

Page 1
Qtopia Desktop
OPERATION MANUAL
Page 2

Copyright Notice
No part of this publication may be reproduced, transmitted, transcribed, stored in a
retrieval system, or translated into any computer language, in any form or by any
means, without the express written permission of Sharp Corporation.
Company and product names mentioned in this manual are trademarks or
registered trademarks of their respective owners.
Software Copyright 2002 Trolltech AS
CAUTION
• The manufacturer is not responsible and provides no warranty for any
malfunction, problems, or other damage caused by misuse of this product and its
accessories by you or a third party.
• This product, including its accessories, is subject to change without notice for
reasons of product improvement.
• Some of the accessories and optional parts described in this manual may not be
available at the time you purchase this product.
• Some of the accessories and optional parts described in this manual may be
unavailable in some countries.
• Screens and icons in this manual may differ from the actual ones displayed on the
PC.
• This manual uses the following substitute expression:
“SL-5500” → “device”
Important:
• Please install either Intellisync for SL or Qtopia Desktop on your PC.
• If the device has been removed from the Docking Station, make sure to
wait for 30 seconds before replacing it on the Docking Station.
• Modifying the PIM data using an application such as Text Editor application
may cause synchronization failure.
• When starting synchronization, close all applications on a device.
• This application does not support synchronizing with multiple devices at the
same time. One PC can synchronize with a single device. If a program folder
of a PC is shared with multiple users, only users who have installed this
application can use it.
Page 3

• Some characters (symbols, European-language characters, special
characters, etc.) may be affected by synchronization and may become
garbled.
• Only entries with date information from January 1, 1970 to December 31, 2037
will be supported for synchronization.
• If Qtopia Desktop operates improperly or unstably, remove the anti virus or
firewall software from the running program at the startup of your PC.
• Sometimes synchronization may not perform properly with non-English based
operating systems.
®®
Microsoft
Windows 2000 Users
• When you have your device in the Docking Station attached to your PC and
you remove the device from the Docking Station or turn off the device you may
receive an error that says “Unsafe Removal of Device”. Click on the OK button
and this message will go away. This will not damage your PC or the
connection to the Docking Station. To avoid this message, click on the task bar
icon to “Stop SL Series (NDIS 5)” before you turn off your device or remove it
from the Docking Station.
Server PC’s with Personal Firewalls
i
• If you are using your computer as your server and have a personal firewall
installed on your computer, you may need to disable this firewall in order to
complete the synchronization process. You can refer back to your firewall
instruction manual on how to disable this function.
Page 4

ii
Table of Contents
CHAPTER 1: BEFORE YOU BEGIN .................................1
Introduction to the Qtopia Desktop............................................................ 1
Minimum System Requirements ............................................................... 1
Connecting the Device to Your PC and Installing the USB Drivers .......... 2
Installing the Qtopia Desktop .................................................................... 3
The qtopiatray icon.................................................................................... 3
Qtopia Desktop Overview ......................................................................... 4
Menu bar .......................................................................................................... 5
Tool bar ............................................................................................................ 5
Launcher icons ................................................................................................. 6
Status bar ......................................................................................................... 6
Status icons ...................................................................................................... 6
Index screen ..................................................................................................... 6
CHAPTER 2: SYNCHRONIZING DATA ............................7
Setting Up Qtopia Desktop Preferences ................................................... 7
Synchronizing with the Qtopia Desktop .................................................... 9
CHAPTER 3: MANAGING DOCUMENTS
(“Documents”) ...................................................................11
Preparing for Documents Management .................................................. 11
Documents Operations ........................................................................... 13
Documents Commands .................................................................................. 14
CHAPTER 4: PIM APPLICATIONS .................................15
Address Book.......................................................................................... 15
Opening and Reading the Address Book Application..................................... 15
Creating a New Address Book Entry ..............................................................17
Adding/Modifying/Removing Email Address................................................... 18
Viewing Address Book Entry Details .............................................................. 18
Modifying the Address Book Entry ................................................................. 18
Creating a New Category ............................................................................... 19
Address Book Commands..............................................................................19
Calendar.................................................................................................. 21
Opening and Reading the Calendar Application ............................................ 21
Switching Calendar Views .............................................................................. 22
Creating a New Event.....................................................................................23
Viewing the Event Details...............................................................................25
Modifying the Event ........................................................................................25
Creating a New Category ............................................................................... 25
Calendar Commands...................................................................................... 25
Page 5

Todo List ................................................................................................. 27
Opening and Reading the Todo List Application ............................................27
Creating a New Task Entry.............................................................................28
Viewing Todo List Entry Details ...................................................................... 29
Modifying the Todo List Entry ......................................................................... 29
Creating a New Category ............................................................................... 29
Todo List Commands .....................................................................................29
CHAPTER 5: BACKUP/RESTORE.................................. 31
iii
Page 6

Page 7

BEFORE YOU BEGIN 1
CHAPTER 1: BEFORE YOU BEGIN
This chapter introduces the Qtopia Desktop and guides you on how to get started
using the software.
Introduction to the Qtopia Desktop
By installing the Qtopia Desktop on your personal computer, you can synchronize
data between the SL-5500 (the device) and your PC.
This application can play a part in the personal information management (PIM) role
of the device and manage data from your PC by synchronizing with the device.
The applications the Qtopia Desktop can manage are:
• Address Book
• Calendar
• Todo List
• Documents
From the Qtopia Desktop, you can create new entries and modify them (except for
Documents files) as you do on the device.
And the Qtopia Desktop Backup and Restore function provides you with the means
to safeguard the data in your device.
Minimum System Requirements
• 100% IBM Compatible PC
• Microsoft
Microsoft
• Pentium
Pentium 200MHz or higher for Microsoft Windows NT 4.0 Workstation with
SP6
Pentium
Pentium
Pentium/Celeron Family 300MHz or higher for Microsoft Windows XP
• 30MB Available Hard Disk Space
Windows 98/98 Second Edition/2000 Professional/Me/XP,
Windows NT 4.0 Workstation with SP6*
150MHz or higher for Microsoft Windows 98/98 Second Edition
200MHz or higher for Microsoft Windows 2000 Professional
200MHz or higher for Microsoft Windows Me
Page 8

2 BEFORE YOU BEGIN
• 64MB RAM for Microsoft
with SP6/ 2000 Professional/Me
128MB RAM for Microsoft
• CD-ROM Drive
• 1 Available USB Port or Serial Port with Optional Serial Cable CE-170TS
• Mouse or Compatible Pointing Device
* Optional Serial Cable CE-170TS is necessary with Windows NT 4.0 Workstation with SP6 to use this
software.
Windows 98/98 Second Edition/NT 4.0 Workstation
Windows XP
Connecting the Device to Your PC and Installing the USB Drivers
To transfer data between the device and your PC using the Docking Station (USB
cable), install the USB drivers found in the CD-ROM supplied.
Check the Drivers installation manual (“USB DRIVER INSTALLATION GUIDE”).
Refer to the device Start-up Guide (booklet) for connection details.
Note:
About the USB port
• If the USB port on your PC or the USB hub connected to the device does not
operate properly, perform the following steps.
• When your PC comes equipped with several USB ports, connect the device to
another USB port.
• When other USB devices are connected to your PC and used simultaneously,
disconnect them from your PC.
• Operation on a PC that is upgraded from Windows 95 may not be possible.
• A PC whose USB port is added by the user because the PC is not equipped with
a USB port at the time it leaves the factory may not operate properly.
• Activating the power saving mode (suspend, resume, or sleep function etc.) of
some PCs may result in the USB port not functioning properly. In this case,
disable the power saving mode.
• If the USB driver does not operate properly when you connect the device to your
PC via the USB hub, connect it directly to the USB port on your PC. Using the
USB extension cable may result in the USB driver not operating properly.
Page 9

BEFORE YOU BEGIN 3
• If you are using Windows 2000/XP and remove the device form the Docking
Station or turn the device off while it is placed on the Docking Station, a warning
dialog box will be displayed on the screen of your PC (depending on the settings
for Windows XP). In this case, close the warning dialog box.
Installing the Qtopia Desktop
Follow these steps to install Qtopia Desktop:
1.
Make sure that the USB drivers are installed on your PC.
2.
Close all applications on your PC. If you are using anti virus or firewall software,
close them (or disable their function).
3.
Insert the CD-ROM supplied into your CD-ROM drive.
4.
Open D:Index.htm (use your CD-ROM drive letter).
5.
Check the installation procedure and follow the on-screen instructions.
When the installation is complete and your PC is restarted, the qtopiatray icon
(or ) will appear on the Windows system tray (bottom right-hand corner of the
taskbar).
Notes for Windows NT 4.0 Workstation with SP6/2000 Professional/XP users:
This application does not support use by multiple users. It can only be used by the
installer. For example, if an administrator logs in to a PC and installs this application,
then only that administrator is able to use it. Therefore, when other users want to use
this application, they must log in to a PC (with authorization as an administrator) and
install it before use.
The qtopiatray icon
By right-clicking on the qtopiatray icon, the menu will be displayed. This menu allows
you to select the main operation.
Page 10
4 BEFORE YOU BEGIN
Menu items Functions
Start Qtopia Desktop Launches the Qtopia Desktop.*
Close The qtopiatray icon disappears from the Windows system
tray.*
* If the Qtopia Desktop is not launched by “Start Qtopia Desktop”, select Start Æ
Programs Æ Sharp Æ Qtopia Desktop Æ qtopiadesktop to launch the Qtopia
Desktop.
* Select Start Æ Programs Æ Sharp Æ Qtopia Desktop Æ qtopiatray to display
the qtopiatray icon on the Windows system tray.
The qtopiatray icon changes depending on the connection status.
: Your PC is connected to the device.
: Your PC is disconnected from the device.
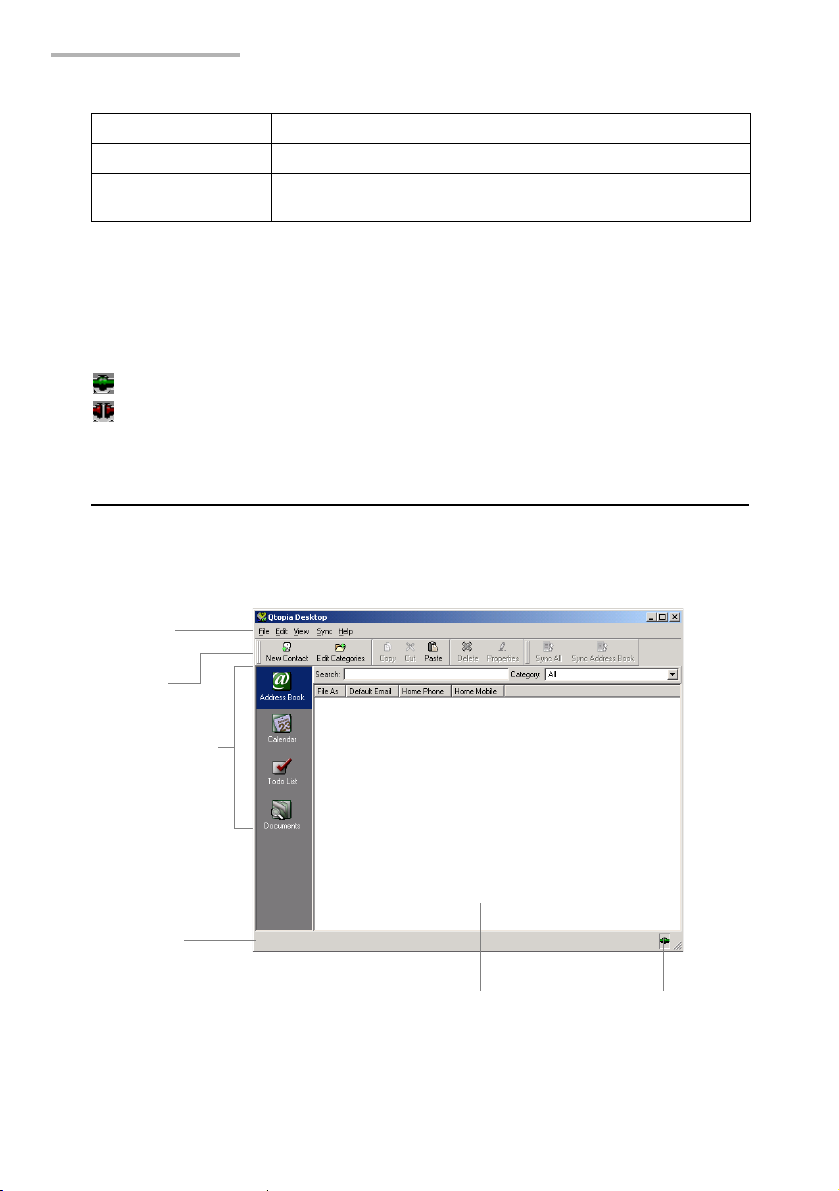
Qtopia Desktop Overview
Right-click the qtopiatray icon on the Windows system tray and then select “Start
Qtopia Desktop” from the menu that appears.
The Qtopia Desktop top screen (Address Book main screen) will be displayed.
Menu bar
Tool bar
Launcher icons
Status bar
Index screen
Status icon
Page 11

BEFORE YOU BEGIN 5
Menu bar
The number of menus and menu commands varies according to the application you
select.
Click each menu name to display the menu commands, and then click the desired
command. You can also access the shortcut menu, if available. Some menus and
menu commands will be dimmed depending on the status when you access them
as with other PC applications.
Tool bar
This bar works as a kind of shortcut version of the menu bar described above for
easier one-click access.
Commands are grouped into two categories:
• Global (common) commands (Sync All, etc.) *
• Main commands (New Contact, Edit Categories, etc.)*
* depending on the application
By right-clicking the mouse button, you can access these menus.
• Display/Hide Global Tool bar
• Display/Hide Main Tool bar
• Line up.
Note:
• If you hide both groups, right-click the menu bar to display them.
• You can move groups by dragging the left edge “ ” anywhere on your
desktop. When you drag inside the tool bar area, you can align menu blocks
by selecting “Line up.”
Page 12
6 BEFORE YOU BEGIN
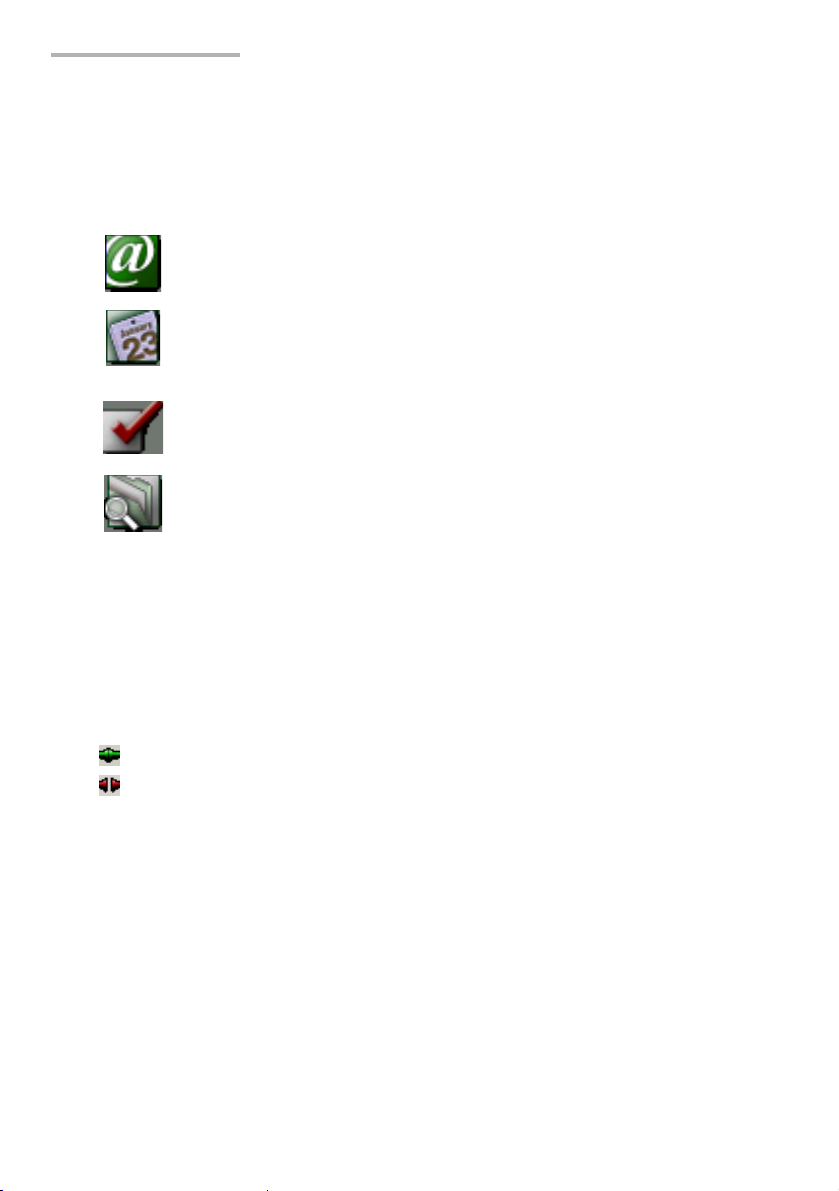
Launcher icons
By clicking each application icon, you can open the main screen of each application.
In the Index area on the right, you can see all entries of each application.
Address Book: The Address Book application allows you to
Calendar: The Calendar application allows you to organize
Todo List: The Todo List application allows you to manage
Documents: You can manage Documents files on your PC.
manage: create, modify, delete personal
information (contacts).
and you keep track of your schedule (events,
meetings, etc.). You can view your schedule by
day, week or month.
tasks you wish to be reminded of.
You can also transfer data between the device
and your PC, delete data, etc.
Status bar
You can see the status of the Qtopia Desktop.
Status icons
You can see the connection status as follows:
: Your PC is connected to the device.
: Your PC is disconnected from the device.
Index screen
You can see entries created by each application in list view, icon view, etc.
Page 13

SYNCHRONIZING DATA 7
CHAPTER 2: SYNCHRONIZING DATA
This application can play a part of the personal information management (PIM) role
of the device and manage data from your PC by synchronizing with the device.
The applications the Qtopia Desktop can synchronize are Address Book, Todo List,
and Calendar.
Setting Up Qtopia Desktop Preferences
Be sure to set up the Qtopia Desktop preferences before performing
synchronization. Default settings will help you to start synchronization without delay.
1.
Start the Qtopia Desktop from the menu by right-clicking on the qtopiatray icon.
2.
Click “File” and then “Settings” on the menu bar.
The Qtopia Desktop Settings screen will be displayed.
Page 14

8 SYNCHRONIZING DATA
3.
Click the General icon on the left of the screen.
The screen has two tabs for general settings telling you how to set up preferences:
Connection Tab: This sets the way Qtopia Desktop communicates with
the device.
PDA Connection Method: Sets the connection method between the Qtopia
Desktop and the device.
USB Check “USB” to set the communication to the USB
connection.
Serial Check “Serial” to set the communication to the serial
connection. (Optional Serial Cable CE-170TS is
required.)
Connection: Displays the IP address of the device for the USB or serial
connection. Normally, no change is necessary for the default
setting. If the IP address of the device has been changed, the same
address must be entered. Tap the Network & Sync icon for the
Setting tab and use the Sync tab to set the IP address of the device.
PDA IP Address By default:
“192.168.129.201” for USB connection.
“192.168.130.101” for serial connection.
Sync Tab: This sets how the Qtopia Desktop synchronizes with
the device.
Page 15

SYNCHRONIZING DATA 9
Conflict Resolution: Sets the basic operations of the Qtopia Desktop when
conflict occurs.
Duplicate Entries Duplicate entries between the Qtopia Desktop and the
device.
Desktop Overrides PDA Overwrites the data of the device with that of the
Qtopia Desktop when data conflict occurs.
PDA Overrides Desktop Overwrites the data of the Qtopia Desktop with that of
the device when data conflict occurs.
4.
Click “OK” to save the settings.
To cancel the changes, click “Revert Changes.”
For detailed information on the Address Book settings, see page 17.
Note:
Synchronizing with the Qtopia Desktop
You can choose how to synchronize with the device:
• synchronize all applications (Address Book, Calendar and Todo List) of the device
at one time, or, synchronize one application at a time.
Follow these steps to synchronize with all applications
(Menu “Sync All”):
1.
Turn the device power on.
2.
Place the device on the Docking Station connected to your PC.
3.
Start the Qtopia Desktop from the menu by right-clicking on the qtopiatray icon.
4.
Make sure the status icon in the bottom right-hand corner of the screen is
displayed indicating the connection is established.
5.
Click “Sync” and then “Sync All” on the menu bar.
Synchronization will begin.
Follow these steps to synchronize with a single application
(Menu “Sync”):
1.
Turn the device power on.
2.
Place the device on the Docking Station connected to your PC.
3.
Start the Qtopia Desktop from the menu by right-clicking on the qtopiatray icon.
Page 16

10 SYNCHRONIZING DATA
4.
Make sure the status icon in the bottom right-hand corner of the screen is
displayed indicating the connection is established.
5.
Click “Sync” and then “Sync” on the menu bar.
Synchronization will begin.
Note:
• Pressing the SYNC button on the Docking Station instead of performing step
5 will carry out the Sync All command.
•
If you connect the device to your PC via the optional Serial Cable and perform
synchronization by pressing the SYNC button on the Docking Station, make sure
to turn the device on before pressing the SYNC button on the Docking Station.
• If you can not see the status icon , exit the Qtopia Desktop and then follow
the steps above.
• Do not operate the device during synchronization.
• Do not press the SYNC button during synchronization.
• Perform the following if your PC does not recognize the device placed on the
Docking Station.
• Remove the device from the Docking Station and place it on the Docking
Station again.
• With your PC disconnected from the network, restart it and then check that
the connection is established between the device on the Docking Station and
a PC. If the problem remains, contact your network administrator. Check also
that the PDA IP Address set on the Qtopia Desktop Settings screen is the
same as the IP address of the device.
• Fields or functions which the Qtopia Desktop and the device do not have in
common will not be synchronized.
• When removing the device from the Docking Station connected via a USB
cable, follow the procedure of removing the USB cable according to your PC
requirements.
• Make sure that the synchronization process is completely finished when
disconnecting the connection cable from your PC or removing the device from
the Docking Station. Do not disconnect the cable from your PC or remove the
device from the Docking Station during synchronization.
• The communication (the synchronization process, etc.) will not be carried out
when the device detects a low battery level or insufficient memory.
• The following events will terminate the communication:
• Turning the device off
• Disconnecting the communication signal by removing the cable, etc.
• Shutting down the PC or logging off
• Communication is not possible when the device is protected with a passcode
or the Welcome screen appears on the device’s display. Clear the passcode
or exit the Welcome screen and then replace the device on the Docking
Station to carry out communication.
Page 17

MANAGING DOCUMENTS (“Documents”) 11
CHAPTER 3: MANAGING DOCUMENTS (“Documents”)
You can manage Documents files on your PC. On the Index screen, you can transfer
data between the device and your PC, delete data, etc.
: For information regarding Documents, refer to the device’s on-line help
Note
and operation manual.
Preparing for Documents Management
1.
With the power turned on, place the device on the Docking Station connected
to your PC.
2.
Start the Qtopia Desktop from the menu by right-clicking on the qtopiatray icon.
3.
Make sure the status icon in the bottom right-hand corner of the screen is
displayed indicating the connection is established.
4.
Click the Documents launcher icon on your PC.
The Documents files of the device are automatically listed on the Documents Index
screen on your PC.
To view the contents of the Documents files, download them to your PC. You can
then open them with the appropriate PC application.
Use the Refresh menu command to update the Documents Index screen by
synchronizing with the Documents folder of the device.
Page 18

12 MANAGING DOCUMENTS (“Documents”)
Direct Search function
Direct Search function
Entering the first few letters of the file name allows you to search for entries that
include those letters.
1.
Click the Search entry box to set the cursor.
Type Filter
function
Category
Filter
function
2.
Enter the first few letters of the file name.
The selected file will be immediately highlighted on the Index screen.
Category Filter function
By grouping Documents files, you can display files by category on the Index screen.
1.
Click the Category drop-down list to open the list.
2.
Click the desired group.
The files included in the group will be displayed.
Type Filter function
By grouping Documents files, you can display files by type on the Index screen.
1.
Click the Type drop-down list to open the list.
2.
Click the desired type.
The files included in the type will be displayed.
Page 19

MANAGING DOCUMENTS (“Documents”) 13
Documents Operations
Follow these steps to transfer Documents files between the device
and your PC, delete them on the Index screen:
To transfer PC files to your device (Menus “Upload File”):
1.
Click “Upload” on the tool bar.
2.
Click the desired file in the upload dialog box and then click “Open.”
The selected file appears on the Index screen of the Qtopia Desktop and the
device.
To transfer files on the device to your PC (Menu “Download File”):
1.
Click the desired file on the Documents Index screen of the Qtopia Desktop.
2.
Click “Download” on the tool bar.
3.
In the Browse Folder dialog box that appears, click the download destination
and then click “OK.”
The selected file will be downloaded.
To delete files on the device (Menu “Delete”):
1.
Click the desired file on the Index screen.
2.
Click “Delete” on the tool bar.
The file both on the Index screen and in the Documents screen of the device will
be deleted at the same time.
Caution:
Note:
• You can upload the Documents files by drag-and-dropping them to the Index
screen.
• When the expansion memory card (CF memory card or SD memory card) is
inserted into the slot of the device, the Destination Location dialog box will be
displayed when you execute the upload. Select the destination location.
• The Documents file icon may look different for the Qtopia Desktop and the
device.
• Changing the file name on the Properties (Details) dialog box (on your PC or
on the device) does not change the actual file name, but changes the
displayed file name. If you download a file whose file name has been changed
in this way, the actual file name of that file will be displayed.
Use this menu with caution. Once you erase Documents files created
by the “Text Editor” application, etc. of the device, you can not restore
them.
Page 20

14 MANAGING DOCUMENTS (“Documents”)
Documents Commands
The Documents main screen offers the following menu commands, which can be
accessed from the menu bar and the tool bar.
Menu Commands
File
Upload File Uploads PC files to the device.
Download File Downloads files on the device to a PC.
Delete Deletes the file selected on the Index screen.
Settings Sets up communication preferences, etc.
Exit Exits the Qtopia Desktop.
Edit
Select All Selects all entries on the Index screen at one time.
Sync
Sync All Synchronizes Address Book, Calendar and Todo List files.
Backup/Restore (See page 31.)
Help
Manual Displays the Qtopia Desktop Help.
About Displays copyright information.
Tool Commands
Upload Uploads PC files to the device.
Download Downloads files on the device to a PC.
Delete Deletes the file selected on the Index screen.
Properties Opens a Properties (Details) dialog box allowing you to
Refresh Updates the Documents Index screen by synchronizing
Sync All Synchronizes Address Book, Calendar and Todo List files.
check the category setting and the file type, etc. For more
information, see the Operation Manual of the device
(separate printed manual).
with the Documents folder of the device.
Page 21

PIM APPLICATIONS 15
CHAPTER 4: PIM APPLICATIONS
This chapter explains how to use the following PIM applications that the Qtopia
Desktop will synchronize: Address Book, Calendar, and Todo List.
: For information regarding PIM applications, refer to the device’s on-line
Note
help and the operation manual.
Address Book
The Address Book application allows you to manage: create, modify, delete
personal information (contacts).
Opening and Reading the Address Book Application
1.
Click the Address Book application icon in the Launcher icon frame.
The Qtopia Desktop will launch and the Address Book main screen will be
displayed.
Direct Search
function
Category Filter
function
Sort function
Page 22

16 PIM APPLICATIONS
Direct Search function
Entries listed in the left-hand corner of the Index screen (List View) will be searched.
For example, when the File As label is listed in the left-hand corner, enter a few
letters of the first name.
The Entry that includes these letters will be searched.
1.
Click the Search entry box to set the cursor.
2.
Enter the first few letters of the first name.
The selected entry will be immediately highlighted on the Index screen.
In the Search field you can use edit functions such as cut and paste by
Note:
right-clicking the mouse button for easier input.
Category Filter function
By grouping entries, you can display entries by category on the Index screen.
1.
Click the Category drop-down list to open the list.
2.
Click the desired category.
The entries included in the category will be displayed.
Sort Function
You can sort entries in the Index list by clicking labels such as File As and Default
Email at the top of the Index list.
1.
Click the desired tab.
Entries will be sorted by the label you click.
Note:
• Every time you click the label, the entries will be sorted in ascending order
( : arrow facing downwards) or in descending order ( : arrow facing
upwards).
• By pointing the cursor between labels (File As and Default Email, for
example), you can control the label width for easier viewing.
Page 23

PIM APPLICATIONS 17
To customize the Address Book Index screen:
This setting allows you to display the desired contacts item (field) in the Address
Book Index screen.
1.
Click “File” and then “Settings” on the menu bar.
The Qtopia Desktop Settings screen will be displayed.
2.
Click the Address Book icon on the left of the screen, if not selected.
3.
To add a new field, click the desired field in the Available Field list and then “Add
>>.”
• To remove the current field, click the desired field in Selected Field list and
then “<< Remove.”
• To change the order of the fields displayed on the Index screen, select the
desired field and then click “Up” or “Down.”
4.
If necessary, repeat step 3 above to add or remove more than one field.
5.
Click “OK” to save the settings.
To cancel the changes, click “Revert Changes.”
Creating a New Address Book Entry
1.
Click “New Contact” on the tool bar.
The Contact Properties dialog box will be displayed telling you to fill out the
required fields.
2.
Enter the required items or select appropriate items by switching tabs. (Home,
Business, etc.)
3.
Click “OK” at the bottom of the screen to save the setting.
Note: For information on entry items, refer to the device’s on-line help and
operation manual.
To group entries in a specific category:
1.
Click “New Contact” on the tool bar or double-click the desired entry on the
Index screen.
The Contact Properties dialog box will be displayed.
2.
Click the Name and Email tab and check the desired category name in the
Categories box.
You can check several category names on one entry.
Page 24

18 PIM APPLICATIONS
3.
Enter or change the required items and click “OK” to save the setting.
Now the entry belongs to the categories, in which you have placed it.
Adding/Modifying/Removing Email Address
On the Contact Properties dialog box, you can add, modify or remove an Email
address by performing the following procedures. After adding, modifying, removing
Email address, click “OK” to save the settings. To change the settings of an Email
address displayed on the Address Book main screen (“Default Email”), click the
desired Email address in the Email box and then click “Set Default”.
To add a new Email address:
1.
Click the Entry box to the left of the “Add” button in the Email box to set the
cursor and enter the Email address.
2.
Click “Add”.
To modify the Email address:
1.
Click the desired Email address in the Email box.
2.
Click “Edit” and modify the Email address in the Entry box.
3.
Click “OK”.
To remove the Email address:
1.
Click the desired Email address in the Email box.
2.
Click “Remove”.
Viewing Address Book Entry Details
1.
Click the desired entry and then click “Properties” in the tool bar, or double-click
the desired entry and then click the Summary tab.
The entry summary will open.
2.
Modify settings by switching tabs, if necessary.
3.
Click “OK” to save the modification.
Modifying the Address Book Entry
1.
Double-click the desired entry.
2.
Modify settings by switching tabs, if necessary.
3.
Click “OK” to save the modification.
Page 25

PIM APPLICATIONS 19
Creating a New Category
1.
Click “Edit Categories” on the tool bar or click “Edit” in the Categories box in the
Contact Properties dialog box.
The Edit Categories dialog box will be displayed.
2.
Click “New Category” and enter the desired category name.
The name highlighted in the Name box (“New Category”) is replaced with the
name you have entered.
3.
Click “OK” to save the settings.
• If you check “Global”, the created category will be applied to all PIM
applications as a common category. If you do not check “Global”, the created
category will be applied only to the application from which you have opened
the Edit Categories dialog box. (The name of the application to which the
created category is applied appears in the App field.)
• To save the settings, click “OK”. The Edit Categories dialog box will be
closed.
• To cancel the settings, click “Cancel” instead of clicking “Apply”.
To modify the category:
1.
Click the desired category.
2.
Modify the category in the Name box.
3.
Click “OK” to save the settings.
To delete the category:
1.
Click the desired category.
2.
Click “Delete Category” and then “OK” to delete the category.
Address Book Commands
The Address Book main screen offers the following menu commands, which can be
accessed from the menu bar and the tool bar.
Page 26

20 PIM APPLICATIONS
Menu Commands
File
New Contact Opens a Contact Properties dialog box to create a
Edit Categories Opens the Edit Categories dialog box.
Properties Opens a Properties dialog box.
Delete Deletes the entry selected on the Index screen.
Settings Sets up communication preferences, etc.
Exit Exits the Qtopia Desktop.
Edit
Copy Copies one or more entries.
Cut Cuts one or more entries.
Paste Pastes one or more entries.
Select All Selects all entries on the Index screen at one time.
View
List Lists the entries.
Small Icons Displays entries using small icons.
Large Icons Displays entries using large icons.
new entry.
Sync
Sync Synchronizes Address Book files.
Sync All Synchronizes Address Book, Calendar and Todo List
Backup/Restore (See page 31.)
Help (See page 14.)
files.
Tool Commands
New Contact Opens a Contact Properties dialog box to create a
Edit Categories Opens the Edit Categories dialog box.
new entry.
Page 27

PIM APPLICATIONS 21
Copy Copies one or more entries.
Cut Cuts one or more entries.
Paste Pastes one or more entries.
Delete Deletes the entry selected on the Index screen.
Properties Opens a Properties dialog box.
Sync All Synchronizes Address Book, Calendar and Todo List
Sync Address Book Synchronizes Address Book files.
files.
Calendar
The Calendar application allows you to organize your schedule. You can view your
schedule by day, week or month.
Opening and Reading the Calendar Application
1.
Click the Calendar application icon in the Launcher icon frame.
The Qtopia Desktop will launch and the Calendar main screen (Monthly view)
will be displayed.
Monthly View
View buttons
Single arrow button
Double arrows
button
Year spinbox
Month drop-down
list box
Page 28

22 PIM APPLICATIONS
Single arrow button
Displays the previous ( ) or next ( ) month.
Double arrows button
Displays January ( ) or December ( ).
Month drop-down list box
Shows 12 months. Click the desired month to jump to the month directly.
Year spinbox
Click the up or down arrow to change the year one by one.
Switching Calendar Views
By clicking the Calendar view buttons, you can switch views.
Weekly View
Single arrow button
Week spinbox
Year spinbox
Scroll bar
Single arrow button
Displays the previous ( ) or next ( ) week.
Week spinbox
Click the up or down arrow to specify the week of the year. The week changes one
by one.
Year spinbox
Click the up or down arrow to change the year one by one.
Scroll bar
Click to display the rest of the time range.
Page 29

Daily View
Single arrow button
Displays the previous ( ) or next ( ) day.
Day of the week button
Click the desired day of the week.
PIM APPLICATIONS 23
Single arrow button
Day of the week
button
Date button
Date button
Click to display the calendar and then specify the desired date.
Creating a New Event
1.
Click “New Event” on the tool bar.
The Event Properties screen will be displayed telling you to fill in the fields.
2.
Enter necessary items or select appropriate items by switching tabs. (General,
Repeat)
General
Description Enter a description that will make it easy to find.
Location Enter the location where the event will occur.
Start Date Specify the start date by changing the spinbox entry.
Select the date part and click the up or down arrow, or
click the to display the calendar and then specify
the desired date.
End Date Specify the end date in the same way as the start date.
Page 30

24 PIM APPLICATIONS
General
Start Time Specify the start time by changing the spinbox entry.
End Time Specify the end time by changing the spinbox entry.
Repeat (This option will be checked automatically when you
All Day If you do not want to make the event occur at a
Alarm Check when you want to set a reminder prior to the
Note Enter a memo, if necessary.
Categories Check the desired category when you want to set
Repeat (Set how the event occurs daily, weekly, monthly or yearly)
Repeat Check if you want to make the event a recurring event
Daily Select “Daily” under Repeat and then set how often
Weekly Select “Weekly” under Repeat and then set how often
Monthly Select “Monthly” under Repeat and then set how often
Yearly Select “Yearly” under Repeat and then set how often
End Date Check and specify the end date by clicking the up or
check the Repeat option in the Repeat tab.)
specified time.
event. There are two choices for alarm volume (with
no sound, with a sound).
categories. (See “Creating a New Category” on
page 19)
and make this a repeat settings for the event.
the event occurs.
the event occurs.
the event occurs. Click one of the following:
Repeat by Day: The event repeats according to day of
the event you have created.
Repeat by Date: The event repeats according to date
of the event you have created.
the event occurs.
down arrow or clicking to specify the date on the
calendar screen that appears.
3.
Click “OK” at the bottom of the screen to save the setting.
Page 31

PIM APPLICATIONS 25
Viewing the Event Details
1.
Click the desired entry in the desired Calendar view and then click “Properties”
in the tool bar.
The Event Properties screen will open.
2.
Modify settings, if necessary.
3.
Click “OK” to save the modification.
Modifying the Event
1.
Click the desired entry in the desired Calendar view and then click “Properties”
in the tool bar.
2.
Modify settings, if necessary.
3.
Click “OK” to save the modification.
Creating a New Category
1.
Click “Edit” in the Category box in the Event Properties screen.
The Edit Categories dialog box will be displayed.
On the Edit Categories dialog box, you can create, modify, or delete the category.
For information on how to create, modify, or delete the category, see page 19.
Calendar Commands
Calendar main screen offers the following menu commands, which can be accessed
from the menu bar and the tool bar.
Menu Commands
File
New Event Opens a Properties dialog box to create a new entry.
Properties Opens a Properties dialog box.
Delete Deletes the entry selected on the Index screen.
Settings Sets up communication preferences, etc.
Exit Exits the Qtopia Desktop.
Edit
Copy Copies one or more entries.
Page 32

26 PIM APPLICATIONS
Edit
Cut Cuts one or more entries.
Paste Pastes one or more entries.
View
Day Views by day.
Week Views by week.
Month Views by month.
Sync
Sync Synchronizes event files.
Sync All Synchronizes Address Book, Calendar and Todo List
files.
Backup/Restore (See page 31.)
Help (See page 14.)
Tool Commands
New Event Opens a Properties dialog box to create a new entry.
Copy Copies one or more entries.
Cut Cuts one or more entries.
Paste Pastes one or more entries.
Delete Deletes the entry selected on the Index screen.
Properties Opens a Properties dialog box.
Day Views by day.
Week Views by week.
Month Views by month.
Sync All Synchronizes Address Book, Calendar and Todo List
Sync Calendar Synchronizes Calendar files.
files.
Page 33

PIM APPLICATIONS 27
Todo List
The Todo List application allows you to manage tasks you wish to be reminded of.
Opening and Reading the Todo List Application
1.
Click the Todo List application icon in the Launcher icon frame.
The Qtopia Desktop will launch and the Todo List main screen will be displayed.
Direct Search function
Category Filter
function
Sort function
Direct Search function
Entering the first few letters of the description allows you to search for entries that
include these letters.
1.
Click the Search entry box to set the cursor.
2.
Enter the first few letters of the description.
The selected entry will be immediately highlighted on the Index screen.
Category Filter function
By grouping entries, you can display entries by category on the Index screen.
1.
Click the Category drop-down list to open the list.
2.
Click the desired category.
The entries included in the category will be displayed.
Page 34

28 PIM APPLICATIONS
Sort Function
You can sort entries in the Index list by clicking labels such as C. (Checked status
button) and Priority at the top of the Index list.
1.
Click the desired tab.
Entries will be sorted by the label you click.
Note:
• Every time you click the label, the entries will be sorted in ascending order
(arrow facing downwards) or descending order (arrow facing upwards).
• By pointing the cursor between labels (Description and Priority, for example),
you can control the label width for easier viewing.
Creating a New Task Entry
1.
Click “New Task” on the tool bar.
The Properties screen will be displayed telling you to fill out the required fields.
2.
Enter necessary items or select appropriate items.
• When selecting the due date, be sure to check the box first and then select
the date. If the box is unchecked, the task is not specified and the due date
is not displayed on the Index screen.
3.
Click “OK” to save the setting.
Note: For information on entry items, refer to the device’s on-line help and
operation manual.
To group entries in a specific category:
1.
Double-click the desired entry on the Index screen.
2.
Click the Category drop-down list.
3.
Click the desired category name.
4.
Click “OK” to save the setting.
Now the entry belongs to the category, in which you have placed it.
Page 35

PIM APPLICATIONS 29
Viewing Todo List Entry Details
1.
Click the desired entry and then click “Properties” in the tool bar, or double-click
the desired entry.
The task will open.
2.
Modify settings, if necessary.
3.
Click “OK” to save the modification.
Modifying the Todo List Entry
1.
Double-click the desired entry.
2.
Modify settings, if necessary.
3.
Click “OK” to save the modification.
Creating a New Category
1.
Click “Edit Categories” on the tool bar.
The Edit Categories dialog box will be displayed.
On the Edit Categories dialog box, you can create, modify, or delete the category.
For information on how to create, modify, or delete the category, see page 19.
Todo List Commands
Todo List main screen offers the following menu commands, which can be accessed
from menu bar and tool bar.
Menu Commands
File
New Task Opens a Properties dialog box to create a new entry.
Edit Categories Opens the Edit Categories dialog box.
Properties Opens a Properties dialog box.
Delete Deletes the entry selected on the Index screen.
Settings Sets up communication preferences, etc.
Exit Exits the Qtopia Desktop.
Page 36

30 PIM APPLICATIONS
Edit
Copy Copies one or more entries.
Cut Cuts one or more entries.
Paste Pastes one or more entries.
Select All Selects all entries on the Index screen at one time.
Sync
Sync Synchronizes Todo List files.
Sync All Synchronizes Address Book, Calendar and Todo List
files.
Backup/Restore (See page 31.)
Help (See page 14.)
Tool Commands
New Task Opens a Properties dialog box to create a new entry.
Edit Categories Opens the Edit Categories dialog box.
Copy Copies one or more entries.
Cut Cuts one or more entries.
Paste Pastes one or more entries.
Delete Deletes the entry selected on the Index screen.
Properties Opens a Properties dialog box.
Sync All Synchronizes Address Book, Calendar and Todo List files.
Sync Todo List Synchronizes Todo List files.
Page 37

BACKUP/RESTORE 31
CHAPTER 5: BACKUP/RESTORE
The Qtopia Desktop Backup and Restore function provides you with the means to
safeguard the data in your device.
When starting Backup/Restore, close all applications on the device.
Note:
Follow these steps to backup the data in your device:
1.
Click “Sync” and then “Backup/Restore” on the menu bar.
The Backup/Restore dialog box will be displayed.
2.
Check the check box of the desired Information Type.
To check all of the check boxes, click “Check All”.
3.
Click “Backup” to backup the data in your device to your PC.
The backup data will be created in the Backup folder.
• The backup data will be overwritten with the data you have just created in
step 3.
• You cannot view or edit the content of the backup data.
About Information Type
You can backup the following types of data.
• Application Data:
Application data in the device such as Address Book, Calendar or Todo List, and
settings (the data in the Setting folder) of the device such as city time settings etc.
• Documents (Internal Memory):
Documents files stored on the internal memory of the device.
Page 38

32 BACKUP/RESTORE
Follow these steps to restore a backup data to your device:
1.
Click “Sync” and then “Backup/Restore” on the menu bar.
The Backup/Restore dialog box will be displayed.
2.
Check the check box of the desired Information Type.
To check all of the check boxes, click “Check All”.
3.
Click “Restore” to restore the backup data to your device.
The data in your device will be overwritten with the restored data.
Page 39

SHARP CORPORATION
 Loading...