


PN-ZT10E
65" Touch Panel
OPERATION MANUAL
ENGLISH DEUTSCH FRANÇAIS
Applicable models (as of March 2007)
LCD MONITOR PN-655E

Authorised representative responsible for the European Union Community Market
SHARP ELECTRONICS (Europe) GmbH
Sonninstraße 3, D-20097 Hamburg
IMPORTANT INFORMATION
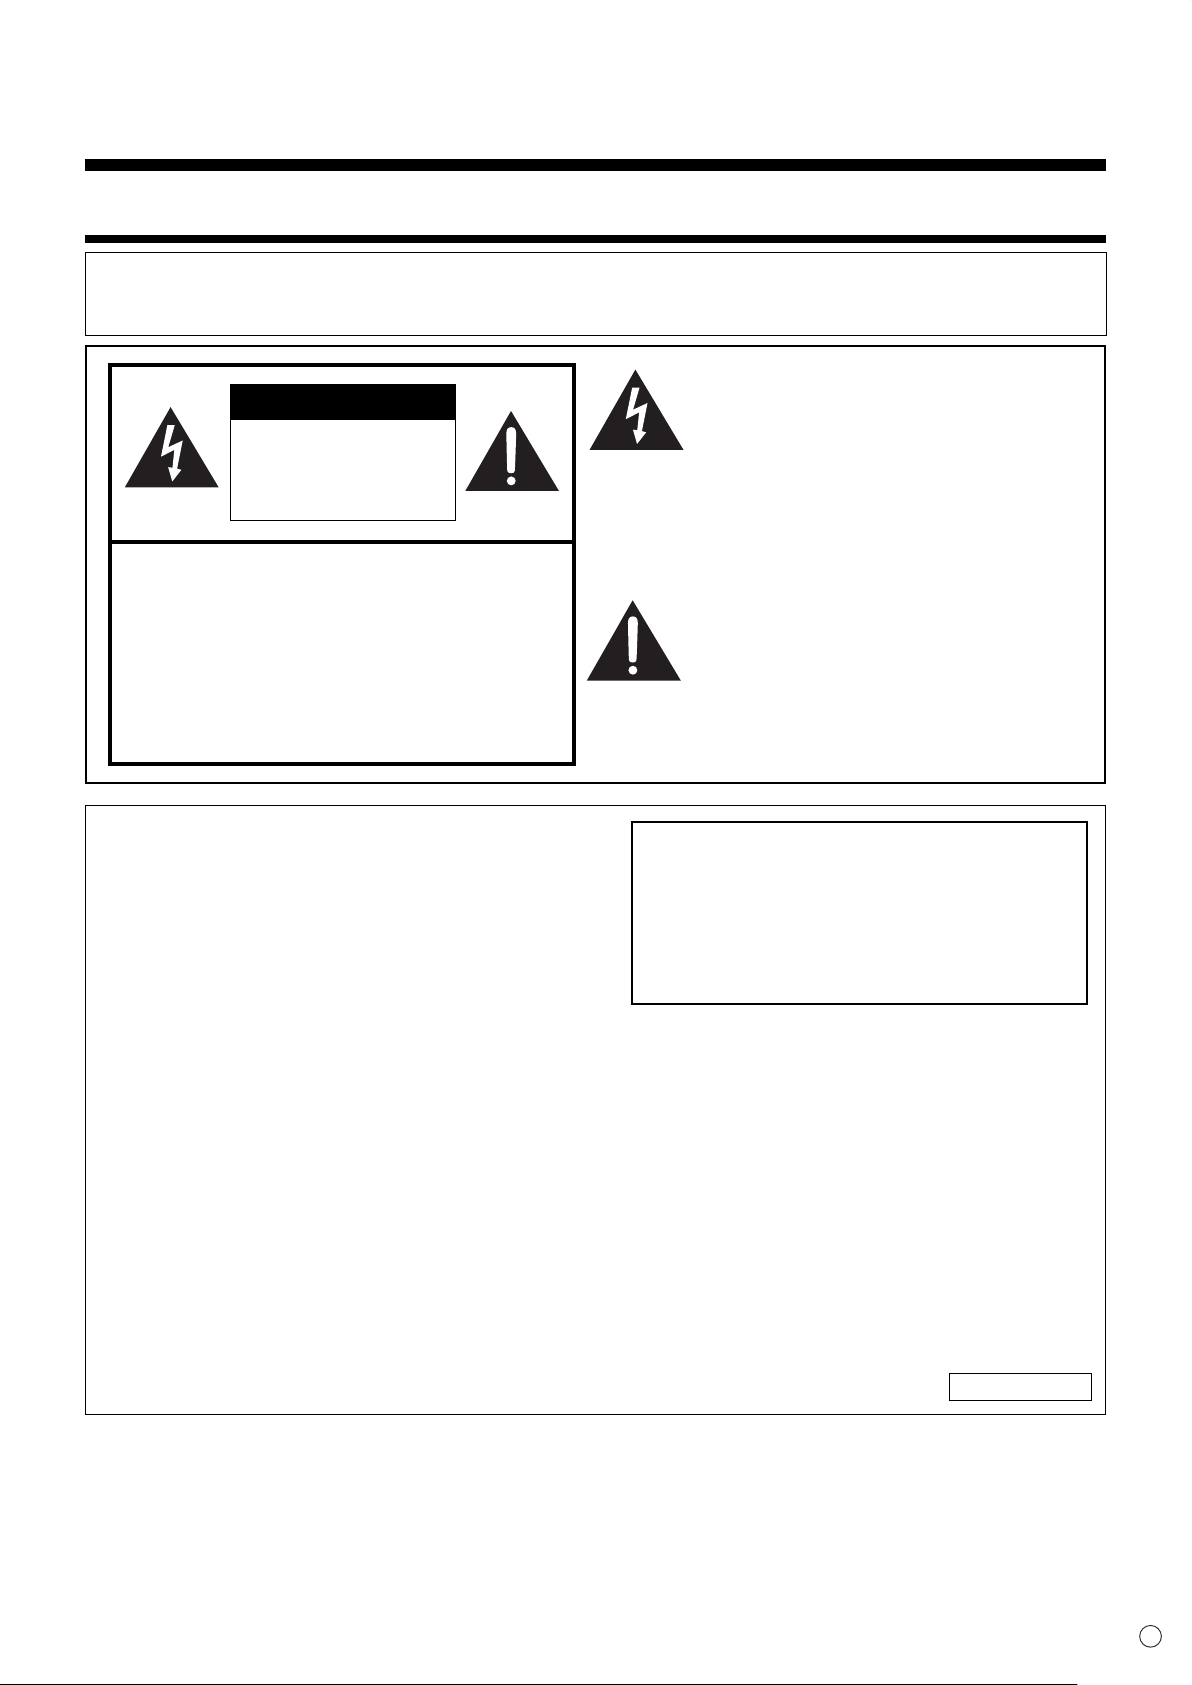
WARNING:
TO REDUCE THE RISK OF FIRE OR ELECTRIC SHOCK, DO NOT
EXPOSE THIS PRODUCT TO RAIN OR MOISTURE.
CAUTION
RISK OF ELECTRIC
SHOCK
DO NOT OPEN
CAUTION: TO REDUCE THE RISK OF
ELECTRIC SHOCK, DO NOT
REMOVE COVER.
NO USER-SERVICEABLE
PARTS INSIDE.
REFER SERVICING TO
QUALIFIED SERVICE
PERSONNEL.
IMPORTANT:
To aid reporting in case of loss or theft, please
record the product’s model and serial numbers in
the space provided. The numbers are located in the
rear of the product.
The lightning fl ash with arrowhead
symbol, within an equilateral triangle,
is intended to alert the user to the
presence of uninsulated “dangerous
voltage” within the product’s enclosure
that may be of suffi cient magnitude
to constitute a risk of electric shock to
persons.
The exclamation point within a triangle
is intended to alert the user to the
presence of important operating and
maintenance (servicing) instructions in
the literature accompanying the product.
Model No.:
Serial No.:
WARNING:
equipment not expressly approved by the manufacturer could void the user’s authority
FCC Regulations state that any unauthorized changes or modifi cations to this
to operate this equipment.
NOTE:
This equipment has been tested and found to comply with the limits for Class A digital device, pursuant
to Part 15 of the FCC Rules. These limits are designed to provide reasonable protection against
harmful interference when the equipment is operated in a commercial environment. This equipment
generates, uses, and can radiate radio frequency energy and, if not installed and used in accordance
with the instruction manual, may cause harmful interference to radio communications. Operation of this
equipment in a residential area is likely to cause harmful interference in which case the user will be
required to correct the interference at his own expense.
U.S.A. ONLY
1
E
IMPORTANT INFORMATION (Continued)
Attention: Your product is marked with this symbol. It means that used electrical and
electronic products should not be mixed with general household waste. There is a separate
collection system for these products.
A. Information on Disposal for Users (private households)
1. In the European Union
Attention: If you want to dispose of this equipment, please do not use the ordinary dust bin!
Used electrical and electronic equipment must be treated separately and in accordance with
legislation that requires proper treatment, recovery and recycling of used electrical and electronic
equipment.
Following the implementation by member states, private households within the EU states may return
their used electrical and electronic equipment to designated collection facilities free of charge*. In
some countries* your local retailer may also take back your old product free of charge if you purchase
a similar new one.
*) Please contact your local authority for further details.
If your used electrical or electronic equipment has batteries or accumulators, please dispose of these
separately beforehand according to local requirements.
By disposing of this product correctly you will help ensure that the waste undergoes the necessary
treatment, recovery and recycling and thus prevent potential negative effects on the environment and
human health which could otherwise arise due to inappropriate waste handling.
2. In other Countries outside the EU
If you wish to discard this product, please contact your local authorities and ask for the correct method
of disposal.
For Switzerland: Used electrical or electronic equipment can be returned free of charge to the dealer,
even if you don’t purchase a new product. Further collection facilities are listed on the homepage of
www.swico.ch or www.sens.ch.
B. Information on Disposal for Business Users
1. In the European Union
If the product is used for business purposes and you want to discard it:
Please contact your SHARP dealer who will inform you about the take-back of the product. You might
be charged for the costs arising from take-back and recycling. Small products (and small amounts)
might be taken back by your local collection facilities.
For Spain: Please contact the established collection system or your local authority for take-back of
your used products.
2. In other Countries outside the EU
If you wish to discard of this product, please contact your local authorities and ask for the correct
method of disposal.
E
2

DEAR SHARP CUSTOMER
Thank you for your purchase of a SHARP product. To ensure safety and many years of troublefree operation of your product, please read the Safety Precautions carefully before using this
product.
SAFETY PRECAUTIONS
Electricity is used to perform many useful functions, but it can also cause personal injuries and property
damage if improperly handled. This product has been engineered and manufactured with the highest
priority on safety. However, improper use can result in electric shock and/or fi re. In order to prevent
potential danger, please observe the following instructions when installing, operating and cleaning the
product. To ensure your safety and prolong the service life of your product, please read the following
precautions carefully before using the product.
1. Read instructions — All operating instructions must be read and understood before the product is
operated.
2. Keep this manual in a safe place — These safety and operating instructions must be kept in a safe
place for future reference.
3. Observe warnings — All warnings on the product and in the instructions must be observed closely.
4. Follow instructions — All operating instructions must be followed.
5. Cleaning — Turn off the connected PC and disconnect the USB cable before cleaning the product.
Use a dry cloth to clean the product. Do not use liquid cleaners or aerosol cleaners.
6. Attachments — Do not use attachments not recommended by the manufacturer. Use of inadequate
attachments can result in accidents.
7. Water and moisture — Do not use the product near water.
8. Ventilation — The vents and other openings in the cabinet are designed for ventilation.
Do not cover or block these vents and openings since insuffi cient ventilation can cause overheating
and/or shorten the life of the product. Do not place the product on a sofa, rug or other similar surface,
since they can block ventilation openings. Do not place the product in an enclosed place such as
a bookcase or rack, unless proper ventilation is provided or the manufacturer’s instructions are
followed.
9. Entering of objects and liquids — Never insert an object into the product through vents or openings.
High voltage fl ows in the product, and inserting an object can cause electric shock and/or short
internal parts.
For the same reason, do not spill water or liquid on the product.
10. Servicing — Do not attempt to service the product yourself. Removing covers can expose you to high
voltage and other dangerous conditions. Request a qualifi ed service person to perform servicing.
11. Repair — If any of the following conditions occurs, turn off the connected PC, disconnect the USB
cable, and request a qualifi ed service person to perform repairs.
a. When a liquid was spilled on the product or when objects have fallen into the product.
b. When the product has been exposed to rain or water.
c. When the product does not operate properly as described in the operating instructions.
Do not touch the controls other than those described in the operating instructions. Improper
adjustment of controls not described in the instructions can cause damage, which often requires
extensive adjustment work by a qualifi ed technician.
d. When the product has been dropped or damaged.
e. When the product displays an abnormal condition. Any noticeable abnormality in the product
indicates that the product needs servicing.
12. Replacement parts — In case the product needs replacement parts, make sure that the service
person uses replacement parts specifi ed by the manufacturer, or those with the same characteristics
and performance as the original parts. Use of unauthorised parts can result in fi re, electric shock
and/or other danger.
13. Safety checks — Upon completion of service or repair work, request the service technician to
perform safety checks to ensure that the product is in proper operating condition.
14. Heat sources — Keep the product away from heat sources such as radiators, heaters, stoves and
other heat-generating products (including amplifi ers).
3
E

SAFETY PRECAUTIONS (Continued)
15. Usage of the product must not be accompanied by fatal risks or dangers that, could lead directly to
death, personal injury, severe physical damage or other loss, including nuclear reaction control in
nuclear facility, medical life support system, and missile launch control in a weapon system.
WARNING:
This is a class A product. In a domestic environment this product may cause radio interference in
which case the user may be required to take adequate measures.
E
4

TIPS AND SAFETY INSTRUCTIONS
- Please understand that Sharp Corporation
bears no responsibility for errors made during
use by the customer or a third party, nor for any
other malfunctions or damage to this product
arising during use, except where indemnity
liability is recognised under law.
- This product and its accessories may be
upgraded without advance notice.
- Do not use the product where ventilation
is poor, where there is a lot of dust, where
humidity is high, or where the product may
come into contact with oil or steam, as this
could lead to fi re.
- Ensure that the product does not come into
contact with water or other fl uids. Ensure that
no objects such as paper clips or pins enter
the product as this could lead to fi re or electric
shock.
- Do not place the product on top of unstable
objects or in unsafe places. Do not allow the
product to receive strong shocks or to strongly
vibrate. Causing the product to fall or topple
over may damage it.
- Do not use in places where the product will
be subject to direct sunlight, near heating
equipment or anywhere else where there is
likelihood of high temperature, as this may lead
to generation of excessive heat and outbreak of
fi re.
- Use the product within the ambient temperature
range of 5 to 35°C. (Also check the temperature
requirements of other devices, including the
target monitor and the connected PC, and
ensure that all requirements are satisfi ed.)
- When an infrared-operated device is used
nearby, the product may malfunction. Keep
such a device away from the product.
- Do not hold the product during transportation;
instead, hold the handles of the monitor.
Holding this product may cause damage or a
malfunction.
- Do not put any object above the product, as it
may cause damage or a malfunction.
- Do not use the product in locations where the
unit is exposed to direct sunlight or other strong
light. Since this product operates with infrared
rays, such light may cause a malfunction.
- Do not touch the touch panel while the PC is
starting up, since it will be detected as a failure
of the infrared transmitter/receiver elements and
will lead to a malfunction. When this occurs,
restart the PC.
- Do not operate the touch panel with a hard
or pointed object such as a fi ngernail, pen, or
pencil.
Maintenance
Before starting maintenance, turn off the power of
the connected PC and disconnect the USB cable.
- Wipe dirt off lightly with a soft cloth.
- If dirt is hard to remove, wipe it off using a
tightly squeezed cloth dampened with a dilute
solution of a neutral detergent. Then wipe the
area with a dry cloth.
- Do not use benzine or thinner for cleaning.
The use of such chemicals may cause material
degradation or cause the coating to peel off.
- Do not allow any volatile matter such as
insecticide to touch the screen. Do not leave
a rubber or plastic object in contact with the
product for a long time. These may cause
material degradation or cause the coating to
peel off.
- When the infrared transmitter/receiver of the
touch panel or the infrared transmitter of the
touch pen is dirty, the unit may malfunction.
Wipe dirt off lightly from these sections with a
soft cloth at least once a day.
- If dust accumulates inside the infrared
transmitter/receiver, the product cannot transmit
or receive infrared rays properly, resulting in
a malfunction. To clean the dust accumulated
inside, contact your dealer (extra charge
required).
Manual Scope
- Microsoft and Windows are registered
trademarks of Microsoft Corporation.
- All other brand and product names are
trademarks or registered trademarks of their
respective holders.
- Illustrations in this manual may not exactly
represent the actual product or display.
- This manual describes operations using
Windows English edition.
5
E

Contents
IMPORTANT INFORMATION .....................................................................................1
DEAR SHARP CUSTOMER .......................................................................................3
SAFETY PRECAUTIONS ...........................................................................................3
TIPS AND SAFETY INSTRUCTIONS ........................................................................5
Supplied Accessories/Operating Requirements ....................................................7
Checking accessories ............................................................................................7
Operating requirements ..........................................................................................7
Part Names ................................................................................................................8
Preparation ................................................................................................................9
Mounting the touch panel .......................................................................................9
Setting up the PC .................................................................................................11
Setting the touch panel ........................................................................................13
Preparing the touch pen and how to use it ...........................................................16
Deleting (Uninstalling) the Programme ................................................................18
Troubleshooting ......................................................................................................19
Specifi cations ..........................................................................................................20
E
6

Supplied Accessories/Operating Requirements
Checking accessories
Make sure the following accessories are provided with the product.
If any component should be missing, please contact your dealer.
Touch panel (1)
USB cable (1)
(Approx. 1.8 m)
Batteries for touch pen
(R-03 [“AAA” size] x 2)
Operation manual (this manual): 1
z
Utility Disk (CD-ROM): 1
z
TouchPanel driver/TouchPanel Setting Program
Blank sticker: 1
z
Place a blank sticker onto the SHARP logo to cover the logo.
Touch pen (1) Touch pen tip (3)
Mounting bracket (5) Mounting screw (10)
• For environmental protection!
Do not dispose of batteries in household garbage. Follow the disposal instructions for your area.
Operating requirements
PC
OS Windows XP (Service Pack 1 or later is recommended)
PC/AT compatible featuring a USB port
(A CD-ROM drive is required for programme installation.)
7
E

Part Names
Touch panel
Infrared transmitter/receiver
Infrared transmitter/receiver
Caution
• The touch pen signal receiver is protruded. Be careful that nothing hits the section or is caught on it.
Also note that if this section is covered with something, the touch pen does not operate properly.
Touch pen signal receiver
Back of the right side
USB terminal
Pen switch
Set this switch to OFF during
normal use.
Set this switch to ON to use the
touch pen.
(When set to ON, the switch
illuminates in green.)
Touch pen
Function switch
Pen tip
Infrared transmitter
E
8

Preparation
Mounting the touch panel
Caution
• Consult your dealer about mounting the touch panel. Mounting the unit should not be conducted by the customer
on their own.
• The touch panel is heavy. Mounting must be performed by two or more people.
• Do not mount a touch panel to the monitor other than the applicable model. Otherwise, the unit may fall and cause
malfunction or injury.
• Mount the touch panel to the monitor after mounting the monitor to the stand or other mountings. Do not try
to mount the touch panel by placing the unit on the fl oor and then placing the monitor over it. This may cause
damage or a malfunction.
• Check that the clearance between the monitor and the touch panel is not too great.
1. Attach the mounting brackets (supplied) at the two positions on the rear of the touch panel for
initial fi xing.
Attach the mounting brackets in the orientation shown in the illustration.
During the initial fi xing, secure the brackets so that they are raised at the highest position.
Touch panel (rear side)
Mounting screws (supplied)
2. Place the touch panel over the front side of the monitor.
Be careful that the touch panel does not hit the monitor.
Mounting bracket (supplied)
Touch panel (rear side)
9
E

Preparation
3. Lower the mounting brackets from the initial position in step 1 and secure them with screws (2
brackets).
4. Attach the remaining mounting brackets (3 brackets).
(Continued)
Caution
• Tighten the mounting screws securely using a fl at-blade screwdriver.
Be careful not to tighten the screws excessively. This may cause distortion of the unit.
E
10

Setting up the PC
To use the touch panel, you need to connect a PC to the touch panel and install the TouchPanel driver
and TouchPanel Setting Program onto the PC.
Installing the TouchPanel driver
Caution
• This procedure requires administrator privilege.
• To use a USB hub, select a model supporting bus power. USB hubs supporting self power cannot be used.
• Do not connect the USB cable until the OS starts up.
• Do not touch the touch panel while connecting the USB cable.
It will be detected as a failure of the infrared transmitter/receiver elements, leading to a malfunction. When this
occurs, disconnect the USB cable once and then reconnect it.
1. Turn on the monitor and PC to display the PC screen on the monitor.
2. Insert the supplied Utility Disk into the CD-ROM drive of the PC.
3. Connect the PC and touch panel with the USB cable (supplied).
To the USB
terminal of the PC
USB cable (supplied)
USB terminal
To the USB terminal
When the cable is connected, the “Welcome to the Found New Hardware Wizard” screen is displayed.
If the message “Can Windows connect to Windows Update to search for software?” appears, select “No,
not this time” and click “Next”.
4. Select “Install the software automatically” and click “Next”.
If the message “has not passed Windows Logo testing to verify its compatibility…” appears, click
“Continue Anyway”.
5. Click “Finish”.
The “Welcome to the Found New Hardware Wizard” screen is displayed again.
If the message “Can Windows connect to Windows Update to search for software?” appears, select “No,
not this time” and click “Next”.
6. Select “Install the software automatically” and click “Next”.
If the message “has not passed Windows Logo testing to verify its compatibility…” appears, click
“Continue Anyway”.
7. Click “Finish”.
This fi nishes the installation of the TouchPanel driver.
11
E

Preparation
Tips
• You can confi rm proper installation of the TouchPanel driver.
1. Click the “start” button and select “Control Panel”.
2. Click “Performance and Maintenance”, “System”.
When you use the Classic View, double-click “System”.
3. Click “Hardware”, “Device Manager”.
4. Double-click “Ports (COM & LPT)”.
When “TouchPanel USB-Serial-V2 Port (COMx)” is displayed, the driver has been installed properly.
“COMx” indicates the COM port No. used for the touch panel. The number varies depending on the PC.
Caution
• After the driver is installed, do not change the USB terminal of your PC that is used for the touch panel.
(Continued)
Installing the TouchPanel Setting Program
• The TouchPanel Setting Program is a programme enabling you to use the touch panel to perform
mouse operation of the existing application programmes. You can also confi gure the settings of the
touch panel operation.
• Before installing the TouchPanel Setting Program, ensure that the TouchPanel driver has been installed
properly (See above).
Caution
• This procedure requires administrator privilege.
• If a former version of the TouchPanel Setting Program has been installed in the PC, delete it (uninstall it) before
installing the new programme.
1. Insert the supplied Utility Disk into the CD-ROM drive of the PC.
2. In “My Computer”, open the CD-ROM icon.
3. Double-click “tpdrv”, “setup.exe”.
The installer starts.
4. Click “OK”.
5. Click the
To change the installation directory, click “Change Directory” and select the desired directory.
6. Click “Continue”.
7. Click “OK”.
This fi nishes installation of the TouchPanel Setting Program.
Restart the PC.
From the next time you start the PC, the TouchPanel Setting Program is activated automatically to
enable touch panel operation.
When the TouchPanel Setting Program is activated for the fi rst time, a calibration screen is displayed
automatically. Follow the instructions on the screen to perform calibration (position adjustment). (See
page 13.)
button.
Tips
• The touch panel is disabled when the TouchPanel Setting Program is not active, including the following occasions:
- When the Windows login screen is displayed.
- When the screen shows a screensaver for which “On resume, password protect” has been set.
- After the “Turn Off Computer” option of Windows is selected.
E
12

Setting the touch panel
The TouchPanel Setting Program allows you to set or calibrate the touch panel.
For the procedure to install the programme, refer to page 12.
1. Click “TouchPanel Setting Program” on the taskbar.
2. Click appropriate buttons to change the setting as desired.
3. When the setting is complete, click “Close”.
Tips
• The changed settings are stored in “C:\Program Files\tpdrv\tpdrv.ini”.
Basic Setting
Port
Specify the COM port of the PC to which the touch panel is connected.
Normally, use “Auto Connect”.
If “Auto Connect” does not work, select the COM port of the PC to which the touch panel is connected.
Calibration Mode
Normal : Select this option to use the normal view.
Special : Select this option for special cases such as using the enlarged view or clipped-and-enlarged
view.
Palm Touch
Select “Off” when you use your fi nger or the touch pen to touch the screen. Select “On” when you use
your palm to touch the screen.
PenID Setting/PenID Display
When more than one pair of touch panels and touch pens are used in proximity, specify ID numbers to
identify individual pairs. (See page 17.)
Calibration
Adjust the position so that the mouse cursor moves accurately to the touched point on the screen.
Follow the instruction displayed on the screen.
(To stop the calibration in progress, press any key on the keyboard.)
13
E

Preparation
User Setting
Click Mode
Drag
Set the touch panel so that touching the
screen corresponds to pressing down the
left mouse button, and so that moving the
fi nger away from the screen corresponds to
releasing the left mouse button.
A click event occurs when contact between
the fi nger and the screen is broken. When the
fi nger moves while touching the screen, the
mouse cursor tracks the move, enabling drag
operation.
Click on Touch
Set the touch panel so that touching the
screen corresponds to the single click of the
left mouse button (pressing and releasing the
button).
A click event occurs when a fi nger touches the
screen.
(Continued)
Pressing the mouse
button
Pressing and
releasing the mouse
button
Drag
No change No change
Releasing the
mouse button
Click on Release 1
A click event occurs when contact between the
fi nger and the screen is broken.
No button-press event occurs while the fi nger
is touching the screen. The cursor does not
track the fi nger movement.
Click on Release 2
A click event occurs when contact between the
fi nger and the screen is broken. A button-press
event occurs when the fi nger touches the
screen. The cursor does not track the fi nger
movement.
No change
Pressing the mouse
button
No change
No change
Pressing and
releasing the
mouse button
Releasing the
mouse button
E
14

Double Click Time
A double click is recognised when the fi rst and second touches occur within the specifi ed time period.
To change the setting, set “Double-click speed” of the mouse setting options of Windows to “Slow”.
Double Click Area
Specify the allowable range to recognise a double click even if the positions of the fi rst and second
touches are not exactly the same.
Touch Pen Switch
Select the function activated when the screen is touched while the function switch of the touch pen is
held down.
Right Button : Works as a right-click of the mouse.
Off : The function switch is disabled.
Right Button Tool
Select whether to display a button on the screen to use a right-click operation with the touch panel.
When you touch this button and then touch the screen, the touch is recognised as a right click.
(Only the fi rst touch after touching the button is recognised as a right click.)
Cursor Adjustment
If you want to change the relationship between the touched point on the screen and the mouse cursor
position, adjust it using the “Up”, “Down”, “Right”, and “Left” buttons.
15
E

Preparation
(Continued)
Preparing the touch pen and how to use it
Inserting batteries
1. Rotate the battery cap and remove it.
Battery cap
2. Insert the supplied batteries (R-03 ["AAA" size] x 2 pieces) in the orientation as shown in the
illustration. Attach the battery cap.
Tips
• The supplied batteries (R-03 [“AAA” size] x 2 pieces) may become exhausted in a shorter time period due to the
storage condition. It is recommended that you replace them with new alkaline batteries (commercially available)
earlier than the specifi cation.
• If the touch pen is not used for a long time, take the batteries out of the touch pen.
• Use manganese or alkaline batteries only.
How to use the touch pen
Caution
• Do not use the touch pen for any purpose other than to operate the touch panel.
• Do not apply a strong force to the pen tip.
• Do not cover the section of the infrared transmitter with your hand.
• Using remote controllers for a TV, VCR or similar devices simultaneously with the touch pen may cause a
malfunction.
• Do not store the touch pen in a vertical position (with the tip downward).
1. Set the Pen switch of the touch panel to ON.
2. Use the touch pen on the screen.
Touching the screen with the touch pen works as a left click of the mouse.
When the screen is touched while the function switch of the touch pen is held down, the function
specifi ed for “Touch Pen Switch” of the TouchPanel Setting Program is activated.
E
16
Tips
• When the pen tip is worn or damaged, replace the tip.
Pull out the old tip and insert a new one.
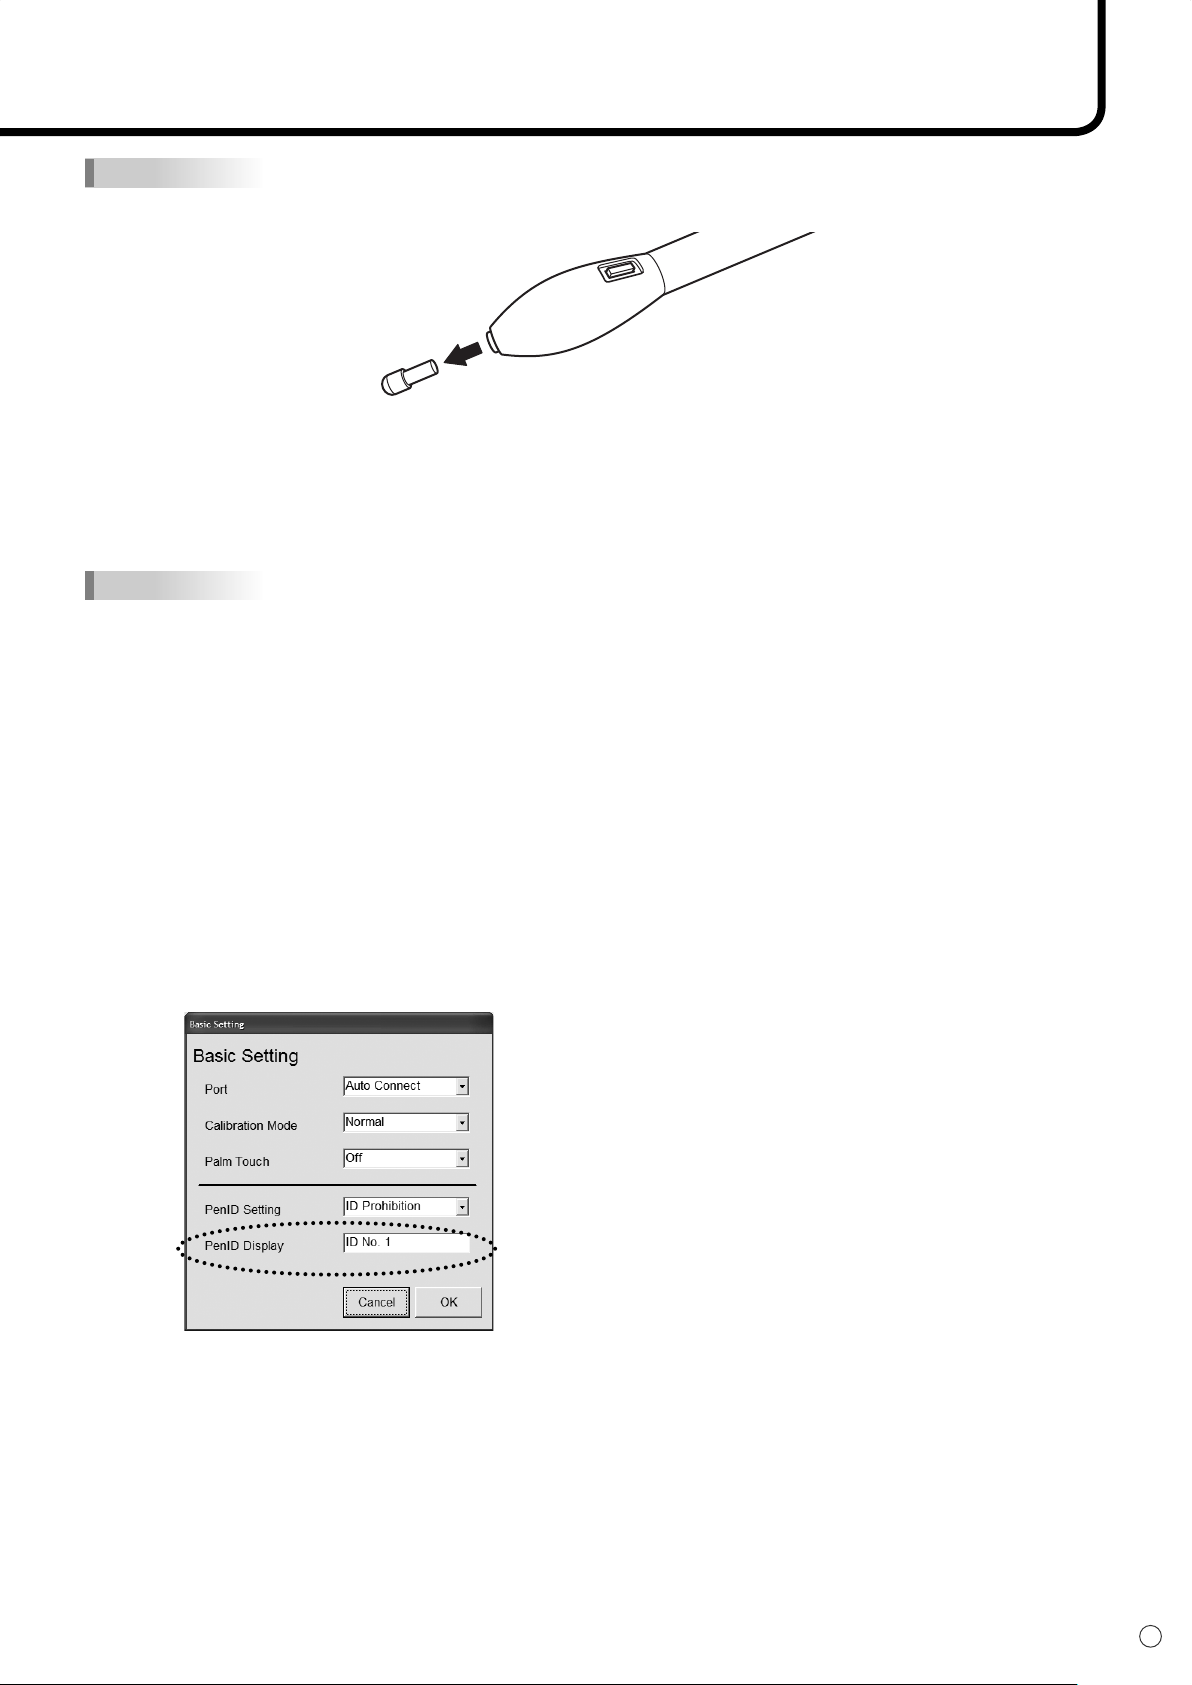
Setting the touch pen ID
When more than one pair of touch panels and touch pens are used in proximity, you need to specify ID
numbers to identify individual pairs.
Tips
• Use the touch pen within a range of about 5 m from the front of the touch panel.
1. Open the Basic Setting screen of the TouchPanel Setting Program.
Click “TouchPanel Setting Program” on the taskbar and select “Basic Setting” of the programme.
(1)
2. Specify the ID number of the touch pen.
(1) Remove the battery cap of the touch pen.
Leave the batteries inside.
(2) While pressing the tip of the touch pen,
1) Attach the battery cap and wait for two seconds or more.
2) Slowly press the function switch three times.
(3) Release the pen tip and slowly press the function switch three times.
(4) Press the pen tip.
(5) Press the function switch to specify the ID number.
Every time the switch is pressed, the ID number shown at “PenID Display” changes.
(6) When a desired ID number is displayed, press the pen tip.
The selected ID number is set as the number shown at “PenID Display”.
3. Specify the ID number of the touch panel.
(1) Select an option from “PenID Setting” in the “Basic Setting” screen.
ID Prohibition: The touch panel can be operated regardless of the ID number of the touch pen.
ID No.1 to 4: The touch panel can be operated only with the touch pen with the same ID
number.
(2) Click “OK”.
17
E

Deleting (Uninstalling) the Programme
Caution
• This procedure requires administrator privilege.
Deleting the TouchPanel Setting Program
1. Click the “start” button, select “All Programs”, “Startup”, and then right-click “tpdrv”.
2. Select “Delete”.
3. Click “Delete Shortcut”.
4. Restart the PC.
5. Click the “start” button, select “Control Panel”, and then click “Add or Remove Programs”.
When you use the Classic View, double-click “Add or Remove Programs”.
6. Select “tpdrv” and click “Change/Remove”.
Follow the instruction displayed on the screen for the remaining procedure.
Deleting the TouchPanel driver
1. Disconnect the USB cable.
2. Click the “start” button, select “Control Panel”, and then click “Add or Remove Programs”.
When you use the Classic View, double-click “Add or Remove Programs”.
3. Select “TouchPanel USB-Serial-V2 Bridge” and click “Change/Remove”.
4. Click “Continue”.
5. Click “Finish”.
The uninstallation process fi nishes.
E
18
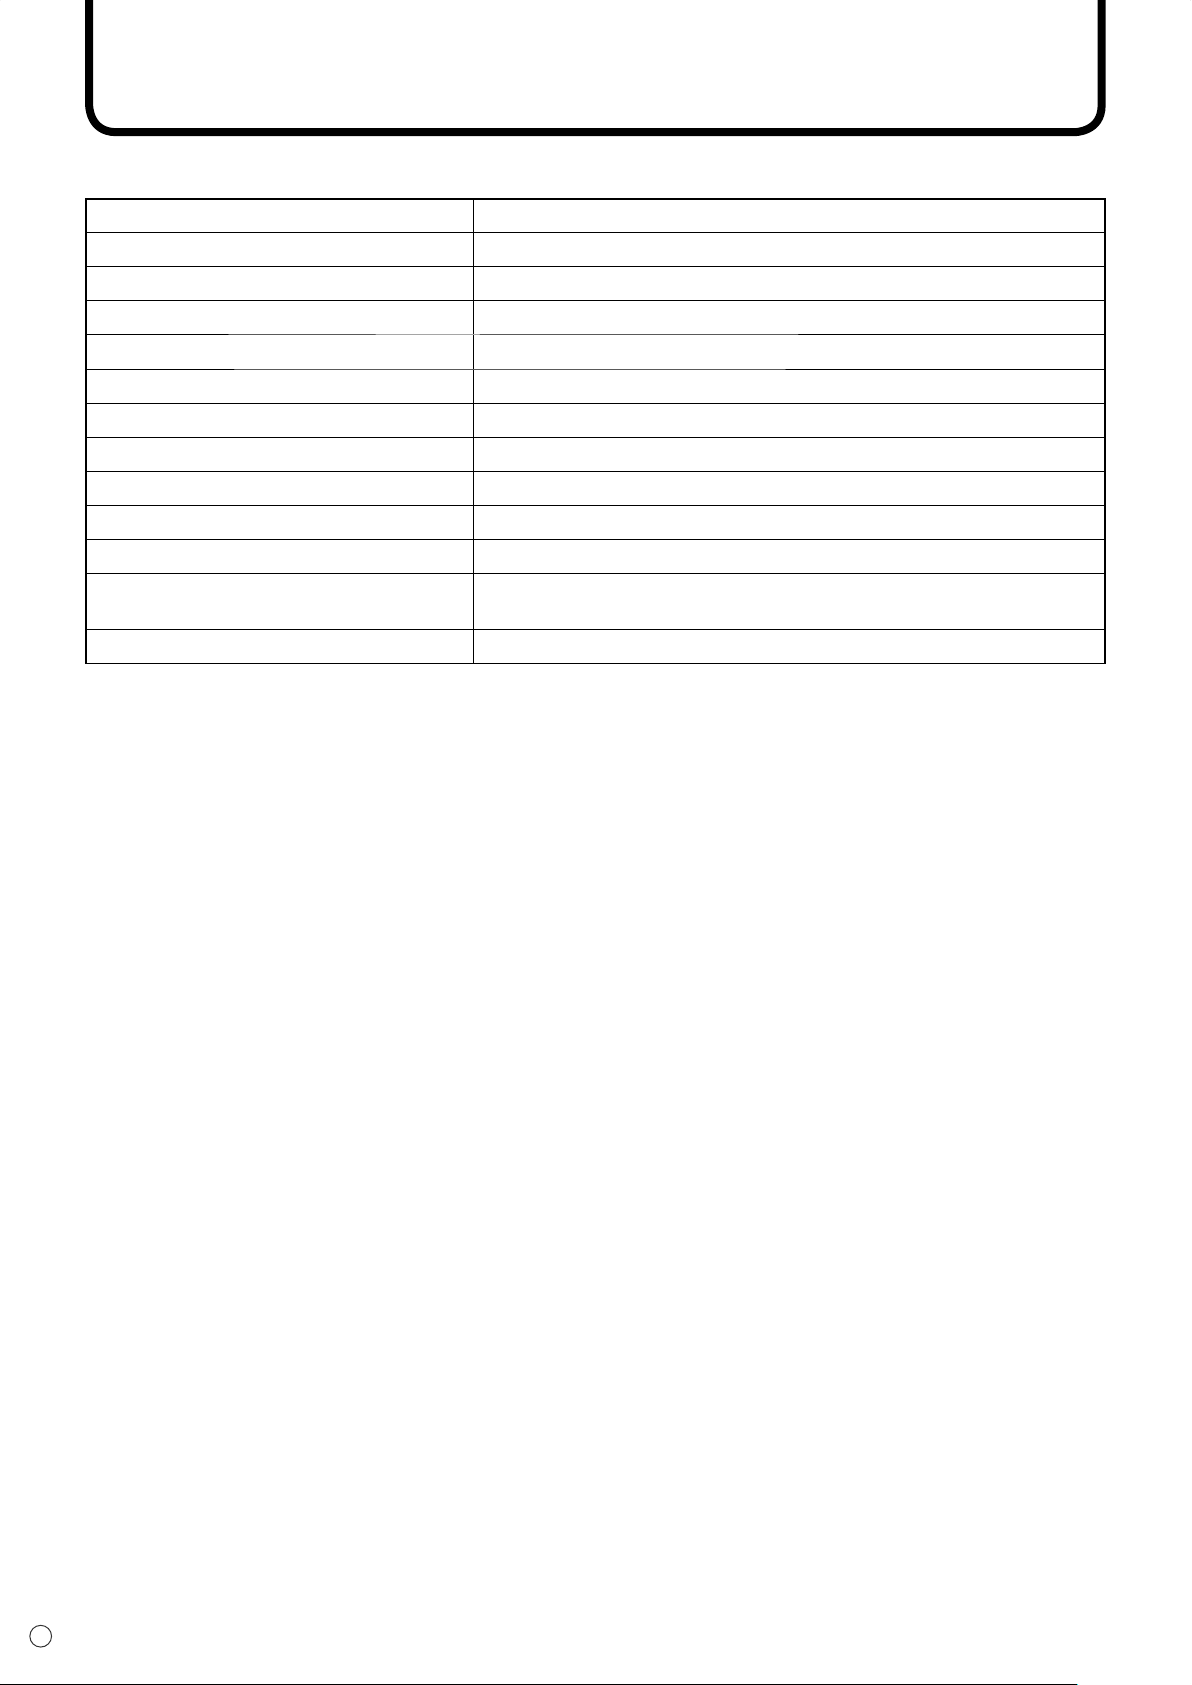
Troubleshooting
Before calling for repair services, make sure following checks for possible remedies to the encountered
symptoms.
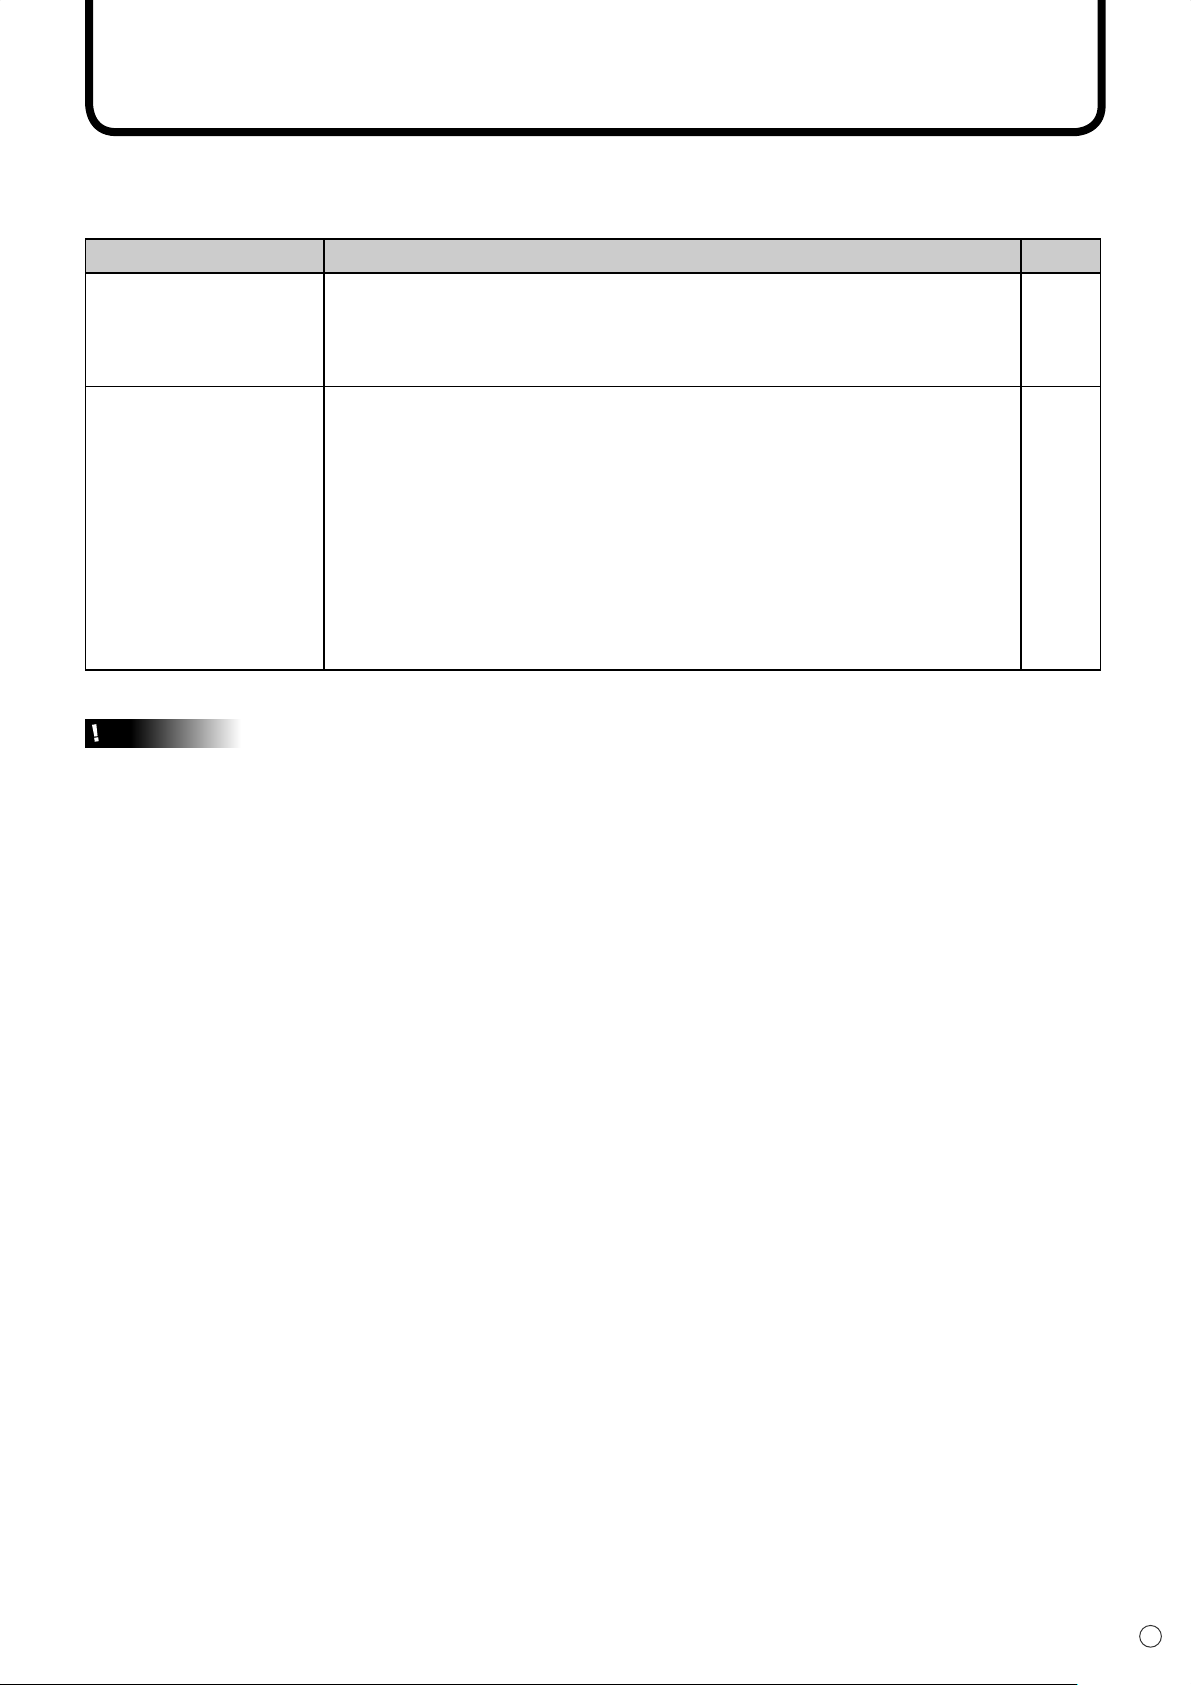
Problem Check item Page
- Is the USB cable connected properly?
The touch panel does
not respond.
Reaction is slow.
Some part on the screen
does not respond.
Caution
• You cannot use two touch panels by mounting them on two monitors connected to a single PC.
In such a case, you can operate only the touch panel mounted on the primary monitor.
• When the PC connected to the touch panel has other USB devices being connected, do not activate such devices
during the touch panel input operation. Otherwise, proper input may be interfered with.
- Did you install the TouchPanel driver and TouchPanel Setting Program?
- Are the batteries of the touch pen exhausted?
- Does the ID number of the touch pen match with that of the touch panel?
- Has the screen been exposed to direct sunlight or strong light?
Is an infrared-operated device used nearby?
Since the touch panel operates with infrared rays, a malfunction may
occur under these conditions.
- Did you touch the screen with a thin object less than approx. 6 x 6 mm?
Such a touch may not be detected with infrared rays, resulting in a
malfunction.
- Did you touch the screen while the PC was starting up or the USB cable
was being connected?
Such a touch is detected as a failure of the infrared transmitter/receiver
elements, leading to a malfunction.
11
11, 12
16
17
-
-
-
19
E
Specifi cations
Product specifi cations
Model PN-ZT10E
Detection method Infrared interruption detection
Panel opening (mm) 1441 (H) x 817 (V)
Detection area (mm) 1428 (H) x 808 (V)
No. of detecting elements 358 (H) x 203 (V)
PC connection terminal USB (conforming with 1.1)
Power requirement DC +5 V max. 450 mA (supplied from USB)
Power consumption 2.3 W
Touch pen Infrared communication method
Operating temperature range 5°C to 35°C *1
Operating humidity range 20% to 80% (no condensation) *1
Dimensions (mm)
Weight (kg) Approx. 23 (excluding mounting brackets)
*1: Before using the touch panel, be sure to check the temperature and humidity requirements of other devices,
including the target monitor and the connected PC, and that all requirements are satisfied.
Approx. 1622 x 84 x 971
(excluding protrusions and mounting brackets)
As a part of our policy of continuous improvement, SHARP reserves the right to make design and
specifi cation changes for product imporovement without prior notice. The performance specifi cation
fi gures indicated are nominal values of production units. There may be some deviations from these
values in individual units.
E
20


Printed in Japan
0PM99012004// (1)
 Loading...