

Page 1
Introduction
Thank you for purchasing this SHARP mobile handset.
Before and while using the handset, please read this
manual throughly and retain it for future reference. This
handset is your partner. Handle it carefully at all times to
ensure its long-term performance.
About this Operation Manual
Instruction scheme
Instructions in this manual are carefully designed to help
you operate the handset smoothly and easily. At the
beginning of each section, the steps that have to be
followed to reach the function you wish to utilise are
shown (Example 1). The steps for all subsequent
subsections are simplified (Example 2). Make sure to
B to enter your selection.
press
Example 1:
(Excerpt from “Using the Camera”)
1 Press B.
The main menu appears.
2 Press a, b, c, or d to highlight “Camera”
press B.
3 Press a or b to highlight “Create picture” and
press B.
The each step to reach camera mode is shown.
Example 2:
(Excerpt from “Capturing Still Images”)
1 At the main menu, select in the following order:
“Camera” → “Create picture.”
2 Press C [].
The "Options" menu appears.
The steps to reach camera mode are simplified as shown
above (step 1).
B, a, b, c, d, and C [Options] indicate the
operation keys in this manual. For information on
the keys and handset operations, refer to “Parts
and Controls” on page 4-18.
Symbols
This indicates useful extra information for
operating the handset.
This indicates important background information
or items that need to be recognised when
operating the handset.
This indicates operations that require extreme
caution before performing on the handset.
1-1
Introduction
Page 2

NOTICE
Introduction
We strongly recommend that you keep separate
permanent written records of all important data. Data
may be lost or altered in virtually any electronic
memory product under certain circumstances.
Therefore, we assume no responsibility for data lost or
otherwise rendered unusable, whether as a result of
improper use, repairs, defects, battery replacement,
use after the specified battery life has expired or any
other cause.
We assume no responsibility, directly or indirectly, for
financial losses or claims from third parties resulting
from the use of this product and any of its functions,
such as stolen credit card numbers, the loss or
alteration of stored data, etc.
All company and/or product names are trademarks
and/or registered trademarks of their respective
holders.
Screen layouts illustrated in this operation manual
may differ from those on the handset.
The information described in this operation manual is
subject to change without notice.
All the functions described in this operation manual
may not be supported by all networks.
We assume no responsibility for contents, information,
etc. downloaded from the network.
1-2
The CGS-LCD is a world advanced technology
product, giving you fine picture quality. Occasionally, a
few black or bright pixels may appear on the screen.
Please note that this will not have any impact on any
of the features or performance.
Copyright
According to copyright laws, the reproduction, alteration
and use of material which is protected by copyright
(music, pictures, etc.) is only permitted for personal or
private use. If the user is not in possession of more
extensive copyrights or has not received the explicit
permission from the co pyright owner to reproduce, alter or
use a copy which has been made or modified in this way,
this is considered to be a violation of the copyright laws
and gives the copyright owner the right to claim for
damages. For this reason, avoid the illegal use of material
which is protected by copyright.
Windows is a registered trademark of Microsoft
Corporation in the United States and/or other countries.
Page 3

Powered by JBlend™, Copyright1997-2004 Aplix Corporation. All rights reserved.
Java and all Java-based trademarks and logos are trademarks or registered trademarks of Sun Microsystems, Inc.
in the U.S. and other countries.
JBlend and all JBlend-based trademarks and logos are
trademarks or registered trademarks of Aplix Corporation in
Japan and other countries.
In this product, JBlend
™
JBlend
is a Java execution environment
that Aplix developed for implementing
advanced performance and fast operation
on small-memory systems. JBlend and
JBlend logo are trademarks or registered
trademarks of Aplix Corporation in Japan
and other countries.
Licensed by Inter Digital Technology Corporation under one
or more of the following United States Patents and/or their
domestic or foreign counterparts and other patents pending, including U.S. Patents: 4,675,863: 4,779,262:
4,785,450 & 4,811,420.
Licensed under U.S. Patent 4,558,302 and foreign counterparts.
™
is incorporated.
T9 Text Input is licensed under one or more of the following:
U.S. Pat. Nos. 5,818,437, 5,953,541, 5,187,480, 5,945,928,
and 6,011,554; Australian Pat. No. 727539; Canadian Pat.
No. 1,331,057; United Kingdom Pat. No. 2238414B; Hong
Kong Standard Pat. No. HK0940329; Republic of Singapore
Pat. No. 51383; Euro. Pat. No. 0 842 463 (96927260.8) DE/
DK, FI, FR, IT, NL,PT.ES,SE,GB; Republic of Korea Pat.
Nos. KR201211B1 and KR226206B1; and additional
patents are pending worldwide.
1-3
Introduction
Page 4
Declaration of Conformity
Introduction
Hereby, Sharp Telecommunications of Europe Ltd, declares
that this TM100 is in compliance with the essential requirements and other relevant provisions of Directive 1995/5/
EC.
A copy of the original declaration of conformity can be
found at the following Internet address:
http://www.sharp-mobile.com
Safety Precautions and Conditions of Use
Your handset conforms to international regulations
insofar as it is used under normal conditions and in
accordance with the following instructions.
Electromagnetic waves
Do not switch on your handset aboard an aircraft (as
your handset may interfere with the aircraft’s
electronic systems). Current legislation forbids this
use and legal action can be taken against the user.
Do not switch on your handset in a hospital, except in
designated areas. Use of your handset’s functions
may affect the performance of medical electronic units
(pacemakers, hearing aid s, insulin pumps, etc.). When
the handset function is on, do not bring it near medical
equipment or into areas in which medical equipment is
1-4
being used. If you have a hearing aid or a pacemaker,
only use the handset on the opposite side of your body
from where it is located. The handset should be kept
at least 15.24 cm (6 inches) from a pacemaker at
ANYTIME the handset is switched on.
Do not switch on your handset near gas or flammable
substances. Observe the rules concerning the use of
handsets at petrol stations, chemical plants and at all
sites where a risk of explosion exists.
Caring for your handset
Do not allow children to use your handset without
supervision.
Do not open or att empt to repair your handset yourself.
The product can only be repaired by authorised
service personnel.
Do not drop your handset or subject it to severe
impacts. Bending the body and pushing the display or
keys with force could damage the handset.
Do not use solvents to clean your handset. Use only a
soft, dry cloth.
Do not carry your handset in your back pocket as it
could break when you sit down. The display is made of
glass and is particularly fragile.
Avoid touching the external connector on the underside
of the handset, since the delicate components within
can be damaged by static electricity.
Do not stick items to the back of the display.
Page 5

Battery
Use your handset only with batteries, chargers and
accessories recommended by the manufacturer. The
manufacturer disclaims any liability for damage
caused by the use of other chargers, batteries or
accessories.
Network configuration and handset usage will affect
talk time and standby time. Using the games or
camera will hasten battery consumption.
When the battery charging alert is displayed on the
screen, charge the battery as soon as possible. If you
continue using your handset ignoring the alert, the
handset may malfunction, and all data and settings
you have stored may be lost at any moment.
Before removing the battery from the handset, make
sure the handset is switched off.
Charge the new battery as soon as possible after
removing the old one.
Do not touch the battery terminals. Batteries can
cause damage, injury or burns if a conductive material
touches exposed terminals. When the battery is
detached from the handset, use a cover made of
nonconductive material for keeping and carrying the
battery safely.
Recommended temperature for using and storing
batteries is approximately 20°C.
The battery’s performance is limited in low
temperatures, particularly below 0°C and the handset
may not work temporarily regardless of the amount of
remaining battery power.
Exposing the handset to extreme temperatures will
shorten battery life.
The battery can be charged and discharged hundreds
of times but it will eventually wear out. When the
operating time (talk time and standby time) is
noticeably shorter than normal, it is time to buy a new
battery.
Use only the standard accessory battery (CE-BL100).
CAUTION
RISK OF EXPLOSION IF BATTERY IS REPLACED
BY AN INCORRECT TYPE.
DISPOSE OF USED BATTERIES ACCORDING
TO THE INSTRUCTIONS
See “Battery Disposal” below.
Battery Disposal
Take the Used battery to the local waste depot.
Do not expose the used battery to an open flame. Do
not dipose in water or dispose with household waste.
1-5
Introduction
Page 6

RF Connector
This RF connector is for connecting Sharp-approved
Introduction
antennas to the handset. Do not connect unapproved
or modified equipment as this may damage the
handset or cause the SAR limit to be exceeded.
Do not touch or crowd the connector unnecessarily as
this may affect standby and call times.
To avoid interfering with blasting operations, turn off
the handset in a blasting area or in a place where a
“turn off two-way radio” sign is posted.
Camera Operation
Learn picture quality, file formats, etc. beforehand.
The display supports up to 65,536 colours. Pictures
can be saved in JPEG format.
Be careful not to move your hand while taking pictures.
If the handset moves while taking a picture, the picture
can be blurred. When taking a picture, hold the
handset firmly to prevent it from moving, or use the
delay timer.
Clean the lens befor e taking a picture. Fingerprints, oil,
etc. on the lens hinder clear focusing. Wipe with a soft
cloth before taking a picture.
Miscellaneous
As the handset uses an electronic storage unit, data
may be lost or corrupted under various circumstances.
1-6
Before connecting the handset to a PC or a peripheral
unit, read the operation manual for the other unit
carefully.
If the handset’s battery has been removed for some
time, or the handset has been reset, the unit’s clock
and calendar may be reinitialised. The date and time
should be updated.
Use only the attached hands free. Some handset’s
functions may not work when unauthorised hands free
are used.
The handset uses the magnet to recognise that the
handset is closed. Do not place magnetic cards near
your handset or get the card caught in the handset as
it may damage the recorded data.
Environment
Keep your handset away from extreme heat. Do not
leave it on the dashboard of a car or near a heater. Do
not leave it in any place that is extremely damp or
dusty.
Since this product is not waterproof, do not use it or
store it where fluids can splash onto it. Raindrops,
water spray, juice, coffee, steam, perspiration, etc.
may also cause a malfunction.
Page 7

Precautions Concerning Vehicle Use
It is the user’s responsibility to verify if local laws
permit the use of a handset in a vehicle. Give full
attention to driving. Pull off onto the side of a road and
park the car before making or answering a call.
If local laws permit, we recommend that you use your
handset with the attached hands free.
Use of your handset’s function may interfere with the
vehicle’s electronic systems, such as the ABS antilock
brakes or the air-bag. To ensure no such problem
occurs, please check with your dealer or car
manufacturer before connecting your handset.
Only allow qualified service maintenance personnel to
install the vehicle accessories. The manufacturer
disclaims any liability for damage which may result as
a consequence of improper use or use contrary to the
instructions contained herein.
SAR
Your handset has been designed, manufactured and
tested so as not to exceed the limits for exposure to
electromagnetic fields recommended by the Council of
the European Union. These limits are part of
comprehensive guidelines developed by independent
scientific organisations. The guidelines include a
substantial safety margin designed to assure the safety of
the handset user and others and to take into account
variations in age and health, individual sensitivities and
environmental conditions. European standards provide
for the amount of radio frequency electromagnetic energy
absorbed by the body when using a handset to be
measured by reference to the Specific Absorption Rate
(SAR). The SAR limit for the general public is currently 2
watts per kilogram averaged over 10 grams of body
tissue. Your handset SAR value is 0.327 watts per
kilogram.
This has been tested to ensure that this limit is not
exceeded even when the handset is operating at its
highest certified power. In use however your handset may
operate at less than full power because it is designed to
use only sufficient power to communicate with the
network.
FCC Declaration of conformity
Triple-band phone: TM100 with USB cable(CE-UC30)
and AC charger(CE-EA32)
This device complies with part 15 of the FCC Rules.
Operation is subject to the following two conditions:
(1) This device may not cause harmful interference, and
(2) this device must accept any interference received,
including interference that may cause undesired
operation.
Responsible Party:
SHARP ELECTRONICS CORPORATION
Sharp Plaza, Mahwah, New Jersey 07430
TEL:1-800-BE-SHARP
Tested To Comply With FCC Standards
FOR HOME OR OFFICE USE
1-7
Introduction
Page 8

FCC Notice
The phone may cause TV or radio interference if used in
Introduction
close proximity to receiving equipment. The FCC can
require you to stop using the phone if such interference
cannot be eliminated.
Information To User
This equipment has been tested and found to comply with
the limits of a Class B digital device, pursuant to Part 15
of the FCC Rules. These limits are designed to provide
reasonable protection against harmful interference in a
residential installation. This equipment generates, uses
and can radiate radio frequency energy and, if not
installed and used in accordance with the instructions,
may cause harmful interference to radio communications.
However, there is no guarantee that interference will not
occur in a particular installation; If this equipment does
cause harmful interference to radio or television
reception, which can be determined by turning the
equipment off and on, the user is encouraged to try to
correct the interference by one or more of the following
measures:
1 Reorient/Relocate the receiving antenna.
2 Increase the separation between the equipment
and receiver.
1-8
3 Connect the equipment into an outlet on a circuit
different from that to which the receiver is
connected.
4 Consult the dealer or an experienced radio/TV
technician for help.
CAUTION: Changes or modifications not expressly
approved by the manufacturer responsible for
compliance could void the user’s authority to
operate the equipment.
Exposure to Radio Waves
THIS MODEL PHONE MEETS THE GOVERNMENT’S
REQUIREMENTS FOR EXPOSURE TO RADIO
WAVES.
Your wireless phone is a radio transmitter and receiver. It
is designed and manufactured not to exceed the emission
limits for exposure to radio frequency (RF) energy set by
the Federal Communications Commission of the U.S.
Government. These limits are part of comprehensive
guidelines and establish permitted level of RF energy for
the general population.
The guidelines are based on standards that were
developed by independent scientific organizations
through periodic and thorough evaluation of scientific
studies. The standards include a substantial safety
margin designed to assure the safety of all persons,
regardless of age and health. The exposure standard for
Page 9

wireless mobile phones employs a unit of measurement
known as the Specific Absorption Rate, SAR. The SAR
limit set by the FCC is 1.6W/kg, * Tests for SAR are
conducted using standard operating positions specified
by the FCC with the phone transmitting at its highest
certified power level in all tested frequency bands.
Although the SAR is determined at the highest certified
power level, the actual SAR level of the phone while
operating can be well below the maximum value. This is
because the phone is designed to operate at multiple
power levels so as to use only the power required to reach
the network. In general, the closer you are to a wireless
base station antenna, the lower the power output.
Before a phone model is available for sale to the public, it
must be tested and certified to the FCC that it does not
exceed the limit established by the government-adopted
requirement for sa fe exposure. The tests are performed in
positions and locations (e.g., at the ear and worm on the
body) as required by FCC for each model. The highest
SAR value for this model phone when tested for use at the
ear is 0.135W/kg and when worm on the body, as
described in this operation manual is 0.392W/kg. Bodyworm Operation; This device was tested for typical bodyworm operations with the back of the phone kept 15mm
from the body. To maintain compliance with FCC RF
exposure requirements, use accessories that maintain a
15mm separation distance between the user’s body and
the back of the phone. The use of belt-clips, holsters and
similar accessories should not contain metallic
components in its assembly. The use of accessories that
do not satisfy these requirements may not comply with
FCC RF exposure requirements, and should be avoided.
While these may be differences between the SAR levels
of various phones and at various positions, they all meet
the government requirement for safe exposure.
The FCC has granted an Equipment Authorization for this
model phone with all reported SAR levels evaluated as in
compliance with the FCC RF emission guidelines. SAR
information on this model phone is on file with the FCC
and can be found under the Display Grant section of
http://www.fcc.gov/oet/fccid after searching on FCC ID
APYNAR0055.
Additional information on Specific Absorption rates (SAR)
can be found on the Cellular Telecommunications &
Internet Association (CTIA) web-site at
http://www.phonefacts.net.
* In the United States and Canada, the SAR limit for
mobile phones used by the public is 1.6Watts/kg (W/kg)
averaged over one gram of tissue. The standard
incorporates a substantial margin of safety to give
additional protection for the public and to account for any
variations in measurements.
1-9
Introduction
Page 10

Table of Contents
Introduction..................................................1-1
Table of Contents
About this Operation Manual ............................... 1-1
NOTICE................................................................1-2
Copyright .............................................................. 1-2
Declaration of Conformity.................................... 1-4
Safety Precautions and Conditions of Use............ 1-4
Table of Contents .......................................2-10
Quick Setup.................................................3-12
If You Upgrade Your Handset............................ 3-16
Parts and Controls .....................................4-18
Main Handset Unit.............................................. 4-18
Display Indicators............................................... 4-21
Guide to the Main Menu............................ 5-23
Using the Main Menu .........................................5-23
List of Menu Function Items ..............................5-25
Basic Handset Operations .........................6-27
Making a Call......................................................6-27
Answering a Call ................................................ 6-27
Redialling............................................................6-28
Useful Functions................................................. 6-29
Using the Camera....................................... 7-33
Capturing Still Images........................................7-33
2-10
Shooting Video Images.......................................7-38
Common Functions & Information.....................7-41
Entering Text ..............................................8-45
Text Table for Multi-tap Input ............................8-45
Selecting the Input Language ..............................8-46
Selecting the Input Method .................................8-46
Using Text Templates..........................................8-47
Using the Contacts List ..............................9-48
Contacts List Basics ............................................9-48
Selecting the Memory..........................................9-49
Saving Information to the Contacts List..............9-50
Dialling from the Contacts List...........................9-51
Editing the Contacts List.....................................9-53
Setting the Groups...............................................9-58
Checking the Memory Status ..............................9-59
Setting the Speed Dial List..................................9-60
Checking Own Numbers.....................................9-61
Using the Message Service .......................11-65
Making Messages..............................................11-65
Receiving E-mail Messages ..............................11-70
Reading Messages .............................................11-71
Page 11

Settings for the Messages ................................. 11-76
Making Text Templates.................................... 11-78
Using Voice Mail.............................................. 11-80
Setting Cell Broadcasts..................................... 11-80
Setting Cell Info................................................ 11-82
Downloading and Other Features .......... 12-83
Using Pictures................................................... 12-83
Using Sounds.................................................... 12-90
Using Games or Applications......................... 12-100
Using Videos .................................................. 12-103
Memory Status................................................ 12-106
Using the Personal Organiser............... 13-107
Using the Calendar ......................................... 13-107
Using the Alarm.............................................. 13-109
Using the Calculator....................................... 13-112
Using Memo Recording.................................. 13-113
Using the Phone Help..................................... 13-114
Using the Call History ........................... 14-115
Calling from the Call Log............................... 14-115
Saving a Call Log to the Contacts List........... 14-116
Deleting a Call Log......................................... 14-117
Clearing Call Logs.......................................... 14-117
Checking the Duration of Calls ...................... 14-118
Checking the Cost of Calls ............................. 14-119
Checking the Amount of Data
Communication............................................... 14-121
Setting the Handset................................ 15-122
Setting the Display Language .........................15-122
Setting the Display..........................................15-122
Setting The Auto Keypad Lock.......................15-127
Resetting the Phone Setting.............................15-128
Setting the Profiles..........................................15-128
Call Settings ....................................................15-135
Call Diverts .....................................................15-138
Setting Networks.............................................15-140
Setting Java™ Applications............................15-143
Setting the Date and Time...............................15-146
Setting Security...............................................15-147
Customising Keys ...........................................15-160
Master Reset....................................................15-161
Connecting to a PC ................................ 16-162
Installing Software ..........................................16-162
Connecting the Handset ..................................16-163
Troubleshooting ..................................... 17-164
Index........................................................ 18-167
2-11
Table of Contents
Page 12
Quick Setup
Quick Setup gives you the basic information you need to
start using your handset by simply following the steps.
Quick Setup
Step 1:
Unpacking
Check that you have the following items;
The handset
Rechargeable Li-ion battery
AC charger
Hands free EARphone & MIC
Hands free EARphone & MIC Adapter
CD-ROM
Operation Manual
Some other brochures or supplements may also be
contained.
Step 2:
Inserting the SIM Card and the
Battery
In order to access the services available, do not forget to
insert a SIM card and a battery. The SIM card carries the
user’s identity for accessing the network and also stores
personal information such as the handset directory and
3-12
received SMS messages, etc. Only use a 3V SIM card
with your handset.
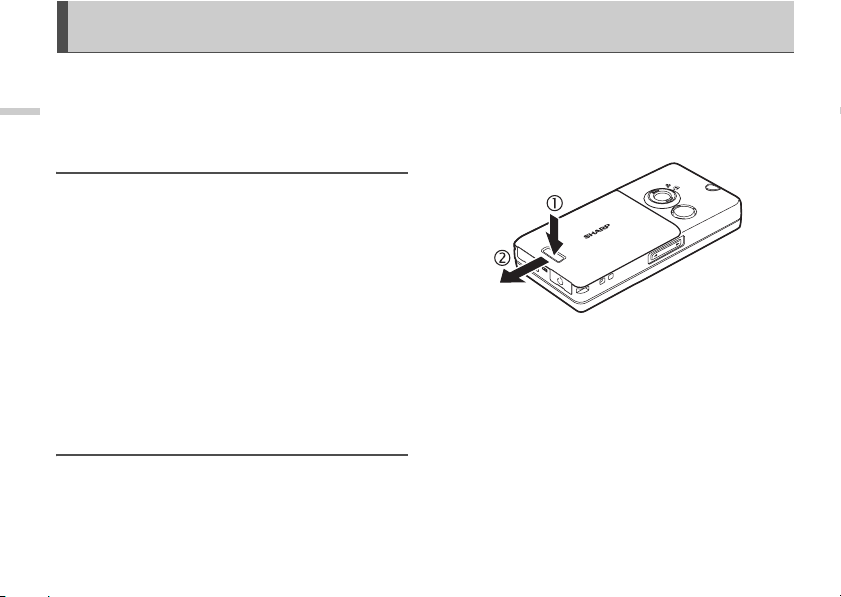
1 Press (c) and slide the cover in the direction
of the arrow (
d).
2 Remove the battery cover.
Page 13
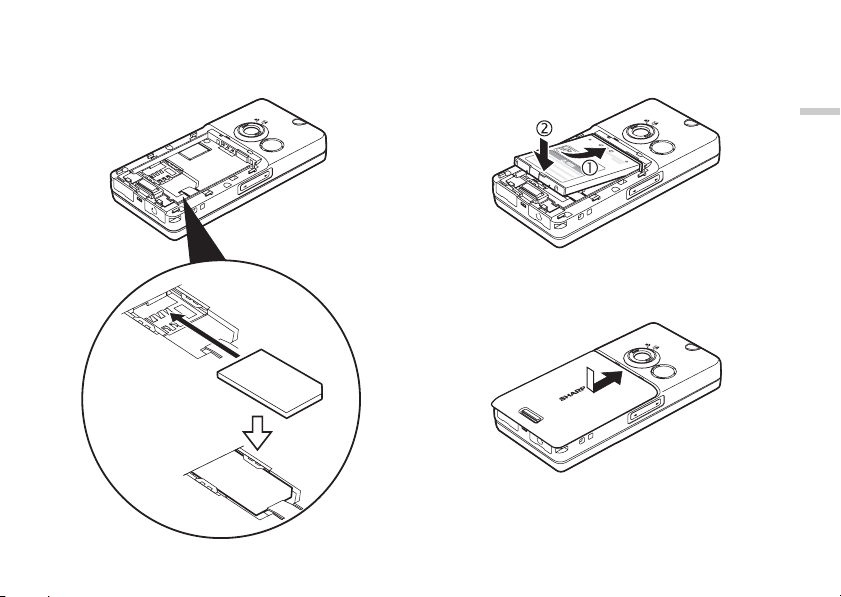
3 Slide the SIM card into the SIM holder as
illustrated.
Do not touch the metal part of the SIM terminal.
4 Position the battery with the printed side up.
Insert its top end as illustrated into slot
insert the other end into position
c and
d.
5 Align the battery cover with the battery
compartment as illustrated and slide it in the
direction of the arrow until it clicks.
Removing the SIM Card
In step 3, press the back of the card, slide it in the opposite
direction and remove it from the SIM holder.
3-13
Quick Setup
Page 14

Step 3:
Charging the Battery
The battery is not fully charged when you purchase the
Quick Setup
handset. Charge the battery for at least 2 hours before
using the handset.
Using the Charger
1 Insert the charger plug into an AC outlet.
2 Open the external connector cap and insert
the charger (label facing up) into the USB/
Charger connector. The Indicator LED lights
red.
3-14
3 When charging is complete, the Indicator
LED turns off.
Charging time may vary depending on the state of
the battery and other conditions. For information
on the battery, refer to “Battery” on page 1-5.
Removing the charger
Disconnect the charger plug from the AC outlet and
unplug the charger from the handset.
To charge using the cigarette lighter charger
The optional cigarette lighter charger (CE-CL30) supplies
power for charging from the cigarette lighter socket of a
car.
Page 15
Battery Status
Check the battery indicator displayed in the upper left of
the display to estimate remaining battery power. When
the battery is empty, “ ” appears on the display and
an alarm sounds. The battery may only last for another 5
minutes. If you are using your handset, charge the battery
immediately.
Battery Indicators Charge Level
Sufficiently charged
Partially charged
Charging recommended
Charging required
Empty
Step 4:
Turning Your Handset On
Press F and hold for approximately 2 seconds.
The standby screen appears.
For information on key operations, refer to
“Parts and Controls” on page 4-18.
When turning on the handset, you will be asked
to enter a PIN (Personal Identification Number)
code. Enter it and press
information, refer to “If You Upgrade Your
Handset” on page 3-16.
B. For more
Turning Your Handset Off
Press F and hold for approximately 2 seconds.
Step 5:
Setting the Date and Time
Set the date and time before using the handset. If date
and time are left unset, you cannot operate some timebased functions correctly.
1 Slide open the handset.
2 Press B.
The main menu appears.
3-15
Quick Setup
Page 16
3 Press a, b, c or d to highlight “Settings”
and press
B.
4 Press a or b to highlight “Date & Time” and
B.
Quick Setup
press
5 Press a or b to highlight “Set date/time” and
B.
press
6 Enter the day, month, year and time using the
digit keys and press
If you enter the time in the 12-hour format,
press
P. Press P to switch between am
and pm.
For more information on how to set date and time,
refer to “Setting the Date and Time” on page 15-
146.
3-16
B.
If You Upgrade Your Handset
If you have a mobile phone before purchasing this
handset, you may use your previous SIM card with the
new handset. In this case, you should keep in mind two
things for the setup.
Entering the PIN Code
If you insert a SIM card you have used for your previous
mobile phone, you may be requested to enter a PIN code
when you turn on your handset. For more information on
the PIN code, refer to “Setting Security” on page 15-147.
1 Enter your PIN code that you used for your
old mobile phone.
2 Press B.
If your PIN code is entered incorrectly three
times in a row, the SIM card is locked.
To release the lock, try entering the PUK
(Personal Unblocking Key) code (8 digits)
provided by your service provider. For more
information on the code, contact your service
provider.
Page 17

Copying the Contacts List from the
SIM card
The first time you insert a SIM card you have used for your
previous mobile phone, you are asked whether you wish
to copy the information such as the “Contacts list” entries.
Follow the on-screen instructions, or you can do it later
using the “Contacts list” menu as follows.
1 Press B.
The main menu appears.
2 Press a, b, c, or d to highlight “Contacts”
and press
3 Press a or b to highlight “Contacts list” and
press
4 Press C [Options].
The “Options” menu appears.
5 Press a or b to highlight “Advanced” and
press
6 Press a or b to highlight “Copy all from SIM”
and press
7 Press C [Yes].
Copying starts.
To cancel, press
B.
B.
B.
B.
A [No].
Quick Setup
3-17
Page 18

Parts and Controls
Main Handset Unit
Before reading this operation manual, becoming familiar
with the names and locations of parts and controls is
Parts and Controls
recommended.
Also, in this section are icons and indications that change
in the display.
4-18
Page 19
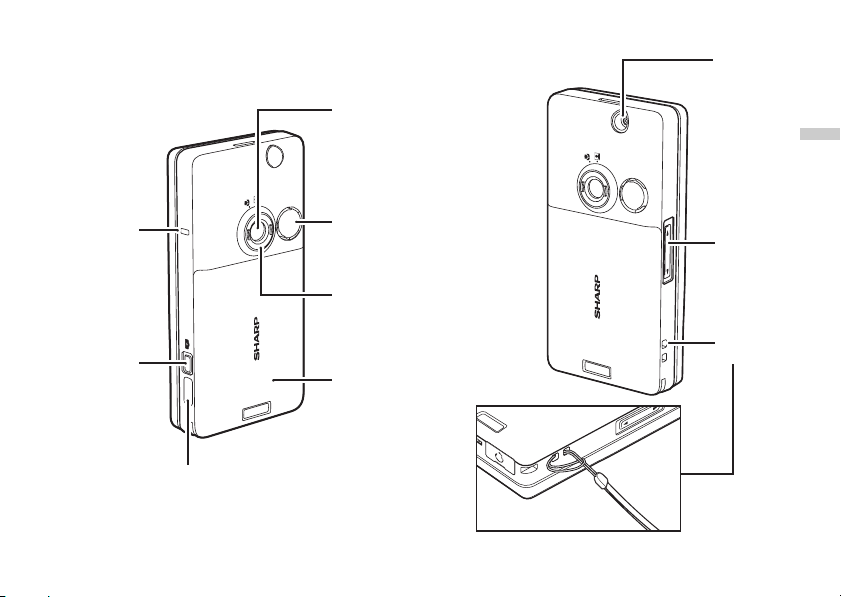
Camera Lens
RF
Connector
Parts and Controls
Indicator LED
Shutter Release
X
Button
Infrared Port
Self-portrait Mirror
Macro Dial
(Close-up)
Battery Cover
Side-up/
Side-down
V W
Key
Strap Slot
4-19
Page 20

Slide Functions
Parts and Controls
When open:
the display and keypad light up.
the keypad is unlocked.
When closed:
the keypad is locked.
Java™ applications are suspended.
the display returns to standby mode (except while
entering text, in camera mode, or, etc.)
the handset sends the busy tone to the caller.
For information on how to set this function, refer to
“Settings for Sliding the Handset Closed” on page 15-
137.
calls are terminated
For information on how to set this function, refer to
“Settings for Sliding the Handset Closed” on page 15-
137.
4-20
Hands free EARphone & MIC
Connection
1 Put the pad over the earphone. (You can use the
hands free EARphone & MIC without the pads.)
2 Open the external connector cap and insert the
hands free EARphone & MIC adapter into the
earphone connector as illustrated (
3 Insert the plug of the hands free EARphone &
MIC into the other end of the hands free
EARphone & MIC adapter as illustrated (
For information on how to answer a call, refer to
“Answering a Call” on page 6-27.
d).
e).
Page 21
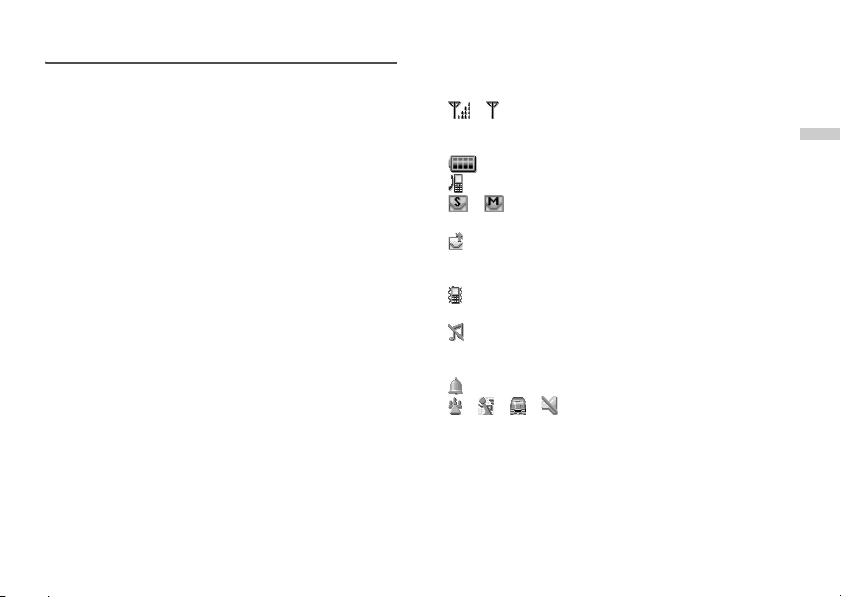
Display Indicators
This section describes the status indicators displayed on
top of the screen.
Status Indicators
1. / : Indicates the strength of the
received signal or that the service
is out of range.
2. : Indicates the battery level.
3. : Appears when in call.
4. / : Appears when a new SMS/MMS
message has arrived.
5. : Appears when the “Outbox”
contains messages you failed to
send.
6. : Appears when vibration (page 9-
55) is set.
7. : Appears when “Setting the Ringer
Volume” (page 15-129) is set to
“Silent.”
8. : Appears when the alarm is set.
9. / / / :
Indicates the handset’s profiles
(Conference/Activity/In car/Silent)
(page 15-128).
4-21
Parts and Controls
Page 22
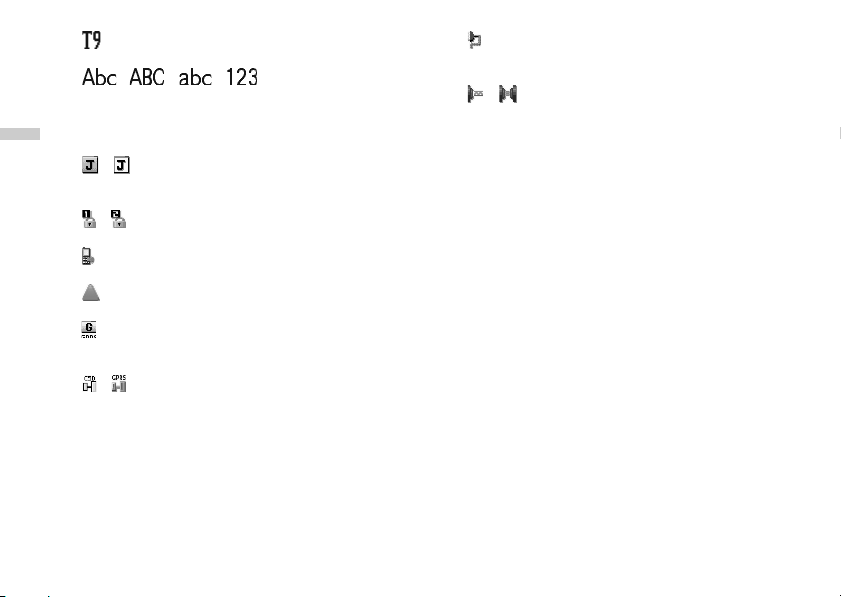
10. : Appears when the T9 text input
11. / / / :
Parts and Controls
12. / : Appears when the Java™
13. / : Appears when viewing secured
14. : Appears when “Diverts” (page 15-
15. : Appears when your handset is
16. : Appears when your handset is
17. / : Appears when the WAP or MMS
method is activated.
Indicates the text input method
(First letter upper case mode/
Upper case mode/Lower case
mode/Numeric mode).
application is executed (colour) or
suspended (sepia).
WAP* browsers.
138) is set to “All Calls.”
roaming outside of your network.
GPRS** enabled and within range.
Flashes during GPRS transmission.
communication is in CSD*** or
GPRS mode.
4-22
18. : Appears when the USB cable (CE-
19. / : Appears when “Infrared” is on or
*WAP (Wireless Application Protocol)
A generic name for the communication protocol used to
access the Internet on small wireless mobile terminals
such as mobile phones and PDAs.
**GPRS (General Packet Radio Service)
GPRS is a packet data transmission service for mobile
phones based on the GSM standard. When using data
communications like WAP, there is no need to keep track
of connection time as rates are charged by the amount of
data (number of packets) transmitted. The service gives
you the feeling of a continual connection without the
worries of a dial-up connection. The connection speed
varies according to mobile phone and provider
specifications as well as crowding on the network.
***CSD (Circuit Switched Data)
Circuit switching is, in other words, the conventional way
of transmitting data. Just like a telephone landline, rates
are charged by connection time. Maximum connection
speeds are 9.6kbps and 14.4kbps, but are affected by
mobile phone and provider specifications.
UC30) is connected to your
handset.
during connection.
Page 23
Guide to the Main Menu
Using the Main Menu
After turning your handset on, the standby screen
appears. If you wish to use any functions other than the
basic call operation, press
This has 9 gates for functions, operations, and settings.
When you reach the main menu, use
(navigation keys) to navigate the cursor and press
select the function you wish to enjoy.
In this manual, the operation required to access
functions is described by the operation of the
navigation keys.
B once to get the main menu.
a, b, c or d
B to
5-23
Guide to the Main Menu
Page 24

Basic Key Operations
To use soft keys and the centre key
Your handset uses soft keys (A and C) to help
navigate the handset. At the bottom left and right side of
the display, the respective operations of the keys are
shown. The function of each soft key at any given time is
Guide to the Main Menu
displayed at the bottom left and right of the screen.
The function of the centre key is displayed in the centre by
a graphical icon.
Example:
When
A [Back] is displayed as illustrated:
A [Back] to return to the previous menu.
Press
When
C [Select] is displayed as illustrated:
Press
C [Select] to select a menu item.
To use navigation keys
a, b, c, d indicate the navigation keys.
When you navigate the cursor to select an item, press
b, c or d to highlight the item and press B.
To use the F key
Press F to return to the standby screen.
5-24
a,
To return to the previous menu, you can also
c except when returning to the standby
press
screen.
To select an item in the menu,
be used instead of
select an item when
edge on the display.
B. Also, d can be used to
C [Select] can
e is displayed at the right
Page 25

List of Menu Function Items
This table shows you the items in the function level (1st level), their respective menus (2nd level) and their page number.
Main Menu
(1st level)
SIM Application
Profiles
Call Register
Sub Menu
(2nd level) & Page No.
Missed calls (page 14-115)
Received calls (page 14-115)
Dialled numbers (page 14-115)
Call timers (page 14-118)
Call costs (page 14-119)
Data counter (page 14-121)
Main Menu
(1st level)
Messages
Downloads
Contacts
Organiser
Camera
Sub Menu
(2nd level) & Page No.
SMS (page 11-65)
MMS (page 11-65)
E-mail (page 11-65)
Text templates (page 11-66)
Voice mail (page 11-80)
Memory status (page 12-106)
Cell Broadcasts (page 11-80)
Cell info (page 11-82)
Pictures (page 12-83)
Sounds (page 12-90)
Games & more (page 12-100)
Videos (page 12-103)
Memory status (page 12-106)
Contacts list (page 9-48)
Speed dial list (page 9-60)
My numbers (page 9-61)
Calendar (page 13-107)
Alarm (page 13-109)
Calculator (page 13-112)
Memo recording (page 13-113)
Phone help (page 13-114)
Create picture (page 7-33)
Create video (page 7-38)
5-25
Guide to the Main Menu
Page 26

Guide to the Main Menu
Main Menu
(1st level)
Settings
5-26
Sub Menu
(2nd level) & Page No.
Phone settings (page 15-122)
Profiles (page 15-128)
Connectivity (page 15-140)
Java™ (page 15-143)
Date & Time (page 15-146)
Security (page 15-147)
Account settings (page 15-159)
Internet
Favourites settings (page 15-160)
Master reset (page 15-161)
Page 27
Basic Handset Operations
This section describes basic phone call functions.
Confirm that the handset is on.
Making a Call
1 Slide open the handset and enter a phone
number with the keypad.
When entering a number, start with the area code.
2 Confirm the number and press D.
Start talking when the connection is established.
If you enter a wrong number
Press A [Clear] to delete one digit. Press A [Clear]
and hold for approximately 2 seconds to delete all digits
and return to standby mode.
Ending a Call
Press F to end the call.
The estimated total time for the call appears.
Sliding close the handset also ends a call.
Answering a Call
1 The handset rings and the Indicator LED flashes
for an incoming call.
2 Press D, B or C [Answer].
The call is connected and “ ” appears.
When the Any Key Answer Function
is Activated
When the “Any Key Answer” function is on, you can
answer the call by pressing any key except
d. For information on “Any Key Answer,” refer to
or
“Setting Any Key Answer” on page 15-133.
When the Hands Free Kit is
Connected
When the Hands Free Kit is Connected, press the button
of the hands free EARphone & MIC as illustrated to
answer a call.
F, A, c
6-27
Basic Handset Operations
Page 28

When the Hands free EARphone & MIC is
connected to the handset and the “Any Key
Answer” function is set to “On” you can , answer
calls by pressing the
When the Hands free EARphone & MIC is
connected to the handset, and "Automatic
answer" is s et to "On", the handset automatically
connects the c all after the specif ied time and you
Basic Handset Operations
can talk to the caller. For information on
"Automatic answer", refer to “Setting the
Automatic Answer” on page 15-134.
If your subscription includes the Calling Line
Identification (CLI) service, the caller’s number
appears on the screen. If the caller’s name and
number are stored in the “Cont acts list,” the caller’s
name and phone number appear on the screen.
If the number is a restricted number, “withheld”
appears.
When receiving a call f rom a person whose picture
is registered in the “Contacts list,” the receiving
display and the picture appear alternately. For
more information on the “Contacts list” refer to
“Using the Contacts List” on page 9-48.
V or W key.
Rejecting an Incoming Call
You can reject a call you do not wish to answer.
1 Press F while the handset is ringing.
You can also reject an incoming call by sliding
closed the handset.
6-28
Redialling
The handset keeps a record of the phone numbers of the
10 most recent calls dialled, missed, or received. You can
retrieve these phone numbers to make calls.
1 Press D while the handset is in standby mode.
2 Press c or d to highlight a category between
“Dialled numbers,” “Received calls,” and
“Missed calls.”
3 Press a or b to highlight the number you wish
to call.
4 Press D to redial the call.
Setting Automatic Redialling
This function makes the handset redial automatically
when the first redial attempt is unsuccessful. For
information on “Auto redial,” refer to “Activating Auto
Redial” on page 15-137.
Page 29

Useful Functions
Speed Dialling
Up to 9 phone numbers from the “Contacts list” memory
(Handset and SIM) can be assigned to speed dials. You
can call the numbers using the digit keys. For information
on the “Speed dial list,” refer to “Setting the Speed Dial
List” on page 9-60.
1 To dial a number using the speed dial, press and
hold for approximately 2seconds any of the digit
keys (H to O and Q. G cannot be used as
the speed dial because it is already assigned to
the “Voice mail.”)
The phone number stored in the “Speed dial list” is
dialled.
Call Waiting
This service enables you to talk to a third party while you
are in the middle of another call. After activating this
service, a beep tone notifies you of the second call.
To activate this service, refer to “Activating the Call
Waiting Service” on page 15-135.
1 During a call, press C [Options].
The “Options” menu appears.
2 Press a or b to highlight “Hold & Answer” and
press B.
The second party is put on hold and you can talk to
the third party.
3 Press C [Options].
The “Options” menu appears.
4 Press a or b to highlight “Swap calls” and
press B.
You can switch between the two calls.
5 Press C [Options].
The “Options” menu appears.
6 Press a or b to highlight “Release call” and
press B.
You are ending the current call to return to the held
call.
The call waiting service may not be available
on all networks. Contact your service provider
for more information.
If you do not wish to answer the second call,
A [Reject], or press C [Options] and
press
press
a or b to highlight “Busy” or “Reject,”
then press
the call log of the second call is saved as a
missed call.
B in step 2. If “Reject” is selected,
6-29
Basic Handset Operations
Page 30

Accessing the SMS Menu During a
Call
1 During a call, press C [Options].
The “Options” screen appears.
2 Press a or b to highlight “SMS” and press B.
3 Press a or b to highlight one of following
Basic Handset Operations
options.
When selecting “Create Message”:
allows you to make an SMS message.
When selecting “Inbox,” “Sent,” or “Drafts”:
allows you to access these folders. For more
information on SMS, refer to “Using the Message
Service” on page 11-65.
Conference Call
This service enables you to call more than 2 people at the
same time. You can talk with 5 participants at most with
this service. To make a conference call, you must have
one active call and one held call.
1 With one active call and one held call, press C
[Options].
The “Options” menu appears.
2 Press a or b to highlight “Multiparty” and press
B.
6-30
3 Press a or b to highlight “Conference all” and
press B to initiate the conference call.
You can talk with all the people on the line.
4 Press F to end the conference call.
The conference call ends.
To add new participants to the conference call
1 During the call, press C [Options] and select
“Dial.”
2 Enter the phone number you wish to include in
the conference call.
3 Press D.
After the call is connected, continue from the step 1
of “Conference Call.”
If you wish to include other participants in the
conference call, perform the same process again.
To put all the participants on hold
1 During the call, press C [Options] and select in
the following order : “Multiparty” → “Conference
all.”
2 Press a or b to highlight “Conference Hold all”
and press B.
Page 31

To reject adding more participants
1 During the call, press C [Options] and select in
the following order : “Multiparty” → “Conference
all.”
2 Press a or b to highlight “Reject” to reject or
“Busy” to send the busy tone and press B.
To put the current call on hold and continue
having a conference call with the remaining
participants
1 During the call, press C [Options] and select in
the following order : “Multiparty” → “Conference
all.”
2 Press a or b to highlight “Exclude” and press
B.
To disconnect from the conference call but still
allow the other participants to continue
talking together
1 During the call, press C [Options] and select in
the following order : “Multiparty” → “Conference
all.”
2 Press a or b to highlight “Transfer” and press
B.
To end the call with all participants
1 During the call, press C [Options] and select in
the following order : “Multiparty” → “Conference
all.”
2 Press a or b to highlight “Release all” and
press B.
To end the call with a conference call
participant
1 During a conference call, press a or b to
highlight the person that you wish to disconnect
from the conference call.
2 Press C [Options].
The “Options” menu appears.
3 Press a or b to highlight “Release call” and
press B.
To have a conversation with participants
privately
When you wish to have a conversation with one of the
participants privately, you can select a person from the
conference list and put others on hold.
1 During a conference call, press a or b to
highlight the person that you wish to disconnect
from the conference call.
6-31
Basic Handset Operations
Page 32

2 Press C [Options].
The “Options” menu appears.
3 Press a or b to highlight “Multiparty” and press
B.
4 Press a or b to highlight “Private” and press
B.
Basic Handset Operations
5 When you have finished the private
conversation, continue from step 1 of
“Conference Call (page 6-30).”
The conference call service may not be available
on all networks. Contact your service provider for
more information.
6-32
Page 33

Using the Camera
This handset features a built-in camera and video. The
functions now let you take pictures or video clips, as well
as having a digital zoom. Once you’ve taken your picture
or video, you can save it, then send it to others via MMS.
For information on how to send pictures and video clips,
refer to “Sending Pictures/Video Clips” on page 7-43.
Capturing Still Images
1 Press B.
The main menu appears.
2 Press a, b, c, or d to highlight “Camera”
press B.
3 Press a or b to highlight “Create picture” and
press B.
The camera image appears in the display and the
display switches to the landscape as illustrated in
step 4.
The navigation key reorients to correspond to
the horizontal position of the camera.
All the fol lowing explanations for camera and
video modes show the navigation keys as seen
when the handset is held horizontally.
4 Hold the camera horizonatally as illustrated.
Using the Camera
5 Press the shutter release button (X) or B.
The shutter sound is heard, and the still image shot
appears.
7-33
Page 34

Using the Camera
7 If you wish to retake a picture without saving,
press A [ ] in this step. You can take the
picture again.
Pressing
Pressing the shutter release button for
If you wish to leave digital camera mode
While in the “Create picture” mode, you can
C while the handset is in standby
mode also activates the camera.
approximately 2 seconds also activates the
camera mode.
without registering the taken picture, press
before step 6.
switch to the “Create video” mode. Press
[ ] to display the “Options” menu and select
“Change to video mode,” then press
7-34
B.
F
C
This handset uses a CCD sensor. Although this
handset has be en manufactured careful ly, some
pictures may still appear too bright or too dark.
If the handset has been left in a warm place for
a long time before taking or registering a
picture, the picture quality may be poor.
Pictures taken with the camera may differ from
the actual image of the subject in colour and
brightness.
To take a self-portrait
Hold the handset as illustrated to take a self-portrait or a
group picture. You can see your reflection in the mirror
provided.
Selecting the Picture Size
Pictures are saved in JPEG format in the following three
sizes.
Large: 480 × 640 dots
Medium: 240 × 320 dots
Small: 120 × 160 dots
Page 35

1 At the main menu, select in the following order:
“Camera” → “Create picture.”
2 Press C [].
The “Options” menu appears.
3 Press a or b to highlight “Picture size” and
press B.
4 Press a or b to highlight the picture size you
wish to select and press B.
Selecting the Picture Quality
1 At the main menu, select in the following order:
“Camera” → “Create picture.”
2 Press C [].
The “Options” menu appears.
3 Press a or b to highlight “Picture quality” and
press B.
4 Press a or b to highlight “Normal” or “Fine” and
press B.
Adjusting the Brightness of the
Picture
1 At the main menu, select in the following order:
“Camera” → “Create picture.”
2 Press a (brighter) or b (darker) to adjust the
brightness (exposure level) of the picture.
Returning to the standby mode once, resets the
brightness setting to default.
Selecting the Shutter Sound
You can select the shutter sound from 3 preset patterns.
1 At the main menu, select in the following order:
“Camera” → “Create picture.”
2 Press C [].
The “Options” menu appears.
3 Press a or b to highlight “Shutter sound” and
press B.
4 Press a or b to highlight the sound you wish to
select and press B.
You can select from “Pattern 1,” “Pattern 2,” or
“Pattern 3.”
To play back the shutter sound, press
C [].
7-35
Using the Camera
Page 36

Viewing the Saved Pictures
You can review the pictures saved in “My pictures.”
1 At the main menu, select in the following order:
“Camera” → “Create picture.”
2 Press C [].
The “Options” menu appears.
3 Press a or b to highlight “My pictures” and
Using the Camera
press B.
The thumbnail index of saved pictures appears.
4 Press a, b, c, or d to select the image you
wish to view and press B.
The selected picture appears.
5 After you view the picture, press A [].
The display returns to the thumbnail index.
When you save pictures, the assigned file
names are “YMMDDnnn.jpg” (YMMDD is a
Y (Year), M (Month), D (Day) and nnn is a 3
digit number).
You can view the file name, date and size of
your pictures in the thumbnail index of saved
pictures.
7-36
Selecting the Frame
You can select and set the frame from preset patterns or
saved pictures.
1 At the main menu, select in the following order:
“Camera” → “Create picture.”
2 Press C [].
The “Options” menu appears.
3 Press a or b to highlight “Add frame” and
press B.
4 Press a or b to highlight “Preset frame” or “My
pictures” and press B.
If you wish to put no frame, select “Off.”
5 Press a, b, c, or d to select the frame you
wish to view and press B.
If you set the picture size to “Large,” you
cannot select a frame.
If you activate “Using Continuous Shooting
(page 7-37),” you cannot set a frame.
If you set frames from “My pictures”, select
PNG format only in step 5.
Page 37

Using Continuous Shooting
Four pictures are taken in succession. Auto shooting and
manual shooting are available.
1 At the main menu, select in the following order:
“Camera” → “Create picture.”
2 Press C [].
The “Options” menu appears.
3 Press a or b to highlight “Continuous
shooting” and press B.
4 Press a or b to highlight “Auto shooting” or
“Manual shooting” and press B.
Auto shooting: Four pictures are taken in a row
Manual shooting: Pictures are taken one by one
To cancel continuous shooting, select “Off” in this
step.
5 Press the shutter release button (X) or B to
start continuous shooting.
When the continuous shooting is finished, the
pictures taken are saved automatically.
To end the function, press
by pressing
by pressing
A [].
X or B.
X or B.
If you set the picture size to “Large”, you
cannot use the continuous shooting function.
If you select a frame for taking pictures, you
cannot use the continuous shooting function.
7-37
Using the Camera
Page 38

Shooting Video Images
You can record video clips with sound.
1 Press B.
The main menu appears.
2 Press a, b, c, or d to highlight “Camera”
press B.
Using the Camera
3 Press a or b to highlight “Create video” and
press B.
The video image appears in the display and the
display switches to the landscape as illustrated in
step 4. The navigation key reorients to correspond
to the horizontal position of the camera.
7-38
4 Hold the camera horizontally as illustrated.
5 Press the shutter release button (X) or B.
The sound of starting the video recording is heard
and the recording starts.
If you press
the sound of ending the video recording is heard.
X or B again, the recording stops and
Page 39
While in the “Create video” mode, you can switch
to the “Create picture” mode. Press
display “Options” menu and select “Change to
video mode,” then press
B.
C [] to
Selecting Video Quality
1 At the main menu, select in the following order:
“Camera” → “Create video.”
2 Press C [].
The “Options” menu appears.
3 Press a or b to highlight “Video quality” and
press B.
4 Press a or b to highlight “Normal” or “Fine” and
press B.
Adjusting the Brightness of Video
Clips
In “Create video” mode, press a (brighter) or b (darker)
to adjust the brightness (exposure level) of video clips.
Returning to the standby mode once, resets the
brightness setting to default.
Viewing Saved Video Clips
You can view saved video clips in “My videos.”
1 At the main menu, select in the following order:
“Camera” → “Create video.”
2 Press C [].
The “Options” menu appears.
3 Press a or b to highlight “My videos” and
press B.
The thumbnail index of saved video clips appears.
4 Press a, b, c, or d to select the video clip
you wish to playback and press B.
5 Press B.
The selected video clip is played back.
To pause playback, press
To resume playback, press
To stop playback, press
To display the video clip in actual size, press
[].
B.
B again.
A [].
C
7-39
Using the Camera
Page 40

6 After you have checked the video clip, press A
[].
The display returns to the thumbnail index.
When you save video clips, the assigned file
names are “YMMDDnn.3gp” (YMMDD is a
Y (Year), M (Month), D (Day) and nnn is a 3
digit number).
The file name, date and size of your pictures
Using the Camera
are displayed in the thumbnail index of saved
video clips.
If the video clip has been recorded with sound,
the volume can be adjusted by pressing
b.
The volume depends on the “Ringer Volume”
setting (p. 15-129). The volume is 0 when
“Ringer Volume” is set to “Silent” or “Step
Tone.”
7-40
a or
Recording Video Clips without Sound
You can select to record video clips with or without sound.
In the default setting, the video clip is recorded with
sound. To record the video clip without sound, follow the
steps below.
1 At the main menu, select in the following order:
“Camera” → “Create video.”
2 Press C [].
The “Options” menu appears.
3 Press a or b to highlight “Voice record” and
press B.
4 Press a or b to highlight “Off” and press B.
Page 41

Common Functions & Information
This section describes useful common functions you can
use for both camera and video.
Using the Digital Zoom Function
1 At the main menu, select in the following order:
“Camera” → “Create picture” or “Create video.”
2 Press c to zoom out (the subject becomes
smaller) or press d to zoom in (the subject
becomes larger.)
Zoom ratio switches between “×1,” ”×2,” and “×4.”
When “Picture Size” is set to “Medium” in
“Create picture” mode, you can use the digital
zoom function in two steps (×1, ×2).
When “Picture Size” is set to “Large” in “Create
picture” mode, the digital zoom function is not
available.
Taking Close-up Pictures
When the distance to the subject is approximately 5 cm,
set the macro dial to the macro position (
distance to the subject is approximately 40 cm or more,
set the macro dial to the normal position (
S). When the
U).
1 At the main menu, select in the following order:
“Camera” → “Create picture” or “Create video.”
2 Set the macro dial to the macro position (S.)
3 Press the shutter release button (X) or B to
take a picture or to record video.
To cancel macro mode
Set the macro dial to the normal position (U).
Using the Delay Timer
1 At the main menu, select in the following order:
“Camera” → “Create picture” or “Create video.”
2 Press C [].
The “Options” menu appears.
3 Press a or b to highlight “Delay timer” and
press B.
4 Press a or b to highlight “On” and press B.
“ ” appears and returns to “Create picture/video”
mode.
7-41
Using the Camera
Page 42
5 Press the shutter release button (X) or B to
start the delay timer.
10 seconds after the timer sounds, the shutter
sounds, and the camera takes a picture or starts
recording video.
To cancel the delay timer
1 Press C [ ] while the delay timer setting is
Using the Camera
on.
The “Options” menu appears.
2 Press a or b to highlight “Delay timer” and
press B.
3 Press a or b to highlight “Off” and press B.
The delay timer turns off.
While the delay timer is operating, the indicator
LED flashes.
If the shutter release buttton (
pressed while the delay timer is operating, the
picture is taken immediately.
The zoom function with
brightness adjustment of the picture/video with
a or b are unavailable while the delay timer
is operating.
If you wish to stop taking pictures with the
timer, press
operating.
A [ ] while the delay timer is
X) or B is
c or d, and
7-42
Using the Night Mode
This option allows you to take a picture of the best quality
when it is dark.
1 At the main menu, select in the following order:
“Camera” → “Create picture” or “Create video.”
2 Press C [].
The “Options” menu appears.
3 Press a or b to highlight “Night mode” and
press B.
4 Press a or b to highlight “On” and press B.
" " appears and the handset returns to “Create
picture/video” mode.
Page 43

Sending Pictures/Video Clips
You can send your saved pictures/video clips to other
handsets via MMS.
1 In “Create picture / video” mode, after taking a
picture or recording video, press a or b to
highlight “Send via MMS” and press B.
In “Create picture” mode, press C [ ] after
taking picture to select “Send via MMS.”
For information on how to send pictures or video
clips, refer to the page 12-88 for sending pictures,
and page 12-104 for sending video clips.
Deleting Pictures/Video Clips
For information on how to delete pictures or video clips,
refer to page 12-90 for deleting pict ures, and page 12-105
for deleting video clips.
When the Memory Space is Low
When the available space in “My picture/My videos”
memory is low, the remaining shots indicator in the upper
left of the screen turns red. If the memory space becomes
zero, and when you try to take a picture again, “Memory
full. You cannot take a picture!” (“Memory full. You c annot
record a video!” in the “Create video” mode) appears.
Meanings of Indicators in the “Create
Picture/Video” Mode
Remaining shots/sets indicator
123: Indicates the remaining number of
pictures or sets of video clips that can
be taken or recorded.
Delay timer indicator (p. 7-41)
: Indicates when the delay timer is set.
Continuous shooting indicators (for the “Create picture”
mode only)(p. 7-37)
:
When pictures are taken in continuous
shooting mode, these indicators
appear on the screen.
Picture size indicators (for “Create picture” mode only)
(p. 7-34)
Large: 480 × 640 dots
Medium: 240 × 320 dots
Small: 120 × 160 dots
7-43
Using the Camera
Page 44

Picture quality indicators (for “Create picture” mode
only)(p. 7-35)
Indicates the quality (normal or fine) of the picture to
be taken.
:Fine
:Normal
Video quality indicators (for “Create video” mode only)
(p. 7-39)
Using the Camera
Indicates the quality (normal or fine) of video clip to
be recorded.
:Fine
:Normal
Picture/Video brightness (exposure level) indicators (p. 735, p. 7-39)
(+2): Bright
(+1): ↓
(±0): Normal
(-1): ↓
(-2): Dark
7-44
Zooming ratio indicators (P. 7-41)
Indicates the magnification (×1, ×2, ×4).
: Original size
: Double size
: Quadruple size
Voice recording indicator (for “Create Video” mode only)
(p. 7-40)
:On
: Off
Page 45

Entering Text
This section provides information on how to enter text
using the handset keypad for contacts list entries and text
messages, etc. Before you try to enter text, you should
familiarise yourself with the text input methods. In multitap input method, several characters are assigned to
each key and you enter the desired character by pressing
the key a few times.
Text Table for Multi-tap Input
The table lets you know how many times you need to
press a certain key to display the character you wish to
enter. Pressing the key changes the character in order as
shown in the table. When you reach the last character, it
returns to the first one.
Example: Press
appears.
English Mode
Key
G
H
I
J
H once. “A” appears. Press twice. “B”
Upper Case
Characters
. (full-stop) , (comma) - (hyphen) ? !
’ (apostrophe) @ :1
ABC2 abc2 2
DEF3 def3 3
GHI4 ghi4 4
Lower Case
Characters
Numeric
1
Upper Case
Key
Characters
JKL5 jkl5 5
K
MNO6 mno6 6
L
PQRS7 pqrs7 7
M
TUV8 tuv8 8
N
WXYZ9 wxyz9 9
O
(space)+ = < > € £ $ ¥ % & 0 0
Q
*+P?
P
.,?!:;-+#*
@' '' ( ) _ & € £ $
% / < > § = \ | ¥
˜
¿¡ ^ [ ] { } ¤ Å Ä
R
Æ å ä æ à Ç É è é ì
Ñ ñ Ö Ø ö ø ò ß Ü ü
ù ∆ Φ Γ Λ Ω Π Ψ ∑ Θ
Ξ (space) (return)
Lower Case
Characters
Numeric
Q-O: Press and hold to enter numbers 0-9.
P: Press and hold to shift to sentence mode,
Upper case, Lower case or Numeric (Abc,
ABC, abc, or 123).
R: Press and hold to shift between multi-tap and
T9 mode.
8-45
Entering Text
Page 46

Selecting the Input Language
You can select the input language on the text entry
screen.
1 On the text entry screen, press C [Options].
The “Options” menu appears.
2 Press a or b to highlight “Input language” and
press B.
3 Press a or b to highlight the language you
Entering Text
wish to select and press B.
8-46
Selecting the Input Method
T9 Text Input
T9 text input method is a shortcut to enter text easily and
quickly.
1 On the text entry screen, press C [Options].
The “Options” menu appears.
2 Press a or b to highlight “Input method” and
press B.
3 Press a or b to highlight the T9 mode (T9
Abc,T9 ABC, T9 abc) you wish to select and
press B.
“ ” appears on the top of the display.
4 Press each key once for any letter on that key.
Example: To enter the word “How”, press J L
O.
5 If the word shown isn’t the one you want, press
a or b until you highlight the correct one.
6 Press B to select the word.
Page 47

If the correct word is not shown in step 5, enter the
correct word again after switching to the multi-tap
input method.
If you press
inserted next to the selected word.
Q instead of step 6, a space is
Entering Symbols and Punctuation
To enter symbols or punctuation, press R.
Using Text Templates
You can use the sentences registered in “Text templates”
when entering text. For information on how to create the
text templates, refer to “Registering Phrases to the Text
Template” on page 11-78.
1 On the text entry screen, press a, b, c, or d
to move the cursor to the point you wish to insert
the template.
2 Press C [Options].
The “Options” menu appears.
3 Press a or b to highlight “Text template” and
press B.
4 Press a or b to highlight the text template you
wish to select and press B.
The selected text template is inserted.
8-47
Entering Text
Page 48

Using the Contacts List
In the “Contacts list,” you can store the phone numbers
and E-mail addresses of your friends, family and
colleagues, etc. Us ing “Contacts list,” you can dial or send
messages easily without entering a phone number or an
E-mail address manually.
Contacts List Basics
In the “Contacts list,” you can store up to 500 entries. In
each entry, you can store the following items.
Using the Contacts List
Items stored in the handset memory
Name: Up to 30 characters
Phone number: Up to 40 digits, 3 phone numbers /
E-mail Address: Up to 60 characters, 2 addresses /
Group: Selectable from 8 groups
Address: Up to 100 characters
Note: Up to 60 characters
Thumbnail image: 1 image
9-48
entry
entry
Items stored in the SIM memory
Name: The number of characters that can
Phone number: Up to 40 digits
The capacity of the “Contacts list” differs between
when storing in your handset memory and when
storing in the SIM card. For example, you cannot
store a thumbnail i mage in the “Conta cts list” in the
SIM card.
be stored differs depending on the
SIM card you use.
Viewing the Contacts List
1 Press B.
The main menu appears.
2 Press a, b, c, or d to highlight “Contacts”
and press B.
3 Press a or b to highlight “Contacts list” and
press B.
The index view of the “Contacts list” appears.
You can also access the “Contacts list” by
b while in standby mode.
pressing
The “Contacts list” is empty when you purchase
the handset.
Page 49

Selecting the Memory
You can store new entries in the “Contacts list.” Before
saving new entries or viewing stored entries in the
“Contacts list,” select the handset memory or the SIM
card memory.
Selecting the Memory for saving
1 At the main menu, select in the following order:
“Contacts” → “Contacts list.”
2 Press C [Options].
The “Options” menu appears.
3 Press a or b to highlight “Advanced” and press
B.
4 Press a or b to highlight “Save to” and press
B.
5 Press a or b to highlight “Handset,”
“Selection,” or “SIM” and press B.
If you select “Selection,” you can select the memory
(of the handset or SIM card) each time a new entry
is saved. For information on how to select the
memory when saving a new entry, refer to “Saving
Information to the Contacts List” on page 9-50.
Selecting the Memory for viewing
1 At the main menu, select in the following order:
“Contacts” → “Contacts list.”
2 Press C [Options].
The “Options” menu appears.
3 Press a or b to highlight “Advanced” and press
B.
4 Press a or b to highlight “Source” and press
B.
5 Press a or b to highlight “Handset” or “SIM”
and press B.
9-49
Using the Contacts List
Page 50

Saving Information to the Contacts List
1 At the main menu, select in the following order:
“Contacts” → “Contacts list.”
2 Press C [Options].
The “Options” menu appears.
3 Press a or b to highlight “Add new contact”
Using the Contacts List
and press B.
The “New Entry” screen appears.
If you select “Selection” in step 5 of “Selecting the
Memory for saving (page 9-49),” specify the
memory (Handset or SIM) each time before making
an entry.
When selecting “Handset entry:”
items you can enter are “Name,” “Phone 1,” “Phone
2,” “Phone 3,” “E-mail 1,” “E-mail 2,” “Group,”
“Address,” and “Note.”
When selecting “SIM entry:”
items you can enter are only “Name” and “Phone.”
4 Press a or b to highlight the item you wish to
enter and press B.
The entry screen appears. For information on how
to enter text, refer to “Entering Text” on page 8-45.
9-50
5 When you finish entering the information, press
B and A [Save].
For information on items, the number of the
characters you can enter, and digits of each item
you can enter in the handset or SIM card memory,
refer to “Contacts List Basics” on page 9-48.
Adding a Phone Number from Call
Register Entries
You can enter the phone numbers and names of the caller
in the “Contacts list” from “Call Register” logs such as
“Missed calls,” “Received calls,” or “Dialled numbers.”
1 Display the “Call Register” log you wish to select.
For information on “Call Registers,” refer to “Using
the Call History” on page 14-115.
2 Press a or b to highlight the number you wish
to save in the “Contacts list” and press C
[Options].
The “Options” menu appears.
3 Press a or b to highlight “Save to Contacts”
and press B.
Page 51

Saving an Input Phone Number to the
Contacts List
1 After you enter the phone number in standby
mode, press C [Save].
2 Follow the steps from step 3 of “Saving
Information to the Contacts List (page 9-50),” to
complete the operation.
Dialling from the Contacts List
When dialling from the “Contacts list,” display the index
view of the “Contacts list” first.
Dialling from the Contacts List
Screen
1 At the main menu, select in the following order:
“Contacts” → “Contacts list.
2 Press a or b to highlight the name you wish to
call and press D to dial.
If there are two or more entries registered in the
selected entry, press a or b to highlight the phone
number you wish to call and press D.
If no entries are found in the list, you can create an
entry from the list. Press
from step 3 of “Saving Information to the Contacts
List” (page 9-50).
You can also make a call by pressing the digit
key corresponding to the list number.
If you cannot find the name you wish to dial or
send messages to, follow the steps in
“Searching a Name and Number in the
Contacts List (page 9-52).”
C [Options] and follow
9-51
Using the Contacts List
Page 52

Dialling from the Details Screen
1 At the main menu, select in the following order:
“Contacts” → “Contacts list.”
2 Press a or b to highlight the name which
contains the phone number you wish to dial and
press B.
The detail screen appears.
3 Press a or b to highlight the phone number
Using the Contacts List
you wish to dial and press D to dial.
Sending Messages from the Details
Screen
1 At the main menu, select in the following order:
“Contacts” → “Contacts list.”
2 Press a or b to highlight the name you wish to
call and press B.
The detail screen appears.
3 Press a or b to highlight the phone number or
E-mail address of the recipient you wish to send
a message to.
4 Press C [Options].
The “Options” menu appears.
9-52
5 Press a or b to highlight “Send message” and
press B.
6 Press a or b to highlight “via SMS,” “via MMS,”
or “via E-mail” and press B.
Searching a Name and Number in the
Contacts List
If you cannot find the name or number you wish to call at
a glance in index view, you can search for it by entering
only the first few characters.
1 At the main menu, select in the following order:
“Contacts” → “Contacts list.”
2 Press C [Options].
The “Options” menu appears.
3 Press a or b to highlight “Search” and press
B.
4 Enter the first few characters of the name you
wish to call.
Matched results appear in alphabetical order. If
there is no exact entry in the “Contacts list,” the
name alphabetically similar appears.
Page 53

5 Press a or b to scroll through the list for
selecting the name you wish to call and press B.
The detail screen of the “Contacts list” appears.
You can also dial by pressing D when the name
you wish to call is highlighted in step 4.
Editing the Contacts List
If you cannot find the name you wish to edit, follow
the steps in “Searchin g a Name and Number in the
Contacts List (page 9-52).”
Editing a Contacts List Entry
1 At the main menu, select in the following order:
“Contacts” → “Contacts list.”
2 Press a or b to highlight the name you wish to
edit.
3 Press C [Options].
The “Options” menu appears.
4 Press a or b to highlight “Edit” and press B.
The “Edit Entry” screen appears.
5 Press a or b to highlight the item you wish to
edit and press B.
6 When you have finished editing, press B.
If you wish to edit another item, repeat steps 5 and
6.
9-53
Using the Contacts List
Page 54

7 Press A [Save].
The changes are saved.
If you do not wish to save the changes, press C
[Options] before step 7 and press a or b to
highlight “Cancel”, then press B.
Adding a Thumbnail Image to Entries
(for the handset entry only)
You can add a thumbnail image to entries in the handset
memory.
1 At the main menu, select in the following order:
Using the Contacts List
“Contacts” → “Contacts list.”
2 Press a or b to highlight the entry you wish to
add a thumbnail image to and press B.
The detail screen appears.
3 Press C [Options].
The “Options” menu appears.
4 Press a or b to highlight “Thumbnail” and
press B.
The thumbnail list (the “My pictures” screen)
appears.
9-54
5 Press a or b to highlight a thumbnail image
you wish to add and press B.
If the picture size exceeds 240 [W] × 320 [H] dots,
press a, b, c, or d to specify the area you wish
to display and press B.
6 Press B to add a thumbnail image to the entry.
You cannot add thumbnail images to entries in the
SIM Memory.
To change the thumbnail image in the
“Contacts list” entry
Select “Change” after step 4.
To remove the thumbnail image in the
“Contacts list” entry
Select “Remove” after step 4.
The “Options” menu items “Change” and
“Remove” appear only when a thumbnail image is
added to the selected entry.
If you delete an image added as a thumbnail in
“My picture,” the corresponding thumbnail image
is also removed.
Page 55

Setting the Ringtone for a Contacts
List Entry (for the handset entry
only)
You can set a ringtone or the vibrator to a “Contacts list”
entry in the handset memory.
1 At the main menu, select in the following order:
“Contacts” → “Contacts list.”
2 Press a or b to highlight the name you wish to
set and press B
The detail screen of the entry appears.
3 Press C [Options].
The “Options” menu appears.
4 Press a or b to highlight “Ringtone” and press
B.
5 Press a or b to highlight “On” and press B.
If you wish to cancel the ringtone setting, select “Off”
in this step.
6 Press a or b to highlight “Assign melody” and
press B.
8 Press a or b to highlight the ringtone you wish
to set and press C [OK].
For more information on how to select a ringtone,
refer to “Setting a Melody as the Ringtone” on
page 15-129.
9 Press a or b to highlight “Vibration” and press
B.
10 Press a or b to highlight “Enable,” “Disable,” or
“Link to Sound” and press B.
For information on how to set the vibration, refer to
“Setting the Vibration” on page 15-130.
11 When setting is complete, press C [OK].
Copying Entries Between Memories
You can copy entries between the handset and SIM card
memories. This function is useful when you wish to
backup entries or organise your memory space. Before
copying, make sure of which memory’s entries are
displayed on the display.
1 At the main menu, select in the following order:
“Contacts” → “Contacts list.”
2 Press a or b to highlight the name which you
wish to copy to another memory.
9-55
Using the Contacts List
Page 56

3 Press B to display the detail screen and press
a or b to highlight the phone number you wish
to copy.
4 Press C [Options].
The “Options” menu appears.
5
Press a or b to highlight “Copy to SIM” to copy
the entry to the SIM card or “Copy to handset” to
copy the entry to the handset memory and press
6 Press C [Yes].
Using the Contacts List
The name and the phone number selected in step 2
are copied to another memory.
If you wish to cancel, press C [No] in step 6.
Even if multiple phone numbers are registered to
one name, you can copy only one phone number
per name to the SIM card.
Copying All Entries from the SIM
Card to the Handset Memory
You can copy all entries from the SIM card to the handset
memory at once. This function is useful when you restore
the handset memory with the backup copy in the SIM Card.
When you insert the SIM card into your handset for the
first time and start to use the “Contacts list” function, a
confirmation screen appears automatically, asking you if
you wish to copy or not.
9-56
1 At the main menu, select in the following order:
“Contacts” → “Contacts list.”
2 Press C [Options].
The “Options” menu appears.
3 Press a or b to highlight “Advanced” and press
B.
4 Press a or b to highlight “Copy all from SIM”
B
.
and press B.
5 Press C [Yes].
If you wish to cancel, press A [No] in this step.
Swapping the Location Number of the
Phone Number (for SIM card entries
only)
1 At the main menu, select in the following order:
“Contacts” → “Contacts list.”
2 Press a or b to highlight the desired name and
press B.
3 Press a or b to highlight the desired phone
number and press C [Options].
The “Options” menu appears.
Page 57

4 Press a or b to highlight “Swap” and press B.
5 Enter the location number you wish to swap and
press B.
Deleting a Contacts List Entry
If you cannot find the desired name, follow the
steps in “Searching a Name and Number in the
Contacts List (on page 9-52).”
1 At the main menu, select in the following order:
“Contacts” → “Contacts list.”
2 Press a or b to highlight the name you wish to
delete.
3 Press C [Options].
The “Options” menu appears.
4 Press a or b to highlight “Delete” and press B.
5 Press C [Yes].
If you wish to cancel, press A [No] in this step.
Once you delete a “Contacts list” entry, it cannot
be restored.
Deleting All Contacts List Entries
By the following steps you can delete all entries in the
“Contacts list.” Before deleting all “Contacts list” entries,
ensure that you are accessing the memory you wish to
delete. For information on how to select the memory for
“Contacts list” entries, refer to “Selecting the Memory” on
page 9-49.
1 At the main menu, select in the following order:
“Contacts” → “Contacts list.”
2 Press C [Options].
The “Options” menu appears.
3 Press a or b to highlight “Advanced” and press
B.
4 Press a or b to highlight “Delete all entries”
and press B.
5 Enter your handset code and press B.
For information on the handset code, refer to
“Enabling the Handset Lock” on page 15-148.
6 Press a or b to highlight “Handset entries” or
“SIM entries” and press B.
7 Press C [Yes].
If you wish to cancel, press A [No] in this step.
Once you delete all entries in the “Contacts list,”
they cannot be restored.
9-57
Using the Contacts List
Page 58

Setting the Groups
You can set group icons when saving the “Contacts list”
entries so that you can easily find and edit them.
Viewing Groups
1 At the main menu, select in the following order:
“Contacts” → “Contacts list.”
2 Press C [Options].
Using the Contacts List
The “Options” menu appears.
3 Press a or b to highlight “Group” and press B.
4 Press a or b to highlight “View groups” and
press B.
5 Press a or b to highlight the group name you
wish to view and press B.
The check box indicates that the group has been
selected.
To cancel the selected group, press B again. The
checkbox becomes blank again.
In step 5, press C [Options] to display the
“Options” menu and select “Select current only” to
view only the selected group or “Select all” to view
all groups.
9-58
Group Call
You can set different ringtones for each group. When you
purchase this handset, groups are set to off. If you do not
set a group ringtone, the ringtone assigned in the
“Profiles” is used. For information on the “Profiles,” refer
to “Setting the Profiles” on page 15-128.
1 At the main menu, select in the following order:
“Contacts” → “Contacts list.”
2 Press C [Options].
The “Options” menu appears.
3 Press a or b to highlight “Group” and press B.
4 Press a or b to highlight “Group call” and press
B.
5 Press a or b to highlight the group name you
wish to set and press B.
6 Press a or b to highlight “On” and press B.
If you wish to cancel the ringtone setting, select “Off”
in this step.
7 Press a or b to highlight “Assign melody” and
press B.
Page 59

9 Press a or b to highlight the ringtone you wish
to set.
For more information on how to select a ringtone,
refer to “Setting a Melody as the Ringtone” on
page 15-129.
10 Press a or b to highlight “Vibration” and press
B.
11 Press a or b to highlight “Enable,” “Disable,” or
“Link to Sound” and press B.
For information on how to set the vibration, refer to
“Setting the Vibration” on page 15-130.
12 When setting is complete, press C [OK].
Checking the Memory Status
You can check the number of entries registered in the
“Contacts list.”
1 At the main menu, select in the following order:
“Contacts” → “Contacts list.”
2 Press C [Options].
The “Options” menu appears.
3 Press a or b to highlight “Memory status” and
press B.
You can check the memory status of the handset
memory and SIM card.
9-59
Using the Contacts List
Page 60

Setting the Speed Dial List
You can set a maximum of 9 phone numbers in the
“Speed dial list”.
For information on making a call by Speed dialling,
refer to “Speed Dialling” on page 6-29.
Setting Contacts List entries in the
Speed Dial List
Using the Contacts List
If you cannot find the desired name, follow the
steps in “Searching a Name and Number in the
Contacts List (page 9-52).”
1 At the main menu, select in the following order:
“Contacts” → “Contacts list.”
2 Press a or b to highlight the name you wish to
add to the “Speed dial list” and press B.
The detail screen appears.
3 Press C [Options].
The “Options” menu appears.
4 Press a or b to highlight “Add to Speed dial”
and press B.
5 Press a or b to highlight the number you wish
to set and press B.
9-60
The nine digit keys correspond to list numbers.
Viewing the Speed Dial List
1 At the main menu, select “Contacts.”
2 Press a or b to highlight “Speed dial list” and
press B.
The “Speed dial list” appears.
Deleting the Speed Dial List
1 At the main menu, select “Contacts.”
2 Press a or b to highlight “Speed dial list” and
press B.
The “Speed dial list” appears.
3 Press a or b to highlight the item you wish to
delete and press C [Options].
The “Options” menu appears.
4 Press a or b to highlight “Delete” and press B.
5 Press B.
If you wish to cancel, press A [No] in this step.
Page 61

To re-assign another phone number to a
“Speed Dial”
Select “Re-assign” in step 4 of “Deleting the Speed Dial
List.”
To clear all the “Speed dial list” items
Select “Clear all” in step 4 of “Deleting the Speed Dial
List.”
Checking Own Numbers
You can check your own voice, data and fax phone
numbers.
1 At the main menu, select “Contacts.”
2 Press a or b to highlight “My numbers” and
press B.
3 Press a or b to highlight “Voice,” “Data,” or
“Fax.”
The phone number you wish to check appears.
“Voice,” “Data,” or “Fax” may not be displayed
depending on the SIM card.
If your number is not saved on your SIM card,
you can enter it yourself. (Certain SIM cards do
not support this function.)
9-61
Using the Contacts List
Page 62

10-62
Page 63

10-63
Page 64

10-64
Page 65

Using the Message Service
Making Messages
This section explains various messaging functions that
enable you to send video clips, pictures, and sounds as
well.
SMS (Short Message Service): This service enables
you to send text messages of up to 1024 characters to
other GSM mobile users. You can send or receive the
messages even if you are talking on the handset, and can
also use text templates to help you compose messages.
MMS (Multimedia Messaging Service): Your handset is
already enabled to deal with the Multimedia Messaging
Service (MMS). You can send messages with graphical
images, photographs, sounds, animations or video clips
attached, and receive WAP alerts.
E-Mail: This function enables you to use E-mail
messaging. This function enables you to directly access
the E-mail messaging service for your PC internet
provider. Before using the function, you have to make
some settings with the handset. For information on how to
set up your E-mail function, refer to “Settings for the
Messages” on page 11-76.
When sending SMS, mess ages exceeding 160
characters are divided during the sending
process. If the recipient uses a compatible
handset, divided messages are recombined
and delivered as one message. If sent to a
non-compatible handset, messages are
divided into 152 character lots and delivered
separately.
Some messaging functions may not be
available, depending on the network service
you use. If you experience any inconveniences
using these services, contact your service
provider for details.
The following steps show you how to make and send
messages.
1 Press B.
The main menu appears.
2 Press a, b, c or d to highlight “Messages”
and press B.
The “Messages” menu appears.
3 Press a or b to highlight “SMS,” “MMS,” or “E-
mail” and press B.
The messaging menu appears.
11-65
Using the Message Service
Page 66

4 Press a or b to highlight “Create message”
and press B.
5 Enter the phone number or E-mail address of the
person you wish to send the message to and
press B.
If you are sending an SMS message:
you can only enter a phone number.
If you are sending an MMS message:
you can enter either a phone number or an E-mail
address.
If you are sending an E-mail message:
you can only enter an E-mail address.
Using the Message Service
If you wish to select a phone number from the
“Contacts list,” search for the phone number. For
information on how to search “Contact list” entries,
refer to “Searching a Name and Number in the
Contacts List” on page 9-52.
6 Enter your message.
For information on how to enter text, refer to
“Entering Text” on page 8-45.
7 When you have finished writing the message,
press B.
You can check the message length at the top right
side of the message screen to figure out how
many more characters you can enter.
11-66
When sending an S MS message of more than 160
characters, a confirmation message appears.
Press
C [Yes] to send or A [No] to cancel.
Using the Text Templates
For information on how to create text templates, refer to
“Making Text Templates” on page 11-78.
1 At the main menu, select in the following order:
“Messages” → select “SMS,” “MMS,” or “E-mail”
→ “Create message.”
Enter the phone number or E-mail address and
B.
press
2 Press a, b, c, or d to move the cursor to the
point you wish to insert the text template, and
press C [Options].
3 Press a or b to highlight “Text template” and
press B.
4 Press a or b to highlight the template you wish
to enter from the list and press B. Go back to
step 6 of “Making Messages (page 11-65).”
Page 67

Adding the Subject of the Message
(for MMS and E-mail messaging
only)
1 After entering a message, press B.
2 Press a or b to highlight “Subject” and press
B.
3 Enter the subject of the message and press B.
You can enter up to 40 characters as the subject.
It may be limited depending on your network
service. Contact your service provider if you have
a problem sending mails.
Sending the Message
1 After you have entered the message and
subject, press B.
2 Press a or b to highlight “Send” and press B.
The handset starts to send the message. After
sending the message, the message is listed in the
“Sent” box.
If you wish to save the message to the “Drafts” box,
select “Save to Drafts” instead of pressing
In case the message cannot be sent for some
reason, the message stays in the Outbox and “ ”
is displayed on the standby screen.
B.
To add recipients
1 After entering a message, press B.
2 Press a or b to highlight “Add contact” and
press B.
3 Press a or b to highlight “To,” “Cc,” or “Bcc”
and press B.
If you are sending SMS, you can select “To:” only.
If you are sending MMS, you cannot select “Bcc.”
4 Enter the phone number or E-mail address of the
additional recipient and press B.
If you are sending MMS, you can select a phone
number from the list.
5 When adding recipients is complete, press A
[Back].
You can enter up to 60 characters for “To,” “Cc,”
or “Bcc.” It may be limited depending on your
service provider. Contact your service provider if
you have a problem sending mails.
11-67
Using the Message Service
Page 68

To send a message using the message template
(for MMS messaging only)
You can send message templates with an image and
voice attachment.
1 At the main menu, select in the following order:
“Messages” → “MMS” → “Message template.”
2 Enter the phone number or E-mail address and
press B.
3 Press a or b to highlight a template you wish
to send and press B.
Using the Message Service
11-68
Setting the Slide Show On and Off
(for MMS messaging only)
This function enables you to create messages that have
up to 10 slides. Each slide can contain one picture, one
sound file and up to 1000 characters of text (up to the
message total of 100 kbytes).
The options available for the slide are:
Add: To add a new slide.
Remove: To remove the active slide.
Previous: To navigate to the previous slide.
Next: To navigate to the next slide.
EVA (e-Animation file) and video clip data
cannot be attached as slide data to the
message.
If you select “Off,” you can attach 20 pictures,
sounds, or video clips up to 100 kbytes in total.
1 At the main menu, select in the following order:
“Messages” → “MMS” → “Settings.”
The “Settings” menu appears.
2 Press a or b to highlight “Slide show” and
press B.
3 Press a or b to highlight “On” or “Off” and
press B.
Page 69

Attaching Data (for MMS messaging
only)
You can send pictures, sounds, and video clips saved in
“Attach pictures,” “Attach sounds,” or “Attach videos” by
attaching them to MMS. When attaching video clips,
“Slide show” must be set to “Off.”
1 At the main menu, select in the following order:
“Messages” → “MMS” → “Create messages.”
Enter the phone number or E-mail address and
press
B.
2 Press C [Options].
The “Options” menu appears.
3 Press a or b to highlight “Attach picture,”
“Attach sound,” or “Attach video” and press B.
The list of “My pictures,” “My sounds,” or “My videos”
appears.
4 Press a or b to highlight the file you wish to
attach and press B.
The selected picture, sound or video clip is
attached.
To remove attached data
1 In step 4 of “Attaching Data (for MMS messaging
only),” press a or b to highlight the file name
you wish to remove and press C [Options].
The “Options” menu appears.
2 Press a or b to highlight “Remove” and press
B.
3 Press C [Yes].
If you wish to cancel, press A [No] in this step.
Sending a Message from the Draft
Box
1 At the main menu, select in the following order:
“Messages” → select “SMS,” “MMS,” or “E-mail.”
2 Press a or b to highlight “Drafts” and press B.
3 Press a or b to highlight the message you wish
to send in the Drafts box and press C
[Options].
The “Options” menu appears.
4 Press a or b to highlight “Send” and press B.
If you wish to modify the message, operate the
following procedure instead of step 4.
11-69
Using the Message Service
Page 70

5 Press a or b to highlight “Edit message” and
press B. When sending “SMS,” select “Edit.”
6 If necessary, modify the phone number or E-mail
address of the recipient and press B.
7 Press a or b to highlight “Send” and press B.
The handset starts sending the message.
You cannot modify a “Slide Show” message that i s
created on another handset.
Using the Message Service
11-70
Receiving E-mail Messages
When the handset is within the service area, SMS and
MMS messages are received automatically. However,
you need to perform the following steps to retrieve E-mail
messages held at the service provider.
1 Press B.
The main menu appears.
2 Press a, b, c, or d to highlight “Messages”
and press B.
The “Messages” menu appears.
3 Press a or b to highlight “E-mail” and press B.
The “E-mail” menu appears.
4 Press a or b to highlight “Inbox” and press B.
“Check new E-mail?” appears. If you select “Yes,”
the messages are delivered.
To retrieve messages again, press
and press
and then press
For information on reading messages, refer to
“Reading Messages” on page 11-71.
a or b to highlight “New E-mail check”,
B.
C [Options]
Page 71

Reading Messages
Depending on the type of the received message, the
following indicator appears at the top of the standby
screen.
SMS: MMS: E-mail:
1 Press B.
The main menu appears.
2 Press a, b, c or d to highlight “Messages”
and press B.
The “Messages” menu appears.
3 Press a or b to highlight “SMS,” “MMS,” or “E-
mail” and press B.
Each messaging menu appears.
4 Press a or b to highlight “Inbox” and press B.
MMS messages that are marked with a clip denote
mails with attachments.
5 Press a or b to highlight the mess age you wish
to read and press B.
6 Press a or b to scroll through the message.
7 When you have finished reading the message,
press B.
To check sender/receiver information (for the
MMS and E-mail messaging only)
1 At the main menu, select in the following order:
“Messages” → select “MMS” or “E-mail” →
“Inbox.”
2 Press a or b to highlight the message you wish
to check and press C [Options].
The “Options” menu appears.
3 Press a or b to highlight “Details” and press
B.
The sender’s or receiver’s phone number or E-mail
address, time and date stamp, subject, and size
appear.
When you receive SMS, the sender’s phone
number and a part of the message appear.
When the sender’s phone number is stored in
the “Contacts list,” the sender’s name appears
instead of the phone number.
A message with a “ ” icon indicates an
unread message. If the “Inbox,” “Sent” box or
“Drafts” box is full, red icons is displayed.
Delete unwanted messages.
11-71
Using the Message Service
Page 72

Replying to a Message
1 At the main menu, select in the following order:
“Messages” → select “SMS,” “MMS,” or “E-mail”
→ “Inbox.”
2 Press C [Options].
The “Options” menu appears.
3 Press a or b to highlight “Reply” and press B.
4 Enter your message
For information on how to enter text, refer to
“Entering Text” on page 8-45.
5 Press B.
Using the Message Service
If you wish to reply to all addresses on an MMS or
E-mail message, select “Reply All” in step 3.
Forwarding a Message
1 At the main menu, select in the following order:
“Messages” → select “SMS,” “MMS,” or “E-mail”
→ “Inbox.”
2 Press C [Options].
The “Options” menu appears.
3 Press a or b to highlight “Forward” and press
B.
11-72
4 Enter the phone number or E-mail address of the
recipient and press B.
If you wish to select the phone number (for SMS and
MMS) or E-mail ad dress (for MMS and E-mail) in the
“Contacts list,” refer to “Searching a Name and
Number in the Contacts List” on page 9-52.
When you forward an MMS message, the
attached data is also sent to the recipient.
However, the handset will not send any data it
recognises as having copyrights.
The “Subject” field is automatically filled with
the original subject preceded by “Fw: .” The
original message cannot be changed.
Modifying a Message
You can modify an original message you made before or
after sending it. If the message you wish to modify is in the
“Drafts,” “Sent,” or “Outbox,” select the respective boxes
in step 4.
1 At the main menu, select in the following order:
“Messages” → select “SMS,” “MMS,” or “E-mail.”
2 Press a or b to highlight “Drafts,” “Sent” or
“Out box,” and press B.
If you select “SMS” in step 1, you cannot select
“Outbox” in this step.
Page 73

3 Press a or b to highlight the mess age you wish
to modify and press B.
4 Press C [Options].
The “Options” menu appears.
5 Press a or b to highlight “Edit message”
(select “Edit” for SMS) and press B.
6 Modify the message and press B.
Saving the Phone Number or E-mail
Address of a Sender
1 At the main menu, select in the following order:
“Messages” → select “SMS,” “MMS,” or “E-mail”
→ “Inbox.”
2 Press C [Options].
The “Options” menu appears.
3 Press a or b to highlight “Save to Contacts”
and press B.
For information on how to enter a name and the
other information, refer to “Saving Information to the
Contacts List” on page 9-50.
Retrieving a Message (for MMS
messaging only)
When “ ” or “ ” is in the “Inbox,” the following can be
done.
1 At the main menu, select in the following order:
“Messages” → select “MMS.”
2 Press a or b to highlight “Inbox” and press B.
3 Press a or b to highlight the alert you wish to
download.
4 Press C [Options].
The “Options” menu appears.
5 Press a or b to highlight “Download” and press
B.
You can press B, instead of steps 4 and 5 to start
downloading.
11-73
Using the Message Service
Page 74

Resending a Message in the Outbox
(for MMS and E-mail messaging
only)
1 At the main menu, select in the following order:
“Messages” → select “MMS” or “E-mail.”
2 Press a or b to highlight “Outbox” and press
B.
3 Press a or b to highlight the message you wish
to resend and press C [Options].
The “Options” menu appears.
Using the Message Service
4 Press a or b to highlight “Re-send” and press
B.
Confirmation of Delivery Report (for
MMS messaging only)
1 At the main menu, select in the following order:
“Messages” → “MMS.”
2 Press a or b to highlight “Sent” and press B.
3 Press a or b to highlight the message for
which you wish to confirm the delivery report for
and press C [Options].
The “Options” menu appears.
11-74
4 Press a or b to highlight “Delivery report” and
press B.
This menu is available only for sent messages that
have the “Delivery report” set “On.” For information
on the “Delivery Report,” see “Settings for the
Messages” on page 11-76.
Deleting Messages
1 At the main menu, select in the following order:
“Messages” → select “SMS,” “MMS,” or “E-mail.”
2 Press a or b to highlight “Inbox,” “Drafts,”
“Sent,” or “Outbox” and press B.
If you select “SMS” in step 1, you cannot select
“Outbox” in this step.
3 Press a or b to highlight the message you wish
to delete and press C [Options].
The “Options” menu appears.
4 Press a or b to highlight “Delete” and press B.
The confirmation screen appears.
5 Press a or b to highlight “One message” or “All
messages” and press B.
6 Press C [Yes].
The selected messages are deleted.
To cancel, press
A [No] in this step.
Page 75

Once you have deleted a message, they cannot
be restored.
You cannot delete locked messages.
To lock messages (for MMS and E-mail
messaging only)
1 At the main menu, select in the following order:
“Messages” → select “MMS” or “E-mail.”
2 Press a or b to highlight “Inbox” or “Sent” and
press B.
3 Press a or b to highlight the mess age you wish
to lock or unlock and press C [Options].
The “Options” menu appears.
4 Press a or b to highlight “Lock/Unlock” and
press B.
Calling the Sender (for SMS and
MMS messaging only)
You can call the sender of a message in the “Inbox”
whose address (From) is the phone number.
1 At the main menu, select in the following order:
“Messages” → select “SMS” or “MMS.”
2 Press C [Options].
3 Press a or b to highlight “Inbox” and press C
[Options].
The “Options” menu appears.
4 Press a or b to highlight “Call sender” and
press B.
Extracting the Phone Number (for
SMS messaging only)
You can call using phone numbers in the message.
1 At the main menu, select in the following order:
“Messages” → “SMS.”
2 Press a or b to highlight “Inbox,” “Drafts”, or
“Sent” and press B.
3 Press a or b to highlight the message that
contains the phone number you wish to extract
and press B.
11-75
Using the Message Service
Page 76

4 Press C [Options].
The “Options” menu appears.
5 Press a or b to highlight “Extract numbers”
and press B.
Phone numbers embedded in the message appear.
6 Press C [Options].
7 Press a or b to highlight “Call” and press B.
The handset starts to call the number.
To save this phone number in the “Contacts list,”
press
a or b to highlight “Save to Contacts” and
B. For information on how to enter a name,
press
Using the Message Service
refer to “Saving Information to the Contacts List” on
page 9-50.
If you select “Extract URL” in step 5 above, you
can extract the URL of a web site.
11-76
Settings for the Messages
1 Press B.
The main menu appears.
2 Press a, b, c or d to highlight “Messages”
and press B.
The “Messages” menu appears.
3 Press a or b to highlight “SMS,” “MMS,” or “
E-mail” and press B.
Each messaging menu appears.
4 Press a or b to highlight “Settings” and press
B.
To set for SMS messaging
After step 4 of “Setting for the Messages,” set the
following items.
When you finish making settings, press
Message centre:
Enter the message centre number to enable the service.
Message lifetime:
Set the time span that the message service centre
continually tries to send the message to the recipient you
specified.
Message format:
Select a message format from the 7 choices.
A [Back].
Page 77

Connection type:
Select a connection type.
Reply path:
Confirm delivery:
Optimisation:
Converts double-byte characters (such as European
characters with an accent) into single-byte characters
before sending the messages. Please note that you may
be charged double for sending double-byte character
messages.
To set MMS messaging
After step 4 of “Setting for the Messages,” set the
following items.
When you finish making settings, press
Download message:
Select between “Immediate” and “Deferred” message
download.
Roaming download:
Defers MMS download when roaming outside of your
network.
Delivery rep. allow:
Enables “Delivery report” when receiving a message that
applies to the “Delivery report” function.
Anonymous reject:
Rejects messages from an unknown or empty address
name.
A [Back].
Auto delete:
Deletes the oldest message automatically, when the
Sentbox is full.
Slide show:
Enables slide show when sending a message.
Advanced:
Priority: prioritises composed messages.
Delivery report: enables delivery report.
Expiry time: sets the expiry time for messages stored
in the server.
Sender visibility: Displays the information about the
sender.
Slide interval: Sets the slide display time when
sending a message.
11-77
Using the Message Service
Page 78

To set for E-mail messaging
For inforamation on the E-mail settings, refer to “Setting
an Account” on page 15-153.
Using the Message Service
11-78
Making Text Templates
You can register up to 20 text templates for frequently
used text on the handset.
1 Press B.
The main menu appears.
2 Press a, b, c, or d to highlight “Messages”
and press B.
3 Press a or b to highlight “Text templates” and
press B.
The lilst of the text templates appears.
Registering Phrases to the Text
Template
120 characters may be registered in any text template.
1 At the main menu, select in the following order:
“Messages” → “Text templates.”
2 Press a or b to highlight the item you wish to
register and press B.
3 Enter the text and press B.
For information on how to enter text, refer to
“Entering Text” on page 8-45.
Page 79

Editing Text Templates
1 At the main menu, select in the following order:
“Messages” → “Text templates.”
The list of the text templates appears.
2 Press a or b to highlight the item you wish to
edit and press B.
3 Edit the text template and press B.
For more information on how to enter text, refer to
“Entering Text” on page 8-45.
Viewing Text Templates
1 At the main menu, select in the following order:
“Messages” → “Text templates.”
2 Press a or b to highlight the item you wish to
view and press C [Options].
The “Options” menu appears.
3 Press a or b to highlight “View” and press B.
The selected text template is displayed.
When you have finished confirmation, press
[Back].
You cannot edit the text template in step 3.
A
Deleting Text Templates
1 At the main menu, select in the following order:
“Messages” → “Text templates.”
2 Press a or b to highlight the item you wish to
delete and press C [Options].
The “Options” menu appears.
3 Press a or b to highlight “Delete” and press B.
4 Press C [Yes].
The selected text template is deleted.
If you wish to cancel deletion, press
step.
Once you delete the text template, it cannot be
restored.
A [No] in this
11-79
Using the Message Service
Page 80

Using Voice Mail
You can use the voice mail service according to the
service provider you use. For information on the voice
mail service, contact your service provider.
Calling Voice Mail
1 Press B.
The main menu appears.
2 Press a, b, c or d to highlight “Messages”
and press B.
The “Messages” menu appears.
Using the Message Service
3 Press a or b to highlight “Voice mail” and
press B.
The “Voice mail” menu appears.
4 Press a or b to highlight “Call Voice mail” and
press B.
Setting Voice Mail
1 At the main menu, select in the following order:
“Messages” → “Voice mail.”
2 Press a or b to highlight “Voice mail settings”
and press B.
3 Press a or b to highlight “Home mailbox” or
“Roam mailbox” and press B.
11-80
Setting Cell Broadcasts
This setting enables you to receive the cell broadcast
messages such as weather forecasts, and traffic reports,
etc. If you are in a certain network area, your handset
receives the broadcast information for your subscription.
Reception may not be available with some mobile
networks. Contact your service provider for details.
1 Press B.
The main menu appears.
2 Press a, b, c or d to highlight “Messages”
and press B.
The “Messages” menu appears.
3 Press a or b to highlight “Cell Broadcasts” and
press B.
The “Call Broadcasts” menu appears.
4 Press a or b to highlight “On/Off,” and press
B.
5 Press a or b to highlight “On” to set the cell
broadcasts on or “Off” to set it off and press B.
Page 81

Reading Cell Broadcast Messages
1 When you receive a cell broadcast message,
press B.
A popup is displayed over the standby screen.
2 Press a or b to scroll through the message.
3 When you finish reading, press B.
Subscribing to Cell Broadcasts
Select the page of the cell broadcast message that you
want.
1 At the main menu, select the following order:
“Messages” → “Cell Broadcasts.”
2 Press a or b to highlight “Settings” and press
B.
3 Press a or b to highlight “Set info subjects”
and press B.
4 Press a or b to highlight “Add/Remove” and
press B.
5 Press a or b to highlight the page you wish to
view and press B.
If you have finished viewing, press A [Back].
You can set a maximum of four subjects for
subscription in step 5.
When you cannot find the page you wish to
view in the list that appears in step 5, select
“Create subject” in step 4, and enter the
subject code to add a page. For details on the
subject code, contact your service provider.
Setting Languages
You can select and change the language for the
broadcast message display.
1 At the main menu, select the following order:
“Messages” → “Cell Broadcasts.”
2 Press a or b to highlight “Settings” and press
B.
3 Press a or b to highlight “Language” and press
B.
4 Press B.
The language list appears.
5 Press a or b to highlight the language you
wish to set and press B.
Press A [Back] to exit.
11-81
Using the Message Service
Page 82

Setting Cell Info
Cell info is the message information that operators send
to subscribers in certain areas. When you receive cell
info, the message (area code) is displayed on the standby
screen.
This function may not be available on all phone
networks. Contact your service provider for more
information.
Enabling/Disabling Cell Info
1 Press B.
Using the Message Service
The main menu appears.
2 Press a, b, c or d to highlight “Messages”
and press B.
The “Messages” menu appears.
3 Press a or b highlight “Cell Info” and press B.
The “Cell Info” menu appears.
4 Press a or b to highlight “On” or “Off” and
press B.
If cell info is set to “On,” the standby time will
decrease because of increase in the battery
usage.
11-82
Page 83

Downloading and Other Features
The picture formats available on the handset are:
: Images in PNG format
: Images in JPEG format
: e-Animation file (NEVA)
: Images in GIF format
: Images in BMP format
: Images in WBMP format
: Images in WPNG format
Downloading Pictures
1 Press B.
The main menu appears.
2 Press a, b, c, or d to highlight “Downloads”
and press B.
3 Press a or b to highlight “Pictures” and press
B.
The “Pictures” menu appears.
4 Press a or b to highlight “More pictures” and
press B.
The download channel for the picture gallery
appears.
To download wallpapers for the handset
Press a or b to highlight “More wallpapers” instead of
“More pictures” in step 4 above. The download channel
for wallpapers appears.
12-83
Downloading and Other
Features
Page 84

Viewing Pictures
1 At the main menu, select in the following order:
“Downloads” → “Pictures” → “My pictures.”
The thumbnail index of “My pictures” appears.
2 Press a, b, c, or d to select an image in the
thumbnail index you wish to view and press B.
The selected picture is displayed.
When you have finished viewing the picture, press
A [Back].
To zoom in to the picture
After displaying the picture in step 2 above, if the picture
is small (120 × 160 dots), press
Downloading and Other
Features
To scroll the picture
After displaying the picture in step 2 above, press a, b,
c, or d to scroll the picture.
Some pictures cannot be scrolled depending on
the picture size.
12-84
B to enlarge the picture.
Setting the stored image as wallpaper
1 At the main menu, select in the following order:
“Downloads” → “Pictures” → “My pictures.”
The thumbnail index of “My pictures” appears.
2 Press a, b, c, or d to select an image in the
thumbnail index you wish to view and press C
[Options].
The “Options” menu appears.
3 Press a or b to highlight “Wallpaper” and press
B.
The selected picture appears as the wallpaper.
If you wish to view the full size image of the picture
before setting it as the wallpaper, press
display the image in step 2 above before pressing
C [Options]. Then select “Wallpaper” in the
“Options” menu.
B to
Page 85

Editing Pictures
You can edit pictures by retouching, adding frames or
stamps, or rotating. Also, you can adjust the size of the
picture or rename the picture file.
To retouch pictures
1 At the main menu, select in the following order:
“Downloads” → “Pictures” → “My pictures.”
The thumbnail index of “My pictures” appears.
2 Press a, b, c, or d to select an image in the
thumbnail index you wish to retouch and press
B.
The selected picture is displayed.
3 Press C [Options].
The “Options” menu appears.
4 Press a or b to highlight “Edit pictures” and
press B.
5 Press a or b to highlight “Retouch” and press
B.
6 Press a or b to highlight one of the options
below and press B.
The “Retouch” options:
Sepia, Sparkling, Ripples, Tile, Emboss, Oil
painting, Clear frame, Round frame, Soft frame,
Zigzag frame
7 The selected option is confirmed on the display.
Press B to apply.
If you wish to cancel, press A [Cancel].
Once you retouch a picture, it cannot be restored.
Only pictures in JPEG format between 52 × 52
pixels and 320 × 240 pixels (or 240 × 320) can be
retouched.
To add a frame to pictures
1 At the main menu, select in the following order:
“Downloads” → “Pictures” → “My pictures.”
The thumbnail index of “My pictures” appears.
2 Press a, b, c, or d to select an image in the
thumbnail index you wish to add a frame to and
press B.
The selected picture is displayed.
3 Press C [Options].
The “Options” menu appears.
4 Press a or b to highlight “Edit picture” and
press B.
5 Press a or b to highlight “Add frame” and
press B.
12-85
Downloading and Other
Features
Page 86

6 Press a, b, c or d to select a frame and
press B.
7 The selected option is confirmed on the display.
Press B to apply.
If you wish to cancel, press A [Cancel].
Once you add a frame to a picture, the picture
cannot be restored.
Only pictures in JPEG format between 52 × 52
pixels and 320 × 240 pixels (or 240 × 320) can be
retouched.
To add stamps to pictures
1 At the main menu, select in the following order:
Downloading and Other
Features
“Downloads” → “Pictures” → “My pictures.”
The thumbnail index of “My pictures” appears.
2 Press a, b, c, or d to select an image in the
thumbnail index you wish to add stamps to and
press B.
The selected picture is displayed.
3 Press C [Options].
The “Options” menu appears.
4 Press a or b to highlight “Edit picture” and
press B.
12-86
5 Press a or b to highlight “Add stamps” and
press B.
6 Press a or b to select a stamp and press B.
7 Press a, b, c, or d to move the cursor to the
point you wish to add the stamp and press B.
To add more stamps, p ress C [Options] and select
“Other Stamps,” and then repeat steps 6 and 7.
8 To finish stamping, press C [Options] and
select “Save”.
Once you add stamps to a picture, it cannot be
restored.
Only pictures in JPEG format between 52 × 52
pixels and 320 × 240 pixels (or 240 × 320) can be
retouched.
To rotate pictures
1 At the main menu, select in the following order:
“Downloads” → “Pictures” → “My pictures.”
The thumbnail index of “My pictures” appears.
2 Press a, b, c, or d to select an image in the
thumbnail index you wish to rotate and press B.
The selected picture is displayed.
Page 87

3 Press C [Options].
The “Options” menu appears.
4 Press a or b to highlight “Edit picture” and
press B.
5 Press a or b to highlight “Rotate” and press B.
The picture is rotated 90° anticlockwise.
6 Press B once to rotate the picture 90°
anticlockwise.
7 Press C [Save].
Only pictures in JPEG format between 52 × 52
pixels and 320 × 240 pixels (or 240 × 320) can be
retouched.
To change the name of the picture
1 At the main menu, select in the following order:
“Downloads” → “Pictures” → “My pictures.”
The thumbnail index of “My pictures” appears.
2 Press a, b, c, or d to select an image in the
thumbnail index you wish to change the name of
and press C [Options].
The “Options” menu appears.
3 Press a or b to highlight “Rename” and press
B.
The text entry scree n appears. For more information
on how to enter text, refer to “Entering Text” on
page 8-45.
4 When you have finished renaming, press B to
save.
If you wish to view the full picture before renaming
B to display the image in step 2 before
it, press
pressing
C [Options]. Then select “Rename” in
the “Options” menu.
The following characters cannot be used for the
file name: /, \, :, *, ?, ", <, >, | and . (full-stop).
12-87
Downloading and Other
Features
Page 88

Saving Pictures to the Contacts List
You can add pictures to the “Contacts list.”
1 At the main menu, select in the following order:
“Downloads” → “Pictures” → “My pictures.”
The thumbnail index of “My pictures” appears.
2 Press a, b, c, or d to select an image in the
thumbnail index you wish to add to the “Contacts
list” and press C [Options].
The “Options” menu appears.
3 Press a or b to highlight “Save to Contacts”
and press B.
2 options appear. Select “Existing entry” or “New
Downloading and Other
Features
entry” according to your purpose.
To save the picture to the existing entry
4 After step 3 of “Saving Pictures to Contacts List,”
press a or b to highlight “Existing entry” and
press B.
To save the picture in creating a new entry
4 After step 3 of “Saving Pictures to Contacts List,”
press a or b to highlight “New Entry” and press
B.
12-88
Sending Pictures as Attachments
1 At the main menu, select in the following order:
“Downloads” → “Pictures” → “My pictures.”
The thumbnail index of “My pictures” appears.
2 Press a, b, c, or d to select an image in the
thumbnail index you wish to send with a
message and press C [Options].
The “Options” menu appears.
3 Press a or b to highlight “Send via MMS” and
press B.
For information on how to make messages, refer to
“Using the Message Service” on page 11-65.
If you wish to view the full picture before sending
it, press
B to display the image in step 2 before
pressing
C [Options]. Then select “Send via
MMS” in the “Options” menu.
Page 89

Checking the Picture Information
1 At the main menu, select in the following order:
“Downloads” → “Pictures” → “My pictures.”
The thumbnail index of “My pictures” appears.
2 Press a, b, c, or d to select an image in the
thumbnail index whose detail you wish to check
and press B.
The selected picture is displayed.
3 Press C [Options].
The “Options” menu appears.
4 Press a or b to highlight “Picture details” and
press B.
12-89
Downloading and Other
Features
Page 90

Deleting Pictures
1 At the main menu, select in the following order:
“Downloads” → “Pictures” → “My pictures.”
The thumbnail index of “My pictures” appears.
2 Press a, b, c, or d to select an image in the
thumbnail index you wish to delete and press
C [Options].
The “Options” menu appears.
3 Press a or b to highlight “Delete” and press B.
4 Press a or b to highlight “One picture” or “All
pictures” and press B.
5 Press C [Yes].
Downloading and Other
Features
If you wish to cancel deletion, press A [No] in this
step.
Once you delete a picture, it cannot be restored.
If you wish to view the full picture before deleting
it, press
B to display the image in step 2 before
C [Options] and then select “Delete” in
pressing
the “Options” menu.
12-90
Using Sounds
In the “Sounds” function mode, you can download
“Sounds,” “Ringtones,” and “Melodies.” You can also
create original ringtones and edit them.
The sound formats available on the handset are:
: Sound files in SMAF format
: Original Ringtones (composed in Melody Editor)
: Sound files in MIDI format
: Sound files in i Melody format
: Sound files in WAVE format
: Sound files in AMR format
SMAF (Synthetic music Mobile Application
Format) is a music data format for handsets.
Page 91

Downloading Sound
1 Press B.
The main menu appears.
2 Press a, b, c, or d to highlight “Downloads”
and press B.
3 Press a or b to highlight “Sounds” and press
B.
The “Sounds” menu appears.
4 Press a or b to highlight “More sounds” and
press B.
The download channel for sounds appears.
To download ringtones
Press a or b to highlight “More ringtones” instead of
“More sounds” in step 4 above.
Playing Back Sounds or Original
Ringtones
When “My sounds” is empty, you cannot select
“My sounds.”
1 At the main menu, select in the following order:
“Downloads” → “Sounds” → “My sounds.”
The list of “My sounds” appears.
2 Press a or b to highlight an item you wish to
playback and press B.
Playback of the selected sound file starts.
When you wish to stop playback, press
You can playback or stop the sound file in the
“Options” menu by pressing
2.
B.
C [Options] in step
Sending Sounds or Original
Ringtones as Attachments
1 At the main menu, select in the following order:
“Downloads” → “Sounds” → “My sounds.”
The list of “My sounds” appears.
2 Press a or b to highlight the file you wish to
send as an attachment and press C [Options].
The “Options” menu appears.
12-91
Downloading and Other
Features
Page 92

3 Press a or b to highlight “Send via MMS” and
press B.
For information on how to make messages, refer to
“Using the Message Service” on page 11-65.
Sounds with a red icon cannot be sent as an
attachment.
When “My sounds” is empty, you cannot select
“My sounds.”
Checking the Sound or Original
Ringtone Information
1 At the main menu, select in the following order:
Downloading and Other
Features
“Downloads” → “Sounds” → “My sounds.”
The list of “My sounds” appears.
2 Press a or b to highlight a file whose details
you wish to check and press C [Options].
The “Options” menu appears.
3 Press a or b to highlight “Sound details” and
press B.
When “My sounds” is empty, you cannot select
“My sounds.”
12-92
Changing the Name of Sound Files
1 At the main menu, select in the following order:
“Downloads” → “Sounds” → “My sounds.”
The list of “My sounds” appears.
2 Press a or b to highlight a file whose name you
wish to change and press C [Options].
The “Options” menu appears.
3 Press a or b to highlight “Rename” and press
B.
The text entry screen appears. For information on
how to enter text, refer to “Entering Text” on page 8-
45.
4 When you have finished renaming, press B to
save.
Even after changing the name of a sound file in
step 4, you can recover the old name manually.
The following characters cannot be used for a
file name: /, \, :, *, ?, ", <, >, | and . (full-stop).
When “My sounds” is empty, you cannot select
“My sounds.”
Page 93

Deleting Sounds
1 At the main menu, select in the following order:
“Downloads” → “Sounds” → “My sounds.”
The list of “My sounds” appears.
2 Press a or b to highlight an item you wish to
delete and press C [Options].
The “Options” menu appears.
3 Press a or b to highlight “Delete” and press B.
4 Press a or b to highlight “One sound” or “All
sounds” and press B.
5 Press C [Yes].
If you wish to cancel, press A [No] in this step.
Once you delete a sound file, it cannot be
restored.
You can also delete original ringtones with the
same steps above.
When “My sounds” is empty, you cannot select
“My sounds.”
Using Melody Editor
You can create original ringtones by using “Melody
Editor”. You can also send melodies by attaching them to
MMS.
Your original ringtone is registered in “My sounds.”
To create an original ringtone
Enter the name of the melody.
1 At the main menu, select in the following order:
“Downloads” → “Sounds” → “Melody Editor.”
2 Press a or b to highlight “Create new” and
press B.
3 Enter the title of your original ringtone and press
B.
You can enter up to 24 characters as the title. For
information on how to enter text, refer to “Entering
Text” on page 8-45.
12-93
Downloading and Other
Features
Page 94

Setting tempo and the type of chords
4 Press a or b to highlight one of the tempos
below and press B.
The tempos: “Allegro (Fast)” 150
Tempo is defined by the number of crochet beats
( ) played per minute (bpm).
“Moderato (Normal)” 125
“Andante (Slow)” 107
“Adagio (Very Slow)” 94
5 Press a or b to highlight “8 chords,” “16
chords,” or “32 chords” and press B.
The “Score Input” screen appears.
Input melody
Downloading and Other
Features
6 Press the digit key to specify the pitch of the
musical note or rest.
For more information, refer to “To input a melody” on
page 12-95.
7 Press P or R to specify the length of the
musical note or rest.
For more information, refer to “To input a melody” on
page 12-95.
8 Press d after inputting one note.
Input the next note after the cursor moves to the
right.
12-94
9 Repeat steps 6 to 8 to complete the melody.
When you press B during input, the melody that
you have entered is played back.
Press
C [Options] and select “Play before Cursor”
while entering notes, to playback the melody
displayed on the screen up to the cursor position.
Press
C [Options] and select “Select Chord”, to
select another chord. Repeat steps 6 to 8 to input
notes for the new chord.
Save the ringtone
10 When you finish inputting, press C [Options].
The “Options” menu appears.
11 Press a or b to highlight “Save” and press B.
12 Press a or b to highlight “Save to My sounds”
and press B.
You can copy, cut, and paste notes by using the
“Options” menu in the “Score Input” screen.
If the capacity or memory in “My sounds” becomes
insufficient, the m essage “Maximum capacity: 250
Not registered.” or “Not registered. Memory full.” is
displayed. The display returns to the screen of
step 12. Try again after deleting unnecessary
items.
Page 95

To input a melody
Specifying the pitch of the musical note
You can specify the pitch of a musical note and rest by
pressing the keys shown below.
C
(Do)D(Re)E(Mi)F(Fa)G(Sol)A(La)B(Si)
GHIJKLMQ
Pressing the key above once, specifies a crotchet ( ) in
middle scale (no mark).
Pressing the same key repeatedly, shifts the note through
the available octave ra nge ( or added correspond ing
to octave range)
Pressing
a or b while a note is selected, causes the
note to move a semitone higher or lower.
a
a
a
Rest
a
Specifying the length of notes and rests
You can specify the length of each musical note and rest
by pressing
the length of notes and rests in reverse to pressing
P or R repeatedly. Pressing R, changes
P.
Crotchet (Crotchet rest)
P
Quaver (Quaver rest)
P
Seminquaver (Seminquaver rest)
P
P
Semibreve (Semibreve rest)
P
Minim (Minim rest)
If you wish to specify a dotted note or a triplet, press
after selecting the target note.
O
Downloading and Other
Features
Pressing (
b
Q) enters a Crochet rest ( ).
b
b
b
O
O
O
12-95
Page 96

You cannot make a dotted semi quaver (dotted
semi quaver rest) or a dotted semi breve
(dotted semi breve rest).
Three continuous notes are required for a
triplet.
Specifying a tie
To specify a tie, press
An underscore (_) is displayed next to the note, and the
note is tied with the next.
To enter the next note, press
the right, then repeat the operation to input the melody.
If the cursor is positioned next to a note, you can repeat
the note immediately left of the cursor by pressing
b.
Downloading and Other
Features
Sample steps to input melody
To get used to inputting melodies, input the simple
melody shown below.
N after selecting the target notes.
d and move the cursor to
1 At the main menu, select in the following order:
“Downloads” → “Sounds” → “Melody Editor.” →
“Create new.”
12-96
a or
2 Enter the title of your original ringtones and
press B.
3 Select the tempo and the type of chords.
The “Score Input” screen appears. For information
on selecting the tempos and the type of chords,
refer to “Setting tempo and the type of chords” on
page 12-94.
4 Press G to input “C.”
The “C” note sounds and the “C” crotchet appears in
the “Score Input” screen.
5 Press d to move the cursor.
6 Press “K” to input “G”.
7 While selecting “G” crotchet, press P to
change the length of the note.
“G” crotchet changes to “G” quaver.
8 Press d to move the cursor.
9 Press Q to input a crotchet rest and press P
to change the crochet rest to a quaver rest.
A quaver rest appears next to the “G” note in the
“Score Input” screen.
Page 97

10 Press d to move the cursor.
11 Press G to input an “E” note and press b to
move the note one semitone lower.
12 Press B to play back the melody now input.
To edit the existing melody
1 At the main menu, select in the following order:
“Downloads” → “Sounds” → “Melody editor.”
2 Press a or b to highlight “Existing melodies”
and press B.
The list of “Existing melodies” appears.
3 Press a or b to highlight the melody you wish
to edit and press C [Options].
The “Options” menu appears.
4 Press a or b to highlight “Edit data” and press
B.
The title entry (edit) screen appears.
After this step, follow the steps from step 6 of “To
create an original ringtone” on page 12-93.
You can also star t editing the existing melody from
“My sounds” by following the steps below.
1 At the main menu, select in the following order:
“Downloads” → “Sounds” → “My sounds.”
2 Press a or b to highlight the item you wish to
edit and press C [Options].
The “Options” menu appears.
3 Press a or b to highlight “Edit data” and press
B.
Only a user created melody can be selected in this
step.
To set the tone of each chord
1 In the “Score Input” screen press C [Options].
(refer to “To create an original ringtone” on
page 12-93.)
The “Options” menu appears.
2 Press a or b to highlight “Set tone” and press
B.
The “Set tone” screen appears.
3 Press c or d to highlight a category of tones.
4 Press a or b to highlight a tone.
For more information on tones, refer to the table on
page 12-98.
The selected tone is applied to the selected chord.
Press
C [Options] in this step and select “Play
Current Chord,” to play back the melody input in the
selected tone.
12-97
Downloading and Other
Features
Page 98

Press C [Options] in this step and select “Confirm
Tones” to play back the syllable names (1 octave
from C) in the selected tone.
5 Press B to set the tone and go back to the
“Score Input” screen.
You can also reach the “Set tone” screen for the
existing melodies from “My sounds” by following
the steps below.
1 At the main menu, select in the following order:
“Downloads” → “Sounds” → “My sounds.”
2 Press a or b to highlight the item whose tone
you wish to set and press C [Options].
Downloading and Other
Features
The “Options” menu appears.
Only a user created melody can be selected in this
step.
3 Press a or b to highlight “Set tone” and press
B.
4 Press a or b to highlight the chord whose tone
you wish to set and press B.
The “Set tone” screen appears.
12-98
Category
Pianos
Organs
Basses
Tone
Piano
Bright Piano
E. Grand Piano
Honky-tonk
Electric Piano 1
Electric Piano 2
Harpsichord
Clavi
Drawbar Organ
Percussive Organ
Rock Organ
Church Organ
Reed Organ
Accordion
Harmonica
Tango Accordion
Acoustic Bass
Finger Bass
Pick Bass
Fretless Bass
Slap Bass 1
Slap Bass 2
Synth Bass 1
Synth Bass 2
Category
Chimes
Guitars
Strings 1
Tone
Celesta
Glockenspiel
Music Box
Vibraphone
Marimba
Xylophone
Tubular Bells
Dulcimer
Nylon Guitar
Steel Guitar
Jazz Guitar
Clean Guitar
Muted Guitar
OverdrivenGuitar
Distortion Guitar
Guitar Harmonics
Vio li n
Viola
Cello
Contrabass
Tremolo Strings
Pizzicato Strings
Harp
Timpan i
Page 99

Category
Strings 2
Reeds
Synth
Leads
Tone
String Ensemble 1
String Ensemble 2
Synth Strings 1
Synth Strings 2
Choir Aahs
Voice Oohs
Synth Voice
Orchestra Hit
Soprano Sax
Alto Sax
Tenor Sa x
Baritone Sax
Oboe
English Horn
Bassoon
Clarinet
Square Lead
Sawtooth Lead
Calliope Lead
Chiff Lead
Charang Lead
Voice Lead
Fifth Lead
Bass & Lead
Category
Brasses
Flutes/
Pipes
Synth
Pads
Tone
Trumpet
Trombone
Tuba
Muted Trumpet
French Horn
Brass Section
Synth Brass 1
Synth Brass 2
Piccolo
Flute
Recorder
Pan Flute
Blown Bottle
Shakuhachi
Whistle
Ocarina
New Age Pad
War m Pad
Polysynth Pad
Choir Pad
Bowed Pad
Metallic Pad
Halo Pad
Sweep Pad
Category
Synth
Effects
Percussions
Tone
Rain
Soundtrack
Crystal
Atmosphere
Brightness
Goblins
Echoes
Science Fiction
Tinkle Bell
Agogo
Steel Drums
Woodblock
Taiko Drums
Melodic Tom
Synth Drum
Reverse Cymbal
Category
Ethnics
Effects
Tone
Sitar
Banjo
Shamisen
Koto
Kalimba
Bagpipe
Fiddle
Shanai
Gtr. Fret Noise
Breath Noise
Seashore
Bird Tweet
Telephone Ring
Helicopter
Applause
Gunshot
12-99
Downloading and Other
Features
Page 100

To set the strength of each chord
1 In the “Score Input” screen, press C [Options]
(refer to “To create an original ringtone” on
page 12-93.)
The “Options” menu appears.
2 Press a or b to highlight “Set strength” and
press B.
The “Set strength” screen appears.
3 Press a or b to highlight “Loud,” “Medium,” or
“Soft” and press B.
By pressing C [Play] in this step before pressing
B, you can check the strength of the selected
Downloading and Other
Features
chord.
You can also reach the “Set strength” screen for
existing melodies from “My sounds” by following
the steps below.
1 At the main menu, select in the following order:
“Downloads” → “Sounds” → “My sounds.”
2 Press a or b to highlight “My sounds” and
press B.
3 Press a or b to highlight the item whose
strength you wish to set and press C [Options].
The “Options” menu appears.
12-100
Only a user created melody can be selected in this
step.
4 Press a or b to highlight “Set strength” and
press B.
5 Press a or b to highlight the chord whose
strength you wish to set and press B.
The “Set strength” screen appears.
Using Games or Applications
You can use various kinds of games and applications with
the handset. To use games and applications, download
these via the Internet. Some games and applications offer
the ability to connect to a network either within a game or
through a network based application.
Applications may be both localised (no
connectivity) and network based (using the mobile
Internet to update information/play games). You
may be charged for using network-based
applications. Please contact your service provider
for more information.
 Loading...