

DIGITAL MULTIFUNCTIONAL SYSTEM
User's Manual
MODEL: MX-M6570
MX-M7570
Click to jump to the table of contents of the
desired chapter.
BEFORE USING THE MACHINE
Functions of the machine and procedures
for placing originals and loading paper
COPIER
Using the copy function
PRINTER
Using the printer function
FACSIMILE
Using the fax function
SCANNER / INTERNET FAX
Using the scan / Internet fax function
DOCUMENT FILING
Storing jobs as files on the hard
drive
MANUAL FINISHING
Using the manual finishing function
SYSTEM SETTINGS
Configuring settings to make the
machine easier to use
HOW TO USE THIS MANUAL
(1) (2) (3) (4)
(6)
(5)
(6)
(5)
Click a button below to move to the page that you wish to view.
The following explanation assumes that Adobe Acrobat Reader is being used (Some buttons do not appear in the
default state.).
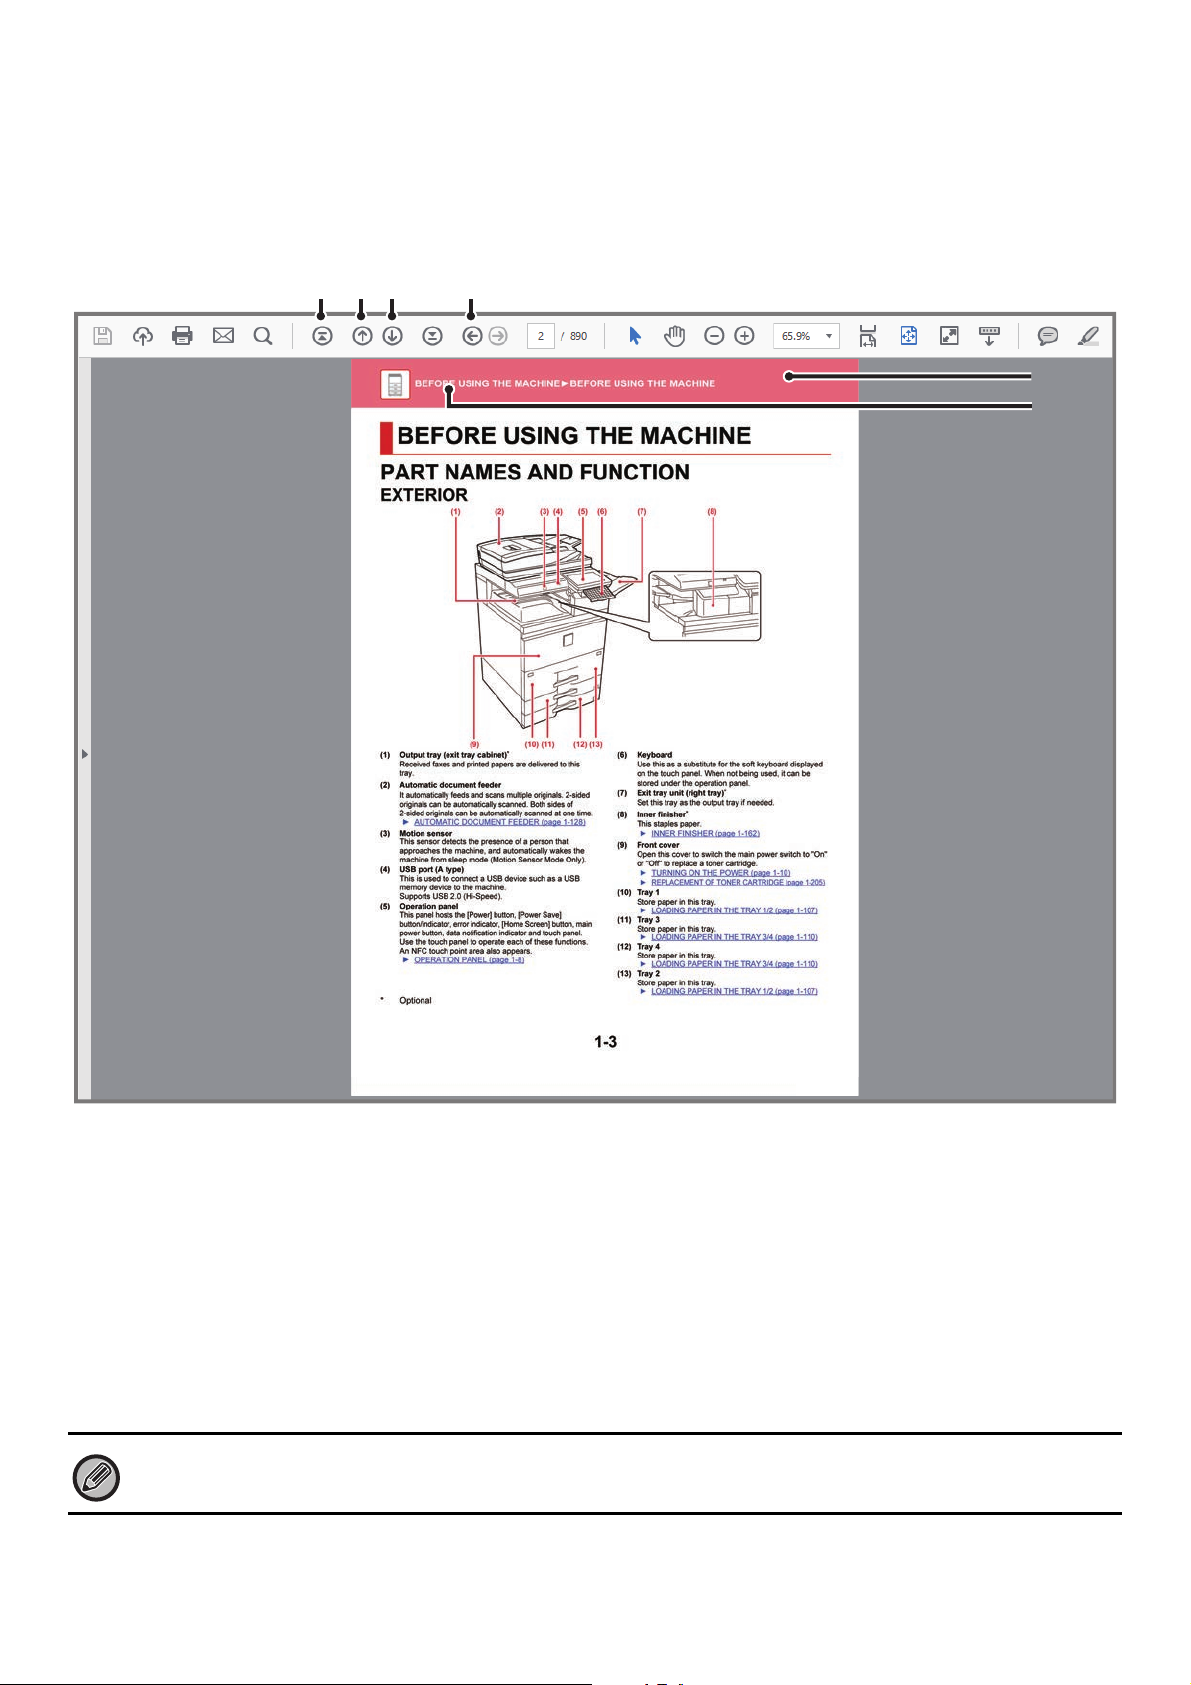
(1) Return to top page button
If an operation does not proceed as expected, click this
button to start over again.
(2) Back one page button
Displays the previous page.
(3) Forward one page button
Displays the next page.
(4) Return to previously displayed page button
Displays the page that was displayed before the current
page.
(5) Title button
Displays the page of the title indicated by the button.
(6) Contents button
Displays the contents of each chapter.
For example, if the current page is part of the printer
chapter, the table of contents of the printer chapter
appears.
If a button does not appear, refer to Adobe Reader Help to display the button.
i
ABOUT OPERATION MANUAL
This manual explains how to use the MX-M6570/MX-M7570 digital multifunctional system.
Please note
• For information on installing the drivers and software cited in this manual, please refer to the Software Setup Guide.
• For information on your operating system, please refer to your operating system manual or the online Help function.
®
• The explanations of screens and procedures in a Windows environment are primarily for Windows
different depending on the version of the operating system or the software application.
• The explanations of screens and procedures in a Macintosh environment are based on Mac OS X v10.12 in the case of Mac OS
X. The screens may be different depending on the version of the operating system or the software application.
• Wherever "MX-xxxx" appears in this manual, please substitute your model name for "xxxx".
• Considerable care has been taken in preparing this manual. If you have any comments or concerns about the manual, please
contact your dealer or nearest SHARP Service Department.
• This product has undergone strict quality control and inspection procedures. In the unlikely event that a defect or other problem
is discovered, please contact your dealer or nearest SHARP Service Department.
• Aside from instances provided for by law, SHARP is not responsible for failures occurring during the use of the product or its
options, or failures due to incorrect operation of the product and its options, or other failures, or for any damage that occurs due
to use of the product.
Warning
• Reproduction, adaptation or translation of the contents of the manual without prior written permission is prohibited, except as
allowed under copyright laws.
• All information in this manual is subject to change without notice.
10. The screens may be
Illustrations and the operation panel and touch panel shown in this manual
The peripheral devices are generally optional, however, some models include certain peripheral devices as standard equipment.
The explanations in this manual assume that a paper drawer is installed on the MX-M7570.
For some functions and procedures, the explanations assume that devices other than the above are installed.
The display screens, messages, and key names shown in the manual may differ from those on the actual machine
due to product improvements and modifications.
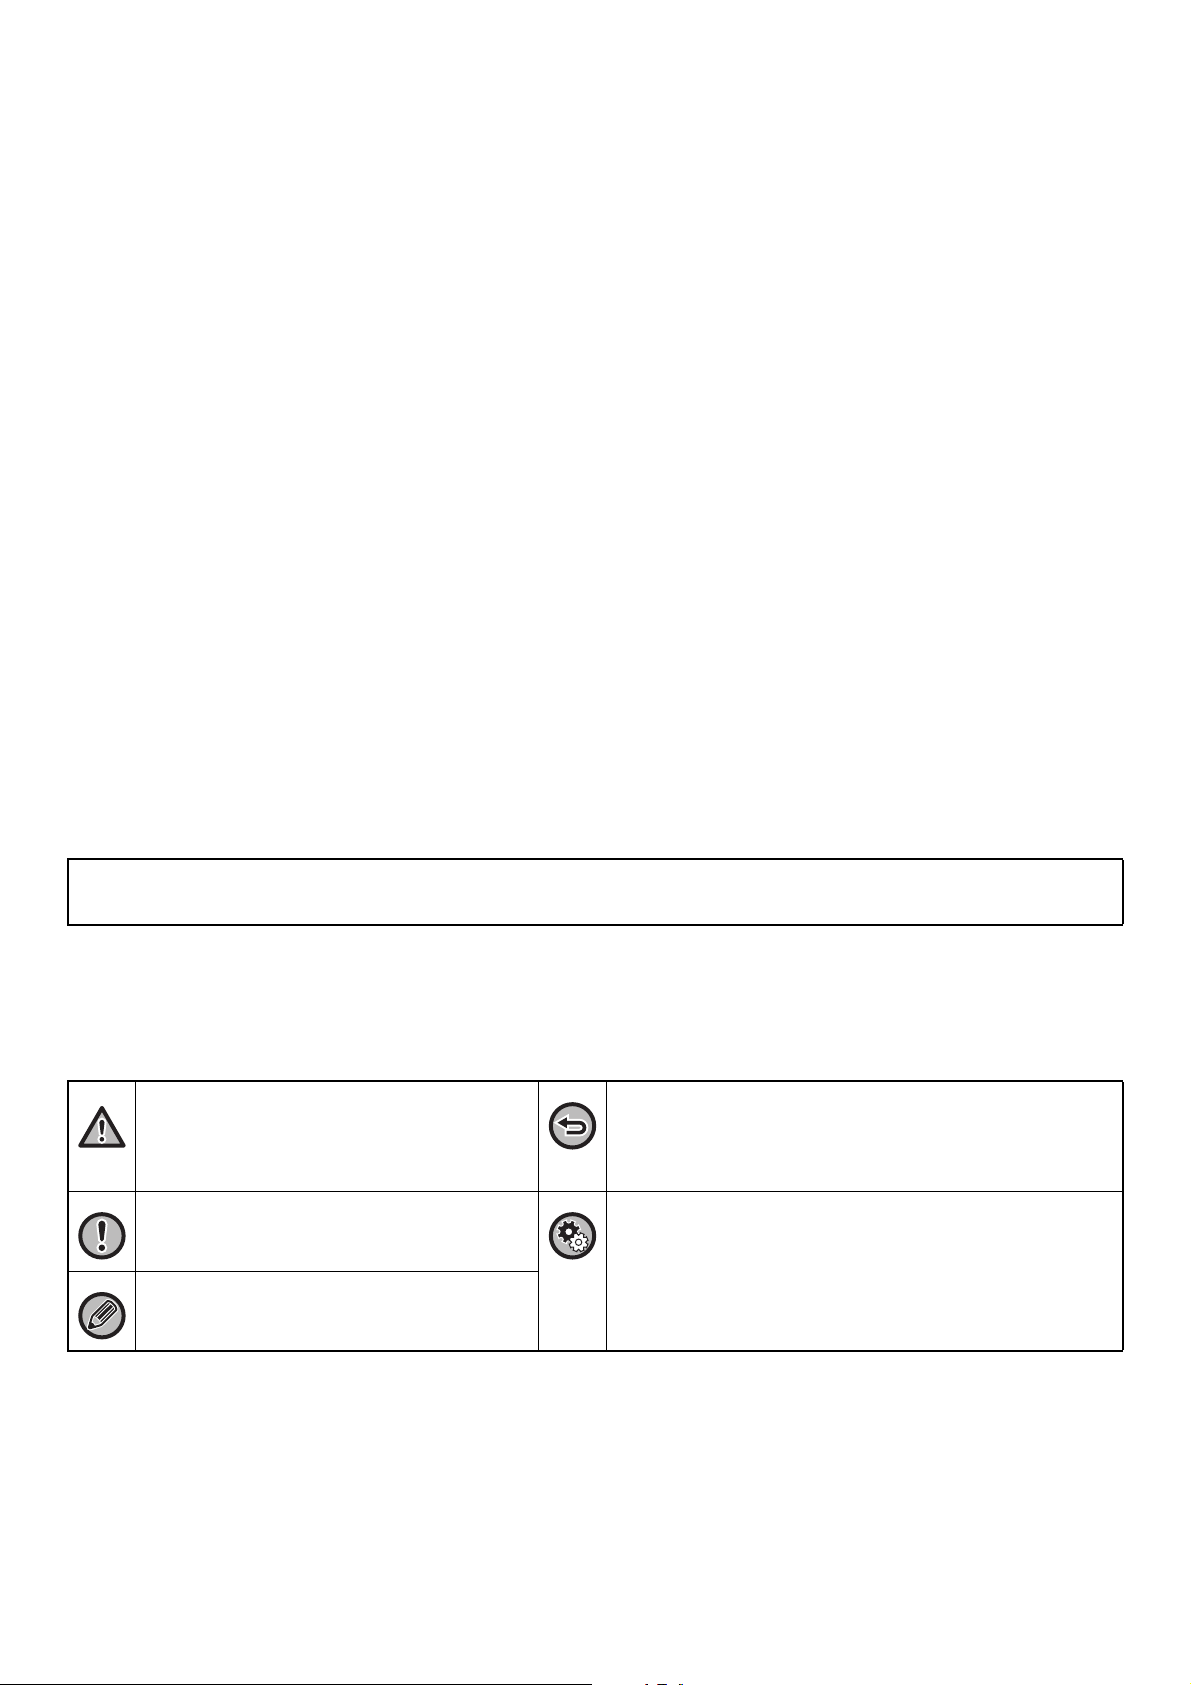
Icons used in the manuals
The icons in the manuals indicate the following types of information:
This alerts you to a situation that could result in
death or serious personal injury. This alerts
you to a situation that could result in personal
injury or damage to properties.
This alerts you to a situation where there is a
risk of machine damage or failure.
This supplements function or operation
procedure.
This explains how to stop or correct an operation.
This describes a routine work relevant to setting mode.
ii

BEFORE USING THE MACHINE
BEFORE USING THE MACHINE
PART NAMES AND FUNCTION . . . . . . . . . . . . . . . 1-4
• EXTERIOR . . . . . . . . . . . . . . . . . . . . . . . . . . . . 1-4
• INTERIOR . . . . . . . . . . . . . . . . . . . . . . . . . . . . . 1-6
• AUTOMATIC DOCUMENT FEEDER AND
DOCUMENT GLASS. . . . . . . . . . . . . . . . . . . . . 1-7
• SIDE AND BACK . . . . . . . . . . . . . . . . . . . . . . . . 1-8
• OPERATION PANEL. . . . . . . . . . . . . . . . . . . . . 1-9
TURNING ON THE POWER. . . . . . . . . . . . . . . . . . . 1-11
TOUCH PANEL . . . . . . . . . . . . . . . . . . . . . . . . . . . . 1-12
• TOUCH TYPES . . . . . . . . . . . . . . . . . . . . . . . . . 1-12
• HOME SCREEN . . . . . . . . . . . . . . . . . . . . . . . . 1-16
• PREVIEW SCREEN . . . . . . . . . . . . . . . . . . . . . 1-20
• OPERATION OF FREQUENTLY USED KEYS. 1-27
• ACTION PANEL . . . . . . . . . . . . . . . . . . . . . . . . 1-28
• CONFIRMATION SCREEN FOR FAVORITE
MENUS AND SETTINGS . . . . . . . . . . . . . . . . . 1-28
Eco . . . . . . . . . . . . . . . . . . . . . . . . . . . . . . . . . . . . . . 1-31
• ECO FUNCTIONS OF THE MACHINE . . . . . . . 1-31
• AUTO POWER SHUT-OFF MODE . . . . . . . . . . 1-32
• PREHEAT MODE . . . . . . . . . . . . . . . . . . . . . . . 1-33
• ECO RECOMMENDATION FUNCTION
DISPLAY . . . . . . . . . . . . . . . . . . . . . . . . . . . . . . 1-33
• AS SOON AS THE REMOTE JOB IS
FINISHED, ENTER AUTO POWER SHUT OFF
MODE . . . . . . . . . . . . . . . . . . . . . . . . . . . . . . . . 1-34
• ECO SCAN . . . . . . . . . . . . . . . . . . . . . . . . . . . . 1-37
• Eco Scan Setting . . . . . . . . . . . . . . . . . . . . . . . . 1-37
• Energy Saving Pattern List . . . . . . . . . . . . . . . . 1-38
• Power ON/OFF Schedule Setting . . . . . . . . . . . 1-39
• Specific Date Operation Settings. . . . . . . . . . . . 1-40
• DISPLAYING ECO RECOMMENDATION
SETTINGS (ECO RECOMMENDATION
FUNCTION DISPLAY). . . . . . . . . . . . . . . . . . . . 1-41
• Toner Save Mode . . . . . . . . . . . . . . . . . . . . . . . 1-41
• MOTION SENSOR . . . . . . . . . . . . . . . . . . . . . . 1-42
USER AUTHENTICATION . . . . . . . . . . . . . . . . . . . . 1-43
• AUTHENTICATION BY USER NUMBER . . . . . 1-43
• AUTHENTICATION BY LOGIN
NAME/PASSWORD . . . . . . . . . . . . . . . . . . . . . 1-45
User Control . . . . . . . . . . . . . . . . . . . . . . . . . . . . . . 1-48
• User List . . . . . . . . . . . . . . . . . . . . . . . . . . . . . . 1-48
• Custom Index . . . . . . . . . . . . . . . . . . . . . . . . . . 1-51
• Organization /Group List. . . . . . . . . . . . . . . . . . 1-51
• Default Settings . . . . . . . . . . . . . . . . . . . . . . . . 1-51
• Pages Limit Group . . . . . . . . . . . . . . . . . . . . . . 1-57
• Machine Page Limit Setting . . . . . . . . . . . . . . . 1-57
• Authority Group . . . . . . . . . . . . . . . . . . . . . . . . 1-58
• Favorite Operation Group. . . . . . . . . . . . . . . . . 1-62
• User Count . . . . . . . . . . . . . . . . . . . . . . . . . . . . 1-64
• Card Setting . . . . . . . . . . . . . . . . . . . . . . . . . . . 1-66
• ACTIVE DIRECTORY LINKING FUNCTION . . 1-67
BILLING CODE . . . . . . . . . . . . . . . . . . . . . . . . . . . . 1-71
• BILLING CODE . . . . . . . . . . . . . . . . . . . . . . . . 1-71
• USE BILLING CODE . . . . . . . . . . . . . . . . . . . . 1-72
• REGISTERING A NEW BILLING CODE . . . . . 1-75
• EDITING OR DELETING THE REGISTERED
BILLING CODE . . . . . . . . . . . . . . . . . . . . . . . . 1-78
• Billing Code Setting . . . . . . . . . . . . . . . . . . . . . 1-81
CLOUD LINK. . . . . . . . . . . . . . . . . . . . . . . . . . . . . . 1-84
• BEFORE USING THE CLOUD LINK
FUNCTION . . . . . . . . . . . . . . . . . . . . . . . . . . . . 1-84
• UPLOADING SCANNED DATA TO A CLOUD
SERVICE . . . . . . . . . . . . . . . . . . . . . . . . . . . . . 1-86
• PRINTING DATA IN A CLOUD SERVICE . . . . 1-86
AirPrint . . . . . . . . . . . . . . . . . . . . . . . . . . . . . . . . . . 1-88
Easily connect with an NFC-compatible mobile
device (EASY CONNECT) . . . . . . . . . . . . . . . . . . . 1-91
• CONNECTING BY NFC . . . . . . . . . . . . . . . . . . 1-91
• CONNECTING BY QR CODE . . . . . . . . . . . . . 1-92
• Easy Connection Setting . . . . . . . . . . . . . . . . . 1-93
NAS . . . . . . . . . . . . . . . . . . . . . . . . . . . . . . . . . . . . . 1-94
Public Folder / NAS Setting . . . . . . . . . . . . . . . . . 1-95
UNIVERSAL DESIGN IN THE MACHINE. . . . . . . . 1-98
• UNIVERSAL DESIGN RELATED TO
OPERATION . . . . . . . . . . . . . . . . . . . . . . . . . . 1-98
UNIVERSAL DESIGN RELATED TO VISION . . .
•
UNIVERSAL DESIGN RELATED TO HEARING . . .
•
UNIVERSAL DESIGN FEATURES. . . . . . . . . . . . . .
•
ITEMS RECORDED IN THE JOB LOG . . . . . . . . . 1-102
1-99
1-99
1-100
1-1

BEFORE USING THE MACHINE
PRINTING A MANUAL FROM THE OPERATION
PANEL . . . . . . . . . . . . . . . . . . . . . . . . . . . . . . . . . . . 1-104
LOADING PAPER
IMPORTANT POINTS ABOUT PAPER . . . . . . . . . . 1-105
• NAMES AND LOCATIONS OF TRAYS. . . . . . . 1-105
• THE DEFINITION OF "R" IN PAPER SIZE . . . . 1-105
• APPLICABLE PAPER TYPES. . . . . . . . . . . . . . 1-106
LOADING PAPER IN THE TRAY 1/2. . . . . . . . . . . . 1-109
LOADING PAPER IN THE TRAY 3/4. . . . . . . . . . . . 1-112
LOADING PAPER IN THE LARGE CAPACITY
TRAY . . . . . . . . . . . . . . . . . . . . . . . . . . . . . . . . . . . . 1-116
LOADING PAPER INTO THE BYPASS TRAY . . . . 1-121
HOW TO PLACE THE LONG PAPER GUIDE. . . . . 1-124
• PAPER SETTINGS IN THE SYSTEM
SETTINGS. . . . . . . . . . . . . . . . . . . . . . . . . . . . . 1-125
HOW TO PLACE THE ORIGINAL
SELECTING A PROCEDURE FOR PLACING THE
ORIGINAL DEPENDING ON THE TYPE AND
STATUS OF THE ORIGINAL . . . . . . . . . . . . . . . . . . 1-129
AUTOMATIC DOCUMENT FEEDER . . . . . . . . . . . . 1-131
DOCUMENT GLASS . . . . . . . . . . . . . . . . . . . . . . . . 1-133
STOPPING/DELETING A JOB, PRIORITY
PROCESSING AND CHECKING THE STATUS
TYPES OF JOB STATUS SCREENS . . . . . . . . . . . 1-135
STOPPING/DELETING A JOB IN PROGRESS OR
RESERVED . . . . . . . . . . . . . . . . . . . . . . . . . . . . . . . 1-137
PRIORITY PROCESSING OF A RESERVED JOB . 1-138
CHECKING A RESERVED JOB OR THE JOB IN
PROGRESS . . . . . . . . . . . . . . . . . . . . . . . . . . . . . . . 1-140
CHECKING COMPLETED JOBS. . . . . . . . . . . . . . . 1-141
READING THE JOB LIST . . . . . . . . . . . . . . . . . . . . 1-142
ADDRESS BOOK
ADDRESS BOOK. . . . . . . . . . . . . . . . . . . . . . . . . . . 1-145
ADDRESS BOOK SCREEN. . . . . . . . . . . . . . . . . . . 1-146
STORING ADDRESSES THROUGH DIRECT
ENTRY . . . . . . . . . . . . . . . . . . . . . . . . . . . . . . . . . . . 1-150
STORING ADDRESSES THROUGH GLOBAL
ADDRESS SEARCH . . . . . . . . . . . . . . . . . . . . . . . . 1-151
STORING ADDRESSES FROM FAX OR IMAGE
SEND LOGS. . . . . . . . . . . . . . . . . . . . . . . . . . . . . . . 1-153
STORING GROUPS . . . . . . . . . . . . . . . . . . . . . . . . . 1-154
EDITING/DELETING ADDRESSES IN ADDRESS
BOOK . . . . . . . . . . . . . . . . . . . . . . . . . . . . . . . . . . . 1-156
SETTING THE SCOPE FOR PUBLICIZING
CONTACTS AND GROUPS . . . . . . . . . . . . . . . . . . 1-158
DELETING THE TRANSMISSION HISTORY. . . . . 1-159
REGISTER AN ADDRESS BOOK IN THE WEB
PAGE. . . . . . . . . . . . . . . . . . . . . . . . . . . . . . . . . . . . 1-160
• Category Setting. . . . . . . . . . . . . . . . . . . . . . . . 1-162
PERIPHERAL DEVICES
PERIPHERAL DEVICES. . . . . . . . . . . . . . . . . . . . . 1-163
INNER FINISHER . . . . . . . . . . . . . . . . . . . . . . . . . . 1-165
• PART NAMES . . . . . . . . . . . . . . . . . . . . . . . . . 1-165
• SUPPLIES . . . . . . . . . . . . . . . . . . . . . . . . . . . . 1-166
• INNER FINISHER MAINTENANCE . . . . . . . . . 1-166
FINISHER . . . . . . . . . . . . . . . . . . . . . . . . . . . . . . . . 1-168
• PART NAMES . . . . . . . . . . . . . . . . . . . . . . . . . 1-168
• HOW TO STAPLE MANUALLY . . . . . . . . . . . . 1-169
• SUPPLIES . . . . . . . . . . . . . . . . . . . . . . . . . . . . 1-170
• FINISHER MAINTENANCE . . . . . . . . . . . . . . . 1-170
FINISHER (LARGE STACKER) . . . . . . . . . . . . . . . 1-172
• PART NAMES . . . . . . . . . . . . . . . . . . . . . . . . . 1-172
• SUPPLIES . . . . . . . . . . . . . . . . . . . . . . . . . . . . 1-173
• FINISHER (LARGE STACKER)
MAINTENANCE . . . . . . . . . . . . . . . . . . . . . . . . 1-173
SADDLE STITCH FINISHER . . . . . . . . . . . . . . . . . 1-177
• PART NAMES . . . . . . . . . . . . . . . . . . . . . . . . . 1-177
• HOW TO STAPLE MANUALLY . . . . . . . . . . . . 1-178
• SUPPLIES . . . . . . . . . . . . . . . . . . . . . . . . . . . . 1-179
SADDLE STITCH FINISHER MAINTENANCE. . .
•
SADDLE STITCH FINISHER (LARGE STACKER). . .
PART NAMES. . . . . . . . . . . . . . . . . . . . . . . . . . . .
•
HOW TO STAPLE MANUALLY . . . . . . . . . . . . . .
•
SUPPLIES . . . . . . . . . . . . . . . . . . . . . . . . . . . . . .
•
•
SADDLE STITCH FINISHER (LARGE STACKER)
MAINTENANCE . . . . . . . . . . . . . . . . . . . . . . . . . .
PUNCH MODULE (MX-PN16B) . . . . . . . . . . . . . . . 1-195
• DISCARDING PUNCH WASTE . . . . . . . . . . . . 1-195
PUNCH MODULE (MX-PN13B) . . . . . . . . . . . . . . . 1-197
• DISCARDING PUNCH WASTE . . . . . . . . . . . . 1-197
Sharp OSA . . . . . . . . . . . . . . . . . . . . . . . . . . . . . . . 1-199
• APPLICATION COMMUNICATION . . . . . . . . . 1-199
• EXTERNAL ACCOUNT APPLICATION . . . . . . 1-200
• Sharp OSA Settings . . . . . . . . . . . . . . . . . . . . . 1-202
1-180
1-184
1-184
1-178
1-185
1-185
1-2

BEFORE USING THE MACHINE
REMOVING MISFEEDS
REMOVING MISFEEDS . . . . . . . . . . . . . . . . . . . . . . 1-205
MAINTENANCE
REGULAR MAINTENANCE. . . . . . . . . . . . . . . . . . . 1-206
• CLEANING THE DOCUMENT GLASS AND
AUTOMATIC DOCUMENT FEEDER . . . . . . . . 1-206
• CLEANING THE BYPASS FEED ROLLER. . . . 1-208
REPLACEMENT OF TONER CARTRIDGE. . . . . . . 1-209
REPLACING THE WASTE TONER BOX . . . . . . . . 1-212
REPLACING THE STAMP CARTRIDGE. . . . . . . . . 1-213
CHARACTER ENTRY
NAMES AND FUNCTIONS OF SOFT KEYBOARD
KEYS . . . . . . . . . . . . . . . . . . . . . . . . . . . . . . . . . . . . 1-215
• SET THE KEYBOARD SETTING . . . . . . . . . . . 1-216
1-3
BEFORE USING THE MACHINE►BEFORE USING THE MACHINE
(2)
(5) (7)
(3)
(4)
(9) (10) (11) (12) (13)
(8)(6)
(1)
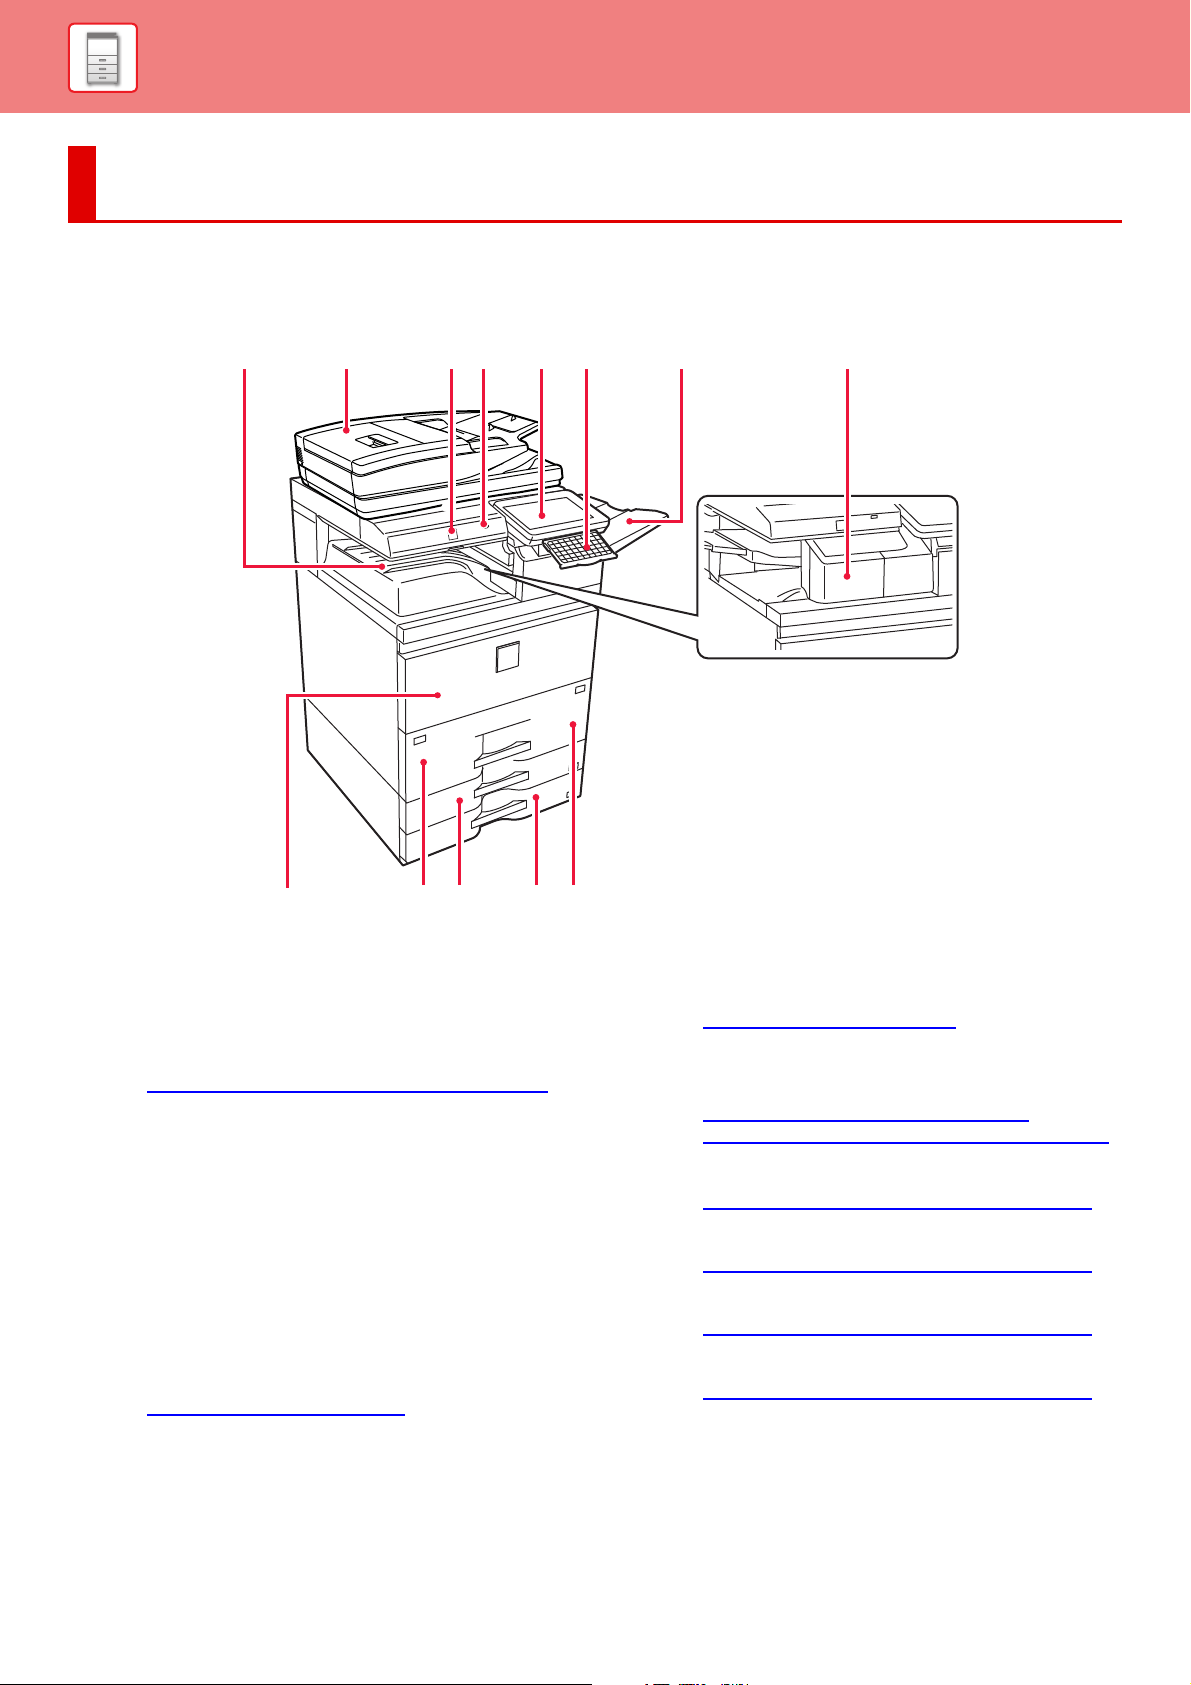
BEFORE USING THE MACHINE
PART NAMES AND FUNCTION
EXTERIOR
(1) Output tray (exit tray cabinet)
Received faxes and printed papers are delivered to this
tray.
(2) Automatic document feeder
It automatically feeds and scans multiple originals. 2-sided
originals can be automatically scanned. Both sides of
2-sided originals can be automatically scanned at one time.
► AUTOMATIC DOCUMENT FEEDER (page 1-131)
(3) Motion sensor
This sensor detects the presence of a person that
approaches the machine, and automatically wakes the
machine from sleep mode (Motion Sensor Mode Only).
(4) USB port (A type)
This is used to connect a USB device such as a USB
memory device to the machine.
Supports USB 2.0 (Hi-Speed).
(5) Operation panel
This panel hosts the [Power] button, [Power Save]
button/indicator, error indicator, [Home Screen] button, main
power button, data notification indicator and touch panel.
Use the touch panel to operate each of these functions.
An NFC touch point area also appears.
► OPERATION PANEL
(6) Keyboard
Use this as a substitute for the soft keyboard displayed
on the touch panel. When not being used, it can be
stored under the operation panel.
*
(page 1-9)
*Optional
(7) Exit tray unit (right tray)
Set this tray as the output tray if needed.
(8) Inner finisher
This staples paper.
► INNER FINISHER
(9) Front cover
Open this cover to switch the main power switch to "On"
or "Off" to replace a toner cartridge.
► TURNING ON THE POWER
►
REPLACEMENT OF TONER CARTRIDGE (page 1-209)
(10) Tray 1
Store paper in this tray.
►
LOADING PAPER IN THE TRAY 1/2 (page 1-109)
(11) Tray 3
Store paper in this tray.
►
LOADING PAPER IN THE TRAY 3/4 (page 1-112)
(12) Tray 4
Store paper in this tray.
►
LOADING PAPER IN THE TRAY 3/4 (page 1-112)
(13) Tray 2
Store paper in this tray.
LOADING PAPER IN THE TRAY 1/2 (page 1-109)
►
*
*
(page 1-165)
(page 1-11)
1-4
BEFORE USING THE MACHINE►BEFORE USING THE MACHINE
(21)(20) (22)
(23)
(24)
(25)
(15)(14)
(19)(18)
(16) (17)
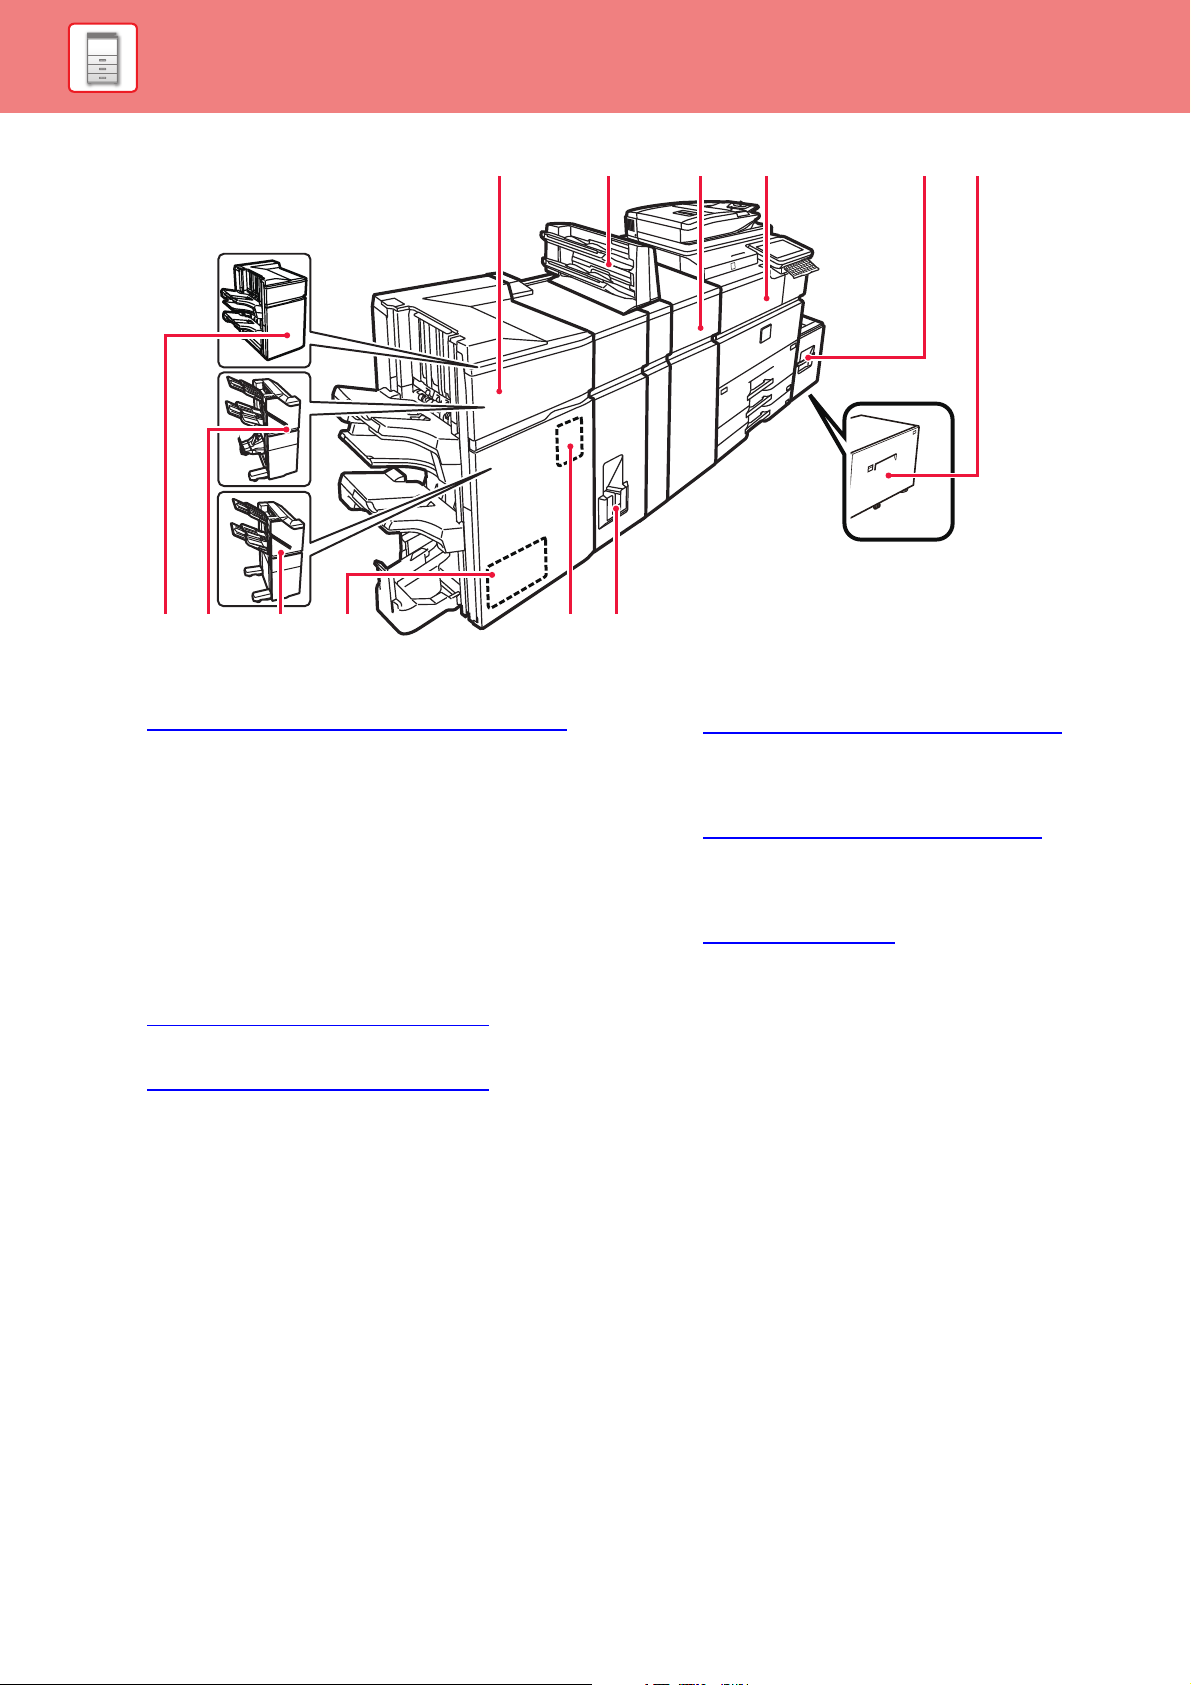
(14) Saddle Stitch Finisher (large stacker)
*
This staples and folds paper. A punch module can also
be installed to punch holes in output paper.
►
SADDLE STITCH FINISHER (LARGE STACKER) (page 1-184)
(15) Inserter*
Covers and insertion sheets to be inserted into printed
sheets can be loaded.
Using the manual finishing function, you can directly feed
paper into the finisher (large stacker) or saddle stitch
finisher (large stacker) to staple, punch or fold the paper.
(16) Curl correction unit*
This unit corrects curls in printed paper.
(17) Paper pass unit
*
Relay between the machine and the finisher, finisher (large stacker),
saddle stitch finisher or saddle stitch finisher (large stacker).
(18) Tray 5 (MX-LC18)
*
Store paper in this tray.
Large capacity tray (MX-LC18) (page 1-116)
►
(19) Tray 5 (MX-LC19)*
Store paper in this tray.
►
Large capacity tray (MX-LC19) (page 1-117)
*Optional
(20) Finisher (large stacker)
*
This staples paper. A punch module can also be installed
to punch holes in output paper.
► FINISHER (LARGE STACKER)
(21) Saddle Stitch Finisher
*
(page 1-172)
This staples and folds paper. A punch module can also
be installed to punch holes in output paper. You can also
perform stapling manually.
► SADDLE STITCH FINISHER
(22) Finisher
*
(page 1-177)
This staples paper. A punch module can also be installed
to punch holes in output paper. You can also perform
stapling manually.
► FINISHER
(page 1-168)
(23) Trimming module*
This trims the excess of saddle-stitched output.
(24) Punch module
*
This is used to punch holes in output. Requires a finisher,
finisher (large stacker), saddle stitch finisher or saddle
stitch finisher (large stacker).
(25) Folding unit*
This folds and outputs paper.
1-5
BEFORE USING THE MACHINE►BEFORE USING THE MACHINE
(1) (3)
(6)
(4)
(5) (7) (8)
(2)
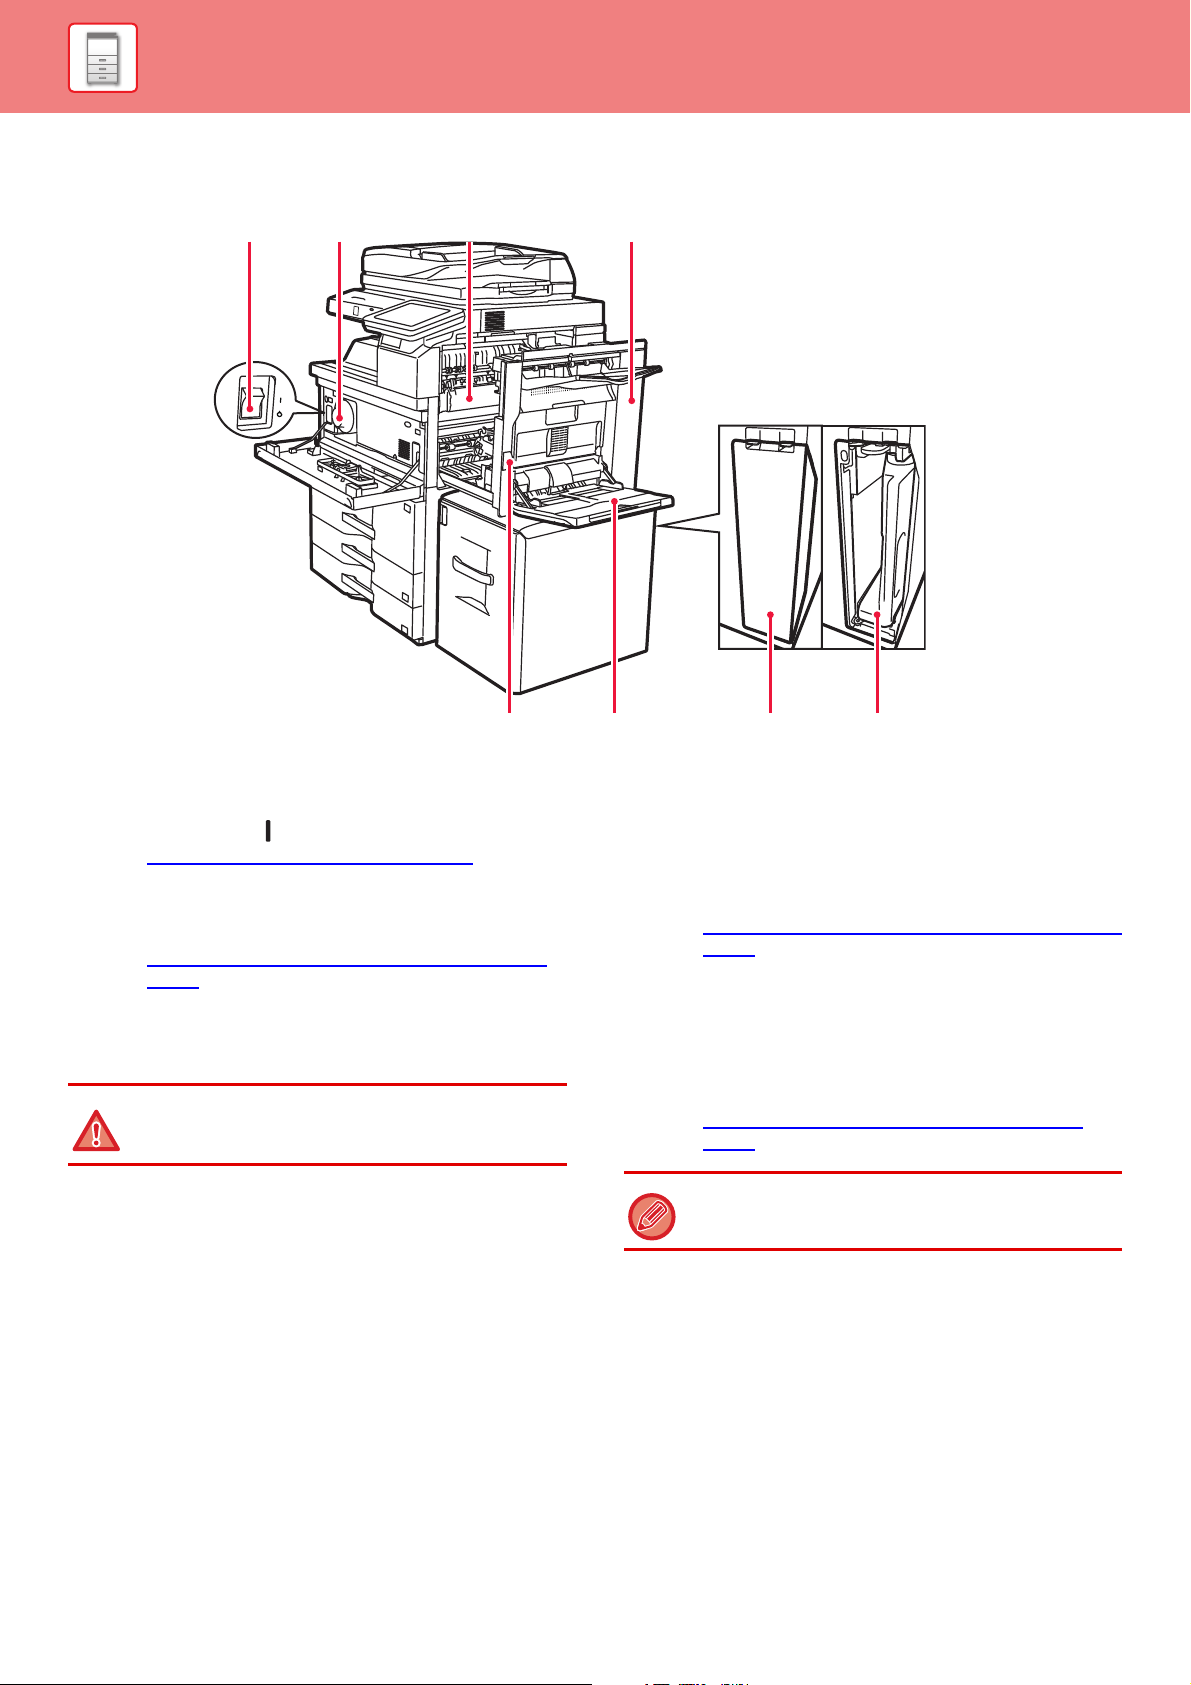
INTERIOR
(1) The main power switch
Use this switch to turn on the power for the machine.
When using the fax or Internet fax functions, always keep
this switch in the “ ” position.
► TURNING ON THE POWER
(2) Toner cartridge
This cartridge contains toner.
When the toner in a cartridge runs out, replace with new one.
► REPLACEMENT OF TONER CARTRIDGE (page
1-209)
(3) Fusing unit
Heat is applied here to fuse the transferred image onto
the paper.
The fusing unit is hot. Take care not to burn yourself
when removing a misfeed.
(4) Right side cover
Open this cover to remove a paper misfeed.
(page 1-11)
(5) Right side cover release lever
To remove a paper misfeed, pull and hold this lever up to
open the right side cover.
(6) Bypass tray
Use this tray to feed paper manually.
When loading paper larger than 8-1/2" x 11"R or A4R,
pull out the extension guide.
► LOADING PAPER INTO THE BYPASS TRAY
1-121)
(7) Cover for waste toner box
Open this cover when you need to replace the waste
toner box.
(8) Waste toner box
This container collects excess toner that remains after
printing.
► REPLACING THE WASTE TONER BOX
1-212)
A service technician collects replaced waste toner
box.
(page
(page
1-6
BEFORE USING THE MACHINE►BEFORE USING THE MACHINE
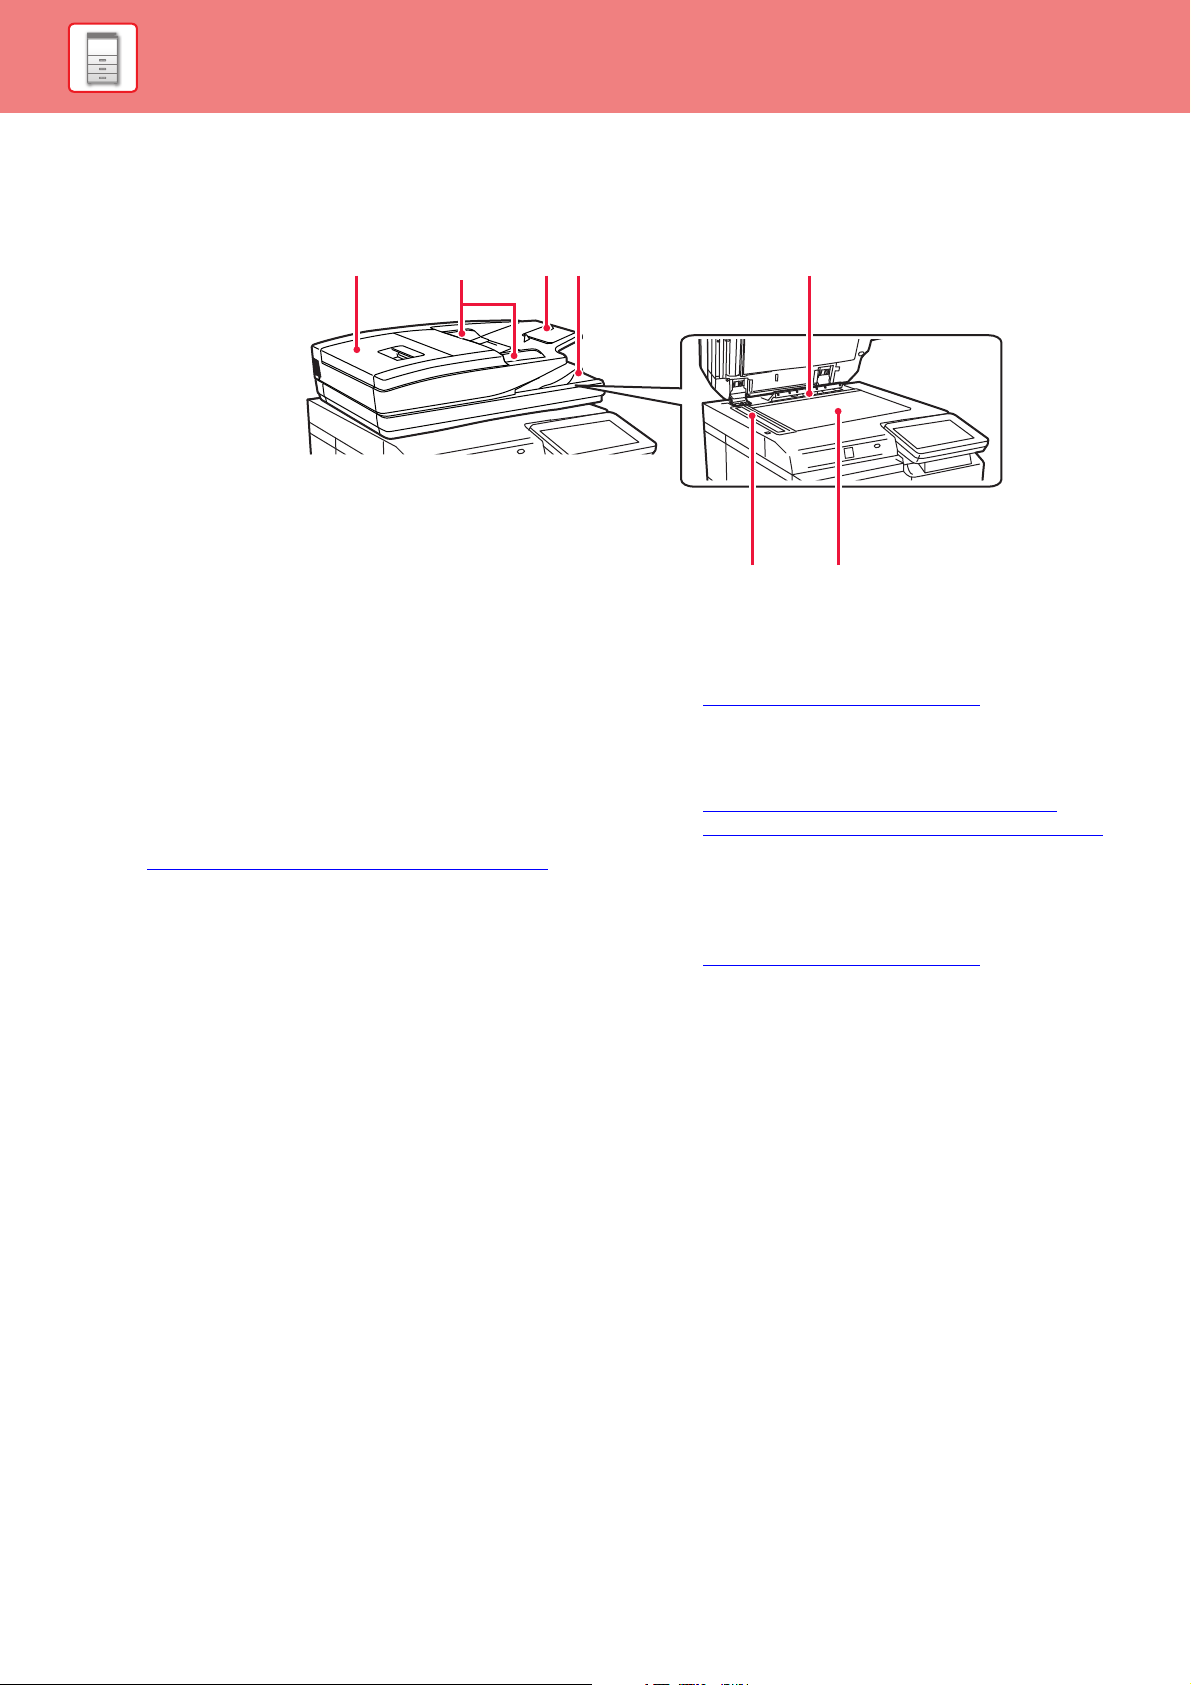
AUTOMATIC DOCUMENT FEEDER AND DOCUMENT
GLASS
(1) Document feeding cover
Open this cover to remove an original misfeed.
(2) Original guides
These guides help ensure that the original is scanned
correctly.
Adjust the guides to the width of the original.
(3) Document feeder tray
Place the original.
Place the original with the print side facing up.
► AUTOMATIC DOCUMENT FEEDER
(4) Original exit tray
The original is discharged to this tray after scanning.
(2)
(page 1-131)
(3)(1) (4)
(5)
(7)(6)
(5) Original size detector
This unit detects the size of an original placed on the
document glass.
► DOCUMENT GLASS
(6) Scanning area
Originals placed in the automatic document feeder are
scanned here.
► CLEANING THE DOCUMENT GLASS AND
AUTOMATIC DOCUMENT FEEDER (page 1-206)
(7) Document glass
If you want to scan books or other thick originals that
cannot be fed through the automatic document feeder,
place them on this glass.
► DOCUMENT GLASS
(page 1-133)
(page 1-133)
1-7
BEFORE USING THE MACHINE►BEFORE USING THE MACHINE
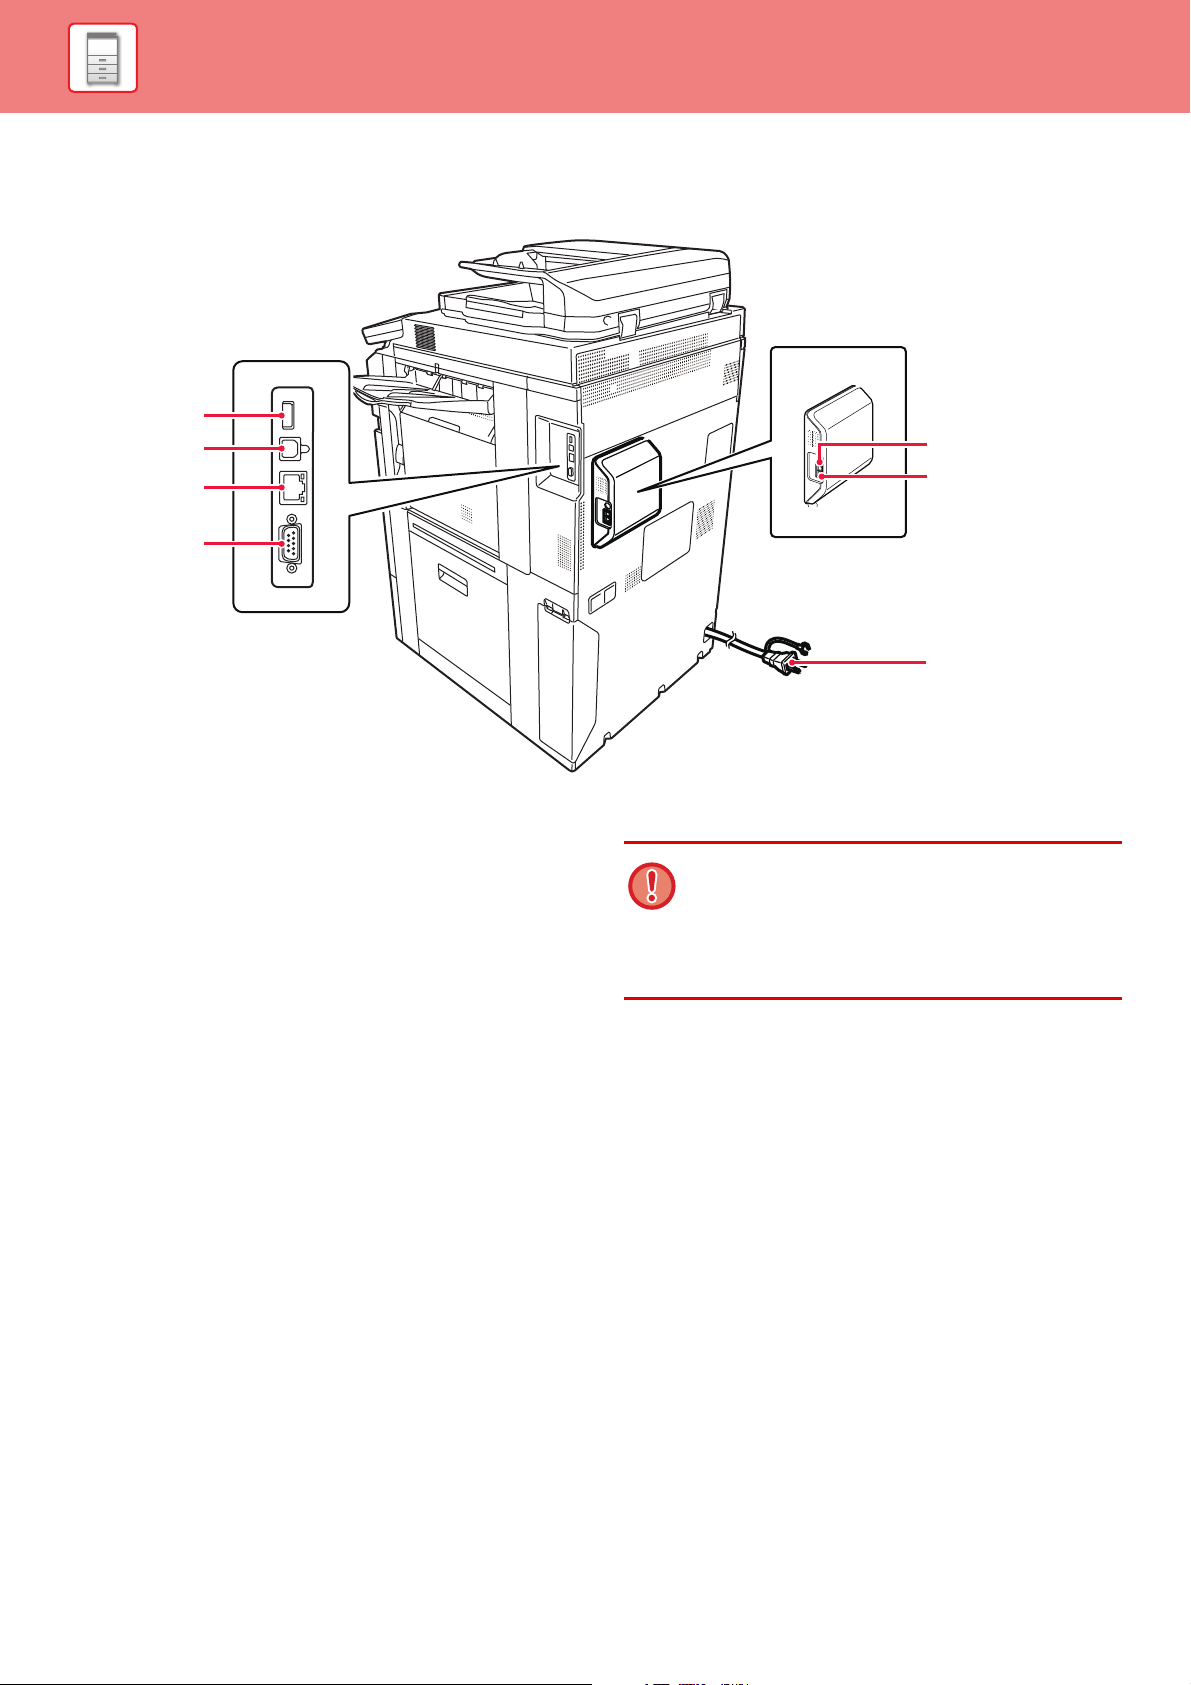
SIDE AND BACK
(1)
(2)
(3)
(4)
(5)
(6)
(1) USB connector (A type)
This is used to connect a USB device such as a USB
memory device to the machine.
Supports USB 2.0 (Hi-Speed).
(2) USB connector (B type)
This machine does not use this connector.
(3) LAN connector
Connect the LAN cable to this connector when the
machine is used on a network.
Use a shielded LAN cable.
(4) Service-only connector
* Optional
(7)
This connector is for use only by service technicians.
Connecting a cable to this connector may cause the
machine to malfunction.
Important note for service technicians:
The cable connected to the service connector must be
less than 118" (3 m) in length.
(5) Extension phone jack (TEL)*
When the fax function of the machine is used, an
extension phone can be connected to this jack.
(6) Telephone line jack (LINE)*
When the fax function of the machine is used, the
telephone line is connected to this jack.
(7) Power plug
1-8
BEFORE USING THE MACHINE►BEFORE USING THE MACHINE
(1) (2) (3) (4) (5) (9)(8)(6) (7)
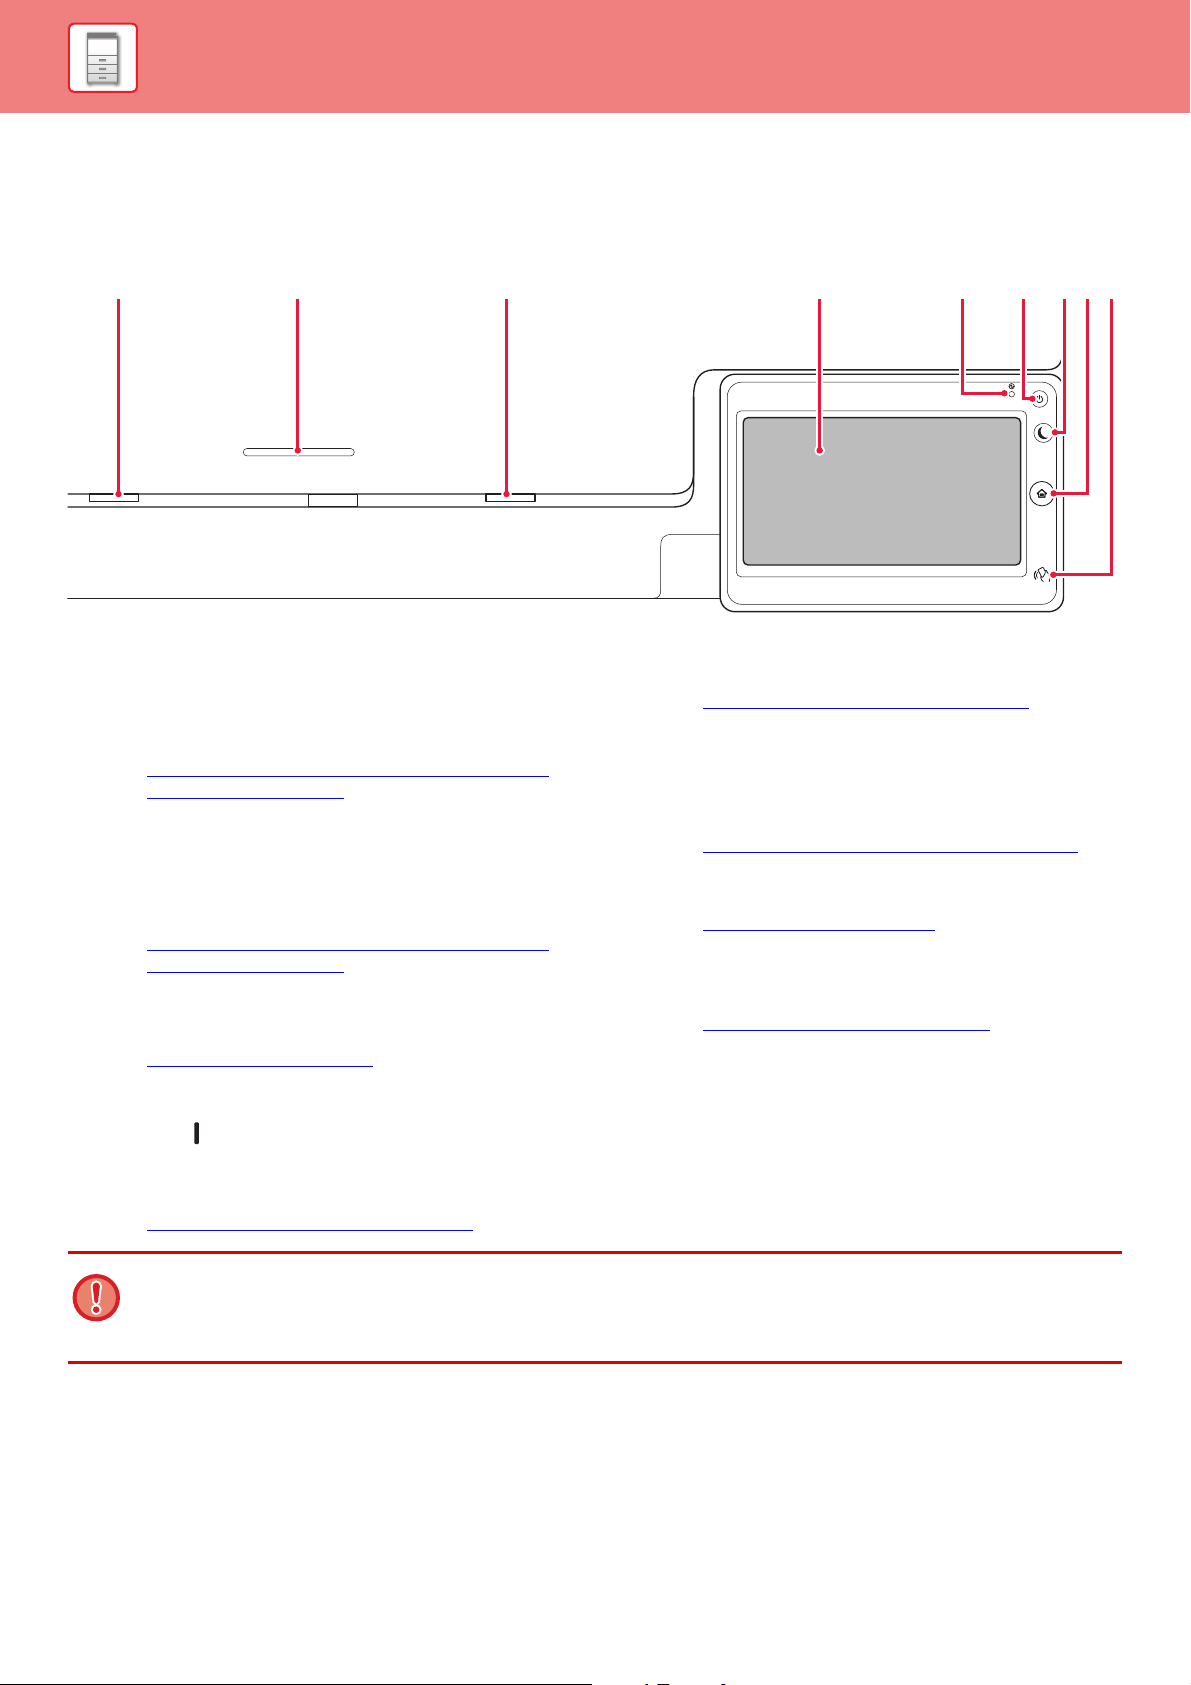
OPERATION PANEL
This section describes the names and functions of the respective parts of the operation panel.
(1) Data notification indicator
The indicator lights solidly or blinks to indicate the status
of a job.
When the Exit tray unit (right tray) is used for output, this
blinks until the output is removed.
► DATA NOTIFICATION INDICATOR AND ERROR
INDICATOR (page 1-10)
(2) IC card reader holder
Place an IC card reader here when IC cards are used for
user authentication.
(3) Error indicator
Lights solidly or blinks to indicate the status of the error.
► DATA NOTIFICATION INDICATOR AND ERROR
INDICATOR (page 1-10)
(4) Touch panel
Messages and keys appear on the touch panel display.
Operate the machine by directly tapping the displayed keys.
► TOUCH TYPES (page 1-12)
(5) Main power indicator
This lamp lights up when the machine's main power switch
is in the “ ” position.
Blinks green during the time that the [Power] button does not
operate immediately after the main power switch is switched on.
Blinks green while print data is being received.
► TURNING ON THE POWER (page 1-11)
(6) [Power] button
Use this button to turn the machine's power on and off.
► TURNING ON THE POWER
(7) [Power Save] button/indicator
Use this button to set the machine to Sleep mode for
energy saving.
[Power Save] button blinks when the machine is in Sleep
Mode.
► AUTO POWER SHUT-OFF MODE (page 1-32)
(8) [Home Screen] key
Use this button to display the home screen.
► HOME SCREEN
(9) NFC touch point area
You can easily connect a mobile device to the machine
by touching the mobile device.
►
CONNECTING BY NFC (page 1-91)
(page 1-16)
(page 1-11)
[Home Screen] key
Use your finger to touch the [Home Screen] key.
If you use a pen or other tool to touch the key, it may not operate properly.
Risk of malfunctioning if you use with jewelry or other accessories.
1-9
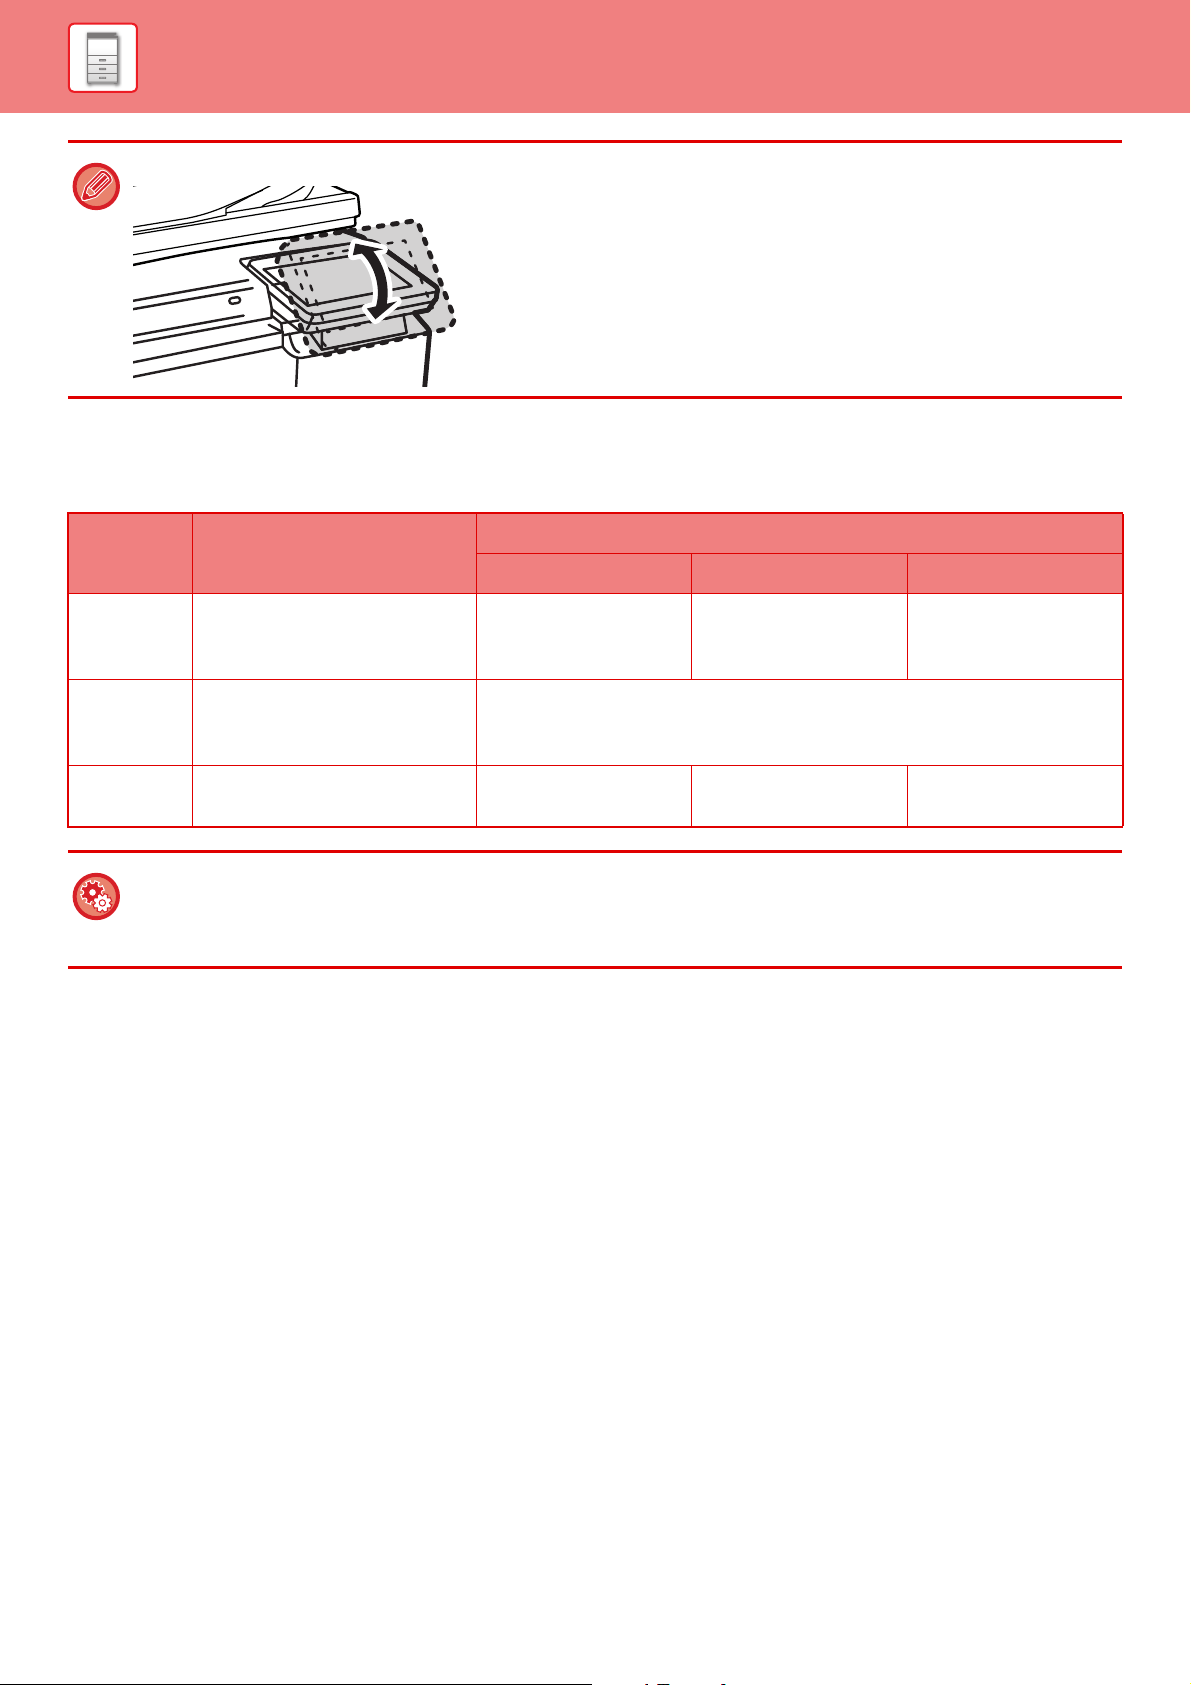
BEFORE USING THE MACHINE►BEFORE USING THE MACHINE
You can change the angle of the touch panel.
DATA NOTIFICATION INDICATOR AND ERROR INDICATOR
The data notification indicator and the error indicator lights solidly or blinks to indicate the status of the machine.
Error indicator (red) Data notification indicator (green)
Pattern 1 Pattern 2 Pattern 3
Solidly Errors that do not stop machine
operation, such as almost out
of toner.
Blinks Errors that stop machine
operation, such as misfeeds
and out of toner.
On/Blinking
Priority
To set the status indicated by the data notification indicator
•
In "Settings (administrator)", select [System Settings] → [Common Settings]→ [Device Control] → [Data Indicator Setting].
• To set the error indication
Set in "Settings (administrator)" →[
Blinking Priority Blinking Priority Blinking Priority On Priority
System Settings] → [Common Settings] → [Device Control] →
Job in progress, such
as paper feeding or
output.
A fax is being received
When the exit tray unit (right tray) is used for output, this blinks until the output
is removed.
Ready state or other
state where jobs can
be accepted.
An original has been
placed in the
document feeder
[Error Light Setting].
1-10
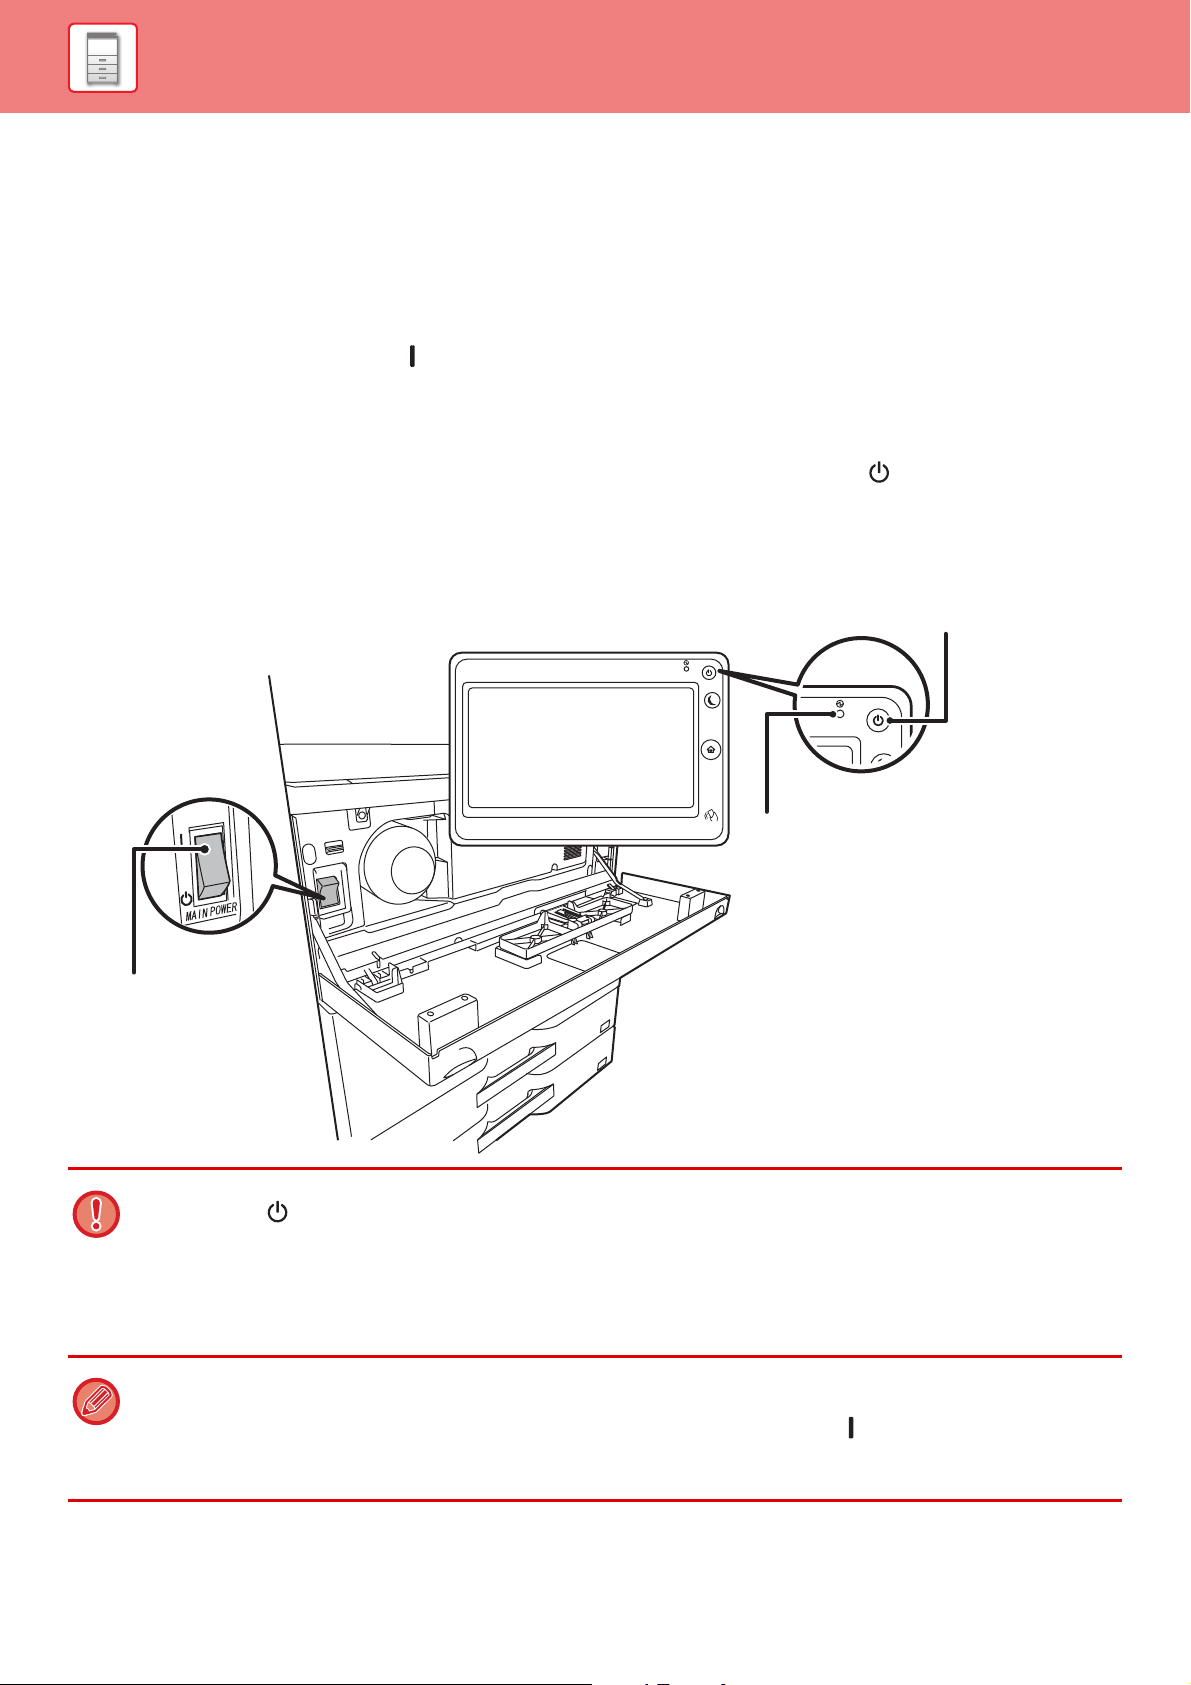
BEFORE USING THE MACHINE►BEFORE USING THE MACHINE
Main power indicator
[Power] button
The main power switch
TURNING ON THE POWER
This section describes how to turn on/off the machine's power and how to restart the machine.
Operate two power switches: the main power switch inside the front cover, located in the lower left corner, and the
[Power] button on the operation panel.
Turning on the power
• Turn the main power switch to the " " position.
• When the main power indicator lights in green, press the [Power] button.
Turning off the power
Turn off the power by pressing the [Power] button, then turn the main power switch to the " " position.
Restart the machine
Turn off the power by pressing the [Power] button and then press it again to turn on the power.
• When turning off the main power switch, press the [Power] button on the operation panel and then turn the main power
switch to the " " position.
In a sudden case of main power outage, turn the power for the machine back on and then turn it off in the correct order.
If the machine is left for a long time with the main power having been turned off prior to the [Power] button being turned off,
abnormal noises, degraded image quality or other problems may result.
• Turn off both the [Power] button and the main power switch and unplug the power cord if you suspect a machine failure, if
there is a bad thunderstorm nearby, or when you are moving the machine.
• If the fax function will be used, and in particular if reception or timer transmission will take place at night, do not turn the
main power off.
• When using the fax or Internet fax function, always keep the main power switch in the " " position.
• In order for some settings to take effect, the machine must be restarted. In some states of the machine, restarting with the
[Power] button may not make the settings take effect. In this case, turn off the main power switch and then turn it on again.
1-11
BEFORE USING THE MACHINE►BEFORE USING THE MACHINE
Easy
Scan
HDD
File retrieve
Others
Margin Shift
Off
Left
Down
Right
( 0~2 )
inch
1/2
Sharp OSA
No. of copies
1
Text/Printed
Photo
Photo
Text/Photo
3
Easy
Scan
HDD
File retrieve
Data in Folder
Job Status
Send and Print
Call Eco Program
Store Data Temporarily
LINE PRINTER
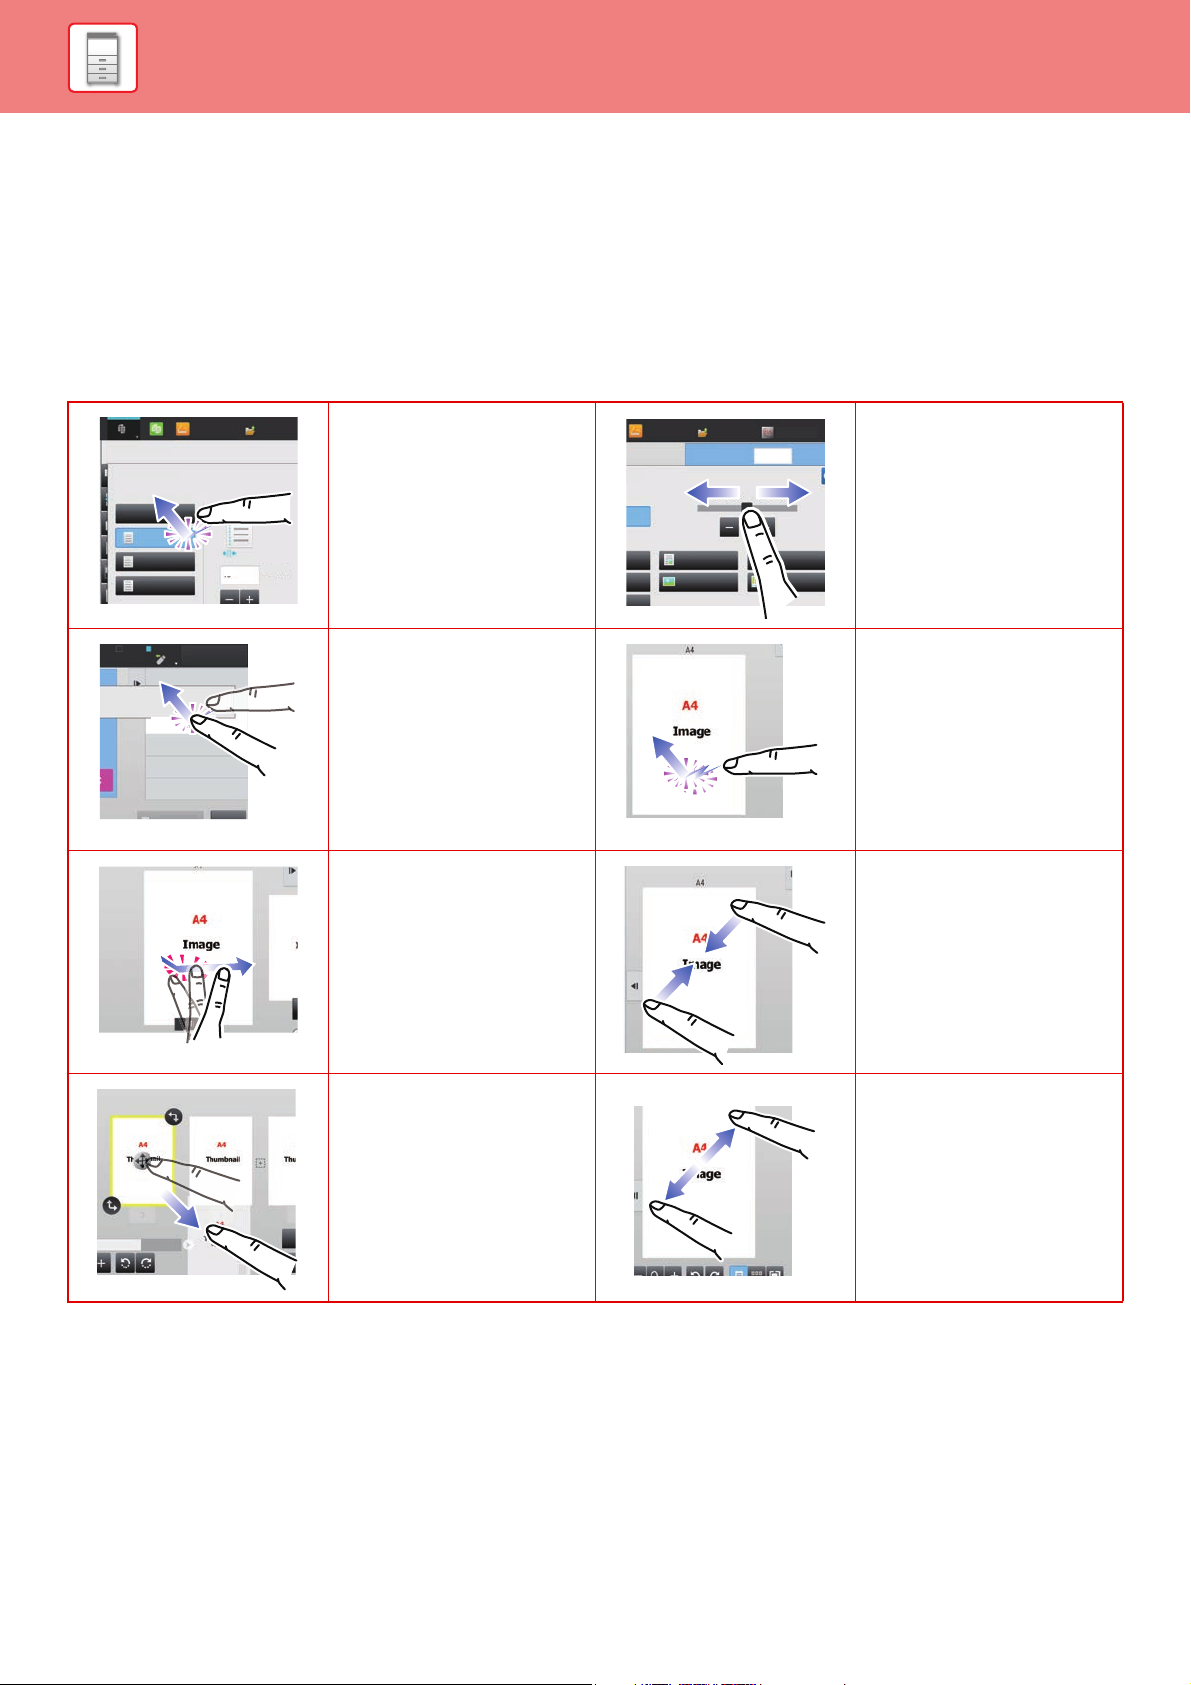
TOUCH PANEL
TOUCH TYPES
In addition to tapping, equivalent to conventional touching, the touch panel of the machine can be operated by long
touching, flicking and sliding.
Operation types
Tapping
Touch the panel with your
finger and then lift it quickly.
Use this method to select a
key, tab or check box.
Long touching
Touch the panel with your
finger and hold it for a while.
Keep holding (long touching)
it on the action panel or
characters in the text box to
display characters in a
balloon.
Flicking
Flick the panel to scroll a
preview image quickly.
Sliding
Slide the scroll bar (with your
finger touching the panel) to
scroll up and down a list with
a large number of items.
Double tapping
Touch the screen twice. Use
this operation to enlarge the
image in the preview.
Pinch
Touch the screen with two
fingers and move them
toward each other. This is
used to reduce the browser
and preview display.
Dragging
Drag (slide your finger
touching the panel in a
random direction) to replace
a page in the original during
preview.
Spread
Touch the screen with two
fingers and move them away
from each other. This is used
to enlarge the browser and
preview display.
1-12
BEFORE USING THE MACHINE►BEFORE USING THE MACHINE
Others
Margin Shift
Off
Right
Left
Down
Adjust 2nd pg value to 1st.
Back
Preview
Side 1 Side 2
CA
Proof Copy
Start
4
11x14
3
8½x14
8½x11
1/21/2
( 0~2 )
inch
( 0~2 )
inch
(A)
(B) (B)
(E)
(C)
(D)
(C)
Preview
Speaker
Start
W
ABC
Address
All
Frequent
Use
Narrow Down
All
Category
All
Sending History
Call by Search Number
Print Individual List
Call Search Number
Add New
Send Same Image
as Fax Address
Category 0
Category 1
Category 5
Category 3
Category 2
Category 4
Category 6
CA
(A)
(C)
(B)
Others
Background Adjustment
Adjust Original Background Darkness.
Preview
Off
On
Touch [+] darken background.
Touch [-] erase background.
Original
Change Size/Direction.
Erase
Erase Shadow Around
Sharpness
Adjust Outline of Image
Exposure
Select Type/Exposure
CA
Proof Copy
Start
4
3
11x14
8½x14
8½x11
(A)
Operation on respective screens
Key (tapping)
A. Tap to select an item. The selected key turns into a different color.
B. Tap numeric keys to enter numbers.
C. Tap to increase or decrease the value. Long touching causes the value to be increased or decreased until you stop
touching.
D. Tap to enter a checkmark and enable the setting.
E. Tap here to close the screen.
List (tapping, sliding and flicking)
A. Tap to select an item. The selected item turns into a different color.
B. Slide the bar up and down.
It appears when the item does not fit in the screen.
C. Flick the key upwards or downwards. The item scrolls up or down.
Slider (sliding)
A. Slide the knob from side to side.
Back
1-13
BEFORE USING THE MACHINE►BEFORE USING THE MACHINE
Preview CA
Original
Others
Auto
Direct EntryInchAB Custom Size
Image Orientation
No. of copies
Skip Blank Page in Original
Copy Ratio
Enlarge/Reduce Copy
Blank Page Skip
Background Adjustment
2-Sided Copy
A5
216 x 343
B5R B4
A5R A4 A3
B5 A4R 216 x 340
A4
Proof Copy
Start
4
3
11x14
8½x14
8½x11
(A)
Send and Print
Scan Original Again
Without change Settings
Store Data in Folder
File
Store Data Temporarily
Quick File
Start
CA
(A)
Tab (tapping)
A. Tap a tab to switch what is displayed.
Preview screen (Double tapping/ Pinch/ Spread)
A. When a preview screen is "pinched", the screen image is reduced. When "spread", the image is enlarged.
When "Double tapping", the image is also enlarged.
1 / 7
1-14

BEFORE USING THE MACHINE►BEFORE USING THE MACHINE
TAP OPERATION SETTING
You can configure settings for tap operation on the touch panel in "Settings (administrator)" – [System Settings] →
[Common Settings] → [Operation Settings] → [Condition Settings] → [Key Operation Setting].
Key Operation Setting
Keys Touch Sound
Controls the key touch sound level, or turns the sound off.
Make Key Touch Sound at Default Setting
When you specify the exposure in the exposure adjustment screen of each mode, a bleep sounds three times when the
reference value is reached.
Screen in which setting is effective Initial value
Ratio setting screen in base screen of copy mode Ratio 100%
Exposure setting screen in base screen of copy mode
Exposure adjustment screen in base screen of fax, Internet fax, and network scanner
modes
Exposure adjustment screen for Scan to HDD in document filing mode
Auto Clear Setting
The time until Auto Clear activates can be set to any number of seconds from 10 to 240 in increments of 10 seconds.
If the machine is not used for the duration of time set here, the auto clear function will clear any settings that have been
selected and return the screen to the base screen of copy mode or the job status screen.
Cancel Timer
This is used to disable the auto clear function.
Key Operation Setting
Time for Accepting Key Entry
This setting determines how long a key in the touch panel must be tapped until the key input is registered. The time
can be set from 0 to 2 seconds in increments of 0.5 seconds.
By lengthening the time setting, key input can be prevented when a key is tapped accidentally. Keep in mind,
however, that when a longer setting is selected more care is required when tapping keys to ensure that key input is
registered.
Disable Auto Key Repeat
This is used to disable key repeat.
Key repeat causes a setting to change continuously not only each time the key is tapped but while a key is tapped.
Time for Accepting Key Entry of Long Touch
Select a time when a long key touch is detected.
Double Tap Interval Setting
Select an interval when a double tap is detected.
Exposure level: 3 (medium)
1-15
BEFORE USING THE MACHINE►BEFORE USING THE MACHINE
Easy
Copy
Easy
Scan
Operation
Guide
Enlarge
Display Mode
Settings Total Count LCD Control
Easy
Copy
Easy
Scan
HDD
File retrieve
Sharp OSA
LINE PRINTER
Job Status
10:15 AM
Toner Quantity
Bk
Sharp OSAPrint Release
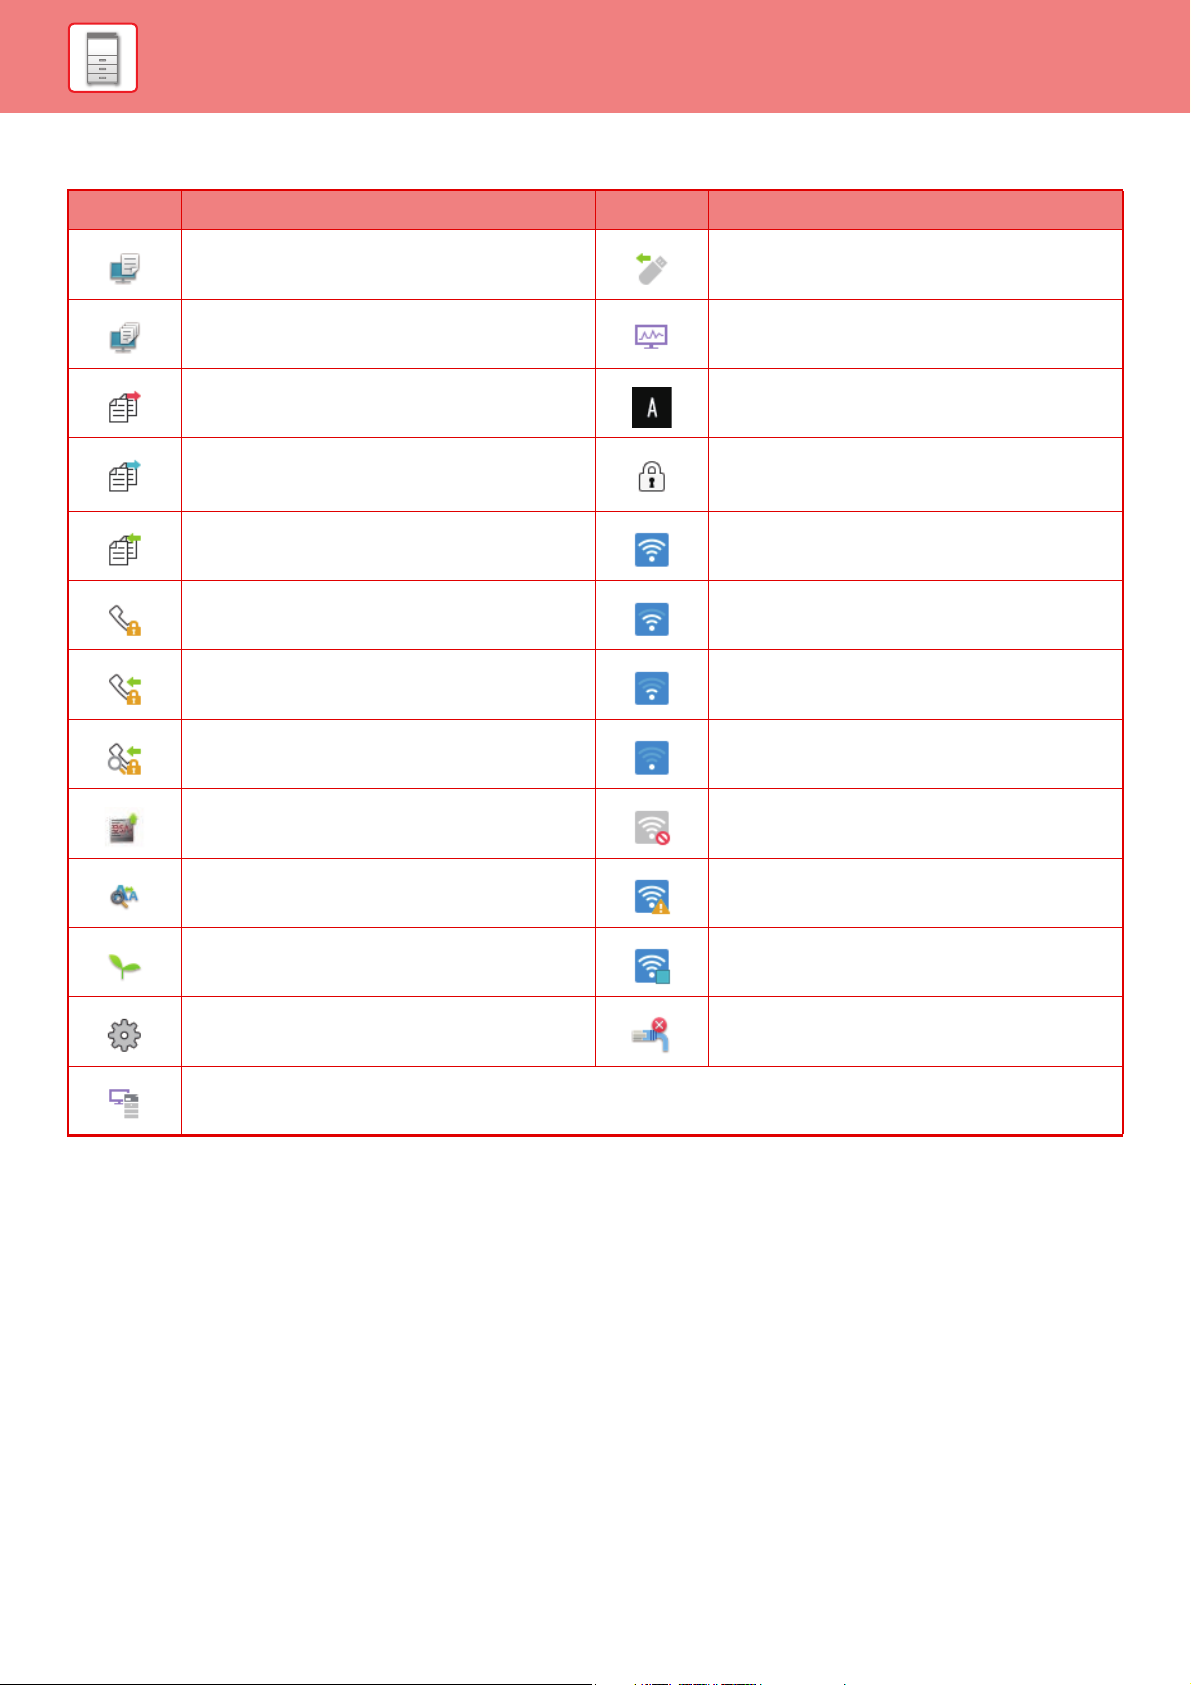
Tap a mode to change to
that mode.
►Changing mode
from the mode display
(page 1-19)
Select shortcut keys for
modes or functions.
►Changing mode
from the Home
screen (page 1-19)
Use these keys to select
functions that make the
machine easier to use.
Displays the machine's status other than the job
using icons.
► Icon indicating the status of the machine
(page
1-17)
Displays the job in
progress or waiting with
text or icon.
Select functions that can
be utilized in respective
modes.
Tap the tab, and the list of
function keys is
displayed.
► ACTION PANEL
(page 1-28)
Switch the pages for
displaying shortcut keys.
Displays the time.
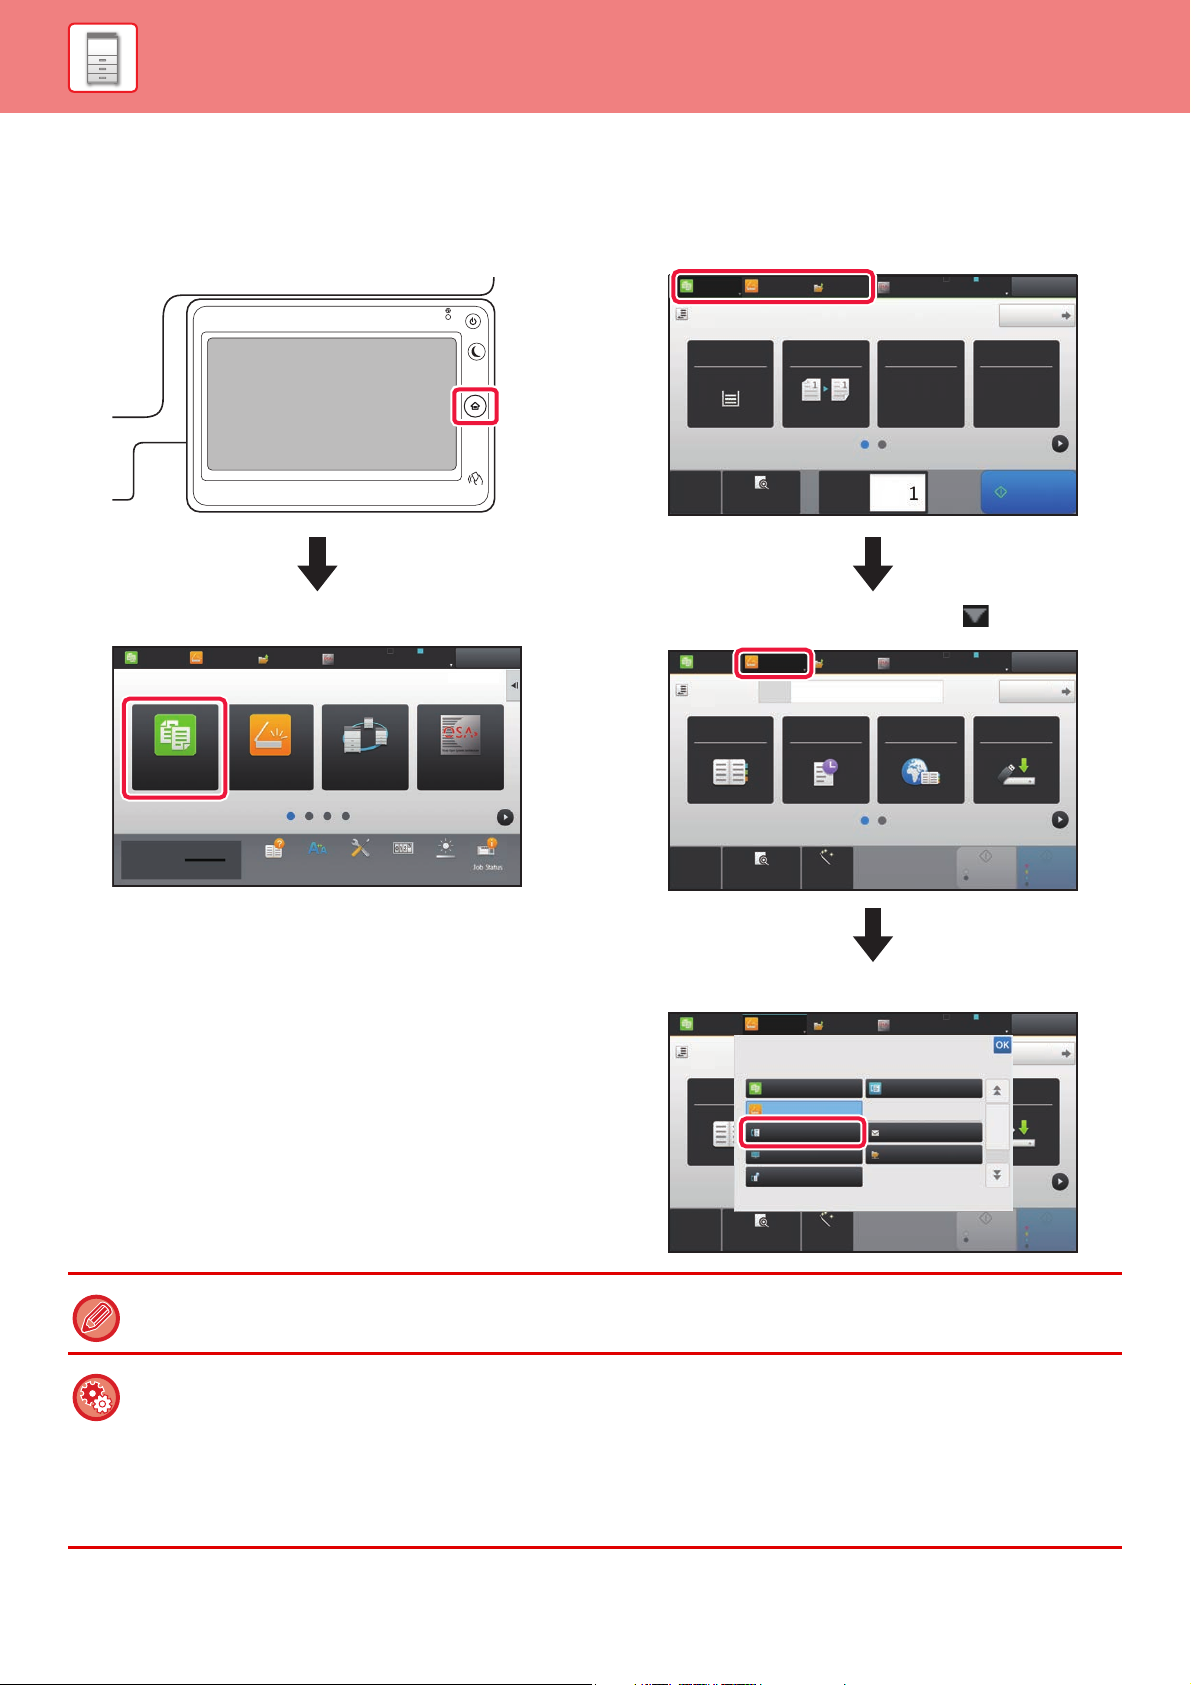
HOME SCREEN
Pressing the [Home Screen] key on the operation panel displays the home screen on the touch panel. The home screen
displays the keys for selecting modes or functions.
For procedures for adding and deleting shortcut keys, see "U/I Customize Guide".
• To set the home screen for each "Favorite Operation Group List":
In "Settings (administrator)", select [User Control] → [Favorite Operation Group List] → [Home Screen List].
Perform this setting when user authentication is used.
• To display the External Service Connect shortcut keys:
You can add shortcut keys for the External Service Connect functions (Google Drive, OneDrive, SharePoint Online, Gmail,
Exchange (E-Mail)) to the home screen.
►BEFORE USING THE CLOUD LINK FUNCTION
(page 1-84)
1-16
BEFORE USING THE MACHINE►BEFORE USING THE MACHINE
Icon indicating the status of the machine
Icon Machine status Icon Machine status
Printer data is being processed. A USB device is installed.
Printer data is being printed. The field support system is enabled.
Send data exists. Single-byte alphanumeric character entry
Forward error data exists. A data security kit is installed.
Received data exists. Connecting to the access point (Level 4)
Received confidential fax data exists. Connecting to the access point (Level 3)
Received data is held. Connecting to the access point (Level 2)
Received preview data exists. Connecting to the access point (Level 1)
OSA communication is in progress. Not connected to the access point
Enlarge display mode is enabled. Bad connection of the wireless LAN device in
Eco mode is enabled. Waiting for the access point
A maintenance notification is issued. A LAN cable is not connected.
Remote operation is in progress.
* Contact your dealer or nearest SHARP Service Department.
the machine
*
1-17

BEFORE USING THE MACHINE►BEFORE USING THE MACHINE
Screen Display Settings
You can configure settings for tap operation on the touch panel in “Settings (administrator)” – [System Settings] →
[Common Settings] → [Operation Settings] → [Condition Settings] → [Screen Display Settings].
Enlarge Display Mode
Displays large characters on the screen.
appears in the system area when Large Character Mode is enabled.
Message Time Setting
The duration of time that messages appear in the touch panel (the time until a message is automatically cleared) can be
set to any number of seconds from 1 to 12.
Language Setting
The language that appears in the touch panel can be changed to any language.
When user authentication is enabled and a display language is specified in the favorite operation group, that setting is given
priority.
Default Display Setting
Set the screen that appears after auto clear and login.
You can select from Easy Copy, Copy, Easy Scan, E-mail, Network Folder, FTP/Desktop, Easy Fax, Internet Fax, Fax,
Print Release, Data Entry, Address Book, Address Book (Easy Scan), Address Book (Easy Fax), Document Filing,
Home Screen, Exchange (E-Mail), Gmail, or the Sharp OSA Screen.
Display Favorite Menus as Default
You can specify to display the "Favorite" first during mode selection.
Display Action Panel as default.
Specify whether or not to display with the action panel on the screen.
Icon is displayed when LAN cable is not connected.
Show an icon when a LAN cable is not connected.
Display Confirmation Dialog when job is canceled.
Show a confirmation dialog box when a job is canceled.
Switch the Number of Sets to be Displayed for Job Status
Set whether the remaining number of sets or the final number of sets is shown in the job status.
Alignment Order of 10-Key
Set whether the numeric keys are arranged in ascending order with "1" in the upper left corner, or "1" in the lower left
corner.
Setting Display from Main Unit
Select settings for the path information of the setting destination displayed when setting mode is set on the machine.
Display Current Path
Set whether or not the current setting items are shown in the path information.
Enable link of current path
Set whether the link at the top is enabled.
MFP Display Pattern Setting
Set the background color of the touch panel. Each time you change patterns, the touch panel image at the bottom of the
screen changes.
1-18
BEFORE USING THE MACHINE►BEFORE USING THE MACHINE
10:15 AM10:15 AM
LINE PRINTER
Easy
Copy
Easy
Scan
HDD
File retrieve
Sharp OSA
Job Status
Print Release Sharp OSA
Easy
Copy
Easy
Scan
Operation
Guide
Enlarge
Display Mode
Settings Total Count LCD Control
Toner Quantity Bk
Press the [Home Screen] key.
Tap the mode icon.
CA
Preview
Copies
Original
8½x11
Paper
Select
Tray 1 1 → 1
8½x11
2-Sided Copy Copy Ratio Staple / Punch
100%
Detail
LINE PRINTER
Easy
Copy
Easy
Scan
HDD
File retrieve
Sharp OSA
Job Status
Off
Start
CA
Preview Auto Set
Original
8½x11
Address
Address Book
Sending History
Global
Address Search
Scan to HDD/
USB
Detail
LINE PRINTER
Easy
Copy
Easy
Scan
HDD
File retrieve
Sharp OSA
Job Status
Start
Color
Start
B/W
E-mail Address
Tap on the mode display.
CA
Preview Auto Set
Original
Address Fax Number
Detail
LINE PRINTER
Easy
Copy
Easy
Scan
HDD
File retrieve
Sharp OSA
Job Status
Start
Color
Start
Address Book
Scan to HDD/
USB
8½x11
Select the mode.
Network Folder
Easy Fax
Easy Scan
Easy Copy
Fax E-Mail
FTP/Desktop
Internet Fax
B/W
Tap the key that shows .
Tap for any mode desired.
CHANGING MODES
Changing mode from the Home screen
Changing mode from the mode display
For procedures for editing the home screen, see "U/I Customize Guide".
• Mode Key Display Setting
In "Settings (administrator)", select [System Settings] → [Common Settings] → [Operation Settings] → [Condition Settings]
→ [Mode Key Display Setting].
Configure settings for the display of mode keys at the top of the screen.
• Modes to Display
Select the mode keys that you want to display.
• Display Mode Keys on Home
You can enable display of the mode keys in the home screen as well.
1-19
BEFORE USING THE MACHINE►BEFORE USING THE MACHINE
Start
Preview
Scan
Again
CA
Start
Send and Print
Scan Original Again
Without change Settings
Store Data in Folder
File
Store Data Temporarily
Quick File
CA
In Easy mode In Normal mode
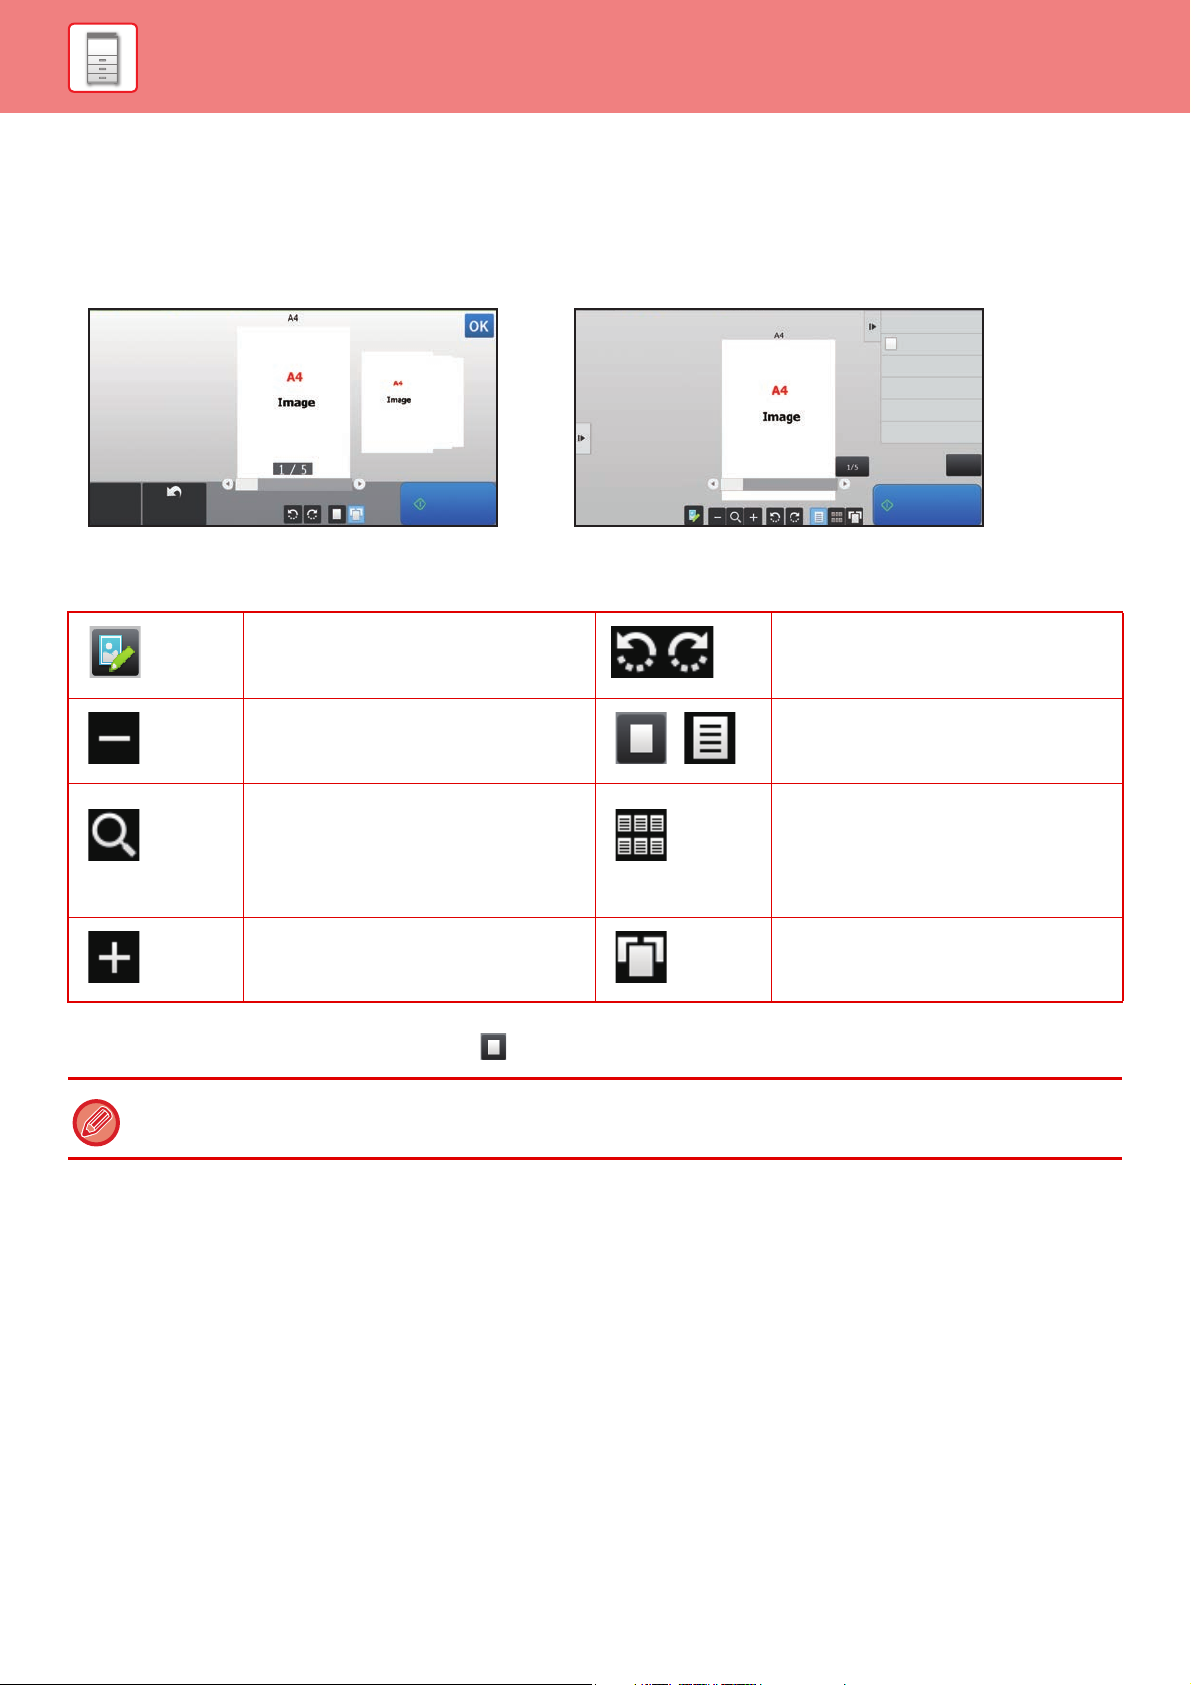
PREVIEW SCREEN
In the preview screen, you can view output images or images stored in the machine using the touch panel.
Keys used in the preview screen
This changes the mode to edit mode.
Pages of the original can be changed,
rotated, or deleted.
*1, *2 This reduces the image.
*1, *2 This displays the scroll bar for
enlargement/reduction operations.
Moving the slider to the left reduces the
image, and moving the slider to the right
enlarges the image.
*1, *2 This enlarges the image. *1 This displays pages in a 3D view.
*1 Can also be used in Easy mode.
*2 In Easy mode, this appears when you tap .
• The display position of an image can be moved by dragging it while it is enlarged.
• To enlarge an image, double-tap it when the preview image is displayed by page.
*1 This rotates the preview image of whole
page in the arrow's direction. The
printing result is not rotated.
*1
This displays preview images of
,
respective pages.
This displays thumbnails of preview
images.
1-20

BEFORE USING THE MACHINE►BEFORE USING THE MACHINE
Preview Setting
Configure preview settings and settings such as specifying thumbnail view as the default setting for display of Document
Filing and other files.
In "Settings (administrator)", select [System Settings] → [Common Settings] → [Operation Settings] → [Condition
Settings] → [Preview Setting].
Received Data Image Check Setting
Select whether or not a preview of received faxes and Internet faxes is shown. This is displayed when a facsimile
expansion kit or Internet fax expansion kit is installed.
Default List/Thumbnail Display
• Fax/I-Fax Reception Data: Select whether the default display format of the received fax/I-Fax
list screen is list or thumbnails.
• File Retrieve of Main Folder/Quick File Folder: Select whether the default display format of the document filing main
folder and temporary folder screens is list or thumbnails.
• File Retrieve of Custom Folder: Select whether the default display format of the document filing
custom folder screen is list or thumbnails.
• File Retrieve of Direct Print: Select whether the default state of the folder screen for direct print
shows the folders as a list or as thumbnails.
"Fax/I-Fax Reception Data" in "Received Data Image Check Setting" and "Default List/Thumbnail Display" can also be set
using [Received Data Image Check Setting] and [Default List/Thumbnail Display] in "Settings (administrator)" – [System
Settings] → [Image Send Settings] →[Common Settings] → [Condition Settings] → [Preview Setting].
1-21
BEFORE USING THE MACHINE►BEFORE USING THE MACHINE
5
Edit End
Move the Page
Rotate 180 Degrees
Specify Chapter Inserts
Insert Blank Page
Delete the Page
Erase Specified Original Area
Erase Specified Range
52341
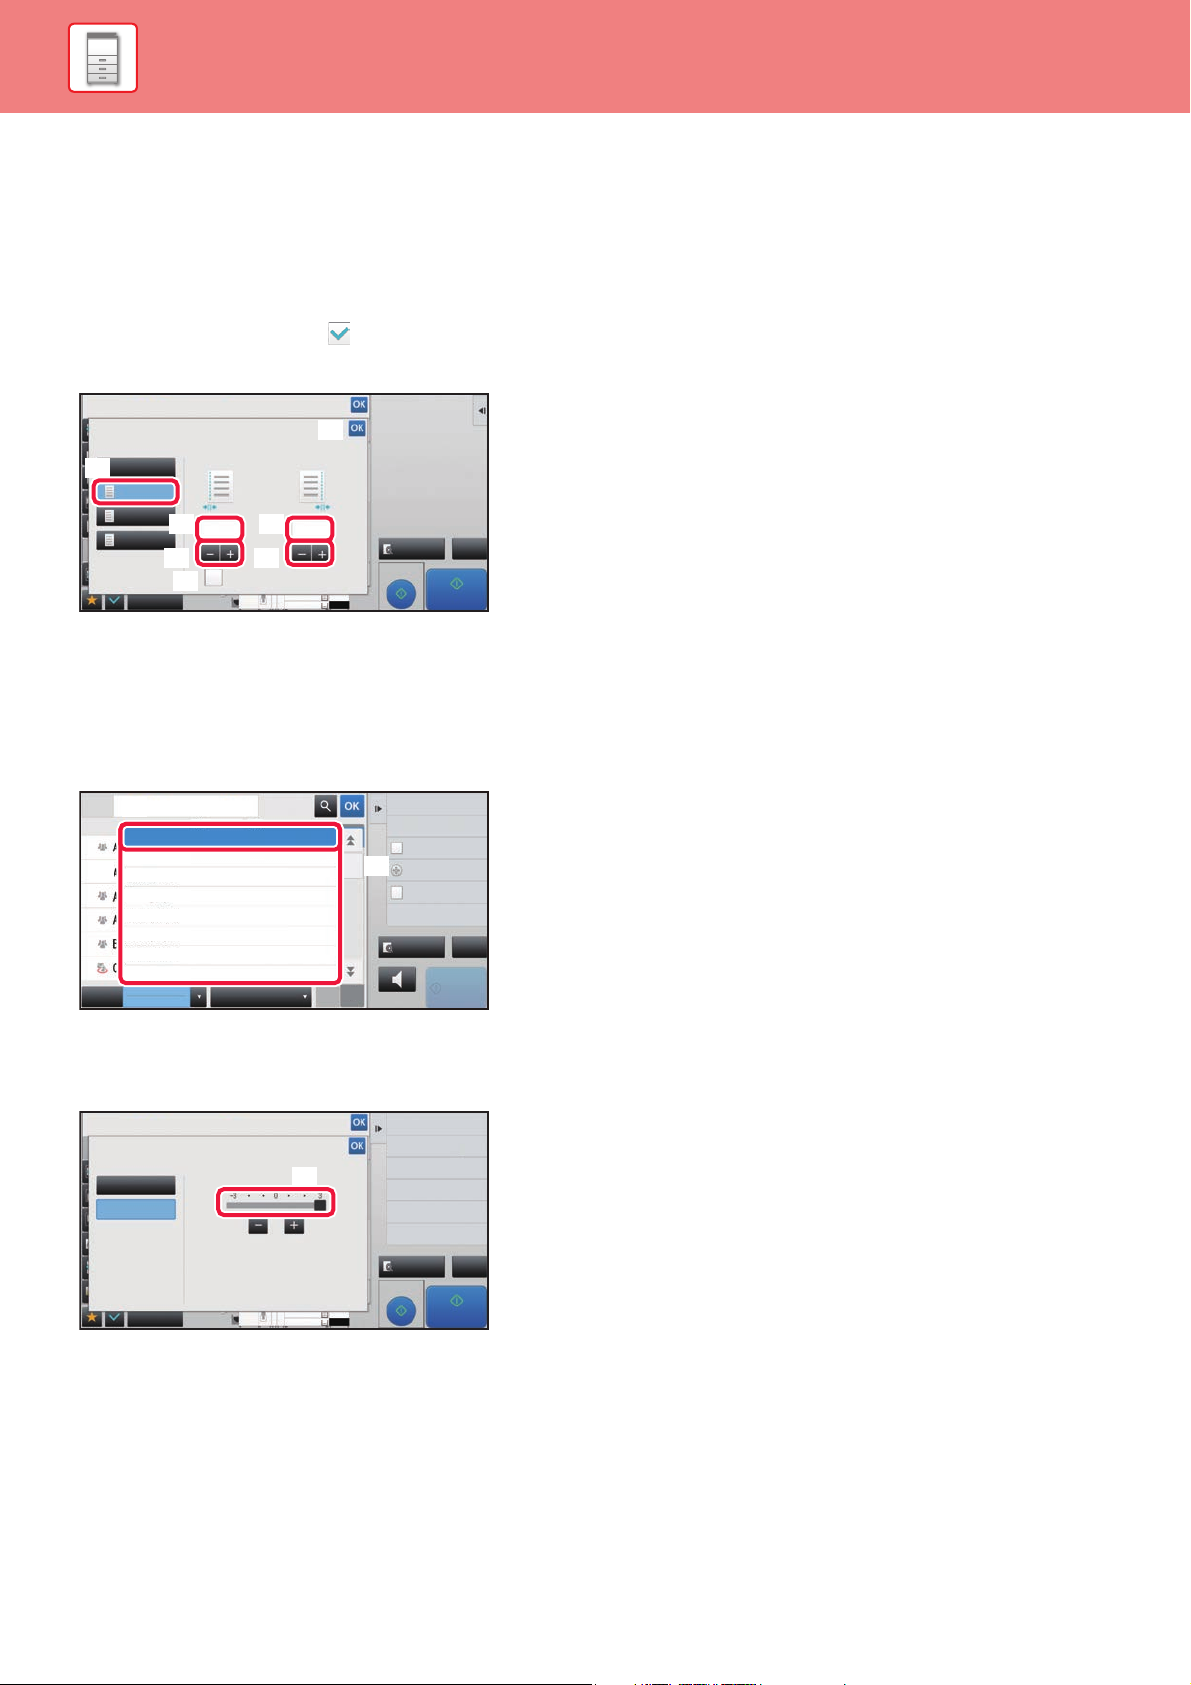
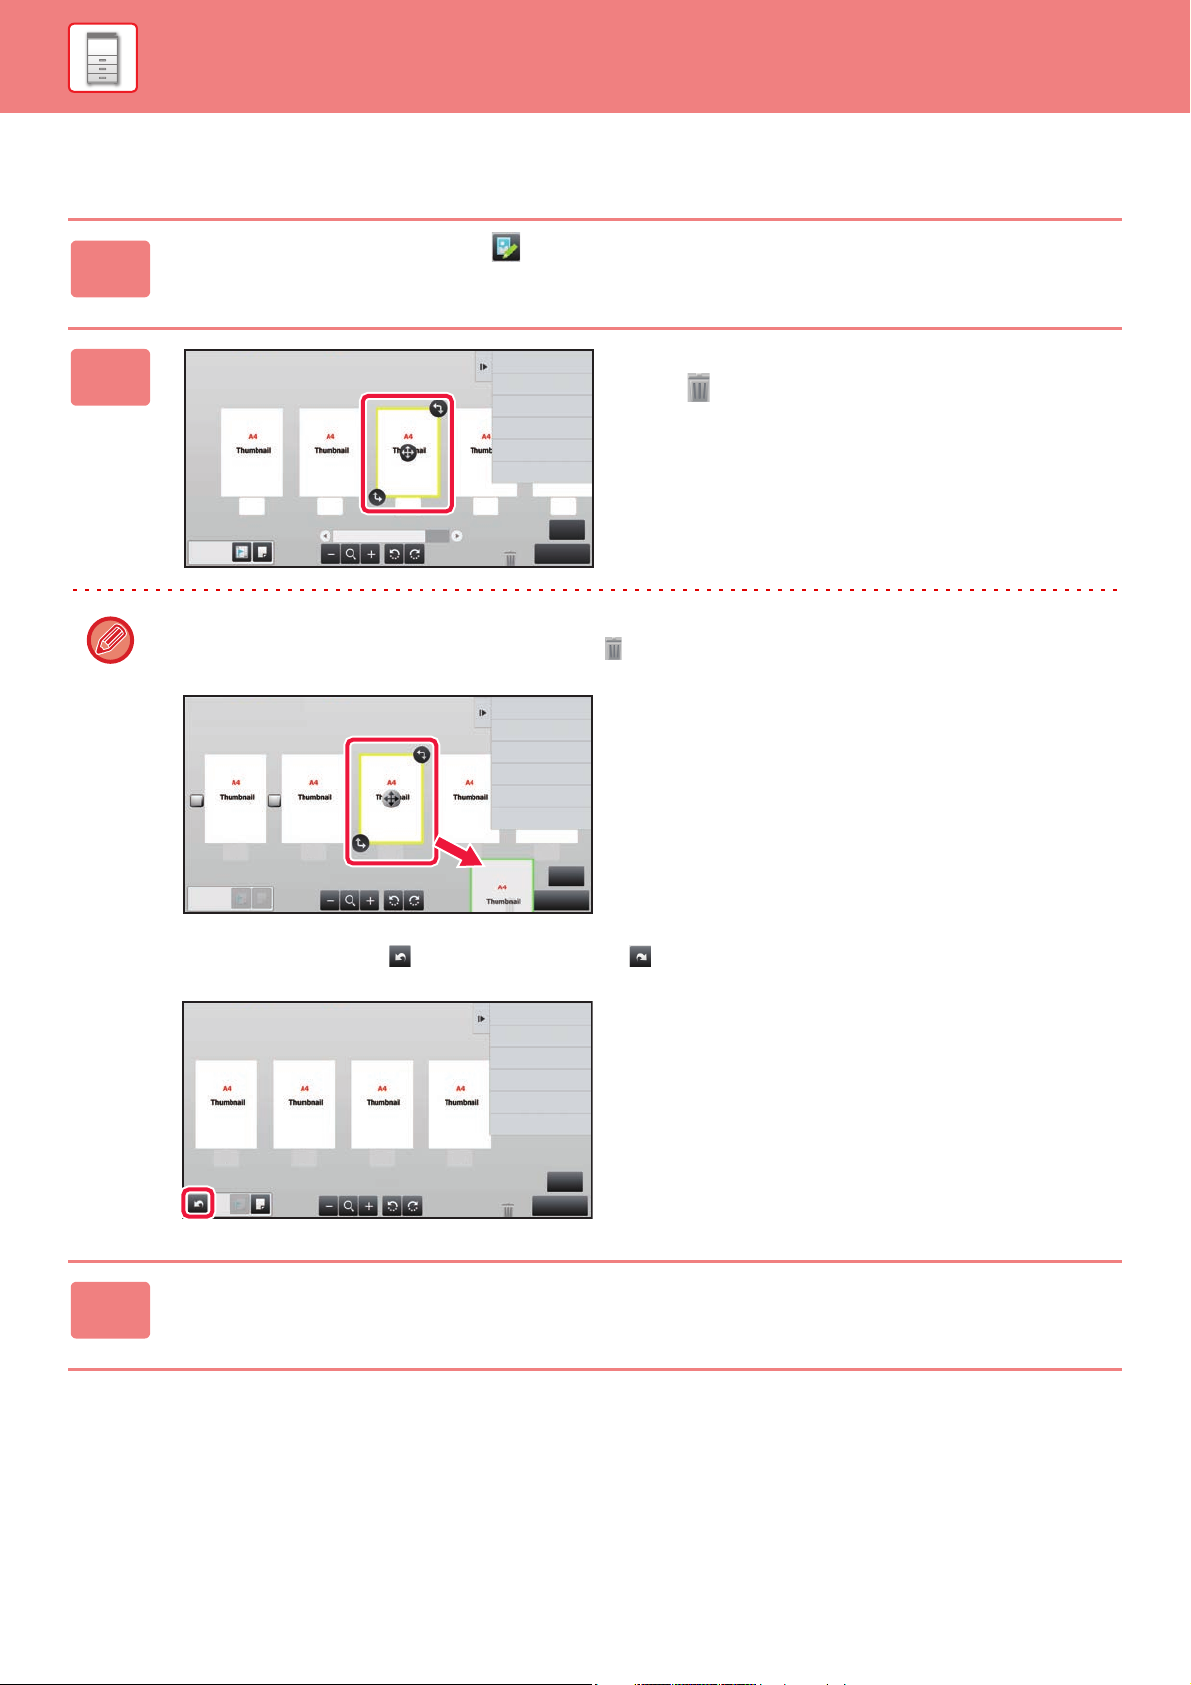
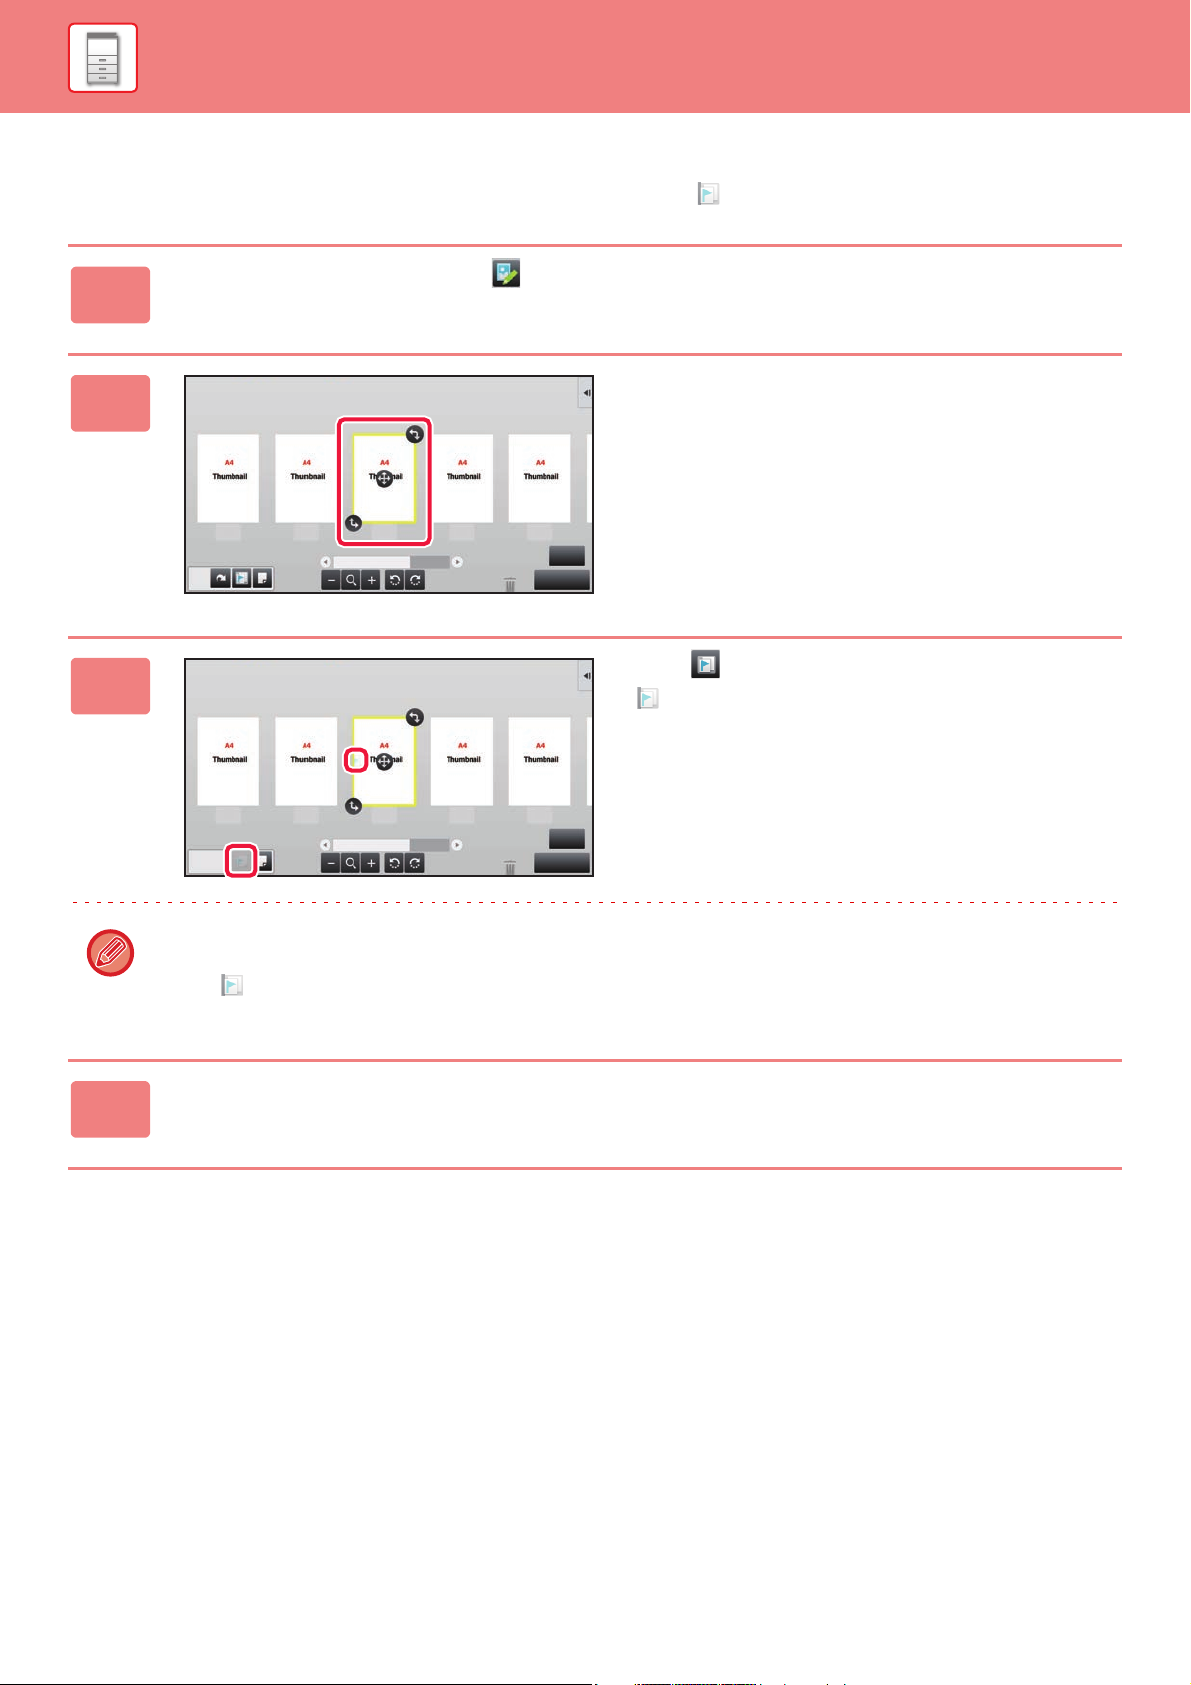
Deleting a page
In the preview screen, tap to switch to edit mode.
1
2
• You can also delete the page by tapping [Delete the Page] on the action panel.
• You can also delete the page by dragging a page to .
Tap the page you want to delete, and
tap .
Cancel and ReturnSelect the location to move.
21 3 4 5
4
Edit End
• To undo the deletion, tap . To redo the deletion, tap .
Erase Specified Range
Erase Specified Original Area
Delete the Page
Move the Page
Rotate 180 Degrees
Insert Blank Page
4321
4
Edit End
3
Tap the [Edit End] key.
1-22
BEFORE USING THE MACHINE►BEFORE USING THE MACHINE
6
Edit End
4 5321
6
Edit End
4 5321
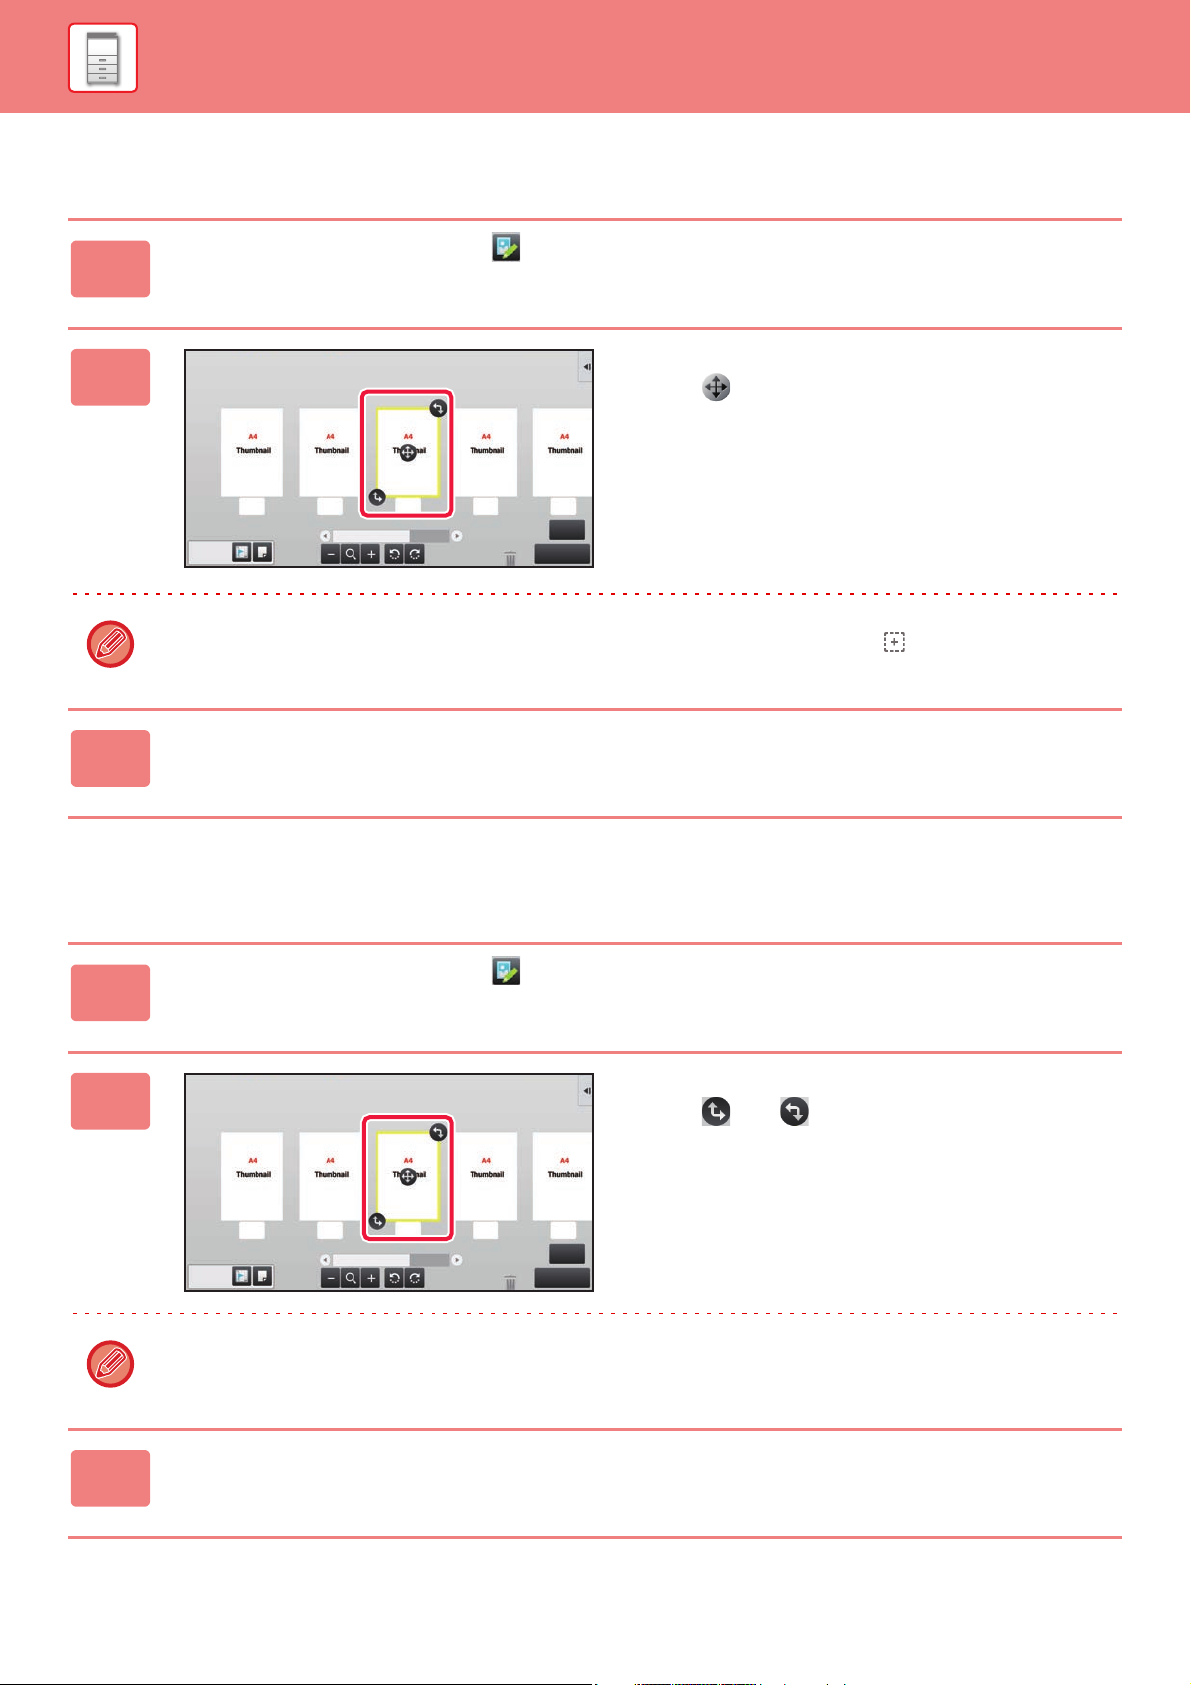
Moving a page
In the preview screen, tap to switch to edit mode.
1
2
Tap the page you want to move, and
drag to move the page.
You can also move the page by tapping [Move the Page] on the action panel and then tap of the destination.
Tap the [Edit End] key.
3
Rotating a page
In the preview screen, tap to switch to edit mode.
1
2
Tap the page you want to rotate, and
drag or to rotate the page.
3
You can also rotate the page by tapping [Rotate 180 Degrees] (Copy mode only) or [Rotate 90 Degrees] (Fax and
scanner mode only) on the action panel.
Tap the [Edit End] key.
1-23
BEFORE USING THE MACHINE►BEFORE USING THE MACHINE
6
Edit End
4 5321
6
Edit End
4 5321
Setting chapter inserts
When N-Up or 2-Sided is specified, you can move a page marked with to the first page.
In the preview screen, tap to switch to edit mode.
1
Tap the page you want to set chapter
2
inserts.
3
4
Tap .
is displayed on the page.
• You can also set chapter inserts by tapping [Specify Chapter Inserts] on the action panel.
• To cancel the Chapter Inserts setting:
Tap displayed on the page, or select the page and tap [Cancel Chapter Inserts of Selected Page.] on the action
panel.
Tap the [Edit End] key.
1-24
BEFORE USING THE MACHINE►BEFORE USING THE MACHINE
4
Edit End
Cancel and ReturnSelect the location to insert blank
page.
45321
6
Edit End
Move the Page
Rotate 180 Degrees
Specify Chapter Inserts
Insert Blank Page
Delete the Page
Erase Specified Original Area
Erase Specified Range
4 5321
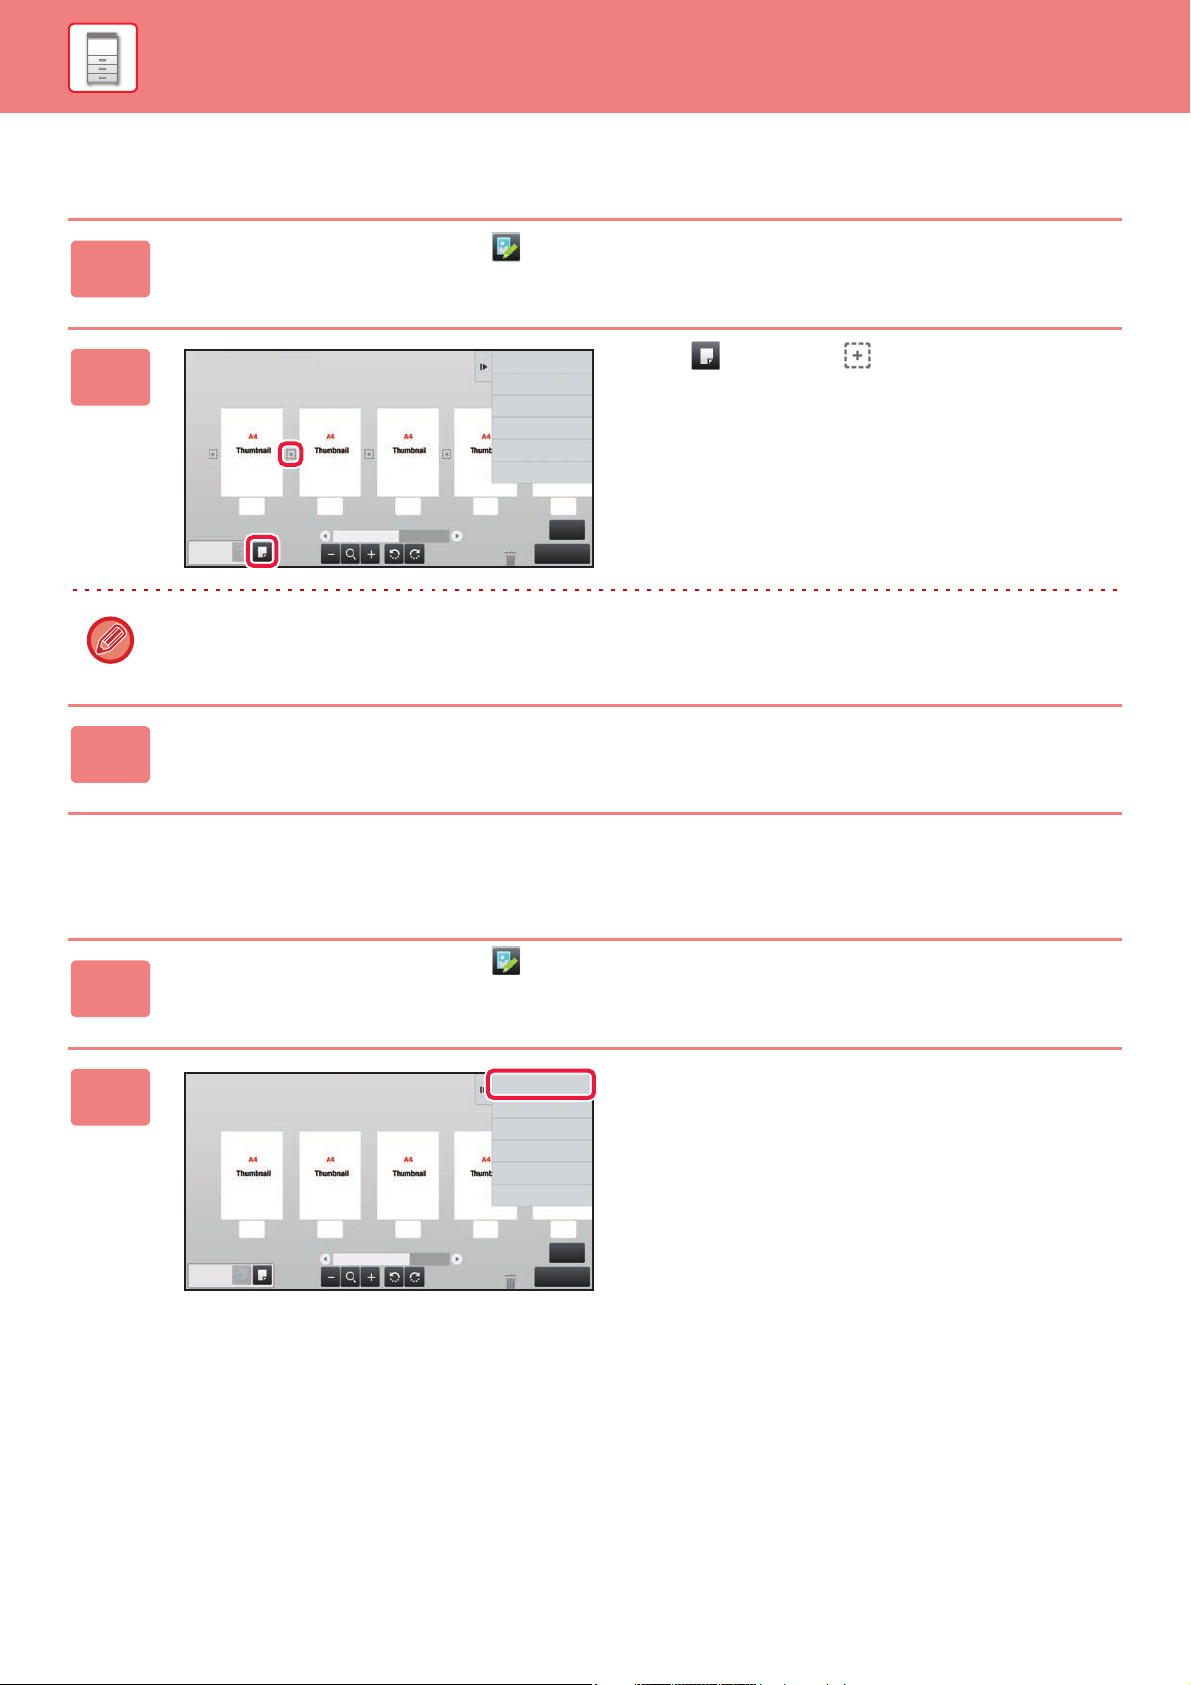
Inserting a blank page
In the preview screen, tap to switch to edit mode.
1
2
Tap , and tap for the location
into which you want to insert a blank
page.
You can also insert a blank page by tapping [Insert Blank Page] on the action panel.
Tap the [Edit End] key.
3
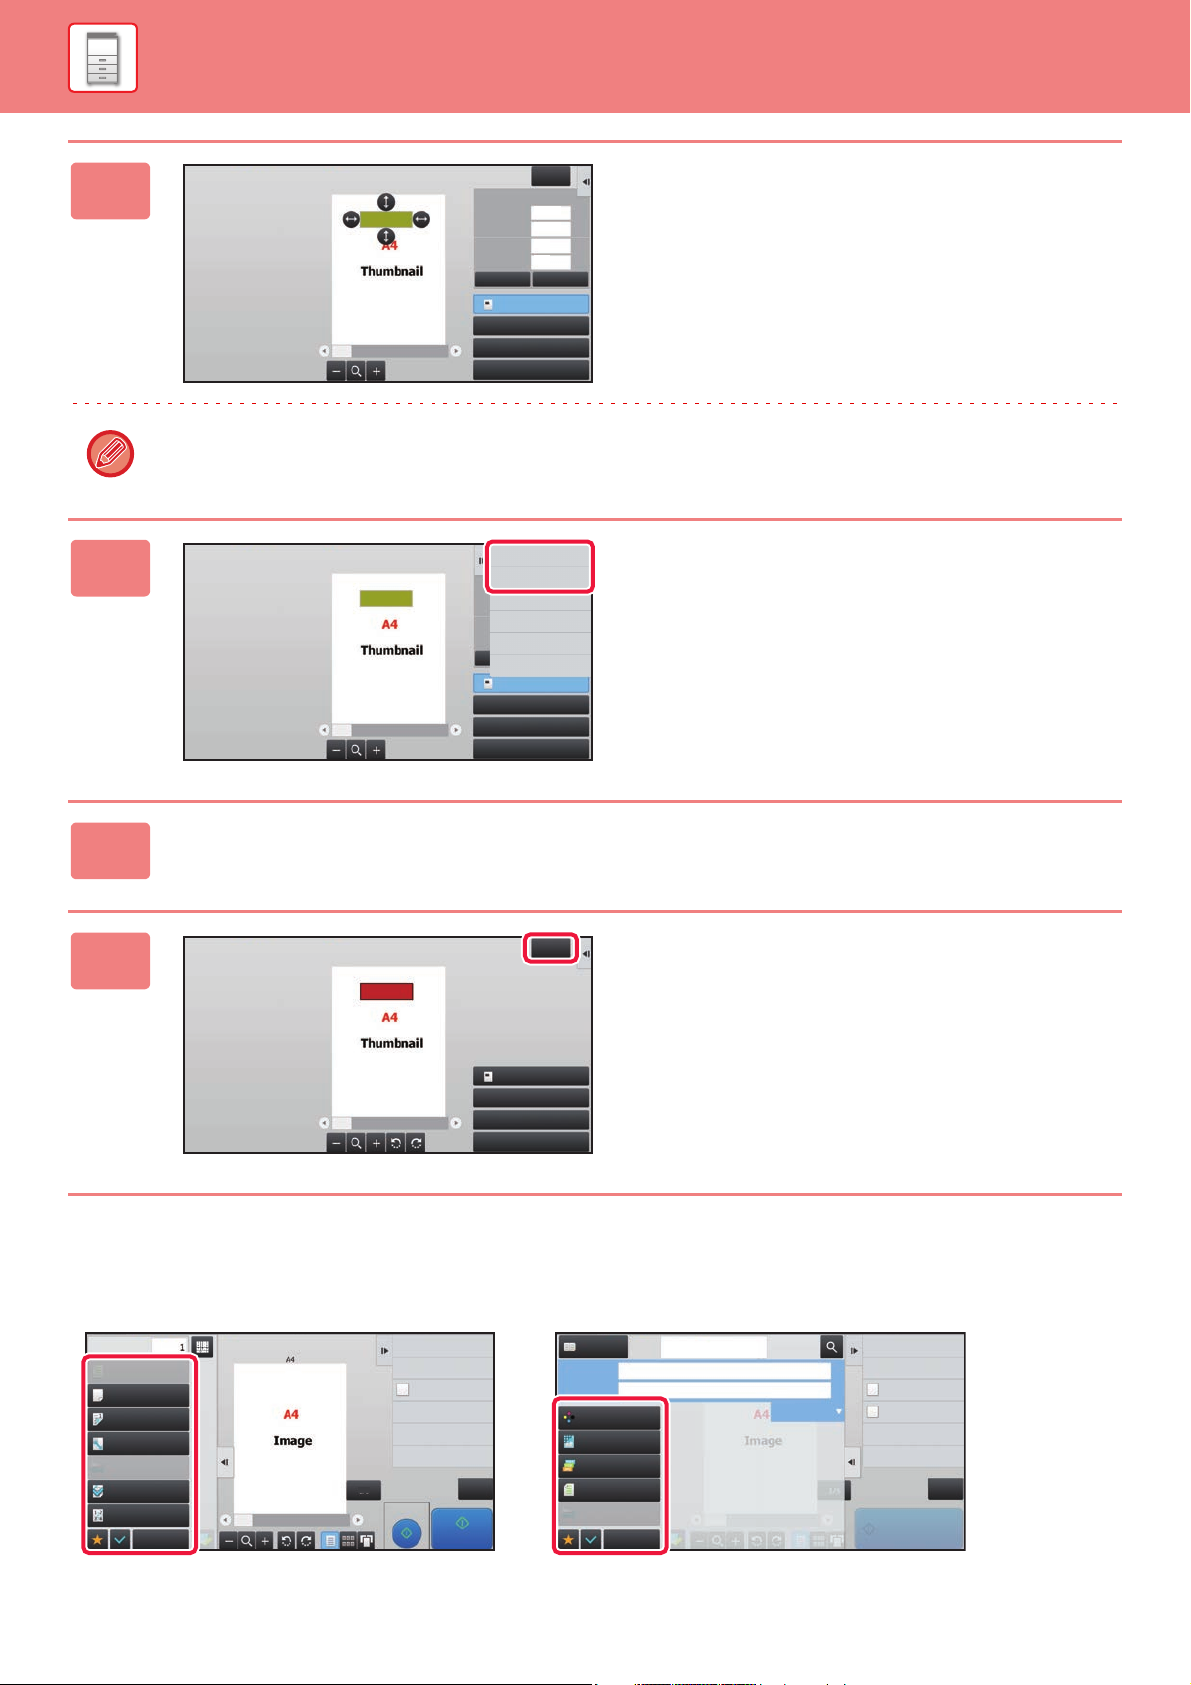
Deleting part of the original image
In the preview screen, tap to switch to edit mode.
1
2
Tap [Erase Specified Range] on the
action panel.
1-25
BEFORE USING THE MACHINE►BEFORE USING THE MACHINE
Specify Range2
Specify Range3
Specify Range4
Erase Specified Range
Apply This Erase
Position to This Page.
Reverse Erase Range
Apply This Erase
Position to All Pages.
1 / 6
Copies
Paper Select
Auto
Exposure
Auto
Original
Auto A4
Start
Send and Print
Scan Original Again
Without change Settings
Store Data in Folder
File
Store Data Temporarily
Quick File
Proof Copy
Register Current Settings
Program Registration
2-Sided Copy
1-Sided→1-Sided
Copy Ratio
100%
Others
CA
Output
N-Up
Off
Start
Color Mode
Auto/Mono2
Resolution
200x200dpi
File Format
PDF
Original
Auto
Others
Address Book
Subject
File Name
Address Touch to input Address
Options
Exposure
CA
Sending History
Quick File
Call Search Number
Check Send/Receive
Status
Send Same Image
as Fax Address
Store Data Temporarily
File
Store Data in Folder
Specified by System Settings
3
4
Erase Specified Range
Start Point
X
Y
Height
Width
Clear OK
Specify Range2
Specify Range3
Specify Range4
Exit
53
31
31
97
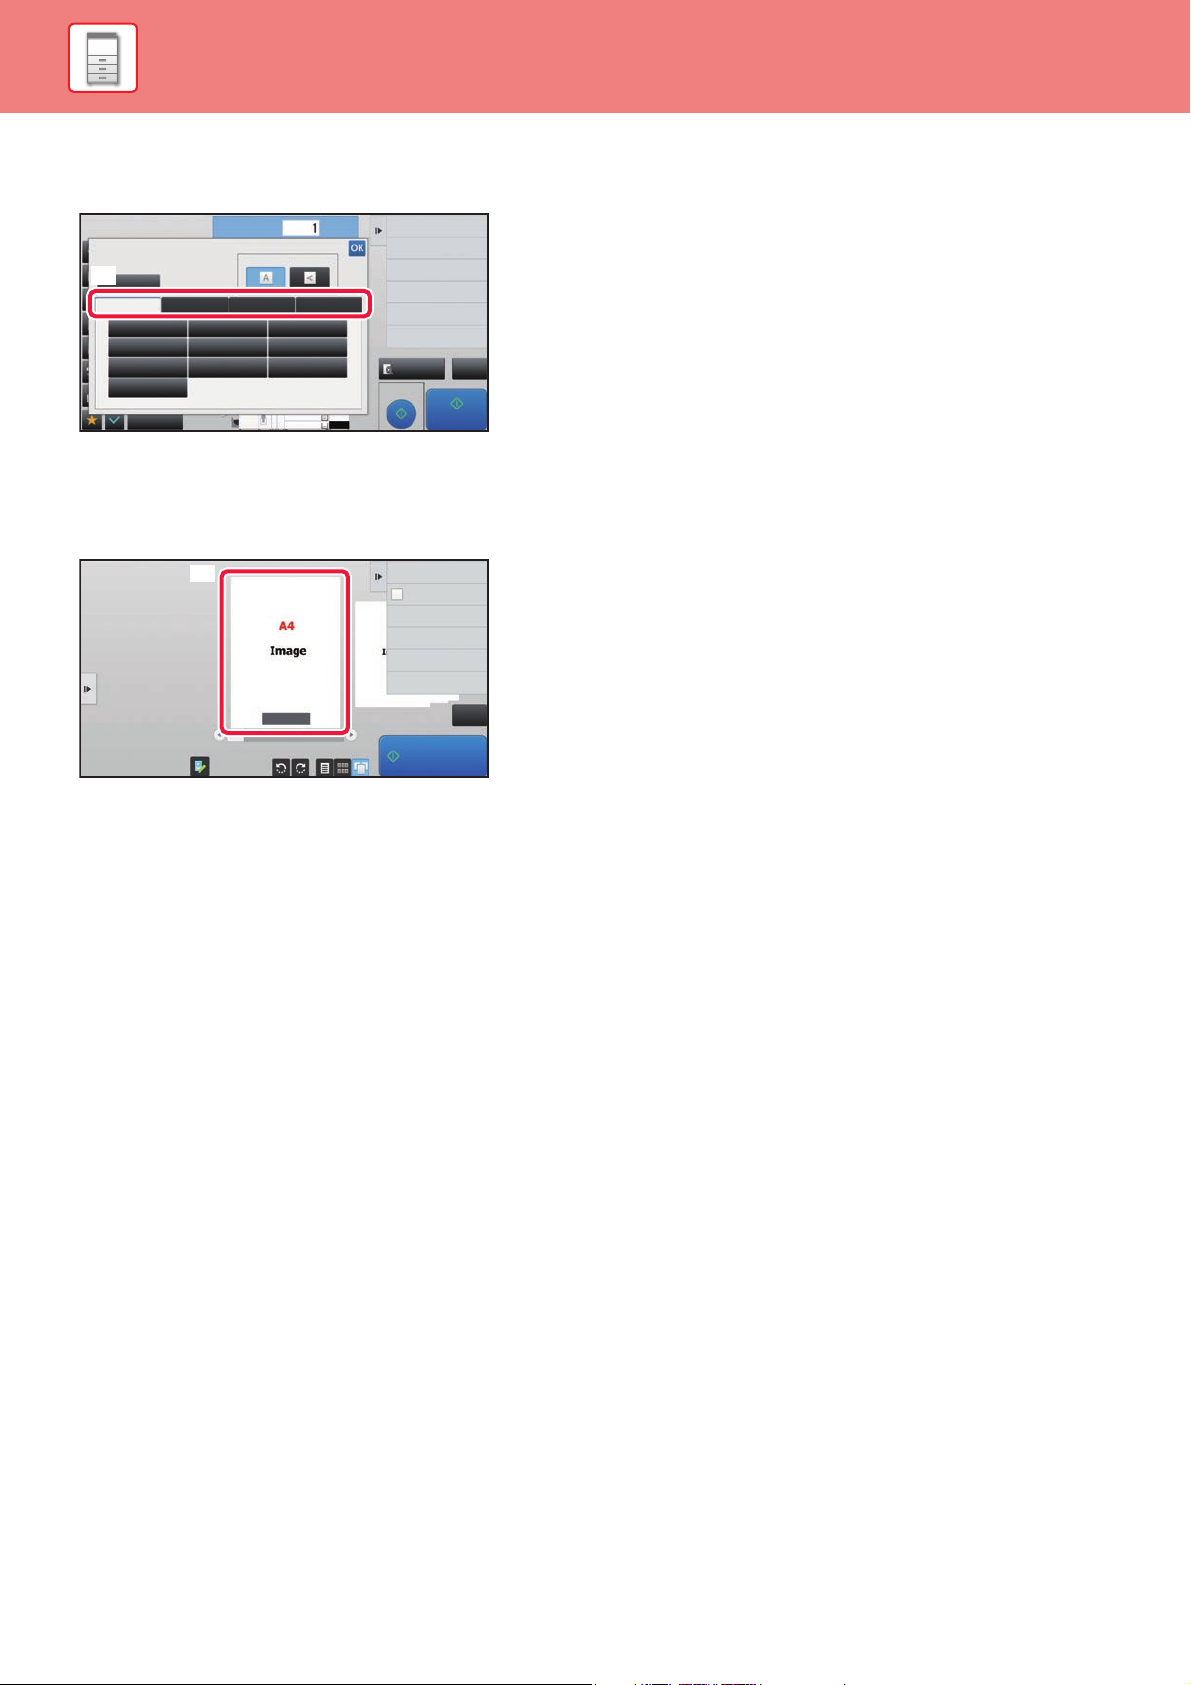
Follow the on-screen instructions to
specify the erase range.
Specify the erase range and then tap the [Execute] key.
To delete the image outside the selected range, tap [Reverse Erase Range] on the action panel.
On the action panel, select [Apply This
Start Point
Height
Width
Erase Position to All Pages.] or [Apply
This Erase Position to This Page.].
As necessary, repeat the steps to specify the erase range and the pages to
5
which it is applied.
Erase Specified Range
Exit
Tap the [Exit] key.
6
Erase Range1
Specify Range2
Specify Range3
Specify Range4
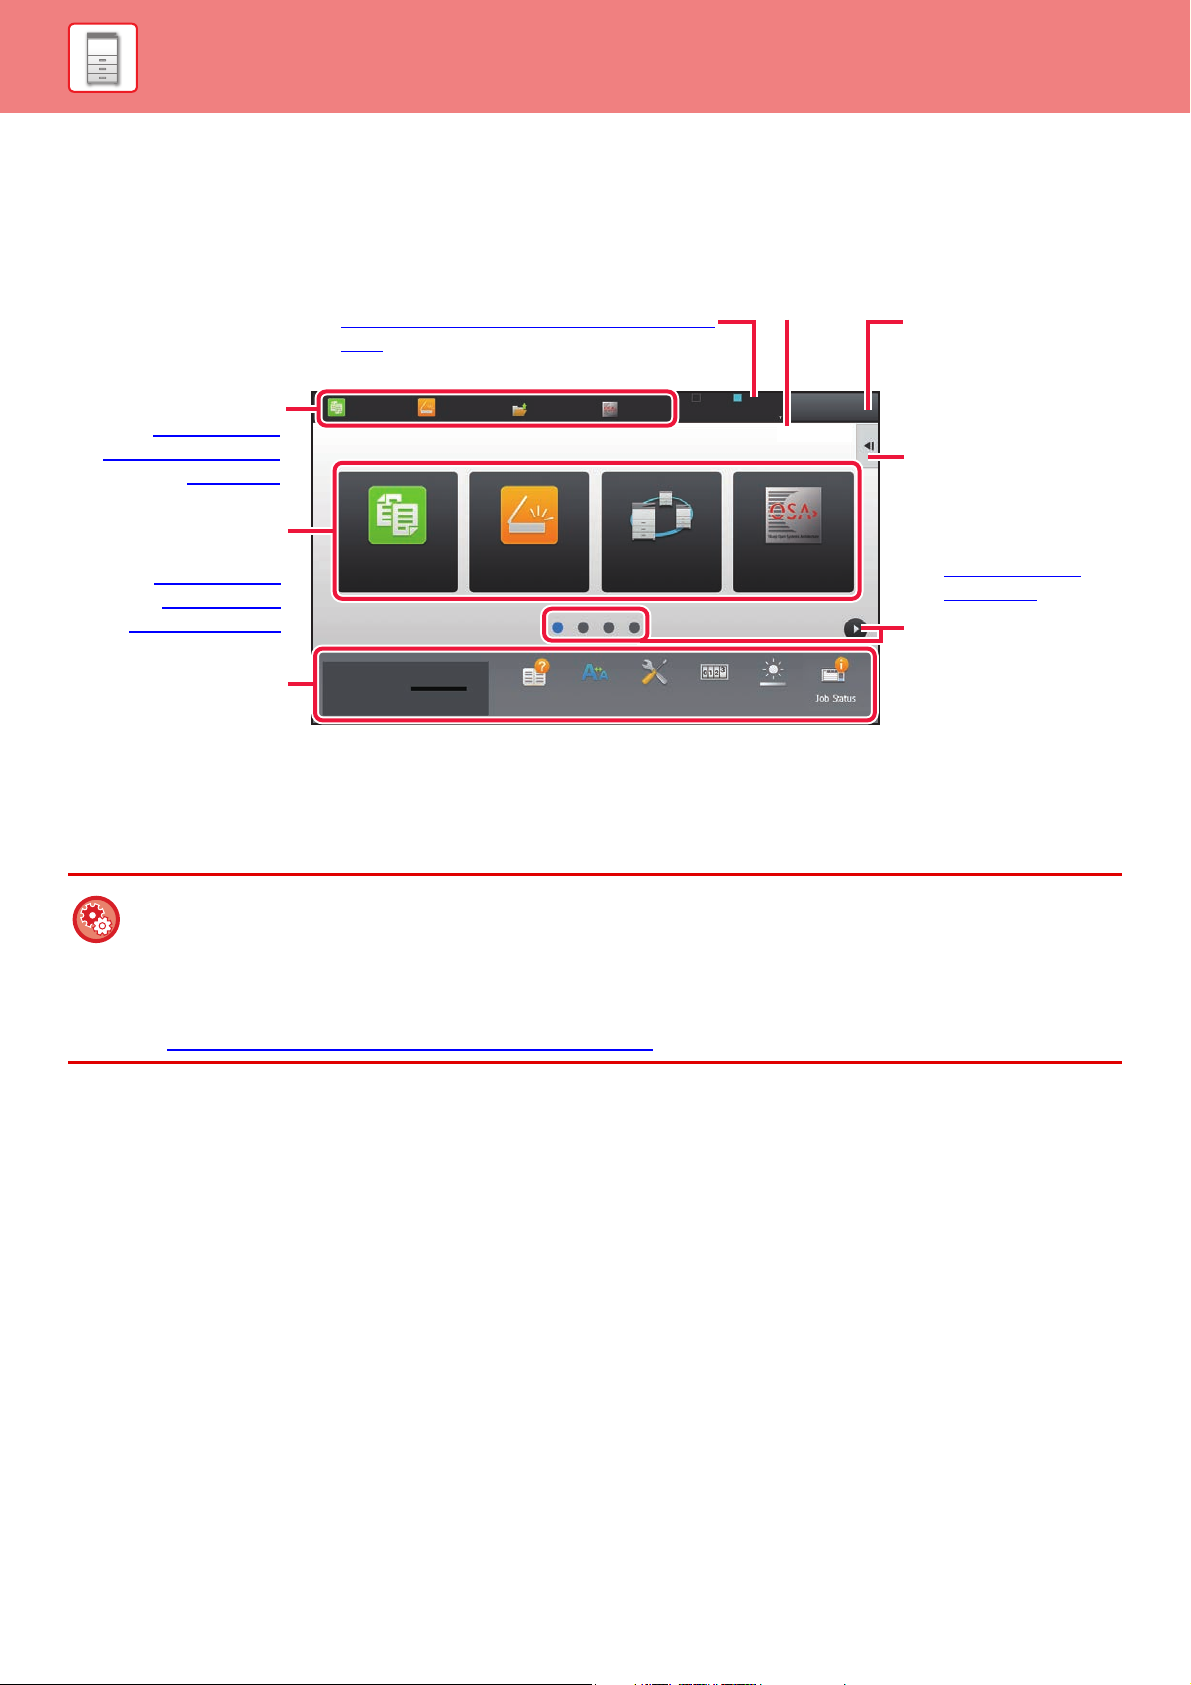
Changing the settings
Tapping the tab on the left of the screen allows you to change the settings.
You cannot tap the keys for functions whose settings cannot be changed.
1-26
BEFORE USING THE MACHINE►BEFORE USING THE MACHINE
1
No. of copies
Start
CA
Cancel Copy
Start
CA
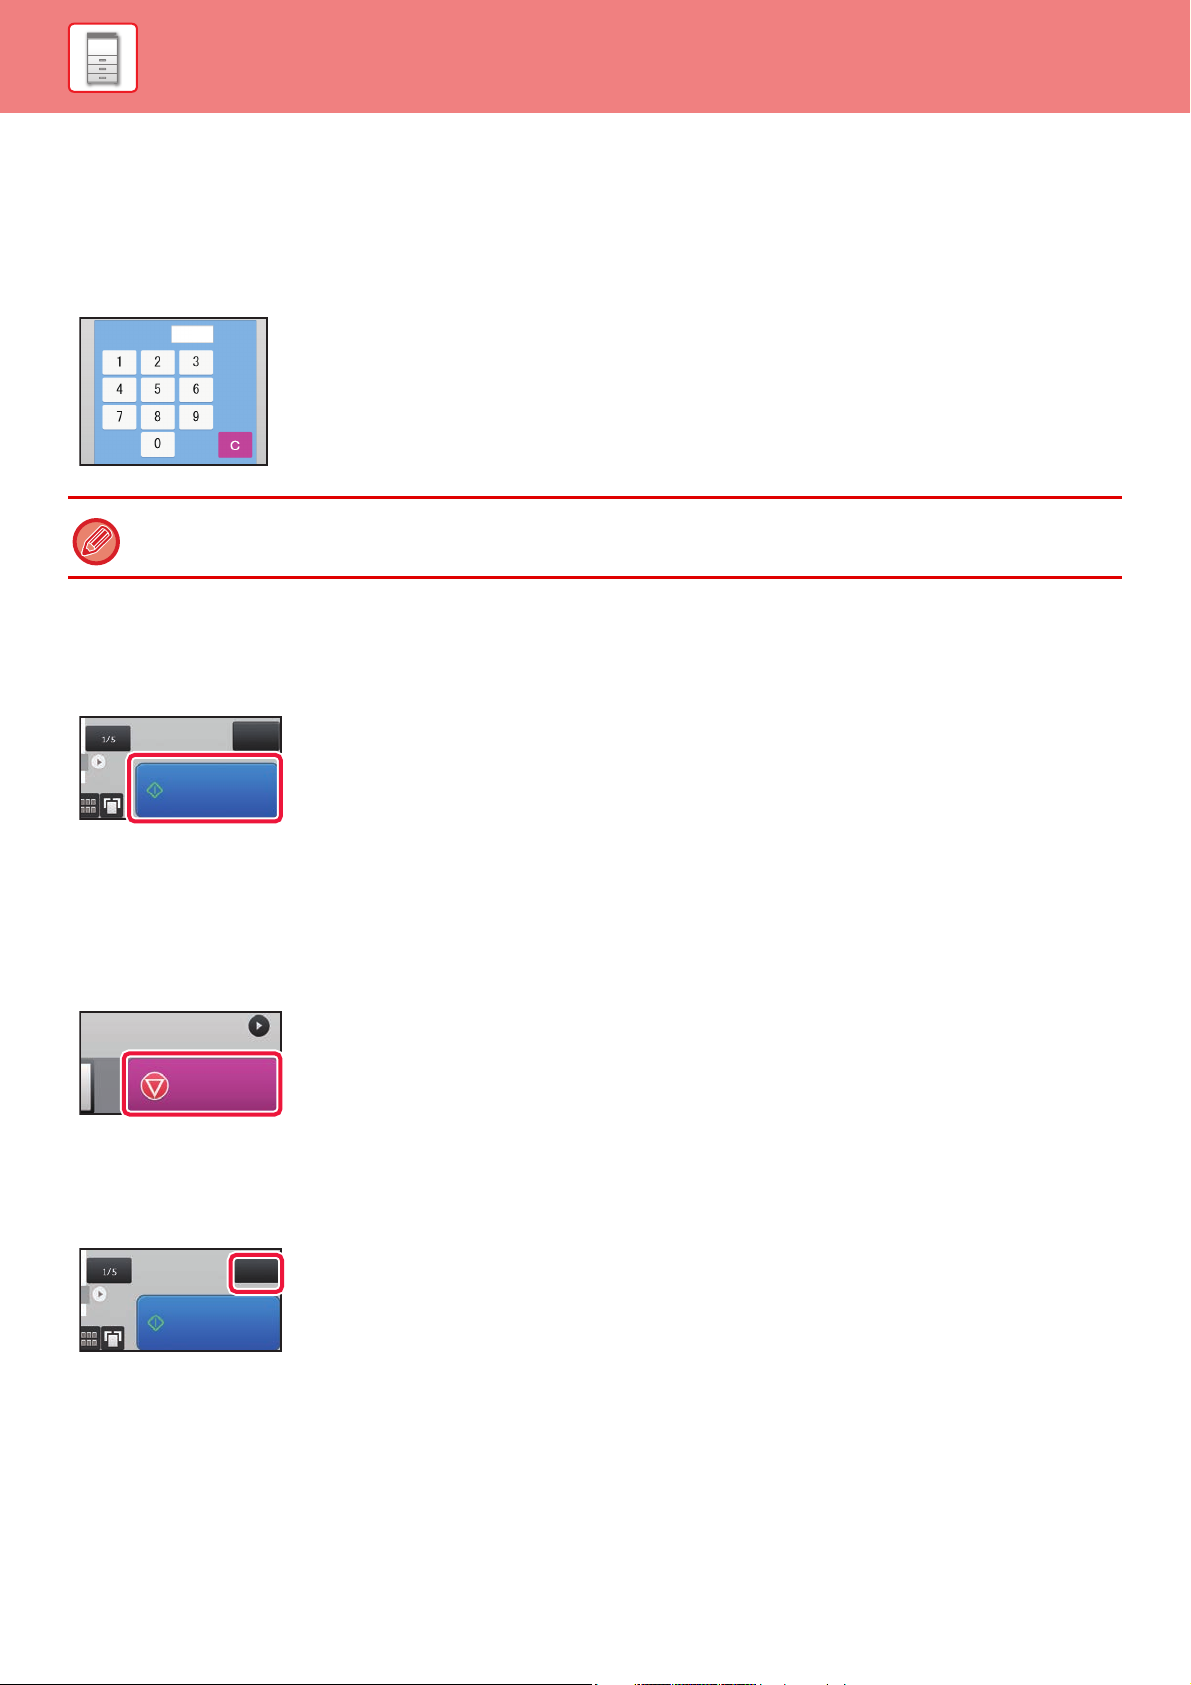
OPERATION OF FREQUENTLY USED KEYS
Numeric keys
Tap a number to enter it.
To clear the entered number, tap the [C] key.
On the address screen, you can enter characters other than numbers, and a different key layout is provided. You can also
move the cursor by using the [←] and [→] keys. Tap the [C] key to delete one character to the left of the cursor.
[Start] key
Tap to perform a print or send job.
[Cancel Copy] key, [Storing Canceled] key, [Cancel Scan] key, [Sending
Canceled] key
Tap to stop copying, printing, or transmission.
[CA] key
Tap to cancel all settings and restore the initial status in each mode.
1-27
 Loading...