

Page 1

OPERATION
MANUAL
(for printer and scanner)
DIGITAL MULTIFUNCTIONAL
SYSTEM
Page
• INTRODUCTION ....................1
• CONTENTS............................2
• PRINT.....................................3
• SCAN ...................................12
• SYSTEM SETTINGS............23
• TROUBLESHOOTING .........25
• SPECIFICATIONS ...............29
Page 2

INTRODUCTION
This manual describes the printer and scanner functions of the digital multifunctional system.
Note
• For information on loading paper, replacing toner cartridges, clearing paper misfeeds, handling peripheral devices,
and other copier-related information, please refer to "Operation manual (for general information and copier)" that
accompanies the machine.
• For information on installing the drivers and software cited in this manual, please refer to the separate "Software
setup guide".
• For information on the operating system, please refer to your operating system manual or the online Help function.
• The screen images and procedures that appear in this manual are mainly for Windows Vista. With other versions
of Windows, some screen images may be different from those in this manual.
• The explanations in this manual are based on American English and the North American version of the software.
Software for other countries and regions may vary slightly from the North American version.
• This manual refers to the Reversing single pass feeder as the "RSPF" and the Single pass feeder as the "SPF".
Unless specific mention is made, both the RSPF and the SPF are referred to simply as "SPF".
• Where "MX-xxxx" appears in this manual, please substitute the name of your model for "xxxx".
In some regions the "System settings guide" cited in this manual is a separate manual, and in other regions the
"System settings guide" is included in the "Operation manual (for general information and copier)".
The display screens, messages, and key names shown in the manual may differ from those on the actual machine
due to product improvements and modifications.
1
Page 3

CONTENTS
INTRODUCTION ........................................................................................................................................ 1
1
BASIC PRINTING .............................................. 3
● IF THE TRAY RUNS OUT OF PAPER DURING
● PAUSING A PRINT JOB...................................4
● WHEN "PAPER SOURCE" IS SET TO [AUTO
● HOW [BYPASS TRAY] AND [BYPASS
OPENING THE PRINTER DRIVER FROM THE
[START] BUTTON ............................................. 5
PRINTER DRIVER SETTINGS .......................... 6
● TWO-SIDED PRINTING (ONLY FOR MODELS
●
●
●
● PRINTING A WATERMARK...........................10
OUTLINE OF THE PRINT STATUS WINDOW
PRINT
PRINTING.........................................................4
SELECT] ...........................................................4
MANUAL] DIFFER IN THE "PAPER SOURCE"
SETTINGS ........................................................4
THAT SUPPORT TWO-SIDED PRINTING) .....7
PRINTING MULTIPLE PAGES ON ONE PAGE
FITTING THE PRINT IMAGE TO THE PAPER
ROTATING THE PRINT IMAGE 180 DEGREES
......8
....9
...10
... 11
3
SYSTEM SETTINGS LIST............................... 23
USING THE SYSTEM SETTINGS
4
TROUBLESHOOTING..................................... 25
● PRINTING PROBLEMS................................. 25
● SCANNING PROBLEMS ............................... 27
5
SYSTEM SETTINGS
...................... 24
TROUBLESHOOTING
SPECIFICATIONS
2
SCANNING OVERVIEW .................................. 12
SCANNING FROM A TWAIN-COMPLIANT
APPLICATION
● SCANNER DRIVER SETTINGS.....................15
SCANNING FROM A WIA-COMPLIANT
APPLICATION (WINDOWS XP/Vista) ............ 17
SCANNING FROM THE "SCANNER AND
CAMERA WIZARD" (WINDOWS XP) ............. 18
SCANNING USING THE KEYS ON THE
MACHINE......................................................... 20
BUTTON MANAGER ....................................... 21
● BUTTON MANAGER SETTINGS ...................22
SCAN
.................................................. 13
2
Page 4
DATA
ON LINE
SCAN
PRINT
COPY
1
This chapter explains the basic procedure for printing and how to select printer driver settings for various purposes.
Note
Paper that can be used and the procedures for loading paper are the same as for copying. See the "Operation
manual (for general information and copier)".
BASIC PRINTING
The following example explains how to print a document from WordPad.
Before printing, make sure that the correct size of paper for your document has been loaded in the machine.
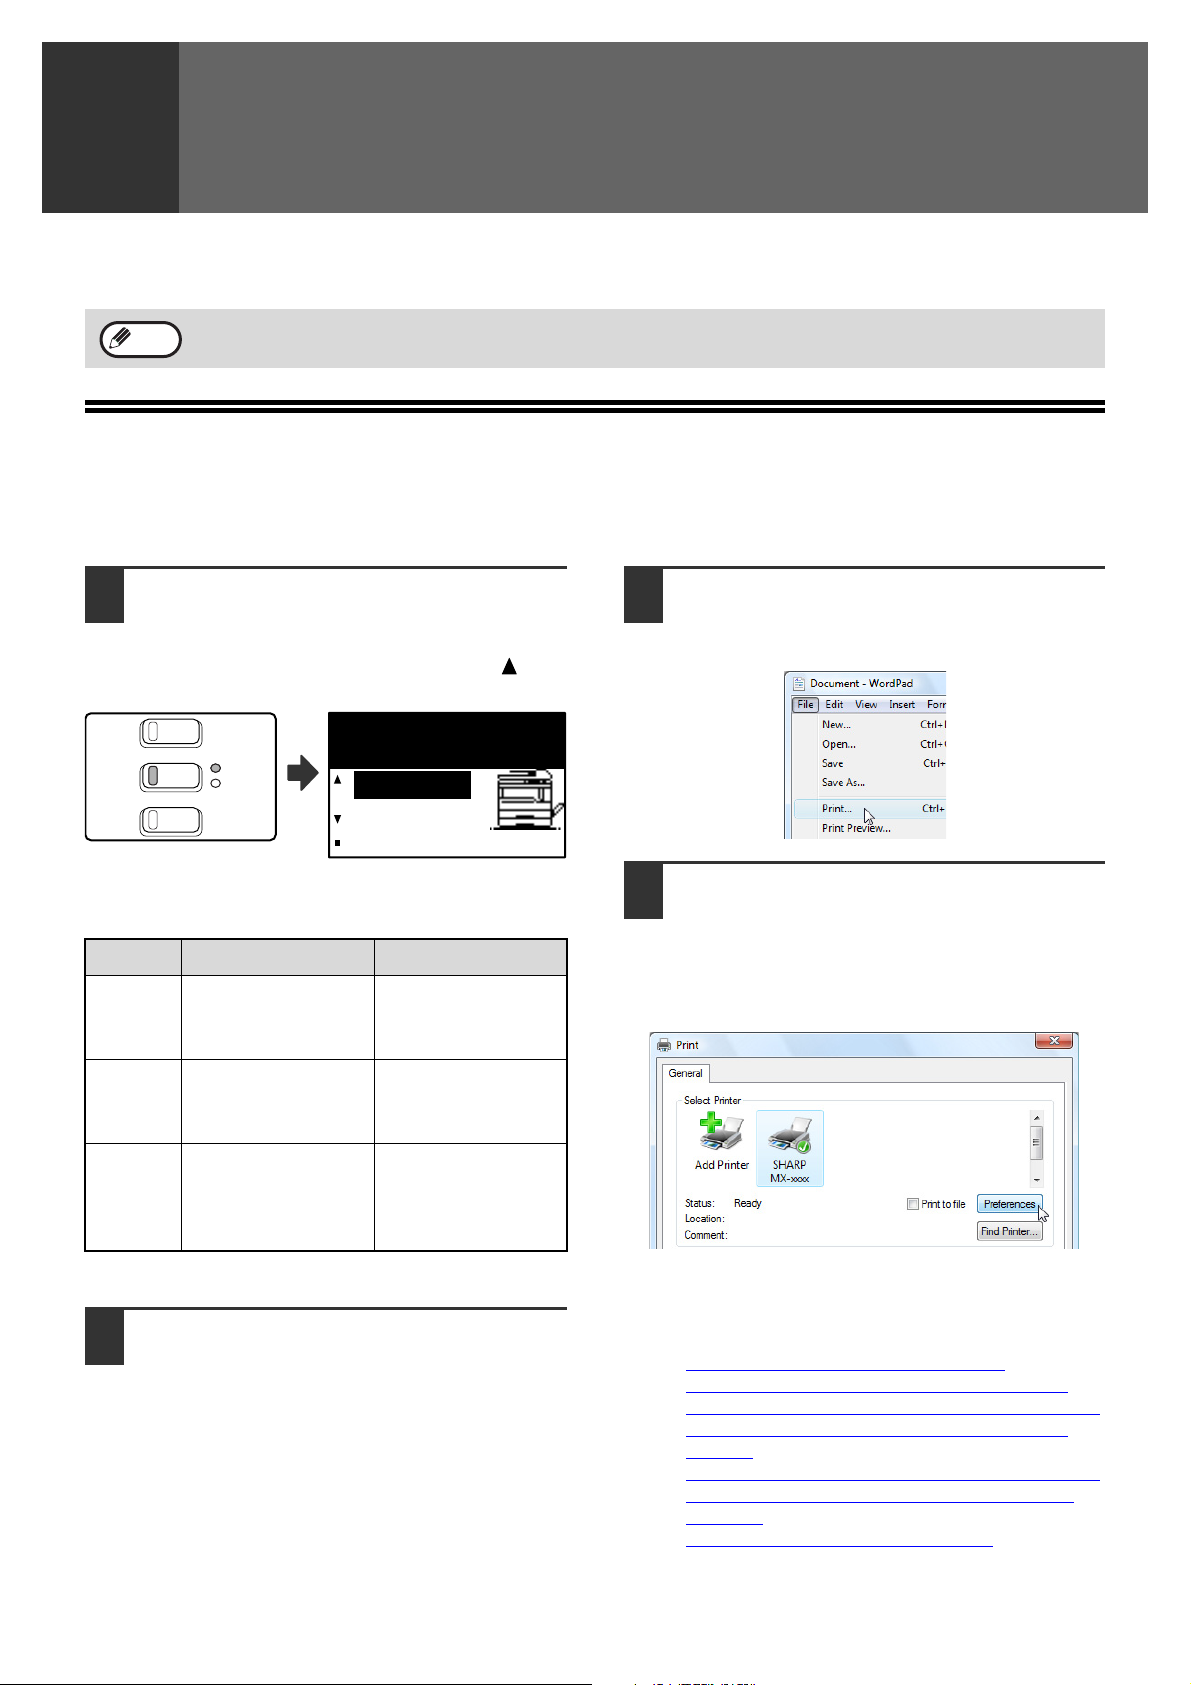
Make sure that the ONLINE indicator
1
on the operation panel is lit.
If the ONLINE indicator is not on, press the [PRINT]
key to switch to printer mode and then use the [ ] key
to select "ONLINE".
Ready to print.
ONLINE
OFFLINE
The status of the printer function is indicated by the
ONLINE and DATA indicators above the [PRINT] key.
ONLINE indicator DATA indicator
Lit
The machine is
online.
Printing is possible.
There is print data in
memory that has not
been printed yet.
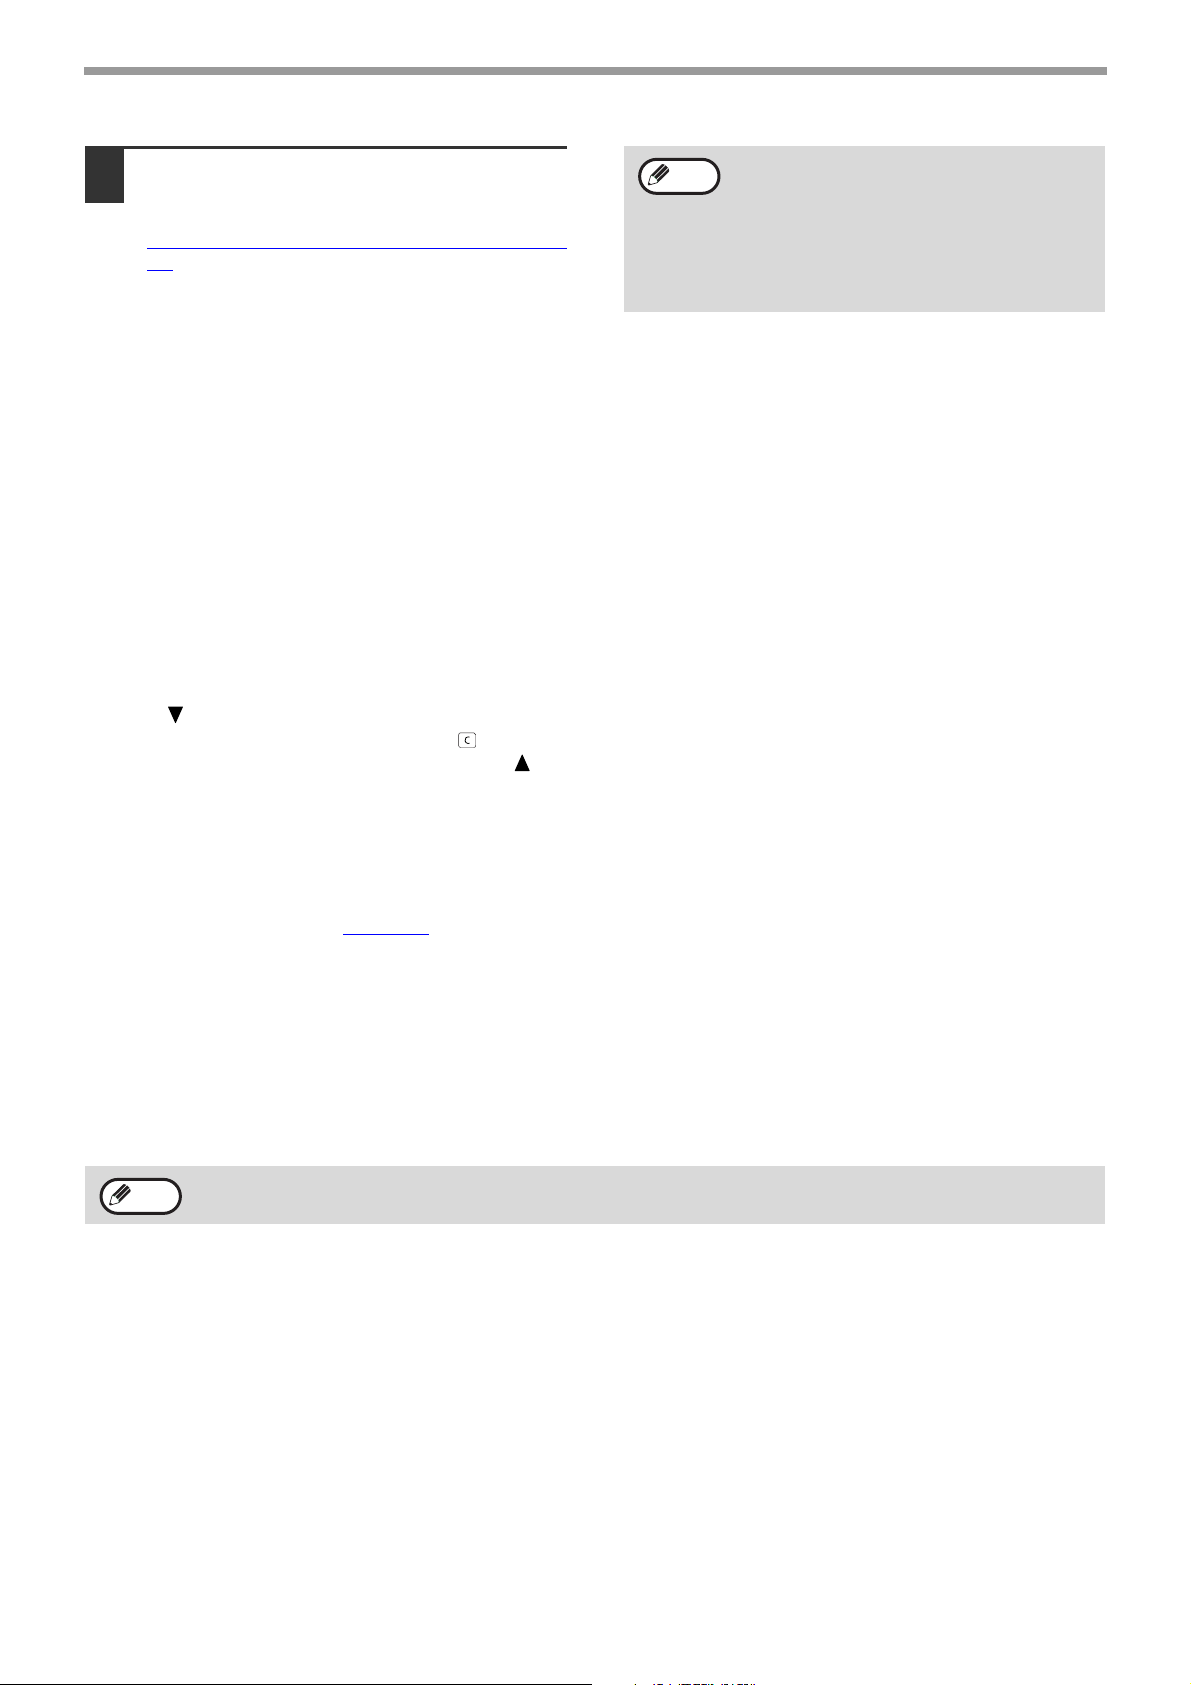
Select [Print] from the application's
3
[File] menu.
The "Print" dialog box will appear.
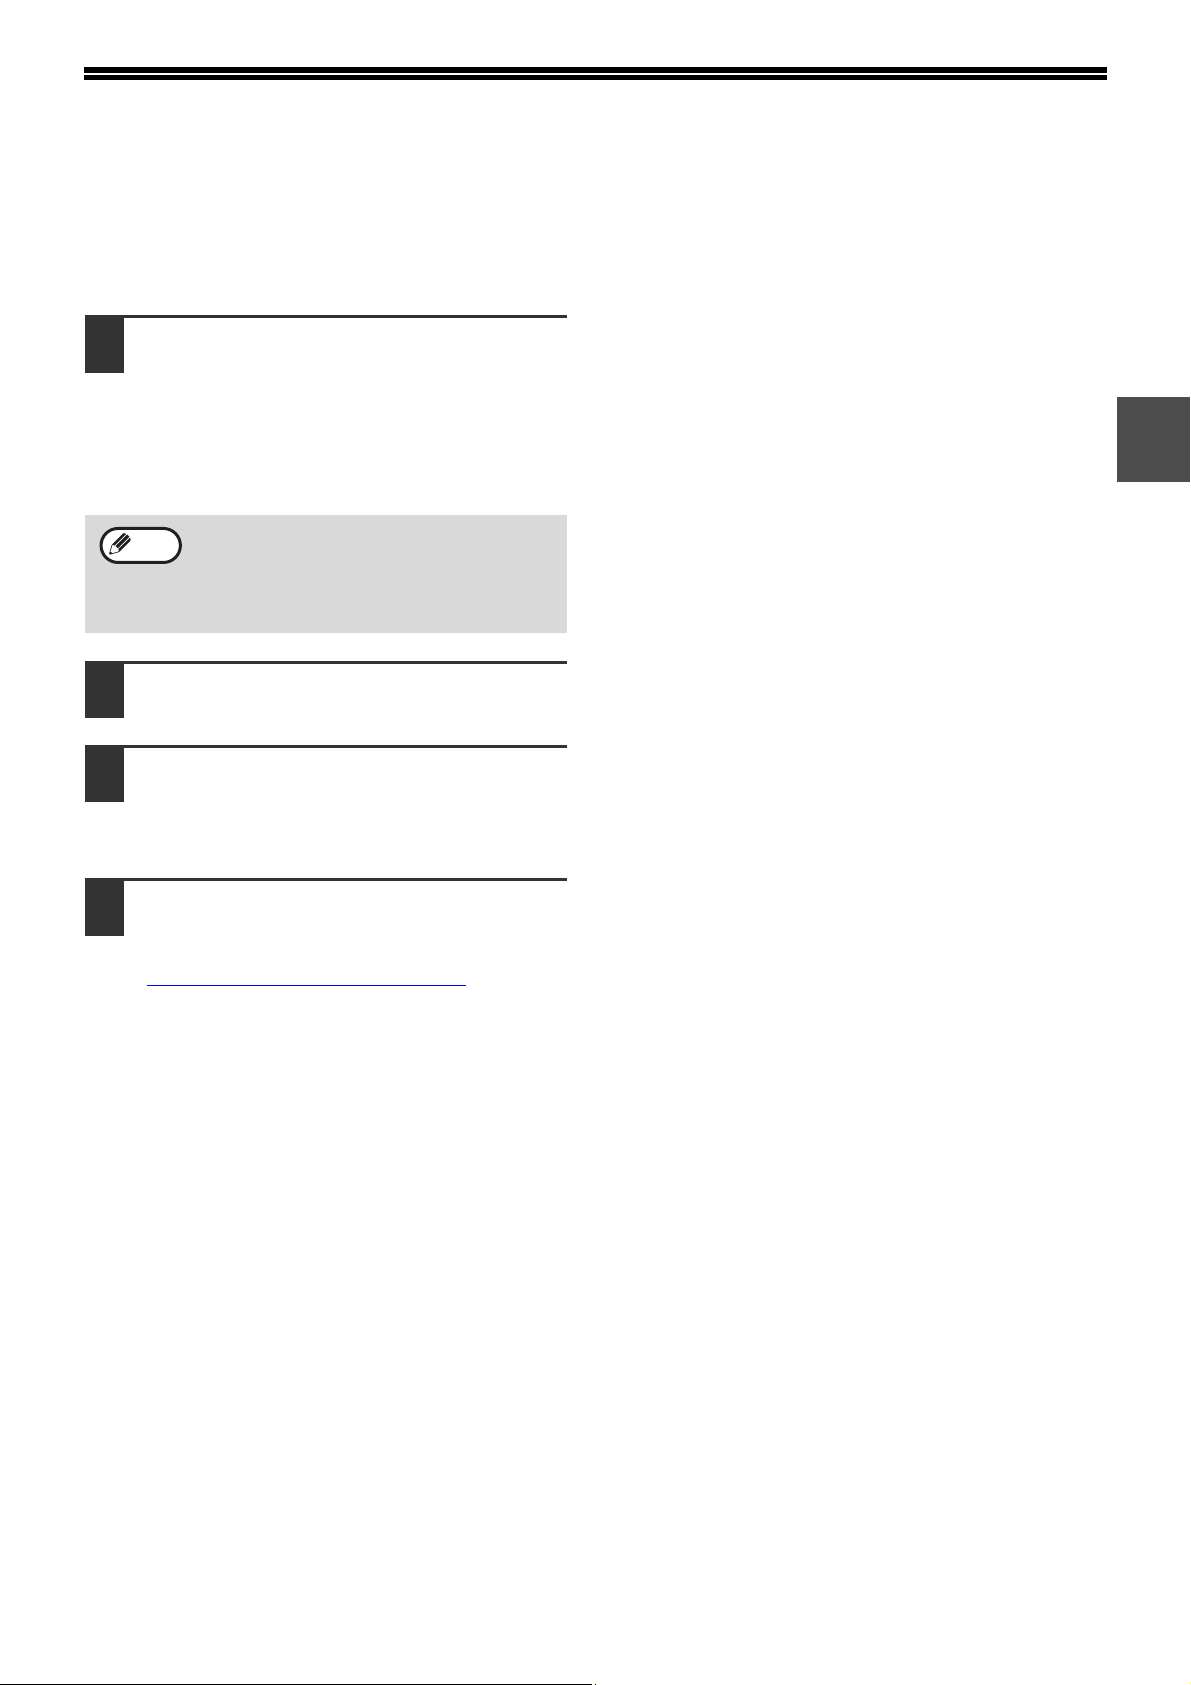
Make sure that "SHARP MX-xxxx" is
4
selected as the printer.
If you need to change any print settings, click the
[Preferences] button to open the printer driver
setup screen.
The printer driver setup screen will appear.
Blinking
Off
Start WordPad and open the
2
A print job is being
canceled.
The machine is
offline.
Printing is not
possible.
Printing is in
progress or data is
being received.
There is no print
data in memory
and print data is
not being received.
document that you wish to print.
Windows 2000 does not have the [Preferences]
button in this dialog box. Select settings as
needed on each of the tabs in the setup screen
and click the [OK] button.
☞PRINTER DRIVER SETTINGS (page 6),
TWO-SIDED PRINTING (ONLY FOR MODELS
THAT SUPPORT TWO-SIDED PRINTING) (page 7),
PRINTING MULTIPLE PAGES ON ONE PAGE
(page 8),
FITTING THE PRINT IMAGE TO THE PAPER (page 9)
ROTATING THE PRINT IMAGE 180 DEGREES
(page 10),
PRINTING A WATERMARK (page 10)
,
3
Page 5
PRINT
Click the [Print] button.
5
Printing begins. When printing begins, the Print
Status Window automatically opens.
☞OUTLINE OF THE PRINT STATUS WINDOW (page
11)
Note
When the job separator tray is
installed
The output tray can be selected when
selecting print settings at the time of
printing. To change the tray selection, select
the desired tray in "Output" in the [Paper] tab
of the printer driver setup screen.
IF THE TRAY RUNS OUT OF PAPER DURING PRINTING
Add paper to the tray that ran out or to the bypass tray. If you add paper to the bypass tray, press the [PRINT] key on
the machine to switch to printer mode and select "BYPASS-TRAY". Printing will resume. Note that if the "AUTO
TRAY SWITCHING" setting is selected in the "PAPER SIZE SET" (accessed by pressing the [SPECIAL
FUNCTION] key) and there is the same size of paper in another tray, the machine will automatically switch to the
other tray and continue printing.
PAUSING A PRINT JOB
To pause a print job, press the [PRINT] key on the machine to switch to printer mode and then select "OFFLINE"
with the [ ] key. The machine pauses the print job and then goes offline.
• To cancel a print job, press the [C] key ( ).
• To resume printing, select "ONLINE" with the [ ] key.
WHEN "PAPER SOURCE" IS SET TO [AUTO SELECT]
If "Paper Source" is set to [Auto Select] in the [Paper] tab of the printer driver setup screen and the correct size of
paper for a print job is not loaded in the machine, the printing procedure will vary depending on the "FORCED
OUTPUT OF PRINT" setting (page 23)
in the system settings.
When "FORCED OUTPUT OF PRINT" is disabled
Add paper to the bypass tray, press the [PRINT] key on the machine to switch to printer mode, and select
"BYPASS-TRAY". Printing will resume.
When "FORCED OUTPUT OF PRINT" is enabled
The closest size of paper in a tray other than the bypass tray will be used for printing.
Note
If the print image is in a different orientation than the paper, the print image will be automatically rotated 90
degrees to enable correct printing on the paper. (Other than the bypass tray)
HOW [BYPASS TRAY] AND [BYPASS MANUAL] DIFFER IN THE "PAPER SOURCE" SETTINGS
There are two bypass tray settings in "Paper Source" in the [Paper] tab of the printer driver setup screen:
• When [Bypass Tray] is selected, the print job is automatically printed on the paper in the bypass tray.
• When [Bypass Manual] is selected, the print job is not printed until paper is inserted into the bypass tray. If paper
is already in the bypass tray, remove the paper and then re-insert it to begin printing.
4
Page 6
OPENING THE PRINTER DRIVER FROM THE [START] BUTTON
To change the printer driver settings, follow the steps below. Settings adjusted in this way will be the initial settings
when you print from an application. (If you change the settings in the printer driver setup screen at the time of
printing, the settings will revert to the initial settings when you quit the application.)
Click the [Start] button and select
1
[Control Panel] and then select
[Printer].
• In Windows XP, click the [start] button, and
then click [Printers and Faxes].
• In Windows 2000, click the "Start" button and
point to [Settings], and then select [Printers].
1
Note
Click the "SHARP MX-xxxx" printer
2
driver icon.
Select [Properties] from the
3
[Organize] menu.
In Windows XP/2000, select [Properties] from the
[File] menu.
Click the [Printing Preferences] button
4
in the [General] tab.
The printer driver setup screen will appear.
☞PRINTER DRIVER SETTINGS (page 6)
In Windows XP, if [Printers and Faxes] does
not appear in the [start] menu, select
[Control Panel], select [Printers and Other
Hardware], and then select [Printers and
Faxes].
5
Page 7
PRINTER DRIVER SETTINGS
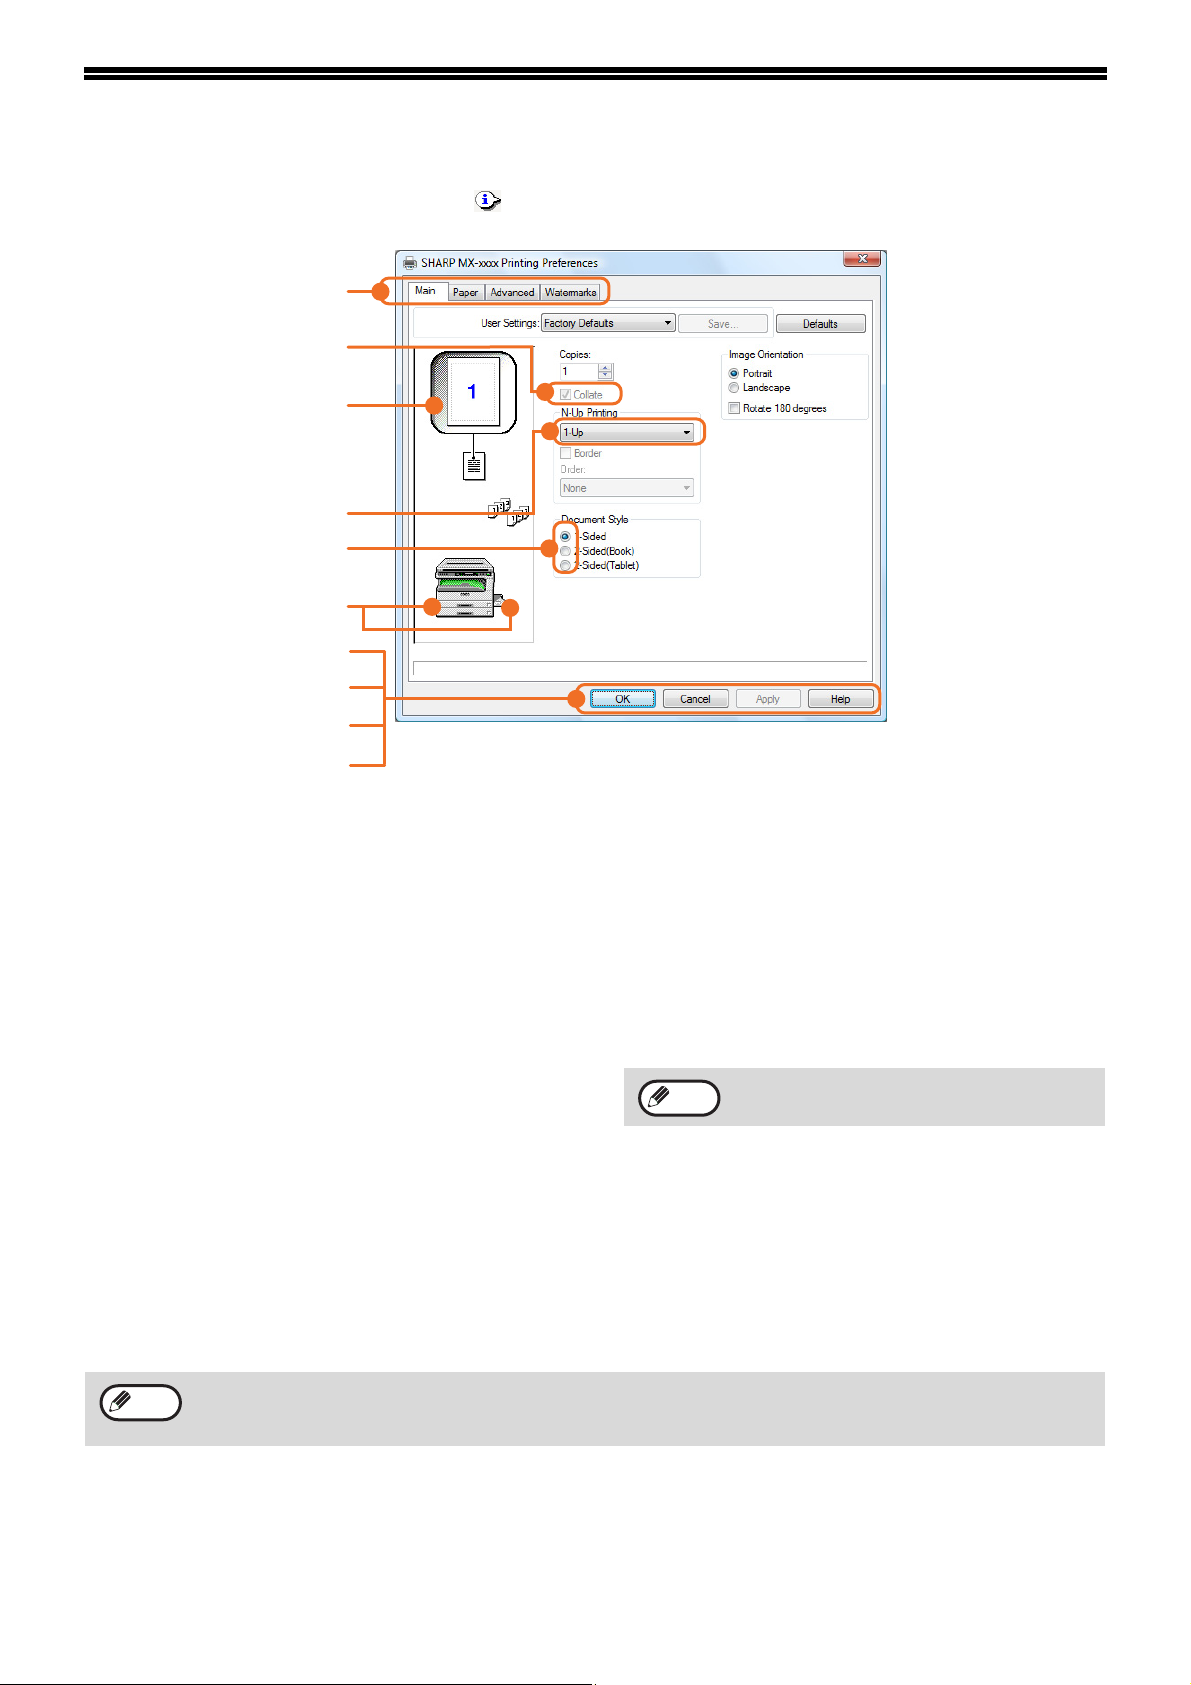
Some restrictions exist on the combinations of settings that can be selected in the printer driver setup screen. When
a restriction is in effect, an information icon ( ) will appear next to the setting. Click the icon to view an explanation
of the restriction.
(1)
(2)
(3)
(4)
(5)
(6)
(7)
(8)
(9)
(10)
(1) Tab
The settings are grouped on tabs. Click on a tab
to bring it to the front.
(2) Checkbox
Click on a checkbox to activate or deactivate a
function.
(3) Print image
This shows the effect of the selected print
settings.
(4) Drop-down list
Allows you to make a selection from a list of
choices.
(5) Check button
Allows you to select one item from a list of
options.
(6) Image of paper trays
The tray selected in "Paper Source" in the [Paper]
tab appears in blue. You can also click on a tray to
select it.
(7) [OK] button
Click this button to save your settings and exit the
dialog box.
(8) [Cancel] button
Click this button to exit the dialog box without
making any changes to the settings.
(9) [Apply] button
Click to save your settings without closing the
dialog box.
Note
(10) [Help] button
Click this button to display the help file for the
printer driver.
The [Apply] button does not appear when
you open this window from an application.
6
Note
The settings and the image of the machine will vary depending on the model. If a tray or job separator tray option
is installed, see "CONFIGURING THE PRINTER DRIVER" in "3. TROUBLESHOOTING AND USEFUL
INFORMATION" in the "Software setup guide" to configure the settings for the option.
Page 8
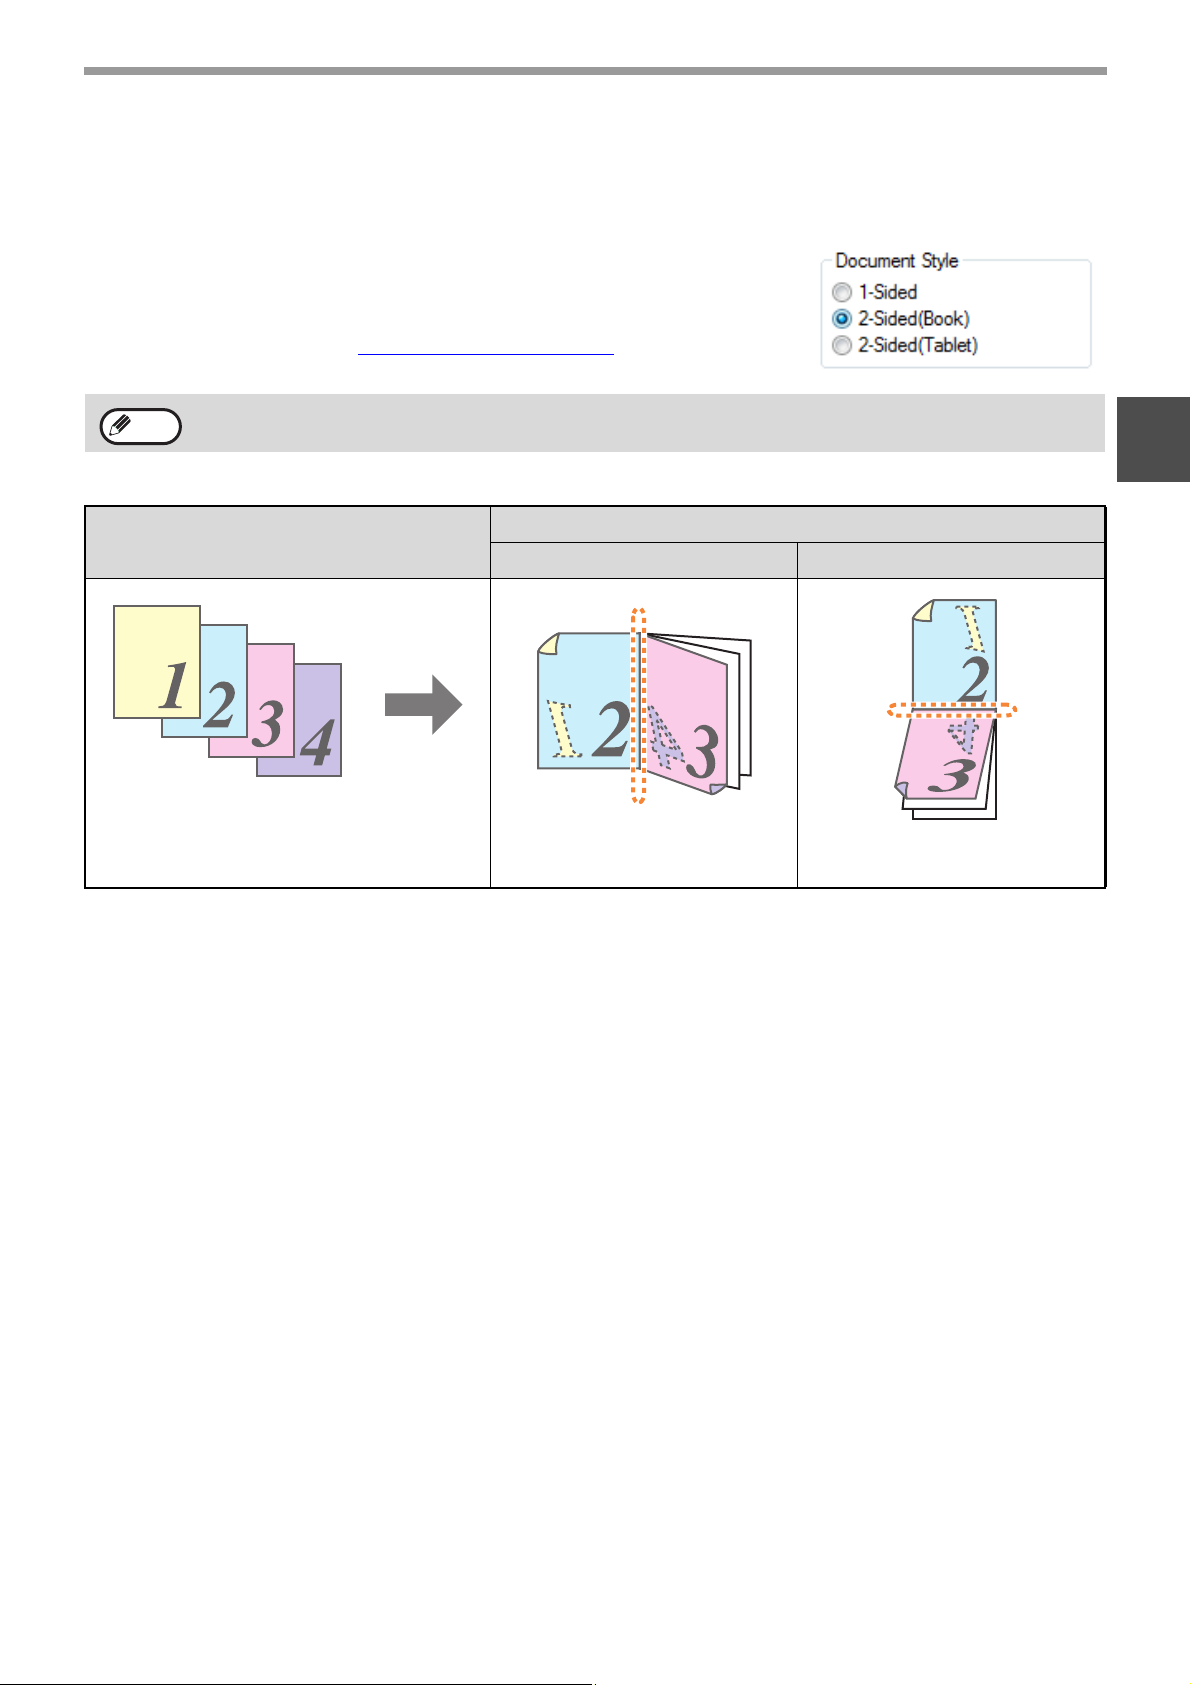
TWO-SIDED PRINTING (ONLY FOR MODELS THAT SUPPORT TWO-SIDED PRINTING)
On models that have the two-sided printing function, both sides of the paper can
be printed on.
To use this function, open the printer driver setup screen and select [2-Sided
(Book)] or [2-Sided (Tablet)] from "Document Style" in the [Main] tab.
To open the printer driver, see "BASIC PRINTING" (page 3)
•
Note
The following example shows the result when portrait data is printed on both sides of the paper.
Paper sizes that can be used for two-sided printing are Ledger, Letter, Legal, Foolscap, A3, A4, A5, B4 and B5.
• The bypass tray cannot be used for two-sided printing.
.
PRINT
1
Print data
Printing result
2-Sided (Book) 2-Sided (Tablet)
The pages are printed so that
they can be bound at the side.
The pages are printed so that
they can be bound at the top.
7
Page 9
PRINT
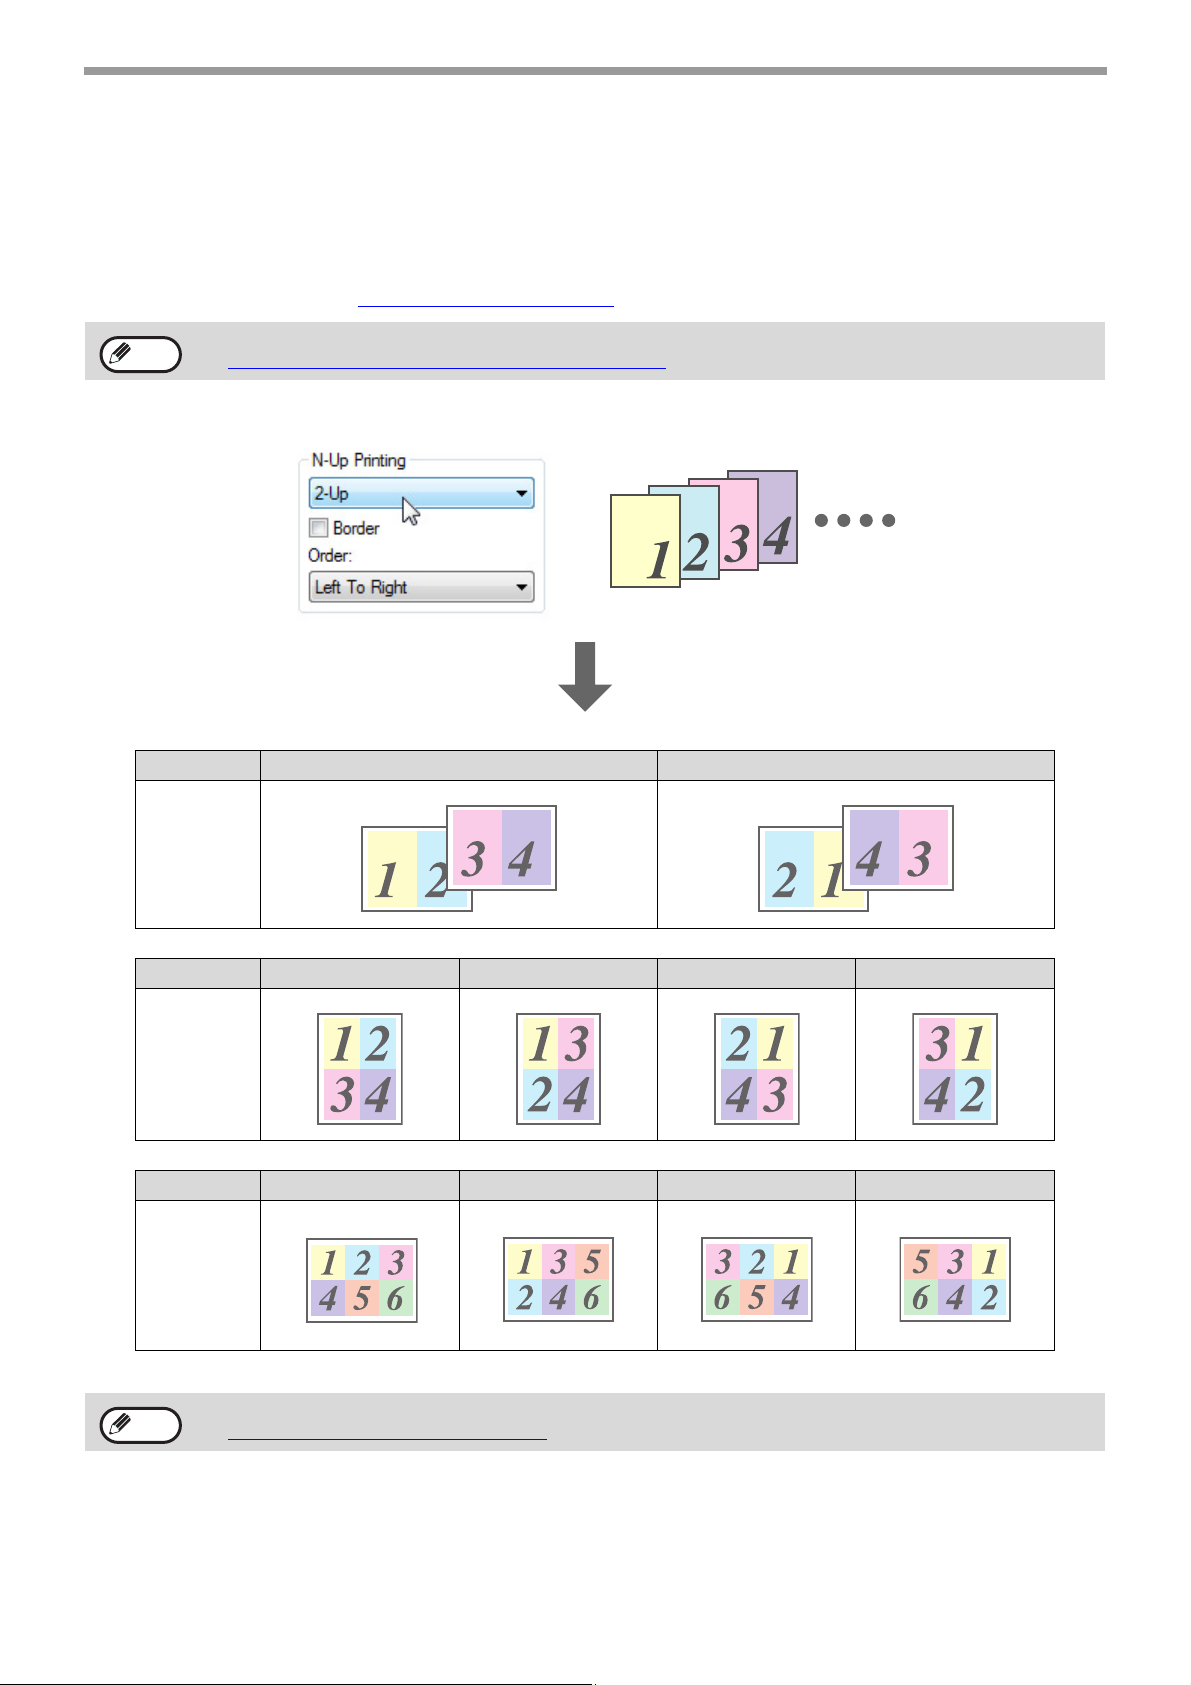
PRINTING MULTIPLE PAGES ON ONE PAGE
This feature allows you to reduce and print two, four or six document pages on a single sheet of paper.
To use this function, open the printer driver setup screen and select the number of pages per sheet (2-Up, 4-Up or
6-Up) in "N-Up Printing" in the [Main] tab.
The order of the pages can be changed in the "Order" menu.
To open the printer driver, see "
BASIC PRINTING" (page 3).
Note
For example, when [2-Up], [4-Up] or [6-Up] is selected, the result will be as follows depending on the selected order.
The "N-Up Printing" setting is not available when [Fit To Paper Size] is selected.
☞ FITTING THE PRINT IMAGE TO THE PAPER (page 9)
N-Up Left to Right Right to Left
[2-Up]
N-Up Right, and Down Down, and Right Left, and Down Down, and Left
[4-Up]
N-Up Right, and Down Down, and Right Left, and Down Down, and Left
[6-Up]
If you select the [Border] checkbox, borderlines will be printed around each page.
Note
The order can be viewed in the print image in the printer driver setup screen.
☞ PRINTER DRIVER SETTINGS
(page 6)
8
Page 10

PRINT
FITTING THE PRINT IMAGE TO THE PAPER
The printer driver can adjust the size of the print image to match the size of the paper loaded in the machine.
Follow the steps shown below to use this function. The explanation below assumes that you intend to print a ledger
or A3 size document on letter or A4 size paper.
To open the printer driver, see "BASIC PRINTING" (page 3)
.
Note
Click the [Paper] tab in the printer
1
driver setup screen.
Select the original size (Ledger or A3)
2
of the print image in "Paper Size".
Select [Fit To Paper Size].
3
The "Fit To Paper Size" setting is not available when "N-Up Printing" is selected.
☞ PRINTING MULTIPLE PAGES ON ONE PAGE (page 8)
or
or
Select the size of the paper (Letter or
4
A4) that is loaded in the machine from
"Fit to Paper Size".
The size of the print image will be automatically
adjusted to match the paper loaded in the
machine.
Paper Size: Ledger or A3
Fit To Paper Size: Letter or A4
Ledger or A3 size
document
(Paper Size)
Letter or A4 size
paper
(Fit To Paper Size)
1
9
Page 11

PRINT
ROTATING THE PRINT IMAGE 180 DEGREES
The print image can be rotated 180 degrees.
This feature rotates the print image 180 degrees to enable correct printing on paper
that can only be loaded in one orientation.
To use this function, select the image orientation in "Image Orientation" on the
[Main] tab, and then click on the [Rotate 180 degrees] checkbox.
To open the printer driver, see "BASIC PRINTING" (page 3)
Printing result
.
Note
Landscape
Rotate 180 degrees
ABCD
The procedure for loading paper is explained in the "Operation manual (for general information and copier)".
Landscape
Rotate 180 degrees
ABCD
PRINTING A WATERMARK
You can print a watermark such as "CONFIDENTIAL" on your document. To print a watermark, open the printer
driver setup screen, click the [Watermarks] tab, and follow the steps below.
To open the printer driver, see "BASIC PRINTING" (page 3)
How to Print a Watermark
From the "Watermark" drop-down list, select the watermark that you wish to print (for example "CONFIDENTIAL"),
and start printing.
.
Print sample
You can enter text to create your own custom watermark. For details on watermark settings, view printer driver Help.
☞ PRINTER DRIVER SETTINGS (page 6)
10
Page 12

OUTLINE OF THE PRINT STATUS WINDOW
When printing begins, the Print Status Window automatically opens.
The Print Status Window is a utility that monitors the machine and informs you of the name of the document being
printed and any errors that occur.
(1)
(2)
(3)
(4)
(5)
(6)
(7)
(1) Status window
Provides information on the current status of the
printer.
(2) Status icons
The status icons appear to alert you to printer
errors. Nothing appears when printing is taking
place normally.
The icons are explained below. Follow the
instructions in the status window to solve the
problem.
1
(5) [Cancel Job] button
Printing can be canceled by clicking this button
before the machine receives the job.
(6) [Help] button
Click this button to display the help file for the
Print Status Window.
(7) [Close] button
Click this button to close the Print Status Window.
Icon Print Status
An error has occurred that
requires immediate
attention.
An error has occurred that
requires attention soon.
(3) Tab
Click a tab to bring it to the front. The [Options]
tab allows you to select display options for the
Print Status Window.
(4) Document Name
Shows the name of the document currently being
printed.
11
Page 13

SCAN
2
This chapter explains how to scan from a computer connected to the machine by a USB cable, and how to scan
using the machine's operation panel.
SCANNING OVERVIEW
The flow chart shown below provides an overview of scanning.
Caution
Scanning from a
TWAIN*
WIA*
☞For more information, see "4. COPY FUNCTIONS" in the "Operation manual (for general information and copier)".
Start up a Twain-compliant
or WIA-compliant
application, and select the
machine's scanner driver.
The environment in which the machine's scanning function can be used is subject to certain limitations. For more
information, see "1. INSTALLING THE SOFTWARE (THAT ACCOMPANIES THE MACHINE)" in the "Software
setup guide".
1
-compliant or
2
-compliant application
Set the scan preferences
Scanning from the "Scanner
and Camera Wizard"
(Windows XP)
Place the original in the scanning position
Start up the "Scanner and
Camera Wizard" from
"Control Panel" in your
computer.
Using the machine to begin
scanning
Press the [SCAN] key on the
machine to switch to
scanner mode and select the
destination (SC1: to SC6:)
*3
Scanning
☞
SCANNING FROM A
TWAIN-COMPLIANT
APPLICATION (page 13),
SCANNING FROM A
WIA-COMPLIANT APPLICATION
(WINDOWS XP/Vista) (page 17)
*1 TWAIN is an international interface standard for scanners and other image acquisition devices. By installing a TWAIN driver on
your computer, you can scan and work with images using a variety of TWAIN-compliant applications.
*2 WIA (Windows Imaging Acquisition) is a Windows function that allows a scanner, digital camera or other imaging device to
communicate with an image processing application. The WIA driver for this machine can only be used in Windows XP/Vista.
*3 To begin scanning using the machine's operation panel, settings must be configured in the Control Panel after Button Manager
is installed. For more information, see "SETTING UP BUTTON MANAGER" in "1. INSTALLING THE SOFTWARE (THAT
ACCOMPANIES THE MACHINE)" in the "Software setup guide".
☞SCANNING FROM THE
"SCANNER AND CAMERA
WIZARD" (WINDOWS XP)
(page 18)
Scanning
Scanning
☞SCANNING USING THE
KEYS ON THE MACHINE
(page 20),
BUTTON MANAGER (page 21)
12
Page 14

SCANNING FROM A TWAIN-COMPLIANT APPLICATION
The SHARP scanner driver is compatible with the TWAIN standard, allowing it to be used with a variety of
TWAIN-compliant applications. The procedure for scanning from some applications may differ in places from the
procedure below. For more information, refer to the manual or the help file of your application.
Place the original(s) that you wish to
1
scan on the document glass or in the
SPF.
For information on placing an original for
scanning, see "4. COPY FUNCTIONS" in the
"Operation manual (for general information and
copier)".
Start up a Twain-compliant
2
application and select [Select
Scanner] from the [File] menu.
Select [SHARP MFP TWAIN W] and
3
then click the [Select] button.
Note
• If you are using Windows XP/Vista, you
can also select [WIA-SHARP MX-xxxx] to
scan using the WIA driver.
☞
SCANNING FROM A WIA-COMPLIANT
APPLICATION (WINDOWS XP/Vista)
(page 17)
• Depending on your system, [SHARP MFP
TWAIN W 1.0 (32-32)] or [WIA-SHARP
MX-xxxx 1.0 (32-32)] may appear in the
above select source screen.
In the "Scanning Position" menu,
5
select the location where you placed
the original in Step 1.
• If you placed a one-sided original in the SPF,
select [SPF (Simplex)].
• If you placed a two-sided original in the RSPF,
select [SPF (Duplex-Book)] or [SPF
(Duplex-Tablet)].
Note
• If you selected [SPF (Duplex-Book)] or
[SPF (Duplex-Tablet)] from the "Scan
Position" menu, select [Right edge is fed
first] or [Top edge is fed first] for the
orientation of the original.
• For original sizes for which two-sided
scanning is possible, see "REVERSING
SINGLE PASS FEEDER / SINGLE PASS
FEEDER" in "3. PERIPHERAL DEVICES
AND SUPPLIES" in the "Operation
manual (for general information and
copier)".
2
Select [Acquire Image] from the [File]
4
menu.
The scanner driver setup screen will appear.
☞SCANNER DRIVER SETTINGS (page 15)
Click the [Preview] button.
6
The preview image will appear.
Note
• If the angle of the image is not correct,
reset the original and click the [Preview]
button again.
• If the preview image is not oriented
correctly, click the [Rotate] button in the
preview screen. This rotates the preview
image 90 degrees clockwise, allowing you
to correct the orientation without resetting
the original.
☞Preview screen (page 16)
• If you inserted multiple pages in the SPF,
the machine previews only the top page of
the originals and then sends it to the
original exit area. Return the previewed
original to the SPF before starting the
scanning job.
13
Page 15

SCAN
Specify the scanning area and select
7
the scan preferences.
For information on specifying the scan area and
selecting the scan preferences, see scanner
driver Help.
☞SCANNER DRIVER SETTINGS (page 15)
Caution
When you are ready to begin
8
• Scanning a large area at high resolution
results in a large quantity of data and a
prolonged scanning time. When selecting
the scan preferences, lower the resolution
or specify a suitable scanning area.
• The scan resolution will vary depending
on the scanning area and how much
memory in the machine is free. For
example, if a letter or A4 original is
scanned in full color at 300 dpi with only
the standard memory installed, the
machine will scan the original in full color
at 150 dpi and the scanner driver will
enhance the resolution to 300 dpi.
• To scan a ledger or A3 original in full color
at 600 dpi without using enhancement,
the 256 MB memory option is required.
scanning, click the [Scan] button.
Scanning begins and the image is acquired into
the application that you are using.
In the application, assign a file name and save
the file.
Note
To cancel a scanning job after the [Scan]
button has been clicked, press the [Esc] key
on your keyboard or the [C] key ( ) or [CA]
key ( ) on the operation panel.
14
Page 16

SCAN
SCANNER DRIVER SETTINGS
The scanner driver setup screen consists of the "Set-up screen", which lets you select scan settings, and the
"Preview screen", which shows the scanned image. For details on the scan settings, click the [Help] button in the
preview screen to display Help.
Set-up Screen
(1)
(2)
(3)
(4)
(5)
(6)
(7)
(1) "Scanning Position" menu
("Scanning Source" in some regions)
Select the location where the original is placed.
Selections are [Platen] (document glass), [SPF
(Simplex)], [SPF (Duplex-Book)] or [SPF
(Duplex-Tablet)].
Note
(2) "Scanning Mode" menu
Select "Preset" or "Custom Settings" ("Standard"
or "Professional" in some regions) for the
scanning mode.
The "Preset (or Standard)" screen lets you select
the original type as well as monitor, photo, fax, or
OCR according to the purpose of scanning.
If you wish to change the default settings for
these four buttons, or select custom settings such
as the image type and resolution before
scanning, switch to the "Custom Settings (or
Professional)" screen.
For details on the settings, click the [Help] button
in the preview screen to display Help.
(3) "Image Area" menu
Set the scanning area. To scan the original size
detected by the machine, select [Auto]. The
scanning area can also be specified as desired in
the preview window.
On machines without an SPF, this setting is
fixed at [Platen].
(4) [Zoom Preview] checkbox
When this is selected, the selected part of the
preview image will be enlarged when the
[Preview] button is clicked.
To return to the regular view, remove the checkmark.
Note
(5) [Preview] button
Previews the document.
Note
(6) [Scan] button
([Scanning] in some regions)
Click to scan an original using the selected
settings. Before clicking the [Scan] button, make
sure the settings are correct.
Note
(7) [Close] button
Click to close the scanner driver setup screen.
[Zoom Preview] cannot be used when [SPF]
is selected in the "Scanning Position" menu.
If [Preview] is canceled by immediately
pressing the [Esc] key on your keyboard, or
the [C] key ( ) or [CA] key ( ) on the
machine, nothing will appear in the preview
screen.
To cancel a scanning job after the [Scan]
button is clicked, press the [Esc] key on your
keyboard or the [C] key ( ) or [CA] key
( ) on the machine.
2
15
Page 17

SCAN
Preview screen
(1)
(2)
(3)
(4)
(5)
(1) Preview window
Click the [Preview] button in the Set-up screen to
display the scanned image. You can specify the
scanning area by dragging the mouse inside the
window. The inside of the frame that appears
when you drag the mouse will be the scanning
area. To cancel a specified scanning area and
clear the frame, click anywhere outside the frame.
(2) [Rotate] button
Click to rotate the preview image 90 degrees
clockwise. This allows the orientation to be
corrected without resetting the original. Upon
scanning, the image file is created in the
orientation shown in the preview window.
(3) [Image Size] button
Click this button to open a dialog box that allows
you to specify the scanning area by entering
numbers. Pixels, mm, or inches can be selected
for the units of the numbers. By initially specifying
a scanning area, numbers can be entered to
change that area relative to the top left corner as
a fixed origin.
(4) [Auto Scan Area Adjustment] button
([Auto Scan Area Judgement] in some
regions)
Click this button when the preview screen is
displayed to automatically set the scanning area
to the entire preview image.
Click the [Auto Scan
Area Adjustment] button
to automatically set the
scanning area to the
entire preview image.
Preview image
Preview window
(5) [Help] button
Click to display the help file for the scanner driver.
16
Page 18

SCANNING FROM A WIA-COMPLIANT APPLICATION (WINDOWS XP/Vista)
If you are using Windows XP/Vista, you can use the WIA driver to scan from Paint and other WIA-compliant
applications. The procedure for scanning using Paint is explained in the following.
Place the original(s) that you wish to
1
scan on the document glass or in the
SPF.
For information on placing an original for
scanning, see "4. COPY FUNCTIONS" in the
"Operation manual (for general information and
copier)".
Start Paint and then select [From
2
Scanner or Camera] from the [File]
menu.
The scan screen of the WIA driver will appear.
Note
If you have WIA drivers for other devices
installed on your computer, the "Select
Device" screen will open. Select [SHARP
MX-xxxx] and click the [OK] button.
Select the paper source and picture
3
type, and click the [Preview] button.
• The preview image will appear.
• If you placed the original on the document
glass, select [Flatbed] for the "Paper source".
• If you placed the original in the SPF, select
[Document Feeder] for the "Paper source" and
specify the original size in "Page size".
Note
• If an SPF is not installed on your machine,
the "Paper source" menu will not appear.
• If you select [Document Feeder] for the
"Paper source" and click the [Preview]
button, the top original in the SPF is
previewed. The previewed original is sent
to the original exit area, so you will need
to return it to the SPF before starting the
scanning job.
2
Click the [Scan] button.
4
• Scanning begins and the image is acquired into
Paint.
• Use [Save] in your application to select a file
name and folder for the scanned image, and
save the image.
• To cancel scanning after the [Scan] button has
been clicked, click the [Cancel] button or press
the [C] key ( ) or [CA] key ( ) on the
machine operation panel.
17
Page 19

SCANNING FROM THE "SCANNER AND CAMERA WIZARD" (WINDOWS XP)
The procedure for scanning with the "Scanner and Camera Wizard" in Windows XP is explained here. The "Scanner
and Camera Wizard" lets you scan an image without using a TWAIN-compliant or WIA-compliant application.
Place the original(s) that you wish to
1
scan on the document glass or in the
SPF.
For information on placing an original for
scanning, see "4. COPY FUNCTIONS" in the
"Operation manual (for general information and
copier)".
Click the [start] button, the [Control
2
Panel], [Printers and Other Hardware],
and then [Scanners and Cameras].
Click the [SHARP MX-xxxx] icon and
3
then click [Get pictures] in [Imaging
Tasks].
The "Scanner and Camera Wizard" will appear.
Click the [Next] button.
4
Select the "Picture type" and "Paper
5
source", and click the [Next] button.
• If you placed the original on the document
glass, select [Flatbed] for the "Paper source".
• If you placed the original in the SPF, select
[Document Feeder] for the "Paper source" and
specify the original size in "Page size".
• You can click the [Preview] button to display the
preview image.
Note
• If an SPF is not installed on your machine,
the "Paper source" menu will not appear.
• If you select [Document Feeder] for the
"Paper source" and click the [Preview]
button, the top original in the SPF is
previewed. The previewed original is sent
to the original exit area, so you will need
to return it to the SPF before starting the
scanning job.
• To adjust the resolution, picture type,
brightness and contrast settings, click the
[Custom settings] button.
18
Page 20

Specify a group name, format and
6
folder for saving the image, and then
click the [Next] button.
JPG, BMP, TIF or PNG can be selected for the
format. To begin scanning, click the [Next] button.
When scanning ends, the following
7
screen will appear. Select the next
task you wish to perform and then
click the [Next] button.
If you are ready to end the session, click
[Nothing. I'm finished working with these
pictures].
SCAN
2
Click the [Finish] button.
8
The "Scanner and Camera Wizard" closes and
the scanned image is saved in the specified
folder.
19
Page 21

SCANNING USING THE KEYS ON THE MACHINE
LINE
DATA
DATA
ON LINE
FAX
SCAN
PRINT
PQ
ACC
GHI
PQRS
BACK
OK
MNO
_
The procedure for scanning using the [SCAN] key is explained in the following. When scanning is performed by this method,
the previously specified application will automatically start and the scanned image will be acquired into the application.
Note
Place the original(s) that you wish to scan
1
• Scanner mode cannot be used in the following situations:
• A problem has occurred in the machine such as a paper misfeed or an open cover.
• The system settings are being used.
• The tray paper size is being set.
• During copying or printing
• During scanning of an original for a fax transmission (when the fax option is installed)
• If the machine is in copy mode, press the [SCAN] key to switch to scanner mode and clear the previously set
copy settings.
on the document glass or in the SPF.
For information on how to place the original, see
"4. COPY FUNCTIONS" in the "Operation
manual (for general information and copier)".
Press the [SCAN] key.
2
DESTINATION SELECT
SC1:
SC2:
SC3:
SC4:
Press the [OK] key.
4
The selected destination
appears.
Press the [START] key.
5
Scanning begins.
Ready to scan.
SC2:
The [SCAN] key indicator lights up to indicate that the
machine is in scanner mode and the destination
selection screen appears in the display. A name can
be entered in Button Manager for each of the
destinations "SC1:" to "SC6:", which will appear in the
format "SC1:XXXXX".
Use the [ ] or [ ] key to select the
3
desired scan destination.
The following applications have been set at the factory
for each of the scan destinations 1 to 6.
If you wish to change a setting, see "BUTTON
MANAGER SETTINGS" (page 22).
Scan Destination Application that starts
SC1: Sharpdesk
SC2: Email
Note
• The [COPY] key, [PRINT] key, or [FAX]
key can be pressed in scanner mode to
switch to the corresponding mode.
• For restrictions on using copy, printer, or
fax mode while in scanner mode, or using
scanner mode while in copy, printer, or fax
mode, see "OPERATION IN COPY,
PRINT, SCAN, AND FAX MODES" in "1.
BEFORE USING THE PRODUCT" in the
"Operation manual (for general
information and copier)".
SC3: FAX
SC4: OCR
SC5: Microsoft Word
SC6: Filing
20
Page 22

BUTTON MANAGER
Button Manager is a software utility that allows the scanner function to be used by means of the [SCAN] key on the
machine. The Button Manager software allows you to assign a destination application and scan settings to each of
the six destinations on the machine.
To scan using the machine's operation panel, settings must be configured in the Control Panel after Button Manager
is installed. To install Button Manager and configure settings, see "SETTING UP BUTTON MANAGER" in "1.
INSTALLING THE SOFTWARE (THAT ACCOMPANIES THE MACHINE)" in the "Software setup guide".
Setup window
To view Help for a setting, click the button in the upper right-hand corner of the Button Manager setup window
(Scan Button Destination Settings screen) and then click the setting.
(1)
(2)
(3)
(4)
2
(5)
(6)
(7)
(8)
(1) Tab
Select the desired destination. The tabs contain
scan settings for each of the scan destinations
(SC1 through SC6) on the machine.
(2) "Application Selection" area
Select the application that starts up here.
(3) [Show TWAIN setting screen when scanning]
checkbox
Select whether or not the TWAIN screen is shown
when scanning. When the checkbox is selected,
the TWAIN screen appears when scanning is
executed to let you adjust the scanning
conditions.
(4) "Scan Setup" area
Set the scan conditions.
(5) [OK] button
Click to save your settings and close the dialog
box.
(6) [Cancel] button
Click this button to close the dialog box without
making any changes to the settings.
(7) [Apply] button
Click to save your settings without closing the
dialog box.
(8) [Help] button
Click this button to display the help file for Button
Manager.
The scan settings for each of the six destinations can be changed in Button Manager.
To change the settings, see "BUTTON MANAGER SETTINGS" (page 22)
.
21
Page 23

SCAN
BUTTON MANAGER SETTINGS
If you need to configure Button Manager settings, follow the steps below. For details on Button Manager settings,
see Button Manager Help. (page 21)
Right-click the Button Manager icon
1
( ) on the task bar and select
[Settings] from the pop-up menu.
The Button Manager settings will open.
Note
Click the tab that you wish to
2
If the Button Manager icon does not appear on
the task bar, click the [start] button, select [All
Programs] ([Programs] in Windows 2000),
select [Sharp Button Manager W], and then
click [Button Manager] to start Button
Manager. The Button Manager icon appears
on the task bar.
configure.
Set up the start-up application in the
3
"Application Selection" area.
Note
• If the [Show TWAIN setting screen when
scanning] checkbox is selected, the
setting screen will appear when scanning
is executed to let you adjust the scanning
conditions.
• If an application other than [FAX] is
selected, you can select the "File format"
of the scanned image. If [PDF] is selected
for the file format, the image quality may
be slightly degraded.
Select scanning conditions such as
4
"Color Mode" and "Scanning Side" in
the "Scan Setup" area.
• If you placed a two-sided original in the RSPF,
select [Duplex-Book] or [Duplex-Tablet] as
appropriate for the position of the binding on
the original.
• The name of the tab can be changed. Click the
[Menu Name] button and enter a new name.
After entering a name, click the [Apply] button
or [OK] button. This also changes the scan
destination name that appears on the machine.
(Example: SC1: XXXXX)
Note
Click the [OK] button.
5
This completes the settings.
• If you selected [Duplex-Book] or
[Duplex-Tablet] from the "Scanning Side"
menu, select "Right edge is fed first" or
"Top edge is fed first" for the orientation of
the original.
• For original sizes for which two-sided
scanning is possible, see "REVERSING
SINGLE PASS FEEDER / SINGLE PASS
FEEDER" in "3. PERIPHERAL DEVICES
AND SUPPLIES" in the "Operation
manual (for general information and
copier)".
• Some settings cannot be selected in
some applications.
• When [Show TWAIN setting screen when
scanning] is selected, only [Menu name]
can be selected.
22
Page 24

SYSTEM SETTINGS
3
The system settings allow the administrator of the machine to enable and disable functions to suit the needs of the
workplace. This chapter explains system settings for the printer and scanner functions. For system settings that are
common to all modes, see the "System settings guide".
For the initial administrator password set at the factory, see "PROGRAMMING AN ADMINISTRATOR
PASSWORD" in the "System settings guide".
SYSTEM SETTINGS LIST
The system settings for the printer and scanner functions are shown in the following table. Factory default settings
are indicated in bold. When "ENABLE, DISABLE" appears in the "Settings" column of a program, the program is
enabled by pressing the [OK] key so that a checkmark appears in the checkbox. A checkmark in the checkbox ( )
indicates that "ENABLE" is selected. No checkmark ( ) indicates that "DISABLE" is selected.
Mode System settings Settings Explanation
Printer NOTICE PAGE ENABLE, DISABLE Select whether or not a Notice Page is printed
when printing is not successful due to a
memory full (or other) error.
FORCED OUTPUT OF
PRINT
Scanner DISABLE USB SCAN YES, NO Select whether or not scanning from a
ENABLE, DISABLE When no tray has the specified size of paper,
this setting is used to select whether or not
the print job will be printed on the closest size
of paper.
computer and scanning from the machine are
disabled. When "YES" is selected, USB
scanning is disabled.
23
Page 25

USING THE SYSTEM SETTINGS
EXPOSURE
COLOR MODE
PAPE
RESOLUT
COPY
SCAN
SPECIAL
FUNCTION
LINE
DATA
DATA
ON LINE
PQ
ACC
GHI
PQRS
BACK
OK
ABC DEF
JKLGHI MNO
TUVPQRS WXYZ
@.-
_
READ-END
ACC. #-C
INTERRU
Follow the steps below to access the system settings for the printer and scanner functions.
Press the [SPECIAL FUNCTION] key.
1
The special function screen
appears.
Select "SYSTEM SETTINGS" with the
2
[ ] or [ ] key.
SPECIAL FUNCTION
PAPER SIZE SET
DISPLAY CONTRAST
TOTAL COUNT
SYSTEM SETTINGS
Press the [OK] key.
3
Enter admin
password.
ADMIN PASSWORD:
The administrator password
entry screen will appear.
-----
Press the [OK] key.
6
OK
PRINTER
NOTICE PAGE
FORCED OUTPUT OF
PRINT
The settings of the
selected mode will
appear.
Example: The above screen shows the settings when
printer mode is selected.
Select the desired program with the
7
[ ] or [ ] key.
• A checkbox appears to the left of several of the
programs. To enable a function (make a checkmark
appear), press the [OK] key. To cancel a selection,
press the [OK] key once again to remove the
checkmark and disable the function. Go to step 9.
• When the [OK] key is pressed for a program that
does not have a checkbox, the settings for the
program appear.
Use the numeric keys to enter the
4
administrator password.
MODE SELECT
CHANGE ADMIN PW
COPIER
PRINTER
SCANNER
• " " will appear for each digit entered.
• The mode selection screen will appear.
Select the desired mode with the [ ]
5
or [ ] key.
MODE SELECT
CHANGE ADMIN PW
COPIER
PRINTER
SCANNER
24
Press the [OK] key and follow the
8
instructions in the program screen.
OK
To use another program for the same
9
mode, select the desired program with
the [ ] or [ ] key.
To use a program for a different mode, press the
[BACK] key and select the desired mode. To exit
the system settings, press the [CA] key ( ).
Page 26

TROUBLESHOOTING
4
TROUBLESHOOTING
This chapter explains what to do if you encounter a problem while printing or scanning. For problems related to the
machine such as running out of paper or paper misfeeds, see the "Operation manual (for general information and
copier)".
Troubleshooting information can also be found in the README files for each of the software programs. To view a
README file, see "1. INSTALLING THE SOFTWARE (THAT ACCOMPANIES THE MACHINE)" in the "Software
setup guide".
PRINTING PROBLEMS
Problem Cause and solution Page
The machine is set to off-line mode.
→ Press the [PRINT] key to select printer mode and then select "ON
LINE" with the [ ] key.
3
Print jobs are not
received.
(DATA indicator does
not blink.)
The machine is not selected correctly in the application
from which you are printing.
→ In the dialog box that appears after you select [Print] from the [File]
menu in the application, make sure you have selected the machine
as the printer.
Copying or scanning is in progress, or a fax is being
printed (when the fax option is installed).
→ Wait until copying, scanning, or fax printing is finished.
Has the printer driver been installed correctly?
→ Follow these steps to check and see if the printer driver is installed.
1 Click the [Start] button, click [Control Panel], and then click
[Printer].
In Windows XP, click the [start] button, and then click [Printer
and Faxes].
In Windows 2000, click the [Start] button, select [Settings] and
then click [Printers].
2 If the "SHARP MX-xxxx" printer driver icon is shown but you
still cannot print, the printer driver may not have been
installed correctly. In this case, delete the software and then
reinstall it.
The machine is not correctly connected with your
computer.
→ Check both ends of the printer cable and make sure you have a solid
connection. For information on cables, see "SPECIFICATIONS"
(page 29).
3
–
5
Software setup
guide
29
The port setting is not correct.
→ Printing is not possible if the printer driver port setting is not correct.
Set the port correctly.
Printing is disabled.
→ If "CANCEL JOBS OF INVALID ACCOUNTS" is enabled in the
system settings, printing will not be possible. Consult the
administrator.
Software setup
guide
System settings
guide
25
Page 27

TROUBLESHOOTING
Problem Cause and solution Page
A Notice Page
(NP-001) has been
printed, but the
print data has not
been printed
completely.
Printing does not
take place
(DATA indicator is
blinking.)
Printing is slow.
The printed image
is light and
uneven.
A print job containing more data than can be held in the
print memory is sent to the machine.
→ Disable the ROPM function on the [Configuration] tab of the printer
driver setup screen. If you need to use the ROPM function, divide the
pages of the print data into two or more print jobs.
→ The memory allocated to the printer function can be changed in the
system setting "MEM. FOR PRINTER".
There is no paper in the specified tray.
→ Load paper in the tray.
"FORCED OUTPUT OF PRINT" is disabled.
→ Add paper to the bypass tray, press the [PRINT] key on the machine
to switch to printer mode, and then select "BYPASS-TRAY". Printing
will resume.
Simultaneous use of two or more application software
programs.
→ Start printing after quitting all unused application software programs.
The paper is loaded so that printing takes place on the
back side of the paper.
→ Some types of paper have a front and a back side. If the paper is
loaded so that printing takes place on the back side, toner will not
adhere well to the paper and a good image will not be obtained.
System settings
guide
Operation manual
(for general
information and
copier)
4
–
–
The printed image
is dirty.
The printed image
is skewed or it
runs off the paper.
You are using paper that is outside the specified size and
weight range.
→ Use paper within the specified range.
The paper is curled or damp.
→ Replace the paper. During periods when the machine is not used for
a long time, remove the paper from the tray and store it in a dark
place in a bag to prevent moisture absorption.
You did not set sufficient margins in the paper settings of
your application.
→ The top and bottom of the paper may be dirty if the margins are set
outside of the specified print quality area.
→ Set the margins within the specified print quality area.
The paper size set in the printer driver is not the same as
the paper size loaded in the tray.
→ Make sure that the paper size setting matches the size of the paper
loaded in the tray. If the [Fit to Page] setting is selected, make sure
that the paper size selected in the "Fit To Paper Size" drop-down list
is the same as the size of the paper loaded in the tray.
The image orientation setting in the printer driver is not
correct.
→ Click the [Paper] tab in the printer driver setup screen and make sure
the "Image Orientation" setting is correct.
Paper is not loaded properly.
→ Make sure the paper is properly loaded.
Operation manual
(for general
information and
copier)
Operation manual
(for general
information and
copier)
–
6
6
Operation manual
(for general
information and
copier)
26
The margins are not set correctly in the application.
→ Check the paper size and margin settings in the application. Also
make sure that the print settings are correct for the paper size.
–
Page 28

SCANNING PROBLEMS
Problem Cause and solution Page
The document glass or the underside of the document
cover/SPF is dirty.
→ Clean regularly.
The original is smudged or blotchy.
→ Use a clean original.
You have not specified a suitable resolution.
→ Make sure that the resolution setting in the scanner driver is
appropriate for the original.
You are scanning a large area (for example an entire 11" x
17" or A3 document) at high resolution.
→
If you attempt to scan a large area at high resolution and there is insufficient
Poor scanning
quality.
Poor scanning
quality.
memory in the machine to hold the scanned data, scanning will take place at
a lower resolution and the scanner driver will enhance the data to make up
for the lower resolution. However, the quality of the enhanced image will not
be as high as if scanning took place at the higher resolution.
To scan a ledger or A3 original in full color at 600 dpi without using
enhancement, the 256 MB memory option is required.
You have not specified a suitable value for the "B/W
Threshold" setting.
→ If you are using a TWAIN-compliant application and are using
[White], [Red], [Green], or [Blue] for "Light Source" in the TWAIN
driver, make sure that the "B/W Threshold" setting is appropriate. A
larger threshold value makes your output darker, while a small
threshold value makes it lighter. To adjust the threshold
automatically, click the [Auto Threshold] button on the [Image] tab of
the "Custom Settings (or Professional)" screen.
The brightness and contrast settings are not suitable.
→ If you are scanning with a TWAIN-compliant application and the
resulting image has unsuitable brightness or contrast (for example it
is too bright), click the [Auto Brightness/Contrast Adjustment] button
on the [Color] tab of the "Custom Settings (or Professional)" screen.
You can also click the [Brightness/Contrast] button to adjust the
brightness and the contrast while viewing the scanned output image
on the screen. If you are scanning with a WIA-compliant application
or the "Scanner and Camera Wizard", click [Adjust the quality of the
scanned picture] or the [Custom settings] button and adjust the
brightness and contrast.
[Quick Scan] has been selected.
→ If scanning is performed when [Quick Scan] has been selected in the
[Preference] tab of the "Custom Settings (or Professional)" of the
TWAIN driver, image quality may be degraded. This is because the
scanned data is transferred using JPEG compression. If image
quality is poor, then perform scanning again without selecting the
[Quick Scan] option. (By default [Quick Scan] is not selected.)
The original is not placed face up in the SPF or face down
on the document glass.
→ Place the original face up in the SPF or face down on the document
glass.
The original was not placed in the correct position.
→ Place the original correctly.
TROUBLESHOOTING
Operation manual (for
general information
and copier)
–
15
14
–
4
–
15
Operation manual
(for general
information and
copier)
Operation manual
(for general
information and
copier)
27
Page 29

TROUBLESHOOTING
Problem Cause and solution Page
Unable to scan the
image.
Scanner transfer
speed is slow.
If scanning is not possible, shut down your computer,
turn off the machine's power switch, and unplug the
machine's power cord. Next, start your computer, restore
power to the machine, and try scanning again. If scanning
is still not possible, check the following items.
Your application is not TWAIN/WIA compliant.
→ If your application is not TWAIN/WIA compliant, scanning will not be
possible. Make sure your application is TWAIN/WIA compliant.
You have not selected the scanner driver of the machine
in your application.
→ Make sure that the machine's scanner driver is selected in your
TWAIN/WIA-compliant application.
You have not specified all scanning preferences appropriately.
→ Scanning a large area at high resolution results in a large quantity of
data and a prolonged scanning time. When selecting the scan
preferences, lower the resolution or specify a suitable scanning area.
"DISABLE USB SCAN" has been enabled in the system
settings.
→ Consult the administrator.
Make sure that your computer meets the system
requirements for the USB 2.0 interface (Hi-Speed mode).
→ Make sure that "USB2.0 MODE" described in the "System settings
guide
" is set to "HI-SPEED".
–
–
13
14
23
System settings
guide
28
Page 30

SPECIFICATIONS
5
Printer specifications
Printing speed* MX-M200D: 20 pages/min, MX-M160D/MX-M160: 16 pages/min
Resolution 600 dpi
Memory
Page memory
IMC Memory
Emulation SPLC (Sharp Printer Language with Compression)
Memory expansion
Interface port USB 2.0 port
Interface cables
* Print speed during printing of the second sheet and following sheets when using 8-1/2" x 11" (A4) plain paper and performing
continuous one-sided printing of the same page; excluding use of offset output.
MX-M200D/MX-M160D: 32 MB, MX-M160: 16 MB
16 MB
256 MB expansion memory board (AR-SM5) can be installed in one DIMM expansion
slot
[USB cable]
Shielded twisted pair cable (max. length 10 feet (3 m))
Please purchase a commercially available USB cable.
29
Page 31

SPECIFICATIONS
Scanner specifications
Type Flatbed color scanner
Scanning method Document glass / SPF / RSPF
Light source Cold cathode fluorescent lamp
Resolution
Original types Sheet media, books
Effective scanning area
Scanning speed
Scanning colors
Protocol TWAIN / WIA (Windows XP/Vista) / STI
Interface port USB 2.0 port
Drop out color Ye s
Supported operating
systems
Void area
Interface cables
* The resolution may be enhanced by the scanner driver depending on the scanned area and resolution.
*
Basic: 600 dpi x 600 dpi
Setting range: 50 dpi - 9600 dpi
11-45/64" (297 mm) (Lengthwise) x 17" (431 mm) (Width)
Color / Black and White (light source color selected): 2.88 msec/line
Grayscale / Black and White: 0.96 msec/line
Black and white 2 value
Grayscale
Full Color
Windows 2000/XP/Vista
(For more information, see "1. INSTALLING THE SOFTWARE (THAT ACCOMPANIES
THE MACHINE)" in the "Software setup guide".)
Top and bottom edges 7/64" (2.5 mm), right and left edges 1/8" (3.0 mm)
(at the periphery of the machine's maximum scanning area)
[USB cable]
Shielded twisted pair cable (max. length 10 feet (3 m))
Please purchase a commercially available USB cable.
Note
As a part of our policy of continuous improvement, SHARP reserves the right to make design and specification
changes for product improvement without prior notice.
30
Page 32

OPERATION MANUAL (for printer and scanner)
MXM200D-EN1-PRINTER
 Loading...