

Page 1
PORTABLE MINIDISC RECORDER
GRABADOR/REPRODUCTOR MINIDISC PORTÁTIL
MODEL
MODELO
MD-MT90W
OPERATION MANUAL
MANUAL DE MANEJO
ENGLISH
ESPAÑOL
Please refer to pages E-1 to E-46.
Consulte las páginas S-1 al S-46.
Page 2

ENGLISH
Introduction
Thank you for purchasing this SHARP product. For the best performance, read this manual carefully. It will guide you
in operating your SHARP product.
Contents
„
Important Introduction
Accessories . . . . . . . . . . . . . . . . . . . . . . . . . . . . . . . . .2
Special Notes . . . . . . . . . . . . . . . . . . . . . . . . . . . . . . 3-4
Names of Controls and Indicators . . . . . . . . . . . . . 5-6
Precautions. . . . . . . . . . . . . . . . . . . . . . . . . . . . . . . . . . 7
„
Preparation
Inserting a MiniDisc. . . . . . . . . . . . . . . . . . . . . . . . . . .8
Connections . . . . . . . . . . . . . . . . . . . . . . . . . . . . . . 9-10
„
Basic Operat ion
Recording . . . . . . . . . . . . . . . . . . . . . . . . . . . . . . . 11-12
-Introduction/Contents-
Playback . . . . . . . . . . . . . . . . . . . . . . . . . . . . . . . . 13-14
Important Introduction
„
Useful Features
Advanced Playback . . . . . . . . . . . . . . . . . . . . . . . 15-16
Advanced Recording . . . . . . . . . . . . . . . . . . . . . . 17-21
Recording from a Microphone . . . . . . . . . . . . . . 22-24
Checking Displays . . . . . . . . . . . . . . . . . . . . . . . . 25-26
Battery Power. . . . . . . . . . . . . . . . . . . . . . . . . . . . 27-28
Hold Function. . . . . . . . . . . . . . . . . . . . . . . . . . . . . . . 29
E-1
ENGLISH
„
Advanced Features
Changing Default Settings . . . . . . . . . . . . . . . . . . . . 30
Titling a MiniDisc. . . . . . . . . . . . . . . . . . . . . . . . . .31-34
Editing a Recorded MiniDisc . . . . . . . . . . . . . . . . 35-37
Listening through Another System. . . . . . . . . . . . . 38
„
References
Other Features and Caution. . . . . . . . . . . . . . . . . . . 39
MiniDisc System Limitations . . . . . . . . . . . . . . . . . . 40
Error Messages. . . . . . . . . . . . . . . . . . . . . . . . . . .41-42
Troubleshooting . . . . . . . . . . . . . . . . . . . . . . . . . .43-44
Maintenance . . . . . . . . . . . . . . . . . . . . . . . . . . . . . . . 44
Specifications . . . . . . . . . . . . . . . . . . . . . . . . . . . .45-46
00/12/27 E_90EX_1.FM
Page 3
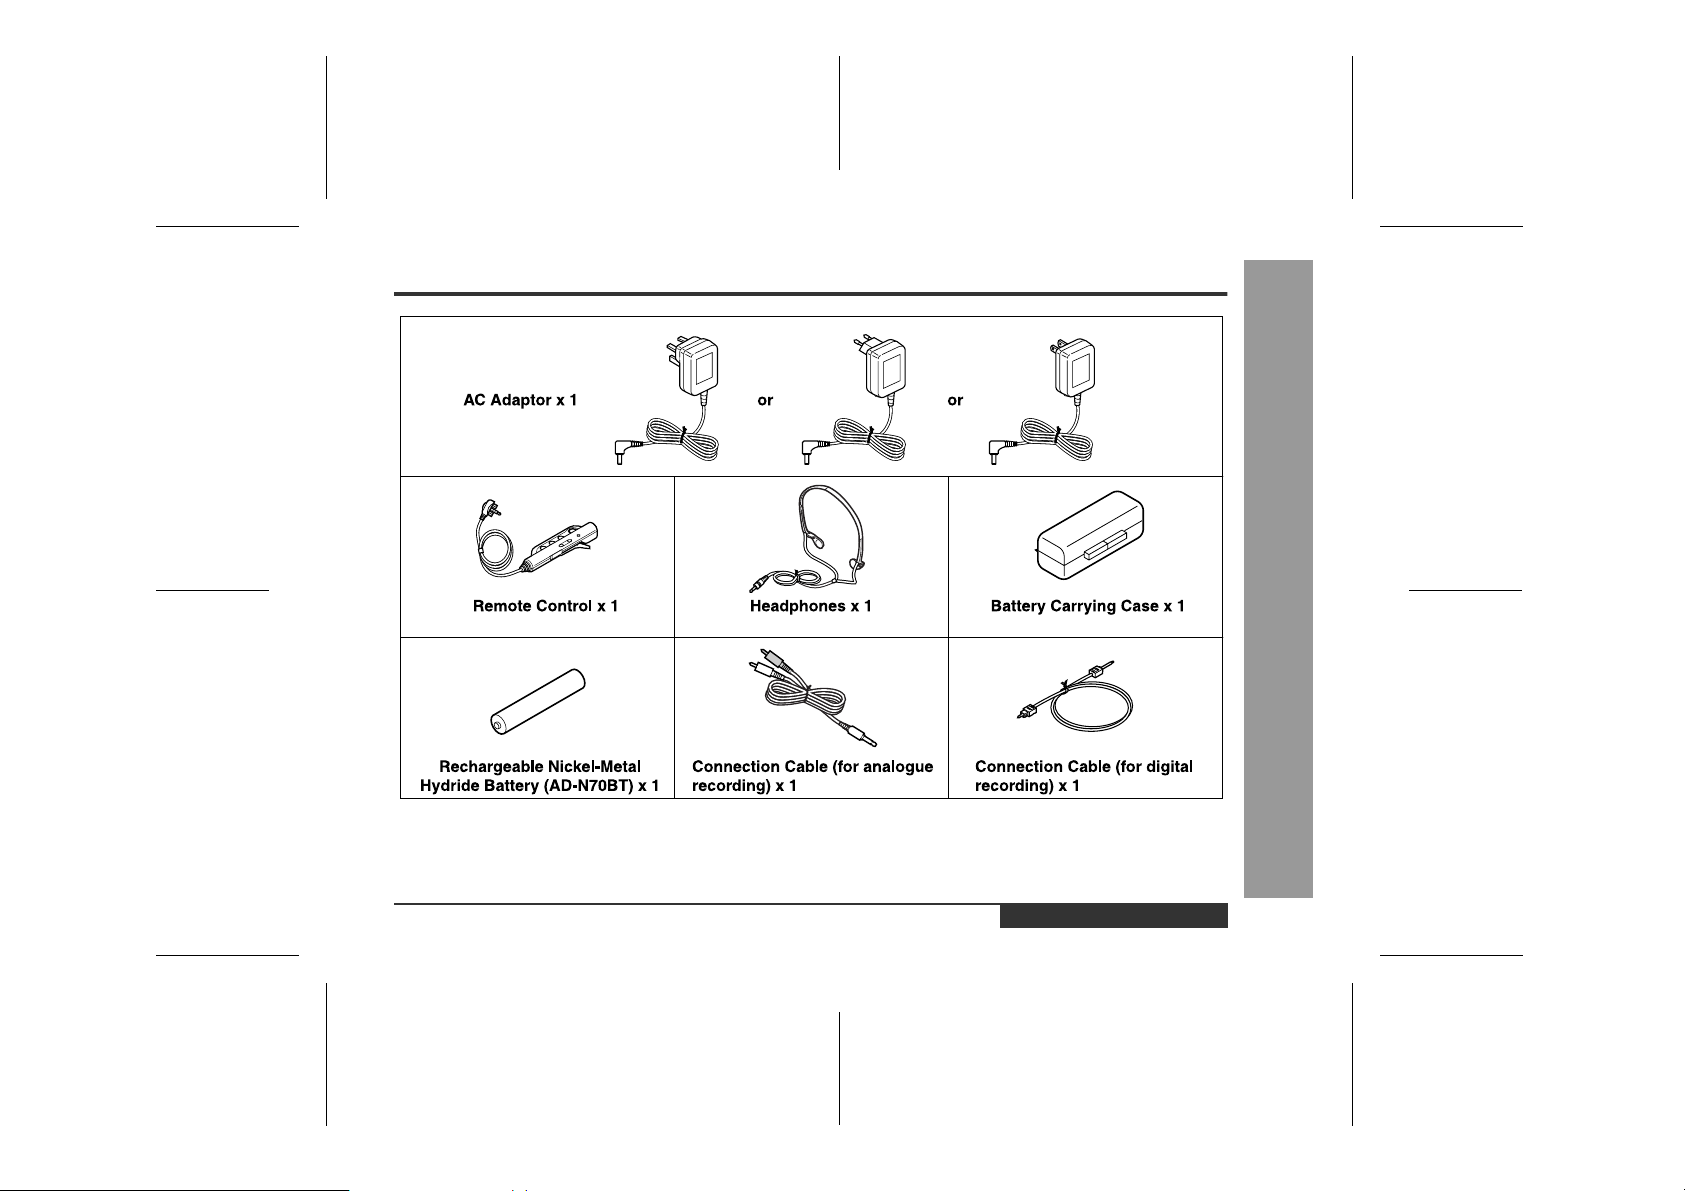
Accessories
Notes:
z
Parts and equipment mentioned in this operation manual other than those detailed above are not included.
z
The AC adaptor may be different from the one in the drawing.
-Accessories-
Important Introduction
ENGLISH
00/12/27 E_90EX_1.FM
E-2
Page 4
Special Notes
„
Warnings
z
The supplied AC adaptor contains no user serviceable
parts.
Never remove covers unless qualified to do so. It contains dangerous voltages, always remove mains plug
from the main outlet socket before any service operation or when not in use for a long period.
z
The AC adaptor supplied with the MD-MT90W must
not be used with other equipment.
z
To prevent fire or shock hazard, do not expose this
appliance to dripping or splashing.
No objects filled with liquids, such as vases, shall be
placed on the apparatus.
„
Caution
z
SHARP is not liable for damage or loss of your recording arising from malfunction of this unit.
z
When recording important selections, make a prelimi-
-Special Notes-
nary test to ensure that the desired material is properly recorded.
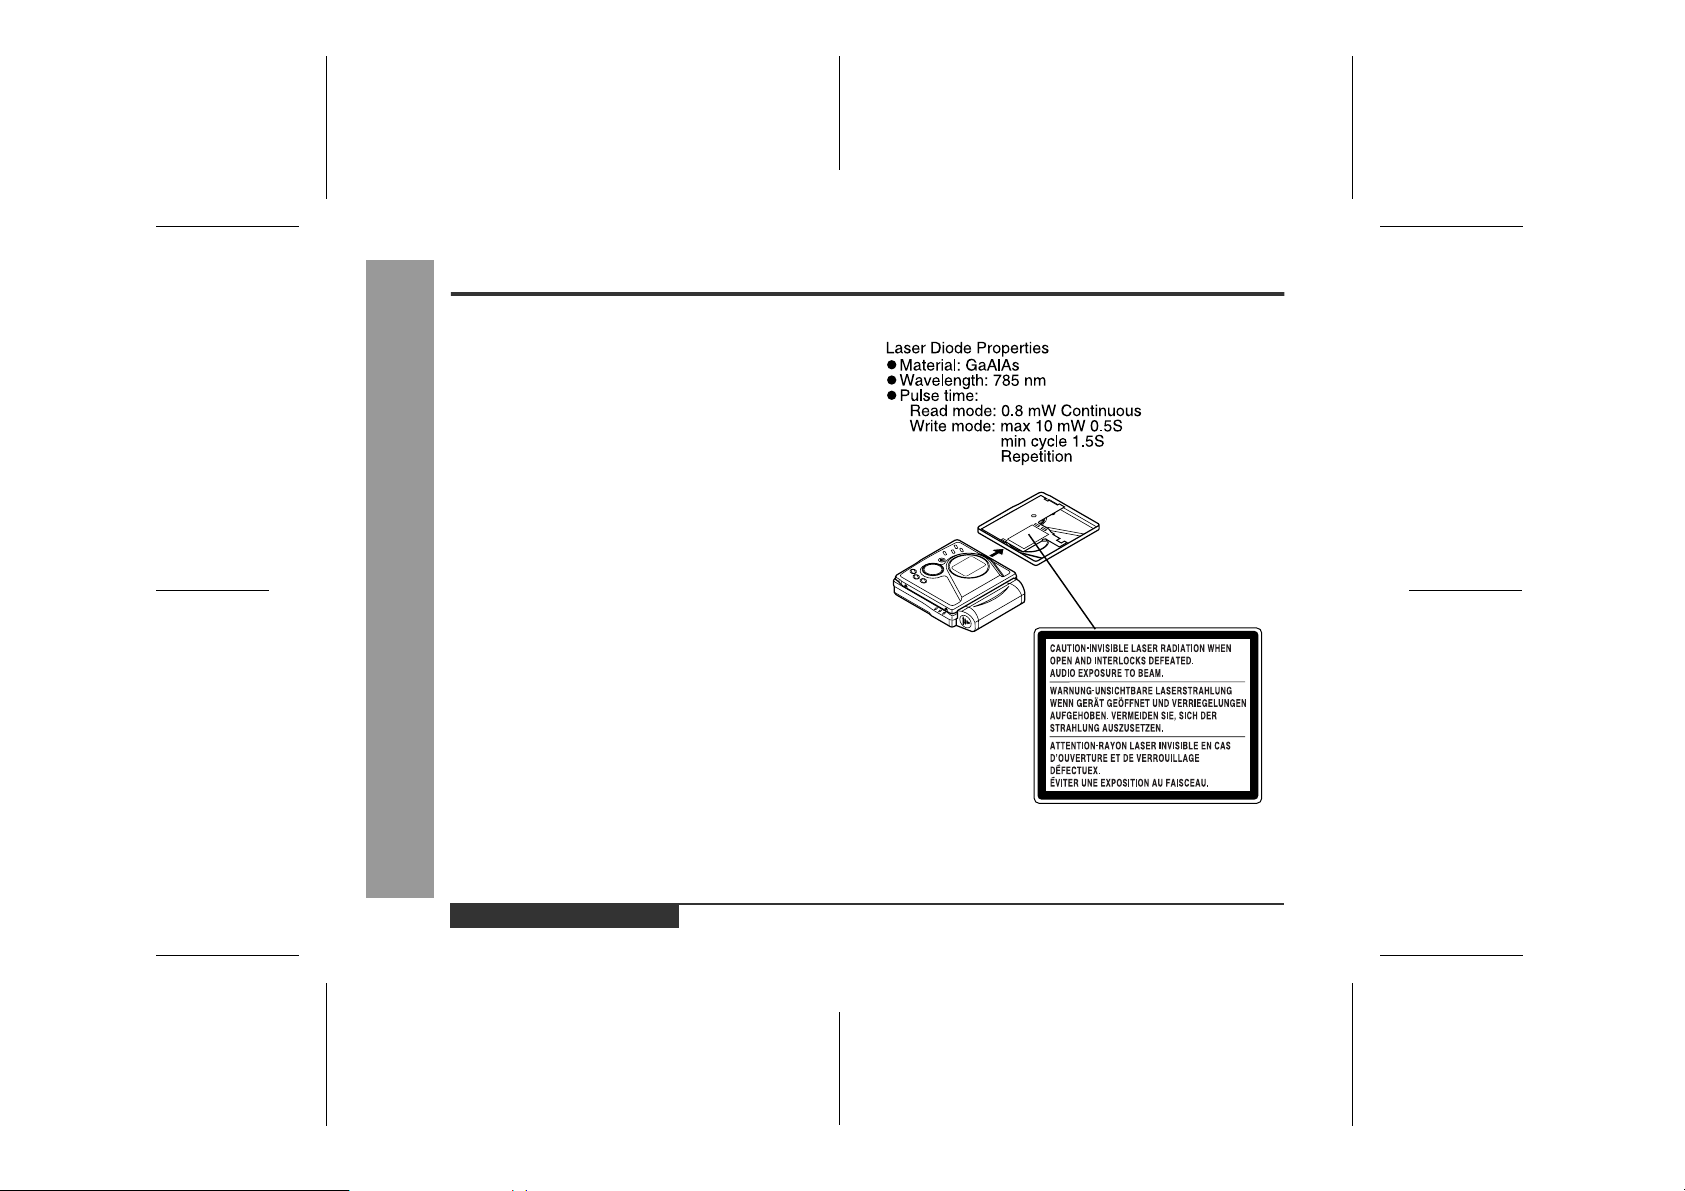
z
This product is classified as a CLASS 1 LASER
PRODUCT.
z
Important Introduction
Use the Portable MiniDisc Recorder only in accordance with the instructions given in this manual and
do not attempt to interfere with the interlock switch or
make any other adjustment as this may result in exposure to hazardous radiation.
E-3
ENGLISH
00/12/27 E_90EX_1.FM
Page 5

„
Notes
z
Audio-visual material may consist of copyrighted
works which must not be recorded without the authority of the owner of the copyright. Please refer to the
relevant laws in y our country.
z
The letters in brackets contained in the model number
indicate the colour of the product only. Operation and
specifications are unaffected.
z
US and foreign patents licensed from Dolby Laboratories.
-Special Notes-
Important Introduction
ENGLISH
00/12/27 E_90EX_1.FM
E-4
Page 6
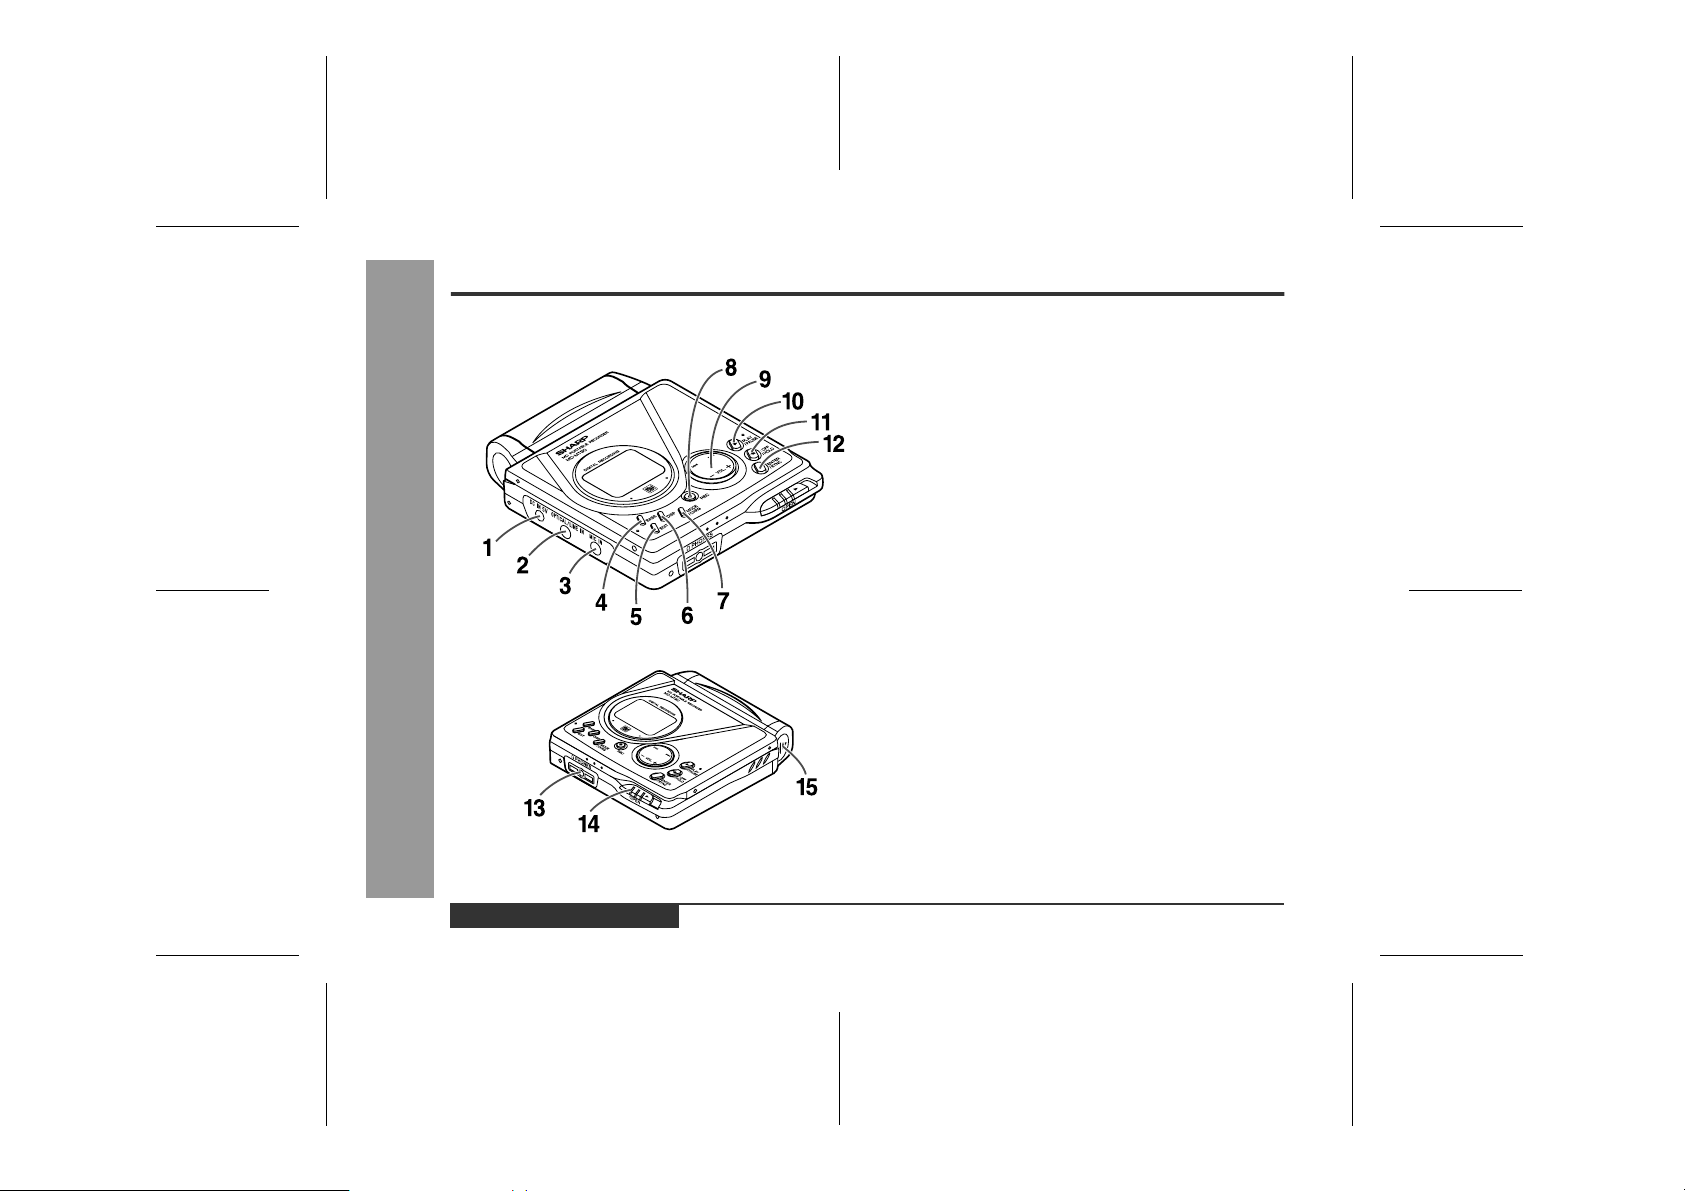
Names of Controls and Indicators
Important Introduction
-Names of Controls and Indicators-
„
Main unit
1.5V DC Input Socket (9)
2.Optical/Line Input Socket (9, 10)
3.Microphone Input Socket (22)
4.Bass/Delete Button (14, 32)
5.Edit/Auto Mark/Time Mark Button (20, 24, 31)
6.Display/Character Select Button (25, 31)
7.Mode/Charge Button (16, 27)
8.Record/Track Mark Button (11, 20)
9.Volume/Cursor/Fast Forward/Fast Reverse/
Recording Level/Name Select Button (11, 14, 15,
31, 32)
10.Play/Pause Button (11, 14)
11.Stop/Power Off/Hold Button (12, 14, 29)
12.Enter/Fast Play/Synchro Button (16, 17, 19)
13.Remote Control/Headphones/Line Output Socket
(13, 38)
14.Open Lever (8)
15.Battery Cover (27)
E-5
ENGLISH
00/12/27 E_90EX_1.FM
Page 7
„
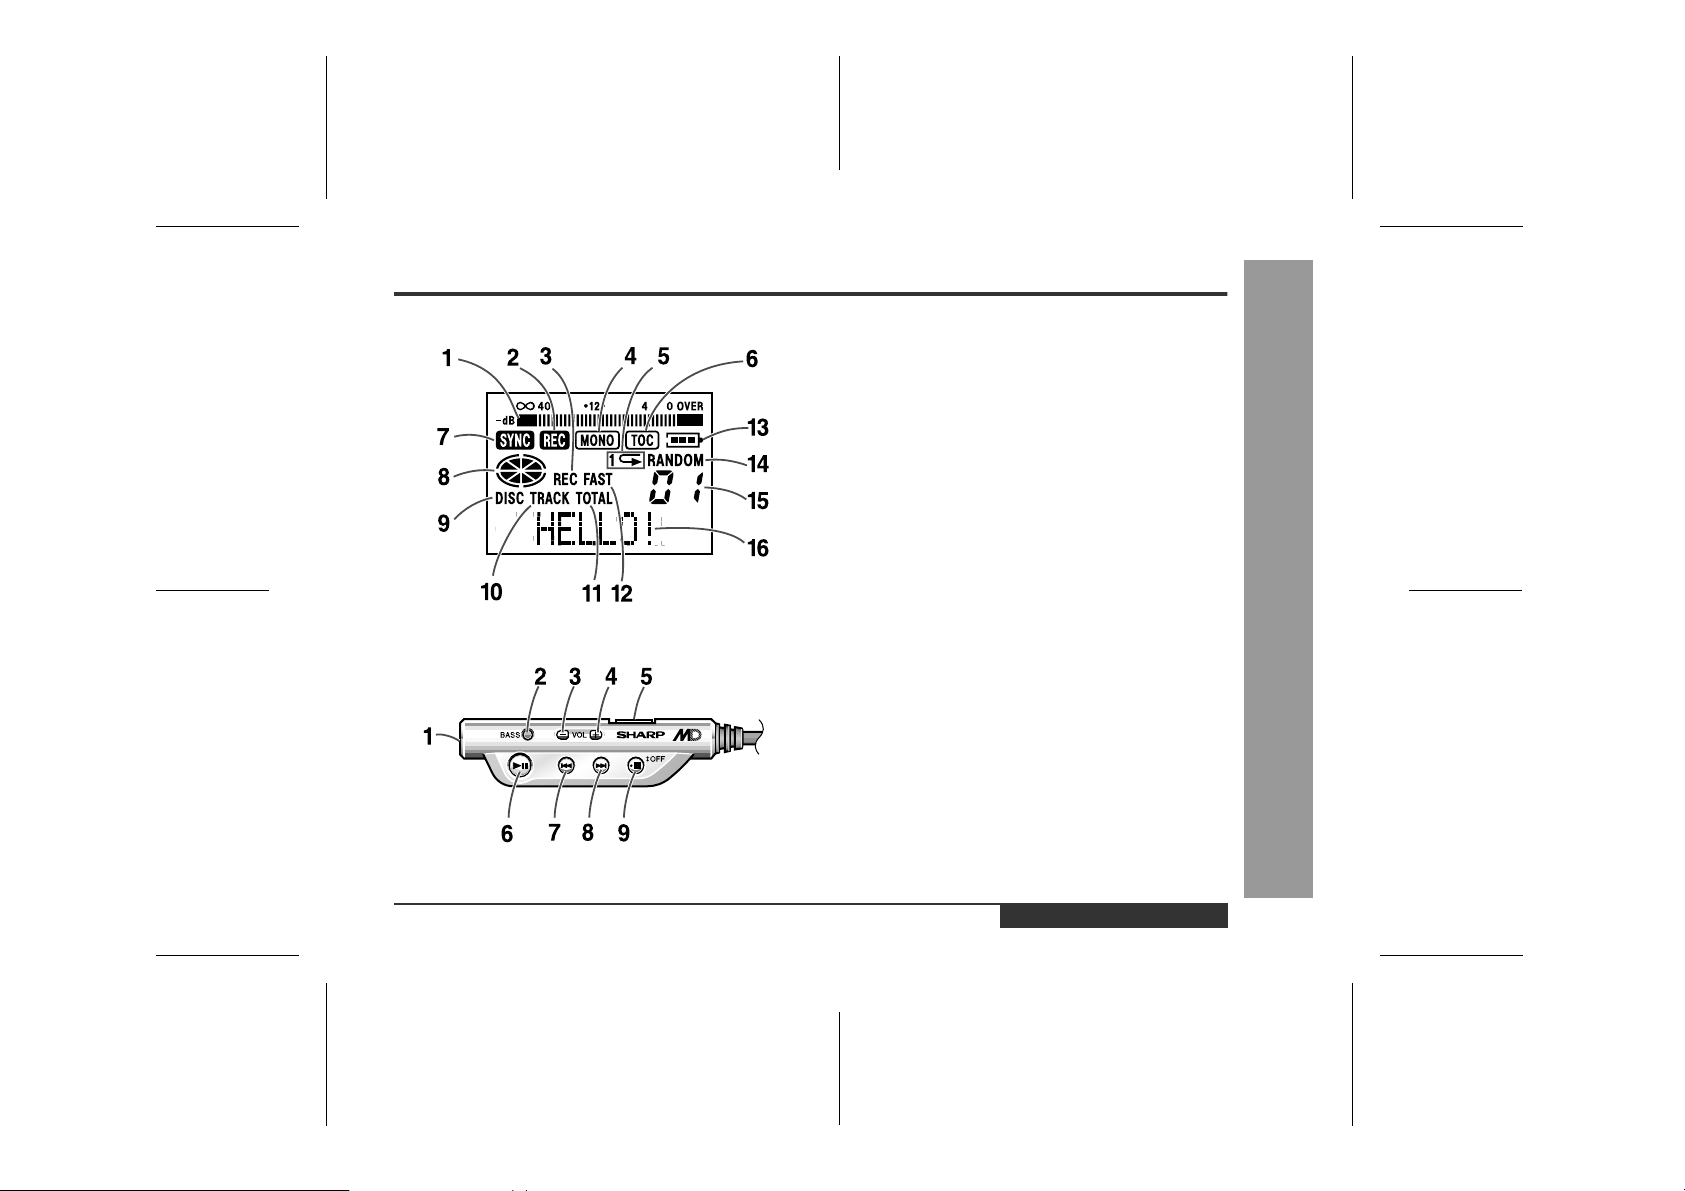
Display panel
1.Level Meter (11)
2.Record Indicator (11)
3.Rem aining Recording Time Indicator (25)
4.Monaural Long-Play Mode Indicator (18)
5.Repeat Indicator (16)
6.TOC Indicator (12)
7.Synchro Recording Indicator (17)
8.Disc Mode Indicator
9.Disc Name Indicator (25)
10.Track Name Indicator (25)
11.Total Track Number Indicator (25)
12.Fast Play Indicator (16)
13.Bat tery Indicator (26)
14.Random Indicator (16)
15.Track Number Indicator (25)
16.Character/Time Information Indicator
„
Remote control unit
1.Headphones Socket (13)
2.Bass/Delete/Track Mark Button (14, 20, 32)
3.Volume Down/Cursor Button (14, 32)
4.Volume Up/Cursor Button (14, 32)
5.Hold Switch (29)
6.P lay/Pause Button (11, 14)
7.Fast Reverse/Recording Level Down/Name Select
Button (11, 15, 31)
8.Fast Forward/Recording Level Up/Name Select
Button (11, 15, 31)
9.S top/Power Off Button (12, 14)
Important Introduction
-Names of Controls and Indicators-
ENGLISH
00/12/27 E_90EX_1.FM
E-6
Page 8
Precautions
„
Important
z
Do not wear your headphones when you are crossing
streets or near traffic.
z
Do not use your headphones whilst
driving a motor vehicle, it may create a traffic hazard and may be illegal. Remember to obey all of the
safety rules in your area.
z
Do not play the unit at a high volume. Hearing experts
advise against extended listening at high volume levels.
z
If you experience ringing in your ears, reduce the volume or discontinue use.
z
No naked flame sources, such as lighted candles,
should be placed on the apparatus.
z
Attention should be drawn to the environmental
aspects of battery disposal.
-Precautions-
z
This portable MD should only be used within the range
of 0°C - 40°C (32°F - 104°F).
To avoid accidental electric shock or other possible
problems, observe the precautions listed below.
z
Important Introduction
Do not disassemble or modify the unit.
z
Do not drop or subject the unit to shock.
z
Do not use the unit near open flames.
z
Do not spill liquid on the unit.
z
Do not use an external power supply, other than the
5V DC supplied with this unit, as it may damage it.
SHARP is not responsible for damage due to improper
z
use. Refer all servicing to a SHARP authorised service centre.
„
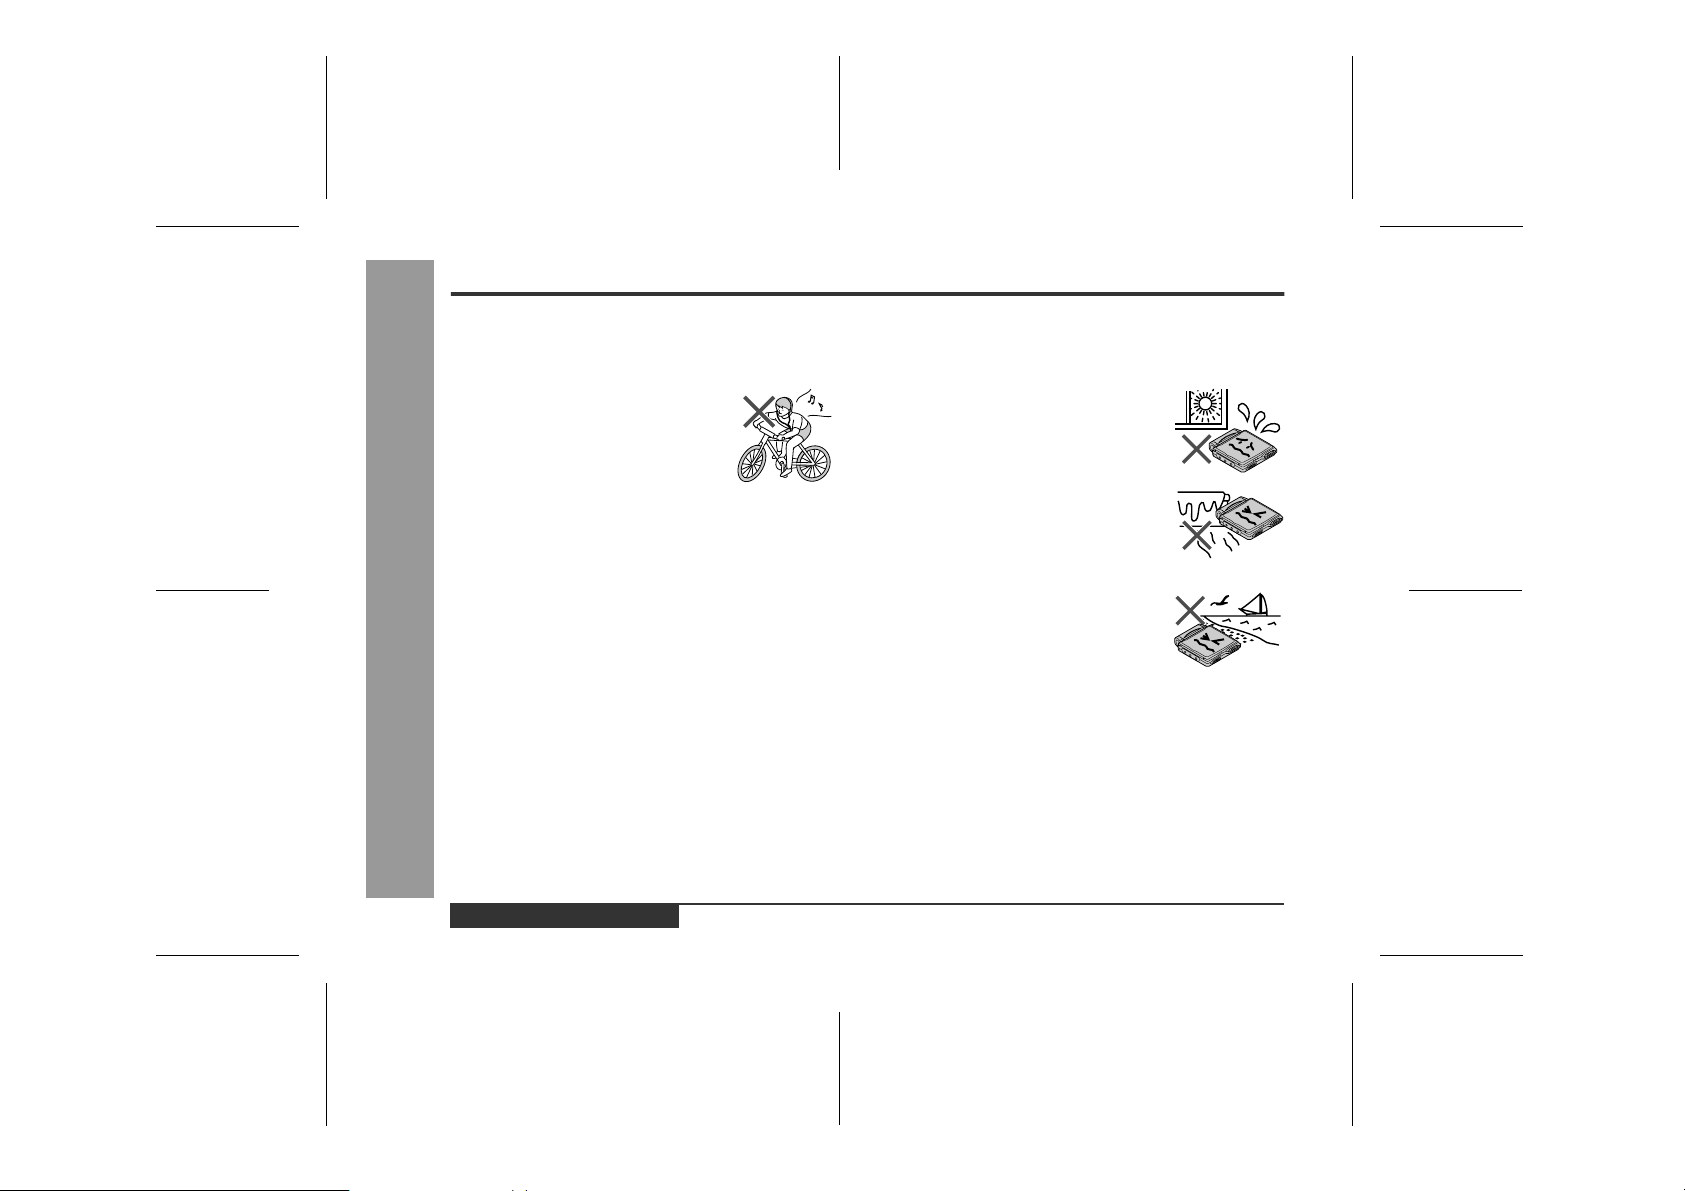
Storing the unit
Avoid using or leaving the unit in the following
places.
z
Places exposed to direct sunlight for
many hours (especially in cars with
the doors and windows closed) or
near heaters. (The cabinet may deform, change colour or the unit may
malfunction.)
z
Places exposed to excessive dust.
z
Places exposed to water.
z
Places where temperatures are excessively high or low.
z
Places (bathrooms) where the humidity is extremely high.
z
Places with strong magnetic fields
such as TVs or loudspeakers.
z
Places exposed to vibration.
z
Places where sand can easily enter
the inside of the unit (beaches etc.).
z
If the unit is used near radio tuners or TVs, noise and/
or picture interference may result. If you experience
these problems, move the unit away from such
devices.
It is not recommendable to put the MiniDisc into a rear
z
pocket, as this may damage the product when sitting.
E-7
ENGLISH
00/12/27 E_90EX_1.FM
Page 9
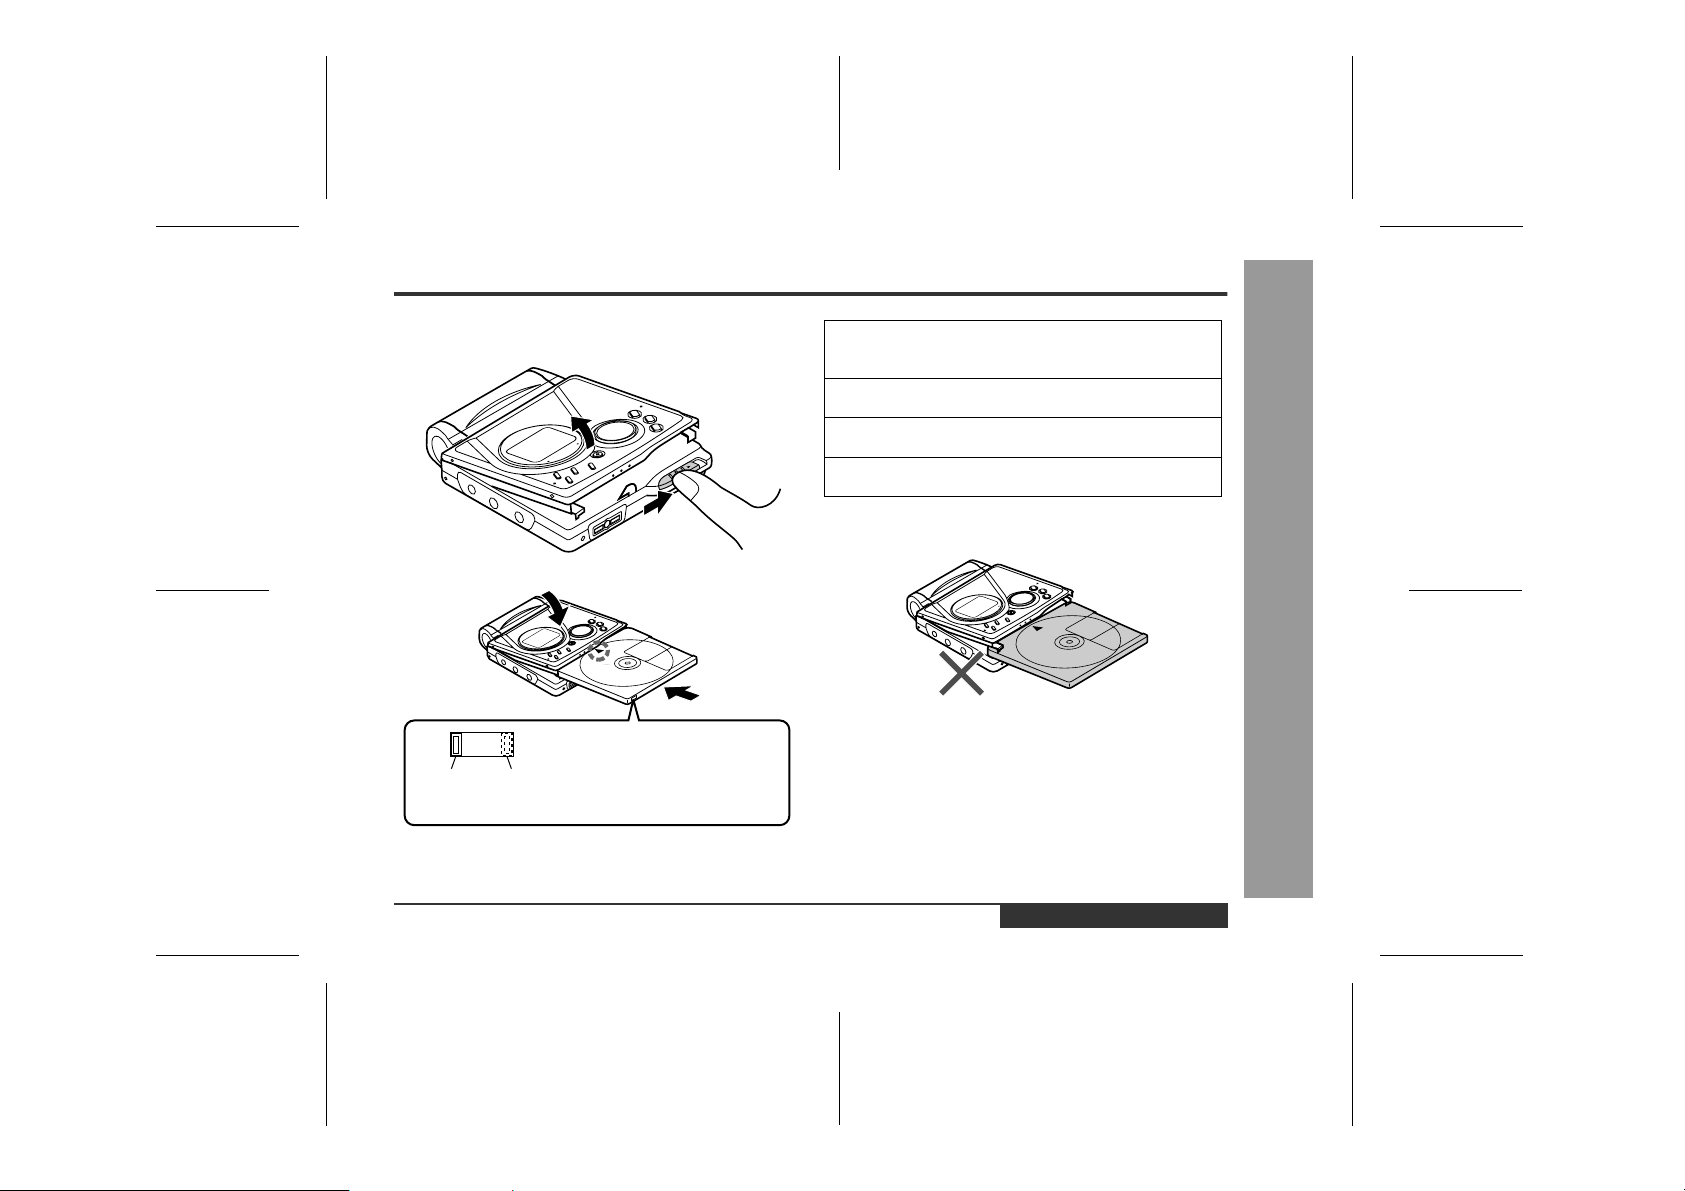
Inserting a MiniDisc
2
1
Slide the OPEN lever to release the compartment door.
2
Lift it up.
3
Insert a MiniDisc as shown.
4
Close the compartment door.
Recordable
4
Recording
prevented
1
3
When you record on a MiniDisc,
check that the erase prevention
tab is set to the "Recordable"
position.
Notes:
z
Do not place the MiniDisc under the holder.
z
If any resistance is felt, do not force the MiniDisc into
the unit, as it may cause damage to the unit. If resistance is felt, remove the MiniDisc and reload it.
z
The lid cannot be opened if "TOC" is displayed refer to
the instruction on page 12.
ENGLISH
00/12/27 E_90EX_2.FM
Preparation
-Inserting a MiniDisc-
E-8
Page 10
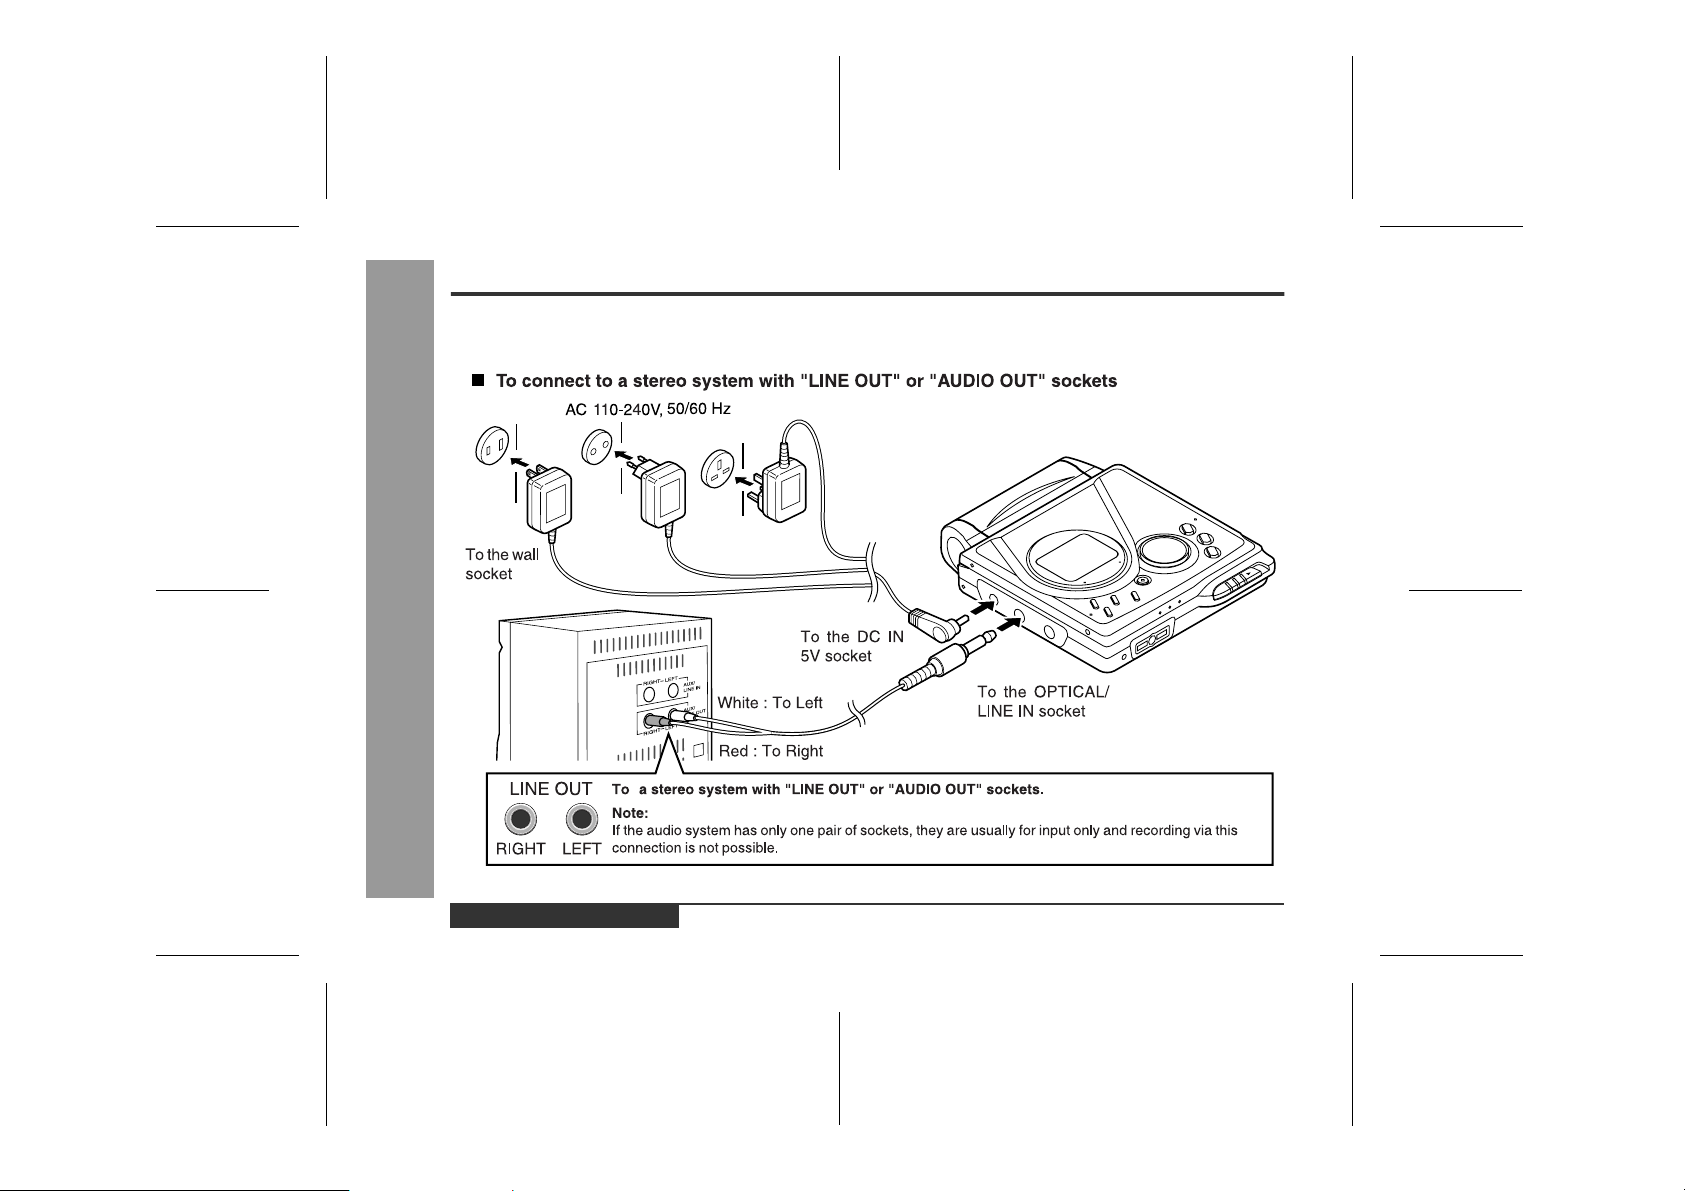
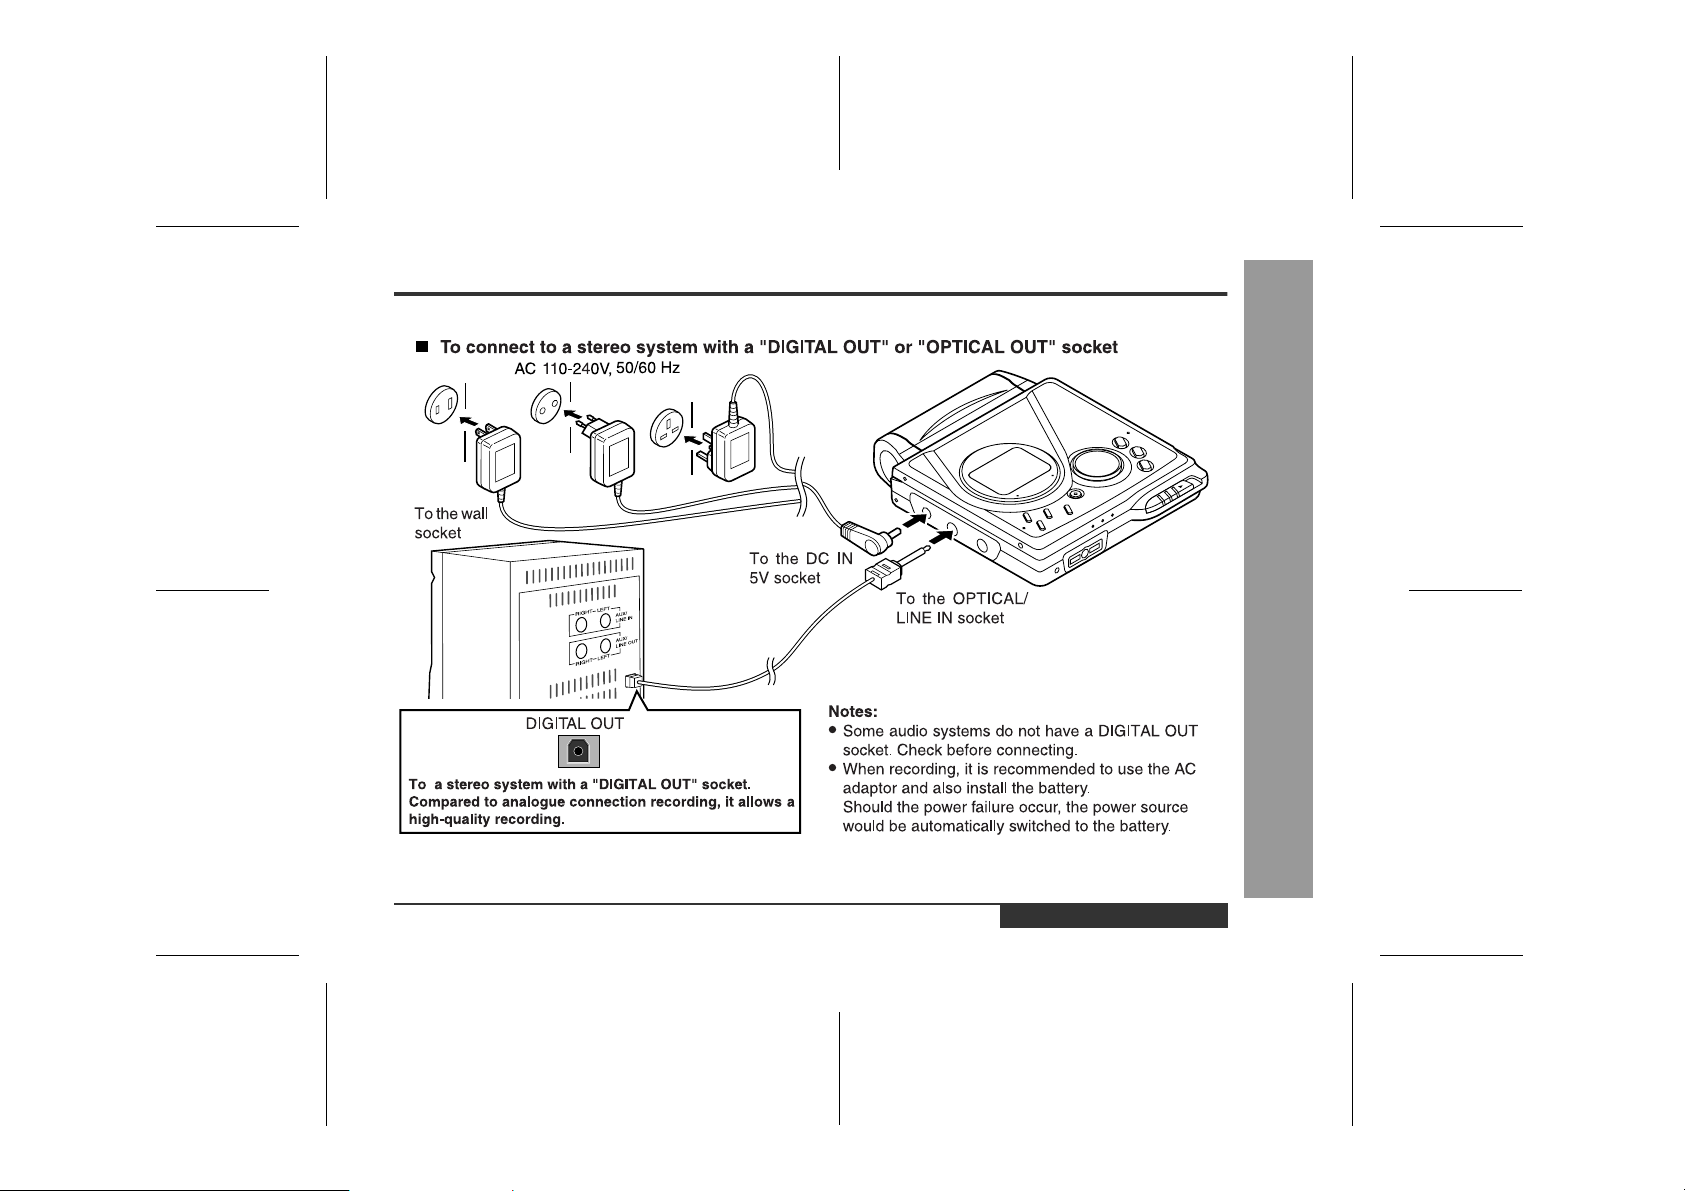
Connections
You can record your favourite CDs or tapes to MD.
-Connections-
Preparation
E-9
ENGLISH
00/12/27 E_90EX_2.FM
Page 11
-Connections-
Preparation
ENGLISH
00/12/27 E_90EX_2.FM
E-10
Page 12
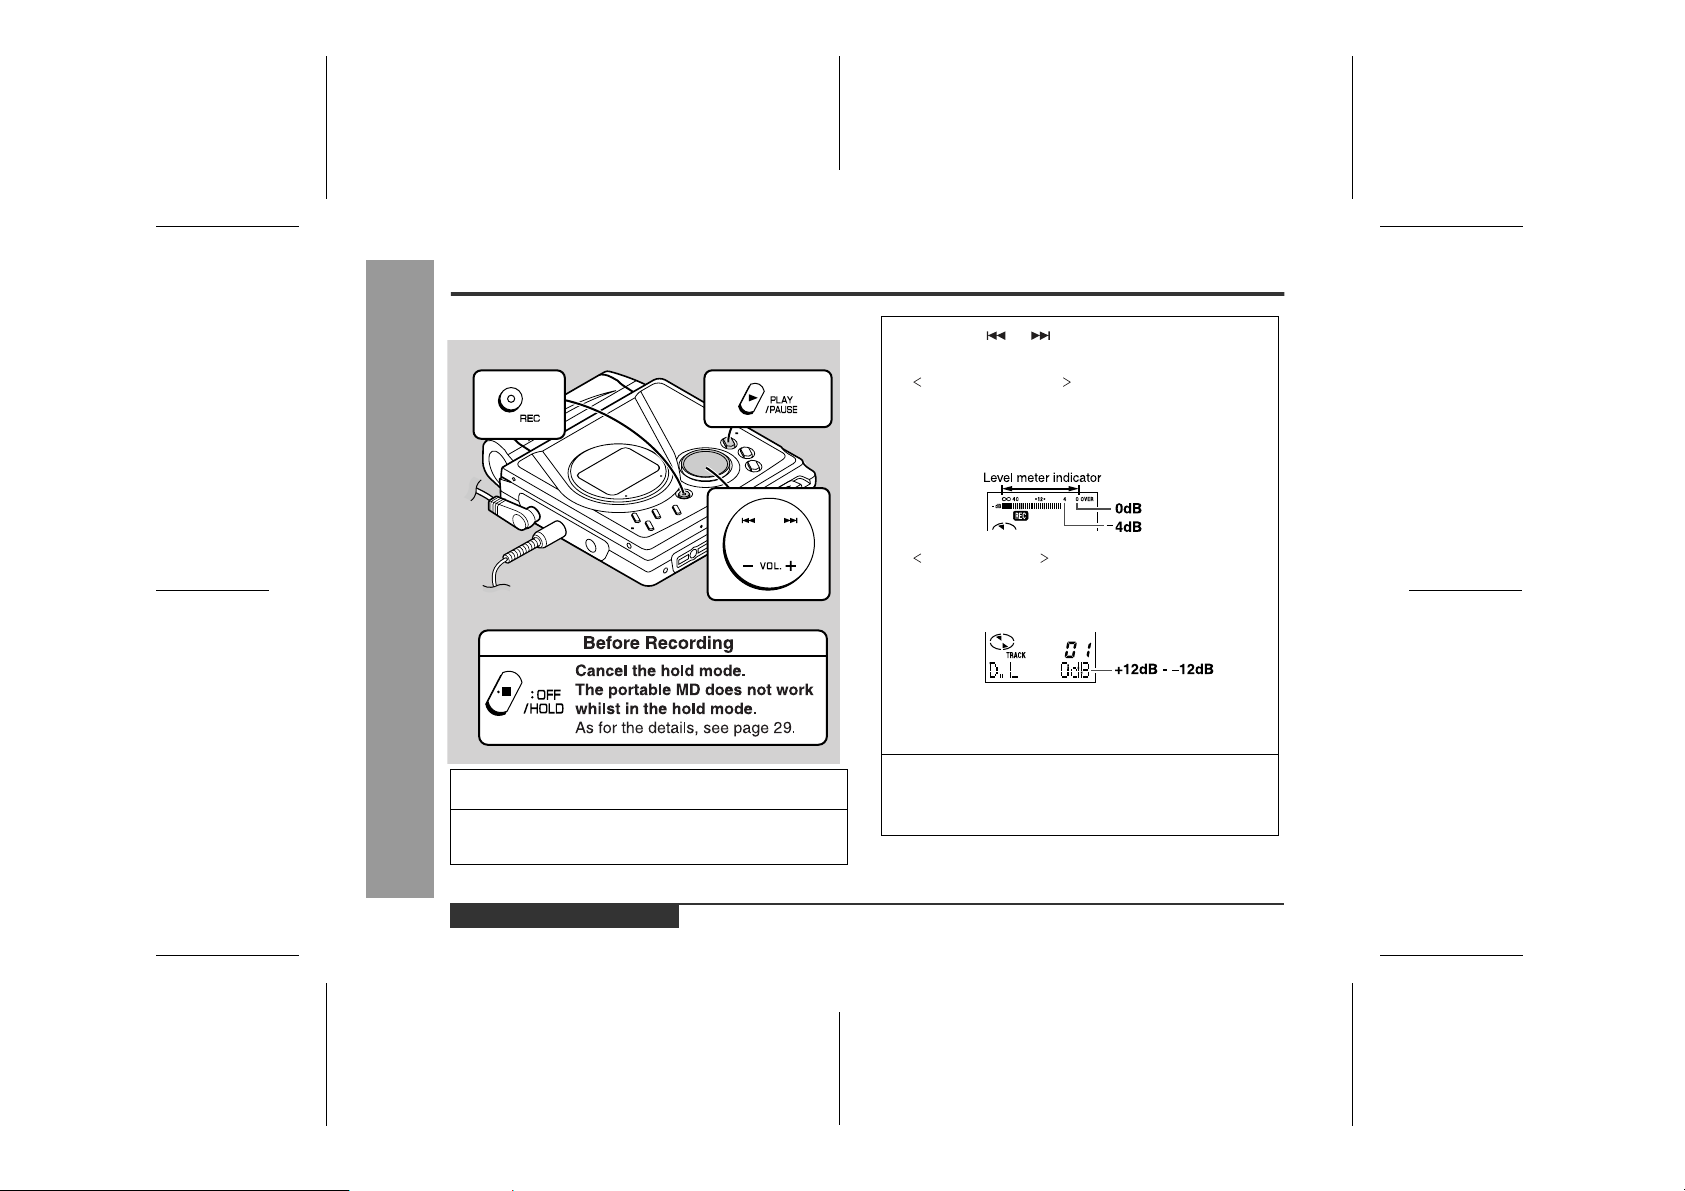
Recording
-Recording-
Basic Operation
1
2
Press the REC button.
Begin playback on the stereo system connect ed to
this portable MD.
3
Press the or button to adjust the recording
level.
Analogue recording
Adjust the recording level so that the maximum sound
volume from the source makes the reading swing
somewhere between --- 4 dB and 0 dB.
Digital recording
You can adjust the level in 1dB incre m ents within the
range of +12 - --- 12dB.
Once you adjust the digital rec ording level, the setting
remains even after the recording st ops. (For cancellation instructions, see page 30.)
4
Press the PAUSE button on the stereo system to
enter the playback pause mode.
Here you can search for the track to record.
E-11
ENGLISH
00/12/27 E_90EX_3.FM
Page 13
5
Press the PLAY/PAUSE butt on to start the MiniDisc
unit recording.
6
Begin playback on the stereo system, the output
will be recorded.
To interrupt recording
Press the PLAY/PAUSE button.
z
To resume recording, press the PLAY/PAUSE button
again.
The track number will be increased by one each time
z
the recording is interrupted.
To stop recording
Press the /:OFF button.
z
When recording stops, "TOC" appears. Whilst "TOC"
appears the MiniDisc recorded contents have not yet
been updated.
z
To prevent the new recording from being lost it is not
possible to remove the MiniDisc whilst "TOC" is displayed.
To update the recorded contents of the MiniDisc
Press the /:OFF button whilst in the stop mode.
The power turns off after recorded contents have been
updated on the MiniDisc.
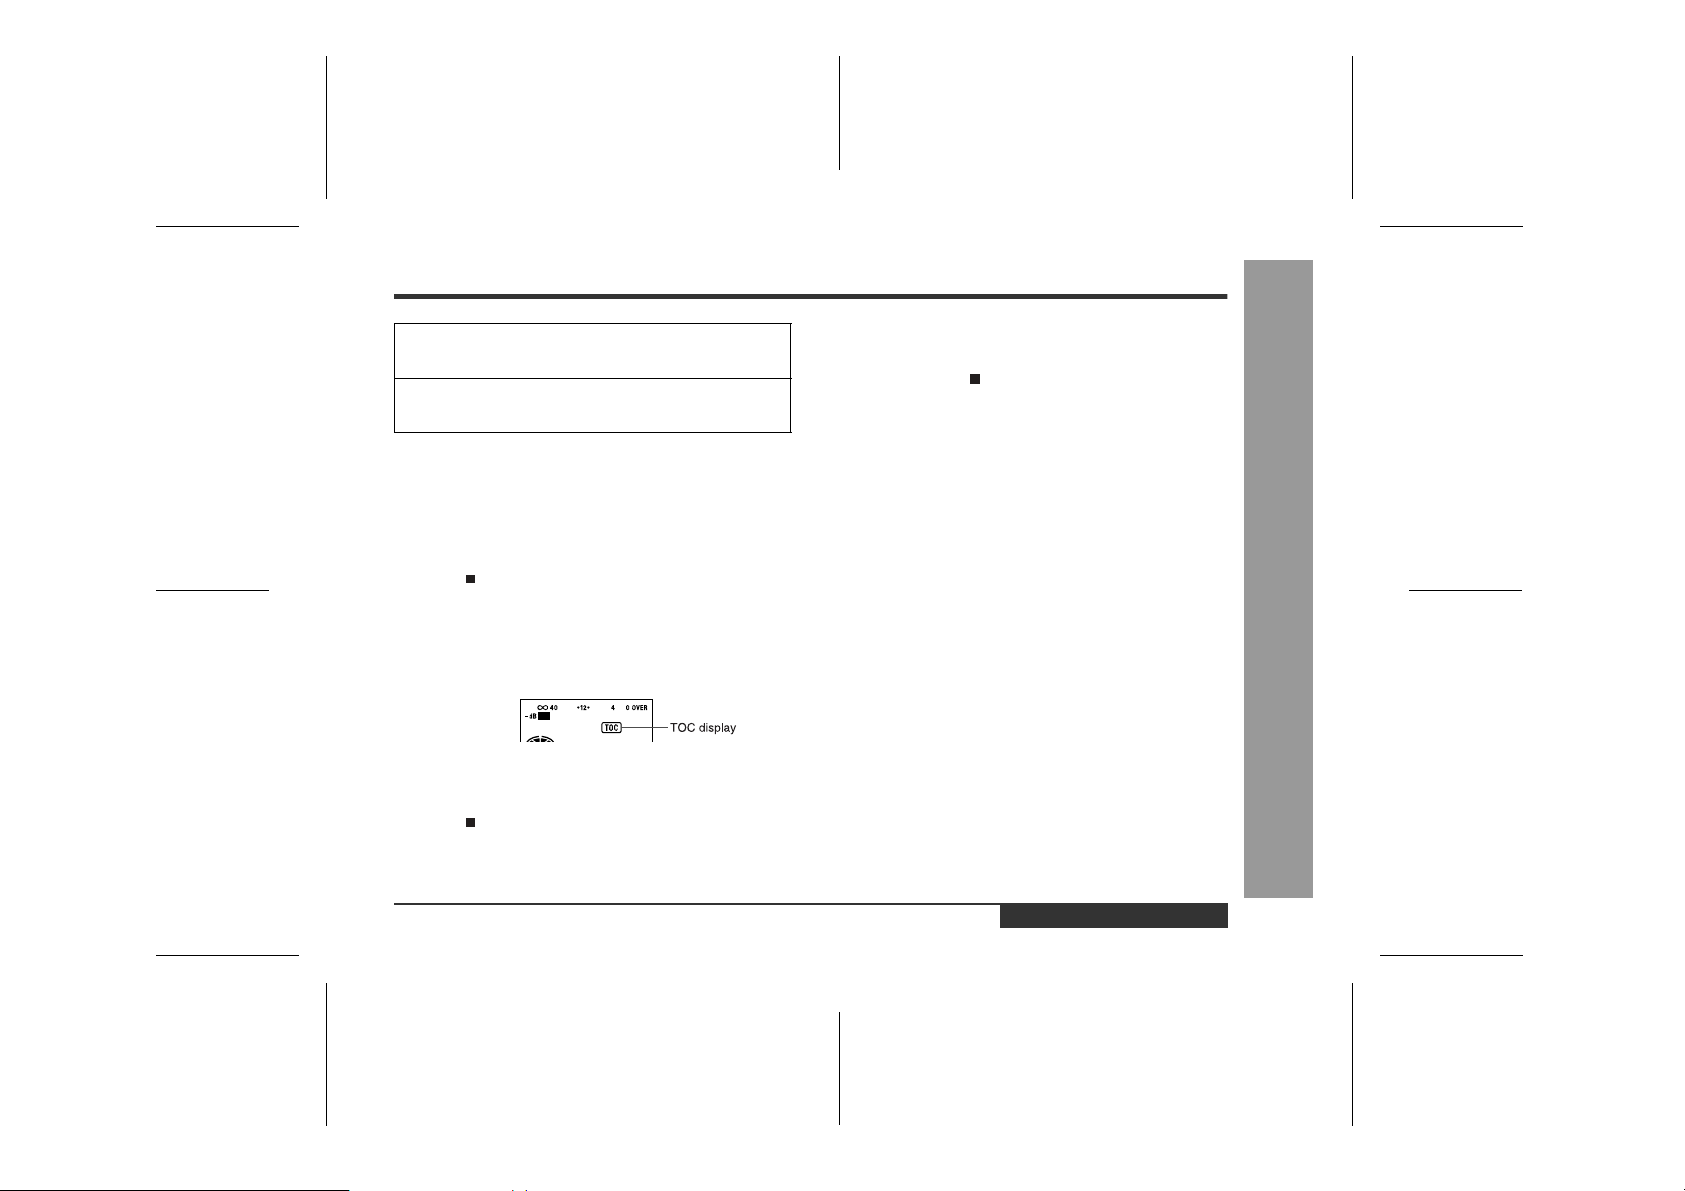
About the TOC
After any recording or editing function "TOC" (Table Of
Contents) is displayed. To finalise the recording or editing
function, press the /:OFF button. During this process
"TOC" will flash and "TOC EDIT!" will be displayed. During any recording or editing function the MiniDisc unit lid
is locked, the MiniDisc cannot be removed until the process is finalised.
Warning:
If the power is removed (Battery/AC adaptor) whilst
"TOC" is displayed, the MiniDisc unit lid will remain
locked until the battery/main power is restored and the
unit is turned on. Your new recordings or edited changes
will be lost and your MiniDisc may become unusable.
Caution:
Whilst "TOC" or "TOC EDIT!" is displayed, follow the
instructions below.
- Do not jerk or bump the unit.
- Do not unplug the AC adaptor.
- Do not remove the rechargeable battery or an alkaline battery.
- Do not subject the unit to shock.
Otherwise, tracks may not be recorded properly.
Notes:
z
Changing the volume level whilst recording does not
affect the recording.
z
You cannot adjust the bass level whilst recording.
-Recording-
Basic Operation
ENGLISH
00/12/27 E_90EX_3.FM
E-12
Page 14
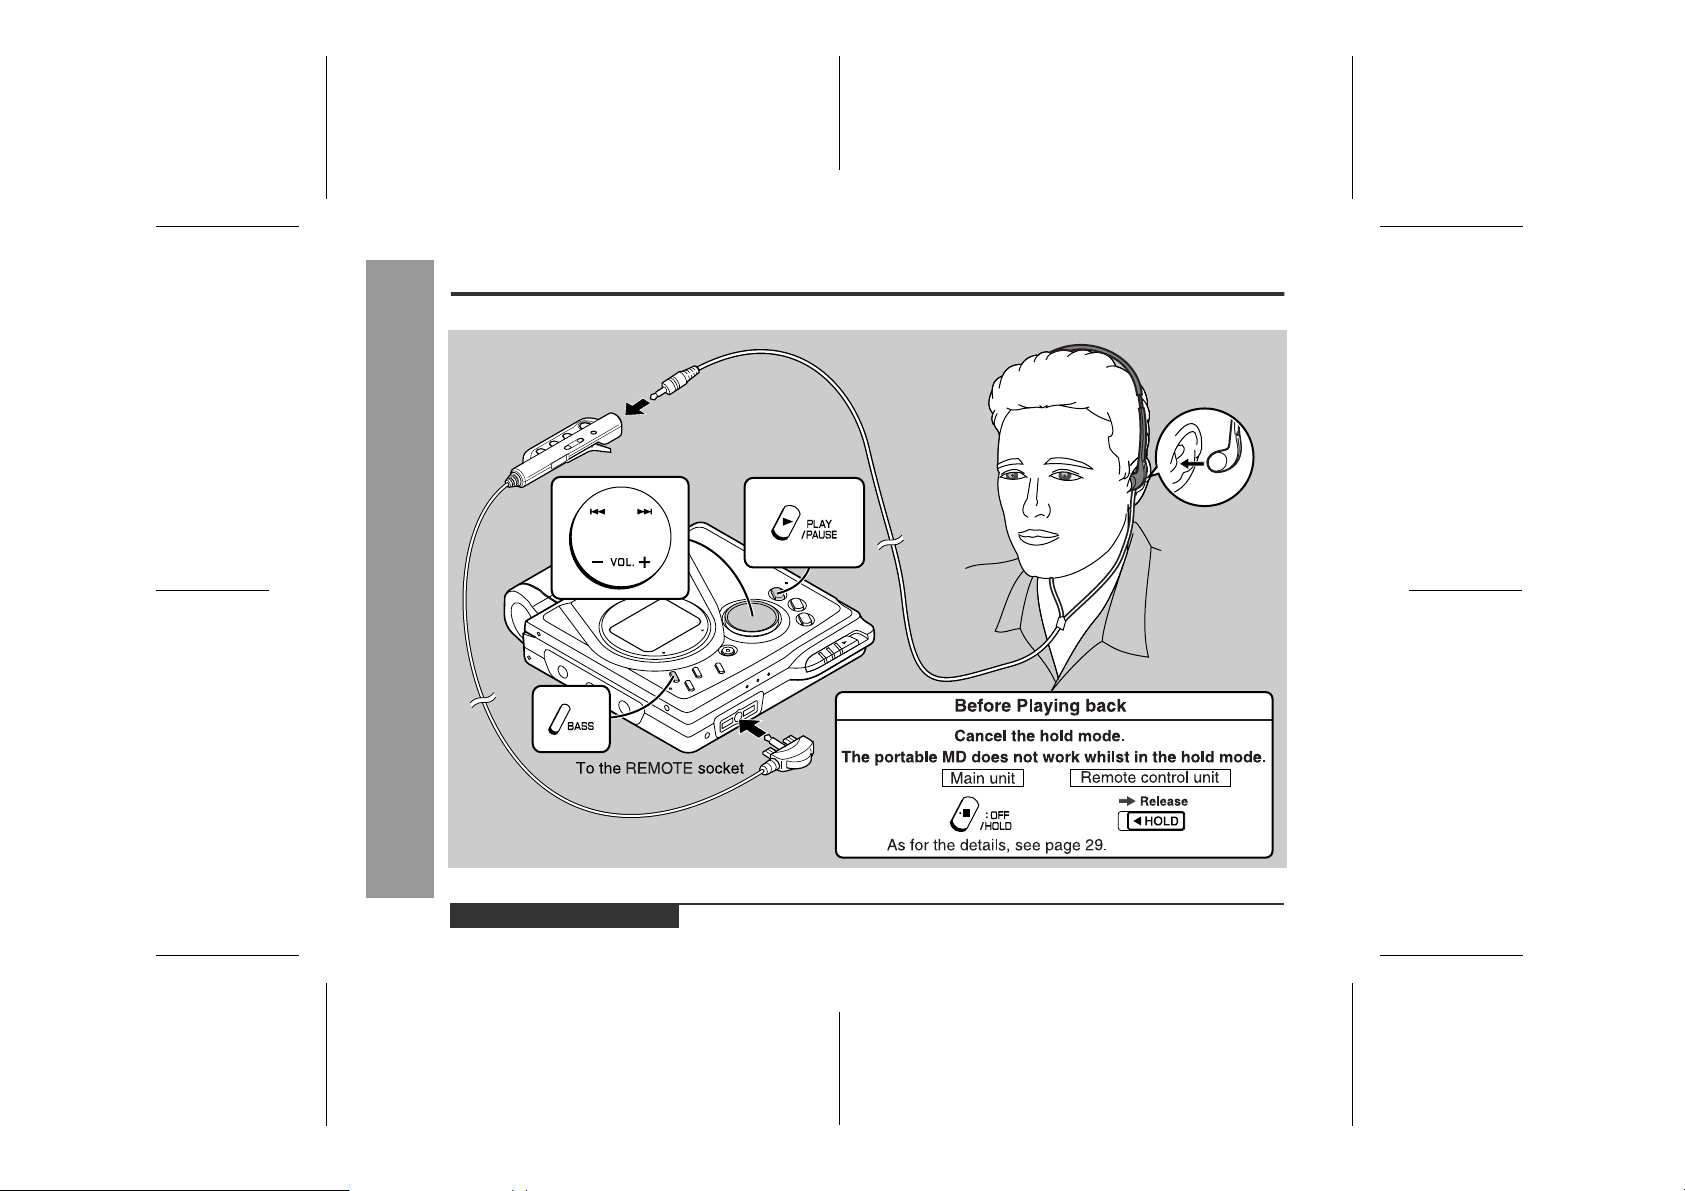
Playback
-Playback-
Basic Operation
E-13
ENGLISH
00/12/27 E_90EX_3.FM
Page 15

1
Insert the headphones plug firmly i nto the headphones socket on the remote control unit.
2
Plug the remote control into the REMOTE socket on the unit.
3
Insert a MiniDisc (page 8).
4
Press the PLAY/PAUSE button.
Playback starts automatically with a playback only
MiniDisc or a MiniDisc which is protected against
accidental erasure (Auto-play function).
To interrupt playback
Press the PLAY/PAUSE button.
To resume playback, press the PLAY/PAUSE button
again.
To stop playback
Press the /:OFF button.
If the unit is not operated for at least 2 minutes whilst in
the stop mode, the power will shut off automatically.
To turn off the power
Press the /:OFF button whils t in the stop mode .
„
Volume contr ol
Press the VOL+ button to increase the volume and the
---
button to decrease the volume.
VOL
„
Bass control
Each time the BASS button is pressed, the tone will be
switched as follows.
BASS 1 Emphasised slightly
BASS 2 Emphasised more
BASS 3 Emphasised fully
BASS OFF Cancelled
Notes:
z
If power failure occurs whilst playing a disc using the
AC adaptor, disconnect it from the wall socket. Otherwise, playback may start automatically when electricity
resumes.
z
If you connect the AC adaptor without installing the
rechargeable battery, playback may start automatically. Be sure to turn off the power.
z
Reduce the volume before starting to play. MiniDiscs,
compared to ordinary cassette tapes, have very little
noise. If the volume is adjusted according to your
usual expectations of noise, high volume may damage
your hearing.
The sound escaping from your headphones may
z
annoy people around you. In particularly crowded
places (such as on trains or buses), reduce the volume.
-Playback-
Basic Operation
ENGLISH
00/12/27 E_90EX_3.FM
E-14
Page 16
Advanced Playback
„
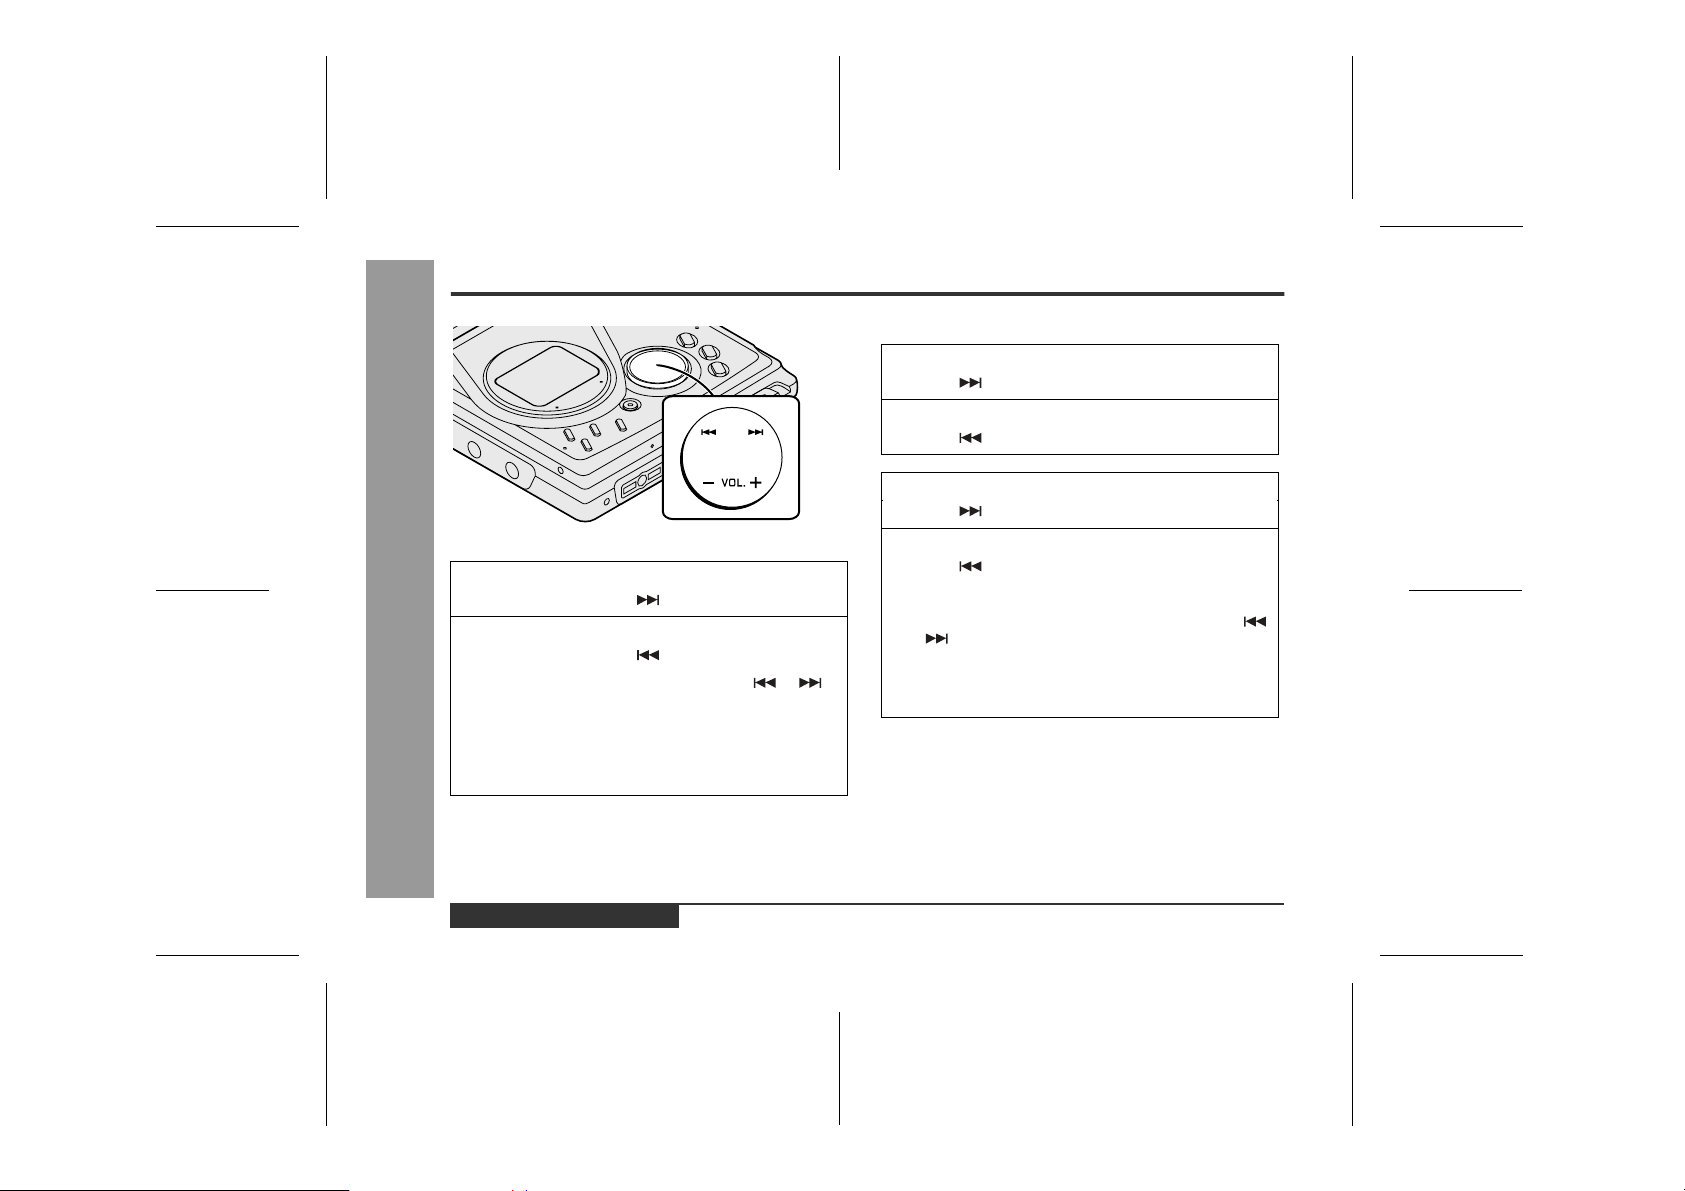
To locate the desired portion
For audible fast forward:
Press and hold down the button during playback.
For audible fast reverse:
Press and hold down the button during playback.
-Advanced Playback-
Useful Features
z
Normal playback will resume when the or
button is released.
z
When the end of the last track is reached during fast
forward, the unit will enter the pause mode. When
the beginning of the first track is reached during fast
reverse, the unit will enter the playback mode.
„
To locate the beginning of a track
To move to the beginning of the next track:
Press the button during playback.
To restart the track being played:
Press the button during playback.
To locate the next track:
Press the button whilst the unit is stopped.
To locate the previous track:
Press the button whilst the unit is stopped.
z
To skip a number of tracks at one time, press the
or button repeatedly until the desired track number is shown.
z
When you press the PLAY/PAUSE button, playback
starts from the beginning of the track.
E-15
ENGLISH
00/12/27 E_90EX_4.FM
Page 17
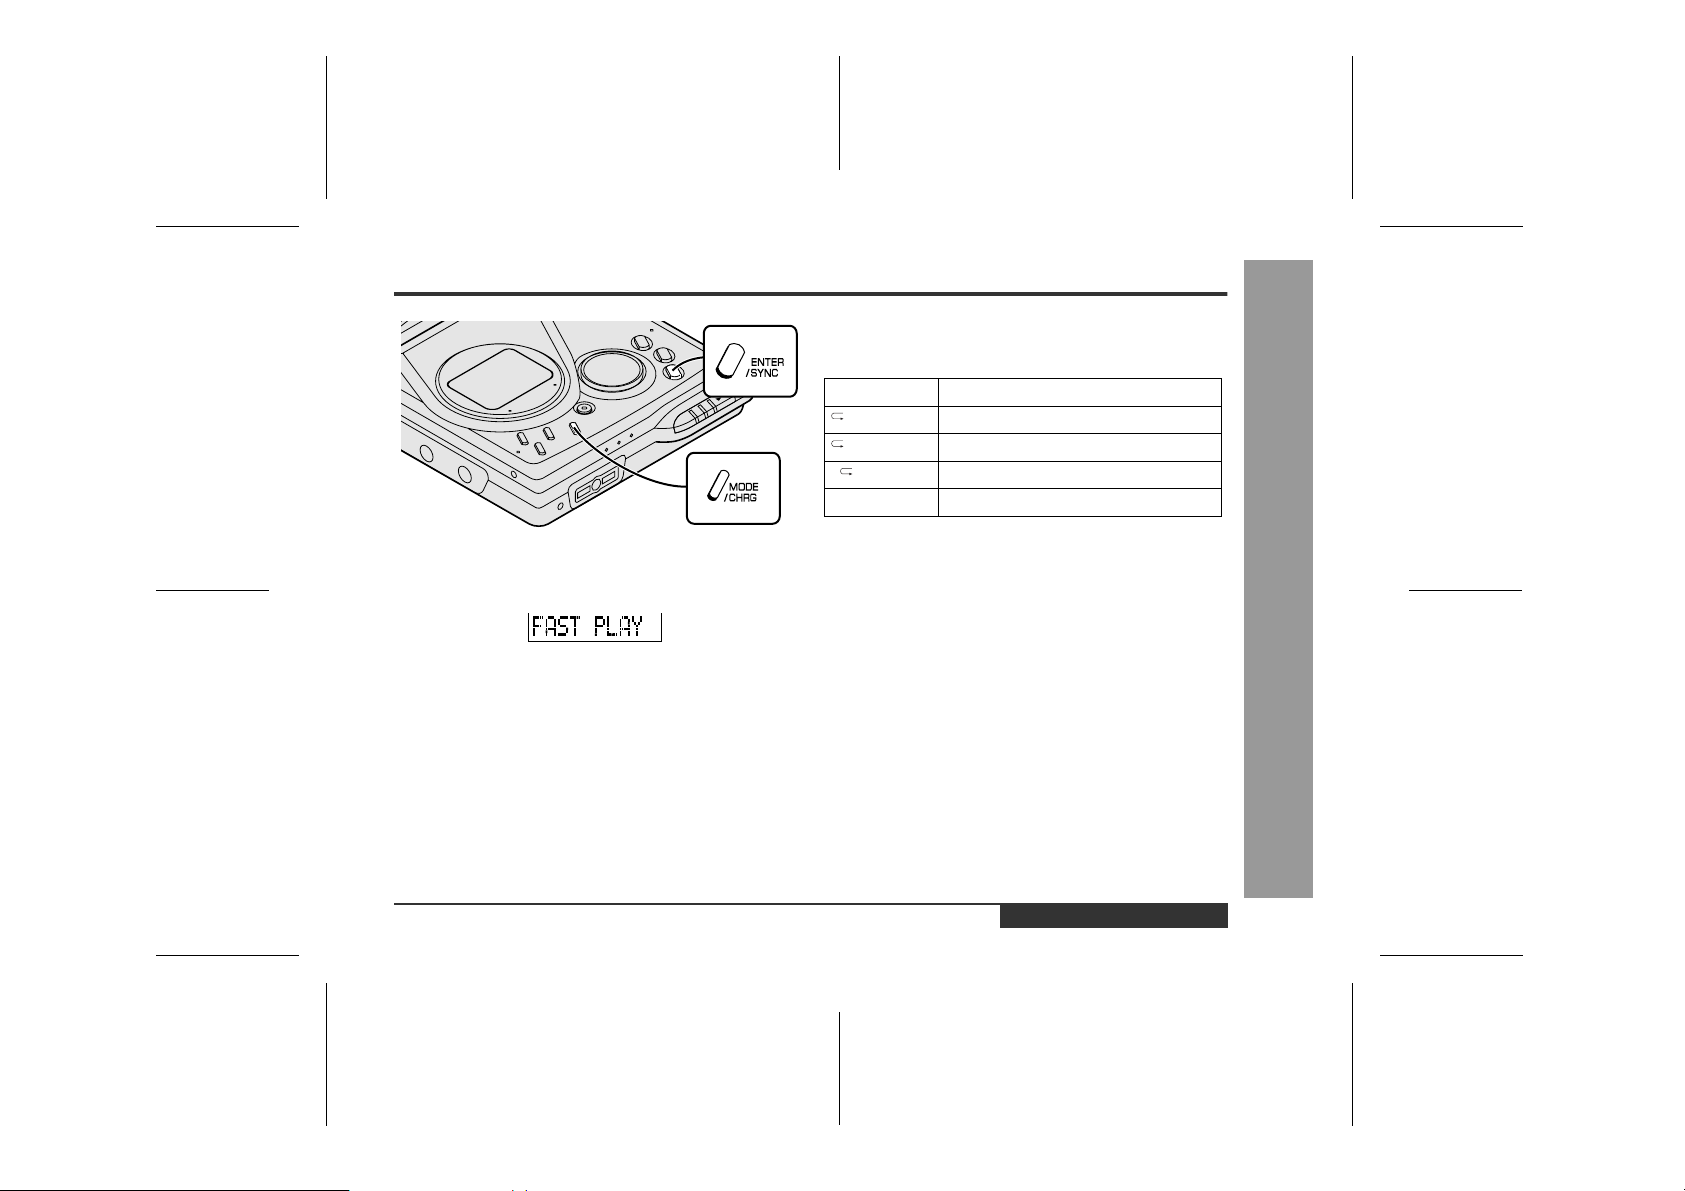
„
Random play or repeat play
During playback, press the MODE/CHRG button repeatedly to select the playback mode.
RANDOM Random play
RANDOM Repeat play of tracks in random order
Repeat play of all of the tracks
1 Repeat play of a single track
No display Normal playback
„
To play at double speed
Press the ENTER/SYNC button whilst a MiniDisc
recorded in the monaural long-play mode is being play ed.
z
If a track recorded in the stereo mode is reached during fast playback, the fast playback mode will be cancelled.
z
Depending on the contents recorded on a MiniDisc, it
may be difficult to hear them.
To interrupt fast playback
Press the PLA Y /PAUSE button during playback.
When the PLAY/PAUSE button is pressed again, the unit
will resume fast playback.
To return to normal playback
Press the ENTER/SYNC button.
Notes:
z
If the playback mode is selected whilst stopped, press
the PLAY/PAUSE button to start playback.
z
When "TOC" is displayed, random play or repeat play
is impossible.
z
In random play the unit will select and pla y trac ks automatically. (You cannot select the order of the tracks.)
After all of the tracks have been played once each in
random order, the unit will stop automatically.
z
During random, random repeat, or single track repeat
play, you can forward or reverse the MiniDisc only
within the track being played.
z
During random play, the unit cannot find the beginning
of any track which has been played.
Repeat play lasts until you stop the unit.
z
ENGLISH
00/12/27 E_90EX_4.FM
Useful Features
E-16
-Advanced Playback-
Page 18
Advanced Recording
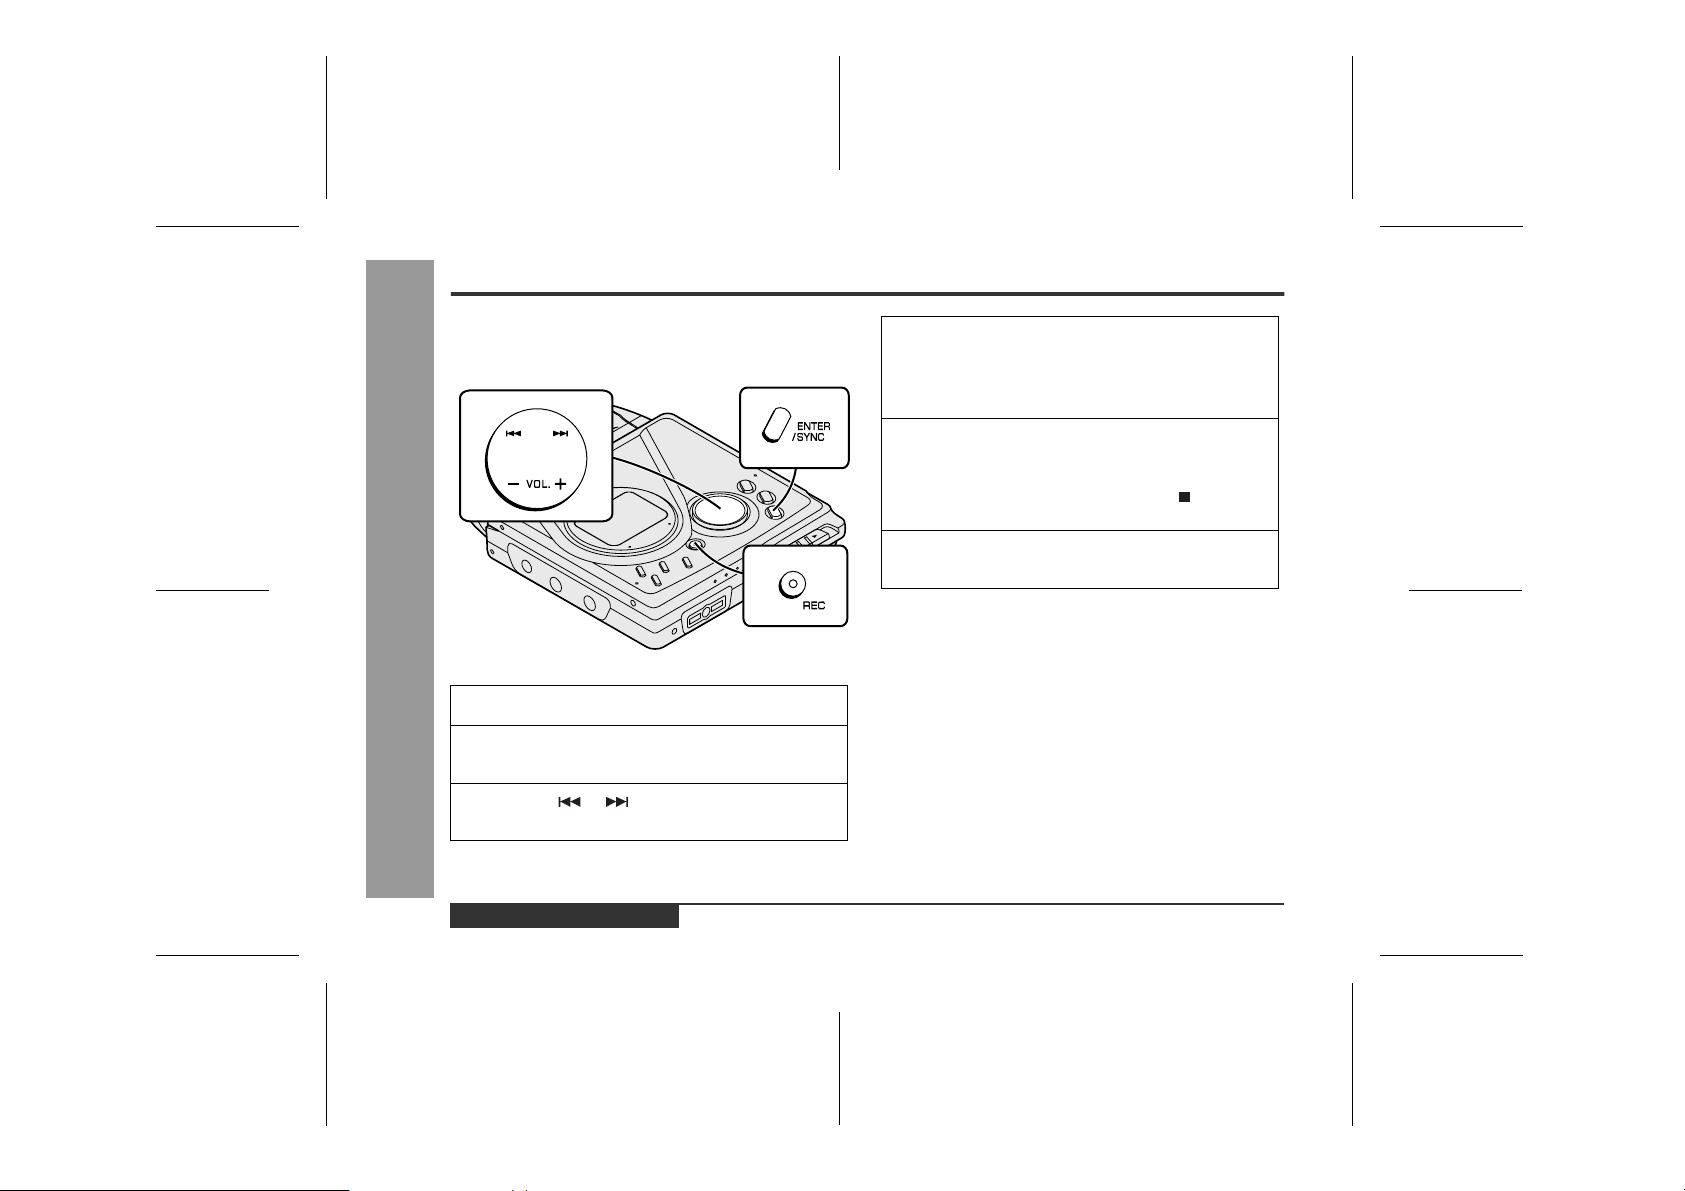
„
Playback sound-actuated recording
Recording automatically starts or pauses by detecting
sound from the stereo system (Synchronised recording).
Useful Features
-Advanced Recording-
1
Press the REC button.
2
Begin playback on the stereo system connected
to this portable MD.
3
Press the or button to adjust the recording level. (See page 11.)
4
Press the PAUSE button on the stereo system
to enter the playback pause mode.
Select the starting point for your recording and
press the PAUSE button.
5
Press the ENTER/SYNC button.
z
"SYNC" will be displayed.
z
To cancel the operation, press the /:OFF button.
6
Begin playback on the stereo system. Recording will begin automatically.
To interrupt recording
z
When the stereo system is stopped, the unit will enter
the synchro recording pause mode. When playback is
resumed, the recording will be resumed.
z
If a silence lasts for 3 seconds or more, the recording
will be paused (pause function does not work for
approximately 10 seconds after a recording starts).
When the unit receives sound again, recording automatically starts.
A new track number is created when the recording
z
resumes.
E-17
ENGLISH
00/12/27 E_90EX_4.FM
Page 19
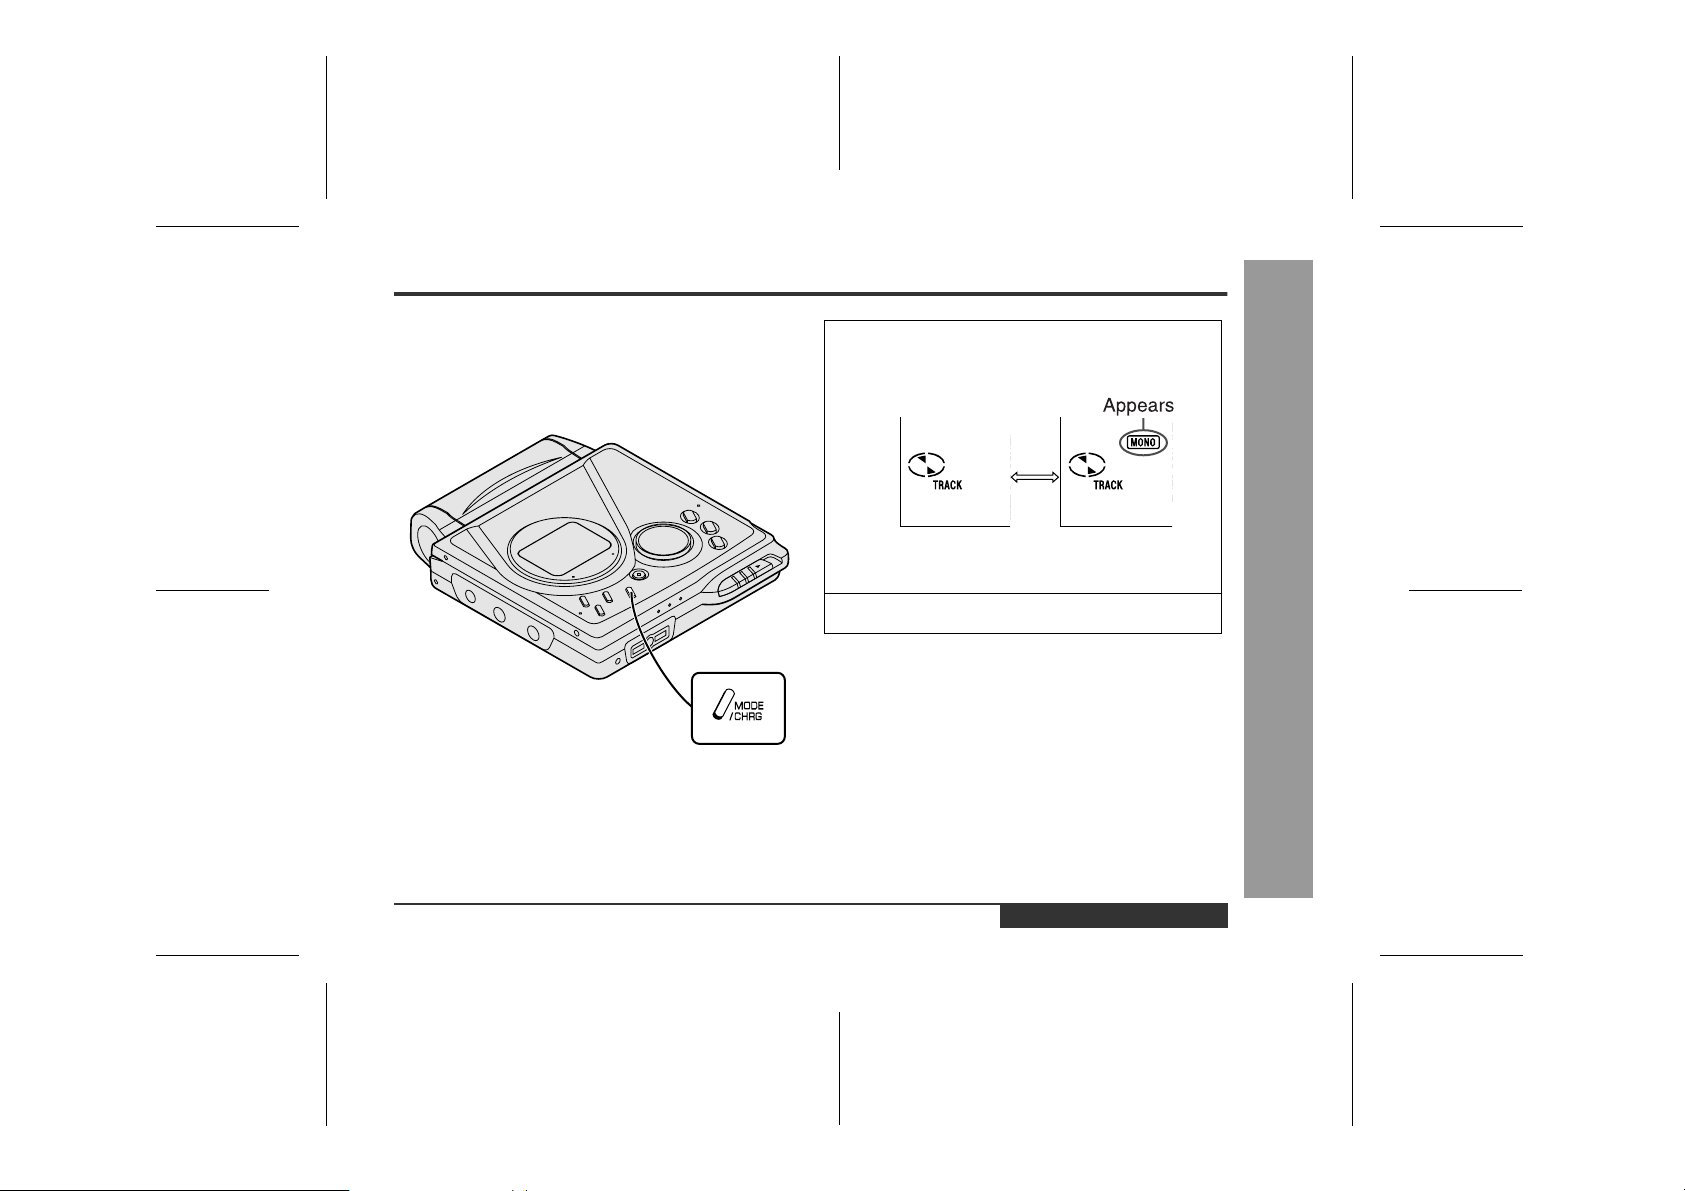
„
Long-play recording
When recording in monaural long-play mode, the available recording time will be doubled. Monaural long-play
recordings can be replayed at double speed, see page
16.
1
Press the MODE/CHRG button whilst the recording is paused.
Stereo mode Monaural long-play
2
Start recording.
Notes:
z
When the unit is stopped after a recording has been
made in this mode, the recording mode will return to
the stereo mode automatically.
z
If input is from a stereo source, the sounds from the
left and right channels will be combined.
z
Although the monitor sound you hear in the headphones whilst recording is in stereo, recording will be
monaural.
z
MiniDiscs recorded in the monaural long-play mode
may not play on other MiniDisc players.
mode
ENGLISH
00/12/27 E_90EX_4.FM
Useful Features
E-18
-Advanced Recording-
Page 20
Advanced Recording (continued)
„
To start recording from the middle of a track
You can erase a portion of a track and make a new
recording.
All of the tracks that follow the newly recorded track will
be erased.
1
During playback, press the PLAY/PAUSE button
at the point where you want to begin recording.
2
Press the REC button.
To cancel the operation, press the /:OFF button.
3
Press the ENTER/SYNC button.
All of the tracks and track names will be erased, following the point where the playback is paused.
4
Press the PLAY/PAUSE button.
Recording will start.
Useful Features
E-19
-Advanced Recording-
Note:
To keep a track after the point you want to make a new
recording, move the track and then make recording after
that point. (See "Editing a Recorded MiniDisc", page 37.)
ENGLISH
00/12/27 E_90EX_4.FM
Page 21
„
To create your own track numbers
You can create your own track numbers at any point.
Whilst recording, press the REC button at the point
where you want to create track numbers.
The track number will be increased by one.
z
One track number will be added every time the REC
button is pressed.
z
The BASS button on the remote control can also be
used add track numbers.
„
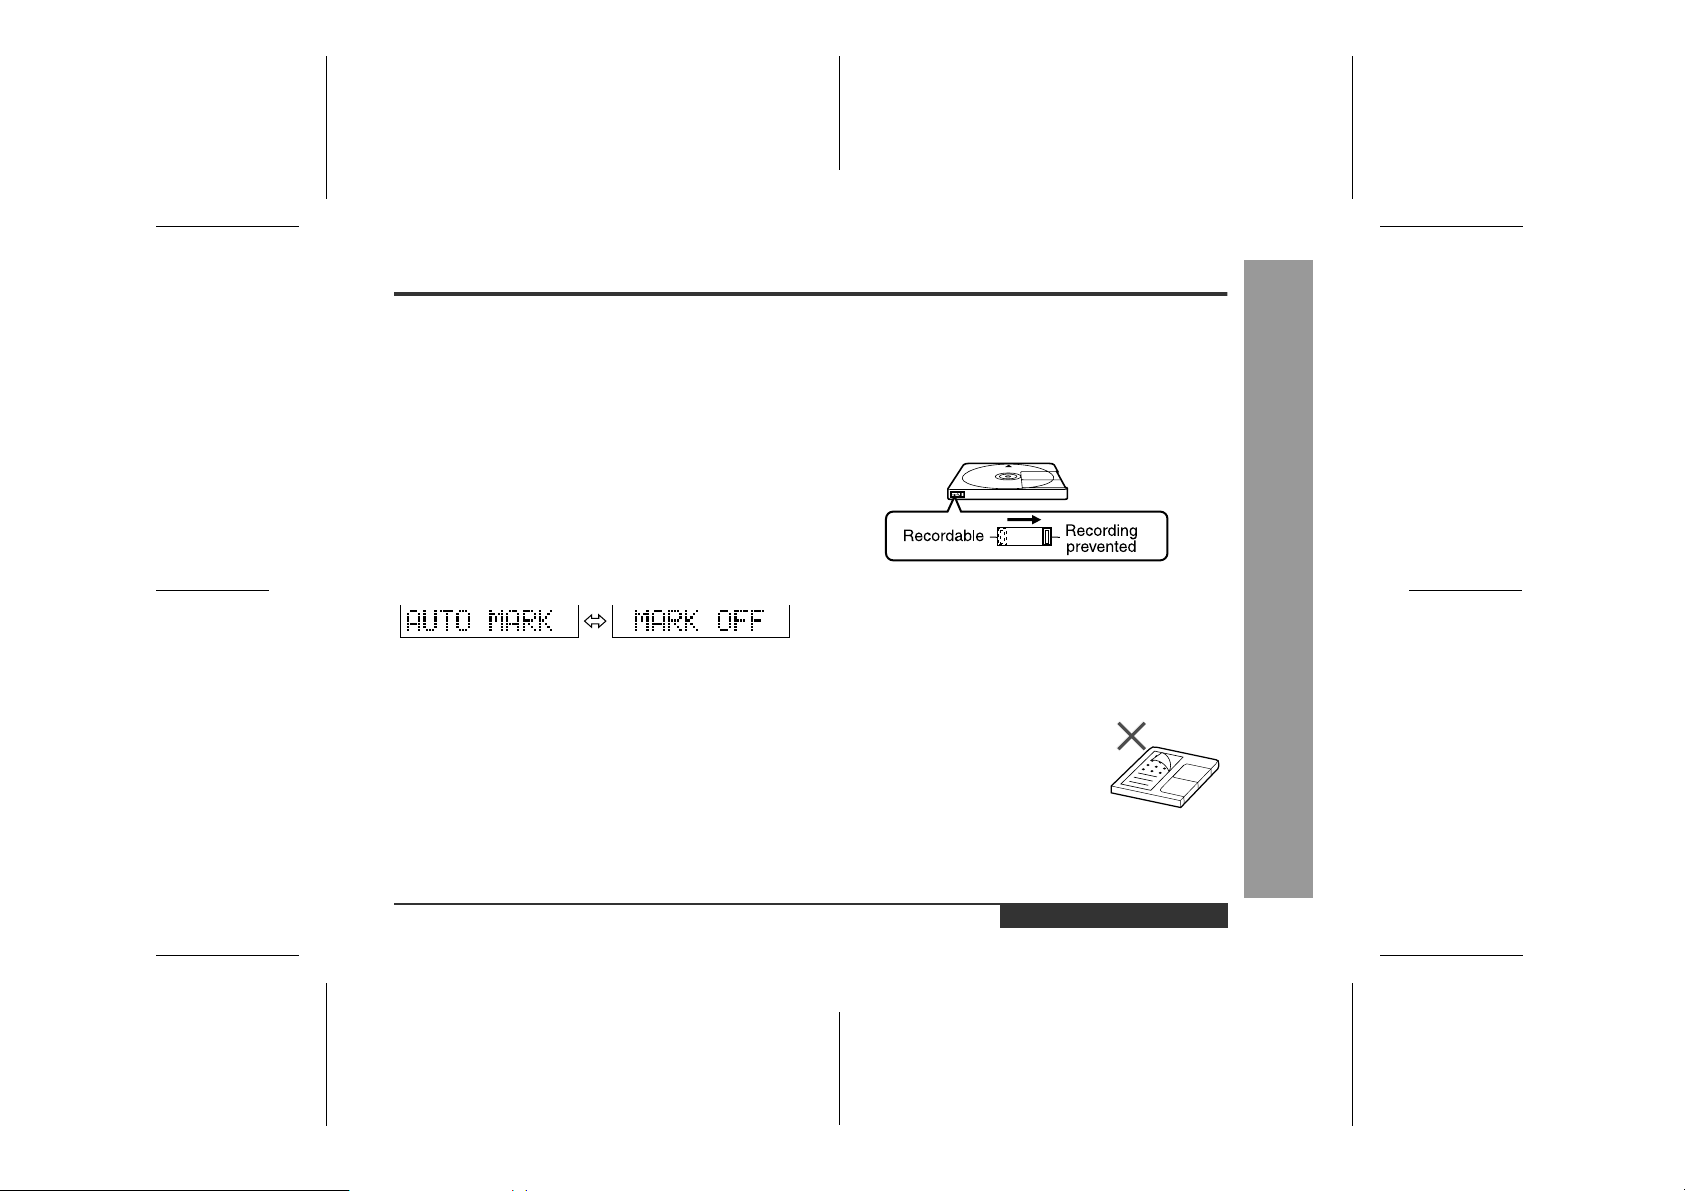
Recording tracks as a single track
You can record several pieces of music as a single track
by disabling the auto marker function.
When a recording is paused or whilst recording...
Press the EDIT button.
Note:
When making digital recordings using a CD player or an
MiniDisc player, track numbers will be created automatically regardless of the setting of the auto marker function.
„
To prevent recorded MiniDiscs from being
erased accidentally
Slide the accidental erase prevention tab, located on the
side of the MiniDisc, in the direction indicated by the
arrow.
The MiniDisc will then be protected against accidental
erasure.
To add a re cording to such a MiniDisc, slide the accidental erase prevention tab back to its original position.
„
Helpful tip when attaching a label
When attaching a label to a MiniDisc cartridge, be sure to
note the following. If the label is not attached properly, the
MiniDisc may jam inside the unit and it may not be possible to remove it.
z
If the label peels off or partially lifts
away, replace it with a new one.
z
Do not put a new label on top of an existing one.
z
Attach the label only in the specified
location.
Useful Features
-Advanced Recording-
ENGLISH
00/12/27 E_90EX_4.FM
E-20
Page 22
Advanced Recording (continued)
„
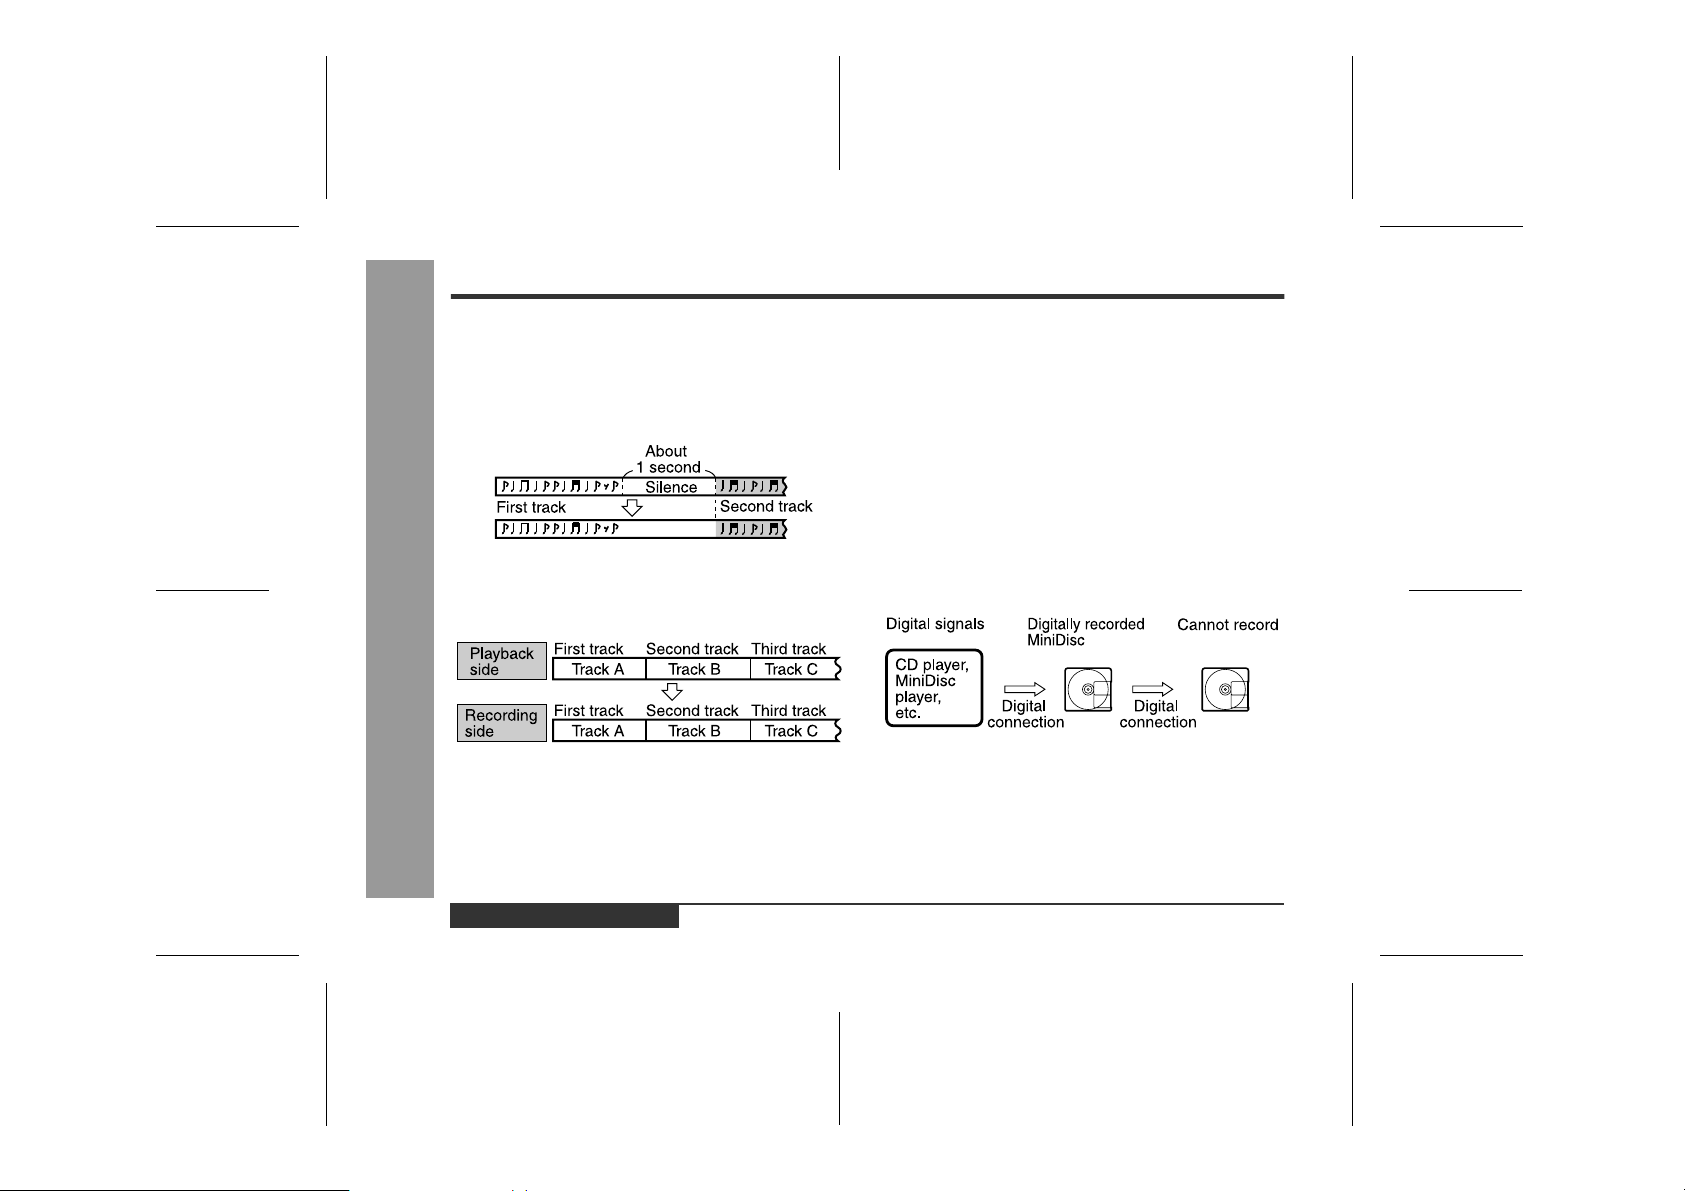
About track numbers
1. Track numbers are created automatically during recording via the analogue connection when a silence
of 1 second or more is detected (Auto marker function). A series of tracks can be recorded as one by
disabling the auto marker function, see page 20.
2. When recording from a CD or a MiniDisc using the
digital connection, track numbers will be created at
the same points as on the CD or MiniDisc (Synchro
marker function).
Useful Features
-Advanced Recording-
z
Track numbers may not be created in proper places,
depending on the source to be recorded from, such as
signals with noise.
z
The track numbers on the playback side may not
match the track numbers recorded on the MiniDisc.
z
When recording, if a programmed playback is performed by the source or playback is performed by
selecting tracks manually, the MiniDisc track numbers
may not be the same as on the source.
z
Track numbers may not be created properly, depending on the connected stereo system.
„
About sampling rate converter
This portable MD incor porates a sampling rate converter
meaning it can record from digital radios or DAT tape
recorders.
„
Note for digital recording
You cannot copy a MiniDisc that you recorded from digital
inputs to another MiniDisc or DAT. It is prevented by the
SCMS (Serial Copy Management System). Recording
from analogue inputs is not affected.
E-21
ENGLISH
00/12/27 E_90EX_4.FM
Page 23
Recording from a Microphone
„
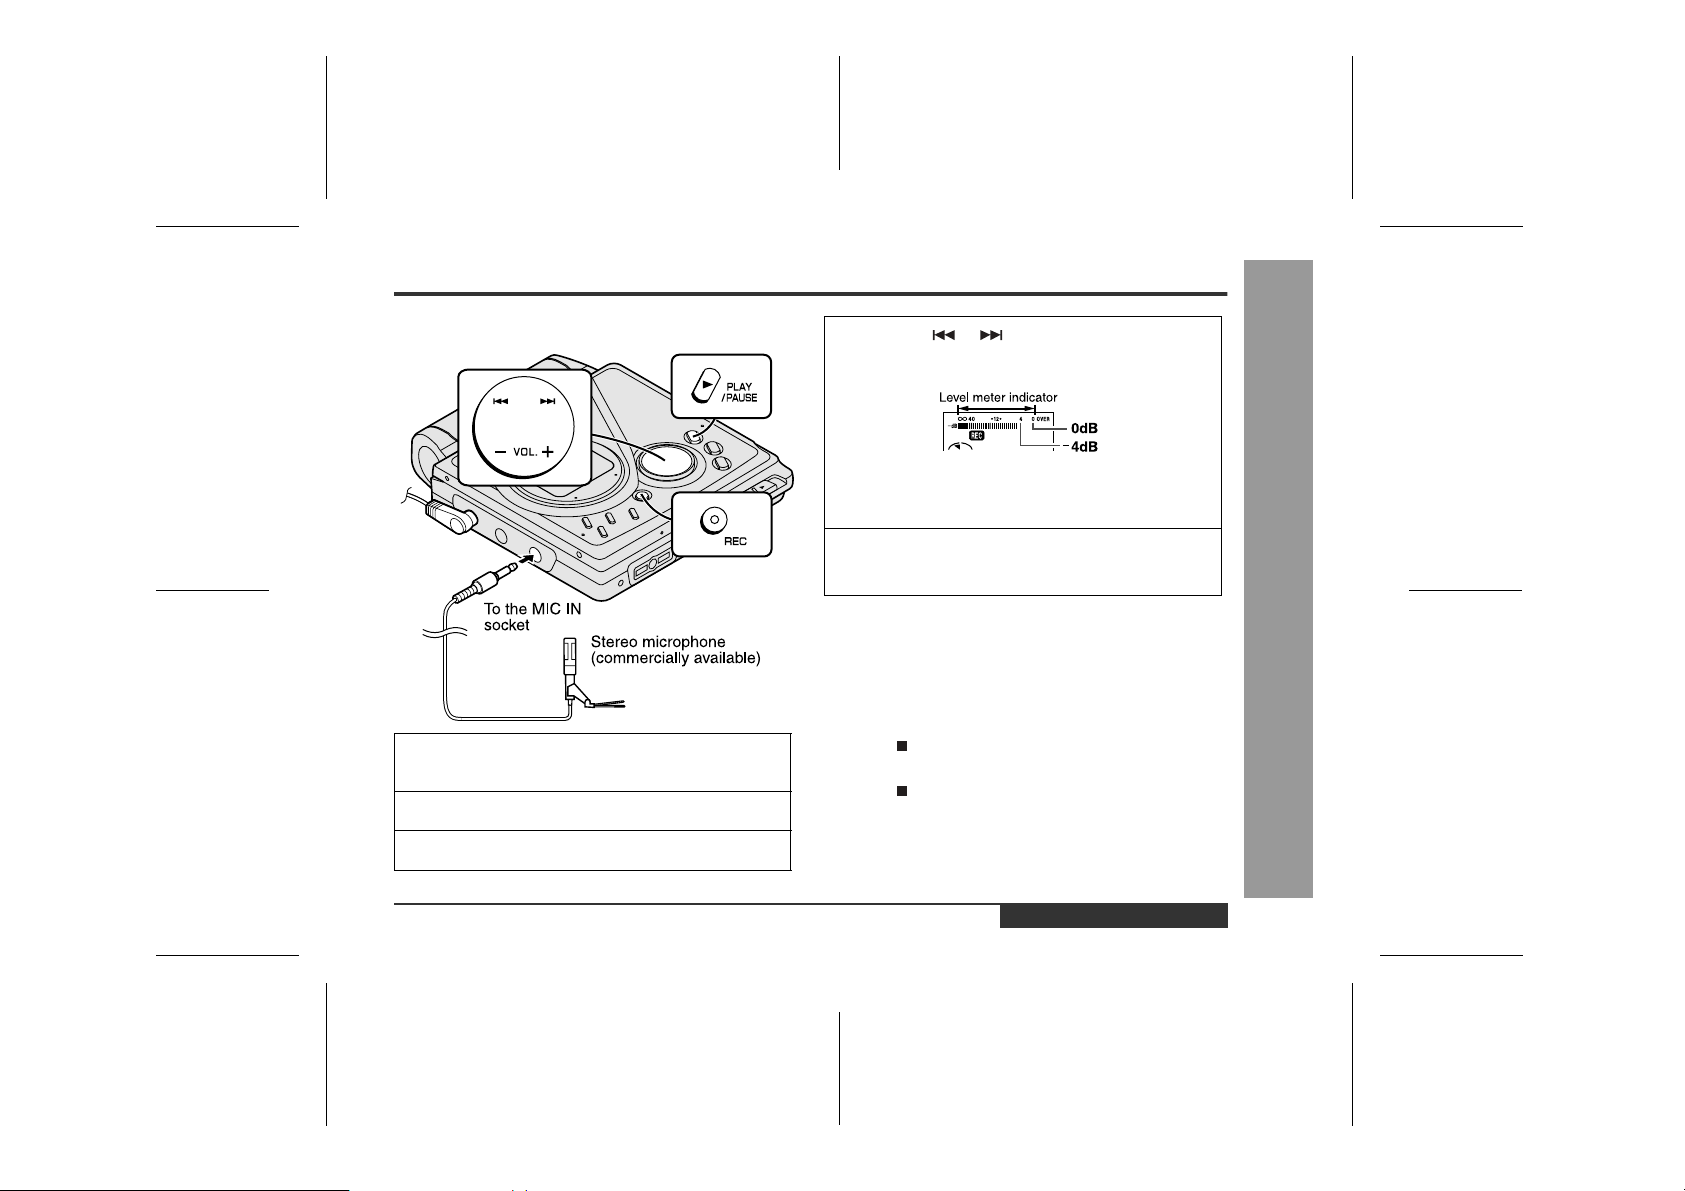
To record from a microphone
1
Connect a stereo microphone to the MIC IN
socket.
2
Insert a recordable MiniDisc (page 8).
3
Press the REC button.
4
Press the or button to adjust the recording level.
Adjust the recording level so that the maximum
sound volume from the source makes the reading
swing between
5
Press the PLAY/PAUSE button.
Recording will start.
To interrupt a recording
Press the PLAY/PAUSE button whilst recording.
z
To resume r ecording, press the PLAY/PAUSE button
again. The track number will be increased by one each
time you interrupt a recording.
To stop recording
Press the /:OFF button.
To write recorded contents on the MiniDisc
Press the /:OFF button whilst in the stop mode.
---
4 dB and 0 dB.
Useful Features
-Recording from a Microphone-
ENGLISH
00/12/27 E_90EX_4.FM
E-22
Page 24

Recording from a Microphone (continued)
„
Sound-actuated recording (Mic Synchronised recording)
1
Press the REC button.
2
Press the or button to adjust the recording level.
3
Press the ENTER/SYNC button to select the recording sensitivity.
Useful Features
-Recording from a Microphone-
MIC SYNC H : Recording starts when the unit
MIC SYNC L : Recording starts when the unit
4
When a sound, such as person speaking, is
picked up by the microphone, recording will be-
gin automatically.
---
detects
can start recording from quiet
sounds).
detects
24 dB or more (The unit
---
12 dB or more.
About pause function
The unit automatically pauses when the microphone
does not pick up any sound for 3 seconds or more.
(Pause function does not work for approximately 10 seconds after a recording starts.) When the microphone
picks up sound again, recording starts automatically.
Notes:
z
Whilst making a mic recording, do not connect anything to the OPTICAL/LINE IN socket on the portable
MD.
z
To use a microphone, be sure it is a plug-in-power
type microphone.
- When a plug-in-power type microphone is plugged in,
the portable MD will provide power for the microphone's operation.
If a different t ype of microphone i s plugged in, it may not
operate properly or it may c ause the unit to malf unction.
z
Insert the plug firmly. If you don't, the recording will not
be made properly.
z
Use a microphone with a 3.5 mm (1/8") diameter stereo
mini plug.
z
If the unit starts recording too often from low unwanted
noises, set the microphone input to "MIC SYNC L".
z
Recording sensitivity can be changed whilst recording.
E-23
ENGLISH
00/12/27 E_90EX_4.FM
Page 25
„
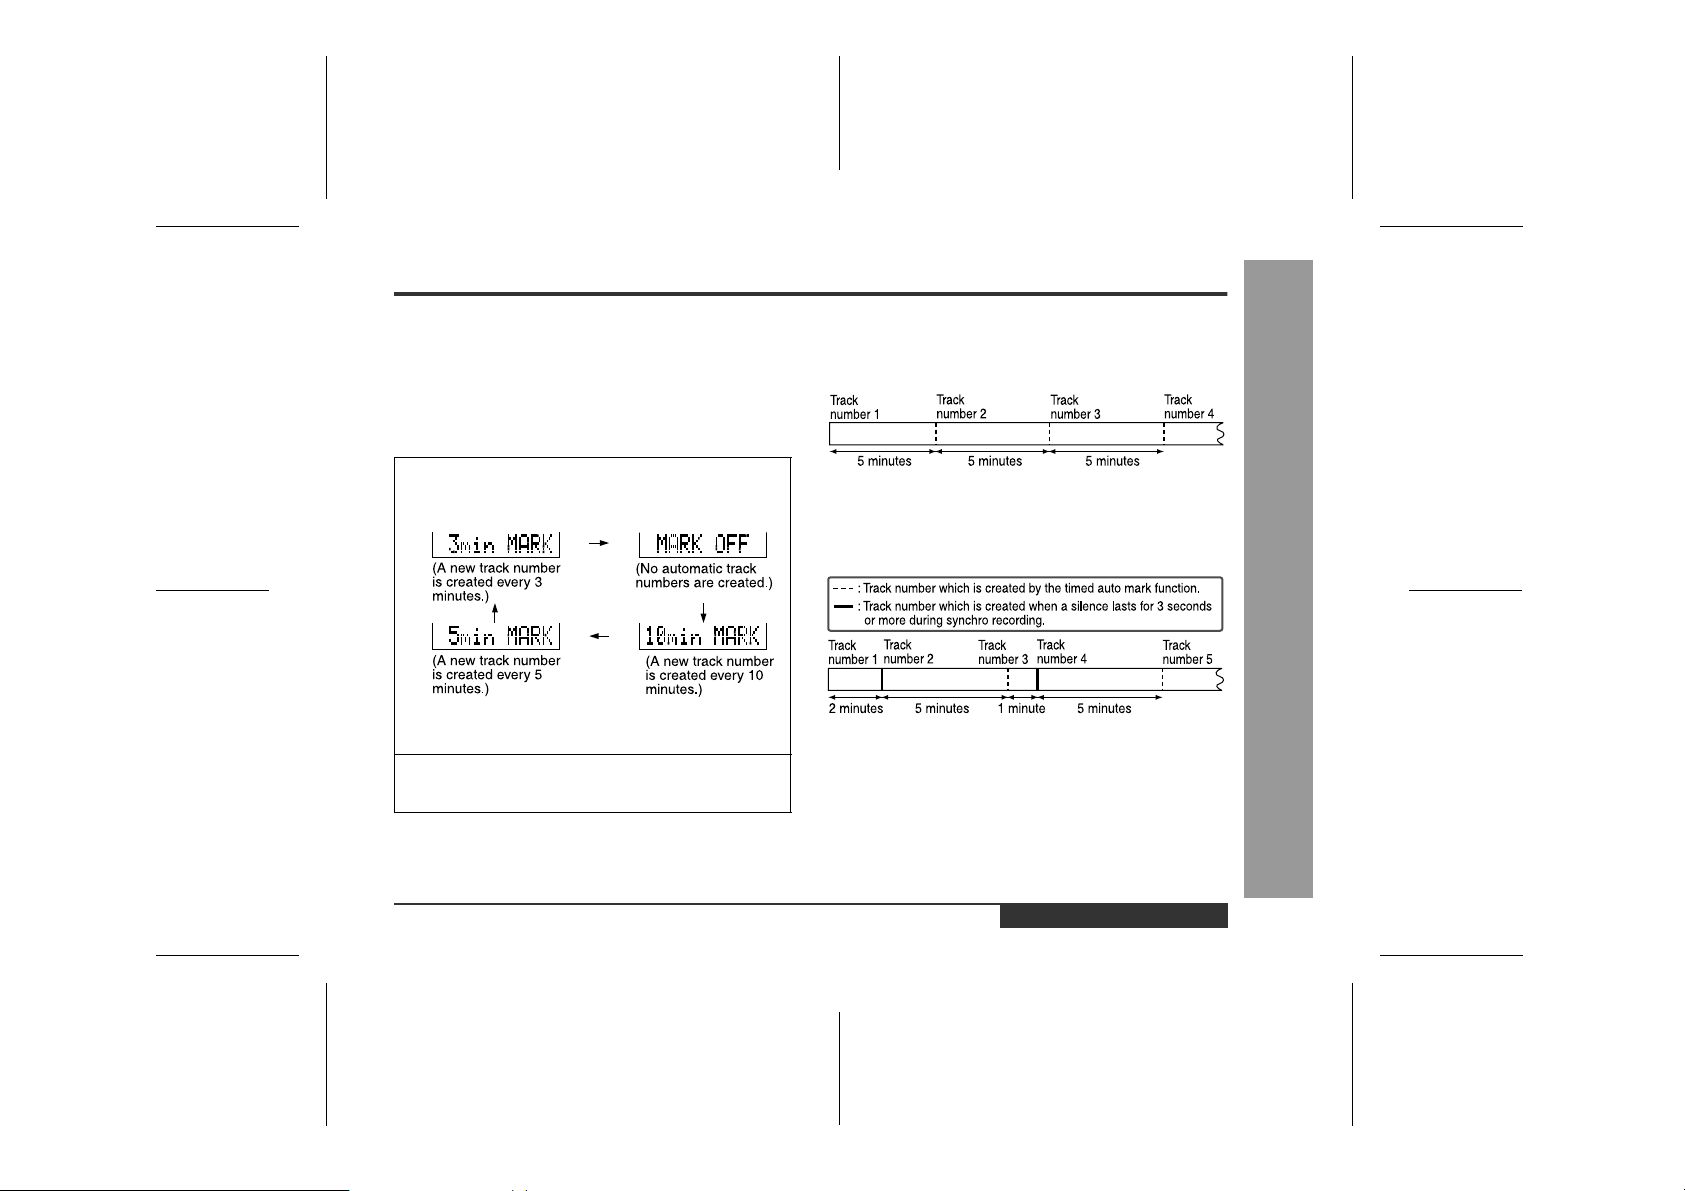
Track intervals
When recording from the microphone, track numbers will
be created automatically at regular intervals (default setting: approximately every 5 minutes). During a mic synchro recording, the unit pauses when a silence lasts for 3
seconds or more, and creates a track number.
Changing intervals between tracks
1
When a recording is paused or whilst recordi ng,
press the EDIT button repeatedly.
The interval between marks may vary slightly compared with the actual recording time.
2
Track numbers will be created automatically at
regular intervals.
Example: Set to "5 minutes".
During a mic manual recording
Timed auto marks will be created every 5 minutes.
During a mic synchro recording
If a silence lasts for 3 seconds or more, a timed auto
mark will be created 5 minutes after the previous mark is
created.
Creating track numbers manually
Press the REC button whilst recording.
Useful Features
-Recording from a Microphone-
ENGLISH
00/12/27 E_90EX_4.FM
E-24
Page 26
Checking Displays
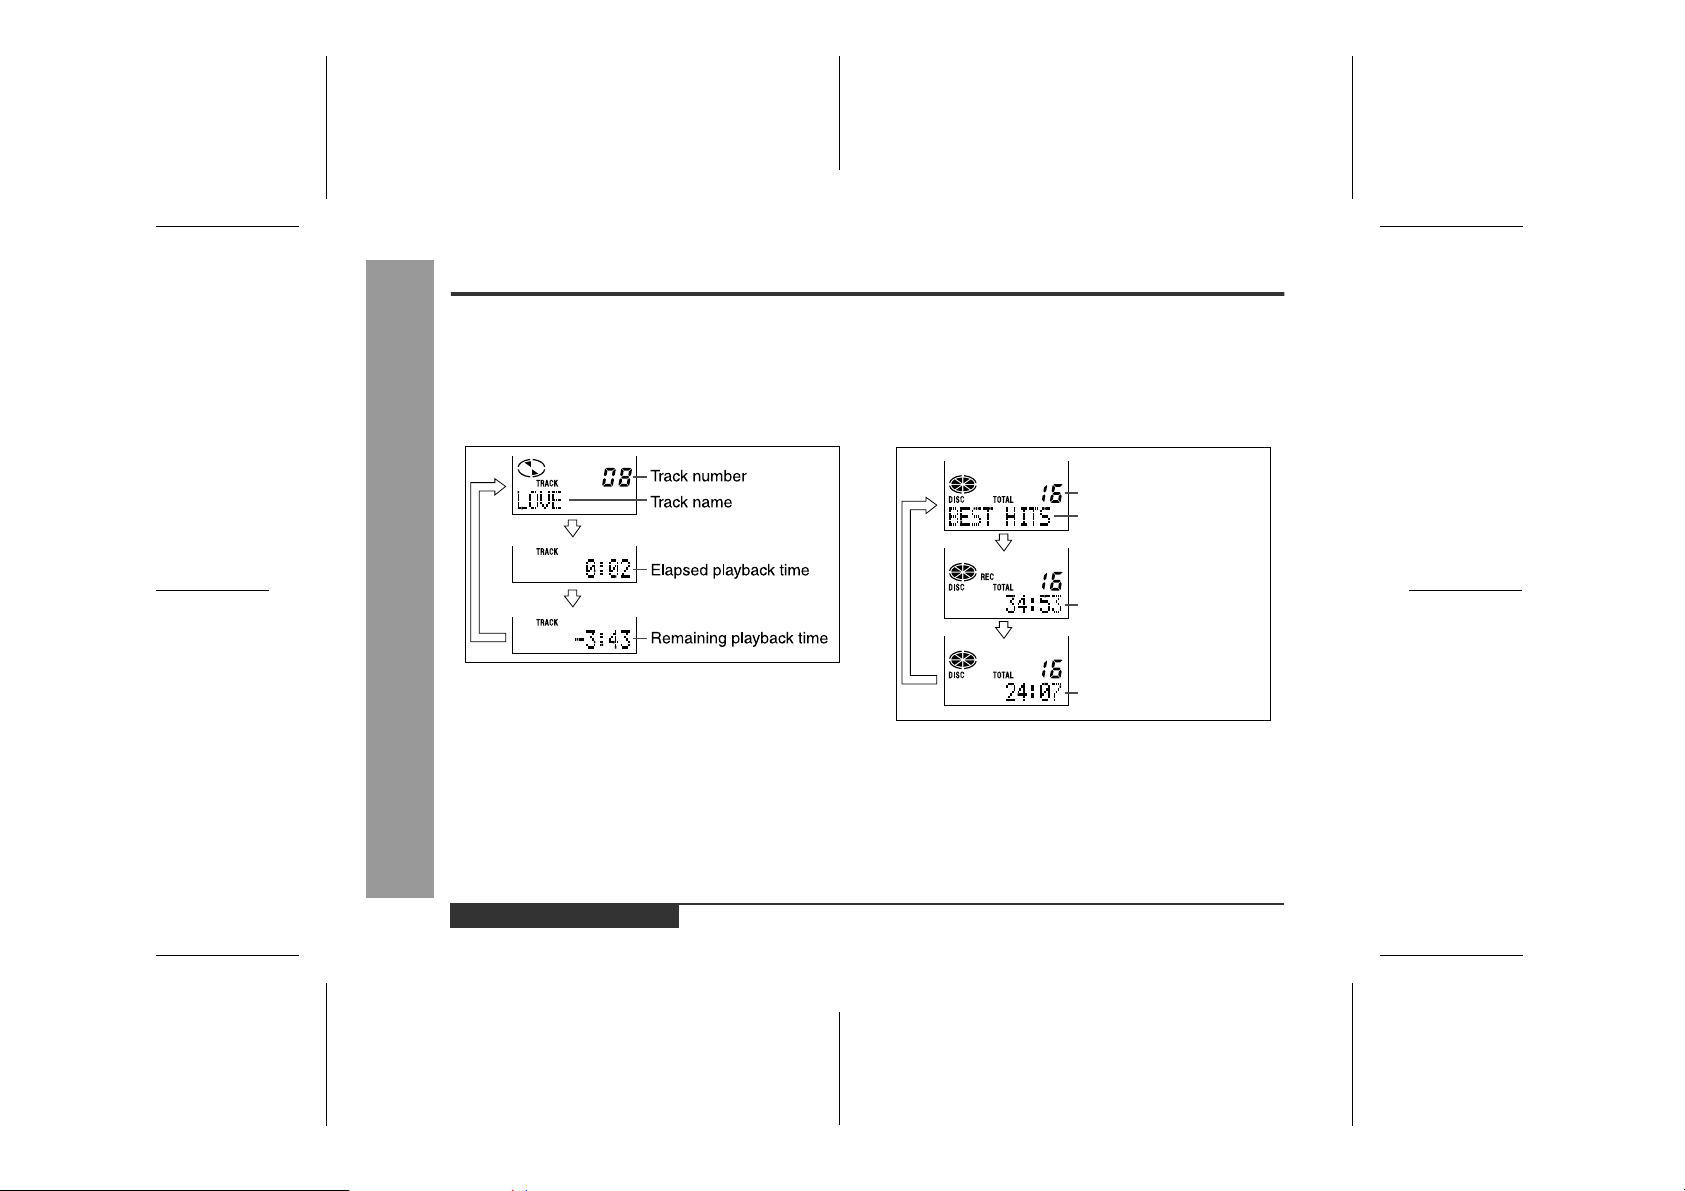
„
To check the elapsed time and remaining
time of the track
During playback, press the DISP button.
Each time the button is pressed, the display will change
as follows.
-Checking Displays-
Notes:
Useful Features
z
If the disc name or the track name was not originally
recorded on the MiniDisc, "NO NAME" will be displayed.
z
Remaining recording time will not be displayed with a
playback-only MiniDisc.
z
Elapsed playback time and remaining playback time
may be different from the actual time.
„
To check the remaining recording time and
the total playing time
Whilst in the stop mode, press the DISP button.
Each time the button is pressed, the display will change
as follows.
Total number of tracks
Disc name
Remaining recording time
Total playing time
E-25
ENGLISH
00/12/27 E_90EX_4.FM
Page 27
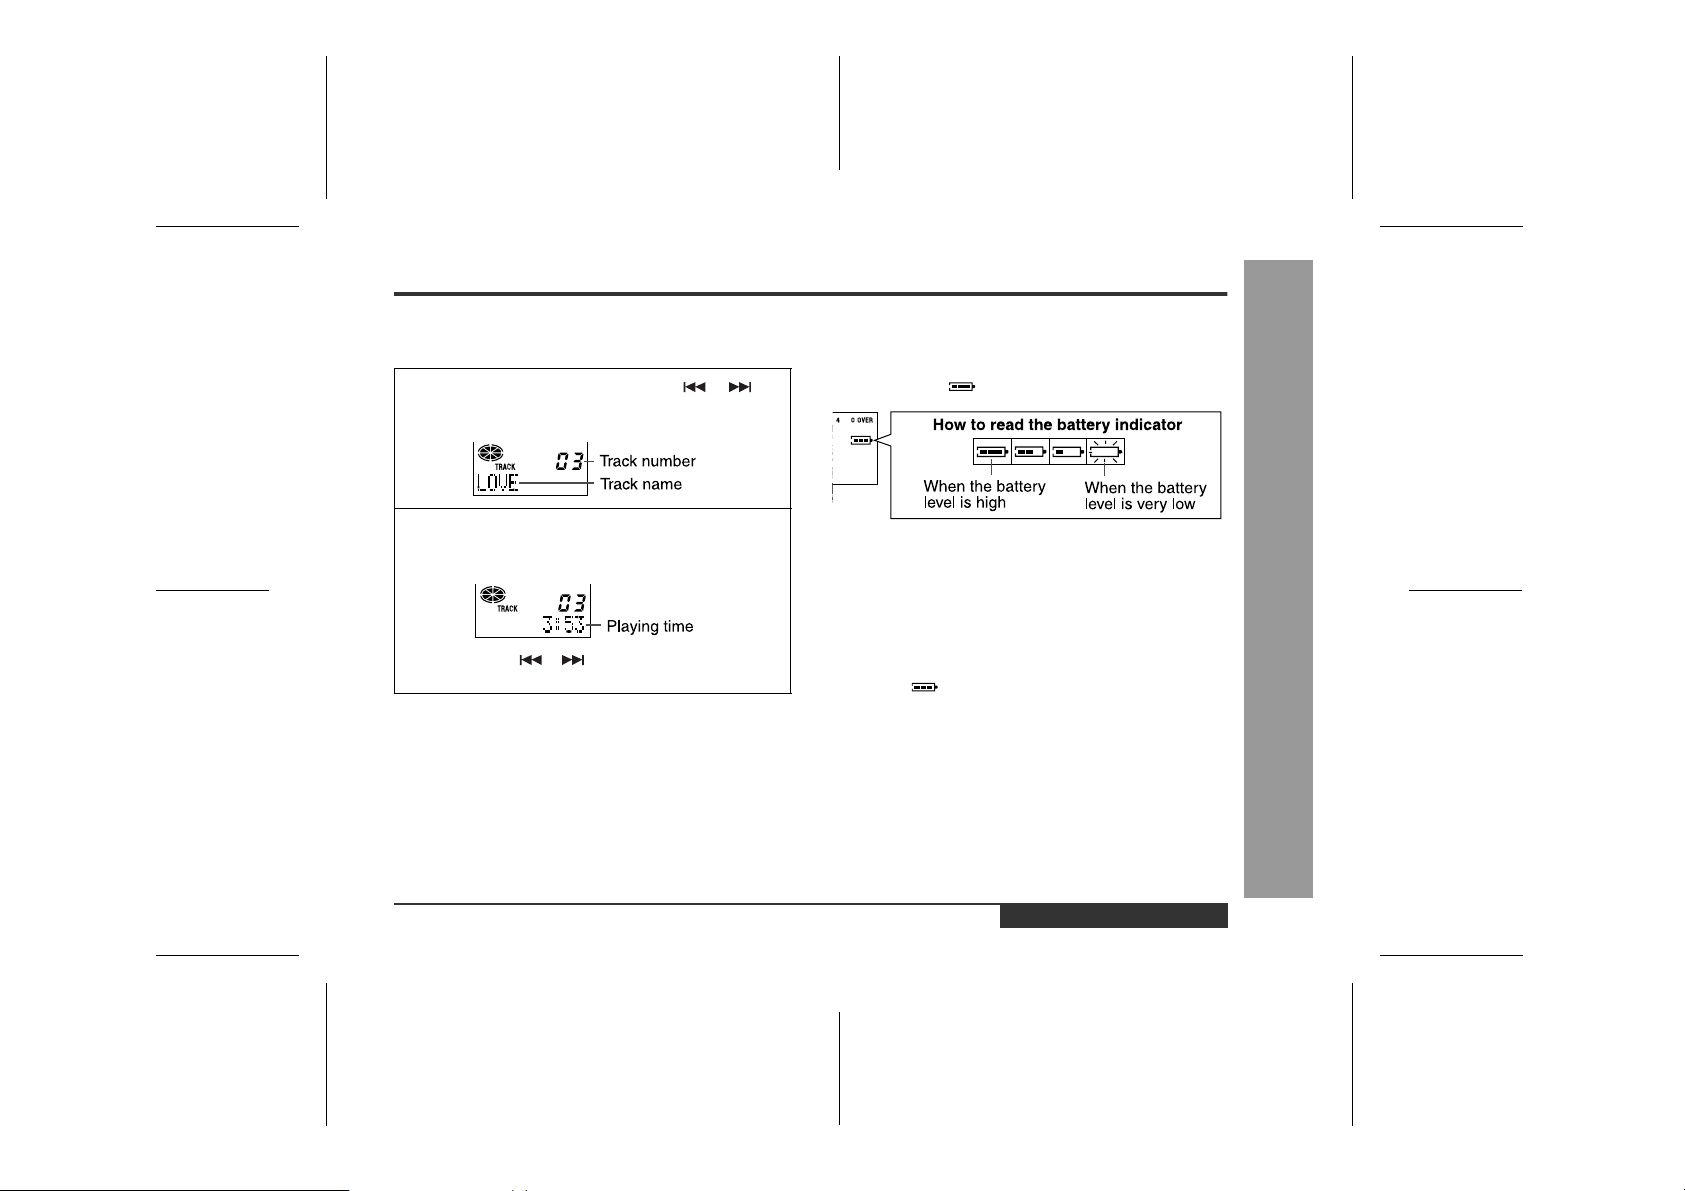
„
To display the playing time of an individual
track
1
Whilst in the stop mode, press the or button to display the track number and track name.
2
Press the DISP button to display the playing
time for that track.
Each time the or button is pressed, the playing
time of the previous or next track w ill be displayed.
„
Checking the remaining amount of battery
level
The remaining amount of battery level is shown by the
battery indicator ( ) during operation.
z
When the battery is completely discharged, the battery indicator will flash. Recharge the battery or
replace the alkaline battery with a new one.
z
When the battery has run completely out, "BATT
EMPTY" will appear. Then, the power will be disconnected automatically.
Notes:
z
If you use the battery which you stopped charging
halfway, " " may appear. It does not mean that the
battery is completely charged.
z
The battery indicator will not correctly display the
remaining capacity for approximately 10 seconds after
the power has been turned on.
z
When the AC adaptor or a separately available car
adaptor is used, the battery indicator will not be
shown.
z
The number of bars shown in the battery indicator may
increase or decrease, depending on the operation
being performed. This is normal.
Useful Features
-Checking Displays-
ENGLISH
00/12/27 E_90EX_4.FM
E-26
Page 28
Battery Power
-Battery Powe r-
Useful Features
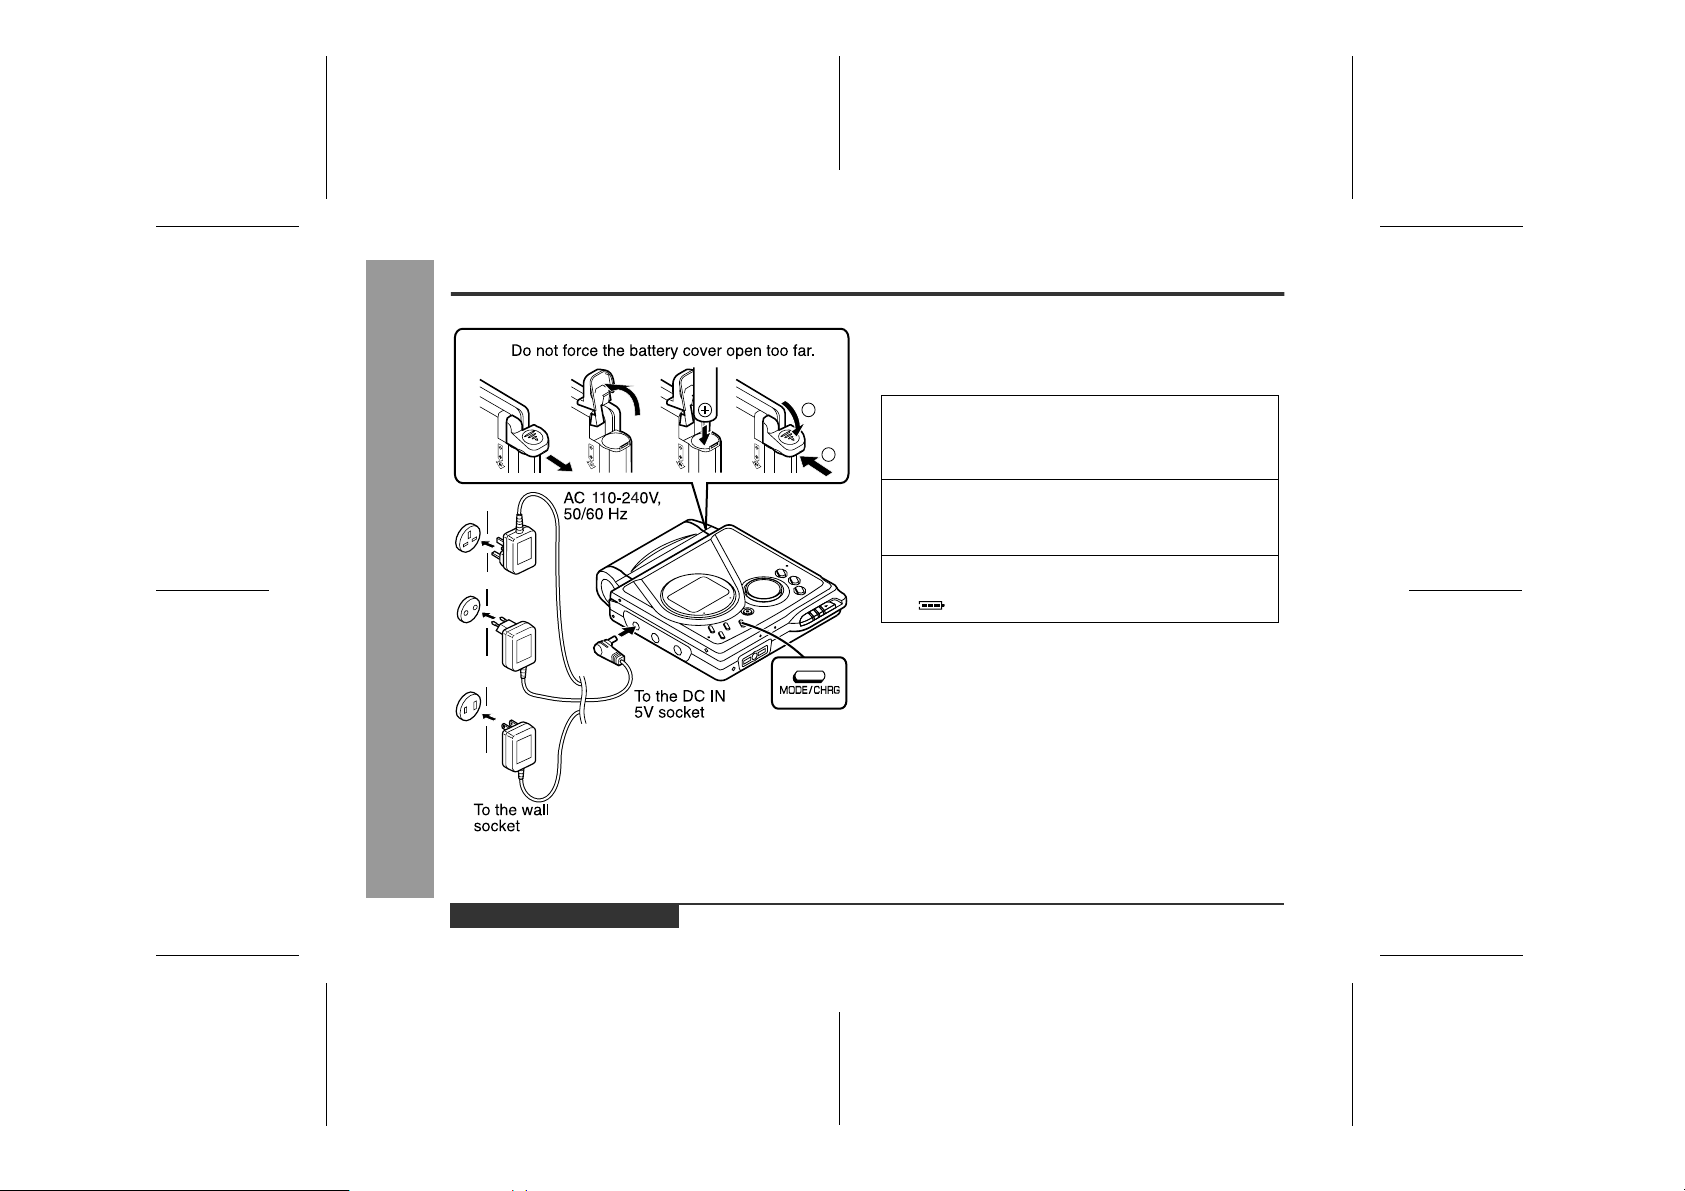
„
Charging the rechargeab le batte ry
When the rechargeable battery is used for the first time
or when you want to use it after a long period of disuse,
be sure to charge it fully.
1
2
1
Insert the rechargeable battery.
A rechargeable battery other than the one supplied
or the optional one (AD-N70BT) cannot be charged.
2
Plug the AC adaptor into the wall socket, and
then insert the plug on the other end into the DC
IN 5V socket.
3
Press the MODE/CHRG button.
" " will flash, and battery will begin charging.
z
After the rechargeable battery is charged or used, it
will get slightly warm. This is normal.
z
When the portable MD is turned on or operating, the
battery will not be charged.
E-27
ENGLISH
00/12/27 E_90EX_4.FM
Page 29

„
About charging time
After about 3.5 hours have passed, " " will
go out. The battery c h ar ging is about 90% c omplete.
To charge the batter y fully, continue charging for about 2
more hours. In this case, you do not need to press the
MODE/CHRG button. Even if the MODE/CHRG button is
pressed, " " will not appear.
Notes:
z
Charge the battery within the range of 5°C - 35°C
(41°F - 95°F).
z
Charging is completed when " " does not blink
when you plug in the AC adaptor and press the
MODE/CHRG button.
z
The unit can be left in the charging state after it is
completed.
Caution:
z
Use the specified battery AD-N70BT only. Do not
charge a battery (nickel-cadmium, alkaline, etc.) other
than that specified.
z
Do not remove the outer cover of the rechargeable battery. It may cause heat generation, fire, or explosion.
z
Do not dip the battery in water, do not dispose of it in a fire, and do not take it apart.
z
If the rechargeable battery terminal is dirty, charging
may not start. In such a case, wipe off the dirt with a
dry cloth.
z
Do not disassemble the battery.
„
Using with the rechargeable or alkaline battery
1
Disconnect the AC adaptor.
2
Insert the rechargeable battery
or alkaline battery from the (+)
marked side.
Use a commercially available LR6,
"AA" size alkaline battery.
Notes:
z
Setting the volume lev el to "0" whilst recording with the
rechargeable or an alkaline battery reduces the battery drain.
z
When you do not use the unit for hours, remove the
battery. (The battery drains gradually even when the
power is turned off.)
z
Carry the battery in the supplied case.
z
This unit can be used with the AC adaptor when the
rechargeable or an alkaline battery is in the unit.
Caution:
Do not use a nickel-cadmium battery.
-Battery Powe r-
Useful Features
ENGLISH
00/12/27 E_90EX_4.FM
E-28
Page 30
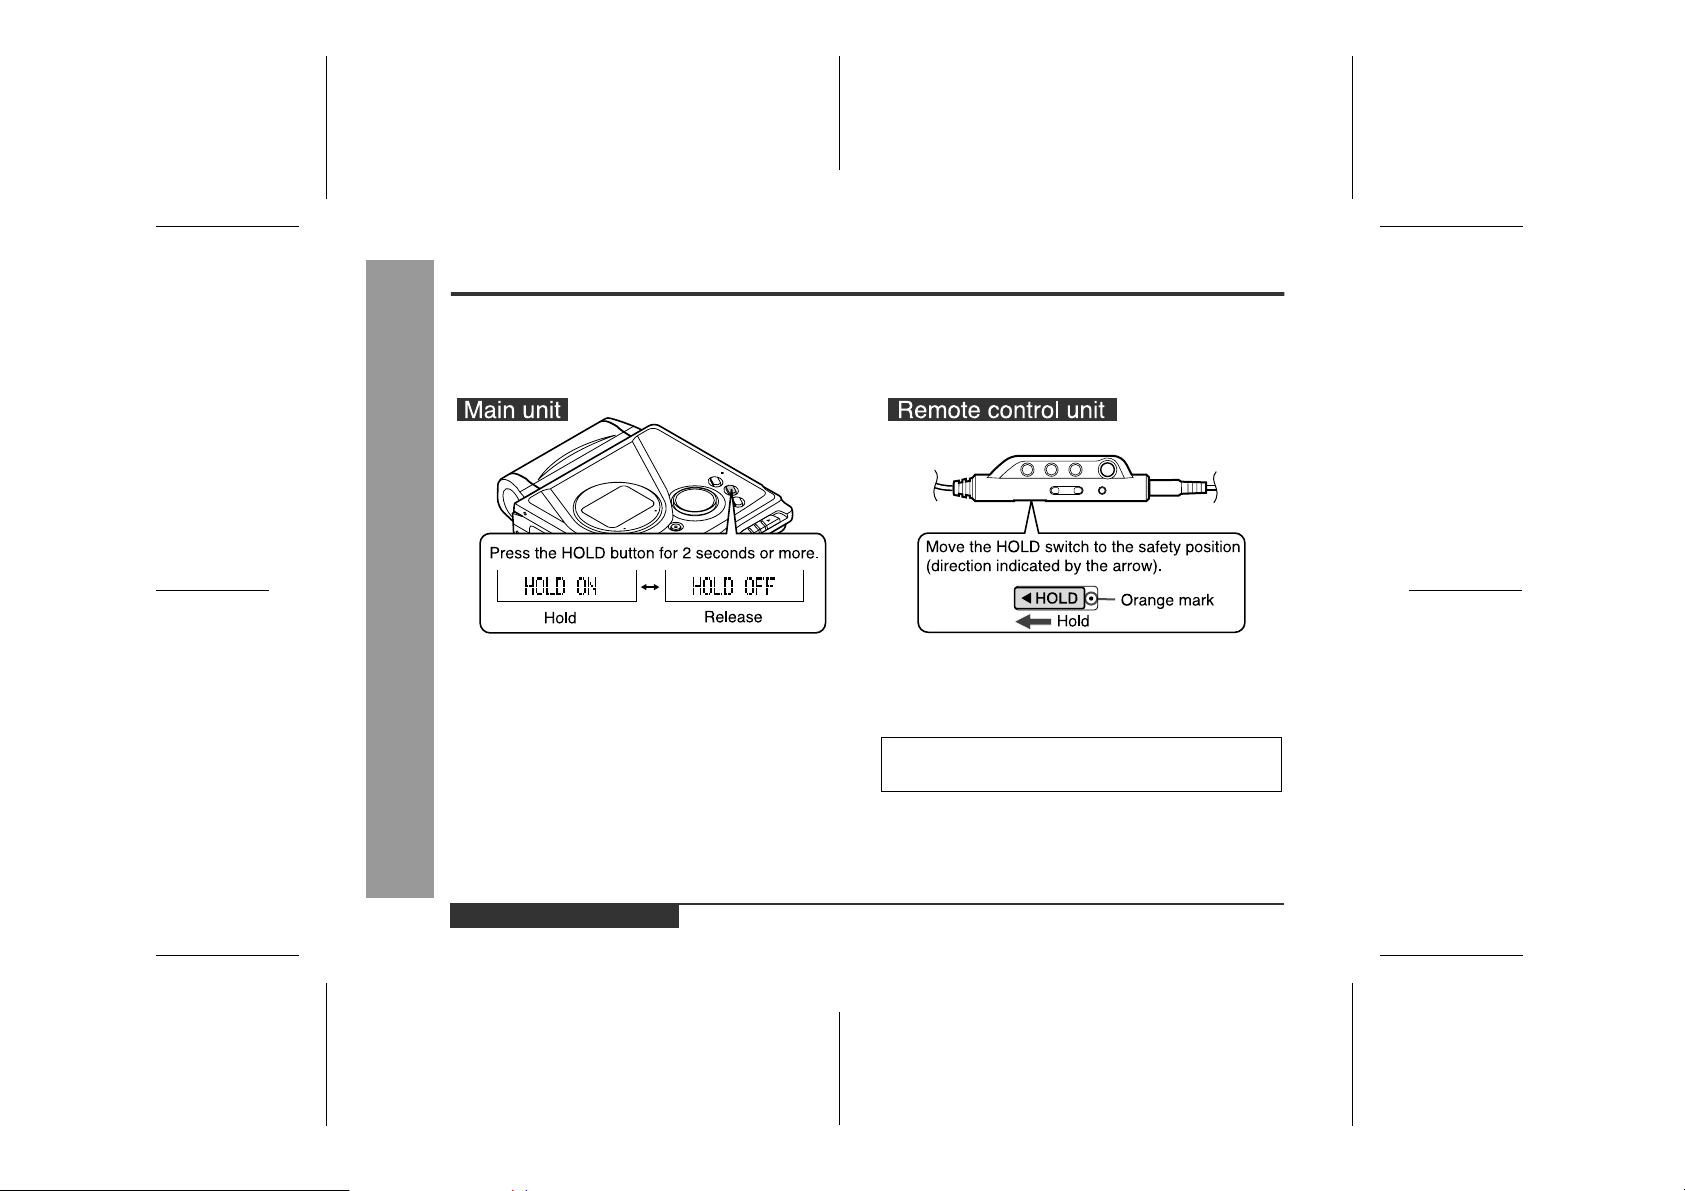
Hold Function
The present operation condition can be kept even if
other buttons are accidentally pressed in a place such
as a crowded train.
-Hold Function-
If the battery is inser ted or the AC adaptor is connected,
Useful Features
you can set this function even when the power is turned
off.
To cancel the hold mode
Press and hold down the HOLD button for 2 seconds or
more whilst the unit is in the hold mode.
"HOLD OFF" will be shown.
To cancel the hold mode
Move the HOLD switch away from the safety position
(the opposite direction of the arrow).
If the hold function is active whilst the power is turned
off, the power cannot be turned on by mistake and the
battery will not be drained.
E-29
ENGLISH
00/12/27 E_90EX_4.FM
Page 31
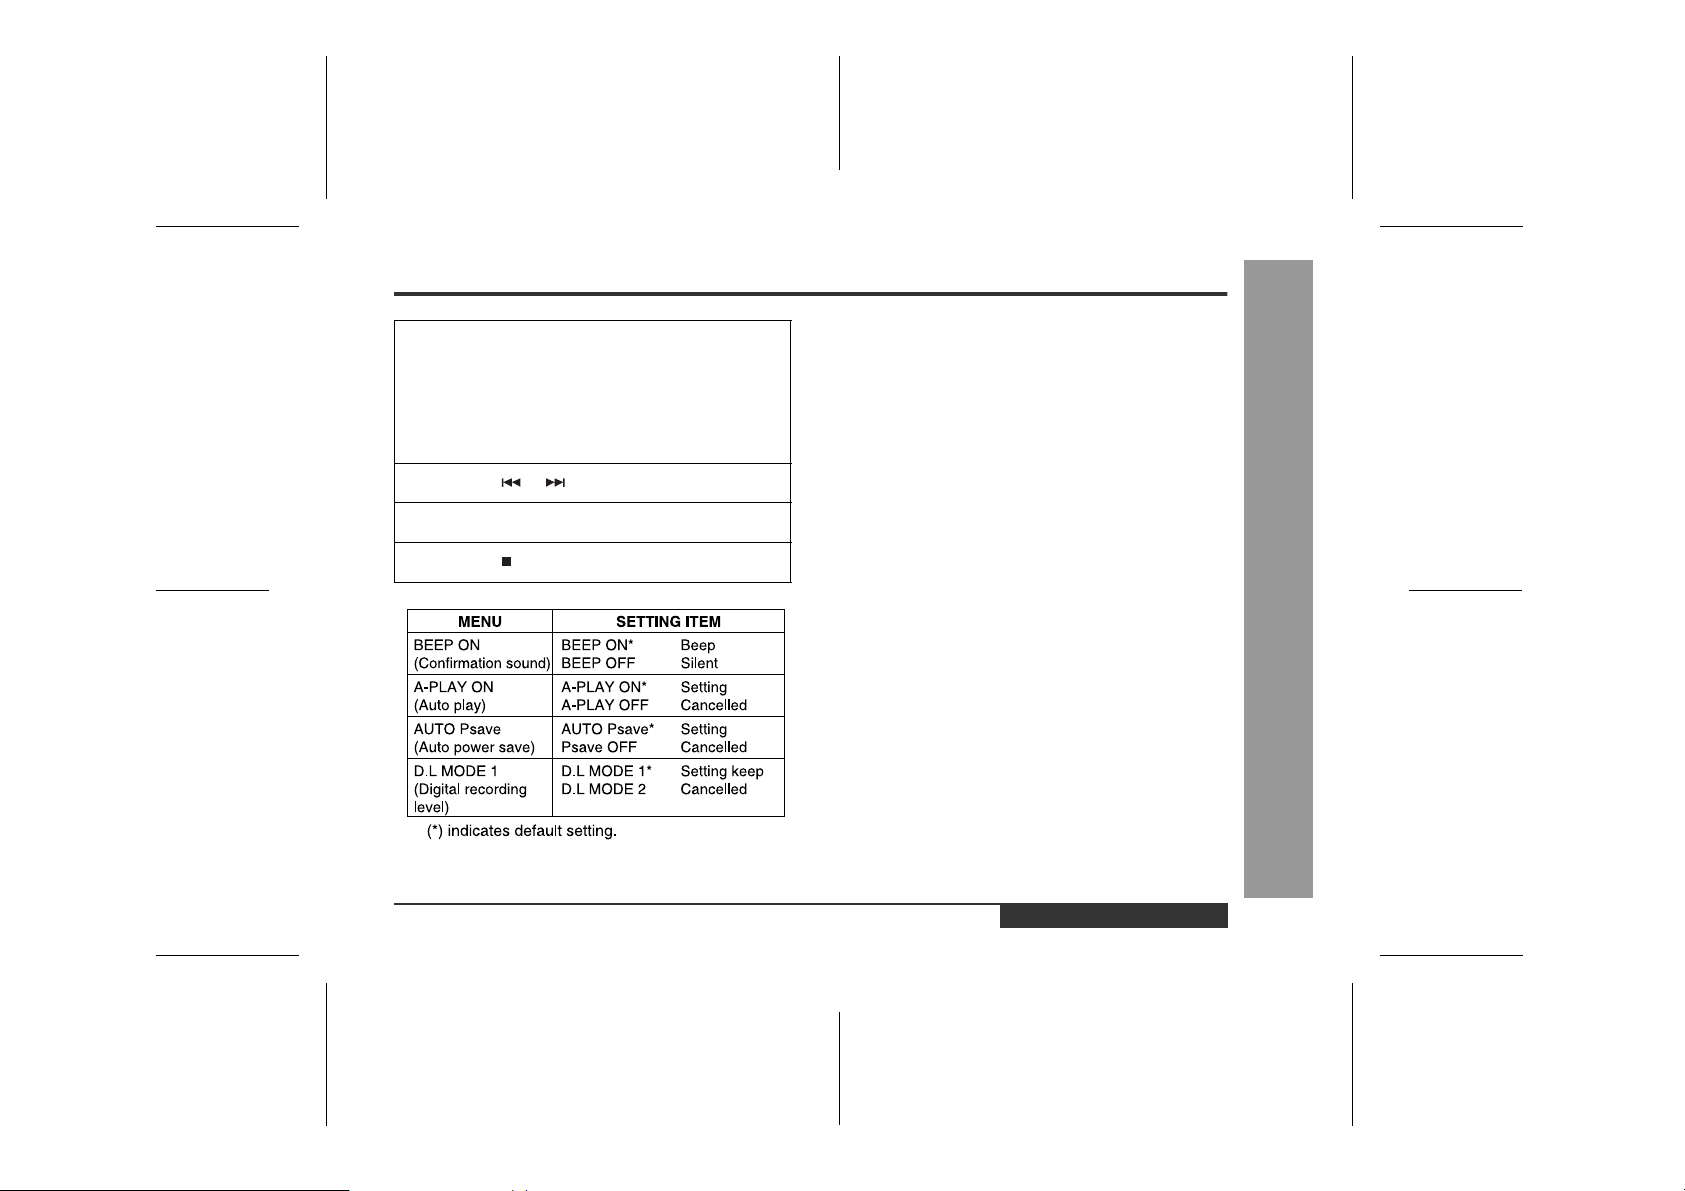
Changing Default Settings
Whilst in the stop mode ...
1
With a MiniDisc inserted, press the MODE/
CHRG button for 2 seconds or more. "SET UP"
will appear.
When you release the button, "BEEP ON" or "BEEP
OFF" will appear.
2
Press the or button to display the menu.
3
Press the MODE/CHRG button to switch items.
4
Press the /:OFF button.
„
Beep sound
You can eliminate the confirmation sound that beeps
when you press a button.
„
Auto play
You can make the unit not play automatically when you
insert a playback-only MiniDisc or an accidental erasure
protected MiniDisc.
„
Auto power save
When the unit is used in a place exposed to much vibration, sound skipping can be decreased by cancelling the
auto power save function. (Battery will drain faster.)
What is auto power save function?
Auto power save function automatically adjusts the sound
skip memory storage to be from 5 to 10 seconds depending on playback conditions, this saves battery power. If
the MiniDisc unit is used in areas of much vibration, it
may be necessary to fix the sound skip memory to 10
seconds "Psave OFF". This will improve performance
under difficult conditions but uses more power. (When
the AC/car adaptor is used the 10 second mode is alwa ys
used.)
„
Digital recording level
"D.L MODE 1"
The digital recording level you set will be kept even after
cancelling recording.
"D.L MODE 2"
Every time you cancel recording, the level will return to
[D.L 0dB].
Advanced Features
-Changing Default Settings-
ENGLISH
00/12/27 E_90EX_5.FM
E-30
Page 32

Titling a MiniDisc
„
Creating disc and track names
Load a MiniDisc to be named. A playback only or recording prevented MiniDisc cannot be edited.
1
2
<Disc name> <Track name>
Whilst in the stop
mode, press the EDIT
button to select "DISC
NAME".
Press the ENTER/SYNC button.
Whilst in the pause
mode, press the EDIT
button to select
"TRACK NAME".
3
Press the DISP button repeatedly to select the
type of characters.
The first 3 characters in the group of the selected
characters will be displayed for about 1 second.
4
Press the or button repeatedly to select
the letter.
-Titling a MiniDisc-
Advanced Features
E-31
z
The unit will enter the character input mode.
z
To cancel the operation, press the /:OFF button.
ENGLISH
5
Press the ENTER/SYNC button to enter it.
00/12/27 E_90EX_5.FM
Page 33

6
To enter more letters, repeat steps 3 - 5.
7
When the name has been completely entered,
press the EDIT button.
8
"TOC" will be displayed. To write the updated
contents to the MiniDisc, press the /:OFF but-
ton.
You cannot remove the MiniDisc whilst "TOC" is
displayed. "TOC" will not disappear until the recorded contents have been updated.
Note:
One disc name and up to 255 track names can be created per disc (a maximum of 100 characters for the disc
and each track name and a total of 1,700 characters can
be entered).
„
To erase a character
Press the VOL+ or VOL
character you want to erase, and then press the BASS
button.
„
To enter a space
Press the VOL+ button to move the cursor to the right.
„
Characters (symbols)
---
button to move the cursor to the
Space
-Titling a MiniDisc-
Advanced Features
ENGLISH
00/12/27 E_90EX_5.FM
E-32
Page 34

Titling a MiniDisc (continued)
„
To add characters
1
Put the unit in the character input mode.
(Perform steps 1 - 2 on page 31.)
2
Press the VOL+ or VOL--- b u t t o n to m o v e th e c u r sor to the right of the character, where you want
to add a new character.
3
Select the character to add.
(Perform steps 3 - 4 on page 31.)
4
Press the ENTER/SYNC button.
-Titling a MiniDisc-
5
Press the EDIT button.
Advanced Features
6
"TOC" will be displayed. To write the updated
contents to the MiniDisc, press the /:OFF but-
ton.
You cannot remove the MiniDisc whilst "TOC" is
displayed. "TOC" will not disappear until the recorded contents have been updated.
„
Stamping titles from another MiniDisc
Before stamping
When there are 2 MiniDiscs on which the same tracks
are recorded, you can transfer the character information
(disc and track names) of the Master MiniDisc to another
MiniDisc (for stamping).
1. What is a master MiniDisc?
A recordable MiniDisc that contains tracks and character information. (You cannot transfer the information
from a playback-only MiniDisc.)
2. What is a MiniDisc for stamping?
A MiniDisc that contains the same tracks in the same
order as the master MiniDisc. (Make sure that the total
number of tracks of the master MiniDisc and the one for
stamping are the same.)
E-33
ENGLISH
00/12/27 E_90EX_5.FM
Page 35

Master MiniDisc operation
1
Insert a Master MiniDisc.
Do not mistake the Master MiniDisc f or the target one.
2
Whilst in the stop mode, press the EDIT button to
select "NAME STAMP" .
3
Press the ENTER/SYNC button.
To cancel the operation , press the /:OFF button.
4
Press the ENTER/SYNC button.
5
When the unit displays "CHANGE MD", remove the
master MiniDisc.
Remove it without t urning off the power. Or, the operation will be cancelled.
Operation of the MiniDisc for stamping
6
Load a MiniDisc for stamping.
7
Press the ENTER/SYNC button.
The unit will finish recording the character info rmation
and enter the stop mode.
Note:
If the total number of tracks on the master MiniDisc does
not match that on the MiniDisc for stamping, the unit will
display "Can'tSTAMP" and turn off the power.
If this happens, adjust the total number of tracks on the
newly recorded MiniDisc using the edit operation.
-Titling a MiniDisc-
Advanced Features
ENGLISH
00/12/27 E_90EX_5.FM
E-34
Page 36
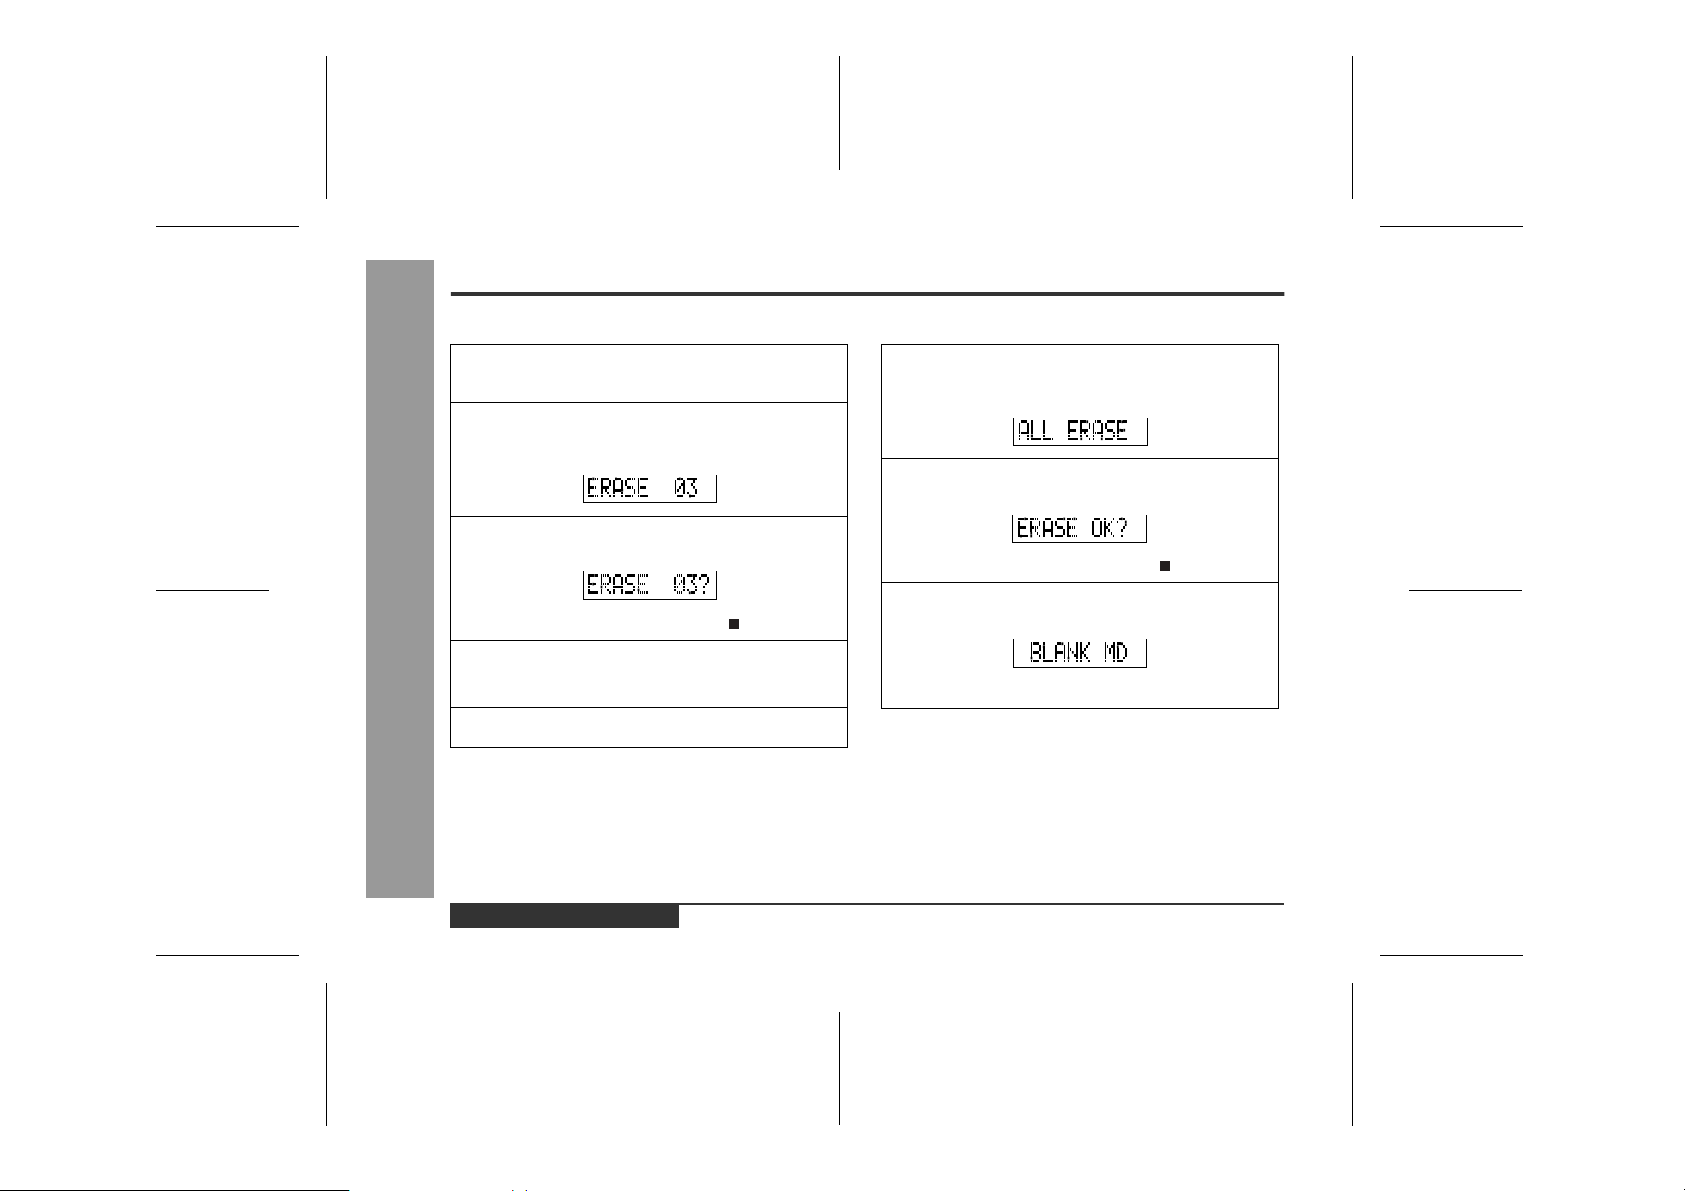
Editing a Recorded MiniDisc
„
To erase tracks one at a time
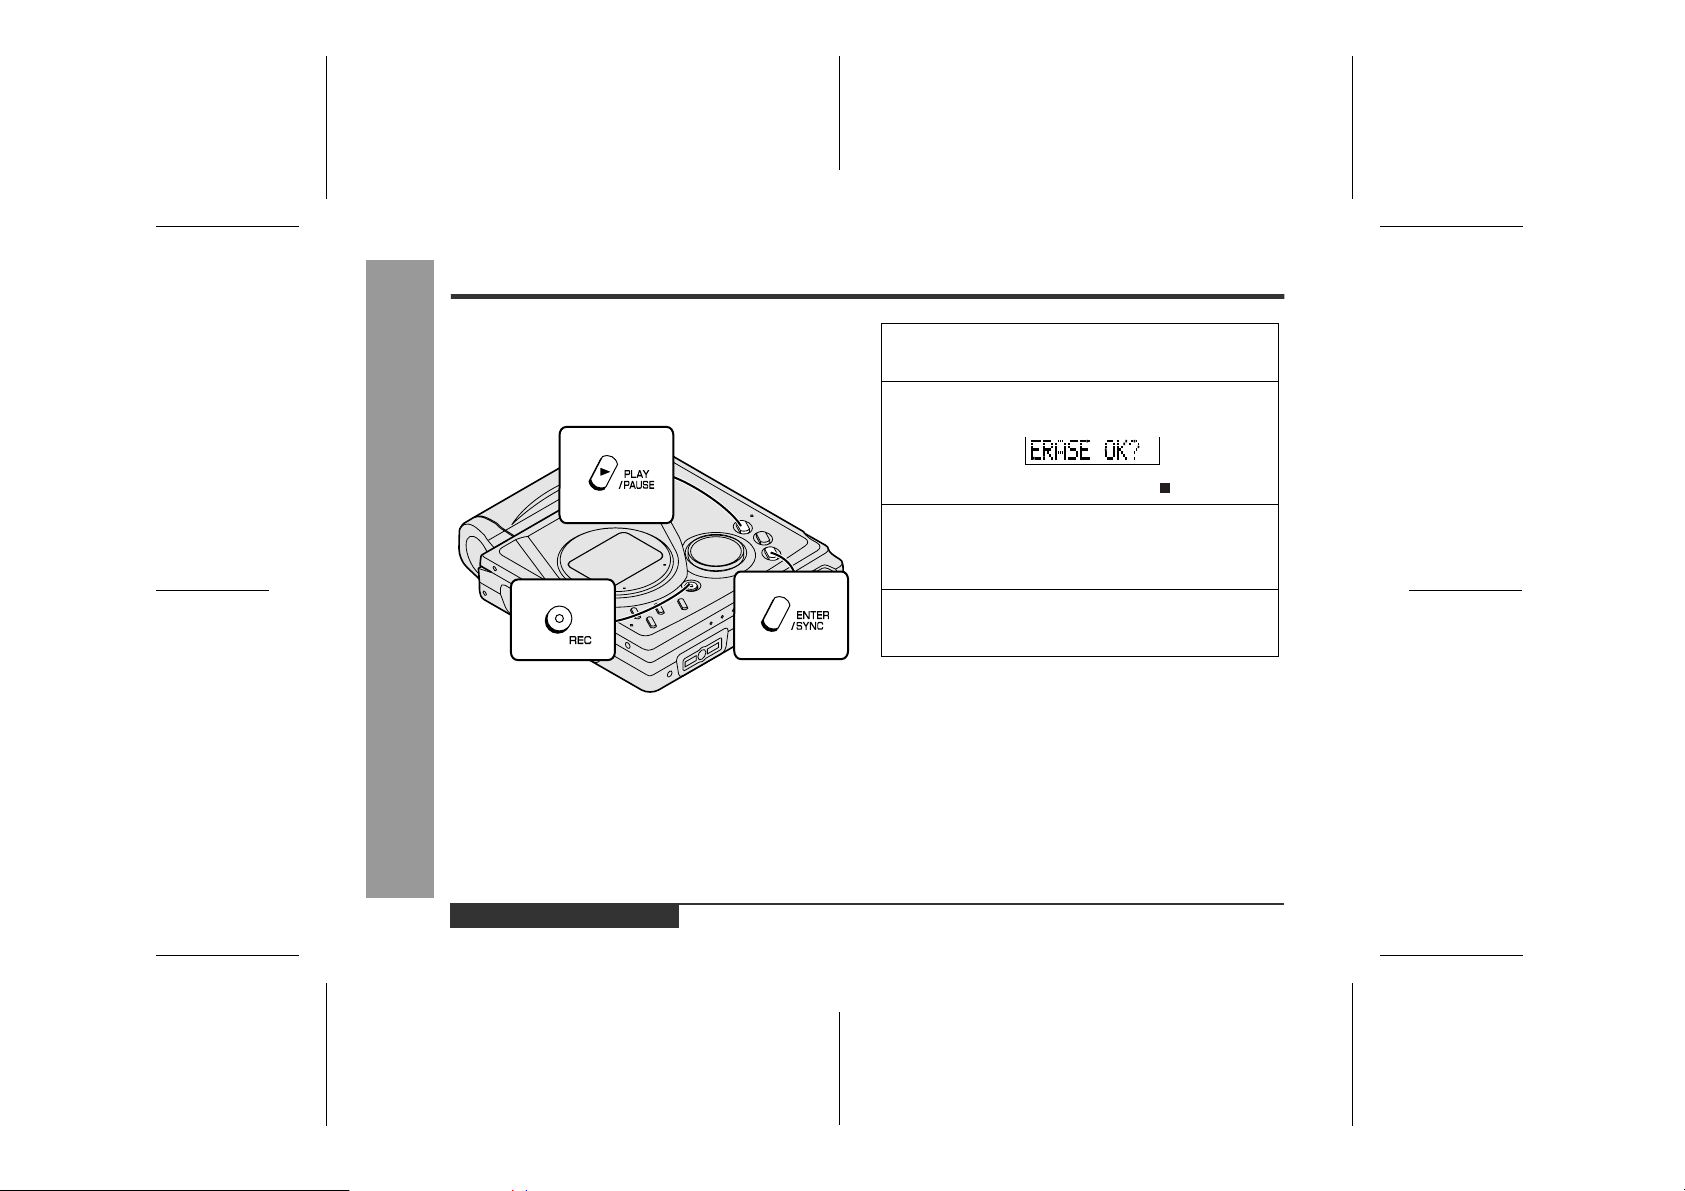
1
Start playing the track to be erased, and press
the PLAY/PAUSE button.
2
Press the EDIT button repeatedly to select
"ERASE".
3
Press the ENTER/SYNC button.
To cancel the operation, press the /:OFF button.
4
Press the ENTER/SYNC button again.
Advanced Features
-Editing a Recorded MiniDisc-
The track will be erased.
5
To erase other tracks, repeat steps 1 - 4.
„
To erase all of the tracks at once
1
Whilst in the stop mode, press the EDIT button
repeatedly to select "ALL ERASE".
2
Press the ENTER/SYNC button.
To cancel the operation, press the /:OFF button.
3
Press the ENTER/SYNC button again.
All of the tracks will be erased.
Caution:
Once a track has been erased, it cannot be recovered. Check the track number before erasing it.
E-35
ENGLISH
00/12/27 E_90EX_5.FM
Page 37

„
To divide a track
1
Start playing the track to be divided into two.
Press the PLAY/PAUSE button at the point
where you want to divide the track.
2
Press the EDIT button repeatedly to select "DIVIDE".
3
Press the ENTER/SYNC button.
To cancel the operation, press the /:OFF button.
4
Press the ENTER/SYNC button again.
The track will be divided into two tracks, and the unit
will pause at the beginning of the second of the two
new tracks.
„
To combine tracks
1
Start playing the last of the two tracks to be
combined, and press the PLAY/PAUSE button.
2
Press the EDIT button repeatedly to select
"COMBINE".
3
Press the ENTER/SYNC button.
To cancel the operation, press the /:OFF button.
4
Press the ENTER/SYNC button.
The two tracks will be combined, and the unit will be
paused at the beginning of the combined track.
Advanced Features
-Editing a Recorded MiniDisc-
ENGLISH
00/12/27 E_90EX_5.FM
E-36
Page 38

Editing a Recorded MiniDisc (continued)
„
To move a track When a track has a name before dividing:
1
Play the track to be moved, and press the PLAY/
PAUSE button.
2
Press the EDIT button repeatedly to select
"MOVE".
3
Press the ENTER/SYNC button.
To cancel the operation, press the /:OFF button.
4
Press the or button to select the direc-
Advanced Features
-Editing a Recorded MiniDisc-
tion.
5
Press the ENTER/SYNC button again.
The track will be moved, and the unit will be paused
at the beginning of the track.
The two new trac ks will ha ve the same name. Howe ver, i n
the TOC FULL condition, the second track may not be
named.
Total number of tracks that can be divided:
Each disc can hold up to 255 tracks. However, even if the
number of assigned tracks has not reached 254, it might
not be possible to make any further divisions of tracks.
To combine two non-adjacent tracks:
First, put the two tracks next to each other in the order
you want using the MOVE function. Then combine them
using the COMBINE function.
When one or both tracks to be combined have
a name:
The first track name will be used. However, when the first
track does not have a name, the second track name will
be used.
In the following cases, tracks may not be combined.
z
Digital recorded track and analogue recorded track.
z
Long play recorded track and stereo recorded track.
z
Tracks whose recording time is less than 12 seconds.
E-37
ENGLISH
00/12/27 E_90EX_5.FM
Page 39

Listening through Another System
„
Listening through a stereo system
Notes:
z
It is recommended that the volume level of the MiniDisc unit be set to maximum when listening through a
stereo system.
z
When recording with stereo system, eliminate the confirmation sound (page 30). Otherwise, it will also be
recorded.
z
The recording will be made in the analogue mode.
z
Character information will not be recorded.
„
Listening through a car stereo
Notes:
z
Adjust the volume of both this portable MD and a car
stereo.
z
Do not operate this portable MD whilst you drive a car .
It may distract your attention and cause a traffic accident.
z
Do not use any car adaptor except for the separately
availabl e AD-CA20X.
z
Remove the battery when you power the unit from the
car battery.
Advanced Features
-Listening through Another System-
ENGLISH
00/12/27 E_90EX_5.FM
E-38
Page 40

Other Features and Caution
„
Resuming auto play
When you stop playback and replay the MiniDisc
without removing it, playback starts from the point
you stopped it.
Once you remove the MiniDisc, playback starts from
the first track.
The unit provides the following functions when you
use it with the separately available car adaptor (ADCA20X) (when the rechargeable or alkaline battery is
References
removed):
1. When you turn off the engine, the power of this portable MD also turns off. (It may not work with some types
of cars.)
-Other Features and Caution-
2. When you restart the engine, playback starts from the
beginning of the stopped track.
„
Rechargeable battery
z
A rechargeable nickel-metal hydride battery is the only
kind that can be used. Even if the battery is not used,
you should charge it at least once every three months
because of the special quality of this battery.
z
The rechargeable battery can be charged approximately 300 times.
z
When the operating time is reduced to about half the
normal amount of time, even after a full charge is performed, replace the battery with a new one (ADN70BT).
z
When the battery is charged for the first time or is
charged after not being used for a long period, the
operating time may be shorter than normal. The battery life will recover with normal use i.e. charging and
discharging.
z
To avoid shortening the ser vice life of the battery, only
recharge the battery after it has been completely discharged.
z
If the rechargeable battery is used in a cold environment, the operating time will be reduced.
z
Do not carry the battery in your pocket or a bag
together with metal objects (keys, coins, jewelry, etc.).
The battery may short out and generate significant
amounts of heat.
z
Do not short-circuit the ter minals as they will become
very hot and will damage the battery.
z
Do not drop or subject the battery to shock.
z
Do not insert objects (metal etc.) into the battery compartment of this product or into the rechargeable battery.
E-39
ENGLISH
00/12/27 E_90EX_6.FM
Page 41

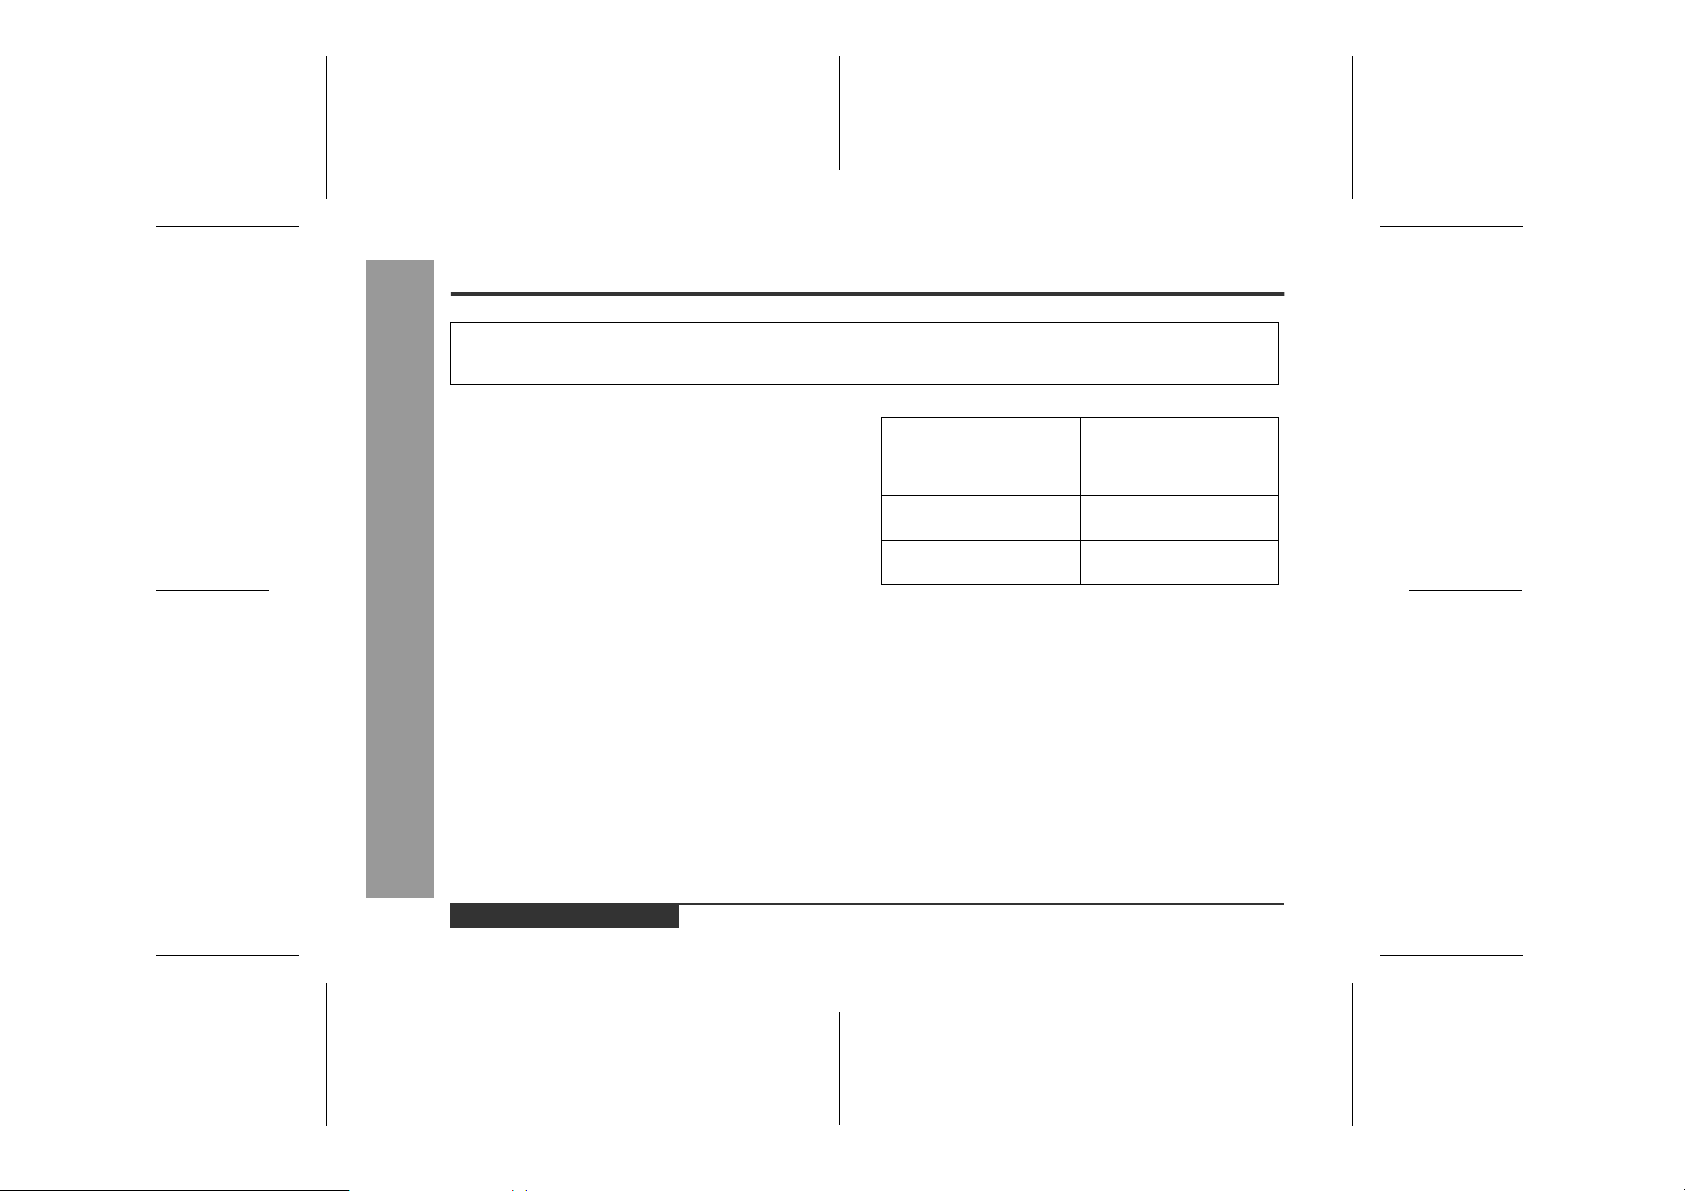
MiniDisc System Limitations
The unit may have the following symptoms whilst recording or editing. The unit is not out of order.
SYMPTOM LIMITATIONS
"DISC FULL" or "TOC FULL" appears
even though the MiniDisc still has recording time left.
The remaining recording time does not
increase even though you erased
tracks.
The total of the recorded time and the
remaining time does not match the maximum recordable time.
Combine function does not work.
Sound skips in fast reverse/forward.
A track number is created in the middle
of a track.
More than 255 tracks (maximum) cannot be recorded regardless of
the recording time. If the MiniDisc is recorded or edited repeatedly or
if it has scratches (recording skips scratched parts), you may not be
able to record the maximum tracks above.
The unit does not count non-recorded portions that last 12 or fewer
seconds to display the remaining recording time. The time may not
increase even if you erase short tracks.
One cluster (approximately 2 seconds) is the minimum unit for recording. For example, a 3-second track uses 2 clusters (approximately 4 seconds). Therefore, the actual recordable time may be
shorter than the displayed time.
A MiniDisc on which recording and editing are repeated may not allow the combine function.
One track is divided and recorded in separate places on a repeatedly
recorded or edited MiniDisc. Sound may skip.
A track number may be created if there are scratches or dust on the
MiniDisc.
References
-MiniDisc System Limitations-
ENGLISH
00/12/27 E_90EX_6.FM
E-40
Page 42

Error Messages
ERROR
MESSAGES
BATT
EMPTY
BLANK MD
Can't COPY
Can't EDIT
Can't
READ (*)
Can't REC
Can't
STAMP
Can't
-Error Messages-
WRITE
DEFECT
DISC
FULL
Er-MD (**)
HOLD
LOCKED
NO DISC
References
MEANING REMEDY
The battery is run down.
z
Nothing is recorded.
z
You tried to record from a copy prohibited MiniDisc.
z
A track cannot be edited.
z
The disc data cannot be read because the disc or
z
unit is damaged.
Recording cannot be performed corre ctly due to
z
vibration or shock.
Stamp function does not work.
z
Cannot save the TOC information correctly to a
z
MiniDisc. (A large portion of the disc has been
damaged.)
The disc is scratched.
z
The disc is out of recording space.
z
The microprocessor h as reported a system fault
z
and the unit is out of order.
The unit is in the hold mode.
z
You removed a MiniDisc whilst recording or editing.
z
A disc has not been loaded.
z
Charge the recharge able battery or re place the alkaline
z
battery (or use the AC adaptor for power).
Replace the disc with a recorded disc.
z
Record using the analogue cable.
z
Change the stop position of the track and then edit it.
z
Reload the disc.
z
Replace it with another record ed disc.
z
Re-record or replace it with another recordable disc.
z
Check the number of tracks.
z
Replace the disc with another recordable disc.
z
If the sound you hear is not right, record again.
z
Replace the disc with another recordable disc.
z
Replace it with another recordable disc.
z
To have it repaired, go t o the di stribut or where yo u pur-
z
chased the un i t.
Cancel the hold mode.
z
Turn off the power and remove the MiniDisc.
z
Load a disc.
z
E-41
ENGLISH
00/12/27 E_90EX_6.FM
Page 43

NO
SIGNAL
NOT
PLAY
PLAY MD
POWER ?
PRO-
TECTED
SORRY
TEMP
OVER
TOC
FORM (**)
TOC FULL
Tr.
Protect
? DISC
Number or symbol appears in (*) position.
Poor connection of the digital cable.
z
No output signal comes out from the connected
z
unit to playback.
The input signal has improper sampling frequency.
z
You tried to play back a track that cannot be
z
played with this equipment.
You recorded on a playback-only disc.
z
Improper power is being supplied.
z
The write protection tab of a MiniDisc is set t o the
z
protected position.
You tried to record on a playback-only disc.
z
Since a track number is currently being located or
z
updated, the unit cannot accept your command.
The temperature is too high.
z
There is an error in the recording signal.
z
There is no space left for recording character in-
z
formation (track names, disc names, etc.).
The track has been protec ted from b eing erased .zEdit the track with the device on which it was recor ded.
z
A disc which contains data other t han music was
z
played.
There is an error in the signal recorded on the disc.
z
Connect the digital cable securely.
z
If the portable CD player has a function to prevent
z
sound skips, deactivate it.
Playback with the connected unit.
z
Play back another track.
z
Replace it with a recordable disc.
z
Use one of the specified power sourc es.
z
Move the write protection tab back to its original posi-
z
tion.
Replace it with a recordable MiniDisc.
z
Wait for a while and try the operat i on again.
z
Turn off the power, and wait for a while.
z
Erase all of the tracks, and then record again.
z
Replace it with another recordab le disc.
z
A disc which contains non-music data cannot be
z
played.
Replace it with another recorded disc.
z
References
-Error Messages-
ENGLISH
00/12/27 E_90EX_6.FM
E-42
Page 44

Troubleshooting
Many potential "problems" can be resolved by the owner witho ut calling a serv ice technician. If something seems to be wrong
with this product, check th e following before calling your authorised SHARP dealer or service centre.
PROBLEM CAUSE
The unit does not turn on.
No sound is heard from the headphones.
When the operation buttons are
pressed, the unit does not respond.
References
Some sounds are skipped.
-Troubleshooting-
The MiniDisc cannot be ejected.
Recording and editing are impossible.
Is the AC adaptor disconnected?
z
Is the battery exhausted?
z
Is the unit in the hold mode?
z
Has condensation formed insi de the unit?
z
Is the unit being influenced by mechanical shock or by static electricity?
z
Is the volume set too low?
z
Is the remote control unit or the headphones plugged in?
z
Are you trying to play a MiniDisc with d ata on it instead o f a MiniDisc contain ing
z
music?
Is the unit in the hold mode?
z
Is the battery exhausted?
z
Is the remote control unit plug or the headphones plug inserted firmly?
z
Is the battery exhausted?
z
Is the unit bein g s u bj e c t ed to excessive vibration?
z
Has the track number or cha r acter information been writt en on the disc yet?
z
Is the unit in the recording or editi ng mode?
z
Is the MiniDisc protected against accidental erasure?
z
Is the unit connected properly to the other equipment?
z
Is the AC adaptor unplugged or di d a power failure occur whilst recording or
z
editing?
Is the unit in the hold mode?
z
Is an optical signal being out put from the stereo system? Read the operation
z
manual for the stereo system.
E-43
ENGLISH
00/12/27 E_90EX_6.FM
Page 45

Maintenance
„
If trouble occurs
When this product is subjected to strong external interference (mechanical shock, excessive static electricity,
abnormal supply voltage due to lightning, etc.) or if it is
operated incorrectly, it may malfunction.
If such a problem occurs, do the following:
1. Unplug the AC adaptor from the wall socket.
2. Remove the battery.
3. Leave the unit completely unpowered for approximately 30 seconds.
4. Plug the AC adaptor back into the wall socket and reoperate the unit.
„
Moisture condensation
When the unit has condensation inside, the disc signals
cannot be read, and the unit may not function properly.
In the following cases, condensation may form inside the
unit.
z
Shortly after turning on a heater.
z
When the unit is placed in a room where there is
excessive steam or moisture.
z
When the unit is moved from a cool place to a warm
place.
To remove condensation:
Remove the MiniDisc and leave the unit for approximately 1 hour. The condensation should evaporate and
the unit will work properly.
„
Cleaning
When the unit becomes dirty
Clean it with a soft cloth.When the unit is excessively
dirty, use a soft cloth dampened in water (external surfaces only).
Clean the plugs and the connecting socket.
If the plugs or sockets are dirty, noise may be heard.
Cleaning will prevent noise.
Caution:
z
Do not use chemicals for cleaning (petrol, paint thinner, etc.). It may damage the cabinet finish.
z
Do not apply oil to the inside of the unit. It may cause
malfunctions.
-Maintenance-
References
ENGLISH
00/12/27 E_90EX_6.FM
E-44
Page 46
Specifications
As a part of our policy of continuous improvement, SHARP reserves the right to make design and specification changes for product improvement without prior notice. The performance specification figures indicated are nominal values
of production units. There may be some deviations from these values in individual units.
„
General
Power source:
DC 1.2V: Rechargeable Nickel-Metal Hydride
DC 5V: AC adaptor (AC 110-240V, 50/60 Hz)
DC 1.5V: Commercially available, "AA" size
DC 4.5V: Optional car adaptor, AD-CA20X (for
References
Power consumption:
-Specifications-
Output power:
Charging
time:
battery (AD-N70BT) x 1
(LR6), alkaline battery x 1
cars with a 12-24V DC negative earth
electrical system)
0.15A (AC adaptor)
RMS; 20 mW (10 mW + 10 mW)
(0.2% T.H.D.)
Approx. 3.5 hours (90 %)
Approx. 5.5 hours (fully charged)
(When using the AC adaptor included
with the unit)
Battery life:
When using the rechargeable battery (fully charged)
included with the unit
Continuous recording:
Approx. 7 hours
Continuous play:
Approx. 12 hours
z
The continuous recording time is for analogue inputs
when the volume level is set to "VOL 0".
z
The continuous play time shows the value when the
volume level is set to "VOL 15".
z
The above values are the standard values when the
unit is charged and used at an ambient temperature of
25°C (77°F).
z
The operating time when using an alkaline battery
may be different, depending on the type and manufacturer of the battery, and on the operating temperature.
When using a commercially available, high capacity,
"AA" size (LR6), alkaline
battery
Continuous recording:
Approx. 3 hours
Continuous play:
Approx. 12 hours
E-45
ENGLISH
00/12/27 E_90EX_6.FM
Page 47

Input sensitivity:
Recording
level
MIC H 0.25 mV 10 k ohms
MIC L 2.5 mV 10 k ohms
LINE 100 mV 20 k ohms
Output level:
Headphones
LINE 250 mV (-12
Dimensions:
Weight:
Input socket:
Output socket:
Reference input
level
Specified
output
- 10 mW + 10 mW16 ohms
dB)
Width: 81.1 mm (3-7/32")
Height: 19.9 mm (13/16")
Depth: 92.4 mm (3-21/32")
172 g (0.38 lbs.) with rechargeable bat-
tery
Line/optical digital, microphone (pow-
ered by the main unit)
Headphones (impedance: 16 ohms)/
remote control unit
Input impedance
Maximum
output level
- 10 k ohms
Load impedance
„
MiniDisc Recorder
Type:
Signal read-
out:
Audio chan-
nels:
Frequency
response:
Rotation
speed:
Error correc-
tion:
Coding:
Recording
method:
Sampling frequency:
Wow and
flutter:
Portable MiniDisc recorder
Non-contact, 3-beam semi-conductor
laser pick-up
Stereo 2 channels/monaural (long-play
mode) 1 channel
20 - 20,000 Hz (±3 dB)
Approx. 400 - 900 rpm
ACIRC (Advanced Cross Interleave
Reed-Solomon Code)
ATRAC (Adaptive TRansform Acoustic
Coding), 24-bit computed type
Magnetic modulation overwrite method
44.1 kHz (32 kHz and 48 kHz signals
are converted to 44.1 kHz, and then recorded.)
Unmeasurable (less than ±0.001% W.
peak)
References
-Specifications-
ENGLISH
00/12/27 E_90EX_6.FM
E-46
Page 48

ESPAÑOL
Introducción
Muchas gracias por haber adquirido este producto SHARP. Lea atentamente este manual para conseguir el mejor
rendimiento del aparato. Le servirá también como guía operativa de este producto SHARP.
Índice
Introducciones importantes
S-1
„
Introducciones importantes
Accesorios . . . . . . . . . . . . . . . . . . . . . . . . . . . . . . . . . . 2
Notas especiales . . . . . . . . . . . . . . . . . . . . . . . . . . . 3-4
Denominación de los controles y de los
indicador e s . . . . . . . . . . . . . . . . . . . . . . . . . . . . . . . . 5-6
Precauciones . . . . . . . . . . . . . . . . . . . . . . . . . . . . . . . . 7
„
Preparación
Inserción de un minidisco. . . . . . . . . . . . . . . . . . . . . . 8
Conexiones. . . . . . . . . . . . . . . . . . . . . . . . . . . . . . . 9-10
-Introducción/Índice-
„
Operación básica
Grabació n . . . . . . . . . . . . . . . . . . . . . . . . . . . . . . . 11 -1 2
Reproducción . . . . . . . . . . . . . . . . . . . . . . . . . . . . 13-14
„
Características útiles
Reproducción avanzada . . . . . . . . . . . . . . . . . . . 15-16
Grabación avanzada . . . . . . . . . . . . . . . . . . . . . . 17-21
Grabació n d e s de un micrófono . . . . . . . . . . . . . 22-2 4
Comprobación de las visualizaciones. . . . . . . . 25-26
Alimentación con pilas . . . . . . . . . . . . . . . . . . . . 27-2 8
Función de retención. . . . . . . . . . . . . . . . . . . . . . . . .29
ESPAÑOL
„
Características avanzadas
Cambio de los ajustes iniciales. . . . . . . . . . . . . . . . 30
Título de un minidisco . . . . . . . . . . . . . . . . . . . . .31-34
Edición de un minidisco grabado . . . . . . . . . . . .35-37
Audición a través de otro sistema. . . . . . . . . . . . . . 38
„
Referencias
Otras características y precauciones . . . . . . . . . . . 39
Limitaciones del sistema de minidiscos. . . . . . . . . 40
Mensajes de error . . . . . . . . . . . . . . . . . . . . . . . . .41-42
Localización y reparación de averías . . . . . . . . . 43-44
Mantenimiento. . . . . . . . . . . . . . . . . . . . . . . . . . . . . . 44
Especificaciones técnicas . . . . . . . . . . . . . . . . . .45-46
00/12/27 S_90EX_1.FM
Page 49

Accesorios
Notas:
z
Las partes y equipos mencionados en este manual de manejo, que no sean los arriba detallados, no están incluidos.
z
El adaptador de CA podría ser diferente al descrito en la ilustración.
-Accesorios-
Introducciones importantes
ESPAÑOL
00/12/27 S_90EX_1.FM
S-2
Page 50

Notas especiales
„
Advertencia
z
Tenga en cuenta que dentro del adaptador de CA
suministrado no hay piezas que pueda reparar.
No quite nunca las tapas a menos que se esté cualificado para hacerlo. Este aparato tiene en su interior
tensiones peligrosas. Desenchufe siempre la clavija
de la red del tomacorriente antes de realizar cualquier
servicio de mantenimiento y cuando no se use el aparato durante un largo período de tiempo.
z
El adaptador de CA suministrado con el MD-MT90W
no se deberá utilizar con otro equipo.
z
Para evitar incendios y descargas eléctricas, no
exponga el aparato a goteo o salpicadura de líquidos.
No deberán ponerse encima del aparato objetos que
estén llenos de líquido, como por ejemplo un florero.
„
Precaución
SHARP no se hace responsable de daños o pérdidas
z
de su grabación debidas a fallas de funcionamiento de
-Notas especiales-
este aparato.
Cuando vaya a hacer grabaciones importantes, es
z
aconsejable que haga una prueba preliminar para
garantizar que la grabación deseada se efectuará
adecuadamente.
z
Introducciones importantes
Este producto está clasificado como un PRODUCTO
LASER DE CLASE 1.
z
Utilice el grabador/reproductor minidisc portátil sólo
de acuerdo con las instrucciones dadas en este
manual y no intente interferir el interruptor de bloqueo
ni realizar ningún otro ajuste porque podría ocasionar
la exposición a radiación peligrosa.
S-3
ESPAÑOL
00/12/27 S_90EX_1.FM
Page 51

„
Notas
z
El material audiovisual puede consistir en trabajos
que tengan derechos de autor y que no deben grabarse sin la autorización del poseedor de dichos derechos de autor. Sírvase consultar las leyes aplicables
en su país.
z
Las letras entre corchetes contenidas en el número
del modelo indican el color del producto solamente. El
funcionamiento y las especificaciones no quedan
afectados.
z
Patentes de los Estados Unidos y de otros países con
licencia de Dolby Laboratories.
-Notas especiales-
Introducciones importantes
ESPAÑOL
00/12/27 S_90EX_1.FM
S-4
Page 52

Denominación de los controles y de los indicadores
„
Aparato principal
1.Toma de entrada de 5 V CC (9)
2.Toma de entrada óptica/línea (9, 10)
3.Toma de entrada de micrófono (22)
4.Botón de graves (14, 32)
5.Botón de edición/marcación automática/marcación de tiempo (20, 24, 31)
Botón selector de vis ualización /carac tere s (25, 31 )
6.
7.Botón de selección de modo/carga (16, 27)
8.Botón de grabación/marcación de pista (11, 20)
9.Botón selector de volumen/cursor/avance rápido/
inversión rápida/nivel de grabación/nombre
(11, 14, 15, 31, 32)
10.Botón de reproducción/pausa (11, 14)
11.Botón de parada/desconexión de alimentación/
retención (12, 14, 29)
12.Botón de introducción/reproducción rápida/sincronización (16, 17, 19)
13.Toma del controlador remoto/auriculares/salida
de línea (13, 38)
14.Palanca de abertura (8)
15.Cubierta de las pilas (27)
Introducciones importantes
-Denominación de los controles y de los indicadores-
S-5
ESPAÑOL
00/12/27 S_90EX_1.FM
Page 53

„
Panel visualizador
1.M edidor de nivel (11)
2.Indicador de grabación (11)
3.Indicador del tiempo remanente de grabación (25)
4.Indicador del modo de reproducción larga
monofónica (18)
5.Indicador de repetición (16)
6.Indicador de TOC (12)
7.Indicador de grabación sincronizada (17)
8.Indicador del modo de disco
9.Indicador de nombre de disco (25)
10.Indicador del nombre de pista (25)
11.Indicador del número total de pistas (25)
12.Indicador de reproducción rápida (16)
13.Indicador de pila/batería (26)
14.Indicador de reproducción aleatoria (16)
15.Indicador de número de pista (25)
16.Indicador de información de caracteres/tiempo
„
Controlador remoto
1.Toma de auriculares (13)
2.Botón de graves/borrado/marcación de pista
(14, 20, 32)
3.Botón de reducción de volumen/cursor (14, 32)
4.Botón de incremento de volumen/cursor (14, 32)
5.Interruptor de retención (29)
6.Botón de reproducción/pausa (11, 14)
7.Botón de inversión rápida/reducción del nivel de
grabación/selección de nombre (11, 15, 31)
8.Botón de avance rápido/incremento del nivel de
grabación/selección de nombre (11, 15, 31)
9.Botón de parada/desconexión de alimentación
(12, 14)
Introducciones importantes
-Denominación de los controles y de los indicadores-
ESPAÑOL
00/12/27 S_90EX_1.FM
S-6
Page 54

Precauciones
„
Importante
No se ponga auriculares cuando atraviese calles ni
z
cuando esté cerca del tráfico.
No emplee los auriculares mientras
z
conduce un vehículo, porque puede
crear situaciones peligrosas en el tráfico y puede ser ilegal. Recuerde que
debe respetar las reglas de s egurid ad
de su zona.
No reproduzca sonido en el aparato a altos niveles de
z
volumen. Los expertos dicen que es perjudicial la audición prolongada a altos niveles de volumen.
Si nota timbres en los oídos, reduzca el volumen o no uti-
z
lice el aparato.
Las fuentes de llamas abiertas, tales como v e las encend i-
z
das no deben colocarse encima del ap arato.
Deberá prestarse atención a los aspectos del medio
z
ambiente al deshacerse de las pilas.
El grabador de MD sólo debe ser utilizado dentro de un
z
-Precauciones-
margen de temperaturas de 0°C - 40°C.
Para evit ar l as desca r ga s eléctr icas u otr o s pos ibl es problemas, respete las precauciones que se mencionan a
continuación.
No desmonte ni modifique el aparato.
z
No se caiga el aparato al sue l o y no expóngalo a golpes.
z
No emplee el aparato cerca de llamas de fuego.
z
Introducciones importantes
No derrame ningún líquido sobre el aparato .
z
El empleo de una fuente de alimentación exterior que no
z
sea la de 5V CC suministrada con el grabador de MD
puede dañarlo.
SHARP no se hace responsable de los daños debidos a
z
la utilización incorrecta. Solicite todo el servicio a un centro de ser vicio autorizado SHA R P.
„
Almacenaje del aparato
No emplee ni deje el aparato en l os lugares siguientes.
Lugares expuestos a la luz directa del
z
sol durante muchas horas (especia lmente dentro de automóviles con las
puertas y ventanillas cerradas) ni cerc a
de estufas. (P o dr ía deformarse la caja,
cambiar el color o podría averiarse el
aparato.)
Lugares expuestos a polvo excesivo.
z
Lugares expuestos al agua.
z
Lugares donde las temperaturas sean excesiv amente alta s
z
o bajas.
Lugares (salas de baño ) donde la hume-
z
dad sea muy alta.
Lugares con fuertes campos magnéti-
z
cos tales como televisores y altavoces
potentes.
Lugares expuestos a las vibraciones.
z
En cualquier lugar donde la arena pue-
z
da introducirse con facilidad en el interior del aparato (playa, etc .).
Si se usa el aparato cerca de sintonizadores de radio o
z
televisores, puede producirse ruido y/o interferencias en
la imagen. Si nota alguno de estos problemas, separe el
aparato de tales aparatos.
No es recomendable poner el MD en un bolsillo trasero,
z
porque esto podría dañar el producto al sentarse.
S-7
ESPAÑOL
00/12/27 S_90EX_1.FM
Page 55

Inserción de un minidisco
1
Deslice la palanca OPEN para abrir la puerta del
compartimiento.
2
Levántela.
3
Inserte un minidisco como se muestra.
4
Cierre la puerta del compartimiento.
Notas:
z
No ponga el MD debajo del soporte.
Preparación
z
Si se siente cualquier resistencia, no inserte a la
fuerza el MD en el aparato, porque podría dañar el
aparato. Si se siente resistencia, extraiga el MD y
vuelva a cargarlo.
z
La tapa no podrá abrirse si se visualiza "TOC"; consulte las instrucciones de la página 12.
ESPAÑOL
00/12/27 S_90EX_2.FM
-Inserción de un minidisco-
S-8
Page 56

Conexiones
Podrá grabar en un MD sus discos CD o cintas preferidos.
-Conexiones-
Preparación
S-9
ESPAÑOL
00/12/27 S_90EX_2.FM
Page 57

-Conexiones-
Preparación
ESPAÑOL
00/12/27 S_90EX_2.FM
S-10
Page 58

Grabación
-Grabación-
3
Pulse el botón o para ajustar el nivel de grabación.
Grabación analógi ca
Ajuste el nivel de g rabaci ón de modo que el nivel máximo de volumen del sonido de la fuente haga que la indicación oscile entre --- 4 dB y 0 dB.
Grabación digital
Podrá ajustar el nivel e n incrementos de 1d B dentro del
margen de +12 - --- 12dB.
Operación básica
1
Pulse el botón REC.
2
Inicie la reproducción en el sistema estéreo conectado a este MD portátil.
S-11
ESPAÑOL
Una vez haya ajustado el nivel de grabación digital , el
ajuste quedará incluso después de haberse parado la
grabación. (Para las instruccio nes de cancelación, vea
la página 30.)
4
Pulse el botón PAUSE del sistema est éreo para establecer el modo de pausa de reproducción.
Aquí podrá buscar la pista a grabarse.
00/12/27 S_90EX_3.FM
Page 59

5
Pulse el bo tón PLA Y/PAUSE para inic iar la g rabación del aparato de MD.
6
Inicie la reproducción en el sistema estéreo, y se
grabará la salida.
Para interrumpir la grabación
Pulse el botón PLA Y /PAUSE.
z
Para reanudar la grabación, pulse de nuevo el botón
PLAY/PAUSE.
El número de pista se incrementará en uno cada vez
z
que se interrumpa la grabación.
Para detener la grabación
Pulse el botón /:OFF.
z
Cuando se detenga la grabación, aparecerá "TOC"
(índice). Mientras aparece "TOC", aún no se habrá
actualizado el contenido grabado en el MD.
z
Para evitar que se pierda la nueva grabación, no
puede extraerse el minidisco mientras se visualiza
"TOC".
Para actualizar el contenido grabado del MD
Pulse el botón /:OFF mientras esté en el modo de
parada.
La alimentación se desconectará después de haber
actualizado el contenido grabado en el MD.
Acerca del TOC
Después de haber efectuado cualquier función de grabación o de edición, se visualiza "TOC" (Índice). Para finalizar la función de grabación o edición, pulse el botón /
:OFF. Durante este proceso, "TOC" parpadeará y se
visualizará "TOC EDIT!". Durante cualquier función de
grabación o edición, la tapa del minidisco está bloqueada, y el minidisco no puede extraerse hasta haberse
terminado el proceso.
Advertencia:
Si se extrae la alimentación (pila/batería/adaptador de
CA) mientras se visualiza "TOC", la tapa del aparato de
MD queda bloqueada hasta que se recupere la pila/batería/alimentación principal y se conecte la alimentación
del aparato. Se perderán sus grabaciones o cambios editados nuevos y su MD podría quedar inutilizable.
Precaución:
Mientras se visualiza "TOC" o "TOC EDIT!", siga la instrucción siguiente.
- No sacuda ni golpee el aparato.
- No desenchufe el adaptador de CA.
- No extraiga la batería ni ninguna pila alcalina.
- No someta a golpes el aparato.
De lo contrario, las pistas podrían quedar incorrecta-
mente grabadas.
Notas:
z
Los cambios del nivel de volumen durante la grabación no afectan la grabación.
z
No podrá ajustar el nivel de graves durante la grabación.
-Grabación-
Operación básica
ESPAÑOL
00/12/27 S_90EX_3.FM
S-12
Page 60

Reproducción
-Reproducción-
Operación básica
S-13
ESPAÑOL
00/12/27 S_90EX_3.FM
Page 61
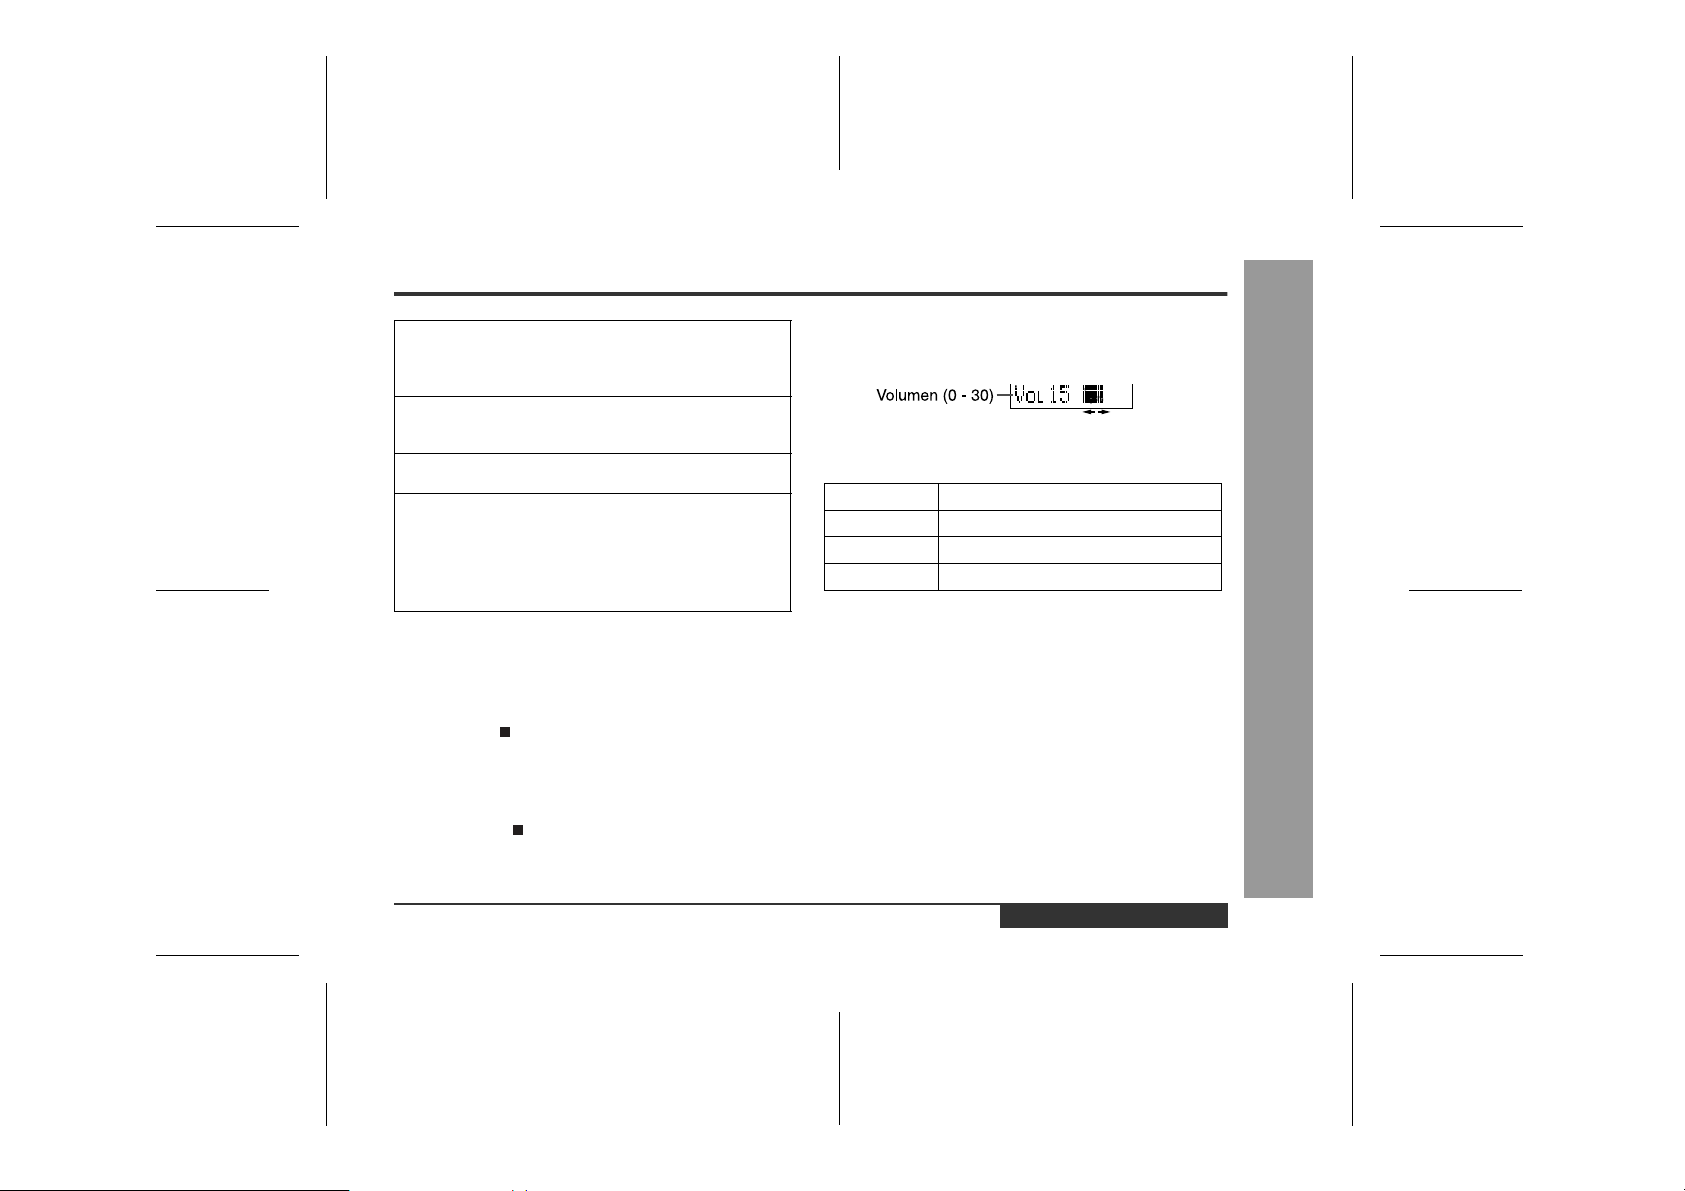
1
Inserte firmemente la clavija de los auriculares
en la toma de auriculares del controlador remo-
to.
2
Enchufe el controlador remoto a la toma REMOTE del aparato.
3
Inserte un MD (página 8).
4
Pulse el botón PLAY/PAUSE.
La reproducción empezará automáticamente con
un MD de sólo reproducción o un MD que está protegido contra borrado accidental (Función de reproducción automática).
Para interrumpir la reproducción
Pulse el botón PLA Y /PAUSE.
Para reanudar la reproducción, pulse de nuevo el botón
PLAY/PAUSE.
Para detener la reproducción
Pulse el botón /:OFF.
Si el aparato no se utiliza durante un mínimo de 2 minutos en el modo de parada, la alimentación se desconectará automáticamente.
Para desconectar la alimentación
Pulse el botón /:OFF mientras esté en el modo de
parada.
„
Control de volumen
Pulse el botón VOL+ para aumentar el volumen y el
botón VOL
„
Cada vez que se pulsa el botón BASS, el tono cambia de
la forma siguiente.
BASS 1 Se realza ligeramente.
BASS 2 Se realza más.
BASS 3 Se realza por completo.
BASS OFF Cancelado.
Notas:
z
z
z
z
---
para disminuirlo.
Control de graves
Si ocurre una falla de alimentación durante la reproducción de un disco empleando el adaptador de CA,
desen chúfelo de la toma de pared. De lo contrario, la
reproducción podría iniciarse automáticamente
cuando se recupere la electricidad.
Si conecta el adaptador de CA sin instalar la batería
recargable, la reproducción podría empezar automáticamente. Asegúrese de desconectar la alimentación.
Reduzca el volumen antes de iniciar la reproducción.
Los MD, en comparación con las cintas de cassette
normales, tienen muy poco ruido. Si se ajusta el volumen según el ruido que puede esperarse normalmente, el alto volumen podría dañar los oídos.
El sonido que se escapa por los auriculares puede
molestar a la gente que esté cerca de usted. En lugares particularmente llenos de gente (como en trenes o
autobuses), reduzca el volumen.
ESPAÑOL
-Reproducción-
Operación básica
S-14
00/12/27 S_90EX_3.FM
Page 62
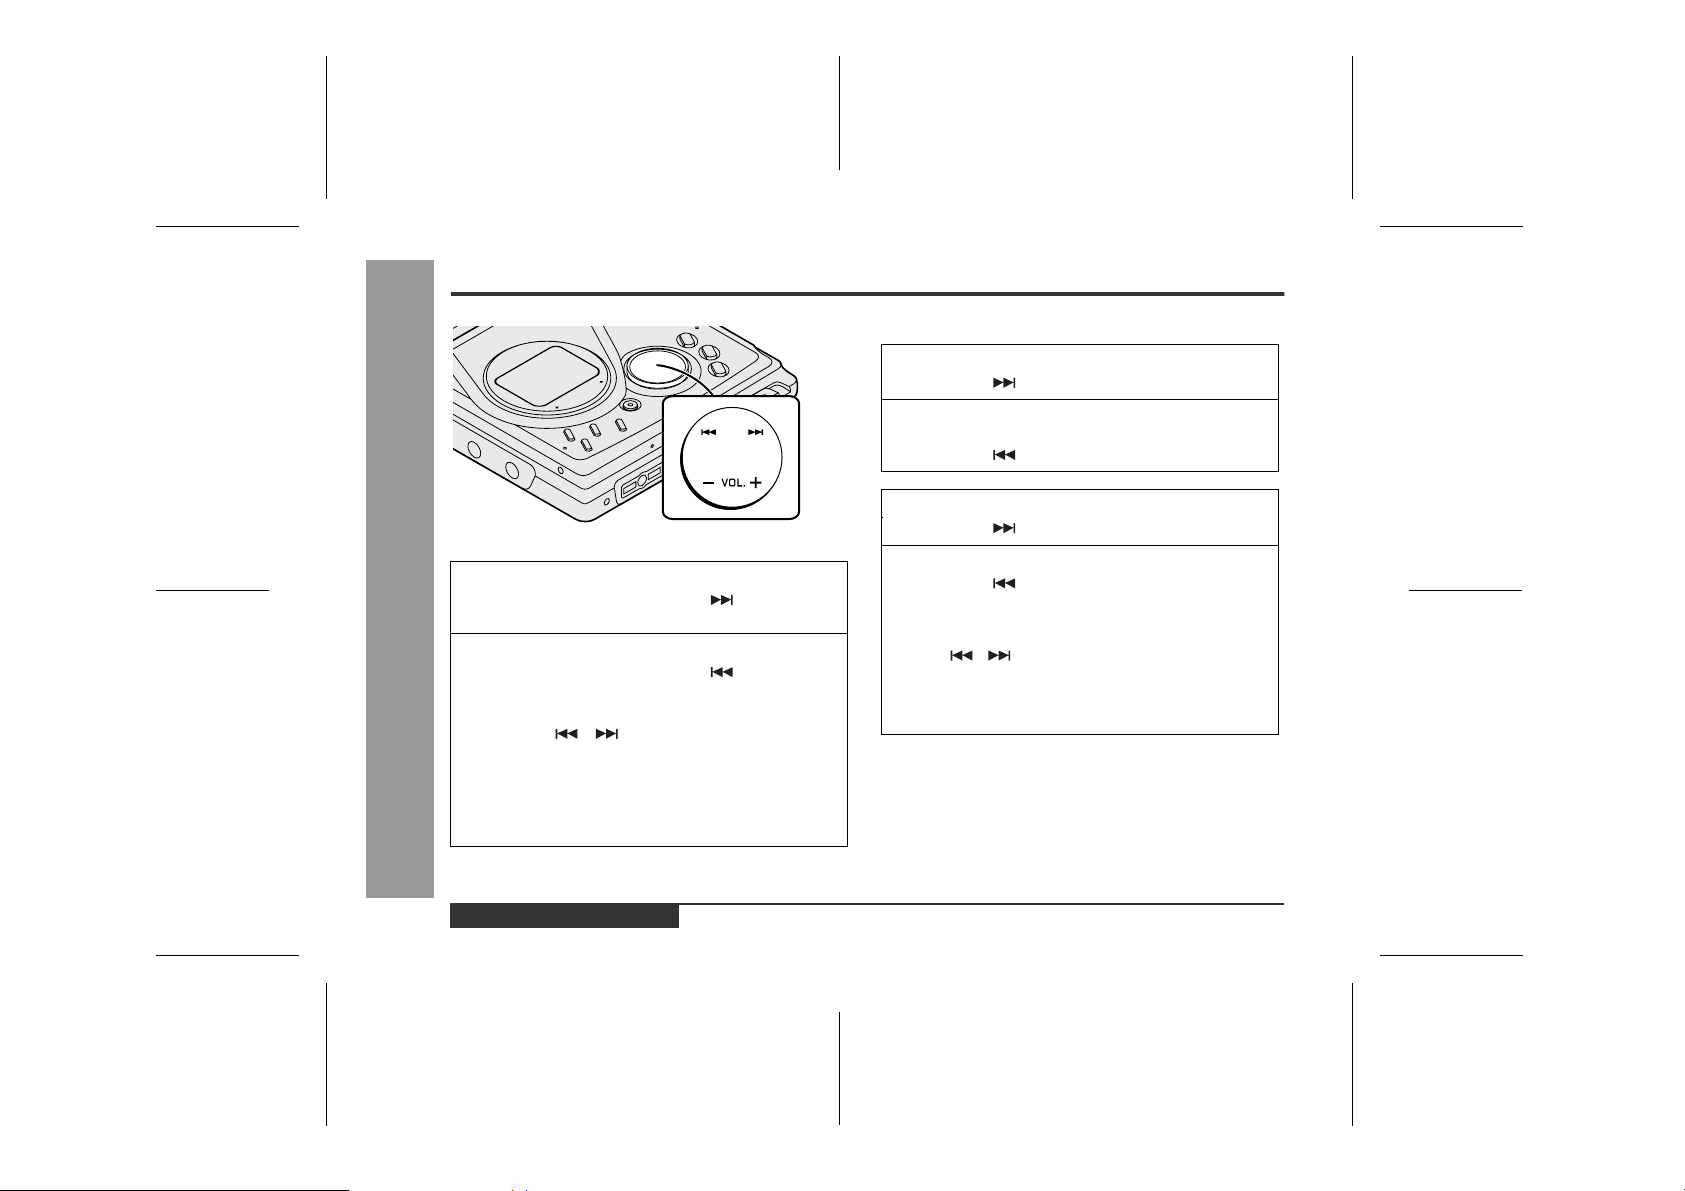
Reproducción avanzada
„
Para localizar la parte deseada
Para avance rápido audible:
Pulse y mantenga pulsado el botón durante la reproducción.
Para inversión rápida audible:
Pulse y mantenga pulsado el botón durante la reproducción.
-Reproducción avanzada-
Características útiles
z
La reproducción normal continuará cuando se suelte el botón o .
z
Cuando se llegue al final de la última pista durante
el avance rápido, el aparato entrará en el modo de
pausa. Cuando se llegue al principio de la primera
pista durante la inversión rápida, el aparato entrará
en el modo de reproducción.
„
Para localizar el principio de una pista
Para pasar al principio de la siguiente pista:
Pulse el botón durante la reproducción.
Para empezar de nuevo la pista que está reproduciendo:
Pulse el botón durante la reproducción.
Para buscar la pista siguiente:
Pulse el botón mientras el aparato esté parado.
Para buscar la pista anterior:
Pulse el botón mientras el aparato esté parado.
z
Para saltar cierto número de pistas a la vez, pulse el
botón o repetidamente hasta que se muestre
el número de la pista deseada.
z
Cuando pulse el botón PLAY/PAUSE, la reproducción se iniciará desde el principio de la pista.
S-15
ESPAÑOL
00/12/27 S_90EX_4.FM
Page 63

„
Para reproducir al doble de la velocidad
Pulse el botón ENTER/SYNC mientras se esté reproduciendo un MD grabado en el modo de reproducción larga
monfónica.
z
Si se llega a una pista grabada en el modo estéreo
durante la reproducción rápida, se cancelará el modo
de reproducción rápida.
z
Dependiendo del contenido grabado en un MD, puede
resultar difícil su audición.
Para interrumpir la reproducción rápida
Pulse el botón PLA Y /PAUSE durante la reproducción.
Cuando se pulse otra vez el botón PLAY/PAUSE, el aparato reanudará la reproducción rápida.
Para volver a la reproducción normal
Pulse el botón ENTER/SYNC.
„
Reproducción aleatoria o reproducción
repetida
Durante la reproducción, pulse repetidamente el botón
MODE/CHRG para seleccionar el modo de reproducción.
RANDOM Reproducción aleatoria
RANDOM Reproducción repetida de pistas en or-
1
Sin visualización
Notas:
z
Si se selecciona el modo de reproducción mientras el
aparato está parado, pulse el botón PLAY/PAUSE para
iniciar la reproducción.
z
Cuando se visualice "TOC", la reproducción aleatoria
o la repetición de la reproducción resultará imposible.
z
En la reproducción aleatoria, el aparato seleccionará
y reproducirá las pistas automáticamente. (No podrá
seleccionar el orden de las pistas.) Una vez reproducidas todas las pistas una vez en orden aleatorio, el
aparato se detendrá automáticamente.
z
Durante la reproducción aleatoria, la repetición de la
reproducción aleatoria, o la repetición de la reproducción de una sola pista, podrá avanzar o invertir el MD
sólo dentro de la pista que esté reproduciendo
z
Durante la reproducción aleatoria, el aparato no podrá
encontrar el principio de ninguna pista que ya haya
sido reproducida.
La repetición de la reproducción continuará hasta que
z
pare el aparato.
den aleatorio
Reproducción repetida de todas las pistas
Reproducción repetida de una sola pista
Reproducción normal
ESPAÑOL
-Reproducción avanzada-
Características útiles
S-16
00/12/27 S_90EX_4.FM
Page 64

Grabación avanzada
„
Grabación activada por sonido de reproducción
La grabación se inicia o pausa automáticamente
mediante la detección del sonido del sistema estéreo
(grabación sincronizada).
3
Pulse el botón o para ajustar el nivel de
grabación. (Vea la página 11.)
4
Pulse el botón PAUSE del sistema estéreo para
establecer el modo de pausa de reproducción.
Seleccione el punto de inicio de la grabación y pulse el botón PAUSE.
5
Pulse el botón ENTER/SYNC.
z
Se visualizará "SYNC".
z
Para cancelar la operación, pulse el botón /
:OFF.
6
Inicie la reproducción en el sistema estéreo. La
grabación se iniciará automáticamente.
-Grabación avanzada-
Características útiles
1
Pulse el botón REC.
2
Inicie la reproducción en el sistema estéreo conectado a este MD portátil.
S-17
ESPAÑOL
Para interrumpir la grabación
z
Cuando el sistema estéreo esté parado, el aparato se
establecerá en el modo de pausa de grabación sincronizada. Cuando se reanude la reproducción, se
reanudará también la grabación.
z
Si un silencio dura 3 o más segundos, la grabación se
pausará (la función de pausa no funciona durante
unos 10 segundos después de haberse iniciado la
grabación). Cuando el aparato vuelve a recibir sonido,
se inicia automáticamente la grabación.
Se crea un número nuevo de pista cuando se rean uda
z
la grabación.
00/12/27 S_90EX_4.FM
Page 65

„
Grabación de larga duración
Cuando grabe en el modo de reproducción larga
monofónica, el tiempo de grabación disponible se duplicará. Las grabaciones de reproducciones largas monofónicas pueden reproducirse al doble de la velocidad; vea
la página 16.
1
Pulse el botón MODE/CHRG mientras la grabación esté pausada.
Modo estéreo Modo de reproducción
2
Inicie la grabación.
Notas:
z
Cuando el aparato está parado después de haber
efectuado una grabación en este modo, el modo de
grabación retornará automáticamente al modo estéreo.
z
Si la entrada es de una fuente estéreo, se combinará
el sonido de los canales izquierdo y derecho.
z
Aunque el sonido monitor que se oye por los auriculares durante la grabación sea estéreo, la grabación se
realizará con sonido monofónico.
z
Es posible que los minidiscos grabados en el modo de
reproducción larga monofónica no puedan reproducirse en otros reproductores de minidiscos.
larga monofónica
ESPAÑOL
00/12/27 S_90EX_4.FM
-Grabación avanzada-
Características útiles
S-18
Page 66

Grabación avanzada (continuación)
„
Para iniciar la grabación desde el medio de
una pista
Podrá borrar una parte de una pista y realizar una nueva
grabación.
Todas las pis tas que sigan a la pista nuevamente grabada se borrarán.
-Grabación avanzada-
Características útiles
1
Durante la reproducción, pulse el botón PLAY/
PAUSE en el punto en el que desee iniciar la
grabación.
2
Pulse el botón REC.
Para cancelar la operación, pulse el botón /:OFF.
3
Pulse el botón ENTER/SYNC.
Todas las pistas y nombres de pistas, a partir del
punto donde se activó la pausa de reproducción, se
borrarán.
4
Pulse el botón PLAY/PAUSE.
Se iniciará la grabación.
Nota:
Para conservar una pista que está detrás del punto en el
que desea efectuar una nueva grabación, mueva la pista
y realice entonces la grabación detrás de este punto.
(Vea el apartado de "Edición de un minidisco grabado"
en la página 37.)
S-19
ESPAÑOL
00/12/27 S_90EX_4.FM
Page 67

„
Para crear sus propios números de pista
Podrá crear sus propios números de pista en cualquier
punto.
Mientras graba, pulse el botón REC en el punto en el
que desee crear los números de pista.
El número de pista se incrementará en uno.
z
Se añadirá un número de pista cada vez que se pulse
el botón REC.
z
El botón BASS del controlador remoto también podrá
utilizarse para añadir números de pista.
„
Grabación de pistas como una sola pista
Podrá grabar varias piezas musicales como si fuera una
sola pista inhabilitando la función del marcador automático.
Durante la grabación o cuando la grabación está pausada...
Pulse el botón EDIT.
Nota:
Cuando efectúe grabaciones digitales usando un reproductor de CD o un reproductor de MD, los números de
pista se crearán automáticamente sin tener en cuenta el
ajuste de la función del marcador automático.
„
Para impedir que los MD grabados sean
borrados por accidente
Deslice la lengüeta de protección contra borrado accidental, situada en un lado del minidisco, en el sentido
indicado por la flecha.
El MD quedará entonces protegido contra borrado accidental.
Para añadir una grabación a tal minidisco, deslice la lengüeta de protección contra borrado accidental hasta su
posición original.
„
Sugerencia útil para colocar una etiqueta
Cuando coloque una etiqueta en un cartucho de MD,
tenga en cuenta lo indicado a continuación. Si la etiqueta
no se pega bien, el MD podría atascarse en el interior del
aparato y no sería posible sacarlo.
z
Si la etiqueta se pela parcialmente,
reemplácela por otra nueva.
z
No ponga una etiqueta nueva encima
de otra vieja.
z
Coloque las etiquetas en los lugares
especificados solamente.
-Grabación avanzada-
Características útiles
ESPAÑOL
00/12/27 S_90EX_4.FM
S-20
Page 68

Grabación avanzada (continuación)
„
Acerca de los números de pista
Los números de pista se crean automáticamente duran-
1.
te la grabación mediante la conexión analógica cuando
se detecta un silencio de 1 o más segundos (función del
marcador automático). Puede grabarse una serie de
pistas como si fueran una sola inhabilitando la función
del marcador automático, vea la página 20.
2. Cuando grabe de un CD o minidisco empleando la
conexión digital, los números de pista se crearán en
los mismos puntos que los del CD o minidisco (función de marcador sincronizado).
-Grabación avanzada-
Características útiles
z
Es posible que los números de pista no se creen en
los lugares correctos, dependiendo de la fuente de la
que se graba, como en el caso de señales con ruido.
z
Los números de las pistas en el lado de reproducción
es posible que no coincidan con los números de las
pistas grabadas en el MD.
z
Cuando grabe, si realiza una reproducción programada mediante la fuente, o si realiza la reproducción
seleccionando manualmente las pistas, los números
de las pistas del MD es posible que no sean iguales
que los de la fuente.
z
Es posible que los números de pista no se creen
correctamente, dependiendo del sistema estéreo que
se haya conectado.
„
Acerca del convertidor de la velocidad de
muestreo
El grabador de MD incorpora un convertidor de velocidad
de muestreo, lo cual significa que puede grabar de radios
digitales o de grabadoras DAT.
„
Nota sobre la grabación digital
No podrá copiar un MD que haya grabado desde entradas digitales a otro MD ni a una DAT. El SCMS (sistema
de gestión de copias en serie) lo evita. Las grabaciones
de entradas analógicas no quedan afectadas.
S-21
ESPAÑOL
00/12/27 S_90EX_4.FM
Page 69

Grabación desde un micrófono
„
Para grabar desde un micrófono
1
Conecte un micrófono estéreo a la toma MIC IN.
2
Inserte un MD grabable (página 8).
3
Pulse el botón REC.
4
5
Para interrumpir una grabación
Pulse el botón PLAY/PAUSE mientras graba.
z
Para detener la grabación
Pulse el botón /:OFF.
Para escribir el contenido grabado en el MD
Pulse el botón /:OFF mientras esté en el modo de
parada.
Pulse el botón o para ajustar el nivel de
grabación.
Ajuste el nivel de grabación de modo que el nivel
máximo de volumen del sonido de la fuente haga
que la indicación oscile entre
Pulse el botón PLAY/PAUSE.
Se iniciará la grabación.
Para reanudar la grabación, pulse de nuevo el botón
PLAY/PAUSE. El número de pista se incrementará en
uno cada vez que se interrumpa una grabación.
---
4 dB y 0 dB.
Características útiles
-Grabación desde un micrófono-
ESPAÑOL
00/12/27 S_90EX_4.FM
S-22
Page 70

Grabación desde un micrófono (continuación)
„
Grabación activada por sonido (grabación
sincronizada con el micrófono)
1
Pulse el botón REC.
2
Pulse el botón o para ajustar el nivel de
grabación.
3
Pulse el botón ENTER/SYNC para seleccionar la
sensibilidad de grabación.
MIC SYNC H : La grabación se inicia cuando el
Características útiles
-Grabación desde un micrófono-
MIC SYNC L : La grabación se inicia cuando el
4
Cuando el micrófono capta un sonido, como el
de la voz de una persona, la grabación se inicia
automáticamente.
---
aparato detecta
(El aparato puede empezar a
grabar desde sonidos muy bajos.)
aparato detecta
24 dB o más.
---
12 dB o más.
Acerca de la función de pausa
El aparato se pausa automáticamente cuando el micrófono no capta ningún sonido durante 3 o más segundos.
(La función de pausa no funciona durante unos 10
segundos después de haberse iniciado la grabación.)
Cuando el micrófono vuelve a captar sonido, se inicia
automáticamente la grabación.
Notas:
z
z
- Cuando se enchufa un micrófono del tipo de clavija
- Si se emplea un tipo distinto de micrófono, es posible
z
z
z
z
Mientras hace una grabación con micrófono, no
conecte nada a la toma OPTICAL/LINE IN del grabador de MD.
Para emplear un micrófono, asegúrese de que sea un
micrófono con clavija de alimentación.
de alimentación, la grabador de MD suministrará la
alimentación para que funcione el micrófono.
que no funcione correctamente o puede causar mal
funcionamiento en el aparato.
Inserte firmemente la clavija. Si no, la grabación no se
hará adecuadamente.
Utilice un micrófono con una miniclavija estéreo de 3,5
mm de diámetro.
Si el aparato inicia con demasiada frecuencia la grabación con sonidos muy bajos que no son necesarios,
ajuste la entrada de micrófono a "MIC SYNC L".
La sensibilidad de grabación puede cambiarse
durante la grabación.
S-23
ESPAÑOL
00/12/27 S_90EX_4.FM
Page 71

„
Intervalos de las pistas
Cuando se graba con el micrófono, los números de pista
se crean automáticamente a intervalos regulares (ajuste
inicial: aproximadamente cada 5 minutos). Durante una
grabación sincronizada con el micrófono, el aparato se
pausa cuando un silencio dura 3 o más segundos, y crea
un número de pista.
Cambio de los intervalos entre pistas
1
Cuando la grabación está pausada o durante la
grabación, pulse repetidamente el botón EDIT.
El intervalo entre las marcas puede variar ligeramente en comparación con el tiempo de grabación
real.
2
Los números de pista se crearán automáticamente a intervalos regulares.
Ejemplo: Ajuste a "5 minutos".
Durante una grabación manual con micrófono
Las marcas automáticas temporizadas se crearán cada
5 minutos.
Durante una grabación sincronizada con
micrófono
Si un silencio dura 3 o más segundos, la marca automática temporizada se creará 5 minutos después de
haberse creado la marca previa.
Creación manual de los números de pista
Pulse el botón REC mientras graba.
Características útiles
-Grabación desde un micrófono-
ESPAÑOL
00/12/27 S_90EX_4.FM
S-24
Page 72

Comprobación de las visualizaciones
„
Para comprobar el tiempo transcurrido y el
tiempo remanente de la pista
Durante la reproducción, pulse el botón DISP.
Cada vez que se pulse el botón, la visualización cambiará de la forma siguiente.
Notas:
z
Si el nombre del disco o nombre de la pista no se
Características útiles
había grabado originalmente en el MD, se visualizará
"NO NAME" .
z
El tiempo de grabación remanente no se visualizará
-Comprobación de las visualizaciones-
con un MD de sólo reproducción.
z
El tiempo de reproducción transcurrido y el tiempo de
reproducción remanente pueden ser distintos del
tiempo real.
„
Para comprobar el tiempo de grabación
remanente y el tiempo de reproducción
total
Mientras está en el modo de parada, pulse el
botón DISP.
Cada vez que se pulse el botón, la visualización cambiará de la forma siguiente.
S-25
ESPAÑOL
00/12/27 S_90EX_4.FM
Page 73
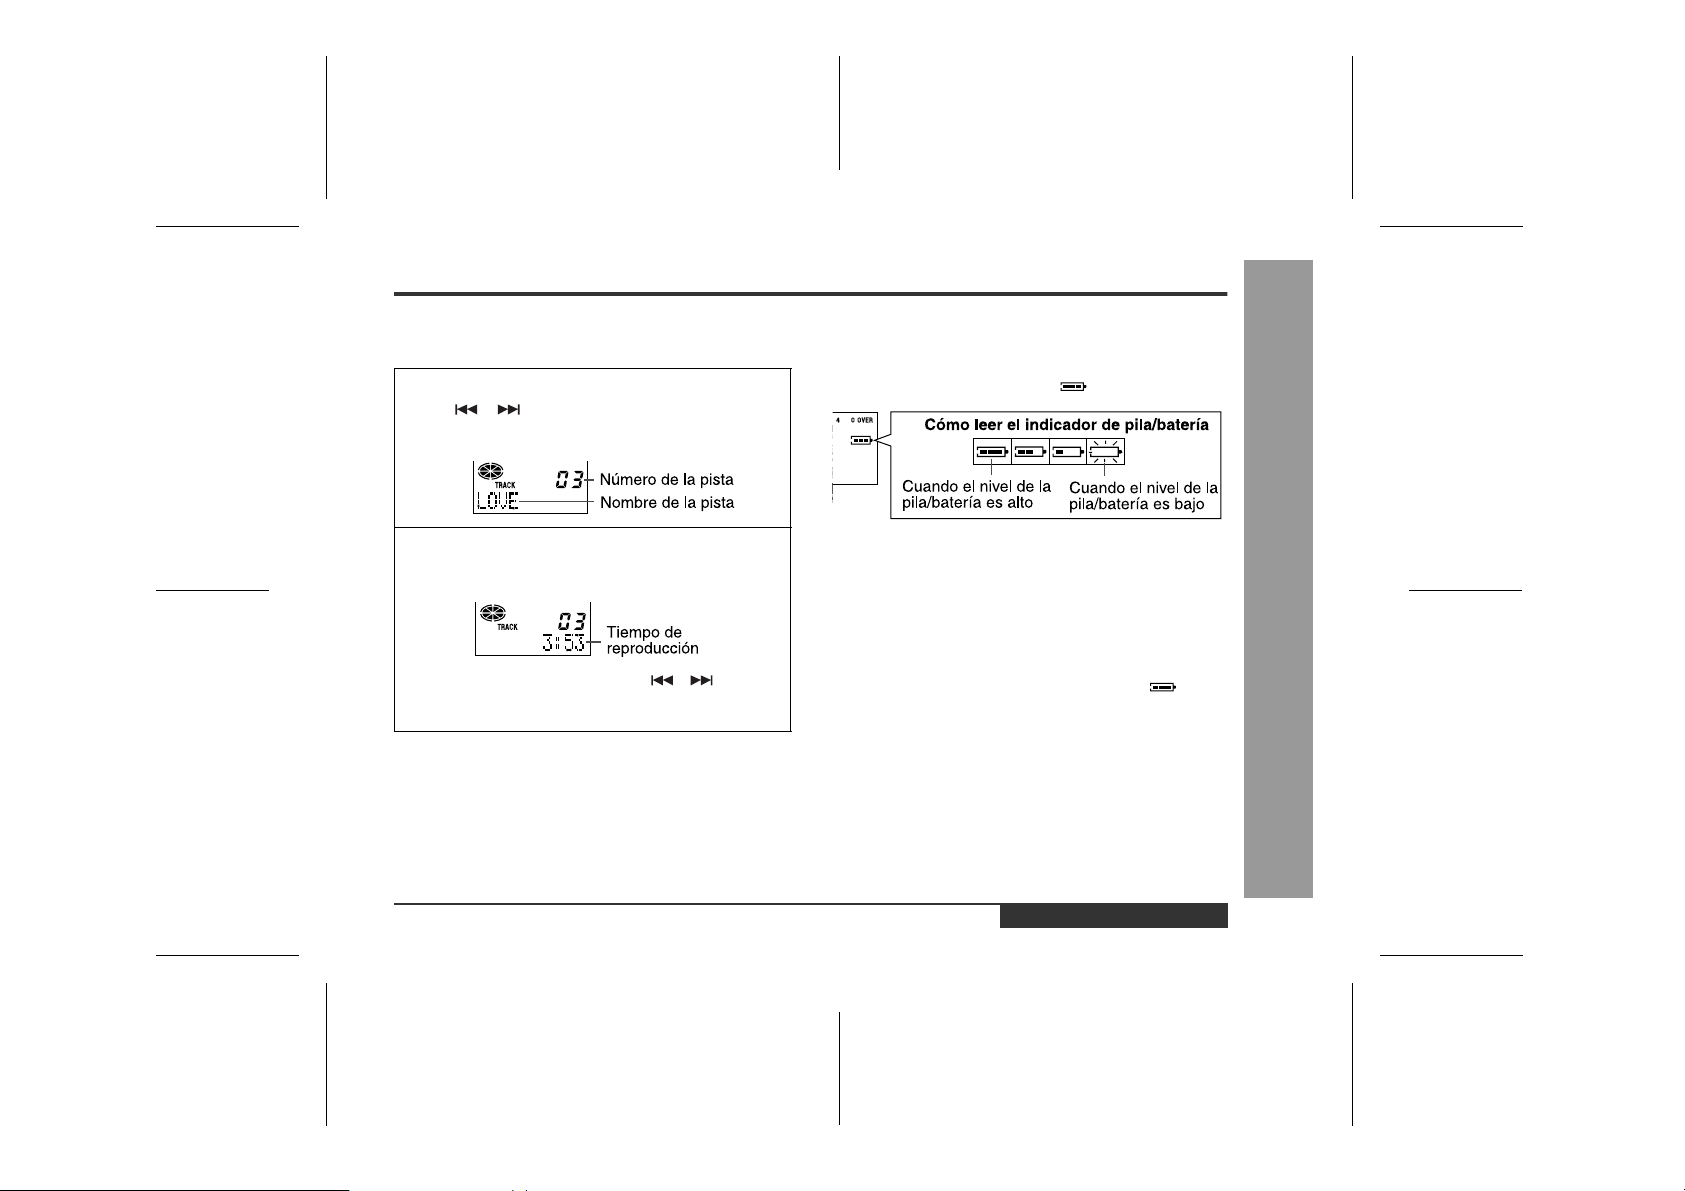
„
Para visualizar el tiempo de reproducción
de una pista individual
1
Mientras esté en el modo de parada, pulse el botón o para visualizar el número de pista
y el nombre de la pista.
2
Pulse el botón DISP para visualizar el tiempo de
reproducción de esta pista.
Cada vez que se pulse el botón o , se visualizará el tiempo de reproducción de la pista anterior
o de la siguiente.
„
Comprobación de la cantidad restante de
nivel de pila/batería
La cantidad restante de nivel de pila/batería se muestra
mediante el indicador de pila/batería ( ) durante la operación.
z
Cuando la pila/batería esté casi agotada por completo, el indicador de pila/batería parpadeará. Cargue
la batería o reemplace la pila alcalina por otra nueva.
z
Cuando la pila/batería esté completamente agotada,
"BATT EMP TY" aparecerá. Luego, la alimentación se
desconectará automáticamente.
Notas:
z
Si emplea una batería que ha dejado de cargar antes de
terminar la carga, es posible que aparezca " " . Esto
no significa que la batería esté completamente cargada.
z
El indicador de pila/batería no visualizará correctamente
la capacidad remanente durante unos 10 segundos después de haber conectado la alimentación.
z
Cuando se utilice el adaptador de CA o un adaptador
para automóvil de venta por separado, el indicador de
pila/batería no se mostrará.
z
El número de barras mostrado en el indicador de pila/
batería puede aumentar o disminuir, dependiendo de
la operación que esté siendo realizada. Esto es normal.
Características útiles
-Comprobación de las visualizaciones-
ESPAÑOL
00/12/27 S_90EX_4.FM
S-26
Page 74
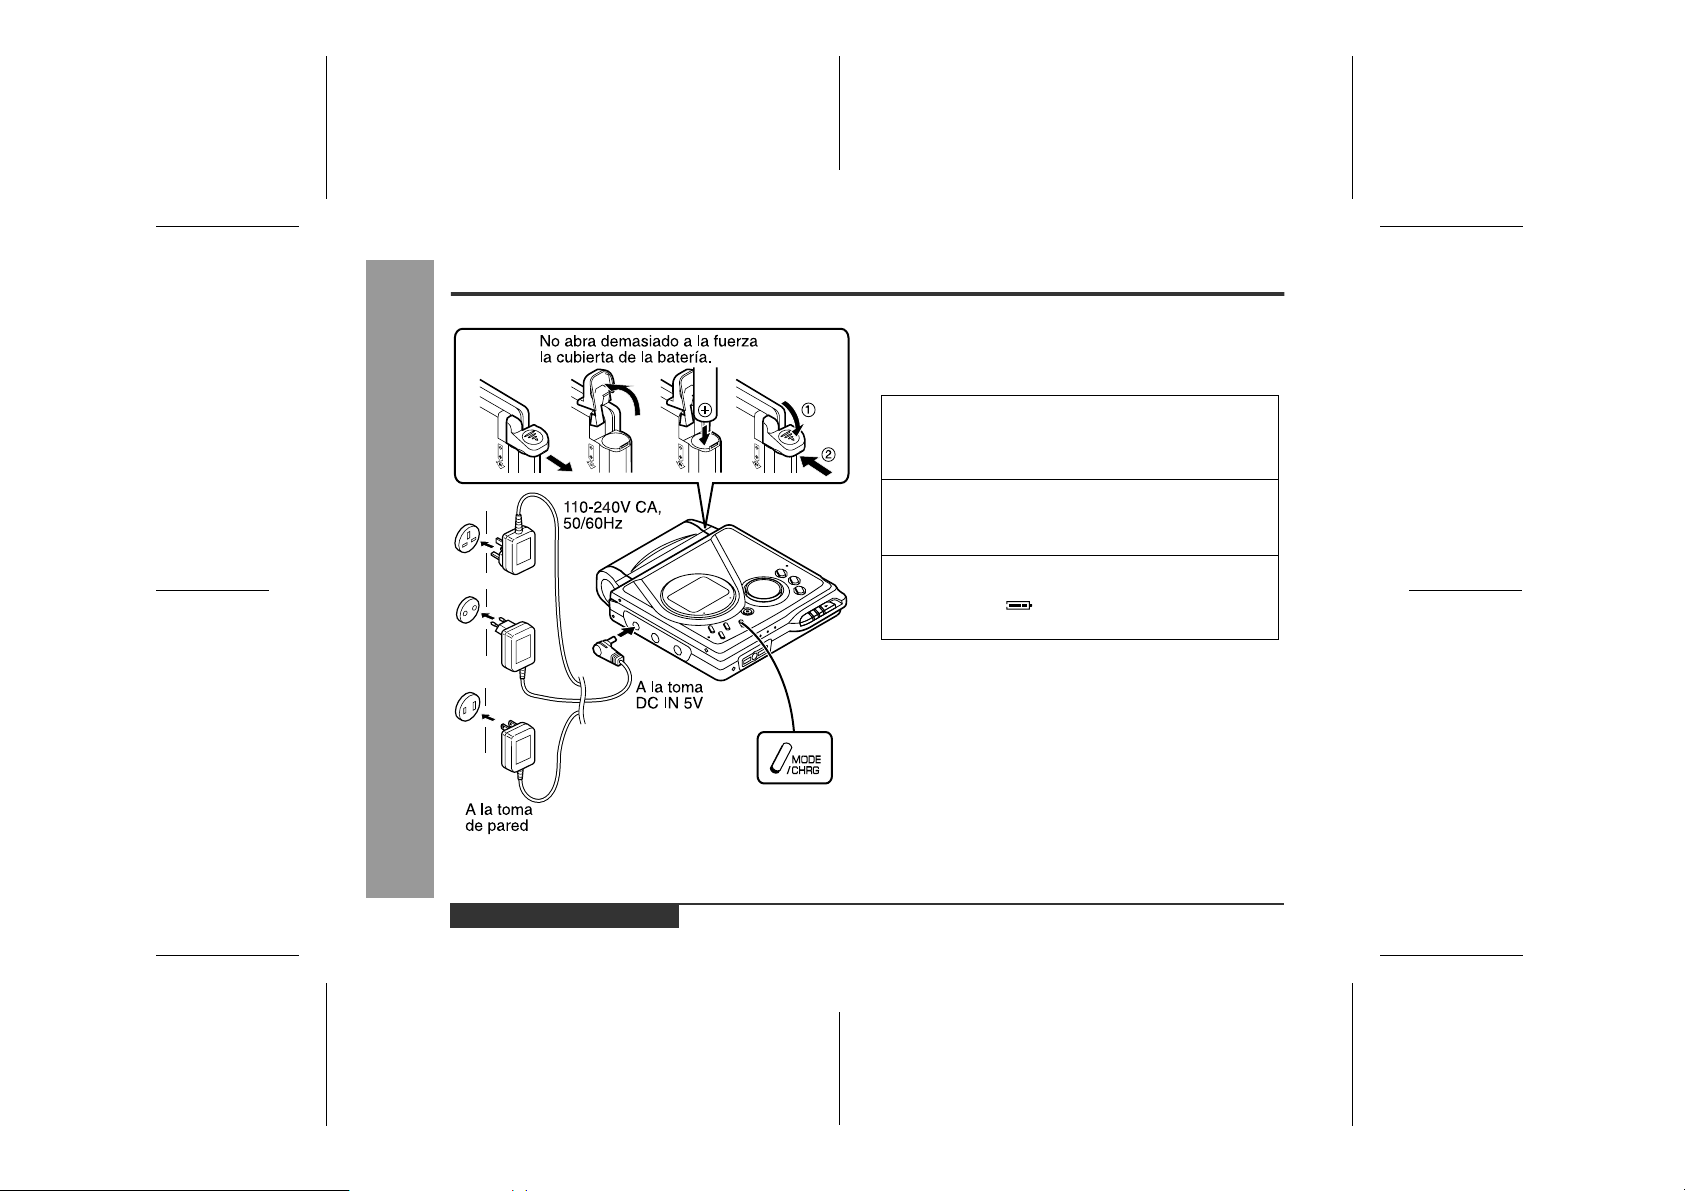
Alimentación con pilas
-Alimentación con pilas-
Características útiles
„
Carga de la batería
Cuando la batería recargable se utilice por primera vez o
cuando desee usarla después de mucho tiempo de no
haberla utilizado, asegúrese de cargarla por completo.
1
Inserte la batería recargable.
No podrá recargarse ninguna batería que no sea la
suministrada o la opcional (AD-N70BT).
2
Enchufe el adaptador de CA en la toma de corriente, e inserte entonces la clavija del otro ex-
tremo en la toma DC IN 5V.
3
Pulse el botón MODE/CHRG.
Parpadeará " " y comenzará la carga de la batería.
z
Después de haber cargado o usado la batería recargable, se calentará un poco. Esto es normal.
z
Cuando se conecte la alimentación del grabador de
MD o se haga funcionar, no se cargará la batería.
S-27
ESPAÑOL
00/12/27 S_90EX_4.FM
Page 75

„
Acerca del tiempo de carga
Después de haber transcurrido unas 3,5 horas,
se apagará " ". La carga de la batería está
aproximadamente 90% completada.
Para cargar por completo la batería, continúe la carga
durante aproximadamente 2 horas más. En este caso, no
será necesario pulsar el botón MODE/CHRG. Aunque se
pulse el botón MODE/CHRG, no aparecerá " ".
Notas:
z
Cargue la batería dentro del margen de 5°C - 35°C.
z
La carga se habrá completado cuando no parpadea
" " al enchufar el adaptador de CA y pulsar el botón
MODE/CHRG.
z
El aparato se puede quedar en el estado de carga
después de haberse completado.
Precaución:
z
Use sólo la batería especificada AD-N70BT. No cargue ninguna batería (níquel-cadmio, alcalina, etc.)
que no sea la especificada.
z
No quite la cubierta exterior de la batería recargable. Puede causar la generación de
calor, incendio, o explosión.
z
No sumerja la batería en el agua, no la tire
al fuego ni la desmonte.
z
Si el terminal de la batería recargable está sucio, es
posible que no empiece la carga. En tal caso, limpie el
polvo con un paño seco.
z
No desmonte la batería.
„
Empleo con la batería o pila alcalina
1
Desenchufe el adaptador de CA.
2
Inserte la batería o la pila alcalina desde el lado con la marca
(+).
Emplee una pila alcalina LR6 del
tamaño "AA" de venta en las tiendas del ramo.
Notas:
z
Si se ajusta el nivel de volumen a "0" mientras se
graba con la batería o con la pila alcalina, se reduce el
desgaste de las mismas.
z
Cuando no emplee el aparato durante muchas horas,
extraiga la batería. (La batería se gasta gradualmente
incluso cuando la alimentación está desconectada.)
z
Lleve la batería dentro del estuche suministrado.
z
Este aparato puede utilizarse con el adaptador de CA
cuando la batería o una pila alcalina están dentro del
aparato.
Precaución:
No emplee pilas de níquel-cadmio.
-Alimentación con pilas-
Características útiles
ESPAÑOL
00/12/27 S_90EX_4.FM
S-28
Page 76

Función de retención
Se podrá mantener la condición de operación actual
aunque se pulsen otros botones por accidente en un lugar como en un tren lleno.
Si se usan la pila o se conecta el adaptador de CA,
-Función de retención-
podrá ajustar esta función aunque la alimentación esté
desconectada.
Características útiles
Para cancelar el modo de retención
Pulse y mantenga pulsado el botón HOLD durante 2 o
más segundos mientras el aparato está en el modo de
retención.
Se mostrará "HOLD OFF".
Para cancelar el modo de retención
Aleje el interruptor HOLD de la posición de seguridad
(en el sentido opuesto al de la flecha).
Si se activa la función de retención mientras la alimentación está desconectada, la alimentación no podrá conectarse por equivocación y la pila/batería no se agotará por accidente.
S-29
ESPAÑOL
00/12/27 S_90EX_4.FM
Page 77
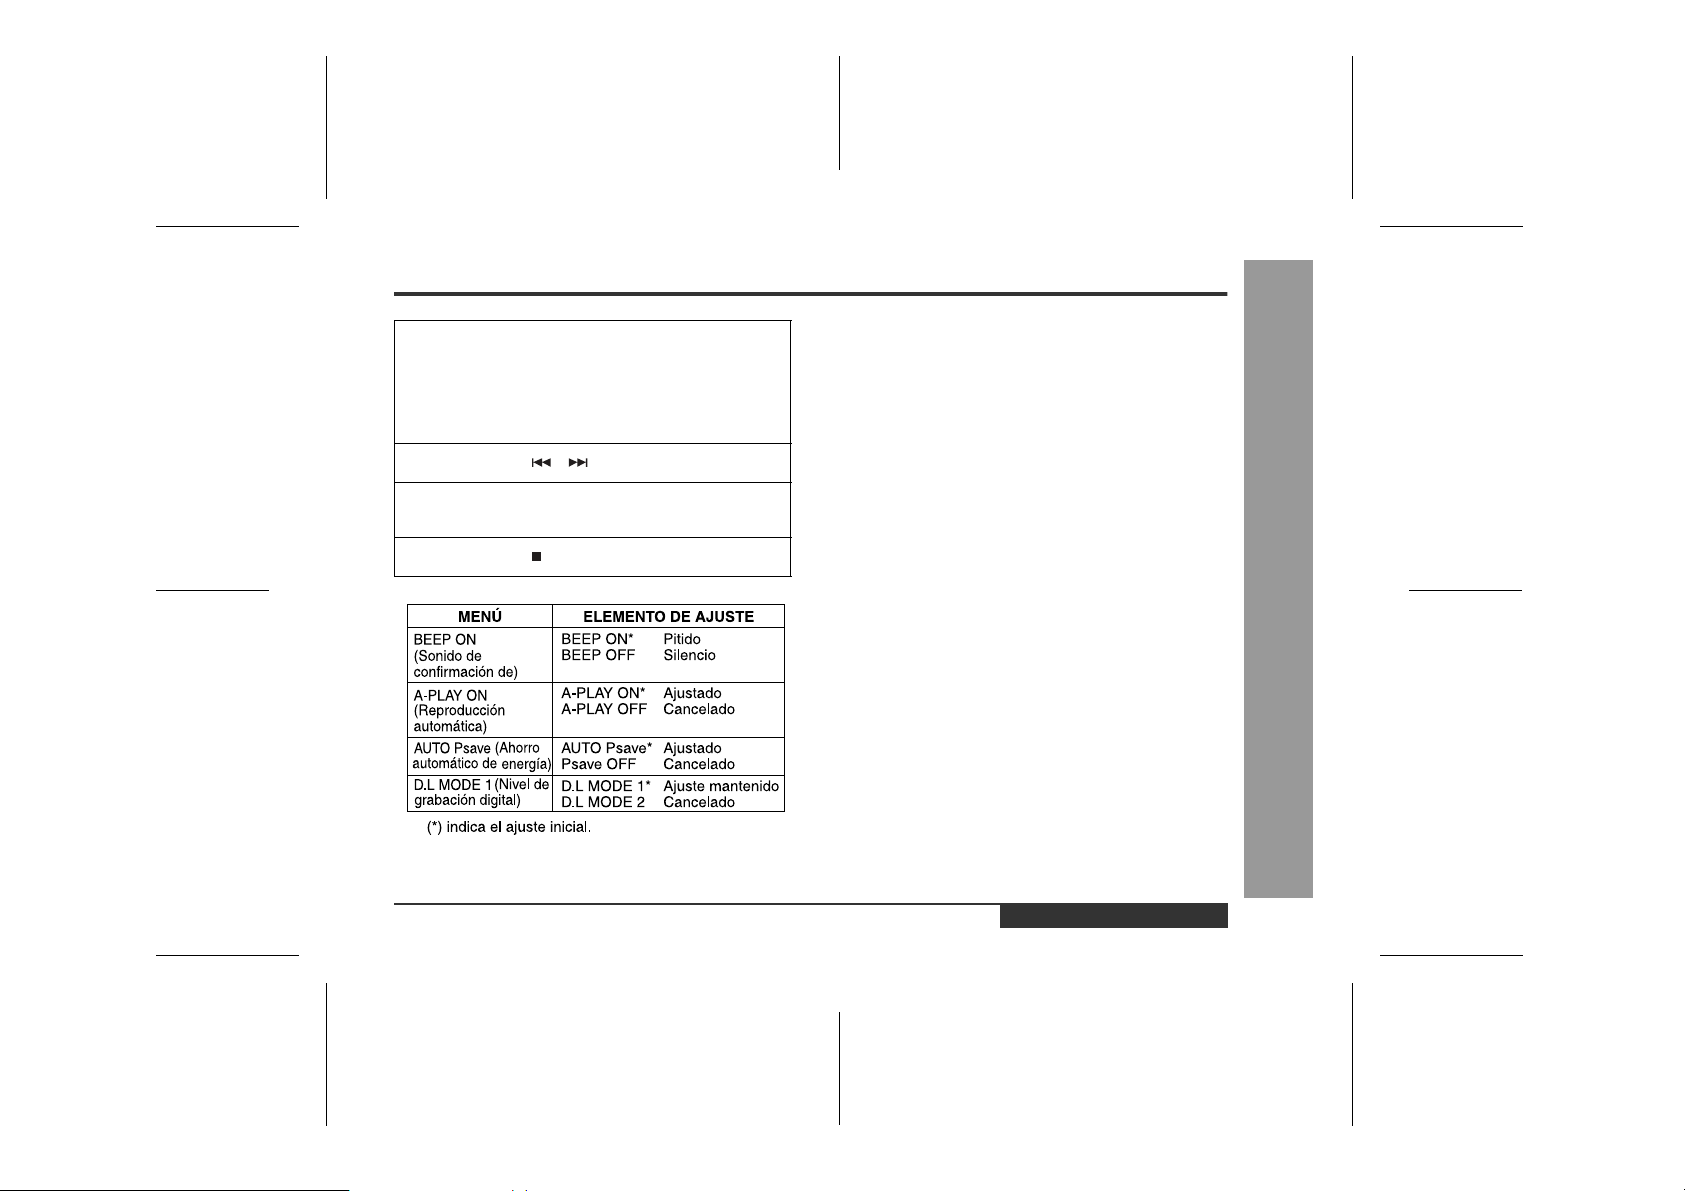
Cambio de los ajustes iniciales
Mientras esté en el modo de parada...
1
Con un MD insertado, pulse el botón MODE/CHRG
durante 2 o más segundos. Aparecerá "SET UP".
Cuando suelte el botón, aparecerá "BEEP ON" o
"BEEP OFF".
2
Pulse el botón o para visualizar el menú.
3
Pulse el botón MODE/CHRG para cambiar los elementos.
4
Pulse el botón /:OFF.
„
Podrá eliminar el sonido de confirmación que suena
cuando se pulsa un botón.
„
Podrá hacer que el aparato no reproduzca automáticamente cuando usted inserte un MD de sólo reproducción
o un MD protegido contra borrado accidental.
„
Cuando se emplee el aparato en un lugar expuesto a
muchas vibraciones, el salto del sonido podrá reducirse
cancelando la función de ahorro de energía automática.
(La batería se gastará con mayor rapidez.)
¿Qué es la función de ahorro de energía automática?
La función de ahorro de energía automática ajusta automáticamente el almacenamiento de la memoria de saltos
de sonido para que sea de 5 a 10 segundos dependiendo de las condiciones de reproducción, para ahorrar
energía de la batería. Si se emplea la unidad de minidiscos en zonas de muchas vibraciones, es posible que sea
necesario fijar la memoria de saltos de sonido a 10
segundos "Psave OFF". De este modo se mejorará el
funcionamiento en situaciones difíciles, pero se gastará
más la batería. (Cuando se emplee el adaptador de CA/
automóvil, siempre se emplea el modo de 10 segundos.)
„
"D.L MODE 1"
Se retendrá el nivel de grabación digital que haya ajustado incluso después de cancelar la grabación.
"D.L MODE 2"
Cada vez que cancele la grabación, el nivel volverá a
[D.L 0dB].
Sonido de pitido
Reproducción automática
Ahorro automático de energía
Nivel de grabación digital
-Cambio de los ajustes iniciales-
Características avanzadas
ESPAÑOL
00/12/27 S_90EX_5.FM
S-30
Page 78
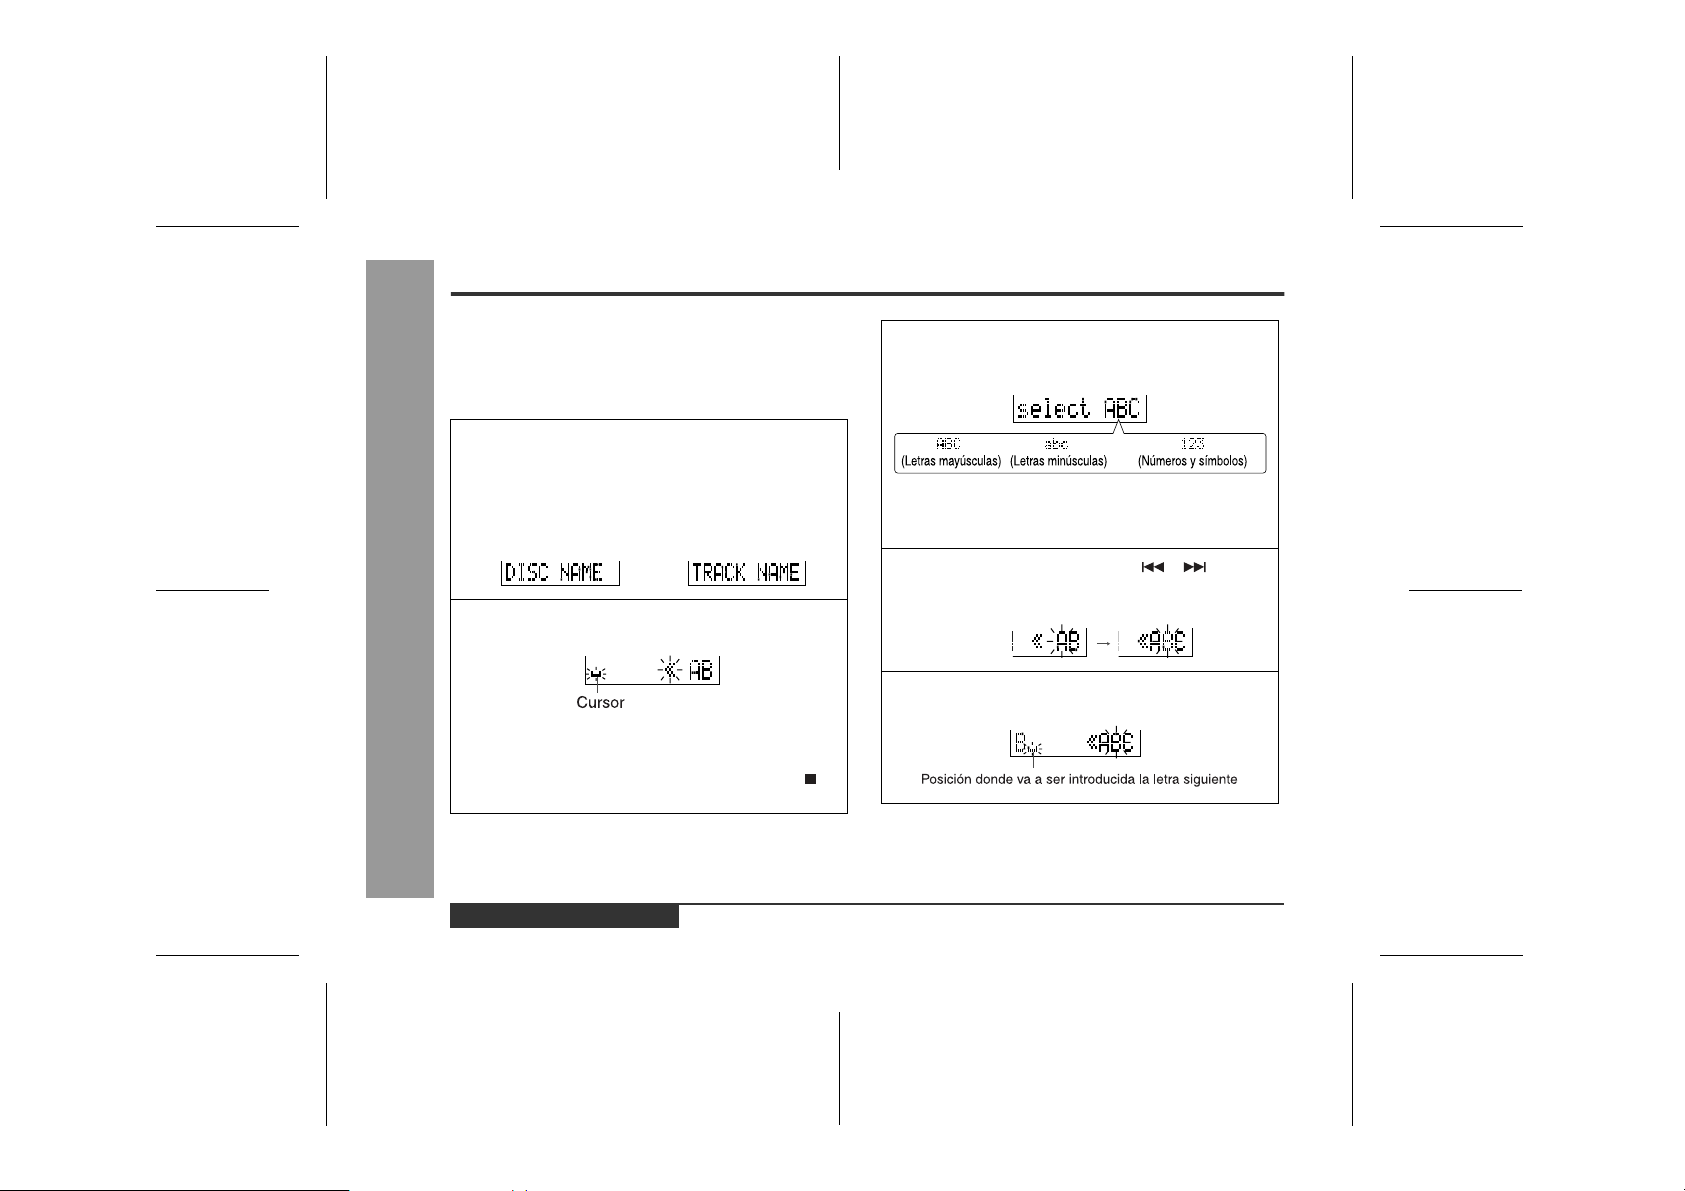
Título de un minidisco
„
Creación de los nombres del disco y de las
pistas
Cargue un minidisco para ponerle un nombre. Un MD de
sólo reproducción o un MD protegido contra grabación
no se puede editar.
<Nombre del disco> <Nombre de pista>
1
Mientras esté en el
modo de parada, pulse
el botón EDIT para seleccionar "DISC NAME".
2
Pulse el botón ENTER/SYNC.
Mientras esté en el
modo de pausa, pulse
el botón EDIT para seleccionar "TRACK NAME".
3
Pulse repetidamente el botón DISP para seleccionar el tipo de caracteres.
Los 3 primeros caracteres del grupo de caracteres
seleccionados se visualizarán durante 1 segundo
aproximadamente.
4
Pulse repetidamente el botón o para seleccionar la letra.
-Título de un minidisco-
Características avanzadas
S-31
z
El aparato se establecerá en el modo de entrada
de caracteres.
z
Para cancelar la operación, pulse el botón /
:OFF.
ESPAÑOL
5
Pulse el botón ENTER/SYNC para introducirlo.
00/12/27 S_90EX_5.FM
Page 79
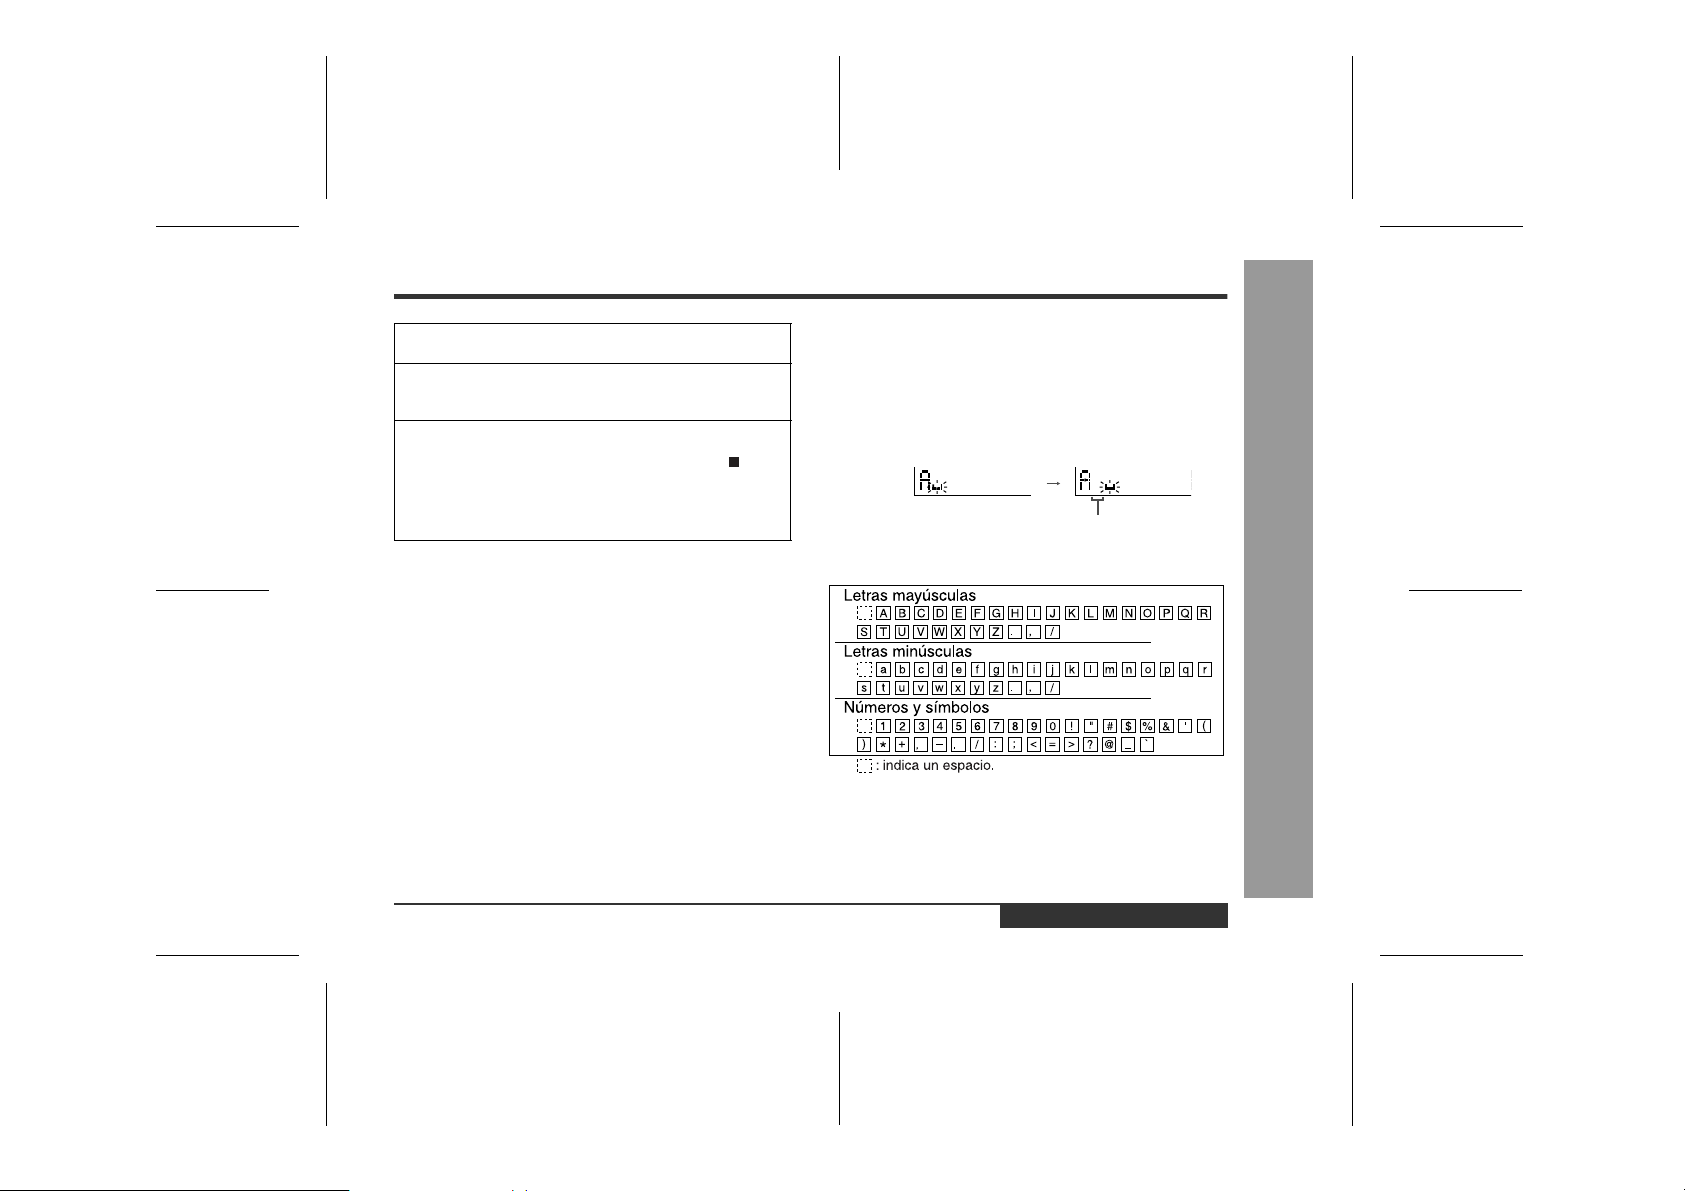
6
Para introducir más letras, repita los pasos 3 - 5.
7
Cuando se haya introducido completamente el
nombre, pulse el botón EDIT.
8
"TOC" se visualizará y para escribir el contenido actualizado en el MD, pulse el botón /:OFF.
No podrá extraer el MD mientras se visualiza
"TOC". "TOC" no desaparecerá hasta que se haya
actualizado el contenido grabado.
Nota:
Pueden crearse un nombre de disco y hasta 255 nombres de pista por cada disco (pueden introducirse un
máximo de 100 caracteres para el nombre de disco y de
cada pista y un total de 1.700 caracteres).
„
Para borrar un carácter
Pulse el botón VOL+ o VOL
carácter que desee borrar, y después pulse el botón
BASS.
„
Para introducir un espacio
Pulse el botón VOL+ para mover el cursor a la derecha.
„
Caracteres (símbolos)
---
para mover el cursor al
Espacio
-Título de un minidisco-
Características avanzadas
ESPAÑOL
00/12/27 S_90EX_5.FM
S-32
Page 80
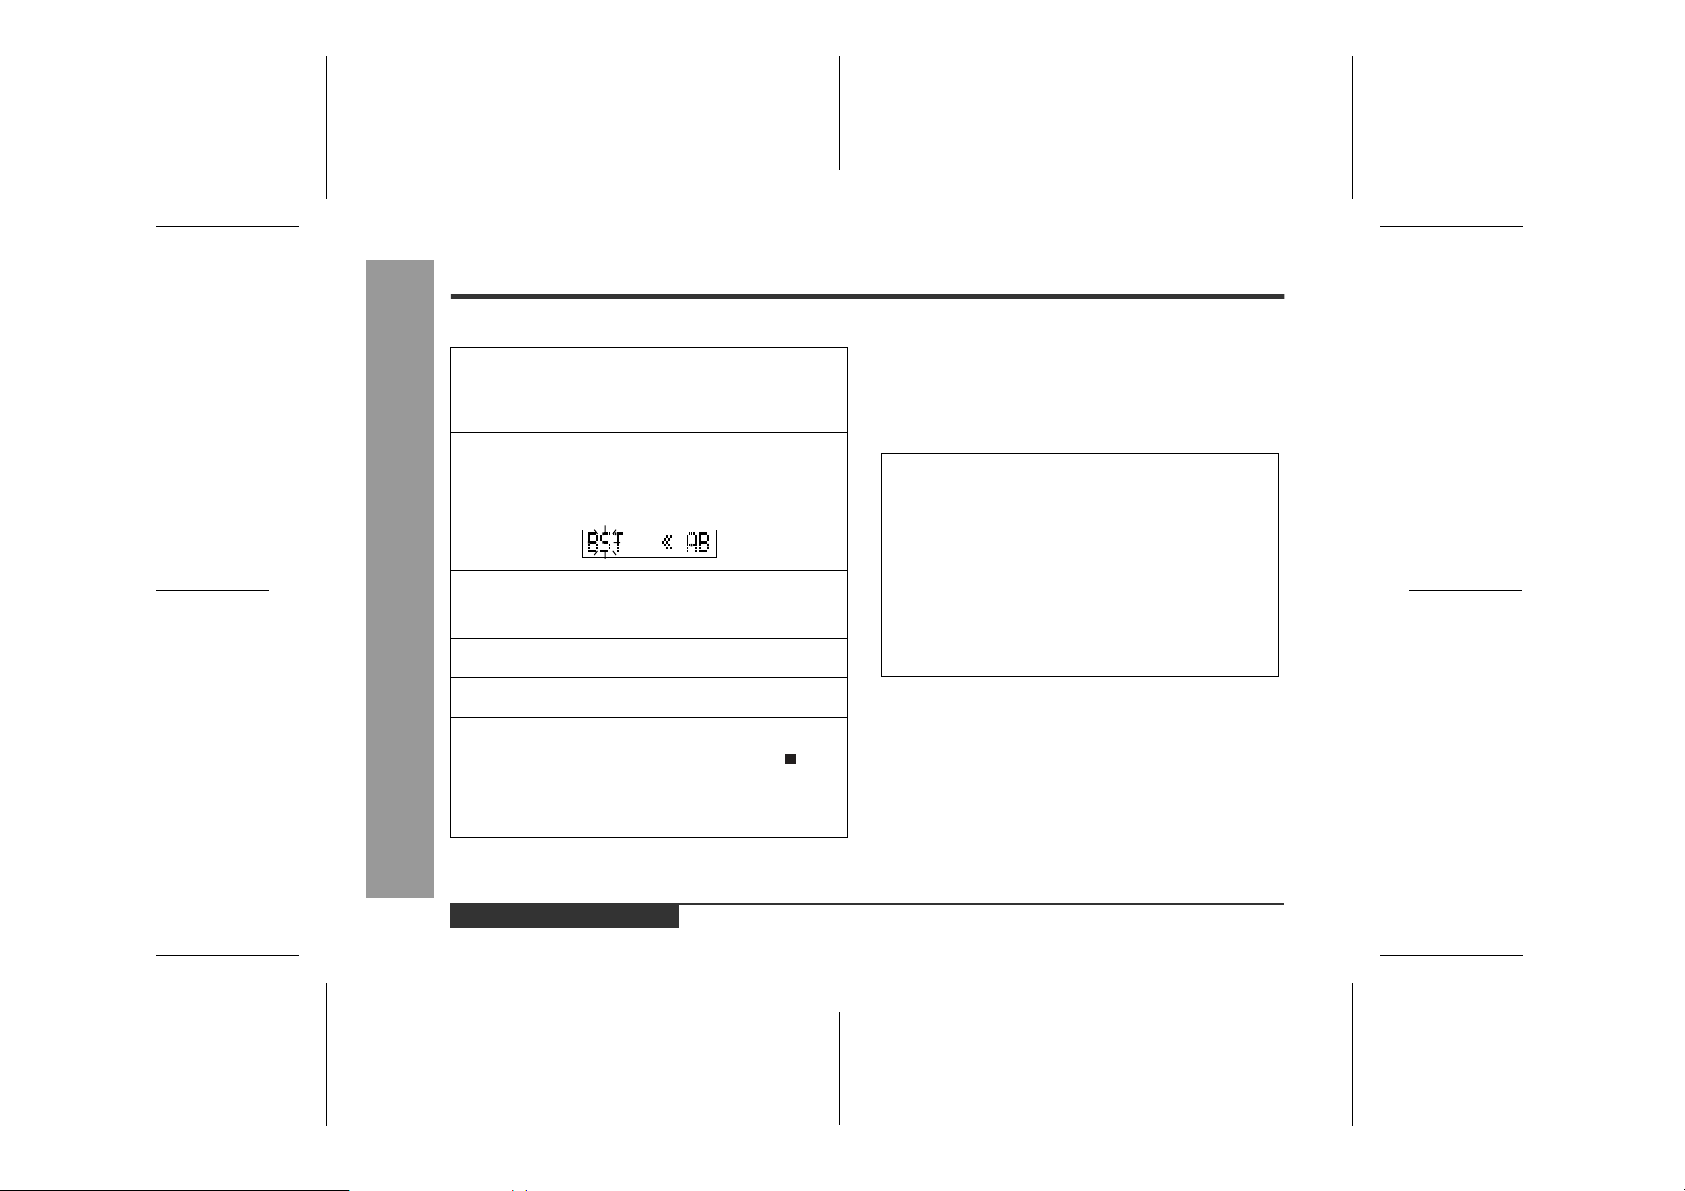
Título de un minidisco (continuación)
„
Para añadir caracteres
1
2
3
4
-Título de un minidisco-
5
Características avanzadas
6
Ponga el aparato en el modo de introducci ón de
caracteres.
(Efectúe los pasos 1 - 2 de la página 31.)
Pulse el botón VOL+ o VOL
sor al carácter, donde desea añadir un nuevo
carácter.
Seleccione el carácter a añadirse.
(Efectúe los pasos 3 - 4 de la página 31.)
Pulse el botón ENTER/SYNC.
Pulse el botón EDIT.
"TOC" se visualizará y para escribir el contenido actualizado en el MD, pulse el botón /:OFF.
No podrá extraer el MD mientras se visualiza
"TOC". "TOC" no desaparecerá hasta que se haya
actualizado el contenido grabado.
---
para mover el cur-
„
Estampar los títulos de otros minidiscos
Antes del estampado
Cuando hay 2 minidiscos en los que hay grabadas las
mismas pistas, podrá transferir la información de caracteres (nombres de disco y de pista) del MD maestro al
otro MD (para el estampado).
1. ¿Qué es un MD maestro?
Un MD grabable que contiene información de pistas y
caracteres. (No se puede transferir la información de
un MD de sólo reproducción.)
2. ¿Qué es un MD para estampado?
Un MD que contiene las mismas pistas en el mismo orden que el MD maestro. (Asegúrese de que el número
total de pistas del MD maestro sea el mismo que el del
MD para estampado.)
S-33
ESPAÑOL
00/12/27 S_90EX_5.FM
Page 81

Operación con el MD maestro
1
Inserte el MD maestro.
No confunda el MD maestro por el de destino.
2
Mientras esté en el modo de parada, pulse el botón
EDIT para selec c ion a r "N AME STAMP".
3
Pulse el botón ENTER/ SYNC.
Para cancelar la operación, pulse el botón /:OFF.
4
Pulse el botón ENTER/ SYNC.
5
Cuando el aparato muestra "CHANGE MD", extraiga el MD maestro.
Extráigalo sin desconectar la alimentación. De lo contrario, se cancelará la operación.
Operacion con el MD para estampado
6
Inserte un MD para estampado.
7
Pulse el botón ENTER/SYNC.
El aparato terminará la gr abación de l a informa ción de
caracteres y se establecerá en el modo de parada.
Nota:
Si el número total de pistas del MD maestro no corresponde con el del MD para estampado, el aparato visualizará "Can'tSTAMP" y desconec tará la alimentación.
Si así sucede, ajuste el número total de pistas del MD
que se ha grabado empleando la operación de edición.
-Título de un minidisco-
Características avanzadas
ESPAÑOL
00/12/27 S_90EX_5.FM
S-34
Page 82
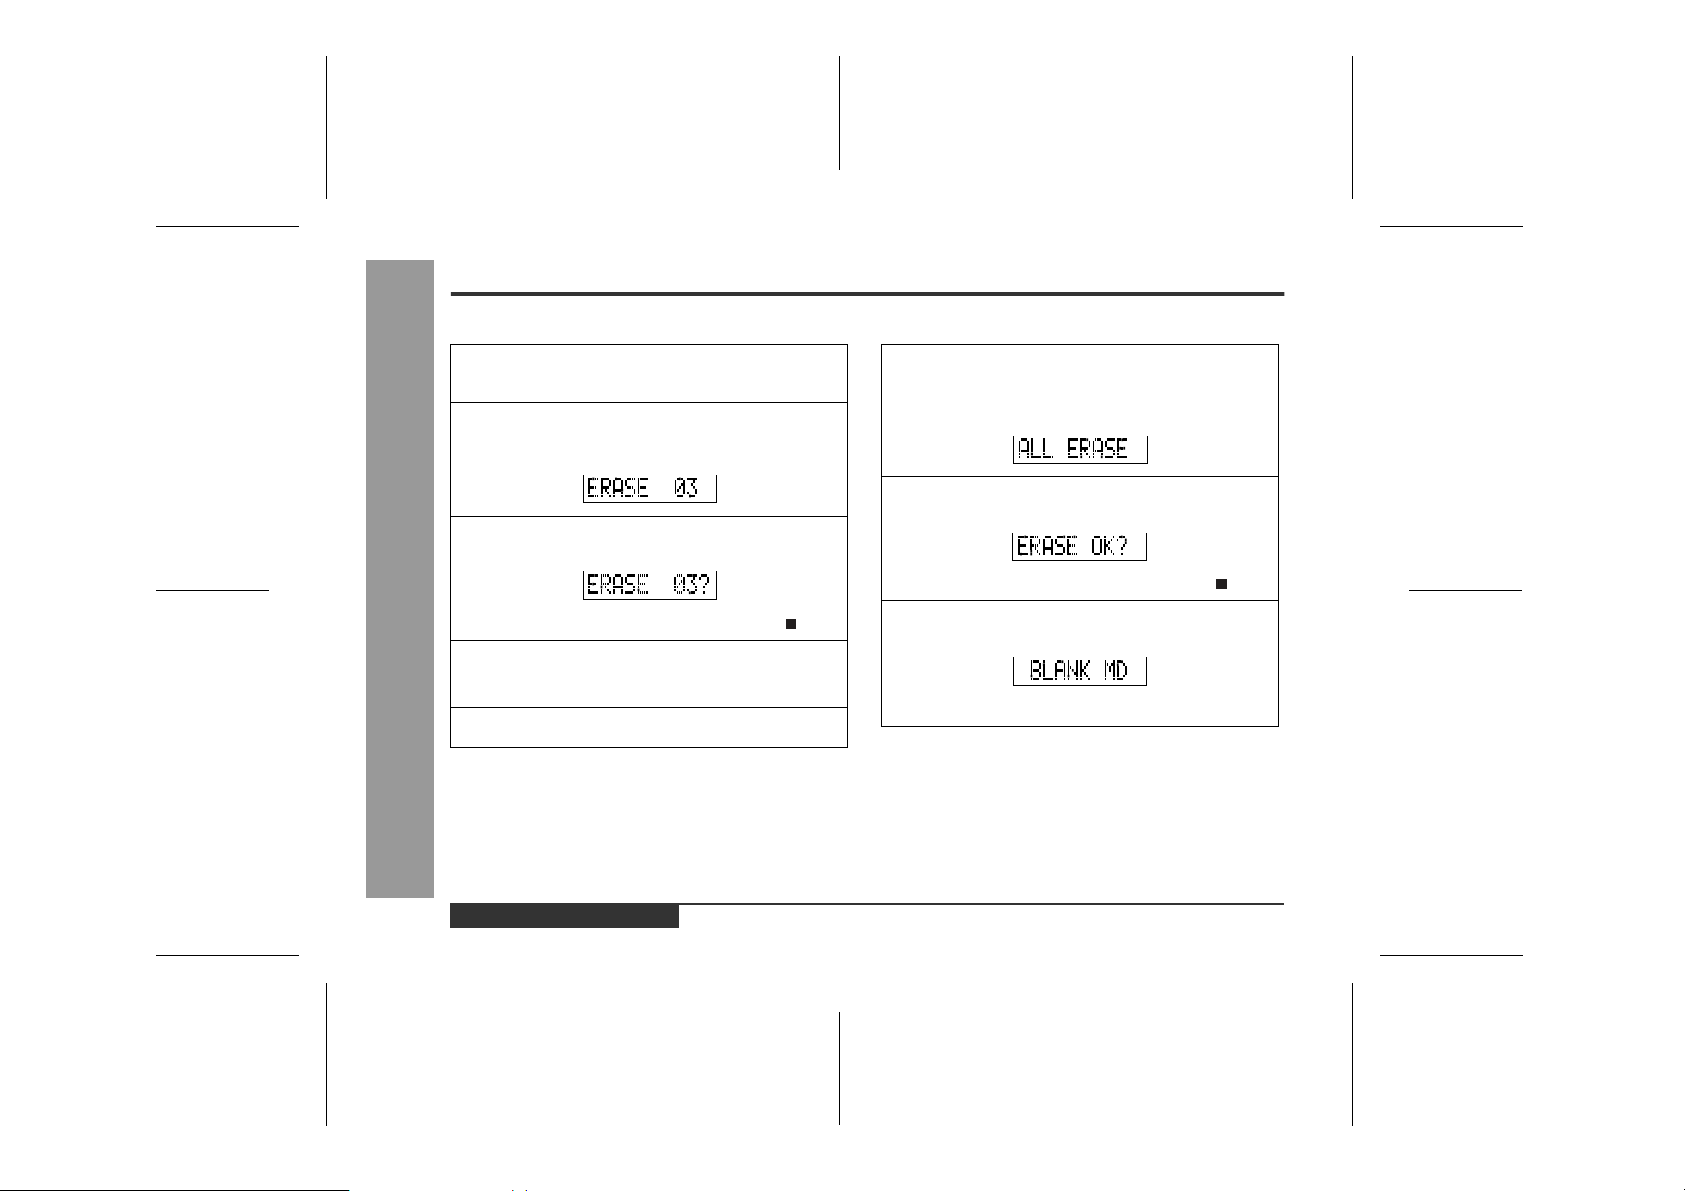
Edición de un minidisco grabado
„
Para borrar pistas una por una
1
2
3
4
5
-Edición de un minidisco grabado-
Características avanzadas
Empiece a reproducir la pista que desee borrar
y pulse el botón PLAY/PAUSE.
Pulse repetidamente el botón EDIT para seleccionar "ERASE".
Pulse el botón ENTER/SYNC.
Para cancelar la operación, pulse el botón /:OFF.
Pulse de nuevo el botón ENTER/SYNC.
La pista se borrará.
Para borrar otras pistas, repita los pasos 1 - 4.
„
Para borrar todas las pistas a la vez
1
Estando en el modo de parada, pulse repetidamente el botón EDIT para seleccionar "ALL
ERASE".
2
Pulse el botón ENTER/SYNC.
Para cancelar la operación, pulse el botón /:OFF.
3
Pulse de nuevo el botón ENTER/SYNC.
Todas las pistas se borrarán.
Precaución:
Una vez se ha borrado una pista, no podrá recuperarse. Compruebe el número de pista antes de
borrarla.
S-35
ESPAÑOL
00/12/27 S_90EX_5.FM
Page 83

„
Para dividir una pista
1
Empiece a reproducir la pista que desee dividir
en dos. Pulse el botón PLAY/PAUSE en el punto
donde desee dividir la pista.
2
Pulse repetidamente el botón EDIT para seleccionar "DIVIDE".
3
Pulse el botón ENTER/SYNC.
Para cancelar la operación, pulse el botón /:OFF.
4
Pulse de nuevo el botón ENTER/SYNC.
La pista se dividirá en dos pistas, y el aparato hará
una pausa al principio de la segunda de las dos pistas nuevas.
„
Para combinar pistas
1
Empiece a reproducir la última de las dos pistas
que desee combinar, y pulse el botón PLAY/
PAUSE.
2
Pulse repetidamente el botón EDIT para seleccionar "COMBINE".
3
Pulse el botón ENTER/SYNC.
Para cancelar la operación, pulse el botón /:OFF.
4
Pulse el botón ENTER/SYNC.
Las dos pistas se combinarán, y el aparato hará
una pausa al principio de la pista combinada.
-Edición de un minidisco grabado-
Características avanzadas
ESPAÑOL
00/12/27 S_90EX_5.FM
S-36
Page 84

Edición de un minidisco grabado (continuación)
„
Para desplazar una pista Cuando una pista tiene nombre antes de la
1
2
3
4
-Edición de un minidisco grabado-
Características avanzadas
5
Reproduzca la pista que va a desplazar, y pulse
el botón PLAY/PAUSE.
Pulse repetidamente el botón EDIT para seleccionar "MOVE".
Pulse el botón ENTER/SYNC.
Para cancelar la operación, pulse el botón /:OFF.
Pulse el botón o para seleccionar la dirección.
Pulse de nuevo el botón ENTER/SYNC.
La pista se desplazará, y el aparato hará una pausa
al principio de la pista.
división:
Las dos nuevas pistas tendrán el mismo nombre. Sin
embargo, en la condición TOC FULL, la segunda pista
puede que no tenga nombre.
Número total de pistas que pueden dividirse:
Cada disco tiene cabida hasta para 255 pistas. Sin
embargo, aunque el número de pistas asignadas no
haya llegado a la 254, puede no resultar posible hacer
más divisiones de las pistas.
Para combinar dos pistas que no son continuas:
Primero, ponga las dos pistas una junto a la otra en el
orden que desee empleando la función MOVE. Entonces, combínelas empleando la función COMBINE.
Cuando una o ambas pistas que v an a ser combinadas tengan un nombre:
Se utilizará el nombre de la primera pista. Sin embargo,
cuando la primera pista no tiene nombre, se utilizará el
nombre de la segunda pista.
En los casos siguientes, es posible que no se
combinen pistas.
z
Pista grabada digitalmente y pista grabada analógicamente.
z
Pista grabada en reproducción larga y pista grabada
en estéreo.
z
Pistas cuyo tiempo de grabación es de menos que 12
segundos.
S-37
ESPAÑOL
00/12/27 S_90EX_5.FM
Page 85

Audición a través de otro sistema
„
Audición a través de un sistema estéreo
Notas:
z
Se recomienda que se ajuste el nivel de volumen del
reproductor de MD a máxima al escuc har a través de
un sistema estéreo.
z
Cuando grabe con un sistema estéreo, elimine el
sonido de confirmación (página 30). De lo contrario,
también se grabará.
z
La grabación se realizará en el modo analógico.
z
La información de caracteres no se grabará.
„
Audición a través de un equipo estéreo de
automóvil
Notas:
z
Ajuste el volumen del grabador de MD y del estéreo
de automóvil.
z
No opere el grabador de MD mientras conduzca un
vehículo. Podría distraerle y ser causa de un accidente de tráfico.
z
No emplee ningún adaptador de automóvil que no sea
el AD-CA20X de venta por separado.
z
Extraiga la batería cuando alimente el aparato con la
batería del automóvil.
ESPAÑOL
-Audición a través de otro sistema-
Características avanzadas
S-38
00/12/27 S_90EX_5.FM
Page 86
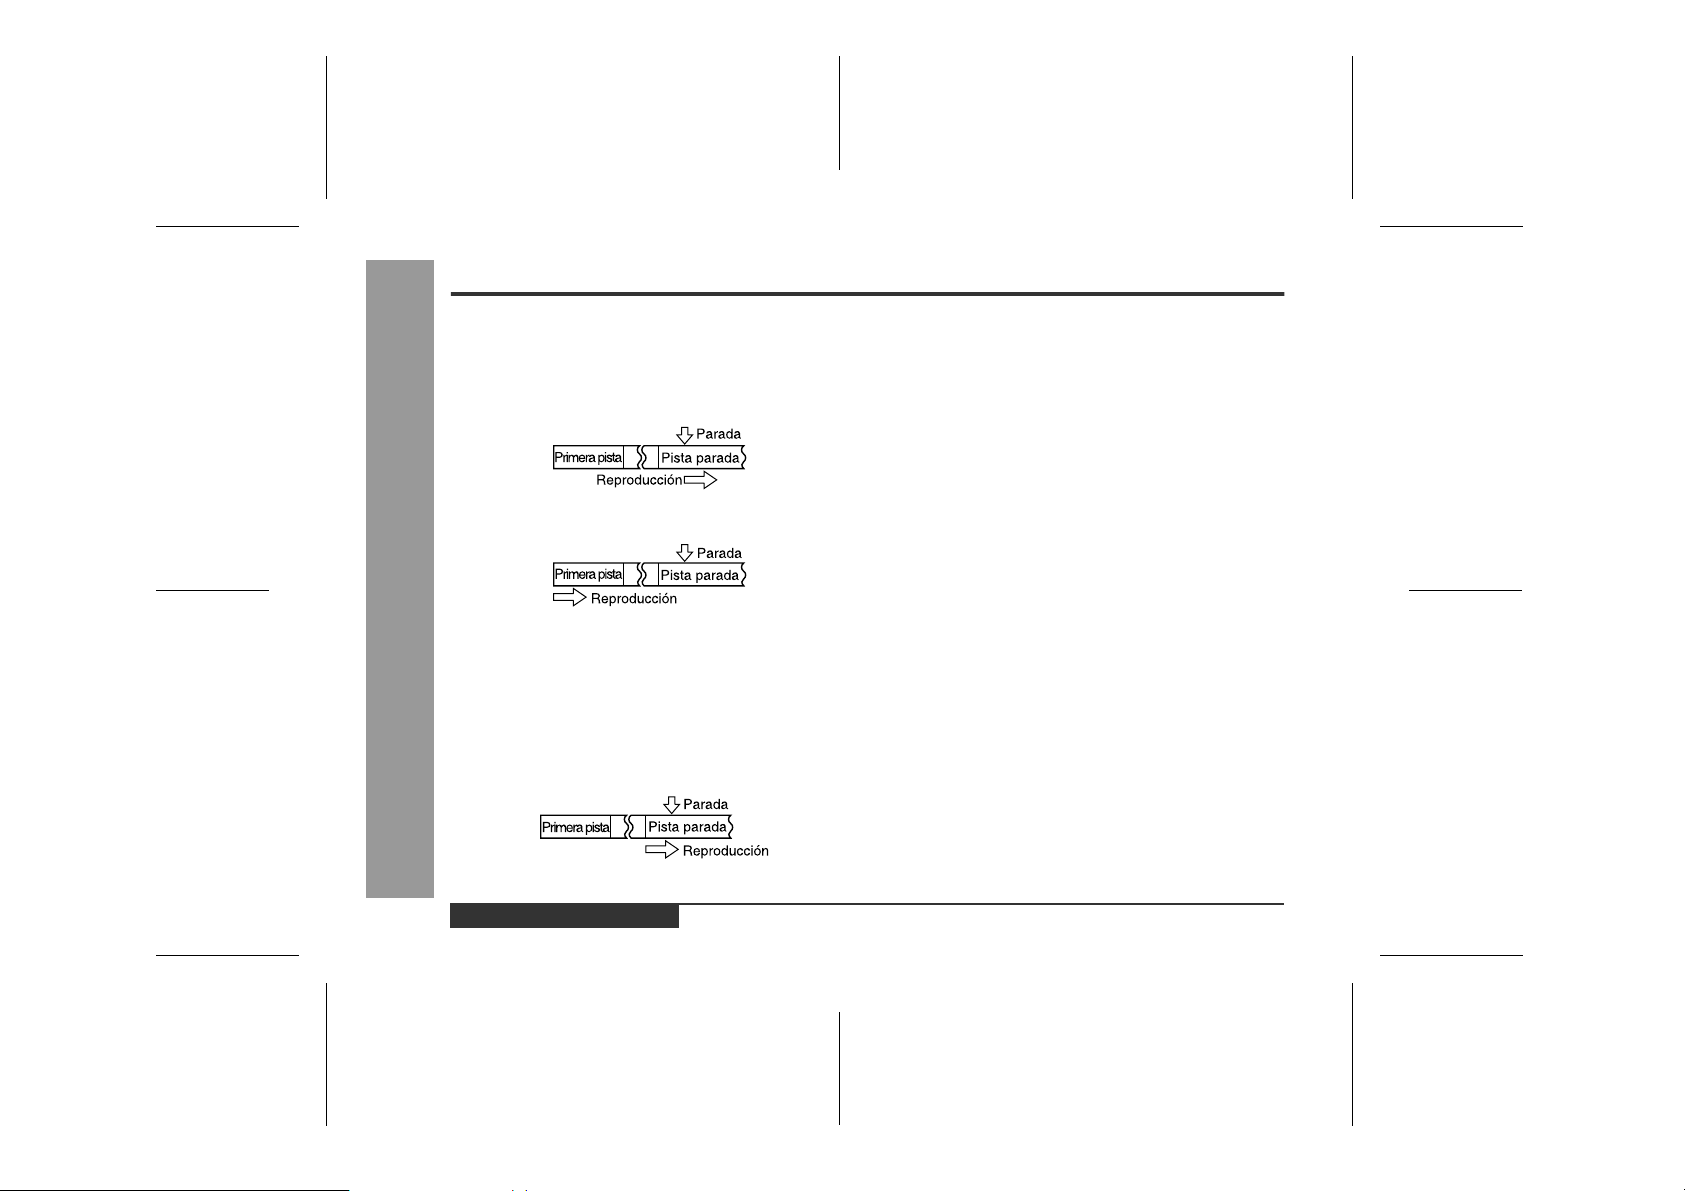
Otras características y precauciones
„
Reanudación de la reproducción automática
Cuando detenga la reproducción y vuelva a reproducir el MD sin extraerlo, la reproducción se iniciará
desde el punto en que antes se paró.
Una vez haya extraído el MD, la reproducción se iniciará desde la primera pista.
El aparato ofrece las funciones siguientes cuando lo
emplea con un adaptador de automóvil de venta por
Referencias
separado (AD-CA20X) (cuando la batería o la pila
alcalina están extraídas):
1. Cuando desconecta el motor, la alimentación del gra-
bador también se desconecta. (Es posible que no funcione con ciertos tipos de automóviles.)
2. Cuando vuelva a arrancar el motor, la reproducción se
-Otras características y precauciones-
iniciará desde el principio de la pista en la que se paró.
„
Batería recargable
z
Sólo pueden utilizarse las baterías recargables del
tipo de hidruro de níquel-metal. Aunque no se utilice la
batería, deberá cargarla por lo menos una vez cada
tres meses debido a la calidad especial de esta batería.
z
La batería recargable puede recargarse aproximadamente 300 veces.
z
Cuando se reduzca el tiempo de operación aproximadamente a la mitad del tiempo normal, incluso después de una recarga completa, reemplace la batería
por otra nueva (AD-N70BT).
z
Cuando se carga la batería por primera vez o se
carga después de no haberla utilizada durante mucho
tiempo, es posible que el tiempo de servicio sea más
corto de lo normal. La duración de servicio de la batería se recupera con el empleo normal, es decir, cargándola y descargándola.
z
Para evitar que se acorte la duración de servicio de la
batería, recárguela sólo después de haberla descargado por completo.
z
Si la batería recargable se utiliza en un ambiente frío,
el tiempo de operación disminuirá.
z
No lleve la batería dentro del bolsillo ni en una bolsa
junto con objetos metálicos (llaves, monedas, joyas,
etc.) La batería podría cortocircuitarse y generar
mucho calor.
z
No cortocircuite los terminales ya que se calentarían
mucho y dañaría la batería.
z
No se caiga la batería al suelo y no expóngala a golpes.
z
No inserte objetos (metálicos etc.) en el compartimiento de la batería de este producto ni en la batería
recargable.
S-39
ESPAÑOL
00/12/27 S_90EX_6.FM
Page 87

Limitaciones del sistema de minidiscos
Es posible que se aprecien en el aparato los síntomas siguientes durante la grabación o la edición. No significa que el
aparato esté averiado.
SÍNTOMA LIMITACIONES
Aparece "DISC FULL" o "TOC FULL"
aunque todavía quede tiempo para grabar en el MD.
El tiempo de grabación remanente no
aumenta aunque se borren pistas.
El tiempo grabado total y el tiempo remanente no corresponden con el tiempo máximo que se puede grabar.
La función de combinación no opera.
Salta el sonido durante la inversión/
avance rápidos.
Se crea un número de pista a mitad de
una pista.
No pueden grabarse más de 255 pistas (máximo) independientemente del tiempo de grabación. Si el MD se graba o edita repetidamente o si tiene rayadas (la grabación salta las partes rayadas), es
posible que no pueda grabar el número máximo de pistas arriba
mencionado.
El aparato no cuenta las partes sin grabar que tienen 12 o menos
segundos para visualizar el tiempo de grabación remanente. Es posible que no aumente el tiempo aunque borre pistas cortas.
Un cluster (aproximadamente 2 segundos) es la unidad mínima de
grabación. Por ejemplo, una pista de 3 segundos emplea 2 clusters
(aproximadamente 4 segundos). Por lo tanto, el tiempo que realmente puede grabarse puede ser menor que el tiempo visualizado.
Es posible que no pueda realizarse la función de combinación en un
MD en el que se han realizado repetidamente grabaciones y ediciones.
Una pista se ha dividido y grabado en lugares distintos en un MD en
el que se han realizado repetidamente grabaciones o ediciones. Es
posible que salte el sonido.
Puede crearse un número de pista si hay rayadas o polvo en el MD.
Referencias
-Limitaciones del sistema de minidiscos-
ESPAÑOL
00/12/27 S_90EX_6.FM
S-40
Page 88

Mensajes de error
MENSAJES
DE ERROR
BATT EMPTY
BLANK MD z No hay nada grabado. z Reemplace el disco por otro que esté grabado.
Can't COPY z Ha intentado grabar un MD protegido contra copias. z Grabe usando el cable analógico.
Can't EDIT z Una pista no puede editarse. z Cambie la posición de parada de la pista y vuelva a intentar
Can't READ (*)
Can't REC z No puede efectuarse correctamente la grabación
Can't STAMP
Can't WRITE z No puede almacenarse la información del TOC co-
Referencias
DEFECT z El disco está rayado. z Si el sonido que oye no es adecuado, pruebe a grabar otra
-Mensajes de error-
DISC FULL z
Er-MD (**) z El microprocesador ha informado un defecto del sis-
HOLD z El aparato está en el modo de retención. z Cancele el modo de retención.
LOCKED z Ha extraído un minidisco durante la grabación o edi-
NO DISC z No se insertado ningún disco. z Inserte un disco.
SIGNIFICADO REMEDIO
z La pila/batería se ha gastado. z Cargue la batería recargable o reemplace la pila alcalina (o
z Los datos del disco no pueden leerse porque el dis-
co o el aparato están dañados.
debido a vibraciones o golpes en el aparato.
z La función de estampado no funciona. z Compruebe el número de las pistas.
rrectamente en un minidisco. (Una parte grande del
disco se ha dañado.)
Se ha terminado el espacio de grabación del disco.
tema y el aparato está averiado.
ción.
utilice el adaptador de CA como fuente de alimentación).
la edición.
z Vuelva a insertar el disco.
z Reemplácelo por otro disco grabado.
z Vuelva a grabarlo o reemplácelo por otro disco grabable.
z Reemplácelo por otro disco grabable.
vez.
z Reemplácelo por otro disco grabable.
z Reemplácelo por otro disco grabable.
z Para su reparación, lleve el aparato al distribuidor donde lo
compró.
z Desconecte la alimentación y extraiga el minidisco.
S-41
ESPAÑOL
00/12/27 S_90EX_6.FM
Page 89

NO SIGNAL z Conexión defectuosa del cable digital.
NOT PLAY z Ha intentado reproducir una pista que no puede re-
PLAY MD z Usted intentó grabar en un disco de sólo reproduc-
POWER ? z Se suministra una alimentación incorrecta. z Emplee una de las fuentes de alimentación especificadas.
PROTECTED
SORRY z Puesto que se está buscando o escribiendo un nú-
TEMP OVER z La temperatura es demasiado alta. z Desconecte la alimentación y espere un poco.
TOC FORM (**)
TOC FULL z No queda espacio para registrar la información de
Tr. Protect z La pista está protegida contra borrado. z Edite la pista con el aparato con el que fue grabada.
? DISC z Se reproduce un disco que contiene datos que no
Un número o un símbolo aparece en la posición de (*).
z No sale ninguna señal desde el aparato conectado
para la reproducción.
z La señal de entrada no tiene ninguna frecuencia de
muestreo adecuada.
producirse con este equipo.
ción.
z La lengüeta de protección contra escritura de un MD
está ajustada a la posición protegida.
z Ha intentado grabar en un disco que es de sólo re-
producción.
mero de pista, el aparato no puede aceptar su comando.
z Hay un error en la señal de grabación. z Borre todas las pistas y luego grabe otra vez.
caracteres (nombres de pista, nombres de disco,
etc.).
son musicales.
z Hay un error en la señal grabada en el disco.
z Conecte en seguridad el cable digital.
z Si el reproductor de discos CD portátil tiene función para
evitar saltos del sonido, desactívela.
z Reproducción con el aparato conectado.
z Reproduzca otra pista.
z Re emplácelo por un disco grabable.
z Mueva la lengüeta de protección contra escritura a su po-
sición original.
z Reemplácelo por un minidisco grabable.
z Espere un poco y vuelva a intentar la operación.
z Reemplácelo por otro disco grabable.
z Los discos que contienen datos que no son musicales no
pueden reproducirse.
z Reemplácelo por otro disco grabado.
Referencias
-Mensajes de error-
ESPAÑOL
00/12/27 S_90EX_6.FM
S-42
Page 90

Localización y reparación de averías
Muchos posibles "probl emas" podrá n ser sol uciona dos por el propiet ario sin q ue éste llame a un técnic o en reparac iones. Si
parece que falla alg o e n es te pr oduct o, comp rueb e l a t abl a sig uien te an te s de llama r a su conc esion ario SHARP a ut orizad o
o a un centro de reparaciones.
PROBLEMA CAUSA
El aparato no se enciende. z ¿E stá el adaptador de CA desconectado?
No se oye sonido por los auriculares. z ¿Está el volumen ajustado demasiado bajo?
El aparato no responde cuan do se pulsan botones de operación.
Referencias
Se saltan algun os sonidos. z ¿Está agotada la pila/batería?
El minidisco no puede ser expulsado. z ¿Ya se ha escrito el número de pista o la información de caracteres en el disco?
No es posible grabar ni editar. z ¿Está el minidisco protegido contra borrado accidental?
-Localización y reparación de averías-
z ¿Está agotada la pila/batería?
z ¿Está el aparato en el modo de retención?
z ¿Se ha formado condensación de humedad en el interior del aparato?
z ¿Está siendo afectado el aparato por sacudidas mecánicas o electricidad estática?
z ¿Están enchufados los auriculares o el controlador remoto?
z ¿Está usted intentando reproducir un minidisco con datos en lugar de un minidisco
con música?
z ¿Está el aparato en el modo de retención?
z ¿Está agotada la pila/batería?
z ¿E stá enchufa da firmemente la clavija del controlador remot o o de los auriculares?
z ¿Está el aparato sometido a una vibración excesiva?
z ¿E stá el aparato en el modo de grabación o en el modo de edición?
z ¿Está conectado correctamente el aparato a otro equipo?
z ¿Está desenchufado el adaptador de CA? ¿Se produjo un fallo en la alimentación
mientras se grababa o se editaba?
z ¿Está el aparato en el modo de retención?
z ¿Se emite una señal óptica desde el sistema estéreo? Lea el manual de manejo del
sistema estéreo.
S-43
ESPAÑOL
00/12/27 S_90EX_6.FM
Page 91

Mantenimiento
„
Si ocurren problemas
Si se somete este producto a fuertes interferencias externas (golpes mecánicos, electricidad estática excesiva,
tensión de alimentación anormal debido a rayos, etc.) o
si se opera incorrectamente, puede funcionar mal.
Si ocurre uno de estos problemas, haga lo siguiente:
1. Desenchufe el adaptador de CA del tomacorriente
de CA.
2. Quite la pila/batería.
3. Deje el aparato completamente desconectado durante unos 30 segundos.
4. Vuelva a conectar el adaptador de CA en el tomacorriente de CA y vuelva a intentar la operación.
„
Condensación de humedad
Cuando el aparato tenga condensación en su interior, las
señales del disco no podrán ser leídas y el aparato podrá
funcionar mal.
La condensación puede formarse en el interior del aparato en los casos siguientes.
z
Poco después de haber encendido una calefacción.
z
Cuando el aparato se pone en una habitación donde
hay un exceso de vapor o humedad.
z
Cuando el aparato se transporta de un lugar frío a otro
caliente.
Para eliminar la condensación:
Extraiga el MD y deje el aparato durante aproximadamente 1 hora. La condensación se evaporará y el aparato funcionará correctamente.
„
Limpieza
Cuando se ensucia el aparato
Límpielo con un paño suave.Cuando el aparato está demasiado sucio, emplee un paño suave humedecido en
agua (sólo las superficies exteriores).
Limpie las clavijas y las tomas de conexión.
Si las clavijas o las tomas están sucias, podría oírse
ruido. La limpieza evitará el ruido.
Precaución:
z
No emplee productos químicos para la limpieza
(petróleo, disolvente, etc.). Podría dañar el acabado
del mueble.
z
No aplique aceite al interior del aparato. P odría causar
mal funcionamiento.
Referencias
-Mantenimiento-
ESPAÑOL
00/12/27 S_90EX_6.FM
S-44
Page 92

Especificaciones técnicas
Como parte de la política de mejoras continuas, SHARP se reserva el derecho de realizar cambios en el diseño y
especificaciones para la mejora del producto sin previo aviso. Las figuras indicadas que especifican el rendimiento
son valores nominales de los aparatos de producción. Puede haber algunas desviaciones de estos valores en los
aparatos individuales.
„
General
Fuente de alimentación:
1,2V CC: Batería recargable de hidruro de ní-
5V CC: Adaptador de CA (110-240V CA, 50/60
1,5V CC: Pila alcalina, tamaño "AA" (LR6) de
4,5V CC: Adaptador para automóviles opcional,
Referencias
Consumo de
potencia:
-Especificaciones técnicas-
Potencia de
salida:
Tiempo de
carga:
quel-metal (AD-N70BT) x 1
Hz)
venta en el comercio x 1
AD-CA20X(para automóviles con sistema eléctrico de 12-24V CC de puesta a tierra negativo)
0,15 A (adaptador de CA)
RMS: 20 mW (10 mW + 10 mW)
(Distorsión armónica total del 0,2%)
Aprox. 3,5 horas (90%)
Aprox. 5,5 horas (completamente car-
gada) (Cuando se emplea el adaptador de CA incluido con el aparato)
Duración de la batería:
Cuando se utiliza la batería recargable (completamente cargada)
suministrada
Grabación continua:
Aprox. 7 horas
Reproducción continua:
Aprox. 12 horas
z
El tiempo de grabación continua es para las entradas
analógicas cuando el nivel de volumen está ajustado
a "VOL 0".
z
El tiempo de reproducción continua muestra el valor
cuando el nivel de volumen está ajustado a "VOL 15".
z
Los valores de arriba son los valores estándar cuando
el aparato está cargado y se emplea a una temperatura ambiental de 25°C.
z
Es posible que el tiempo de operación cuando se
emplea una pila alcalina sea distinto, dependiendo del
tipo y de la marca de la pila, y de la temperatura de
funcionamiento.
Cuando emplee una pila
alcalina de alta capacidad
del tamaño "AA" (LR6) de
venta en las tiendas del
ramo
Grabación continua:
Aprox. 3 horas
Reproducción continua:
Aprox. 12 horas
S-45
ESPAÑOL
00/12/27 S_90EX_6.FM
Page 93
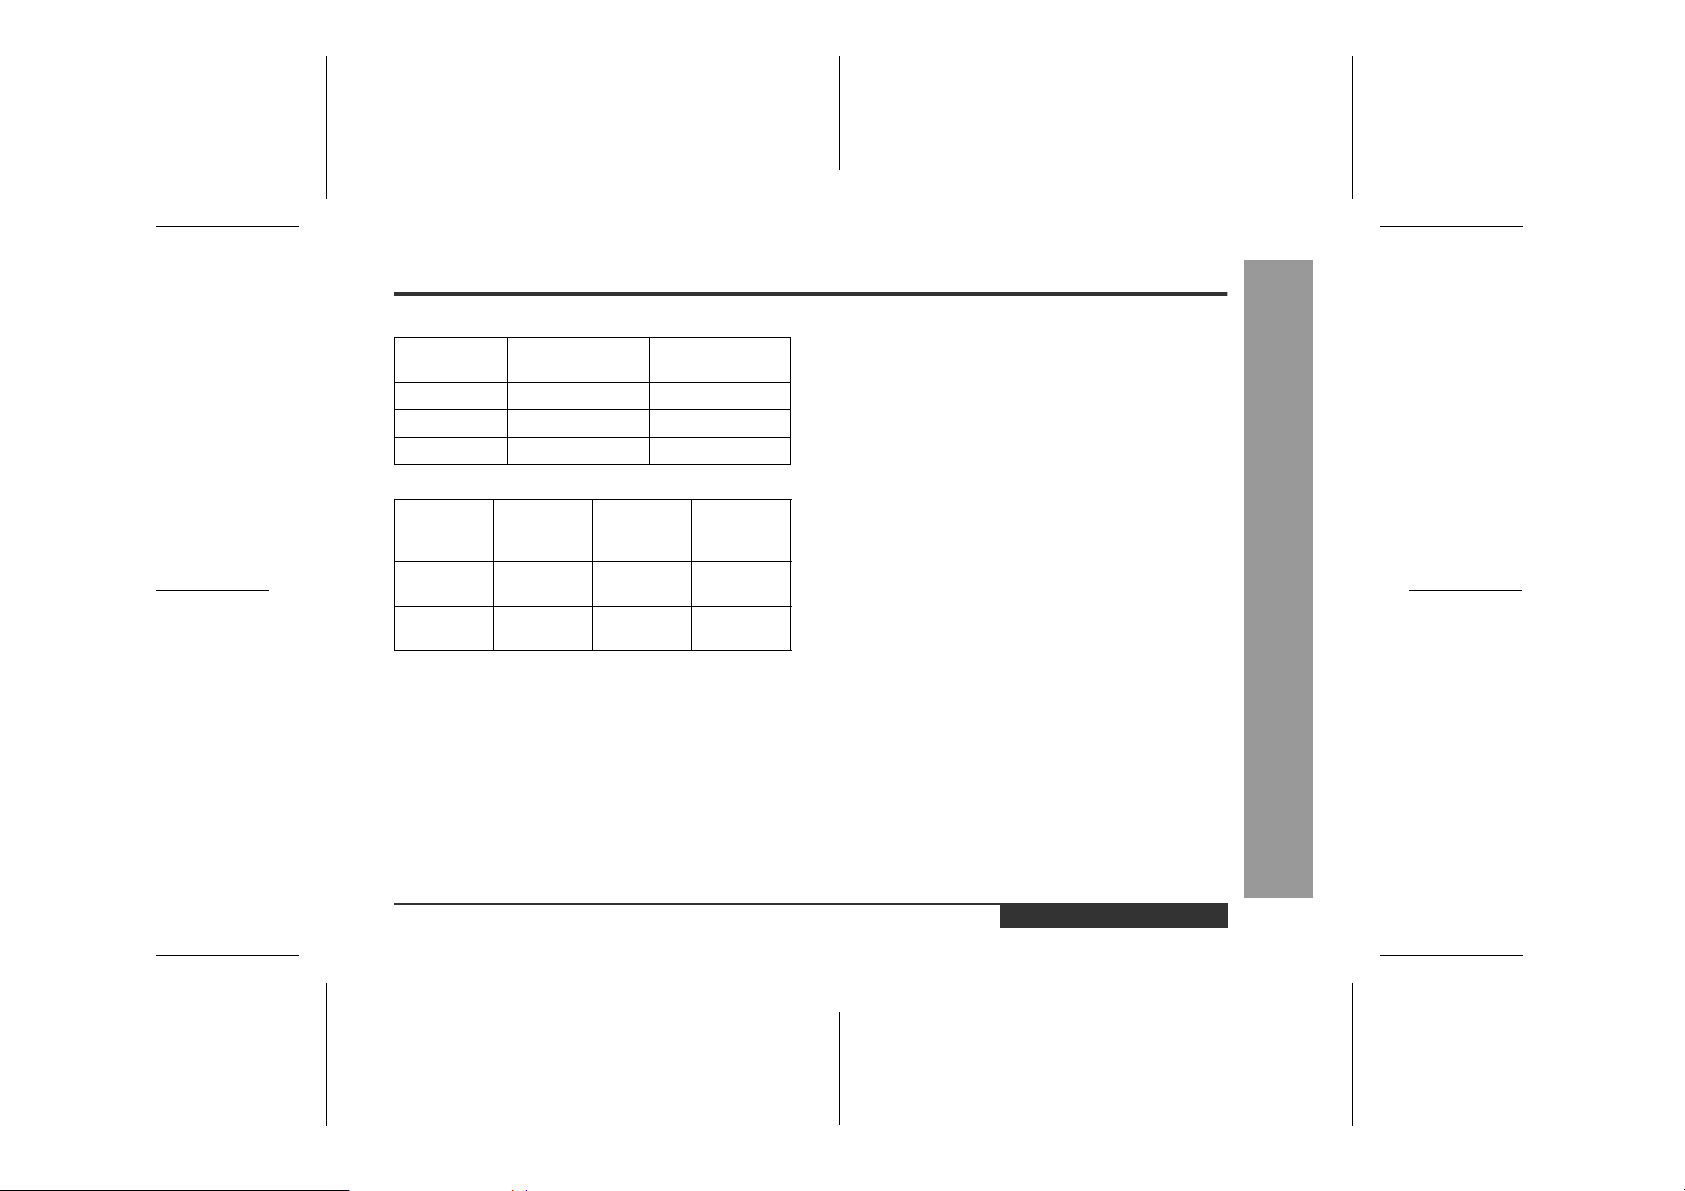
Sensibilidad de entrada:
Nivel de gra-
bación
MIC H 0,25 mV 10 k ohmios
MIC L 2,5 mV 10 k ohmios
LINE 100 mV 20 k ohmios
Nivel de salida:
Auriculares - 10 mW + 10 mW16 ohmios
LINE 250 mV (-12
Dimensiones:
Peso:
Toma de en-
trada:
Toma de sali-
da:
Nivel de entrada
de referencia
Salida especificada
dB)
Ancho: 81,1 mm
Alto: 19,9 mm
Profundo: 92,4 mm
172 g con batería recargable
Línea/óptico digital, micrófono (alimen-
tado desde el aparato principal)
Auriculares (impedancia: 16 ohmios)/
controlador remoto
Nivel máximo de sali-
Impedancia de
entrada
Impedancia
de carga
da
- 10 k ohmios
„
Grabadora de minidiscos
Tipo:
Lectura de
las señales:
Canales de
audio:
Respuesta
de frecuencia:
Velocidad de
rotación:
Corrección
de errores:
Codificación:
Método de
grabación:
Frecuencia
de muestreo:
Ululaciones
y trémolos:
Grabador/reproductor minidisco portátil
Fonocaptor de láser semiconductor de
3 haces, sin contacto
2 canales estéreo/ 1 canal monoaural
(modo de reproducción larga)
20 - 20.000 Hz (±3 dB)
400 - 900 rpm aproximadamente
ACIRC (Advanced Cross Interleave
Reed-Solomon Code)
ATRAC (Adaptive TRansform Acoustic
Coding), tipo computado de 24 bits
Método de sobreescritura por modulación magnética
44,1 kHz (las señales de 32 kHz y 48
kHz se convierten en señales de 44,1
kHz y luego son grabadas.)
Inmensurable (menos del ±0,001%
cresta ponderada)
Referencias
-Especificaciones técnicas-
ESPAÑOL
00/12/27 S_90EX_6.FM
S-46
Page 94

SHARP CORPORATION
TINSZ0661AWZZ
2
A0101.TO
 Loading...