

Page 1
PORTABLE MINIDISC RECORDER
1
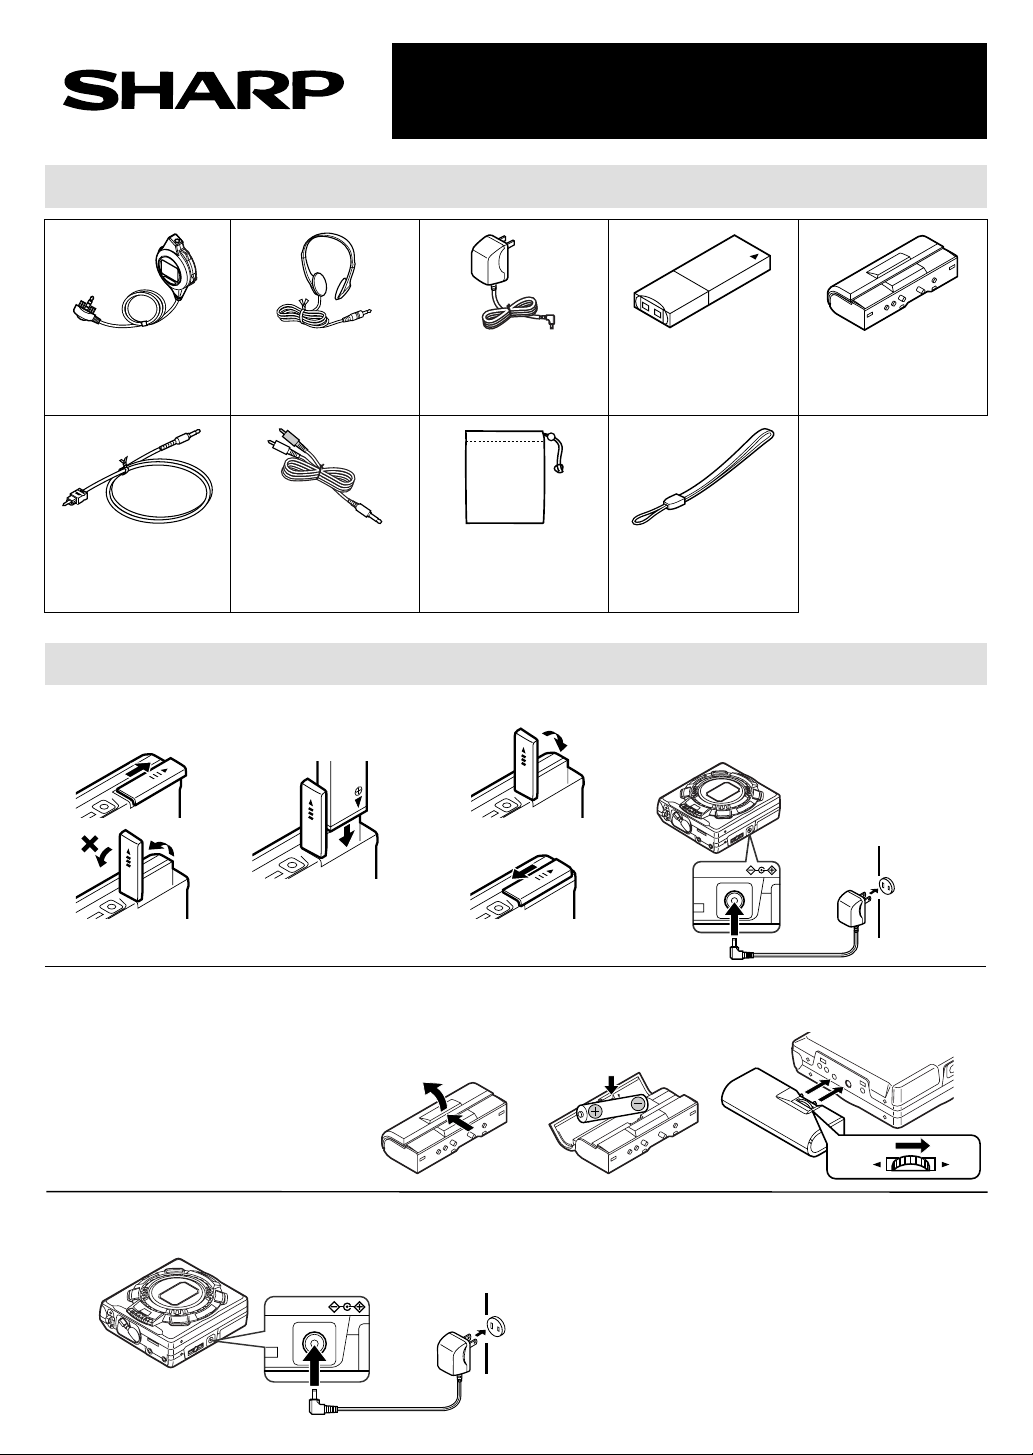
Check the supplie d accessori es /
● Remote Control Unit
x 1
●
Controlador remoto
x 1
● Optical Digital Cable
x 1
●
Cable óptico digital x
1
2
Power source /
● Headphones x 1
●
Auriculares x 1
● Analog Cable x 1
●
Cable analógico x 1
Alimentación
Quick Guide/Guía rápida
Compruebe los a ccesorios s uministrad os
● AC Adaptor x 1
●
Adaptador de CA x 1
● Carrying Bag x 1
●
Caja para el
transporte x 1
● Rechargeable
Lithium-Ion Battery x 1
●
Batería recargable de
litio-ion x 1
● Handstrap x 1
●
Correa para la
muñeca x 1
● Battery Case x 1
●
MD-MS722
Caja de la pila x 1
■ Rechargeable battery power
■
Alimentación de la batería recargable
➁
32
Open.
Abrir.
➀
OPEN
Press.
Pulsar.
OPEN
OPEN
DC IN
5V
• Back of the MD recorder
•
Parte posterior de la
grabadora de MD
2
3
RELEASE LOCK
• AC 120V,
60Hz
•
120V CA,
60Hz
14
OPEN
OPEN
OPEN
OPEN
■ Alkaline battery power
■
Alimentación de la pila alcalina
● Make sure that a fully charged
rechargeable battery is inserted.
● Do not use the unit if it only has an
alkaline battery in it.
●
Asegúrese de que se ha insertado una
batería completamente cargada.
●
No emplee el aparato si sólo tiene una
pila alcalina instalada.
1
■ AC power
■
Alimentación de CA
DC IN
5V
• AC 120V, 60Hz
•
120V CA, 60Hz
Page 2
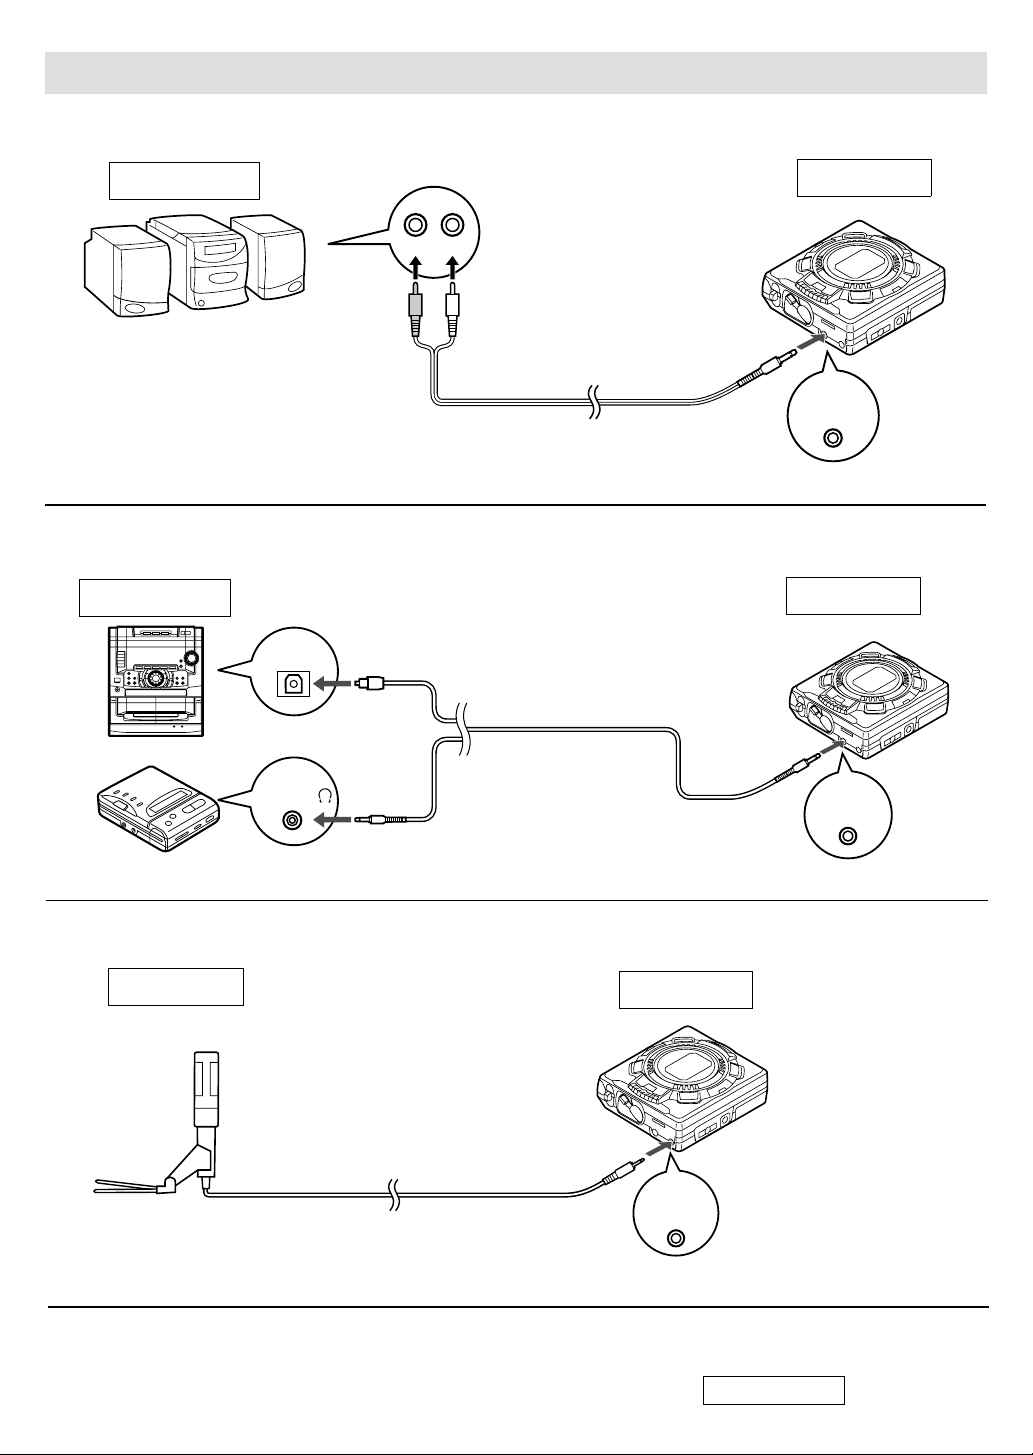
Connection /
3
■ Analog recording
■
Grabación analógica
Playback side
Lado de reproducción
Conexión
LR
Recording side
Lado de grabación
• To the line output jacks
on a stereo
•
A los enchufes de
salida de línea de un
equipo estéreo
■ Digital recording
■
Grabación digital
Playback side
Lado de reproducción
DIGITAL OUT
OPTICAL OUT
(RIGHT)
(DERECHO)
(LEFT)
(IZQUIERDO)
• Analog cable included with this unit
•
Cable analógico suministrado con este
• Optical digital cable
(supplied)
•
Cable óptico digital
(suministrado)
• Optical digital cable
(AD-M2DC, available
separately)
•
Cable óptico digital
(AD-M2DC,
disponible por
separado)
OPTICAL/
LINE IN
Recording side
Lado de grabación
OPTICAL/
LINE IN
■ Microphone
■
Micrófono
Stereo microphone
Micrófono estéreo
Recording side
Lado de grabación
MIC IN
PLUG IN
POWER
Printed in Japan
Impreso en Japón
TINSZ1382AFZZ
A9810.2.5MNS.SM
Page 3

Recording /
4
■ Recording from CDs or MDs (Synchro recording)
■
Grabación de discos compactos o minidiscos (Grabación sincronizada)
Grabación
Connect the external equipment.
1
Conecte el equipo externo.
Insert a recordable MiniDisc.
2
Inserte un minidisco grabable.
■ Recording from the microphone (Mic synchro recording)
■
Grabación de un micrófono (Grabación sincronizada con micrófono)
Connect the stereo microphone to
1
the MIC IN jack.
Conecte el micrófono estéreo al
enchufe MIC IN del aparato principal.
Insert a recordable MiniDisc.
2
Inserte un minidisco grabable.
3
4
5
6
3
4
REC
While playing sound from the external
equipment connected to this unit, move the
shuttle switch up or down to adjust the
recording level.
Mientras se reproduce el sonido del equipo
externo conectado a este aparato, mueva el
selector de mando de lanzadera hacia arriba o
abajo para ajustar el nivel de grabación.
ENTER
SYNC
Begin playback on the source equipment.
Inicie la reproducción en el equipo fuente.
REC
Move the shuttle switch up or down to adjust
the recording level.
Mueva el selector de mando de lanzadera hacia
arriba o abajo para ajustar el nivel de grabación.
Press the ● REC button.
Pulse el botón ● REC.
Press the ENTER/SYNC button.
Pulse el botón ENTER/SYNC.
Press the ● REC button.
Pulse el botón ● REC.
To stop recording:
Para detener la grabación:
Press the ■/:OFF button.
Pulse el botón ■/:OFF.
After recording:
Después de la grabación:
Press the ■/:OFF button while in the stop mode.
Pulse el botón ■/:OFF estando en el modo de parada.
5
6
To remove the MiniDisc:
Para extraer el minidisco:
Turn off the power and move
the EJECT lever in the direction
indicated by the arrow.
Desconecte la alimentación y
mueva la palanca EJECT en el
sentido indicado por la flecha.
Press the ENTER/SYNC button to select the
synchro recording level. (This level can be
changed, even while recording.)
Pulse el botón ENTER/SYNC para seleccionar el
nivel de la grabación sincronizada. (Este nivel
ENTER
SYNC
podrá cambiarse incluso durante la grabación.)
When a noise, such as a person speaking, is
picked up by the microphone, recording will
begin automatically.
Cuando el micrófono capte un ruido, el de una
persona que hable por ejemplo, la grabación
empezará automáticamente.
Page 4

Playing a MiniD isc /
5
Insert the headphones plug firmly into the
1
headphones jack on the remote control unit.
Inserte firmemente la clavija de los auriculares
en el enchufe de auriculares del controlador
remoto.
Plug the remote control unit into the jack
2
on the main unit. Push the plug all the way in.
Enchufe el controlador remoto en el enchufe
del aparato princip al. Empuje completamente
hacia adentro la clavija.
Reproducci ón de un minidisco
Playback does not start when a MiniDisc is inserted:
La reproducción no empieza cuando se inserta un
minidisco:
Press the 06 button.
REMOTE
In the following cases, the auto-play function will not work.
● When the recordable MiniDisc write protection tab is
closed
● When the auto-play function has been canceled
Pulse el botón 06.
En los casos siguientes, la función de reproducción
automática no se activará.
●
Cuando esté cerrada la lengüeta de protección contra
escritura del minidisco grabable
●
Cuando haya sido cancelada la función de reproducción
automática
To interrupt playback:
Para interrumpir la reproducción:
Press the 06 button during playback.
● To resume playback, press the 06 button again.
Pulse el botón
●
Para reanudar la reproducción, pulse de nuevo el botón
06
06
.
durante la reproducción.
Load a MiniDisc in the direction indicated by
3
the arrow on the MiniDisc, with the label side
facing up.
Cargue un minidisco en el sentido indicado por
la flecha del minidisco, con el lado de la etiqueta
hacia arriba.
● The power will be turned on automatically, and
playback will start from the first track.
(Auto-play function)
●
La alimentación se conectará automáticamente, y
la reproducción empezará desde la primera pista.
(Función de reproducción automática)
6
Sound control /
Adjust the volume.
From the main unit:
Press the + button to increase the volume and the –
button to decrease the volume.
From the remote control unit:
Move the shuttle switch up once to increase the volume,
and move it down once to decrease the volume.
Ajuste el volumen.
Desde el aparato principal:
Pulse el botón + para aumentar el volumen y el botón –
para reducirlo.
Desde el controlador remoto:
Mueva el selector de mando de lanzadera una vez hacia
arriba para aumentar el volumen, y muévalo hacia abajo
para reducirlo.
• Volume (0 - 30)
Volumen (0 - 30)
•
Control de l sonid o
To stop playback:
Para detener la reproducción:
Press the ■/:OFF button.
Pulse el botón ■/:OFF.
To turn off the power:
Para desconectar la alimentación:
Press the ■/:OFF button while in the stop mode.
Pulse el botón ■/:OFF estando en el modo de parada.
Adjust the bass level.
Each time the BASS button is pressed, the tone will be
switched as follows:
Ajuste el nivel de los graves.
Cada vez que pulse el botón BASS, el tono cambiará de
la forma siguiente:
BASS 1
BASS 2
BASS 3
BASS OFF
BASS 1
BASS 2
BASS 3
BASS OFF
Bass sounds are emphasized slightly.
Bass sounds are emphasized more.
Bass sounds are emphasized even more.
Bass emphasis is canceled.
Los sonidos graves se realzan ligeramente.
Los sonidos graves se realzan más.
Los sonidos graves se realzan aún más.
El realce de los graves se cancela.
 Loading...