

Page 1
Connecting the monitor and turning the monitor on and off
CAUTION!
- When connecting, ensure that both the monitor
and computer are switched off.
- Be careful not to overly bend the cable or add
extension cords as this could lead to a
malfunction.
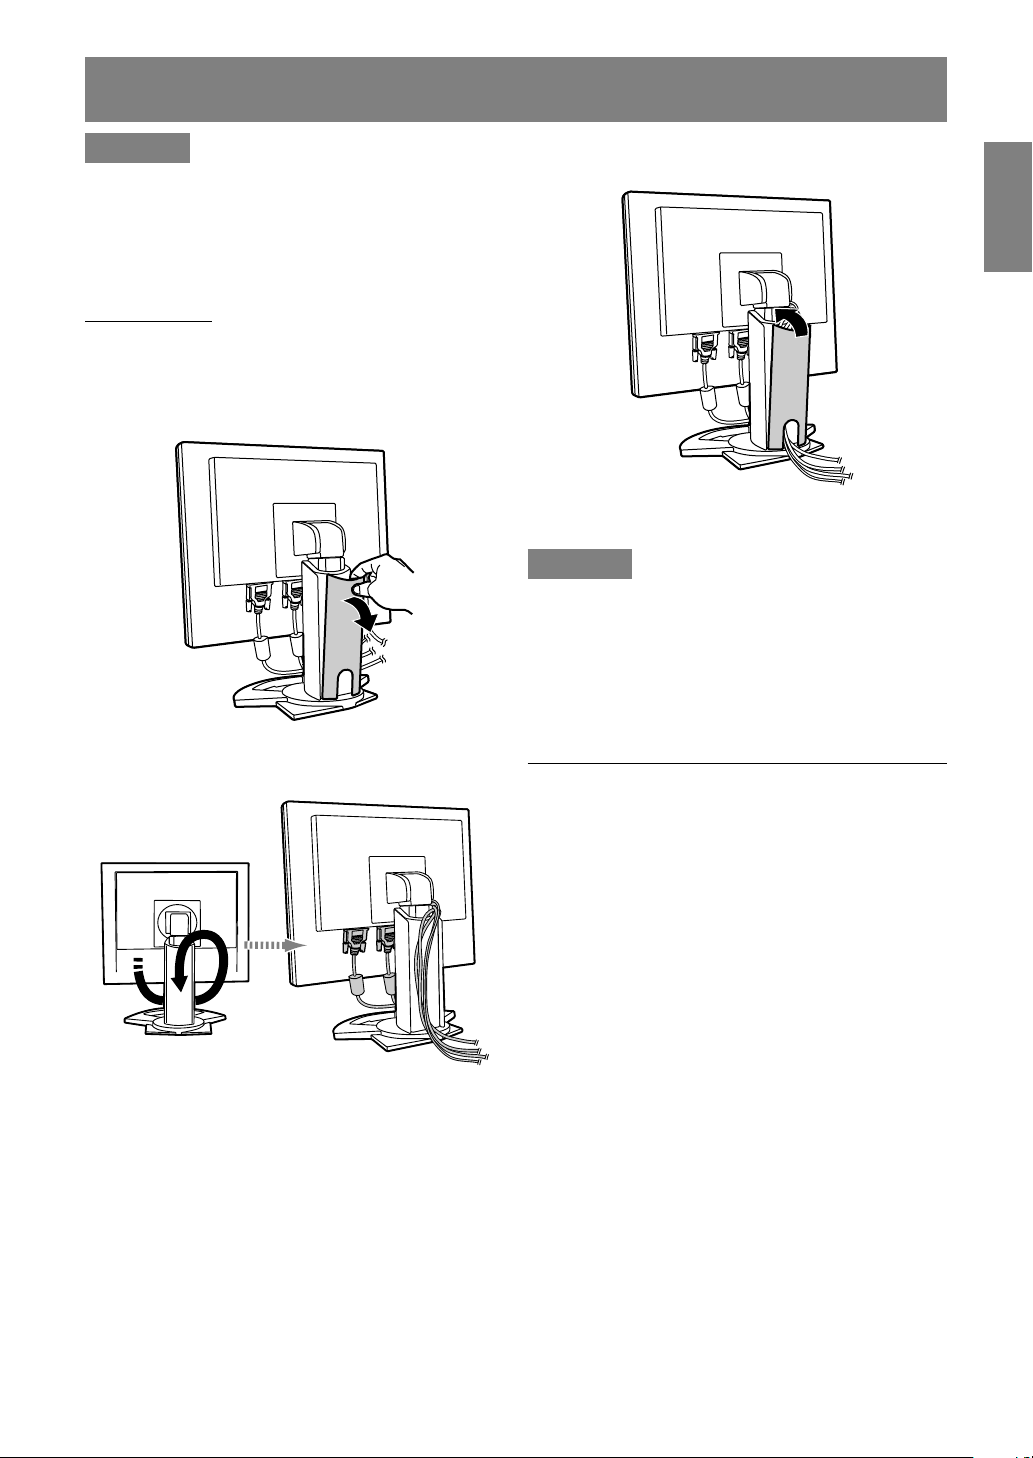
Cable storage
If necessary, excess cable can be housed in the
stand.
1.Remove the cover.
Gently pull the top of the cover towards yourself.
2.Run cable along the back of the stand.
Pass cable in front of the stand, and then bring it
through the back.
3.Refit the cover.
Be careful not to pinch the cable.
EnglishDeutschFrançaisItalianoEspañolEnglish
- If the cover is hard to refit, do not force it.
Check whether cables are trapped.
CAUTION!
- If the display is to be rotated, first house the
cable, and then check while gently turning the
display. If it cannot be turned, rehouse the cable
with sufficient slack. (If there is insufficient cable
length, rotation will be impossible. Forcing
rotation may cause cable disconnection.)
Connecting the monitor to a computer
The accessory signal cable enables connection of
two computers.
(One analog and one digital connection.)
- To achieve an analog and digital connection for
two computers, a separately sold signal cable is
required.
- The separately sold 2-input cable enables
connection of two computers to the DVI-I input
terminal.
- When using the 2-input cable, set the connecting
input terminal [INPUT-1] or [INPUT-2] to [2LINES]
under the MODE SELECT-1 Menu. (p.20, 23)
- If the display is to be rotated, first house the
cables with the display in the long height
position, so there is sufficient length when the
display is turned.
11
Page 2
Connecting the monitor and turning the monitor on and off
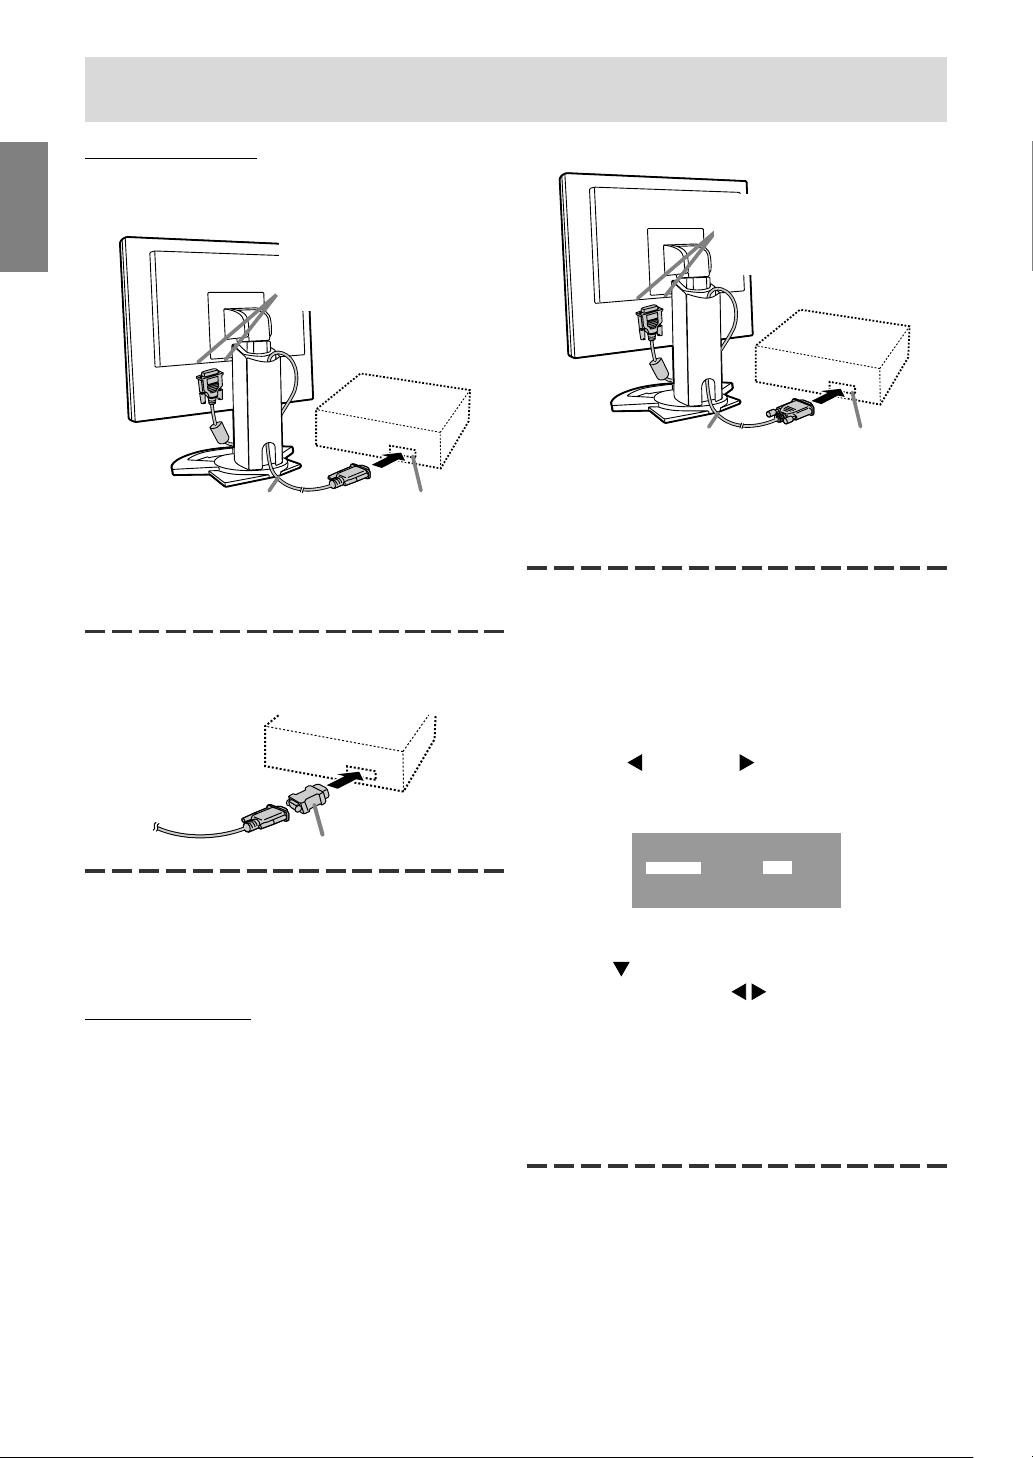
Analog connection
Connect the analog signal cable to the analog RGB
output terminal of the computer.
Input terminal 1 and 2
You can connect to
either side.
Input terminal 1 and 2
You can connect to
either side.
Analog signal cable
Analog RGB output
terminal
- Paying attention to connector direction, firmly
insert the signal cable to terminal, and then
tighten the screws at both sides.
If connecting to a D-sub 15 pin 2 row Apple Power
Macintosh, attach a Macintosh conversion adapter
(commercially available) to the analog signal cable.
Macintosh conversion adapter
Note:
- If connecting to the Sun Ultra series, a
conversion adapter (commercially available) may
be required.
Digital connection
Connect the digital signal cable to the digital RGB
output terminal of the computer.
- For digital RGB connection, the monitor has an
input for connecting to a computer with a DVIcompatible output connector (DVI-D 24 pin or
DVI-I 29 pin) and UXGA output capability.
(Depending on the type of computer to be
connected, the display may not work correctly.)
- Use the accessory digital signal cable or an NLC04J cable (sold separately).
If using other commercially available digital
signal cables, correctly display may not be
achieved. UXGA resolution may not be available
when using the NL-C01E digital signal cable.
Digital signal cable
Digital RGB output
terminal
- Paying attention to connector direction, firmly
insert the signal cable to terminal, and then
tighten the screws at both sides.
Set the monitor as follows when establishing a
digital connection with a Power Mac using an ADCDVI adapter made by Belkin. (Operation has been
checked with the Power Mac G4 M7627J/A)
- Perform settings with the Power Mac power
supply off.
1.After connecting the power cord, turn on the
monitor’s main power.
2.Press the
button and button simultaneously,
and while doing this press the POWER button
(i.e. turn the power on).
MAC DIGITAL
INPUT-1 OFF ON
INPUT-2 OFF ON
3.Set the input terminal to which the Belkin ADCDVI adapter is connected to ON.
Use the button to select [INPUT1] or
[INPUT2], and use the
buttons to select
[ON] and [OFF].
- Do not set to [ON] if you are not using a Belkin
ADC-DVI adapter, as this may result in
incorrect display.
4.Press the power button, and turn off the monitor
power.
This completes setting.
12
Page 3
Connecting the monitor and turning the monitor on and off
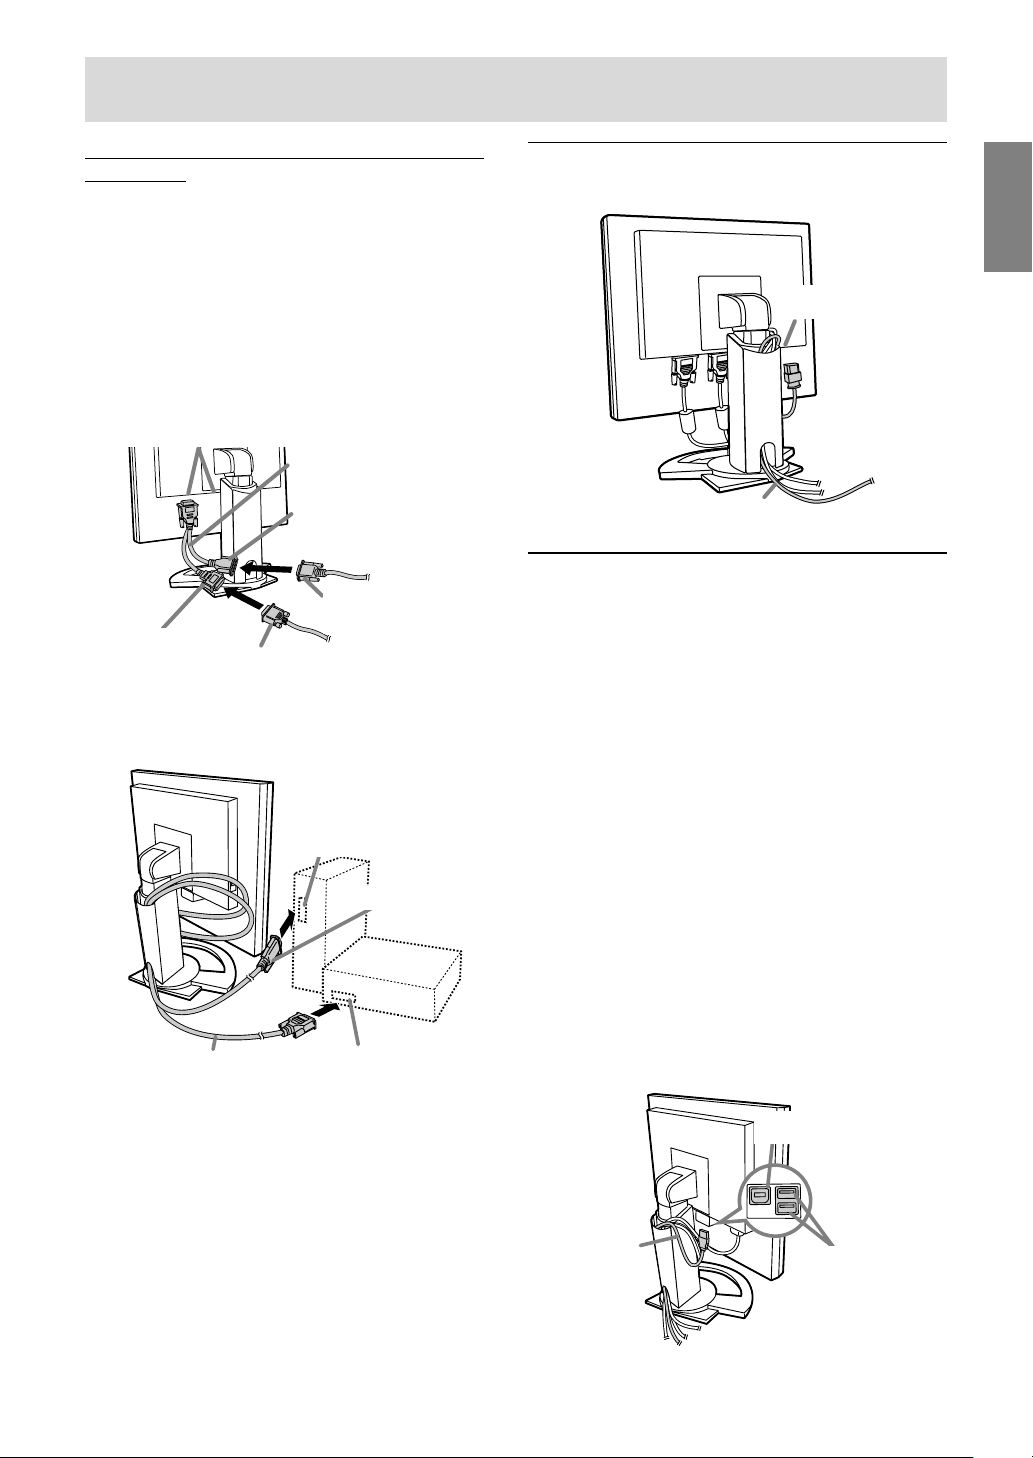
When connecting using a separately sold 2input cable
The separately sold 2-input cable (NL-C03J)
enables connection between the DVI-I input
terminal on the monitor and the two PCs.
(One analog and one digital connection.)
1.Connect the 2-input cable to the DVI-I input
terminal of the monitor, and then connect the
analog signal cable (commercially available) and
the digital signal cable to the 2-input cable.
Input terminal 1 and 2
You can connect to
either side.
2-input cable
(purchased separately)
mini D-sub 15 pin
Analog signal cable
(commercially available)
DVI-D24 pin
Digital signal cable
- For analog connection, use the commercially
available analog signal cable (both ends
should be mini D-sub 15 pin).
2.Connect each signal cable to the computers.
Analog RGB
output terminal
Analog signal cable
Digital signal cable
- Paying attention to connector orientation, firmly
insert the signal cable into the PC, and then
tighten the screws at both sides.
Digital RGB output terminal
Connecting the monitor to a power
source
EnglishDeutschFrançaisItalianoEspañolEnglish
Power terminal
AC outlet
Power cord
Connecting a USB device
This monitor is equipped with a USB standard
(Rev. 1.1) self-powered hub.
Downstream (2 ports)
Each of these ports enables connection of a USB
device with working current up to 500 mA.
Upstream (1 port)
This enables connection of a USB compatible
computer or USB hub.
Notes:
- If a USB cable is required, please use the one
included.
- Before connecting, ensure that the shape of the
USB cable connector is correct.
- For information regarding the USB function (such
as set-up) please refer to the operation manual
of the computer to be connected.
- Some computers, OS and other devices may not
be able to be activated. To ascertain a certain
device's USB compatibility, please contact the
manufacturer of the device.
Upstream
Notes:
- When using the 2-input cable, set the connecting
input terminal [INPUT-1] or [INPUT-2] to [2LINES]
under the MODE SELECT-1 Menu. (p.20, 23)
- The monitor connected to the 2-input cable by
analog connection may not be automatically
recognized and setup under Plug & Play. Perform
storage of setup information manually. (p. 29)
13
USB cable
Downstream
Page 4
Connecting the monitor and turning the monitor on and off
Turning the power on
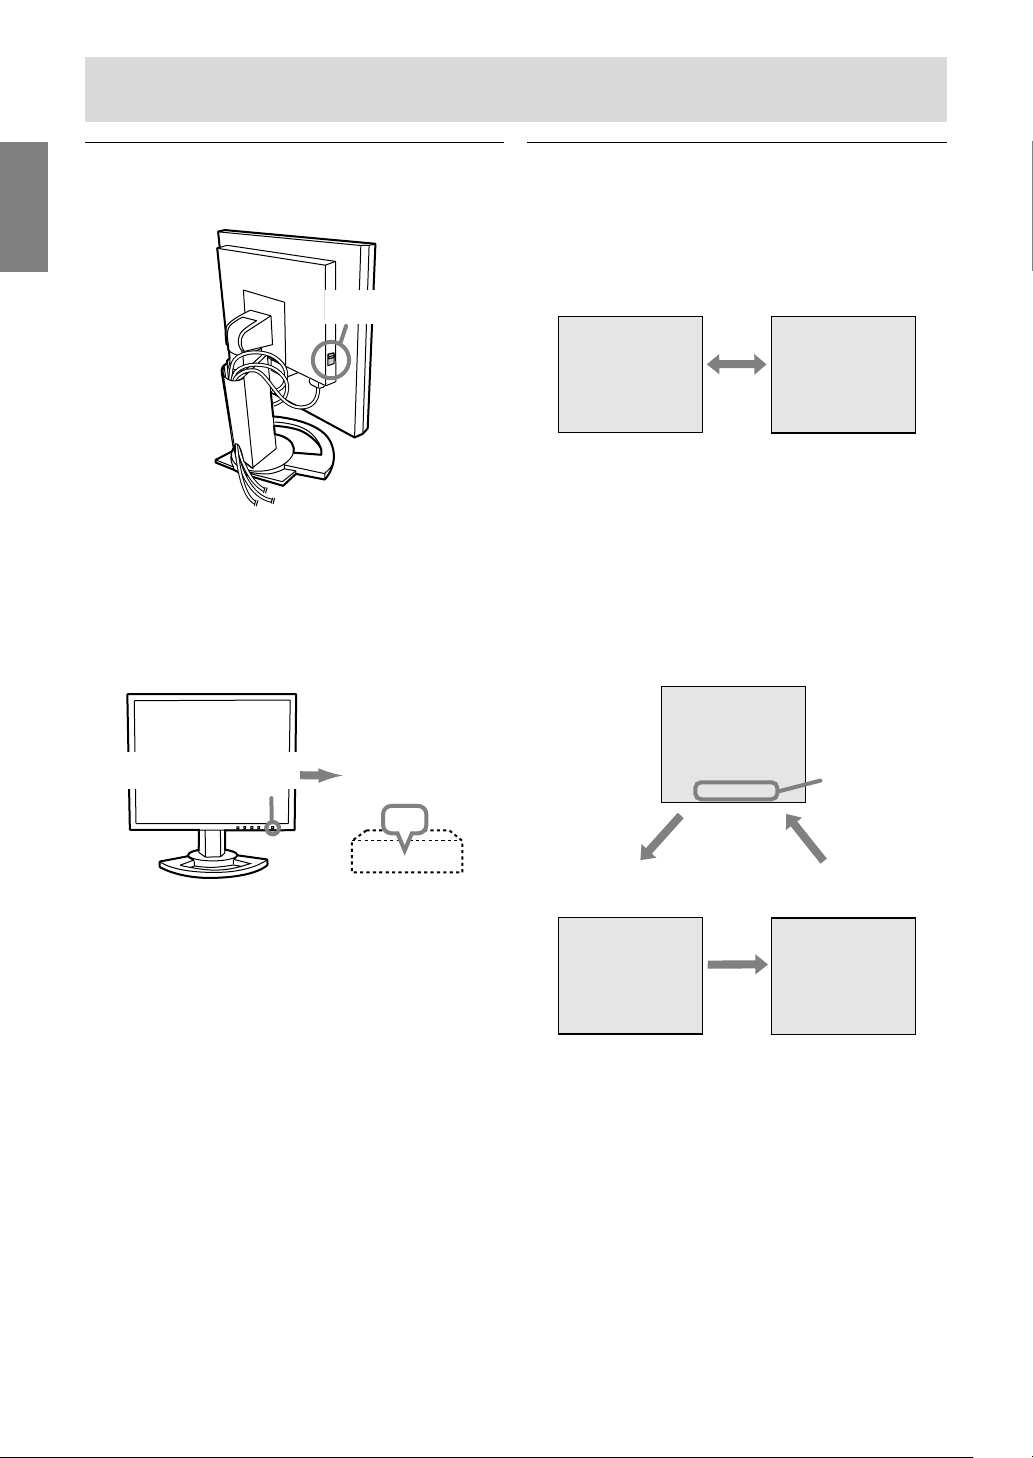
1.Turn on the main power of the monitor.
Main power switch
- When switching the main power switch on and
off, always wait for an interval of at least 5
seconds. Rapid switching may result in
malfunction.
2.Press the monitor's POWER button.
The power LED will light up orange.
3.Turn on the computer.
Turn on the
Press power button
computer power
supply.
ON
Changing between input terminals
Use the INPUT button to switch between signal
input terminals.
When not using a 2-input cable
Select [INPUT-1] Select [INPUT-2]
INPUT-1
< >
The input signal type (ANALOG/DIGITAL) is
displayed within angle brackets < >.
When using a 2-input cable
When selecting the input terminal connected to the
2-input cable, the input terminal [INPUT-1] or
[INPUT-2] is displayed, followed by the symbol for
analog [-A] or digital [-D].
(Example when connecting the 2-input cable to
input terminal 2 [INPUT-2])
INPUT
INPUT
Select [INPUT-1]
INPUT-1
< >
INPUT-2
< >
<ANALOG>
or <DIGITAL>
INPUT
When a signal is input from the computer, the
power LED lights up green, and the screen is
displayed (After power is turned on, it may take a
little time until the screen is displayed.)
- If the input terminal to which the computer is
connected has not been selected, the screen
will not be displayed. If necessary, perform
input terminal switching. (right column)
Notes: (when using an analog signal)
- If using the monitor for the first time or after
having changed the system settings during use,
perform an automatic screen adjustment (p. 17).
- When connecting to a notebook, if the notebook
computer's screen is set so that it is displaying at
the same time, the MS-DOS screen may not be
able to display properly. In this case, change the
settings so that only the monitor is displaying.
Select [INPUT-2]
(analog)
INPUT2-A
<ANALOG>
INPUT
Select [INPUT-2]
(digital)
INPUT2-D
<DIGITAL>
Note:
- When there is no input signal, [NO SIGNAL] is
displayed.
14
Page 5
Connecting the monitor and turning the monitor on and off
Turning the power off
1.Turn the computer off.
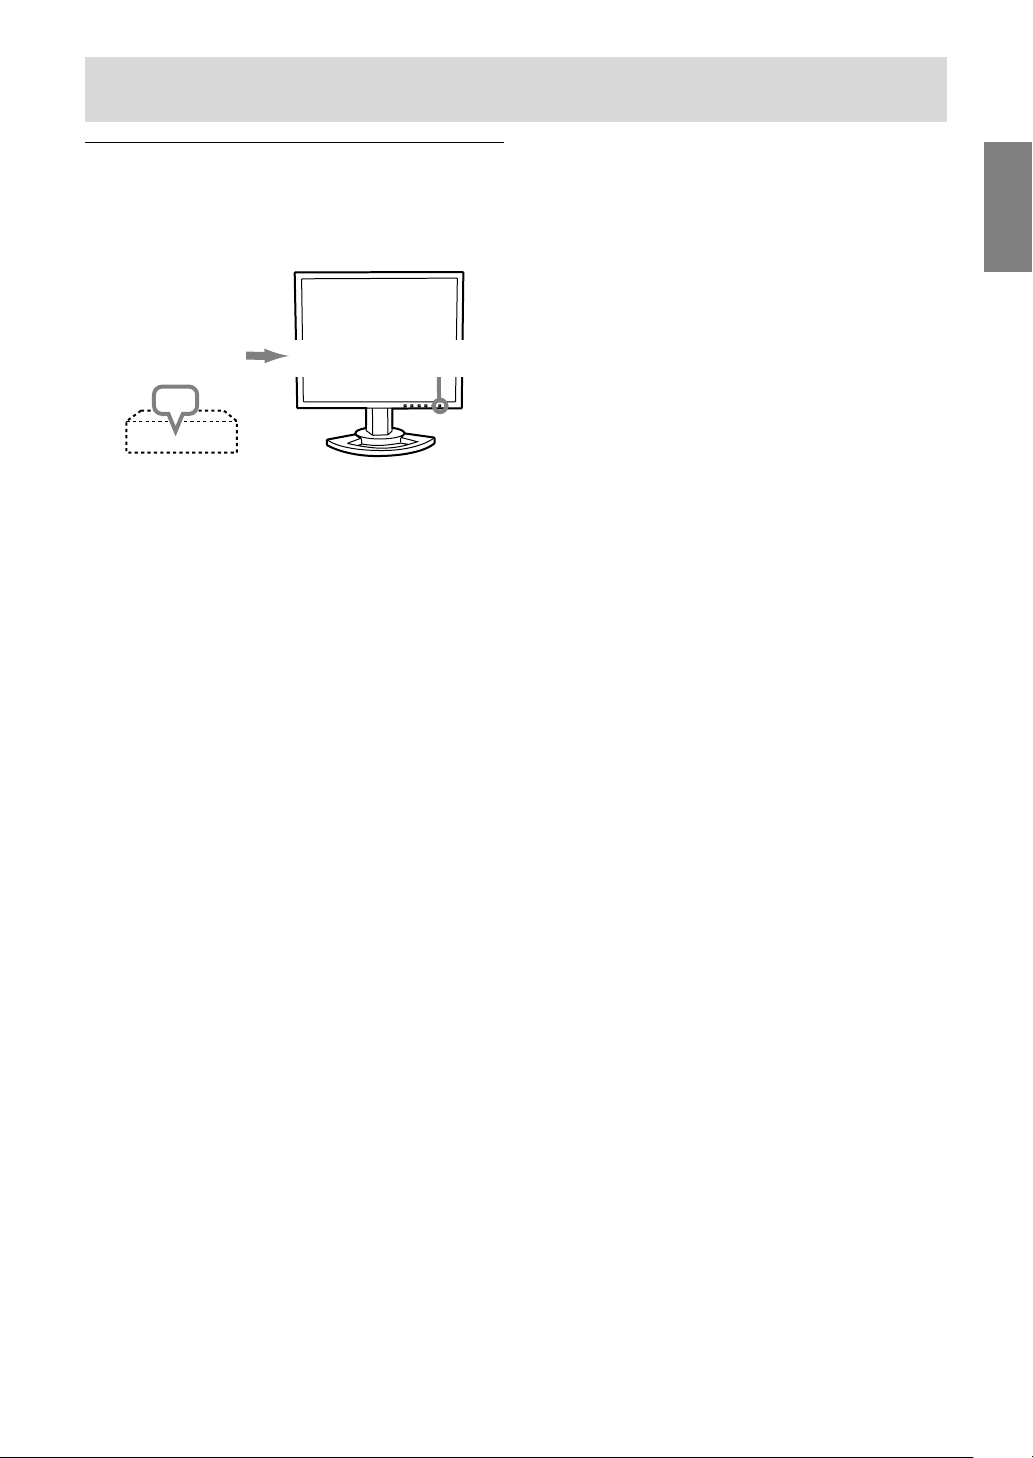
2.Press the monitor's POWER button.
The Power LED will disappear.
EnglishDeutschFrançaisItalianoEspañolEnglish
Turn the computer
off
OFF
If the monitor will not be used for a long time, turn
off the main power switch of the monitor, and
remove the power plug from the outlet.
Press power button
15
 Loading...