

Page 1

LC-42P7H
LCD COLOUR TELEVISION
液晶彩色電視機
液晶彩色電視機
OPERATION MANUAL
使用說明書
使用說明書
ENGLISH
中文 (繁體)中文 (簡體)
Page 2

Page 3

LC-42P7H
LCD COLOUR TELEVISION
ENGLISH
OPERATION MANUAL
Dear SHARP customer
Thank you for your purchase of the SHARP LCD colour TV product. To ensure safety and many years of
trouble-free operation of your product, please read the Important Safety Precautions carefully before
using this product.
Contents
ENGLISH
Dear SHARP customer ........................................... 1
Contents .................................................................. 1
Trademarks ............................................................. 2
Important Safety Precautions ............................... 3
Supplied accessories ............................................. 4
Preparation ............................................................. 5
Inserting the batteries ......................................... 5
Using the remote control unit .............................. 5
Cautions regarding remote control unit ........... 5
Attaching the stand ............................................. 6
Setting the TV ..................................................... 7
Setting the TV on the wall ................................... 8
Removing the stand ............................................ 8
Basic connection ................................................ 9
Connecting to an antenna .............................. 9
Connecting to the AC outlet ........................... 9
Connecting a VCR, game console or
camcorder ..................................................... 10
Connecting a DVD player ................................. 10
Connecting a Digital TV Decoder (Set Top Box)
Connecting a PC .............................................. 11
Part names .............................................................12
TV (Front) ...........................................................12
TV (Rear) ............................................................13
Remote control unit ...........................................14
Watching TV ...........................................................15
Turning on the power .........................................15
Turning off the power .........................................15
Simple button operations for changing
channels ..........................................................15
Using Flashback (A) on the remote
control unit ......................................................16
Using MPX on the remote control unit ................16
Simple button operation for changing
volume/sound .................................................17
Sleep timer ........................................................17
... 11
Basic adjustment settings ....................................18
Menu operation buttons .....................................18
On-Screen Display .............................................18
Menu items (TV/INPUT1-2) ................................19
Menu items (HDMI/DVI) ......................................19
Auto installation .................................................20
Programme setup ..............................................20
Auto search ...................................................20
Manual setting for each channel ....................21
Search tuning ...........................................21
Fine tuning ................................................21
Colour system ..........................................22
Sound system (Broadcasting system) ...... 22
Labelling channels ....................................22
Skipping channels ................................... 23
Setting the child lock ................................23
Password setting for child lock
(for TV input mode) See page 31.
Sort .............................................................. 23
Erase Programme ........................................ 24
AV MODE selection .......................................... 25
OPC (Optical Picture Control) setting ................ 25
Picture adjustments .......................................... 26
Advanced ......................................................... 27
Colour temperature ...................................... 27
Black .............................................................27
3D-Y/C ........................................................ 27
Monochrome ................................................28
Film mode .................................................... 28
Range of OPC .............................................. 28
Audio adjustment .............................................. 29
Surround ...................................................... 29
Power Control ...................................................30
1
Page 4

Contents
Useful adjustment settings .................................. 31
Password setting for child lock
(for TV input mode) ........................................ 31
Input Skip ..........................................................32
Input Signal (PC input mode only) ......................32
Auto Sync. adjustment (PC input mode only) .....33
Fine Sync. adjustment (PC input mode only) ......33
Input Label ........................................................ 34
Image position .................................................. 34
Wide Screen Signalling (WSS) ........................... 35
Picture aspect ratio ........................................... 35
Standby Mode ...................................................36
Reset .................................................................36
WIDE mode (for TV/AV input mode) .................. 37
WIDE mode (for PC input mode) ....................... 38
Audio Only ........................................................ 39
DNR (Digital Noise Reduction) ........................... 39
HDMI Setup ...................................................... 39
Language setting for on-screen display ............. 40
Identifi cation ......................................................40
Colour system setting ....................................... 40
Using external equipment .................................... 41
Displaying an external equipment image .......... 41
Displaying a DVD image (Example) ................... 41
Input Select .......................................................41
Useful features ..................................................... 42
Freezing images ................................................ 42
Appendix ............................................................... 43
Troubleshooting ................................................ 43
RS-232C port specifi cations ............................. 44
PC compatibility chart ....................................... 45
Specifi cations ................................................... 46
Optional accessories ........................................ 46
Dimensional drawings.......................................... 47
Trademarks
• “HDMI, the HDMI logo and High-Defi nition Multimedia Interface are trademarks or registered trademarks of HDMI
Licensing LLC.”
2
Page 5
Important Safety Precautions
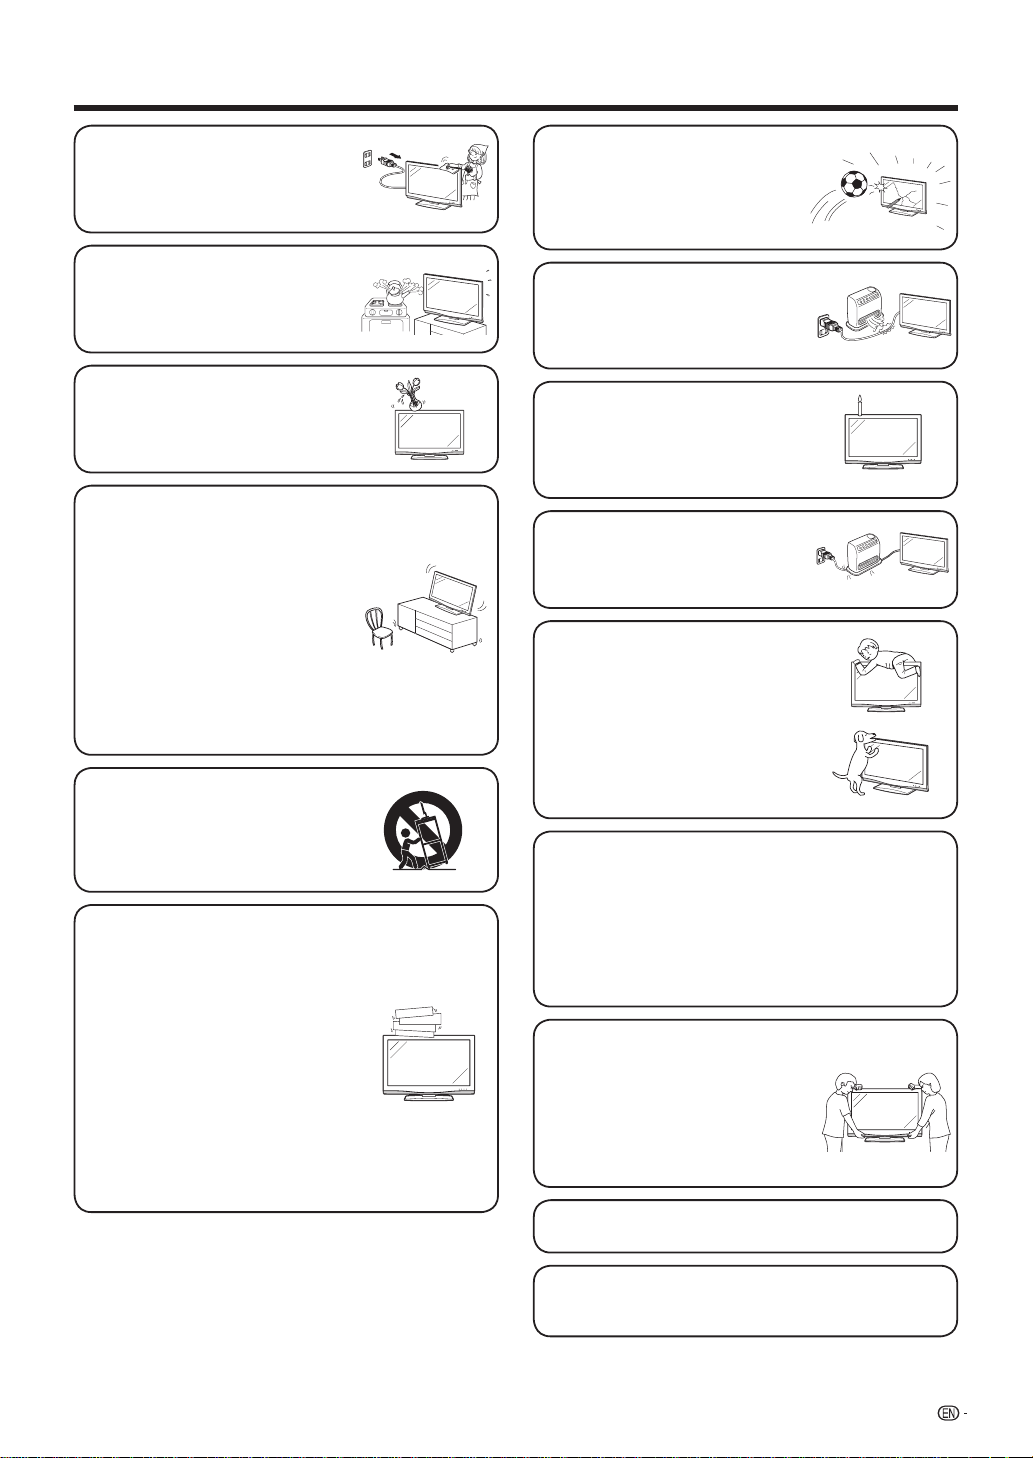
• Cleaning — Unplug the AC cord
from the AC outlet before cleaning
the product. Use a damp cloth to
clean the product. Do not use liquid
cleaners or aerosol cleaners.
• Water and moisture — Do not use
the product near water, such as
bathtub, washbasin, kitchen sink,
laundry tub, swimming pool and in a
wet basement.
• Do not place vases or any other
water-fi lled containers on this
product.
The water may spill onto the product
causing fi re or electric shock.
• Stand — Do not place the product
on an unstable cart, stand, tripod
or table. Doing so can cause the
product to fall, resulting in serious
personal injuries as well as damage
to the product. Use only a cart,
stand, tripod, bracket or table
recommended by the manufacturer
or sold with the product. When
mounting the product on a wall, be
sure to follow the manufacturer's
instructions. Use only the mounting
hardware recommended by the
manufacturer.
• The LCD panel used in this product
is made of glass. Therefore, it can
break when the product is struck
forcefully or with a sharp object. If
the LCD panel is broken, be careful
not to be injured by broken glass.
• Heat sources — Keep the product
away from heat sources such as
radiators, heaters, stoves and other
heat-generating products (including
amplifi ers).
• To prevent fi re, never place any type
of candle or naked fl ames on the
top or near the TV set.
• To prevent fi re or shock hazard, do
not place the AC power cord under
the TV set or other heavy items.
• Do not place heavy objects on this
product or stand on it. Doing so
could cause injury if the product
overturns. Take special care near
children and pets.
• When relocating the product
placed on a cart, it must be moved
with utmost care. Sudden stops,
excessive force and uneven fl oor
surface can cause the product to fall
from the cart.
• Ventilation — The vents and other
openings in the cabinet are designed
for ventilation. Do not cover or block
these vents and openings since
insuffi cient ventilation can cause
overheating and/or shorten the life
of the product. Do not place the
product on a bed, sofa, rug or other
similar surface, since they can block
ventilation openings. This product is
not designed for built-in installation;
do not place the product in an
enclosed place such as a bookcase
or rack, unless proper ventilation
is provided or the manufacturer's
instructions are followed.
The LCD panel is a very high technology product
with 6,220,800 thin fi lm transistors, giving you fi ne
picture details.
Due to the very large number of pixels, occasionally
a few non-active pixels may appear on the screen
as a fi xed point of blue, green or red.
This is within product specifi cations and does not
constitute a fault.
Precautions when
transporting the TV
Be sure to always carry the TV
by two people holding it with two
hands — one hand on each side
of the TV.
• Do not display a still picture for a long time, as this could
cause an afterimage to remain.
• Install the product on the place where the AC cord can
be unplugged easily from the AC outlet, or from the AC
INPUT terminal on the rear of the product.
3
Page 6
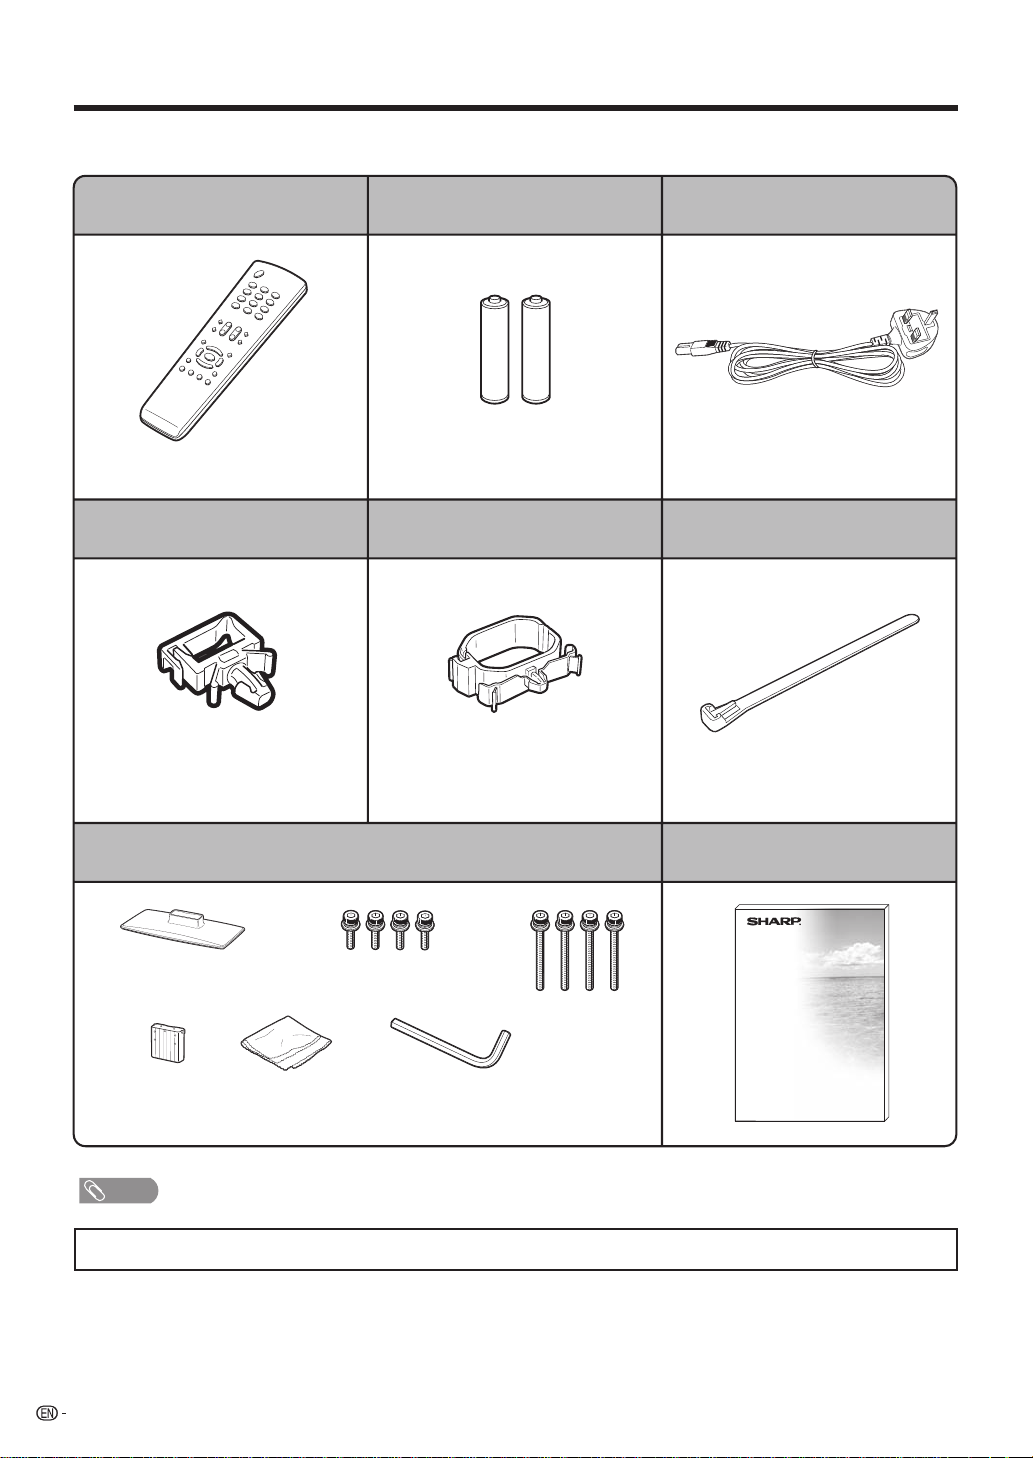
Supplied accessories
Make sure the following accessories are provided with the product.
Remote control unit “AAA” size battery (g2) AC cord
Page 14 Page 5 Page 7
AC cord clamp Cable clamp
Page 7 Page 7
Stand base
Stand post
Cloth
Short screws (g4)
Hex key
Page 6
Cable tie
Page 7
Operation manualStand unit
Long screws
(g4)
NOTE
• Always use the AC cord supplied with the TV.
• The illustrations and on-screen displays in this operation manual are for explanation purposes and may vary slightly from the
actual operations.
4
Page 7

Preparation
Inserting the batteries
Before using the TV for the fi rst time, insert two “AAA” size batteries (supplied). When the batteries become
depleted and the remote control fails to operate, replace the batteries with new “AAA” size batteries.
1 Open the battery cover.
CAUTION
Improper use of batteries can result in chemical leakage or explosion. Be sure to follow the instructions below.
• Do not mix batteries of different types. Different types of batteries have different characteristics.
• Do not mix old and new batteries. Mixing old and new batteries can shorten the life of new batteries or cause chemical
leakage in old batteries.
• Remove batteries as soon as they have worn out. Chemicals that leak from batteries can cause a rash. If you fi nd any
chemical leakage, wipe thoroughly with a cloth.
• The batteries supplied with this product may have a shorter life expectancy due to storage conditions.
• If you will not be using the remote control unit for an extended period of time, remove the batteries from it.
2 Insert two supplied “AAA” size
batteries.
• Place batteries with their terminals
corresponding to the (e) and (f)
indications in the battery compartment.
3 Close the battery cover.
Using the remote control unit
Use the remote control unit by pointing it towards the
remote sensor window.
Objects between the remote control unit and sensor
window may prevent proper operation.
Remote control
sensor
Cautions regarding remote control unit
• Do not subject the remote control unit to shock.
In addition, do not soak the remote control unit with liquids, or place it in an
area with high humidity.
• Do not install or place the remote control unit under direct sunlight.
The heat may cause deformation of the unit.
• The remote control unit may not work properly if the remote sensor window
of the TV is under direct sunlight or strong lighting. In such case, change the
angle of the lighting or TV, or operate the remote control unit closer to the
remote sensor window.
5 m
30°30°
5
Page 8
Preparation
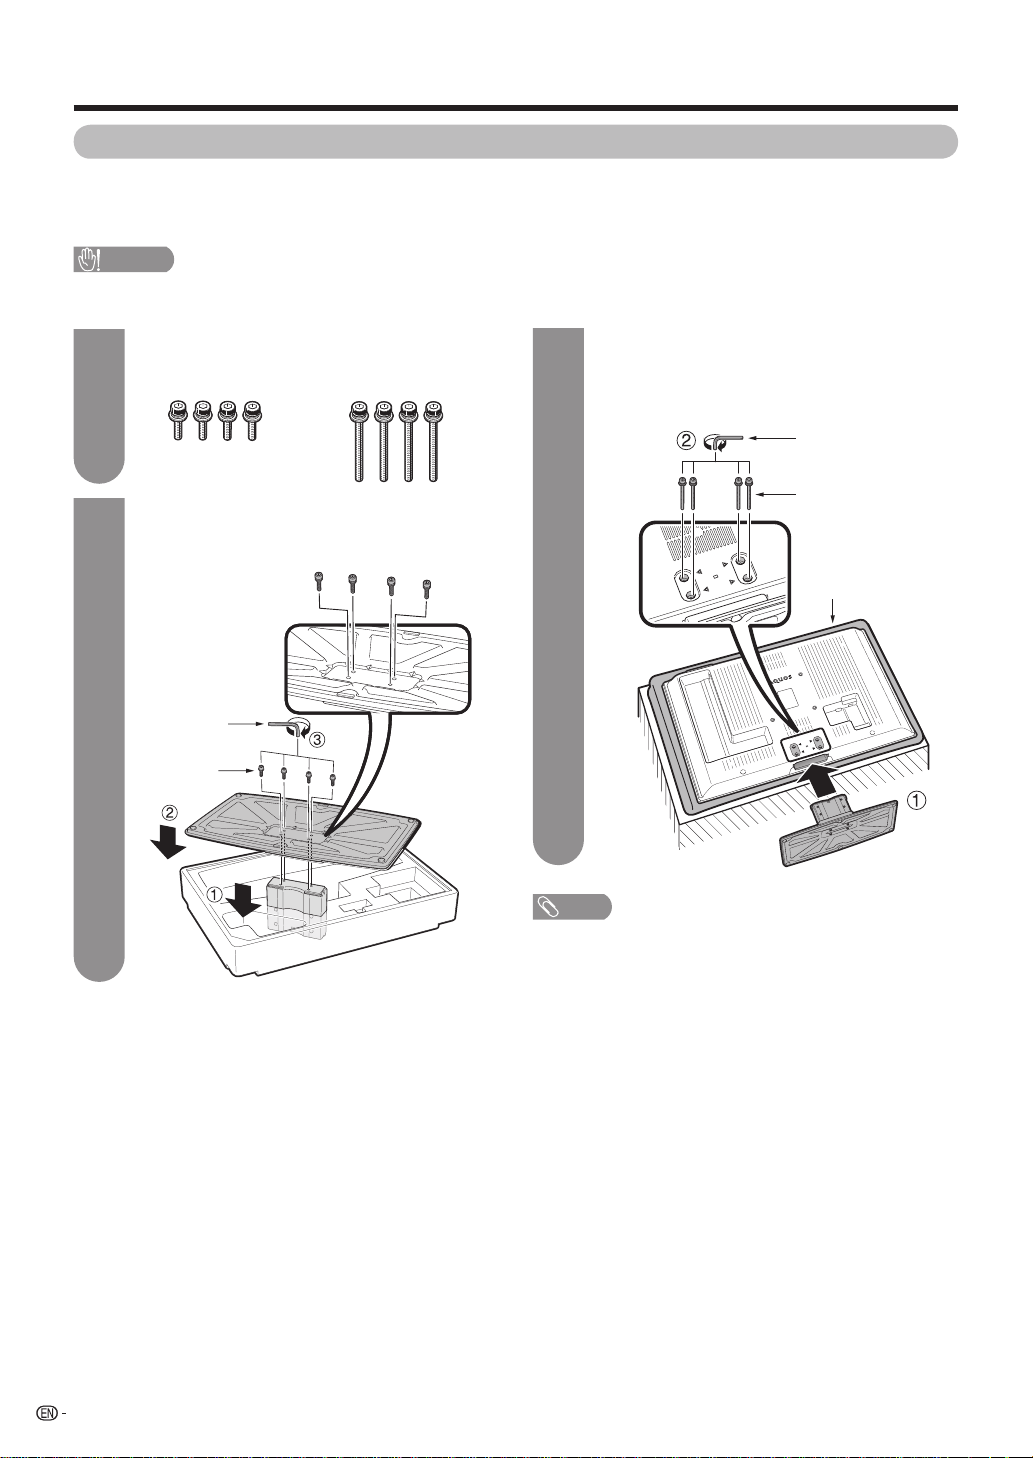
Attaching the stand
• Before attaching (or detaching) the stand, unplug the AC cord from the AC INPUT terminal.
• Before performing work spread cushioning over the base area to lay the TV on. This will prevent it from being
damaged.
CAUTION
• Attach the stand in the correct direction.
• Be sure to follow the instructions. Incorrect installation of the stand may result in the TV falling over.
Confi rm the 8 screws supplied with the TV.
1 3
2
Short screws (g4)
(used in step 2)
Attach the supporting post for the stand unit
onto the base using the box for the stand unit
as shown below.
Hex key
Short screw
Long screws (g4)
(used in step 3)
• To detach the stand, perform the steps in reverse order.
Insert the stand into the openings on the
1
bottom of the TV.
Insert and tighten the 4 long screws into
2
the 4 holes on the rear of the TV.
Hex key
Long screw
Soft cushion
NOTE
6
Page 9
Preparation
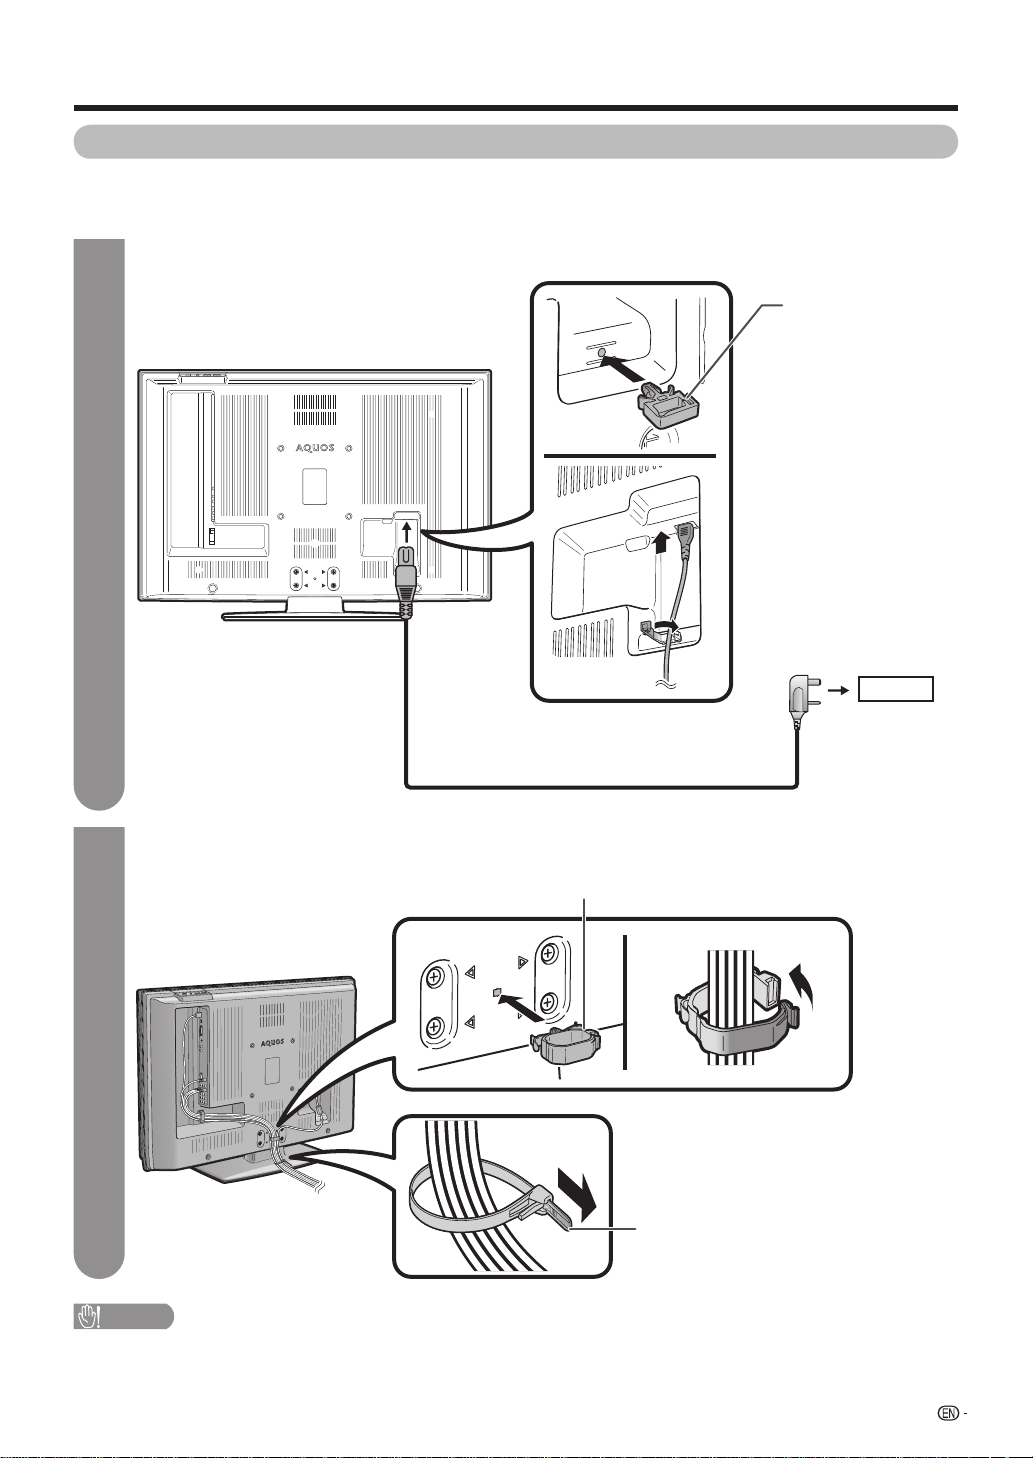
Setting the TV
Notes on installing the TV
• Avoid direct sunlight and place the TV in a well-ventilated location.
• Place the TV in a level location.
Connecting the AC cord, antenna, and external equipment to the TV
1
TV (rear view)
AC cord clamp
See pages 9 to 11 for
connecting antennas and
external equipment, such
as VCR and DVD player.
• Place the TV close to the AC outlet, and keep the power plug within reach.
Bundling the cables
2
Insert the cable clamp in the hole on the TV as shown.
Cable clamp
AC outlet
AC cord
Cable tie
CAUTION
• TO PREVENT RISK OF ELECTRIC SHOCK, DO NOT TOUCH UN-INSULATED PARTS OF ANY CABLES WITH THE
AC CORD CONNECTED.
7
Page 10
Preparation
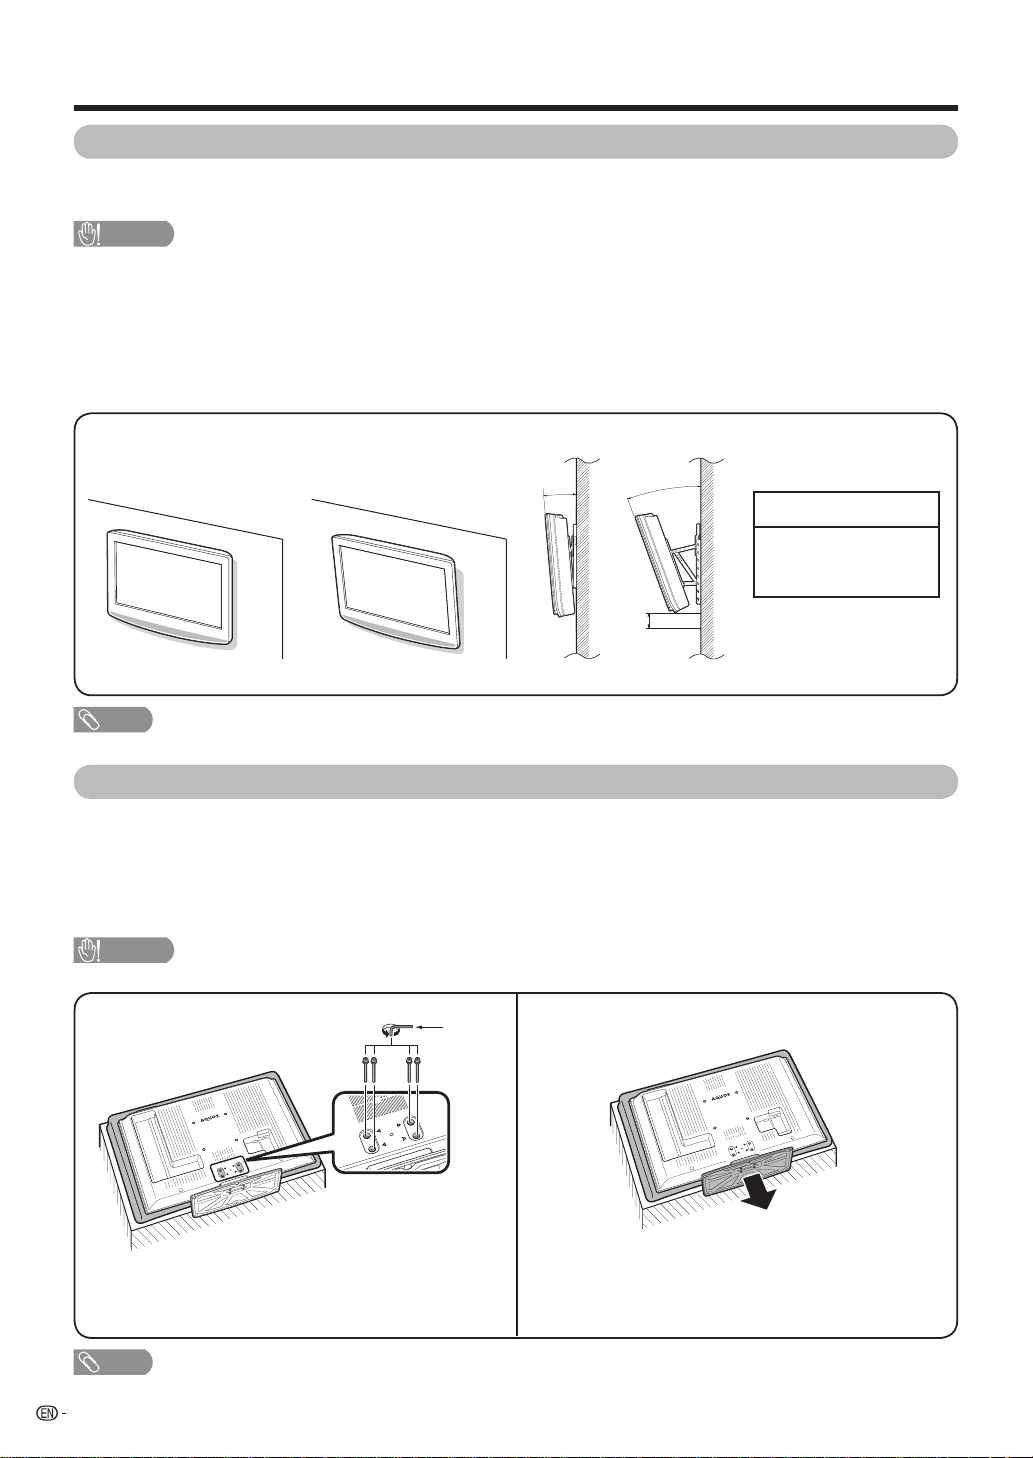
Setting the TV on the wall
• You can mount the TV on the wall, using the optional AN-37AG2/AN-52AG1 bracket.
• For details, refer to the instructions supplied with the optional bracket.
CAUTION
• This TV should be mounted on the wall only with the AN-37AG2/AN-52AG1 (SHARP) wall mount bracket. The use
of other wall mount brackets may result in an unstable installation and may cause serious injuries.
• Installing the Liquid Crystal Television requires special skill that should only be performed by qualifi ed service
personnel. Customers should not attempt to do the work themselves. SHARP bears no responsibility for improper
mounting or mounting that results in accident or injury.
Using an optional bracket to mount the TV
• You can ask a qualifi ed service personnel about using an optional AN-37AG2/AN-52AG1 bracket to mount the TV to the wall.
• Carefully read the instructions that come with the bracket before beginning work.
Hanging on the wall
AN-37AG2/AN-52AG1 wall mount bracket.
(See the bracket instructions for details.)
About setting the TV angle and height adjustment
0° or 5°
1
2
For AN-52AG1
0°/5°/10°/15°/20°
1
-5/0/+5 cm
2
(can be moved 5 cm
up or down)
Vertical mounting
NOTE
• Detach the cable clamps on the rear of the TV when using the optional mount bracket.
Angular mounting
AN-37AG2 AN-52AG1
Removing the stand
For wall mounting with the optional bracket, remove the stand.
Before detaching/attaching the stand
• Before detaching (or attaching) the stand, unplug the AC cord from the AC outlet.
• Remove all terminal covers and connected cables.
• Lay the TV down on cushioning (such as a blanket) over a table.
• Make sure two or more people perform the operation.
CAUTION
• Do not remove the stand from the TV unless using an optional bracket to mount it.
1
Hex key
2
Unfasten the four screws used to secure the stand
in place.
NOTE
• To attach the stand, perform the above steps in reverse order.
8
Detach the stand from the TV.
(Hold the stand so it will not drop from the edge of
the base area.)
Page 11

Preparation
Simple operations for watching a TV programme
Basic connection
Connecting to an antenna
To enjoy a clearer picture, use an outdoor antenna. The following is a brief explanation of the types of connections
that are used for coaxial cable.
Standard DIN45325 plug (IEC169-2)
75-ohm coaxial cable (round cable)
Antenna cable
(commercially available)
Room antenna terminal
(75-ohm type)
Connecting to the AC outlet
To antenna
terminal
Rear view
AC outlet
NOTE
• Always turn off the power of the TV when connecting the AC cord.
• Disconnect the AC cord from the AC outlet if the TV will not be used for a long period of time.
9
Page 12
Preparation
You can connect many types of external equipment to your TV, like a VCR, game console, camcorder, DVD
player, Digital TV Decoder (STB) and PC. To view external source images, select the input source from TV/VIDEO
on the remote control unit or TV/VIDEO on the TV.
CAUTION
• To protect all equipment, always turn off the TV before connecting to a VCR, game console, camcorder, DVD player, Digital
TV Decoder (STB), PC or other external equipment.
• Refer to the relevant operation manual (VCR, DVD player, etc.) carefully before making connections.
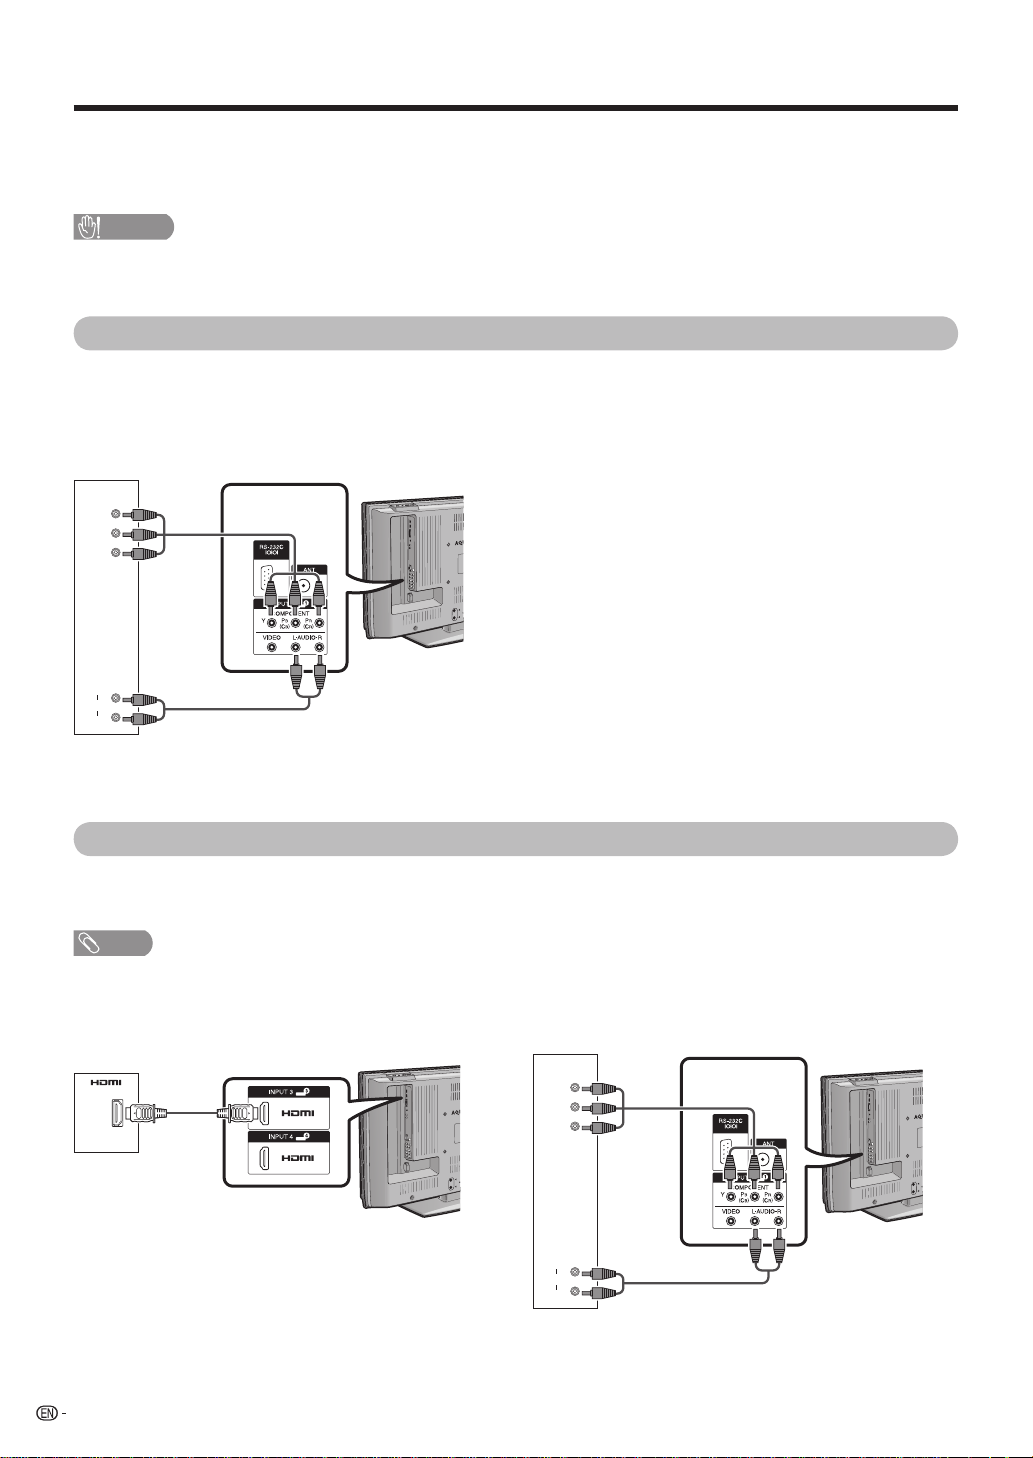
Connecting a VCR, game console or camcorder
A VCR, game console, camcorder and some other audiovisual equipment can be conveniently connected using
the INPUT 1/INPUT 2 (component) terminals.
When using component cable
(commercially available).
Y
B
P
(CB)
PR
(CR)
L
AUDIO
R
VCR/
Game console/
Camcorder
Connecting a DVD player
You can use the INPUT 1/INPUT 2 (component) or INPUT 3/INPUT 4 (HDMI) terminal when connecting to a DVD
player and other audiovisual equipment.
NOTE
• When using a DVI-HDMI conversion adaptor, input the Audio Signal from the AUDIO terminal of INPUT 4.
When using HDMI cable
(commercially available).
DVD player
When using component cable
(commercially available).
Y
P
B
(CB)
PR
(CR)
L
AUDIO
R
DVD player
10
Page 13
Preparation
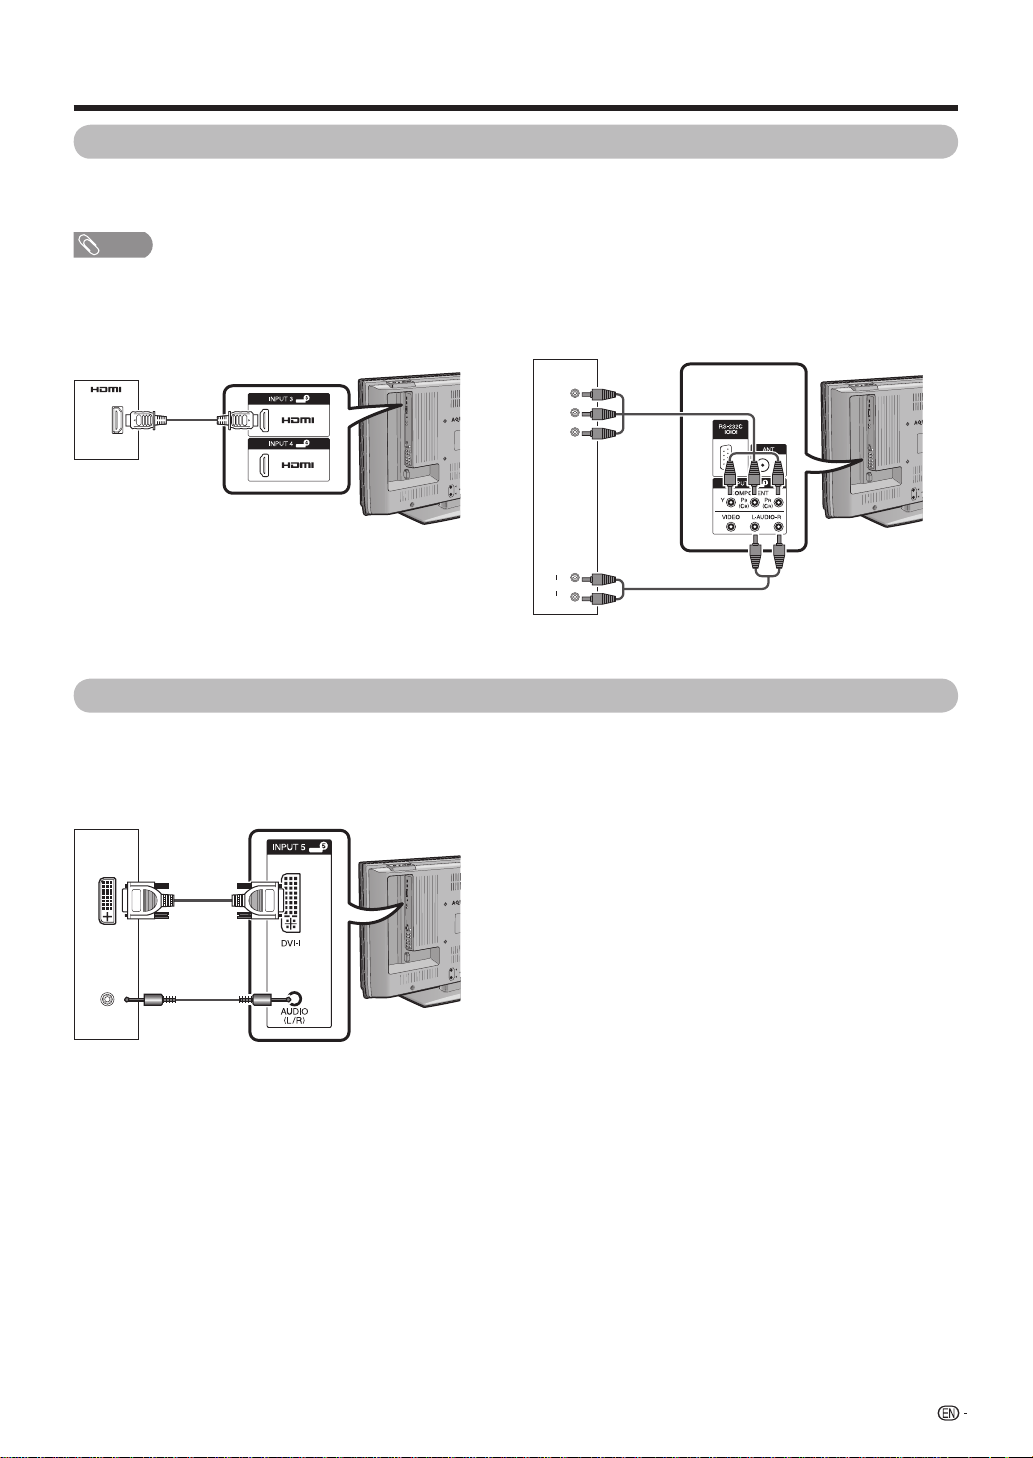
Connecting a Digital TV Decoder (Set Top Box)
You can use the INPUT 1/INPUT 2 (component) or INPUT 3/INPUT 4 (HDMI) terminal when connecting to a Digital
TV Decoder (STB) and other audiovisual equipment.
NOTE
• When using a DVI-HDMI conversion adaptor, input the Audio Signal from the AUDIO terminal of INPUT 4.
When using HDMI cable
(commercially available).
When using component cable
(commercially available).
Y
B
P
(CB)
PR
(CR)
Digital TV
Decoder (STB)
L
AUDIO
R
Digital TV
Decoder (STB)
Connecting a PC
You can use the INPUT 5 (DVI) terminal when connecting to a PC.
When using DVI cable
(commercially available).
DVI-I
PC
AUDIO
(L/R)
11
Page 14
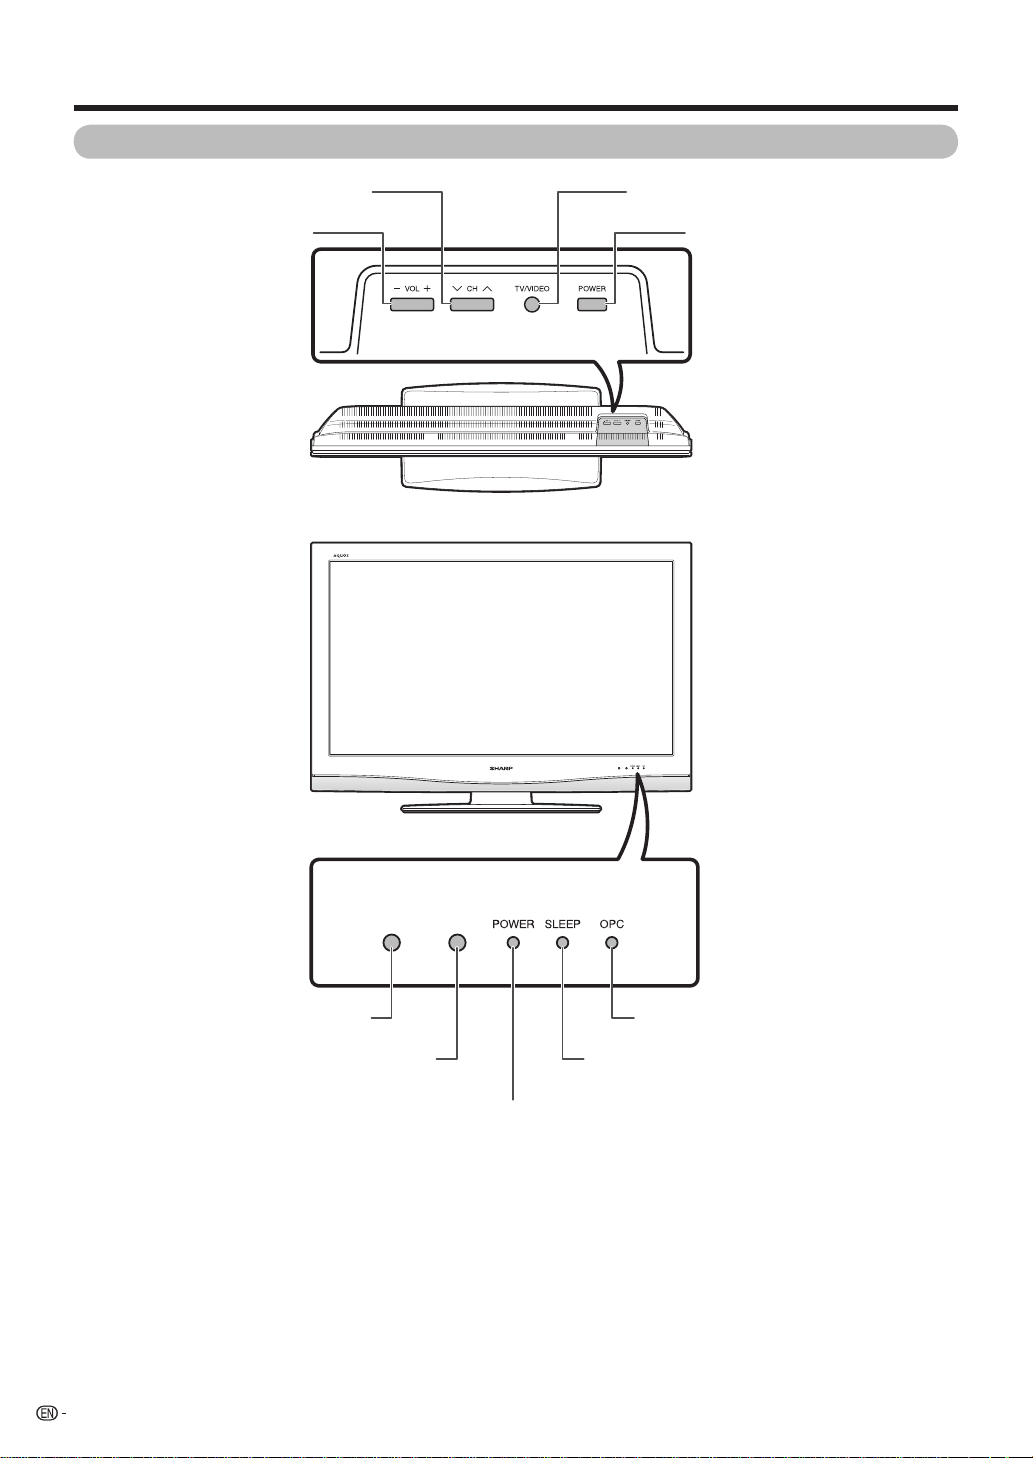
Part names
TV (Front)
Channel up (r)/down (s) buttons
Volume up (e)/down (f) buttons
TV/VIDEO button
POWER (On/Off) button
Remote control sensor
POWER indicator
12
OPC indicator*
SLEEP timer indicatorOPC sensor
*OPC: Optical Picture Control
(See page 25.)
Page 15
Part names
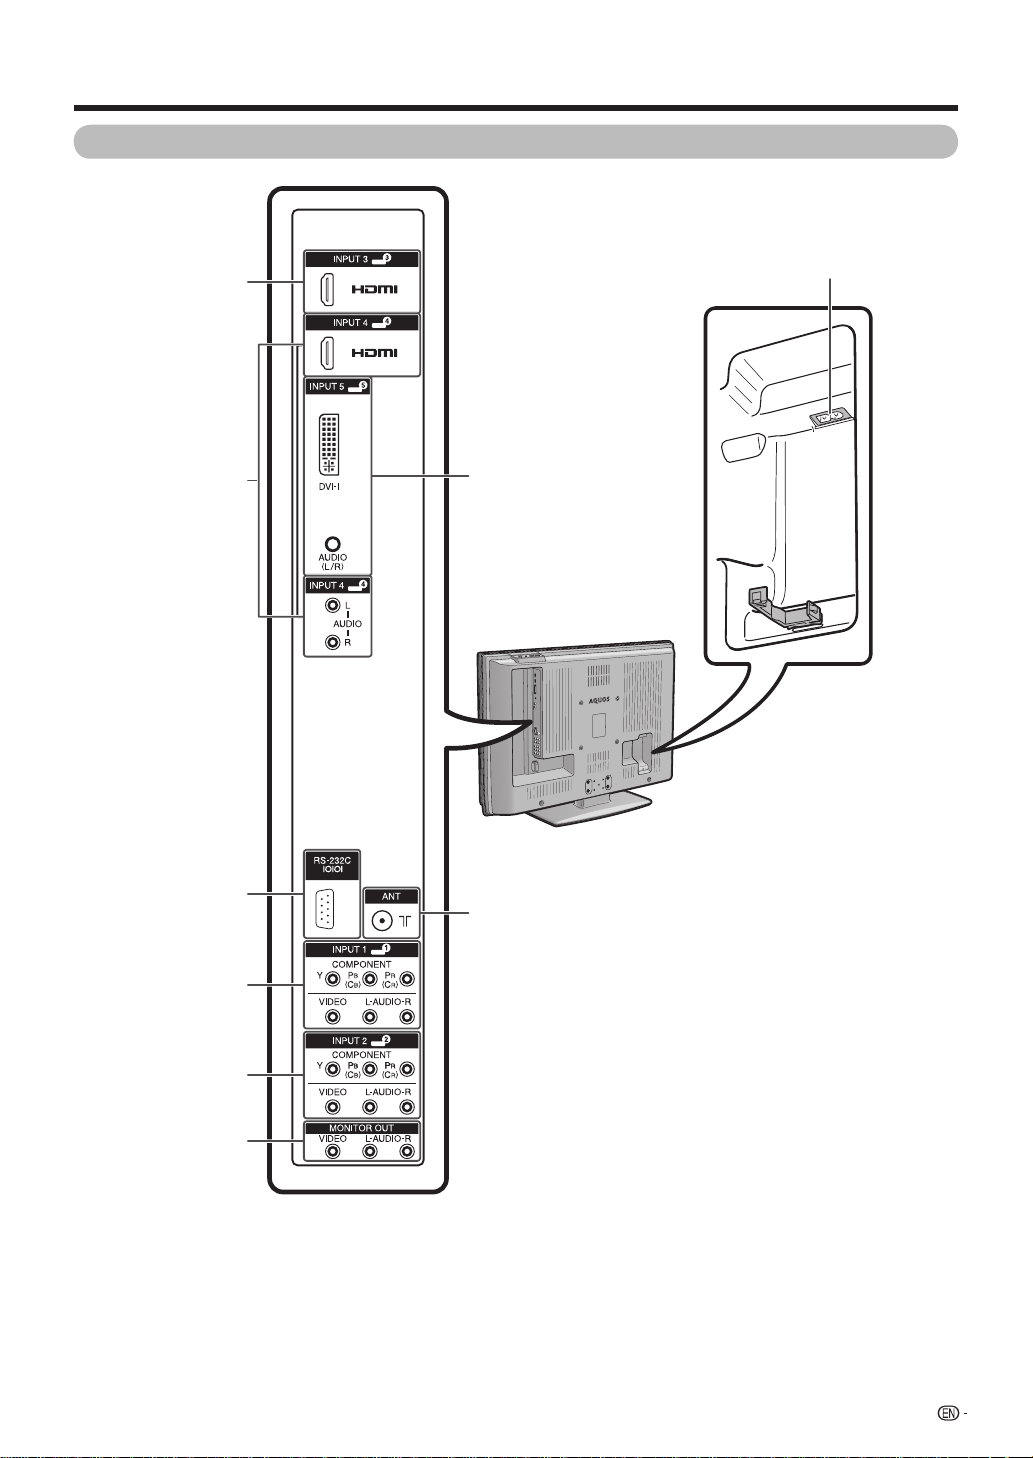
TV (Rear)
INPUT 3 (HDMI)
terminals
INPUT 4 (HDMI)
terminals
AC INPUT terminal
INPUT 5 terminals
RS-232C terminal
INPUT 1 terminals
INPUT 2 terminals
MONITOR OUTPUT
terminals
Antenna input terminal
13
Page 16
Part names
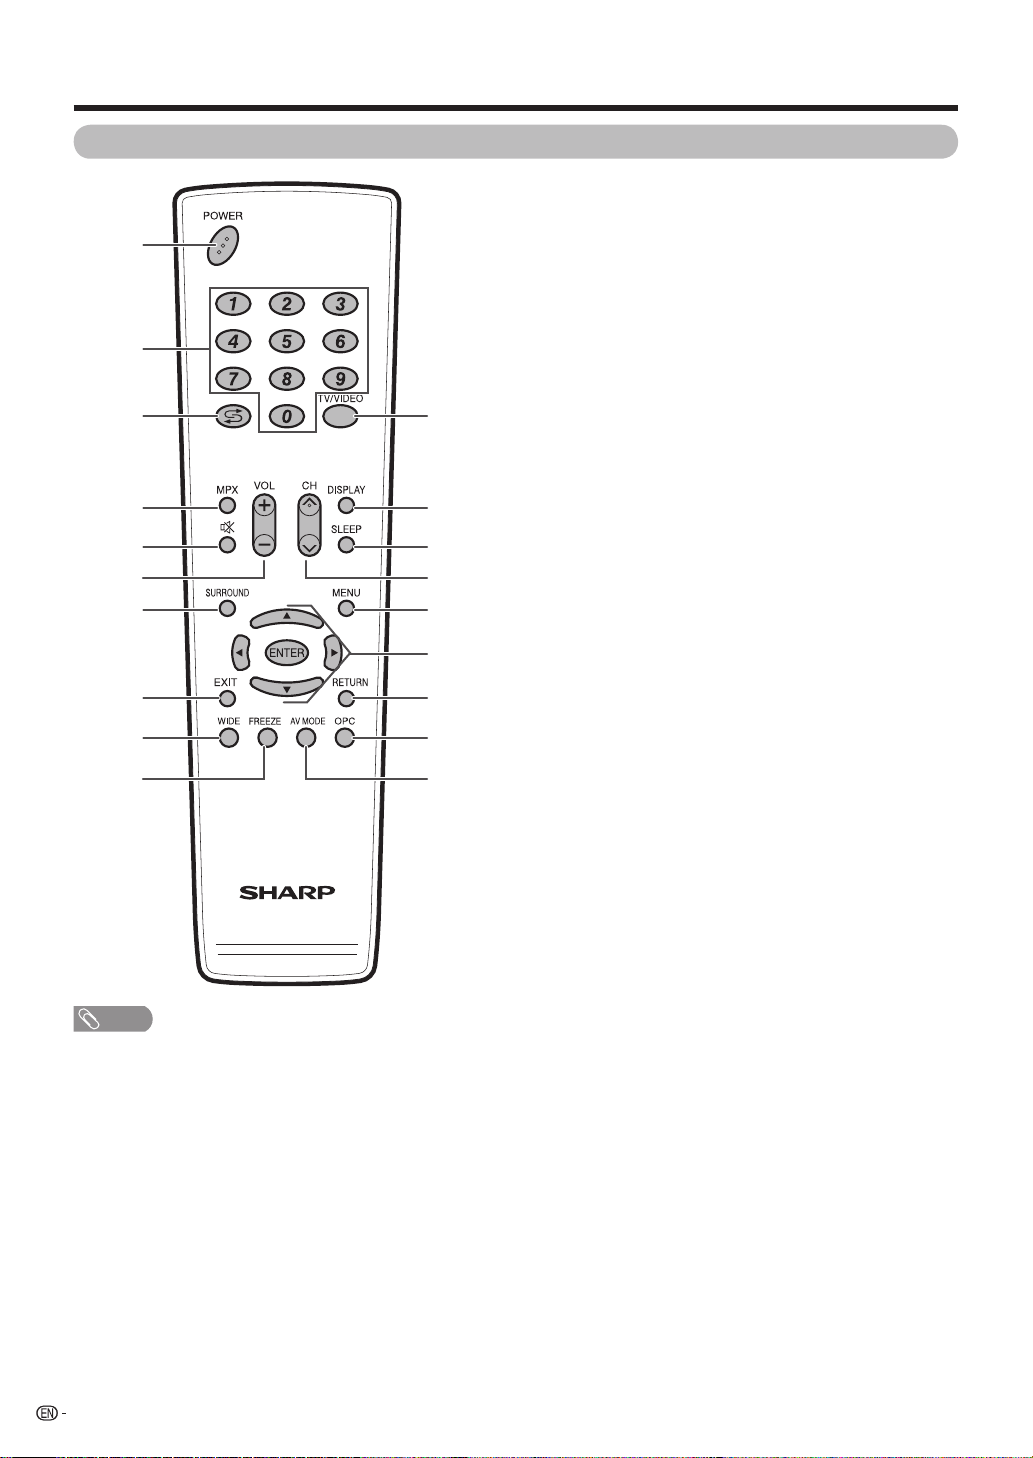
Remote control unit
1
2
3
4
5
6
7
8
9
10 19
NOTE
• When using the remote control unit, point it at the TV.
11
12
13
14
15
16
17
18
1 POWER (STANDBY/ON)
To switch the power on and off. (See page 15.)
2 0 – 9
Set the channel. (See page 15.)
3 A (Flashback)
Press to return to the previous selected channel or
external input mode. (See page 16.)
4 MPX
Select the sound multiplex mode. (See page 16.)
5 e (Mute)
Mute the sound. (See page 17.)
6 VOLk/VOL
Set the volume. (See page 17.)
7 SURROUND
Select Surround settings. (See page 29.)
8 EXIT
Turn off the On-Screen Display.
9 WIDE
Change the wide image mode. (See pages 37 and 38.)
10 FREEZE
Freeze a motion picture on the screen. (See page 42.)
11 TV/VIDEO (INPUT SOURCE)
Select an input source. (TV, INPUT 1, INPUT 2, INPUT 3,
INPUT 4, INPUT 5) (See pages 10, 34 and 41.)
12 DISPLAY
Display the channel or input information.
13 SLEEP
Set the Sleep timer. (See page 17.)
14 CHr/CH
TV input mode: Select the channel. (See page 15.)
15 MENU
Display the menu screen. (See page 18.)
16 a/b/c/d (Cursor)
Select a desired item on the setting screen. (See page
18.)
ENTER
Execute a command. (See page 18.)
17 RETURN
MENU mode: Return to the previous menu screen. (See
page 18.)
18 OPC
To switch the Optical Picture Control on and off. (See
page 25.)
19 AV MODE
Select an audio and video setting. (See page 25.)
l
s
14
Page 17

Watching TV
Turning on the power
Press POWER on the TV.
• POWER indicator (Green): The TV is on. (After a few
seconds, an image appears with sound.)
• After turning the power “ON” by pressing POWER on the
TV, you can turn the power ON/OFF by pressing POWER
on the remote control.
POWER button
POWER indicator
Turning off the power
Press POWER on the remote control.
• The TV enters standby mode and the image on the screen
disappears.
• The POWER indicator on the TV changes from green to
red.
Press POWER on the TV.
• The POWER indicator on the TV turns off.
• When the TV is turned off by POWER on the TV, you
cannot turn on the power by pressing POWER on the
remote control.
POWER indicator
Off Power off
The TV is in standby mode.Red
The TV is on.Green
Simple button operations for changing channels
You can change channels in several ways.
Using CHr/s on the remote control unit
• Press CHr to increase the channel number.
• Press CHs to decrease the channel number.
NOTE
• CHr/s on the TV operates the same as CHr/s on
the remote control unit.
Using 0 — 9 on the remote control unit
Select the channels directly by pressing buttons 0 to 9.
a
To select a 1-digit channel (e.g. channel 2):
• Press 0, followed by 2.
To select a 2-digit channel (e.g. channel 12):
• Press 1, followed by 2.
NOTE
• If you are not going to use this TV for a long period of time,
be sure to remove the AC cord from the AC outlet.
• Minor power is consumed when the TV is turned off by
POWER on the TV.
POWER button
15
Page 18

Watching TV
Using Flashback (A) on the remote
control unit
Press A to switch the currently tuned channel to the
previously tuned channel.
Press A again to switch back to the currently tuned
channel.
Press A to toggle between the currently selected
input source and the previously selected one.
Using MPX on the remote control unit
In the NICAM TV broadcasts
When receiving a stereo signal
Each time you press MPX, the mode switches
between NICAM STEREO and MONO.
Stereo mode
BBC2
99
PAL
B/G
NICAM
STEREO
When receiving a bilingual signal
Each time you press MPX, the mode switches among
NICAM CH A, NICAM CH B, NICAM CH AB and
MONO.
Bilingual mode
BBC2
99
PAL
B/G
NICAM NICAM
CH A
BBC2
99
PAL
B/G
MONO
BBC2
99
PAL
B/G
CH B
When receiving a monaural signal
Each time you press MPX, the mode switches
between NICAM MONO and MONO.
Monaural mode
NICAM
BBC2
99
PAL
B/G
MONO
BBC2
99
PAL
B/G
MONO
In the TV mode of A2 TV broadcasts
When receiving a stereo signal
Each time you press MPX, the mode switches
between STEREO and MONO.
Stereo mode
BBC2
99
PAL
B/G
STEREO
BBC2
99
PAL
B/G
MONO
When receiving a bilingual signal
Each time you press MPX, the mode switches among
CH A, CH B and CH AB.
Bilingual mode
BBC2
99
PAL
B/G
CH A
BBC2
BBC2
99
PAL
B/G
CH B
99
PAL
B/G
CH AB
When receiving a monaural signal
When you press MPX, “MONO” displays.
Monaural mode
BBC2
99
PAL
B/G
MONO
NOTE
• “BBC2”, “99” and “PAL” are tentative network name,
channel and colour system.
BBC2
99
PAL
B/G
MONO
16
NICAM
BBC2
99
PAL
B/G
CH AB
Page 19

Watching TV
Simple button operation for changing volume/sound
Changing the volume
You can change the volume on the TV or on the
remote control unit.
• To increase the volume, press VOLk.
• To decrease the volume, press VOLl.
20
NOTE
• “TV”, “INPUT1”, “INPUT2”, “INPUT3”, “INPUT4” and
“INPUT5” modes can store volume adjustment values
separately.
Using Mute (e) on the remote control unit
mutes the current sound output.
e
Sleep timer
Allows you to set a time when the TV automatically
switches to standby.
Press SLEEP.
1
• Remaining time displays when sleep timer has
been set.
Sleep Timer: Remain 2 hr. 00 min.
Each time you press SLEEP, the remaining
2
time switches as shown below.
0 hr. 30 min. 1 hr. 00 min. 1 hr. 30 min.
Off
NOTE
• The sleep timer indicator on the TV lights up when the time
has been set.
• When the time has been set, countdown automatically
starts.
• Five minutes before the preset of time expires, the
remaining time displays each minute.
• Select “Off” by pressing SLEEP to cancel the sleep timer.
2 hr. 30 min. 2 hr. 00 min.
Press e.
1
• The sound is silenced.
• “M” is displayed while the mute function is on.
Mute
NOTE
• Within 30 minutes after pressing e, press one of the
buttons below to cancel the mute.
— VOLl/VOL
—
e
• Mute will be cancelled after 30 minutes. However,
the TV will not suddenly output loud sound as the
volume level will be set to 0 automatically. Increase
the volume level by pressing VOLk.
Press e again within 30 minutes to cancel the
2
mute.
• Before 30 minutes, the volume level returns to the
k
previous setting.
17
Page 20

Basic adjustment settings
Menu operation buttons
Use the following buttons on the remote control to
operate the menu.
On-Screen Display
(Example)
...
[
Option
MENU
Option
Audio Only
DNR
Input Select
Colour System
Item displayed in yellow
1
Input Select
• This indicates the item currently selected.
• Press ENTER to go to the adjustment screen for this
item.
Item in brackets
2
• This indicates the current setting for the item.
Item displayed in white
3
• This indicates an item can be selected.
Item displayed in grey
4
• This indicates that the item cannot be selected.
* There are various reasons why items cannot be
selected, but the main reasons are as follows:
1. Nothing is connected to the selected input
terminal.
2. The function is not compatible with the current
input signal.
[VIDEO]
[Auto]
]
1
2
3
4
MENU: Press to open or close the menu screen.
a/b/c/d
: Press to select a desired item on the
screen or adjust a selected item.
ENTER: Press to go to the next step or complete
the setting.
RETURN: Press to return to the previous step.
ENTER
: Select : Enter
RETURN
: Back
MENU
: End
The bar above is an operational guide for
the remote control. The bar will change in
accordance with each menu setting screen.
NOTE
• Menu options differ in the selected input modes, but the
operating procedures are the same.
• The screens in the operation manual are for explanation
purposes (some are enlarged, others cropped) and may
vary slightly from the actual screens.
18
Page 21

Basic adjustment settings
Menu items (TV/INPUT1-2)
List of menu items to help you with operations
Picture Picture
OPC .............................................................................. Page 25
Backlight ..................................................................... Page 26
Contrast ....................................................................... Page 26
Brightness ................................................................... Page 26
Colour .......................................................................... Page 26
Tint ............................................................................... Page 26
Sharpness ................................................................... Page 26
Advanced
Colour Temp. ................................................... Page 27
Black ................................................................ Page 27
3D-Y/C ............................................................. Page 27
Monochrome ................................................... Page 28
Film Mode ........................................................ Page 28
Range of OPC .................................................. Page 28
Reset ............................................................................ Page 26
Audio
Treble ........................................................................... Page 29
Bass ............................................................................. Page 29
Balance ........................................................................ Page 29
Surround ...................................................................... Page 29
Reset ............................................................................ Page 29
Menu items (HDMI/DVI)
List of menu items to help you with operations
OPC .............................................................................. Page 25
Backlight ..................................................................... Page 26
Contrast ....................................................................... Page 26
Brightness ................................................................... Page 26
Colour .......................................................................... Page 26
Tint ............................................................................... Page 26
Sharpness ................................................................... Page 26
Advanced
Colour Temp. ................................................... Page 27
Black ................................................................ Page 27
Monochrome ................................................... Page 28
Film Mode ........................................................ Page 28
Range of OPC .................................................. Page 28
Reset ............................................................................ Page 26
Audio
Treble ........................................................................... Page 29
Bass ............................................................................. Page 29
Balance ........................................................................ Page 29
Surround ...................................................................... Page 29
Reset ............................................................................ Page 29
Power Control
No Signal Off ............................................................... Page 30
No Operation Off ........................................................ Page 30
Setup
Auto Installation .......................................................... Page 20
Programme Setup ...............................................Pages 20-24
Child Lock ................................................................... Page 31
Input Skip .................................................................... Page 32
Input Label .................................................................. Page 34
Position ........................................................................ Page 34
WSS ............................................................................. Page 35
4:3 Mode ...................................................................... Page 35
Standby Mode ............................................................. Page 36
Language ..................................................................... Page 40
Identifi cation ............................................................... Page 40
Reset ............................................................................ Page 36
Option
Audio Only ................................................................... Page 39
DNR .............................................................................. Page 39
Input Select ................................................................. Page 41
Colour System ............................................................ Page 40
Power Control
No Signal Off ............................................................... Page 30
No Operation Off ........................................................ Page 30
Setup
Input Skip .................................................................... Page 32
Input Signal ................................................................. Page 32
Auto Sync. ................................................................... Page 33
Input Label .................................................................. Page 34
Fine Sync. .................................................................... Page 33
Position ........................................................................ Page 34
Standby Mode ............................................................. Page 36
Language ..................................................................... Page 40
Reset ............................................................................ Page 36
Option
Audio Only ................................................................... Page 39
DNR .............................................................................. Page 39
Input Select ................................................................. Page 41
HDMI Setup ................................................................. Page 39
NOTE
• Some menu items may not be displayed depending on the
selected input source.
19
Page 22

Basic adjustment settings
Auto installation
You can run auto installation again, even after setting
up the preset channels.
Press MENU and the MENU screen displays.
1
Press c/d to select “Setup”.
2
Press a/b to select “Auto Installation”, and
3
then press ENTER.
...
[
Setup
MENU
Setup Option
Auto Installation
Programme Setup
Child Lock
Input Skip
Position
WSS
4:3 Mode
Standby Mode
Language
Identification
Reset
If you have already set the password, enter it
4
here.
• See page 31 for setting a password.
Auto Installation
[Panorama]
[Mode1]
[English]
]
[On]
Programme setup
You can run the auto search procedure again at any
time by accessing the Setup menu and Programme
Setup. Channels can be tuned automatically or
manually.
Auto search
You can also automatically search by performing
the procedure below. This is the same function as
programme auto search in auto installation.
Press MENU and the MENU screen displays.
1
Press c/d to select “Setup”.
2
Press a/b to select “Programme Setup”, and
3
then press ENTER.
If you have already set the password, enter it
here.
• See page 31 for setting a password.
...
[
Setup
MENU
Setup Option
Auto Installation
Programme Setup
Child Lock
Input Skip
Position
WSS
4:3 Mode
Standby Mode
Language
Identification
Reset
Programme Setup
[Panorama]
[Mode1]
[English]
]
[On]
Press c/d to select “Yes”, and then press
5
ENTER.
Press a/b to select the desired language
6
listed on the screen, and then press ENTER.
• After this setting, the programme auto search
begins.
NOTE
• After performing step 6, the menu screen shown in step 3
will reappear. Do not turn off the TV before then, because
the TV is saving the data found.
20
Press a/b to select “Auto Search”, and then
4
press ENTER.
Press c/d to select “Yes”, and then press
5
ENTER.
• After this setting, the programme auto search
begins.
NOTE
• After performing step 5, the menu screen shown in step 3
will reappear. Do not turn off the TV before then, because
the TV is saving the data found.
Page 23

Basic adjustment settings
Manual setting for each channel
You can set some channel items manually. They are
Search, Fine (TV frequency), Colour sys., Sound sys.,
Label (Network name), Skip and Lock (Child Lock).
Press MENU and the MENU screen displays.
1
Press c/d to select “Setup”.
2
Press a/b to select “Programme Setup”, and
3
then press ENTER.
If you have already set the password, enter it
here.
• See page 31 for setting a password.
Press a/b to select “Manual Adjust”, and
4
then press ENTER.
Press c/d to select “Yes”, and then press
5
ENTER.
Programme Setup “Manual Adjust” menu
01 SAT.1 02 PR07 03 KABEL
Search tuning
Press a/b/c/d to select the channel you
1
want to edit, and then press ENTER.
• The selected channel information displays.
Press a/b to select “Search”, and then press
2
ENTER.
MENU
Search
Fine
Colour sys.
Sound sys.
Label
Skip
Lock
Press a/b to select item and press ENTER.
3
• Next: Search the next channel.
• Store: Memorise the current display channel.
• Cancel: Return to the previous screen. (The
search result will not be stored.)
Fine tuning
Press a/b/c/d to select the channel you
1
want to edit, and then press ENTER.
• The selected channel information displays.
Press a/b to select “Fine”, and then press
2
ENTER.
[
Setup
...
Programme Setup
[179.25]
[Auto]
[B/G]
[SAT.1]
[Off]
[Off]
]
179.25 MHz
Next
Store
Cancel
Next
You can select one of the following settings.
Search (See page 21.)
1
Fine (See page 21.)
2
Colour system (See page 22.)
3
Sound system (See page 22.)
4
Label (See page 22.)
5
Skip (See page 23.)
6
Lock (See page 23.)
7
Press c/d to adjust the frequency, and then
3
press ENTER.
• Adjust while checking the background picture as
a reference.
Search
Fine
Colour sys.
Sound sys.
Label
Skip
Lock
[179.25]
[Auto]
[B/G]
[SAT.1]
[Off]
[Off]
179.25 MHz
• Instead of the method above, you can also set
by directly entering the frequency number of the
channel with 0 — 9.
• When setting a frequency on the “Fine” screen,
the last fi gure of the frequency needs to be “0” or
“5”.
a
• 179.25 MHz: Press 1 s 7 s 9 s 2 s 5.
• 49.25 MHz: Press 4 s 9 s 2 s 5 s ENTER.
21
Page 24

Basic adjustment settings
Manual setting for each channel (continued)
Colour system
Press a/b/c/d to select the channel you
1
want to edit, and then press ENTER.
• The selected channel information displays.
Press a/b to select “Colour sys.”, and then
2
press ENTER.
• Receivable colour systems are listed.
Colour system menu
...
[
Setup
MENU
Search
Fine
Colour sys.
Sound sys.
Label
Skip
Lock
Press a/b to select the optimum colour
3
system, and then press ENTER.
Programme Setup
[179.25]
[Auto]
[B/G]
[SAT.1]
[Off]
[Off]
Sound system (Broadcasting system)
Press a/b/c/d to select the channel you
1
want to edit, and then press ENTER.
• The selected channel information displays.
]
Auto
PAL
SECAM
NTSC 3.58
NTSC 4.43
PAL-60
Labelling channels
You can assign a label to each channel.
Press a/b/c/d to select the channel you
1
want to edit, and then press ENTER.
• The selected channel information displays.
Press a/b to select “Label”, and then press
2
ENTER.
• The alphabet and numbers are listed.
Labelling menu
Search
Fine
Colour sys.
Sound sys.
Label
Skip
Lock
Press a/b/c/d to select each character of
3
the new name for the channel, and then press
[179.25]
[Auto]
[B/G]
[SAT.1]
[Off]
[Off]
A
B
C
D
E
K
L
U
V
0123456789
F
M
N
O
P
W
X
Y
Z
ENTER.
Repeat until the name is fully spelt out.
4
• The name can be 5 characters or less.
• When you want to set a channel name of less than
5 characters, select “END”, then press ENTER to
exit from the labelling menu.
G
H
Q
R
+
–_
CLEAR
I
J
BACK
S
T
.
END
Press a/b to select “Sound sys.”, and then
2
press ENTER.
• Receivable sound systems (Broadcasting systems)
are listed.
Sound system menu
Search
Fine
Colour sys.
Sound sys.
Label
Skip
Lock
Press a/b to select the optimum sound
3
system, and then press ENTER.
[179.25]
[Auto]
[B/G]
[SAT.1]
[Off]
[Off]
B/G
D/K
I
M
22
Page 25

Basic adjustment settings
Manual setting for each channel (continued)
Skipping channels
Channels with “Skip” set to “On” are passed over
when using CHr/s even if selected while watching
the image from the TV.
Press a/b/c/d to select the channel you
1
want to edit, and then press ENTER.
• The selected channel information will be displayed.
Press a/b to select “Skip”, and then press
2
ENTER.
• Skip menu displays.
Programme Setup
[Auto]
[B/G]
[Off]
[Off]
Skip menu
]
Off
On
...
[
Setup
MENU
Search
Fine
Colour sys.
Sound sys.
Label
Skip
Lock
Press a/b to set “Skip” to “On”, and then
3
press ENTER.
[179.25]
[SAT.1]
Setting the child lock
You can block the viewing of any channel.
Press a/b/c/d to select the channel you
1
want to edit, and then press ENTER.
• The selected channel information will be displayed.
Sort
Channel positions can be sorted freely.
Press MENU and the MENU screen displays.
1
Press c/d to select “Setup”.
2
Press a/b to select “Programme Setup”, and
3
then press ENTER.
If you already set the password, enter it here.
• See page 31 for setting a password.
Press a/b to select “Sort”, and then press
4
ENTER.
Press c/d to select “Yes”, and then press
5
ENTER.
Press a/b/c/d to select the channel you
6
want to move, and then press ENTER.
Move it to the desired position by pressing
7
a/b/c/d
Repeat the steps 6 and 7 until all desired
8
channels are sorted.
, and then press ENTER.
Sort menus
01 SAT.1
0106SAT.1 KABEL
02 03 04 05
Press a/b to select “Lock”, and then press
2
ENTER.
• Child lock menu will be displayed
Lock menu
Search
Fine
Colour sys.
Sound sys.
Label
Skip
Lock
Press a/b to set “Lock” to “On”, and then
3
press ENTER.
[179.25]
[Auto]
[B/G]
[SAT.1]
[Off]
[Off]
Off
On
NOTE
• See page 31 for setting a password.
• If “Lock” is set to “On” for a channel, “Child lock has been
activated” is displayed when you select the channel, and
the image and sound of the channel is blocked.
• When pressing ENTER while “Child lock has been
activated” is displayed, password input menu will be
displayed. Inputting the correct password lifts the child lock
temporarily until the power is turned off.
01 SAT.1 KABEL02
01 KABEL SAT.102
Next
01 SAT.1 02 KABEL
Next
01 KABEL
Next
23
Page 26

Basic adjustment settings
Erase Programme
The individual programme can be erased.
Press MENU and the MENU screen displays.
1
Press c/d to select “Setup”.
2
Press a/b to select “Programme Setup”, and
3
then press ENTER.
If you already set the password, enter it here.
• See page 31 for setting a password.
Press a/b to select “Erase Programme”, and
4
then press ENTER.
Press c/d to select “Yes”, and then press
5
ENTER.
Press a/b/c/d to select the channel you
6
want to erase, and then press ENTER.
• A message screen pops up.
Press c/d to select “Yes”, and then press
7
ENTER to erase the selected programme. All
the subsequent programmes move up.
Repeat the steps 6 and 7 until all desired
8
channels are erased.
Erase programme menus
01 SAT.1
SAT.1
Pro702 KABEL03 04 05
01
06 07 08 09 10
11 12 13 14 15
16 17 18 19 20
Next
02 Pro7
01 SAT.1 03 KABELPro702
06 07 08 09 10
11 12 13 14 15
16 17 18 19 20
01 SAT.1 02 KABEL
06 07 08 09 10
11 12 13 14 15
16 17 18 19 20
04 05
Next
02 KABEL
03 04 05
Next
24
Page 27

Basic adjustment settings
AV MODE selection
The AV MODE function enables you to select appropriate
settings for audio and video to account for the system
environment which can vary due to factors like room
brightness, type of programme watched or the type of
image input from external equipment.
Using AV MODE on the remote control unit
Press AV MODE.
1
• Present AV MODE displays.
Press AV MODE again before the mode
2
displayed on the screen disappears.
• The mode changes as shown below.
When the input source is TV, INPUT1 or 2 terminals (Example)
AV MODE: STANDARD
AV MODE: DYNAMIC
AV MODE: DYNAMIC (Fixed)
When the input source is INPUT3, 4 or 5 terminals (Example)
AV MODE: STANDARD
AV MODE: MOVIE
AV MODE: GAME
AV MODE: USER [TV]
AV MODE: MOVIE
OPC (Optical Picture Control) setting
You can set the TV to automatically adjust the screen
to suitable backlight brightness according to the
lighting conditions.
Using OPC on the remote control unit
Press OPC to switch the OPC function on and off.
Using OPC on the menu screen
Press MENU and the MENU screen displays.
1
Press c/d to select “Picture”.
2
Press a/b to select “OPC”.
3
AV MODE: DYNAMIC
AV MODE: DYNAMIC (Fixed)
Selected item
STANDARD
MOVIE
GAME
PC
USER
DYNAMIC
(Fixed)
DYNAMIC
NOTE
• You can select a different AV MODE item for each input
mode. (For example, select STANDARD for TV input and
DYNAMIC for VIDEO input.)
For a highly defi ned image in a normally
bright room
For a movie
Lowers image brightness for easier viewing.
For PC. (Available only when inputting an
HDMI or DVI signal.)
Allows the user to customise settings as
desired. You can set the mode for each
input source.
Changes the image and sound settings to
the factory preset values. No adjustments
are allowed.
For a clear-cut image emphasising high
contrast for sports viewing
AV MODE: GAME
AV MODE: PC
AV MODE: USER [ ]
Description
Press c/d to select the desired item, and
4
then press ENTER.
Selected item
Off
On
On: Display
NOTE
• Make sure no object obstructs the OPC sensor, which
could affect its ability to sense surrounding light.
The brightness is fi xed at the value set in
“Backlight” (See page 26).
Automatically adjusts
Displays the OPC effect on the screen
while adjusting the brightness of the
screen.
Description
25
Page 28

Basic adjustment settings
Picture adjustments
You can adjust the picture to your preference.
Follow the steps to adjust the picture.
Press MENU and the MENU screen displays.
1
Press c/d to select “Picture”.
2
Press a/b to select a specifi c adjustment
3
item.
Press c/d to adjust the item to your desired
4
position.
NOTE
• For resetting all adjustment items to factory preset values,
pressa/b to select “Reset”, press ENTER, press c/d to
select “Yes”, and then press ENTER.
MENU
Picture Audio
STANDARD
OPC
Backlight [+14] –16
Contrast
Brightness
Colour
Tint
Sharpness
Advanced
Reset
Selected item
Backlight
Contrast
Brightness
Colour
Tint
Adjustment items
[
]
Picture
Off On On: Display
[+30]
0
[0]
–30
[0]
–30
[0]
–30
[0]
–10
button
c
The screen dims
For less contrast
For less brightness
For less colour
intensity
Skin tones become
purplish
+16
+40
+30
+30
+30
+10
button
d
The screen
brightens
For more contrast
For more brightness
For more colour
intensity
Skin tones become
greenish
Sharpness
For less sharpness
For more sharpness
NOTE
• Select “Advanced” and then press ENTER to set “Colour
Temp.”, “Black”, “3D-Y/C”, “Monochrome”, “Film Mode” or
“Range of OPC”. See pages 27 and 28.
26
Page 29

Basic adjustment settings
Advanced
Advanced setting enables you to set the picture
adjustment in more detail. There are six options you
can choose from.
Colour temperature
Adjusts the colour temperature to give the best white
image.
Press MENU and the MENU screen displays.
1
Press c/d to select “Picture”.
2
Press a/b to select “Advanced”, and then
3
press ENTER.
Press a/b to select “Colour Temp.”, and then
4
press ENTER.
Press a/b to select the desired level, and
5
then press ENTER.
Selected item
High
Mid-High
Middle
Mid-Low
Low
Description
White with bluish tone
White with reddish tone
3D-Y/C
Provides high quality images with minimal dot crawl
and cross colour noise.
Repeat steps 1 to 3 in Colour temperature.
1
Press a/b to select “3D-Y/C”, and then press
2
ENTER.
Colour Temp.
Black
3D – Y/C
Monochrome
Film Mode
Range of OPC
Press a/b to select the desired level, and
3
then press ENTER.
Selected item
Standard
Fast
Slow
NOTE
• 3D-Y/C is not selectable depending on the input signal
type.
• 3D-Y/C may not operate depending on the input signal
type or noisy input signal.
Normal adjustment
For movie image
For still image
Standard
Fast
Slow
Description
Black
For easier viewing, change the viewing depth by
selecting a level for automatically adjusting the dark
portion of an image.
Repeat steps 1 to 3 in Colour temperature.
1
Press a/b to select “Black”, and then press
2
ENTER.
Press c/d to select “On”, and then press
3
ENTER.
Colour Temp.
Black
3D - Y/C
Monochrome
Film Mode
Range of OPC
Selected item
On
Off
For high detail in black portions
No adjustment
On Off
Description
27
Page 30

Basic adjustment settings
Monochrome
For viewing images in monochrome.
Press MENU and the MENU screen displays.
1
Press c/d to select “Picture”.
2
Press a/b to select “Advanced”, and then
3
press ENTER.
Press a/b to select “Monochrome”, and then
4
press ENTER.
Press c/d to select “On”, and then press
5
ENTER.
Film mode
Automatically detects a fi lm-based source (originally
encoded at 24/25 frames/second, depending on the
vertical frequency), analyses it then recreates each still
fi lm frame for high-defi nition picture quality.
Repeat steps 1 to 3 in Monochrome.
1
Press a/b to select “Film Mode”, and then
2
press ENTER.
Press c/d to select “On”, and then press
3
ENTER.
Range of OPC
The brightness level range of the OPC sensor’s
automatic adjustments can be set according to your
preferences. The adjustment range of the OPC sensor
can be set to a maximum of +16 and a minimum of
-16.
Repeat steps 1 to 3 in Monochrome.
1
Press a/b to select “Range of OPC”, and
2
then press ENTER.
Press a/b to select “Max.” or “Min.”, and
3
then adjust the item to the desired position.
Selected item
Max.
Min.
NOTE
• This function is available only when the OPC setting is set
to On.
• The maximum setting cannot be set to a smaller number
than the minimum setting.
• The minimum setting cannot be set to a bigger number
than the maximum setting.
• The maximum and minimum settings cannot be set to the
same number.
• Depending on the brightness of the surrounding light, the
OPC sensor might not operate if the adjustment range is
small.
-15 through +16
-16 through +15
Description
NOTE
• Film Mode is not selectable depending on the input signal
type.
28
Page 31
Basic adjustment settings
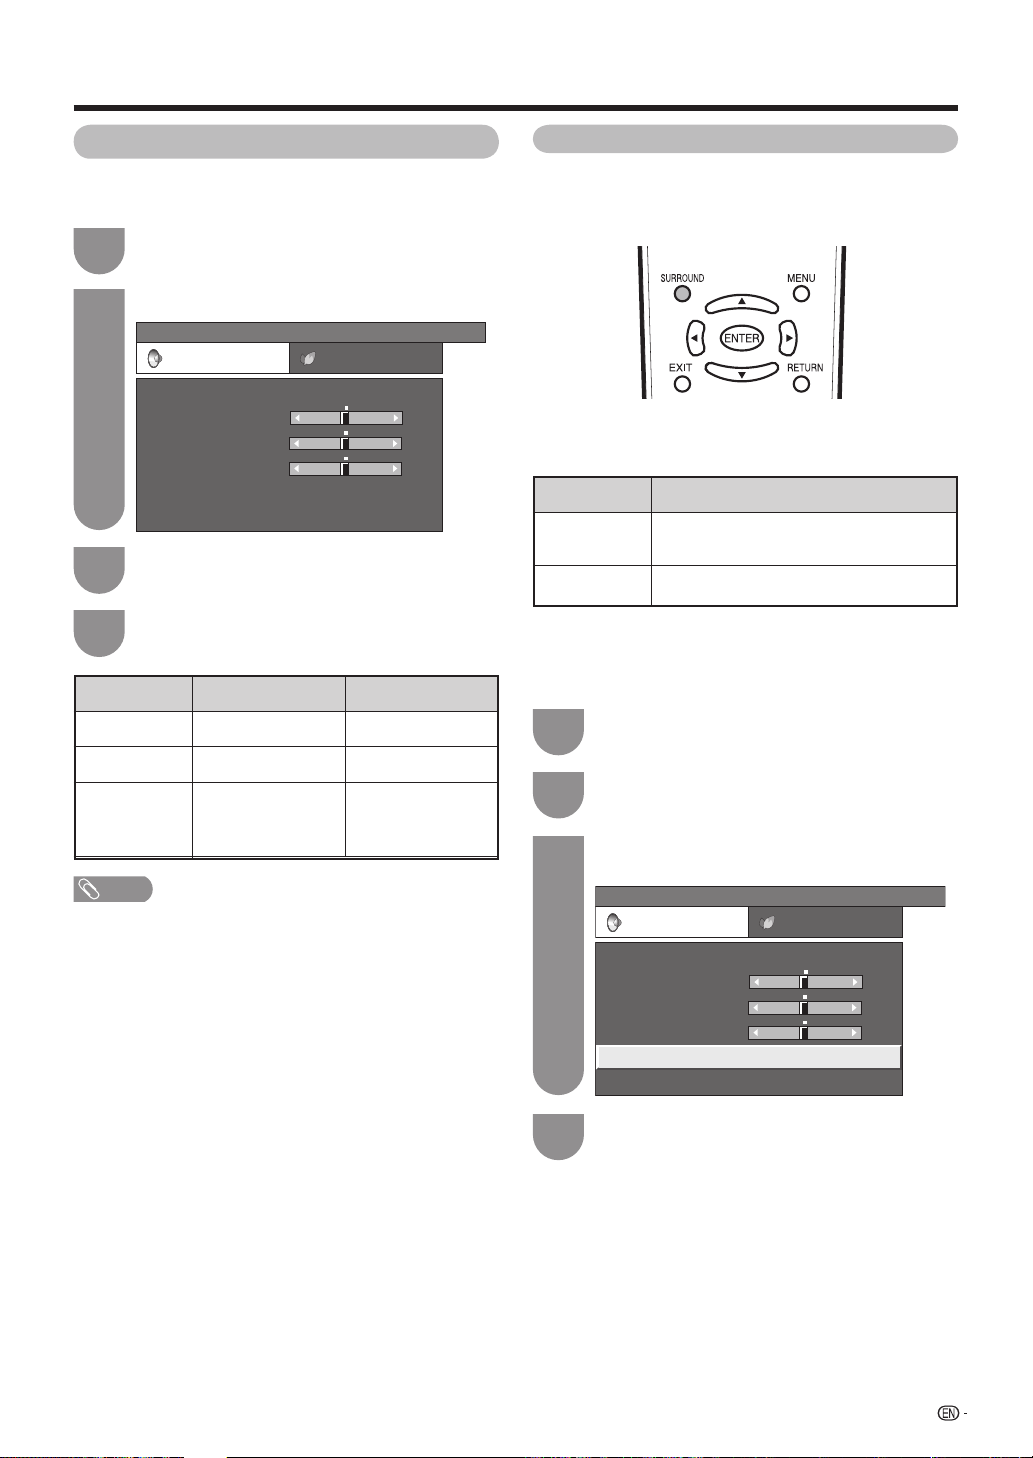
Audio adjustment
You can adjust the sound quality to your preference
with the following settings.
Press MENU and the MENU screen displays.
1
Press c/d to select “Audio”.
2
Press a/b to select a specifi c adjustment
3
item.
Press c/d to adjust the item to your desired
4
position.
Selected item
Treble
[
]
MENU
Audio
Audio Power Control
STANDARD
Treble
Bass
Balance
Surround
Reset
[0] –15
[0]
–15
[0]
L
button
c
For weaker treble
+15
+15
R
[Off]
button
d
For stronger treble
Surround
When you set to “On”, you can enjoy surround sound,
the same as if you were in a movie theatre.
Using SURROUND on the remote control unit
Press SURROUND to switch the Surround function
on and off.
Selected item
On
Off
Makes it possible to enjoy natural, realistic
surround sound.
Outputs the normal sound.
Using Surround on the menu screen
You can produce Surround effects from the “Audio”
setting.
Press MENU and the MENU screen displays.
1
Description
Bass
Balance
For weaker bass
Decrease audio from
the right speaker
For stronger bass
Decrease audio
from the left
speaker
NOTE
• For resetting all adjustment items to factory preset values,
press a/b to select “Reset”, press ENTER, press c/d
to select “Yes”, and then press ENTER.
Press c/d to select “Audio”.
2
Press a/b to select “Surround”, and then
3
press ENTER.
...
[
MENU
Audio
Audio Power Control
Surround
]
STANDARD
Treble
Bass
Balance
Surround
Reset
Press c/d to select “On”, and then press
4
ENTER.
[0] –15
[0]
–15
[0]
L
+15
+15
R
[Off]
29
Page 32

Basic adjustment settings
Power Control
Power Control setting allows you to save energy.
No Signal Off
When set to “Enable”, the power will automatically shut
down if no signal inputs for 15 minutes.
Press MENU and the MENU screen displays.
1
Press c/d to select “Power Control”.
2
• Power control menu displays.
Press a/b to select “No Signal Off”, and then
3
press ENTER.
Press c/d to select “Enable”, and then press
4
ENTER.
• Five minutes before the power shuts down,
remaining time displays every minute.
NOTE
• “Disable” is factory preset value.
• When a TV programme fi nishes, this function may not
operate.
No Operation Off
When set to “Enable”, the power will automatically shut
down if there is no operation for 3 hours.
Press MENU and the MENU screen displays.
1
Press c/d to select “Power Control”.
2
• Power control menu displays.
Press a/b to select “No Operation Off”, and
3
then press ENTER.
Press c/d to select “Enable”, and then press
4
ENTER.
• Five minutes before the power shuts down,
remaining time displays every minute.
NOTE
• “Disable” is factory preset value.
30
Page 33

Useful adjustment settings
Password setting for child lock (for TV input mode)
Allows you to use a password to protect certain
settings from being accidentally changed.
Setting a password
Register a 4-digit password number to use the Child
Lock function.
Press MENU and the MENU screen displays.
1
Press c/d to select “Setup”.
2
Press a/b to select “Child Lock”, and then
3
press ENTER.
If you already set the password, enter it here.
4
Resetting the password
Allows you to reset your password.
Press MENU and the MENU screen displays.
1
Press c/d to select “Setup”.
2
Press a/b to select “Child Lock”, and then
3
press ENTER.
Enter the password.
4
Press a/b to select “Reset”, and then press
5
ENTER.
Press c/d to select “Yes”, and then press
6
ENTER.
Change password
Reset
Yes No
Press a/b to select “Change password”, and
5
then press ENTER.
Change password
Reset
New Password
Reconfirm
Enter the 4-digit number as a password using
6
0 — 9.
Change password
Reset
New Password
Reconfirm
Enter the same 4-digit number as in step 6 to
7
confi rm.
• “The new password was registered” displays.
NOTE
• To view a locked channel (Lock setting in Programme
Setup “Manual Adjust” is set to “On”), you must enter
a password. (See page 23.) When you select a locked
channel, a password prompt message pops up. Press
ENTER to display the password input window.
–––
–
––––
–––
–
––––
NOTE
• As a precautionary measure, make a note of your
password and keep it in a familiar place. If you lose
or forget your password, initialise the TV to return all
settings except for the TV channel settings to factory
preset values. (See page 48.)
• This function is only available for TV input mode.
• To relock a channel which has been temporarily unlocked
by inputting the correct password, turn power off and then
on again.
31
Page 34

Useful adjustment settings
Input Skip
This setting allows you to skip the HDMI or DVI input
on the “Input Select” menu.
Press MENU and the MENU screen displays.
1
Press c/d to select “Setup”.
2
Press a/b to select “Input Skip”, and then
3
press ENTER.
Press a/b to select the Input (INPUT3,
4
INPUT4 or INPUT5) you wish to skip, and then
press ENTER.
INPUT 3 (HDMI1)
INPUT 4 (HDMI2)
INPUT 5 (DVI)
Yes
Press c/d to select “Yes”, and then press
5
ENTER.
Press MENU to exit.
6
No
Input Signal (PC input mode only)
• Some input signals may have to be registered manually to
display properly.
• The pairs of input signals (resolutions) in the list below are
not distinguishable when received. In such case, you have
to set the correct signal manually. After setting once, it will
display when the same signal (resolution) is input again.
1024 x 768 1360 x 768
NOTE
• You can only select the “Input Signal” on the Setup menu
when receiving one of the 2 input signals listed above.
Press MENU and the MENU screen displays.
1
Press c/d to select “Setup”.
2
Press a/b to select “Input Signal” and then
3
press ENTER.
Press a/b to select the desired input signal
4
on the display.
1024 x 768
1360 x 768
(Example)
32
Page 35

Useful adjustment settings
Auto Sync. adjustment (PC input mode only)
For automatically adjusting the PC image.
Press MENU and the MENU screen displays.
1
Press c/d to select “Setup”.
2
Press a/b to select “Auto Sync.”, and then
3
press ENTER.
Press c/d to select “Yes”, and then press
4
ENTER.
• Auto Sync. starts and “Adjusting the image”
displays.
...
MENU
[
Setup
Auto Sync.
]
NoYes
Fine Sync. adjustment (PC input mode only)
Ordinarily you can easily adjust the picture as
necessary to change image position using Auto Sync.
In some cases, however, manual adjustment is needed
to optimise the image.
Press MENU and the MENU screen displays.
1
Press c/d to select “Setup”.
2
Press a/b to select “Fine Sync.”, and then
3
press ENTER.
Press a/b to select the specifi c adjustment
4
item.
H-Pos. [ 90] ab
[ 39]
V-Pos.
Clock
Phase
Reset
ab
[ 90]
ab
[ 20]
ab
30%
Press MENU to exit.
5
NOTE
• When Auto Sync. is successful, “Auto Sync completed
successfully” displays. If not, Auto Sync. failed.
• Auto Sync. may fail even if “Auto Sync completed
successfully” displays.
• Auto Sync. may fail if the computer image has low
resolution, has unclear (black) edges, or is moved while
executing Auto Sync.
• Be sure to connect the PC to the TV and switch it on
before starting Auto Sync.
• Auto Sync. can be executed only when inputting analogue
signals.
Selected item
H-Pos.
V-Pos.
Clock
Phase
Press c/d to adjust the item to your desired
5
position.
Press MENU to exit.
6
NOTE
• For resetting all adjustment items to the factory preset values,
press a/b to select “Reset”, and then press ENTER.
• “Clock” and “Phase” in the “Fine Sync.” menu can be
adjusted only when inputting analogue signals.
Centres the image by moving it to the left
or right.
Centres the image by moving it up or
down.
Adjusts when the image fl ickers with
vertical stripes.
Adjusts when characters have low contrast
or when the image fl ickers.
Description
33
Page 36

Useful adjustment settings
Input Label
You can assign each input source a label you like.
Press TV/VIDEO to select the desired input
1
source.
Press MENU and the MENU screen displays.
2
Press c/d to select “Setup”.
3
Press a/b to select “Input Label”, and then
4
press ENTER.
Press a/b/c/d to select each character of
5
the new name for the input source, and then
press ENTER.
DVD
A
B
C
D
E
F
G
K
L
M
N
U
V
0123456789
Repeat until the name is fully spelt out.
6
• The name can be 6 characters or less.
• When you want to set an input source name of
less than 6 characters, select “END”, then press
ENTER to exit from the labelling menu.
O
W
X
Y
P
Q
Z
+
(Example)
H
R
–_
CLEAR
I
J
BACK
S
T
.
END
Image position
For adjusting a picture's horizontal and vertical
position.
Press MENU and the MENU screen displays.
1
Press c/d to select “Setup”.
2
Press a/b to select “Position”, and then
3
press ENTER.
Press a/b to select “H-Pos.” or “V-Pos.”.
4
H-Pos. a10 b10
[ 0]
V-Pos. a20
[ 0]
Reset
Selected item
H-Pos.
V-Pos.
Press c/d to adjust the item to your desired
5
position.
NOTE
• For resetting all adjustment items to the factory preset
values, press a/b to select “Reset”, and then press
ENTER.
• Adjustments are stored separately according to input
source.
Centres the image by moving it to the left
or right.
Centres the image by moving it up or
down.
Description
b20
INPUT SOURCE
TV
INPUT1
INPUT2
DVD
INPUT4
INPUT5
(Example)
NOTE
• You cannot change labels if the input source is TV.
34
Page 37

Useful adjustment settings
Wide Screen Signalling (WSS)
WSS allows a television to switch automatically among
the different screen formats.
Press MENU and the MENU screen displays.
1
Press c/d to select “Setup”.
2
Press a/b to select “WSS”, and then press
3
ENTER.
Press c/d to select “On” or “Off”, and then
4
press ENTER.
NOTE
• Try to set WIDE mode if an image does not switch to the
correct screen format. When the broadcast signal contains
no WSS information, the function will not work even if
enabled.
Picture aspect ratio
The WSS signal has 4:3 auto-switching that allows you
to select between Panorama and Normal.
Press MENU and the MENU screen displays.
1
Press c/d to select “Setup”.
2
Press a/b to select “4:3 Mode”, and then
3
press ENTER.
Press c/d to select “Panorama” or “Normal”,
4
and then press ENTER.
WSS signal 4:3 screen
4:3 mode “Panorama” 4:3 mode “Normal”
Selected item
Description
Panorama
Normal
Wide image without side bars
Normal range keeping 4:3 or 16:9 aspect
ratio
35
Page 38

Useful adjustment settings
Standby Mode
Standby Mode may be set to either start the TV quickly
from standby or conserve energy while on standby.
Press MENU and the MENU screen displays.
1
Press c/d to select “Setup”.
2
Press a/b to select “Standby Mode”, and
3
then press ENTER.
Press a/b to select “Mode1” or “Mode2”,
4
and then press ENTER.
Selected item
Mode1
Mode2
Press MENU to exit.
5
Starting the TV is quick from standby.
Power consumption is small during
standby.
Description
Reset
If complex adjustments are made and the settings
cannot be restored to normal, you can reset the
settings to the factory preset values.
Press MENU and the MENU screen displays.
1
Press c/d to select “Setup”.
2
Press a/b to select “Reset”, and then press
3
ENTER.
• “Return to factory pre-settings” displays on the
screen.
Press c/d to select “Yes”, and then press
4
ENTER.
• “Now, TV will restart automatically. OK?” displays
on the screen.
Press c/d to select “Yes”, and then press
5
ENTER.
• “Now initialising...” displays on the screen and
blinks.
• After the reset has completed, the power shuts
off and then comes back on. The screen will have
returned to its original settings.
Now initialising...
NOTE
• The AV MODE will be set to “DYNAMIC”.
• The Programme Setup settings will not be changed.
• The Language settings will not be changed.
36
Page 39

Useful adjustment settings
WIDE mode (for TV/AV input mode)
WIDE MODE
Normal
Zoom 14:9
Panorama
Full
Cinema 16:9
Cinema 14:9
Manual Selection
Press WIDE.
1
• The WIDE MODE menu displays.
• The menu lists the wide mode options selectable
for the type of video signal currently received.
Press WIDE or a/b while the WIDE MODE
2
menu displays on the screen.
• As you toggle down the options, each mode is
immediately refl ected on the TV.
Auto Selection
If you set “WSS” and “4:3 Mode” in the Setup menu
on page 35, the optimum WIDE mode is automatically
chosen for every broadcast containing the WSS
information.
“WSS” menu
To enable Auto Selection, set “WSS” in the Setup
menu to “On”. (See page 35.)
“4:3 Mode” menu
To set the type of the wide screen, select “Panorama”
or “Normal” in the 4:3 Mode menu. (See page 35.)
4:3 Mode set to “Panorama” 4:3 Mode set to “Normal”
Selected item
Normal
Zoom 14:9
Panorama
Full
Cinema 16:9
Cinema 14:9
Dot by Dot
Normal
For 4:3 “standard” pictures. A side bar appears on each side.
For 14:9 letterbox pictures. A thin side bar appears on each side, and you may also see bars on the top and
bottom with some programmes.
In this mode the picture is progressively stretched toward each side of the screen.
For 16:9 squeeze pictures.
For 16:9 letterbox pictures. Bars may appear on the top and bottom with some programmes.
For 14:9 letterbox pictures. Bars may appear on the top and bottom with some programmes.
Displays an image with the same number of pixels on the screen (only when receiving 1080i/1080p signal).
Zoom 14:9 Panorama
NOTE
• If the broadcast signal contains no WSS information, Auto
Selection will not function even when the WSS option is
enabled.
Description
NOTE
• Some screen sizes may not be
displayable depending on the
input signal.
Cinema 14:9 Cinema 16:9 Full
37
Page 40

Useful adjustment settings
WIDE mode (for PC input mode)
a
Screen size images.
You can select the screen size.
NOTE
• Connect the PC before making adjustments.
• Selectable screen size may vary with input signal type.
Press WIDE.
1
• The WIDE MODE menu displays.
WIDE MODE
Normal
Cinema
Full
Dot by Dot
(Example)
Press WIDE or a/b to select a desired item
2
on the menu.
Input Signal CinemaNormal
1024g768
Input Signal
1360g768
Keeps the original
aspect ratio in a full
screen display.
For viewing wide
screen programs. The
top and bottom of
the image is slightly
cropped.
Full
An image fully fi lls the
screen.
Full Dot by Dot
An image fully fi lls the
screen.
Dot by Dot
Detects the resolution
of the signal and
displays an image
with the same number
of pixels on the
screen.
Detects the resolution
of the signal and
displays an image
with the same number
of pixels on the
screen.
38
Page 41

Useful adjustment settings
Audio Only
When listening to music from a music programme, you
can set the display off and enjoy audio only.
Press MENU and the MENU screen displays.
1
Press c/d to select “Option”.
2
Press a/b to select “Audio Only”, and then
3
press ENTER.
Press c/d to select “On”, and then press
4
ENTER.
Selected item
On
Off
NOTE
• When you make operations that change the picture on the
TV such as by changing the input source, the Audio Only
function is set to “Off”.
Audio is output without screen image.
Both screen images and audio are output.
Description
HDMI Setup
HDMI (High-Defi nition Multimedia Interface) terminal
selection.
To watch an HDMI equipment image, select
1
“INPUT3” or “INPUT4” using TV/VIDEO on the
remote control unit or on the TV.
Press MENU and the MENU screen displays.
2
Press c/d to select “Option”.
3
Press a/b to select “HDMI Setup”, and then
4
press ENTER.
• The HDMI Setup can be selected only when
“INPUT3” or “INPUT4” is selected.
...
[
Option
MENU
Option
Audio Only
DNR
HDMI Setup
Press a/b to select the desired item, and
5
then press ENTER.
HDMI Setup
]
[Off]
DNR (Digital Noise Reduction)
Produces a clearer video image.
Press MENU and the MENU screen displays.
1
Press c/d to select “Option”.
2
Press a/b to select “DNR”, and then press
3
ENTER.
Press a/b to select the desired level, and
4
then press ENTER.
Off
High
Low
HDMI Setup
items
Signal
Type
Auto View
Audio
Select
6
NOTE
• Refer to your external equipment operation manual for the
signal type.
• Item under “Signal Type” can be selected when the
equipment is connected with a DVI-HDMI conversion cable.
• When the equipment is connected with an HDMI cable,
items are automatically set and cannot be selected.
• “Audio Select” is only available for INPUT4.
Selectable
items
RGB/
YCbCr4:4:4/
YCbCr4:2:2
Enable/
Disable
Digital/
Analogue
Select the video signal type
from the HDMI terminal.
Set whether or not to use
WIDE MODE based on signal
recognition, including an HDMI
signal.
Select “Digital” for audio signal
via the HDMI terminal.
Select “Analogue” for audio
signal via the AUDIO jack.
Description
Press a/b/c/d to select the desired setting,
and then press ENTER.
39
Page 42

Useful adjustment settings
Language setting for on-screen display
You can also select a language from setup menu.
Select from among 3 languages: English, Chinese and
Arabic.
Press MENU and the MENU screen displays.
1
Press c/d to select “Setup”.
2
Press a/b to select “Language”, and then
3
press ENTER.
Press a/b to select the desired language
4
listed on the screen, and then press ENTER.
Identifi cation
You can check the current version of the software on
the screen.
Colour system setting
You can change the colour system to one that is
compatible with the image on the screen.
Press MENU and the MENU screen displays.
1
Press c/d to select “Option”.
2
Press a/b to select “Colour System”, and
3
then press ENTER.
Press a/b to select a compatible video signal
4
system of your equipment, and then press
ENTER.
Auto
PAL
SECAM
NTSC 3.58
NTSC 4.43
PAL-60
NOTE
• Factory preset value is “Auto”.
• If “Auto” is selected, colour system for each channel is
automatically set. If an image does not display clearly,
select another colour system (e.g. PAL, NTSC 4.43).
40
Page 43

Using external equipment
Displaying an external equipment image
Explanation here is for the setting when connecting
DVD player to INPUT1 terminal.
NOTE
• Each time TV/VIDEO is pressed, the input source toggles.
• If the image does not come in clearly, you may need to
change the input signal type setting on the “Input Select”
menu.
• Refer to your external equipment operation manual for the
signal type.
Displaying a DVD image (Example)
To watch a DVD image, select “INPUT1” using
1
TV/VIDEO on the remote control unit or TV/
VIDEO on the TV.
INPUT SOURCE
TV
INPUT1
INPUT2
INPUT3
INPUT4
INPUT5
Select the desired signal type on “Input Select”
2
in the “Option” menu.
For INPUT1 signal
...
MENU
[
Option
Input Select
]
Auto
COMPONENT
VIDEO
Input Select
Selecting input source
Can use for selecting the input source.
Using TV/VIDEO on the remote control unit or on
the TV
TV/VIDEO allows you to choose from the available
input sources.
Press TV/VIDEO on the remote control unit or
1
on the TV.
Press TV/VIDEO on the remote control unit or
2
on the TV to select the input source.
• The image and sound from the selected source
are output on the TV.
• You can also select the input source by pressing
.
a/b
Selecting input signal type
For setting the signal type of external equipment.
Press MENU and the MENU screen displays.
1
Press c/d to select “Option”.
2
Press a/b to select “Input Select”, and then
3
press ENTER.
Press a/b to select a signal type you want to
4
set, and then press ENTER.
Input source
INPUT 1
INPUT 2
INPUT 5
NOTE
• If no (colour) image displays, try to change the other
signal type.
• Check the operation manual of the external equipment for
the signal type.
• When the signal type is set to “Auto”, the input terminal
where cable is connected is automatically selected.
• When the signal type is set to “Auto” and multiple video
signal cables are connected, the signal type is selected in
the following prioritised order:
INPUT 1/INPUT 2: COMPONENTs VIDEO
• When the signal type for “INPUT5” is set to “DIGITAL”
or “ANALOGUE”, a “PC” or “AV” signal is automatically
detected.
Auto, COMPONENT, VIDEO
Auto, COMPONENT, VIDEO
Auto, DIGITAL, ANALOGUE
Selectable item
The setting is stored and can be selected.
41
Page 44

Useful features
Freezing images
Allows you to capture and freeze one frame from a
moving image that you are watching.
Press FREEZE.
1
• Captures one frame from a moving image.
Press FREEZE again to cancel the function.
2
NOTE
• This function does not work in INPUT 5.
• When this function is not available, “No still image display
available” will display.
• The still image automatically goes out after 30 minutes.
42
Page 45

Appendix
Troubleshooting
Problem
• No power.
• Unit cannot be operated.
• Remote control unit does not
operate.
• Picture is cut off.
• Strange colour, light colour, or
dark, or colour misalignment.
• Power is suddenly turned off.
• No picture.
Possible Solution
• Check if you pressed POWER on the remote control unit. (See page 15.)
If the indicator on the TV lights up red, press POWER.
• Is the AC cord disconnected? (See page 7.)
• Has the power been turned on? (See page 15.)
• External infl uences such as lightning, static electricity, etc., may cause improper
operation. In this case, operate the unit after fi rst turning the power off the TV or
unplugging the AC cord and re-plugging it in after 1 or 2 minutes.
• Are batteries inserted with polarity (e, f) aligned? (See page 5.)
• Are batteries worn out? (Replace with new batteries.)
• Are you using it under strong or fl uorescent lighting?
• Is a fl uorescent light illuminated to remote control sensor?
• Is the image position correct? (See page 34.)
• Are screen mode adjustments such as picture size made correctly? (See pages 35,
37 and 38.)
• Adjust the picture tone. (See pages 26 to 28 and 39.)
• Is the room too bright? The picture may look dark in a room that is too bright.
• Check the colour system setting. (See pages 22 and 40.)
• Check the input signal setting. (See pages 32 and 41.)
• Check the HDMI Setup setting. (See page 39.)
• The unit's internal temperature has increased.
Remove any objects blocking vent or clean.
• Check the power control setting. (See page 30.)
• Is sleep timer set? (See page 17.)
• Is connection to other equipment correct? (See pages 10 and 11.)
• Has input signal setup been done correctly after connection? (See pages 32 and 41.)
• Is the correct input selected? (See page 41.)
• Is picture adjustment correct? (See pages 26 to 28.)
• Is the antenna connected properly? (See page 9.)
• Is “On” selected in “Audio Only”? (See page 39.)
• No sound.
• Is the volume too low? (See page 17.)
Cautions regarding use in high and low temperature environments
• When the unit is used in a low temperature space (e.g. room, offi ce), the picture may leave trails or appear slightly delayed.
This is not a malfunction, and the unit will recover when the temperature returns to normal.
• Do not leave the unit in a hot or cold location. Also, do not leave the unit in a location exposed to direct sunlight or near a
heater, as this may cause the cabinet to deform and the LCD panel to malfunction.
Storage temperature: f20°C to e60°C.
43
Page 46

Appendix
RS-232C port specifi cations
PC Control of the TV
• When a programme is set, the TV can be controlled from the PC using the RS-232C terminal.
The input signal (PC/video) can be selected, the volume can be adjusted and various other adjustments and
settings can be made, enabling automatic programmed playing.
• Attach an RS-232C cable cross-type (commercially available) to the supplied Din/D-sub RS-232C for the
connections.
NOTE
• This operation system should be used by a person who is accustomed to using PCs.
Communication conditions
Set the RS-232C communications settings on the PC to match the communications conditions of the TV. The
communications settings of the TV are as follows:
Baud rate:
Data length:
Parity bit:
Stop bit:
Flow control:
9,600 bps
8 bits
None
1 bit
None
Communication procedure
Send the control commands from the PC via the RS-232C connector.
The TV operates according to the received command and sends a response message to the PC.
Do not send multiple commands at the same time. Wait until the PC receives the OK response before sending the
next command.
Command format
Eight ASCII codes e CR
C1 C2 C3 C4 P1 P2 P3 P4
Command 4-digits Parameter 4-digits Return code
Parameter
Input the parameter values, aligning left, and fi ll with space(s) for the remainder. (Be sure that four values are input for the
parameter.)
When the input parameter is not correct, “ERR” returns. (Refer to “Response code format”.)
Command 4-digits: Command. The text of four characters.
Parameter 4-digits: Parameter 0 — 9, space, ?
0
0009
a 30
100
0055
When “?” is input for some commands, the present setting value responds.
?
????
44
Page 47
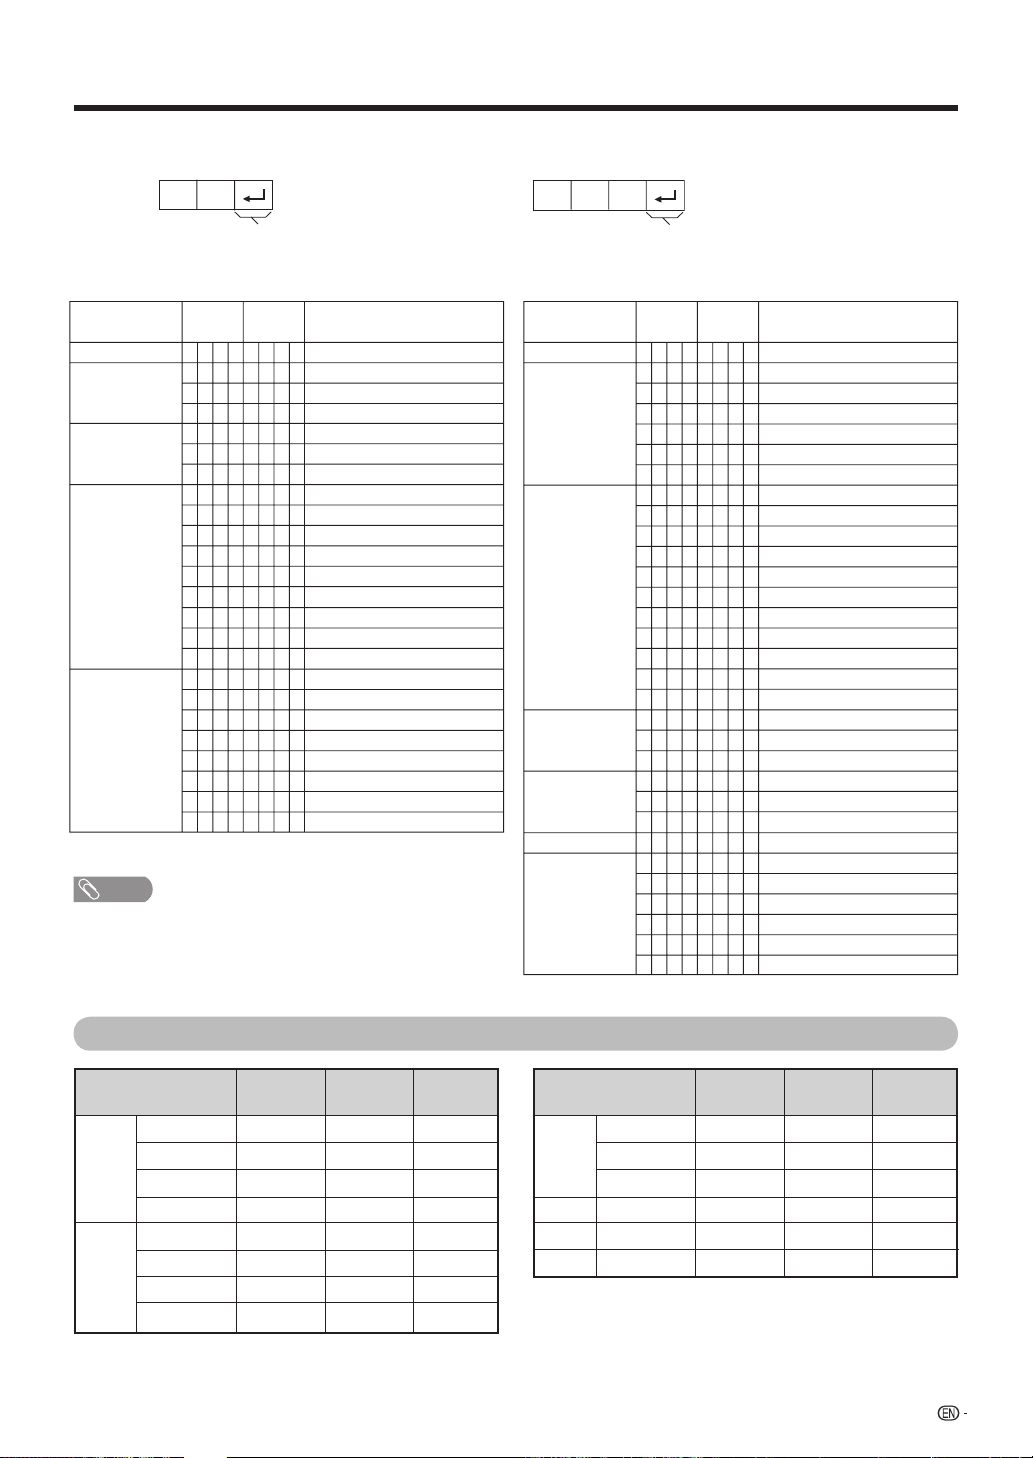
Appendix
Response code format
Normal response
OK
Problem response (communication error or incorrect command)
ERR
Return code (0DH)
Commands
• Commands not indicated here are not guaranteed to operate.
CONTROL ITEM COMMAND PARAMETER
0
R
W
O
POWER SETTING
INPUT SELECTION A
CHANNEL
INPUT SELECTION B
AV MODE
SELECTION
P
_
D
G
T
I
_
D
V
T
I
D
V
A
I
*
H
C
C
D
C
C
A
A
A
A
A
A
A
A
*
P
U
H
_
W
D
H
_
1
P
N
I
0
1
P
N
I
1
1
P
N
I
3
2
P
N
I
0
2
P
N
I
1
2
P
N
I
3
5
P
N
I
0
5
P
N
I
5
5
P
N
I
6
D
M
V
0
D
M
V
1
D
M
V
2
D
M
V
3
D
M
V
4
D
M
V
5
D
M
V
6
D
M
V
7
_
POWER OFF (STANDBY)
_
_
_
INPUT SWITCHING (TOGGLE)
_
_
_
TV (CHANNEL FIXED)
_
_
_
INPUT1—5 (1—5)
_
_
TV DIRECT CHANNEL (1—99)
_
_
*
CHANNEL UP
_
_
_
CHANNEL DOWN
_
_
_
INPUT1 (Auto)
_
_
_
INPUT1 (COMPONENT)
_
_
_
INPUT1 (VIDEO)
_
_
_
INPUT2 (Auto)
_
_
_
INPUT2 (COMPONENT)
_
_
_
INPUT2 (VIDEO)
_
_
_
INPUT5 (Auto)
_
_
_
INPUT5 (DIGITAL)
_
_
_
INPUT5 (ANALOGUE)
_
_
_
TOGGLE
_
_
_
STANDARD
_
_
_
MOVIE
_
_
_
GAME
_
_
_
USER
_
_
_
DYNAMIC (Fixed)
_
_
_
DYNAMIC
_
_
_
PC
_
_
_
CONTROL
CONTENTS
NOTE
• If an underbar (_) appears in the parameter column, enter a
space.
• If an asterisk (*) appears, enter a value in the range
indicated in brackets under CONTROL CONTENTS.
Return code (0DH)
CONTROL ITEM COMMAND PARAMETER
VOLUME
POSITION
WIDE MODE
MUTE
SURROUND
AUDIO CHANGE
SLEEP TIMER
M
L
O
V
S
O
P
H
S
O
P
H
S
O
P
V
S
O
P
V
K
C
L
C
E
S
H
P
E
D
I
W
E
D
I
W
E
D
I
W
E
D
I
W
E
D
I
W
E
D
I
W
E
D
I
W
E
D
I
W
E
D
I
W
E
D
I
W
E
D
I
W
E
T
U
M
E
T
U
M
E
T
U
M
U
S
C
A
U
S
C
A
U
S
C
A
A
H
C
A
M
T
F
O
M
T
F
O
M
T
F
O
M
T
F
O
M
T
F
O
M
T
F
O
_
_
*
*
_
*
*
*
_
*
*
*
_
*
*
*
_
*
*
*
_
*
*
*
_
*
*
_
_
_
0
_
_
_
1
_
_
_
2
_
_
_
3
_
_
_
4
_
_
_
5
_
_
_
6
_
_
_
7
_
_
_
8
_
_
_
9
_
_
_
1
0
_
_
0
_
_
_
1
_
_
_
2
_
_
_
0
_
_
_
1
_
_
_
2
_
_
_
_
_
_
_
0
_
_
_
1
_
_
_
2
_
_
_
3
_
_
_
4
_
_
_
5
_
CONTROL
CONTENTS
VOLUME (0—60)
H-POSITION (AV) (f10—e10)
H-POSITION (PC) (0—180)
V-POSITION (AV) (f20—e20)
V-POSITION (PC) (0—100)
CLOCK (0—180)
PHASE (0—40)
TOGGLE (AV)
NORMAL (AV)
ZOOM 14:9 (AV)
PANORAMA (AV)
FULL (AV)
CINEMA 16:9 (AV)
CINEMA 14:9 (AV)
NORMAL (PC)
CINEMA (PC)
FULL (PC)
DOT BY DOT (PC)
TOGGLE
MUTE ON
MUTE OFF
SURROUND TOGGLE
SURROUND ON
SURROUND OFF
TOGGLE
OFF
SLEEP TIMER 30 MIN
SLEEP TIMER 1 HOUR
SLEEP TIMER 1 HOUR 30 MIN
SLEEP TIMER 2 HOUR
SLEEP TIMER 2 HOUR 30 MIN
PC compatibility chart
Resolution
VGA
SVGA
720 g 400
640 g 480
640 g 480
640 g 480
800 g 600
800 g 600
800 g 600
800 g 600
Horizontal
Frequency
31.5 kHz
31.5 kHz
37.9 kHz
37.5 kHz
35.1 kHz
37.9 kHz
48.1 kHz
46.9 kHz
Vertical
Frequency
70 Hz
60 Hz
72 Hz
75 Hz
56 Hz
60 Hz
72 Hz
75 Hz
VESA
Standard
✓
✓
✓
✓
✓
✓
✓
Resolution
XGA
WXGA
SXGA
SXGA+
1024 g 768
1024 g 768
1024 g 768
1360 g 768
1280 g 1024
1400 g 1050
Horizontal
Frequency
48.4 kHz
56.5 kHz
60.0 kHz
47.7 kHz
64.0 kHz
65.3 kHz
Vertical
Frequency
60 Hz
70 Hz
75 Hz
60 Hz
60 Hz
60 Hz
VESA
Standard
✓
✓
✓
✓
✓
✓
45
Page 48

Appendix
Specifi cations
Model
Item
LCD panel
Number of dots 6,220,800 dots (1920 g 1080 g 3 dots)
Video Colour System
TV
Function
Brightness
Backlight life
Viewing angles H : 176º V : 176º
Audio amplifi er
Speakers 10 g 4 cm 4pcs
Terminals
OSD language
Power Requirement
Power Consumption
Weight
Operating Temperature
• As a part of policy of continuous improvement, SHARP reserves the right to make design and specifi cation changes for
product improvement without prior notice. The performance specifi cation fi gures indicated are nominal values of production
units. There may be some deviations from these values in individual units.
TV-Standard
Receiving
Channel
TV-Tuning System
STEREO/BILINGUAL
Rear
without stand
with stand 32.5 kg
VHF/UHF
CATV
ANTENNA IN
INPUT 1
INPUT 2
INPUT 3
INPUT 4
INPUT 5 Ø 3.5mm jack (Audio input), DVI (DVI-I input)
MONITOR OUTPUT
RS-232C
42o (106 cm) Advanced Super View & BLACK TFT LCD
PAL/SECAM/NTSC 3.58/NTSC 4.43/PAL 60
PAL: B/G, D/K, I SECAM: B/G, D/K, K/K
44.25-863.25 MHz
S1-S41ch (including Hyperband)
Auto Preset 99 ch
NICAM: B/G, I, D/K A2 stereo: B/G
450 cd/m
60,000 hours (at Backlight Standard position)
15W g 2
75 q DIN type
VIDEO in, AUDIO in, COMPONENT in (480p, 576p, 480P, 576P, 720P/50Hz,
720P/60Hz, 1080p/50Hz, 1080p/60Hz)
VIDEO in, AUDIO in, COMPONENT in (480p, 576p, 480P, 576P, 720P/50Hz,
720P/60Hz, 1080p/50Hz, 1080p/60Hz)
HDMI (HDMI input) (480p, 576p, 480P, 576P, 720P/50Hz, 720P/60Hz, 1080p/50Hz,
1080p/60Hz, 1080P/50Hz, 1080P/60Hz)
HDMI (HDMI input) (480p, 576p, 480P, 576P, 720P/50Hz, 720P/60Hz, 1080p/50Hz,
1080p/60Hz, 1080P/50Hz, 1080P/60Hz), AUDIO in
VIDEO out, AUDIO out
9 pin D-sub male connector
English/Chinese/Arabic
AC 110-240 V, 50/60 Hz
229 W (0.9 W Standby)
29.0 kg
0°C - 40°C
2
LC-42P7H
NTSC: M
1
Optional accessories
The listed optional accessories are available for the LCD
colour TV. Please purchase them at your nearest shop.
• Additional optional accessories may be available in the near
future. When purchasing, please read the newest catalogue for
compatibility and check the availability.
46
Part name
Wall mount bracket
Model number
AN-37AG2
AN-52AG1
Page 49

Dimensional drawings
540
Unit: mm
733
200
85
67558
933
1031
200
14096
526
421
292
47
Page 50

CLEARING THE PASSWORD
If you forget the password, clear the password using the following procedure.
Press MENU to display the MENU screen, and then press c/d to select “Setup”.
1
Press a/b to select “Auto Installation”, “Programme Setup”, “Child Lock”, and the password input
2
screen displays.
Press and hold both CHr and VOLk on the TV simultaneously until the message appears on the
3
screen.
The Password is .
NOTE
• As a precautionary measure, make a note of your password above, scissor it from this manual, and keep it in a familiar place.
48
Page 51

Page 52

Printed on post-consumer recycled paper.
本說明用紙使用的是再生紙。
本說明用紙使用的是再生紙。
Printed in Malaysia
馬來西亞印刷
馬來西亞印刷
TINS-C981WJZZ
07P02-MA-NG
 Loading...