

Page 1

LC-40LE730E LC-46LE730E
LC-40LE731E LC-46LE731E
LC-40LE732E LC-46LE732E
LCD COLOUR TELEVISION
LCD-FARBFERNSEHGERÄT
TÉLÉVISEUR COULEUR À ÉCRAN
CRISTAUX LIQUIDES (LCD)
TELEVISORE A COLORI LCD
LCD-KLEURENTELEVISIE
TELEVISIÓN EN COLOR LCD
TELEVISOR DE CRISTAL LÍQUIDO
OPERATION MANUAL
BEDIENUNGSANLEITUNG
MODE D’EMPLOI
MANUALE DI ISTRUZIONI
GEBRUIKSAANWIJZING
MANUAL DE INSTRUCCIONES
ENGLISHDEUTSCHFRANÇAISITALIANO
NEDERLANDS
MANUAL DE OPERAÇÃO
ESPAÑOLPORTUGUÊS
®
Page 2
DivX Certified® to play DivX® video up to HD 1080p, including premium content.
ABOUT DIVX VIDEO: DivX® is a digital video format created by DivX, LLC, a subsidiary of Rovi Corporation. This
is an official DivX Certified® device that plays DivX video. Visit divx.com for more information and software tools to
convert your files into DivX videos.
ABOUT DIVX VIDEO-ON-DEMAND: This DivX Certified® device must be registered in order to play purchased
DivX Video-on-Demand (VOD) movies. To obtain your registration code, locate the DivX VOD section in your device
setup menu. Go to vod.divx. com for more information on how to complete your registration.
Covered by one or more of the following U.S. Patents:
7,295,673; 7,460,668; 7,515,710; 7,519,274
DivX®
The mains lead of this product is fitted with a non-rewireable (moulded) plug incorporating a 13A fuse. Should
the fuse need to be replaced, a BSI or ASTA approved BS 1362 fuse marked
above, which is also indicated on the pin face of the plug, must be used.
Always refit the fuse cover after replacing the fuse. Never use the plug without the fuse cover fitted.
In the unlikely event of the socket outlet in your home not being compatible with the plug supplied, cut off the
mains plug and fit an appropriate type.
DANGER:
The fuse from the cut-off plug should be removed and the cut-off plug destroyed immediately and disposed of in
a safe manner.
Under no circumstances should the cut-off plug be inserted elsewhere into a 13A socket outlet, as a serious
electric shock may occur.
To fit an appropriate plug to the mains lead, follow the instructions below:
IMPORTANT:
The wires in the mains lead are coloured in accordance with the following code:
Blue: Neutral
Brown: Live
As the colours of the wires in the mains lead of this product may not correspond with the coloured markings
identifying the terminals in your plug, proceed as follows:
• The wire which is coloured blue must be connected to the plug terminal which is marked N or coloured black.
• The wire which is coloured brown must be connected to the plug terminal which is marked L or coloured red.
Ensure that neither the brown nor the blue wire is connected to the earth terminal in your three-pin plug.
Before replacing the plug cover make sure that:
• If the new fitted plug contains a fuse, its value is the same as that removed from the cut-off plug.
• The cord grip is clamped over the sheath of the mains lead, and not simply over the lead wires.
IF YOU HAVE ANY DOUBT, CONSULT A QUALIFIED ELECTRICIAN.
SPECIAL NOTE FOR USERS IN THE U.K.
)5)
or
and of the same rating as
Page 3

OPERATION MANUAL
• The illustrations and the OSD in this operation manual are for explanation purposes and may vary slightly from the actual
operations.
• The examples used throughout this manual are based on the LC-40LE730E model.
• The LC-40LE730E, LC-40LE731E, LC-40LE732E, LC-46LE730E, LC-46LE731E and LC-46LE732E models are compatible
with high definition broadcasts, H.264 compressed (MPEG4 H.264, MPEG4 AVC, MPEG4 AVC/H.264).
ENGLISH
Contents
ENGLISH
Contents ....................................................................... 1
Introduction ................................................................ 2
Dear SHARP customer ................................................. 2
Important Safety Precautions ....................................... 2
Remote Control unit ..................................................... 3
TV (Front view) ............................................................. 4
TV (Side and rear view) ................................................. 4
Preparation ................................................................. 5
Supplied accessories ................................................... 5
Attaching the stand unit ............................................... 5
Optional accessory ....................................................... 5
Fixing the TV on a wall ................................................... 5
Inserting the batteries ................................................... 6
Using the remote control unit ....................................... 6
Cautions regarding the remote control unit ................... 6
Quick guide ................................................................. 7
Initial installation overview ............................................. 7
Before turning on the power ......................................... 8
Inserting a CA Card ...................................................... 8
Initial auto installation .................................................... 9
Checking quality and signal strength ............................ 9
Watching TV ............................................................. 10
Daily operation ........................................................... 10
Switching on/off ......................................................... 10
Switching between analogue and digital broadcasts .. 10
Changing channels ..................................................... 10
Selecting an external video source .............................. 10
Selecting audio language ............................................ 10
Switching subtitle language ........................................ 10
EPG ........................................................................... 11
Selecting a programme using EPG ............................. 11
Teletext ...................................................................... 12
Using MHEG-5 application (UK only) .......................... 12
Connecting external devices ........................... 13
Introduction to connections ........................................ 13
HDMI connection ..................................................... 14
Component connection ........................................... 14
VIDEO connection ................................................... 14
SCART connection .................................................. 15
Speaker/amplifier connector .................................... 15
Connecting a PC .................................................... 16
HDMI (DVI) connection ................................................ 16
Analogue connection................................................... 16
Menu Operation ...................................................... 18
What is the menu? ..................................................... 18
Common operations ................................................ 18
Basic Adjustment .................................................. 19
Picture settings .......................................................... 19
Audio settings ............................................................ 20
Multimedia .................................................................. 20
Time settings .............................................................. 21
Lock settings............................................................... 21
Channel settings ........................................................ 22
Settings Menu ............................................................ 24
Sotware update via USB .......................................... 24
Channel list ................................................................ 25
Selecting the channel you want display ................... 25
Channel information display (DTV/CADTV only) ........ 25
Useful viewing functions .................................... 26
Selecting the picture format ........................................ 26
Selecting the picture format manually ...................... 26
Setting when using external devices ........................... 26
Source list ............................................................... 26
Connecting a USB device (Media Player) .................... 26
MEDIA PLAYER Function ....................................... 27
Picture mode .......................................................... 27
Music mode ........................................................... 27
Video mode ............................................................ 28
USB/HOME MEDIA device compatibility ..................... 28
Power save settings ................................................... 28
HDMI devices ............................................................ 29
Controlling HDMI devices using HDMI CEC ................. 29
HDMI CEC connection ................................................ 29
HDMI CEC menu ........................................................ 30
Operating a HDMI CEC device .................................... 30
Connected TV ........................................................... 31
What is Connected TV? .............................................. 31
Internet setup ............................................................. 31
Operations in Connected TV ...................................... 33
HbbTV ....................................................................... 33
USB REC function ................................................... 34
USB REC function ...................................................... 34
Enjoying 3D Image Viewing .............................. 36
Enjoying 3D image viewing ........................................ 36
Viewing 3D images ..................................................... 36
Configuring the TV settings to enhance 3D image
viewing ....................................................................... 37
Display format for 3D and 2D images ......................... 37
Troubleshooting - 3D images ...................................... 38
Appendix .................................................................... 39
Abbreviation list .......................................................... 39
Information on the software license for this product .... 39
Troubleshooting .......................................................... 40
Environmental Specifications ...................................... 40
Specifications ............................................................. 41
EU Energy Label for Televisions .................................... 42
Information about EU Eco-Label ................................. 43
End of life disposal ..................................................... 44
Trademarks ................................................................ 44
1
Page 4
Introduction
Dear SHARP customer
Thank you for your purchase of the SHARP LCD colour TV product. To ensure safety and many years of troublefree operation of your product, please read the Important Safety Precautions carefully before using this product.
Important Safety Precautions
• Cleaning—Unplug the AC cord from the AC outlet before cleaning the product. Use a damp cloth to clean the product. Do
not use liquid cleaners or aerosol cleaners.
• Use a soft damp cloth to gently wipe the panel when it is dirty. To protect the panel, do not use a chemical cloth to clean
it. Chemicals may cause damage or cracks in the cabinet of the TV.
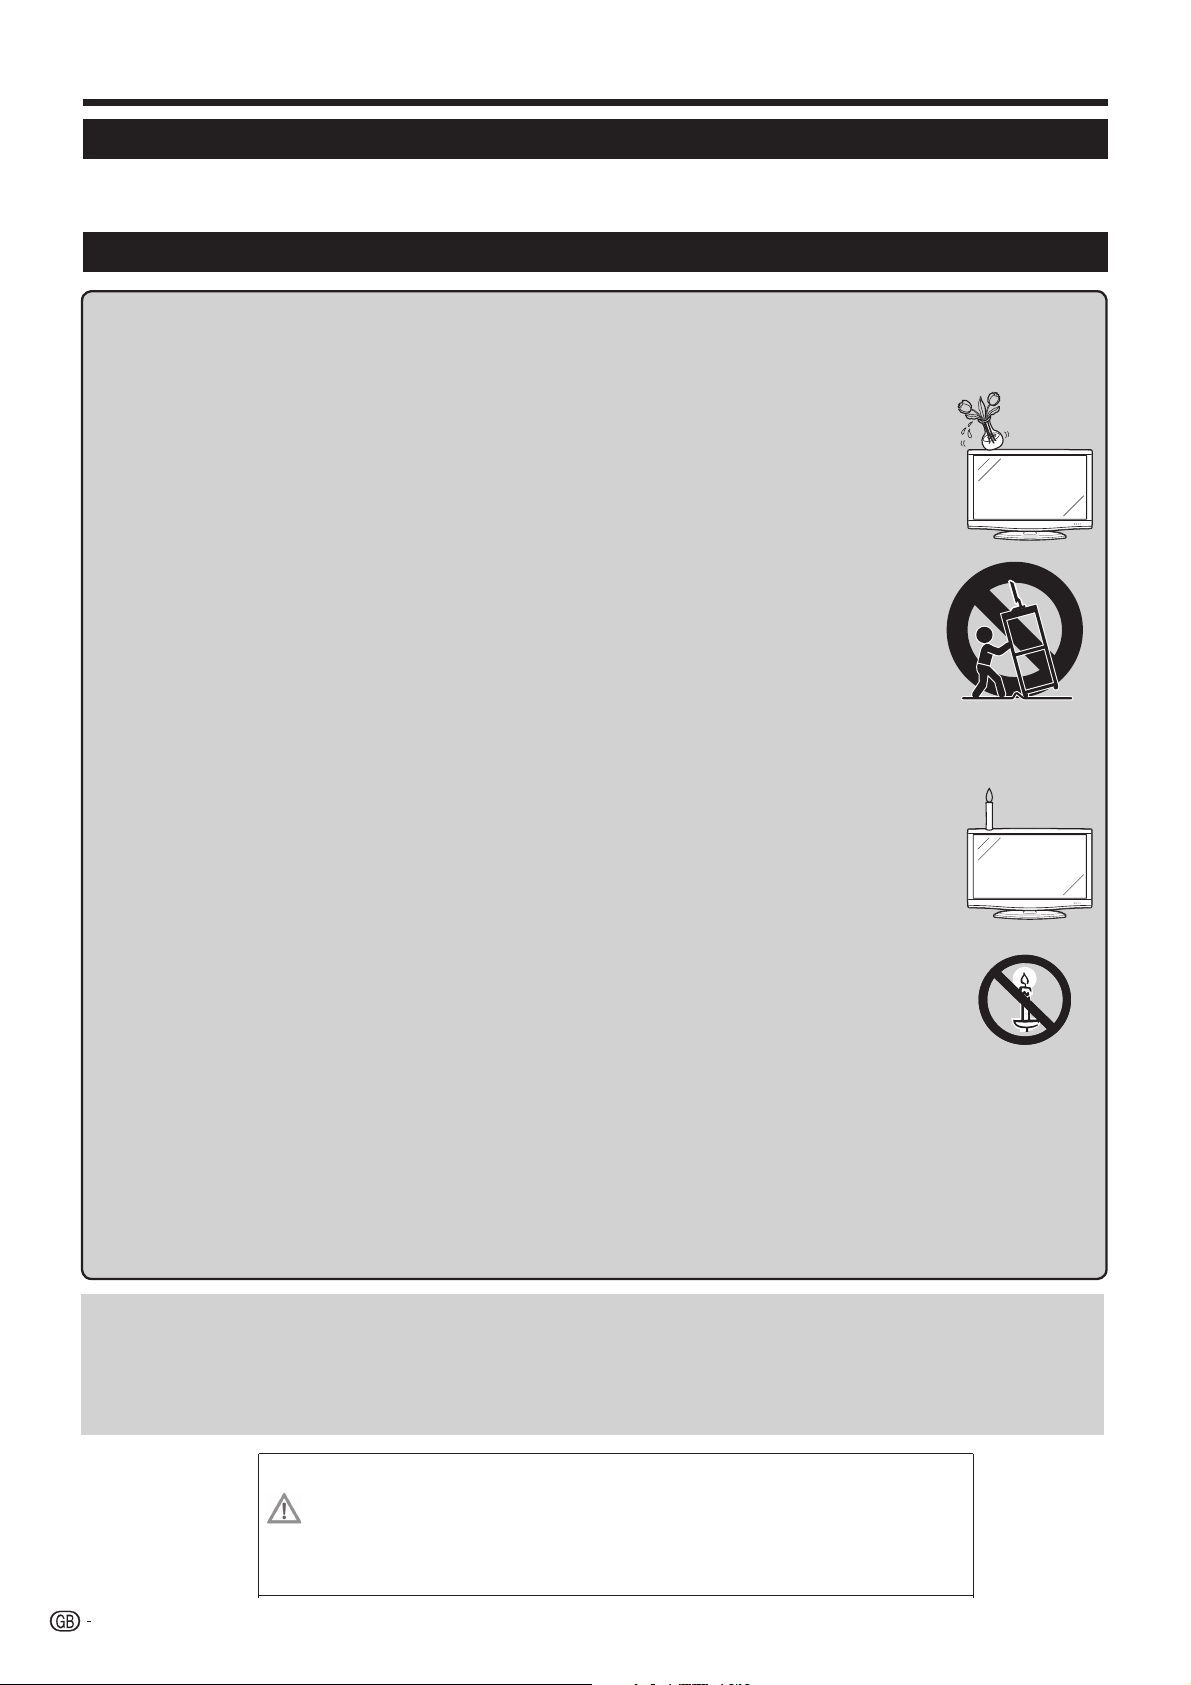
• Water and moisture—Do not use the product near water, such as bathtub, washbasin, kitchen sink,
laundry tub, swimming pool and in a wet basement.
• Do not place vases or any other water-filled containers on this product. The water may spill onto the
product causing fire or electric shock.
• Stand—Do not place the product on an unstable cart, stand, tripod or table. Doing so can cause the
product to fall, resulting in serious personal injuries as well as damage to the product. Use only a cart,
stand, tripod, bracket or table recommended by the manufacturer or sold with the product. When
mounting the product on a wall, be sure to follow the manufacturer’s instructions. Use only the
mounting hardware recommended by the manufacturer.
• When relocating the product placed on a cart, it must be moved with utmost care. Sudden stops,
excessive force and uneven floor surface can cause the product to fall from the cart.
• Ventilation—The vents and other openings in the cabinet are designed for ventilation. Do not cover or
block these vents and openings since insufficient ventilation can cause overheating and/or shorten the
life of the product. Do not place the product on a bed, sofa, rug or other similar surface, since they can
block ventilation openings. This product is not designed for built-in installation; do not place the product in an enclosed
place such as a bookcase or rack, unless proper ventilation is provided or the manufacturer’s instructions are followed.
• The LCD panel used in this product is made of glass. Therefore, it can break when the product is dropped or impact
applied. If the LCD panel is broken, be careful not to be injured by broken glass.
• Heat sources—Keep the product away from heat sources such as radiators, heaters, stoves and other
heat-generating products (including amplifiers).
• Headphones—Do not set the volume at a high level. Hearing experts advise against extended listening at
high volume levels.
• To prevent fire, never place any type of candle or naked flames on the top or near the TV set.
• To prevent fire or shock hazard, do not place the AC cord under the TV set or other heavy items.
• Do not display a still picture for a long time, as this could damage the LCD screen.
• There is power consumption always if main plug is connected. Be aware that only way to disconnect
mains power from your TV is to unplug mains plug from the wall, it shall remain readily operable during
use of your product.
• Servicing—Do not attempt to service the product yourself. Removing covers can expose you to high
voltage and other dangerous conditions. Request a qualified person to perform servicing.
The LCD panel is a very high technology product, giving you fine picture details.
Due to the very large number of pixels, occasionally a few non-active pixels may appear on the screen as a fixed point of
blue, green or red. This is within product specifications and does not constitute a fault.
Precautions when transporting the TV
When transporting the TV, never carry it by holding onto the speakers. Be sure to always carry the TV by two people holding
it with two hands—one hand on each side of the TV.
Cautions regarding use in high and low temperature environments
• When the TV is used in a low temperature space (e.g. room, office), the picture may leave trails or appear slightly delayed. This
is not a malfunction, and the TV will recover when the temperature returns to normal.
• Do not leave the TV in a hot or cold location. Also, do not leave the TV in a location exposed to direct sunlight or near a heater,
as this may cause the cabinet to deform and the LCD panel to malfunction.
Storage temperature: -20 °C to e60 °C.
English
Caution : DANGEROUS VOLTAGE INSIDE !
TO PREVENT ELECTRIC SHOCK, DO NOT REMOVE COVER. NO-USER SERVICEABLE PARTS
INSIDE. REFER SERVICING TO QUALIFIED SERVICE PERSONAL.
2
Page 5
Introduction
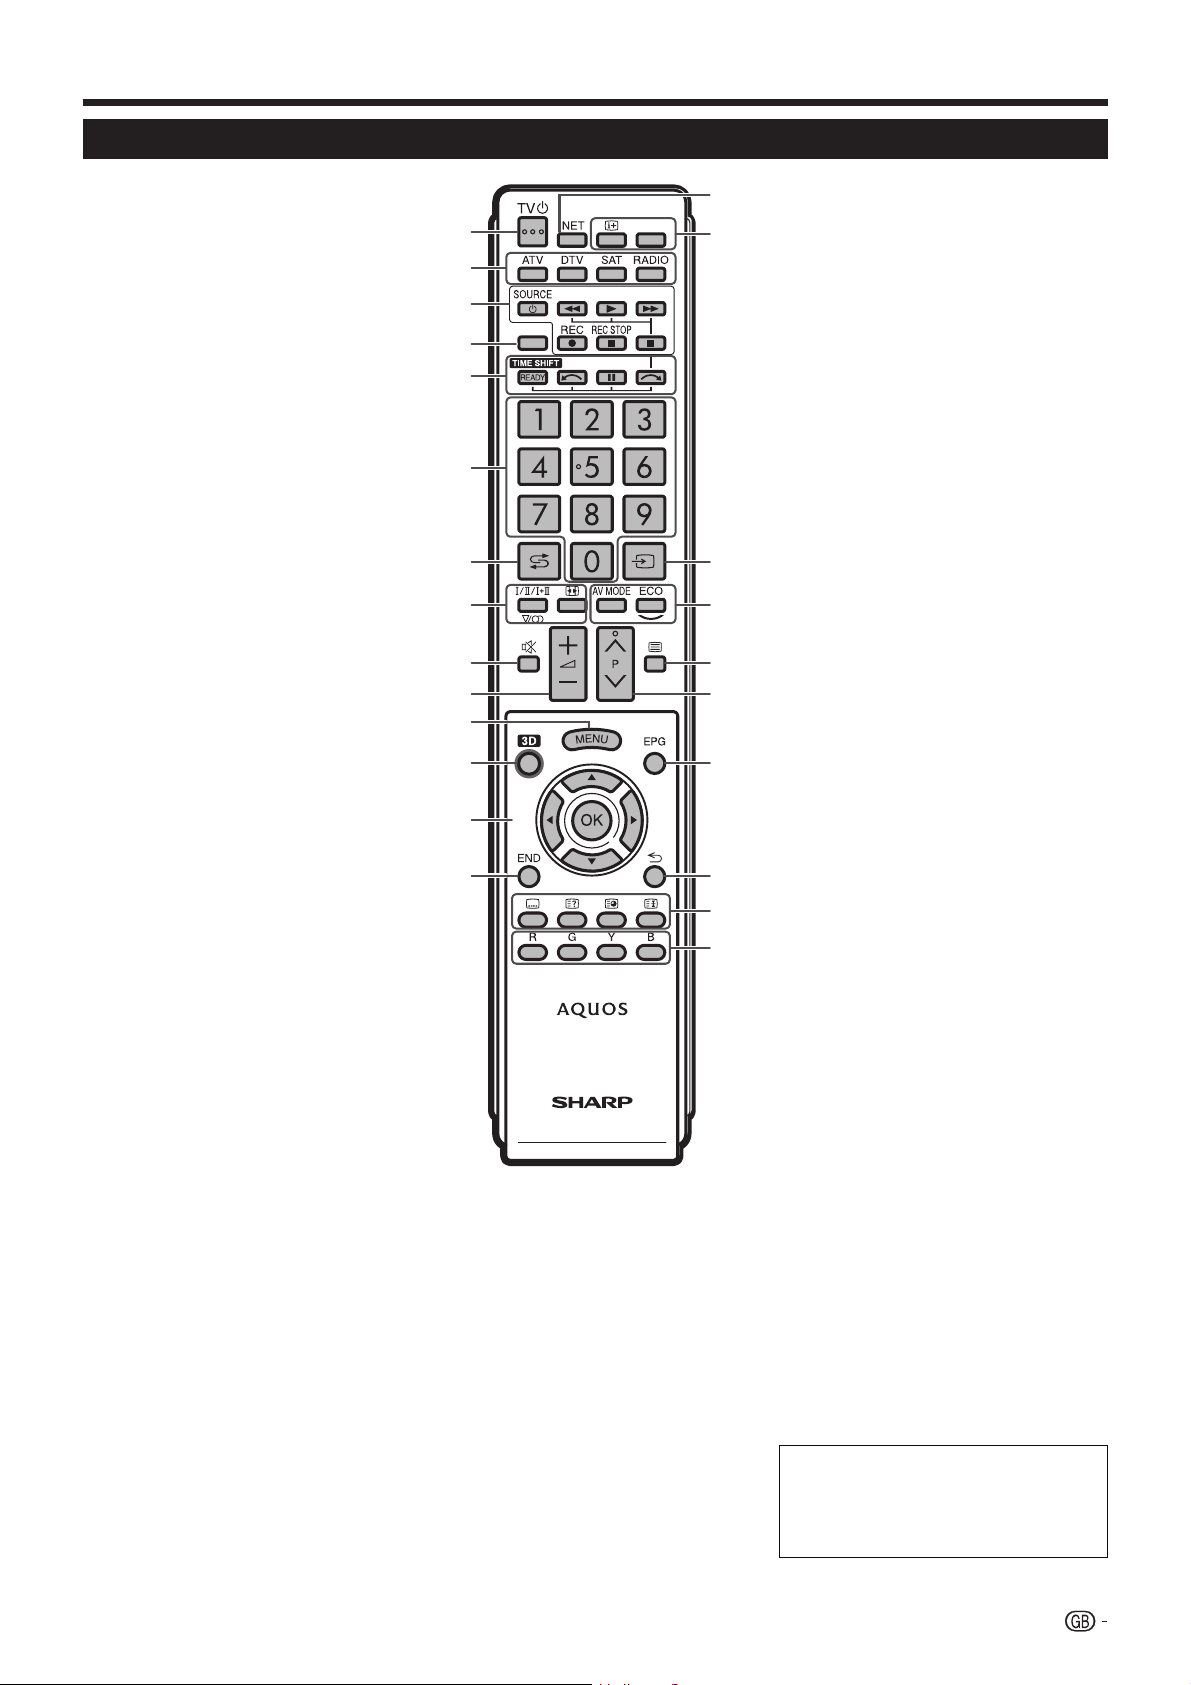
Remote control unit
1 >a (Standby/On) (Page 10)
2 ATV
Access conventional analogue TV
mode.
DTV
Access digital TV mode.
SAT
Access satellite mode.
RADIO
DTV/SAT: Switch between radio and
data mode.
• When only data broadcasting
(no radio broadcasting) is
transmitted by DVB, the radio
broadcasting will be skipped.
3 HDMI CEC buttons (Pages 29
and 30)
4 USB REC (
Record a programme you are
watching.
5 TIME SHIFT
Not used.
6 Numeric buttons 0_9
Set the channel. Enter desired
numbers. Set the page in teletext
mode.
• When the five Nordic countries
(Sweden, Norway, Finland,
Denmark or Iceland) are selected
in the country setting from initial
auto installation (Page 9), DTV
services are four digits. When
another country is selected, DTV
services are three digits.
7 A (Flashback)
Return to the previously selected
channel or external input.
8 7 (Sound mode) (Page 20)
Select a sound multiplex mode.
f Picture format (Page 26)
Change between different picture
formats.
9 e (Mute)
TV sound on/off.
0 i+/- (Volume)
Increase/decrease TV volume.
Q @
“Menu” screen on/off.
W 3D (Page 36)
Select between 3D and 2D image
viewing.
E a/b/c/d (Cursor)
Select a desired item.
USB REC/Media Player/Home Media:
S / V
Rewind and fast forward.
T / L
Rewind and forward in units of 5
minutes.
;
Execute a command.
Pages 11, 20, 34 and 35)
15
116
AVF
2
3
USB REC
4
5
6
7
8
9
10
17
18
19
20
11
12
13
14
U
S
T
V
21
22
23
24
ATV/DTV/SAT: Display “CH list” when
no other “Menu” screen is running.
R >
ATV/DTV/SAT: Exit the “Menu”
screen.
T NET
Access “Connected TV” mode.
(Page 31)
Y p Channel information (Page 25)
Display the station information
(channel number, signal, etc.) on the
screen.
FAV
Shows the favourite channels list.
U b Source List (Page 10)
Select an input source.
I # (Page 19)
Select audio/video settings.
ECO
On/Off (Page 28)
Select “Power save” setting.
O m Teletext (Page 12)
ATV: Display analogue teletext.
DTV/SAT: Select MHEG-5 or teletext
for DTV/SAT.
P :r/s
ATV/DTV/SAT: Select the TV
channel.
NET: Scrolls pages up/down.
A EPG (Page 11)
DTV/SAT: Display the EPG screen.
S 6 Return
ATV/DTV/SAT: Return to the previous
“Menu” screen.
NET: Return to the previous page
(This may not function for some
services).
D Buttons for useful operations
[ Subtitle (Pages 10, 12 and 24)
Switch subtitle languages on/off.
k Reveal hidden teletext
(Page 12)
1 Subpage (Page 12)
3 Freeze/Hold (Page 12)
Teletext: Stop updating teletext
pages automatically or release the
hold mode.
F R/G/Y/B Colour buttons
The coloured buttons are
correspondingly used to select the
coloured items on the screen (e.g.,
EPG, MHEG-5, teletext).
Important information:
Satellite services are only
available for the LE732 model
series.
3
Page 6
Introduction
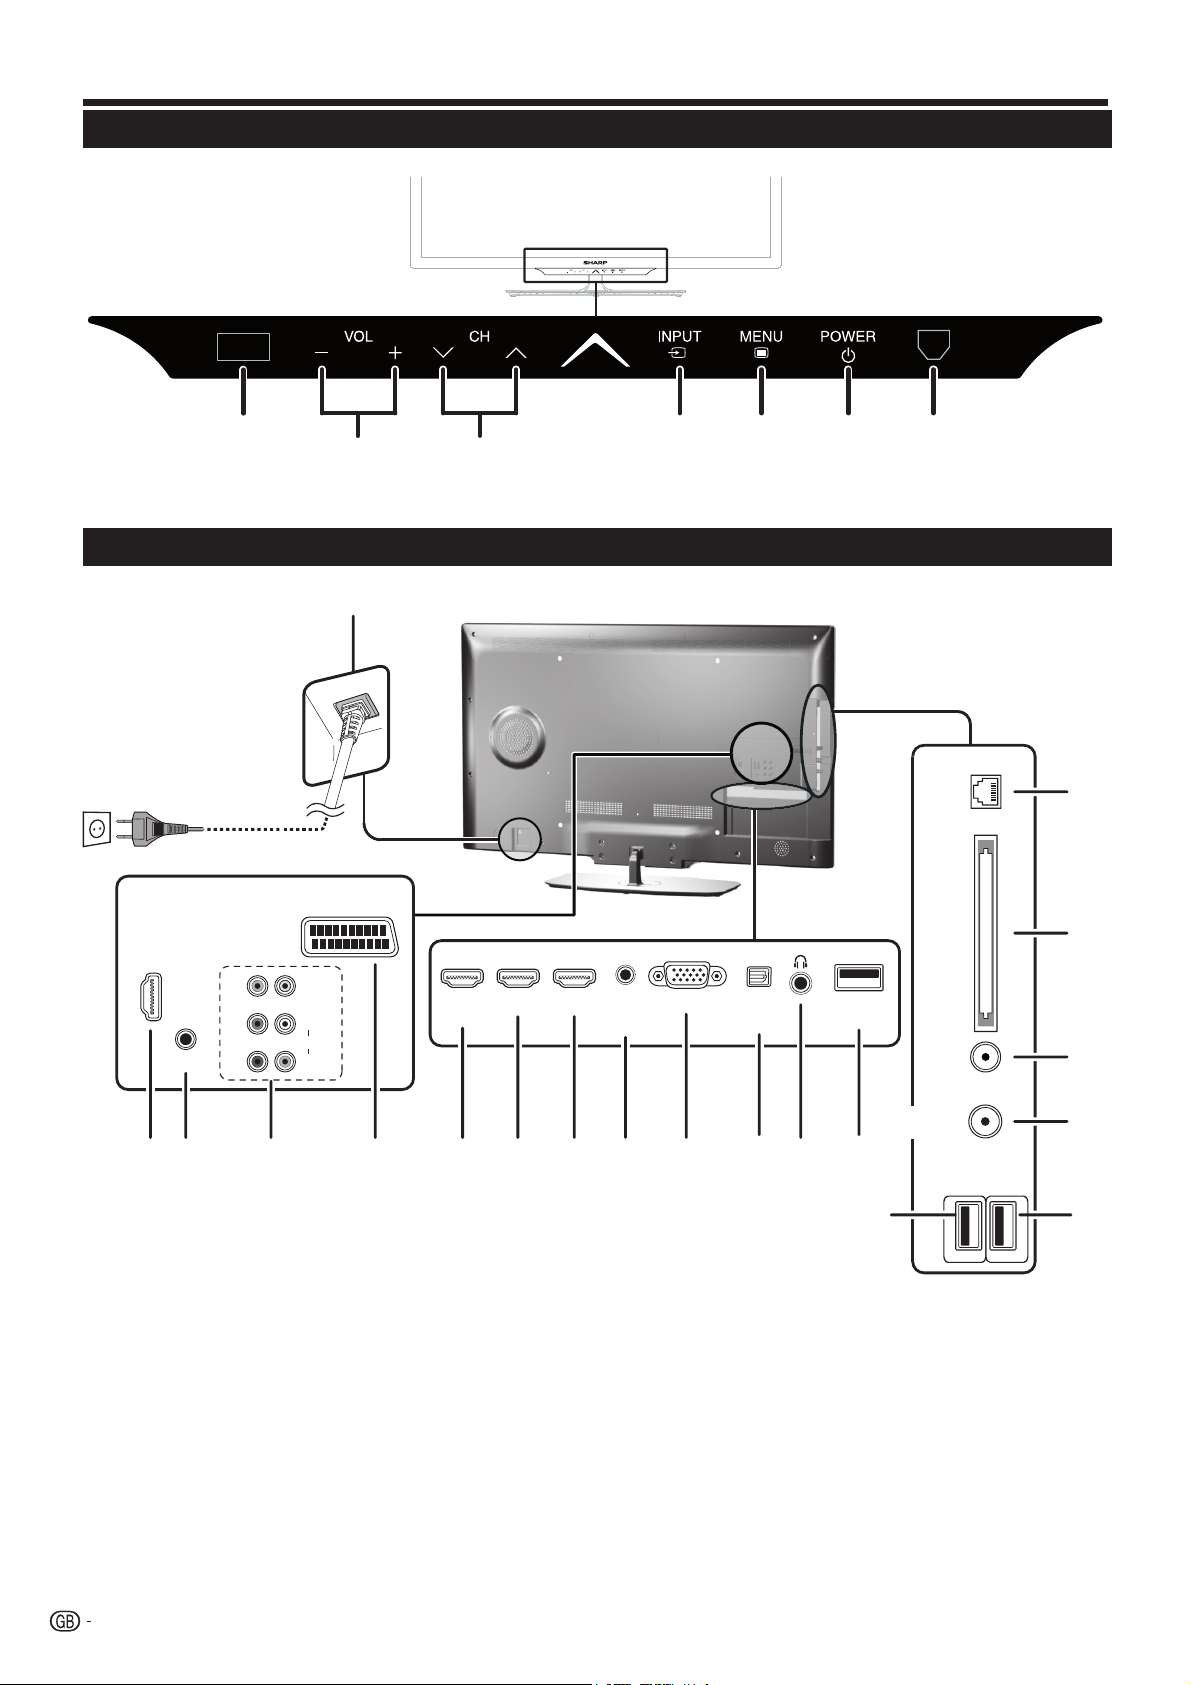
TV (Front view)
3D infrared
emitter
*TV indicator status (Page 10)
Volume
buttons
TV (Side and rear view)
16
Illumination led*
Programme (channel)
buttons
Input
source
button
Menu
button
Power
button
Remote
Control
Sensor
SCART (AV/RGB/S-VIDEO)
HDMI 4
19
VIDEO
L
AUDIO
R
5
Pr
Pb
SERVICE
Y
13 9
USB terminal (USB REC / MEDIA
1
PLAYER / SOFTWARE / HDD
READY / 3D GLASSES BATTERY)
2 USB terminal (MEDIA PLAYER /
SOFTWARE / HDD READY / 3D
GLASSES BATTERY)
3 USB terminal (Wi-Fi use only)
4 HEADPHONES jack
5 SCART (AV/RGB, Y/C Input) terminal
HDMI 1
(ARC)
HDMI 2
HDMI 3
HDMI / PC
ANALOG
AUDIO
INPUT
PC IN
DIGITAL
AUDIO
OUTPUT
10 11 12 14 6 8 4 3
6 PC Input
7 Antenna input terminal
8 OPTICAL DIGITAL AUDIO OUTPUT
terminal (SPDIF)
9 SERVICE connector (jack 3.5 mm)
14 AUDIO input for DVI and PC
(Jack 3.5mm connector)
15 COMMON INTERFACE slot
16 AC INPUT terminal
17 SAT (Satellite antenna input) (Only
10 HDMI 1 (HDMI/DVI/ARC)
11 HDMI 2 (HDMI/DVI)
12 HDMI 3 (HDMI/DVI)
18 ETHERNET (10/100) terminal
19 COMPONENTS / AV terminals
13 HDMI 4 (HDMI/DVI)
USB
(WIFI)
(LE732 series)
2
LE732 series)
ETHERNET
C.I.
ANTENNA
SAT
USB
(HDD)
18
15
7
17
1
WARNING
• Excessive sound pressure from earphones and headphones can cause hearing loss.
• Do not set the volume at a high level. Hearing experts advise against extended listening at high volume levels.
4
Page 7
Preparation
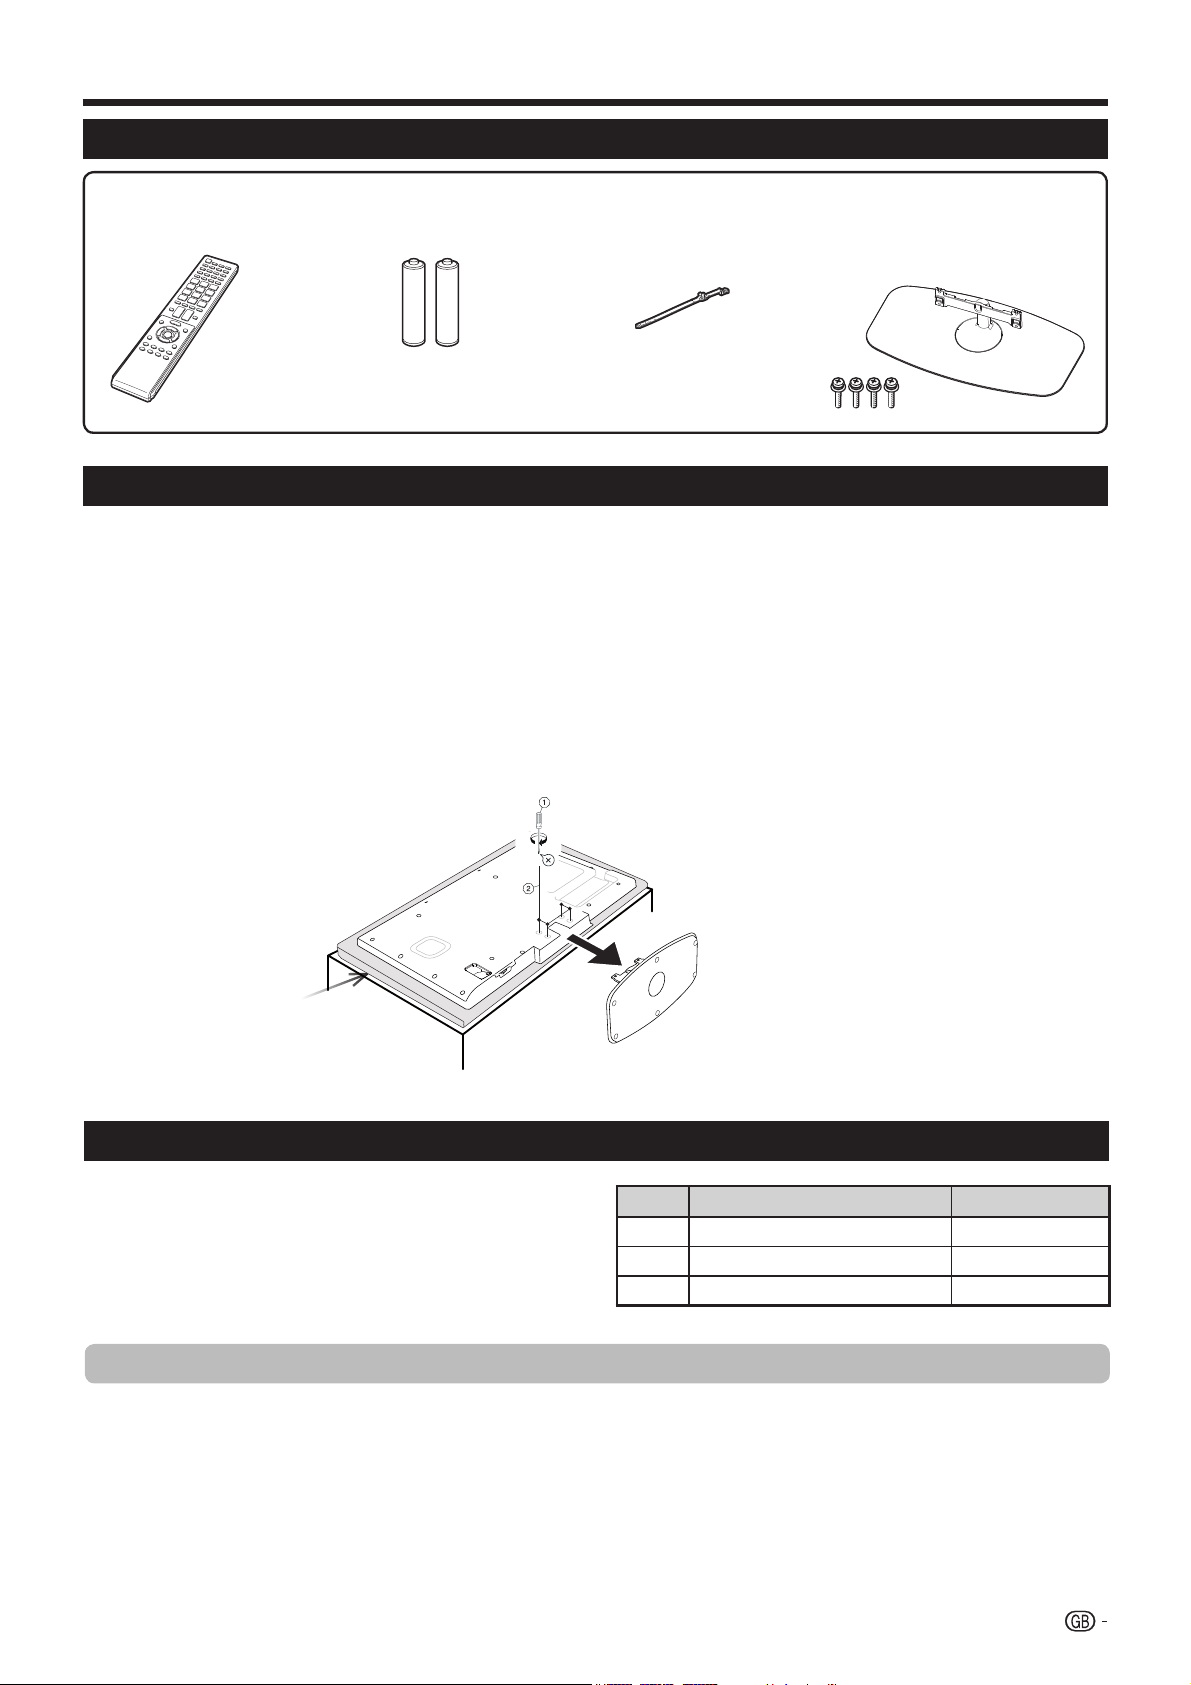
Supplied accessories
Remote control unit
(g1)
• “AAA” size battery (g2)
• Operation manual (This publication)
• Cable tie (x1)
• Stand unit (x1)
Attaching the stand unit
• Before attaching (or detaching) the stand, unplug the AC cord.
• Before performing work, spread cushioning over the surface on which you will be laying the TV. This will prevent it
from being damaged.
CAUTION
• Attach the stand in the correct direction.
• Be sure to follow the instructions. Incorrect installation of the stand may result in the TV falling over.
Inserting the stand
Insert the stand into the openings on the bottom of the TV (Hold the stand so it will not drop from the edge
of the base area).
Insert and tighten the four screws into the four holes on the rear of the TV.
Soft cushion
NOTE
• To detach the stand unit, perform the above steps in reverse order.
Optional accessory
The listed optional accessories are available for this
LCD colour TV. Please purchase them at your nearest
shop.
• Additional optional accessories may be available in the
near future. When purchasing, please read the newest
catalogue for compatibility and check the availability.
Fixing the TV on a wall
• This TV should be fixed on a wall only with the wall fix bracket available from SHARP (above table). The use of other
wall fix brackets may result in an unstable installation and may cause serious injuries.
• Fixing the LCD colour TV requires special skills and should only be performed by qualified service personnel.
Customers should not attempt to do the work themselves. SHARP bears no responsibility for improper fixing or
fixing that results in accident or injury.
• You can ask qualified service personnel about using an optional bracket to fix the TV on a wall.
• To use this TV fixed on a wall, first remove the adhesive tape at the two locations on the rear of the TV, and then use the screws
supplied with the wall fix bracket to secure the bracket to the rear of the TV.
• When you fix the TV on a wall, you should attach the supporting post.
No. Part name Part number
1 Wall mount bracket AN-37AG5
2 Wi-Fi adapter AN-WUD630
3 3D glasses AN-3DG20-B
5
Page 8
Preparation
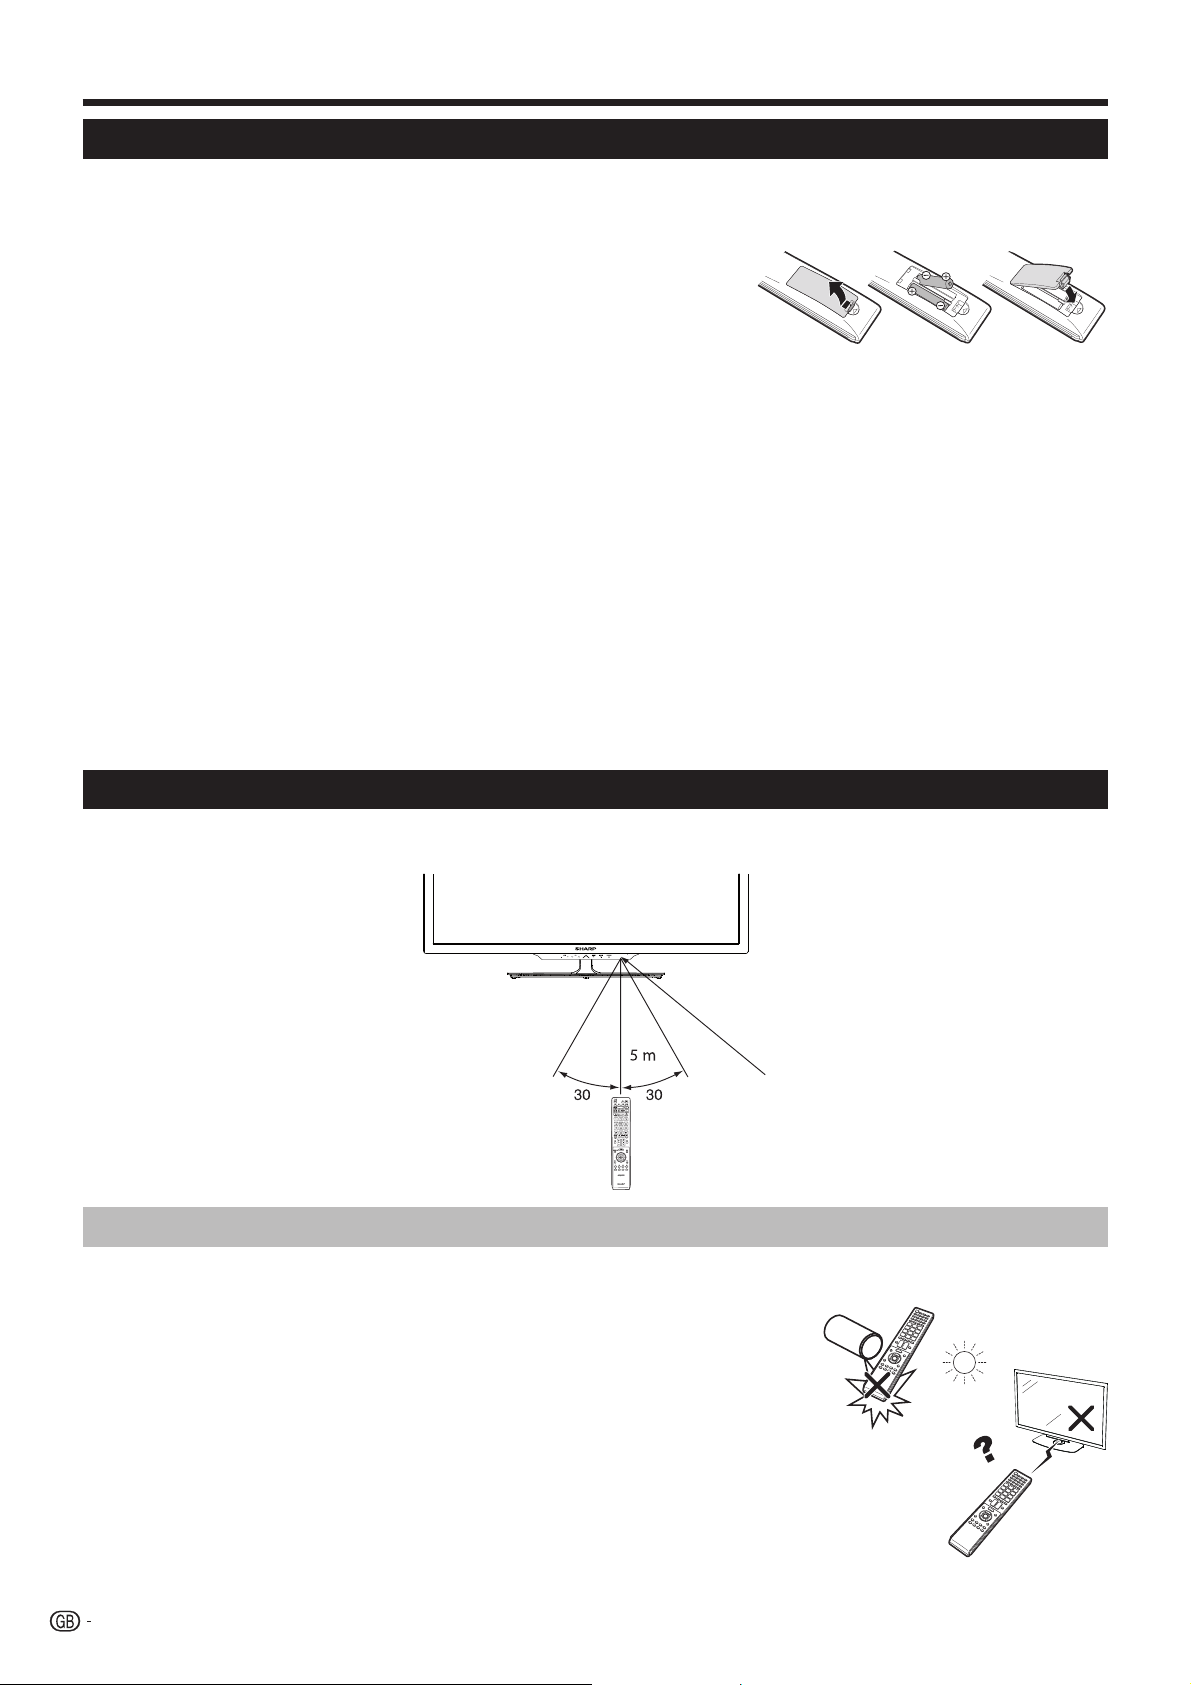
Inserting the batteries
Before using the TV for the first time, insert the two supplied “AAA” size batteries. When the batteries become
depleted and the remote control unit fails to operate, replace the batteries with new “AAA” size batteries.
1 Open battery cover.
2 Insert two supplied “AAA” size batteries.
• Place batteries with their terminals corresponding to
the (+) and (-) indications in the battery compartment.
3 Close the battery cover.
CAUTION
Improper use of batteries can result in chemical leakage or explosion. Be sure to follow the instructions below.
• Do not mix batteries of different types. Different types of batteries have different characteristics.
• Do not mix old and new batteries. Mixing old and new batteries can shorten the life of new batteries or cause
chemical leakage in old batteries.
• Remove batteries as soon as they have worn out. Chemicals that leak from batteries can cause a rash. If you fi nd
any chemical leakage, wipe thoroughly with a cloth.
• The batteries supplied with this product may have a shorter life expectancy due to storage conditions.
• If you will not be using the remote control unit for an extended period of time, remove the batteries from it.
• When replacing the batteries, use zinc-carbon batteries instead of alkaline ones.
Note on disposing batteries:
The batteries provided contain no harmful materials such as cadmium, lead or mercury.
Regulations concerning used batteries stipulate that batteries may no longer be thrown out with the household
rubbish. Deposit any used batteries free of charge into the designated collection containers set up at commercial
businesses.
Using the remote control unit
Use the remote control unit by pointing it towards the remote control sensor. Objects between the remote control
unit and sensor may prevent proper operation.
oo
Remote control sensor
Cautions regarding the remote control unit
• Do not expose the remote control unit to shock. In addition, do not expose the remote control unit to liquids,
and do not place in an area with high humidity.
• Do not install or place the remote control unit under direct sunlight. The heat
may cause deformation of the unit.
• The remote control unit may not work properly if the remote control sensor of
the TV is under direct sunlight or strong lighting. In such cases, change the
angle of the lighting or the TV, or operate the remote control unit closer to the
remote control sensor.
6
Page 9
Quick guide
Initial installation overview
Follow the steps below one by one when using the TV for the first time. Some steps may not be necessary
depending on your TV installation and connection.
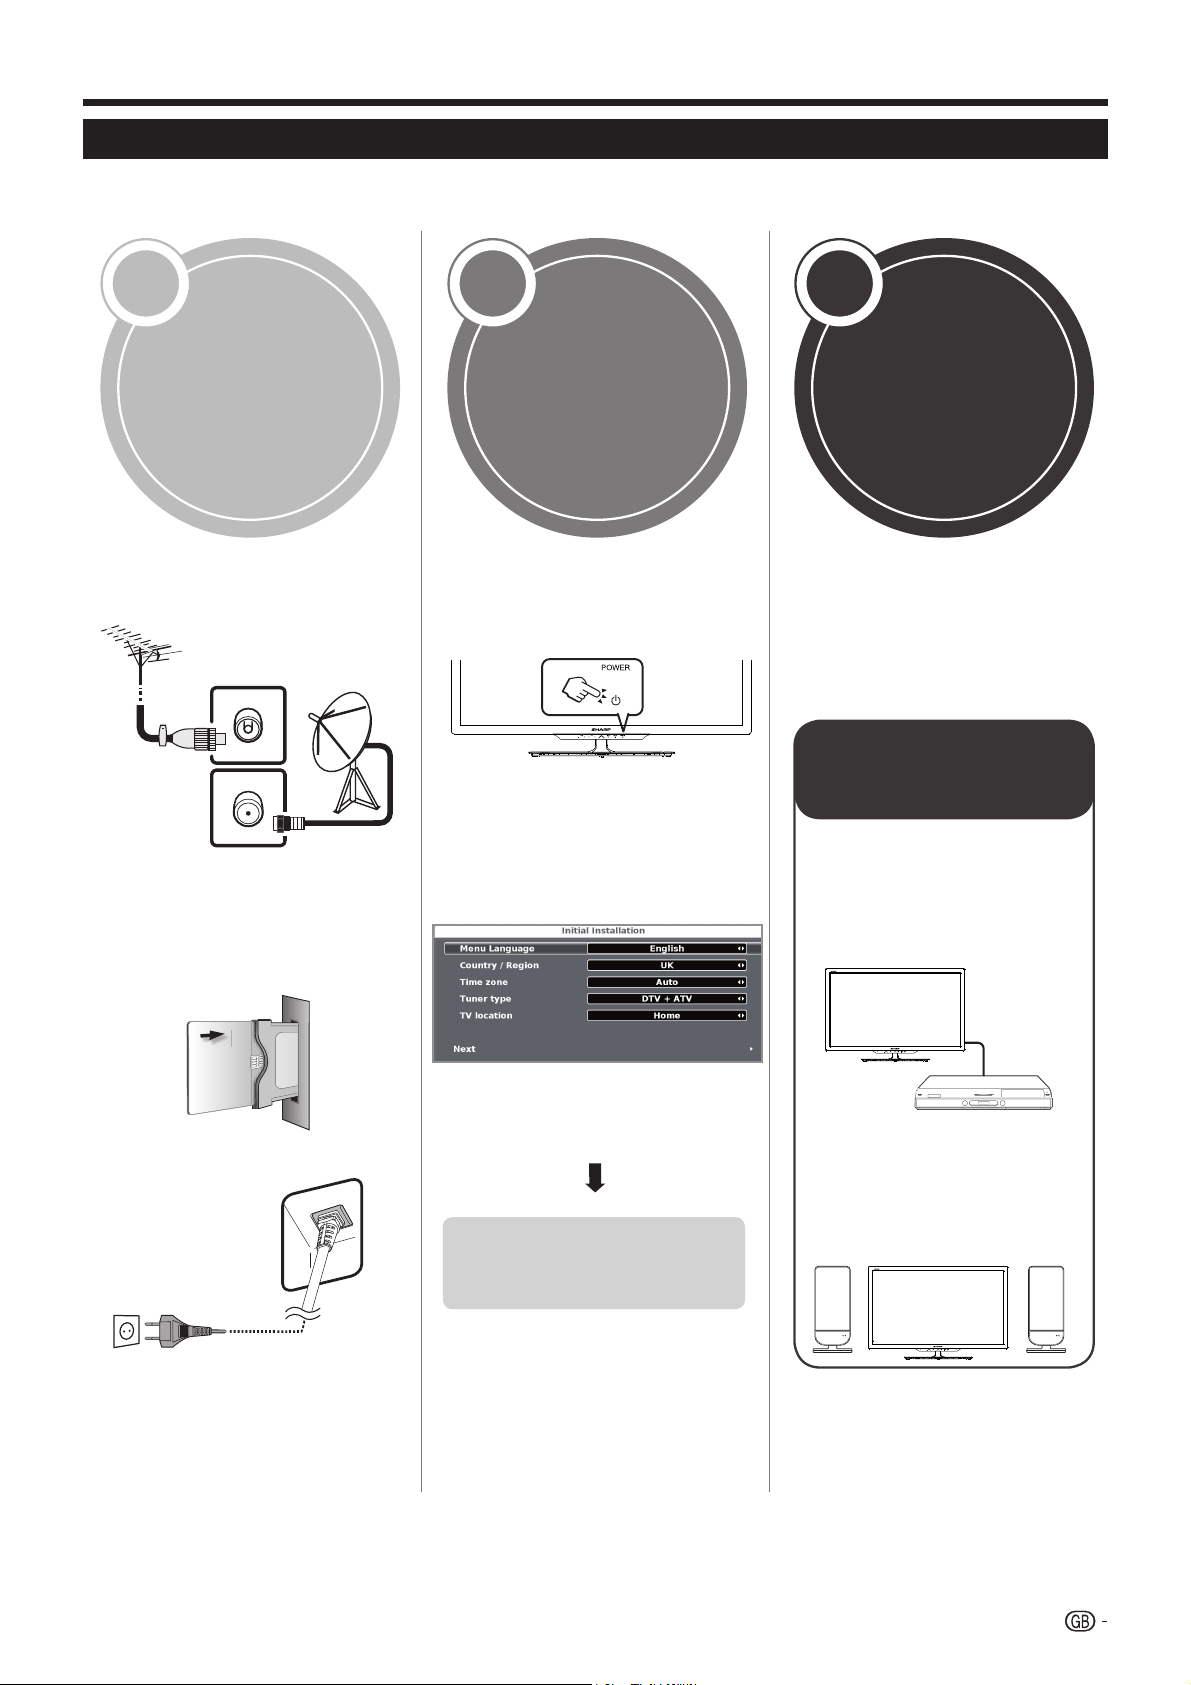
1 2 3
Power on and
Preparation
Connect an antenna cable to
the antenna terminal (Page 8).
If necessary, insert a CA
card into the CI slot to watch
scrambled broadcasts
(Page 8.)
run the auto
installation
Turn on the power using a on
the TV (Page 10).
Run the initial auto installation
(Page 9).
Language, country, tuner
type settings and TV Location
setting.
Watch TV
Congratulations!
Now you can watch TV.
If necessary, adjust the
antenna to attain maximum
signal reception (Page 9).
Connect
external devices
Connect external
devices such as a
DVD player/recorder
as instructed (Pages
13, 14 and 15).
Plug in the AC cord (Page 8).
Product shape varies in some countries.
Go to Next
.
Start searching
channels
Connect external
audio devices such as
speakers/amplifier as
instructed (Pages 13,
14 and 15).
7
Page 10
Quick guide
●
●
●
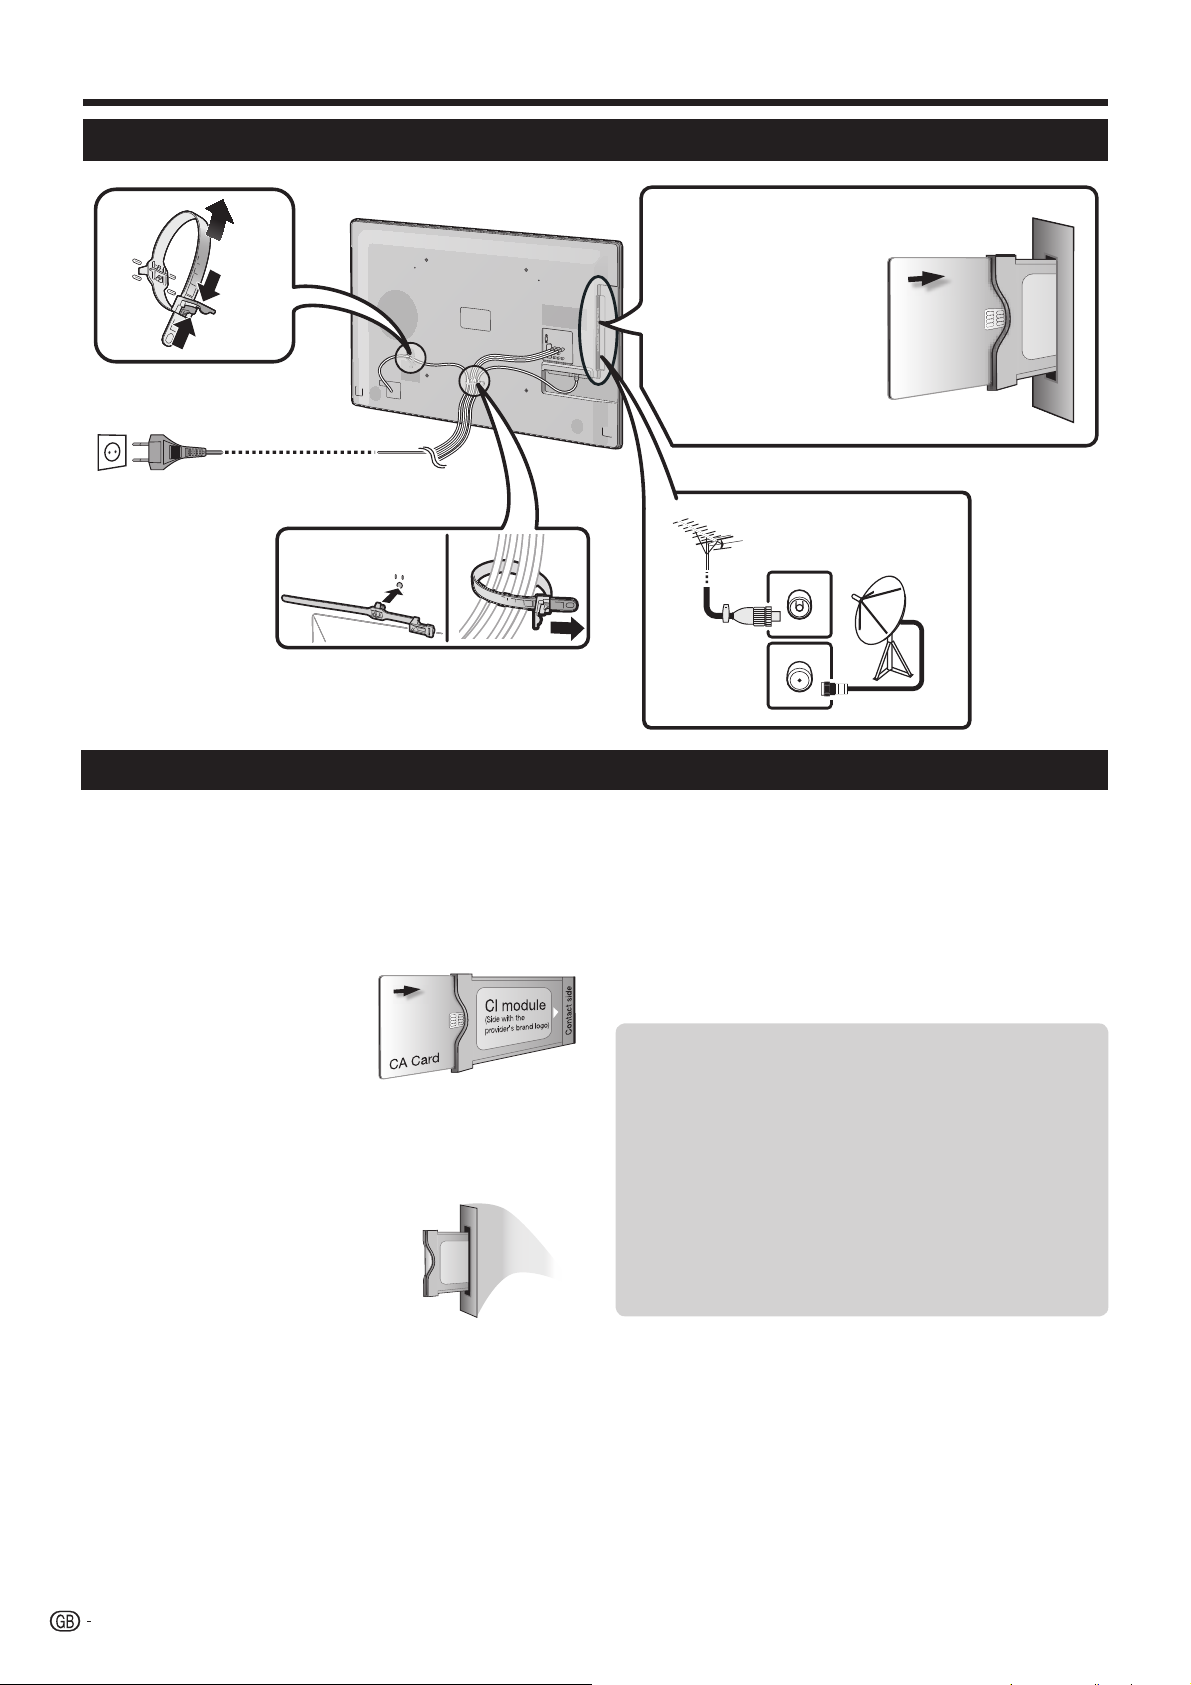
Before turning on the power
AC cord
Product shape varies
in some countries.
Place the TV close to the
AC outlet, and keep the
power plug within reach.
1 Carefully insert the CI
Module in the CI slot
with the contact side
forward.
2 The logo on the CI
Module must be
facing outward from
the rear of the TV.
Standard
DIN45325 plug
(IEC 169-2) 75q
coaxial cable.
Inserting a CA Card
In order to receive coded digital stations, a Common
Interface Module (CI Module) and a CA Card must be
inserted in the CI slot of the TV.
The CI Module and the CA Card are not supplied
accessories. They are usually available from your
dealers.
Inserting the CA Card into the CI Module
1
With the side with the
gold coloured contact
chip facing the side of
the CI Module marked
with the provider’s
logo, push the CA Card
into the CI Module as far as it will go. Note the
direction of the arrow printed on the CA Card.
Inserting the CI Module in the CI slot
2 Carefully insert the CI Module in the CI slot with
the contact side forward. The
logo on the CI Module must be
facing outward from the rear of
the TV. Do not use excessive
force. Make sure the module is
not bent in the process.
Checking CI Module information
1 Press MENU and the “PICTURE” menu is
shown.
2 Press c/d to select “CHANNEL” menu.
• The content of this menu depends on the provider of
the CI Module.
3 Press a/b to select “CI information”, and then
press OK.
● Module
General information on CI Module displays.
● Menu
Adjustment parameters of each CA Card displays.
● Enquiry
You can input numerical values such as passwords here.
NOTE
The content of each screen depends on the provider of
the CI Module.
NOTE
• Make sure that the CI module is properly inserted.
• This menu is only available for digital stations.
• It takes about 30 seconds to certify the license key when you insert a CA card into the CI+ compatible CI module for the first
time. This process may fail when there is no antenna input or you have never run “Auto installation”.
• The CI+ compatible CI module sometimes upgrades its firmware. You may not receive any TV images before upgrading. You
can only use the power button during upgrading.
• The CI+ compatible CI module does not allow you to output any copy protected programmes using monitor out.
• If the TV displays an update confirmation message for the CA card while receiving CI+ compatible broadcasts, follow the
screen prompts.
8
Page 11

Quick guide
Initial auto installation
When the TV is powered on for the first time after purchase,
the initial auto installation wizard appears. Follow the menus
and make the necessary settings one after another.
Confirm the following before turning
on the power
E Is the antenna cable connected?
E Is the AC cord plugged in?
1 Press a on the TV.
• The initial auto installation wizard appears.
2 Setting the OSD language.
Press a/b/c/d to select the desired language.
3 Setting the country.
Press ▲/▼/◄/► to select your country or area.
• This setting screen only appears during the initial auto
installation.
4 Select time zone.
5 Select broadcast settings.
Press ▲/▼ to select “Tuner type”. Press ◄/► to
select between differents tune type:
Picture Mode is changed, the TV will automatically
switch back to DYNAMIC when there is no signal input
from the TV or remote control unit for 30 minutes.
If you have chosen STORE by mistake, go to Settings
→ Restore Factory Default → OK, and the TV returns
to the initial screen.
7 Starting channel search.
Press ▼ to select Next and then press OK.
• If you want to search for more broadcasts, execute
“DTV (or ATV, or CADTV) manual tuning” from the
menu “CHANNEL” (Page 22).
• To watch both analogue broadcasts and digital
broadcasts, you should perform the channel search
setting “DTV+ATV” or “CADTV+ATV”.
• Is not possible to search digital and cable digital
broadcasts at the same time.
8 The TV searches for, sorts and stores all the
receivable TV stations according to their settings
and the connected antenna.
• To cancel the initial auto installation in progress, press
END.
NOTE
• If you turn the power on the TV after performing step 4,
initial auto installation wizard does not appear. The auto
installation function allows you to execute the installation
again from the Channel menu (Page 22).
• When "France" is selected in the Country setting, the PIN
code setting cannot be skipped.
• After initial Auto Tuning is completed, the default PIN is
automatically set to “3001”. To change the PIN setting, refer
to Lock menu on page 21.
Checking quality and
signal strength
If you install a DVB-T/T2/S/S2 antenna for the first time
of relocate it, you should adjust the alignment of the
antenna to receive a good reception while checking the
antenna setup screen.
1 Press a channel you want to check.
2 Press MENU.
3 Press ► to select “Channel” menu and then press
OK.
4 Press ▲/▼ to select "Signal Information" and
then press OK.
CADTV: Cable digital broadcasts.
ATV: Analogue broadcasts.
DTV: Digital broadcasts.
DTV + ATV: Digital and analogue broadcasts.
CADTV+ATV: Cable and analogue broadcasts.
SADTV: Satellite broadcasts.
SADTV + ATV: Satellite and analogue broadcasts.
6 Selecting the TV location.
Home
Store
Press ◄/► to select where you will use this TV, and
then press OK.
•HOME: For domestic use.
•STORE: DYNAMIC mode is predetermined. If the
5 Position and align the antenna so that the maximum
possible values for “Signal Strength” and “Signal
Quality” are obtained.
NOTE
• The values of “Signal Strength” and “Signal Quality” indicate
when to check the appropriate alignment of the antenna.
9
Page 12
Watching TV
AVF
Daily operation
Switching on/off
Turning on/off the power
Press a on the TV to switch it on.
Switch it off by pressing a on the TV.
NOTE
• When turning off the power
using a on the TV, EPG
data will be lost.
• The terminal layout may differ
depending on the model.
Standby mode
E Switching to standby mode
If the TV is switched on (BLUE LED), you can switch
it to standby by pressing TVa on the remote control
unit.
E Switching on from standby
From standby (RED LED), press TVa on the remote
control unit.
AVF
TV indicator status
LED indicator Status
Off
Blue
Red
Violet
NOTE
StandBy with USB REC programmed
• If you are not going to use this TV for a long period of time,
be sure to remove the AC cord from the AC outlet.
• A small amount of electric power is still consumed even
when a is turned off.
Power off
Power on
Standby
Switching between digital, satellite
and analogue broadcasts
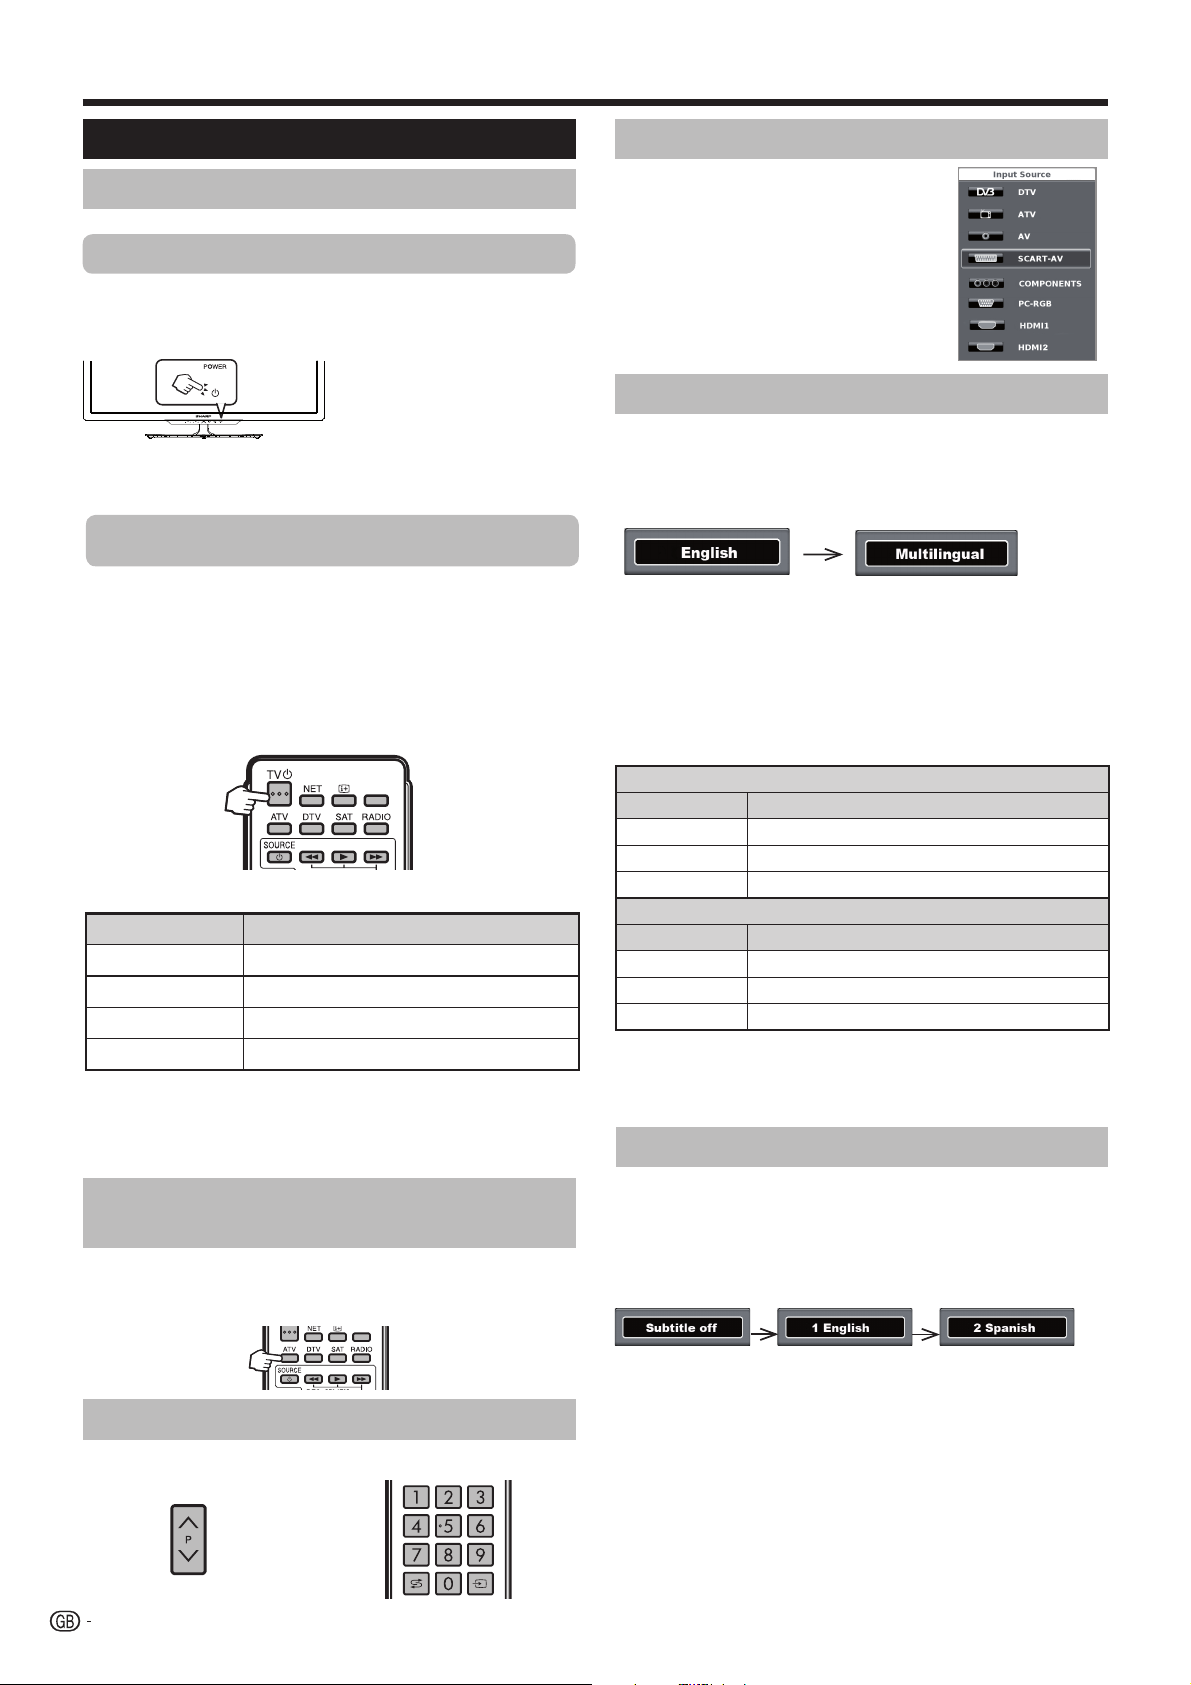
E Press “ATV”, “DTV”, "SAT" or "RADIO" to
change between modes.
Selecting an external video source
Once the connection is made,
press b to display the
“Source List” screen,
and then press a/b to
switch over to the appropriate
external source with OK.
Selecting audio language
E DTV/CADTV/SAT mode:
Each time you press 2 the audio language switches
between audio sources available.
6
NOTE
• The audio mode screen disappears in three seconds.
• Selectable items vary depending on the received
broadcasts.
E ATV mode:
Each time you press 2, the mode switches as shown
in the following tables.
NICAM TV broadcasts selection
Signal Selectable items
Stereo
Bilingual
Monaural
Signal Selectable items
Stereo
Bilingual
Monaural
NOTE
NICAM STEREO, MONO
NICAM CH A, NICAM CH B, NICAM CH AB, MONO
NICAM MONO, MONO
A2 TV broadcasts selection
STEREO, MONO
CH A, CH B, CH AB
MONO
• When no signal is received, the audio mode will display
“MONO”.
Switching subtitle languages
E DTV/CADTV/SAT mode:
Press SUBTITLES [ button to change between
different languages available, or to enabled/disabled
the subtitles.
6
Changing channels
With Pr/s:
10
With 0–9:
E ATV mode:
The available subtitles according to the broadcasting
will be enabled or disabled by pressing the SUBTITLES
[ key.
Page 13
Watching TV
T
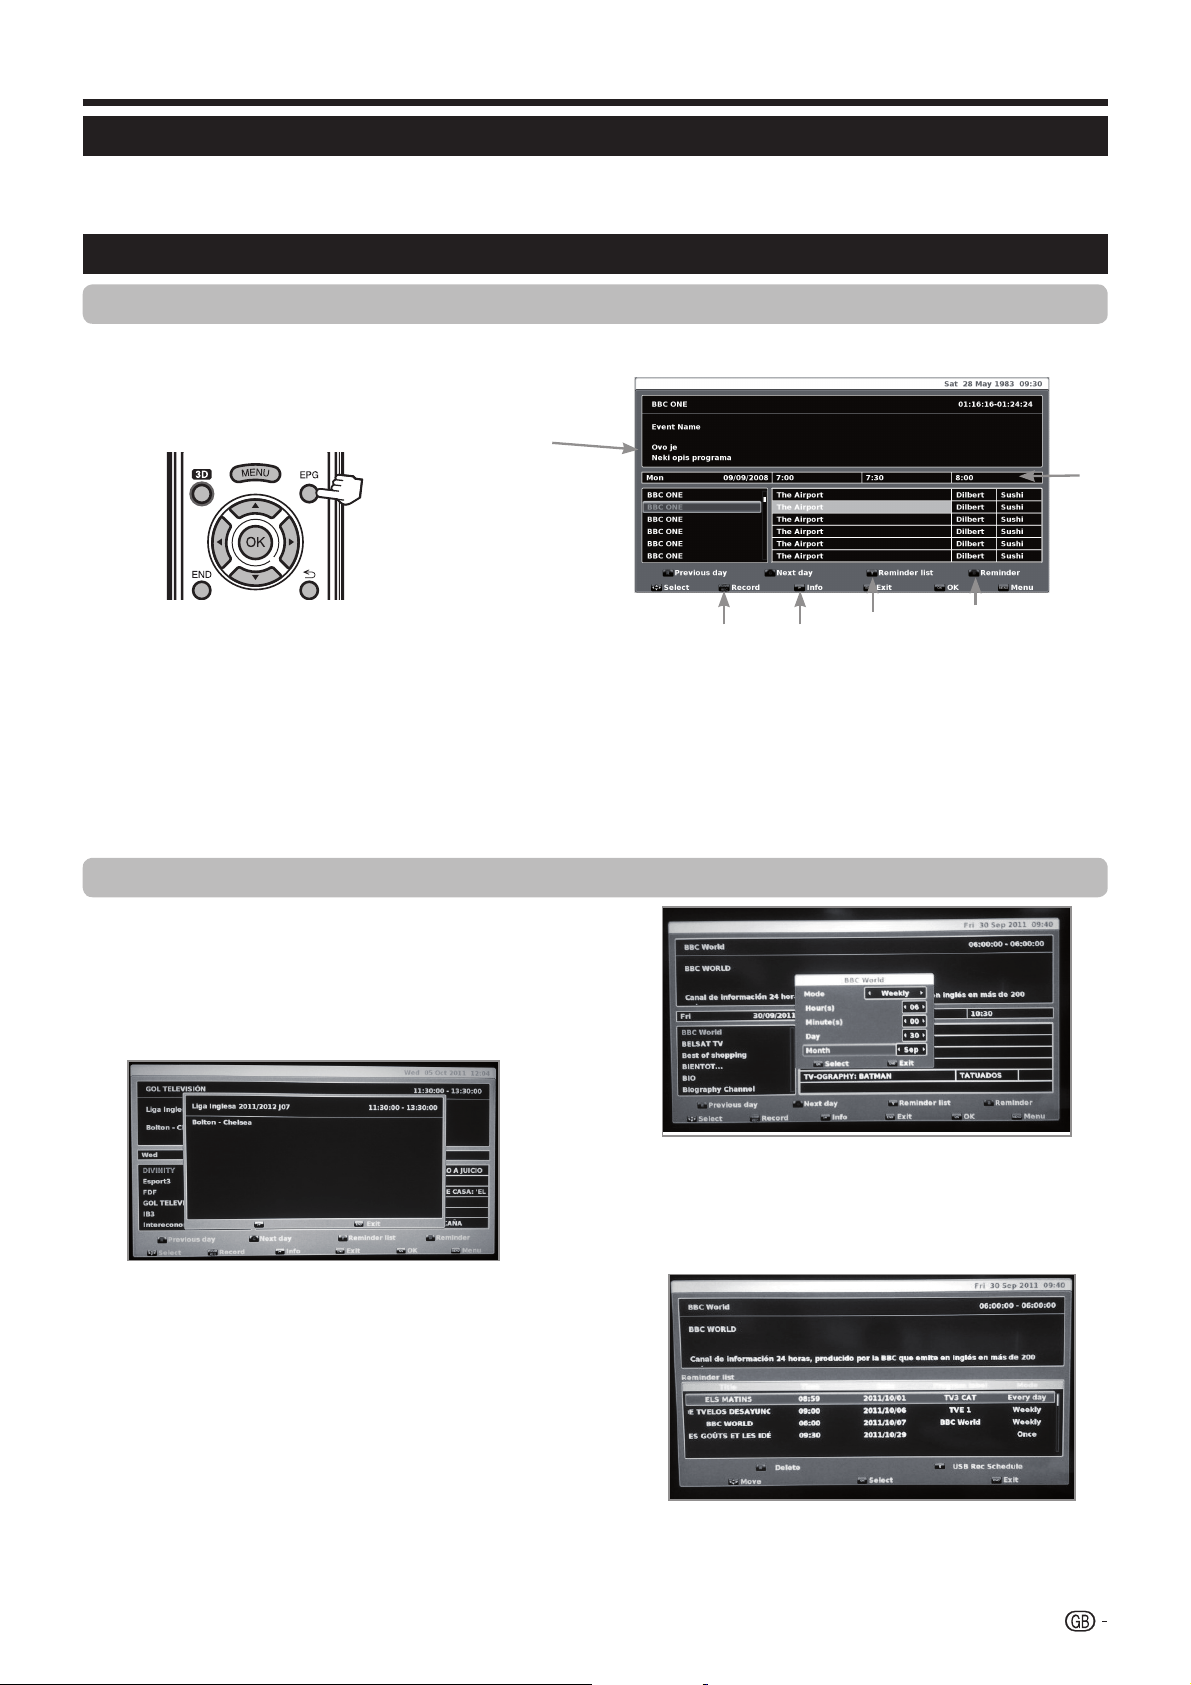
EPG
EPG is a programme list that is displayed on the screen. With the EPG, you can check the schedule of digital
channels, view detailed information about it, tune to an event currently on-air and set a timer for future events.
Selecting a programme using EPG
Basic Operation
The illustrations on this page are explained using three digit services.
E Display/Close the EPG screen
Press EPG.
2
U
S
E Select a program
V
6
3
5
1 Select the time span
-Press c/d to select the time span you want to search, press OK.
• Continue to press d to display programs in the next time span.
2 Select the desired program
-Press a/b to select the desired program, press OK.
• If a or b are displayed on the left of the programs, continue to press a/b to display next or previous screen.
-Press END to exit of EPG.
Other EPG functions
3 Revise the program information
1 Press ▲/▼/◄/► to select the program you want to
revise.
2 Press
“p.
Program information
1
4
3 Press p to return to EPG.
4 “Reminder” function
1 Select the broadcasting emitting the program
which you want to remember.
2 Press the BLUE key on the remote control.
3 With ▲/▼/◄/► select Mode, Hour, Minute, Day
and Month which you want the program to be
remembered. Press OK.
5 ”Reminder list” function
1 Press the YELLOW key to visualize all programmed
reminders.
2 Press ▲/▼/◄/► to select a reminder and then
press the RED key to delete it.
6 “Record” function
Press the USB REC key (Remote Control) to
setup the recording parameters. See “Recording
with timer” on page 34.
11
Page 14
Watching TV
Teletext
What is Teletext?
Teletext broadcasts pages of information and
entertainment to specially equipped TV. Your TV
receives teletext signals broadcast by a TV network,
and decodes them into graphical format for viewing.
News, weather and sports information, stock exchange
prices and programme previews are among the many
services available.
Turning Teletext on/off
1 Select a TV channel or external source providing
a teletext programme.
2 Press m to display the Teletext.
• Many stations use the TOP operating system, while
some use FLOF (e.g. CNN). Your TV supports both
these systems. The pages are divided into topic groups
and topics. After switching on the teletext, up to 1.000
pages are stored for fast access.
• Each time you press m, the screen switches as shown
below.
• If you select a programme with no teletext signal, “No
Teletext available” displays.
• The same message displays during other modes if no
teletext signal is available.
Teletext
Teletext
NOTE
• Teletext will not work if the selected signal type is RGB.
Buttons for teletext operations
Buttons Description
Pr/s
Colour (R/G/
Y/B)
0–9
v (Top/
Bottom/Full)
k (Reveal
hidden
Teletext)
3 (Freeze/
Hold)
[ (Subtitle
for Teletext)
1 (Subpage)
Increase or decrease the page number.
Select a group or block of pages
displayed in the coloured brackets at the
bottom of the screen by pressing the
corresponding Colour (R/G/Y/B) on the
remote control unit.
Directly select any page from 100 to 899
by using the 0–9 numeric buttons.
Switch the teletext image to Top, Bottom
or Full.
Reveal or hide hidden information such
as an answer to a quiz.
Stop updating teletext pages
automatically or release the hold mode.
Display the subtitle or exit the subtitle
screen.
• Subtitles will not be displayed when
the service does not contain subtitle
information.
TXT mode: Reveal or hide subpages.
• ◄ button: Move to the previous
subpage.
• ► button: Move to the following
subpage.
• OK button: shows a menu with two
user controls (size and index).
• Yellow button: Pressing one time,
upper half of the screen is shown.
Pressing a second time, the bottom
half of the screen is shown. Pressing
a third time, page returns to normal
size.
• Blue button: shows the index page.
When OK button is pressed while
the menu is on the screen, it
disappears.
Note that with this menu on the
screen the linked pages cannot be
selected.
TV mode: Display the time.
12
Using the MHEG-5 application
(UK only)
Some services bring you programmes with the MHEG
application encoded, letting you experience DTV/
CADTV interactively.
When provided, the MHEG-5 application will start
when you press m.
NOTE
• MHEG may not be displayed in 3D mode.
Page 15
Connecting external devices
S
CE
US
(
)
N
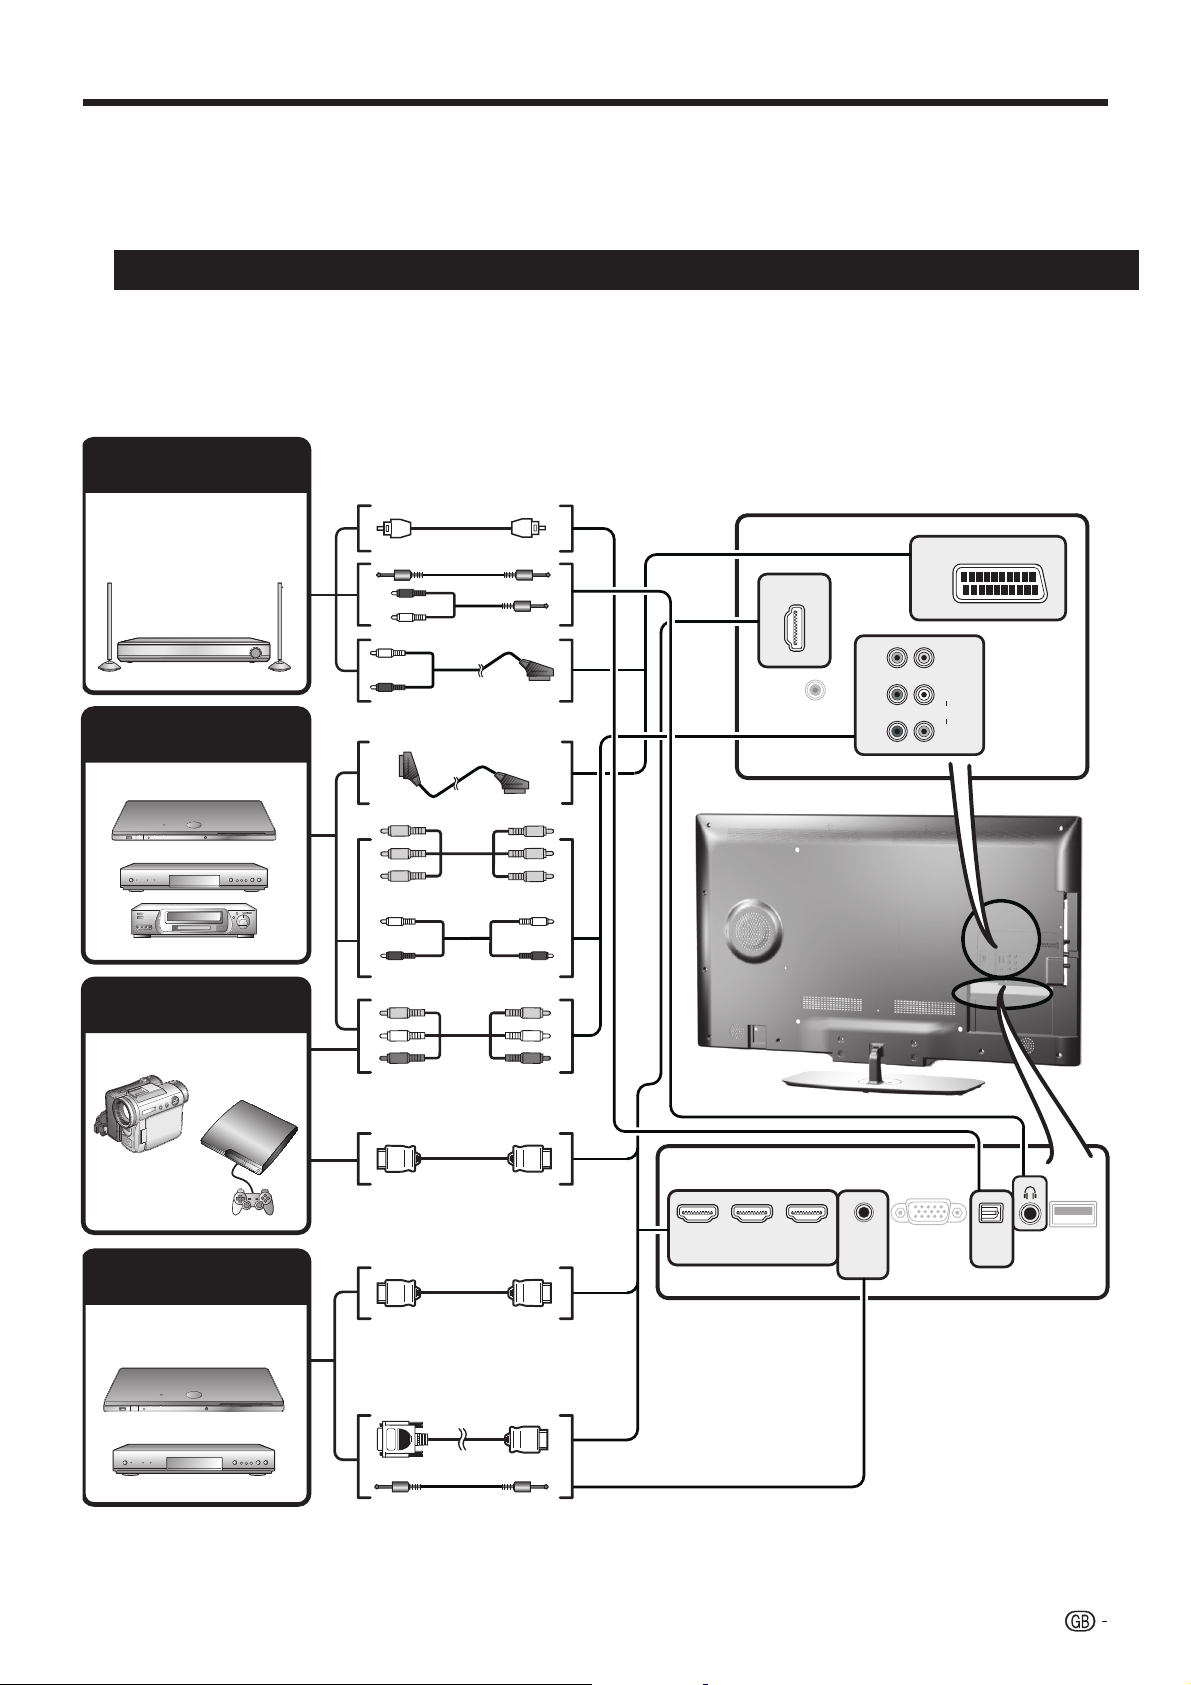
E Before connecting ...
• Be sure to turn off the TV and any devices before making any connections.
• Firmly connect a cable to a terminal or terminals.
• Carefully read the operation manual of each external device for possible connection types. This also helps you get
the best possible audiovisual quality to maximise the potential of the TV and the connected device.
Introduction to connections
The TV is equipped with the terminals as shown below. Find the cable corresponding the TV’s terminal and
connect the device.
NOTE
• The cables illustrated in pages 13, 14 and 15 are commercially available items.
Audio device (Page 15)
Audio cable
Video recording device
(Pages 14 and 15)
Game console or
camcorder (Page 14)
Audio cable
Audio cable
SCART cable
Components cable
Audio cable
AV cable
HDMI 4
ERVI
SCART (AV/RGB/S-VIDEO)
Pr
Pb
Y
VIDEO
L
AUDIO
R
HDMI-certified cable
HDMI 1
(ARC)
HDMI 2
HDMI 3
HDMI / PC
ANALOG
AUDIO
INPUT
PC I
DIGITAL
AUDIO
OUTPUT
WIFI
B
HDMI device (Page 14)
HDMI-certified cable
DVI/HDMI Cable
ø 3.5 mm stereo mini jack cable
13
Page 16

Connecting external devices
HDMI connection
YPB
PR
Component connection
CB)
CR)
(
(
Example of connectable devices
●
DVD player/recorder ● Blu-ray player/recorder
●
Game console
The HDMI connections permit digital video and audio
transmission via a connection cable from a player/
recorder. The digital picture and sound data are
transmitted without data compression and therefore
lose none of their quality. Analogue/digital conversion
is no longer necessary in the connected devices, which
also would result in quality losses.
RCA / ø 3.5 mm
stereo mini jack cable
HDMI / PC
ANALOG
HDMI 1
(ARC)
HDMI 2
HDMI 3
DVI/HDMI
cable
HDMI-certified
cable
AUDIO
INPUT
Example of connectable devices
●
VCR ● DVD player/recorder
●
Blu-ray player/recorder
You will enjoy accurate colour reproduction and high
quality images through the INPUT COMPONENTS /
AV terminal when connecting a DVD player/recorder or
other device.
L
AUDIO
R
Pr
Pb
Y
Components
cable
P
Audio cable
R
DVI/HDMI conversion
Using a cable DVI/HDMI, the digital signals of a DVD
video, can be also reproduced through a compatible
HDMI connection. The sound should be supplied
additionally.
• On connecting a DVI/HDMI cable to the HDMI terminal, may
be the picture does not become visualized clearly.
• Both HDMI and DVI use the same method of HDCP
protection against copy.
• For connecting a DVI cable, a commercially available adaptor
(not supplied) is necessary.
NOTE
• Depending on the type of HDMI cable used, it may appear a
video noise. Be sure to use a certified HDMI cable.
• On reproducing HDMI picture, the best format is
automatically detected and adjusted for the picture
.
Compatible video signal
576i, 576p, 480i, 480p, 1080i, 720p, 1080p
VIDEO connection
Example of connectable devices
●
VCR ● DVD player/recorder
●
Blu-ray player/recorder
●
Game console ● Camcorder
You can use the COMPONENTS/AV terminal when
connecting to a game console, camcorder, a DVD
player / recorder or other device.
VIDEO
L
AUDIO
R
AV cable
14
Page 17

Connecting external devices
●
SCART connection
Example of connectable devices
● VCR ●
●
DVD player/recorder
SCART cable
Decoder
SCART (AV/RGB/S-VIDEO)
Speaker/amplifier connector
Example of connectable devices
● Connecting an amplifier with digital audio
input
Connect an amplifier with external speakers as shown
below.
Optical Audio cable
DIGITAL
AUDIO
OUTPUT
Decoder
NOTE
•
In cases when the decoder needs to receive a signal from
the TV, make sure to select the appropriate input terminal to
which the decoder is connected in “Source List” (Page 10).
Amplifier with optical
digital audio input
● After connecting
Digital audio output setting
After connecting an amplifier with optical digital
audio input as shown, you should set an audio
output format compatible with the programme you
are watching or the device connected.
Go to “MENU” > “Sound” > “SPDIF Mode” >
select “PCM” or “Dolby Digital”.
NOTE
• When you set this to “Dolby Digital”, and you
receive the Dolby Digital or Dolby Digital Plus audio
formats, Dolby Digital audio is output. Otherwise,
PCM audio is output.
When you set this to “PCM”, PCM audio is output
no matter what audio formats you receive.
15
Page 18

Connecting a PC
●
PC connection
HDMI (DVI) Connection
HDMI 1, 2, 3 or 4
PC
HDMI
PC
ø 3,5 mm stereo mini
● After connection
● If after connecting a PC to the TV through a HDMI
cable, the audio does not run, connect a mini stereo
connector of ø 3.5mm between TV and PC as
indicated in the previous drawing.
HDMI-certified cable
DVI/HDMI Cable
jack cable
HDMI / PC
ANALOG
AUDIO
INPUT
HDMI 1
(ARC)
HDMI 2
HDMI 4
HDMI 3
DVI/VGA Conversion cable
PC
HDMI 1
(ARC)
HDMI 2
HDMI 3
HDMI / PC
ANALOG
AUDIO
INPUT
PC IN
DIGITAL
AUDIO
OUTPUT
ø 3,5 mm stereo
mini jack cable
NOTE
• When using the PC-IN terminal is necessary to connect a
audio cable.
Selecting the picture size
You can select the picture size.
1 Press MENU on the remote control,then press
OK.
2 Press ▼ key to select “Advanced Video”, then
press OK.
3 Press ▼ key to select “Aspect ratio”, then press
OK.
4 Press ▼ key to select the desired item, then press
OK.
USB
(WIFI)
● When a PC is connected to the TV with a DVI
cable, it will be necessary to connect a mini stereo
connector of ø 3.5mm of the TV to PC as indicated
in the previous drawing.
Analogue Connection
VGA cable
PC
ø 3,5 mm stereo
mini jack cable
HDMI 1
(ARC)
HDMI 2
HDMI 3
HDMI / PC
ANALOG
AUDIO
INPUT
PC IN
DIGITAL
AUDIO
OUTPUT
(WIFI)
USB
Example
Normal Full
Item
Auto
Full
Dot by Dot
Picture size is adjusted automatically
An image fully fi lls the screen
Displays an image with the same
number of pixels on the screen
NOTE
• You can also select an item by pressing f on the remote
control unit.
• Connect the PC before making adjustments.
• Selectable picture size may vary with input signal type.
• The “Aspect ratio” adjustment is only available for analogue
signals through the “PC IN” terminal.
16
Page 19

Connecting a PC
1
Adjusting the PC image
1
automatically
This function enables the screen to be automatically
adjusted to its best possible condition when the
analogue terminals of the TV and PC are connected
with a commercially available DVI/VGA conversion
cable, etc.
1. Press b to select PC-RGB from Source List,
and then press OK.
2. Press MENU key.
3. Press ◄ key to select “Settings” and press OK.
4. Press ▼ key to select “Input Settings” and press
OK.
5. Press ▼ key to select “PC Settings” and press
OK.
6. Press ▼ key to select “Auto Adjustment” and
press OK.
NOTE
• When connect a PC and select PC-RGB source, the “Auto
adjustment” is executed automatically.
• “Auto adjustment” may fail if the PC image has low
resolution, has unclear (black) edges, or is moved while
executing “Auto adjustment”.
• Be sure to connect the PC to the TV and switch it on before
starting “Auto adjustment”.
• “Auto adjustment” can be executed only when inputting
analogue signals through the “PC IN” terminal.
6. Press ▲/▼ to select the specific adjustment item.
7. Press ◄/► to adjust the item to the desired
position.
Item
H-Pos.
V-Pos.
Phase
Clock
Auto
Adjustment
Reset
Settings
Centres the image by moving it to the
left or right.
Centres the image by moving it up or
down.
Adjusts when characters have low
contrast or when the image fl ickers.
Adjusts when the image fl ickers with
vertical stripes
Adjusts automatically the image
Return to the original image.
NOTE
• The “PC Settings” options in the “Settings” menu can be
adjusted only when inputting analogue signals through the
“PC IN” terminal.
• Depending of resolution, the vertical/horizontal manual
range can be different.
PC compatibility chart
Adjusting the PC image manually
Ordinarily you can easily adjust the picture as necessary
to change image position using “Auto Adjustment”.
In some cases, however, manual adjustment is needed
to optimise the image.
1. Press b to select PC-RGB from Source List,
and then press OK.
2. Press MENU key.
3. Press ◄ key to select “Settings” and press OK.
4. Press ▼ key to select “Input Settings” and press
OK.
5. Press ▼ key to select “PC Settings” and press
OK.
Resolution
VGA
VGA
SVGA
XGA
WXGA
SXGA
SXGA+
UXGA
1080p
VGA, SVGA, XGA, WXGA, SXGA, SXGA+ and UXGA are
registered trademarks of International Business Machines
Corporation.
640 g 480
720 g 400
800 g 600
1.024 g 768
1.360 g 768
1.280 g 1.024
1.400 g 1.050
1.600 g 1.200
1.920 g 1.080
Horizontal
Frequency
31,5 kHz 60 Hz
31,47 kHz 70 Hz
37,9 kHz 60 Hz
48,4 kHz 60 Hz
47,7 kHz 60 Hz
64,0 kHz 60 Hz
65,3 kHz 60 Hz
75,0 kHz 60 Hz
67,5 kHz 60 Hz
Vertical
Frequency
NOTE
• This TV has only limited PC compatibility, correct operation
can only be guaranteed if the video card conforms exactly to
the VESA 60 Hz standard. Any variations from this standard
may result in picture distortions.
17
Page 20

AVF
US
C
Menu operation
What is the menu?
• You need to call up the OSD to perform settings for the TV. The OSD for the settings is called "MENU".
• The "MENU" enables various settings and adjustments.
• The "MENU" can be operated with the remote control unit and with the TV panel control keys.
Common operations
1
Display the menu
screen
Press MENU and the “MENU”
screen displays.
S
2
Select an item
B RE
Press a/b/c/d to select/adjust the
desired menu, and adjust the item to
the desired level, and then press OK.
Press MENU to return to the previous
"MENU" page.
E Selecting in the menu
U
V
T
E Selecting options
3
Exit the menu
screen
The operation will exit the "MENU"
screen if you press END before it is
completed.
NOTE
• "MENU" options differ in the selected input modes, but the operating procedures are the same.
• The screens in the operation manual are for explanation purposes (some are enlarged, others cropped) and may vary slightly from
the actual screens.
• Items in darker grey cannot be selected.
Operation without a remote control unit
(with the TV panel control keys)
This function is useful when there is no remote control
unit within your reach.
1 Press MENU to display
initial MENU screen, or
to return to previous
MENU screen.
2 Press CHr/s instead of a/b or ik/l
instead of c/d to select the item.
3 Press b to open a new MENU level or accept the
setting
NOTE
• The “MENU” screen will disappear if left unattended for
several seconds.
18
The Guide Display at the top of the screen shows the
menu bar.
1 Picture 4 Time 7 Settings
2 Audio 5 Lock
3 Multimedia 6 Channels
The Guide Display at the bottom of the screen shows
the operations with the OSD.
The bar above is an operational guide for the remote
control unit. The bar will change in accordance with
each menu setting screen.
About the Guide Display
Page 21

Basic adjustment
Picture settings
Picture
Picture adjustments
When the Picture Mode is set to “User”, the picture
can be adjusted according to your preferences. See the
following setting table.
Adjustments options
Selected
setting
Brightness
Contrast Contrast goes down Contrast goes up
Colour
Tint
Sharpness Soften details Emphasize details
Backlight
Advanced
Video
◄ Button ► Button
Brightness goes
down
Colour intensity
goes down
Skin tones become
purplish
The screen dims
This TV provides various functions for
optimizing the picture quality.
See the following table.
Brightness goes up
Colour intensity
goes up
Skin tones become
greenish
The screen
brightens
Selected
setting
Aspect Ratio
Colour
Temperature
Noise
Reduction
Advanced
Video
This function may be not available in some types of input
*
signal.
Dynamic
backlight
Film mode
Fine Motion
Advanced
◄ Button ► Button
Changes between
different picture sizes
Adjusts the colour
temperature to give the
best white image: cool,
normal, warm.
Improves picture quality
(choose among different
*
Automatically detects a
recreates each still frame
for high-definition picture
options)
Adjusts screen
brightness based on
image content.
film-based source and
quality.
Reducing motion blur.
AV MODE
“AV MODE” gives you several viewing options to
choose from to best match the system environment,
which can vary due to factors like room-brightness,
type of programme watched or the type of image input
from external equipment.
1 Press AV MODE.
2 Every time AV MODE is pressed the TV changes
the mode as follows:
STANDARD → SOFT → ECO → CINEMA → USER →
DYNAMIC
6
19
Page 22

●
●
●
●
●
●
●
●
●
●
●
●
●
Basic adjustment
Audio settings
Sound
Sound adjustments
When the Sound Mode is set to “User”, the sound
can be adjusted according to your preferences. See the
following setting table.
Adjustments options
Selected
setting
Balance
Treble Reduce treble Increase treble
Bass Reduce bass Increase bass
Surround
Sound
Auto
Volume
SPDIF
Mode
Clear voice Off On
Bass
Enhancer
● Sound Mode
Select your desired setting. The available options are:
S
TANDARD→MUSIC→MOVIE→SPORTS→USER6
● Surround Sound
This function allows you to enjoy surround sound.
Auto Volume
Reduces sudden volume changes, for example,
during commercials or when switching from one
channel to another.
● SPDIF Mode
Digital audio output.
● Clear voice
This function emphasises speech against
background noise for greater clarity.
● Bass Enhancer
This function allows you to enjoy bass-enhancer.
● Headphones Volume
Headphones volume control.
20
◄ Button ► Button
Increase audio from
the left speaker
Off On
Off On
(PCM) Activates
digital audio output
Off On
Increase audio from
the right speaker
Dolby Digital
Multimedia
Your home network (*)
(*) The name of your home network will appear here once detected.
Multimedia
Multimedia menu
iPlayer (Only LE731 for UK)
Internet television and radio service for the BBC.
YouTube
Access to YouTube services directly.
This option is available only when the TV is
connected to Internet.
Media Player
Access to Multimedia Menu. (See page 27)
Media Player Settings
This TV allows play video on demand (DivX
You need to register the TV before playing the DivX
content.
This is the function to confirm your registration code.
● DivX® VOD Register
To activate this option you need to register the code
at www.divx.com/vod, download the VOD log file
and reproduce it in TV.
● DivX® VOD Deregister
Displays the deactivation code necessary to write
off this TV at www.divx.com/vod.
● Video Preview
Setting this option to On, allows you preview the
video that you select in a little window in the screen.
USB REC
● USB REC Manual programming
Allows you to schedule the program recorder.
● USB REC Programmed recording list
Allows you to visualize all scheduled recordings.
● USB REC Recorded list
Allows you to see the recorded program list.
● USB REC settings
Allows to select disk, disk setup, speed test and
disk space reserved for this function.
For USB REC detailed operation see page 35.
Your home network
Your home network will be available in the
Multimedia Menu in case it is connected to the
TV set through the Ethernet terminal or via Wi-Fi
(Optional Accessory, see page 5).
See "Connected TV" for detailed operation (page
31).
® VOD).
®
Page 23

●
●
●
●
●
●
●
●
Basic adjustment
Time settings
This adjustment allows you to set or to display the
following functions: Clock, Off/On Timer and Sleep
Timer.
Time
Time adjustments
● Clock
This function allows you to display the clock information
(day / month / year / hour/ minute). The time and the
date can’t be modified in this option.
● Off timer
Allows you to set a time when the TV automatically
enters in standby mode.
● On timer
Allows you to set the time when the TV must switch on.
Sleep timer
Allows you to setup the automatic Switch Off for:
10min., 20min., 30min., 60min., 90min., 120min.,
180min. and 240min.
NOTE
• Select “Off” to cancel the sleep timer.
•
When the time has been set, countdown starts automatically.
• The last minute is displayed second to second.
● No operation off
Switches the TV off when no key is pressed for 3
hours.
● No signal off
When this function is activated the TV enters in
standby mode automatically if there is no signal input
during 10 minutes.
In PC mode, when there is no signal input, the TV
goes into standby mode after 15 seconds.
● Time zone
Allows you to setup the time zone.
● Summer time
Allows you to change automatically to summer time
(auto, off, on.)
Lock settings
Lock
Lock programs
This function allows you to use a password to lock
certain programs and adjustments.
The password is always needed to access to this
menu (by default, the password is 3001.)
● Par
ental guidance
This function allows you to restrict DTV/CADTV/
SADTV (
age classification.
The information about classification is provided by the
broadcasting station.
●
Set password
Allows you to change the password. Press OK, enter
the new password. To confirm, go out from Lock
menu.
● Block pr
The password is needed before locking one program.
1 Select the program or programs you want to lock
2 Press End to exit.
This option enters your selection in a locked channels
list.
NOTE
• To prevent the channel search, when one program is locked,
the channel menu is locked too.
• To view a locked channel, you must enter the password.
When you select a locked channel a password prompt
message pops up.
• You must repeat the previous steps to unlock one locked
program.
only LE732 model) programs depending on the
ogram
and press GREEN button. A padlock appears next
to the locked channel in the channel list.
21
Page 24

●
●
●
●
●
●
●
●
●
●
●
●
●
Basic adjustment
Channel settings
Channel
Channel adjustments
Allows to reconfigure the channels after initial auto
installation has been completed.
Install channels
● Auto tuning
This function allows you to select the country and
automatically adjusts the channels for digital, cable,
satellite (Only LE732 model series) or analogue
individually.
● DTV manual tuning
Allows you to tune digital channels manually.
CADTV manual tuning
Allows you to add new cable services manually.
This setting appears after searching for cable broadcasts.
SADTV manual tuning
Allows you to add new satellite services manually.
This setting appears after searching for satellite broadcasts.
See next page.
ATV manual tuning
Allows you to tune in analogue channels manually.
Programme edit
Allows you move channels, delete channels, skip
channels and to set up a favourite channels list.
Select the channel you want to reorganize and press
◄/►to change between Viewable, Skipped (to
ignore it) and Favorite (to add it to favorite list). Press
the RED button to delete it, the YELLOW button to
move it or GREEN button to rename it.
NOTE
• If you press FAV when you are not in any adjustment menu,
the favourite channel list will appear.
Satellite edit
Allows you to adjust the satellite propierties.
● Signal information
Shows the signal power and quality.
● CI information
Allows to see the CA card information (Conditional
Access Module): name, supplier and OSD.
● Auto channel number
Automatic channel sorting.
● Additional search
Use this menu to add new services automatically.
22
(Only LE732 model series)
(Only LE732 model series
)
Searching for cable broadcasts
● CADTV Auto Tuning
Allows you to add cable services.
1 With ▲/▼/◄/► keys select Channel, then select
Auto Tuning and press OK.
2 With ▲/▼/◄/► keys select Country and Tuner
type (CADTV).
3 Go to Start Search and press OK.
● CADTV Manual Tuning
After the CADTV Auto tuning, you may add new
cable services manually.
1 With ▲/▼/◄/► keys select Channel and CADTV
Manual tuning and press OK.
2 Select manually Frequency and Symbol rate by
using numerical keys (Remote Control).
3 With ▲/▼ keys select Modulation and press OK.
4 Select the Modulation from the list, confirm by
pressing OK and press 6 to return.
5 With ▲/▼ keys select Start Search and press OK.
NOTE
• The value of "Frequency", "Symbol rate" and
"Modulation" should be set to the value specified by the
cable provider.
Page 25

Basic adjustment
●
●
●
Searching for satellite broadcasts
(Only for LE732 model series)
SADTV Auto tuning
Allows you to tune satellite services.
1 Press MENU on the remote control. With ◄/► keys
select Channel, then selectAuto Tuning and press
OK.
2 With ▲/▼/◄/► keys select Tuner type → SADTV.
3 Go to Start Search and press OK.
The following screen will appear:
Choose the setup applicable to your satellite device and
confirm your choice pressing OK button on the remote
control.
The automatic search will start.
SADTV manual Tuning
This option allows you add satellite services manually.
Press MENU on the remote control. With ▼ key select
SADTV manual Tuning
and press OK.
Select Satellite Set. You can choose between the
following options:
Consult your dealers before using a method other than
Single Satellite.
1 Select Single Satellite and then press OK.
2 Press ▼ to select "Satellite 1" and press OK.
● Input Satellite
Choose the setting applicable to your satellite
device and press OK.
● Frequency (MHz)
Introduce the transponder frequency in MHz.
● Symbol rate
Introduce the symbol rate.
● Polarization
Allows to choose between horizontal or vertical
polarization.
Select Start Search and press OK to start searching.
Satellite edit
This option allows you to adjust manually the satellite
properties.
Press
▼ to select "Satellite Edit" and then press OK.
3 Select Satellite Name and press OK. Enter the
satellite name using software keyboard.
4 Select LNB Type and choose between Universal
or User. If you choose Universal the other settings
remains disabled (grey). If you choose "User" the
following settings will be enabled:
● Low LO freq.
Allows you to change default low frequency.
● High LO freq.
Allows you to change default high frecuency.
● Polarization
Depending on the broadcaster characteristics choose
between Vertical&Horizontal (search for in both
polarities), Vertical or Horizontal (search for in one
polarity) or LNB OFF (LNB power off).
● 22K settings
Select ON to add the high band to the search
automatically process by applying 22KHz tone.
Press ▼ to select Save and then press OK to save the
settings.
23
Page 26
● Language
●
●
●
Basic adjustment
●
●
●
●
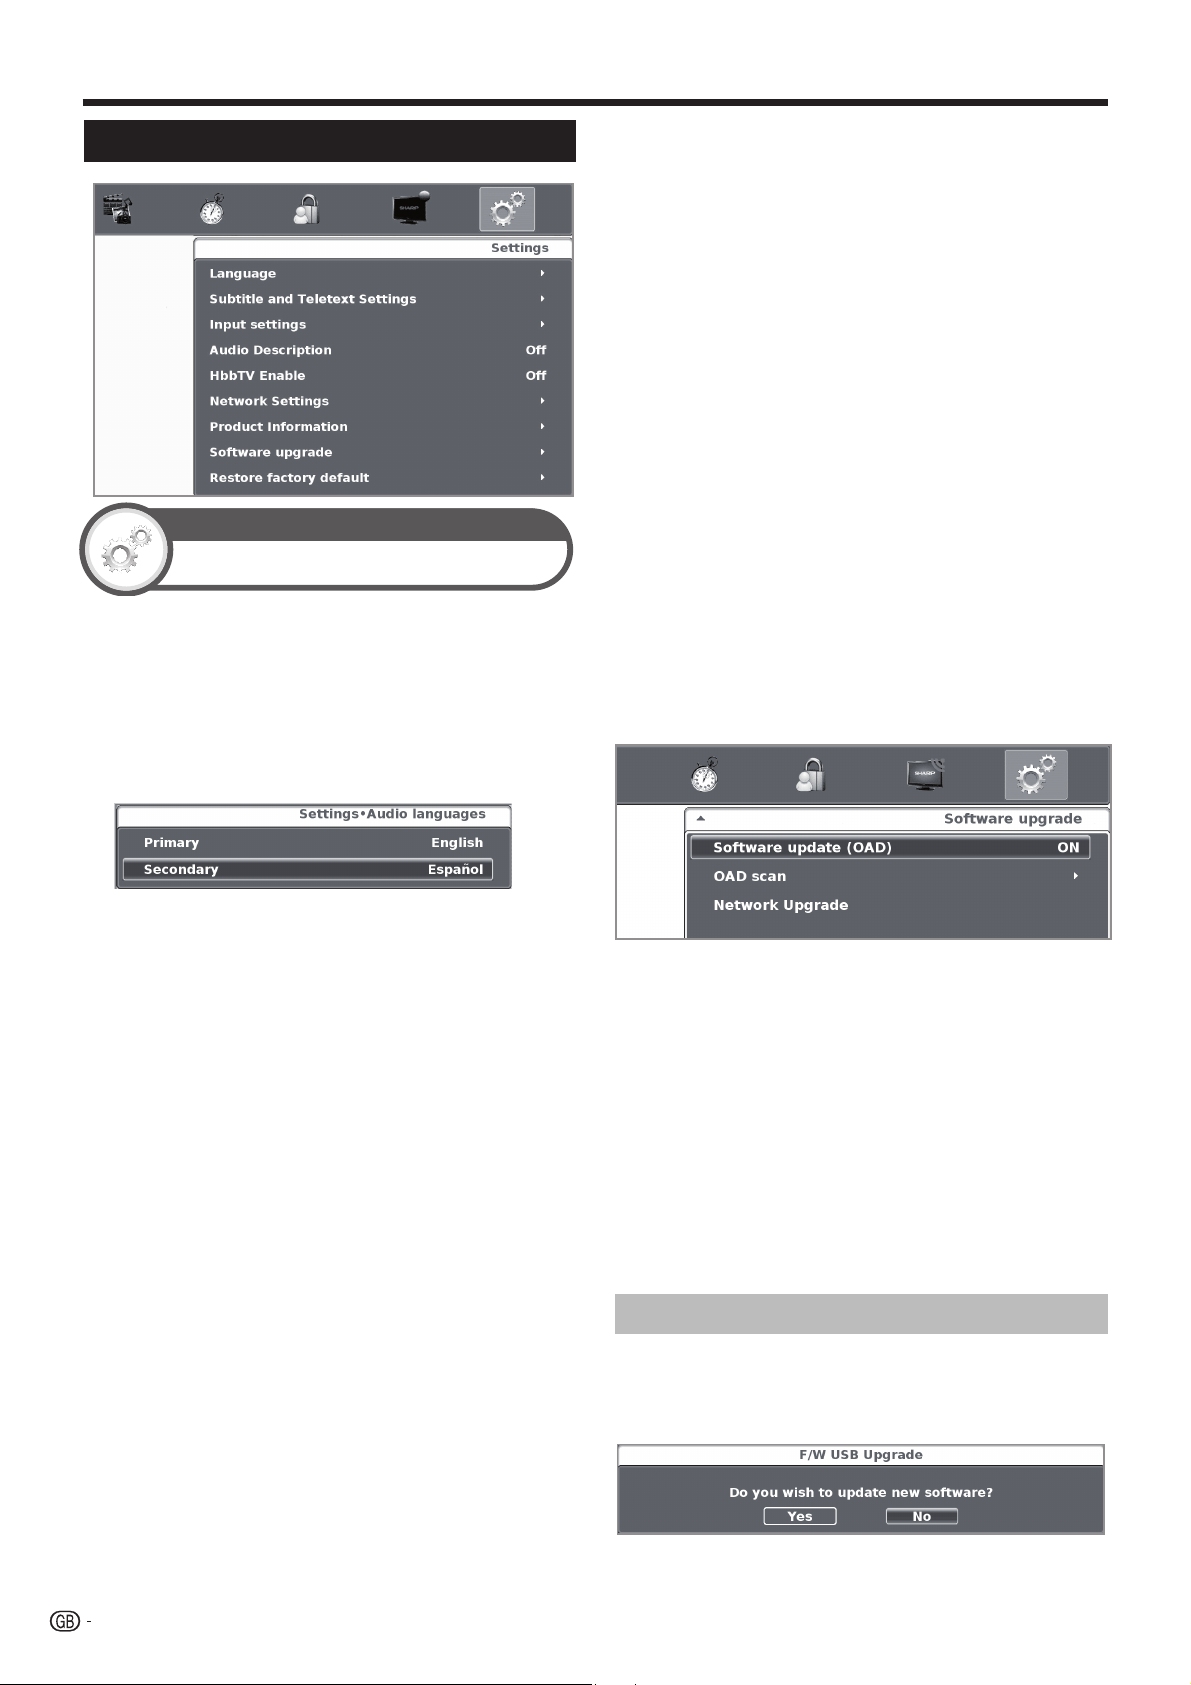
Settings
Settings
Settings menu
Language
Allows you to select the screens language and the
audio language.
● OSD Language
Press a/b/c/d to select the "Menu" language,
then press OK.
● Audio Languages
Press a/b to select the audio language.
HbbTV Enable
This setting allows you to access to new services from
entertainment providers such as broadcasters, online
providers, including catch-up TV, video on demand
(VoD), interactive advertising, personalisation, voting,
games and social networking. (See page 33).
NOTE:
• When the "Audio description" is set to "On", the audio
description sound is superimposed on the main audio when
you select a broadcast compatible with audio description.
• This function is available only for DTV broadcasts. This
“Audio description" menu is not displayed for the ATV or
the external inputs.
• The audio description sound is superimposed on the main
audio only when the sound is output on the speaker sound
output, headphone sound output and sound for audio out
output. The sound is not output on the S/PDIF sound output
and the SCART sound output.
Network Settings
Internet setup. (See page 31).
● Product information
Shows hardware and software version.
Software upgrade
This option allows you to have the TV software version
always updated.
Subtitle and Teletext Settings
Allows you to activate/deactivate the subtitles,
select the subtitles language and the subtitle teletext
language. Also allows select the subtitles mode
choosing between: Normal or Hard of Hearing.
● Subtitle Mode
Normal / Hard of Hearing.
● Subtitle Language
Primary / Secondary.
● Teletext charset (Language)
Allows you choice the character set for teletext
language.
NOTE
• Subtitles will not be displayed when the service does not
contain subtitle information.
Input Settings
Allows you to adjust individual settings:
● Input Labels
Allows associate each input source with a
description.
● HDMI CEC (Consumer Electronics Control)
Activate / deactivate HDMI CEC. (See page 29)
● PC Settings
Allows to adjust the picture when a PC is connected.
(See page 16)
Audio description
This function allows you to enable output of audio of
audio description if the TV receives a signal including
audio description.
● Software Update (OAD)
Setting to ON this option the TV automatically
determines whether a new software version is
available (through digital broadcasts) when the TV
is in standby mode.
● OAD scan
Checks immediately if there is new software.
● Network upgrade
This function allows you to update to the latest
software via network.
Follow the on-screen instruction.
NOTE:
• A broadband connection and Network setup are
required to update the software using the internet.
Software update via USB
1 Add the binary file to USB memory root.
2 Insert the memory in any USB side TV set socket.
3 The next message appear:
24
Page 27
Basic adjustment
●
4 Press ◄ to select Yes and press OK. The
software update will start
•The updated percentage appears.
5 When software update finishes, remove the USB
memory and press Ok to reset the TV.
6 Return to Settings < Product information
menu to check that the version has been updated
successfully.
Restore factory default
Recover the configuration that the TV had when it left
the factory.
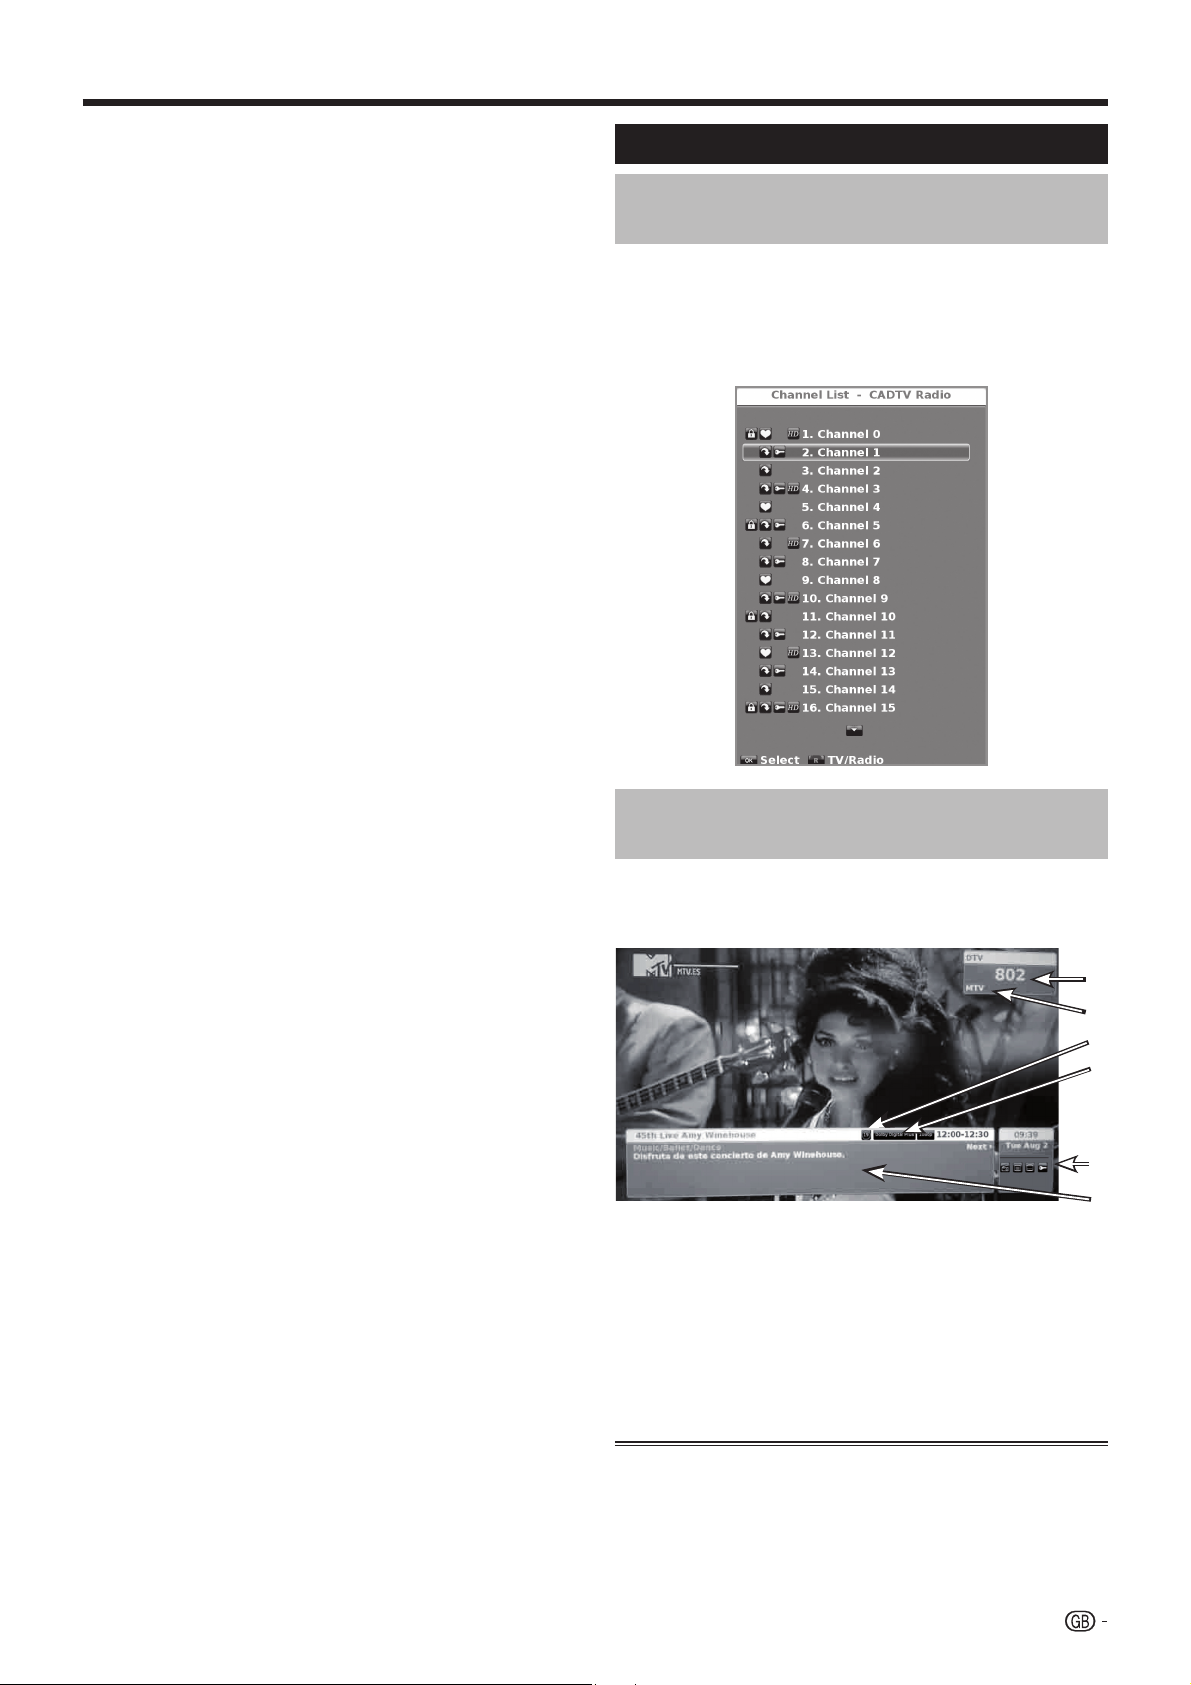
Channel list
Selecting the channel
you want to watch
1 Press OK and the list of tuned channels will be
displayed.
2 Use ▲/▼ to select the channel you want to watch
and press OK.
Channel information display
(DTV/CADTV only)
You can display the channel information that you are
watching at this moment by pressing p on the remote
control unit.
Information that appears on the screen:
Program number
Program name
Age classification
Audio
Available Services: Radio / Teletext /
Subtitles / Encripted
Information about the program which is
being broadcast
CLEARING THE PIN
If you lose or forget your PIN, you can clear the PIN
following these steps:
1 Go to «MENU»→«LOCK».
2 Enter “3001” to cancel out the current PIN.
The current PIN is reset to “3001”.
25
Page 28

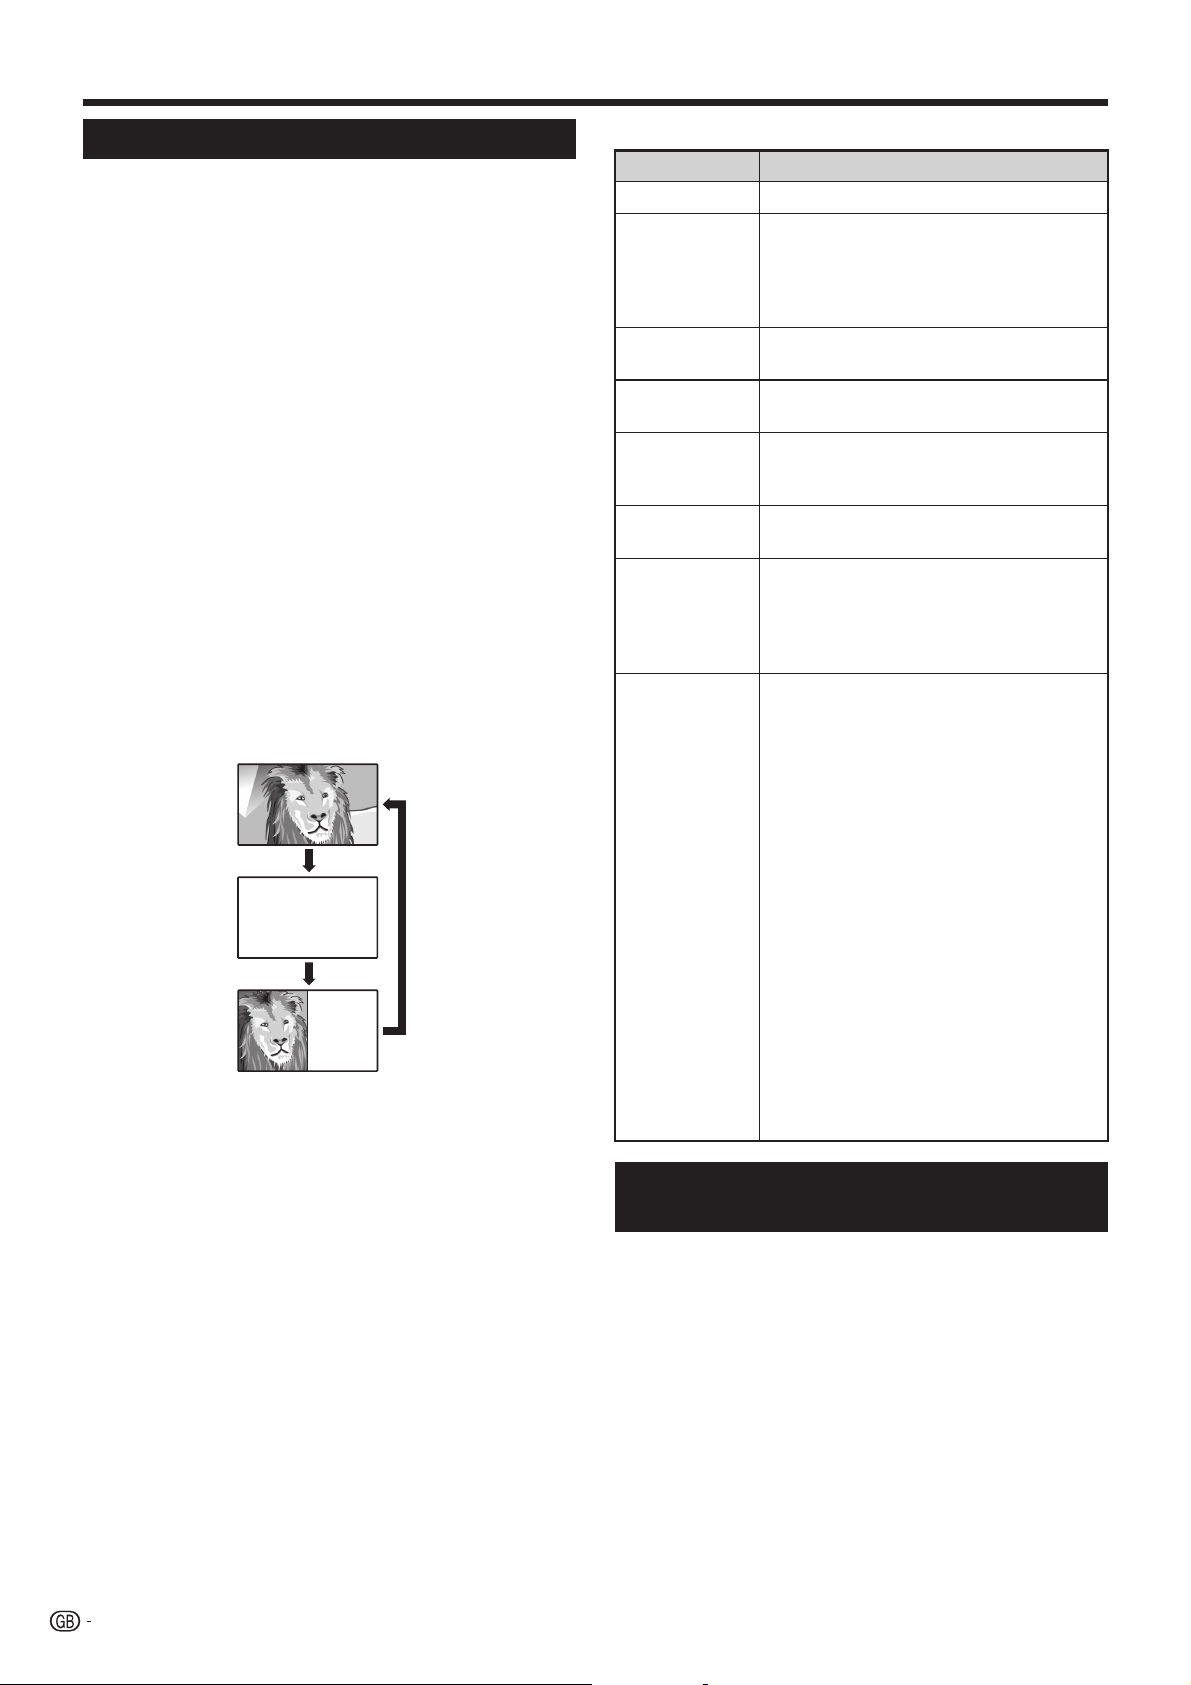
Useful viewing functions
Selecting the picture format
Selecting the picture
format manually
You can select the picture format. The selected picture
format varies depending on the type of signal received.
1 Press f on the remote control unit to change
between different kinds of pictures.
Sizes for SD Signal (Standard Definition)
Normal 4:3 : Keeps the original aspect ratio in a full
screen display.
Zoom 14:9 : For 14:9 letterbox pictures. A thin side
bar appears on each side, and you may also see
bars on the top and bottom with some programs.
Panorama: In this mode, picture is stretched toward
each side of the screen. The picture may appear
similar to “Full” depending on broadcast signals.
Full: For 16:9 squeeze pictures.
Cinema 16:9: For 16:9 letterbox pictures. Bars
may appear on the top and bottom with some
programs.
Cinema 14:9: For 14:9 letterbox pictures. Bars
may appear on the top and bottom with some
programs.
Auto: The TV selects the picture size automatically.
Setting when using external
devices
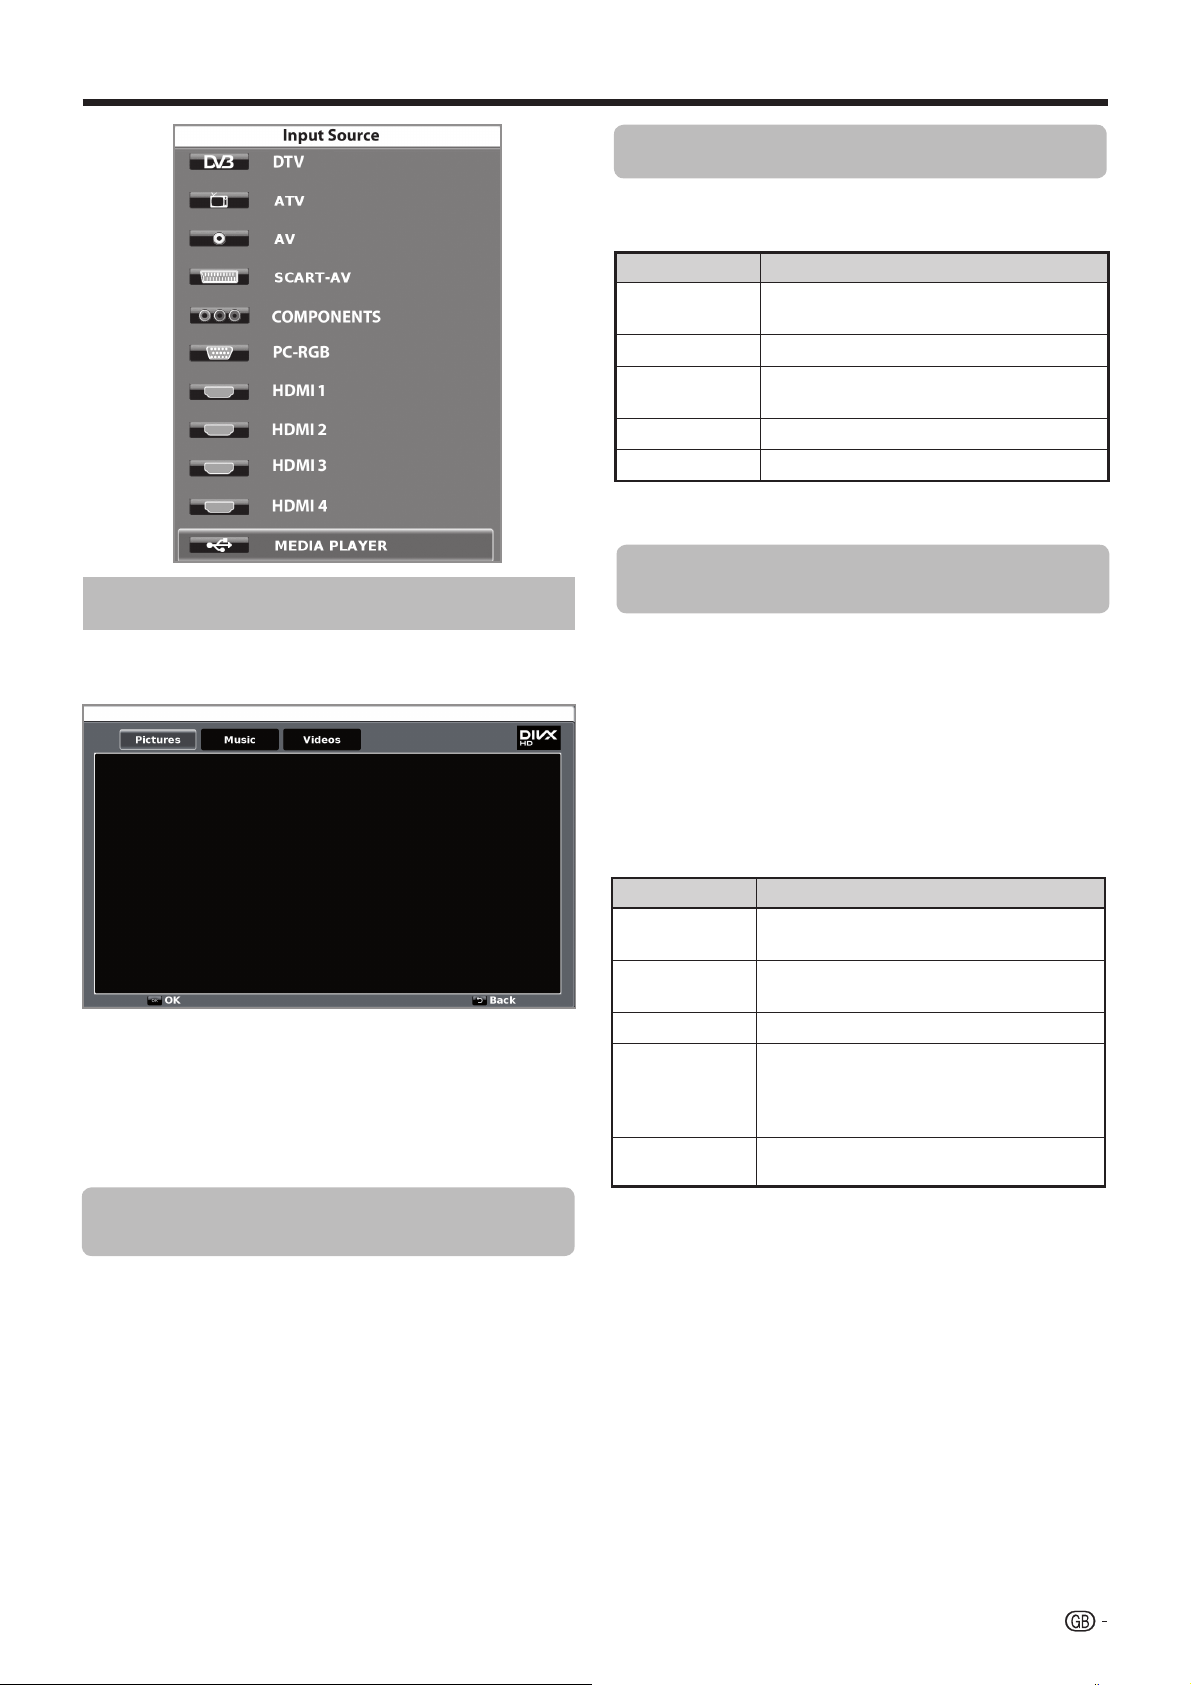
Source list
For selecting the input type of external equipment.
• If no (colour) image is displayed, try changing to
another signal type.
• Check the operations manual of the external equipment
for the signal type.
Connecting a USB device
(Media Player)
Connect an USB device to the TV as shown below.
Sizes for HD Signal (High Definition) HDMI
Full: Overscan image. Cuts out all sides of the
picture.
Underscan: Displays a high definition picture
adjusted perfectly. Picture noise may appear on
the sides of picture with some programs.
Underscan mode for 1080(i/p) video signals is
same as Dot by Dot mode.
Auto: this mode allows the TV to change between
different picture sizes automatically.
NOTE
• Some items do not appear depending on the type of
received signal.
• Depending on the USB device, the TV may not be
able to recognise the contained data.
• Use only alphanumeric characters for naming files.
• File names over 80 characters (may vary depending
on character set) may not be displayed.
• Do not disconnect a USB device or memory card from
the TV while transferring files, using the slide show
function, when a screen is switching to another or
before you exit “MEDIA PLAYER” from the “Source
List” menu.
• Compatibility with USB hard disc connection.
• Do not connect and disconnect a USB device from
the TV repeatedly.
26
Page 29
Useful viewing functions
MEDIA PLAYER function
Viewing pictures on full screen
Buttons for full screen display operation
Buttons Description
▲/▼ Cursor
6 button
Blue button
Yellow button
Red button
Go to the previous/next photo in the
same directory.
Go back to the previous screen.
Zoom: ▲/▼/◄/► allow to move through
the pictures when zoom is activated.
Rotates 90º the photo on screen.
Slide show.
Music mode
After selecting Media Player, the TV loads USB device
files, and shows the following screen:
1 Pressing ◄/► buttons you can change between
different modes: Pictures, Music or Videos.
Press OK to select the option you want to reproduce.
2 Press ▲/▼/◄/► to select the folder where you
want to search the files and then press OK.
Picture mode
Reproduces MP3 music files.
1 Select Music mode and press OK.
Select the files you want to reproduce with ▲/▼ /◄/►
2
buttons and press OK to start the reproduction.
3 Press OK to stop the reproduction of MP3 files and
press END to exit the Music mode.
• You can stop/restart the reproduction pressing OK.
Buttons for music reproduction
Buttons Description
▲/▼ Cursor
◄/► Cursor
END button
RED button
OK button
Go to the previous/next track in the same
directory.
Backward / Fast forward ( on
reproduction mode)
Go back to the previous screen.
(x1) Reproduce the selected file
indefinitely.
(x2) Reproduce all the files on the folder
indefinitely.
Play/Pause reproduction.
You can reproduce photos with JPEG (*.JPE, *.JPG),
and PNG format on your TV.
Several kinds of reproduction are possible.
1 Select Picture mode and press OK.
2 Select the file you want to display on full screen
with ▲/▼ /◄/► buttons and press OK to start the
viewing.
• You can go
to the previous/next page pressing Pr/s
button.
27
Page 30
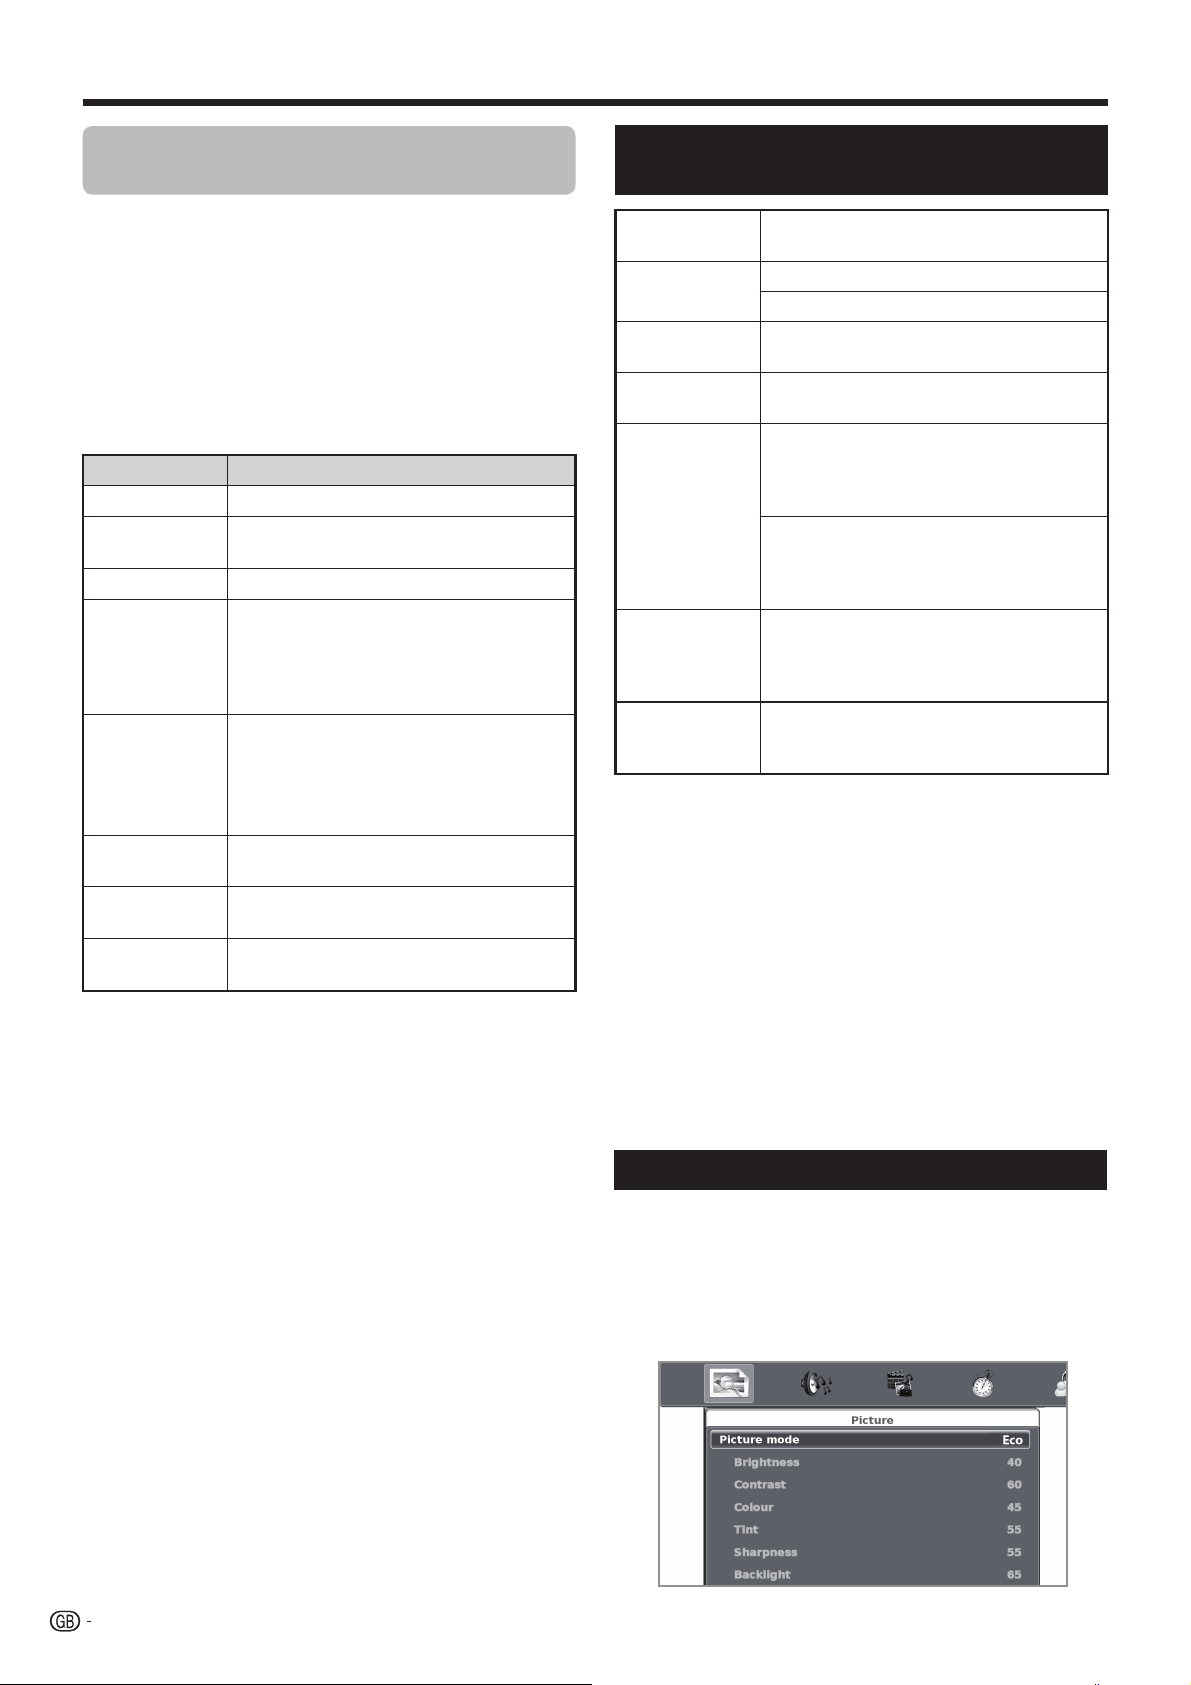
Useful viewing functions
Video mode
Reproduces films and videos.
1 Select Video mode and press OK.
2 Select the files you want to reproduce with ▲/▼ / ◄/►
buttons and press OK to start the reproduction.
3 Press OK to stop / restart the reproduction.
4 Press END to exit the Video mode.
Buttons for video reproduction mode
Buttons Description
▲/▼ Cursor
◄/► Cursor
END button
RED button
BLUE button
OK button
MENU button
f button
Go to the previous/next chapter.
Backward / Fast forward
Go back to the previous screen.
Allows you to repeat a fragment of a film
indefinitely. The first keystroke defines
initial point, the second keystroke defines
final point. The third keystroke restarts the
normal reproduction.
Allows you to backward or forward until a
point in the movie.
Introduce “hh:mm:ss”, select "Seek" and
press OK.
Play / Pause the reproduction.
Shows the menu to adjust the video
image during reproduction.
Performs ZOOM operation in films and
videos.
USB / HOME MEDIA device
compatibility
USB 2.0
device
File system USB REC: NTFS
Home Media
(DLNA)
Photo file
format
Music file
format
Multimedia
Container
Video file
format
NOTE
• Progressive format jpeg files are not supported.
• Music files in USB 1.1 devices may not be played properly.
• Operation using USB hubs is not guaranteed.
• The external hard disc with capacity exceeding 1TB cannot
be detected correctly.
• Cables used to prolong the USB device must be certified
as USB 2.0.
• In USB devices, video files may not be played properly if
speed is not enough.
• Play non-standard encoded files is not guaranteed.
• The file extension does not uniquely specify a file's contents.
It’s very common for Internet files to have a mismatch
between the file extension and its contents; for this reason
some files could not be played in this TV set.
USB Memory, USB card reader, USB
HDD (Mass Storage class)
USB Media Player: FAT / FAT32 / NTFS
DLNA 1.5 DMP
(Digital Media Player certified)
JPEG, PNG
Mpeg 1 (Layer 1 & L2), MP3
Sampling frequency: 8Khz, 11.025 Khz,
12Khz, 16Khz, 22.050Khz, 32Khz, 44.1
Khz, 48 Khz
HEACC, AAC (MP4), WAV (PCM),
WMA, AC3, EAC3.
Sampling frequency:32Khz, 44.1 Khz,
48 Khz
TS (Transport Stream), MOV, MP4,
MKV, MPG (MPEG2 Program Stream),
WMV, ASF, AVI, DivX, RM, RMVB, FLV,
VOB
MPEG1, MPEG2, MPEG4, DivX, XVid,
AVC/H.264, VC-1, AVS, Divx311 (SD
Only), RealVideo
28
Power save settings
This function enables you to automatically reduce the
backlight brightness in order to decrease the power
consumption and increase the backlight life span.
In menu Picture → Picture Mode select the ECO
setting.
Page 31

HDMI devices
Controlling HDMI devices using
HDMI CEC
E What is HDMI CEC?
Using the HDMI CEC protocol, you can interactively
operate compatible system devices (AV amplifier, DVD
player/recorder, Blu-ray player/recorder) using a single
remote control unit.
NOTE
• HDMI CEC does not work while using USB REC functions.
E What you can do with HDMI CEC
One touch recording (DTV/SAT only)
You do not have to search for the remote control unit
of your recording device. Press the REC E or REC
STOP H buttons to start/stop recording what you
see on the recorder.
One touch play
When the TV is in standby mode, it will automatically
turn on and play back the image from the HDMI
source.
HDMI CEC connection
First connect the speaker system or a player/recorder
that supports the HDMI CEC protocol.
Connecting a player/recorder via the
speaker system
HDMI 4
HDMI 3
HDMI 2
HDMI 1
(ARC)
DIGITAL
AUDIO
OUTPUT
Player / Recorder Speaker
system
Single remote control operation
HDMI CEC automatically recognises connected
HDMI devices and you can control the TV and the
devices as if using an universal remote control unit.
Operating title list of external devices
In addition to displaying the TV’s own timer list (Page
35), you can also call up the external player’s top
menu or player’s / recorder’s title list provided that the
devices support HDMI CEC.
Multiple control of HDMI devices
You can select which HDMI device to operate using
the “Device List” menu.
NOTE
• When you use HDMI CEC, make sure to use a certified
HDMI cable.
• Point the remote control unit toward the TV, not to the
connected HDMI device.
• Video noise may occur depending on the type of HDMI
cable used. Make sure to use a certified HDMI cable.
• Up to three HDMI recording devices, one AV amplifier and
three players can be connected using this system.
• These operations affect the HDMI device selected as the
current external source. If the device does not operate, turn
on the device and select the appropriate external source
using b.
• When you insert/remove HDMI cables or change
connections, turn on all connected HDMI devices before
turning on the TV. Confirm that picture and audio are
correctly displayed/output by selecting “HDMI 1”, “HDMI 2”,
“HDMI 3” or “HDMI 4” from the “INPUT” menu.
HDMI-certified cable (commercially available)
Optical audio cable (commercially available)
NOTE
• Refer to the operation manual of the device to be connected
for further details.
• After unplugging connection cables or changing the
connection pattern, turn on the power of the TV after all
relevant devices power have been turned on. Change the
external input source by pressing b, select the appropriate
external source and verify the audiovisual output.
• The cables illustrated in the following explanation are
commercially available items.
29
Page 32

HDMI devices
Connecting a player/recorder only
HDMI 4
HDMI 3
HDMI 2
HDMI 1
(ARC)
Player/Recorder
HDMI-certified cable (commercially available)
HDMI CEC (Consumer Electronics
Control) menu
Basic operation
Go to “Menu” > “Settings” > "Input Settings" > “HDMI
CEC” and select the menu you want to set.
Connection for using “Speaker Output”
You can choose to listen to the TV sound only from the
speaker system.
1. Set to On and press 6.
The sound from the TV speaker is silenced and only
the sound from the speaker system is audible.
2. Set to Off and press 6.
Speaker system is silenced and TV speaker is
audible.
You need to use ARC-compatible cables/devices and
connect to the HDMI 1 terminal to activate this function.
NOTE
• When you use "Speaker Output" make sure to use a HDMI
cable 1.4 or upper.
Device List
If multiple HDMI devices are connected in a daisy chain,
you can specify which device to control here.
Press a/b to select “Model select”, and then
press OK. The HDMI device changes every time
you press OK.
HDMI CEC control
Set to “On” to enable HDMI CEC functions.
Auto TV Power On
If this is activated, the one touch play function is enabled.
While the TV is in standby mode, it automatically turns
on and plays back the image from the HDMI source.
NOTE
• The factory default for this item is “Off”.
Auto Link Power Off
If this function is set to "On", is possible to power off all
HDMI devices connected in a daisy chain.
Speaker Output (Audio Return Channel)
If this function is set to “On”, the TV can send audio data
for video content shown on the TV to a connected audio
device to HDMI 1 with just one ARC-compatible cable
(HDMI 1.4 or upper). Using this function eliminates the
need to use a separate digital or analogue audio cable.
Device Scan
Search all HDMI devices connected to the TV.
Operating a HDMI CEC device
HDMI CEC allows you to operate the HDMI-connected
device with a single remote control unit.
USB REC
1 Press I to start playback of a title.
2 Press J to fast forward.
• Press G to reverse.
• Press REC E to start recording.
• Press REC STOP H to stop recording.
• Press H to stop.
• Press F to pause.
• Press SOURCE a to turn the HDMI-
connected device on/off.
NOTE
• ARC is only available in HDMI 1 terminal.
30
Page 33

Connected TV
What is Connected TV?
Connected TV set to play easily digital media
contents coming from the Network (Internet or Home).
Connected TV offers up to two different modes:
E Internet services support (BBC iPlayer (Only LE731
for UK), YouTube, and HbbTV).
E Media Streaming support for existing DLNA
servers on your Home Network. In fact, user can
play movies, listen to music or view pictures in the
easiest way, even from playlist fi les (Media Player).
Connected TV provides a variety of services for each
country.
NOTE
• Because Connected TV is an online system, it can be
modifi ed over time to better serve its purpose.
• Some Connected TV services may be added, changed or
discontinued after some time.
• You cannot download and save neither fi les nor install
plugins.
• Home Media (DLNA) requires external streaming media
software installed on a PC, inside the HOME Network, that
is not included with Connected TV.
• Home Media (DLNA) server software as Windows Media
Player 11 (Windows Vista included) or Windows Media
Player 12 (Windows 7 included), TVersity (www.tversity.
com), Nero Media Home (www.nero.com), or Twonky Media
Manager (www.twonky.com) are preferred but other can be
used also. Visit the DLNA website (www.dlna.org) to see the
certifi ed media server list. Follow the server software’s user
manual for setup, share and stream media contents.
• Home Media (DLNA) (Video, Music and Photo) data is
organized in folders depending on the Server hierarchy;
options such as Artist, Genre, Composer, Ratings, Playlist
or Watch Folders may be present for sorting content, but
can be different depending of the selected Media Server.
• The “Play To” function of some PC Media Players may result
in very compressed video quality. For best video quality,
please use the USB Media Player function of the TV.
DISCLAIMERS
• SHARP corporation bears no responsibility regarding
the content and quality of the content provided by the
content service provider.
NOTE
• If you choose a wired connection to the router, you need
an ETHERNET cable (not included, commercially available).
• If you do not have a broadband internet connection, consult
the store where you purchased your TV or ask your internet
service provider or telephone company.
• An ETHERNET and wireless connection cannot be used at
the same time. Use only one of the connection types.
• A wireless LAN connection and performance cannot be
guaranteed for all residential environments. In the following
cases, the wireless LAN signal may be poor or drop, or the
connection speed may become slower.
- When used in buildings made with concrete, reinforced
steel, or metal.
- When placed near objects that obstruct the signal.
- When used with other wireless devices that emit the same
frequency.
- When used in the vicinity of microwave ovens and other
devices that emit a magnetic fi eld, electrostatic charge, or
electromagnetic interference.
• A stable connection speed is required to play back streaming
content. Use an ETHERNET connection if the wireless LAN
speed is unstable.
Wired installation
Use an ETHERNET cable to connect the ETHERNET
terminal on the TV to your broadcast router as shown
below. This is recommended when enjoying services
which require stable connection speeds, such as
streaming media.
● Wired connection overview
Internet setup
Connecting to the internet
To enjoy Connected TV, you need to connect the TV to
a router with a high speed connection to the internet.
The TV connection to the router can either be wired or
wireless.
To access to the TV internet confi guration go to
Settings→Network setup. The next screen is shown:
PC (Home Media Server)
Router (commercially available)
ETHERNET cable (commercially available)
Network (Internet)
● How to connect
LAN
ETHERNET cable
1 Switch on the router (commercially available). Refer to
the router’s operation manual for switching on.
lanimret TENREHTEretuoR
31
Page 34

Connected TV
•
•
•
•
•
2 Connect the ETHERNET terminal on the TV to the
router (commercially available) with an ETHERNET
cable (commercially available).
3 Go to SETTINGS >”Network settings”> “Network
type”.
4 Press OK and ▲/▼ to select “Wired”, and then
press OK. The wired connection will be automatically
established.
To change the settings manually go to “Advanced
Network Setup”> IP Adress Setup> Off, now you
can introduce the settings manually.
Wireless installation
Use the SHARP (AN-WUD630) USB adapter (sold
separately) with the TV.
● Wireless connection overview
PC (Home Media Server)
Wireless LAN router/access point
Wireless
Network (Internet)
NOTE
• When using the SHARP wireless LAN adapter (sold
separately), try to provide as much free space around the
device for best performance.
• Make sure the firewalls in your network allows access to the
TV wireless connection.
• Operations cannot be guaranteed when used with access
points that do not have Wi-Fi® certification.
• A wireless LAN access point is required to connect the TV to
the Internet using a wireless LAN. See the operation manual
of your access point for setup.
● How to connect
1 Switch on your router before starting the network
installation.
2 Connect the
separately) to the USB Wi-Fi port on the TV.
• Do not use a wireless LAN adapter other than the
WUD630
be guaranteed.
• If your wireless network is secured, have the encryption key
ready to enter on screen.
3 Go to “Settings” >”Network settings”>
“Network type”.
4 Press OK and ▲/▼ to select “Wireless”, and then
press OK.
The "Wireless" connection will be automatically selected if the TV
detects only the wireless USB adapter.
32
AN-WUD630
Sharp wireless LAN adapter, as operations cannot
LAN USB adapter (sold separately)
AN-WUD630
USB adapter
(sold
AN-
Select "Wireless setup".
5
There are three ways to connect by wireless the TV
to a network:
• Easy setup
1 Select WPS configuration and press OK. Press
▼ to select "PBC" and press OK.
2 Press ▼ to select Start scan and press OK.
3 Press the WPS button on the router/access point
(AP). Wait until the connection is established.
• If connection failed, please be sure WPS feature is
enabled (See the operation manual of your router/access
point(AP) for setup.)
• In case of router/access point does not support WPS,
write the encryption key for that network using the
software keyboard. See Assisted Setup explanation.
• To establish the connection manually select "PIN",
press OK, select Start scan and press OK .Follow the
on-screen instructions and the operation manual of the
router/access point(AP).
• Assisted setup
Shows the network name list (SSID).
1 Select the network you want to connect.
If network is protected, introduce the encryption key
2
using the software keyboard and press Green button.
3 Select Done and press OK.
The TV will connects to the network you have selected.
• Manual setup
Allows you to establish the wireless connection introducing
all data manually.
• Advanced Network Setup
Allows you to introduce manually all network setup.
• Network Connection Test
Check the connection status
NOTE
• To connect your TV to the internet, you must have a
broadband internet connection.
• If you do not have a broadband internet connection, consult
the store where you purchased your TV or ask your internet
service provider or telephone company.
• There is no need to enter the security key for subsequent
connections to the wireless network.
• If your access point is set to a stealth mode (Hidden SSID,
that prevents detection by other devices), you may not be
able to establish a connection. In this case, disable the
stealth mode on the access point.
• To change wireless LAN connection settings, go to
“Settings” > “Network Settings”.
• Any low bandwidth adapter (router, hub, wireless access
point,…) will show poor network connection and then, poor
streaming quality. It’s recommended 56 Mbps or higher
bandwidth for full feature.
• Working close to other Wireless/Bluetooth network, can
appear some trouble using Wi-Fi adapter on the Connected
TV. Due to wireless link cannot be guarantee, please try to
change Wi-Fi channel on Access Point (AP) for avoiding
interferences. Please refer to Access Point User Manual.
Page 35

Connected TV
●
Operations in Connected TV
Basic Operation
The illustrations on this page are for explanation
purposes. They are subject to change without notice.
AVF
USB REC
E Display the start page
Press NET.
NOTE
• When connect TV to the Internet, a message which
requests a software update may display in some
cases.
E Select a service
Press▲/▼/◄/► to select the desired service, and then
press OK.
• Press Pr/s to scroll pages up/down (This may
not work for some services).
• Press 6 to return to the previous page (This may
not work for some services).
U
V
S
T
HbbTV (Hybrid Broadcast Broadband TV)
Some broadcasters bring you access to new services
from entertainment providers such as broadcasters,
online providers, including catch-up TV, video on
demand (VoD), interactive advertising, personalisation,
voting, games and social networking.
This function requires internet connection through the
ETHERNET or the Wi-Fi adapter AN-WUD630 (optional
accessory).
HbbTV Enable
1. Press MENU → Settings and select "HbbTV
enable" setting.
2. Select On to enable this function by pressing OK.
3. When the selected program offers this service it will
be seen on screen. Just press the requested key to
activate.
Then, the picture/list of available services will appear.
4.
5. Follow the broadcaster instructions.
E Exit Connected TV
Press END/ATV/DTV/SAT.
DISCLAIMERS
• This Sharp device facilitates the access to content and services provided by third parties. The content and services accessible via this device
belong to and may be proprietary to third parties. Therefore, any use of such third party content and services must be in accordance with any
authorization or terms of use provided by such content or service provider. Sharp shall not be liable to you or any third party for your failure
to abide by such authorization or terms of use. Unless otherwise specifi cally authorized by the applicable content or service provider, all third
party content and services provided are for personal and non-comercial use; you may not modify, copy, distribute, transmit, display, perform,
reproduce, upload, publish, license, create derivative works from, transfer or sell in any manner or medium any content or services available via
this device.
• Sharp is not responsible, nor liable, for customer service-related issues related to the third party content or services. Any questions, comments
or service-related inquires relating to the third party content or service should be made directly to the applicable content or service provider.
• You may not be able to access content or services from the device for a variety of reasons which may be unrelated to the device itself, including,
but not limited to, power failure, other Internet connection, or failure to confi gure your device property. Sharp, its directors, offi cers, employees,
agents, contractors and affi liates shall not be liable to you or any third party with respect to such failures or maintenance outages, regardless of
cause or whether or not it could have been avoided.
• ALL THIRD PARTY CONTENT OR SERVICES ACCESSIBLE VIA THIS DEVICE IS PROVIDED TO YOU ON AN "AS-IS" AND "AS AVAILABLE" BASIS
AND SHARP AND ITS AFFILIATES MAKE NO WARRANTY OR REPRESENTATION OF ANY KIND TO YOU, EITHER EXPRESS OR IMPLIED,
INCLUDING, WITHOUT LIMITATION, ANY WARRANTIES OF MERCHANTABILITY, NON- INFRINGEMENT, FITNESS FOR A PARTICULAR
PURPOSE OR ANY WARRANTIES OF SUITABILITY, AVAILABILITY, ACCURACY, COMPLETENESS, SECURITY, TITLE, USEFULNESS, LACK
OF NEGLIGENCE OR ERROR·FREE OR UNINTERRUPTED OPERATION OR USE OF THE CONTENT OR SERVICES PROVIDED TO YOU OR
THAT THE CONTENT OR SERVICES WILL MEET YOUR REQUIREMENTS OR EXPECTATIONS.
• SHARP IS NOT AN AGENT OF AND ASSUMES NO RESPONSIBILITY FOR THE ACTS OR OMISSIONS OF THIRD PARTY CONTENT OR
SERVICE PROVIDERS, NOR ANY ASPECT OF THE CONTENT OR SERVICE RELATED TO SUCH THIRD PARTY PROVIDERS.
• IN NO EVENT WILL SHARP AND/OR ITS AFFILIATES BE LIABLE TO YOU OR ANY THIRD PARTY FOR ANY DIRECT, INDIRECT, SPECIAL,
INCIDENTAL, PUNITIVE, CONSEQUENTIAL OR OTHER DAMAGES. WHETHER THE THEORY OF LIABILITY IS BASED ON CONTRACT, TORT,
NEGLIGENCE, BREACH OF WARRANTY, STRICT LIABILITY OR OTHERWISE AND WHETHER OR NOT SHARP AND/OR ITS AFFILIATES
HAVE BEEN ADVISED OF THE POSSIBILITY OF SUCH DAMAGES.
33
Page 36

●
●
●
●
●
USB REC function
USB REC function
USB REC (Video Recorder)
USB REC function allows you to record a TV programme
and watch it later. Also allows you to temporize one or
more recording and they will be available for a later on
view.
These recordings will not be lost when the TV is turned off.
USB REC requires an external USB 2.0 memory,
always connected and previously configured to record
the information.
The USB 2.0 memory must be connected in USB1
terminal.
ANTENNA
(LE732* series)
2
SAT
USB
(HDD)
The USB 2.0 memory must be formatted before
first use for USB REC function.
Go to Multimedia>USB REC>USB REC Settings,
then press OK:
USB
REC
17
1
USB REC operation
USB REC can activate immediately recording by
using USB REC on the remote control, or with a timer
using data taken from EPG or programming an event
manually. To use either method follow the instructions
below:
Immediate recording:
●
The recording starts when user decides:
1 Press USB REC on the remote control to start
recording the current programme. REC symbol
appears in the bottom left corner of the screen.
2 To stop recording the current programme, press
END twice, change TV programme or input source,
or switch- off the TV set.
3 Press END during playback mode to stop the
playback and return to recording mode of current
programme. The TV set continues recording and
the REC symbol is shown on the screen.
While the recording is activated the REC symbol, the
recording progress bar or playback progress bar will be
displayed.
hh:mm:ss
hh:mm:ss
REC
••••••••••••••••••••••••••••••••••••••••••••••••••••
The bar shows the recording start time, current time
and expected end, and the remaining recording time.
hh:mm:ss
[hhhh:mm:ss]
● Select disk
Only available in case that there are more than one
partition in the external USB memory (Choose between
C:, D:, etc.).
● Disk setup
You can choose the size of USB device which will be
used for USB REC function, in 1GByte fractions. The
USB device will be formatted.
ATTENTION:
• All the data in this device will be lost.
• In case that you have a USB device with partitions, all
the data in the selected partition will be lost.
● Speed test
Allows to see the compatibility grade between USB
memory and the TV set.
NOTES:
• The file system of USB device must be NTFS. If the device
has other system, the TV set does not recognize it.
• The minimum USB 2.0 memory size to use with USB REC
function is 1GByte.
• As a concept, USB REC can record up to 26 minutes on SD
DTV/CADTV broadcasts and 7 minutes on HD DTV/CADTV
broadcasts, for every GByte.
Recording with timer
●
It can be programmed a recording by using two
methods. Using the programme guide (EPG) or manually
with the option “USB REC Manual programming” on
the menu USB REC.
1 Programming a timer with the EPG
1. Press EPG to select the programme you want to
record. Then press REC.
2. Set up the recording parameters (auto, once, every
day or weekly) and press OK to confi rm.
2 Programming with “USB REC Manual
programming”.
1. To activate a timer recording use the menu option
Multimedia > USB REC and the option USB
REC Manual programing. Press OK.
34
2. Set up the desired recording parameters (channel,
mode, date, start time and end) and press OK.
Page 37

●
●
USB REC function
Recordings and timings
● Recordings and timings
1. The timings will be stored in the USB REC
Programmed recording list in the USB REC
menu, pending to be executed.
2. All the fi nished recordings are available on the “USB
REC Recorded list” in the
Select the fi le you want to view and press OK
USB REC menu.
3. The TV set can start a timer recording while is in
standby mode. When the recording starts in this
mode, the status indicator (AQUOS pyramid) will
change from red to violet.
NOTES:
•
If you try to switch off the TV (TVa on RC) during a USB
recording, an on screen menu will appear. Then you can
decide to switch off completely or continue with the recording
until the end of the USB REC Manual programming. In
case it is an Immediate recording (you pressed USB REC
button), you can decide to switch off completely or continue
with the recording during the time you decide, or stop the
recording. In both cases, if you choose to continue with the
recording, the TV will switch off, but continue showing the
pyramid icon lighting in purple.
• If you switch off the TV through the a on the panel control
key, the USB recording will be stopped directly and the TV
will be switched off.
4. The timer recordings are not possible when the TV
set is off, this is when the status indicator (AQUOS
pyramid) is not lit.
Deleting recordings
●
To delete non desired recordings stored in USB device,
follow the instructions below:
• Press OK to playback the programme being
recorded. The TV set continues recording the
broadcast while you are watching the recorded
programme. The TV set shows
screen.
symbol on the
I
• Press OK during playback to pause. The TV
shows the symbol
• Press
V
playback to fast forward. By pressing
V
key repeatedly, allows you to select the fast
forward. By pressing
forwards in intervals of fi ve minutes. Press OK to
restore the normal speed.
• Press
key repeatedly, allows you to select the
S
during playback to rewind. By pressing
S
rewind speed. By pressing
rewinds in intervals of five minutes. Press OK to
restore the normal speed.
on the screen.
F
key the recording fast
L
T key the recording
1.
Go to Multimedia > USB REC and select "USB
REC Recorded list".
2. Select the recording you want delete.
3. Press BLUE button on the remote control.
The deletion process is irreversible and causes
permanent loss of the recording.
NOTES:
The USB REC recording function does not work for Radio,
•
ATV channels or external inputs.
• It can appear displaying troubles during rewind or fast forward
modes, depending on the USB memory characteristics.
• The recorded data will be never available for any external
device (computer) or in other TV even if it is the same model.
The recordings only can be displayed in the same TV in
which they were made.
• Programmes which require a PIN to watch them cannot be
recorded until you enter the PIN
.
35
Page 38

Enjoying 3D image viewing
Enjoying 3D image viewing
You can enjoy 3D-supported images on the TV when
you wear 3D glasses (AN-3DG20-B), sold separately.
Confi rm how to use the 3D glasses before watching
3D-supported images. These 3D glasses are only for
use with SHARP LCD TVs supporting 3D.
Viewing 3D images
1 Select the 3D source (HDMI).
2 Press "3D" button on Remote Control.
NOTE
• The TV screen may temporarily become black when the TV
is trying to detect a 3D image signal and when switching
from 3D to 2D mode.
Receiving a 3D image signal that
can be detected automatically
The image signal may contain a 3D identification signal.
You can enable the TV to automatically detect the 3D
image type.
• After pressing 3D button a screen appears prompting
you to select between the following options.
Receiving a 3D image signal that
cannot be detected automatically
When the TV receives a 3D image signal that cannot be
detected automatically, you can select between 3D and
2D image viewing.
1 Select the 3D source (HDMI).
2 Press "3D" button on Remote Control.The
following screen appears.
3 Press c/d to select “Top-Bottom” , “Side-by-
Side” or “Off(2D)”, and then press ;.
E To view in 3D mode (Top-Bottom or Side-
by-Side)
1
Press a/b to select the 3D signal type (“Side
by Side” or “Top and Bottom”), and then
press ;.
• If you select the same system as that of the input
signal, 3D images are displayed.
2 Turn on the 3D glasses switching them to
"3D" and then wear the 3D glasses.
• The LED lights in green.
E When “3D Display” is set to “ON (AUTO)”
The 3D display format is detected automatically and
the appropriate 3D image is displayed.
E When “3D Display” is set to “Off (2D)”
The image is displayed as 2D format.
36
E To view in 2D mode
To view 2D mode without glasses:
1 Press a/b to select the "
press ;.
To view 2D mode some of you at the same time than
other people are viewing 3D mode:
Off (2D)”
, and then
1 Follow up the step 1 of previously described
in "
To view in 3D mode (Top-Bottom
or Side-by-Side)
".
2 Turn on the 3D glasses switching to "2D" and
then wear the 3D glasses.
• The LED lights in green
NOTE
• After approximately 10 minutes without receiving 3D signal
the 3D glasses turn off automatically.
• To power off the power of 3D glasses, switch them to Off.
The LED will also turn off.
Page 39
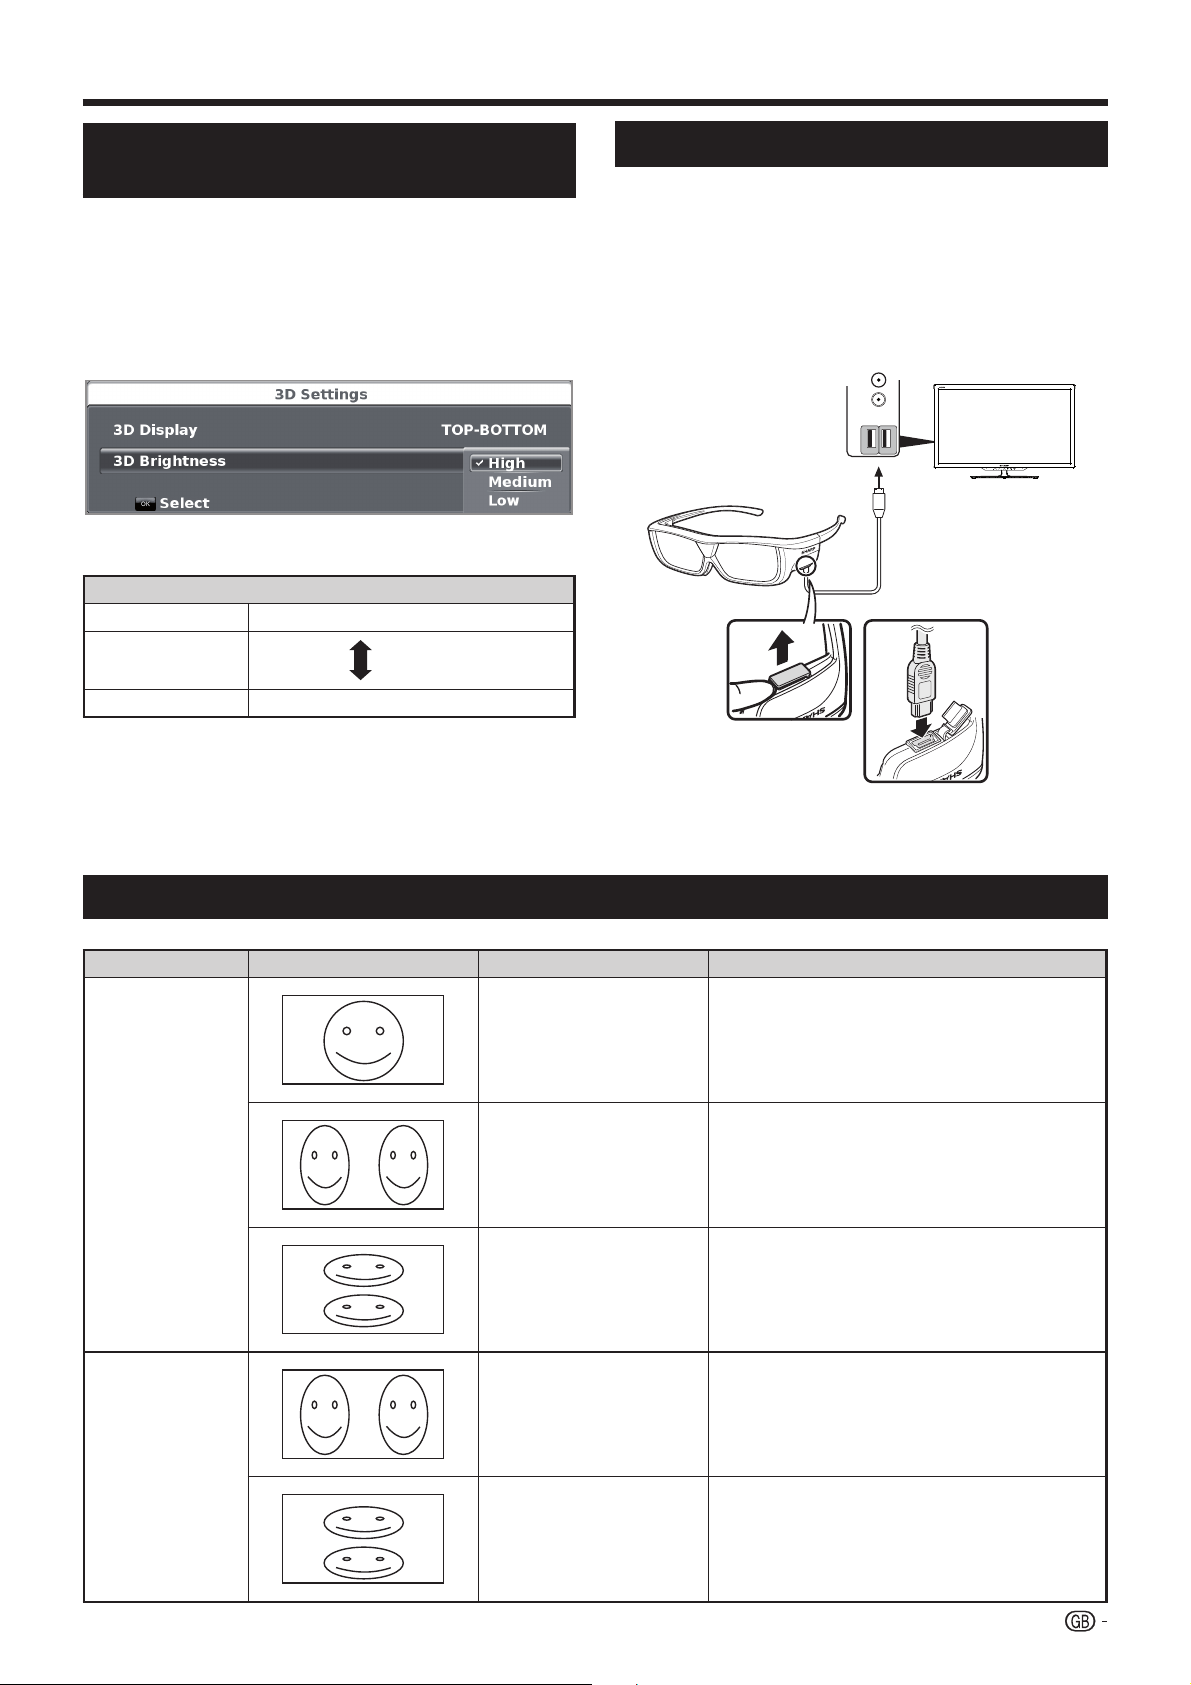
Enjoying 3D image viewing
Configuring the TV settings to
enhance 3D image viewing
You can adjust the brightness of the TV for 3D image
viewing.
1 Press 3D button while you are viewing 3D image.
2 Press
3 To adjust de brightness press a/b to choose
between the options.
High
Medium
Low
select 3D Brightness and press OK.
b to
Item
The screen brightens
The screen dims
Recharging the 3D glasses battery
When the battery power is low, the LED light blinks one
time per second. If the 3D glasses battery runs out,
you can recharge the 3D glasses battery by connecting
the USB-mini USB cable, supplied with glasses,
of the TV set side USB terminals or any other proper
source.
When the LED light goes off, the recharge is complete.
USB
(HDD)
to any
NOTE
• The "Backlight" adjust is not available for 3D image.
• In 3D mode some display settings may not be available.
Display format for 3D and 2D images
Image for input signals Selectable mode Description
3D mode
(using the 3D
glasses)
Top and Bottom
3D
Side by Side
• 3D images Auto mode.
• Creates 3D images from 3D images displayed side
by side. The image is split into a left and right image,
and then the images are stretched and displayed
sequentially to create a 3D image.
• Creates 3D images from 3D images displayed
on the top and bottom. The image is split into a
top and bottom image, and then the images are
stretched and displayed sequentially to create a 3D
image.
2D mode
(without using
the 3D glasses)
Side by Side s 2D
Top and Bottom s 2D
• Creates 2D images from 3D images displayed
side by side. Only the left image is stretched and
displayed. The image does not appear in 3D.
• Creates 2D images from 3D images displayed on
the top and bottom. Only the top image is stretched
and displayed. The image does not appear in 3D.
37
Page 40

Enjoying 3D image viewing
3D glasses lenses
• Do not apply pressure to the lenses of the 3D glasses. Also, do not drop or bend the 3D glasses.
• Do not scratch the surface of the lenses of the 3D glasses with a pointed instrument or other object. Doing so may
damage the 3D glasses and reduce the quality of 3D images.
• Use only the cloth provided with the 3D glasses to clean the lenses.
3D glasses infrared receiver
• Do not allow the infrared receiver to become dirty, and do not attach stickers to or otherwise cover the infrared receiver.
Doing so may prevent the receiver from operating normally.
• If the 3D glasses are affected by other infrared data communication equipment, 3D images may not be displayed
correctly.
Caution during viewing
• Do not use devices that emit strong electromagnetic waves (such as cellular phones or wireless transceivers) near the
3D glasses. Doing so may cause the 3D glasses to malfunction.
• The 3D glasses cannot operate fully at extreme high or low temperatures. Use them within the specified usage
temperature range.
• If the 3D glasses are used in a room with fluorescent lighting (50/60 Hz), the light within the room may appear to flicker.
In this case, either darken or turn off the fluorescent lights when using the 3D glasses.
• Wear the 3D glasses correctly. 3D images will not be correctly visible if the 3D glasses are worn upside down or backto-front.
• Other displays (such as computer screens, digital clocks, and calculators) may appear dark and difficult to view while
wearing the 3D glasses. Do not wear the 3D glasses when watching anything other than 3D images.
• If you lie on your side while watching the TV with 3D glasses, the picture may look dark or may not be visible.
• Be sure to stay within the viewing angle and optimum TV viewing distance when watching 3D images. Otherwise, you
may not be able to enjoy the full 3D effect.
• The 3D glasses may not work properly if there is any other 3D product or electronic device turned on near the glasses
or TV. If this occurs, turn off the other 3D product or electronic device or keep the device as far away as possible from
the 3D glasses.
• Stop using this product in any of the following situations:
– When images consistently appear doubled while you are wearing the 3D glasses.
– When you have difficultly perceiving the 3D effect.
• If the 3D glasses are faulty or damaged, stop using them immediately. Continued use of the 3D glasses may cause eye
fatigue, headaches and illness.
• If you have any abnormal skin reaction, stop using the 3D glasses. In very rare instances, such reactions may be due to
an allergic reaction to the coating or materials used.
• If your nose or temples become red or you experience any pain or itchiness, stop using the 3D glasses. Pressure
caused by long periods of use may lead to such reactions and may result in skin irritation.
• You may not be able to use several menu items while you are watching the TV in 3D mode.
• You cannot use the 3D function in radio or data mode.
NOTE
• These 3D glasses are only for use with SHARP LCD TVs supporting 3D.
Troubleshooting - 3D Images
Problem Possible solution
• 3D images are not displayed. • Is “3D auto change” set to “No”? Press 3D to switch to 3D mode.
• The 3D glasses turn off
automatically.
• Switching the 3D glasses button to
2D or 3D does not cause the LED
light to green.
38
• If “3D auto change” is set to “Yes” but no 3D images are displayed, check the display format of the
content being viewed. Some 3D image signals may not be recognized as 3D images automatically.
Press 3D to select the appropriate display format for the 3D image.
• Are the 3D glasses set to 3D mode?
• Is there an obstacle between the 3D glasses and the TV, or is something covering the infrared
receiver on the 3D glasses? The 3D glasses operate by receiving a signal from the TV. Do not place
anything between the 3D infrared emitter on the TV and the infrared receiver on the 3D glasses.
• Is there an obstacle between the 3D glasses and the TV, or is something covering the infrared
receiver on the 3D glasses? The 3D glasses turn off automatically after three minutes if no signal
is received from the TV. Do not place anything between the 3D infrared emitter on the TV and the
infrared receiver on the 3D glasses.
• Is the battery in the 3D glasses exhausted? If the LED light does not light after pressing the power
button for more than one second, the battery is exhausted. Recharge the battery via mini USB
connector.
Page 41

Appendix
Abbreviation list
Abbreviated term Stands for
ATV
CEC
DNR
DTV
CADTV
DVB-T
DVB-C
DVI
EPG
HDCP
HDMI
MHEG
OSD
PCM
USB
WSS
DLNA
LNB
Analogue TV
Consumer Electronics Control
Digital Noise Reduction
Digital TV
Cable Digital TV
Digital Video Broadcasting-Terrestrial
Digital Video Broadcasting-Cable
Digital Visual Interface
Electronic Programme Guide
High-bandwidth Digital Content Protection
High-Definition Multimedia Interface
Multimedia and Hypermedia Expert Group
On Screen Display
Pulse Code Modulation
Universal Serial Bus
Wide Screen Signalling
Digital Living Network Alliance
Low-Noise Block converter
Information on the software license for this product
Software composition
The software included in this product is comprised of various software components whose individual copyrights are held by
SHARP or by third parties.
Software developed by SHARP and/or third part
The copyrights for the software components and various relevant documents included with this product that were developed or
written by SHARP are owned by SHARP and are protected by the Copyright Act, international treaties, and other relevant laws.
This product also makes use of freely distributed software and software components whose copyrights are held by third parties.
39
Page 42

Appendix
Troubleshooting
Problem Possible Solution
• No power.
• The TV cannot be operated. • External influences such as lightning, static electricity, etc., may cause improper operation. In this
• Remote control unit does not operate.
• Picture is cut off. • Is the image position correct?
• Strange colour, light colour, or dark
colour, or colour misalignment.
• Power is suddenly turned off. • The TV’s internal temperature has increased.
• No picture. • Are connections to external equipment correct? (Pages 13, 14 and 15)
• No sound. • Is the volume too low?
• The TV sometimes makes a cracking
sound.
• Check if you pressed
If the indicator on the TV lights up red, press
• Is the AC cord disconnected?
• Check if you pressed a on the TV.
case, operate the TV after first turning off the power, or unplugging the AC cord and re-plugging
it in after one or two minutes.
• Are batteries inserted with polarity (e, f) aligned?
• Are batteries worn out? (Replace with new batteries.)
• Are you using it under strong or fluorescent lighting?
• Is a fluorescent light illuminating to the remote control sensor?
• Are screen mode adjustments (Picture format) such as picture size made correctly? (Page 26.)
• Adjust the picture tone.
• Is the room too bright? The picture may look dark in a room that is too bright.
• Check the “Picture” setting (Page 19).
Remove any objects blocking the vent or clean.
• Is the “Sleep Timer” set? Select “Off” from the “Time” menu (Page 21).
• Is “No Signal Off” or “No operation Off” activated?
• Is the input signal type selected correctly after connection? (Page 10)
• Is the correct input source selected? (Page 10)
• Is the picture adjustment correct? (Pages 19)
• Is the antenna connected properly? (Page 8)
• Make sure that headphones are not connected.
• Check if you pressed e on the remote control unit.
• This is not a malfunction. This happens when the cabinet slightly expands and contracts
according to changes in temperature. This does not affect the TV’s performance.
TVa
on the remote control unit.
TVa
.
Environmental Specifications
40" 46"
*1 On-Mode (W) (HOME MODE) 48 W 60 W
*2 Energy-Save-Mode (W) ECO 39 W 55 W
*3 Standby-Mode (W) 0.21 W 0.21 W
*4 Off Mode (W) 0.16 W 0.16 W
*5 Annual Energy Consumption (kWh) 70 kWh 88 kWh
*6 Annual Energy Consumption
Energy-Save-Mode (kWh)
ECO 57 kWh 80 kWh
*1 Measured according to IEC 62087 Ed. 2.
*2 For further information about the Energy Save function, please
see related pages in this operation manual.
*3 Measured according to IEC 62301 Ed. 1.
*4 Measured according to IEC 62301 Ed. 1.
*5 Annual energy consumption is calculated on the basis of the
On-Mode (HOME MODE) power consumption, watching TV 4
hours a day, 365 days a year.
*6 Annual energy consumption is calculated on the basis of the
Energy-Save-Mode power consumption, watching TV 4 hours
a day, 365 days a year.
40
Page 43
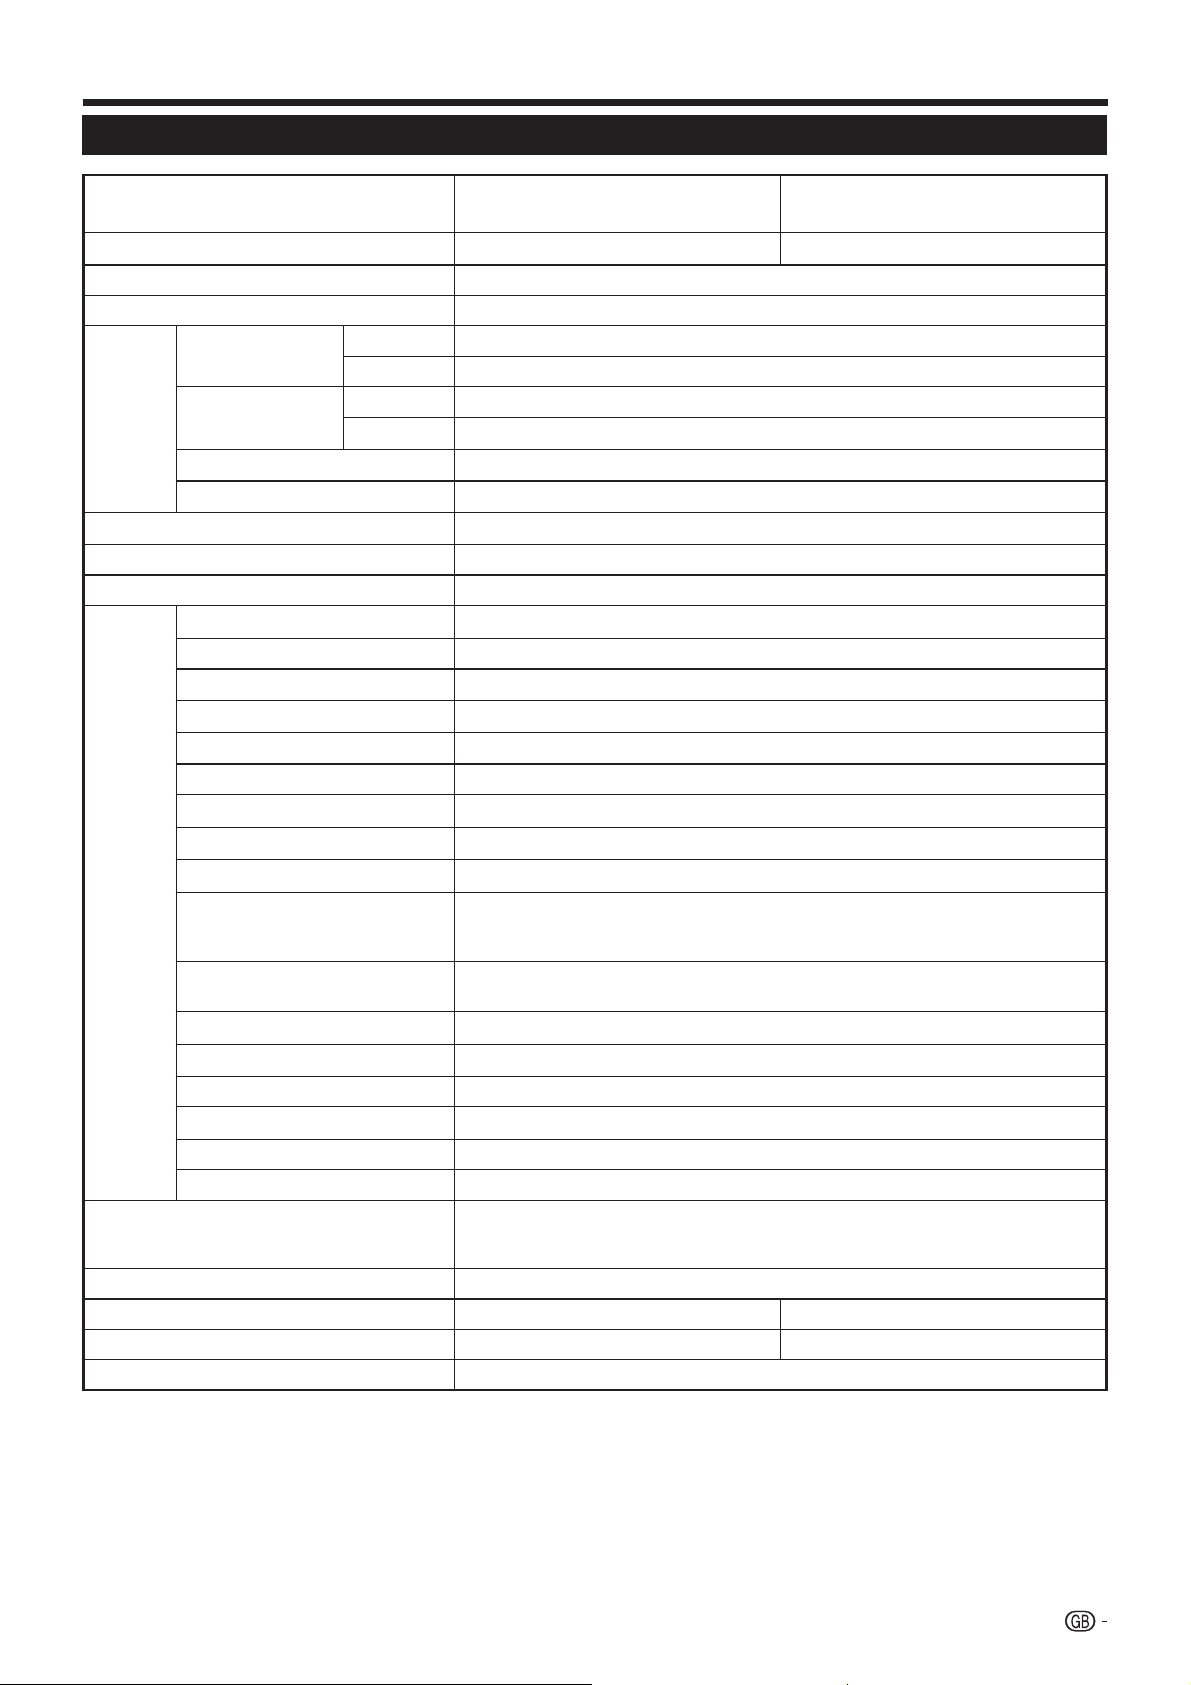
Appendix
Specifications
Item
LCD Panel
Resolution 6.220.800 dots (1.920 x 1.080 pixels)
Video Colour System PAL/SECAM/NTSC 3.58/NTSC 4.43/PAL 60
TV Standard Analogue CCIR (B/G, I (LE731 for UK and Ireland only), D/K, L/L’)
Digital DVB-T (2K/8K OFDM)(H.264), DVB-C, DVB-T2 (LE731 only), DVB-S/S2 (LE732 only)
TV
Functions
Viewing angles H: 176°, V: 176°
Audio Amplifi er 10 W + 5 W + 5 W
Speaker Woofer Ø 70 mm, tweeter (Ø 11 mm) x 2
Terminals
OSD language
Power Requirement AC 220–240 V, 50 Hz
Power Consumption (IEC62087 Method) 102W (0.21 W Standby) 124W (0.21 W Standby)
Weight 12.2 Kg (Without stand), 14.4 Kg (With stand)
Operating Temperature 0 °C to +40 °C
Receiving Channel
TV-Tuning System Auto Preset 999 ch: non-Nordic / 9999 ch: Nordic (ATV: 99 ch), Auto Label, Auto Sort
STEREO / BILINGUAL NICAM/A2
TV Antenna UHF/VHF 75 Ω Din type (Analogue & Digital)
SERVICE Ø 3.5 mm jack
SCART SCART (AV input, RGB input, TV output, Y/C input)
PC INPUT VGA (D-Sub 15pin), Ø 3.5 mm jack (shared with HDMI)
COMPONENTS COMPONENT IN: Y/PB(CB)/PR(CR), RCA (AUDIO R/L)
HDMI1 HDMI, Ø 3.5 mm jack (shared with PC INPUT), ARC, 3D.
HDMI2 HDMI, Ø 3.5 mm jack (shared with PC INPUT), 3D.
HDMI3 HDMI, Ø 3.5 mm jack (shared with PC INPUT), 3D.
HDMI4 (Rear) HDMI, Ø 3.5 mm jack (shared with PC INPUT), 3D.
USB 1 (USB REC / Media Player
/ HDD Ready / 3D Glasses
charge)
USB 2 (Media Player / HDD Ready
3D Glasses charge)
USB 3 (WIFI) USB 2.0 HOST (A type) (Wi-Fi use only)
ETHERNET (10/100) Network connector
AV RCA connector (AV input)
SPDIF OUT Optical S/PDIF digital audio output.
C. I. (Common Interface) EN50221, R206001, CI+ specifi cation
Headphones Ø 3.5 mm jack (Audio output)
VHF/UHF E2–E69 ch, F2–F10 ch, I21–I69 ch, IR A–IR J ch (Digital: IR A ch–E69 ch)
CATV Hyper-band, S1–S41 ch
40” LCD COLOUR TV, Models:
LC-40LE730E, LC-40LE731E, LC-40LE732E
40” BLACK TFT LCD LED TV 46” BLACK TFT LCD LED TV
USB 2.0 HOST (A Type)
USB 2.0 HOST (A type)
Czech, Danish, Dutch, English, Estonian, Finnish, French, German, Greek, Hungarian,
Italian, Latvian, Lithuanian, Norwegian, Polish, Portuguese, Russian, Slovak, Slovene,
Spanish, Swedish, Turkish, Ukrainian, Byelorussian, Romanian, Croatian, Serbian.
46” LCD COLOUR TV, Models:
LC-46LE730E, LC-46LE731E, LC-46LE732E
16.7Kg (Without stand), 19.7 Kg (With stand)
41
Page 44

Appendix
EU Energy Label for Televisions
On 30 November, 2010 the European Commission adopted the Commission Delegated Regulation (EU) No
1062/2010 with regard to energy labelling of televisions.
The Regulation entered into force on 20 December 2010 and applies in all Member States.
Manufacturers and dealers are required to display the label shown below, on their televisions from 30 November
2011.
The label provides information to assist consumers in evaluating televisions for energy effi ciency and energy
consumption and to make a purchasing decision that contributes to the protection of the environment and to a
lower carbon society.
The fi gure below shows the label design and explains the information included. For further information please
visit the Sharp internet homepage (http://www.sharp.eu).
The retailer or online shop where you purchased your television from would have displayed the label and its
corresponding rating. If in doubt please consult them.
In addition to saving energy many Sharp LCD televisions also carry the EU Ecolabel, a voluntary environmental
label that is awarded to goods which meet the environmental requirements of the EU ecolabelling scheme (for
details see http://ec.europa.eu/environment/ecolabel/). This voluntary label enhances further the environmental
credentials of our televisions.
NOTE
• Methods for calculating the Energy Effi ciency Index and the annual on-mode energy consumption are set out
in Annex II of Regulation (EU) No 1062/2010. The determination of the on-mode consumption is based on the
international standard IEC 62087 Ed. 2.
42
Page 45

Appendix
Information on the EU Eco-label
Sharp LCD-TV with an EU Eco-label
This product has offi cially been awarded the Eco-label of the European Union, “The Flower” (for details
see EU Commission Decision 2009/300/EC - OJ L 82/3 dated 28.3.2009).
Sharp is the fi rst company to achieve this Eco-label for TVs thus demonstrating its commitment to
improving our environment.
The Flower is granted only to the products that meet rigorous criteria and demonstrate positive
contributions towards a better environment. Further information can be found at:
http://www.ecolabel.eu
What makes this Sharp product ecologically outstanding?
This TV set uses a Liquid Crystal Display (LCD) instead of the classical Cathode Ray Tube (CRT). Some
of the advantages are:
• Design for high energy effi ciency. This cuts energy consumption and saves money.
•
Reduced energy consumption during use and stand-by. Energy savings in different modes are possible
(see Appendix in this operation manual.)
• The lifetime of the background light is approx. 2.5 times longer than that of a CRT.
• This TV complies with the chemical requirements of the EU Eco-label.
•
A minimum of two year functionality are granted in all EU-states.
• Spare parts will be available after ceasing the production of this model for:
seven years, for electrical components
fi ve years, for mechanical parts
four years, for decorative parts
• This product has been designed for easy disassembly, recovery and recycling and should not be
discarded with your ordinary household waste – for further details please refer to the “Information on
Proper Disposal” mentioned in this operation manual.
• Should repair become necessary, please contact your retailer. You can also contact your local Sharp
approved service centre (see Sharp local website).
What can you do to contribute towards helping to protect the environment?
• Please do not leave your TV in stand-by mode, unplug it when it is not used for a long time. There is
zero energy consumption if you unplug your TV or nearly zero watt if the TV has a hard-off-switch. The
location is described in this operation manual.
• The energy consumption in the on-mode can be reduced by lowering the brightness of the backlight
when the unit is in operation. This will reduce overall running costs.
43
Page 46

End of life disposal
A. Information on Disposal for Users (private households)
1. In the European Union
Attention: If you want to dispose of this equipment, please do not use the ordinary dust bin!
Used electrical and electronic equipment must be treated separately and in accordance with legislation that requires
proper treatment, recovery and recycling of used electrical and electronic equipment.
Following the implementation by member states, private households within the EU states may return their used
electrical and electronic equipment to designated collection facilities free of charge*. In some countries* your local
Attention: Your product
is marked with this
symbol. It means that
used electrical and
electronic products
should not be mixed
with general household
waste. There is a
separate collection
system for these
products.
retailer may also take back your old product free of charge if you purchase a similar new one.
*) Please contact your local authority for further details.
If your used electrical or electronic equipment has batteries or accumulators, please dispose of these separately
beforehand according to local requirements.
By disposing of this product correctly you will help ensure that the waste undergoes the necessary treatment, recovery
and recycling and thus prevent potential negative effects on the environment and human health which could otherwise
arise due to inappropriate waste handling.
2. In other Countries outside the EU
If you wish to discard this product, please contact your local authorities and ask for the correct method of disposal.
For Switzerland: Used electrical or electronic equipment can be returned free of charge to the dealer, even if you don’t
purchase a new product. Further collection facilities are listed on the homepage of www.swico.ch or www.sens.ch.
B. Information on Disposal for Business Users
1. In the European Union
If the product is used for business purposes and you want to discard it:
Please contact your SHARP dealer who will inform you about the take-back of the product. You might be charged for
the costs arising from take-back and recycling. Small products (and small amounts) might be taken back by your local
collection facilities.
For Spain: Please contact the established collection system or your local authority for take-back of your used
products.
2. In other Countries outside the EU
If you wish to discard of this product, please contact your local authorities and ask for the correct method of disposal.
The battery supplied with this product contains traces of Lead.
For EU: The crossed-out wheeled bin implies that used batteries should not be put to the general household waste!
There is a separate collection system for used batteries, to allow proper treatment and recycling in accordance with
legislation. Please contact your local authority for details on the collection and recycling schemes.
For Switzerland: The used battery is to be returned to the selling point.
For other non-EU countries: Please contact your local authority for correct method of disposal of the used battery.
Trademarks
• “HDMI, the HDMI logo and High-Definition Multimedia Interface are trademarks or registered trademarks of HDMI Licensing LLC.”
• Manufactured under license from Dolby Laboratories.
• “Dolby” and the double-D symbol are trademarks of Dolby Laboratories.
• The “HD TV 1080p” Logo is trademark of DIGITALEUROPE.
• The DVB logo is the registered trademark of the Digital Video Broadcasting—DVB—project.
• DivX®, DivX Certified® and associated logos are trademarks of Rovi Corporation or its subsidiaries and are used under
license.
• The “CI Plus” Logo is a trademark of CI Plus LLP.
• DLNA®, the DLNA Logo and DLNA CERTIFIED™ are trademarks, service marks, or certification marks of the Digital Living
Network Alliance.
• All other company or product names are trademarks or registered trademarks of their respective companies.
44
Page 47

LC-40LE730E LC-40LE731E LC-40LE732E
LC-46LE730E LC-46LE731E LC-46LE732E
(630) [705]
([400])
(560) [635]
([18.8])
(196) [187.2]
(887) [1020.1]
(947) [1081]
(457) [484.6]
([400])
(500) [574.5]
{70}
(111.4) [115.2]
(350.5) [388.5]
([40])
(242) [265]
40”: ( )
46”: [ ]
40”/46”: ([ ])
Page 48

PIN
SHARP MANUFACTURING POLAND Sp. z o.o.
Ostaszewo 57b, 87-148 Łysomice, Poland
SHARP CORPORATION
http://www.sharp-eu.com
Printed in Poland
Gedruckt in Polen
Imprimé en Pologne
Stampato in Polonia
Gedrukt in Polen
Impreso en Polonia
Impresso na Polónia
TINS-F204WJZZ
11P12-PL-NG
 Loading...