

Page 1

S ARR
AQUOS
LC-40LE550U
LIQUID CRYSTAL TELEVISION
TELEVISOR CON PANTALLA
DE CR|STAL LIQUIDO
OP
MAN[
| DOLBY }.,{_31r_| '°
IMPORTANT : Please read this operation manual before starting operating the equipment.
IMPORTANTE : Lea este manual de operaci6n antes de comenzar a operar el equipo.
DIGITAL ..................................
Page 2
LC-40LE550U
LiQUiD CRYSTAL TELEViSiON
ENGLISH
OPERATION MANUAL
IMPORTANT:
To aid reporting in case of loss or theft, please
record the TV's model and serial numbers in the
space provided, The numbers are located at the
rear of the TV,
Model No,:
Serial No,:
IMPORTANT INFORMATION
WARNING: TO REDUCE THE RISK OF FIRE OR ELECTRIC SHOCK, DO NOTi
l EXPOSE TH S PRODUCT TO RAN OR MO STURE, 1
The lightning flash with arrow-head
symbol,within an equilateral triangle,is
l oOFo OTR'CSHOCK
CAUTION: TO REDUCE THE RISK OF ELECTRIC SHOCK,
DO NOT REMOVE COVER (OR BACK).
NO USER-SERVICEABLE PARTS INSIDE.
REFER SERVICING TO QUALIFIED SERVICE
PERSONNEL.
intended to alert the user to the presence
of uninsulated"dangerous voltage"within
the product's enclosure that may be of
sufficient magnitude to constitute a risk of
electric shock to persons.
The exclamation point within a triangle
presence of important operating and
maintenance(servicing)instruction in the
literature accompanying the product.
Q-1
Page 3
iMPORTANT iNFORMATiON
CAUTION: TO PREVENT ELECTRIC SHOCK,MATCH WIDE BLADE OF PLUG TO WIDE SLOT,
FULLY INSERT,
WARNING: FCC Regulations state that any unauthorized changes or modifications to this
equipment not expressly approved by the manufacturer could void the user's authority to operate
this equipment,
CAUTION:
This product satisfies FCC regulations when shielded cables and connectors are used to connect
the unit to other equipment, To prevent electromagnetic interference with electric appliances such
as radios and televisions, use shielded cables and connectors for connections,
DECLARATION OF CONFORMITY:
SHARP LIQUID CRYSTAL TELEVISION, MODEL LC-40LE550U
This device complies with Part 15 of the FCC Rules, Operation is subject to the
following two conditions: (1) This device may not cause harmful interference, and (2) this device
must accept any interference received, including interference that may cause undesired operation,
RESPONSIBLE PARTY:
For Business Customers: URL http://www,sharpusa,com
INFORMATION:
This equipment has been tested and found to comply with the limits for a Class B digital device,
pursuant to Part 15 of the FCC Rules, These limits are designed to provide reasonable protection
against harmful interference in a residential installation, This equipment generates, uses and can
radiate radio frequency energy and, if not installed and used in accordance with the instructions,
may cause harmful interference to radio communications, However, there is no guarantee
that interference will not occur ina particular installation, If this equipment does cause harmful
interference to radio or television reception, which can be determined by turning the equipment off
and on, the user is encouraged to try to correct the interference by one or more of the following
measures:
-- Reorient or relocate the receiving antenna,
-- Increase the separation between the equipment and receiver,
-- Connect the equipment into an outlet on a circuit different from that to which the receiver is
connected,
-- Consult the dealer or an experienced radio/TV technician for help,
Note to CATV system installer: This reminder is provided to call the CATV system installer's
attention to Article 820 of the National Electrical Code that provides guidelines for proper
grounding and, in particular, specifies that the cable ground shall be connected to the grounding
system of the building, as close to the point of cable entry as practical,
This product qualifies for ENERGY STAR when "Home" is selected for "TV Location",
Setting "TV Location" to "Home" allows the TV to achieve an energy-saving status for household
use,
SHARP ELECTRONICS CORPORATION
Sharp Plaza, Mahwah, New Jersey 07495-1163
TEL: 1-800-BE-SHARP
TRADEMARKS
The terms HDMI and HDMI High-Definition Multimedia Interface, and the HDMI Logo
are trademarks or registered trademarks of HDMI Licensing LLC in the United States
and other countries.
Manufactured under license from Dolby Laboratories.Doby and the doubte-D
symbol are trademarks of Dotby Laboratories.
(D-2
Page 4

DEAR SHARP CUSTOMER
Thank you for your purchase of the Sharp Liquid Crystal Television. To ensure safety and
many years of trouble-free operation of your product, please read the Important Safety
Instructions carefully before using this product.
IMPORTANT SAFETY INSTRUCTIONS
1) Read these instructions.
2) Keep these instructions.
3) Heed all warnings.
4) Follow all instructions.
5) Do not use this apparatus near water.
6) Clean only with dry cloth.
7) Do not block any ventilation openings. Install in accordance with the manufacturer's
instructions.
8) Do not install near any heat sources such as radiators, heat registers, stoves, or other
apparatus (including amplifiers) that produce heat.
9) Protect the power cord from being walked on or pinched particularly at plugs, convenience
receptacles, and the point where they exit from the apparatus.
10) Only use attachments/accessories specified by the manufacturer.
11) Use only with the cart, stand, tripod, bracket, or table specified by the manufacturer, or
sold with the apparatus. When a cart is used, use caution when moving the cart/apparatus
combination to avoid injury from tip-over.
12) Unplug this apparatus during lightning storms or when unused for long periods of time.
13) Refer all servicing to qualified service personnel. Servicing is required when
the apparatus has been damaged in any way, such as power-supply cord
or plug is damaged, liquid has been spilled or objects have fallen into the
apparatus, the apparatus has been exposed to rain or moisture, does not
operate normally, or has been dropped.
14) WARNING: To reduce the risk of fire or electric shock, do not expose this apparatus to rain
or moisture.
15) Where the MAINS plug or an appliance coupler is used as the disconnect device, the
disconnect device shall remain readily operable.
16) The apparatus shall not be exposed to dripping or splashing and that no objects filled with
liquids, suchas vases, shall be placed on the apparatus.
Additional Safety Information
17) Power Sources--This product should be operated only from the type of power source
indicated on the marking label. Ifyou are not sure of the type of power supply to your
home, consult your product dealer or local power company. For products intended to
operate from battery power, or other sources, refer to the operating instructions.
18) Overloading--Do not overload wall outlets, extension cords, or integral convenience
receptacles as this can result in a risk of fire or electric shock.
19) Object and Liquid Entry--Never push objects of any kind into this product through
openings as they may touch dangerous voltage points or short-out parts that could result
in a fire or electric shock. Never spill liquid of any kind on the product.
20) Damage Requiring Service--Unplug this product from the wall outlet and refer servicing to
qualified service personnel under the following conditions:
a) When the AC cord or plug is damaged,
b) If liquid has been spilled, or objects have fallen into the product,
c) If the product has been exposed to rain or water,
d) If the product does not operate normally by following the operating instructions.
Adjust only those controls that are covered by the operating instructions as an improper
adjustment of other controls may result in damage and will often require extensive work
by a qualified technician to restore the product to its normal operation,
e) If the product has been dropped or damaged in any way, and
f) When the product exhibits a distinct change in performance - this indicates a need for
service.
4
Q-3
Page 5
IMPORTANT SAFETY INSTRUCTIONS
21) Replacement Parts--When replacement parts are required, be sure the service technician
has used replacement parts specified by the manufacturer or have the same
characteristics as the original part. Unauthorized substitutions may result in fire, electric
shock, or other hazards.
22) Safety Check--Upon completion of any service or repairs to this product, ask the service
technician to perform safety checks to determine that the product is in proper operating
condition.
23) Wall or ceiling mounting--Use a wall mount bracket that has been listed by an
independent laboratory (such as UL, CSA, ETL).
• These servicing instructions are for use by qualified service personnel only. To reduce the risk of electric
shock do not perform any servicing other than that contained in the operating instructions unless you are
k, qualified to do so.
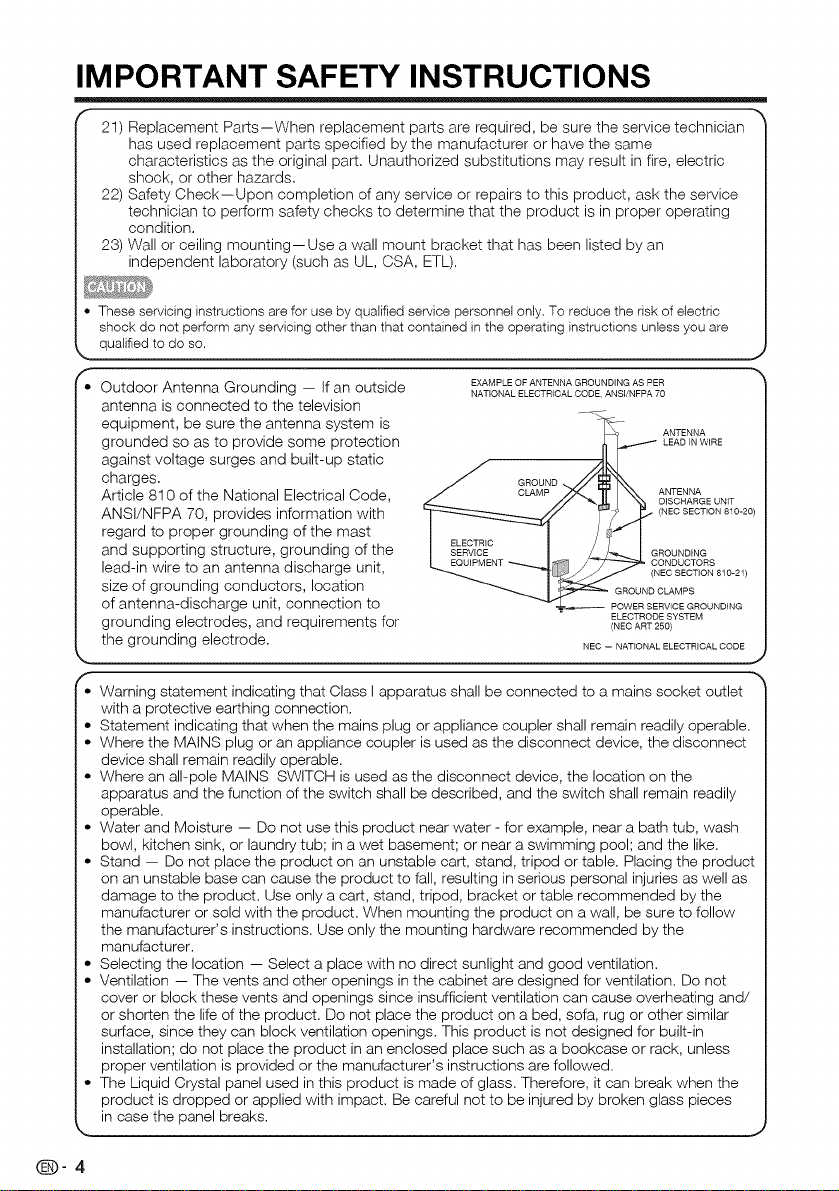
Outdoor Antenna Grounding -- Ifan outside
antenna is connected to the television
equipment, be sure the antenna system is
grounded so as to provide some protection
against voltage surges and built-up static
charges.
Article 810 of the National Electrical Code,
ANSI/NFPA 70, provides information with
regard to proper grounding of the mast
and supporting structure, grounding of the
lead-in wire to an antenna discharge unit,
size of grounding conductors, location
of antenna-discharge unit, connection to
grounding electrodes, and requirements for
the grounding electrode.
EXAMPLE OF ANTENNA GROUNDING AS PER
NATIONAL ELECTRICAL CODE ANSI/NFPA 70
ANTENNA
LEAD IN WIRE
CLAMP ANTENNA
GROUND
__ DISCHARGE UNIT
NEC -- NATIONAL ELECTRICAL CODE
(NEC SECTION 810-20)
CONDUCTORS
_L i ROUNDING
NEC SECTION 810-21)
GROUND CLAMPS
POWER SERVICE GROUNDING
ELECTRODE SYSTEM
(NEO ART 250)
• Warning statement indicating that Class I apparatus shall be connected to a mains socket outlet
with a protective earthing connection.
• Statement indicating that when the mains plug or appliance coupler shall remain readily operable.
• Where the MAINS plug or an appliance coupler is used as the disconnect device, the disconnect
device shall remain readily operable.
• Where an all-pole MAINS SWITCH is used as the disconnect device, the location on the
apparatus and the function of the switch shall be described, and the switch shall remain readily
operable.
• Water and Moisture -- Do not use this product near water - for example, near a bath tub, wash
bowl, kitchen sink, or laundry tub; in a wet basement; or near a swimming pool; and the like.
• Stand -- Do not place the product on an unstable cart, stand, tripod or table. Placing the product
on an unstable base can cause the product to fall, resulting in serious personal injuries as well as
damage to the product. Use only a cart, stand, tripod, bracket or table recommended by the
manufacturer or sold with the product. When mounting the product on a wall, be sure to follow
the manufacturer's instructions. Use only the mounting hardware recommended by the
manufacturer.
• Selecting the location -- Select a place with no direct sunlight and good ventilation.
• Ventilation -- The vents and other openings in the cabinet are designed for ventilation. Do not
cover or block these vents and openings since insufficient ventilation can cause overheating and/
or shorten the life of the product. Do not place the product on a bed, sofa, rug or other similar
surface, since they can block ventilation openings. This product is not designed for built-in
installation; do not place the product in an enclosed place such as a bookcase or rack, unless
proper ventilation is provided or the manufacturer's instructions are followed.
• The Liquid Crystal panel used in this product is made of glass. Therefore, itcan break when the
product is dropped or applied with impact. Be careful not to be injured by broken glass pieces
in case the panel breaks.
_-4
J
Page 6
IMPORTANT SAFETY INSTRUCTIONS
• Heat -- The product should be situated away from heat sources such as radiators, heat registers,
stoves, or other products (including amplifiers) that produce heat.
• The Liquid Crystal panel is a very high technology product with 2,073,600 pixels, giving you fine
picture details. Occasionally, a few non-active pixels may appear on the screen as a fixed point
of blue, green or red. Please note that this does not affect the performance of your product.
• Lightning -- For added protection for this television equipment during a lightning storm, or when
it is left unattended and unused for long periods of time, unplug it from the wall outlet and
disconnect the antenna. This will prevent damage to the equipment due to lightning and
power-line surges.
• Power Lines -- An outside antenna system should not be located in the vicinity of overhead
power lines or other electric light or power circuits, or where it can fall into such power lines or
circuits. When installing an outside antenna system, extreme care should be taken to keep
from touching such power lines or circuits as contact with them might be fatal.
• To prevent fire, never place any type of candle or flames on the top or near the TV set.
• To prevent fire or shock hazard, do not place the AC cord under the TV set or other heavy items.
• Do not display a still picture for a long time, as this could cause an afterimage to remain.
• To prevent fire or shock hazard, do not expose this product to dripping or
splashing.
No objects filled with liquids, such as vases, should be placed on the product.
• Do not insert foreign objects into the product. Inserting objects in the air
vents or other openings may result in fire or electric shock. Exercise special
caution when using the product around children.
Precautions when transporting the TV
• When transporting the TV, never carry it by holding or otherwise putting pressure onto the display.
Be sure to always carry the TV by two people holding it with two hands -- one hand on each side
of the TV.
Caring for the Cabinet
• Use a soft cloth (cotton, flannel, etc.) and gently wipe the surface of the cabinet.
• Using a chemical cloth (wet/dry sheet type cloth, etc.) may deform the components of the main
unit cabinet or cause cracking.
• Wiping with a hard cloth or using strong force may scratch the surface of the cabinet.
• If the cabinet is very dirty, wipe with a soft cloth (cotton, flannel, etc.) soaked in neutral detergent
diluted with water and thoroughly wrung out, and then wipe with a soft dry cloth.
• The cabinet is primarily made of plastic. Avoid using benzene, thinner, and other solvents, as
these may deform the cabinet and cause the paint to peel off.
• Do not apply insecticides or other volatile liquids.
Also, do not allow the cabinet to remain in contact with rubber or vinyl products for a long period
of time. Plasticizers inside the plastic may cause the cabinet to deform and cause the paint to
peel off.
Caring for the Liquid Crystal panel
• Turn off the main power and unplug the AC cord from the wall outlet before handling.
• Gently wipe the surface of the display panel with a soft cloth (cotton, flannel, etc.).
To protect the display panel, do not use a dirty cloth, liquid cleaners,
or a chemical cloth (weV dry sheet type cloth, etc.). This may damage __ ,_ _ _j
• Wiping with a hard cloth or using strong force may scratch the surface
the surface of the display panel. _i_ -'_''-_ _
of the display panel.
• Use a soft damp cloth to gently wipe the display panel when it is really
dirty. (It may scratch the surface of the display panel when wiped strongly.)
• If the display panel is dusty, use an anti-static brush, which is commercially available, to clean it.
• To avoid scratching the frame or screen, please use a soft, lint free cloth for cleaning. Approved
cleaning cloths are available directly from Sharp in single (00Z-LCD-CLOTH) or triple (00Z-LCD-
CLOTH-3) packs.
Call 1-800-BE-SHARP for ordering, or VISIT http://www.sharpusa.com/SharpDirect.
L
Q-5
Page 7

iMPORTANT SAFETY iNSTRUCTiONS
CHILD SAFETY:
PROPER TELEVISION PLACEMENT MATTERS
THE CONSUMER ELECTRONICS iNDUSTRY CARES
® Manufacturers, retailers and the rest of the consumer electronics industry are committed
to making home entertainment safe and enjoyable.
® As you enjoy your television, please note that all televisions - new and old- must be
supported on proper stands or installed according to the manufacturer's
recommendations. Televisions that are inappropriately situated on dressers,bookcases,
shelves, desks, speakers, chests, carts, etc., may fall over, resulting in injury.
TUNE IN TO SAFETY
® ALWAYS follow the manufacturer's recommendations for the safe installation of your
television.
® ALWAYS read and follow all instructions for proper use of your television.
® NEVER allow children to climb on or play on the television or the furniture on which the
television is placed.
® NEVER place the television on furniture that can easily be used as steps, such as a
chest of drawers.
® ALWAYS install the television where it cannot be pushed, pulled over or knocked down.
® ALWAYS route cords and cables connected to the television so that they cannot be
tripped over, pulled or grabbed.
WALL OR CEILING MOUNT YOUR TELEVISION
® ALWAYS contact your retailer about professional installation ifyou have any doubts
about your ability to safely mount your television.
® ALWAYS use a mount that has been recommended by the television manufacturer and
has a safety certification by an independent laboratory (such as UL, CSA, ETL).
® ALWAYS follow all instructions supplied by the television and mount manufacturers.
® ALWAYS make sure that the wall or ceiling where you are mounting the television is
appropriate.
Some mounts are net designed to be meunted to walls and ceilings with steel studs er
cinder block construction. If you are unsure, contact a professional installer.
® Televisions carl be heavy. A minimum of two people is required for a wall or ceiling mount
installation.
MOVING AN OLDER TELEViSiON TO A NEW PLACE IN YOUR HOME
® Marly new television buyers move their older CRT televisions into a secondary
room after the pumhase of a flat panel television. Special care should be made
in the placement of older CRT televisions.
® ALWAYS place your older CRT television on furniture that issturdy and
appropriate for its size and weight.
® NEVER place your older CRT television on a dresser where children may be
tempted to use the drawers to climb.
® ALWAYS make sure your older CRT television does not hang over the edge of
your furniture.
(D-6
CE.org/safety
Page 8
QUICK REFERENCE
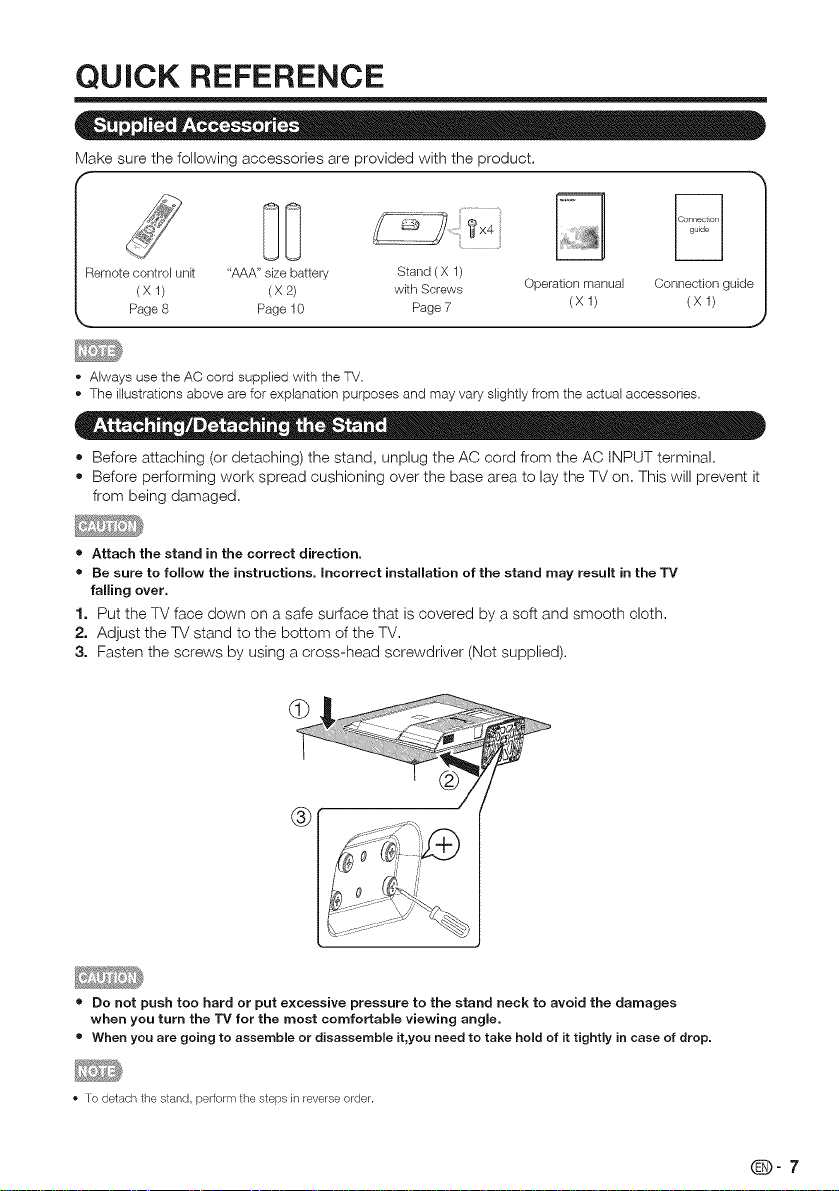
Make sure the following accessories are provided with the product.
Remote control unk "AAA" size battery Stand ( X 1)
(X 1) (X 2) with Screws Operation manual Connection guide
Page 8 Page 10 Page 7 (X 1) (X 1)
• Always usetheAC cord suppliedwith the TV.
• The illustrationsabovearefor explanationpurposesand mayvaryslightlyfrom the actualaccessories.
• Before attaching (or detaching) the stand, unplug the AC cord from the AC INPUT terminal.
• Before performing work spread cushioning over the base area to lay the TV on. This will prevent it
from being damaged.
• Attach the stand in the correct direction.
• Be sure to follow the instructions. Incorrect installation of the stand may result in the TV
falling over.
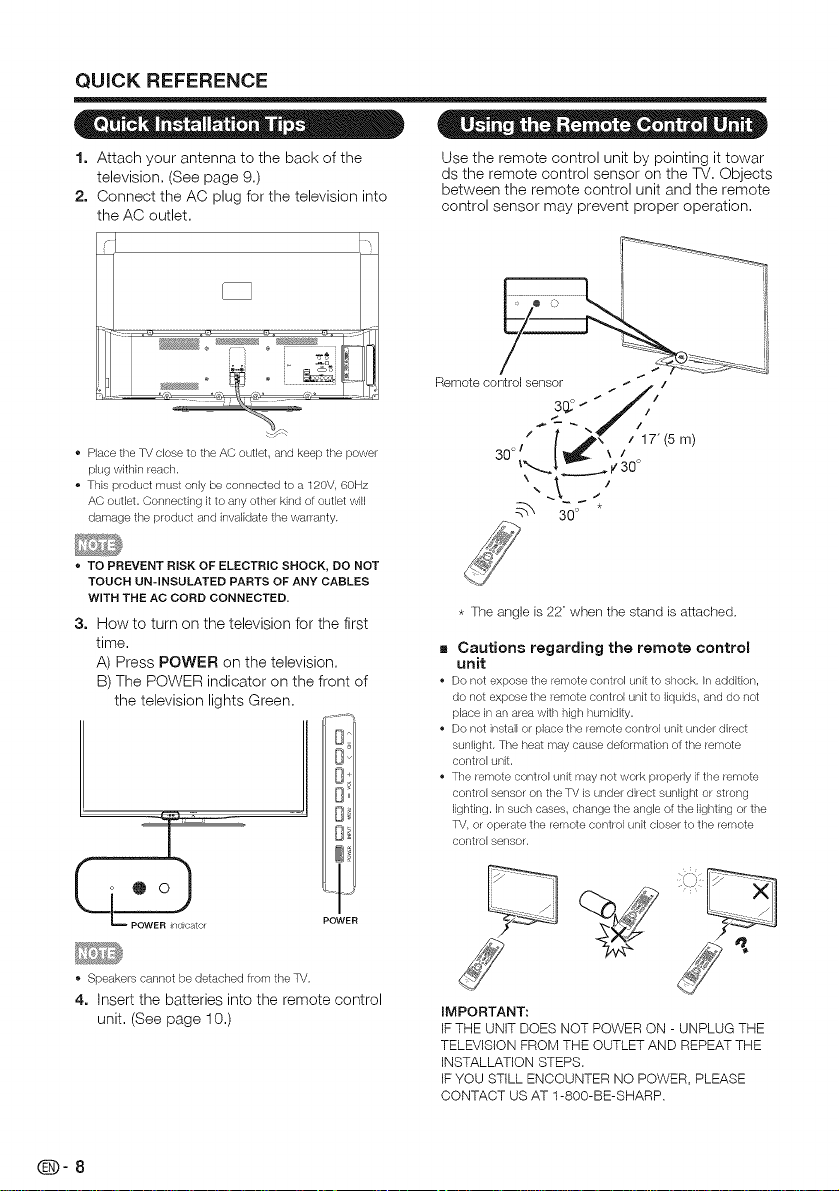
1. Put the TV face down on a safe surface that is covered by a soft and smooth cloth.
2. Adjust the TV stand to the bottom of the TV.
3. Fasten the screws by using a cross-head screwdriver (Not supplied).
®
• Do not push too hard or put excessive pressure to the stand neck to avoid the damages
when you turn the TV for the most comfortable viewing angle.
• When you are going to assemble or disassemble it,you need to take hold of it tightly in case of drop,
To detach the stand, perform the steps in/everse order.
_-7
Page 9
QUICK REFERENCE
o . • •
1. Attach your antenna to the back of the
television, (See page 9,)
2. Connect the AC plug for the television into
the AC outlet,
Place the TV close to the AC outlet, and keep the power
plug within reach.
• This product must only be connected to a 120V, 60Hz
AC outlet. Connecting it to any other kind of outlet will
damage the product and invalidate the walranty.
• TO PREVENT RISK OF ELECTRIC SHOCK, DO NOT
TOUCH UN-INSULATED PARTS OF ANY CABLES
WITH THE AC CORD CONNECTED.
3. How to turn on the television for the first
time,
A) Press POWER on the television,
B) The POWER indicator on the front of
the television lights Green,
Dvll
.... 8_11
I D_II
$ = = = • = • =
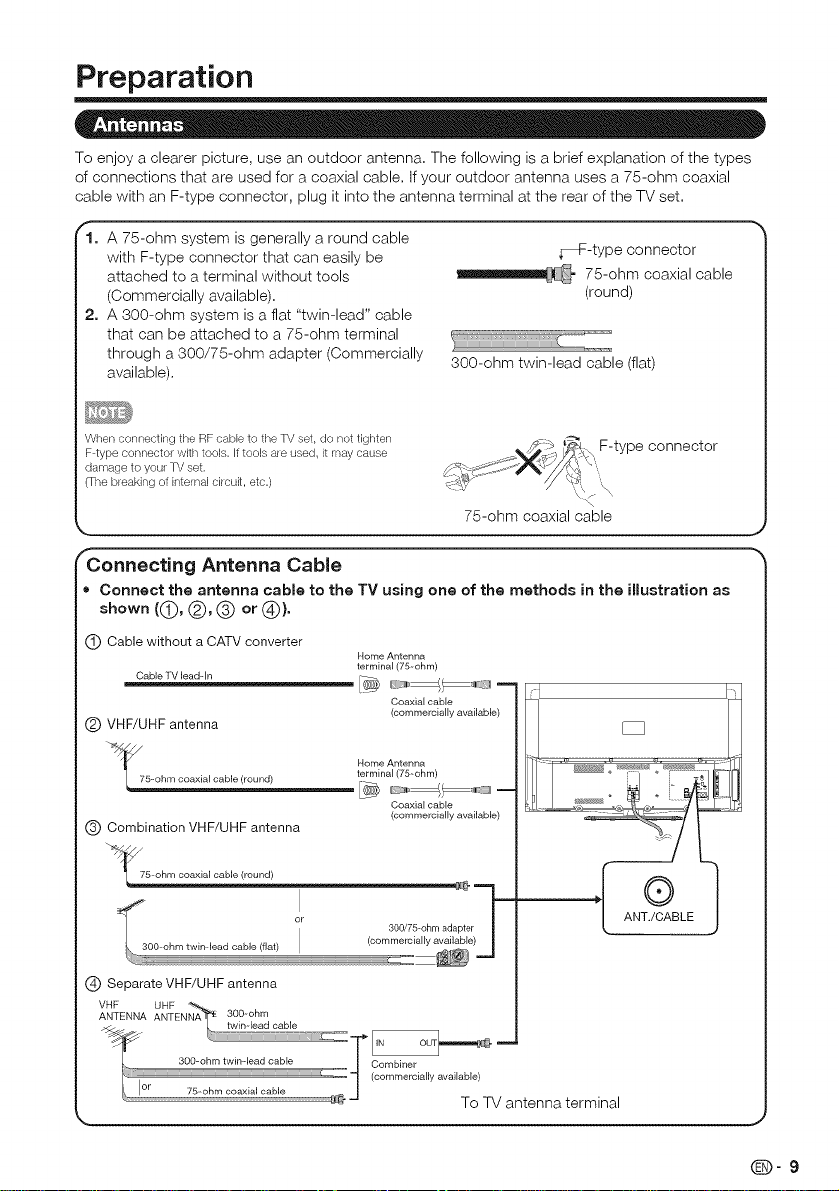
Use the remote control unit by pointing it towar
ds the remote control sensor on the TV. Objects
between the remote control unit and the remote
control sensor may prevent proper operation.
Remote control sensor
3o°` I,L", / m/
* The angle is 22 °when the stand is attached,
Cautions regarding the remote control
unit
Do not expose the lemote control urfit to shock. In addKion,
do not expose the/emote contlol unit to liquids, and do not
place in an area with high humidity.
Do not install or place the lemote control unit under dilect
sunlight. The heat may cause deformation of the/emote
cont/ol unit.
The/emote contlel unit may not work p/operly if the/emote
control sensor on the TV is under dilect sunlight or stleng
lighting. In such cases, change the angle of the lighting or the
TV, or operate the lemote cent/ol unit closer to the lemote
control sensor.
ore_ t POWER
Speakers cannot be detached from the TV.
4. Insert the batteries into the remote control
unit, (See page 10,)
@9-8
IMPORTANT:
IF THE UNIT DOES NOT POWER ON - UNPLUG THE
TELEVISION FROM THE OUTLET AND REPEAT THE
INSTALLATION STEPS.
IF YOU STILL ENCOUNTER NO POWER, PLEASE
CONTACT US AT 1-800-BE-SHARP.
Page 10
Preparation
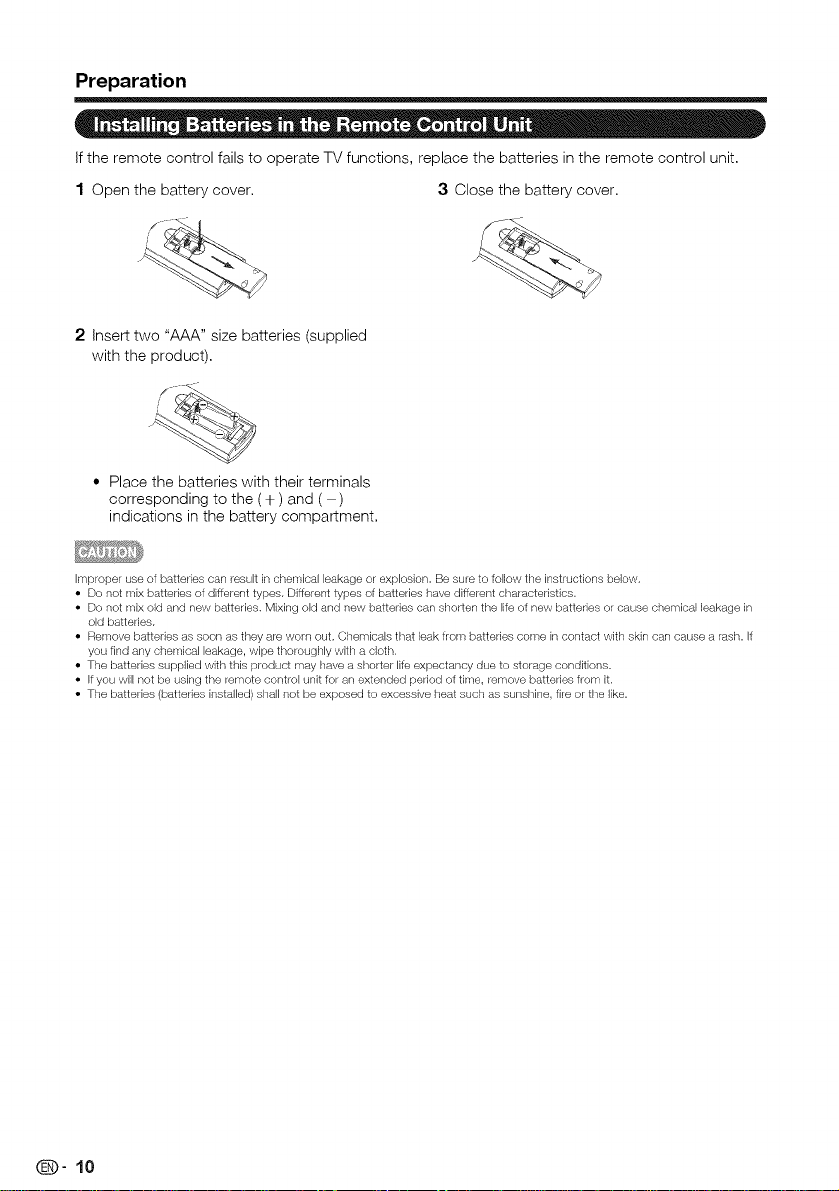
To enjoy a clearer picture, use an outdoor antenna, The following isa brief explanation of the types
of connections that are used for a coaxial cable, If your outdoor antenna uses a 75-ohm coaxial
cable with an F-type connector, plug it into the antenna terminal at the rear of the TV set=
1. A 75-ohm system is generally a round cable
with F-type connector that can easily be
attached to a terminal without tools
(Commercially available).
_F-type connector
75-ohm coaxial cable
(round)
2. A 300-ohm system is a flat "twin-lead" cable
that can be attached to a 75-ohm terminal
through a 300/75-ohm adapter (Commercially
available).
When connecting the RF cable to the TV set, do not tighten _ _-> _\ F-type connector
F typ ......... tot with tools. If tool....... d, it may ..... -o <_,t:y,,7_/_ _
damage to you/TV set, _'R_ {t!:C= o,,i_'_%_-//i,%<
0-he bleaking of internal ci/ouit, etc.) 1_-_ // X{,q k
300-ohm twin-lead cable (flat)
75-ohm coaxial cable
Connecting Antenna Cable
. Connect the antenna cable to the TV using one of the methods in the illustration as
shown ((_), (_), (_) or (_)}.
Cable without a CATVconverter
Cable TV lead-in
(_ VHF/UHFantenna
_f 5--oh m coaxial cable (round)
(_) Combination VHF/UHF antenna
Home Antenna
terminal (75--ohm)
Coaxial cable
{commercially available)
Home Antenna
terminal (75--ohm)
Coaxial cable
(commercially available)
75--ohm coaxial cable (round)
(_ SeparateVHF/UHFantenna
VHF UHF
ANTENNA ANTENNA 300--ohm
300=ohm twinqead cable | Combiner
cr 75-ohm coaxial cable _. J
-- "=_ (commercially available)
To TV antenna terminal
(D-9
Page 11
Preparation
if the remote control fails to operate TV functions, replace the batteries in the remote control unit,
1 Open the battery cover, 3 Close the battery cover,
2 Insert two "AAA" size batteries (supplied
with the product),
• Place the batteries with their terminals
corresponding to the (+ ) and ( )
indications in the battery compartment,
Improper use of batteries can result in chemical leakage or explosion. Be sure to tollow the instructions below.
• Do not mix batteries of different types. Different types ot batteries have different chalactedstics.
• Do not mix old and new batteries. Mixing old and new batteries can shorten the life of new batteries or cause chemical leakage in
old batteries.
• Remove batteries as soon as they are worn out. Chemicals that leak from batteries come incontact with skin can cause a rash. If
you find any chemical leakage, wipe thoroughly with a cloth.
• The batteries supplied with this product may have a shorter lite expectancy due to storage conditions.
• Ifyou will not be using the remote control unit tor an extended period of time, remove batteries from it.
• The batteries (batteries installed) shall not be exposed to excessive heat such as sunshine, fire or the like.
(D" 10
Page 12
Contents
IMPORTANT INFORMATION ..................................................................................................... 1
TRADEMARKS ............................................................................................................................ 2
IMPORTANT SAFETY INSTRUCTIONS ..................................................................................... 3
QUICK REFERENCE ................................................................................................................... 7
Supplied Accessories ............................................................................................................ 7
Attaching/Detaching the Stand .............................................................................................. 7
Quick installation Tips ............................................................................................................ 8
Using the Remote Control Unit .............................................................................................. 8
Antennas ............................................................................................................................... 9
Connecting Antenna Cable .................................................................................................... 9
installing Batteries in the Remote Control Unit ........................................................................ 10
Contents ...................................................................................................................................... 11
Part Names ................................................................................................................................. 12
TV (Front) ............................................................................................................................... 12
TV (Side/Rea0 ....................................................................................................................... 12
Remote Control Unit .............................................................................................................. 13
introduction to Connections ..................................................................................................... 14
Experiencing HD images ....................................................................................................... 14
Types of Connection ............................................................................................................. 14
Connecting to External Equipment .......................................................................................... 15
Connecting a Blu-ray Disc/DVD Player or HD Cable/Satellite Set-top Box ............................. 15
Connecting a Game Console, VCR, Camcorder or Cable/Satellite Set-top Box ..................... 16
Connecting an Audio Amplifier ............................................................................................... 17
Connecting an AV Amplifier ................................................................................................... 17
Connecting a PC ................................................................................................................... 18
Watching TV ................................................................................................................................ 19
Turning On/Off the Power ...................................................................................................... 19
EZ Setup ............................................................................................................................... 19
Direct Button Operation ............................................................................................................ 21
On-Screen Display Menu .......................................................................................................... 24
Menu items ........................................................................................................................... 24
On-Screen Display Menu Operation ...................................................................................... 25
Menu Operation Button ......................................................................................................... 26
Picture Settings ..................................................................................................................... 26
Audio Settings ....................................................................................................................... 28
Power Control ....................................................................................................................... 28
System Options ..................................................................................................................... 29
initial Setup ............................................................................................................................ 31
information ............................................................................................................................ 34
Enjoying Photo/Music/Video Playback .................................................................................... 35
Appendix ..................................................................................................................................... 38
Troubleshooting .................................................................................................................... 38
Specifications ........................................................................................................................ 39
PC Compatibility Chart .......................................................................................................... 40
RS232 Port Specifications ..................................................................................................... 41
Legal notices ......................................................................................................................... 42
Calling for Service ...................................................................................................................... 43
Dimensional Drawings
• The dimensional drawings for the LCD TV set are shown on the inside back cover.
@9"11
Page 13
Part Names
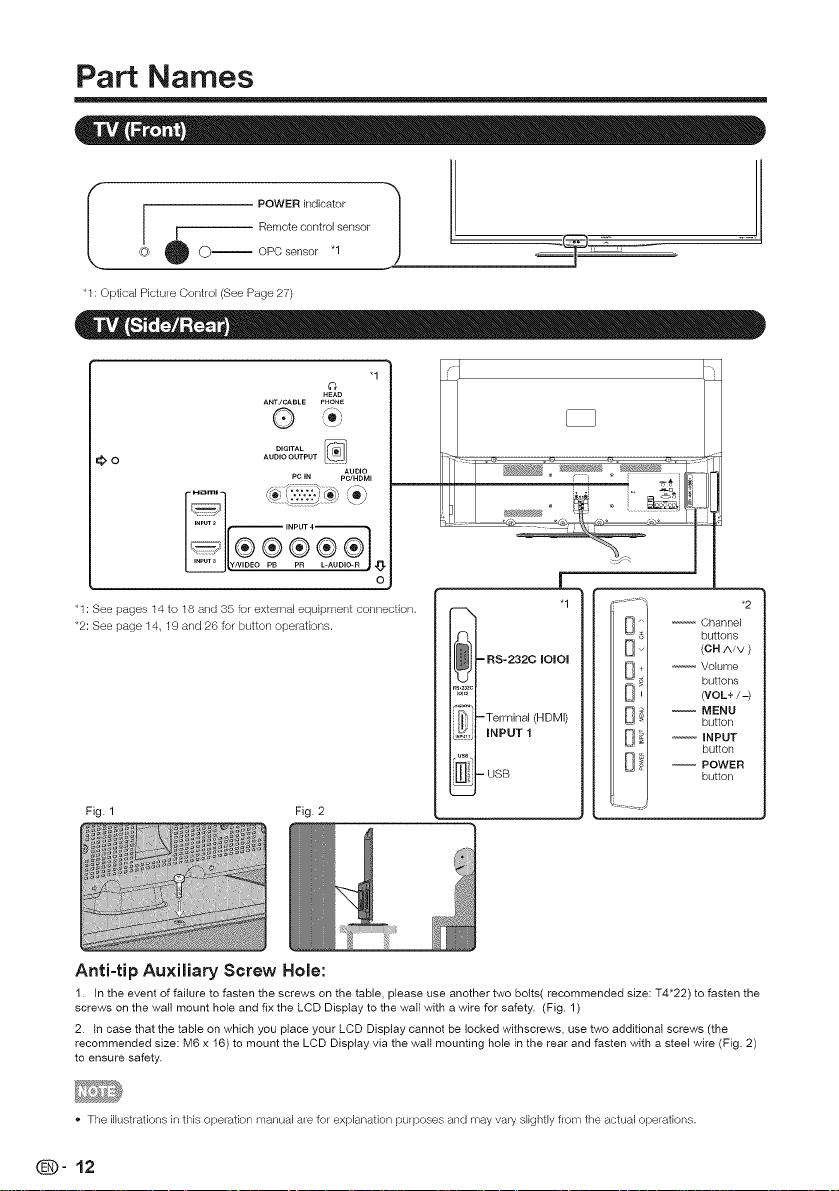
I [ POWER indicator "_
I Z Remot ..... tro, ....... /
'_ _ O OPC ....... "1 )
*t: Optical Picture Control (See Page 27)
"1
HEAO
ANTJCABLE PHONE
®
_;,o
F 1 '_-"",:.':,':/_/_°s
__ p_R_INPUT 2 INPUT 4
'1 :See pages 14 to 18 and 35 for external equipment connection,
*2: See page 14, 19 and 26 for button operations.
DIGITALAUDIO OUTPUT
PC IN pC/HDMI
AUDIO
o
-9 ÷
I_}-RS-232C IOIOI
R_.23_c
iOlOl
]}} -Terminal (HDMI)
.6_, INPUT 1
m-D B
J
"1
-- Channel
-- Volume
-- MENU
-- INPUT
-- POWER
buttons
(OH Nv )
buttons
(VOL+/-)
button
button
button
*2
Fig. 1 Fig. 2
Anti-tip Auxiliary Screw Hole:
1. In the event of failure to fasten the screws on the table, please use another two bolts( recommended size: T4"22) to fasten the
screws on the wail mount hole and fix the LCD Display to the wail with a wire for safety. (Fig. 1)
2. In case that the table on which you place your LCD Display cannot be locked withscrews, use two additional screws (the
recommended size: M6 x 16) to mount the LCD Display via the wall mounting hole in the rear and fasten with a steel wire (Fig. 2)
to ensure safety.
• The illustrations in this operation manual ale for explanation pulposes and may vary slightly flora the actual operations.
qD" 12
Page 14
Part Names
25--
26--
--15
........................iiiil
3HA_P
wc_iv
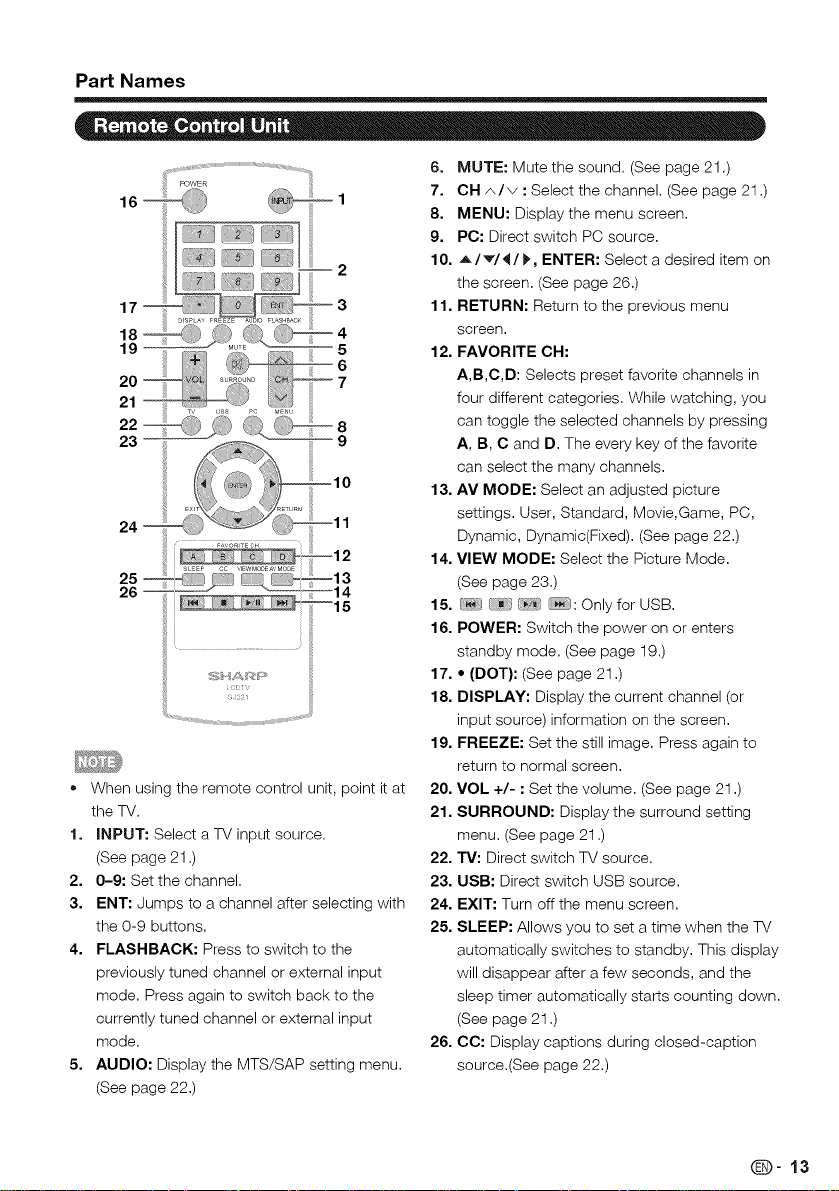
* When using the remote control unit, point it at
the TV.
1. INPUT" Select a TV input source.
(See page 21.)
2. 0-9" Set the channel.
3. ENT" Jumps to a channel after selecting with
the 0-9 buttons.
4. FLASHBACK" Press to switch to the
previously tuned channel or external input
mode. Press again to switch back to the
currently tuned channel or external input
mode.
5. AUDIO" Display the MTS/SAP setting menu.
(See page 22.)
iii_i
6. MUTE: Mute the sound. (See page 21 .)
7. OH _../v • Select the channel. (See page 21 .)
8. MENU" Display the menu screen.
9. PC" Direct switch PC source.
10. A/_/4/_, ENTER" Select a desired item on
the screen. (See page 26.)
11. RETURN" Return to the previous menu
screen.
12. FAVORITE OH:
A,B,C,D: Selects preset favorite channels in
four different categories. While watching, you
can toggle the selected channels by pressing
A, B, O and D. The every key of the favorite
can select the many channels.
13. AV MODE" Select an adjusted picture
settings. User, Standard, Movie,Game, PC,
Dynamic, Dynamic(Fixed). (See page 22.)
14. VIEW MODE" Select the Picture Mode.
(See page 23.)
15. : Only for USB.
16. POWER" Switch the power on or enters
standby mode. (See page 19.)
17. • (DOT}" (See page 21.)
18. DISPLAY" Display the current channel (or
input source) information on the screen.
19. FREEZE" Set the still image. Press again to
return to normal screen.
20. VOL +/- •Set the volume. (See page 21 .)
21. SURROUND" Display the surround setting
menu. (See page 21 .)
22, TV" Direct switch TV source.
23. USB" Direct switch USB source.
24. EXIT: Turn off the menu screen.
25. SLEEP" Allows you to set a time when the TV
automatically switches to standby. This display
will disappear after a few seconds, and the
sleep timer automatically starts counting down.
(See page 21 .)
26. CO" Display captions during closed-caption
source.(See page 22.)
(D'13
Page 15
introduction to Connections
An HDTV without an HD source is just an ordinary TV.
To enjoy HD images on the TV, you should get HD programming from the following:
• Over-the-air broadcasting via HD quality antenna
• HD cable/satellite subscription
• HD compatible external equipment
For information on updating to HD programming, ask your cable/satellite service provider.
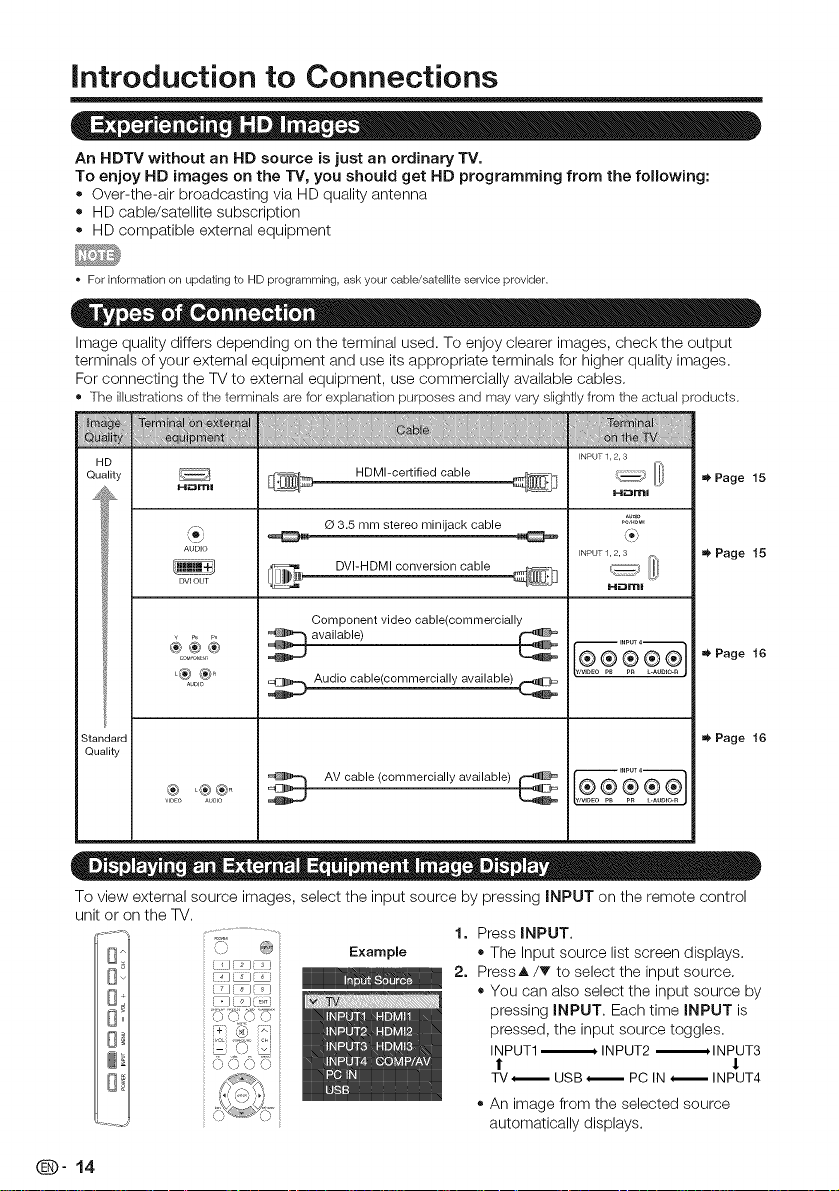
Image quality differs depending on the terminal used. To enjoy clearer images, check the output
terminals of your external equipment and use its appropriate terminals for higher quality images.
For connecting the TV to external equipment, use commercially available cables.
® The illustrationsof theterminalsare for explanationpurposes and mayvaryslightlyfrom the actual products.
H D INPUT 1, 2, 3
Quality H_mu_ _ mUMl-certified cable _-]]_ _'---7............[[i,
fm
AUDIO INPUT 1, 2, 3
DVI OUT R'-i_::3m I
..... _ Audio cable(commercially available)
Standard =_ Page 16
Quality
_o _o_ _ AV Gable (oommeroially available) _ ¥_o@ @ _}
O 3.5 mm stereo minijack cable 2'_'°='
ov, o ,oonveraioncab,e
Component video cable(commercially
Page 15
=_ Page 15
'_ Page 16
To view external source images, select the input source by pressing INPUT on the remote control
unit or on the TV.
®
Example
1. Press iNPUT.
• The Input source list screen displays.
2. PressA/T to select the input source.
• You can also select the input source by
pressing iNPUT. Each time iNPUT is
pressed, the input source toggles.
INPUT1-_ INPUT2 -_HNPUT3
! t
TV_ USB_ PC IN _ INPUT4
• An image from the selected source
automatically displays.
QD" 14
Page 16
Connecting to E×ternal Equipment
You can connect many types of external equipment to your TV. To view external source images,
select the input source from iNPUT on the remote control unit or on the TV. (See pages 13 and 21.)
For connecting the TV to external equipment, use commercially available cables.
To protect equipment, always turn off the TV before connecting any external equipment.
Please read the relevant operation manual (Blu-ray disc player, etc.) carefully before making connections.
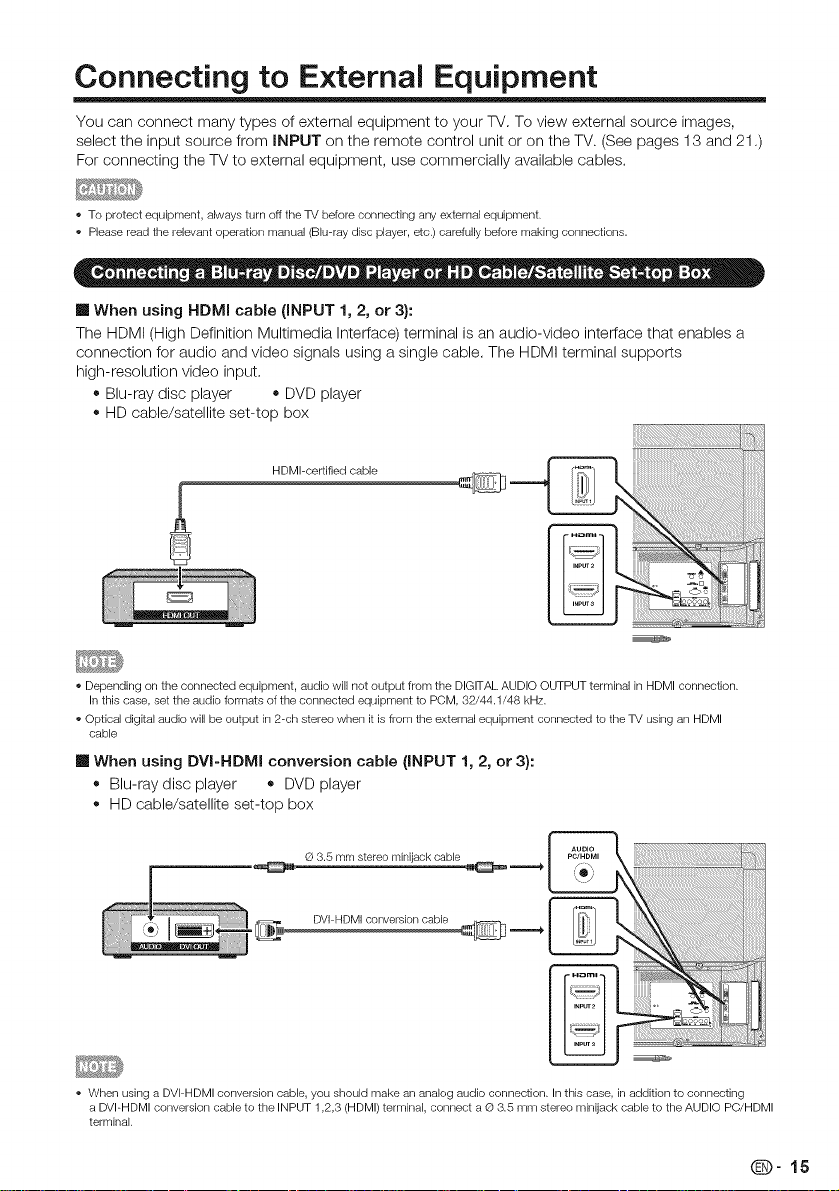
[] When using HDMI cable (iNPUT 1, 2, or 3}:
The HDMI (High Definition Multimedia Interface) terminal is an audio-video interface that enables a
connection for audio and video signals using a single cable. The HDMI terminal supports
high-resolution video input.
• Blu-ray disc player • DVD player
• HD cable/satellite set-top box
HDMI-certified cable
Depending on the connected equipment, audio will not output from the DIGITAL AUDIO OUTPUT terminal in HDMI connection.
In this case, set the audio formats of the connected equipment to POM, 32/44.1/48 kHz.
Optical digital audio will be output in 2-ch stereo when it is from the external equipment connected to the TV using an HDMI
cable
[] When using DVI-HDMI conversion cable (iNPUT 1, 2, or 3):
Blu-ray disc player • DVD player
• HD cable/satellite set-top box
G 3.5 mm stereo minijack cable
DVI HDMI conversion cable
When using a DVI-HDMI conversion cable, you should make an analog audio connection. In this case, in addition to connecting
a DVI-HDMI conversion cable to the INPUT 1,2,3 (HDMI) terminal, connect a © 3.5 mm stereo minijack cable to the AUDIO PC/HDMI
terminal.
Q-15
Page 17
Connecting to External Equipment
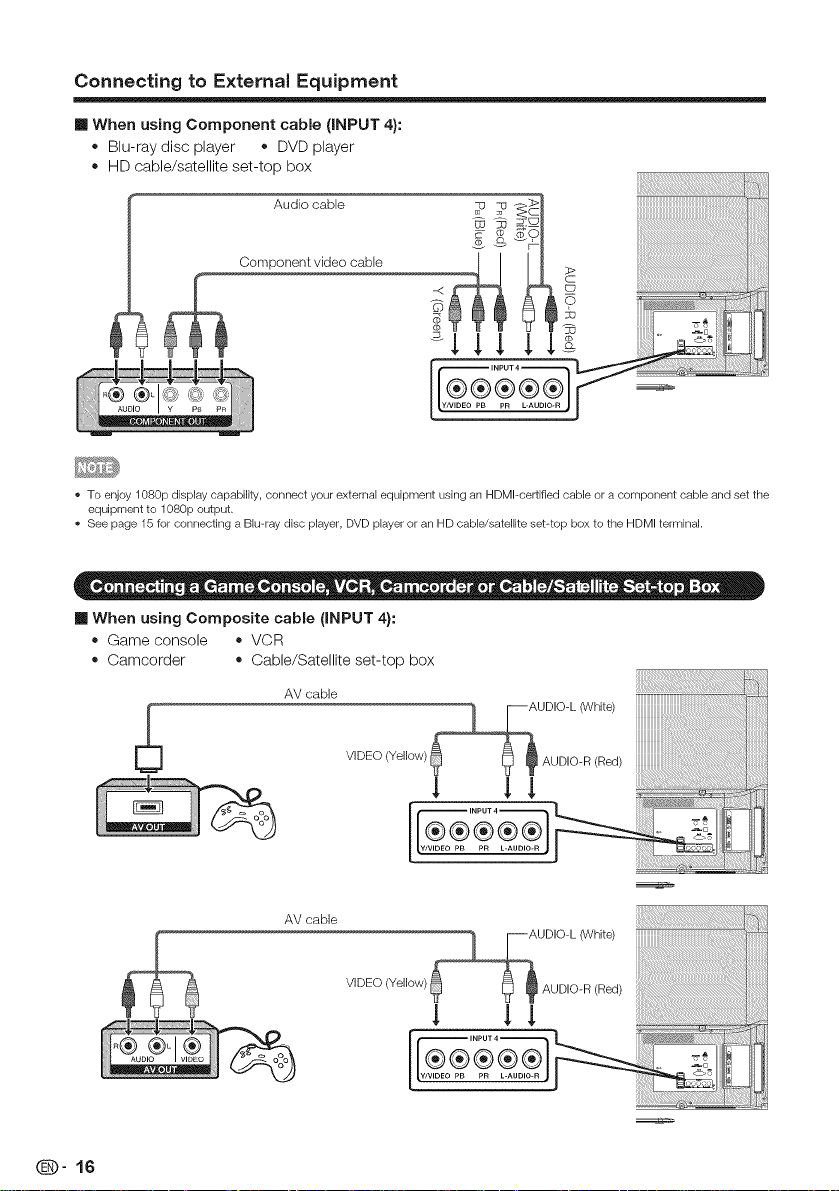
[] When using Component cable (INPUT 4):
• Blu-ray disc player • DVD player
• HD cable/satellite set-top box
Audio cable
Component video cable
. To enjoy 1080p display capability, connect your external equipment using an HDMl-certified cable or a component cable and set the
equipment to 1080p output.
See page 15 for connecting a Blu-ray disc player, DVD player or an HD cable/satellite set-top box to the HDMI terminal.
[] When using Composite cable (INPUT 4}:
• Game console • VCR
• Camcorder • Cable/Satellite set-top box
AV cable
(D" 16
AV cable
Page 18

Connecting to External Equipment
[] When using coa×ial cable:
It is possible to output audio through the DIGITAL AUDIO terminal. PCM audio outputs from the
terminal,
• Digital Audio output is not available when using an HDMI input.
HD Cable/Satellite set top box
If the image isnot in sync with the audio, check the settings of the connected sur/ound system.
Letting the TV output the audio to an AV amplifier.
Q-17
Page 19
Connecting to External Equipment
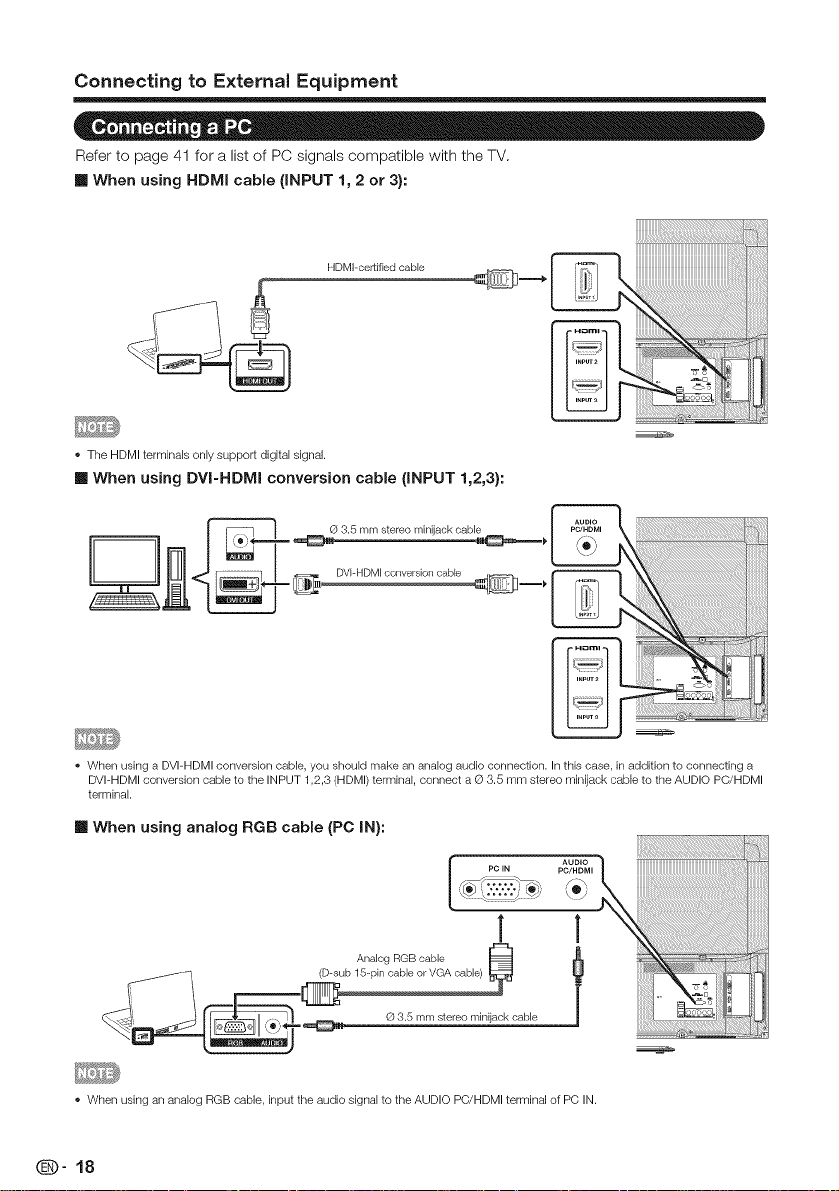
Refer to page 41 for a listof PC signals compatible with the TV.
[] When using HDMI cable (iNPUT 1, 2 or 3):
HDMI-certified cable
+ The HDMI terminals only support digital signal.
[] When using DVI-HDMI conversion cable (INPUT 1,2,3):
When using a DVI-HDMI conversion cable, you should make an analog audio connection. In this case, in addition to connecting a
DVI-HDMI conversion cable to the INPUT 1,2,3 (HDMI) terminal, connect a © 3.5 mm stereo minijack cable to the AUDIO PC/HDMI
terminal.
[] When using analog RGB cable (PC IN):
PC IN PO/HDMI
_®?++.-.++-q_Y to_
AUDIO
1 1
Analog RGB cable _ l
+ When using an analog RGB cable, input the audio signal to the AUDIO PC/HDMI terminal of PC IN.
(D" 18
Page 20
Watching TV
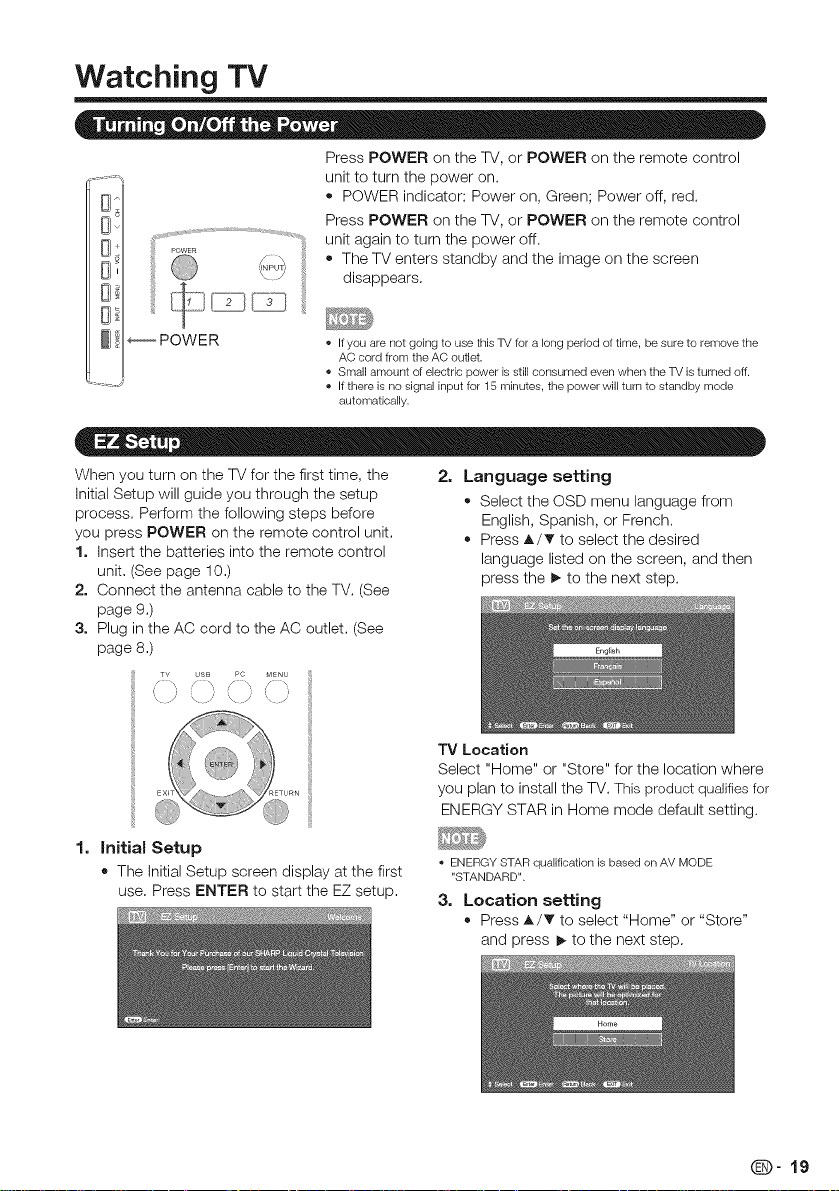
Press POWER on the TV, or POWER on the remote control
_, unit to turn the power on.
,_, unit again to turn the power off.
[__ • The TV enters standby and the image on the screen
__' disappears.
• POWER indicator: Power on, Green; Power off, red.
Press POWER on the TV, or POWER on the remote control
_POWER
If you are not going to use this TV for a long period of time, be sure to remove the
AC cord from the AC outlet.
• Small amount of electric power is still consumed even when the TV is turned off.
If there is no signal input for 15 minutes, the power will turn to standby mode
automatically.
When you turn on the TV for the first time, the
Initial Setup will guide you through the setup
process. Perform the following steps before
you press POWER on the remote control unit.
1. Insert the batteries into the remote control
unit. (See page 10.)
2. Connect the antenna cable to the TV. (See
page 9.)
3. Plug in the AC cord to the AC outlet. (See
page 8.)
TV USB PC MENU
'\ J '\ /' _X. /'
1,
Initial Setup
• The Initial Setup screen display at the first
use. Press ENTER to start the EZ setup.
2. Language setting
• Select the OSD menu language from
English, Spanish, or French.
• Press A/T to select the desired
language listed on the screen, and then
press the P-to the next step.
"IV Location
Select "Home" or "Store" for the location where
you plan to install the TV. This product qualifies for
ENERGY STAR in Home mode default setting.
ENERGY STAR qualification is based on AV MODE
"STANDARD".
3. Location setting
• Press A/T to select "Home" or "Store"
and press _ to the next step.
Q-19
Page 21
Watching TV
Home: "Power Saving"isset to "On"+and AV MODE
is setto "STANDARD".
Store: "Power Saving" isset to "Off"and AV MODE is
set to "DYNAMIC(Fixed)".
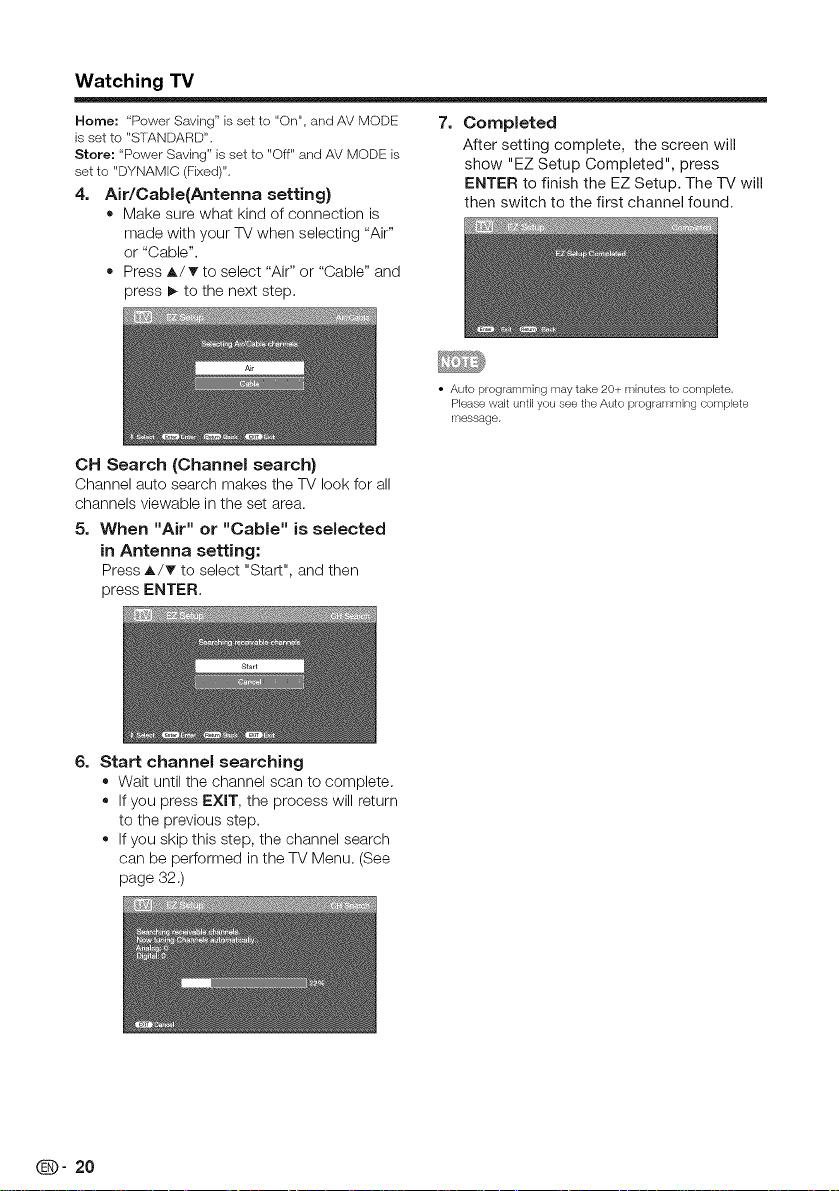
4, Air/Cable(Antenna setting}
+ Make sure what kind of connection is
made with your TV when selecting "Air"
or "Cable".
+ Press _./T to select "Air" or "Cable" and
press _ to the next step.
CH Search (Channel search}
Channel auto search makes the TV look for all
channels viewable in the set area.
5, When "Air" or "Cable" is selected
in Antenna setting:
Press A/T to select "Start", and then
press ENTER.
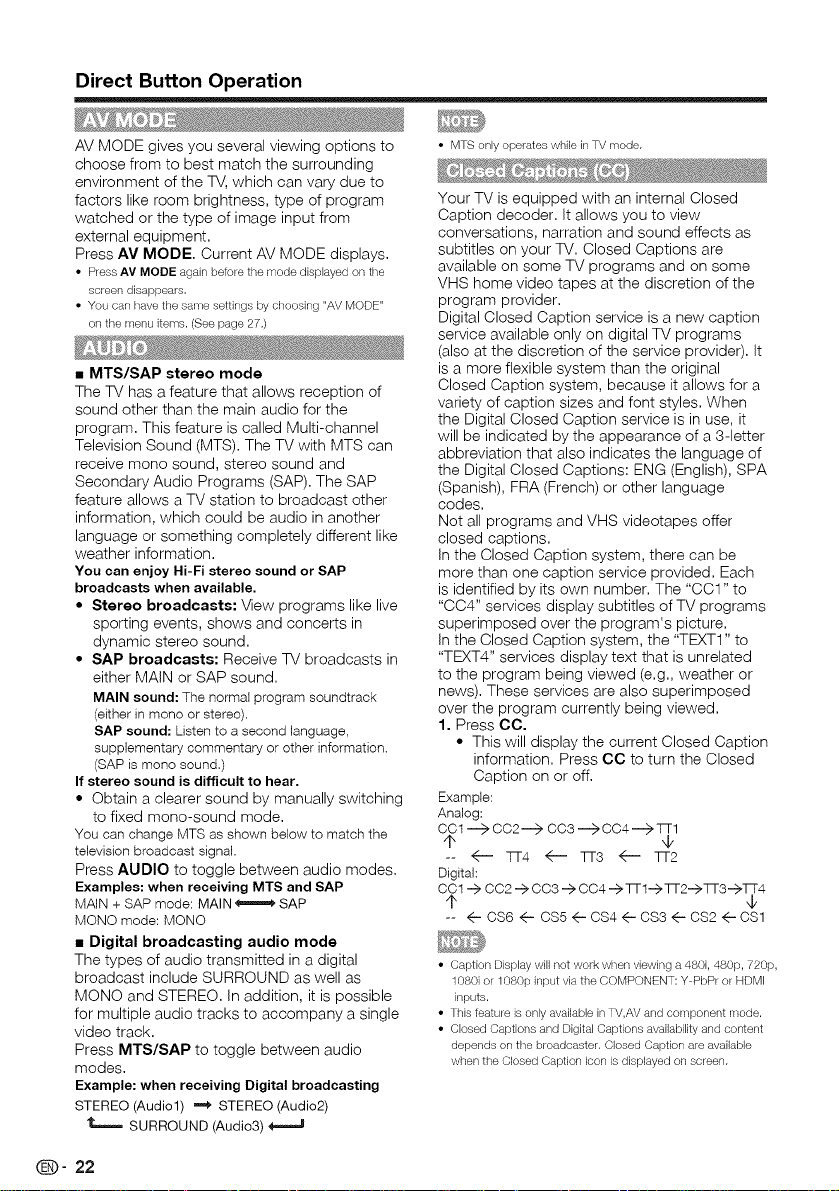
7, Completed
After setting complete, the screen will
show "EZ Setup Completed", press
ENTER to finish the EZ Setup. The TV will
then switch to the first channel found.
• Auto programming may take 20+ minutes to complete.
Please wait until you see the Auto programming complete
message.
6=
Start channel searching
+ Wait until the channel scan to complete.
+ If you press EXIT, the process will return
to the previous step.
+ If you skip this step, the channel search
can be performed in the TV Menu. (See
page 32.)
Page 22

Direct Button Operation
O ®
You can change channels by pressing CH A/v
or 0-9, or • (DOT),
Examples:
To select a 1 or 2-digit channel number
(e. g., Channel 5):
Press 5 _ ENT,
To select a 3-digit channel number
(e. g., Channel 115):
Press1 _ 1 _5_ENT,
To select a 4-digit channel number
(e. g., Channel 22.1):
Press 2 _ 2 _ • (DOT) _ 1 _ ENT,
• When selecting a I digit channel nulnber, it isnot necessal_/
to press 0 before the number.
You can change the volume by pressing
VOL + / on the TV or on the remote control
unit,
• To increase the volume, press VOL+,
• To decrease the volume, press VOL ,
Mutes the current sound output,
Press MUTE,
• Mute can be canceled by using the method below. Mute will
be canceled if you press VOL + / -or MUTE,
Allows you to set a time when the TV
automatically switches to standby,
Press SLEEP,
• The remaining time displays when the
sleep timer has been set,
• Each time you press SLEEP, the remaining
time switches as shown below,
Off "_ 30 "-_60"-_ 90 "_ 120
t =
• When set, the time automatically starts
counting down,
• if you want to adjust the sleep timer, you
can press SLEEP twice then change the
time setting,
• Select "Off" by pressing SLEEP to cancel the sleep tilneh
• The TV will enter standby mode (power indicator lights red)
when the remaining time reaches zero.
Press FLASHBACK to switch to the previously
tuned channel or input,
• Press FLASHBACK again to switch back
to the currently tuned channel or input,
To view external source images, select the input
source using INPUT on the remote control unit
or INPUT on the TV,
1. Press INPUT.
• A list of selectable sources appears.
2. Press INPUT again to select the input
source,
• An image from the selected source
automatically displays,
• Each time INPUT is pressed, the input
source toggles,
• If you press A/T to select the input
source, press ENTER to confirm your
selection,
• See page 14 18 for external equipment connection.
The surround function produces Surround effect
from the speakers, Each time you press
SURROUND, the mode changes between On
and Off.
• On: Makes it possible to enjoy natural,
realistic surround sound,
• Off: Outputs the normal sound,
• You can have the same settings by choosing "Surround '_on the
menu items, (See page 28.)
Allows you to capture and freeze a moving
image that you are watching,
Press FREEZE.
• A moving image is captured,
• Press FREEZE again to cancel the
function,
(89" 21
Page 23
Direct Button Operation
AV MODE gives you several viewing options to
choose from to best match the surrounding
environment of the TV, which can vary due to
factors like room brightness, type of program
watched or the type of image input from
external equipment.
Press AV MODE, Current AV MODE displays.
• Press AV MODE again betore the mode displayed on the
screen disappears,
• You can have the same settings by choosing "AV MODE"
on the menu items. (See page 27,)
• MTS/SAP stereo mode
The TV has a feature that allows reception of
sound other than the main audio for the
program. This feature is called Multi-channel
Television Sound (MTS). The TV with MTS can
receive mono sound, stereo sound and
Secondary Audio Programs (SAP).The SAP
feature allows a TV station to broadcast other
information, which could be audio in another
language or something completely different like
weather information.
You can enjoy Hi-Fi stereo sound or SAP
broadcasts whenavailable.
• Stereo broadcasts: View programs like live
sporting events, shows and concerts in
dynamic stereo sound.
• SAP broadcasts: Receive TV broadcasts in
either MAIN or SAP sound.
MAIN sound:The normalprogramsoundtrack
(eitherin mono or stereo).
SAP sound: Listento a second language,
supplementarycommentary or other information.
(SAPis monosound.)
If stereo sound is difficultto hear.
• Obtain a clearer sound by manually switching
to fixed mono-sound mode.
You can changeMTS as shown below to match the
televisionbroadcast signal.
Press AUDIO to toggle between audio modes.
Examples:when receiving MTS andSAP
MAIN + SAPmode: MAIN_ SAP
MONOmode: MONO
• Digital broadcasting audio mode
The types of audio transmitted in a digital
broadcast include SURROUND as well as
MONO and STEREO. In addition, it is possible
for multiple audio tracks to accompany a single
video track.
Press MTS/SAP to toggle between audio
modes.
Example: when receivingDigital broadcasting
STEREO(Audio1) "_ STEREO(Audio2)
IL====SURROUND(Audio3) _====J
• MTS only operates while in TV mode,
Your TV is equipped with an internal Closed
Caption decoder. It allows you to view
conversations, narration and sound effects as
subtitles on your TV. Closed Captions are
available on some TV programs and on some
VHS home video tapes at the discretion of the
program provider.
Digital Closed Caption service is a new caption
service available only on digital TV programs
(also at the discretion of the service provider). It
is a more flexible system than the original
Closed Caption system, because it allows for a
variety of caption sizes and font styles. When
the Digital Closed Caption service is in use, it
will be indicated by the appearance of a 3-letter
abbreviation that also indicates the language of
the Digital Closed Captions: ENG (English), SPA
(Spanish), FRA (French) or other language
codes.
Not all programs and VHS videotapes offer
closed captions.
In the Closed Caption system, there can be
more than one caption service provided. Each
is identified by its own number. The "OO1" to
"004" services display subtitles of TV programs
superimposed over the program's picture.
In the Closed Caption system, the "TEXT1" to
"TEXT4" services display text that is unrelated
to the program being viewed (e.g., weather or
news). These services are also superimposed
over the program currently being viewed.
1. Press CC.
• This will display the current Closed Caption
information. Press CC to turn the Closed
Caption on or off.
Example:
Analog:
COt _ C02---_ C03 ---_ CC4-'-_qq-1
¢ ¢
-- _ qq-4 _ qq-3 _ qq-2
Digital:
CO1 "-> C02 --> 003 "-> 004 "-> qq-1--_ qq-2"-)qq-3 -->qq-4
¢ ¢
-- 4- 0S6 4- 0S5 4- 0S4 4- CS3 4- CS2 4- CS1
• Caption Display witl not work when viewing a 480i, 480p, 720p,
1080i or 1080p input via the COMPONENT: Y PbPr or HDM]
inputs.
• This teature is only available in TV,AV and component mode.
• Closed Captions and Digital Captions availabitity and content
depends on the broadcaster. Closed Caption are available
when the Closed Caption icon is displayed on screen,
(D" 22
Page 24
Direct Button Operation
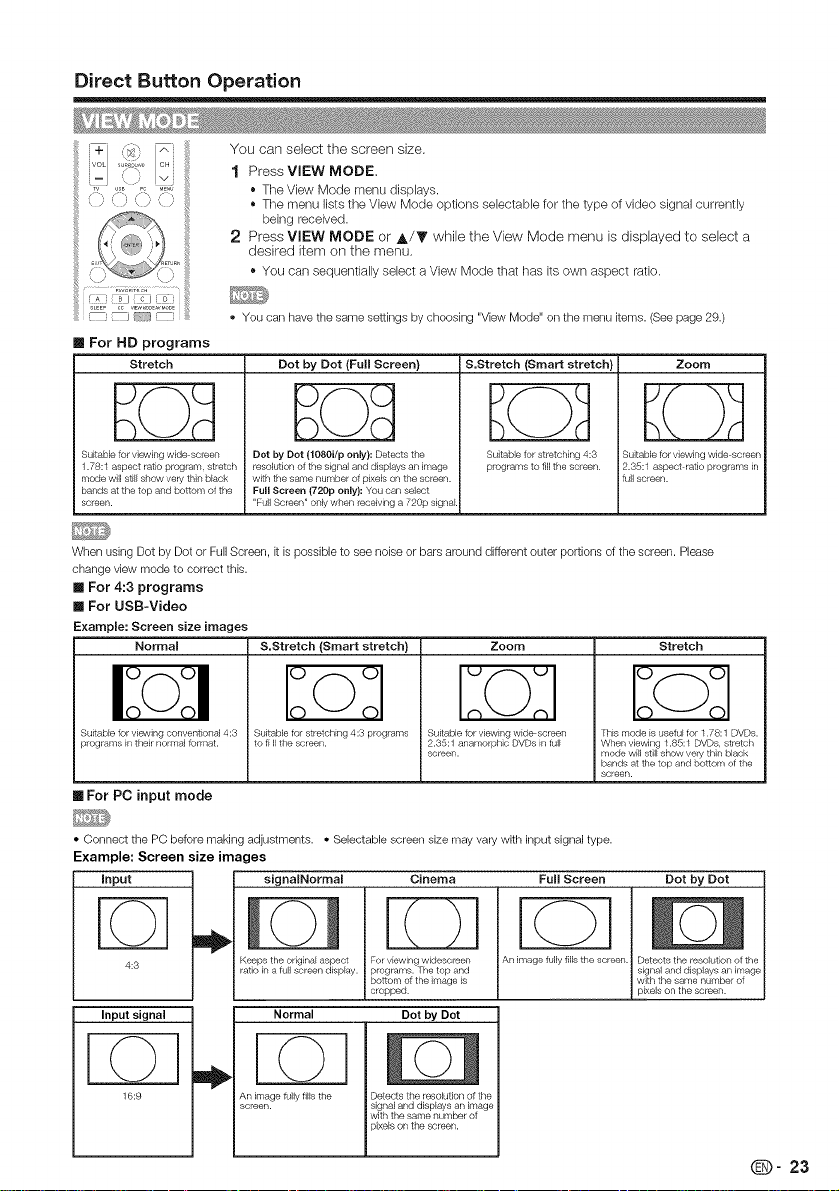
_/ A You can select the screen size,
ivoL _5,, cHi
ii ,4 1 PressVlEWMODE,
• The menu lists the View Mode options selectable for tile type of video signal currently
being received.
2 Press VIEW MODE or A/T while the View Mode menu is displayed to select a
R_
[] For HD programs
Stretch
desired item on the menu,
• YOU call sequentially select a View Mode that has its own aspect ratio.
You can have the same settings by choosing "View Mode" on the menu items. (See page 29.)
Dot by Dot (Full Screen) Zoom
S.Stretch (Smart stretch)
) L
Suitable for viewing wide screen
1.78:t aspect ratio program, stretch
mode will still show very thin black
bands at the top and boltom of the
screen.
When using Dot by Dot or Full Screen, it is possible to see noise or bars around different outer portions of the screen. Please
change view mode to correct this.
[] For 4:3 programs
[] For USB-Video
Example: Screen size images
Normal
Suitable for viewing conventional 4:3
programs in their normal format.
Dot by Dot (1080i/p only}: Detects the
resolution of the signal and displays an image
with the same number of pixe[s on the screen.
Full Screen (720p only}: You can select
"Full Screen" only when receiving a 720p signal
S.Stretch (Smart stretch)
Suitable for stretching 4:3 programs
to fi II the screen.
Suitable tot viewing wide screen
2.35:1 anamorphic DVDs in full
screen.
Suitable for stretching 4:3
programs to fill the screen.
Zoom
Suitable for viewing wide screen
2.35:1 aspect ratio programs _n
full screen.
Stretch
This mode is useful for t .78:1 DVDs.
When viewing 1.85:1 DVDs. stretch
mode will still show ve/y thin black
bands at the top and bottom of the
screen.
[] For PC input mode
• Connect the PC before making adjustments. • Selectable screen size may vary with input signal type.
Example: Screen size images
Cinema Full Screen Dot by Dot
i
i
i
D
i
input _ signalNormuI
4:3 ratio in a fuji screen display, programs. The top and
Input signal
Keeps the original aspect For viewing widescreen
botlom of the image is
cropped.
Normal
Dot by Dot
Animagefully fillsthe screen.
i
Detects the resolution of the
signal and displays art image
with the same number of
pixe]s on the screen.
[
._©
16:9
An image f_lly fills the
screen.
D
Detects the resolution of the
signal and displays an image
with the same number of
)ixels on the screen.
(D" 23
Page 25
On-Screen Display Menu
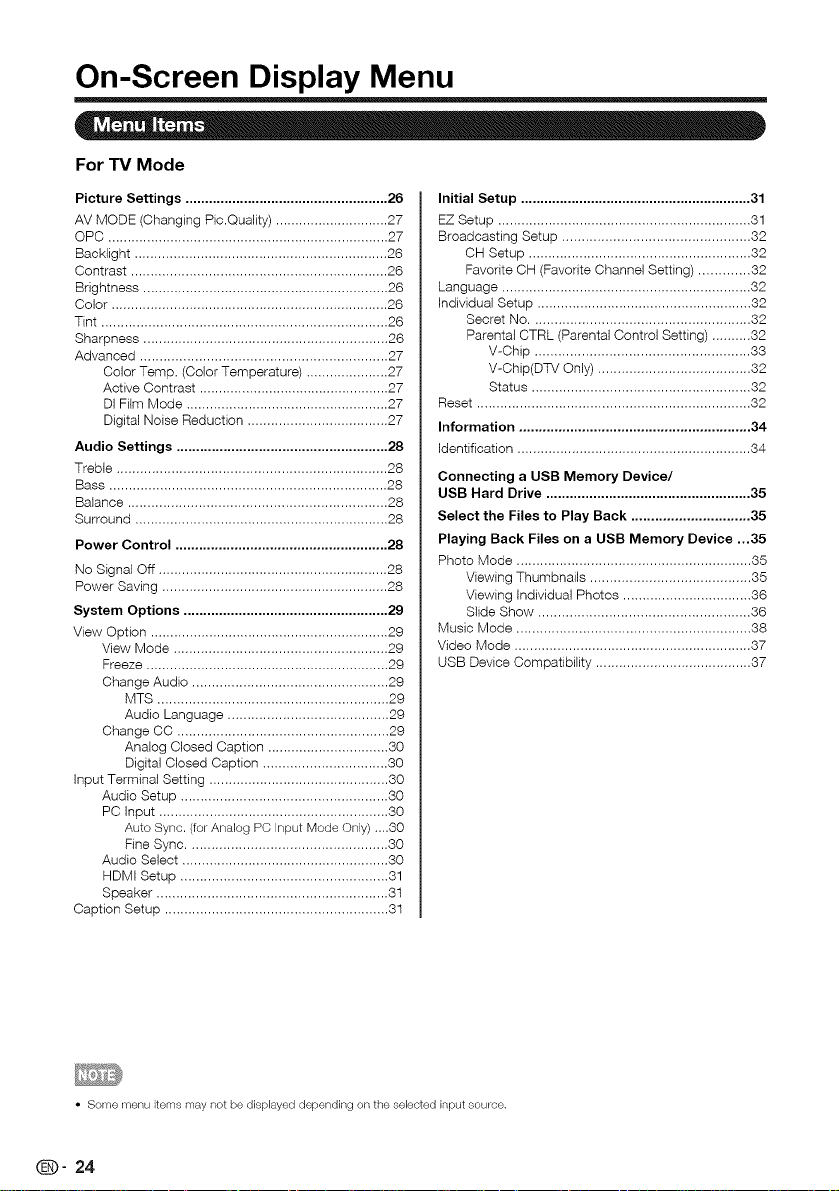
For TVMode
Picture Settings .................................................... 26
AV MODE (Changing Pic.Quality) ............................. 27
OPC ........................................................................ 27
Back{ight ................................................................. 26
Contrast .................................................................. 26
Brightness ............................................................... 26
Color ....................................................................... 26
Tint ......................................................................... 26
Sharpness ............................................................... 26
Advanced ............................................................... 27
Color Temp. (Color Temperature) ..................... 27
Active Contrast ................................................. 27
DI Film Mode .................................................... 27
Digital Noise Reduction .................................... 27
Audio Settings ...................................................... 28
Treble ..................................................................... 28
Bass ....................................................................... 28
Balance .................................................................. 28
Surround ................................................................. 28
Power Control ...................................................... 28
No Signal Off ........................................................... 28
Power Saving .......................................................... 28
System Options .................................................... 29
View Option ............................................................. 29
View Mode ....................................................... 29
Freeze .............................................................. 29
Change Audio .................................................. 29
MTS ........................................................... 29
Audio Language ......................................... 29
Change CC ...................................................... 29
Analog Closed Caption ............................... 30
Digital Closed Caption ................................ 30
Input Terminal Setting .............................................. 30
Audio Setup ..................................................... 30
PC Input ........................................................... 30
Auto Sync. (forAnalog PC Input Mode Only) ....80
Fine Sync ................................................... 30
Audio Select ..................................................... 30
HDMI Setup ..................................................... 31
Speaker ........................................................... 31
Caption Setup ......................................................... 31
Initial Setup ........................................................... 31
EZ Setup ................................................................. 81
Broadcasting Setup ................................................ 32
CH Setup ......................................................... 32
Favorite CH (Favorite Channel Setting) ............. 82
Language ................................................................ 82
Individual Setup ....................................................... 82
Secret No ........................................................ 32
Parental CTRL (Parental Control Setting) .......... 82
V-Chip ....................................................... 88
V-Ohip(DTV Only) ....................................... 32
Status ........................................................ 32
Reset ...................................................................... 82
Information ........................................................... 34
Identification ............................................................ 84
Connecting a USB Memory Device/
USB Hard Drive .................................................... 35
Select the Files to Play Back .............................. 35
Playing Back Files on a USB Memory Device ...35
Photo Mode ............................................................ 35
Viewing Thumbnails ......................................... 35
Viewing Individual Photos ................................. 86
Slide Show ...................................................... 36
Music Mode ............................................................ 88
Video Mode ............................................................. 37
USB Device Compatibility ........................................ 87
• Some menu items may not be displayed depending on the selected input source.
(8_)" 24
Page 26
On-Screen Display Menu
Example
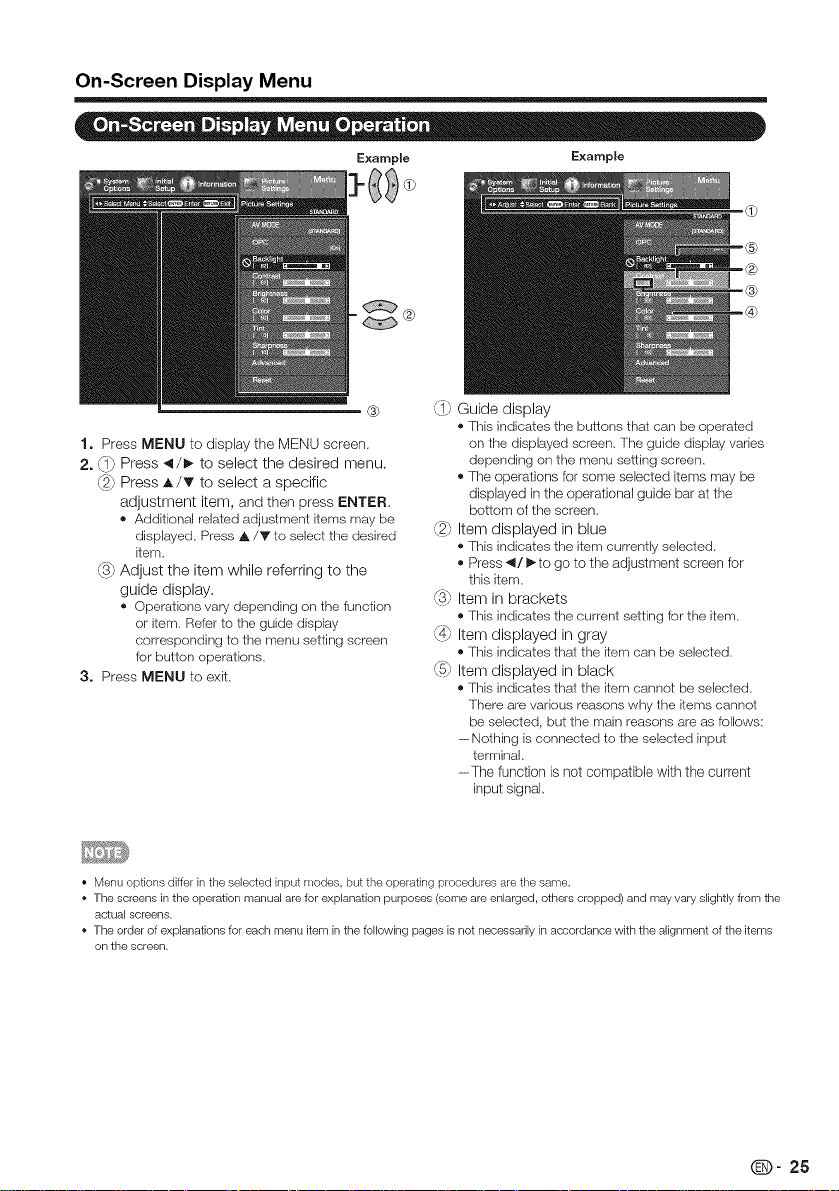
1. Press MENU to display the MENU screen,
2. {17 Press _1/_ to select the desired menu.
{27 Press A/T to select a specific
adjustment item, and then press ENTER,
® Additional related adjustment items may be
displayed, Press A/Y to select the desired
item,
{3_ Adjust the item while referring to the
guide display.
® Operations vary depending on the function
or item, Refer to the guide display
corresponding to the menu setting screen
for button operations.
3. Press MENU to exit.
Example
®
®
(_1_Guide display
® This indicates the buttons thai carl be operated
on the displayed screen, The guide display varies
depending on the menu setting screen,
• The operations for some selected items may be
displayed in the operational guide bar at the
bottom of the screen,
,{2_ Item displayed in blue
® This indicates the item currently selected.
• Press _1/_ to go to the adjustment screen for
this item,
'% Item in brackets
® This indicates the current setting for the item,
(_4_Item displayed in gray
® This indicates that the item can be selected,
_5_ Item displayed in black
® This indicates that the item cannot be selected,
There are various reasons why the items cannot
be selected, but the main reasons are as follows:
------Nothingisconnected to the selected input
terminal
-The function is not compatible with the current
input signal,
• Menu options differ in the selected input modes, but the operating procedures are the same,
• The screens in the operation manual are for explanation purposes (some are enlarged, others cropped) and may vary slightly from the
actual screens.
• The order of explanations for each menu item in the following pages is not necessarily in accordance with the alignment of the items
on the screen.
Q- 25
Page 27
On=Screen Display Menu
= Oo- o • = • = = - =
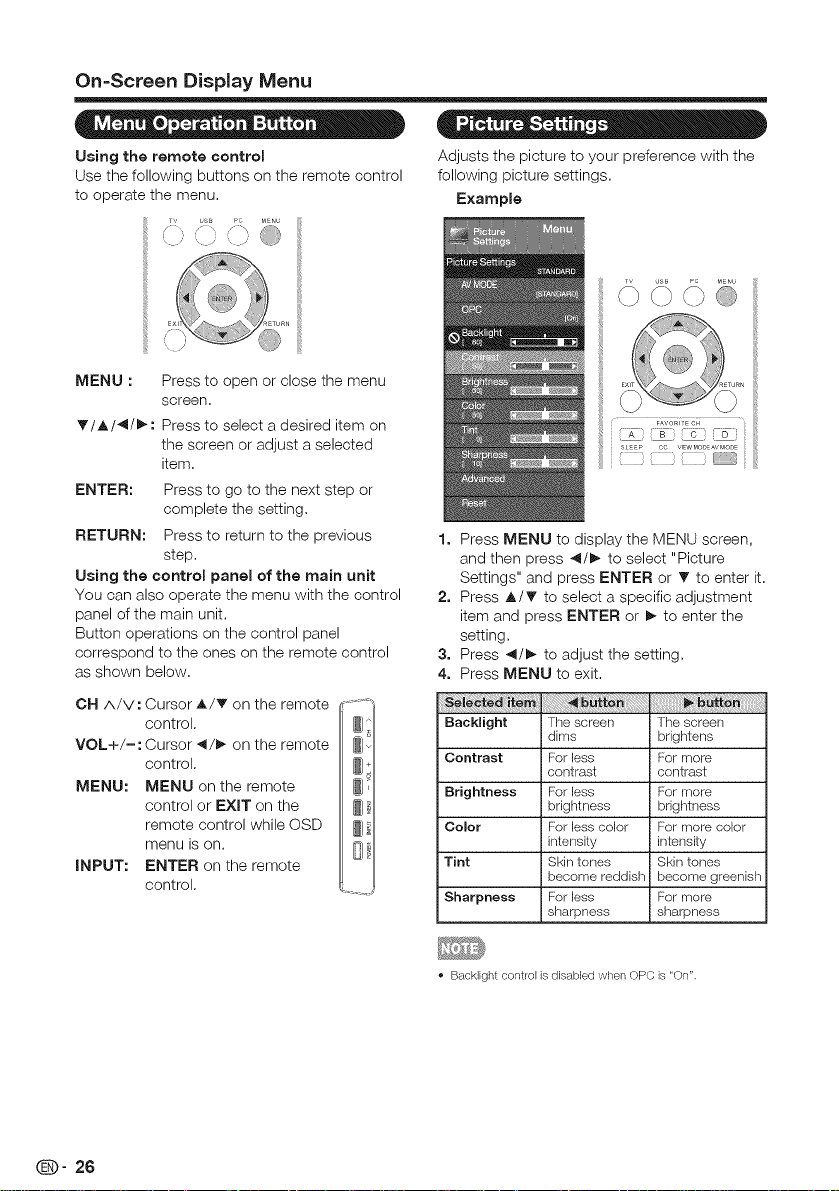
Using the remote control
Use the following buttons on the remote control
to operate the menu.
Adjusts the picture to your preference with the
following picture settings.
Example
, = (_j iI
MENU : Press to open or close the menu
T/A/4/_: Press to select a desired item on
ENTER: Press to go to the next step or
RETURN: Press to return to the previous
Using the control panel of the main unit
You can also operate the menu with the control
panel of the main unit.
Button operations on the control panel
correspond to the ones on the remote control
as shown below.
CN A/V: Cursor A/_r on the remote
VOL+/-: Cursor 41/_ on the remote
MENU: MENU on the remote
INPUT: ENTER on the remote
screen.
the screen or adjust a selected
item.
complete the setting.
step.
control.
control.
control or EXIT on the
remote control while OSD _] #1
menu is on.
control.
..... : i ......
1. Press MENU to display the MENU screen,
and then press 4/_- to select "Picture
Settings" and press ENTER or V to enter it.
2. Press A/_ to select a specific adjustment
item and press ENTER or _ to enter the
setting.
3. Press 4/_ to adjust the setting.
4. Press MENU to exit.
Backlight The screen The screen
Contrast Forless Formore
Brightness Forless Formore
Color Forless color Formore color
Tint Skintones Skin tones
Sharpness Forless Formore
dims brightens
contrast contrast
brightness brightness
i intensity intensity
i becomereddish become greenish
isharpness sharpness
(D" 26
• Backlight control is disabled when OPC is "On".
Page 28

On-Screen Display Menu
The audio and video settings can be changed
to suit the program or input content being
watched,
Select from the following AV modes,
USER/STANDARD/MOVIE/GAME/PC/
DYNAMIC/DYNAMIC (Fixed)
Example:
When the input source is TV, COMPONET/AV,
PC IN or HDMI 1 to 4
STANDARD,_ MOVIE ,_ GAME,_ PC ,_ DYNAMIC
STANDARD _ USER _ DYNAMIC (Fixed)
STANDARD: For a highly defined image in a normal lighting.
MOVIE: For a movie.
GAME: Lowers image brightness for easier viewing.
PC: For PC.
USER: Allows the user to customize settings as desired.
You can set the mode for each input source.
DYNAMIC: For a clear-cut image emphasizing high
contrast, useful for sports viewing.
DYNAMIC (Fixed): Changes the image and sound
settings to the factory preset values.No adjustments are
allowed.
You can sdect AV MODE by pressing AV MODE on the
remote control unit. See page 22 for details of AV MODE
settings.
!
Automatically adjusts the brightness of the
screen.
Off: The brightness is fixed at the value set in
"Backlight".
On: Automatically adjusts.
When set to "On", the Optical Picture Control (OPC)
senses the surrounding light and automatically
adjusts the backlight brightness. Make sure nothing
obstructs the OPC sensor, which could affect its
ability to sense surrounding light.
This TV provides various advanced functions
for optimizing the picture quality.
For a better white balance, use color
temperature correction.
Warm: White with reddish tone
Standard:
Cool: White with bluish tone
User:
White balance can be adjusted manually through
the PVG/B Gain between a maximum of 255 and a
minimum of 0 for each color temperature.
For resetting all adjustment items to the factory preset values,
press A/Y to select "Reset", and then press ENTER.
Automatically adjusts the image contrast
according to the scene.
On: Automatically adjusts the image
contrast.
Off: No adjustment.
Automatically detects a film-based source
(originally encoded at 24 frames/second),
analyzes it then recreates each still film frame
for high-definition picture quality.
Auto: Detects, analyzes, converts film
source.
Off: Normal viewing mode.
"DI Film Mode" does not function depending on input signal
type.
"Auto" does not function when channel display shows an input
signal resolution of 480p, 720p, or 1080p.
"DI Film Mode" is not available during PC format input.
Produces a clearer video image.
Auto: Automatically adjusts the level of
noise reduction.
High/Medium/Low: Select a desired level
for viewing a clearer video image.
Off: No adjustment.
For resetting all adjustment items to the factory preset values,
press _. /Y to select "Reset", and then press ENTER.
"Digital Noise Reduction" is not available when you set PC format
is being input.
This feature is only available in ATV,AV and component mode.
@9" 27
Page 29

On-Screen Display Menu
• • " ®
You can adjust the sound quality to your
preference with the following settings.
Example
i TV USB PCMEN
1=
Press MENU to display the MENU screen,
and then press 4!/!_ to select "Audio
Settings".
2=
Press •/T to select a specific adjustment
item.
• Select "Surround" and then press ,_/1_
to set.
3=
Press A/V' (or _1/1_) to select the desired
setting, and then press ENTER.
4.
Press MENU to exit.
88
Treble
Bass
Balance
, For resetting Audio adjustment items to the factory preset
values, press A/Yto select "Reset", press ENTER, press
A/Vto select "Yes", and then press ENTER.
Forweaker
treble
Forweaker
bass
Decreaseaudio
fromthe right
speaker
Forstronger
treble
Forstronger
bass
Decreaseaudio
from the left
speaker
The surround function produces Surround
effect from the speakers.
On: Makes it possible to enjoy natural,
realistic surround sound.
Off: Outputs the normal sound.
D • - • •
Power control setting allows you to save energy.
Example
Tv usB PC MENU
0 (-) 0 @
1. Press MENU to display the MENU screen,
and then press _1/1_to select "Power
Control".
2. Press _./T to select a specific adjustment
item, and then press ENTER.
3. Press A/T ( or 41/1_) to select the desired
setting, and then press ENTER.
4. Press MENU to exit.
This function allows the TV to automatically shut
the power down when there is no signal
received.
Enable: The power will automatically shut
down ifthere is no signal for 15 minutes.
Disable: This function does not work.
This function allows you to set the Power
Saving level in order to decrease the power
consumption and increase the backlight
lifespan.
On: Optimizes power reduction based upon
video content.
Off: This function does not work.
, "Power Saving" does not function when you set AV
MODE to DYNAMIC (Fixed)".
, You cannot select a different Power Saving item for
each AV MODE.
, For some discs, setup may be required on your DVD/BD player.
In this case, please refer to the operation manual of your
DVD/BD player.
(D" 28
Page 30

On-Screen Display Menu
1. Press MENU to display the MENU screen,
and then press _1/_ to select "System
Options".
2. Press A/T to select a specific adjustment
item and then press ENTER.
3. Press A/T (or 4/_ ) to select the desired
setting, and then press ENTER.
4. Press MENU to exit.
These functions are useful for adjusting the
audio and video settings. The View Option
functions can be operated with the remote
control unit.
This function changes the screen size.
Select "View Option" on the menu to display
the View Mode menu screen.
The View Mode menu varies depending on the
input source.
The TV has a feature that allows reception of
sound other than the main audio for the program.
This feature is called Multi-channel Television
Sound (MTS). The TV with MTS can receive
mono sound, stereo sound and Secondary
Audio Programs (SAP). The SAP feature allows a
TV station to broadcast other information, which
could be audio in another language or something
completely different like weather information.
You can enjoy Hi-Fi stereo sound or SAP
broadcasts where available,
® Stereo broadcasts: View programs like live
sporting events, shows and concerts in dynamic
stereo sound,
® SAP broadcasts: Receive TV broadcasts in either
MAIN or SAP sound,
MAIN sound: The normal program seundtrack
(either in mono or stereo),
SAP sound: Listen to a second language,
supplementary commentary or other infermation,
(SAP is mone sound.)
if stereo sound is difficult to hear.
® Obtain a clearer sound by manually switching to
fixed mono--sound mode,
You can change MTS as shown below to match the
television broadcast signal,
Press ENTER to toggle between audio modes,
Examples: when receiving MTS and SAP
STEREO mode: STEREO .m_ MONO
STEREO ÷ SAP mode: ST(SAP) m SAP(ST) '-_ MONO
MAIN + SAP mode: MAIN _ SAP
MONO mode: MONO
Digital broadcasting audio mode
The types of audio transmitted in a digital broadcast
include SURROUND as well as MONO and STEREO.
In addition,it is possible for multiple audio tracks to
accompany a single video track.
Press ENTER to toggle between audio modes.
Example: when receiving Digital broadcasting
STEREO (Audio 1) '_" STEREO (Audio 2)
SURROUND (Audio 3) 411
! I
You can select View Mode by pressing ViEW MODE on the
remote control unit. See page 23 for adjusting the video being
input from a TV, PC, other audiovisual equipment, USBWideo.
Allows you to capture and freeze a moving
image that you are watching.
You can select Freeze by pressing FREEZE on the remote
control unit. See page 21 for details of Freeze function.
MTS only operates while in TV mode.
Gives you the possibility to swap between main
and alternative language, when it is available in
digital channel.
Allows you to change the Closed Caption
display. Select "Change CC" on the menu to
display the Closed Caption information.
You can change Closed Caption by pressing CC on the remote
control unit. See page 22 for details of Closed Caption function.
Q- 29
Page 31

On-Screen Display Menu
This allows you to select the Closed Captions
service levels of analog broadcasting to be
displayed. Closed captioning allows you to read
the voice content of television programs on the
TV screen. Designed to help the hearing
impaired, this feature uses on-screen "text
boxes" to show dialogues and conversations
while the TV program is in progress. Captions
will appear on the screen during captioned
broadcasts.
• 001,2, 3, or 4
Dialogues(anddescriptions)forthe actionon the
captioned TVprogramshows on screen. Usually
CC1 isthe most used.CC2 carlbe usedfor
alternatelanguagesif theyare beingtransmitted,
• TEXT1, 2, 3, or 4
Often usedfor channelguide, schedules,bulletin
board informationfor Closed captions programs,
news, weatherinformation,or stock market reports,
Net all Captionservicesarenecessarilybeing used
by a lV channelduring the transmissionof aClosed
Caption program.
This allows you to configure the way you
choose to view digital captioning. Select one of
the digital service channels made available by
the caption provider. There are six standard
services. Service 1 is designated as the Primary
Caption Service. This service contains the
verbatim, or near-verbatim captions for the
primary language being spoken in the
accompanying program audio. Service 2 is
designated as the Secondary Language Service.
This service contains captions in a secondary
language, which is a translation of the captions
in the primary Caption Service. The other
service sub channels are not pre-assigned. It is
up to the discretion of the individual caption
provider to utilize the remaining service
channels.
You can output digital audio to an AV amplifier
or similar device whose DIGITAL AUDIO INPUT
terminal is connected to the DIGITAL AUDIO
OUTPUT terminal on the TV. Please select an
audio output format compatible with the audio
format of the program you are watching and
the equipment connected.
PCM: The optical output terminal outputs
audio signal in PCM form. Ifyour digital
audio system does not support Dolby
Digital, select "PCM".
Dolby Digital: The optical output terminal
outputs audio signal in Dolby Digital form. It
reproduces sound from surround program
of digital.
Off: Disables digital audio output.
The Auto Sync. is only available when the input
source is PC and your TV is receiving a
computer signal. Select Auto Sync. for
adjusting the settings automatically.
, Be sure to connect the PC to the TV and switch it
on before starting "Auto Sync.".
Ordinarily you can easily adjust the picture as
necessary to change image position using
"Auto Sync.". In some cases, however, manual
adjustment is needed to optimize the image.
H-Pos." Centers the image by moving it to
the left or right.
V-Poso" Centers the image by moving it up
or down.
Clock: Adjust when the image flickers with
vertical stripes.
Phase: Adjust when characters have low
contrast or when the image flickers.
, The default cursor position may not be in the center, because
the screen position variable ranges may be asymmetrical.
, The screen position variable ranges depend on the View Mode
or the signal type. The ranges can be seen on the position
-setting screen.
This function sets the terminal to output the
computer audio.
The adjustment items vary depending on the
input source. Select the input source
corresponding to the terminal connected to the
PC and then adjust the desired item.
(D" 30
Page 32

On-Screen Display Menu
[] PC IN • Caption Style: Set to As Default or Custom mode,
Video: Select this when the TV and PC are
connected using an analog RGB cable and the
audio is not input.
Video+Audio: Select this when the TV and PC
are connected using an analog RGB cable and
the audio is input via a © 3.5 mm stereo minijack,
[] HDMI iN
Auto: Audio path is set to HDMI or PC line in
automatically.
HDMl(Digital}: Select this when the TV and PC
are connected using an HDMI-certified cable and
audio is input via the same cable.
NDMl+Analog: Select this when the TV and PC
are connected using a DVI-HDMI conversion
cable and the audio is input via a G 3.5 mm
stereo minijack.
When "Audio Select" is set to "HDMl(Digital)", sound will not
be produced if you use only an HDMI-certified cable to
connect HDMI-compatible equipment. To produce sound,
you should make an analog audio connection.
If you want to connect HDMl=compatible equipment using
only an HDMl=certified cable, set "Audio Select" to
"HDMl(Digital)".
HDMI Mode only shows and is available when
HDMI device is connected. Select from Auto,
Graphic or Video.
Auto: The HDMI input timing is set to Video mode or
Graphic mode automatically,
Graphic: HDMI input timing set to Graphic mode (PC),
The image is full scan,
Video: HDM] input timing set to Video mode. The
image is over scan,
HDMI Mode is only workable for HDMI Video & Progressive
timing as followed: 1920xl 080p, 1280x720p, 720x480p,
720x576p.
Choose to turn on or off the TV internal speaker.
The audio output signals will not be turned off
even though the TV speaker is off. The default
setting is On.
This function allows you to adjust the closed
caption screen appearance to suit your
preference. You can adjust 8 items:
If Custom mode is selected, user can modify the
detail styles described below, The setting result will
be shown immediately on the bottom of the
submenu OSD,
Note : This f_ature is only available in TV, AV and
component mode.
® Caption Size: Selects this option to choose a
caption display size according to your own
preference, Select "Small", "standard", or "Large",
® Foreground Color: Choose the caption display
text color,
® Foreground Opacity: Select the text opacity,
® Background Color: Choose one of the background
color.
® Background Opacity: Choose one of the
background opacity options.
® Window Color: Choose one of the display
windows color.
® Window Opacity: Select one of the display window
opacity options.
. = •
Example
T\, _sB _c MEnU
©©0@
1. Press MENU to display the MENU screen,
and then press _/_" to select "Initial Setup".
2. Press A/T to select a specific adjustment
item, and then press ENTER.
,_ When you select Individual Setup, you can
enter the 4-digit secret number here. See
page 32 for setting a secret number.
3. Press A/T (or 4/_" ) to select the desired
setting, and then press ENTER.
4. Press MENU to exit.
You can run EZ Setup again, even after setting
up the preset channels.
Language: Select from among 3 languages
(English, French and Spanish),
TV Location: Select "Home" or "Store" for the
location where you plan to installthe TV,
Home: "PowerSaving"is setto "On", andAV MODE isset
to "STANDARD".
Store: "Power Saving"isset to "Off"and AV MODE isset
to "DYNAMIC(Fixed)".
ENERGYSTARqualification isbasedon AVMODE
"STANDARD".
i
(D" 31
Page 33

On-Screen Display Menu
Air/Cable: Make sure what kind of connection is
made with your lM when selecting "Air" or "Cable".
OH Search: Channel auto seamh makes the lM
look for aNchannels viewable in the set area,
If "Cable"isselected for Antennasetting, scrambled
channelsare removedafterthe Channelsearchhas
beencompleted.
Completed: The settings confirmation screen is
displayed, Confirm the information displayed on
the screen,
, See EZ Setup on pages 19 to 20 for setting each item.
, If no channel is found, confirm the type of connection made
with your TV and try "EZ Setup" again.
, While watching, you can toggle the selected channels by
pressing the A,IB,C, and D button on the remote control.
You can also select a language from the Initial
Setup menu. Select from among 3 languages:
English, French and Spanish.
If complex adjustments are made and the
settings cannot be restored to normal, you can
reset the settings to the factory preset values.
If Initial Installation does not memorize all the
channels in your region, follow the instructions
below to manually memorize the channels.
Air/Cable: Make sure what kind of connection
is made with your TV when selecting "Air" or
"Cable".
CH Search" Channel auto search makes the
TV look for all channels viewable in the set area.
CH Memory: You can select the channels to
skip in each ANALOG (Air), ANALOG (Cable),
DIGITAL (Air) and DIGITAL (Cable).
, If no channel is found, confirm the type of conneetion made
with your TV and try channel search again.
, If you press ENTER after OH search finish, OH search is
re-start.
This function allows you to program 4 favorite
channels, in 4 different categories. By setting
the favorite channels in advance, you can select
your favorite channels easily.
To register your favorite channel:
1. Press MENU on the remote control and select
"Initial Setup"/"Broadcasting Setup"/
"Favorite CH",
2. Press A/y to select the category that you want to
store your favorite channel,
3. Press A/T to select your desired channel and
press ENTER button to confirm.
To delete your favorite channel
1. Press MENU on the remote control and select
"initial Setup"/"Broadcasting Setup"/
"Favorite CH",
2. Press A/V to select "All data clear" and press
ENTER to start clearing all favorite channel data.
The Channel Setup settings will not be changed.
The Language settings will not be changed.
The Secret number settings will not be changed.
The TV Location settings will not be changed.
Before entering the Individual Setup, user has to
key in the Secret No. first.Enter a 4-digit Secret
No. with the number buttons on the remote
control. The default Secret No. is 0000.
Allows you to use a secret number to protect
certain settings from being accidentally changed.
New Secret No. :
Enter a 4-digit Secret No. with the number
buttons on the remote control to change your
secret No..
Confirm Secret No. :
Enter your new 4-digit Secret No. again to
confirm.
As a preeautionary measure, make a note of your secret
number and keep it in a familiar place.
Used to enable or disable the parental control
function. This function will not be selectable
from the menu if you do not first configure your
secret number.
Yes: EnablesParentalCTRL
No: DisablesParentalCTRL
The "V-Chip (DTV Only)" will only be selectable
when a new rating system can be downloaded
via digita broadcasting in the U.S.
(D" 32
Page 34

On-Screen Display Menu
V-CHIP is an electronic filtering device built into
your TV. This tool gives parents a great degree
of control over broadcasts accessed by their
children. It allows parents to select programs
judged suitable for child viewing while blocking
ones judged not suitable. It does so
automatically once you activate the V-CHIP
feature in your TV. "V-Chip" and "Status" will
not be selectable from the menu if you do not
first configure your secret number.
® The U,S, hastwo ratingsystems for viewingcontent:
TVParentalGuidelinesand movie ratings,
® The R/ ParentalGuidelineswork in conjunction with
theV-CHIP to helpparents screenout inappropriate
televisionshows fromtheirchildren,
® Movieratingsare usedfor original moviesrated by
the MotionPicture Associationof America(MPAA)
as watched on cable TVand net edited for
television,TheV-CHIPcan alsobe set to block
MPAA rated movies,
The setting automatically enters "Block" for any ratings below
your selection.
, If Status is not set to "On", the configuration settings will not
work.
[] MPAA (Voluntary movie rating system}
Example
Press A/T to adjust the item to your desired
position." _" indicates the item is blocked.
Press MENU to exit.
G: General audiences, All ages admitted.
PG: Parental guidance suggested, Some material may
not be suitable for children,
PG-13: Parents strongly cautioned, Seine material
may be inappropriate for children under 13.
R: Restricted, Under 17 requires accompanying parent
or adult guardian (age varies in some jurisdictions),
NC-17: No one 17 and under admitted,
X: X is an older rating that is unified with NC 17 but
may be encoded in the data of older movies,
Voluntary movie rating system only uses an age-based
rating.
[] TV Parental Guidelines
Example
Press A/T to adjust the item to your desired
position." It" indicates the item is blocked.
Press MENU to exit.
Suggested age
TV-Y: All children.
TV-Y?: Directed to older children.
I'V-G: General audience.
TV-PG" Parental Guidance suggested.
TV-14" Parents strongly cautioned.
TV-MA: Mature audience only.
Example
When setting an individualcontent-based rating
item:
1. Press I_ or ENTER to access blocked
content items from the currently selected
age-based rating item.
2. Press A/T to select an individual item, and
then press ENTER to unblock it ("_" is
removed). Repeat the same steps for the
other items.
3. Press _1or RETURN to register after all
individual content rating items are set.
Content
FV: Fantasy violence.
V: Violence.
S: Sexual situation.
L: Adult language.
D: Sexually suggestive dialog.
_-Y [] [] [] [] []
_-Y7 X [] [] [] []
_-G [] [] [] []
_-PG X X X X
W-14 X X X X
iiiiiiiiiiiiiiiiiiiiiiiiiiiiiiiiiiiiiiiiiiiiiiiiiii_-MA X X X
Q- 33
Page 35

On-Screen Display Menu
[] : The content rating can be set, but this
rating is not normally broadcast by TV stations.
X : Content rating can be set.
Canadian Rating Systems (Canadian English
ratings and Canadian French ratings)
® The [_/rating systems in Canada are based on the
Canadian Radio-Television and Telecommunications
Commission (CRTC) policy on violence in television
programming,
® While violence is the most important content
element to be rated, the structure developed takes
into consideraiion other program content like
language, nudity, sexuality and mature themes.
® When setting the V-CHIP on the Canadian system
you can choose either the Canadian English ratings
or the Canadian French ratings,
[] Canadian English Ratings
Example
Press A/_' to adjust the item to your desired
position. "_" indicates the item is blocked.
Press MENU to exit.
E: Exempt: Includes news, sports, documentaries and
other information programming; talk shows, music
videos, and variety programming.
C: Children: Intended for younger children under the
age of 8 years. Pays careful attention to themes that
could threaten their sense of security and well being.
C8+: Children over 8 years old: Contains no portrayal
of violence as the preferred, acceptable, or only way
to resolve conflict; nor encourage children to imitate
dangerous acts which they may see on the screen.
6: General: Considered acceptable for all age groups.
Appropriate viewing for the entire family, contains
very little violence, physical, verbal or emotional.
PG: Parental Guidance: Intended for a general
audience, but may not be suitable for younger
children (under the age of 8)because it could
contain controversial themes or issues.
14+: Over 14 years: Could contain themes where
violence is one of the dominant elements of the
storyline, but it must be integral to the development of
plot or character. Language usage could be profane
and nudity present within the context of the theme.
18+: Adults: intended for viewers 18years and older and
might contain depictions of violence, which while
related to the development of plot, character or
themes, are intended for adult viewing. Could contain
graphic language and portrayals of sex and nudity.
[] Canadian French Ratings
Example
Press A/T to adjust the item to your desired
position. "_" indicates the item is blocked. Press
MENU to exit.
E: Exempt programming,
G: General: All ages and children, contains minimal
direct violence, but may be integrated into the plot
in a humorous or unrealistic manner.
8arts+: General but inadvisable for young children:
May be viewed by a wide public audience, but could
contain scenes disiurbing to children under 8 who
cannot distinguish between imaginary and real
situations. Recommended for viewing with parent,
13arts+: Over 13 years: Could contain scenes of
frequent violent scenes and therefere recommended
for viewing with parent.
16arts+: Over 16 years: Could contain frequent violent
scenes and intense violence.
18arts+: Over 18 years: Only for adult viewing. Could
contain frequent violent scenes and extreme
violence,
[] How to temporarily release the V-CHIP
BLOCK
When the V-CHIP BLOCK is working and
censors a broadcast, "V-CHIP HAS BEEN
ACTIVATED." displays.
1. Press ENTER while the V-CHIP is working, and
then the secret number setting menu displays.
2. Input the 4-digit secret number by using 0-9.
At this time V-CHIP BLOCK temporarily releases.
[] Reactivating the temporarily released
V-CHIP BLOCK
You can reactivate the temporarily released
V-CHIP BLOCK as shown below.
• Select "Status" setting from the Parental CTRL menu to
reactivate BLOCK. (See page 32.)
Select "V-Chip" setting ("MPAA", "TV Guidelines", "(}an.
English Ratings" or "(}an. French Ratings") from the
Parental CTRL to reactivate BLOCK. (See pages 33 to 34.)
Switch off the TV power.
Performing any of the three above will activate the V-CHIP BLOCK.
1. Press MENU to display the MENU screen, and
then press 4/_ to select "Information".
2. Press A/_' to select a specific adjustment item,
and then press ENTER.
3. Press _,/T (or _/_-) to select the desired
setting, and then press ENTER.
4. Press MENU to exit.
(8_)" 34
The current version of the TV software is displayed.
Page 36

Enjoying Photo/Music/Video Playback
You can connect the TV to a USB memory
device, USB hard drive to enjoy viewing
pictures, listening to music, and watching
videos.
• Depending on the USB memory device/USB hard drive, the
TV may not be able to recognize the recorded data.
• It may take time to read the recorded data if the USB
memory device/USB hard drive contains many files or folders.
Use only alphanumeric characters for naming files.
• File names over 80 characters (may vary depending on
character set) may not be displayed.
Insert the USB memory device with recorded
photos, music or videos into the USB terminal
on the TV.
When connecting a USB hard drive, be sure to use
a hard drive with an AC adapter.
Do not remove a USB memory device or memory
card from the TV while transferring files, using the
slide show function, or switching screens, or before
you exit "USB" from the INPUT list.
Do not insert and remove a USB memory device/
USB hard drive to and from the TV repeatedly.
When using a card reader, be sure to insert Memory
first before using the card reader.
2. Press 4/_, to select "Photo", "Music" or
"Video", and then press ENTER,
Example
3. Press 4/1_ to select the desired folder,
and then press ENTER,
• 16GB is the maximum number of LISB drives that can be
displayed.
"VIEW MODE" is fixed during the Photo or Music mode.
During "Video mode", is depending on the type of video
signal currently being received.(see page 25)
• The key guide display disappears automatically after a set
time. To display the key guide display again, press DISPLAY.
Example
De not use a USB extension cable when
connecting a USB memory device to the USB
terminal on the TV.
Using a USB extension cable with the USB
memory device may prevent the TV from
performing correctly.
1. Press INPUT to select USB from the input
list or press USIB direct button to enter it,
Buttons for thumbnails operations
A/y/_/1_ Select a desired item.
ENTER When selecting a folder icon: Enter this directory.
RETURN Return to the previous process.
Menu Sub Menu
When selecting a photo thumbnail: Slide show.
35
Page 37

Enjoying Photo/Music/Video Playback
Press MENU to display the sub-menu. You can
browse the files by the following options.
,, Sort
MediaType
Thumbnail size
• When there are invalid photo files, the X mark will be display
for the file.
• You can see the file name, shooting date, file size and pixel
size of the selected photo in the top-left corner of the screen
(shooting date is only available in the EXIFfile format).
The photo selected on the thumbnail selection
screen by press ENTER,
Buttons for slide show operation
BIT Return to the thumbnail selection screen.
A (red) Repeat one / Repeat all.
B (green) Select slider show interval.
C (blue) Select slide show effect.
D (yellow) Play the photo in random order.
/ _ Go to the previous/next photo.
II Viewing individual photo.
DISPLAY Display the information.
Menu Sub Menu.
Press MENU to display the sub-menu. You can
select the following options to display the photos,
Pause
Repeat
Shuffle
', Duration
,, Effect
Show Info
• The key guide display disappears automatically after a set time.
To display the key guide display again, press DISPLAY.
The photo in slide show by pressing II,
Example
Example
Buttons for viewing individual Photos
operation
EXIT Return to the thumbnail selection screen.
A {red) Repeat one / Repeat all
B {green) Rotate the photo by 90 degrees to the right.
C (blue) Zoom photo.
D (yellow) Play the photo in random order.
/ _ Go to the previous/next photo.
Slider show.
DISPLAY Display the information.
Menu Sub Menu
Press MENU to display the sub-menu. You can
select the following options to display the photos.
Play
,, Repeat
Shuffle
,, Rotate
Zoom
Show Info
• The key guide display disappears automatically after a set time.
To display the key guide display again, press DISPLAY.
• Rotating photos only applies to the temporarily selected item
and this setting is not saved.
Example
Buttons for music mode
A/T/_/l_ Select a desired item.
ENTER directory.
RETURN Return to the previous process.
Menu Sub Menu
Press MENU to display the sub-menu. You can
browse the files by the following options.
,, Sort
Media Type
Thumbnail size
When selecting a folder icon: Enter this
When selecting a music file: Play music.
Example
Q- 36
Page 38

Enjoying Photo/Music/Video Playback
Buttons for playing music
BIT Return to the thumbnail selection screen.
A(red) Repeat one / Repeat all
B{green) Play the music in random order.
D{ye!lew} Display the information.
/ _ Go to the next/previous photo.
/ _ Forward/Backward.
b-/. Play/Pause.
DISPLAY Display the information.
Menu Sub Menu
Press MENU to display the sub-menu. You can
select the following options to play the musics,
Pause
'. Repeat
Shuffle On
Show Info
,. Hide Spectrum
Lyric options
Example
Buttons for Video mode
A/V/_/1_ Select a desired item.
ENTER When selecting a folder icon: Enter this
RETURN Return to the previous process.
Menu Sub Menu
Press MENU to display the sub-menu. You can
browse the files by the following options.
,, Sort
Media Type
Thumbnail size
directory.
When selecting a video file: Play video.
Example
Buttons for playing Video
EXIT Return to the thumbnail selection screen.
A(red) Repeat one / Repeat all
B(green) Backward
C (blue) Forward
D {yellow) Repeat AB. Select the part you want to
11_/|1 / [] Play/Pause/Stop.
DISPLAY Display the information.
Menu Sub Menu
play repeatedly.
/ D._ Go to the next/previous video.
Press MENU to display the sub-menu. You can
follow the options to play the videos,
* Pause
_' Repeat
* Program
_, Show Info
* AV Mode
_, Title
* Edition
_, Chapter
* View Mode
USB device USB Memory, USB card reader (Mass
File system FAT/FAT32/NTFS (USB hard drive only)
Photo file JPEG (.jpg .jpeg) Progressive JPEG
format (.jpg .jpeg) BMP (.bmp) PNG (.png)
Music file MP3 (.mp3)
format Bitrate: 32k, 40k, 48k, 56k, 64k, 80k,
.avi AVI Motion Jpeg LPCM
.mkv MKV MPEG4 LPCM
.asf ASF H.264 LPCM
.mp4 (SMP4) MPEG4 HEAAC
.mov (SMP4) MPEG4 AAC-LC/
.mpg PS MPEG2 LPCM
.mpeg MPEG1 MPEG
Storage class), USB hard drive
96k, 112k, 128k, 160k, 192k, 224k,
256k, 320kbps
Sampling frequency: 32k, 44. lk, 48kHz
XviD
H.264 MP3
MPEG4 AC3
MPEG2 ADPCM
MPEG1
XviD MP3
H.264 AC3
MPEG2 ADPCM
XviD AC3
MP4 H.264 AAC-LC/
MP4 H.264
XviD MP3
XviD MP3
Motion Jpeg HEAAC
MP3
ADPCM
AC3
• Operation using USB hubs is not guaranteed.
• Some video file formats may not be played depending on the file.
• Some images may not be displayed in the appropriate aspect
ratio depending on the file format.
(D" 37
Page 39

Appendix
Problem Possible Solution
• Check ifyou pressed POWER on the remote control unit, (See page
• No power 19,) if the indicator on the TV is still red, press POWER on the TV,
• Unit cannot be improper operation, in this case, operate the unit after first turning
operated, off the power of the TV or unplugging the AC cord and re-plugging
• Remote control unit • Are batteries worn out? (Replace with new batteries.)
does not operate, • Are you using it under strong or fluorescent lighting?
• Picture is cut off/with • Are screen mode adjustments such as picture size made correctly?
sidebar screen, (See page 23,)
• Strange color, light • Adjust the picture tone, (See page 26 and 27,)
color, or color • is the room too bright? The picture may look dark in a room that
misalignment, is too bright,
• Power is suddenly • The unit's internal temperature has increased, Remove any
turned off,
• No picture • is connection to other components correct? (See page 16,)
• No sound
• The TV sometimes • This is not a malfunction, This happens when the cabinet slightly
makes a cracking expands and contracts according to change intemperature, This
sound, does not affect the TV's performance,
• is the AC cord disconnected? (See page 8,)
• Has the power been turned on? (See page 19,)
• External influences such as lightning, static electricity, may cause
it after 1 or 2 minutes,
• Are batteries inserted with polarity ( +, - ) aligned? (See page 10,)
• is a fluorescent light illuminated near the remote control sensor?
• is the sleep timer set? (See page 21 ,)
objects blocking vent,
• is the correct input selected? (See page 14,)
• is the volume too low? (See page 21,)
• Have you pressed MUTE on the remote control unit? (See page 21 ,)
If you forgot the password number, reset the secret number by following the procedures below:
1. Press MENU
2. Select "lnitialSetup", press "ENTER"
3. Select "Individual Setup", press "ENTER"
4. Press number 7071
5. Select "Secret No."
6. Enter new password
As a precautionary measure, make a note of your secret number above, cut it from this manual, and keep it in a safe place.
Cautions regarding use in high and low temperature environments
• When the unit isused in a low temperature space (e,g, room, office), the picture may leave
trails or appear slightly delayed, This is not a malfunction, and the unit will recover when the
temperature returns to normal.
• Do not leave the unit in a hot or cold location. Also, do not leave the unit in a location exposed
to direct sunlight or near a heater, as this may cause the cabinet to deform and the Liquid
Crystal panel to malfunction.
Storage temperature: -4°F to +140°F (-20°0 to +60°0)
(D" 38
Page 40

Appendix
Item Model: LC-40LE550U
LCD Size 40" (]lass ( 40" Diagonal )
panel Resolution 2,073,600 pixels (1,920 x 1080)
lV-standard (COIR) American IV Standard ATSC/NTSC System
VHF/UHF VHF 2-13ch, UHF 14-690h
CAR/ 1-135ch (non scrambled channel only)
lV Channel Broadcast 2-69ch
Function (8VSB)
Audio out 10 W x 2
Terminals ANT/CABLE 750 Unbalance, F Type x 1 for Analog And Digital (VHF/UHF/CA]V)
OSD language English/French/Spanish
Power Requirement AC 120V, 60Hz
ON MODE POWER 50W
Power Consumption 89W (0.5W Standby with AC 120V)
Weight
Dimension*2 R/ _-stand 365/16x233/o4X9 7/64 inch
(Wx Hx D) lV only 36546 x 214_4 x 3 1_32inch
Operating temperature ÷32°F to +-104°F (0°C to +-40°C)
Receiving Terrestrial
Audio multiplex BTSC System
Si(_e
Rear PC/HDMI
Digital
Digital cable *_
(64/256 1-1350h (non-scrambled channel only)
QAM)
RS-232C 9-pin D-sub male connector
INPUT 1 HDMI in with HDCP, Audio in (® 3.5 mm stereo jack)
USB Photo/Music/Video mode, Software update
Headphone Headphone out
DIGFAL
AUDIO Optical Digital audio output x I (PCM/DoIby Digital)
OUTPUT
PC IN ANALOG RGB (PC) in (15pin mini D-sub female connector)
AUDIO Audio in (© 3.5 mm jack)
INPUT 2 HDMI in with HDCP, Audio in (® 3.5 mm stereo jack)
INPUT 3 HDMI in with HDCP, Audio in (® 3.5 mm stereo jack)
INPUT 4 COMPONENT/AV in
R/_- stand 20.5 Ibs. / 9.3 kg
R/only 18.5 Ibs. / 8.4 kg
"1 Emergency alert messages via Cable are unreceivable.
*2 The dimensional drawings ale shown on the inside back cover.
As pad of policy of continuous improvement, SHARP leselves the light to make design and specification changes tot ploduct
improvement without plier notice. The performance specification figules indicated are nominal values of production units.
There may be some deviations flora these values in individual units.
(D" 39
Page 41

Appendix
it is necessary to set the PC correctly to display XGA and WXGA signal,
PC VESAStandard
PC
Resolution
720 x 400
VGA
SVGA 800 x 600
XGA 1024 x 768
WXGA 1666 x 768
WUXGA 1920 x 1080
640 x 480
Horizontal
Frequency
31.46 kHz
31.47 kHz
37.50 kHz
37.88 kHz
48.08 kHz
46.88 kHz
48.36 kHz
56.48 kHz
60.02 kHz
47.71 kHz
66.58 kHz
Vertical
Frequency
70.08 Hz
59.94 Hz
75.00 Hz
60.32 Hz
72.19 Hz
75.00 Hz
60.00 Hz
70.07 Hz
75.06 Hz
59.79 Hz
59.94 Hz
m
o
o
o
o
o
o
o
o
o
o
[] PC control of the TV
• Attach an RS-232C cable cross-type (commercially
available) to the supplied Din/D-Sub RS-232C for the
connections.
• Thisoperation system shouldbe used by a personwho is
accustomed to usingcomputers.
[] Communication conditions
Set the RS-232C communication settings on the PC to
match the TV's communication conditions.
The TV's communication settings are as follows:
9,600 bps
8 bits
None
1 bit
None
[] Communication procedure
Send the control commands from the PC via the RS-
232C connector.
The TVoperates according to the received command
and sends a response message to the PC.
Do not send multiple commands at the same time.
Wait until the PC receives the OK response before
sending the next command.
[] Command format
Eight ASCIIcodes + CR
Ic=Ic21cs1041plIP2IP31P41_l
Command 4-digits Parameter4-digits Returncode
Command 4-digits: Command. Thetext offour characters.
Parameter4-digits: Parameter0-9, x, blank,?
[] Parameter
Input the parameter values, aligning left, and fill with
blank(s) for the remainder. (Be sure that 4 values are
input for the parameter.)
When the input parameter is not within an adjustable
range, "ERR" returns. (Refer to "Response code format".)
Any numerical value can replace the "x" on the table.
When "?" is input for some
commands, the
present setting
value responds.
[] Response code format
Normal response Problem response (communication
Returncode (0DH) " Returncode (0DH)
error or incorrect command)
(89" 40
Page 42

Appendix
[] Command table
Commands not indicated here are not guaranteed to operate.
CONTROL ITEM 3OMMAND PARAMETER
POWER ON COMMAND SETTING .........
POWERSETTING ! ! ! 1 I "_,_erOn
INPUT SELFCTION A %/ ITIVIDI01 i i
AVMODESELECTION A V M D * - - 5:DYNAMIC,6:DYNAMIO(F[<ED),7:USER
VOLUME V i O i L i _' * i * i i Volume(0100)
POSITION CLOCK Of L iC I K * i * i * i_ OnlyPOmode ((_180,rrenudisplayrange+/90)
........ i iiliii
MUTE M i U i T i ' * i i i - 0: (Toggle), 1:On 2: Off
......... i°isiu, i- i- i- 0:(Teggle_...........
AUDIO SELECTION AICIH I xl i I (Toggle)
........... iFiTiM I i-i-i ........................................3:OFFTIMER 90MIN 4:OFFTIMER 120MIN
CHANNEL
REMOTE CONTROL BU ]TONS ! ! ! ! ! ! ! 40:ENTER, 41: _, 42: _ >43 ,_ ,44:1_ > 451RE_JRN
co cl LIOIP _i-i-i- (Toggle)
nlslPin 01 i i Dr
Pow 0 i i ........
i i i ....
= = = i = = =
TOGGLE i T i G i x i i i (Toggle)
....... IAIVI :*i-i-i ........................... (16)
NNNINNN0(TOGGLO...............................
H POSITION H i P i O i S ! * i * i * i Only pC mode (0 100,menu disolay range+/ 50)
V POSITION V i P i O i S , * i * i * i ,, Only PC mode (0 40,rrenq display ran(]e+/20)
PHASE P ! H ! S ! E * ! * ! * ! OnlyPOmode ((_40>rrenudisplayrange+/20)
W I IIDIEI*I i i 0:(Tc,g gle) ......................................
iiiiiii ..................by..............
! ! ! ! ! ! !
! ! ! ! ! ! !
i i i I i i i
DIRECT D l C i C i H * i * i * i Tile channel number of%/
CHANNEL i i i ! i i i (1 135)
(ANALOG) i i i i i i i
DIRECT D i A i 2 i P * (0100 9999)
....... ,C,2,U :i i**i2 (1999)
(DIGITAL) i i i i i i i
DiOi2iL*i'i* i _00_)
i i i i i i i
DICIIlO,*I*I*I* )9_)
DiOi"i ,*i*i*i* )6_S)
OHUP of HI UI x i i i Theohannelnumberof%/+l
OH DOWN CIHIDI@,xl i I The channel number of %/ 1
R ! C ! K ! Y . ! , ! - ! - 0 9:0 9, I0: do[, I I: ENT 12: POWER 13: DISpLAy
! ! ! ! ! ! ! 161_/1,19: ,_ 20:m,21:_, 24: SLEEp 27: CC
i i i ! i i i 28:AV MODE 30: FLASHBACK 311 MUTE, 32:VOL
i i i i i i i 33:VOL+,34:CH/',SS:CHv36:INPUTD8:MENU,
i i i I i i i 46: EXIT, 48:SURROUND 49:AUDIO, 50:A(red),
i i i i i i i 51 :B (green)> 52: C (blue)> 531 D _/ell_,_)> 54: FREEZE,
i i i I i i i 60:%/61:USB, 62:PC
CONTROL CONTENTS
The pc>/_er On command related
The pc_/_er On command a_epted
It shifts to standby
The Power On Command m, lst be waited until systetr is oornpletely F_/_er oft (LED p:_/_er
indicator turns to be Red/
It input _wito he_ by the toggle (It is the same as an input change Im_y)
It input _witc hes to %/ (A channel remains as it is (Last memory))
It input _witches to INPUT1 INPUT6
Although it _n choose n_,_, it is toggle operation in inside
The screen position vaiable ranges depend on the Vi_,e Mode or the
signal type The ranges can be seen on the position _tting screen
o: Although I[ c_l ch_ n_,,, It Is toggle operation In _, _lable Item£
1: At_lable In [A_4 SD timing and {PC] except some timing ('1)
234: One, _, _lable when [AV] _gn_ I£ being Inp_
5: Atallable In [A_4 720p a_d [PC] except 1280x720 1920xl OS0 lifting
6: At_lable In [A_4 10801 _ld 1080p timing and [PC] except 160OXl 200 1280xl 024(LC_32SV40L0
_d 1400x1050(LC_S2SV40L_
7: One, at allable In [F_,) except _rne lifting(*2)
('1)13COx768 1366x768 1280x1024 140Ox1050 1600x1200 1920x1080
('2)1300x768 1366x768 1280x720 1920x1080
An input change isincluded if it is not %/display
In Air 2 690h is effective
In Cable 1 135ch is effective
DIGITAL Air _TWOpart numbers, 2 digit plus 2 digit)
DIGITAL Cable (Two Part numbers, 3 digit plus 3 digit)
Front half of DIGITAL CABLF CHANNEL NO (Designate major channel)
DIGITAL Cable (Two Part numbers, 3 digit plus 3 digit)
Rear half of DIGITAL CABLE CHANNEL NO (Designate trinor channel)
DIGITAL Cable (One Part numbers, 5 diqit, less than 10000)
DIGITAL Cable (One Part numbers, 5 digit, more _an 1o,ooo)
t is not v dish,lay it w inr_ut swtch to v (sat _o fu_ct o_ as C _A)
If it is not %/display it will input a,_itoh to %/ (same function as CH V )
• If an underbar (_) appears in the parameter column, enter a space.
• If an asterisk (*) appears, enter a value in the range indicated in brackets under CONTROL CONTENTS.
• Any numerical value can replace the "x" on the table.
_- 41
Page 43

Appendix
This device complies with Part 15 of the FCC Rules, Operation of this product is subject to the
following two conditions: (1) this device may not cause harmful interference, and (2) this device must
accept any interference received, including interference that may cause undesired operation,
This equipment has been tested and found to comply within the limits for a class B digital device,
pursuant to Part 15 of the FCC Rules, These limits are designed to provide reasonable protection
against harmful interference in a residential installation,
This equipment generates, uses, and can radiate radio frequency energy and, if not installed and
used in accordance with the instructions, may cause harmful interference to radio communications,
However, there is no guarantee that interference will not occur in a particular installation, Ifthis
equipment does cause harmful interference to radio or television reception, which can be determined
by turning the equipment off and on, the user is encouraged to try to correct the interference by one
or more of the following measures:
• Reorient or relocate the receiving antenna.
• Increase the separation between the equipment and receiver,
• Connect the equipment into an outlet on a circuit different from that to which the receiver is
connected,
• Consult the dealer or an experienced radio/TV technician for help,
Changes or modifications not expressly approved by the party responsible for compliance with the
FCC Rules could void the user's authority to operate this equipment,
Connections to this device must be made with shielded cables with metallic RF/EMI connector
hoods to maintain compliance with FCC Rules and Regulations,
Q- 42
Page 44

Calling for Service
For location of the nearest Sharp Authorized Service, or to obtain product literature,
accessories, supplies, or customer assistance, please call 1-800-BE-SHARP.
LIMITED WARRANTY
CONSUMER LIMITED WARRANTY
SHARP ELECTRONICS CORPORATION warrants to the first consumer purchaser that this Sharp brand Liqt.fid Crystal Display prodt.lct (the
"Product"), when shipped in its odginal container, will be free from defective workmanship and materials, and agrees that it will, at its optk)n, either
repair the defect or replace the defective Product or part thereof with a new or remant.#actured eqt.livalent at no charge to the purchaser for parts or
labor for the period(s) set forth below.
This warranty does not apply to any appearance items of the Product or if the serial number or model number affixed to the Prodt.lct has been
removed, defaced, changed, altered or tampered with. This warranty does not cover installation or signal reception problems. This limited warranty
will not apply if the Product has been or is being used in a commercial setting or application; this warranty is meant solely for the non commercial,
household use of the Product by consumers in their home or residence. If you intend to or already use this Product for commercial purposes or in a
commercial setting, there are warranties available to cover your use of this Product, the terms of which may vary. Please contact 1 800 BE-SHARP
for further information.
In order to enforce your rights under this limited warranty, yot.l should follow the steps set forth below. Yot.l must be able to provide proof of
purchase to the servicer, which proof must include the date of purchase.
To the extent permitted by applicable state law, the warranties set forth are in lieu of, and exclt.lsive of, all other warranties, express or implied.
Specifically ALL OTHER WARRANTIES OTHER THAN THOSE SET FORTH ABOVE ARE EXCLUDED, ALL EXPRESS AND IMPLIED WARRANTIES
INCLUDING THE WARRANTIES OF MERCHANTABILITY, FITNESS FOR USE, AND FITNESS FOR A PARTICULAR PURPOSE ARE SPECIFICALLY
EXCLUDED. IF, UNDER APPLICABLE STATE LAW, IMPLIED WARRANTIES MAY NOT VALIDLY BE DISCLAIMED OR EXCLUDED, THE DURATION
OF SUCH IMPLIED WARRANTIES IS LIMITED TO THE PERIOD(S) FROM THE DATE OF PURCHASE SET FORTH BELOW. THIS WARRANTY
GIVES YOU SPECIFIC LEGAL RIGHTS. YOU MAY ALSO HAVE OTHER RIGHTS WHICH VARY FROM STATE TO STATE.
The warranties given herein shall be the sole and exclusive warranties granted by Sharp and shall be the sole and exclusive remedy available to the
purchaser and only for the time periods set forth herein. No other representations or promises reade by anyone are permitted. Correction of
defects, in the manner and for the period of time described herein, shall constitute complete fulfillment of all liabilities and responsibilities of Sharp
to the purchaser with respect to the Product, and shall constitute full satisfaction of all claims, whether based on contract, negligence, strict liability
or otherwise. Sharp does not warrant nor shall Sharp be liable, or in any way responsible, for Prodt.lcts which have been subject to abuse
(inclt.lding, bt.lt not limited to, improper voltage), accident, misuse, negligence, lack of reasonable care, alteration, modification, tampering, misuse,
improper operation or maintenance or any damages or defects in the Product which were caused by repairs or attempted repairs performed by
anyone other than a Sharp authorized servicer. Nor shall Sharp be liable or in any way responsible for any incidental or consequential economic or
property damage. Some states do nct allow limits on warranties or on remedies for breach in certain transactk)ns; in such states, the limits herein
may not apply.
THIS LIMITED WARRANTY IS VALID ONLY IN THE FIFTY (50) UNITED STATES, THE DISTRICT OF COLUMBIA. AND PUERTO RICO
Model Specific Section
Your Product Model Number & Description:
Warranty Period for this Product:
Additional Exclusions from
Warranty Coverage (if any):
What to do to Obtain Service:
TO OBTAIN PRODUCT INFORMATION OR PURCHASE ACCESSORIES, CALL 1-800-BE-SHARP OR VISIT www.sharpusa.com
LC-40LE550U LCD Color Television
(Be sure to have this information and Proof of Purchase available when you
need service for your Product.)
One (1) year parts and labor from date of purchase.
Image Retention resulting from a fixed image being displayed for long periods of
time is not covered by this Limited Warranty (see Operation Manual on how to
prevent this).
Service is provided by a Sharp Authorized Service Center inthe United States. To
find the location of the nearest Sharp Authorized Service Center, call Sharp toll
free at 1 800 BE-SHARP. Sharp will provide instructions on service options
available for your Prodt.lct.
If it is deemed the Product is to be shipped for servicing, be sure it is insured and
packaged securely. Please use two persons to carry the Product, transport it in
original packaging or packaging that provides comparable protection of the
Product, and ensure that the Product is covered to avoid scratches and damage.
Sharp shall not be responsible for lost, stolen or misdirected mail or for damage to
the product incurred during shipping.
For Products that are deemed in home service, a servicer will come to your
location. If necessary, the servicer may remove the unit for repair at the service
facility and return it once completed. In home service is not available in all areas
and Sharp may, at our option, elect to provide transportation of the Product to and
frorn an Authorized Service Center in those areas.
SHARP
SHARP ELECTRONICS CORPORATION
Sharp Plaza, Mahwah, New Jersey 07495-1163
SHARP CORPORATION
Q- 43
Page 45

LC-40LE550U
TV DE CRISTAL L|QUIDO
ESPANOL
MANUAL DE FUNCIONAMIENTO
IMPORTANTE:
Para facilitar la realizaci6n de informes en NOm. de modelo:
caso de perdida o robo, registre el modelo
y el n0mero de serie de la TV en el espacio NOm. de serie:
proporcionado. Estos n0meros est_n ubicados
en la parte posterior de la TV.
INFORMACI(SN IMPORTANTE
ADVERTENCIA: PARA REDUCIR EL RIESGO DE INCENDIO O DESCARGA
EL@CTRICA,NO EXPONGA ESTE PRODUCTO A LA LLUVIA O HUMEDAD,
El simbolo de rap dentro de un tdangulo
equiKttero pretende a4erta[ al usuado de la
existencia de voltaje pe4igroso no aislado en
el interio[ de4 producto, cuya magnitud
puede set 1o suficientemente grande como
papa constituir un riesgo de desca[ga
el6ctrica.
PRECAUCION: PARA REDUCIR EL RtESGO DE DESCARGA
ELECTRICA, NO RETIRE LA CUBIERTA (O LA PARTETRASERA).
NO HAY PARTES INTERNAS PARA SERVlCIO POR PARTEDEL
DEJE EL SERVlCIO A PERSONAL SERVICIO CUALIFICADO.
USUARIO.
El signo de exclamaciOn dent[o de un
tdangulo indica la presencia de
instrucciones de funcionamiento y
mantenimiento en la documentaciOn que
acompaha a4producto.
O-1
Page 46

INFORMACION IMPORTANTE
PRECAUCl6N: PARA EVITAR DESCARGAS ELECTRICAS, HAGA COINCIDIR LA CLAVIJA MAS
ANCHA DEL ENCHUFE CON LA RANURA MAS ANCHA E INSERTE POR COMPLETO.
ADVERTENClA: Las regulaciones de la FCC senalan que cualquier cambio o modificaci6n no
autorizado en este equipo que no hayan sido expresamente aprobados por el fabricante podria
anular la autorizaci6n del usuario para utilizar este equipo.
PRECAUCI6N:
Este producto satisfaee los reglamentos de la FCC cuando se utilizan conectores y cables
blindados para conectar la unidad a otro equipo. Para impedir las interferencias electromagneticas
con aparatos electricos tales como radios y TV, utilice conectores y cables blindados para hacer
las conexiones.
DECLARACl6N DE CONFORMIDAD:
TELEVISOR DE CRISTAL L[QUIDO SHARP, MODELO LC-40LE550U
Este dispositivo cumple con el Apartado 15 de las Normas FCC.
Su funcionamiento est_ sujeto alas dos condiciones siguientes: (1) Este dispositivo no deber_
causar interferencias perjudiciales, y (2)deber_ aceptar cualquier interferencia que reciba, incluy
endo interferencias que puedan causar un funcionamiento no deseado. PARTE RESPONSABLE:
Para clientes de negocios: URL http://www.sharpusa.com
INFORMACl6N:
Este equipo ha sido probado y ha demostrado cumplir con los I[mites establecidos para los
aparatos digitales de la Clase B, de conformidad con el Apartado 15 de las Normas de la FCC.
Estos I[mites ban sido designados para proporcionar una protecci6n razonable contra la
interferencia perjudicial en una instalaci6n residencial. Este equipo genera, utiliza y puede radiar
energfa radioelectrica, y, si no se instala y utiliza de acuerdo con las instrucciones, puede causar
una interferencia perjudicial en las comunicaciones por radio. Sin embargo, no hay ninguna
garant[a de que no se produzcan interferencias en una instalaci6n particular. Si este equipo causa
interferencias perjudiciales en las recepciones de radio o televisi6n, Io que puede determinarse
f_cilmente apagando y encendiendo el equipo, al usuario se le recomienda corregir la interferencia
tomando una o m_s de las medidas siguientes:
-- Cambie la orientaci6n o el lugar de instalaci6n de la antena receptora.
-- Aumente la separaci6n entre el equipo y el receptor.
-- Conecte el equipo a una toma de corriente de un circuito diferente del aquel al que est_
conectado el receptor.
-- Consulte al distribuidor o tecnico de radio/TV calificado para solicitar su ayuda.
SHARP ELECTRONICS CORPORATION
Sharp Plaza, Mahwah, New Jersey 07495-1163
TEL: 1-800-BE-SHARP
Nota al instalador del sistema de CATV: El instalador del sistema debe recordar el Articulo 820 del
C6digo Nacional Electrico que contiene las pautas b_sicas y, en particular, especifica que el cable
a tierra debe ser conectado al sistema de toma de tierra del edificio, Io m_s cerca posible al punto
de entrada del cable como sea pr_ctico.
Este producto cumple los requisitos del programa ENERGY STAR cuando se selecciona "Casa"
para "Ubicaci6n TV".La configuraci6n "Ubicaci6n TV" en "Casa" permite que el televisor funcione
en condiciones de ahorro energetico para uso domestico.
MARCAS COMERClALES
• Los t@minos HD[VIIy HD[VIIHigh-Definition Multimedia interface y el Iogotipo de HD[VII son j
marcas registradas de HDMI Licensing LLC en EE. UU. y otros pa[ses.
• Fabricado bajo licencia de Dolby Laboratories. Dolby y el s[mbolo de la doble "D" son marcas ]
comerciales de Dolby Laboratories.
@-2
1
J
Page 47

ESTIMADO CLIENTE DE SHARP
Gracias por adquirir la TV de cristal liquido Sharp. Para garantizar la seguridad y muchos
a_os de funcionamiento sin problemas del producto, lea detenidamente la seccion
INTRUCCIONES IMPORTANTES DE SEGURIDAD antes de utilizar el producto.
INSTRUCCIONES IMPORTANTES DE SEGURIDAD
1) Lea estas instrucciones.
2) Guarde estas instrucciones.
3) Preste atencion a todas las advertencias.
4) Siga todas las instrucciones.
5) No utilice este aparato cerca del agua.
6) Dmpielo solamente con un paRo seco.
7) No tape las aberturas de ventilacion. Instale el aparato de acuerdo con las instrucciones del
fabricante.
8) No instale el aparato cerca de ninguna fuente de calor como, por ejemplo, radiadores, salidas de
aire caliente, estufas u otros aparatos (incluyendo amplificadores) que produzcan calor.
9) Proteja el cable de alimentaci6n para que nadie Io pise ni quede aplastado, especialmente en las
clavijas, tomas de corriente y puntos por donde sale del aparato.
10) Utilice solamente los accesorios suministrados por el fabricante.
11) Utilice el aparato solamente con el carrito, soporte, tripode, mensula o mesa especificado per el
fabricante, o vendido con el propio aparato. Cuando utilice un cardto, tenga cuidado cuando
mueva la combinacion del cardto y el aparato para evitar que se caigan y se estropeen.
12) Desenchufe este aparato durante las tormentas electricas o cuando no
Io utilice durante largos periodos de tiempo.
13) Solicite todos los trabajos de reparaci6n al personal cualificado solamente. Las
reparaciones seran necesarias cuando se haya da_ado el aparato de cualquier forma:
cuando se haya estropeado el cable o la clavija de alimentaci6n, se hayan derramado
liquidos o hayan caido objetos en el interior del aparato, cuando este haya estado expuesto
a la Iluvia o a la humedad, cuando no funcione normalmente o cuando se haya caido.
14) ADVERTENCIA: Para reducir el riesgo de incendio o descarga electrica, no exponga este
producto a la Iluvia o humedad.
15) En aquellos casos donde se utiliza el enchufe de alimentacion electrica o el conector del producto
como el dispositivo de desconexi6n, este debera permanecer en 6ptimas condiciones de
funcionamiento.
16) No se debera exponer el producto a salpicaduras y no se deberan colocar sobre el producto
objetos con liquidos, como jarrones.
Informacibn de seguridad adicional
17) Fuentes de energia -- Este producto debera utilizarse solamente con el tipo de fuente de energia
indicado en la etiqueta de especificaciones. Si no estb. seguro del tipo de suministro de energia
de su casa, consulte a su distribuidor o a la compaRia de electricidad de su Iocalidad. Para los
productos diseRados para funcionar con pilas u otra fuente de energia, consulte las instrucciones
de operaci6n.
18) Sobrecarga -- No sobrecargue las tomas de corriente, los cables de prolongaci6n o los
receptaculos de conveniencia integrales porque se puede correr el riesgo de causar un incendio
o recibir una descarga electrica.
19) Entrada de objetos y liquidos -- No meta nunca objetos de ninguna clase en este producto a
traves de las aberturas porque pueden tocar puntos de alto voltaje peligrosos o cortocircuitar
partes que podrian causar un incendio o una descarga electrica. No derrame nunca liquidos de
ningOn tipo sobre el producto.
20) DaRos que necesitan ser reparados--Desenchufe este producto de la toma de corriente y solicite
las reparaciones al personal de servicio cualificado cuando se den las condiciones siguientes:
a) Cuando el cable o la clavija de CA estb. daRado.
b) Si se ha derramado algun liquido o han caido objetos en el interior del producto.
c) Si el producto ha sido expuesto a la Iluvia o al agua.
d) Si el producto no funciona normalmente siguiendo las instrucciones de operaci6n. Ajuste
solamente aquellos controles descritos en las instrucciones de operacion, ya que un ajuste
incorrecto de otros controles podra causar daRos que a menudo requieren un arduo trabajo
de ajuste por parte de un tecnico cualificado para que el producto pueda volver a funcionar
normalmente.
e) Si el producto se ha caido o daRado de cualquier forma.
f) Cuando el producto muestra un cambio notable en su rendimiento, Io que indica que necesita
_J
ser reparado.
0-3
Page 48

INSTRUCCIONES IMPORTANTES DE SEGURIDAD
f
21) Piezas de repuesto--Cuando se necesJten piezas de repuesto, aseg0rese de que el tecnico de
servicio utilice las piezas de repuesto especificadas por el fabricante u otras cuyas caracteristicas
sean similares alas de las piezas originales. Ei uso de piezas no autorizadas puede causar
incendios, descargas electricas u otros peligros.
22) Verificacion de seguridad -- Una vez completado cualquJer trabajo de mantenJmiento o
reparacion en este producto, pida al tecnico de servicio que realice verificaciones de seguridad
para determinar si el producto esta en condiciones de funcionamiento apropiadas.
23) Montaje en pared o techo: Utilice un soporte montaje en pared aprobado por un laboratorio
independiente (como UL, CSA, ETL).
$61o el personal de servicio tecnico calificado debera usar estas instrucciones de servicio tecnico. Para
reducir el riesgo de que ocurra una descarga etectrica, no realice ningun tipo de mantenimiento que no este
en las instrucciones de funcionamiento, a menos que este calificado para hacedo=
k.
Conexi6n a tierra de la antena exterior: Si se
conecta una antena exterior a laTV, asegOrese
de que el sistema de antena este conectado
a tierra para obtener cierta protecci6n ante los
aumentos de voltaje y la acumulaci6n de cargas
estaticas,
El articulo 810 del C6digo Electrico Nacional,
ANSI/NFPA 70, proporciona informaci6n
relacionada con la conexi6n a tierra correcta
del poste y la estructura de apoyo, laconexi6n
a tierra del cable de entrada a una unidad de
descarga, el tamano de los conductores de
conexi6n a tierra, la ubicaci6n de la unidad de
descarga de antena, la conexi6n a los electrodos
de conexi6n a tierra y los requisitos para el
electrodo de conexi6n a tierra,
EJEMPLO DE OONEXION A TIERRA DE LA ANTENA SEGUN
EL CODIGO ELECTRICO NAC]ONAL ANSI,NFPA 70
ABRAZADERAS DE
CONEXI©N A TIERRA UN_DAD DE
_i CABLE DE ENTRADA
.... %
DE ANTENA
DESCARGA DE ANTENA
(NEC SECC_ON 810 20)
CONDUCTORES
DE CONEXION A TIERRA
(NEC SEOO_©N 810 21}
__ SISTEMA DE ELECTRODOS DE CONEXION
ERAS DE CONEXION A TIERRA
A TIERRA DEL SERV_C]O ELECTR_CO
{NEC ART 250)
NEC CODIGO ELECTRICO NACIONAL
J
• La advertencia indJca que los aparatos de Clase I deberan conectarse a un tomacorriente que cuente
con un conductor de conexJ6n a tierra de proteccJ6n.
• DeclaracJ6n que indica que el enchufe de alimentacJ6n de corrJente o el acoplador del producto
debera estar sJempre listo para usar.
• El enchufe de alimentacJ6n de corriente o el acoplador del aparato son dispositivos de desconexi6n;
el dJspositivo de desconexi6n debera estar siempre listo para usar.
• Cuando se utilice el INTERRUPTOR PRINCIPAL DE CORRIENTE omnipolar como el dispositivo de
desconexi6n, se debera descrJbir la ubicaci6n del producto y el funcionamiento del interruptor, y el
interruptor debera estar siempre listo para usar.
• Agua y humedad -- No utilice este producto cerca del agua como, por ejemplo, una baBera,
palangana, fregadero de cocina o lavadora; en un s6tano hOmedo; cerca de una piscina o un lugar
similar.
• Soporte--No coloque el producto en un carrito, soporte, tripode o mesa inestable. La colocacion del
producto en una base inestable puede ser la causa de que el producto se caiga, Io que podra causar
lesiones graves a personas y tambien daBos al producto. UtJlice solamente un carrito, soporte,
tripode, mensula o mesa recomendado por el fabricante o vendJdo junto con el producto. Cuando
coloque el producto en una pared, asegurese de seguir las instrucciones del fabricante. Utilice
solamente el hardware de montaje recomendado por el fabricante.
• Eleccion de la ubicaci6n--Elija un lugar no expuesto a la luz solar directa y con buena ventilaci6n.
• Ventilacion-- Los orJficJos de ventJlacJ6n y otras aberturas de la cubierta han sido dJse_ados para
ventilar el producto. No cubra nJ bloquee estos orificios de ventilaci6n y aberturas porque la falta de
ventilaci6n puede causar recalentamiento y/o reducir la duracion del producto. No coloque el
producto en una cama, sofa, alfombra u otra superficie similar porque las aberturas de ventilaci6n
podr4_n quedar bloqueadas. Este producto no ha sido diseBado para ser empotrado; no Io coloque
en un lugar cerrado como, por ejemplo, un mueble libreria o estanteria a menos que disponga de la
ventilaci6n apropiada o se sigan las instrucciones del fabrJcante.
La pantalla de cristal liquido utilizada en este producto esta hecha de cristal. Por Io tanto, podra
romperse si el producto se cae o recJbe un impacto fuerte. En el case de que se rompa la pantalla de
cristal liquido, tenga cuidado para que no le hieran las piezas de cristal roto.
k..
@-4
,)
Page 49

INSTRUCCIONES IMPORTANTES DE SEGURIDAD
• Calor -- El producto deber_, colocarse alejado de las fuentes de calor como, por ejemplo, radiadores,
salidas de aire caliente, estufas u otros productos (incluyendo amplificadores) que produzcan calor.
• La pantalla de cristal liquido es un producto de alta tecnologia que tiene 2.073.600 pixeles,
Io que le proporciona una imagen fina muy detallada. De vez en
cuando puede que aparezcan algunos pixeles no activos en la pantalla
a modo de puntos fijos de color azul, verde o rojo. Tenga en cuenta que esto no afecta para nada al
funcionamiento de su producto.
• Tormentas electricas -- Para una mayor proteccbn de la TV durante una tormenta electrica o cuando
se deja descuidada y sin usar durante largos periodos de tiempo, desenchOfela de la toma de
corriente de la pared y desconecte la antena. Esto evitara daRos al TV debidos a rayos y subidas de
tension.
• Cables de electricidad -- No debera ubicarse un sistema de antena exterior cercano a cables de
electricidad que pasen por encima de este u otras luces electricas o circuitos de alimentaci6n, o
donde pueda caer sobre tales cables de electricidad o circuitos. Cuando instale un sistema de antena
exterior, debera tomar un cuidado extremo para evitar tocar tales cables de electdcidad o circuitos,
pues el contacto con ellos podria resultar fatal.
• Para evitar un incendio, no ponga nunca ningOn tipo de vela o llama al descubierto encima o cerca de
laTV.
• Para evitar un incendio o una descarga electrica, no ponga el cable de CA debajo de la TV u otros
objetos pesados.
• No muestre una imagen fija durante mucho tiempo, ya que esto podra ser la
causa de que quede una imagen residual en la pantalla.
• Para evitar un incendio o una descarga electrica, no exponga este producto a
goteo ni alas salpicaduras.
Tampoco deber_.n ponerse encima del producto objetos Ilenos de liquidos
como, por ejemplo, floreros.
• No introduzca ningOn tipo de objeto en el producto. Introducir objetos por las aberturas de ventilacion
o por otras aberturaspuede ser causa de incendio o de descarga electrica. Tome especiales
precauciones al utilizar el producto con niRos en las proximidades.
Precauciones al transportar la TV
• Cuando transporte la TV, nunca la Ileve colgando ni ejerciendo presion sobre la pantalla. AsegOrese
de que el traslado de la TV Io realicen siempre dos personas y que sujeten el producto con ambas
manos, es decir, una de cada lado de la unidad.
Cuidado de la cubierta
• Utilice un paRo suave (algod6n, franela, etc.) y limpie suavemente la superficie de la cubierta.
• Utilizar un pare con quimicos (paRo tipo hoja seco/hOmedo) podria deformar los componentes de la
cubierta de la unidad principal y provocar grietas.
• La limpieza con un paRo duroo utilizando demasiada fuerza podria rayar la superficie de la cubierta.
• Si la cubierta esta sumamente sucia, realice la limpieza con un paRo suave (algod6n, franela, etc.)
humedecido en detergente neutro diluido en agua y retuerzalo por completo. Luego, limpie con un
paRo suave seco.
• La cubierta esta fabricada principalmente con plb.stico. Evite utilizar benceno, diluyente u otros
solventes, ya que podrian deformar la cubierta y causar un desprendimiento de la pintura.
• No rode con insecticidas u otros liquidos volatiles.
Ademas, tampoco permita que la cubierta entre en contacto con productos de goma o vinilo durante
perbdos extensos de tiempo. Los plastificantes que forman parte del plastico podrian hacer que la
cubierta se deforme y la pintura se desprenda.
Cuidado del panel de cristal liquido
• Apague el producto y desenchufe el cable de CA del toma de corriente antes de la manipulaci6n.
• Limpie suavemente la superficie del panel de la pantalla con un pare
suave (algodon, franela, etc.).
Para proteger el panel de la pantalla, no utilice un paRo sucio, Iimpiadores
liquidos o paros con quimicos (paRo tipo hoja seco /hOmedo, etc.). Esto
podria daRar la superficie del panel de la pantalla.
• La limpieza con un paRo duroo utilizando demasiada fuerza podria rayar
la superficie del panel de la pantalla.
• Cuando el panel de la pantalla este muy sucio, utilice un paRo suave humedecido para limpiarlo.
(Tenga cuidado al pasar el paRo porque si Io hace con fuerza puede daRar el panel de la pantalla).
• Si el panel de la pantalla tiene polvo, utilice un cepillo contra la electricidad estb.tica (disponible en
comercios) para Iimpiarlo.
• Para evitar rayar el marco o la pantalla, utilice un paRo suave y sin pelusas para la limpieza. Los paros
de limpieza aprobados estan disponible de forma directa a traves de Sharp en kits de un pare
(OOZ-LCD-CLOTH) o tres paros (OOZ-LCD-CLOTH-3). Comuniquese al 1-800-BE-SHARP para
realizar su pedido o visite http://www.sharpusa.com/SharpDirect.
,, ,)
0-5
Page 50

INSTRUCCIONES DE SEGURIDAD IMPORTANTES
SEGURIDAD DE LOS NI_IOS:
ASUNTOS RELAClONADOS CON LA CORRECTA COLOCAClON DEL TELEVISOR
A LA INDUSTRIA DE LOS ARTiCULOS ELECTRONICOS DE
CONSUMO LE IMPORTA
Los fabncantes, los minoristas y el resto de la industria de los artfculos electr0nicos de consumo
el compromiso de Iograr que el entretenimiento en el hogar sea seguro y se pueda disffutar.
- Cuando disfrute de su televisor, tenga en cuenta que todos los televisores --ya sean nuevos o
viejos--deben estar colocados sobre un soporte adecuado o instalados segun las
recomendaciones del fabricante. Los televisores que se colocan en forma inadecuada sobre
tocadores, bibliotecas, estantes,escritorios, parlantes, cajoneras, carros, etc. pueden caer y
provocar lesiones.
SINTONICE LA SEGURIDAD
® SIEMPRE siga las recomendaciones del fabricante para instalar el televisor de manera segura.
® SIEMPRE lea y siga todas las instrucciones para el uso adecuado del televisor.
® NUNOA permita que los ninos trepen o jueguen sobre el televisor o sobre el mueble en el que
se encuentra ubicado el televisor.
® NUNOA coioque el televisor sobre un mueble que se pueda usar f_cilmente como escalera;
pot ejemplo, una cajonera.
® SIEMPRE instale el televisor donde no se pueda empujar, ni sea posible tirar de el o voltearlo.
® SIEMPRE acomode los cables conectados al televisor de manera tal que nadie pueda tropezar
con ellos ni tirar de ellos.
INSTALACION DEL TELEVISOR EN LA PARED O EN EL ClELO RASO
® SIEMPRE comuniquese con su verldedor para consultarle acerca de un instalador profesional
si tiene dudas con respecto a su capacidad de instalar el televisor de manera segura.
® SIEMPRE utilice un soporte recomerldado por el fabricante de televisores que tenga una
certificaci6n de seguridad de un laboratorio independiente (como UL,CSA, ETL),
® SIEMPRE siga todas las instrucciones proporcionadas pot los fabricantes del televisor y
del soporte.
® SIEMPRE asegurese de que la pared o el cielo raso sobre el que instala eltelevisor sea
adecuado. Ciertos soportes no estan dise_ados para ser instalados en paredes o cielo rasos
con travesa_los de acero o construcciones con bloques de cemento prefabricados. Si no esta
seguro al respecto,comuniquese con un instalador profesional.
- Los televisores pueden set pesados. Se requieren como minimo dos personas para instalar un
televisor en lapared o elcielo raso.
COMO REUBICAR UN TELEVISOR VIEJO EN EL HOGAR
Muchas personas Ilevarlsus viejos televisores CRT a una habitaci0n secundaria de lacasa
cuando compran un televisor de pantalla plana. Se debe prestar especial atencion a la ubicacion
de losviejos televisores CRT.
® SIEMPRE coloque su viejotelevisor CRT sobre un mueble resistente que resulte adecuado
para su tamano y su peso.
® NUNCA coloque su viejo televisor CRT sobre un tocador en el que los ni_lospuedan usar los
cajones para trepar.
,_ SIEMPRE asegurese de que su viejo televisor CRT no sobresalga pot los bordes del mueble.
(D-6
CE.org/safety CE_
Page 51

REFERENCIA RAPIDA
Aseg0rese de que los siguientes accesorios esten incluidos con el producto,
f
Control remoto Pila de tama_o "AAA" Base (X 1) Manual de
( X 1) (X 2) con to+nillos funcionamiento Guia de Conexi6n
_. Pagina 8 Pagina 10 Pagina 7 ( X 1) ( X 1) ,J
Utilice siempre el cable de alimentaciOn de CA suminisbado con la TV.
Las ilustradones que aparecen ante+iormente poseen s0lo fines explicativos y pueden vadal Iigeramente de los accesorios +eales.
• Antes de colocar (o extraer) la base, desenchufe el cable de CA del terminal ENTRADA DE CA,
• Antes de realizar cualquier trabajo, coloque una protecci6n sobre el _rea de la base a fin de
poder apoyar la TV en este lugar, Esto permitir_ evitar que la TV sufra danos,
• Coloque la base en la direcci6n correcta.
• Asegurese de seguir las instrucciones. La instalacibn incorrecta de la base podria
causar una caida de la TV.
1. Coloque la TV boca abajo sobre una superficie segura que este cubierta por un pano suave.
2. Ajuste la base de la TV en la parte inferior de la TV,
3. Coloque los tomillos con un destornillador de cabeza en forma de cruz (no suministrado),
®
• No empuje con demasiada fuerza ni aplique presi6n e×cesiva sobre el cueUo de la base
a fin de evitar daRos al adaptar la TV al angulo de visualizaci6n rnas adecuado.
• AI armar o desarmar, debe sujetarla correctamente para evitar caidas.
Para ext+aer labase, lealice los pasos en orden inverse.
0-7
Page 52

REFERENCIA RAPIDA
1o Coloque laantena en laparte posterior de la Utilice el control remote apuntando hacia el
TV, (Consulte la pflgina 9), sensor del control remote ubicado en la TV.
2. Conecte el enchufe de CA de la TV en un Los objetos que se encuentren entre el control
tomacorriente de CA. remote y su sensor podrian no permitir un
funcionamiento correcto.
Remote control sensor
Coloque laTV cerca de un tomacor/iente de CA que posea
un f4cil acceso,
$61o se deber4 conectar este p/oducto a un tomacor/iente
de CA de 120 V, 60 Hz. La conexi6n del producto a otto
ripe de tomacor/iente podria daPlal el producto yanular la
garantia.
PAPA EVITAR UN RIESGO DE DESCARGA ELECTRICA,
NO TOQUE LAS PARTES SIN AISLACION DE LOS
CABLES CON EL CABLE DE ALIMENTACI6N DE CA
ENCHUFADO.
3. Encendido de la TV per primera vez.
A) Presione POWER (ENCENDIDO/
APAGADO) en la TV.
B) Elindieador POWER (ENCENDIDO/
APAGADO) ubicado en la parte frontal
de la TV se apaga.
ac
ENCENDIDO/
APAGADO
No es posible desmontar los altavoces de la TV.
ENCENDIDO
/APAGADO
4, Inserte las pilas en el oontrol remote.
(consulte la pagina 10).
/ t "h_ _f" //1T(5m)
30 ! |tm_ \ /
,
30
* El angulo es de 22 o cuando la stang se adjunta.
•, Precauciones relacionadas con el control
remote
• No exponga el contlol lemoto a impactos. Adem;*s, no
exponga el cent/el lemoto a liquidos ni Io coloque en lugares
con glan porcentaje de humedad,
• No instab ni coloque el control/emote bajo la luz solar
dilecta. El calor podria causar una deformaci6n dd cent/el
remote.
• El cent/el remote podrfa no funcionar de turma corlecta si
su sensor ubicado en laTV est;* ubbado debajo de luz solar
dilecta o iluminaciOn intensa, En estos cases, cambie el
_ngulo de iluminaci6n o la ubicaci6n de la TV, o utilice el
conhol remote ross cercano a su sensor.
IMPORTANTE:
SI LA UNtDAD NO SE ENCIENDE, DESENCHUFE LA
TV DEL TOMACORRIENTE Y REPITA LOS PASOS
DEINSTALACION. SI StGUE SIN PODER ENCENDER
LA -R/, CONTACTENOS TELEF©NICAMENTE AL
1-800-BE- SHARP.
@-8
Page 53

Preparaci6n
Para disfrutar de una imagen m_s nitida, utilice una antena exterior. A continuaci6n, se realiza una
explicaei6n breve sobre los tipos de conexiones utilizados para un cable coaxial. Si la antena
exterior utiliza un cable coaxial de 75 ohmios con un conector tipo F, conectelo en el terminal de
antena ubicado en la parte posterior de la TV.
1. Generalmente, un sistema de 75 ohmios
es un cable redondo con un conector tipo _Conector tipo F
F que puede conectarse f_cilmente al Cable coaxial de
terminal sin la utilizaci6n de herramientas F5ohmios (redondo)
(disponible en comercios).
2. Un sistema de 300 ohmios es un cable
piano de "doble conductor" que puede Cable de doble conductor de
conectarse a un terminal de 75 ohmios 300 ohmios (piano)
a traves de un adaptador de 300/75
ohmios (disponible en comercios).
AI conectar el cable RF a la TV, no apdete el conector _ ._-_ ...... j % //,x_, .
tipo F con herrarnientas. Si se utilizan herrarnientas, '_ _-- // \,_,?
podrfa daflalse la TV. (Aveda del cbcuito interno, etc.) _ / '_\( \
......._Yi_: ......
_:'- _,t\ Conector tipo F
Cable coaxial de 75 ohmios
Conexi6n de cable de antena
• Conecte el cable de la antena a la TV utilizando uno de los metodos que aparecen en
la ilustraci6n (@ ,@ ,® o@)
(_ Cable sin corwersor de CATV
Cable de entrada de TV por cable
(_) Antena VHF/UHF
"_Cable coaxial de75 ohlnios (redondo)
(_ Combinaci6n de antena VHF/UHF
@ Antena VHF/UHF por separado
Terminal de antena
hogare[la (75 ohmios)
Cable coaxial
(disponibb en colnelcios)
Terminal de antena
hogale[la (75 ohmios)
Cable coaxial
(disponible on comereios)
@-9
Page 54

Preparacion
Si el control remoto no puede realizar las funciones de la TV, reemplace las pilas del control remoto,
1 Abra la tapa de las pilas, 3 Cierre la tapa de las pilas,
2 Inserte las pilas de tama_o "AAA"
(incluidas con el producto),
• Coloque las pilas segOn las indicaciones
de polaridad ( + ) y ( -) del compartimiento
de las pilas,
La utilizaci6n incorrecta de las pilas podria derivar en fugas qufmicas o explosiones,
AsegOrese de seguir las instrucciones que aparecen a continuaci6n,
• No mezcle pilas de diferentes tipos, Los diferentes tipos de pilas poseen diferentes caracteristicas,
• No mezcle pilas usadas con nuevas, Mezclar pilas usadas con nuevas podria acortar la vida Otil
de las pilas nuevas o causar una fuga qufmica en las pilas usadas,
• Extraiga las pilas ni bien estan agotadas, Los quimicos que podrian filtrarse desde las pilas y
entrar en contacto con la piel pueden causar un sarpullido, Si existe alguna fuga de qufmicos,
limpie meticulosamente con un pano,
• Las pilas suministradas con este producto podrian tener una expectativa de vida Otil mas corta en
funci6n de las condiciones de almacenamiento,
• Si no utilizara el control remoto durante un periodo de tiempo extenso, extraiga las pilas,
• No exponga las pilas (pilas instaladas) a un calor excesivo, tales como los rayos directos del sol,
fuego o condiciones similares,
@-10
Page 55

Contenido
INFORMACION IMPORTANTE ................................................................................................ 1
MARCAS COMERCIALES ........................................................................................................ 2
INSTRUCCIONES IMPORTANTES DE SEGURIDAD ............................................................. 3
REFERENCIA RAPIDA .............................................................................................................. 7
Accesorios suministrados .................................................................................................... 7
Colocaci6n/extracci6n de la base ........................................................................................ 7
Sugerencias para la instalacbn rapida ................................................................................. 8
Utilizacbn del control remoto ............................................................................................... 8
Antenas ............................................................................................................................... 9
Conexbn de cable de antena .............................................................................................. 9
Instalaci6n de las pilas en el control remoto ......................................................................... 10
Oentenido .................................................................................................................................. 11
Nombres de las partes ............................................................................................................ 12
TV (parte frontal) .................................................................................................................. 12
TV (parte lateral/posterior) .................................................................................................... 12
Control remoto .................................................................................................................... 13
Introduccion a las conexiones ................................................................................................ 14
Experiencia con imagenes en alta definicbn ........................................................................ 14
Tipos de conexbn ................................................................................................................ 14
Conexion de los equipos externos .......................................................................................... 15
Conexi6n de un reproduetor de Blu-ray Dise/DVD o sintonizador de
TV por cable/satelital de alta definici6n ................................................................................. 15
Conexbn de una consola de videojuegos, videograbadora,
videocamara o sintonizador de TV por cable/satelital .......................................................... 16
Conexbn de un amplificador de audio ................................................................................. 17
Conexi6n de un amplificador de audio/video ....................................................................... 17
Conexbn de una PC............................................................................................................ 18
Visualizacion de la TV .............................................................................................................. 19
Encendido/apagado ............................................................................................................. 19
Configuraci6n inicial ............................................................................................................. 19
Utilizacion directa de los botones .......................................................................................... 21
Menu de visualizacion en pantalla .......................................................................................... 24
Elementos del men0 ............................................................................................................ 24
Funcionamiento del men0 de visualizacbn en pantalla ......................................................... 25
Botones para la navegaci6n por el men0 ............................................................................. 26
Ajustes de Imagen ............................................................................................................... 26
Ajustes de audio .................................................................................................................. 28
Control de Energfa ............................................................................................................... 28
Opciones de Sistema .......................................................................................................... 29
Configuracbn Inicial ............................................................................................................. 31
Informaci6n ......................................................................................................................... 34
Disfrute con la reproduccion de fotos/musica/video ........................................................... 35
Apendice ................................................................................................................................... 38
Soluci6n de problemas ........................................................................................................ 38
Especificaciones ................................................................................................................. 39
Tabla de compatibilidad con PC .......................................................................................... 40
Especifi caciones del puerto RS232 ..................................................................................... 41
Avisos legales ...................................................................................................................... 42
Ilustraciones dimensionales
• Las ilustraciones dimensionales para la TV LCD aparecen en la contratapa interior,
O"11
Page 56

Nombres de las partes
ENCENDIDO/APAGADO
I ! ]ndioador de !
*OPC: Control de imagen 6ptica (Consulte la p_gina 27).
._..-_ Sensor del cont/d/emote
U O--oPc, ÷-
"1
HEAO
ANTJCABLE PHONE
®
_;,0
r 1 '_-"",:.':,':/_/_°s
__ p_R_INPUT 2 INPUT 4
"1 : Consulte las p4*ginas 14,16,17,18 y 35 pala la conexiOn de
equipos extemos.
*2: Consulte lap4*gina 14, 19, y 26 para obtener intermaciOn
sobre el funcionamiento de los botones.
DIGITALAUDIO OUTPUT
PC IN pC/HDMI
AUDIO
o
I_}- RS-232C iOiOi
R_.23_c
iolol
]}} -Terminal (HDMI)
.6_, INPUT 1
m
"1
-- Channel
-- Volume
-- MENU
-- INPUT
-- POWER
buttons
(OH Nv )
buttons
(VOL+/-)
button
button
button
*2
Fig. 1 Fig. 2
Orificio de tomillo au×iliar para prevention de volcado:
1. Antes de la utilizaci6n de la TV, sujete la TV a la mesa estable con el tornilto (tamai_o recomendado: T4 x 22) (Fig. 1).
2. En case de que no sea posible sujetar los tornillos a la mesa, utilice otros dos pernos (tamai_o recomendado: M6 x 16) para
sujetar los tornilIos al orificio de montaje en pared y sujetar la TV a ta pared con un atambre para mayor seguridad. (Fig. 2)
• Las ilustlaciones de este manual de funcionamiento poseen s01o fines explicativos y pueden set diferentes de las funciones/eales.
qD" 12
Page 57

Nombres de las partes
• AI utilizar el control remoto, apunte hacia la
TV,
1. INPUT (ENTRADA}: Permite seleccionar
una fuente de entrada de la TV, (Consulte la
pagina 21),
2. 0-9: Permite seleccionar el canal,
3. ENT (IR): Se dirige a un canal luego de
seleccionarlo con los botones 0-9.
4. FLASHBACK (CANAL ANTERIOR):
Presione este bot6n para regresar al canal o
modo de entrada externa sintonizado
previamente, Presione nuevamente este
bot6n para regresar al canal o modo de
entrada externa sintonizada actualmente,
5. AUDIO: Muestra el menO de configuraci6n
de MTS/SAP, (Consulte la pagina 22),
6. MUTE (SILENCIAR}: Permite silenciar el
sonido, (Consulte la pagina 21),
7. CH A/v : Permite seleccionar el canal,
(Consulte la p_gina 21),
8. MENU (MENU}: Muestra la pantalla de
menO,
9. PC: Permite cambiar directamente a la
fuente PC,
10. • / • / _1/1_, ENTER (ACEPTAR}: Permite
seleccionar un elemento deseado en la
pantalla, (Consulte la pagina 26),
11. RETURN (REGRESAR}: Permite regresar
a la pantalla de menO anterior,
12. FAVORITE CH (CANALES FAVORITOS}:
A, B, C, D: Permite preestablecer canales
favoritos en 4 categorfas diferentes, AI
visualizar la TV, puede cambiar entre los
canales seleccionados presionando A, B, C
y D, Cada tecla de favoritos permite
seleccionar varios canales,
13. AV MODE (MODO DE A/V): Permite
seleccionar una configuraci6n de imagen
ajustada, User (Usuario), Standard
(Estandar), Movie (Oine), Game (Juegos),
PC, Dynamic (Dinamico), Dynamic (Fixed)
(Dinamico (Fijo)), (Consulte la pagina 22).
14. VIEW MODE (MODO DEVISUALIZACION}:
Permite seleccionar el modo de imagen,
(Consulte la pagina 23),
15./_ : $61o para USB,
16. POWER (ENCENDIDO/APAGADO}:
Permite encender la TV o colocarla en el
modo de espera, (Consulte la pagina 19),
17. • (PUNTO): (Consulte la pagina 21).
18. DISPLAY (VISUALIZAR}: Permite visualizar
la informaci6n sobre el canal actual (o fuente
de entrada) en la pantalla,
19. FREEZE (CONGELAR}: Permite congelar
la imagen, Presione nuevamente este bot6n
para regresar a la pantalla normal,
20. VOL + / - : Permite establecer el volumen,
(Consulte la pagina 21),
21. SURROUND (SONIDO ENVOLVENTE}:
Muestra el men0 de configuraci6n de sonido
envolvente. (Consulte la pagina 21 ),
22. TV: Permite cambiar directamente a la
fuente TV,
23. USB: Permite cambiar directamente a la
fuente USB.
24. EXIT (SALIR): Permite salir de la pantalla
de men0,
25. SLEEP (TEMPORIZADOR}: Permite
establecer un tiempo luego del que la TV
ingresara automati-camente en el modo de
espera, Esta pantalla desaparecera luego
de algunos segundos y el temporizador
comenzara automaticamente la cuenta
regresiva, (Consulte la pagina 21 ),
26. CC: Permite visualizar los subtftulos en la
fuente de subtftulos ocultos, (Consulte la
pagina 22),
O"13
Page 58

Introducci6n a las conexiones
Una TV de alta definition sin una fuente de alta definicion e$ sirnplernente una TV normal.
Para disfrutar irnagene$ en alta definicion, deberb obtener una programacion de alta
definition a partir de las siguientes fuentes:
• Transmisbn por aire a traves de una antena con calidad de alta definicbn
Suscripcbn a TV satelital/cable de alta definicbn
Equipo externo compatible con alta definicbn
• Para obtenel infolmaciOn sobre cOmo actualizar a la programaciOn en alta definition, consulte a su proveedor de servidos de TV
satelital o pot cable.
La calidad de la imagen varia en funci6n del terminal utilizado, Para disfrutar de im_genes m_s
n[tidas, compruebe los terminales de salida del equipo externo y utilice sus terminales apropiados
para Iograr im_genes de mayor calidad,
Para la conexi6n de la TV con equipos externos, utilice cables disponibles en comercios,
• Las ilustraciones de los terminales poseen s61o fines explicativos y pueden variar ligeramente de
los productos reales.
Calidad de
la imagen H_ml
\_/
AUDIO
DVI OUT
co,_,, _,
,® ®n
Audio
(®) _ (Q}. _ Cable de A/V (disponible en comercios_
est_nda,Ca,idad .......... _ _ __o_ _ L-_AU_O_R}D " Page ,6
Cable HDMI cedificado
Cable minijack est6reo de _) 3,5 mm
Cable de conversbn DVI HDMI ,[_
Cable de video componente
(disponlbl ............ los)
Cable de audio (disponible en comercios)_ _ Page 16
ENTRADA 1 2, 3
M_::lm! "
ENTRADA 1 2, 8
(o?
Para visualizar im_genes de fuentes externas, seleccion e la fuente de entrada presionando el bot6n
INPUT (ENTRADA) en el control remoto o en la TV,
1. Presione el bot6n INPUT (ENTRADA}.
Ejemplo
* Aparecer_ la pantalla OH List (Lista de
canales),
2. Presione el bot6n A/T para seleccionar
la fuente de entrada,
o!;i?:i!;7:2:i_::L
" 0 O, ©,
o Tambien puede seleccionar la fuente de
entrada presionando el bot6n
ENTRADA. Cada vez que se presione
el bot6n ENTRADA, se cambiar_ la
fuente de entrada,
O _" _' _'_
ENTRADA1-_ ENTRADA2_ ENTRADA3
f t
TV_USB _PC IN_ ENTRADA4
oAparecer_ automaticamente la imagen
de la fuente seleccionada,
@-14
=$'Page 15
=_ Page 15
Page 59

Cone×i6n de los equJpos e×temos
Puede ooneotar varios tipos de equipos extemos en la TV.Para visualizar im_genes de fuentes
externas, seleooione la fuente de entrada utilizando el bot6n entrada en el oontrol remoto o el bot6n
INPUT (ENTRADA} en la TV. (©onsulte las p_ginas 13 y 21),Para la oonexi6n de la TV oon equipos
extemos, utilioe oables disponibles en oomeroios,
• Para proteger los equipos, apague siempre la TV antes de conectar cualquier equipo extemo.
• Lea detenidamente el manual de funcionamiento pertinente (reproductor de Blu-ray Disc, etc.) antes de reaiizar
las oonexiones.
•, AI utilizar el cable HDMI (iNPUT (ENTRADA) 1, 2 o 3}:
El terminal HDMI (Interfaz Multimedia de Alta Definioi6n) es una interlaz de audio/video que permite
laoonexi6n de las senales de audio y video a traves de un solo oable, El terminal HDMI admite una
entrada de video de alta resoluci6n,
• Reproductorde Blu-ray Disc • Reproductor de DVD
• SintonizadordeTV pot cable/satelitaIde alta definici6n
Cable HDMI certificado
Dependiendodel equipo conectado, nose emitiraaudio desdeel terminal DIGITALAUDIO OUTPUTen la conexion HDMI.En
estecaso, establezcalosformatos de audio delequipo conectado en PCM,32/44,1/48 kHz.
Seemitir_ audio digital6ptico enest6reo de 2canalescuando procede delequipo externoconectado al televisormedianteun
cableHDMI.
•, AI utilizar un cable de conversi6n DVI-HDMI (iNPUT (ENTRADA) 1, 2 o 3):
• Reproductor de Btu-ray Disc = Reproductor de DVD
• Sintonizador de TV pot cable/satelitaI de alta definici6n
Cable minijack est6reo de _) 3,5 mm
, I
• AI utilizar un cable de conversion DVI HDMI, deber_/ealizar una conexiOn de audio anal6gica. En este caso, adem_*s de conectar
un cable de conversion DVI HDMI al terminal INPUT 1,2 o 3 (HDMI) (ENTRADA 1,2 o 3), conecte un cable minijack esteleo de
e 3,5 mm al terminal AUDIO PC/HDMI.
_===-_
O"15
Page 60

Cone×i6n de los equipos extemos
mAI utilizar el cable de video componente (iNPUT (ENTRADA) 4):
• Reproductor de Blu-ray Disc + Reproductor de DVD
• Sintonizador de TV pot cable/satelital de alta definici6n
CbMe de composante video
Cable de audio
+
• Para disfrutar de una visualizaciOn 1080p, conecte el equipo externo utilizando un cable HDMI certificado o un cable de video
componente y configure el equipo en la salida 1080p,
• Consulte la pagina 15 pa+a obtener in+urmaciOn sob+e laconexiOn de un rep+oductor de Blu ray Disc, rep+oductor de DVD o
sintonizador de TV por cabb/uatelital de alta definiciOn at ter rninal HDMI,
mAI utilizar el cable de video compuesto (iNPUT (ENTRADA) 4}:
• Consola de videojuegos • Videograbadora
• Videoc_mara • Sintonizador de TV por cable/satelital
Cable de AV
+ill
®®®®®
PB PR L-AUDIO-R
UDIO-L (White)
AUDIO-R (Red)
li
(8_" 16
Page 61

Cone×i6n de los equipos e×temos
[] At utitizar un cabte coaxial:
Es posible transmitir audio a traves del terminal DiGiTAL AUDIO (AUDIO DiGiTAL). Se emite audio
PCM desde el terminal.
Cable coaxial
AUDIO OUTPUT
• La salida de audio digital no est,* disponible al util izar la entrada HDMI.
Sintonizador de TV pot cable/
satelital de alta definici6n
Si laimagen no est4 sincronizada con el audio, verifique laconfiguraciOn del sistema de sonido envolvente conectado.
Salida del audio de la TV a traves de un amplificador de A/V:
O"17
Page 62

Cone×ion de los equipos externos
Consulte la p_gina 40 para obtener una lista de lassenales de PC compatibles con laTV,
•, AI utilizar el cable HDMI (INPUT (ENTRADA) 1, 2 o 3}:
CaUe HDMI celtificado
Los telminales HDMI s61o admiten se_!ales digkales.
•, AI utilizar un cable de cenversidn DVI-HDMI (INPUT (ENTRADA} 1, 2 o 3}:
AI utilizar un cable de conversion DVI HDMI, deber_/ealizal una conexiOn de audio anal6gica. En este caso, adem_*s de
conectar un cable de conversb n DVI HDMI al terminal INPUT 1,2 o 3 (HDMI) (ENTRADA 1,2 o 3), conecte un cable minijack
est6reo de o 3,5 mm al terrain al AUDIO PC/HDMI,
•, AI utilizar un cable RGB analogico (PC IN (ENTRADA DE PC}}:
_ _'........._,
PcIN
1 1
Oable RGB anal0gico _
_1_ Cable minijack est6reo de _)3,5 mm
AI utilizar un cable AGB anal6gico, conecte la se_al de audio en el terminal AUDIO PC/HDMI de PC IN (ENTRADA DE PC).
@-18
(c
Page 63

Visualizaci6n de la TV
Presione POWER (ENCENDIDO/APAGADO) en la TV o
...... ,. encender la TV.
_ • Existeun peque_o consume de energia el6ctrica induso cuando la TV se encuentr_
POWER (ENCENDIDO/APAGADO) en el control remote para
* Indicador POWER (ENCENDIDO/APAGADO): Encendido:
verde; apagado: rojo.
Presione POWER (ENCENDIDO/APAGADO) en la TV o
POWER (ENCENDIDO/APAGADO) en el control remote
nuevamente para apagar la TV.
, La TV ingresa en el mode de espera y desaparece la imagen
en la pantalla.
* Si no utilizar_ la TV durante un pedode de tiempo extenso, asegOrese de
desenchufar el cable de alimentaciOn de CA de1 tomacordente de CA.
apagada.
Si no existe ninguna se¢!al de ent/ada durante 5 minutes, la TV ingresar_
autom4*ticamente en el mode de espera.
Cuando encienda la TV per primera vez,
Configuraci6n inicial Io guiar_ per el proceso de
configuraci6n. Realice los siguientes pasos
antes de presionar POWER (ENCENDIDO/
APAGADO) en el control remote.
1. Inserte las pilas en el control remote.
(Consulte la p_gina 10).
2. Conecte el cable de la antena a la TV.
(Consulte la p_gina 9).
3. Enchufe el cable de alimentaci6n de CA en
un tomacorriente de CA. (Consulte la
p_gina 8).
TV USB PC MENU
J........J" :i;:
\ 9 '\ / ", / )
1. Configuraci6n inicial
• Aparecer_ la pantalla Configuraci6n inicial
la primera vez que encienda la TV.
Presione el bot6n ENTER (ACEPTAR)
para comenzar con la configuraci6n EZ,
2. Configuraci6n de idioma
• Seleccione el idioma del menO OSD entre
English, Espanol o Frangais,
• Presione A/T para seleccionar el idioma
deseado que aparece en la pantalla y, a
continuaci6n, presione lp- para avanzar al
pr6ximo paso.
Ubicacion "iV
Seleccione "Casa" o "Tienda" segOn el lugar en
el que va a instalar el televisor, Este producto
cumple con ENERGY STAR en mode predeterminado
de ajuste para Casa.
La calificaci6n ENERGY STAR esta basada en el MODe
AV "Estandar".
3. Configuraci6n de ubicaci6n
• Presione el bot6n A/T para seleccionar
"Inicio" o "Almacenar" y presione el bot6n
para avanzar al pr6ximo paso,
@-19
Page 64

Visualizaci6n de la TV
Home (Hogar): "Power Saving" ("Ahorro de energfa)
esta establecido en "On" ("Activado") y AV MODE
(MODO DE A/V) esta establecido en "STANDARD"
("ESTANDAR").
Tienda: "Ahorro de energfa" se establece en
"Apagado" y MODO AV se establece en "DINAMICO
(Fijo)". Se puede establecer Reiniciar Imagen y Demo.
4, Ant,/Cable (Ajuste de antena)
• Aseg0rese que tipo de conexi6n se esta
realizando con la TV al seleccionar "Aire"
o "Cable",
• Presione el bot6n A/V para seleccionar
"Aire" o "Cable" y presione el bot6n •
para avanzar al pr6ximo paso,
Busq. Canal (Busqueda de canales)
La b0squeda automatica de canales hace que
el televisor busque todos los canales que
puedan verse en la zona establecida.
5, Cuando se selecciona "Air" ("Aire) o
"Cable" en la configuracion Antenna
(Antena):
Pulse A/V para seleccionar "lnicio", y luego
pulse ENTER.
7. Completado
Despues de que se complete la
configuraci6n, la pantalla mostrara "EZ
Setup Completed" ("Configuraci6n EZ
completada"), presione ENTER (ACEPTAR)
para finalizar la configuraci6n EZ. La TV
cambiara al primer canal encontrado.
• La programaciOn autom;*tica requerir_ 20 minutos o m£s en
completarse, Espere hasta que aparezca el mensaje
"ProgramaciOn autom_tica completada".
6. Ini¢io de la busqueda de canales
• Espere a que finalice la b0squeda de
canales.
• Si presiona EXIT (SALIR}, el proceso
regresara al paso anterior.
• Si omite este paso, es posible realizar la
b0squeda de canales desde el men0 TV.
(Consulte la pagina 32).
Page 65

Utilizaci6n directa de los botches
• Se puede cancelar el silencio utilizando el metodo que
@ a continu_ci6n.
_ii_ aparece
rs_TJ
@@@@
(; () (()
Puede cambiar los canales presionando los
botones CH A/ V O 0-90 • (PUNTO).
Ejemplos:
Para seleccionar un n_mero de canal de 1 6 2
digitos (por ejemplo, el canal 5):
Presioneel bot6n 5_IR.
Para seleccionar un n_mero de canal de3
digitos (por ejemplo, el canal 115):
Presioneel bot6n 1_1 _5_ IR
Para seleccionar un n_mero de canal de4
digitos (por ejemplo, el canal 22,1):
Presioneel boton 2 _ 2 _ * (PUNTO)_ 1
• AI seleccionar un nOmero de canal de 1 digito, no es necesari
o presionar 0 antes del nOmero.
Puede cambiar el volumen presionando
VOL +/- en la TV o en el control remoto.
• Para subir el volumen, presione VOL +.
• Para bajar el volumen, presione VOL -.
Para visualizar imagenes de fuentes externas,
seleccione la fuente de entrada utilizando el
bot6n INPUT (ENTRADA) en el control remoto
o el bot6n INPUT (ENTRADA) en la TV,
1. Presione el bot6n INPUT (ENTRADA),
• Aparecera una lista de todas las fuentes
seleccionables,
2. Presione INPUT (ENTRADA) nuevamente
para seleccionar la fuente de entrada,
• Aparecera automaticamente la imagen de
la fuente seleccionada,
• Cada vez que se presione el bot6n INPUT
(ENTRADA), se cambiara la fuente de
entrada,
• Si presiona el bot6n A/, para
seleccionar la fuente de entrada, presione
el bot6n INTRO para confirmar la
selecci6n,
Se cancelar4_ el silencio si presiona VOL +/- o MUTE
(SILENCIAR)
Permite establecer un tiempo luego del que la
TV ingresara automaticamente en el modo de
espera.
Presione el bot6n SLEEP (TEMPORIZADOR).
• Aparecera el tiempo restante cuando
se haya establecido el temporizador.
• Cada vez que presione el bot6n SLEEP
(TEMPORIZADOR), eltiempo restante
cambiara como se muestra a continuaci6n:
Des _ 30 .= 60 .= 90 .= 120
t t
• @uando el temporizador este establecido,
se iniciaraautomaticamente la cuenta
regresiva.
• Si desea ajustar el temporizador, puede
presionar el bot6n SLEEP
(TEMPORIZADOR) dos veces y, a
continuaci6n, cambiar la configuraci6n del
tiempo,
• Seleccione "OFF" (Non) y presione el bot6n SLEEP
(TEMPORIZADOR} para cancelar el temporizador.
• La T_/ingresard] en el modo de espera (el indicador
encendido/apagado se encender_i de color rojo) cuando el
tiempo restante Ilegue a cero.
Presione el Presione el bot6n FLASHBACK
(CANAL ANTERIOR) para cambiar al canal o
entrada sintonizada previamente,
• Presionenuevamenteelbot6n FLASHBACK
(CANAL ANTERIOR)paracambiaral canalo
entradasintonizadoactualmente.
La funci6n de sonido envolvente otorga un
efecto de sonido envolvente desde los
altavoces. Cada vez que presione el bot6n
SURROUND (SONIDO ENVOLVENTE), este
modo cambiara entre Activado y Desactivado,
• Act: Permitedisfrutar de un sonidoenvotvente
naturaly realista=
• Des: Seemite el sonido normal.
• Puede acceder a la misma configuraci6n si selecciona
"Sonido envolvente" en los elementos del menO.
(Consulte la p&gina 28).
• Consulte la p4gina 14 18 para la conexi6n de los equipos
externos.
Permite silenciar la salida de sonido actual,
Presione el bot6n MUTE (SILENClAR),
Permite capturar y congelar una imagen en
movimiento que este visualizando.
Presione el bot6n FREEZE (CONGELAR}.
• Se captura una imagen en movimiento.
• Presione el bot6n FREEZE (CONGELAR)
nuevamente para cancelar esta funci6n,
@- 21
Page 66

UtilizaciOn directa de los botches
MODO DE A/V le otorga varias opciones de
visualizacbn seleccionables para adaptarse
mejor a los entornos de la TV, que pueden
variar debido a factores como el brillo de la sala,
el tipo de programa visualizado o el tipo de
entrada de imagen de los equipos externos.
• Presioneel bot6n AV MODE (MODO DE A/V).
Aparecerael MODODEA/V actual.
• Puedetenet losmismosajusteseligiendo
"Congelar"en los elementosdetmenO.
(Consultela pagina27=)
• Modo est_reo MTS/SAP
La TV posee una funci6n que permite la
recepci6n de sonido ademas del audio principal
del programa. Esta funci6n se llama Sonido
Multicanal de Televisi6n (MTS). La TV con MTS
puede recibir sonido mono, sonido est@eo y
programas de audio secundarios (SAP, por sus
siglas en ingles). La funci6n SAP permite que
una estaci6n de TV transmita otra informaci6n,
que podria ser audio en otro idioma o algo
completamente diferente, como informaci6n
sobre el clima.
Puede disfrutar de sonido est_reo de alta
definiciOno transmisiones SAP, cuando est_
disponible.
• Transmisiones est_reo: Visualiceprogramas
como eventos deportivos,showsy conciertosen
vivo con sonido estereodinamico.
• Transmisiones SAP: RecibatransmisionesdeTV
con sonido PRINCIPALo SAP=
$onido PRINCIPAL:Sonido normal detprograma
(yasea en mono o estereo)=
$onido SAP: Escucheun segundoidioma,
comentarioscomplementariosu otrainformaci6n.
(SAPes sonidomono).
Sies dificil escuchar sonidoestereo.
• Obtenga unsonidomas nitidocambiando
manualmenteal modo de sonidomono=
Puede cambiar el MTS como se muestra a
continuacbn para ajustarlo a la senal de
transmisbn de televisbn.
Presione el bot6n AUDIO para cambiar entre
los modos de audio.
Ejemplos: al recibir MTS y SAP
Modo PRINCIPAL+ SAP: PRINCIPAL4,==,=_SAP
Modo MONO:MONO
• Modo de audio de transmisiOn digital
Los tipos de audio transmitidos en una
transmisbn digital incluyen ENVOLVENTE,
MONO y ESTEREO. Ademas, es posible que
varias pistas de audio acompanen a una sola
pista de video.
Presione MTS/SAP para cambiar entre los
modos de audio.
Ejemplo: al recibirtransmisiones digitales
ESTEREO(Audio1)==_ESTEREO(Audio2)
ENVOLVENTE(Audio3)
• MTS sOlo funciona en el modo TV.
La TV posee un decodificador interno de
subtitulos ocultos. Permite visualizar como
subtitulos en la TV conversaciones, narraciones
y efectos de sonido. Los subtitulos ocultos
estan disponibles en algunos programas de TV
yen algunas cintas de video hogarenas VHS, a
discrecbn del encargado del programa.
El servicio de subtitulos ocultos digitales es un
nuevo servicio de subtitulos disponible s61o en
programas de TV digital (tambien a discrecbn
del proveedor del servicio). Es un sistema mas
flexible que el sistema de subtitulos ocultos
original, debido a que permite diferentes
tamanos y estilos de fuentes para los subtitulos.
Ouando se utiliza el servicio de subtitulos
ocultos digitales, aparecera una abreviatura de
3 letras que tambien indica el idioma de los
subtitulos ocultos digitales: ENG (ingles), SPA
(espanol), FRA (frances) u otros c6digos de
idioma.
No todos los programas y cintas de video VHS
ofrecen el servicio de subtitulos ocultos.
En el sistema de subtitulos ocultos, existe mas
de un servicio de subtitulos proporcionado.
Oada uno esta identificado con un nOmero. Los
servicios "OO1" a "004" muestran subtitulos de
los programas de TV superpuestos sobre la
imagen del programa.
En el sistema de subtitulos ocultos, los servicios
"TEXTO 1 o "TEXTO 4 muestran texto que no
esta relacionado con el programa que se esta
visualizando (por ejemplo, el clima o noticias).
Estos servicios tambien estan superpuestos
sobre el programa que se esta visualizando.
1. Presione el bot6n CC (subtitulos ocultos).
• Se abrira la pantalla actual de informacbn
de subtitulos ocultos. Presione el bot6n
00 para activar o desactivar la funcbn de
subtitulos ocultos.
Ejemplo:
Anal6gica:
CO1---) 002---) 003 ---) 004 J-) ]q-1
'1" ¢
-- _ ]q-4 4:-- ]q-3 _ ]q-2
Digital:
CO1J>C02 --) C03--) 004 --)]q-1J>]q-2--)qq-3J>]q-4
¢ ¢
-- 4- CS6 4- CS54- 0S4 4- 0S3 4- CS2 4- CS1
• La visualizaci6n de subtitulos ocultos no funcionarE] al
visualizar una entrada 480i, 480p, 720p, 1080i o 1080p a
travOs de VIDEO COMPONENTE: entr_*das Y PbPr o HDMI.
• La disponibilidad yel contenido de los subtitulos ocultos
dependen del proveedor del programa. Los subtitulos ocultos
est;_n disponibles cuando aparece el icono de subtitulos
ocultos en la pantalla.
• La disponibilidad yel contenido de los subtitulos ocultos y
subtitulos ocultos digitales dependen del proveedor del
programa. Los subtitulos ocultos est_n disponibles cuando
aparece el icono de subtftulos ocultos en la pantalla.
_- 22
Page 67

Utilizacion directa de los botones
Puede seleccionar el tama_o de la pantalla.
1 Presione el boton VIEW MODE (MODO DE VISUALIZAOION},
• Aparecera el menLi Modo de vista.
• Este mer/O n/uestra las opciones de Modo de vista que se pueder/seleccior/ar para el dpo
de senal de video que se esta recibiendo actualmente.
2 Presione el bot6n VIEW MODE (MODO DE VISTA} o A/V cuando aparezca el
menO Modo de vista para seleccionar el elemento deseado en el menO.
• Puede tener los mismos ajustes digiendo "Modo de Vista" en los dementos del men0. (Consulte la p_*gina 29.)
[] Para programas HD
Alarqa.
Punto x punto IPantana Cornpleta}
.9 L_
Alar_a. S IArnpliacion inteli_iente)
i
i
i) c.
Zoom
Adecuado para vet programas con una
relaci6rl de aspecto de 1.78:1 de
pantalla panoramica. El modo de
ampliaciOn todavla rnostrara fralljas
negras muy finas en la parle superior e
interior de la pantalla.
Cuando utilice la funci6n Punto x punto o Pantalla Completa es posible que se vean barras o ruido alrededor de pares
exteriores diferentes de la pantalla. Cambie el modo de vista para corregir esto.
• Para programas en 4:3 • Para USB-Video
Ejemplo: imagenes de los tamaSos de pantalla
Normal Alarga. S Zoom Aumento
N
Ideal para la visualizaci6n de
programas en 4:3 convencionales
en su formato normal.
• Para el modo de entrada de PC
Conecte la PC antes de realizar ajustes.
El tamaf_o de pantalla sdeccionable puede vadar segOn el tipo de sef!al de entrada.
SePal de entrada
4:3
SePal de entrada
i Punto X punto (solamente 1080i/p):
Detecta la resoluci6n de ]a seP_aly
i visudiza una imagen con el rnisrno n0melx}
de pixeles en ]a pantalla.
Pantaila Compieta (solamente 720p):
Puede seleccionar "Pantalla Completa"
solarnente cuando reciba una se¢la1720p.
(aumento inteligente)
Sit,re para ampliar programas 4:3 de
forma que Nenen la pantalla.
LOJ
Ideal para expandir programas
en 4:3 y cubrir toda la pantalla.
Normal Cine
Mantiene la relaci6n de Ideal para la visualizaci6n
aspecto original en una en pantalla panoramica.
visualizaci6n de pantalla Se recorta la parle superior
completa, e interior de la imagen.
Full Screen
Ideal para la visualizaci6n de DVD
anam6rficos en 2,35:1 de pantalla
panoramica en pantalla completa.
Punto de Dot
Este modo es de suma utilidad para DVD
en 1.78:1. AI visualizar DVD en 1.85:1. el
modo de expansi6n mostrara tranjas
negras delgadas en la parle superior
e inferior de la panta]la.
Full Screen
C)
La imagen cubre toda la
pantalla.
Adecuado para vet programas
con urla relaci6n de aspecto de
2.35:1 de pantalla panoramica
en toda
Punto de Dot
El
Detect_ la resolucidn de la
serial y rnuestra la imagen
con la rnisma cantidad de
plxeles en la pantalla.
i i
16:9
l©
La irnagen cubre
toda la pantalla.
E]
Detecta la resoluci6n de
la seFial y muestra la
imagen con la misma
cantidad de pixeles en
la pantalla.
O" 23
Page 68

Mend de visualizacibn en pantalla
Para el modo TV
Ajustes de Imagen ............................................... 26
Modo AV ................................................................. 27
Ajuste de OPC ........................................................ 27
Luz de fondo ........................................................... 26
Contraste ................................................................ 26
Briflo ........................................................................ 26
Color ....................................................................... 26
Matiz ....................................................................... 26
Nitidez ..................................................................... 26
Avanzado ................................................................ 27
Temperatura dei color ...................................... 27
Contraste activo ............................................... 27
Modo de peiicu]a DI .......................................... 27
Reducci6n ruido ............................................... 27
Ajustes de audio ................................................... 28
Agudos ................................................................... 28
Graves .................................................................... 28
Balance .................................................................. 28
Sonido surround ..................................................... 28
Control de Energia ............................................... 28
Apagado sin sepal ................................................... 28
Ahorro de energfa .................................................... 28
Opciones de Sistema ........................................... 29
Opciones de Vista ................................................... 29
Modo de Vista ................................................. 29
Congeiar .......................................................... 29
Cambiar Audio ................................................. 29
MTS ........................................................... 29
Lenguaje del Audio .................................... 29
Cambiar CC ..................................................... 29
Subtitutos Analogos .................................... 30
Subtitu]os Digitales ..................................... 30
Ajustes de Terminales de Entrada ............................ 30
Ajuste de audio ................................................ 30
Entrada PC ....................................................... 30
Ajuste de sinc[enizaci0n autom_tica (pa[a mode
de entrada de PC anal0gica solamente) ...........30
Ajuste de sincronizaci6n fina ....................... 30
Seiecci6n Audio ................................................ 30
Configuracion HDM] ......................................... 3t
Aitavoces ......................................................... 31
Ajuste de subtftulos ................................................. 31
Configuraci6n Inicial ............................................ 31
Autoinstalaci6n ....................................................... 31
Ajuste de Transmision ............................................. 32
Ajuste de Canal ................................................ 32
Canal favorito (Ajuste de los canales favodtos) ..32
Idioma ..................................................................... 32
Ajuste Individual ....................................................... 32
No= secreto ...................................................... 32
Control de los padres ...................................... 32
V-Chip ....................................................... 33
V-Chip (s61o DTV) ....................................... 32
Estado ....................................................... 32
Reiniciar .................................................................. 32
Informaci6n .......................................................... 34
Identificaci6n ........................................................... 34
Conectar al dispositivo de memoria USB/
disco duro USB .................................................... 35
Seleccionar los archivos que deben
reproducirse ........................................................ 35
Reproducir archivos de un dispositivo
de memoria USB ........................................... 35
Modo de fotos ........................................................ 85
Visua]izaci6n de vistas miniaturizadas ............... 35
Visua]izaci6n de una fotografia individual .......... 86
Presentacion de diapositivas ............................ 36
Modo de mOsica ..................................................... 86
Modo Video ............................................................ 87
Compatibilidad del dispositivo USB ......................... 37
• AIgunos dementos del menO podrfan no aparecen en funciOn de lafuente de entrada sdeccionada.
@- 24
Page 69

Mend de visualizacion en pantalla
1. Pulse MENU para visualizar la pantalla
MEN0,
2. C1_Pulse _1/1_ para seleeeionar el menO
deseado.
'_2_'Pulse V/_, para seleccionar un elemente
de ajuste espedfico, y luego pulse
ENTER,
• Es posible que se presenten elementos
adicionales de ajuste que esten
relacionados, Pulse V/A para
seleccionar el elemento deseado,
(3_'Ajuste el elemente al consultar la pantalla
gala,
• Las operaciones var[an segOn la
funci6n o elemento, Consulte la
pantalla gufa correspondiente a la
pantalla de ajuste del menO para
operaciones con botones,
3. Pulse MENU para salir,
Ejemplo
®
Ejemplo
_1_Pantalla gufa
• Esto indica los botones que se pueden
operar en la pantalla exhibida, La pantalla
gufa varia segOn la pantalla de ajuste de
menO,
• Las operaciones para algunos elementos
seleccionados se pueden presentar en la
barra de gufa de operaci6n de la parte
inferior de la pantalla,
_2_':Elemento visualizado en azul
• Esto indica el elemento actualmente
seleccionado,
• Pulse _1/1_ para pasar a la pantalla de
ajuste para este elemento,
_3] Elemento entre corchetes
• Esto indica el ajuste actual para el
elemento,
_4_Elemento visualizado en gris
• Esto indica que el elemento puede ser
seleccionado,
_5] Elemento de color negro
• Esto indica que el elemento no puede ser
seleccionado,
Hay varias razones per las cuales los
elementos no pueden ser seleccionados,
pero las razones principales son las
siguientes:
--No hay nada conectado al terminal de
entrada seleccionado,
--La funci6n no es compatible con la senal
de entrada actual,
®
• Las opdones del menO son diferentes segOn los modes de entrada selecdonados, pero los procedimientos de a*juste son los mismos.
• Las pantallas en el manual de operaciOn se ofrecen con fines explicativos (algunas ampliadas, otras recortadas) y pueden ser un
poco diferentes de las pantallas reales.
• El orden de las explicaciones para cada elemento dd men0 en las siguientes p_*ginas no necesariamente est,{ de acuerdo con la
alineaciOn de los elementos en pantalla.
@- 25
Page 70

Menu de visualizacibn en pantalla
Utilizaci6n del control rernoto
Utilice los siguientes botones en el control
remoto para navegar por el men0,
MENU (MEN0): Presione este bot6n para abrir
o cerrar la pantalla del men0,
T/A/4/_-: Presione estos botones para
seleccionar un elemento
deseado en la pantalla o
ajustar el elemento
seleccionado,
Intro: Presione este bot6n para
avanzar al pr6ximo paso o
para completar la
configuraci6n,
RETURN
(REGRESAR):
Presione este bot6n para
regresar al paso anterior,
Utilizaci6n del panel de control de la
unidad principal
Tambien puede navegar por el men0 con
el panel de control de la unidad principal,
El funcionamiento de los botones del panel
de control concuerda con aquel del control
remoto, tal como se muestra a continuaci6n,
CH v/A : Cursor v'/_, en el control
remoto.
_11
_11
VOL + / - : Cursor 4/_ en el control
MENU (MENU): MENU (MENU)
en el control remoto o EXIT
(SALIR) en el control remoto cuando
el men00SD se encuentra abierto.
INPUT (ENTRADA): Intro en el
remoto.
control remoto.
Permite ajustar la imagen a su preferencia a
traves de las siguientes configuraciones de
imagen,
Tv usB Pc MEnU
O()O@
....... F_;;S_i _ .....
SLEEP 00 XIE/_, MODE AV MOUE
1. Presione MENU (MENU) para visualizar la
pantalla MENU (MENU) y, a continuaci6n,
presione 4/_ para seleccionar "Picture
Settings" ("Configuraci6n de imagen") y
presione ENTER (ACEPTAR) o T para
ingresar,
2. Presione T/A para seleccionar un elemento
de ajuste especifico y presione Intro o _-
para ingresar en la configuraci6n,
3. Presione 4/_- para ajustar la configuraci6n,
4. Presione el bot6n MENU (MENU) para salir,
Luz de fondo
Contraste Para reducir Para aumentar
Brillo Para reducir Para aumentar
Color intensidad de la intensidad
Matiz piel se rojizos piel se vuelven
Nitidez Para reducir la Paraaumentar
El control de/et/oiluminaciOn aparecer;* deshabilitado cuando
la funciOn OPC est;_ establecida en "On" ('Activado").
La pantalla se La pantalla se
obscurece ilumina
et contraste el contraste
et brillo el brillo
Para reducir ta Para aumentar
color de color
Los tonos de la
nitidez la nitidez
Z:I:[_
Los tonos de la
mas verdosos
@- 26
Page 71

Mend de visualizacion en pantalla
Se pueden cambiar los ajustes de audio y video
para adecuarse al programa o contenido de
entrada que se esta mirando.
Seleccione de los siguientes modos de AV,
USER (USUARIO)/STANDARD (ESTANDAR)/
MOVIE (CINE)/GAME (JUEGOS)/PC/DYNAMIC
(DINAMICO)/DYNAMIC (Fixed)(DINAMICO (Fijo))
Ejemplo: Cuando la fuente de entrada es TV,
COMPONENTES, PC IN o HDMI 1 a 4
Est4ndar _ PELJCULA _ JUEGO _ PC_DIN_,MIC©
!
Estandar _ USUARIO [TV] _ DIN_,MICO (Fijo)
IEst_ndar: Para una imagen altamente definida en una
iluminacisn normal.
PELJCULA: Para una pelieula.
JUEGO: Reduce el brillo paraver mas facilmente las imagenes.
PC: Para PC.
USUARIO: Permite al usuario personalizar los ajustes que
desee. Puede ajustar el modo para cada una de las fuentes
de entrada.
DIN,_MICO: Para una imagen nitida que realza el contraste,
0til para ver programas deportivos.
DIN,_MICO (Fijo): Cambia las opciones de imagen y sonido
a los valores preajustados en la fabrica. No se permite hacer
ajustes.
• Puede seleccionar MODO AV pulsando AV MODE en el
control remoto. Consulte la p;*gina 22 para detalles de los
ajustes de MODO AV,
Ajusta automaticamente el brillo de la pantalla.
Apagado: El brillo se fija con el valor
establecido en "Luz trasera".
Encendido: Ajuste automatico
• Cuando se pone en "Encendido", el control de imagen 6ptica
(OPC) capta la luz ambiental y ajusta autom_ticamente el
bdllo de la luz de rondo.
AsegOrese de que nada tape el sensor OPC, Io que
podria afectar a su habNidad para sentir la luz
ambiental,
Este televisor proporciona varias funciones
avanzadas para optimizar la calidad de la
imagen.
• Para reponer todos los dementos de ajuste a los valores de
f_bdca, pulse A/T para selecdonar "Reiniciar", y luego pulse
ENTER.
Para un mejor balance de blancos, utilice la
correcci6n de la temperatura de color,
Calida: Blanco con tonos rojizos
Estandar:
Fria: Blaneo con tonos azulados
• Usuario: Se puede ajustar manualmente el
balance de blancos a traves de la ganancia
de rojo, verde y azul entre un maximo de 255
y un minimo de 0 para la temperatura de
cada color,
• Para reponer todos los elementos de ajuste a los
valores de fabrica, pulse A/T para seleccionar
"Reiniciar", y luego pulse ENTER=
Automaticamente ajusta el contraste de la
imagen de acuerdo a la escena.
Encendido: Automaticamente ajusta el
contraste de la imagen.
Apagado:Sin ajuste
Detecta automaticamente una fuente de pelicula
(codificada originalmente a 24 fotogramas/
segundo), la analiza y luego recrea cada
fotograma fijo para ofrecer una calidad de
imagen de alta definici6n.
Automatico: Detecta, analiza y convierte la
fuente de pelicula.
Apagado: Modo de vista normal.
• "DI Film Mode" ("Modo de pelicula DI") no funciona seg0n
el tipo de serial de entrada.
• "Auto" ("AutomE_tico") no funciona cuando el canal posee
una resoluci6n de se_!al de entrada 480p, 720p o 1080p,
• "DI Film Mode" ("Modo de pelicula DI") no est_ disponible en
la entrada de tormato de PC,
Produce una imagen mas clara.
Auto: Ajusta automaticamente el nivel de
reducci6n de ruido.
Alta/Medio/Baja: Seleccione un nivel
deseado para ver una imagen de video mas
clara,
Apagado: Sin ajuste.
• "Digital Noise Reduction" ("Reducd6n de ruidos digitales") no
est;_ disponible cuando se utiliza la serial de formato de PC.
O" 27
Page 72

Mend de visualizacion en pantalla
= • = . • •
Puede ajustar la calidad del sonido seg0n sus
preferencias empleando los ajustes siguientes,
Ejemplo
0
i TV USB PCMEN
1. Pulse MENU para visualizar la pantalla
MENU, y luego pulse _1/1_ para seleccionar
"Ajustes de audio",
2. Pulse A/, para seleccionar un elemento de
ajuste especffico,
• Seleccione "Surround" ("Envolvente") y
presione _1/1_para ajustar,
3. Pulse A/T (o _1/1_) para seleccionar el
ajuste deseado, y luego pulse ENTER,
4. Presione el bot6n MENU (MENU}
para salir,
Agudos mas debiles mas fuertes
Graves mas d6biles mas fuertes
Balance del altavoz del altavoz
Para agudos Para agudos
Para graves Para graves
Reduce el audio Reduce el audio
derecho izquierdo
• • • = = o .
El ajuste de control de la alimentaci6n le
permite ahorrar energia,
Ejemplo
1. Pulse MENU para visualizar la pantalla
MEN0, y luego pulse _1/1_ para seleccionar
"Control de Energia",
2. Pulse A/T para seleccionar el elemento de
ajuste especffico, y luego pulse ENTER,
3. Pulse A/T (o _1/1_) para seleccionar el
ajuste deseado, y luego pulse ENTER,
4. Pulse MENU para salir,
Esta funci6n permite que el televisor se apague
automaticamente cuando no se recibe sepal,
Activar: La alimentaci6n se desconectara
automaticamente cuando no se reciba serial
durante 15 minutos,
Desactivado: No se realiza esta funci6n,
Esta funci6n permite establecer el nivel de
Ahorro de energia para reducir el consumo de
energia y aumentar lavida 0til de la luz trasera,
Act: Optimiza el consumo de energia para
video,
Des: No se realiza esta funci6n,
• Para reponer los elementos de ajustes de audio a los valores
preajustados de f_brica, pulse A/V para seleccionar
"Reiniciar", pulse ENTER, pulse l/V para seleccionar "S[",
y luego pulse ENTER.
La funci6n de sonido envolvente otorga un
efecto de sonido envolvente desde los
altavoces,
Act: Permite disfrutar de un sonido
envolvente natural y realista,
Des: Se emite el sonido normal,
• Para algunos discos tal vez sea necesario hacer la
preparaciOn en su reproductor DVD/BD. En este caso,
consulte el manual de operaciOn de su reproductor DVD/BD.
• "Power Saving" ("Ahorro de energid') no funciona cuando se
establece AV MODE (MODO DE A/V) en DYNAMIC (Fixed)
DINAMICO (Fijo)).
• No puede seleccionar un elemento de Ahorro de energia
diferente para cada MODO AV.
Page 73

Mend de visualizacion en pantalla
ii iiil
1. Pulse MENU para visualizar la pantalla
MEN0, y luego pulse _1/1_ para seleccionar
"Opciones de Sistema",
2. Pulse A/T para seleccionar un elemento de
ajuste espedfi co, y luego pulse ENTER,
3. Pulse A/T (o _1/1_) para seleccionar el
ajuste deseado, y luego pulse ENTER,
4. Pulse MENU para salir,
Estas funciones son 0tiles para ajustar los
ajustes de audio y vfdeo, Las funciones de
Opciones de Vista se pueden operar con el
control remoto,
Esta funci6n cambia el tamaSo de la pantalla,
Seleccione "Opciones de Vista" en el men0 para
visualizar la pantalla de men0 Modo de Vista,
El men0 Modo de Vista varfa segOn lafuente de
entrada,
El televisor con MTS puede recibir sonido mono,
sonido estereo y programas de audio
secundarios (SAP). La funci6n SAP permite que
una emisora de TV pueda emitir otra informaci6n,
que bien puede ser audio en otro idioma o algo
completamente diferente como, por ejemplo,
informaci6n relacionada con el tiempo
meteorol6gico.
Podr& disfrutar de sonido est_reo de Hi-Fi o de
emisiones SAP donde se encuentren disponibles.
• Emisiones estereo: Vea programas como
acontecimientos deportivos, espectaculos y
conciertos con un sonido estereo dinamico.
• Emisiones SAP: Reciba emisiones de TV con
sonido MAIN o SAP.
Sonido MAIN: Pista de sonido de programa normal
(mono o estereo).
Sonido SAP: Escuche un segundo idioma, un
comentafio suplementado y otra informaci6n. (SAP
es sonido mono.)
Si el sonido est_reo se eye con difioultad.
• Obtenga un sonido mas ciaro cambiando
manualmente al modo de sonido mono fijo.
Puede cambiar MTS como se muestra abajo para que
concuerde con la seSal de emision de tetevisi6n.
Pulse ENTER para cambiar entre los modos de audio.
Ejemplos: cuando se reciben MTS y SAP
Modo STEREO: STEREO _ MONO
Modo STEREO + SAP: S][(SAP) '_ SAP(ST)'_ MONO
Modo MAIN + SAP: MAIN _ SAP
Modo MONO: MONO
Modo de audio de emisibn digital
Los tipos de audio transmitidos en una emision digital
incluyen AMBIENTAL, MONO y STEREO. Ademas, es
posible que m0ttiples pistas de audio acompa_en a
una sola pista de video.
Pulse ENTER para cambiar entre los modos de audio.
Ejemplo: euando se recibe una emisi6n digital
STEREO (Audio1) '_ STEREO (Audio2)
AMBIENTAL (AudioS)
! I
• Puede se,leccionar Modo de Vista pulsando VIEW MODE en
el control remoto. Consulte la pEsgina23 para el ajuste del
video que se estE] tr_*nsmitiendo desde una TV, PC, otro
dispositivo audiovisual, video USB.
Le permite capturar y congelar una imagen en
movimiento que este mirando,
• Puede seleccionar Congelar pulsando FREEZE en el control
remoto. Consulte la p_gina 21 para detalles de la funciOn de
congelaciOn.
ii!ii! ii!i!ii!i
El televisor tiene una funci6n que permite recibir
sonido diferente del audio principal para el
programa, A esta funci6n se le llama sonido de
televisi6n multicanal (MTS),
• MTS sOIo tunciona en el mode TV.
Le otorga la posibilidad de cambiar entre el
idioma principal y alternativo, cuando esta
disponible en el canal digital,
Le permite cambiar lavisualizaci6n de los
subtitulos ocultos, Seleccione "Cambiar CC" en
el men0 para visualizar la informaci6n de los
subtitulos ocultos,
• Puede seleccionar los subtitulos ocultos pulsando CC en el
control remoto. Consulte la p_gina 22 para detalles de la
funciOn de los subtitulos ocultos.
O" 29
Page 74

Mend de visualizacion en pantalla
Permite seleccionar los niveles de servicio de
subt[tulos ocultos de las transmisiones
anal6gicas que se visualizaran.
Los subt[tulos ocultos permiten leer en la
pantalla de la TV el contenido de voz de los
programas de televisi6n. Disenado para ayudar
alas personasconproblemas auditivos, este
servicio utiliza "cuadros de texto" en pantalla
para mostrar dialogos y conversaciones durante
el transcurso del programa de TV. Los
subt[tulos apareceran en la pantalla durante las
transmisiones con subt[tulos.
• 001,2,3o4
Apareceranenla pantallalos dialogos(y
descripciones)para la acciondet programa de TV
con subtitulos. Generalmente,CO1es laopcion
mas utilizada.002 puede utilizarsepara idiomas
alternativos,siemprey cuando selos este
transmitiendo.
• TEXT01, 2, 3 o 4
Generalmenteutilizadoparaguias decanales,
programaciones,caRelesde anuncios sobre
programascon subtitulos ocultos, noticias,
informaci6nsobre el clima einformes sobre Ios
mercadosbursatiles. Durantelatransmisi6ndeun
programacon subtitulosocuitos, no se utilizan
necesariamentetodos losserviciosde subtftulos.
POM" El terminal de salida 6ptica da salida a
se_ales de audio en formato PCM. Si su
sistema de audio digital no es compatible
con Dolby Digital, seleccione "PCM".
Dolby Digital" El terminal de salida 6ptica da
salida a senales de audio en formato Dolby
Digital. Reproduce sonido de programa
ambiental digital.
Desaetivade" Desactiva la salida de audio
digital.
Para ajustar automaticamente la imagen de PC.
Auto Sync (Sincronizaci6n automatica) se
encuentra s61o disponible cuando la fuente de
entrada es PC y la TV esta recibiendo una senal
de la computadora. Seleccione Auto Sync
(Sincronizaci6n automatica) para el ajuste
automatico de la configuraci6n.
• AsegOrese de conectar el PC al televisor y encenderlo antes
de iniciar "Sinc. auto.".
Permite configurar la forma en la que desea
visualizar los subtitulos ocultos digitales.
Seleccione uno de los canales de servicio digital
proporcionados por el proveedor de los
subt[tulos ocultos. Existen seis servicios
estandares. Servicio 1 esta designado como el
servicio de subt[tulos ocultos principal. Este
servicio contiene subt[tulos ocultos palabra por
palabra o casi palabra por palabra del idioma
principal que se esta reproduciendo en el
programa. Servicio 2 esta designado como el
servicio de idioma secundario. Este servicio
contiene subt[tulos ocultos en un idioma
secundario, que es una traducci6n de los
subt[tulos ocultos del servicio de subt[tulos
ocultos principal. Los otros subcanales de
servicio no estan asignados previamente.
Queda a voluntad del proveedor de los
subt[tulos ocultos utilizar los canales de servicio
restantes.
Puede dar salida a audio digital a un
amplificador AV u otro dispositivo similar cuyo
terminal DIGITAL AUDIO INPUT este conectado
al terminal DIGITAL AUDIO OUTPUT del
televisor. Seleccione un formato de salida de
audio compatible con el formato de audio del
programa que usted esta viendo y con el
equipo conectado.
_- 30
Normalmente, utilizando "Sinc. auto.", usted
puede ajustar facilmente la imagen segOn sea
necesario para cambiar su posici6n. Sin
embargo, en algunos casos, para optimizar la
imagen sera necesario hacer el ajuste manual.
Pes. H." Centra la imagen moviendola hacia
la derecha o hacia la izquierda.
Pes. V." Centra la imagen moviendola hacia
arriba o hacia abajo.
Relej" Ajuste cuando la imagen parpadea
con franjas verticales.
Fase" Ajuste cuando los caracteres tienen un
contraste bajo o cuando la imagen parpadea.
• La posiciOn predeterminada del cursor podria no set en el
centro debido a que la gama variable de la posiciOn de la
pantalla podrfa ser asim6trica.
• Los tangos variables de posiciOn de la pantalla dependen del
Modo de Vista o del tipo de serial. Los ranges pueden
visualizarse en la pantalla de ajuste de posiciOn.
Esta funci6n establece el terminal que va dar
salida al audio del computador.
Los elementos de ajuste varian segOn la fuente
de entrada. Seleccione la fuente de entrada
correspondiente al terminal conectado al PC y
luego ajuste el elemento deseado.
Page 75

Mend de visualizacion en pantalla
• PC IN
Video: Seteccione esto cuando ei TV yet PC estan
conectados usando un cabIe anal6gico RGB y no
hay entrada de audio.
Video+Audio: Seteccione esto cuando ei TV y ei PC
estan conectados usando un cable anal6gico RGB y
la entrada de audio se realiza pot medic de un
miniconector estereo de O 3.5 mm=
• HDMI IN
Auto (Autom_tico): La ruta de audio se establece
automaticamente en HDMI o entrada de Ifnea de PC.
HDMl(Digital): Seleccione esto cuando el TV y el
PC estan conectados usando un cable certificado
HDMI y {a entrada de audio se realiza pot medic del
mismo cable.
HDMI + An_logo: Seleccione esto cuando etTV y
et PC estan conectados usando un cable de
conversion de DVI-HDMI y la entrada de audio se
realca pot medic de un miniconector estereo de
© 3,5 mm.
• Cuando "SelecciOn Audio" se estaUece en "HDMI (DUta0",
no se obtendr_ sonido si solo utiliza un cable ce_tiflcado
HDMI pal-a*conectar con el equipo compatible con HDMI.
Para obtener sonido debe realizar una conexi6n analOgica
de audio,
• Si desea conecta/un equipo compatible con HDMI
utilizando so]o un cable certificado HDMI,
estaUezca "Sdecci6n Audio" en "HDMl(Digital)",
HDMI Mode (Modo HDMI) s61o aparece y esta
disponible cuando se conecta un dispositivo
HDMI.
Puede seleccionar entre Auto (Autom_tico},
Graphic (Gr_ficos) o Video.
Auto (Automatico): Se estabIece automaticamente la
sincronizacion de la entrada HDMI en el modo Video o
Graphic (Graficos).
Graphic (Gr_ficos): Se establece la sincronizacion de
la entrada HDMI en el modo Graphic (Graficos) (PC).
La imagen posee un escaneo completo.
Video: Se establece la sincronizacion de la entrada
HDMI en el modo Video. La imagen posee un
sobreesoaneo.
• HDMI Mode (Modo HDMI) sOlo funciona para la sincronizaciOn
de video HDMI y sincronizaciOn progresiva en las siguientes
resdudones:
1920xl 080p, 1280x720p, 720x480p y 720x576p.
Permite activar/desactivar los altavoces internos
de la TV, Las seflales de salida de audio no se
desactivaran incluso si se desactivan los
altavoces de la TV, La configuraci6n
predeterminada es On (Activado),
Esta funciCn le permite ajustar la apariencia en
la pantalla de los subtitulos ocultos de forma
que se ajusten a su preferencia.Puede ajustar 8
elementos:
• Estilo de subtitulos: Permite establecer esta
opci6n en e{ modo Default (Predeterminado) o
Custom (Personalizado).Si se selecciona el modo
Custom (Personalizado), el usuario puede modificar
los estilos de detalle que se describen a
continuaci6n. El resultado de la configuracion
aparecera inmediatamente en la paste inferior det
submenO OSD.
Nota: Esta funci6n esta s61o disponible en el modo
de TV, A/V y video componente=
• Tama_o de subtitulos: SeIeccione esta opci6n
para elegir un tamar_o de visualizaci6n de subtftulos
ocuitos en funcion de sus preferencias. Seleccione
"Small" ("Peque_o"), "Standard" ("Estandar") o
"Large" ("Grande").
• Color de primer piano: Permite seleccionar et
color det texto para la visualizaci6n de los subtitulos
ocultos.
• Opacidad de primer piano: Permite seleccionar la
opacidad det texto=
• Color de fondo: Permite seleccionar una de las
opciones de color de fondo.
• Opacidad de fondo: Permite seteccionar una de
las opciones de opacidad de fondo.
• Color de ventana: Permite seleccionar uno de los
colores para la ventana.
• Opacidad de ventana): Permite seleccionar una
de las opciones de opacidad de ventana=
Ejemplo
1. Pulse MENU para visualizar la pantalla
MENU, y luego pulse _1/1_ para seleccionar
"Configuraci6n Inicial".
2. Pulse A/, para seleccionar el elemento de
ajuste especifico, y luego pulse ENTER.
• Cuando seleccione individual Setup
(Configuraci6n individual), puede ingresar
aqui el nOmero seereto de 4 digitos.
Consulte la pagina 32 para configurar un
nOmero seereto.
3. Pulse A/T (o _1/1_) para seleccionar el
ajuste deseado, y luego pulse ENTER.
4. Pulse MENU para salir.
Podra volver a realizar la autoinstalaciCn incluso
despues de confi gurar los canales preajustados.
Idioma: Sdeccione entre3 idiomas(Ingles,FrancCs
yEspanol).
UbicaciCnTV: Sdeccione "Casa"o "Tienda"segOnellugar
en el que va ainstalareltelevisor.
Hogar: "PowerSaving" ("Ahorrode energia)est_estaUecido
en "On"("Activado")y AV MODE (MODODEA/V) est;_
estaUeddo en "STANDARD"("ESTANDAR").
Tienda: "Ahorrode energfa"se estableceen "Apagado" y
MODO AV se estableceen "DINAMICO(Fijo)".Se puede
estaUecer ReiniciarImagenyDemo.
La calificaci6nENERGYSTAResta basadaen el MODO
AV"Estandar".
@- 31
Page 76

Mend de visualizacion en pantalla
Ant./Cable: AsegOresedetaclase de conexionque
se hacecon su televisorcuando se selecciona
"Antena"o "Cable".
Busq. Canal: LabOsquedaautomatica de canales
haceque eitelevisorbusque todoslos canalesque
puedan verseenlazonaestabIecida.
• Si seieccione"Cable"para laconfiguracionde ]a
antena,los canalescodificados se eIiminaran
unavez quese hayacompletado la busquedade
canales.
Completado: Sevisualizalapantal[a de
confirmaci6nde los ajustes.Confirmela informaci6n
quese visualizaenla pantal]a.
• Consulte Configurac[On EZ en las p_g[nas 19 y 20 para la
configuraciOn de cada elemento.
• Si no se encuentra n[ngOn canal, asegOrese de la dase de
conex[On que se ha hecho con su televisor e intente de
nuevo "AutoinstalaciOn".
Si la preparaci6n inicial no memoriza todos los
canales de su regi6n, siga las instrucciones de
abajo para memorizar manualmente los canales.
Ant,/Cable: AsegOrese de la clase de conexi6n
que se hace con su televisor cuando se
selecciona "Antena" o "Cable".
Busq. Canal: La bOsqueda automatica de
canales hace que el televisor busque todos los
canales que puedan verse en la zona establecida.
Mem. Canal: Puede seleccionar los canales
que quiere omitir para cada uno de los tipos de
senal, ANALOG (Ant.), ANALOG (Cable),
DIGITAL (Ant.) y DIGITAL (Cable).
• Si no se encuentra ningOn canal, asegOrese de la clase de
conex[On que se ha hecho con su televisor e [ntente de
nuevo la b0squeda de canal,
• S[ presiona ENTER (ACEPTAR} despues f[nal[zar la
bOsqueda de canales, se vudve a realizar la b0squeda de
canales,
• AI visualizar, puede cambiar los canales seleccionados
presionando el botOn A, B, C y D en el contrd remote.
Tambien puede seleccionar un idioma desde el
menO Configuraci6n Inicial. Seleccione entre 3
idiomas: Ingles, Frances y Espaflol.
Si se hacen ajustes complejos y no es posible
restaurar los elementos de ajuste a los valores
normales, puede reponer todos los elementos
de ajuste a los valores de f_tbrica.
• Los elementos de a*juste de canales no camb[ar_n.
• Los dementos de a*juste de idioma no cambiar_*n,
• Los ajustes del nOmero secreto no camb[ar_n.
• Los elementos de _*juste de la ublcaci6n de la TV no
camblar_n.
Antes de ingresar en Individual Setup
(Configuraci6n individual), el usuario debe
ingresar en primer lugar el nOmero secreto.
Ingrese el nOmero secreto de 4 digitos con los
botones numericos del control remoto. El
nOmero secreto predeterminado es 0000.
Le permite utilizar un nOmero secreto para
proteger ciertos ajustes y evitar que sean
cambiados por accidente.
N_m. secreto nuevo:
Ingrese un nOmero secreto de 4 digitos con los
botches numericos del control remoto para cambiar el
numero seoreto=
Confirme el n_mero secreto:
Vuelva a ingresar el n0mero secreto de 4 digitos para
confirmar=
Esta funci6n le permite programar 4 canales
favoritos en 4 categorias diferentes.
Estableciendo de antemano los canales favoritos,
usted podr_t seleccionarlos luego f_tcilmente.
Para almacenar s.u canal favorito:
1. Presione MENU en el control remoto y seleccione
"Configuraci6n inicial"/"Oonfiguraci6n de
transmisi6n"/"Canales favoritos".
2. Presione A/, para seieccionar la categoria en la
que desea almacenar su canal favorito.
3. Presione A/T para seleccionar el canal deseado y
presione el bot6n ENTER (AOEPTAR) para
confirmar.
Para borrar su canal favorito:
1. Presione MENU en el control remoto y seleccione
"Configuraci6n inicial"/"Oonfiguraci6n de
transmisi6n"/"Canales favoritos".
2. Presione A/T para seleccionar "All data clear
(Borrado de todos los datos) "y presione ENTER
(ACEPTAR) para comenzar a borrar todos los
datos de canales favoritos.
@- 32
• Come medida de precauciOn, anote su nOmero secrete y
gu&rdelo en un lugar donde no Io pierda,
Se utiliza para activar o desactivar la funci6n de
control parental. No se puede seleccionar esta
funci6n en el menO a menos que se configure
primero el nOmero secreto.
Si: Activa control parental.
No: Desactiva control parental.
"V-Chip (DTVOnly)" ("V-Chip (s61oDTV)") s61o
estara disponible cuando se pueda descargar
un nuevo sistema de clasificaci6n a traves de la
transmisi6n digital en Estados Unidos.
Page 77

Mend de visualizacion en pantalla
V-CHIP es un dispositivo electr6nico de filtraci6n
incorporado en su televisor, Esta herramienta
permite que los padres controlen
considerablemente las emisiones a las que
puedan acceder sus hijos, Los padres pueden
elegir programas que consideren adecuados
para sus hijos y bloquear aquellos que no
juzguen adecuados, Lo hace automaticamente
una vez que usted activa la funci6n V-CHIP en
su televisor,"V-Ohip" y "Estado" no se
seleccionaran desde el men0 si usted no
configura primero su n0mero secreto,
• En los EE.UU. hay dos sistemas de calificaci6n para
vet imagenes reproducidas: consejos de TV para
los padres y calificaciones de pelfcutas.
• Los consejos de TV para los padres funcionan en
combinaci6n con el V-CHIP para que los padres
puedan evitar que sus hijos vean programas de
televisi6n inapropiados para eilos.
• Las calificaciones de pelfcutas se utilizan para tas
peticulas originales calificadas por la Asociaci6n
Cinematografica de America (MPAA) para set vistas
per TV per cable y que no hart side editadas para
vet per televisi6n. El V-CHIP tambien se puede
ajustar para bloquear las peticulas calificadas per la
MPAA.
• El ajuste entra automaticamente en "Btoqueo" para
cualquier calificaci6n inferior a la que usted ha
elegido=
• Si Estado no se pone en "Encendido", los ajustes
de configuraci6n no se activaran.
• MPAA (Sistema de calificacion voluntaria
para peliculas)
Pulse A/V para ajustar el elemento en su
posici6n deseada, "_" indica que el elemento
esta bloqueado, Pulse MENU para salir,
G: P0biico en general. Todas las edades admitidas.
PG: Se sugiere la presencia de los padres. Puede que
algo deI material no sea adecuado para los ni_os.
PG-13: Se recomienda la presencia de los padres.
Puede que atgo del material no sea adecuado para
ni_os de menos de t3 a_os.
R: Restringido. Los menores de 17 a_os deben ir
acompa_ados per los padres o un adulto encargado
de etlos (ta edad cambia en algunas jurisdicciones)=
NO-17: No se admite a nadie menor de 17 a_os.
X: La clasificaci6n X es una categoria antigua que se
encuentra unificada con NO-1 7, pete todavia puede
encontrarse codificada en los dates de peliculas
antiguas=
• El sistema de calificaci6n voiuntaria para pelfculas
s61o utiliza una calificaci6n basada en la edad.
Ejemplo
• Consejos de TV para los padres
Ejemplo
Pulse A/V para ajustar el elemento en su
posici6n deseada, "_" indica que el elemento
esta bloqueado, Pulse MENU para salir,
Edad sugerida
TV-Y :Todos tos ni_os
TV-Y7 : Dirigida a los ni_os mayores.
TV-G : P0bIico en general.
TV-PG : Se sugiere la presencia de los padres.
TV-14 : Se recomienda la presencia de los padres.
TV-MA : Para p0blico adulto sotamente.
Cuando ajuste un elemento individual de
calificacion basado en el contenido:
1. Pulse I_ o ENTER para aceeder a los
elementos del contenido bloqueado desde el
elemento de calificaci6n basado en la edad
actualmente seleccionado.
2. Pulse A/, para seleccionar un elemento
individual, y luego pulse ENTER para
desbloquearlo (desaparece "_"). Repita los
mismos pasos para los otros elementos.
3. Pulse • o RETURN para registrar una vez
establecidos todos los elementos individuales
de la calificaci6n basada en el contenido.
Contenido
FV : Violencia fantastica.
V :Vioiencia.
S : Actos sexuales.
L : Lenguaje de adultos.
D : Dialogo con sugerencias sexuales=
[] : Se puede establecer la califi cacion del
contenido, pero normalmente los canales de
televisi6n no la emiten.
X : Se puede establecer la calificacion del
contenido.
Ejemplo
TV-Y [] [] [] [] []
TV-Y7 X [] [] [] []
TV-G [] [] [] []
TV-PG X X X X
TV-14 X X X X
TV-MA X X X
O" 33
Page 78

Mend de visualizacion en pantalla
Sistemas de calificaci6n canadienses
(calificaciones para el ingles canadiense y para
el frances canadiense)
• Los sistemas de calificaci6n de TV en Canada se
basan en la polftica de la Comisi6n Canadiense de
Radiotetevisi6n y Telecomunicaciones (CRTC)
relacionada con la violencia en los programas de
tetevisi6n.
• Aunque la violencia es et elemento mas importante
que debe catificarse, la estructura desarrollada tiene
en consideracion otros contenidos de los programas
come, per ejemplo, el lenguaje, los desnudos, la
sexualidad y los temas de madurez.
• Cuando se ajuste et V-CHIP en el sistema
canadiense usted podra etegir entre las
calificaciones para el ingles canadiense o las
calificaciones para el frances canadiense.
= Calificaciones para el ingles canadiense
Pulse A/V para ajustar el elemento en
suposici6n deseada, "_" indica que el elemento
esta bloqueado, Pulse MENU para salir.
E: Exento: Inctuye prograrnas de noticias, deportes,
documentales y otros programas de infomlaci6n;
programas de entrevistas, videos musicales y programas
de variedades.
C: Nihos: Para los ni_os peque_os de menos de 8 a_os.
Pone touche cuidado con los temas que puedan
amenazar su sentido de seguridad y bienestar.
C8+: Ni_os de m_s de 8 a_os: Programas que no
contienen violencia come forma preterida, aceptabte o
0nioa para resolver confliotos; tampoco inoita a los ni_os
a irnitar actos peligrosos que 6stos puedan vet en ta
pantalla.
G: General: Considerado come aoeptabte para todos los
p0btioos. Apropiado para vedo toda la tamilia; contiene
muy poca violencia fisica, verbal o emooional.
PG: Aoompa_amiento de los padres: Para el p0btico en
general, pete tal vez no sea adecuado para los ni_os
mas peque_los (menos de 8 a_os) porque puede
contener temas controvedidos.
14+: M_s de 14 a_os: Puede contener temas en los que
la viotencia es uno de los elementos dominantes de la
historia, pete 6sta debe set esencial para el desarrollo de
la trama o el caracter. El lenguaje puede set protano y
haber desnudos en el tema.
18+: Adultos: Para espectadores de 18 a_os en adelante.
Puede contener escenas viotentas que, aunque est6n
relacionadas con el desarrolto de ta trama, los caracteres
o los temas, ban side fiJmadas para que las vean los
adultos. Pueden tenet un lenguaje soez y escenas de
sexo y desnudos.
= Calificaciones para el frances canadiense
Ejemplo
Ejemplo
Pulse A/V para ajustar el elemento en
suposici6n deseada. "_" indica que el elemento
esta bloqueado, Pulse MENU para salir,
E: Programaci6n exenta.
G: General: Para todos los p0blicos, contiene el rninimo
de violencia directa, pete puede estar integrada en la
trama de una manera humorosa o poco realista.
8ans+: General pete no recomendado para los ni_os
peque_os: Lo puede vet la mayoria del p0blico, pete
puede tenet escenas que motesten a los nihos de menos
de 8a_os incapaces de distinguir entre las situaciones
reales e imaginarias. Recomendado para set visto en
compa_ffa de los padres.
13ans+: Mas de 13 a_os: Puede contener escenas de
violencia frecuente y, per Io tanto, se recomienda verlo
en compa_fia de los padres.
16ans+: Mas de 16 a_os: Puede contener escenas de
vioiencia frecuente y de intensa violencia.
18ans+: Mas de 18 a_os: $61opara aduItos. Puede
contener escenas de violencia frecuente y de intensa
violencia.
•, Cancelacion temporal del V-CHIP BLOCK
El V-CHIP BLOCK funciona para censurar una
emision, yen ese case se visualiza "V-CHIP HA
SIDO ACTIVADO".
1. Pulse ENTER mientras esta activada la funci6n
V-CHIP y luego se visualizara el men0 de ajuste
del n0mero secrete.
2. tntroduzca el n0mero secrete de 4 digitos
utilizando 0-9. Ahora se cancela temporalmente
V-CHIP BLOCK.
•, Reactivacion del V-CHIP BLOCK
cancelado temporalmente
Puede reactivar el V-CHIP BLOCK cancelado
temporalmente come se muestra a continuaci6n.
• Seleccione el ajuste de "Estado" desde el men0
Control de los padres para reactivar BLOCK.
(Consulte la pagina 32.)
• Seleccione el ajuste "V Chip" ("MPAA", "TV Guidelines",
"Califi. Ing. Canada" o "Califi. Fra. Canada") desde
Control de los padres para reactivar BLOCK. (Consulte
las p_ginas 33 a 34.)
• Desconecte la alimentaciOn del televisor.
• El V CHIP BLOCK se activar_ al ejecutar uno cualquiera de
los tres m6todos de arriba.
0 o _ 0
Ejemp'o '\JF_'__\_ _ _ !
1. Pulse MENU para visualizar la pantalla MENU, y
luego pulse _1/1_ para seleccionar "lnformacion".
2. Pulse &/V para seleccionar el elemento de
ajuste especifi co, y luego pulse ENTER•
3. Pulse &/V (o _1/1_) para seleccionar el ajuste
deseado, y luego pulse ENTER.
4. Pulse MENU para salir.
_)- 34
Se muestra la versi6n actual del software del
televisor,
Page 79

Disfrute con la reproducci6n de fotos/m sica/video
Puede conectar la TV a un dispositivo de
memoria USB o disco duro USB para disfrutar
de la visualizaci6n de im_genes, reproducci6n
de mOsica y visualizaci6n de videos.
• En funci6n del dispositivo de memoria USB o disco duro
USB, es posible que la TV no pueda reconocer los datos
almaoenados.
Es posible que se demore algunos minutos la lectura de los
datos almacenados si el dispositivo de memoria USB/disco
duro USB posee demasiados archivos o carpetas.
• Use solamente caraoteres altanure6ricos para poner norebre
a sus arohivos.
Los nombres de archivos de mas de 80 caracteres (esto
podria variar dependiendo del conjunto de caracteres)
podrian no ser desplegados.
2. Pulse _1/_ para seleccionar "Foto",
"MOsica" o "Video", y luego pulse ENTER.
Ejemplc
Inserte el dispositivo de memoria USB con las
fotograffas, mOsica o videos almacenados en el
terminal USB de la TV.
f
AI conectar un disco duro USB, asegOrese de
utilizar un adaptador CA.
No remueva un dispositivo de memoria USB o
tarjeta de memoria del televisor mientras se esten
transfiriendo archivos, usando la funci6n de
exhibici6n de diapositivas o cambiando de pantallas
o antes de salir de "USB" desde ta Lista de entradas.
No inserte y remueva un dispositivo de memoria
USB/disco duro USB al o del televisor repetidamente.
Cuando use un lector de tarjetas, asegOrese de
insertar la Memoria primero antes de usar el lector
de tarjetas.
• No utilice un cable USB alargador cuando
conecte un dispositivo de memoria USB al
terminal USB del televisor.
• El utilizar un alargador USB con el dispositivo
de memoria USB puede provocar que el
televisor no funcione correctamente.
1. Presione INPUT (ENTRADA} para
seleccionar USB desde la lista de entradas o
presione el bot6n directo USB para ingresar.
3. Pulse _1/_ para seleccionar la carpeta
deseada, y luego pulse ENTER.
16 GB es la capacidad m£xima de unidades USB que se
admiten,
"VIEW MODE" ("MODO DE VlSUALIZACION") es una
configuraci6n fija durante el modo Photo (Fotografias) o
Music (MOsica). Durante el modo "Video", esto depende del
tipo de sdial de video que se est_ recibiendo actualmente
(consulte la p£gina 23),
La pantalla de guia de teclas desaparece autom£ticamente
transcurrido un determinado tiempo. Para que aparezca de
nuevo, pulse DISPLAY.
Ejemplo
Botones para visualizaei6n de vistas miniaturizadas
A/T'/_1/1_ Selecciona_ el elemento deseado.
AOPPTAR en este directorio,
RETURN Retornar al proceso anterior.
Menu Submen0
AI seleccionar un icono de carpeta: Ingresa
AI seleccionar una vista en miniatura de una
fotografia: Inicio de presentaci6n.
O" 35
Page 80

Disfrute con la reproducci6n de fotos/musica/video
Presione MENU (MEN0) para visualizar el
submenO, Puede examinar los archivos a traves
de las siguientes opciones,
Ordenar
Tipo de medio
Tama_o de vista en miniatura
• Cuando existan archivos de fotografia inv_lidos, aparecer_t la
marca X para el archivo.
Puede visualizar el nombre del archivo, la techa de captura,
el tamaho de archivo y eltamat/o en pixeles de la totografia
selecdonada en la esquina superior izquierda de la pantalla
(la techa de captura se encuentra s61o en el formato de
archivo EXIF),
La fotografia seleccionada en la pantalla de selecoi6n
de vistas en miniatura al presionar ENTER (ACEPTAR}.
Ejemplo
Presentaci6n de diapositivas
SAMR Retornar a la pantalla de selecd6n de vistas
A (rojo} Repetir una vez/repetir todo.
B (verde} Seleccione el inte_/alo de la presentaci6n,
C (azul) Seleccione el efecto de la presentaci6n,
D (amarillo} ReproducciOn de la fotograffas en orden aleatorio
I! Visualizaci6n de una fotografia,
VlSUALIZAR Muestra lainformaci6n,
Men_ SubmenO
miniaturizadas.
/ _ Fotografia anterior/fotografia siguiente.
Presione MENU (MEN0) para visualizar el
submenO, Puede seleccionar las siguientes
opciones para la visualizaci6n de fotografias,
Pausar
Repetir
Aleatorio
Duraci6n
Efecto
Mostrar informaci6n
• La pantalla de gu[a de teclas desaparece autom_tticamente
transcurrido un determinado tiempo. Para que aparezca de
nuevo, pulse DISPLAY.
Presione H en la presentaci6n de la fotografia.
Ejemplo
Botones para la visualizaci6n de fotografias
individuales
SAMR Regresa a la pantalla de seleccbn de vistas
A (rojo} Repetk una vez/repetk todo,
B (verde} Gke la fotografia 90 grados hada la derecha,
C (azul) Zoom de la fotografia.
D (amarillo} Reproducci0n de la fotografras en orden aleatorio.
/ _ Fotografia antedor/fotografia siguiente,
VlSUAMZAR Muestrala informacbn.
Men_ SubmenO
Presione MENU (MEN0} para visualizar el
submenO, Puede seleccionar las siguientes
opciones para la visualizaci6n de fotografias,
Reproducir
Repetir
Aleatorio
Girar
Zoom
Mostrar informacion
• La pantalla de guia de teclas desaparece autom_tticamente
transcurrido un determinado tiempo. Para que aparezca de
nuevo, pulse DISPLAY.
La rotacbn de fotos solo se aplica al elemento seleccionado
temporalmente y esta configuraci6n no es guardada,
Botones para el modo de rn_sica
&/'f'/4/l_ Selecdonar el elemento deseado,
ENTER Entrez dans ce directoke,
RETURN Retornar al proceso anterior.
Men_ SubmenO
Presione MENU (MENU} para visualizar el
submenO, Puede examinar los archivos a traves
de las siguientes opciones,
Ordenar
Tipo de medio
Tama_o de vista en miniatura
en miniatura,
Presentad6n.
Ejemplo
Pour s61ectionner une icOne de dossier:
Pour s61ectionner un fichier musique: Lecture
de la musique.
Ejernplo
@- 36
Page 81

Disfrute con la reproduccion de fotos/m(lsica/video
Botones para la reproduccibn de mQsica
Botones para la reproduccibn de videos
SAMR Regresa a la pantalla de selecci6n de vistas
A (rojo} Repetir una vez/repetir todo.
B (verde} ReproducdOn de la mOsica en orden aleatorio
D (amarillo) Muestra la informaci6n.
-_4 / _ Avance/retroceso
_- / H ReproducciOn/pausa.
VlSUAMZAR Muestra lainformaci6n.
Men_ SubmenO
en miniatura.
/ _ Fotografia anterior/fotografia siguiente.
Presione MENU (MEN(l) para visualizar el
submenO, Puede seleccionar las siguientes
opciones para la reproducci6n de mOsica,
'* Pausar
,* Repetir
,* Aleatorio activado
,* Mostrar informaci6n
* Ocultar espectro
,* Opciones de letras
Ejemplo
Botones para el rnodo Video
A/T/-_/!_ SelecciOn de un demento deseado.
ACEPTAR AI seleccionar un icono de carpeta: Ingresa
RETURN Regresa al proceso anterior.
Menu Submen0
en este directodo.
AI seleccionar un archivo de video:
ReproducciOn del video.
Presione MENU (MEN(I) para visualizar el
submenO, Puede examinar los archivos a traves
de las siguientes opciones,
'* Ordenar
,* Tipo de medio
,* Tama5o de vista en miniatura
Ejemplo
SAMR Regresaa lapanta41ade selecciOndevistasen miniatura
A (rojo} Repetir una vez/repetir todo.
B (verde} retroceso
C (azul) Avance
D (amarillo) Repetid6n AB. Selecdone la parte que
/ IIl!/ m ReproducciOn/pausa/detenci6n.
VISUAMZAR Muestra lainformaciOn.
Men_ SubmenO
Presione MENU (MEN0) para visualizar el
submen0. Puede seleccionar las siguientes
opciones para la reproducci6n de videos.
Pausar
,, Repetir
,, Programa
,, Mostrar informacion
• Modo A/V
• Tftulo
• Edici6n
• Cap[tulo
• Modo de visuaiizaci6n
Dispositivo Memoria USB, lector de tarjetas USB (Clase de
USB Almacenamiento Masivo), disco duro USB
Sistema de FAT/FAT32/NTFS (solo disco duro USB)
archivos
Formato de JPEG (.jpg .jpeg), JPEG progresivo (.jpg
archivos de
fotograf[as .jpeg), BMP (.bmp) y PNG (.png)
Formato de MP3 (.mp3) Velocidad binaria: 32k, 40k, 48k,
archivo de 56k, 64k, 80k, 96k, 112k, 128k, 160k, 192k,
mL_sica 224k, 256k, 320kbpsFrecuencia de
.mkv MKV H.264 AC3
.mp4 MP4 H.264 AAC-LC/
.mov MP4 H.264
.mpg PS MPEG2 LPCM
.mpeg MPEG1 MPEG
desea reproducir de forma repetitiva.
/ _'_ Video siguiente/video anterior.
muestreo: 32k, 44,1k, 48kHz
XviD
H.264 MP3
.avi AVI Motion Jpeg LPCM
.asf ASF H.264 LPCM
(SMP4) M PEG4 HEAAC
(SMP4) Motion Jpeg HEAAC
MPEG4 AC3
MPEG2
MPEG1 ADPCM
XviD MP3
MPEG4 LPCM
MPEG2 ADPCM
XviD AC3
XviD MP3
XviD MP3
MPEG4 AAC-LC/
MP3
ADPCM
AC3
No se garantiza la operaciOn cuando se usan concentradores
USB.
Es posible que algunos formatos de archivo de video no
puedan reproducirse.
Es posible que algunas im_genes no se muestren con la
proporciOn dimensional adecuada dependiendo del formato
de[ archivo.
- 37
Page 82

Apendice
Problema Posible soluci6n
• Vedfique si presiono el boton POWER (ENCENDIDO/APAGADO) en el control
• La TV no remoto. (Consuite la pagina 19). Si ei indicador de ta TV sigue de color rojo,
enciende presione el bot6n POWER (ENCENDIDO/APAGADO) en la TV.
• No se puede un funcionamiento defectuoso. En este caso, utilice la TV luego de apagaria o
utilizar la TV. desenchufar et cable de alimentaci6n de CA y voiviendoia a enchufar al cabo de 1
• El control remote • _,Estan agotadas las pilas? (Reemplace con pilas nuevas).
no funciona. • _,Esta utilizando ta TV debajo de una iluminaci6n intensa o fluorescente?
• La imagen se corLa • _,Serealizaron correctamente los ajustes det mode de pantalla, tales come el
con franjas a los tamaF_ode imagen? (Consulte la pagina 23).
lados.
• Coiores extraSos,
colores claros o • Ajuste el tone de {a imagen. (Consulte tas paginas 26 a 27.)
colores ma{ • sEsta demasiado brillante la habitaci6n? La imagen puede aparecer oscura en
alineados una habitaci6n que esta demasiado brillante.
• La TV se apaga • _,Esta ajustado el temporizador de apagado? (Consulte ta pagina 21).
repentinamente, que este obstruyendo laventilaci6n.
• No hay imagen • $Se ha seleccionado la entrada correcta? (Consutte la pagina 14).
• No hay sonido. • _,Presion6 el boton MUTE (SILENCIAR} en el control remote?
• La TV en • Esto no es un mal funcionamiento. Esto ocurre cuando ta caja se expande y
ocasiones hace un contrae Iigeramente de acuerdo a los cambios de temperatura. Esto no afecta
sonido crujiente, el funcionamiento de la TV.
• &El cable de alimentaci6n de CA esta desenchufado? (Consulte la pagina 8).
• $Se encendio la TV? (Consulte la pagina 19).
• Las influencias externas, como los rayos o la electricidad estatica, pueden causar
6 2 minutes.
• _,Estan coiocadas las pilas con la polaridad (+, -) correcta? (Consulte la pagina 10).
• sHay una luz fluorescente encendida cerca det sensor de{ control remoto?
• La temperatura interna de {aunidad ha aumentado. Extraiga cualquier objeto
• _,Es correcta la conexion a otros componentes? (Consulte {a pagina 16).
• _,Esta elvolumen demasiado bajo? (Consutte la pagina 21).
(Consutte la pagina 21).
Si olvida la contrasefla, restablezca el n0mero secreto siguiendo los procedimientos que se detallan
a continuaci6n:
1. Presione MENU.
2. Seleccione "Configuration inicial" y presione "ACEPTAR",
3. Seleccione "Configuration individual" y presione "ACEPTAR",
4. Presione el nOmero 7071.
5. Seleccione "NQrn. secreto",
6. Ingrese la contrasefla nueva,
* Como medida de p/ecauci6n, anote m_'{s ar/iba su nOmero secreto, c0rtelo de este manual y gu_ldelo en un lugar seguro.
Precauciones relacionadas con la utilizaci6n de la TV en entornos de temperaturas altas y bajas
• Cuando se utiliza la TV en ambientes de baja temperatura (por ejemplo, una habitaci0n u oficina), la
imagen podria dejar rastros o mostrarse ligeramente retrasada. Esto no representa un funcionamiento
defectuoso. La TV se recuperar_, cuando la temperatura regrese a un valor normal.
• Tampoco deje la TV en una ubicacion expuesta a la luz solar directa o cerca de un calentador, debido
a que esto podria causar que la cubierta se deforme y provocar un funcionamiento defectuoso del
panel de cristal liquido.
Temperatura para guardar la unidad: -4°F a +140°F (-20°C a +60°C)
@- 38
Page 83

Apendice
Elemento Modelo: LC-40LE550U
Panel Tama_io Clase 40" ( 40" Diagonal)
LCD Resoluci6n 2,073,600 pixeles (1,920 x 1080)
lV estandar (CCIR) Sistema ATSC/NTSC, estb_ndar de la 'f_/norteamericana
VHF/UHF Canales de VHF 2-13, canales de UHF 14-69
CAW Canales 1-135 (solamente canal no codificado)
Funci6n recepci6n digital (8VSB) Canales 2-69
de TV
Audio mOltiplex Sistema BTSC
Salida de audio 10 W x 2
Par_e
lateral
Terminales ANFTCABLE 750 desequilibrada, tipo F x 1 para Anal6gica y Digital (VHF/UHF/CArv)
Canal de terrestre
Par_e PC IN Entrada ANALOG RGB (PC) (Conector hembra mini Dsub de 15 contactos
)osterior
Idioma OSD Ingles / franc@s/ espariol
Alimentaci6n CA 120V, 60Hz
On Mode Power 50W
Consumo 89W (0.5W en espera con 120V CA)
Peso
Dimensiones*2 Televisor _-soporte 36s/16x23S/64x9 7/64 pulgada
(AnxAIxPr) Televisorsolamente 36s/16x214_4x31?s_ pulgada
Temperatura de funcionamiento +32°F a +-104°F (0°C a +40°C)
"1 No pueden recibi/se mensajes de alerta de emergencia via cable.
*2 Los "Dimensional D/awings" (Dibujos acotados) se muestran en la cubierta trasera interior.
SHARP sigue una pol'tica de mejoras continuas, pot Io tanto, se reserva el derecho de hacer cambios en el dise_o y en las
especiflcaciones, para mejorar el producto, sin previo aviso. Las cifras de las especificaciones del/endimiento indicadas son
valores nominales de las unidades de producci6n. Es posible que los valores de algunas unidades individuales sean algo
diferentes de los valores indicados en esta tabla.
Emisi6n
Cable digital*
(64/256 Canales 1-135 (solamente canal no codificado)
QAM)
RS-232C Conector macho D-sub de 9 conectos
ENTRADA 1 Entrada HDMI con HDCP, entrada de audio (toma mini estereo de o 3,5 mm)
USB Modo de fotos/mosicaYv[deo, Actualizaci6n de software
Auriculares Salida para auriculares
DIGFAL
AUDIO Salida audio digital 6ptica x 1 (PCM/Dolby Digital)
OUTPUT
AUDIO Entrada de audio (conector de q_3,5 mm)
PC/HDMI
ENTRADA 2 Entrada HDMI con HDCP, entrada de audio (toma mini estereo de o 3,5 mm)
ENTRADA 3 Entrada HDMI con HDCP, entrada de audio (toma mini estereo de o 3,5 mm)
ENTRADA 4 COMPONENT7 EntradaAV
Televisor _-soporte 26,5 Ibs./9.3 kg
Televisor solamente 18,5 Ibs,/8.4 kg
O" 39
Page 84

Apendice
Esnecesarioajustarcorrectamente el PCpara visualizarsepalXGA yWXGA.
PC Est&ndar VESAResoluci6n
720 x 400
VGA 640 x 480
SVGA 800 x 600
PC
XGA 1024 x 768
WXGA 1666 x 768
WUXGA 1920 x 1080
Horizontal
Frecuencia
31,46 kHz
31,47 kHz
37,50 kHz
37,88 kHz
48,08 kHz
46,88 kHz
48,36 kHz
56,48 kHz
60,02 kHz
47.71 kHz
66.58 kHz
Frecuencia
vertical
70.08 Hz
59.94 Hz
75.00 Hz
60.32 Hz
72.19 Hz
75.00 Hz
60.00 Hz
70.07 Hz
75.06 Hz
59,79 Hz
59.94 Hz
Apendice
[] Control de la TV con NaPC [] Forrnato del comando
® Conecte un cable RS-232C de tipo cruzado
(disponible en comercios) al Din/D-Sub RS-232C sum-
inistrado para efectuar las conexiones.
• S61o aquellas personas acostumbradas a utiNzar
computadoras deberAn emplear este sistema de
operaci6n.
[] Condiciones de la comunicaci6n
Ajuste la configuracion de comunicaci6n RS-232C en la PO
para que coincida con los ajustes de comunicacion de la TV.
A continuaci6n, se detalta ta configuraci6n de comunicaci6n
de la TV:
9.600 bps
8 bits
Ninguno
bit
Ninguno
[] Procedirniento de comunicaci6n
Envie los comandos de control desde la PC a traves del
conector RS-2320.
La TV ejecuta una funcion de acuerdo con el comando
recibido y envia un mensaje de respuesta a la PC.
No envie varios comandos al mismo tiempo.
Espere a que la PC reciba ta respuesta "OK" antes de enviar
el siguiente comando.
Ocho c6digos ASCII + CR
Oomandode4 dlgitos Par&metrode4 dlgiros C6digo dedevoluci6n
Comando de 4 digitos: comando. Texto de los cuatro
Par&metro de 4 digitos: par&metro 0-9, x, vacio, ?
[] Par_metro
Ingrese los valores del par&metro, alineando hacia la
izquierda, y complete con campos vacios para el resto.
(Aseg0rese de ingresar 4 valores para el par&metro).
Cuando el par&metro ingresado no se encuentre dentro de
un rango ajustable, se devolver& "ERR". (Oonsulte <<Formato
de los codigos de respuesta"). Cualquier valor numerico
puede reemplazar a "x" en la tabla.
[] Forraato de los c6digos de respuesta
Respuesta norm al Problema de la respuesta (error de
C6digo de devolueidn _ C6digo de devoluci6n
(0DH) (0DH)
caracteres.
Cuando se envia "?" para
algunos
comandos,
el valor de '_ '_ '_ '?
configuracion enviado
previamente responde.
comunicaci6n o comando incorrecto)
m
O
O
O
O
O
O
O
O
O
O
@- 40
Page 85

Apendice
[] Procedimiento de comunicacibn
No se garantiza et funcionamiento de aqueflos comandos no incIuidos.
ELEMENTO DE CONTROL COMANDO PARAMET_ OONTENI_S DE LOS _TROLES
Encen_o
SELECaONDE _NM,TAR
CON_IGURAC_O_DEENCEND_,APAGADO
MO_DEVISUAL_CIO W I D E
S_LE_CAR M / T E
SO,_DOEN_LVENTE A S S U
SELECCION DE AUDIO
TEM_DR _DO_
• Si aparece un gui6n bajo (_) en la columna det par#tmetro, ingrese un espacio.
• Si aparece un asterisco (*), ingrese un valor en el rango indicado entre parentesis dentro de CONTENIDOS DE LOS
CONTROLES.
• Cualquier valor numerico puede reemplazar a "x" en la tabla.
FOSlC_HORIZONTAL
FASE P H S E
iii
ilii i............
• !, !, ! _loone_m_oPC _1_ _ o_vi_o,z_d_menu+, ¸ _0_
_on_
1_p_ib_ #n_ar#_l_i_ dEdNinci6nest&P_[AV(AfV)]y [PCex_toalguaasr_l_lon_ <)
234DiponbN_o ruando_ transmitelaseral[AV(_X0
1280x1024(LC_2SV_U}v14_x1_C(kC32SV49U)
C_le DIGITAL {n_ero de _ pa_ 3 dgtc_ ma_ 3 6gt_)
Mtad del_n_ra _ _M _ _N_ _ _BLE DGTAL (rib ig_16_ _ G-lea _r,enor)
Cable D_G_TAL {n_ero _ _s p3_ 3 dgt_ ma_ 3_gt_)
Mtad taer& _ N0M g_ CAN_ a_ CABLE OlG TAL _ i_n_ _ caRal R_Por)
Cable DIG_T_ n r-ero _ _;[ pa_e 5 _git_ i_]fEr_r ;[ 000B}
Cable DIG_T_ n r-ero _ _;[ Ba_e 5 _8it_ _Berlor a 10 0B0)
Si TV no e ASSle_lon;_a _ c;B-_ bi;_r& a esla entrad_ _rr,i rr_ funa6n que CH }
Si TV no e A_le_l_;_a _ car- _i;_r& a esta entrad_ _rr,i rr_ f_na6n que CH }
@- 4i
Page 86

Apendice
Este dispositivo cumple con el Apartado 15 de las Normas FCC. Su funcionamiento esta sujeto
alas dos condiciones siguientes: (1) Este dispositivo no debera causar interferencias
perjudiciales y (2) este dispositivo debera aceptar cualquier interferencia que reciba, incluidas
interferencias que puedan causar un funcionamiento no deseado.
Este equipo ha sido probado y ha demostrado cumplir con los Ifmites establecidos para los
dispositivos digitales clase B, de conformidad con el Apartado 15 de las Normas de la FCC.
Estos Ifmites ban sido designados para proporcionar una protecci6n razonable contra la
interferencia perjudicial en una instalaci6n residencial. Este equipo genera, utiliza y puede radiar
energ[a radioelectrica, y, si no se instala y utiliza de acuerdo con las instrucciones, puede
causar una interferencia perjudicial en las comunicaciones pot radio. Sin embargo, no hay
ninguna garant[a de que no se produzcan interferencias en una instalaci6n particular. Si este
equipo causa interferencias perjudiciales en las recepciones de radio o televisi6n, Io que puede
determinarse facilmente apagando y encendiendo el equipo, al usuario se le recomienda
corregir la interferencia tomando una o mas de las medidas siguientes:
• Cambie la orientaci6n o el lugar de instalaci6n de la antena receptora.
Aumente la separaci6n entre el equipo y el receptor.
Conecte el equipo a un tomacorriente de un circuito diferente de aquel al que esta
conectado el receptor.
Consulte al distribuidor o tecnico de radio/TV calificado para solicitar su ayuda.
Los cambios o modificaciones no aprobados de forma expl[cita pot la parte responsable del
cumplimiento con las Normas de la FCC podr[an anular la autoridad del usuario para utilizar
este equipo.
Las conexiones con este dispositivo deberan reatizarse con cables btindados con
recubrimiento de conectores RF/EMI metalicos para mantener el cumptimiento con las
Normas y Regulaciones de la FCC.
_- 42
Page 87

Dimensional Drawings
LC=40LE550U Unit_: pouce (mm)
Unit: inch (mm)
Unidad: pulgada (mm)
36 5/16 (922)
3/t,9/2'):
40"
35 7/64(891.6) .1 I
I
LO
915/32 (88),, l
od
_.L
16ss/_ (420)
9 7/64 (231)
i
! z
'/:::::::::: _ _' _ _ I q, o r_ :::::::-K]
°b
* Active area/Area activa/Zone active
/ / L,
Page 88

®
SHARP ELECTRONICS CORPORATION
Sharp Plaza, Mahwah, New Jersey 07495-1163
SHARP CORPORATION
Printed in China
Impreso en China
083-0001-2265 _
Maker Code
 Loading...