

Page 1
ENGLISH
SHARP ELECTRONICS (Europe) GmbH
Sonninstraße 3, D-20097 Hamburg
SHARP CORPORATION
http://www.sharp.eu
LC-32LE340E
LCD COLOUR TELEVISION OPERATION MANUAL
LCD TELEVIZOR U BOJI KORISNIČKI PRIRUČNIK
HRVATSKI
50201414
Page 2
Contents
Features ................................................................. 4
Dear SHARP customer ........................................... 4
Introduction ............................................................. 4
Preparation ............................................................. 4
Important safety precautions .................................. 5
Safety Precautions ................................................. 6
Power Source ..................................................... 6
Power Cord ......................................................... 6
Moisture and Water ............................................ 6
Cleaning.............................................................. 6
Ventilation ........................................................... 6
Heat and Flames ................................................ 6
Lightning ............................................................. 6
Replacement Parts ............................................. 6
Servicing ............................................................. 6
Waste Disposal ................................................... 6
Information for Users in European Union
Countries ............................................................ 6
Disconnecting the Device ................................... 6
Headphone Volume ............................................ 6
Installation........................................................... 7
LCD Screen ........................................................ 7
Warning .............................................................. 7
Package Contents .................................................. 8
Optional Accessory ................................................. 8
Environmental Information ..................................... 9
Repair Information .................................................. 9
Remote Control Buttons ....................................... 10
(**)USING MY BUTTON 2 .................................... 10
LCD TV and Operating Buttons .............................11
Viewing the Back side Connections ......................11
Viewing the Connections - Side Connectors ........ 12
Antenna Connection ............................................. 13
Aerial/Cable Connection ................................... 13
Power Connection ................................................ 13
Using USB Inputs ................................................. 13
Side HDMI Connection ......................................... 14
Connecting the LCD TV to a PC ........................... 14
Connecting to a DVD Player................................. 15
Using Side AV Connectors ................................... 15
Using Other Connectors ....................................... 15
Connecting to a Wired Network ............................ 16
Connecting to a Wireless Network (Optional)....... 17
Remote Control Handset ...................................... 18
Inserting Batteries ............................................. 18
Switching On/Off ................................................... 18
To Switch the TV On ......................................... 18
To Switch the TV Off ......................................... 18
Digital Teletext (*) .............................................. 18
Analogue Teletext ............................................. 19
Input Selection ...................................................... 19
Operation with the Buttons on the TV ............... 19
Volume Setting ..............................................19
Programme Selection ................................... 19
Viewing Main Menu .......................................19
AV Mode ....................................................... 19
Operation with the Remote Control .................. 19
Volume Setting ..............................................19
Programme Selection
(Previous or Next Programme) ..................... 19
Programme Selection (Direct Access) .......... 19
Viewing Electronic Programme Guide (EPG) ....... 19
Recording via EPG Screen ............................... 20
Programme Options.......................................... 21
First Time Installation............................................ 21
Auto Tuning .......................................................... 22
Auto Channel Scan Menu Operation ................ 23
Manual Tuning ..................................................... 23
Network Channel Scan ..................................... 23
Analog Fine Tune.............................................. 24
First Time Installation ........................................ 24
Clear Service List (*) ......................................... 24
Managing Stations: Channel List .......................... 24
Channel List Types ........................................... 24
Operating the Channel List ............................... 25
Moving a Channel ............................................. 25
Deleting a Channel ........................................... 25
Renaming a Channel ........................................ 25
Locking a Channel ............................................ 25
Channel List Filter ............................................. 25
Managing Stations: Favourites ............................. 25
Button Functions ............................................... 26
Managing Stations: Sorting Channel List ............. 26
On-Screen Information ......................................... 26
Media Playback Using Media Browser ................. 26
Viewing Videos via USB .................................. 27
Viewing Photos via USB ................................... 27
Slideshow Options ............................................ 27
Playing Music via USB ..................................... 28
Recordings ........................................................... 28
Media Browser Settings........................................ 29
Timeshift Recording ............................................. 29
Instant Recording ................................................. 29
Watching Recorded Programmes ....................... 30
Using DLNA Network Service ............................... 30
Information ........................................................ 30
Step 1: Nero Media Home Installation .............. 30
Step 2: Connecting to a Wired or Wireless
Network............................................................. 30
Wired Connection ............................................. 30
Wireless Connection ......................................... 30
Step 3: Playing Shared Files via Media
Browser............................................................. 31
Connecting to your Cell Phone via WiFi
(Optional) .......................................................... 32
Changing Image Size: Picture Formats ................ 32
Confi guring Picture Settings ................................. 33
Operating Picture Settings Menu Items ............ 33
Picture Settings Menu Items ............................. 33
PC Picture Settings........................................... 34
Confi guring Sound Settings ..................................34
Operating Sound Settings Menu Items ............. 34
Sound Settings Menu Items.............................. 34
Confi guring Your TV’s Settings ............................. 35
Operating Settings Menu Items ........................ 35
Settings Menu Items ......................................... 35
English - 1 -
A01_[GB]_MB70_5112UK_DVBT_C_DLNA_HBBTV_MMH_WIFI_32942LED_GOLD11_10075886_50201414.indd 1A01_[GB]_MB70_5112UK_DVBT_C_DLNA_HBBTV_MMH_WIFI_32942LED_GOLD11_10075886_50201414.indd 1 16.04.2012 14:48:4616.04.2012 14:48:46
Page 3

Using a Conditional Access Module ..................... 35
Viewing Conditional Access Menu (*) ............... 35
Confi guring Language Preferences ......................36
Parental Control.................................................... 36
Parental Settings Menu Operation (*) ............... 37
Timers ................................................................... 37
Setting Sleep Timer .......................................... 37
Setting Programme Timers ............................... 37
Adding a Timer ..............................................37
Editing a Timer .............................................. 37
Deleting a Timer ............................................37
Recording Confi guration ....................................... 38
Confi guring Date/Time Settings ............................ 38
Confi guring Source Settings .................................38
Confi guring Network Settings ............................... 39
Confi guring Wired Device Settings ................... 39
Setting Network Type ........................................ 39
Setting Confi guration Status ............................. 39
IP Address ........................................................ 39
Confi guring Wired Network Settings in Advanced
Mode ................................................................. 39
Wi-Fi Settings (Optional) ...................................... 39
Information ........................................................ 40
Delete Saved Wifi Profi les ................................ 40
Connecting to your Cell Phone via WiFi
(Optional) .......................................................... 40
Confi guring Other Settings ................................... 40
Operation .......................................................... 40
Other Features ..................................................... 41
Teletext ................................................................. 42
Tips ....................................................................... 42
Appendix A: INTERNET PORTAL ........................ 44
Appendix B: PC Input Typical Display Modes ...... 45
Appendix C: AV and HDMI Signal Compatibility
(Input Signal Types) .............................................. 45
Appendix D: Supported DVI Resolutions.............. 46
Appendix E: Supported File Formats for USB
Mode..................................................................... 46
Appendix F: Software Upgrade ............................ 47
Manual Software Update .................................. 47
Appendix G: HBBTV System ................................ 48
Appendix H: Nero MediaHome Installation.......... 50
Specifi cations ....................................................... 53
Digital Reception (DVB-T) .................................... 53
Digital Reception (DVB-C) .................................... 53
Dimensional Drawings .......................................... 54
End of life disposal ............................................... 55
Installing the Stand ............................................... 56
Uninstalling the Stand........................................... 57
Screw Dimensions ................................................ 58
English - 2 -
A01_[GB]_MB70_5112UK_DVBT_C_DLNA_HBBTV_MMH_WIFI_32942LED_GOLD11_10075886_50201414.indd 2A01_[GB]_MB70_5112UK_DVBT_C_DLNA_HBBTV_MMH_WIFI_32942LED_GOLD11_10075886_50201414.indd 2 16.04.2012 14:48:4816.04.2012 14:48:48
Page 4

SPECIAL NOTE FOR USERS IN THE U.K.
The mains lead of this product is fi tted with a non-rewireable (moulded) plug incorporating a 5A fuse. Should
the fuse need to be replaced, a BSI or ASTA approved BS 1362 fuse marked
as above, which is also indicated on the pin face of the plug, must be used.
Always refi t the fuse cover after replacing the fuse. Never use the plug without the fuse cover fi tted.
In the unlikely event of the socket outlet in your home not being compatible with the plug supplied, cut off the
mains plug and fi t an appropriate type.
DANGER:
The fuse from the cut-off plug should be removed and the cut-off plug destroyed immediately and disposed
of in a safe manner.
Under no circumstances should the cut-off plug be inserted elsewhere into a 5A socket outlet, as a serious
electric shock may occur.
To fi t an appropriate plug to the mains lead, follow the instructions below:
IMPORTANT:
The wires in the mains lead are coloured in accordance with the following code:
Blue: Neutral
Brown: Live
As the colours of the wires in the mains lead of this product may not correspond with the coloured
markings identifying the terminals in your plug, proceed as follows:
The wire which is coloured blue must be connected to the plug terminal which is marked N or coloured •
black.
The wire which is coloured brown must be connected to the plug terminal which is marked L or coloured •
red.
Ensure that neither the brown nor the blue wire is connected to the earth terminal in your three pin plug.
Before replacing the plug cover make sure that:
If the new fi tted plug contains a fuse, its value is the same as that removed from the cut-off plug.•
The cord grip is clamped over the sheath of the mains lead, and not simply over the lead wires.•
IF YOU HAVE ANY DOUBT, CONSULT A QUALIFIED ELECTRICIAN.
ASA
or and of the same rating
English - 3 -
A01_[GB]_MB70_5112UK_DVBT_C_DLNA_HBBTV_MMH_WIFI_32942LED_GOLD11_10075886_50201414.indd 3A01_[GB]_MB70_5112UK_DVBT_C_DLNA_HBBTV_MMH_WIFI_32942LED_GOLD11_10075886_50201414.indd 3 16.04.2012 14:48:4816.04.2012 14:48:48
Page 5
Features
Remote controlled colour LCD TV.•
Fully integrated Terrestrial digital-cable TV (DVB-T •
C- MPEG2) (DVB-T-C MPEG4)
4 HDMI connectors for digital video and audio. •
This connection is also designed to accept high
defi nition signals.
2 USB inputs.•
Programme recording•
Programme timeshifting•
10.000 programmes.•
OSD menu system.•
Integrated tuner DVB-T-C HD, MPEG 2 / MPEG 4 •
compatible.
2 Scart sockets for external devices (such as video, •
video games, audio set, etc.).
Teletext, Fastext, TOP text.•
Headphone connection.•
Automatic programming system.•
Forward or backward manual tuning.•
Sleep timer / Child lock.•
Automatic sound mute when no transmission.•
NTSC playback. •
AVL (Automatic Volume Limiting).•
Auto power down.•
PLL (Frequency Search).•
PC input. •
Plug&Play for Windows 98, ME, 2000, XP, Vista, •
Windows 7.
• Ethernet (LAN) for Internet connectivity and service
• Picture Off function
802.11n WIFI Support (Optional)•
• DLNA
Hbb TV•
MMH•
Dear SHARP customer
Thank you for your purchase of the SHARP LCD
colour TV product. To ensure safety and many years
of trouble-free operation of your product, please read
Important safety precautions carefully before using
this product.
Introduction
Please read the corresponding instructions of this
handbook prior to the fi rst usage of the device, even
when the usage of electronic devices is familiar
to you. Notice especially the chapter SAFETY
PRECAUTIONS. Carefully keep the handbook as
future reference. When selling the device or giving it
away, absolutely give these direction for use.
Thank you for choosing this product. This manual will
guide you for the proper operation of your TV.
Before operating the TV, please read this
manual thoroughly. Please do keep this
manual in a safe place for future references.
This device is intended to receive and display TV
programs. The different connection options make
an additional expansion of the reception and display
sources possible (receiver, DVD player, DVD recorder,
VCR, PC etc.). This device is only suitable for the
operation in dry interiors. This appliance is intended
solely for private domestic use and may not be used
for industrial and commercial purposes. We exclude
liability in principle, if the device is not used as
intended, or unauthorized modifi cations have been
made. To operate your LCD TV in extreme ambient
conditions may cause the damage of the device.
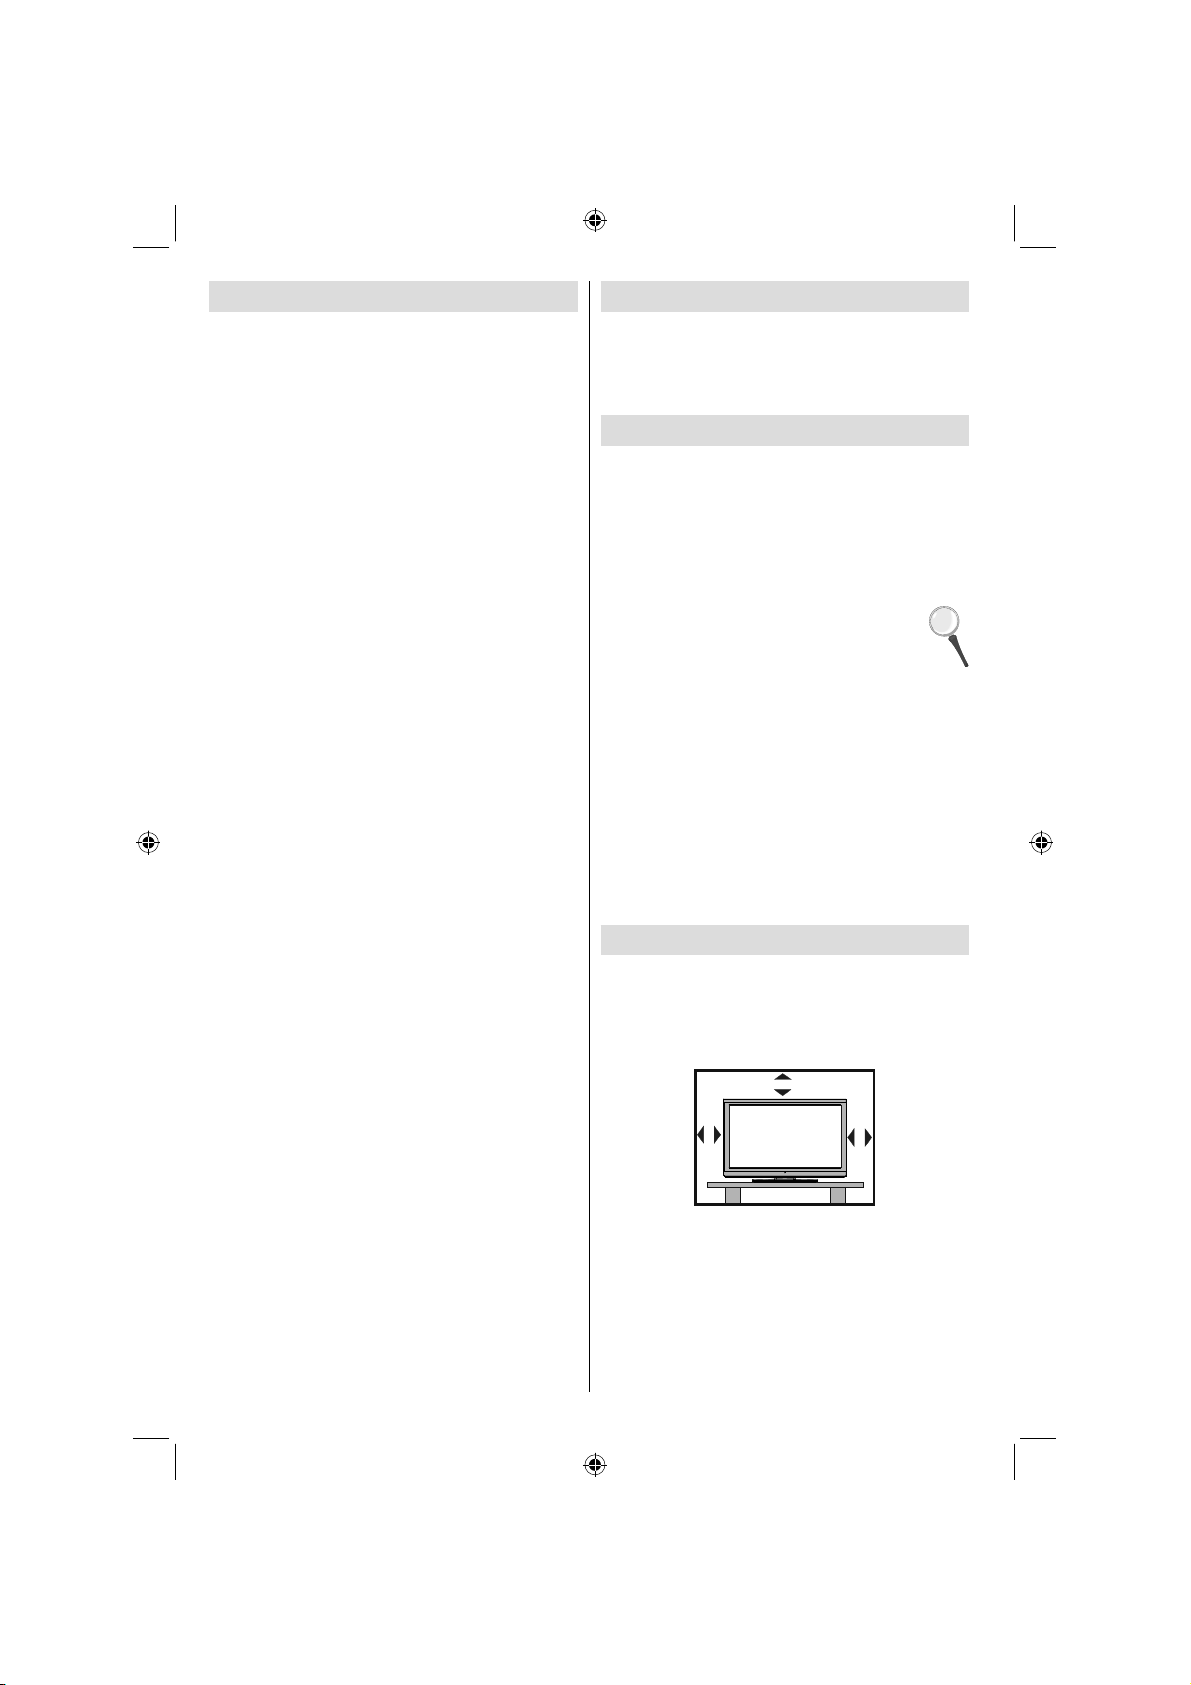
Preparation
For ventilation, leave a free space of at least 10 cm
all around the set. To prevent any fault and unsafe
situations, please do not place any objects on top of
the set. Use this device in moderate climates.
10 cm
10 cm
10 cm
The illustrations and the OSD in this operation •
manual are for explanation purposes and may vary
slightly from the actual operations.
The examples used throughout this manual are •
based on the
A01_[GB]_MB70_5112UK_DVBT_C_DLNA_HBBTV_MMH_WIFI_32942LED_GOLD11_10075886_50201414.indd 4A01_[GB]_MB70_5112UK_DVBT_C_DLNA_HBBTV_MMH_WIFI_32942LED_GOLD11_10075886_50201414.indd 4 16.04.2012 14:48:4816.04.2012 14:48:48
LC-32LE340E model.
English - 4 -
Page 6
Important safety precautions
Cleaning—Unplug the AC cord from the AC outlet before cleaning the product. Use a damp cloth to clean •
the product. Do not use liquid cleaners or aerosol cleaners.
Use a soft damp cloth to gently wipe the panel when it is dirty. To protect the panel, do not use a chemical •
cloth to clean it. Chemicals may cause damage or cracks in the cabinet of the TV.
Water and moisture—Do not use the product near water, such as bathtub, washbasin, kitchen sink, laundry •
tub, swimming pool and in a wet basement.
Do not place vases or any other water-fi lled containers on this product. The water may spill onto the product •
causing fi re or electric shock.
Stand—Do not place the product on an unstable cart, stand, tripod or table. Doing so can •
cause the product to fall, resulting in serious personal injuries as well as damage to the product.
Use only a cart, stand, tripod, bracket or table recommended by the manufacturer or sold
with the product. When mounting the product on a wall, be sure to follow the manufacturer’s
instructions. Use only the mounting hardware recommended by the manufacturer.
When relocating the product placed on a cart, it must be moved with utmost care. Sudden •
stops, excessive force and uneven fl oor surface can cause the product to fall from the cart.
Ventilation—The vents and other openings in the cabinet are designed for ventilation. Do not •
cover or block these vents and openings since insuffi cient ventilation can cause overheating
and/or shorten the life of the product. Do not place the product on a bed, sofa, rug or other
similar surface, since they can block ventilation openings. This product is not designed for
built-in installation; do not place the product in an enclosed place such as a bookcase or rack,
unless proper ventilation is provided or the manufacturer’s instructions are followed.
The LCD panel used in this product is made of glass. Therefore, it can break when the •
product is dropped or impact applied. If the LCD panel is broken, be careful not to be injured
by broken glass.
Heat sources—Keep the product away from heat sources such as radiators, heaters, stoves •
and other heat-generating products (including amplifi ers).
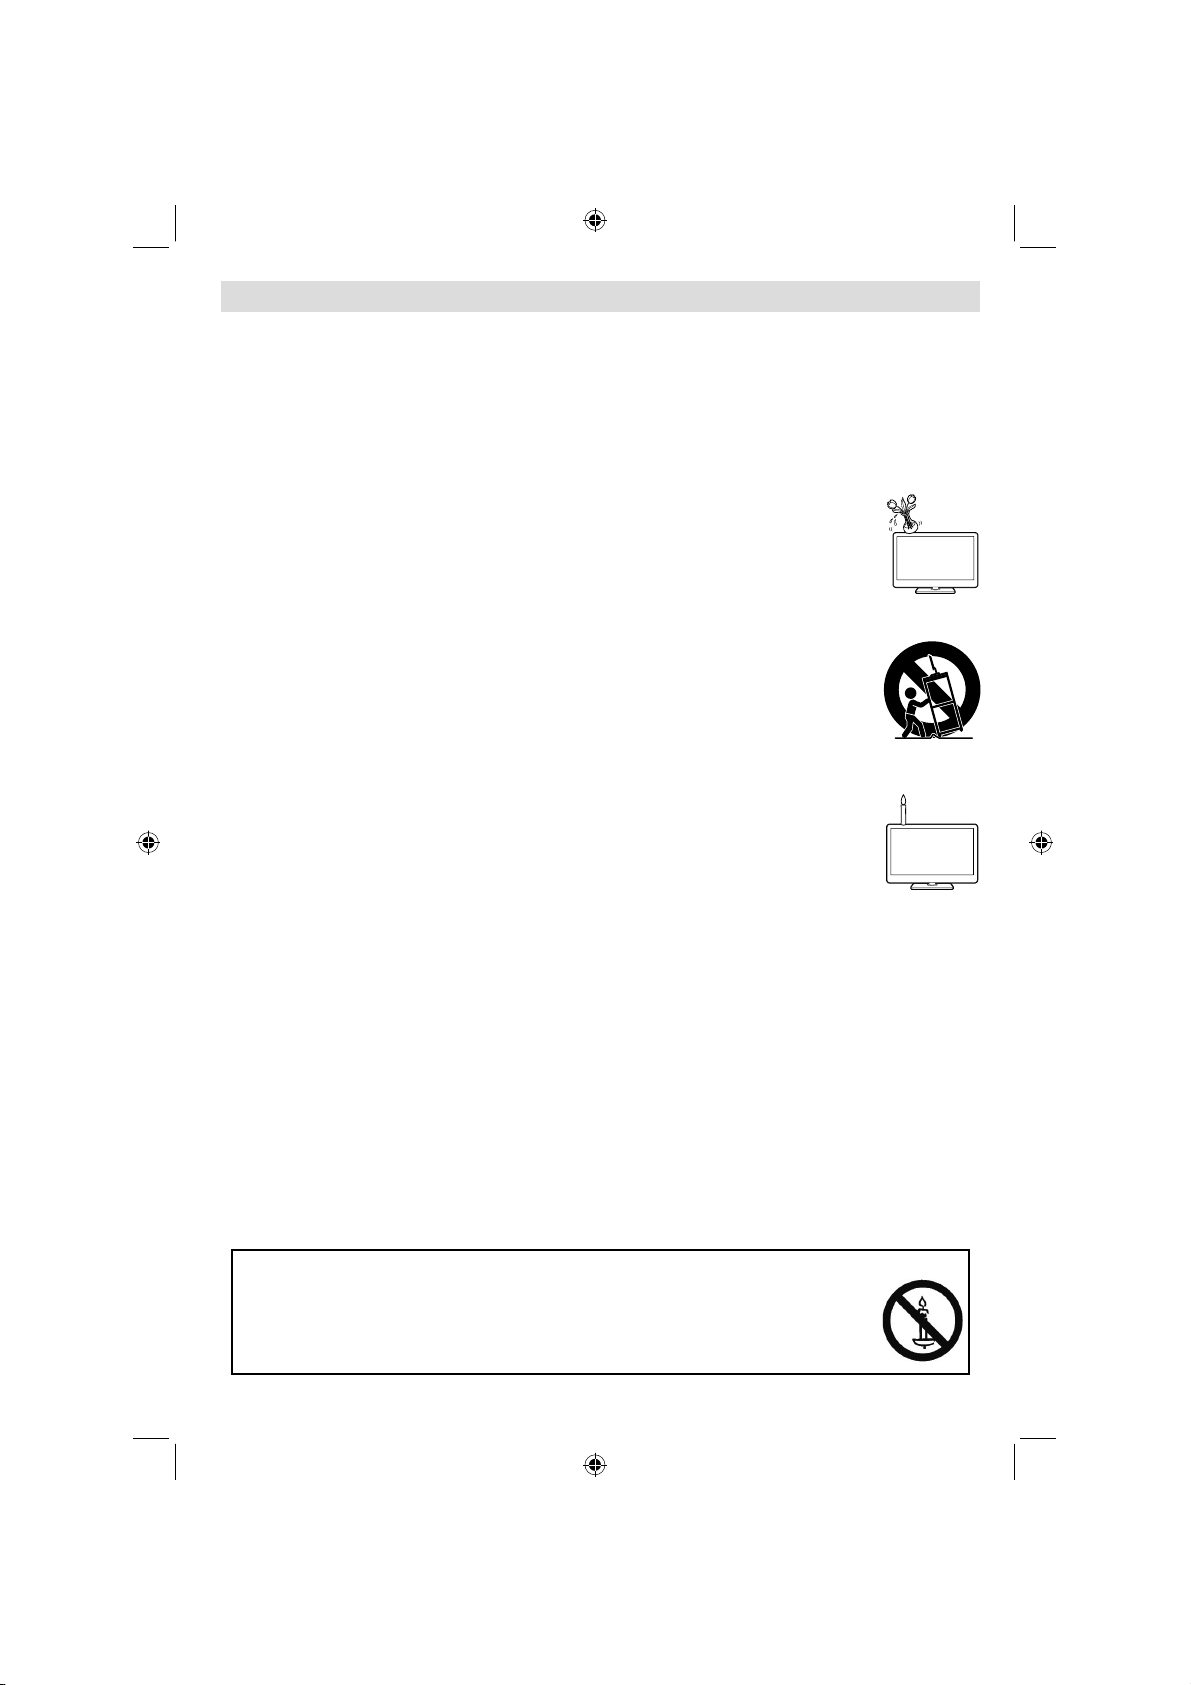
To prevent fi re, never place any type of candle or naked fl ames on the top or near the TV •
set.
To prevent fi re or shock hazard, do not place the AC cord under the TV set or other heavy items.•
Headphones—Do not set the volume at a high level. Hearing experts advise against extended listening at •
high volume levels.
Do not display a still picture for a long time, as this could cause an afterimage to remain.•
There is power consumption always if main plug is connected.•
Servicing—Do not attempt to service the product yourself. Removing covers can expose you to high voltage •
and other dangerous conditions. Request a qualifi ed person to perform servicing.
The LCD panel is a very high technology product, giving you fi ne picture details.
Due to the very large number of pixels, occasionally a few non-active pixels may appear on the screen as a
fi xed point of blue, green or red. This is within product specifi cations and does not constitute a fault.
Precautions when transporting the TV
When transporting the TV, never carry it by holding onto the speakers. Be sure to always carry the TV by two
people holding it with two hands—one hand on each side of the TV.
WARNING
To prevent the spread of fi re, keep candles or other open fl ames away from this product
at all times.
English - 5 -
A01_[GB]_MB70_5112UK_DVBT_C_DLNA_HBBTV_MMH_WIFI_32942LED_GOLD11_10075886_50201414.indd 5A01_[GB]_MB70_5112UK_DVBT_C_DLNA_HBBTV_MMH_WIFI_32942LED_GOLD11_10075886_50201414.indd 5 16.04.2012 14:48:4916.04.2012 14:48:49
Page 7
Safety Precautions
Please read the following recommended safety
precautions carefully for your safety.
Power Source
The TV set should be operated only from a 220-240
V AC, 50 Hz outlet. Ensure that you select the correct
voltage setting for your convenience.
Power Cord
Do not place the set, a piece of furniture, etc. on the
power cord (mains lead) or pinch the cord. Handle the
power cord by the plug. Do not unplug the appliance
by pulling from the power cord and never touch the
power cord with wet hands as this could cause a short
circuit or electric shock. Never make a knot in the cord
or tie it with other cords. The power cords should be
placed in such a way that they are not likely to be
stepped on. A damaged power cord can cause fi re or
give you an electric shock. When it is damaged and
needs to be replaced, it should be done by qualifi ed
personnel.
Moisture and Water
Do not use this device in a humid and
damp place (avoid the bathroom, the
sink in the kitchen, and near the washing
machine). Do not expose this device to
rain or water, as this may be dangerous
and do not place objects fi lled with liquids,
such as fl ower vases, on top. Avoid from
dripping or splashing.
If any solid object or liquid falls into the cabinet, unplug
the TV and have it checked by qualifi ed personnel
before operating it any further.
Cleaning
Before cleaning, unplug the TV set from
the wall outlet. Do not use liquid or aerosol
cleaners. Use soft and dry cloth.
Ventilation
The slots and openings on the TV set are intended for
ventilation and to ensure reliable operation. To prevent
overheating, these openings must not be blocked or
covered in anyway.
Heat and Flames
The set should not be placed near to open
fl ames and sources of intense heat such
as an electric heater. Ensure that no open
fl ame sources, such as lighted candles,
are placed on top of the TV. Batteries
should not be exposed to excessive heat
such as sunshine, fi re or the like.
Lightning
In case of storm and lightning or when
going on holiday, disconnect the power
cord from the wall outlet.
Replacement Parts
When replacement parts are required, make sure that
the service technician has used replacement parts,
which are specifi ed by the manufacturer or have the
same specifi cations as the original one. Unauthorized
substitutions may result in fi re, electrical shock or
other hazards.
Servicing
Please refer all servicing to qualified
personnel. Do not remove the cover
yourself as this may result in an electric
shock.
Waste Disposal
Instructions for waste disposal:•
Packaging and packaging aids are recyclable and •
should principally be recycled. Packaging materials,
such as foil bag, must be kept away from children.
Batteries, including those which are heavy metal-•
free, should not be disposed of with household
waste. Please dispose of used battery in an
environment friendly manner. Find out about the
legal regulations which apply in your area. Don’t try
to recharge batteries. Danger of explosion. Replace
batteries only with the same or equivalent type.
Cold cathode fluorescent lamp in LCD PANEL •
contains a small amount of mercury; please follow
the local laws or regulations for disposal.
Information for Users in European Union
Countries
This symbol on the product or on its
packaging means that your electrical
and electronic device should be
disposed at the end of its service life
separately from your household wastes.
There are separate collection systems
for recycling in EU.
For more information, please contact
the local authority or the dealer where you purchased
the product.
Disconnecting the Device
The mains plug is used to disconnect TV set from
the mains and therefore it must remain readily
operable.
Headphone Volume
Excessive sound pressure from earphones
and headphones can cause hearing loss.
English - 6 -
A01_[GB]_MB70_5112UK_DVBT_C_DLNA_HBBTV_MMH_WIFI_32942LED_GOLD11_10075886_50201414.indd 6A01_[GB]_MB70_5112UK_DVBT_C_DLNA_HBBTV_MMH_WIFI_32942LED_GOLD11_10075886_50201414.indd 6 16.04.2012 14:48:4916.04.2012 14:48:49
Page 8
Installation
To prevent injury, this device must be securely
attached to the wall in accordance with the installation
instructions when mounted to the wall (if the option
is available).
LCD Screen
The LCD panel is a very high technology product
with over 6 million thin fi lm transistors, giving you fi ne
picture details. Occasionally, a few non-active pixels
may appear on the screen as a fi xed blue, green or
red point. Please note that this does not affect the
performance of your product.
Warning
Do not leave your TV in standby or operating mode
when you leave your house.
The Standby / On button doesn´t separate this •
device completely from mains. Moreover the device
consumes power in the standby operation. In order
to separate the device completely from mains, the
mains plug has to be pulled from the mains socket.
Because of that the device should be set up in a
way, that an unobstructed access to mains socket
is guaranteed, so that in case of emergency the
mains plug can be pulled immediately. To exclude
the danger of fi re, the power cord should principally
be separated from the mains socket prior to a longer
period of non-usage, i.e. during vacations.
Electrical device not in the hands of children
Never let children use electrical device unsupervised.
Children can´t always recognize properly the
possible dangers. Batteries / accumulators can be
life threatening when swallowed. Store batteries
unreachable for small children. In case of swallowing
a battery medical aid has to be sought immediately.
Also keep the packaging foils away from children.
There is danger of suffocation.
Licence Notifi cation (optional)
Manufactured under license from Dolby
Laboratories.
TRADEMARK ACKNOWLEDGMENT
“Dolby” and the double-D symbol are trademarks of
Dolby Laboratories.
“DLNA®, the DLNA Logo and DLNA CERTIFIED® are
trademarks, service marks, or certifi cation marks of
the Digital Living Network Alliance.”
“HDMI, the HDMI logo and High-Definition •
Multimedia Interface are trademarks or registered
trademarks of HDMI Licensing LLC.”
The “HD TV 1080p” Logo is a trademark of EICTA.•
The DVB logo is the registered trademark of the •
Digital Video Broadcasting—DVB—project.
Licence Notification
DivX®, DivX Certified® and associated logos are trademarks of DivX®, Inc. and are used under license.
ABOUT DIVX VIDEO: DivX® is a digital video
The Standby / On button doesn´t separate this
device completely from mains. Moreover the device
consumes power in the standby operation. In order to
separate the device completely from mains, the mains
plug has to be pulled from the mains socket. Because
of that the device should be set up in a way, that an
unobstructed access to mains socket is guaranteed,
so that in case of emergency the mains plug can be
pulled immediately. To exclude the danger of fi re, the
power cord should principally be separated from the
mains socket prior to a longer period of non-usage,
i.e. during vacations.
format created by DivX®, LLC, a subsidiary of Rovi
Corporation. This is an official DivX Certified® device
that plays DivX® video. Visit divx.com for more
information and software tools to convert your files
into DivX video.
ABOUT DIVX VIDEO-ON-DEMAND: This DivX Certified
device must be registered in order to play purchased
®
Video-on-Demand (VOD) movies. To obtain
DivX
your registration code, locate the DivX
®
VOD sec-tion
in your device setup menu. Go to vod.divx.com for
more information on how to complete your registration.
DivX Certifi ed® to play DivX® video, including premium
content.
®
English - 7 -
A01_[GB]_MB70_5112UK_DVBT_C_DLNA_HBBTV_MMH_WIFI_32942LED_GOLD11_10075886_50201414.indd 7A01_[GB]_MB70_5112UK_DVBT_C_DLNA_HBBTV_MMH_WIFI_32942LED_GOLD11_10075886_50201414.indd 7 16.04.2012 14:48:5016.04.2012 14:48:50
Page 9
Package Contents
Optional Accessory
The listed optional accessories are available for
this LCD colour TV. Please purchase them at your
neerest shop.
Additional optional accessories may be available •
in the near future. When purchasing, please read
the newest catalogue for compatibility and check
availability.
INTERNET
SCREEN
LANG SUBTITLE
PRESETS
EPG
TEXT
FAV SLEEP
1
3
2
ABC DEF
4
6
5
GHI
JKL MNO
8
9
7
PQRS
TUV WXYZ
0
SOURCE
SWAP
MENU
V +
P +
P -
-
V
BACK
EXIT
INFO
Y B T N 1M UT O Y B T N 2MUTOMULTIMEDIA
Remote Control
LCD TV
Batteries: 2 X AAA
Instruction Book
1 X Video & Audio
Connection Cable
No. Part name Part number
1 Wi-Fi Adapter AN-WUD340
Nero media home CD
Note: You should check the accessories after
purchasing. Make sure that each accessory is
included.
English - 8 -
A01_[GB]_MB70_5112UK_DVBT_C_DLNA_HBBTV_MMH_WIFI_32942LED_GOLD11_10075886_50201414.indd 8A01_[GB]_MB70_5112UK_DVBT_C_DLNA_HBBTV_MMH_WIFI_32942LED_GOLD11_10075886_50201414.indd 8 16.04.2012 14:48:5116.04.2012 14:48:51
Page 10
Environmental Information
This television is designed to consume less energy to save environment. You not only help to save the •
environment but also you can save money by reducing electricity bills thanks to the energy effi ciency feauture
of this TV. To reduce energy consumption, you should take the following steps:
You can use Power Save Mode setting, located in the •
as Eco, the TV will switch to energy-saving mode and luminance level of TV set will be decreased to
optimum level. Note that some picture settings will be unavailable to be changed when the TV is in Power
Save Mode.
If you set power save mode as Picture off, a message will appear on the screen and backlight will be off •
within three seconds. Press any button on the remote controller to activate the picture again.
You can also use MY BUTTON 1 on the remote control to activate or deactivate Power Save Mode. Whenever •
you press MY BUTTON 1, on-screen messages will be displayed accordingly.
When the TV is not in use, please switch off or disconnect the TV from the mains plug. This will also reduce •
energy consumption.
Disconnect power when going away for longer time.•
It is highly recommended to activate Power Save Mode setting to reduce your annual power consumption.Also •
it is recommended to disconnect the TV from the mains plug to save energy more when you do not use.
Please help us to save environment by following these steps.•
Picture Settings menu. If you set Power Save Mode
Repair Information
Please refer all servicing to qualifi ed personnel. Only qualifi ed personnel must repair the TV. Please contact
your local dealer, where you have purchased this TV for further information.
English - 9 -
A01_[GB]_MB70_5112UK_DVBT_C_DLNA_HBBTV_MMH_WIFI_32942LED_GOLD11_10075886_50201414.indd 9A01_[GB]_MB70_5112UK_DVBT_C_DLNA_HBBTV_MMH_WIFI_32942LED_GOLD11_10075886_50201414.indd 9 16.04.2012 14:48:5216.04.2012 14:48:52
Page 11
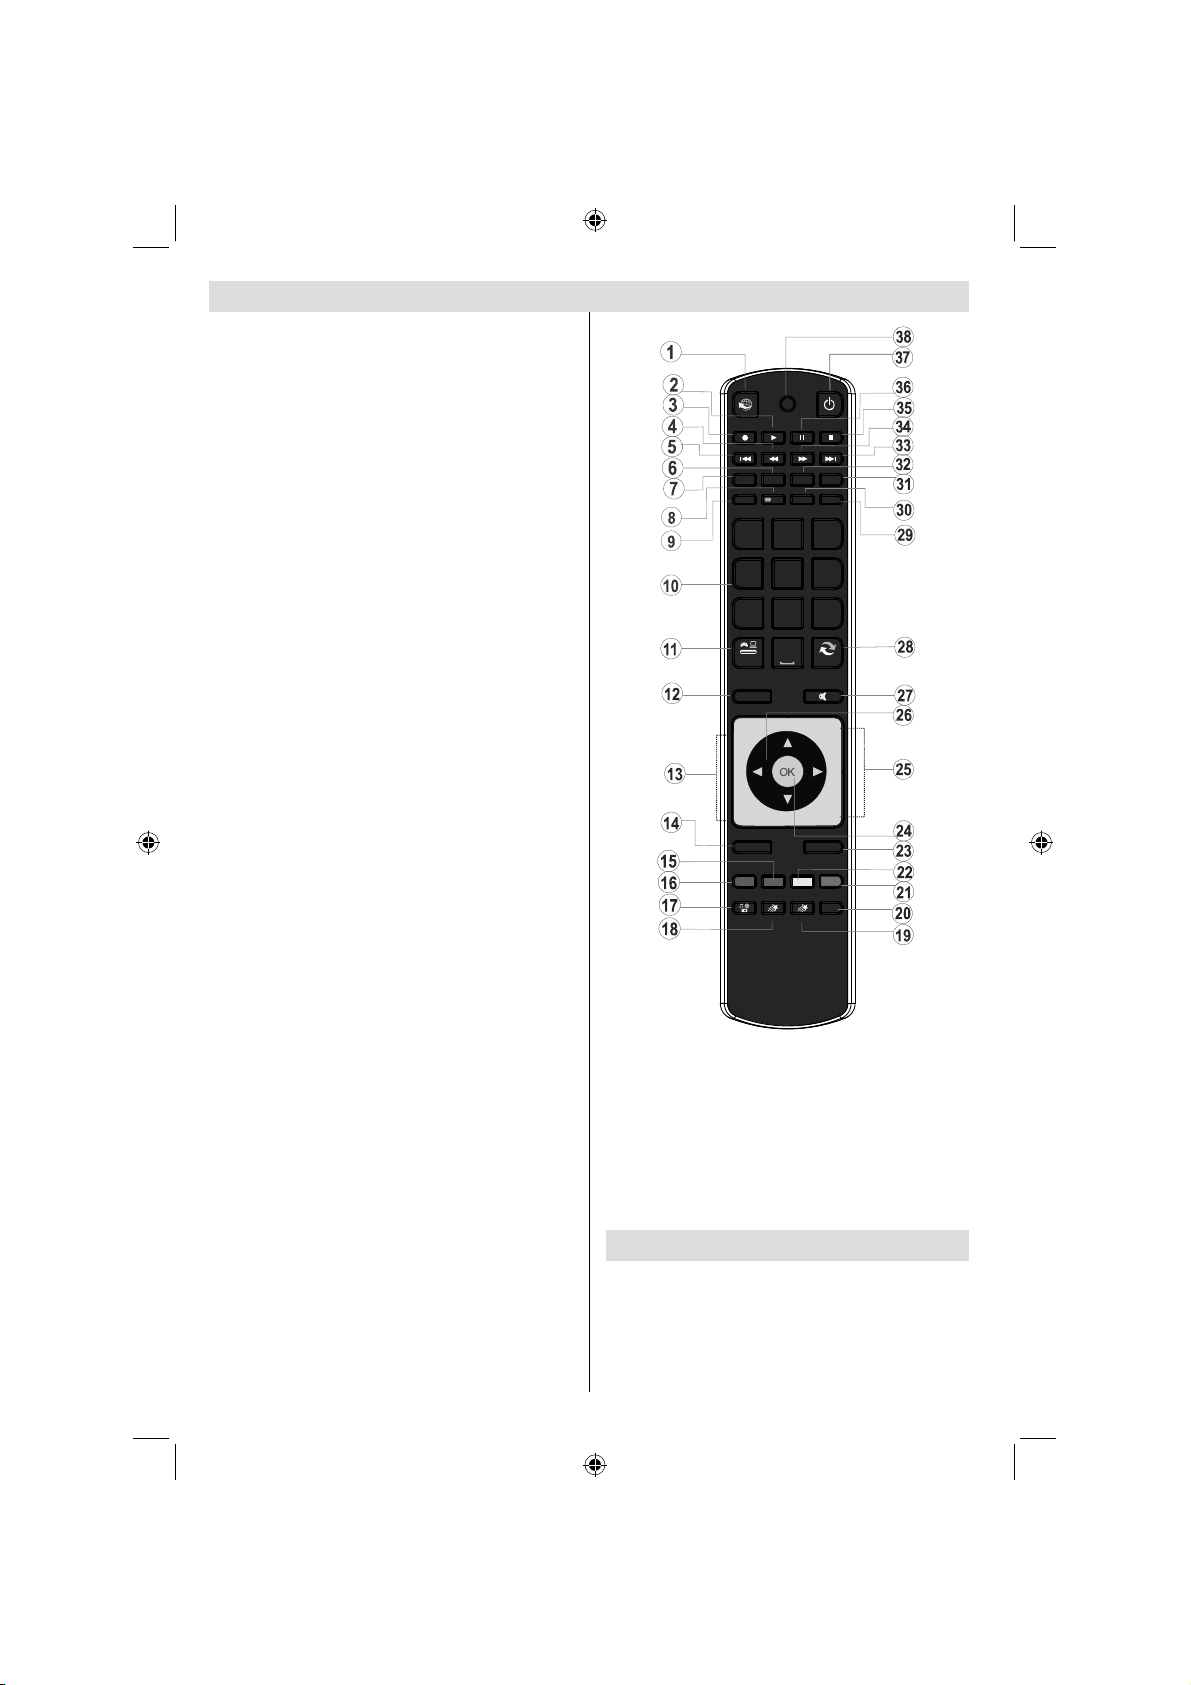
Remote Control Buttons
Acti1. vate Portal mode (*)
Play (in Media Browser mode) 2.
Programme recording3.
Fast rewind (in Media Browser mode)4.
No function5.
Mono/Stereo - Dual I-II / Current Language / 6.
Play preview (in Media Browser mode)
Image size 7.
Teletext / Mix8.
Electronic Programme Guide9.
Numeric buttons10.
AV / Source11.
Menu on/off 12.
Programme Down - Page up / Programme Up - 13.
Page down
Back to previous menu 14.
Green button15.
Red button16.
Media Browser17.
My Button 1: Power save mode eco/off18.
My Button 2(**)19.
Info / Reveal (in TXT mode)20.
Blue button21.
Yellow button22.
Exit (in DTV mode) / Return / Index page (in 23.
TXT mode)
OK / Select / Hold (in TXT mode) / Channel List24.
Volume up / down25.
Navigation buttons26.
Mute27.
Previous programme / Now (in EPG mode)28.
Sleep timer29.
Favourite mode selection30.
Picture mode selecion / Changes picture mode 31.
(in Media Browser video mode)
Subtitle on-off / TXT subtitle (analogue TV 32.
mode) / Subtitle (in Media Browser mode).
No function33.
Fast forward (in Media Browser mode)34.
Stop (in Media Browser mode)35.
Pause / Timeshift recording36.
Standby37.
Operation LED light38.
(*) Please refer to Portal TV section to learn
how to use remote control while in portal TV
function.
(**)USING MY BUTTON 2
When on a desired source, channel or link, press MY
BUTTON 2 for fi ve seconds, until the “MY BUTTON
IS SET” message is displayed on the screen. This
confirms that MY BUTTON 2 is now associated with
the selected function.
English - 10 -
INTERNET
SCREEN
EPG
4
GHI
7
PQRS
SOURCE
P +
P -
1
MENU
BACK
SUBTITLE
LANG
TEXT
2
ABC DEF
5
JKL MNO
8
TUV WXYZ
0
Y BTN 1MUTO Y BTN 2MUTOMULTIMEDIA
FAV SLEEP
SWAP
EXIT
PRESETS
3
6
9
V +
V
-
INFO
A01_[GB]_MB70_5112UK_DVBT_C_DLNA_HBBTV_MMH_WIFI_32942LED_GOLD11_10075886_50201414.indd 10A01_[GB]_MB70_5112UK_DVBT_C_DLNA_HBBTV_MMH_WIFI_32942LED_GOLD11_10075886_50201414.indd 10 16.04.2012 14:48:5216.04.2012 14:48:52
Page 12
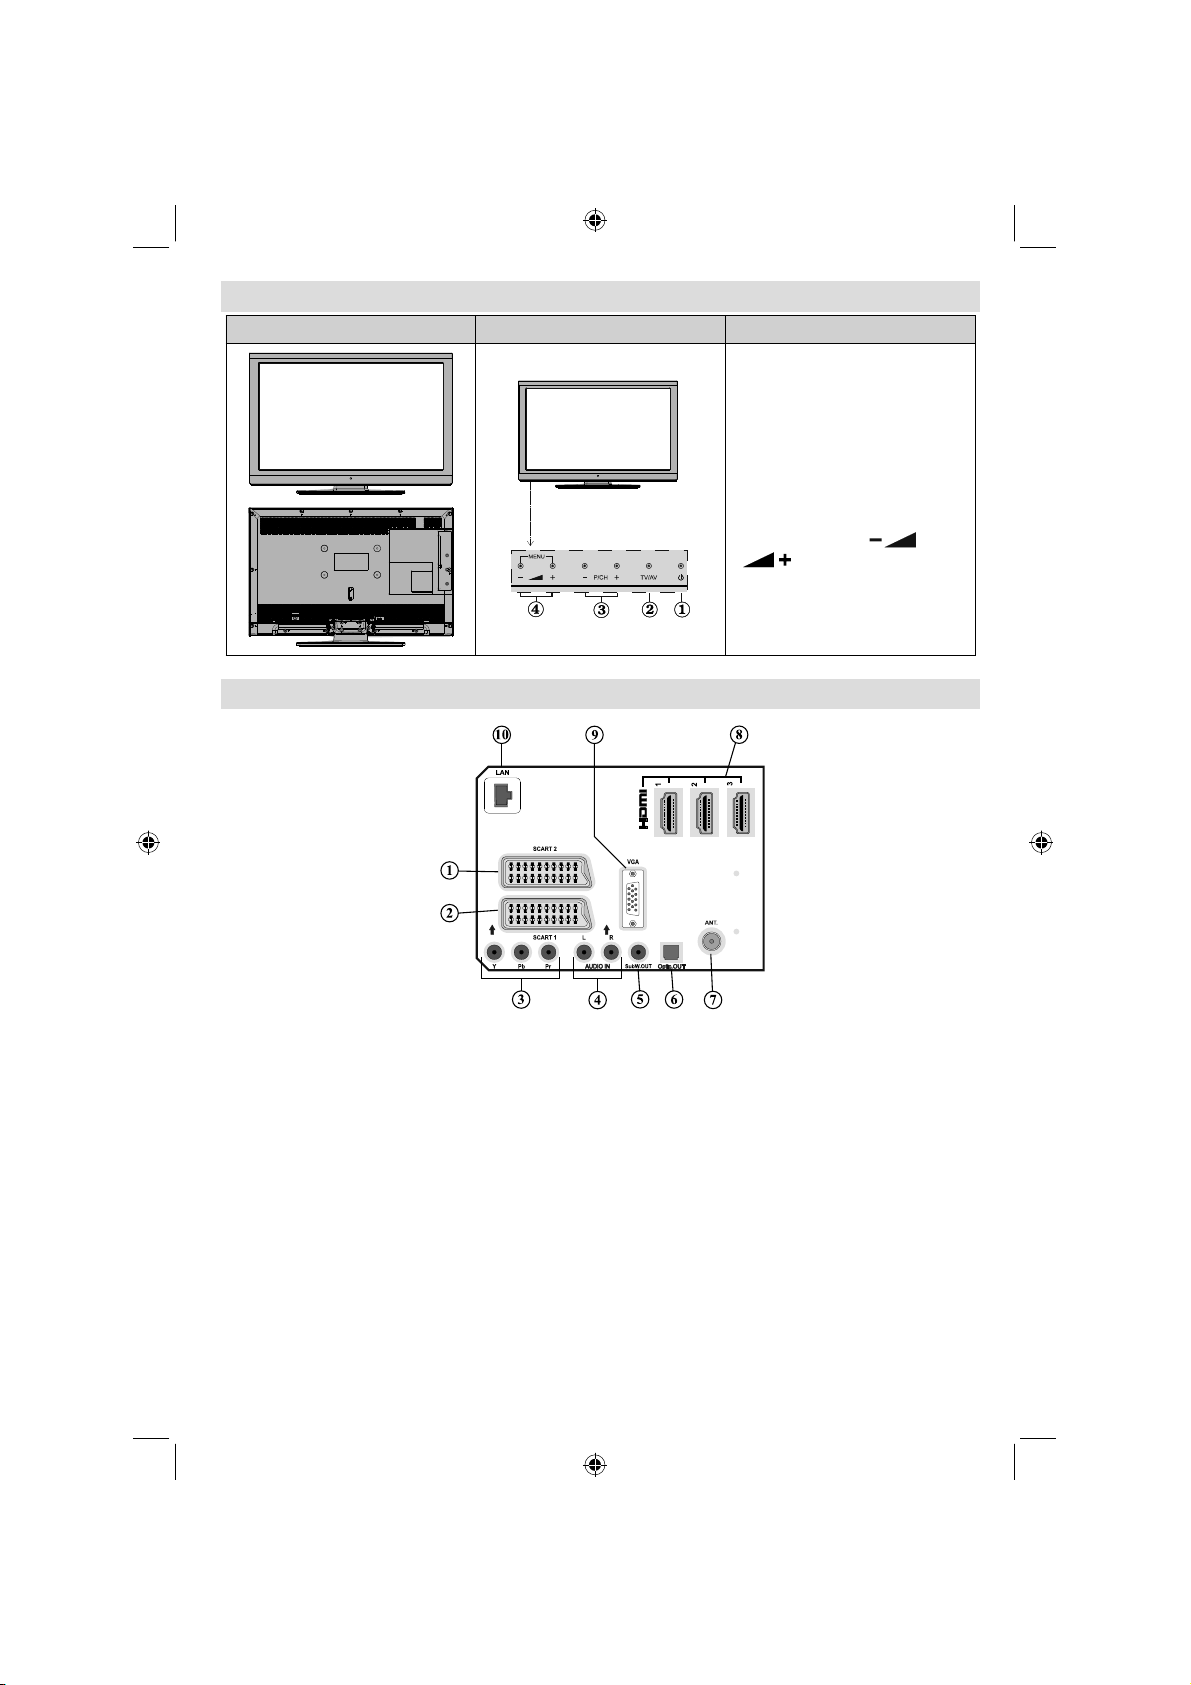
LCD TV and Operating Buttons
FRONT and REAR VIEW Control buttons VIEW Control Buttons
1. Standby/On button
2. TV/AV button
3. Programme Up/Down buttons
4. Volume Up/Down buttons
Note: Press “
” buttons at the same
“
time to view main menu.
” and
Viewing the Back side Connections
SCART 21. inputs or outputs for external devices.
SCART 12. inputs or outputs for external devices. Connect the SCART cable between SCART socket on
the TV and SCART socket on your external device (such as a decoder, a VCR or a DVD player).
Note: If an external device is connected via the SCART socket, the TV will automatically switch to AV
mode.
Component Video Inputs (YPbPr)3. are used for connecting component video.
You can connect the component video and audio sockets with a device that has component output.
Connect the component video cables between the COMPONENT VIDEO INPUTS on on the TV and
the component video outputs of your device. While connecting, be sure that the letters on your TV, “Y”,
“Pb”, “Pr” correspond with your device’s connectors.
PC/YPbPr Audio Inputs4. are used for connecting audio signals of a PC or a device that connects to the
TV via YPbPr. Connect the PC audio cable between the AUDIO INPUTS on the TV and audio output
of your PC to enable PC audio. Connect the audio cable between AUDIO INPUTS on the TV and audio
outputs of your device to enable component audio.
Subwoofer Out5. is for connecting an external, active subwoofer to the set to give a much deeper bass
effect. Use an appropriate RCA cable to connect the set to a subwoofer unit.
S/PDIF Digital Out6. outputs digital audio signals of the currently watched source.
Use a digital optic cable to transfer audio signals to a device that has S/PDIF input.
English - 11 -
A01_[GB]_MB70_5112UK_DVBT_C_DLNA_HBBTV_MMH_WIFI_32942LED_GOLD11_10075886_50201414.indd 11A01_[GB]_MB70_5112UK_DVBT_C_DLNA_HBBTV_MMH_WIFI_32942LED_GOLD11_10075886_50201414.indd 11 16.04.2012 14:48:5316.04.2012 14:48:53
Page 13
RF Input7. connects to an aerial or cable antenna system.
Note that if you use a decoder or a media recorder, you should connect the aerial cable through the
device to the television with an appropriate antenna cable, as shown in the illustration in the following
pages.
HDMI 3: HDMI Input8.
HDMI 2: HDMI Input
HDMI 1: HDMI Input
HDMI Inputs are for connecting a device that has an HDMI socket. Your LCD TV is capable of
displaying High Defi nition pictures from devices such as a High Defi nition Satellite Receiver or DVD
Player. These devices must be connected via the HDMI sockets or Component Socket. These sockets
can accept either 720p or 1080p (optional) signals. No sound connection is needed for an HDMI to
HDMI connection.
PC Input9. is for connecting a personal computer to the TV set.
Connect the PC cable between the PC INPUT on the TV and the PC output on your PC
Ethernet input (for service and Internet connectivity)10.
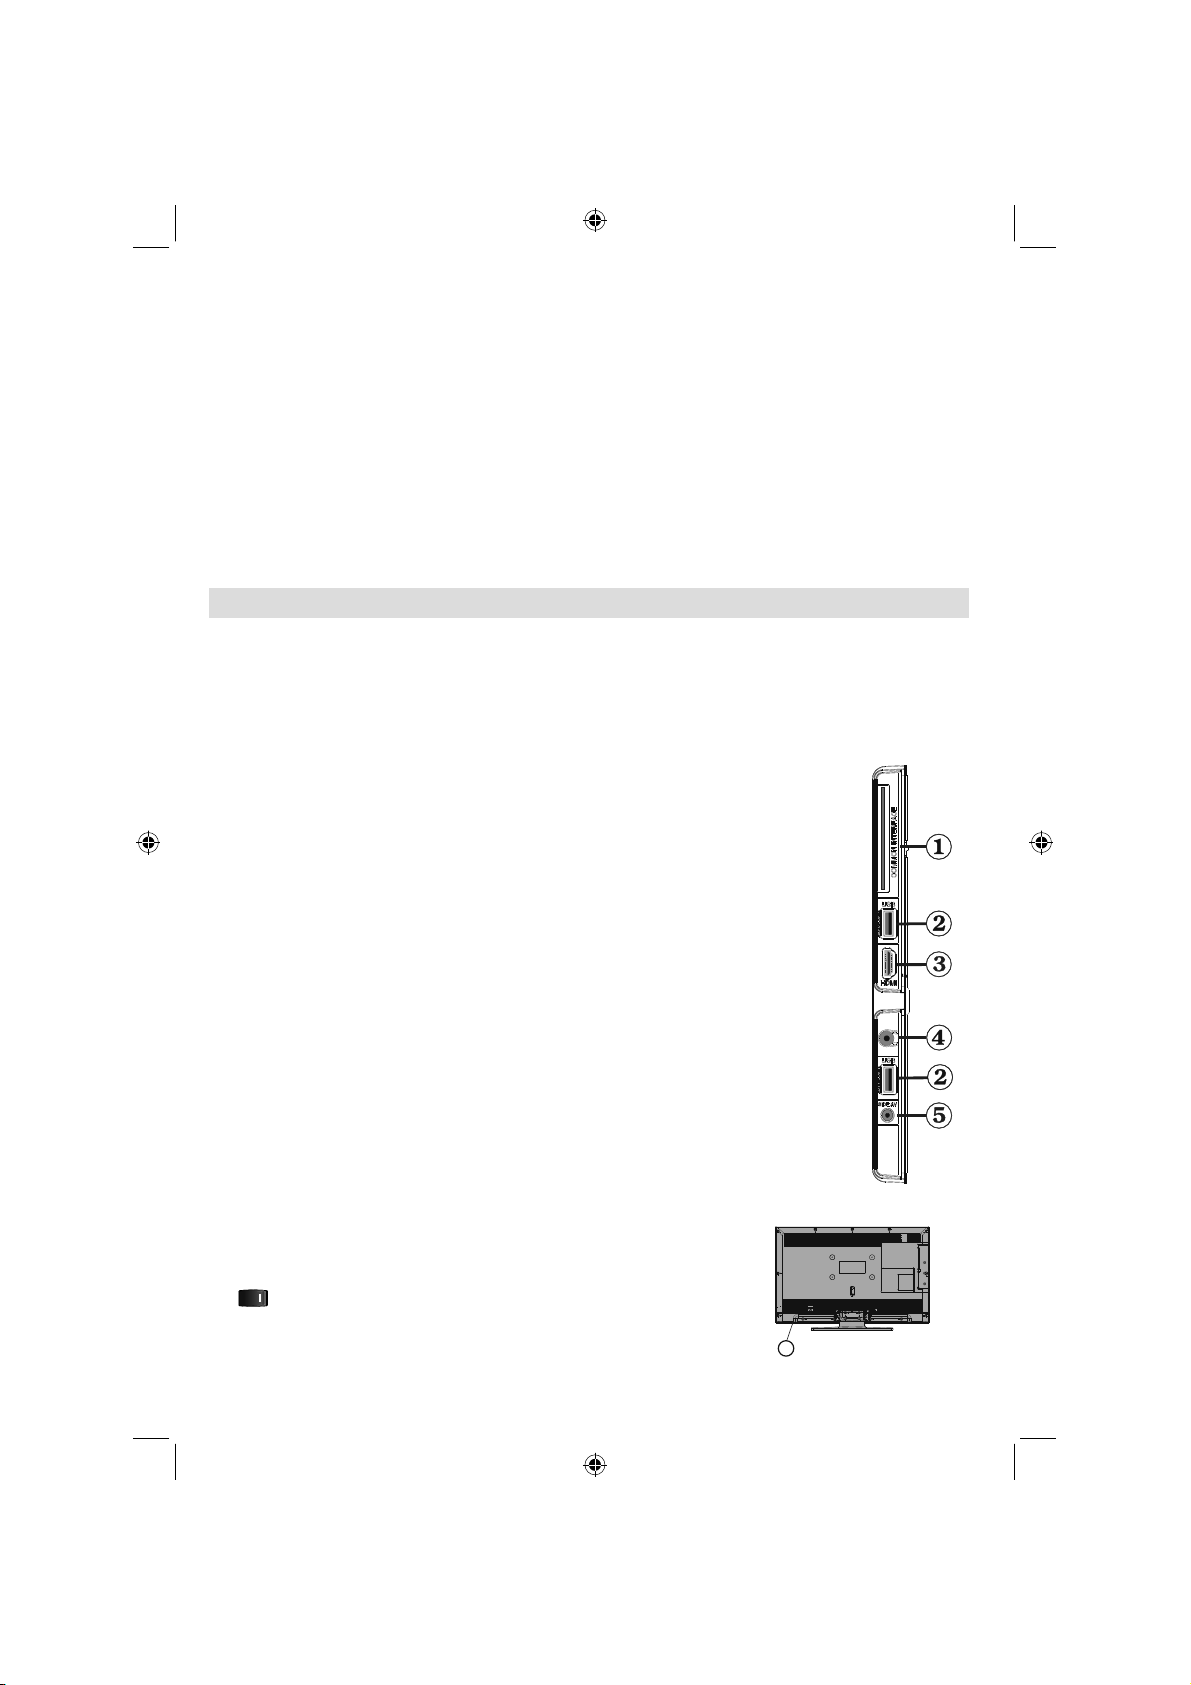
Viewing the Connections - Side Connectors
CI Slot is used for inserting a CI card. A CI card allows you to view all the channels that you subscribe 1.
to. For more information, see “Conditional Access” section.
Side USBs2.
Note that programme recording feature is available via these USB inputs. You can connect external hard disk drives to
this input.
Side HDMI Input is for connecting a device that has an HDMI socket.3.
Headphone jack is used for connecting an external headphone to the system. Connect 4.
to the HEADPHONE jack to listen to the TV from headphones (optional).
Side audio-video connection5. input is used for connecting video and audio signals
of external devices. To make a video connection, you must use the supplied AV
connection cable for enabling connection. First, plug singular jack of the cable to the
TV’s Side AV socket. Afterwards, insert your video cable’s (not supplied) connector into
the YELLOW input (located on the plural side) of the supplied AV connection cable.
Colours of the connected jacks should match.
To enable audio connection, you must use RED and WHITE inputs of the side AV
connection cable. Afterwards, insert your device’s audio cable’s connectors into
the RED and WHITE jack of the supplied side AV connection cable. Colours of the
connected jacks should match.
Note: You should use audio inputs of side AV connection cable (RED & WHITE)
to enable sound connection when connecting a device to your TV by using PC or
COMPONENT VIDEO input.
6. , switch is used for turning the TV on or off.
6
English - 12 -
A01_[GB]_MB70_5112UK_DVBT_C_DLNA_HBBTV_MMH_WIFI_32942LED_GOLD11_10075886_50201414.indd 12A01_[GB]_MB70_5112UK_DVBT_C_DLNA_HBBTV_MMH_WIFI_32942LED_GOLD11_10075886_50201414.indd 12 16.04.2012 14:49:2216.04.2012 14:49:22
Page 14
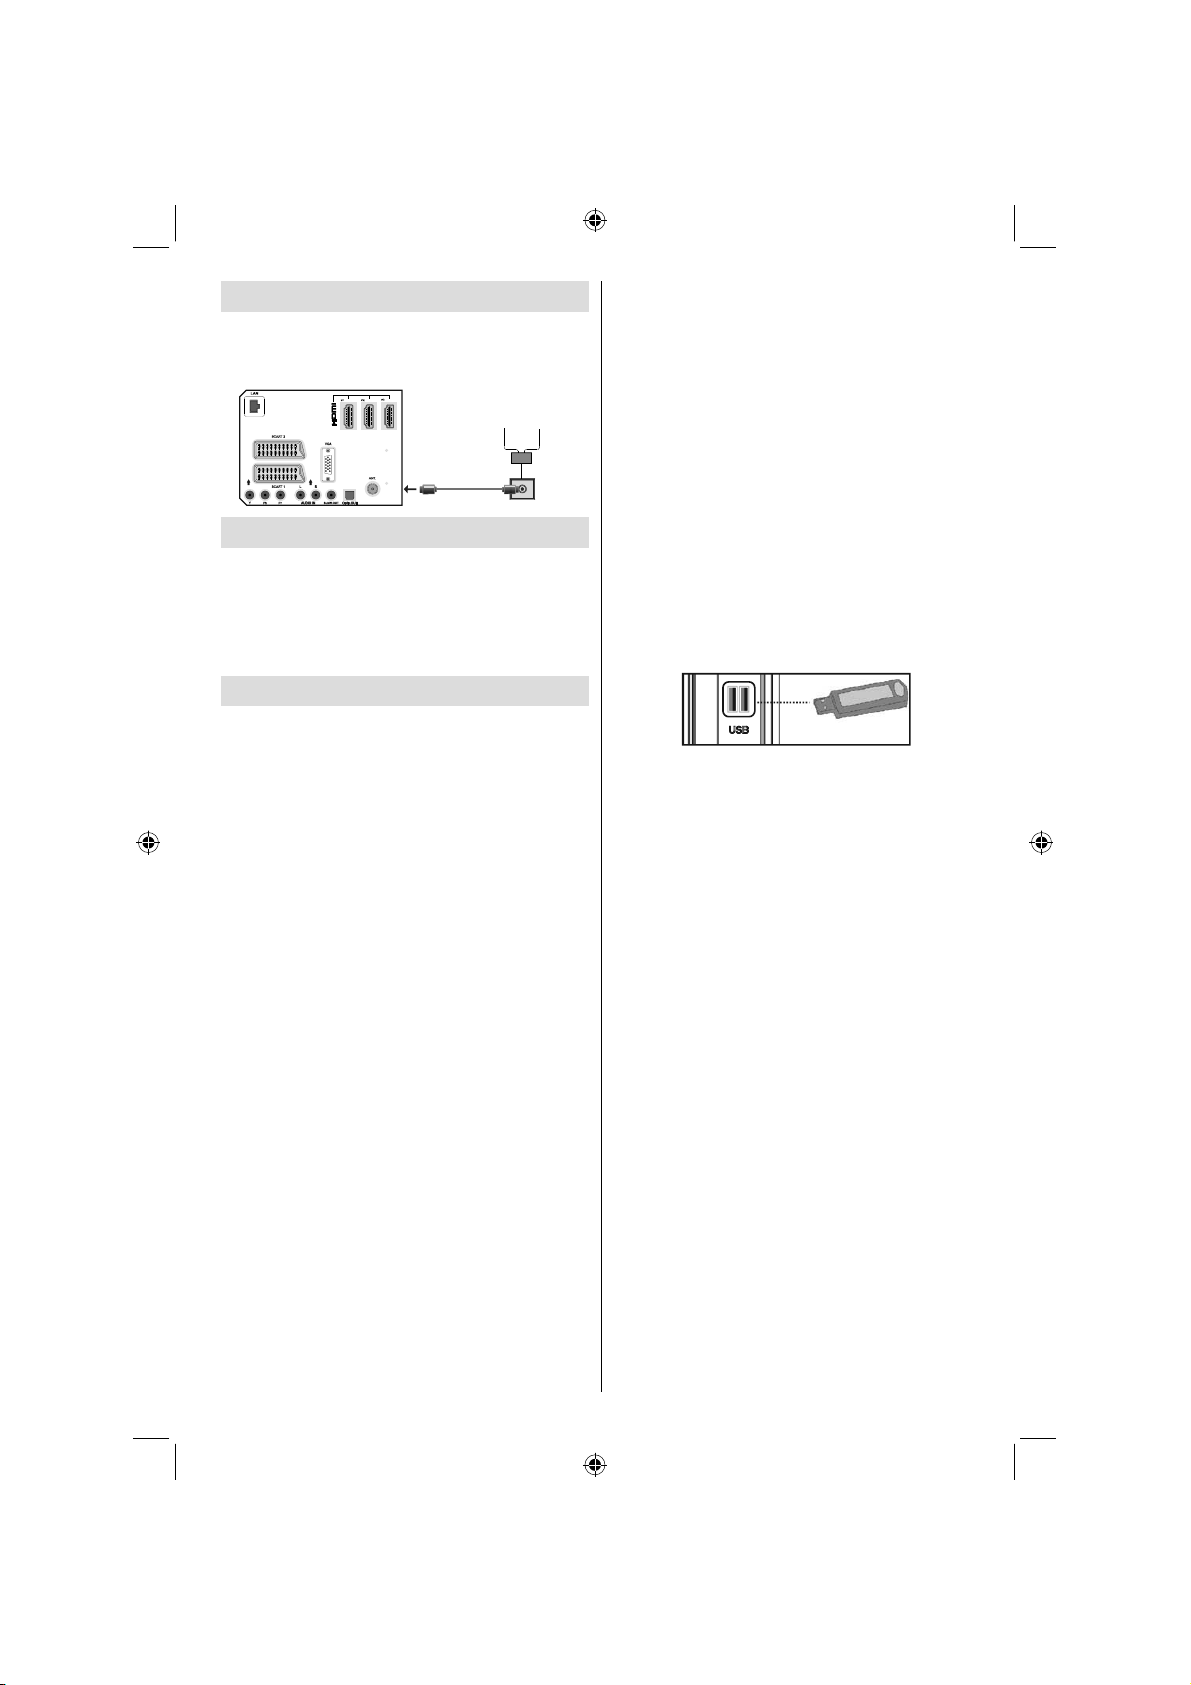
Antenna Connection
Aerial/Cable Connection
Connect the aerial or cable TV plug to the AERIAL •
INPUT socket located at the rear of the TV.
Aerial or Cable
Power Connection
IMPORTANT: The TV set is designed to operate on
220-240V AC, 50 Hz socket.
After unpacking, allow the TV set to reach the •
ambient room temperature before you connect the
set to the mains. Plug the power cable to the mains
socket outlet.
Using USB Inputs
USB Connection
You can connect a USB hard disk drive or USB •
memory stick to your TV by using the USB inputs
of the TV. This feature allows you to play fi les stored
in a USB drive or record programmes.
2.5” and 3.5” inch (hdd with external power supply) •
external hard disk drives are supported.
If one or more partitions of your hard drive are exFAT •
formatted, none or less partitions might be visible,
even if they are formatted with a different fi le system
than exFat.
To record a programme, you should fi rst connect •
a USB disk to your TV while the TV is switched
off. You should then switch on the TV to enable
recording feature. Otherwise, recording feature will
not be available.
IMPORTANT !
You may back up your fi les before making any •
connections to the TV set in order to avoid any
possible data loss. Note that manufacturer will not
be responsible for any fi le damage or dataloss.
It is possible that certain types of USB devices (e.g. •
MP3 Players) or USB hard disk drives/memory sticks
may not be compatible with this TV.
IMPORTANT: The TV supports only FAT32 and
NTFS disk formatting. However, NTFS format is not
supported for recording features. For recording, if you
connect a USB disk with NTFS format, the TV will ask
you to format the content. See the section, “Format
Disk” in the following pages for more information on
disk formatting.
Note that ALL the data stored on the USB disk will
be lost and then the disk format will be converted to
FAT32 in such a case.
USB Disk Connection
• Plug your USB device to the USB input of the TV.
Note: Plug or unplug your USB disk while the TV is
switched off.
Note: If you are going to connect a USB hard disk drive
to the TV set, USB connection cable used between
the disk drive and the TV should have a USB logo
and should be as short as possible.
Note: While formatting a USB hard disk that has 1TB
(Tera Byte) or more fi le capacity, you can experience
problems with the formatting process. In such a
case, you should format the disk with your personal
computer and the formatted disk type should be
FAT32.
SIDE VIEW USB MEMORY
CAUTION !
Quickly plugging and unplugging USB devices, •
is a very hazardous operation. Especially, do not
repeatedly quickly plug and unplug the drive. This
may cause physical damage to the USB player and
especially the USB device itself.
Do not pull out USB module while playing or •
recording a fi le.
Programme Recording
To record a programme, you should fi rst connect a
USB disk to your TV while the TV is switched off.
You should then switch on the TV to enable recording
feature.
IMPORTANT: When using a new USB hard disk drive,
it is recommended that you fi rst format the disk using
your TV’s “Format Disk” option.
For using recording function, you should connect a •
USB disk or an external hard disk drive to the TV
and connected USB disk should have at least 1 GB
capacity and should have 2.0 speed compatibility.
If the connected USB device does not support 2.0
speed, an error message will be displayed.
Note: Recorded programmes are saved into the
connected USB disk. If desired, you can store/copy
recordings on a computer; however, these fi les will
not be available to be played on a computer. You can
play the recordings only via your TV.
English - 13 -
A01_[GB]_MB70_5112UK_DVBT_C_DLNA_HBBTV_MMH_WIFI_32942LED_GOLD11_10075886_50201414.indd 13A01_[GB]_MB70_5112UK_DVBT_C_DLNA_HBBTV_MMH_WIFI_32942LED_GOLD11_10075886_50201414.indd 13 16.04.2012 14:49:4916.04.2012 14:49:49
Page 15
For more information on recording programmes, •
Recor de d prog ra mmes a re split in to 4GB
•
partitions.
see sections “Instant Recording”, “Timeshifting”,
“Electronic Programme Guide”, “Recordings” or
“Recording Timers” in the following parts.
Recorded programmes are split into 4GB
•
partitions.
Recorded programmes are stored in the following •
directory of the connected USB disk: \DVR\RECS.
All recordings are indicated with a number. A text
(txt) fi le is created for each recording. This text
file includes information such as broadcaster,
programme, and recording time.
Timeshifting may be stopped according to USB •
device write speed. If the USB device speed is not
enough for video stream bitrate, timeshifting may
be stopped and recording may fail. If HD service
bitrate is greater than 13 Mbp/sec. some freeze can
be seen during timeshifting on both USB disk and
on external HDD.
Recordings of HD programmes can occupy bigger •
size on the USB disk depending on the broadcast’s
resolution. For this reason it is recommended
to use USB hard disk drives for recording HD
programmes.
Do not plug out the USB/HDD during the recording. •
This may harm the connected USB/HDD.
Multipartiton support is available. Maximum two •
different partitions are supported. If the disk have
more than two partitions, crash may occur. First
partition of the usb disk is used for PVR ready
features. It also must be formatted as primary
partition to be used for PVR ready features.
Some stream packets may not be recorded because •
of signal problems, so sometimes video may freezes
during playback.
Record, Play, Pause, Display (for PlayListDialog) •
keys could not be used when teletext is ON. If a
recording starts from timer when teletext is ON,
teletext is automatically turned off. Also teletext
usage is disabled when there is ongoing recording
or playback.
• Radio record is not supported.
• The Tv can record programmes up to ten hours.
For USB-recording function (when HD broadcast •
is being recorded), please use a USB-harddisk. A
USB-stick cannot be used for this function.
Side HDMI Connection
You can use side HDMI input to connect a device that
has an HDMI connector to your TV. Use an appropriate
HDMI cable to make such a connection. Note that you
should switch to the HDMI source to view the content
from the connected device. Power off both the TV and
the device before making any connections. Side HDMI
Input supports connections between HDMI devices
such as DVD players. You can use side HDMI input
of the TV to connect to an external HDMI device. Use
an HDMI cable to connect.
HDMI DEVICE SIDE VIEW
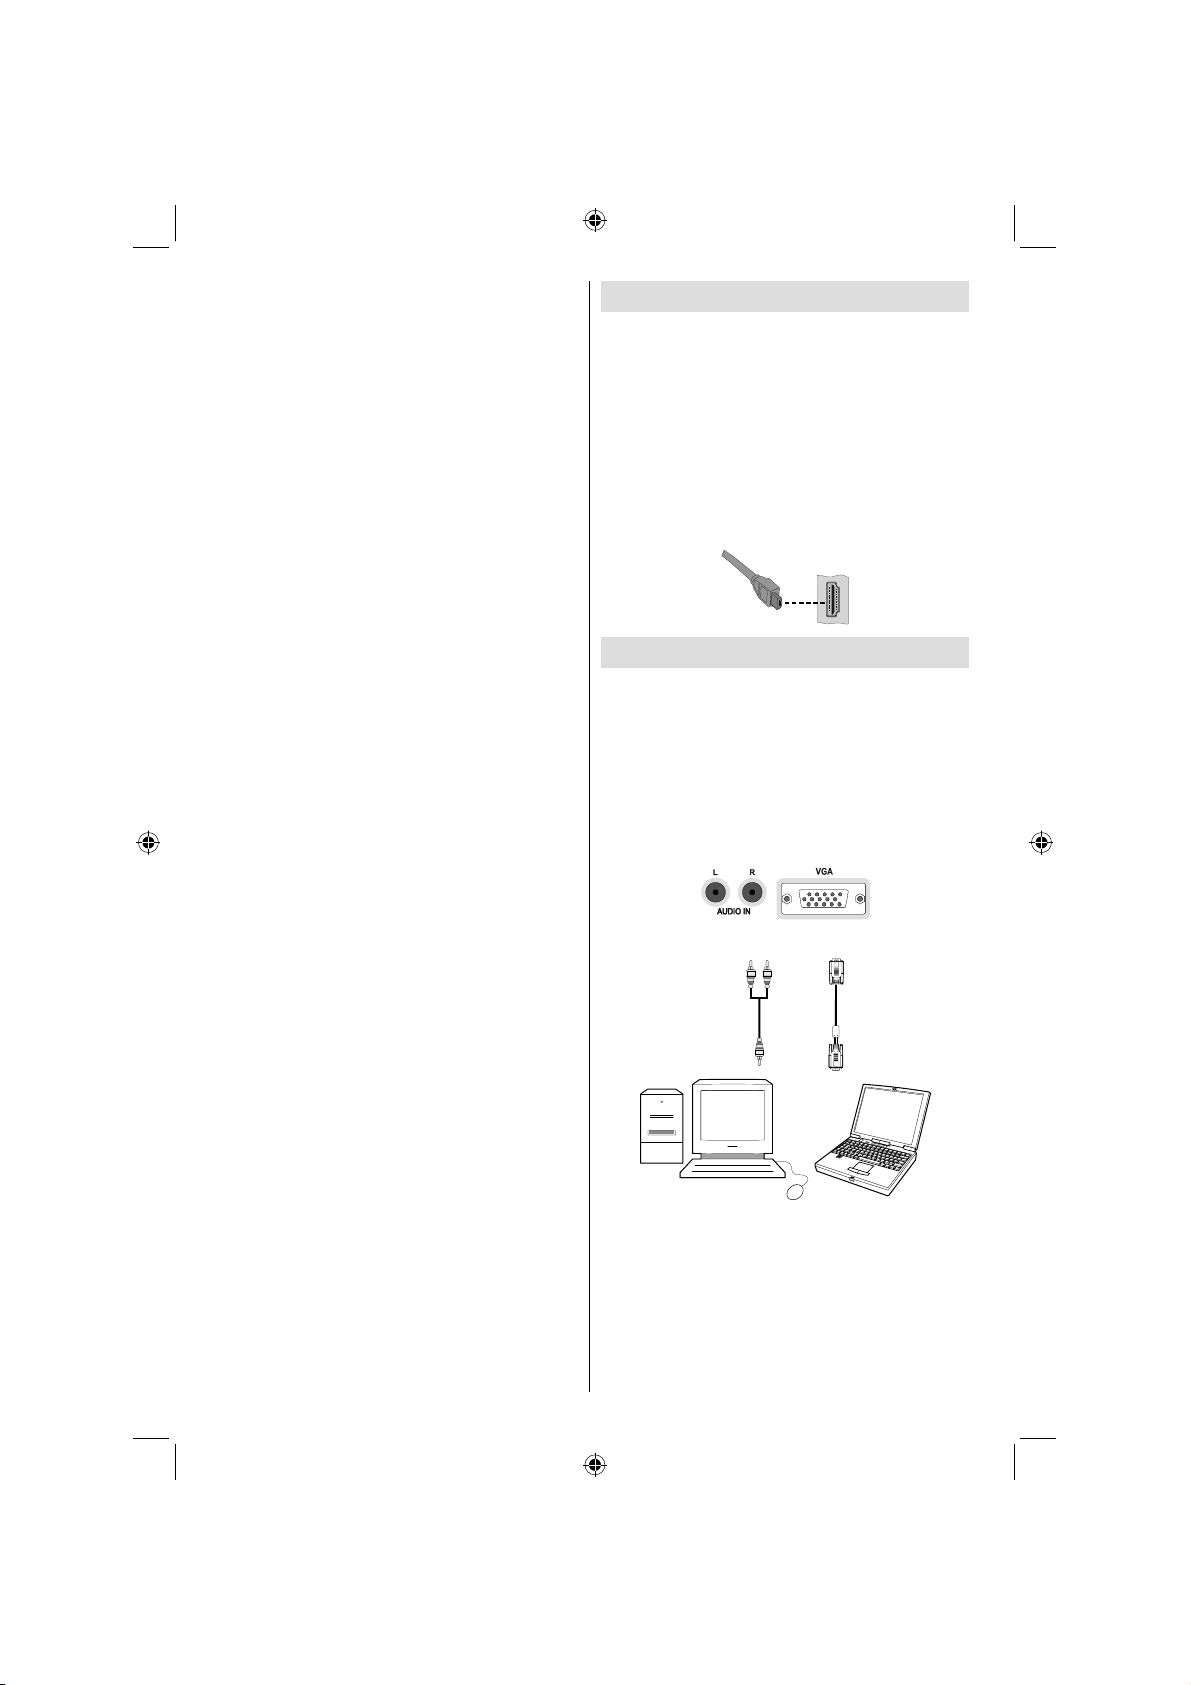
Connecting the LCD TV to a PC
For displaying your computer’s screen image on your
LCD TV, you can connect your computer to the TV set.
Power off both computer and display before making
any connections. Use 15-pin D-sub display cable to
connect a PC to the LCD TV. When the connection
is made, switch to PC source. See “Input selection”
section. Set the resolution that suits your viewing
requirements. Resolution information can be found
in the appendix parts.
Audio inputs of the TV
PC audio cable
(not supplied)
Audio output of the PC
PC input of the TV
PC VGA cable
(not supplied)
Monitor output of the PC
English - 14 -
A01_[GB]_MB70_5112UK_DVBT_C_DLNA_HBBTV_MMH_WIFI_32942LED_GOLD11_10075886_50201414.indd 14A01_[GB]_MB70_5112UK_DVBT_C_DLNA_HBBTV_MMH_WIFI_32942LED_GOLD11_10075886_50201414.indd 14 16.04.2012 14:49:5016.04.2012 14:49:50
Page 16
Connecting to a DVD Player
If you want to connect a DVD player to your LCD
TV, you can use connectors of the TV set. DVD
players may have different connectors. Please refer
to your DVD player’s instruction book for additional
information. Power off both the TV and the device
before making any connections.
Note: Cables shown in the illustration are not
supplied.
If your DVD player has an HDMI socket, you can •
connect via HDMI. When you connect to DVD player
as illustrated below, switch to HDMI source. See,
“Input Selection” section.
Most DVD players are connected through •
COMPONENT SOCKETS. Use a component video
cable to connect video input. For enabling audio, use
a component audio cable as illustrated below. When
the connection is made, switch to YPbPr source.
See, “Input selection” section.
You may also connect through the SCART 1 or •
SCART 2. Use a SCART cable as shown below.
Note: These three methods of connection perform the
same function but in different levels of quality. It is not
necessary to connect by all three methods.
HDMI
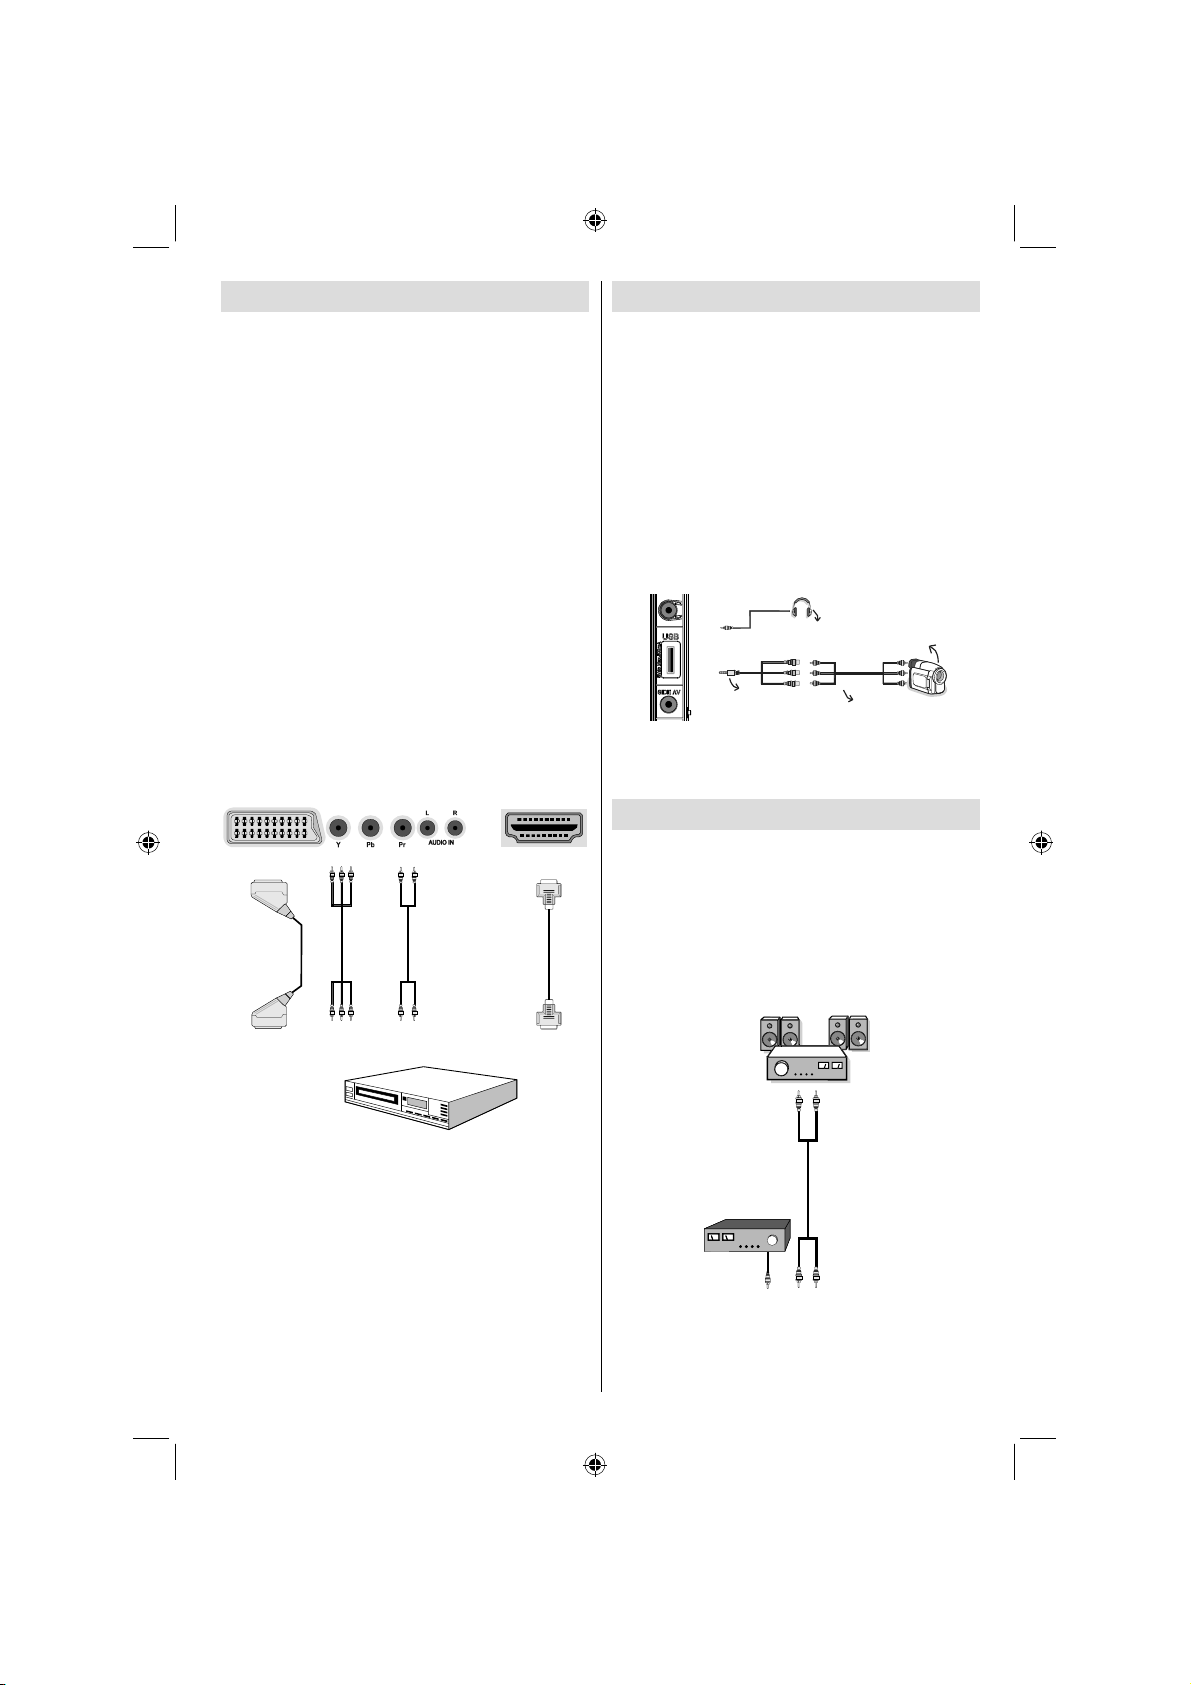
Using Side AV Connectors
You can connect a range of optional equipment to your
LCD TV using side connectors of the TV.
For connecting a camcorder or camera , you should •
use SIDE AV socket (side). To do this, you must use
the supplied video/audio connection cable. First,
plug single jack of the cable to the TV’s AV I N socket
(side). Afterwards, insert your camera cable’s (not
supplied) connectors into the plural part of the video/
audio connection cable. Colours of the connected
jacks should match. See illustration below.
Afterwards, you should switch to • AV I N source. See
the section Input selection in the following sections
for more information.
Headphone
Camera
AVConnection
Cable(supplied)
To listen the TV sound from headphones, you •
should connect headphones to your TV by using the
HEADPHONE jack as illustrated above.
Using Other Connectors
You can connect a range of optional equipment
to your LCD TV. Possible connections are shown
below. Note that cables shown in the illustration are
not supplied.
For connecting a to a device that has SPDIF support, •
use an appropriate SPDIF cable to enable sound
connection.
AVCable
(notsupplied)
External Speakers
A device that
supports
SPDIF signal.
Scart sockets
Component
video
inputs
Component
audio
inputs
DVD Player
HDMI
inputs
English - 15 -
A01_[GB]_MB70_5112UK_DVBT_C_DLNA_HBBTV_MMH_WIFI_32942LED_GOLD11_10075886_50201414.indd 15A01_[GB]_MB70_5112UK_DVBT_C_DLNA_HBBTV_MMH_WIFI_32942LED_GOLD11_10075886_50201414.indd 15 16.04.2012 14:49:5116.04.2012 14:49:51
Page 17
Connecting to a Wired Network
For connecting to a wired LAN network, you should perform the following steps:
Connect broadband ISP connection ethernet cable to the ETHERNET INPUT of your modem.•
Ensure that Nero Media Home software is installed to your PC.(for DLNA function). See Appendix H for more •
information on the installation process.
Afterwards, you should connect your PC to the one of your modem’s LAN connectors (e.g. LAN 1) by using •
a proper LAN cable.
Use another LAN output of your modem (e.g. LAN 2) to enable the connection to your TV. You can add •
your TV to your LAN by connecting the LAN port at the rear of your TV to your modem’s LAN connector as
illustrated below.
To access and play shared fi les, you must Select Media Browser. Press Menu button and select Media •
Browser by using Left or Right button. Press OK to continue. Select the desired fi le type and press OK. You
must always use the Media Browser screen to access and play shared network fi les.
PC/HDD/Media Player or any other devices that are DLNA 1.5 compatible should be used with wired •
connection for higher playback quality.
To confi gure wired settings please refer Network Settings section in Settings menu.
Broadband ISP
Connection
PC with Nero
Media Home
software installed
Lan(Ethernet cable)
Rear of TV
You might be able to connect your TV to your LAN network depending on your network’s confi guration. In •
such a case, use an ethernet cable to connect your TV directly to the network wall outlet.
The modem port
on the wall
Rear of TV
English - 16 -
A01_[GB]_MB70_5112UK_DVBT_C_DLNA_HBBTV_MMH_WIFI_32942LED_GOLD11_10075886_50201414.indd 16A01_[GB]_MB70_5112UK_DVBT_C_DLNA_HBBTV_MMH_WIFI_32942LED_GOLD11_10075886_50201414.indd 16 16.04.2012 14:49:5616.04.2012 14:49:56
Page 18

Connecting to a Wireless Network (Optional)
IMPORTANT: “Veezy 100” USB dongle(sold separately) is required to use wireless network feature.
To use your TV with your wireless network, you need a “Veezy 100” Wireless USB dongle. To make your
modem’ s SSID visible, you should change your SSID settings via modem’s software. The TV cannot connect
to the networks with hidden SSID.
For connecting to a wireless LAN network, you should perform the following steps:
Connect broadband ISP connection ethernet cable to the ETHERNET INPUT of your modem.•
Ensure that Nero Media Home software is installed to your PC. (for DLNA function).•
Afterwards, you should connect wireless adaptor to one of the USB inputs of the TV.•
To confi gure wireless settings please refer Network Settings section in Settings menu.
Broadband ISP
Connection
PC with Nero
Media Home
software installed
USB Inputs (Side of the TV)
Wireless Lan
Adaptor
A Wireless-N router (IEEE 802.11a/b/g/n) with simultaneous 2.4 and 5 GHz bands designed to increase •
bandwidth. Optimized for smoother and faster HD video streaming, file transfers, and wireless gaming.
Use LAN connection for quicker file sharing between other devices like computers.•
The frequency and channel differ depending on the area.•
The transmission speed differs depending on the distance and number of obstructions between the •
transmission products, the configuration of these products, the radio wave conditions, the line traffic, and
the products that you use. The transmission may also be cut off or get disconnected depending on the radio
wave conditions DECT phones, or any other WiFi 11b appliances. The standard values of the transmission
speed are the theoretical maximum values for the wireless standards. They are not the actual speeds of
data transmission.
The location where the transmission is most effective differs depending on the usage environment.•
Wireless LAN adaptor should be connected directly to the TV’s USB port. USB hubs are not supported.•
To configure wireless settings please refer wifi section in Settings menu.•
Wireless LAN adaptor supports 802.11 a,b,g & n type modems. It is highly recommended that you should •
use IEEE 802.11n communication protocol in order to avoid any possible problems while watching videos.
Use the other usb input, if you experience problems with audio/video performance.•
You must change your modem’s SSID when there are any other modems around with the same SSID. You •
can encounter connection problems otherwise. Use wired connection instead if you experience problems
with wireless connection.
English - 17 -
A01_[GB]_MB70_5112UK_DVBT_C_DLNA_HBBTV_MMH_WIFI_32942LED_GOLD11_10075886_50201414.indd 17A01_[GB]_MB70_5112UK_DVBT_C_DLNA_HBBTV_MMH_WIFI_32942LED_GOLD11_10075886_50201414.indd 17 16.04.2012 14:49:5716.04.2012 14:49:57
Page 19
Remote Control Handset
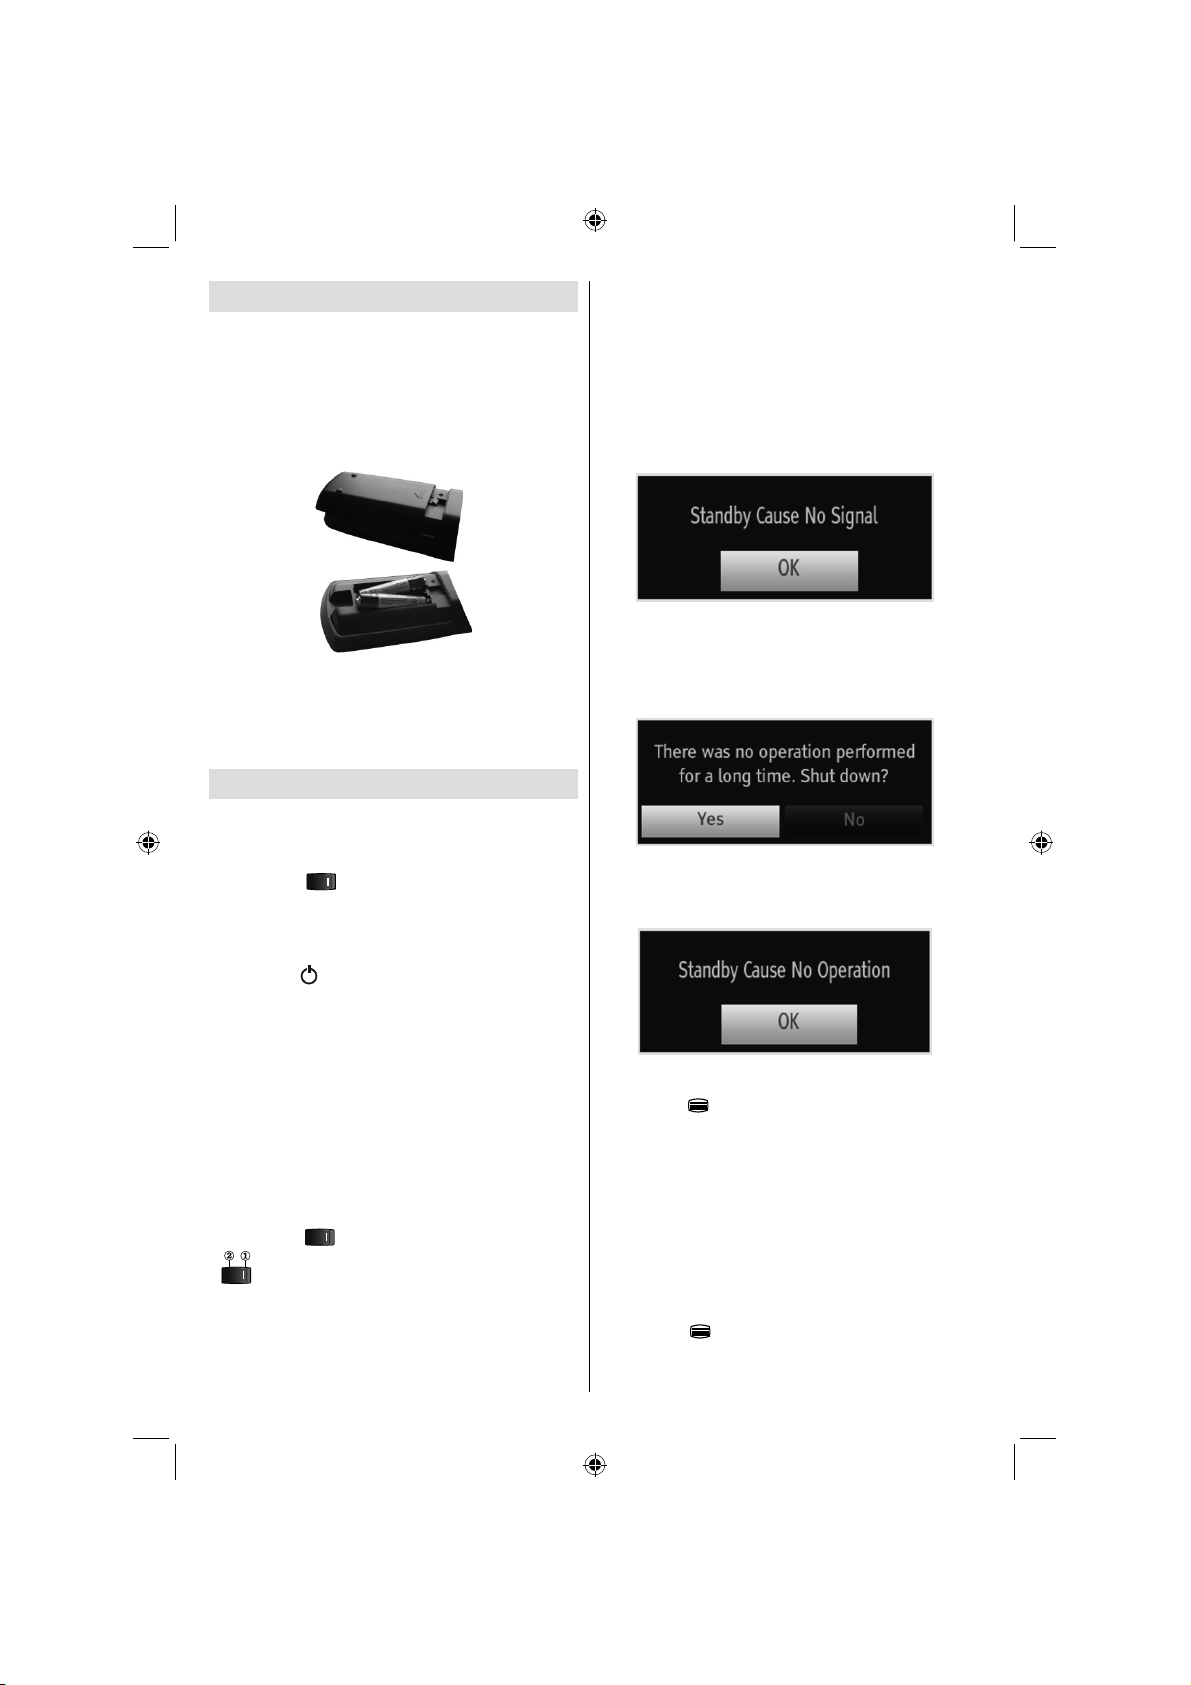
Inserting Batteries
Remove the battery cover located on the back of •
the handset by gently pulling backwards from the
indicated part.
Insert two • AAA/R3 or equivalent type batteries
inside. Observe the correct polarity (+/-) when
inserting batteries and replace the battery cover.
Note: Remove the battery from remote control
handset when it is not to be used for a long period.
Otherwise it can be damaged due to any leakage of
batteries. Remote range is approximately 7m/23ft.
Switching On/Off
To Switch the TV On
Connect the power cord to the 220-240V AC, 50 •
Hz socket.
Switch the “•
to position “|” so the TV will switch to standby mode.
Then the standby LED lights up.
To switch on the TV from standby mode either:•
Press the “•
on the remote control.
Press the • -P/CH or P/CH+ touch button on the TV.
The TV will then switch on.
Note: If you switch on your TV via standby button
on the remote control, the programme/source that
you were watching last will be reselected. The TV
will switch on with the last selected channel number,
regardless of the channel number that you select from
the remote control to switch on the TV.
By either method the TV will switch on.
To Switch the TV Off
Switch the “• ” button to position 2 as illustrated,
so the TV will switch OFF.
To power down the TV completely, unplug the •
power cord from the mains socket.
” button on the rear left hand side
” button, P+ / P- or a numeric button
Note: When the TV is switched to standby mode,
standby LED can blink to indicate that features such
as Standby Search, Over Air Download or Timer is
active. The LED can also blink when you switch on
the TV from standby mode.
Standby Notifi cations
If the TV switches off while in No Signal mode, the
following on-screen message will be displayed on the
next switch-on:
When the Auto Tv Off timeout is reached, the following
message will be displayed on the screen. Select YES
to shut down the TV. Select NO to cancel. The TV
will switch off as well, if you do not make a selection
on this screen.
If the TV switches off owing to the auto power down
feature, the following on-screen message will be
displayed on the next switch-on:
Digital Teletext (*)
• Press the “ ” button.
The digital teletext information appears.•
Operate it with the coloured buttons, cursor buttons •
and OK button.
The operation method may differ depending on the
contents of the digital teletext.
Follow the instructions displayed on digital teletext
screen.
When Press “• OK” button or similar message appears
on the screen, press the OK button.
When the “•
television broadcasting.
” button is pressed, the TV returns to
English - 18 -
A01_[GB]_MB70_5112UK_DVBT_C_DLNA_HBBTV_MMH_WIFI_32942LED_GOLD11_10075886_50201414.indd 18A01_[GB]_MB70_5112UK_DVBT_C_DLNA_HBBTV_MMH_WIFI_32942LED_GOLD11_10075886_50201414.indd 18 16.04.2012 14:49:5816.04.2012 14:49:58
Page 20
With digital broadcasting (DVB), in addition to digital •
teletext broadcasting together with the normal
broadcasting, there are also channels with just digital
teletext broadcasting.
The aspect ratio (picture shape) when watching •
a channel with just digital teletext broadcasting is
the same as the aspect ratio of the picture viewed
previously.
When you press the “•
teletext screen will be displayed.
(*) If available in your country
” button again, the digital
Analogue Teletext
Use of teletext and its functions are identical to
the analogue text system. Please do refer to the
“TELETEXT” explanations.
Input Selection
Once you have connected external systems to
your TV, you can switch to different input sources.
Press “SOURCE” button on your remote control
consecutively for directly changing sources.
*
(*) AV IN source option will switch to the device
connected via the SIDE AV socket.
You can operate your TV using both the remote control
and onset buttons.
Operation with the Buttons on the TV
Volume Setting
Press “• ” button to decrease volume or
button to increase volume, so a volume level scale
(slider) will be displayed on the screen.
Programme Selection
Press “• P/CH +” button to select the next programme or
“P/CH -” button to select the previous programme.
Viewing Main Menu
Press the “• ”/“ ” button at the same time
to view main menu. In the Main menu select the submenu using “AV” button and set the sub-menu using
“ ” or “ ” buttons. To learn the usage of
the menus, refer to the menu system sections.
AV Mode
Press the “• AV” button in the control panel on the TV
to switch between AV modes.
Operation with the Remote Control
The remote control of your TV is designed to control •
all the functions of the model you selected. The
functions will be described in accordance with the
menu system of your TV.
Volume Setting
Press “• V+” button to increase the volume. Press “V-”
button to decrease the volume. A volume level scale
(slider) will be displayed on the screen.
Programme Selection (Previous or Next
Programme)
Press “• P -” button to select the previous
programme.
Press “• P +” button to select the next programme.
Programme Selection (Direct Access)
Press numeric buttons on the remote control to select •
programmes between 0 and 9. The TV will switch
to the selected programme. To select programmes
between, press the numeric buttons consecutively.
When the pressing time is due for the second
numeric button, only the fi rst digit programme will
be displayed. Press directly the programme number
to reselect single digit programmes.
Note: If the background is transparent, on screen texts
will be slightly transparent as well.
Viewing Electronic Programme
Guide (EPG)
You can view the electronic programme guide (EPG)
to view information about available programmes. To
view the EPG menu please press EPG button on the
remote control.
Press “•
channels.
Press “•
programme list.
EPG• menu displays available information on all
channels.
Please note that event information is updated •
automatically. If there are no event information
data available for channels, EPG will be displayed
with blanks.
”/“ ” buttons to navigate through
”/“ ” buttons to navigate through the
English - 19 -
A01_[GB]_MB70_5112UK_DVBT_C_DLNA_HBBTV_MMH_WIFI_32942LED_GOLD11_10075886_50201414.indd 19A01_[GB]_MB70_5112UK_DVBT_C_DLNA_HBBTV_MMH_WIFI_32942LED_GOLD11_10075886_50201414.indd 19 16.04.2012 14:49:5916.04.2012 14:49:59
Page 21
OK (Options): Views/records or sets timer for future
programs.
INFO (Event Details): Displays the programmes in
detail.
Green button: Programme schedule will be listed
Yellow button: Display EPG data in accordance with
timeline schedule
Blue button (Filter): Views fi ltering options.
(RECORD): the TV will start to record the
selected progamme. You can press again to stop
the recording.
—EPG List schedule—
Red button (Prev Time Slice): Displays the
programmes of previous time slice.
Green button (Next Time Slice): Displays the
programmes of the next time slice.
Yellow button (Prev Day): Displays the programmes
of previous day.
Blue button (Next day): Displays the programmes
of the next day.
Text button (Filter): Views fi ltering options.
Numeric buttons (Jump): Jumps to the preferred
channel directly via numeric buttons.
OK (Options): Views/records or sets timer for future
programs.
INFO (Event Details): Displays the programmes in
detail.
English - 20 -
(RECORD): the TV will start to record the
selected progamme. You can press again to stop
the recording.
—Timeline schedule—
Red button (Prev Day): Displays the programmes
of previous day.
Green button (Next day): Displays the programmes
of the next day.
Yellow button (Zoom): Expands programme
information.
Blue button (Filter): Views fi ltering options.
INFO (Event Details): Displays the programmes in
detail.
Numeric buttons (Jump): Jumps to the preferred
channel directly via numeric buttons.
OK (Options): Views/records or sets timer for future
programs.
Text (Search): Displays “Guide Search” menu.
SUBTTL: Press SUBTITLE button to view Select
Genre menu. Using this feature, you can search the
programme guide database in accordance with the
genre. Info available in the programme guide will
be searched and results matching your criteria will
be listed.
(Now) : Shows the current programme.
(RECORD): the TV will start to record the
selected progamme. You can press again to stop
the recording.
Recording via EPG Screen
IMPORTANT: To record a programme, you should
fi rst connect a USB disk to your TV while the TV is
switched off. You should then switch on the TV to
enable recording feature. Otherwise, recording feature
will not be available.
(RECORD): the TV will start to record the
selected progamme. You can press again to stop
the recording.
Note: Switching to a different broadcast or source is
not available during the recording.
/ : Page left / Page right.
A01_[GB]_MB70_5112UK_DVBT_C_DLNA_HBBTV_MMH_WIFI_32942LED_GOLD11_10075886_50201414.indd 20A01_[GB]_MB70_5112UK_DVBT_C_DLNA_HBBTV_MMH_WIFI_32942LED_GOLD11_10075886_50201414.indd 20 16.04.2012 14:50:0016.04.2012 14:50:00
Page 22
Programme Options
In EPG menu, press the OK button to enter the “Event
Options” menu.
Select Channel
In EPG menu, using this option, you can switch to the
selected channel.
Record / Delete Record Timer
IMPORTANT: To record a programme, you should
fi rst connect a USB disk to your TV while the TV is
switched off. You should then switch on the TV to
enable recording feature. Otherwise, recording feature
will not be available.
After you have selected a programme in EPG menu, •
press the OK button and and Options screen will
be displayed. Select “Record” option and press the
OK button. After this operation, a recording becomes
set to the selected programme.
To cancel an already set recording, highlight that •
programme and press the OK button and select
the option “Delete Rec. Timer”. The recording will
be cancelled.
Note: You cannot switch to any other channel or
source while there is an active recording on the
current channel.
Set Timer / Delete Timer
After you have selected a programme in EPG menu,
press the OK button and and Options screen will
be displayed. Select “Set Timer on Event” option
and press OK button. You can set a timer for future
programmes.
To cancel an already set reminder, highlight that
programme and press the OK button. Then select
“Delete Timer” option. The timer will be cancelled.
Note: It is not possible to record or set timer for two or
more individual events at the same time interval.
First Time Installation
IMPORTANT: Ensure that the aerial or cable is
connected and a Common Interface module is not
inserted before switching on the TV for the fi rst
time installation.
Do not insert a common interface module during the
search process.
When the TV is operated for the fi rst time, installation •
wizard will guide you through the process. First,
language selection screen will be displayed:
English - 21 -
Use “• ” or “ ” buttons to select your language
and press OK button to set selected language and
continue.
After selecting the language, “• Welcome!” screen will
be displayed, requiring you to set Country, Search
Type, Teletext Language, Scan Encrypted and
Store Mode options.
By pressing “• ” or “ ” button, select the country
you want to set and press “ ” button to highlight
Search Type option. Use “ ” or “ ” to set the
desired search type. Available search types are
digital only, analog TV only and full.
When set, press “•
Use “ ” or “ ” to select the desired Teletext
Language.
You can activate Store mode option by using •
or button. If the Store mode is set to “enabled”,
E-Pop option will be available in other settings
menu. If it is set to “disabled”, Store mode will
not be available after the First Time Installation.
Note: If Store Mode is enabled, some features may
be affected.
Press “•
option. Scan Encrypted will be then highlighted.
You can set Scan Encrypted as Yes if you want to
scan coded stations.
Press • OK button on the remote control to continue
and the following message will be displayed on the
screen:
” button after setting Teletext Language
” to select Teletext Language.
A01_[GB]_MB70_5112UK_DVBT_C_DLNA_HBBTV_MMH_WIFI_32942LED_GOLD11_10075886_50201414.indd 21A01_[GB]_MB70_5112UK_DVBT_C_DLNA_HBBTV_MMH_WIFI_32942LED_GOLD11_10075886_50201414.indd 21 16.04.2012 14:50:0016.04.2012 14:50:00
Page 23
If you select CABLE option and press OK button on
the remote control to continue, the following message
will be displayed on the screen:
To continue please select YES and press OK. To
cancel operation, select NO and press OK.
You can select frequency ranges from this screen. For
highlighting lines you see, use “ ” or “ ” button. You
can enter the frequency range manually by using the
numeric buttons on the remote control. Set Start and
Stop Frequency as desired by using numeric buttons
on the remote control. After this operation, you can set
Search Step as 8000 KHz or 1000 KHz. If you select
1000 KHz, the TV will perform search process in a
detailed way. Searching duration will thus increase
accordingly. When fi nished, press OK button to start
automatic search.
If you select AERIAL option from the Search Type
screen, the television will search for digital terrestrial
and analogueTV broadcasts.
After all the available stations are stored, Channel •
List will be displayed on the screen. If you like the
sort channels, according to the LCN, please select
“Yes” and than press “OK”.
Press • OK button to quit channel list and watch TV.
Auto Tuning
HINT: Auto tuning feature will help you to retune the TV
set in order to store new services or stations.
Press “MENU” button on the remote control and
select Installation by using “
OK button and the following menu screen will be
displayed.
” or “ ” button. Press
Note: You can press “MENU” button to cancel.
End of the search process, Choose Region menu
screen will be displayed (if any multiple region variants
are detected). Please select country and region choice
then press OK to continue.
English - 22 -
A01_[GB]_MB70_5112UK_DVBT_C_DLNA_HBBTV_MMH_WIFI_32942LED_GOLD11_10075886_50201414.indd 22A01_[GB]_MB70_5112UK_DVBT_C_DLNA_HBBTV_MMH_WIFI_32942LED_GOLD11_10075886_50201414.indd 22 16.04.2012 14:50:0116.04.2012 14:50:01
Select Automatic Channel Scan (Retune) by using “
”/“ ” button and press OK button. Automatic Channel
Scan (Retune) options will be displayed. You can
select options by using “ ”/“ ” and OK buttons.
Page 24
Auto Channel Scan Menu Operation
Digital Aerial: Searches and stores aerial DVB
stations.
Digital Cable: Searches and stores cable DVB
stations.
Analogue: Searches and stores analogue stations.
Digital Aerial & Analogue: Searches and stores both
analogue and aerial DVB stations.
Digital Cable & Analogue: Searches and stores both
analogue and cable DVB stations.
Whenever you select an automatic search type and •
press OK button, a confi rmation screen will appear
on the screen. To start installation process, select
Yes, to cancel select No by using .“
OK button.
After auto channel scan type is set and selected •
and confi rmed, installation process will start and
progress bar will move along. Press “MENU” button
to cancel process. In such a case, located channels
are not stored.
” or “ ” and
Manual Tuning
HINT: This feature can be used for direct broadcast
entry.
Select • Manual Channel Scan from the Installation
menu by using “
Scan options screen will be displayed.
Select the desired • Search Type using “
” button. Manual search options will change
accordingly. Use “ ”/“ ” button to highlight an item
and then press “ ” or “ ” button to set an option.
You can press “MENU” button to cancel.
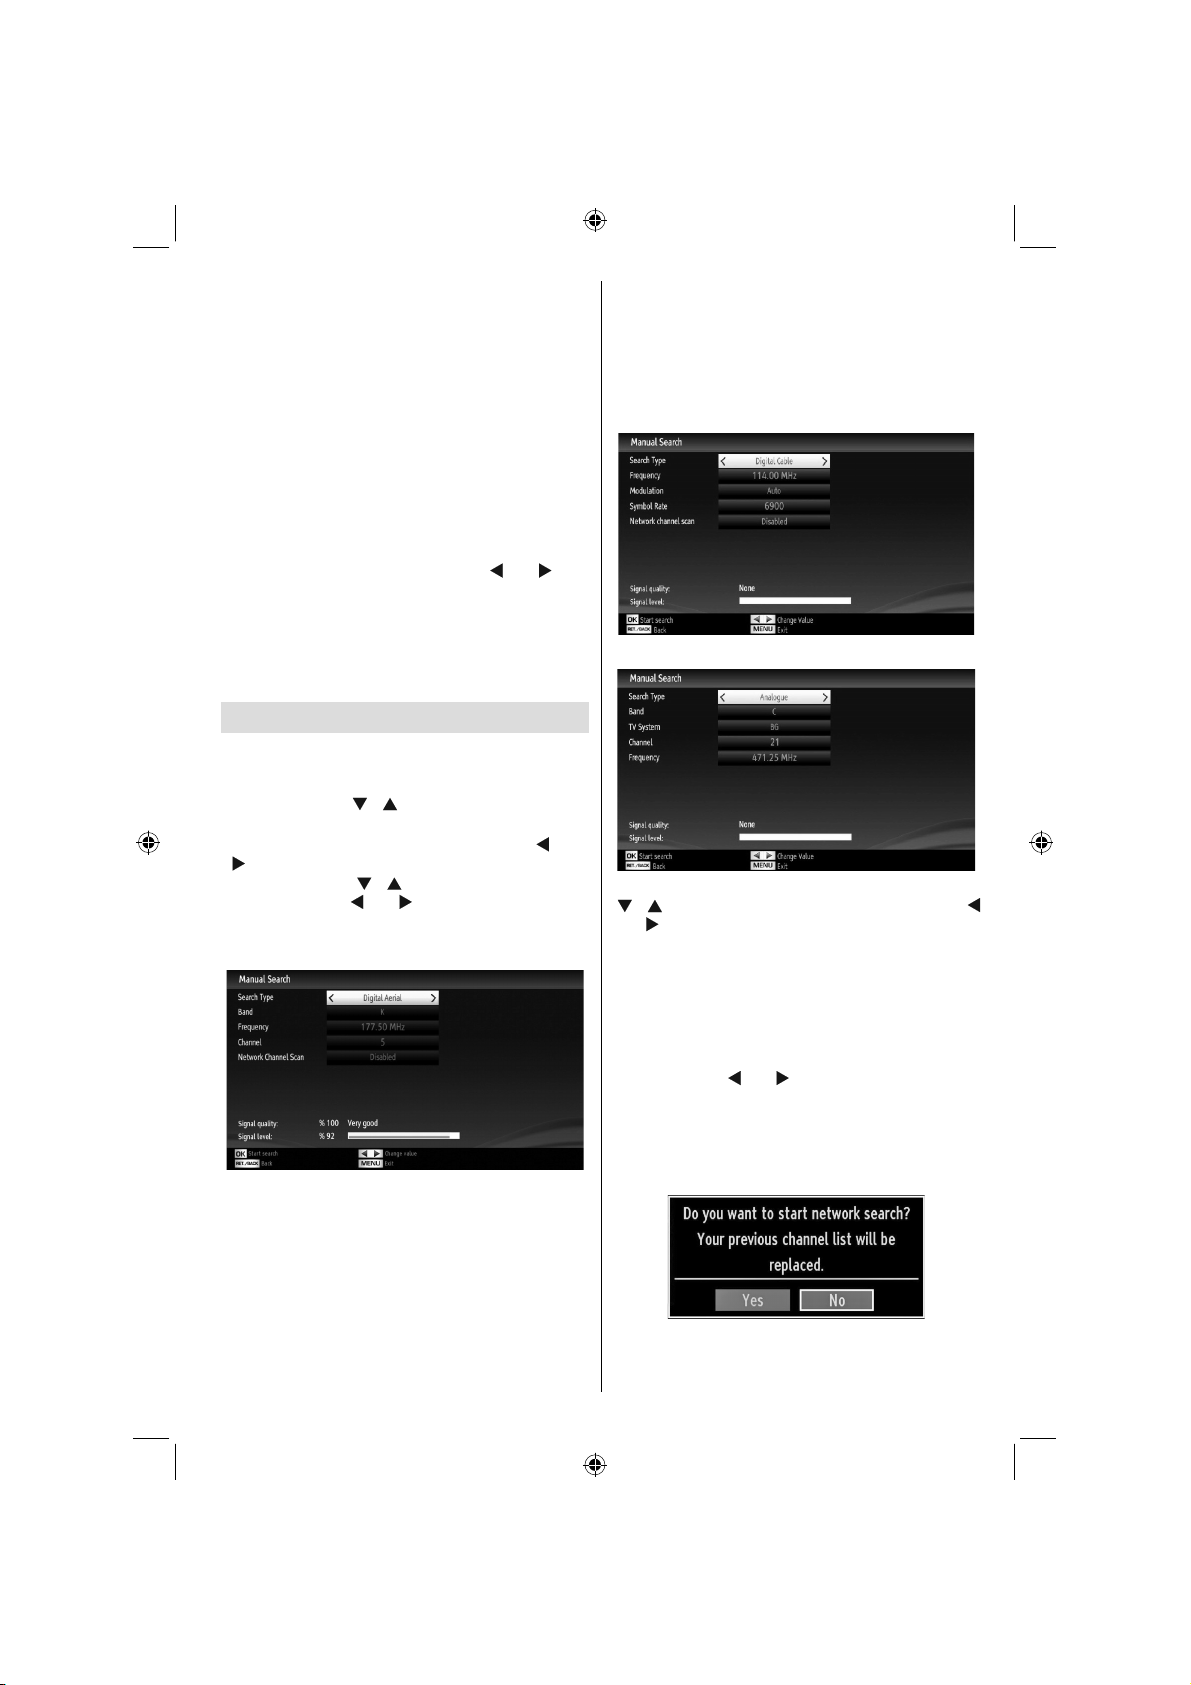
Digital Aerial Manual Search
In manual channel scan, the number of the multiplex
or frequency are entered manually and only that
multiplex or frequency are searched for the channels.
After selecting search type as Digital Aerial, you
must select the desired Band and then you can enter
the multiplex or frequency number using the numeric
buttons and press OK button to search.
Band Options:
D_Band = VHF 9-24
S_Band = VHF 12-20, UHF 21-41
”/“ ” and OK buttons. Manual
” or “
English - 23 -
K_Band = VHF 5-12, UHF 21-69
Digital Cable Manual Search
In cable manual scan, you can enter frequency,
modulation, symbol rate and network channel scan
options. After selecting search type as Digital Cable,
you can set the desired options and press OK button
to search.
Analogue Manual Search
After selecting search type as analogue, you can use
“ ”/“ ” button to highlight an item and then press “
” or “ ” button to set an option.
Enter the channel number or frequency using the
numeric buttons. You can then press OK button
to search. When the channel is located, any new
channels that are not on the list will be stored.
Network Channel Scan
Select Network Channel Scan from the installation
menu by using “ ” or “ ” and OK buttons. Network
Channel Scan selection screen will be displayed.
Select Digital Aerial or Digital Cable and press
OK button to continue. The following message will
be asked. Select Yes to continue or select No to
cancel.
If you start Digital Aerial scan process, automatic
scanning will start. You can press “MENU” button
to cancel.
A01_[GB]_MB70_5112UK_DVBT_C_DLNA_HBBTV_MMH_WIFI_32942LED_GOLD11_10075886_50201414.indd 23A01_[GB]_MB70_5112UK_DVBT_C_DLNA_HBBTV_MMH_WIFI_32942LED_GOLD11_10075886_50201414.indd 23 16.04.2012 14:50:0216.04.2012 14:50:02
Page 25
If you start Digital Cable scan process, the following
screen will be displayed.
You can select frequency ranges from this screen. For
highlighting lines you see, use “ ” or “ ” button. You
can enter the frequency range manually by using the
numeric buttons on the remote control. Set Start and
Stop Frequency as desired by using numeric buttons
on the remote control. After this operation, you can set
Search Step as 8000 KHz or 1000 KHz. If you select
1000 KHz, the TV will perform search process in a
detailed way. Searching duration will thus increase
accordingly. When fi nished, press OK button to start
automatic search. Automatic searching screen will be
displayed during the process.
Note: If you select an extended gap between Start
and Stop frequency rate, automatic search duration
will take a longer time.
Analog Fine Tune
Select • Analog Fine Tune from the Installation menu
by using “ ” or “ ” and OK buttons. Analog Fine
Tune screen will be displayed. Analog Fine Tune
feature will not be available if there are no analog
channels, digital channels and external sources
stored.
Press • OK button to proceed. Use “
to set Fine Tune. When fi nished, press OK button
again.
” or “ ” button
First Time Installation
If you want to delete all channels and settings please
select First Time Installation and press OK. The
TV’s memory will be deleted and installation progress
starts.
Clear Service List (*)
(*) This setting is visible only when the Country option
is set to Denmark, Sweden, Norway or Finland.
Use this setting to clear channels stored. Press “
” or “ ” button to select Clear Service List and then
press OK. The following OSD will be displayed on
the screen:
English - 24 -
Select YES and press OK to continue or select NO
and press OK button to cancel.
Managing Stations: Channel List
The TV sorts all stored stations in the Channel List.
You can edit this channel list, set favourites or set
active stations to be listed by using the Channel List
options.
Press “• MENU” button to view main menu. Select
Channel List item by using “
OK to view menu contents.
Select Active Network feature allows you to select
only the broadcasts within the selected network.
Select Edit Channel List to manage all stored
channels. Use “
Edit Channel List.
” or “ ” and OK buttons to select
Channel List Types
You can set channel list type function to display
desired types of available channels.
RED: Lists only digital aerial and analogue
broadcasts.
GREEN: Lists only digital cable and analogue
broadcasts.
OK: Watch selected.
MENU: Exits.
BLUE: Displays fi ltering options.
” or “ ” button. Press
A01_[GB]_MB70_5112UK_DVBT_C_DLNA_HBBTV_MMH_WIFI_32942LED_GOLD11_10075886_50201414.indd 24A01_[GB]_MB70_5112UK_DVBT_C_DLNA_HBBTV_MMH_WIFI_32942LED_GOLD11_10075886_50201414.indd 24 16.04.2012 14:50:0416.04.2012 14:50:04
Page 26

Operating the Channel List
Press “• ” or “ ” button to select the channel that
will be processed. Press “ ” or “ ” button to select
a function on Channel List menu.
Use • P+/P- buttons to move page up or down.
Press • BLUE button to view fi ltering options.
Press “• MENU” button to exit.
Note: The channels listed are mixed at the channel
list. Channel types can be differentiated by the icons
next to them: DTV (digital tv), HD (HD TV) , ATV
(Analogue TV) ,TV (TV), RD (Radio), encrypted, lock,
and at the favourite list.
Listed channels can also be sorted by using the active
channel list fi lter.
Moving a Channel
First select the desired channel. Select Move option •
in the channel list and press OK button.
Edit Number screen will be displayed. Enter the •
desired channel number by using the numeric
buttons on the remote control. If there is a previously
stored channel on that number, a warning screen
will be displayed. Select Yes if you want to move the
channel and press OK.
Press • OK button to process. Selected channel is
now moved.
Deleting a Channel
You can press GREEN button to tag/untag all
channels; YELLOW button to tag/untag channel.
Select the channel that you want to delete and select •
Delete option. Press OK button to continue.
A warning screen will appear. Select • YES to delete,
select No to cancel. Press OK button to continue.
Renaming a Channel
Select the channel that you want to rename and •
select Edit Name option. Press OK button to
continue.
Pressing “•
next character. Pressing “ ” or “ ” button toggles
the current character, i.e., ‘b’ character becomes ‘a’
by “
” or “ ” button moves to the previous/
” and ‘c’ by “ ”. Pressing the numeric buttons
English - 25 -
‘0...9’ replaces the highlighted character with the
characters printed above the button one by one as
the button is pressed.
When fi nished, press • OK button to save. Press
“MENU” to cancel.
Locking a Channel
You can press GREEN button to tag/untag all
channels; YELLOW button to tag/untag a single
channel.
Select the channel that you want to lock and select •
Lock option. Press OK button to continue.
You will be asked to enter parental control PIN. •
Default PIN is set as 0000. Enter the PIN number.
Press • OK button when the desired channel is
highlighted to lock/unlock the channel. Lock symbol
will be displayed next to the selected channel.
Channel List Filter
Channel list fi ltering option can be set as desired. Use
fi lter to set channels as TV only, Radio only and Text
only. If encrypted channel are not listed, you can as set
free by using CAS/free feature. You can jump to the
related channels by using A-Z options. You can sort
channels alphabetically by using Sort option. You can
customize channel list by using all this feature.
Managing Stations: Favourites
You can create a list of favourite programmes.
Press “• MENU” button to view main menu. Select
Channel List item by using “
OK to view menu contents.
Select • Favourites to manage favourite list. Use “
”/“ ” and OK buttons to select Favourites.
You can set various channels as favourites so that •
only the favourite channels are navigated.
Select a channel by using “• ” or “ ” button. Press
OK button to add selected channel to favourites list.
Press OK button again to remove.
” or “ ” button. Press
A01_[GB]_MB70_5112UK_DVBT_C_DLNA_HBBTV_MMH_WIFI_32942LED_GOLD11_10075886_50201414.indd 25A01_[GB]_MB70_5112UK_DVBT_C_DLNA_HBBTV_MMH_WIFI_32942LED_GOLD11_10075886_50201414.indd 25 16.04.2012 14:50:0516.04.2012 14:50:05
Page 27
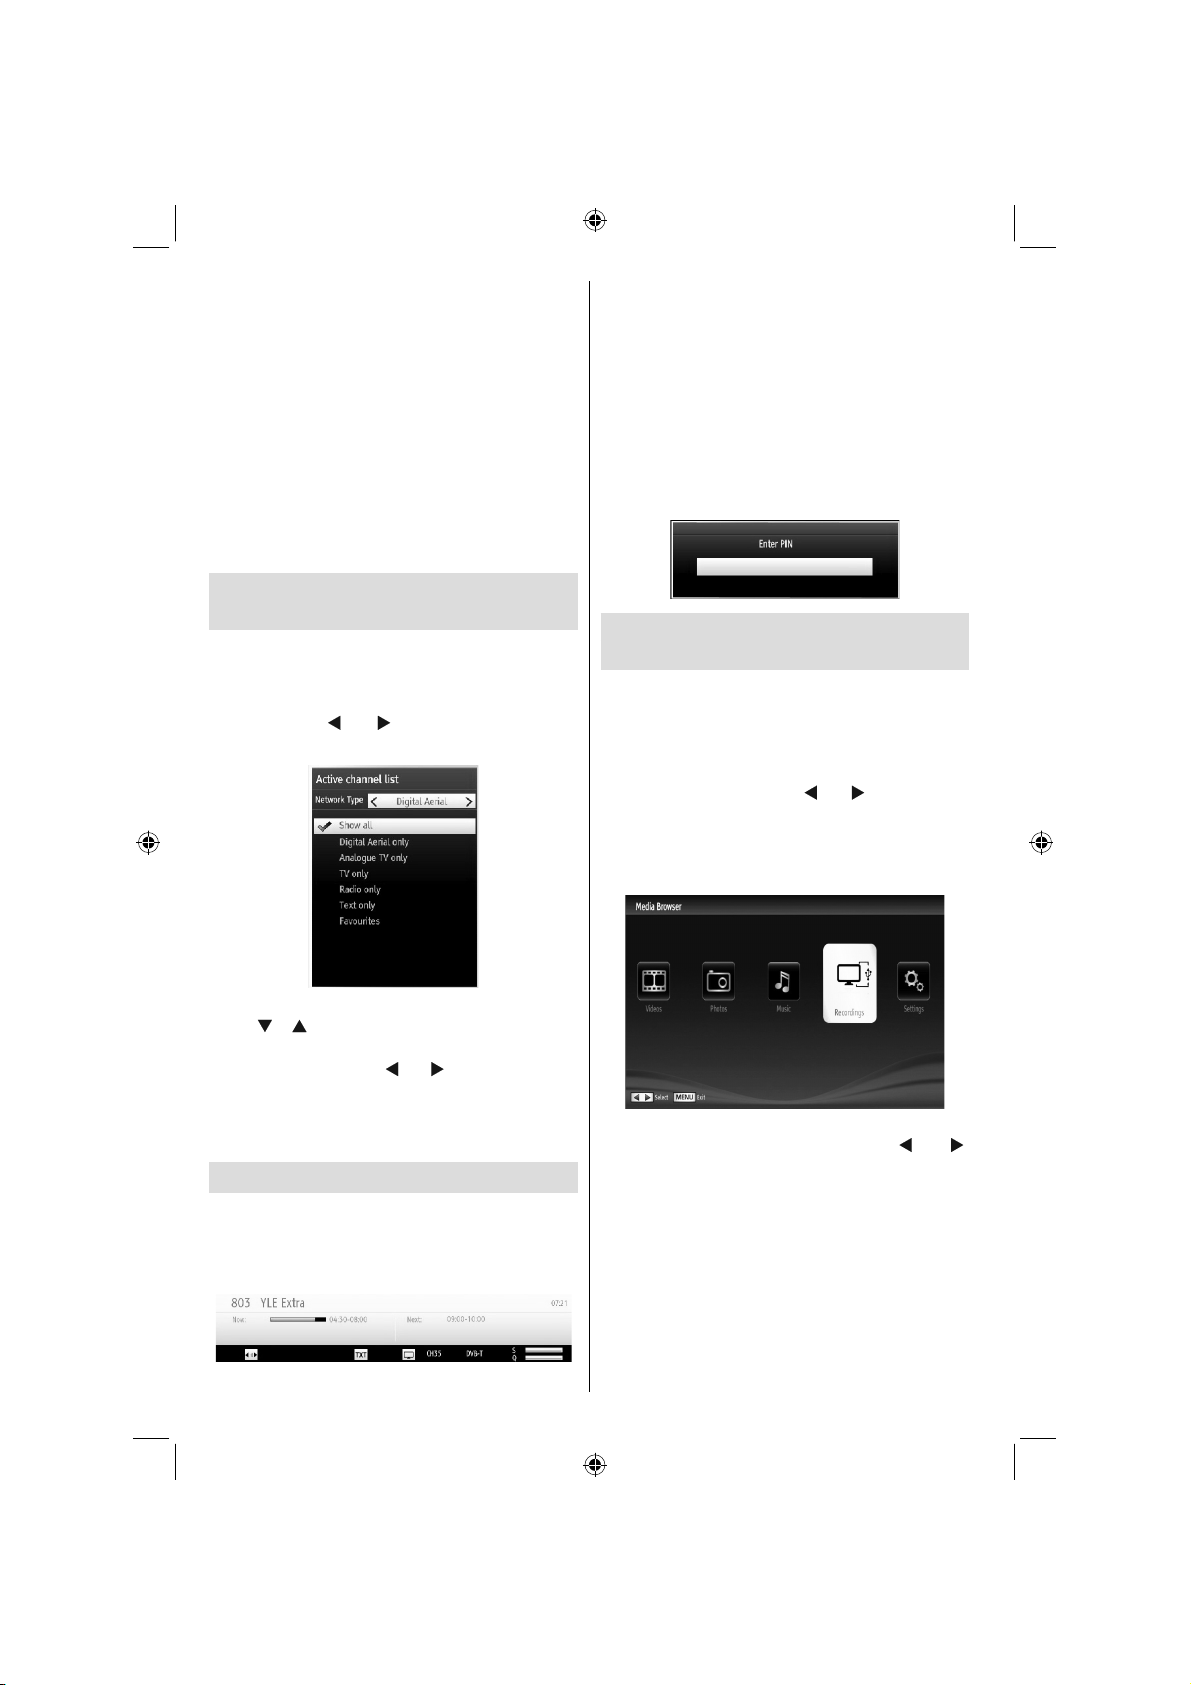
Button Functions
OK• : Add/remove a station.
YELLOW• : Tag/untag a channel.
GREEN• : Tag/untag all channels.
BLUE• : Displays fi ltering options.
When a channel is added to the favourite list, you
can press FAV button while watching TV in order to
navigate only through your favourite channels with
P+/P- button.
Press FAV button again to navigate through all
channels again.
Note: In the channel list, always all channels will be
shown.
Managing Stations: Sorting
Channel List
You can select broadcasts to be listed in the channel
list. To display specifi c types of broadcast, you should
use Active Channel List setting.
Select Active Channel List from the Channel list
menu by using “
to continue.
” or “ ” button. Press OK button
The information banner gives information on the
channel selected and the programmes on it. The name
of the channel is displayed, along with its channel
list number.
Hint: Not all channels broadcast the programme
data. If the name and time of the programme are not
available, then information banner will be displayed
with blanks.
If the selected channel is locked, you must enter the
correct four-digit numeric code to view the channel
(default code is 0000). “Enter PIN” will be displayed
on the screen in such a case:
Media Playback Using Media
Browser
If the USB stick is not recognized after power off/on
or First Time Installation, fi rst, plug the USB device
out and power off/on the TV set. Plug the USB device
in again.
To display Media Browser window, press either
“MENU” button on the remote control and then select
Media Browser by pressing “ ” or “ ” button. Press
OK button to continue. Media Browser menu options
will be displayed.
Also, when you plug USB devices, media browser
screen will be displayed automatically:
You can choose an active channel list from the list by
using “ ” /“ ” and OK buttons.
Broadcast Type (optional): When you set the desired
broadcast type by using “
display the related channel list. If the related source
has does not include any stored channels, “No
channels for this type have been found.” message
will be displayed on the screen.
On-Screen Information
You can press “INFO” button to display on-screen
information. Details of the station and current
programme will be displayed on the information
banner.
A01_[GB]_MB70_5112UK_DVBT_C_DLNA_HBBTV_MMH_WIFI_32942LED_GOLD11_10075886_50201414.indd 26A01_[GB]_MB70_5112UK_DVBT_C_DLNA_HBBTV_MMH_WIFI_32942LED_GOLD11_10075886_50201414.indd 26 16.04.2012 14:50:0616.04.2012 14:50:06
” or “ ” button, the TV will
You can play music, picture and video fi les from
the connected USB memory stick. Use “ ” or “ ”
button to select Videos, Photos, Music, Recordings
or Settings.
You can connect two USB devices to your TV. If both
USB devices include music, picture or video fi les, USB
selection OSD will be displayed on the screen. The
fi rst USB device connected to the TV will be named
as USB Drive1.
English - 26 -
Page 28
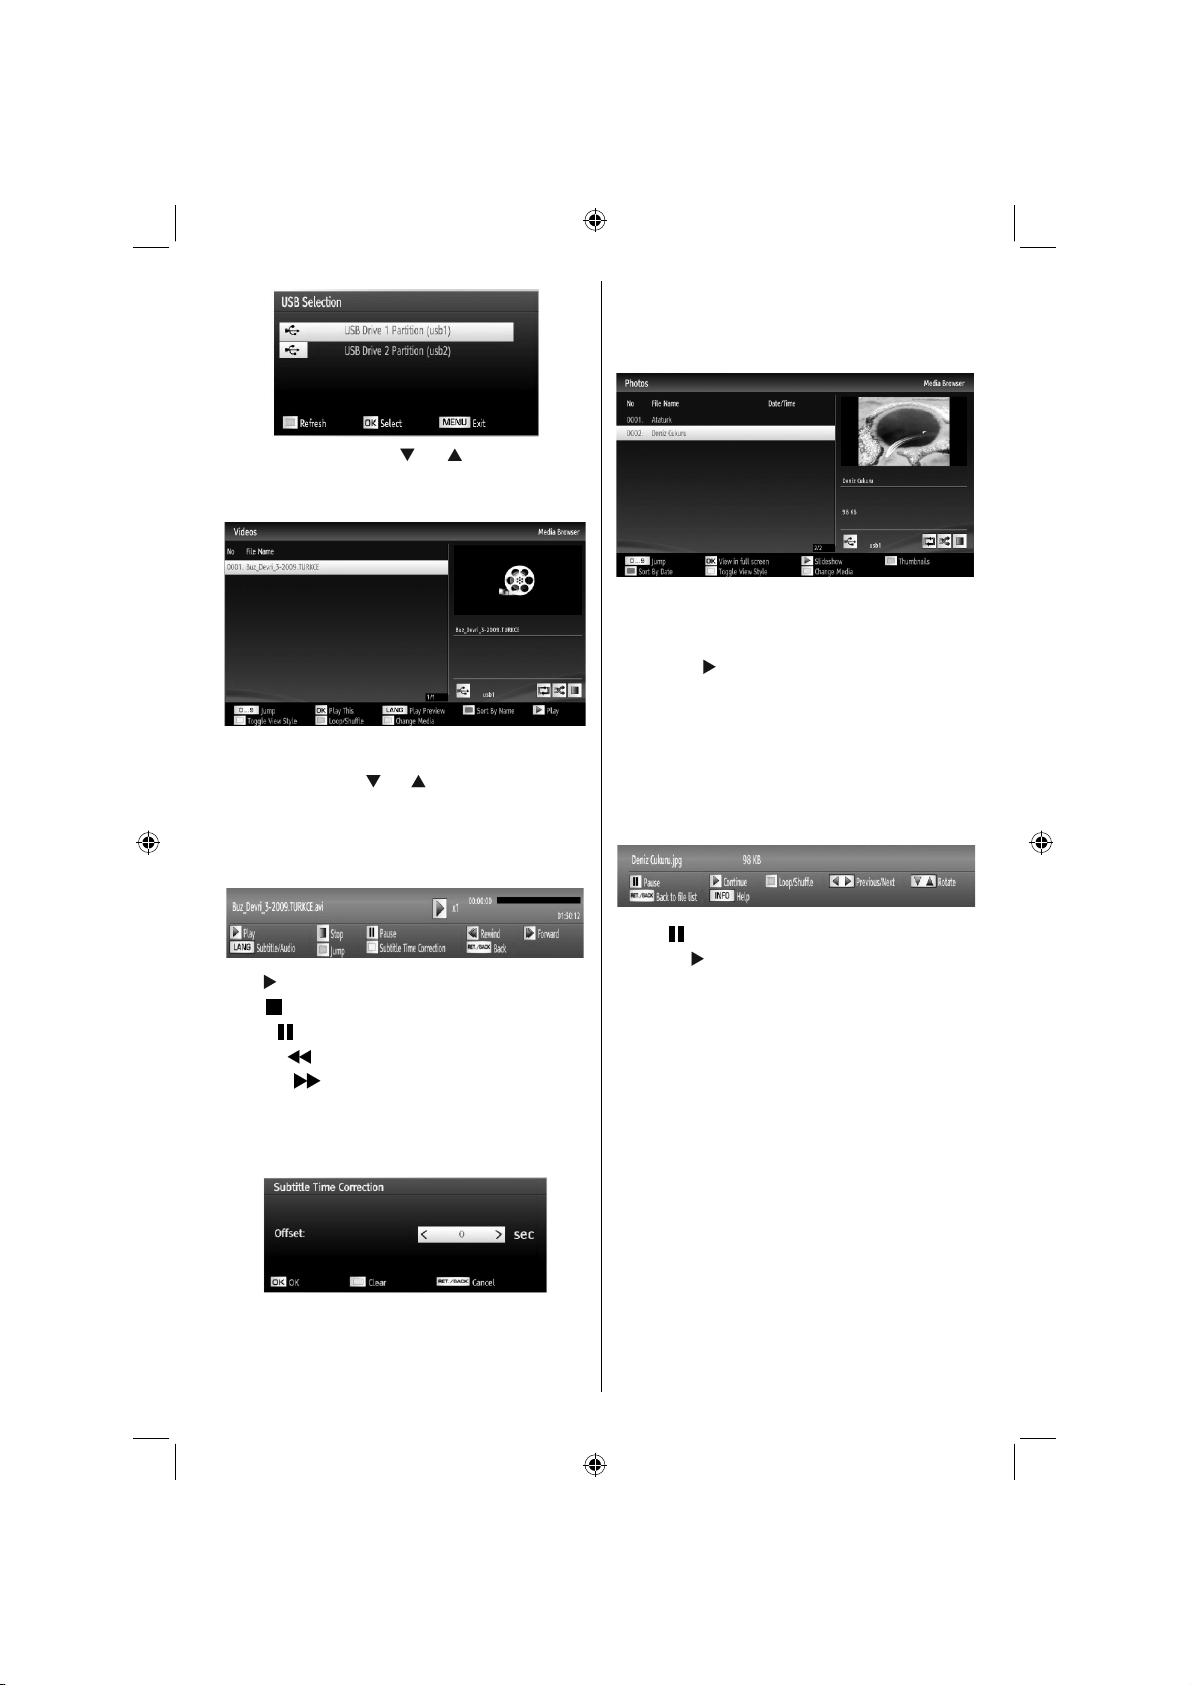
Select a device by using “ ” or “ ” button and press
OK.
Viewing Videos via USB
When you select Videos from the main options,
available video fi les will be fi ltered and listed on this
screen. You can use “ ” or “ ” button to select a video
fi le and press OK button to play a video. If you select
a subtitle fi le and press OK button, you can select or
deselect that subtitle fi le. The following menu will be
displayed while playing a video fi le:
Viewing Photos via USB
When you select Photos from the main options,
available image fi les will be fi ltered and listed on this
screen.
Jump (Numeric buttons): Jump to selected fi le using
the numeric buttons.
OK: Views the selected picture in full screen.
Slideshow (
all images.
RED: Sorts fi les by date.
GREEN: Views images in thumbnails.
BLUE: Switch between music,photo,video and all
YELLOW: Change view style
button): Starts the slideshow using
Slideshow Options
Pause ( button) : Pauses the slideshow.
Continue (
Play ( button): Starts the video playback.
Stop (
Pause (
Rewind (
Forward ( button): Goes forward.
Subtitle/Audio (LANG. button): Sets subtitle/
Audio.
Yellow: Opens subtitle time correction menu
Press BACK button to switch back to previous
menu.
A01_[GB]_MB70_5112UK_DVBT_C_DLNA_HBBTV_MMH_WIFI_32942LED_GOLD11_10075886_50201414.indd 27A01_[GB]_MB70_5112UK_DVBT_C_DLNA_HBBTV_MMH_WIFI_32942LED_GOLD11_10075886_50201414.indd 27 16.04.2012 14:50:0716.04.2012 14:50:07
button): Stops the video playback.
button): Pause the video playback.
button): Goes backward.
English - 27 -
Previous/Next (Left/Right buttons): Jumps to
previous or next fi le on slideshow.
Rotate (Up/Down buttons): Rotates the image using
up/down buttons.
Loop/Shuffl e (GREEN button): Press once to disable
Loop. Press again to disable both Loop and Shuffl e.
Press once more to enable only Shuffl e. Press again
to enable all. You can follow the disabled functions
with the change of the icons.
BACK (Exit): Back to fi le list.
INFO: Displays help screen.
button) : Continues the slideshow.
Page 29
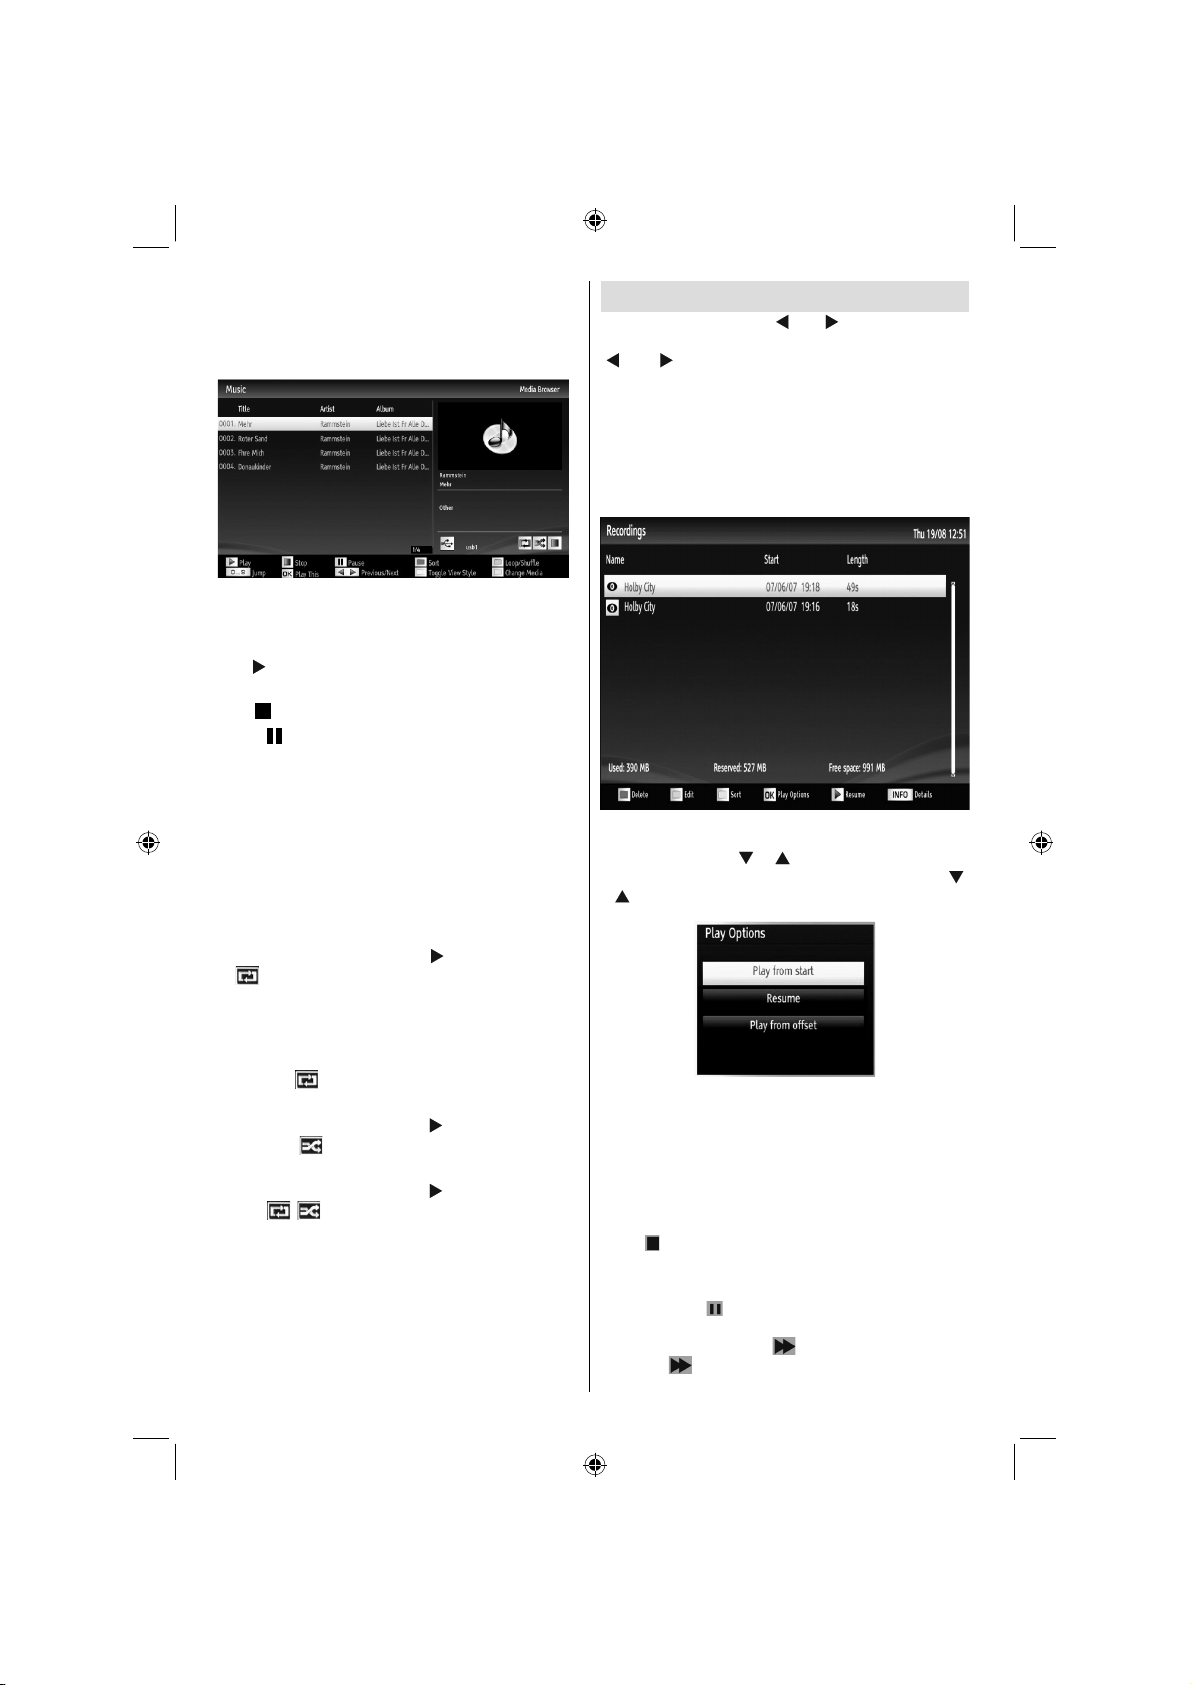
Playing Music via USB
When you select Music from the main options,
available audio fi les will be fi ltered and listed on this
screen.
0..9 (Jump): When you press a digit button displays
textual fi le search.
Play This (OK button) : Plays the selected fi le.
button) : Plays all media fi les starting with
Play (
the selected one.
Stop (
Pause (
Previous/Next (Left/Right buttons): Jumps to
previous or next fi le to play.
RED: Sorts fi les by Title, Artist or Album.
Loop/Shuffl e (GREEN button): Press once to disable
Loop. Press again to disable both Loop and Shuffl e.
Press once more to enable only Shuffl e. Press again
to enable all. You can follow the disabled functions
with the change of the icons.
Note:
If you start the playback with the
the
fi le. The playback will proceed accordingly and when
the end of the list is reached, it will be played again
from the beginning (loop function).
If you start the playback with the OK button and
activate the symbol, the same music or video fi le
will be played in a loop (repeat function).
If you start the playback with
activate the symbol, music or video fi le will be
played in a shuffl e.
If you start the playback with
activate
will continue randomly and the random playback will
continue.
BLUE: Switch between music,photo,video and all.
YELLOW: Change view style.
button): Stops playback.
button): Pauses the selected playback.
button and activate
symbol, the TV will play the next music/video
or OK button and
or OK button and
, symbols, music or video fi le playback
English - 28 -
Recordings
In the main menu, use “ ” or “ ” buttons to select
Media Browser. Highlight Recordings item by using
“ ” or “ ” button and press OK button to enter.
Recordings will then be displayed.
IMPORTANT: To view Recordings, you should fi rst
connect a USB disk to your TV while the TV is
switched off. You should then switch on the TV to
enable recording feature. Otherwise, recording feature
will not be available.
Select a recorded item from the list (if previously
recorded) by using “ ” / “ ” button. Press OK button
to view Play Options. Select an option by using “ ”
/ “ ” or OK buttons.
Available playback options:
• Play from start: Plays the recording from the
beginning.
• Resume: Recommences the recordings.
• Play from offset: Specifi es a playing point.
Note: Viewing main menu and menu items will not be
available during the playback.
(STOP) button to stop a playback and return
Press
to return to Recordings.
Slow Forward
If you press
recorded programmes, slow forward feature will be
available. You can use button to slow forward.
Pressing button consecutively will change slow
forwarding speed
(PAUSE) button while watching
A01_[GB]_MB70_5112UK_DVBT_C_DLNA_HBBTV_MMH_WIFI_32942LED_GOLD11_10075886_50201414.indd 28A01_[GB]_MB70_5112UK_DVBT_C_DLNA_HBBTV_MMH_WIFI_32942LED_GOLD11_10075886_50201414.indd 28 16.04.2012 14:50:0816.04.2012 14:50:08
Page 30
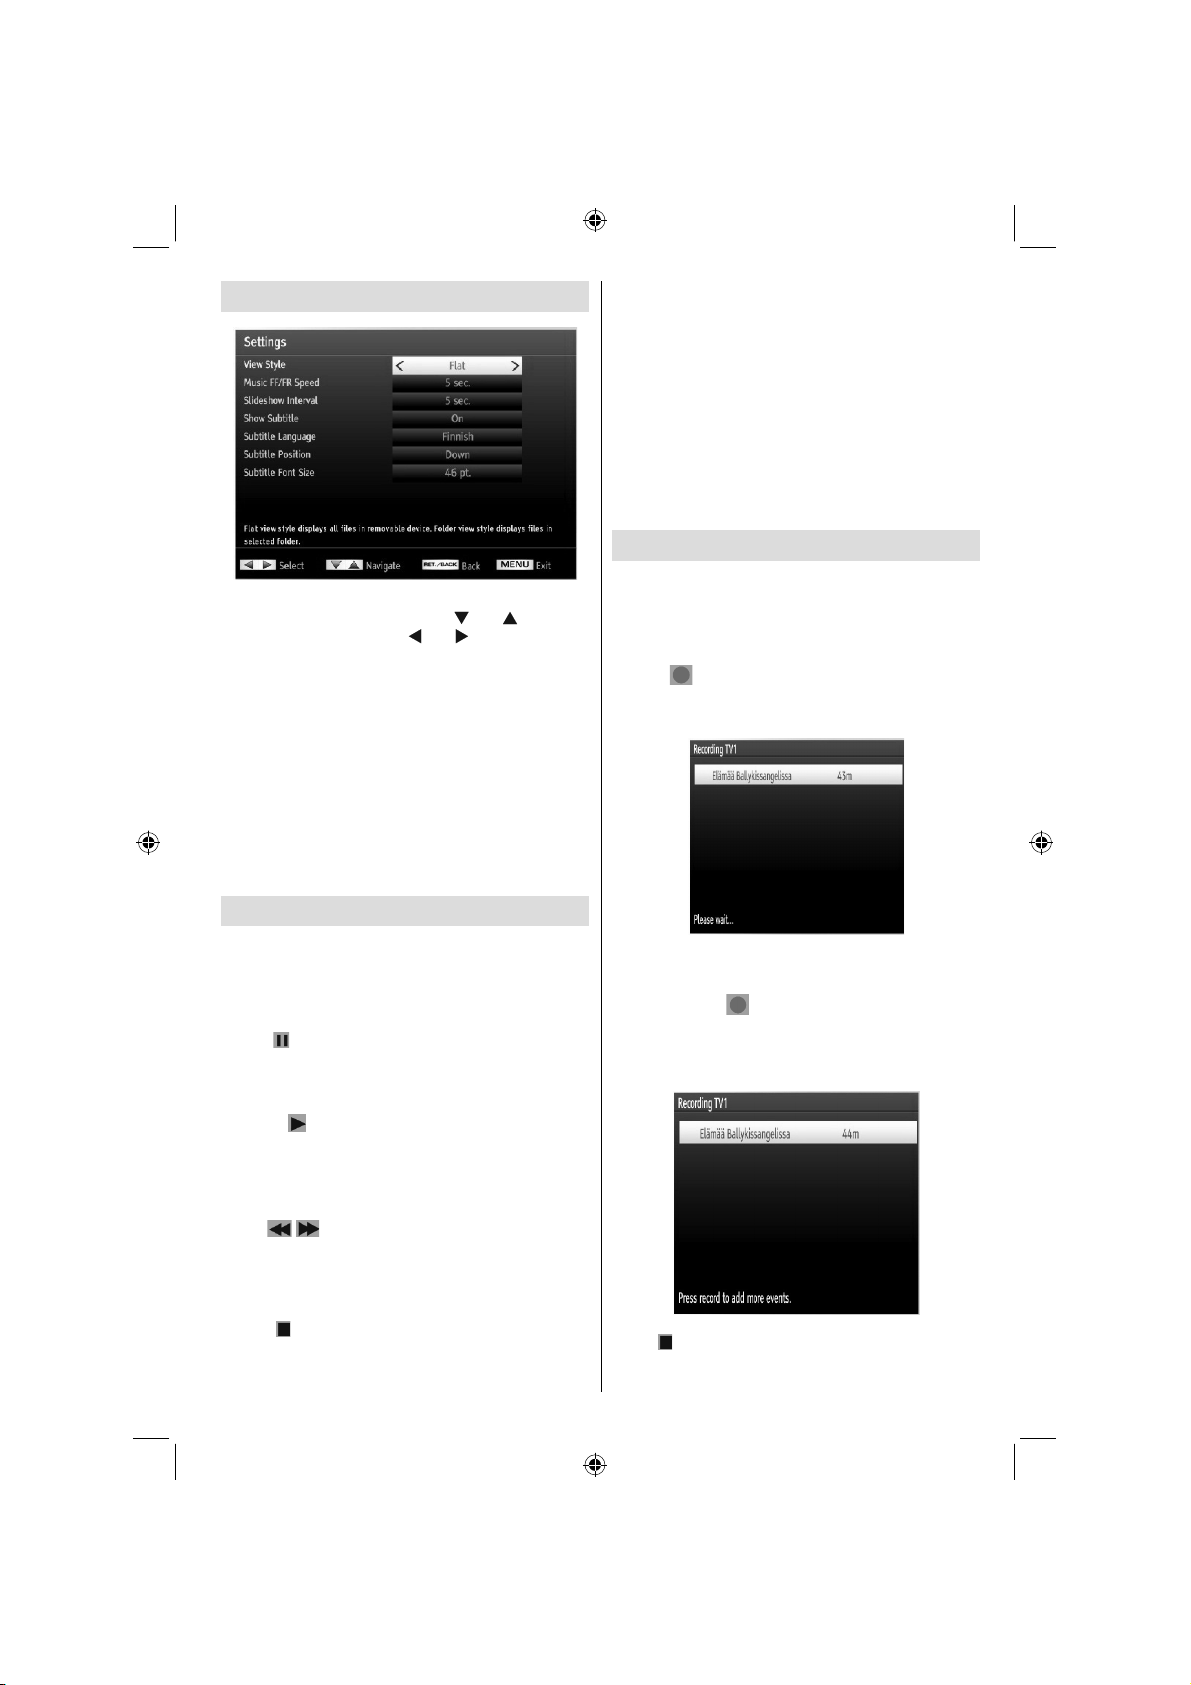
Media Browser Settings
You can set your Media Browser preferences by
using the Settings dialog. Press “ ” or “ ” button to
highlight an item and use “ ” or “ ” button to set.
View Style: Sets default browsing mode.
Music FF/FR Speed: Sets Music FF/FR Speed
time.
Slide Show Interval: Sets slide show interval time.
Show Subtitle: Sets subtitle enabling preference.
Subtitle Language: Sets supported subtitle
language.
Subtitle Position: Sets subtitle position as up or
down.
Subtitle Font Size: Sets subtitle font size (max.
54pt).
Timeshift Recording
IMPORTANT: To record a programme, you should
fi rst connect a USB disk to your TV while the TV is
switched off. You should then switch on the TV to
enable recording feature. Otherwise, recording feature
will not be available.
• Press
for switching to timeshifting mode.
• In timeshifting mode, the programme is paused and
simultaneously recorded to the connected USB disk
(*). Press
programme from the stopped moment.
• This playback is performed in x1 playback speed.
You will see the timeshift gap between the real and
the timeshifted programme in the info bar.
• Use
forward or backward on timeshift playback. When
the timeshift is reached, timeshifting mode will be
quitted and you will switch back to watching normal
broadcast.
• Press
(PAUSE) button while watching a broadcast
(PLAY) button again to watch the paused
/ (PREVIOUS/NEXT) buttons to move
(STOP) button to quit timeshifting mode.
(*) Similtaneous timeshifting recording’s duration
depends on your connected USB disk’s file size
and defined Max. Timeshift in the Recordings
Confi guration menu. See the section, “Recordings”
for more information on setting Max. Timeshift.
Note: Switching to a different broadcast or source;
and viewing main menu are not available during the
timeshifting.
Lip Sync delay may occur during the timeshifting.
Standby button is ignored during the timeshifting.
The TV will not switch to standby mode during the
timeshifting.
Instant Recording
IMPORTANT: To record a programme, you should
fi rst connect a USB disk to your TV while the TV is
switched off. You should then switch on the TV to
enable recording feature. Otherwise, recording feature
will not be available.
• Press
event instantly while watching a programme. The
following OSD appears on the screen:
• Record OSD will then be displayed for a short time
and the current event will be recorded.
• You can press
control again to record the next event on the EPG. In
this case, OSD will display the programmed events
for recording.
Press (STOP) button to cancel instant recording.
The following OSD will be displayed:
(RECORD) button to start recording an
(RECORD) button on the remote
English - 29 -
A01_[GB]_MB70_5112UK_DVBT_C_DLNA_HBBTV_MMH_WIFI_32942LED_GOLD11_10075886_50201414.indd 29A01_[GB]_MB70_5112UK_DVBT_C_DLNA_HBBTV_MMH_WIFI_32942LED_GOLD11_10075886_50201414.indd 29 16.04.2012 14:50:0916.04.2012 14:50:09
Page 31

Select Yes by using “ ” or “ ” / OK buttons to cancel
instant recording.
Note: Switching to a different broadcast or source;
and viewing Media Browser are not available during
the recording.
Watching Recorded Programmes
In the main menu, use “ ” or “ ” buttons to select
Media Browser. Highlight Recordings item by using
“ ” or “ ” button and press OK button to enter.
Recordings will then be displayed.
IMPORTANT: To view Recordings, you should fi rst
connect a USB disk to your TV while the TV is
switched off. You should then switch on the TV to
enable recording feature. Otherwise, recording feature
will not be available.
Select a recorded item from the list (if previously
recorded) by using “ ” / “ ” button. Press OK button
to view Play Options. Select an option by using “ ”
/ “ ” or OK buttons.
Available playback options:
• Play from start: Plays the recording from the
beginning.
• Resume: Recommences the recordings.
• Play from offset: Specifi es a playing point.
Note: Viewing main menu and menu items will not be
available during the playback.
Press
to return to Recordings.
(STOP) button to stop a playback and return
English - 30 -
Slow Forward
If you press
recorded programmes, slow forward feature will be
available. You can use button to slow forward.
Pressing button consecutively will change slow
forwarding speed.
(PAUSE) button while watching
Using DLNA Network Service
Information
DLNA (Digital Living Network Alliance) is a standard
that eases viewing process of digital electronics and
makes them more convenient to use on a home
network. For further information, visit www.dlna.org.
DLNA standard allows you to view and play photos,
music and videos stored in the DLNA media server
connected to your home network.
Step 1: Nero Media Home Installation
DLNA function cannot be used if the server program
is not install to your PC. Please prepare your PC
with the provided Nero Media Home programme. For
more information about the installation, please refer
to appendix H.
Step 2: Connecting to a Wired or Wireless
Network
Wired Connection
Connect your network’s LAN cable to the • ETHERNET
INPUT of your TV. Make sure that the preparation
of media server, connections and network settings
are completed properly (See the chapter, Network
Settings for more information).
Wireless Connection
IMPORTANT: “Veezy 100” USB dongle(sold
separately) is required to use wireless network
feature. To use your TV with your wireless network,
you need a “Veezy 100” Wireless USB dongle.
Please plug in the Wi-Fi dongle to one of the USB •
ports of the TV.
Select • Network Settings from the Settings
menu.
Press • YELLOW button to start searching for
available wireless networks. If any active wireless
networks are found, a list will be displayed.
Please select your desired network from the list. If •
the selected network is protected with a password,
please enter the correct key by using the virtual
keyboard. You can use this keyboard via navigation
buttons (Left/Right/Up/Down) and OK button on the
remote control.
A01_[GB]_MB70_5112UK_DVBT_C_DLNA_HBBTV_MMH_WIFI_32942LED_GOLD11_10075886_50201414.indd 30A01_[GB]_MB70_5112UK_DVBT_C_DLNA_HBBTV_MMH_WIFI_32942LED_GOLD11_10075886_50201414.indd 30 16.04.2012 14:50:0916.04.2012 14:50:09
Page 32

Wait until the IP address is shown on the screen. This •
means that the connection is now established.
See the chapter Network Settings for detailed
confi guration information. You can press BLUE button
to test internet speed.
Step 3: Playing Shared Files via Media
Browser
Select • Media Browser by using Left or Right button
from the main menu and press OK button. Media
browser will be then displayed.
DLNA support is available only with Media Browser •
folder mode. To enable folder mode, go to Settings
tab in the main media browser screen and press
OK. In the settings options, highlight View Style and
change to Folder using Left or Right button.
Please select desired media type and press • OK
If sharing configurations are set properly, the •
following OSD message will be displayed after
selecting the desired media type. Select OK to
display selected network or USB memory content.
If you want to refresh the device list, press GREEN
button. You can press MENU to exit.
If available networks are found, they will be listed •
on this screen.
Select media server or network that you want to •
connect by using “
OK button.
If you select media type as • Video and choose a
device from the selection menu, a new menu screen
will appear on the screen as below:
Select • Videos from this screen to list all the available
video fi les from the selected network.
To play other media types from this screen, you must •
go back to main Media Browser screen and select
media type as desired and then perform the network
selection again (See Step 3).
Refer to Media Browser USB Playback section for •
further information on fi le playback.
Subtitle fi les do not work if you watch video from •
network through DLNA.
You can connect only one television with DLNA to •
same network.
If a problem occurs with DLNA network, please •
switch on/off your television.
Trick mode and jump are not supported with DLNA •
function.
CAUTION:
There may be some PC’s which may not be able to •
utilize the DLNA function due to administrator and
security settings. (such as business PC’s).
For best home network streaming with this set, the •
supplied Nero software should be installed.
For home server function, only PCs with WINDOWS •
7 operating system are supported.
Please restart the PC after releasing the media fi les •
for dlna server function, in order to make changes
available.
” or “ ” buttons and press
English - 31 -
A01_[GB]_MB70_5112UK_DVBT_C_DLNA_HBBTV_MMH_WIFI_32942LED_GOLD11_10075886_50201414.indd 31A01_[GB]_MB70_5112UK_DVBT_C_DLNA_HBBTV_MMH_WIFI_32942LED_GOLD11_10075886_50201414.indd 31 16.04.2012 14:50:1016.04.2012 14:50:10
Page 33

Connecting to your Cell Phone via WiFi
(Optional)
If your cell phone has WiFi feature, you can connect •
your cell phone to your TV by using WiFi connection
via a router, in order to play content from your phone.
For this, your cell phone must have an appropriate
sharing software.
Connect to your router following the steps stated •
above in the Wireless Connection section.
Afterwards, engage your cell phone with the router •
and then activate sharing software on your cell
phone. Then, select fi les that you would like to share
with your TV.
If the connection is established correctly, you should •
now access the shared fi les of your cell phone via
the Media Browser of your TV.
Enter Media Browser menu and playback device •
selection OSD will be displayed. Select your cell
phone’s ident and press OK to continue.
Note: This feature may not be supported by some
cell phones.
Changing Image Size: Picture
Formats
Programmes can be watched in different picture •
formats, depending on the transmission received.
You can change the aspect ratio (image size) of •
the TV for viewing the picture in different zoom
modes.
Press “• SCREEN” button repeatedly to change
the image size. Available zoom modes are listed
below.
Auto
When AUTO is selected, the aspect ratio of the screen
is adjusted by the information provided by the selected
source(if available)
The format being displayed in AUTO mode is
completely independent of WSS information which
could be included in the broadcast signal or the signal
from an external device.
Note: Auto mode only will be available in HDMI, YPbPr
and DTV sources.
16:9
This uniformly stretches the left and right sides of a
normal picture (4:3 aspect ratio) to fi ll the wide TV
screen.
For 16:9 aspect ratio pictures that have been •
squeezed into a normal picture (4:3 aspect ratio),
use the 16:9 mode to restore the picture to its
original shape.
Subtitle
This zooms up the wide picture (16:9 aspect ratio)
with subtitles to the full screen.
Note: You can shift the screen up or down by pressing
“ ” / “ ” buttons while picture zoom is selected as
14:9 Zoom, Cinema or Subtitle.
14:9
This zooms up the wide picture (14:9 aspect ratio) to
the upper and lower limits of the screen.
14:9 Zoom
This option zooms to the 14:9 picture.
4:3
Use to view a normal picture (4:3 aspect ratio) as this
is its original size.
English - 32 -
A01_[GB]_MB70_5112UK_DVBT_C_DLNA_HBBTV_MMH_WIFI_32942LED_GOLD11_10075886_50201414.indd 32A01_[GB]_MB70_5112UK_DVBT_C_DLNA_HBBTV_MMH_WIFI_32942LED_GOLD11_10075886_50201414.indd 32 16.04.2012 14:50:1116.04.2012 14:50:11
Page 34

Cinema
This zooms up the wide picture (16:9 aspect ratio) to
the full screen.
Confi guring Picture Settings
You can use different picture settings in detail.
Press “MENU” button and select the Picture icon
by using “
Picture Settings menu.
” or “ ” button. Press OK button to view
Power Save Mode: Use “
Power Save Mode. Press “ ” or “ ” button to set Power
Save Mode as Eco, Picture Off and Disabled. See the
section, “Environmental Information” in this manual for
further information on Power Save Mode.
Backlight: This setting controls the backlight level and
it can be set to Low, Medium, High and Auto.
Noise Reduction: If the broadcast signal is weak and
the picture is noisy, use Noise Reduction setting to
reduce the noise amount. Noise Reduction can be set to
one of these options: Low, Medium, High or Off.
Advanced Settings
” or “ ” button to select advenced settins.
Use “
” or “ ” button to select
Dynamic Contrast: You can change contrast rate by
using dynamic contrast function. Dynamic contrast can
be set to one of these options: Low, Medium, High
or Off.
Colour Temp: Sets the desired colour tone.
Operating Picture Settings Menu Items
Press “• ” or “ ” button to highlight a menu item.
” or “ ” button to set an item.
Use “•
Press “• MENU” button to exit.
Picture Settings Menu Items
Mode: For your viewing requirements, you can set
the related mode option. Picture mode can be set to
one of these options: Cinema, Game, Dynamic and
Natural.
Contrast: Sets the lightness and darkness values of
the screen.
Brightness: Sets the brightness value for the screen.
Sharpness: Sets the sharpness value for the objects
displayed on the screen.
Colour: Sets the colour value, adjusting the colors.
English - 33 -
A01_[GB]_MB70_5112UK_DVBT_C_DLNA_HBBTV_MMH_WIFI_32942LED_GOLD11_10075886_50201414.indd 33A01_[GB]_MB70_5112UK_DVBT_C_DLNA_HBBTV_MMH_WIFI_32942LED_GOLD11_10075886_50201414.indd 33 16.04.2012 14:50:1116.04.2012 14:50:11
Picture Zoom:Sets the picture size to Auto,16:9,
Subtitle,14:9, 14:9 Zoom, 4:3 or Cinema.
HDMI True Black: While watching from HDMI source,
this feature will be visible in the Picture Settings menu.
You can use this feature to enhance blackness in the
picture. You can set this feature as “On” for activating
HDMI True Black mode.
Note: HDMI True Black On/Off feature functions only
when the HDMI device output is set to RGB.
Film mode: Films are recorded at a different number of
frames per second to normal television programmes.
Press “
feature on when you are watching fi lms to see the fast
motion scenes clearly.
Skin tone: Adjust the desired skin tone
Colour Shift: Adjust the desired colour tone.
RGB Gain: You can confi gure the colour temperature
values using the RGB Gain feature.
” or “ ” button to select Film Mode. Press “
” or “ ”button to set this feature On or Off. Turn this
Page 35

Reset: Resets the picture settings to factory default
settings.
While in VGA (PC) mode, some items in Picture menu
will be unavailable. Instead, VGA mode settings will be
added to the Picture Settings while in PC mode.
PC Picture Settings
For adjusting PC picture items, do the following:
Press “
menu appears on the screen.
Contrast, Brightness, Colour, Colour Temp and
Picture Zoom and other settings in this menu are
identical to settings defi ned in TV picture menu under
“Main Menu System”.
Sound, Settings and Source settings are identical to
the settings explained in main menu system.
PC Position: Select this to display PC position menu
items.
Autoposition: Automatically optimizes the display.
Press OK to optimize.
H Position: This item shifts the image horizontally to
right hand side or left hand side of the screen.
V Position: This item shifts the image vertically
towards the top or bottom of the screen.
Dot Clock: Dot Clock adjustments correct the
interference that appear as vertical banding in
dot intensive presentations like spreadsheets or
paragraphs or text in smaller fonts.
Phase: Depending on the resolution and scan
frequency that you input to the TV set, you may see
a hazy or noisy picture on the screen. In such a case
you can use this item to get a clear picture by trial
and error method.
” or “ ” button to select Picture icon. Picture
English - 34 -
Confi guring Sound Settings
Sound settings can be confi gured according to your
personal preferences.
Press “MENU” button and select the Sound icon by
using “
Sound Settings menu.
Operating Sound Settings Menu Items
Sound Settings Menu Items
Volume: Adjusts volume level.
Equalizer: Press OK button to view equalizer sub-
menu.
In Equalizer menu, the preset can be changed to
Music, Movie, Speech, Flat, Classic and User.
Press the “MENU” button to return to the previous
menu.
Note: Equalizer menu settings can be changed
manually only when the Equalizer Mode is in User.
Balance: This setting is used for emphasizing left or
right speaker balance.
Headphone: Sets headphone volume.
Sound Mode: You can select Mono, Stereo, Dual I
or Dual II mode, only if the selected channel supports
that mode.
” or “ ” button. Press OK button to view
Press “• ” or “ ” button to highlight a menu item.
Use “•
” or “ ” button to set an item.
Press “• MENU” button to exit.
A01_[GB]_MB70_5112UK_DVBT_C_DLNA_HBBTV_MMH_WIFI_32942LED_GOLD11_10075886_50201414.indd 34A01_[GB]_MB70_5112UK_DVBT_C_DLNA_HBBTV_MMH_WIFI_32942LED_GOLD11_10075886_50201414.indd 34 16.04.2012 14:50:1316.04.2012 14:50:13
Page 36

AVL : Automatic Volume Limiting (AVL) function sets the
sound to obtain fi xed output level between programmes
(For instance, volume level of advertisements tend to
be louder than programmes).
Headphone/Lineout: When you connect an external
amplifier to your TV using the headphone jack,
you can select this option as Lineout. If you have
connected headphones to the TV, set this option as
Headphone.
Digital Out: Sets digital out audio type.
Confi guring Your TV’s Settings
Detailed settings can be configured to suit your
personal preferences.
Press “MENU” button and select Settings icon by
using “
Settings menu.
Operating Settings Menu Items
Settings Menu Items
Conditional Access: Controls conditional access
modules when available.
Language: Confi gures language settings.
Parental: Confi gures parental settings.
Timers: Sets timers for selected programmes.
Date/Time: Sets date and time.
Sources: Enables or disables selected source
options.
Network Settings: In Network Settings window you
can set network type of the TV set.
Other Settings: Displays other setting options of
the TV set.
” or “ ” button. Press OK button to view
Press “• ” or “ ” button to highlight a menu item.
Press • OK button to select an item.
Press “• MENU” button to exit.
Using a Conditional Access
Module
IMPORTANT: Insert or remove the CI module only
when the TV is SWITCHED OFF.
In order to watch certain digital channels, a •
conditional access module (CAM) can be necessary.
This module must be inserted in the CI slot of your
TV.
Obtain the Conditional Access Module (CAM) and •
the viewing card by subscribing to a pay channel
company, then insert those to the TV using the
following procedure.
Insert the CAM and then the viewing card to the •
slot that is located in the terminal cover at the rear
side of the TV.
The CAM should be correctly inserted, it is •
impossible to insert fully if reversed. The CAM or
the TV terminal may be damaged if the CAM is
forcefully inserted.
Connect the TV to the mains supply, switch on
and then wait for few moments until the card is
activated.
When no module is inserted, “• No Common
Interface module detected” message appears on
the screen.
Refer to the module instruction manual for details •
of the settings.
Viewing Conditional Access Menu (*)
(*) These menu settings may change depending on
the service provider.
Press “MENU” button and select the icon by using “
” or “ ” button. Press OK button to view Settings
menu. Use “ ” or “ ” button to highlight Conditional
Access and press OK to view menu items.
English - 35 -
A01_[GB]_MB70_5112UK_DVBT_C_DLNA_HBBTV_MMH_WIFI_32942LED_GOLD11_10075886_50201414.indd 35A01_[GB]_MB70_5112UK_DVBT_C_DLNA_HBBTV_MMH_WIFI_32942LED_GOLD11_10075886_50201414.indd 35 16.04.2012 14:50:1316.04.2012 14:50:13
Page 37

Confi guring Language
Preferences
You can operate the TV’s language settings using
this menu.
Press “MENU” button and select the Settings icon
by using “
Settings menu. Use “ ” or “ ” button to highlight
Language and press OK to continue:
Use “ ” or “ ” button to set an item. Settings are
stored automatically.
Menu: displays the system language.
Preferred
These settings will be used if available. Otherwise the
current settings will be used.
Audio• : Sets the preferred audio language.
Subtitle• : Sets the subtitle language. Selected
language will be seen in subtitles.
Teletext• : Sets teletext language.
Guide• : Sets the preferred Guide language.
Current (*)
(*) These settings can be changed if only the
broadcaster supports. Otherwise, settings will not be
available to be changed.
Audio• : Changes the audio language for the current
channel.
Subtitle• : Sets the subtitle language for the current
channel.
Note: If the Country option is set to Denmark, Sweden,
Norway or Finland, the Language Settings menu will
function as described below:
” or “ ” button. Press OK button to view
English - 36 -
Language Settings
In the Settings menu, highlight the Language Settings
item by pressing “ ” or “ ” buttons. Press OK and
Language Settings submenu will be displayed on
the screen:
” or “ ” buttons to highlight the menu item
Use “
that will be adjusted and then press “ ” or “ ” button
to set.
Notes:
System Language determines the on-screen menu •
language.
Audio Language is used for selecting the soundtrack •
of a channels.
Primary settings are the first priority when multiple •
choices are available on a broadcast. Secondary
settings are the alternatives when the first options
are not available.
Parental Control
To prohibit viewing of certain programmes, channels
and menus can be locked by using the parental
control system.
This function enables or disables the menu protection
system and allows the PIN code to be changed.
Press “MENU” button and select the Settings by using
“
” or “ ” button. Press OK button to view Settings
menu. Use “ ” or “ ” button to highlight Parental
and press OK to continue:
To display parental lock menu options, PIN number
should be entered. Factory default PIN number is
0000. After coding the correct PIN number, parental
settings menu will be displayed:
A01_[GB]_MB70_5112UK_DVBT_C_DLNA_HBBTV_MMH_WIFI_32942LED_GOLD11_10075886_50201414.indd 36A01_[GB]_MB70_5112UK_DVBT_C_DLNA_HBBTV_MMH_WIFI_32942LED_GOLD11_10075886_50201414.indd 36 16.04.2012 14:50:1416.04.2012 14:50:14
Page 38

Parental Settings Menu Operation (*)
Select an item by using “•
” or “ ” button to set an item.
Use “•
Press• OK button to view more options.
(*) If you set Country option as UK in the fi rst time
installation, Maturity Lock and Child Lock options
will not be visible. This setting is available only for
EU countries.
Menu Lock: Menu lock setting enables or disables
the menu access. You can disable access to the
installation menu or the whole menu system.
Maturity Lock: When set, this option gets the maturity
information from the broadcast and if this maturity level
is disabled, disables access to the broadcast.
Child Lock: When Child Lock is set, the TV can only
be controlled by the remote control. In this case the
control panel buttons will not work, except for the
Standby/On button. When Child Lock is activated
you are able to switch the TV into Standby mode with
the Standby/On button. To switch the TV on again,
you need the remote control. Hence, if one of those
buttons is pressed, Child Lock Is On will be displayed
on the screen when the menu screen is not visible.
Set PIN: Defi nes a new PIN number. Use numeric
buttons to enter a new pin number. You will need
to code your new PIN a second time for verifi cation
purposes.
IMPORTANT: The factory default PIN number is 0000,
if you change the PIN number make sure you write it
down and keep it safe.
” or “ ” button.
English - 37 -
Timers
To view Timers menu, press MENU button and select
Settings icon by using “ ” or “ ” button. Press OK
button to view Settings menu. Use “ ” or “ ” button
to highlight Timers and press OK to continue:
Setting Sleep Timer
This setting is used for setting the TV to turn off after
a certain time.
Highlight Sleep Timer by using “•
Use “•
” or “ ” button to set. The timer can be
programmed between Off and 2.00 hours (120
minutes) in steps of 30 minutes.
Setting Programme Timers
You can set programme timers for a particular
programme using this feature.
Press “
timer function buttons will be displayed on the
screen.
” button to set timers on an event. Programme
Adding a Timer
Press • YELLOW button on the remote control to
add a timer.
Channel: Changes channel by using “
Network Type: This feature is unavailable to be set.
Timer Type: You can select timer type as Record
or Timer.
Date: Enter a date using the numeric buttons.
Start: Enter a starting time using the numeric
buttons.
End: Enter an ending time using the numeric
buttons.
Duration: Displays duration between the starting and
ending time.
Repeat: Sets a timer to be repeated as Once, Daily or
Weekly. Use “
Change/Delete: Sets the change/delete permission.
Playback: Sets the playback permission and parental
settings.
Press • GREEN button to save the timer. Press RED
button to cancel.
” or “ ” buttons to select an option.
Editing a Timer
Select the timer you want to edit by pressing “• ”
or “ ” button.
Press • GREEN button. Edit Timer menu screen will
be displayed.
When fi nished with editing, press • GREEN button to
save. You can press “MENU” button to cancel.
Deleting a Timer
Select the timer you want to delete by pressing “•
” or “ ” button.
Press • RED button.
Select • YES by using “ ” or “ ” buttons to delete the
timer. Select NO to cancel.
” or “ ” button.
” or “ ”.
A01_[GB]_MB70_5112UK_DVBT_C_DLNA_HBBTV_MMH_WIFI_32942LED_GOLD11_10075886_50201414.indd 37A01_[GB]_MB70_5112UK_DVBT_C_DLNA_HBBTV_MMH_WIFI_32942LED_GOLD11_10075886_50201414.indd 37 16.04.2012 14:50:1516.04.2012 14:50:15
Page 39

Recording Confi guration
Select Recording Confi guration item in the Settings
menu to confi gure recording settings. The following
menu is displayed for recording confi guration.
The following options are available for adjustments:
Start Early (*)
You set recording timer’s starting time to start earlier
by using this setting.
(*) Available only for EU country options.
End Late (*)
You set recording timer’s end time to end later by
using this settings.
(*) Available only for EU country options.
Max Timeshift
This setting allows you to set the maximum time
allowed for timeshifting. Duration options are
approximate and can change accordingly, depending
on the broadcast received. When the Max Timeshift
time is reached, auto play will proceed.
Format Disk
IMPORTANT: Note that ALL the data stored on the
USB disk will be lost and then the disk format will be
converted to FAT32 if you activate this feature.
•If you want to delete all fi les on the connected USB
hard disk drive or memory stick, you can use Format
Disk option.
• Also, if your USB disk malfunctions, you can try
formatting the USB disk. In most cases formatting
the USB disk will restore normal operation; however,
ALL the data stored on the USB disk will be lost in
such a case.
• Press OK button while the Format Disk option
is highlighted. A menu will appear on the screen,
requiring you to enter a pin number. If you have not
changed the pin number, the factory default is 0000.
After you enter the pin, a pop-up menu appears on
the screen to ensure that the hard disk should be
formatted, select “YES” and press OK to format the
hard disk. Select “NO” and press OK to cancel. Ensure
you back up important recordings before you format
the USB disk unit.
English - 38 -
Hard Disk Info
To view the details about the USB disk, highlight Hard
Disk Info by using “
disk information will be displayed
” or “ ” key and press OK. USB
Confi guring Date/Time Settings
Select Date/Time in the Settings menu to confi gure
Date/Time settings. Press OK button.
Use “• ” or “ ” buttons to highlight Date/Time.
Date, Time, Time Settings Mode and Time Zone
Setting will be available.
” or “ ” buttons to highlight the Time Settings
Use “
Mode. Time Settings Mode is set using “ ” or “ ”
buttons. It can be set to AUTO or MANUAL.
When AUTO is selected, Date/Time and Time Zone
options will not be available to be set. If MANUAL
option is selected as the Time Zone can be altered:
• By pressing “
Use “
” or “ ” buttons to change the Time Zone
between GMT-12 or GMT+12. Date/Time on the top
of the menu list will then change according to the
selected Time Zone.
Changes are automatically stored. Press “• MENU”
to exit.
” or “ ” buttons select Time Zone.
Confi guring Source Settings
You can enables or disable selected source options.
The TV will not switch to the disabled source options
when “SOURCE” button is pressed.
A01_[GB]_MB70_5112UK_DVBT_C_DLNA_HBBTV_MMH_WIFI_32942LED_GOLD11_10075886_50201414.indd 38A01_[GB]_MB70_5112UK_DVBT_C_DLNA_HBBTV_MMH_WIFI_32942LED_GOLD11_10075886_50201414.indd 38 16.04.2012 14:50:1616.04.2012 14:50:16
Page 40

Select • Sources in the Settings menu and press
OK button.
Press“•
Use “•
selected source. Changes are automatically
stored.
” or “ ” buttons to select a source.
” or “ ” button to enable or disable the
Confi guring Network Settings
Note: Your TV’s Network Settings include Wired and
Wireless Connection options. However, if your TV
does not have USB Wi-Fi dongle(sold separately),
you should use Wired Connection type. If you try to
connect via Wireless Connection when your TV does
not have a USB Wi-Fi dongle, a warning screen will
appear and the TV will not get an IP address. Try
connecting the LAN cable after this and then the TV
will be able to get an IP address.
Confi guring Wired Device Settings
On • Network Settings window you can set network
type of the TV set, which connects the TV to
the Internet. If you are connecting the TV via
ETHERNET INPUT, select Network Type as Wired
Device to confi gure.
Setting Network Type
Network type can be selected as • Wired or Wireless
device, in accordance with the active connection to the
TV set. Select this as Wired if you have connected to
the TV a LAN cable. Select as Wireless if you connect
via the wireless USB dongle(sold separately).
Setting Confi guration Status
This section displays the status of the connection. •
Select Connected if you want to activate Wired or
Wireless connection. Select as Not Connected to
quit an active connection.
IP Address
If an active connection is available, the IP address •
will be displayed on this section. If you want to
confi gure IP address preferences, press GREEN
button and switch to the advanced mode.
Confi guring Wired Network Settings in
Advanced Mode
After pressing GREEN button, Advanced mode will
be available. While in Advanced Mode, press RED
button to edit settings. When fi nished, press OK to
save, Press RETURN/BACK to cancel.
Wi-Fi Settings (Optional)
Wi-Fi feature can be used for a wireless network
connection (optional). The feature is used for
infrastructure purposes only, such as connecting to
the web, hbb sites and connecting with DLNA servers
(optional). Select Wireless Device option to switch to
Wireless Settings from Network Settings window.
Press GREEN button to switch to advanced mode
and then press OK button to edit settings.
To enable Wi-Fi feature, profi les should be confi gured
properly. Please plug in the Wi-Fi dongle(sold separately)
to one of the USB ports (IMPORTANT: “Veezy 100” USB
dongle is required to use wireless network feature. To
use your TV with your wireless network, you need a
“Veezy 100” Wireless USB dongle.).
Press YELLOW button to scan wireless network
from network settings menu. Afterwards available
network list will be displayed. Please select your
desired network from the list. If the selected network
is protected with a password, please enter the correct
key by using the virtual keyboard. You can use this
keyboard via navigation buttons (Left/Right/Up/Down)
and OK button on the remote control. Wait until the
IP the address is shown on the screen.
English - 39 -
A01_[GB]_MB70_5112UK_DVBT_C_DLNA_HBBTV_MMH_WIFI_32942LED_GOLD11_10075886_50201414.indd 39A01_[GB]_MB70_5112UK_DVBT_C_DLNA_HBBTV_MMH_WIFI_32942LED_GOLD11_10075886_50201414.indd 39 16.04.2012 14:50:1716.04.2012 14:50:17
Page 41

This means that the connection is now established.
To disconnect from a wireless network, you should
highlight Confi guration Status and press OK.
You can navigate between menu tabs by pressing left/
right buttons. The help bar on the bottom of the dialog
shows features that you may use. Press BLUE button
to check your internet connection speed.
You can check the signal strenght by using the network
settings menu for the wireless device mode.
Information
Configuration Status: Displays wi-fi status as
connected or not connected.
IP Address: Displays the current IP address.
Network Name: Connected networks’ name will be
displayed.
Delete Saved Wifi Profi les
Saved profi les will be deleted if you press red button
while wireless device selection osd is on the screen.
Connecting to your Cell Phone via WiFi
(Optional)
If your cell phone has WiFi feature, you can connect •
your cell phone to your TV by using WiFi connection
via a router, in order to play content from your phone.
For this, your cell phone must have an appropriate
sharing software.
Connect to your router following the steps stated •
above in the Wireless Connection section.
Afterwards, engage your cell phone with the router •
and then activate sharing software on your cell
phone. Then, select fi les that you would like to share
with your TV.
If the connection is established correctly, you should •
now access the shared fi les of your cell phone via
the Media Browser of your TV.
Enter Media Browser menu and playback device •
selection OSD will be displayed. Select your cell
phone’s ident and press OK to continue.
Note: This feature may not be supported by some
cell phones.
Confi guring Other Settings
To view general confi guration preferences, select
Other Settings in the Settings menu and press OK
button.
Operation
Press “• ” or “ ” buttons to select an item.
” or “ ” button to set an option.
Use “•
Press• OK button to view a sub-menu.
Menu Timeout: Changes timeout duration for menu
screens.
Scan Encrypted: When this setting is on, search
process will locate the encrypted channels as well. If
it is set as Off, encrypted channels will not be located
in automatic search or manual
ackground: Activates or deactivates blue
Blue B
background system when the signal is weak or
absent.
Software Upgrade: To ensure that your TV always
has the most update information, you can use this
setting. In order for the proper operation, please
ensure that the TV is set to standby mode.
You can enable or disable automatic upgrade by
setting Automatic Scanning option.
search.
English - 40 -
A01_[GB]_MB70_5112UK_DVBT_C_DLNA_HBBTV_MMH_WIFI_32942LED_GOLD11_10075886_50201414.indd 40A01_[GB]_MB70_5112UK_DVBT_C_DLNA_HBBTV_MMH_WIFI_32942LED_GOLD11_10075886_50201414.indd 40 16.04.2012 14:50:1816.04.2012 14:50:18
Page 42

You can manually search for new software by
selecting Scan for upgrade.
Application version: Displays the current application
version.
Hard of Hearing: If the broadcaster enables any
special signal concerning the audio, you can set this
setting as On to receive such signals.
Audio Description: Audio description refers to
an additional narration track for blind and visually
impaired viewers of visual media, including television
and movies. The description narrator talks through
the presentation, describing what is happening on the
screen during the natural pauses in the audio (and
sometimes during dialogue, if deemed necessary).
You can use this feature, only if the broadcaster
supports that additional narration track.
Auto TV Off: You can set the timeout value of auto off
feature. After the timeout value is reached and the TV
is not operated for selected time, the TV will go off.
Standby Search (optional): Use “
to select Standby Search and then press “ ” or “
” button to set this setting as On or Off. If you
change Standby Search to Off, this function will be
unavailable.To use Standby Search please make sure
that you select Standby Search as On.
E-Pop: If you set E-Pop to “enabled”, your TV’s
features will be illustrated on the top of the screen.
To deactivate this feature, please set to “disabled”.
” or “ ” button
Other Features
Displaying TV Information: Programme Number,
Programme Name, Sound Indicator, time, teletext,
channel type and resolution information is displayed
on the screen when a new programme is entered or
“INFO” button is pressed.
Mute Function: Press “
Mute indicator will be displayed in the upper side of
the screen. To cancel mute, there are two alternatives;
the fi rst one is pressing the “
one is increasing the volume level.
Picture Mode Selection: By pressing PRESETS
button, you can change Picture Mode settings in
accordance with your viewing requirements. Available
options are Dynamic, Natural, Cinema and Game.
Displaying Subtitles: You can enable subtitles by
pressing the SUBTITLE button of the remote control.
Press SUBTITLE button again to disable subtitle
function.
If “Subtitle” is On, pressing the “
the following warning message to be displayed on the
screen (** for UK only)
” button to disable sound.
” button and the second
” button causes
English - 41 -
A01_[GB]_MB70_5112UK_DVBT_C_DLNA_HBBTV_MMH_WIFI_32942LED_GOLD11_10075886_50201414.indd 41A01_[GB]_MB70_5112UK_DVBT_C_DLNA_HBBTV_MMH_WIFI_32942LED_GOLD11_10075886_50201414.indd 41 16.04.2012 14:50:1816.04.2012 14:50:18
Page 43

Teletext
Teletext system transmits information such as news,
sports and weather on your TV. Note that is the signal
degrades, for example in poor/adverse weather
conditions, some text errors may occur or the teletext
mode may be aborted.
Teletext function buttons are listed below:
“
” Teletext / Mix : Activates teletext mode when
pressed once. Press again to place the teletext screen
over the programme (mix). Pressing again will quit
the teletext mode.
“BACK” Index: Selects the teletext index page.
“INFO”Reveal: Shows hidden information (e.g.
solutions of games).
“OK” Hold: Holds a text page when convenient. Press
again to resume.
”/“ ” Subcode Pages: Selects subcode pages if
“
available when the teletext is activated.
P+ / P- and numbers (0-9): Press to select a page.
Note: Most TV stations use code 100 for their index
pages.
Coloured Buttons (RED/GREEN/YELLOW/
BLUE)
Your TV supports both FASTEXT and TOP text
systems. When these systems are available, the
pages are divided into groups or topics. When
FASTEXT system is available, sections in a teletext
page will become colour-coded and can be selected
by pressing the coloured buttons. Press a coloured
button that corresponds to with your needs. The
coloured writings will appear, showing you which
coloured buttons to use when TOP text transmission
is present. Pressing “ ” or “ ” commands will request
the next or previous page respec tively.
Tips
Screen Care: Clean the screen with a dry, soft cloth.
Do not use abrasive solvents as they may damage the
coating layer of the TV screen. For your safety, unplug
the mains plug when cleaning the set. When moving
the TV, hold it properly from the bottom part.
Image Persistence: Please note that ghosting may
occur while displaying a persistent image. LCD TVs’
image persistence may disappear after a short time.
Try turning off the TV for a while.
To avoid this, do not leave the screen in still picture
for extended periods.
No Power: If your TV system has no power, please
check the main power cable and connection to the
mains socket outlet.
Poor Picture: Have you selected the correct TV
system? Is your TV set or house aerial located too
close to a non-earthed audio equipment or neon
lights, etc.? Mountains or high buildings can cause
double pictures or ghost images. Sometimes you can
improve the picture quality by changing the direction
of the aerial. Is the picture or teletext unrecognisable?
Check if you have entered the correct frequency.
Please retune the channels. The picture quality may
degrade when two peripherals are connected to the
TV at the same time. In such a case, disconnect one
of the peripherals.
No Picture: Is the aerial connected properly? Are the
plugs connected tightly to the aerial socket? Is the
aerial cable damaged? Are suitable plugs used to
connect the aerial? If you are in doubt, consult your
dealer. No Picture means that your TV is not receiving
a transmission. Have you selected the correct button
on the remote control? Try once more. Also make sure
the correct input source has been selected.
Sound: You can not hear any sound. Did you perhaps
interrupt the sound, pressing the
coming from only one of the speakers. Is the balance
set to one extreme? See Sound Menu.
Remote Control: Your TV no longer responds to the
remote control. Perhaps the batteries are exhausted.
If so you can still use the local buttons on the TV.
Input Sources: If you cannot select an input source,
it is possible that no device is connected. Check
the AV cables and connections if you have tried to
connect a device.
Recording Unavailable: To record a programme, you
should fi rst connect a USB disk to your TV while the
TV is switched off. You should then switch on the TV to
enable recording feature. Otherwise, recording feature
will not be available. If you cannot perform recording,
try switching off the TV and then re-inserting the USB
device while the TV is switched off.
button? Sound is
English - 42 -
A01_[GB]_MB70_5112UK_DVBT_C_DLNA_HBBTV_MMH_WIFI_32942LED_GOLD11_10075886_50201414.indd 42A01_[GB]_MB70_5112UK_DVBT_C_DLNA_HBBTV_MMH_WIFI_32942LED_GOLD11_10075886_50201414.indd 42 16.04.2012 14:50:1916.04.2012 14:50:19
Page 44

USB Is too Slow: If “USB is too slow” message is
displayed on the screen while starting a recording,
try restarting the recording. If you still get the same
error, it is possible that your USB disk does not meet
the speed requirements. Try connecting another
USB disk.
Wireless Network Not Available: Ensure that the
firewalls of your network allows the TV wireless
connection. “Veezy 100” usb wifi dongle(sold
separately) should be plugged properly (if available).
If the wireless network does not function properly,
try using the wired network in your home. Refer to
the Wired Connection section for more information
on the process.
If the Net TV does not function, check the modem
(router) fi rst. If the router does not have a problem,
check the internet connection of your modem.
Try searching for wireless networks again, using the
Network Settings menu screen.
Connection is Slow: See the instruction book
of your wireless modem to get information on the
internal service area, connection speed, signal quality
and other settings. You need to have a high speed
connection for your modem.
Distruption during playback or slow reactions:
You could try the following in such a case: Keep
at least three meters distance from microwave ovens,
mobile telephones, bluetooth devices or any other
Wi-Fi compatible devices. Try changing the active
channel on the WLAN router.
Internet Connection Not Available / DLNA Mode
Not Operating: If the MAC address (a unique
identifi er number) of your PC or modem has been
permanently registered, it is possible that your TV
might not connect to the internet. In such a case, the
MAC address is authenticated each time when you
connect to the internet. This is a precaution against
unauthorized access. Since your TV has its own
MAC address, your internet service provider cannot
validate the MAC address of your TV. For this reason,
your TV cannot connect to the internet. Contact your
internet service provider and request information on
how to connect a different device, such as your TV,
to the internet.
It is also possible that the connection may not be
available due to a firewall problem. If you think
this causes your problem, contact your internet
service provider. A fi rewall might be the reason of a
connectivity and discovery problem while using the TV
in DLNA mode or while browsing via DLNA.
Invalid Domain: Ensure that you have already logged
on to your PC with an authorized username/password
and also ensure that your domain is active, prior to
sharing any fi les in your DLNA server program on your
PC. If the domain is invalid, this might cause problems
while browsing fi les in DLNA mode.
English - 43 -
A01_[GB]_MB70_5112UK_DVBT_C_DLNA_HBBTV_MMH_WIFI_32942LED_GOLD11_10075886_50201414.indd 43A01_[GB]_MB70_5112UK_DVBT_C_DLNA_HBBTV_MMH_WIFI_32942LED_GOLD11_10075886_50201414.indd 43 16.04.2012 14:50:1916.04.2012 14:50:19
Page 45

Appendix A: INTERNET PORTAL
You can access PORTAL mode using your TV. To do this, an active internet connection is required. Follow
the steps on Connecting to a Wired/Wireless(optional) Network section to connect your TV to internet. After
the connection is established, you can select or view portal options.
Note: Broadband internet connection is required for high quality viewing. Ensure that the internet connection
is made properly. You must set the Country and Language data correctly in the First Time Installation for the
proper operation of internet portal.
Press “
will be displayed as the template below. Available applications’ contents may change depending on the
application content provider.
Select a link or application using the Left and Right or Up or Down buttons and press OK to activate.
Note: Possible application dependent problems may be caused by the content service provider.
” button on your remote control and portal application options will be displayed. Application options
Use Up/Down and Left/Right buttons to navigate between the items on Portal screen. •
Press • OK button to confi rm your selection.
Press • BACK to go to the previous screen.
Press • EXIT to quit internet portal mode.
English - 44 -
A01_[GB]_MB70_5112UK_DVBT_C_DLNA_HBBTV_MMH_WIFI_32942LED_GOLD11_10075886_50201414.indd 44A01_[GB]_MB70_5112UK_DVBT_C_DLNA_HBBTV_MMH_WIFI_32942LED_GOLD11_10075886_50201414.indd 44 16.04.2012 14:50:1916.04.2012 14:50:19
Page 46

Appendix B: PC Input Typical
Display Modes
The display has a maximum resolution of 1920 x 1080.
The following table is an illustration of some of the
typical video display modes. Your TV may not support
different resolutions. Supported resolution modes are
listed below. If you switch your PC to an unsupported
mode, a warning OSD will appear on the screen.
Index Resolution
1 640x480p - VGA 59
2 640x480p - VGA 72
3 640x480p - VGA 75
4 640x480p - VGA 85
5 800x600p - SVGA 56
6 800x600p - SVGA 60
7 800x600p - SVGA 72
8 800x600p - SVGA 75
9 800x600p - SVGA 85
10 1024x768p - XGA 60
11 1024x768p - XGA 60
12 1024x768p - XGA 66
13
14
15
16
17
18
19
20
21
22
23
24
25
26
27
28
29
30
1024x768p - XGA 70
1024x768p - XGA 75
1024x768p - XGA 84
1152x864p 75
1280x1024p - SXGA 75
1280x1024p - SXGA 85
1280x1024p - SXGA 60
1280x768p - WXGA 59
1280x768p - WXGA 59
1280x768p - WXGA 74
1280x768p - WXGA 84
1280x960 - WXGA 60
1280x960p - WXGA 85
1360x768p - WXGA 60
1360x768p - WXGA 60
1400x1050p - SXGA+ 74
1600x1200p - UXGA 60
1920x1080p 59
Frequency
(Hz)
Appendix C: AV and HDMI Signal
Compatibility (Input Signal Types)
Source Supported Signals Available
PAL 50/60 O
EXT-1
(SCART 1)
EXT-2
(SCART-2)
AV IN
(SIDE AV)
YPbPr
HDMI1
HDMI2
HDMI3
HDMI4
(X: Not Available, O: Available)
In some cases a signal on the LCD TV may not be displayed
properly. The problem may be an inconsistency with standards
from the source equipment (DVD, Set-top box, etc. ). If you
do experience such a problem please contact your dealer and
also the manufacturer of the source equipment.
NTSC 60 O
RGB 50 O
RGB 60 O
PAL 50/60 O
NTSC 60 O
RGB 50 X
RGB 60 X
PAL 50/60 O
NTSC 60 O
480I 60Hz O
480P 60Hz O
576I 50Hz O
576P 50Hz O
720P 50Hz O
720P 60Hz O
1080I 50Hz O
1080I 60Hz O
1080P 50Hz O
1080P 60Hz O
480I 60Hz O
480P 60Hz O
576I 50Hz O
576P 50Hz O
720P 50Hz O
720P 60Hz O
1080I 50Hz O
1080I 60Hz O
1080P 50Hz O
1080P 60Hz O
1080P 24Hz O
English - 45 -
A01_[GB]_MB70_5112UK_DVBT_C_DLNA_HBBTV_MMH_WIFI_32942LED_GOLD11_10075886_50201414.indd 45A01_[GB]_MB70_5112UK_DVBT_C_DLNA_HBBTV_MMH_WIFI_32942LED_GOLD11_10075886_50201414.indd 45 16.04.2012 14:50:1916.04.2012 14:50:19
Page 47

Appendix D: Supported DVI Resolutions
(
)
When connecting devices to your TV’s connectors by using DVI converter cables (not supplied), you can refer
to the following resolution information.
24Hz 25Hz 30Hz 50Hz 60Hz
480i
480p
576i
576p
720p
1080i
1080p
;
;
;;
;;
;;;; ;
;
;
Appendix E: Supported File Formats for USB Mode
Media
File
Extension
Video Audio
.mpg, .mpeg MPEG1/2 MPEG1 Layer 1/2/3
.dat MPEG1 MPEG1 Layer 1/2
.vob MPEG1/2
H.264, MPEG2/4,
VC-1
MPEG4, H.264,
H.263
Movie
.mkv
.mp4, m4v
.avi XVID
.mov
MPEG4, H.264,
H.263
.asf, .wmv VC-1 WMA max 1920x1080 @ 30P 20Mbit/sec
.mp3
Music
.wma WMA
.wav LPCM
-
.m4a AAC
Photo .jpg .jpeg Baseline JPEG
Format
AC- 3, MPEG1 Layer 1/2,
DVD-LPCM
MPEG1 Layer 1/2/3, AAC,
EAC-3/AC-3
AAC, EAC-3/AC-3
MPEG1 Layer 1/2/3, AC-3,
LPCM, WMA
AAC, EAC-3/AC-3
MPEG 1 Layer 1/2/3 (MP3)
Maximum resolution/Bit rate etc.
Remarks
max 1920x1080 @ 30P 20Mbit/sec
max 1920x1080 @ 30P 20Mbit/sec
Most QuickTime streams appear to be
MPEG-4 Part 12
max WxH = 14592x12288
Up to 8 MegaByte
Note: Supported DLNA fi le formats are same with the USB mode’s.
English - 46 -
A01_[GB]_MB70_5112UK_DVBT_C_DLNA_HBBTV_MMH_WIFI_32942LED_GOLD11_10075886_50201414.indd 46A01_[GB]_MB70_5112UK_DVBT_C_DLNA_HBBTV_MMH_WIFI_32942LED_GOLD11_10075886_50201414.indd 46 16.04.2012 14:50:2016.04.2012 14:50:20
Page 48

Appendix F: Software Upgrade
• Your TV is capable of fi nding and updating new software upgrades over broadcast channels.
• For broadcast channels search, TV looks the available channels stored in your settings. So before software
upgrade search, it is advised to auto search and update all available channels.
1) Software upgrade search via user interface
• It is possible manually to check if there is a new software upgrade for your TV set.
• Simply navigate on your main menu. Choose Settings and select Other Settings menu. In Other Settings
menu navigate on to the Software Upgrade item and press OK button to open Upgrade Options menu.
• In Upgrade Options menu select Scan for upgrade and press OK button.
• If a new upgrade is found, it starts to download the upgrade. A progress bar indicates the remaining download
progress. When download completes with success a message is displayed for reboot to activate new software.
Press OK to continue with the reboot operation.
2) Background search and upgrade mode
• While TV is connected to Internet, in background it searches for critical software upgrades. If a critical software
upgrade is found it downloads the upgrade silently. When download completes with success a message is
displayed for reboot operation to activate new software. Press OK to continue with the reboot operation.
3) 3.AM search and upgrade mode
• If Automatic scanning in Upgrade Options menu is enabled, TV wakes up at 03:00 and searches broadcast
channels for new software upgrade. If new software is found and downloaded successfully, with next power
up TV opens with new software version.
Note on reboot operation: Reboot is the last step in software upgrade operation if download of new software is
fi nished successfully. During reboot TV makes fi nal initializations. In reboot sequence panel power is closed and
front led indicates the activity with blinking. Around 5 minutes later TV restarts with new software activated.
• If your TV fails to restart in 10 minutes, unplug power for 10 minutes and re-plug again. TV should open with
new software safely. If you still can not get TV working, please kindly repeat unplug and plug sequence a few
times more. If your set still can not operate, please call the service personnel to fi x the problem for you.
Caution: While led is blinking during reboot do not unplug your TV’s power. Doing this may cause
your TV not to re-open again and can only be fi xed by service personnel.
Manual Software Update
Ensure that the ethernet cable is connected to your TV. If the ethernet cable is connected to the TV, ensure
that the TV is receiving.
Menu -> Settings -> Network Settings -> Confi guration Status -> Connected
Go to Settings tab from the main menu and select Other Settings. Highlight Software Upgrade and press OK.
Select Scan for Upgrade and press OK button.
An OSD screen including the progress bar will be visible under the Software upgrade” title.
A warning screen will be displayed on the screen, stating that the TV will be rebooted. Press OK button to
fi nalize upgrade process and reboot TV.
English - 47 -
A01_[GB]_MB70_5112UK_DVBT_C_DLNA_HBBTV_MMH_WIFI_32942LED_GOLD11_10075886_50201414.indd 47A01_[GB]_MB70_5112UK_DVBT_C_DLNA_HBBTV_MMH_WIFI_32942LED_GOLD11_10075886_50201414.indd 47 16.04.2012 14:50:2016.04.2012 14:50:20
Page 49

Appendix G: HBBTV System
HbbTV (Hybrid Broadcast Broadband TV) is a new industry standard that seamlessly combines TV services
delivered via broadcast with services delivered via broadband and also enables access to Internet only
services for consumers using connected TVs and set-top boxes. Services delivered through HbbTV include
traditional broadcast TV channels, catch-up services, video-on-demand, EPG, interactive advertising,
personalisation, voting, games, social networking and other multimedia applications.
HbbTV applications are available on channels where they are signalled by the broadcaster (currently
various channels on Astra broadcast HbbTV applications). The broadcaster marks one application as
“autostart” and this one is started by the platform automatically. The autostart applications are generally
launched with a small red button icon to notify the user that there is an HbbTV application on that channel
(The shape and the location of the red button depends on the application). The red button is displayed for
some and then may disappear. The user then should press the red button to open the application page.
After the page is displayed the user can go back to the initial red button icon state by pressing the red
button again. The user can toggle between the red button icon mode and full UI mode of the application
via pressing red button. It should be noted that the red button switching capability is provided by the
application and some application may behave differently.
Figure x: Service with red button application (taken from HbbTv specifi cation)
If the user swicthes to another channel while an HbbTv application is active (either in red button icon
mode or full UI mode), the following scenarios can occur.
- The application can continue running.
- The application can be terminated.
- The application can be terminated and another autostart red button application can be launched.
HbbTv allows the applications to be retrieved both from broadband or broadcast. The broadcaster may
enable both ways or one of them. If the platfrom does not have an operational broadband connection,
the platform can still launch applications transmitted on broadcast.
The autostart red button applications generally provide links to other applications. An example of this is
shown below. The user then can switch to other applications by using the links provided. The applications
should provide a way to terminate themselves, usually button 0 is used for this.
English - 48 -
A01_[GB]_MB70_5112UK_DVBT_C_DLNA_HBBTV_MMH_WIFI_32942LED_GOLD11_10075886_50201414.indd 48A01_[GB]_MB70_5112UK_DVBT_C_DLNA_HBBTV_MMH_WIFI_32942LED_GOLD11_10075886_50201414.indd 48 16.04.2012 14:50:2016.04.2012 14:50:20
Page 50

Figure a: ARD start bar application
a b
Figure b: ARD EPG application, broadcast video is shown on the left bottom, can be terminated by pressing 0.
HbbTv applications use keys on the remote control to interact with the user. When an HbbTv applications is
launched, the control of some keys are owned by the application. For example, numeric channel selection
may not work on a teletect application where the numbers indicate teletext pages.
HbbTv requires AV streaming capability for the platform. There are numerous applications providing VOD
(video on demand) and catch-up TV services. The user can use play, pause, stop, forward, and rewind
keys on the remote control to interact with the AV content.
English - 49 -
A01_[GB]_MB70_5112UK_DVBT_C_DLNA_HBBTV_MMH_WIFI_32942LED_GOLD11_10075886_50201414.indd 49A01_[GB]_MB70_5112UK_DVBT_C_DLNA_HBBTV_MMH_WIFI_32942LED_GOLD11_10075886_50201414.indd 49 16.04.2012 14:50:2016.04.2012 14:50:20
Page 51

Appendix H: Nero MediaHome
Installation
This software is compatible with Windows XP and
Windows 7.
To install Nero MediaHome, please proceed as
follows:
Note: To use DLNA function, this software should be
installed to your PC.
Insert the Nero MediaHome installation disc in 1.
your optical disc drive.
The Nero MultiInstaller screen with a button to start •
the installation process will open automatically.
If below window is not displayed automatically, •
double-click on the fi le SetupX located on
the Nero MediaHome installation disc.
Click the Next button.3.
The integrated serial is displayed. •
Please do not change displayed serial. •
Click the Next button. 4.
The License Conditions (EULA) screen is •
displayed.
Click on the button labeled Nero MediaHome 2.
Essentials to start the installation process.
The Nero MediaHome installation wizard is •
displayed.
If necessary change installation language from the •
language selection menu before continuing.
English - 50 -
A01_[GB]_MB70_5112UK_DVBT_C_DLNA_HBBTV_MMH_WIFI_32942LED_GOLD11_10075886_50201414.indd 50A01_[GB]_MB70_5112UK_DVBT_C_DLNA_HBBTV_MMH_WIFI_32942LED_GOLD11_10075886_50201414.indd 50 16.04.2012 14:50:2016.04.2012 14:50:20
Please read the license agreement carefully 5.
and select the appropriate check box if you
agree to the terms of the agreement. Installation
is not possible without this agreement.
Page 52

Click the Next button.6.
The Select Installation Type screen is displayed.•
It is possible to choose between Typical, meaning
standard installation, or Custom installation. User
defi ned installation allows you to determine languages
to be installed and to choose the installation path.
Use Typical installation and click the Next 7.
button.
The Prerequisites screen is displayed.•
The Nero MediaHome installation wizard checks the
availability of required third-party software on your PC.
If applications are missing they are listed and must be
installed before continuing installation.
Click the Install button.8.
As soon as all prerequisites are installed, the Install •
button will change to a Next button.
Click the Next button.9.
The Ready to Start Installation Process screen •
is displayed, installation begins and finishes
automatically. A progress bar informs you of the
progress of the installation process.
English - 51 -
A01_[GB]_MB70_5112UK_DVBT_C_DLNA_HBBTV_MMH_WIFI_32942LED_GOLD11_10075886_50201414.indd 51A01_[GB]_MB70_5112UK_DVBT_C_DLNA_HBBTV_MMH_WIFI_32942LED_GOLD11_10075886_50201414.indd 51 16.04.2012 14:50:2116.04.2012 14:50:21
Page 53

Installation fi nishes.10.
The Help us to Enhance Nero Software screen is
displayed. In order to offer a better service, Nero
is collecting anonymous data to determine which
features are used and what problems, if any, occur.
If you would like to help by participating in the 11.
anonymous collection of usage data, select the
check box and click the Next button.
The final screen of the installation wizard is •
displayed.
Click the Exit button.12.
Run Nero MediaHome by pressing shortcut icon.14.
Click ADD icon from LOCAL FOLDERS to add the •
folder you want to share with the network. Select
the folder that you want to share and click START
SERVER.
You can display all media types from the library. 15.
Click Refresh icon to refresh. Click STOP
SERVER icon to stop server.
A shortcut called Nero MediaHome 4 is now 13.
placed on your desktop
Congratulations! You successfully installed Nero
MediaHome 4 on your PC.
English - 52 -
A01_[GB]_MB70_5112UK_DVBT_C_DLNA_HBBTV_MMH_WIFI_32942LED_GOLD11_10075886_50201414.indd 52A01_[GB]_MB70_5112UK_DVBT_C_DLNA_HBBTV_MMH_WIFI_32942LED_GOLD11_10075886_50201414.indd 52 16.04.2012 14:50:2216.04.2012 14:50:22
Page 54

Specifi cations
TV BROADCASTING
PAL/SECAM B/G D/K K’ I/I’ L/L’
RECEIVING CHANNELS
VHF (BAND I/III)
UHF (BAND U)
HYPERBAND
NUMBER OF PRESET CHANNELS
10.000
CHANNEL INDICATOR
On Screen Display
RF AERIAL INPUT
75 Ohm (unbalanced)
OPERATING VOLTAGE
220-240V AC, 50 Hz.
AUDIO OUTPUT POWER (W
2 x 8
POWER CONSUMPTION (W)
135 W (max)
< 0,5 W (Standby)
PANEL
16:9 display, 32” (80 cm) Screen Size
DIMENSIONS (mm)
DxLxH (With stand): 205,5 x 773 x 522
Weight (Kg): 11,10
DxLxH (Without stand): 39 x 773 x 490
Weight (Kg): 9,55
) (10% THD)
RMS.
Digital Reception (DVB-T)
Transmission Standards:
DVB-T, MPEG2,DVB-T, MPEG4 HD
i. DEMODULATION
-Symbol rate: COFDM with 2K/8K FFT mode.•
-Modulation: 16-QAM - 64-QAM FEC for all DVB •
modes (automatically found)
MHEG-5 ENGINE compliant with ISO/IEC 13522-5 •
UK engine Profi le (UK only)
Object carousel support compliant with ISO/IEC •
135818-6 and UK DTT profi le(UK only)
Frequency range: 474-850 MHz for UK models•
ii. VIDEO
-H.264 (MPEG-4 part 10) main and high profi le level •
4.1/MPEG-2 MP@HL video decoder.
-HD display multi format capable (1080i, 720p, •
576p)
-CVBS analogue output.(In HD channels, this will •
not be available
iii. AUDIO
-MPEG-1 layer I/II, MPEG-2 layer II, AAC, HEAAC, •
AC3, E-AC3
-Sampling frequencies supported are 32, 44.1 & •
48 kHz
Digital Reception (DVB-C)
Transmission Standards:
DVB-C, MPEG2, DVB-C, MPEG4
i. DEMODULATION
-Symbolrate: 4.0 Msymbols/s to 7.2 Msymbols/s
- Modulation: 16-QAM , 32-QAM ,64-QAM, 128-QAM
and 256-QAM
ii. VIDEO
- All MPEG2 MP@ML formats with up-conversion and
fi ltering to CCIR601 format.
-CVBS analogue output
iii. AUDIO
-All MPEG1 Layer 1 and 2 modes
-Sampling frequencies supported are 32, 44.1 & 48
kHz.
English - 53 -
A01_[GB]_MB70_5112UK_DVBT_C_DLNA_HBBTV_MMH_WIFI_32942LED_GOLD11_10075886_50201414.indd 53A01_[GB]_MB70_5112UK_DVBT_C_DLNA_HBBTV_MMH_WIFI_32942LED_GOLD11_10075886_50201414.indd 53 16.04.2012 14:50:2216.04.2012 14:50:22
Page 55

Dimensional Drawings
773
490
522
English - 54 -
A01_[GB]_MB70_5112UK_DVBT_C_DLNA_HBBTV_MMH_WIFI_32942LED_GOLD11_10075886_50201414.indd 54A01_[GB]_MB70_5112UK_DVBT_C_DLNA_HBBTV_MMH_WIFI_32942LED_GOLD11_10075886_50201414.indd 54 16.04.2012 14:50:2216.04.2012 14:50:22
Page 56

End of life disposal
English - 55 -
A01_[GB]_MB70_5112UK_DVBT_C_DLNA_HBBTV_MMH_WIFI_32942LED_GOLD11_10075886_50201414.indd 55A01_[GB]_MB70_5112UK_DVBT_C_DLNA_HBBTV_MMH_WIFI_32942LED_GOLD11_10075886_50201414.indd 55 16.04.2012 14:50:3716.04.2012 14:50:37
Page 57

Installing the Stand
IMPORTANT
Please read the following information carefully before attaching the stand to your new Sharp Television.
Installing the Stand
! Before fitting the stand, ensure that the TV is unplugged from its power source.
! Place the Sharp Television (1) on a soft, stable and flat surface, facing down.
! Place the Stand (3) on the stand mounting pattern on the rear side of the TV.
Ensure the Stand (3) is placed correctly and that you can see the screw holes on the back of the Sharp Television.
! Place the Stand Cover (2) on the Stand (3).
! Ensure the Stand Cover (3) is placed correctly and that you can see the screw holes on the back of the Sharp Television.
! DO NOT insert the screws before placing the plastic molding.
! Insert the four screws provided and tighten them gently until the stand is properly fitted.
1. Sharp Television
2. Stand Cover
3. Stand
English - 56 -
A01_[GB]_MB70_5112UK_DVBT_C_DLNA_HBBTV_MMH_WIFI_32942LED_GOLD11_10075886_50201414.indd 56A01_[GB]_MB70_5112UK_DVBT_C_DLNA_HBBTV_MMH_WIFI_32942LED_GOLD11_10075886_50201414.indd 56 16.04.2012 14:50:3716.04.2012 14:50:37
Page 58

Uninstalling the Stand
IMPORTANT
Please read the following information carefully before detaching the stand of your Sharp Television.
Uninstalling the Stand
! Before detaching the stand, ensure that the TV is unplugged from its power source.
! Place the Sharp Television on a soft, stable and flat surface, facing down.
! Unscrew gently the four screws that attach the foot assembly and remove the screws when they are completely
unscrewed.
! Remove the stand and plastic moulding gently from the panel.
English - 57 -
A01_[GB]_MB70_5112UK_DVBT_C_DLNA_HBBTV_MMH_WIFI_32942LED_GOLD11_10075886_50201414.indd 57A01_[GB]_MB70_5112UK_DVBT_C_DLNA_HBBTV_MMH_WIFI_32942LED_GOLD11_10075886_50201414.indd 57 16.04.2012 14:50:3816.04.2012 14:50:38
Page 59

Screw Dimensions
L
D
Model D L Item Number VESA Installation of the Screw
LC-32LE340E
Ø4 30 8
To the wall
200 x 100 (W x H)
M4 18 4 To the product
English - 58 -
A01_[GB]_MB70_5112UK_DVBT_C_DLNA_HBBTV_MMH_WIFI_32942LED_GOLD11_10075886_50201414.indd 58A01_[GB]_MB70_5112UK_DVBT_C_DLNA_HBBTV_MMH_WIFI_32942LED_GOLD11_10075886_50201414.indd 58 16.04.2012 14:51:2116.04.2012 14:51:21
Page 60

Sadržaj
Funkcije ................................................................ 62
Dragi korisniče SHARP proizvoda ........................ 62
Uvod ..................................................................... 62
Priprema ............................................................... 62
Važne sigurnosne mjere ....................................... 63
Sigurnosne mjere ................................................. 64
Izvor napajanja ................................................. 64
Priključni kabel .................................................. 64
Vlaga i voda ...................................................... 64
Čišćenje ............................................................ 64
Ventilacija.......................................................... 64
Toplina i plamen ................................................ 64
Grmljavina......................................................... 64
Rezervni dijelovi................................................ 64
Servisiranje ....................................................... 64
Zbrinjavanje otpada .......................................... 64
Informacije za korisnike u zemljama Europske
unije .................................................................. 64
Isključivanje uređaja ......................................... 64
Glasnoća u slušalicama .................................... 64
Instalacija .......................................................... 65
LCD zaslon ....................................................... 65
Upozorenje ....................................................... 65
Sadržaj pakiranja .................................................. 66
Dodatna oprema po izboru ................................... 66
Informacije o zaštiti okoliša .................................. 67
Informacije o popravku ......................................... 67
Gumbi na daljinskom upravljaču........................... 68
(**)UPORABA MOG GUMBA 2 ............................68
LCD TV i funkcijski gumbi ..................................... 69
Pregled stražnjih priključaka ................................. 69
Pregled priključaka – bočni konektori ................... 70
Antenski priključak ................................................ 71
Priključak za krovnu/kabelsku antenu............... 71
Uključivanje napajanja .......................................... 71
Uporaba USB ulaza .............................................. 71
Bočni HDMI priključak .......................................... 72
Spajanje LCD televizora na računalo ................... 72
Spajanje na DVD uređaj ....................................... 73
Uporaba bočnih AV konektora .............................. 73
Uporaba ostalih konektora.................................... 73
Žično mrežno povezivanje ................................... 74
Bežično mrežno povezivanje (opcija) ................... 75
Daljinski upravljač ................................................. 76
Umetanje baterija.............................................. 76
Uključivanje/Isključivanje ...................................... 76
Uključivanje televizora ...................................... 76
Isključivanje televizora ...................................... 76
Digitalni teletekst (*) .......................................... 76
Analogni teletekst ............................................. 77
Odabir ulaza ......................................................... 77
Rukovanje gumbima na televizoru ................ 77
Podešavanje glasnoće .................................. 77
Odabir programa ........................................... 77
Pregled glavnog izbornika ............................ 77
AV mod ......................................................... 77
Rukovanje daljinskim upravljačem.................... 77
Podešavanje glasnoće .................................. 77
Odabir programa
(prethodni ili sljedeći program) ...................... 77
Odabir programa (izravan pristup) ................ 77
Elektronički programski vodič (EPG) .................... 77
Snimanje putem EPG okvira............................. 78
Opcije programa ............................................... 79
Prva instalacija ..................................................... 79
Automatsko podešavanje ..................................... 80
Izbornik za automatsko pretraživanje kanala ... 81
Ručno podešavanje ............................................. 81
Pretraživanje mrežnih kanala ........................... 81
Analogno fi no podešavanje .............................. 82
Prva instalacija.................................................. 82
Briši popis usluga (*) ......................................... 82
Upravljanje postajama: Popis kanala ................... 82
Vrste popisa kanala .......................................... 82
Premještanje kanala ......................................... 83
Brisanje kanala ................................................ 83
Mijenjanje imena kanala .................................. 83
Zaključavanje kanala ....................................... 83
Filtar popisa kanala........................................... 83
Upravljanje postajama: Favoriti ............................ 84
Funkcije gumba ................................................ 84
Upravljanje postajama: Sortiranje Popisa kanala ... 84
Zaslonske informacije ........................................... 84
Reprodukcija medija pomoću preglednika medija.. 85
Gledanje videa preko USB-a ........................... 85
Pregled fotografi ja pomoću USB-a ................... 86
Opcije za prikaz slika u nizu ............................. 86
Reprodukcija glazbe pomoću USB-a .............. 86
Arhiva snimanja .................................................... 87
Postavke Preglednika Medija ............................... 87
Snimanje zadržane žive slike .............................. 87
Trenutačno snimanje ............................................ 88
Gledanje snimljenih programa ............................. 88
Korištenje DLNA mrežnih usluga .......................... 89
Informacije ........................................................ 89
Korak 1: Instalacija Nero Media Home ............. 89
Korak 2: Žično ili bežično mrežno povezivanje .. 89
Žično povezivanje ............................................. 89
Bežično povezivanje ......................................... 89
Korak 3: Reproduciranje zajedničkih datoteka
pomoću preglednika medija .............................. 89
Povezivanje s mobilnim telefonom putem WiFi-ja
(opcija) .............................................................. 90
Promjena veličine slike: Formati slike................... 91
Konfi guriranje postavki slike ................................. 92
Stavke izbornika Postavke radne slike ............. 92
Stavke izbornika Postavke slike ....................... 92
Postavke za računalnu sliku ............................. 93
Konfi guriranje postavki zvuka ............................... 93
Stavke izbornika postavki radnog zvuka .......... 93
Stavke izbornika Postavke zvuka ..................... 93
Konfi guriranje postavki vašeg televizora .............. 94
Stavke izbornika Radnih postavki ..................... 94
Stavke izbornika Postavke................................ 94
Korištenje modula za uvjetni pristup .................... 94
Pregled izbornika uvjetnog pristupa (*) ............. 94
Hrvatski - 59 -
A02_[HR]_MB70_5112UK_DVBT_C_DLNA_HBBTV_MMH_WIFI_32942LED_GOLD11_10075886_50201414.indd 59A02_[HR]_MB70_5112UK_DVBT_C_DLNA_HBBTV_MMH_WIFI_32942LED_GOLD11_10075886_50201414.indd 59 16.04.2012 14:54:2416.04.2012 14:54:24
Page 61

Konfi guriranje željenih jezičnih postavki ............... 95
Kontrola pristupa .................................................. 95
Rukovanje izbornikom kontrole pristupa (*) ...... 96
Tajmeri .................................................................. 96
Postavljanje tajmera za samoisključivanje........ 96
Postavljanje tajmera za programe .................... 96
Dodavanje tajmera ........................................ 96
Uređivanje tajmera ........................................ 96
Brisanje tajmera ............................................ 97
Konfi guracija snimanja ......................................... 97
Konfi guriranje postavki za funkciju datum/vrijeme ... 97
Konfi guriranje postavki zvuka ............................... 98
Konfi guriranje postavki mreže .............................. 98
Konfi guriranje postavki žičnih uređaja .............. 98
Podešavanje tipa mreže ................................... 98
Status postavki konfi guracije ............................ 98
IP adresa .......................................................... 98
Postavke konfi guracije žične mreže u naprednom
modu ................................................................. 98
Wi-Fi postavke (opcija) ......................................... 99
Informacije ........................................................ 99
Brisanje spremljenih Wi-Fi profi la ..................... 99
Povezivanje s mobilnim telefonom putem WiFi-ja
(opcija) .............................................................. 99
Konfi guriranje ostalih postavki ............................ 100
Rukovanje ....................................................... 100
Ostale funkcije .................................................... 100
Teletekst ............................................................. 101
Savjeti ................................................................. 101
Dodatak A: INTERNET PORTAL ........................ 103
Dodatak B: PC ulaz - Tipični modovi prikaza...... 104
Dodatak C: AV i HDMI kompatibilni signali
(Vrste ulaznih signala) ........................................ 104
Dodatak D: Podržane DVI rezolucije .................. 105
Dodatak E: Formati datoteka koje podržava USB
mod..................................................................... 105
Dodatak F: Nadogradnja softvera....................... 106
Ručna nadogradnja softvera .......................... 106
Dodatak G: HBBTV sustav ................................. 107
Dodatak H: Instalacija početne stranice Nero
MediaHome ........................................................ 109
Specifi kacije.........................................................112
Digitalni prijem (DVB-T) .......................................112
Digitalni prijem (DVB-C) ......................................112
Mjerna skica ........................................................113
Odlaganje po isteku vijeka uporabe ....................114
Instaliranje stalka .................................................115
Demontaža stalka ................................................116
Veličine vijaka ......................................................117
Hrvatski - 60 -
A02_[HR]_MB70_5112UK_DVBT_C_DLNA_HBBTV_MMH_WIFI_32942LED_GOLD11_10075886_50201414.indd 60A02_[HR]_MB70_5112UK_DVBT_C_DLNA_HBBTV_MMH_WIFI_32942LED_GOLD11_10075886_50201414.indd 60 16.04.2012 14:54:2616.04.2012 14:54:26
Page 62

POSEBNA NAPOMENA ZA KORISNIKE U U.K.
Kabel za napajanje ovog proizvoda ima nezamjenjivi utikač (ugrađen) s osiguračem od 5A. Ako osigurač
treba zamijeniti, mora se koristiti BS 1362 osigurač odobren od BSI-a ili ASTA-e i/ili iste ili veće voltaže, što
je naznačeno na glavi utikača.
Vratite poklopac osigurača na njegovo mjesto nakon izmjene osigurača. Ne koristite utikač bez pričvršćenog
poklopca osigurača.
U rijetkom slučaju, ako utičnica u vašem domu ne odgovara isporučenom utikaču, presijecite kabel za napajanje
i pričvrstite utikač odgovarajućeg tipa.
OPASNOST:
Osigurač izrezanog utikača treba ukloniti, a izrezani utikač odmah uništiti i zbrinuti na siguran način.
Ni pod kojim uvjetima izrezani utikač ne smije se umetati negdje drugdje u utičnicu od 5A, jer postoji opasnost
od strujnog udara.
Za pričvršćivanje odgovarajućeg utikača na kabel za napajanje, slijedite donje upute:
VAŽNO:
Žice kabela za napajanje obojane su bojama u skladu s donjim pravilom:
Plava: Neutralno
Smeđa: Živa/pod naponom
Ako boje žica kabela za napajanje ovog proizvoda možda ne odgovaraju bojama
na oznakama u vašem utikaču, postupite na sljedeći način:
Žicu plave boje treba se spojiti na priključak kabela koji je označen slovom N ili obojan u crno.•
Žicu smeđe boje treba se spojiti na priključak kabela koji je označen slovom L ili obojan u crveno.•
Provjerite kako ni smeđ
Prije postavljanja poklopac utikača provjerite:
Sadržava li novo postavljeni utikač osigurač, je li njegova vrijednost ista uklonjenom iz izrezanog utikača.•
Držak kabela pričvršćen je preko omotača kabela za napajanje, a ne izravno preko strujnih žica.•
AKO NISTE SIGURNI, POSAVJETUJETE SE S KVALIFICIRANIM ELEKTRIČAROM.
a ni plava žica nisu spojeni na uzemljenje u vašem 3-strukom utikaču.
Hrvatski - 61 -
A02_[HR]_MB70_5112UK_DVBT_C_DLNA_HBBTV_MMH_WIFI_32942LED_GOLD11_10075886_50201414.indd 61A02_[HR]_MB70_5112UK_DVBT_C_DLNA_HBBTV_MMH_WIFI_32942LED_GOLD11_10075886_50201414.indd 61 16.04.2012 14:54:2616.04.2012 14:54:26
Page 63

Funkcije
LCD televizor u boji s daljinskim upravljanjem.•
Potpuno integrirani televizor za primanje zemaljskog •
televizijskog digitalno-kabelskog signala (DVB-T
C-MPEG2) (DVB-T-C MPEG4).
4 HDMI konektori za digitalni video i audio signal. •
Ovaj priključak je predviđen i za primanje signala
visoke rezolucije (HD).
2 USB ulaza.•
Snimanje programa•
Program sa zadržanom slikom•
10 000 programa•
Sustav OSD izbornika.•
Ugrađeni tuner DVB-T-C HD, MPEG 2 / MPEG 4 •
kompatibilan.
2 scart utičnica za vanjske uređaje (kao što su video, •
video igre, audio uređaji, itd.).
Teletekst, brzi tekst, tekst na vrhu.•
Priključak za slušalice.•
Sustav automatskog programiranja.•
Ručno podešavanje prema naprijed ili natrag.•
Samoisključivanje / Blokada za djecu.•
Automatsko prigušivanje zvuka kada nema •
emitiranja.
NTSC reproduciranje. •
AVL (automatsko ograničenje glasnoće).•
Auto napajanje isključeno.•
PLL (traženje frekvencije).•
PC ulaz. •
‘’Uključi i igraj’’ za Windows 98, Windows 7, ME, •
2000, XP, V
Ethern•
usluge
Funkcija Slika isključena•
802.11n WiFi podržan (opcija)•
• DLNA
Hbb TV•
MMH•
ista.
et (LAN) za internetsko povezivanje i
Dragi korisniče SHARP
proizvoda
Hvala Vam na kupnji SHARP LCD televizora u boji.
Iz sigurnosnih razloga te kako bi dugo godina mogli
bez problema koristit proizvod, molimo prije uporabe
ovog proizvoda pažljivo pročitajte Važne sigurnosne
mjere.
Uvod
Pročitajte upute u ovom priručniku prije prve upotrebe
uređaja, čak i ako ste već dobro upoznati s radom
i upotrebom elektroničkih uređaja. Naročitu pažnju
obratite na poglavlje SIGURNOSNE MJERE.
Priručnik s uputama čuvajte na sigurnom mjestu za
buduću upotrebu. Ako uređaj prodajete ili dajete na
korištenje drugoj osobi, uz uređaj obavezno priložite
i ove upute.
Zahvaljujemo na odabiru ovog proizvoda. Ovaj
priručnik sadrži upute za pravilnu upotrebu
televizora. Prije upotrebe televizora, molimo
pažljivo pročitate ovaj priručnik. Molimo
čuvajte ga na sigurnom mjestu za buduću
upotrebu.
Ovaj uređaj namijenjen je za primanje i prikazivanje TV
programa. Različite mogućnosti spajanja omogućuju
priključivanje dodatnih izvora za primanje i prikazivanje
(prijemnik, DVD uređaj, DVD snimač, VCR, PC, itd.).
Ovaj uređaj namijenjen je isključivo za rad u suhim
prostorijama. Ovaj uređaj namijenjen je isključivo za
privatnu upotrebu u kućanstvima i ne smije se koristiti
u industrijske i komercijalne svrhe. Načelno, naša
odgovornost je isključena u slučaju nenamjenske
upotrebe ili u slučaju neovlaštenih preinaka na
uređaju. Rad LCD televizora u ekstremnim uvjetima
može uzrokovati oštećenje uređaja.
Priprema
Za ventilaciju ostavite najmanje 10 cm slobodnog
prostora sa svih strana uređaja. Kako bi se spriječile
nezgode i nesigurne situacije, molimo na uređaj
ne stavljate nikakve predmete. Uređaj koristite u
umjerenoj klimi.
10 cm
10 cm
10 cm
Slike i zaslonski (OSD) prikazi u ovom korisničkom •
priručniku služe samo za objašnjenje i mogu se
razlikovati od stvarnih.
Primjeri koji se koriste u ovom priručniku temelje se •
na LC-32LE340E modelu.
Hrvatski - 62 -
A02_[HR]_MB70_5112UK_DVBT_C_DLNA_HBBTV_MMH_WIFI_32942LED_GOLD11_10075886_50201414.indd 62A02_[HR]_MB70_5112UK_DVBT_C_DLNA_HBBTV_MMH_WIFI_32942LED_GOLD11_10075886_50201414.indd 62 16.04.2012 14:54:2616.04.2012 14:54:26
Page 64

Važne sigurnosne mjere
Čišćenje - isključite AC kabel iz AC utičnice prije čišćenja proizvoda. Za čišćenje proizvoda koristite vlažnu •
krpu. Ne koristite tekućine ili aerosol.
Koristite mekanu, vlažnu krpu i blago obrišite panel kada je nečist. Kako bi zaštitili panel, za čišćenje ne •
koristite kemijski obrađenu tkaninu. Kemikalije mogu izazvati oštećenja ili napukline na kućištu televizora.
Voda i vlaga- Ne koristite proizvod blizu vode, na primjer blizu kade, umivaonika, sudopera, vjedara za pranje •
rublja, bazena za plivanje i vlažnih podruma.
Na proizvod ne stavljajte vaze ili slične predmeta napunjene vodom. Voda se može proliti po proizvodu i •
izazvati vatru ili strujni udar.
Stalak - Ne stavljajte proizvod na nestabilna kolica, tronožac ili stol. U tom slučaju proizvod •
može pasti, što može izazvati ozbiljne osobne ozljede kao i oštećenja proizvoda. Koristite
samo kolica, stalak, tronožac, konzolu ili stol koji je preporučio proizvođač ili se prodaje s
proizvodom. Prilikom montaže proizvoda na zid, slijedite upute proizvođača. Koristite samo
opremu za montiranje preporučeno od strane proizvođača.
Kada premještate proizvod koji je smješten na kolicima, morate ga pomicati s velikom pažnjom. •
Nagla zaustavljanja, pretjerana sila ili neravan pod mogu dovesti do pada proizvoda s kolica.
Ventilacija - Otvori za ventilaciju i drugi otvori na kućištu televizora namijenjeni su za ventilaciju. •
Ne prekrivajte ili ne zatvarajte otvore za ventilaciju i druge otvore, jer nedovoljna ventilacija
može izazvati pregrijavanje i/ili kraći vijek uporabe proizvoda. Proizvod ne stavljajte na krevet,
sofu, tepih ili slične površine, jer one mogu zatvoriti otvore za ventilaciju. Ovaj proizvod nije
namijenjen za ugradnju; ne postavljajte proizvod u zatvorene prostore kao što su police ili
stalaže za knjige, osim u slučaju ako je osigurana ispravna ventilacija ili ako su poštovane
upute proizvođača.
LCD panel na ovom proizvodu napravljen je od stakla. Može se razbiti ako se proizvod ispusti •
ili udre. Ako se LCD panel razbije, pazite kako se ne bi ozlijedili na slomljenom staklu.
Izvori topline-Držite proizvod dalje od izvora topline, kao što su radijatori, grijači, peći i drugi •
proizvodi koji stvaraju toplinu (uključ
Kako bi spriječili požar, ne stavljajte na vrh ili pored televizora svijeće ili otvoreni plamen.•
Kako bi se spriječila opasnost od požara ili udara, ne stavljajte AC kabel ispod televizora ili •
drugih teških predmeta.
Slušalice-Ne podešavajte glasnoću na najjače. Stručnjaci za sluh ne preporučuju dugo slušanje preglasnog •
zvuka.
Ne prikazujte fi ksnu sliku predugo, jer to može izazvati zadržavanje zaostale slike.•
Struja se troši uvijek kada je priključen kabel za napajanje.•
Servisiranje-Ne pokušavajte sami popravljati proizvod. Uklanjanje kućišta izlaže vas visokom naponu i drugim •
opasnim situacijama. Potražite kvalifi cirano osoblje koje će izvršiti servisiranje.
ujući i pojačala).
LCD panel proizvod je visoke tehnologije i omogućava vam savršenu sliku.
Zbog velikog broja piksela, ponekad se na zaslonu može pojaviti par neaktivnih piksela koji se vide kao fi ksna
plava, zelena ili crvena točka. Ovo je uključeno u specifi kacije proizvoda i ne smatra se kvarom.
Mjere opreza prilikom transportiranja televizora
Kad prenosite televizor, nikad ga ne smijete držati za zvučnike. Uvijek vodite računa da dvije osobe nose
televizor, držeći ga s dvije ruke-po jedna ruka sa svake strane televizora.
UPOZORENJE
Kako bi se spriječilo širenje požara, svijeće i ostale izvore otvorenog plamena uvijek držite
podalje od proizvoda.
Hrvatski - 63 -
A02_[HR]_MB70_5112UK_DVBT_C_DLNA_HBBTV_MMH_WIFI_32942LED_GOLD11_10075886_50201414.indd 63A02_[HR]_MB70_5112UK_DVBT_C_DLNA_HBBTV_MMH_WIFI_32942LED_GOLD11_10075886_50201414.indd 63 16.04.2012 14:54:2716.04.2012 14:54:27
Page 65

Sigurnosne mjere
Pročitajte pažljivo sljedeće preporučene
sigurnosne mjere radi vlastite sigurnosti.
Izvor napajanja
Prijemnik se smije napajati samo naponom od 220240 V AC, 50 Hz. Svakako provjerite jeste li odabrali
pravilan napon.
Priključni kabel
Preko priključnog kabela (glavnog priključka) ne
stavljajte uređaj, kao ni komade namještaja i sl.
te pazite da isti ne prignječite. Rukujte priključnim
kabelom držeći ga za utikač. Ne izvlačite utikač
povlačenjem kabela i kabel nikada ne dirajte mokrim
rukama zbog opasnosti od kratkog spoja ili strujnog
udara. Nikada ne pravite čvorove na kabelu i ne
vežite ga drugim kabelima. Priključni kabeli moraju se
postaviti tako da se ne mora hodati po njima. Oštećeni
priključni kabel može izazvati požar ili strujni udar. Ako
je kabel oštećen i treba ga zamijeniti, posao povjerite
kvalifi ciranom stručnjaku.
Vlaga i voda
Uređaj ne koristite u vlažnim i mokrim
prostorima (ne koristite u kupaonici, u
blizini sudopera ili perilice). Ne izlažite
uređaj kiši ili vodi zbog moguće opasnosti
i ne stavljajte na uređaj posude s
tekućinom, poput vaza. Izbjegavajte
kapanje i prskanje tekućine po uređaju.
Ako u kućište padne neki predmet ili tekućina, izvadite
utikač televizora iz utičnice i pozovite kvalifi ciranog
električara koji će pregledati uređaj prije ponovnog
rada.
Čišćenje
Prije čišćenja, izvadite utikač uređaja iz
zidne utičnice. Ne koristite tekućine ili
aerosol. Čistite mekom i suhom krpom.
Ventilacija
Prorezi i otvori na televizoru služe za ventilaciju i
osiguravaju pouzdan rad uređaja. Da bi se spriječilo
pregrijavanje, otvori ne smiju biti zapriječeni ili
pokriveni.
Toplina i plamen
Uređaj se ne smije postaviti u blizini
otvorenog plamena i izvora jake topline
kao npr. električne grijalice. Na uređaj
se ne smiju stavljati izvori otvorenog
plamena, npr. upaljene svijeće. Baterije
se ne smiju izlagati velikoj vrućini, npr. od
sunca, vatre i slično.
Grmljavina
U slučaju olujnog nevremena ili grmljavine
te ako odlazite na godišnji odmor, izvadite
priključni utikač iz zidne utičnice.
Rezervni dijelovi
U slučaju upotrebe rezervnih dijelova, provjerite koristi li
serviser rezervne dijelove navedene u specifi kacijama
proizvođača ili dijelove s istim specifi kacijama kao
što su originalni dijelovi. Neovlaštene zamjene mogu
izazvati požar, strujni udar ili druge opasnosti.
Servisiranje
Molimo, servis prepustite kvalifi ciranom
osoblju. Ne skidajte sami poklopac, zbog
opasnosti od strujnog udara.
Zbrinjavanje otpada
Upute za zbrinjavanje otpada:•
Ambalaža i sredstva za ambalažu mogu se reciklirati •
i prvenstveno su namijenjeni reciklaži. Ambalažni
materijali, poput plastičnih vrećica, moraju se držati
izvan dohvata djece.
Baterije, uključujući i one koje ne sadrže teške •
metale, ne smiju se bacati zajedno s ostalim kućnim
otpadom. Istrošene baterije zbrinite na ekološki
prihvatljiv način. Raspitajte se o zakonskim propisima
važećima u vašem mjestu. Ne pokušavajte ponovno
puniti baterije. Opasnost od eksplozije. Zamijenite
baterije samo istom ili odgovarajućom vrstom.
Hladna katodna fl uorescentna lampa u LCD PLOČI •
sadrži malu količinu žive; molimo pridržavajte se
lokalnih zakona i propisa o njenom zbrinjavanju.
Informacije za korisnike u zemljama
Europske unije
Ovaj simbol na proizvodu ili njegovoj
ambalaži znači da električne i
elektroničke uređaje na kraju njihova
vijeka trajanja morate zbrinuti u otpad
odvojeno od ostalog kućnog otpada. U
zemljama EU postoje posebni sustavi
za sakupljanje otpada namijenjenog
recikliranju.
Za više informacija obratite se lokalnim nadležnim
tijelima ili prodavaonici u kojoj ste kupili uređaj.
Isključivanje uređaja
Mrežni utikač koristi se za isključivanje televizora iz
mreže i zato mora biti spreman za rad.
Glasnoća u slušalicama
Preveliki zvučni tlak u slušalicama može
uzrokovati oštećenje ili gubitak sluha.
Hrvatski - 64 -
A02_[HR]_MB70_5112UK_DVBT_C_DLNA_HBBTV_MMH_WIFI_32942LED_GOLD11_10075886_50201414.indd 64A02_[HR]_MB70_5112UK_DVBT_C_DLNA_HBBTV_MMH_WIFI_32942LED_GOLD11_10075886_50201414.indd 64 16.04.2012 14:54:2816.04.2012 14:54:28
Page 66

Instalacija
Radi sprječavanja ozljeda, uređaj mora biti sigurno
pričvršćen na zid u skladu s uputama za postavljanje
na zid (ako ta mogućnost postoji).
LCD zaslon
LCD panel predstavlja proizvod visoke tehnologije s
preko 6 milijuna tankoslojnih tranzistora zahvaljujući
kojima dobivate fine detalje slike. Povremeno je
moguća pojava nekoliko neaktivnih piksela na zaslonu
u obliku fi ksne plave, zelene ili crvene točke. Međutim,
to ne utječe na kvalitetu rada vašeg proizvoda.
Upozorenje
Ne ostavljajte televizor uključen ili u modu pripravnosti
kada napuštate kuću.
Gumb Pripravnost / Uključeno ne isključuje uređaj •
iz mreže. Štoviše, dok je u modu pripravnosti,
uređaj i dalje troši električnu energiju. Za potpuno
isključivanje uređaja iz električne mreže, izvadite
mrežni utikač iz mrežne utičnice. Zato je važno
da uređaj postavite tako da se omogući slobodan
pristup mrežnoj utičnici, što je posebno važno u
hitnim slučajevima kada morate brzo izvaditi utikač.
Da biste isključili opasnost od požara, priključni
kabel treba u načelu izvaditi iz mrežne utičnice ako
uređaj ne namjeravate koristiti duže vrijeme, npr.
kada odlazite na odmor.
Djeca ne smiju koristiti električne uređaje
Ni u kojem slučaju ne smijete dopustiti djeci korištenje
električnih uređaja bez nadzora. Djeca ne uviđaju
uvijek moguće opasnosti. Baterije / akumulatori
mogu biti opasni po život ako se progutaju. Spremite
baterije na mjesto nedostupno djeci. U slučaju gutanja
baterije, odmah zatražite liječničku pomoć. Ambalažne
folije i vrećice također čuvajte izvan dohvata djece.
Postoji opasnost od gušenja.
Obavijest o licenciji (opcija)
Proizvedeno pod licencijom Dolby Laboratories.
POTVRDA O ZAŠTITNOM ZNAKU
“Dolby” i dva D zaštitni su znakovi tvrtke Dolby
Laboratories.
“DLNA®, DLNA logotip i DLNA CERTIFIED® zaštitni su
znakovi, uslužni žigovi ili certifi cirane oznake Digital
Living Network Alliance.”
“HDMI, HDMI logotip i High-Defi nition Multimedia •
Interface su zaštićeni i registrirani zaštitni znakovi
HDMI Licensing LLC.”
“HD TV 1080p” logotip je zaštitni znak EICTA.•
DVB logotip je registrirani zaštitni znak Digital •
Video Broadcasting-DVB-projekt.
Obavijest o licenciji
DivX®, DivX Certified® i povezani logotipovi zaštitni su
znakovi DivX®, Inc. i koriste se pod licencijom.
Gumb Pripravnost / Uključeno ne isključuje uređaj iz
mreže. Štoviše, dok je u modu pripravnosti, uređaj i
dalje troši električnu energiju. Za potpuno isključivanje
uređaja iz električne mreže, izvadite mrežni utikač iz
mrežne utičnice. Zato je važno da uređaj postavite
tako da se omogući slobodan pristup mrežnoj utičnici,
što je posebno važno u hitnim slučajevima kada
morate brzo izvaditi utikač. Da biste isključili opasnost
od požara, priključni kabel treba u načelu izvaditi iz
mrežne utičnice ako uređaj ne namjeravate koristiti
duže vrijeme, npr. kada odlazite na odmor.
Hrvatski - 65 -
A02_[HR]_MB70_5112UK_DVBT_C_DLNA_HBBTV_MMH_WIFI_32942LED_GOLD11_10075886_50201414.indd 65A02_[HR]_MB70_5112UK_DVBT_C_DLNA_HBBTV_MMH_WIFI_32942LED_GOLD11_10075886_50201414.indd 65 16.04.2012 14:54:2916.04.2012 14:54:29
O DIVX VIDEU: DivX® je digitalni video format
kreiran od strane DivX®, LLC, koji je podružnica Rovi
korporacije. Ovo je službeni DivX Certified® uređaj
koji reproducira DivX® videa. Za više informacija te za
softverske alate za prebacivanje Vaših datoteka u DivX®
video format posjetite divx.com.
O DIVX VIDEU-NA-ZAHTJEV: Ovaj DivX Certified®
uređaj mora se registrirati kako bi mogao reproducirati
kupljena DivX® video-na-zahtjev (VOD-Video on Demand)
fi lmove. Kako biste dobili svoj registracijski kod, pogledajte
®
VOD odjeljak na izborniku za podešavanje vašeg
DivX
uređaja. Za više informacija kako izvršiti registraciju idite
na vod.divx.com. DivX Certifi ed
®
za reprodukciju DivX®
videa, uključujući i premium sadržaj.
Page 67

Sadržaj pakiranja
LCD televizor
Baterije: 2 X AAA
INTERNET
SCREEN
LANG SUBTITLE
PRESETS
EPG
TEXT
FAV SLEEP
1
3
2
ABC DEF
4
6
5
GHI
JKL MNO
8
9
7
PQRS
TUV WXYZ
0
SOURCE
SWAP
MENU
V +
P +
Priručnik s uputama
Dodatna oprema po izboru
Navedena dodatna oprema po izboru dostupna je za
ovaj LCD televizor u boji. Molimo, kupite je u najbližoj
trgovini.
Ostala dodatna oprema po izboru bit će dostupna u •
uskoro. Prilikom kupnje pročitajte i najnoviji katalog
zbog kompatibilnosti i provjere dostupnosti.
Br. Dio naziva Dio broja
1 Wi-Fi adapter AN-WUD340
P -
-
V
BACK
EXIT
INFO
Y B T N 1M UT O Y B T N 2MUTOMULTIMEDIA
1 X video i audio
priključni kabel
Daljinski
upravljač
Nero media home CD
Napomena: Nakon kupnje, provjerite pribor. Provjerite
sadrži li isporuka sav pribor.
Hrvatski - 66 -
A02_[HR]_MB70_5112UK_DVBT_C_DLNA_HBBTV_MMH_WIFI_32942LED_GOLD11_10075886_50201414.indd 66A02_[HR]_MB70_5112UK_DVBT_C_DLNA_HBBTV_MMH_WIFI_32942LED_GOLD11_10075886_50201414.indd 66 16.04.2012 14:54:2916.04.2012 14:54:29
Page 68

Informacije o zaštiti okoliša
Ovaj televizor je napravljen tako da troši manje energije i time čuva okoliš. Zahvaljujući funkciji energetske •
učinkovitosti ovog televizora, ne samo što pomažete u očuvanju okoliša već istovremeno štedite novac
smanjujući račune za struju. Kako bi smanjili potrošnju energije, trebate slijediti ove korake:
Možete koristiti postavke moda za štednju energije, koji se nalazi u izborniku Postavke slike. Ako podesite •
mod uštede energije kao Eko, televizor će se prebaciti u mod uštede energije, a razina osvijetljenost televizora
će se smanjiti na optimalnu razinu. Upamtite, kako se neke postavke slike neće moći promijeniti kada je
televizor u modu uštede energija.
Ako podesite mod uštede energije kao Slika isključena, na zaslonu će se prikazati poruka, a pozadinsko •
svjetlo će se ugasiti nakon 3 sekunde. Za ponovnu aktivaciju slike, pritisnite bilo koji gumb na daljinskom
upravljaču.
Za aktivaciju ili deaktivaciju moda uštede energije možete koristiti i MOJ GUMB 1 na daljinskom upravljaču.•
Kad pritisnete MOJ GUMB 1, pojavit će se odgovarajuća zaslonska poruka.
Kada se televizor ne koristi, molimo isključite ga ili isključite televizor iz struje putem glavnog strujnog kabela. •
I to će smanjiti potrošnju energije.
Kada odlazite na duže vrijeme, isključite uređaj iz napajanja.•
Preporuča se aktiviranje postavki moda uštede energije kako biste smanjili godišnju potrošnju struje. Također, •
kada ne koristite uređaj, preporuka je isključiti televizor iz struje putem glavnog strujnog kabela kako biste
smanjili potrošnju struje.
Molimo vas, pomozite nam očuvati okoliš tako što ćete se pridržavati ovih koraka.•
Informacije o popravku
Molimo, servis prepustite kvalifi ciranom osoblju. Samo kvalifi cirano osoblje smije popravljati televizor. Molimo
za daljnje informacije, kontaktirajte vašeg lokalnog prodavača, kod kojeg ste kupili ovaj televizor.
Hrvatski - 67 -
A02_[HR]_MB70_5112UK_DVBT_C_DLNA_HBBTV_MMH_WIFI_32942LED_GOLD11_10075886_50201414.indd 67A02_[HR]_MB70_5112UK_DVBT_C_DLNA_HBBTV_MMH_WIFI_32942LED_GOLD11_10075886_50201414.indd 67 16.04.2012 14:54:3016.04.2012 14:54:30
Page 69

Gumbi na daljinskom upravljaču
Aktive mod Portal (*)1.
Reprodukcija (u modu Preglednika medija) 2.
Snimanje programa3.
Brzo premotavanje unatrag (u modu 4.
Preglednika medija)
Nema funkcije5.
Mono/Stereo - Dual I-II / Trenutni jezik / Prikaži 6.
sažetak (u modu Preglednika medija)
Veličina slike 7.
Teletekst / Miks8.
Elektronički programski vodič9.
Brojčani gumbi10.
AV / Izvor11.
Izbornik uključen/isključen 12.
Program dolje / Stranica gore / Program gore / 13.
Stranica dolje
Povratak na prethodni izbornik. 14.
Zeleni gumb15.
CRVENI gumb16.
Preglednik medija17.
Moj gumb 1: Mod uštede energije Eco/isključen18.
Moj gumb 2 (**)19.
Info / Otkrij (u TXT modu)20.
Plavi gumb21.
Žuta tipka22.
Izlaz (u DTV modu) / Povratak / Stranica s 23.
kazalom (u TXT modu)
OK/Odaberi/Drži (u TXT modu) / Popis kanala24.
Glasnoća gore/dolje25.
Gumbi za navigaciju26.
Prigušeno27.
Prethodi program / Sad (u EPG modu)28.
Samoisključivanje29.
Odabir moda favorita30.
Odabir moda slike / Mijenja mod slike (u video 31.
modu Preglednika medija)
Podnaslov uključen-isključen / TXT podnaslov 32.
(analogni TV mod) / Podnaslov (u modu
Preglednika medija)
Nema funkcije33.
Brzo premotavanje unaprijed (u modu 34.
Preglednika medija)
Stani (u modu Preglednika medija)35.
Pauza / Snimanje uz zadržavanje slike 36.
(timeshift)
Pripravan37.
Uporaba LED svjetla38.
(*) Molimo, za više informacija o tome kako
koristiti daljinski upravljač kod funkcije portal TV
pogledajte odjeljak Portal TV.
Hrvatski - 68 -
INTERNET
SUBTITLE
SCREEN
EPG
4
GHI
7
PQRS
SOURCE
P +
P -
1
MENU
BACK
LANG
TEXT
2
ABC DEF
5
JKL MNO
8
TUV WXYZ
0
Y BTN 1MUTO Y BTN 2MUTOMULTIMEDIA
FAV SLEEP
SWAP
EXIT
PRESETS
3
6
9
V +
V
-
INFO
(**)UPORABA MOG GUMBA 2
Kad ste priključeni na željeni izvor, kanal ili poveznicu,
pritisnite MOJ GUMB 2 na pet sekundi, sve dok
se na zaslonu ne prikaže poruke “MOJ GUMB JE
PODEŠEN”. To je potvrda kako je MOJ GUMB 2
povezan sa odabranim funkcijama.
A02_[HR]_MB70_5112UK_DVBT_C_DLNA_HBBTV_MMH_WIFI_32942LED_GOLD11_10075886_50201414.indd 68A02_[HR]_MB70_5112UK_DVBT_C_DLNA_HBBTV_MMH_WIFI_32942LED_GOLD11_10075886_50201414.indd 68 16.04.2012 14:54:3016.04.2012 14:54:30
Page 70

LCD TV i funkcijski gumbi
POGLED SPRIJEDA I STRAGA Kontrolni gumbi PREGLED Kontrolni gumbi
1.Gumb Pripravan/ Uključen
2. Gumb TV/AV
3. Gumb Program gore/dolje
4. Gumb Glasnoća gore/dolje
Napomena: Pritisnite istovremeno
gumb “
pregled glavnog izbornika.
” i “ ” za
Pregled stražnjih priključaka
SCART 21. ulazi ili izlazi za vanjske uređaje.
SCART 12. ulazi ili izlazi za vanjske uređaje. Spojite SCART kabel između SCART utičnice na televizoru
i SCART utičnice na vanjskom uređaju (dekoder, VCR ili DVD uređaj).
Napomena: Ako se vanjski uređaj spaja preko SCART utičnice, televizor se automatski prebacuje u AV
mod.
Video ulazi komponenti (YPbPr) koriste se za spajanje komponenti videa.3.
Utičnice komponenti videa možete spojiti s uređajem koji ima komponentni izlaz. Spojite video kabele
komponente između VIDEO ULAZA KOMPONENTE na televizoru i video izlaza komponente na
vašem uređaju. Za vrijeme spajanja provjerite odgovaraju li slova “Y”, “Pb”, “Pr” na vašem televizoru,
konektorima na vašem uređaju.
PC/YPbPr audio ulazi koriste se za spajanje audio signala iz osobnog računala ili uređaja koji se spaja 4.
na TV putem YPbPr. Spojite PC audio kabel između AUDIO ULAZA na televizoru i audio izlaza vašeg
osobnog računala radi aktiviranja PC zvuka. Spojite audio kabel između AUDIO ULAZA na televizoru i
audio izlaza vašeg uređaja radi aktiviranja zvuka komponente.
Subwoofer izlaz za povezivanje vanjskog, aktivnog subwoofera na televizor kako bi se dobio dublji 5.
zvuk basa. Koristite odgovarajući RCA kabel za spajanje na subwoofer.
Hrvatski - 69 -
A02_[HR]_MB70_5112UK_DVBT_C_DLNA_HBBTV_MMH_WIFI_32942LED_GOLD11_10075886_50201414.indd 69A02_[HR]_MB70_5112UK_DVBT_C_DLNA_HBBTV_MMH_WIFI_32942LED_GOLD11_10075886_50201414.indd 69 16.04.2012 14:54:3116.04.2012 14:54:31
Page 71

S/PDIF digitalni izlaz šalje digitalne audio signale iz trenutačno gledanog izvora. 6.
Za prijenos audio signala na uređaj koji ima S/PDIF ulaz koristite digitalni optički kabel.
RF ulaz spaja se na krovni ili kabelski antenski sustav.7.
Obratite pažnju na to da ako koristite dekoder ili snimač medija, morate spojiti antenski kabel preko
uređaja na televizor pomoću odgovarajućeg antenskog kabela, kao što je prikazano na slici na
sljedećim stranicama.
HDMI 3: HDMI Ulaz8.
HDMI 2: HDMI Ulaz
HDMI 1: HDMI ulaz
HDMI ulazi služe za spajanje uređaja koji ima HDMI utičnicu. Vaš LCD televizor može prikazivati slike
visoke defi nicije odnosno rezolucije s uređaja kao što je satelitski prijemnik visoke defi nicije ili DVD
uređaj. Te uređaje morate spojiti preko HDMI utičnica ili utičnice komponente. Ove utičnice mogu
primati signale od ili 720p ili 1080p (po izboru). Za spajanje HDMI na HDMI nije potrebno spajanje
zvuka.
PC ulaz služi za spajanje osobnog računala na televizor. 9.
Spojite PC kabel između utičnice PC ULAZA (PC INPUT) na televizoru i PC izlaza (PC output) na
osobnom računalu.
Ulaz za Ethernet (za usluge i internetsko povezivanje)10.
Pregled priključaka – bočni konektori
CI prorez koristi se za umetanje CI kartice. CI kartica omogućuje gledanje svih kanala na koje se 1.
pretplatite. Za više informacija pogledajte odlomak ‘’Uvjetovani pristup’’.
Bočni USB2.
Upamtite kako je funkcija snimanja programa moguća putem ovih USB ulaza. Na ovaj ulaz možete
spojiti vanjski pogon tvrdog diska.
Bočni HDMI ulaz služi za spajanje uređaja koji ima HDMI utičnicu.3.
Utičnica za slušalice koristi se za spajanje vanjske slušalice na sustav. Priključite 4.
SLUŠALICE u odgovarajuću utičnicu kako biste slušali zvuk iz televizora kroz slušalice
(opcija).
Ulaz za bočno audio-video povezivanje koristi za za povezivanje video i audio 5.
signala vanjskih uređaja. Za povezivanje videa, morate koristiti isporučeni priključni
AV kabel koji će omogućiti povezivanje. Najprije umetnite kabel s jednim utikačem u
utičnicu YPbPr televizora (sa strane). Nakon toga, umetnite konektor video kabela
(nije isporučen) u ŽUTI ulaz (smješten na pluralnoj strani) isporučenog AV priključnog
kabela. Boje spojenih utikača moraju međusobno odgovarati.
Kako bi omogućili audio povezivanje, morate koristiti CRVENE i BIJELE ulaza na strani
AV priključnog kabela. Nakon toga, umetnite konektor audio kabela uređaja u CRVENI
i BIJELI utikač na strani dovoda signala AV priključnog kabela. Boje spojenih utikača
moraju međusobno odgovarati.
Napomena: Trebate koristiti audio ulaze na AV priključnom kabelu (CRVENE i BIJELE)
kako bi osigurali zvučno povezivanje prilikom povezivanja uređaja na vaš televizor
putem računala ili ulaza KOMPONENTI VIDEA.
6. , prekidač se koristi za uključivanje i isključivanje televizora.
Hrvatski - 70 -
A02_[HR]_MB70_5112UK_DVBT_C_DLNA_HBBTV_MMH_WIFI_32942LED_GOLD11_10075886_50201414.indd 70A02_[HR]_MB70_5112UK_DVBT_C_DLNA_HBBTV_MMH_WIFI_32942LED_GOLD11_10075886_50201414.indd 70 16.04.2012 14:55:0116.04.2012 14:55:01
6
Page 72

Antenski priključak
Priključak za krovnu/kabelsku antenu
Spojite antenski ili kabelski TV utikač na utičnicu •
za ANTENSKI ULAZ (AERIAL INPUT) na stražnjoj
strani televizora.
Zračna ili
kabelska antena
Uključivanje napajanja
VAŽNO: TV uređaj je namijenjen radu na napajanju
iz utičnice od 220-240V AC, 50 Hz.
Nakon otpakiranja, televizor ostavite da postigne •
sobnu temperaturu prije nego ga priključite na
mrežu. Uključite mrežni kabel u mrežnu utičnicu.
Uporaba USB ulaza
USB spajanje
Možete priključiti USB pogon tvrdog diska ili •
USB memorijski štapić na televizor putem USB
ulaza na televizoru. Ova funkcija omogućava vam
reprodukciju datoteka spremljenih na USB pogonu
ili snimljenih programa.
Podržan je 2,5“ u 3,5“ inčni (hdd s vanjskim •
napajanjem) vanjski pogoni tvrdog diska.
Ako su jedna ili vie particija tvrdog diska exFAT •
formatirani, ipak particije mobu biti vidljive, ako
su formatirane drukim sustavom datoteka od
exFAT-a.
Kako bi snimili program prvo trebate povezati •
USB karticu s vašim TV, za to vrijeme TV mora biti
isključen. Potom, trebate uključiti televizor kako bi
aktivirali funkciju snimanja. U suprotnom, funkcija
snimanja neće biti moguća.
VAŽNO!
Možete napraviti sigurnosne kopije svojih datoteka •
prije ikakvog spajanja na televizor kako ne biste
eventualno izgubili podatke. Upamtite kako
proizvođač ne preuzima odgovornost za oštećenje
ili gubitak podataka.
Moguće je da neke vrste USB uređaja (npr. MP3 •
uređaji) ili pogoni USB tvrdog diska/memorijski
štapići nisu kompatibilni s ovim televizorom.
VAŽNO:Televizor podržava samo formate diska
FAT32 i NTFS. Međ utim, funkcije snimanja ne
podržavaju format NTFS. Za snimanje, ko priključite
USB disk s NTFS formatom, televizor će vas tražiti da
formatirate sadržaj. Za više informacija o formatiranju
diska pogledajte odjeljak “Formatiranje diska” na
sljedećim stranicama.
Hrvatski - 71 -
Ne zaboravite da će SVI podaci spremljeni na USB
disku biti izgubljeni i format diska tada će se prebaciti
u FAT32.
Povezivanje USB diska
• Priključite USB uređaj na USB ulaz televizora.
Napomena: Ukopčajte ili iskopčajte USB disk dok je
televizora isključen.
Napomena: Ako mislite priključiti USB pogon tvrdog
diska na televizor, priključni kabel USB za spajanje
pogona diska i televizora treba imati oznaku USB i
treba biti što kraći.
Napomena: Prilikom formatiranja USB tvrdog diska
kapaciteta 1TB (terabajt) ili više, mogući su problemi
u postupku formatiranja. U tom slučaju, morate
formatirati disk na vašem računalu,a format diska
treba biti FAT32.
BOČNI POGLED USB MEMORIJA
OPREZ!
Naglo uključivanje i isključivanje USB uređaja je •
jako rizičan postupak. Pogotovo, nemojte učestalo
naglo uključivati i isključivati USB pogon. To može
izazvati fi zičko oštećenje USB čitača te samog
USB uređaja.
Tijekom reprodukcije ili snimanja datoteke ne •
uklanjajte USB modul.
Snimanje programa
Kako bi snimili program prvo trebate povezati USB
karticu s vašim TV, za to vrijeme TV mora biti isključen.
Potom, trebate uključiti televizor kako bi aktivirali
funkciju snimanja.
VAŽNO: Prilikom upotrebe novog pogona USB tvrdog
diska preporučuje se da najprije formatirate disk
pomoću opcije ‘’Formatiraj disk’’ vašeg televizora.
Za upotrebu funkcije snimanja, morate spojiti USB •
disk ili vanjski pogon tvrdog diska na televizora i
spojeni USB disk mora imati kapacitet od najmanje
1 GB i brzinsku kompatibilnost od 2.0. Ako priključeni
USB uređaj ne podržava brzinu 2,0, pojavit će se
poruka o grešci.
Napomena: Snimljeni programi spremljeni su na
priključeni USB disk. Ako želite, možete spremiti/
kopirati snimke na računalo, međutim, te datoteke
se neće moći reproducirati na računalu. Snimljeno
možete samo reproducirati na televizoru.
Za više informacija o snimanju programa, pogledajte •
dio „Brzo snimanje“, „Mogućnost zadrške žive slike
pri snimanju”, „Vodič elektroničkog programiranja“,
„Knjižnica snimljenog materijala“ ili „Brojač snimanja“
u sljedećim odjeljcima.
A02_[HR]_MB70_5112UK_DVBT_C_DLNA_HBBTV_MMH_WIFI_32942LED_GOLD11_10075886_50201414.indd 71A02_[HR]_MB70_5112UK_DVBT_C_DLNA_HBBTV_MMH_WIFI_32942LED_GOLD11_10075886_50201414.indd 71 16.04.2012 14:55:2916.04.2012 14:55:29
Page 73

Snimljeni programi podijeljeni su u particije od po
Snimljeni programi podijeljeni su u particije od po
•
4GB.
•
4GB.
Snimljeni programi spremaju se u sljedeći direktorij •
spojenog USB diska: \DVR\RECS. Sve snimke
označene su brojem. Tekstualna (txt) datoteka
kreirana je za svaki snimljeni sadržaj. Ova tekstualna
datoteka sadrži informacije o televizijskoj kući,
programu i trajanju snimanja.
Zadržana slika može se zaustaviti u ovisnosti •
od brzine zapisivanja USB uređaja. Ako brzina
USB uređaja nije dovoljna za brzinu prijenosa
video sadržaja, zadržana slika može se zaustaviti
te snimanje možda neće uspjeti. Ako je brzina
prijenosa HD usluge veća od 13 Mbp/sek, zamrznuta
slika može se pojaviti tijekom zadržavanja slike i kod
USB diska i kod vanjskog HDD uređaja.
Snimanje HD programa može zauzimati više •
prostora na USB disku, što ovisi o rezoluciji
emitiranog programa. Radi toga, za snimanje HD
programa preporuča se koristiti USB pogon tvrdog
diska.
Nemojte isključivati USB/HDD tijekom snimanja. To •
može oštetiti priključeni USB/HDD.
Moguće je podržati multiparticije. Maksimalno su •
podržane dvije različite particije. Ako disk ima više
od dvije particije, može doći do kvara. Prva particija
usb diska koristi se za funkciju PVR spremnosti.
Također, disk treba biti formatiran kao prva particija
za korištenje funkcije PVR spremnosti.
Neki emitirani programi neće se moći snimiti zbog •
problema sa signalom, ponekad se video može
zamrznuti tijekom reprodukcije.
Gumbi Snimanje, Reprodukcija, Pauza, Prikaz (kod •
Okvira popisa izvođenja) ne mogu se koristiti kada je
teletekst UKLJUČEN. Ako snimanje započinje kada
je teletekst UKLJUČEN, teletekst će se automatski
isključiti. Također, teletekst je deaktiviran kada je u
tijeku snimanje ili reprodukcija.
• Snimanje radijskog sadržaja nije podržano.
Televizor može snimati programe u trajanju do •
deset sati.
Za funkciju USB-snimanja (kad se snima HD •
emitirani programi) koristite USB tvrdi disk. USB
memorijski štapić ne može se koristiti za ovu
funkciju.
Bočni HDMI priključak
Za spajanje uređaja koji ima HDMI konektor na vaš
televizor možete koristiti bočni HDMI ulaz. Spajanje
provedite pomoću odgovarajućeg HDMI kabela.
Da biste vidjeli sadržaj iz spojenog uređaja, morate
prebaciti na izvor HDMI. Isključite iz napajanja i
televizor i uređaj prije ikakvog priključivanja. Bočni
HDMI ulaz podržava priključke između HDMI uređaja,
kao što su DVD čitači. Bočni HDMI ulaz televizora
možete koristiti za spajanje na vanjski HDMI uređaj.
Za spajanje koristite HDMI kabel.
HDMI UREĐAJ BOČNI POGLED
Spajanje LCD televizora na
računalo
Ako želite prikazati sliku sa zaslona računala na
LCD televizoru, računalo možete spojiti na televizor.
Isključite iz napajanja i računalo i zaslon prije
bilokakvog priključivanja. Pomoću D-sub zaslonskog
kabela s 15 -pinova spojite računalo na LCD televizor.
Kada je spajanje provedeno, prebacite na PC izvor.
Vidi odlomak “Odabir ulaza”. Odaberite rezoluciju koja
odgovara vašim zahtjevima za gledanje. Informacije
o rezoluciji nalaze se u dodacima.
TV audio ulazi
PC audio kabel
(nije ukljuèen u isporuku)
PC audio izlaz
PC ulaz TV-a
PC VGA kabel
(nije ukljuèen u isporuku)
Izlaz monitora za PC
Hrvatski - 72 -
A02_[HR]_MB70_5112UK_DVBT_C_DLNA_HBBTV_MMH_WIFI_32942LED_GOLD11_10075886_50201414.indd 72A02_[HR]_MB70_5112UK_DVBT_C_DLNA_HBBTV_MMH_WIFI_32942LED_GOLD11_10075886_50201414.indd 72 16.04.2012 14:55:3016.04.2012 14:55:30
Page 74

Spajanje na DVD uređaj
Ako na LCD televizor želite spojiti DVD uređaj, možete
koristiti konektore televizora. DVD uređaji mogu imati
drukčije konektore. Molimo da dodatne informacije
potražite u priručniku s uputama za rad vašeg DVD
uređaja. Isključite iz napajanja i televizor i uređaj prije
ikakvog priključivanja.
Napomena: Kabeli prikazani na slici nisu obuhvaćeni
isporukom.
Ako vaš DVD uređaj ima HDMI utičnicu, možete ga •
spojiti preko HDMI. Kad DVD uređaj spojite kao što
je prikazano na slici, prebacite na HDMI izvor. Vidi
odlomak “Odabir ulaza”.
Većina DVD uređaja spaja se preko UTIČNICA •
KOMPONENTE. Za spajanje video ulaza upotrijebite
video kabel komponente. Za aktiviranje zvuka,
upotrijebite audio kabel komponente kao što je
prikazano na slici. Kada je spajanje provedeno,
prebacite na YPbPr izvor. Vidi odlomak “Odabir
ulaza”.
Također možete ga spojiti preko SCART 1 ili SCART •
2. Upotrijebite SCART kabel kao što je prikazano
dolje.
Napomena: Ova tri načina spajanja imaju istu funkciju
ali se razlikuju po kvaliteti. Nije potrebno spajati na
sva tri načina.
HDMI
Uporaba bočnih AV konektora
Na LCD televizor možete spojiti razne dodatne uređaje
pomoću bočnih konektora na televizoru.
Za spajanje kamkordera ili kamere, morate koristiti •
BOČNU AV utičnicu (sa strane). U tu svrhu morate
upotrijebiti isporučeni video/audio priključni kabel.
Najprije umetnite kabel s jednim utikačem u utičnicu
AV IN na televizoru (sa strane). Nakon toga, umetnite
konektore kabela kamere (nije dio isporuke) u
višestruke utičnice video/audio priključnog kabela.
Boje spojenih utikača moraju međusobno odgovarati.
Vidi sliku dolje.
Nakon toga, prebacite na • AV I N izvor. Dodatne
informacije pronaći ćete u poglavlju Odabir ulaza u
nastavku uputa.
Slušalice
AV priključni
kabel (isporučen)
Da biste slušali zvuk televizora preko slušalica, spojite •
slušalice na televizor pomoću utikača SLUŠALICE kao
što se vidi na slici gore.
Uporaba ostalih konektora
Na vaš LCD televizor možete spojiti razne uređaje po
izboru. Mogućnosti spajanja prikazane su dolje. Kabeli
prikazani na slici nisu obuhvaćeni isporukom.
Za spajanje na uređaj koji ima SPDIF podršku, •
koristite odgovarajući SPDIF kabel za aktiviranje
priključka zvuka.
AV kabel
(nije isporučen)
Kamera
Vanjski zvučnici
Scart utičnice
Video ulazi
komponente
Audio ulazi
komponente
DVD svirač
HDMI ulazi
Uređaj koji
podržava
SPDIF signal.
Hrvatski - 73 -
A02_[HR]_MB70_5112UK_DVBT_C_DLNA_HBBTV_MMH_WIFI_32942LED_GOLD11_10075886_50201414.indd 73A02_[HR]_MB70_5112UK_DVBT_C_DLNA_HBBTV_MMH_WIFI_32942LED_GOLD11_10075886_50201414.indd 73 16.04.2012 14:55:3116.04.2012 14:55:31
Page 75

Žično mrežno povezivanje
Za povezivanje na žičnu LAN mrežu, trebate uraditi sljedeće:
Priključiti širokopojasni ISP ethernet priključni kabel na ETHERNET ULAZ (ETHERNET INPUT) na •
modemu.
Provjerite je li Nero Media Home softver instaliran na računalu (za DLNA funkciju). Za više informacija o •
postupku instalacije pogledajte Dodatak H.
Nakon toga, povežite računala na jedan od LAN konektora modema (npr. LAN 1) pomoću ispravnog LAN •
kabela.
Koristite drugi LAN izlaz modema (npr. LAN 2) za povezivanje televizora. Televizor možete povezati pomoću •
LAN-a tako što ćete povezati LAN ulaz sa stražnje strane televizora na LAN konektor modema, kao što je
prikazano dolje.
Za pristup i reprodukciju dijeljenih datoteka, trebate odabrati preglednik medija. Pritisnite gumb Izbornik te •
odaberite ikonu Preglednik medija pomoću lijevog ili desnog gumba. Za nastavak pritisnite OK. Odaberite
željeni tip datoteke i pritisnite OK. Za pristup i reprodukciju dijeljenih mrežnih datoteka morate uvijek koristiti
zaslon preglednika medija.
PC/HDD/Media Player ili neki drugi uređaj koji je DLNA 1.5 kompatibilan koristiti prilikom žičnog spajanja •
za visoku kvalitetu reprodukcije.
Za konfi guraciju žičnih postavki pogledajte odjeljak Postavke mreže na izborniku Postavke.
Širokopojasna
ISP veza
Računalo s instaliranom
Softverom
Nero Media Home
Lan (Ethernet kabel)
Stražnji dio televizora
Televizor ćete priključiti na LAN mrežu u ovisnosti o konfi guraciji mreže. U tom slučaju, koristite ethernet •
kabel za priključivanje televizora izravno na mrežnu zidnu utičnicu.
Zidni ulaz za
Modem
Stražnji dio televizora
Hrvatski - 74 -
A02_[HR]_MB70_5112UK_DVBT_C_DLNA_HBBTV_MMH_WIFI_32942LED_GOLD11_10075886_50201414.indd 74A02_[HR]_MB70_5112UK_DVBT_C_DLNA_HBBTV_MMH_WIFI_32942LED_GOLD11_10075886_50201414.indd 74 16.04.2012 14:55:3616.04.2012 14:55:36
Page 76

Bežično mrežno povezivanje (opcija)
VAŽNO: “Veezy 100” USB hardverski ključ(prodaje se zasebno) je potreban za korištenje funkcije bežične
mreže.
Kako bi koristili televizor i bežičnu mrežu, treba vam “Veezy 100” bežični USB hardverski ključ. Kako bi vaš
modem bio SSID vidljiv, trebate izmijeniti SSID postavke pomoću softvera modema. Televizor se ne može
spojiti na mreže ako je SSID skriven.
Za povezivanje na bežičnu LAN mrežu, trebate uraditi sljedeće:
Priključiti širokopojasni ISP ethernet priključni kabel na ETHERNET ULAZ (ETHERNET INPUT) na •
modemu.
Provjerite je li Nero Media Home softver instaliran na računalu. (za DLNA funkciju).•
Nakon toga, priključite bežični adapter na jedan od USB ulaza televizora.•
Za konfi guraciju bežičnih postavki pogledajte odjeljak Postavke mreže na izborniku Postavke.
Širokopojasna
ISP veza
Računalo s instaliranom
Softverom
Nero Media Home
USB ulazi (Bočna strana televizora)
Bežični lan
Adapter
Bežični N ruter (IEEE 802.11a/b/g/n) s istodobnim 2,4 i 5 GHz pojasom kreiran je kako bi povećao širinu •
frekvencijskog pojasa. Optimizirano za nesmetan i brz HD video prijenos, prijenos podataka i bežično
igranje igrica.
Koristite LAN priključak za brže prebacivanje datoteke između pojedinih uređaja, kao što su računala.•
Frekvencija i kanali razlikuju se prema područjima.•
Brzina prijenosa razlikuje se s obzirom na udaljenost i broj prepreka između prijenosnih proizvoda, •
konfi guracije tih proizvoda, stanja radio-valova, linijskog prometa i proizvoda koje koristite. Također, prijenos
može biti prekinut ili isključeno zbog stanja radio valova DECT telefona ili drugim WiFi 11b uređajima.
Standardne vrijednosti brzine prijenosa su teoretske maksimalne vrijednosti za bežične standarde. To nisu
stvarne brzine prijenosa podataka.
Lokacije na kojima je prijenos najučinkovitiji ovise o okruženju.•
Bežični LAN adapteri trebaju se izravno priključiti na USB ulaze televizora. USB adapteri nisu podržani.•
Za konfi guracije bežičnih postavki pogledajte wifi odjeljak u izborniku Postavki.•
Bežični LAN adaptor podržava 802.11 a, b, g i n tipove modema. Preporuča se uporaba IEEE 802.11n •
komunikacijskog protokola kako bi se izbjegli mogući problemi tijekom gledanja videa.
Ako imate problema s reprodukcijom zvuka/slike koristite drugi usb ulaz.•
Morate izmijeniti SSID modema, ako u blizini postoje drugi modemi s istim SSID-em. U protivnom možete •
imati probleme s vezom. Ako imate problema s bežičnim povezivanjem, koristite žično povezivanje.
Hrvatski - 75 -
A02_[HR]_MB70_5112UK_DVBT_C_DLNA_HBBTV_MMH_WIFI_32942LED_GOLD11_10075886_50201414.indd 75A02_[HR]_MB70_5112UK_DVBT_C_DLNA_HBBTV_MMH_WIFI_32942LED_GOLD11_10075886_50201414.indd 75 16.04.2012 14:55:3716.04.2012 14:55:37
Page 77

Daljinski upravljač
Umetanje baterija
Skinite poklopac pretinca za baterije na stražnjoj •
strani daljinskog upravljača laganim guranjem prema
natrag u skladu s oznakom.
Unutra umetnite dvije AAA/R3 ili slični tip baterija. •
Prilikom umetanja baterija vodite računa o ispravnom
polaritetu (+/-) i vratite poklopac pretinca za
baterije.
Napomena: Izvadite baterije iz daljinskog upravljača
ako ga ne namjeravate koristiti dulje vrijeme. U
suprotnom, moguće je ošteć enje zbog curenja
baterije. Radni domet iznosi oko 7m/23ft.
Uključivanje/Isključivanje
Uključivanje televizora
Spojite mrežni kabel na utičnicu od 220-240V AC, •
50 Hz.
Prebacite gumb “•
na položaj “|” tako da se televizor prebaci u mod
spremnosti. Upali će se LED svjetlo koja označava
pripravnost za rad.
Za uključivanje televizora iz moda pripravnosti ili:•
Pritisnite gumb “•
na daljinskom upravljaču.
Ili, pritisnite gumb na dodir • -P/CH ili P/CH+ na
televizoru. Televizor će se tada uključiti.
Napomena:
pripravnosti na daljinskom upravljaču, odabrat će se program/
izvor kojeg ste zadnjeg gledali. Televizor će se upaliti i kanal
koji ste zadnjeg gledali će se pojaviti, bez obzira koji ste broj
kanala pritisnuli na daljinskom upravljaču prilikom paljenja
televizora.
Televizor se uključuje na bilo koji od opisanih
načina.
Ako uključite televizor pomoć u gumba
Isključivanje televizora
Prebacite gumb “• ” na položaj 2 kao što je
prikazano,
Za potpuno isključivanje TV uređaja, izvucite •
mrežni kabel iz mrežne utičnice.
” na stražnjoj lijevoj strani
”, P+ / P- ili bilo koji brojčani gumb
a televizor će se tada ISKLJUČITI.
Hrvatski - 76 -
Napomena: Kada se televizor prebaci u mod
pripravnosti, LED svjetlo za mod pripravnosti može
treperiti što znači da je aktivna funkcija poput
Pretraživanje u modu pripravnosti, Bežično učitavanje
ili Tajmer. LED svjetlo može treperiti i kada uključite
televizor iz moda pripravnosti.
Obavijest o pripravnosti
Ako se televizor ugasi dok je u mod bez televizijskog
signala, prilikom idućeg paljenja pojavit će se sljedeća
zaslonska poruka:
Kada istekne vrijeme proisteklo iz funkcije automatsko
gašenje televizora, na zaslonu će se pojaviti sljedeća
poruka. Odaberite Da za gašenje televizora.
Odaberite NE za poništenje. Ako ne odaberete niti
jednu opciju prikazanu na zaslonu, televizor će se
također isključiti.
Ako se televizor ugasi zbog aktivirane funkcije
automatskog gašenja, prilikom idućeg paljenja pojavit
će se sljedeća zaslonska poruka:
Digitalni teletekst (*)
• Pritisnite gumb “ ”.
• Prikazuju se digitalne teletekst informacije.
• Koristite gumbe u boji, gumbe pokazivača te gumb
OK.
Način rada razlikuje se ovisno o sadržaju digitalnog
teleteksta.
Pratite upute prikazane na zaslonu digitalnog
teleteksta.
Kad pritisnete gumb “OK” ili se pojavi slična poruka •
na zaslonu, pritisnite gumb OK.
A02_[HR]_MB70_5112UK_DVBT_C_DLNA_HBBTV_MMH_WIFI_32942LED_GOLD11_10075886_50201414.indd 76A02_[HR]_MB70_5112UK_DVBT_C_DLNA_HBBTV_MMH_WIFI_32942LED_GOLD11_10075886_50201414.indd 76 16.04.2012 14:55:3716.04.2012 14:55:37
Page 78

Kada se pritisne gumb “• ”, televizor se vraća na
normalan način emitiranja.
Kod digitalnog zemaljskog emitiranja (DVB-T), osim •
digitalnog teleteksta emitiranog zajedno s normalnim
emitiranjem, postoje i kanali samo s digitalnim
teletekst emitiranjem.
Omjer slike (oblik slike) tijekom gledanja kanala koji •
ima samo digitalno emitiranje teleteksta isti je kao i
omjer ranije gledane slike.
Ako ponovno pritisnete gumb “•
zaslon s digitalnim teletekstem.
(*) Ako je dostupno u vašoj državi
”, prikazat će se
Analogni teletekst
Korištenje teleteksta i njegovih funkcija identično je
onome kod sustava analognog teksta. Za objašnjenja
pogledajte “TELETEKST”.
Odabir ulaza
Nakon što ste na televizor spojili vanjske sustave,
možete ga prebaciti na različite izvore ulaza. Pritisnite
gumb “SOURCE” na daljinskom upravljaču za izravnu
promjenu izvora.
*
(*) Opcija za AV I N izvor prebacit će se za uređaj
povezan putem bočnog AV priključka.
Radom televizora možete upravljati i pomoću daljinskog
upravljača i pomoću gumba na televizoru.
Rukovanje gumbima na televizoru
Podešavanje glasnoće
Pritisnite gumb “• ” za smanjivanje glasnoće ili
gumb za povećanje glasnoće; tada će se na
zaslonu pojaviti klizač s prikazom jačine glasnoće.
Odabir programa
Pritisnite gumb “• P/CH +”za odabir sljedećeg
programa ili “P/CH -” za odabir prethodnog
programa.
Hrvatski - 77 -
Pregled glavnog izbornika
Pritisnite istovremeno gumbe “• ”/“ ” za
pregled glavnog izbornika. U glavnom izborniku
odaberite podizbornik pomoću gumba “AV” i
postavite taj podizbornik pomoću gumba “ ” ili
“
”. U poglavljima o sustavu izbornika možete
saznati više o upotrebi izbornika.
AV mod
Pritisnite gumb “AV” na upravljačkoj ploči televizora •
za prebacivanje s jednog AV moda na drugi.
Rukovanje daljinskim upravljačem
Daljinski upravljač vašeg televizora namijenjen je za •
upravljanje funkcijama odabranog modela. Funkcije
su opisane u skladu sa sustavom izbornika vašeg
televizora.
Podešavanje glasnoće
Pritisnite gumb “• V+” za povećanje glasnoće.
Pritisnite gumb “V-” za smanjenje glasnoće. Na
zaslonu će se pojaviti klizač s prikazom jačine
glasnoće.
Odabir programa (prethodni ili sljedeći
program)
Pritisnite gumb “• P-” za odabir prethodnog
programa.
Pritisnite gumb “• P+” za odabir sljedeć eg
programa.
Odabir programa (izravan pristup)
Pritisnite brojčane gumbe na daljinskom upravljaču •
za odabir programa između 0 i 9. Televizor se
prebacuje na odabrani program. Za odabir ostalih
programa, pritisnite uzastopno brojčane gumbe.
Ako je isteklo vrijeme za pritisak drugog brojčanog
gumba, prikazat će se program prve brojke.
Pritisnite izravno broj programa da biste ponovno
odabrali program s jednoznamenkastim brojem.
Napomena: Ako je pozadina prozirna, zaslonske
poruke će također biti lagano prozirne.
Elektronički programski vodič
(EPG)
Za informacije o raspoloživim programima možete
pogledati elektronički programski vodič (EPG). Za
pregled EPG izbornika pritisnite EPG gumb na
daljinskom upravljaču.
Pritisnite gumbe “•
kanala.
Pritisnite “•
programa.
EPG izbornik prikazuje raspoložive informacije na •
svim kanalima.
”/“ ” gumbe za navigaciju popisom
”/“ ” za kretanje između
A02_[HR]_MB70_5112UK_DVBT_C_DLNA_HBBTV_MMH_WIFI_32942LED_GOLD11_10075886_50201414.indd 77A02_[HR]_MB70_5112UK_DVBT_C_DLNA_HBBTV_MMH_WIFI_32942LED_GOLD11_10075886_50201414.indd 77 16.04.2012 14:55:3816.04.2012 14:55:38
Page 79

Molimo da uzmete u obzir da se informacije o •
događajima obnavljaju automatski. Ako na kanalima
nema dostupnih podataka s informacijama o
događajima, EPG će biti prikazan s prazninama.
OK (nije obvezatno): Pokazuje/snima ili postavlja
tajmer za buduće programe.
INFO (Detalji): Za detaljan prikaz programa.
Zeleni gumb: Pokazati će se raspored programa
Žuti gumb: Prikazati će se EPG podaci u skladu s
vremenskim rasporedom
Plavi gumb (Filtar): Prikazuje opcije fi ltriranja.
(SNIMANJE): televizor počinje snimati odabrani
program. Možete ponovno pritisnuti gumb za
zaustavljanje snimanja.
—EPG popis rasporeda—
Crveni gumb (Prethodni vremenski
odsječak):Prikazuje programe prethodnog
vremenskog odsječka.
Zeleni gumb (Sljedeći vremenski odsječak):
Prikazuje programe sljedećeg vremenskog
odsječka.
Žuti gumb (Preth. dan): Prikazuje programe
prethodnog dana.
Plavi gumb (Sljedeći dan): Prikazuje programe
sljedećeg dana.
Tekstni gumb (Filtar): Prikazuje opcije fi ltriranja.
Brojčani gumbi (Skok): Pomak na željeni kanal
izravno pomoću brojčanih gumba.
OK (nije obvezatno): Pokazuje/snima ili postavlja
tajmer za buduće programe.
Hrvatski - 78 -
INFO (Detalji): Za detaljan prikaz programa.
(SNIMANJE): televizor počinje snimati odabrani
program. Možete ponovno pritisnuti gumb za
zaustavljanje snimanja.
—Vremenski rasporeda—
Crveni gumb (Preth. dan). Prikazuje programe
prethodnog dana.
Zeleni gumb (Sljedeći dan): Prikazuje programe
sljedećeg dana.
Žuti gumb (Zumiranje): Proširene informacije o
programu.
Plavi gumb (Filtar): Prikazuje opcije fi ltriranja.
INFO (Detalji): Za detaljan prikaz programa.
Brojčani gumbi (Skok): Pomak na željeni kanal
izravno pomoću brojčanih gumba.
OK (nije obvezatno): Pokazuje/snima ili postavlja
tajmer za buduće programe.
Tekst (Traži): Prikazuje izbornik “Pretraživanje
vodiča”.
PODNASLOV: Pritisnite gumb SUBTITLE kako bi
vidjeli izbornik Izaberi žanr. Pomoću ove funkcije
možete pretraživati bazu podataka programskog
vodiča u skladu s odabranim žanrom. Pretražuju se
informacije dostupne u programskom vodiču i navode
se rezultati koji odgovaraju vašim kriterijima.
(Sada): Prikazuje aktualni program.
(SNIMANJE): televizor počinje snimati odabrani
program. Možete ponovno pritisnuti gumb za
zaustavljanje snimanja.
Snimanje putem EPG okvira
VAŽNO: Kako bi snimili program prvo trebate povezati
USB karticu s vašim TV, za to vrijeme TV mora biti
isključen. Potom, trebate uključiti televizor kako bi
aktivirali funkciju snimanja. U suprotnom, funkcija
snimanja neće biti moguća.
(SNIMANJE): televizor počinje snimati odabrani
program. Možete ponovno pritisnuti gumb za
zaustavljanje snimanja.
Napomena: Prebacivanje na drugi kanal ili izvor nije
moguće tijekom snimanja.
A02_[HR]_MB70_5112UK_DVBT_C_DLNA_HBBTV_MMH_WIFI_32942LED_GOLD11_10075886_50201414.indd 78A02_[HR]_MB70_5112UK_DVBT_C_DLNA_HBBTV_MMH_WIFI_32942LED_GOLD11_10075886_50201414.indd 78 16.04.2012 14:55:3916.04.2012 14:55:39
Page 80

/ : Stranica lijevo / Stranica desno.
Opcije programa
U EPG izborniku, pritisnite gumb OK za otvaranje
izbornika ‘’Opcije događaja’’.
Odaberi kanal
U EPG izborniku upotreba ove opcije omogućuje
prebacivanje na odabrani kanal.
Snimi / Briši tajmer snimanja
VAŽNO: Kako bi snimili program prvo trebate povezati
USB karticu s vašim TV, za to vrijeme TV mora biti
isključen. Potom, trebate uključiti televizor kako bi
aktivirali funkciju snimanja. U suprotnom, funkcija
snimanja neće biti moguća.
Nakon što ste u EPG izborniku odabrali program, •
pritisnite OK i prikazat će se zaslon s Opcijama.
Odaberite stavku “Snimanje” i pritisnite OK.
Nakon toga, snimanje je postavljeno za odabrani
program.
Za poništavanje već postavljenog snimanja, označite •
program i pritisnite OKpa odaberite opciju “Briši
snimanje. Tajmer”. Snimanje će se otkazati.
Napomena: Tijekom aktivnog snimanja na aktualnom
kanalu, nije moguće prebacivanje na neki drugi kanal
ili izvor.
Postavi tajmer / Briši tajmer
Nakon što ste u EPG izborniku odabrali program,
pritisnite OK i prikazat će se zaslon s Opcijama.
Odaberite stavku “Postavi tajmer događaja” i pritisnite
gumb OK. Možete postaviti tajmer za buduće
programe.
Za poništavanje već postavljenog tajmera, označite
program i pritisnite OK. Zatim odaberite opciju “Briši
tajmer”. Snimanje će se otkazati.
Napomena: Nije moguće snimati ili postaviti tajmer za
dva ili više pojedinačna događaja u istom vremenskom
intervalu.
Prva instalacija
VAŽNO: Provjerite jesu li zračna ili kabelska
antena povezana te da modul uobičajenog sučelja
nije umetnut, prije paljenja televizora prilikom
prve instalacije.
Tijekom postupka pretraživanja ne umećite modul
uobičajenog sučelja.
Kad televizor radi po prvi put, kroz instalaciju vas •
vodi pomoćnik za instalaciju. Najprije se prikaže
zaslon za odabir jezika.
Pomoću gumba • “ ” ili “ ” odaberite svoj jezik i
pritisnite OK za postavljanje odabranog jezika pa
nastavite dalje.
Nakon odabira jezika, pojavit će se zaslon •
“Dobrodošli!”, od Vas će se tada dražiti podešavanje
opcija Država, Način pretraživanja, Jezik teleteksta,
Pretraživanje kodiranih kanala i Mod trgovine .
Pritiskom gumba “• ” ili “ ” odaberite državu koju
želite postaviti te pritisnite gumb “ ” za označavanje
opcije Način pretraživanja. Za odabir željenog
načina pretraživanja koristite gumbe “ ” ili “ ”.
Dostupne vrste pretraživanja su samo digitalni,
samo analogni televizijski kanali i sve.
Kad to podesite, pritisnite “•
teleteksta. Za odabir željenog Jezika teleteksta
pritisnite gumb “ ” ili “ ”.
Opciju moda prikazivanja u trgovini možete aktivirati •
pomoću “
u trgovini podešen na “aktivirano”, opcija E-Pop
bit će dostupna u izborniku ostalih postavki. Ako
je podešen na “deaktivirano”, mod prikazivanja u
trgovini neće biti dostupan nakon prve instalacije.
Napomena: Ako je mod prikazivanja u trgovini aktiviran,
to može utjecati na neke funkcije televizora.
Pritisnite gumb “•
za Jezik teleteksta. Tada će se označiti pretraživanje
kodiranih kanala. Za pretraživanje kodiranih kanala
možete odabrati Da, ako želite pretraživati kodirane
stanice.
” ili “ ” gumba. Ako je mod prikazivanja
” nakon što ste podesili mogućnosti
” za odabir Jezika
Hrvatski - 79 -
A02_[HR]_MB70_5112UK_DVBT_C_DLNA_HBBTV_MMH_WIFI_32942LED_GOLD11_10075886_50201414.indd 79A02_[HR]_MB70_5112UK_DVBT_C_DLNA_HBBTV_MMH_WIFI_32942LED_GOLD11_10075886_50201414.indd 79 16.04.2012 14:55:4016.04.2012 14:55:40
Page 81

Za nastavak pritisnite OK na daljinskom upravljaču, •
a na zaslonu se prikazuje sljedeća poruka:
Ako odaberete opciju KABELSKA i za nastavak
pritisnite OK na daljinskom upravljaču, na zaslonu se
prikazuje sljedeća poruka:
Za nastavak odaberite DA i pritisnite OK. Za poništenje
postupka, odaberite NE i pritisnite OK.
Napomena: Pritisnite gumb “IZBORNIK” ako želite
poništiti postupak.
Završetak procesa pretraživanja, pojavit će se zaslon
izbornika Odaberi regiju (ako su pronađeni višestruki
izbori za regiju). Molimo, odaberite državu i regiju te
pritisnite OK za nastavak.
Kada su sve dostupne postaje spremljene, na •
zaslonu će se prikazati Popis kanala. Ako želite
sortirati kanale, prema LCN-u, molimo odaberite
“Da”, a zatim pritisnite “OK”..
Na ovom zaslonu možete odabrati frekvencijski
raspon. Za označavanje redaka koristite gumb “ ” ili
“ ”. Frekvencijski raspon možete unijeti i ručno putem
numeričkih gumba na daljinskom upravljaču. Postavite
željenu početnu i završnu frekvenciju korištenjem
brojčanih gumba na daljinskom upravljaču. Nakon
ovog postupka, možete postaviti Korak pretrage kao
8000 KHz ili 1000KHz. Ako odaberete 1000 KHz,
televizor će obaviti detaljno pretraživanje. Zbog toga
će se produžiti vrijeme pretraživanja. Po završetku,
pritisnite gumb OK za pokretanje automatskog
pretraživanja.
Ako na zaslonu Vrsta pretraživanja odaberete opciju
KROVNA ANTENA, televizor će pretraživati digitalne
zemaljske i analogne televizijske programe.
Hrvatski - 80 -
A02_[HR]_MB70_5112UK_DVBT_C_DLNA_HBBTV_MMH_WIFI_32942LED_GOLD11_10075886_50201414.indd 80A02_[HR]_MB70_5112UK_DVBT_C_DLNA_HBBTV_MMH_WIFI_32942LED_GOLD11_10075886_50201414.indd 80 16.04.2012 14:55:4116.04.2012 14:55:41
Pritisnite OK da biste izašli iz popisa kanala i gledali •
televiziju.
Automatsko podešavanje
SAVJET: Funkcija automatskog podešavanja pomaže
vam da ponovno podesite TV uređaj kako biste mogli
spremiti nove servise ili kanale.
Pritisnite gumb “IZBORNIK” na daljinskom upravljaču
te odaberite Instalaciju korištenjem “
Pritisnite gumb OK, pa će se prikazati sljedeći zaslon
izbornika.
” ili “ ” gumba.
Page 82

Odaberite Automatsko pretraživanje kanala (Ponovno
podešavanje) pomoću gumba “ ”/“ ” te pritisnite
gumb OK. Prikazat će se opcije automatsko
skeniranje kanala (Ponovno podešavanje). Opcije
možete odabrati pritiskom na gumbe “ ”/“ ” ili OK.
Izbornik za automatsko pretraživanje
kanala
Digitalna zračna antena: Pretražuje i pohranjuje
zračne DVB stanice.
Digitalna kabelska antena: Pretražuje i sprema
kabelske DVB kanale.
Analogni: Pretražuje i pohranjuje analogne stanice.
Digitalna zračna i analogna: Pretražuje i sprema i
analogne i zračne digitalne kanale.
Digitalna kabelska i analogna:Pretražuje i pohranjuje
obje vrste, analogne i kabelske DVB kanale.
Uvijek kada odaberete automatsko pretraživanje •
i pritisnete gumb OK , prikazat će se zaslon za
potvrđivanje. Za pokretanje postupka instalacije,
odaberite Da, za otkazivanje odaberite Ne pomoću
gumba “
Nakon postavljanja i potvrđivanja automatskog •
pretraživanja kanala, pokreće se postupak instalacije
i traka odvijanja postupka se pomiče. Za poništenje
pritisnite gumb “IZBORNIK”. U tom slučaju,
zaključani kanali neće biti pohranjeni.
” ili “ ” i OK.
Ručno podešavanje
SAVJET: Ova funkcija može se koristiti za izravan
unos kanala.
Odaberite Ručno podešavanje kanala s Instalacijskog •
izbornika pomoću gumba “ ”/“ ” i OK. Prikazat će
se zaslon s opcijama ručnog pretraživanja.
Odaberite željenu Vrstu pretraživanjapomoću •
gumba “
mijenjaju se u skladu s tim. Pritisnite “ ”/“ ” gumb
i označite neku stavku i zatim je postavite pomoću
gumba “ ” or “ ”. Pritisnite gumb “IZBORNIK” ako
želite poništiti postupak.
Ručno traženje digitalne antene
Kod ručnog pretraživanja kanala, broj multipleksa
unosi se ručno i kanali se pretražuju samo u tom
multipleksu. Nakon što ste kao tip pretrage odbrali
” ili “ ”. Opcije ručnog pretraživanja
Hrvatski - 81 -
digitalno-zračnu, trebate odabrati i željeni pojas i
tek tada možete pomoću numeričkih gumba unijeti
multipleks ili broj frekvencije te pritisnite gumb OK
za pretraživanje.
Opcije pojasa:
D_Band (D_pojas) = VHF 9-24
S_Band (S_pojas) = VHF 12-20, UHF 21-41
K_Band (K_pojas) = VHF 5-12, UHF 21-69
Ručno traženje digitalne kabelske antene
Kod ručnog pretraživanja kabelskih programa, možete
unijeti modulaciju frekvencije, brzinu signalizacije i
opcije pretraživanja kanala na mreži. Nakon odabira
tipa pretrage kao Digitalno kabelske, možete postaviti
željene opcije i pritisnuti gumb OK za pretraživanje.
Ručno analogno pretraživanje
Nakon odabira analogne vrste pretraživanja, pritisnite
gumb “ ”/“ ” i označite neku stavku i zatim je
postavite pomoću gumba “ ” ili “ ”.
Unesite broj kanala ili frekvencije uporabom brojčanih
gumba. Za pretragu možete pritisnuti gumb OK.
Nakon lociranja kanala, svi novi kanali koji nisu na
popisu će se spremiti.
Pretraživanje mrežnih kanala
Odaberite Pretraživanje mrežnih kanala na
instalacijskom izborniku pomoću gumba “ ” ili “
” i OK. Pojavit će se zaslon za odabir pretraživanja
mrežnih kanala. Odaberite digitalnu ili digitalnokabelsku antenu i pritisnite gumb OK za nastavak.
Pojavit će se sljedeće pitanje. Odaberite Da za
nastavak, a Ne za poništenje.
A02_[HR]_MB70_5112UK_DVBT_C_DLNA_HBBTV_MMH_WIFI_32942LED_GOLD11_10075886_50201414.indd 81A02_[HR]_MB70_5112UK_DVBT_C_DLNA_HBBTV_MMH_WIFI_32942LED_GOLD11_10075886_50201414.indd 81 16.04.2012 14:55:4216.04.2012 14:55:42
Page 83

Ako počnete pretragu digitalnih zračnih kanala,
započet će automatsko pretraživanje. Pritisnite gumb
“IZBORNIK” ako želite poništiti postupak.
Ako počnete pretraživanje digitalno-kabelskih kanala,
pojavit će se sljedeći zaslon.
Na ovom zaslonu možete odabrati frekvencijski
raspon. Za označavanje redaka koristite gumb “ ” ili
“ ”. Frekvencijski raspon možete unijeti i ručno putem
numeričkih gumba na daljinskom upravljaču. Postavite
željenu početnu i završnu frekvenciju korištenjem
brojčanih gumba na daljinskom upravljaču. Nakon
ovog postupka, možete postaviti Korak pretrage kao
8000 KHz ili 1000KHz. Ako odaberete 1000 KHz,
televizor će obaviti detaljno pretraživanje. Zbog toga
će se produžiti vrijeme pretraživanja. Po završetku,
pritisnite gumb OK za pokretanje automatskog
pretraživanja. Tijekom tog postupka bit će prikazan
zaslon za automatsko pretraživanje.
Napomena: Ako odaberete veći razmak između
početka i kraja frekvencijskog područja, automatsko
pretraživanje trajat će duže.
Analogno fi no podešavanje
Odaberite Analogno fino podešavanjena •
instalacijskom izborniku pomoću gumba “ ” ili “
” i OK. Prikazat će se zaslon analognog fi nog
podešavanja. Funkcija analognog fi nog podešavanja
neće biti dostupna ako nema spremljenih analognih
kanala, digitalnih kanala i vanjskih izvora.
Pritisnite OK za nastavak. Za odabir stavke Fino •
podešavanje pritisnite gumb “
gotovi, pritisnite ponovo gumb OK.
” ili “ ”. Kad budete
Prva instalacija
Ako želite izbrisati sve kanale i postavke odaberite
Prvu instalaciju i pritisnite OK. Memorija televizora će
se izbrisati, a započet će postupak instalacije.
Briši popis usluga (*)
(*) Ova postavka vidljiva je samo ako se opcija Država
podesi na Dansku, Švedsku, Norvešku ili Finsku.
Pomoću ove postavke izbrišite spremljene kanale.
Pritisnite gumb “
popis servisa (Clear Service List) i zatim pritisnite
OK. Na zaslonu se prikaže sljedeća zaslonska (OSD)
poruka:
Odaberite DA i pritisnite OK za nastavak ili odaberite
NE i pritisnite OK za poništenje.
” ili “ ” da odaberete stavku Briši
Upravljanje postajama: Popis
kanala
Televizor sortira sve spremljene postaje u Popis
kanala. Pomoću opcija Popis kanala možete uređivati
popis kanala, postaviti favorite ili aktivne stanice koje
će se pojaviti na popisu.
Pritisnite gumb “IZBORNIK” za otvaranje glavnog •
izbornika. Odaberite stavku Popis kanala pomoću
gumba “
izbornika.
Odabir aktivne mreže je funkcija koja vam omogućava
odabir programa koje emitira samo odabrana
mreža.
Odaberite Uredi popis kanala za upravljanje svim
spremljenim kanalima. Pomoću gumba “
OK odaberite stavku Uredi popis kanala.
Vrste popisa kanala
Možete podesiti funkciju vrste popisa kanala za prikaz
željenih vrsta dostupnih kanala.
” ili “ ”. Pritisnite OK za pregled sadržaja
” ili “ ” i
Hrvatski - 82 -
A02_[HR]_MB70_5112UK_DVBT_C_DLNA_HBBTV_MMH_WIFI_32942LED_GOLD11_10075886_50201414.indd 82A02_[HR]_MB70_5112UK_DVBT_C_DLNA_HBBTV_MMH_WIFI_32942LED_GOLD11_10075886_50201414.indd 82 16.04.2012 14:55:4416.04.2012 14:55:44
Page 84

CRVENI: Prikazuje samo digitalne zračne i analogno
emitirane programe.
ZELENI: Prikazuje samo digitalne kabelske i analogno
emitirane programe.
OK:Gledajte odabrane programe.
IZBORNIK:Izlaz
PLAVI:Prikazuje opcije fi ltriranja.
Rukovanje popisomkanala
Pritisnite gume “• ” ili “ ” za odabir kanala koji ćete
koristiti. Pritisnite gumb “ ” ili “ ” za odabir funkcije
u izborniku Popisa kanala.
Koristite gumbe • P+/P- za pomicanje stranica gore
ili dolje.
Pritisnite PLAVI gumb za pregled opcija fi ltriranja.•
Za izlaz, pritisnite gumb “• MENU”.
Napomena: Na popisu kanala, navedeni kanali su
izmiješani. Vrste kanala mogu se razlikovati prema
ikonici koja se nalazi uz njih: DTV (digitalna tv), HD
(HD TV), ATV (analogna Tv), TV (TV), RD (radio),
kodirani, zaključani i popis favorita.
Popisani kanali mogu se, također, sortirati pomoću
fi ltra popisa aktivnih kanala.
Premještanje kanala
Najprije odaberite željeni kanal. Odaberite opciju •
Premjesti na popisu kanala i pritisnite OK.
Prikazat će se zaslon Uredi broj. Unesite broj •
željenog kanala uporabom brojčanih gumba na
daljinskom upravljaču. Ako postoji već unesen
Hrvatski - 83 -
kanal s tim brojem, pojavit će se poruka upozorenja.
Odaberite Da, ako želite premjestiti kanal i zatim
pritisnite OK.
Pritisnite OK za izvršenje. Odabrani kanal je sada •
prebačen.
Brisanje kanala
Pomoću ZELENOG gumba možete staviti/skinuti
oznaku svim kanalima; pomoću ŽUTOG gumba to
možete učiniti za jedan kanal.
Odaberite kanal koji želite brisati i odaberite opciju •
Briši. Za nastavak pritisnite gumb OK.
Prikazat će se zaslon s upozorenjem. Odaberite •
DA za brisanje, a Ne za poništenje. Za nastavak
pritisnite gumb OK.
Mijenjanje imena kanala
Odaberite kanal koji želite preimenovati i odaberite •
opciju Uredi ime. Za nastavak pritisnite gumb OK.
Pomoću gumba “•
sljedeći znak. Pomoću gumba “ ” ili “ ” aktualno
slovo/znak se mijenja, tj. ‘b’ postaje ‘a’ pomoću “ ”
a ‘c’ pomoću “ ”. Pritiskanje brojčanih gumba ‘0...9’
mijenja označeni znak sa znakom ispred guba, jedan
po jadan kako se gumb pritišće.
Po završetku pritisnite OK za spremanje. Pritisnite •
“IZBORNIK” za poništavanje.
” ili “ ” pomičete se na prethodni/
Zaključavanje kanala
Pomoću ZELENOG gumba možete staviti/skinuti
oznaku svim kanalima; pomoću ŽUTOG gumba to
možete učiniti za jedan kanal.
Odaberite kanal koji želite blokirati i odaberite opciju •
Zaključaj. Za nastavak pritisnite gumb OK.
Traži se unos PIN-a kontrole pristupa. Zadane •
vrijednosti PIN-a postavljene su na 0000. Unesite
broj PIN-a.
Pritisnite OK kada se označi željeni kanal da biste ga •
blokirali/deblokirali. Zaključani simbol bit će prikazan
do odabranog kanala.
Filtar popisa kanala
Prema želji može se podesiti opcija fi ltriranja popisa
kanala. Koristite fi ltar za podešavanje kanala kao
samo televizijski, samo radijski ili samo tekstualni. Ako
kodirani kanali nisu na popisu, možete ih besplatno
podesiti pomoću funkcije CAS/besplatno. Možete
skočiti na određeni kanal pomoću opcija A-Z. Kanale
možete sortirati po abecedi pomoću opcije Sortiraj.
Kanale možete podesiti prema vašim željama
uporabom svih ovih funkcija.
A02_[HR]_MB70_5112UK_DVBT_C_DLNA_HBBTV_MMH_WIFI_32942LED_GOLD11_10075886_50201414.indd 83A02_[HR]_MB70_5112UK_DVBT_C_DLNA_HBBTV_MMH_WIFI_32942LED_GOLD11_10075886_50201414.indd 83 16.04.2012 14:55:4416.04.2012 14:55:44
Page 85

Upravljanje postajama: Favoriti
Možete kreirati popis favorit programa.
Pritisnite gumb “IZBORNIK” za otvaranje glavnog •
izbornika. Odaberite stavku Popis kanala pomoću
gumba “
izbornika.
Odaberite stavku Favoriti za upravljanje popisom •
favorita. Pomoću gumba “ ”/“ ” i OK odaberite
stavku Favoriti.
Razne kanale možete podesiti kao favorite tako •
da se navigacija obavlja samo među omiljenim
kanalima.
” ili “ ”. Pritisnite OK za pregled sadržaja
Upravljanje postajama:
Sortiranje Popisa kanala
Možete odabrati servise koji će biti navedeni na popisu
kanala. Za prikaz određene vrste servisa tj. emitiranja,
morate koristiti postavku Aktivnog popisa kanala.
Odaberite Aktivni popis kanala na izborniku Popis
kanala pomoću gumba “
pritisnite gumb OK.
” ili “ ”. Za nastavak
Odaberite kanal pomoću gumba “• ” ili “ ”. Pritisnite
OK i dodajte odabrani kanal popisu favorita. Pritisnite
ponovno OK radi uklanjanja.
Funkcije gumba
OK: • Dodaje/uklanja postaju.
ŽUTI: • Stavlja/skida oznaku pojedinom kanalu.
ZELENI:• Stavlja/skida oznaku svim kanalima.
PLAVI: • Prikazuje opcije fi ltriranja.
Kad je kanal dodan na popis favorita, a vrijeme
gledanja televizora možete pritisnuti FAV gumb
za kretanja po omiljenim kanalima pomoću gumba
P+/P-.
Za ponovno kretanje po kanalima pritisnite FAV gumb
još jednom.
Napomena: Na popisu kanala uvijek će se prikazati
svi kanali.
Možete odabrati aktivan popis kanala na popisu
pomoću gumba “
Vrsta emitiranih programa (opcija): Kada postavite
željenu vrstu emitiranja pomoću gumba “
će prikazati relevantni popis kanala. Ako relevantni
izvor nema nijedan spremljeni kanal, na zaslonu
će se prikazati poruka “Za ovu vrstu nije pronađen
nijedan kanal.”.
”/“ ” i OK.
” ili “ ”, TV
Zaslonske informacije
Za prikazivanje informacija na zaslonu, pritisnite gumb
“INFO”. Pojedinosti o postaji i aktualnom programu
prikazat će se u informativnom okviru.
Informativni okvir daje informacije o odabranom kanalu
i programu koji se na njemu emitira. Prikazano je ime
kanala kao i pripadajući broj na popisu kanala.
Savjet: Ne emitiraju svi kanali podatke o programima.
Ako nema imena i vremena programa, informativni
okvir bit će prikazan s prazninama.
Ako je odabrani kanal zaključan, morate upisati točan
četveroznamenkasti ključ za gledanje tog kanala
(zadani kod je 0000). “U tom slučaju na zaslonu se
prikaže poruka Unesite PIN”.
Hrvatski - 84 -
A02_[HR]_MB70_5112UK_DVBT_C_DLNA_HBBTV_MMH_WIFI_32942LED_GOLD11_10075886_50201414.indd 84A02_[HR]_MB70_5112UK_DVBT_C_DLNA_HBBTV_MMH_WIFI_32942LED_GOLD11_10075886_50201414.indd 84 16.04.2012 14:55:4516.04.2012 14:55:45
Page 86

Reprodukcija medija pomoću
preglednika medija
Ako USB memorijski štapić nije prepoznat nakon
paljenja/gašenja ili prve instalacije, prvo isključite
USB uređaj i izvucite ga van, a zatim ugasite/upalite
televizor. Ponovo uključite USB uređaj.
Za prikaz prozora Preglednik medija, pritisnite
“IZBORNIK”na daljinskom upravljaču i zatim odaberite
Preglednik medija pomoću gumba “
nastavak pritisnite gumb OK. Prikazat će se opcije
izbornika Preglednik medija.
Također, kada priključite USB uređaj, automatski
će se prikazati zaslon preglednika medija:
Moguće je reproducirati glazbene, slikovne i video
datoteke s USB memorije. Pomoću gumba “ ” ili “ ”
odaberite Video, Fotografi je, Glazbu, Arhivu snimanja
ili Postavke.
Možete spojiti dva USB uređaja na vaš televizor. Ako
oba USB uređaja sadržavaju glazbu, sliku ili videa,
pojavit će se zaslonski prikaz za USB odabir. USB
uređaj koji je spojen prvi na televizor bit će nazvan
USB Drive1.
” ili “ ”. Za
Gledanje videa preko USB-a
Kada s opcija izbornika odaberete stavku Video,
dostupne video datoteke će se fi ltrirati i zatim navesti
na zaslonu. Za odabir video datoteke možete koristiti
gumb “ ” ili “ ” i zatim pritisnite OK za reproduciranje.
Ako odaberete datoteku s podnaslovom i pritisnete
gumb OK, možete odabrati ili poništiti odabir te
datoteke s podnaslovom. Tijekom reproduciranja
video datoteke prikazat će se sljedeći izbornik:
Reproduciranje (gumb ):Pokreće video
reprodukciju.
Stani (
Pauza (
Natrag (
Naprijed ( gumb): Premotaj naprijed.
Podnaslov/Audio (gumb LANG.): Postavlja
podnaslov/audio.
Žuti: Otvara izbornik za ispravak vremena
podnaslova
gumb): Zaustavlja video reprodukciju.
gumb): Prekida video reprodukciju.
gumb): Premotaj unatrag.
Pritisnite gumb BACK za vraćanje na prethodni
Odaberite uređaj pomoću gumba “ ” ili “ ”, a zatim
pritisnite OK.
Hrvatski - 85 -
A02_[HR]_MB70_5112UK_DVBT_C_DLNA_HBBTV_MMH_WIFI_32942LED_GOLD11_10075886_50201414.indd 85A02_[HR]_MB70_5112UK_DVBT_C_DLNA_HBBTV_MMH_WIFI_32942LED_GOLD11_10075886_50201414.indd 85 16.04.2012 14:55:4616.04.2012 14:55:46
izbornik.
Page 87

Pregled fotografi ja pomoću USB-a
Kada s opcija izbornika odaberete stavku Fotografi je,
dostupne slikovne datoteke će se fi ltrirati i zatim
navesti na zaslonu.
Reprodukcija glazbe pomoću USB-a
Kada s opcija izbornika odaberete stavku Glazba,
dostupne audio datoteke će se fi ltrirati i zatim navesti
na zaslonu.
Skok (brojčani gumbi): Pomak na odabranu
datoteku pomoću brojčanih gumba.
OK: Prikaz odabrane slike u punom zaslonu.
Slike u nizu (
nizu za sve slike.
CRVENI: Sortira datoteke po datumu.
ZELENI: Prikaz malih sličica.
PLAVI:Prebacuje između glazbe, fotografi ja, videa i
svega navedenog.
ŽUTA:Mijenja način pregleda
gumb): Pokreće prikazivanje slika u
Opcije za prikaz slika u nizu
Pauza ( gumb): Prekida prikazivanje slika.
Nastavi (
nizu.
Prethodna/sljedeća(gumbi lijevo/desno): Pomak
na prethodnu ili sljedeću datoteku za prikazivanje
slika u nizu.
Okreni (gumbi gore/dolje): Okreće sliku pomoću
gumba gore/dolje.
Petlja/Nasumce (ZELENI gumb): Pritisnite jedanput
za deaktiviranje Petlje. Pritisnite ponovno za
deaktiviranje i Petlje i funkcije Nasumce. Pritisnite još
jednom kako bi samo deaktivirali funkciju Nasumce.
Pritisnite ponovno za aktiviranje svih funkcija.
Isključene funkcije možete pratiti na osnovu promjene
ikona.
BACK (Izlaz): Povratak na popis datoteka.
INFO: Prikazuje zaslon za pomoć.
gumb) : Nastavlja prikazivanje slika u
0..9 (Skok):Kad pritisnete brojčani gumb prikazuje se
pretraga tekstualnih datoteka.
Reproduciraj ovo (gumb OK) : Reproducira se
odabrana datoteka.
Reproduciranje (
datoteke medija počevši od odabrane datoteke.
Stani (
Pauza (
reprodukcija.
Prethodna/sljedeća(gumbi lijevo/desno): Pomak
na prethodnu ili sljedeću datoteku za reprodukciju.
CRVENI: Sortira datoteke prema naslovu, izvođaču
ili albumu.
Petlja/Nasumce (ZELENI gumb): Pritisnite jedanput
za deaktiviranje Petlje. Pritisnite ponovno za
deaktiviranje i Petlje i funkcije Nasumce. Pritisnite još
jednom kako bi samo deaktivirali funkciju Nasumce.
Pritisnite ponovno za aktiviranje svih funkcija.
Isključene funkcije možete pratiti na osnovu promjene
ikona.
Napomena:
Ako pokrenete reprodukciju pomoću
aktivirate
glazbenu/video datoteku. Reprodukcija će se nastaviti
po redu i kad dođe do kraja popisa, ponovno će
započeti od početka (funkcija petlje).
Ako reprodukciju pokrećete pomoću gumba OK i
aktivirate
ista glazbena ili video datoteka (funkcija
ponavljanja).
Ako reprodukciju pokrećete pomoću
i aktivirate
se nasumično reproducirati.
Ako reprodukciju pokrećete pomoću
i aktivirate ,
datoteka će se nasumično nastaviti te će se nastaviti
i nasumična reprodukcija.
gumb): Zaustavlja reprodukciju.
gumb): Reproduciraju se sve
gumb): Prekida se odabrana
gumba i
simbol, televizor će reproducirati iduću
simbol, reproducirati će se neprekidno
ili gumba OK
simbol, glazbena ili video datoteka će
ili gumba OK
, simbole, glazbena ili video
Hrvatski - 86 -
A02_[HR]_MB70_5112UK_DVBT_C_DLNA_HBBTV_MMH_WIFI_32942LED_GOLD11_10075886_50201414.indd 86A02_[HR]_MB70_5112UK_DVBT_C_DLNA_HBBTV_MMH_WIFI_32942LED_GOLD11_10075886_50201414.indd 86 16.04.2012 14:55:4716.04.2012 14:55:47
Page 88

ŽUTA: Mijenja način pregleda
PLAVI: Prebacuje između glazbe, fotografi ja, videa i
svega navedenog.
Arhiva snimanja
Za odabir Preglednika medija u glavnom izborniku
koristite gumbe “ ” ili “ ”. Označite stavku u Arhivi
snimanja pomoću gumba “
gumb OK za ulaz. Prikazat će se Arhiva snimanja.
VAŽNO: Za pregled arhive snimanja, najprije spojite
USB disk na isključeni prijemnik. Potom, trebate
uključiti televizor kako bi aktivirali funkciju snimanja. U
suprotnom, funkcija snimanja neće biti moguća.
Odaberite neku snimljenu stavku s popisa (ako je
prethodno snimljena) gumbom “ ” / “ ”. Pritisnite
gumb OK za pregled Opcija reprodukcije. Opcije
možete odabrati pritiskom na gumbe “ ” / “ ” ili
OK.
Moguće opcije reprodukcije:
• Reproduciraj od početka: Reproducira snimljeni
zapis od početka.
• Nastavak: Ponovno počinje sa snimanjem.
• Reproduciraj od pomaka: Određuje mjesto od kojeg
kreće reprodukcija.
Napomena: Tijekom reprodukcije nije moguć pregled
glavnog izbornika i stavki izbornika.
” ili “ ”, a zatim pritisnite
Hrvatski - 87 -
Pritisnite gumb (STANI) za zaustavljanje
reprodukcije i povratak u Arhivu snimanja.
Polako naprijed
Ako pritisnete gumb
snimljenog programa, funkcija polako unaprijed može
se koristiti. Za funkciju polako unaprijed možete
koristiti gumb. Uzastopnim pritiskanjem gumba
možete promijeniti brzinu funkcije sporo unaprijed.
(PAUZA) tijekom gledanja
Postavke Preglednika Medija
Željene postavke Preglednika medija možete postaviti
pomoću dijaloga Postavke. Pritisnite gumb “ ” ili “
” i označite jednu stavku i zatim je postavite pomoću
gumba “ ” ili “ ”.
Način pregleda: Postavlja zadani mod preglednika.
Glazba FF/FR Brzina: Glazba FF/FR Brzina:
Interval prikazivanja slika u nizu: Postavlja vrijeme
intervala prikazivanja slika u nizu.
Pokaži podnaslov: Postavlja željenu postavku
aktiviranja podnaslova.
Jezik podnaslova: Postavlja jezik podnaslova.
Položaj podnaslova: Postavlja gornji ili donji položaj
podnaslova.
Veličina znakova podnaslova:Postavlja veličinu
znakova podnaslova (maks. 54 pt).
Snimanje zadržane žive slike
VAŽNO: Kako bi snimili program prvo trebate povezati
USB karticu s vašim TV, za to vrijeme TV mora biti
isključen. Potom, trebate uključiti televizor kako bi
aktivirali funkciju snimanja. U suprotnom, funkcija
snimanja neće biti moguća.
• Pritisnite gumb
program kako biste se prebacili u mod zadržane
žive slike.
• U modu zadržane žive slike, emitirani program
je zadržan i istovremeno se snima na priključenu
USB karticu (*). Pritisnite ponovno gumb
(REPRODUCIRAJ) za gledanje zadržanog emitiranog
programa od trenutka kada ste ga zaustavili.
(PAUZA) dok gledate emitirani
A02_[HR]_MB70_5112UK_DVBT_C_DLNA_HBBTV_MMH_WIFI_32942LED_GOLD11_10075886_50201414.indd 87A02_[HR]_MB70_5112UK_DVBT_C_DLNA_HBBTV_MMH_WIFI_32942LED_GOLD11_10075886_50201414.indd 87 16.04.2012 14:55:4816.04.2012 14:55:48
Page 89

• Reprodukcija se odvija pri x1 brzini reprodukcije.
Vidjet ćete jaz između zadržane i stvarne slike, a u
info traci program zadržane slike.
• S gumbima
krećite se naprijed ili natrag pri reprodukciji zadržane
slike. Kada je završeno s zadržavanjem slike, mod
zadržane slike će se napustiti te će se programi
prebaciti na gledanje normalo emitiranih programa.
• Pritisnite gumb
zadržane slike.
(*) Trajanje usporednog snimanja zadržane slike ovisi
o veličini priključene USB kartice i defi niranom maks.
zadržane slike u izborniku Postavki za snimanje. Za
više informacija o maks. zadržanoj slici pogledajte
dio “Snimanje“.
Napomena: Tijekom zadržavanja slike nije moguće
prebacivanje na drugi kanal ili izvor, te pregled glavnog
izbornika.
Kod zadržane slike može se pojaviti odstupanje kod
sinkronizacije glasa i mimike.
Gumb pripravnosti je zanemaren tijekom prikaza
zadržane slike. Televizor se neće prebaciti u mod
pripravnosti tijekom prikaza zadržane slike.
/ (PRETHODNI/SLJEDEĆ I)
(STANI) za napuštanje moda
Trenutačno snimanje
VAŽNO: Kako bi snimili program prvo trebate povezati
USB karticu s vašim TV, za to vrijeme TV mora biti
isključen. Potom, trebate uključiti televizor kako bi
aktivirali funkciju snimanja. U suprotnom, funkcija
snimanja neće biti moguća.
• Pritisnite gumb
pokretanje snimanja programa za vrijeme gledanja
programa. Na zaslonu će se pojaviti sljedeća
poruka:
(SNIMANJE) za trenutačno
Za otkazivanje trenutačnog snimanja pritisnite gumb
(STANI). Prikazat će se sljedeći zaslonski prikaz:
Odaberite Da gumbima “ ” ili “ ” / OK za otkazivanje
trenutačnog snimanja.
Napomena: Tijekom snimanja nije moguće
prebacivanje na drugi kanal i gledanje preglednika
medija.
Gledanje snimljenih programa
Za odabir Preglednika medija u glavnom izborniku
koristite gumbe “ ” ili “ ”. Označite stavku u Arhivi
snimanja pomoću gumba “ ” ili “ ”, a zatim pritisnite
gumb OK za ulaz. Prikazat će se Arhiva snimanja.
VAŽNO: Za pregled arhive snimanja, najprije spojite
USB disk na isključeni prijemnik. Potom, trebate
uključiti televizor kako bi aktivirali funkciju snimanja. U
suprotnom, funkcija snimanja neće biti moguća.
• Tada će se nakratko prikazati zaslonski prikaz
snimanja a aktualni program će se snimati.
• Možete ponovno pritisnuti gumb
na daljinskom upravljaču radi snimanja sljedećeg
događaja na elektroničkom programskom vodiču. U
tom slučaju, zaslonski prikaz će prikazati programirane
stavke za snimanje.
A02_[HR]_MB70_5112UK_DVBT_C_DLNA_HBBTV_MMH_WIFI_32942LED_GOLD11_10075886_50201414.indd 88A02_[HR]_MB70_5112UK_DVBT_C_DLNA_HBBTV_MMH_WIFI_32942LED_GOLD11_10075886_50201414.indd 88 16.04.2012 14:55:4916.04.2012 14:55:49
(SNIMANJE)
Odaberite neku snimljenu stavku s popisa (ako je
prethodno snimljena) gumbom “ ” / “ ”. Pritisnite
gumb OK za pregled Opcija reprodukcije. Opcije
možete odabrati pritiskom na gumbe “ ” / “ ” ili
OK.
Hrvatski - 88 -
Page 90

Moguće opcije reprodukcije:
• Reproduciraj od početka: Reproducira snimljeni
zapis od početka.
• Nastavak: Ponovno počinje sa snimanjem.
• Reproduciraj od pomaka: Određuje mjesto od kojeg
kreće reprodukcija.
Napomena: Tijekom reprodukcije nije moguć pregled
glavnog izbornika i stavki izbornika.
Pritisnite gumb
reprodukcije i povratak u Arhivu snimanja.
Polako naprijed
Ako pritisnete gumb
snimljenog programa, funkcija polako unaprijed
može se koristiti. Za funkciju polako unaprijed možete
koristiti gumb. Uzastopnim pritiskanjem gumba
možete promijeniti brzinu funkcije sporo unaprijed.
(STANI) za zaustavljanje
(PAUZA) tijekom gledanja
Bežično povezivanje
VAŽNO: “Veezy 100” USB hardverski ključ(prodaje se
zasebno) je potreban za korištenje funkcije bežične
mreže. Kako bi koristili televizor i bežičnu mrežu, treba
vam “Veezy 100” bežični USB hardverski ključ.
Molimo, umetnite Wi-Fi hardverski ključ u jedan od •
USB ulaza na televizoru.
Odaberite Postavke mreže na izborniku Postavke.•
Pritisnite ŽUTI gumb za početak pretraživanja •
raspoloživih bežičnih mreža. Ako se pronađu
bežične mreže, pojavit će se na popisu.
Molimo, odaberite željenu mrežu s popisa. Ako je •
odabrana mreža zaštićena lozinkom, molimo unesite
ispravnu lozinku pomoću virtualne tipkovnice. Ovu
tipkovnicu možete koristiti pomoću navigacijskih
gumba (lijevo/desno/gore/dolje) i gumba OK na
daljinskom upravljaču.
Korištenje DLNA mrežnih usluga
Informacije
DLNA (Digital Living Network Alliance) je standard
koji olakšava uporabu digitalne elektronike i
pojednostavljuje je za uporabu u kućanstvima. Za
više informacija, posjetite www.dlna.org.
DLNA standard omogućava pregled i reprodukciju
fotografi ja, slika i videa memoriranih na DLNA medija
severu povezanom s vašom kućnom mrežom.
Korak 1: Instalacija Nero Media Home
DLNA funkcija ne može se koristiti ako program
poslužitelj nije instaliran na vašem računalu. Molimo,
instalirajte Nero Media Home program na računalo.
Za više informacija o instalaciji, molimo pogledajte
dodatak H.
Korak 2: Žično ili bežično mrežno
povezivanje
Žično povezivanje
Priključite mrežni LAN kabel na ETHERNET ULAZ •
na televizoru. Provjerite jesu li ispravno izvršene
pripreme poslužitelja medija, priključaka i postavki
mreže(pogledajte odjeljak Postavke mreže za više
informacija).
Hrvatski - 89 -
Pričekajte dok se IP adresa ne prikaže na zaslonu. •
To znački kako je veza uspostavljena.
Za detaljne informacije o konfi guraciji, pogledajte
odjeljak Postavke mreže. Za testiranje internetske
brzine možete pritisnuti PLAVI gumb.
Korak 3: Reproduciranje zajedničkih
datoteka pomoću preglednika medija
Odaberite Preglednik medija pomoću Lijevog ili •
desnog gumba na glavnom izborniku i pritisnite
gumb OK. Preglednik medija će se prikazati.
DLNA je podržana samo s modom mapa preglednika •
medija. Za aktiviranje moda mape, idite na oznaku
Postavke na glavnom zaslonu preglednika medija i
pritisnite OK. U opcijama postavki, označite Način
pregleda i promijenite ga u Mapa pomoću gumba
lijevo ili desno.
Molimo, odaberite željeni tip medija i pritisnite OK•
A02_[HR]_MB70_5112UK_DVBT_C_DLNA_HBBTV_MMH_WIFI_32942LED_GOLD11_10075886_50201414.indd 89A02_[HR]_MB70_5112UK_DVBT_C_DLNA_HBBTV_MMH_WIFI_32942LED_GOLD11_10075886_50201414.indd 89 16.04.2012 14:55:5016.04.2012 14:55:50
Page 91

Ako su zajedničke konfi guracije ispravno podešene, •
nakon odabira željenog tipa medija pojavit će se
sljedeća zaslonska (OSD) poruka. Odaberite OK
za prikaz željene mreže ili sadržaja USB memorije.
Ako želite osvježiti popis uređaja, pritisnite ZELENI
gumb. Pritisnite IZBORNIK za izlaz.
Ako su pronađene dostupne mreže, bit će prikazane •
na zaslonu.
Odaberite medijski poslužitelj ili mrežu na koju se •
želite priključiti pomoću gumba “
gumb OK.
Ako kao tip medija odaberete Video i odaberete •
uređaj s izbornika odabira, na zaslonu će se pojaviti
novi zaslon izbornika, kao što je prikazano dolje:
” ili “ ” te pritisnite
Za reprodukciju drugog tipa medija s ovog zaslona, •
morate se vratiti na glavni zaslon preglednika medija
i odabrati tip medija kao odabrani, te zatim ponovno
odabrati mrežu (vidi korak 3).
Za više informacija o reprodukciji datoteka pogledajte •
odjeljak USB reprodukcija preglednika medija.
Ako gledate vidao s mreže preko DLNA datoteke •
podnaslova neće funkcionirati.
Na istu mrežu možete povezati samo jedan televizor •
pomoću DLNA.
Ako je pojavi problem s DLNA mrežom, molimo •
uključite/isključite televizor.
DLNA funkcija ne podržava mod skoka i posebnih •
efekata.
OPREZ:
Na nekim računalima DLNA funkcija neće se moći •
koristiti zbog postavki administratora i sigurnosti.
(kao što su poslovna računala).
Za najbolji prijenos podataka kućne mreže ovog •
televizora, treba instalirati isporučeni Nero softver.
Kod funkcije kućnog poslužitelja, podržana su samo •
računala s WINDOWS 7 operativnim sustavom.
Kako bi promijene bile dostupne, ponovno pokrenite •
računalo nakon objavljivanja medijskih datoteka za
funkciju dlna poslužitelja.
Povezivanje s mobilnim telefonom putem
WiFi-ja (opcija)
Ako vaš mobilni telefon ima WiFi funkciju, možete •
povezati vaš mobilni telefon na televizor pomoću
WiFi priključka pomoću usmjerivača te reproducirati
sadržaj na vaš telefon. Kako bi to bilo moguće, vaš
mobitel treba imati odgovarajući zajednički softver.
Spojite se na usmjerivač sljedeći korake navedene •
u odjeljku bežično povezivanje.
Nakon toga, aktivirajte vaš mobilni telefon preko •
usmjerivača i aktivirajte zajednički softver na
mobilnom telefonu. Potom, odaberite datoteke koje
želite podijeliti s televizorom.
Ako je veza ispravno uspostavljena, sad trebate •
moći dijeliti datoteke s vašeg mobilnog telefona
putem preglednika medija na televizoru.
Uđite u izbornik preglednika medija, tad će se pojaviti •
zaslonska (OSD) poruka o odabranom uređaju za
reprodukciju. Odaberite ident mobilnog telefona i
pritisnite OK za nastavak.
Napomena: Ovu funkciju možda ne podržavaju neki
mobilni telefoni.
Odaberite Videa na zaslonu kako bi se prikazale sve •
raspoložive video datoteke odabrane mreže.
Hrvatski - 90 -
A02_[HR]_MB70_5112UK_DVBT_C_DLNA_HBBTV_MMH_WIFI_32942LED_GOLD11_10075886_50201414.indd 90A02_[HR]_MB70_5112UK_DVBT_C_DLNA_HBBTV_MMH_WIFI_32942LED_GOLD11_10075886_50201414.indd 90 16.04.2012 14:55:5016.04.2012 14:55:50
Page 92

Promjena veličine slike: Formati
slike
Programi se mogu gledati u različitim formatima •
slike, ovisno o primanom prijenosu.
Možete promijeniti omjer slike (veličinu slike) •
televizora za gledanje slike u različitim modovima
zumiranja.
Pritisnite gumb “• SCREEN” više puta da biste
promijenili veličinu slike. Dostupni modovi zumiranja
navedeni su u nastavku.
Auto
Kada je odabrana opcija AUTO, omjer zaslona
se podešava na temelju informacija dobivenih od
odabranog izvora (ako je dostupno)
Format prikazan u AUTO modu je potpuno nezavisan
od WSS informacija, koje mogu biti dio emitiranog
signala ili signala vanjskog uređaja.
Napomena: Auto mod dostupan je samo kod HDMI,
YPbPr i DTV izvora.
16:9
Omogućuje ravnomjerno rastezanje normalne slike
ulijevo i udesno (omjer slike 4:3) kako bi se popunio
široki TV zaslon.
14:9
Za povećanje široke slike (omjer 14:9) do gornjih i
donjih granica zaslona.
Zumiranje 14:9
Ova opcija omogućava zumiranje slike u omjer
14:9.
4:3
Koristite za gledanje normalne slike (omjer 4:3) budući
da je to njen originalni oblik.
Za slike s omjerom 16:9 koje su stisnute u normalnu •
sliku (omjer 4:3), koristite mod 16:9 za vraćanje
originalnog oblika slike.
Podnaslov
Za povećanje široke slike (omjer 16:9) s podnaslovima
u puni zaslon.
Napomena: Možete se pomicati po zaslonu goredolje pomoću gumba “ ” / “ ” ako je zumiranje slike
odabrano kao Zumiranje 14:9, Kino ili Podnaslov.
Hrvatski - 91 -
A02_[HR]_MB70_5112UK_DVBT_C_DLNA_HBBTV_MMH_WIFI_32942LED_GOLD11_10075886_50201414.indd 91A02_[HR]_MB70_5112UK_DVBT_C_DLNA_HBBTV_MMH_WIFI_32942LED_GOLD11_10075886_50201414.indd 91 16.04.2012 14:55:5116.04.2012 14:55:51
Kino
Za povećanje široke slike (omjer 16:9) u puni
zaslon.
Page 93

Konfi guriranje postavki slike
Možete koristiti različite detaljne postavke slike.
Pritisnite gumb “IZBORNIK” i odaberite ikonu slike
pomoću gumba “
izbornika Postavke slike.
Stavke izbornika Postavke radne slike
Označite pojedinu stavku izbornika pomoću gumba •
“ ” ili “ ”.
Pomoću gumba “•
Za izlaz, pritisnite gumb “IZBORNIK” .•
Stavke izbornika Postavke slike
Mod: Možete postaviti opciju moda u skladu s vašim
zahtjevima. Mod slike može se postaviti kao jednu od
ovih opcija: Kino,Igra,Dinamičan i Prirodno.
Kontrast: Podešava vrijednosti osvjetljenja i potamnjenja
ekrana.
Osvjetljenje: Postavlja vrijednosti osvjetljenja ekrana.
Oštrina: Podešava vrijednosti oštrine prikaza objekata
koji se vide na ekranu.
Boja: Postavlja vrijednosti boje, prilagođavajući ih.
Mod uštede energije : Pomoću gumba “
odaberite mod uštede energije. Pritisnite gumb “ ” ili “
”za podešavanje moda uštede energije na Eko, Slika
isključena ili Deaktivirano. Pogledajte dio “Informacije o
zaštiti okoliša” u ovom priručniku za daljnje informacije
o modu uštede energije.
Pozadinsko svjetlo: Ova postavka upravlja razinom
pozadinskog svjetla i može je se podesiti na Nisku,
Srednju, Visoku i Auto.
Smanjenje šuma: Ako je emitirani signal slab i slika ima
šumove, smanjite šum pomoću postavke Smanjenje
šuma. Redukcija šuma može se postaviti kao jedna od
ovih opcija: Niska, srednja, visoka ili isključeno.
” ili “ ”. Pritisnite OK za otvaranje
” ili “ ” postavite stavku.
” ili “ ”
Napredne postavke
Napredne postavke podesite pomoću gumba “
”.
Dinamički kontrast: Možete izmijenit razinu kontrasta
pomoću funkcije dinamičkog kontrasta. Dinamički
kontrast može se postaviti kao jedna od ovih opcija:
Niska, Srednja, Visoka ili Isključeno.
Temperatura boje: Postavlja željeni ton boje.
Zumiranje slike:Postavlja veličinu slike na Auto,16:9,
Podnaslov,14:9, 14:9 Zum, 4:3 ili Kino.
HDMI istinski crno: Tijekom gledanja iz HDMI izvora,
ova funkcija je vidljiva na izborniku Postavke slike. Ovu
funkciju možete koristiti za pojačavanje zatamnjenja
slike. Ovu funkciju možete postaviti kao “Uključeno” za
aktiviranje HDMI istinski crno moda.
Napomena: Isključite/uključite funkciju HDMI istinski
crno samo kad je izlaz HDMI uređaja podešen na
RGB.
Mod fi lma: Filmovi su snimljeni s različitim brojem
kadrova po sekundi u usporedbi s običnim televizijskim
programima. Pritisnite gumb “
Film. Pritisnite gumbe “ ” ili “ ” kako bi ovu funkciju
podesili na Auto ili Isključeno. Uključite ovu funkciju kada
gledate fi lmove da biste jasno vidjeli brze scene.
Boja kože: Prilagođava željenu boju kože
Promjena boje: Prilagođava željenu nijansu boje.
RGB pojačanje: Pomoću funkcije RGB pojačanja
možete konfi gurirati vrijednosti temperature boje.
Resetiranje: Resetira postavke slike na tvornički zadane
vrijednosti.
Dok je aktivan VGA (PC) mod, pojedine stavke u
izborniku Slika neće biti dostupne. Umjesto toga,
postavke moda VGA dodat će se postavkama slike u
računalnom modu.
” ili “ ” za odabir Moda
” ili “
Hrvatski - 92 -
A02_[HR]_MB70_5112UK_DVBT_C_DLNA_HBBTV_MMH_WIFI_32942LED_GOLD11_10075886_50201414.indd 92A02_[HR]_MB70_5112UK_DVBT_C_DLNA_HBBTV_MMH_WIFI_32942LED_GOLD11_10075886_50201414.indd 92 16.04.2012 14:55:5116.04.2012 14:55:51
Page 94

Postavke za računalnu sliku
Za podešavanje stavki računalne slike, uradite
sljedeće:
Za odabir ikone Slika pritisnite gumb “
zaslonu će se pojaviti izbornik slike.
Podešavanja Kontrasta, Osvjetljenja, Boje,Temperature
boje, Zuma slike i ostalih postavki u ovom izborniku
ista su kao i podešavanja defi nirana u izborniku za
TV sliku pod ‘’Sustav glavnog izbornika“.
Postavke Zvuka, Postavki i Izvora identične su
postavkama objašnjenima u poglavlju sustav glavnog
izbornika.
PC položaj: Odaberite ovo za prikaz stavki izbornika
za položaj računala.
Autopoložaj: Automatski optimizira prikaz. Pritisnite
OK za optimizaciju.
H položaj: Ova stavka sliku pomiče vodoravno
udesno ili ulijevo na zaslonu.
V položaj: Ova stavka pomiče sliku okomito prema
gore ili dolje na zaslonu.
Dot Clock - Uklanjanje okomitih smetnji:
Prilagođavanje uklanjanja okomitih crta (Dot Clock)
ispravlja smetnje koje se javljaju kao okomite crte u
prezentacijama s dosta crta kao što su radni listovi,
odjeljci ili tekst s malim slovima.
Faza: Ovisno o rezoluciji i frekvenciji pretraživanja
koje ste unijeli u televizor, slika na zaslonu može biti
nejasna ili imati šumove. U tom slučaju možete koristiti
ovu stavku kako biste dobili čistu sliku po principu
metode pogodaka i promašaja.
” ili “ ”. Na
Konfi guriranje postavki zvuka
Postavke zvuka mogu se konfi gurirati prema vašim
osobnim preferencijama
Pritisnite gumb “IZBORNIK” i odaberite ikonu zvuka
pomoću gumba “
pregled izbornika Postavke zvuka.
Stavke izbornika postavki radnog zvuka
Označite pojedinu stavku izbornika pomoću gumba •
“ ” ili “ ”.
Pomoću gumba “•
Za izlaz, pritisnite gumb “IZBORNIK”.•
Stavke izbornika Postavke zvuka
Glasnoća: Prilagodite razinu glasnoće.
Ekvalizator: Pritisnite gumb OK za pregled pod-
izbornika ekvalizatora.
” ili “ ”. Pritisnite gumb OK za
” ili “ ” postavite stavku.
U izborniku ekvalizatora, postojeća podešavanja
mogu se izmijeniti u Glazba, Film, Govor, Ravno,
Klasično i Korisnička. Pritisnite “IZBORNIK” za
povratak na prethodni izbornik.
Napomena: Izbornik postavki ekvalizatora može se
ručno mijenjati kada je Ekvalizator mod podešen na
korisnika.
Balans: Ova postavka se koristi kako bi se naglasio
balans lijevog ili desnog zvučnika.
Hrvatski - 93 -
A02_[HR]_MB70_5112UK_DVBT_C_DLNA_HBBTV_MMH_WIFI_32942LED_GOLD11_10075886_50201414.indd 93A02_[HR]_MB70_5112UK_DVBT_C_DLNA_HBBTV_MMH_WIFI_32942LED_GOLD11_10075886_50201414.indd 93 16.04.2012 14:55:5216.04.2012 14:55:52
Page 95

Slušalice: Podešava glasnoću u slušalicama.
Mod zvuka: Možete odabrati Mono, Stereo, Dual I
ili Dual II mod, ali samo ako odabrani kanal podržava
dotični mod.
AVL: Funkcija automatskog ograničavanja glasnoće
(AVL) podešava zvuk kako bi se dobivala ista jačina
zvuka kod različitih programa (na primjer, glasnoća
kod promidžbenih poruka obično je veća nego kod
drugih emisija).
Slušalice/izlaz za slušalice (lineout): Prilikom
priključivanja vanjskog pojačala na vaš televizor
pomoću ulaza za slušalice, ovu opciju možete podesiti
kao Lineout. Ako ste na televizor priključili slušalice,
ovu opciju podesite kao Slušalice.
Digitalni izlaz: Postavlja tip vanjskog digitalnog
audio signala.
Konfi guriranje postavki vašeg
televizora
Detaljne postavke mogu se konfi gurirati prema vašim
osobnim preferencijama
Pritisnite gumb “IZBORNIK” i odaberite ikonu
Postavke pomoću gumba “
OK za pregled izbornika Postavki.
Stavke izbornika Radnih postavki
Označite pojedinu stavku izbornika pomoću gumba •
“ ” ili “ ”.
Pritisnite gumb OK i odaberite stavku. •
Za izlaz, pritisnite gumb “IZBORNIK”.•
Stavke izbornika Postavke
Uvjetovani pristup: Kontrolira modul uvjetnog
pristupa kada postoji.
JEZIK: Konfi gurira jezične postavke.
” ili “ ”. Pritisnite gumb
Roditeljski: Konfigurira postavke roditeljske
kontrole.
Tajmeri: Podešava tajmere za odabrane programe.
Datum/Vrijeme: Podešava datum i vrijeme.
Izvori: Omogućava ili onemogućava odabrane opcije
izvora.
Postavke televizijske mreže: U okviru Mreže postavke
možete podesiti tip mreže za svoj televizor.
Ostale postavke: Prikazuje opcije drugih postavki
za televizor.
Korištenje modula za uvjetni
pristup
VAŽNO: Umetnite ili uklonite CI modul samo kada
je televizor ISKLJUČEN.
Da biste mogli gledati određene digitalne kanale, •
potreban je modul za uvjetovani pristup (CAM).
Ovaj modul morate umetnuti u CI otvor na vašem
televizoru.
Nabavite Modul za uvjetovani pristup (CAM) i karticu •
za gledanje tako da se pretplatite na televizijsku kuću
koja emitira program uz plaćanje, zatim ih umetnite
u televizor na sljedeći način.
Umetnite CAM, i zatim karticu za gledanje u prorez •
na poklopcu na stražnjoj strani televizora.
CAM treba postaviti pravilno, ne može ući do kraja •
ako se okrene naopako. CAM ili televizijski terminal
mogu se oštetiti ako ih pokušate ugurati na silu.
Uključite televizor u strujnu utičnicu, upalite ga i
pričekajte par trenutaka kako bi se kartica aktivirala.
Ako se modul ne umetne, na zaslonu se pojavi •
poruka ‘’Modul zajedničkog sučelja nije otkriven’’.
Detalje potražite u priručniku s uputama za modul.•
Pregled izbornika uvjetnog pristupa (*)
(*) Postavke ovog izbornika mogu se promijeniti što
ovisi o pružatelju usluga.
Pritisnite gumb “IZBORNIK” i odaberite ikonu
pomoću gumba “
pregled izbornika Postavki. Pomoću gumba “ ” ili “ ”
označite Uvjetovani pristup i pritisnite OK za pregled
stavki izbornika.
” ili “ ”. Pritisnite gumb OK za
Hrvatski - 94 -
A02_[HR]_MB70_5112UK_DVBT_C_DLNA_HBBTV_MMH_WIFI_32942LED_GOLD11_10075886_50201414.indd 94A02_[HR]_MB70_5112UK_DVBT_C_DLNA_HBBTV_MMH_WIFI_32942LED_GOLD11_10075886_50201414.indd 94 16.04.2012 14:55:5316.04.2012 14:55:53
Page 96

Konfi guriranje željenih jezičnih
postavki
Pomoću ovog izbornika možete upravljati jezičnim
postavkama televizora.
Pritisnite gumb “IZBORNIK” i odaberite ikonu
Postavke pomoću gumba “
OK za pregled izbornika Postavki. Pomoću gumba
” ili “ ” označite stavku Jezik i pritisnite OK za
“
nastavak:
Pomoću gumba “ ” ili “ ” postavite stavku. Postavke
se spremaju automatski.
Izbornik: prikazuje jezik sustava.
Preferirane postavke
Ove se postavke mogu koristiti samo ako su
dostupne. U suprotnom slučaju, koristit će se trenutne
postavke.
Audio: • Postavlja željeni audio jezik.
Podnaslovi: • Postavlja jezik podnaslova. Odabrani
jezik vidi se u podnaslovima.
Teletekst: • Postavlja jezik teleteksta.
Vodič: • Postavlja željeni jezik Vodiča.
Trenutne postavke (*)
(*) Ove postavke mogu se promijeniti samo ako
televizijske kuće koje emitiraju programe to podržavaju.
U suprotnom, postavke se ne mogu promijeniti.
Audio:• Odaberite audio jezik za trenutno izabrani
kanal.
Podnaslovi: • Postavlja jezik podnaslova za trenutno
izabrani kanal.
Napomena: Ako se pod opcijom Država odabere
Danska, Švedska, Norveška ili Finska, izbornik
Postavke jezika funkcionirat će na sljedeći način:
” ili “ ”. Pritisnite gumb
Postavke jezika
U izborniku Postavke označite stavku Postavke jezika
pomoću gumba “ ” ili “ ”’. Pritisnite OK i na zaslonu
će se prikazati podizbornik Postavke jezika:
Pomoću gumba “
koju ćete podešavati i zatim pritisnite gumb “ ” ili “
”.
Napomene:
Jezik sustava određuje jezik zaslonskog izbornika.•
Audio jezik koristi se za odabir zvučnog zapisa •
kanala.
Primarne postavke su prioritetne postavke u slučaju •
višestrukog izbora kod određenog prijenosa.
Sekundarne postavke su alternativne postavke u
slučaju kad prve opcije nisu dostupne.
” ili “ ” označite stavku izbornika
Kontrola pristupa
Da bi se onemogućilo gledanje određenih programa,
kanali i izbornici mogu se blokirati pomoću sustava
kontrole pristupa.
Ova funkcija uključuje ili isključuje sustav zaštite
izbornika i omogućuje promjenu PIN-a.
Pritisnite gumb “IZBORNIK” i odaberite Postavke
pomoću gumba “
pregled izbornika Postavki. Pomoću gumba “ ” ili “ ”
označite stavku Pristup i pritisnite OK za nastavak:
Za prikaz opcija izbornika kontrole pristupa, treba
upisati PIN broj. Tvornički zadani broj PIN-a je 0000.
Nakon kodiranja ispravnog PIN broja,, prikazat će se
izbornik kontrole pristupa:
” ili “ ”. Pritisnite gumb OK za
Hrvatski - 95 -
A02_[HR]_MB70_5112UK_DVBT_C_DLNA_HBBTV_MMH_WIFI_32942LED_GOLD11_10075886_50201414.indd 95A02_[HR]_MB70_5112UK_DVBT_C_DLNA_HBBTV_MMH_WIFI_32942LED_GOLD11_10075886_50201414.indd 95 16.04.2012 14:55:5416.04.2012 14:55:54
Page 97

Rukovanje izbornikom kontrole pristupa (*)
Odaberite stavku pomoću gumba “• ” ili “ ”.
Pomoću gumba “•
Pritisnite gumb OK za pregled više opcija.•
(*) Ako opciju Država postavite kao UK tijekom prve
instalacije, opcije Dobno zaključavanje i Blokada za
djecu neće se vidjeti. Ova postavka dostupna je samo
za države članice EZ.
Zaključavanje izbornika: Postavka zaključavanja
izbornika uključuje ili isključuje pristup izborniku.
Možete isključiti pristup instalacijskom izborniku ili
cjelokupnom sustavu izbornika.
Dobno zaključavanje: Kada je podešena, ova
funkcija daje informacije o dobnoj zaštiti dobivena
od televizijske postaje, a ako je ta dobna zaštita
onemogućena, onemogućuje pristup tom kanalu.
Blokada za djecu: Ako se postavi Blokada za djecu,
televizorom će se moći upravljati samo pomoću
daljinskog upravljača. U tom slučaju, gumbi na
kontrolnoj ploči neće raditi, osim gumba Pripravan/
Uključeno. Kada je uključena funkcija Blokada za
djecu, TV uređaj možete prebaciti u mod Pripravnosti
pomoću gumba Pripravan/Uključeno. Za ponovno
uključivanje televizora, treba vam daljinski upravljač.
Ako se pritisne jedan od ovih gumba, na zaslonu će se
prikazati poruka Roditeljsko zaključavanje uključeno
kad zaslon s izbornikom nije vidljiv.
Postavi PIN: Defi nira novi PIN broj. Pomoću brojčanih
gumba unesite novi PIN broj. Novi PIN morate unijeti
još jednom u svrhu verifi kacije.
VAŽNO: Tvornički postavljen PIN broj je 0000, ako
mijenjate PIN, svakako ga zapišite i č
sigurnom.
” ili “ ” postavite stavku.
uvajte na
Hrvatski - 96 -
Tajmeri
Kako bi pregledali tajmere, pritisnite gumb IZBORNIK
i odaberite ikonu Postavke pomoću gumba “ ” ili “
”. Pritisnite gumb OK za pregled izbornika Postavke.
Pomoću gumba “ ” ili “ ” označite stavku Tajmeri i
pritisnite OK za nastavak:
Postavljanje tajmera za samoisključivanje
Ova postavka koristi se za postavljanje isključivanja
televizora nakon određenog vremena.
Označite stavku Samoisključivanje gumbima “•
” ili “ ”.
Postavite pomoću gumba “•
samoisključivanja može se programirati između
opcije Isključeno i 2.00 sata (120 minuta) u
razmacima od po 30 minuta.
Postavljanje tajmera za programe
Tajmere programa možete postaviti za određeni
program.
Pritisnite gumb “
određenu emisiju. Na zaslonu će se pokazati funkcijski
gumbi tajmera programa.
” za postavljanje tajmera za
Dodavanje tajmera
Pritisnite ŽUTI gumb na daljinskom ako želite dodati •
tajmer.
Kanal: Mijenja kanal pomoću gumba “
Vrsta televizijske mreže: Ovu funkciju nije moguće
podesiti.
Tip tajmera: Možete odabrati vrstu tajmera između
Snimanje ili Tajmer.
Datum: Unesite datum koristeći se brojčanim
gumbima.
Početak: Unesite datum početka koristeći se
brojčanim gumbima.
Kraj: Unesite datum završetka koristeći se brojčanim
gumbima.
Trajanje: Prikazuje vrijeme trajanja između vremena
početka i završetka.
Ponovi: Postavlja tajmer tako da se ponavlja jednom,
dnevno ili tjedno. Pomoću gumba “
stavku.
Promijeni / Briši: Postavlja dozvolu za promijeni/briši.
Reprodukcija: Postavljaj dozvolu za reprodukciju i
kontrole pristupa.
Pritisnite ZELENI gumb za spremanje tajmera. •
Pritisnite CRVENI gumb za poništavanje.
Uređivanje tajmera
Odaberite tajmer koji želite uređivati pomoću gumba •
“ ” ili “ ”.
Pritisnite ZELENI gumb. Pojavit će se zaslon •
izbornika Uredi tajmer.
” ili “ ”. Funkcija
” ili “ ”.
” ili “ ” odaberite
A02_[HR]_MB70_5112UK_DVBT_C_DLNA_HBBTV_MMH_WIFI_32942LED_GOLD11_10075886_50201414.indd 96A02_[HR]_MB70_5112UK_DVBT_C_DLNA_HBBTV_MMH_WIFI_32942LED_GOLD11_10075886_50201414.indd 96 16.04.2012 14:55:5516.04.2012 14:55:55
Page 98

Po završetku uređivanja, pritisnite ZELENI gumb za •
spremanje. Pritisnite gumb “IZBORNIK” ako želite
poništiti postupak.
Brisanje tajmera
Odaberite tajmer koji želite izbrisati pomoću gumba •
“ ” ili “ ”.
Pritisnite CRVENI gumb.•
Odaberite DA pomoću gumba “• ” ili “ ” za brisanje
tajmera. Odaberite NE za poništenje.
Konfi guracija snimanja
Odaberite stavku Snimanja u izborniku Postavke radi
konfi guriranja postavki snimanja. Za konfi guriranje
snimanja prikazuje se sljedeći izbornik.
•Ako želite izbrisati sve datoteke na spojenom USB
pogonu tvrdog diska ili memorijskom štapiću, možete
koristiti opciju Formatiraj disk.
• Osim toga, u slučaju nepravilnog rada USB diska,
pokušajte ga formatirati. U većini slučajeva, nakon
formatiranja USB disk će raditi normalno; međutim,
SVI podaci spremljeni na USB disku u tom slučaju
bit će izgubljeni.
• Pritisnite OKdok je označena stavka Formatiraj
disk. Na zaslonu će se pojaviti izbornik koji traži unos
PIN broja. Ako niste promijenili PIN broj, tvornička
postavka je 0000. Nakon što unesete PIN, na zaslonu
se pojavi okvir skočnog izbornika kao podsjetnik na
potrebu formatiranja diska; odaberite ‘’DA’’ i pritisnite
OK za formatiranje diska. Odaberite ‘’NE’’ i pritisnite
OK za poništavanje. Prije formatiranja USB diska,
napravite sigurnosne kopije svih važnih snimanja.
Informacije o tvrdom disku
Za pregled pojedinosti o USB disku, označite stavku
Informacije o tvrdom disku pomoću gumba “
” i pritisnite OK. Prikazat će se informacije o USB
disku
” ili “
Konfi guriranje postavki za
funkciju datum/vrijeme
Za konfiguriranje postavki Datuma/Vremena,
odaberite stavku Datum/Vrijeme u izborniku Postavke.
Pritisnite gumb OK .
Moguća su sljedeća podešavanja:
Počni ranije (*)
Postavljate ranije vrijeme pokretanja tajmera
snimanja.
(*) Dostupno samo za opcije zemalja EU.
Završi kasnije (*)
Pomoću ovih postavki postavili ste kasnije vrijeme
završetka tajmera za snimanje.
(*) Dostupno samo za opcije zemalja EU.
Maks zadržavanje slike
Ova postavka omogućuje podešavanje maksimalnog
vremena zadržavanja slike. Vrijeme trajanja je
postavljeno približno i može se mijenjati po potrebi,
ovisno o prijemu emitiranih programa. Kad se dosegne
maks zadržavanje slike, automatska reprodukcija će
se nastaviti.
Formatiraj disk
VAŽNO: Ne zaboravite da će SVI podaci spremljeni
na USB kartici biti izgubljeni i format diska tada će se
prebaciti u FAT32 ako aktivirate ovu funkciju.
Hrvatski - 97 -
A02_[HR]_MB70_5112UK_DVBT_C_DLNA_HBBTV_MMH_WIFI_32942LED_GOLD11_10075886_50201414.indd 97A02_[HR]_MB70_5112UK_DVBT_C_DLNA_HBBTV_MMH_WIFI_32942LED_GOLD11_10075886_50201414.indd 97 16.04.2012 14:55:5616.04.2012 14:55:56
Označite stavku Datum/vrijeme pomoću gumba “•
” ili “ ”
Datuma, vrijeme, mod postavki vremena i vremenske
zone bit će aktivirani.
Gumbima “
Postavljanje moda postavki vremena podešava se
gumbom “ ” ili “ ”. Može se podesiti na AUTO ili
RUČNO (MANUAL).
Kada se odabere AUTOMATSKO podešavanje,
opcije datum/vrijeme i vremenska zona neće se
moći podesiti. Ako se odabere opcija RUČNO za
postavljanje vremenske zone, vremensku zonu
možete mijenjati:
” ili “ ” označite mod postavki vremena.
Page 99

• Pomoću gumba “ ” ili “ ” odaberite stavku
Vremenska zona.
Pomoću gumba “
zonu na GMT-12 ili GMT+12. Datum/vrijeme na vrhu
popisa izbornika tada će se promijeniti u skladu s
odabranom vremenskom zonom.
Promjene se automatski spremaju. Pritisnite •
“IZBORNIK” za izlaz.
” ili “ ” promijenite vremensku
Konfi guriranje postavki zvuka
Možete omogućiti il onemogućiti odabrane opcije
zvuka. Televizor se neće prebaciti na opcije izvora
koje su onemogućene kada je gumb “SOURCE”
pritisnut.
Konfi guriranje postavki mreže
Napomena: Mrežne postavke televizora uključuju
opcije žičnog i bežič nog povezivanja. Ako vaš
televizor nema USB Wi-Fi hardverski ključ (prodaje se
zasebno), tad trebate koristiti žično povezivanje. Ako
se pokušate povezati pomoću bežičnog povezivanja,
a vaš televizor nema USB Wi-Fi hardverski ključ,
zaslon upozorenja će se pojaviti, a televizor neće
dobiti IP adresu. Pokušajte priključiti LAN kabel i
televizor će dobiti IP adresu.
Konfi guriranje postavki žičnih uređaja
U okviru Mrežne postavke možete podesiti tip mreže •
za vaš televizor, koji će povezati televizor na internet.
Ako povezujete televizor pomoću ETHERNET
ULAZA, za konfi guraciju odaberite tip mreže kao
Žični uređaj.
Podešavanje tipa mreže
Tip mreže može se podesiti kao žični ili bežični uređaj, •
u skladu s aktivnim priključkom televizora. Podesite
ga na Žičnim, ako ste televizor povezali pomoću LAN
Odaberite stavku Izvori u izborniku Postavke i •
pritisnite OK.
Pomoću gumba “•
Pomoću gumba “•
odabrani izvor. Promjene se automatski spremaju.
” ili “ ” odaberite izvor.
” ili “ ” uključite ili isključite
kabela. Podesite ga na Bežični, ako ste se povezali
pomoću bežičnog USB hardverskog ključa(prodaje
se zasebno).
Status postavki konfi guracije
Ovdje je prikazan status priključka. Odaberite •
Priključen, ako želite aktivirati žični ili bežični
priključak. Odaberite Nije priključen, ako želite izaći
iz aktivnog priključka.
IP adresa
Ako je aktivan priključak dostupan, IP adresa će •
se tada pojaviti. Ako želite konfi gurirati preferirane
IP adresu, pritisnite ZELENI gumb i prebacite se u
napredni mod.
Postavke konfi guracije žične mreže u
naprednom modu
Nakon što ste pritisnuli ZELENI gumb, napredni mod
bit će dostupan. Kad ste u naprednom modu, pritisnite
CRVENI gumb za uređenje postavki. Kad završite,
pritisnite OK za spremanje, pritisnite POVRATAK/
NATRAG za poništenje.
Hrvatski - 98 -
A02_[HR]_MB70_5112UK_DVBT_C_DLNA_HBBTV_MMH_WIFI_32942LED_GOLD11_10075886_50201414.indd 98A02_[HR]_MB70_5112UK_DVBT_C_DLNA_HBBTV_MMH_WIFI_32942LED_GOLD11_10075886_50201414.indd 98 16.04.2012 14:55:5716.04.2012 14:55:57
Page 100

Wi-Fi postavke (opcija)
Wi-Fi opcija može se koristiti za bežično mrežno
povezivanje (opcija). Ova funkcija koristi se samo
za infrastrukturne namjene, kao što je povezivanje
na web, hbb stranice te povezivanje s DLNA
poslužiteljima (opcija). Odaberite opciju Bežični uređaj
za prijelaz na bežične postavke u okviru mrežnih
postavki.
Pritisnite ZELENI gumb za prijelaz u napredni mod, a
zatim pritisnite gumb OK za uređenje postavki.
Za aktiviranje Wi-Fi funkcije, treba ispravno konfi gurirati
profile. Molimo, umetnite Wi-Fi hardverski ključ,
(prodaje se zasebno), u jedan od USB ulaza (VAŽNO:
“Veezy 100” USB hardverski ključ je potreban za
korištenje funkcije bežične mreže. Kako bi koristili
televizor i bežičnu mrežu, treba vam “Veezy 100”
bežični USB hardverski ključ.
Pritisnite ŽUTI gumb za pretraživanje bežičnih mreža
putem izbornika mrežni postavki. Nakon toga, prikazat
će se popis dostupnih mreža. Molimo, odaberite
željenu mrežu s popisa. Ako je odabrana mreža
zaštićena lozinkom, molimo unesite ispravnu lozinku
pomoću virtualne tipkovnice. Ovu tipkovnicu možete
koristiti pomoću navigacijskih gumba (lijevo/desno/
gore/dolje) i gumba OK na daljinskom upravljaču.
Pričekajte dok se IP adresa ne prikaže na zaslonu.
To znački kako je veza uspostavljena. Za isključivanje
s bežične mreže, trebate označiti Status konfi guracije
i pritisnuti OK.
Između oznaka izbornika možete se kretati pritiskom
na gumbe lijevo/desno. Pomoćna alatna traka na
dnu dijaloškog okvira prikazuje funkcije koje možete
koristiti. PritisnitePLAVI gumb za provjeru brzine
internetske veze.
Za provjeru jačine signala možete koristiti izbornik
mrežnih postavki za mod žičnog uređaja.
Informacije
Status konfiguracije: Prikazuje wi-fi status kao
priključen ili nepriključen.
IP adresa: Prikazuje trenutnu IP adresu.
Naziv mreže: Prikazat će se naziv priključene
mreže.
Brisanje spremljenih Wi-Fi profi la
Pohranjeni profi li izbrisat će se ako pritisnete crveni
gumb, za vrijeme prikaza zaslonske poruke (OSD).
Povezivanje s mobilnim telefonom putem
WiFi-ja (opcija)
Ako vaš mobilni telefon ima WiFi funkciju, možete •
povezati vaš mobilni telefon na televizor pomoću
WiFi priključka pomoću usmjerivača te reproducirati
sadržaj na vaš telefon. Kako bi to bilo moguće, vaš
mobitel treba imati odgovarajući zajednički softver.
Spojite se na usmjerivač sljedeći korake navedene •
u odjeljku bežično povezivanje.
Nakon toga, aktivirajte vaš mobilni telefon preko •
usmjerivača i aktivirajte zajednički softver na
mobilnom telefonu. Potom, odaberite datoteke koje
želite podijeliti s televizorom.
Ako je veza ispravno uspostavljena, sad trebate •
moći dijeliti datoteke s vašeg mobilnog telefona
putem preglednika medija na televizoru.
Uđite u izbornik preglednika medija, tad će se pojaviti •
zaslonska (OSD) poruka o odabranom uređaju za
reprodukciju. Odaberite ident mobilnog telefona i
pritisnite OK za nastavak.
Napomena: Ovu funkciju možda ne podržavaju neki
mobilni telefoni.
Hrvatski - 99 -
A02_[HR]_MB70_5112UK_DVBT_C_DLNA_HBBTV_MMH_WIFI_32942LED_GOLD11_10075886_50201414.indd 99A02_[HR]_MB70_5112UK_DVBT_C_DLNA_HBBTV_MMH_WIFI_32942LED_GOLD11_10075886_50201414.indd 99 16.04.2012 14:55:5716.04.2012 14:55:57
 Loading...