

Page 1

LC-22D1H
LC-26D1H
LC-32D1H
(LC-32D1H Only)
POWER
Page 2

Page 3

-1-
Page 4

-2-
Page 5

-3-
Page 6

Dolby Laboratories Dolby D Dolby Laboratories
HDMI ,HDMI High-Definition Multimedia Interface (
) HDMI LLC
LC-22D1H
PAL-B/G I D/K
NTSC-MN
PAL/NTSC/SECAM
110V-240V 50/60Hz
54 (0.6 )
2 x 3
VGA x 1, x 1 ( HDMI )( 3.5 )
x 1
x 1 x 2
SECAM-B/G D/K
(UHF/VHF/75 )
-4-
HDMI
NICAM
LC-26D1H LC-32D1H
71 (0.6 ) 122 (0.6 )
2 x3 2 x7.5
USB x 1
HDMI x 2
x 1, x 1
x 2
x 1
x 1
Page 7

LC-22D1H
SOURCE
MENU
CH+
CH-
VOL+
VOL-
3
Power
USB
30 30
1:
2: LED
3:
AC-INPUT
110-240V~ 50/60Hz
HDMI2 Input
HDMI1 Input
Video Input
Component
Input
1
2
PC/HDMI
Audio Input
LC-26D1H / LC-32D1H
SOURCE
MENU
CH+
CH-
VOL+
VOL-
Power
1 SOURCE
2 MENU
3 CH+/CH- TV CH+/CH-
MENU
CH+/CH-
4 VOL+/VOL-
MENU
5 POWER
6 USB
Monitor Out
L
Video
VGA INPUT
R
ANT
1
2 3 4 5 6 7 8 9
1 AC 2 HDMI 3 4 5 6
HDMI 7 8 9
-5-
Page 8

LC-26D1H & LC-32D1H
USB
Video
L
Audio
R
Input 2
10
11
12
10 USB
11 2
13
IEC
75
AC-INPUT
110-240V~ 50/60Hz
HDMI2 Input
HDMI1 Input
Video Input
PC/HDMI
Component
Audio Input
Input
Monitor Out
L
Video
R
VGA INPUT
ANT
-6-
Page 9

(Hz) (KHz)
1
2
3
4
5
6
7
( LC-32D1H)
640x480
800x600
1024x768
1360x768
1280x1024
1440x900
1920x1080
60
60
60
60
60
60
60
HDMI
480i, 480p, 576i, 576p, 720p/50Hz, 720p/60Hz,
1080i/50Hz, 1080i/60Hz, 1080p/24Hz, 1080p/50Hz, 1080p/60Hz.
31.47
37.88
48.36
47.7
63.98
55.93
66.64
-7-
Page 10

DVD
HDMI
AC-INPUT
110-240V~ 50/60Hz
AV LC-22D1H
Y
P
BPR
HDMI2 Input
HDMI1 Input
Video Input
Component
Input
L
L
R
PC/HDMI
Audio Input
R
(/)
Pb Pr
L
VGA INPUT
R
ANT
Y
Monitor Out
L
Video
R
DVD
480i, 480p, 576i, 576p, 720p/50Hz, 720p/60Hz,
1080i/50Hz, 1080i/60Hz, 1080p/24Hz, 1080p/50Hz, 1080p/60Hz.
1
2 DVI HDMI
-8-
Page 11

POWER
1OK2 3
4 5 6
7 8 9 0
TV MENU TV/VIDEO
CH.LIST
SOUND
+
VOL
PIC
_
SLEEP WIDE
9
10
11
12
13
14
15
16
17
18
ATV/DTVFREEZE
1
2 2 1.5V AAA
3
1
2
MUTE
MPX
EXIT
CH
_
INDEX
INFOFAVEPG
SUBTITLE
1:POWER
2: NUMERIC KEY
19
20
21
3: TV MENU
(11
4: CURSOR
5: CH LIST
6: VOL+/-
22
7: PIC
8: SLEEP
23
24
+
25
26
9: FREEZE
10: ATV/DTV
ATV DTV
11: EPG
(14)
12: FAV
ATV DTV
27
12
19:MUTE
28
29
30
31
32
33
34
35
20:MPX
21:FLASHBACK ( )
22:TV/VIDEO
23: OK
24: EXIT
25: SOUND
26: CH+/CH-
27: WIDE
28: INDEX
DTV
(T IME) (Channel)
29: INFO
DTV
34: SUBTITLE
DTV
13,14,30,31:
(12
14 )
-9-
Page 12

15 FW
16 FF
17
18
32
33
34
-10-
Page 13

Language
OK
1.
< >< >
(USB)
2).
OK
__
UHF CH 35
++
1).
+
MENU
OK
96% UHF CH 68 DTV
+
OK
-11-
3).
__
10
I
10
424.25 MHz
++
MENU
Page 14
50
50
50
50
50
40
31
50
MENU EXIT
MENU
FAV
FAV
FAV
FAV
MENU
1)
2) NTSC
3)
4) PC
3.
MENU
OK
< >< >
1)
2)
MENU
2.
<OK>
< >< >
4.
OK
-- -- -- --
< >< >
-12-
Page 15
5.
7.
)
/Language
< >< >
< >
6.
< >< >
(
< >< >
<OK>
USB 2.0
USB
<OK>
1/1
1< >
<OK> <6666>
2 ,< >
1,2
3 4-18
1<>
2 <9527>
3< >
4 <9527>
5
C
USB <OK>
, <
> <OK>
1/1
01 By My side.mp3 02 By My side.mp3
04 I Won't Lase A... 05 Just When I... 06 By My side.mp3
Sub Menu
: By My side
: By My side
: 128K
: Chet Lam
44K
: 2007
: 1981KBytes
-13-
Page 16

<>
<OK>
<EXIT>
<INFO> <OK>
< > <OK>
JPEG JPEG .jpg
BMP .bmp
PNG( .png )
MP3( .mp3 )
WAV( .wav )
8. (EPG)
00:00:33/00:04:22
Repeat ALL
00:00:48/00:04:22
1.
INFO
2.
EPG
04:55 28th 4
3.
__
OK
11
15
16
8
16
<OK>
++
EPG
EPG
08/11 15:14
11 ( )
12 (HD)
13
14
15 4 :
16
81 VIP
82 J2 o ( )
OK
INDEX
<><>
<Index> <
><>
-14-
Page 17

;
-15-
Page 18

LC-22D1H
530
478.3
:
99.2
60.8
395.9
269.3
360
100
100
34.5
359
235.4
200
-16-
Page 19

LC-26D1H
659.8
578
111. 4
:
103.5
326
501.4
297.5
440
200
100
54
447.9
260
-17-
Page 20

LC-32D1H
:
105.5
790
90
699.7
440
400
200
393.7
577.5
84.5
523
335.5
260
-18-
Page 21

VHF/UHF
LC-22D1H LC-26D1H LC-32D1H
PAL-B/G, I, D/K, SECAM-B/G, D/K, NTSC-MN
DMB-T/H
48MHz-858MHz
470-858MHz
99
NICAM: B/G, I, D/K, A2 Stereo: B/G
YPbPr, CVBS, VGA, HDMI
480i/p, 576i/p, 720p/50Hz, 720p/60Hz, 1080i/50Hz, 1080i/60Hz,
1080p/24Hz, 1080p/50Hz, 1080p/60Hz
480i/p, 576i/p, 720p/50Hz, 720p/60Hz, 1080i/50Hz, 1080i/60Hz,
1080p/24Hz, 1080p/50Hz, 1080p/60Hz
110-240V ~ 50/60Hz
54 (0.6 ) 71 (0.6 ) 122 (0.6 )
2 x 3 2 x 3 2 x 7.5
oo
0 C - 40 C
(AAA x 2)
-19-
Page 22

Contents
Safety an d warnin gs.... ...... ...... ............................. ...... ..........2-3
Introdu ction. ...... ...... ............................. ...... ...... ..................... 4
Install ation. ...... ...... ............................. ...... ...... .................. ..5-8
Remote Co ntrol. ...... ...... ............................. ...... ...... ...........9-10
Operati on.... ...... ...... ............................. ...... ...... ............... 11-14
Trou ble Shoo ting.. ............................. ...... ...... ........................15
Dimensional Drawings....... ...... ...... ............................. ...... ..... 16
Specifi cation s..... ...... ............................. ...... ...... ....................19
-1-
Page 23

IMPORTANT SAFETY INSTRUCTION
1) Read the se in str uct ion s.
2) Kee p the se in str uct ion s.
3) Heed all warn ings.
4) Fol low a ll in str uct ion s.
5) Do not use t his a ppa rat us ne ar wa ter.
6) Clean only wi th dr y clo th.
7) Do not blo ck an y ven til ati on op eni ngs ,
install i n acc ord anc e wit h the i nst ruc tio ns.
8) Do not ins tal l nea r any h eat s our ces s uch
as rad iat ion s, he at re gis ter s, st ove s, or
othe r app ara tus ( inc lud ing a mpl ifi ers ) tha t
produce h eat .
9) Do not def eat t he sa fet y pur pos e of th e
polarized pl ug. I f the p rov ide d plu g doe s not
fit in to yo ur ou tle t, co nsu lt an e lec tri cia n for
replace men t of th e obs ole te ou tle t.
10) Pr ote ct th e pow er co rd fr om be ing
step ped o n or pi nch ed pa rti cul arl y at pl ugs ,
conveni ence rec ept acl es, a nd th e poi nt
where the y ext end f rom t he ap par atu s.
11) Onl y use a tta chm ent s/a cce sso rie s
specifi ed by t he ma nuf act ure r.
12) Unplug thi s app ara tus d uri ng li ght ing
stor ms or w hen u nus ed fo r lon g per iod s of
time .
13) Refer a ll se rvi cin g to qu ali fie d ser vic e
personn el. Serv ici ng is r equ ire d whe n the
apparatus ha s bee n dam age d in an y way,
such a s pow er- sup ply c ord o r plu g is
damaged, liq uid h as be en sp ill ed or o bje cts
have fall en in to th e app ara tus , the
apparatus ha s bee n exp ose d to ra in or
moistur e, do es no t ope rat e nor mal ly, or h as
been dropped.
14) Ma in pl ug is u sed a s the d isc onn ect
device, t he di sco nne ct de vic e sha ll re mai n
readily oper abl e.
15) Th e ven til ati on op eni ngs s hou ld no t be
cove red b y ite ms, s uch a s new spa per s,
tabl e-c lot h, cu rta ins , etc .
16) No nake d fla me so urc es, s uch a s
lighted c and les , sho uld b e pla ced o n the
apparatus.
17) Attent ion s hou ld be d raw n to th e
environmen tal a spe cts o f bat ter y dis pos al.
18) Th e use o f app ara tus i n mod era te
climate .
19) Th e app ara tus s hal l not b e exp ose d to
dripping or sp las hin g and t hat n o obj ect s
fill ed with li qui ds, s uch a s vas es, s hal l be
placed on the ap par atu s.
SA FET Y AN D WARNI NGS
CAU TION
RISK OF ELECTRIC SHOCK
DO NOT OPEN!
TO REDUCE THE RISK OF ELECTRIC SHOCK, DO
NOT REMOVE COVER (OR BACK).NO USER
SERVICEABLE PARTS INSIDE. REFER SERVICING
TO QUALIFIED SERVICE PERSONNEL.
The symbol indicates that dangerous
voltages constituting a risk of electric
shock are present within this unit.
The symbol indicates that there are
important operating and maintenance
instructions in the literature accompanying
this unit.
WARNING:
To prevent fire or shock hazard, do not
expose this appliance to rain or moisture.
This symbol indicates that this product
incorporates double insulation between
hazardous main voltage and user accessible
parts. Only use identical replacement parts.
WARNING: To reduce the risk of fire or electric
shock,do not expose this apparatus to rain.
-2-
CAUT IO N
Page 24

Warning
High voltages are used in the operation of
this television. Do not remove the cabinet
back from your set. If maintenance is
required, contact qualified service
personnel.
WARNINGS AND CAUTIONS
Caution
Do not trap the power supply cord under
the television .
Warning
To prevent fire or electrical shock
hazard, do not expose the television
to rain or moisture.
Warning
Do not drop or push objects into the
television cabinet , slots or openings.
Never spill any kind of liquid on the
television .
Caution
Do not block the ventilation holes at the
back cover. Adequate ventilation is
essential to prevent failure of electrical
components.
Caution
Never stand on, lean on, or suddenly push
the television or its stand. You should pay
special attention to children. Serious injury
may result if the television overturns.
Caution
Do not place your television on an unstable
cart, stand, shelf or table. Serious injury to
an individual , and damage to the
television, may result if the television
overturns.
Caut ion
When t he te lev isi on is n ot us ed fo r an
exte nde d per iod o f tim e, it i s
reco mme nde d to di sco nne ct th e AC
power cor d fro m the AC o utl et.
-3-
Page 25

INTRODUCTION
Thank you very much for purchasing this
television. To enjoy trouble-free operation of
your product, please read this manual
carefully and keep it handy for easy
reference.
CAUTION
Never tamper with any components inside
the TV, or any other adjustment controls
not mentioned in this manual. All LCD-TVs
are high voltage instruments. Unplug the
AC cord from the AC outlet before cleaning
the product, then wipe the TV with a dry
soft cloth. During thunder and lighting,
unplug the power cord and antenna cord to
prevent damage to your TV. All repairs to
this TV should only be performed by
qualified TV service personnel.
INSTALLATION
*Locate the TV in the room where light
does not strike the screen directly.
*Total darkness or a reflection on the
picture screen can cause eyestrain. Soft
and indirect lighting is recommended for
comfortable viewing.
*Allow enough space between the TV and
the wall to permit ventilation.
*Avoid excessively warm locations to
prevent possible damage to the cabinet or
premature component failure.
*Do not cover the ventilation openings
when using theTV.
Trad emarks
Manufac tur ed un der l ice nse f rom D olb y Lab ora tor ies , Dol by an d the d oub leD symb ol ar e tra dem ark s of Do lby L abo rat ori es.
"HDMI,t he HD MI lo go an d Hig h-D efi nit ion M ult ime dia I nte rfa ces a re
trad ema rks o r reg ist ere d tra dem ark s of HD MI Li cen sin g LLC .
Main feat ures
① Used a s Telev isi on, d isp lay t erm ina l, PC d isp lay
② High l umi nan ce, w ide v iew ing a ngl e
HDMI i nte rfa ce
③
NICA M
④
Main parameter
Model
TV System
Video Signal System PAL/NTSC/SECAM
Input Power Vol tage
Power Consumption(Standby)
Audio Output Power
Input Termimals
Output Terminals
LC-22D1H
PAL-B/G I D/K
NTSC-MN
AC 110V-240V 50/60Hz
54W(0.6W)
2 x 3W
VGA x 1,AUDIO x 1(shared with HDMI)( 3.5mm jack)
Video x 1 Video x 2
Audio x 1 Audio x 2
LC-26D1H LC-32D1H
SECAM-B/G D/K
71W(0.6W) 122W(0.6W)
2 x 2 x3 7.5WW
USB x 1
HDMI x 2
Component x1
Anternna x1
(UHF/VHF/75 Din type)
Video x 1, Audio x 1
-4-
Page 26

INSTALLATION
Front Panel
30 30
1: Remote c ontrol s ensor
2: Indica tor LED:
GREEN POW ER ON
RED STANDBY
3: Contro l Panel
Rear Panel
Control Panel
LC-22D1H
SOUR CE
MENU
CH+
CH-
VOL+
VOL-
3
1
2
LC-26D1H / LC-32D1H
1.SOURCE
Display the input source menu.
2.MENU
Display main MENU.
3.CH+/CH-
In TV mode,press“CH+”or“CH-”
to change the channel up and down.
In MENU mode, press “CH+”or
“CH-”to select items. In standby mode, it can
turn on the TV.
4.VOL+/VOL-
Adjust sound level.
In MENU mode, press“VOL+”or“VOL-”
to adjust the item that you selected.
5. POWER
6. USB
Powe r
USB
SOUR CE
MENU
CH+
CH-
VOL+
VOL-
Powe r
AC-IN PUT
110-24 0V~ 50/ 60Hz
1
HDMI2 Inpu t
HDMI1 Inpu t
Video In put
Compone nt
Input
PC/HDM I
Audio Inp ut
2 3 4 5 6 7 8 9
Monit or Out
L
Video
VGA INPU T
R
ANT
All the input terminals are(from left to right):
1:AC INPUT, 2:HDMI,3:VIDEO, 4:COMPONENT, 5:AUDIO(Share between video and
component terminals),6:PC AUDIO(Share with HDMI terminals), 7:MONITOR OUT,
8:VGA INPUT, 9:ANTENNA
-5-
Page 27

Side Panel
For LC-26D1H & LC-32D1H
INSTALLATION
USB
Video
L
Audio
R
Input 2
10
11
12
ANTENNA
Connecting a PC
STEPS:
Be sur e bot h the T V and c omp ute r are
set to P owe r off .
1.Co nne ct VG A and au dio c abl e.
2.Co nne ct th e pow er co rd.
3.Po wer o n the T V, swit ch to P C mod e.
4.Po wer o n the P C.
This s equ enc e is ve ry im por tan t.
AC-INPU T
110-240V ~ 50/60 Hz
HDMI2 Input
HDMI1 Input
Video Input
PC/HDMI
Component
Audio Input
Input
Monitor O ut
L
Video
R
VGA INPUT
10: USB
11: VI DE O IN PU T
(VIDEO 2)
12: AUDIO INPUT
Note :
Aeri al co nne cti ons :IE C(f ema le) .
Inpu t imp end anc e:7 5 unb ala nce d.
ANT
-6-
Page 28

PC Compatibility Chart
INSTALLATION
RESOLUTION
1
2
3
4
5
6
7
640x480
800x600
1024x768
1360x768
1280x1024
1440x900
1920x1080
(Only for LC-32D1H)
V.Freq.(Hz) H.Freq.(KHz)
60
60
60
60
60
60
60
HDMI Compatible Signal Format
480i, 480p, 576i, 576p, 720p/50Hz, 720p/60Hz,
1080i/50Hz, 1080i/60Hz, 1080p/24Hz, 1080p/50Hz, 1080p/60Hz.
31.47
37.88
48.36
47.7
63.98
55.93
66.64
-7-
Page 29

INSTALLATION
Connecting External Devices
This television provides two group of AV(LC-22D1H provides one group only), one group of
component terminals for convenient connection to VCR, DVD or other video equipment. Please
refer to the owner's manual of the equipment to be connected as well.
You can use the input terminals on the rear panel as follows.
VIDEO EQUIPMENT with component terminals
Pb Pr
L
VGA INPU T
R
ANT
HDMI
AC-IN PUT
110-240 V~ 50/6 0Hz
HDMI2 Inpu t
HDMI1 Inpu t
Video Inp ut
Video
Y
P
BPR
Componen t
Input
VIDEO EQUIPMENT
Y
L
R
RL
Video
Monit or Out
Video
To audio
output terminal
To video
output terminal
L
R
PC/HDM I
Audio Inp ut
L
R
Audio L/R
It can be connected to the following equipments: VCR, multi disc player, DVD, camcorder, video game
console or stereo system, etc.
Component terminals can support these video formats: 480i, 480p, 576i, 576p, 720p/50Hz, 720p/60Hz,
1080i/50Hz, 1080i/60Hz, 1080p/24Hz, 1080p/50Hz, 1080p/60Hz.
Note : 1.V ide o and c omp one nt te rmi nal s sha re th e sam e aud io in put t erm ina l.
2.HD MI in D VI mo de sh are t he sa me au dio i npu t ter min al wi th PC .
-8-
Page 30

REMOTE CONTROLREMOTE CONTROL
REMOTE CONTROL
POWE R
1OK2 3
4 5 6
7 8 9 0
TV MEN U TV/ VIDEO
CH.L IST
SOUN D
+
VOL
PIC
_
SLEE P WI DE
9
10
11
12
13
14
15
16
17
18
ATV/DT VFR EEZE
MUTE
MPX
EXIT
CH
_
INDE X
INFOFAVEPG
SUBT ITLE
1:POWER
To set the TV to standby or power on.
2: NUMERIC KEY
For direct access to channels.
19
20
21
3: TV MENU
To display TV menu.(Page 11)
4: CURSOR
To move within the menu.
5: CH LIST
To display the channel list.
6: VOL+/-
22
To adjust sound level.
7: PIC
To switch picture mode.
23
8: SLEEP
Set timer to turn off the TV.
9: FREEZE
24
+
25
26
To freeze the picture.
10: ATV/DTV
To switch between ATV and DTV.
11: EPG
To display the Electronic Program Guide Screen.
(Page 14)
27
28
29
30
31
32
33
34
35
12: FAV
To access your favourite channels list in ATV or
DTV mode.(Page 12)
19:MUTE
To disable or enable the sound output.
20:MPX
To select the available audio language.
21:FLASHBACK ( )
To access the previously viewed channel.
22:TV/VIDEO
To select input source.
23: OK
To confirm selection.
24: EXIT
To return to the previous menu or exit menu.
25: SOUND
To switch sound mode.
26: CH+/CH To access the next or previous channels.
27: WIDE
To change picture aspect ratio.
28: INDEX
To select "Time" or "Channel" on the EPG table
in DTV mode
29: INFO
To display information about the program being
viewed and what's on next in DTV mode.
34: SUBTITLE
To switch between different subtitles in DTV mode.
13,14,30,31: COLOR KEY
4 coloured keys are used to access the
item on corresponding pages.(Page 12 & 14)
-9-
Page 31

MEDI A PLAY key:
15: FW :Fa st ba ckw ard .
16: FF :Fa st fo rwa rd.
17: Pl ay in m edi a pla y mod e.
18: Pa use i n med ia pl ay mo de.
32: NE XT
33: PR EVI OUS
35: St op in m edi a pla y mod e.
REMOTE CONTROL
-1 0-
Page 32

Inst all ati on Gu ide
OPERATION
OSD L angua ge
Nor way
Rum ania
Pol and
Rus sian
Por tugal
Ser bia
This screen only appear wh en the TV is first ti me
turn on or reset to factory se tting. Pr ess OK key to
start auto turning .
And after turning, the scr een will sh ow the first
DTV program.
Swi tzerl and
Slo venia
Spa in
UK
New Zeala nd
Swe den
OK
Eng lish
Chi na(HK )
Tuni s
Alg eria
1.CH ANN EL ME NU
The first item of the MENU is ch annel men u( for
ATV or DTV on ly).
Aut o Tuning
DTV M anual Tu ning
ATV Man ual Tun ing
Pro gramm e Edit
CHA NNEL
< >
You can search ch annels an d edit programs here.
1).Auto tuning
Search all the channels au tomatically(you can
select ATV, DTV or DTV+ATV)
Tune Ty pe DTV+ ATV
Chi na(HK )
Tuni s
Alg eria
Press to select ATV and DT V at first ,
then press OK to start auto tu ning .
Sig nal Inf ormat ion
Sof tware U pdate (USB)
Egy pt
Sou th Afric a
Isr ael
MEN U
Channel Tuning
ATV : 0 Pr ogram me(s)
DTV : 0 P rogra mme(s )
Ira n
United Arab Emirat..
Slo vak
OK
NOTE :
All the channels includi ng ATV and DTV
can be tuned at one time,if th e Tune Type is
DTV+ATV .
All th e st ore d ch an nel s wi ll be d is ap pea re d after
auto t un ing .
Afte r au to tu ni ng , t he TV wil l sh ow the co nt ent s
of the f ir st DT V ch an nel .
2).DTV Manual tuning
You can select a DT V channel , then find the
program in this channel.
Press to change the channe l number or i nput the
channel number. Press OK to se arch the pr ograms .
NOTE:
Bad, Normal and Good means s ignal intensity.
DTV Man ua l Tun ing
_
UHF C H 35
Pre ss OK to se arch
Bad N ormal
3). ATV Manual tuning
Press to select the channel number
for manual tuning. Press to select
"search" or "Fine tune" ,c onfirm th e
execution by pressing .
ATV Ma nual Tun ing
_
Sto rage To 1
Sys tem I
Cur rent CH 1
Sea rch
Fin e-Tune
Fre quenc y 424.2 5 MHz
Sav e MENU
+
Goo d
+
96% U HF CH 68 DT V
-11 -
Page 33

OPERATION
NOTE :
Press red button to store th e channel s after manual
tuning .
4). Program edit
You can Delete, R ename, Sk ip, or assign any
programs as your favouri te progra ms.
Dele te
Press red button, the high lighted p rogram will be
deleted.
Rena me
Only can rename ATV programs.
Move the cursor to the progr am, press g reen
button to rename the progr am.
Press to choose the charac ter. Press to
move the cursor.
Press MENU button to exit ed it. Press E XIT to
exit the menu.
Note: ATV programs name can only contain 5
characters.
Press to choose the progra m, press
blue button to skip this pro gram, The will
show on the right side of the pr ogram.
Choose the skipped progr am, press b lue button
again, you can cancel the sk ip,The wi ll
disappear.
Favo uri te
Press to choose the progra m, press FAV
button, it will show on the ri ght side of t he
program.Choose the FAV program, press
FAV button ag ain, you can cancel the FAV,
will disappear.
Once your favorite group i s created , you can
press the FAV key to quickly access your favorite
channel.
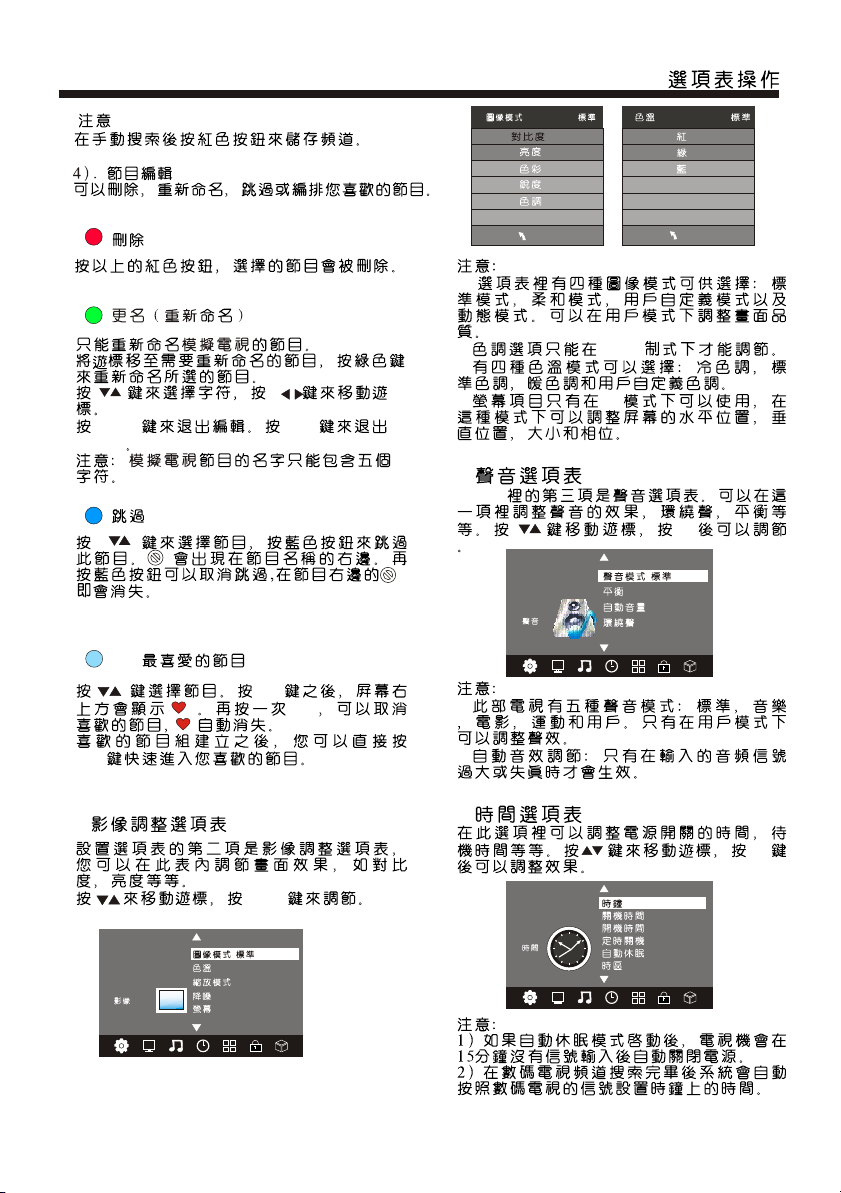
2. PIC TUR E MEN U
The second item of the MENU is P ICTURE ME NU.
You can adjust pi cture effect he re, such as
contrast, brightness , etc.
Press to move, press OK to adjust.
Pic ture Mo de Stan dard
Col or Temper ature
Asp ect Rat io
PICT URE
< >
Noi se Redu ction
Scr een
Pic ture Mo de User
Con trast 5 0
Bri ghtne ss 50
Col or 50
Sha rpnes s 50
Tint 5 0
MEN U
NOTE:
1).There are 4 picture mod es: Stand ard, Mild, User
and Dynamic.You can only a djust the picture effect
when "User" mode is select ed.
2).Tint is available i n NTSC system only.
3).There are 4 colors temp erature m odes:
Cool,Medium, Warm an d User.
4).Screen is available i n PC mode only which,
you can adjust horizonta l positio n, vertical
position, size and phase .
Col or Tempera ture Us er
Red 4 0
Gre en 31
Blu e 50
3.SOU ND ME NU
The third item of the MENU is th e SOUND
MENU.
You can adjust th e sound effect he re such as
treble, bass, balance et c.
Press to move, press OK to adjust.
Sou nd Mode S tanda rd
Bal ance
SOUN D
< >
Note:
1).There are 5 sound modes :
Standard, Music, Movie , Sports an d User.You
can only adjust the sound effect when "User "
mode is selected.
2).Auto volume: only ava ilable wh en the input
signal volume is too large o r with dist ortion.
Aut o Volume
Sur round S ound
4.TIM E MEN U
The forth item of the menu is th e TIME MENU.
You can adjust th e power on/ off ti me, sleep
time etc. Press to move, press OK to adju st.
Clo ck -- -- -- - -
Off Ti me
On Tim e
TIME
< >
NOTE:
1.If "Auto Sleep" is set to on , the TV will be
automatically powere d off if there is no si gnal
within 15 minutes.
2.The clock time will be set a utomati cally after the
DTV channels are tuned.
-1 2-
Sle ep Timer
Aut o Sleep
Time Z one
MEN U
Page 34

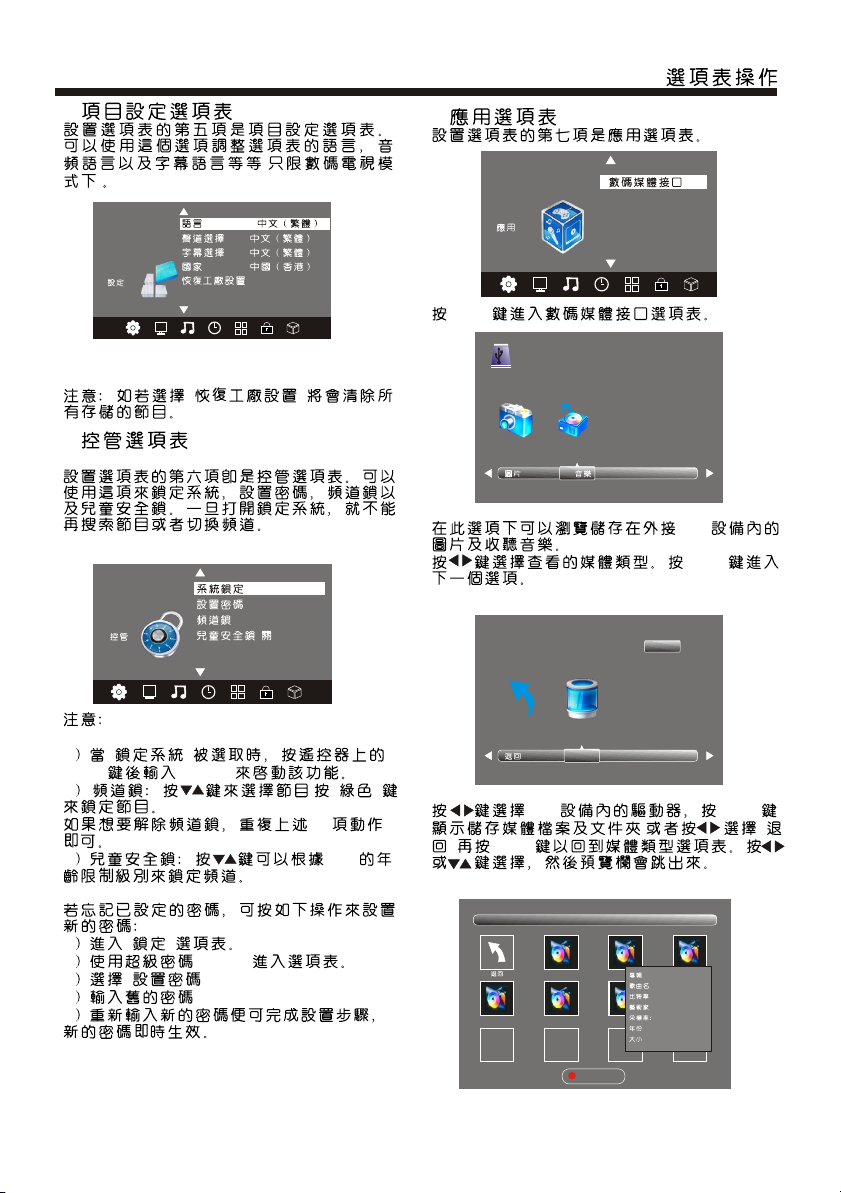
5.OPT ION M ENU
The fifth item of the MENU is th e OPTION
MENU. You can adjust the Menu lang uage,
Audio language,Subti tle language etc (only
for DTV).
Aud io Lang uages
Sub title L angua ges
Cou ntry Ch ina(H K)
OPTI ON
< >
NOTE :
Rest or e fac to ry d efa ul t will cl ea r all t he p rogra ms .
Res tore Fa ctory D efaul t
OPERATION
7. AP PL ICATIONS M EN U
The se ve nth i te m of t he ME NU i s the APPL IC ATI ONS
MENU .
DMP
APP LICATI ONS
< >
Pres s OK t o ent er t he D MP menu .
USB 2 .0
6.LOC K MEN U
The sixth item of the MENU is th e LOCK MENU .
You can lock syst em, set pas sword, block program
and set parental guidanc e. Once you s et the lock
system on, you cannot sear ch the chan nels or
change any programs.
Loc k Syste m
Set P asswo rd
Blo ck Prog ram
LOC K
< >
NOTE:
1) When "Lock system" is hig hlighte d, press
OK and enter the default pas sword "66 66" to
activate it.
2) Block program: Press to choose the
program, press green but ton to bloc k the
program. If you want to unbl ock the pro gram,
simply repeat steps ment ioned in 1 an d 2.
3) Parental guidance: Pr ess to choo se
4~18 years.
If you forget your passwor d, you can cl ear it
with the following steps :
1) Enter into the "Lock" men u.
2) Enter the super code: 952 7.
3) Select "Set Password" .
4) Input "9527" as old passw ord.
5) Enter the new password, t hen the set ting
process is finished and th e new passw ord
will be enabled.
Par ental G uidan ce Off
PHOT O MUSIC
You ca n en joy v ie wing ph ot os an d li steni ng m usi c
from e xt ern al U SB d evi ce . Selec t th e med ia t ype
by pre ss ing , p re ss O K to en te r the nex t
sele ct ion m en u.
1/1
Ret urn C
Pres s to s elect t he r igh t dr ive and p re ss
OK to di sp lay m ed ia f ile s an d fol de r li st or
choo se " Ret ur n" t o bac k to t he medi a ty pe
sele ct ion m en u. S ele ct t he medi a fi le by p re ssing
or , the n th e previ ew f ram e wi ll pop up .
1/1
01 By My si de.mp 3 02 B y My side .mp3
Retu rn
04 I Won' t Lase A.. . 05 Just W hen I.. . 06 By My si de.mp 3
Albu m: By My si de
Title : By My sid e
Bit Ra te: 128 K
Arti st: Che t Lam
Samp ling: 4 4K
Year:
Size : 1981K Bytes
-13-
Sub M enu
Page 35

OPERATION
Pres s th e but to n to p lay t he m edia fi le i n ful l
scre en , the f ol lo win g co ntr ol b ar w ill b e
disp la yed o n th e sc ree n.
00: 00:33 /00:0 4:22
Pau se F F P rev. N extFB Sto p
Pres s th e curso r on t he re mo te cont ro l to di sp lay
the ot he r opt io ns o n the c on trol ba r.
Play list
Info .
Goto Tim e
The op ti ons a va il abl e in t he co nt ro l bar w il l be
differ en t when "P ho to" i s se lecte d fr om th e ex terna l
USB de vi ce.
Pres s to s elect t he f unc ti on icon , pr ess O K
to con fi rm th e fu nc tio n.
Pres s or E XIT to exit t he c ont ro l bar.
Pres s "I NFO " or " OK " to di sp lay the c on tro l ba r again .
NOTE :
Choo se t he In fo i co n and p re ss OK
to dis pl ay th e In fo M ENU .
MUT E
Rep eat ALL
00: 00:48 /00:0 4:22
Belo w ph oto f or ma ts ar e su ppo rt ed :
—JPEG (J PEG for ma t, fi le s with th e ex ten si on ".jp g" )
—BMP (fil es w ith the e xt ens io n ".bmp ")
—PNG (f il es wi th t he e xte ns ion ".p ng ")
Belo w mu sic f or ma ts ar e su pport ed :
—MP3 (f il es wi th t he e xte ns ion ".m p3 ")
—WAV (fil es w ith t he e xt ens io n ".wav ")
INFO
1.
Use to choose the programs , Press
INFO key, you can display the highlighted pro gram's
information.
Sche du le
2.
Press yellow key, the entire reminder sched ule
will be listed. Press to choose the lis t, press
red key to delete the schedule list.
Press EPG to return to EPG menu.
Sch ed ul e Li st 0 4: 55 2 8t h Apr D el et e
3.
Press the blue key to choose o ne progra m
and set up one reminder time , the TV screen wil l
show the selected progra m in the remi nder time
automatically.
DELE TE
Time D ate
Remi nd er
_
OK
Pro gramm e Title
Rem inder
11 Hom e
15 Mi nute
16 Ho ur
Aug M onth
16 Da te
Onc e Mode
Cha nnel Na me
+
BAC K
8.EPG M enu (Electr onic Prog ram
Guide )
The EPG menu is used to look at wh at is being
broadcasted on DTV chann el.
To access the EPG menu, press EPG bu tton,
the following menu will be d isplayed:
PRO GRAMM E GUIDE TI ME
24 / Se p 15:12
11 Hom e Wealth B log(C )
12 HD a T V Wealth B log(H D)(C)
13 TV S Af terno ontea t ime sho w
14 CT I-Asi a New Talwa n Star Aven ue
15 CC TV 4 TV Dram a
16 Wo rld ETV
81 Ja de The Gre en Room
82 J2 L ovey Do vey My Fi ji
OK
Sch eduleInfo
Rem inder
INDE X
Press OK to save the reminde r.
Note:
Programme Guide can be dis played according to
"TIME" or "CHANNEL". You can sel ect "TIME " or
"CHANNEL" by pressing th e index key.
-14-
Page 36

TR OUB L E SHO O TIN G
Phenomeno n or Sym ptom
Pictu re Audio
Snow Nois e
Ghos t
Inte rfe rence
Norm al Pi cture
No pic tur e Mute
No col our Nor mal a udio Col ou r contr ol
Norm al au dio
Nois e
Mute
Inspe ctio n Chec k
Anten na p osi ti on , dir ec tio n
or con ne cti on
Ante nn a pos it io n, di re cti on
or con ne cti on
Elec tr oni c eq ui pme nt ,ca r/
moto rc ycl e, fl uor es cent li gh t
Volum e( che ck i f mu te is
acti va ted o r if t he a udi o sy stem
conn ec tio ns a re n ot co rr ect)
Powe r co rd i s no t inser te d
Cont ra st a nd b right ne ss /v olume
setu p
Pict ure
brea kin g up
No col our
The LCD TV panel is produced with very high pre cision technology giving you fin e picture details
in vibrant color. Occasion ally, a few non-act ive pixels may appear on the screen as a f ixed
point of red, green, blue, b lack or whi te. Please note this does n ot affect the per formanc e of
the product.
Norm al au dio
or wea k
Nois e
Retu ne c han ne l
TV sy ste m
-15-
Page 37

DI MEN S ION A L DR AW ING S
LC-22D1H
530
478.3
360
269.3
395.9
235.4
Units :mm
60.8
359
99.2
200
100
100
34.5
-16-
Page 38

DI MEN S ION A L DR AW ING S
LC-26D1H
659.8
578
440
326
501.4
297.5
Units :mm
111.4
103.5
447.9
260
200
100
54
-17-
Page 39

DI MEN S ION A L DR AW ING S
LC-32D1H
Units :mm
105.5
790
699.7
393.7
577.5
335.5
440
90
523
260
400
200
84.5
-18-
Page 40

Specifications
SP ECI F ICAT ION S
Model
TV System
Receiving Channel
Digital Terrestrial Broadcast 470-858MHz
Stereo / Bilingual NICAM: B/G, I, D/K, A2 Stereo: B/G
Video Input
Component
HDMI
Power Requirement
Power Consumption (Standby) 54W (0.6W) 71W (0.6W) 122W (0.6W)
Audio Output
Operating Temperature
Accessory
* The specifications provided here are for reference only.
Differences may occur as product technology will be updated occassionally.
Design and specifications are subject to change without notice.
Analogue
Digital
VHF/UHF
LC-22D1H LC-26D1H LC-32D1H
PAL-B/G, I, D/K, SECAM-B/G, D/K, NTSC-MN
DMB-T/H
48MHz-858MHz
Auto Preset 99 CHTV-Tunning System
YPbPr, CVBS, VGA, HDMI
480i/p, 576i/p, 720p/50Hz, 720p/60Hz, 1080i/50Hz, 1080i/60Hz,
1080p/24Hz, 1080p/50Hz, 1080p/60Hz
480i/p, 576i/p, 720p/50Hz, 720p/60Hz, 1080i/50Hz, 1080i/60Hz,
1080p/24Hz, 1080p/50Hz, 1080p/60Hz
110-240V ~ 50/60Hz
2 x 3W 2 x 3W 2 x 7.5W
o o
0 C - 40 C
User manual, Remote control, Battery (AAA x 2)
-19-
Page 41

PART NO. :4 031 C2 21 217
 Loading...