

Page 1

LC-20B5E
LCD COLOUR TELEVISION
LCD-FARBFERNSEHGERÄT
TÉLÉVISION COULEUR À ÉCRAN
À CRISTAUX LIQUIDES (LCD)
ENGLISH
DEUTSCH
FRANÇAIS
OPERATION MANUAL
BEDIENUNGSANLEITUNG
MODE D’EMPLOI
Page 2

This equipment complies with the requirements of Directive 89/336/EEC and 73/23/EEC as amended by 93/68/EEC.
ASA
Dieses Gerät entspricht den Anforderungen der EG-Richtlinien 89/336/EWG und 73/23/EWG mit Änderung 93/68/EWG.
Ce matériel répond aux exigences contenues dans les directives 89/336/CEE et 73/23/CEE modifiées par la directive 93/68/CEE.
Dit apparaat voldoet aan de eisen van de richtlijnen 89/336/EEG en 73/23/EEG, gewijzigd door 93/68/EEG.
Dette udstyr overholder kravene i direktiv nr. 89/336/EEC og 73/23/EEC med tillæg nr. 93/68/EEC.
Quest’apparecchio è conforme ai requisiti delle direttive 89/336/EEC e 73/23/EEC come emendata dalla direttiva 93/68/EEC.
« „ͷًÛÙ·ÛÁ ·ıÙfi ·ÌÙ·ÔÍÒflÌÂÙ·È ÛÙÈÚ ··ÈÙfiÛÂÈÚ Ù˘Ì Ô‰Á„È˛Ì ÙÁÚ EıÒ˘·˙ÍfiÚ EÌ˘ÛÁÚ 89/336/EOK Í·È 73/23/EOK,
¸˘Ъ ФИ Н·МФМИЫПФfl ·ıЩФfl ЫıПОБТ˛ЛБН·М ·¸ ЩБМ Ф‰Б„fl· 93/68/EOK.
Este equipamento obedece às exigências das directivas 89/336/CEE e 73/23/CEE, na sua versão corrigida pela directiva 93/
68/CEE.
Este aparato satisface las exigencias de las Directivas 89/336/CEE y 73/23/CEE, modificadas por medio de la 93/68/CEE.
Denna utrustning uppfyller kraven enligt riktlinjerna 89/336/EEC och 73/23/EEC så som kompletteras av 93/68/EEC.
Dette produktet oppfyller betingelsene i direktivene 89/336/EEC og 73/23/EEC i endringen 93/68/EEC.
Tämä laite täyttää direktiivien 89/336/EEC ja 73/23/EEC vaatimukset, joita on muutettu direktiivillä 93/68/EEC.
SPECIAL NOTE FOR USERS IN THE U.K.
The mains lead of this product is fitted with a non-rewireable (moulded) plug incorporating a 3A fuse. Should the fuse need to
be replaced, a BSI or ASTA approved BS 1362 fuse marked or
on the pin face of the plug, must be used.
Always refit the fuse cover after replacing the fuse. Never use the plug without the fuse cover fitted.
In the unlikely event of the socket outlet in your home not being compatible with the plug supplied, cut off the mains plug and
fit an appropriate type.
DANGER: The fuse from the cut-off plug should be removed and the cut-off plug destroyed immediately and disposed of in a
safe manner.
Under no circumstances should the cut-off plug be inserted elsewhere into a 13A socket outlet, as a serious
electric shock may occur.
To fit an appropriate plug to the mains lead, follow the instructions below:
IMPORTANT: The wires in the mains lead are coloured in accordance with the following code:
Blue : Neutral Brown : Live
As the colours of the wires in the mains lead of this product may not correspond with the coloured markings identifying the
terminals in your plug, proceed as follows;
• The wire which is coloured blue must be connected to the plug terminal which is marked N or coloured black.
• The wire which is coloured brown must be connected to the plug terminal which is marked L or coloured red.
Ensure that neither the brown nor the blue wire is connected to the earth terminal in your three-pin plug.
Before replacing the plug cover make sure that:
• If the new fitted plug contains a fuse, its value is the same as that removed from the cut-off plug.
• The cord grip is clamped over the sheath of the mains lead, and not simply over the lead wires.
IF YOU HAVE ANY DOUBT, CONSULT A QUALIFIED ELECTRICIAN.
and of the same rating as above, which is also indicated
Page 3

Contents
LC-20B5E
ENGLISH
LCD COLOUR TELEVISION
ENGLISH
OPERATION MANUAL
Dear SHARP customer .................................................... 2
Important Safety Precautions ......................................... 2
Supplied Accessories ...................................................... 4
Preparation ....................................................................... 5
Installing Batteries in the Remote Control ................... 5
Using Remote Control .................................................5
Power Connection .......................................................6
Antenna Connection ................................................... 6
Listening with Headphones.........................................6
First Installation ........................................................... 7
Part Names of Main Unit .................................................. 8
How to fix the cables ................................................... 9
Part Names of Remote Control .....................................10
Basic Operation.............................................................. 11
Turning On and Off the Main Power .......................... 11
STANDBY/ON ............................................................ 11
Switching the TV/VIDEO (AV1/AV2/CARD/TV) Mode
Sound Volume ........................................................... 12
Changing Channels .................................................. 12
Selecting Menu Items................................................ 13
Basic Adjustment Settings ............................................ 15
Picture Adjustments .................................................. 15
I/P Setup .................................................................... 15
DNR (Digital Noise Reduction).................................. 16
Film Mode.................................................................. 16
Cool Climate .............................................................. 16
Useful Features .............................................................. 17
Sound Adjustments ................................................... 17
Hi-Fi Sound Settings.................................................. 17
Programmes .............................................................. 18
Using Programme Table ............................................ 20
Clock Setup ............................................................... 21
Features .................................................................... 21
Timer Functions ......................................................... 22
On-screen Display .................................................... 22
Child Lock ................................................................. 23
Rotate ........................................................................25
AV Connections ......................................................... 26
Language ..................................................................27
NICAM Broadcast Selection ..................................... 28
A2 Stereo Broadcast Selection ................................. 28
Teletext............................................................................ 29
Before Using Memory Cards ......................................... 31
Copyright................................................................... 31
About Memory Cards ..................................................... 32
Commercially Available Memory Cards .................... 32
Preparing a Memory Card......................................... 32
Notes on Using Memory Cards and
PC Card Adapters .............................................. 32
Loading a PC Card Adapter .......................................... 33
Loading a PC Card Adapter ..................................... 33
Changing from Card Mode to the TV mode .............. 33
Inserting/Removing a PC Card Adapter ................... 33
Playing Back Mode ........................................................ 34
Select Mode .............................................................. 34
... 11
Recording/Playing Back a Memory Card ..................... 35
Recording on the Memory Card................................ 35
Playing Back the Memory Card. ............................... 35
Precautions when Playing Back PC Image Data
on the LCD TV SET ............................................. 35
Recording on a Memory Card (Video Setup) ............... 36
Rec Mode .................................................................. 36
Pre-Recording ........................................................... 36
Recording a TV Programme in Real-time .................... 37
Recording as a Motion Picture .................................. 37
Easy Recording ......................................................... 37
Setting Timer Recording ............................................... 38
Adjusting the Clock ................................................... 38
Timer Rec ..................................................................38
Checking the Programme List................................... 39
Checking the Recording Mode ................................. 40
At the Set Time ..........................................................40
If There Is Not Sufficient Space On a Memory Card... 40
If Power Outage Happens/AC Cord or
DC Plug at the LCD TV Set is Unplugged
During Recording ............................................... 40
Playing Back Motion Pictures (Normal Mode)............. 41
Normal Playback ....................................................... 41
Repeat ....................................................................... 41
Playing Back Motion Pictures (Special Mode) ............ 42
Slow-motion ............................................................... 42
Zoom ......................................................................... 43
Protecting/Deleting Motion Pictures ............................ 44
Protecting Motion Picture Files.................................. 44
Unprotecting Motion Picture Files ............................. 44
Deleting One Motion Picture File............................... 45
Deleting All Motion Picture Files................................ 45
Playing Back Still Pictures ............................................ 46
Listing Still Pictures (Index) ....................................... 47
Displaying One Picture at a Time.............................. 47
Slideshow Setup........................................................ 48
My Programme .......................................................... 49
Displaying Pictures in Slideshow in Order
Specified in “My programme” ............................ 49
Rotate ........................................................................50
Switching Files .......................................................... 50
Audio Select .............................................................. 51
Recording on a Memory Card ....................................... 52
Shutter .......................................................................52
Capturing a TV Programme in Real-time ..................... 53
Capturing as Still Pictures .........................................53
Protecting/Deleting Still Pictures ................................. 54
Protecting Still Picture Files ....................................... 54
Unprotecting Still Picture Files .................................. 54
Deleting One Still Picture File .................................... 55
Deleting All Still Picture Files ..................................... 55
Formatting a Card .......................................................... 56
Connecting External Devices........................................ 57
Examples of external devices that can be connected
21-pin Euro-SCART (RGB) ........................................ 58
Troubleshooting ............................................................. 59
Specifications ................................................................. 61
Dimensional Drawings................................................... 62
... 57
Page 4

Dear SHARP customer
Thank you for your purchase of the SHARP LCD colour TV product. To ensure safety and many years of trouble-free
operation of your product, please read the Important Safety Precautions carefully before using this product.
Important Safety Precautions
Electricity is used to perform many useful functions, but it can also cause personal injuries and property damage
if improperly handled. This product has been engineered and manufactured with the highest priority on safety.
However, improper use can result in electric shock and/or fire. In order to prevent potential danger, please
observe the following instructions when installing, operating and cleaning the product. To ensure your safety
and prolong the service life of your LCD colour TV product, please read the following precautions carefully
before using the product.
1. Read instructions—All operating instructions must be read and understood before the product is operated.
2. Keep this manual in a safe place—These safety and operating instructions must be kept in a safe place for future
reference.
3. Observe warnings—All warnings on the product and in the instructions must be observed closely.
4. Follow instructions—All operating instructions must be followed.
5. Attachments—Do not use attachments not recommended by the manufacturer. Use of inadequate attachments can
result in accidents.
6. Power source—This product must operate on a power source specified on the specification label. If you are not sure
of the type of power supply used in your home, consult your dealer or local power company.
7. AC cord protection—The AC cords must be routed properly to prevent people from stepping on them or objects
from resting on them. Check the cords at the plugs and product.
8. Overloading—Do not overload AC outlets or extension cords. Overloading can cause fire or electric shock.
9. Entering of objects and liquids—Never insert an object into the product through vents or openings. High voltage
flows in the product, and inserting an object can cause electric shock and/or short internal parts. For the same
reason, do not spill water or liquid on the product.
10. Servicing—Do not attempt to service the product yourself. Removing covers can expose you to high voltage and
other dangerous conditions. Request a qualified service person to perform servicing.
11. Repair—If any of the following conditions occurs, unplug the AC cord from the AC outlet, and request a qualified
service person to perform repairs.
a. When the AC cord or plug is damaged.
b. When a liquid was spilled on the product or when objects have fallen into the product.
c. When the product has been exposed to rain or water.
d. When the product does not operate properly as described in the operating instructions.
Do not touch the controls other than those described in the operating instructions. Improper adjustment of
controls not described in the instructions can cause damage, which often requires extensive adjustment work
by a qualified technician.
e. When the product has been dropped or damaged.
f. When the product displays an abnormal condition. Any noticeable abnormality in the product indicates that
the product needs servicing.
12. Replacement parts—In case the product needs replacement parts, make sure that the service person uses
replacement parts specified by the manufacturer, or those with the same characteristics and performance as the
original parts. Use of unauthorized parts can result in fire, electric shock and/or other danger.
2
13. Safety checks—Upon completion of service or repair work, request the service technician to perform safety checks
to ensure that the product is in proper operating condition.
14. Wall or ceiling mounting—When mounting the product on a wall or ceiling, be sure to install the product according
to the method recommended by the manufacturer.
Page 5
Important Safety Precautions (Continued)
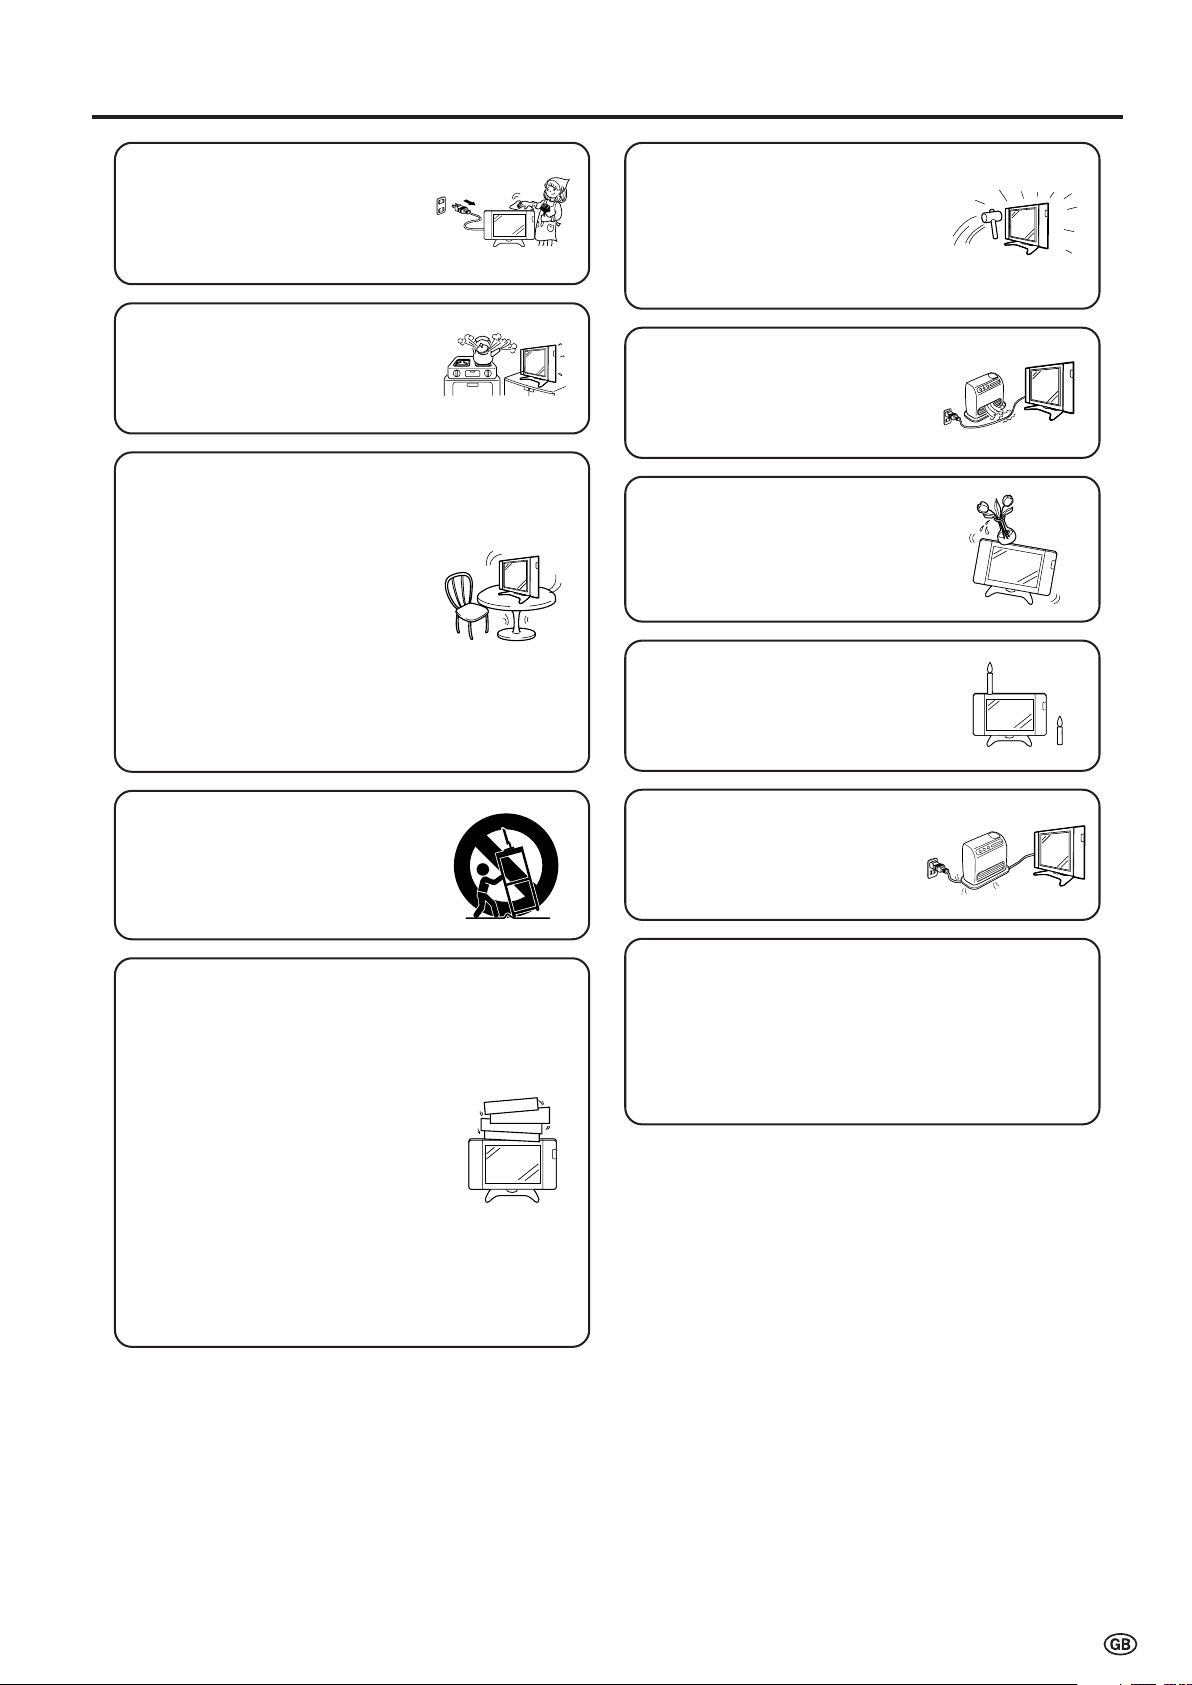
• Cleaning—Unplug the AC cord
from the AC outlet before cleaning
the product. Use a damp cloth to
clean the product. Do not use
liquid cleaners or aerosol
cleaners.
•Water and moisture—Do not use
the product near water, such as
bathtub, washbasin, kitchen sink,
laundry tub, swimming pool and in
a wet basement.
• Stand—Do not place the product
on an unstable cart, stand, tripod
or table. Doing so can cause the
product to fall, resulting in serious
personal injuries as well as
damage to the product. Use only
a cart, stand, tripod, bracket or
table recommended by the
manufacturer or sold with the
product. When mounting the
product on a wall, be sure to
follow the manufacturer’s
instructions. Use only the
mounting hardware recommended
by the manufacturer.
• The LCD panel used in this
product is made of glass.
Therefore, it can break when the
product is dropped or applied
with impact. Be careful not to be
injured by broken glass pieces in
case the LCD panel breaks.
• Heat sources—Keep the product
away from heat sources such as
radiators, heaters, stoves and
other heat-generating products
(including amplifiers).
• Do not place vases or any other
water-filled containers on this
product. The water may spill onto
the product causing fire or electric
shock.
•To prevent fire, never place any
type of candle or naked flames on
the top or near the TV set.
• When relocating the product
placed on a cart, it must be
moved with utmost care. Sudden
stops, excessive force and
uneven floor surface can cause
the product to fall from the cart.
•Ventilation—The vents and other
openings in the cabinet are
designed for ventilation. Do not
cover or block these vents and
openings since insufficient
ventilation can cause overheating
and/or shorten the life of the
product. Do not place the product
on a bed, sofa, rug or other similar
surface, since they can block
ventilation openings. This product
is not designed for built-in
installation; do not place the
product in an enclosed place
such as a bookcase or rack,
unless proper ventilation is
provided or the manufacturer’s
instructions are followed.
•To prevent fire or shock hazard,
do not place the AC power cord
under the TV set or other heavy
items.
The LCD panel is a very high technology product with
921,600 thin film transistors, giving you fine picture
details.
Due to the very large number of pixels, a few
non-active pixels may occasionally appear
on the screen as a fixed point of blue, green or red.
This is within product specifications and does not
constitute a fault.
3
Page 6
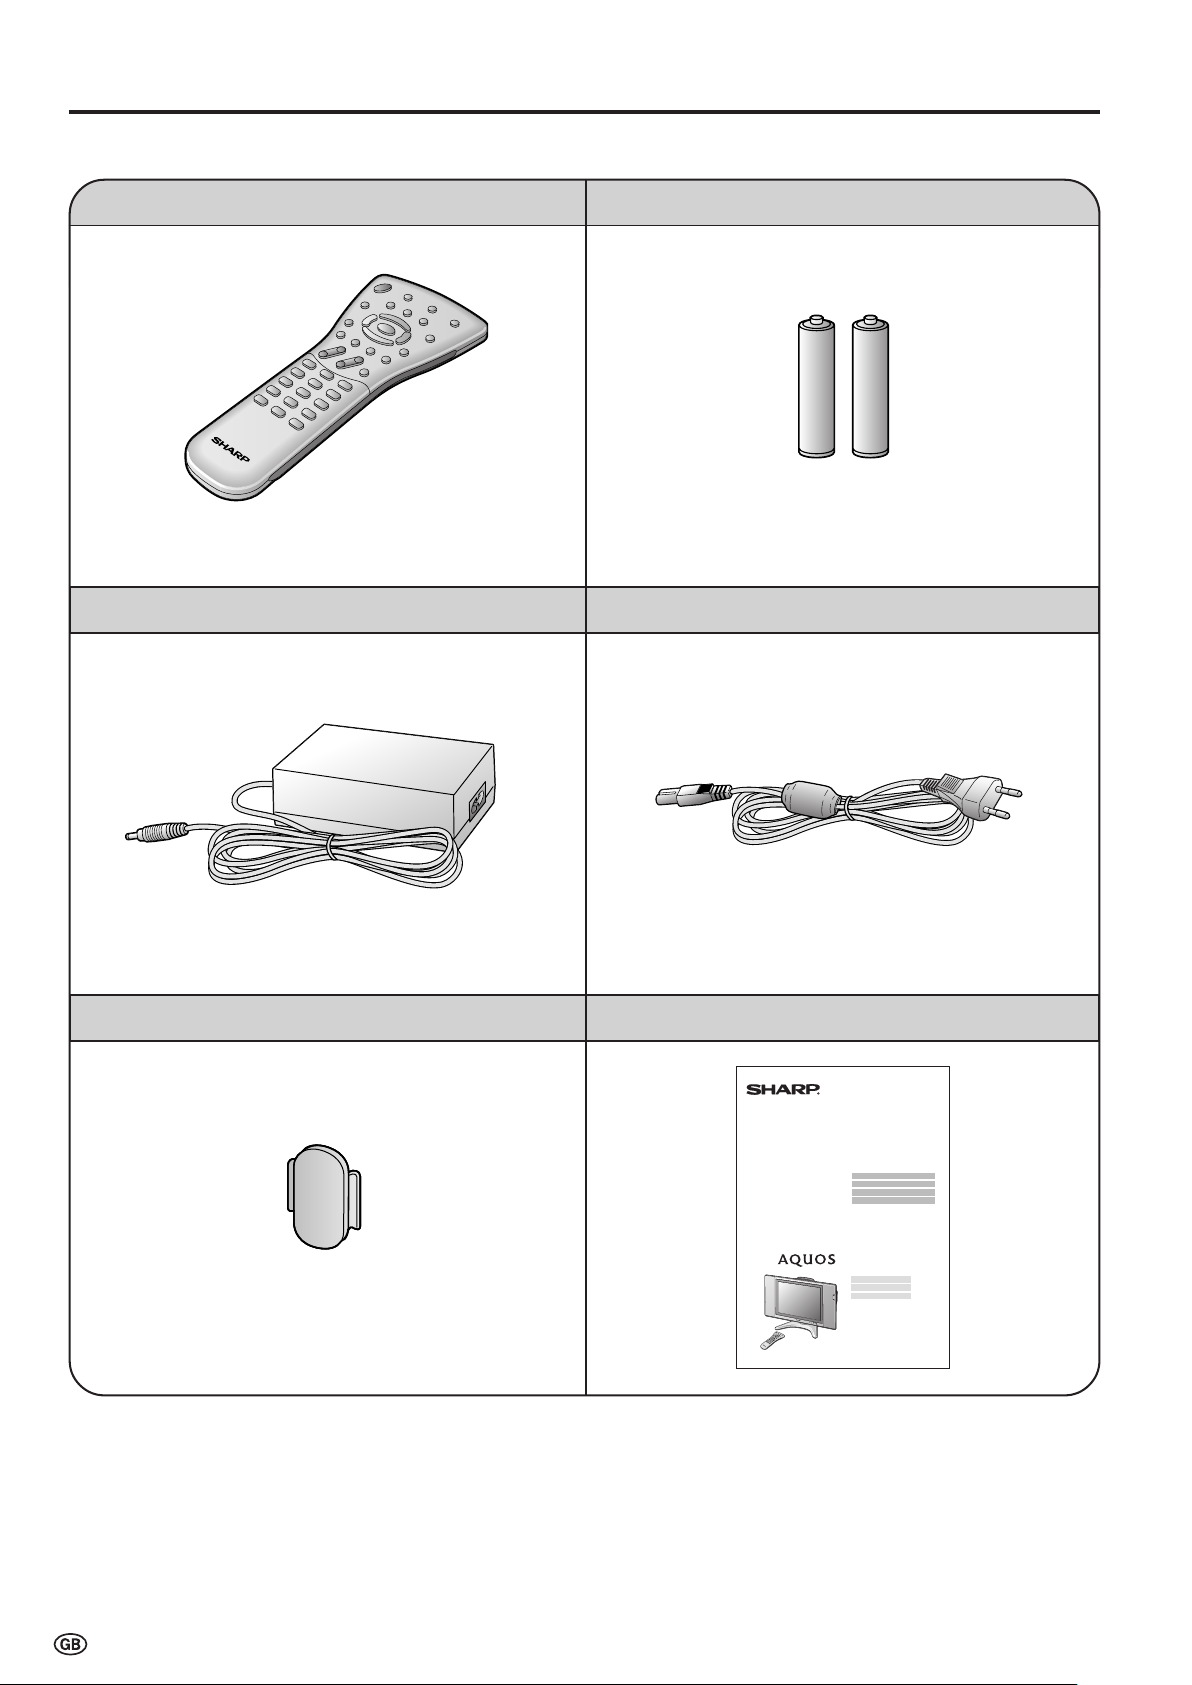
Supplied Accessories
Make sure the following accessories are provided with the LCD TV set.
Wireless remote control
pages 5 and 10 page 5
AC adapter
“AAA” size batteries (×2)
AC cord
*Product shape varies in some countries.
page 6 page 6
Cable holder
page 9
Operation manual
LC-20B5E
4
Page 7
Preparation
+
–
+
–
Headphone jack
OPC indicator
STANDBY/ON
indicator
Remote sensor
OPC sensor
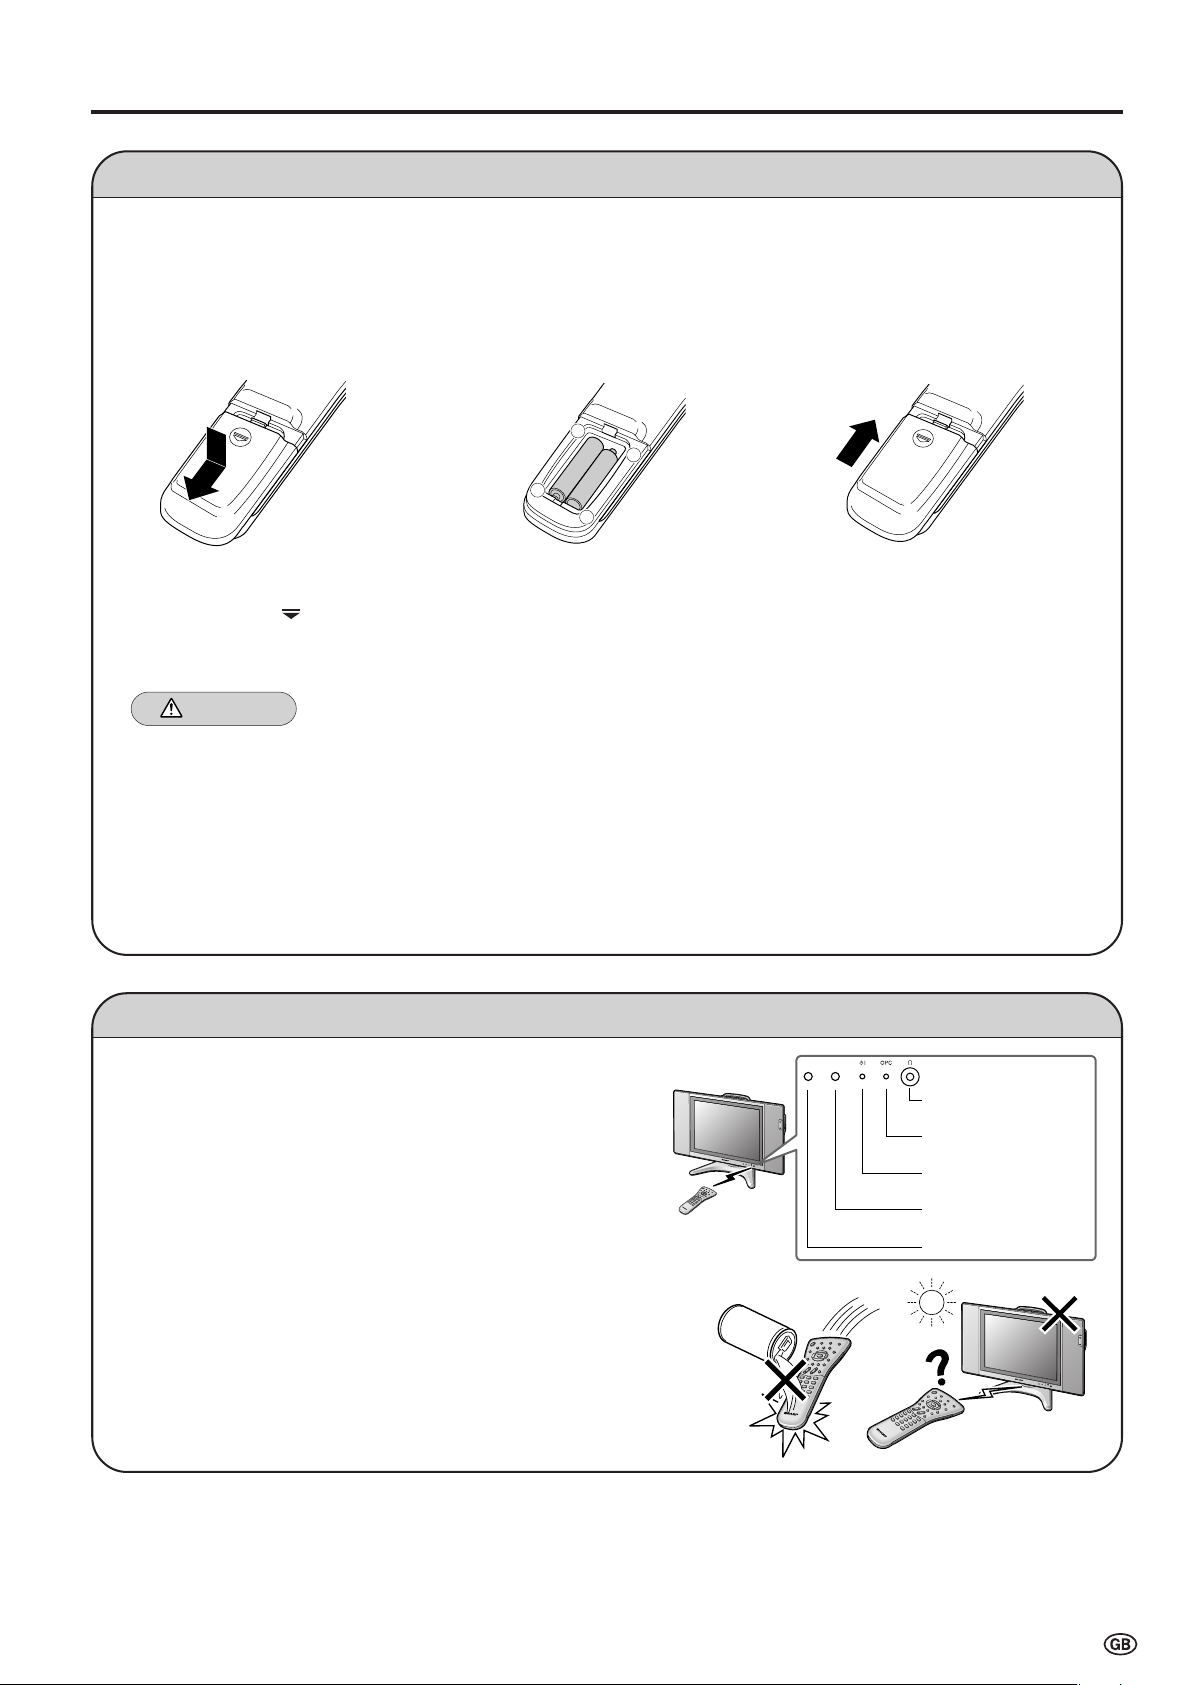
Installing Batteries in the Remote Control
Before using the LCD TV set for the first time, install the two “AAA” size batteries supplied in the remote control. When the
batteries become depleted and the remote control fails to operate, replace the batteries with new “AAA” size batteries.
1 Open the battery cover. 2 Insert two “AAA” size batteries. 3 Close the battery cover.
■ Slide the cover while
pressing the (
) part.
■ Place batteries with their
terminals corresponding
to the (+) and (–)
indications in the battery
compartment.
■ Engaging the lower
claw with the remote
control, close the
cover.
Caution!
Precautions regarding batteries
■ Improper use of batteries can result in a leakage of chemicals and/or explosion. Be sure to follow the instructions below.
• Place batteries with their terminals corresponding to the (+) and (–) indications.
•Different types of batteries have different characteristics. Do not mix batteries of different types.
•Do not mix old and new batteries. Mixing old and new batteries can shorten the life of new batteries and/or cause old
batteries to leak chemicals.
•Remove batteries as soon as they are depleted. Chemicals that leak from batteries can cause a rash. If chemical
leakage is found, wipe it off with a cloth.
• The batteries supplied with the LCD TV set may have a shorter operating time due to storage conditions.
• If the remote control is not to be used for an extended period of time, remove the batteries from the remote control.
Using Remote Control
■ Use the remote control by pointing it towards the remote sensor
window of the main unit. Objects between the remote control and
sensor window may prevent proper operation.
Cautions regarding use of remote control
■ Do not apply shock to the remote control. In addition, do not
expose the remote control to liquids, and do not place it in an area
with high humidity.
■ Do not install or place the remote control under direct sunlight. The
heat may cause deformation of the unit.
■ The remote control may not work properly if the remote sensor
window is under direct sunlight or strong lighting. In such a case,
change the angle of the lighting or main unit, or operate the remote
control closer to the remote sensor window.
5
Page 8
Preparation (Continued)
NOTE
Headphones
POWER INPUT
DC12V
(
MAIN POWER
)
Headph.vol.[ 30]
0
+60
NOTE
Connect to the DC input terminal of the LCD TV set.
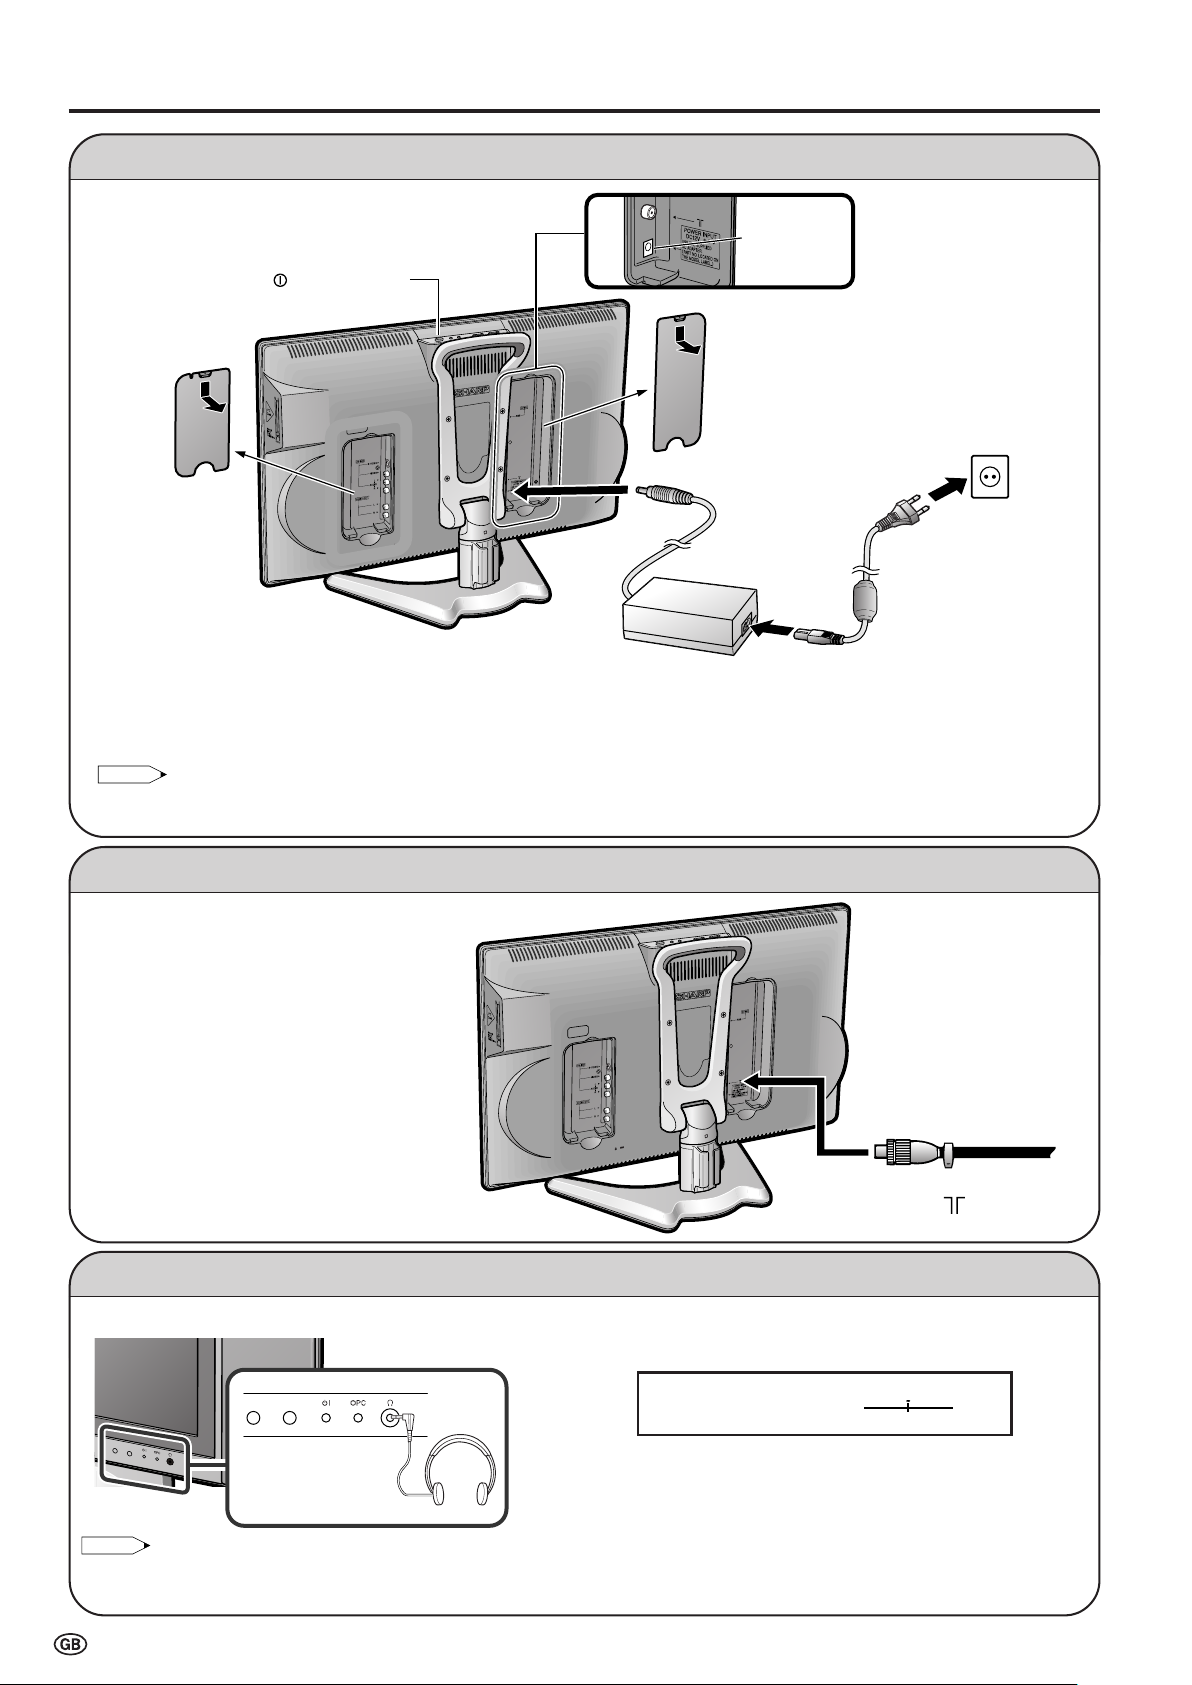
Power Connection
Pull down the hook
to open the cover.
To POWER INPUT
Pull down the hook to
open the cover.
Household
power outlet
terminal
Plug into an AC outlet.
AC adapter
AC cord*
* Product shape varies in
some countries.
■ Using the AC Adapter
• Although the AC adapter may become warm during use, this is not a malfunction.
• Do not wrap or cover the AC adapter with a blanket or similar covering. This can cause a malfunction or accident.
• Do not attempt to disassemble or modify the AC adapter. The insides of the AC adapter contain high-voltage components that can
result in the risk of electrical shock.
• Always turn the X (MAIN POWER) switch of the LCD TV set to OFF when connecting the AC adapter.
• Unplug the AC adapter from the LCD TV set and power outlet when the LCD TV set is not to be used for a long period of time.
Antenna Connection
To enjoy a clearer picture, we recommend that
you use an outdoor antenna. The following is a
brief explanation of the type of connection that is
used for coaxial cable:
Please ensure your 75-ohm coaxial cable is
fitted with a DIN 45325 (IEC169-2) coaxial
plug and plug it into the antenna terminal at
the back of the LCD TV set (antenna cable
not supplied).
Listening with Headphones
■ Plug the headphone mini-plug into the Headphone jack located on the front of the LCD TV set.
Please refer to page 17 to adjust the
sound volume.
75-ohm coaxial cable
(round cable)
To antenna input
terminal ( )
• Headphones are not included in the supplied accessories.
• Even if a headphone mini-plug is connected to the Headphone jack, sound can be heard from the main unit speaker.
6
Page 9
0 0 0
0
0
0
NOTE
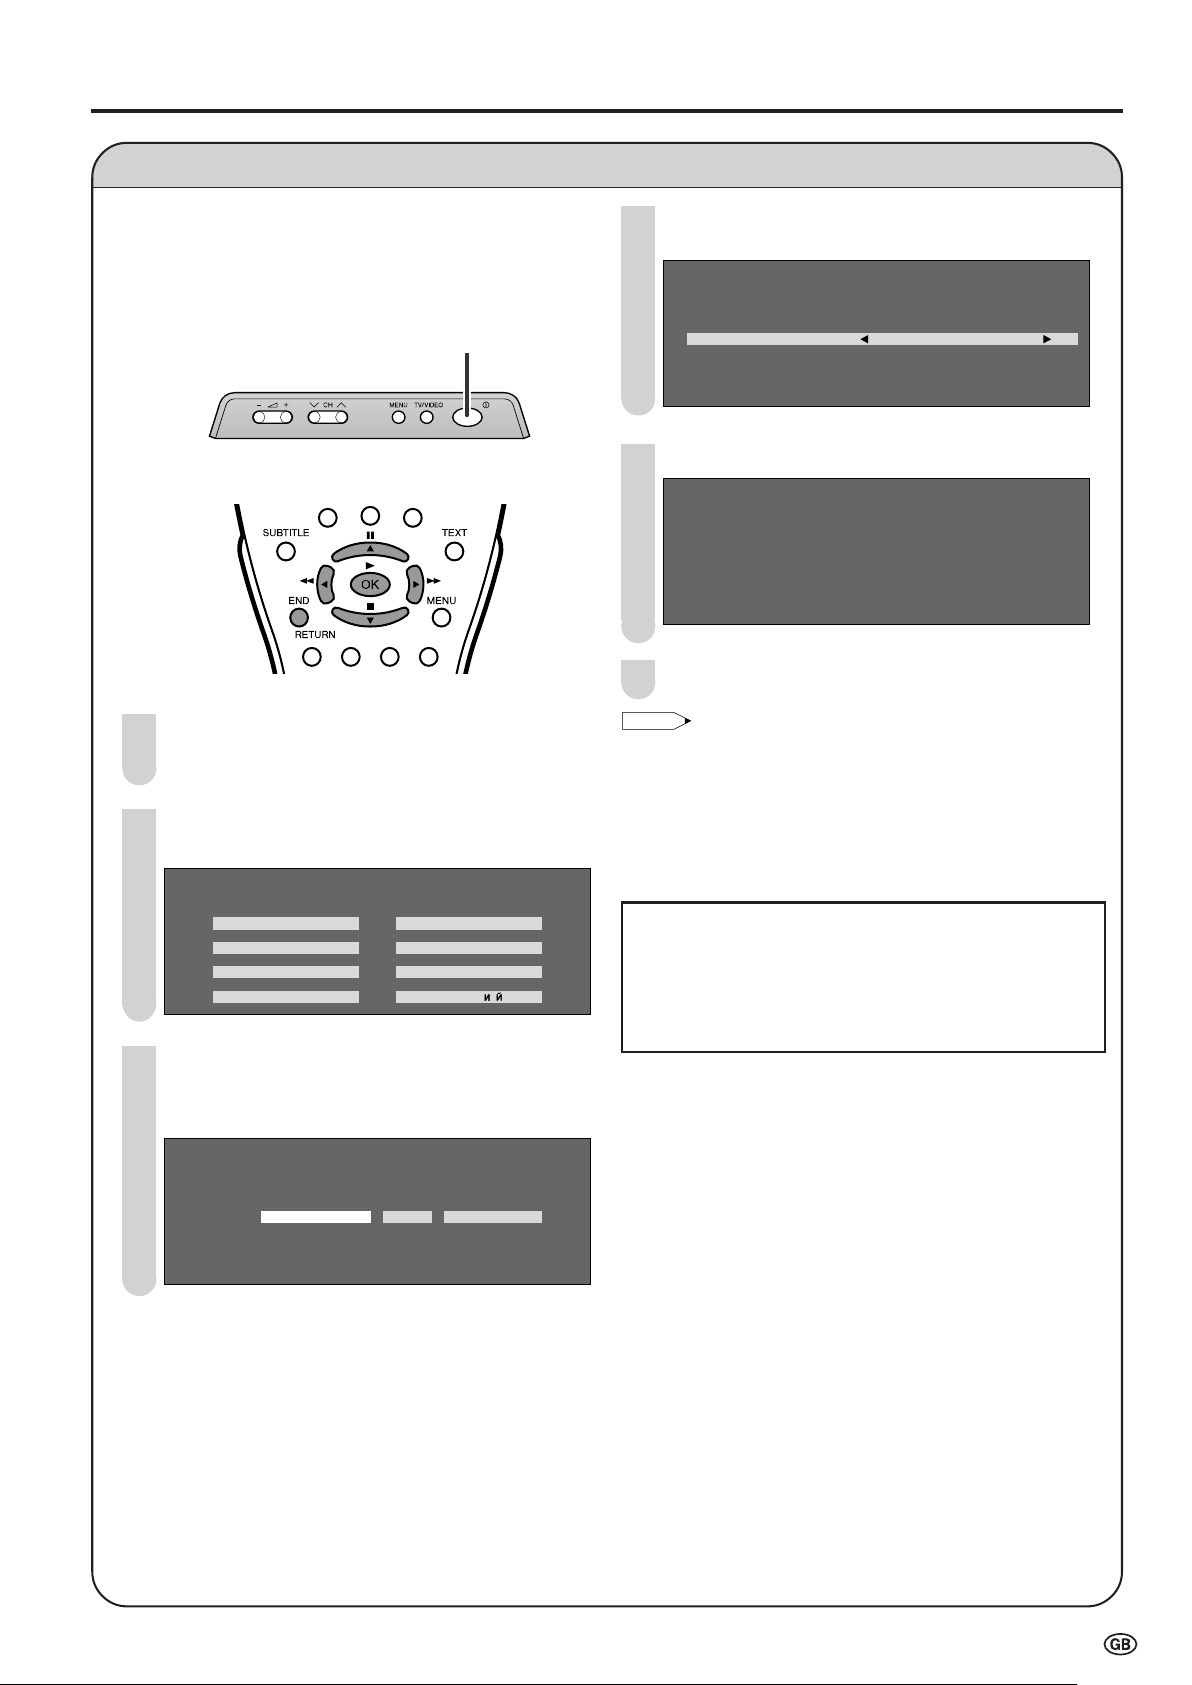
First Installation
0 0 0 0 0 0 0 0 0 0
Preparation (Continued)
When you turn on the LCD TV set for the first time, the
First Installation routine, which makes installation easier,
is activated. Using this routine, you can select the onscreen display language, clock setup and automatically
search for and store all the receivable channels.
X (MAIN POWER)
1
Press X (MAIN POWER). The “First installation”
screen with a list of the languages for the on-screen
display is displayed.
2
Press '/"/\/| to select the desired language, and
press OK.
First installation
Select option
English Italiano
Deutsch Nederlands
Fran
Espa
ç ais Svenska
ñ ol Pycck
Press '/" to select the desired adjustment item,
4
and press \/| to select the desired item.
First Installation
Automatic search
Country UK
Colour system PAL
Sound system I
Time zone :
Press OK to begin the automatic programme search.
5
First installation
759.25MHz P AL-I
8 16
1 E 0 2 9 17
2 E 0 4 1 18
3 U 0 2 11 19
4 U 0 4 12 2
5 E 0 5 13 21
6 E 0 8 14 22
7 E 1 0 15 23
Press END to exit.
6
• The input mode is automatically switched to AV1 when “First
installation” is selected.
• You can change the following items after the First installation
routine by selecting Language (see page 27), Clock setup
(see page 21) and Automatic search (see page 18) on the TV
menu.
• Set the time difference with global standard time of your area
for “Time zone”, when “Other countries” is selected in “Country”.
■ Backup
The clock function is maintained for about 10 minutes
even when the adapter has been shut off due to a power
outage or when moving the LCD TV set. (Since about 30
minutes are required to charge the backup power supply,
the clock function may not be able to be maintained if the
charging time is excessively short.)
3 Press \/| to select day/month/day of week, year or
time. Press '/" to adjust them, and press OK.
• The time you set is automatically updated via teletext
time information.
First installation
Adjust setting
1/ 1 Thu 2 4 : :
7
Page 10
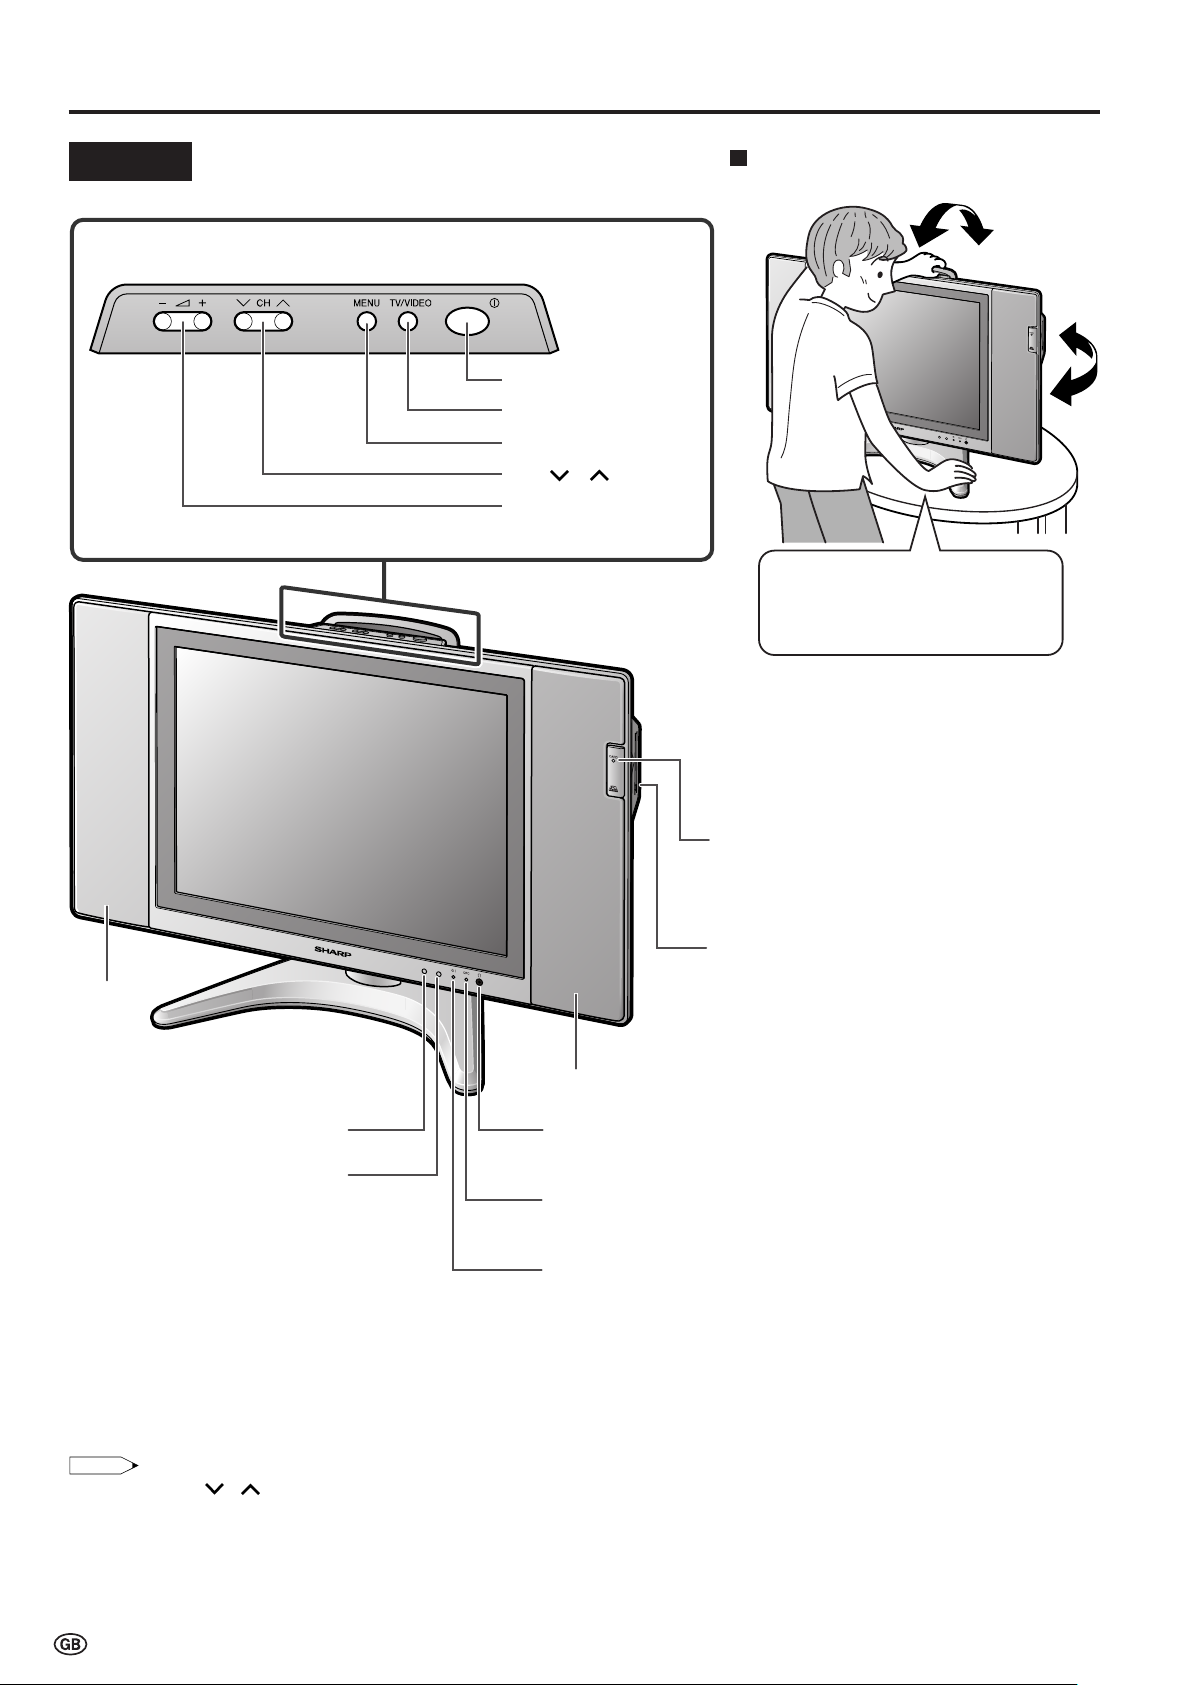
Part Names of Main Unit
NOTE
Tilt the display by grabbing onto
the carrying handle while securely
holding down the stand with your
other hand.
How to adjust the angle
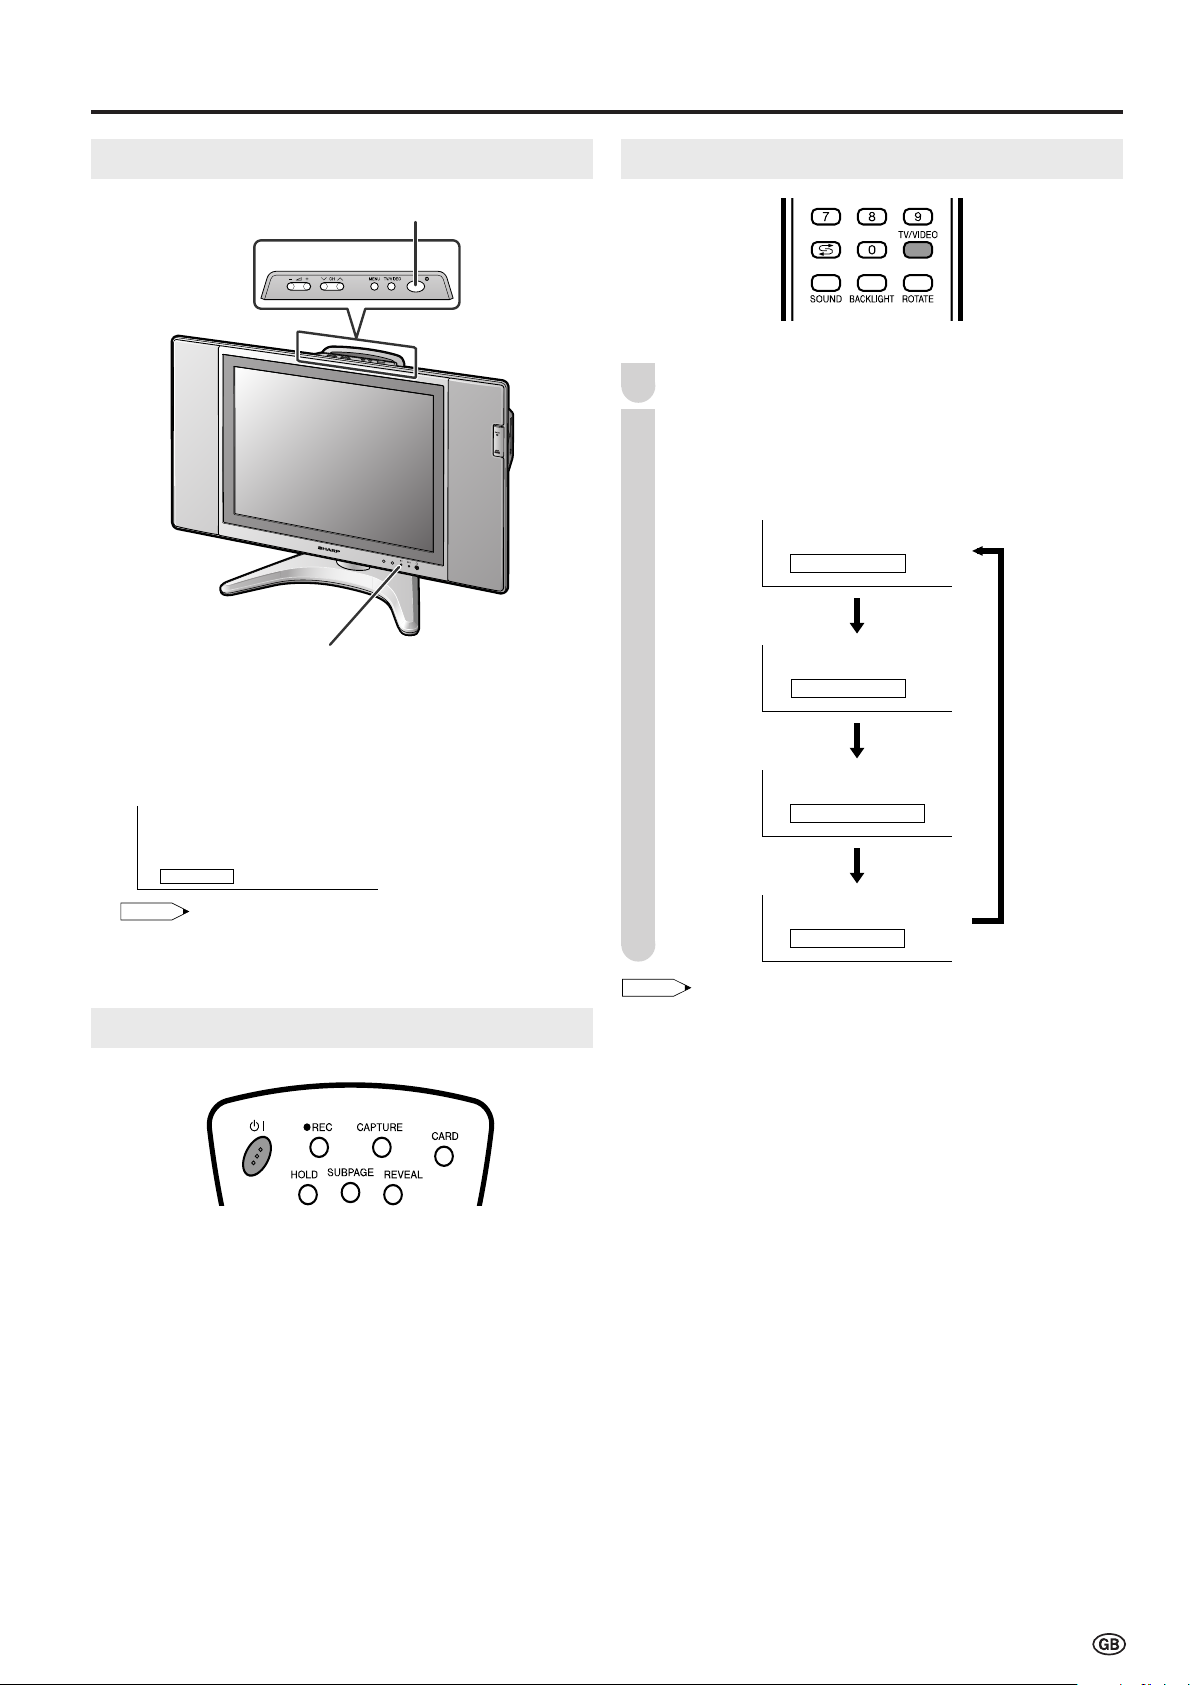
Controls
Upper control panel
X (MAIN POWER)
TV/VIDEO
MENU
CH ( )/( )
i (–)/(+) (Volume)
Speaker
OPC sensor
Remote sensor
To change the vertical angle of the LCD TV
set, tilt the screen up to 5 degrees forward
or 10 degrees backward. The LCD TV set
can also be rotated up to 25 degrees to right
and left. Please adjust the angle so that the
LCD TV set can be watched most comfortably.
Card Lamp
When timer recording is set: Orange
When recording: Red
During standby: Green
PC Card Slot
Speaker
Headphone jack
Plug the headphone mini-plug into the Headphone jack
located on the front of the LCD TV set. (See page 6.)
OPC indicator (Optical Picture Control)
The Optical Picture Control indicator lights up green when the
“Backlight” is set to “Auto (OPC)”. (See page 21.)
STANDBY/ON indicator
STANDBY/ON indicator lights up green when the power is on,
and red when in the standby mode (the indicator will not light
when the main power is off). The indicator blinks red when the
LCD TV set receives the remote control signal, and orange
when the wake-up timer is set (the indicator will lights when in
the standby mode).
• TV/VIDEO, CH ( )/( ), i (–)/(+) (Volume) and MENU on the main unit have the same functions as the same buttons on the
remote control. Fundamentally, this operation manual provides a description based on operation using the remote control.
8
Page 11
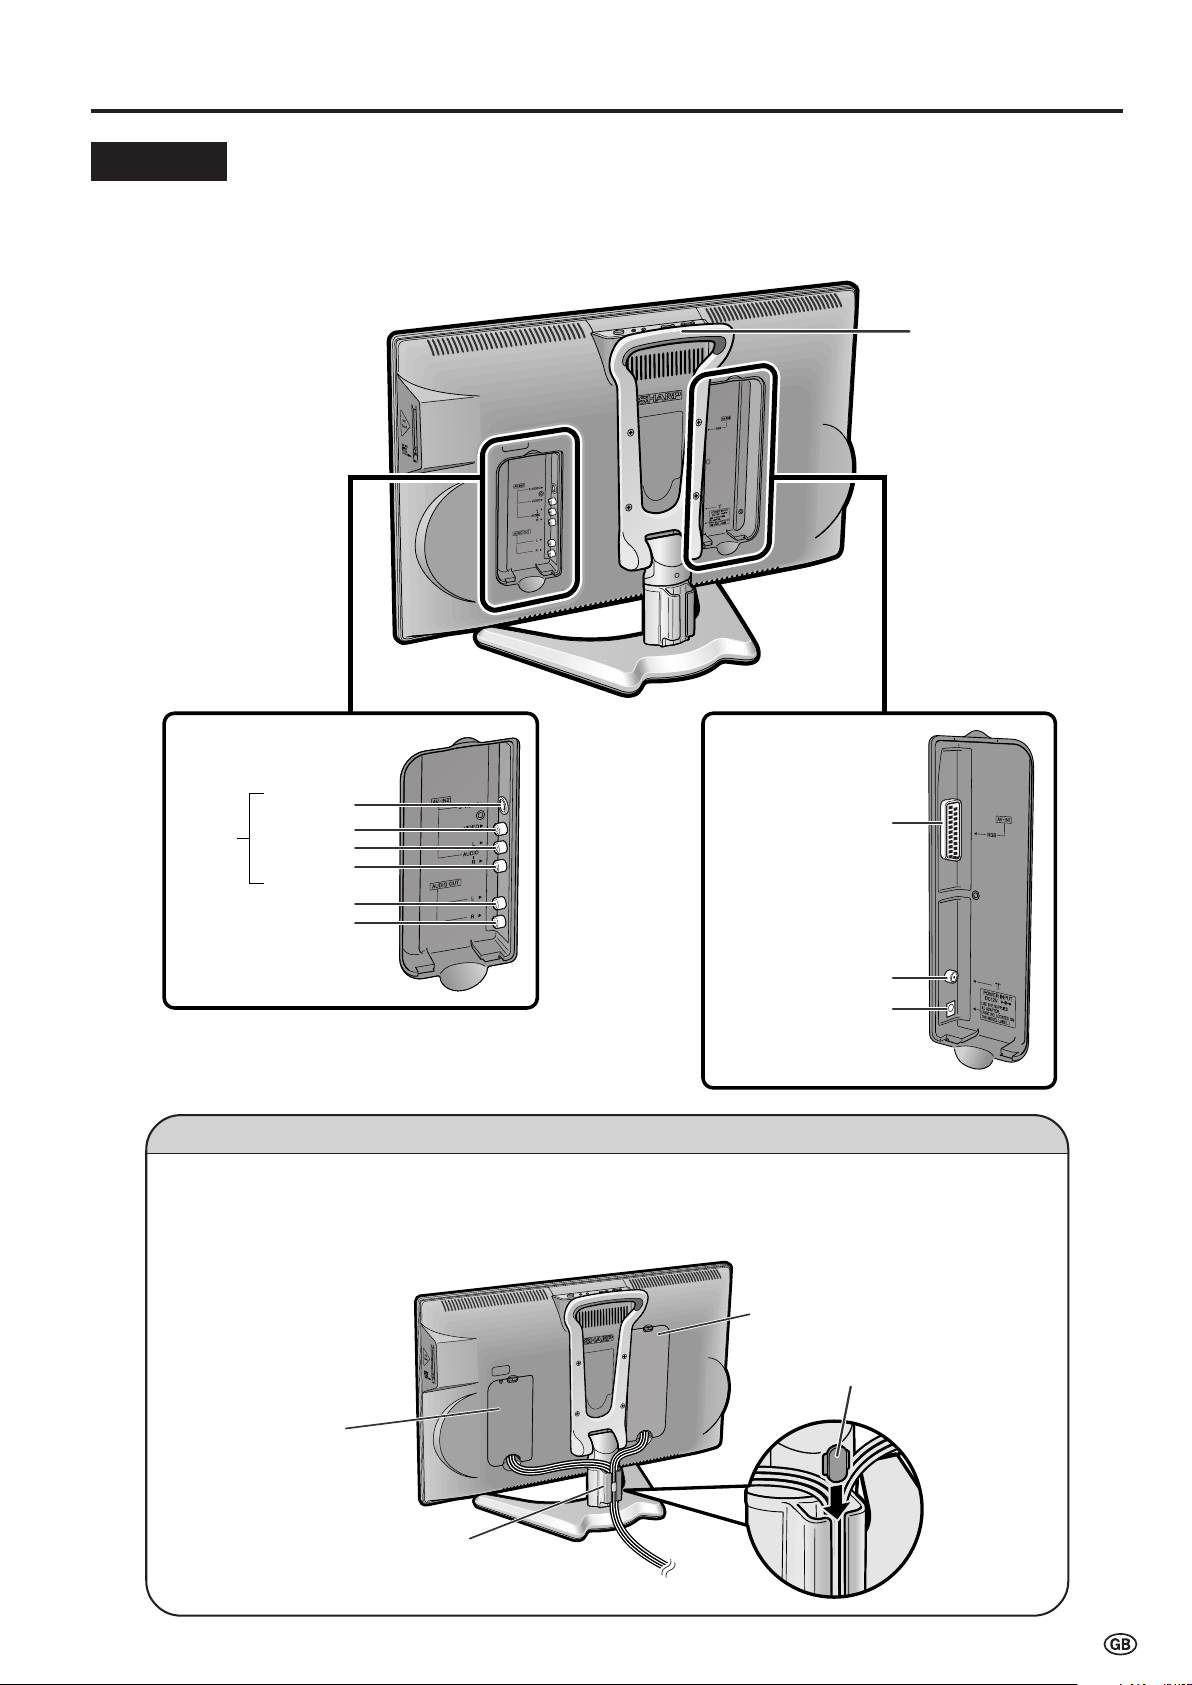
Terminals
AV-IN1
(21-pin Euro-SCART)
Antenna terminal
POWER INPUT
DC 12V
Carrying handle
Rear View
S-VIDEO
AV-IN2
VIDEO
AUDIO OUT (R)
AUDIO OUT (L)
AUDIO (R)
AUDIO (L)
Terminal cover
Cable holder
Terminal cover
Support cover
Part Names of Main Unit (Continued)
How to fix the cables
•Pull the cables connected to each terminal through the holes and close the left and right terminal covers.
Push the cables into the grooves of the support covers. Insert the cable holder (supplied) from above the
support cover and fix the cables.
9
Page 12
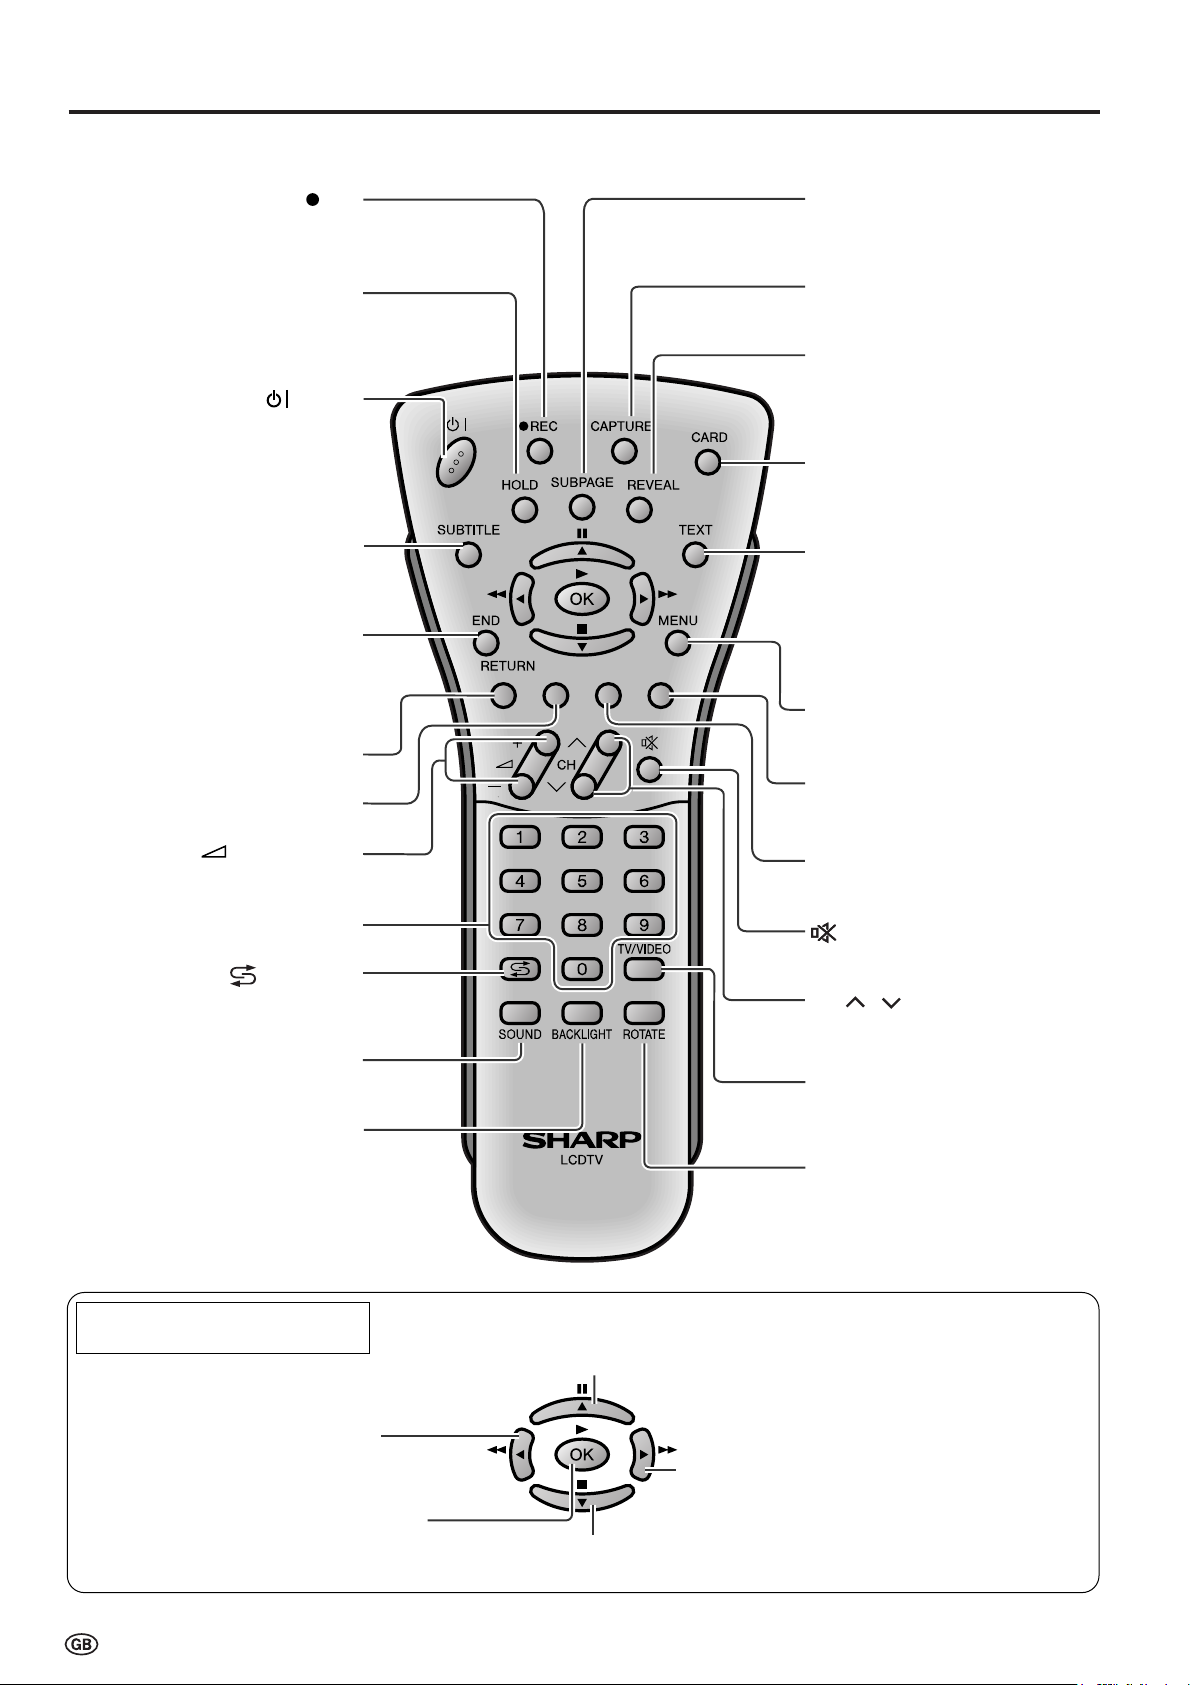
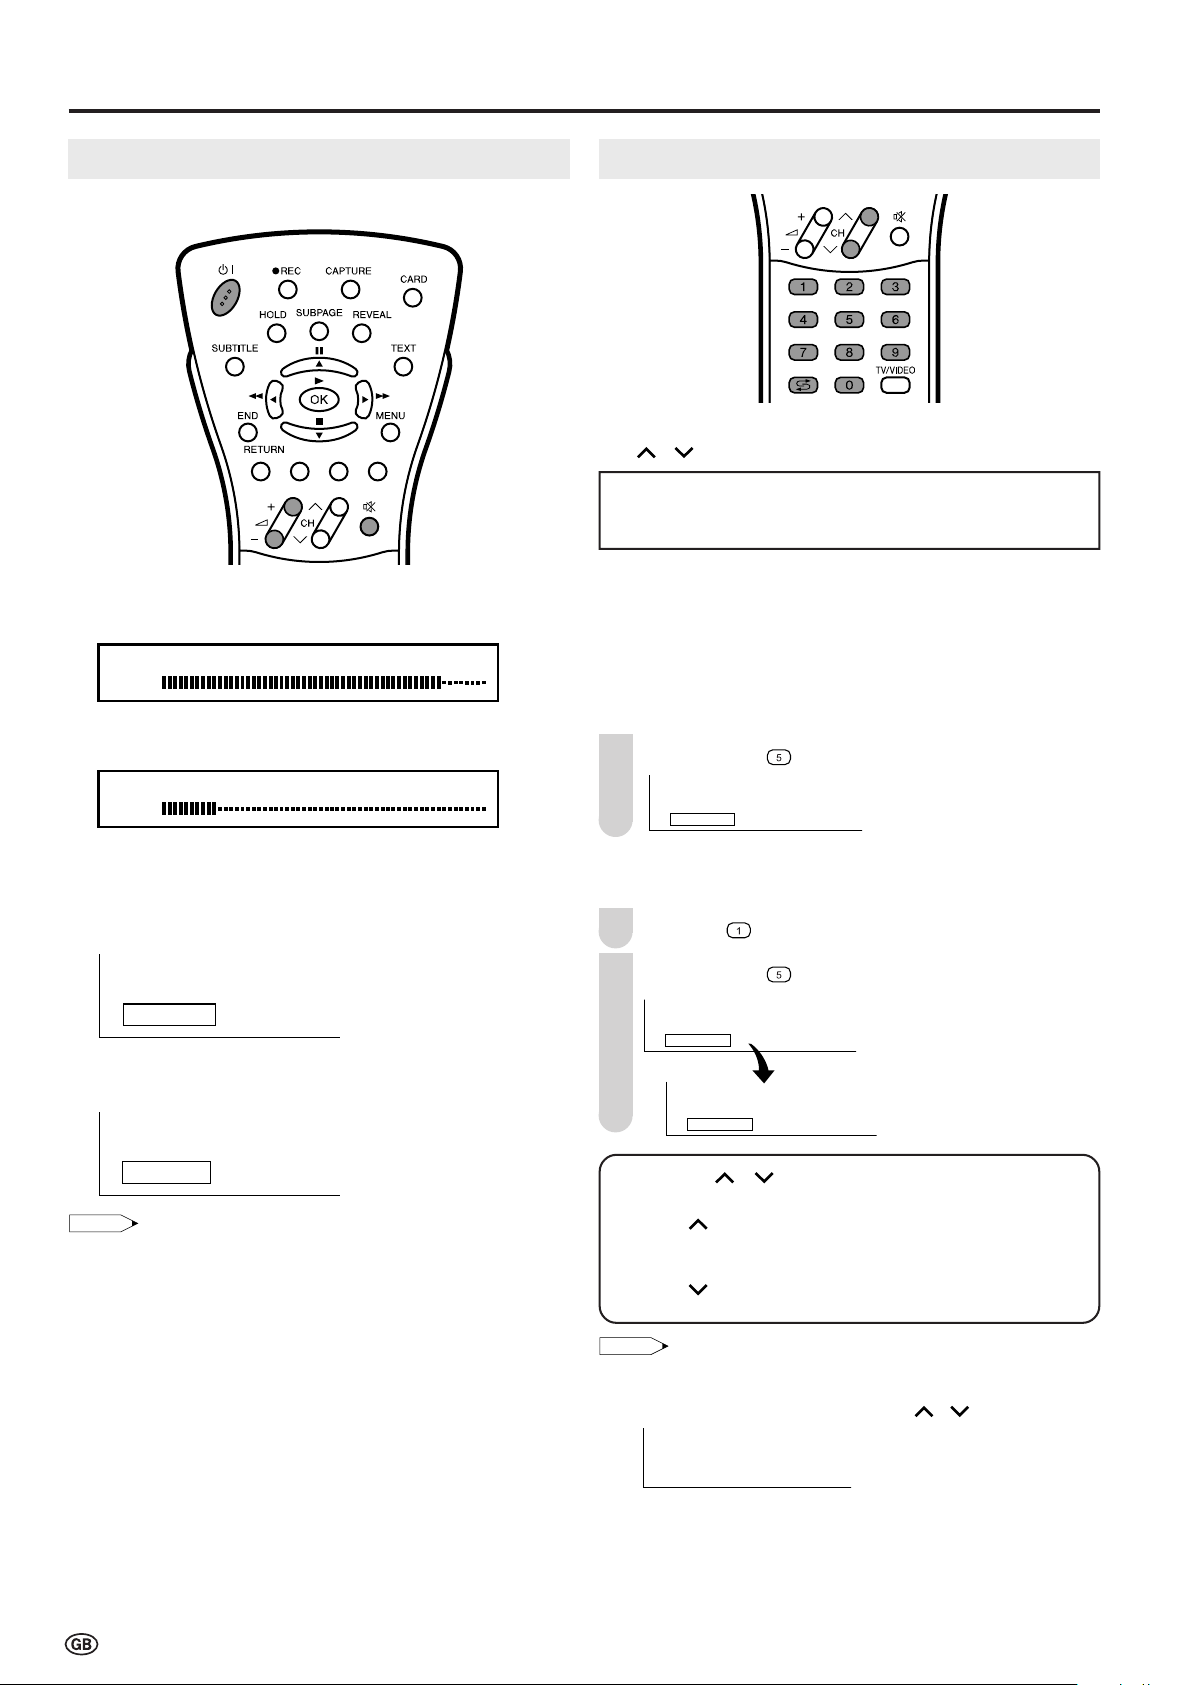
Part Names of Remote Control
SUBTITLE
Displays the Teletext
Subtitle directly.
(P. 30)
HOLD
Temporarily holds the
current Teletext page.
(P. 30)
REC
Records the motion
picture.
(P. 37)
(Mute)
Switches the sound on and off.
(P. 12)
Yellow,
Timer function Menu
(P. 22, 29)
Cyan, Status Display
(P. 29, 37)
TV/VIDEO
Switches the input source between
AV1, AV2, CARD (only playback)
and TV mode. (P. 11)
Channel Select
(P. 12)
MENU
Displays the TV menu.
(P. 13)
(+)/(
-
) (Volume
)
(P. 12)
(Flashback)
Returns to the previous
channel. (P. 12)
Red, Picture Menu
(P. 15, 29)
END
Returns to normal screen.
(P. 7)
TEXT
Displays the Teletext mode
screen. (P. 29)
(Power)
(P. 11)
SOUND
Switches the sound
mode. (P. 28)
REVEAL
Displays hidden information
such as solutions to riddles
and puzzles. (P. 30)
CARD
Switches between motion and
still picture. (P. 34)
SUBPAGE
Displays the Teletext
Subpage directly.
(P. 30)
CAPTURE
Records the still picture.
(P. 53)
ROTATE
Rotates the display in every
direction. (P. 25)
Move the cursor to the upwards
(Select the menu items)
/
Still
(Pause the motion picture playback or card recording)
Move the cursor to the right
(Select the menu items)
/
Fast Forward
(Fast forwards the picture)
Move the cursor to the downwards
(Select the menu items)
/
Stop
(stop the motion picture playback or card recording)
OK
(Set the menu or items by selecting the cursor)
/
Play
(Playback the card)
Move the cursor to the left
(Select the menu items)
/
Fast Reverse
(Fast reverses the picture)
How to use the cursor during the
motion picture playback
BACKLIGHT
Selects the brightness and
OPC of the display.
(P. 21)
Green, Sound Menu
(P. 17, 29)
CH ( )/( )
(P. 12)
10
Page 13
NOTE
1 S06
Basic Operation
NOTE
AV2
Video index
AV1
1 S06
Turning On and Off the Main Power
X (MAIN POWER)
STANDBY/ON indicator
● Press X (MAIN POWER). The STANDBY/ON indicator
instantly changes from blinking red to green and the LCD
TV set is turned on.
On-screen display
Switching the TV/VIDEO (AV1/AV2/CARD/TV) Mode
Turn on the power of the connected video equipment.
1
Press TV/VIDEO to select the applicable input source.
2
The screen changes in order of AV1, AV2, CARD and
TV mode each time TV/VIDEO is pressed.
AV1 mode
AV2 mode
CARD mode
• The On-screen display disappears after a few seconds.
● To turn off the main power, press X (MAIN POWER).
STANDBY/ON
To turn off the LCD TV
BB
Press
B. The STANDBY/ON indicator will turn red.
BB
To turn the LCD TV back on
BB
Press
B again. The STANDBY/ON indicator will turn green.
BB
TV mode
• About the video modes
• AV1: Select this when viewing the signals from the video
equipment connected to the AV-IN1 terminal.
• AV2: Select this when viewing the signals from the video
equipment connected to the AV-IN2 terminals using the
VIDEO or S-VIDEO terminal for video input.
• CARD: Select this when running a memory card. (“Still index”
will be displayed when still picture mode is selected, and
“Video index” will be displayed when motion picture
mode is selected.)
• If both VIDEO and S-VIDEO terminals are connected with cables,
the S-VIDEO input terminal is selected as the high priority.
11
Page 14
Basic Operation (Continued)
5
15
1
NOTE
1
●
Volume
50
Volume
10
Sound off
Sound on
NOTE
Sound Volume
■ To adjust the volume
● Press i (+) to increase the sound volume.
The bar indicator shifts right.
● Press i (–) to decrease the sound volume.
The bar indicator shifts left.
Changing Channels
You can select channels using Channel Select or
)/( ).
CH (
•To handle the increasing number of channels available, this
LCD TV set allows you to select up to 200 channels (0 to
199).
Using Channel Select
■
When selecting the channel using Channel Select, finish
inputting the channel number by holding down the button for
the last digit for a moment.
To select a one-digit channel
(e.g. Channel 5):
1
Hold down the
button.
■ To mute the sound
● Press
● Press
• When i (+)/(–) is pressed in the Mute mode, the sound turns
on and the volume indicator is displayed.
• The Mute function is cancelled when
ee
e (Mute) to temporarily turn off the sound.
ee
“Sound off” is displayed.
ee
e (Mute) again to turn off the Mute function.
ee
“Sound on” is displayed.
BB
B is pressed.
BB
To select a two/three-digit channel
(e.g. Channel 15):
Press the
1
Hold down the
2
button.
button.
Using CH ( )/( )
Press CH ( ) and the channels change in the order shown below:
1 → 2 → 3 → . . . → 198 → 199 → 0 → 1 → 2 → 3 → . . .
Press CH ( ) and the channels change in the order shown below:
3 → 2 → 1 → 0 → 199 → 198 → . . . → 3 → 2 → 1 → . . .
• Channel “0” is reserved for RF output of VCR.
• Channels not set with auto search or via Setup are set to skip and
therefore cannot be displayed using CH ( )/( ).
12
■ Using
● Press
AA
A (Flashback)
AA
AA
A to switch the currently tuned channel to the
AA
previously tuned channel.
● Press
AA
A again to switch back to the currently tuned
AA
channel.
Page 15

Menu[Picture
]
Contrast [ 3Contrast [ 3 ] ] +6 +6
Brightness [ Brightness [ ] -3] -3 +3 +3
Colour [ Colour [ ] -3] -3 +3 +3
T int [ int [ ] -3] -3 +3 +3
Sharpness [ Sharpness [ ] -1 +1
Advanced
Reset
Picture Sound Setup Features Card
0 0
0
0
0
0
0
0
0
0
0
0
0
0
0
NOTE
Menu[Picture
]
Contrast [ 3Contrast [ 3 ] ] +6 +6
Brightness [ Brightness [ ] -3] -3 +3 +3
Colour [ Colour [ ] -3] -3 +3 +3
T int [ int [ ] -3] -3 +3 +3
Sharpness [ Sharpness [ ] -1 +1
Advanced
Reset
Picture Sound Setup Features Card
0 0
0
0
0
0
0
0
0
0
0
0
0
0
0
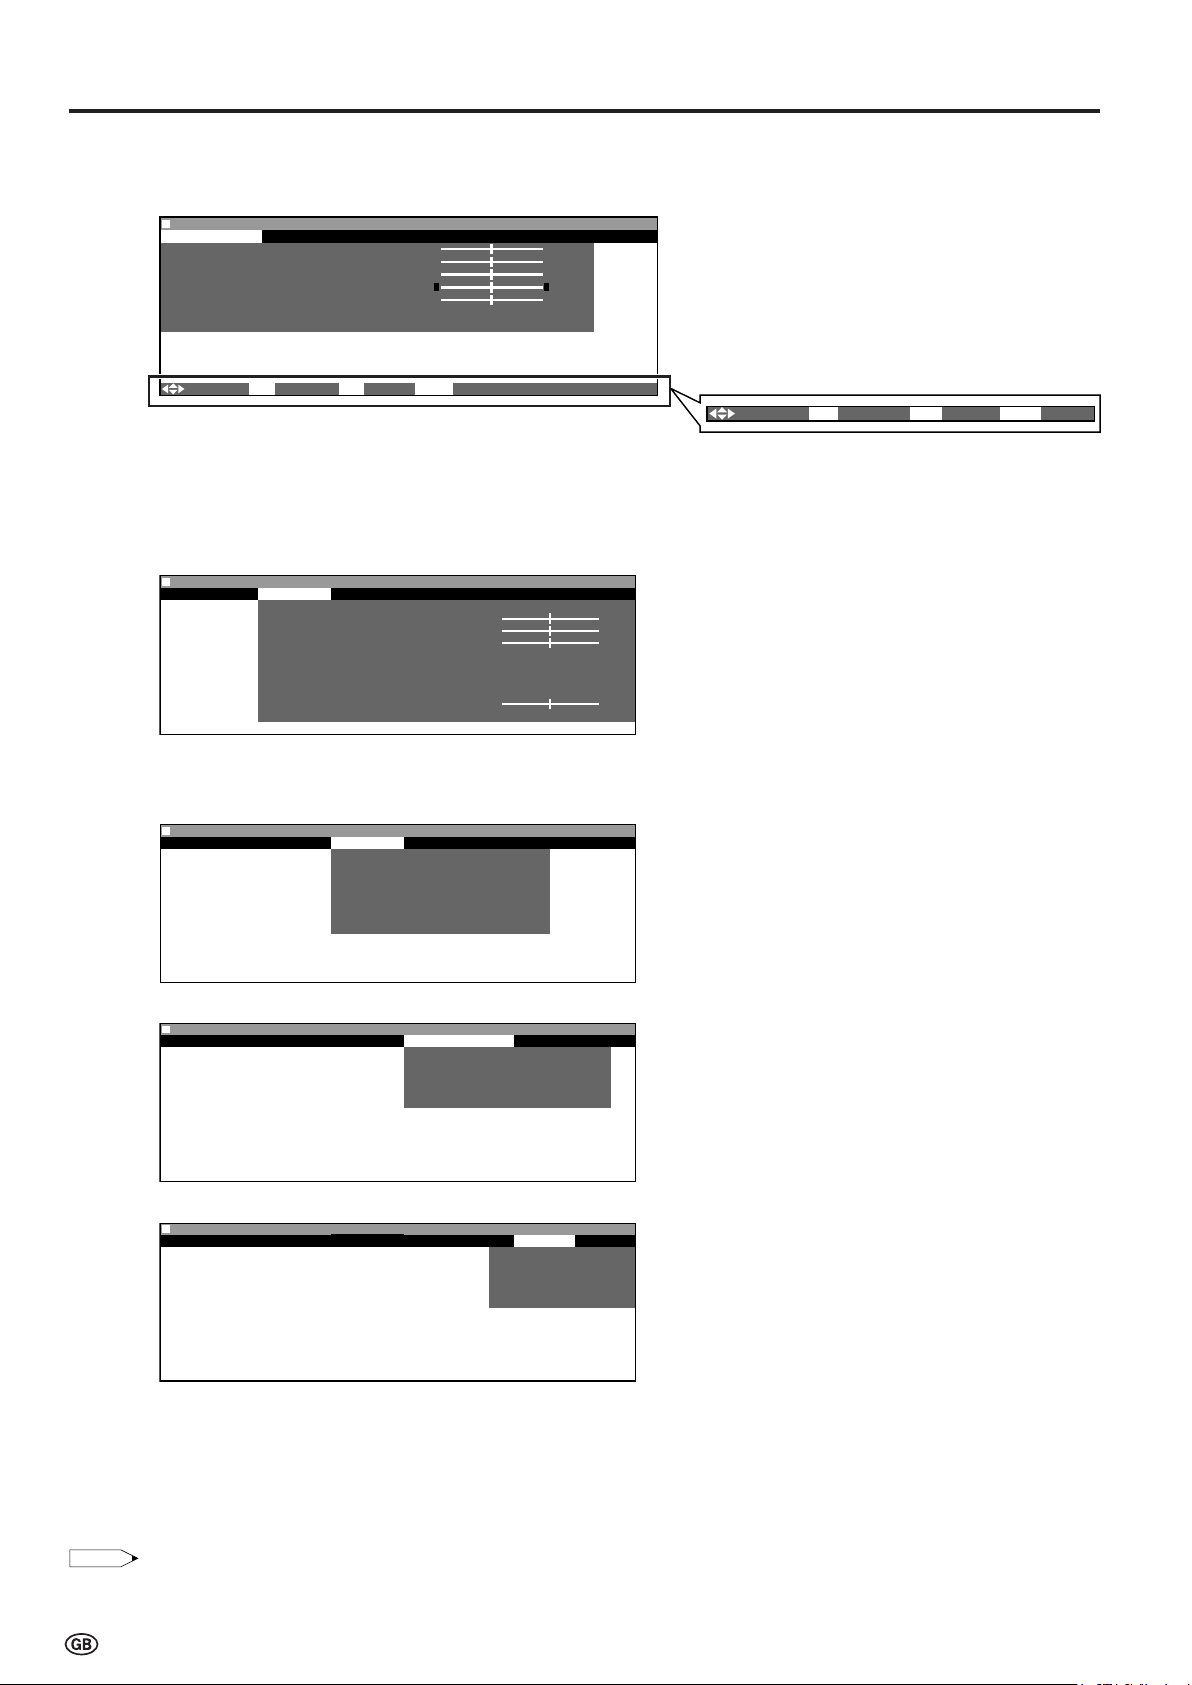
Selecting Menu Items
• The menus can be used to adjust the various settings of
your LCD TV set. Select the desired menu item by
following the steps below.
Basic Operation (Continued)
■ Using menus
Press MENU on the remote control to display the Menu
1
Screen.
Press \/| to select the desired menu item.
2
• The cursor moves left or right.
• The cursor indicates the selected menu item.
Press '/" to select the desired item, and press \/|
3
to adjust the selected item.
• For “Advanced” and “Reset”, press OK to display the setting
screen.
• See the next page for the setting screens.
■ Using direct control menu
Control panel of the main unit
TV/VIDEO
ii
i (–)/(+)
ii
(Volume)
Press MENU on the main unit to display the Menu
1
CH ( )/( )
Screen.
2
Press i (–)/(+) to select the desired menu item.
• The cursor moves left or right.
• The cursor indicates the selected menu item.
3
Press CH ( )/( ) to select the desired item and press
i (–)/(+) to adjust the selected item.
• For “Advanced” and “Reset”, press TV/VIDEO to display the
setting screen.
MENU
4
Press MENU to return to the previous screen or END to
return to the normal screen.
4
Press MENU to return to the previous screen.
• Each time MENU is pressed, you will return to the screen
previously shown.
• The items displayed differ depending on the setting conditions.
• The item selected is displayed in yellow.
• Settings most recently adjusted will be saved in memory.
13
Page 16
Basic Operation (Continued)
NOTE
0
Balance [ ] -1
Menu[Setup]
Picture Sound Setup Features Card
Programmes
First installation
Rotate
AV connections
Clock setup
Language
Demo
::
Select
OK:
Enter MENU:Back
END:
Exit
Menu[Picture]Menu[Picture]
Picture Sound Setup Features Card
Contrast [ 3Contrast [ 3 ] ] +6 +6
Brightness [ Brightness [ ] -3] -3 +3 +3
Colour [ Colour [ ] -3] -3 +3 +3
Tint [ Tint [ ] -3] -3 +3 +3
Sharpness [ Sharpness [ ] -1] -1 +1 +1 Advanced
Advanced
Reset
::
Select
OK:
Enter MENU:Back
END:
Exit
0 0
0
0
0
0
0
0
0
0
0
0
0
0
0
■ Menu setting screens
For details on using each setting screen, refer to the page number indicated.
Picture
Page
Contrast .......................................................... 15
Brightness ....................................................... 15
Colour ............................................................. 15
Tint .................................................................. 15
Sharpness ....................................................... 15
Advanced .................................................. 15, 16
Reset ............................................................... 15
The bar above is an operational guide for
the remote control. The bar will change in
accordance with each menu screen.
Sound
Setup
Features
Menu[Sound]
Picture Sound Setup Features Card
Sound via [TV]
T reble [ ] -1 +1
Bass [ ] -1 +1
Headph.vol.[ 3 ] +6
Loudsp.sound
Headph.sound
A V audio sig.
Sound wide
Balance [ ] -1
Reset
Menu[Features]
Picture Sound Setup Features Card
Backlight
T imer functions
Auto power off
On- screen display
Child lock
0
0
0 0
0 0 0
0
0
+1
Page
Sound via ........................................................ 17
0
0
0
Treble .............................................................. 17
Bass ................................................................ 17
Headph. vol. ................................................... 17
Loudsp. sound ................................................ 17
Headph. sound ............................................... 17
AV audio sig. .................................................. 17
Sound wide ..................................................... 17
Balance ........................................................... 17
Reset ............................................................... 17
Page
Programmes .............................................. 18-20
First installation .............................................. 7
Rotate ............................................................. 25
AV connections ............................................... 26
Clock setup ..................................................... 21
Language ........................................................ 27
Demo* ............................................................. 14
Page
Backlight ......................................................... 21
Timer functions ............................................... 22
Auto power off ................................................ 21
On-screen display........................................... 22
Child lock ................................................... 23-25
Card
• The illustrations and on-screen displays in this manual are for explanation purposes and may vary slightly from the actual appearance.
14
Menu[Card]
Picture Sound Setup Features Card
Select mode
Video setup
Timer rec
Still setup
Format
Page
Select mode .................................................... 34
Video setup .......................................... 36, 41-45
Timer rec ................................................... 38, 39
Still setup .......................................48-52, 54, 55
Format............................................................. 56
*About “Demo” in “Setup”
• “Demo” is a function for demonstration display at a
shop.
•To turn off the demonstration, do the following:
1. Press \/| to select “Setup” in the Menu screen.
2. Press '/" to select “Demo”, and press OK.
3. Press '/" to select “Demo”.
4. Press \/| to select “Off”, and press OK.
5. Press END to exit.
Page 17
Menu[Picture
]
Contrast [ 3Contrast [ 3 ] ] +6 +6
Brightness [ Brightness [ ] -3] -3 +3 +3
Colour [ Colour [ ] -3] -3 +3 +3
Tint [ Tint [ ] -3] -3 +3 +3
Sharpness [ Sharpness [ ] -1 +1
Advanced
Reset
Picture
0 0
0
0
0
0
0
0
0
0
0
0
0
0
0
NOTE
Menu[Picture Advanced
]
Contrast [ 3Contrast [ 3 ] ] +6 +6
Brightness [ Brightness [ ] -3] -3 +3 +3
Colour [ Colour [ ] -3] -3 +3 +3
Tint [ Tint [ ] -3] -3 +3 +3
Sharpness [ Sharpness [ ] -1 +1
Advanced
Reset
Picture
0 0
0
0
0
0
0
0
0
0
0
0
0
0
0
Menu[Picture
Basic Adjustment Settings
Picture Adjustments
Adjust the picture to your preference with the following
picture settings.
Press MENU to display the Menu screen.
1
• The Picture Menu screen can be displayed directly by
pressing the Red.
Press \/| to select “Picture”.
2
Press '/" to select a specific adjustment item.
3
I/P Setup
Adjusting the image and input signal can give you a more
beautiful picture.
Press MENU to display the Menu screen.
1
• The Picture Menu screen can be displayed directly by
pressing the Red.
Press \/| to select “Picture”.
2
Press '/" to select “Advanced”, and press OK.
3
4
Press \/| to adjust the item to your desired position.
5
Press END to exit.
Selected item
Contrast
Brightness
Colour
Tint
Sharpness
cc
c button
cc
For less contrast
For less brightness
For less colour
intensity
Skin tones become
purplish
For less sharpness
dd
d button
dd
For more contrast
For more brightness
For more colour
intensity
Skin tones become
greenish
For more sharpness
• Select “Advanced” and press OK to set “I/P Setup”, “DNR”, “Film
mode” or “Cool climate”. See pages 15 and 16.
• When resetting all adjustment items (except “Advanced”) to factory
preset values,
1 Press '/" to select “Reset”, and press OK.
2 Press \/| to select “Yes”, and press OK.
Press '/" to select “I/P Setup”, and press OK.
4
Menu[Picture
I/P Setup
DNR Select option
Film mode
Cool climate Interlace
Progressive
Press '/" to select “Interlace” or “Progressive”, and
5
Advanced]
press OK.
Press END to exit.
6
Selected item
Interlace
Progressive
Use this setting when you cannot get a clear
picture with Progressive. (Especially suitable for
media with special effects like game software.)
Normally, you should select this setting.
Description
15
Page 18
Basic Adjustment Settings (Continued)
Menu[Picture Advanced
]
Contrast [ 3Contrast [ 3 ] ] +6 +6
Brightness [ Brightness [ ] -3] -3 +3 +3
Colour [ Colour [ ] -3] -3 +3 +3
Tint [ Tint [ ] -3] -3 +3 +3
Sharpness [ Sharpness [ ] -1 +1
Advanced
Reset
Picture
0 0
0
0
0
0
0
0
0
00
0
0
0
0
NOTE
Menu[Picture
NOTE
Menu[Picture Advanced
]
Contrast [ 3Contrast [ 3 ] ] +6 +6
Brightness [ Brightness [ ] -3] -3 +3 +3
Colour [ Colour [ ] -3] -3 +3 +3
Tint [ Tint [ ] -3] -3 +3 +3
Sharpness [ Sharpness [ ] -1 +1
Advanced
Reset
Picture
0 0
0
0
0
0
0
0
0
0
0
0
0
0
0
Menu[Picture Advanced
]
I/P Setup
DNR Select option
Film mode
Cool climate On
Off
Menu[Picture Advanced
]
Contrast [ 3Contrast [ 3 ] ] +6 +6
Brightness [ Brightness [ ] -3] -3 +3 +3
Colour [ Colour [ ] -3] -3 +3 +3
Tint [ Tint [ ] -3] -3 +3 +3
Sharpness [ Sharpness [ ] -1 +1
Advanced
Reset
Picture
0 0
0
0
0
0
0
0
0
00
0
0
0
0
DNR (Digital Noise Reduction)
Produces a clearer video image.
Press MENU to display the Menu screen.
1
• The Picture Menu screen can be displayed directly by
pressing the Red.
Press \/| to select “Picture”.
2
Press '/" to select “Advanced”, and press OK.
3
Press '/" to select “Film mode”, and press OK.
4
Menu[Picture
I/P Setup
DNR Select option
Film mode
Cool climate On
Off
Press '/" to select “On”, and press OK.
5
Press END to exit.
6
Advanced]
• Set the “Film mode” to “On” manually to detect a film-based source
(originally encoded at 24 frames/second) when the input source
has vertical frequency of 50 Hz (e.g. PAL, SECAM etc.) .
Cool Climate
Improves LCD response when viewing fast-moving images.
The effect is greater at low room temperatures (at or below
15˚C/59˚F).
Press '/" to select “DNR”, and press OK.
4
Press '/" to select “On”, and press OK.
5
Press END to exit.
6
Film Mode
Automatically detects a film-based source (originally encoded
at 24 frames/second), analyses it, and then recreates each
still film frame for high-definition picture quality.
Press MENU to display the Menu screen.
1
• The Picture Menu screen can be displayed directly by
pressing the Red.
2
Press \/| to select “Picture”.
3
Press '/" to select “Advanced”, and press OK.
1 Press MENU to display the Menu screen.
• The Picture Menu screen can be displayed directly by
pressing the Red.
Press \/| to select “Picture”.
2
Press '/" to select “Advanced”, and press OK.
3
Press '/" to select “Cool climate”, and press OK.
4
Menu[Picture Advanced
I/P Setup
DNR Select option
Film mode
Cool climate On
Off
Press '/" to select “On”, and press OK.
5
]
16
Press END to exit.
6
•Cool climate may cause image noise. If this occurs, set the
function to “Off”.
Page 19
Menu[Sound
]
Sound via [TV]
Treble [ ] -1 +1
Bass [ ] -1 +1
Headph.vol.[ 3 ] +6
Loudsp.sound
Headph.sound
AV audio sig.
Sound wide
Balance [ ] -1 +1
Reset
Sound
0
0
0 0
0
0
0
0
0
0
0
0
NOTE
Useful Features
Menu[Sound Sound via
]
Sound
0
0
0 0
0
0
0
0
0
0
0
0
Sound via [TV]
Treble [ ] -1 +1
Bass [ ] -1 +1
Headph.vol.[ 3 ] +6
Loudsp.sound
Headph.sound
AV audio sig.
Sound wide
Balance [ ] -1 +1
Reset
Menu[Sound Sound via]
NOTE
Hi-fi Volume
20
Sound Adjustments
You can adjust the sound quality to your preference with the
following settings.
1
Press MENU to display the Menu screen.
• The Sound Menu screen can be displayed directly by
pressing the Green.
Press \/| to select “Sound”.
2
Press '/" to select a specific adjustment item.
3
Hi-Fi Sound Settings
This programme allows you to enjoy higher sound quality
when connecting the AUDIO OUT terminals to an external
amplifier using an audio cord.
1
Perform steps 1 and 2 in Sound Adjustments to
display the “Sound” screen.
Press '/" to select “Sound via”, and press OK.
2
Press \/| to adjust the item to your desired position.
4
Press END to exit.
5
Selected item
Sound via
Treble*
Bass*
Headph. vol.*
\\
\ button
\\
TV Hi-fi
For weaker treble
For weaker bass
Decrease headphones
volume
Loudsp. sound
Sound1 Sound2 Sound1+2 Mono
Stereo Mono
Mono
(*The choices differ depending on whether or
Headph. sound*
AV audio sig.
Sound wide*
Balance*
not a NICAM or A2 stereo signal is received.)
See page 28.
Sound1 Sound2 Sound1+2
Off On (Increase the spread of the sound.)
Increase the volume of
the left speaker
* “Cannot operate” is displayed when the “Sound via” item is set to “Hi-fi”.
• In the “AV audio sig.” item, mono-video recorders should select
“Sound1” or “Sound2”. Stereo-video recorders should select
“Sound1+2” so that the desired sound can be selected when
playing back the video.
• “AV audio sig.” is only selected when a bilingual programme is
received.
• When resetting all adjustment items (except “Loudsp. sound”,
“Headph. sound”, “AV audio sig.” and “Sound wide”) to factory
preset values,
1 Press '/" to select “Reset”, and press OK.
2 Press \/| to select “Yes”, and press OK.
||
| button
||
For stronger treble
For stronger bass
Increase headphones
volume
Increase the volume of
the right speaker
Press \/| to select “Hi-fi”, and press OK.
3
• The sound from the built-in speakers will be turned off.
Menu[Sound Sound via]
Select option
T V Hi-fi
4
Press '/" to select the desired item, and press OK.
Press '/"/\/| to select the Sound mode, and press
5
OK.
6
Press END to exit.
• Pressing i (–)/(+) will display the volume indicator shown
below. You can adjust the volume by pressing + or – on the same
button.
* To exit this mode, switch “Sound via” from “Hi-fi” to “TV” in the Sound
menu.
17
Page 20
Useful Features (Continued)
Menu[Setup Programmes]Menu[Setup Programmes]
Automatic search
759.25MHz PAL-I
8 E 9 16 E54
1 S 6 9 E1 17 E56
2 S 8 1 E11 18 E57
3 S1 11 E36 19
4 S11 12 E37 2
5 E 3 13 E38 21
6 E 5 14 E5 22
7 E 6 15 E53 23
0
NOTE
Menu[Setup Programmes]
Menu[Setup Programmes]
0
Menu[Setup Programmes
]
Programmes
First installation
Rotate
AV connections
Clock setup
Language
Demo
Setup
Menu[Setup Programmes]
Menu[Setup Programmes]
0 0 0
NOTE
Menu[Setup Programmes]Menu[Setup Programmes]
Automatic search
8 E 9 16 E54
1 S 6 9 E1 17 E56
2 S 8 1 E11 18 E57
3 S1 11 E36 19
4 S11 12 E37 2
5 E 3 13 E38 21
6 E 5 14 E5 22
7 E 6 15 E53 23
0
Programmes
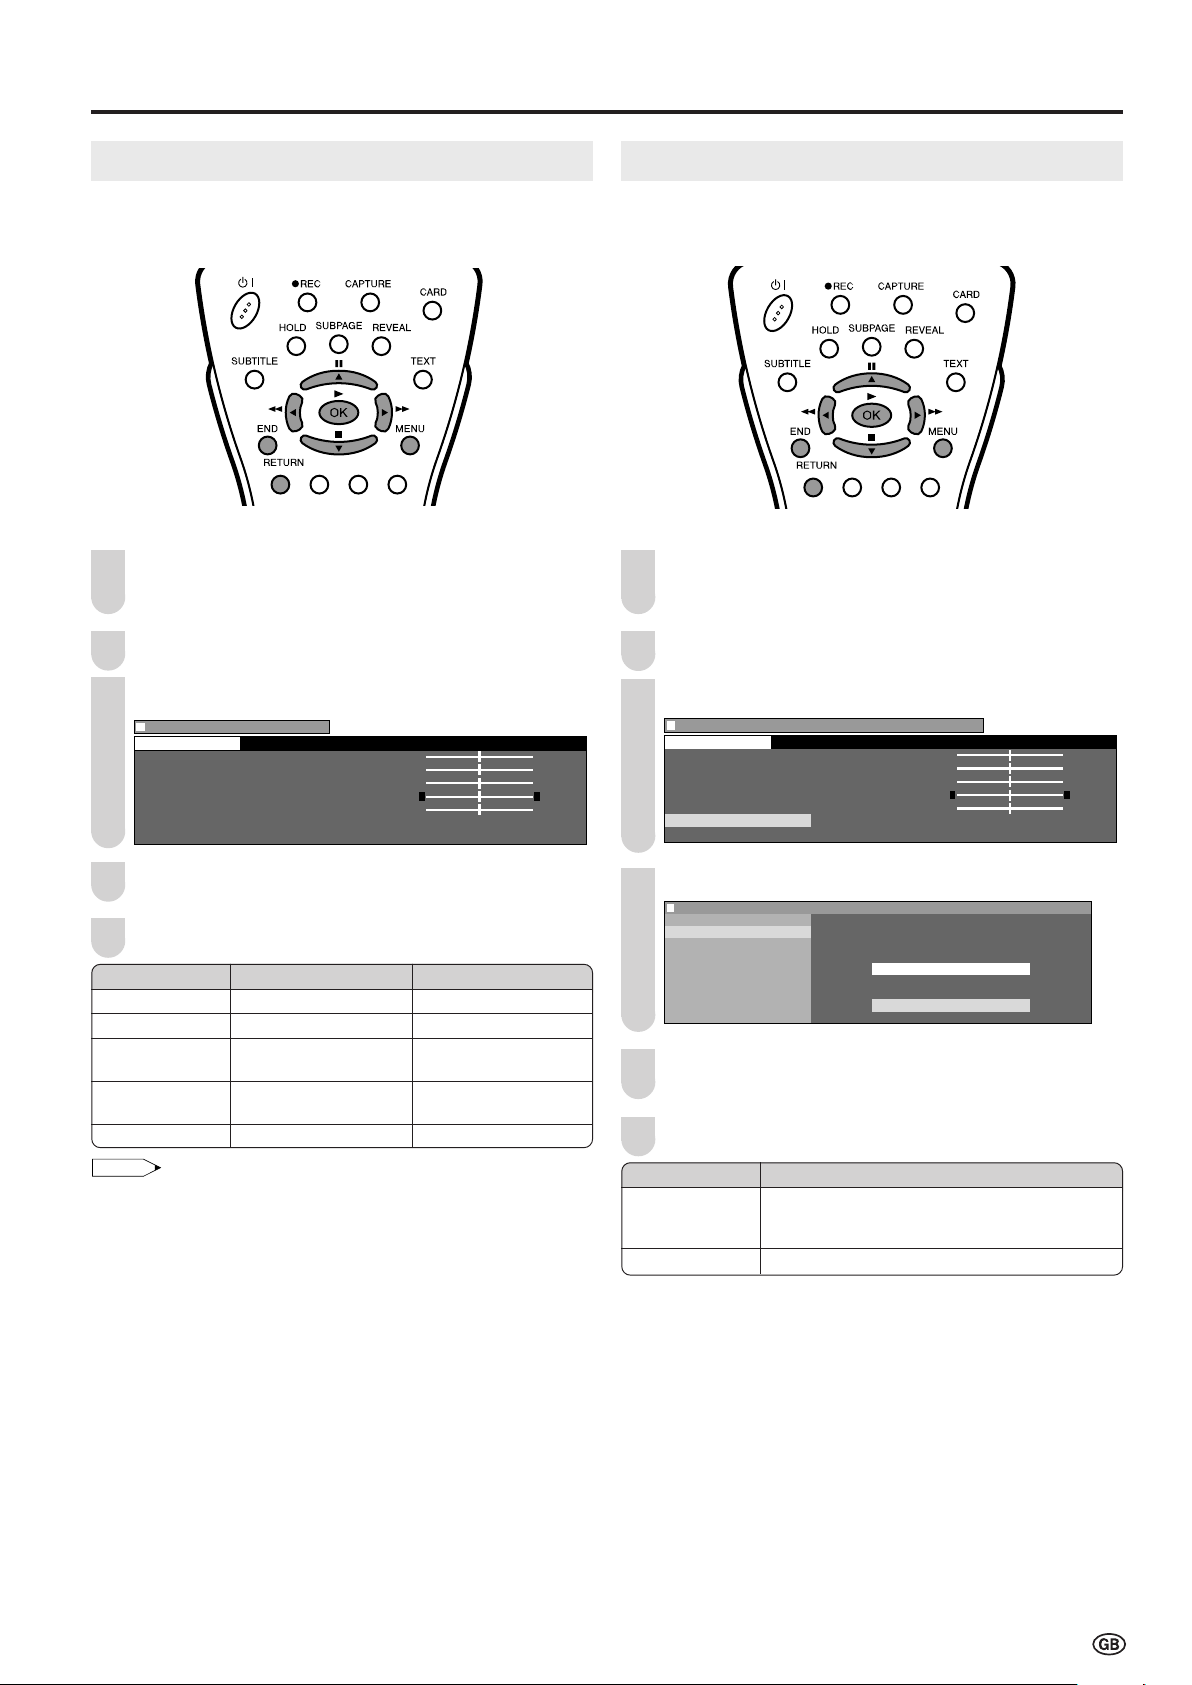
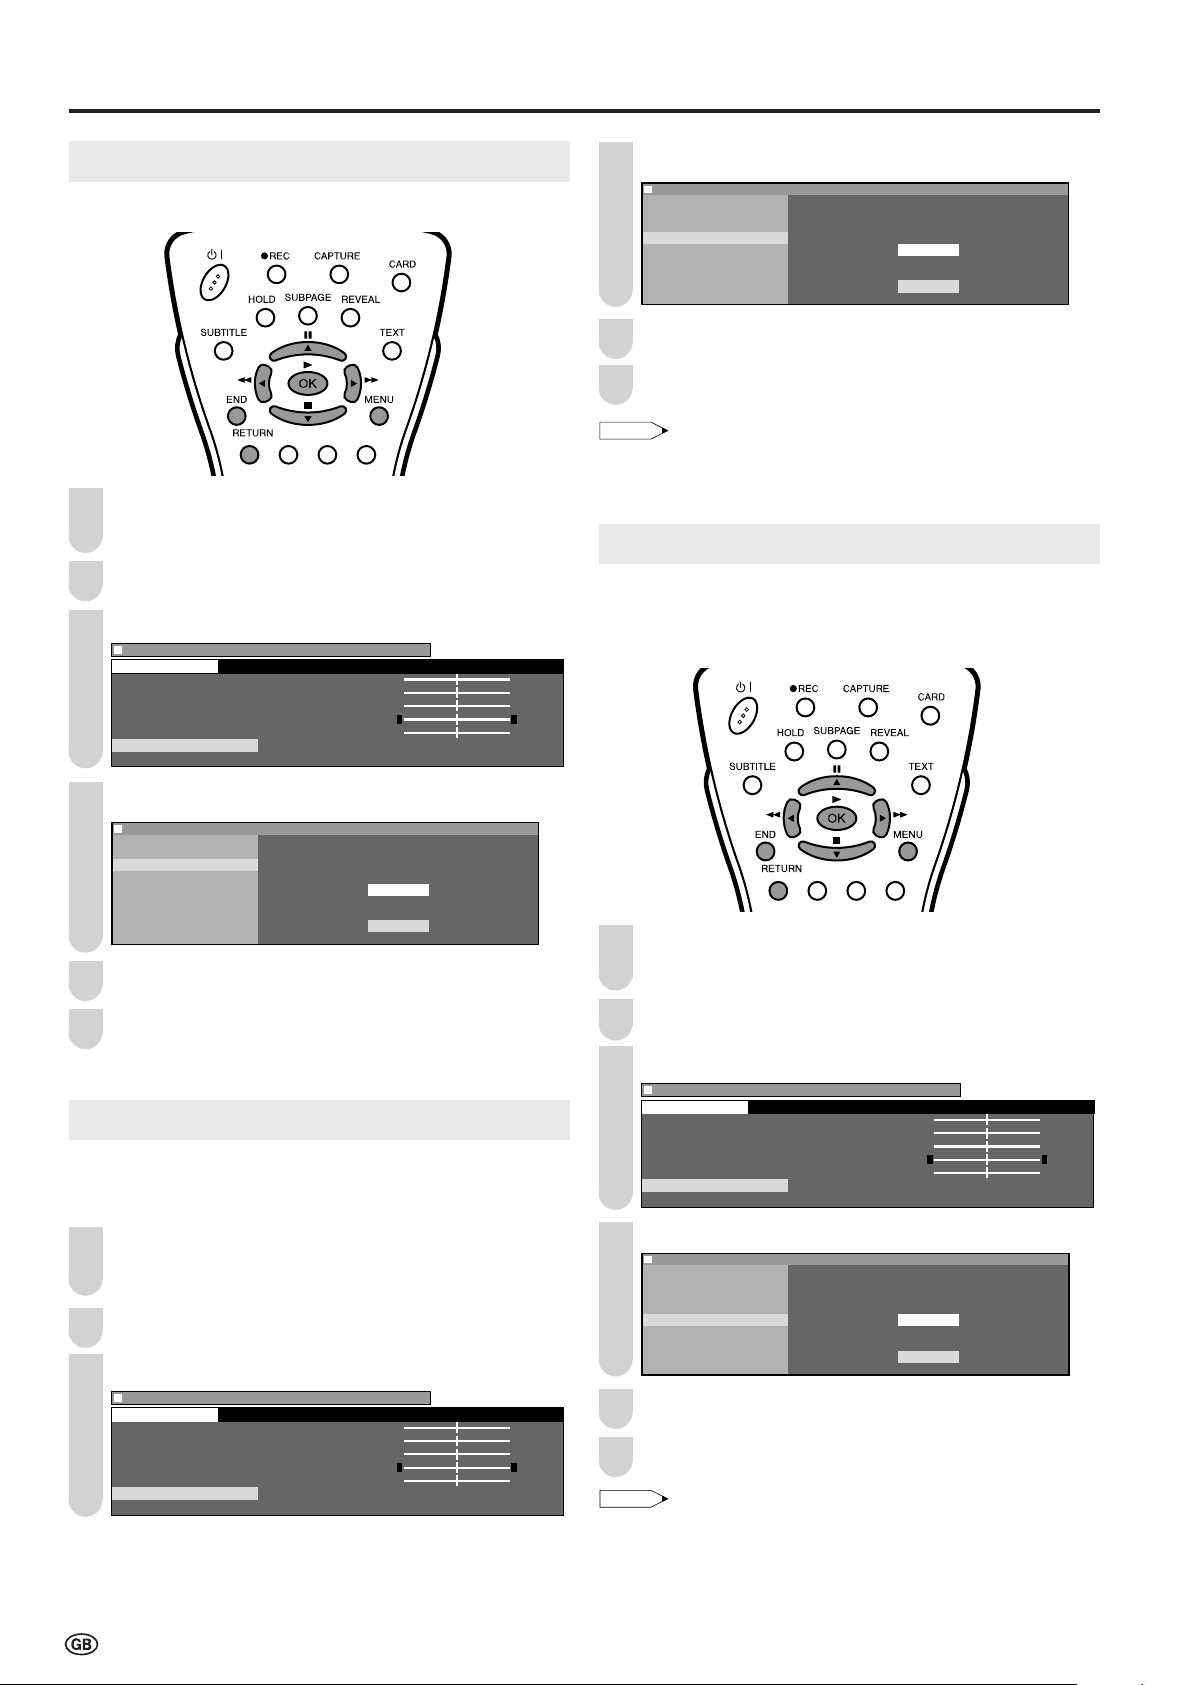
[1] Automatic search
Perform the procedure below to search for and store new
programmes after the First Installation routine.
Press MENU to display the Menu screen.
1
Press \/| to select “Setup”.
2
Press '/" to select “Programmes”, and press OK.
3
Press '/"/\/| to select the programme position from
7
which the programmes are to be stored, and press OK
to begin the automatic programme search.
0
0
0
0
0
0
• See page 7 for details on the search process.
“Search is completed” is displayed, and press END to
8
0
0
0
0
0
exit.
[2] Manual adjustment
Individual settings of programmes can be adjusted.
4
Press '/" to select “Automatic search”, and press
OK.
Menu[Setup Programmes]
Automatic search
Automatic search
Manual adjustment
Sort
Erase programme range
Enter/change name
5
Press '/" to select the desired item, and press \/|
to adjust the selected item.
Menu[Setup Programmes]
Automatic search
Adjust setting
Country UK
Colour system PAL
Sound system I
Time zone :
Store progr.from
• You can change “Colour system”, “Sound system” and “Time zone”
only when “Other countries” is selected in “Country”.
• Set the time difference with global standard time of your area
for “Time zone”.
Press '/" to select “Store progr. from”, and press OK
6
to display the “Store progr. from” screen.
Perform steps 1 to 3 in [1] Automatic search to display
1
the “Programmes” screen.
Press '/" to select “Manual adjustment”, and press
2
OK.
Menu[Setup Programmes]
Manual adjustment
Automatic search
Manual adjustment
Sort
Erase programme range
Enter/change name
Press '/" to select the desired item, and press \/|
3
to make the adjustment. (See the table next page for
details.)
• You can also use Channel Select to adjust the “Frequency”
item.
Menu[Setup Programmes]
Manual adjustment
Adjust setting
Channel 199
Frequency 859MHz
Name E 3
Colour system PAL
Sound system I
Skip Off
Press END to exit.
4
0
0
0
0
0
0
18
0
0
0
0
0
Page 21

Useful Features (Continued)
Menu[Setup Programmes]
Menu[Setup Programmes]Menu[Setup Programmes]
Erase programme range
8 E 9 16 E54
1 S 6 9 E1 17 E56
2 S 8 1 E11 18 E57
3 S1 11 E36 19
4 S11 12 E37 2
5 E 3 13 E38 21
6 E 5 14 E5 22
7 E 6 15 E53 23
0
0
0
0
0
0
0
0
0
0
0
0
Menu[Setup Programmes]
0
0
0
0
0
0
0
0
0
0
0
0
NOTE
NOTE
Menu[Setup Programmes]
0
0
0
0
0
0
0
0
0
0
0
Menu[Setup Programmes]Menu[Setup Programmes]
Sort
8 E 9 16 E54
1 S 6 9 E1 17 E56
2 S 8 1 E11 18 E57
3 S1 11 E36 19
4 S11 12 E37 2
5 E 3 13 E38 21
6 E 5 14 E5 22
7 E 6 15 E53 23
0
Adjustment item
Channel
Choice/Value range
0–199
The channel changes to the higher
Description
or lower channel.
Frequency
044 – 859 (MHz)
Receivable frequencies depending on
TV norm, installation site, and range.
Name
Colour
A – Z, +, -, ., !, /, 0 – 9
Auto, PAL, SECAM
Programme name (up to five characters).
Colour norm.
system
Sound
system
Skip
B/G, I, D/K, L, L’,
Auto*
On Off
TV norm.
Channel numbers with a “(•) (RED)”
mark on the left are set to Skip.
* This item “Auto” in “Sound system” appears only when the “Colour
system” is set to “Auto”.
• Depending on the settings in the colour system of the channels,
switching between channels may be slow. If you want to speed up
channel switching, switch “Auto” in “Colour system” to the current
reception system (PAL or SECAM).
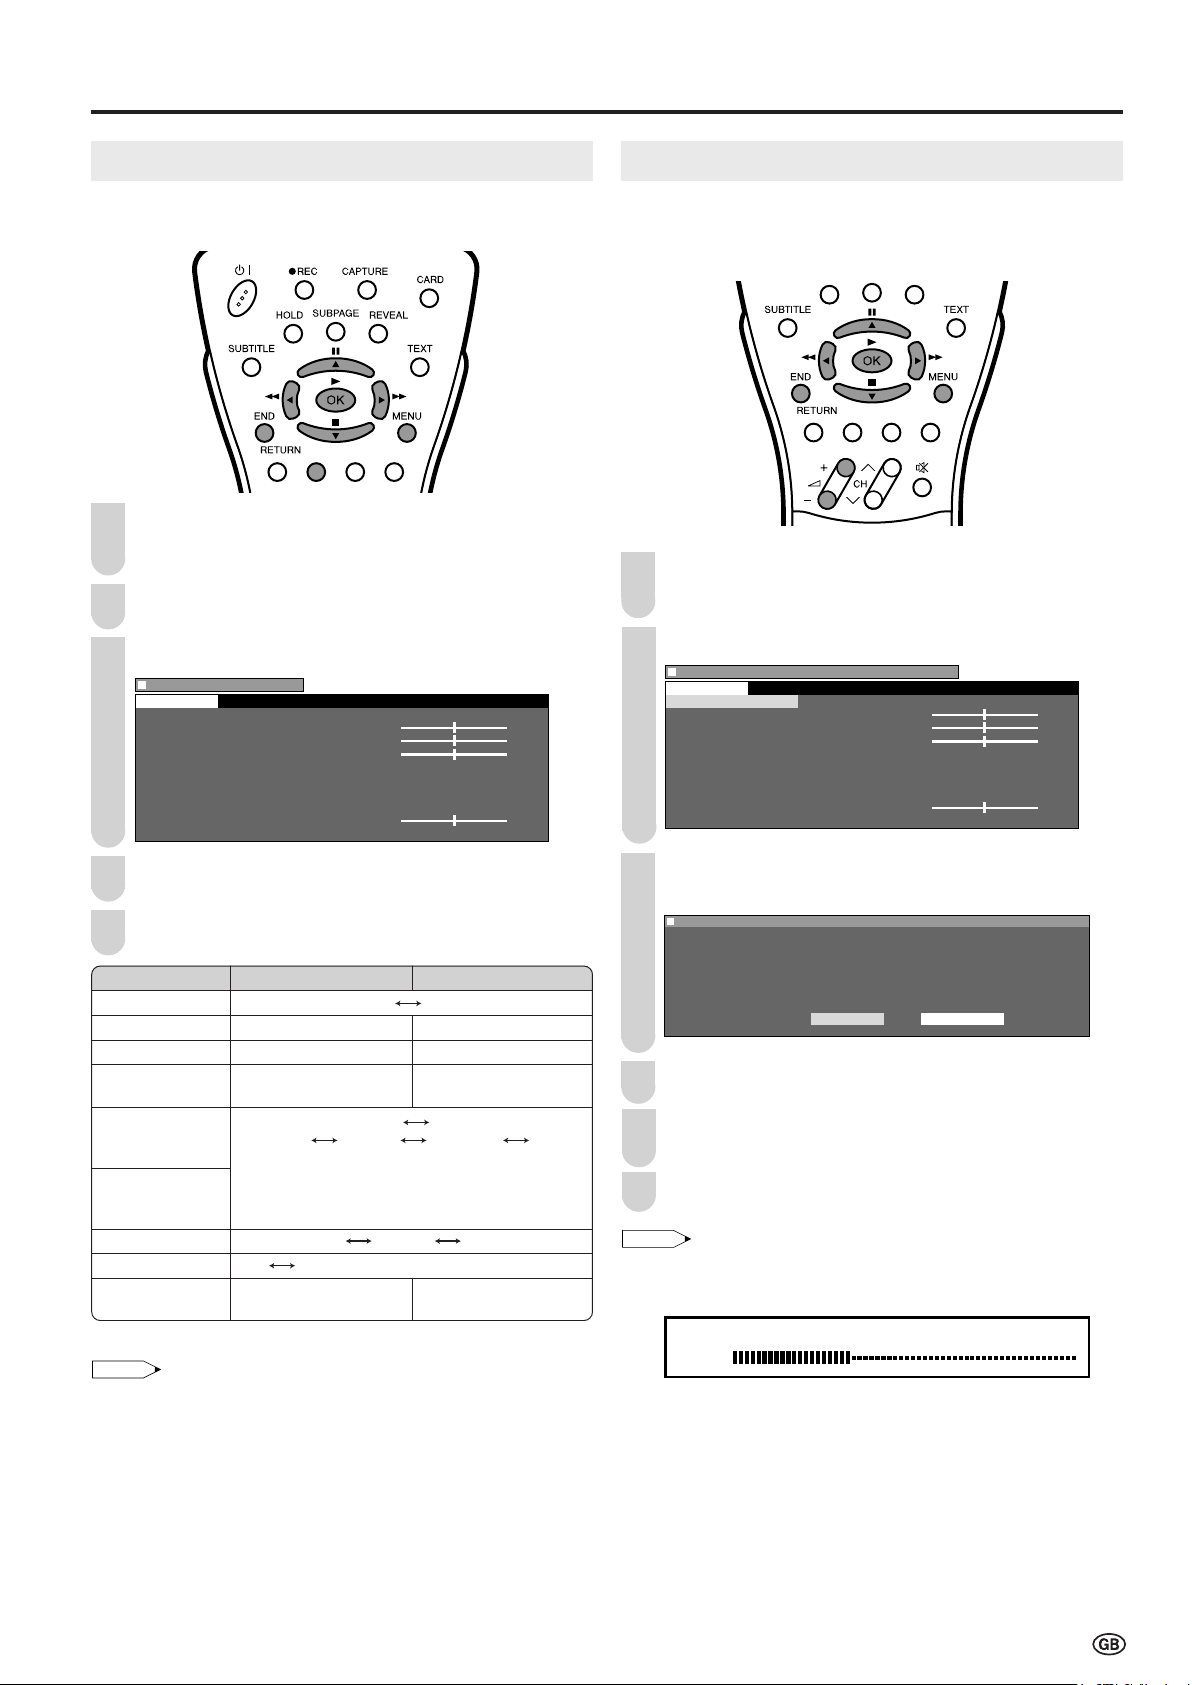
[3] Sort
The programme positions for individual programmes can
be freely changed.
[4] Erase programme range
The individual programme or programmes in a connected
range can be erased.
Perform steps 1 to 3 in [1] Automatic search to display
1
the “Programmes” screen.
Press '/" to select “Erase programme range”, and
2
press OK.
Menu[Setup Programmes]
Erase programme range
Automatic search
Manual adjustment
Sort
Erase programme range
Enter/change name
Perform steps 1 to 3 in [1] Automatic search to display
1
the “Programmes” screen.
Press '/" to select “Sort”, and press OK.
2
Menu[Setup Programmes]
Sort
Automatic search
Manual adjustment
Sort
Erase programme range
Enter/change name
Press '/"/\/| to select the desired programme, and
3
press OK to sort.
• When OK is pressed, the Move mode is activated. Press
'/"/\/| to move the currently marked programme to the
desired programme position. When the channel has moved
to the desired position, all the preceding/subsequent channel
position will go up/down. Press OK to exit the Move mode.
Press '/"/\/| to select the programme to be erased,
3
and press OK. The selected programme is shown in
yellow.
• If you want to erase programmes in a connected range,
select the programme at the beginning of the desired range.
If you are erasing programmes in a connected range,
4
press '/"/\/| to select the programme at the end of
the range. The selected programmes are shown in
yellow.
Menu[Setup Programmes]
Erase programme range
8 E 9 16 E54
1 S 6 9 E1 17 E56
2 S 8 1 E11 18 E57
3 S1 11 E36 19
4 S11 12 E37 2
5 E 3 13 E38 21
6 E 5 14 E5 22
7 E 6 15 E53 23
Press OK to erase the selected programme(s). All the
5
subsequent programmes move up.
Press END to exit.
4
Press END to exit.
6
• The programme cannot be erased when “Wake-up timer” or “Timer
rec” is set to “On”.
19
Page 22

Useful Features (Continued)
Programme table
8 E 9 16 E54
1 S 6 9 E1 17 E56
2 S 8 1 E11 18 E57
3 S1 11 E36 19
4 S11 12 E37 2
5 E 3 13 E38 21
6 E 5 14 E5 22
7 E 6 15 E53 23
0
0
0
0
0
0
0
0
0
0
0
0
Menu[Setup Programmes]
Menu[Setup Programmes]
0
0
0
0
0
0
0
0
0
0
0
0
Menu[Setup Programmes]
0
0
0
0
0
0
0
0
0
0
0
[5] Enter/change name
The name of an individual programme can be entered or
changed.
Perform steps 1 to 3 in [1] Automatic search to display
1
the “Programmes” screen.
Press '/" to select “Enter/change name”, and press
2
OK.
Menu[Setup Programmes]
Enter/change name
Automatic search
Manual adjustment
Sort
Erase programme range
Enter/change name
Using Programme Table
The Programme table shows a list of all receivable programmes. They are located in channels 0 to 199. The
currently selected programme is displayed in yellow, and the
child-locked programmes are displayed in red.
To select the desired programme
Press OK to display Programme table.
1
Press '/"/\/| to select the desired programme.
2
• To display the next or previous list of the Programme table,
press '/" when the cursor is at a programme in the lowerright or upper-left position, or press \/| when the cursor is
at a programme in the right or left column.
3
Press '/"/\/| to select the desired programme, and
press OK.
• The character at the input position blinks.
Menu[Setup Programmes]
Enter/change name
8 E 9 16 E54
1 6 9 E1 17 E56
2 S 8 1 E11 18 E57
3 S1 11 E36 19
4 S11 12 E37 2
5 E 3 13 E38 21
6 E 5 14 E5 22
7 E 6 15 E53 23
Press \/| to select the input position, and press '/"
4
to select the desired character.
Menu[Setup Programmes]
Enter/change name
8 E 9 16 E54
1 SA6 9 E1 17 E56
2 S 8 1 E11 18 E57
3 S1 11 E36 19
4 S11 12 E37 2
5 E 3 13 E38 21
6 E 5 14 E5 22
7 E 6 15 E53 23
Press OK to accept the name entered, and press END
5
to exit.
Press OK to display the selected programme.
3
Press END to exit.
4
20
Page 23

Useful Features (Continued)
Menu[Features
]
Backlight
Timer functions
Auto power off
On-screen display
Child lock
Features
Backlight:Bright
Backlight:Medium
Backlight:Auto(OPC)
Backlight:Dark
NOTE
Menu[Setup Clock setup
]
Programmes
First installation
Rotate
AV connections
Clock setup
Language
Demo
Setup
Menu[Setup Clock setup]Menu[Setup Clock setup]
Adjust setting
15/12 Wed 2 4 12: :
0
0
0
0
0
0
NOTE
Clock Setup
The Timer functions that turn power on at the specified time
do not work unless the clock has been adjusted. Be sure to
adjust the clock first.
Press MENU to display the Menu screen.
1
Press \/| to select “Setup”.
2
Press '/" to select “Clock setup”, and press OK.
3
Features
The Feature items can be set by the user.
Press MENU to display the Menu screen.
1
Press \/| to select “Features”.
2
Press '/" to select the desired adjustment item, and
3
then press OK.
Press \/| to select day/month/day of week, year or
4
time. Press '/" to make the adjustment.
Press END to exit.
5
• The time set is automatically updated to the newest time via the
time information of the Teletext broadcast.
• When broadcasting other than Teletext broadcast is received the
time is possibly displayed incorrectly. Take especially care when
performing timer-recording, etc.
■ Backup
The clock function is maintained for about 10 minutes even
when the adapter has been shut off due to a power outage
or when moving the LCD TV set. (Since about 30 minutes
are required to charge the backup power supply, the clock
function may not be able to be maintained if the charging
time is excessively short.)
Press \/| to make the adjustment. (Except “Timer
4
function”, “On-screen display” and “Child lock” menu items)
Press END to exit.
5
Selected item
Backlight*
Auto power
off (only TV
mode)
* Backlight setting can be switched in one touch using the remote control
(see below).
Factory setting
[Bright] Maximum
brightness
[
Off
] This feature
is inactive.
Adjustable item/range
[Medium] Brightness 60% → Suitable
[Dark]
[Auto (OPC)] Screen brightness is
[On] The power of the LCD TV set is
for viewing in well-lit areas.
Saves energy.
Brightness 20% → Sufficiently
bright when viewing in dim areas.
adjusted according to the
ambient light of the room.
turned off when there is no
signal for 5 minutes.
Directly setting the Backlight
You can change the setting of Backlight directly.
Press BACKLIGHT to display the Backlight screen.
1
Each time you press BACKLIGHT, the mode changes
2
as follows. You can select the desired mode.
• The Backlight screen automatically disappears after 4 seconds.
• See the table above for details of the each brightness setting.
• When set to “Auto (OPC)”, make sure that no object obstructs the
OPC sensor, which could affect its ability to sense surrounding light.
21
Page 24

Useful Features (Continued)
Menu[Features T imer functions
]
Backlight
T imer functions
Auto power off
On- screen display
Child lock
Features
Menu[Features Timer functions]Menu[Features Timer functions]
Sleep timer
Alarm Adjust setting
Wake-up timer
Time Set
HH:MM Off
NOTE
Menu[Features On- screen display
]
Backlight
T imer functions
Auto power off
On- screen display
Child lock
Features
MenuMenu[Features On- screen display
]
Adjust setting
Position bottom
Sound info yes
T ime no
Card yes
Alarm time no
Sleep time no
W ake-up time no
NOTE
Timer Functions
Press MENU to display the Menu screen.
1
• The Timer function Menu screen can be displayed directly by
pressing the Yellow.
2
Press \/| to select “Features”.
Press '/" to select “Timer functions”, and press OK.
3
Press '/" to select the desired item, and press OK.
4
(See the table below.)
On-screen Display
You can adjust various settings for on-screen displays.
1
Perform steps 1 and 2 in Features to display “Features”
screen.
Press '/"
2
OK to display the “On-screen display” screen.
3
Press '/" to select the desired adjustment item. (See
the table below.)
to select “On-screen display”, and press
Press
\/|
5
time with Channel Select or
Press END to exit.
6
Adjustment item
1
Sleep timer
Alarm
*
Wake-up timer*
* Be sure to adjust the clock with “Clock setup” in “Setup” before setting
“Sleep timer”, “Alarm” or “Wake-up timer”.
• The time is automatically set/corrected via the Teletext broadcast
when available.
• Timer programming settings are cancelled when the duration
of the power outage exceeds the backup time. (See page 21.)
to make the adjustment. Input the desired
'/"
.
Input value/Choice
*
HH:MM
Off On
HH:MM
Vol.
Off On
HH:MM
Channel
Vol.
Off On
The LCD TV set automatically turns
off at the specified time everyday.
The alarm sound turns on at the
specified time everyday.
The LCD TV set automatically
turns on at the specified time, with
the specified channel, and with the
specified sound volume every day.
Description
Press \/| to make the adjustment.
4
Press END to exit.
5
Adjustment item
Position
Sound info
Time
Card
Alarm time
Sleep time
Wake-up time
• The On-screen display automatically disappears after 30 seconds.
• To activate the On-screen display, use the Cyan.
• The status display changes each time the Cyan is pressed.
Choice
bottom top
no yes
no yes
no yes
no yes
no yes
no yes
To select the position of the Onscreen display.
To select whether or not sound
info is to be displayed, when a
channel has been selected.
To select information to be
displayed on the On-screen
display.
Description
22
Page 25

Useful Features (Continued)
Menu[Features Child lock
]
Backlight
T imer functions
Auto power off
On- screen display
Child lock
Features
Menu[Features Child lock]
NOTE
Menu[Features Child lock]
NOTE
Menu[Features Child lock]
Menu[Features Child lock]
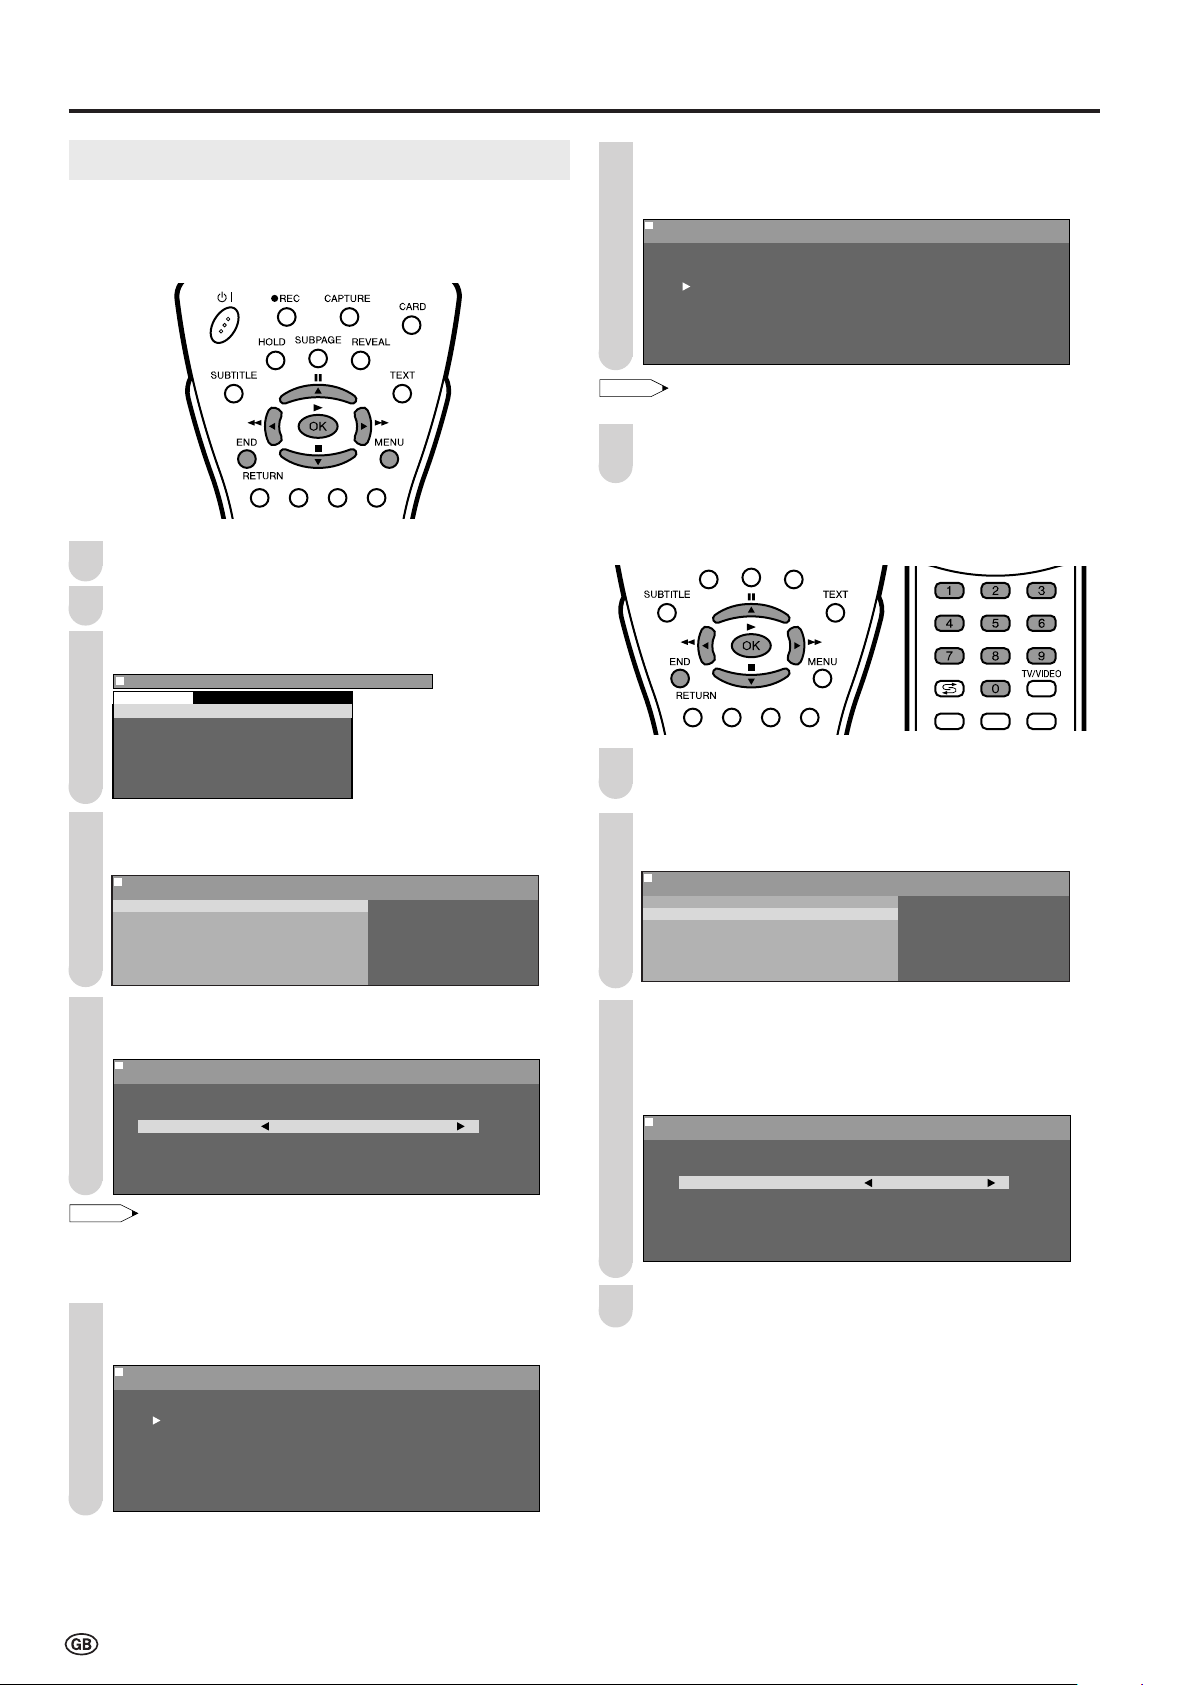
Child Lock
Important:
•
Please refer to page 63 for “IMPORTANT NOTE ON DISENGAGING
ADVANCED CHILD LOCK”.
The Child Lock function blocks the viewing of any channel for
which the child lock has been set.
To use the Child Lock function, you first need to define your
PIN (Personal Identification Number).
[1] Defining a PIN
Perform steps 1 and 2 in Features to display “Features”
1
screen.
Press '/" to select “Child lock”, and press OK to
2
display the PIN input screen.
[2] Changing/Cancelling a PIN
■ To change a PIN
Perform steps 1 and 2 in [1] Defining a PIN to display
1
the PIN input screen.
Input your four-digit PIN (e.g. 1234) with Channel
2
Select.
Menu[Features Child lock]
Please input your PIN:
????
• When the PIN is correctly input, the “Child lock” screen is
displayed.
Input the desired four-digit PIN (e.g. 1234) with
3
Channel Select, and press OK.
Menu[Features Child lock]
Please define your PIN.
1234
• Be sure to make a note of your PIN before pressing OK.
• The PIN will not be set if MENU or END is pressed before the
fourth digit has been input.
Press OK to accept the input PIN.
4
• Numbers input are hidden with ????.
• If the PIN has been input incorrectly, “Wrong PIN!” is displayed.
Press '/" to select “Change PIN”, and press OK. The
3
currently defined PIN is displayed.
Input the new four-digit PIN (e.g. 5678) with Channel
4
Select.
Menu[Features Child lock]
Change PIN
Please input your PIN:
5678
Press END to exit.
5
■ To cancel a PIN
● In step 3 above, press '/" to select “Cancel PIN”, and
press OK. Press
Menu[Features Child lock]
Cancel PIN
Select option
\/| to select “Yes”, and press OK.
Y es No
23
Page 26

Useful Features (Continued)
NOTE
Menu[Features Child lock]
Menu[Features Child lock]Menu[Features Child lock]
For Individual progr. only
8 E 9 16 E54
1 S 6 9 E1 17 E56
2 S 8 1 E11 18 E57
3 S1 11 E36 19
4 S11 12 E37 2
5 E 3 13 E38 21
6 E 5 14 E5 22
7 E 6 15 E53 23
0
0
0
0
0
0
0
0
0
0
0
0
NOTE
NOTE
Menu[Features Child lock]Menu[Features Child lock]
For all programmes
For all programmes
For individual progr. only
Change PIN
Cancel PIN
Menu[Features Child lock]
[3] Setting a Child Lock
There are four different ways of activating a child lock:
1. General child lock for all programmes immediately
2. General child lock for all programmes with daily time
limit
3. General child lock for all programmes with single time
limit
4. Programme-position related child lock without time
limit
The Child Lock comes into effect only after the LCD TV
set has input the standby mode and is then turned on
again.
■ To set a Child Lock for all programmes with a time limit
Perform steps 1 and 2 in [2] Changing/Cancelling a
1
PIN to display the “Child lock” screen.
• If the current clock time is within the time limit, the Child Lock is
activated immediately after the LCD TV set is turned off and on
again. For example, if the current clock time is 9:00 and the time
limit is specified from 22:00 to 14:00, the lock is effective from 9:00
to 14:00.
Warning:
• The child lock timer takes its clock information from the Teletext
broadcast. The Teletext broadcast may be in a different time zone
and therefore child lock timer may not activate as expected.
Please refer to page 29 for details.
■ To set a Child Lock for individual programmes without
time limit
Perform steps 1 and 2 in [2] Changing/Cancelling a
1
PIN to display the “Child lock” screen.
Press '/" to select “For individual progr. only”, and
2
press OK to display the “For individual progr. only”
screen.
Menu[Features Child lock]
For Individual progr. only
For all programmes
For individual progr. only
Change PIN
Cancel PIN
Press '/" to select “For all programmes”, and press
2
OK to display the “For all programmes” screen.
Press '/" to select the desired item. (See the table
3
below.)
Menu[Features Child lock]
For all programmes
Adjust setting
Immediately yes
Daily < : - : >
Once < : - : >
Press \/| to select the desired choice, and, if required,
4
input digits with Channel Select.
Press END to exit.
5
Adjustment item
Immediately
Daily
Once
24
Choice/Input value
no yes
Select “yes” to activate the Child
Lock immediately (after the LCD
TV set has been turned off and
on again). The lock remains
effective until “no” is selected.
no
Input the start and end time for a
daily-recurring Child Lock. The
HH:MM-HH:MM
lock is activated everyday unless
“no” is selected.
no
Input the start and end time for a
once-only Child Lock. The length
HH:MM-HH:MM
of the period should be up to 24
hours.
Description
Press '/"/\/| to select the desired programme.
3
Press OK to lock the programme. The locked
4
programme is displayed in red.
• To unlock the programme, select the programme and press OK.
• The Child Lock remains effective until it is cancelled.
Press END to exit.
5
• When a Child Lock is activated, “Cannot operate” is displayed in
the “Programmes” and “First installation” items are selected.
Page 27

Useful Features (Continued)
Menu[Features Child lock]
NOTE
Menu[Setup Rotate
]
Programmes
First installation
Rotate
AV connections
Clock setup
Language
Demo
Setup
Menu[Setup Rotate]Menu[Setup Rotate]
Select option
Normal
Mirror
Rotate
Upside down
NOTE
Rotate: upside down
Rotate: normal
Rotate: mirror
Rotate: rotate
[4] Temporarily cancelling the Child Lock setting
You can view a programme for which a Child Lock has
been set by temporarily cancelling the Child Lock setting.
Perform the procedure below to input your PIN and
cancel the Child Lock if you are prompted to do so.
● When the PIN input screen is displayed, input your PIN
with Channel Select. The normal screen appears when
the PIN is correctly input.
Menu[Features Child lock]
Please input your PIN:
????
• If the PIN has been input incorrectly, “Wrong PIN!” is displayed.
Rotate
You can set the orientation of the picture.
Press MENU to display the Menu screen.
1
Press \/| to select “Setup”.
2
Press '/" to select “Rotate”, and press OK.
3
Press '/" to select the desired mode, and press OK.
4
[Normal]: Normal
image orientation.
[Mirror]: To display
mirror images for
special uses.
Press END to exit.
5
Directly setting the Rotate
Press ROTATE to display the Rotate screen.
1
Each time you press ROTATE, the mode changes as
2
follows. You can select the desired mode.
• The Rotate screen automatically disappears after 4 seconds.
• The Rotate is set to “Normal” at the factory setting.
•
If you choose “Mirror” or “Upside down”, the sound orientation also
changes.
[Rotate]: To display
rotated images for
special uses.
[Upside down]: To
display upside down
images for special
uses.
25
Page 28

Useful Features (Continued)
NOTE
Menu[Setup AV connections]
NOTE
Menu[Setup AV connections
]
Programmes
First installation
Rotate
AV connections
Clock setup
Language
Demo
Setup
Menu[Setup
Menu[Setup AV connections]
AV Connections
It is possible to manually adjust various settings for connections with external devices on the “AV connections” screen.
[1] AV1/AV2
Select the appropriate signal type and colour standard for
the signals from the video equipment connected to the
AV1 or AV2 terminal.
Press MENU to display the Menu screen.
1
Press \/| to select “Setup”.
2
Press '/" to select “AV connections”, and press OK.
3
Adjustment item
Signal type*
Choice
Auto, CVBS, Y/C
To select the signal type of
Description
external equipment.
AFC
Mode1, Mode2
To select frequency control
modes. Mode1 is suitable for
DVD players or decoders, and
Mode2 is suitable for VCRs or
Camcorders.
Colour system
Auto, PAL,
Colour norm.
SECAM, N358
(NTSC 3.58),
N443 (NTSC
4.43), PAL-M,
PAL-N, PAL60
* “Signal type” is only visible when the AV1 is selected.
•
If no (colour) image is displayed, try to change to a different signal
type.
• Depending on the compatibility with the various types of
equipment, the picture may become skewed. In this case, select
the “AFC” (Automatic Frequency Control) mode that will improve
the picture.
• Switching between AV input signals may be slow, depending on
the settings in “Colour system”. If you want to speed up signal
switching, switch “Auto” in “Colour System” to the current reception
colour system.
[2] For programmes
• It is possible to select AV control voltage and the RGB
signal for programme positions 1 to 199.
• When connecting a video device to the AV1 terminal,
you need to adjust the decoder programme settings.
Press '/" to select “AV1”, “AV2(Y/C)”, or
4
“AV2(CVBS)”, and press OK.
Menu[Setup
A V1 Adjust setting
A V2(Y/C)
A V2(CVBS) Signal type Auto
For progra mmes
Colour system Secam
Press '/" to select the desired item, and press \/|
5
A V connections]
AFC Mode1
to make the adjustment. (See the following table for
details.)
Menu[Setup AV connections]
AV1 Adjust setting
AV2(Y/C)
AV2(CVBS) Signal type Auto
For progra mmes
Colour system Secam
Press END to exit.
6
AFC Mode1
Perform steps 1 to 3 in [1] AV1/AV2 to display “AV
1
connections” screen.
Press '/" to select “For programmes”, and press OK.
2
Menu[Setup AV connections]
AV1 Adjust setting
AV2(Y/C)
AV2(CVBS) AV Control voltage
For progra mmes
RGB select
<no >
For decoder connected to AV1
Sound from AV1 <Dec.>
Press '/" to select the “AV Control voltage” or “RGB
3
no
select”.
Press \/| to select “yes” or “no”.
4
• After one or both items are set to “yes”, and when AV control
voltage or RGB signal is input, the appropriate image is received
for all programme positions 1 to 199.
26
Page 29

Menu[Setup AV connections]
5
Menu[Setup Language
]
Programmes
First installation
Rotate
A V connections
Clock setup
Language
Demo
Setup
Press '/" to select “For decoder connected to AV1”,
and press OK to display decoder programme selection
screen.
8 E 9 16 E54
1 S 6 9 E1 17 E56
2 S 8 1 E11 18 E57
3 S1 11 E36 19
4 S11 12 E37 2
5 E 3 13 E38 21
6 E 5 14 E5 22
7 E 6 15 E53 23
Press '/"/\/| to select the programme for the
6
0
0
0
0
0
0
0
0
0
0
0
0
decoder, and press OK. Repeat the same procedure if
you want to specify other decoder programmes.
Press MENU to return to the “For programmes” screen.
7
Press '/" to select “Sound from AV1”, and press \/|
8
to select the desired sound source.
Menu[Setup AV connections]
Adjust setting
AV1
AV2(Y/C) AV Control voltage
AV2(CVBS) <no >
For progra mmes
<no >
For decoder connected to AV1
Sound from AV1 Dec.
RGB select
Useful Features (Continued)
Language
The language for the On-Screen Display can be selected
English, German, French, Spanish, Italian, Dutch, Swedish or
Russian.
Perform steps 1 and 2 in Rotate to display “Setup”
1
screen.
Press '/" to select “Language”, and press OK.
2
Press END to exit.
9
Press '/"/\/| to select the desired language, and
3
press OK.
Menu[Setup Language
Select option
English Italiano
Deutsch Nederlands
Fran
Espa
Press END to exit.
4
ç ais Svenska
ñ ol Pycck
]
27
Page 30

Useful Features (Continued)
Mono
Stereo
S ound 1
S ound 2
S ound 1+2
Mono
NOTE
S ound 1
S ound 2
S ound 1+2
Mono
Mono
NOTE
NICAM Broadcast Selection
This enables the selection of the reception mode when
receiving a NICAM-I or NICAM-B/G signal. To let you enjoy
NICAM broadcasting, this LCD TV set receives NICAM
stereo system, bilingual, and monaural broadcasts.
Stereo
The LCD TV set is receiving a stereo broadcast.
•Each time you press SOUND, the mode changes between
“Stereo” and “Mono”.
•When “Mono” is selected, the TV sound is output monaurally.
Stereo
Bilingual
The LCD TV set is receiving a bilingual broadcast.
•Each time you press SOUND, the mode changes as follows:
Mono
A2 Stereo Broadcast Selection
This enables the selection of the reception mode when
receiving an A2 stereo signal. To let you enjoy A2 stereo
broadcasting, this LCD TV set receives A2 stereo system
and bilingual broadcasts.
Stereo
The LCD TV set is receiving a stereo broadcast.
•Each time you press SOUND, the mode changes between
“Stereo” and “Mono”.
• When “Mono” is selected, the TV sound is output monaurally.
Bilingual
The LCD TV set is receiving a bilingual broadcast.
• Each time you press SOUND, the mode changes as follows:
Monaural
The LCD TV set is receiving a monaural broadcast.
• Even if you press SOUND, the mode does not change.
• If approximately 3 seconds pass without a button being pressed,
the mode setting is automatically terminated and the LCD TV set
returns to the normal mode.
• The setting can be individually selected for each channel number.
• If approximately 3 seconds pass without a button being pressed,
the mode setting is automatically terminated and the LCD TV set
returns to normal mode setting.
• The setting can be selected individually for each channel number.
• You can also turn off the A2 stereo mode by setting the “Loudsp.
sound” item to “Mono” in “Sound”, which is displayed when you
press
Green
(see page 17).
28
Page 31

TELETEXT
Red Green Yellow
Cyan
100
NOTE
TELETEXT
Red Green Yellow
Cyan
100
369 SHARP-TEXT
1
2
3
4
5
6
7
8
9
10
11
12
13
14
15
16
17
18
19
20
21
22
23
02:52:21
100 200
Teletext
■ What is Teletext?
Teletext is an information service organised like a
magazine, which is provided by some TV stations in
addition to regular television broadcasting. Your LCD TV
set receives special Teletext signals broadcast by a TV
station, processes the information and displays it
graphically on the screen. News, weather and sports
information, stock exchange prices, programme reviews
and closed captioning for people hard of hearing are
among the many services available through Teletext.
■ Teletext mode
Teletext is activated with TEXT on the remote control and
is also closed with it. The LCD TV set can be controlled in
Teletext mode directly by inputting commands with the
remote control and indirectly through the on-screen
display (menu system).
[1] Turning on and off Teletext mode
Select a TV channel that is broadcasting the Teletext
1
programme.
2
Press TEXT to display Teletext screen.
■ Operating instructions in Teletext mode
• The FLOF system for teletext is transmitted in UK
currently.
• The TOP system for teletext is transmitted in Germany
currently.
• If TOP Teletext is broadcast, a control line and TOP line
can be displayed on the screen. The TOP line involves
the operating instructions associated with all of the
Coloured buttons if TOP text is transmitted, or the
operating instructions for only Red and Green if TOP
text is not being transmitted.
• If there are subpages, a control line holding the operating instructions for subpages can be displayed on line
24.
● To turn off the Teletext mode, press TEXT again.
[2] Using the TOP line
When TOP Teletext is being broadcast, you can display
the TOP line, which contains the operating instructions on
the screen.
Press the Coloured buttons to operate the Teletext
1
screen.
• Press Red to display the previous page and Green
to display the next page. Yellow and Cyan are as
indicated on the TOP line.
• By pressing Red the previously selected page will appear
down to the first page which showed up directly after
switching on the teletext. Therefore Red has no function
directly after switching on the teletext.
29
Page 32

Teletext (Continued)
369 SHARP-TEXT
1
2
3
4
5
6
7
8
9
10
11
12
13
14
15
16
17
18
19
20
21
22
23
02:52:21
100 200
ABC
DEF
ABC DEF
[3] Changing subpages
If a page has been selected from among several
subpages, you can display a control line which contains
the subpage numbers.
Press SUBPAGE. The control line with the subpage
1
numbers is displayed on line 24, and the number of the
currently selected subpage is displayed in blue.
[5] Using Teletext menu
To select the character set
During Teletext broadcast, press MENU to display the
1
“Character set” screen.
Character set
West Europe
East Europe
Turkish/Greek
Cyrillic
Press '/" to select the desired character set.
2
• The colour of the letters will turn to yellow. When selecting
the character set, pressing OK will change the letters to grey
for an instant and then return them back to yellow.
Press END to exit.
3
Press \/| to select the desired subpage number.
2
The selected subpage is displayed.
•You can also use Channel Select to select the desired
subpage.
Press SUBPAGE to turn off the control line.
3
[4] Using the TOP table
When TOP Teletext is being broadcast, you can display
the TOP table with the current programme data if one
exists.
Press OK to display the TOP table. The Teletext page
1
is temporarily turned off.
Press '/" to select the desired item. Press \/| to
2
select topics (column 1) or subtopics (column 2) if they
exist.
Press OK. A page associated with the selected item is
3
displayed.
30
[6] Useful Features for Teletext
● HOLD on the remote control can be used to hold the
current teletext page.
Press the button again to cancel the hold mode.
● '/" can be used to zoom the current teletext page as
below.
* The screen is displayed in each mode each time '/" is
pressed.
● SUBTITLE can be used to quickly activate subtitles.
* Press TEXT to deactivate subtitles.
● REVEAL can be used to display hidden information such
as solutions to riddles and puzzles. Press the button again
to hide the information.
Page 33

Before Using Memory Cards
■ Important Notes on Using Memory Cards
• SHARP cannot be held responsible for misuse of the LCD TV set, any troubles during use, or other problems, or any
damages arising out of the use of the LCD TV set, except for those cases for which Sharp is liable by law.
• If you or other people misuse the LCD TV set, or the LCD TV set is affected by static electricity or electrical noise, the
recorded data may be in danger of being changed or lost.
• If you are making an important recording, run a test in advance to ensure that the recording would be performed correctly
in terms of picture or sound quality.
• SHARP cannot be held responsible nor make any compensations even if pictures or sound cannot be recorded correctly
because of any troubles when using the LCD TV set.
Copyright
Note:
For U.K.
• Recording and playback of any material may require consent. Please refer particularly to the provisions of the
Copyright Act 1956, the Dramatic and Musical Performers Protection ACT 1958, the Performers Protection Acts
1963 and 1972 and to any subsequent statutory enactments and orders.
For Europe
• Audio-visual material may consist of copyrighted works which must not be recorded without the authority of the
owner of the copyright.
Please refer to relevant law in your country.
Duplicating images and music by copying and/or editing from videocassettes and/or TV programmes that are
subject to copyrights is only permitted when the edited or copied versions are used for personal pleasure. With
the exception of cases when the user personally is the owner of the copyrights of the object in question or when
specific and written permission has been obtained from the owner(s) of the object in question, the user is not
permitted to make copies and/or duplications and/or edited versions as this constitutes a violation of the copyright
laws, possible exposing the user to demands for compensation for damages. Therefore, be sure to strictly observe
the existing copyright laws.
In addition when using image data that includes third parties, since the use of such images without prior permission
may constitute an intrusion on the privacy of third parties, be sure to refrain from such usage.
■ Card mode specifications
Recording/Playback File Format
Still Picture
Motion Picture
* Motion picture files and still image files recorded, stored or edited with other devices may not play back correctly.
■ Concerning the standard number of recorded images and recording time
Still Pictures
Recordable Pictures
* Recordable numbers may vary depending on the reception conditions of the LCD TV set and/or the contents of images.
Motion Pictures
Recordable Time
Size of a Captured Still Picture
Recording File Format
Size of a Recorded Motion
Picture/Number of Frames
Playback
File Format
Picture Size
640 × 480
Picture Size
320 × 240
320 × 240
320 × 240
JPEG (DCF compliant)
640×480 dots
SP/LP...ASF (Motion Picture: MPEG-4 compliant, Sound: WMA-compliant)
EP ........ ASF (Motion Picture: MPEG-4 compliant, Sound:
SP ... Size: 320×240 dots, Frame: approx. 25 frames/sec
LP ... Size: 320×240 dots, Frame: approx. 25 frames/sec
EP ... Size: 320×240 dots, Frame: approx. 12.5 frames/sec
ASF (Motion Picture: MPEG-4 compliant, Sound: WMA-compliant)
ASF (Motion Picture: MPEG-4 compliant, Sound: G.726-compliant)
Memory Card
32MB
Approx. 300 pictures
Recording Mode
SP
LP
EP
Approx. 1,000 pictures
128MB
Memory Card Capacity
256MB
Approx. 10min.
Approx. 30min.
Approx. 1h
G.726-compliant
5GB
Approx. 4h
Approx. 10h
Approx. 25h
)
* Recordable time may vary depending on reception conditions of the LCD TV set or the contents of images.
* The maximum amount of data you can record on a memory card is 1,024 pictures in total including still and motion pictures.
* Files in excess of 4GB and files exceeding 12 hours of recording time cannot be recorded and/or played back.
31
Page 34

About Memory Cards
xD-Picture Card
SD Memory Card
miniSDTM Card
Adapter
MultiMediaCard
SmartMedia
CompactFlash
Memory Stick
PC Card Adapter
PC Card HDD
miniSD
TM
Card
■ You can use memory cards (commercially available) for
recording and playing back pictures.
• Please use an appropriate PC card adapter (commer-
cially available) for each memory card.
•
The following memory cards are available. (Note that names
for memory cards vary depending on the manufacturer.)
Memory card name
SD Memory Card
miniSD™ Card
CompactFlash
MultiMediaCard
SmartMedia
Memory Stick
Memory Stick Pro
xD-Picture Card
Micro Drive
PC Card HDD
Storage capacity
512 MB or less
32 MB or less
2 GB or less
128 MB or less
128 MB or less
128 MB or less
1 GB or less
128 MB or less
2 GB or less
5 GB or less
* At present, January, 2004
The capacity of the memory stick only serves as a
guide and may differ depending on brand.
Trademarks
SD Memory Card is a trademark.
CompactFlash is a trademark of SanDisk Corporation of the USA.
MultiMediaCard is a trademark of Infineon
Technologies AG of Germany.
SmartMedia is a trademark of Toshiba
Corporation.
Memory Stick is a trademark of Sony Corporation.
• Some motion pictures recorded with other devices may
not be played back correctly.
* Depending on the card or adapter used, normal opera-
tion may not be possible.
Commercially Available Memory Cards
• To read picture files recorded with digital cameras, use
the PC card adapter recommended by the corresponding manufacturer. (The names of PC card adapters vary
depending on the manufacturer.)
• For directions concerning the use of digital cameras or
PC card adapters, please refer to the operation manual
provided with each product.
• Depending on the card or adapter used, normal operation may not be possible.
■ In the card mode, you can playback DCF compliant JPEG
pictures captured with other devices.
* DCF (Design rule for Camera File system) is a standard
of the Japan Electronics and Information Technology
Industries Association (JEITA). This standard specifies
the image file format used for images shot with a digital
camera.
Notes on Using Memory Cards and PC Card Adapters
Please note the following when using memory cards and PC card adapters to avoid corruption of data or malfunction of the
LCD TV set.
● If you use a memory card other than the ones specified above, its ability to record or play back pictures is not guaranteed.
● Some PC card adapters have restrictions in regards to memory card capacity. Refer to the relevant operation manual for
such restrictions.
● Some pictures which have been created, modified, or copied on your PC may not be played back correctly.
● Do not bend, drop or apply a shock to memory cards or PC card adapters.
● Keep memory cards or PC card adapters away from heat, water or direct sunlight.
● Do not take apart or modify memory cards or PC card adapters.
● Refer to the appropriate operation manuals for details on using or keeping memory cards or PC card adapters.
● Do not turn the LCD TV set off while a memory card is in operation (e.g. playing back, recording or displaying a
slideshow).
● The recorded data may be erased or changed due to incorrect operation, the influence of static electricity and electrical
noise, therefore be sure to back-up the data regularly.
● Be sure to back-up important files using other media such as a PC.
• Be sure to use an appropriate PC card adapter (commercially available) for each memory card.
Preparing a Memory Card
Insert a memory card (commercially available) into a PC card
adapter (commercially available).
Example:
Inserting the SD memory card into a PC card adapter.
32
Page 35

The Card Eject button
Press the Card Eject button.
The Card Eject button
PC card adapter
The Card Lamp lights up green.
When pressed, the card eject button pops up.
The PC card adapter is ejected when the button is
pressed again.
The Card Eject button
Confirm the Card Lamp has turned green.
NOTE
Loading a PC Card Adapter
Loading a PC Card Adapter
You need to set a memory card in a PC card adapter before
loading it. (See page 32.)
1
Check the Card Eject button is pressed.
Insert a PC card adapter into the PC card slot on the
2
LCD TV set slowly.
* Insert a card straight
into the slot.
The Card Lamp turns green.
3
Inserting/Removing a PC Card Adapter
Important:
•
Do not allow foreign objects to enter the PC card slot. This could lead
to defects.
Confirm the Card Eject button is in the depressed
1
position.
Insert the PC card adapter.
2
Changing from Card Mode to the TV mode
Press either Channel Select, TV/VIDEO or CH ( )/( ) .
Press the Card Eject button, and remove the PC card
3
adapter.
• If the Card Eject button is not in the depressed position, the card
cannot operate. Please use with the Card Eject button in the
depressed position.
• When ejecting the PC card adapter, confirm the Card Lamp is
green before ejecting the adapter.
• Never eject the PC card adapter when the Card Lamp is red.
• When there are many files, reading can take about 5 minutes.
33
Page 36

Menu[Card Select mode
]
Select mode
Video setup
Timer rec
Still setup
Format
Card
Menu[Card Select mode]
NOTE
Playing Back Mode
Still 1/ 2
13/ 5/ 4 11:35
0
000
0
0
Select Mode
Switches the mode between motion picture and still picture.
Press CARD.
• The playback mode used when recording is displayed. Each time
you press this button, the mode is switched as follows.
[Motion Picture]
0
Video 1/ 1
13
/ 0 5 / 0 4 Thu 11: Ch 13 EP
14
/ 0 5 / 0 4 Fri 11: AV1 SP
14
/ 0 6 / 0 4 Mon 1 :3 Ch 15 LP
15
/ 0 6 / 0 4 Tue 1 :3 AV2 LP
16
/ 0 6 / 0 4 Wed 1 :3 Ch 15 EP
0
0
0
0
0
0
0
0
0
0
0
0
0
0
0
0
You can also set the mode from the Menu screen.
Press MENU to display the Menu screen.
1
Press \/| to select “Card”.
2
3
Press '/" to select “Select mode”, and press OK.
Press \/| to select the desired mode, and press OK.
4
Menu[Card Select mode]
Select option
Video Still
• Selected mode is displayed.
Press END to exit.
5
• Protected files are displayed with the “ ” mark.
• Files that could not be read are displayed with an “X” mark.
* When no motion picture is present, “No video file” is displayed.
"
"
[Still Picture]
* When no still picture is present, “No still image file” is displayed.
34
Page 37

Recording/Playing Back a Memory Card
Recording on the Memory Card
When Recording Motion Pictures:
● Set the picture quality for recording motion pictures. →
● Set the date, channel, and picture quality for the programme you want to record. → Timer rec (See page 38.)
● Make the settings not to miss the moment you want to record. → Pre-recording (See page 36.)
When Recording Still Pictures:
● Make the settings for the shutter click to be heard when a picture is captured. → Shutter (See page 52.)
The following settings are available to help you make correct recordings.
Rec mode (See page 36.)
Playing back the Memory Card How to playback motion/still pictures.
Select the picture (motion picture or still picture) to be played back. →
When Playing Back Motion Pictures:
● Playback the selected picture repeatedly. → Repeat (See page 41.)
● Playback the selected picture more slowly than normal. → Slow-motion (See page 42.)
● Zooms the selected picture. → Zoom (See page 43.)
● Deletes unnecessary files or protects the files you want to keep. → Edit (See pages 44 and 45.)
Select mode (See page 34.)
When Playing Back Still Pictures:
● Start playing back pictures with the setup as specified. →
● Displays still pictures you have selected one after another at a certain interval. → Slideshow setup (See page 48.)
● Displays still pictures in order you have specified. → My programme (See page 49.)
● Rotates a still picture. → Rotate (See page 50.)
● Plays a background music while playing back still pictures. → Audio select (See page 51.)
● Deletes unnecessary files or protects the files you want to keep. → Edit (See pages 54 and 55.)
Still setup (See page 48.)
Precautions when Playing Back PC Image Data on the LCD TV Set
Recording formats of image data:
When recording image data on the LCD TV set, the recording formats are as follows.
● When recording motion pictures: The SD_VIDEO folder is created and the data is stored in. When playing the card, the
SD_VIDEO recording format is recognized.
● When recording still pictures: The DCIM folder is created and the data is stored in. When playing the card, the DCIM
recording format is recognized.
When playing the card, record PC data in a recording format the LCD TV set can recognize.
1. When copying motion pictures from a PC to a card recorded with the LCD TV set, only play these pictures after placing
them in the SD_VIDEO folder.
2. When copying still pictures from a PC to a card recorded with the LCD TV set, only play these pictures after placing
them in the DCIM folder.
3. When using a new card for copying motion pictures, first format the card and create a SD_VIDEO folder before placing
the data in the folder for playback.
4. When using a new card for copying still pictures, first format the card and create a DCIM folder before placing the data in
the folder for playback.
When creating, revising, or copying images using your PC, the edited images may not playback correctly.
35
Page 38

Menu[Card Video setup
]
Select mode
Video setup
Timer rec
Still setup
Format
Card
Menu
NOTE
Menu[Card Video setup
]
Select mode
Video setup
Timer rec
Still setup
Format
Card
Menu[Card Video Setup]Menu[Card Video Setup]
Rec mode
Pre-recording
Repeat Select option
Slow-motion
Zoom
Edit
On Off
NOTE
Recording on a Memory Card (Video Setup)
Rec Mode
Use this setting for recording images you are currently
watching. Select the recording mode (picture quality) for a
motion picture.
1
Press MENU to display the Menu screen.
2
Press \/| to select “Card”.
3
Press '/" to select “Video setup”, and press OK.
Pre-Recording
When setting pre-recording to “On”, recording will be initiated
starting from 5 seconds earlier.
Press MENU to display the Menu screen.
1
Press \/| to select “Card”.
2
Press '/" to select “Video setup”, and press OK.
3
Press '/" to select “Rec mode”, and press OK.
4
[
Menu
Rec mode
Pre-recording
Repeat Select option
Slow-motion
Zoom SP
Edit
LP
EP
Press '/" to select “SP”, “LP” or “EP”, and press OK.
5
Press END to exit.
6
Selected item
SP
LP
EP
• When using the SP mode, differences in picture quality can occur
depending on the card used. In this case, it is recommended to
record in the LP mode.
• When switching to the Card mode after finishing the recording, the
motion picture mode is indicated.
• When switching to the Card mode after finishing recording a still
picture, the still image mode is indicated.
Card Video Setup
Use this mode for normal use.
Use this mode for making long recordings.
When recording with the LP/EP mode, there is a
bigger difference in the image and sound quality
than recording in the SP mode.
]
Description
Press '/" to select “Pre-recording”, and press OK.
4
Press \/| to select “On”, and press OK.
5
Press END to exit.
6
• Pre-recording is enabled only in the motion picture mode. It is not
possible to capture an image a few seconds before as a still
picture.
When recording with the “Pre-recording” mode set to “On”
• The LAP time at playback will be a few seconds longer than the
LAP time at the end of recording.
• Depending on the timing the recording was started, the time the
pre-recording can return may vary slightly, for example, immediately after selecting a channel or immediately after turning on the
power.
• When timer recording has been set in “Timer rec”, the start time
will not return even if “Pre-recording” is set to “On”.
36
Page 39

Rec pause
Lap : :3
SP/Remaining Time :32
Time 2:18
1 Mono
0
000
0 0
NOTE
Lap 0:30 1:00 1:30 2:00
REC
Lap : :3
SP/Remaining Time :35
Time 2:15
1 Mono
0
0
0 0
0
0
Recording a TV Programme in Real-time
Recording as a Motion Picture
Press Cyan to check that the desired recording mode has
been selected and that the memory card has enough space
for recording.
X (MAIN POWER)
Card Lamp
When recording: Red
■ To Pause Recording
Press
• When resuming the recording, press ●REC once more.
.
■ To Stop Recording
Press ■.
• By pressing Cyan, you can confirm the conditions during
recording.
• Press Cyan again to switch off the screen display.
• When the memory card runs out of space, “Card is full” will be
displayed while in the Teletext mode, and the recording will stop.
• When you press TEXT during the recording, “Cannot operate” is
displayed. The recording itself continues.
• During teletext broadcast, CAPTURE is functional. However,
●REC is not functional during teletext broadcast, and “Cannot
operate” is displayed.
• When the X (MAIN POWER) on the LCD TV set is pressed during
recording, the recording cannot be stopped normally creating the
danger the file is corrupted.
• Pressing the
recording.
• When the card has no remaining capacity left, the information
display shows “Card is full” and the recording is stopped.
• During recording, you cannot switch to a different channel and you
cannot switch to another input.
•
When the timer reaches the stop time, the recording will be stopped.
•
If the stop time is reached during timer recording the pause mode is
switched on, but timer recording will continue.
BB
B on the remote control during recording stops the
BB
Press Channel Select, CH ( )/( ) or TV/VIDEO to
1
select the channel you want to record.
2
Press ●REC to start recording.
• The recording is started from the moment the button is
pressed.
* When the remaining time is indicated as [08:00], this means
you can record for eight more hours.
Easy Recording
When pressing ●REC again during normal recording, you
can easily switch to timer recording.
Each time you press ●REC, the recording time changes as
follows.
37
Page 40

15/05 Sat
14/05 Fri
13/05 Thu
Mon ~ Fri
Mon ~ Sat
Daily
Every Sun
:
Every Sat
The time is displayed
in forward direction
The time is displayed
in backward direction
Current Date
a
b
Next month 12/06 Sat
0:00
23:59
:
21:50
21:40
:
19:47
19:46
19:45
19:44
:
12:00
:
0:01
Displays times in forward direction
Displays times in backward direction
Current Time
a
b
Menu[Card Timer rec
]
Select mode
Video setup
Timer rec
Still setup
Format
Card
Menu[Card
Menu[Card Menu[Card T imer rec]
Setup Setup
Adjust T imer Rec. setting
Date Start Stop Ch Mode Set Date Start Stop Ch Mode Set
13/0 5 Thu --:--~ --:-- 1 SP On
0
0
NOTE
Menu[Card
Menu[Card
Setting Timer Recording
Adjusting the Clock
The LCD TV set has a built-in clock. Be sure to adjust the
clock with “Clock setup” in “Setup” before setting the timer.
(See page 21.)
Timer Rec
Warning:
• When broadcasting other than Teletext broadcast is received the
time is possibly displayed incorrectly. Take especially care when
performing timer-recording, etc.
Set the date, start time, end time, channel, and record mode
for the TV programme you want to record.
You can set up to 8 programmes for timer recording up to
one month in advance.
Make sure that you have finished setting channels. (See pages
18 and 19.)
• Date
The date can be set within the next one month. You can
also set for daily or weekly recording.
Press MENU to display the Menu screen.
1
Press \/| to select “Card”.
2
Press '/" to select “Timer rec”, and press OK.
3
Press \/| to select “Setup”, and press OK.
4
Menu[Card
Setup
T imer rec]
Setup Programme list
• Start/Stop
You can set the start and stop times.
• Ch
In the case of channels for which Child Lock is not set, AV1
and AV2 can be selected.
• Mode
SP, LP, EP or FIT can be selected. (Please refer to page
39 for information of FIT.)
38
Press '/" to set “Date”.
5
• You can set the date within the next one month, or you can
select daily or weekly recording.
• When the time set by the timer is reached during timer recording,
the power is set to standby but the recording will be continued.
Press \/| to select “Start”.
6
• Press ' to display the time in forward direction.
• Press " to display the time in backward direction.
Menu[Card
Setup
Adjust T imer Rec. setting
Date Start Stop Ch Mode Set
13/0 5 Thu 19:45~ --:-- 1 SP On
7
Press \/| to select “Stop”.
T imer rec]
0
0
• Press ' to display the time in forward direction.
• Press " to display the time in backward direction.
Menu[Card
Setup
Adjust T imer Rec. setting
Date Start Stop Ch Mode Set
13/0 5 Thu 19:45~ 21:45 1 SP On
T imer rec]
0
0
Page 41

Menu[Card
NOTE
Menu[Card
NOTE
Menu[Card
NOTE
8
Menu[Card
Menu[Card Timer rec]Menu[Card Timer rec]
Programme list Programme list
13/ 0 5 Thu 19:45~21:45 1 SP On
14/ 0 5 Fri 21: ~22: 15 EP On
15/ 0 5 Sat 19: ~21: 15 SP On
0 0
0 0
0 0
0
0
0
0
0 0
Press \/| to select “Ch”.
• When you press ', channels are displayed in forward
direction.
• When you press ", channels are displayed in backward
direction.
Menu[Card
Setup
Adjust T imer Rec. setting
Date Start Stop Ch Mode Set
13/0 5 Thu 19:45~ 21:45 1 SP On
T imer rec]
0
0
• Programmes set for Child Lock or set to “On” in “Skip” are not
displayed.
Press \/| to select “Mode”, and press '/" to select
9
either “SP”, “LP”, “EP” or “FIT”.
Menu[Card
Setup
Adjust T imer Rec. setting
Date Start Stop Ch Mode Set
13/0 5 Thu 19:45~ 21:45 1 SP On
T imer rec]
0
0
Setting Timer Recording (Continued)
Checking the Programme List
You can check the current recording states in the list.
1
Perform steps 1 to 3 in Timer Rec to display the “Timer
rec” screen.
2
Press \/| to select “Programme list”, and press OK.
Menu[Card
Programme list
Setup Programme list
T imer rec]
• The recording is performed within the times set. When there is no
remaining time on the card, the message “Remaining Time 0:00” is
displayed and the recording will be interrupted. In this case, use
another card or delete recorded files to make more space. (See
page 45 for deleting files)
• FIT refers to automatic recording while adjusting image quality
between SP and LP so that the recording is completed within the
specified time. It may not be possible to record using FIT depending on the remaining capacity of the card.
• Two recordings cannot be programmed simultaneously for FIT.
Press \/| to select “Set”, and press '/" to select
10
either “On”, “Off” or “CLR”.
Menu[Card
Setup
Adjust T imer Rec. setting
Date Start Stop Ch Mode Set
13/0 5 Thu 19:45~ 21:45 1 SP On
Press OK to set the timer.
11
12
Press END to exit.
T imer rec]
0
0
Press '/" to select the file you want to check, and
3
press OK.
Press END to exit.
4
To change the programme
In the step 3 above, press '/" to select the programme to be
changed or clear, and press OK.
Press \/| to select the desired item, and adjust with '/".
• Timer programming settings are cancelled when the duration
of the power outage exceeds the backup time. (See page 21.)
39
Page 42

Setting Timer Recording (Continued)
NOTE
Checking the Recording Mode
Press Cyan.
Remain still 1 7
SP/Remaining Time :35
Time 2:15
1 Mono
0
0
0
At the Set Time
• Starts recording with the channel and the mode you
have set, and stops at the end time.
• Do not remove the card during recording. Otherwise,
problems may occur, causing the data including those
previously recorded not to be recorded or kept properly.
If There Is Not Sufficient Space On a
Memory Card
• Recording stops when the card runs out of free space.
• Make sure that there is enough space on a card,
because timer recording can be set, like with VCRs,
without taking free space in account.
If Power Outage Happens/AC Cord or DC
Plug at the LCD TV Set is Unplugged
During Recording
• Because the recording is not completed under normal
conditions, the file cannot be stored while unnecessary
data remains in the memory card. To delete unnecessary data, select “Delete file” in “Edit” and proceed to
delete the file. (See page 45.)
• Start formatting the card after saving necessary files to
a PC or other external media. All data and files are
deleted upon format.
• If you turn the power off using
B B
B on the remote
B B
control while timer recording is set, both picture and
sound go off at the preset recording start time and
then the recording will start. (The recording also starts
at the set time as well, when the power is on.)
X (MAIN POWER)
When timer recording is set: Orange
When recording: Red
During standby: Green
• If you turn the power off using
set, timer recording will not work.
• When the recording mode is switched to “SP”, “LP”, “EP” or “FIT”
the remaining recording time will change accordingly.
• You cannot pause the timer recording.
• You cannot switch channels during timer recording.
• The clock cannot be adjusted while timer recording is set.
• When the Card Eject button is pressed and the card is removed
during timer recording standby, the recording will take place as set
when a card is reinserted.
XX
X (MAIN POWER) on the LCD TV
XX
40
Page 43

Video 1/ 1 Video 1/ 1
13/ 5/ 4 Thu 11: Ch 13 EP 13/ 5/ 4 Thu 11: Ch 13 EP
14/ 5/ 4 Fri 11: AV1 SP 14/ 5/ 4 Fri 11: AV1 SP
14/ 6/ 4 Mon 1 :3 Ch 15 LP 14/ 6/ 4 Mon 1 :3 Ch 15 LP
15/ 6/ 4 Tue 1 :3 AV2 LP 15/ 6/ 4 Tue 1 :3 AV2 LP
16/ 6/ 4 Wed 1 :3 Ch 15 EP 16/ 6/ 4 Wed 1 :3 Ch 15 EP
0
0
0
0
0
0
0
0
0
0
0
0
0
0
0
0
0
0
0
0
0
0
0
0
0
0
0
Resume
Top
0 0 0 0
0 0
0
NOTE
0
0
0
0
0
Menu[Card Video setup
]
Select mode
Video setup
Timer rec
Still setup
Format
Card
Menu[Card Video Setup]
Playing Back Motion Pictures (Normal Mode)
Normal Playback
Modes for Playing Back Motion Pictures
Normal/Repeat/Slowmotion/Zoom
The Playback Quality of the Memory Card
As the memory card of this device records conforming to the
MPEG-4 system (image compression technology), the replay
image will not have the same picture quality as the image
while it was being recorded.
Press CARD to switch to the motion picture mode.
1
• The recorded motion picture list is displayed.
2
Press '/" to select the title, and press OK.
Operations while playing back
Pause
Playback
Fast Forward
Fast Reverse
Stop
• If you press ■ while playing back, fast forwarding, fast rewinding,
or pausing, the respective operation is terminated and you will
return to the recorded motion picture list.
• During fast forwarding and fast rewinding, no sound is output.
• When the motion picture file is recorded using a device other than
this LCD TV set, the “Resume” or “Top” selection screen may not
display.
Press while playing back.
Press | while pausing, fast forwarding, or fast
reversing.
Press while playing back. Pressing 2, 3 or 4
times respectively fast forwards at 8 and 32 normal
speed and back to regular speed.
Press while playing back. Pressing 2, 3 or 4
times respectively fast reverses at 8 and 32 normal
speed and back to regular speed.
Press ■ while playing back.
You will return to the recorded motion picture list.
Repeat
You can specify one file or all files to replay repeatedly.
• When selecting a motion picture you paused while playing
back the last time, the selection screen; “Resume” or “Top”
will be displayed.
• Depending on the type of file, you may not resume a picture
by selecting “Resume”.
| Play
: :3
Repeat[Off ]
T ime 1 1:
Card
Press END to exit.
3
Press CARD to switch to the motion picture mode.
1
• The recorded motion picture list is displayed.
Video 1/ 1
13/ 5/ 4 Thu 11: Ch 13 EP
14/ 5/ 4 Fri 11: AV1 SP
14/ 6/ 4 Mon 1 :3 Ch 15 LP
15/ 6/ 4 Tue 1 :3 AV2 LP
16/ 6/ 4 Wed 1 :3 Ch 15 EP
Press MENU to display the Menu screen. Press \/| to
2
0
0
0
0
0
0
0
0
0
0
0
0
0
0
0
0
0
0
0
0
select “Card”.
Press '/" to select “Video setup”, and press OK.
3
Press '/" to select “Repeat”, and press OK.
4
Menu[Card Video Setup]
Rec mode
Pre-recording
Repeat Select option
Slow-motion
Zoom
Edit
Off File All
0
0
41
Page 44

0
0
0
0
0
Menu[Card Video setup
]
Select mode
Video setup
Timer rec
Still setup
Format
Card
Menu[Card Video Setup]
0
0
0
0
0
0
0
0
0
0
Resume
Top
| Play
: :3
Repeat[File]
T ime 1 1:
Card
0 0 0 0
0 0
0
NOTE
Playing Back Motion Pictures (Special Mode)
5
Press \/| to select “Off”, “File” or “All”, and press OK.
0
Video 1/ 1
13/ 5/ 4 Thu 11: Ch 13 EP
14/ 5/ 4 Fri 11: AV1 SP
14/ 6/ 4 Mon 1 :3 Ch 15 LP
15/ 6/ 4 Tue 1 :3 AV2 LP
16/ 6/ 4 Wed 1 :3 Ch 15 EP
0
0
0
0
0
0
0
0
0
0
0
0
0
0
0
0
0
0
0
• The recorded motion picture list is displayed.
0
0
Slow-motion
File
All
Off
6
A file is played back repeatedly.
Plays back a file completely and then another in order.
Does not perform repeat playback.
Press '/" to select the file to repeat, and press OK.
• When selecting a motion picture you paused while playing
back the last time, the selection screen; “Resume” or “Top”
will be displayed.
7
Press END to exit.
■ When One File is Specified for Repeat Playback
Press CARD to switch to the motion picture mode.
1
• The recorded motion picture list is displayed.
Video 1/ 1
13/ 5/ 4 Thu 11: Ch 13 EP
14/ 5/ 4 Fri 11: AV1 SP
14/ 6/ 4 Mon 1 :3 Ch 15 LP
15/ 6/ 4 Tue 1 :3 AV2 LP
16/ 6/ 4 Wed 1 :3 Ch 15 EP
Press MENU to display the Menu screen. Press \/| to
2
0
0
0
0
0
0
0
0
0
0
0
0
0
0
0
0
0
0
0
0
select “Card”.
Press '/" to select “Video setup”, and press OK.
3
Press '/" to select “Slow-motion”, and press OK.
4
Menu[Card Video Setup]
Rec mode
Pre-recording
Repeat Select option
Slow-motion
Zoom
Edit
On Off
0
0
• If you press ■ while playing back, fast forwarding, fast reversing,
or pausing, the respective operation is terminated and you will be
return to the recorded motion picture list.
• During playback of motion pictures, setting for repeat playback and
slow-motion cannot be performed.
42
Press \/| to select “On”, and press OK.
5
Video 1/ 1
13/ 5/ 4 Thu 11: Ch 13 EP
14/ 5/ 4 Fri 11: AV1 SP
14/ 6/ 4 Mon 1 :3 Ch 15 LP
15/ 6/ 4 Tue 1 :3 AV2 LP
16/ 6/ 4 Wed 1 :3 Ch 15 EP
0
0
0
0
0
0
0
0
0
0
0
0
0
0
0
0
0
0
0
0
0
0
• The recorded motion picture list is displayed.
Press '/" to select the title to playback in slow-
6
motion, and press OK.
Press END to exit.
7
Page 45

Playing Back Motion Pictures (Special Mode) (Continued)
| Slow
: :3
Repeat[Off ]
T ime 11:
Card
0 0 0 0
0 0
0
NOTE
0
0
0
0
0
Menu[Card Video setup
]
Select mode
Video setup
Timer rec
Still setup
Format
Card
Menu[Card Video Setup]
Enlarge playback is not
0
0
0
0
0
| Play
: :3
Repeat[Off ]
T ime 11:
Card
0 0 0 0
0 0
0
| Play
: :3
Repeat[Off ]
Time 11:
Card
Zoom
0 0 0 0
0 0
0
NOTE
■ The Screen When Slow-motion is Specified
• During slow-motion playback, no sound is output.
• To cancel slow-motion playback, set “Slow-motion” to “Off”.
Zoom
Press '/" to select the title to zoom, and press OK.
5
Video 1/ 1
13/ 5/ 4 Thu 11: Ch 13 EP
14/ 5/ 4 Fri 11: AV1 SP
14/ 6/ 4 Mon 1 :3 Ch 15 LP
15/ 6/ 4 Tue 1 :3 AV2 LP
16/ 6/ 4 Wed 1 :3 Ch 15 EP
0
0
0
0
0
0
0
0
0
0
0
0
0
0
0
0
0
0
0
• The recorded motion picture list is displayed.
• Only when the “EP” recording mode is used, zoom playback
can be performed.
Press END to exit.
6
■ The Screen When Zoom is Specified
0
0
0
Press CARD to switch to the motion picture mode.
1
• The recorded motion picture list is displayed.
Video 1/ 1
13/ 5/ 4 Thu 11: Ch 13 EP
14/ 5/ 4 Fri 11: AV1 SP
14/ 6/ 4 Mon 1 :3 Ch 15 LP
15/ 6/ 4 Tue 1 :3 AV2 LP
16/ 6/ 4 Wed 1 :3 Ch 15 EP
Press MENU to display the Menu screen. Press \/| to
2
0
0
0
0
0
0
0
0
0
0
0
0
0
0
0
0
0
0
0
0
select “Card”.
3
Press '/" to select “Video setup”, and press OK.
Press '/" to select “Zoom”, and press OK. Press \/|
4
to select “On”, and press OK.
Menu[Card Video Setup]
Rec mode
Pre-recording
Repeat Select option
Slow-motion
Zoom
Edit On Off
Enlarge playback is not
available in SP/LP file
0
0
When you set “Zoom” to “On”.
• Only when the “EP” recording mode is used, zoom playback can
be performed.
43
Page 46

Menu[Card Video setup
]
Select mode
V ideo setup
T imer rec
Still setup
Format
Card
Menu[Card Video setup]Menu[Card Video setup]
Rec mode Select option
Pre-recording
Repeat
Slow-motion Protect
Zoom
Edit Delete file
Delete all
0
0
0
0
0
0
0
0
0
0
NOTE
Protecting/Deleting Motion Pictures
Protecting Motion Picture Files
You can protect files you do not want to be deleted.
Press CARD to display the list of recorded motion
1
pictures.
Press MENU to display the Menu screen. Press \/| to
2
select “Card”.
Press '/" to select “Video setup”, and press OK.
3
• Protecting the file:
By setting to protect files, you can avoid deleting files by accident.
It is recommended to protect important files.
Unprotecting Motion Picture Files
• Align the cursor with the mark and press OK.
Press '/" to select “Edit”, and press OK.
4
Press '/" to select “Protect”, and press OK.
5
Protect selected file 1/ 1
13/ 5/ 4 Thu 11: Ch 13 EP
14/ 5/ 4 Fri 11: AV1 SP
14/ 6/ 4 Mon 1 :3 Ch 15 LP
15/ 6/ 4 Tue 1 :3 AV2 LP
16/ 6/ 4 Wed 1 :3 Ch 15 EP
Press '/" to select the file you want to protect, and
6
0
0
0
0
0
0
0
0
0
0
0
0
0
0
0
0
0
0
0
press OK.
Protect selected file 1/ 1
13/ 5/ 4 Thu 11: Ch 13 EP
14/ 5/ 4 Fri 11: AV1 SP
14/ 6/ 4 Mon 1 :3 Ch 15 LP
15/ 6/ 4 Tue 1 :3 AV2 LP
16/ 6/ 4 Wed 1 :3 Ch 15 EP
0
0
0
0
0
0
0
0
0
0
0
0
0
0
0
0
0
0
0
0
0
0
0
0
0
will be displayed.
Press END to exit.
7
44
Page 47

Protecting/Deleting Motion Pictures (Continued)
Menu[Card Video setup]
Press OK to delete
all video files
Menu[Card Video setup]
0
0
0
0
0
NOTE
Deleting One Motion Picture File
This operation deletes one file that has not been set for
protecting.
1
Perform steps 1 to 4 in Protecting Motion Picture
Files to display the “Edit” screen.
Press '/" to select “Delete file”, and press OK.
2
Menu[Card Video setup]
Rec mode Select option
Pre-recording
Repeat
Slow-motion Protect
Zoom
Edit Delete file
Delete all
Deleting All Motion Picture Files
This operation deletes all files that have not been set for
protecting.
Perform steps 1 to 4 in Protecting Motion Picture
11
Files to display the “Edit” screen.
Press '/" to select “Delete all”, and press OK.
22
Menu[Card Video setup]
Rec mode Select option
Pre-recording
Repeat
Slowmotion Protect
Zoom
Edit Delete file
Delete all
Press '/" to select the file you want to delete, and
3
press OK.
0
Delete selected file 1/ 1
13/ 5/ 4 Thu 11: Ch 13 EP
14/ 5/ 4 Fri 11: AV1 SP
14/ 6/ 4 Mon 1 :3 Ch 15 LP
15/ 6/ 4 Tue 1 :3 AV2 LP
16/ 6/ 4 Wed 1 :3 Ch 15 EP
4
Press OK again.
0
0
0
0
0
0
0
0
0
0
0
0
0
0
0
0
0
0
0
• The selected file will be deleted.
Delete selected file 1/ 1
14/ 5/ 4 Fri 11: AV1 SP
14/ 6/ 4 Mon 1 :3 Ch 15 LP
15/ 6/ 4 Tue 1 :3 AV2 LP
16/ 6/ 4 Wed 1 :3 Ch 15 EP
Press END to exit.
5
0
0
0
0
0
0
0
0
0
0
0
0
0
0
0
0
0
0
0
• Do not turn off the power and do not eject the card during deletion
of one file or all files. The card may not operate normally after that.
• Even if only one file is being deleted, it may take some time if it
large. Please wait until the file is deleted.
0
0
0
0
0
Press OK again.
3
• All files will be deleted.
Deleting video files
45
Page 48

Playing Back Still Pictures
Still 1/ 1
13/ 5/ 4 11:35
000
0
0
0
Menu[Card Still setup]
Slid
e shoho
Slid
e shoho
Menu[Card Still setup]
Slideseshoho
Slideseshoho
Modes for Playing Back Still Pictures
You can specify various modes with “Card” in the Menu
screen.
■ Listing Still Pictures; Index (page 47)
(1) Lists nine still pictures at a time.
(2) Displays one still picture you select in full screen.
(2) One Picture at a Time
(1) Nine Pictures at a Time
■ Slideshow Setup (page 48)
You can set the interval to 1-10 seconds, 1 minute, 15
minutes or 60 minutes, and select the order from among
“Normal”, “Random” or “My programme”. “Repeat” can also
be selected.
The Slideshow Setup Screen
Menu[Card Still setup]
Slid
e s
w
start Adjust setting
Slid
e s
w
setup
My programme
Rotate Interval < 5Sec >
Audio select Order Normal
Shutter Repeat On
Edit Initial Index
■ Rotate (page 50)
Recorded pictures can be displayed rotated 90 degrees
clockwise or anticlockwise.
■ Audio Select (page 51)
You can select the sound played through the speaker.
The Audio Select Screen
Menu[Card Still setup]
Slid
w
start Select option
Slid
w
setup
My programme
Rotate
Audio select Off T V
Shutter
Edit AV1 AV2
■ My Programme (page 49)
From a large number of pictures, you can select and set up
to 32 pictures. (Up to 32 set pictures can be displayed in
slideshow.)
Full-screen display using
the selected order
46
Page 49

Playing Back Still Pictures (Continued)
Still 1/ 2
13/ 5/ 4 11:35
0
000
0
0
Still 1/ 2
13/ 5/ 4 11:35
0
000
0
0
Still 2/ 2
0
000
Page
NOTE
Still 1/ 2
13/ 5/ 4 11:35
0
000
0
0
NOTE
Listing Still Pictures (Index)
Fast paging in forward/backward direction
When multiple still pictures are recorded, you can speed up
paging in forward/backward direction by keeping \/|
depressed during paging forward/backward direction.
1
Insert the memory card. Press CARD to display the
index of still picture.
Displaying One Picture at a Time
You can select a picture from the memory card and display
individually.
Press CARD to display the index of still picture.
1
Press '/"/\/| to position the cursor at the last file in
2
the page (at the lower right), and press |.
The next index page is displayed. (The cursor moves to
the top file of the page.)
Press '/"/\/| to select the picture to display, and
2
press OK.
• When you press ■, you will return to the index of still picture.
• Depending on the recording mode of digital still cameras, pictures
may not be displayed in full screen.
• After registering My Programme, if the number of files during still
picture or motion picture recording has exceeded 1,024, they are
not displayed in the index but they are played back from My
Programme. Files that are registered in My Programme but not
displayed in the index cannot be deleted from My Programme. In
that case, you can only delete those particular files by first deleting
files that are displayed in the index in order to make the files to be
deleted appear in the Index.
47
Page 50

Playing Back Still Pictures (Continued)
Still 1/ 2
13/ 5/ 4 11:35
0
000
0
0
Menu[Card Still setup
]
Select mode
Video setup
Timer rec
Still setup
Format
Card
Menu[Card Still setup]
Slid
e shoho
Slid
e shoho
Menu[Card Still setup]
Slid
e shoho
Slid
e shoho
Menu[Card Still setup]
Slid
e shoho
Slid
e shoho
Menu[Card Still setup]
Slid
e shoho
Slid
e shoho
Menu[Card Still setup]
Slid
e shoho
Slid
e shoho
NOTE
Slideshow Setup
You can set the interval to 1-10 seconds, 1 minute, 15 minutes,
or 60 minutes, and select the playback order from among
“Normal”, “Random” or “My programme”.
Press CARD to display the index of still picture.
1
6
Press '/" to select “Still setup”, and press OK. Press
'/" to select “Slideshow setup”, and press OK.
Press '/" to select “Interval”. Press \/| to select
7
“1-10 Sec”, “1 Min”, “15 Min” or “60 Min”.
Menu[Card Still setup]
Slid
e s
w
start Adjust setting
Slid
e s
w
setup
My programme
Rotate Interval 5Sec
Audio select Order Normal
Shutter Repeat On
Edit Initial Index
Press '/" to select “Order”. Press \/| to select
8
“Normal”, “Random” or “My programme”.
Menu[Card Still setup]
Slid
e s
w
start Adjust setting
Slid
e s
w
setup
My programme
Rotate Interval < 5Sec >
Audio select Order Normal
Shutter Repeat On
Edit Initial Index
Press '/" to select “Repeat”. Press \/| to select
9
“On” or “Off”.
Menu[Card Still setup]
Slid
e s
w
start Adjust setting
Slid
e s
w
setup
My programme
Rotate Interval < 5Sec >
Audio select Order Normal
Shutter Repeat On
Edit Initial Index
Press MENU to display the Menu screen.
2
Press \/| to select “Card”. Press '/" to select “Still
3
setup”, and press OK.
Press '/" to select “Slideshow start”, and press OK.
4
Menu[Card Still setup]
Slid
e s
w start
Slid
e s
w setup
My programme Select option
Rotate
Audio select
Shutter
Edit Yes No
Press \/| to select “Yes”, and press OK.
5
• The slideshow starts according to the initial mode.
Press MENU if you want to change the settings halfway
through.
Press '/" to select “Initial”. Press \/| to select
10
“Slideshow” or “Index”, and press OK.
• The initial screen is the mode first displayed when switching
to the still picture mode.
Menu[Card Still setup]
Slid
e s
w
start Adjust setting
Slid
e s
w
setup
My programme
Rotate Interval < 5Sec >
Audio select Order Normal
Shutter Repeat On
Edit Initial Index
Press '/" to select “Slideshow start”, and press OK.
11
Press \/| to select “Yes”, and press OK.
• The slide show resumes in accordance with the new
settings.
If you press ■, the slideshow will be stopped.
• When using the slideshow for the first time after purchase, it
operates in accordance with the factory presets as follows.
Interval: 5 seconds
Order: Normal
Repeat: Off
• Slideshow is paused while the Menu screen is displayed.
• The display interval does not include the time it takes for the LCD
TV set to process the image and display it. Therefore, the image
may not be displayed for the display interval set. (In general, the
processing time slows it down by 1-3 seconds.)
48
Page 51

My Programme
Still 1/ 2
13/ 5/ 4 11:35
0
000
0
0
Menu[Card Still setup
]
Select mode
Video setup
Timer rec
Still setup
Format
Card
Menu[Card Still setup]
Still 1/ 2
13/ 5/ 4 21:35
0
000
0
0
1
2 3
4
NOTE
Menu[Card Still setup
]
Select mode
Video setup
Timer rec
Still setup
Format
Card
Menu[Card Still setup]
You can select up to 32 pictures and specify the order for
displaying in slideshow.
Press CARD to display the index of still picture.
1
Playing Back Still Pictures (Continued)
7
Perform the step above to select as many pictures as
you like (up to 32).
• To delete the settings registered in “My programme”, select
“Delete” at step 4, and press OK.
Press END to exit.
8
• When My Programme is set using another device, it cannot be
edited.
• When My Programme is created using this device, you can add to
it but you cannot edit it. Please delete all files if you want to
change the order.
• After registering My Programme, if the number of files during still
picture or motion picture recording has exceeded 1,024, they are
not displayed in the index but they are played back from My
Programme. Files that are registered in My Programme but not
displayed in the index cannot be deleted from My Programme. In
that case, you can only delete those particular files by first deleting
files that are displayed in the index in order to make the files to be
deleted appear in the Index.
Displaying Pictures in Slideshow in the
Order Specified in “My programme”
Register the slideshow playback order in advance using the
settings in “My Programme”.
Press MENU to display the Menu screen.
2
Press \/| to select “Card”. Press '/" to select “Still
3
setup”, and press OK.
Press '/" to select “My programme”, and press OK.
4
Menu[Card Still setup]
Slid e s ho w
start
Slid e s ho w
setup
My programme Select option
Rotate
Audio select
Shutter
Edit Setup Delete
Press \/| to select “Setup”, and press OK.
5
Press '/"/\/| to select a picture, and press OK.
6
Press MENU to display the Menu screen.
1
Press \/| to select “Card”.
2
Press '/" to select “Still setup”, and press OK.
3
Press '/" to select “Slideshow start”, and press OK.
4
Menu[Card Still setup]
Slid e s ho w
start
Slid e s ho w
setup
My programme Select option
Rotate
Audio select
Shutter
Edit Yes No
• The selected picture will be numbered. Pictures will be
displayed in numerical order.
49
Page 52

Playing Back Still Pictures (Continued)
Menu[Card Still setup
]
Select mode
Video setup
Timer rec
Still setup
Format
Card
Menu[Card Still setup]
Slid
e shoho
Slid
e shoho
Menu[Card Still setup]
Slid
e shoho
Slid
e shoho
NOTE
Menu[Card Still setup]
Slid
e shoho
Slid
e shoho
5
Press \/| to select “Yes”, and press OK.
• The slideshow will be started.
Press END to exit.
6
Rotate
You can rotate a displayed picture file.
6
Press '/" to select “Rotate ” or “
Menu[Card Still setup]
Slid
e s
w
start
Slid
e s
w
setup Adjust setting
My programme
Rotate Rotate
Audio select
Shutter Rotate
Edit
Next file
Rotate”.
• The picture will be rotated to left or to right each time OK is
pressed.
Rotate Rotates the file being displayed.
Select “ Rotate” to rotate the picture 90 degrees anti
clockwise.
Select “Rotate ” to rotate the picture 90 degrees
clockwise.
Playback the memory card. Display the picture you
1
want to rotate in either the card playback mode or the
slideshow mode.
Press MENU to display the Menu screen.
2
Press \/| to select “Card”.
3
Press '/" to select “Still setup”, and press OK.
4
• Pictures cannot be rotated during the index screen.
• The rotation information is deleted when the power is turned off.
Switching Files
Switches files while in the Rotate menu.
Perform steps 1 to 5 in Rotate to display the “Rotate”
1
screen.
Press '/" to select “Next file”, and press OK.
2
Menu[Card Still setup]
Slid
e s
w
start
Slid
e s
w
setup Adjust setting
My programme
Rotate Rotate
Audio select
Shutter Rotate
Edit
Next file
Press '/" to select “Rotate”, and press OK.
5
Menu[Card Still setup]
Slid
e s
w
start
Slid
e s
w
setup Adjust setting
My programme
Rotate Rotate
Audio select
Shutter Rotate
Edit
50
Next file
Page 53

Audio Select
Menu[Card Still setup
]
Select mode
Video setup
Timer rec
Still setup
Format
Card
Menu[Card Still setup]
Slid
e shoho
Slid
e shoho
Audio select Off T V
NOTE
Off TV
AV2 AV1
Playing background music when playing back a card.
You can output the sound of other devices (e.g. TV or VCR)
when playing back a card.
Playing Back Still Pictures (Continued)
Press '/"/\/| to select the sound to be output, and
6
press OK.
One of the following sound setting can be selected
when playing back a card.
TV
AV1
AV2
Press END to exit.
7
The sound of the TV channel tuned just
before you switched to the card playback
mode will be output. The sound of bilingual or
stereo programmes becomes the sound set
using the TV screen.
The sound from the device connected to AV1
will be output.
The sound from the device connected to AV2
will be output.
Playback the memory card. Display the picture in either
1
the card playback mode or the slideshow mode.
Press MENU to display the Menu screen.
2
Press \/| to select “Card”.
3
Press '/" to select “Still setup”, and press OK.
4
• Each time SOUND is pressed during playback of still pictures, the
mode changes as follows.
Press '/" to select “Audio select”, and press OK.
5
Menu[Card Still setup]
Slid
e s
w
start Select option
Slid
e s
w
setup
My programme
Rotate
Audio select Off T V
Shutter
Edit AV1 AV2
51
Page 54

Menu[Card Still setup
]
Select mode
V ideo setup
T imer rec
Still setup
Format
Card
Menu[Card Still Setup]Menu[Card Still Setup]
SlidSlid e se s hoho w
start
SlidSlid e se s hoho w
setup
My programme Select option
Rotate
Audio select
Shutter
Edit On Off
NOTE
Recording on a Memory Card
Shutter
Enables you to make sure that whenever a still picture is
captured the shutter sounds.
1
Press MENU to display the Menu screen.
2
Press \/| to select “Card”.
3
Press '/" to select “Still setup”, and press OK.
4
Press '/" to select “Shutter”, and press OK.
5
Press \/| to select “On”, and press OK.
6
Press END to exit.
• The volume of the shutter sound can be adjusted using i (+)/(–).
52
Page 55

Capturing a TV Programme in Real-time
NOTE
Capturing as Still Pictures
Press Channel Select, CH ( )/( ) or TV/VIDEO to
1
select the channel you want to record.
Press CAPTURE.
2
• The screen freezes for a moment, and the image is recorded
as a still picture.
• When “Shutter” is set to “On”, the shutter sound can be
heard at the same time.
During this time, no sound from the TV or input signal can be
heard.
• When you try to capture an image from a fast moving picture,
there may be a small temporal delay in the captured picture.
• The number of remaining pictures only serves as a guide and may
differ on the reception conditions and the contents of the image.
Whenever you want to record an image, press
3
CAPTURE as many times as needed.
•For protecting the pictures, see “Protecting Still Picture Files”
on page 54.
53
Page 56

Menu[Card Still setup
]
Select mode
Video setup
Timer rec
Still setup
Format
Card
Menu[Card Still setup]Menu[Card Still setup]
SlidSlid e se s hoho w
start Select option
SlidSlid e se s hoho w
setup
My programme
Rotate Protect
Audio select
Shutter Delete file
Edit
Delete all
0
000
0
0
Protect selected file 1/ 2
13/ 5/ 4 11:35
Protect selected file 1/ 2
15/ 5/ 4 9:15
0
000
0
0
0
NOTE
Protecting/Deleting Still Pictures
Protecting Still Picture Files
You can protect files you do not want to be deleted.
1
Press CARD to display the index of still picture.
6
7
Press '/"/\/| to select the file you want to protect,
and press OK.
will be displayed.
Press END to exit.
2
Press MENU to display the Menu screen. Press \/| to
select “Card”.
3
Press '/" to select “Still setup”, and press OK.
4
Press '/" to select “Edit”, and press OK.
5
Press '/" to select “Protect”, and press OK.
• Protecting the file:
By setting to protect the file, the accidental deleting the file by
mistake can be avoided. It is recommended to protect at the
important files.
Unprotecting Still Picture Files
• Align the cursor with the mark and press OK.
54
Page 57

Protecting/Deleting Still Pictures (Continued)
Menu[Card Still setup]
Slid
e shoho
Slid
e shoho
Press OK to delete
all still image files
Menu[Card Still setup]
Slid
e shoho
Slid
e shoho
Delete selected file 1/ 2
13/ 5/ 4 11:35
0
000
0
0
Delete selected file 1/ 2
13/ 5/ 4 12:45
000
0
0
0
NOTE
Deleting One Still Picture File
This operation deletes one file that has not been set for
protecting.
Perform steps 1 to 4 in Protecting Still Picture Files to
1
display the “Edit” screen.
Press '/" to select “Delete file”, and press OK.
2
Menu[Card Still setup]
Slid
e s
w
start Select option
Slid
e s
w
setup
My programme
Rotate Protect
Audio select
Shutter Delete file
Edit
Delete all
Deleting All Still Picture Files
This operation deletes all files that have not been set for
protecting.
Perform steps 1 to 4 in Protecting Still Picture Files to
11
display the “Edit” screen.
Press '/" to select “Delete all”, and press OK.
22
Menu[Card Still setup]
Slid
e s
w
start Select option
Slid
e s
w
setup
My programme
Rotate Protect
Audio select
Shutter Delete file
Edit
Delete all
Press '/"/\/| to select the file you want to delete,
3
and press OK.
Press OK again.
4
• Selected file will be deleted.
Press OK again.
3
• All files will be deleted.
Deleting still image files
■ File display (motion picture/still picture)
When the card contains 1,024 or more motion pictures and/or still
pictures, motion pictures have priority while those after number
1,024 are not displayed on the screen. When free space is created
by deleting files, eject and reinsert the card or switch the power off
and on again to reread the contents of the card in order to display its
contents. Up to 1,024 files can be displayed with all motion pictures
first followed by still pictures.
Press END to exit.
5
• Even if only one file is being deleted, it may take some time if it is
large. Please wait until the file is deleted.
55
Page 58

Menu[Card Format
]
Select mode
Video setup
Timer rec
Still setup
Format
Card
Menu[Card Format]Menu[Card Format]
Format card
Yes No
NOTE
Formatting a Card
All motion picture and still picture files are deleted including
any files that have been set for protecting.
Run the memory card. Press MENU to display the
1
Menu screen.
. Press \/| to select “Card”.
2
Press '/" to select “Format”, and press OK.
3
Press \/| to select “Yes”, and press OK.
4
Press OK again to start formatting.
5
Format card
including protected ones)
will be deleted.
• When you use the memory card for the first time, make sure to
read the Operation manual for the card.
• The card locked with card lock function cannot be formatted.
All files (video, still,
56
Page 59

NOTE
Connecting External Devices
It is possible to enjoy video and sound by connecting a VCR and home video game system to the terminals located on the
rear of the LCD TV set.
When connecting an external device, turn off the power of the LCD TV set and connecting device to prevent any possible
damage.
To AV-IN2 terminal
To AV-IN1 terminal
Examples of external devices that can be connected
• Camcorder
• Home video game system
• VCR
• Laser disc player
• DVD
• Decoder
* PC connection is not possible.
• Use a commercially available audio/video cord for the cable.
• Only connect audio/video signals to AV-IN1 and 2 terminals. Connecting other signals may result in a malfunction.
• The VIDEO input terminal and the S-VIDEO input terminal on the AV-IN2 side are shared connections with priority given to the S-VIDEO
terminal. If both terminals are connected, the video signals from the S-VIDEO input terminal are selected for the AV-IN2 input.
When viewing video from the VIDEO input terminal, do not connect anything to the S-VIDEO input terminal.
• For details concerning usage and connection of external devices, see the respective instruction manuals.
Outputting audio (AUDIO OUT)
It is possible to output audio from the LCD TV set through the AUDIO OUT terminals.
Connect an audio amplifier, etc.
57
Page 60

Connecting External Devices (Continued)
2
4
6
8
10
12
14
16
18
20
1
3
5
7
9
11
13
15
17
19
21
S-Video cord
To S-VIDEO
input terminal
To S-VIDEO
output terminal
To AV-IN2
terminals
To audio/video
output terminals
Audio/video cord
Audio (R)
Audio (L)
Video
VCR
Home video game system
NOTE
Connecting a Decoder through the 21-pin Euro-SCART (AV-IN1/RGB)
21-pin Euro-SCART (RGB)
1. Audio right output
2. Audio right input
3. Audio left output
4. Common earth for audio
5. Earth for blue
6. Audio left input
7. BLUE input
8. Audio-video control
9. Earth for green
10. Not used
11. GREEN input
12. Not used
13. Earth for red
14. Earth
15. RED input
16. RED/GREEN/BLUE control
17. Earth for video
18. Earth for RED/GREEN/BLUE control
19. Video output
20. Video input (PAL/SECAM/NTSC)
21. Plug shield
To AV-IN1 (21-pin Euro-SCART)
terminal
21-pin Euro-SCART
connector
Decoder
Connecting a VCR or a home video game system (AV-IN2)
• When connecting to both the VIDEO input and S-VIDEO input terminals for AV-IN2, priority is given to the S-VIDEO input terminal.
58
Page 61

Troubleshooting
Before calling for repair services, make the following checks for possible remedies to the symptoms encountered.
LCD TV set
Sound
Problem Check item
• Make sure the AC adapter is properly inserted in the power
Picture
Picture
There is no
picture or sound.
There is no
picture.
There is no
picture from
AV-IN2.
There is no
sound.
There is no
picture or sound,
just noise.
outlet.
• Reception other than that of broadcasting stations could be the
problem.
• Make sure the input mode is set to TV.
• Make sure the main power switch of the LCD TV set is on.
• Make sure Picture adjustment is properly adjusted.
• The fluorescent lamp may have reached the end of its service
life.
• Make sure the S-VIDEO terminal has nothing connected.
• Make sure the volume is not set to minimum.
• Make sure the sound is not set to mute.
• Make sure the antenna cable is properly connected.
• Bad reception could be the problem.
Reference
page
6
–
11
11
15
–
9, 58
12
12
6
–
Picture is not
clear.
Picture is too
light or improperly tinted.
The picture is
too dark.
Remote control does not work.
Unit cannot be operated.
• Make sure the antenna cable is properly connected.
• Bad reception could be the problem.
• Check the colour adjustment.
• Check if “Backlight” is set to “dark”.
• Check “Contrast”.
• The fluorescent lamp may have reached the end of its service
life.
• Check if batteries in the remote control have sufficient power.
• Make sure the remote sensor window is not under strong
lighting.
• External influences such as lightning, static electricity, etc., may
cause improper operation. In this case, operate the unit after
first turning the power off the LCD TV set, or unplugging the AC
cord and re-plugging it in after 1 or 2 minutes.
6
–
15
21
15
–
5
5
–
■ Cautions regarding use in high and low temperature environments
•
When the unit is used in a low temperature space (e.g. room, office), the picture may leave trails or appear slightly delayed.
This is not a malfunction, and the unit will recover when the temperature returns to normal.
• Do not leave the unit in a hot or cold location. Also, do not leave the unit in a location exposed to direct sunlight or near a
heater, as this may cause the cabinet to deform and the LCD panel to malfunction.
(Storage temperature: –20°C to +60°C (–4°F to +140°F))
59
Page 62

Troubleshooting (Continued)
Antenna
Problem Check item
•The reception may be weak.
The picture is
not sharp.
The picture
shakes.
The picture has
ghosts.
The picture is
spotted.
•The quality of the broadcast may also be bad.
•Make sure the antenna is facing the correct direction.
•Make sure the outside antenna has not been disconnected.
•Make sure the antenna is facing the correct direction.
• Broadcast waves may be reflected from adjacent mountains or buildings.
• There may be interference from automobiles, trains, high-voltage lines, neon lights, etc.
•There may be interference between the antenna cable and power cable. Try positioning
them further apart.
There are
stripes on the
screen or
colours fade.
• Is the unit receiving interference from other devices?
Transmission antennas of radio broadcasting stations and transmission antennas of
amateur radios and cellular phones may also cause interference.
• Use the unit as far apart as possible from devices that may cause possible interference.
60
Page 63

Specifications
Item 20" LCD COLOUR TV, Model: LC-20B5E
LCD panel 20" Advanced Super View & BLACK TFT LCD
Number of dots 921,600 dots
Video colour system PAL/SECAM/NTSC
TV TV-Standard (CCIR) B/G, I, D/K, L, L’
TV-Tuning System Auto preset 200 ch.
STEREO/BILINGUAL NICAM, A2 stereo
AUTO PRESET YES
CATV ~Hyper Band
Brightness 450 cd/m
Lamp life 60,000 hours*
Viewing angles H: 170° V: 170°
Audio amplifier 2.1 W × 2
Speakers ø 5.7 cm × 2 pcs.
Terminals AV-IN1 21 pin Euro-SCART
AV-IN2 S-VIDEO, VIDEO, AUDIO
OUT AUDIO
Antenna DIN
Headphones 3.5 mm ø jack (Front)
PC Card slot PC Card Type II (PC card adapter)
Image File Format JPEG files complying with DCF format
OSD language English/German/French/Spanish/Italian/Swedish/Dutch/Russian
Power requirement DC 12 V, AC 110 V – 240 V, 50/60 Hz
Power consumption 67 W (1.26 W at Standby) : AC 230 V (with AC adapter)
56 W : DC 12 V
Weight 9.2 kg w/o accessories
Accessories Operation manual, Wireless remote control, Batteries (× 2), AC adapter, AC cord,
Cable holder
* The typical period of time after which the lamp’s power output will have decreased by about half, given that the AQUOS is used continuously
in a 25°C/77°F room under standard lighting and brightness conditions.
■ As a part of policy of continuous improvement, SHARP reserves the right to make design and specification changes for the LCD TV set
improvement without prior notice. The performance specification figures indicated are nominal values of production units. There may be
some deviations from these values in individual units.
2
61
Page 64

6880
244
178
403.3
300.8
261
452 (including rubber foot)
673
384
212
39359
450 (including rubber foot)
47
100
100
Dimensional Drawings
Unit: mm
62
Page 65

Information for Customers
on environmentally friendly disposal of this SHARP product
If this product cannot be used any more, it should be disposed of in a legally correct and environmentally sound way.
DO NOT DISPOSE OF THIS PRODUCT WITH YOUR HOUSEHOLD WASTE
OR MIXED WITH OTHER WASTES! YOU MIGHT ENDANGER THE ENVIRONMENT!
Sharp Corporation is committed to protecting the environment and conserving energy. Our goal is to minimize the
environmental impact of our products by continually implementing and improving product technologies, designs, and
customer information aimed at environmental conservation.
(1) For our customers in Belgium,The Netherlands, Sweden, and Switzerland
SHARP takes part in the respective national recycling systems for electronic equipment, which have been founded on the
basis of the environmental laws in these countries.
Please see here details on the respective countries.
Country
Recycling Information for that Country
Sweden
The Netherlands
Belgium
Switzerland
Please use the Swedish electronics recycling system called “ELRETUR”,
and see the website at http://www.el-kretsen.se
Please use the Dutch electronics recycling system called “ICT-Milieu”,
and see the website at http://www.nederlandict.nl/index.php
Please use the Belgian electronics recycling system called “Recupel”,
and see the website at http://www.recupel.be
Please use the Swiss electronics recycling system called “SWICO”,
and see the website at http://www.swico.ch
(2) For our customers in United Kingdom, Germany, France, and Italy
Please contact your local authorities for collection and recycling facilities, or contact a recycling service company, which is
licensed for the recycling of electronic equipment.
IMPORTANT NOTE ON DISENGAGING ADVANCED CHILD LOCK
We suggest removing the following instruction. As this Operation Manual is multilingual, we also suggest the same with each
language.
If you have forgotten your personal code number and cannot disengage ADVANCED CHILD LOCK, follow the procedure below.
1. Press MENU to display the Menu screen.
2. Press \/| to select “Features”.
3. Press '/" to select “Child lock”, and press OK.
4. The PIN input menu is appeared.
5. Input “3001” with Channel Select.
The Child lock setting menu is displayed.
ADVANCED CHILD LOCK will now be disengaged.
We suggest that you remove this instruction from the manual to prevent children from reading it. Keep it in a safe space for future
reference.
63
Page 66

64
 Loading...