

Page 1

Free Standing Type
直立型
型號
KC-JG20A
*
AIR PURIFIER
with Humidifying Function
Operation Manual
ENGLISH
加濕型空氣清新機
使用説明書
*The number attached to this technical mark indicates the
approximate number of ions per cubic centimeter measured at
a point (1.2 m above the floor) near the center of a room of the
Recommended Room Size when an air purifier with the
humidifying function equipped with the high-density
Plasmacluster Ion Generator is running the air purifying
function in the “medium” mode near a wall.
This product is equipped with the generator with the indicated
capacity.
*本技術標示的數字是將已裝置高濃度PCI離子產生器的加濕型空
氣清新機放置在貼近牆壁的位置,在「中」風速下運行空氣淨化
功能時,在建議面積的房間中央位置附近(距離地面1.2米),
量度出每1立方厘米空氣中所含離子的大約數量。
本產品已裝置了指定容量的離子產生器。
"Plasmacluster" and "Device of a cluster of
grapes" are trademarks of Sharp Corporation.
Thank you for purchasing SHARP Air Purifier.
Please read this manual carefully for proper use.
Please be sure to read “SAFETY PRECAUTIONS”
before using the Air Purifier.
After reading, keep the manual in a convenient location
for future reference.
多謝您購買SHARP空氣清新機。
請仔細閱讀本說明書,以便正確地使用本空氣清新機。
使用空氣清新機之前,請務必閱讀「重要安全事項」。
閱讀後請妥善保存本說明書,以便日後翻閱。
Page 2

ENGLISH
Page 3

ENGLISH
Contents
Preparation
FEATURES
IMPORTANT SAFETY INSTRUCTIONS
PARTS NAME
PREPARATION
Filter Installation
Fill the Water Tank
How to use
OPERATION
Clean Air & Humidify Mode
Clean Air Mode
Plasmacluster Ion Shower Mode
CONVENIENT FUNCTIONS
Lights Control
Plasmacluster Ion ON/OFF
Child Lock
Adjustment of Sensor Detection Sensitivity
Auto Restart
OFF Timer
Sound Indicator Setting for Water Supply
Frequently Asked Questions
...............................................................................
..........................................................................
........................................................................
.....................................................................
...........................................................................
.............................................................................
....................................
...................................................
....................................................
......................................
.................................................
Page
E-2
E-4
E-6
E-8
E-9
ENGLISH
E-10
E-11
E-12
E-13
E-14
E-15
How to care
CARE AND MAINTENANCE
When “Filter Maintenance Indicator Light” turns on
Main Unit
HEPA Filter /
Active Carbon & Silica Gel Deodorizing Filter
Water Tank / Back Panel / Humidifying Filter / Humidifying Tray
IMPORTANT INFORMATION
Filter Performances
For Effective Use
FILTER REPLACEMENT
HEPA Filter
Active Carbon & Silica Gel Deodorizing Filter
Humidifying Filter
.............................................................................
......................................................................
When needed
TROUBLESHOOTING
Specifications
SPECIFICATIONS
...................................................
.................................
............
..................................................
.........................................................
.............................................................
...................................................................
E-16
E-18
E-19
E-20
E-21
E-22
E-23
E-24
E-29
Page 4

FEATURES
Unique airflow quickly collects
dust and odor. To suction air from
all directions at a stretch and
firmly catch dirt with 3 layer filters
Unique airflow quickly collects
dust and odor. To suction air from
all directions at a stretch and
firmly catch dirt with 3 layer filters
High-density Plasmacluster
High-density Plasmacluster
Ions keep your rooms clean
Ions keep your rooms clean
throughout a year
throughout a year
Spring
Pollen prevention
(Filters effect)
Rainy season
Mold prevention
Summer Autumn Winter
Suppressing the activity of airborne viruses
Suppressing the activity of airborne viruses
Viruses suppressing effect of Plasmacluster Air Purifier. This is the effect
in approx. 18 min. (FU-A30) in approx. 25m
It is not the effect in actual use space.)
3
sealed test space. (FU-A30)
*1
*1
・ The same ions as in nature
・ Identified Air Purifying Mechanism
・ Proven Safety of Plasmacluster Ion
Suppressing the activity of airborne allergens of mite droppings and carcasses
Removal of Clinging Odors
Reduction of static electricity
*1 Institut Pasteur in Ho Chi Minh City. The test was conducted in approx. 25m3 test
space based on Japan Electrical Manufactures' Association voluntary standard (JEM1467).
In case of FU-A30 (in operation with airflow "MAX"), 99% of allergens can be suppressed in
approx. 18 min.
*5
(The performance of FU-A30 is lower than that of KC-JG20A)
*2 ITEA Corporation. The test was conducted in approx. 25m
(in operation with airflow "MAX"), 99% of allergens can be suppressed in approx. 51 min.
(The performance of FU-F28 is lower than that of KC-JG20A)
*3 In-house investigation. Remove cigarette smoke odor to an unnoticeable level in about 90 minutes.
*4 In-house investigation. Approx. 41m
after approx. 13 minutes.
*5 LSI Medience Corporation
*4
3
test space, the initial voltage of 5kV decreased to 0.5kV
*3
Reduction of static electricity
3
test space. In case of FU-F28
*2
*4
When the air in the room is polluted suddenly
Clean Ion Shower Mode
Clean Ion Shower Mode
Full-power operation is carried out
by setting the air volume to "MAX" for
60 minutes to purify air rapidly.
The Plasmacluster technology has an effect that
suppresses the activity of airborne viruses and
decomposes and removes allergens such as feces /
carcass of mite. This technology does not create
completely sterile environment or guarantee the
prevention of microbial infection.
The actual number of ions and effect of air purification
vary depending on the environment of the room (such as
the area, shape, whether an air conditioner is used or
ventilation is performed, and where the product is located)
and the usage (such as the blowout direction of ions and
the operation mode).
E-2
Auto Mode
Auto Mode
Monitors the pollution level, temperature
and humidity of air in a room and
changes the operation automatically.
Page 5

Unique airflow quickly collects
Unique airflow quickly collects
dust and odor. To suction air from
dust and odor. To suction air from
all directions at a stretch and
all directions at a stretch and
firmly catch dirt with 3 layer filters
firmly catch dirt with 3 layer filters
Back Panel
(Pre-filter)
Active Carbon & Silica Gel Deodorizing Filter
Aerodynamic airflow at 20 °
diagonally backward
HEPA Filter
Large dust
Odor, Formaldehyde
Small dust, virus and allergic substances
Installation
Install the main unit at the most suitable place.
*
Do not block air
intake or air outlet by
curtain or furniture.
Sufficient space*
* The dust collecting performance will be the same
even if using the unit 3cm away from the wall,
but place it as far as possible (30cm away
recommended) because it may dirty the wall or
floor around.
60cm or more
3cm or more
Sufficient space*
Encompassing airflow
ENGLISH
In case TV or radio broadcast signals
become noisy or an atomic radio watch or
clock does not display the correct time,
move the unit away from the TV, radio or
atomic radio timepieces.
• Use the unit in room temperature between 0 to 35°C
To prevent dew condensation or freezing that leads to
the reduced life or failure of filters.
• Avoid direct sunlight
To prevent deformation, deterioration or discoloration.
• Keep the main unit away from windows or air
blown from air conditioners or heaters
To prevent deformation, deterioration or discoloration
as well as the malfunction of sensors.
• Place the unit on a rigid place
To prevent the floor from being dented or scratched.
• If wall or furniture around the main unit gets dirty,
separate the product from wall sufficiently.
• Be aware of dirt on the floor and surrounding wall
where the unit is used at the same place for a long
period of time
Move the unit and clean the floor and walls
occasionally.
E-3
Page 6

IMPORTANT SAFETY INSTRUCTIONS
Always follow basic safety precautions when using electrical appliances, including the following:
WARNING
• Read all instructions before using the unit.
• Use only a 220 volt outlet.
• Do not use the unit if the power cord or plug is damaged or if the connection to the wall outlet is loose.
• Periodically remove dust from the plug.
• Do not insert fingers or foreign objects into the air intake or air outlet.
• When removing the power plug, always hold the plug and never pull on the cord.
Failure to do so can cause a short circuit resulting in electric shock or fire.
• When moving the unit, do not damage the power cord with the casters.
Failure to do so can cause electric shock, heat generation, or fire.
• Do not remove the plug when your hands are wet.
• Do not place the unit near gas appliances or fireplaces.
• Always unplug the unit when refilling the water tank, cleaning the unit, or when the unit is not in use. Failure to
do so can cause a short circuit resulting in electric shock or fire.
In order to avoid safety hazards, if the power cord is damaged, it must be replaced by either the
•
manufacturer, a service agent, a Sharp Authorized Service Center or a similarly qualified service provider.
• Only a Sharp Authorized Service Centre should service this air purifier. Contact the nearest Service Centre for
any problems, adjustments, or repairs.
• Do not operate the unit in rooms where aerosol insecticides are present. Do not operate the unit in rooms
where there is oily residue, incense, sparks from lit cigarettes, or chemical fumes in the air. Do not operate the
unit in places where it may get wet, such as a bathroom.
• Be cautious when cleaning the unit. Strong corrosive cleansers can damage the exterior.
• When carrying the unit, first remove the Water Tank and Humidifying Tray, and then hold the unit by the
handles on both sides.
• Do not drink the water in the Humidifying Tray or Water Tank.
• Replace the water in the Water Tank daily with fresh tap water, and regularly clean the Water Tank and
Humidifying Tray (Ref. E-10, 16, 17 and 20). When the unit is not in use, remove water from the Water Tank
and Humidifying Tray. Leaving water in the Water Tank or Humidifying Tray can cause mold, bacteria, and bad
odors.
• This applian
capabilities, nor by persons with insufficient experience and knowledge of how to operate the unit, unless they
are given proper supervision and instruction on how to use the unit by a person responsible for their safety.
Do not allow children to play with the unit.
– Always follow below instructions to reduce the risk of electric shock, fire, or injury:
ce is not intended for use by persons (including children) with reduced physical, sensory, or mental
NOTE
If the air purifier interferes with radio or television reception, try one or more of the following measures:
• Adjust or relocate the receiving antenna.
• Increase the distance between the unit and the radio or TV.
• Connect the equipment into an outlet on a circuit different from that of the radio or TV receiver.
• Consult the dealer or a qualified radio or TV technician.
E-4
– Instructions when the unit interferes with radio or TV reception
Page 7

CAUTIONS CONCERNING OPERATION
• Do not block the air intake or air outlet.
• Do not place the unit near or on hot objects, such as stoves or heaters, or where it may come into contact with
steam.
• Always operate the unit in an upright position.
• When moving the unit, use the handles on both sides.
Do not move the unit when it is in operation.
• If the unit is on tatami mat, easily damaged floor, an uneven surface, or thick-piled carpet, lift it up when
moving.
• When moving the unit by its casters, move it slowly and in a horizontal direction.
• Before moving the unit, make sure it is not operating, and remove the Water Tank and Humidifying Tray while
holding the handles of the unit.
• When removing the Water Tank, be careful not to get your fingers caught inside the unit.
• Do not operate the unit without the filters, the Water Tank, and the Humidifying Tray properly installed.
• Do not wash and reuse the HEPA filter and the Active Carbon Deodorizing Filter.
It will not improve filter performance and may cause electric shock or malfunction.
• Clean the exterior with a soft cloth only.
Do not use volatile fluids or detergents.
Doing so may damage or crack the exterior of the unit and cause sensor malfunctions.
• The frequency of descaling maintenance will depend on the hardness of and the impurities in the
water used; the harder the water the more often descaling will be necessary.
• Keep the unit away from water.
ENGLISH
INSTALLATION GUIDELINES
• When using the unit, place it at least 2-meters away from equipment that emits electric waves, such as
televisions or radios, to avoid electrical interference.
• Avoid locations where the sensors are exposed to direct wind.
Doing so may cause malfunctions.
• Avoid locations where furniture, fabrics, or other objects can come in contact with the unit and
interfere with the intake and air outlet.
• Avoid locations where the unit is exposed to condensation or drastic changes in temperature.
Appropriate room temperature is between 0 – 35 ºC.
• Place the unit on a level and stable surface with sufficient air circulation.
When placed on heavy carpet, the unit may vibrate slightly.
Place the unit on a level surface to avoid water leakage from the Water Tank and Humidifying Tray.
• Avoid locations that generate grease or oily smoke.
Doing so may cause the unit exterior to crack and the sensors to malfunction.
• To ensure proper airflow, place the unit about 30 cm (1 ft) away from the wall.
The wall directly behind the air outlet may become dirty over time. When using the unit for an extended period
of time at the same location, periodically clean the walls adjacent to it. You can also prevent walls from
becoming dirty by covering them with a vinyl sheet or other protective covering.
• To move the unit with casters, check that the casters (on right and left sides) are unlocked and move it
slowly in the lateral direction only.
FILTER GUIDELINES
• Follow the instructions in this manual for proper filter care and maintenance.
E-5
Page 8

Clean Air Mode Button / Indicator Light (light green)
PARTS NAME
Main Unit, Control Panel and Front Monitor
Front
Main
Unit
Air Outlet (front)
Caster
Lock
Control Panel
Filter Maintenance Indicator
Light (orange)
Plasmacluster Ion
ON/OFF Button
OFF Timer Button/
Filter Reset Button/
Indicator Light (light green)
Fan Speed Button /
Indicator Light (light green)
page
page
E-16
E-12
page
E-14
page
E-11
Front Monitor
Humidifying Indicator Light
page
E-10~11
Off
Green
Red
(Flashing)
Not humidifying
Humidifying
Fill water
Indicates the air conditions and approximate humidity in a room.
Dust Monitor
Current Humidity Indicator (green)
Indicates the present humidity (estimated).
(Display ranges from 6% to 99% by percent)
Humidity level cannot be set.
Indicates the pollution level of
room air with 5 levels *.
Green
Room air
Red
Clean
Dirty
E-6
Page 9

Press any button
indicated with to
start operation.
Plasmacluster Ion Indicator Light (blue)
Plasmacluster Ion Shower Mode Button / Indicator Light (light green)
Clean Air & Humidify Mode Button / Indicator Light (light green)
Clean Air Mode Button / Indicator Light (light green)
Back
Handle
(left and right)
Handle of Water Tank
Sensor Unit
(Temperature and humidity sensor /
dust sensor)
Water Tank
Humidifying Filter
Do Not Remove!
Be sure to attach it
during operation even if
humidification operation
is not carried out.
Humidifying Tray
(internal)
Tank Cap
Lighting: “ON”, Not lighting: “OFF”
Child Lock Button/
Indicator Light
(light green)
Power Off Button
Lights Control Button
page
E-10
page
E-12
page
E-10~11
page
E-12
page
E-11
page
E-10
Louver (automatic)
Air Outlet (back)
HEPA Filter
Active Carbon & Silica
Gel Deodorizing Filter
Back Panel
(Pre-filter)
Air Intake
Do not block the
air outlet or air intake.
Caster
(4 locations)
Casters can be moved
only in the lateral direction.
ENGLISH
Do Not Remove!
Tray Partition
Float
This styrene foam
is not a packing
material.
Roller
Plug
Power cord
(plug shape varies by country)
E-7
Page 10

PREPARATION
Filter Installation
Be sure to install filters before plugging the unit.
Upper tabs (one each
at right and left)
Back Panel
HEPA Filter
Remove the
back panel
to take the
filters out.
Active Carbon & Silica Gel Deodorizing Filter
Take filters (2 types)
out of plastic bags
HEPA Filter
Tag surface should be
attached to the front side
Tag
Active Carbon &
Silica Gel
Deodorizing Filter
Install the filters
in order from the
HEPA Filter to the
Active Carbon &
Silica Gel
Deodorizing
Filter.
No difference on both sides
• The filters (2 types) are
found in the main unit.
• Pull the tag of the HEPA
filter out to the Active
Carbon & Silica Gel
Deodorizing Filter to
make it easy to remove it.
HEPA Filter
Tag
Active Carbon & Silica Gel
Deodorizing Filter
Click
E-8
Mount the
back panel
Lower tabs (one each at
right and left)
Page 11

Fill the Water Tank
Fill tap water in the Water Tank to operate the unit in the Clean Air & Humidify mode.
Press down the
Handle of
water tank
Water tank
Fill water
Water tank
Handle of Water Tank,
and then pull the
Water Tank out
Unscrew the
Tank cap
Water Tank Cap
and fill tap water
in the Water Tank
• Be careful, do not let water spill over.
•
Before filling water, drain the remaining
water in the Water Tank and then rinse
it by shaking with a small amount of
fresh tap water.
ENGLISH
The Water
Tank is
self-standing.
Caution
Click
Tighten the
Water Tank Cap
Install the Water
Tank
• Tighten the Cap firmly to make
sure no water leaks out.
• Be sure to wipe off water droplet
on the Water Tank.
• Take care not to get fingers caught
between the main unit and Water
Tank.
• Firmly hold the main unit for
mounting the Water Tank.
• Use tap water only. (Otherwise, breed of bacteria may occur)
• Do not fill hot water (≥ 40°C), aroma oil, chemicals, dirty water, detergent or aromatic
substances into the Water Tank. (Otherwise, cracks and/or water leakage could result)
E-9
Page 12

Insert the plug into
the socket.
OPERATION
Clean Air & Humidify Mode
The operation in this mode is generally recommended. (Humidity level cannot be set.)
Fill water Operate Stop
Caution
Fill up the Water
Tank with tap
water
Water tank
Beep
Select a preferred
fan speed
Beepー
• When water in the Water Tank runs out, the Humidifying Indicator Light blinks in red and starts
operation without humidifying function.
• When the fan speed is set to “AUTO” or "POLLEN", the unit controls
the humidifying level for the optimized humidity. However, the humidity
could be too high or too low depending on the size or condition of the
room in which the unit is installed.
• If humidity is too low: Set the fan speed to “MAX” or “MED” for operation.
• If humidity is too high: Operate the unit in the clean air mode.
page
page
E-9
E-11
• When operating the unit for the first time
after the plug is inserted into the socket,
default operation sets the fan speed at
“AUTO” and Plasmacluster Ion “ON”.
• From the second time onwards, the unit
operates with the same setting as the
previous one.
Humidifying Indicator Light
Off
Green
Red
(Flashing)
* When the fan speed is set at “AUTO” or
“POLLEN”, the unit stops humidifying when
it reaches the optimal humidity level and the
Humidifying Indicator Light turns OFF.
Not humidifying
Humidifying
Fill water
Room temperature Optimal humidity
*
Clean Air Mode
Suitable for rainy seasons or when the humidity is high. (operable without filling the Water Tank)
Operate Stop
E-10
Beep
Beepー
Select a preferred
fan speed
page
E-11
• When operating the unit for the first time
after the plug is inserted into the socket,
default operation sets the fan speed at
“AUTO” and Plasmacluster Ion “ON”.
• From the second time onwards, the unit
operates with the same setting as the
previous one.
Humidifying Indicator Light
Off
Not humidifying
Page 13

Plasmacluster Ion Shower Mode
When the air in a room suddenly becomes polluted
Operation with MAX airflow for 60 minutes to purify
air rapidly.
The operation mode automatically returns to the
previous setting after 60 minutes.
Operate
Beep
Stop
Caution
• When water in the Water Tank runs out, the Humidifying Indicator Light blinks in red and starts
operation without humidifying function.
• When the Plasmacluster Ion ( ) is “OFF”, the unit will not discharge Plasmacluster Ion but still
remove dust and odors by filters.
Beepー
• When eliminating pollens brought home
• During or after vacuum-cleaning
• When taking in the laundry hung outdoors
• When quickly deodorizing household odors
• When deodorizing cooking smell or odors
from the laundry dried indoors
Humidifying Indicator Light
Off
Green
Red
(Flashing)
* When humidity reaches the optimal level,
the unit stops humidifying and the
Humidifying Indicator Light turns OFF.
* When the unit starts operation in the
Plasmacluster Ion Shower mode while the
Water Tank is empty, the Humidifying
Indicator Light will not turn ON.
Not humidifying
Humidifying
Fill water
*
ENGLISH
Fan Speed
Select a preferred
fan speed
AUTO
POLLEN
MAX
MED
LOW
Select the preferred fan setting in the Clean Air & Humidify mode or
Clean Air mode.
This setting is not available during operation in the Plasmacluster Ion Shower mode.
Press the Fan Speed Button to change settings as
follows:
Beep,
Beep
Monitors the room condition with the “Dust, Temperature and Humidity Sensor” and
automatically switch the fan speed.
Operates the unit at MAX fan speed for the first 10 minutes, and then at LOW and
MAX fan speed at 20-minute intervals alternately to effectively eliminate pollens.
Keeps operating at the “MAX” fan speed. (The noise level will be louder)
Keeps operating at the “MED” fan speed.
Keeps operating at the “LOW” speed quietly.
Beep
Beep
Beep Beep
E-11
Page 14
CONVENIENT FUNCTIONS
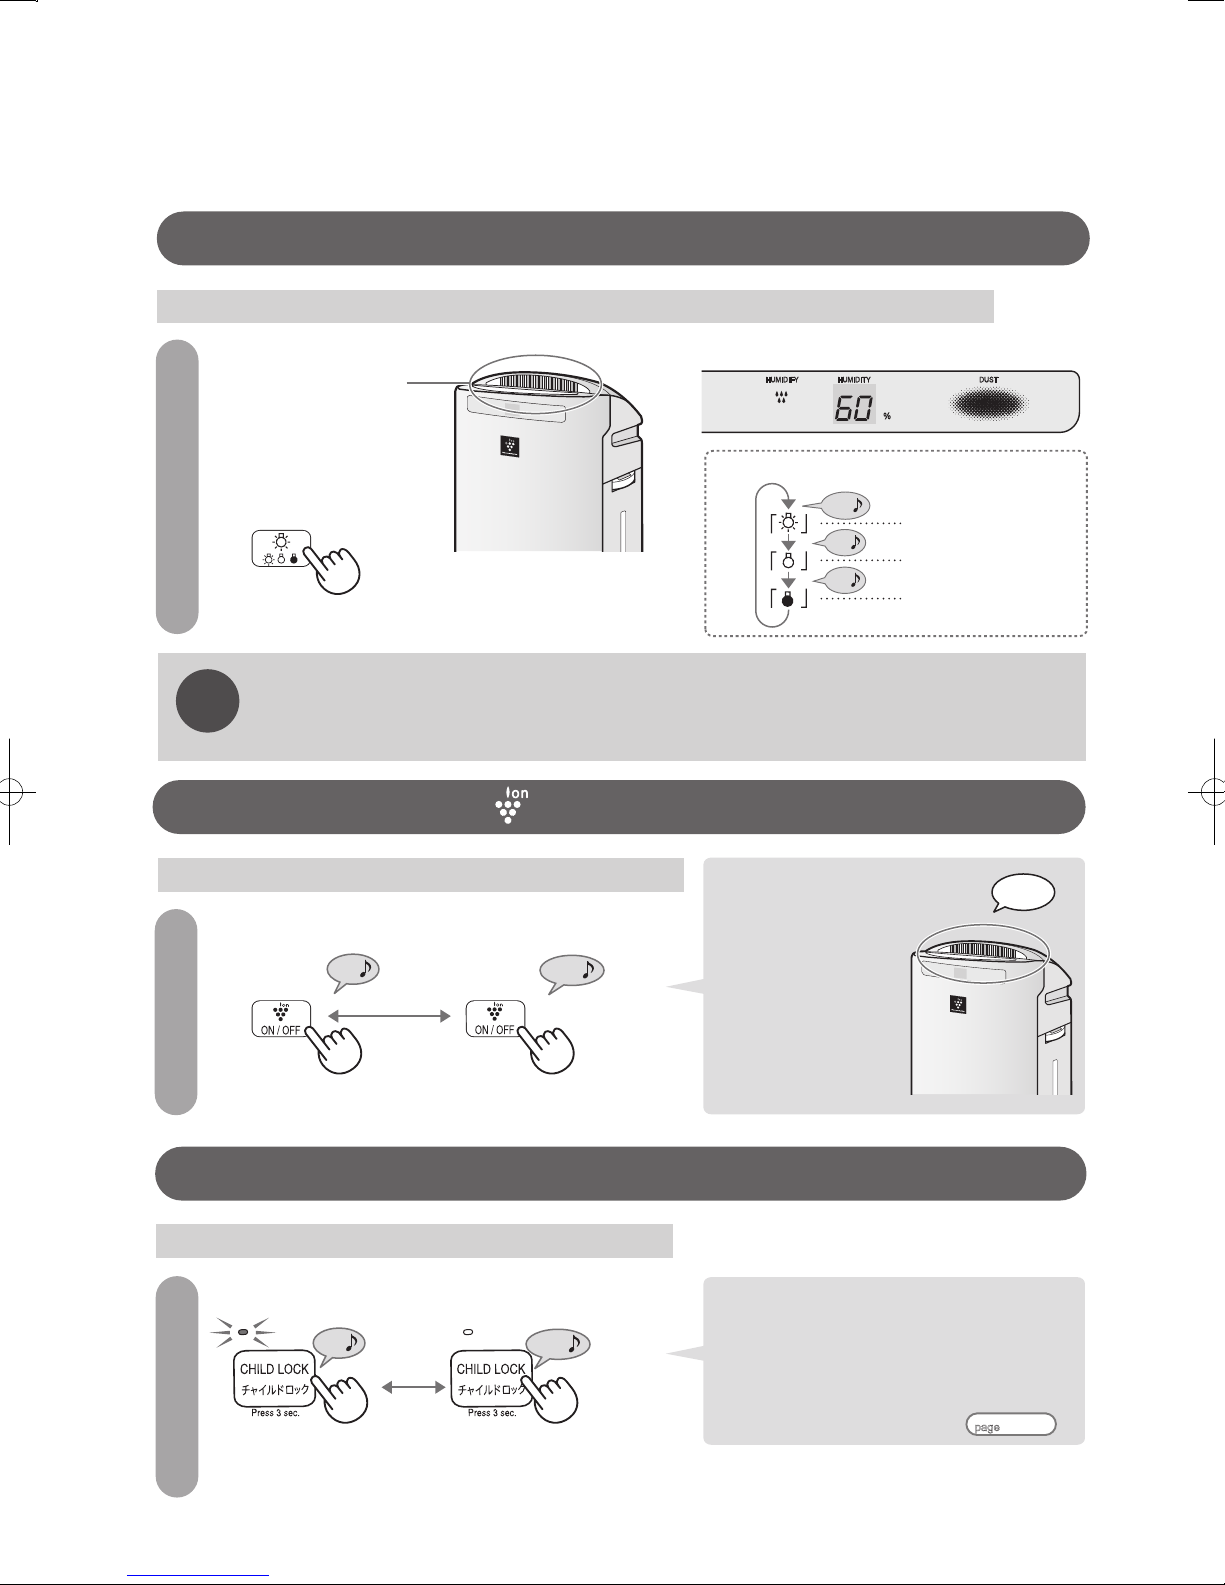
Lights Control
Press the Button when the monitor or Plasmacluster Ion Indicator Light is too bright
Front Monitor
Plasmacluster Ion
Indicator Light
Setting
• Press the Button to change settings as follows:
(In operation)
Caution
• When the light is set to “OFF”, the Humidifying Indicator Light starts blinking once water needs
to be filled.
• When the light is set to “OFF”, it operates in "Dim" mode if the unit is restarted.
Beep
Beep
Beep
Beep
Bright
Dim
Off
Plasmacluster Ion ( ) ON/OFF
Press the Button to turn ON or OFF the Plasmacluster Ion function
“ON” “OFF”
(In operation) (In operation)
ON/OFF
Beep
Beep,
Beep
• When it is "OFF":
The Plasmacluster
Indicator Light (blue)
goes out.
Child Lock
When you want to prevent mishandling by children.
Setting/Canceling
“Set”
Beep
Press for at least
3 seconds
“Cancel”
Beep,
Beep
Press for at least
3 seconds
• If you set the child lock, the operation other
than cancellation of child lock is disabled.
If the main unit is unplugged, the setting is
released.
(While auto restart is set, the child lock is
not cancelled even if the main unit is
unplugged.)
page
Off
E-13
E-12
Page 15

Adjustment of Sensor Detection Sensitivity
(When the unit is OFF)
Beep
1
Press for at least
3 seconds
(In 8 seconds)
select the
2
preferred sensor
detection
sensitivity
Completed
Beepー
Sensors detect:
・Household dust (dust, dust mite feces and dead mites, mold spores, pollens), cigarette smoke etc.
• Fan Speed Indicator Light indicates the
current sensor detection sensitivity.
(“Standard” by default)
• Press the Button to change settings as
follows:
Beep
“LOW”
• Adjustment automatically finishes if the
Power OFF button is pressed in 8 seconds.
• The sensor detection sensitivity setting
will be saved even if the unit is
unplugged.
Beep,
Beep
“Standard”
“HIGH”
Beep
ENGLISH
Dust Monitor
does not change from "Red"
(frequently becomes "Red")
does not change from "Green"
(frequently becomes "Green")
…… adjust it to "Low"
…… adjust it to "High"
Auto Restart
If you want to restart the operation automatically when the power is recovered from electric power failure
(When the unit is OFF)
Setting Canceling
Beep
Press for at least
3 seconds
(When the unit is OFF)
Beep,
Beep
"LOW", "MED", and "MAX" Lights
are lighting for 10 seconds
• Even if the main unit unplugged or the
breaker cuts off during operation, the
operation is restarted with previous
operation mode and setting after power
recovery.
Press for at least
3 seconds
E-13
Page 16

CONVENIENT FUNCTIONS
(Continued)
OFF Timer
The operation will be automatically stopped as scheduled.
(In operation)
Setting/Canceling Setting/Canceling
Beep
(While the timer is in operation)
Check
Beep
(Within 3
seconds)
Select the
preferred time
• Press the Button to change settings as follows:
Beep Beep Beep Beep
1 Hour 2 Hours 4 Hours 8 Hours OFF
• The setting is automatically completed when no
operation is performed for 3 seconds.
(The OFF Timer Indicator Light will turn on)
• To turn off, change the setting to display “ (OFF)”.
(The OFF Timer Indicator Light will turn off.)
• It returns to the previous display in 3 seconds after the
setting is changed.
• The remaining time is displayed when pressing the
button once. (The time is rounded up to the nearest hour)
(Example)
Remaining time: Over 3 hours and less than 4 hours
• If you press the OFF timer button while the remaining
time is displayed, you can change the setting time or turn
off the OFF timer.
Beep,
Beep
Sound Indicator Setting for Water Supply
“Set” “Cancel”
(When the unit is OFF) (When the unit is OFF)
Beep
Press for at least
3 seconds
E-14
Beep,
Beep
Press for at least
3 seconds
• When this setting is “ON”, the unit
generates an audible beep sound (for
about 10 seconds) while the Humidifying
Indicator Light is blinking.
• When the setting is “OFF”, the unit
generates no beep sound while the
Humidifying Indicator Light is blinking.
• If the unit is unplugged, this setting will be
cancelled and no beep sound will be
generated.
Page 17

Frequently Asked Questions
I do not see steam. Is it really humidifying? Doesn't
the product humidify the room too much?
When the Humidifying Filter is moisturized, humid air will be discharged from air
outlet. Humidification is achieved without water-boiling, so steam or vapour cannot
be seen. It will not humidify the room excessively.
Why does the humidity level not increase during
humidifying operation?
Humidity may not rise to the optimal level when there is no water in the tank or the
humidifying filter is clogged with hard water scale or dust. Clean the humidifying
filter, the tray and the water tank.
Also, humidity may not rise to the optimal level depending on the size or condition
of a room where the product is used.
In that case, set the fan speed to “MAX” or “MED”.
page
E-16,17,20
It seems that the unit is blowing out cold air.
As the water draws heat from room when it is evaporated, the temperature of wind
becomes lower than room temperature. You may feel cold depending on the size
of the room.
(When the room temperature is 20°C and the humidity is 30%, the temperature of wind blowing out
from the air outlet is approximately 15°C)
The unit is designed to blow air toward a diagonally rear direction and a front direction
at the same time to efficiently deliver the high-density Plasmacluster Ion throughout a
room. You may feel cold depending on the location where the unit is placed.
(If you feel cold, change the location of the unit)
Do I have to use tap water?
The tap water is chlorinated and germs hardly develop.
If you use any water other than tap water (well water, water of water cleaner,
bottled mineral water etc.), mold or germs develop frequently, producing plenty of
scale and odors.
Carry out the maintenance frequently is required.
ENGLISH
The air blowing out is smelly.
Odor could come out from the air outlet through filters or other sections after the
unit in use is exposed to strong odor such as cigarette or BBQ smoke or if
saprophytic bacteria have propagated in residual water in the Humidifying Tray or
Water Tank.
Clean the HEPA Filter, Active Carbon & Silica Gel Deodorizing Filter, Humidifying
Filter, Humidifying Tray and Water Tank.
page
E-16~20
E-15
Page 18

Be sure to power OFF
When the unit operates for 24 hours a day, the Indicator Light turns ON (Orange) in approximately a month (720 hours).
and unplug the unit
Pull out the plug
CARE AND MAINTENANCE
[Otherwise, electric shock and/or injury could result]
before maintenance.
WARNING
When “Filter Maintenance Indicator Light” turns on
Indicates the time to clean the Water Tank, Humidifying Filter, Humidifying Tray, Back Panel and Sensor unit.
Back
Unplug
Sensor Unit
3
2
Detach the
Water Tank
Back Panel
1
and clean it.
Slightly lift up the
Humidifying Tray and then
pull it out. Clean the
Humidifying Filter and the
Humidifying Filter
Water Tank
• See the knack of detachment
(At the lower left of this page)
Humidifying Tray.
• Be careful, do not spill out water
from the Humidifying Tray.
Humidifying Tray
Knack of detachment
Humidifying Tray
Hold it up slightly
•
Drain water from the
Caution
Humidifying Tray periodically.
(Mold or saprophytic bacteria
could propagate resulting in
smelly odor)
Pull out
Reinstall the Humidifying
Filter, Humidifying Tray, and
Water Tank back to the unit.
• Be sure to mount the
Humidifying Filter with the
correct side facing front.
Gray side
(The gray side should face
the front)
Clean the Back Panel.
Detach the Back panel and
then clean the Sensor Unit.
Reinstall the Back Panel,
insert the plug into the socket,
Beep
Press for
at least
3 seconds
and press the OFF timer
button for 3 seconds or more.
(The Filter Maintenance
Indicator Light turns off)
• After cleaning, make sure to press the OFF timer button for at
least 3 seconds to reset it even if the Filter Maintenance Indicator
Light has not been on.
You will be notified of the next maintenance time about a month later (if the
unit is operated 24 hours a day)
E-16
Page 19

Be sure to clean
the unit to keep it
clean for use.
Light turns ON (Orange) in approximately a month (720 hours).
Water Tank
Tank cap
<<Every time the
Water Tank is filled>>
Fill a small amount of water
into the Water Tank and
Caution
• Do not place the
tank with the tank
cap down.
(otherwise, water
leakage may occur)
• Do not shake the
shake it for rinsing
Handle of
water tank
the inside of the Tank
Humidifying Filter / Humidifying Tray
Rinse the
filter
with water
• Do not disassemble the filter frame
when cleaning Humidifying Filter.
Once a month
Tank by holding the
.
handle
Water
See page for cleaning when the parts are too dirty and smelly.
ENGLISH
E-20
Float
Tray Partition
Wash
with water
Roller
Back Panel / Sensor Unit
Back
Sensor Unit
(internal)
Remove
dust by a
vacuum cleaner.
• The Tray Partition is
Caution
Caution
• Remove the dust inside by a
vacuum cleaner through the
hole in the sensor unit.
(To prevent malfunctioning of
the sensor)
attached loosely.
It is not a defect.
• Do not detach the Tray
Partition, Float and
Roller.
• Avoid applying
excessive force.
(Otherwise, the filters
may be damaged.)
E-17
Page 20

WARNING
Be sure to power OFF
and unplug the unit
CARE AND MAINTENANCE
(Continued)
Pull out the plug
[Otherwise, electric shock and/or injury could result]
before maintenance.
Main Unit
Unplug
Main Unit / Louver
When heavily dirty
Do not use the following:
(Otherwise, damaged surfaces or malfunction may be
caused.)
Thinner
Benzine
Thinner
Benzine
Alcohol
Oven cleaner
Cleanser
Oven cleaner
Cleanser
Bleach
Synthetic
Bleach
Residential and
household
synthetic
detergent (alkaline)
detergent
Spray detergent
Spray detergent
Wire wool
Do not rinse the main unit
with water.
Wipe the main unit
with soft cloth
• Wipe off the heavy dirt with cloth
damped with cold or lukewarm water
(40 °C or less).
• Clean the casters as well.
E-18
Page 21

Deodorizing and de-formaldehyde 2-in-1 Filter
When odor comes out from the air
HEPA Filter / Active Carbon & Silica Gel Deodorizing Filter
*Clean the Active Carbon & Silica Gel Deodorizing Filter and HEPA Filter at the same time
outlet
When an odor is persisting
HEPA Filter
Vacuum the tagged
surface softly
Tag
Active Carbon & Silica
Gel Deodorizing Filter
Vacuum softly
Never rinse the Filter with water.
(Otherwise, the filter will be damaged)
• Maintain only the tagged surface.
Do not clean up the opposite surface.
(Otherwise, the filter will be damaged)
• Remove the dust attached to the surface of
filter.
• The filter is fragile. Be careful not to exert
strong force to it excessively.
Never rinse the Filter
with water.
(Otherwise, the filter will be damaged)
• Both surfaces can be maintained.
• Remove the odor and dust on the filter.
ENGLISH
Please cover the ground with
newspapers when maintaining the filter.
* Black powder of activated carbon may come off, but it is not a defect.
Do not dry the filter under direct sunlight.
•
Caution
(Otherwise, the filter performance will
be degraded)
E-19
Page 22

WARNING
Be sure to power OFF
and unplug the unit
Pull out the plug
CARE AND MAINTENANCE
(Continued)
[Otherwise, electric shock and/or injury could result]
before maintenance.
Water Tank / Back Panel / Humidifying Filter / Humidifying Tray
Water Tank
Unscrew the Water Tank Cap and wash the inner
Water Tank and the Cap.
Sponge, etc.
Toothbrush, etc.
Tank cap
White mass could adhere to the rubber part of the Water Tank
Cap. Remove the dirt by using a toothbrush or similar tool.
Humidifying Filter / Humidifying Tray
Dirt status
Parts to be cleaned
Kitchen detergent (powder) or Baking soda
Required chemical
Amount of use
Hard water scale or odor
Humidifying Filter / Humidifying Tray Humidifying Filter
(See the lower part of this page for
"When using baking soda")
Approx. 60g per 1L of water
Back Panel
Soak the panel into water with diluted
kitchen detergent.
Rinse off detergent thoroughly.
Dry the panel in the shade.
Back Panel
Soak for about 10 min.
Red, yellow, or white dirt may be attached
to Humidifying Filter / Tray. It is mineral or
iron substance in tap water. It is not defect.
Hard white mass
Citric acid
Available at pharmacies or drug stores
Water or lukewarm water (approx. 40°C or less)
Approx. 6g per 1L of water
How to wash
Duration
After soaking
•
Caution
• Insufficient rinsing could result in the remaining odor of detergent or citric acid or the
• If you use the product while water scale or white mass remains, water leakage may occur.
Soak
Rinse off detergent or citric acid thoroughly with water. (To avoid odor or deformation/discoloration of the main unit)
The use of non-designated detergent could result in deformation, discoloration or cracks (water leakage).
deformation/discoloration of the main unit.
When using baking soda (for persistent odors)
Dissolve commercially available baking soda in water, and soak the Filter in the solution for
about 30 minutes.
Rinse the filter well after soaking.
Amount of use
E-20
Approx. 60g per liter of water
About 30~60 min.
Soak
About 2 hours
Page 23

IMPORTANT INFORMATION
Filter Performances
Filter Frame (white)
Humidifying Filter
Filter Frame (gray)
HEPA Filter
Active Carbon &
Silica Gel
Deodorizing Filter
Back Panel
Performances
It absorbs water from
Humidifying Tray,
humidifying the air passing
through it.
It catches pollen, allergens
(dust mite and their feces),
mold, dust, cigarette smoke
(particles), and hair of pet.
It absorbs life odor such as
formaldehyde, cigarette
smoke (odor), odor of toilet,
odor of food waste and odor
of pet.
It catches large dust
particles.
Timing for
maintenance
Once a month
When it is heavily
contaminated or
smelly
Do NOT rinse it
with water.
When it is heavily
contaminated or
smelly
Do NOT rinse it
with water.
Once a month
Timing for
replacement
Once a 5 years
page
E-23
The filter frame is
not a replacement
part. Do not throw
away.
Once a 10 years
page
E-22
Once a 10 years
page
E-22
Replacement is
not required.
ENGLISH
• It is not possible to remove all of harmful gas components and odor components that are
Caution
constantly generated.
For Effective Use
• The air purifier is designed to collect dust or odor components in a room. If it operates in the environment
with strong odors like air freshener, aroma oil, cigarettes and BBQ, the odors will adhere to filters which
might generate bad odor in weeks to months.
In this case, clean the “HEPA Filter”, “Active Carbon & Silica Gel Deodorizing Filter and “Humidifying
Filter”.
If odors still persist after cleaning, it is recommended to replace the filters.
• In the environment with strong odors, it is recommended to ventilate the room regularly.
• The unit takes longer to remove odor than dust.
• Do not use fluorocarbon polymer or silicone-containing products* near the main unit.
The fluorocarbon polymer or silicone could get stuck inside the unit, preventing it from discharging
Plasmacluster Ion.
* Hair care products (e.g. split-end coat, hair mousse, hair treatment, etc.), cosmetics, antiperspirant,
antistatic agents, waterproof sprays, polishes agent, glass cleaners, chemical clothes, wax, etc.
E-21
Page 24

WARNING
Be sure to power OFF
and unplug the unit
FILTER REPLACEMENT
Pull out the plug
[Otherwise, electric shock and/or injury could result]
before replacement.
HEPA Filter
Model:
FZ-CD20BH-HK
• Before replacing the Filter, lay down newspaper etc. to prevent dirt from adhering to the
Caution
surrounding objects.
• Dispose the old HEPA Filter according to the local garbage classification rules.
• Under the certain usage environment, the Filter could generate odor and therefore need to be
replaced in weeks to months.
• The HEPA Filter is a consumable item. Please pay for the replacement filter even during the
warranty period.
HEPA filter materials ………………...
HEPA Filter
Active Carbon &
Silica Gel
Deodorizing Filter
Once a 10 years*
The Filter cannot be washed with water.
Be sure to replace it on a periodic basis.
(Replace the Filter according to the instructions
provided with the replacement filter)
Polypropylene and polyethylene
Active Carbon & Silica Gel Deodorizing Filter
Model:
* The estimated filter replacement cycle: when the filter's dust / odor collecting ability decreases to 50% of its
initial stage (suppose dust / odor collection amount is equivalent to 5 cigarettes a day).
According to The Japan Electrical Manufacturers' Association Standards JEM1467, the replacement cycle is
about 5 years if its dust / odor collection amount is equivalent to 10 cigarettes a day.
FZ-GB20GT-HK
• Before replacing the Filter, lay down newspaper etc. to prevent dirt from adhering to the
Caution
• Dispose the old Active Carbon & Silica Gel Deodorizing Filter according to the local garbage
• Under the certain usage environment, the Filter could generate odor and therefore need to be
• The
HEPA Filter
Active Carbon &
Silica Gel
Deodorizing Filter
surrounding objects.
classification rules.
Active Carbon & Silica Gel Deodorizing Filter materials …………
replaced in weeks to months.
Deodorizing Filter is a consumable item. Please pay for the replacement filter even during the
warranty period.
The Filter cannot be washed with water.
Be sure to replace it on a periodic basis.
(Replace the Filter according to the instructions
provided with the replacement filter)
Once a 10 years*
Paper and polystyrene (frame)
E-22
Page 25

Humidifying Filter
Once a 5 years*
Model:
FZ-BB90ZK-HK
The filter frame is not a replacement part. Do not
Filter Frame (white)
Humidifying Filter
Filter Frame
(gray)
• Dispose the old Filter according to the local garbage classification rules.
Caution
* The time for the humidification capability to descend to 50% of rated humidification capability when the
humidification operation is carried out for 8 hours a day (referencing "standard of The Japan Electrical
Manufacturers' Association (JEM1426)"). The lifetime may be shortened depending on the status of use.
It is necessary to maintain the filter periodically.
Humidifying Filter materials……
• The Humidifying Filter is a consumable item. Please pay for the replacement filter even during the
warranty period.
throw it away.
The life of the Humidifying Filter varies by water quality.
Replace the Humidifying Filter before reaching the end of the 5-year
life if:
• Water scale or odor still persists after cleaning
• The Filter is heavily discolored (in black or yellow) or dirty
• White mass adheres to the entire Filter
• The Filter is heavily damaged or has lost its shape
(Replace the Filter according to the instructions provided with the
replacement filter)
PET
ENGLISH
E-23
Page 26

Check the following
table before calling
for service or
TROUBLESHOOTING
contacting us.
Symptom
Water is not reduced from
the Water Tank
Water is reduced slowly
Humidification
Humidity does not rise.
Remedy
•
The humidification amount varies by the humidity and temperature of a room.
In the more humid (e.g. rainy day) or cold environment:
… The humidification amount decreases and water in the Water Tank is
reduced slowly.
In the less humid (e.g. dry day) or warmer environment:
… The humidification amount increases and water in the Water Tank is
reduced quickly.
• Is the unit operating in the Plasmacluster Ion Shower mode or at the
fan speed set to “AUTO” or “POLLEN” in the clean air & humidify
mode?
The unit in these modes controls humidity level and stops humidifying
when it reaches the optimal humidity.
• Have the Water Tank, Humidifying Tray and Humidifying Filter been
firmly mounted?
• Does water scale or dirt adhere to the Humidifying Filter / Tray?
Clean the Filter.
• Is water contained in the Water Tank?
• The room in which the unit is used might be too large.
Use the unit in the room not larger than the Recommended area.
Isn't the main unit installed at a place where is exposed to wind of
heating appliance?
The temperature sensor / humidity sensor may be malfunctioning.
Change the installation location.
• Does water scale or dirt adhere to the Humidifying Filter / Tray?
Clean the filter
Refer
to
E-10~11
E-16
E-16,17,20
E-9
E-3
E-16,17,20
Odors or smoke is not
removed.
Odor
Air from the air outlet
is smelly.
• Filters might be left in plastic bags.
Take the filters out of plastic bags.
• Air blown from the air outlet becomes weaker.
Remove dirt or dust from the parts with in the table below:
Parts to be cleaned
Unit
Unit
Back
Panel
Back
Panel
Main
• Was the unit used in a room with strong odors?
If it operates in the environment with strong odors like cigarettes or
BBQ, the filters could generate odor and therefore need to be replaced
in weeks to months.
It is recommended to ventilate the room regularly.
• Inspect the parts with in the table below and clean any smelly parts:
Main
• The unit emits small traces of ozone when generating Plasmacluster
Ion, therefore, sometimes it might be smelly in the air outlet. The ozone
emissions are well below safety level.
Humidifying
Water
Tank
Parts to be cleaned
Humidifying
Water
Tank
Tray
Tray
Humidifying
Humidifying
Active Carbon & Silica Gel
Filter
Filter
Deodorizing Filter
Active Carbon & Silica Gel
Deodorizing Filter
HEPA
Filter
HEPA
Filter
E-8
E-16~20
E-16~20
E-24
Page 27

Symptom
Remedy
Refer
to
The sound of "pip-pip"
comes out from the unit.
Sound Front Monitor
The ticking or clicking
sound is heard from the
air outlet.
The Dust Monitor does
not change.
The Dust Monitor
remains red, it does not
return to green.
• This is the sound of bubbles made when water flows from the Water
Tank to the Humidifying Tray.
According to different humidification amount, the frequency of the
sound will be different. It is not a breakdown.
• It is the sound when Plasmacluster Ion is generated. It is not a defect.
The loudness of the sound varies by the usage environment or
operation mode. The sound may be louder or softer depending on the
usage environment or operation mode, but the loudness does not
account for the differences in effects.
• The sensitivity of the sensor may be unstable after the unit is just
started, the color of the Dust Monitor may remain unchanged.
The sensor sensitivity is stabilized after operating the unit for minutes.
Adjust the sensor sensitivity if the sensor does not sensitive
enough.
• If the color stays in green, air is kept clean.
The sensor might fail to detect odors generated from some locations.
The sensor functions properly if the color of the Dust Monitor changes
when cigarette smoke is blown at the sensor or a towel is shaken near
the unit.
• The sensor sensitivity may not fit some room conditions.
Stop the operation and set the sensitivity of sensor to "High" or "Standard".
• Dust may be clogged in the sensor unit.
Detach the back panel and remove
dust through the hole shown in the
figure on the right with a vacuum
cleaner in order to clean
the internal sensor unit.
(Main unit / back)
Sensor unit
(internal)
ENGLISH
E-13
E-13
E-16,17
The Dust Monitor does
not turn green.
The Dust Monitor
changes color frequently.
The Front Monitor is too
bright.
Indicator Light
The Plasmacluster Ion
Indicator Light does not
light up.
• Dirt comes from outside if windows or door of the room are always open
or the room is less airtight. In this case, the Monitor takes some time to
turn green.
• The sensor may react to air generated by opening or closing a door or
sudden temperature changes.
• The sensitivity of sensor can be adjusted.
Stop the operation and set the sensitivity of sensor to "LOW" or
"Standard".
• The monitor light can be darker or turned off.
Press the Lights Control Button.
• Isn't the Plasmacluster Ion function set to "OFF"?
Press Plasmacluster Ion ON/OFF button and set it "ON".
• Isn't the monitor set to "OFF"?
Press the Lights Control button and set the brightness of monitor
to "BRIGHT" or "DIM".
E-13
E-12
E-12
E-12
E-25
Page 28

TROUBLESHOOTING (Continued)
Symptom
The Filter Maintenance
Indicator Light is ON.
The Filter Maintenance
Indicator Light does not
turn OFF.
The Humidifying
Indicator Light
Indicator Light does not
turn ON or blinks in red
when water is contained
in the Water Tank.
Remedy
• Clean the parts with in the table below.
Parts to be cleaned
Main
Unit
• Press the OFF timer button for 3 seconds or more after maintenance.
(The Filter Maintenance Indicator Light turns off.)
• The Float might be stuck.
Clean up the Humidifying Tray, remove dirt around the Float and
mount it firmly.
• Is the Water Tank or Humidifying Tray firmly inserted to the main unit?
Be sure to mount them firmly to the main unit.
• The Float could malfunction and fail to indicate water supply properly if
it is put closer to speakers, electromagnetic cookers or other magnetic
objects.
• In the Plasmacluster Ion Shower mode or at the fan speed set to
“AUTO” or “POLLEN” in the Clean Air & Humidify mode, the unit stops
humidifying and the Humidifying Indicator Light turns OFF when it
reaches the optimal humidity.
Back
Panel
Water
Tank
Humidifying
Tray
Humidifying
Active Carbon & Silica Gel
Filter
Deodorizing Filter
HEPA
Filter
Refer
to
E-16~20
E-16
E-
16,17,
20,27
E-7,16
–
E-10,11
The indication of the
current humidity differs
from the readings of
other hygrometers.
The monitor displays
Error Display
The monitor displays
• This is because humidity varies by location even in a single room.
• The accuracy or speed of response to changes in humidity varies
between the Current Humidity Indicator and other hygrometers.
(Check the humidity display as an estimated indication)
• Make sure the Humidifying Filter, Humidifying Tray and Roller are
properly installed, and then restart the unit again.
• Unplug the unit wait for one minute and then plug in and restart the unit
again.
If error is displayed repeatedly, contact SHARP
authorized service center.
–
–
E-7,16,
27
–
E-26
Page 29

Symptom
Remedy
Refer
to
The Tray Partition, Float
• Follow the steps below to mount the Tray Partition, Float or Roller:
or Roller comes off.
Tray Partition
Insert the Tray Partition as shown in the figure below.
Tray Partition / Float / Roller
Float
Put the Float
1
under this
projection
(Do not disassemble)
Put the Float
2
tab into the
hole
Float
Tray Partition
Click
Roller
Hang the Roller on the projection of the
Humidifying Tray in the arrowed direction.
–
ENGLISH
Put the other
3
tab of the Float
into the hole
Humidifying Tray At falling
The Humidifying Tray
cannot be pulled out.
When the main unit falls
down during humidification
operation or when tank is
filled with water
.
Tab
Float
Sectional view
• Hold the Humidifying Tray up slightly and pull it out.
Hold it up slightly Pull it out
• If you lay down the main unit during humidification operation (when
the main unit is filled with water), stop operation immediately and
unplug the unit. Contact SHARP authorized service center for
checking.
Be careful not
to mount the
Roller in a
wrong
direction.
E-16
–
E-27
Page 30

TROUBLESHOOTING (Continued)
Symptom
You cannot operate the
unit.
Want to fix the main unit.
Others
The unit does not operate
in the same setting as the
previous operation. (When
the operation is restarted
or after the operation of
Plasmacluster Ion Shower
mode )
Water or the Humidifying
Filter / Tray gets red,
yellow, or white stain.
Remedy
• Check if the child lock is set.
To cancel the child lock, press the Child lock button for at least
3 seconds or more.
• Lower the Caster Lock (2 positions on right and left
sides) to fix the casters. Be sure to use right and left
Casters at the same time.
• Check if the plug has been removed from the socket.
The default setting is restored if the plug is removed from the socket.
(You can set the Auto Restart function)
• It is mineral or iron substance in tap water. It is not a defect.
Drain water and clean the Humidifying Filter / Tray.
Lock
Refer
to
E-12
E-6
E-13
E-17,20
E-28
Page 31

SPECIFICATIONS
Model
Power supply
Recommended Room Size for
Plasmacluster 7000 *
Operation mode
Recommended Room Size
Fan speed
Air volume (m
Power consumption (W)
Noise level (dBA)
Humidification capacity (ml/h) *2
Water Tank capacity (L)
Dimensions (mm)
Weight (kg)
Power cord length (m)
Standby power (W)
1
3
/h)
Clean Air & Humidify Mode Clean Air Mode
2
~21m
“MAX”
192 162 66 216 180 66
19
42
“MED” “LOW”
13
38 23 44 40
450
KC-JG20A
220V 50Hz
2
21m
“MAX”
4.7
Approx. 3.0
W 382×D 247×H 574
Approx. 8.2
2.0
Approx. 0.8
23 16
2
~25m
“MED” “LOW”
4.2
22
ー
*1 This is a room size with which approximately 7,000 ions/cm3 can be measured in the air near center of the
room (1.2m above the floor) when the product is installed near wall and operated by "MED" airflow.
*2 Humidification capacity at 20 °C and 30% RH. Humidification capacity changes according to indoor
temperature and humidity.
Replacement Filters
Filter category
HEPA Filter
Active Carbon & Silica Gel Deodorizing Filter
Humidifying Filter
Filter model
FZ-CD20BH-HK
FZ-GB20GT-HK
FZ-BB90ZK-HK
ENGLISH
E-29
Page 32

中文
Page 33

中文
目錄
使
特點
重要安全事項
用
各部分名稱
之
使用之前
前
操作方法
使
用
方
方便的功能
法
常見問題
..........................................................................................
............................................................................
................................................................................
...................................................................................
安裝過濾網
注水入儲水箱
加濕空氣淨化模式
空氣淨化模式
強力PCI除菌模式
亮度調校
PCI開/關
兒童安全鎖
感測器的靈敏度調校
自動重新啟動
定時關機
注水聲音提示設定
...........................................................................
..................................................................................
......................................................................
..............................................................................
..................................................................
...............................................................................
..................................................................................
頁數
C-2
C-4
C-6
C-8
C-9
C-10
C-11
C-12
C-13
C-14
C-15
日常保養
保
養
檢
「過濾網清潔指示燈」點亮時的清潔保養
主機
HEPA過濾網/活性碳矽膠除臭過濾網
儲水箱/背板/加濕過濾網/加濕托盤
重要須知
過濾網性能
為了有效使用
過濾網更換指南
HEPA過濾網
活性碳矽膠除臭過濾網
加濕過濾網
故障時的檢查事項
查
事
項
.........................................................................................
規格
規
格
..................................................................................
...................................................................................
......................................
..............................................
..................................................................................
........................................................................
.............................................................................
....................................................................
C-16
C-18
C-19
C-20
C-21
C-22
C-23
C-24
C-29
Page 34

特點
高濃度PCI
高濃度PCI
全年保持室內空氣清新
全年保持室內空氣清新
春天 雨季 夏天 秋天 冬天
去除花粉
(過濾網效果)
抑制霉菌
抑制浮游病毒
*1
• 與自然界存在的正、負離子相同
• 空氣淨化機制已確認
• PCI安全性已驗證
*5
抑制塵蟎排泄物、塵螨屍體等致敏原
去除附著的異味
*4
減少靜電
*1 胡志明市巴斯德研究所。根據日本電機工業會規格(JEM1467)標準在約25m3的測試空間進行測試。
FU-A30(在「高」風速下運行)在約18分鐘內可抑制99%過敏原。
(FU-A30的性能低於KC-JG20A)
*2 ITEA Corporation。在約25m
內可抑制99%過敏原。
(FU-F28的性能低於KC-JG20A)
*3 社內測試。在約90分鐘內,迅速去除香煙煙味至不易察覺的水平。
*4 社內測試。在約41m
*5 LSI Medience Corporation
3
的測試空間進行測試。FU-F28(在「高」風速下運行)在約51分鐘
3
的測試空間,初始電壓為5kV,約13分鐘後,降低至0.5kV。
*3
*2
減少靜電
*4
室內空氣突然變髒時
強力PCI除菌模式
強力PCI除菌模式
在「高」風速下運行
60分鐘,迅速淨化空氣。
PCI空氣淨化技術,有效抑制浮游病毒,以及分解和去除塵
蟎排泄物、塵蟎屍體等過敏物質,但不能製造出無菌狀
態,亦不能保證可以防止細菌感染。
離子的實際數量,以及淨化效果將因房間的環境(面積、
形狀、是否使用冷氣機或進行通風、產品的安裝位置等)
和使用方法(離子的吹出方向、運行模式等)而有所不
同。
C-2
自動模式
自動模式
監測室內空氣的污染程度、
溫度和濕度,相應地自動
切換運行模式。
Page 35

獨有的氣流技術,迅速
獨有的氣流技術,迅速
去除灰塵和異味,全方
去除灰塵和異味,全方
位吸入污濁空氣,利用
位吸入污濁空氣,利用
3層過濾網牢牢鎖住灰塵
3層過濾網牢牢鎖住灰塵
背板
(前置過濾網)
活性碳矽膠除臭過濾網
符合空氣動力學,
向後傾斜20°送風
HEPA過濾網
大灰塵
異味、甲醛
小灰塵、病毒和過敏物質
安裝須知
請將主機放在合適的地方。
*
請避免窗簾或者傢
俱將吹出口或吸入
口遮蔽。
請預留足夠空間*
* 即使離開牆壁3cm放置使用,也不會影響集塵能
力,但可能會引致牆壁或地面變髒。因此請盡可
能遠離牆壁擺放(建議離開牆壁30cm放置)。
60cm或以上
3cm或以上
請預留足夠空間*
環繞氣流
當電視機或收音機廣播訊號受到干擾、
原子電波鐘錶無法正確顯示時間時,請
將空氣清新機移至遠離電視、收音機或
原子電波鐘錶的地方。
• 請在約0°C~35°C的房間內使用
以防結露或凍結引起過濾網壽命減少或故障。
• 請遠離陽光直射的位置
以防變形、變質、變色。
• 請放置在遠離窗戶或冷氣機、發熱器具出風口的位置
以防變形、變質、變色以及感測器出錯。
• 請放置在堅固的地方
以防損壞或刮花地板。
• 當主機附近的牆壁或傢俱有髒污時,請盡可能遠離牆壁
放置使用。
• 在同一地方長時間使用時,請注意主機底部的地面或周
圍的牆壁等是否有髒污。
請經常移動主機放置位置並對地面和牆壁進行清掃。
C-3
Page 36

重要安全事項
使用電器時,必須遵守基本安全預防措施,包括以下各方面:
警告
– 為了減少觸電、火警或受傷等危險,請務必遵守以下注意事項:
• 在使用空氣清新機之前請閱讀所有注意事項。
• 只能使用220V插座。
• 如果電源線或者插頭已經損壞,或者牆上的電源插座已經鬆脫,請勿使用空氣清新機。
• 定期清除電源插頭上的灰塵
• 請勿將手指或異物插入吸氣口或吹出口。
• 當拔除電源插頭時,須務必緊握插頭而不要拉扯電源線。
否則可能因短路而引起觸電或火警。
• 移動空氣清新機時,請勿讓腳輪損壞電源線。
否則可能引起觸電、過熱或起火。
• 手濕時請勿拔插電源插頭。
• 請勿在氣體設備或壁爐附近放置空氣清新機。
• 給儲水箱加水、清潔本機或不使用本機時,請務必拔除電源插頭。 否則可能因短路而引起觸電或火警。
• 如果電源線損壞,必須由製造商、服務代理、SHARP 授權的維修中心或具有同等資格的服務提供商負責更換,
以免發生安全危險。
• 只有SHARP 授權的維修中心方可維修本空氣清新機。當需要調校、修理或出現問題時,請聯絡就近的維修中心。
• 當房間裡使用了噴霧殺蟲劑時,請勿使用本機。 如果房間裡有油渣、焚香、點煙時的火苗、空氣中有化學氣味,
請勿使用本機。浴室等容易變濕的地方,也不要使用本機。
• 清潔空氣清新機時請小心。具強力腐蝕性的清潔劑會損壞本機表面。
• 搬運本機時,先取下儲水箱和加濕托盤,然後緊握主機兩側的手柄。
• 請勿飲用加濕托盤或儲水箱裡的水。
• 每天用新鮮自來水更換儲水箱裡的水,定期清潔儲水箱和加濕托盤(請參閱 C-10、16、17 和 20頁)。 不使用
本機時,請倒出儲水箱和加濕托盤裡的水。把水留在儲水箱或加濕托盤裡可能會滋生霉菌和細菌,及產生異味。
• 除非得到監護人或負責其安全人士的適當監督或指導,否則,本機不適合身體官能或心智能力退化者,或缺乏操
作經驗和知識的人士(包括兒童) 使用。本機不應該作為兒童的玩具。
在沒有監督的情況下,兒童不應對本機進行清潔保養。
注意
如果空氣清新機對收音機或電視接收造成干擾,請嘗試以下其中一項或多項措施:
C-4
– 本機對收音機或電視接收造成干擾時的注意事項
• 調整或重新放置接收天線。
• 增加空氣清新機和收音機或電視的距離。
• 將本機的電源與收音機或電視接收器的電源連接到不同的電路。
• 請諮詢經銷商或具備相關資格的收音機或電視技術人員。
Page 37

操作的注意事項
• 請勿堵塞吸氣口或吹出口。
• 請勿將本機靠近或放在熱源物體上(如爐灶、暖爐或可能接觸到蒸氣的場所)。
• 使用時請勿平放本機。
• 移動本機時,須一直緊握主機兩側的手柄。
運行過程中請勿移動本機。
• 在榻榻米、易損壞的地板、不平坦的表面或厚地毯上移動本機時請向上抬起。
• 用腳輪移動本機時,請緩慢地沿著水平方向移動。
• 移動本機前,請確保本機未有運行,然後握住主機的手柄取下儲水箱和加濕托盤。
• 取下儲水箱時,注意不要夾到手指。
• 請勿在沒有正確安裝過濾網、儲水箱和加濕托盤的情況下操作本機。
• 請勿清洗和重用HEPA過濾網和活性碳除臭過濾網。
否則不但不會提升過濾網性能,還可能導致觸電或故障。
• 只能使用軟布清潔本機表面。
請勿使用揮發性液體或清潔劑。
否則本機表面可能會損壞或破裂,還可能導致感測器故障。
• 除垢保養的次數視乎所用水的硬度和其中的雜質而定;水質越硬,越需經常除垢。
• 請將本機放在遠離水源的地方。
安裝指南
• 使用本機時,請將本機放置於發出電波的設備(如電視機或收音機)至少2米以外的地方,以防產生電波干擾。
• 請勿安裝在感測器直接對住風口的地方。
否則可能引起故障。
• 請勿安裝在傢俱、織物或其他物件可能會接觸到空氣清新機、干擾吸氣口和出風口的地方。
• 請勿安裝在冷凝環境或溫度會出現劇烈變化的地方。
室溫以0至35ºC為宜。
• 安裝必須穩固,且通風良好。
把本機放置在鋪有厚地毯的地方時,可能導致本機微微震動。
請將本機放置在平坦的表面上,以免儲水箱和加濕托盤漏水。
• 請勿安裝在會產生油脂或油煙的地方。
否則可能會導致本機表面破裂及感測器故障。
• 為了確保氣流通暢,請遠離牆壁大約30厘米(1英尺)放置。
排氣口後面的牆壁可能會隨著時間變髒。 當在同一位置長時間使用本機時,請定期清潔附近的牆壁。
亦可用乙烯板或其他保護罩蓋住,以防牆壁變髒。
• 使用腳輪移動時,先確認腳輪鎖(左右兩側各有2個)是否已經解除,然後請緩慢地向左右方向移動。
過濾網指南
• 遵照說明書指示,了解正確保養和清潔過濾網的方法。
C-5
Page 38

空氣淨化鍵/指示燈(淺綠)
各部分名稱
主機、操作面板、前置顯示器
主機
前面
吹出口(前)
腳輪固定鎖
操作面板
過濾網清潔指示燈(橙)
頁數
C-16
PCI開/關鍵
定時關機鍵/
過濾網重設鍵/
指示燈(淺綠)
風量切換鍵/指示燈(淺綠)
頁數
頁數
C-12
C-14
頁數
C-11
前置顯示器
加濕指示燈
頁數
C-10~11
熄滅
綠燈亮
紅燈閃爍
加濕停止
加濕中
請加水
提示房間內的空氣狀況和濕度的大致狀況。
濕度監測器(綠)
顯示目前的大概濕度。(在6%~99%範圍
內以1%刻度變動顯示)
無法調整濕度設定。
塵埃監測器
房間的空氣污染水平通過
5個階段來顯示。
綠
房
間
的
空
氣
紅
乾淨
髒污
C-6
Page 39

按下帶 號的操作鍵
之後,即開始運行。
PCI指示燈(藍)
強力PCI除菌鍵/指示燈(淺綠)
加濕空氣淨化鍵/指示燈(淺綠)
空氣淨化鍵/指示燈(淺綠)
背面
手柄
(左右)
儲水箱手柄
感測器(內部)
(溫度和濕度感測器/灰塵感測器)
儲水箱
加濕過濾網
請勿拆下!
運行期間即使不進行
加濕運行,也務必
將其安裝在主機上。
點亮:「開」,熄滅:「關」
頁數
C-10
頁數
C-10
頁數
C-11
亮度調校鍵
兒童安全鎖鍵/指示燈
(淺綠)
頁數
C-12
運行停止鍵
頁數
C-10~11
頁數
C-12
導風板(自動)
吹出口(後面)
HEPA過濾網
活性碳矽膠除臭過濾網
背板
(前置過濾網)
吸入口
請勿遮蔽
吹出口或吸入口。
腳輪
(4個)
加濕托盤
請勿拆下!
托盤隔離板
浮子
發泡材料並不是
包裝材料。
滾輪
儲水箱蓋
只可以左右移動。
插頭
電源線
(插頭形狀因國別/地區而異)
C-7
Page 40

使用之前
安裝過濾網
請在插入電源插頭之前,安裝過濾網。
上側扣鉤
(左右兩側各一個)
背板
拆下背板、
取出過濾網。
• 主機中有(2種)過濾網。
HEPA過濾網
活性碳矽膠除臭過濾網
HEPA過濾網
標籤面應安裝到前面
標籤
活性碳矽膠
除臭過濾網
將過濾網(2種)
從塑膠袋內取出來
按從HEPA過濾網
到活性碳矽膠除臭
過濾網的順序安裝
過濾網。
無前後之分
• 若將HEPA過濾網的標籤
拉到活性碳矽膠除臭過濾
網上的話,在取下時會更
方便。
HEPA過濾網
標籤
活性碳矽膠除臭過濾網
咔嘰
C-8
安裝背板
下側扣鉤(左右兩側各一個)
Page 41

注水入儲水箱
使用加濕空氣淨化模式前,請先注入自來水到儲水箱。
按下儲水箱手柄,
然後拉出手柄、
取出儲水箱
儲水箱手柄
儲水箱
打開儲水箱蓋,向
儲水箱蓋
儲水箱加入自來水
• 請注意不要讓水溢出。
•
儲水箱可能會有少量的水殘留,在加水
之前請先把它們倒掉,然後加入少量
的新鮮自來水搖晃清洗。
咔嘰
注水
儲水箱
扭緊儲水箱蓋
安裝儲水箱
儲水箱為
獨立式。
• 確認扭緊,沒有漏水。
• 請務必抹乾儲水箱上的水滴。
• 注意手指不要夾到主機和儲水箱
之間。
• 握緊主機,以安裝儲水箱。
• 請勿使用自來水以外的水。(否則可能滋生細菌)
注意
• 請勿在儲水箱中加入40°C或以上的熱水、香油、化學藥品、污水、清潔劑、芳香劑。
(否則可能引致裂開及/或漏水)
C-9
Page 42

操作方法
加濕空氣淨化模式
一般情況下建議使用此模式。(無法調整濕度設定。)
用自來水注滿
儲水箱
加
水
運
行
儲水箱
嗶
選擇自己喜歡的
風速
頁數
頁數
C-11
C-9
請將電源插頭插入
電源插座。
• 在將電源插頭插入電源插座後初次運行
時,預設風速設定為「自動」及PCI
設定為「開」。
• 從第2次開始,將與前一次相同的模式下
運行。
加濕指示燈
熄滅
加濕停止
*
—
嗶
停
止
• 儲水箱內的水用完後,加濕指示燈紅色將閃爍,主機會繼續運行但並不加濕。
注意
• 風速在「自動」或「花粉」模式時,機器會調節加濕量,
以達到最佳的濕度,但由於所放置房間的大小或環境不同,
也可能會發生濕度過高或過低的情況。
• 濕度過低時:請設定風速「高」或「中」運行。
• 濕度過高時:請在空氣淨化模式下運行。
* 風速在「自動」或「花粉」狀態時,一旦達
空氣淨化模式
適合梅雨季節等濕度高的時候使用。(不給儲水箱加水也可以使用)
嗶
• 在將電源插頭插入電源插座後初次運行
• 從第2次開始,將與前一次相同的模式下
運
行
選擇自己喜歡的
風速
頁數
C-11
綠燈亮
紅燈閃爍
到最佳濕度以後,加濕運行將停止,加濕指
示燈也將熄滅。
時,預設風速設定為「自動」及PCI
設定為「開」。
運行。
加濕中
請加水
房間溫度 最佳濕度
停
嗶—
止
C-10
熄滅
加濕指示燈
加濕停止
Page 43

強力PCI除菌模式
室內空氣突然變髒時
在高風速下運行60分鐘,迅速淨化空氣。
60分鐘後,運行狀態自動回到之前的模式。
運
嗶
行
停
嗶—
止
注意
• 儲水箱內的水用完後,加濕指示燈紅色將閃爍,主機會繼續運行但並不加濕。
• 設定PCI ( )「關」的話,將不再釋放PCI離子,但過濾網會照常去除灰塵和異味。
• 去除帶回家的花粉時
• 在使用吸塵器時或使用完以後
• 取回室外曬洗衣物時
• 如需迅速去除生活異味時
• 去除烹調後或室內晾曬衣物的異味時
加濕指示燈
熄滅
綠燈亮
紅燈閃爍
*
一旦達到最佳濕度以後,加濕運行將停止,加
濕指示燈也將熄滅。
*
在儲水箱沒有水的狀態下,開始強力PCI除菌
運行時,加濕指示燈不會點亮。
加濕停止
加濕中
請加水
*
風速切換
自動
花粉
高
中
低
在加濕空氣淨化模式或空氣淨化模式下選擇自己喜歡的風速設定。
在強力PCI除菌模式下運行時,風速則不可改變。
按下風量切換鍵,可按下列順序改變:
嗶,嗶
嗶 嗶 嗶 嗶
選擇自己
喜歡的風速
通過「塵埃·溫濕度感應器」對房間的狀態進行監測,自動切換風速。
在頭10分鐘高風速運行以後,接著以20分鐘的間隔交替進行低風速和高風速運行,
有效去除花粉。
風速連續在「高」下連續運行。(噪音將變大)
風速連續在「中」下連續運行。
風速連續在「低」下較安靜地連續運行。
C-11
Page 44

方便的功能
亮度調校
前置顯示器或PCI指示燈太亮時按下操作鍵
PCI指示燈
前置顯示器
設
(運行中)
定
注意
• 指示燈在「關」的狀態下,如果需要加水,加濕指示燈將會閃爍。
• 指示燈在「關」的狀態下,停止運行後再啟動主機時,前置顯示器將設定在「暗」的狀態。
PCI ( ) 開/關
按下操作鍵,開啟或關閉PCI功能
「開」 「關」
(運行中) (運行中)
開
/
關
嗶
嗶,嗶
• 按下操作鍵,前置顯示器將按如下所示進行切換:
嗶嗶
嗶
嗶
• 在「關」的狀態下:
PCI指示燈(藍)
熄滅。
亮
暗
關
關
兒童安全鎖
希望防止兒童亂按按鈕或不當操作。
「設定」
設
定
/
解
按3秒鐘以上 按3秒鐘以上
除
C-12
嗶
「解除」
嗶,嗶
• 在兒童鎖設定狀態下,除解除兒童鎖之外的
操作一律無效。一旦拔下電源插頭,設定將
被解除。
(在自動重新啟動設定中,即使拔下電源插
頭也無法解除。)
頁數
C-13
Page 45

感測器的靈敏度調校
(主機在「關」的狀態下)
嗶
1
2
按3秒鐘以上
(8秒鐘以內)
設定自己喜歡的
感測器靈敏度
• 風量指示燈顯示當前設定的感測器靈敏
度。(預設為「標準」)
• 按下操作鍵,前置顯示器將按如下所示進
行切換:
嗶 嗶嗶,嗶
「低」
「標準」
「高」
完
嗶—
成
感測器可感測:
• 塵埃(灰塵、塵蟎排泄物和屍體、霉菌的胞子、花粉)、香煙煙霧等。
塵埃監測器
「紅」色持續不變時
(經常變成「紅」色時)
「綠」色持續不變時
(經常變成「綠」色時)
…… 請調校至「低」
…… 請調校至「高」
• 8秒鐘以內按下運行停止鍵將自動完成
• 感測器靈敏度的設定,即使拔出電源插頭
自動重新啟動
停電後,電力重新恢復,讓主機自動重新啟動
(主機在「關」的狀態下)
• 即使在運行中拔下電源插頭或者跳閘,
設
定
按3秒鐘以上
嗶
「低」、「中」、「高」速指示
燈點亮10秒鐘時
調校。
也會保留設定的記憶。
再次接通電源時,也會恢復到停電前的
運行模式和設定。
(主機在「關」的狀態下)
解
嗶,嗶
除
按3秒鐘以上
C-13
Page 46

方便的功能
定時關機
設定時間過後,將自動停止運行。
(接前頁)
設
定
/
解
除
(定時運行中)
檢
查
(運行中)
• 按下操作鍵,前置顯示器將按如下所示進行切換:
嗶
嗶
(3秒鐘以內)
選擇自己喜歡的
時間
• 3秒內若沒有操作,將自動完成設定。
• 如要取消設定,按鍵更改設定以顯示「 (關)」。
• 設定更改後3秒鐘內,將恢復到先前的顯示。
• 顯示剩餘時間。(時間會四捨五入至最近的小時)
剩餘時間:超過3小時、不到4小時
• 在剩餘時間顯示中,若觸按定時關機鍵,可以改變設定時
嗶 嗶 嗶 嗶
1小時 2小時 4小時 8小時 關
(定時關機指示燈將點亮)
(定時關機指示燈將熄滅。)
(例)
間,也可以解除定時關機。
嗶,嗶
注水聲音提示設定
「設定」 「解除」
(主機在「關」的狀態下) (主機在「關」的狀態下)
設
定
/
解
除
按3秒鐘以上 按3秒鐘以上
C-14
嗶
嗶,嗶
• 設定為「開」後,當加濕指示燈閃爍時,
提示音將鳴響(約10秒鐘)。
• 設定為「關」後,當加濕指示燈閃爍時,
提示音不再鳴響。
• 一旦拔下電源插頭,設定將被解除,提示
音也不再鳴響。
Page 47

常見問題
看不到蒸氣冒出。真的在加濕嗎?會否過度加濕?
本產品採用的是透過吹風到加濕過濾網來產生濕氣的「氣化系統」,而不是透過煮
熱水來產生水氣(蒸氣)的系統,所以您看不到水氣冒出。由於沒有使用加熱器,
因而可以省電,並且可以在濕度變高時降低加濕量。這就意味著絕不會出現過度加
濕的情況。您也可透過加濕指示燈確認這一點。
加濕運行期間,濕度沒有上升,為什麼?
如果儲水箱內沒有水,或加濕過濾網被硬水垢或灰塵堵塞,則可能出現濕度上升不
到最佳水平的情況。請清潔加濕過濾網、托盤和儲水箱。
另外,視乎所放置房間的大小或狀態,濕度可能上升不到最佳水平。
在達不到最佳濕度的情況下,請調校風量為「高」或「中」來運行。
頁數
C-16,17,20
吹出來的風比較冷。
由於水蒸發時會從房間吸熱,所以吹出來的風的溫度會比室溫低。視乎房間的大小,
您可能會感到寒意。
(室溫20°C,濕度30%時,從吹出口吹出的風約為15°C)
為了使高濃度PCI能夠高效地擴散到整個房間,本機會朝斜後方和前方同時吹風。
由於放置的地方不同,您可能會感到寒冷。
(在感到寒冷時,請移動主機到其他地方)
是否必須使用自來水作加濕呢?
自來水經過氯化處理,較難滋生細菌。
如果使用自來水以外的任何水(井水、經淨水器處理過的水、瓶裝礦泉水等),
經常會滋生霉菌或細菌,因而產生水垢和異味。
請經常進行清潔保養。
吹出的風有異味。
在有香煙、烤肉等強烈氣味的環境下使用後,或者殘留在加濕托盤或儲水箱
內的水滋生細菌時,異味可能透過過濾網或其他部分從吹出口發出。
請清潔HEPA過濾網、活性碳矽膠除臭過濾網、加濕過濾網、加濕托盤和儲
水箱。
頁數
C-16~20
C-15
Page 48

日常保養
約1個月(720小時)後,指示燈將會點亮(橙)。
警告
保養前,請務必停止運行,
拔出插頭
並拔出電源插頭。
[否則可能引致觸電及/或受傷]
「過濾網清潔指示燈」點亮時的清潔保養
提示何時需要清潔儲水箱、加濕過濾網、加濕托盤、背板和感測器。
背面
感測器
背板
加濕過濾網
• 請參閱拆下方法
儲水箱
拔出
1
(本頁左下角)
以每天操作24小時計算
3
2
取下儲水箱進行清潔。
稍微向上提起加濕托盤,
向外拉出。清潔加濕過濾網
和加濕托盤。
• 請注意不要讓加濕托盤內的水
溢出。
加濕托盤
拆下方法
加濕托盤
稍微向上提起
• 定期排乾加濕托盤裡的水。
注意
(否則可能滋生霉菌或細菌,
造成異味)
拉出
請按原來模樣將
加濕過濾網、加濕托盤
和儲水箱裝回到主機上。
•
安裝加濕過濾網時請務必使正
確的一面朝前。
灰色一面
(灰色一面應朝前)
清潔背板。拆下背板,
清潔感測器。
裝回背板,將電源插頭插入
電源插座,按定時關機鍵
嗶
按3秒鐘以上
• 清潔後,過濾網清潔指示燈即使不點亮,也請持續觸按定時關機鍵
3秒鐘以上,以便重設。
下一次的保養時間會在約1個月之後(以每天操作24小時計算)
3秒鐘或以上。
(過濾網清潔指示燈將熄滅)
C-16
Page 49

請務必清潔主機,
保持清潔,
以便使用。
約1個月(720小時)後,指示燈將會點亮(橙)。
儲水箱
儲水箱蓋
<<每次加水時>>
加入少量的水
搖動清洗儲水箱內部
儲水箱手柄
加濕過濾網/加濕托盤
浮子
托盤隔離板
滾輪
背板/感測器
背面
用水
沖洗過濾網
用水清洗
塵埃可用
吸塵器吸取。
• 放置儲水箱時,儲水箱
注意
•
清潔時,請勿拆下加濕過濾網。
注意
蓋不能朝下。(否則可
能漏水)
• 請勿手握儲水箱把手搖
晃清洗。
• 托盤隔離板的安裝是較
鬆的。並非故障。
• 請勿拆下托盤隔離板、
浮子、滾輪。
1個月1次
髒
污
較
為
嚴
重
時
、
感
覺
有
異
味
時
的
清
潔
方
法
請
參
考
C-20
頁
說
明
。
感測器
(內部)
• 請勿用力過猛。
注意
• 透過感測器的孔,用吸塵器吸
出灰塵。
(以防感測器出錯)
(否則可能會對過濾網
造成損傷。)
C-17
Page 50

日常保養(接前頁)
警告
保養前,請務必停止運行,
並拔出電源插頭。
拔出插頭
[否則可能引致觸電及/或受傷]
主機
主機/導風板
拔出
請勿使用下列物品:
(否則可能損壞表面或導致機器故障)
揮發油
稀釋劑
揮發油
酒精
稀釋劑
烘箱清潔劑
去污劑
烘箱清潔劑
去污劑
漂白劑
漂白劑
住宅、家庭用
合成清潔劑
(鹼性)
合成清潔劑
髒污嚴重時
噴霧式清潔劑
噴霧式清潔劑
鋼絲球
請勿用水淋洗主機。
請用柔軟
擦拭
的布
• 髒污嚴重時,請用沾有冷水或者溫水
(40°C或以下)的布擦拭。
• 對腳輪也請進行清潔保養。
C-18
Page 51

HEPA過濾網/活性碳矽膠除臭過濾網
* 請同時清潔活性碳矽膠除臭過濾網和HEPA過濾網
從出風口出來的風有異味時
異味持久不散時
HEPA過濾網
輕輕吸取帶標籤的一面
標籤
活性碳矽膠除臭過濾網
輕輕吸取
請絕對不要用水清洗過濾網。
(否則將損害過濾網的性能)
• 請僅對帶標籤的一面進行清潔保養。
另一面請絕對不要清掃。
(否則將損害過濾網的性能)
• 清除過濾網表面附著的灰塵。
• 由於過濾網比較容易破損,請注意不要用力過猛。
請絕對不要用水清洗過濾網。
(否則將損害過濾網的性能)
• 可以對兩面進行清潔保養。
• 去除過濾網上帶異味的灰塵。
在地板上鋪墊一些報紙等,可以避免弄髒周圍環境。
* 活性碳的黑粉可能掉落,但這並非故障。
注意
• 請絕對不要在陽光下晾曬。
(否則將損害過濾網的性能)
C-19
Page 52

日常保養(接前頁)
儲水箱/背板/加濕過濾網/加濕托盤
警告
保養前,請務必停止運行,
並拔出電源插頭。
拔出插頭
[否則可能引致觸電及/或受傷]
儲水箱
打開儲水箱蓋,清洗儲水箱內部和蓋子。
用海綿等
用牙刷等
儲水箱蓋
儲水箱的橡膠部位可能會有白色污垢附著,請用牙刷
或類似工具去除污垢。
加濕過濾網/加濕托盤
髒污狀態
清潔部件
需要的物品
(有關「小蘇打的使用」,請參考本頁下方的說明)
水垢較難去除或有異味
加濕過濾網/加濕托盤 加濕過濾網
廚房用清潔劑(粉末)或者小蘇打
加濕過濾網/托盤上可能會有紅色、黃色或白色污垢附著,但這
是自來水中的礦物或鐵質。並非異常。
背板
放在稀釋的廚房用清潔劑中浸洗。
請徹底沖洗乾淨,確保沒有清潔劑殘留。
充分晾乾。
背板
浸泡約10分鐘。
白色固體物較難去除
檸檬酸
在醫藥商店可以買到
用量
清洗方法
時間
浸泡之後
• 使用非指定清潔劑可能導致變形、變色或開裂(漏水)。
注意
• 如果不充分沖洗乾淨,則會有清潔劑或檸檬酸的味道殘留,或令主機變形/變色。
• 若有水垢或者白色固體物殘留而照常使用的話,可能會導致漏水。
浸泡
請用水徹底沖洗乾淨,確保沒有清潔劑或檸檬酸殘留。(以免產生異味,令主機變形/變色)
每公升水約60克
約30~60分鐘
。
水或者溫水(約40°C或以下)
浸泡
使用小蘇打時(異味持久不散時)
可將市售的小蘇打溶解在水中,把過濾網放入溶液中浸泡約30分鐘。
浸泡以後,請徹底沖洗乾淨。
用量
每公升水約60克
每公升水約6克
約2小時
C-20
Page 53

重要須知
過濾網性能
功能 更換時間保養時間
HEPA過濾網
活性碳矽膠
除臭過濾網
背板
過濾網框架(白)
加濕過濾網
過濾網框架(灰)
吸取加濕托盤上的水,使
其氣化,對通過的空氣進
行加濕。
捕捉花粉、致敏原(塵蟎
及其排泄物)、霉菌、灰
塵、香煙煙霧(粒子)和
寵物的毛髮。
吸附甲醛、香煙煙霧(異
味)、廁所的異味、生活
垃圾的異味、寵物的異味
等生活異味。
捕捉較大灰塵粒子。
1個月1次
髒污嚴重或
有異味時
請絕對不要水洗。
髒污嚴重或
有異味時
請絕對不要水洗。
1個月1次
5年1次
頁數
C-23
過濾網框架並不是
更換部件,請勿丟
棄。
10年1次
頁數
C-22
10年1次
頁數
C-22
無須更換。
注意
• 無法全部去除有害氣體成分及持續產生的異味成分。
為了有效使用
• 空氣清新機可以收集房間內的灰塵或異味成分。在有空氣清新劑、香油、香煙和烤肉等強烈氣味的環境下
使用的話,氣味將會附著在過濾網上,有可能會在數週到數月內就有異味產生的情況。
當發生這種情況時,請對「HEPA過濾網」、「活性碳矽膠除臭過濾網」和「加濕過濾網」進行清潔。
如果清潔後異味仍未除去,建議更換過濾網。
• 在有強烈氣味的環境下使用的話,建議經常對房間進行通風換氣。
• 與去除灰塵相比,去除異味更花費時間。
• 在主機的附近,請勿使用碳氟聚合物或含有硅酮的產品*。
在主機內部,若有碳氟聚合物或硅酮附著的話,將影響PCI離子釋放。
* 護髮產品(例如:分叉髮油、頭髮摩絲、護髮品等)、化妝品、止汗劑、靜電防護劑、防水噴霧劑、
拋光劑、玻璃清洗液、化學抹布、蠟等。
C-21
Page 54

過濾網更換指南
警告
更換前,請務必停止運行、
並拔出電源插頭。
拔出插頭
[否則可能引致觸電及/或受傷]
HEPA過濾網
型號: FZ-CD20BH-HK
HEPA過濾網
活性碳矽膠
除臭過濾網
• 在更換過濾網之前,請用報紙等鋪墊,以防灰塵黏附到四周的物品上。
• 舊的HEPA過濾網,請根據當地的垃圾分類規則進行處理。
注意
HEPA過濾網材質 ………………...
• 在特定使用環境下,過濾網可能會產生異味,因此需在數週到數月內進行更換。
• HEPA過濾網為消耗品,保養期內也需要購買。
活性碳矽膠除臭過濾網
10年1次*
請勿用水清洗過濾網。
務必定期更換。
(請根據替換過濾網隨附的說明書更換過濾網)
聚丙烯和聚乙烯
10年1次*
型號: FZ-GB20GT-HK
HEPA過濾網
活性碳矽膠
除臭過濾網
• 在更換過濾網之前,請用報紙等鋪墊,以防灰塵黏附到四周的物品上。
注意
• 舊的活性碳矽膠除臭過濾網,請根據當地的垃圾分類規則進行處理。
活性碳矽膠除臭過濾網材質 …………
• 在特定使用環境下,過濾網可能會產生異味,因此需在數週到數月內進行更換。
• 除臭過濾網為消耗品,保養期內也需要購買。
* 以每天燃點5支香煙,而集塵 / 除臭效能比初次使用時減少一半來計算,過濾網的壽命約為10年。
根據「日本電機工業會規格JEM 1467」標準,以每天燃點10支香煙時,過濾網的壽命約為5年。
請勿用水清洗過濾網。
務必定期更換。
(請根據替換過濾網隨附的說明書更換過濾網)
紙和聚苯乙烯(框架)
C-22
Page 55

加濕過濾網
型號: FZ-BB90ZK-HK
5年1次*
過濾網框架(白)
加濕過濾網
過濾網框架(灰)
• 舊的過濾網,請根據當地的垃圾分類規則進行處理。
注意
* 如果每天加濕運行8小時,加濕效能從額定數值降至50%時所需的時間作參考(請參考「日本電機工業會規格
JEM1426」標準)。視乎使用狀態,壽命可能縮短。請務必定期進行保養。
加濕過濾網材質 ……
• 加濕過濾網為消耗品,保養期內也需要購買。
PET
過濾網框架並不是更換部件。請勿丟棄。
由於水質不同,加濕過濾網的壽命也將有所差異。5年之內,若出現
下列情況時請進行更換:
• 清潔後,水垢或異味還是無法去除
• 變色(黑色或黃色)或髒污嚴重
• 白色固體物全面覆蓋過濾網
• 嚴重損壞或變形
(請根據替換過濾網隨附的說明書更換過濾網)
C-23
Page 56

在委託修理或聯絡
我們之前,請檢查
下表。
故障時的檢查事項
問題 解決方法
儲水箱中的水沒有減少、
減少速度很慢
加
濕
濕度沒有上升。
•
根據房間的濕度和溫度,加濕量將發生變化。
像濕度高(下雨天等)或寒天的時候:
… 加濕量將變少,儲水箱內的水也將緩慢地減少。
而在濕度低的時候(乾燥天等)或熱天的時候:
… 加濕量將增加,儲水箱內的水將容易減少。
• 是在強力PCI除菌模式或者加濕空氣淨化模式「自動」或「花粉」風速下
運行嗎?
在這些模式下,由於自動調節加濕量,一旦達到最佳濕度以後將停止
加濕。
• 儲水箱、加濕托盤和加濕過濾網是否穩妥地安裝?
• 加濕過濾網/托盤上附著水垢或污物嗎?
請進行清潔
• 儲水箱內有水嗎?
• 使用空氣清新機的房間可能太大。
請在不大於所建議面積的房間內使用。
主機是否放在暖風機的出風口所覆蓋的範圍?
可能會引起溫濕度感測器出現錯誤。請改變擺放的位置。
• 加濕過濾網/托盤上附著水垢或污物嗎?
請進行清潔
請參閱
C-10~11
C-16
C-16,17,20
C-9
C-3
C-16,17,20
異味或煙霧未能去除。
出風口吹出的風有異味。
異
味
• 過濾網仍然包在塑膠袋裡。
將過濾網從塑膠袋內取出來。
• 出風口吹出的風變弱了。
請清除下表中帶 的部件上的污物或灰塵:
清潔部件
主機 儲水箱 加濕托盤
• 是否在異味強烈的房間內使用?
如果在有香煙或烤肉等強烈氣味的環境下使用的話,在數週到數月內過
濾網就會有異味產生,此時可能需要更換過濾網。
建議在使用空氣清新機的同時,經常對房間進行通風和換氣。
• 請對下表中帶 記號的部件進行檢查,對產生異味的部件進行清潔:
主機 儲水箱 加濕托盤
• 在產生PCI正負離子時,會同時產生微量的臭氧,所以在出風口有時會有
異味,但只是微量,對健康沒有影響。
背板
背板
過濾網
清潔部件
過濾網
加濕
加濕
活性碳矽膠
除臭過濾網
活性碳矽膠
除臭過濾網
HEPA
過濾網
HEPA
過濾網
C-8
C-16~20
C-16~20
C-24
Page 57

問題 解決方法
請參閱
產品發出「滴答」聲
聲
出風口發出嘀嗒或咔嘰聲。
音
塵埃監測器沒有變化。
塵埃監測器持續亮紅燈,
前
不變為綠色。
置
顯
示
器
• 這是水從儲水箱流向加濕托盤發出的氣泡聲。
根據加濕量,聲音的頻密度會有所不同。
• 這是產生PCI 正負離子時發出的聲音,並非故障。聲音的大小因使用環境
或運行模式而異。視乎使用環境或運行模式的不同,聲音可能時大時小,
但聲音的大小不會造成效果差異。
• 空氣清新機剛啟用時,感測器的靈敏度不太穩定,塵埃監測器的顏色可
能沒有變化。運行數分鐘之後,感測器的靈敏度會變得穩定。
如果仍覺得感測器不夠靈敏,請調整感測器靈敏度。
• 監測器持續亮綠燈,空氣一直處於清潔狀態。
由於塵埃可能於不同位置產生,感測器可能檢測不到。可將燃點的香煙
對著感測器吹,或在周圍拍打毛巾,若監測器的顏色發生變化則屬正常。
• 感測器的靈敏度與房間狀態不相匹配。
請停止運行,並設定感測器靈敏度為「高」或「標準」。
• 灰塵可能堵塞感測器。
拆下背板,透過右圖所示的孔用吸塵
器吸出灰塵,清潔內部感測器。
(主機/背面)
感測器
(內部)
C-13
C-13
C-16,17
塵埃監測器沒有變綠色。
塵埃監測器頻繁變色。
主機前面的顯示器太亮。
PCI指示燈不點亮。
指
示
燈
• 由於經常打開房間的窗或門或房間氣密性較差時,外面的灰塵會進入房
間來。在這種情況下,監測器需要一些時間才會變綠。
• 感測器可能對因房門開關或溫度驟變產生的氣流引起反應。
• 可以對感測器的靈敏度進行調整。
請停止運行,並設定感測器靈敏度為「低」或「標準」。
• 顯示器的亮度可以調暗或熄滅。請觸按亮度調校鍵。
• PCI功能是否在「關」的狀態?
請按PCI開 / 關鍵,開啟PCI功能。
• 顯示器是否在「關」的狀態?
觸按亮度調校鍵,設定顯示器的亮度:「亮」或「暗」。
C-13
C-12
C-12
C-12
C-25
Page 58

故障時的檢查事項
(接前頁)
問題 解決方法
過濾網清潔指示燈點亮。
過濾網清潔指示燈不熄滅。
儲水箱內有水,加濕指示燈
不點亮或者紅燈閃爍。
指
示
燈
• 請對下表中帶 記號的部件進行清潔。
清潔部件
主機 儲水箱 加濕托盤
• 保養之後,請持續觸按定時關機鍵3秒鐘或以上。
(過濾網清潔指示燈熄滅。)
• 浮子可能卡住了。
請對加濕托盤進行清潔,清除浮子周圍的污物,然後穩妥地進行
安裝。
• 儲水箱或加濕托盤是否穩妥地安裝在主機上?
請務必將它們穩妥地安裝在主機上。
• 喇叭、電磁爐或其他有磁性的物體一旦靠近,可能會引起浮子出錯,
從而導致無法顯示加水情況。
• 在強力PCI除菌模式下,或在加濕空氣淨化模式下風速在「自動」或
「花粉」狀態時,一旦達到最佳濕度以後,運行將停止,加濕指示燈
也將熄滅。
背板
加濕
過濾網
活性碳矽膠
除臭過濾網
HEPA
過濾網
請參閱
C-16~20
C-16
C-
16,17,
20,27
C-7,16
–
C-10,11
「濕度」監測器顯示和其它
濕度計有所不同。
顯示器顯示
出
錯
顯示器顯示
顯
示
• 即使在同一個房間,由於位置不同,濕度也可能有所不同。
• 濕度監測器和其他濕度計對濕度變化的反應精確度或速度有所不同。
(濕度顯示僅作參考)
• 確保加濕過濾網、加濕托盤和滾輪安裝正確,然後再次接通電源。
• 拔出電源插頭、等待1分鐘左右以後再重新插入電源,再一次啟動機器
運行。
如果不停顯示出錯信息時,請聯絡SHARP 授權的維修中心。
–
–
C-7,16,
27
–
C-26
Page 59

問題 解決方法
請參閱
托盤隔離板、
浮子或滾輪脫落。
托
盤
隔
離
板
/
浮
子
/
滾
輪
托盤隔離板
浮子
1
將浮子放在
該突起部分
的下面
• 請根據下列步驟安裝托盤隔離板、浮子或滾輪:
如下圖所示插入托盤隔離板。
(請勿拆下)
將浮子的
2
扣鉤插入
孔內
浮子
–
托盤隔離板
咔嘰
滾輪
按箭咀所示,將滾輪橫向鉤掛在加濕
托盤的突起部分。
3
無法拉出加濕托盤。
加
濕
托
盤
主機導致翻倒時。
(加濕運行中,或者
儲水箱中有水時)
翻
倒
時
將浮子另一
側的扣鉤插
入孔內
扣鉤
浮子
截面圖
• 稍微向上提、然後拉出。
稍微向上提起 拉出
• 在加濕運行中(主機儲水箱有水的情況下)主機翻倒,立即停止操作並
拔出插頭,聯絡SHARP 授權的維修中心,以進行檢查。
注意不要弄
錯滾輪的安
裝方向。
C-16
–
C-27
Page 60

故障時的檢查事項
(接前頁)
問題 解決方法
主機無法操作。
想固定主機使用。
在與前一次同樣設定條件下
其
無法運行。(重新啟動運行
他
時、在強力PCI除菌模式運
行後)
水或加濕過濾網/托盤中有
紅色、黃色或白色污垢。
• 檢查是否設定了兒童安全鎖。
請按兒童安全鎖鍵至少3秒鐘或以上,解除兒童安全鎖。
• 按下腳輪固定鎖(左右2處)使之固定。務必同時使用
左右兩側的腳輪固定鎖。
• 檢查插頭是否已經從電源插座拔出。
如果已經從電源插座拔出插頭,主機將回到初設定狀態。
(可設定自動重新啟動)
• 這是自來水中的礦物或鐵質。並非故障。
排乾所有的水並清潔加濕過濾網/托盤。
請參閱
C-12
C-6
固定
C-13
C-17,20
C-28
Page 61

規格
型號
電源
Plasmacluster 7000的
*
適用面積
操作模式
適用面積
氣流
風 量(立 方米 /小時)
耗 電 量(瓦)
噪 音(分貝)
加 濕 量(毫 升/ 小 時)
儲 水 箱 容量(公 升)
外 形 尺寸(毫 米)
重 量(公 斤)
電 源 線長度(米)
待 機 功 率(瓦)
1
加濕空氣淨化模式 空氣淨化模式
「高」
192 162 66 216 180 66
19
42
*2
~21平方米
「中」 「低」
13
38 23 44 40
450
382(闊)×247(深)×574(高)
KC-JG20A
220伏特 50赫茲
21平方米
4.7
約3.0
約8.2
2.0
約0.8
~25平方米
「高」
23 16
「中」 「低」
ー
*1 在此大小的房間內,將空氣清新機放置在貼近牆壁的位置,在「中」風速下運行時,在房間中央位置附近
(距離地面約1.2米)測出每1立方厘米空氣中含有約7,000個離子。
*2 溫度為20°C、相對濕度為30%時的加濕量。加濕量隨著室內溫濕度變化而變化。
更換用過濾網 (另購配件)
過濾網類別
HEPA過濾網
活性碳矽膠除臭過濾網
加濕過濾網
過濾網型號
FZ-CD20BH-HK
FZ-GB20GT-HK
FZ-BB90ZK-HK
4.2
22
C-29
Page 62

備忘錄
Page 63

備忘錄
Page 64

KC-JG20A
型號
*本技術標示的數字是將已裝置高濃度PCI離子產生器的加濕型空
氣清新機放置在貼近牆壁的位置,在「中」風速下運行空氣淨化
功能時,在建議面積的房間中央位置附近(距離地面1.2米),
量度出每1立方厘米空氣中所含離子的大約數量。
本產品已裝置了指定容量的離子產生器。
*The number attached to this technical mark indicates the
approximate number of ions per cubic centimeter measured at
a point (1.2 m above the floor) near the center of a room of the
Recommended Room Size when an air purifier with the
humidifying function equipped with the high-density
Plasmacluster Ion Generator is running the air purifying
function in the “medium” mode near a wall.
This product is equipped with the generator with the indicated
capacity.
SHARP CORPORATION
OSAKA, JAPAN
Printed in Japan
TINS-A948KKRZ 16KH 1
 Loading...