

Page 1
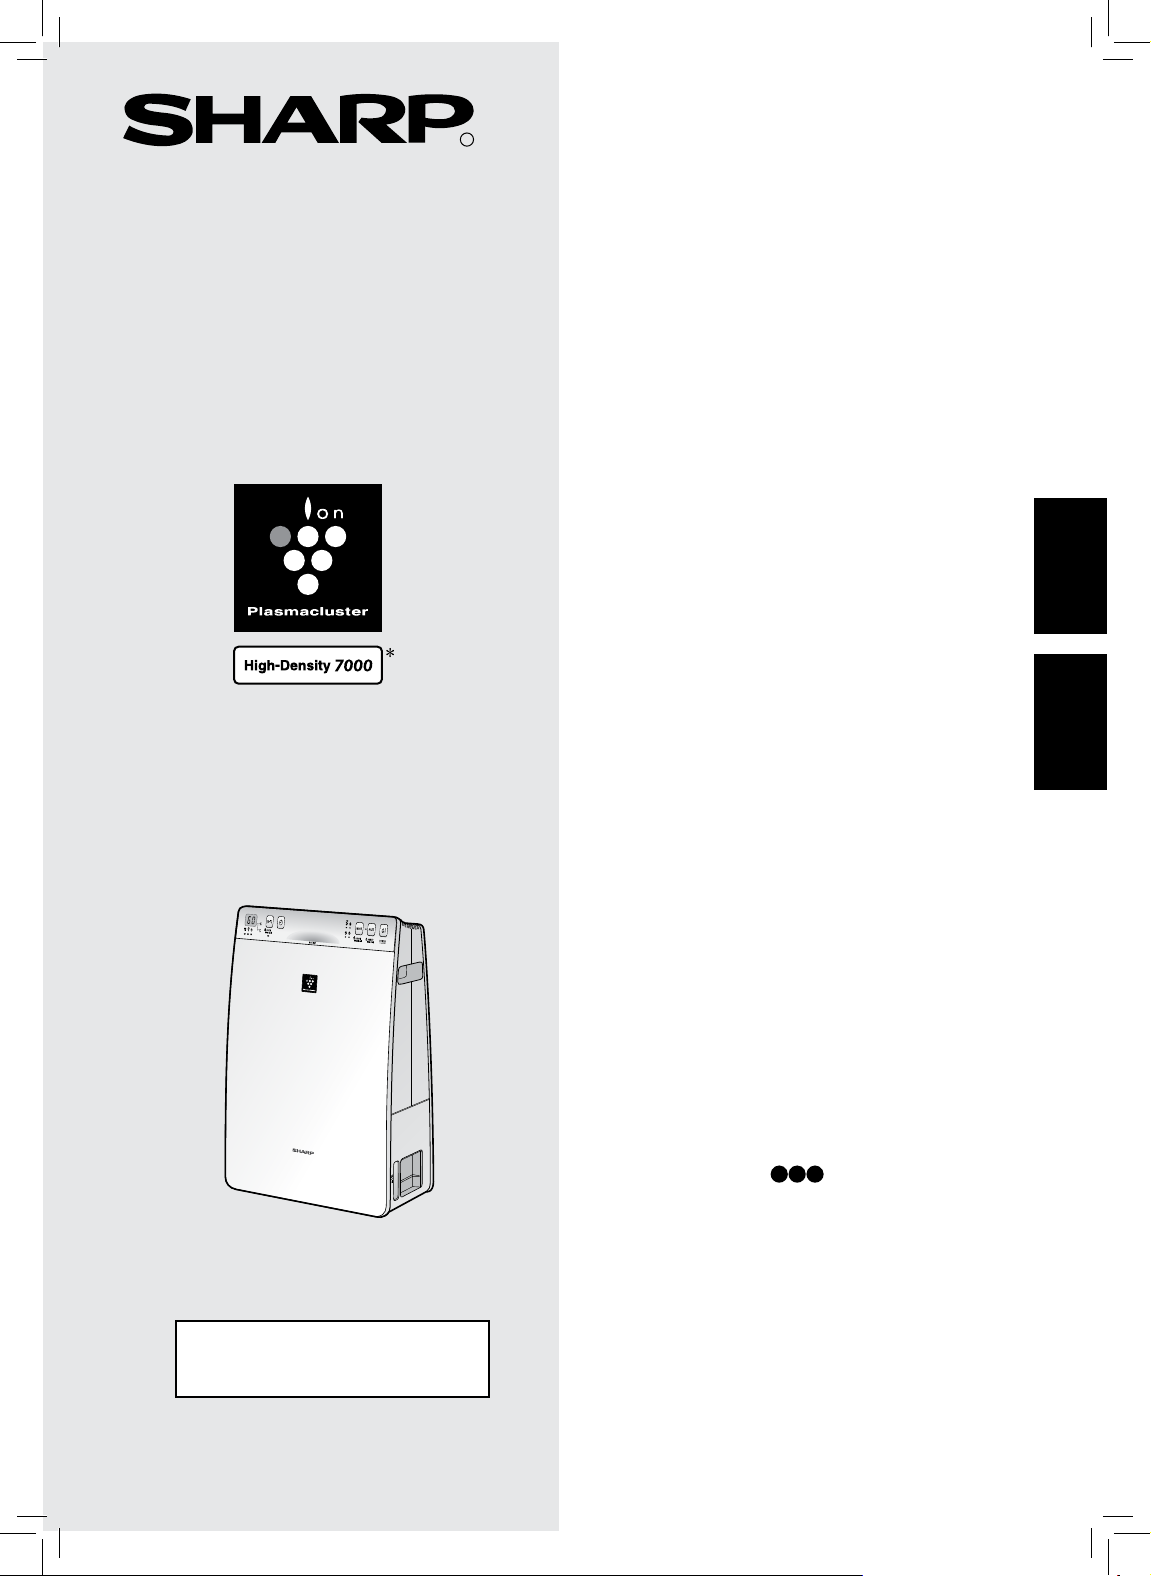
KC-F30Y
R
PANDUAN PENGOPERASIAN
PEMBERSIH UDARA
“Plasmacluster” and “Device of a cluster of
grapes” are trademarks of Sharp Corporation.
dengan Moisturizing Function
AIR PURIFIER
with Humidifying Function
OPERATION MANUAL
*The number in this technology mark indicates
the approximate number of ions supplied into 1
cm3 of air, which is measured around the center
of a room (with the “High-Density Plasmacluster
7000” applicable fl oor area), at a height of 1.2m
above the fl oor, at the wind volume setting
in air purifying mode, and when a humidifi er
& air purifi er or an air purifi er using the high-
density plasmacluster ion evolving device is
placed close to a wall. This product is equipped
with a device of corresponding capacity.
INDONESIAENGLISH
Jenis berdiri
Free standing type
No.Reg. : I.15.STI3.00601.0413
Page 2

Sebelum mengoperasikan pembersih udara Anda yang
baru, baca berikut ini
Pembersih udara menyedot udara melalui saluran masuk, mengedarkan udara ke
Pre-Filter, Filter Deodorizing dan Filter HEPA di dalam unit, lalu melepaskan kembali
udara melalui saluran keluar. Filter HEPA dapat menghilangkan 99,97% partikel debu
seukuran 0,3 mikron yang melaluinya dan juga membantu menghilangkan bau.
Filter Deodorizing secara bertahap menyerap bau selagi melewati fi lter.
Sebagian bau yang diserap oleh fi lter akan terpecah seiring waktu, dan menghasilkan
bau sampingan. Tergantung pada kondisi penggunaan, dan khususnya bilamana
produk digunakan di lingkungan yang secara signifi kan lebih buruk dibandingkan kondisi
rumah tangga biasa, berbagai bau ini akan lebih cepat tercium dari biasanya. Jika bau
tidak juga hilang, ganti fi lter.
CATATAN
• Pembersih udara dirancang untuk membuang debu yang terkandung di udara dan bau.
Pembersih udara tidak dirancang untuk membuang gas-gas berbahaya seperti karbon monoksida
yang terkandung dalam asap rokok.
Pembersih udara tidak dapat sepenuhnya melenyapkan bau jika sumber bau tersebut masih ada.
Filter HEPA
Filter Deodorizing
Pre-Filter
Page 3
INDONESIA
FITUR
Kombinasi Unik Teknologi Penyehatan Udara
Sistem Penyaringan Tiga Lapis +
Plasmacluster + Pelembaban
PERANGKAP DEBU*
Pre-Filter menyaring debu dan berbagai
partikel besar lain yang terkandung dalam
udara.
MENGURANGI BAU
Filter Deodorizing menyerap sebagian
besar bau-bauan yang biasa muncul
dalam ruangan.
MENGURANGI SERBUK & JAMUR*
Filter HEPA menyaring 99,97% partikel
seukuran 0,3 mikron.
MENYEGARKAN UDARA
Dengan menyemburkan ion-ion positif dan
negatif yang seimbang, penyehat udara
Plasmacluster menyajikan proses alami.
KELEMBABAN
Dapat beroperasi hingga
*Bila udara disirkulasikan melewati sistem fi lter.
**Ukuran ruangan: hingga m
Teknologi sensor terus menerus memonitor
mutu udara dan secara otomatis menyesuaikan
pengoperasian sesuai level kemurnian dan
kelembaban udara.
jam per pengisian.**
2
DAFTAR ISI
PETUNJUK PENTING KESELAMATAN
NAMA-NAMA BAGIAN
PERSIAPAN
PENGOPERASIAN
FUNGSI BERGUNA
PERAWATAN DAN PEMELIHARAAN
PENANGGULANGAN MASALAH
SPESIFIKASI
......................................................
.................................................
.................................
.........................................
....................................
.........
.....
IN-10
...
IN-11
IN-15
IN-17
IN-2
IN-4
IN-6
IN-8
INDONESIA
Terima kasih atas kepercayaan anda membeli
Air Purifi er SHARP. Bacalah panduan ini secara
seksama sebelum menggunakannya. Setelah
itu, simpan panduan ini ke lokasi yang mudah
dikenali untuk referensi.
IN-1
Page 4

PETUNJUK PENTING KESELAMATAN
Selalu ikuti langkah-langkah pencegahan untuk keselamatan dasar bilamana menggunakan
peralatan elektrik, termasuk berikut ini:
Selalu perhatikan hal-hal berikut ini untuk mengurangi risiko sengatan listrik,
PERINGATAN
Baca semua petunjuk sebelum menggunakan unit ini.
•
Hanya gunakan stopkontak 220-240 volt.
•
Jangan gunakan unit bila kabel atau steker listrik rusak atau penyambungan ke stopkontak
•
kendor.
Bersihkan debu dari colokan secara berkala.
•
Jangan memasukkan jari anda atau benda lain ke saluran masuk atau keluar udara.
•
• Saat melepas colokan listrik, selalu pegang kepala colokan dan jangan pernah menarik kabelnya.
Kegagalan untuk melakukannya dapat menimbulkan hubungan arus pendek yang berakibat
sengatan listrik atau kebakaran.
• Jangan mencabut steker listrik saat tangan anda basah.
• Jangan menggunakan unit dekat peralatan gas atau api.
Selalu cabut unit pada saat mengisi ulang Penampung Air, membersihkan unit, atau bilamana
•
unit tidak sedang digunakan. Kegagalan untuk melakukannya dapat menimbulkan hubungan arus
pendek yang berakibat sengatan listrik atau kebakaran.
Untuk menghindarkan bahaya keselamatan, jika kabel daya rusak, harus diganti oleh pabrik,
•
agen servis, Pusat Servis Resmi Sharp, atau penyedia layanan yang memenuhi syarat.
Hanya Pusat Servis resmi SHARP yang seharusnya menangani servis pembersih udara ini.
•
Hubungi Pusat Servis terdekat untuk masalah, penyetelan atau perbaikan apa pun.
Jangan mengoperasikan unit dalam ruangan yang mengandung obat semprot pembunuh
•
serangga. Jangan operasikan unit dalam ruangan yang mengandung endapan minyak, asap dupa,
percikan api rokok yang menyala, atau uap kimia dalam udara. Jangan operasikan unit di tempat
yang dapat membasahkan unit, seperti di kamar mandi.
Berhati-hatilah saat membersihkan unit. Pembersih korosif yang keras dapat merusakkan bagian luar unit.
•
Bilamana membawa / memindahkan unit, pertama-tama lepaskan Penampung Air, lalu bawa unit
•
dengan pegangan pada kedua sisi.
Membawa / memindahkan unit saat ada air di dalam Penampung Air dapat menimbulkan berikut ini:
•
•
Sengatan listrik.
•
Kerusakan pada unit karena tumpahan internal.
•
Tumpahan air.
Jangan meminum air di Penampung Air.
•
Ganti air dalam Penampung Air tiap hari dengan air keran segar, dan bersihkan secara berkala (Lihat
•
IN-12 dan IN-13). Bila unit tidak digunakan, buang air yang ada dalam Penampung Air.
Membiarkan air dalam Penampung Air dapat mengakibatkan timbulnya jamur, bakteri, dan bau
busuk. Dalam kasus-kasus khusus, bakteri tersebut dapat mengancam kesehatan.
Peralatan ini tidak ditujukan untuk penggunaan oleh orang (termasuk anak-anak) dengan
•
kekurangan kemampuan fi sik, sensorik, atau mental, maupun oleh orang yang kurang
berpengalaman dan berpengetahuan tentang pengoperasian unit ini, kecuali jika diberi
pengawasan dan pengarahan yang memadai tentang cara penggunaan unit ini oleh orang yang
bertanggung jawab atas keselamatannya. Jangan izinkan anak-anak bermain-main dengan unit ini.
-
kebakaran, atau cedera:
Apa yang harus dilakukan jika unit mengganggu penerimaan gelombang radio atau TV
CATATAN
Jika pembersih udara mengganggu penerimaan gelombang radio atau televisi, coba lakukan salah
satu atau beberapa tindakan berikut ini:
Sesuaikan atau pindahkan antena penerima.
•
Jauhkan jarak antara unit dengan radio atau TV.
•
Sambungkan peralatan ini ke stop kontak pada sirkuit yang berbeda dari sirkuit penerima
•
gelombang radio atau TV.
Konsultasi ke dealer atau teknisi Radio/TV yang berpengalaman untuk membantu Anda.
•
-
IN-2
Page 5

PERHATIAN SAAT MENGOPERASIKAN
• Jangan mengoperasikan unit bila fi lter dan Penampung Air tidak terpasang dengan benar.
• Jauhkan unit dari air.
• Jangan mencuci dan menggunakan ulang fi lter HEPA dan fi lter Deodorizing.
Melakukannya tidak akan meningkatkan kinerja fi lter dan juga dapat mengakibatkan sengatan listrik
atau kegagalan pengoperasian.
• Bersihkan kabinet luar dengan kain lembut.
Jangan gunakan cairan yang mudah menguap atau deterjen. Melakukannya dapat merusak atau
meretakkan bagian luar unit.
Tambahan lagi, melakukannya dapat menyebabkan kegagalan fungsi sensor.
• Frekuensi perawatan anti-kerak tergantung pada kekerasan dan ketidakmurnian air yang Anda
gunakan; semakin keras air, semakin sering pemeliharaan anti-kerak harus dilakukan.
• Sebelum memindahkan unit, pastikan bahwa unit sudah tidak beroperasi, dan lepaskan Penampung
Air sambil menahan pegangan sisi dari unit.
• Saat melepas / memasang kembali Penampung Air, hati-hati agar jari Anda tidak tersangkut dalam
unit.
• Bila memindahkan unit, gunakan pegangan pada kedua sisi.
Jangan pindahkan unit saat sedang beroperasi.
• Jangan menutup penyedot udara atau celah udara keluar.
• Jangan tempatkan unit dekat atau pada benda-benda panas, seperti kompor atau pemanas, atau di
tempat yang dapat membuat unit langsung terkena uap.
• Selalu operasikan unit pada posisi menghadap ke depan.
INDONESIA
PEDOMAN PEMASANGAN
• Pada saat menggunakan unit, tempatkan sekurang-kurangnya 2 meter jauhnya dari peralatan yang
memancarkan gelombang listrik, seperti televisi atau radio, untuk menghindarkan gangguan elektrik.
• Hindari lokasi-lokasi di mana sensor terpapar pada angin langsung.
Melakukannya dapat mengakibatkan kegagalan fungsi unit.
• Hindari lokasi-lokasi di mana perabot, kain, atau benda-benda lain dapat bersentuhan dengan unit
dan mengganggu penyedotan dan pengeluaran udara.
• Hindari lokasi-lokasi di mana unit terpapar pada pengembunan atau perubahan suhu yang drastis.
Suhu ruangan yang tepat berkisar antara 0 – 35 ºC.
• Tempatkan unit pada permukaan yang rata dan stabil, dengan cukup sirkulasi udara.
Bila ditempatkan di atas karpet tebal, unit dapat sedikit bergetar.
Tempatkan unit pada permukaan yang rata untuk menghindarkan kebocoran air dari Penampung Air.
• Hindari lokasi-lokasi yang dapat menimbulkan lemak atau asap minyak.
Melakukannya dapat mengakibatkan bagian luar unit retak dan sensor gagal berfungsi.
• Kemampuan unit untuk mengumpulkan debu tetap efektif bahkan saat unit sedekat 3 cm dari dinding,
dinding di sekitarnya dan lantai bisa menjadi kotor. Tempatkan unit agak jauh dari dinding.
Dinding di belakang saluran keluar udara mungkin lama kelamaan menjadi kotor. Saat menggunakan
unit untuk jangka waktu panjang di lokasi yang sama, bersihkan dinding di dekatnya secara berkala.
PEDOMAN FILTER
• Ikuti instruksi dalam buku petunjuk ini untuk pemeliharaan dan perawatan fi lter yang benar.
IN-3
Page 6
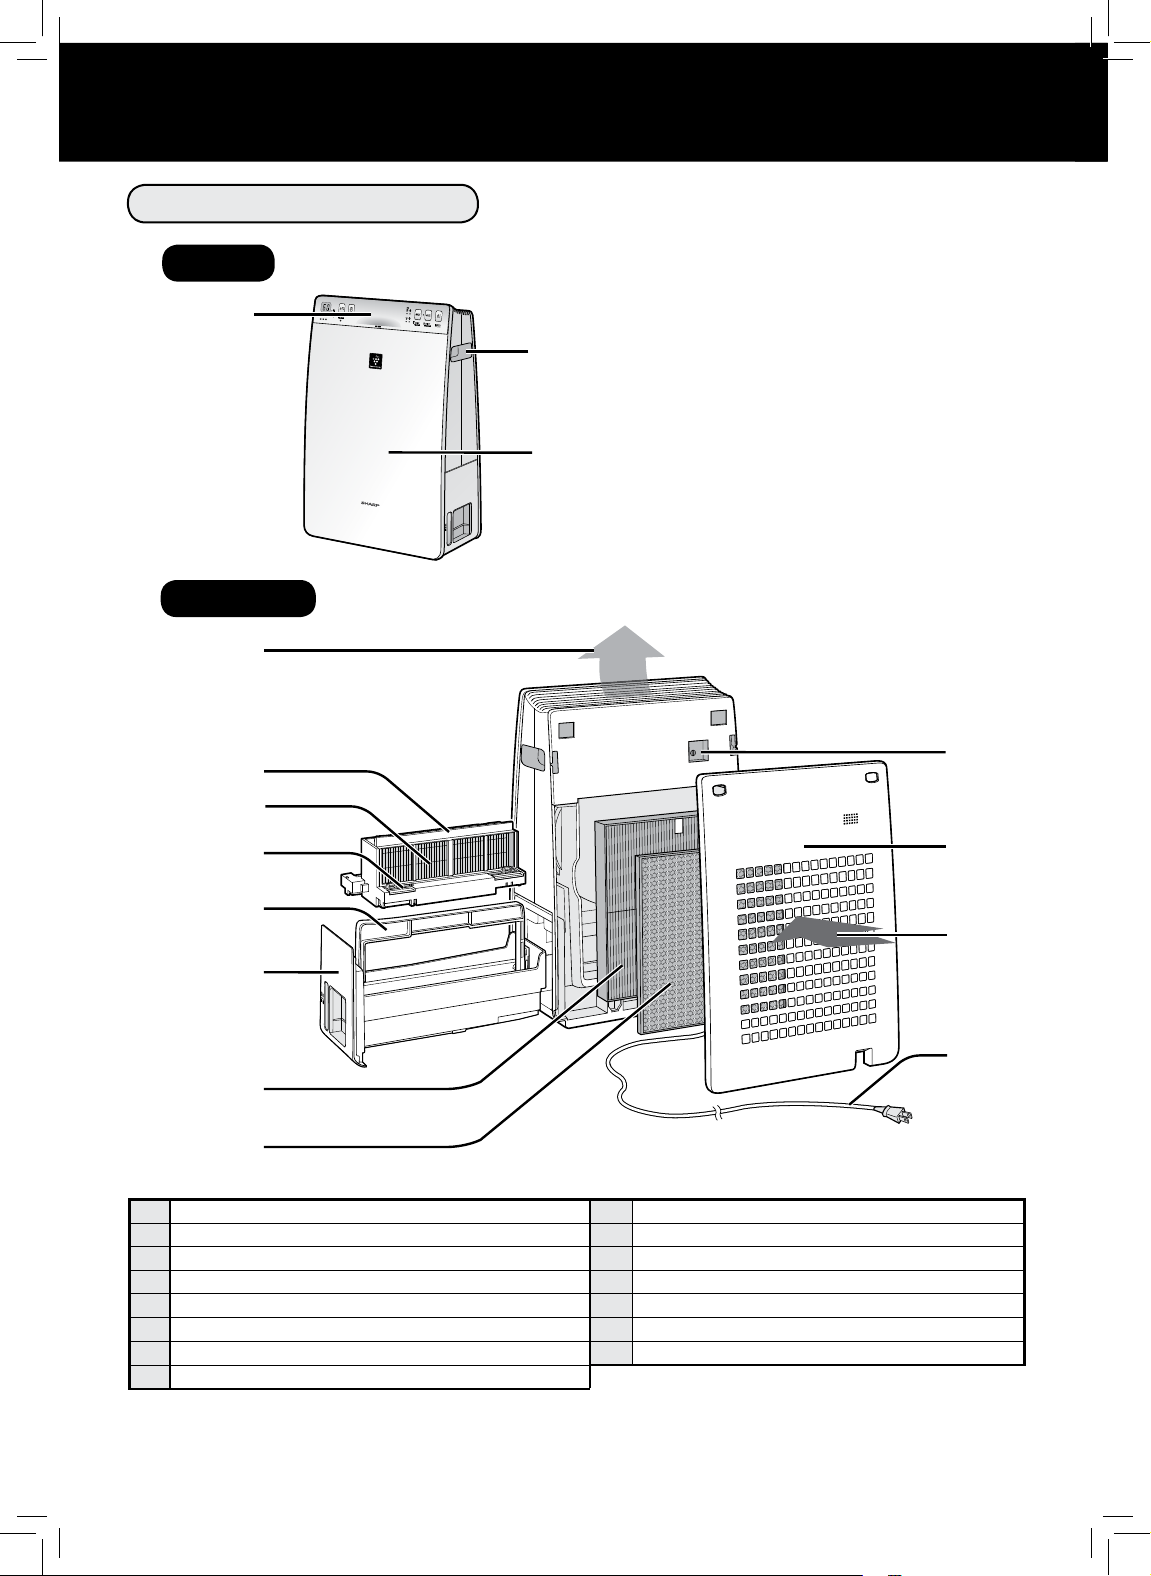
NAMA-NAMA BAGIAN
DEPAN / BELAKANG
DEPAN
1
2
3
BELAKANG
4
5
6
7
8
9
10
11
Panel Operasi / Tampilan (Lihat IN-5)
1
Pegangan (2 Lokasi)
2
Unit Utama
3
Saluran keluar udara
4
Bingkai Filter
5
Filter Pelembab
6
Pelampung
7
Pegangan Penampung
8
(Bentuk steker berbeda-beda di tiap negara.)
Penampung air
9
Filter HEPA
10
Filter Deodorizing
11
Sensor (internal)
12
Panel Belakang (Pre-Filter)
13
Saluran Masuk Udara
14
Kabel listrik / Steker
15
12
13
14
15
IN-4
Page 7
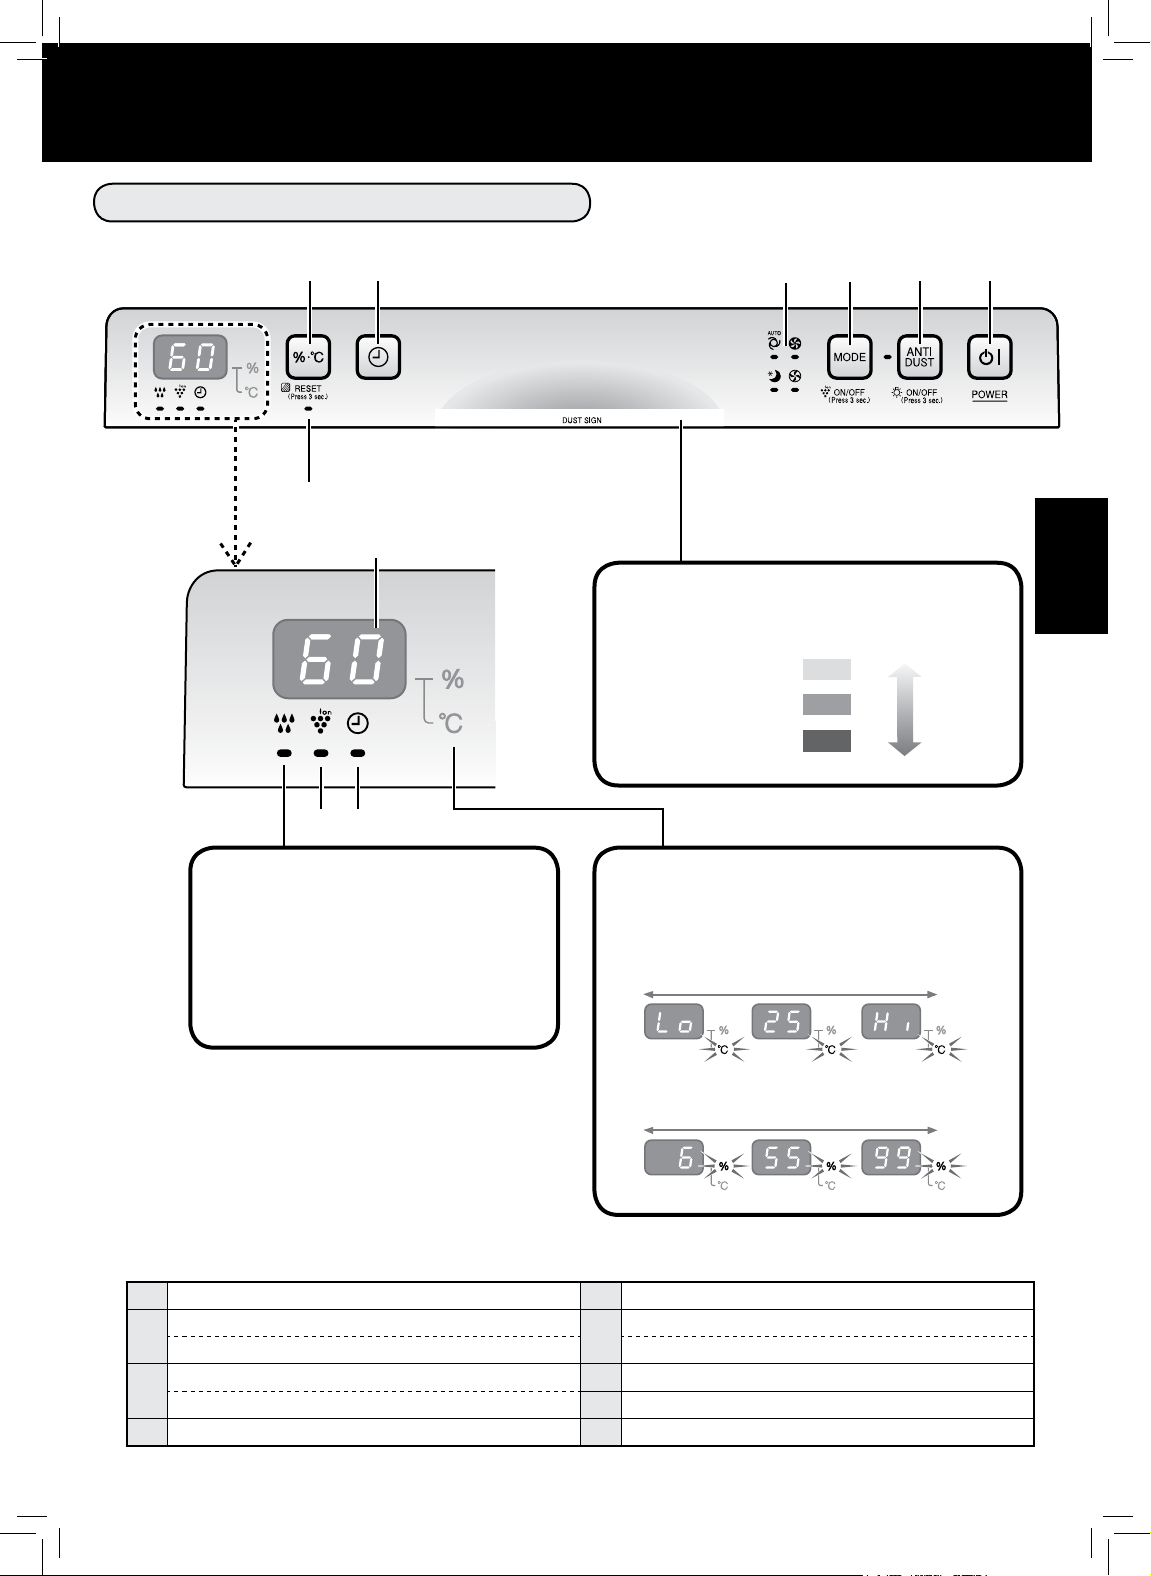
PANEL OPERASI / TAMPILAN
6
54321
1
Tampilan
98
Dust Sign (monitor debu)
Mengindikasikan kemurnian udara
sesuai kode-warna 3 level.
Hijau
Oranye
Merah
Tidak murni
INDONESIA
Bersih
Lampu Kelembaban
Hijau
.................. Kelembaban MENYALA
Hijau
.................. Unit butuh air
(Berkedip)
Mati
................... Kelembaban MATI
1
Tombol POWER ON/OFF
Tombol ANTI DUST / Lampu Indikator (hijau)
2
(Tekan 3 detik) Tombol LAMPU ON/OFF (Tekan 3 detik) Tombol RESET FILTER
Tombol MODE
3
(Tekan 3 detik) Tombol Ion Plasmacluster ON/OFF
4
Lampu Indikator Fan Speed (hijau)
Monitor Kelembaban / Suhu
Mengindikasikan kisaran level kelembaban /
suhu dalam ruangan.
suhu 0 hingga 50ºC ditampilkan dengan interval 1ºC
-1ºC atau kurang 51ºC atau lebih
kelembaban 6 hingga 99% ditampilkan dengan
interval 1%
Tombol Timer MATI
5
Tombol Pilih Tampilan
6
Lampu Indikator Filter (Oranye)
7
Lampu Indikator Ion Plasmacluster (biru)
8
Lampu Indikator Timer MATI (hijau)
9
IN-5
Page 8
PERSIAPAN
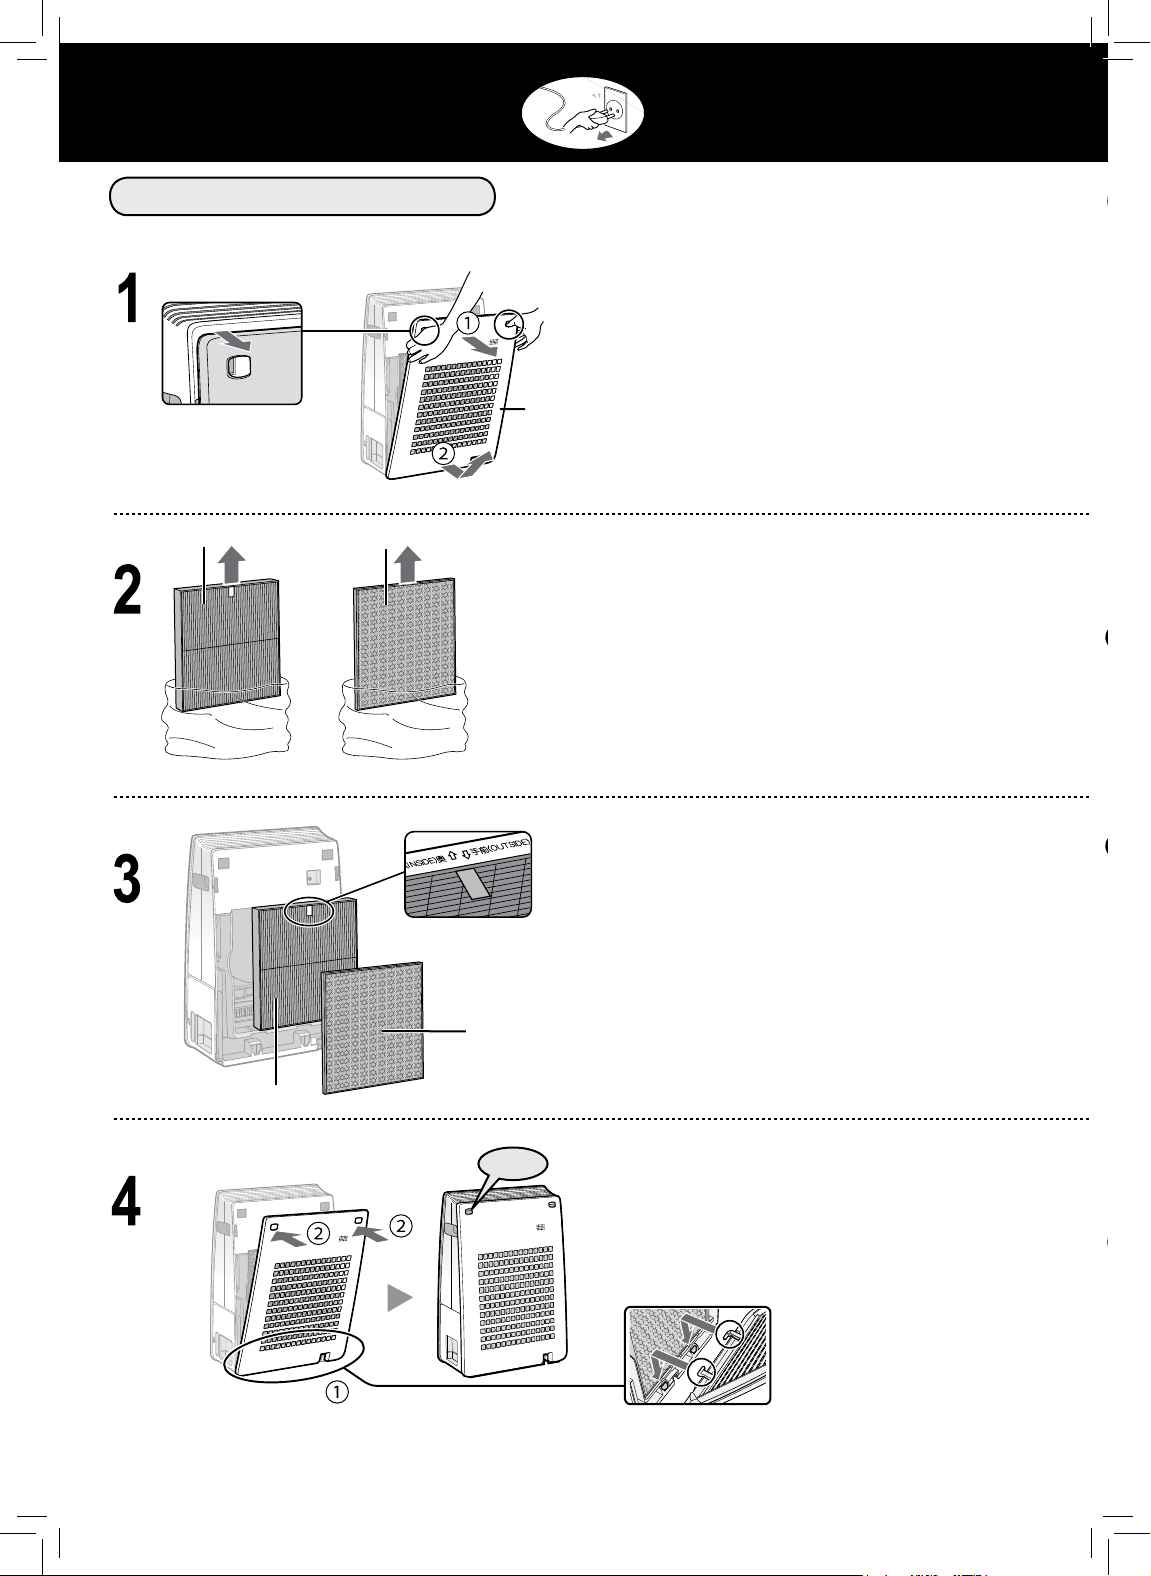
PEMASANGAN FILTER
Selalu pastikan Anda sudah melepaskan
steker daya dari stop kontak di dinding.
Buka Panel Belakang.
Panel Belakang
Filter HEPA
Filter HEPA
Filter Deodorizing
Mengeluarkan Filter dari tas
plastik.
Pasang Filter dengan urutan
yang benar seperti yang
ditunjukkan.
Filter Deodorizing
Klik
Pasang Panel Belakang.
IN-6
Page 9

MENGISI ULANG PENAMPUNG AIR
Unit dapat digunakan bahkan tanpa air di dalam Penampung Air.
Tarik keluar Penampung Air.
Bersihkan Penampung Air jika kotor atau
ada bau yang tercium.
(Lihat IN-12, IN-13)
Isi Penampung Air dengan air
keran menggunakan metode
A
atau
PERHATIAN
B
.
A
INDONESIA
ATAU
B
PERHATIAN
FULL
FULL
PERHATIAN
• Saat membawa Penampung Air, pegang
dengan kedua tangan atau pegang
Pegangan Penampung.
• Dengan hati-hati isi dengan air agar tidak
memercik.
• Jangan mengisi melebihi indikator
“FULL”.
Pasang Penampung Air.
PERHATIAN
• Kembalikan Pegangan
Penampung ke posisi
semula sebelum
memasang.
• Jangan paparkan unit ke air. Melakukannya dapat mengakibatkan hubungan arus pendek atau sengatan
listrik.
• Gunakan hanya air segar. Menggunakan sumber air lain mendatangkan risiko tumbuhnya jamur, kerak,
atau bakteri.
• Jangan menggunakan air panas (40 ºC), zat kimia, larutan pewangi. Melakukannya dapat merusak
bentuk unit atau mengakibatkan kegagalan fungsi unit.
• Saat melepas dan memasang Penampung Air, berhati-hatilah agar air tidak tumpah.
IN-7
Page 10
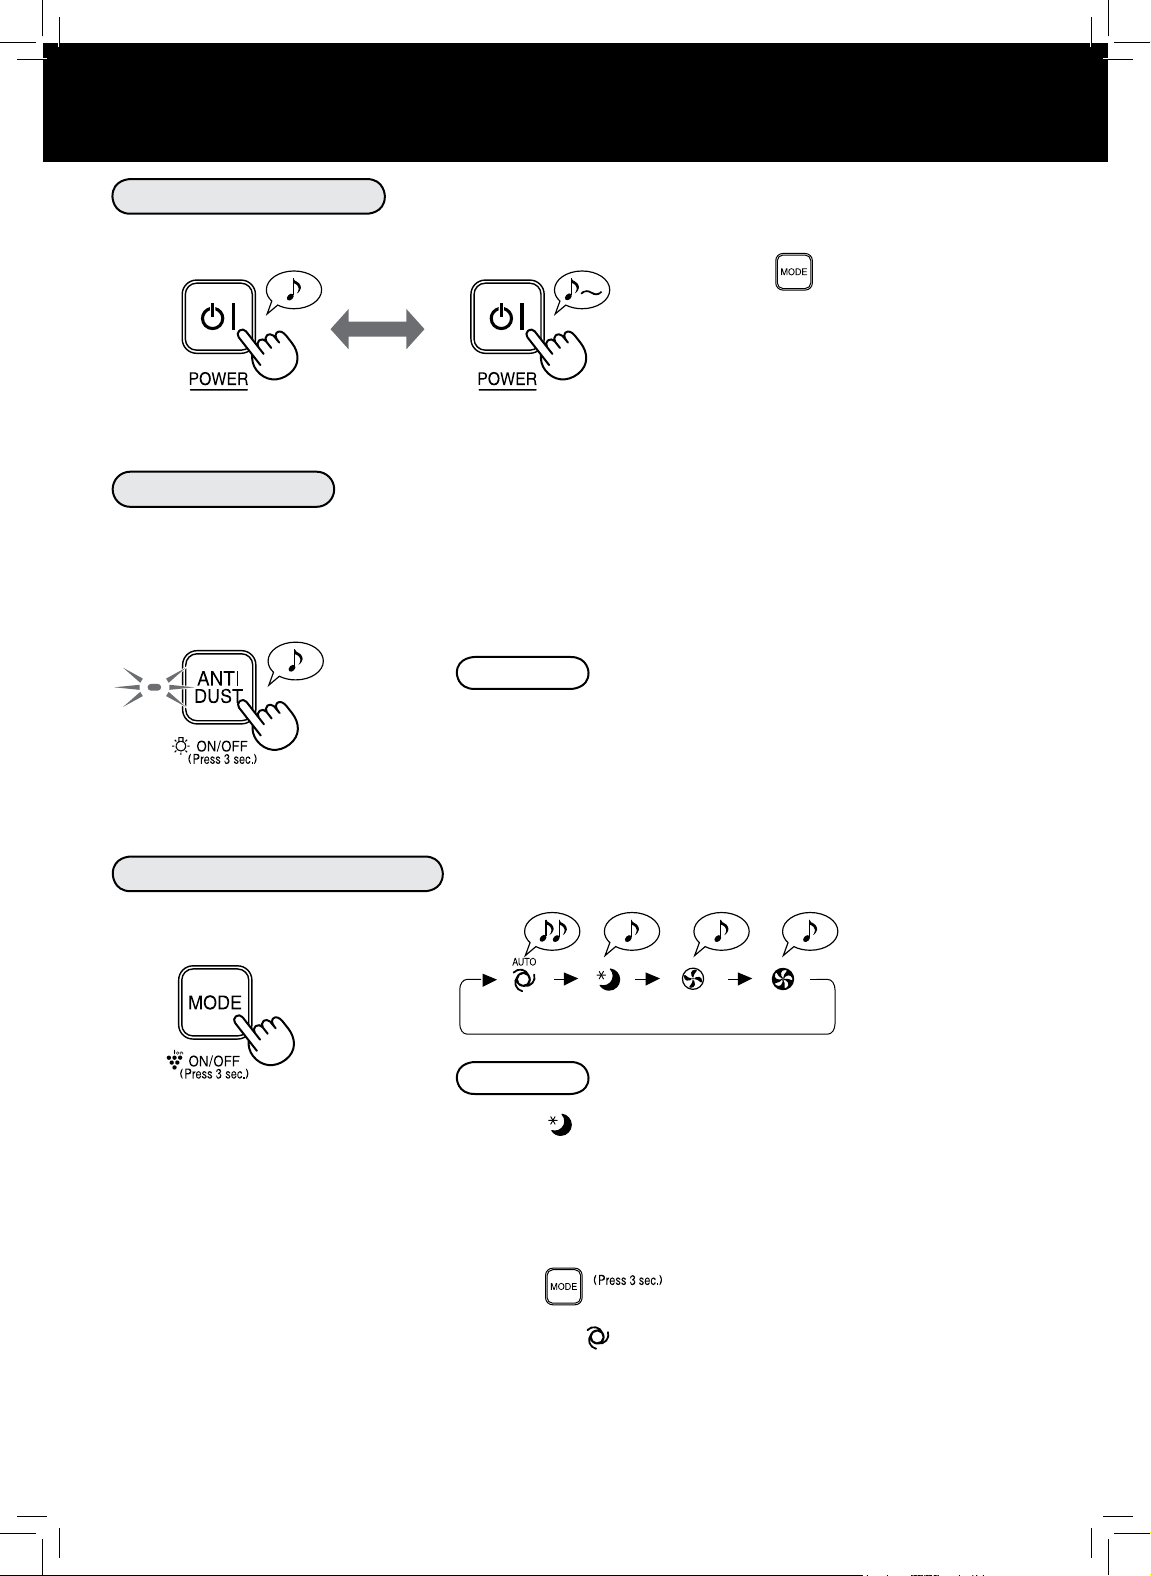
PENGOPERASIAN
Power ON / OFF
MULAI
BERHENTI
• Pilih kecepatan kipas yang diinginkan
menggunakan .
• Operasi akan dimulai dengan mode
sebelumnya, kecuali apabila kabel listrik
telah dilepas dari stopkontak.
ANTI DUST
Melepaskan ion Plasmacluster dengan kepadatan tingggi dan menyemburkan udara secara kuat
selama 60 menit.
MULAI
CATATAN
• Jika pengoperasian selesai, unit akan kembali ke mode
pengoperasian sebelumnya.
Unit dapat beralih ke mode lainnya selama mode ini.
KECEPATAN KIPAS
Pilih kecepatan kipas yang diinginkan.
CATATAN
SLEEP
• Unit akan beroperasi sangat tenang dengan kecepatan kipas
rendah.
Indikator Ion Plasmacluster mati secara otomatis.
Meskipun lampu indikator mati, Ion Plasmacluster tetap
dilepaskan ke udara kecuali jika Ion Plasmacluster dimatikan
dengan
.
OTOMATIS
• Kecepatan kipas secara otomatis berubah-ubah antara TINGGI
dan RENDAH, tergantung pada nilai ketidakmurnian udara.
Sensor mendeteksi ketidakmurnian untuk pengoperasian efektif.
IN-8
Page 11
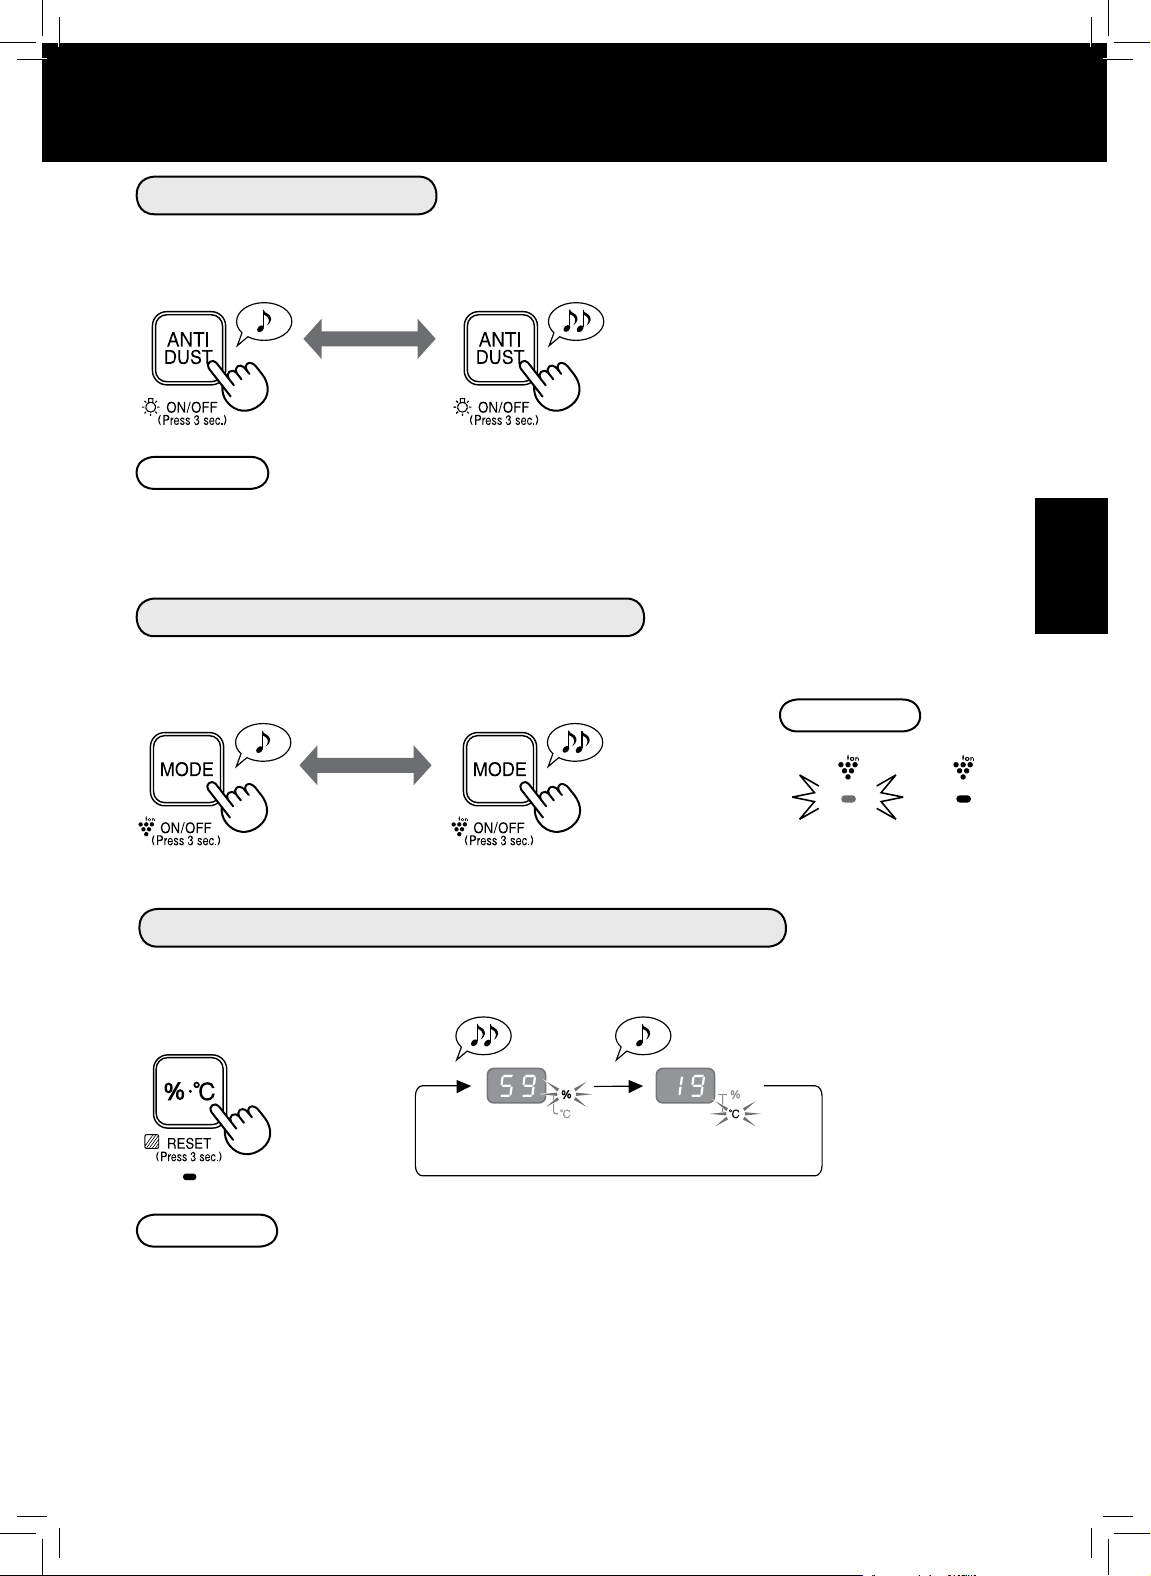
KENDALI LAMPU
Anda dapat mengatur Indikator permukaan depan ke OFF ketika Indikator terlalu terang.
MENYALA MATI
Tekan
lebih dari 3 detik.
Tekan
lebih dari 3 detik.
CATATAN
• Ketika unit mulai beroperasi, Indikator Ion Plasmacluster selalu menyala. Dalam mode SLEEP,
tombol kendali lampu tidak beroperasi.
ION PLASMACLUSTER ON/OFF
Ketika Ion Plasmacluster ON (hidup), Lampu Indikator Ion Plasmacluster menyala. (biru)
MENYALA
Tekan
lebih dari 3 detik.
MATI
Tekan
lebih dari 3 detik.
CATATAN
MENYALA
MATI
Mengubah tampilan (kelembaban / suhu)
INDONESIA
Mengubah tampilan kelembaban atau suhu saat ini.
Suhu Saat ini
(parkiraan)
Kelembaban Saat ini
(parkiraan)
CATATAN
Suhu saat ini dan kelembaban saat ini adalah perkiraan.
Nilainya bisa berbeda dari nilai yang diindikasikan oleh higrometer pengukur suhu lainnya.
• Tidak ada fungsi untuk menyesuaikan suhu.
• Pengaturan kelembaban tidak dapat disesuaikan.
• Tidak dapat menyingkirkan kelembaban.
IN-9
Page 12
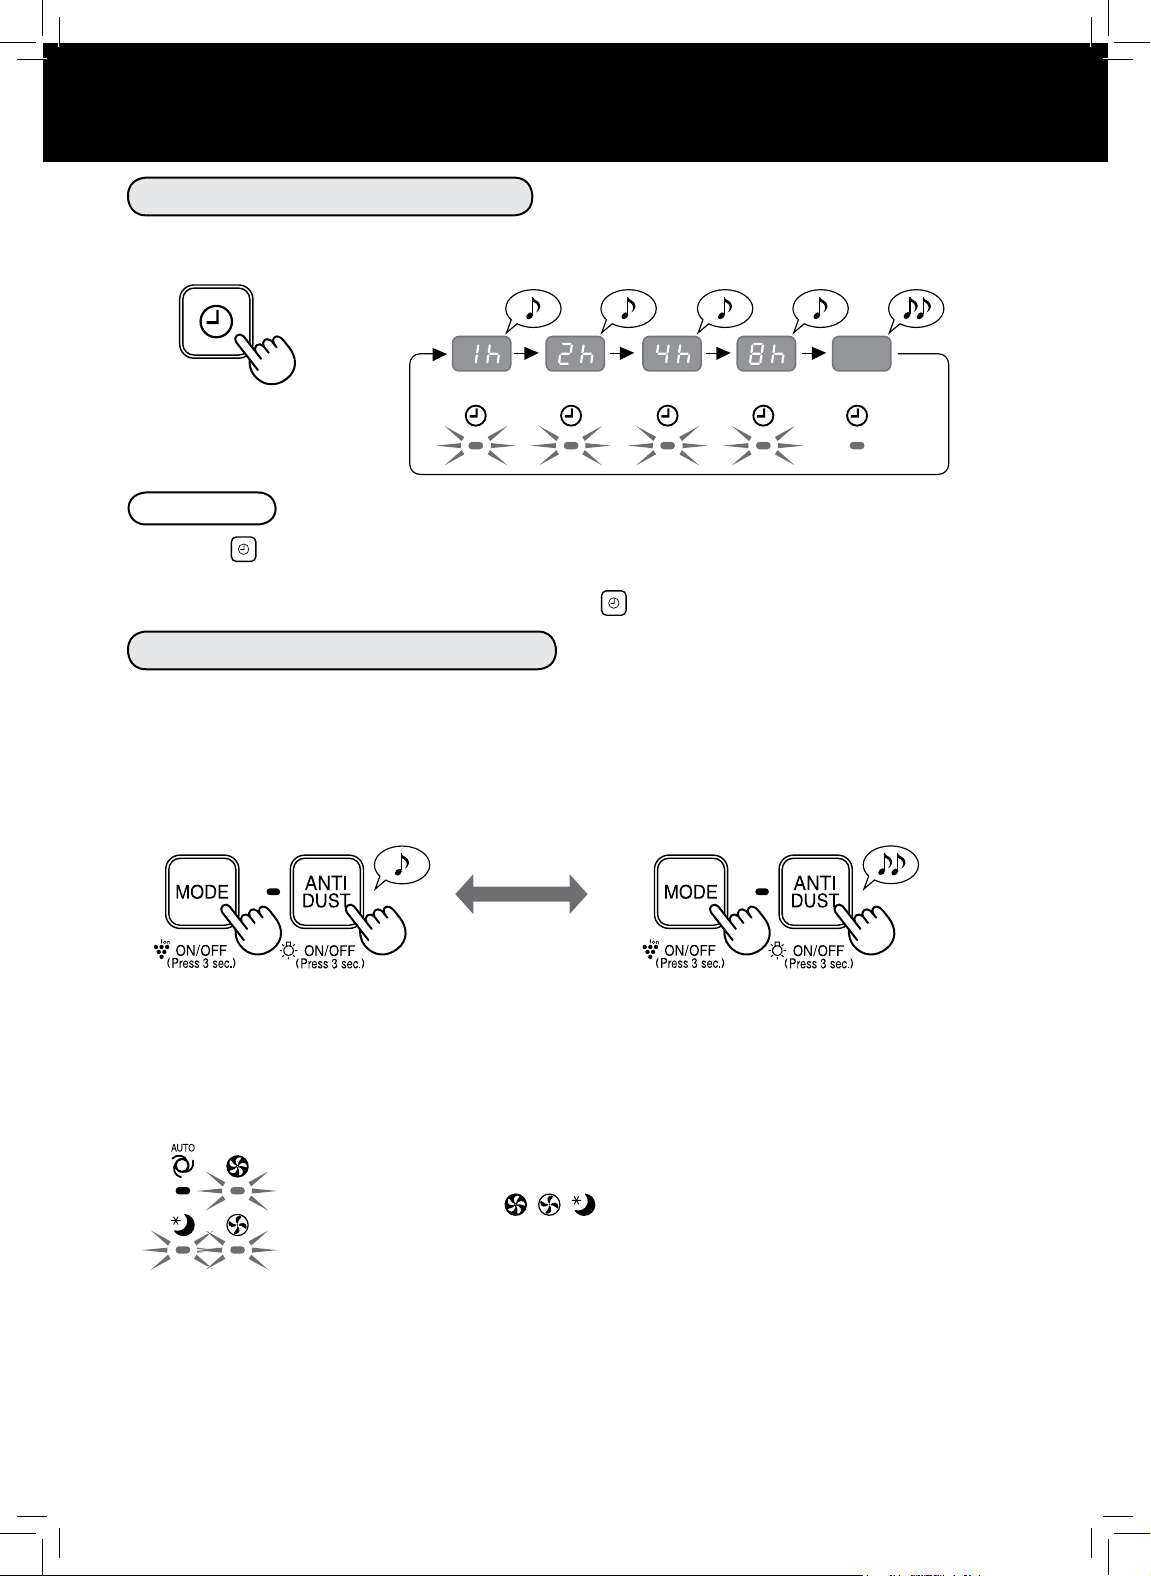
FUNGSI YANG BERGUNA
PENGATUR WAKTU Mati
Pilih lama waktu yang Anda inginkan. Unit akan berhenti secara otomatis setelah lama waktu yang
ditentukan sudah terpenuhi.
1 jam 2 jam 4 jam 8 jam
PEMBATALAN
CATATAN
• Menekan menggunakan setting PENGATUR WAKTU MATI akan menampilkan waktu yang
tersisa.
• Untuk mengatur ulang waktu pengoperasian, tekan
selagi sisa waktu ditampilkan.
MULAI ULANG OTOMATIS
Jika unit dicabut atau jika aliran listrik terputus, unit akan melanjutkan pengoperasian menggunakan
setting sebelumnya setelah daya tersambung kembali.
MATIMENYALA
(saat unit MATI) (saat unit MATI)
Tekan kedua tombol pada
saat yang sama selama 3
detik atau lebih.
Menyala
Bila lampu indikator
dilakukan.
Tekan kedua tombol pada
saat yang sama selama 3
detik atau lebih.
, , menyala selama 10 detik, setting selesai
IN-10
Page 13

PERAWATAN DAN PEMELIHARAAN
INDIKATOR FILTER
Lampu Indikator fi lter akan menyala
setelah kurang lebih 720 jam. (30
hari × 24 jam =720 jam)
Ini merupakan pengingat untuk
melakukan pemeliharaan yang
dijelaskan di bawah ini. (Lihat IN-11,
IN-12, IN-13)
Setelah melakukan
perawatan, reset
Indikator Filter.
Tekan lebih dari 3 detik.
UNIT
PANEL BELAKANG
SENSOR
Sensor (internal)
Usap dengan kain kering dan lembut.
PERHATIAN
• Jangan gunakan cairan mudah menguap.
Pengencer cat berbahan benzena atau bubuk pemoles dapat
merusak permukaan unit.
• Jangan gunakan deterjen.
Bahan-bahan deterjen dapat merusak unit.
Bersihkan debu dengan hati-hati menggunakan alat
pembersih, seperti penyedot debu dengan sambungan
yang benar.
CATATAN
Membersihkan panel belakang saat sangat kotor
1. Campur sedikit deterjen dapur dengan air dan
rendam sekitar 10 menit.
INDONESIA
Panel Belakang
CATATAN
Filter Sensor
PERHATIAN
• JANGAN menekan berlebihan pada saat
menggosok panel belakang.
2. Bilas deterjen dapur dengan air bersih.
3. Keringkan betul fi lter di area berventilasi baik.
Membersihkan sensor saat sangat kotor
1. Lepaskan Panel Belakang dan lepaskan Filter
Sensor.
2. Bersihkan debu dari Sensor dengan hati-hati
menggunakan alat pembersih, seperti penyedot
debu dengan sambungan yang benar.
3. Jika Filter Sensor sangat kotor, cuci dengan air
dan keringkan sepenuhnya.
IN-11
Page 14

PERAWATAN DAN PEMELIHARAAN
FILTER DEODORIZING
FILTER HEPA
Bersihkan debu dengan hati-hati menggunakan alat pembersih, seperti
penyedot debu dengan sambungan yang benar.
• Hanya bersihkan
permukaan
yang diberi tag.
Jangan bersihkan
permukaan
sebaliknya.
PERHATIAN
• Kedua permukaan dapat
dibersihkan.
Ta g
•Filter-fi lter ini sangat rapuh. Jangan memberikan tekanan berlebihan.
MELEPASKAN DAN MEMASANG KEMBALI FILTER PELEMBAB
MELEPASKAN
Tarik Pegangan
Penampung ke atas.
Putar pegangan ke bawah
di sisi baliknya.
Tetesan air bisa menetes dari Filter Pelembab dan Bingkai Filter.
PERHATIAN
•
MEMASANG KEMBALI
Pasang Filter Pelembab.
Tutup penutup Bingkai Filter.
Lepaskan Bingkai Filter.
Setelah pemeliharaan, pasang kembali komponen-komponen dengan benar.
Sejajarkan dengan tanda
Pasang Bingkai Filter.
Buka penutup Bingkai Filter.
Lepaskan Filter Pelembab.
.
Angkat Pegangan
Penampung.
Kembalikan ke posisi
semula.
IN-12
Page 15

Selalu pastikan Anda sudah melepaskan
steker daya dari stop kontak di dinding.
PENAMPUNG AIR
BINGKAI FILTER
Penampung Air
Pelampung (Styrofoam)
Bingkai Filter
Bilas bagian dalam Penampung Air dan Bingkai
Filter.
PERHATIAN
• Jangan lepaskan Pelampung dari Bingkai Filter.
CATATAN
Cara membersihkan saat sangat kotor
1. • Lepaskan Bingkai Filter dari
Penampung Air dan isi dengan air
sampai indikator “PENUH”.
• Taruh Bingkai Filter di dalam air.
2. Tambahkan sedikit deterjen dapur ke
dalam air.
3. Rendam selama 30 menit.
4. Bilas deterjen dapur dengan air bersih.
• Bersihkan bagian-bagian yang sulit
dijangkau dengan lap katun atau sikat
gigi.
INDONESIA
FILTER PELEMBAB UDARA
CATATAN
Berbagai larutan peluruh kerak yang
direkomendasikan
• Asam sitrat (tersedia di sebagian apotek)
• 100% air jeruk nipis dalam kemasan, tanpa
daging buah.
1. Rendam dalam air dengan larutan peluruh kerak
sekitar 30 menit lebih.
PERHATIAN
•
Bila menggunakan air jeruk nipis sebagai larutan
peluruh kerak, rendam lebih lama.
2. Bilas bersih larutan peluruh
kerak dengan air banyak.
Cara membersihkan saat sangat kotor
Bilas dengan air banyak.
Saat meluruhkan kerak
<dengan asam sitrat>
2 1/
2
cangkir air
<dengan air jeruk nipis>
3 cangkir
air
3 sendok
teh
1
/
cangkir
4
IN-13
Page 16

PERAWATAN DAN PEMELIHARAAN
PENGGANTIAN FILTER
Kapan harus mengganti fi lter
Masa pakai fi lter beragam, tergantung pada lingkungan ruangan, kondisi penggunaan, dan lokasi unit.
Jika debu atau bau terus melekat, ganti fi lter. (Lihat "Sebelum mengoperasikan pembersih udara Anda
yang baru, baca berikut ini" di bagian belakang penutup.)
Saran usia pakai fi lter HEPA dan fi lter Deodorizing dan waktu penggantian berikut ini diperkirakan
dari pemurnian ruangan di mana 5 batang rokok dihisap per hari dan kinerja pengumpulan debu dan
penghilangan bau dari unit sudah menurun sampai separuh level fi lter baru.
Kami menyarankan penggantian fi lter lebih sering apabila unit digunakan pada kondisi yang secara
signifi kan lebih buruk dibandingkan rumah tangga biasa.
• Filter HEPA Sekitar 2 tahun setelah penggunaan pertama
• Filter Deodorizing Sekitar 2 tahun setelah penggunaan pertama
• Filter Pelembab Sekitar 5 tahun setelah penggunaan pertama
Model Filter Pengganti
Konsultasikan dengan dealer Anda pada saat membeli fi lter pengganti.
MODEL PEMBERSIH
UDARA
KC-F30Y
Filter HEPA :
FZ-F30HFE FZ-F30DFE FZ-F30MFE
MODEL FILTER PENGGANTI
1 unit
Filter Deodorizing
: 1 unit
Filter Pelembab :
1unit
CATATAN
Gunakan label tanggal untuk mengingatkan Anda kapan harus
mengganti fi lter.
Label tanggal ada di sebelah kiri unit.
Membuang fi lter
Buang fi lter bekas sesuai undang-undang dan peraturan setempat.
Bahan Filter HEPA :
• Filter : Polipropilen
• Bingkai
Bahan Filter Deodorizing :
• Filter : Arang aktif, Polietilen Tereftalat, Polipropilen
• Bingkai : Kertas
: Poliester
Filter Pelembab
Bingkai Filter (abu-abu)
Bahan Filter Pelembab:
• Filter : Rayon, Poliester
Filter HEPA
Filter Deodorizing
IN-14
Page 17

PENANGGULANGAN MASALAH
Sebelum menghubungi pihak servis, tinjau bagan penyelesaian masalah di bawah ini
untuk memastikan bahwa permasalahan bukan terletak pada kegagalan fungsi unit.
GEJALA
Bau dan asap terus melekat.
Lampu Dust Sign (monitor
debu) tetap hijau meskipun
udara tidak bersih.
Lampu Dust Sign (monitor
debu) tetap oranye atau merah
meskipun udara bersih.
Unit mengeluarkan bunyi klikklik atau tik-tik.
Udara yang dikeluarkan oleh
unit berbau.
Unit tidak beroperasi bila udara
mengandung asap rokok.
PENANGANAN
(hal-hal berikut ini tidak
disebabkan oleh kegagalan fungsi)
• Periksa fi lter. Jika fi lter-fi lter tampak sangat kotor, bersihkan
atau ganti. (Lihat IN-12, IN-13, IN-14)
• Udara mungkin kotor saat unit dihubungkan ke sumber listrik.
Cabut, tunggu satu menit lalu hubungkan kembali.
•Bukaan sensor debu yang kotor atau tersumbat mempengaruhi
kerja sensor. Bersihkan panel belakang dengan hati-hati. (Lihat
IN-11).
• Unit dapat mengeluarkan bunyi klik-klik atau tik-tik saat
menghasilkan ion.
• Periksa apakah fi lter-fi lter sangat kotor.
• Bersihkan atau ganti fi lter.
• Pembersih Udara Plasmacluster mengeluarkan sedikit zat ozon
yang dapat
menghasilkan bau.
• Periksa apakah unit dipasang di lokasi yang menyulitkan sensor
untuk mendeteksi asap rokok.
• Periksa apakah bukaan sensor debu tidak tertutup atau
tersumbat. Jika memang tertutup atau tersumbat, bersihkan
panel belakang. (Lihat IN-11).
INDONESIA
Lampu Indikator Filter menyala.
Lampu Dust Sign (monitor
debu) mati.
Lampu Indikator Suplai Air tidak
menyala sekalipun Penampung
Air kosong.
Level air dalam Penampung Air
tidak menurun, atau menurun
dengan lambat.
Warna lampu Dust Sign (monitor
debu) sering berganti-ganti.
Terdapat kesenjangan antara
Monitor Kelembaban unit dan
higrometer lain dalam ruangan.
• Bila mengganti fi lter, hubungkan kabel daya ke stop kontak, lalu
tekan Tombol Reset Filter.
• Periksa apakah Modus Lampu MATI sedang berjalan. Jika
betul, tekan Tombol Lampu ON/OFF untuk menyalakan lampu
indikator. (Lihat IN-9)
• Bersihkan Penampung Air. Pastikan bahwa unit ditempatkan
pada permukaan yang rata.
• Periksa apakah Penampung Air sudah terpasang dengan benar.
Periksa Filter Pelembab.
• Jika fi lter sangat kotor, bersihkan atau ganti.
(Lihat IN-12, IN-13, IN-14)
• Lampu Dust Sign (monitor debu) secara otomatis berganti
warna saat sensor debu mendeteksi adanya ketidakmurnian.
• Terdapat perbedaan tingkat kelembaban dalam ruangan yang
sama.
• Sensor memiliki parameter pengukuran yang berbeda.
• Jika monitor mengindikasikan SUHU, tekan Tombol Pilih
Tampilan. (Lihat IN-9)
IN-15
Page 18

PENANGGULANGAN MASALAH
TAMPILAN KESALAHAN
DIGITAL
INDIKASI
Kesalahan motor kipas.
Kesalahan sensor suhu-kelembaban.
DETIL KESALAHAN PENANGANAN
Jika kesalahan terus berlanjut, hubungi Pusat Servis Sharp.
Cabut unit, tunggu satu menit, lalu
sambungkan kembali unit.
IN-16
Page 19

SPESIFIKASI
SPECFiguresarenotfixedyet.
Sumber listrik
Penyetelan Kecepatan Kipas MAKSIMUM SEDANG SLEEP
BERSIHKAN
UDARA
BERSIHKAN
UDARA&
MELEMBABKAN
Ukuran ruangan yang Disarankan (m
Ukuran ruangan yang direkomendasikan untuk ion
Plasmacluster kepadatan tinggi (m
Kapasitas Penampung Air (L)
Sensor-sensor Debu / Suhu & Kelembaban
Tipe Filter
Panjang Kabel (m) 2,0
Dimensi (mm) 410 (lebar) x 340 (panjang) x 684 (tinggi)
Berat (kg) 13,0
Kecepatan kipas (m
Daya listrik (W)
Level Kebisingan (dBA)
Kecepatan kipas (m3/jam)
Daya listrik (W)
Level Kebisingan (dBA)
Pelembaban (mL/jam)*1
Pengumpul debu HEPA *4
Anti bau Menghilangkan bau
2
3
)*3
/jam)
2
)*2
220 V ~ 240 V 50/60 Hz
402 294 90
53 32 6,6
49 44 20
402 294 132
53 33 10
49 44 26
730 600 300
~50
~35
4,0
INDONESIA
*1 • Nilai perubahan pelembaban sesuai suhu dan kelembaban dalam ruangan dan luar ruangan.
Nilai pelembaban meningkat seiring peningkatan suhu atau penurunan kelembaban.
Nilai pelembaban menurun seiring penurunan suhu atau peningkatan kelembaban.
• Syarat Pengukuran : 20 ºC, 30 % kelembaban (JEM1426)
*2 • Ukuran ruangan yang direkomendasikan adalah luas ruangan yang dapat dilembabkan pada saat
kipas unit beroperasi pada setting kecepatan maksimum.
• Ukuran ruangan yang direkomendasikan adalah area di mana sejumlah tertentu partikel debu dapat
dibersihkan dalam waktu 30 menit.
*3 • Ukuran ruangan di mana kurang lebih 7000 ion per sentimeter kubik dapat diukur dari tengah
ruangan di mana unit ditempatkan di samping dinding, bekerja pada pengaturan maksimum, dan
dengan tinggi sekitar 1,2 meter dari lantai.
*4 • Filter membersihkan lebih dari 99,97% partikel dengan ukuran sekecil-kecilnya 0,3 mikron.
(JEM1467)
Daya Siaga
Bila steker daya unit dicolokkan pada stop kontak di dinding, unit mengonsumsi sekitar 0,6 watt daya siaga untuk
dapat mengoperasikan sirkuit-sirkuit elektrik.
Untuk menghemat energi, cabut kabel daya bila unit tidak sedang digunakan.
IN-17
Page 20

Before operating your new air purifi er, please read the following
The air purifi er draws in room air through the air intake, circulates it through a Pre-Filter,
a Deodorizing Filter and a HEPA Filter inside the unit, and then discharges it through the
air outlet. The HEPA Filter can remove 99.97% of dust particles as small as 0.3 microns
that pass through the fi lter and also helps absorb odors.
The Deodorizing Filter gradually absorbs odors as they pass through the fi lter.
Some odors absorbed by the fi lters will break down over time, causing additional odors.
Depending on usage conditions, and especially if the product is used in environments
signifi cantly more severe than a normal household, these odors may become noticeable
sooner than expected. If these odors persist, replace the fi lters.
NOTE
• The air purifi er is designed to remove air-suspended dust and the odors.
The air purifi er is not designed to remove harmful gases such as carbon monoxide contained in
cigarette smoke.
The air purifi er may not completely remove an odor if the source of the odor is still present.
HEPA Filter
Deodorizing Filter
Pre-Filter
Page 21

ENGLISH
FEATURES
A Unique Combination of Air Treatment
Technologies
Triple Filtration System + Plasmacluster +
Humidifi cation
TRAPS DUST*
Pre-Filter traps dust and other large
airborne particles.
DECREASES ODORS
Deodorizing fi lter absorbs many common
household odors.
REDUCES POLLEN & MOLD*
HEPA fi lter traps 99.97% of particles as
small as 0.3 microns.
FRESHENS
By emitting a balance of positive and negative
ions, Plasmacluster air treatment is a natural
process.
HUMIDIFIES
Can operate up to
*When air is circulated through the fi lter system.
**Room size: up to m
Sensor technology continuously monitors air
quality and automatically adjusts operation
based on air purity and humidity level.
hours per fi lling.**
2
CONTENTS
IMPORTANT SAFETY INSTRUCTIONS
PART NAMES
PREPARATION
OPERATION
USEFUL FUNCTION
CARE AND MAINTENANCE
TROUBLESHOOTING
SPECIFICATIONS
...............................................
............................................
.................................................
.................................
...................
..............................
......................................
.....
E-2
E-4
E-6
E-8
E-10
E-11
E-15
E-17
ENGLISH
Thank you for purchasing this SHARP Air
Purifi er. Please read this manual carefully
before using the air purifi er. After reading,
keep the manual in a convenient location for
future reference.
E-1
Page 22

IMPORTANT SAFETY INSTRUCTIONS
Always follow basic safety precautions when using electrical appliances, including the
following:
Always observe the following to reduce the risk of electrical shock, fi re, or injury:
WARNING
Read all instructions before using the unit.
•
Use only a 220-240 volt outlet.
•
Do not use the unit if the power cord or plug is damaged or if the connection to the wall
•
outlet is loosened.
Periodically remove dust from the power plug
•
Do not insert fi ngers or foreign objects into the air intake or air outlet.
•
When removing the power plug, always hold the plug and never pull the cord.
•
Failure to do so can cause a short circuit resulting in electrical shock or fi re.
• Do not remove the plug when your hands are wet.
Do not use this unit near gas appliances or fi replaces.
•
Always unplug the unit when refi lling the Humidifying Tray, cleaning the unit, or when the unit is not
•
in use. Failure to do so can cause a short circuit resulting in electrical shock or fi re.
In order to avoid safety hazards, if the power cord is damaged, it must be replaced by either
•
the manufacturer, a service agent, a Sharp authorized Service Center or a similarly qualifi ed
service provider.
Only a Sharp Authorized Service Center should service this air purifi er. Contact the nearest Service
•
Center for any problems, adjustments, or repairs.
Do not operate the unit in rooms where aerosol insecticides are present. Do not operate the unit in
•
rooms where there is oily residue, incense, sparks from lit cigarettes, or chemical fumes in the air.
Do not operate the unit in places where it may get wet, such as a bathroom.
Be cautious when cleaning the unit. Strong corrosive cleansers can damage the exterior.
•
When carrying / moving the unit, fi rst remove the Humidifying Tray, and then hold the unit by the
•
handles on both sides.
Carrying / moving the unit when there is water in the Humidifying Tray can cause the following:
•
•
Electrical shock.
•
Damage to the unit caused by internal spillage.
•
Water spillage.
Do not drink the water in the Humidifying Tray.
•
Replace the water in the Humidifying Tray daily with fresh tap water, and regularly clean it
•
(Ref. E-12 and E-13). When the unit is not in use, dispose of the water in the Humidifying Tray.
Leaving water in the Humidifying Tray can cause mold, bacteria, and bad odors.
In rare cases, such bacteria can be a health hazard.
This appliance is not intended for use by persons (including children) with reduced physical,
•
sensory, or mental capabilities, nor by persons with insuffi cient experience and knowledge of how
to operate the unit, unless they are given proper supervision and instruction on how to use the unit
by a person responsible for their safety. Do not allow children to play with the unit.
-
.
What to do if the unit interferes with radio or TV reception
NOTE
If the air purifi er interferes with radio or television reception, try one or more of the following
measures:
Adjust or reposition the receiving antenna.
•
Increase the distance between the unit and the radio or TV.
•
Connect the equipment into an outlet on a circuit different from that of the radio or TV receiver.
•
Consult the dealer or an experienced radio/TV technician for help.
•
-
E-2
Page 23

CAUTIONS CONCERNING OPERATION
• Do not operate the unit without the fi lters and the Humidifying Tray properly installed.
• Keep the unit away from water.
• Do not wash and reuse the HEPA fi lter and Deodorizing fi lter.
Doing so will not improve fi lter performance and can also cause electric shock or operating
malfunctions.
• Clean the exterior with a soft cloth only.
Do not use volatile liquids or detergents. Doing so can damage or crack the exterior of the unit.
In addition, doing so can cause sensor malfunctions.
• The frequency of descaling maintenance will depend on the hardness of and the impurities in the
water that you use; the harder the water the more often descaling will be necessary.
• Before moving the unit, make sure it is not operating, and remove the Humidifying Tray while holding
the side handle of the unit.
• When removing / reattaching the Humidifying Tray, be careful to not to get your fi ngers caught inside
the unit.
• When moving the unit, use the handles on both sides.
Do not move the unit when it is in operation.
• Do not block the air intake or air outlet.
• Do not place the unit near or on hot objects, such as stoves or heaters, or where it may come into
contact with steam.
• Always operate the unit in an upright position.
INSTALLATION GUIDELINES
ENGLISH
• When using the unit, place it at least 2 meters away from equipment that emits electric waves, such
as televisions or radios, to avoid electrical interference.
• Avoid locations where the sensors are exposed to direct wind.
Doing so can cause the unit to malfunction.
• Avoid locations where furniture, fabrics, or other objects can come in contact with the unit and
nterfere with the intake and outtake of air.
• Avoid locations where the unit is exposed to condensation or drastic changes in temperature.
Appropriate room temperature is between 0 – 35 ºC.
• Place the unit on a level and stable surface with suffi cient air circulation.
When placed on heavy carpet, the unit may vibrate slightly.
Place the unit on a level surface to avoid water leakage from the Humidifying Tray.
• Avoid locations that generate grease or oily smoke.
Doing so can cause the unit exterior to crack and the sensors to malfunction.
• The dust collecting ability of the unit is effective even when the unit is as close to 3 cm from the wall,
the surrounding walls and fl oor may get dirty. Please place the unit at a distance from the wall.
The wall directly behind the air outlet may become dirty over time. When using the unit for an
extended period of time at the same location, periodically clean the walls adjacent to it.
FILTER GUIDELINES
• Follow the instructions in this manual for proper fi lter care and maintenance.
E-3
Page 24

PART NAMES
FRONT / BACK
FRONT
1
BACK
4
2
3
5
6
7
8
9
10
11
Operation Panal / Display (Ref.E-5)
1
Handle (2 Locations)
2
Main Unit
3
Air Outlet
4
Filter Frame
5
Humidifying Filter
6
Float
7
Tray Handle
8
(Plug shape varies by country.)
Humidifying Tray
9
HEPA Filter
10
Deodorizing Fiter
11
Senser (internal)
12
Back Panel (Pre-Filter)
13
Air lnlet
14
Power Cord / Plug
15
12
13
14
15
E-4
Page 25

OPERATION PANEL / DISPLAY
6
1
Display
98
54321
Dust Sign
Indicates the air purity according to
3 color-coded levels.
Green
Orange
Red
Clean
Impure
ENGLISH
Humidfy Light
Green
................ Humidify ON
Green
................ Unit needs water
(Flashing)
Off
..................... Humidify OFF
1
POWER ON/OFF Button
ANTI DUST Button / Indicator Light (green)
2
(Press 3 sec.) LIGHT ON/OFF Button (Press 3 sec.) FILTER RESET Button
MODE Button
3
(Press 3 sec.) Plasmacluster Ion ON/OFF Button
4
Fan Speed Indicator Lights (green)
Humidity / Temperature monitor
Indicates the approximate humidity /
temperature level in the room.
temperature 0 to 50ºC is displayed at 1ºC-intervals
-1ºC or less 51ºC or more
humidity 6 to 99% is displayed at 1%-intervals
OFF Timer Button
5
Display Select Button
6
Filter Indicator Light (Orange)
7
Plasmacluster Ion Indicator Light (blue)
8
OFF Timer Indicator Light (green)
9
E-5
Page 26

PREPARATION
FILTER INSTALLATION
Always be sure to remove the
power plug from the wall outlet.
Remove the Back Panel.
Back Panel
HEPA fi lter
HEPA fi lter
Deodorizing fi lter
Remove the Filters from the
plastic bag.
Install the Filters in the corect
order as shown.
Deodorizing fi lter
Click
Install the Back Panel.
E-6
Page 27

REFILLING THE HUMIDIFYING TRAY
The unit can be used even without water in the Humidifying Tray.
Pull out the Humidifying Tray.
Clean the Humidifying Tray if it becomes
dirty or there is a noticeable odor.
(Ref. E-12,E-13)
Fill the Humidifying Tray with tap
water by method
A
CAUTION
A
or
B
.
OR
B
CAUTION
FULL
FULL
CAUTION
• When carrying the Humidifying Tray, hold it
with both hands or grip the Tray Handle.
• Gently fi ll it with water to avoid splash
water.
• Do not fi ll beyond the “FULL” indicator.
Install the Humidifying Tray.
CAUTION
• Return the Tray Handle
to its original position
before installing.
ENGLISH
• Do not expose the unit to water. Doing so can cause a short circuit or electrical shock.
• Use only fresh tap water. Using other water sources risks the growth of molds, fungi, or bacteria.
• Do not use hot water (40 ºC), chemical agents, aromatic substances. Doing so can deform the unit or
cause it to malfunction.
• When removing and installing the Humidifying Tray, be careful not to spill any water.
E-7
Page 28

OPERATION
Power ON / OFF
START
STOP
• Select the desired fan speed by .
• Unless the power cord has been
unplugged, the operation starts in the
previous mode it was operated in.
ANTI DUST
Releases high-density Plasmacluster ions and discharges strong air fl ow for 60 minutes.
START
NOTE
• When the operation fi nishes, the unit will return to the prior
operation mode.
It is able to change the other mode during this mode.
FAN SPEED
Select the desired fan speed.
NOTE
SLEEP
• The unit will operate very quietly with low fan speed.
Plasmacluster Ion Indicator goes off automatically.
Even though the indicator is off, Plasmacluster Ion is
dispersed into air unless Plasmacluster Ion is turned off
by
AUTO
• The fan speed is automatically switched between HIGH and
LOW depending on the amount of impurities in the air.
The sensors detect impurities for effi cient operation.
E-8
Page 29

LIGHT CONTROL
You can set the front surface Indicator to OFF when the Indicator is too bright.
ON OFF
Press
more 3 seconds.
Press
more 3 seconds.
NOTE
• When the unit starts operation, the Plasmacluster Ion Indicator always lights. In SLEEP mode,
Light Control button doesn’t operate.
Plasmacluster Ion ON/OFF
When Plasmacluster Ion is ON, the Plasmacluster Ion Indicator Light is on. (blue)
ON
Press
more 3 seconds.
OFF
Press
more 3 seconds.
NOTE
ON
OFF
Changing display (humidity / temperature)
ENGLISH
Changing display of current humidity or temperature.
Current humidity
(estimated)
Current temperature
(estimated)
NOTE
Current temperature and current humidity indicate the estimated values.
The values may be different from values indicated by other temperature gauge hygrometer.
• There is no function for adjusting the temperature.
• Humidity setting cannot be adjusted.
• Cannot dehumidify .
E-9
Page 30

USEFUL FUNCTION
Off TIMER
Select the length of time you want. The unit automatically stops once the selected time is reached.
1 hour 2 hours 4 hours 8 hours
CANCELLATION
NOTE
• Pressing with the OFF TIMER setting displays the remaining time.
• To reset the operating time, press
while the remaining is being displayed.
Auto RESTART
If the unit is unplugged or if there is a power failure, the unit will resume operation with the previous
settings after power is restored.
OFFON
(with the unit OFF) (with the unit OFF)
Press both buttons at the
same time for 3 seconds or
more.
Lighting
If the
Press both buttons at the
same time for 3 seconds or
more.
, , indicators light up for 10 seconds, the setting is completed.
E-10
Page 31

CARE AND MAINTENANCE
FILTER INDICATOR
The fi lter Indicator Light will turn
on after approximately 720 hours.
(30 days × 24 hours =720 hours)
This is a reminder to perform the
maintenance described below.
(Ref.E-11,E-12,E-13)
UNIT
BACK PANEL
SENSOR
Sensor (internal)
After performing
maintenance, reset
the Filter Indicator.
Press more 3 seconds.
Wipe with a dry, soft cloth.
CAUTION
• Do not use volatile fl uids.
Benzene paint thinner or polishing powder can damage the surface.
• Do not use detergents.
Detergent ingredients can damage the unit.
ENGLISH
Gently remove dust with an appropriate cleaning tool,
such as a vacuum cleaner with the proper attachment.
Back Panel
NOTE
Sensor Filter
NOTE
Cleaning the back panel when it is overly dirty
1. Add a small amount of kitchen detergent to
water and soak for about 10 minutes.
CAUTION
• DO NOT apply excessive pressure when
scrubbing the back panel.
2.Rinse off the kitchen detergent with clean water.
3.Completely dry the fi lter in a well-ventilated area.
Cleaning the sensor when it is overly dirty
1. Remove the Back Panel and removing the
Sensor Filter.
2. Gently remove dust from the Sensor with an
appropriate cleaning tool, such as a vacuum
cleaner with the proper attachment.
3. If the Sensor Filter is overly dirty, wash it with
water and dry it thoroughly.
E-11
Page 32

CARE AND MAINTENANCE
DEODORIZING FILTER
HEPA FILTER
Gently remove dust with an appropriate cleaning tool, such as a vacuum cleaner
with the proper attachment.
• Maintain only the
tagged surface. Do
not clean up the
opposite surface.
CAUTION
• Both surfaces can be
maintained.
Ta g
• The fi lters are fragile. Do not apply excessive pressure.
REMOVING AND REATTACHING THE HUMIDIFYING FILTER
REMOVING
Pull the Tray Handle up.
Turn the handle down
on the reverse side.
CAUTION
REATTACHING
Install the Humidifying Filter.
Close the Filter Frame cover.
• Drops of water map drip from the Humidifying Filter and the Filter Frame.
After maintenance, correctly reattach the parts.
Remove the Filter Frame.
Align with the
Install the Filter Frame.
mark.
Open the Filter Frame cover.
Remove the Humidifying
Filter.
Lift the Tray Handle.
Return it to its
original position.
E-12
Page 33

Always be sure to remove the power plug
from the wall outlet.
HUMIDIFYING TRAY
FILTER FRAME
Humidifying Tray
Float (Styrofoam)
Filter Frame
Rinse the inside of the Humidifying Tray and
the Filter Frame.
CAUTION
• Do not remove the Float from the Filter Frame.
NOTE
How to clean when overly dirty
1. • Remove the Filter Frame from the
Humidifying Tray and fi ll it with water
until the “FULL” indicator.
• Put the Filter Frame in water.
2. Add a small amount of kitchen
detergent to the water.
3. Soak for 30 minutes.
4. Rinse off the kitchen detergent with
clean water.
• Clean any hard-to-reach parts which
with a cotton swab or toothbrush.
ENGLISH
HUMIDIFYING FILTER
NOTE
Recommended descaling solutions
• Citric acid (available at some drugstores)
• 100% bottled lemon juice with no pulp.
1. Soak in water with a descaling solution for
about more 30 minutes.
How to clean when overly dirty
Rinse with plenty of water.
CAUTION
• When using lemon juice as your descaling
solution, allow for more soak time.
2. Rinse off the descaling solution
with plenty of water.
When descaling
<with citric acid>
2 1/2 cups
of water
<with lemon juice>
3 cups of
water
3 tea
spoons
1
/4 cups
E-13
Page 34

CARE AND MAINTENANCE
FILTER REPLACEMENT
When to replace the fi lter
Filter life varies depending on the room environment, usage conditions, and location of the unit.
If dust or odor persists, replace the fi lter.(Refer to “Before operating your new air purifi er, please read the
following” in the back of the cover.)
Lifespan of HEPA fi lter and Deodorizing fi lter and replacement suggestions are based on purifying
a room in which 5 cigarettes are smoked per day and the unit’s dust collection and deodorizing
performance has declined to half the level of a new fi lter.
We recommend replacing the fi lter more frequently if the unit is used in conditions signifi cantly more
severe than a normal household.
• HEPA Filter About 2 years after fi rst use
• Deodorizing Filter About 2 years after fi rst use
• Humidifying Filter About 5 years after fi rst use
Replacement Filter Model
Consult your dealer when purchasing a replacement fi lter.
REPLACEMENT FILTER MODEL
AIR PURIFIER MODEL
KC-F30Y
HEPA Filter :
1 unit
FZ-F30HFE FZ-F30DFE FZ-F30MFE
Deodorizing
Filter : 1 unit
Humidifying
Filter : 1unit
NOTE
Use the date label to remind you when to replace the fi lter.
There is the date label on the left side of the unit.
Disposing of fi lters
Dispose of used fi lters according to local laws and regulations.
HEPA Filter material :
• Filter : Polypropylene
• Frame : Polyester
Deodorizing Filter material :
• Filter : Activated charcoal, Polyrthylene terephthalate, Polypropylene
• Frame : Paper
Humidifying Filter
Filter Frame (gray)
Humidifying Filter material :
• Filter : Rayon, Polyester
HEPA Filter
Deodorizing Filter
E-14
Page 35

TROUBLESHOOTING
Before calling for service, review the troubleshooting chart below to make sure that
the problem is not a unit malfunction.
SYMPTOM REMEDY
Odor and smoke persists.
The Dust Sign light is green
even when the air is not clean.
The Dust Sign light is orange or
red even when the air is clean.
The unit makes a clicking or
ticking sound.
Air discharged from the unit has
an odor.
The unit does not operate when
cigarette smoke is in the air.
(the following are not due to a malfunction)
• Check the fi lters. If they appear to be extremely dirty, clean or
replace them. (Ref. E-12,E-13,E-14)
• The air may have been dirty when the unit was plugged in.
Unplug the unit, wait one minute, and then plug the unit in
again.
• Dirty or clogged dust sensor openings interfere with sensor
operation. Gently clean the back panel. (Ref. E-11).
• The unit may make clicking or ticking sounds when it is
generating ions.
• Check to see if the fi lters are extremely dirty.
• Clean or replace the fi lters.
• Plasmacluster Air Purifi ers emit small traces of ozone that can
produce an odor.
ENGLISH
• Check to see if the unit is installed in a location that makes it
diffi cult for the sensors to detect cigarette smoke.
• Check to see if the dust sensor openings are blocked or
clogged. If they are blocked or clogged, clean the back panel.
(Ref. E-11).
The Filter Indicator Light is on.
The Dust Sign lights are turned
off.
The Water Supply Indicator
Light does not light up when the
Humidifying Tray is empty.
The water level in the
Humidifying Tray does not
decrease or decreases slowly.
The Dust Sign lights change
color frequently.
There is a discrepancy between
the unit’s Humidity Monitor and
another hygrometer in the room.
• Whenever replacing the fi lters, connect the power cord to an
outlet and then press the Filter Reset Button.
• Check to see if the Lights OFF Mode is selected. If it is selected,
press the Light ON/OFF Button to turn the indicator lights on.
(Ref. E-9)
• Clean the Humidifying Tray. Make sure that the unit is on a level
surface.
• Check to see if the Humidifying Tray is correctly installed. Check
the Humidifying Filter.
• If the fi lter is extremely dirty, clean or replace it.
(Ref. E-12, E-13, E-14).
• The Dust Sign lights automatically change color when the dust
sensor detect impurities.
• There is a difference in the humidity level within the same room.
• The sensor have different measurement parameters.
• If the monitor indicates TEMPERTURE, press the Display
Select Button. (Ref. E-9)
E-15
Page 36

TROUBLESHOOTING
ERROR DISPLAY
DIGITAL
INDICATION
Fan motor error.
Temperature-humidity sensor error.
If the error continues to occur, contact a Sharp Service Center.
ERROR DETAILS REMEDY
Unplug the unit, wait one minute, then plug
the unit in again.
E-16
Page 37

SPECIFICATIONS
Specfiguresarenotfixedyet.
Power supply
Fan Speed Adjustment MAX MED SLEEP
Fan Speed (m
CLEAN AIR
CLEAN AIR
&HUMIDIFY
Recommended Room Size (m
High density Plasmacluster ion recommended room size (m
Humidifying Tray Capacity (L)
Sensors Dust / Temperature & Humidity
Filter type
Cord Length (m) 2.0
Dimensions (mm) 410 (W) × 340 (D) × 684 (H)
Weight (kg) 13.0
Rated Power (W)
Noise Level (dBA)
Fan Speed (m
Rated Power (W)
Noise Level (dBA)
Humidifi cation (mL/hour)*1
Dust collection HEPA *4
Deodorization Deodorizing
*1 • The amount of humidifi cation changes in accordance with indoor and outdoor temperature and
humidity.
The amount of humidifi cation increases as temperatures rises or humidity decreases.
The amount of humidifi cation decreases as temperatures decrease or humidity rises.
• Measurement Conditions : 20 ºC, 30 % humidity (JEM1426)
3
/hour)
3
/hour)
2
)*2
220 V ~ 240 V 50/60 Hz
402 294 90
53 32 6.6
49 44 20
402 294 132
53 33 10
49 44 26
730 600 300
~50
2
)*3
~35
4.0
ENGLISH
*2 • The recommended room size is one that can be humidifi ed when the unit’s fan is operating at the
maximum speed setting.
• The recommended room size is an area in which a given amount of dust particles can be removed
in 30 minutes.
*3 • Room size in which approximately 7000 ions per cubic centimeter can be measured in the center of
the room when the unit is placed next to a wall, is running at maximum settings, and is at a height
of approximately 1.2 meters from the fl oor.
*4 • The fi lter removes more than 99.97% of particles at least 0.3-microns in size. (JEM1467)
Standby Power
When the unit’s power plug is inserted in a wall outlet it consumes about 0.6 watts of standby power in order to
operate electrical circuits.
To conserve energy, unplug the power cord when the unit is not in use.
E-17
Page 38

PT. SHARP TRADING INDONESIA
KAWASAN INDUSTRI KIIC, JL. HARAPAN RAYA LOT LL 1 & 2,
GEDUNG NO. 01 DESA SIRNABAYA, KEC. TELUK JAMBE
TIMUR,KABUPATEN KARAWANG 41361
FACTORY
USE ONLY
Printed in China
TINS-A878KKRZ
16D
CN
-
1
 Loading...