

Page 1

KA-62V19IM0-EU
K-62D19IM2-EU
Cooking
IT
Istruzioni per l’uso
FR Guide D’utilisatio
EN
User Manual
DE FBedienungsanleitung
Home Appliances
Page 2

GB-Declaration of conformity
We declare that our products meet the applicable
European Directives, Decisions and Regulations
and the requirements listed in the standards
referenced.
DE-Konformitätserklärung
Wir erklären, dass unsere Produkte die
geltenden europäischen Richtlinien,
Entscheidungen und Regularien sowie die
in den referenzierten Standards gelisteten
Anforderungen erfüllen.
FR-Déclaration de conformité
Nous déclarons que nos produits sont conformes
aux Directives, Décisions et Règlementations
européennes en vigueur et aux exigences visées
dans les normes citées en référence.
ES-Declaración de conformidad
Declaramos que nuestros productos cumplen
con las Directivas Europeas, Decisiones
y Regulaciones aplicables y los requisitos
enumerados en dichas normativas.
PT-Declaração de conformidade
Declaramos que os nossos produtos
cumprem as Diretivas Europeias, Decisões
e Regulamentos aplicáveis e os requisitos
enumerados nas referências normalizadas.
a Direttive, Decisioni e Regolamenti europei e ai
requisiti elencati negli standard di riferimento.
GR-Δήλωση συμμόρφωσης
Δηλώνουμε ότι τα προϊόντα μας πληρούν τις
εφαρμόσιμες Ευρωπαϊκές Οδηγίες, Αποφάσεις
και Κανονισμούς, καθώς και τις απαιτήσεις που
περιέχονται στα πρότυπα όπου γίνεται αναφορά.
BG-Декларация за съответствие
Ние заявяваме, че нашите продукти отговарят
на приложимите европейски директиви,
решения и регламенти и на изискванията,
посочени в гореописаните стандарти.
CZ-Prohlášení o shodě
Prohlašujeme, že naše výrobky splňují příslušné
evropské směrnice, rozhodnutí, předpisy a
požadavky uvedené ve zmiňovaných normách.
SK-Vyhlásenie o zhode
Vyhlasujeme, že naše produkty spĺňajú príslušné
smernice, rozhodnutia, nariadenia a požiadavky
vypísané v uvedených štandardoch.
EE-Vastavusdeklaratsioon
Deklareerime, et meie tooted vastavad
kohaldatavatele Euroopa direktiividele, otsustele
ja määrustele ning viidatud standardites
sätestatud nõuetele.
SV-Försäkran om överensstämmelse
Vi försäkrar att våra produkter uppfyller gällande
EU-direktiv, beslut och förordningar och de krav
som anges i de standarder som refereras.
NL-Conformiteitsverklaring
We verklaren dat onze producten voldoen aan
de van toepassing zijnde Europese richtlijnen,
besluiten en voorschriften in de normen
waarnaar wordt verwezen.
IT-Dichiarazione di conformità
Dichiariamo che i nostri prodotti sono conformi
FI-Yhteensopivuuslauseke
Tuotteemme ovat yhteensopivia EU:n
tuotedirektiivien, päätösten ja säädösten kanssa,
sekä niissä listattujen standardien kanssa.
HR-Izjava o sukladnosti
Izjavljujemo da su naši proizvodu u skladu s
primjenjivim Direktivama, Odlukama i Uredbama
Europske unije te zahtjevima navedenima u
Page 3

spomenutim standardima.
SR-Izjava o usklađenosti
Izjavljujemo da naši proizvodi zadovoljavaju
primenljive evropske direktive, odluke i
propise, kao i zahteve navedene u naznačenim
standardima.
DA-Overensstemmelseserklæring
Vi erklærer, at vores produkter opfylder de
gældende europæiske direktiver, beslutninger
og forordninger, og de anførte standarder der
henvises til.
NO-Samsvarserklæring
Vi erklærer at våre produkter oppfyller de
gjeldende europeiske direktiver, beslutninger
og forskrifter, og kravene i standardene som det
henvises til.
UK-Декларація відповідності
Цим ми заявляємо, що наші продукти
відповідають усім застосовним директивам,
рішенням та нормам Європейського союзу.
Вимоги зазначено в додаткових матеріалах
щодо стандартів.
MK-Декларација за усогласеност
Изјавуваме дека нашите производи ги
исполнуваат применливите европски
директиви, решенија и одредби, како и
побарувањата наведени во посочените
стандарди.
referencia tartalmaknál.
SL-Izjava o skladnosti
Zagotavljamo, da so naši izdelki skladni z
ustreznimi evropskimi direktivami, sklepi in
predpisi ter zahtevami, ki so navedene v
referenčnih standardih.
AL-Deklarata e konformitetit
Ne deklarojmë se produktet tona përmbushin
Direktivat e aplikueshme evropiane, Vendimet
dhe Rregulloret si dhe kërkesat e renditura në
standardet e referuara.
LT-Atitikties deklaracija
Tvirtiname, kad mūsų produktai atitinka
susijusiose Europos direktyvose, sprendimuose
ir reglamentuose pateikiamų standartų keliamus
reikalavimus.
LV-Atbilstības deklarācija
Mēs apliecinām, ka mūsu produkti atbilst
attiecīgajām Eiropas direktīvām, lēmumiem un
noteikumiem, kā arī prasībām, kas norādītas
pieminētajos standartos.
PL-Deklaracja zgodności
Oświadczamy, że nasze produkty spełniają
wymagania odpowiednich dyrektyw, decyzji
i regulacji Unii Europejskiej oraz wymagania
określone w wymienionych standardach.
RO-Declarație de conformitate
Noi declarăm că produsele noastre respectă
Directivele Europene, Deciziile și Reglementările
aplicabile și condițiile enumerate în standardele
menționate.
HU-Megfelelőségi nyilatkozat
Ezúton igazoljuk, hogy termékeink megfelelnek
az EU direktíváknak, jogszabályoknak,
előírásoknak. Az előírások felsorolása a
Page 4

GB: The symbol on the product or on its
packaging indicates that this product may not
be treated as household waste. Instead it shall
be handed over the applicable collection point
for recycling of electrical and electronic equip-
ment. By ensuring this product is disposed of
correctly, you will help prevent potential nega-
tive consequences for the environment and hu-
man health, which could otherwise be caused
by inappropriate waste handling of this product.
For more detailed information about recycling
this product, please contact your local city of-
ces, your household waste disposal service or
the shop where you purchased the product.
DE: Dieses Symbol auf dem Produkt oder der
Verpackung besagt, dass das Produkt nicht
als Hausmüll behandelt werden darf. Statt-
dessen sollte es einem Sammelpunkt für das
Recycling von elektrischen und elektronischen
Geräten übergeben werden. Indem Sie dafür
sorgen, dass dieses Produkt korrekt verwertet
wird, helfen Sie dabei, mögliche negative Fol-
gen für die Umwelt und die menschliche Ge-
sundheit zu verhindern, die ansonsten durch
die ungeeignete Beseitigung dieses Produkts
entstehen könnten. Weitere Informationen über
die Verwertung diese Produkts erhalten Sie,
wenn Sie sich mit Ihrer örtlichen Behörde, der
Hausmüllabfuhr oder dem Geschäft in Ver-
bindung setzen, bei dem Sie dieses Produkt
erworben haben.
FR: Ce symbole sur le produit ou sur
l’emballage indique que ce produit ne doit pas
être traité comme des déchets ménagers. Il
doit plutôt être remis au point de ramassage
concerné, se chargeant du recyclage du maté-
riel électrique et électronique. En vous confor-
mant à une procédure d’enlèvement correcte
du produit, vous aiderez à prévenir tout effet
nuisible à l’environnement et à la santé, qu’une
manipulation inappropriée pourrait autrement
provoquer. Pour plus de détails concernant
le recyclage de ce produit, veuillez contacter
votre autorité locale, un centre de recyclage
des déchets domestiques ou la boutique où
vous avez acheté le produit.
ES: Este símbolo en el producto o su emba-
laje indica que este producto no debe tratarse
como residuo doméstico. Por el contrario, debe
llevarse al punto de recogida responsable del
reciclaje de equipos eléctricos y electrónicos.
Al asegurarse de que este producto se elimine
correctamente, ayudará a prevenir las posibles
consecuencias negativas para el medio am-
biente y la salud de los seres humanos que,
de lo contrario, podrían producirse debido a
la manipulación incorrecta de los residuos de
este producto. Para obtener información más
detallada sobre el reciclaje de este producto,
póngase en contacto con la ocina municipal
local, con el servicio de eliminación de resi-
duos domésticos o con el comercio en el que
haya adquirido el producto.
PT: Este símbolo no produto ou embalagem
signica que o produto não pode ser tratado
como resíduo doméstico. Pelo contrário, deve
ser entregue num ponto de recolha aplicável
para reciclagem de equipamento elétrico e
eletrónico. Ao garantir que este produto é
eliminado de forma correta estará a ajudar
a evitar eventuais consequências negativas
para o meio ambiente e a saúde humana, que
poderão ser provocadas pela incorreta gestão
Page 5

de resíduos deste produto. Para informações
mais detalhadas sobre a reciclagem deste
produto, contacte as suas autoridades locais,
centro de reciclagem ou a loja onde comprou
o produto.
NL: Het symbool op het product of de verpak-
king geeft aan dat dit product niet mag worden
behandeld als huishoudelijk afval. In plaats
daarvan dient het te worden ingeleverd bij het
van toepassing zijnde inzamelpunt voor de
recycling van elektrische en elektronische ap-
paratuur. Door dit product correct te verwijde-
ren voorkomt u mogelijke negatieve gevolgen
voor het milieu en de menselijke gezondheid,
die anders zouden kunnen worden veroorzaakt
door een onjuiste afvalverwerking van dit
product. Meer gedetailleerde informatie over
de recycling van dit product kunt u opvragen bij
uw gemeente, de afvalverwijderingsdienst of
de winkel, waar u het product hebt gekocht.
IT: Il simbolo sul prodotto o sulla confezione
indica che questo prodotto potrebbe non es-
sere trattato come riuti domestici. Al contrario
saranno trasmessi al punto di raccolta adegua-
to per il riciclo delle componenti elettriche ed
elettroniche. Assicurando il corretto smalti-
mento del prodotto, si eviteranno potenziali
conseguenze negative per l’ambiente e la
salute dell’uomo, che potrebbero vericarsi in
caso di smaltimento non corretto del prodotto.
Per maggiori informazioni sul riciclaggio del
prodotto, contattare l’ufcio locale, il servizio
di smaltimento o il negozio in cui il prodotto è
stato acquistato.
GR: Το σύμβολο αυτό που βρίσκεται στο
προϊόν ή στη συσκευασία του σημαίνει πως
το προϊόν δεν θα πρέπει να αντιμετωπίζεται
ως οικιακό απόρριμμα. Αντίθετα, θα πρέπει να
παραδίδεται στο αρμόδιο σημείο συλλογής για
ανακύκλωση ηλεκτρικού και ηλεκτρονικού εξοπλισμού. Διασφαλίζοντας τη σωστή απόρριψη
του προϊόντος αυτού, συντελείτε στην πρόληψη
αρνητικών συνεπειών για το περιβάλλον και
την ατομική υγεία, οι οποίες θα μπορούσαν,
κατά τα άλλα να προκληθούν λόγω ακατάλληλου χειρισμού απόρριψης του προϊόντος αυτού. Για πιο λεπτομερείς πληροφορίες σχετικά
με την ανακύκλωση αυτού του προϊόντος, επικοινωνήστε με την τοπική δημοτική υπηρεσία,
την υπηρεσία απόρριψης οικιακών αποβλήτων,
ή το κατάστημα από όπου προμηθευτήκατε το
προϊόν.
BG: Символът върху продукта или неговата опаковка означава, че той не трябва да
бъде третиран като битов отпадък. Вместо
това, трябва да бъде занесен в някой от
центровете за рециклиране на електронна техника. Чрез правилното извеждане
от експлоатация на този продукт, Вие ще
помогнете за предотвратяване на възможните негативни последствия за околната
среда и човешкото здраве, които биха
възникнали при неправилното му изхвърляне. За по-подробна информация относно
рециклирането на този продукт се свържете
с местните органи на управление, център за
рециклиране или магазина, откъдето сте го
закупили.
CZ: Symbol na výrobku nebo na doprovod-
ných dokumentech k výrobku znamená, že s
tímto přístrojem nelze zacházet jako s domovním odpadem. Namísto toho je nutné přístroj
předat do nejbližšího sběrného střediska k
recyklaci elektrického a elektronického vyba-
vení. Zajištěním řádné ekologické likvidace
přístroje pomůžete zamezit možnému škodlivému dopadu na životní prostředí a lidské zdraví,
Page 6

který by jinak mohl vzniknout při nesprávné
likvidaci tohoto výrobku. Pro bližší informace
ohledně recyklace tohoto výrobku kontaktujte
prosím místní úřady, službu likvidace domovních odpadů nebo prodejnu, kde jste produkt
koupili.
SK: Tento symbol nachádzajúci sa na výrobku
alebo balení označuje, že výrobok nesmie
byť braný ako domový odpad. Namiesto toho
by ste ho mali dať na vhodné zberné miesto
na recykláciu elektrického a elektronického
zariadenia. Zaistením správnej likvidácie tohto
výrobku pomôžete zabrániť možným negatívnym následkom na životné prostredie a zdravie
ľudí, ku ktorým by mohlo dôjsť pri nesprávnej
manipulácii s týmto výrobkom. Podrobnejšie
informácie o recyklácii tohto výrobku vám
poskytne miestny orgán, recyklačné stredisko
alebo obchod, v ktorom ste zakúpili výrobok.
EE: See tootel või selle pakendil olev sümbol
näitab, et toodet ei tohi käsitseda tavalise
olmeprügina. Selle asemel tuleb see anda
ümbertöötlemiseks üle asjakohasesse elektri-ja
elektroonikaseadmete kogumispunkti. Tagades
toote korraliku utiliseerimise, aitate vältida
negatiivseid mõjusid keskkkonnale ja inimeste
tervisele, mida tootejäätmete vale käitlemine
muidu kaasa võiks tuua. Selle toote utilisee-
rimise kohta täpsema teabe saamiseks võtke
palun ühendust oma kohaliku omavalitsuse,
prügiettevõtte või kauplusega, kust te toote
ostsite.
SV: Denna symbol på produkten eller
förpackningen innebär att produkten inte bör
behandlas som hushållsavfall. I stället skall
den överlämnas till lämplig insamlingsplats för
återvinning av elektrisk och elektronisk utrust-
ning. Genom att säkerställa att denna produkt
kasseras korrekt, hjälper du till att förhindra po-
tentiella negativa konsekvenser för miljön och
människors hälsa, som annars kunde orsakas
av olämplig avfallshantering av denna produkt.
För mer detaljerad information om återvinning
av denna produkt, kontakta dina lokala myndig-
heter, återvinningscenter eller butiken där du
har köpt produkten.
FI: Tämä symboli tuotteessa tai sen pak-
kauksessa merkitsee, että tätä tuotetta ei
saa hävittää kotitalousjätteen mukana. Laite
on sen sijaan toimitettava elektronisille ja
sähkölaitteille soveltuvaan keräyspisteeseen
kierrätettäväksi. Varmistamalla tämän tuotteen
asianmukaisen hävitystavan autat suojelemaan
ympäristöä ja ihmisten terveyttä mahdolli-
silta haittavaikutuksilta joita saattaisi ilmetä
tämän tuotteen asiattomasta hävittämisestä.
Lisätietoja tämän tuotteen kierrättämisestä saat
ottamalla yhteyttä paikallisiin viranomaisiin,
kierrätyskeskukseen tai myymälään, josta ostit
tuotteen.
HR: Simbol na proizvodu ili ambalaži označava da proizvod ne smijete baciti zajedno s
kućnim otpadom. Umjesto toga, odnesite ga
na odgovarajuće sabirno mjesto za recikliranje
električne i elektroničke opreme. Osigurava-
njem ispravnog odlaganja ovog proizvoda,
spriječit ćete potencijalne negativne učinke na
okoliš i ljudsko zdravlje koji će izaći na vidjelo
nakon neprikladnog odlaganja ovog proizvoda.
Za više informacija o recikliranju ovog proizvoda obratite se lokalnoj službi, reciklažnom cen-
tru ili trgovini u kojoj ste kupili ovaj proizvod.
SR: Simbol na proizvodu ili na njegovom
pakovanju naznačava da ovaj proizvod možda
neće biti tretiran kao otpad iz domaćinstva.
Umesto toga će se predati primenljivoj tački
Page 7

za preuzimanje zarad recikliranja električne
i elektronske opreme. Starajući se da ovaj
proizvod bude pravilno uklonjen, pomoćićete
da se spreče potencijalne negativne posledice
za okruženje i ljudsko zdravlje, što može da u
suprotnom izazove neodgovarajuće upravljanje
otpadom ovog proizvoda. Za detaljnije
informacije o recikliranju ovog proizvoda,
molimo vas da kontaktirajte vašu lokalnu
gradsku kancelariju, uslugu otklanjanja vašeg
otpada iz domaćinstva ili prodavnicu gde ste
kupili proizvod.
DA: Dette symbol på produktet eller embal-
lagen betyder, at produktet ikke må behandles
som husholdningsaffald. Det skal i stedet
indleveres til et indsamlingssted for genbrug af
elektrisk og elektronisk udstyr. Ved at sikre, at
dette produkt bliver bortskaffet korrekt, hjælper
du med til at forebygge eventuelle negative
konsekvenser for miljøet og menneskers
helbred, som ellers kunne forårsages af forkert
bortskaffelse af dette produkt Hvis du ønsker
mere detaljerede oplysninger om genbrug af
dette produkt, bedes du kontakte din lokale
myndighed, genbrugsplads, eller den butik,
hvor du købte produktet.
NO: Dette symbolet på produktet eller pakken
innebærer at produktet ikke skal behandles
som husholdningsavfall. I stedet skal det
leveres til en gjenvinningstasjon for elektrisk og
elektronisk utstyr. Ved å sørge for korrekt av-
hending av apparatet, vil du bidra til å forhindre
potensielle negative konsekvenser for miljøet
og menneskers helse, som ellers kunne ha
inntruffet grunnet feilaktig avfallshåndtering av
produktet. For mer detaljert informasjon om re-
sirkulering av dette produktet, bes du kontakte
de lokale myndigheter, en gjenvinningsstasjon,
eller butikken der du kjøpte produktet.
UK: Цей символ, нанесений на виріб або
його упаковку, означає, що виріб не можна
викидати разом із побутовим сміттям. Натомість його слід передати на відповідний
пункт збору електричного та електронного
обладнання, що підлягає повторній переробці. Подбавши про належну ліквідацію
виробу, ви допоможете попередити можливі
негативні наслідки для довкілля та здоров’я
людей, які могли б виникнути в разі неправильного поводження з цим виробом. Для
одержання більш докладної інформації про
повторну переробку цього виробу звертайтесь
у місцеві органи влади, центр повторної переробки чи в магазин, у якому було придбано
виріб.
MK: Симболот на производот или на
неговото пакување покажува дека овој
производ не смее да се третира како
отпад од домаќинствата. Наместо тоа, ќе
биде предаден на соодветната станица
за отпад за рециклирање на електрична
и електронска опрема. Со правилно
фрлање на овој производ, ќе помогнете
да се спречат потенцијалните негативни
последици за животната средина и здравјето
на луѓето, кои инаку би можеле да настанат
од неправилно ракување со отпадот на
овој производ. За подетални информации
околу рециклирањето на овој производ,
контактирајте ја вашата локална градска
канцеларија, сервисот за фрлање на отпад
од домаќинствата или продавницата во која
сте го купиле производот.
RO: Acest simbol aplicat pe produs sau amba-
laj indică faptul că produsul nu ar trebui considerat deşeu casnic. În schimb, acesta trebuie
Page 8

predat centrelor de colectare adecvate de reci-
clare a echipamentelor electrice şi electronice.
Asigurând eliminarea corectă a acestui produs,
ajutaţi la prevenirea posibilelor consecinţe negative asupra mediului şi sănătăţii umane, care
pot cauzate tratarea inadecvată a deşeurilor
rezultate din acest produs. Pentru informaţii
detaliate, cu privire la reciclarea acestui pro-
dus, vă rugăm să contactaţi autorităţile locale,
centrele de reciclare sau magazinul.
HU: Ez a jelölés a terméken vagy a csomago-
lásán azt jelenti, hogy a készüléket a háztartási
hulladéktól külön kell kezelni. Az elhasznált ké-
szüléket az elektromos és elektronikai beren-
dezések begyűjtőhelyére kell szállítani. Azzal,
hogy gondoskodik a termék megfelelő hulladék
elhelyezéséről, segít megelőzni a környezetre
és az emberi egészségre gyakorolt lehetséges
negatív következményeket, amelyek egyébként
a termék helytelen hulladékkezelése esetén
előfordulhatnának. A termék újrahasznosításával kapcsolatos bővebb információért, kérjük,
vegye fel a kapcsolatot a helyi önkormányzat-
tal, hulladékkezelő szolgáltatókkal, vagy az
üzlettel, ahol a terméket megvásárolta.
SL: Simbol na izdelku ali embalaži označuje,
da s tem izdelkom ni dovoljeno ravnati kot z
običajnimi gospodinjskimi odpadki. Treba ga je
oddati na ustrezno zbirno reciklirno mesto za
električno in elektronsko opremo. S pravilnim
odlaganjem tega izdelka boste pomagali pri
preprečevanju potencialnih negativnih vplivov
na okolje in zdravje ljudi, ki ga sicer lahko
povzroči neprimerno odlaganje tega izdelka.
Za podrobnejše informacije o recikliranju tega
izdelka se obrnite na lokalne oblasti, pristojne
za odstranjevanje odpadkov ali trgovino, v ka-
teri ste kupili izdelek.
AL: Simboli mbi produkt ose mbi paketimin e
tij tregon se ky produkt nuk mund të trajtohet
si mbeturinë shtëpiake. Në vend të kësaj
ai do të dorëzohet pranë pikës përkatëse
të grumbullimit për riciklimin e pajisjeve
elektrike dhe elektronike. Duke u siguruar
që ky produkt të hidhet siç duhet, ju do të
ndihmojë në parandalimin e pasojave negative
të mundshme për mjedisin dhe shëndetin e
njeriut, e cila mund të ndryshe të shkaktohen
nga trajtimi i papërshtatshëm i mbetjeve të këtij
produkti. Për informacion më të detajuar mbi
riciklimin e këtij produkti, ju lutemi kontaktoni
zyrën tuaj lokale të qytetit, shërbimin e hedhjes
së mbeturinave shtëpiake ose dyqanin ku keni
blerë produktin.
LT: Šis simbolis ant gaminio ar pakuotės reiškia, kad gaminio negalima išmesti su buitinėmis atliekomis. Jį reikia nugabenti į atitinkamą
elektrinių ir elektroninių prietaisų surinkimo
punktą perdirbimui. Pasirūpindami tuo, kad
gaminys būtų tinkamai utilizuotas, padėsite
apsisaugoti nuo neigiamų pasekmių aplinkai
ir žmonių sveikatai, kurias priešingu atveju
sukeltų netinkamas šio gaminio utilizavimas.
Norėdami gauti išsamesnę informaciją apie šio
gaminio perdirbimą, kreipkitės į miesto valdžios
instituciją, vietinę buitinių atliekų tvarkymo tarnybą ar parduotuvę, kurioje įsigijote gaminį.
LV: Šis simbols uz izstrādājuma un iepakojuma norāda, ka izstrādājumu nevar izmest
sadzīves atkritumos. Tā vietā to var nodot
piemērotā elektrisko un elektronisko iekārtu
pārstrādājamo atkritumu savākšanas vietā.
Nodrošinot, ka šis izstrādājums tiek izmests
pareizā veidā, varat palīdzēt novērst potenciāli
negatīvo ietekmi uz apkārtējo vidi un cilvēku
veselību, ko pretējā gadījumā var radīt nepareiza šī izstrādājumu atkritumu apsaimniekošana.
Page 9

Lai saņemtu papildinformāciju par izstrādājuma pārstrādi, sazinieties ar vietējo pārvaldi,
pārstrādes centru vai tirdzniecības vietu, kurā
iegādājāties izstrādājumu.
PL: Ten symbol umieszczony na produkcie
lub opakowaniu oznacza, że produktu nie
wolno usuwać razem ze zwykłymi odpadkami z
gospodarstw domowych. Zamiast tego należy
go przekazać odpowiedniemu punktowi zbiórki
przekazującemu
urządzenia elektryczne i elektroniczne do
recyklingu. Pilnując odpowiedniego usunięcia
produktu, pomagasz zapobiegac ewentualnych
negatywnym konsekwencjom dla środowiska i
zdrowia ludzkiego, które mogłyby
zostać spowodowane niewłaściwym usunięciem zużytego produktu. Szczegółowe
informacje dotyczące recyklingu opisywanego
produktu można uzyskać od władz lokalnych,
służby zbiórki odpadów z gospodarstw domowych lub u sprzedawcy urządzenia.
Page 10

Gentile cliente,
Il nostro obiettivo è offrirti prodotti di alta qualità che superano le tue aspettative. La
tua apparecchiatura è prodotta in impianti moderni ed è collaudata con attenzione.
Questo manuale è stato preparato per aiutarti a usare la tua apparecchiatura, che
è stata fabbricata usando la più recente tecnologia con sicurezza e la massima
efcienza. Prima di usare l'apparecchiatura, leggi con attenzione questa guida che
include informazioni di base per una installazione, manutenzione e uso sicuri. Contatta il centro di assistenza clienti autorizzato più vicino per l'installazione del tuo
prodotto.
IT
Page 11

Contenuti
Presentazione e dimensioni del prodotto
Avvertenze
Preparazione per l'installazione e l'uso
Uso del forno
Pulizia e manutenzione del prodotto
Assistenza e trasporto
IT
Page 12

PRESENTAZIONE E DIMENSIONI DEL PRODOTTO
Forno combinato incorporato
Built-in Combined Oven
ELENCO DEI COMPONENTI
1- Pannello di controllo
2- Maniglia
3- Porta forno
4- Blocco bambini
5- Vassoio
6- Elemento riscaldante inferiore
(dietro la piastra)
7- Elemento riscaldante superiore (dietro la
piastra)
8- Griglia
9- Rastrelliera
10- Illuminazione forno
11- Riscaldamento tubo (dietro la piastra)
12- Ventola (dietro la piastra)
13- Portelli per lo scarico dell'aria
IT
Page 13

PIASTRA IN VETROCERAMICA
2
1
1. Riscaldatore in vetroceramica
2 Supercie in vetroceramica
IT
Page 14

AVVERTENZE SULLA SICUREZZA
LEGGERE LE PRESENTI ISTRUZIONI CON ATTENZIONE E NELLA LORO
INTERESSA PRIMA DI UTILIZZARE
LA PROPRIA APPARECCHIATURA, E
CONSERVARLE IN UN LUOGO ADATTO PER EVENTUALI RIFERIMENTI.
IL PRESENTE MANUALE È STATO
REALIZZATO PER PIÙ MODELLI.
LA PROPRIA APPLICAZIONE POTREBBE NON ESSERE DOTATA DI
ALCUNE DELLE FUNZIONALITÀ ILLUSTRATE NEL PRESENTE MANUALE. PRESTARE ATTENZIONE ALLE
ESPRESSIONI DOTATE DI ULLUSTRAZIONI DURANTE LA LETTURA
DEL MANUALE.
Avvertenze generali
sulla sicurezza
La presente apparecchiatura può essere
usata da bambini dagli
otto anni di età e da persone con capacità siche, sensoriali o mentali ridotte o mancanza
di esperienza e conoscenze nel caso in cui
siano state assegnate
a supervisori o abbiano ottenuto istruzioni
in merito all'uso sicuro
dell'apparecchiatura e
comprendano i pericoli coinvolti. L'apparec-
chiatura non è un giocattolo. La pulizia e la
manutenzione non devono essere eseguiti a
bambini in assenza di
supervisione.
AVVERTENZE: L'apparecchiatura e le sue
parti accessibili diventano incandescenti
durante l'uso. Fare at-
tenzione a evitare di
toccare gli elementi incandescenti. I bambini
di età inferiore agli otto
anni devono essere tenuti a distanza se non
in presenza di sorveglianza continua.
AVVERTENZE: la cottura sulla piastra con
grasso od olio è pericolosa e può provocare
incendi. NON provare
in alcun caso a spegnere gli incendi con
l'acqua, ma spegnere
l'apparecchiatura e coprire la amma con un
coperchio o una coperta d'amianto.
IT
Page 15

AVVERTENZE: Pericolo di incendio: non
conservare oggetti sulle superci di cottura.
AVVERTENZE: Se la
supercie è spaccata, disattivare l'apparecchiatura per evitare eventuali
scosse elettriche.
Per le piastre dotate di
coperchio, rimuovere
eventuali versamenti dal
coperchio prima dell'apertura. Inoltre consentire il
raffreddamento della supercie della piastra prima
di chiudere il coperchio.
L'apparecchiatura non
è progettata per essere operata tramite timer
esterni o sistemi di controllo a distanza separati.
vi periodi nel normale
uso possono diventare
incandescenti.
Non usare detergenti
abrasivi o grafatori in
metallo aflati per pulire il vetro dello sportello del forno o le altre
superci perché potrebbero grafare la supercie, provocando la
rottura del vetro o dan-
ni alla supercie.
Non usare pulitori a
vapore per la pulizia
dell'apparecchiatura.
AVVERTENZE: Assicurarsi che l'apparecchiatura sia spenta prima
di sostituire la lampada
per evitare eventuali
scosse elettriche.
Durante l'uso, l'apparecchiatura diventa incandescente. Fare attenzione a evitare di toccare gli
elementi incandescenti
all'interno del forno.
Durante l'uso, le maniglie tenute per bre-
IT
• ATTENZIONE: le parti
accessibili potrebbero
essere incandescenti
durante la cottura o l'u-
so della griglia. Tenere
lontani i bambini.
Per i piani di cottura a
induzione, non collo-
Page 16

care oggetti metallici
come coltelli, forchette,
cucchiai e coperchi sulla supercie della piastra, perché possono
diventare bollenti.
Per i piani di cottura a induzione, dopo l'uso, disattivare l'elemento del
piano usando i relativi
comandi e non fare af-
damento sul rilevatore.
La tua apparecchiatura è prodotta secondo tutti gli standard e i regolamenti
internazionali e locali applicabili.
La manutenzione e la riparazione devono essere eseguite esclusivamente da
tecnici di servizio autorizzati. La manutenzione e la riparazione se eseguite da
tecnici non autorizzati potrebbero causare rischi. È pericoloso alterare o modicare le speciche dell'apparecchiatura.
Prima dell'installazione, assicurarsi che
le condizioni di distribuzione locali (natura del gas, pressione del gas, tensione e frequenza elettriche) e i requisiti
dell'apparecchiatura siano compatibili.
I requisiti per questa apparecchiatura
sono indicati sull'etichetta.
• ATTENZIONE: Questa apparecchiatura
è progettata esclusivamente per la cottura degli alimenti e per l'uso domestico
interno e non deve essere usata per altri
scopi o in altre apparecchiature, come per
usi non domestici o in ambienti commerciali o per il riscaldamento degli ambienti.
Non provare a sollevare o spostare l'apparecchiatura tirando la maniglia dello
sportello.
Tutte le possibili misure di sicurezza
sono state applicate per garantire la sicurezza del consumatore. Poiché il vetro potrebbe rompersi, fare attenzione
durante la pulizia per evitare di grafarlo. Evitare di colpire o battere sul vetro
con degli accessori.
Assicurarsi che il cavo di alimentazione
non si pieghi durante l'installazione. Se
il cavo di alimentazione è danneggiato,
deve essere sostituito dal produttore,
dal vostro agente di servizio o da persone similmente qualicate al ne di
evitare rischi.
Quando lo sportello del forno è aptero,
non permettere ai bambini di salire o
sedere sopra di esso.
Avvertenze sull'installazione:
Non usare l'apparecchiatura prima che
sia completamente installata.
L'apparecchiatura deve essere installa-
ta e operata da un tecnico autorizzato. Il
produttore non è responsabile dei danni
causati da una collocazione e installazione difettosa effettuata da soggetti
non autorizzati.
Durante il disimballaggio dell'apparecchiatura, assicurarsi che non abbia subito
danni durante il trasporto. In caso di difetti,
non usare l'apparecchiatura e contattare
immediatamente il servizio di assistenza
qualicato. I materiali usati per l'imballaggio (nylon, graffettatrici, schiuma espansa...ecc.) potrebbero avere effetti negativi
sui bambini, e dovrebbero essere raccolti
e rimossi immediatamente.
Proteggere l'apparecchiatura dagli effetti atmosferici. Non esporla agli effetti
di sole, pioggia, neve, ecc.
I materiali che circondano l'apparecchiatura (cabina) devono essere in grado di
resistere a temperatura di almeno 100°C.
Durante l'uso
Quando il forno viene azionato per la pri-
ma volta, i materiali isolanti e gli elementi
di riscaldamento emetteranno odore.
IT
Page 17

Per questa ragione, prima di usare il
forno, azionare alla massima temperatura per 45 minuti. Nello stesso tempo
è necessario ventilare adeguatamente
l'ambiente in cui il prodotto è installato.
Durante l'uso, le superci interne ed
esterne del forno si riscaldano. Quando
si apre lo sportello del forno, allontanarsi per evitare la corrente di aria incandescente dal forno. Potrebbe causare
ustioni.
Non collocare materiali inammabili o
combustibili, all'interno o nelle vicinanze dell'apparecchiatura quando è in
funzione.
Usare sempre guanti da forno per rimuovere e spostare gli alimenti nel forno.
Non allontanarsi del fornello durante la
cottura con oli liquidi o solidi. Potrebbero incendiarsi in caso di surriscaldamento estremo. Non versare acqua
sulle amme causate dell'olio. Coprire
la casseruola o la padella con il suo coperchio per togliere l'aria alle amme e
spegnere il fornello.
Posizionare le pentole al centro della
zona di cottura, e ruotare le maniglie in
una posizione sicura così che non possano essere afferrate.
Se l'apparecchiatura non viene usata
per molto tempo, staccare la spina. Tenere disattivato l'interruttore di controllo principale. Se l'apparecchiatura non
viene usata per molto tempo, chiudere
la valvola del gas.
Assicurarsi che le manopole di controllo dell'apparecchiatura siano sempre in
posizione "0" (arresto) quando non vie-
ne usata.
Il vassoio si inclina quando viene estratto. Fare attenzione a non versare liquidi
bollenti.
Quando lo sportello o il cassetto del forno è aperto, non lasciare niente sopra
di esso. L'applicazione potrebbe sbilanciarsi o il coperchio rompersi.
Non collocare oggetti pesanti o prodotti
inammabili o incendiabili (nylon, borse
di plastica, carta, panni...ecc.) nel cassetto. Questo include stoviglie con accessori di plastica (p.es. maniglie).
Non appendere tovaglie, panni o indumenti all'apparecchiatura o alle relative
maniglie.
Durante la pulizia e la manutenzione
Spegnere sempre l'apparecchiatura
prima di operazioni come la pulizia o la
manutenzione.
Ciò può essere fatto dopo avere staccato l'apparecchiatura o spegno gli interruttori principali.
Non rimuovere le manopole di controllo
per pulire il pannello di controllo.
PER MANTENERE L'EFFICIENZA
E LA SICUREZZA DELLA PROPRIA
APPARECCHIATURA, RACCOMANDIAMO DI USARE SEMPRE PARTI
ORIGINALI O CHIAMARE I NOSTRI
AGENTI DI ASSISTENZA AUTORIZZATI IN CASO DI NECESSITÀ.
PREPARAZIONE PER L'INSTALLAZIONE E L'USO
Prodotto con le parti e i materiali della
migliore qualità, questo forno moderno,
funzionale e pratico soddisferà tutti i tuoi
bisogni. Assicurarsi di leggere il manuale per ottenere risultati ottimali ed evitare
eventuali problemi in futuro. Le informazioni seguenti contengono regole necessarie alle corrette operazioni di posizionamento e manutenzione. Dovrebbero
essere lette soprattutto dai tecnici che
posizionano l'apparecchiatura.
CONTATTA IL CENTRO DI ASSISTENZA AUTORIZZATO PER L'INSTALLAZIONE DEL TUO FORNO!
IT
Page 18

SCEGLIERE UNA POSIZIONE
PER IL FORNO
Esistono diversi elementi a cui fare attenzione quando si sceglie un posto per
il proprio forno.
Assicurarsi di considerare le nostre
raccomandazioni seguenti per evitare
eventuali problemi e situazioni pericolose che potrebbero vericarsi in seguito!
Quando si sceglie un posto per il forno,
fare attenzione a che non siano presenti materiali inammabili o combustibili
nelle vicinanze, come tende, olio, panni, ecc., che potrebbero rapidamente
incendiarsi.
I mobili intorno al forno devono essere realizzati in materiali resistenti a più di 50°C.
Le modiche richieste dal cabinato su
parete e dal tubo di aspirazione sopra
il prodotto combinato incorporato e le
altezze minime della tavola per il forno
sono indicate nella gura 1. Di conseguenza, il tubo di aspirazione deve essere a un'altezza minima di 65 cm dalla
tavola. Se non è presente un tubo di
aspirazione, l'altezza non deve essere
inferiore a 70 cm.
ISTRUZIONI DEL FORNO IN-
CORPORATO
2
Inserire il forno nella cabina spingendolo in avanti. Aprire lo sportello del forno
e inserire due viti nei fori ubicati sopra
il telaio del forno. Quando il telaio del
prodotto tocca la supercie in legno del
cabinato, serrare le viti.
piani
min.
min.
50 mm
25 mm
Piano di cottura incorporato
VENTOLA DI SCARICO
Minimo 65cm
Minimo 70cm
(con coperchio)
(senza coperchio)
Forno incorporato
Se il forno è installato sotto un piano di
cottura, la distanza tra il piano e il pannello superiore del forno deve essere
almeno di 50 mm e la distanza tra il piano e la parte superiore del pannello di
controllo deve essere almeno di 25 mm.
Figura 1
IT
Page 19

Le dimensioni e il materiale del cabinato in cui il forno sarà installato devono
essere corrette e resistenti agli aumenti di temperatura. In una installazione
corretta, i contatti con le parti isolate
o elettriche devono essere evitati. Le
parti isolanti devono essere installate in modo tale da garantire che non
possano essere rimosse usando degli
strumenti. Si sconsiglia l'installazione
dell'apparecchiatura in vicinanza di un
frigorifero o in un cassone frigorifero.
Altrimenti le prestazioni delle apparecchiature indicate saranno inuenzate
negativamente dal calore emanato.
Dopo la rimozione del forno dall'imballaggio, assicurarsi che il forno non
sia danneggiato. In caso si sospetti la
presenza di difetti nell'apparecchiatura,
non usarla e contattare immediatamen-
te il servizio autorizzato.
POSIZIONAMENTO DEL FORNELLO INCORPORATO
Per prevenire la perdita di liquidi dalla
piastra, con il forno è fornito uno speciale stucco sigillante. Applicare lo stucco intorno allo spazio del fornello della
cucina, della misura indicata nella gura
2. Estendere lo stucco in cinque pezzi
applicandolo intorno al fornello. Collocare la piastra si di esso, con i pulsanti di
controllo sul lato destro. Assicurarsi che
aderisca alle pinze come nella Figura 3.
Dopo avere collocato la piastra a posto,
rimuovere lo stucco in eccesso intorno ai
lati usando una spatola (Figura 3).
Nel caso in cui lo spessore del piano
della cucina sia inferiore a 40 mm, usare la pinza come indicato nella Figura 3.
Collocare le piastre direttamente sullo
spazio di apertura (Figura 5a-5b)
590mm
520mm
150mm
560mm
Min.50mm
Min.60mm
490mm
– Un cablaggio non correttamente ese-
guito potrebbe danneggiare l'apparecchiatura. Tali danni non saranno
coperti dalla garanzia.
– L'apparecchiatura è progettata per
connettersi a 220-240V~. Se la presa
elettrica è diversa da quanto indicato, contattare immediatamente l'assi-
stenza autorizzata.
L’azienda produttrice dichiara che non
si assume responsabilità in caso di
danni o perdite causate dalla mancata
osservanza delle norme di sicurezza!
Le istruzioni seguenti devono essere
osservate durante il cablaggio:
il cavo di messa a terra deve essere
connesso tramite la vite con il segno di
messa a terra. La connessione del cavo
di alimentazione deve essere come indicato nella gura 6. Se non sono presenti prese per la messa a terra conformi
IT
Page 20

ai regolamenti nell'ambiente dell'installazione, contattare immediatamente il
servizio di assistenza autorizzato.
La presa della messa a terra deve essere vicina all'apparecchiatura. Non
usare in nessun caso una prolunga.
Il cavo di alimentazione non deve entrare a contatto con la supercie incandescente del prodotto.
In caso di danni al cavo di alimentazione, contattare immediatamente il servizio di assistenza autorizzato. Il cavo
deve essere sostituito dal servizio di
assistenza autorizzato.
Il cablaggio dell'apparecchiatura deve
essere eseguito dal servizio di assi-
stenza autorizzato. Usare un cavo di
alimentazione modello H05VV-F.
Un cablaggio non correttamente eseguito potrebbe danneggiare l'apparecchiatura. Tali danni non saranno coperti
dalla garanzia.
L'apparecchiatura è progettata per connettersi a 220-240V. Se l'elettricità è
diversa dal valore indicato, contattare
immediatamente il servizio di assistenza autorizzato.
L'azienda produttrice dichiara di non assumersi responsabilità in caso di danni
o perdite causate dalla mancata osservanza delle norme di sicurezza!
ta. La connessione dell'apparecchiatura deve essere come indicato nella gura 6. L'apparecchiatura è progettata per
l'uso con una spina per la connessione
ssa alla presa elettrica. È necessario
installare un disconnettore multipolare
all'interno del circuito di alimentazione
con un'apertura di contatto di almeno
3mm (classicato 40A, modello a ritardo di funzione).
2
3x2.5mm 220V~
2
3x2.5mm 230V~
2
3x2.5mm 240V~
Per modelli superiori a 9500W, usare cavi con diametro
For models over 9500W, wires with a diameter of
2
di 3x4.0 mm2.
3x4.0 mm must be used.
2
5x1.5mm 380V~, 3N~
2
5x1.5mm 400V~, 3N~
2
5x1.5mm 415V~, 3N~
Figura 6
Figure 6
CABLAGGIO E SICUREZZA DEL FORNO COMBINATO INCORPORATO
Il cablaggio dell'apparecchiatura deve
essere eseguito dal servizio di assi-
stenza autorizzato. L'apparecchiatura è
progettata per connettersi a 220-240V~
e 380-415V 3N ~. Se la presa elettrica
è diversa da quanto indicato, contattare
immediatamente l'assistenza autorizza-
IT
Page 21

USO DEL FORNO
PANNELLO DI CONTROLLO PER
LA PIASTRA IN VETROCERAMICA
Manopole di impostazione del calore per fornelli in vetroceramica
Manopole di impostazione del calore
per fornelli in vetroceramica
L'apparecchiatura è controllata usando
le manopole e il calore conservato viene confermato dalla spia dell'indicatore
del calore residuo sulla supercie in
vetroceramica
Il fornello controllato dalla manopola è
progettato per funzioanre su sei livelli
di calore:
1 Posizione per mantenimento di
calore
2-3 Posizioni per cottura lenta
4-5-6 Posizioni per cottura, arrosto e
bollitura
I riscaldatori duali e ovali hanno due
zone di riscaldamento. Per attivare la
zona esterna per il riscaldatore duale/
ovale, girare la manopola in posizione
una volta. In queto modo le due zone
esterne si accendono.
Per disattivare la zona esterna di un
riscaldatore duale/ovale, girare la
manopola in posizione
questo modo le due zone esterne si
spengono.
una volta. In
Funzioni calore residue
Dopo tutti i processi di cottura il vetro
in vetroceramica contiene del calore
detto calore residuo. Il controllo può
calcolare approssimativamente il
calore del vetro nel caso peggiore. Se
la temperatura calcolata è superiore a
+ 60 ° C, ciò viene indicato nella spia
dell'indicatore di calore residuo relativa. Lo schermo del calore residuo
viene mostrato no a che la temperatura del riscaldatore è > + 60°C.
Dopo avere riapplicato la tensione di
alimentazione al controllo della piastra
dopo una interruzione della tensione di
IT
Page 22

alimentazione, che fa sì che lo schermo del calore residuo lampeggi, se il riscaldatore corrispondente ha un calore
residuo superiore a + 60°C prima che
l'interruzione di corrente si è vericata.
Lo schermo lampeggia sino a che il
tempo del calore residuo massimo è
scaduto o il riscaldatore viene selezio-
nato e attivato.
SUGGERIMENTI E CONSIGLI
Stoviglie
· Usare stoviglie spesse, piatte, a
fondo liscio e dello stesso diametro
dell'elemento. Ciò consente di ridurre i
tempi di cottura.
· Stoviglie in acciaio, acciaio smaltato, ghisa e acciaio inox (se indicato
chiaramente dal produttore) daranno i
risultati migliori.
· Stoviglie in acciaio smaltato o alluminio o con fondo in rame possono
lasciare residui metallici sul piano di
cottura. Tali residui potranno essere
rimossi solo con molte difcoltà. Pulire
il piano di cottura dopo ogni uso.
· Le stoviglie sono adatte all'induzione
se un magnete resta attaccato sul loro
fondo.
· Le stoviglia devono essere collocate
centralmente sulla zona di cottura. Se
non vengono collocate correttamente
ciò viene indicato sullo schermo.
· Alcune pentole potrebbero emettere diversi suoni; ciò avviene a causa
del loro design e non ha effetto sulle
prestazioni o la sicurezza del piano di
cottura.
CORRETTO
ERRATO
CORRETTO ERRATO
Risparmio energetico:
· Le zone di cottura a induzione si
adattano automaticamente al fondo
delle stoviglie, entro un certo limite. A
ogni modo la parte magnetica del fon-
do delle stoviglie deve avere un diame-
tro minimo a seconda della dimensione
della zona di cottura.
· Collocare le stoviglie sulla zona di
cottura prima che si accenda. Se si accende prima di collocare le stoviglie, la
zona di cottura non funzionerà e viene
visualizzato lo schermo di controllo.
- Usare un coperchio per ridurre il tempo di cottura.
· Quando il liquido bolle, ridurre la
temperatura.
- Usare la quantità minima d'acqua o
grasso per ridurre i tempi di cottura.
· Selezionare la temperatura adeguata
per le applicazioni di cottura usate.
Esempi di applicazioni di cottura
Le informazioni contenute nella tabella
seguente servono solo da indicazione.
IT
Page 23

Impostazioni Uso per
0 Elemento spento
1-3 Avvertimento silenzioso
4-5 Inizia a bollire,
6-7 Riscaldamento e bollitura
8 Bollitura, rosolatura e
9 Calore massimo
P Funzione boost
avvertimento lento
rapida
scottatura
Suggerimenti per la pulizia
· Non usare cuscinetti abrasivi, detergenti corrosivi, detergenti spray od
oggetti aflati per pulire le superci del
piano di cottura.
· Per rimuovere gli alimenti bruciati,
bagnare con un panno umido e un
detersivo.
· Usare un raschiatore per rimuovere
gli alimenti o i residui. Gli alimenti appiccicosi devono essere puliti immediatamente una volta versati, prima che il
vetro si raffreddi.
· Fare attenzione a non grattare l'adesivo in silicone collocato sui bordi del
vetro durante l'uso del raschiatore.
· Il raschiatore è dotato di una lama
quindi è necessario tenerlo fuori dalla
portata dei bambini.
· Usare uno speciale detergente per
piani in ceramica quando il piano è
ancora caldo. Sciacquare e asciugare
usando un panno o una tovaglia pulita.
IT
Page 24

PANNELLO DI CONTROLLO
Forno incorporato
Manopola di controllo
piastra a induzione
Manopole
di controllo
funzionamento forno
USO DEL FORNO DELL'APPARECCHIATURA
Manopola di controllo delle funzioni del forno
Per selezionare la funzione di cottura
desiderata, ruotare la manopola al simbolo relativo, i dettagli delle funzioni del
forno sono indicate nella sezione successiva.
Timer
Illuminazione
termostato forno
Manopola di controllo
piastra a induzione
Manopole di controllo funzionamento forno
Per selezionare la funzione di cottura
desiderata, ruotare la manopola al simbolo relativo, i dettagli delle funzioni del
forno sono indicate nella sezione successiva.
IT
Page 25

Funzioni forno
* Le funzioni del forno potrebbero essere diverse a seconda del modello.
Illuminazione forno:
Si illumina solo la luce del forno e resta
accesa durante la cottura.
Funzione Defrost:
Le spie di avviso del forno si accendono, la ventola inizia a funzionare.
Funzione di cottura statica:
Il termostato e le luci di avviso del forno
si accendono, gli elementi riscaldanti inferiore e superiore iniziano a funzionare. La funzione di cottura statica emette
calore, assicurando anche la cottura
degli alimenti collocati sugli scaffali superiori e inferiori. È l'ideale per cucinare dolci, torte, pasta al forno, lasagne e
pizza. Si raccomanda di preriscaldare il
forno per 10 minuti e di cuocere usando
una sola mensola alla volta con questa
funzione.
Per usare la funzione di sbrinamento, prendere gli alimenti congelati e
collocarli nel forno su uno scaffale
posto nel terzo alloggio partendo dalla parte inferiore. Si raccomanda di
collocare un vassoio da forno sotto
gli alimenti da sbrinare, per raccogliere l'acqua accumulata a causa del
ghiaccio che si scioglie. Questa funzione non cuocerà né preparerà al forno il tuo cibo, serve solo a sbrinarlo.
Funzione ventola:
Il termostato e le luci di avviso del
forno si accendono, la ventola e gli elementi riscaldanti superiore e inferiore
iniziano a funzionare.
Questa funzione è ottima per ottenere
risultati nella cottura di dolci. La cottura
viene effettuata dall'elemento riscaldante
inferiore e superiore all'interno del forno
e dalla ventola che fornisce la circolazione dell'aria, dando un leggero effetto
griglia al cibo. Si raccomanda il preriscaldamento del forno per circa 10 minuti.
Funzione griglia:
Il termostato e le luci di avviso del forno si
accendono, l'elemento riscaldante griglia
inizia a funzionare. Questa funzione è
usata per la grigliatura e la tostatura degli
alimenti. Usare gli scaffali superiori del
forno. Spazzolare delicatamente la griglia
con dell'olio per impedire agli alimenti di
attaccarsi e collocare gli alimenti al centro
della griglia. Collocare sempre un vassoio
al di sotto per raccogliere eventuali
gocce di olio o grasso. Si raccomanda il
preriscaldamento del forno per circa 10
minuti. Avviso: Quando si usa la griglia,
lo sportello del forno deve restare chiuso
e la temperatura del forno deve essere
regolata su 190
0
C.
Funzione griglia rapida:
Il termostato e le luci di avviso del forno
si accendono, la griglia e gli elementi
riscaldanti superiore iniziano a funzionare.
La funzione è usata per la grigliatura
rapida e per coprire un'area superficiale
maggiore, come nella grigliatura di carni.
Usare gli scaffali superiori del forno.
IT
Page 26

Spazzolare delicatamente la griglia con
dell'olio per impedire agli alimenti di
attaccarsi e collocare gli alimenti al centro
della griglia. Collocare sempre un vassoio
al di sotto per raccogliere eventuali
gocce di olio o grasso. Si raccomanda il
preriscaldamento del forno per circa 10
minuti. Avviso: Quando si usa la griglia,
lo sportello del forno deve restare chiuso
e la temperatura del forno deve essere
0
regolata su 190
C.
Funzione pizza:
Il termostato e le luci di avviso del forno
si accendono, l'anello e gli elementi
riscaldanti superiore e inferiore vengono
azionati.
La ventola e la funzione riscaldante
inferiore è l'ideale per cuocere alimenti
come pizze in poco tempo.
Funzione griglia doppia e
ventola:
Il termostato e le luci di avviso del forno
si accendono, la griglia e gli elementi
riscaldanti superiore iniziano a funzionare.
La funzione è usata per grigliare
rapidamente alimenti spessi e per
coprire una superficie maggiore. Sia gli
elementi riscaldanti superiori che la griglia
vengono alimentati insieme alla ventola
per assicurare una cottura uniforme.
Usare gli scaffali superiori del forno.
Spazzolare delicatamente la griglia
con dell'olio per impedire agli alimenti
di attaccarsi e collocare gli alimenti al
centro della griglia. Collocare sempre
un vassoio al di sotto per raccogliere
eventuali gocce di olio o grasso. Si
raccomanda il preriscaldamento del forno
per circa 10 minuti.
Mentre la ventola disperde il calore
del forno in modo uniforme, l'elemento
riscaldante inferiore assicura la cottura
degli alimenti.
Funzione tubo
Il termostato e le luci di avviso del forno
si accendono, la ventola e un elemento
riscaldante inferiore iniziano a funziona-
re.
La funzione turbo disperde in modo uniforme il calore nel forno. Tutti gli alimenti sullo scaffale saranno cotti in modo
uniforme. Si raccomanda di preriscaldare il forno per circa 10 minuti.
Avviso: Quando si usa la griglia, lo
sportello del forno deve restare chiuso
e la temperatura del forno deve essere
0
regolata su 190
C.
IT
Page 27

4.2. A VISIO ÉRINTÉSVEZÉRELT
SZABÁLYOZÓ HASZNÁLATA
A SÜTÉSI IDŐ BEÁLLÍTÁSA:
Az óra beállítása:
A beépített sütő beszerelésekor állítsa
be az órát az alábbiak szerint.
A sütő beszerelésekor a “0.00” szimbólum
kezd villogni a kijelzőn. Nyomja meg az
“M“ gombot vagy a “ - “ és “ + “ gombokat
az óra beállításához. “ : ” jel villogni kezd
a kijelzőn. Állítsa be a “ - “ és a “ + “
gombokkal. Ha az Automatikus sütési mód
ki van kapcsolva, az óra beállításához
nyomja meg a “ - “ és “ + “ gombokat
egyszerre. Állítsa be a “ - “ és a “ + “
gombokkal.
A sütő funkció használatához be kell
állítania a pontos időt.
IT
A perc időzítő beállítása:
Érintse meg a “ ” jelet mutató gombot.
A “ ” jel villogni kezd a kijelzőn. “0.00”
jelet mutat az óra kijelzője. Állítsa be
a kívánt időtartamot a riasztáshoz az
időzítő + és - gombjaival, miközben villog
a szimbólum. A beállítást követő kis időn
belül a szimbólum elkezd folyamatosan
világítani. Ha a szimbólum elkezdett
folyamatosan világítani, a gyelmeztető
hangjelzés időzítése megtörtént. A
beállított időben az időzítő gyelmeztető
hangjelzést ad és a kijelzőn elkezd villogni
a szimbólum. A készülék “ - “ vagy “+“
gombjával kikapcsolhatja a hangjelzést,
és a szimbólum eltűnik a kijelzőről.
Page 28

A sütési időtartam beállítása:
Ezt a funkciót a kívánt időtartamú sütéshez
használhatja. Helyezze a megsütni kívánt
ételt a sütőbe. Állítsa a sütőt a kívánt sütési
üzemmódra. A sütni kívánt ételtől függően
állítsa be a sütő hőmérséklet szabályozóján
a hőfokot. Nyomja le az “M” jelet míg az
időtartam “ |>| ” jele megjelenik az időzítő
kijelzőjén. “AUTO” felirat jelenik meg a
kijelzőn. Állítsa be az elkészíteni kívánt
étel sütésének időtartamát az időzítő + és
- gombjaival, miközben az időzítő ebben a
pozícióban van. A beállítás elvégzése után
kis idővel a kijelzőn az óra jelenik meg,
és a sütési időtartam jele folyamatosan
világítani kezd a kijelzőn.
A beállított időtartam eltelte után az időzítő
kikapcsolja a sütőt és figyelmeztető
hangjelzést ad. Ezen kívül az “AUTO” felirat
is villogni kezd a kijelzőn. A kezelőegység
bármely gombjának megnyomására a
hangjelzés elhallgat. Az “AUTO” felirat
villogni kezd a kijelzőn. A “ - “ and “ + “
jelek egyszerre történő megnyomásával
kiléphet az “AUTO” módból.
A sütés befejező időpontjának
beállítása:
Ezzel a funkcióval egy meghatározott
időtartamot követően kezdhet el sütni,
a megadott időtartamig. Helyezze a
megsütni kívánt ételt a sütőbe. Állítsa a
sütőt a kívánt sütési üzemmódra. A sütni
kívánt ételtől függően állítsa be a sütő
hőmérséklet szabályozóján a hőfokot.
Nyomja le az “M” jelet míg az időtartam “
|>| ” jele megjelenik az időzítő kijelzőjén.
“AUTO” jelenik meg a kijelzőn. Állítsa be
az étel elkészültének sütési időtartamát
a (+) és a (-) gombokkal, miközben az
időzítő ebben a pozícióban van. Majd
érintse meg az “M” jelet amíg a “ >| ” jel
meg nem jelenik. Az óra jele és a sütési
idő villogni kezd. Állítsa be a sütni kívánt
étel elkészültének tervezett időpontját
a (+) és a (-) gombokkal, miközben az
időzítő ebben a pozícióban van. A beállítás
elvégzése után kis idővel a kijelzőn az
óra jelenik meg, és a sütési idő “ >| ” jele
folyamatosan világítani kezd a kijelzőn. A
sütő működésbe lép a beállított befejezési
időpontból visszaszámolt sütési időtartam
időpontjában, és befejezi a sütést a
beállított befejezési időpontban. Az
időzítő hangjelzést ad és az “AUTO”
villogni kezd a kijelzőn. Az időzítő
bármelyik gombjának megnyomásával
kikapcsolhatja a hangjelzést. Az “AUTO”
felirat villog a kijelzőn. A “ - “ and “ + “
jelek egyszerre történő megnyomásával
kiléphet az “AUTO” módból.
A digitális időzítő beállítása:
Nyomja meg a “-“ jelet amíg hangjelzést
nem hall. Az időzítő sípszószerű
hangjelzést ad. A “-“ jel minden egyes
megnyomásakor háromféle különböző
jelzőhang hallatszik. Ha nem nyom le
további gombot, az időzítő a legutolsó
jelzőhangot menti el.
Billentyűzár aktiválása
A billentyűzár funkció használatával
megelőzhetjük, hogy a készülék a
kezelőegységen véletlenül megnyomott
parancsot végrehajtson. A billentyűzár
bekapcsolásához nyomja le a “+” jelet
amíg a billentyűzár jele megjelenik
a kijelzőn. Nyomja meg a “+” jelet a
billentyűzár feloldásához.
IT
Page 29

Accessori
Il prodotto è dotato di accessori. È anche possibile usare accessori acquistati
da altre fonti, ma devono essere resistenti al calore e alle amme. È anche
possibile usare piatti di vetro, stampi
per torte e vassoi da forni adeguati per
l'uso in forno.. Seguire le istruzioni del
produttore quando si usano altri accessori. Nel caso di uso di piatti di piccole
dimensioni, collocare il piatto nella griglia, così che si troverà completamente
sulla parte centrale della griglia. Se gli
alimenti da cuocere non coprono completamente il vassoio del forno, se gli
alimenti sono presi dal congelatore o il
vassoio è usato per la raccolta dei liquidi degli alimenti che scorrono durante
la grigliatura, le modiche della forma
possono essere osservate nel vassoio.
Ciò è dovuto alle alte temperatura che
si vericano durante la cottura. Il vassoio ritorna alla sua vecchia forma quando
si raffredda dopo la cottura. Si tratta di
un normale evento sico che si verica
durante il trasferimento del calore. Non
collocare vassoi e piatti in vetro caldi in
ambienti freddi subito dopo averli tolti
dal forno per evitare di romperli. Non collocare su superci fredde e umide. Collocare su un panno da cucina asciutto
e attendere che si asciughi. Quando si
usa la griglia del forno; raccomandiamo
(quando appropriato) di usare la griglia
fornita con il prodotto. Quando si usa
la griglia; collocare un vassoio su una
delle mensole per consentire la raccolta
dell'olio. È possibile aggiungere acqua
al vassoio per la pulizia. Come spiegato
nei paragra corrispondenti, non tentare in alcun caso di usare la piastra a gas
della griglia senza il coperchio di prote-
zione. Se il proprio forno a gas dispone
di una piastra a gas con griglia, ma il
coperchio per il calore è assente, o se
è danneggiata e non può essere usata, richiedere una parte di ricambio dal
centro di assistenza più vicino.
Cavità forno
5. Sostegni
5. Rack
4. Sostegni
4. Rack
3. Sostegni
3. Rack
2. Sostegni
2. Rack
1. Rack
1. Sostegni
Accessori forno
Gli accessori per il proprio forno potrebbero essere differenti a seconda del
modello.
Griglia
La griglia è usata per cuocere o per collocare stoviglie.
AVVISO- Collocare correttamente la
griglia in uno dei supporti nella cavità
del forno e spingerla verso dietro.
Vassoio
IT
Page 30

Il vassoio è usato per cuocere dolci
come sformati, ecc. Per collocare correttamente il vassoio nella cavità, posizionarlo su uno dei sostegni e spingerla
verso dietro.
Vassoio profondo
Il vassoio profondo è usato per cuocere stufati. Per collocare correttamente
il vassoio nella cavità, posizionarlo su
uno dei sostegni e spingerla verso di-
etro.
PULIZIA E MANUTENZIONE
DEL FORNO
PULIZIA
Prima di iniziare a pulire il forno, assicurarsi che i pulsanti di controllo siano disattivati e l'apparecchiatura sia fredda.
Scollegare l'apparecchiatura.
Non usare materiali pulenti contenenti particelle che potrebbero grafare le
parti verniciate e smaltate del forno.
Usare detergenti a crema o liquidi che
non contengono particelle. Non usare
creme caustiche, polveri abrasive, lana
di ferro o strumenti rigidi perché potrebbero danneggiare le superci. Nel
caso in cui del liquido in eccesso venga
versato sul forno e si incendi, potrebbe
danneggiare lo smalto. Pulire immediatamente i liquidi versati. Non usare pulitori a vapore per la pulizia del forno.
Rimozione dei supporti della
griglia
Estrarre la griglia come indicato. Dopo
averla rilasciata dai fermi, sollevarla.
IT
Pulizia l'interno del forno
Assicurarsi di staccare il forno prima di
iniziare la pulizia. I migliori risultati si
ottengono pulendo l'interno del forno
mentre è ancora tiepido. Spazzolare il
forno con un panno morbido e bagnato con acqua saponata dopo ogni uso.
Quindi spazzolare nuovamente, questa
volta con un panno bagnato, e quindi
asciugare. Una pulizia completa usando detergenti in polvere e a secco. Per
i prodotti con telai smaltati catalitici, le
pareti posteriori e laterali del telaio inferno non richiedono pulizia. A ogni
modo; a seconda dell'uso, si raccomanda di sostituirli dopo un certo periodo di
tempo.
Page 31

MANUTENZIONE
Sostituzione della lampadina
del forno
mento secondo il manuale.
Con l'eccezione di ciò, in caso di proble-
mi con il prodotto, contattare il "servizio
di assistenza autorizzato".
La sostituzione della lampadina del forno deve essere eseguita dal un tecnico autorizzato. La classicazione della
lampadina deve essere di 230V, 25
watt, modello E14, T300, prima di modicare la lampadina il forno deve essere
staccato e deve essere freddo.
Il design della lampadina è specico per l'uso con apparecchiatura domestiche per la cucina e non è adatto
all'illuminazione della casa.
ASSISTENZA E TRASPORTO
REQUISITI PRIMA DI
CONTATTARE L'ASSISTENZA
Se il forno non funziona:
Il forno potrebbe essere disattivato, o
disconnesso. Per i modelli dotati di timer, l'ora potrebbe non essere regolata.
Se il forno non riscalda:
Il calore potrebbe non essere regolato
con l'interruttore di controllo del riscal-
datore.
Se la lampadina interna non si accende:
Vericare l'alimentazione elettrica. Bi-
sogna controllare se le lampadine sono
difettose. Se sono difettose, sostituirle
seguendo la guida.
Cucina (se la parte inferiore-superiore
non cuoce in modo uniforme):
Controllare la posizione della mensola,
il periodo di cottura e i valori di riscalda-
INFORMAZIONI RELATIVE AL
TRASPORTO
Se è necessario il trasporto:
Conservare l'imballatura originale del
prodotto e usare la confezione originale
per il trasporto. Seguire i contrassegni
di trasporto sul contenitore. Collocare
con del nastro il fornello sulle parti superiori, il coperchio e le testate ai pannelli da cucina.
Collocare un foglio di carta tra il coperchio superiore e il pannello da cucina,
coprire il coperchio superiore, quindi
collocare del nastro sulle superci laterali del forno.
Collocare del cartone o carte con del
nastro sul coperchio anteriore del vetro
interno del forno adattandolo ai vassoi,
afnché la griglia e ai vassoi nel forno
non danneggino il coperchio del forno
durante il trasporto. Inoltre collocare
con del nastro i coperchi del forno alle
pareti laterali.
Se non si possiede il contenitore origi-
nale.
Prendere misure adeguate per assicurare le superci esterne (vetro e superci verniciate) e del forno per proteggerli
da possibili urti.
IT
Page 32

(min)
Periodo
di cottura
-
gni
Pos.
soste
Pos.
(min)
termostato
(min)
Periodo
di cottura
gni
Pos.
soste-
-
stato (°C)
Pos. termo
(min)
Periodo
di cottura
-
stegni
Pos. so
(°C)
Pos.
termostato
(min)
Periodo
di cottura
200 4 10-15
30-40 170 -190 1-2 30-40 150-170 1-2-3 25-35
Pos.
TURBO INFERIORE-SUPERIORE VENTOLA INFERIORE-SUPERIORE GRIGLIA
Pos.
PIATTI
sostegni
(°C)
170-190 1-2-3 35-45 170-190 1-2 35-45 170-190 1-2 25-35
termostato
Dolce a
strati
orta 150-170 1-2-3
T
Biscotti 150-170 1-2-3 25-35 170-190 1-2 30-40 150-170 1-2-3 25-35
Polpette alla
griglia
IT
175-200 2 40-50 175-200 2 40-50 175-200 2 40-50
Alimenti
umidi
Pollo 200 1-2 45-60 200 1-2 45-60 200 * 50-60
Braciole 200 3-4 15-25
Bistecca 200 4 15-25
160-180 1-4 30-40
Dolce a due
Torta a due
livelli
170-190 1-4 35-45
livelli
* Cucinare con spiedo per pollo arrosto...
Page 33

Cher client,
Notre objectif est de vous offrir des produits de haute qualité dépassant vos attentes. Votre appareil est produit dans des usines modernes et est soumis à de
soigneux tests de qualité. Ce manuel a été préparé pour vous aider à utiliser votre appareil, fabriqué en utilisant les dernières technologies, avec conance et de
manière efcace. Avant d'utiliser votre appareil, veuillez lire attentivement ce guide comprenant des informations basiques de sécurité concernant l'installation,
l'entretien et l'utilisation. Veuillez contacter votre centre de service après-vente
autorisé le plus proche pour l'installation de votre appareil.
FR
Page 34

Table des matières
Présentation et taille du produit
Avertissements
Préparation de l’installation et de l’utilisation
Utilisation du four
Nettoyage et entretien de votre produit
Service et transport
FR
Page 35

PRÉSENTATION ET TAILLE DU PRODUIT
LISTE DES COMPOSANTS :
1- Panneau de commande
2- Poignée
3- Porte du four
4- Verrouillage parental
5- Plateau
6- Élément chauffant inférieur
(derrière la plaque)
7- Élément chauffant supérieur (derrière la
plaque)
8- Grille
9- Guides
10- Lampe de four
11- Élément chauffant turbo (derrière la
plaque)
12- Ventilateur (derrière la plaque)
13- Plaques de blocage de l’extraction d’air
FR
Page 36

PLAQUES VITROCÉRAMIQUES
2
1
1. Système de cuisson vitrocéramique
2. Surface vitrocéramique
FR
Page 37

AVERTISSEMENTS DE
SÉCURITÉ
LISEZ CES INSTRUCTIONS
ENTIÈREMENT AVEC ATTENTION
AVANT D’UTILISER VOTRE APPAREIL, ET GARDEZ-LES DANS UN EMPLACEMENT PRATIQUE POUR UNE
CONSULTATION ULTÉRIEURE, SI
NÉCESSAIRE.
CE MANUEL EST PRÉPARÉ POUR
PLUS D’UN MODÈLE.
VOTRE APPAREIL PEUT DONC NE
PAS DISPOSER DE CERTAINES DES
FONCTIONS DÉCRITES DANS CE
MANUEL. FAITES ATTENTION AUX
EXPRESSIONS AYANT DES ILLUSTRATIONS DURANT VOTRE LECTURE
DE CE MANUEL D’UTILISATION.
Avertissements
généraux de sécurité
Cet appareil peut être
utilisé par des enfants
de plus de 8 ans et des
personnes aux capacités
physiques, sensorielles
ou mentales réduites ou
manquant d'expérience
et de connaissances s'ils
sont supervisés ou s'ils
ont reçu des instructions
concernant l'utilisation
de cet appareil en toute
sûreté et comprennent
les risques encourus. Les
enfants ne doivent pas
jouer avec l'appareil. Le
nettoyage et l’entretien
ne doivent pas être
effectués par des enfants
non supervisés.
AVERTISSEMENT :
L’appareil et ses pièces
accessibles chauffent
durant l’utilisation. Faites attention à ne pas toucher les éléments chauffants. Les enfants de
moins de 8 ans doivent
être tenus à distance de
l’appareil, sauf en cas de
supervision continue.
AVERTISSEMENT : La
cuisson non surveillée
de graisse ou d’huile sur
une plaque électrique
peut être dangereuse et
être cause d’incendie.
N’essayez JAMAIS
d’éteindre un feu avec
de l’eau, mais coupez l’alimentation de
l’appareil puis recouv-
rez les ammes, par ex.
avec un couvercle ou
une couverture antifeu.
AVERTISSEMENT :
Danger de feu : ne stoc-
kez pas d’objets sur les
FR
Page 38

surfaces de cuisson.
AVERTISSEMENT : Si
la surface est craquelée,
éteignez l’appareil pour
éviter tout risque de choc
électrique.
Pour les plaques incorporant un couvercle, toutes
les traces d’aliments doivent être retirées du couvercle avant l’ouverture.
Veuillez attendre que la
surface des plaques de
cuisson refroidisse avant
de fermer le couvercle.
Cet appareil n’est
pas conçu pour être
utilisé via un minuteur ou un système de
télécommande externe.
Durant l’utilisation,
l’appareil chauffe. Faites
attention à ne pas toucher les éléments chauffants à l’intérieur du four.
Durant l’utilisation, des
poignées tenues pendant une longue période
peut devenir chaude
en conditions normales
d’utilisation.
N’utilisez pas de nettoye-
ur abrasif agressif ou de
grattoir métallique pour
nettoyer le verre des plaques et les autres surfaces, ceux-ci pouvant rayer
les surfaces et provoquer
l’éclatement du verre ou
endommager la surface.
N’utilisez pas de nettoyeur à vapeur pour nettoyer cet appareil.
AVERTISSEMENT : Assurez-vous que l’appareil
est éteint avant de remplacer la lampe pour
éviter tout risque de choc
électrique.
ATTENTION : Les
pièces accessibles peuvent chauffer durant
l’utilisation du four (cuisson normale ou gril). Les
jeunes enfants doivent
être tenus à distance.
Pour les plaques de cuisson à induction, les
objets métalliques tels
que couteaux, fourchettes, cuillères et couverc-
les ne doivent pas être
placé sur la surface des
plaque, celle-ci pouvant
FR
Page 39

être chaude.
- Pour les plaques de cuisson à induction, éteignez
les foyers de cuisson en
utilisant leurs commandes
et non en dépendant du
détecteur de casserole.
Votre appareil est fabriqué
conformément aux standards et lois locales et internationales en vigueur.
Les travaux d’entretien et de réparation
ne doivent être effectués que par des
techniciens de service autorisés. Les
travaux d’installation et de réparation
effectués par des techniciens nonautorisés peuvent vous mettre en danger. Il est dangereux d’altérer ou de
modier les spécications de l’appareil
d’une quelconque manière.
Avant l’installation, assurez-vous que
les conditions locales de distribution
(nature et pression du gaz ou tension et
fréquence électriques) et les réglages
de l’appareil sont compatibles. Les
réglages requis pour cet appareil sont
indiqués sur l’étiquette.
ATTENTION : Cet appareil est uniquement conçu pour la cuisson des aliments
dans un environnement domestique
en intérieur, il ne doit pas être utilisé à
d’autres ns ou dans d’autres applicati-
ons, comme une utilisation non domestique, dans un environnement commercial ou pour chauffer des pièces.
N’essayez pas de soulever ou de
déplacer l’appareil en tirant sur la
poignée de porte.
Toutes les mesures de sécurité possibles ont été prises pour assurer votre
sécurité. Puisque le verre peut casser,
vous devez faire attention à ne pas le
rayer. Évitez de frapper ou de heurter le
verre avec des accessoires.
Assurez-vous que le cordon
d’alimentation ne soit pas coincé durant
l’installation. Si le cordon d’alimentation
est endommagé, il doit être remplacé
par le fabricant, son agent de service ou par une personne similairement
qualiée pour éviter tout risque.
Lorsque la porte du four est ouverte,
ne laissez pas les enfants grimper ou
s’assoir sur la porte.
Avertissements d’installation :
N’utilisez pas l’appareil avant qu’il ne
soit complètement installé.
L’appareil doit être installé par un technicien autorisé et mis en service. Le
fabricant n’est pas responsable de tout
dommage pouvant être causé par une
mise en place ou installation effectuée
par des personnes non-autorisées.
Lorsque vous déballez l’appareil, assurez-vous qu’il n’ait pas été endommagé
durant le transport. En cas de défaut,
n’utilisez pas l’appareil et contac-
tez un agent de service qualié
immédiatement. Les matériaux utilisés
dans l’emballage (nylon, agrafes, styrofoam, etc...) pouvant avoir des effets
nocifs sur les enfants, ils doivent être
collectés et éliminés immédiatement.
Protégez votre appareil des effets
atmosphériques. Ne l’exposez pas au
soleil, à la pluie, à la neige, etc...
Les matériaux entourant l’appareil do-
ivent être capables de supporter une
température d’au moins 100°C.
Durant l’utilisation
Durant votre première utilisation du four,
une odeur se dégagera des matériaux
d’isolation et des éléments chauffants.
Pour cette raison, avant d’utiliser votre four, faites-le tourner à vide à la
température maximale pendant 45 mi-
nutes. Au même moment vous devez
ventilez correctement l’environnement
dans lequel le produit est installé.
FR
Page 40

Durant l’utilisation, les surfaces
extérieures et intérieures du four peuvent chauffer. Lorsque vous ouvrez
la porte de four, reculez pour éviter la
vapeur chaude sortant du four. Celle-ci
peut poser un risque de brûlure.
• Ne placez pas de matériaux inammables ou combustibles dans ou près
de l’appareil lorsqu’il est en route.
Utilisez toujours des gants pour four
pour retirer et remplacer les aliments
dans le four.
Ne laissez pas les plaques de cuisson
sans surveillance lorsque vous cuisinez avec des huiles solides ou liquides.
Celles-ci peuvent prendre feu lorsqu’elles
sont soumises à de la chaleur extrême.
Ne versez jamais d’eau sur les ammes
causées par l’huile. Recouvrez la casserole ou la poêle avec un couvercle an
d’étouffer la amme s’étant développée
et éteignez les plaques électriques.
Positionnez toujours les casseroles au-
dessus du centre de la zone de cuisson, et tournez les poignées en position
sécurisée an qu’elles ne puissent pas
être renversée ou attrapées.
Si vous n’utilisez pas l’appareil pendant
une période prolongée, débranchez-
le. Gardez l’interrupteur principal de
contrôle à l’arrêt. Lorsque vous n’utilisez
pas l’appareil, gardez aussi la vanne de
gaz fermée.
Assurez-vous que les boutons de commande de l’appareil soient toujours en
position « 0 » lorsqu’il n’est pas utilisé.
Les plaques de cuisson s’inclinent lors-
qu’elles sont retirées du four. Faites
attention à ne pas renverser de liquide
chaud.
Lorsque la porte du four est ouverte,
ne laissez rien dessus. Ceci pourrait
déséquilibrer votre appareil ou endommager la porte.
Ne placez pas d’objets lourds ou inflammables (nylon, sac plastique, papi-
er, tissu, etc...) dans le four. Ceci inclut
les articles de cuisine comprenant des
pièces en plastique (par ex. poignées).
N’accrochez pas de chiffon ou de
vêtements sur l’appareil ou sa poignée.
Durant le nettoyage et l’entretien :
Coupez toujours l’appareil avant
d’effectuer des opérations de nettoyage
ou d’entretien.
Cela est possible après avoir débranché
l’appareil ou coupé les interrupteurs
principaux.
Ne retirez pas les boutons de commande pour nettoyer le panneau de commande.
POUR MAINTENIR L’EFFICACITÉ ET
LA SÉCURITÉ DE VOTRE APPAREIL,
NOUS VOUS RECOMMANDONS DE
TOUJOURS UTILISER DES PIÈCES
DÉTACHÉES ORIGINALES ET DE
N’APPELER QUE NOS AGENTS DE
SERVICES AUTORISÉS EN CAS DE
BESOIN.
PRÉPARATION DE
L’INSTALLATION ET DE
L’UTILISATION
Fabriqué avec des pièces et matériaux
de meilleure qualité, ce four moderne
et pratique répond à tous vos besoins.
Assurez-vous de lire ce manuel pour
obtenir de meilleurs résultats et éviter
les problèmes futurs. Les informations
fournies ci-dessous contiennent des
règles importantes concernant la mise
en place et les opérations de service.
Elles doivent impérativement être lues,
particulièrement par le technicien positionnant l’appareil.
CONTACTEZ UN CENTRE DE
SERVICE AUTORISÉ POUR
L’INSTALLATION DE VOTRE FOUR !
FR
Page 41

CHOISIR UN EMPLACEMENT
POUR LE FOUR
Vous devez faire attention à plusieurs
points durant la mise en place de votre
four.
Assurez-vous de prendre nos
considérations ci-dessous en compte
an d’éviter tout problème et toute situation dangereuse pouvant se développer
ultérieurement. Durant la mise en place
du four, faites attention à ce que des
matériaux inammables ou combustibles, tels que des rideaux, de l’huile,
des vêtements, etc..., ne soient pas à
proximité de l’appareil, ceux-ci pouvant
rapidement prendre feu.
Les meubles entourant l’appareil doivent utiliser des matériaux résistant à
des températures 50 °C supérieures à
la température ambiante.
Les changements requis des placards
muraux et ventilateurs d’extraction audessus du produit combiné encastrable ainsi que les hautes minimales de la
planche de four sont présentés dans la
Figure 1. Le ventilateur d’extraction doit
ainsi être au moins 65 cm au-dessus
des plaques de cuisson. Si aucun ventilateur d’extraction n’est installé, la hau-
teur ne doit pas être inférieure à 70 cm.
Min. 60 cm
VENTILATEUR D'EXTRACTION
INSTALLATION DU FOUR
ENCASTRABLE
min. 150mm
576mm
575mm
557mm
520mm
550mm
595mm
595mm
2 x
41mm
Min.
25mm
min. 60 mm
490mm
560mm
min. 600mm
590mm
min. 560mm
min. 590mm
max. 580mm
min. 555mm
Insérez le four dans son emplacement
en le poussant vers l’avant. Ouvrez la
porte du four et insérez deux vis dans
les trous situés sur le cadre du four.
Lorsque le cadre du four touche la surface en bois du compartiment, serrez
les vis.
Surface de travail
min.
min.
50 mm
25 mm
Plaques encastrables
Minimum 70cm
Minimum 65 cm
(Sans couvercle)
(Avec le couvercle)
Figure 1
Four encastrable
Si le four est installé sous une plaque de
cuisson, la distance entre la surface de
travail et le panneau supérieur du four
doit être au moins 50 mm et la distance
entre la surface de travail et la surface
FR
Page 42

supérieure du panneau de contrôle doit
être au moins 25 mm.
Les dimensions et matériaux du cabi-
net dans lequel le four doit être installé
doivent être corrects et résister aux hautes températures. Dans une installati-
on correcte, le contact aux pièces sous
tension ou isolantes doit être évité. Les
pièces isolantes doivent être installées
de manière ce qu'elles ne puissent
pas être retirées en utilisant un outil
quelconque. L'installation de l'appareil
à proximité d'un réfrigérateur ou d'un
congélateur n'est pas recommandée.
Les performances des appareils
susmentionnés pourraient autrement
être dégradées par la chaleur dégagée.
Après avoir enlevé votre four de son
emballage, assurez-vous que le four
est intact. Si vous suspectez que votre
appareil est endommagé d'une quelconque manière, ne l'utilisez pas. Con-
tactez immédiatement un agent de service autorisé.
Min.50mm
150mm
520mm
560mm
590mm
Min.60mm
490mm
MISE EN PLACE DU FOUR
ENCASTRABLE
An d'éviter une fuite de tout liquide sur
le plan de travail, un mastic d'étanchéité
spécial est fourni avec votre four. App-
liquez ce mastic tout autour du trou du
plan de travail, mesuré selon la tail-
le indiquée dans le Figure 2. Étendez
le produit en 5 pièces en l'étirant et
appliquez-le autour du trou. Placez
les plaques par-dessus, en plaçant les
commandes à droite. Assurez-vous de
xer les plaques tel qu'indiqué dans le
gure 3. Une fois les plaques en place,
retirez tout excès de mastic tout autour
en vous aidant d'une spatule (Figure 3).
Si l'épaisseur du plan de travail
dépasse 40 mm, utilisez le système de
xation indiqué dans la Figure 4. Placez
les plaques directement dans le trou
d'ouverture (Figure 5a-5b).
– Un raccordement défectueux pourrait
endommager l’appareil. De tels dommages ne seront pas couverts par la
garantie.
– Cet appareil est conçu pour être
raccordé à un réseau 220-240V~. Si
la tension de l’alimentation diffère de
cette valeur, contactez le centre de
service autorisé immédiatement.
Le fabricant déclare qu’il ne saurait en
aucun cas être responsable de tous
types de dommages et de pertes dus à
un non-respect des normes de sécurité !
Les instructions fournies ci-dessous
doivent être suivies impérativement
durant le raccordement :
Le câble de mise à la terre doit être
connecté via la vis dotée de la marque
de terre. Le raccordement du câble
d’alimentation doit correspondre à la
Figure 6. Si aucune prise mise à la terre
FR
Page 43

et se conformant aux normes n’existe
dans l’environnement d’installation,
appelez le centre de service
immédiatement.
La prise mise à la terre doit être proche
de l’appareil. N’utilisez jamais de cordon
d’extension.
Le câble d’alimentation ne doit pas
entrer en contact avec la surface
chaude du produit.
En cas de câble d’alimentation
endommagé, assurez-vous d’appeler le
centre de service autorisé. Le câble doit
être remplacé par le centre de service
autorisé.
Le câblage de l’appareil doit être
remplacé par le centre de service
autorisé. Un câble d’alimentation de
type H05VV-F doit être utilisé.
Un raccordement défectueux pourrait
endommager l’appareil. De tels
dommages ne seront pas couverts par
la garantie.
L’appareil est conçu pour être raccordé
à une alimentation 220-240V. Si la
tension de l’alimentation diffère de cette
valeur, contactez le centre de service
autorisé immédiatement.
Le Fabricant déclare qu’il ne saurait
en aucun cas être responsable de
tous types de dommages et de pertes
dus à un non-respect des normes de
sécurité !
et 380-415V 3N ~. Si la tension de
l’alimentation diffère de cette valeur,
contactez le centre de service autorisé
immédiatement. Le raccordement
de l'appareil doit être effectué tel
qu'indiqué en Figure 6. Cet appareil est
conçu pour être utilisé avec une prise
murale. Il est nécessaire d'installer un
interrupteur omnipolaire à fusible dans
le circuit d'alimentation, avec un contact
de séparation d'au moins 3 mm (valeur
nominale 40A, type à retardement).
2
3x2.5mm 220V~
2
3x2.5mm 230V~
2
3x2.5mm 240V~
Pour les modèles de plus 9500 W, des câbles de
For models over 9500W, wires with a diameter of
2
3x4.0 mm must be used.
diamètre de plus de 3x4.0 mm2 doivent être utilisé.
2
5x1.5mm 380V~, 3N~
2
5x1.5mm 400V~, 3N~
2
5x1.5mm 415V~, 3N~
Figure 6
Figure 6
RACCORDEMENT ET
SÉCURITÉ DU FOUR COMBINÉ
ENCASTRABLE
Le câblage de l’appareil doit être
remplacé par le centre de service
autorisé. Cet appareil est conçu pour
être raccordé à un réseau 220-240V~
FR
Page 44
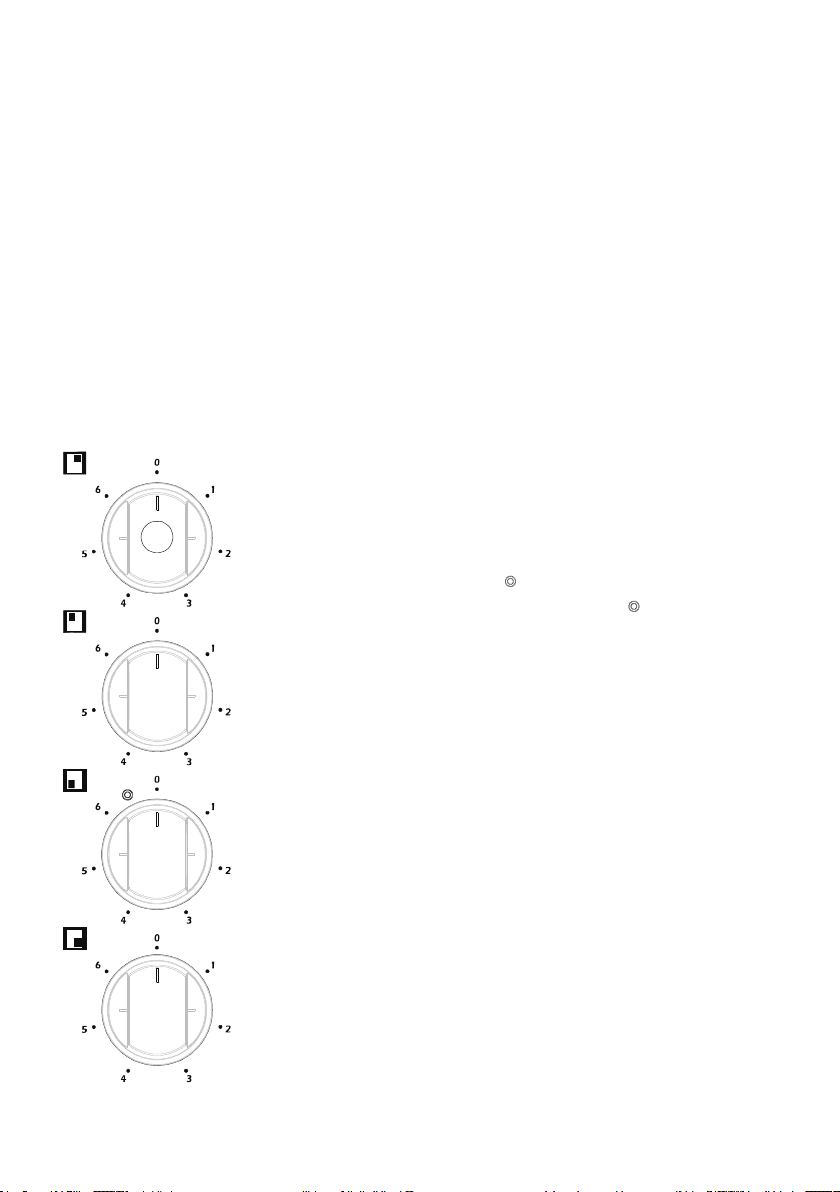
UTILISATION DU FOUR
PANNEAU DE COMMANDE DES
PLAQUES VITROCÉRAMIQUES
BOUTONS DE RÉGLAGE DE
CHALEUR DES PLAQUES
VITROCÉRAMIQUES
BOUTONS DE RÉGLAGE DE
CHALEUR DES PLAQUES
VITROCÉRAMIQUES
Cet appareil est contrôlé par des
boutons de réglage, et la chaleur
résiduelle est indiquée par un voyant
de chaleur résiduelle sur la surface
vitrocéramique.
Les plaques à commande par bouton
sont conçues pour fonctionner à 6
niveaux de chaleur :
1 Position de maintien au chaud
2-3 Position de chauffage à faible
chaleur
4-5-6 Cuisson - position rôtissage et
ébullition
Les plaques doubles et ovales
disposent de deux zones de cuisson.
Pour activer la zone externe d'une
plaque double et ovale, placez le
bouton en position une fois. Les deux
zones externes s'allument alors.
Pour désactiver la zone externe d'une
plaque double et ovale, placez le
bouton
deux zones externes s'éteignent
alors.
en position une fois. Les
Fonctions de chaleur résiduelle
Après tous les processus de cuisson,
de la chaleur stockée dans le
matériau vitrocéramique, appelée
chaleur résiduelle, est présente.
Les commandes peuvent calculer
approximativement la température
du verre dans le pire des cas. Si
la température calculée dépasse
+ 60 ° C, le voyant de chaleur
résiduelle correspondant s'active
pour indiquer de la chaleur résiduelle.
L’afchage de chaleur résiduelle est
indiqué tant que la température de
foyer calculée dépasse + 60° C.
FR
Page 45

Une fois les commandes de la
plaque de cuisson à nouveau sous
tension après une panne de courant,
l’afchage de chaleur résiduelle peut
se déclencher si le foyer correspondant
avait une chaleur résiduelle de plus
de 60° C avant la panne de courant.
L’afchage clignotera jusqu’à ce que
la durée de chaleur résiduelle ait
expiré ou jusqu’à ce que le foyer soit
sélectionné et activé.
ASTUCES ET CONSEILS
Poêles et casseroles
Utilisez des poêles et casseroles ayant
un fond plat, épais, lisse et du même
diamètre que les zones de cuisson.
Ceci optimisera les temps de cuisson.
Les poêles et casseroles en acier,
acier émaillé, fonte et acier inoxydable
(si étiquetées de manière appropriée)
vous offriront de meilleurs résultats.
Les poêles et casseroles en acier
émaillé ou aluminium ou à fond en
cuivre peuvent laisser des résidus
métalliques sur les plaques. Ces
résidus peuvent être difciles à
nettoyer. Nettoyez les plaques après
chaque utilisation.
Une poêle ou casserole est adaptée
aux plaques à inductions si un aimant
colle à son fond.
Les récipients doivent être placés au
centre des zones de cuisson. S'ils
ne sont pas placés correctement,
s'afche.
Lors de l'utilisation de certaines poêles,
il est possible d'entendre de petits
bruits durant la cuisson. Ceci est dû à
la conception des poêles et n'affecte
en rien les performances ou la sécurité
des plaques.
CORRECT
FAUX
CORRECT FAUX
Économies d'énergie
Les zones de cuisson à induction
s'adaptent automatiquement à
la taille du fond du récipient de
cuisson, jusqu'à une certaine limite.
Cependant la partie magnétique du
fond du récipient doit avoir un diamètre
minimum dépendant de la taille de la
zone de cuisson.
Placez le récipient sur la zone de
cuisson avant de la mettre en route. Si
la plaque est mise en route avant de
placer un récipient, la zone de cuisson
ne fonctionnera pas et l'afchage
afchera .
Utilisez un couvercle pour réduire le
temps de cuisson.
Lorsqu'un liquide commence à bouillir,
réduisez le réglage de température.
Minimisez la quantité de liquide ou de
gras utilisée pour réduire les temps de
cuisson.
Sélectionnez la température
appropriée à chaque cuisson
spécique.
Exemples de cuissons
Les informations fournies dans le
tableau suivant ne sont fournies qu'à
FR
Page 46

titre d'indication.
Réglages Utilisez pour
0 Foyer à l'arrêt
1-3 Réchauffement léger
4-5 Léger frémissement,
6-7 Réchauffage et
8 Bouillonnement, cuisson à
9 Température maximum
P Fonction Boost
réchauffement lent
frémissement
la poêle et grillades
Astuces de nettoyage
N'utilisez pas de tampon abrasif, de
nettoyant corrosif ou aérosols ou
d'objets coupants pour nettoyer les
surfaces des plaques.
Pour éliminer les aliments brûlés,
détrempez-les avec un chiffon humide
et du liquide vaisselle.
Vous pouvez utiliser un racloir pour
enlever tout résidu alimentaire. Les
aliments collants doivent être nettoyés
immédiatement, avant que le verre ne
refroidisse.
Faites attention à ne pas rayer l'adhésif
siliconé placé aux bords du verre en
utilisant un racloir.
Le racloir comprend un rasoir, il doit
donc être gardé hors de la portée des
enfants.
Utilisez un nettoyant spécial pour
plaques céramiques sur les plaques
lorsqu'elles sont encore chaudes.
Rincez et essuyez avec un chiffon
propre ou un papier absorbant.
FR
Page 47

PANNEAU DE COMMANDE
Four encrastrable
Bouton de commande
des plaques à induction
Bouton de
contrôle du four
Minuterie
UTILISATION DE LA PARTIE
FOUR DE L'APPAREIL
Bouton de commande de la
fonction four
Pour sélectionner la fonction de cuisson désirée, tournez le bouton vers le
symbole correspondant. Les fonctions
du four sont expliquées en détails dans
la section suivante.
Lampe de
fonctionnement du
four
Bouton de commande des
plaques à induction
Bouton de contrôle du four
Pour sélectionner la fonction de cuisson désirée, tournez le bouton vers le
symbole correspondant. Les fonctions
du four sont expliquées en détails dans
la section suivante.
FR
Page 48

Fonctions du four
* Les fonctions de votre four peuvent
différer selon le modèle de votre produit.
Lampe du four :
Uniquement la lampe du four s’allumera
et restera allumée durant toutes les
fonctions de cuisson.
Fonction décongélation :
Les voyants d’avertissement du four
s’allumeront, le ventilateur commencera à tourner.
Pour utiliser la fonction de décongélation,
placez vos aliments congelés dans
le four sur une grille placée dans le
troisième emplacement depuis le bas.
Il est recommandé de placer une plaque de cuisson sous les aliments à
décongeler, an de récupérer l'eau
accumulée durant la fonte de la gla-
ce. Cette fonction ne cuira pas vos aliments, elle ne sert qu'à les décongeler.
Fonction ventilateur :
Le thermostat du four et les voyants
d’avertissement s’allumeront, les
éléments chauffants supérieurs et
inférieurs et le ventilateur se mettront
en route.
Cette fonction est parfaite pour la
cuisson des pâtisseries. La cuisson est
effectuée par les éléments chauffants
inférieurs et supérieures dans le four
tandis que le ventilateur permet la
circulation de l'air, ce qui donne un
léger effet de gril aux aliments. Il est
recommandé de préchauffer le four
pendant environ 10 minutes.
Fonction de cuisson
statique :
Le thermostat du four et les voyants
d’avertissement s’allumeront, les
éléments supérieurs et inférieurs se
mettront en route. La fonction de cuisson statique émet de la chaleur, ce qui
assure une cuisson homogène des aliments dans les parties hautes et basses
du four. Elle est parfaite pour la cuisson
des pâtisseries, des gâteaux, des gratins de pâtes, des lasagnes et des pizzas. Il est recommandé de préchauffer
le four pendant 10 minutes et de ne cuire qu’avec une seule grille avec cette
fonction.
Fonction gril :
Le thermostat du four et les voyants
d’avertissement s’allumeront, l’élément de
chauffage du gril commence à fonctionner.
Cette fonction est utile pour griller les
aliments. Utilisez les grilles supérieures
du four. Graissez légèrement la grille avec
de l’huile pour éviter que les aliments ne
collent et placez les aliments au centre
de la grille. Placez toujours un plateau
en dessous pour collecter les gouttes
d’huile ou de graisse. Il est recommandé
de préchauffer le four pendant environ
10 minutes. Avertissement : Durant la
fonction gril, la porte du four doit être
fermée et la température du four doit être
réglée sur 190
0
C.
FR
Page 49

Fonction de gril plus rapide :
Le thermostat du four et les voyants
d’avertissement s’allumeront, les
éléments de gril et du haut commenceront
à fonctionner. La fonction est utilisée pour
griller plus rapidement les aliments et
pour couvrir une large surface, comme
pour la grillade de viande. Utilisez la
partie supérieure du four. Graissez
légèrement la grille avec de l’huile pour
éviter que les aliments ne collent et
placez les aliments au centre de la grille.
Placez toujours un plateau en dessous
pour collecter les gouttes d’huile ou de
graisse. Il est recommandé de préchauffer
le four pendant environ 10 minutes.
Avertissement : Durant la fonction gril,
la porte du four doit être fermée et la
température du four doit être réglée sur
1900C.
Fonction double gril et
ventilateur :
Le thermostat du four et les voyants
d’avertissement s’allumeront, l'élément
de gril, l'élément chauffant supérieur et le
ventilateur commenceront à fonctionner.
Cette fonction est utilisée pour griller
rapidement des aliments épais et pour
couvrir une plus large zone de cuisson. Le
gril et les éléments chauffants supérieurs
se mettront en route, le ventilateur
permettant une cuisson homogène.
Utilisez les grilles supérieures du four.
Graissez légèrement la grille avec de
l’huile pour éviter que les aliments ne
collent et placez les aliments au centre
de la grille. Placez toujours un plateau
en dessous pour collecter les gouttes
d’huile ou de graisse. Il est recommandé
de préchauffer le four pendant environ
10 minutes.
Avertissement : Durant la fonction gril,
la porte du four doit être fermée et la
température du four doit être réglée sur
0
C.
190
Fonction pizza
Le thermostat du four et les voyants
d’avertissements s’allumeront, les
éléments chauffants circulaire et
inférieur et le ventilateur commenceront
à fonctionner.
La cuisson ventilée à chauffage inférieur
est parfaite pour cuire les aliments comme
les pizzas de manière homogène en peu
de temps.
L'élément chauffant inférieur assure la
cuisson de pâtes à pain et gâteaux, le
ventilateur répartissant la chaleur du four.
Fonction Turbo
Le thermostat du four et les voyants
d’avertissements s’allumeront, le
élément chauffant inférieur et le ventilateur commenceront à fonctionner.
La fonction turbo permet de répartir la
chaleur de manière homogène dans
le four. Les aliments seront cuits de
manière homogène sur toutes les grilles. Il est recommandé de préchauffer
le four pendant environ 10 minutes.
FR
Page 50

4.2. COMMENT UTILISER L'UNITÉ DE CONTRÔLE TACTILE
Touche de réglage de minuterie/
Touche mode
Affichage
Afchage minuterie
minuterie
imer displ
réglage de température pour la
sonde de température/verrouillage
ayT
des touches
M
Ajustement de l'horloge :
Lorsque le four encastrable est installé
pour la première fois, l'heure doit être
ajustée selon les instructions ci-dessous.
Lorsque le four est installé pour la
première fois, "0.00" commence à
clignoter sur l'afchage. Appuyez sur la
touche "M" ou les touches "-" et "+" pour
activer le mode de réglage de l'heure. Le
symbole " : " commence à clignoter sur
l'afchage. Vous pouvez ajuster l'heure
avec les touches "-" ou "+". Si le mode de
cuisson automatique est à l'arrêt, Appuyez
sur les touches "-" et "+" pour activer le
mode de réglage de l'heure. Vous pouvez
ajuster l'heure avec les touches "+" et "-".
Vous devez ajuster l'heure pour utiliser
le four.
RÉGLAGE DES MINUTERIES
DU FOUR :
Réglage de la minuterie de
rappel :
Appuyez sur la touche d'alarme afchant
le symbole " ". “ ” clignotera sur l'afchage.
"0.00" apparaitra sur l'afchage de l'horloge.
Ajustez la période d'avertissement désirée
en utilisant les touches d'augmentation
et de diminution de minuterie lorsque le
symbole clignote. Une fois le réglage
effectué, le symbole commence à
s'allumer de manière constante. Lorsque le
symbole commence à s'allumer de manière
constante, le réglage de la minuterie
d'avertissement est effectué. Lorsque la
minuterie s'est écoulée, celle-ci active
un avertissement sonore et le symbole
commence à clignoter à l'écran. Appuyez
sur "+" ou "-" cela arrêtera le signal sonore
et le symbole disparaitra de l'écran.
FR
Page 51

Réglage de la minuterie de
durée de cuisson :
Cette fonction est utilisée pour cuire
durant la gamme de temps désirée. Les
aliments à cuire sont placés dans le four.
Le four est réglé sur la fonction de cuisson
désirée. Le thermostat du four est ajusté
à la température requise selon le plat à
cuire. Appuyez sur la touche "M" jusqu'à
ce que vous voyez le symbole de durée "
|>| " sur l'afchage de minuterie. "AUTO"
apparait sur l'afchage. Ajustez la période
de cuisson désirée en utilisant les touches
d'augmentation et de diminution de
minuterie lorsque la minuterie est dans
cette position. Une fois l'opération de
réglage effectuée, l'heure s'affichera
sur l'écran et le symbole de durée
commencera à s'allumer de manière
constante sur l'écran.
Une fois cette heure atteinte, la minuterie
arrêtera le four et déclenchera un signal
sonore. "AUTO" commencera aussi à
clignoter sur l'écran. Toute pression d'une
touche de l'unité de commande arrêtera
le signal sonore. "AUTO" continuera à
clignoter. Appuyez sur les symboles " - "
et " + " en même temps pour stopper le
mode "AUTO".
Réglage de la minuterie de n de
cuisson :
Cette fonction est utilisée pour cuire après
une certaine période de temps pour une
durée prédénie. Les aliments à cuire sont
placés dans le four. Le four est réglé sur la
fonction de cuisson désirée. Le thermostat
du four est ajusté à la température requise
selon le plat à cuire.
Appuyez sur la touche "M" jusqu'à ce
que vous voyez le symbole de durée "
|>| " sur l'afchage de minuterie. "AUTO"
apparait sur l'afchage. Ajustez la période
de cuisson désirée en utilisant les touches
FR
d'augmentation et de diminution de
minuterie lorsque la minuterie est dans
cette position. Puis Appuyez sur la
touche "M" jusqu'à ce que vous voyiez
le symbole " >| ", l'heure commence à
clignoter lorsque la période de cuisson
est réglée. Ajustez alors l'heure d'arrêt
de cuisson désirée en appuyant sur les
touches d'augmentation et de diminution
de la minuterie. Une fois l'opération de
réglage effectuée, l'heure s'affichera sur
l'écran et le symbole " >| " commencera
à s'allumer de manière constante sur
l'écran. Le four commencera à fonctionner
à l'heure calculée en déduisant la période
de cuisson et de l'heure de fin de
cuisson, et s'arrêtera à l'heure de fin de
cuisson. La minuterie déclenchera un
signal audible et le symbole "AUTO"
commencera à clignoter à l'écran.
Toute pression d'une touche de la
minuterie arrêtera le signal sonore.
"AUTO" continuera à clignoter.
Appuyez sur les symboles " - " et " + "
en même temps pour stopper le mode
"AUTO".
Réglage du sig
minuterie :
Appuyez sur
vous entendiez un son. La minuterie
émet un signal de bip sonore. À chaque
fois que la touche " - " est appuyée, la
minuterie émet un autre type de signal
sonore. N’ appuyez plus sur aucune
touche et le dernier signal sonore sera
sélectionné.
Fonction de verrouillage des
touches
La fonction de verrouillage des touches
permet d'empêcher l'activation de l'unité
de commande par accident. Pour activer
le verrouillage des touches,appuyez sur la
touche « + « jusqu’à ce que vous voyiez le
symbole de verrouillage des touches sur
l’affichage. Appuyez la touche " + " pour
désactiver le verrouillage des touches.
la touche " - " jusqu'à ce que
nal sonore de
Page 52

Lorsque le four est en route, si
aucune touche n'est pressée ou
aucun bouton n'est utilisé pendant
6 heures, le four se met à l'arrêt.
(min)
cuisson
Période de
-
grille
Posi
tion de
GRIL
(min)
thermostat
Position du
(min)
cuisson
Période de
-
grille
Posi
tion de
VENTILATEUR
INFÉRIEUR-SUPÉRIEUR
(°C)
thermostat
Position du
(min)
cuisson
Période de
-
grille
Posi
tion de
(°C)
thermostat
Position du
(min)
cuisson
Période de
200 4 10-15
200 4 15-25
de grille
Position
TURBO INFÉRIEUR-SUPÉRIEUR
(°C)
thermostat
Position du
PLATS
Feuilleté 170-190 1-2-3 35-45 170-190 1-2 35-45 170-190 1-2 25-35
Gâteau 150-170 1-2-3 30-40 170 -190 1-2 30-40 150-170 1-2-3 25-35
Cookie 150-170 1-2-3 25-35 170-190 1-2 30-40 150-170 1-2-3 25-35
Boulettes
de viande
Poissons 175-200 2 40-50 175-200 2 40-50 175-200 2 40-50
FR
Poulet 200 1-2 45-60 200 1-2 45-60 200 * 50-60
Côtelettes 200 3-4 15-25
Steak de
bœuf
Gâteaux
160-180 1-4 30-40
sur deux
plaques
170-190 1-4 35-45
Pâtisserie
sur deux
plaques
* Cuire avec des brochettes de poulet grillé...
Page 53

Accessoires
Le produit est fourni avec des accessoires. Vous pouvez aussi utiliser des
accessoires obtenus à partir d’autres
sources, ceux-ci devant résister à la
chaleur et aux ammes. Vous pouvez
utiliser des plats en verre, des plats
en silicone et des plaques de cuisson
appropriés dans le four. Suivez les instructions du fabricant lorsque vous utilisez des accessoires tiers. Lorsque de
petits plats sont utilisés, placez le plat
sur la grille, celui étant entièrement
sur la partie centrale de la grille. Si
les aliments que vous souhaitez cuisiner ne couvrent pas le plateau pour
four complètement, si les aliments sont
surgelés ou si le plateau est utilisé pour
collecter les jus des aliments durant
leur grillage, une déformation du plate-
au peut être observée. Ceci est dû aux
hautes températures se développant
durant la cuisson. Le plateau reprendra
sa forme normale en refroidissant après
la cuisson. Ceci est un phénomène
physique normal se développant durant
le transfert de chaleur. Ne déplacez pas
de plats en verre chauds directement
du four vers un environnement froid pour éviter de les endommager. Ne
les placez pas sur des surfaces froides
et humides. Placez-les sur un chiffon
sec et laissez-les refroidir lentement.
Lorsque vous utilisez le four en fonction gril, nous recommandons (lorsque
approprié) d’utiliser la grille fournie avec
le produit. Lorsque vous utilisez la grille,
placez une plaque sur l’une des positi-
ons inférieures an de collecter les graisses. De l’eau peut être versée dans
la plaque pour assister le nettoyage de
la plaque. Tel qu’expliqué dans les clauses correspondantes, n’essayez jamais
d’utiliser le gril à gaz sans le couvercle
de protection du gril. Si votre four est
équipé d’un four à gril à gaz, mais si la
protection thermique du gril est manquante, ou si elle est endommagée et
ne peut pas être utilisé, demandez une
pièce de rechange au centre de service
autorisé le plus proche.
Cavité du four
5. Grille
5. Rack
4. Grille
4. Rack
3. Grille
3. Rack
2. Grille
2. Rack
1. Rack
1. Grille
Accessoires du four
Les accessoires de votre four peuvent
différer selon le modèle de votre produit.
Grille
La grille est utilisée pour griller ou pour
placer des plats dans le four.
AVERTISSEMENT- .placez la grille correctement dans l’un des guides de la
cavité du four et poussez-la vers le bas.
Plaque de cuisson peu profonde
La plaque de cuisson peu profonde est
FR
Page 54

utilisée pour la cuisson des boulange-
ries telles que ans, etc... Pour placer
correctement la plaque dans la cavité,
placez-la dans n’importe quelles guides
et poussez-la vers l’arrière.
NETTOYAGE ET
ENTRETIEN DE VOTRE
FOUR
NETTOYAGE
Avant de commencer le nettoyage de
votre four, assurez-vous que tous les
boutons de contrôle sont désactivés et
que votre appareil est froid. Débranchez
l’appareil.
Plaque profonde
La plaque de cuisson profonde est
utilisée pour cuire les ragoûts. Pour
placer correctement la plaque dans la
cavité, placez-la dans n’importe quelles
guides et poussez-la vers l’arrière.
Retrait des grilles latérales de
support
Tirez sur la grille latérale de support tel
qu'indiqué dans l'illustration. Une fois
enlevée de ses attaches, tirez-la vers
le haut.
N’utilisez pas de matériaux de nettoyage contenant des particules pouvant
rayer les parties émaillées et peintes
de votre four. Utilisez des nettoyants
crémeux ou liquides, ne contenant pas
de particules. Celles-ci pouvant endommager les surfaces, n’utilisez pas de
crèmes corrosives, de poudres de nettoyage abrasives, de laine métallique
ou d’outils durs. Si un excès de liquide
s’étant écoulé dans votre four commence à brûler, il peut endommager
l'émaille. Nettoyez immédiatement tout
écoulement de liquide. N’utilisez pas
de nettoyeur à vapeur pour nettoyer cet
appareil.
Nettoyage de l’intérieur du four.
Assurez-vous de débrancher le four
avant de commencer son nettoyage
Vous obtiendrez de meilleurs résultats
si vous nettoyez l’intérieur du four lorsque le four est légèrement chaud. Nettoyez votre four avec un chiffon et de
l’eau savonneuse après chaque utilisation. Nettoyez-le à nouveau, cette fois
avec un chiffon humide, et séchez-le.
Un nettoyage complet utilisant des produits de nettoyage de type sec et poudre. Pour les produits équipés de cadres
catalytiques en émail, les parois avant
FR
Page 55

et arrière du cadre intérieur n’ont pas
besoin d’être nettoyées. Cependant,
suivant l’utilisation, il est recommandé
de les remplacer après une certaine
période de temps.
ENTRETIEN
Remplacement de la lampe du
four
supérieures ne cuisent pas de manière
homogène) :
Contrôlez l’emplacement des grilles, la
durée de cuisson et les valeurs de chaleur dans le manuel.
Si ces instructions ne permettent pas
de résoudre un problème avec votre
produit, veuillez appeler le centre de
service autorisé.
Le changement de la lampe du four doit
être effectué par un technicien autorisé.
La lampe doit être de type E13, T300,
230V, 25W. Avant de changer la lampe,
le four doit être éteint et doit être froid.
Le design de la lampe est spécique
aux appareils domestiques de cuisson,
elle n’est pas adaptée aux applications
d’éclairage des pièces.
SERVICE ET TRANSPORT
EXIGENCES AVANT DE
CONACTER LE SERVICE
Si le four ne fonctionne pas :
Le four peut avoir été éteint ou
débranché. Sur les modèles équipés de
minuterie, l'horloge n'est peut être pas
réglée.
Si le four ne chauffe pas :
la chaleur peut être ajustée avec
l’interrupteur de contrôle du chauffage
du four.
Si la lampe d’intérieur ne s’allume pas :
L’alimentation électrique doit être
vériée. Vériez si la lampe est
défectueuse. Le cas échéant,
remplacez-la en respectant le guide suivant.
Cuisson (si les parties inférieures et
INFORMATIONS RELATIVES AU
TRANSPORT
Si vous avez besoin de transporter
l’appareil :
Gardez l'emballage d'origine de votre
produit et utiliser-le pour le transporter. Suivez les instructions de transport
sur l’emballage. Scotchez les pièces
supérieures, couvercles et porte-casseroles du four sur les panneaux de cuisson.
Placez un papier entre le panneau
supérieur et le panneau de cuisson, couvrez le couvercle supérieur puis scotchez aux surfaces latérales du four.
Scotchez du carton ou du papier sur
la partie vitrée intérieure du panneau
avant, les plaques et grilles de votre
four pouvant endommager le panneau
du four durant le transport. Scotchez
aussi les panneaux du four aux parois
latérales.
Si vous ne disposez de l’emballage original :
Prenez des mesures appropriées pour
sécuriser les surfaces externes (verre
et surfaces peintes) et le four an de le
protéger des chocs.
FR
Page 56

Dear Customer,
Our goal is to offer you high quality products that exceed your expectations. Your
appliance is produced in state of the art facilities and is carefully tested for quality.
This manual is prepared to help you use your appliance, which has been manufac-
tured using the most recent technology, with condence and maximum efciency.
Before using your appliance, carefully read this guide which includes basic information on safe installation, maintenance and use. Please contact your nearest
Authorized Service Centre for the installation of your product.
EN
Page 57

Contents
Presentation and size of product
Warnings
Preparation for installation and use
Using the oven
Cleaning and maintenance of your product
Service and Transport
EN
Page 58

PRESENTATION AND SIZE OF PRODUCT
Built-in Combined Oven
7
LIST OF COMPONENTS :
1- Control panel
2- Handle
3- Oven Door
4- Child Lock
5- Tray
6- Lower Heating Element (behind
the plate)
9
7- Upper Heating Element (behind the
plate)
8- Wire Grill
9- Racks
10- Oven Light
11- Turbo Heating Element(behind the
plate)
12- Fan (behind the plate)
13- Air Outlet Shutters
EN
Page 59

VITROCERAMİIC HOB
1
2
1. Vitroceramic Heater
2 Vitroceramic glass surface
EN
Page 60

SAFETY WARNINGS
READ THESE INSTRUCTIONS CAREFULLY AND COMPLETELY BEFORE
USING YOUR APPLIANCE, AND KEEP
IT IN A CONVENIENT PLACE FOR
REFERENCE WHEN NECESSARY.
THIS MANUAL IS PREPARED FOR
MORE THAN ONE MODEL IN COMMON.
YOUR APPLIANCE MAY NOT HAVE
SOME OF THE FEATURES THAT ARE
EXPLAINED IN THIS MANUAL. PAY
ATTENTION TO THE EXPRESSIONS
THAT HAVE FIGURES, WHILE YOU
ARE READING THE OPERATING MANUAL.
General Safety Warnings:
This appliance can be
used by children aged
from 8 years and above
and persons with reduced physical,sensory
or mental capabilities
or lack of experience
and knowledge if they
have been given supervision or instruction
concerning use of the
appliance in a safe way
and understand the hazards involved. Children shall not play with
the appliance. Cleaning
and user maintenance
shall not be made by
children without supervision.
WARNING: The appliance and its accessible
parts become hot during use. Care should
be taken to avoid touching heating elements.
Children less than 8
years of age shall be
kept away unless continuously supervised.
WARNING: Unattended cooking on a hob
with fat or oil can be
dangerous and may re-
sult in re. NEVER try
to extinguish a re with
water, but switch off the
appliance and then co-
ver ame e.g. with a lid
or a re blanket.
WARNING: Danger of
re: do not store items
on the cooking surfaces.
WARNING: If the surface is cracked, switch off
EN
Page 61

the appliance to avoid
the possibility of electric shock.
For hobs incorporating
a lid, any spillage should be removed from
the lid before opening.
And also the hob surface should be allowed to
cool before closing the
lid.
The appliance is not intended to be operated
by means of an external timer or separate
remote-control system.
During use, the appliance becomes hot.
Care should be taken
to avoid touching heating elements inside
the oven.
During use, handles
held for short periods in
normal use can get hot.
Do not use harsh abrasive cleaners or sharp
metal scrapers to clean the oven door glass
and other surface sin-
ce they can scratch the
surface, which may result in shattering of the
glass or damage to the
surface.
Do not use steam cleaners for cleaning the
appliance.
WARNING: Ensure that
the appliance is switched off before replacing the lamp to avoid
the possibility of
electric shock.
CAUTION: Accessible
parts may be hot when
the cooking or grilling is
in use. Young children
should be kept away.
-For induction hobs,
metallic objects such
as knives, forks, spoons and lids should not
be placed on the hob
surface since they can
get hot.
-For induction hobs,
after use, switch off
the hob element by its
control and do not rely
EN
Page 62

on the pan detector.
Your appliance is produced in accordance with all applicable local and
international standards and regulations.
Maintenance and repair work must be
made only by authorized service
technicians. Installation and repair work
that is carried out by unauthorized
technicians may endanger you. It is
dangerous to alter or modify the specications of the appliance in any way.
Prior to installation, ensure that the local distribution conditions (nature of
the gas and gas pressure or electricity
voltage and frequency) and the adjustments of the appliance are compatible.
The adjustment conditions for this appliance are stated on the label.
CAUTION: This appliance is designed
only for cooking food and is intended for
indoor domestic household use only
and should not be used for any other
purpose or in any other application,
such as for non-domestic use or in a
commercial environment or room heating.
Do not try to lift or move the appliance
by pulling the door handle.
All possible security measures have
been taken to ensure your safety. Since
the glass may break, you should be careful while cleaning to avoid scratching.
Avoid hitting or knocking on the glass
with accessories.
Ensure that the supply cord is not wedged during the installation. If the supply
cord is damaged, it must be replaced by
the manufacturer, its service agent or
similarly qualied persons in order to
prevent a hazard.
While the oven door is open, do not let
children climb on the door or sit on it.
Installation Warnings:
Do not operate the appliance before it is
fully installed.
The appliance must be installed by an
authorized technician and put into use.
The producer is not responsible for any
damage that might be caused by defective placement and installation by unauthorized people.
When you unpack the appliance, make
sure that it is not damaged during
transportation. In case of any defect; do
not use the appliance and contact to the
authorized maintenance service immediately. As the materials used for packaging (nylon, staplers, styrofoam...etc)
may cause harmful effects to children,
they should be collected and removed
immediately.
Protect your appliance against atmospheric effects. Do not expose it to effects
such as sun, rain, snow etc.
The surrounding materials of the app-
liance (cabinet) must be able to withstand a temperature of min 100°C.
During usage ;
When you rst run your oven a certain
smell will emanate from the insulation
materials and the heater elements.
insulation materials and the heater ele-
ments. For this reason, before using
your oven, run it empty at maximum
temperature for 45 minutes. At the
same time you need to properly ventilate the environment in which the product
is installed.
EN
Page 63

During usage, the outer and inner surfaces of the oven get hot. While opening
the oven door, step back to avoid the
hot steam coming out of the oven. There may be a risk of burns.
Do not put ammable or combustible
materials, in or near the appliance when
it is operating.
Always use oven gloves to remove and
replace food in the oven.
Do not leave the cooker while cooking
with solid or liquid oils. They may catch
re on condition of extreme heating.
Never pour water on to ames that are
caused by oil. Cover the saucepan or
frypan with its cover in order to choke
the ame that has occured in this case
and turn the cooker off.
Always position pans over the centre of
the cooking zone, and turn the handles to a safe position so they cannot be
knocked or grabbed.
If you will not use the appliance for a
long time, plug it off. Keep the main
control switch off. Also when you do not
use the appliance, keep the gas valve
off.
Make sure the appliance control knobs
are always in the “0” (stop) position
when it is not used.
The trays incline when pulled out. Be
careful not to let hot liquid spill over.
When the door or drawer of the oven is
open, do not leave anything on it. You
may unbalance your appliance or break
the cover.
Do not put heavy things or ammable
or ignitable goods (nylon, plastic bag,
paper, cloth...etc) into the drawer. This
includes cookware with plastic acces-
sories (e.g. handles).
Do not hang towels, dishcloths or clot-
hes from the appliance or its handles.
During cleaning and maintenance:
Always turn the appliance off before
operations such as cleaning or maintenance.
You can do it after plugging the appliance off or turning the main switches off.
Do not remove the control knobs to clean the control panel.
TO MAINTAIN THE EFFICIENCY AND
SAFETY OF YOUR APPLIANCE, WE
RECOMMEND YOU ALWAYS TO USE
THE ORIGINAL SPARE PARTS AND
TO CALL ONLY OUR AUTHORIZED
SERVICES IN CASE OF NEED.
PREPARATION FOR
INSTALLATION AND USE
Manufactured with best quality parts
and materials, this modern, functional
and practical oven will meet your needs in all respects. Make sure to read
the manual to obtain successful results
and not to experience any problems in
the future. The information given below
contain rules that are necessary for correct positioning and service operations.
They should be read without fail especially by the technician who will position
the appliance.
CONTACT THE AUTHORIZED SERVICE FOR THE INSTALLATION OF
YOUR OVEN!
EN
Page 64

CHOOSING A PLACE FOR THE
OVEN
INSTALLATION OF BUILT-IN
OVEN
There are several points to pay attention to when choosing a place for your
oven.
Make sure to take into account our recommendations below in order to prevent any problems and dangerous situations, which might occur later! When
choosing a place for the oven, attention
should be paid that there are no ammable or combustible materials in the
close vicinity, such as curtains, oil, cloth
etc. which quickly catch re.
Furnitures surrounding the oven must
be made of materials resistant to heat
more than 50 C° of the room temperature.
Required changes to wall cabinets and
exhaust fans above the built-in combined product as well as minimum heights from the oven board are shown in
Figure 1. Accordingly, the exhaust fan
should be at a minimum height of 65 cm
from the hob board. If there is no exhaust fan the height should not be less
than 70 cm.
min. 150mm
576mm
575mm
557mm
520mm
550mm
595mm
595mm
2 x
41mm
Min.
25mm
min. 60 mm
490mm
560mm
min. 600mm
min. 590mm
590mm
min. 560mm
max. 580m
min. 555mm
m
Insert the oven into the cabinet by pushing it forward. Open the oven door and
insert 2 screws in the holes located on
the oven frame. When the product frame touches the wooden surface of cabinet, tighten the screws.
Figure 1
Worktop
min.
min.
50 mm
25 mm
Built-in hob
Built-in oven
If the oven is installed under a hob, the
distance between the worktop and the
top panel of the oven must be a minimum of 50 mm and the distance between the worktop and the top of control
EN
Page 65

panel must be a minimum of 25 mm.
The dimensions and material of the
cabinet in which the oven will be installed must be correct and resistant to
increases in temperature. In a correct
installation, contact with electrical or
insulated parts must be prevented. In-
sulating parts need to be tted in a way
to ensure that they cannot be removed
by using any kind of tool. Installing the
appliance in the close vicinity of a refrigerator or a deep-freezer is not recommended. Otherwise, the performance
of the above-m entioned appliances
will be negatively affected due to emanating heat. After removing your oven
from its packaging, be sure that the
oven is not harmed. In case, you suspect of any damage to the appliance,
do not use it; immeditely contact Authorized Service.
gure 5a-5b)
150mm
Min.50mm
520mm
560mm
590mm
Min.60mm
490mm
POSITIONING THE BUILT-IN
HOB
In order to prevent leakage of any liquids
on the counter, a special sealing putty is
supplied together with your oven. Apply
tihs putty around the clearance on the
kitchen counter, measured in the size
indicated in the Figure 2. Extend the ve-piece putty by stretching and apply it
around the clearance. Place the hob on
it, with its control buttons being on the
right side. Make sure to t the clamps
as shown in the Figure 3. After tting
your hob into its place, neatly remove
the excess sealing putty around the sides with the help of a spatula(Figure 3).
In case the thickness of the kitchen counter is less than 40mm, use the clamp
as shown in the Figure 4. Place your
hobs directly into the opening gap( Fi-
EN
– Faulty wiring may damage the appli-
ance. Such damage will not be covered under the warranty.
– The appliance is designed to connect
to 220-240V~. If the electricity is different than the value given above, call
the Authorized Service Centre immediately.
The manufacturer declares that
its bears no liability of any kind for
damage and loss arising from not
complying with safety standards!
The instructions given below must be
followed without fail during wiring :
The earthing cable must be connected
via the screw with the earthing mark.
Supply cable connection must be as
shown in Figure 6. If there is no earthed
outlet conforming to regulations in
the installation environment, call the
Page 66

Authorized Service immediately.
The earthed outlet must be in close
vicinity of the appliance. Never use an
extension cord.
The supply cable should not contact the
product’s hot surface.
In case of any damage to the supply
cable, make sure to call the Authorized
Service. The cable must be replaced by
the Authorized Service.
Wiring of the appliance must be
performed by the Authorized Service.
H05VV-F type supply cable must be
used.
Faulty wiring may damage the
appliance. Such a damage will not be
covered under the warranty.
The appliance is designed to connect
to 220-240V~ electricty is different
than the value given above, call the
Authorized Service immediately.
The Manucaturer Firm declares that its
bears no responsibility whatsover for
any kind of damage and loss arising
from not complying with safety norms!
openning of at least 3mm ( rated 40A,
delay functioning type ).
2
3x2.5mm 220V~
2
3x2.5mm 230V~
2
3x2.5mm 240V~
For models over 9500W, wires with a diameter of
2
3x4.0 mm
must be used.
2
5x1.5mm 380V~, 3N~
2
5x1.5mm 400V~, 3N~
2
5x1.5mm 415V~, 3N~
Figure 6
WIRING AND SAFETY OF THE
BUILT-IN COMBINED OVEN
Wiring of the appliance must be
performed by the Authorized Service.
The appliance is designed to connect
to 220-240V~ and 380-415V 3N ~
electricity. If the mains electricity is
different than the value given above,
call the Authorized Service immediately.
Connection
of the appliance must be as shown in
Figure 6. The appliance is designed for
xed connection to the mains. There
is to install an all pole disconnector
inside they supply circuit with a contact
EN
Page 67

USING THE OVEN
CONTROL PANEL FOR
VITROCERAMIC HOB
HEAT SETTING KNOBS FOR
VITROCERAMIC COOKERS
Heat setting knobs for vitroceramic
cookers
The appliance is operated by using
knob control and the heat stored
isconrmed by residual heat indicator
lamp on the vitroceramic surface
Knob controlled cooker is designed
foroperating at 6 heat levels:
1Keeping warm position
2-3Heating position at low heat
4-5-6Cooking – roasting and
boilingposition
Dual and oval heaters have two
heatingzones. To activate the outer
zone of adual/oval heater, turn the
knob to position once. In this way
both outerzones switches on.
To deactivate the outer zone of a
dual/oval heater, turn the knob to
position once. In this way, both
outerzones switches off.
Residual Heat Functions
After all cooking processes there is
someheat stored in the vitroceramic
glass called residual heat. The
control cancalculate roughly how hot
the glass is in the worst case. If the
calculated temperature is higher than
+ 60 ° C,then this will be indicated
in the related residual inducator
heat indicator lamp. The residual
heat display is shown as long as the
calculated heater temperature is > +
60° C.
After reapplying the supply voltage to
the hob control after an interruption
of the supply voltage occurred,
causes that the residual heat display
ashes,if the corresponding heater
had a residual heat of greater + 60 ° C
EN
Page 68

before the power interruption occurred.
The display will ash until the max.
residualheat time has expired or the
heater will be selected and activated.
HINTS AND TIPS
Cookware
· Use thick, at, smooth bottome
cookwares that are the same diameter
as the element. This will help reduce
cooking times.
· Cookware made of steel, enamelle
steel, cast iron and stainless steel
(if appropriately abelled by the
manufacturer) will give you the best
results.
· Cookware made of enamelled stee
or aluminium or copper bottoms can
cause a metallic residue to remain on
the hob. If left, this becomes difcult
to remove. Clean the hob after every
use.
· Cookware is suitable for induction i
a magnet sticks to the bottom of the
cookware.
· Cookware must be placed centrall
on the cooking zone. If it is not placed
correctly, is displayed.
· When using certain pans, you ma
get various noises from the pans, this
is due to the design of the pans and
does not effect the performance or
safety of the hob.
CORRECT
FALSE
CORRECT FALSE
Energy saving
· Induction cooking zones adap
automatically to the size of the
cookware bottom up to a certain
limit. However the magnetic part of
the cookware bottom must have a
minimum diameter depending upon the
size of the cooking zone.
· Place the cookware on the cookin
zone before it is switched on.If it is
switched on before putting any
cookware, the cooking zone will not
operate and the control display
shows.
· Use a lid to reduce cooking time
· When liquid comes to the boil, reduc
the temperature setting.
· Minimise the amount of liquid or fat t
reduce cooking times.
· Select the proper temperature settin
for the cooking applications.
Examples of cooking
applications
The information given in the following
table is for guidance only.
EN
Page 69

Settings Use for
0 Element off
1-3 Delicate warning
4-5 Gentle simmering, slow
6-7 Reheating and rapid
8 Boling, saute and searing
9 Maximum heat
P Boost function
warning
simmering
Cleaning tips
· Do not use abrasive pads, corrosive
cleaners, aerosol cleaners or sharp
objects to clean the surfaces of the
hob.
· To remove burnt food, soak it off with
a damp cloth and washing-up liquid.
· You may use a scraper for cleaning
food or residues. Sticky foods must be
cleaned immediately when they spill,
before the glass has cooled down.
· Be careful not to scratch the silicon
adhesive placed on the edges of the
glass whilst using a scraper.
· The scraper has a razor, therefore, it
must be kept away from children.
· Use special ceramic hob cleaner on
the hob while it is warm to touch. Rinse
and wipe dry with a clean cloth or
paper towel.
EN
Page 70

CONTROL PANELS
Built_in Oven
Induction Hob
Control Knob
USING THE OVEN PART OF THE
APPLIANCE
Oven Function Control Knob
To select the desired cooking function,
turn the knob to the related symbol the
details of the oven functions are explained in the next section.
Oven Function
Control Knob
Timer
Oven
Thermostat
Knob
Induction Hob
Control Knob
Oven Function Control Knob
To select the desired cooking function,
turn the knob to the related symbol the
details of the oven functions are explained in the next section.
EN
Page 71

Oven Functions
* The functions of your oven may be different due to the model of your product.
Oven Lamp:
Only the oven light will be turned on and
it will remain on in all cooking functions.
Defrost Function:
The oven’s warning lights will be turned
on, the fan will start operating.
Static Cooking Function:
The oven’s thermostat and warning
lights will be turned on, the lower and
upper heating elements will start operating. The static cooking function emits
heat, ensuring even cooking of the food
on the lower and upper shelves. This is
ideal for making pastries, cakes, baked
pasta, lasagne and pizza. Pre-heating
the oven for 10 minutes is recommended and it is best to cook on only one
shelf at a time when using this function.
Grilling Function:
To use the defrost function, take your
frozen food and place it in the oven on
a shelf placed in the third slot from the
bottom. Placing an oven tray under the
defrosting food to catch the water accumulated due to the melting ice is recommended. This function will not cook or
bake your food, it will only help defrost it.
Fan Function:
The oven's thermostat and warning
lights will be turned on, the upper and
lower heating elements and fan will
start operating.
This function is very good for baking
pastries. Cooking is carried out by the
lower and upper heating elements
within the oven and by the fan
providing air circulation, which will give
the food a slightly grilled effect. Preheating the oven for about 10 minutes
is recommended.
EN
The oven’s thermostat and warning lights
will be turned on, the grill heating element
will start operating. This function is used
for grilling and toasting foods. Use the
upper shelves of the oven. Brush the wire
grid lightly with oil to stop foods sticking
and place foods in the centre of the grid.
Always place a tray beneath to catch any
oil or fat drippings. Pre-heating the oven
for about 10 minutes is recommended.
Warning: When grilling, the oven door
must be closed and the oven temperature
should be adjusted to 190
0
C.
Faster Grilling Function:
The oven’s thermostat and warning
lights will be turned on, the grill and upper
heating elements will start operating. The
function is used for faster grilling and for
covering a larger surface area, such as
grilling meats. Use the oven's upper
shelves. Brush the wire grid lightly with
oil to stop foods sticking and place foods in
the centre of the grid. Always place a tray
beneath to catch any oil or fat drippings.
Pre-heating the oven for about 10 minutes
is recommended. Warning: When grilling,
the oven door must be closed and the
Page 72

oven temperature should be adjusted
0
to 190
C
Double Grill and Fan
Function:
While the fan evenly disperses the heat
of the oven, the lower heating element
ensures the baking of food dough.
The oven’s thermostat and warning
lights will be turned on, the grill and
upper heating elements and fan will start
operating.
This function is used for faster grilling of
thicker foods and for covering a larger
surface area. Both the upper heating
elements and grill will be energised along
with the fan to ensure even cooking.
Use the upper shelves of the oven. Brush
the wire grid lightly with oil to stop foods
sticking and place foods in the centre
of the grid. Always place a tray beneath
to catch any oil or fat drippings. Preheating the oven for about 10 minutes
is recommended.
Warning: When grilling, the oven door
must be closed and the oven temperature
0
should be adjusted to 190
C.
Turbo Function
The oven’s thermostat and warning
lights will be turned on, the ring heating
element and fan will start operating.
The turbo function evenly disperse the
heat in the oven. All foods on all racks
will be cooked evenly. It is recommended to pre-heat the oven about 10 minutes.
Pizza Function
The oven's thermostat and warning
lights will be turned on, the ring and
lower heating elements and fan will start
operating.
Fan and lower heating function is ideal
for baking food, such as pizza, equally
in a short time.
EN
Page 73

4.2. HOW TO USE THE VISIO TOUCH CONTROL UNIT
Timer Setting/Temparature
settings for meat probe / Key
Mode Key
Timer Display
lock
M
Alarm Key Oven Function
Temparature Display Time Setting Key
Adjusting the Day Time:
When the built in oven installed rstly the
time of day must be adjusted according
to below instructions.
When oven installed rstly,“0.00” will start
to ash on the display. Touch “M“ sensor
or “ - “ and “ + “ sensors to adjust the day
time mode. “ : ” symbol will start to ash
on the display. You can adjust it with “ - “
and “ + “ sensor.If Auto cooking mode is
off, touch “ - “ and “ + “ sensors at the
same time to the day time mode. You can
adjust it with “ - “ and “ + “ sensor.
You have to adjust the day time to use
oven function.
ADJUSTING THE COOKER
TIME:
Adjusting the Minute Minder:
Touch alarm sensor which shows “ ”
symbol. “ ” will be ashing on the display.
“0.00” will appear on the clock digits. Adjust
the desired time period for the warning by
using Timer Plus and Minus sensor while
the symbol is ashing. Some time after
the completion of the adjustment, symbol
will begin to light continuously. When the
symbol begins to light continuously, the
audible warning time adjustment is done.
When the set time is up, the timer gives
an audible warning and symbol begins
to ash on the screen. Pressing “ - “or
“+“ will stop the audible warning and the
symbol disappears on the screen.
EN
Page 74

Adjusting the Cooking
Duration Time:
This function is used to cook in the desired
time range. The foods to be cooked are
put into the oven. The oven is adjusted
to the desired cooking function. The oven
temperature is adjusted to the desired
degree depending on the dish to be
cooked. Touch on the “M” sensor until
you see Duration time symbol “ |>| ” on
the timer display screen. “AUTO” appear
on the display. Adjusted the cooking period
for the food you wish to cook, by using the
Timer Plus and minus sensor while the
timer is in this position. Some time after
the adjustment operation is completed,
the day’s time will appear on the screen
and the Duration time symbol will begin
to continuously light on the screen.
At the completion of the set duration,
the timer will stop the oven and give
an audible warning. Also, “AUTO” will
begin to ash on the screen. Touching
any sensor of the control unit will end
the audible warning. “AUTO” will go on
to ash. Touch “ - “ and “ + “ symbols at
the same time to nish “AUTO” mode.
Adjusting the Cooking End Time:
This function is used to cook after a certain
period of time, within certain duration.
The food to be cooked is put into the
oven. The oven is adjusted to the desired
cooking function. The oven temperature is
adjusted to the desired degree depending
on the dish to be cooked.
Touch on the “M” sensor until you see
Duration time symbol “ |>| ” on the timer
display screen. “AUTO” appear on the
display. Adjusted the cooking period for
the food you wish to cook, by using the
Timer Plus and minus sensor while the
timer is in this position.Then touch the
“M” sensor until you see “ >| ” symbol.
the day time will begin to ash, with the
addition of the cooking period. Adjust the
nishing time for the food by using the
Timer Plus and minus sensor while the
timer is in this position. Some time after
the adjustment operation is completed,
the day time will appear on the screen and
the “ >| ” symbol will begin to continuously
light on the screen. The oven will start
operating at the time calculated by
deducting the cooking period from the
set finishing time, and will stop at the
set nishing time. The timer will give an
audible warning and “AUTO” will begin
to ash on the screen will begin to ash.
Touching any button of the timer will end
the audible warning. “AUTO” will go on
to ash. Touch “ - “ and “ + “ symbols at
the same time to nish “AUTO” mode.
Digital Timer Sound Adjustment:
Touch “-“ sensor until you hear sound.
timer will give an audible signal beep. After
that each time “-“ sensor is touched, timer
will give three different types of signal
beep. Do not touch any further sensor
and timer will save the last selected signal
type.
Key Lock Function
The key lock function is used to prevent
operating any functions of the control
unit by mistake. Touch “+” sensor until
you see key lock symbol on the display
to activate key lock. Touch the “+” sensor
to deactivate key lock.
EN
Page 75

While oven is operating, if control switches
pushed or touched for 6 hours, oven turns off.
(min)
period
Cooking
pos.
Rack
and touch buttons are not
TURBO LOWER-UPPER LOWER-UPPER FAN GRILL
pos. (min)
Thermostat
(min)
period
Cooking
pos.
Rack
pos. (°C)
Thermostat
(min)
period
Cooking
pos.
Rack
pos. (°C)
Thermostat
(min)
period
Cooking
pos.
Rack
200 4 10-15
pos. (°C)
Thermostat
DISHES
170-190 1-2-3 35-45 170-190 1-2 35-45 170-190 1-2 25-35
Layered
pastry
Cake 150-170 1-2-3 30-40 170 -190 1-2 30-40 150-170 1-2-3 25-35
Cookie 150-170 1-2-3 25-35 170-190 1-2 30-40 150-170 1-2-3 25-35
Grilled
meatballs
EN
Watery food 175-200 2 40-50 175-200 2 40-50 175-200 2 40-50
Chicken 200 1-2 45-60 200 1-2 45-60 200 * 50-60
Chop 200 3-4 15-25
Beefstake 200 4 15-25
160-180 1-4 30-40
Two-tray
cake
170-190 1-4 35-45
Two-tray
pastry
* Cook with roast chicken skewer...
Page 76

Accessories
The product is supplied with accessories. You can also use accessories you
purchase from other sources, but they
must be heat and ame resistant. You
can also use glass dishes, cake moulds
and oven trays that are appropriate for
use in an oven. Follow the
manufacturer’s instructions when using
other accessories. In the event small
size dishes are used, place the dish
onto the wire grid, as it will completely
be on the middle part of the grid. If the
food to be cooked does not cover the
oven tray completely, if the food is taken
from the deep freezer or the tray is being used for collecting the food’s juices
that ow during grilling, form changes
can be observed in the tray. This is due
to the high temperatures that occur during cooking. The tray will return to its
old form when the tray cools down after
cooking. This is a normal physical event
that occurs during heat transfer. Do not
place hot glass trays and dishes into a
cold environment straight from the oven
to avoid breaking the tray or dish. Do
not put onto cold and wet surfaces. Place on a dry kitchen cloth and allow to
cool slowly. When using the grill in your
oven; we recommend you use the grid
that was supplied with the product
(where appropriate). When using the
wire grid; put a tray onto one of the lower shelves to allow the oil to be collected. Water may be added to the tray to
assist in cleaning. As explained in the
corresponding clauses, never attempt
to use the gas operated grill burner without the grill protection lid. If your oven
has a gas operated grill burner, but the
grill heat shield is missing, or if it is da-
maged and cannot be used, request a
spare part from the nearest service
centre.
Oven Cavity
5. Rack
4. Rack
3. Rack
2. Rack
1. Rack
Oven Accessories
The accessories for your oven may be
different due to the model of your product.
Wire grid
Wire grid is used to grill or to place different cookwares on.
WARNING- Fit the grid correctly into
any corresponding rack in the oven cavity and push it to the back.
Shallow Tray
The shallow tray is used to bake pastry
such as ans etc.To locate the tray correctly in the cavity, put it to any rack and
EN
Page 77

push it to the back.
Deep Tray
The deep tray is used to cook stews.To
locate the tray correctly in the cavity, put
it to any rack and push it to the back.
Removal of wire shelf
Pull the wire shelf as shown in the picture. After releasing it from clips, lift it up.
CLEANING AND
MAINTENANCE OF YOUR
OVEN
CLEANING
Before starting to clean your oven, be
sure that all control buttons are off and
your appliance is cooled off. Unplug the
appliance.
Do not use cleaning materials containing particles that might scratch the
enamelled and
painted parts of your oven. Use cream cleaners or liquid cleaners, which
do not contain particles. As they might
harm the surfaces, do not use caustic
creams, abrasive cleaning powders, rough wire wool or hard tools. In the event
the excess liquids spill over and your
oven should burn, this may cause damage to the enamel. Clean up the split
liquids immediately. Do not use steam
cleaners to clean the oven.
Cleaning the interior of the
oven
Make sure to unplug the oven before
you start cleaning it. You will obtain best
results if you clean the oven interior while the oven is slightly warm. Wipe your
oven with a soft piece of cloth dampened with soap and water after each
use. Then wipe it again, this time with a
wetted cloth, and wipe it dry. Complete
cleaning using dry and powder type cleaners. For product with catalytic enamel
frames, the rear and side walls of the
EN
Page 78

inner frame do not require cleaning. However; depending on usage, replacing
them after a certain period of time is recommended.
MAINTENANCE
Replacing the Oven Light
The change of oven lamp must be done
by by an authorized technician. The rating of the bulb should be 230V, 25Watt,
Type E14,T300 before changing the
lamp, the oven should be switched off
and it should be cool.
The lamp design is specic for use in
household cooking appliances and it is
not suitable for household room illumination.
SERVICE AND
TRANSPORT
REQUIREMENTS BEFORE
CONTACTING SERVICE
guide.
Cooking (if the lower-upper parts do not
cook equally):
Control the shelf locations, cooking pe-
riod and heat values according to the
manual.
Apart from these issues, if you are experiencing any problems with your product, please call to the Authorized Service Centre.
INFORMATION RELATED TO
TRANSPORT
If you need any transport:
Keep the original product packaging
and use the original case for carrying.
Follow the transport instructions on the
case. Tape the cooker on upper parts,
hats and heads and saucepan carriers
to the cooking panels.
Place a paper between the upper cover
and cooking panel, cover the upper cover, than tape to the side surfaces of the
oven.
If the oven does not operate:
The oven may have be switched off, or
disconnected On models tted with a timer, the time may not be regulated.
If the oven does not heat:
the heat may be not adjusted with the
oven’s heater control switch.
If the interior lighting lamp does not
light:
The electricity must be inspected. It
must be inspected to see whether the
lamps are defective. If they are defective, you can change them following the
EN
Tape cardboard or paper onto the front
cover on interior glass of the oven as it
will be suitable to the trays, for the wire
grill and trays in your oven not damage to the oven’s cover during transport.
Also tape the oven’s covers to the side
walls.
If you do not have the original case :
Take appropriate measures to secure
the external surfaces (glass and painted surfaces) and of the oven to protect
it against possible blows.
Page 79

Sehr geehrte/r Kunde/in,
Unser Ziel ist es, Ihnen ein qualitativ hochwertiges Produkt zur Verfügung zu stel-
len, das Ihre Erwartungen sogar noch übertrifft. Ihr Gerät wurde in hochmodernen
Produktionsstätten produziert und seine Qualität wurde sorgfältig getestet. Dieses
Handbuch wurde erstellt, um Sie bei der Verwendung Ihres Haushaltsgeräts zu unterstützen, das mit modernster Technik, Sorgfalt und höchster Qualität hergestellt
wurde. Lesen Sie sich vor der Verwendung Ihres Geräts diese Anleitung
sorgfältig durch, die grundlegende Informationen für eine sichere Inbetriebnahme,
Pflege und Verwendung enthält. Bitte setzen Sie sich mit Ihrem nächsten
zugelassenen Kun-dendienst wegen der Inbetriebnahme und dem Anschluss
Ihres Geräts in Verbindung.
DE
Page 80

Inhalt
Vorstellung und Abmessungen des Produkts
Warnhinweise
Vorbereitung des Einbaus und der Nutzung
Den Backofen nutzen
Reinigung und Wartung Ihres Produkts
Reparatur und Transport
DE
Page 81

VORSTELLUNG UND ABMESSUNGEN DES PRODUKTS
Kombi-Einbaubackofen
KOMPONENTENLISTE:
1: Bedienfeld
2: Griff
3: Backofentür
4: Kindersicherung
5: Schublade
6: Unteres Heizelement(hinter
der Platte)
7: Oberes Heizelement(hinter der Platte)
8: Drahtgrill
9: Backbleche
10: Backofenbeleuchtung
11: Turbo-Heizelement (hinter der Platte)
12: Ventilator (hinter der Platte)
13: Luftauslassklappen
DE
Page 82

Glaskeramik Kochfeld
1
2
1. Glaskochfeld
2. Glaskeramikoberäche
DE
Page 83

SICHERHEITSHINWEISE
LESEN SIE SICH DIESE ANLEITUNG
VOLLSTÄNDIG UND SORGFÄLTIG
VOR DER VERWENDUNG IHRES GERÄTS DURCH UND BEWAHREN SIE
SIE FÜR SPÄTERES NACHSCHLAGEN AN EINEM LEICHT ERREICHBAREN ORT AUF.
DIESES HANDBUCH WURDE FÜR
MEHR ALS EIN MODELL ERSTELLT.
IHR GERÄT MUSS NICHT UBER ALLE
DER EIGENSCHAFTEN VERFUGEN,
DIE IN DIESEM HANDBUCH
BESCHRIEBEN SIND. ACHTEN SIE
BEIM LESEN DIE-SER ANLEITUNG
AUF BESCHREIBUNGEN MIT
ABBILDUNGEN.
Allgemeine Sicherheits-
Aufsicht von Kindern ausgeführt werden.
ACHTUNG: Während
des Betriebs wird das
Gerät und äußere
Bereiche davon heiß.
Pas-sen Sie auf, dass
Sie die Heizelemente
nicht berühren. Kinder
unter 8 Jahren sollten
von dem Gerät
ferngehalten wer-den,
es sei denn, sie befinden sich unter ständiger Aufsicht.
hinweise
ACHTUNG: Unbeauf-
Das Gerät darf von Kindern ab 8 Jahren und Menschen mit körperlichen,
Sinnes- oder mentalen
Einschränkungen oder
mangelnder Erfahrung
und mangelndem Wissen
bedient werden, wenn
Sie unter Aufsicht stehen
oder eine Einweisung in
die sichere Handhabung
sichtigtes Kochen mit
Fett oder Öl auf einem
Kochfeld kann gefährlich
sein und zu einem Brand
führen. Löschen Sie ein
Feuer NIEMALS mit
Wasser, sondern schalten das Gerät aus und
ersticken die Flamme z.
B. mit einem Deckel oder
einer Feuerdecke.
des Geräts erhalten haben und die damit verbundenen Gefahren kennen.
Kinder dürfen nicht mit
dem Gerät spielen. Die
Reinigung und Anwenderwartung sollte nicht ohne
ACHTUNG: Brandgefahr: Legen Sie keine
Gegenstände auf den
Kochächen ab.
ACHTUNG: Wenn die
Oberäche Risse aufweist,
DE
Page 84

schalten Sie das Gerät
aus, um einen Stromschlag zu vermeiden.
Bei Kochächen, die mit
einer Abdeckung ausgestattet sind, sollten Sie Verschmutzungen vor dem
Abnehmen des Deckels
entfernen. Bevor Sie den
Deckel wieder schließen,
müssen Sie die Kochäche abkühlen lassen.
Das Gerät ist nicht für
die Bedienung mit einer
externen Zeitschaltuhr
oder getrennten Fernbedienung vorgesehen.
Das Gerät wird während
seiner Verwendung heiß.
Passen Sie auf, dass Sie
die Heizelemente im Inneren des Ofens nicht
berühren.
Die Griffe werden bei
normaler Verwendung
ebenfalls heiß.
da diese die Oberäche
zerkratzen können, was
zum Splittern des Glases oder Schäden an der
Oberäche führen kann.
Verwenden Sie zur Reinigung des Geräts keinen Dampfreiniger.
ACHTUNG: Achten Sie
darauf, dass das Gerät,
bevor Sie die Lampe austauschen, ausgeschaltet ist, um einen Stromschlag zu vermeiden.
VORSICHT: Berührbare
Teile können beim Braten oder Grillen sehr heiß
werden. Kleine Kinder
müssen von dem Gerät
ferngehalten werden.
Metallische Objekte wie
Messer, Gabeln, Löffel
und Deckel sollten nicht
auf die Kochfeldoberäche gelegt werden, da
sie heiß werden können.
Verwenden Sie keine
ätzenden Scheuermittel oder scharfe Metallschaber, um die Glastür
des Ofens und andere
Oberächen zu reinigen,
DE
Bei Indunktionskochfeldern schalten Sie nach
der Nutzung das Kochfelds mit dem Schalter
aus und verlassen Sie
sich nicht auf die Topfer-
Page 85

kennung.
Ihr Gerät wurde nach allen geltenden
nationalen und internationalen
Normen und Vorschriften hergestellt.
Wartungs- und Reparaturarbeiten dürfen nur von autorisierten Servicetechnikern durchgeführt werden. Wartungsund Installationsarbeiten, die nicht von
autorisierten Technikern durchgeführt
wurden, können Sie in Gefahr bringen.
Es ist gefährlich, das Gerät in jeglicher
Weise zu modizieren oder umzubauen.
Vor dem Einbau müssen Sie die örtlichen Energieversorgungsbedingungen
(Art des Gases, Gasdruck oder elektrische Spannung und Frequenz) und deren Kompatibilität mit dem Gerät prüfen
. Die Voraussetzungen für dieses Gerät
sind auf dem Etikett genannt.
VORSICHT: Diese Gerät ist nur für das
Kochen von Speisen in einem privaten
Haushalt vorgesehen und darf nicht zu
einem anderen Zweck oder einer anderen Verwendung, wie gewerblicher oder
beruflicher Verwendung oder
Raumhei-zung, genutzt werden.
Versuchen Sie niemals, das Gerät zu
heben oder zu bewegen, indem Sie am
Türgriff ziehen.
Es wurden alle möglichen
Sicherheitsmaßnahmen ergriffen, um
Ihre Sicherheit zu garantieren. Da
das Glas brechen kann, sollten Sie
beim Reinigen vor-sichtig sein, um
Kratzer zu vermeiden. Vermeiden
Sie, mit dem Zubehör gegen das Glas
zu schlagen oder zu stoßen.
Achten Sie beim Einbau darauf,
dass das Stromkabel nicht
eingeengt wird. Ein beschädigtes
Netzkabel muss vom Hersteller,
einem Kundendienst oder ähnlich
qualifizierten Fachperso-nal
ausgetauscht werden.
Lassen Sie Kinder nicht auf die geöffnete Backofentür klettern oder darauf
sitzen.
DE
Einbauhinweise
Benutzen Sie den Backofen erst, wenn
er vollständig eingebaut ist.
Das Gerät muss von einem autorisier-
ten Techniker angeschlossen und in
Betrieb genommen werden. Der Hersteller ist nicht für Schäden haftbar, die
durch einen falschen Einbau oder einen
falschen Anschluss durch nicht autorisierte Personen entstehen.
Wenn Sie das Gerät auspacken, achten
Sie bitte auf mögliche Transportschäden. Wenn ein Schaden vorliegt, dürfen
Sie das Gerät nicht verwenden und Sie
müssen sich sofort mit dem autorisierten Kundendienst in Verbindung setzen.
Die verwendeten Verpackungsmaterialien (Nylon, Heftklammern, Styropor,
usw.) stellen eine Gefahr für Kinder
dar und sollten daher sofort entsorgt
werden.
Schützen Sie Ihr Gerät vor Umweltein-
üssen. Setzen Sie es nicht Einüssen
wie Sonne, Regen, Schnee, usw. aus.
Die das Gerät umgebenden Materialien
(z.B. Schränke) müssen einer
Tempe-ratur von min. 100°C
standhalten.
Während der Verwendung
Wenn Sie Ihren Backofen das erste
Mal verwenden, kann ein bestimmter
Geruch aus dem Isoliermaterial und
den Heizelementen austreten.
Aus diesem Grund sollten Sie den
Backofen vor der Verwendung im leeren Zustand bei Höchsttemperatur 45
Minuten lang betreiben. Gleichzeitig
müssen Sie für eine ausreichende Entlüftung des Raumes sorgen, in dem das
Produkt aufgestellt ist.
Die inneren und äußeren Oberächen
werden während der Verwendung heiß.
Wenn Sie die Backofentür öffnen, treten Sie einen Schritt zurück, um dem
Dampf, der aus dem Ofen austritt, auszuweichen. Es besteht Verbrennungs-
Page 86

gefahr.
Stellen Sie keine brennbaren oder ent-
ammbaren Stoffe in oder neben das
Gerät, wenn es in Betrieb ist.
Verwenden Sie stets Ofenhandschuhe,
wenn Sie Speisen in den Backofen stellen oder aus ihm herausnehmen.
Lassen Sie den Backofen nicht unbeaufsichtigt, wenn Sie mit festen oder
üssigen Ölen kochen. Diese können
bei extremer Erhitzung Feuer fangen.
Schütten Sie niemals Wasser in brennendes Öl. Decken Sie den Kochtopf
oder die Pfanne mit einem Deckel ab,
um etwaige Flammen zu ersticken und
schalten Sie den Backofen aus.
Stellen Sie Töpfe und Pfannen immer in
die Mitte der Kochzone und drehen die
Griffe in eine sichere Position, damit sie
nicht angestoßen und zufällig gegriffen
werden können.
Wenn Sie den Backofen längere
Zeit nicht benutzen, trennen Sie ihn
vom Netz. Der Hauptschalter sollte
da-bei ausgeschaltet sein. Wenn Sie
das Gerät nicht verwenden, drehen
Sie das Gasventil zu.
Achten Sie darauf, dass die Bedienknöpfe des Backofens immer auf „0"
(Aus) stehen, wenn der Ofen nicht benutzt wird.
Die Bleche neigen sich, wenn sie herausgezogen werden. Seien Sie vorsichtig und lassen Sie keine heiße Flüssigkeit überlaufen.
Stellen Sie nichts auf die geöffnete Tür
oder die Schublade des Backofens. Sie
können Ihr Gerät aus dem Gleichgewicht bringen oder den Deckel abbrechen.
Stellen Sie keine schweren Gegenstände bzw. entammbare oder entzündliche Materialien (Nylon, Plastiktüten, Papier, Stoff usw.) in die Schublade. Dies
gilt auch für Kochgeschirr mit Kunststoffzubehör (z. B. Griffe).
Hängen Sie keine Handtücher, Küchentücher oder Kleidung an das Gerät oder
seine Griffe.
Während der Reinigung und Wartung
Sie müssen das Gerät ausschalten, be-
vor Sie Reinigungs- oder Wartungsarbeiten durchführen.
Sie können dies durch das Ausstecken
des Geräts oder Ausschalten des Netzschalters tun.
Wenn Sie das Bedienfeld reinigen, entfernen Sie nicht die Bedienknöpfe .
WIR EMPFEHLEN, DASS SIE STETS
ORIGINALERSATZTTEILE FÜR DEN
FALL EINER REPARATUR VERWENDEN UND NUR IHREN ZUGELASSENEN KUNDENDIENST RUFEN, UM DIE
EFFIZIENZ UND SICHERHEIT IHRES
GERÄTS AUFRECHTZUERHALTEN.
VORBEREITUNG DES EINBAUS
UND DER VERWENDUNG
Dieser moderne, funktionale und praktische Backofen wurde aus den hochwertigsten Bestandteilen und
Materialien hergestellt und wird Ihre
Wünsche in jeder Hinsicht erfüllen.
Sie sollten sich dieses Handbuch
durchlesen, um erfolg-reiche
Ergebnisse zu erhalten und in Zu-kunft
keine Probleme zu haben. Die folgenden Informationen enthalten
Regeln, die für die richtige Aufstellung
und Repa-raturarbeiten wichtig sind. Sie
sollten vor allem von dem Techniker,
der das Gerät einbaut, sorgfältig
gelesen werden.
SETZEN SIE SICH MIT DEM ZUGELASSENEN KUNDENDIENST FÜR
DEN EINBAU IHRES BACKOFENS IN
VERBINDUNG!
DE
Page 87

EINEN PLATZ FÜR DEN BACKOFEN AUSWÄHLEN
EINBAU DES EINBAUOFENS
590mm
520mm
Für die Aufstellung Ihres Backofens
sind einige Punkte zu beachten.
Sie müssen unsere folgenden Empfehlungen beachten, um Probleme und
gefährliche Situationen, die später auftreten könnten, zu vermeiden. Wenn Sie
einen Platz für Ihren Backofen auswählen, müssen Sie darauf achten, dass sich
keine brenn- oder entammbaren Materialien, wie Vorhänge, Öl, Stoff,usw., die
leicht Feuer fangen können, in unmittel-
barer Nähe des Backofens benden.
Die den Backofen umgebenden Möbel
müssen aus einem Material sein, das einer Hitzeentwicklung von mehr als 50 C°
über der Raumtemperatur standhält.
An Wandschränken und Dunstabzugshauben über dem eingebauten Kombinationsprodukt erforderliche Änderungen sowie die Mindesthöhen über der Herdplatte
sind Abbildung 1 zu entnehmen. Dementsprechend muss sich die Dunstabzugshaube in einer Mindesthöhe von 65 cm
über der Herdplatte benden. Wenn keine
Dunstabzugshaube vorhanden ist, darf die
Höhe nicht weniger als 70 cm betragen.
Min. Abstand 60 cm
DUNSTABZUGHAUBE
41mm
560mm
490mm
min. 60 mm
Min.
25mm
min. 600mm
min. 590mm
min. 560mm
max. 580mm
min. 555mm
min. 150mm
576mm
575mm
557mm
550mm
595mm
595mm
2 x
Schieben Sie den Backofen vorwärts
in den Schrank. Öffnen Sie die Backofentür und setzen Sie zwei Schrauben
in die Löcher im Rahmen des Ofens.
Wenn der Rahmen des Backofens die
Holzoberäche des Schranks berührt,
ziehen Sie die Schrauben fest.
Arbeitsplatte
Min.
Min.
50 mm
25 mm
Einbaukochfeld
Einbauherd
(mit Haube)
(ohne Haube)
Mindestens 70cm
Mindestens 65 cm
Abb. 1
Wenn der Backofen unter einem Kochfeld eingebaut wird, muss der Abstand
zwischen der Arbeitsplatte und der oberen Platte des Backofens mindestens
50 mm und der Abstand zwischen der
Arbeitsplatte und der oberen Kante der
Steuerleiste mindestens 25 mm betragen.
DE
Page 88

Die Abmessungen und das Material des
Schranks, in dem der Ofen eingebaut
werden soll, müssen passend und hitzebeständig sein. Bei einem korrekten
Einbau sollte kein Kontakt mit elektrischen oder isolierten Teilen bestehen.
Isolierende Teile sollten so
eingefügt werden, sodass sie nicht
ohne Verwen-dung von Werkzeugen
entfernt werden können. Der Einbau
in der Nähe eines Kühlschranks oder
einer Gefriertruhe wird nicht
empfohlen. Sonst kann die Leistung
des o.g. Geräts durch die aus-tretende
Hitze beeinträchtigt werden.
Nachdem Sie Ihren Ofen aus der
Ver-packung entfernt haben,
vergewissern Sie sich, dass der Ofen
nicht beschä-digt ist. Sollten Sie
Schäden am Gerät vermuten,
verwenden Sie es nicht, son-dern
kontaktieren Sie unverzüglich den
zugelassenen Kundendienst.
DIE POSITION DES EINBAU-KOCHFELDS AUSWÄHLEN
Um das Austreten von Flüssigkeiten
auf die Arbeitsplatte zu vermeiden, wird
ein spezieller Dichtungskitt mitgeliefert. Bringen Sie diesen Kitt an der Öffnung der Arbeitsplatte an, der in Abb.
2 angegebenen Größe entsprechend.
Strecken Sie den fünfteiligen Kitt und
bringen Sie ihn rund um die Öffnung
an. Platzieren Sie das Kochfeld darauf, sodass sich die Bedienknöpfe
auf der rechten Seite befinden. Stellen
Sie sicher, dass Sie die Klammern
wie in Abb. 3 anbringen. Nachdem
Sie das Kochfeld angebracht haben,
entfernen Sie jeglichen
Kittüberschuss an den Seiten mit
einem Spachtel (Abb. 3).
Sollte die Dicke der Arbeitsplatte
weniger als 40 mm betragen,
verwenden Sie die Klammer wie in Abb.
4. Bringen Sie diese am Kochfeld an in
der Öffnung an (Abb. 5a- 5b)
590mm
520mm
150mm
560mm
Min.50mm
Min.60mm
490mm
– Eine fehlerhafte Verdrahtung kann zu
Schäden am Backofen führen. Derartige Schäden sind nicht von der Garantie abgedeckt.
– Die passende Spannung für die-
ses Gerät ist 220-240V~. Wenn das
Stromnetz eine andere Spannung als
angegeben aufweist, rufen Sie bitte
direkt den zugelassenen Kundendienst.
Der Hersteller übernimmt keinerlei Verantwortung für Schäden und Verluste
jeglicher Art, die aus der Nichtbeachtung von Sicherheitsnormen herrühren!
Während des Stromanschlusses müssen die folgenden Anweisungen unbedingt befolgt werden
Das Erdungskabel muss mit der
Schraube mit der Erde-Markierung verbunden werden. Das Stromkabel muss,
wie in Abbildung 6 gezeigt, angeschlossen werden. Wenn es in der Aufstellum-
DE
Page 89

gebung keine geerdete Steckdose, welche lokalen Regulierungen entspricht,
gibt, rufen Sie sofort den zugelassenen
Kundendienst.
Die geerdete Steckdose muss sich in
unmittelbarer Nähe des Backofens benden. Verwenden Sie niemals ein Verlängerungskabel.
Das Stromkabel darf nicht die heiße
Oberäche des Produkts berühren.
Im Fall eines beschädigten Stromkabels müssen Sie den autorisierten
Kundendienst rufen. Das Kabel muss
vom autorisierten Kundendienst ausgetauscht werden.
Der Anschluss des Geräts muss vom
zugelassenen Kundendienst vorgenommen werden. Ein H05VV-F Kabel
muss verwendet werden.
Eine fehlerhafte Verdrahtung kann zu
Schäden am Backofen führen. Derartige Schäden werden nicht von der Garantie abgedeckt.
Das Gerät ist dafür konstruiert, mit einer
Spannung von 220-240V~ betrieben zu
werden. Wenn die Spannung von dem
genannten Wert abweicht, setzen Sie
sich sofort mit dem autorisierten Kundendienst in Verbindung.
Die Herstellerrma übernimmt keinerlei
Verantwortung für Schäden und Verluste jeglicher Art, die aus der Nichtbeachtung von Sicherheitsnormen herrühren!
Stromnetz eine andere Spannung als
angegeben aufweist, rufen Sie bitte direkt den zugelassenen Kundendienst.
Der Anschluss muss, wie in Abbildung
6 gezeigt, erfolgen. Das Gerät ist für die
Verwendung mit einem Stecker oder einer festen Verbindung zum Stromnetz
ausgelegt. Innerhalb der Stromleitung
ist eine allpolige Freischaltung mit einer
Kontaktöffnung von mindestens 3mm
zu installieren (40A Bemessungswert,
Verzögerungstyp).
2
3x2.5mm 220V~
2
3x2.5mm 230V~
2
3x2.5mm 240V~
For models over 9500W, wires with a diameter of
2
3x4.0 mm must be used.
Für Modelle über 9500W müssen Kabel mit einem
Durchmesser von 3x4.0 mm2 verwendet werden.
2
5x1.5mm 380V~, 3N~
2
5x1.5mm 400V~, 3N~
2
5x1.5mm 415V~, 3N~
Figure 6
Abb. 6
ANSCHLUSS UND SICHERHEIT
DES EINBAU-KOMBIOFENS
Der Anschluss des Geräts muss vom
zugelassenen Kundendienst vorgenommen werden. Das Gerät ist für
eine Spannung von 220-240V~ und
380-415V 3N ~ ausgelegt. Wenn das
DE
Page 90

DAS OFENBEDIENFELD
FÜR DAS INDUKTIONSKOCH-
FELD VERWENDEN
HITZEEINSTELLUNGSKNÖPFE
FÜR GLASKERAMIKHERDE
1 Bewahrung der Wärmeposition
2-3 Wärmeposition auf Niedrighitze
4-5-6 Gar-, Brat-und Kochpositi-on
HITZEEINSTELLUNGSKNÖPFE FÜR
GLASKERAMIKHERDE
Das Gerät wird mit Bedienknöpfen
betrieben und die gespeichterte Hitze
wird von einer Restwärmeanzeige auf
dem Glaskeramikkochfeld angegeben.
Dual- und Ovalkochfelder haben zwei
Heizzonen . Um die äußere Zone
eines Dual-/Ovalkochfeld zu aktivieren,
drehen Sie den Knopf um eine Position
weiter Auf diese Weise werden beide
äußere Zonen eingeschaltet.
Um die äußere Zone eines Dual-/Ovalkochfeld zu desaktivieren, drehen Sie
den Knopf
Auf diese Weise werden beide äußere
Zonen ausgeschaltet.
Resthitzefunktion
Nach jedem Kochvorgang ist immer
noch Hitze in der Glaskeramikober-
äche vorhanden, die als Resthitze
bezeichnet wird. Die Steuerung kann
ungefähr berechnen, wie heiß das
Glas im schlimmsten Fall sein kann.
Wenn die berechnete Hitze höher als
+ 60°C ist, dann wird dies von der
entsprechenden Restwärmeanzeigeleuchte angezeigt, Die Resthitzeanzeige erscheint so lange die berechnete
Heizzonentemperatur über + 60° C
beträgt.
um eine Position weiter
Der knopfgesteuerte Herd ist für den
Betrieb mit 6 Hitzestufen vorgesehen:
Wenn nach einem Stromausfall die
Kochächensteuerung wieder mit
Strom versorgt wird, dann blinkt die
Restwärmeeanzeige, wenn die entsprechende Heizzone eine Restwärmevon mehr als + 60 ° vor dem Strom-
DE
Page 91
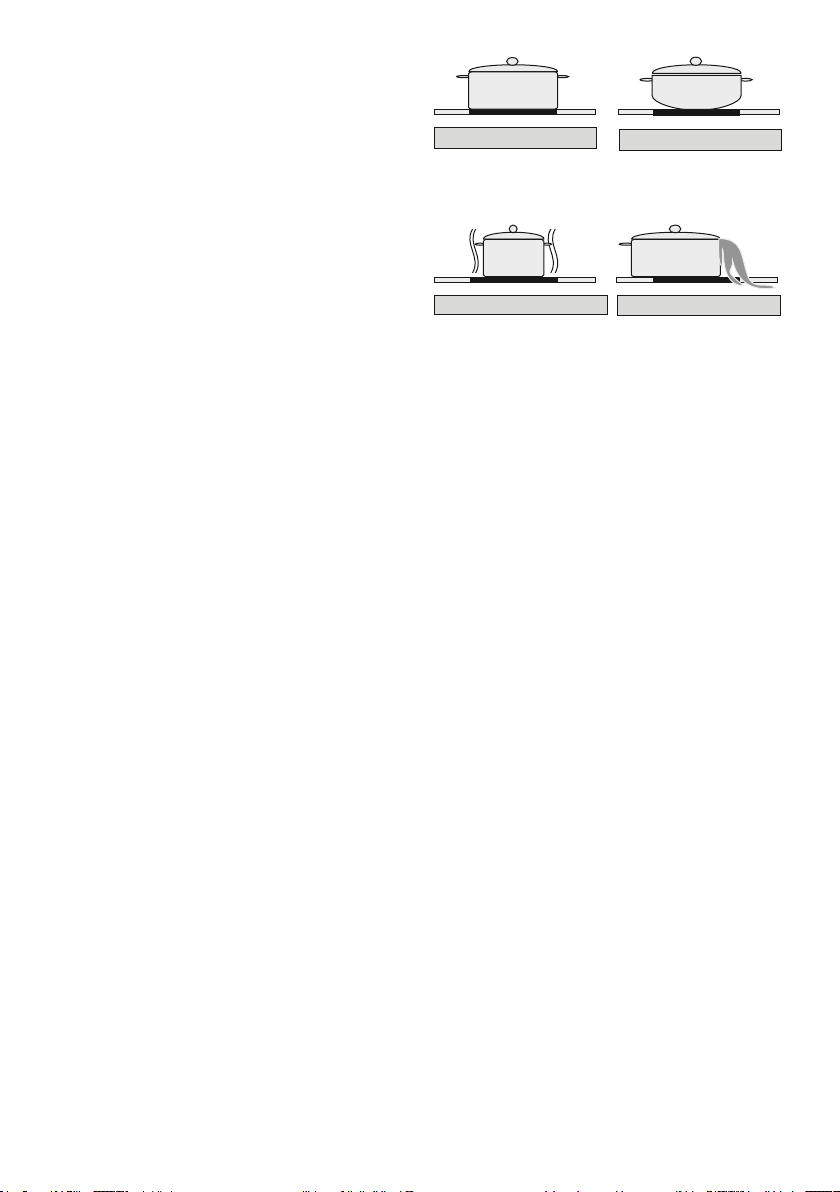
ausfall hatte. Die Anzeige blinkt so
lange, bis die maximale Restwärmeezeit abgelaufen ist oder die Heizzone
ausgewählt und eingeschaltet wird.
TIPPS UND TRICKS
Kochgeschirr
· Nutzen Sie dickes, aches Kochgeschirr mit einem ebenen Boden und
dem selben Durchmesser wie die
Kochzone. Dies verringert die Kochzeiten.
· Kochgeschirr aus Stahl, emailliertem
Stahl, Gusseisen und Edelstahl (wenn
vom Hersteller entsprechend markiert),
liefert die besten Kochergebnisse.
· Kochgeschirr mit Böden aus emailliertem Stahl, Aluminium oder Kupfer
kann metallische Rückstände auf dem
Kochfeld verursachen. Diese können
schwer zu entfernen sein. Reinigen Sie
das Kochfeld nach jeder Nutzung.
· Kochgeschirr ist geeignet für Induktion, wenn am Boden des
Kochgeschirrs ein Magnet haftet
· Das Kochgeschirr muss zentral auf
die Kochzone gestellt werden. Bei
nicht korrekter Platzierung wird dies
angezeigt.
· Bei Nutzung bestimmter Pfannen
könnten diese diverse Geräusche
produzieren. Dies liegt am Design der
Pfannen und hat keinen Einuss auf
die Funktionalität oder Sicherheit des
Kochfelds.
RICHTIG
FALSCH
RICHTIG FALSCH
Energiesparen
· Induktionszonen passen sich in
einem gewissen Maße automatisch an
die Größe des Kochgeschirrs an. Dennoch muss der magnetische Teil des
Kochgeschirr-Bodens einen gewissen
Durchmesser haben, welcher von der
Größe der Kochzone abhängt.
· Platzieren Sie das Kochgeschirr auf
die Kochzone bevor Sie diese einschalten. Wenn Sie die Kochzone vorher einschalten, funktioniert diese nicht
und das Kontrollfeld zeigt das an.
· Benutzen Sie zur Verringerung der
Kochzeit einen Deckel.
· Wenn eine Flüssigkeit anfängt zu
Kochen, reduzieren Sie die zugeführte
Temperatur.
· Minimieren Sie die Menge von Flüssigkeit oder Fett, um Kochzeiten zu
verringern.
· Wählen Sie für den gewünschten
Kochzweck die geeignete Temperatur.
Beispiele für Kochzwecke
Die Information der folgenden Tabelle
dient nur
DE
zur Orientierung.
Page 92

Einstellungen
0
1-3 Sanfte Erwärmung
4-5
6-7 Aufwärmen und
8 Kochen, Braten und
9 Maximale Hitze
P Boost-Funktion
Ausschalten
Ausschalten
Schonender
Siedeprozess, langsame
Erwärmung
schneller Siedeprozess
Schmoren
Reinigungshinweise
· Verwenden Sie zur Reinigung der
Oberäche des Kochfelds keine
Scheuerschwämme, ätzende Reinigungsmittel, Reinigungssprays oder
scharfe Gegenstände.
· Zur Entfernung von verbranntem
Essen benutzen Sie ein feuchtes Tuch
und Spülmittel.
· Zur Entfernung von Essensresten
können Sie einen Schaber verwenden.
Klebrige Lebensmittel müssen sofort
nach dem Überkochen und bevor
die Glasäche abgekühlt ist gereinigt
werden.
· Beschädigen Sie nicht den Sili-
konkleber am Rand der Glasäche,
wenn Sie einen Schaber verwenden.
· Ein Schaber hat eine Rasierklinge
und muss daher von Kindern ferngehalten werden.
· Nutzen Sie spezielles Reinigungsmittel für Kochfelder, wenn das Kochfeld
handwarm ist. Wischen Sie es ab und
trocknen es mit einem sauberen Tuch
oder Papiertuch.
DE
Page 93

BEDIENFELDER
Einbauofen
Kocheldsteuerung
Herdfunktion
Timer
DIE BENUTZUNG DES BACKO-
FENTEILS DES GERÄTS
Backofenfunktion
Zur Auswahl der gewünschten Kochfunktion drehen Sie den Knopf auf das
entsprechende Symbol. Die Einzelhei-
ten zu den Backofenfunktionen nden
Sie im nächsten Abschnitt.
Ofentermperatur
Kochfeldbedienung
DE
Page 94

Backofenfunktionen
* Die Funktionen Ihres Backofens können je nach Modell Ihres Produkts unterschiedlich sein.
zehnminütiges Vorheizen des Backofen ist empfehlenswert.
Backofenlampe:
Nur die Backofenlampe wird eingeschaltet und bleibt bei allen Backfunktionen angeschaltet.
Auftaufunktion:
Die Warnlichter des Backofens werden
eingeschaltet, der Lüfter beginnt zu arbeiten.
Zur Nutzung der Auftaufunktion stellen Sie Ihre gefrorenen Lebensmittel
in den Backofen auf die dritte Schiene
von unten. Es wird empfohlen, unter
die aufzutauenden Nahrungsmittel ein
Ofenblech zum Auffangen des Schmelzwassers zu platzieren. Diese Funktion wird Ihre Lebensmittel nicht garen
oder backen, sondern nur auftauen .
Umluft-Funktion:
Der Thermostat und die Warnlichter
des Backofens schalten sich ein, das
obere und untere Heizelement heizen
sich auf und der Lüfter schaltet sich
ein.
Diese Funktion erzielt gute Ergebnisse
beim Backen von Gebäck. Das Backen wird durch das obere und untere
Heizelement durchgeführt und die vom
Lüfter erzeugte Luftzirkulation gibt den
Speisen einen leichten Grilleffekt. Ein
Ober- und Unterhitze-Funk-
tion:
Der Thermostat und die Warnlichter des
Backofens schalten sich ein, das untere und obere Heizelement heizen sich
auf. Die Ober-/Unterhitze-Funktion gibt
Wärme ab, um Speisen auf den oberen
und unteren Blechen gleichzeitig zu garen. Dies ist ideal für Gebäck, Kuchen,
Nudelauäufe, Lasagne und Pizza. Es
wird empfohlen, den Backofen 10 Minuten lang vorzuheizen und es ist am
Besten, bei dieser Funktion nur auf einer Schiene zu garen.
Grillfunktion:
Der Thermostat und die Warnlichter
des Backofens schalten sich ein, das
Grillheizelement heizt sich auf. Diese
Funktion wird zum Grillen und Rösten
verwendet. Nutzen Sie die oberen
Schienen des Backofens. Bürsten sie
das Drahtgitter leicht mit Öl ab, um ein
Anhaften der Speisen zu verhindern
und stellen Sie die Speisen in die Mitte
des Gitters. Stellen Sie immer ein
Blech darunter, um heruntertropfendes
Fett oder Öl aufzufangen.. Ein etwa
zehnminütiges Vorheizen des Backofens
ist empfehlenswert. Achtung: Beim Grillen
muss die Backofentür geschlossen und
die Backofentemperatur auf 190
0
C
eingestellt sein.
Schnellgrillfunktion:
DE
Page 95

Der Thermostat und die Warnlichter des
Backofens schalten sich ein, das obere
Heizelement und das Grillelement heizen
sich auf. Diese Funktion wird für ein
schnelleres Grillen und für die Abdeckung
einer größeren Oberäche, z. B. für das
Grillen von Fleisch, verwendet. Benutzen
Sie die oberen Schienen des Backofens.
Bürsten sie das Drahtgitter leicht mit Öl
ab, um ein Anhaften der Speisen zu
verhindern und stellen Sie die Speisen
in die Mitte des Gitters. Stellen Sie immer
ein Blech darunter, um heruntertropfendes
Fett oder Öl aufzufangen.. Ein etwa
zehnminütiges Vorheizen des Backofens
ist empfehlenswert. Achtung: Beim Grillen
muss die Backofentür geschlossen und
die Backofentemperatur auf 190 °C
eingestellt sein.
Doppelgrill-Umluftfunktion:
Der Thermostat und die Warnlichter des
Backofens schalten sich ein, das obere
Heizelement und das Grillelement heizen
sich auf und der Lüfter schaltet sich ein.
um heruntertropfendes Fett oder
Öl aufzufangen. Ein etwa
zehnminütiges Vorheizen des
Backofens ist empfehlenswert.
Achtung: Beim Grillen muss die
Backofentür geschlossen und die
0
Backofentemperatur auf 190
C eingestellt
sein.
Pizzafunktion:
Der Thermostat und die Warnlichter des
Backofens schalten sich ein, das obere
Heizelement und das Grillelement heizen
sich auf und der Lüfter schaltet sich ein.
Der Lüfter zusammen mit dem unteren
Heizelement ist ideal zum Backen von
Speisen, wie z.B. Pizza, in kurzer Zeit.
Während der Lüfter die Hitze gleichmäßig
verteilt, sorgt das untere Heizelement für
das Backen des Teigs.
Diese Funktion wird für das Grillen
dickere Speisen und zur Abdeckung einer
größeren Oberäche verwendet. Sowohl
die oberen Heizelemente als auch der
Grill werden zusammen mit dem Lüfter
verwendet, um ein gleichmäßiges Garen
zu ermöglichen.
Nutzen Sie die oberen Schienen des
Backofens. Bürsten sie das Drahtgitter
leicht mit Öl ab, um ein Anhaften der
Speisen zu verhindern und stellen Sie
die Speisen in die Mitte des Gitters.
Stellen Sie immer ein Blech darunter,
DE
Turbofunktion
Der Thermostat und die Warnlichter
des Backofens schalten sich ein, das
untere Heizelement heizt sich auf und
der Lüfter schaltet sich ein.
Die Turbofunktion wird die Hitze gleichmäßig im Ofen verteilen. Die Speisen
auf allen Schienen werden gleichmäßig
gegart. Es wird empfohlen, den Backofen für 10 Minuten vorzuheizen.
Page 96

NUTZUNG DER VISIO TOUCH STEUERUNG
Einstellung der Uhrzeit:
Bei der Inbetriebsnahme muss zuerst
die Uhrzeit anhand der folgenden
Instruktionen eingestellt werden.
Bei der ersten Inbetriebnahme blinkt “0.00”
auf dem Display. Berühren Sie die „M“
Taste oder oder benutzen Sie die „-“ und
„+“ Tasten zum einstellen der Uhrzeit. “ : ”
das Zeichen beginnt auf dem Bildschirm
zu blinken. Sie können mit den „-“ und
„+“ Sensoren Einstellungen vornehmen.
Wenn der Autokoch-Modus deaktiviert
ist, drücken Sie die „-“ und „+“ Sensoren
gleichzeitig für den Tageszeit-Modus. Sie
können ihn mit den „-“ und „+“ Sensoren
kongurieren.
Zur Nutzung der Ofenfunktion müssen Sie
den Tageszeit-Modus anpassen.
EINSTELLUNG DES
OFENTIMERS:
Einstellung des
Minutentimers:
Berühren Sie den Alarmsensor, das “ ”
Symbol wird angezeigt. “ ” blinkt auf dem
Bildschirm. “0.00” wird anstatt der Uhrzeit
angezeigt. Stellen Sie während das
Symbol blinkt die gewünschte Zeitperiode
mittels der Plus- und Minussensoren ein.
Eine Zeit nach der Einstellung wird das
Symbol kontinuierlich leuchten. Nachdem
das Symbol durchgehend leuchtet,
ist die Einstellung der Alarmfunktion
abgeschlossen. Nach Ablauf des Timers
gibt es einen hörbaren Signalton und
das Symbol beginnt auf dem Bildschirm
zu blinken. Durch Drücken von „-“ oder
„+“ wird der Signalton gestoppt und das
Symbol verschwindet vom Bildschirm.
DE
Page 97

Einstellung des Backzeit-
Timers:
Diese Funktion dient der Einstellung
einer gewünschten Backdauer. Die
zuzubereitende Nahrung wird in den
Ofen gegeben. Der Ofen wird auf das
gewünschte Kochprogramm eingestellt.
Abhängig vom Essen, das zubereitet
w
erden soll, wird die Ofentemperatur
auf die gewünschte Gradzahl eingestellt.
Berühren Sie den “M” Sensor, bis Sie das
Zeitraumdauer-Symbol „ |>| ” auf dem TimerBilschirm sehen. “AUTO” erscheint auf dem
Bildschirm. Während der Timer sich in dieser
Position bendet, benutzen Sie die Plus- und
Minus-Sensoren zur Einstellung der für das
zu backende Essen gewünschten Backzeit.
Eine Zeit nachdem die Konfiguration
abgeschlossen ist, erscheint die Tageszeit
wieder auf dem Bildschirm und das ZeitraumSymbol wird fortwährend auf dem Bildschirm
zu sehen sein.
Nach Ablauf der eingestellten Zeit, stoppt der
Timer den Ofen und gibt eine hörbare Warnung
aus. Auch wird “AUTO” auf dem Bildschirm
zu blinken beginnen. Die Berührung eines
beliebigen Sensors auf dem Kontrollfeld wird
den hörbaren Warnton beenden. “AUTO”
wird weiterhin blinken. Berühren Sie die „-“
und „+“ Symbole gleichzeitig zum Beenden
des Modus “AUTO”.
Anpassung der Back-Endzeit:
Diese Funktion wird zum Backen nach
einer bestimmten Zeit, innerhalb eines
bestimmten Zeitraums benutzt. Die
zuzubereitende Nahrung wird in den
Ofen gegeben. Der Ofen wird auf das
gewünschte Kochprogramm eingestellt.
Abhängig vom Essen, das zubereitet
werden soll, wird die Ofentemperatur
auf die gewünschte Gradzahl eingestellt.
Berühren Sie den “M” Sensor, bis Sie das
Zeitraumdauer-Symbol „ |>| ” auf dem
Timer-Bilschirm sehen. “AUTO” erscheint
auf dem Bildschirm. Während der Timer
sich in dieser Position bendet, benutzen
Sie die Plus- und Minus-Sensoren zur
Einstellung der für das zu backende Essen
gewünschten Backzeit. Dann Berühren
Sie den “M” Sensor, bis Sie das Symbol
“ |>| ” sehen. Die Tageszeit wird unter
Angabe der Backperiode anfangen
zu blinken. Während sich der Timer in
dieser Position bendet, stellen Sie die
gewünschte Endzeit für die Zubereitung
mit den Plus- und Minus-Sensoren ein.
Eine Zeit nachdem die Konfiguration
abgeschlossen ist, erscheint die Tageszeit
wieder auf dem Bildschirm und das
Symbol „ >| ” wird fortwährend auf dem
Bildschirm zu sehen sein. Der Ofen wird
zur berechneten Zeit anfangen, indem er
die Backzeit von der eingestellten Endzeit
abzieht. Er ist dann zur eingestellten
Endzeit fertig. Der Timer gibt eine hörbare
Warnung von sich und “AUTO” wird auf
dem Bildschirm zu blinken beginnen. Die
Berührung eines beliebigen Sensors
auf dem Kontrollfeld wird den hörbaren
Warnton beenden. “AUTO” wird weiterhin
blinken. Berühren Sie die „-“ und „+“
Symbole gleichzeitig zum Beenden des
Modus “AUTO”.
Toneinstellung des Timers:
Berühren Sie den „-“ Sensor, bis Sie
einen Ton hören. Der Timer wird einen
hörbaren Signalton abgeben. Nach jedem
Berühren des „-“ Sensors, gibt der Timer
insgesamt drei verschiedene Signaltöne
von sich. Wenn Sie den Sensor nicht
mehr berühren, wird der letzte abgespielte
Signalton gespeichert.
Tastensperre
Die Tastensperre wird verwendet, um das
versehentliche Ändern von eingestellten
Funktionen im Kontrollfeld zu verhindern.
Betätigen Sie zur Aktivierung den „+“
Sensor, bis das Symbol für die Tastensperre
auf dem Bildschirm erscheint. Betätigen
Sie den „+“ Sensor abermals um die
Tastensperre aufzuheben.
DE
Page 98

Wenn der Ofen in Betrieb ist und
für 6 Stunden kein Einstellknopf
oder Touch-Sensor berührt wird,
stellt sich der Ofen automatisch ab.
Koch-
Zeit (Min.)
Ein-
pos.
schub-
TURBO OBERES-UNTERES OBERER & UNTERER LÜFTER GRILL
Pos. (Min.)
Thermostat
Koch-
Zeit (Min.)
Ein-
pos.
schub-
Pos. (°C)
Thermostat
Koch-
Zeit (Min.)
pos.
Einschub-
Pos. (°C)
Thermostat
Koch-
Zeit (Min.)
-
pos.
Einschub
200 4 15-25
Pos. (°C)
Thermostat
GERICHTE
Blätterteigge-
170-190 1-2-3 35-45 170-190 1-2 35-45 170-190 1-2 25-35
bäck
Kuchen 150-170 1-2-3 30-40 170 -190 1-2 30-40 150-170 1-2-3 25-35
Gebäck 150-170 1-2-3 25-35 170-190 1-2 30-40 150-170 1-2-3 25-35
Grillfleisch 200 4 10-15
175-200 2 40-50 175-200 2 40-50 175-200 2 40-50
Wässrige
DE
Speisen
Geflügel 200 1-2 45-60 200 1-2 45-60 200 * 50-60
Braten 200 3-4 15-25
Steak,
Lende
160-180 1-4 30-40
Zweifach-
Kuchen
170-190 1-4 35-45
Zweifach-
Gebäck
* Backen mit Brathuhn-Spieß...
Page 99

Zubehör
Das Produkt wird mit Zubehör ausgeliefert. Sie können auch aus anderes
Zubehör verwen-den, dieses muss
jedoch hitze- und feuerfest sein. Sie
können auch Glas-geschirr,
Kuchenformen und Backo-fenbleche
verwenden, die für die Ver-wendung in
einem Backofen geeignet sind. Wenn
Sie fremdes Zubehör ver-wenden,
müssen Sie die Anleitungen des
Herstellers befolgen. Wenn kleines
Geschirr verwendet wird, stellen Sie
es in die Mitte des Drahtgitters. Wenn
die zu garende
Speise das Backofenblech nicht vollständig bedeckt, wenn
die Speise aus dem Gefrierschrank
kommt oder das Blech für das Auffangen von Speisesäften, die während des
Grillens heruntertropfen, verwendet
wird, kann sich das Blech verformen.
Dies geschieht wegen der während des
Bratens auftretenden hohen Temperaturen. Das Blech kehrt, nachdem es
wieder abgekühlt ist, in seine alte Form
zurück. Dies ist ein normales physikalisches Phänomen, das während des
Hitzeaustauschs vorkommt. Stellen Sie
keine heißen Glastabletts und kein
Glasge-schirr direkt aus dem Backofen
in eine kalte Umgebung, um das
Zerbrechen der Tabletts oder des
Geschirrs zu ver-meiden. Stellen Sie
sie nicht auf kalte oder nasse
Oberflächen. Stellen Sie sie auf ein
trockenes Küchentuch und las-sen Sie
sie langsam auskühlen. Wenn Sie den
Grill Ihres Backofens verwenden,
empfehlen wir Ihnen (wenn geeignet),
den mitgelieferten Rost zu verwenden.
Wenn Sie den Drahtrost verwenden,
dann stellen Sie ein Blech auf eine der
unteren Schienen, damit herabtropfendes Öl aufgefangen wird. Sie können
Wasser in das Blech füllen, um die
Reinigung zu erleichtern. Wie schon in
den entsprechenden Absätzen erklärt,
versuchen Sie niemals, einen gasbetriebenen Grillbrenner ohne den Grill-
schutzdeckel zu verwenden. Wenn Ihr
Herd einen gasbetriebenen Grillbrenner
besitzt, aber das Hitzeschild des Grills
fehlt, beschädigt ist oder nicht verwendet werden kann, dann bestellen Sie
beim nächsten zugelassenen Kundendienstzentrum einen Ersatz.
Bratröhre
5. Schiene
5. Rack
4. Schiene
4. Rack
3. Schiene
3. Rack
2. Schiene
2. Rack
1. Rack
1. Schiene
Backofenzubehör
Das Zubehör Ihres Backofens kann
je nach Modell Ihres Produkts unterschiedlich sein.
Drahtgitter
Der Drahtrost wird zum Grillen oder Abstellen von unterschiedlichem Kochgeschirr verwendet.
ACHTUNG- Schieben Sie den Rost
richtig in die entsprechende Schiene
der Bratröhre ein und schieben Sie ihn
nach hinten.
DE
Page 100

Flaches Blech
Das ache Blech wird zum Backen von
Gebäck, wie Flans usw., verwendet.
Um das Blech richtig in der Röhre anzubringen, legen Sie es auf eine Schiene
und schieben es nach hinten.
Tiefes Blech
Das tiefe Blech wird zum Schmoren verwendet. Um das Blech richtig in der Röhre anzubringen, legen Sie es auf eine
Schiene und schieben es nach hinten.
REINIGUNG UND WARTUNG IHRES BACKOFENS
REINIGUNG
Bevor Sie mit der Reinigung Ihres
Backofens beginnen, müssen alle Bedienknöpfe auf „Aus' gestellt und
der Backofen muss abgekühlt sein.
Das Gerät ausstecken.
Verwenden Sie keine Reinigungsmittel,
die Partikel enthalten, welche die emaillierten und lackierten Teile Ihres Ofens
verkratzen könnten. Verwenden Sie
Scheuermilch oder Flüssigreiniger, die
keine Partikel enthalten. Verwenden Sie
keine scharfen Cremes, Scheuerpulver, Drahtwolle oder harte Werkzeuge,
da diese die Oberächen beschädigen
können. Für den Fall, dass übergelaufene Flüssigkeit sich in Ihren Backofen
eingebrannt haben sollte, kann dies das
Email beschädigen. Wischen Sie übergelaufene Flüssigkeit sofort auf. Verwenden Sie zur Reinigung des Backofens keinen Dampfreiniger.
Entfernung des Gitterrosts
Ziehen Sie, wie im Bild gezeigt, am Gitterrost. Nachdem Sie ihn aus der Halterung entfernt haben, heben Sie ihn an.
DE
Reinigen des Ofeninnenraums
Sorgen Sie dafür, dass der Backofen
ausgesteckt ist, bevor Sie mit seiner
Reinigung beginnen. Sie erhalten bei
der Reinigung des Ofeninnenraums die
besten Ergebnisse, wenn der Backofen
noch ein wenig warm ist. Wischen Sie
den Backofen mit einem weichen, nach
jeder Verwendung in Seifenwasser getauchten, Tuch aus. Dann wischen Sie
ihn nochmal mit einem feuchten Tuch
aus und wischen ihn dann trocken. Eine
vollständige Reinigung untrer Verwendung von Trockenpulverreinigern. Bei
einem Herd mit katalytisch emaillierten
Zargen müssen die Rück- und die Seitenwände des Innenrahmens nicht ge-
 Loading...