

Page 1
Page 2

Congratulations on purchasing the
IQ-8900/lQ-8920
unit.
Please read this operation manual thoroughly to
familiarize yourself with all the features of the unit and to
ensure years of reliable operation. You may also find it
useful to keep this operation manual on hand for
reference.
l
The only difference between the IQ-8900 and the
IQ-8920 is memory capacity.
l
Unless otherwise specified, the text and materials in
this manual apply to both models,
One of the models or certain accessories described in
this manual may not be available in your country when
you purchase this product.
Check with your local SHARP dealer concerning
availability.
All company and/or product names are trademarks and/or
registered trademarks of their respective manufacturers.
NOTICE
l SHARP
strongly recommends that separate permanent
written records be kept of all important data. Data may
be lost or altered in virtually any electronic memory
product under certain circumstances. Therefore,
SHARP assumes no responsibility for data lost or
otherwise rendered unusable whether as a result of
improper use, repairs, defects, battery replacement, use
after the specified battery life has expired, or any other
cause.
l
SHARP assumes no responsibility, directly or indirectly,
for financial losses or claims from third persons
resulting from the use of this product and any of its
functions, such as stolen credit card numbers, the loss
of or alteration of stored data, etc.
l
The information provided in this manual is subject to
change without notice.
1
Page 3
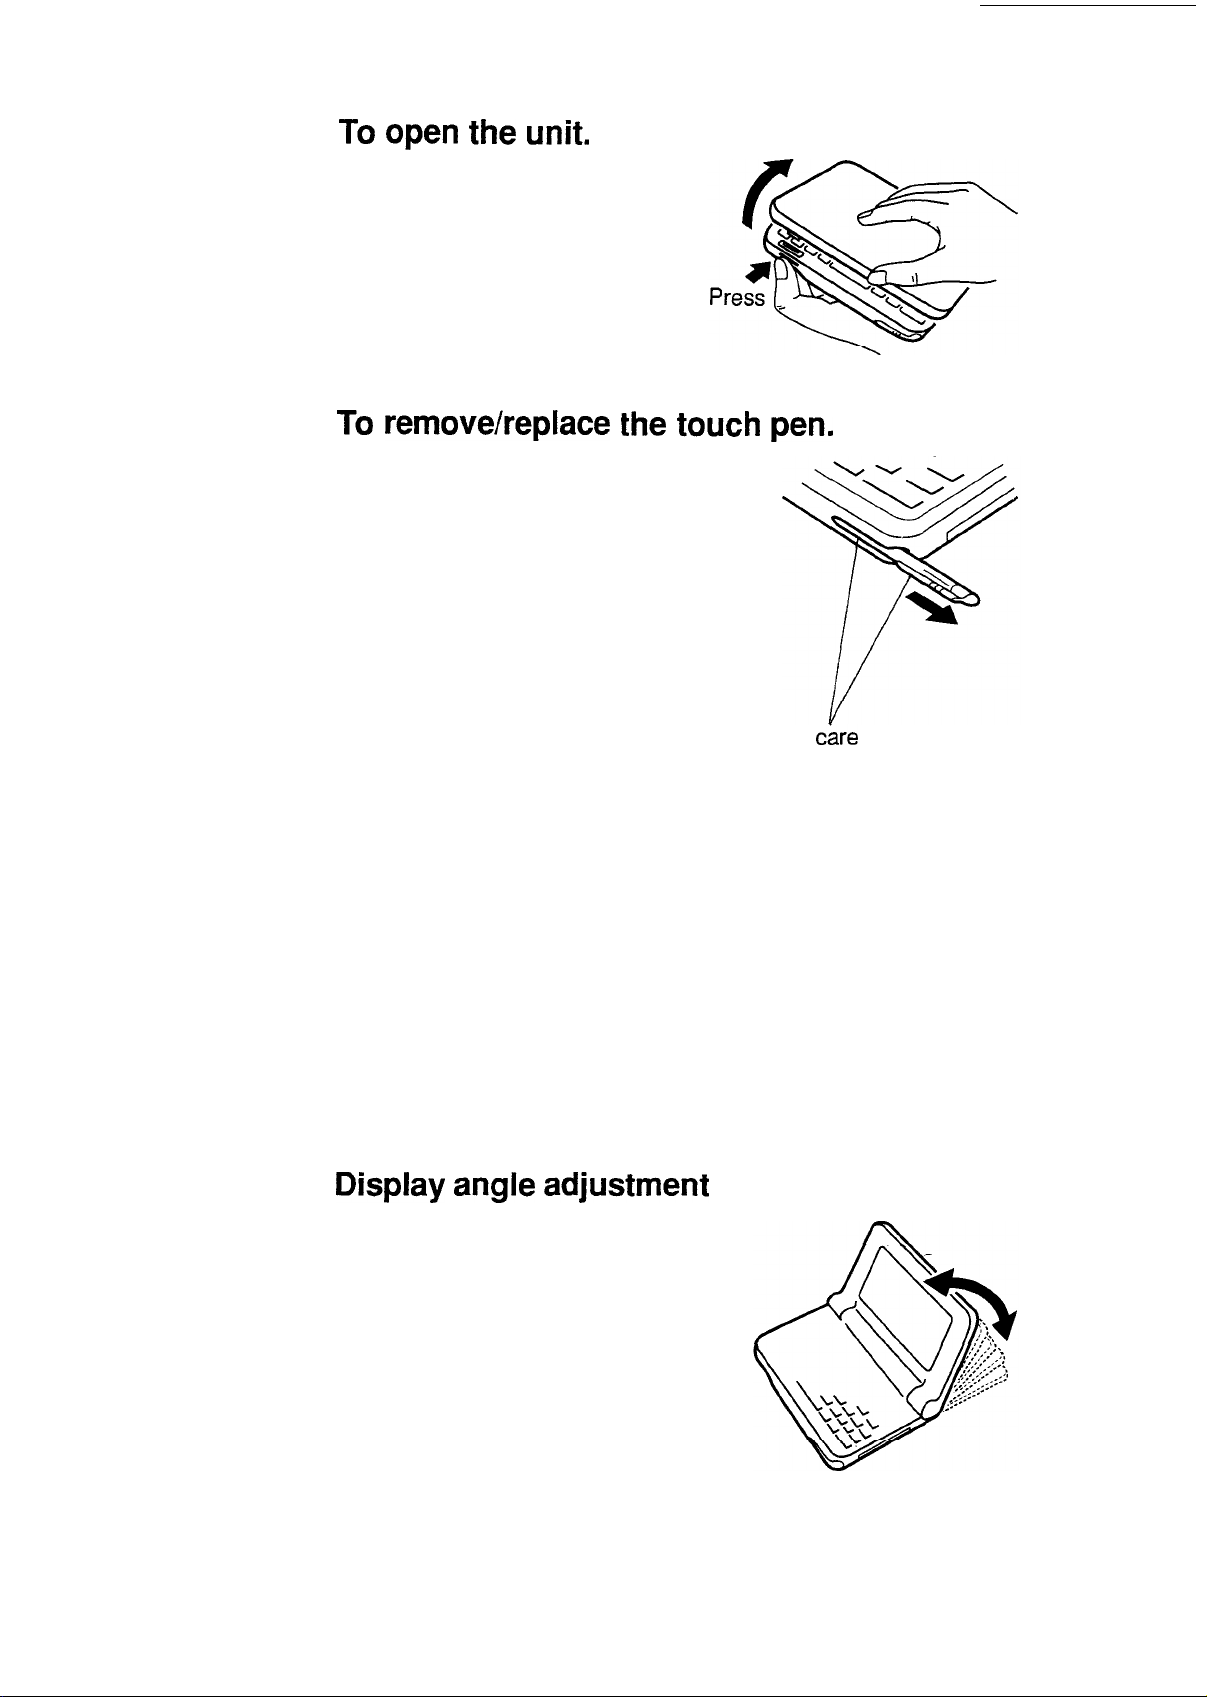
To
open the unit.
Press the lock button and
open the unit.
To
remove/replace
the touch pen.
To remove the touch pen,
which is installed at the front
right of the unit, pull in the
direction indicated.
To replace the touch pen,
slowly push the pen point
back into place (push in the
opposite direction to that
indicated), then check the
pen is safely secured.
Open
Take
c&-e
to ensure the
ridge grip on the touch
pen aligns correctly with
the mounting slot.
Caution:
Use only the attached touch pen to operate with the
display.
Do not use a pencil or any other sharp pointed object,
and always keep the point of the touch pen and the
display clean, to prevent scratching and damage to the
display.
Display
angle
adjustment
The display can be adjusted
to any angle to make reading
easy.
Page 4
uick Start
v
Important things to do:
q
q
13(
Please read through this Quick Start section even if you hate
to read operation manuals. The Quick Start section will get you
up and running with your unit in just a few minutes. Refer to
the rest of the manual for more details about a particular
operation.
Please read through the section for answers to commonly
asked questions. There is a good chance that any general
questions you have about your unit will be answered there.
Press (2nd)
application on the unit. The on-screen help is a quick
reference guide explaining various controls and their functions.
5
when you need help using a particular
.
3
Page 5
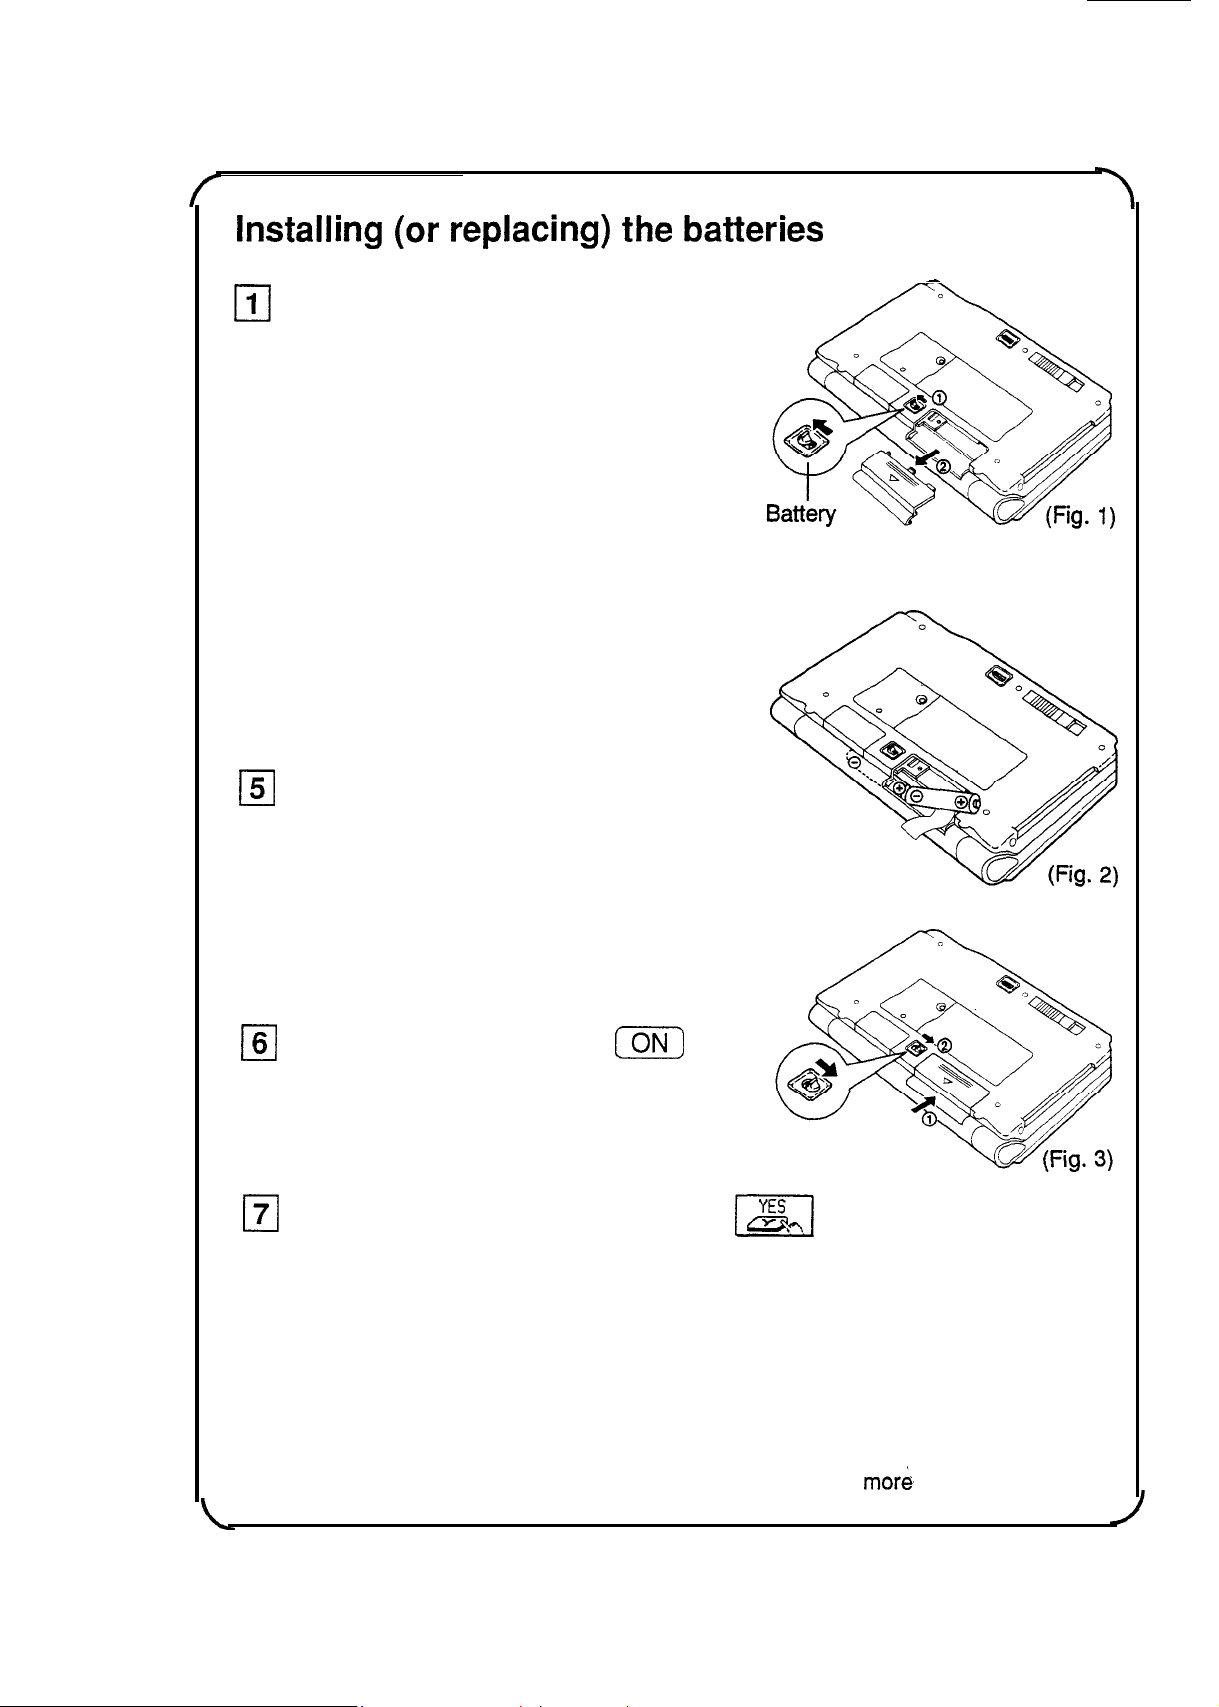
Installing (or replacing) the batteries
1
Set the battery replacement switch
cl
on the back of the unit to “REPLACE
BATTERIES” (exposing the red dot).
(Fig. 1)
2
Slide off the operation battery cover.
q
(Fig. 1)
replacement
Insert the two batteries atop the
3
cl
ribbon tab, as shown. (Fig. 2)
Replace the operation battery cover.
4
cl
(Fig. 3)
Set the battery replacement switch to
5
0
“NORMAL OPERATION”. (Fig. 3)
switch
-
If this is the first time you have
installed batteries in your unit,
proceed to the following steps.
While holding down the
6
0
on the keyboard, push the RESET
button on the back of the unit using
the touch pen or a similar object.
7
When a message appears, touch
0
completely clearing the memory.
On average, you can expect to get about two months of
battery life based on one hour a day of constant use. Actual
battery life will vary depending on individual use.
See “Getting the Unit Up and Running,” Chapter 1, for
[m]
key
m/
to initialize the unit,
mor&
details.
Page 6
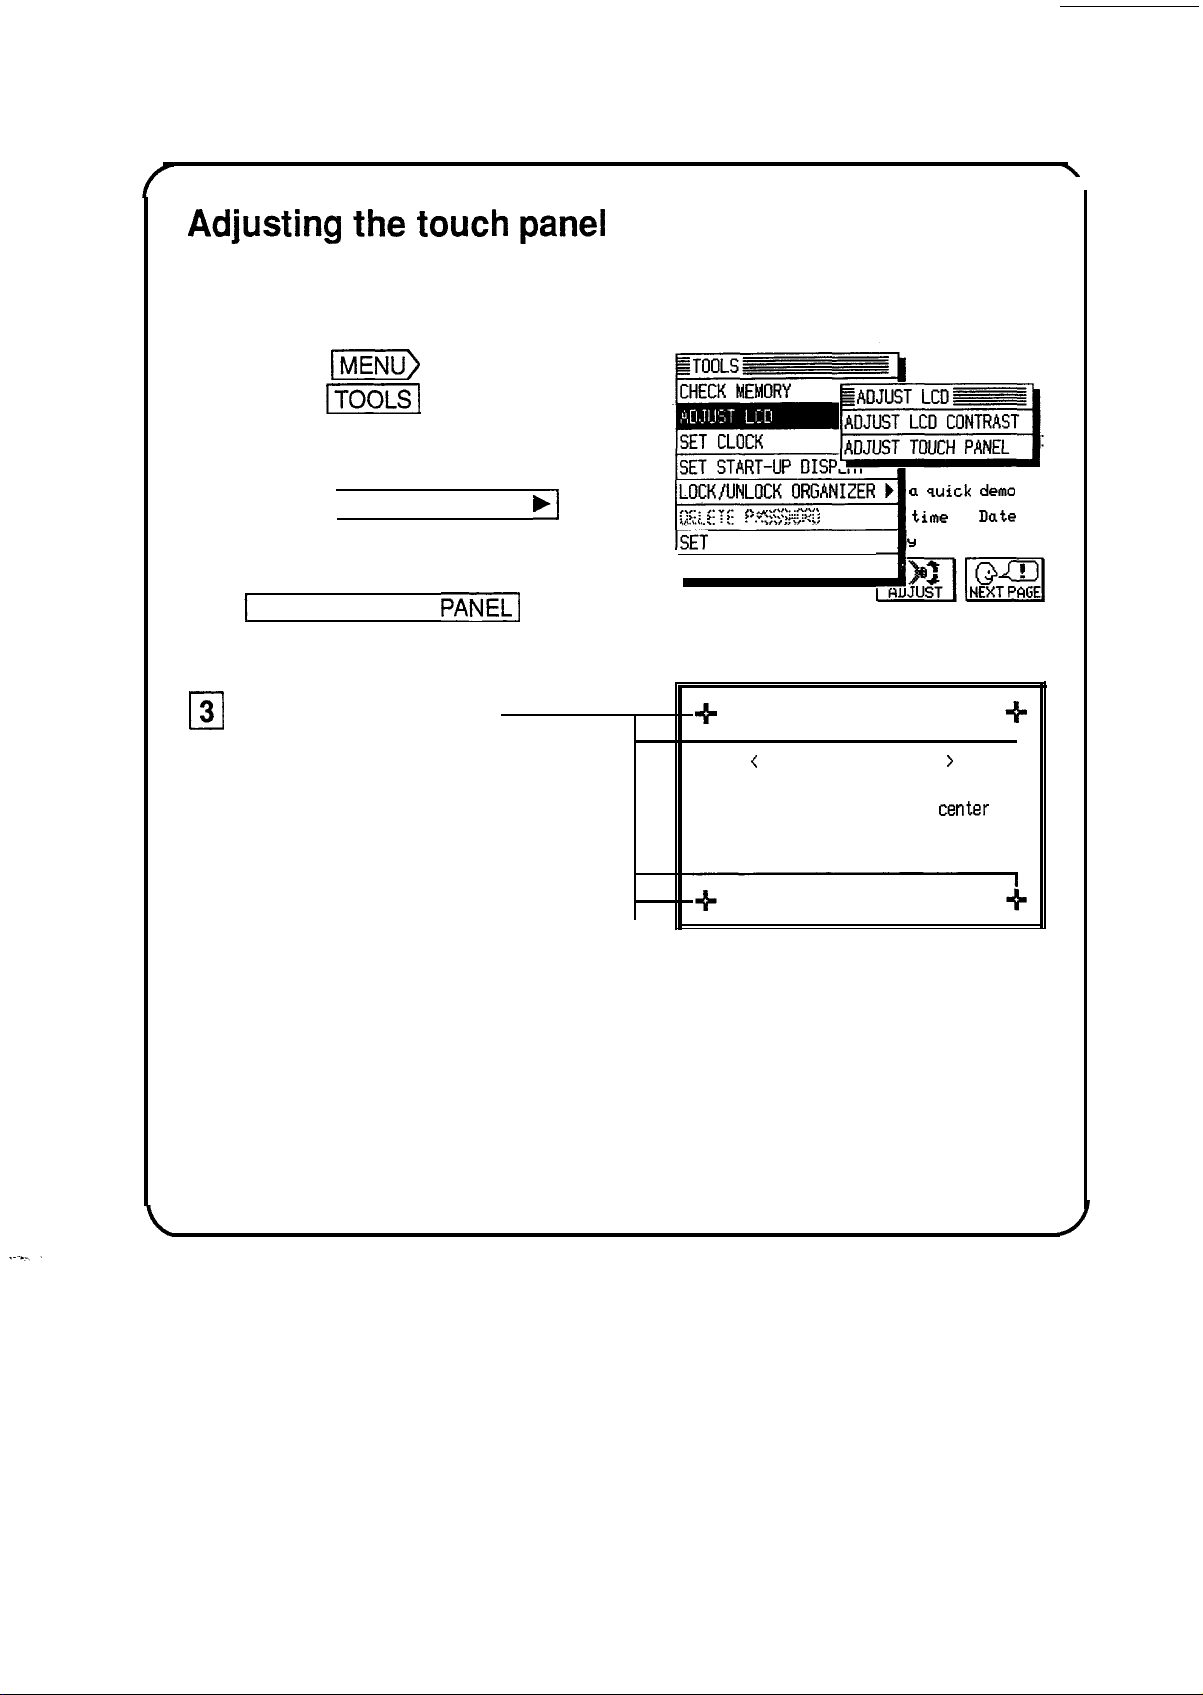
Adjusting the touch panel
Before using the unit, you should adjust the touch panel to ensure
optimal response when touching or writing on the display.
1
q
Press
touch
m)
v]
and then
to open the
TOOLS menu.
Touch [ADJUST LCD
2
cl
on the TOOLS menu and
then touch
1
ADJUST TOUCH
PANEL1
the submenu.
Touch all four of the
3
0
cross-points with the touch
pen.
Note: If the display is not
cleared from the screen,
verify that you have
touched each point.
(Points that have been
touched appear gray.)
.]
on
LOCK/UNLOCK
1-1
,,..\...
ISET
MORE TOOLS
,. ~ *.,.:.:<y:/;
?'.".::::z+..>
: . .
DAILY ALARMS
?k
<
ADJUST
Please
all
four
organizer’s
ORGANIZER b a quick demo
time
&
IY
at the left
,JrnI
TOUCH PANEL
touch the exact
cross-points with the
pen.
>
center
Date
+
of
See “Getting the Unit Up and Running,” Chapter 1, for more details.
5
Page 7
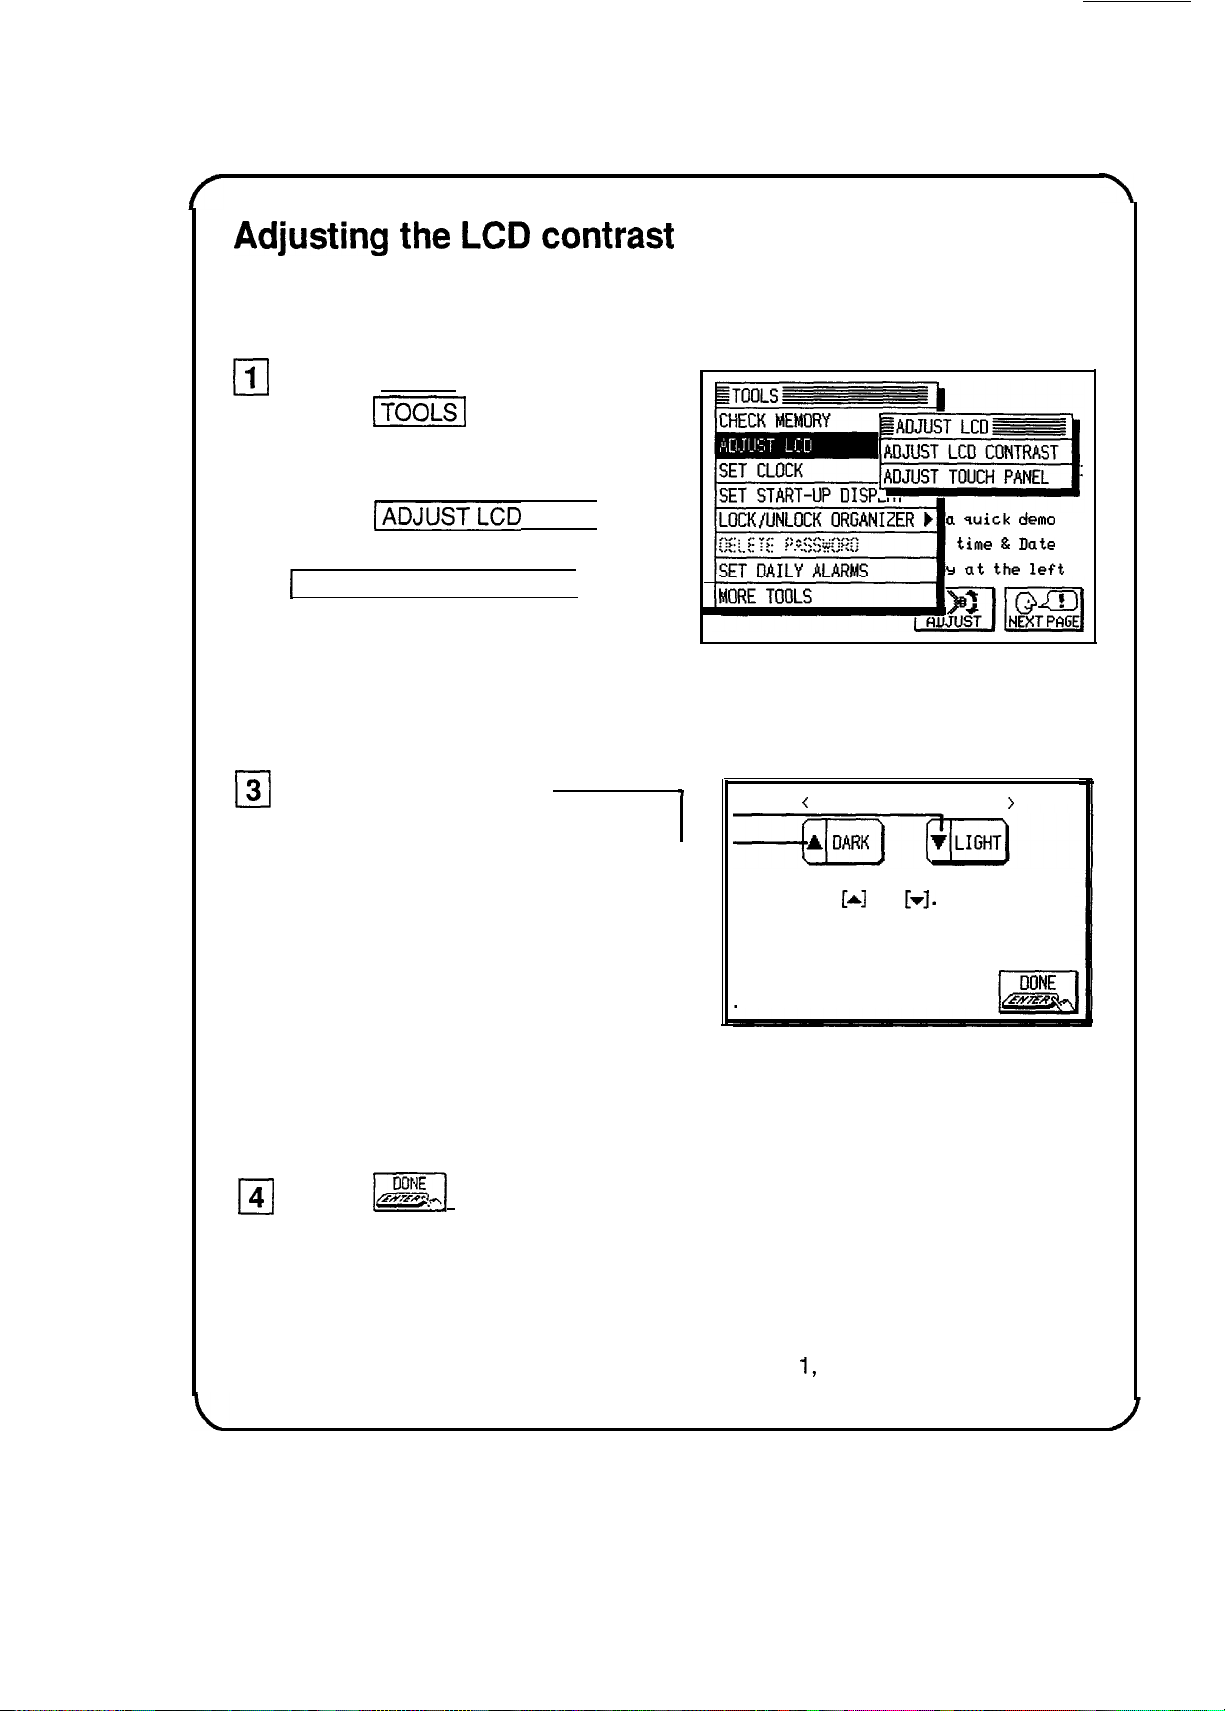
Adjusting the LCD contrast
You may find it necessary to adjust the LCD contrast to suit certain
lighting conditions.
(II
Press (MENU) and then
touch
TOOLS menu.
2 Touch IADJUSTLCD
q
on the menu, then touch
1
ADJUST LCD CONTRAST]
the submenu.
-1
to open the
ä
1
on
a
quick demo
time &
Date
Y
at the
left
3 Touch the buttons to
Cl
adjust the contrast to your
liking.
Note: If dark, horizontal
lines appear on the
display, then you have set
the contrast too dark.
Simply lighten it until the
lines disappear.
14)
Touch
See “Getting the Unit Up and Running,” Chapter 1, for more details,
K]
when you are finished.
7
Note: You can get here
when the unit
the [MENU] key and then
pressing the [ON] key.
(
ADJUST
To adjust the LCD contrast,
Press
[A]
LCD CONTRAST
or
[T].
is
off by
directly
holding
>
down
Page 8
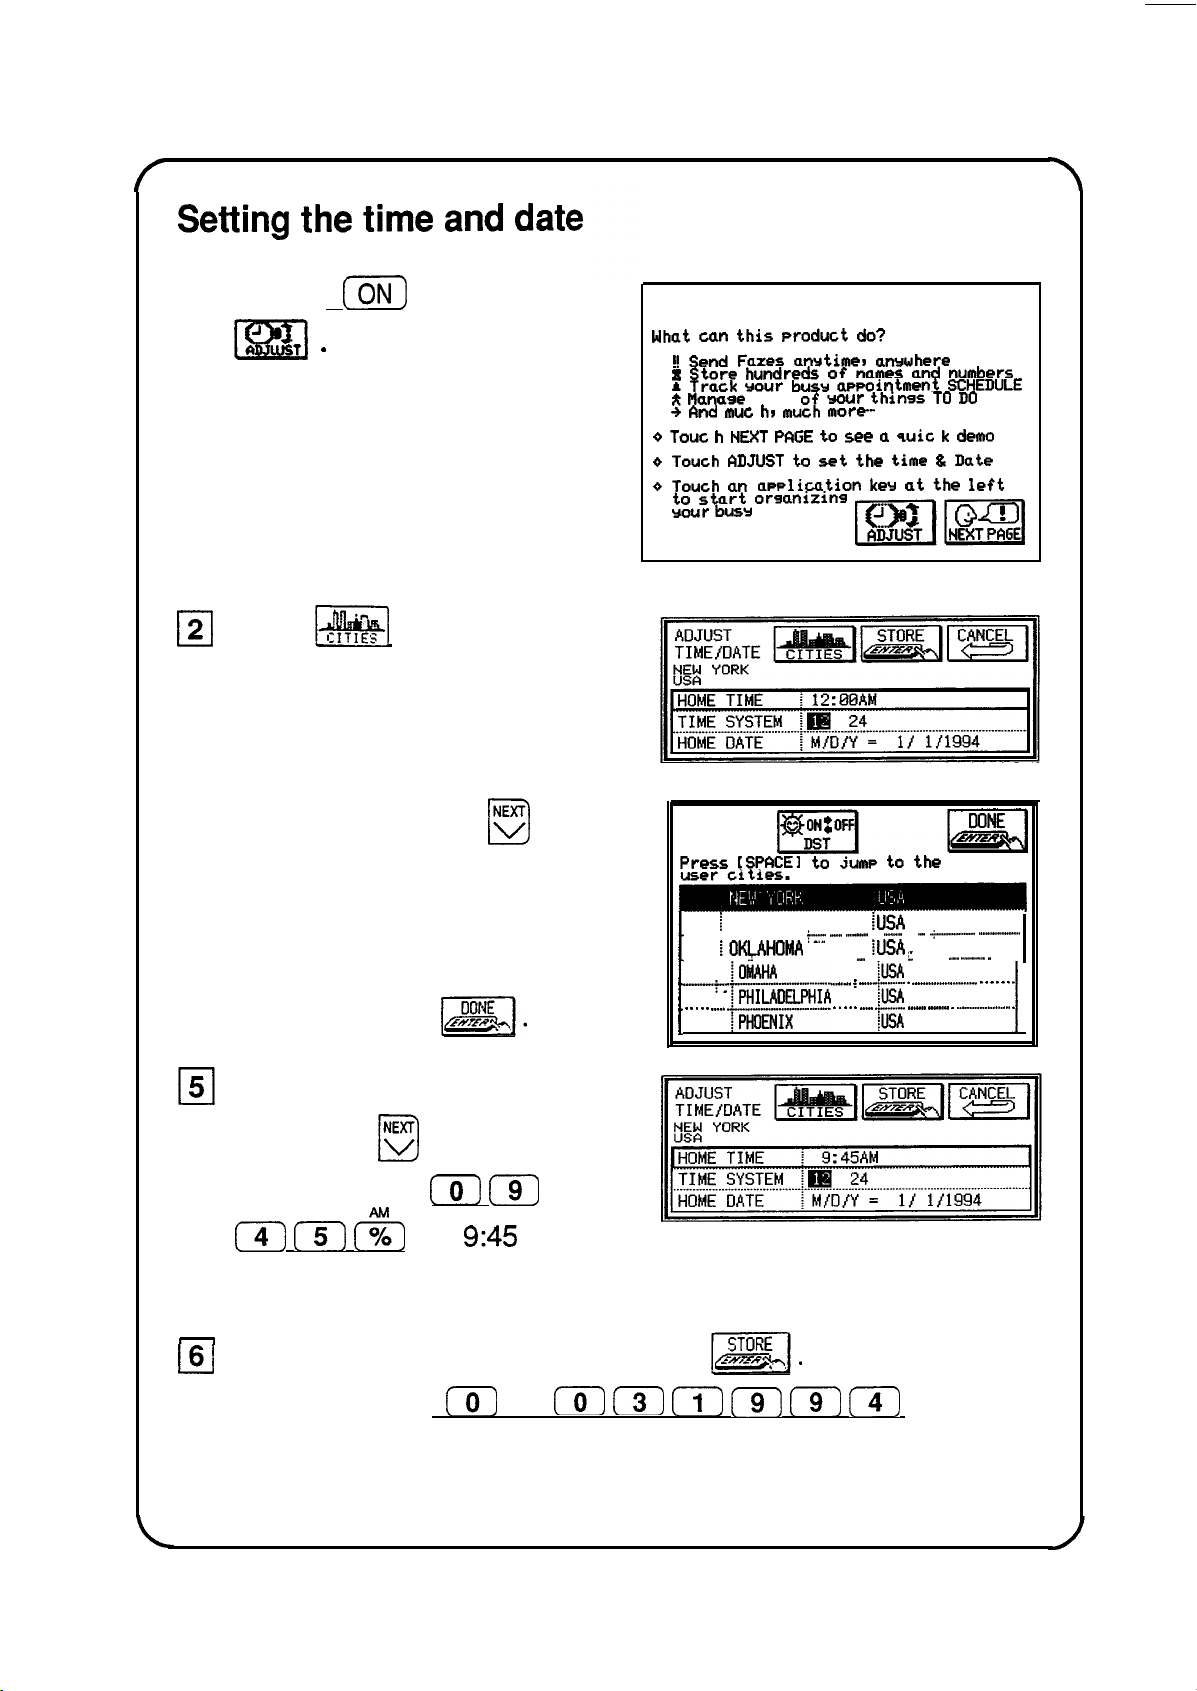
Setting the time and date
q
Press
J
I)
us1
m
[ON)
-
and touch
(If the demo has already
been disabled, select SET
CLOCK from the TOOLS
menu, then select
ADJUST TIME/DATE from
the submenu.)
121
Touch
!$@&I
to set your
home city.
3
Press the first letter of the
cl
name of your home
country, then press
until you find a city in your
D
Welcome!
What
can
this product do?
!! Send
Faxes
I Store
fi Track
e Manase
+ And muc hr much
Q
Tout h NEXT PAGE to
Q
Touch ADJUST to set the time & Date
Q
Touch an awlication ker at the left
to start orsanizins
your
busy
y
CHANGE
HOME CITY
Press [SpACEI
anytime,
hundreds of
your
busy aPPointment SCHEDULE
all of
life
anywhere
names and numbers
wour things TO DO
more-
see a
quit k demo
to jump to the
time zone.
4
Touch the city to select it
cl
and then touch
151
Type the correct time and
m].
then press @ twice.
(For example:
14) (5) (%]
[o) (3)
for
9:45
AM.)
w
Type the correct date and then touch
(For example:
(-6-j
(5)
(0) (3) (?-) [-%i-] (9) (7)
3, 1994.)
1
NORFOLK
. . . . . . . . . . .
iOKLAHO#A
. . . . . . . . .
t
.“..“....y”......“.” -__......_..........-. i -....-... “I . .._....._..........” . . . . . . .
/ . . . . . .._.. pL&!!?“!
f...".."
CITY
";
. . . . . . . . . . . . . .
. . . . . . . . . . . . . . . . . . . .
:USA
.-.._ .._._-_."
.
..._._."
.
.._ ..+"..."-
tl!iiA
"""
.
i....
.
. . . . . . .
. . . . .
.._ ii ..-.. ““..” . ..-................. /
..-..,....-...........
I._."
-....--..........
_ . . . .
I=].
for May
See “Getting the Unit Up and Running,” Chapter 1, for more details.
7
Page 9
r
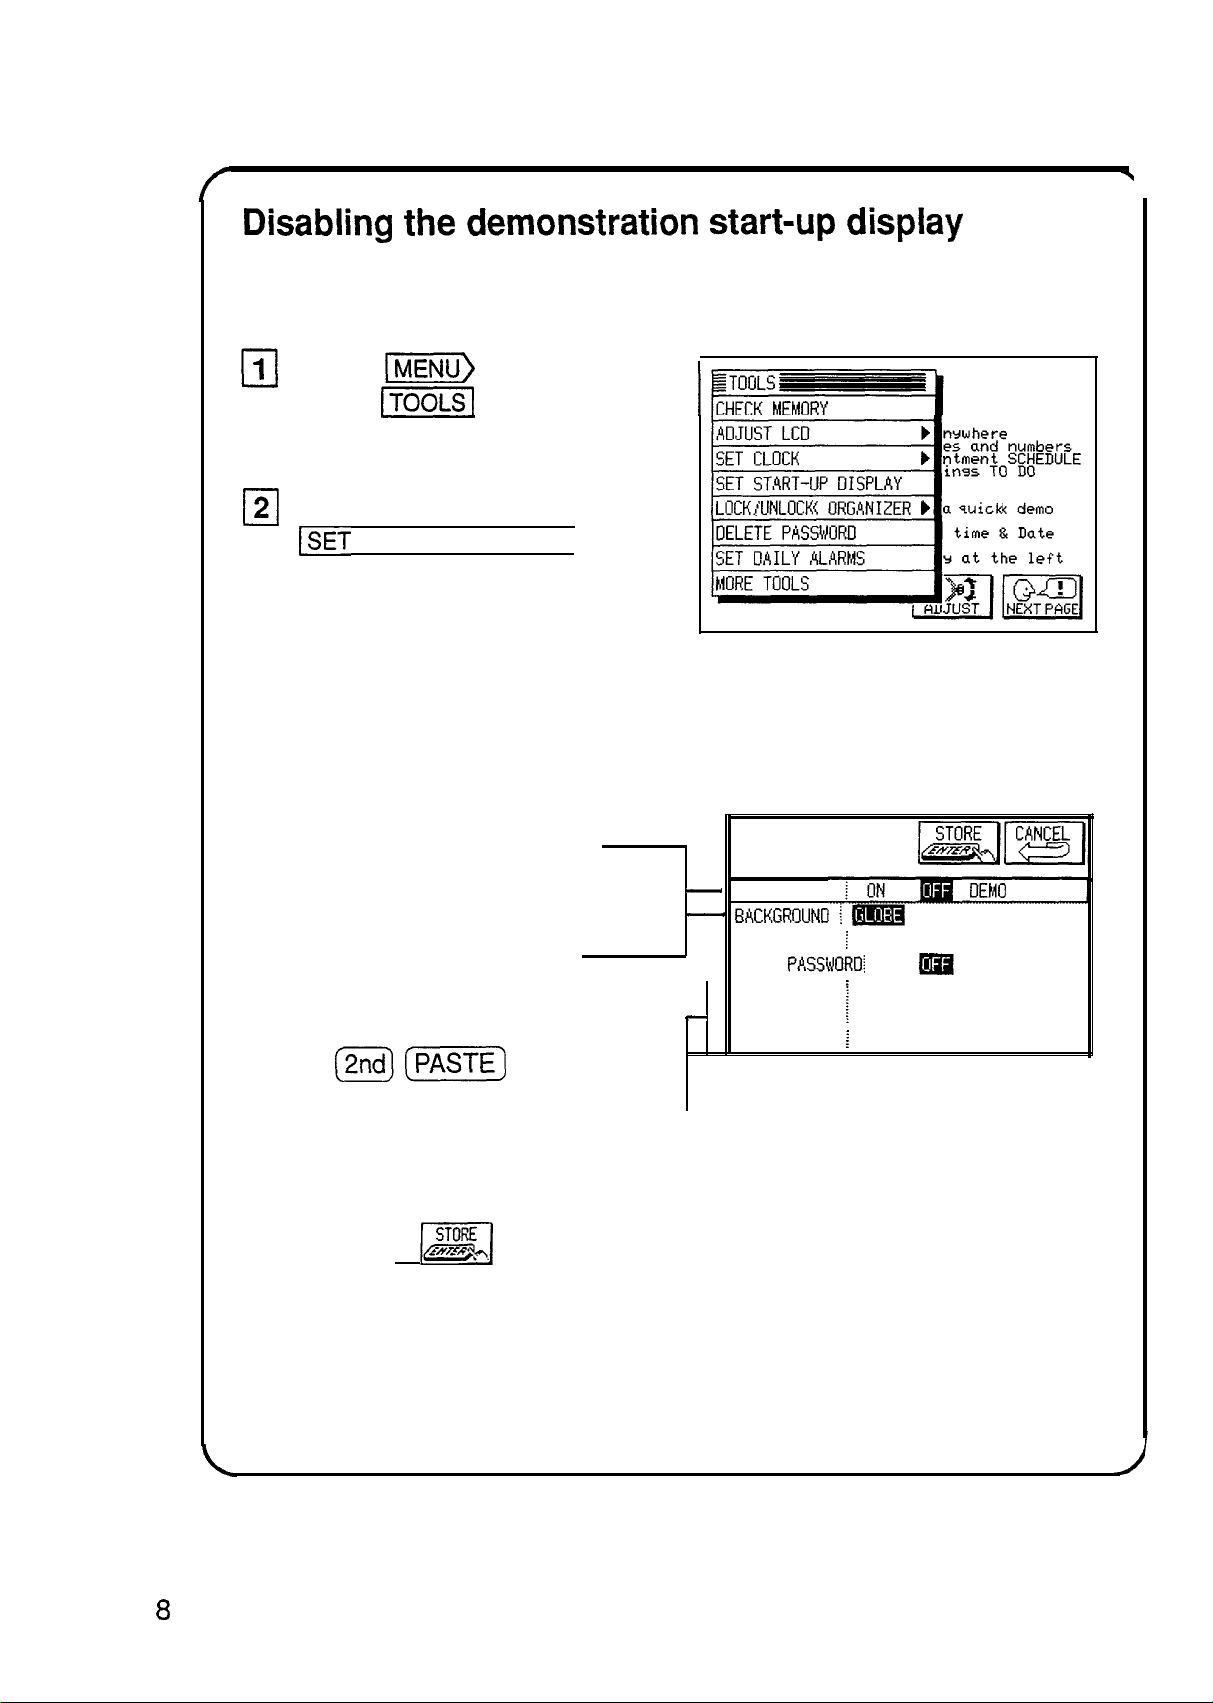
Disabling the demonstration start-up display
Your unit comes with a built-in demo which is turned on by default.
You will most likely want to shut this off at this time.
1
cl
Press
touch
Im)
v]
and then
to open the
7
TOOLS menu.
2
Touch
cl
~SET
START-UP DISPLAY].
3
Touch OFF in the box next
q
to START-UP to disable
the demo start-up display.
If you want your name, number
and address to be displayed on
start-up, touch ON instead of OFF.
GLOBE is the default start-up
display. To paste in a picture you
have copied from Scrapbook,
select USER’S and then
type
(2ndl[7%%%]
.
~~g:i$:E;~k;;,
LOCK!UNLOCK
SET
START-UP DISPLAY
-
START-UP
- EACKGROUNO i m
. . . . . . . . . . . . . . . . . . . . . . . . . . . . . . . . . . . . . . . . . . . . . . . . . . . . . . . . . . . . . . . . . . . . . . . . . . . . . . . . . . . . . . . . . . . . . . . . . . . . . . . .
USER'S
. . . . . . . . . . . . . . . . . . . . . . . . . . . . . . . . . . . . . . . . . . . . . . . . . . . . . . . . . . . . . . . . . . . . . . . . . . . . . . . . . . . . . . . . . . . . . . . . . . . . . . . . . .
ASK
. . . . . . . . . . . . . . . . . . . . . . . . . . . . . . . . . . . . . . . . . . . . . . . . . . . . . . . . . . . . . . . . . . . . . . . . . . . . . . . . . . . . . . . . . . . . . . . . . . . . . . . .
OWNER
. . . . . . . . . . . . . . . . . . . . . . . . . . . . . . . . . . . .
-
TEL NUMBER
. . . . . . . . . . . . . . . . . . . . . . . . . . . . . . . . . . . . . . . . . . . . . . . . . . . . . . . . . . . . . . . . . . . . . . . . . . . . . . . . . . . . . . . . . . . . . . . . . . . . . . . . . . . . . .
ADDRESS
ORGANIZER b a
i
I
[Paste picture here]
PASSVORDI
ON
:
j
. . . . . . . . . . . . . . . . . . . . . . . . . . . . . . . . . . . . . . . . . . . . . . . . . . . . . . . . . . . . . . . . . . . . . . . . .
i
i
quick
demo
USER'S PICTURE
[9ili
Type in your name, number, and-
address here.
q
8
Touch
m]
See “Setting the Start-Up Display,” Chapter 9, for more details.
to save all the changes.
Page 10
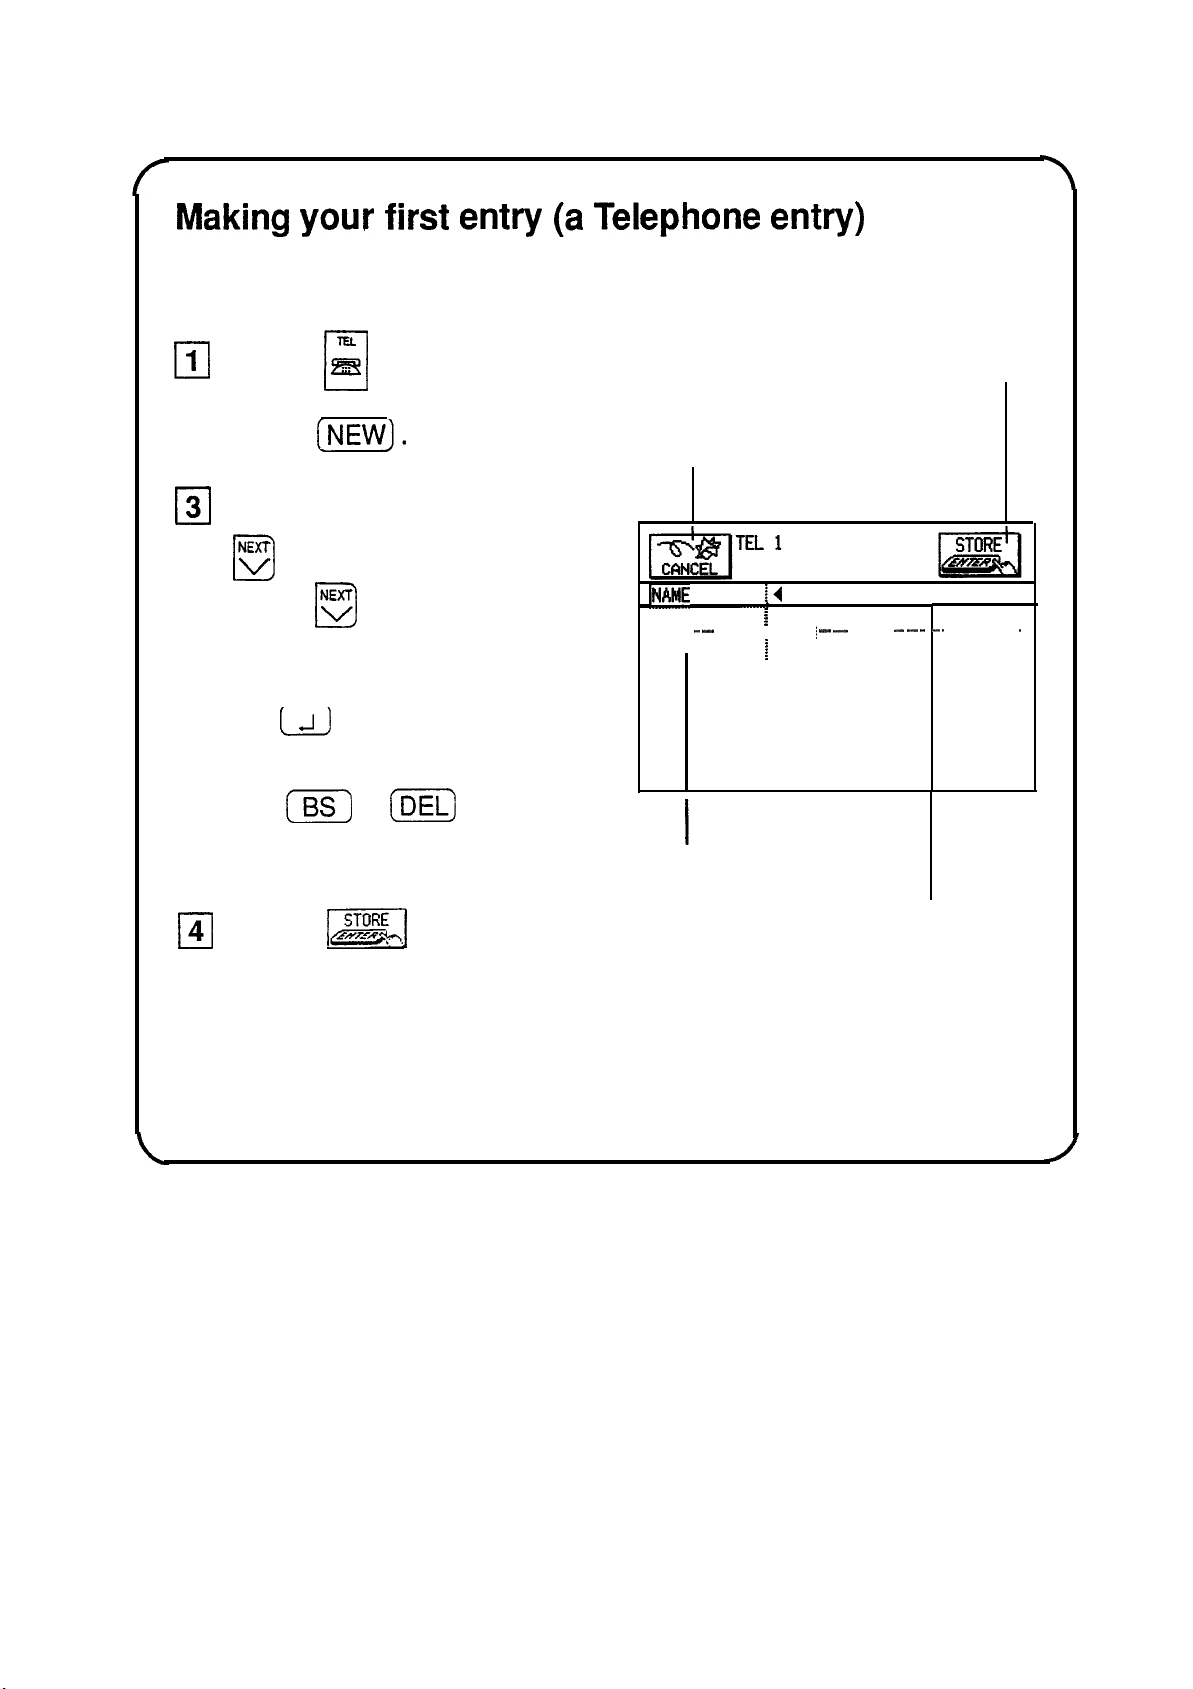
Making your first entry (a Telephone entry)
Note: The procedures described in the example below can be used
in many of this unit’s applications.
1
Press j& .
cl
0
Touch here to store the
entry into memory.
2
Press
cl
Type in a name, press
3
0
‘G
D
press
(NEW).
, type in a number,
NC
, then type in
cl
an address.
Use
u
to move to the next
line within a field.
Use
(E)
and the
cursor keys to correct mistakes.
Touch
4
0
m]
or
(E)
when
you are finished.
Touch here to cancel
the new entry.
FAME
NUMBER
. . . . . .
.._._
"..".."
ADDRESS
Simply touch a field name to
select the field for data entry.
:4
:
. . ..." . . . . . . . . .
The dark outlines around a
field indicates that it is selected.
!
i _......"
.._......."
. . . . . .
"^".I ..1-1..
-.--...
I . . . . . . . . . . ..I..
I
See “Making a New Entry,” Chapter 2, for more details.
Page 11
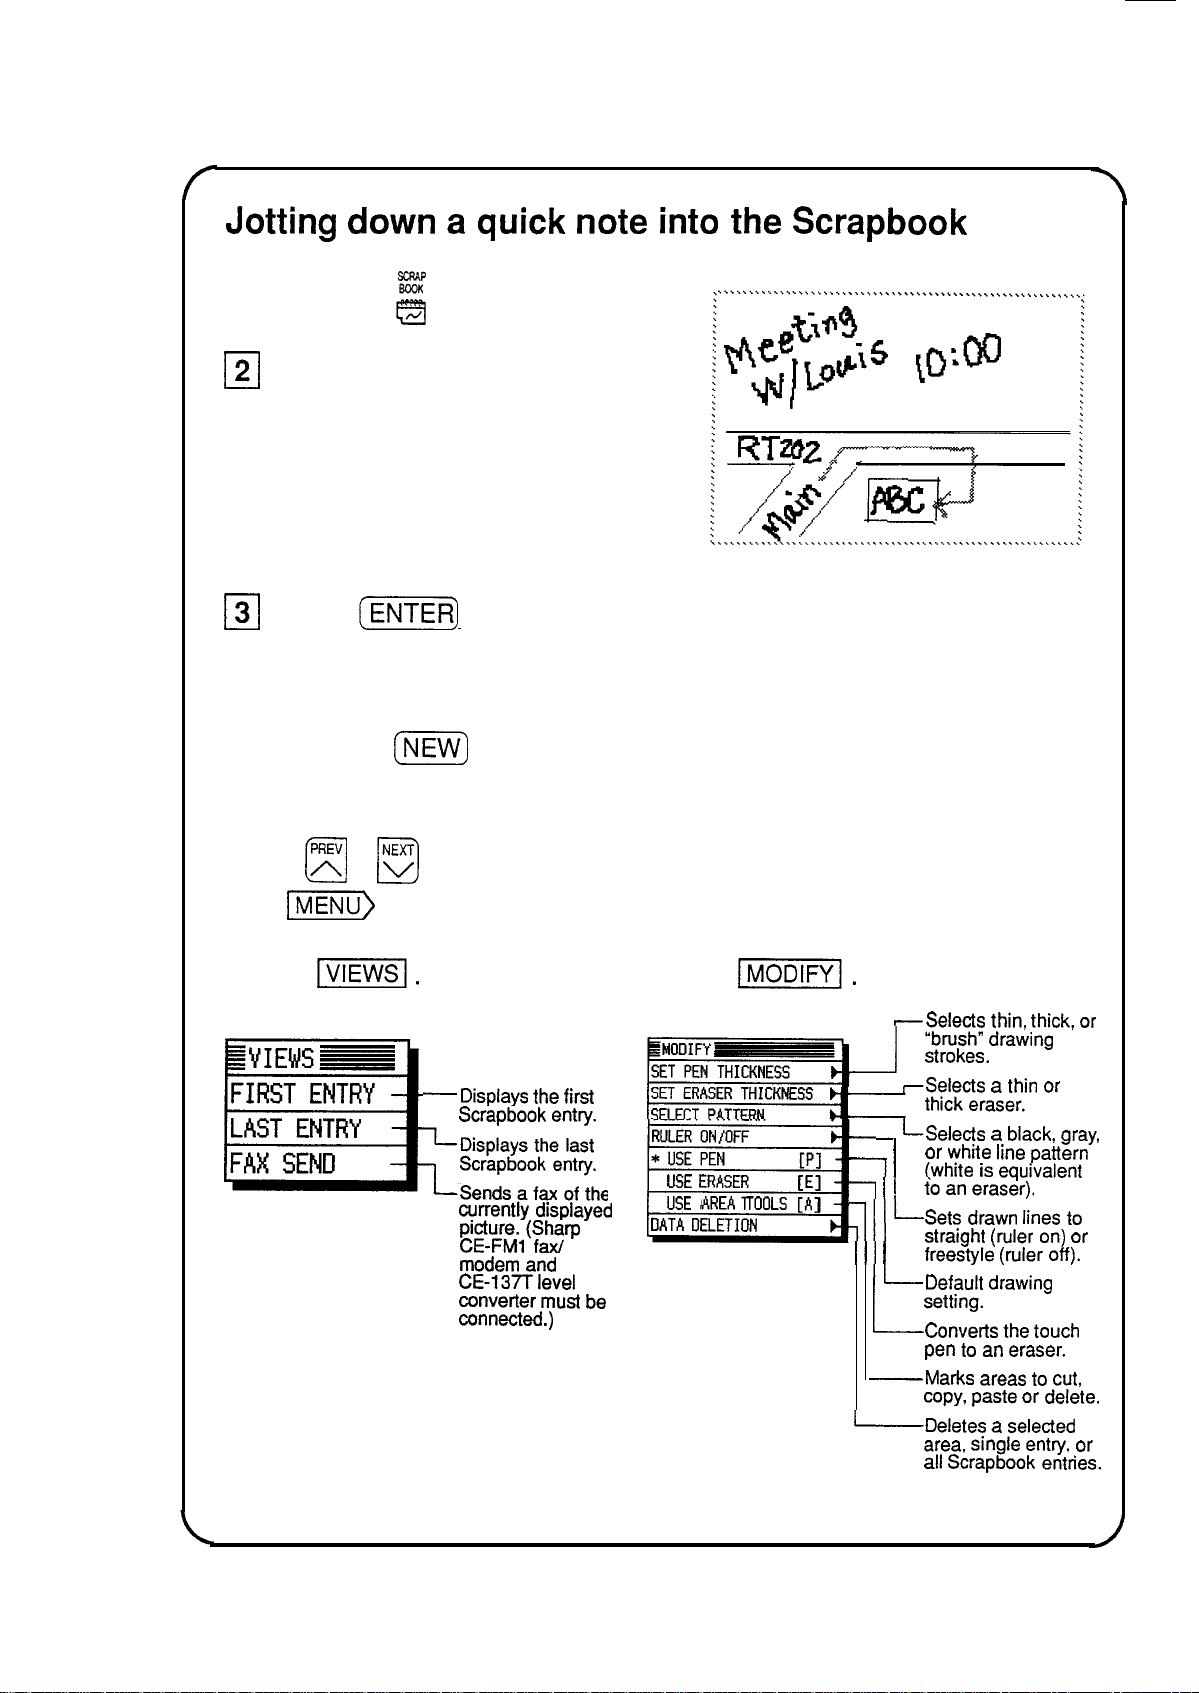
Jotting down a quick note into the Scrapbook
q
121
131
Now you can close the Scrapbook by pressing another application
key or press
Other Scrapbook Features
Use a ,
Press
Take the pen and write a
note on the display.
Press
are finished drawing.
cl
(m)
u
j!j
(N)
.
when you
to create other drawings.
t
o
view other scrapbook entries.
Use
IMENU)
Touch
to access other features.
I.
-Displays the first
Scrapbook entry.
currently displayed
gg$$P
modem and
CE-137T level
converter must be
connected.)
Touch
_---_.
RULER ON/OFF
*
USE PEN
USE ERASER
USE AREA TOOLS [A]
DATA DELETION
,a
p-j.
-Selects thin, thick, or
“brush” drawing
-J
.__.
[PI r
1 1
[El
lW--
III
Ill I
-Deletes
strokes.
-Selects a thin or
LSelects a black, gray,
or white line pattern
’
(white is equivalent
io an
I!
L-
L
-Marks
eraser).
Sets drawn lines to
straight (ruler on) or
freestyle (ruler off).
Default drawing
setting.
Converts the touch
pen to an eraser.
areas to cut,
copy, paste or delete.
a
area, single entry, or
all Scrapbook entries.
selected
10
See “The Scrapbook Application,” Chapter 6, for more details.
Page 12
--
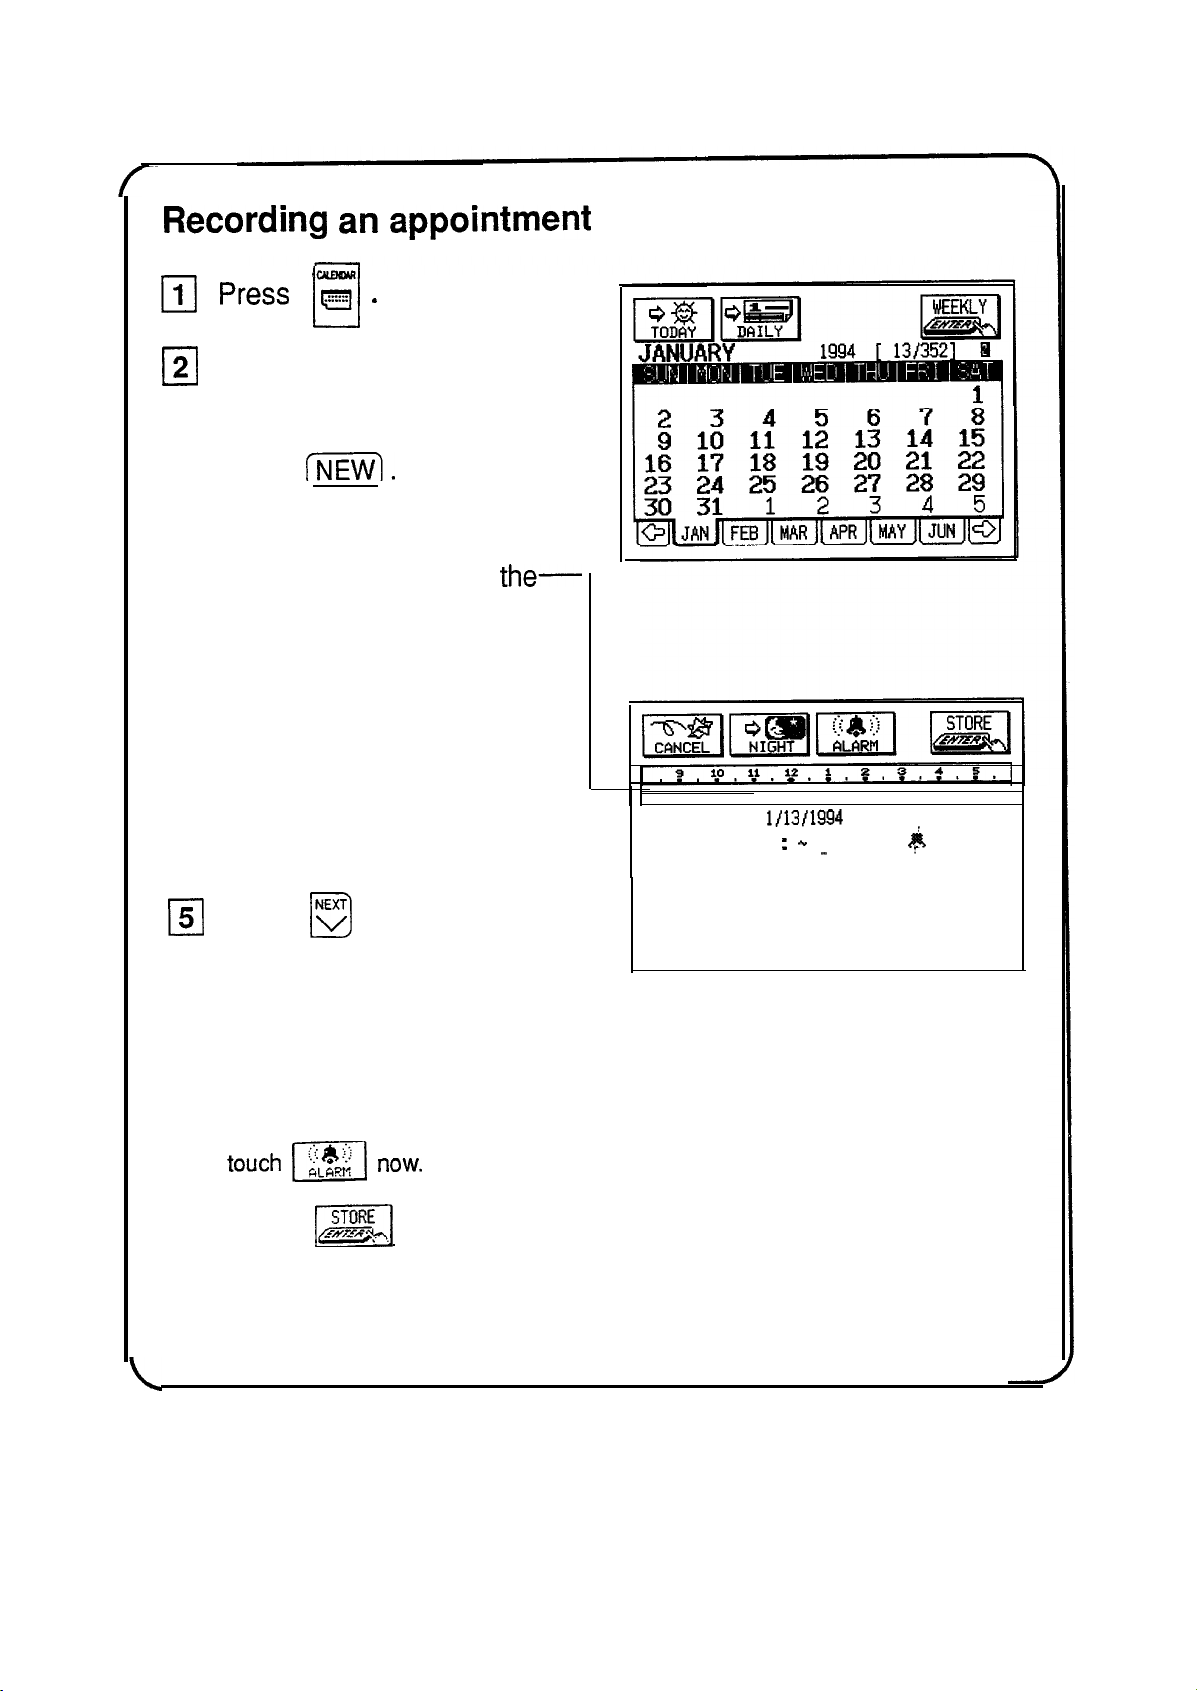
Recording an appointment
press
1
III
Touch the day you wish to
2
El
make an appointment on.
Press
3
cl
Touch the time bar at
4
q
time the appointment
begins, then touch it again
at the time the
appointment ends.
You can also use the keyboard to
enter the times if your
appointment does not fall on the
hour or half-hour.
g .
u
INEW).
the-
DATE: M/D/Y=
. . . . . . . . . . . . . . . . . . . . . . . ..." . . . . . . . . . . . . . . .. . . . . . . . . . . . . . . . . . . . . . . . . . . . . . . . . . . . . . . . . . . . . .
TIME: : .+ :
. . . . . . . . . . . . . . . . . . . . . . . . . . . . . . . . . . . . . . . . . . . . . . . . . . . . . .
l/13/1994
. . . . . . . . . . . . . . . . . . . . . . . . . . . .
..-..
y
. . . . . . . . . . . . . . . . . . . . . . . . . . . . .
h
:
t
. . . . . . . . . . . . . . . . . . . . . . . . . . . . . .
Press B and
5
0
type in a description.
(Example: “Meeting with
Pat”)
If you want to set an alarm to
remind you of the appointment,
6
El
touch 1x1
Touch
See “The Schedule Application,” Chapter 3, for more details.
m]
now.
to store the entry into memory.
11
Page 13
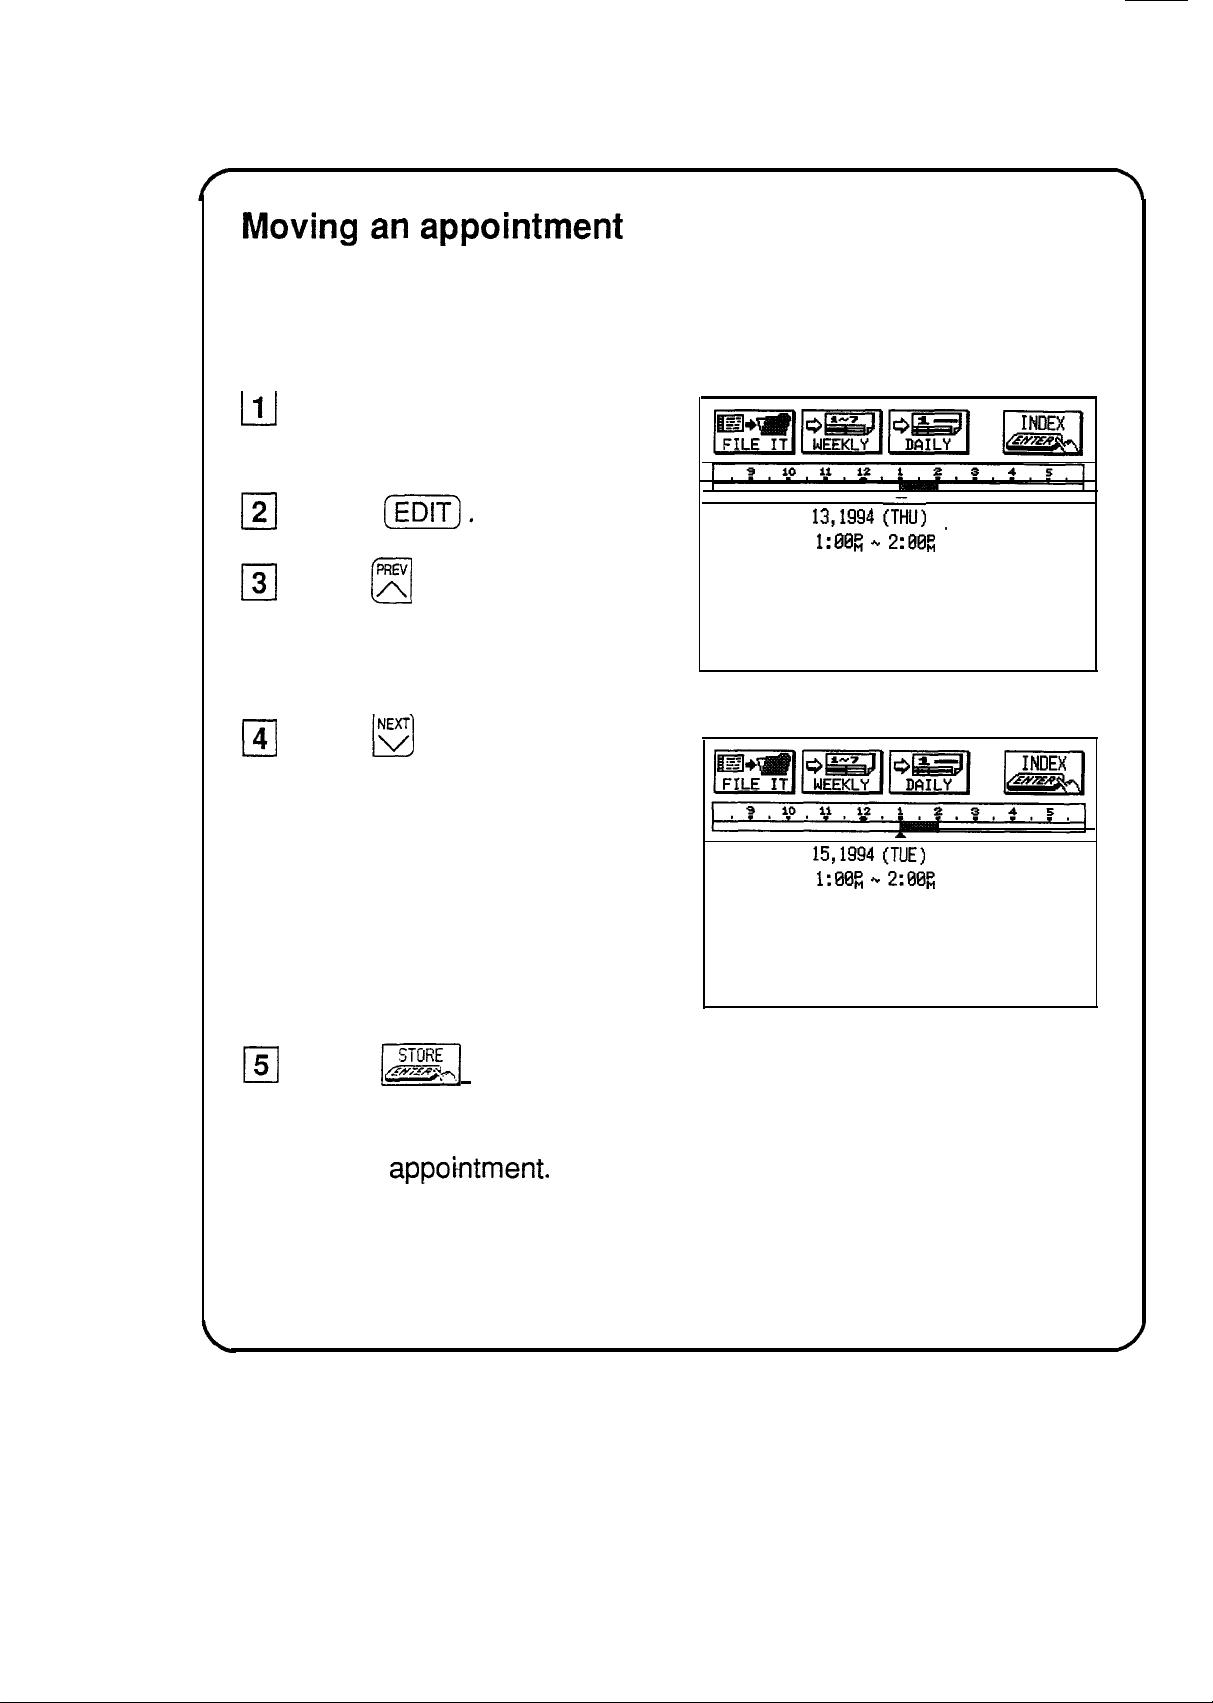
Moving an appointment
Appointment times and dates can frequently change. Rather
than
re-typing the information, you can easily change an appointment
stored in the unit.
111
Find the Schedule entry
you want to move.
121
Press
131
Press
[EE).
m
and type in the
DATE: JAN
. . . . . . . . . . . . . . . . . . . . . . . . . . . . . . . . . . . . . . . . . . . . . . . . . . . . . . . . . . . . . . . . . . . . . . . . . .
TIME:
. . . . . . . . . . . . . . . . . . . . . . . . . . . . . . . . . . . . . . . . . . . . . . . . . . . . . . . . . . . . . . . . . . . . . . . . . . . . . . . . . . . . . . . . . . . . . . . . . . . . . . . . . . . . . . . . . . . . . . .
Meeting with Pat
13,1994
(TiU)
1:00; .+ 2:00g
_
. . . . . . . . . . . . . . . . . . . . . . . . . . . . . . . . . . . . . . . . . . .
new date (if the date has
been changed).
141
Press
B
to move to the
time field and touch the
time bar at the time the
appointment begins, then
touch it again at the time
DATE: MAR
. . . . . . . . . . . . . . . . . . . . . . . . . . . . . . . . . . . . . . . . . . . . . . . . . . . . . . . . . . . . . . . . . . . . . . . . . . . . . . . . . . . . . . . . . . . . . . . . . . . . . . . . . . . . . . . . . . . . . . .
TIME:
. . . . . . . . . . . . . . . . . . . . . . . . . . . . . . . . . . . . . . . . . . . . . . . . . . . . . . . . . . . . . . . . . . . . . . . . . . . . . . . . . . . . . . . . . . . . . . . . . . . . . . . . . . . . . . . . . . . . . . .
Meeting with
15,1994 (TUE)
1:00p, ‘* 2:00D,
Pat
the appointment ends (if
the time has been
changed).
151
Touch
mi
to save the changes.
Note: You can also use the Cut and Paste functions to move an
appo’ktment.
See “The Schedule Application,” Chapter 3, for more details.
See p. 207.
12
Page 14
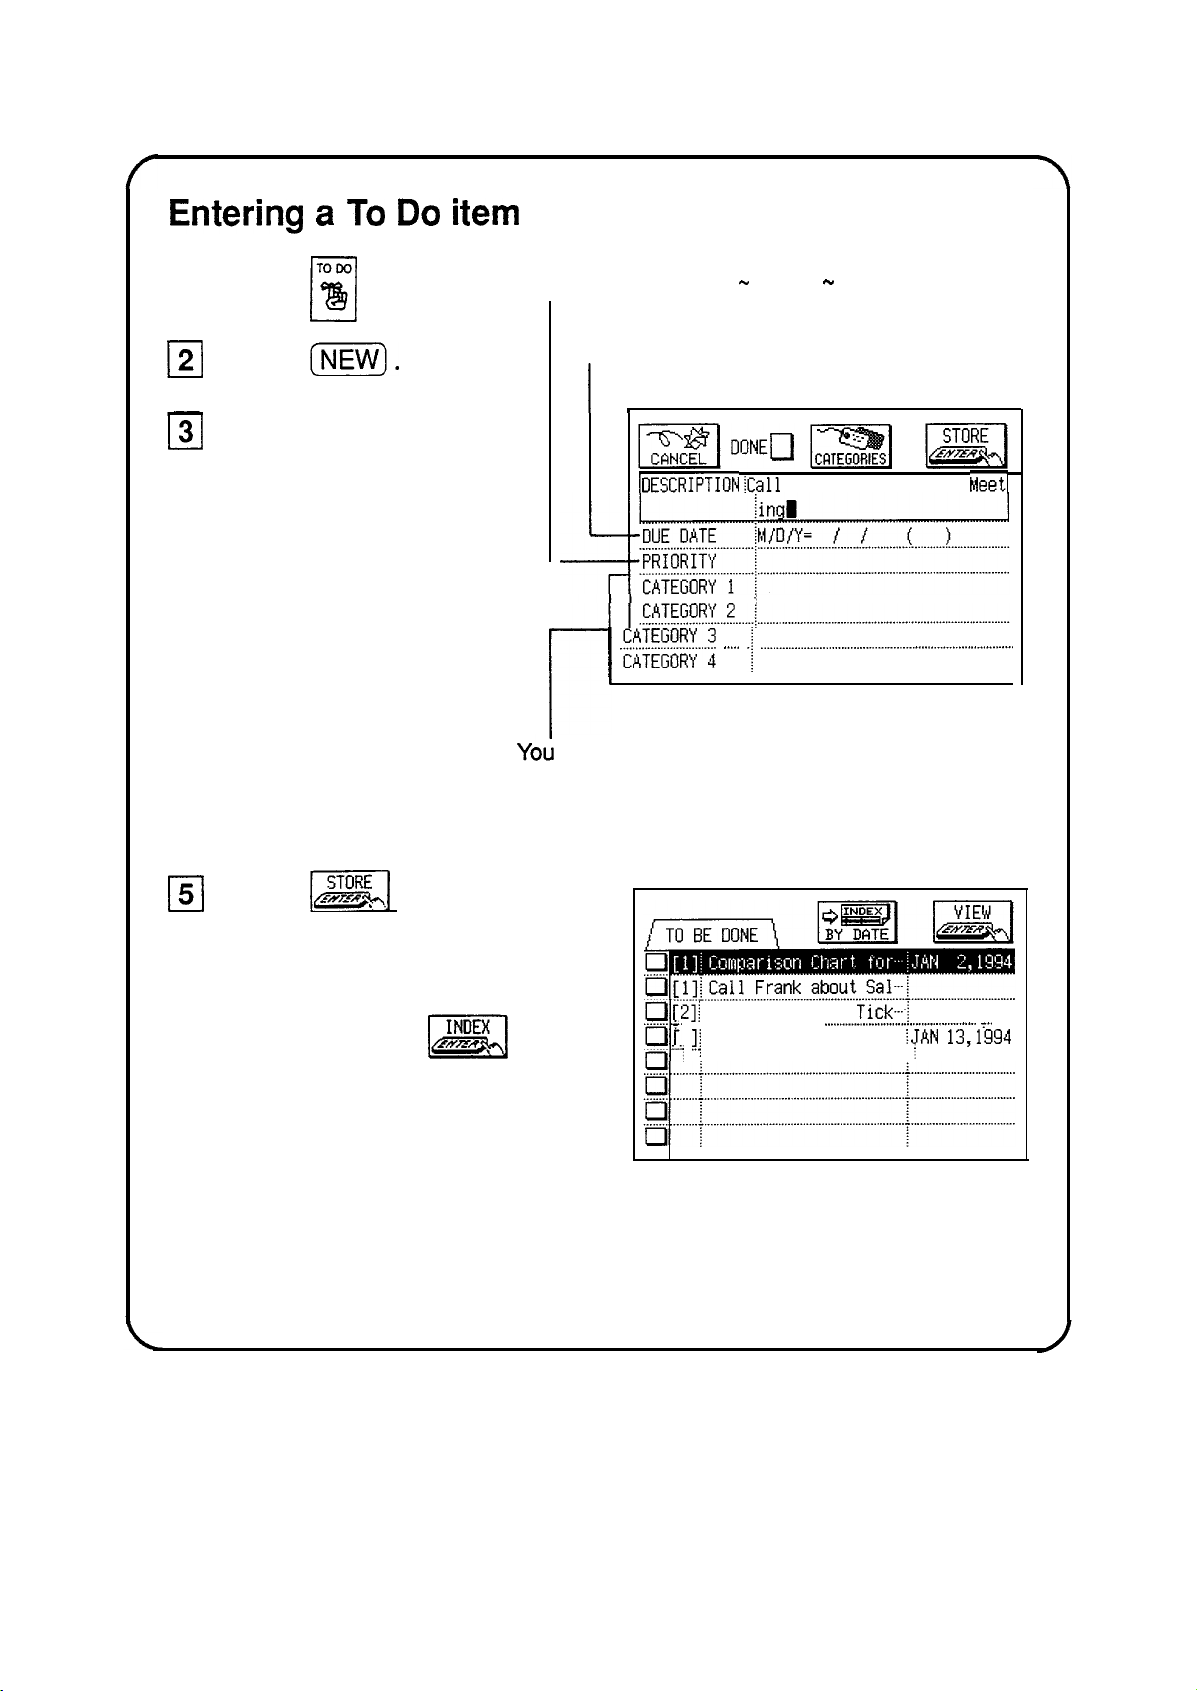
Entering a To Do item
q
12)
131
Press ‘g .
0
Press (KKK).
Type in a description.
You can assign the task a priority using a
single character. (0 - 9 or A - Z).
Type in a due date here if the To Do
item has one.
I ,
4
If desired, type in any
q
other information.
Yob
later use these to filter the item in a To Do list.
151
Touch
[=I
when you
are finished.
You can now press 2Ex to
Q
iDESCRIPTION
. . . . . . . . . . . . . . . . . . . . . . . . . . . . . . . . . . .
p
1 p;;.,.;
can assign up to 5 categories to a task, then
[2]1
+
. . . . . . . . . . . . .
........i
iCal
Frank about Sales
..j
. . . . . . . . . . . . . . . . . . . . . . . . . . . . . . . . . . . . . . . . . . . . . . . . . . . . . . . . . . . . . . . . . . . . . . . . . . . .
,_,_, 1 _.__.____._._._._,_....,,....,.......................................,...........,
Pick up Theater
]f
Finish report
. . . . . . . . . . . . . . . . . . . . . . . . . . . . . . . . . . . . . . . . . . . . . . . . . . . .
Tick-i
.._.___.............................................
fJAN 13,1994
Meet1
y . .
i
. . . . . . . . . . . . . . . . . . . . . .
see a list of all your To Do
items or you can review them
in the Calendar views.
See “The To Do Application,” Chapter 3, for more details.
13
Page 15
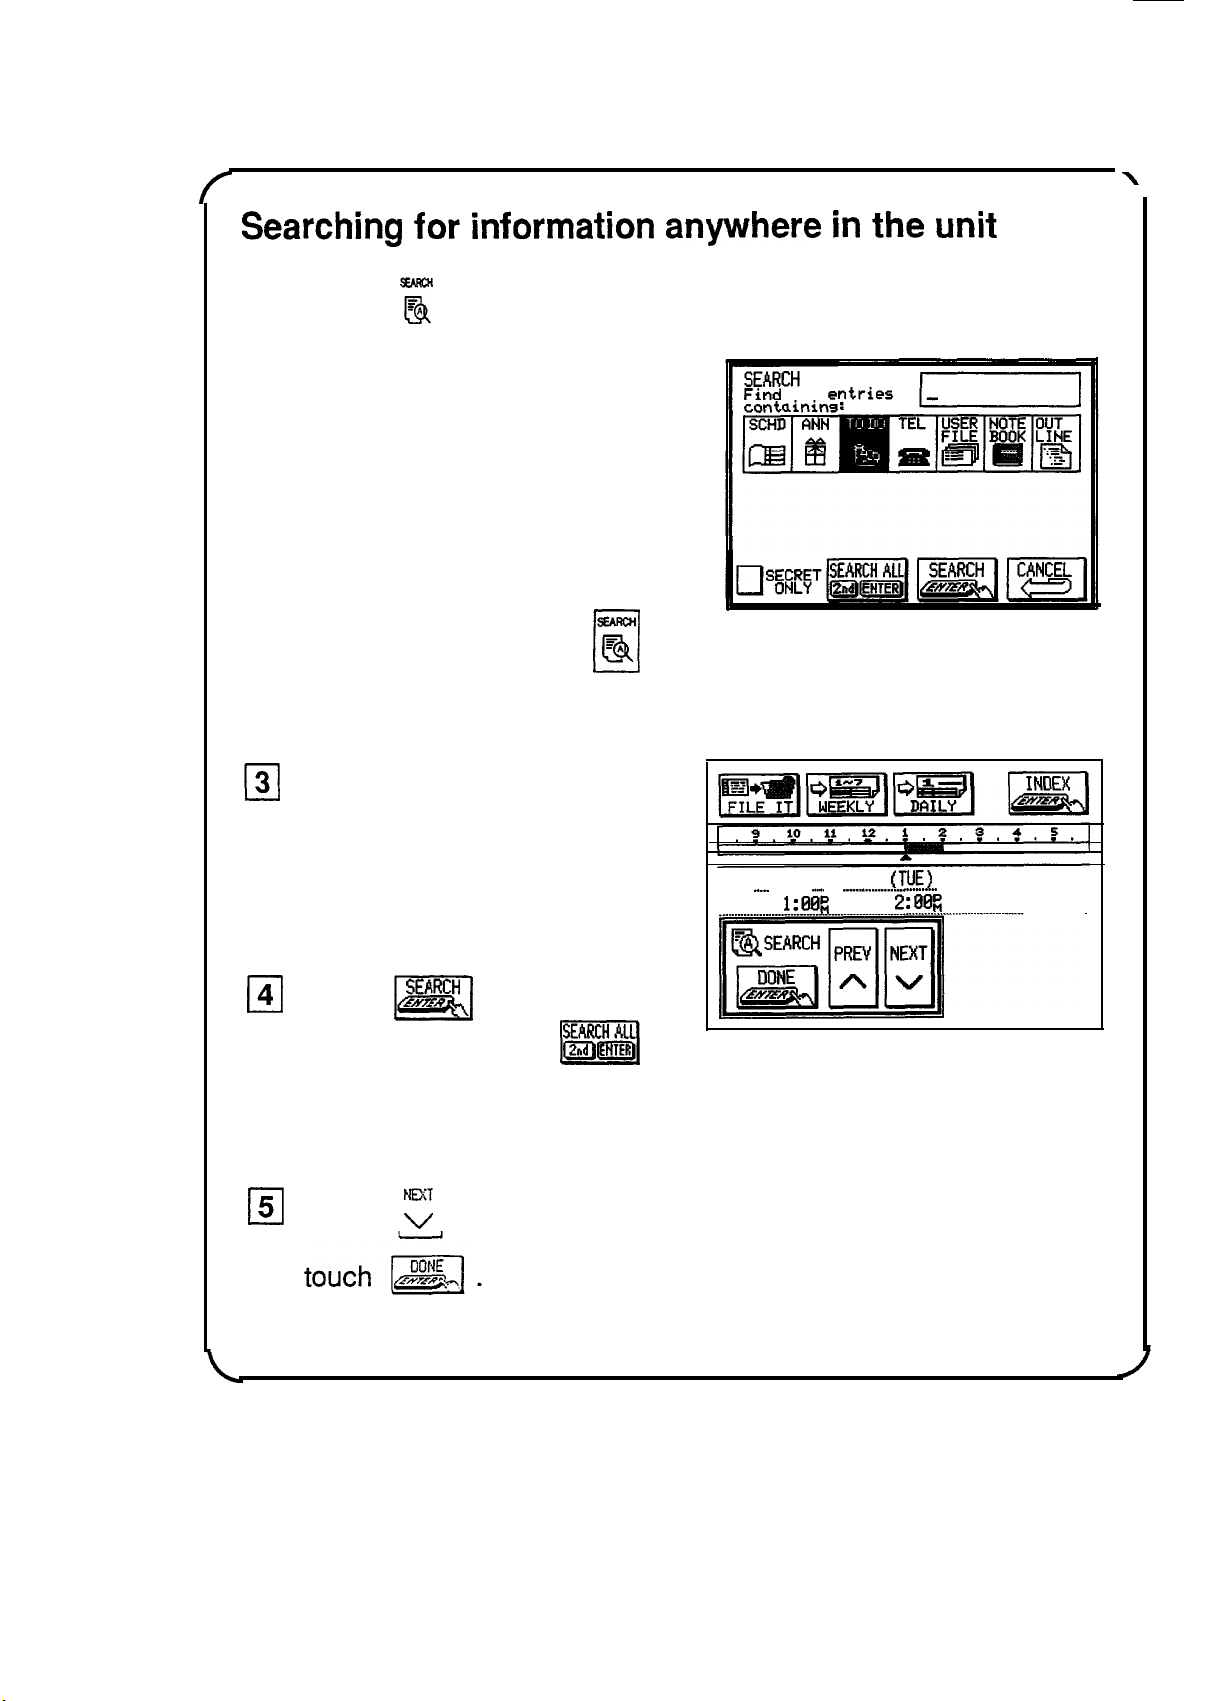
Searching for information anywhere in the unit
q
Press E .
cl
2
Type in any word stored in
cl
an entry that you want to
search for.
You can use up to 16 characters
(letters, numbers, symbols, etc.).
If you highlight a word in an entry
with the pen and then press g ,
that word will automatically
appear in the search word box.
131
Select the application you
want to search.
The application you were using
last will always be the default
application.
cl
Find
all
containins:
DATE: MAR 15 1994
".^
...........
TIME:
entries
.._.
.
..............
.._...............-.......-
.
.
l:EIEi~
.
(TUE)
..........................................
2:88::
.......
.........
............
,%.!$cH
4 Touch
cl
m
to begin
searching (or touch
to search in ail applica-
tions).
5 Touch
III
rl
until you find the entry you are looking for, then
7
See “General Operation,” Chapter 2, for more details.
ml
14
Page 16
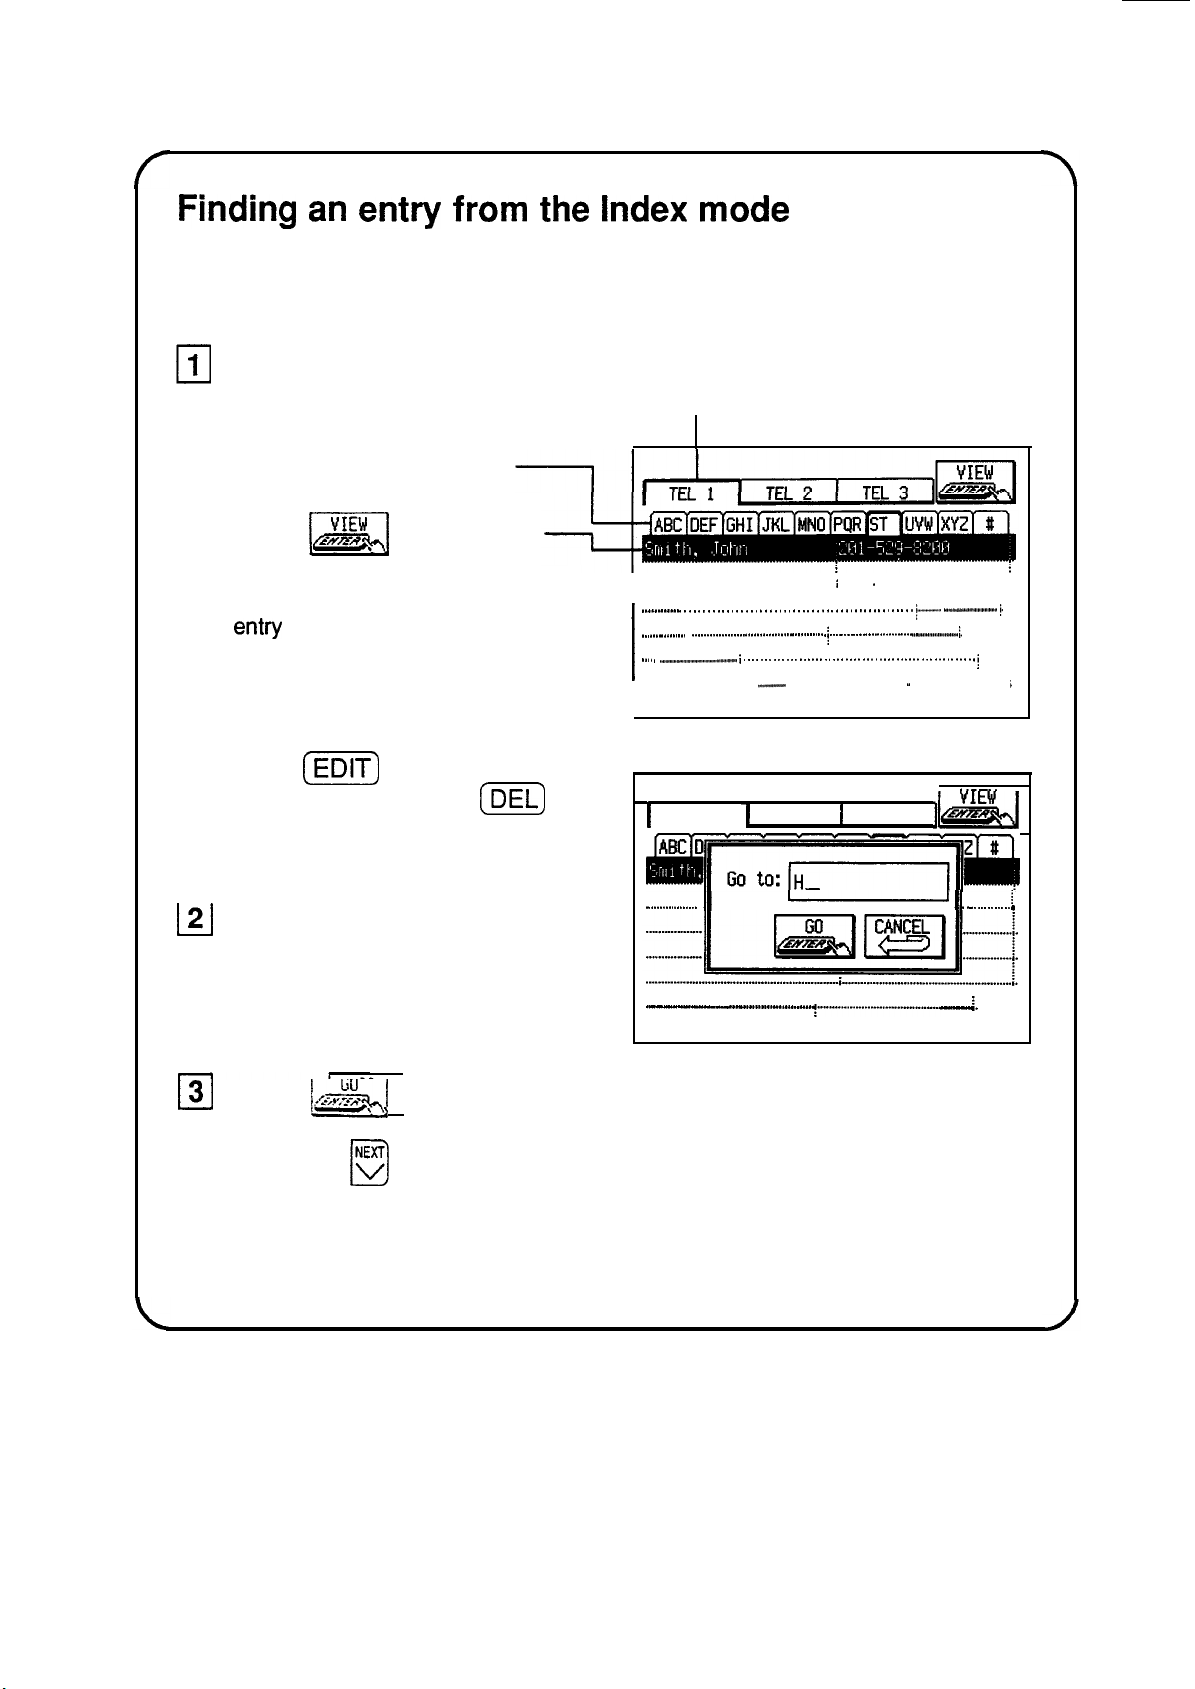
Finding an entry from the Index mode
The Index modes for Tel, User File, Outline and Notebook are very
similar.
Select an application and
1
0
go to the Index mode.
Touch these tabs to jump to
these alphabetical listings.
Touch one of these tabs to select
the file.
Touch
name highlighted or touch a
name twice to view a particular
entry
Press
selected entry, or press
to delete the selected entry.
121
Type the first few letters of
L;yE,wIawith a desired
.
in full.
(m]
to edit the
(DEL)
an entry to begin the Go
To search.
131
Touch
IL&&]
to jump to the entry that starts with these letters.
\
I
. . . . . . . . . . . . . . . . . . . . . . . . . . . . . . . . . . . . . . . . . . . . . . . . . . . . . . . . . . . . . .
I
. . . . . . . . . . . . . . . . . . . . . . . . . . . . . . . . . . . . . . . . . . . . . . . . . . + -....................................
I ............
. . . . . . . . . . . . . . . . . . . . . . . . . . . . . . . . . . . . . . . . . . . . . . i . . . . . . . . . . . . . . . . . . . . . . . . . . . . ..-.......................
1. . . . . . . . . . . . . . .
.
. . . . .I,.......................................................
. . . . . . . . . . . . . . . . . . . . . . . . . . . .
I
1
TEL 1 1 TEL 2 I TEL 3
llllidimru
. . . . . . . . . . . . . . . . . .
. . . . . . . . . . . . . . . . . . . . . . . . . . . . . . . . . “” -.........-.......-...
i . . . . . . . . . . . . . . . . . . . . . . . . . . . . . . . . . . . . . . . . . . . . . . . . . . . . . . .
..-.........................
. . . . . . . . . . . . . . . . . . . . . . . . . . . . .
II
-
W”.”
. . . . . . . . . . . . . . . . . . . . . . . . . . . . . . . . . . . . . . . . . .
i
. . . . . . . . . . .
I
. . . . . . . . . . . . . . . . . . . . . . . .
jr&i-/
. . . . . . . . . . . . .
i.
/.
j
..--..
II. . ... . . . . . . . . . . i.I
j.
j
i.
q
Press B until you see the entry you are looking for.
See “General Operation,” Chapter 2, for more details.
15
Page 17
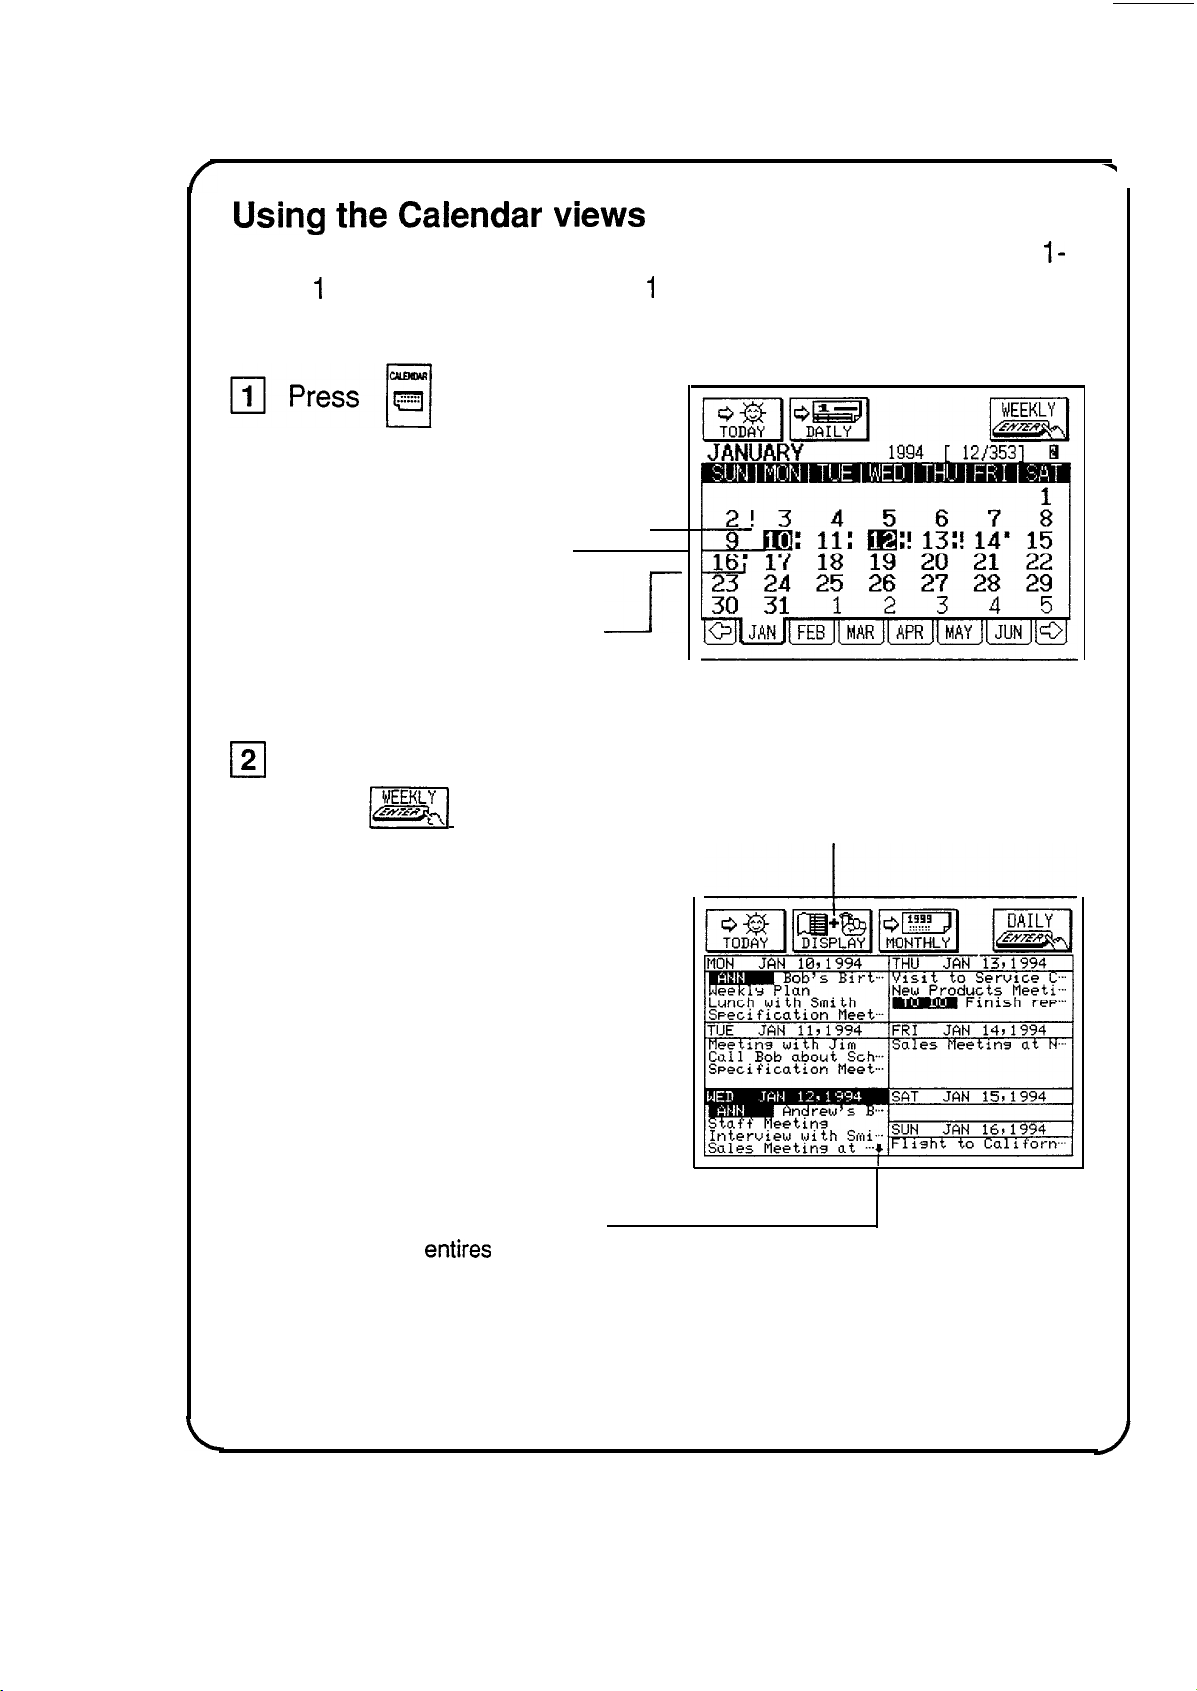
Using the Calendar views
The Calendar consists of 5 different views: a 3-month, l-month,
l-
week, 1 -week (graphical), and a 1 -day view. These views allow
you to see information stored in Schedule, Ann and To Do.
to display the
1 -month view.
Exclamation points indicate
To Do items.
Reversed dates indicate
Anniversary events.
Dots indicate appointments.
2
Touch a date and then
0
touch
RI
to see more
1
Touch to hide Schedule and Ann
information so that only To Do
information is visible. Touch again to
restore the hidden information.
details.
16
This symbol indicates there
are more
See “The Calendar Application,” Chapter 3, for more details.
entires
on this day.
Page 18
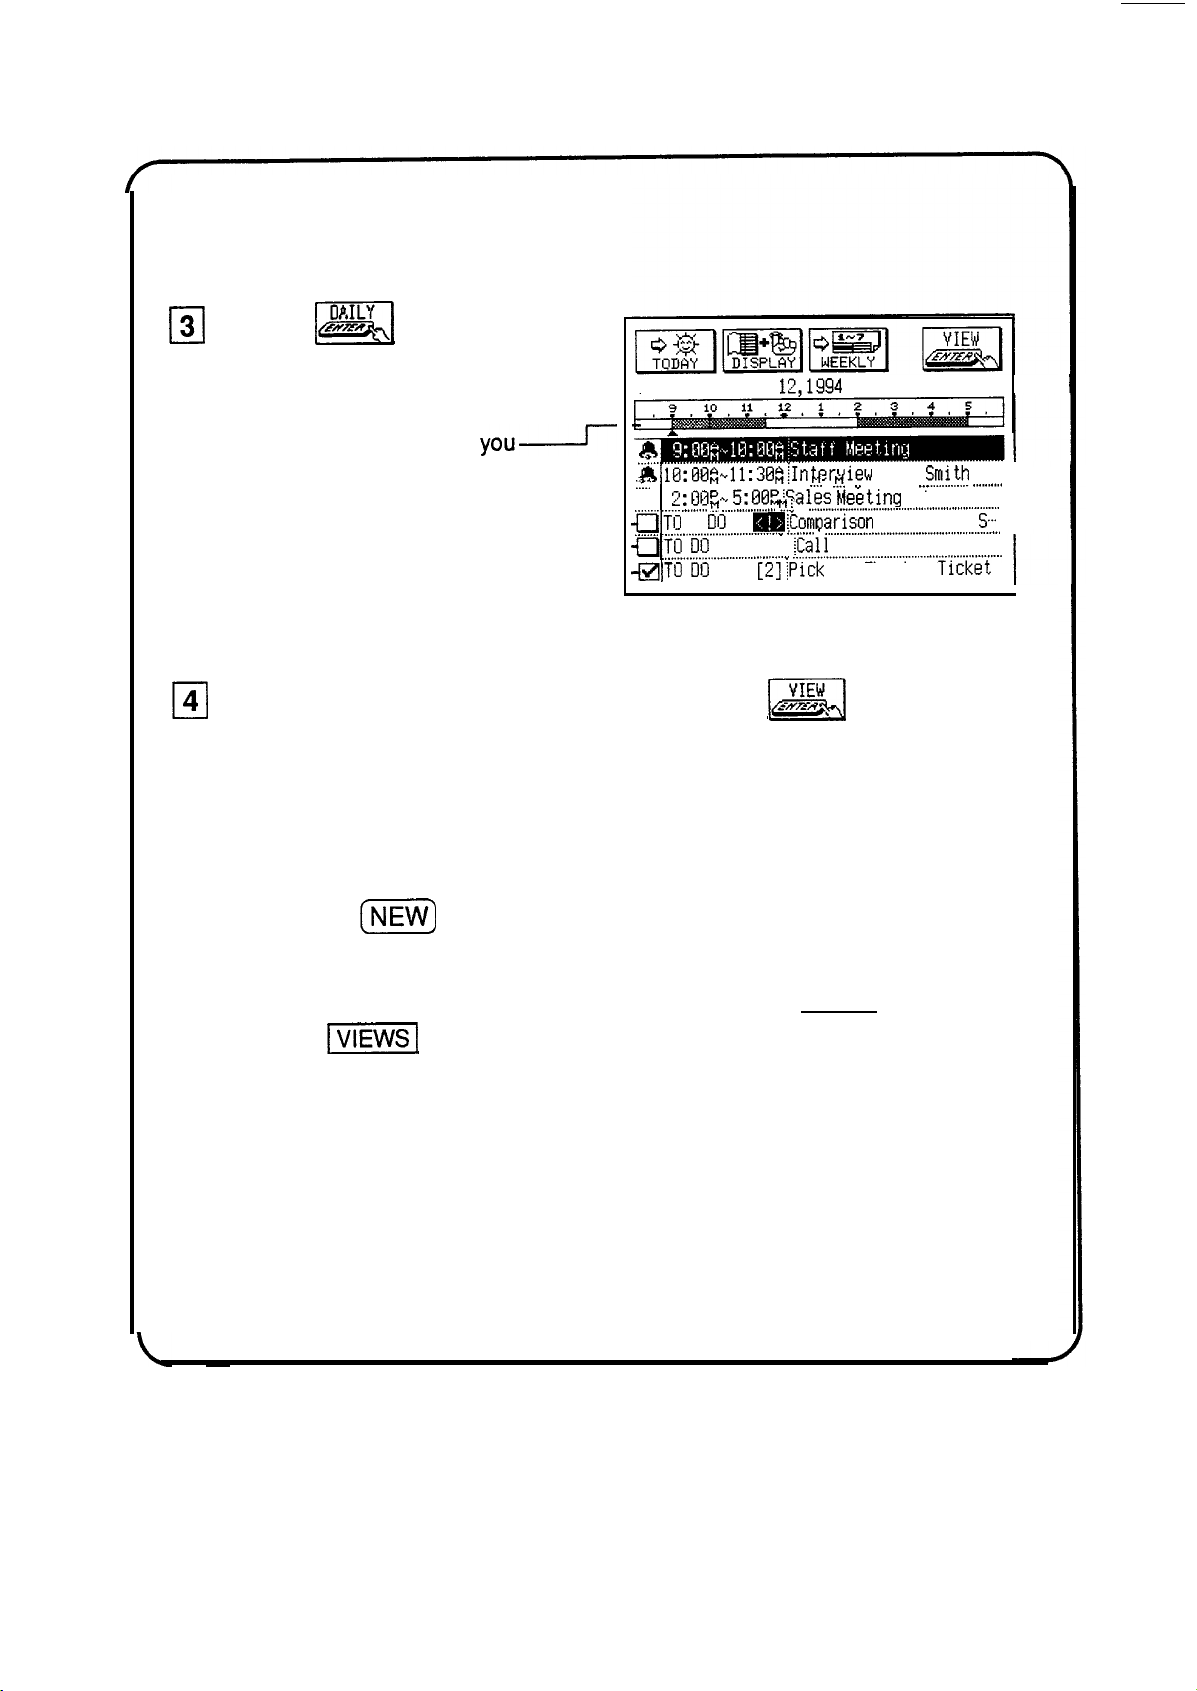
3
cl
Touch
mi
to see the
details of the selected date.
This time bar shows
when you have appointments
and when you have free time.
You can mark To Do items off
as done by touching here.
4
Touch an entry to select it and then touch
0
you2
-E
WEDNESDAY JAN l&1994
A.lB:BB~~l1:38*~Interview
.t..
,,,.....
Q’rll no m.
____.___
QTO DU
-@TO IIII
entry’s application.
Note:
If you press
make a new Schedule entry on the currently selected date.
The Calendar application only displays information stored in Schedule,
Anniversary, and To Do. You cannot actually store information in the
Calendar application.
(NEW)
in any of these views, the unit will assume you want to
7 ITEMS
with
. __ __ rr
2:013p-, 5:BBPiSales hleetmg
___._._..,._...
M
___........_..__,,,
._._.,..._.__._._.__......,...........,”
,..__.____._._..._._.........,.,..,....”
I
(1)
[2];Pick
m
.!I ”
. .
M; .
.._...._.._._._____.................................................
Xomoarison
._....... Q _.___________..__._.........................................
iCal
Frank about
“..“.........,.,“““““““““““..........
up
Theater
to go to that
$~JI ,_____,,,,
..,.
at Royal-
Chart for 5. I
Ticket
I
,
Sales-
You can access any of these views directly by pressing (MENU) and then
touching
II
See “The Calendar Application,” Chapter 3, for more details.
.
17
Page 19
Editing an Entry
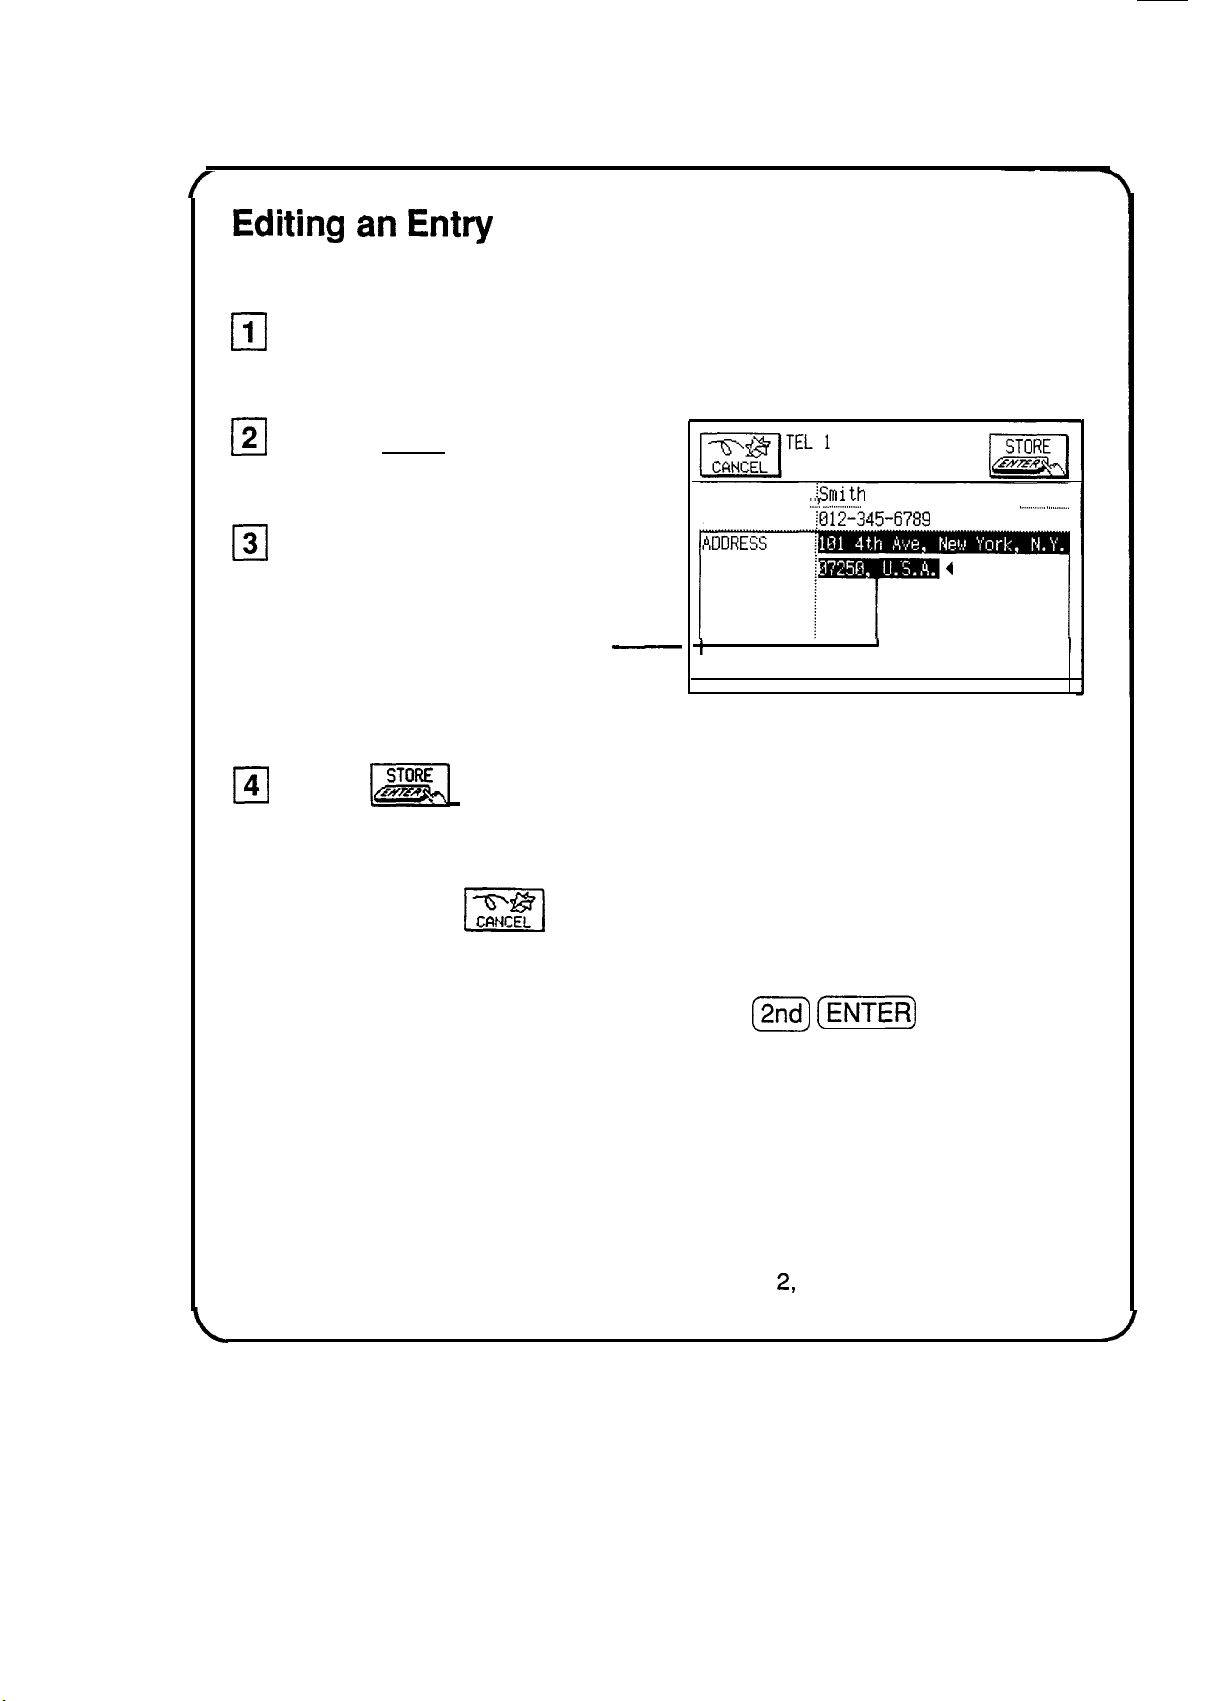
Find an entry that you wish to change.
1
cl
m
Press [EDIT).
131
Make any necessary
changes.
You can also drag the pen over
text to select it, then cut the text
and paste it elsewhere, or just
delete it.
141
Touch
[m
when you are finished.
If you make a mistake and want to restore the original entry,
simply touch
m]
If you want to save these changes as a new entry
(thus preserving the original) press
-
instead.
NAME
. . . . . . . . . . . . . .
NUMBER
t
iSmith
..._! _._...............
$312-345-6789
C2nd) (m)
John
. . . . . . . . . . . . . . . . . . . .
I
,____._,.,,.
,,.__.__._.
I
instead.
18
See “Editing an Existing Entry,“ Chapter 2, for more details,
Page 20
Deleting an Entry
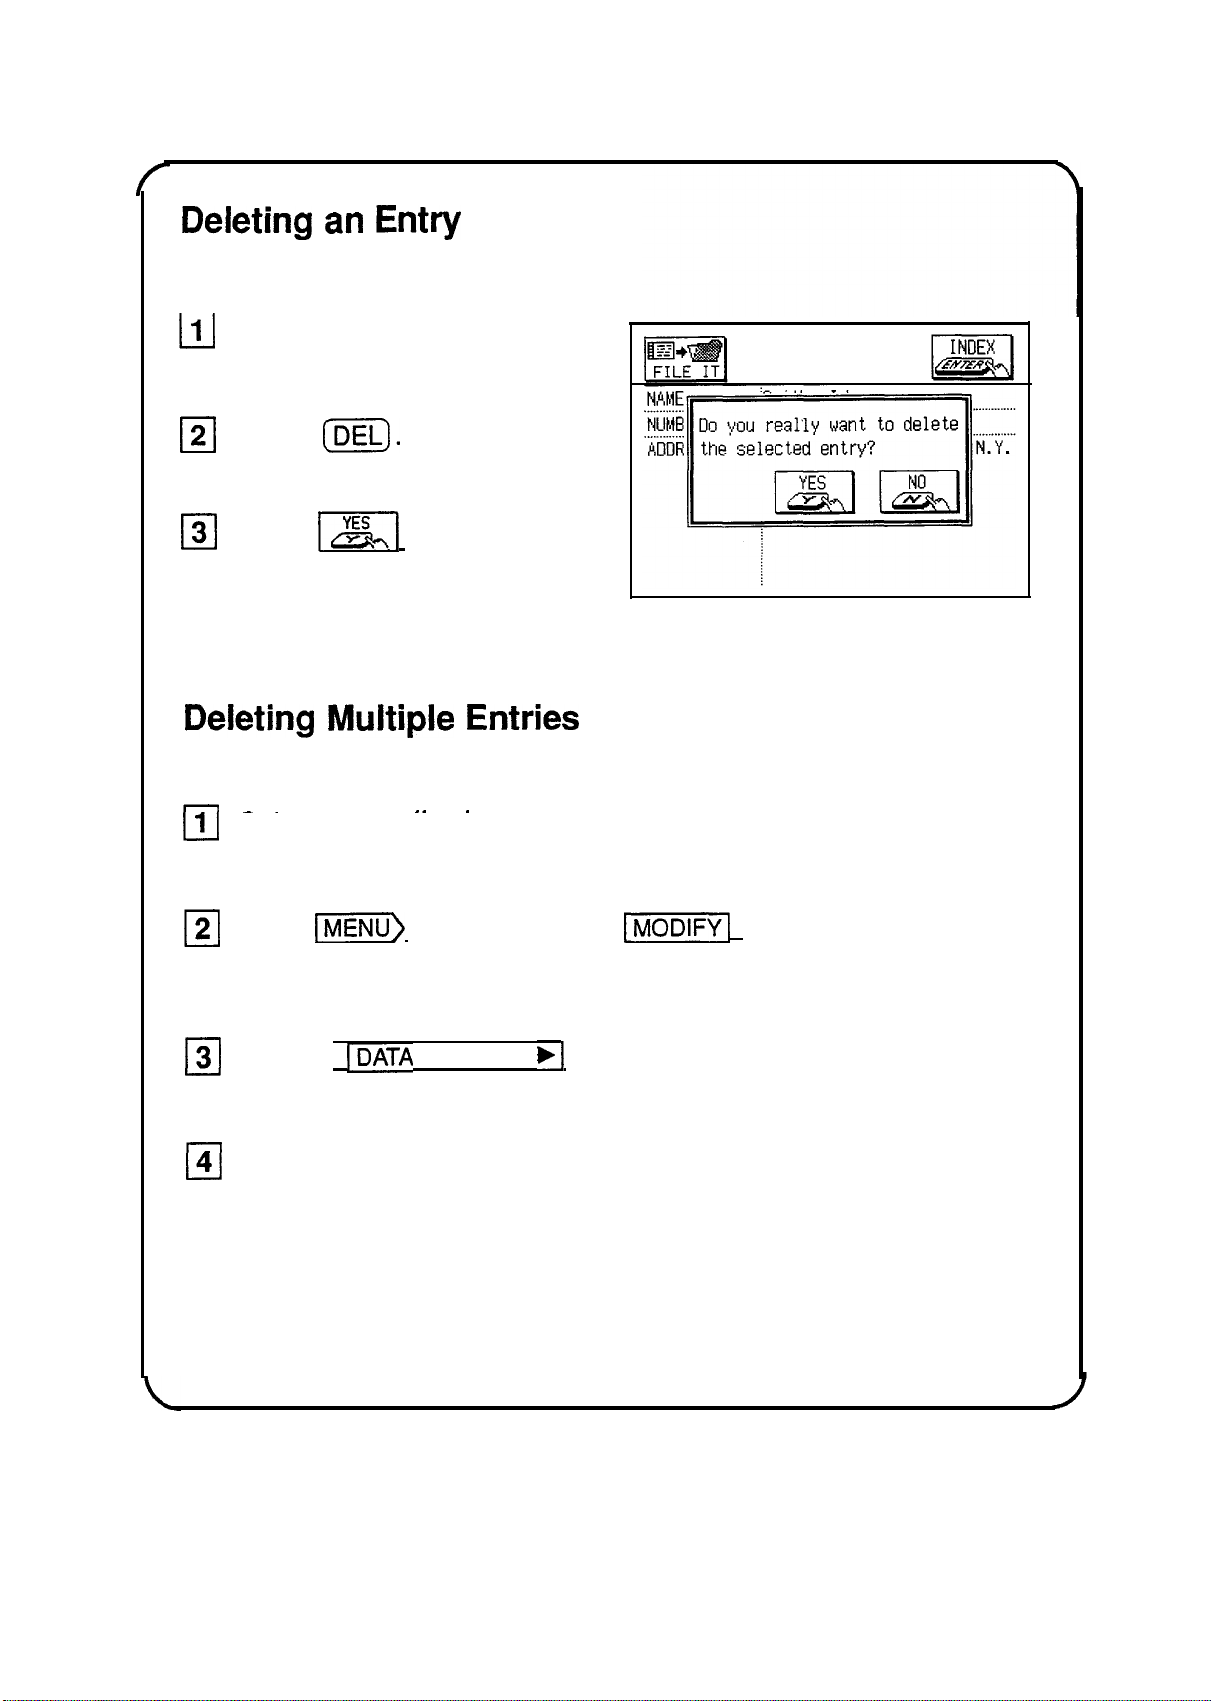
111
Find an entry that you
wish to delete.
121
Press
131
Touch
the deletion.
[DEL).
[xl
to confirm
TEL 1
Deleting Multiple Entries
__
I
-.
111
Select an application that you want to delete data from.
.
121
Press
menu.
3 Touch
cl
4
Select which group of information you wish to delete.
0
(The selection will vary for each application.)
v)
See “Deleting Entries from the Unit,” Chapter 2, for more details.
and then touch
IDATA
DELETION
b/
.
II
to open the MODIFY
19
Page 21
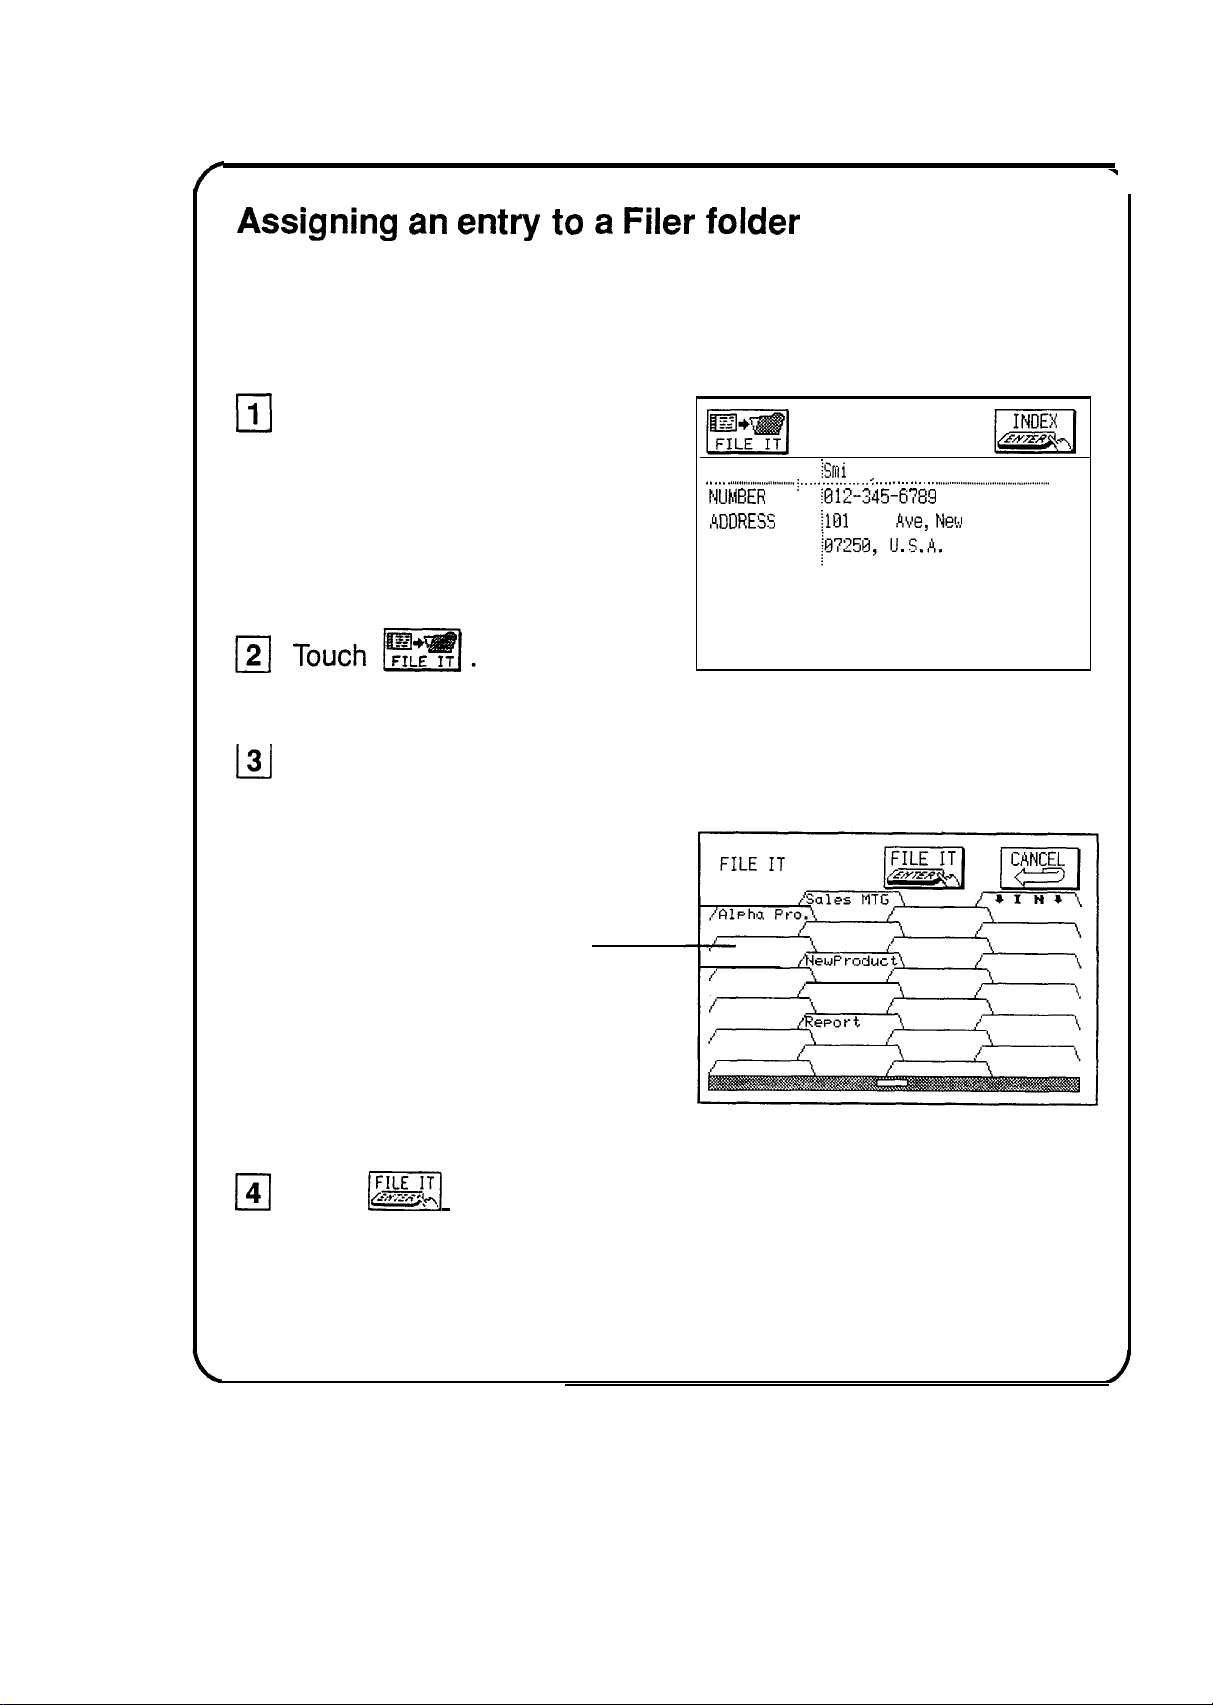
Assigning an entry to a Filer folder
Note: The entry will not be copied or moved to a folder. It is simply
“assigned” to the folder. Entries assigned to folders can be
worked with as usual.
Find the entry you wish to
assign to a folder. Be sure
to display the entry in the
VIEW mode (not the
INDEX).
131
Touch the folder(s) you
want to assign this entry to.
Touch once to select a folder.
Touch again to cancel a selection.
TEL 1
:iSrni
NAME
. . . . . ..t...........................
NUMBER
. . . . . . . . . . . . . . . . . . . . . . . . . . . . . . . . . . . . . . . . . . . . . . . . . . . . . . . . . . . . . . . . . . . . . . . . . . . . . . . . . . . . . . . . . . . . . . . . . . .
,ADORESS
th. John
j . . . . . . . . . . . . . . . . . . . . . . . . . . . . . . .
iB12-345~678!3
$01
4th
Ave, Net;!
.._.__.............................................
York, N.Y.
You can select multiple folders.
Note: You can assign entries to
an unnamed folder and name the
folder later.
m
Touch
m/
when you finish selecting the folder(s).
See “The Filer Application,” Chapter 7, for more details.
20
Page 22
Using the Filer
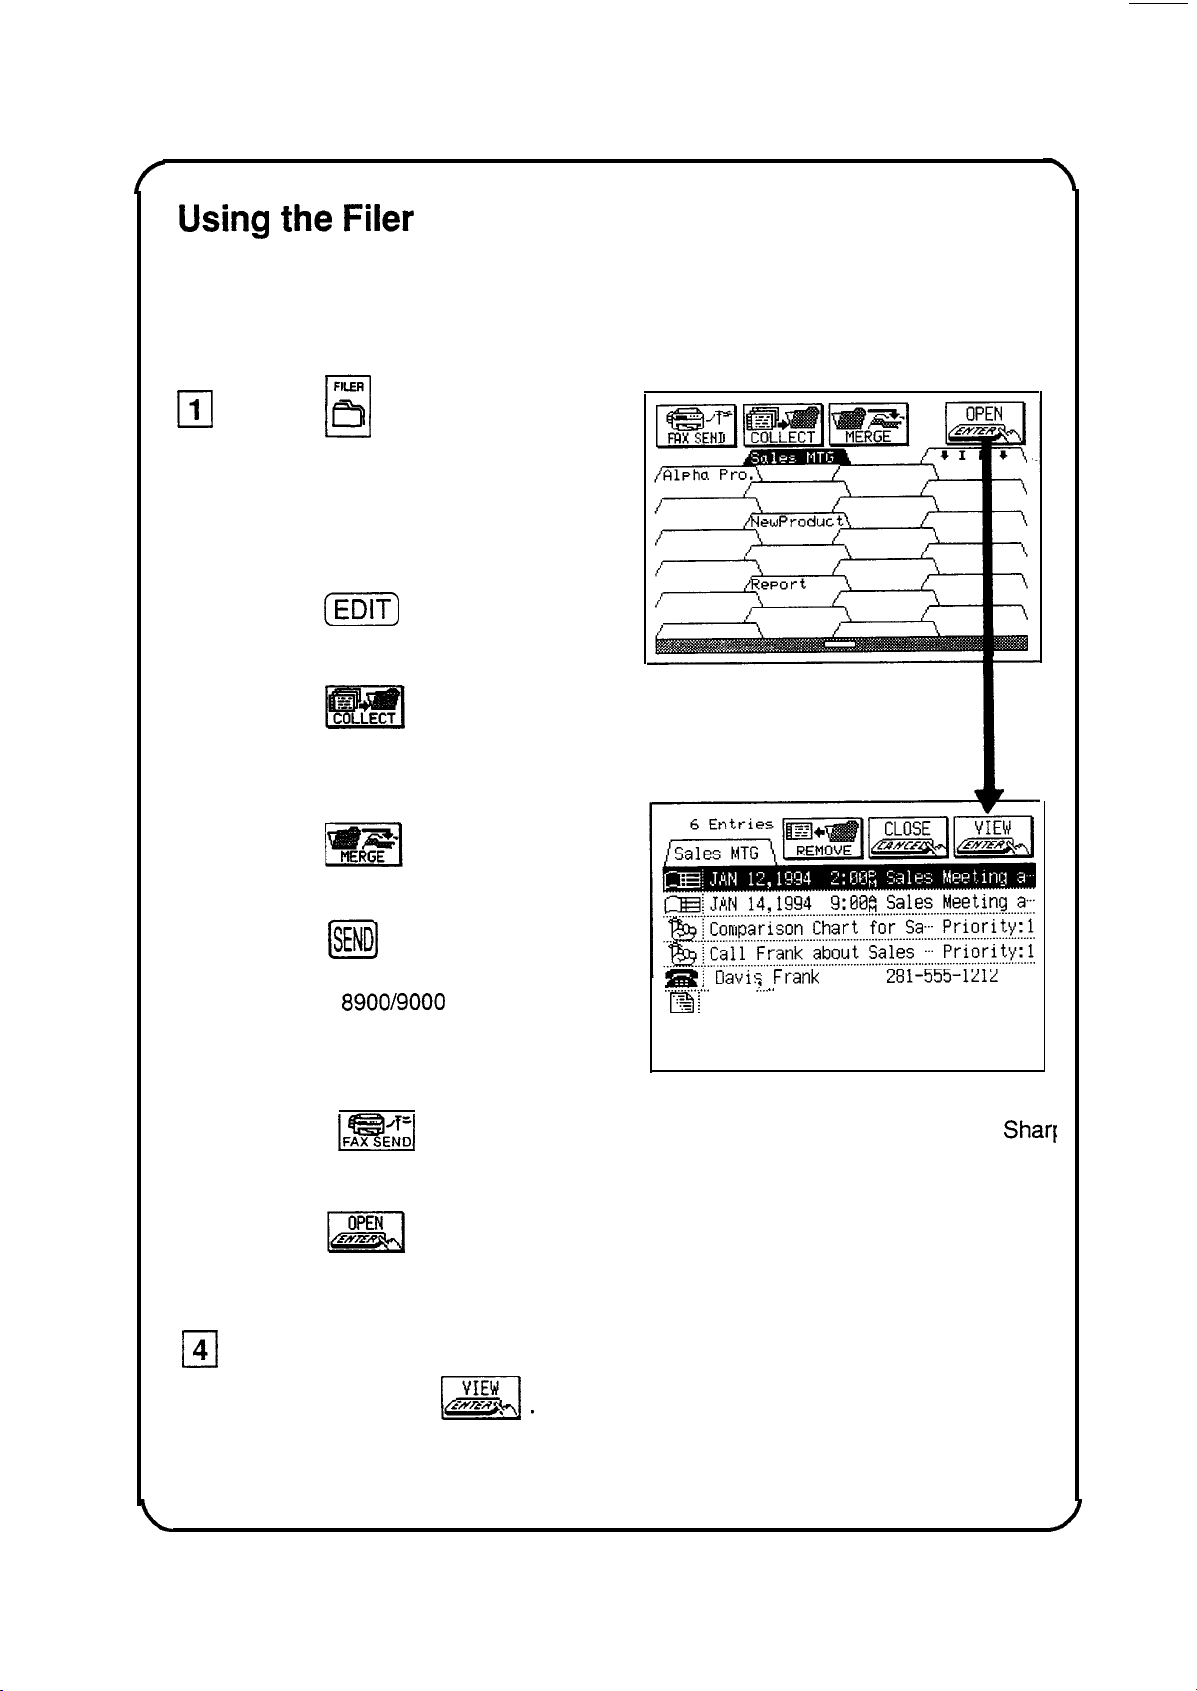
The Filer allows you to group your entries into folders, which lets
you access and manage your information by subject matter instead
of just by application.
FILER
1
Press a to access your
cl
folders.
Touch a folder to select it.
2
cl
Now you can:
LJ
Press
the folder.
Touch
automatically assign a group of
entries to the selected folder based
on a search word.
Touch
selected folder with another folder.
Press
the entries assigned to this folder to
another
infrared transfer). All entries will
appear in the receiving unit’s “IN”
folder.
(iZiQ
ISEND]
to send a copy of all
8900/9000
to name (or rename)
to have the unit
to merge the
Series unit (via
Bf Davis Ft-ank
...............
...............
B !
Sales Figure
.........................................................................................................................
...........................................................................................................
.
.............
....................................................................................
.1__
..
-
Touch
CE-FM1 fax/modem and CE-137T level converter are required).
IFRti:I
to fax a copy of all the entries in the selected folder (the
Sharf
3
cl
Touch
m
to view
all the entries assigned to the folder.
4
To go to the actual entry (VIEW mode), simply touch the entry
0
and then touch
See “The Filer Application,” Chapter 7, for more details.
ml.
21
Page 23
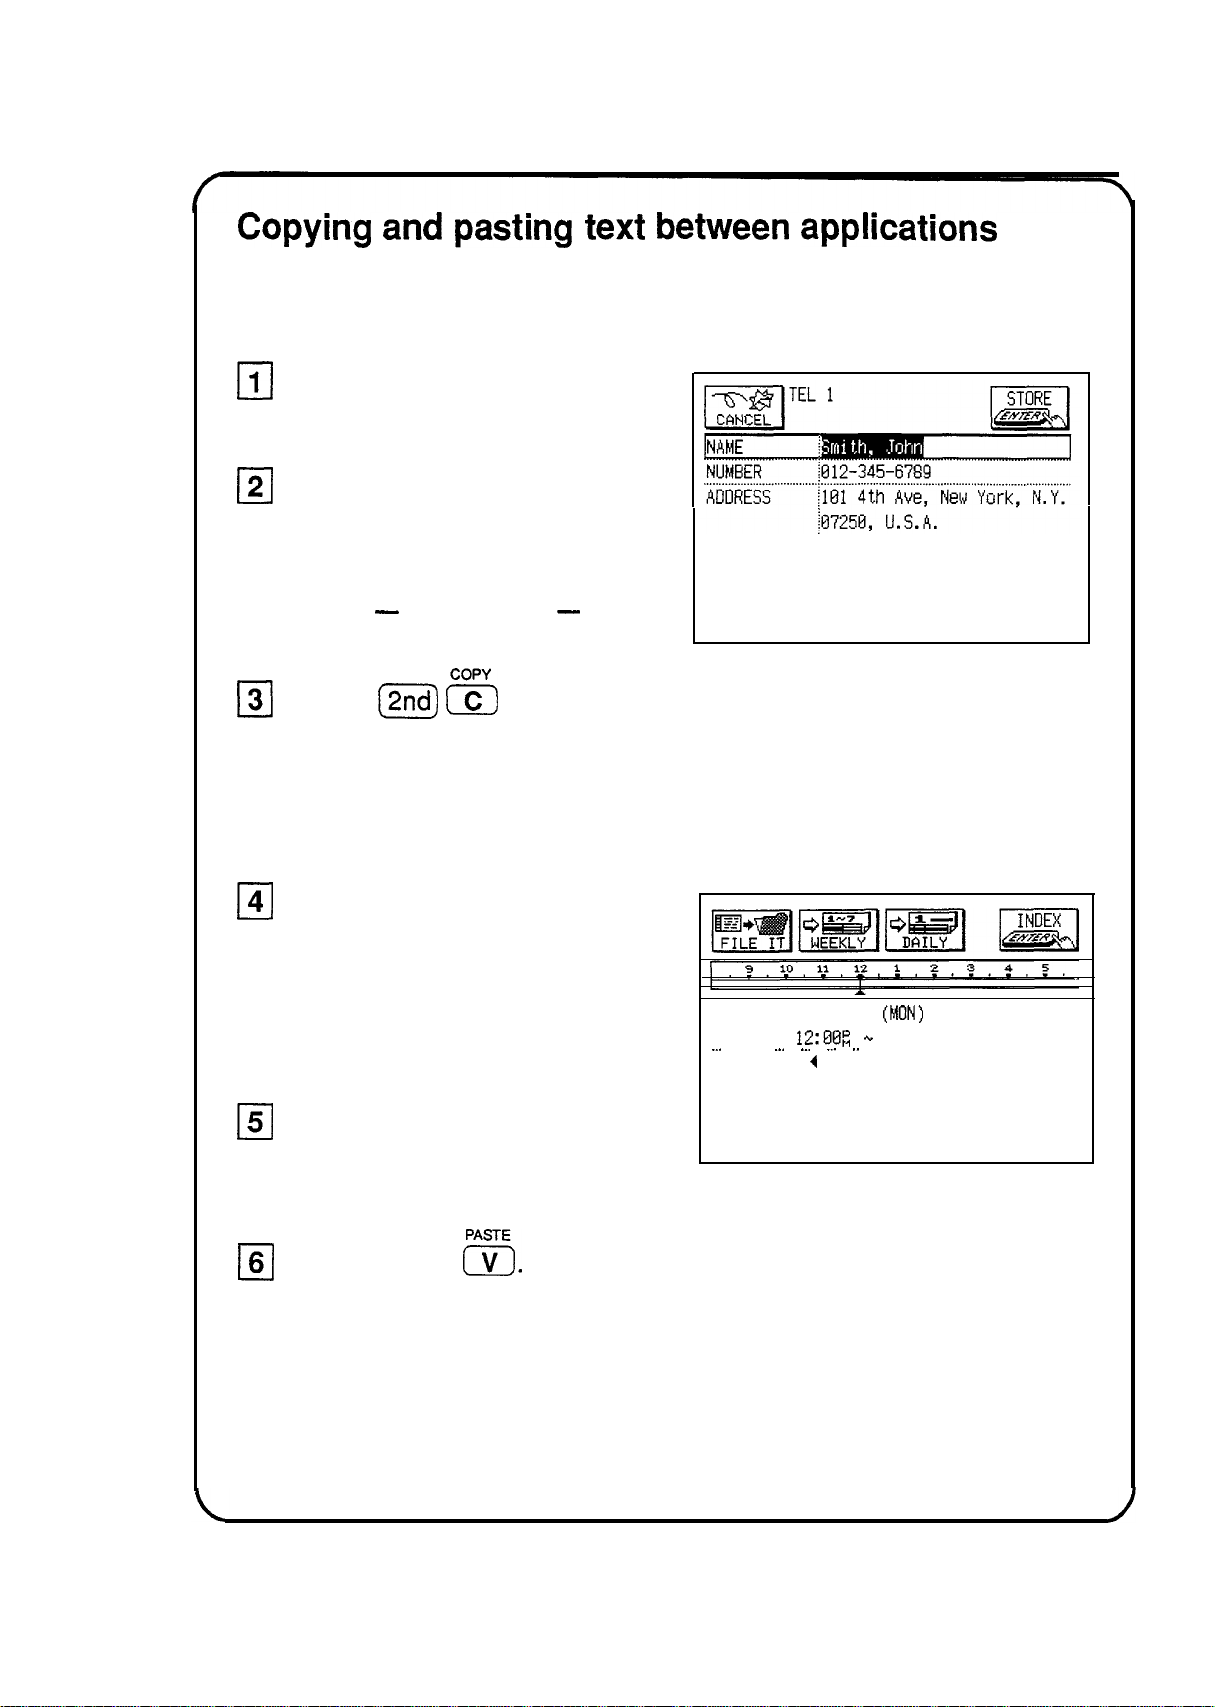
Copying and pasting text between applications
You may find a need to copy text from one place to another in the
unit.
Go to the entry you
want to copy text from.
121
Drag the pen over a word
or sentence to select it.
The text will be displayed in
reverse -white on black - to
indicate it is selected.
131
Press
the text to the clipboard.
Anything currently on the clipboard
is replaced with the text you just
copied.
j2nd) s
to copy
141
Go to the entry you want to
add the text to.
Be sure you are in the EDIT mode
when adding text to an entry.
151
Touch the desired place of
insertion.
16(
Press (2nd)
See “Copying or Moving a Block of Text,” Chapter 7, for more details.
E.
DATE: FEB 14 1994
. . . . . . . . . . . . . . . . . . . . . . . . . . . . . . . . . ...! . . . . . . . . . . . . . . . . . . . . . . . . . . . . . . . . . . . . . . . . . . . . . . . . . . . . . . . . . . . . . . . . . . . . . . . . . . . . . . . . . .
TIME:
__.
.
Lunch with
12:E)BR +.
_.. ._. ,_. ,.
4
(MON)
:
. . . . . .
22
Page 24
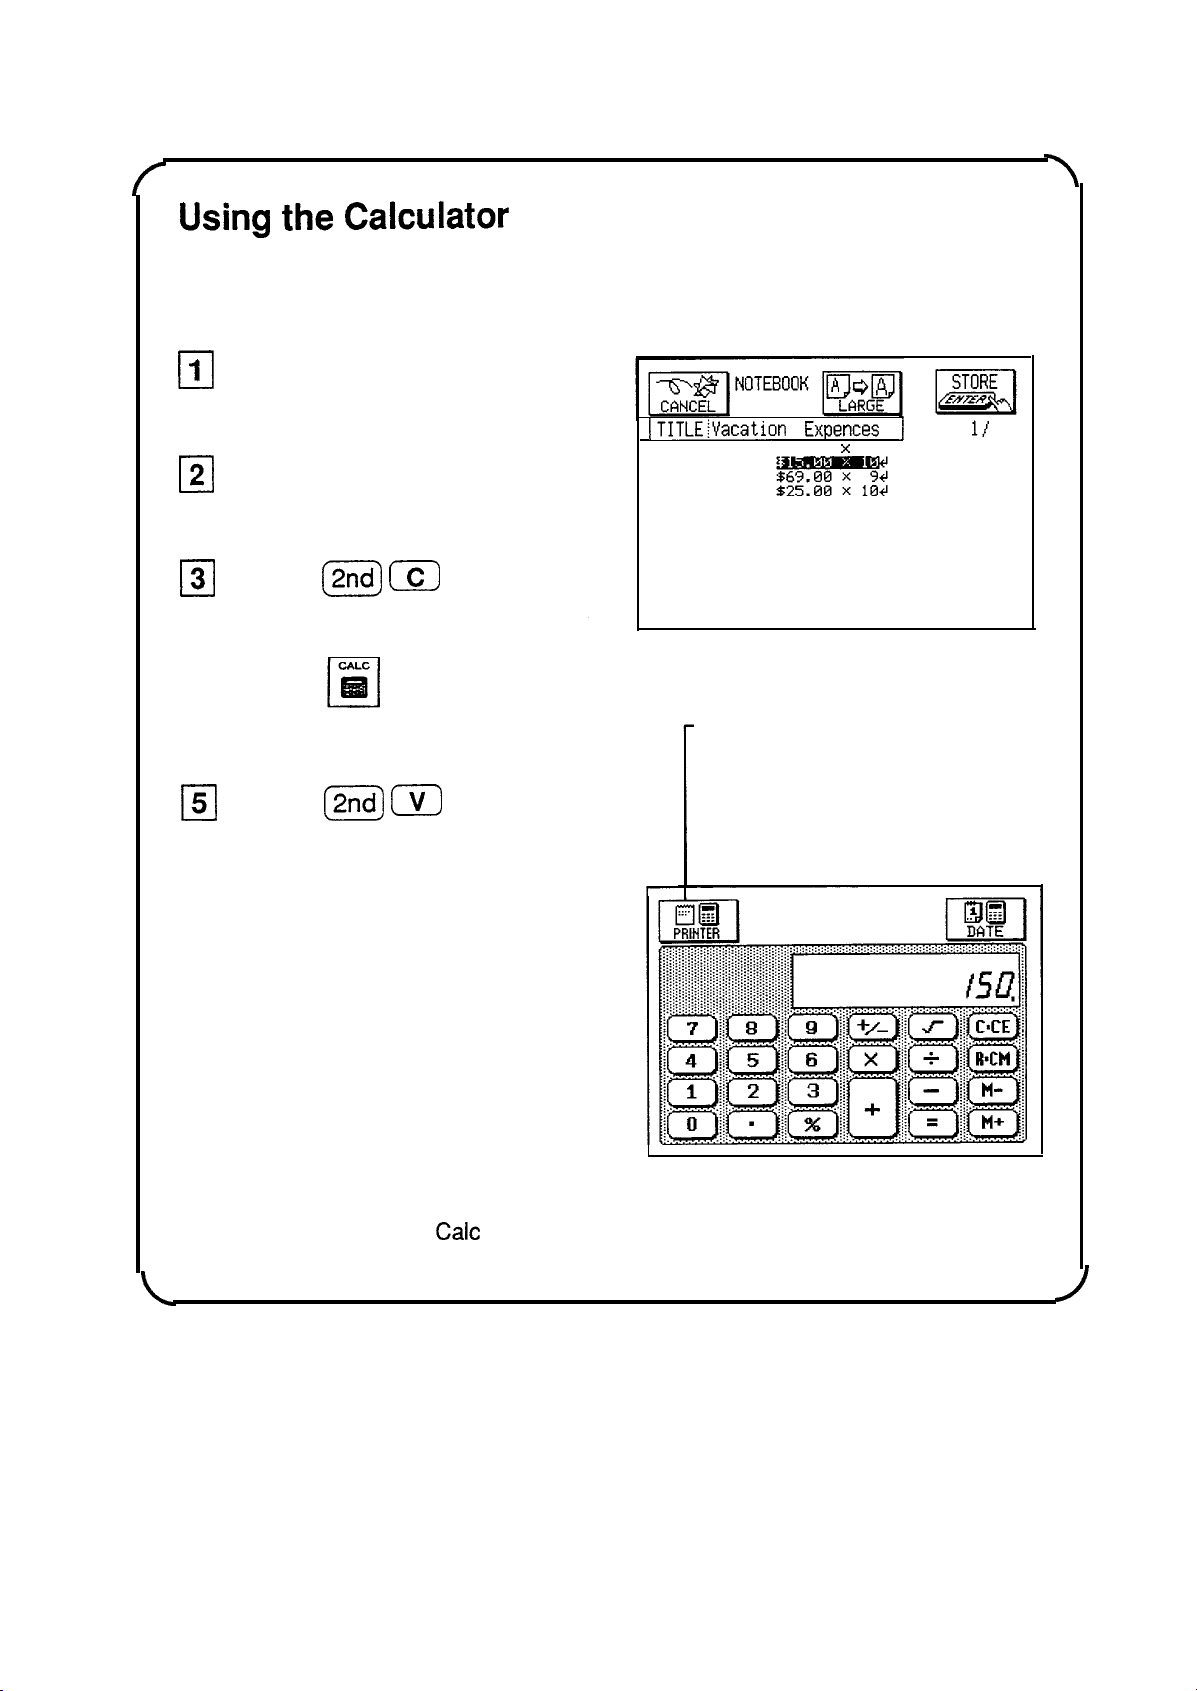
Using the Calculator
In addition to working like a standard calculator, the unit’s
Calculator can work with numbers stored in an entry.
Find an entry that you have
1
El
stored numbers in.
PAGE
Drag the pen over a
2
cl
number to highlight it.
cow
0
3
Press
(2ndj (cl
to copy
the number to the clipboard.
ITITLE!Vacation Expences 1
Car rental
Gasoline
Hotel
Food
Total
$79.95 x 10
1,'
1
799.504
Press
4
cl
the Calculator.
Press
5
El
the copied number to the
Calculator.
Perform any calculations
6
cl
you desire by touching the
Calculator’s keypad.
to call
PASTE
(%J WJ
See “The
-Touch if you want to display
an electronic “print out” to
check calculations as you
to enter
Calc
Application,” Chapter 6, for more details.
work.
23
Page 25
Answers to
My batteries only lasted for two months. Is there something wrong?
Q:
Commonly Asked Questions
Will I lose data in memory when I change the batteries?
A:
There is probably nothing wrong with your unit. Battery life will vary from
user to user. A number of factors will affect battery life, including how much
the unit is used. The battery life is rated at 70 hours of continuous use.
Assuming an average of one hour per day of continuous use, you would get
about 2 months of battery life. Two months indicates heavier usage.
When you change the main operating batteries, the back-up battery will
protect data in memory. Be sure to follow the directions carefully when
changing the batteries.
An optional battery case is available, which will extend the life of your
operating batteries.
I have a SHARP 8000* Series Organizer. How can I transfer my data
Q:
from it to this new unit?
The data format on your new unit is different to that on the 8000 Series
A:
Organizer. You can get data from the 8000 Series (or 7000 Series) one
application at a time using one of the following methods:
l
If you have your 8000 Series data on a RAM card, do the following:
-
Insert the RAM card into the 8900 Series.*
-
Turn on the 8900 Series.
-
Go to an application (Tel, Schedule, etc.).
-
Press
[m)
and then touch
1
PERIPHERALS1 , select IMPORT
OTHER FORMAT, then select VIA RAM CARD.
-
Repeat the last two steps for each application you wish to import.
l
If you own one of the Sharp Organizer Link software packages for an
8000 Series Organizer (either for the IBM and compatibles or the
Macintosh) do the following:
-
Hook up the cable to the 8900 Series.
-
Turn on the 8900 Series.
-
Press (MENU) and then touch
IPERIPHERALS]
, select IMPORT
OTHER FORMAT, then select VIA PC LINK.
-
Now use the link software on the PC to send the Information to the
8900 Series.
* 8000 Series: IQ-8000, 08200, IQ-8400,
IQ-8100M, IQ-8300M, IQ-85OOM
8900 Series: IQ-8900, IQ-8920
9000 Series: IQ-9000, IQ-9200
24
Page 26
l
You can purchase the CE-315L transfer cable. Then do the following:
-
Hook up the cable to the 8900 Series and the 8000 Series.
Organizer.
-
Turn
(oPTloN) (4j
-
Turn on the 8900 Series.
-
Go to an application (Tel, Schedule, etc.).
-
Press
OTHER FORMAT, then select VIA
.-
Repeat the last two steps for each application you wish to import.
Note:
on the 8000 Series Organizer and press
(m)
.
[%%@I
and then touch
~PERlPtiERALS~
DIRECT
, select
CABLE.
IMPORT
Data can only be transferred from an 8000 or 7000 Series
Organizer to the
8900/9000
Series unit, and not vice versa.
The procedures above will not
replace
the existing data on the
Organizer but add to it.
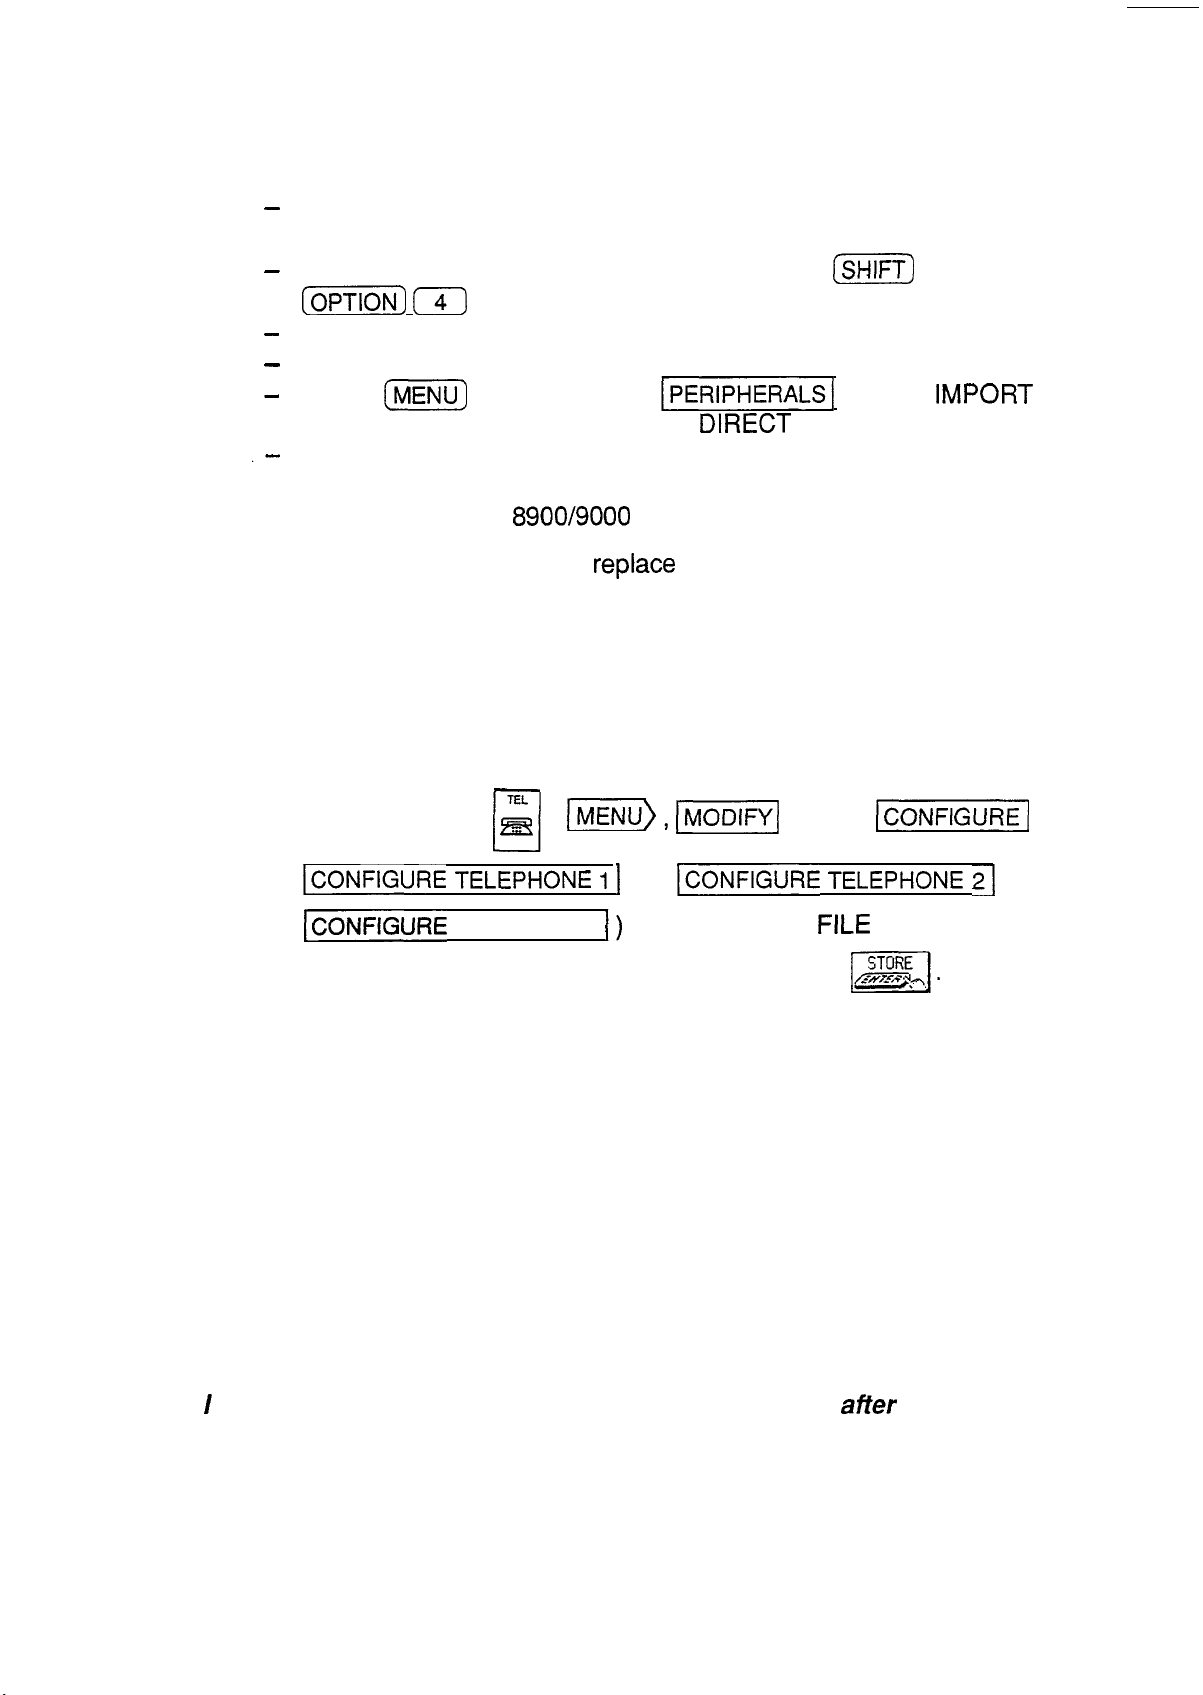
Warning: If you have used free fields in Telephone on your 8000 Series
Organizer, you must set the number of fields in Telephone on the
8900 Series to be the same (8) BEFORE transferring the
information to the 8900 Series. Otherwise the data in the free fields
will not be transferred onto the 8900 Seires.
To do this touch & ,
Ir\llENU), (-1
touch
w(
u
~~ONFIGURE TELEPHONE i 1
ICONFIGURE
TELEPHONE 3
the number of fields (at least 8) and then touch
(or
[CONFIGURE TELEPHONE 21
1)
and then select
FILE
NAME. Enter
Now go
m].
back and import the 8000 Series data. See p. 134,276 and 277.
Q:
I have an older model of the SHARP Organizer and imported the data
into this unit. But when I went to the Tel application in my new unit, ail
of my entries looked strange.
Some words were split in two and some
lines ended too early. The entries don’t look like this in the other
Organizer. What can I do?
A:
In certain applications, such as Tel, the number of characters allowed per
line is different from that of other Organizer models. This means that the
new line characters you entered in the older Organizer will not produce the
same formatting in this unit. You will need to edit the relevant entries and
reformat them by deleting old new line characters and entering new ones.
or
Q:I saw the message “There is not enough memory...” after trying to store
an entry. What does this mean?
A: You have filled your unit with information. Here are some things you should
try in order to free up some memory:
25
Page 27
1.
Check your Scrapbook. These drawings take up more memory than
regular entries. Be sure to delete any notes or drawings that you no
longer need.
2. Check for old Schedule items. Delete those you no longer need. You can
delete
Check for completed To Do items. You can delete all completed To Do
3.
ali
Schedule entries for an entire month using the Calendar menu.
items using the Jo Do menu.
If you wish, you can purchase a memory expansion RAM card. You can use
these cards like floppy disks, keeping several to store your data by subject,
for example.
I want to print out my unit information. What do / need?
Q:
Here are the things you will need:
A:
1.
The SHARP
Any parallel PC printer that emulates one of the following printers:
2.
Canon
IBM
Epson
Hewlett-Packard
CE-IRI
wireless interface for printers.
BJ-1 Oe series
ProPrinter
series
FX series, LQ series
LaserJet series
Most printers, including portable ink-jet printers on the market today,
emulate at least one of these printers. Check with your local computer
dealer for more information about printers.
How can I back up my data?
Cl:
It is important to always have a back-up of your important information. Here
A:
are some ways of doing this:
l
You can print out a hard copy using the optional accessories. See p. 222.
l
You can back up your entire unit using the IQ-783 256KB RAM card
(for the IQ-8900) or IQ-784 512 KB RAM card (for the IQ-8900 and the
IQ-8920). (if needed, you can just as easily restore your information
back to the unit.) See p. 238.
l
You can use PC or Macintosh link software either from SHARP or a
third party. You will also need one of the various PC-Link cables or the
CE-IR2 wireless interface for computers. Check with your local dealer
regarding features and availability of these products.
Q:
I can’t seem to turn my unit on. I changed the batteries but still nothing
happens. What should 1 do?
A:
Check the following before sending the unit in for service:
26
Page 28

l
Check to see that the CARD LOCK switch is LOCKED and not in the
RELEASE position. You may have accidentally left it unlocked after
removing an IC card.
l
Check that the battery replacement switch on the back of the unit is in
the “NORMAL
OPERATION”
position. If the switch is in the “REPLACE
BATTERIES” position, the unit cannot be turned on.
l
Check or replace the operating batteries, even if you have just replaced
the batteries. It is possible that the batteries were not fresh when you
purchased them.
l
Press the RESET switch. If the unit has been dropped, for example, it
may have to be reset.
This
will not delete your data. If for any reason
data is missing after resetting the unit, it was lost before you pressed
the RESET switch. The RESET switch simply re-starts the unit.
If none of the procedures above works, you will need to send the unit to a
service center. Check the back page of this operation manual for the location
of your nearest service center and call for more information.
Q:
What happens if I am working on an entry and the auto power off
function shuts off the unit before I store the entry?
A:
You will not lose any information. The next time you turn the unit on, the
Resume feature returns you to exactly where you left off.
Q:
I would like to use the Filer feature but I am afraid of using up memory.
How does the Filer work? Does it make a copy of each entry?
A: No. When you assign an entry to a folder in the Filer, it does not use up any
extra memory. The unit doesn’t actually make a copy of the entry, it simply
“assigns” the entry to a folder. Entries are still stored in each individual
application (Tel, Notebook, etc.). The Filer is a great way to organize your
information and there is no reason not to use it.
Q:
I have an older model 8000 Series 256K Organizer that was about 99%
full. When I loaded all of the data into my new unit
(/Q-8920)
and
checked the memory, it read about 65% full. I expected it to read about
50% full. What happened?
A:
This unit uses memory differently to other SHARP Organizers, providing
many more features, formatting capabilities, etc., which require more
memory. Importing data from another type of unit will require more memory
on this unit. This amount will vary depending on the number and type of
records you import.
27
Page 29

What is the Outline application
Q :
Notebook?
The Outline application allows you to group and categorize information using
A:
a hierarchical structure. Everyone has a lot of small but important pieces of
information that have to be memorized or kept track of in a written record, for
example, important personal information: Social Security number, credit card
numbers, various ID numbers, account numbers, clothing sizes, etc. Using
the unit, you could make a number of Notebook entries for each piece of
information, but a better way to manage the information would be to make a
single Outline file called “Personal Information.” This file could then contain
a number of headings (such as Car info., Travel info., Health info., Financial
info., etc.), under which relevant pieces of information could be stored. This
makes it easier to access information and prevents your unit from becoming
cluttered with hundreds of individual entries.
Additional Outline files could also be made, including: favorite movie list,
project management file, To Do lists, price lists, product line-up and
specification file, business plans, product proposals, and meeting notes.
Many types of information can be more easily and efficiently managed in an
Outline structure.
?
Why would I want to use it instead of
Another use of the Outline application is document preparation. Many times
you might want to write a memo, letter, proposal, marketing plan, etc., but
find it difficult to write an entire document from scratch. The Outline
application allows you to capture your thoughts and ideas, then rearrange
and categorize them at any time. You can also copy an Outline file and
paste it into the Notebook application to finish the document there, adding
text to the major topics.
I want to send faxes from my IQ-8900 series unit, but what do I need
Q:
besides the unit itself?
The IQ-8900 series unit has fax software built in, but you will also need the
A:
PC fax/modem and the CE-137T level converter.
Not all PC fax/modems can be used with the IQ-8900 series unit. Contact
your nearest SHARP dealer for information about compatibility and
availability of the PC fax/modems. (If the CE-FM1 Fax/Modem is not
available for use in your country because of the specifications of the
telephone lines, ignore references to it in this manual.)
28
Page 30
.,................,.,.... . . ..-.
:::::::.~;~.:~.:~::~~~.~~
.~:~::i~::::::~.~.:~~.:~::~~.~~:
~:~::::::::::::::~::::::::~.:~.::.:.:.:::::::::::
~.:~:.~~~.::::::?.~.~:~.~.~~~.~.~
I.:.:.:.:.:.:.:.::::::::.:.:.:.:.:.:.: ....:.~.~.~.~.~.
.:.:.:.:.:.:.::::.>:.:.:.,s.:.:.>:.: . . .
.
..‘.........:...
~:::::::::.~.:.:~.:::j:.j;.~<:$$$jjjj :.:,:
i:.:.:.:.:.:.:.:.:. . . . . . . . . . . .
.:::::::::~~~~:~~:~
‘%% .A........n.: . . . . .
::::::::::jjjj.:.::::::.:.:.:.:.:.:::j :.:.:.:.:.:.
.:.:.:.:.:.:.:.:.:~>..:.:jj.:.:.::: :.:~~~:~:
..A.
. . . . .
::::~::::~~~j~~.~.~:::::::?.~~:~..~:i
,:~~~::‘.:~~::~.~~.:~~.:...
:::::::::::::::::::::::~.~.~:~
‘.:2.:.:.:~.:.:.:.:.: . . . .
.A . . . . . . . . . . . . . ..A :.:.: .,.,....
:::::::~;~:~~~:~~,$~
.A.. .
. . . . . . . .
..v..... Y..
.
. ...
. . . . . . . . .
. .
:...:.:.:.:.:.:.:.:.:.: .,:,:,
. .
.,.,.,...,...,
. . . ..__
,:
.>>> . . .
.
. . . . . .
..~.~. >:
. . . . . . . .
::.:j
C
0
Introduction
Quick Start
ontents
. . . . . . . . . . . . . . . .
. . . . . . . . . . . . . . . .
..*............................................................................
..*..............................................................................
Answers to Commonly Asked Questions
Contents
What Your Unit Can Do
About this Manual
.~..............,.,......,,............,..........................................................
. . . . . . . . . . . . . . . .
. . . . . . . . . . . . . . . . . . . . . . . . . . . . . . .
Conventions Used in this Manual
Caring for the unit
. . . . . . . . .
..*......................................................~...............
..I.......................................................
. . . . . . .
..~.................~................~......~.~...
1
3
. . . . . . . ..*................*.......
24
29
37
..~......~................~...~....................
39
41
42
Chapter 1 Getting Started
Pat-t Names and Functions
Getting the Unit Up and Running
Installing the batteries
lnitializing
Setting the clock
Turning the unit on and off
Calibrating the touch panel
Setting the LCD contrast to suit various lighting
conditions
Turning
Turning the key beep on and off
Getting to Know Your Unit
Touch buttons and the touch panel
Applications
Menu operation
.....................................................................
.......................................................
..............................................
..................................................
......................................................................
..........................................................
45
46
48
48
48
49
..........................................
..........................................
.....................................................................
off the
welcome
display.:. ...............................
.................................
.........................................................
54
.............................
..................................................................
............................................................
51
52
52
53
54
55
55
56
The keyboard
...............................................................
Display symbols
Built-in
help and
...........................................................
other messages..
..............................
57
57
58
29
Page 31

Chapter 2 General Operation
...............................................................
61
Opening an Application
Selecting Display Modes
The Index
The
View
The
Edit mode
Making a New Entry
Editing an Existing Entry
Editing Techniques
Fields
The cursor
.............................................................
...........................................................
mode.. .........................................................
mode..
..................................................................
...........................................................
....................................................................
............................................................................
....................................................................
Typing in text
Moving around the display
Moving between fields
Inserting and overwriting text.......................................
Deleting
Working with blocks
text..
62
62
62
..........................................................
.............................................................
63
64
65
67
67
67
68
................................................................
..........................................
.................................................
...............................................................
of text.. ........................................
68
69
70
70
70
71
Scrolling the display .....................................................
Finding Specific Entries in Your Unit
Using
Using
By topic ........................................................................
By date
Deleting Entries from the Unit
Deleting single entries
Deleting entries using the application menu..
the
index mode..
keywords.. ..........................................................
.........................................................................
...................................................
........................................
................................................
.................................................
.............
Drawing Using the Scrapbook ..................................................
Using
Making new graphic entries
Finding
Revising graphic entries ..............................................
Deleting
the
drawing tools
.................................................
.........................................
graphic
graphic entries.. .............................................
entries ................................................
Checking the Time and Date ....................................................
72
72
72
73
74
74
75
75
76
77
77
78
79
79
80
81
30
Checking the Unit’s Memory
.....................................................
The Tools Menu-the Unit’s Basic Utilities
...............................
81
82
Page 32

Chapter 3 Time Management
...............................................................
85
The Calendar Application
Selecting a calendar view
The Monthly view
The Three-month
The Weekly view
The Weekly Graph view
The Daily view
Finding
Selecting a date
The Calendar application menus
The Schedule Application
Making new entries
Finding entries
Moving appointments and editing entries
Deleting entries
Selecting a specific date
Making entries for recurring and extended events
SettingaSchedule
The Schedule application menus
..........................................................
entries using the Calendar views..
...........................................................
............................................
.........................................................
view..
..........................................................
.............................................................
...........................................................
.............................................................
............................................................
...............................................
..............................................
.................
.................................
......................................................
...................
..............................................
...
100
alarm
..........................................
..............................
102
103
86
86
87
87
88
88
89
91
91
92
93
93
95
96
97
99
The To Do Application
Making new entries
Finding and reviewing entries
Editing entries
Checking off completed entries
Using
Deleting entries
The
.............................................................
....................................................
............................................................
categories
To
application
Do
.........................................................
...........................................................
The Ann (Anniversary) Application
Making new entries
Finding entries
Editing entries
Deleting entries
The Ann application menus
Chapter 4 Creating Your Own Database
.....................................................
...........................................................
............................................................
..........................................................
. . . . . . . . . . . . . . ..I..........................
The Tel and User File Applications
104
104
......................................
.................................
menus..
...................................
..........................................
.......................................
107
109
109
112
117
118
119
119
121
122
122
123
125
. . . . . . . . . . . . . . . . . . . . . . . . . . . . . . . . . . . . ...*.
126
31
Page 33

Selecting a file
...........................................................
126
Making new entries
Finding entries ...........................................................
Editing entries ............................................................
Deleting entries ..........................................................
Using picture fields ....................................................
The
Tel
application menus..
The
User
File
....................................................
.......................................
application
menus...............................
Customizing the Tel and User File Applications .....................
Changing file names
Configuring fields .......................................................
Customizing the Index display
..................................................
...................................
Chapter 5 Word Processing and Outlining.......................................
The Notebook Application
Making new entries
Making a new entry based on an existing entry.........14 2
Finding entries
.......................................................
....................................................
...........................................................
127
127
129
129
130
132
133
133
133
134
136
139
140
140
142
Editing entries
Deleting entries
Changing the character size on the display..
Searching for specific words in the text..
Changing character
Using indents and tabs
Turning
Printingafull-size
The Notebook application menus
word wrap on
The Outline Application
Creating
Finding outlines
Displaying
Revising
Outline
Using
The
an
outlines..
deletion
subtopics
Outline application
............................................................
..........................................................
............
..................
(font) styles
..............................................
and off
document
...........................................................
outline..
full
topics
...................................................
..........................................................
..................................................
...............................
...................................
......................................
..............................
.I52
157
......................................................
..........................................................
(children)
.........................................
menus.. ................................
144
144
145
146
146
148
152
157
158
160
161
161
165
167
I71
Chapter 6 Desk Accessories
32
. . . . . . . . . . . . . . . . . . . . . . . . . . . . . . . . . . . . . . . . . . . . . . . . . . . . . . . . . . . . . .
173
Page 34

The
Caic
(Calculator) Application
Performing calculations
The paperless printer
Date calculation
............................................
..............................................
.................................................
.........................................................
174
174
175
177
Using the Calculator with other applications..
When E appears
Calculation examples
The Clock Application
Changing the Home city
Setting the time and date
Checking the time in a city
Adding a User’s city
Daylight saving time (DST)
Setting daily alarms
..............................................................
The Scrapbook Application
Making new entries
Using the drawing tools
Finding entries
Editing entries
Selecting an area
...........
........................................................
.................................................
182
............................................
..........................................
........................................
...................................................
........................................
...................................................
.....................................................
....................................................
.............................................
...........................................................
............................................................
.......................................................
179
180
181
182
184
185
186
187
188
190
191
192
192
192
192
Moving or copying sections of graphic entries
Adding
Deleting entries
The
Chapter 7 Features and Utilities for Added Power
The Filer Application
Assigning entries to folders
Naming or renaming folders
Viewing entries via the Filer
Unassigning entries from folders
Merging folders
Deleting all entries in a folder..
Sharing
The Filer application menus
Copying or Moving a Block of Text
text strings to graphic entries..
..........................................................
scrapbook application
(VIEWS)
..........................
................................................................
.......................................
......................................
......................................
...............................
..........................................................
..................................
folders ............................................................
......................................
.........................................
..........
......................
menu
................
193
194
195
.I96
197
198
199
202
203
204
205
206
.206
207
207
Copying or Moving Entries
......................................................
209
33
Page 35

Creating a New Entry Based on an Existing One . . . . . . . . . . . . . . . . . .
210
The Time Stamp and
The Word Key
The Filter Function
Special Characters
.........................................................................
Registering your words or phrases
Inserting a word or phrase with the Word key..
Editing a word or phrase
Deleting a word or phrase
..................................................................
Turning the Filter on
Turning the
Deleting filtered entries
. . .
Date Stamp
Filter off..
..*............................................*.....*.........
Functions . . . . . . . . . . . . . . . . . . . . . . . . .
...................................................
.................................................
..............................................
Chapter 8 Using the Optional Peripherals
The Peripherals Menu
Application IC Cards
Installing an IC card
.............................................................
...............................................................
...................................................
...........................
........
...........................................
.........................................
........................................
211
211
212
213
213
213
213
214
215
215
216
219
220
220
220
Printing
Sending
from
Fax
the unit..
Setting
Printing the current display
Printing
Printing a specified
Printing
from
Connecting the fax/modem
Setting
Setting
Setting up your personal information for cover
sheets
Sending a fax (Automatic dialing)
Making
Sending
Usingacover
Speed
Editing speed
.............................................................
up the
a
all
the
fax/modem
up
&
other changes to the
a
buttons..
unit for printing
single
entries ......................................................
unit..
the Fax directory
page header
fax (Manual
entry..
group
......................................................
options..
sheet..
...........................................................
button
..................................................
information..
..............................................
................................................
dialing).
...................................
........................................
of entries..
..........................................
.......................................
.......................................
number
..................................
........................
..............................
........................
..............................
222
223
224
225
225
227
227
228
.228
.230
.231
.232
.233
.233
.235
.236
.237
34
Making a speed button secret
.....................................
237
Page 36

Enhancing Capabilities Using a RAM Card
Memory
Backing up data to a RAM
Sharing data with
expansion..
another
...................................................
card
unit
............................
................................
..................................
238
239
240
241
Transferring Data
Exchanging Information with a Personal Computer
Terminal Mode
....................................................................
Transfer between
Receiving data from units other than
the
8900/9000
Transferring data to/from a RAM card
application
..................................................................
8900/9000
Series.. ...............................................
Series units
................
...............
.........................................................................
Hardware requirements
Connecting the
Opening
Configuring the modem settings
Dialing settings..
Changing dialing entry settings
Makingacall..
Hanging up
Receiving a call
On-line
Data
Auto log-on
Terminal
Telecommunications
the
operations
transfer
emulation..
modem..
Terminal
.........................................................
............................................................
.................................................................
..........................................................
..............................................................
.................................................................
.............................................
............................................
mode
(Terminal
...................................................
troubleshooting
......................................
................................
.................................
menus)
........................
........................
242
244
249
251
251
253
253
254
254
255
256
260
260
261
262
263
264
268
270
271
About External Power Supply
Points to
Remember When
Chapter 9 Personalizing Your Unit
The Star&-Up Display
Setting the start-up display
Responses to the start-up
The Secret Function
Registering a password
Marking/unmarking
Accessing secret entries
...............................................................
................................................................
Using
....................................................
.................................................
Peripherals..
........................................
display.. ...........................
.............................................
as
entries
............................................
secret
.....................
........................ 284
273
274
279
280
280
281
282
283
284
35
Page 37

Locking the unit..
........................................................ 286
Changing the Calendar Display
Appendices
A.
B. ASCII Control Code Table
C. Resetting the unit
D. Troubleshooting
E. Battery Replacement
Changing or deleting the
If
you forget
RAM cards and the Secret function
Setting the date
Setting the monthly format
Setting
your
format
up
the Calendar..
password
............................................................................................
List of Key Notations
........................................................
................................................
.............................................................
All
reset
operation..
....................................................
................................................................
........................................................
General guidelines..
password.. .........................
.......................................
..........................
Format
...................................................
..................................
..............................................
.........................................
...........................................
286
287
287
288
288
288
289
291
292
298
299
299
300
301
301
Index
Replacing the
Replacing the
F.
Specifications..
..................................................................
. . . . . . . . . . . . . . . . . . . . . . . . . . . . . . . . . . . . . . . . . . . . . . . . . . . . . . . . . . . . . . . . . . . . . . . . . . . . . . . . . . . . . . . . . . . . . . . . . . . . . . .
operating
memory
batteries..............................
backup
battery......................
302
304
306
311
36
Page 38

The
IQ-8900/IQ-8920
information manager with a new, easy-to-use graphical
user interface, a large, easy-to-read screen, and
pen-based panel operation. Wireless communications
capability with other IQ-8900 series units and personal
computers is built in, and the
provides fax sending capability.
To help you better manage your time and appointments,
you can record appointments, meetings, or any other
is a full-featured, pocket-size
IQ-8900/iQ-8920
also
information connected with a date in the
application; the
and goals -arranged in a priority you assign to them;
the
Ann
events such as anniversaries and birthdays; and the
Calendar
entries in a daily, weekly, or monthly format.
The
record names, phone numbers and addresses, while the
User File
information, entered into categories you set up. Both can
be configured to include the information you need most.
The unit is a word processor as well. The
application offers advanced features, including margin
set, word wrap, and a choice of font size and styles,
allowing you to use the unit for everything from simple
note taking to creating a formal, full-size letter. And the
application lets you record important annual
can display your
Tel
application can be used like an address book to
application is a database for any important
To Do
application helps you track tasks
Schedule, To Do,
Schedule
and
Notebook
Ann
Outline
thoughts and ideas using topics and subtopics, easily
reorganizing them at any time.
The unit’s powerful desk accessories include the
Scrapbook
write notes directly on the display. The
application lets you enter and organize your
application, which lets you create drawings or
Calculator
can
37
Page 39

perform a full range of mathematical functions, and the
built-in
time.
The unit combines quick access to your information with
the ability to search files using a keyword or heading. The
Filter
specified entries. And the
containing information you specify into one location,
ensuring that ail data on a single topic is at your
fingertips. You can also “cut and paste” information within
or between entries and files. And when a printer is
connected to the unit using the optional
interface, you can make hard copies of your data.
The IQ-8900 Series also has powerful telecommunications functions. Using the optional CE-FM1 Fax/Modem
and CE-137T level converter, you can send faxes directly
from the unit (with or without a cover sheet), and transfer
Clock
function makes it possible to select and work with
keeps track of both local and international
Filer
lets you collect ail entries
CE-IRI
wireless
data to and from other units or to remote computers. And
the unit can be given even greater capability through the
use of SHARP application IC cards. Memory capacity
can also be expanded using any of the optional RAM
cards. Features and enhancements such as these,
coupled with capability and ease of use make the
IQ-8900 Series one of the most versatile and advanced
hand-held information managers available in the world
today.
38
Page 40

This manual is designed to help you to fully understand the
capabilities and operations of your unit. The first two
chapters provide a general introduction and instructions
about set-up and initialization, including an overview of the
keyboard, the display, and the operations.
Other chapters are organized according to the type of task,
for example,
Database,
functions and features that meet your particular needs.
This manual consists of 9 chapters and a set of appendices:
Chapter 1. Getting Started
introduces part names and functions, and shows you how
to set up and initiaiize the unit, including how to install
batteries and set the built-in clock.
Chapter 2. General Operation
introduces you to basic concepts and operations on the
unit, including opening an application, using menus, and
the built-in help feature.
Chapter 3. Time Management
Explains those features that help you structure your time
and keep track of appointments and important events: the
Calendar, Schedule, To Do,
Time Management
so that you can give your attention only to those
and
and
Creating Your Own
Ann
applications.
Chapter 4. Creating Your Own Database
Explains the
only store information such as addresses and phone
numbers, but also can be configured to manage almost
any type of information.
Chapter 5. Word Processing and Outlining
Explains word processing in the
and how to structure your ideas and writings using a
simple outline form in the
Tel
and
User File
applications, which not
Notebook
Outline
application,
application.
39
Page 41

Chapter 6. The Desk Accessories
Explains drawing using the
Calculator
on the display whenever they are needed.
Chapter 7. Features and Utilities for Added Power
Explains how to copy entries and other productivity
enhancing features and utilities, including quick access to
information with the
entries, and more.
Chapter 8. Using the Optional Peripherals
Explains printing using the unit, how to transfer data to
and from other units (including previous models), how to
send faxes or exchange data with personal computers
using the optional fax/modem, and using the optional
cards.
Chapter 9. Personalizing your unit
Explains how to change the opening display and
Calendar
and Clock-applications that can be opened
Filer
display format, and how to use the
Scrapbook,
application, filtering selected
and using the
IC
Secret
function and a password.
Appendices
A. List of Key Notations
B. ASCII Control Code Table
C. Reset
D. Troubleshooting
E. Battery Replacement
F. Specifications
40
Page 42

.
.‘.;.>>>; . . . . . . . . ~:.:.~.:...:.:.:.~..:.~:.:;:
.::::~.:.:<.:.:.:<.:.:.+..>+q<.>:.:.:
. . . . . .
.i.. ;.:. .>,.;... . ._
“.-.:...>..:.> ..A
. ..> _
i............ i
.,...,.....,.: .,...J,......
. . .
.,.
.
..v...
A> ,.........,.. .zi:.~.: .:.:.
.A.., v..
. . . . . . ..A..
:.,.>:.: .,...
.,...
. .,.. . . . . . . . .
..~.~.~...~.~. :.,
. ...~+;<.:j, ~~.,~,:,~
v
:.:+:...
:~::~::::.::::~~:.~~~:~~~~~~~.:.:.:.: . . . .
. . . . . . . . . ~:::~r”.::.~~~~~:?~.:~;~~
“-0 .-e>.:
:.:.:...:j.x.:.:.:.: . . . . . . . .<Icic ..,;
:$jp,::.:Zp,~~>Zjjp.X~VZ . .
~:~:~~~~~~.~~~~~~~~~~.~~~~~~
:.:.; i............. .
:~::~~.~~.:~~~...:.:.:.:...;..: . . . . . .
:::~~~~~:.~.?~~;.~~~.::~.:::::::~:.:::~
:.:.:.;~::::::::.:.~.::.:.~.:::.:::~~:::::::::::::
.v...
:~j~~::~j~j~~~~.~j:::~:~.:::::::::::~:
:::::j~::~~~:~.~~.~.:.
:j::jjjj::jj:~j?:.:.:.
:jjjjjjj*j~.$$j
:jjjjjjjjjjjjjjj:.:::.:.
.
. . ..A .,
. . . . . .
. . . . . .
:.:.. . . . .
<.>
.
<‘::
El
onventions
Used
in
this Manual
The following keyboard and symbol conventions are used
throughout this manual:
l
-1,
-1,
and other similar key notations
indicate “touch buttons” on the display which can be
activated by touching with a finger or the touch pen.
(For more information about touch buttons, see p. 55.)
l
(ON), (ENTER) , and other similar notations indicate
keys on the keyboard that should be pressed to
perform operations.
l
Letters and numbers to be entered in examples are
shown in italics, for example
lunch
indicates that
l-u-n-c-h should be typed in. Words shown in boldfaced
letters, such as
Calendar
and
TOOLS,
indicate the
names of applications, functions or menus.
l
Some keys have more than one function, accessed by
using them in combination with
example, also accesses the
HELP
Ial
or
(m).
‘H’, for
screen when the
(2nd) key is used with it. When a key’s second function
is referred to in an explanation, only that function is
shown. For example, the instruction to
screen would be shown as (2nd)
.
cm
l
The m symbol indicates a tip or important point.
l
The unit often lets you perform operations in more than
(w)
one way. These alternatives are indicated by the
see
the
HELP
, not as (2nd)
*c
sym boi.
l
Cross-references to other helpful information are
marked by the -f symbol.
-t
For a full list of key notation, see Appendix A, p. 292.
l
in this manual, 8000 Series, 8900 Series and 9000
Series means the following models:
8000
Series: IQ-8000, IQ-8200, IQ-8400, IQ-81 OOM,
IQ-8300M,
IQ-8500M
8900 Series: IQ-8900, IQ-8920
9000 Series: IQ-9000, IQ-9200
41
Page 43

aring
The unit contains sophisticated circuitry and a glass
display panel which can be damaged if not cared for
properly. A few precautions should be taken regarding the
unit’s care so that it will give you many years of reliable
use.
for the unit
Keep the unit away from extreme
heat. Do not leave it on the
dashboard of a car or near a heater.
Do not leave it in any place that is
extremely damp or dusty.
Do not drop the unit or subject it to
severe impact or extreme force.
Bending the unit beyond its capacity
can damage the circuitry.
Do not use extreme force when
pressing buttons on the display or
the keys. Do not use any sharp,
pointed object or your fingernails to
press them. It is recommended that
you use only the included touch pen
to write or to touch the buttons on
the unit’s display screen.
Sharp or hard objects can scratch
the unit. Be careful that it is protected
when carried with other objects. Do
not store it loose in a bag or
briefcase.
42
Page 44

I(
&q
Clean the unit only with a soft, dry
cloth. Do not use solvents.
Do not carry the unit around in your
back pocket, as it may break when
YOU
sit down. The display is made of
glass and is particularly vulnerable.
j
lls
Replace the batteries as soon as they become weak (see
p. 301). Failing to replace weak batteries may result in
leakage or lost data.
43
Page 45

Page 46

This chapter explains everything you need
to know to set up and begin working with
your unit, from installing the batteries to
initialization. The chapter also includes a
labeled
illustration of the parts of the unit,
and basic explanations of its key features,
from the keyboard to the touch panel display
and its symbols.
45
Page 47

Part Names and
Functions
(CAPS)
\
\
i
[2nd) [ii&q (Gq [
J
,
SPACE
/
]
(INS)
(xq
[ENTER]
/
46
Page 48

Application keys
Open appropriate applications.
r
Display
External power
supply pin
Keyboard
Touch pen holder
Touch pen
X-pin
cable jack
Shows information, and functions
as a
data entry, etc.
optional CE-76BC battery case.
commands.
for computer links, modem
‘Youth
Connects the unit to the
For entry of characters and
Use for selecting touch buttons
and drawing on the touch panel.
Connects a data transfer cable
hook-ups, etc.
panel” for navigation,
-Lock
-Memory
Reset button
button
IC card lock switch
IC card eject switch
back-up battery compartment
Battery replacement switch
Operation battery compartment
IC card slot
Infrared port
Use to initialize and reset the
unit.
Press to open the unit.
Locks the installed IC card into
the unit.
Use to eject an IC card.
Secures batteries into the battery
compartment.
For loading an IC
For infrared communications with
other
8900/9000
card.
Series units, etc.
Page 49

Getting the Unit Up and Running
1.
Installing
the
batteries
Set the battery replacement switch on the back of the unit
to “REPLACE BATTERIES” (exposing the red dot).
2.
Slide off
the operation battery cover.
3. Insert the two batteries atop the ribbon tab, positioning
them according to plus
(+)
and minus (-) polarity, as
shown below.
lnitializing
48
4. Replace the operation battery cover.
5. Set the battery replacement switch to “NORMAL
OPERATION”.
The unit must be initialized the first time it is used.
1. Press and hold the (ON) key.
Page 50

2. While holding down the @ key, push the RESET
button on the back of the unit using the included touch
pen or a similar object. The following message will appear.
Do you really want to initialize
the organizer’s
will delete all main data)?
stain
memory (this
Setting the
clock
3. Touch
I
IYES 1
1
to initialize the unit.
An initial display welcoming you to the unit appears.
l
If you want to take a tour and have a demonstration of
some of the features, touch
press
(ON]
to leave the demonstration at any time and
1-1.
You can
go back to the initial display.
l
The welcome display is shown each time the unit is
turned on unless it is set to off (see p. 53).
l
To skip the tour, or after finishing it, proceed to setting
the clock, below.
In order for the
Calendar, Schedule, To Do,
and other
time-based applications to be accurate, the built-in clock
must be set to the correct city, time and date.
1. Touch
-1
on the welcome display.
49
Page 51

ADJUST
TIWE,'DATE
El YoRK
~
yout- DUSY iit=
We1
come!
2. Touch
IClTlES[.
A list of cities appears.
HOME
CITY
[=ii;-“I
Press
user cities.
3. If the desired city is not displayed, press
(NM)
4.
Touch the desired city to select it and touch
[SPACEI
to
jump
to the
to display the city.
(PREV)
-1.
or
The ADJUST TIME/DATE window reappears with the
50
selected city displayed.
5. Enter the correct time using the numeric keys on the
keyboard.
Enter a zero (0) in front of any single-digit hour or minute
entries.
6. Press
m
or (PM) (above the top row of keys on the
keyboard).
7. Press [NEXT).
Press
[m)
to select the time system.
Page 52

8. Press (NEXT) .
Enter the correct date in the order of month, date, year.
Enter a zero (0) in front of any single-digit month or date.
Use four digits to enter the year.
Welcome!
*f
Turning the
unit on and
Off
9. Touch
-1.
The city, time, and date are set and the window closes.
If you want to reset the clock in the future, use the
TOOLS
Press ION) to turn the power on and
menu. See p. 182.
[m)
to turn the
power off. The unit will not operate if the IC card lock
switch is in the RELEASE position or the battery
replacement switch is in the “REPLACE BATTERIES”
position. Either batteries or the optional CE-76BC battery
case (see p. 273) can be used as the unit’s power source.
Auto power off
To conserve battery power, the unit will turn itself off if it
has not been used for about 12 consecutive minutes. In
order to avoid interrupting data transfers, the auto power
off function is disabled when communicating with other
devices.
If the unit auto powers off before an entry you are
working with is stored in an application, the data will not
be lost. When you press (ON), the unit will return to the
same operating state as before auto power off.
51
Page 53

Calibrating
the touch
panel
Each person holds a pen differently. in order for the unit
to be able to respond properly to your individual style of
writing, drawing, or selecting touch buttons, the touch
panel must be calibrated.
1. Press
CMENU)
and then touch
-1.
2. Touch ADJUST LCD.
A submenu appears.
3. Touch ADJUST TOUCH PANEL.
<
ADJUST
Please touch the exact center of
al 1 four cross-points with the
organizer's pen.
TOUCH PANEL
>
4. Touch the center of each of the four crosses with the
touch pen.
Setting the
LCD
con-
trast to suit
various
lighting
conditions
If the adjustment is successful, “Adjusted!” appears on
the display. If for some reason the adjustment fails, the
message “Sorry, please try again” will appear. Touch the
centers
of all four crosses again until the touch panel is
calibrated.
From time to time, the contrast of the LCD display may
have to be adjusted. You may find, for example, that a
contrast setting that was fine for the home or office is not
adequate when outside or on an airplane. Follow the
procedure below to adjust the LCD contrast.
1. Press
(MENU)
and then touch
)TOOLS]
.
2. Touch ADJUST LCD.
A submenu appears.
52
Page 54

3. Touch ADJUST LCD CONTRAST.
<
ADJUST
To
adjust the
Press
'Note: You can get here directly
when the unit is off by holding down
'the
[MENU] key and then
'pressing the [ON] key.
LCD
CONTRAST
LCO contrast,
[A]
or
[v].
>
4. Adjust the contrast by touching
5. Touch
*r
Turning off
the welcome
display
1. Press
2. Touch SET START-UP DISPLAY.
ml
mj
when you are satisfied with the contrast.
or
[ml.
If for some reason the display is too light or dark for you
to read the display and operate the unit, you can access
the contrast adjustment directly by turning off the unit,
then holding down
pressing
m.
(m)
Press
on the keyboard while
m
and
Ir)
to darken or
lighten the contrast.
You may find that after taking a
tour
of the unit and
seeing a demonstration of its features once or twice, you
want to turn off the welcome display.
[m)
and then touch
lml.
The SET START-UP DISPLAY window opens.
3. Touch OFF in the box next to START-UP.
START-UP DISPLAY
j
USER'S
..__..._..._.........................
ASK
PASSWOROi
. . . . . . . . . . . . . . . . . . . . . . . . . . . . . . . . . . . . .
OWNER
_......_....._....................i
TEL NUMBER
. .
.._.................................
ADDRESS
[Paste picture here]
v
. . . . . .
ON
. . . . . .
i
. .
. . . . .
i
.._._.........................................
m
.._.._.................................................................
_
. . . . . . . .
. . . . . . . . . . . . . . . . . .
"..
y.... -.....
I . . . ..."
.._.........................................................
_..................................................
53
Page 55

If you make a mistake, touch
-1
and start again.
Turning
the key
beep on
and off
4. Touch
ml.
The welcome display is now disabled.
-t
For more information about configuring the start-up
display, see p. 280.
The unit can be set to make a sound (a beep) each time
a key or button is pressed. The default setting is on,
indicated by j on the display. You can use the
menu to change the setting.
1. Press
(MENU)
and then touch
[ml.
2. Touch MORE TOOLS and then touch KEY SOUND
ON/OFF.
A submenu appears. The current setting is marked with
an asterisk.
TOOLS
wick
0 loach HlJJUSl
o Touch an
to
start
your
busr
to
set
nvlication
orsanizin3
life
the time
ker at the left
& Date
3. Touch KEY SOUND OFF.
The key beep is now turned off and ) disappears.
Getting to Know Your Unit
A major advantage of this unit is its graphical user
interface, which displays commands and can carry out
functions through a combination of graphical images and
text. The graphical user interface is not only easy to use,
demo
54
it also gives you a great deal of versatility, since many
Page 56

operations can be carried out using the touch pen on the
display, keys on the keyboard, or a combination of the
two.
Touch
buttons and
the touch
panel
The unit’s display not only shows information, it is also a
“touch panel” which can respond to the touch of a finger
or the touch pen to call up functions and execute
commands. The icons on the display are “touch buttons”
which allow
you to access various
operations simply by
touching the desired button.
Many operations which are carried out using the touch
buttons can also be carried out using keys on the
To store an entry, for example, you can touch
on the display or press
[i%%6)
on the
keyboard.
l
Keyboard alternatives are shown on some touch
buttons.
the manual, indicates that you can touch
the display or press
l
When a symbol on the display matches a key or
For example
[m)
m,
shown as
-1
-1
on the keyboard.
in
on
symbol on the keyboard, either can be used to perform
Applications
the same operation. For example
the same as
(668%)
Currently selected application
.
[CANCELI
r
INTE:
FEE 14
..__,,.._.__._,.....................!
TIME:
. . .
Sharper Meeting at the
1994
(MON)
_._..,.,_.__._._.,__.......,................,.....................................
1:00; ...
..__......................
2:00,q
..__.._.._.___._,_.................,....................
4% 12:55p
Palo
Alto Hotel
0
cf..
function
55
Page 57

Operations on the unit are performed using “applications.”
Menu
operation
The unit’s
applications-they perform an operation and accomplish
a task based on your directions. To open an application,
select it by pressing the appropriate key on the left of the
display.
When working in one application, you can switch to
another application simply by pressing that application
key. Data being processed in the first application will, in
most cases, be preserved and the operation can be
completed when the application is selected again. In
cases when an operation or procedure cannot be
completed, a warning message will indicate this and give
you the option of remaining in the application.
Another powerful aspect of the unit’s graphical user
interface is its system of menus, which can be used to
quickly execute commands and perform operations. With
the exception of the
Calendar
and
Schedule,
Clock,
for example, are
two “universal” menus
-
PERIPHERALS
any application. In addition, except for the
applications have
specific functions and selections that are unique to each
application.
To change the display view, touch
the desired view from the menu. To modify entries, for
example to delete one or several entries, touch
-1
want to perform an operation in another menu, you can
move between the four menus
TOOLS, VIEWS
keys.
and select the desired operation. When you
and
TOOLS - can be accessed from
Clock,
VIEWS
and
and
MODIFY
(PERIPHERALS
MODIFY)
menus, with
I=[
using the
and select
m
all
and
and
m
56
Page 58

,Items
that cannot
be accessed from a
current menu are
shown dimmed.
The
keyboard
.Indicates
is a submenu for
that menu item.
that there
To do application menu
The unit’s keyboard is laid out in a standard format, much
the same as on a typewriter or computer.
Ial
functions
the same as the Shift key on a typewriter or computer,
and (CAPS) the same as a Caps Lock key.
l
Functions (MOVE and
activated when using the
EXP/COL)
Outline
are automatically
application-it is not
necessary to press any other key.
l
Symbols in white above a key such as ’ or : can be
accessed by holding down m and then pressing the
appropriate key.
Display
symbols
-t
l
Functions in blue above a key, such as HELP, can be
accessed by pressing the key after
There is no need to hold down
(2ndj
is pressed.
12nd)
while you press
the other key.
Special symbols and characters, such as Sr and e, can
also be entered on the unit using
[s)
. For a full
explanation, see p. 216.
The following symbols appear at the top of the screen
indicating various operating conditions.
m
The operating batteries are weak and need
to be replaced (see p. 302).
CARD
EDIT
An IC card is currently being used.
The current entry is in the Edit mode.
57
Page 59

2nd
The
[2ndJ
key has been pressed.
CAPS
*
,h
Q
t
4
c
I,
[CAPS)
mode, all typed letters will be in uppercase.
Press
This symbol indicates that the current entry
is marked as “secret” and can only be
accessed when the unit is unlocked (see p.
282).
The unit is locked. Entries marked as secret
cannot be recalled without first entering the
password and unlocking the unit (see p. 282).
The key sound is on (see p. 54).
All alarms are enabled. When this symbol is
not shown, the alarm sound for any set
alarms is disabled (see p. 189).
They indicate that all information in an entry
cannot be shown at one time on the display.
There is additional information in the
direction indicated, which can be viewed
has been pressed. In caps lock
[m)
to turn off caps lock.
Built-in help
and other
messages
using the cursor keys.
The unit has a built-in help feature which acts as a
convenient, on-line reference manual. You can call up
the
Help
(HELP) . On-line help is an extensive resource, so not all
the information available may fit on one display. Use
PREV
I
ml
During the course of normal operations, the unit will
display several different messages to guide you through
these operations. Many of these messages will give you
a choice of commands or ask you to confirm important
operations, while others will simply display information for
you to read. In most cases, you must make a selection
or simply acknowledge the message before continuing.
feature at any time simply by pressing (2nd)
or
NEXT
when you want to return to the regular display.
to scroll the information, then touch
I
58
Page 60

Other messages will flash information briefly and then
disappear.
There
remaining.
Please try again after freeing up
some memory space.
is
not enough memory space
I
Out of memory
So
you really
DELETE
from the
all
want to PERMANENTLY
TELEPHONE
1 entries
organizer?
I
Delete confirmation
-
Touch to proceed.
‘Touch to proceed.
Cancels the operation.
59
Page 61

60
Page 62

i:~.:.:.:.:.:.:.:.s.:.:.:~.::::::::::~~,;:~:
A.. ..:.> ,.,,.,...,.,.,.,
. .
. . . . . . . .
.
‘2~~~::., :.:: :,~~ . ..., ~,.~.
:.:.: . . . . . . . .. .
~:.~..:.:.u~.:::,:~,:
‘~~~:~~.~~~.~~~~~~~~~~:~~~
.~:.:.:.:~.:.:.:.:.:::.:~~~.:.~~.::::~~:::~,::~
:~~~~~.:~~.~~::~~~~,~::::::::::
‘.yx<..+, . . . . . . . . . ..A :.s..<.:.;.:.:.&
:::~..~.~.:.:.~::.:::::::~~~::.~:::::::~?
‘.V.>‘.... :...> ,.,....
~~~~~~~~~~~:~~~~~
‘.....‘...A
~1~~::~::::::~::.:.:.~:::.:::.:::::.::::
. . . .z .. . . . . . .
:+....*........:.::: . . . . . . . I .A :,.&:.:;::::$ :.:::
:~:~~~~:~:::.:~?~~.:~.:.:~cI :.:.:.:.:.,.
. . . . . , . . . . . . . . . . . . i.:.:.:::;.:::.......
~~.~:~~.~:~::~::::~:.
. .. . . .
. . .. . . .
~~~~$~.~~:~~.>~.~
.~:~~.:..~..~~~.~.s,,~.
..,
...:...>,..~+~.:.~ . . . . . . . . . . . . . . .
>>>y.~,+..>
.A.,
,...A,...
:
:..A
,.,.
3.:.
k-l
I
General Operation
J
In this chapter you will learn most of the
unit’s basic operations. The
Scrapbook
applications will be used for the
Tel
and
examples. However, most of the techniques
described here can be applied to all of the
-t
+
built-in applications. Each application is
described in detail later on in the manual.
For a full explanation of the
Tel
application,
see p. 126.
For a full explanation of the
Scrapbook
application, see p. 190.
61
Page 63

Opening an Application
To start using an application, simply press the desired
key, located to the left of the display. Each time you
press [CALENDAR),
(i5i%$, [SGZUiIQ,
(ANN),
[TEL], [UsER),
[SCRAPBOOK) or
appear. Any application open on the display will now be
hidden when a new application is selected. You can
always return to another application at the exact point
where you left off simply by pressing its key again. Only
one application will ever be visible at a time. The Clock
is displayed only while
(NOTEBOOK),
(m)
Selecting Display Modes
Once an application is open, you can switch between
three basic display modes: Index, View, and Edit. Each
display mode has its own unique appearance and
particular purpose.
COUTLINE), (FILERJ,
, the selected application will
(m)
is pressed.
The Index
mode
62
The
Calc,
Index, View, or Edit modes.
The Index mode shows you a one line view of each entry.
From this you can easily find a particular entry. This is
the default view the first time you use an application or
when there are no entries in a particular application.
Calendar,
and
Clock
applications do not have
Page 64

Touch these tabs to Touch these tabs to
select another section
of the alphabet.
The currently
selected entry.
Touch to view
the entire
entry.
Touch any
entry once to
select it or
twice to view
its details.
-
-
switch between
different files.
EL3
___l__._
____
__
Steagle Bill
__._,.__.___..._____,..!
Slitter,
Swanson
_.____..___._,._.__....!
Symone, Barbara
.,....__......._....,.........................................
Ta1
ler, Henry
__
--.--
Tannor,
._ __
,.._...___.__.,...._..,.,..........,..
Robelt
Edward
..___._..._.
.___..._.._.
. .
-------~~-~~~~~~~-'~"~~~~"'~~~"~~
Phil
.. :201-555-1212
i
____...______.....__....~.~....~...~...........~~~~~~~~
i914-555-1212
,_..I ..,__.......__._,.,_......,,,...................
1191-445-0566
.._.__._....
i.Y..Y..Y.
. . . .
;212-555-1212
.,..,.__.._.,...____...........................
I .
:191-934-6972
_,.__._ i ..,..._.........____...................................
;191-353-1187
Other operations from the keyboard:
Touch to view the
currently selected entry.
]
-I--
;
8.
,
.._.............~~~.
_ .
i.
i
j.
:
;
:
i.
;
Accesses entries
that do not begin
with letters.
The View
mode
[NEWj
(rn)
Creates a new entry (Edit mode).
Edits the currently selected entry (Edit
mode).
[DEL)
(imm)
Deletes the currently selected entry.
Displays the currently selected entry in
the View mode.
lPREVj[Kim]
Displays any previous/subsequent
entries not shown.
mm
Selects an entry.
The View mode shows a single entry in its entirety.
Assigns
folders (see p. 201).
an entry to
Filer
r
TEL 1
iSmi
NAME
. . . . . . . . . . . . . . . . . . . . . . . . . . . . . . . .
NUMBER
. . . . . . . .
ADDRESS
.._.........................
th John
I
. . . . . . . . . . . . . ...!
i012-345-6789
i_
_.__._........_.____...,...........,..........................................
;101
4th
Ave,
107250,
U.S. A.
._..__........_._...,,...........................................
New York,
.I.
N.Y.
Switches to the Index
mode.
63
Page 65

Other operations from the keyboard:
The Edit
mode
(N&i]
(g-)
(ii)
(PREV) [m)
Sequentially displays the previous/
Entries are made and all editing and corrections are
carried out in the Edit mode.
Clears an entry or operation without storing it.
Creates a new entry (Edit mode).
Edits the currently displayed entry
(Edit mode).
Deletes the currently displayed entry.
following entries.
Stores an entry to the
runit
memory.
r
cursor.
Other operations from the keyboard:
[T][M)
(CAN)
(ENTER)
[i][?)[F)[y)
IPREV)[iET)
Clears a selected field.
Clears an entry or operation without
storing it.
Stores an entry to the memory.
Moves the cursor.
Selects a field.
. indicates the
selected field.
64
Page 66

Making a
New Entry
In the Index or View mode, pressing
blank form for creating a new entry.
Make the following new Tel entry:
Name
Tel.
Fax.
Address
1. Press
(TEL)
John Smith
20 l-529-8200
20 I-529-9695
123 Main Street, Mahwah, NJ 07430
to open the application.
The application opens in the Index mode.
2. Press
[m)
on the keyboard.
A blank form opens in the Edit mode.
4
NAME
NUMBER
. . . . . . .
ADDRESS
;
..__._....._..................
7
;
. . .
.._.__._.......................................
[m)
opens a
3. Type in the name Smith, John.
4. Press
*r
Touch NUMBER to move to the field.
(m)
to move to the NUMBER field.
5. Type in 201-529-8200 and then press
Notice that
size
of the field box has been automatically adjusted.
the cursor has moved to the next line and the
Icl)
.
65
Page 67

NAME
$rni
th, John
AIJIRESS
j
6. Type in 201-529-9695 FAX.
7. Press
*r
Touch ADDRESS to move to the field.
(NEXT)
to move to the ADDRESS field.
8. Type in 123 Main Street followed by
Type in Mahwah, NJ 07430.
NAME
. . . . .
..__.__._.......................
NUMBER
%rni
i . . . . . . . . . . . . . ...! . . . . . . . . . . . . . . . . . . . . . . . . . . . . . . . . . . . . . . . . . . . . . . . . . . . . . . . . . . . . . .
th John
120
l-529-82004
;201-529-9695
FAX
a.
~
I
’
9. Press
Touch
(ENTER)
to store the entry.
WI.
I
The message “Stored!” will appear briefly. The entry is
now stored in memory and displayed in the View mode.
In order for the fax function to automatically dial a fax
number, it must be entered in FAX NUMBER field. See
p. 136 for more information.
For other useful methods available in the Edit mode, see
p. 67.
66
Page 68

Editing an Existing Entry
To edit an entry already stored in memory, you must first
open the entry in the Edit mode where it was created.
1. Press
2. Select the desired entry in the Index mode or display it in
the View mode.
3. Press (%%) to open the entry in the Edit mode.
4. Make any necessary changes.
5. Touch
finished.
*tr
Press (ENTER).
The new, edited entry is now stored, replacing the original
entry.
(K)
-1
to open the application.
Editing Techniques
to store the changes when you are
Fields
This section explains all the general editing techniques
used in the Edit mode when making a new entry or
editing an existing entry in all of the applications. (The
Notebook
working with text; see p. 140 for more information.)
Most applications divide the display into field boxes. The
number of fields in each application varies, as do the
types of fields. The different field types include text
fields, a date field, time field, and picture field. There are
also a few other special types of text fields. You can
define the number, type, and names of fields in the
and
User File
You can type any character into a text field. The size of a
application has many additional features for
Tel
applications (see p. 133).
67
Page 69

text field is limited only by the size of the entry. Text
fields adjust their size automatically to accommodate the
number of lines entered.
Only a date can be entered in a date field, usually in the
*
The cursor
format of
MM/DDNYYY.
For example, you would type
06231994 to enter June 23, 1994.
Only the time of day can be entered in the time field, in
the format of HH:MM followed by (AM) or (PM]. For
example, to enter 9:00 AM, you would type 0900 then
press (AM].
You can insert a picture from the
Scrapbook
into a
picture field. You cannot enter anything directly into a
picture field; a picture must be pasted from the
Scrapbook.
A picture can also be deleted from the field.
See p. 130 for more information about using picture fields.
The cursor is used to work with text, indicating the
position where text will be entered or deleted. The cursor
Typing in
text
us
is also used to indicate selection items in menus or lists.
In text fields, where there is no restriction on the type of
text (letters or numbers) or number of characters (lines)
that can be entered, the cursor appears as 4 in insertion
mode, or as I in overwrite mode (see p. 70).
In the date and time fields, the cursor appears as
a,
indicating that numbers only should be entered in a
specified format (see above).
In some text fields or boxes, the cursor appears as
_.
Typing in text is simple and straightforward. The unit’s
keyboard is laid out similar to the keyboard on a
typewriter or computer.
68
Page 70

Letters (lowercase and uppercase)
Any of the standard letters (A to 2) can be entered by
pressing the appropriate key. All letters will normally
appear in lower case.
keys while pressing letter key(s) to enter upper-case
letters.
typewriter or computer. Once pressed, the symbol CAPS
will appear in the display. Any letters typed while the
Organizer is in CAPS mode will appear in uppercase. To
switch back to lower-case mode, simply press
again. To enter lower-case letters while in CAPS mode,
hold down
Numbers
The unit has numeric keys located on the keyboard
above the letter keys. Regardless of the CAPS mode (on
or off), pressing these keys will enter numbers. Holding
down la) while pressing a numeric key will, however,
enter the symbol printed above that key.
(m]
functions as a “CAPS lock” key on a
m
while pressing a letter key.
Hold down either of the
m
(m)
Moving
around the
display
Symbols
The symbols that appear in white above certain keys can
be entered directly from the keyboard. Holding down
(al while pressing a key will allow you to enter these
symbols. One symbol, the semicolon, can be entered by
first pressing (2nd) and then the
number of special symbols are available by pressing
(m)
When working in an entry, the easiest way to move the
cursor to a specific location on the display is to touch the
location with the pen. The cursor will immediately move
to the selected position.
You can also move the cursor around the display with the
cursor keys
sometimes be more convenient when you are working
from the keyboard. In addition, you can hold any cursor
(see p. 216).
m,
I,),
(rl,
and
a
key. In addition, a
III.
This may
key down for rapid movement.
69
Page 71

The following convenient key combinations are also
available in the Edit mode:
Moving
between
fields
Inserting and
mI.1
[F] [T)
Moves the cursor to the beginning of the line.
(F] [i)
Moves the cursor to the first line of a field (or
(a)(71
Moves the cursor to the last line of a field (or
In addition to the methods described above, you can
move the cursor directly to the next field in an entry by
touching the desired field name on the display, or by
pressing (NEXT) or
moves to the beginning of the desired field.
To insert text into existing text, move the cursor to the
oves
M
the last line of the previous field if the cursor
is already positioned on the first line of a
field).
the first line of the next field if the cursor is
already positioned on the last line of a field).
the cursor to the end of the line.
(m)
. In either case, the cursor
overwriting
text
Deleting text
character you wish to insert text in front of and begin
typing. Insertion mode is the unit’s default setting,
indicated by the triangle cursor 4. To switch to the
overwrite mode, press (INS] . Any text you enter will
replace existing text. The cursor appears as 1 in the
overwrite mode.
If you make a mistake while entering text, use the
following keys to delete the mistake, then enter the
correct text:
BS
0
(DEL)
[T-mi)
Deletes the character behind the
cursor.
Deletes the character under the cursor.
Deletes the entire line the cursor is on.
Clears the currently selected field.
Except in the
applications.
Notebook
and
Outline
70
Page 72

Working with
blocks of
text
1. Hold the touch pen at the beginning of the text and drag
It is easy to work with blocks of text on the unit. The first
step is to select the text to work with.
it over the entire text that you want to work with. This will
“highlight” the text (display it in reverse-white on black).
Take the pen off the display when the desired text is
highlighted.
q
NUMBEI?
.;ilooREss'
. . . . . . . . . . . . .
I
2. You can now perform a number of operations on the
selected text:
fi%J
or [5iZi)
(2nd)[rn)
(m](m)
j20 1-529-82004
!201-529-9695
'.
. . . . . . . . . . . . . . . . . . . . . . . . . . . . .
:ii23
h,ain
FAX
Streetcl
Deletes all of the selected text.
Copies the selected text to the
clipboard so that it can later be pasted
to another location.
Deletes the selected text from its
current location and moves it to the
clipboard.
., ._ .,. .,.......,..
I
*r
-t
(2nd)
Once text is selected, any new text that is typed in will
replace the selected text.
You can also delete selected text using DATA DELETION
from the menu.
For a full explanation of the Cut/Copy/Paste functions,
see p. 207.
[m)
Replaces the selected text with
whatever is currently in the clipboard.
71
Page 73

Scrolling
If there is more information than can be displayed at one
the display
time, 4 or t will appear on the top of the display. The
arrows indicate the direction you need to scroll in. Press
m
or
a
to scroll the information one line at a time.
Finding Specific Entries in Your Unit
There are a number of ways that you can locate entries
and information in your unit.
Using the
Index mode
The Index mode shows you a listing of all your entries in
a particular application.
1.
Press the desired application key.
2.
Go to the Index mode if it is not displayed.
*r/
3.
Select the file that the entry is in by touching the
appropriate tab.
4.
Use the letter tabs to jump to a particular place in the
alphabet.
You can also jump to a specific entry by entering the first
letters of the entry. A GO TO window will open, filled in
with the letters you typed.
72
Touch
mj
to jump to that entry.
Page 74

5. If the entry is still not displayed, press
[m)
to scroll the list of entries.
CNEXT)
and
6. When the desired entry is displayed, select it and touch
ml
to see the entry in full.
Using
keywords
If you have no idea where an entry is or what letters it
begins with, you will want to use the Search function.
For example, suppose that you find a phone number
without a name and you want to know whose number it is.
1.
Press (SEARCH).
The SEARCH window will open.
SEARCH
Find all entries
containing:
I-
The application you were
previously using is selected
to be searched by default.
2. Enter the phone number you have found. Type
us
To search only secret entries (see p.
282),
touch the
SECRET ONLY box.
this application to search and
the search operation. If you
are not sure about the application, touch 1 SEARCH ALL]
to search all applications.
The unit will now display the first entry that contains the
text, or “keyword,” that you entered.
529-8200.
73
Page 75

iSmith
NAME
... . . . . . . .
I”
. . . . . . . . . . . . . . . .
NUMBER
. . . . . .
John
.:
. . . . . . . .
:
i201-529-8200
. . . . . . . . . . . . . . . . . .
..^.... !..
.
. . . . . . . . . . . . . . . . .
..^.......................
If there is more than one entry that contains the keyword,
By topic
touch
Then touch
ml
until you find the entry you are looking for.
-1
when you have finished searching.
If you highlight text in an entry before pressing
, the text is automatically entered as a keyword.
The
Filer
lets you group entries by subject. For example,
all entries relating to a particular project could be placed
into a single
Filer
folder, making it easy to open one or
more of the entries when necessary. You can group
entries regardless of the applications they were created
in, and entries can belong to more than one folder.
-t
Before you can access entries using the
Filer,
you must
first assign them to folders. See p. 198 for a full
explanation of the
Filer.
74
By date
You can use the various
Calendar
views to quickly and
easily find information related to a time and/or date.
1.
Press [CALENDAR).
The monthly calendar will appear.
2!3
9
m:
16' 17
g;
g':
JAN
4
5 6 7
11:
fm!
13:!
14'
18
19
20
21
2: 2; 2y 2;
3
'
FE5 j\
MAR )I APR ,jl M~4’1’ 11 Jut-4 / e
--
15
22
2;
Page 76

2. Select a day by touching it, then touch
i
3. In the Daily view touch an entry to select it and touch
[WI
to see a
Daily view
to display the details of the entry.
more detailed
view.
I]
or
+
For more information about using the
application, see p. 86.
Deleting Entries from the Unit
Entries in the unit can be deleted using either the
keyboard or the application menu.
1.
Deleting
single
entries
Open the desired application.
2. Select the entry in the Index mode or display it in the
View mode.
3. Press
(DEL)
on the keyboard.
Calendar
A warning message appears asking if you are sure you
want to delete the entry.
75
Page 77

4. Touch
1-1
(or
m]
to cancel the deletion).
*(
Deleting
entries using
the
applica-
tion menu
1.
Open the desired application.
2. Select the entry in the Index mode or display it in the
3. Press
4. Touch DATA DELETION.
Press
m
or
CKiJ,
respectively.
You can also make deletions using the application menu.
The DATA DELETION submenu-a secondary menu
opened from the main application menu-gives you a
great deal of flexibility in doing this.
View mode.
INIENU)
and then touch
-1
to open the
MODIFY menu.
The submenu appears.
Deletes text selected by highlighting
(see p.
71).
76
Deletes a selected entry (explained
below).
Deletes a filtered entry (see p. 215).
Deletes all entries in TEL 1,
or TEL 3 (see p. 129).
Deletes all entries in all TEL files.
TEL2
DATA DELETION submenu in the Tel application
Page 78

Touch SELECTED ENTRY.
5.
A warning message appears asking if you are sure you
want to delete the entry.
*r
6.
Touch
Press
1-1
m
(or
Ir\rol
to cancel the deletion).
or (NJ , respectively.
Drawing Using the Scrapbook
One of the unit’s most powerful, fun, and innovative
Using the
drawing
tools
features is the
gives you the ability to enter drawings as well as
handwritten letters and numbers directly on the display. (It
is recommended that you use only the touch pen when
drawing or writing on the display.)
The
Scrapbook
page.”
1. Press [SCRAPBOOK) to open the application.
..,“..........\..................,.........................;
iBlank
page...
iuse NEXT/PREV
:
:
:
:
:
:
:
:
:
:
:
:
:
:
.
\..............r............................................
to
Scrapbook
application always opens to a “blank
Please
begin drawing
view
other pages.
application. The
or:
;
:
:
:
:
:
:
:
:
:
:
:
:
:
:
:
Scrapbook
2. You can immediately begin drawing using default set of
drawing tools or you can select a different set of tools.
(To change the tools, press (NEW) and then follow STEP
3-J
3. Press (MENU) and touch
The
MODIFY
menu appears.
1-1.
77
Page 79

---
* USE PEN
USE ERASER
USE AREA TOOLS [A]
II ATA
DELETION
L
F
indicates that there is a
submenu for the menu
items.
e
I?1
[El
thin, thick, or “brush”
a thin or thick eraser.
Selects a black, gray, or white line
I
pattern (white is equivalent to an
eraser).
1
Sets
-
-
L
L-Converts the touch pen to an eraser.
drawn lines to
or freestyle (ruler off).
Default drawing setting.
Marks areas to cut, copy, paste or
delete.
Deletes a selected area, single entry,
or all Scrapbook entries.
straigl
drawing
it (ruler on)
Making
new
graphic
entries
After storing an entry, or pressing
recall a stored entry to the blank page, the display
changes to a “viewing page.” Existing graphic entries are
viewed on this page.
1. Press (SCRAPBOOK] to open the application.
A “blank page” appears on the display.
2. Start drawing anywhere in the drawing area with the
touch pen.
3. Write the letter A and draw a circle around it.
. . . . .
..~........\\....~............~...,.....,~~~...........~
:
:
:
:
:
:
:
:
.
:
:
:
:
-0
:
:
:
.
:
:
. . . . . . . . . . . . . . . . . . . . . . . . . . . . . . . . . . . . . . . . . . . . . . . . . . . . . . . . . ..~
A
:
:
:
:
:
:
:
b
:
:
:
:
:
:
:
:
.
:
I
(K)
or
(N)
to
78
4. Press
rrs
(KiZ]
The drawing is now stored.
If you make a mistake while drawing, you can clear it any
time before it is stored by pressing
.
[CANCEL)
.
Page 80

).. .,, . .
:
.
:
:
:
. . .
.. .., ,.. . . ,.> . . . I.‘.% *
1.. ..* .-
.
.
.., ,..I ..I.. I.. . .
:
:
:
:
:
:
:
:
;, ..I... ,.
\. .., ,..
l ,
,.. .*. ..’
. . )-“.*
.’
. .
,.., ,.‘., ,..
:
:
:
:
. . . .
..’
79
Page 81

Press (%@I and then touch [x?jj/.
Deleting
1.
Select
Draw the letter B.
:
:
:
.
:
.
:
:
.
:
:
:
:
:
:
Press
The
Press [w]
USE PEN
to
B
0
(l%EF)
changes are now stored.
.
switch the touch pen back to writing,
:
:
:
:
:
:
\
:
:
:
:
\
:
:
to
open the application.
graphic
entries
l
*
3.
Press
want to delete on the
Press
A warning message appears asking if you are sure you
want to delete the entry.
.‘~..~..........,.,,.,.,~
\
:
;
:
.
:
.
Touch
Prf%S @I or C&-l, resf3ectivelv.
[EEj
[Si) .
“~“““‘~~.~~..\...,,,,.,,,,,~,,,
/%%j
t
I
or (i%q to d’
viewing
(or @
-
o
cancel the deletion).
I
1s~ ay
page.
;
:
/‘
the drawing
YOU
Page 82

Checking the Time and Date
1. To check the current date and time, press and hold
(EiEig
2. Release the key to close the Clock application.
.
+
For a full explanation of the Clock application, see page
182.
Checking the Unit’s Memory
The unit has a certain memory capacity in which
operations are carried out and data that has been
entered, such as phone numbers and memos, is stored.
When the amount of data already stored approaches the
unit’s maximum memory capacity, you may not be able to
store an entry or the data being processed may be lost
when you change applications. To avoid these problems,
you should check the remaining memory space regularly
and free up space when necessary by deleting previous
entries.
The
Check Memory
function makes it possible to easily
check the amount of free memory available in the unit, as
well as in a RAM card (if one is installed), avoiding the
inconvenience of seeing an out-of-memory message.
81
Page 83

1. Press
(K]
and then touch
TOOLS menu.
2. Select CHECK MEMORY.
-1
to open the
0%
/
25;:
EL
TELEPHONE 1 : 11 SCHEOULE
TELEPHONE 2 :
TELEPHONE 3 :
USER FILE 1 :1
USER FILE 2 :
USER FILE 3 :
50;:
0
0 ANN2
TO DO
0 NOTEBOOK : 0
0 SCRAPBOOK : 4
75%
ANN1
OUTLINE :
108%
JF
: 14.'-
.
i
:
: 4
l+,-
If a RAM card is installed, you can touch
Percentage of
memory used.
Number of entries
stored for each
application.
-1
check the memory available on it.
3. Touch
I=[.
Even if the display shows a small amount of free memory
available, the free memory may be too small for certain
features to function.
to
The Tools Menu-the Unit’s Basic Utilities
Many of the unit’s basic utilities are accessed through the
TOOLS
configure certain features such as the display and the
(-1
menu (including page references where full explanations
can be found) are provided below.
82
menu. The menu is also used to set up and
key. An illustration and summary of the
TOOLS
Page 84

kTO#LS
l-
Shows the amount of free and
used memory (see p. 81).
q
CHECK MEMORY
AOJUST
LCD
SET CLOCK
b- -
b- -
SET START-UP DISPLAY -
LOCK/UNLOCK
DELETE
ORGANIZER
1. .
PASSWDRD
SET DAILY ALARMS
MORE
First TOOLS menu
TOOLS
-J
Adjusts the contrast of the LCD
display and calibrates the touch
panel (see p. 52).
Sets the built-in clock (see p. 182).
Configures the start-up display
(see p. 280).
Locks and unlocks entries
protected by the Secret function
(see p. 283 to p. 285).
1
Changes and deletes passwords
(see p. 286).
Sets and turns off up to 7 alarms
to sound daily (see p. 189).
Open the second TOOLS menu.
Touch MORE TOOLS to open the second TOOLS menu.
~MDRE TDDLS
ENABLE/DISABLE ALARM k
KEY SOUND
SET UP
DN/DFF
WORD
KEY
-
1. -
DELETE ALL SECRET DATA
TOOLS
Second TOOLS menu
Turns the alarm sound for set
alarms on and off (see p. 189).
Turns the key beep on and off
(see p.
Use to assign words to the
CWORD)
Deletes all entries marked as
I
secret (see p. 287).
Goes back to the first TOOLS
menu.
54).
key (see p.
211).
83
Page 85

84
Page 86

Time Management
The unit’s
Ann (Anniversary)
easily structure and manage your time,
whether scheduling appointments or
providing reminders about important people
and events. The explanations and examples
in this chapter will give you the information
you need to make all of the time
management features of these applications
work for you on a daily basis.
Calendar, Schedule, To Do,
applications let you
and
85
Page 87

The Calendar Application
The
Calendar
a calendar that you can reference at any time for the
correct date, and it’s also a management assistant,
indicating important dates so that you can better manage
your time and appointments. The application plays three
major roles on the unit:
l
It is a reliable calendar that can show you any month
from January 1901 to December 2099.
l
It indicates entries made in other applications, including
Ann, Schedule,
l
In the Daily view, it serves as a way of accessing
serves as the unit’s “central exchange.” It’s
and
To Do.
Selecting a
calendar
view
*r
entries made in the
Ann, Schedule,
and
To Do
applications.
The
Calendar
application is used to display and indirectly
access information. You cannot make entries in the
Calendar,
so it does not have Index, View, and Edit
modes. What the application does offer you is five views:
Daily, Weekly, Weekly Graph, Monthly, and a
Three-month view. Monthly is the default view and it
appears each time the application is selected (except
when selected from the
To,Do
application).
The views are linked, which means that you can switch
from one to another and the selected date will not
change.
To change the view, touch the desired date then the
appropriate button for the required
You can also use the menu to select a
Calendar
Calendar
view.
view
directly from any other view.
86
l Press
[m]
and then touch
ml
to open the
VIEWS menu.
l
Select the desired view in the submenu.
-f
You can change the
Calendar
application’s initial display.
See p. 288.
Page 88

The Monthly
view
The Monthly view is the
view, and appears every time
open the application.
Selects and displays today’s date.
Calendar
application’s default
[m]
is pressed to
Change to other views.
El
Monthly tabs
r
r
1
IThe
l
The flashing date indicates the currently selected date.
l
There is an
119).
l
! indicates that the day is a due date for a To
(see p. 104).
l
An upper dot indicates a
morning, and a lower dot indicates one in the afternoon
Ann
entry on the highlighted day (see p.
Schedule
entry in the
number of days
in the year that have
passed, the number
remaining, and in
which week the day
fails.
Do
entry
*r (PREV)
The
Three-
month view
or evening (see p. 93).
To display another month, touch the monthly tab for the
desired month. Touching
following or previous six months, respectively.
You can also step through the months sequentially using
and
The Three-month view gives you an overview of a
selected month and the month preceding and following it.
To open the Three-month view, touch 3 MONTH
CALENDAR in the VIEWS menu.
(E)
.
p1
or
1-1
displays the
87
Page 89

I
Displays current
month
displayed.
if not already
The Weekly
view
L
I-
Press
of three months, respectively.
You can display a Monthly view by touching the selected
month.
The Weekly view shows the schedule over a one-week
period. To open the Weekly view, select a date in the
Daily or Monthly view and touch
r
I
(?%@I
or
[NEXT)
Selects and displays
today’s date. views.
r
to see the previous or next set
IWEEKLY].
r
I
1
Changes to the
Monthly view.
Selected month
Change to other
The Weekly
Graph view
Temporarily hides (or
r
reveals) all
and
Ann
the view (see p.
Selected date
Schedule
entries from
108).
1
Press
following weeks, respectively.
You can also go to a Daily view by touching the required
date twice.
The Weekly Graph view shows
one-week period, helping you avoid conflicting
appointments and letting you check your free time at a
(m]
or
(m)
to display the preceding or
Schedule
entries over a
88
Page 90

glance. The view must be selected from the application
menu.
Temporarily removes all
and
Ann
entries from the Weekly and
Daily views, (see p. 108).
l
Schedule
l
Shaded portions indicate times of the day when you
entries are shown in five-minute blocks.
Schedule
Change to other views.
I
Selected date
have appointments or other commitments. Portions that
are blackened indicate that you have more than one
The Daily
view
appointment during that period.
l
To see the morning or evening schedule, press a or
I,), respectively.
Press
[m)
or
(NEXT)
to display the preceding or
following weeks, respectively.
You can go to a Daily view by touching the required day
twice.
The Daily view is convenient for viewing all entries for a
single day. It can be accessed from the
Weekly view by selecting a day and touching
89
Page 91

Temporarily removes all
and
Ann
entries from the Weekly and
Daily views (see p. 108).
Change to the Weekly view.
Schedule
Selected entry
The number of
entries for the
l-
. . :.... . . . . . . . . . . . ....,.............. ;.:.;
2:00+ 5:00RiSales
'~
To"Do
.._............._._.....
* . . . . . . . . . . . . . . . . . . . . . . . . . . . . . . . . . . . . . . . . . . . . . . . . . . . . . . . . . . . . . . . . .
'~
To"'~~
. . . ... . .. . . . . . .. . .. . . . . . . . .. . . . . . . . . . . .. . ..." . . . . . . . . . . . . . . . . . . . . . . . . . . . . . . . . . . . . . . . . . . . . . . . . . . . . . . . . . . . . . . . . . . . . .
q
TII
DO
. . . . . . . . . . . . . . . . . . . . . . . . . . . . . . . . . . . . . . . . . . . . . . . . . . . . . . . . . . . . . . . . . . . . . .
Meeting at
m:Comparison
. . . .. . ..." . . . . . . . . . . . . . . .
(l)$all
[2]jPick
Chart for
. . . . . . . . . . . .. . . . . . . . . . . . . . . . . . . . . . . . . . . . . . . . . . . . . . . . . .
Frank about Sales-
up Theater Ticket
Royal-
. . . .
S-
L-
current day.
Time bar graph for
Schedule
Shaded portions on the bar graph indicate times of the
day when you have appointments or other commitments.
Portions that are blackened indicate that you have more
than one appointment during that period.
Press
a
to display the morning bar graph and
display the evening bar graph.
and
Touch an entry to select it, or
through the entries, then
to display the
m
entry in the View mode of the application that was used
to create it.
entries.
(,;
to
to step
90
*<
*/
rl2.z
Touch the entry twice.
You can also step through days one by one using
and
(PREV).
(NEXT)
If the amount of available memory is small, To Do entries
may not be properly displayed in the Daily view. In this
case, a message will appear indicating this when the
Daily view is selected. To properly display all To Do
entries, delete any unnecessary data, then reselect Daily
view.
Page 92

Finding
Entries in the
Schedule, To Do,
and
Ann
applications
entries using
the Calendar
views
1.
2. Select the entry you want to see in full.
3. Touch
can be recalled from the
In the
Calendar
application,
Go to the Daily view.
iInterview
with Smith
jmi.
Calendar’s
,,__
Daily view.
Schedule
entries
Selecting
a date
The selected entry is displayed in detail in the View mode.
You can also touch the entry twice in the Daily view to go
directly to the application’s View mode.
l
An overdue entry in the
To Do
application (an entry for
which the due date has passed) will always be shown
on the display for today’s date in
l
Monthly goals in the
To Do
application can only be
Calendar
views.
accessed via the Monthly view.
From any view, you can scroll to the previous or next time
period (whether the next month, week, or day) by
pressing
IPREV)
or
(E)
, then touch a particular date,
or move the cursor to it, to select it for display in another
Calendar
view. However, another convenient way of
selecting a date that is not on the display is using GO TO
A SPECIFIC DATE in the
Calendar
application menu.
1. Press
(MENUI,
touch
11
in any Calendar view,
and select GO TO A SPECIFIC DATE.
A date entry window appears.
91
Page 93

GO TO A
SPECIFIC DATE
2. Enter the date you want to select in the order of month,
day, and year. Prefix single-digit months and days with a
0.
Lz-Current!
date
selected
y
-t
The
Calendar
application
menus
3. Touch
The selected date will appear in the current
view.
You can calculate a date some time in the future or the
past using the
3 MONTH
1
WEEKLY
GO TO A SPECIFIC
[GO)
.
Calc
CALENDAR
MONTH
CALENDAR
MPH
application. See p.
Selects the Three-month view
(see p. 87).
Selects the Monthly view
(see p. 87).
Selects the Weekly Graph
(see p. 88).
Goes directly to a particular
date (see p. 91).
DATE
j
I
1
Calendar
174.
92
Configures the default display
1
!&!ODIFY
SET UP [CALENDAR]
SET UP DATE
FORMAT
SET UP MONTHLY FORMAT
DATA
DELETION
I- -
1.~
1.
to Weekly or Monthly view
(see p. 289).
Sets up the date format
M/D/Y or D.M.Y. (see p. 288).
-Sets
-
Sunday-Saturday (see p.
up the Monthly and
Three-month view format
Monday-Sunday or
288).
Schedule
deleted through the
(see p. 97).
entries can be
-
-
Calendar
Page 94

The Schedule Application
The
Schedule
appointments, times and dates for meetings, parties and
events, and set an alarm to sound prior to or at the time
of a scheduled entry. This makes it easy to organize
your entire day and always arrive at appointments on
application allows you to enter
Making new
entries
time.
Monthly view with a small black dot next to the date of an
entry, providing an overview of your schedule.
A
and a description of the event.
There are three basic steps to making a new entry in the
Schedule
starting and ending time, and entering a description for
the entry. (Entering a starting and ending time is optional,
but you must enter a description.) The date for a new
Schedule
application.
Enter the following information:
Schedule
Schedule
application: selecting the date, entering the
entry can easily be selected in the
Date
Time
Description
entries are indicated on the
entry has three fields-for the date, time,
March 15, 1994
8:30
p.m. - 12:OO a.m.
Ides
of March Costume Ball
Calendar’s
Calendar
1.
Press (CALENDAR).
2. Display and select the desired date.
3. Press [NEW ).
The Edit mode opens in the
Schedule
application.
93
Page 95

IBar
graph
DATE:
. . .
IEME:“..I...:
#/D/Y= 3/15/1994
..- - -....
------
-.-._....... 1-11
. . . . . . . .
“...“...,z
.
.
..-.
-L
-.--..............-..
..I-..---...-....?
.
..-......-..-.............
!?t .-........ .!.
. . . . . . . . ...”
4. Enter the party’s starting time from the keyboard. Type 08
30 and press
*f
You can also enter the starting time using the bar graph,
Touch
m
then touch beneath
DATE: M/D/Y=
. . . . . .
TIME:
..-....--....-....
I.."
. . . .
8:30: + I
“.-”
.I..... - . . . . . . . . . -- .
IPM)
.
to display the evening bar graph and
8:30
with the touch pen.
3/15/1994
""-........"..."..."......"
. . . . .
:
..-... - I._... I.”
"..".--.1.-"-~.--
--...
8
:
. . . . . . *- . . . . . .
"..-".-.
“...”
I...
“...“,
5. Enter the ending time. Type 12 00 and press (AM].
*/
You can also enter the ending time using the bar graph.
Touch the end of the bar graph.
6. Move to the DESCRIPTION field.
7. Type Ides of March Costume Ball.
8. Touch (STORE].
The new entry is now stored.
DATE: MAR 15
“-..---
TIME:
“-.---
Ides
.
. .
of March Costume
1994
..“--t-~.-.”
8:30p *r
..-A---.““--&--“-.---.--
(TUE)
.---- ---.“-..“““-
12:00*
Ball
I-
Indicates the starting
time of the entry
currently displayed.
94
Page 96

Press (NEW) if you want to make another entry on the
same day.
Finding
entries
-t
You can also select a date for the new entry using the
application menu. See p. 99.
Using the Index mode
1. Go
to the Index mode.
JAN l&1994;
‘JiN”.12”‘i5Gc..
...................
.!.
JAN 13 19941 $3:BBfi+jVisit to
..
............
JAN
.
.............
JAN 14 1994
JAN 16 19941 $3:8EP+~Flight to
..........................
.............
...!..............
...
13
1994: i l:W+New
...............
......
.
.
........................
............
....
$3:BEi~+~Interview with..?;-.
1”‘2:‘8‘tjf;-Tsales”Meeting”at.,,
j_f_.
.
.............................................................................
.......
i
i”’
........
.........................................
j..
......
;
.
.
................
!!.
...........
.....
I
9:
.
.
..................
88fi+ ;
Sa 1 es Mee
.
....
!!.
.
......
......
.
...
........
Products
........................... ............
...................
............
.......
..................
SerVlCe-
........................
Mee-
ting.i.at;;,
Califo-
.....................
....
Description
r
I
Starting time
The entries you have made are listed in chronological
order. If you do not see the entry you want to view, press
(m)
or
find it.
2. Select an entry.
3. Touch
I[.
The full entry is shown in the View mode.
*f
In step 2, touching an entry twice will also display it
directly in the View mode.
I@?
In the View mode, press
entries sequentially. This will also display the days that
have no entries (as blank pages).
[m)
to scroll through the entries until you
(m)
and Ii%@) to display
95
Page 97

-t
You can also jump to entries by specifying
he date. See
t
p. 99.
Using the Calendar view
You
can access the
of the
Calendar
Schedule
entries from
application by touching the desired entry
the Daily view
twice. (See p. 89 for details.)
Using keywords
Even though you cannot remember the date of an event
or appointment, if you know the contents and/or a word
that appears in the DESCRIPTION field of the entry, you
can access the entry in the following manner.
1. Press
(SEARCH).
The SEARCH window appears.
2. Type in any word that should appear in the
DESCRIPTION field of the entry you are looking for.
3. Touch
If you still do not see the desired entry, press
-1.
(Nm]
display the following matching entries.
to
Moving
appoint-
ments and
editing
entries
4. Touch
ml
when you find the entry you want.
This function does not distinguish between upper- and
lower-case letters.
You can easily keep track of schedule changes, including
the date and time, by editing entries, without reentering
all the information from the beginning.
If the time and/or date of a
Schedule
entry is changed,
the entry is automatically resorted.
1. Select the entry you want to change in the Index mode or
display it in the View mode.
2. Press
lEDlTl.
3. Move to the field you want to change.
4. Make the desired changes.
96
Page 98

5. Touch
LSTORE].
The new, edited entry is now stored.
You can also use cut and paste to move appointments.
Deleting
entries
-t
1.
2. Press
You can delete single entries or groups of entries.
For a full explanation of deleting filtered entries, see p.
215.
Deleting single entries
In the
Schedule
application, select the entry you want to
delete in the Index mode or display it in the View mode.
Or in the
Calendar
application, select the entry you want
to delete in the Daily view.
(m),
touch
ImI,
and select DATA
DELETION.
A submenu opens.
3. Select SELECTED ENTRY.
A warning message will appear asking if you are sure you
want to delete the entry.
4. Touch
*/
You can also delete an entry by pressing
mi
(or
mi
to cancel the deletion).
selecting or displaying it.
(m]
after
97
Page 99

Deleting all entries
All
Schedule
application menu.
entries can be deleted at one time using the
Press
1.
View mode.
2.
Select DATA DELETION.
A submenu appears.
Select ALL SCHEDULE DATA.
3.
A warning message will appear asking if you are sure you
want to delete all the entries in the application.
4.
Touch
It is not possible to delete all entries simultaneously if the
unit is locked. See p. 282.
Deletion of entries over a specific period
You can delete all
month, a week, or a single day through the
application.
(m]
m/
and then touch
(or
1-1
to cancel the deletion).
Schedule
-1
entries for a period of a
in the Index or
Calendar
1.
Press
period you want to delete all
2.
Press
DELETION.
A submenu appears.
[m]
(MENU),
and select the date which falls in the
touch
[SELECTED MONTH
[
[=I
Schedule
and select DATA
entries in.
98
Page 100

3. Select the desired period for deletion.
A warning message appears asking if you are sure you
want to delete all the entries for the selected period.
4. Touch
*/
Selecting a
specific date
pj
You can also delete
date in any
l
Deletion of entries over a specific period cannot be
(or
m]
to cancel the deletion).
Schedule
Calendar
entries for the selected
view with
(s)
.
done if the unit is locked (see p. 282).
l
To delete all
you must be in a
Schedule
Calendar
entries over a specific period,
view which includes the
entire period you want to delete. For example, you
cannot delete entries for an entire week while in the
Daily view.
l
The unit
recognizes
each Monday-to-Sunday interval as
one week. If you select a week for deletion, entries
over this period will be deleted even if a Monthly view is
displayed with a Sunday-to-Saturday format.
If you
want,to
jump to a specific date to find entries or
make a new entry, it can be selected easily using the
application menu.
1.
In the Index or View mode of the
press
[m],
touch
ImI
Schedule
application,
, and select GO TO A
SPECIFIC DATE.
A date entry window appears.
GO TO A
SPECIFIC
DATE
2. Enter the date you want to go to.
3. Touch 1
GOI
.
The first entry on that day is selected in the Index mode,
or displayed in the View mode.
99
 Loading...