

MUTE
ON
/
ST
AND-BY
TREBL
E
A
UDIO IN
BASS
PA
IRIN
G
VO
L
E
SOUN
D
US
B
BLUE
TO
OT
H
DIMMER
RRMCGA342A
WSA
ECO MODE
ENGLISH
Introduction
Thank you for purchasing this SHARP product. To obtain the best performance from this product, please read this
manual carefully. It will guide you in operating your SHARP product.
Special Notes
Supply of this product does not convey a license nor imply any right to distribute content created with this product in
revenue-generating broadcast systems (terrestrial, satellite, cable and/or other distribution channels), revenue-generating streaming applications (via Internet, intranets and/or other networks), other revenue-generating content distribution
systems (pay-audio or audio-on-demand applications and the like) or on revenue-generating physical media (compact
discs, digital versatile discs, semiconductor chips, hard drives, memory cards and the like). An independent license for
such use is required. For details, please visit http://mp3licensing.com
MPEG Layer-3 audio coding technology licensed from Fraunhofer IIS and Thomson.
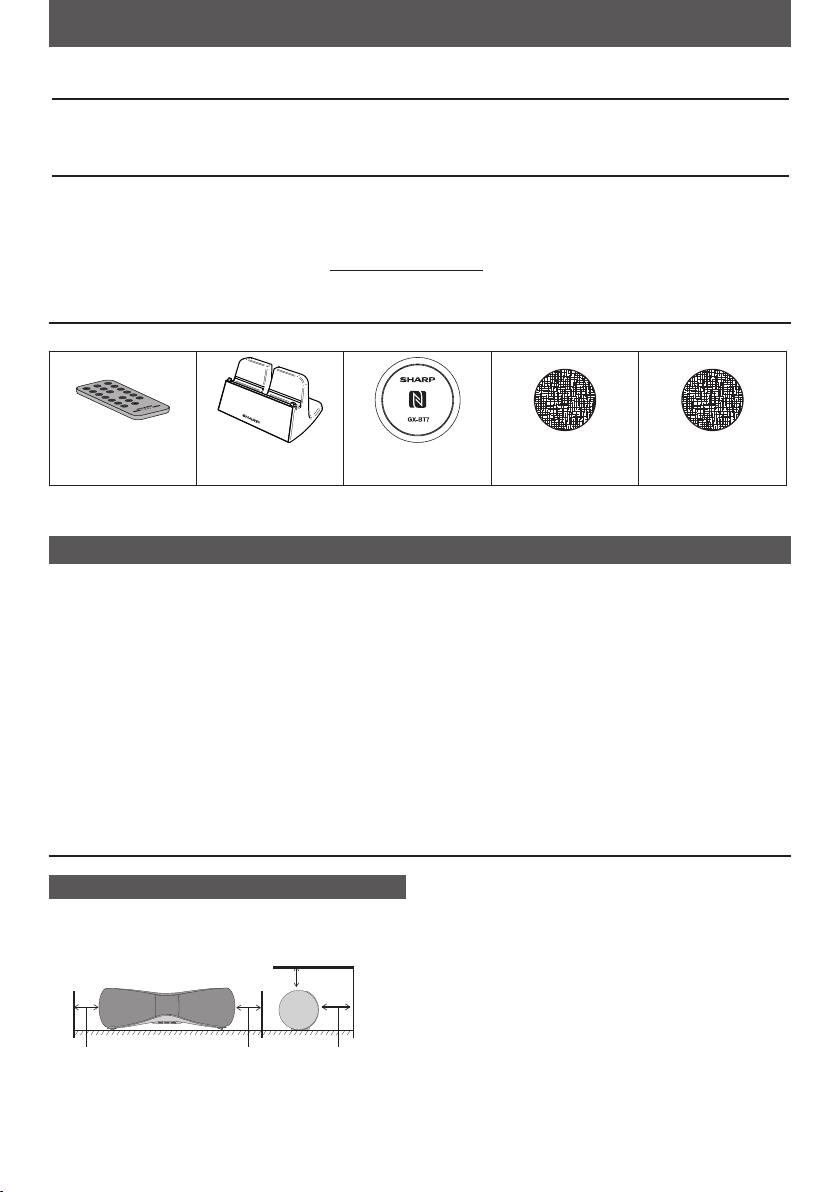
Accessories
The following accessories are included.
Remote control x 1
(RRMCGA342AWSA)
Stand for iPad x 1
NFC tag x 2
CONTENTS
Page
General Information
Precautions ................................................................1 - 2
Controls and indicators ..............................................2 - 3
Preparation for Use
Power Source .................................................................. 4
Remote control ................................................................ 4
Basic Operation
General control ............................................................... 5
Bluetooth
Bluetooth one touch connection via NFC ....................... 6
Listening to Bluetooth enabled devices ..................... 7 - 8
Precautions
General
Please ensure that the equipment is positioned in a well
ventilated area and ensure that there is a free space
along the sides, top and back of the equipment as below.
10 cm (4”)
30 cm (12”) 30 cm (12”) 10 cm (4”)
Velcro tape
(hook type) x 2
Velcro tape
(loop type) x 3
Page
Open Accessory
Listening on Android™ devices ..................................... 9
iPod, iPhone or iPad
Listening to the iPod, iPhone or iPad ............................ 10
Listening to USB mass storage device/MP3 player ...... 11
Advanced Features
Connecting other equipment ........................................ 12
References
Troubleshooting chart .............................................. 12-13
Maintenance ................................................................. 13
Specifications ............................................................... 14
Use the unit on a firm, level surface free from vibration.
Place the unit at least 30 cm (12”) away from any CRT
TV to avoid colour variations across the TV screen. If
the variations persist, move the unit further away from
the TV. LED, plasma and LCD TV are not prone to such
variation.
Keep the unit away from direct sunlight, strong mag-
netic fields, excessive dust, humidity and electronic/
electrical equipment (home computers, facsimiles, etc.)
which generate electrical noise.
Do not place anything on top of the unit.
Do not expose the unit to moisture, to temperatures
higher than 60°C (140°F) or to extremely low temperatures.
E-1
Precautions (continued)
21
7 8
63 54
9
1110 12
If your system does not work properly, disconnect the
AC power lead from the wall socket. Plug the AC power
lead back in, and then turn on your system.
In case of an electrical storm, unplug the unit for safety.
Hold the AC power plug by the head when removing it
from the wall socket, as pulling the lead can damage
internal wires.
The AC power plug is used as a disconnect device and
shall always remain readily operable.
Do not remove the outer cover, as this may result in
electric shock. Refer internal service to your local
SHARP service facility.
The ventilation should not be impeded by covering the
ventilation openings with items, such as newspapers,
tablecloths, curtains, etc.
No naked flame sources, such as lighted candles,
should be placed on the apparatus.
Attention should be drawn to the environmental aspects
of battery disposal.
This unit should only be used within the range of 5°C
- 35°C (41°F - 95°F).
The apparatus is designed for use in moderate climates.
Controls and indicators
Warning:
The voltage used must be the same as that specified on
this unit. Using this product with a higher voltage other
than that which is specified is dangerous and may result in a fire or other type of accident causing damage.
SHARP will not be held responsible for any damage resulting from use of this unit with a voltage other than that
which is specified.
Volume control
The sound level at a given volume setting depends on
speaker efficiency, location, and various other factors. It
is advisable to avoid exposure to high volume levels. Do
not turn the volume on to full at switch on. Listen to music
at moderate levels.
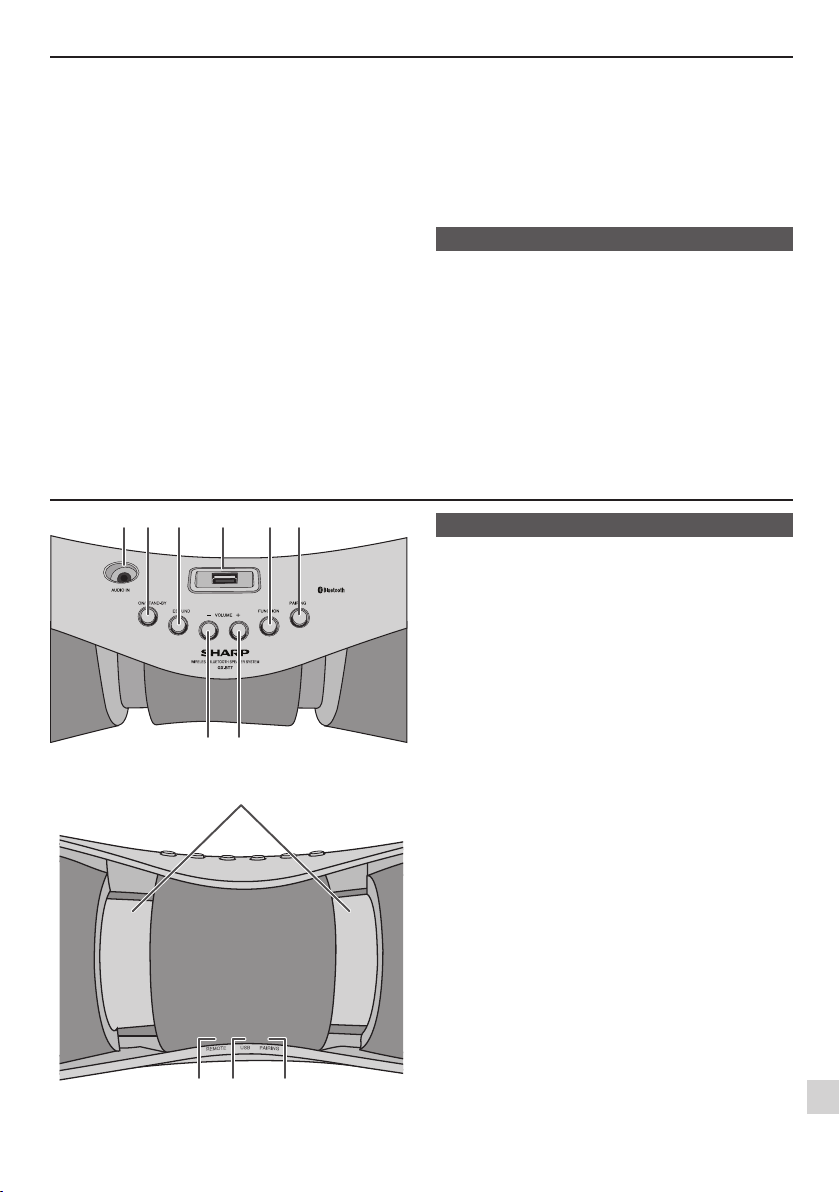
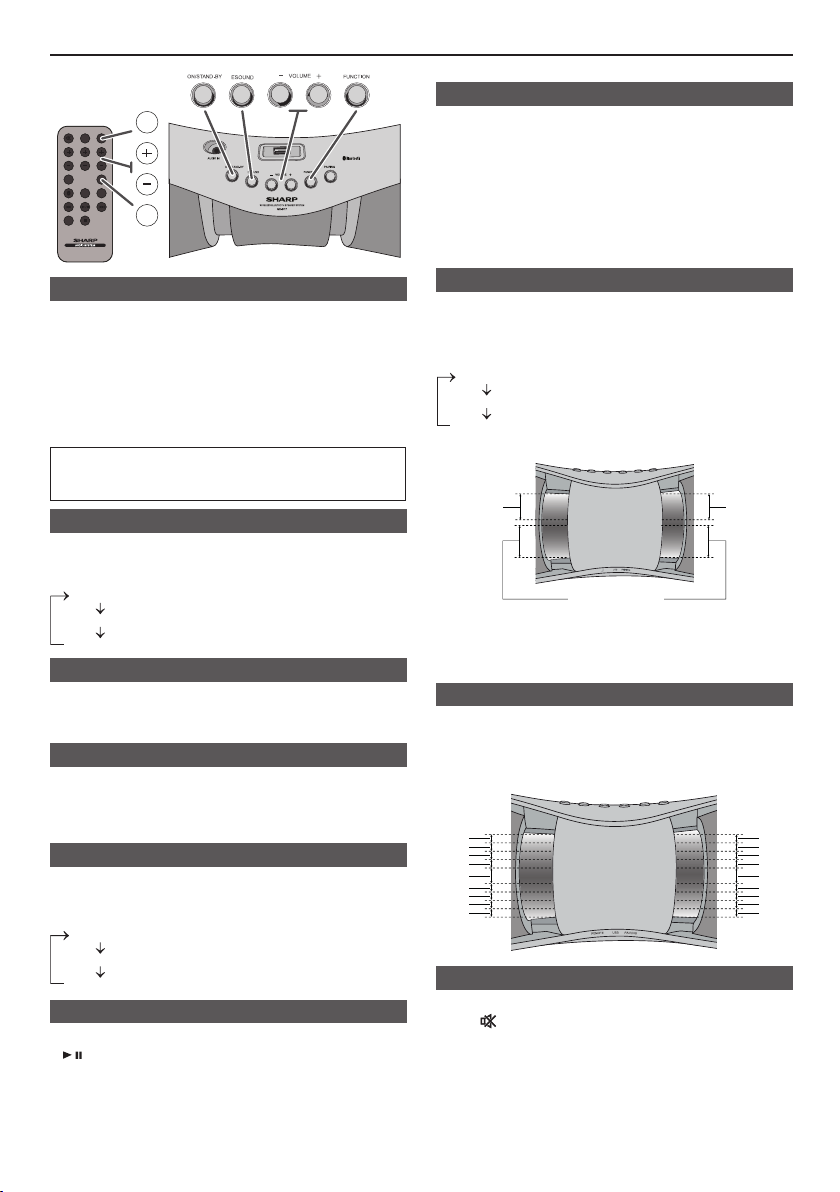
Front panel
Page
1. Audio in socket ...................................................... 12
2. On/Stand-by Button ............................................ 5, 7
3. ESound Button ......................................................... 5
4. USB terminal ................................................ 9, 10, 11
5. Function Button ....................................................... 5
6. Pairing Button .......................................................... 7
7. Volume Down Button ............................................... 5
8. Volume Up Button .................................................... 5
9. LED light .................................................................. 5
10. Remote Sensor ........................................................ 4
11. USB indicator ........................................................... 5
12. Bluetooth/Pairing indicator ................................ 5, 7
E-2
MUTE
ON/
STAND-BY
TREBLE
AUDIO IN
BASS
PAIRING
VOL
E SOUND
USB
BLUETOOTH
DIMMER
RRMCGA342AWSA
ECO MODE
2
3
14
4
6
7
9
11
13
5
8
1
15
16
17
18
19
10
12
Controls and indicators (continued)
3
2
1
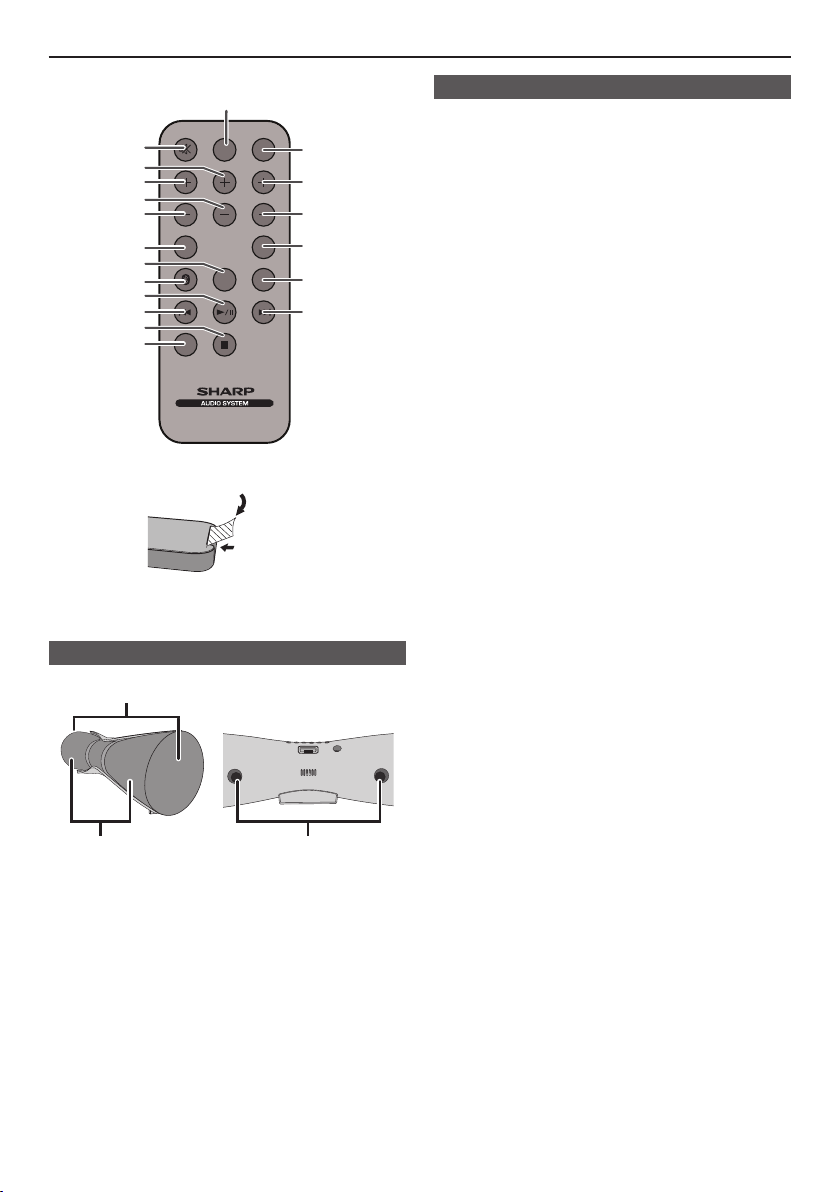
Remote control
Page
1. Eco Mode Button .....................................................
2. Mute Button .............................................................
3. Treble + Button ......................................................... 5
4. Bass + Button ........................................................... 5
5. Treble - Button ......................................................... 5
6. Bass- Button ............................................................ 5
7. Pairing Button .......................................................... 7
8. Audio In Button .................................................. 5, 11
9. Bluetooth Button ..................................................... 7
10. Play/Pause Button ................................... 6, 9, 10, 11
11. Skip down Button .................................... 6, 9, 10, 11
12. Stop Button .............................................. 6, 9, 10, 11
13. Dimmer Button ......................................................... 5
14. On/Stand-by Button ............................................... 5
15. Volume Up Button .................................................... 5
16. Volume Down Button ..............................................
17. Esound Button .........................................................
18. USB Button ................................................... 9, 10, 11
19. Skip up Button ......................................... 6, 9, 10, 11
4
5
5
5
Remote control
Speakers
1. Front speaker
2. Subwoofer
Plastic shield
Note:
Before using the remote control, remove the plastic shield
from the battery holder.
Battery holder
3. Bass Reflex Duct
E-3
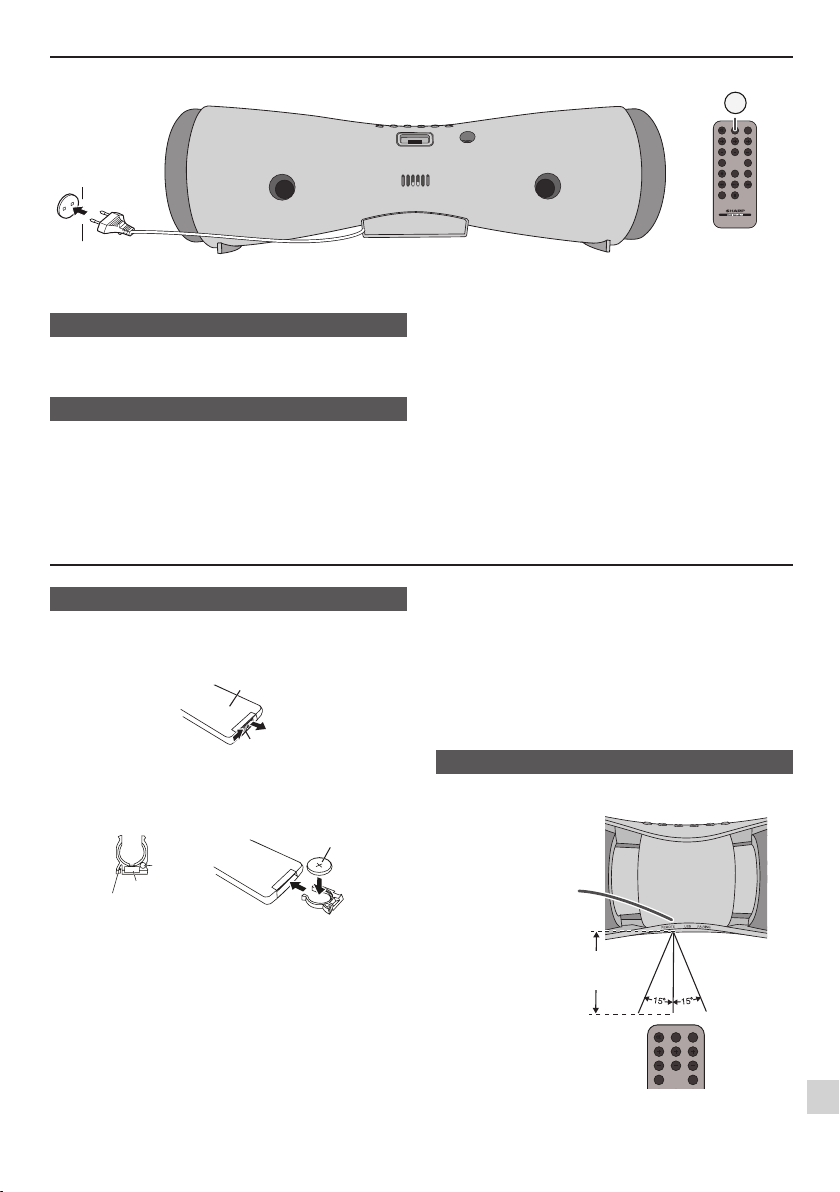
Power Source
MUTE
ON/
STAND-BY
TREBLE
AUDIO IN
BASS
PAIRING
VOL
E SOUND
USB
BLUETOOTH
DIMMER
RRMCGA342AWSA
ECO MODE
ECO MODE
MUTE
ON/
STAND-BY
TREBLE
AUDIO IN
BASS
PAIRING
VOL
E SOUND
USB
BLUETOOTH
ECO MODE
Wall socket
AC 100 - 240 V ~
50/60 Hz
AC power connection
Notes:
Unplug the AC power lead from the wall socket if the
unit will not be in use for a prolonged period of time.
Bluetooth stand-by mode
The first time the unit is plugged in, the unit will enter
the Bluetooth stand-by mode. Pairing indicator will light
up.
Remote control
To cancel the Bluetooth stand-by mode, press the ECO
MODE button (remote control) during Bluetooth standby mode. The unit will enter the low power consumption mode.
To return to the Bluetooth stand-by mode, turn the unit
on and off again.
During Bluetooth stand-by mode, the unit will turn on if
Bluetooth connection is established.
If iPod, iPhone, iPad or Android-powered device is
plugged in, the unit will begin charging. iPod, iPhone,
iPad or Android-powered device charging is invalid
during Eco mode.
Battery installation
1 Whilst pushing the locking tab towards the centre of
the remote control, slide out the battery holder.
Back of remote
control
Locking tab
2 Remove the old battery from the battery holder, insert
the new battery and then slide the battery holder back
into the remote control.
Battery holder
Polarity (+)
symbol
Battery type
Locking tab
Precautions for battery use:
Remove the battery if the unit will not be used for a long
period of time.
This will prevent potential damage due to battery leakage.
Caution:
Do not use rechargeable battery (nickel-cadmium bat-
tery, etc.).
Danger of explosion if battery is incorrectly replaced.
Replace only with the same or equivalent type.
Batteries (battery pack or batteries installed) shall not
be exposed to excessive heat such as sunshine, fire
or the like.
Installing the battery incorrectly may cause the unit to
malfunction.
Positive (+)
side up
Notes concerning use:
Replace the battery if the operating distance is reduced
or if the operation becomes erratic. Purchase “CR
2025”, coin lithium battery.
Periodically clean the transmitter on the remote control
with a soft cloth.
Exposing the sensor on the unit to strong light may in-
terfere with operation. Change the lighting or the direction of the unit if this occurs.
Keep the remote control away from moisture, heat,
shock, and vibrations.
Test of the remote control
The remote control can be used within the range shown
below:
Remote sensor
0.2 m - 6 m
(8” - 20’ )
E-4
MUTE
ON/
STAND-BY
TREBLE
AUDIO IN
BASS
PAIRING
VOL
E SOUND
USB
BLUETOOTH
DIMMER
RRMCGA342AWSA
ECO MODE
ON/
STAND-BY
VOL
E SOUND
Dimmer 1
Dimmer 2
Dimmer Off
Bluetooth
USB
AUDIO IN
MODE 1
MODE 2
MODE Off
MODE 1 MODE 2
MODE Off
+ 4
- 4
- 3
- 2
- 1
+ 3
+ 2
+ 1
0
+ 4
- 4
- 3
- 2
- 1
+ 3
+ 2
+ 1
0
General control
To turn the power on
Press the ON/STAND-BY button to turn the power on.
When the power is first turned on, the speaker frames move
outwards and pneumatic sound will be heard (default setting).
To turn off the pneumatic sound, press and hold the ESOUND
button. The LED lights up and then fades out.
To return to the default setting, press and hold the ESOUND
button again. The LED light will slowly fade in.
After use:
Press the ON/STAND-BY button to enter the power
stand-by mode.
LED light brightness control
To dim the LED light brightness.
Press DIMMER button on the remote control to change
the mode.
Volume auto fade-in
If you turn off and on the main unit with the volume set
to almost maximum, the main unit starts with moderate
volume and fades in to the last set level.
Volume control
Press VOLUME +/– buttons (on main unit) or VOL +/– (on
remote control) to increase or decrease the volume.
The LED light will blink when the volume reaches maximum
or minimum level.
Function
When the FUNCTION button on the main unit is pressed,
the current function will change. Press the FUNCTION
button repeatedly to select the desired function.
Direct key power on function
When you press any of the following buttons, the unit turns on.
/ on the remote control: last selected function activated.
AUDIO IN on the remote control: audio function activated.
USB on the remote control: USB function activated.
BLUETOOTH on the remote control: Bluetooth function
activated
(LED light dim)
(LED light gets dimmer.)
(LED light bright)
: Pairing indicator lights up.
: USB indicator lights up.
: LED lights up at the minimum level.
Auto power off function
The unit will enter the stand-by mode if:
Bluetooth: No connection for 60 seconds.
USB: In the stop mode or no media for 20
minutes
Audio In: No detection of input signal after 20
minutes
Note:
However, if iPod, iPhone, iPad or Android-powered device
is plugged in, the unit will begin charging.
ESound control
When the power is first turned on, the unit will enter ESound
MODE 1.
To change to a different mode, press the ESOUND button
repeatedly until the desired ESound mode apppears.
(Stereo expansion OFF, boost bass sound ON)
(Stereo expansion ON, boost bass sound ON)
(Stereo expansion OFF, boost bass sound OFF)
LED will light up according to the desired ESound mode.
MODE 1
MODE Off
MODE 2
Note
The ESound mode will be set to MODE Off when BASS/
TREBLE control is adjusted.
Bass and treble control
Press BASS or TREBLE +/- button on the remote control to
increase or decrease the bass or treble level respectively.
LED will light up according to the desired Bass or Treble
level.
Muting
The volume is muted temporarily when pressing the
MUTE button on the remote control. Press again to
restore the volume.
E-5
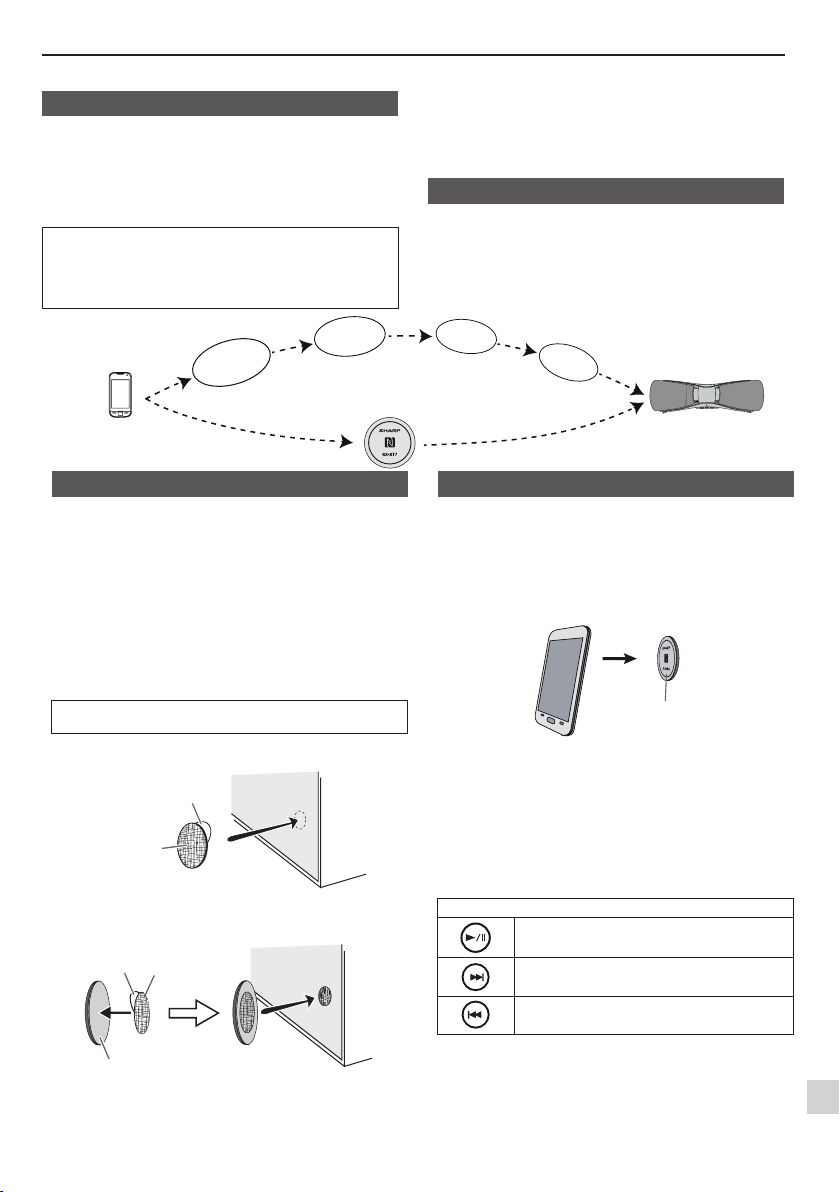
Bluetooth one touch connection via NFC
About NFC technology■
Near Field Communication (NFC) is a set of standards for
devices (smartphones/tablets) to establish radio communication with each other by touching/tapping them together
or bringing them into close proximity.
Using NFC in this product simplifies the pairing method of
Bluetooth connectivity.
This audio system supports NFC-enabled device with
●
Android 4.1, Jelly Bean and higher.
For device with a lower Android version, refer the
●
operation manual of the device for recommended app
(application).
Search/scan
B
l
a
u
n
a
M
(during Bluetooth Standby mode)
NFC tag
A Bluetooth audio
source device
(smartphone/tablet).
Switch ‘ON’
Bluetooth
NFC tag set up■
The NFC tags can be placed anywhere convenient to you. The velcro
tapes supplied will help to secure the tags onto the desired location.
Caution:
Make sure that the NFC tag is placed on a flat and level surface.
●
If you choose not to use the velcro tape, do not place
●
the NFC tag near metal surface to avoid connection
interference during tagging.
Important:
NFC tag has unique ID for each individual set, SHARP
●
provides 2 identical tags for your convenience.
SHARP will not be held liable for the damages caused by
●
rewriting the tags.
Keep all small parts away from children as they may
be accidentally swallowed.
Peel the separator off the velcro tape (loop type)
1
and stick it on a desired surface.
Separator
Velcro tape
(loop type)
Peel the separator off the velcro tape (hook type)
2
and stick it to the rear of the NFC tag. Then place
the tag onto the desired location.
Separator
Rear view of the NFC tag
Velcro tape
(hook type)
Unlike other wireless technology, NFC requires no
discovery or pairing.
Simply tap the source device to the NFC tag to instantly
enjoy seamless connectivity between your smart device
and the audio system.
NFC detection area■
NFC detection area location may vary depending on the
device (smartphone/tablet). Refer operation manual of the
device for detail.
Pairing
o
t
o
e
t
u
h
l
s
e
t
t
i
n
g
Connect
NFC connection for audio playback■
Check that:
Your device (smartphone/tablet) has an NFC function.
●
NFC function on your device is enabled.
●
Screen lock function of the device is off.
●
This unit is not in Eco mode.
●
Your device must be within 10 metres from the unit.
●
Touch your device to the supplied NFC tag.
1
NFC tag
A pop-up window asking whether to proceed with
2
the Bluetooth connection appears on the device.
Select <YES>.
The ‘connected’ message appears when the connec-
●
tion is complete.
Playback will start automatically, otherwise press
3
play (on remote control or source device).
Sound will be heard from the speakers of this unit via
●
audio streaming.
Your device must be within 10 metres from the unit.
●
Various Bluetooth operation buttons (remote control only)
Press the button to play or pause.
Press the button to skip up.
Press and hold to fast forward.
Press the button to skip down.
Press and hold to fast reverse.
Notes:
To listen to audio via Bluetooth connectivity without
●
NFC tag - refer “Pairing with other Bluetooth source
devices” on page 7.
To disconnect, simply touch your device to the tag
●
again.
E-6
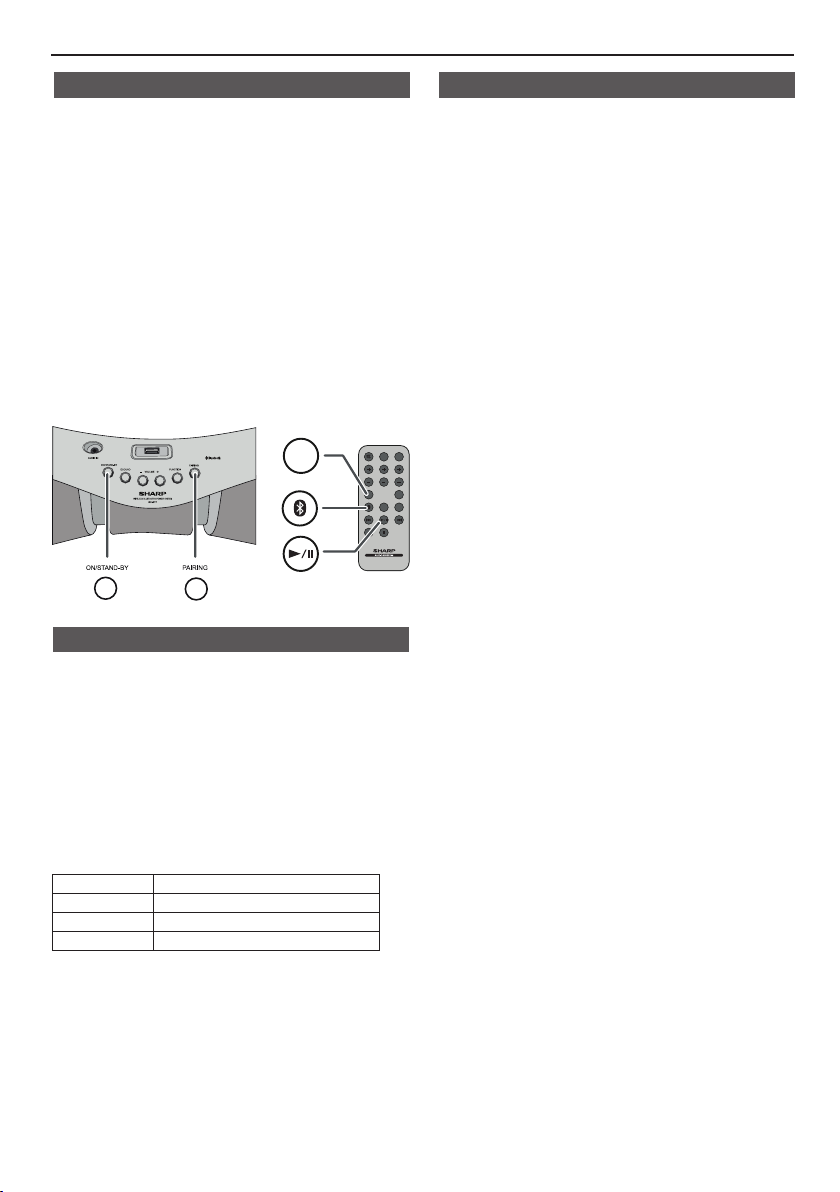
Listening to Bluetooth enabled devices
MUTE
ON/
STAND-BY
TREBLE
AUDIO IN
BASS
PAIRING
VOL
E SOUND
USB
BLUETOOTH
DIMMER
RRMCGA342AWSA
ECO MODE
PAIRING
BLUETOOTH
Bluetooth■
Bluetooth wireless technology is a short-range radio
technology that enables wireless communication between
various types of digital devices, such as mobile phone or
computer. It operates within a range of about 10 metres (30
feet) without the hassle of having to use cables to connect
these devices.
This unit supports the following:
Communication System: Bluetooth Specification version
2.1 Bluetooth + Enhanced Data Rate (EDR).
Support Profile : A2DP (Advanced Audio Distribution Profile)
and AVRCP (Audio/Video Remote Control Profile)
Notes when using unit with a mobile phone
This unit cannot be used to talk over the telephone
●
even when there is a Bluetooth connection made to a
mobile phone.
Please refer to the operating manual supplied with the
●
mobile phone for details on operation of your mobile
phone whilst transmitting the sound using a Bluetooth
connection.
Pairing Bluetooth devices■
Bluetooth devices need to be initially paired first before
they can exchange data. Once paired, it is not necessary
to pair them again unless:
pairing is made with more than 8 devices.
●
Pairing can only be made one device at a time. This
unit can be paired to a maximum of 8 devices. If subsequent device is paired, the oldest device paired, will
be deleted and replaced with the new one.
this unit is reset. All pairing information is deleted when
●
unit is reset.
pairing information is deleted whilst re-pairing, etc.
●
Indicators:
Status PAIRING indicator (blue)
Unconnected Blinks
Pairing mode Blinks quickly
Connected Lights up
However, the indicator status is not displayed during
Bluetooth stand-by mode.
Pairing with other Bluetooth source devices
■
Press the ON/STAND-BY button to turn the power
1
on.
Press the BLUETOOTH button on the remote control
2
or FUNCTION button repeatedly on the main unit to
select Bluetooth function. (Pairing indicator blinks.)
Press and hold the PAIRING button for 3 seconds or
3
more.
PAIRING indicator blinks quickly. The unit is now in
pairing mode and is ready to be paired with other
Bluetooth source device.
Perform pairing procedure on the source device to
4
detect this unit. “SHARP GX-BT7” will appear in the
detected devices list (if available) in the source device. (Refer the source device operating manual for
details).
Notes:
Place the devices to be paired within 1 metre (3
●
feet) of each other when pairing.
Some source devices are unable to display lists of
●
detected devices. To pair this unit with the source
device, refer to the source device operating manual
for details.
Select “SHARP GX-BT7” from the source list. If Pass-
5
code* is required, enter “0000”.
* Passcode may be called PIN Code, Passkey, PIN
number or Password.
Pairing indicator (blue) will stop blinking once the unit
6
is successfully paired with the source device. (Pairing
information is now memorised in the unit.)
Some audio source devices may connect with the unit
automatically after pairing is completed, otherwise
follow the instructions in the source device operating
manual to start connection.
Press the play button on remote control or source de-
7
vice to start Bluetooth streaming playback.
Notes:
If a device such as microwave oven, wireless LAN card,
●
Bluetooth device or any other device that uses the same
2.4 GHz frequency near the system some sound interruption may be heard.
The transmission distance of the wireless signal between
●
the device and the main unit is about 10 m (30 feet), but
may vary depending on your operating environment. If a
steel concrete or metallic wall is between the device and
the main unit, the system may not operate at all, because
the wireless signal cannot penetrate metal.
If this unit or the source device is turned off before Blue-
●
tooth connection is completed, pairing will not be completed and the pairing information will not be memorised.
Repeat step 1 onwards to start pairing again.
To pair with other devices, repeat steps 1 - 5 for each de-
●
vice. This unit can be paired to a maximum of 8 devices.
If subsequent device is paired, the oldest device paired,
will be deleted and replaced with the new one.
Once a device is ousted or deleted from the pairing list,
●
the pairing information for the device is also deleted. To
listen to the sound from the device again, it needs to be
re-paired. Perform steps 1 - 5 to pair the device again.
E-7

Listening to Bluetooth enabled devices
(continued)
Listening to the sound■
Check that:
The source device Bluetooth functionality is ON.
●
Pairing of this unit and the source device is completed.
●
Unit is in connected mode (pairing indicator (BLUE) lights
●
up.)
Press the ON/STAND-BY button to turn the power on.1
Press the BLUETOOTH button on the remote control or
2
FUNCTION button repeatedly on the main unit to select
Bluetooth function.
Start the Bluetooth connection from the Bluetooth
3
stereo audio source device.
Playback will start automatically, otherwise press play
4
(on remote control or source device).
Notes:
For various Bluetooth operations, refer “NFC con-
●
nection for audio playback” on page 6.
If the source device has an extra bass function or
●
equalizer function, set them to off. If these functions
are on, sound may be distorted.
Notes:
Make the Bluetooth connection again if the source device
●
is not turned on, or its Bluetooth functionality is off or is in
sleep mode.
To disconnect the Bluetooth device■
Perform any of the followings.
- Disconnect the Bluetooth connection on the audio source
device.
Refer the operating manual supplied with the device.
- Turn off the Bluetooth stereo audio source device.
- Turn off this unit.
Note:
The volume of this unit may not be controlled as intended
depending on the device.
Auto power on■
During Bluetooth stand-by mode, when music is played from
your device, the unit will automatically power on when the
Bluetooth connection has been set up between the main unit
and your device and they remain connected.
Note:
This function is not applicable during Eco mode.
E-8
Listening on Android™ devices
Introduction : Open Accessory■
Open Accessory support allows external USB hardware
(an Android USB accessory) to interact with an Androidpowered device in a special accessory mode. When an
Android-powered device is in accessory mode, the connected accessory acts as the USB host (powers the bus
and enumerates devices) and the Android-powered device
acts in the USB accessory role. Android USB accessories
are specifically designed to attach to Android-powered
devices and adhere to the Open Accessory Protocol, that
allows them to detect Android-powered devices that support accessory mode.
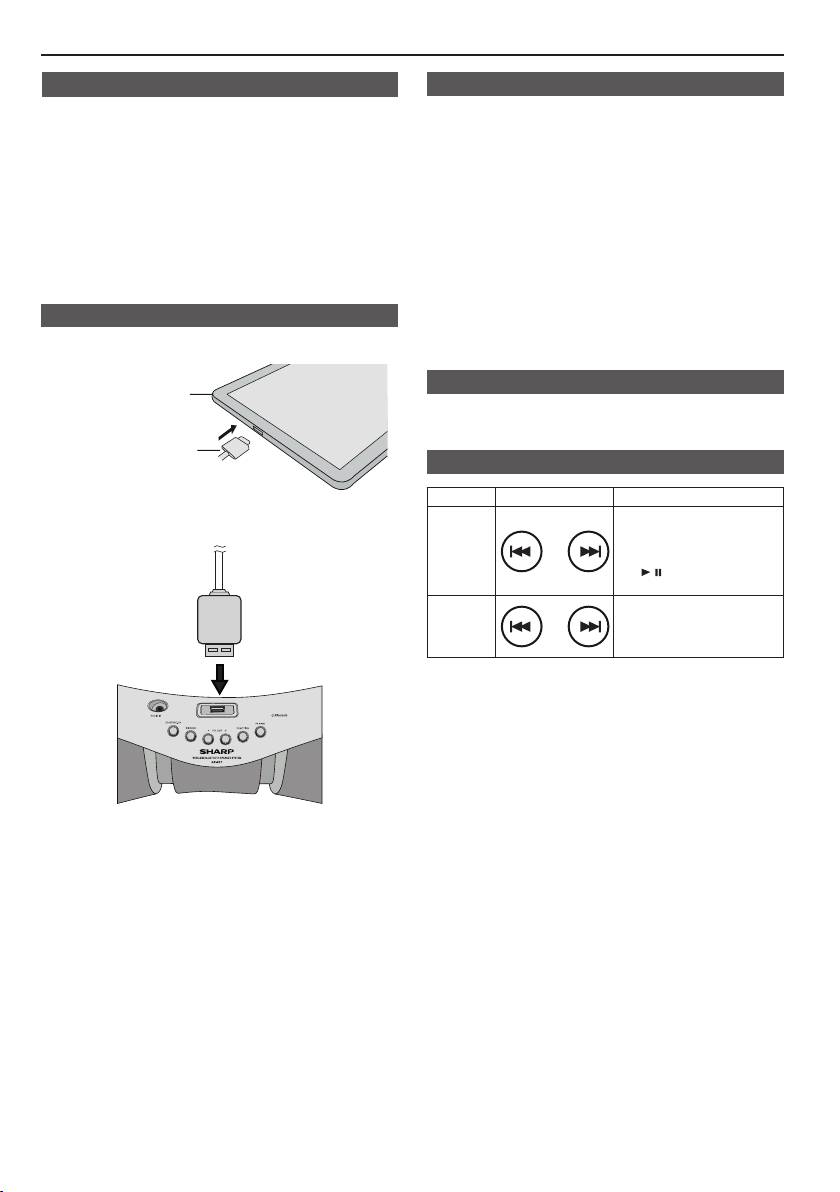
Android device connection (USB)■
Insert the connector to the Android device.
1
(Smartphone/Tablet)
Plug in the Android device to the unit via USB
2
connector.
Device
Connector
(not supplied)
Android device playback■
Press the ON/STAND-BY button to turn the power
1
on.
Press the USB button (remote control) or FUNCTION
2
button repeatedly (main unit) to select USB function.
Connect the device (Smartphone/Tablet) to the unit.
3
Press play (on remote control or source device).
4
Notes:
If the source device has an extra bass or equalizer
●
function, set them to off. If these functions are on,
sound may be distorted.
Incoming calls will pause the playback/application.
●
Once the calls are answered, the conversation can only
●
be heard through the built-in speaker of the cellular
device. Turn on the device speaker or disconnect the
device to start conversation.
To unplug the Android device■
Pause the playback or quit the application (app).
1
Unplug the device from the USB terminal.
2
Various functions■
Function Remote control Operation
Track
up/down
Fast
forward/
reverse
Press in the playback or
stop mode.
If you press the button
in the stop mode, press
the / button to start the
desired track.
Press and hold down in
the playback mode.
Release the button to
resume playback.
Notes:
Controls (play/pause/skip up/skip down) will function
●
based on actual application (app) controls used on
Android devices.
Android is a trademark of Google Inc.
E-9

Listening to the iPod, iPhone or iPad
Made for:
iPhone 5
●
iPhone 4S
●
iPhone 4
●
iPhone 3GS
●
iPhone 3G
●
iPhone
●
iPad (4th generation)
●
iPad mini
●
iPad (3rd generation)
●
iPad 2
●
iPad
●
Caution:
Please update your iPod, iPhone and iPad unit to the
latest software version before using it. Please visit Apple’s
homepage to download the latest version for your iPod,
iPhone and iPad.
Notes:
Once the iPod, iPhone or iPad is plugged in it will begin
charging.
The message “This accessory is not made to work with
iPhone” or similar, may appear on the iPhone screen
when:
- battery is low.
- the iPod, iPhone or iPad is not properly plugged in.
If this occurs, remove and re-plug your iPod, iPhone or
iPad.
iPod touch (5th generation)
●
iPod touch (4th generation)
●
iPod touch (3rd generation)
●
iPod touch (2nd generation)
●
iPod touch (1st generation)
●
iPod classic
●
iPod nano (7th generation)
●
iPod nano (6th generation)
●
iPod nano (5th generation)
●
iPod nano (4th generation)
●
iPod nano (3rd generation)
●
iPod nano (2nd generation)
●
iPod, iPhone and iPad connection (USB)
Insert the connector to the iPod, iPhone or iPad.
1
iPad
Connector
Place the iPad to the stand for iPad.
2
iPad
Stand for iPad
3 Plug in the iPod, iPhone or iPad to the unit via USB
connector.
iPod, iPhone or iPad playback
1 Press the ON/STAND-BY button to turn the power on.
2 Press the USB button on the remote control or
FUNCTION button repeatedly on the main unit to select
USB function.
3 Plug in iPod, iPhone or iPad to the unit.
4 Playback will start automatically, otherwise press play.
Note:
Stop button ( ) is invalid during iPod, iPhone or iPad
playback.
iPhone playback
Sound will only switch from iPhone to the main unit after
authentication process is completed in approximately
10 seconds.
Incoming calls will pause the playback.
Once the calls are answered, the conversation can
only be heard through the built-in iPhone speaker. Turn
on the iPhone speaker or unplug the iPhone to start
conversation.
To disconnect iPod, iPhone or iPad
It is safe to unplug iPod, iPhone and iPad even during
playback.
Various iPod, iPhone and iPad functions
Function Remote control Operation
Track up/
down
Fast
forward/
reverse
Press in the playback
or pause mode. If you
press the button in the
pause mode, press the
/ button to start the
desire track.
Press and hold down in
the playback mode.
Release the button to
resume playback.
E-10

Listening to USB mass storage device/MP3 player
MUTE
ON/
STAND-BY
TREBLE
AUDIO IN
BASS
PAIRING
VOL
E SOUND
USB
BLUETOOTH
DIMMER
RRMCGA342AWSA
ECO MODE
USB
To remove USB memory device
1 Press the button to stop playback.
2 Unplug USB memory device from the USB terminal.
Notes:
SHARP will not be held liable for the loss of data whilst the USB
memory device is connected to the audio system.
Files compressed in MP3 and/or WMA format can be played
back when connected to the USB terminal.
This USB memory’s format supports FAT 12, FAT 16 or FAT 32.
SHARP cannot guarantee that all USB memory devices will
work on this audio system.
USB cable is not recommended for use in this audio system
to connect to USB memory device. Use of the USB cable will
affect the performance of this audio system. Cable supplied with
iPod, iPhone and iPad is not prone to this condition.
This USB memory cannot be operated via USB hub.
The USB terminal in this unit is not intended for a PC connection
but is used for music streaming with a USB memory device.
External HDD-storage cannot be played back via USB terminal.
If the data inside the USB memory is large, it may take longer
time for the data to be read.
This product can play WMA and MP3 files. It will automatically
Note:
This product is not compatible with MTP and AAC file
systems from USB mass storage device or MP3 player.
To play back USB/MP3 player
1 Press the USB button on the remote control or
FUNCTION button repeatedly on the main unit to select
USB function. Connect the USB memory device that
has MP3/WMA format files on the unit.
2 Playback will start automatically.
3 Select desired file to be played back by pressing the
or button.
Note:
To pause playback:
Press the / button.
Various USB functions
Function Remote control Operation
Track up/
down
Fast
forward/
reverse
Press in the playback
or pause mode. If you
press the button in the
pause mode, press the
/ button to start the
desire track.
Press and hold down in
the playback mode.
Release the button to
resume playback.
detect the file type being played. If unplayable file is played on
this product, the file will be automatically skipped. This will take
a few seconds.
This product relates to USB mass storage devices and MP3
players. It may however face some irregularities due to various
unforeseen reasons from some devices. Should this happen,
turn off the unit and then turn it on again.
This unit only supports “MPEG-1 Audio Layer-3” format.
(Sampling Frequency is 32, 44.1, 48kHz)
Playback order for MP3 files may differ depending on the writing
software used during file download.
Bitrate which is supported by MP3 is 32~320 kbps, WMA is
64~160 kbps.
For MP3/WMA files, please put “.MP3” “.WMA” extension. Files
cannot be played back if there is no MP3/WMA extension.
Copyright protected WMA files cannot be played back.
Maximum total number supported for MP3/WMA files is 65025.
However, it is advisable to playback a media with a small amount
of MP3/WMA files to maximise playability.
E-11

Connecting other equipment
Listening to the playback sounds of
portable audio player, etc.
Portable audio
player, etc.
Audio cable (not supplied)
Troubleshooting chart
Many potential problems can be resolved by the owner
without calling a service technician.
If something is wrong with this product, check the
following before calling your authorised SHARP dealer or
service centre.
General
Symptom Possible cause
When a button is
pressed, the unit
does not respond.
No sound is heard. The volume level is set to
Remote control
Symptom Possible cause
The remote control
does not operate.
Set the unit to the power
stand-by mode and then
turn it back on.
If the unit still malfunctions,
reset it. (Refer page 13)
minimum.
The AC power lead of the
unit is not plugged in.
The batteries are
exhausted.
The distance or angle is
incorrect.
The remote control sensor
receives strong light.
1 Use a connection lead to plug in the portable audio
player, etc. to the AUDIO IN socket. When using video
equipment, plug in the audio output to this unit and the
video output to a television.
2 Press the ON/STAND-BY button to turn the power on.
3 Press the AUDIO IN button on the remote control or
FUNCTION button repeatedly on the main unit to select
AUDIO IN function.
4 Play the connected equipment. If volume level of the
connected device is too high, sound distortion may
occur. Should this happen, lower the volume of the
connected device. If volume level is too low, increase
the volume of the connected device.
Note:
To prevent noise interference, place the unit away from
the television.
NFC / Bluetooth■
Symptom Possible cause
No sound is heard.● The unit is too far from the
Bluetooth sound
● The unit is too near to
is interrupted or
distorted.
●
Bluetooth stereo audio
source device.
The unit is not paired
●
with the Bluetooth stereo
audio source device.
●
a device that generates
electromagnetic radiation.
There is an obstacle
●
between the unit and the
Bluetooth stereo audio
source device.
Open Accessory■
Symptom Possible cause
No sound is
● The device is not playing.
produced.
Device will not
● The device is not making
charge.
●
The device is not properly
●
plugged in to the unit.
The AC power lead of the
●
unit is not plugged in.
●
full contact with the USB
terminal.
E-12

Troubleshooting chart (continued)
PAIRING
iPod, iPhone or iPad
Symptom Possible cause
No sound is
produced.
iPod, iPhone or iPad
will not charge.
“This accessory is
not made to work
with iPhone” or
“This accessory is
not supported by
iPhone” appears on
iPhone screen.
The iPod, iPhone or iPad is
not playing.
The iPod, iPhone or iPad is
not properly plugged in to
the unit.
The AC power lead of the
unit is not plugged in.
The iPod, iPhone or iPad is
not making full contact with
the connector.
The iPod or iPhone is not
supported. Refer to page
10 for compatible models.
The iPhone battery is low.
Please charge the iPhone.
iPhone is not properly
plugged in.
USB
Symptom Possible cause
Device cannot be
detected.
Playback does not
start.
There is no MP3/WMA file
inside the device.
The device is not properly
plugged in.
A MTP device is plugged
in.
The device contains AAC
file only.
A copyright-protected
WMA or false MP3 file is
being played back.
Condensation
Sudden temperature changes, storage or operation in an
extremely humid environment may cause condensation
inside the cabinet or on the transmitter on the remote
control. Condensation can cause the unit to malfunction.
If this happens, leave the power on until normal playback
is possible (about 1 hour). Wipe off any condensation on
the transmitter with a soft cloth before operating the unit.
If problem occurs
When this product is subjected to strong external
interference (mechanical shock, excessive static
electricity, abnormal supply voltage due to lightning, etc.)
or if it is operated incorrectly, it may malfunction.
If such a problem occurs, do the following:
1 Set the unit to the stand-by mode and turn the power
on again.
2 If the unit is not restored in the previous operation,
unplug and plug in the unit again, and then turn the
power on.
Note:
If neither operation above restores the unit, clear all the
memory by resetting it.
Factory reset, clearing all memory
1 Press the AUDIO IN (remote control) or FUNCTION
button repeatedly (main unit) to select AUDIO IN
function.
2 Press / button.
3 Within 1 second, press and hold button until
PAIRING indicator lights up.
Caution:
This operation will restore the unit to factory default
condition.
Before transporting the unit
Caution:
Remove all devices plugged in to the unit. Then, set the
unit to the power stand-by mode. Transporting the unit
with other devices plugged in might damage the units.
Maintenance
Cleaning the cabinet
Periodically wipe the cabinet with a soft cloth and a diluted soap solution, then with a dry cloth.
Caution:
Do not use chemicals for cleaning (petrol, paint thinner,
etc.). It may damage the cabinet.
Do not apply oil to the inside of the unit. It may cause
malfunctions.
E-13

Specifications
As part of our policy of continuous improvement, SHARP
reserves the right to make design and specification
changes for product improvement without prior notice.
The performance specification figures indicated are nominal values of production units. There may be some deviations from these values in individual units.
General
Power source AC 100 - 240 V ~ 50/60 Hz
Power
consumption
Dimensions Width: 446 mm (17 - 9/16’’)
Weight 2.5 kg (5.5 lbs.)
Frequency band 2,400GHz - 2,480GHz
Compatible
Bluetooth Profile
( * ) This power consumption value is obtained when the
Bluetooth stand-by mode is cancelled in the power
stand-by mode. Refer to page 4 to cancel the Blue-
tooth stand-by mode.
AC: Power on: 21 W
Power stand-by: 0.4 W (*)
Height: 155 mm (6 - 1/8”)
Depth: 154 mm (6 - 1/16”)
A2DP (Advanced Audio
Distribution Profile), AVRCP (Audio/
Video Remote Control Profile)
Bluetooth 2.1 +EDR
Amplifier
Output power Front speaker:
Input terminals Audio In (audio signal):
RMS: 10 W (5 W + 5 W) (10%
T.H.D.)
RMS: 7 W (3.5 W + 3.5 W) (1%
T.H.D.)
Subwoofer:
RMS: 10 W (10% T.H.D.)
RMS: 8 W (1% T.H.D.)
500 mV/47 k ohms
USB (MP3 / WMA)
USB host
interface
Support file
Bitrate support
Other
File system
support
Complies with USB 1.1 (Full
Speed)/2.0 Mass Storage Class.
Support Bulk only and CBI
protocol.
MPEG 1 Layer 3
WMA (Non DRM)
MP3 (32 ~ 320 kbps)
WMA (64 ~ 160 kbps)
Maximum total number of MP3/
WMA files is 65025.
Maximum total number of
folders is 999 INCLUSIVE of root
directory.
Support USB devices with
Microsoft Windows/DOS/
FAT 12/FAT 16/FAT 32.
2 kbyte block length for sector.
Speaker
Type 2-way type speaker system
Maximum input
power
Rated input
power
Front Speakers:
5 cm (2”) - 3 Ω - Full Range
Subwoofer: 8 cm (3-1/8”) - 6 Ω
- woofer
Front Speakers: 10 W / Channel
Subwoofer: 10 W / Channel
Front Speakers: 5 W / Channel
Subwoofer: 5 W / Channel
E-14
 Loading...