

Page 1
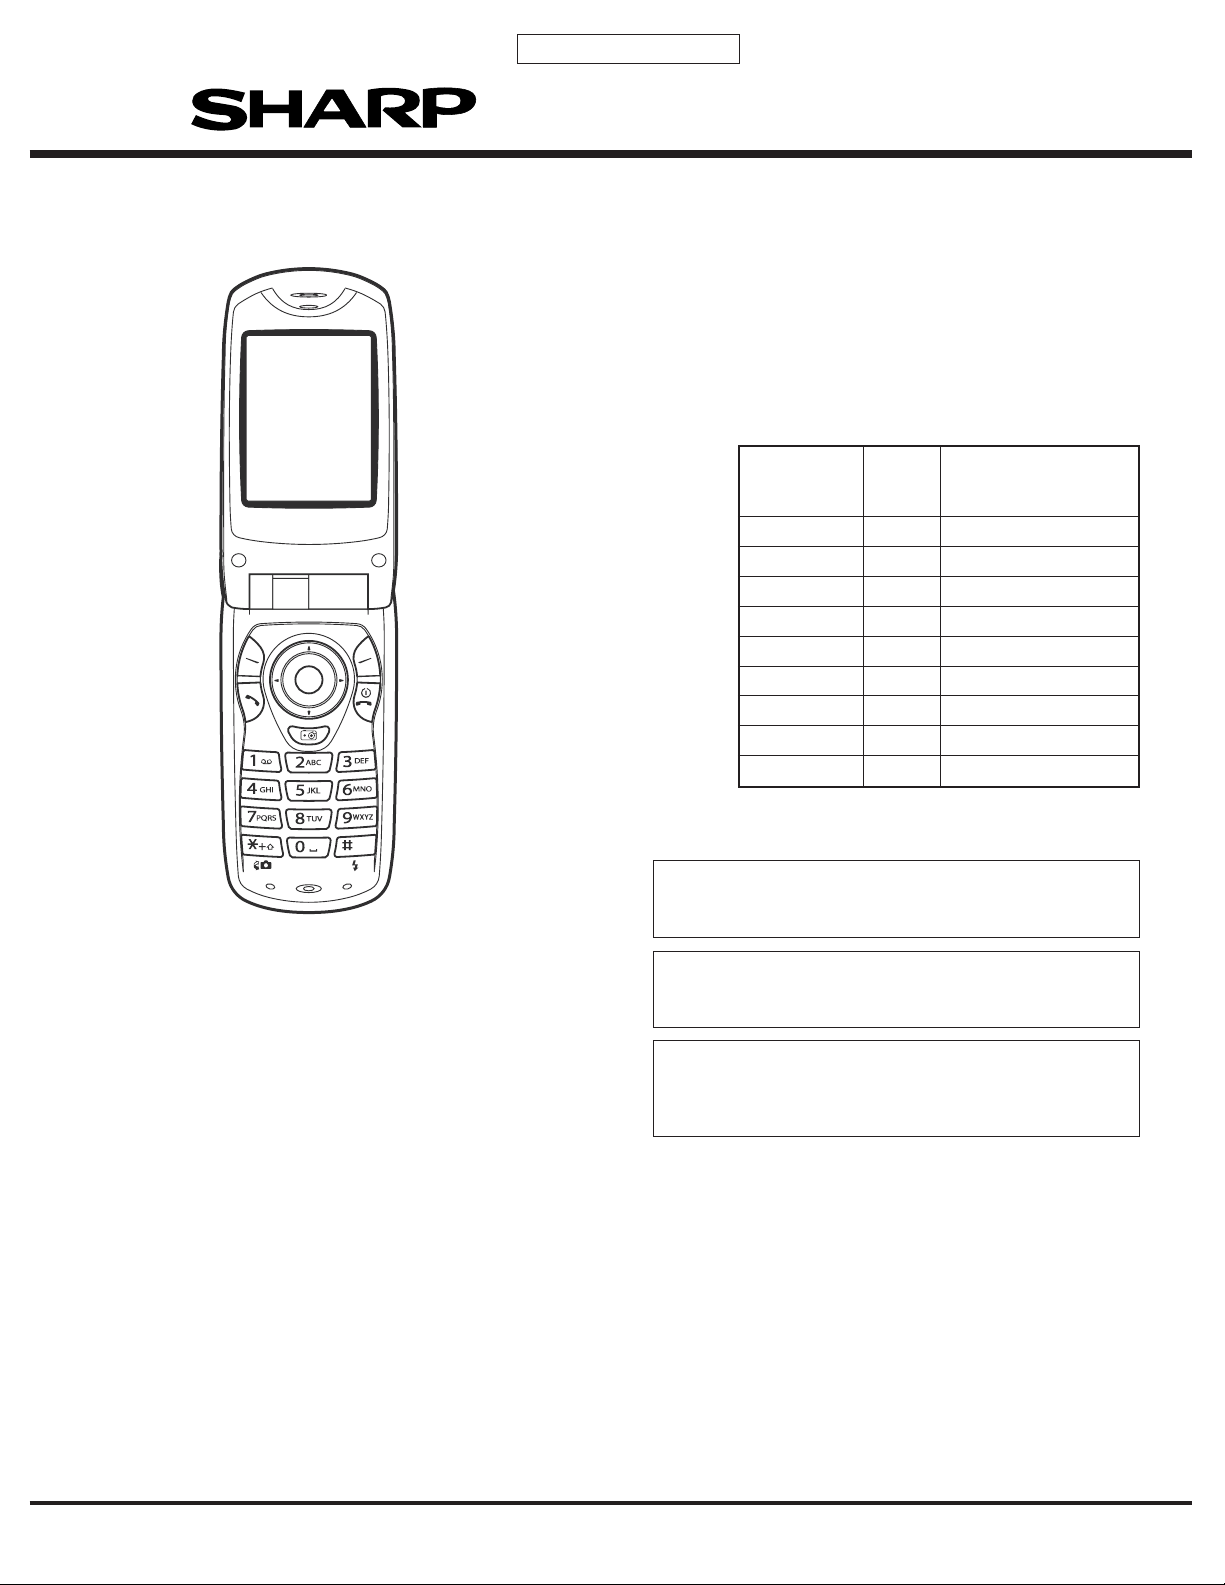
CONFIDENTIAL
SERVICE MANUAL
No. SX430TQGX39/B
DIGITAL MOBILE PHONE
MODEL GX30i
GX30i
INTERNAL
MODEL
NAME
TQGX39A
TQGX39B
TQGX39D
TQGX39E
TQGX39EP
TQGX39G
TQGX39L
TQGX39PP
TQGX39Z
• In the interests of user-safety the set should be restored to its
original condition and only parts identical to those specified
should be used.
• Caution
Risk of explosion if battery is replaced by an incorrect type,
dispose of used batteries according to the instruction.
SELEC-
TION
CODE
A
B
D
E
EP
G
L
PP
Z
DESTINATION
Australia
Hungary
Greece
U.K.
U.K. (Prepaid)
Germany
Malta
Portugal (Prepaid)
New Zealand
First shipped software version:
A02-010-0041-GX30i [A, D, E, EP, G, PP, Z]
A02-010-0050-GX30i [L]
This new model “GX30i” has almost the same structure as the former model “GX30” except for some changed points, and only these
points are described in this service manual.
When servicing the “GX30i”, please refer to the already issued service manual of “GX30 (S5409TQGX30/B)” as well as this service
manual.
This document has been published to be used
SHARP CORPORATION
for after sales service only.
The contents are subject to change without notice.
Page 2
GX30i
CONFIDENTIAL
GX30 SERVICE MANUAL (S5409TQGX30/B) Page 2 – 8 to 2 – 18
• Refer to pages 2-8 to 2-18 in GX30 SERVICE MANUAL (S5409TQGX30/B). Information about the downloading operation
with SPST is described below.
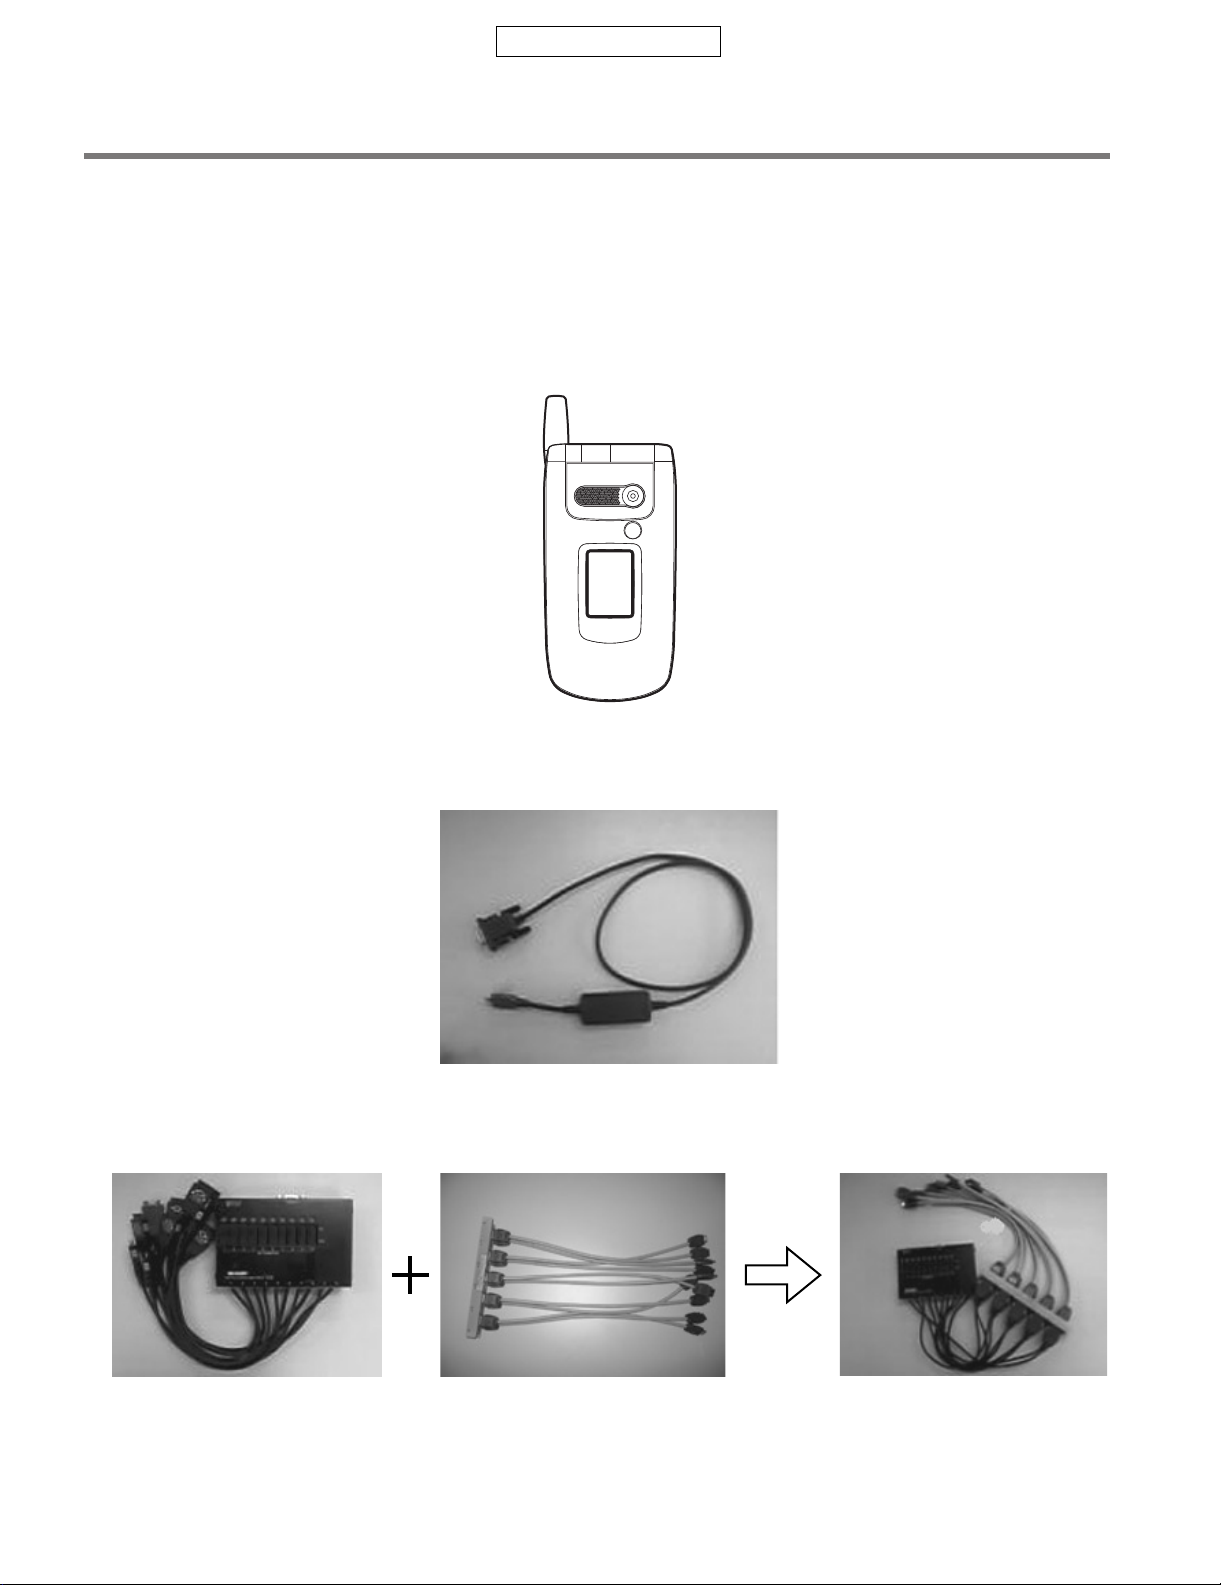
4.4. Downloader
4.4.1 Introduction
Downloader allows you to upgrade the firmware.
1) Required devices
• PC (Operating System: Windows 98/98 SE/2000/XP)
• GX30i handset
• Cable for upgrading
(For downloading data to one handset at a time)
• Communication Box & conversion connector (16-pin → 10-pin)
(For downloading data to multiple handsets simultaneously)
Figure 18
Figure 19
Communication Box Conversion connector
Figure 20
– 2 –
Page 3

CONFIDENTIAL
GX30i
2) Precautions (Read before starting.)
The cable for upgrading or Communication Box is required for download. Read through the following instructions for each device before you start the
operation.
(Usage will be described later in detail.)
[Using the cable for upgrading]
• Use a fully charged battery.
Make sure to install a sufficiently charged battery to the handset before you start.
• Use only the cable for upgrading.
Disconnect the AC charger from the cable beforehand.
• Aborting download.
Press “Quit” button. To resume download, remove the battery from the handset and start over.
To resume download after aborting it (by pressing “Quit” button) with “File System Initialize” selected, remove the battery from the handset and
reselect “File System Initialize”.
• If an error occurs:
Check the error message. To resume download, remove the battery from the handset and start over.
[Using Communication Box]
• Remove the battery.
Make sure to remove the battery before you start.
• Prepare the conversion connector.
The specified conversion connector for upgrading is required. Prepare one for 16-pin → 10-pin conversion.
• Connecting to handsets.
Connect a handset to the cable from SET POWER SW (switch) No. 1 of Communication Box.
• Aborting download
Press “Quit” button.
To resume download, turn off SET POWER SW (switch) of Communication Box and start over.
• If an error occurs:
Check the error message. To resume download, turn off SET POWER SW (switch) of Communication Box and start over.
[Common precautions]
• Initialisation (File System Initialize):
User data will be deleted after initialisation. Keep this in mind when selecting download options.
• Checking SUM:
After download, check that the same SUM value is displayed on the PC and handset.
• If the upgrading tool does not work correctly
Uninstall and install the upgrading tool, and try again.
4.4.2 Connecting handset to PC
1) Using the cable for upgrading (* Make sure the battery is sufficiently charged.)
1. Connect the cable to the PC.
2. Connect the cable to a handset.
2) Using Communication Box (* Remove the battery from the handset.)
1. Connect a PC to Communication Box via a serial cable.
2. Connect the AC charger to Communication Box and then plug it into the outlet.
All SET POWER SW on Communication Box must be turned off.
3. Connect the conversion connector to Communication Box Cables.
Connect the conversion connector in the following order, label side up.
From upper right end: Cable No. 1, 3, 5, 7, and 9.
From lower right end: Cable No. 2, 4, 6, 8, and 10.
Figure 21
– 3 –
Page 4

GX30i
4. The photo below shows the conversion connector connected to Communication Box Cable 1.
5. Connect the other end of the conversion connector to handset.
Make sure the handset and Communication Box Cable 1 are connected via the conversion connector.
[Note]
Handset must be turned off before making any connections.
Press and hold the Power key to turn off handset.
Do not turn the power off in other ways. Malfunction may occur leading to download failure.
Make sure the handset battery is sufficiently charged.
If the battery is low, download may fail.
Charge the battery before the operation.
CONFIDENTIAL
Figure 22
Disconnect the AC charger from a cable for upgrading.
When using the Upgrading tool for download, do not connect the AC charger to the cable.
If you connect the cable for upgrading to the AC charger and handset, charging starts and download will be interrupted.
All SET POWER SW on Communication Box must be turned off.
If a handset is connected with SET POWER SW turned on, charging starts and download will be interrupted.
Make sure handset and Communication Box Cable 1 are connected via the conversion connector.
(When using Communication Box, the only handset connected to Cable 1 can be operated on the PC.)
– 4 –
Page 5
CONFIDENTIAL
GX30i
4.4.3 Download
This section describes how to download the MOT file and initialise user data.
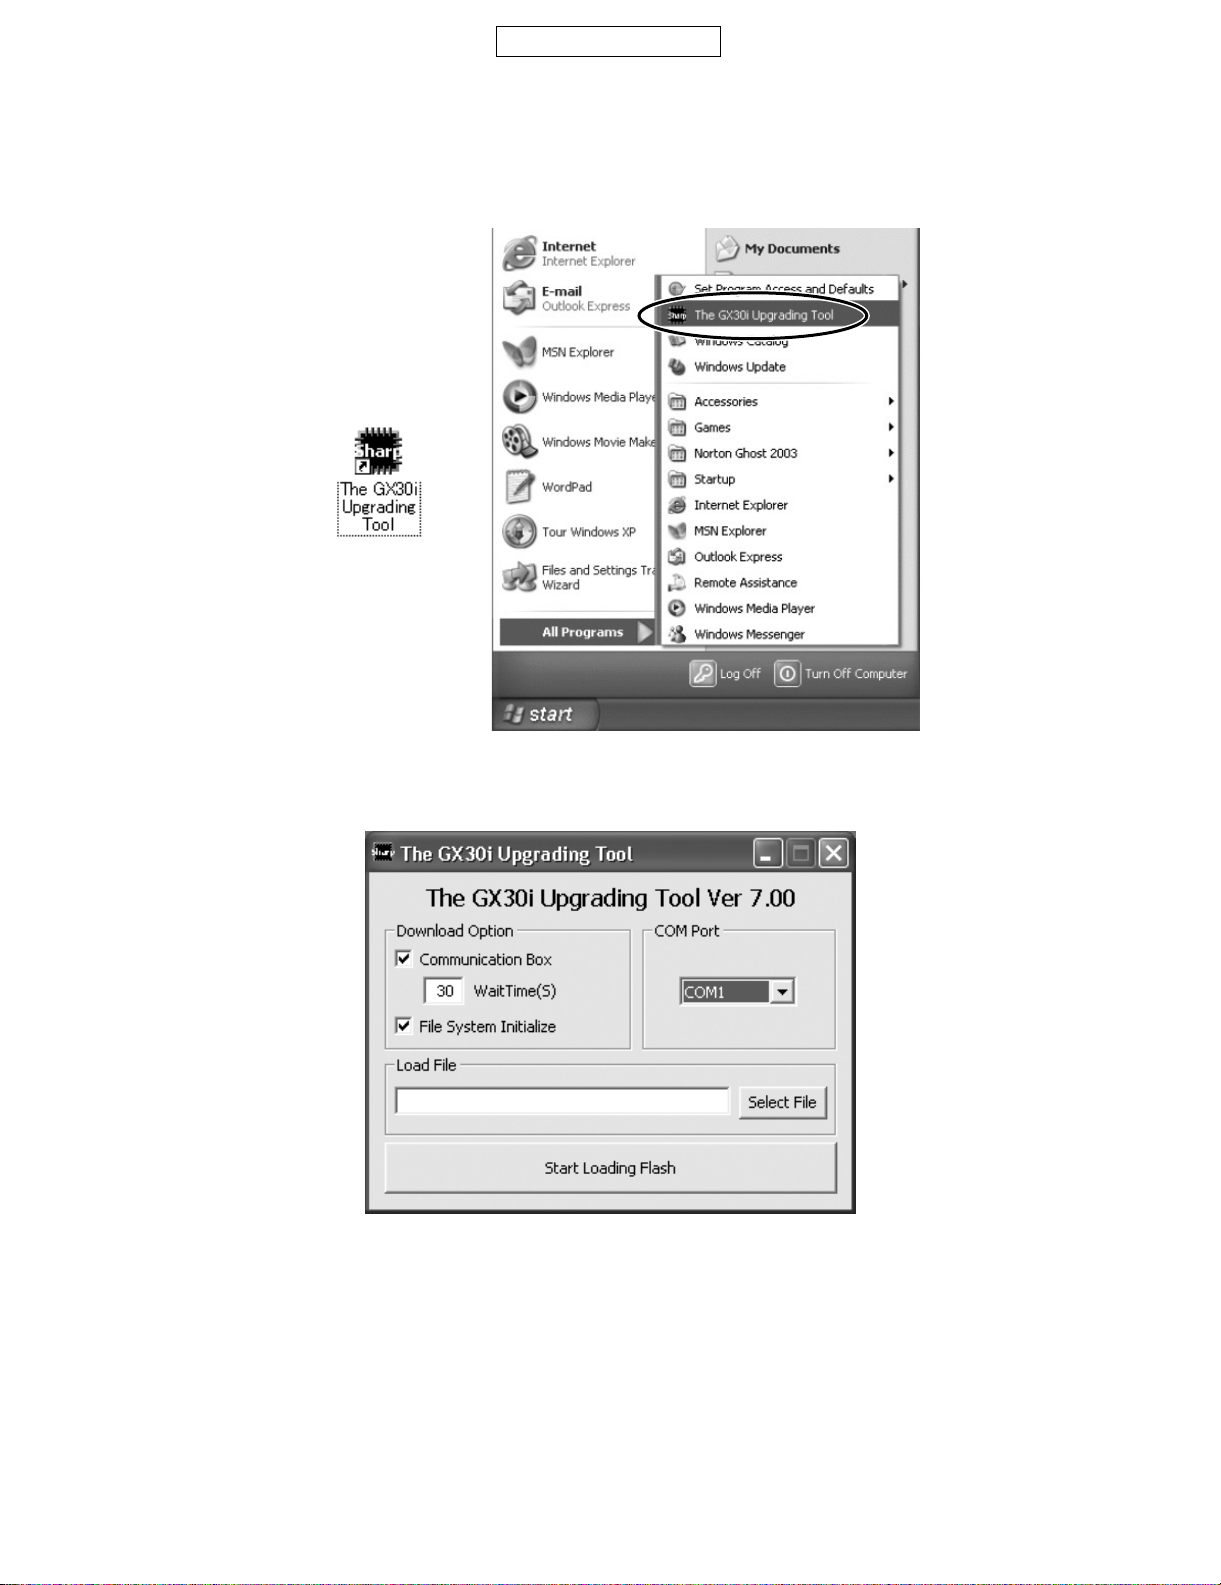
1) Application startup and screen descriptions
1. The icon below is created on your desktop after installation. Double-click it to start the Upgrading tool. You can also start the application by select-
ing “The GX30i UpgradingTool” from the Start menu.
Figure 23
2. The upgrading tool is activated.
Figure 24
[Note]
Disable the power saving mode for the PC beforehand.
If the power saving mode is active, the rewrite operation may fail depending on the PC.
– 5 –
Page 6
GX30i
CONFIDENTIAL
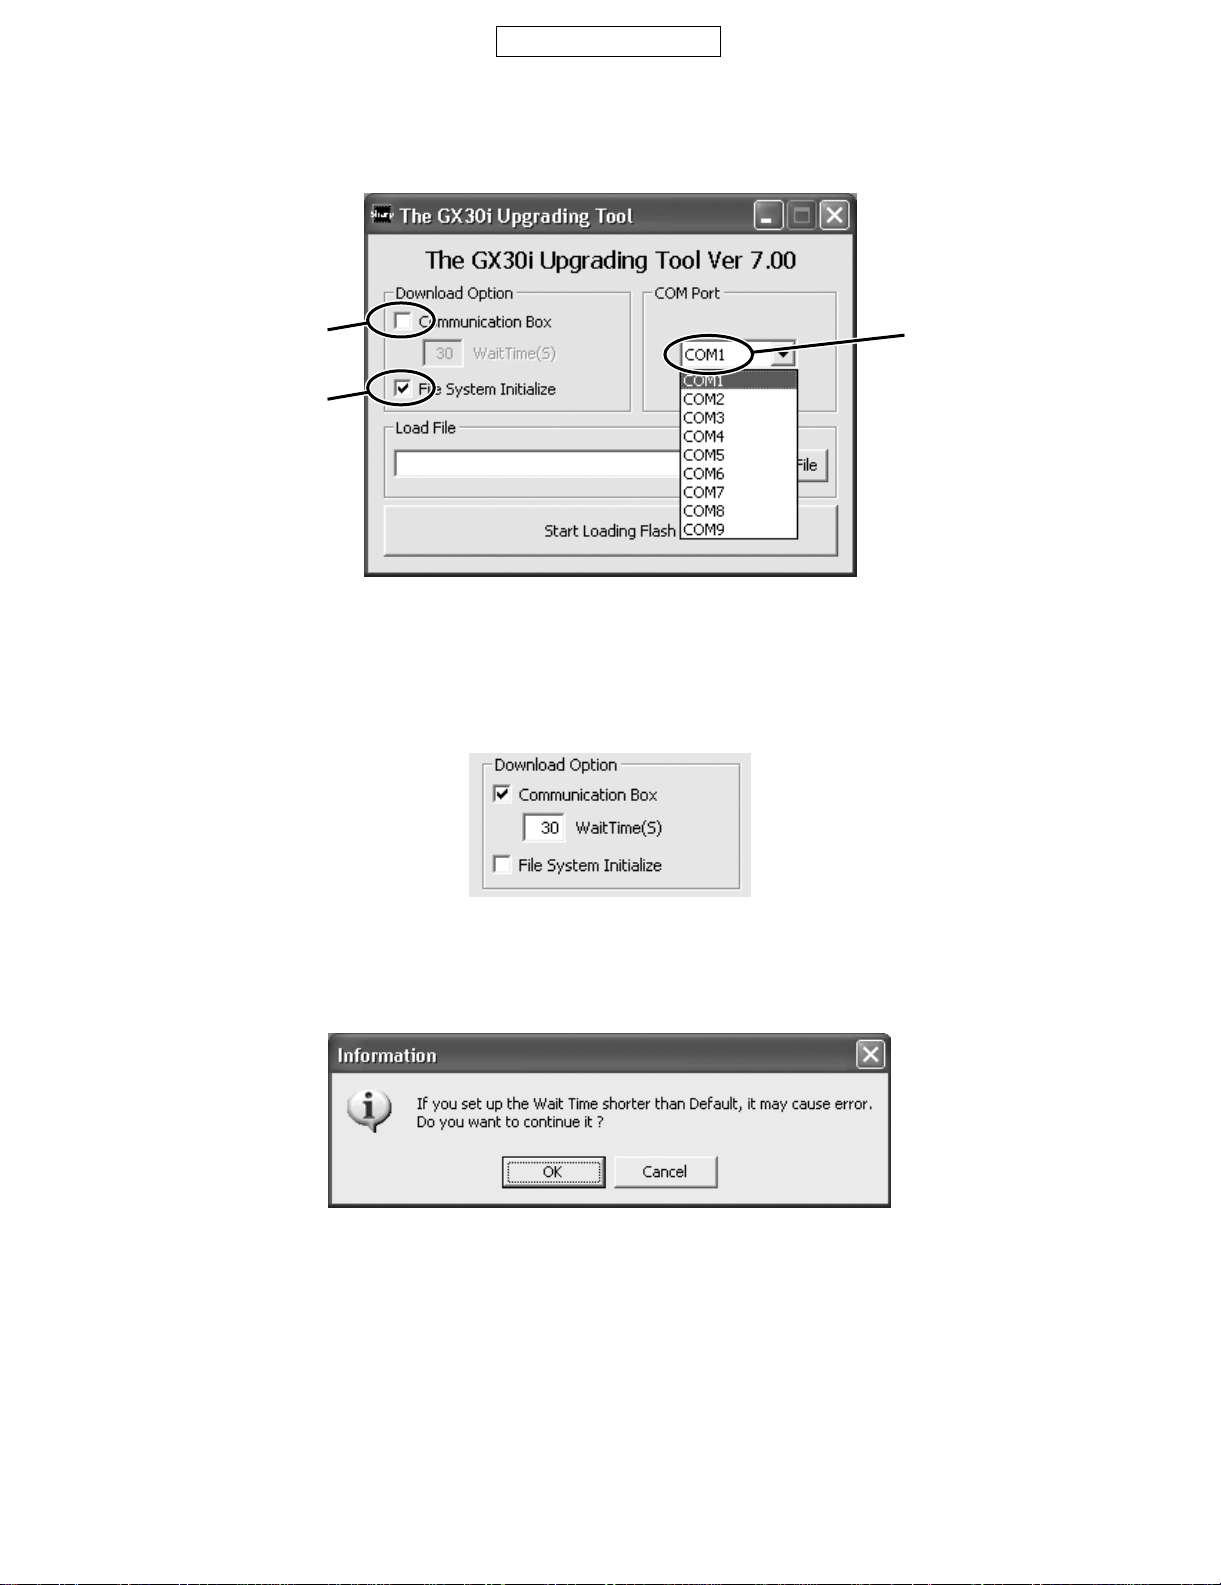
2) Selecting options and COM port
1. Uncheck the check box when using a cable for upgrading. Leave it checked when using Communication Box.
2. To initialise user area, check the “File System Initialize” check box. (It is checked when you first start up the upgrading tool.)
3. Click here and in the pull-down list, select a communications port where the cable or Communication Box is connected.
1
3
2
* The last settings are retained for 1, 2 and 3 (see above).
Figure 25
When using Communication Box, set Wait Time.
Check the Communication Box check box to adjust WaitTime. (Default: 30 seconds)
The time for writing the programme data varies between handsets. Handsets wait for the set WaitTime until the whole process is completed.
If an error occurs, increase the value.
Figure 26
[Notes for the Wait Time setting]
When the set value is smaller than the default (30 seconds), the message on the below appears alerting you a possible error.
Click the “OK” button to proceed, and click the “Cancel” button to change the value.
Figure 27
* Download time
Example) Writing the MOT file to two handsets simultaneously (including initialisation)
Approx. 27 minutes with Wait Time set to 30 seconds (the default value).
– 6 –
Page 7
CONFIDENTIAL
If this screen appears, increase Wait Time and retry.
Error screen
Flash Loader 6.00
CorrespondenceErr = 0x09
Figure 28
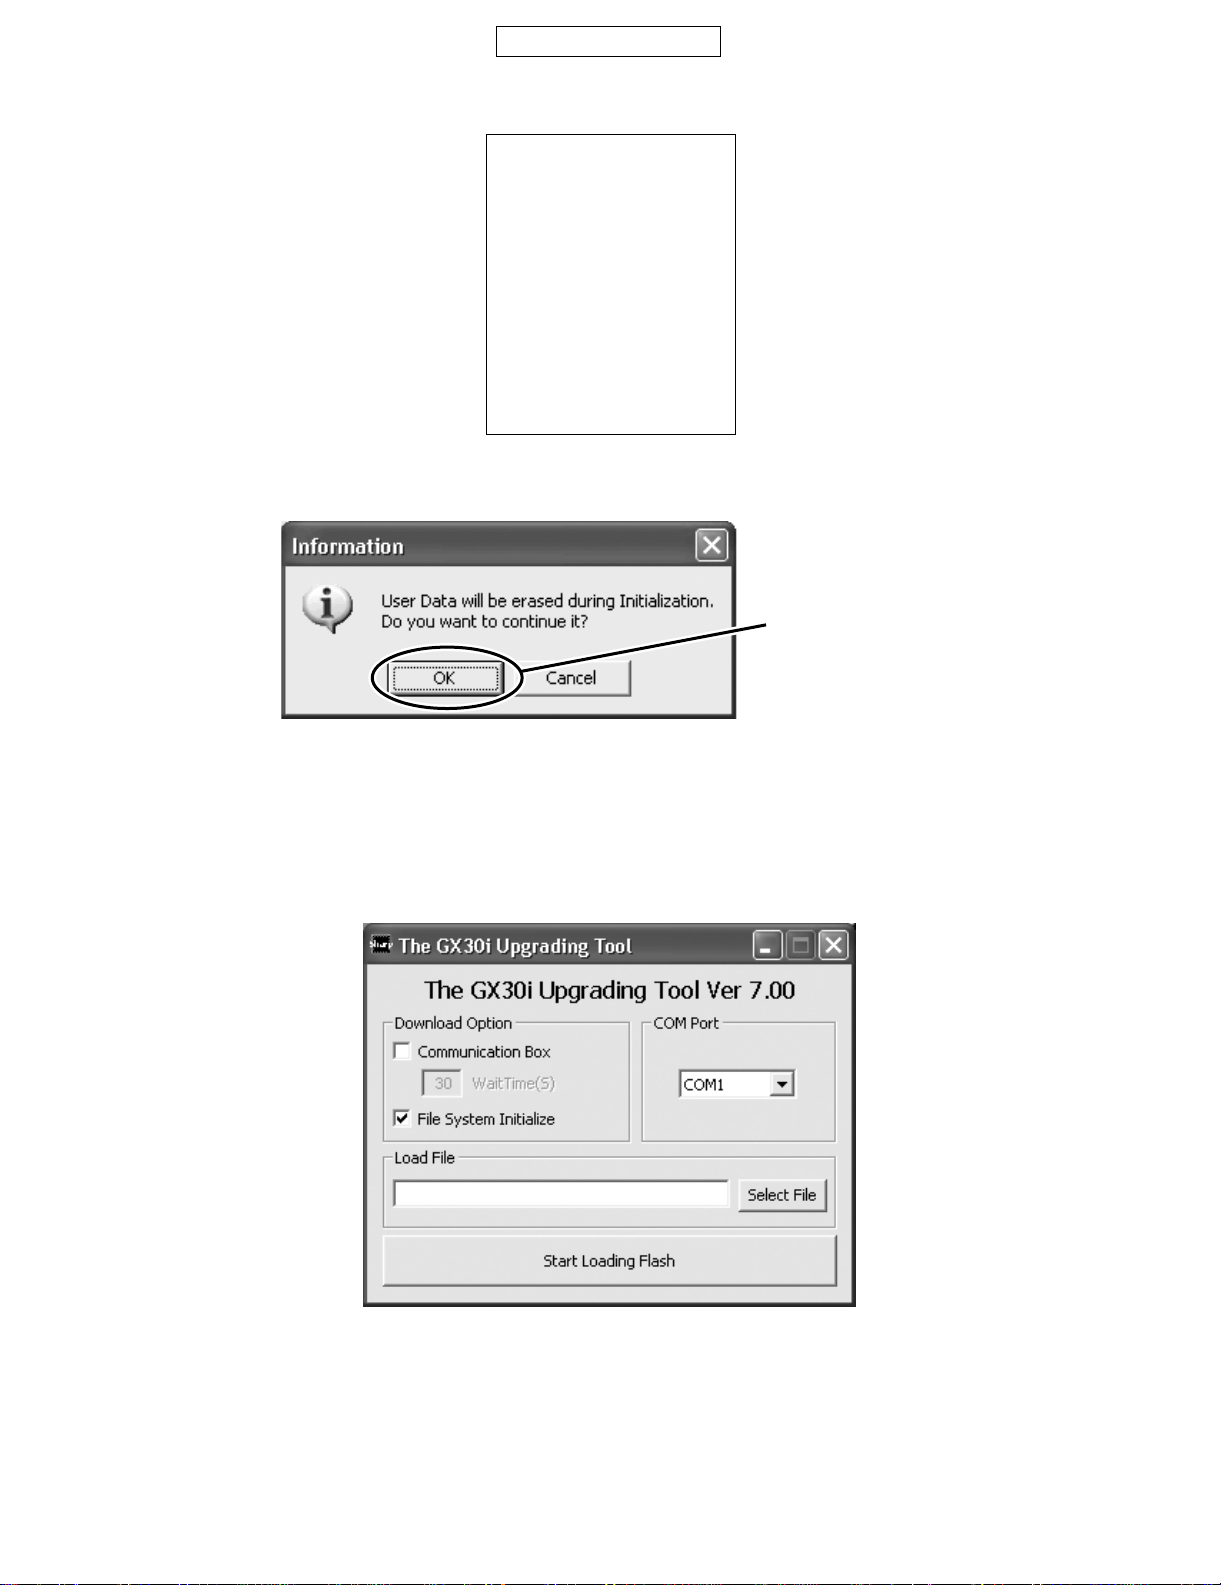
When the “File System Initialize” check box is checked, a confirmation message appears.
GX30i
Click the [OK] button.
Figure 29
[Note]
When you check the “File System Initialize” check box and click “OK” button, user data on the handset will be deleted.
In this case, user data will be initialised after download. Uncheck the check box to avoid this.
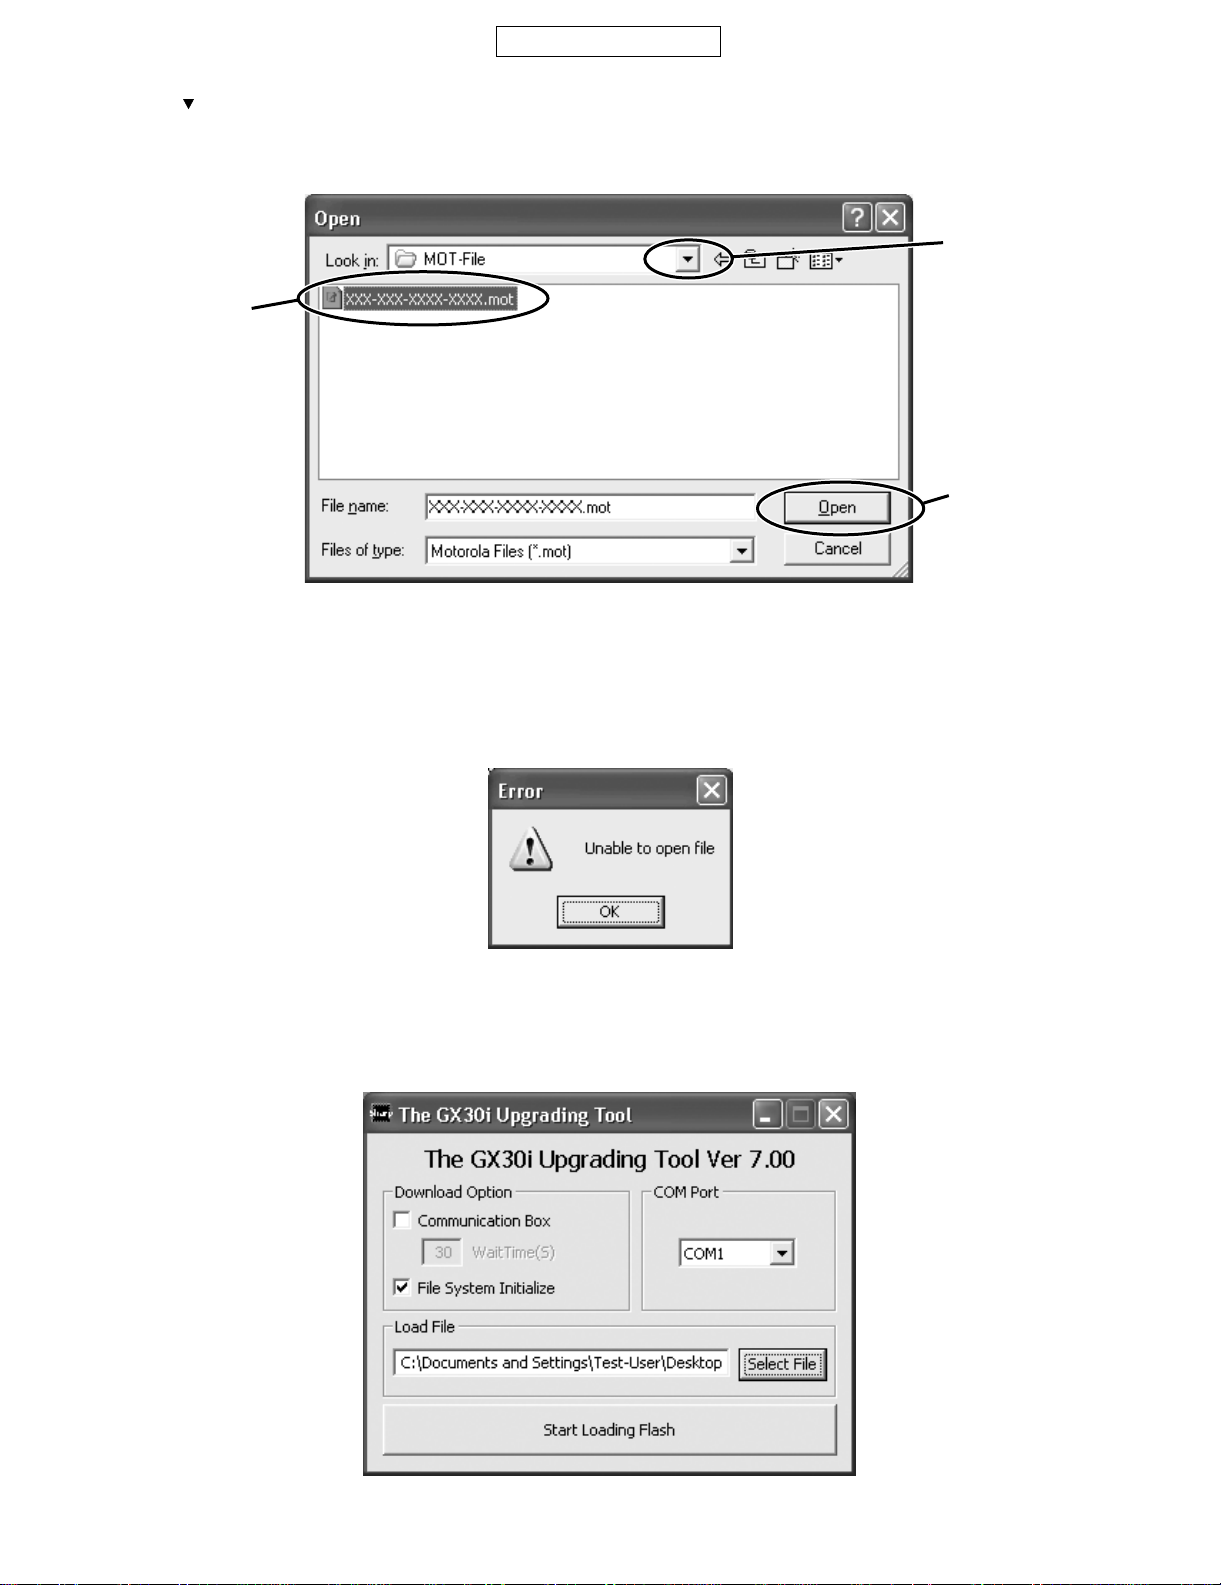
3) Selecting a MOT file
1. Click the “Select File” button.
The Open dialog box appears.
Figure 30
– 7 –
Page 8
GX30i
[Open dialog box]
2. Click the “ ” button to open a desired folder.
3. A Motorola file (.mot) in the folder appears. Click a file to write in.
4. Click the “Open” button to open the file.
CONFIDENTIAL
3
[Note]
Make sure to select a MOT file.
If the File name field is blank, download does not start.
2
4
Figure 31
Use MOT files in the hard disk.
If the selected MOT file is stored in other locations, an error message appears and download does not start.
Figure 32
To use MOT files on CDs or on the network, copy or download them to the hard disk first.
4) Downloading an MOT file
Click the “Start Loading Flash” button to start download.
Figure 33
– 8 –
Page 9

CONFIDENTIAL
1. “The file for download is verified” appears. (does not appear when only “File System Initialize” is checked.)
Wait for approx. 20 seconds and when “Press Power Button” appears, perform the following:
<When using a cable for upgrading>
Hold down the Power key.
<When using the Communication Box>
Turn on handsets from No.10 down to No.1. (turn on only the handsets you are using.)
Figure 34
2. “Keep Pressing Power Button” appears.
<When using a cable for upgrading>
Hold down the Power key until the “Keep Pressing Power Button” disappears.
<When using the Communication Box>
Leave the handsets turned on.
GX30i
3. Download starts.
<When using a cable for upgrading>
When “Keep Pressing Power Button” disappears, release the Power key.
<When using the Communication Box>
Leave the handsets turned on.
Figure 35
Figure 36
– 9 –
Page 10

GX30i
4. When the download starts, handset main display screen shows the software version and the communication process with the PC.
To abort download:
Click the “QUIT” button.
To rewrite the MOT file after aborting download, remove and reinstall the battery and start download.
[Notes for the use of a cable for upgrading]
1. Disconnect the AC charger from the cable. Otherwise charging starts automatically and download is interrupted.
2. Make sure the handset battery is sufficiently charged.
If not, download may fail. Charge the battery before you start.
3. If download is aborted, or interrupted by an error, remove and reinstall the battery and retry.
[Notes for the use of the Communication Box]
1. When “Press Power Button!” appears, turn on handsets from No. 10 down to No. 1. If you turn on the handset No. 1 first, download for No. 2 to
No. 10 will fail.
2. The time to delete the programme data varies between handsets. If the process fails at the default Wait Time (30 seconds), increase the value.
Consequently, this will increase the time to complete the rewrite operation.
Increasing Wait Time by 1 second slows the MOT rewrite operation by approx. 2 seconds.
CONFIDENTIAL
Flash Loader 6.00
Now loading
Figure 37
5) Checking the value of SUM
Make sure the same SUM value is displayed on the PC and handset, and then press [OK] button on the PC to complete the download.
* If the SUM is the same, download has been completed correctly.
* If the values are different, download may have failed. Try again.
After download, a confirmation and the SUM appears.
Figure 38
SUM also appears on handset.
Flash Loader 6.00
Received SUM value
SUM = 0xd929
Figure 39
– 10 –
Page 11

CONFIDENTIAL
If download fails, an error message appears on the PC and handset.
* Shown on the below is an example error message.
If an error message appears, download has failed.
Check the connection between the PC and handset, etc. and start download from the beginning.
Find the message in [4.4.4 Error message list] and follow the instruction in “Cause/Solution” to solve the problem.
* The handset LED light flashes for errors.
Flash Loader 6.00
DownloadErr = 0x44
Adr = 0x1000000
Str = 0xA0
Handset display
Figure 40
6) After the operation
Disconnect the cable for upgrading from handset.
When using the Communication Box, turn off SET POWER SW and then disconnect the cable from handset.
GX30i
7) Initialising only the file system
Follow the instructions below to initialise only the file system.
(User data will be deleted and the handset status will return to the default.)
* Perform this procedure when the handset does not turn on.
1. Check the “File System Initialize” check box.
2. Leave the Load File text box blank.
3. Click the “Start Loading Flash” button.
1
2
3
Figure 41
For further operations, refer to [4.4.3.4) Downloading an MOT file] or [4.4.3.5) Checking the value of SUM].
– 11 –
Page 12

GX30i
CONFIDENTIAL
4.4.4 Error message list
This section describes error messages on the PC and handset.
Follow instructions in “Cause/Solution” to solve problems.
1) Error messages on PC
No. Message Cause/Solution
1 Select a file for Downloading or check the box of Initializing. Load File is not set.
2 Unable to open file. Failed to open the MOT file to download.
3 You need to set the Wait Time! WaitTime (S) is not set.
4 The file you selected is unsuitable for Upgrading. The file is not downloadable.
5 Cannot Setup COM port. The selected COM port does not exist or is used for other opera-
6 RAM Loader not responding to Commands. Make sure the handset is connected correctly to the cable for
7 Correspondence Error = [0xXX] Start download from the beginning.
8 Download Error = [0xXX] Start download from the beginning.
Select a MOT file.
The following are possible causes:
• The file path contains special characters.
Special characters: ~ ¥/:,;*?”<>|~
• The extension of the file is not “mot”.
• The file is in use.
• The file path contains more than 257 bytes of characters.
• There is no drive letter in the file path.
• The file path is entered, but the file name is not.
• The file cannot be found.
• The source drive is a CD-ROM, removal disk, RAM disk or
network drive.
Set WaitTime (S) value.
Select an MOT file for GX30i.
tions.
Select a COM port connected to the cable for upgrading or Communication Box.
upgrading or Communication Box, and start download from the
beginning.
2) Error messages on handset
No. Message Cause/Solution
1 Correspondence Err = [0xXX] Communication error between the PC and handset.
Start download from the beginning.
2 Download Err = [0xXX] Failed to rewrite the Flash ROM
Start download from the beginning.
– 12 –
Page 13

CONFIDENTIAL
2
3
3
1
V
T
L
GX30 SERVICE MANUAL (S5409TQGX30/B)
Page 5 – 24 (9, 10 – A to C)
• Confirm the differences with GX30.
GX30i
GX30 SERVICE MANUAL (S5409TQGX30/B)
Page 5 – 28 (7 to 9 – A to C)
• Confirm the differences with GX30.
930
ATOR
R523
470K
TP508
503
73840B
GULATOR
1
2
3
R547
VinCEVout
Vss
100K
VINT
5
R527
0
4
NC
NC
C516
1
R550
100K
R552
100K
NC
NC
R551
NC
100K
NC
C518
0.1
IC506
ELIMINATED
UGNZ2
BLUETOOTH
MODULE
6
UARTTX
7
UARTRX
12
PCMOUT
PCMCLK
18
13
19
1
2
8
3
14
15
16
PCMSYNC
PCMIN
USBP
USBN
ADDED
UARTCTS
UARTRTS
XTAL±IN
XTAL±OUT
RESET
1
2
3
4
5
6
10
17
11
VCC
VCC±IO
VDD18V
ABCDEF
6 12182430
1 7 13 19 25 31
2 8 14 20 26 32
3 9 15 21 27 33
4 1016222834
511172329
GND
GND
GND
45
23 30
GND
MO100
VIBRATOR
R245
R246
M
R517
R547
R550
BLUETOOTH
AERIAL
TERMINAL
C518
R527
R210
R189
C105
V124
R191
V101
R192
V109
C104
CN503
ELIMINATED
TP112
TP111
D105
IC109
L113
1
3
C142
V104
C139
R542
R545
R544
R543
R515
R516
TP508
AN501
R135
R136
ADDED
C512
5
IC505
1
C143
4
3
R523
BLUETOOTH AERIAL
TP532
5-31 (4-D)
FROM
CAMERA RELAY
FPC PWB-F
CN102
2102030
15
C522
R110A
FL102
TP531
R514
R552
IC506
R551
CN501
CONTACT BATTERY
TP505
TP534
C516
C504
TP520
TP522
TP504
5
4
15 25
FL207
FL101
R273
TP519
TP517
TP501
C505
R10
FL206
R274
TP5
TP5
TP5
TP51
TP51
FS501
GX30 PARTS GUIDE (S5409TQGX30/B)
Page 13 [14] ACCESSORIES/PACKING PARTS
• Confirm the differences with GX30.
8
ADDED
29 ([A] [Z]
Only)
24
5
20 ([E] Only)
26 ([G] Only)
– 13 –
Page 14

GX30i
— MEMO —
CONFIDENTIAL
– 14 –
Page 15

CONFIDENTIAL
PARTS GUIDE
DIGITAL MOBILE PHONE
MODEL GX30i
GX30i
No. SX430TQGX39/B
INTERNAL
TQGX39A
TQGX39B
TQGX39D
TQGX39E
TQGX39EP
TQGX39G
TQGX39L
TQGX39PP
TQGX39Z
“HOW TO ORDER REPLACEMENT PARTS”
To have your order filled promptly and correctly, please furnish the following information.
1. MODEL NUMBER 2. REF. No.
3. PART NO. 4. DESCRIPTION
MODEL
NAME
SELEC-
TION
CODE
A
B
D
E
EP
G
L
PP
Z
DESTINATION
Australia
Hungary
Greece
U.K.
U.K. (Prepaid)
Germany
Malta
Portugal (Prepaid)
New Zealand
Explanation of capacitors/resistors parts codes
Capacitors
VCC ....................... Ceramic type
VCK........................ Ceramic type
VCT........................ Semiconductor type
VC • • MF ............... Cylindrical type (without lead wire)
VC • • MN............... Cylindrical type (without lead wire)
VC • • TV................ Square type (without lead wire)
VC • • TQ ............... Square type (without lead wire)
VC • • CY ............... Square type (without lead wire)
VC • • CZ ............... Square type (without lead wire)
VC • • • • • • • • • J .. The 13th character represents capacity difference.
("J" ±5%, "K" ±10%, "M" ±20%, "N" ±30%,
"C" ±0.25 pF, "D" ±0.5 pF, "Z" +80-20%.)
If there are no indications for the electrolytic capacitors, error is ±20%.
NOTE:
Parts marked with “ ” are important for maintaining the safety of the set.
Be sure to replace parts with specified ones for maintaining the safety and performance of the set.
Resistors
VRD ....................... Carbon-film type
VRS........................ Carbon-film type
VRN ....................... Metal-film type
VR • • MF ............... Cylindrical type (without lead wire)
VR • • MN............... Cylindrical type (without lead wire)
VR • • TV................ Square type (without lead wire)
VR • • TQ ............... Square type (without lead wire)
VR • • CY ............... Square type (without lead wire)
VR • • CZ ............... Square type (without lead wire)
VR • • • • • • • • • J .. The 13th character represents error.
("J" ±5%, "F" ±1%, "D" ±0.5%.)
If there are no indications for other parts, the resistors are ±5%
carbon-film type.
Page 16

GX30i
CONFIDENTIAL
DIFFERENCE BETWEEN GX30 [A] AND GX30i [A]
NO.
[3] DIODES
LED103 VHPYPY1105C-1L VHPPY1103CF-1L LED,Green,PY1103CF AB
LED104 VHPYPY1105C-1L VHPPY1103CF-1L LED,Green,PY1103CF AB
LED106 VHPYPY1105C-1L VHPPY1103CF-1L LED,Green,PY1103CF AB
LED107 VHPYPY1105C-1L VHPPY1103CF-1L LED,Green,PY1103CF AB
LED109 VHPYPY1105C-1L VHPPY1103CF-1L LED,Green,PY1103CF AB
LED110 VHPYPY1105C-1L VHPPY1103CF-1L LED,Green,PY1103CF AB
LED111 VHPYPY1105C-1L VHPPY1103CF-1L LED,Green,PY1103CF AB
LED112 VHPYPY1105C-1L VHPPY1103CF-1L LED,Green,PY1103CF AB
LED117 VHPYPY1105C-1L VHPPY1103CF-1L LED,Green,PY1103CF AB
LED118 VHPYPY1105C-1L VHPPY1103CF-1L LED,Green,PY1103CF AB
LED119 VHPYPY1105C-1L VHPPY1103CF-1L LED,Green,PY1103CF AB
LED120 VHPYPY1105C-1L VHPPY1103CF-1L LED,Green,PY1103CF AB
LED702 VHPGM56271A-1L VHPGM56272A-1L LED,Red/Blue/Green,GM56272A AQ
[11] RESISTORS
R131 VRS-CZ1JB271JT VRS-CZ1JB301JT 300 ohms,1/16W AA
R282 VRS-CZ1JB182DT VRS-CZ1JB202DT 2 kohms,1/16W AA
R283 VRS-CZ1JB222DT VRS-CZ1JB332DT 3.3 kohms,1/16W AA
R516 VRS-CZ1JB474JT VRS-CZ1JB104JT 100 kohm,1/16W AA
R517 VRS-CZ1JB474JT VRS-CZ1JB104JT 100 kohm,1/16W AA
R551 Not Used VRS-CZ1JB104JT 100 kohm,1/16W AA
R552 VRS-CZ1JB104JT Not Used –
PARTS CODE PARTS CODE
GX30 [A] GX30i [A]
DESCRIPTION
PRICE
RANK
[12] OTHER CIRCUITRY PARTS
CA1001 DKENDW108AFSN DKENDW213AFSN Camera Unit BT
[13] CABINET PARTS
104 DKENDW108AFS3 DKENDW213AFS3 Board Unit CS
104-4 DKENDW108AFSN DKENDW213AFSN Camera Unit (CA1001) BT
124 TSPC-A089AFZZ TSPC-A189AFZZ Label,Specifications AE
[14] ACCESSORIES/PACKING PARTS
3 RUNTZ0893AFZZ RUITZA010AFZZ Hands Free Kit AR
5 SPAKCA086AFZZ SPAKCA207AFZZ Packing Case AM
13 TCADHA015AFZZ TCADHA098AFZZ Quick Start Guide AF
19 TINSEA018AFZZ TINSEA060AFZZ User Guide AM
22 UDSKAA014AF01 UDSKAA022AF01 CD-ROM AF
29 Not Used TLABZA053AFZZ Label,ATIC AB
– 2 –
Page 17

CONFIDENTIAL
DIFFERENCE BETWEEN GX30 [B] AND GX30i [B]
NO.
[3] DIODES
LED103 VHPYPY1105C-1L VHPPY1103CF-1L LED,Green,PY1103CF AB
LED104 VHPYPY1105C-1L VHPPY1103CF-1L LED,Green,PY1103CF AB
LED106 VHPYPY1105C-1L VHPPY1103CF-1L LED,Green,PY1103CF AB
LED107 VHPYPY1105C-1L VHPPY1103CF-1L LED,Green,PY1103CF AB
LED109 VHPYPY1105C-1L VHPPY1103CF-1L LED,Green,PY1103CF AB
LED110 VHPYPY1105C-1L VHPPY1103CF-1L LED,Green,PY1103CF AB
LED111 VHPYPY1105C-1L VHPPY1103CF-1L LED,Green,PY1103CF AB
LED112 VHPYPY1105C-1L VHPPY1103CF-1L LED,Green,PY1103CF AB
LED117 VHPYPY1105C-1L VHPPY1103CF-1L LED,Green,PY1103CF AB
LED118 VHPYPY1105C-1L VHPPY1103CF-1L LED,Green,PY1103CF AB
LED119 VHPYPY1105C-1L VHPPY1103CF-1L LED,Green,PY1103CF AB
LED120 VHPYPY1105C-1L VHPPY1103CF-1L LED,Green,PY1103CF AB
LED702 VHPGM56271A-1L VHPGM56272A-1L LED,Red/Blue/Green,GM56272A AQ
[11] RESISTORS
R131 VRS-CZ1JB271JT VRS-CZ1JB301JT 300 ohms,1/16W AA
R282 VRS-CZ1JB182DT VRS-CZ1JB202DT 2 kohms,1/16W AA
R283 VRS-CZ1JB222DT VRS-CZ1JB332DT 3.3 kohms,1/16W AA
R516 VRS-CZ1JB474JT VRS-CZ1JB104JT 100 kohm,1/16W AA
R517 VRS-CZ1JB474JT VRS-CZ1JB104JT 100 kohm,1/16W AA
R551 Not Used VRS-CZ1JB104JT 100 kohm,1/16W AA
R552 VRS-CZ1JB104JT Not Used –
PARTS CODE PARTS CODE
GX30 [B] GX30i [B]
DESCRIPTION
GX30i
PRICE
RANK
[12] OTHER CIRCUITRY PARTS
CA1001 DKENDW108AFSN DKENDW213AFSN Camera Unit BT
[13] CABINET PARTS
104 DKENDW108AFSB DKENDW213AFSB Board Unit CS
104-4 DKENDW108AFSN DKENDW213AFSN Camera Unit (CA1001) BT
124 TSPC-A088AFZZ TSPC-A186AFZZ Label,Specifications AE
[14] ACCESSORIES/PACKING PARTS
3 RUNTZ0893AFZZ RUITZA010AFZZ Hands Free Kit AR
5 SPAKCA031AFZZ SPAKCA207AFZZ Packing Case AM
13 TCADHA021AFZZ TCADHA106AFZZ Quick Start Guide AF
16 TCADZA020AFZZ TCADZA068AFZZ DOC Copy AE
18 TGANZA015AFZZ Not Used –
19 TINSZA006AFZZ TINSZA030AFZZ User Guide AN
22 UDSKAA014AF01 UDSKAA022AF01 CD-ROM AF
28 TLABZA059AFZZ TLABZA081AFZZ Label,Hungary AB
– 3 –
Page 18

GX30i
CONFIDENTIAL
DIFFERENCE BETWEEN GX30 [D] AND GX30i [D]
NO.
[3] DIODES
LED103 VHPYPY1105C-1L VHPPY1103CF-1L LED,Green,PY1103CF AB
LED104 VHPYPY1105C-1L VHPPY1103CF-1L LED,Green,PY1103CF AB
LED106 VHPYPY1105C-1L VHPPY1103CF-1L LED,Green,PY1103CF AB
LED107 VHPYPY1105C-1L VHPPY1103CF-1L LED,Green,PY1103CF AB
LED109 VHPYPY1105C-1L VHPPY1103CF-1L LED,Green,PY1103CF AB
LED110 VHPYPY1105C-1L VHPPY1103CF-1L LED,Green,PY1103CF AB
LED111 VHPYPY1105C-1L VHPPY1103CF-1L LED,Green,PY1103CF AB
LED112 VHPYPY1105C-1L VHPPY1103CF-1L LED,Green,PY1103CF AB
LED117 VHPYPY1105C-1L VHPPY1103CF-1L LED,Green,PY1103CF AB
LED118 VHPYPY1105C-1L VHPPY1103CF-1L LED,Green,PY1103CF AB
LED119 VHPYPY1105C-1L VHPPY1103CF-1L LED,Green,PY1103CF AB
LED120 VHPYPY1105C-1L VHPPY1103CF-1L LED,Green,PY1103CF AB
LED702 VHPGM56271A-1L VHPGM56272A-1L LED,Red/Blue/Green,GM56272A AQ
[11] RESISTORS
R131 VRS-CZ1JB271JT VRS-CZ1JB301JT 300 ohms,1/16W AA
R282 VRS-CZ1JB182DT VRS-CZ1JB202DT 2 kohms,1/16W AA
R283 VRS-CZ1JB222DT VRS-CZ1JB332DT 3.3 kohms,1/16W AA
R516 VRS-CZ1JB474JT VRS-CZ1JB104JT 100 kohm,1/16W AA
R517 VRS-CZ1JB474JT VRS-CZ1JB104JT 100 kohm,1/16W AA
R551 Not Used VRS-CZ1JB104JT 100 kohm,1/16W AA
R552 VRS-CZ1JB104JT Not Used –
PARTS CODE PARTS CODE
GX30 [D] GX30i [D]
DESCRIPTION
PRICE
RANK
[12] OTHER CIRCUITRY PARTS
CA1001 DKENDW108AFSN DKENDW213AFSN Camera Unit BT
[13] CABINET PARTS
104 DKENDW108AFSD DKENDW213AFSD Board Unit CS
104-4 DKENDW108AFSN DKENDW213AFSN Camera Unit (CA1001) BT
124 TSPC-A088AFZZ TSPC-A186AFZZ Label,Specifications AE
[14] ACCESSORIES/PACKING PARTS
3 RUNTZ0893AFZZ RUITZA010AFZZ Hands Free Kit AR
5 SPAKCA031AFZZ SPAKCA207AFZZ Packing Case AM
13 TCADHA023AFZZ TCADHA101AFZZ Quick Start Guide AG
15 TCADZA018AFZZ Not Used –
17 TCADZA028AFZZ Not Used –
19 TINSZA005AFZZ TINSZA025AFZZ User Guide AL
22 UDSKAA014AF01 UDSKAA022AF01 CD-ROM AF
– 4 –
Page 19

CONFIDENTIAL
DIFFERENCE BETWEEN GX30 [E] AND GX30i [E]
NO.
[3] DIODES
LED103 VHPYPY1105C-1L VHPPY1103CF-1L LED,Green,PY1103CF AB
LED104 VHPYPY1105C-1L VHPPY1103CF-1L LED,Green,PY1103CF AB
LED106 VHPYPY1105C-1L VHPPY1103CF-1L LED,Green,PY1103CF AB
LED107 VHPYPY1105C-1L VHPPY1103CF-1L LED,Green,PY1103CF AB
LED109 VHPYPY1105C-1L VHPPY1103CF-1L LED,Green,PY1103CF AB
LED110 VHPYPY1105C-1L VHPPY1103CF-1L LED,Green,PY1103CF AB
LED111 VHPYPY1105C-1L VHPPY1103CF-1L LED,Green,PY1103CF AB
LED112 VHPYPY1105C-1L VHPPY1103CF-1L LED,Green,PY1103CF AB
LED117 VHPYPY1105C-1L VHPPY1103CF-1L LED,Green,PY1103CF AB
LED118 VHPYPY1105C-1L VHPPY1103CF-1L LED,Green,PY1103CF AB
LED119 VHPYPY1105C-1L VHPPY1103CF-1L LED,Green,PY1103CF AB
LED120 VHPYPY1105C-1L VHPPY1103CF-1L LED,Green,PY1103CF AB
LED702 VHPGM56271A-1L VHPGM56272A-1L LED,Red/Blue/Green,GM56272A AQ
[11] RESISTORS
R131 VRS-CZ1JB271JT VRS-CZ1JB301JT 300 ohms,1/16W AA
R282 VRS-CZ1JB182DT VRS-CZ1JB202DT 2 kohms,1/16W AA
R283 VRS-CZ1JB222DT VRS-CZ1JB332DT 3.3 kohms,1/16W AA
R516 VRS-CZ1JB474JT VRS-CZ1JB104JT 100 kohm,1/16W AA
R517 VRS-CZ1JB474JT VRS-CZ1JB104JT 100 kohm,1/16W AA
R551 Not Used VRS-CZ1JB104JT 100 kohm,1/16W AA
R552 VRS-CZ1JB104JT Not Used –
PARTS CODE PARTS CODE
GX30 [E] GX30i [E]
DESCRIPTION
GX30i
PRICE
RANK
[12] OTHER CIRCUITRY PARTS
CA1001 DKENDW108AFSN DKENDW213AFSN Camera Unit BT
[13] CABINET PARTS
104 DKENDW108AFS1 DKENDW213AFS1 Board Unit CS
104-4 DKENDW108AFSN DKENDW213AFSN Camera Unit (CA1001) BT
124 TSPC-A088AFZZ TSPC-A186AFZZ Label,Specifications AE
[14] ACCESSORIES/PACKING PARTS
3 RUNTZ0893AFZZ RUITZA010AFZZ Hands Free Kit AR
5 SPAKCA031AFZZ SPAKCA207AFZZ Packing Case AM
13 TCADHA015AFZZ TCADHA098AFZZ Quick Start Guide AF
15 TCADZA006AFZZ Not Used –
17 TCADZA022AFZZ Not Used –
19 TINSEA004AFZZ TINSEA052AFZZ User Guide AH
22 UDSKAA014AF01 UDSKAA022AF01 CD-ROM AF
– 5 –
Page 20

GX30i
CONFIDENTIAL
DIFFERENCE BETWEEN GX30 [EP] AND GX30i [EP]
NO.
[3] DIODES
LED103 VHPYPY1105C-1L VHPPY1103CF-1L LED,Green,PY1103CF AB
LED104 VHPYPY1105C-1L VHPPY1103CF-1L LED,Green,PY1103CF AB
LED106 VHPYPY1105C-1L VHPPY1103CF-1L LED,Green,PY1103CF AB
LED107 VHPYPY1105C-1L VHPPY1103CF-1L LED,Green,PY1103CF AB
LED109 VHPYPY1105C-1L VHPPY1103CF-1L LED,Green,PY1103CF AB
LED110 VHPYPY1105C-1L VHPPY1103CF-1L LED,Green,PY1103CF AB
LED111 VHPYPY1105C-1L VHPPY1103CF-1L LED,Green,PY1103CF AB
LED112 VHPYPY1105C-1L VHPPY1103CF-1L LED,Green,PY1103CF AB
LED117 VHPYPY1105C-1L VHPPY1103CF-1L LED,Green,PY1103CF AB
LED118 VHPYPY1105C-1L VHPPY1103CF-1L LED,Green,PY1103CF AB
LED119 VHPYPY1105C-1L VHPPY1103CF-1L LED,Green,PY1103CF AB
LED120 VHPYPY1105C-1L VHPPY1103CF-1L LED,Green,PY1103CF AB
LED702 VHPGM56271A-1L VHPGM56272A-1L LED,Red/Blue/Green,GM56272A AQ
[11] RESISTORS
R131 VRS-CZ1JB271JT VRS-CZ1JB301JT 300 ohms,1/16W AA
R282 VRS-CZ1JB182DT VRS-CZ1JB202DT 2 kohms,1/16W AA
R283 VRS-CZ1JB222DT VRS-CZ1JB332DT 3.3 kohms,1/16W AA
R516 VRS-CZ1JB474JT VRS-CZ1JB104JT 100 kohm,1/16W AA
R517 VRS-CZ1JB474JT VRS-CZ1JB104JT 100 kohm,1/16W AA
R551 Not Used VRS-CZ1JB104JT 100 kohm,1/16W AA
R552 VRS-CZ1JB104JT Not Used –
PARTS CODE PARTS CODE
GX30 [EP] GX30i [EP]
DESCRIPTION
PRICE
RANK
[12] OTHER CIRCUITRY PARTS
CA1001 DKENDW108AFSN DKENDW213AFSN Camera Unit BT
[13] CABINET PARTS
104 DKENDW108AFS4 DKENDW213AFS4 Board Unit CS
104-4 DKENDW108AFSN DKENDW213AFSN Camera Unit (CA1001) BT
124 TSPC-A088AFZZ TSPC-A186AFZZ Label,Specifications AE
[14] ACCESSORIES/PACKING PARTS
3 RUNTZ0893AFZZ RUITZA010AFZZ Hands Free Kit AR
13 TCADHA015AFZZ TCADHA098AFZZ Quick Start Guide AF
15 TCADZA006AFZZ Not Used –
17 TCADZA022AFZZ Not Used –
19 TINSEA004AFZZ TINSEA052AFZZ User Guide AH
22 UDSKAA014AF01 UDSKAA022AF01 CD-ROM AF
– 6 –
Page 21

CONFIDENTIAL
DIFFERENCE BETWEEN GX30 [G] AND GX30i [G]
NO.
[3] DIODES
LED103 VHPYPY1105C-1L VHPPY1103CF-1L LED,Green,PY1103CF AB
LED104 VHPYPY1105C-1L VHPPY1103CF-1L LED,Green,PY1103CF AB
LED106 VHPYPY1105C-1L VHPPY1103CF-1L LED,Green,PY1103CF AB
LED107 VHPYPY1105C-1L VHPPY1103CF-1L LED,Green,PY1103CF AB
LED109 VHPYPY1105C-1L VHPPY1103CF-1L LED,Green,PY1103CF AB
LED110 VHPYPY1105C-1L VHPPY1103CF-1L LED,Green,PY1103CF AB
LED111 VHPYPY1105C-1L VHPPY1103CF-1L LED,Green,PY1103CF AB
LED112 VHPYPY1105C-1L VHPPY1103CF-1L LED,Green,PY1103CF AB
LED117 VHPYPY1105C-1L VHPPY1103CF-1L LED,Green,PY1103CF AB
LED118 VHPYPY1105C-1L VHPPY1103CF-1L LED,Green,PY1103CF AB
LED119 VHPYPY1105C-1L VHPPY1103CF-1L LED,Green,PY1103CF AB
LED120 VHPYPY1105C-1L VHPPY1103CF-1L LED,Green,PY1103CF AB
LED702 VHPGM56271A-1L VHPGM56272A-1L LED,Red/Blue/Green,GM56272A AQ
[11] RESISTORS
R131 VRS-CZ1JB271JT VRS-CZ1JB301JT 300 ohms,1/16W AA
R282 VRS-CZ1JB182DT VRS-CZ1JB202DT 2 kohms,1/16W AA
R283 VRS-CZ1JB222DT VRS-CZ1JB332DT 3.3 kohms,1/16W AA
R516 VRS-CZ1JB474JT VRS-CZ1JB104JT 100 kohm,1/16W AA
R517 VRS-CZ1JB474JT VRS-CZ1JB104JT 100 kohm,1/16W AA
R551 Not Used VRS-CZ1JB104JT 100 kohm,1/16W AA
R552 VRS-CZ1JB104JT Not Used –
PARTS CODE PARTS CODE
GX30 [G] GX30i [G]
DESCRIPTION
GX30i
PRICE
RANK
[12] OTHER CIRCUITRY PARTS
CA1001 DKENDW108AFSN DKENDW213AFSN Camera Unit BT
[13] CABINET PARTS
104 DKENDW108AFS2 DKENDW213AFS2 Board Unit CS
104-4 DKENDW108AFSN DKENDW213AFSN Camera Unit (CA1001) BT
124 TSPC-A088AFZZ TSPC-A186AFZZ Label,Specifications AE
[14] ACCESSORIES/PACKING PARTS
3 RUNTZ0893AFZZ RUITZA010AFZZ Hands Free Kit AR
5 SPAKCA031AFZZ SPAKCA207AFZZ Packing Case AM
13 TCADHA016AFZZ TCADHA099AFZZ Quick Start Guide AF
15 TCADZA013AFZZ Not Used –
19 TINSGA002AFZZ TINSGA026AFZZ User Guide AK
22 UDSKAA014AF01 UDSKAA022AF01 CD-ROM AF
– 7 –
Page 22

GX30i
CONFIDENTIAL
DIFFERENCE BETWEEN GX30 [L] AND GX30i [L]
NO.
[3] DIODES
LED103 VHPYPY1105C-1L VHPPY1103CF-1L LED,Green,PY1103CF AB
LED104 VHPYPY1105C-1L VHPPY1103CF-1L LED,Green,PY1103CF AB
LED106 VHPYPY1105C-1L VHPPY1103CF-1L LED,Green,PY1103CF AB
LED107 VHPYPY1105C-1L VHPPY1103CF-1L LED,Green,PY1103CF AB
LED109 VHPYPY1105C-1L VHPPY1103CF-1L LED,Green,PY1103CF AB
LED110 VHPYPY1105C-1L VHPPY1103CF-1L LED,Green,PY1103CF AB
LED111 VHPYPY1105C-1L VHPPY1103CF-1L LED,Green,PY1103CF AB
LED112 VHPYPY1105C-1L VHPPY1103CF-1L LED,Green,PY1103CF AB
LED117 VHPYPY1105C-1L VHPPY1103CF-1L LED,Green,PY1103CF AB
LED118 VHPYPY1105C-1L VHPPY1103CF-1L LED,Green,PY1103CF AB
LED119 VHPYPY1105C-1L VHPPY1103CF-1L LED,Green,PY1103CF AB
LED120 VHPYPY1105C-1L VHPPY1103CF-1L LED,Green,PY1103CF AB
LED702 VHPGM56271A-1L VHPGM56272A-1L LED,Red/Blue/Green,GM56272A AQ
[11] RESISTORS
R131 VRS-CZ1JB271JT VRS-CZ1JB301JT 300 ohms,1/16W AA
R282 VRS-CZ1JB182DT VRS-CZ1JB202DT 2 kohms,1/16W AA
R283 VRS-CZ1JB222DT VRS-CZ1JB332DT 3.3 kohms,1/16W AA
R516 VRS-CZ1JB474JT VRS-CZ1JB104JT 100 kohm,1/16W AA
R517 VRS-CZ1JB474JT VRS-CZ1JB104JT 100 kohm,1/16W AA
R551 Not Used VRS-CZ1JB104JT 100 kohm,1/16W AA
R552 VRS-CZ1JB104JT Not Used –
PARTS CODE PARTS CODE
GX30 [L] GX30i [L]
DESCRIPTION
PRICE
RANK
[12] OTHER CIRCUITRY PARTS
CA1001 DKENDW108AFSN DKENDW213AFSN Camera Unit BT
[13] CABINET PARTS
104 DKENDW108AFSF DKENDW213AFSF Board Unit CS
104-4 DKENDW108AFSN DKENDW213AFSN Camera Unit (CA1001) BT
124 TSPC-A088AFZZ TSPC-A186AFZZ Label,Specifications AE
[14] ACCESSORIES/PACKING PARTS
3 RUNTZ0893AFZZ RUITZA010AFZZ Hands Free Kit AR
5 SPAKCA031AFZZ SPAKCA207AFZZ Packing Case AM
13 TCADHA015AFZZ TCADHA098AFZZ Quick Start Guide AF
19 TINSEA004AFZZ TINSEA052AFZZ User Guide AH
22 UDSKAA014AF01 UDSKAA022AF01 CD-ROM AF
– 8 –
Page 23

CONFIDENTIAL
DIFFERENCE BETWEEN GX30 [PP] AND GX30i [PP]
NO.
[3] DIODES
LED103 VHPYPY1105C-1L VHPPY1103CF-1L LED,Green,PY1103CF AB
LED104 VHPYPY1105C-1L VHPPY1103CF-1L LED,Green,PY1103CF AB
LED106 VHPYPY1105C-1L VHPPY1103CF-1L LED,Green,PY1103CF AB
LED107 VHPYPY1105C-1L VHPPY1103CF-1L LED,Green,PY1103CF AB
LED109 VHPYPY1105C-1L VHPPY1103CF-1L LED,Green,PY1103CF AB
LED110 VHPYPY1105C-1L VHPPY1103CF-1L LED,Green,PY1103CF AB
LED111 VHPYPY1105C-1L VHPPY1103CF-1L LED,Green,PY1103CF AB
LED112 VHPYPY1105C-1L VHPPY1103CF-1L LED,Green,PY1103CF AB
LED117 VHPYPY1105C-1L VHPPY1103CF-1L LED,Green,PY1103CF AB
LED118 VHPYPY1105C-1L VHPPY1103CF-1L LED,Green,PY1103CF AB
LED119 VHPYPY1105C-1L VHPPY1103CF-1L LED,Green,PY1103CF AB
LED120 VHPYPY1105C-1L VHPPY1103CF-1L LED,Green,PY1103CF AB
LED702 VHPGM56271A-1L VHPGM56272A-1L LED,Red/Blue/Green,GM56272A AQ
[11] RESISTORS
R131 VRS-CZ1JB271JT VRS-CZ1JB301JT 300 ohms,1/16W AA
R282 VRS-CZ1JB182DT VRS-CZ1JB202DT 2 kohms,1/16W AA
R283 VRS-CZ1JB222DT VRS-CZ1JB332DT 3.3 kohms,1/16W AA
R516 VRS-CZ1JB474JT VRS-CZ1JB104JT 100 kohm,1/16W AA
R517 VRS-CZ1JB474JT VRS-CZ1JB104JT 100 kohm,1/16W AA
R551 Not Used VRS-CZ1JB104JT 100 kohm,1/16W AA
R552 VRS-CZ1JB104JT Not Used –
PARTS CODE PARTS CODE
GX30 [PP] GX30i [PP]
DESCRIPTION
GX30i
PRICE
RANK
[12] OTHER CIRCUITRY PARTS
CA1001 DKENDW108AFSN DKENDW213AFSN Camera Unit BT
[13] CABINET PARTS
104 DKENDW108AFS7 DKENDW213AFS7 Board Unit CS
104-4 DKENDW108AFSN DKENDW213AFSN Camera Unit (CA1001) BT
124 TSPC-A088AFZZ TSPC-A186AFZZ Label,Specifications AE
[14] ACCESSORIES/PACKING PARTS
3 RUNTZ0893AFZZ RUITZA010AFZZ Hands Free Kit AR
5 SPAKCA031AFZZ SPAKCA207AFZZ Packing Case AM
13 TCADHA019AFZZ TCADHA100AFZZ Quick Start Guide AL
15 TCADZA017AFZZ Not Used –
17 TCADZA025AFZZ Not Used –
19 TINSPA010AFZZ TINSPA019AFZZ User Guide AP
22 UDSKAA014AF01 UDSKAA022AF01 CD-ROM AF
– 9 –
Page 24

GX30i
CONFIDENTIAL
DIFFERENCE BETWEEN GX30 [Z] AND GX30i [Z]
NO.
[3] DIODES
LED103 VHPYPY1105C-1L VHPPY1103CF-1L LED,Green,PY1103CF AB
LED104 VHPYPY1105C-1L VHPPY1103CF-1L LED,Green,PY1103CF AB
LED106 VHPYPY1105C-1L VHPPY1103CF-1L LED,Green,PY1103CF AB
LED107 VHPYPY1105C-1L VHPPY1103CF-1L LED,Green,PY1103CF AB
LED109 VHPYPY1105C-1L VHPPY1103CF-1L LED,Green,PY1103CF AB
LED110 VHPYPY1105C-1L VHPPY1103CF-1L LED,Green,PY1103CF AB
LED111 VHPYPY1105C-1L VHPPY1103CF-1L LED,Green,PY1103CF AB
LED112 VHPYPY1105C-1L VHPPY1103CF-1L LED,Green,PY1103CF AB
LED117 VHPYPY1105C-1L VHPPY1103CF-1L LED,Green,PY1103CF AB
LED118 VHPYPY1105C-1L VHPPY1103CF-1L LED,Green,PY1103CF AB
LED119 VHPYPY1105C-1L VHPPY1103CF-1L LED,Green,PY1103CF AB
LED120 VHPYPY1105C-1L VHPPY1103CF-1L LED,Green,PY1103CF AB
LED702 VHPGM56271A-1L VHPGM56272A-1L LED,Red/Blue/Green,GM56272A AQ
[11] RESISTORS
R131 VRS-CZ1JB271JT VRS-CZ1JB301JT 300 ohms,1/16W AA
R282 VRS-CZ1JB182DT VRS-CZ1JB202DT 2 kohms,1/16W AA
R283 VRS-CZ1JB222DT VRS-CZ1JB332DT 3.3 kohms,1/16W AA
R516 VRS-CZ1JB474JT VRS-CZ1JB104JT 100 kohm,1/16W AA
R517 VRS-CZ1JB474JT VRS-CZ1JB104JT 100 kohm,1/16W AA
R551 Not Used VRS-CZ1JB104JT 100 kohm,1/16W AA
R552 VRS-CZ1JB104JT Not Used –
PARTS CODE PARTS CODE
GX30 [Z] GX30i [Z]
DESCRIPTION
PRICE
RANK
[12] OTHER CIRCUITRY PARTS
CA1001 DKENDW108AFSN DKENDW213AFSN Camera Unit BT
[13] CABINET PARTS
104 DKENDW108AFSC DKENDW213AFSC Board Unit CS
104-4 DKENDW108AFSN DKENDW213AFSN Camera Unit (CA1001) BT
124 TSPC-A089AFZZ TSPC-A189AFZZ Label,Specifications AE
[14] ACCESSORIES/PACKING PARTS
3 RUNTZ0893AFZZ RUITZA010AFZZ Hands Free Kit AR
5 SPAKCA086AFZZ SPAKCA207AFZZ Packing Case AM
13 TCADHA015AFZZ TCADHA098AFZZ Quick Start Guide AF
19 TINSEA018AFZZ TINSEA060AFZZ User Guide AM
22 UDSKAA014AF01 UDSKAA022AF01 CD-ROM AF
29 Not Used TLABZA053AFZZ Label,ATIC AB
COPYRIGHT 2004 BY SHARP CORPORATION
©
ALL RIGHTS RESERVED.
No part of this publication may be reproduced,
stored in a retrieval system, or transmitted in
any form or by any means, electronic, mechanical,
photocopying, recording, or otherwise, without
prior written permission of the publisher.
– 10 –
SHARP CORPORATION
Communication Systems Group
Quality & Reliability Control Center
Higashihiroshima, Hiroshima 739-0192, Japan
B0411-PDF • KS • KJ • J
 Loading...