

Page 1

OPERATION MANUAL
BEDIENUNGSANLEITUNG
MODE D’EMPLOI
PC LINK SYSTEM
FOR EL-9900
PC-LINK-SYSTEM
FÜR EL-9900
SYSTÈME PC LINK
POUR EL-9900
ENGLISH ..................... Page 1
DEUTSCH ....................Seite 22
FRANÇAIS ...................Page 43
For WINDOWS
Für WINDOWS
Pour WINDOWS
CE-LK2
Page 2

Page 3

ENGLISH
PC LINK SYSTEM FOR EL-9900
OPERATION MANUAL
IBM is a registered trademark of International Business Machines Corporation.
Windows and Microsoft Word are registered trademarks of Microsoft Corporation.
All company and/or product names as trademarks and/or registered trademarks of
their respective holders.
Copyright © 2002 SHARP CORPORATION, Japan
1
Page 4

< INTRODUCTION >
Thank you for your purchase.
This product is supplied to customers who agree to the following items; please read
them before using this product.
We shall determine that you’ve approved them at setting up this product’s software.
Terms of Use
Sharp Corporation (hereinafter called “our Company”) shall grant a nonexclusive right
of this product “CE-LK2” upon the following terms to you. You shall agree to the
following terms at setting up this product’s software.
•You shall use the software of this product on one Personal Computer. (hereinafter
called “PC”)
•You may make only one copy of the software on a storage medium for backup
purposes only.
•You shall not use or copy part or all of the operation manual without permission.
• Our Company shall not be held liable to anyone for failure arising out of improper
use of this product and accessories, or during use of them, nor for any damages
suffered from other malfunctions or use of this product.
• This product, including its accessories, are subject to change without notice for
product improvement.
Note
• Some of the models described in this manual may not be available in some
countries.
• Illustrations and icons in this manual may differ from the actual ones.
• "EL-96xx" refers to EL-9600/9600c/9650.
2
Page 5

CONTENTS
♦ GETTING STARTED .............................................................................................. 4
What is PC LINK? ............................................................................................ 4
Checking the Accessories ............................................................................... 4
System Requirements ..................................................................................... 5
Setting Up PC LINK ......................................................................................... 5
Connecting the EL-9900 to the PC .................................................................. 6
♦ USING PC LINK ..................................................................................................... 7
Files PC LINK can Handle ............................................................................... 7
Starting and Exiting PC LINK .......................................................................... 8
Creating and Saving a New Program .............................................................. 8
Sending, Receiving, and Backup Programs and Various Data ........................ 9
Opening a Saved File .................................................................................... 11
Using Edit Functions ...................................................................................... 12
Saving and Printing the Contents of the Edit Screen ..................................... 15
Screen Capture .............................................................................................. 16
Screen Capture on Microsoft Word
(EL-9900 Screen Capture Tool)
Group/Ungroup .............................................................................................. 18
Converting a File ............................................................................................ 19
♦ APPENDIX ........................................................................................................... 20
Ta ble for Converting Special Symbols into TXT Letters ................................. 20
How to Proceed in the Event of Abnormal Conditions ................................... 21
®
Sheet .................................................... 17
3
Page 6
GETTING STARTED
What is PC LINK?
• Creates and edits EL-9900 programs on a PC.
• Receives and saves programs and various data from EL-9900
• Makes a backup of all the contents of memory of EL-9900.
• Sends programs and various data to EL-9900.
• Loads image data of EL-9900.
• Screen capture on Microsoft Word
• Converts programs and various data files into a text file.
Converts program text files into a program file.
•Prints out programs and various data files.
This manual is intended for users who already understand how to use the EL-9900
and how to operate a PC.
Also refer to the PC manual with this book.
Checking the Accessories
®
sheet
Please check that all the following accessories are included upon purchase.
• CD-ROM for IBM PC compatible computer 1
• Communication cable 1
• Operation manual (this book) 1
4
Page 7

System Requirements
• 100% IBM Compatible PC
• Microsoft
•Pentium
Pentium
Pentium
®
Windows® 98/98 Second Edition/2000 Professional/Me/XP
®
150MHz or higher for Microsoft® Windows® 98/98 Second Edition
®
200MHz or higher for Microsoft® Windows® 2000 Professional/Me
®
/Celeron® Family 300MHz or higher for Microsoft® Windows® XP
• 30MB Available Hard Disk Space
• 64MB RAM for Microsoft
128MB RAM for Microsoft
®
Windows® 98/98 Second Edition/2000 Professional/Me
®
Windows® XP
• CD-ROM drive
•1 Available Serial Port
• Mouse or Compatible Pointing Device
• Microsoft Word
Tool for Microsoft Word
®
2000/XP on your PC for installing the "EL-9900 Screen Capture
®
2000/XP"
Setting Up PC LINK
1 Installing the PC LINK Software
1. Start Windows.
2. Insert the supplied CD-ROM into your CD-ROM drive.
3. Click the Start button, and then select Run.
4. Enter “Setup” followed by the path name of the location where the setup program
is saved.
For example, type “D:\setup”.
5. Click on the OK button.
The Setup screen appears, then follow the screen instructions for setup.
When you do not use the Microsoft Word
®
:
At the Select Components stage, deselect the check box for "EL-9900 Screen
Capture Tool". In case the function needs to be installed later, reinstall CE-LK2 at
the time of installation.
After completing the setup, the SHARP PC-LINK for EL-9900 folder is added in the
Program folder of the Start menu.
NOTE: When uninstalling the software, quit Microsoft Word® application beforehand.
5
Page 8
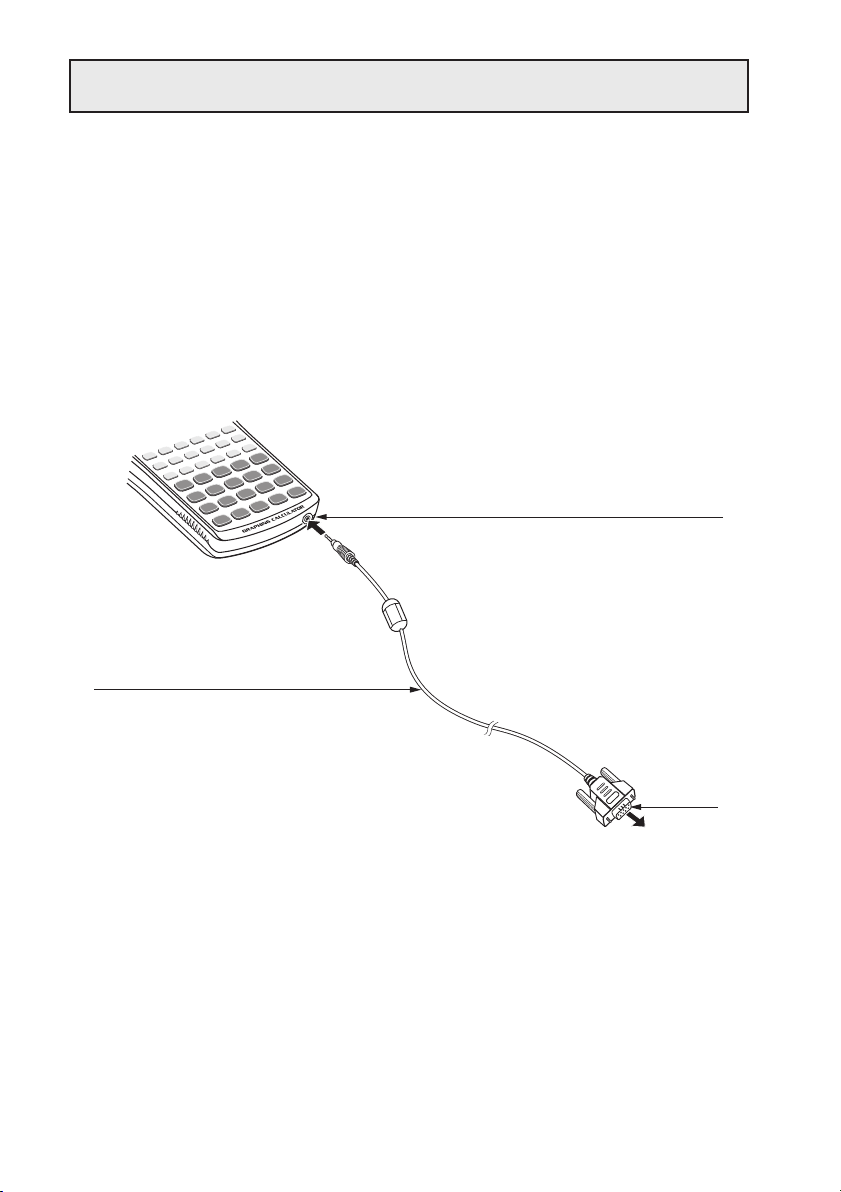
Connecting the EL-9900 to the PC
Connect the EL-9900 to the PC with the supplied communication cable.
NOTE: Push in all connectors firmly and make sure they cannot be removed by pulling
them lightly.
Also tighten the fixing screws.
1. Turn off the EL-9900 and the PC.
2. Connect on side of the supplied communication cable to the peripheral connecting terminal (communication port) on the bottom of the EL-9900; the other side to
the serial port of your PC.
Peripheral connecting terminal
communication cable(supplied)
6
9 pin
To PC serial port
Page 9

USING PC LINK
Files PC LINK can Handle
PC LINK can handle the following files listed below.
Contents of File
Backup
Group
Graph Database (GDB)
Graph Equation
Solver Equation
Picture
List
List Database (List DB)
Matrix
Program
Slide Show
Table Setup
Window Setup
Data variable
Zoom
Text
Tagged Image Format
Bitmap
backup
Set arbitrarily. (Initial value: Group)
g_data1 to g_data9, g_data0
y1 to y9, y0 / x1t to x6t / y1t to y6t /
r1 to r6 / u / v / w ← for EL-96xx/9900
only
Match it with the file name on the calculator.
pict1 to pict9, pict0
I1 to I6
I_data1 to I_data9, I_data0
mat_a to mat_j
Set arbitrarily.
Match it with the file name on the calculator.
tblsetup
winsetup
variable
zoom
Set arbitrarily.
Set arbitrarily.
Set arbitrarily.
File Name on PC
g4b
g4g
g4d
g4y
g4e
g4i
g4l
g4n
g4m
g4p
g4s
g4t
g4w
g4v
g4z
txt
tif
bmp
Extension
EL-9400 EL-9450EL-9900
g3b
g3g
g3d
g3y
-
g3i
g3l
g3n
-
g3p
-
g3t
g3w
g3v
g3z
←
←
←
g5b
g5g
g5d
g5y
-
g5i
g5l
g5n
-
g5p
g5s
g5t
g5w
g5v
g5z
←
←
←
EL-96xx
g2b
g2g
g2d
g2y
g2e
g2i
g2l
g2n
g2m
g2p
g2s
g2t
g2w
g2v
g2z
←
←
←
NOTE: Attention should be required when assigning variables in integral calculations,
because EL-9400/9450/9600 handles variables differently from EL-9900.
(Tolerance will not be assigned for EL-9400/9450/9600; the number of divisions
will be assigned instead.)
7
Page 10

Starting and Exiting PC LINK
1 Starting the PC LINK
Select Start
CE-LK2 to start the PC LINK.
The menu bar and the icons are displayed on the top of the window.
→→
→ Programs
→→
→→
→ SHARP PC-LINK for EL-9900
→→
→→
→ SHARP
→→
2 Exiting the PC LINK
Select the Exit from the File menu, or double-click on the CLOSE box at the uppermost-left corner on the screen.
Note: If a communication will not be available, check the settings of the communication
(COM) port and the cable connection. If these procedures will not solve the
problem, set the Power Management and the screen saver to OFF.
(See Readme.txt for details.)
Creating and Saving a New Program
1 Creating a New Program
NOTE: Only programs can be created.
1. Select the New from the File menu.
The Newly-Edited screen is displayed.
2. Enter a program name in Title:
3. Enter a program.
(For details on entering a program, refer to “Using Edit Functions” on page 12.)
2Saving a Created Program
1. Select the Save As... from the File menu.
The Save As screen is displayed.
2. Specify the drive and folder, and then enter the file name and extension.
The extension is different depending on your calculator.
3. Click on the OK button.
The created program is saved as a new program file with the contents specified in
2.
* Alphanumeric characters can be used for file names. If a program file stored with a file
name that consists of non-alphanumeric characters is sent to the EL-9900, the file
name may change.
8
Page 11

Sending, Receiving, and Backup
Programs and Various Data
(1) Programs and various data can be received from the EL-9900 in order to save
them in a file. The contents saved in the file can also be sent to the EL-9900.
(2) Back up all data of the EL-9900 to the file. Also, restore the backup data to the
EL-9900.
1 Setting a Communication Port
Set a communication port.
Set the communication port where the communication cable for the PC is connected.
1. Select the Communication Port from the Link menu.
A list of communication ports is displayed.
2. Click on the port to be used or Auto Setting.
2 Sending and Receiving Programs and Various Data
Programs and various data can be received from the EL-9900 and saved in a file.
Also, the file can be sent to the EL-9900.
(1) Receiving Programs and Various Data from the EL-9900 to be
Saved in a File
1. Turn on the EL-9900.
2. Select the Receive... from the Link menu.
The Receive Files screen is displayed.
3. Specify the kind of drive, folder, and file, then select the file to be received from
the file list, and click on the Select button.
The selected file is displayed on the File Selected column.
4. Click on the OK button.
The Receiving screen is displayed on the PC screen to start receiving.
5. After the completion of receiving, the initial screen returns.
* If a file stored with a file name that consists of non-alphanumeric characters (Solver
equation, Program, Slide show) is received by a PC, the file name may change.
* If multiple Solver equation and Program files are saved on the EL-9900 with the same
file name, only the initial saved file can be received.
To receive all the files, save each file on the EL-9900 with a different file name.
9
Page 12

(2) Sending a File to the EL-9900
NOTE: Group files, Text files, TIFF files, and Bitmap files cannot be sent to the EL-9900.
1. Turn on the EL-9900.
2. Select the Send... from the Link menu.
The Send Files screen is displayed.
3. Specify the kind of drive, folder, and file, then select the file to be sent from the file
list, and click on the Select button.
The selected file is displayed on the File Selected column.
4. Click on the OK button.
The Sending screen is displayed on the PC screen to start sending.
5. After the completion of sending, the initial screen returns.
3 Making a Backup
All data of the EL-9900 can be backed up to the disk, and the backed up data can be
restored to the EL-9900.
(1) Making a Backup of All Data
1. Turn on the EL-9900.
2. Select the Receive... from the Link menu.
The Receive Files screen is displayed.
3. Specify the kind of drive, folder, then select “backup.g4b” from the file list, and
click on the Select button.
The selected “backup.g4b” is displayed on the File Selected column.
4. Click on the OK button.
The receiving screen is displayed on the PC screen to start receiving, and then all
data of the EL-9900 will be backed up.
(2) Sending Backup Data to the EL-9900
NOTE: All the contents saved in the EL-9900 immediately before this are erased.
Perform the same procedure of “(2) Sending a file to the EL-9900” on this page to
send the back-up file (backup.g4b) to the EL-9900.
10
Page 13

Opening a Saved File
First, display (open) the contents of a file in order to print and edit the contents of the
saved file.
1 Displaying the Contents of a File
NOTE: The contents of Backup files, Group files, GDB files, Graph equation files, Solver
equation files, and TIFF files cannot be displayed.
(The files cannot be opened.)
1. Select the Open... from the File menu.
The Open File screen is displayed.
2. Specify the kind of drive, folder, and file, then select the file whose contents are to
be displayed from the file list.
3. Click on the OK button.
The selected file is opened with its contents displayed.
2 Printing a File
NOTE: The contents of Backup files, Group files, GDB files, Graph equation files, Solver
equation files, and TIFF files cannot be printed.
1. Display the contents of a file on the screen.
2. Select the Print... from the File menu.
The Print Setting screen is displayed.
3. If necessary, specify items such as the range and the number of copies.
4. Click on the OK button.
The Print Run screen is displayed, and then the contents displayed on the screen
are printed.
11
Page 14

Using Edit Functions
NOTE: The files that can be edited with the Edit functions are: List files, List DB files,
Matrix files, Program files, Table setup files, Window setup files, Data variable
files and Zoom files.
The Edit functions are used for creating EL-9900 programs and editing the contents
that have already been saved as files.
1 Entering Commands, Strings, and Values on the Edit
Screen
On the Edit screen, the following three ways can be used to enter commands, strings,
and values.
•Keyboard layout
• Func Table
• PC keyboard
(1) Entering from the Keyboard Layout
Display the Keyboard layout of the calculator on the Edit screen, and then enter
necessary items such as commands.
1. Select the Key Board from the View menu.
The Keyboard layout of the calculator is displayed.
2. Move the cursor to the key on the Keyboard layout you want to enter, and then
click on it. The item is entered in the cursor position on the Edit screen.
*For some items such as “STAT PLOT”, “ZOOM”, and “CALC”, the subcategory and
minor category are displayed. In this case, select the item in the left row (the subcategory) to display the right row (the minor category), and then move the cursor to the
item in the right row that you want to enter, for double-click.
12
Page 15

(2) Entering from the Func Table
The Func Table is used to select necessary items from the list containing items such
as functions, and enter them.
1. Select the item from the major category of the Func Table menu.
Selecting the Key Pad and Func All displays the subcategory.
Selecting other than the Key Pad and Func All displays the subcategory and
minor category, respectively.
2. Perform either of the following operations, and then enter an item in the cursor
position on the Edit screen.
When only the subcategory is displayed, move the cursor to the item that you
want to enter, for double-click.
When the subcategory and minor category are displayed, select the item in the
left row (the subcategory) to display the right row (the minor category), and then
move the cursor to the item in the right row that you want to enter, for double-click.
(3) Entering from the PC Keyboard
Enter necessary items such as functions from the PC keyboard.
2 Editing
(1)Cutting a string
1. Select the string to be cut.
2. Select the Cut from the Edit menu.
The selected string is cut on the Edit screen and moved to the clipboard.
(2)Copying a string
1. Select the string to be copied.
2. Select the Copy from the Edit menu.
The selected string is copied to the clipboard.
(3)Deleting a string
1. Select the string to be deleted.
2. Select the Delete from the Edit menu, or press the DEL on the PC keyboard.
The selected string is deleted.
• Selecting Select All from the Edit menu selects all strings on the Edit screen.
13
Page 16

(4)Pasting the contents of a clipboard to the Edit Screen
The contents moved to the clipboard by “Cutting a string” and “Copying a string” can
be pasted at the cursor position on the Edit screen.
* Selecting the Paste from the Edit menu pastes the contents of the clipboard at the
cursor position on the Edit screen.
(5)Finding a string
1. Select the Find... from the Edit menu.
The Find screen is displayed.
2. Enter the string to be searched for.
If necessary, specify the option to differentiate between uppercase and lowercase.
3. Click on the Find Next button.
The cursor moves to the found string.
(6)Replacing a string
1. Select the Replace... from the Edit menu.
The Replace screen is displayed.
2. Enter the string to be searched for, and then the string after replacement.
If necessary, specify the option to differentiate between uppercase and lowercase.
3. Click on the Find Next button.
The cursor moves to the found string.
4. Perform either of the following:
Click the Find Next button to find the next string without replacing the string.
Click the Replace button to find the next string after replacing the found string.
Click the Replace All button to replace all found strings without checking.
*To return to the state immediately before making an operation (such as after making
an input error), select the Undo from the Edit menu.
14
Page 17

Saving and Printing the Contents
of the Edit Screen
1 Overwriting
NOTE: Program files can be overwritten.
• After completing edition, select the Save from the File menu.
The file is saved in the same file.
2Save As
NOTES: • List files, List DB files, Matrix files, Table setup files, Window setup files, Data
variable files, and Zoom files which are edited with the Edit functions, can be
saved only as text files.
When a file is saved as a text file, letters are included in @s for special
symbols.
(For details on special symbols, see the “Table for Converting Special Symbols
into TXT Letters” on page 20.)
• Alphanumeric characters can be used for file names. If a program file stored
with a file name that consists of non-alphanumeric characters is sent to the EL9900, the file name may change.
1. After completing editing, select the Save As... from the File menu.
The Save As screen is displayed.
2. Specify the drive and folder, and then enter the file name and suitable extension.
3. Click on the OK button.
The file is saved with the contents specified in step 2.
3 Printing
Perform the same procedure as in step 2 or from “2 Printing a File” on page 11, and
then print the contents displayed on the screen.
15
Page 18

Screen Capture
The screen capture function loads image data displayed on the EL-9900 on the PC.
1 Setting a Communication Port
Perform the same procedure as in step 1 or from “1 Setting a Communication Port”
on page 9, and then set the communication port.
2 Loading Image Data
Load image data displayed on the EL-9900.
1. Display the contents to be loaded on the EL-9900 display.
2. Select the Screen Capture from the Link menu.
The Load screen is displayed to load image data.
3. After the completion of loading, the loaded image data is displayed with the
Screen Image screen.
3Saving and Printing Image Data
Image data can be saved in a file and printed by a printer connected to the PC.
(1)Saving
1. Load the image data.
2. Select the Save As... from the File menu.
The Save As screen is displayed.
3. Specify the drive and folder, and then enter the file name and “tif” or “bmp”
extension.
4. Click on the OK button.
(2) Printing
1. Open or load the image data.
2. If necessary, specify the Print image percentage for printing.
3. Select the Print... from the File menu.
The Print Setting screen is displayed.
4. If necessary, specify items such as the range and the number of copies.
5. Click on the OK button.
The Print Run screen is displayed, and then the contents displayed on the screen
are printed.
16
Page 19
Screen Capture on Microsoft Word® Sheet
Installing the "EL-9900 Screen Capture Tool" enables you to directly capture and
insert the image from the EL-9900 to the Microsoft Word
®
document.
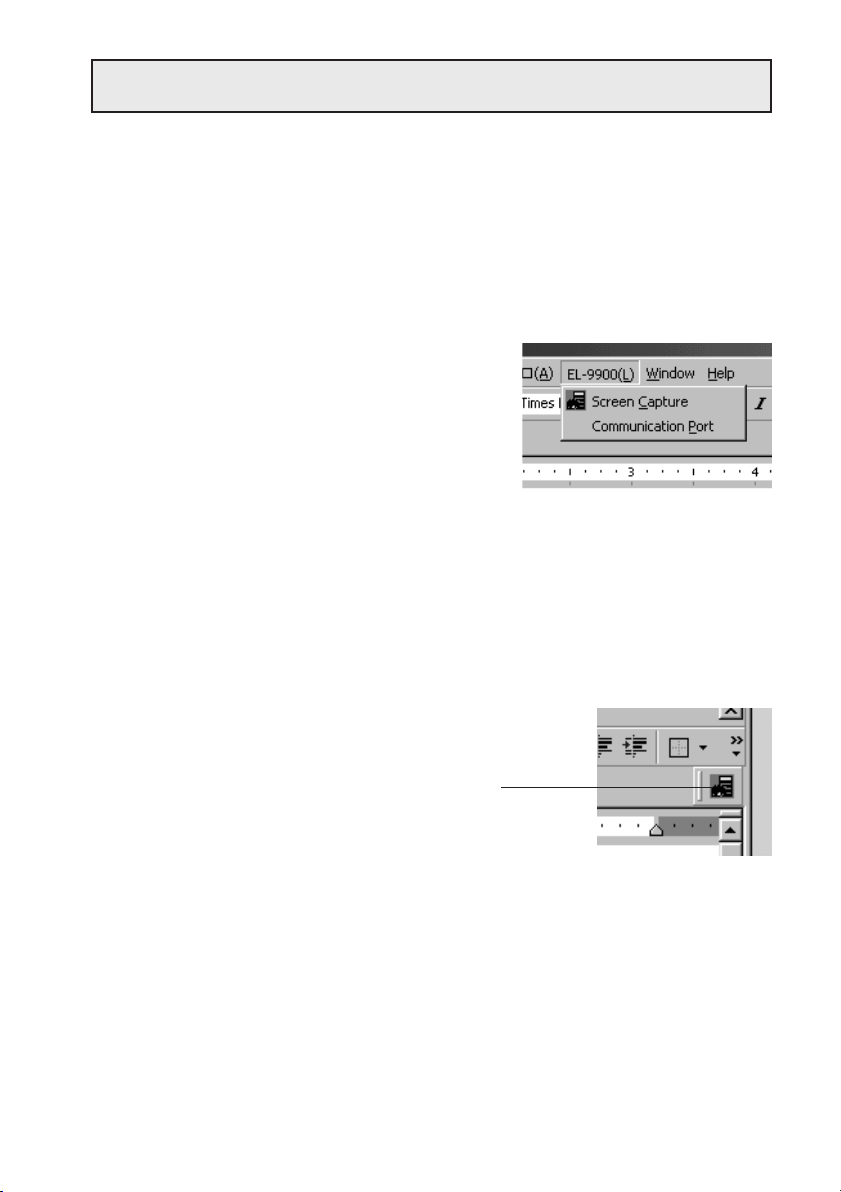
1 Setting the Communication Port
1. Make sure that your PC and EL-9900 are connected with the supplied communication cable.
2. Start Microsoft Word
tion Port from EL-9900 menu on the menu bar.
Communication Port Setting Dialog will open.
3. Select the port you wish to use or select Auto
and click OK.
®
, and select Communica-
2 Screen Capture on Microsoft Word® Sheet
1. Open Microsoft Word document.
2. Move the cursor pointer to the location you wish to insert the captured image.
3. Click the Screen Capture icon in the Tool menu bar or select Screen Capture
from EL-9900 menu on the menu bar.
The captured image (bmp) will be inserted into
the cursor location.
Screen Capture icon
17
Page 20

Group/Ungroup
1Group (Combine individual files into a group file)
It is possible to create a group file either by combining unrelated individual files or by
combining only related files.
1. Select the Group Files... from the Tools menu. The file selection screen to
choose which files to combine into a group file is displayed.
2. Specify drive, directory and the file type. Select the file to group from the file list
and then click the Select button. The selected file is displayed in the File Selected
column.
Continue this file selection process for each file to group.
3. After selecting all the files for file grouping, click the OK button.
The Save As screen is displayed.
4. Perform the same procedure as in step 2 or from “2 Save As” on page 15, and
save as a group file.
2 Ungroup (Ungroup a group file)
1. Select the Ungroup Files... item from the Tools menu.
The group file selection screen to choose which group file to ungroup is displayed.
2. Specify the kind of drive, folder, and file. Select a group file to ungroup from the
file list and then click the OK button.
The folder and drive selection screen to select where to save the individual files
after ungrouping is displayed.
3. Specify the folder and drive and then click the OK button.
The group file selected in step 2 is ungrouped and the individual files are saved
as specified in step 3.
18
Page 21

Converting a File
1 Converting a Program and Various Data Files into a Text
File
NOTE: The following files can be converted to text files: List files, List DB files, Matrix
files, Program files, Table setup files, Window setup files, Data variable files, and
Zoom files.
For conversion to a text file, letters are included in @s for special symbols.
(For details on special symbols, see the “Table for Converting Special Symbols
into TXT Letters” on page 20.)
1. Open or display the contents of the file to be converted to a text file on the screen.
2. Perform the same procedure as in step 1 or from “2 Save As” on page 15; however, enter “txt” as the extension.
2 Converting a Program Text File into a Program File
Program text files can be converted into program files that can be sent to the
EL-9900.
1. Open or display the contents of the program text file to be converted into a
program file.
2. Perform the same procedure as in step 1 or from “2 Save As” on page 15; however, as the extension, enter “g4p” for the EL-9900.
19
Page 22

APPENDIX
Table for Converting Special Symbols
into TXT Letters
Upon conversion to TXT, the letter is included in @s. (@ ... @)
Letter
0
1
2
3
4
5
6
7
8
9
a
b
c
d
e
r
R
g
n
E
(-)
°
r
i
∠
θ
T
π
ˆ
p
_
x
_
y
≠
TXT conversion
0
1
2
3
4
5
6
7
8
9
a
b
c
d
e
r
R
grad
n
EE
deg
rad
i
complex_angle
theta
T
pi
p_hat
x_mean
y_mean
not_=
The letter in the part is bold.
Letter
≥
≤
×
P
C
2
–1
3
⇒
10
Σ
∫
N
σ
χ
F
+
.
→
4
b
÷
int
TXT conversion
>=
<=
x
frac
Per
Com
^2
^-1
^3
sto
root
10
SIGMA
integral
N
sigma
chi
stat_F
box
cross
dot
->
^4
^b
unit
intdiv
20
Page 23

How to Proceed in the Event of
Abnormal Conditions
If this product is exposed to a powerful external electric field or shock during use, an
abnormal condition may seldom occur in which all of the keys, including the ON key
on the calculator connected, do not function. In the event of such a situation operate
the machine from the start again, or reset the calculator by the following procedure
before reoperation. Refer to the EL-9900 Operation manual.
How to reset
1. Pull down the notch to open the battery cover located on the back of the calculator.
2. Place the battery cover back until the notch is snapped on.
3. Press ON .
The verification window will appear on the screen.
4. • To keep the memory contents:
Press ON . The display will return to the initial display.
•To clear all memory contents:
Press CL while the above is being displayed. All memory contents will be
cleared and the display will become as follows.
Pressing any key to display the calculation screen.
21
Page 24

DEUTSCH
PC-LINK-SYSTEM FÜR EL-9900
BEDIENUNGSANLEITUNG
IBM ist ein eingetragenes Warenzeichen der International Business Machines
Corporation.
Windows und Microsoft Word sind eingetragene Warenzeichen der Microsoft Corporation.
Alle aufgeführten Firmen- und/oder Produktnamen sind Warenzeichen oder
eingetragene Warenzeichen der jeweiligen Eigentümer.
Copyright © 2002 SHARP CORPORATION, Japan
22
Page 25

< EINLEITUNG >
Vielen Dank, dass Sie sich für dieses Erzeugnis entschlossen haben.
Bitte lesen Sie diese Anleitung vor der Ingebrauchnahme. Mit Installation der Software gelten die Bedingungen als angenommen.
Der Gebrauch dieses Erzeugnisses setzt das Einverständnis mit den unten
aufgeführten Bedingungen voraus.
Bedingungen für den Gebrauch
Sharp Corporation (nachfolgend “unsere Firma” genannt) gewährt Ihnen zu den
folgenden Bedingungen nichtexklusive Rechte für dieses Erzeugnis “CE-LK2”. Bei
der Installation dieser Software stimmen Sie den folgenden Bedingungen für die
Verwendung der Software zu.
• Die Software darf nur auf einem einzigen Personal Computer (nachfolgend “PC”
genannt) verwendet werden.
• Es darf nur einmal zu Sicherungszwecken auf einen Datenträger kopiert werden.
• Die Bedienungsanleitung darf ohne Genehmigung weder ganz noch teilweise
vervielfältigt oder zu anderen Zwecken benutzt werden.
• Sharp Corporation haftet weder für Ausfälle, die auf unvorschriftsmäsigen oder
vorschriftsmäsigen Gebrauch dieses Erzeugnisses zurückzuführen sind, noch für
Verluste, die sich aus dem Gebrauch oder aus Funktionsfehlern des Erzeugnisses
ergeben.
• Änderungen im Sinne von Verbesserungen an diesem Erzeugnis und dessen
Zubehör sind vorbehalten.
HINWEIS
• In einigen Ländern sind u.U. nicht alle hier beschriebenen Modelle erhältlich.
•Abbildungen und Symbole in dieser Anleitung können von den tatsächlichen
Anzeigen unterscheiden.
• "EL-96xx" bezieht sich auf die Modelle EL-9600/9600c/9650.
23
Page 26

INHALT
♦ VORBEREITUNGEN ............................................................................................ 25
Was ist PC-LINK? .......................................................................................... 25
Überprüfen des Zubehörs .............................................................................. 25
Systemanforderungen ................................................................................... 26
Einrichten von PC-LINK ................................................................................. 26
Anschluss des EL-9900 an den PC ............................................................... 27
♦ GEBRAUCH VON PC-LINK .................................................................................. 28
Mit PC-LINK kompatible Dateiformate ........................................................... 28
Starten und Beenden von PC-LINK ............................................................... 29
Erstellen und Speichern eines neuen Programms ........................................ 29
Übertragen, Empfangen und Sichern von Programmen und Daten .............. 30
Öffnen einer gespeicherten Datei .................................................................. 32
Gebrauch der Editierfunktionen ..................................................................... 33
Speichern und Drucken des Editierfensterinhalts .......................................... 36
Fenster-Einfangfunktion................................................................................. 37
Fenster-Einfangfunktion mit Microsoft Word
("EL-9900 Screen Capture Tool")
Gruppieren/Entgruppieren ............................................................................. 39
Konvertieren einer Datei ................................................................................ 40
♦ ANHANG .............................................................................................................. 41
Konvertierung von Sondersymbolen in TXT-Zeichen..................................... 41
Vorgehensweise bei einer Störung ................................................................ 42
®
Sheet....................................... 38
24
Page 27

VORBEREITUNGEN
Was ist PC-LINK?
• Erstellt und editiert Programme für den EL-9900 auf einem PC.
• Empfängt und speichert Programme und Daten vom EL-9900.
• Erstellt eine Sicherungsdatei mit dem gesamten Speicherinhalt des EL-9900.
• Überträgt Programme und Daten zum EL-9900.
• Lädt Bilddaten vom EL-9900.
•Fenster-Einfangfunktion mit Microsoft Word
•Konvertiert Programme und Datendateien in Textdateien.
Konvertiert Programm-Textdateien in Programmdateien.
•Druckt Programme und Dateien.
Diese Bedienungsanleitung setzt Vertrautheit mit dem Gebrauch des EL-9900 und
PC voraus.
Beziehen Sie sich auch auf die dem PC beiliegende Bedienungsanleitung.
Überprüfen des Zubehörs
®
Sheet
Bitte vergewissern Sie sich beim Kauf des Erzeugnisses, dass das folgende Zubehör
vorhanden ist.
• CD-ROM für IBM-kompatible Computer 1
•Kommunikationskabel 1
• Bedienungsanleitung (dieses Handbuch) 1
25
Page 28

Systemanforderungen
• 100% IBM-kompatibler PC
• Microsoft
•Pentium
Pentium
Pentium
®
Windows® 98/98 Second Edition/2000 Professional/Me/XP
®
150 MHz oder höher für Microsoft® Windows® 98/98 Second Edition
®
200 MHz oder höher für Microsoft® Windows® 2000 Professional/Me
®
/Celeron® Family 300 MHz oder höher für Microsoft® Windows® XP
• 30 MB freier Festplatten-Speicherplatz
• 64 MB RAM für Microsoft
128 MB RAM für Microsoft
®
Windows® 98/98 Second Edition/2000 Professional/Me
®
Windows® XP
• CD-ROM-Laufwerk
•1 freier serieller Datenanschluss
• Maus oder kompatibles Zeigersteuergerät
• Microsoft Word
Capture Tool for Microsoft Word
®
2000/XP auf Ihrem PC zur Installation des “EL-9900 Screen
®
2000/XP”.
Einrichten von PC-LINK
1 Installation der PC-LINK-Software
1. Windows starten.
2. Die mitgelieferte CD-ROM in das CD-ROM-Laufwerk einsetzen.
3. Auf Start klicken und die Option Ausführen wählen.
4. “Setup” und den Pfad zum Setup-Programm eingeben.
Geben Sie z.B. folgendes ein: “D:\setup”.
5. Auf OK klicken.
Das Fenster “Setup” erscheint. Dann den Bildschirminstruktionen folgen.
Wenn Sie Micorsoft Word
®
nicht verwenden:
Beim Punkt “Select Components” die Markierung des Kontrollkästchens “EL-9900
Screen Capture Tool” rückgängig machen. Wenn diese Funktion später installiert
werden soll, müssen Sie zu diesem Zeitpunkt auch CE-LK2 noch einmal
installieren.
Nach Beendigung von “Setup” wird der Ordner SHARP PC-LINK for EL-9900 zum
Program Hauptmenü hinzugefügt.
Hinweis:
26
Vor dem Uninstallieren von Software muss Microsoft Word® beendet werden.
Page 29

Anschluss des EL-9900 an den PC
Den EL-9900 mit dem mitgelieferten Kommunikationskabel am PC anschliessen.
HINWEIS: Alle Steckverbinder fest einstecken und sicherstellen, dass sie sich bei
leichtem Zug daran nicht lösen.
Auch alle Befestigungsschrauben festziehen.
1. EL-9900 und PC ausschalten.
2. Die eine Seite des mitgelieferten Kommunikationskabels am peripheren
Anschluss (Datenanschluss) auf der Unterseite des EL-9900 anschliessen; die
andere Seite am seriellen Anschluss Ihres PCs anschliessen
Anschluss für Peripheriegeräte
Kommunikationskabel (mitgelieferten)
9-polig
An seriellen PC-Anschluss
27
Page 30

GEBRAUCH VON PC-LINK
Mit PC-LINK kompatible Dateiformate
PC-LINK kann mit folgenden Dateiformaten arbeiten:
Dateiinhalt
Backup
Gruppen
Grafikdaten
Grafikgleichungen
SOLVER-Gleichungen
Bilderdateien
Listen
Listendaten
Matrix
Programm
Diashow
Tabellen-Setup
Fenster-Setup
Datenvariable
Zoom
Te xt
Tagged Image Format
Bitmap
Name der PC-Datei
backup
Beliebig (Ausgangswert: Group)
g_data1 bis g_data9, g_data0
y1 bis y9, y0/x1t bis x6t/y1t bis y6t/
r1 to r6 / u / v / w ← nur für
9900
Gleicher Dateiname wie im Rechner
pict1 bis pict9, pict0
I1 bis I6
I_data1 bis I_data9, I_data0
mat_a bis mat_j
Beliebig
Gleicher Dateiname wie im Rechner
tblsetup
winsetup
variable
zoom
Beliebig
Beliebig
Beliebig
EL-96xx/
g4b
g4g
g4d
g4y
g4e
g4i
g4l
g4n
g4m
g4p
g4s
g4t
g4w
g4v
g4z
txt
tif
bmp
Erweiterung
EL-9400 EL-9450EL-9900
g3b
g3g
g3d
g3y
g3i
g3l
g3n
-
g3p
g3t
g3w
g3v
g3z
←
←
g5b
g5g
g5d
g5y
g5i
g5l
g5n
-
g5p
g5s
g5t
g5w
g5v
g5z
←
←
EL-96xx
g2b
g2g
g2d
g2y
g2e
g2i
g2l
g2n
g2m
g2p
g2s
g2t
g2w
g2v
g2z
←
←
Hinweis:
28
Beim Zuweisen von Variablen bei Integralrechnungen ist Vorsicht geboten, weil die
Verwendung von Variablen beim EL-9400/9450/9600 und beim EL-9900
unterschiedlich ist. (Beim EL-9400/9450/9600 kann keine Toleranz (MinutenIntervall) zugewiesen werden; stattdessen wird die Anzahl der Divisionen
zugewiesen.)
Page 31

Starten und Beenden von PC-LINK
1 Starten von PC-LINK
Zum Starten von PC-LINK wählen Sie Start
EL-9900
Der Menübalken und die Symbole werden oben auf der Anzeige dargestellt.
→→
→ SHARP CE-LK2.
→→
→→
→ Programme
→→
→→
→ SHARP PC-LINK for
→→
2 Beenden von PC-LINK
Im File-Menu Exit wählen oder das Programm durch Doppelklick auf das Symbol
CLOSE links oben auf dem Bildschirm schliesen.
Hinweis:
Falls keine Kommunikation nde kommt, überprüfen Sie die Einstellung für den
Datenanschluss (COM) und den Anschluss des Kabels. Sollte sich das Problem
auch nach Überprüfung dieser Punkte nicht beheben lassen, muss die Option
“Power Management” und der Bildschirmschoner ausgeschaltet (OFF) werden.
(Siehe Readme.txt für weitere Hinweise.)
Erstellen und Speichern eines neuen Programms
1Erstellen eis neuen Programms
HINWEIS:Es können nur Programme erstellt werden.
1. Im File-Menu auf New klicken.
Das Fenster “Newly-Edited” erscheint.
2. Neben Title: einen rograamen eingeben.
3. Ein Programm eingeben.
(Für Hinweise zungeben eines Programms siehe den Abschnitt “Gebrauch der
Editierfunktionen” auf Seite 33.)
2 Speichern eines erstellten Programms
1. Im File-Menu Save As... wählen.
Das Fenster “Save As” erscheint.
2. Laufwerk und Ordner ageben, dann Dateinamen und Erweiterung eingeben.
Die Dateierweiterung ist unterschiedlich in Abhängigkeit vom Rechner-Modell.
3. Auf OK klicken.
Das erstellte Programm wird als eine neue Programmdatei mit dem in 2
angegebenen Inhalt gespeichert.
• Als Dateinamen sollten alphanumerische Zeichen verwendet werden. Wenn eine
Programmdatei nicht-alphanumerische Zeichen enthält, kann sich der Dateiname beim
Senden zum EL-9900 ändern.
29
Page 32

Übertragen, Empfangen und Sichern
von Programmen und Daten
(1) Es können Programme und Daten vom EL-9900 empfangen werden, um sie in
einer Datei zu speichern. Der in der Datei gespeicherte Inhalt kann wiederum
zum EL-9900 zurückubertragen werden.
(2) Sämtliche Daten des EL-9900 können in einer Datei gesichert werden. Die in der
Sicherungsdatei gespeicherten Daten können wiederhergestellt und zum EL9900 übertragen werden.
1 Festlegen des Datenanschlusses
Der Datenanschluss, über den die Datenübertragung stattfinden soll, muss festgelegt
werden.
Den Datenanschluss angeben, an dem das Kommunikationskabel angeschlossen ist.
1. Im Link-Menü Communication Port wählen.
Eine Liste mit Datenanschlüssen wird dargestellt.
2. Auf den entsprechenden Datenanschluss oder auf Auto Setting klicken.
2 Übertragen und Empfangen von Programmen und Daten
Vom EL-9900 übertragene Programme und Daten können empfangen und in einer
Datei gespeichert werden. Diese Datei kann wiederum zum EL-9900
zurückübertragen werden.
(1)Empfangen von Programmen und Daten vom EL-9900 und
Speichern in einer Datei
1. Den EL-9900 einschalten.
2. Im Link-Menü Receive... wählen.
Das Fenster “Receive Files” erscheint.
3. Laufwerk, Ordner und Datei angeben. Dann in der Dateiliste die zu empfangende
Datei wählen und auf Select klicken.
Die gewählte Datei erscheint in der Spalte “File Selected”.
4. Auf OK klicken.
Das Fenster “Receiving” erscheint auf dem PC-Bildschirm und der Empfang beginnt.
5. Am Ende des Empfangs wird auf das Ausgangsfenster zurückgeschaltet.
* Wird eine Datei mit einem nicht alphanumerische Zeichen enthaltenden Dateinamen
(SOLVER-Gleichung, Programm, Diashow) vom PC empfangen, kann sich der
Dateiname ändern.
Wenn mehr als eine SOLVER-Gleichung oder Programmdatei unter demselben Namen im
*
EL-9900 gespeichert sind, kann nur die zuerst gespeicherte Datei empfangen werden.
Um alle Dateien empfangen zu können, muss jede unter einem eindeutigen Namen im
EL-9900 gespeichert werden.
30
Page 33

(2)Übertragen einer Datei zum EL-9900
HINWEIS: Gruppen-, Text-, TIFF- und Bitmap-Dateien können nicht zum EL-9900
ubertragen werden.
1. Den EL-9900 einschalten.
2. Im Link-Menü Send... wählen.
Das Fenster “Send Files” erscheint.
3. Laufwerk, Ordner und Datei angeben. Dann in der Dateiliste die zu übertragende
Datei wählen und auf Select klicken.
Die gewählte Datei erscheint in der Spalte “File Selected”.
4. Auf OK klicken.
Das Fenster “Sending” erscheint auf dem PC-Bildschirm und die Übertragung
beginnt.
5. Am Ende der Übertragung wird auf das Ausgangsfenster zurückgeschaltet.
3Erstellen einer Sicherungsdatei
Sämtliche Daten des EL-9900 können auf der Festplatte gesichert, wiederhergestellt
und zum EL-9900 zurückübertragen werden.
(1)Sichern aller Daten in einer Sicherungsdatei
1. Den EL-9900 einschalten.
2. Im Link-Menü Receive... wählen.
Das Fenster “Receive Files” erscheint.
3. Laufwerk, Ordner und Datei angeben. Dann in der Dateiliste “backup.g4b” wählen
und auf Select klicken.
Die gewählte Datei “backup.g4b” erscheint in der Spalte “File Selected”.
4. Auf OK klicken.
Das Fenster “Receiving” erscheint auf dem PC-Bildschirm und der Empfang
beginnt, um eine Sicherungsdatei für alle Daten des EL-9900 zu erstellen.
(2)Übertragen von Sicherungsdateien zum EL-9900
HINWEIS: Durch diesen Vorgang werden alle zu diesem Zeitpunkt im EL-9900
gespeicherten Daten gelöscht.
Wie im Abschnitt (2) “Übertragen einer Datei zum EL-9900” auf dieser Seite
beschrieben vorgehen, um die Sicherungsdatei (backup.g4b) zum EL-9900 zu
senden
31
Page 34

Öffnen einer gespeicherten Datei
Um den Inhalt einer gespeicherten Datei zu drucken oder zu editieren, mus dieser
zunächst auf dem Bildschirm dargestellt (geöffnet) werden.
1 Darstellen des Dateiinhalts
HINWEIS: Der Inhalt von Sicherungs-, Gruppen-, GDB-, Graph-Gleichungs-, Solver-
Gleichungs- und TIFF-Dateien kann nicht dargestellt werden.
(Die Dateien lassen sich nicht öffnen.)
1. Im File-Menü Open... wählen.
Das Fenster “Open File” erscheint.
2. Laufwerk, Ordner und Datei angeben. Dann in der Dateiliste die Datei wählen,
deren Inhalt dargestellt werden soll.
3. Auf OK klicken.
Die gewählte Datei wird geöffnet und deren Inhalt auf dem Bildschirm dargestellt.
2 Drucken einer Datei
HINWEIS: Der Inhalt von Sicherungs-, Gruppen-, GDB-, Graph-Gleichungs-, Solver-
Gleichungs- und TIFF-Dateien kann nicht gedruckt werden.
1. Den Dateiinhalt auf dem Bildschirm.
2. Im File-Menü Print... wählen.
Das Fenster “Print Setting” erscheint.
3. Erforderlichenfalls Posten wie Seitenzahl und Anzahl der Kopien einstellen.
4. Auf OK klicken.
Das Fenster “Print Run” erscheint. Dann wird der Inhalt der dargestellten Datei
gedruckt.
32
Page 35

Gebrauch der Editierfunktionen
HINWEIS: Folgende Dateien können mit den Editierfunktionen bearbeitet werden:
Listendateien, Listendaten-Dateien, Matrixdateien, Programmdateien,
Tabellendateien “, Fensterdateien “, Datenvariablen-Dateien und ZoomDateien.
Die Editierfunktionen dienen zum Erstellen neuer Programme für den EL-9900 sowie
zum Editieren von bereits als Dateien gespeicherten Programmen.
1 Eingabe von Befehlen, Zeichenfolgen und Werten im
Editierfenster
Für die Eingabe von Befehlen, Zeichenfolgen und Werten im Fenster Edit stehen
folgende drei Verfahren zur Verfügung:
• Rechner-Tastenfeld
• Funktionstabelle (“Func Table”)
• PC-Tastenfeld
(1)Eingabe über das Rechner-Tastenfeld
Das Tastenfeld des Rechners im Fenster “Edit” darstellen. Dann die gewünschten
Posten, z.B. Befehle, über die Tasten eingeben.
1. Im View-Menü Key Board wählen.
Das Tastenfeld des Rechners wird dargestellt.
2. Den Cursor auf die entsprechende Taste des Tastenfeldes bewegen und
anklicken. Der Posten erscheint an der Cursorposition im Fenster “Edit”.
* Zu einigen Posten, z.B. “STAT PLOT”, “ZOOM” und “CALC”, werden weitere Flyout-
Menüs dargestellt. In diesem Fall den Posten in der linken Spalte (Unterkategorie)
anwählen, um das Flyout-Menü in der rechten Spalte (Nebenkategorie) darzustellen.
Dann den Cursor auf den gewünschten Posten in der rechten Spalte bewegen und mit
Doppelklick anwählen.
33
Page 36

(2)Eingabe über die Funktionstabelle
Die Funktionstabelle besteht aus einer Liste von Posten, z.B. Funktionen, die durch
Anklicken gewählt werden können.
1. In der Hauptkategorie des Func Table-Menüs einen Posten wählen.
Bei Wahl von “Key Pad” und “Func All” wird die Unterkategorie dargestellt.
Bei Wahl aller anderen Posten erscheint die Unter- bzw. Nebenkategorie.
2. Zum Eingeben eines Postens an der Cursorposition stehen zwei Verfahren zur
Verfugung.
Wenn nur eine Unterkategorie vorhanden ist, den Cursor auf den gewünschten
Posten bewegen und mit Doppelklick anwählen.
Wenn Unter- und Nebenkategorie vorhanden sind, den Posten in der linken
Spalte (Unterkategorie) anwählen, um das Flyout-Menü in der rechten Spalte
(Nebenkategorie) darzustellen. Dann den Cursor auf den gewünschten Posten in
der rechten Spalte bewegen und mit Doppelklick anwählen.
(3)Eingabe über das PC-Tastenfeld
Die gewünschten Posten, z.B. Funktionen, über das PC-Tastenfeld eingeben.
2 Editieren
(1)Ausschneiden einer Zeichenfolge
1. Die auszuschneidende Zeichenfolge markieren.
2. Im Edit-Menü Cut wählen.
Die markierte Zeichenfolge wird ausgeschnitten und in das Clipboard
(Zwischenablage) verschoben, wobei die Ursprungszeichenfolge im Fenster “Edit”
gelöscht wird.
(2)Kopieren einer Zeichenfolge
1. Die zu kopierende Zeichenfolge markieren.
2. Im Edit-Menü Copy wählen.
Die markierte Zeichenfolge wird in das Clipboard kopiert.
(3)Löschen einer Zeichenfolge
1. Die zu löschende Zeichenfolge markieren.
2. Im Edit-Menü Delete wählen oder DEL auf der PC-Tastatur drücken.
Die markierte Zeichenfolge wird gelöscht.
• Die Option Select All im Edit-Menü markiert alle Zeichenfolgen im Fenster “Edit”.
34
Page 37

(4)Einfügen des Clipboardinhalts in das Editierfenster
Zeichenfolgen, die mittels Ausschneiden oder Kopieren in das Clipboard gegeben
worden sind, können an der Cursorposition in das Fenster “Edit” eingefügt werden.
* Mit der Option Paste im Edit-Menü kann der Inhalt des Clipboards an der
Cursorposition in das Fenster Edit eingefügt werden.
(5)Suchen einer Zeichenfolge
1. Im Edit-Menü Find... wählen.
Das Fenster “Find” erscheint.
2. Die zu suchende Zeichenfolge eingeben.
Falls erforderlich, die Option für Unterscheidung zwischen Gros- und
Kleinschreibung wählen.
3. Auf Find Next klicken.
Der Cursor bewegt sich auf die gefundene Zeichenfolge.
(6)Ersetzen einer Zeichenfolge
1. Im Edit-Menü Replace... wählen.
Das Fenster “Replace” erscheint.
2. Die zu suchende Zeichenfolge eingeben und dann die Zeichenfolge, die diese
ersetzen soll.
Falls erforderlich, die Option für Unterscheidung zwischen Gros- und
Kleinschreibung wählen.
3. Auf Find Next klicken.
Der Cursor bewegt sich auf die gefundene Zeichenfolge.
4. Eine der folgenden Optionen wählen:
Auf Find Next klicken, um die Zeichenfolge unverändert zu lassen und die
nächste zu suchen.
Auf Replace klicken, um die Zeichenfolge zu ersetzen und die nächste zu
suchen.
Auf Replace All klicken, um alle gefundenen Zeichenfolgen ohne vorherige
Überprufung zu ersetzen.
* Mit der Option Undo im Edit-Menü kann die unmittelbar vorausgegangene Operation
ruckgangig gemacht werden (z.B. bei einem Eingabefehler).
35
Page 38

Speichern und Drucken des
Editierfensterinhalts
1 Überschreiben
HINWEIS: Programmdateien können uberschrieben werden.
•Wenn die Editierung beendet ist, im File-Menü Save wählen.
Die Datei wird unter demselben Dateinamen gespeichert.
2 Speichern unter einem anderen Dateinamen
HINWEISE: • Listendateien, Listendaten-Dateien, Matrixdateien, Tabellendateien,
Fensterdateien, Datenvariablen-Dateien und Zoom-Dateien, die mit den
Editierfunktionen bearbeitet wurde, können nur als Textdateien gespeichert
werden.
Wenn eine Datei als Textdatei gespeichert wird, werden bei @s
Buchstaben für Sonderzeichen eingefügt.
(Für Hinweise zu Sonderzeichen und Symbolen siehe den Abschnitt
“Konvertierung von Sondersymbolen in TXT-Zeichen” auf Seite 41.
• Dateinamen müssen aus alphanumerischen Zeichen bestehen. Wird ein
Programm, das unter einem nicht alphanumerische Zeichen enthaltenden
Dateinamen gespeichert worden ist, zum EL-9900 übertragen, kann sich
der Dateiname ändern.
1. Wenn die Editierung beendet ist, im File-Menü Save As... wählen.
Das Fenster “Save As” erscheint.
2. Laufwerk und Ordner angeben, dann den Dateinamen und die dazu passende
Erweiterung eingeben.
3. Auf OK klicken.
Die Datei wird unter dem in Schritt 2 angegebenen Namen gespeichert.
3 Drucken
Wie oben bei Schritt 2 vorgehen oder wie bei “2 Drucken einer Datei” auf Seite 32;
dann den Inhalt der Anzeige ausdrucken.
36
Page 39

Fenster-Einfangfunktion
Mit der Fenster-Einfangfunktion (Screen Capture) können auf dem EL-9900
dargestellte Bilddaten auf den PC-Bildschirm geladen werden.
1 Festlegen des Datenanschlusses
Wie oben bei Schritt 1 vorgehen oder wie bei “1 Festlegen des Datenanschlusses”
auf Seite 30; dann den Datenanschluss festlegen.
2 Laden von Bilddaten
Auf dem EL-9900 dargestellte Bilddaten können in den PC geladen werden.
1. Den zu ladenden Bildschirminhalt auf dem EL-9900 darstellen.
2. Im Link-Menü Screen Capture wählen.
Das Fenster “Load” zum Laden von Bilddaten erscheint.
3. Wenn der Ladevorgang beendet ist, erscheinen die geladenen Bilddaten im
Fenster “Screen Image”.
3 Speichern und Drucken von Bilddaten
Bilddaten können in einer Datei gespeichert und auf einem an den PC
angeschlossenen Drucker gedruckt werden.
(1)Speichern
1. Die Bilddaten laden.
2. Im File-Menü Save as... wählen.
Das Fenster “Save As” erscheint.
3. Laufwerk und Ordner angeben, dann den Dateinamen und die Erweiterung “tif”
oder “bmp” eingeben.
4. Auf OK klicken.
(2)Drucken
1. Die Bilddatei öffnen oder laden.
2. Erforderlichenfalls die Abbildungsrate (%) für das Drucken einstellen.
3. Im File-Menü Print... wählen.
Das Fenster “Print Setting” erscheint.
4. Erforderlichenfalls Posten wie Seitenzahl und Anzahl der Kopien einstellen.
5. Auf die OK-Taste klicken.
Das Fenster "Print Run" erscheint. Dann wird der dargestellte Inhalt der Datei
gedruckt.
37
Page 40

Fenster-Einfangfunktion mit
Microsoft Word
®
Sheet
Durch die Installation des “EL-9900 Screen Capture Tool” können Sie ein Bild vom
EL-9900 direkt einfangen und in ein Dokument von Microsoft Word
®
einfügen.
1 Festlegen des Datenanschlusses
1. Sicherstellen, dass der PC und der EL-9900 mit dem mitgelieferten
Kommunikationskabel verbunden sind.
2. Microsoft Word
Port aus dem Menü des EL-9900 wählen.
Das Fenster “Communication Port Setting” wird
geöffnet.
3. Den gewünschten Anschluss markieren oder
Auto wählen und dann auf OK klicken.
®
starten und Communication
2 Fenster-Einfangfunktion mit Microsoft Word® Sheet
1. Ein Dokument von Microsoft Word öffnen.
2. Den Cursorzeiger an die Stelle bewegen, an der das eingefangene Bild eingefügt
werden soll.
3. Auf das Symbol für Fenster-Einfangfunktion des Tools-Menüs klicken oder
Screen Capture aus dem Menü EL-9900 wählen.
Das eingefangene Bild (bmp) wird an der
Cursorposition eingefügt.
Symbol für FensterEinfangfunktion
38
Page 41

Gruppieren/Entgruppieren
1 Gruppieren (Sammeln einzelner Dateien in einer
Gruppendatei)
Eine Gruppendatei kann erstellt werden, indem einzelne unverwandte oder
ausschlieslich verwandte Dateien zu einer Datei zusammengefast werden.
1. Im Tools-Menü Group Files... wählen. Das Fenster “File Selection” zum
Auswählen der zu gruppierenden Dateien erscheint.
2. Laufwerk, Verzeichnis und Dateiart angeben. Eine zu gruppierende Datei in der
Dateienliste wählen und auf Select klicken. Die gewählte Datei erscheint in der
Spalte “File Selected”.
Diesen Vorgang für alle zu gruppierenden Dateien wiederholen.
3. Wenn alle Dateien gewählt sind, auf OK klicken.
Das Fenster “Save As” erscheint.
4. Wie oben bei Schritt 2 vorgehen oder wie bei “2 Speichern unter einem anderen
Dateinamen” auf Seite 36; dann als Gruppendatei speicher.
2 Entgruppieren (Auflösen einer Gruppendatei in einzelne
Dateien)
1. Im Tools-Menü Ungroup Files... wählen.
Das Fenster “Group File Selection” zum Auswählen der zu entgruppierenden
Datei erscheint.
2. Laufwerk, Ordner und Datei angeben. Die zu entgruppierende Datei in der
Dateienliste wählen und auf OK klicken.
Das Fenster “Folder and Drive Selection” erscheint. Hier wird festgelegt, wo die
entgruppierten Dateien gespeichert werden sollen.
3. Ordner und Laufwerk angeben und auf OK klicken.
Damit wird die in Schritt 2 gewählte Gruppendatei entgruppiert. Die Einzeldateien
werden in dem angegebenen Ordner gespeichert.
39
Page 42

Konvertieren einer Datei
1Konvertieren von Programmen und Dateien in
Textdateien
HINWEIS: Folgende Dateien können in Textdateien konvertiert werden: Listendateien,
Listendaten-Dateien, Matrixdateien, Programmdateien, Tabellendateien “,
Fensterdateien “, Datenvariablen-Dateien und Zoom-Dateien.
Wenn eine Datei als Textdatei konvertiert wird, werden bei @s Buchstaben für
Sonderzeichen eingefügt.
(Für Hinweise zu Sonderzeichen und Symbolen siehe den Abschnitt
“Konvertierung von Sondersymbolen in TXT-Zeichen” auf Seite 41.
1. Die in eine Textdatei zu konvertierende Datei öffnen oder den Inhalt auf dem
Bildschirm darstellen.
2. Wie oben bei Schritt 1 vorgehen oder wie im Abschnitt “2 Speichern unter einem
anderen Dateinamen” auf Seite 36; dann die Dateierweiterung “txt” eingeben.
2Konvertieren einer Programm-Textdatei in eine
Programmdatei
Programm-Textdateien können in Programmdateien konvertiert werden, die dann
zum
EL-9900 gesendet werden.
1. Die in eine Programmdatei zu konvertierende Programm-Textdatei öffnen oder
den Inhalt auf dem Bildschirm darstellen.
2. Wie oben bei Schritt 1 vorgehen oder wie im Abschnitt “2 Speichern unter einem
anderen Dateinamen” auf Seite 36; dann die Dateierweiterung “g4p” für den
EL-9900 eingeben.
40
Page 43

ANHANG
Konvertierung von Sondersymbolen in
TXT-Zeichen
Bei der TXT-Konvertierung werden die für Sondersymbole gesetzten Zeichen in zwei
@-Zeichen eingeschlossen (@ ... @).
Zeichen
0
1
2
3
4
5
6
7
8
9
a
b
c
d
e
r
R
g
n
E
(-)
°
r
i
∠
θ
T
π
ˆ
p
_
x
_
y
≠
Zeichen im Bereich erscheinen fett.
TXT-Konvertierung
0
1
2
3
4
5
6
7
8
9
a
b
c
d
e
r
R
grad
n
EE
deg
rad
i
complex_angle
theta
T
pi
p_hat
x_mean
y_mean
not_=
Zeichen
≥
≤
×
P
C
2
–1
3
⇒
10
Σ
∫
N
σ
χ
F
+
.
→
4
b
÷
int
TXT-Konvertierung
>=
<=
x
frac
Per
Com
^2
^-1
^3
sto
root
10
SIGMA
integral
N
sigma
chi
stat_F
box
cross
dot
->
^4
^b
unit
intdiv
41
Page 44

Vorgehensweise bei einer Störung
Wenn das Erzeugnis einem starken elektrischen Feld oder starken Erschütterungen
ausgesetzt wird, kann sich in seltenen Fällen ein Störzustand einstellen, in dem keine
der Tasten funktioniert, einschliesslich der ON -Taste des angeschlossenen
Rechners. Dieser Zustand kann durch Neustarten des Computers oder Rückstellen
des Rechners beseitigt werden. Siehe die Bedienungsanleitung des EL-9900.
Rückstellen
1. Die Ratsche zum Öffnen der Abdeckung des Batteriefachs auf der Rückseite des
Rechners herunterziehen.
2. Die Abdeckung des Batteriefachs wieder aufsetzen, bis die Ratsche einrastet.
3. Drücken Sie ON .
Ein Fenster zur Bestätigung wird angezeigt.
4. • Wenn der Speicherinhalt nicht gelöscht werden soll:
ON drücken. Die Ausgangsanzeige erscheint.
•Wenn der Speicherinhalt gelöscht werden soll:
Die obige Anzeige durch Drücken von CL quittieren. Der gesamte
Speicherinhalt wird gelöscht. In der Anzeige erscheint folgende Meldung:
Drücken einer beliebigen Taste ruft die Ausgangsanzeige auf.
42
Page 45

FRANÇAIS
SYSTÈME PC LINK POUR EL-9900
MODE D’EMPLOI
IBM est une marque déposée par International Business Machines Corporation.
Windows et Microsoft Word sont des marques déposées par Microsoft Corporation.
Les noms de société et les noms de produits sont des marques qui peuvent avoir fait
l'objet d'un dépôt par leur propriétaire.
Copyright © 2002 SHARP CORPORATION, Japon
43
Page 46

< INTRODUCTION >
Nous vous remercions d’avoir choisi ce produit.
Il vous est foumi dans la mesure où vous acceptez les termes et conditions suivants;
veuillez en prendre connaissance avant d»employer le produit.
Nous estimerons que vous avez donné votre accord sur les termes et conditions dès
lors que vous procéderez à la mise en oeuvre du logiciel qui accompagne le produit.
Termes et conditions d’emploi
Sharp Corporation (ci-après désignée, “la Compagnie”) vous accorde le droit non
exclusif d’utiliser le produit, “CE-LK2”, selon les termes et conditions qui suivent. De
votre côté, vous acceptez ces termes et conditions dès lors que vous mettez en
oeuvre le logiciel qui accompagne le produit.
•Vous ne devez installer le logiciel que sur un seul ordinateur personnel.
•Vous n’avez le droit d’effectuer qu’une seule copie du logiciel, quelle que soit le
support, et à seule fin de sauvegarde.
•Vous ne devez pas copier tout ou partie du mode d’emploi sans autorisation.
• La Compagnie ne peut être tenue responsable vis-à-vis de qui que ce soit de
l’emploi incorrect du produit et de ses accessoires, ni des commages ou anomalies de fonctionnement qui pourraient résulter de leur usage.
• Le même produit et les mêmes accessoires peuvent être modifiés par ailleurs
sans avis préalable à fin d’amélioration.
REMARQUE
•Tous les modèles mentionnés dans ce mode d’emploi ne sont pas disponibles
dans certains pays.
• Les illustrations et les icônes de ce mode d'emploi peuvent être différentes de la
réalité.
• "EL-96xx" concerne les modèles EL-9600/9600c/9650.
44
Page 47

TABLE DES MATIÈRES
♦ POUR COMMENCER .......................................................................................... 46
Quelles fonctions sont assurées par PC LINK?............................................. 46
Vérification des accessoires fournis .............................................................. 46
Exigences système ........................................................................................ 47
Mise en oeuvre de PC LINK .......................................................................... 47
Raccordement des appareils EL-9900 à un ordinateur personnel ................ 48
♦ UTILISATION DE PC LINK ................................................................................... 49
Fichiers que PC LINK peut traiter .................................................................. 49
Démarrage et abandon de PC LINK .............................................................. 50
Création et sauvegarde d’un programme ...................................................... 50
Émission, réception et copie de secours des programmes et données ........ 51
Ouverture d’un ficher après sauvegarde ....................................................... 53
Utilisation des fonctions de révision............................................................... 54
Sauvegarde et impression du contenu de la page de révision ...................... 57
Saisie d’écran ................................................................................................ 58
Copie d'écran dans un fichier Microsoft Word
(“EL-9900 Screen Capture Tool”)
Grouper et dégrouper des fichiers ................................................................. 60
Conversion d’un fichier .................................................................................. 61
♦ ANNEXE ............................................................................................................... 62
Ta bleau de conversion des symboles spéciaux en caractères de fichier TXT .....
En présence d’une situation anormale .......................................................... 63
®
.............................................. 59
62
45
Page 48

POUR COMMENCER
Quelles fonctions sont assurées par PC LINK?
• Création et révision sur ordinateur personnel de programmes pour les appareils
EL-9900.
• Réception et sauvegarde de programmes et données provenant des appareils
EL-9900.
• Copie de secours de tout le contenu de la mémoire des appareils EL-9900.
• Émission de programmes et données vers les appareils EL-9900.
• Chargement des données image des appareils EL-9900.
• Copie d'écran dans un fichier Microsoft Word
• Conversion de fichiers programme et données en fichiers texte.
Conversion de fichier texte en fichiers programme.
• Impression de fichier programme et données.
Ce mode d’emploi est destiné aux utilisateurs qui connaissent les manières
d’employer les appareils EL-9900 et un ordinateur personnel.
Veuillez également vous reporter au mode d’emploi de l’ordinateur.
®
Vérification des accessoires fournis
Après votre achat, assurez-vous que les accessoires mentionnés ci-dessous vous
ont bien été fournis.
• CD-ROM pour ordinateur IBM PC ou compatible 1
• Câble de communication 1
• Mode d’emploi (le présent document) 1
46
Page 49

Exigences système
• Ordinateur personnel 100% compatible IBM PC
• Microsoft
•Pentium
Pentium
Pentium
®
Windows® 98/98 deuxième édition/2000 Professional/Me/XP
®
150 MHz ou mieux pour Microsoft® Windows® 98/98 deuxième édition
®
200 MHz ou mieux pour Microsoft® Windows® 2000 Professional/Me
®
ou Celeron® 300 MHz ou mieux pour Microsoft® Windows® XP
• 30 Mo disponibles sur le disque dur
• 64 Mo de mémoire vive pour Microsoft
®
Windows® 98/98 deuxième édition/2000
Professional/Me/XP
128 Mo de mémoire vive pour Microsft
®
Windows® XP
• Lecteur de CD-ROM
• Un port série disponible
• Souris ou dispositif de pointage équivalent
•Microsoft
Microsoft
®
Word® 2000/XP pour l'installation de "EL-9900 Screen Capture Tool for
®
Word® 2000/XP"
Mise en oeuvre de PC LINK
1 Installation du logiciel PC LINK
1. Démarrez Windows.
2. Introduisez le CD-ROM fourni dans le lecteur de CD-ROM.
3. Cliquez sur Démarrer puis sur Exécuter.
4. Tapez "Setup" suivi du chemin menant au support du programme de mise en
oeuvre.
Par exemple, tapez “D:\setup”.
5. Cliquez sur le bouton OK.
La fenêtre de mise en oeuvre s’ouvre puis diverses instructions s’affichent sur
l’écran.
Si vous n'utilisez pas Microsoft Word
®
:
Lors de l'opération Select Components, supprimez la coche dans la case
"EL-9900 Screen Capture Tool". Dans le cas où la fonction doit être installée plus
tard, réinstallez CE-LK2 également au moment de l'installation.
Après achèvement de l'installation, le dossier SHARP PC-LINK for EL-9900 est
ajouté au dossier Programmes du menu Démarrer.
REMARQUE: Avant la désinstallation du logiciel, quittez Microsoft Word®.
47
Page 50

Raccordement des appareils EL-9900 à
un ordinateur personnel
Reliez la calculatrice EL-9900 à l'ordinateur personnel au moyen du câble de liaison
fourni.
REMARQUE: Enfoncez soigneusement tous les connecteurs et assurez-vous qu'ils ne
puissent pas être débranchés en les tirant légèrement.
Serrez également les vis de fixation
1. Mettez hors tension la calculatrice EL-9900 et l'ordinateur personnel.
2. Reliez une extrémité du câble de liaison fourni au connecteur de périphérique
(port de communication) à la base de la calculatrice EL-9900, et l'autre extrémité
au port série de l'ordinateur personnel.
Connecteur pour le raccordement d’un périphérique
Câble de liaison (fourni)
48
9 broches
Vers le port série de l’ordinateur personnel
Page 51

UTILISATION DE PC LINK
Fichiers que PC LINK peut traiter
PC LINK est en mesure de traiter les fichiers figurant dans le tableau ci-dessous.
Nature du fichier
Secours
Groupe
Base de données graphiques
Équation graphique
Résolution d’équation
Image
Liste
Base de données de liste
Matrice
Programme
Diaporama
Configuration de tableau
Configuration de fenêtre
Variables de données
Zoom
Texte
Format d’image avec adresse
Adressé par point
Nom de fichier sur l’ordinateur
backup
Quelconque (Initialement: Group)
g_data1 à g_data9, g_data0
y1 à y9, y0 / x1t à x6t / y1t à y6t /
r1 à r6 / u / v / w
9900 seulement
Même nom que sur la calculatrice
pict1 à pict9, pict0
I1 à I6
I_data1 à I_data9, I_data0
mat_a à mat_j
Quelconque
Même nom que sur la calculatrice
tblsetup
winsetup
variable
zoom
Quelconque
Quelconque
Quelconque
personnel
←
Pour EL-96xx/
g4b
g4g
g4d
g4y
g4e
g4i
g4l
g4n
g4m
g4p
g4s
g4t
g4w
g4v
g4z
txt
tif
bmp
Extension
EL-9400 EL-9450EL-9900
g3b
g3g
g3d
g3y
g3i
g3l
g3n
-
g3p
g3t
g3w
g3v
g3z
←
←
←
g5b
g5g
g5d
g5y
g5i
g5l
g5n
-
g5p
g5s
g5t
g5w
g5v
g5z
←
←
←
EL-96xx
g2b
g2g
g2d
g2y
g2e
g2i
g2l
g2n
g2m
g2p
g2s
g2t
g2w
g2v
g2z
←
←
←
REMARQUE: Un certain soin est requis lors de l'attribution des variables d'un calcul
intégral parce que les modèles EL-9400/9450/9600 traitent les variables
différemment du modèle EL-9900. (La tolérance n'est pas atribuée aux
modèles EL-9400/9450/9600; le nombre de divisions est attribué en lieu et
place.)
49
Page 52

Démarrage et abandon de PC LINK
1 Démarrage de PC LINK
Cliquez sur Démarrer
CE-LK2 pour lancer PC LINK.
La barre de menu et les icônes s'affichent à la partie supérieure de la fenêtre.
→→
→ Programmes
→→
→→
→ SHARP PC-LINK for EL-9900
→→
→→
→ SHARP
→→
2 Abandon de PC LINK
Choisissez l’option Exit que vous propose le menu File, ou bien cliquez deux fois sur
le bouton CLOSE qui se trouve dans le coin supérieur gauche.
REMARQUE: Si la communication n'est pas établie, vérifiez les réglages du port (COM)
ainsi que le câble de liaison. Si ces opérations ne donnent pas satisfaction,
supprimez l'action du Gestionnaire d'alimentation et de l'économiseur
d'écran. (Pour de plus amples détails, consultez le fichier Readme.txt)
Création et sauvegarde d’un programme
1Création d’un programme
REMARQUE: Seuls des programmes peuvent être créés.
1. Choisissez l’option New que vous propose le menu File.
La page de création-révision s’affiche.
2. En regard du champ Title:, tapez le nom du programme.
3. Tapez le programme.
(Pour de plus amples détails sur la manière de taper un programme, reportezvous à la page 54, “Utilisation des fonctions de révision”.)
2 Sauvegarde d’un programme
1. Choisissez l’option Save As... que vous propose le menu File.
La page “Save As” s’affiche.
2. Précisez le type d’unité et le dossier. Tapez le nom du fichier et son extension.
L’ e xtension dépend de la calculatrice.
3. Cliquez sur le bouton OK.
Le programme créé est sauvegardé sous la forme d’un fichier qui présente les
caractéristiques mentionnées au cours de l’opération 2.
* Les caractères alphanumériques peuvent être utilisés pour les désignations de
fichiers. Si un fichier de programme stocké avec une désignation de fichier comprenant
des caractères non-alphanumériques est transmis àl’EL-9900, la désignation de fichier
pourrait changer.
50
Page 53

Émission, réception et copie de
secours des programmes et données
(1) Les programmes et les données provenant des appareils EL-9900 peuvent être
sauvegardés sous forme de fichier. Inversement, le contenu d’un fichier peut être
adressé aux appareils EL-9900.
(2) Les données que contiennent les appareils EL-9900 peuvent être sauvegardées
sous la forme d’un fichier. Pareillement, le fichier peut être chargé dans les
appareils EL-9900.
1 Choix d’un port de communication
Vous devez choisir un port de communication.
Pour cela, vous devez choisir le port sur lequel est branché l’adaptateur de
l’ordinateur personnel.
1. Choisissez l’option Communication Port que vous propose le menu Link.
Une liste de ports de communication s’affiche.
2. Cliquez sur le port que vous désirez utiliser.
2 Émission ou réception de programmes ou de données
Les programmes et les données provenant des appareils EL-9900 peuvent être
sauvegardés sous forme de fichier. Inversement, le contenu d’un fichier peut être
adressé aux appareils EL-9900.
(1)Réception de programmes ou données en provenance des
appareils EL-9900 à sauvegarder sous forme de fichiers
1. Mettez sous tension les appareils EL-9900.
2. Choisissez l’option Receive... que vous propose le menu Link.
La page “Receive Files” s’affiche.
3. Précisez le type d’unité et le dossier. Choisissez, sur la liste, le fichier que vous
souhaitez recevoir; enfin, cliquez sur le bouton Select.
Le nom du fichier choisi est affiché dans la colonne prévue pour cela.
4. Cliquez sur le bouton OK.
La page de réception s’affiche sur l’écran de l’ordinateur et la réception commence.
5. Lorsque la réception est terminée, la page initiale se trouve à nouveau rétablie.
* Si un fichier stocké avec une désignation de fichier comprenant des caractères non-
alphanumériques (Résolution d’équation, Programme, Diaporama) est reçu par un
micro-ordinateur, la désignation de fichier pourrait changer.
51
Page 54

* Si le fichier Résolution d’équation et le fichier Programme sont enregistrés sous le
même nom dans EL-9900, seul le premier enregistrement est accessible. Si vous
désirez accéder à tous les fichiers, veuillez enregistrer chaque fichier sous un nom
différent dans EL-9900.
(2)Émission d’un fichier vers les appareils EL-9900
REMARQUE:
1. Mettez sous tension les appareils EL-9900.
2. Choisissez l’option Send... que vous propose le menu Link.
La page “Send Files” s’affiche.
3. Précisez le dossier puis choisissez, sur la liste, le fichier que vous souhaitez
émettre; enfin, cliquez sur le bouton Select.
Le nom du fichier choisi est affiché dans la colonne prévue pour cela.
4. Cliquez sur le bouton OK.
La page d’émission s’affiche sur l’écran de l’ordinateur personnel et l’émission
commence.
5. Lorsque la réception est terminée, la page initiale se trouve à nouveau rétablie.
Les fichiers groupés, les fichiers texte, les fichiers TIFF et les fichiers adressés
par point ne peuvent pas être émis vers les appareils EL-9900.
3 Copie de secours
Toutes les données que contient la mémoire des appareils EL-9900 peuvent
transférées sur le disque dur de l’ordinateur personnel; inversement, ces données
peuvent être rechargées dans la mémoire des appareils EL-9900.
(1)Copie de secours de toutes les données
1. Mettez sous tension les appareils EL-9900.
2. Choisissez l’option Receive... que vous propose le menu Link.
La page “Receive Files” s’affiche.
3. Précisez le type de d’unité et dossier. Choisissez, sur la liste, “backup.g4b”; enfin,
cliquez sur le bouton Select.
“backup.g4b” choisi est affiché dans la colonne prévue pour cela.
4. Cliquez sur le bouton OK.
La page de réception s'affiche sur l'écran de l'ordinateur personnel, la réception
commence et toutes les données que contient la calculatrice EL-9900 sont
sauvegardées.
(2)Chargement dans la mémoire des appareils EL-9900
REMARQUE:
Procédez aux opérations de cette page, "(2) Emission d'un fichier vers la calculatrice
EL-9900" pour adresser le fichier de secours (backup.g4b) à la calculatrice EL-9900.
52
Cette opération débute par l’effacement complet de tout le contenu de la
mémoire des appareils EL-9900.
Page 55

Ouverture d’un fichier après sauvegarde
Vous désirez afficher le contenu du fichier (ouvrir le fichier) afin de l’imprimer ou de le
réviser.
1 Affichage du contenu d’un fichier
REMARQUE:
1. Choisissez l’option Open... que vous propose le menu File.
La page “Open File” s’affiche.
2. Précisez le dossier puis choisissez, sur la liste, le fichier que vous souhaitez
afficher.
3. Cliquez sur le bouton OK.
Le contenu du fichier choisi s’affiche.
Les fichiers de secours, les fichiers GDB, les fichiers de équation graphique,
les fichiers de résolution d’équation et les fichiers TIFF, ne peuvent pas être
affichés.
(Autrement dit, ces fichiers ne peuvent pas être ouverts.)
2 Impression d’un fichier
REMARQUE:
1. Affichez le fichier sur l'écran.
2. Choisissez l’option Print... que vous propose le menu File.
La page d’impression de fichier s’affiche.
3. Le cas échéant, précisez les données à imprimer et le nombre de copies.
4. Cliquez sur le bouton OK.
La page d’exécution d’impression s’affiche et les données affichées s’impriment.
Les fichiers de secours, les fichiers groupés, les fichiers GDB, les fichiers de
équation graphique, les fichiers de résolution d’équation et les fichiers TIFF, ne
peuvent pas être imprimés.
53
Page 56

Utilisation des fonctions de révision
REMARQUE:
Les fonctions de révision permettent de créer des programmes pour les appareils EL9900 et de modifier le contenu de fichiers qui ont déjà fait l’objet d’une sauvegarde.
Les fichiers que vous pouvez réviser au moyen des fonctions prévues à cet
effet sont: les fichiers de listes, les fichiers de base de données de liste, les
fichiers de matrices, les fichiers de programmes, les fichiers de configuration
de tableau, les fichiers de configuration de fenêtre, les fichiers de variables de
données et les fichiers zoom.
1 Introduction des instructions, chaînes de caractères et
valeurs sur la page de révision
Trois moyens sont à votre disposition pour introduire des instructions, des chaînes de
caractères et des valeurs.
• Clavier de l’appareil
•Table des fonctions
•Clavier de l’ordinateur personnel
(1)Frappe à partir de l'image du clavier
Affichez le clavier sur la page de révision de la calculatrice puis introduisez les
données requises, par exemple des instructions.
1. Choisissez l’option Key Board que vous propose le menu View.
Le clavier de la calculatrice s’affiche.
2. Amenez le curseur sur la touche du clavier que vous désirez utiliser puis cliquez.
La valeur correspondante de la touche s’inscrit à l’emplacement qu’occupe le
curseur sur la page de révision.
* Dans le cas de certaines options telles que "STAT PLOT", "ZOOM" et "CALC", la
catégorie secondaire et les suivantes sont affichées. Dans ce cas, choisissez le poste
dans la partie gauche (la catégorie secondaire) pour afficher la partie droite (la
catégorie suivante) puis placez le curseur sur le poste de droite à sélectionner et
cliquez deux fois.
(2)Utilisation du tableau des fonctions
Le tableau des fonctions est une liste qui regroupe les divers paramètres et fonctions
possibles, et sur laquelle vous pouvez opérer une sélection.
54
Page 57

1. Sur le menu Func Table choisissez un poste de la liste principale.
Si vous choisissez Key Pad et Func All, vous obtenez l’affichage d’une liste
secondaire.
Si vous choisissez autre chose que Key Pad et Func All, vous obtenez l’affichage
d’une liste secondaire ou d’une liste tertiaire, respectivement.
2. Effectuez l’une des opérations suivantes pour introduire, sur la page de révision
et à l’emplacement qu’occupe le curseur, le paramètre ou la fonction choisis sur
une liste.
Si seule la liste secondaire est affichée, amenez le curseur sur le poste que vous
désirez choisir puis cliquez deux fois.
Si la liste secondaire et la liste tertiaire sont affichées, choisissez le poste à
gauche (liste secondaire) de manière à afficher les postes à droite (liste tertiaire)
puis choisissez le poste sur cette liste en cliquant deux fois.
(3)Frappe au clavier de l’ordinateur personnel
Tapez directement sur le clavier de l’ordinateur personnel les paramètres ou les
fonctions requis.
2 Révision
(1)Découper une chaîne de caractères
1. Choisissez la chaîne de caractères qui doit être découpée.
2. Choisissez l’option Cut que vous propose le menu Edit.
La chaîne de caractères choisie est découpée et placée sous le presse-papiers.
(2)Copier une chaîne de caractères
1. Choisissez la chaîne de caractères qui doit être copiée.
2. Choisissez l’option Copy que vous propose le menu Edit.
La chaîne de caractères choisie est copiée et la copie est placée sous le
pressepapiers.
(3)Effacement d’une chaîne de caractères
1. Choisissez la chaîne de caractères qui doit être effacée.
2. Choisissez l’option Delete que vous propose le menu Edit, ou bien appuyez sur
la touche DEL du clavier de l’ordinateur personnel.
• Si vous choisissez l’option Select All que vous propose le menu Edit, c’est l’ensemble
de la page de révision qui est sélectionné.
55
Page 58

(4)
Coller sur la page de révision ce qui est sous le presse-papiers
Ce que vous avez rangé sous le presse-papiers, soit par l’opération “Découper une
chaîne de caractères”, soit par l’opération “Copier une chaîne de caractères”, peut
être collé sur la page de révision à l’emplacement qu’occupe le curseur.
* Choisissez l’option Paste du menu Edit pour coller à l’emplacement qu’occupe le
curseur sur la page de révision, ce que vous avez rangé sous le presse-papiers.
(5)Rechercher une chaîne de caractères
1. Choisissez l’option Find... que vous propose le menu Edit.
La page de recherche s’affiche.
2. Tapez la chaîne de caractères à rechercher.
Le cas échéant, précisez si une différence doit être faite entre les majuscules et
les minuscules.
3. Cliquez sur le bouton Find Next.
Le curseur se place sur la chaîne de caractères.
(6)Remplacer une chaîne de caractères
1. Choisissez l’option Replace... que vous propose le menu Edit.
La page de recherche s’affiche.
2. Tapez la chaîne de caractères à rechercher puis la chaîne de caractères devant
la remplacer.
Le cas échéant, précisez si une différence doit être faite entre les majuscules et
les minuscules.
3. Cliquez sur le bouton Find Next.
Le curseur se place sur la chaîne de caractères.
4. Effectuez l’une des opérations suivantes:
Cliquez sur le bouton Find Next pour localiser la chaîne suivante sans modifier la
chaîne actuelle.
Cliquez sur le bouton Replace pour trouver la chaîne de caractères identique
suivante et après avoir remplacé la présente.
Cliquez sur le bouton Replace All pour remplacer toutes les chaînes de
caractères identiques sans vérification individuelle.
*Pour rétablir la situation précédant immédiatement une opération (par exemple, en cas
d’erreur), choisissez l’option Undo que vous propose le menu Edit.
56
Page 59

Sauvegarde et impression du contenu
de la page de révision
1 Sauvegarde sous le même nom
REMARQUE:
• Lorsque les révisions sont terminées, choisissez l’option Save que vous propose le
menu File.
Le fichier est sauvegardé sous le même nom.
Les fichiers programmes peuvent être écrasés.
2 Sauvegarde sous un autre nom
REMARQUE:
1. Lorsque les révision sont terminées, choisissez l’option Save As... que vous
propose le menu File.
La page “Save As” s’affiche.
2. Précisez le dossier puis tapez le nom du fichier et l’extension convenable.
3. Cliquez sur le bouton OK.
Le fichier est sauvegardé sous la forme d’un fichier qui présente les
caractéristiques mentionnées au cours de l’opération 2.
• Les fichiers de liste, les fichiers de liste DB, les fichiers de matrices, les
fichiers de table de configuration, les fichiers de configuration Windows, les
fichiers de variable et les fichiers zoom qui peuvent être révisés grâce aux
fonctions prévues pour cela, ne peuvent être sauvegardés que comme des
fichiers textes.
Lorsqu’un fichier est sauvegardé sous forme d’un fichier texte, les
caractères spéciaux sont placés entre deux @.
(Pour de plus amples détails concernant les symboles spéciaux, reportezvous au tableau de la page 62, “Tableau de conversion des symboles
spéciaux en caractères de fichier TXT”.)
• Les caractères alphanumériques peuvent être utilisés pour les désignations
de fichiers. Si un fichier de programme stocké avec une désignation de
fichier comprenant des caractères non-alphanumériques est tranmis à l’EL9900, la désignation de fichier pourrait changer.
3Impression
Procédez aux opérations du paragraphe “2 Impression d’un fichier” de la page 53, en
commençant par l’opération 2, puis imprimez le contenu de la page écran.
57
Page 60

Saisie d’écran
La saisie d’écran permet de charger sur l’ordinateur personnel les données de
l’image affichée sur les appareils EL-9900.
1 Choix d’un port de communication
Procédez aux opérations de paragraphe “1 Choix d’un port de communication” de la
page 51, en commençant par l’opération 1, de manière à choisir ce port.
2 Chargement des données image
Chargez les données de l’image affichée sur les appareils EL-9900.
1. Affichez sur les appareils EL-9900, l’image à charger.
2. Choisissez l’option Screen Capture que vous propose le menu Link.
La page de chargement des données image s’affiche sur l’écran.
3. Après la fin du chargement, les données de l'image sont affichées sur la page
Screen Image.
3 Sauvegarde et impression des données image
Les données image peuvent être sauvegardées sous la forme d’un fichier puis
imprimées à l’aide d’une imprimante reliée à l’ordinateur personnel.
(1)Sauvegarde
1. Chargez les données de l'image.
2. Sélectionnez Save As... dans le menu File.
La page “Save As” s'affiche.
3. Précisez l'unité et le dossier puis tapez le nom du fichier avec l'extension "tif" ou
"bmp".
4. Cliquez sur le bouton OK.
(2)Impression
1. Ouvrez l'image ou chargez ses données.
2. Le cas échéant, précisez le pourcentage d'impression de l'image.
3. Sélectionnez Print... dans le menu File.
La page Print Setting s'affiche.
4. Le cas échéant, précisez les options telles que l'étendue et le nombre de copies.
5. Cliquez sur le bouton OK.
La page Print Run s'affiche et le contenu de la page écran est imprimé.
58
Page 61

Copie d'écran dans un fichier Microsoft Word
®
L'installation de "EL-9900 Screen Capture Tool" vous permet de copier directement
l'image de la calculatrice EL-9900 dans un fichier Microsoft Word
®
.
1 Définition du port de communication
1. Assurez-vous que l'ordinateur personnel et la calculatrice EL-9900 sont reliés par
le câble de liaison fourni.
2. Démarrez Microsoft Word
Communication Port sur la barre de menu de
la calculatrice EL-9900. La boîte de dialogue
de définition du port de communication s'ouvre.
3. Sélectionnez le port que vous désirez utiliser,
ou bien sélectionnez Auto, puis cliquez sur le
bouton OK.
2 Copie d'écran dans un fichier Microsoft Word
1. Ouvrez le document Microsoft Word.
2. Placez le curseur à l'endroit où doit être insérée l'image saisie.
3. Cliquez sur l'icône de copie d'écran du menu Tool ou bien sélectionnez Screen
Capture sur la barre de menu de la calculatrice EL-9900.
®
puis sélectionnez
®
L'image saisie (bmp) est insérée à
l'emplacement du curseur.
Icône de copie d'écran
59
Page 62

Grouper et dégrouper des fichiers
1Grouper (Fusionner plusieurs fichiers de manière à n’en
former qu’un seul)
Vous avez la possibilité de créer un fichier de groupe en associant des fichiers qui
n’ont aucun point commun, ou bien en associant des fichiers qui ont un point
commun.
1. Choisissez l’option Group Files... que vous propose le menu Tools. La page de
sélectioin des fichiers à grouper, s’affiche.
2. Précisez le type de fichier, le répertoire et l’unité. Choisissez le fichier à fusionner
sur la liste des fichiers puis cliquez sur le bouton Select. Le nom du fichier choisi
apparaît dans la colonne File Selected. Répétez les mêmes opérations pour
sélectionner les autres fichiers à fusionner.
3. Lorsque vous avez terminé la sélection des fichiers à fusionner, cliquez sur le
bouton OK.
La page de sauvegarde s’affiche.
4. Procédez aux opérations du paragraphe “2 Sauvegarde sous un autre nom” de la
page 57, en commençant par l’opération 2, pour obtenir la sauvegarde de ce
groupe de fichiers.
2 Dégroupage (Séparation des fichiers formant un groupe)
1. Choisissez l’option Ungroup Files... que vous propose le menu Tools.
La page de sélection des fichiers de groupe à séparer, s’affiche.
2. Précisez le type de fichier, le dossier el l’unité. Choisissez le groupe de fichiers à
séparer sur la liste des fichiers puis cliquez sur le bouton OK.
La page de sélection de dossier et d’unité devant permettre la sauvegarde des
fichiers individuels après leur séparation, s’affiche.
3. Précisez le dossier et l’unité puis cliquez sur le bouton OK.
Le groupe de fichiers choisi au cours de l’opération 2 est séparé en fichiers
individuels qui sont sauvegardés selon les conditions précisées au cours de
l’opération 3.
60
Page 63

Conversion d’un fichier
1 Conversion d'un programme et de divers fichiers de
données en un fichier texte
REMARQUE:
1. Ouvrez ou affichez sur l'écran le fichier qui doit être converti en fichier texte.
2. Procédez aux opérations commençant en 1 ou "2 Sauvegarde sous un autre
nom" de la page 57, mais tapez "txt" comme extension.
Les fichiers suivants sont convertis en fichiers textes: fichiers de liste, les
fichiers de liste DB, les fichiers de matrices, les fichiers de table de configuration, les fichiers de configuration Windows, les fichiers de variable et les
fichiers zoom.
Lors de la conversion en fichier texte, les symboles spéciaux sont convertis
avec @s. (Pour de plus amples détails concernant les symboles spéciaux,
reportez-vous à la page 62, "Tableau de conversion des symboles spéciaux
en caractères de fichier TXT".)
2 Conversion d'un fichier texte programme en fichier
programme
Les fichiers textes programmes peuvent être convertis en fichiers programmes qui
peuvent être envoyés à la calculatrice EL-9900.
1. Ouvrez ou affichez sur l'écran le fichier texte programme qui doit être converti en
fichier programme.
2. Procédez aux opérations commençant en 1 ou "2 Sauvegarde sous un autre
nom" de la page 57, mais tapez "g4p" comme extension pour la calculatrice
EL-9900.
61
Page 64

ANNEXE
Tableau de conversion des symboles
spéciaux en caractères de fichier TXT
Après conversion en fichier TXT, les caractères sont placés entre deux @ (@ ... @).
Caractère
0
1
2
3
4
5
6
7
8
9
a
b
c
d
e
r
R
g
n
E
(-)
°
r
i
∠
θ
T
π
ˆ
p
_
x
_
y
≠
Conversion TXT
0
1
2
3
4
5
6
7
8
9
a
b
c
d
e
r
R
grad
n
EE
deg
rad
i
complex_angle
theta
T
pi
p_hat
x_mean
y_mean
not_=
Caractère
≥
≤
×
P
C
2
–1
3
⇒
10
Σ
∫
N
σ
χ
F
+
.
→
4
b
÷
int
Conversion TXT
>=
<=
x
frac
Per
Com
^2
^-1
^3
sto
root
10
SIGMA
integral
N
sigma
chi
stat_F
box
cross
dot
->
^4
^b
unit
intdiv
Les caractères en regard desquels se trouve une partie ombrée , sont gras.
62
Page 65

En présence d’une situation anormale
En cas d'exposition de l'appareil à un champ électrique puissant, ou encore à un
choc, tandis qu'il est en fonctionnement, une anomalie peut se produire et parfois
toutes les touches, y compris la touche ON de la calculatrice connectée, deviennent
inopérantes. En ce cas, reprenez la mise en service de l'appareil depuis le début ou
bien réinitialisez la calculatrice en procédant comme il est dit ci-dessous. Reportezvous au mode d'emploi de la calculatrice EL-9900.
Comment effectuer la réinitialisation
1. Au dos de la calculatrice, poussez la languette vers le bas pour ouvrir le
couvercle du logement des piles.
2. Replacez le couvercle et assurez-vous de son maintien.
3. Appuyez sur la touche ON .
Le message de confirmation s'affiche.
4. • Pour conserver le contenu de la mémoire:
Appuyez sur la touche ON . La page initiale est rétablie.
•Pour effacer le contenu de la mémoire:
Appuyez sur la touche CL tandis que le message ci-dessus est affiché. Le
contenu de la mémoire est effacé et le message suivant s'affiche.
Appuyez sur une touche quelconque pour afficher la page de calcul.
63
Page 66

MEMO/NOTIZEN/BLOC-NOTES
64
Page 67

Page 68

SHARP CORPORATION
PRINTED IN CHINA/GEDRUCKT IN CHINA/IMPRIMÉ EN CHINE
02DGK (TINSL0532EHZZ)
 Loading...