

Page 1

ELECTRONIC ORGANIZER
EL-6850
EL-6890
EL-6890S
OPERATION MANUAL
CONTENTS
Using the Organizer for the First Time ........................................ 1
When Abnormal Conditions Cause a Malfunction ....................... 1
Auto Power Off Function ............................................................. 1
Backlight ..................................................................................... 1
Adjusting the LCD Contrast ........................................................ 2
Turning the Key Touch Tone On and Off ...................................... 2
Freeing Up Memory .................................................................... 2
Part Names ...................................................................................... 3
Display Symbols .............................................................................. 4
Entering Characters .......................................................................... 4
Notes for the Built-in Calendar and the Time .................................... 5
Clock Mode ...................................................................................... 5
Note For Storing the Listings ............................................................ 8
Telephone/E-mail Mode .................................................................... 9
WWW Mode ................................................................................... 11
Calendar Mode ............................................................................... 12
Schedule Mode .............................................................................. 13
Memo Mode ................................................................................... 15
Anniversary Mode .......................................................................... 16
Recalling the Listings ..................................................................... 17
Editing the Listings ......................................................................... 19
Deleting the Listings ....................................................................... 19
Secret Function .............................................................................. 20
Calculator Mode ............................................................................. 22
Currency/Unit Conversion Mode .................................................... 23
Miscellaneous Functions ................................................................ 25
Using the Option Function .............................................................. 29
Battery Replacement ...................................................................... 32
Specifications ................................................................................. 35
Page 2

NOTICE
• SHARP strongly recommends that separate permanent written records be kept of all important data. Data may be lost or
altered in virtually any electronic memory product under certain circumstances. Therefore, SHARP assumes no responsibility
for data lost or otherwise rendered unusable whether as a result of improper use, repairs, defects, battery replacement, use
after the specified battery life has expired, or any other cause.
• SHARP assumes no responsibility, directly or indirectly, for financial losses or claims from third persons resulting from the
use of this product and any of its functions, such as stolen credit card numbers, the loss of or alteration of stored data, etc.
• This Organizer is not designed to visit Web sites or transfer/receive e-mails by using the URL or E-mail addresses you will
store.
• The information provided in this manual is subject to change without notice.
CAUTIONS
• Do not carry the Organizer in the back pocket of slacks or trousers.
• Do not drop the Organizer or apply excessive force to it.
• Do not subject the Organizer to extreme temperatures.
• Since this product is not waterproof, do not use it or store it where fluids can splash onto it. Raindrops, water spray, juice,
coffee, steam, perspiration, etc. will also cause malfunction.
• Clean only with a soft, dry cloth.
• Use only a SHARP approved service facility.
NOTES
• Unless otherwise specified, the text material applies to ALL 3 models.
• Some of the models described in this manual may not be available in some countries.
• All company and/or product names are trademarks and/or registered trademarks of their respective manufactures.
Page 3
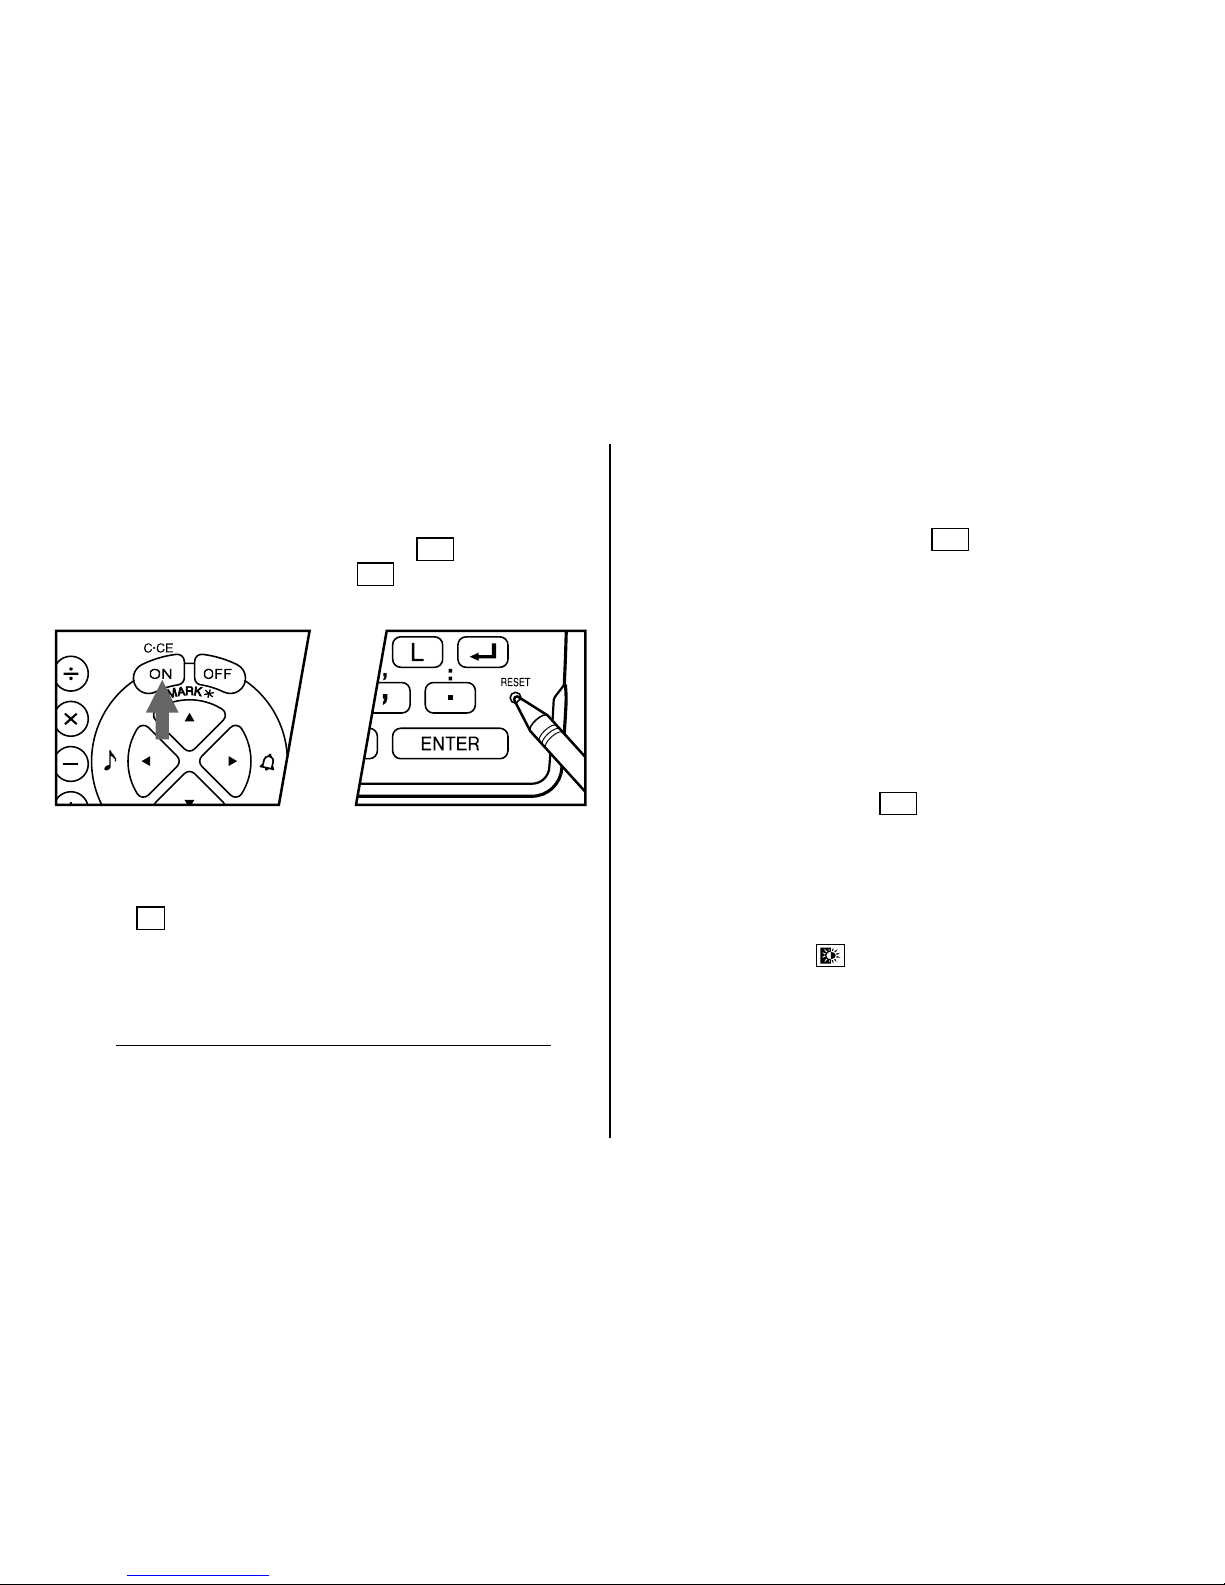
1
Using the Organizer for the First Time
Be sure to perform the following operations before using the
Organizer for the first time.
1. Press the RESET switch while holding
ON
. Release the
RESET switch and then release
ON
.
“CLEAR ALL DATA OK (Y/N) ?” is displayed.
• Under certain conditions the message may appear as
“Data has been impaired ! Press [Y] to CLEAR ALL
memory”. Proceed to the next step in either case.
2. Press
Y
.
3. The Organizer is now initialized. Proceed to set the date
and time of the clock. (Refer to page 7.)
Press the RESET switch with a ball-point pen or similar
object.
Do not use an object with a breakable or sharp tip.
When Abnormal Conditions Cause a Malfunction
If the Organizer is subjected to strong, extraneous electrical
noises or shocks during use, an abnormal condition may
occur in which no keys (including
ON
) will respond. If this
happens, press the RESET switch.
Noises or shocks may erase some or all of the Organizer’s
memory.
Auto Power Off Function
When none of the keys have been pressed for approximately
7 minutes, the Organizer automatically turns the power off to
save the batteries. (The actual time may vary depending upon
the condition of use.) Press
ON
to resume operation.
Backlight
The Organizer provides a built-in Backlight, which allows you
to view the display and use the Organizer even in low-light
conditions. Pressing
once illuminates the display for as
long as you continue to use the Organizer, until you have not
typed any key for the interval you set. (See the following
section, “Setting up the Backlight”.)
Page 4
2
• To turn the Backlight off, press again.
• The Backlight may remain on for less than the set interval
or it may not function if the battery level is very low.
• The Backlight does not function during data transfer.
★
Do not use the Backlight unnecessarily.
• Since the Backlight drains power from the operating
batteries, excessive use of the Backlight will
significantly reduce the life of your batteries.
• Do not continue using the Organizer after it has
automatically turned itself off while the backlight was
being used. Even if it can be turned on again, the clock
time will be incorrect and other functions may not work
properly until the batteries are replaced.
Setting up the Backlight
You can change the interval after which the Backlight turns
off automatically.
1. Press
2nd
MENU NEXT
3.
2. Press
or to change
interval (15 – 60 seconds).
3. Press
ENTER
.
Adjusting the LCD Contrast
1. Press
2nd
MENU
3.
2. Press
or to darken or
lighten the display as
required.
3. Press
C•CE
after adjusting the contrast.
Turning the Key Touch Tone On and Off
The key touch tone is turned on and off by pressing
2nd
.
Freeing Up Memory
When you turn the power on, the following message may be
displayed, asking you to free up memory by deleting
unnecessary space.
Press
Y
to delete it. Freeing
up memory requires not more
than one minute.
Press
N
when you wish to
start the operation soon. (Refer to page 28.)
CAPS
<
B/L SETUP
>
TURN OFF AFTER
15 30 45 60
SECONDS
<
LCD CONTRAST
>
–DARK
–LIGHT
CAPS
DO YOU WANT TO
FREE UP
MEMORY ?
(Yes/No
)
CAPS
Page 5
3
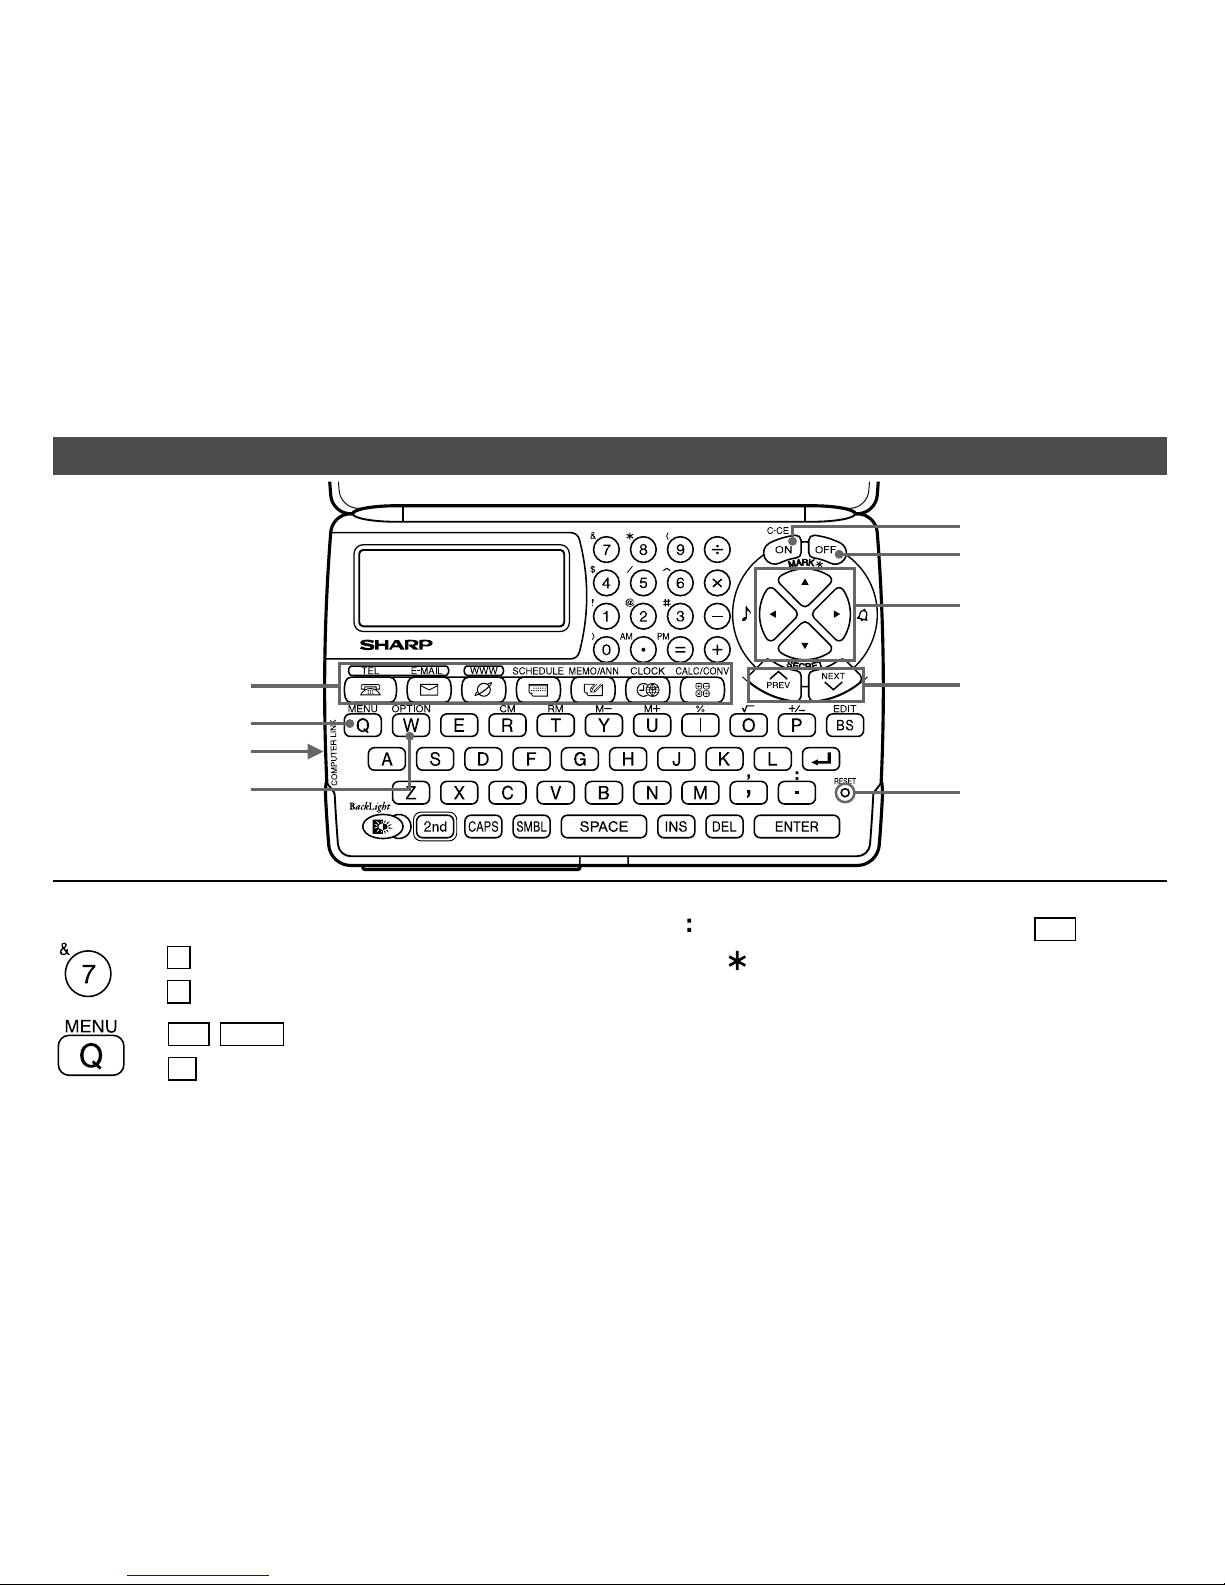
Part Names
OPTION key
MENU key
Mode keys
Computer link
Cursor movement keys
Power ON key
Power OFF key
RESET switch
Search keys
: Indicates the & key.
: Indicates the numeric 7 key.
: Indicates the MENU key.
: Indicates the alphabetic Q key.
To access the symbols above the number key (*1) and “
,
”
and “
”, press the desired key after pressing
2nd
.
*1 … &, , (, $, /, ∧ , !, @, #, )
* Numbers and letters and space between them for entering
are shown as unboxed numbers and letters.
In this manual the keys are represented by symbols,
for example:
→
&
→
7
→
2nd MENU
→
Q
Page 6

4
Display Symbols
:A “beep” will sound when a key is pressed.
:The schedule alarm will sound.
CAPS
:Capital (uppercase) letters will be entered. To enter
small (lowercase) letters, turn “CAPS” off by
pressing
CAPS
.
EDIT
:The listing on the display can be edited.
2nd
:Indicates that
2nd
has been pressed. The function
or character shown in yellow (or green) above the
keypad can be used next.
:More information exists above the current display.
(Press
.)
:More information exists below the current display.
(Press
.)
S
:Secret function is in effect. (Secret listings cannot be
recalled without a password.)
:Indicates that the recalled listing is secret.
BATT
:Indicates that the operating battery level is low.
• In this manual, only the symbols necessary for
explanation will be shown.
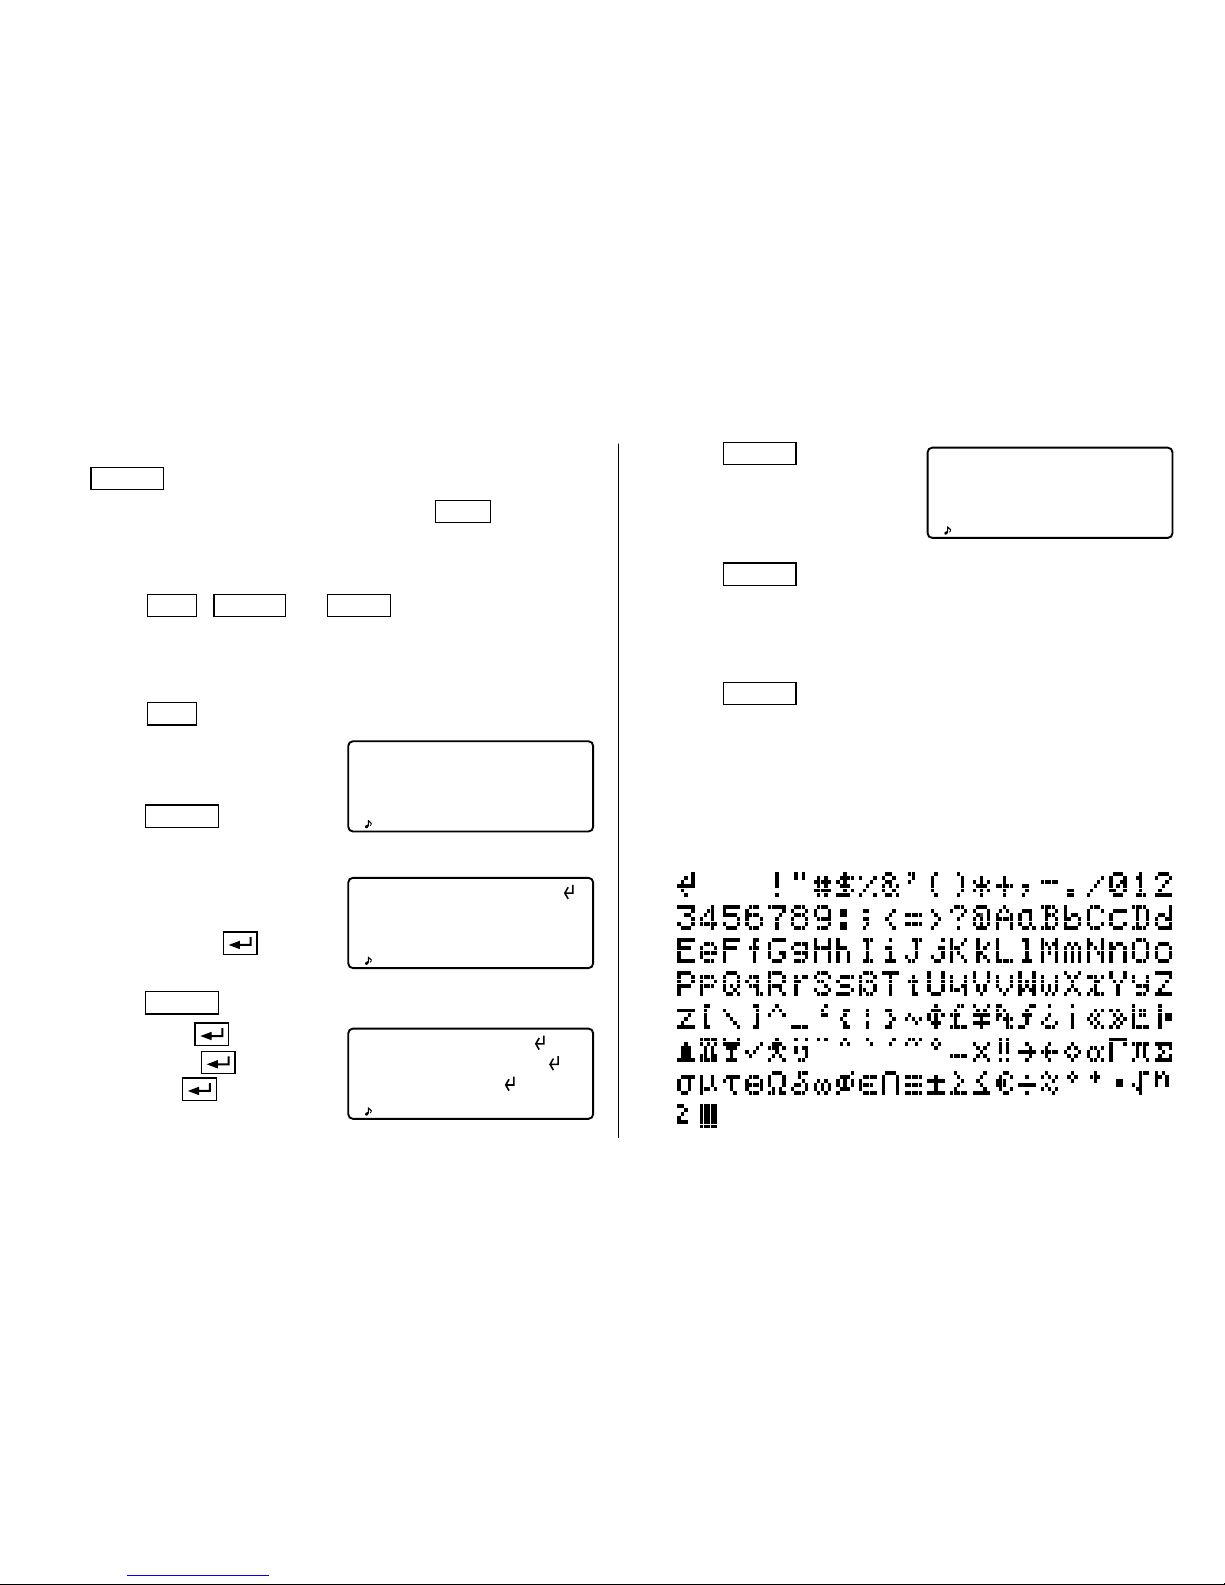
Entering Characters
1.Moving the Cursor
The cursor ( _ or ) can be moved by pressing (or holding
down)
, , , or .
2.Entering Characters
(1) Entering Letters and Numbers
After initializing the Organizer, the default setting for entering
letters will be capital (uppercase) letters. To enter small
(lowercase) letters, turn “CAPS” off by pressing
CAPS
.
• To enter “ ’ ” or “ : ”, press , or : after pressing
2nd
.
(2) Entering graphic symbols and special characters
Press
SMBL
to display the symbol entry mode, allowing a
total of 90 symbols and characters to be selected. To select
the symbol display containing the desired symbol/special
character, press
NEXT
or
PREV
, then press the number
corresponding to it.
• The first display is determined by your previous choice.
The 5 most recently used symbols/special characters are
stored and displayed on this display.
Press
SMBL
to exit the symbol entry mode.
Page 7
5
3.Making Corrections
(1) Inserting characters
Press
INS
to change the cursor from “■” (replace) to “ ”
(insert).
Press
INS
again to change the cursor from “ ” to “■”.
(2) Deleting characters
Press
DEL
or
BS
to delete the character.
•
DEL
and
BS
will not operate in some cases such as
when inputting time during the schedule entry or when
using the calculator. In these cases, press the
C•CE
key
and reenter.
• Press
C•CE
to clear all characters on the current display.
Notes for the Built-in Calendar and the Time
• Calendar, Schedule, and Clock modes allow you to enter
the desired date and time between Jan. 1, 1901 and Dec.
31, 2099.
• If an attempt is made to store an invalid time or date, you
cannot move the cursor to date entering, or cannot store
time and date by pressing
ENTER
. Enter the correct
value and press
ENTER
again.
CAPS
NEW YORK [H
]
MON JAN 1 01
0:00
Day of the week/
Month/Day/Year
Time
LONDON [W
]
MON JAN 1 01
(+
5 00
)
5:00
CAPS
Time
Day of the week/
Month/Day/Year
Home city indication
World city indication
Clock Mode
The Organizer has both Home and World clocks. The display
switches between Home and World clock each time
CLOCK
is pressed.
Home clock World clock
“(+ 5:00)” indicates the time difference from the Home city.
1.Setting the Home Clock
(1) Setting and changing the Home city
Set your local city as the Home city by selecting its zone
number.
Page 8
6
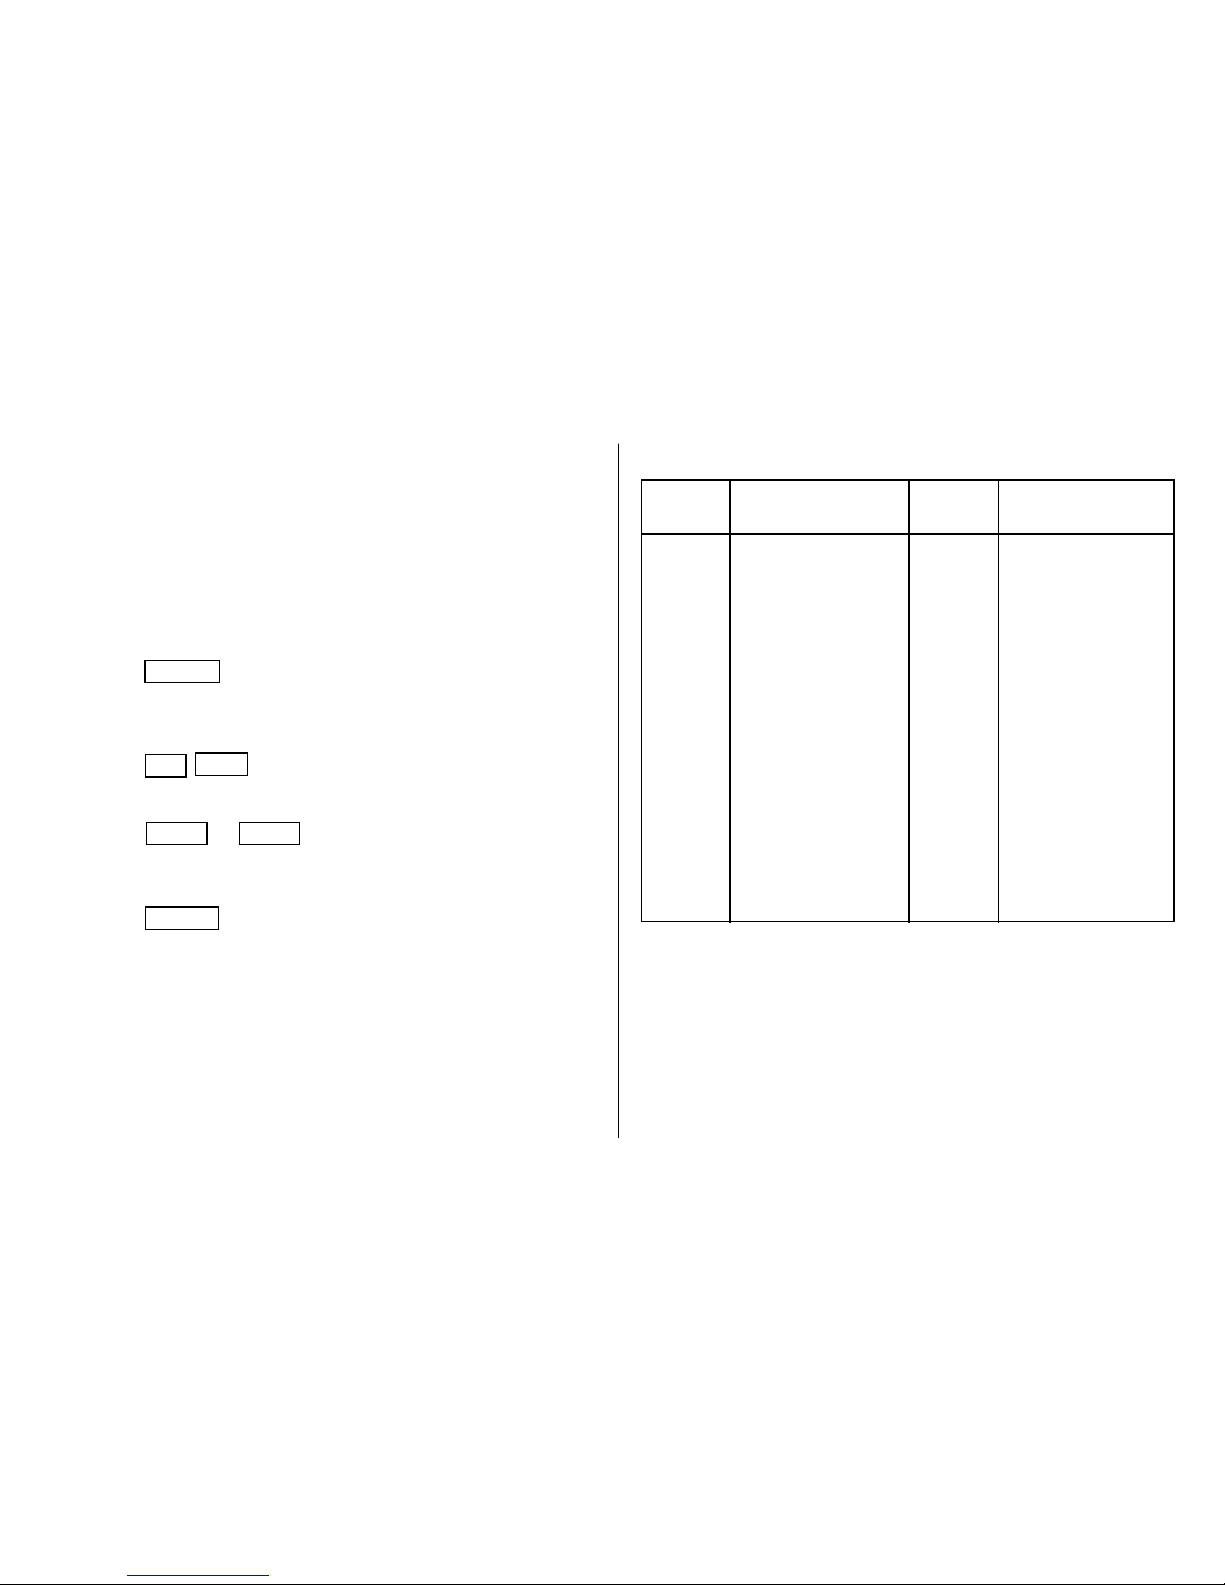
Zone
City
Zone
City
number number
0 10 MOSCOW
1 AUCKLAND 11 CAIRO
2 NOUMEA 12 PARIS
3 SYDNEY 13 LONDON
3.3 ADELAIDE 14
4 TOKYO 15
5 HONG KONG 16 RIO DE JANEIRO
6 BANGKOK 17 CARACAS
6.3 YANGON 18 NEW YORK
7 DHAKA 19 CHICAGO
7.3 NEW DELHI 20 DENVER
8 KARACHI 21 LOS ANGELES
8.3 KABUL 22 ANCHORAGE
9 DUBAI 23 HONOLULU
9.3 TEHRAN 24 MIDWAY
Zone numbers are based on the distance of the zones from
the international date line (zone number zero). For example,
there is a 13-hour difference between the date line and
London (London is 13 hours behind), so the zone number for
London is 13. Honolulu is 23 hours behind the date line, so
its zone number is 23.
The names and zone numbers of 27 cities are stored in the
Organizer's memory. (Refer to this page.)
1. Press
CLOCK
once or twice to display the Home clock.
• The initial Home city after initialization of the Organizer is
New York.
2. Press
2nd
EDIT
to enter the edit mode.
• “18” on the display indicates the time zone.
3. Press
NEXT
or
PREV
to display the desired city which
correspond to your local zone from the cities stored in the
Organizer.
4. Press
ENTER
to set the Home city.
• Some city names are abbreviated on the display as
follows:
HONG KONG → HONGKONG, NEW DELHI → DELHI,
RIO DE JANEIRO → RIO, LOS ANGELES → L.A.,
ANCHORAGE → ANC.
• Zone numbers 0, 14, and 15 have no city name display.
Page 9
7
(2) Setting the Clock
<Example>
Set the date and time to February 8, 2001, 10:05
PM.
1. Press
CLOCK
once or twice to display the Home clock.
2. Press
2nd EDIT
.
• The cursor will flash.
3. Enter the hour and minutes.
1005
PM
(For the 24-hour clock, press
2205
.)
(Enter 2 digits each for both hour and minutes.)
4. Enter the month, day, and year.
02082001
Use to skip entering a number that needs no change.
5. Press
ENTER
. The clock starts from 0 seconds.
• The time can be displayed using either the 12-hour AM/
PM system or the 24-hour system (default). To change the
time system, refer to page 27, “Selecting the Time
System”. AM or PM is displayed for the 12-hour clock. For
this example, set the 12 hour clock.
(Note: 12:00PM: noon, 12:00AM: midnight)
NEW YORK 18
MON JAN 1 01
0:03
CAPS
2.Using the World Clock
(1) Changing the city for the World clock
1. Press
CLOCK
once or twice to display the World clock.
2. Press
2nd EDIT
to enter the edit mode.
3. Press
NEXT
or
PREV
to display the city which
corresponds to the desired zone.
4. Press
ENTER
.
• The date and time need to be changed in the edit mode of
the Home clock.
3.Registering a City Name not Found in the List
If you want to set the city for the World clock to Rome, for
example (Rome belongs to the zone number 12, but is not
included in the city list):
1. Press
CLOCK
once or twice to display the World clock.
2. Press
2nd EDIT
to enter the edit mode.
3. Press
NEXT
(or
PREV
) to set the zone number to 12.
(Initially the city is Paris.)
4. Enter the city name (up to 8
characters).
ROME (Press
DEL
to delete unnecessary
character(s), if necessary.)
ROME 12
FRI FEB 9 ©01
4:05
A
CAPS
Page 10

8
(2) World clock
1. Press
CLOCK
once or twice to display the World clock.
2. Press
2nd EDIT
, then
2nd
ENTER
.
Setting DST in the World clock automatically sets the time
one hour ahead.
• When DST is set for one World city, it is used for all cities
displayed in the World clock.
(3) Clearing DST
To clear DST, follow the steps 1 to 4 for Home clock, or
follow the steps 1 and 2 for World clock.
A “
” disappears.
Note For Storing the Listings
If the memory is full, “MEMORY FULL” will be displayed
briefly and the listing cannot be stored. Delete unnecessary
data and free up memory to make enough space to store new
listings. (Refer to pages 26, 28.)
5. Press
ENTER
to store the new name.
• To register a city name for the Home clock, first display
the Home clock then
2nd EDIT
followed by to
move the cursor to the city name line.
• Only one changed city name can be stored in each of the
Home and World clocks.
• Each changed name is stored until you change the zone
number next time.
4.Setting Daylight Saving Time/Summer Time
If DST (daylight saving time/summer time) is used, the local
time is advanced one hour during the summer.
• DST can be set independently in either the Home or the
World clock. For example, if DST is set for the Home
clock, it does not have to be set for the World clock.
(1) Home clock
1. Press
CLOCK
once or twice to display the Home clock.
2. Press
2nd EDIT
to enter the edit mode.
3. Enter the correct daylight saving time/summer time.
4. Press
2nd ENTER
to set the time as DST.
A “
” appears on the display and DST is now set.
Page 11
9
Telephone/E-mail Mode
Telephone/E-mail listings can be accessed by pressing either
of
TEL
or
E-MAIL
, while both keys recall the same stored
listings respectively in each order on the display.
TEL
recalls and displays the listing in the following order:
NAME → NUMBER → ADDRESS → E-MAIL, while
E-MAIL
does in the following order: NAME → E-MAIL → NUMBER
→ ADDRESS.
Further, Telephone/E-mail listings are divided into 2 files
(TEL/MAIL1, TEL/MAIL2). You can switch them for
convenience by using one for business and one for personal.
The files are cycled each time you press
TEL
or
E-MAIL
.
↔
↔
TEL/MAIL 1
NAME ?
(
TEL MODE
)
CAPS
TEL/MAIL 2
NAME ?
(
TEL MODE
)
CAPS
TEL/MAIL 1
NAME ?
(
E–MAIL MODE
)
CAPS
TEL/MAIL 2
NAME ?
(
E–MAIL MODE
)
CAPS
TEL
E-MAIL
135
the same stored listing
135
the same stored listing
In Telephone/E-mail mode, a listing consists of 4 entries:
name, number, postal address, and E-mail address. The
maximum number of characters that can be entered for each
listing is 512 in all.
Number entry
Address entry
→
E-mail address entry
→
NUMBER ?
CAPS
ADDRESS ?
CAPS
E–MAIL ?
CAPS
Name entry
TEL/MAIL 1
NAME ?
(
TEL MODE
)
CAPS
←
1.Designating the File Names
You can change each file name up to 10 characters long as
follows:
1. Press
2nd MENU NEXT
2
.
2. Enter the new name for TEL/
MAIL1, then press
ENTER
.
CAPS
<FILE NAME
>
1:[TEL/MAIL 1
]
2:[TEL/MAIL 2
]
3:[ URL
]
Page 12
10
Space
edwards@abcd.e
fg.com
–
6. Press
ENTER
, then enter
the E-mail address. For
example,
edwards@abcd.efg.com
7. Press
ENTER
.
“STORED !” will be displayed briefly, then the listing will
be displayed.
• To skip entering the number, address, or E-mail address,
press
ENTER
when “NUMBER ?”, “ADDRESS ?”, or “EMAIL ?” is displayed. However, the name entry can not be
skipped.
• Regardless of the entry order, listings in the Telephone/Email mode are stored internally according to the first
character of the person’s name in the following order:
201–265–5600
CAPS
F 265–1234
–
Edwards Bob
–
Supervisor
Sales dept.
ABCD co.
15 North St.
–
• You can skip changing an each file name by pressing
ENTER
.
• To cancel entering the filenames, press
C•CE
twice.
3. Perform the same procedure as step 2 for TEL/MAIL2 and
URL.
4. Press
TEL, E-MAIL
, or
WWW
to check the new file
name(s).
2.Storing Telephone Listings
1. Press
TEL
to display the TEL/MAIL1 entry prompt.
2. Enter the name. For example,
Edwards Bob
3. Press
ENTER
.
The number entry prompt is displayed.
4. Enter the phone number.
For example,
201-265-5600
F 265-1234
5. Press
ENTER
, then enter the address. For example,
Supervisor
Sales dept.
ABCD co.
15 North St.
Page 13

11
WWW Mode
WWW mode is used exclusively for storing URL (Uniform
Resource Locator) and its remark which reminds you of the
URL contents. In this mode, a WWW listing consists of 3
entries: name, URL, and remark.
1.Storing WWW Listings
1. Press
WWW
to display the
name entry prompt.
2. Enter the name. For example,
SHARP ELECTRONICS CO.
3. Press
ENTER
.
The URL entry prompt
including “www.” is
displayed.
• You can edit “www.” if necessary.
4. Enter the URL. For example,
sharp-usa.com
URL
NAME ?
CAPS
www.sharp–usa.
com
–
URL ?
CAPS
www.
–
5. Press
ENTER
.
The REMARK entry prompt is displayed.
6. Enter the Remark. For
example,
ELECTRONICS
7. Press
ENTER
.
“STORED !” will be
displayed briefly, then the
listing will be displayed.
• The maximum number of characters (including “www.”)
that can be entered for each listing is 512 in all.
SHARP ELECTRON
ICS CO.
www.sharp–usa.
com
CAPS
ELECTRONICS
–
CAPS
Page 14

12
Calendar Mode
Calendar mode is selected by pressing
SCHEDULE
once or
twice. Each time you press this key, the display switches
between Calendar and Schedule modes.
1.Controling the Monthly Calendar Display
The Organizer has a 4-line display and 4 weeks of a month
can be displayed. Use the following keys to control the
display status.
PREV
NEXT
:display the following (or previous) month.
•Hold down either of these keys for rapid
recall.
:move the cursor or scroll the calendar up
(or down) one week.
1. Press
SCHEDULE
once or
twice to display the Calendar
mode.
•“
” indicates the first week of the month is hidden
above. To display the first week, press
until the cursor
scrolls into the previous screen.
2. Press
NEXT
(
PREV
) to display the calendar for the
next (previous) month.
• In the year display, a “ ’ ” is attached to the years 1901 to
1999, while no mark is attached to the years 2000 to
2099.
2.Returning the Calendar to the Current Date
Press
2nd
SCHEDULE
in Calendar mode.
• The current monthly calendar will be displayed, and the
current date will flash.
4 5 6 7 8 9
10
25 26 27
28
11 12 13 14 15 16
17
18 19 20 21 22 23
24
01
2
CAPS
THU FEB 8 '01
TIME ?
CAPS
4 5 6 7 8 9
10
25 26 27
28
11 12 13 14 15 16
17
18 19 20 21 22 23
24
01
2
CAPS
↔
Calendar mode Schedule mode
Page 15

13
Schedule Mode
Schedule mode is selected by pressing
SCHEDULE
once or
twice. Each time you press this key, the display switches
between Schedule mode and Calendar mode.
A schedule listing consists of 3 entries: date, time, and detail.
The maximum number of characters for each detail is 512. In
the date entry, 4 digits can be entered for the year and 2
digits each for the month, day, hour, and minute.
1.Storing Schedule Listings
There are 3 ways to entering the desired date:
(1) Entering the desired date in Calendar mode
(2) Entering the desired date with
NEXT
(or
PREV
)
(3) Entering the desired date directly
After the date has been entered, actual entry of time and
detail is the same for all 3 ways.
(1) Entering the desired date in Calendar mode
<Example>
Enter the following data.
“Lunch with Tom” from 11:30 AM to 1:00 PM on
February 24, 2001.
1. Press
2nd SCHEDULE
in Calendar mode to display the
calendar for the current date (February 8, 2001).
2. Press
, , , or to move the cursor to February
24, 2001.
3. Press
SCHEDULE
to
change to the Schedule
mode. Time entry prompt is
displayed.
• Multiple listings can be scheduled on the same date.
4. Enter the starting and ending time.
1130
AM
01
PM
(For the 24-hour clock, press 1130 13 .)
“DESCRIPTION ?” is displayed.
• “:00” will be entered automatically.
• You can enter schedule details without the ending time.
Press
ENTER
(or ) after entering the starting time to
display “DESCRIPTION ?” prompt.
• You can also enter schedule details without specified time,
except details starting with a number. Skip entering time
and start to enter letters for the details as described in
step 5.
• The hour and minute should each consist of 2 digits.
SAT FEB 24 '01
TIME ?
CAPS
Page 16

14
SAT FEB 24 '01
11:30
A~ 1:00 P
Lunch with Tom
–
4 5 6 7 8 9
10
25 26 27
28
11 12 13 14 15 16
17
01
2
18 19 20 21 22 23
24
• The time can be set using either the 12-hour or 24-hour
format. When you move the cursor to the next entering,
the time is displayed in the format selected in the Time
System of the MENU functions.
• If an attempt is made to store an invalid time, you cannot
move the cursor to the next entering. Enter the correct
time and follow the next procedure.
5. Enter the schedule detail.
Lunch with Tom
6. Press
ENTER
to store the listing.
7. Now, press
SCHEDULE
to
check if the listing is stored
in memory.
• Notice the tag (
) next to “February 24”. It indicates a
schedule item for that date:
Schedule item beginning in the morning
Anniversary item
Schedule item beginning after the noon
(2) Entering the desired date with
NEXT
(or
PREV
)
This way is convenient for entering a nearby date. Press
NEXT
(or
PREV
) and change the display day by day until
the desired date appears.
<Example>
Enter a schedule listing on February 11, 2001.
1. Press
SCHEDULE
once or twice to display the Schedule
mode screen.
2. Press
2nd SCHEDULE
to display time entry prompt for
the current date (February 8, 2001).
3. Press
NEXT
repeatedly until time entry prompt for
February 11, 2001 appears. Enter the time and detail
following the procedure for “(1) Entering the desired date
in Calendar mode” (from step 4) on page 13.
(3) Entering the desired date directly
When the date is not close to the currently displayed date,
this way is more convenient than the above 2 ways.
<Example>
Enter a schedule listing on November 26, 2001.
1. Press
SCHEDULE C•CE
to display the date entry
prompt.
MM/DD/YYYY
MONTH :02
DAY :08
YEAR :2001
CAPS
Page 17

15
2. Enter the date.
11262001
3. Press
ENTER
. Time entry prompt (or Calendar) for
November 26, 2001 is displayed. Enter the time and detail
following the procedure for “(1) Entering the desired date
in Calendar mode” from step 4 (or from step 3) on page
13.
• If an attempt is made to store an invalid date, you cannot
move to the time entry prompt. Enter the correct date and
follow the next procedure.
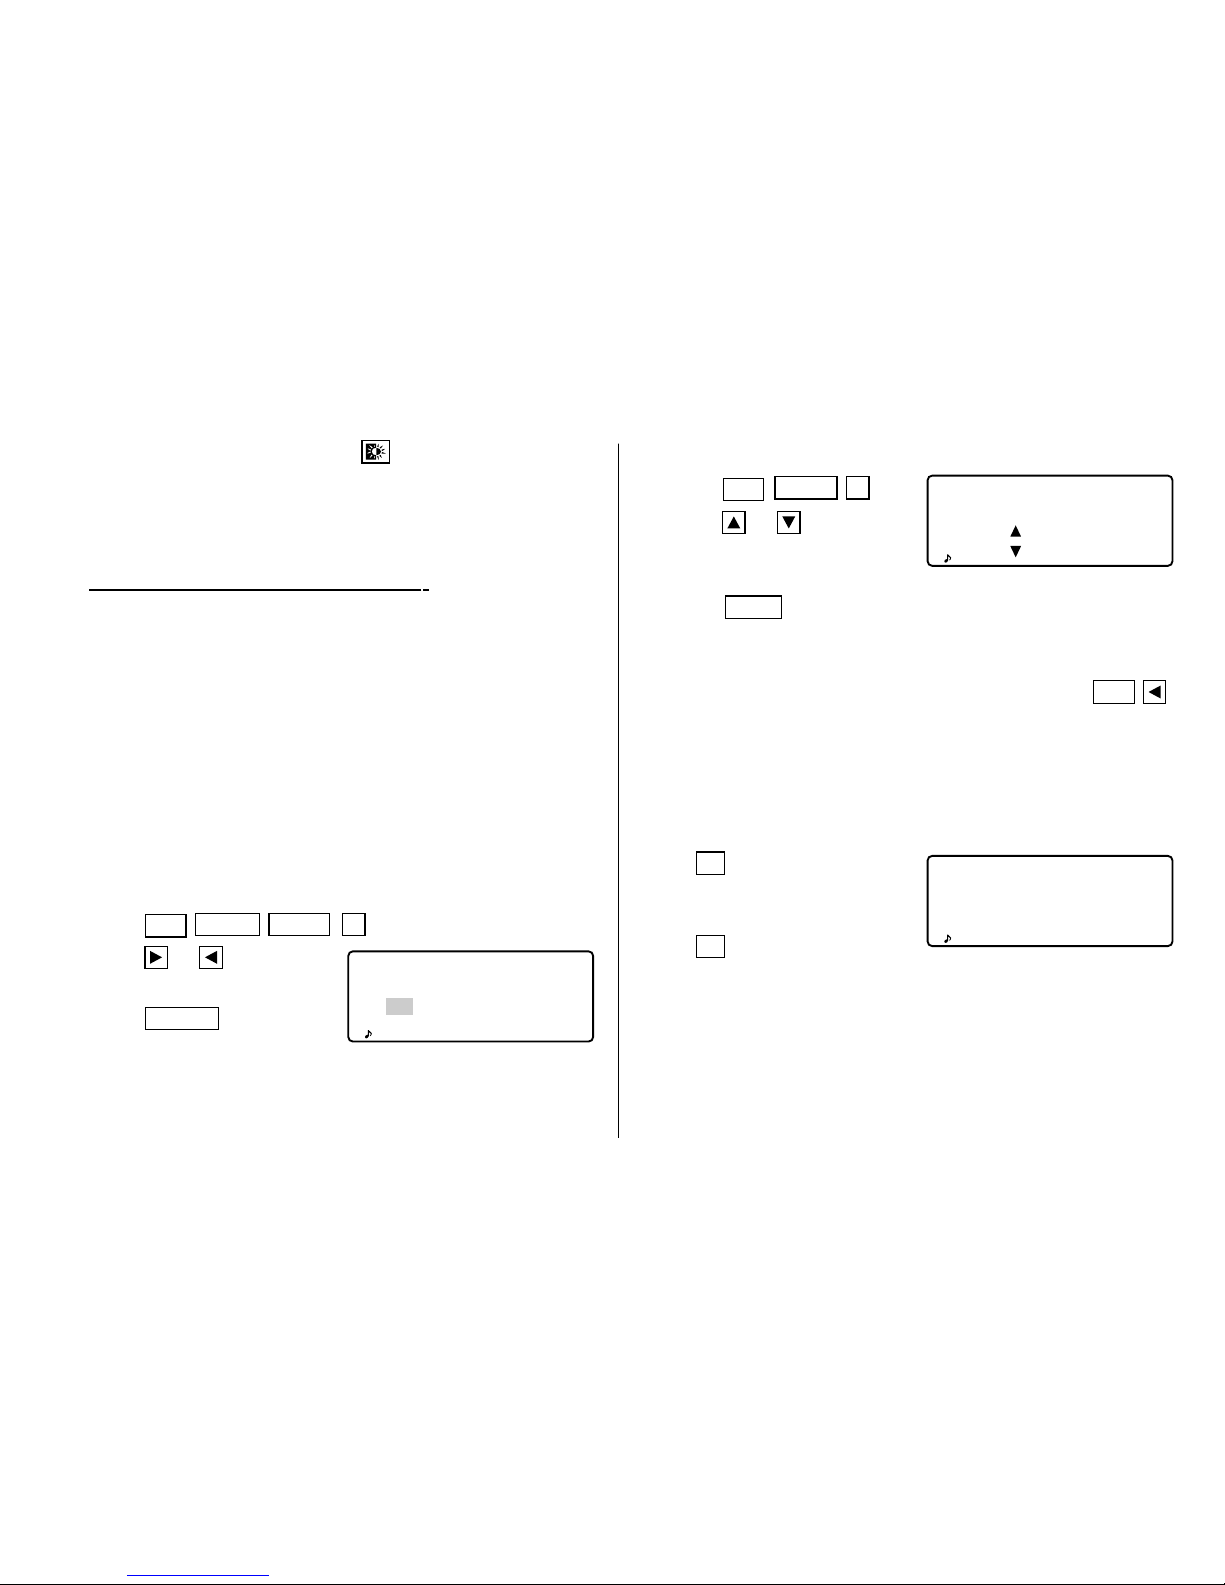
2.Schedule Alarm
Schedule alarm sounds for approximately 20 seconds when
the time set for a schedule listing is reached. The alarm
sounds when a “
” is on the display.
Press
2nd
to turn the “ ” on and off.
• When the “ ” is turned on, alarms will sound for all
schedule listings with that starting time. You cannot
classify or declassify each listing.
• Press
C•CE
to turn the alarm off.
Memo Mode
Memo mode is selected by pressing
MEMO/ANN
once or
twice.
The maximum number of characters for each memo is 512.
1.Storing Memo Listings
1. Press
MEMO/ANN
once
or twice to display the
Memo entry prompt.
2. Enter the data.
3. Press
ENTER
.
MEMO
CAPS
TITLE ?
Page 18

16
Anniversary Mode
Anniversary mode is selected by pressing
MEMO/ANN
once
or twice. Each time you press this key, the display switches
between Memo and Anniversary modes.
In Anniversary mode, you can store anniversaries, such as
birthdays, so that you can recall these important dates easily.
Once a date is stored as an anniversary, the date will be an
anniversary for every year from 1901 to 2099.
The maximum number of characters for each label is 512.
Anniversaries are marked with a tag (
) in the center right of
the date in the monthly calendar.
1.Storing Anniversary Listings
1. Press
MEMO/ANN
once or
twice to display the
Anniversary entry prompt.
2. Enter the date and press
ENTER
(or ) to enter the
label. For example,
0212
ENTER
FEB 12
–ANN–
Nancy's Birthd
ay
–
FEB 12
–ANN–
DESCRIPTION ?
FEB 12
–ANN–
Nancy's Birthd
ay
M/D=– /
–ANN–
M=MONTH D=DAY
CAPS
• If an attempt is made to store an invalid date, you cannot
move to the label entry prompt. Enter the correct date and
follow the next procedure.
3. Enter the label of the
anniversary. For example,
Nancy’s Birthday
4. Press
ENTER
to store in
memory.
Page 19

17
Recalling the Listings
1.Notes for Recalling the Listings
• Perform searching the listings in each mode other than
Clock, Calculator, or Conversion mode.
• When the symbol “
” or “ ” is displayed, more
information exists. Pressing
or scrolls up or down
one line.
• When there are no more (or relevant) listings to be
recalled or to be searched, “NOT FOUND !” is displayed
briefly and the display returns to the entry prompt.
2.Sequential Search
Recalls listings in order in each mode.
Press
NEXT
(or
PREV
) to recall listings in forward (or
reverse) order. Hold down either of these keys for rapid
recall.
Schedule listings
• When nothing has been entered for that day, only the time
entry prompt is displayed.
• Press
2nd SCHEDULE
in Schedule mode to recall
today’s schedule listings. Then press
NEXT
repeatedly to
check if the other listings are scheduled for today.
• Press
2nd NEXT
(or
2nd
PREV
) in Schedule mode
repeatedly to recall listings skipping empty dates. Press
C•CE C•CE
, then press
2nd NEXT
(or
2nd
PREV
) to display the first (or last) listing in chronological order. After the last (or first) listing in chronological
order has been found, “NOT FOUND!” is displayed briefly.
3.Direct Search
Recalls listings by the first character(s) of the name (or the
contents) in Telephone/E-mail, WWW, Schedule, or Memo
mode.
1. Enter the first character(s) of the desired name in each
mode.
2. Press
NEXT
(or
PREV
).
• The search in Schedule mode begins from the currently
displayed date in forward (or reverse) order.
• If the desired listing in Telephone/E-mail or WWW mode is
not in memory, the subsequent listing in sequential order
will be displayed.
• Each time
NEXT
(or
PREV
) is pressed, sequential
search will be performed.
Page 20

18
4.Keyword Search
Recalls listings by a word contained in the desired listing in
Telephone/E-mail, WWW, Schedule, or Memo mode.
<Example>
Recall listings containing the word “ABCD co.”
in the TEL/MAIL1 file.
1. Press
TEL
to display the TEL/MAIL1 file.
2. Enter the keyword.
ABCD CO.
• The keyword can be entered in either capital (uppercase)
or small (lowercase) letters.
The listings will be recalled regardless of whether the
keyword is entered in capital (uppercase) or small
(lowercase) letters.
3. Press
2nd NEXT
.
• Each time
2nd NEXT
are
pressed, subsequent listings
containing the word “ABCD
co.” will be displayed.
5.Date Search
Recalls listings by the date in Calendar, Schedule, or
Anniversary mode.
Calendar or Schedule listings
<Example>
Recall the calendar for December 25, 2001.
1. Press
SCHEDULE
.
2. Press
C•CE
to display the
date entry prompt. To make
a correction, move the
cursor with
or , or
press
C•CE
to clear the displayed date.
3. Enter the month, day, and year.
12252001
• To enter a single-digit month or day, enter zero and the
digit.
4. Press
ENTER
.
The specified calendar or schedule will be displayed.
Anniversary listings
In the Anniversary entry prompt, enter the date and then
press
NEXT
(or
PREV
).
MM/DD/YYYY
MONTH :02
DAY :08
YEAR :2001
CAPS
Edwards Bob
201–265–5600
F 265–1234
Supervisor
CAPS
Page 21

19
Editing the Listings
1.Editing Listings
1. Recall the listing to be edited.
2. Press
2nd EDIT
to enter the edit mode. The cursor
flashes.
3. Edit the listing.
4. Press
ENTER
.
2.Creating a New Listing
Pressing
2nd ENTER
in step 4 above creates a new listing
without deleting the previously stored listing.
This operation is useful when you enter a new listing whose
contents are the same as or similar to the previously stored
listing.
Deleting the Listings
1.Deleting One Listing
1. Recall the listing to be deleted.
2. Press
DEL
. “DELETE ? Y/N” will appear.
3. Press Y to delete the currently displayed listing.
• To cancel the deletion operation, press
N
.
2.Deleting All of the Listings in Each Mode
Refer to “4. Deleting the Data” on page 26.
Deleting all of the listings for an entire month
1. Press
SCHEDULE
once or twice to recall the calendar for
the desired month.
2. Press
DEL
. “DELETE ? Y/N” will appear.
3. Press
Y
to delete all of the schedule listings for the
currently displayed month.
• To cancel the deletion operation, press
N
.
• Although all of the schedule listings for the month are
deleted, anniversaries are still retained.
Page 22

20
Secret Function
The Secret function allows you to protect confidential listings
with a password, so that no unauthorized person can recall
them.
1.Registering a Password
Up to 7 characters can be registered for the password.
If you forget the password, it will be necessary to
clear the password and all secret listings from the
memory (see page 27). As a safeguard, make a
written record of the password.
1. Press
2nd SECRET
.
• If “ALLOW ACCESS TO
SECRET DATA” is displayed
instead, a password is
already registered.
To delete and change the password, refer to page 22.
2. Enter the password. For example,
1234567
ENTER
“PASSWORD [1234567] IS NOW SET” is displayed.
SET PASSWORD
[
–
]
CAPS
ALLOW ACCESS
TO SECRET DATA
[
–
]
CAPS
3. Press
C•CE
to display the entry prompt.
A “S” indicates the Secret function is in effect.
2.Turning the Secret Function On and Off
When the Secret function is on, a “S” is displayed. When
the Secret function is off, the “
S
” is cleared even after the
password is registered.
(1) Turning the Secret function off
1. Press
2nd
SECRET
.
2. Enter the password and
press
ENTER
.
(Enter “1234567” in this case.)
“SECRET DATA ACCESSIBLE !” is displayed briefly. The
Secret function is now off and secret listings can be recalled.
The display changes into the entry prompt without the “
S
”.
• If the incorrect password is entered, “INCORRECT
PASSWORD !” will be displayed briefly and the display
changes into the entry prompt.
• Even after the Secret function is turned off, the Secret
function will automatically be turned on after manual or
auto power off.
Page 23

21
(2) Turning the Secret function on
1. Press
2nd
SECRET
.
2. Press
1
to select “1: HIDE
SECRET”.
“SECRET DATA IS HIDDEN !” is displayed briefly. The
secret function is now on and secret listings cannot be
recalled. The display changes into the entry prompt with
the “
S
”.
3.Designating Listings as Secret
Only one password can be registered, but many secret
listings can be entered.
A “
” next to a listing indicates it is secret. Secret listings
cannot be recalled unless the Secret function is off.
(1) Storing listings as secret
Press
2nd MARK
to display the “ ” during the entry
procedure and store the listing.
(2) Designating stored listings as secret
<Example>
Designate the listing for “Edwards Bob” as
secret.
2:DELETE THE
PASSWORD
1:HIDE SECRET
CAPS
Edwards Bob
201–265–5600
F 265–1234
Supervisor
CAPS
Edwards Bob
201–265–5600
F 265–1234
Supervisor
EDIT
CAPS
1. Recall the listing.
2. Press
2nd EDIT
.
3. Press
2nd MARK
.
The “
” is displayed.
4. Press
ENTER
.
The listing for “Edwards Bob” is now designated as secret.
4.Changing Secret Listings to Non-Secret
1. Turn the Secret function off. (Refer to page 20.)
2. Recall the desired secret listing.
3. Press
2nd EDIT
.
4. Press
2nd
MARK
. A “ ” is cleared.
5. Press
ENTER
.
The secret listing is now changed to non-secret.
5.Recalling (and Editing) Secret Listings
Perform recalling (or editing) secret listings in each mode.
To recall (and edit) secret listings, the Secret function must
first be off.
▲
Page 24

22
(1) Recalling only the secret listings
1. Turn the Secret function off. (Refer to page 20.)
2. Press the desired mode key (other than that for Calendar,
Calculator, or Conversion mode) to display the entry
prompt.
3. Press
2nd MARK
. The “ ” is displayed.
4. Press
2nd NEXT
(or
2nd
PREV
).
The secret listings only are sequentially recalled.
• If no secret listing is found, “NOT FOUND !” is displayed
briefly and the display returns to the entry prompt.
6.Deleting and Changing the Password
1. Turn the Secret function off.
(Refer to page 20.)
2. Press
2nd SECRET
.
3. Press
2
to select “2 : DELETE THE PASSWORD”.
4. Enter the old password to be deleted and press
ENTER
.
“PASSWORD IS DELETED !” is displayed briefly and the
display changes into the entry prompt.
5. To register a new password, follow the procedure
described in “1. Registering a Password” on page 20.
2:DELETE THE
PASSWORD
1:HIDE SECRET
CAPS
↔
Calculator Mode
Press
CALC/CONV
once or twice to select Calculator mode.
Each time you press
CALC/CONV
, the display switches
between Calculator and Conversion modes.
The Organizer can calculate numbers up to 12 digits long.
1.Calculation
Before performing a calculation, press
C•CE C•CE
and
CM
to clear the display and memory.
When +, –, , ,
M
+
, or
M
–
is pressed, the
respective symbol, “+”, “–”, “×”, “ ”, “M+”, or “M–” is
displayed. When
=
or % is pressed, the symbol “=” is
displayed. (In the examples, these symbols are not
described.)
2.Errors
When the integer part of a calculation result or any integer in
the memory exceeds 12 digits, or other invalid operations are
attempted, an error will occur. (“–E–” will appear.) Press
C•CE
to clear the error.
CALC
0.
CAPS
CONVERSION
0.
0.
[1]
$ £
CAPS
Page 25

23
Example Operation Display
(–24+2) 4=–5.5
–
24 + 2 4 =
*1
–5.5
34
+57=91 34 + 57
=
91.
45+57=102 45
=
102.
68×25=1700 68 25
=
1700.
68×40=2720 40
=
2720.
200×10%=20 200 10
%
20.
9 36=25(%) 9 36
%
25.
200+(200×10%)=220
200 + 10
%
220.
500–(500×20%)=400
500 – 20
%
400.
46=(43)2=4096 4 = =
=
4096.
1/8=0.125 8
=
0.125
25 × 5=125
CM
25 5
M
+
–M–
125.
–)84
3= 28 84 3
M
–
–M–
28.
+)68 +17= 85 68
+
17
M
+
–M–
85.
182
RM
–M–
182.
25–9=4 25 – 9
=
4.
–E–
123456789098×145 123456789098 145 =17.9012344192
=17901234419210
C•CE
17.9012344192
(17.9012344192×1012=17901234419200)
*1– (minus) can only be used when entering a negative
number as the first number. Use
+
/–
for following
negative numbers during calculation.
<Example>
5 × (–10)=–50
5 10
+
/–
=
No.
Currency/Unit
Conversion
AB
Rate
1$ £ 0
2$
0
3
DM 0
4 inch cm 2.54
5 oz g 28.35
6 °F °C (°F-32) × 5/9
Currency/Unit Conversion Mode
Each time you press
CALC/CONV
, the display switches
between Calculator and Conversion modes.
Currency conversion, such as from $ to £ and from $ to
,
can be performed. Unit conversions, such as from
centimeters to inches, are also possible. The following
currencies and units in the Organizer are factory installed.
u
Page 26

24
CONVERSION
198
1.8
[1]
$ £
CAPS
CONVERSION
356.4
1.8
[1]
$ £
CAPS
CONVERSION
0.
0.
[1]
$ £
CAPS
CONVERSION
0.
1.8
[1]
$ £
CAPS
• The rates in the above table show the value of B when A
equals 1. Conversion from B to A (for example, from £ to
$) is also possible.
• Currencies No. 1 to No. 3 can be changed. Set the correct
rate before using the conversion function. Units and rates
for items No. 4 to No. 6 cannot be changed.
• The Organizer can calculate numbers up to 12 digits long.
1.Setting a Rate
<Example>
Set the following rate: $1 = £1.8
1. Press
CALC/CONV
once or
twice to select Currency/Unit
conversion mode.
2. Press
NEXT
(or
PREV
) to select the currency or unit
that the rate is to be set for.
3. Enter the rate.
2nd EDIT
1.8
ENTER
• The rate can be entered up to 10 digits long.
2.Converting Currency/Unit
To convert unit A to unit B, press .
To convert unit B to unit A, press
.
<Example 1>
Convert $198 to £.
1. Press
NEXT
(or
PREV
) to select the unit. (In this
example, select No. 1: $1 = £1.8.)
2. Enter the value to be
converted.
198
3. Press to convert it.
The symbol, “→”, changes to
“
” and the conversion result
is displayed.
• After setting each rate, you can perform a consecutive
conversion such as from £ to $, and then from $ to
.
After having finished the conversion No. 1 (from £ to $),
and when you press
NEXT
to select the conversion No.
2 (from $ to
), the conversion result to $ remains on
the display. Pressing
once converts the result from $
to
.
<Example 2>
Convert 25°C to °F.
Page 27

25
CONVERSION
77.
[6]
F C
CAPS
˚
˚
1. Press
NEXT
(or
PREV
) to select the unit. (In this
example, select No. 6. For No. 6, the rate is not displayed.)
2. Enter the value to be converted.
25
3. Press to convert it.
• The conversion result may have a slight calculation error
as a result of rounding off the number. Use the conversion
result for reference.
3.Changing the Unit Name
Only items No. 1 to No. 3 can be changed. While changing
the unit name, you can also set the rate at a time.
1. Select the currency or unit to be changed and press
2nd
EDIT
.
The cursor will flash on the rate field.
2. Enter the rate.
3. Press
to move the cursor to the unit name field.
4. Press
and to move the cursor to the adequate
position and enter the new unit name.
5. Press
ENTER
after the new names and rate have been
entered.
Miscellaneous Functions
By pressing
2nd MENU
, you can perform the following
operations:
.... 1. Setting the Daily Alarm
.... 2. Checking the Memory
Storage
.... 3. Adjusting the LCD
Contrast
.... 4. Deleting the Data
.... 5. Changing the File Names
.... 6. Setting Up the Backlight
.... 7. Selecting the Time
System
.... 8. Freeing Up Memory
1:SET ALARM
2:MEMORY CHECK
3:LCD CONTRAST
< MENU
>
CAPS
1:DELETE DATA
2:FILE NAME
3:B/L SETUP
< MENU
>
CAPS
1:TIME SYSTEM
2:FREE UP MEM.
< MENU
>
CAPS
↓↑
NEXT
PREV
↓↑
NEXT
PREV
Page 28

26
• Even after you have designated an each file name for TEL/
MAIL1, TEL/MAIL2, or URL, “T/M1”, “T/M2”, or “URL”
does not change according to the names you stored.
(Refer to page 9.)
3. Press
NEXT
again to display the number of listings
stored in Memo, Schedule and Anniversary files.
4. Press
C•CE
to return to the display on which you were
before pressing
MENU
.
• When the amount of memory used is reaching almost F
(FULL), delete unnecessary data and free up memory to
make enough space to store new listings.
• Since the same memory is used for Telephone, Schedule,
Anniversary, and Memo modes, the number of listings
that can be stored in each of these modes will vary
depending on the situation of the other modes.
3.Adjusting the LCD Contrast
See page 2 for operation.
4.Deleting the Data
(1) Deleting all of the data in each mode
If all of the entire data for Telephone/E-mail, WWW, Schedule,
Anniversary, or Memo mode is unnecessary, you can delete
all of the data in each mode individually.
0:00 OFF
[O]
to ON/OFF
<
DAILY ALARM
>
1.Setting the Daily Alarm
When the time clock reaches the alarm time, it beeps for
approximately 1 minute. Press
C•CE
to turn the alarm off.
1. Press
2nd MENU
1 to
display the daily alarm
screen.
2. Enter the time.
3. Press
O
to turn on the alarm.
You can turn the daily alarm on and off each time you
press
O
.
4. Press
ENTER
.
2.Checking the Memory Storage
1. Press
2nd MENU
2.
The amount of memory in
use is displayed graphically.
2. Press
NEXT
.
The number of listings
stored in TEL/MAIL1, TEL/
MAIL2 and URL (WWW)
files is displayed.
<
MEMORY CHECK
>
EMPTY FULL
E
–––––––
F
T/M 1:30
T/M 2:9
URL :8
E
–––––––
F
Page 29

27
<Example>
Delete all listings in the TEL/MAIL1 file.
1. Press
2nd
MENU NEXT
1.
2. Press
1
to select TEL/MAIL1.
“DELETE ? Y/N” is displayed.
• After performing the step 1, press the followings keys in
other modes:
TEL/MAIL2:
2
WWW (URL):
3
Schedule:
NEXT
1
1
Anniversary:
NEXT
1
2
Memo:
NEXT
2
• When the Secret function is on, “SECRET ON MODE” is
displayed and the file cannot be deleted. In this case, turn
the Secret function off (page 20) and repeat the above
procedure.
• Even after you have designated the file name, the message
does not change accordingly.
3. Press
Y
.
• To cancel the deletion operation, press N.
• All listings in the TEL/MAIL1 file (including secret listings)
will be deleted.
(2) Deleting the password and secret listings
The password and all secret listings can be deleted at the
same time.
1. Press
2nd MENU NEXT
1.
2. Press
NEXT
3.
“ALL SECRET DATA DELETE ? Y/N” is displayed.
3. Press
Y
.
• To cancel the deletion operation, press N.
• “DELETED !” is displayed briefly and the password and all
secret listings are deleted.
5.Changing the File Names
See page 9, “Designating the File Names” for operation.
6.Setting Up the Backlight
See page 2 for operation.
7.Selecting the Time System
The time system can be switched between 12-hour and
24-hour format.
1. Press
2nd MENU NEXT
NEXT
1.
2. Press
or to select
“12” (12-hour) or “24” (24-hour).
3. Press
ENTER
.
<
TIME SYSTEM
>
12 24
CAPS
Page 30

28
DO YOU WANT TO
FREE UP
MEMORY ?
(Yes/No
)
CAPS
8.Freeing Up Memory
Deleting or modifying data during operation can produce
unnecessary space in the memory of the Organizer.
Execute the deletion operation of the unnecessary space by
freeing up memory, when the Organizer displays “MEMORY
FULL”.
1. Press
2nd MENU NEXT NEXT
.
2. Press 2 to start freeing up memory.
• “WORKING...” is displayed indicating that the memory is
being freed up now.
• The following situations may display the message shown
below.
– When the power is turned on.
– When you performed the
operation, “4. Deleting the
Data” on page 26.
(It is recommended to press
Y
to free up memory.)
• The indication “Replace the OPERATING batteries !”
shown at the time of freeing up memory means that the
operating batteries are almost exhausted. Replace them
with new ones then try again to free up memory.
• The backlight function does not work while the memory is
being freed up.
Page 31

29
• The Backlight is nullified during data transfer. (When the
Backlight is turned on, it is automatically turned off at the
beginning of data transfer.)
• When the Organizers are not in the same mode before
transferring data by entry or mode, “DATA ERROR !” is
displayed and no data transfer is allowed.
However, directories in the TEL (or E-MAIL) and WWW
mode are excluded from this rule. For example, data in the
TEL/MAIL1 directory can be transferred to the WWW
directory.
• When the communication cable is disconnected during
data transfer, “I/O DEVICE ERROR !” is displayed. Press
C•CE
to clear the error, check that the Organizers are
connected correctly, and then start the steps again.
• The indication “Replace the OPERATING batteries !”
shown when
2nd
OPTION
are pressed means that the
operating batteries are almost exhausted. Replace them
with new ones then try again to transfer data.
• When “MEMORY FULL” is displayed and data transfer is
aborted, delete unnecessary data on the receiving
Organizer, then start the steps from the beginning.
Using the Option Function
You can share the specific data, the data in the specific mode,
or the whole data (for the purpose of making a backup copy
or restoring the data) by transferring it to/from another
EL-6850/6890/6890S.
• Backup data transfer is only possible between identical
models.
• Communicating with another EL-6850/6890/6890S
requires the optional cable “CE-260L”.
1. Cautions and Special Notes for Data Transfer
• Turn off the secret function before transferring data by
mode. If the secret function is turned on, data cannot be
transferred by mode.
• After data transfer, the data on the transfering Organizer is
preserved.
• Alarm setting is ignored. The alarm will not sound during
data transfer.
• The Auto power off function is disabled in all the transfer
modes.
Page 32

30
• The indication “WORKING...” shown on the side of the
receiving Organizer at the beginning or end of the data
transmission means that the memory has begun to be
freed up automatically.
2.Transferring Data between Organizers
The single data entry or entire data in a mode (TEL, E-MAIL,
WWW, SCHEDULE, MEMO, ANN) can be transferred between
Organizers.
• Turn both of the Organizers off first before connecting
them with the optional cable. (CE-260L)
A
S
D
Z
X
COMPUTER LINK
R
E
W
Q
2nd
1
1
4
5
A
S
D
Z
X
COMPUTER LINK
R
E
W
Q
2
4
• When an error occurs, “I/O DEVICE ERROR!” is displayed
on the receiving or transferring Organizer, or on both
ones.
1. Press the desired mode key, or recall a listing to be
transferred on the transferring Organizer.
• To transfer all the data by mode, press the mode key to
display the entry prompt. To transfer the data by entry,
recall the desired listing.
2. Press
2nd
OPTION
on
both the Organizers.
The following menus are
displayed.
3. Press
2
on the receiving
Organizer to select RECV
(RECEIVE).
4. Press
1
on the transferring Organizer to select SEND.
1 SEND 4
BACKUP
2 RECV 5
RESTORE
3 VERIFY
<
UNIT TO UNIT
>
CAPS
RECEIVING
<
UNIT TO UNIT
>
MODE
CAPS
Page 33

31
Transferring data between Telephone/E-mail mode and
WWW mode
Transferring data is possible between Telephone/E-mail mode
and WWW mode. When TEL (or E-mail) data is transferred to
WWW data, the E-mail (or postal) address is displayed
followed by the postal (or E-mail) address on the receiving
Organizer. The E-mail (or postal) address returned to the
transferring Organizer is relocated to its original field.
3. Transferring Data to Make Backup
All data in the Organizer can be transferred to another
EL-6850/6890/6890S.
1. Press
2nd
OPTION
on both the Organizers.
2. Press
5
on the receiving
Organizer to select
RESTORE.
3. Press
4
on the transferring
Organizer to select BACKUP.
A confirmation message is
displayed.
RECEIVING
<
UNIT TO UNIT
>
BACKUP
MODE
CAPS
SEND OK ? Y/N
<
UNIT TO UNIT
>
BACKUP
CAPS
5. Data transfer is started.
• To interrupt data transfer, press
ON
.
Messages are displayed on the respective Organizers
while data is being transferred.
Transferring Organizer Receiving Organizer
When these messages are no longer displayed, the data
transfer is completed.
To verify the listing after it has been transferred, select
3
(VERIFY) on the receiving Organizer in step 3.
The following message is
displayed.
If any discrepancies are found, “VERIFY ERROR !” is
displayed.
–VERIFYING–
<
UNIT TO UNIT
>
CAPS
–RECEIVING–
<
UNIT TO UNIT
>
CAPS
–SENDING–
<
UNIT TO UNIT
>
CAPS
Page 34

32
Battery Replacement
Batteries used
Type Model Quantity Use
Lithium battery CR2032 2 Unit operation
Lithium battery CR2032 1 Memory backup
• Do not remove both the operating and memory
backup batteries at the same time. Doing so will clear
the memory of its contents.
• Be sure to write down any important information
stored in memory before replacing the batteries.
1.Precautions
Since improper use of the batteries may cause leakage or
explosion, strictly observe the following instructions.
• Insert the battery with its positive side (+) correctly
positioned.
• Never throw batteries into a fire because they might
explode.
• Keep batteries out of reach of children.
4. Press Y to the confirmation on the transferring
Organizer.
Backup data transfer is
started. Messages are
displayed on the respective
Organizers while the data is
being transferred. When these messages are no longer
displayed, the backup data transfer is completed.
Make sure you really want to delete all the data in the
receiving Organizer before executing the “Restore”
function. Once you start the restoration process, all the
data in the receiving Organizer will be deleted, even if you
cancel the restoration process.
–SENDING–
<
UNIT TO UNIT
>
CAPS
–RECEIVING–
<
UNIT TO UNIT
>
CAPS
Page 35

33
• When batteries become weak, remove them from the
Organizer immediately to avoid battery leakage and
corrosion inside the Organizer.
Because the batteries in the Organizer were installed at the
factory, they may become depleted before the specified
expiration time is reached.
2.Operating Batteries Replacement
(1) Battery replacement time
When “
BATT
” is displayed, immediately replace the
batteries with new ones. If the battery level is very low, the
alarms or the key touch tone may not sound, or similarly the
Backlight may remain on for less than the set interval or it
may not function. Continued use of the Organizer with
consumed batteries can alter or clear the memory contents.
Memory contents may be lost if the batteries are improperly
replaced or if the following instructions are disregarded.
(2) Replacing the batteries
• Make sure the power is turned off before replacing the
batteries.
• Do not press
ON
until the battery replacement
procedure is completed.
1. Press
OFF
to turn the power off.
2. Loosen the screw (counter clockwise) and
remove the battery holder cover on the
back of the unit.
3. Remove the used batteries using a ballpoint pen or similar object.
• Do not use a mechanical pencil or sharp
pointed object.
4. Install two new batteries with the positive sides (+) facing
up.
5. Replace the holder cover and secure it with the screw.
6. The power will be turned on 2 to 3 seconds after
ON
is
pressed. If the power does not come on, press the RESET
switch.
7. Set the clock to the correct time.
3.Memory Backup Battery Replacement
(1) Battery replacement frequency
• Replace the battery every 5 years.
Page 36

34
MEMORY BACKUP BATTERY
INSTALLATION DATE
MONTH
• YEAR
•
When you start to use the Organizer, write down the date on
the label of the Organizer, so that you know when to replace
the battery the next time. For example,
(2) Precautions when replacing the memory backup bat-
tery
• If the memory backup battery is replaced when the
operating batteries are depleted, memory contents will be
lost. Make sure the operating batteries are not depleted. If
the operating batteries are depleted, first replace these
before replacing the memory backup battery.
(3) Replacing the battery
1. Press
OFF
to turn the power off.
2. Loosen the screw (counter clockwise) and
remove the battery holder cover on the
back of the unit.
02 2001
3. Remove the memory backup battery seal.
4. Remove the used battery using a ballpoint pen or similar object.
• Do not use a mechanical pencil or sharp
pointed object.
5. Install a new battery with the positive side (+) facing up.
6. Replace the seal and the holder cover and secure the
cover with the screw.
7. The power will be turned on 2 to 3 seconds after
ON
is
pressed. If the power does not come on, press the RESET
switch. If nothing appears on the display again, replace
the operating batteries.
Page 37

35
WWW mode: Entry and recall of names, URL, and remarks
Calendar mode: From Jan., 1901 to Dec., 2099, Schedule
mark function distinguishing between morning,
afternoon, and anniversary
Schedule mode: Entry and recall of schedule (year, month,
day, hour and minute), schedule alarm
Anniversary mode: Entry and recall of month, day, and labels
of anniversaries
Memo mode: Entry and recall of memo listings
Calculator mode: 12 digits (with calculation status symbol)
Addition, subtraction, multiplication, division, percentage,
square root, memory calculation, etc.
Currency/Unit conversion mode: 10 digits, 6 kinds of
currencies and units
Power consumption: 0.1 W
Operating temperature: 0°C – 40°C (32°F – 104°F)
Power supply: Operating battery: 6V
(DC)
(Lithium battery CR2032×2)
Memory backup battery: 3V (DC)
(Lithium battery CR2032×1)
Specifications
Models: EL-6850, EL-6890, EL-6890S
Product name: Electronic Organizer
Display: 14 columns × 4 lines
Memory capacity: EL-6850 129680 bytes
EL-6890 260752 bytes
EL-6890S 260752 bytes
Clock mode:
Accuracy: ±30 seconds/month (at 25°C/77°F)
Display: Year, month, day, day of the week, hour,
minute, AM/PM, city name, time zone
Clock system: 12-hour/24-hour format (switchable)
World clock function, daylight saving
time/summer time display function,
daily alarm function
Telephone/E-Mail mode: Entry and recall of names,
numbers, postal addresses, and E-mail addresses
Page 38

36
Battery life:
Operating batteries (at 25°C/77°F)
• Approx. 1200 hours; When data is continuously
displayed without Backlight.
• Approx. 300 hours; When data is continuously displayed
with Backlight for 2 minutes per hourly use.
• Approx. 270 hours; When data is searched for 5 minutes
and displayed for 55 minutes per hourly use and
Backlight is on for 2 minutes per hourly use.
• Approx. 1.5 years; When turned off and the clock is
running.
Memory backup battery
• Approx. 5 years (if operating batteries are replaced
promptly when exhausted)
• Approx. 1 year (if operating batteries are exhausted or
not installed)
Weight: Approx. 120 g (0.27 lb.) (Including batteries)
Dimensions:
Open: 139.0 mm (W) × 174.7 mm (D) × 9.5 mm (H)
5-15/32" (W) × 6-7/8" (D) × 3/8" (H)
Closed: 139.0 mm (W) × 89.5 mm (D) × 13.7 mm (H)
5-15/32" (W) × 3-17/32" (D) × 17/32" (H)
Accessories: 3 lithium batteries (installed), operation manual
Page 39

In Europe:
This equipment complies with the requirements of Directive 89/336/EEC
as amended by 93/68/EEC.
Dieses Gerät entspricht den Anforderungen der EG-Richtlinie 89/336/
EWG mit Änderung 93/68/EWG.
Ce matériel répond aux exigences contenues dans la directive 89/336/
CEE modifiée par la directive 93/68/CEE.
Dit apparaat voldoet aan de eisen van de richtlijn 89/336/EEG, gewijzigd
door 93/68/EEG.
Dette udstyr overholder kravene i direktiv nr. 89/336/EEC med tillæg nr.
93/68/EEC.
Quest’apparecchio è conforme ai requisiti della direttiva 89/336/EEC
come emendata dalla direttiva 93/68/EEC.
Η εγκατάσταση αυτή ανταποκρίνεται στις απαιτήσεις των οδηγιών
της Ευρωπαïκής Ενωσης 89/336/ΕΟΚ, !πως ο κανονισµ!ς αυτ!ς
συµπληρώθηκε απ! την οδηγία 93/68/ΕΟΚ.
Este equipamento obedece às exigências da directiva 89/336/CEE na sua
versão corrigida pela directiva 93/68/CEE.
Este aparato satisface las exigencias de la Directiva 89/336/CEE
modificada por medio de la 93/68/CEE.
Denna utrustning uppfyller kraven enligt riktlinjen 89/336/EEC så som
kompletteras av 93/68/EEC.
Dette produktet oppfyller betingelsene i direktivet 89/336/EEC i endringen
93/68/EEC.
Tämä laite täyttää direktiivin 89/336/EEC vaatimukset, jota on muutettu
direktiivillä 93/68/EEC.
In Canada:
This Class B digital apparatus complies with Canadian ICES-003.
In U.S.A:
Declaration of Conformity
Electronic Organizer : EL-6850/EL-6890/EL-6890S
This device complies with Part 15 of the FCC Rules. Operation is subject
to the following two conditions: (1) This device may not cause harmful
interference, and (2) this device must accept any interference received,
including interference that may cause undesired operation.
Responsible Party:
SHARP ELECTRONICS CORPORATION
Sharp Plaza, Mahwah, New Jersey 07430
TEL: 1-800-BE-SHARP
Tested To Comply With FCC Standards
FOR HOME OR OFFICE USE
WARNING – FCC Regulations state that any unauthorized changes or
modifications to this equipment not expressly approved by the
manufacturer could void the user’s authority to operate this equipment.
Note: This equipment has been tested and found to comply with the limits
for a Class B digital device, pursuant to Part 15 of the FCC Rules.
These limits are designed to provide reasonable protection against
harmful interference in a residential installation. This equipment generates,
uses, and can radiate radio frequency energy and, if not installed and
used in accordance with the instructions, may cause harmful interference
to radio communications.
However, there is no guarantee that interference will not occur in a
particular installation. If this equipment does cause harmful interference to
radio or television reception, which can be determined by turning the
equipment off and on, the user is encouraged to try to correct the
interference by one or more of the following measures:
–Reorient or relocate the receiving antenna.
–Increase the separation between the equipment and receiver.
–Connect the equipment into an outlet on a circuit different from that to
which the receiver is connected.
–Consult the dealer or an experienced radio/TV technician for help.
Note: A shielded interface cable is required to ensure compliance with
FCC regulations for Class B certification.
Page 40

SHARP CORPORATION
PRINTED IN CHINA
01CTO (TINSE0481EHZZ)
 Loading...