

Page 1
MODEL
DW-208EX
DEHUMIDIFIER
OPERATION MANUAL
CONTENTS Page
● Precautions ............................................ 2
● Proper Uses ............................................. 6
● Preparations Before Using..................... 7
● Part Names and Functions..................... 8
Preface
G
Features
● Rapid DRY CLOTHES function: Inverter capable of blowing a great volume of airflow
● Choosing airflow direction freely: By a multiflowing louver
● Sufficient capacity (20L /day) : By high-power
dehumidifier
● Separating operation based on purpose for
use: By a right-left-detached control panel
● Large crystal monitor allows you to check
for temperature, humidity and level of room
comfort
● Easily know conditions through a mold warning indicator
● A large tank capacity (about 6.4L)
● Pre-installed CLEAN AIR function
● Casters allow carrying convenience of your
unit
This product is for household use only.
● Operation Procedure ............................ 10
● Dry clothes operation
● Dehumidifying operation
● Changing the Operation Mode............. 12
● Dry clothes operation
● Dehumid settings operation
● How to see indication
● Airflow direction is switched
● How to Operate the Timer .................... 14
OperationOthers
● Defrosting .............................................. 15
● Emptying the Water Tank ..................... 16
● Continuous Drainage............................ 17
● Move
● Maintenance .......................................... 18
● General Reference ................................ 20
● Specifications........................................ 21
● Optional Accessories ........................... 21
● Before Calling for Service .................... 24
Thank you very much for purchasing this SHARP dehumidifier.
Please read this manual carefully to ensure safe, effective use of your dehumidifier.
Please read carefully through “Precautions” before
commencing to use this product.
Please keep this manual within easy reach so that
you can refer to it at any time you need.
This dehumidifier complies with the ’96 Chlorofluo-
*
rocarbons Control Act, using the chlorofluorocarbon
HFC-134a which has an ozone-depletion factor of
zero.
(by using caster) ...................................... 17
● Supplied Accessories
1
Page 2
Precautions
Precautions
Caution symbols Certain symbols are used throughout this manual and on the product to alert you for
important points relating to safe and effective use of this product. These symbols, which
are classified according to the seriousness of the risk involved, are explained below.
Please read this section carefully.
Warning Failure to follow this instruction may result in death or
serious injury.
Cautions Failure to follow this instruction may result in injury or
damage to property.
Warning
Should the supply cord be damaged, it must be replaced
by a service center approved by Sharp as special tools
are required.
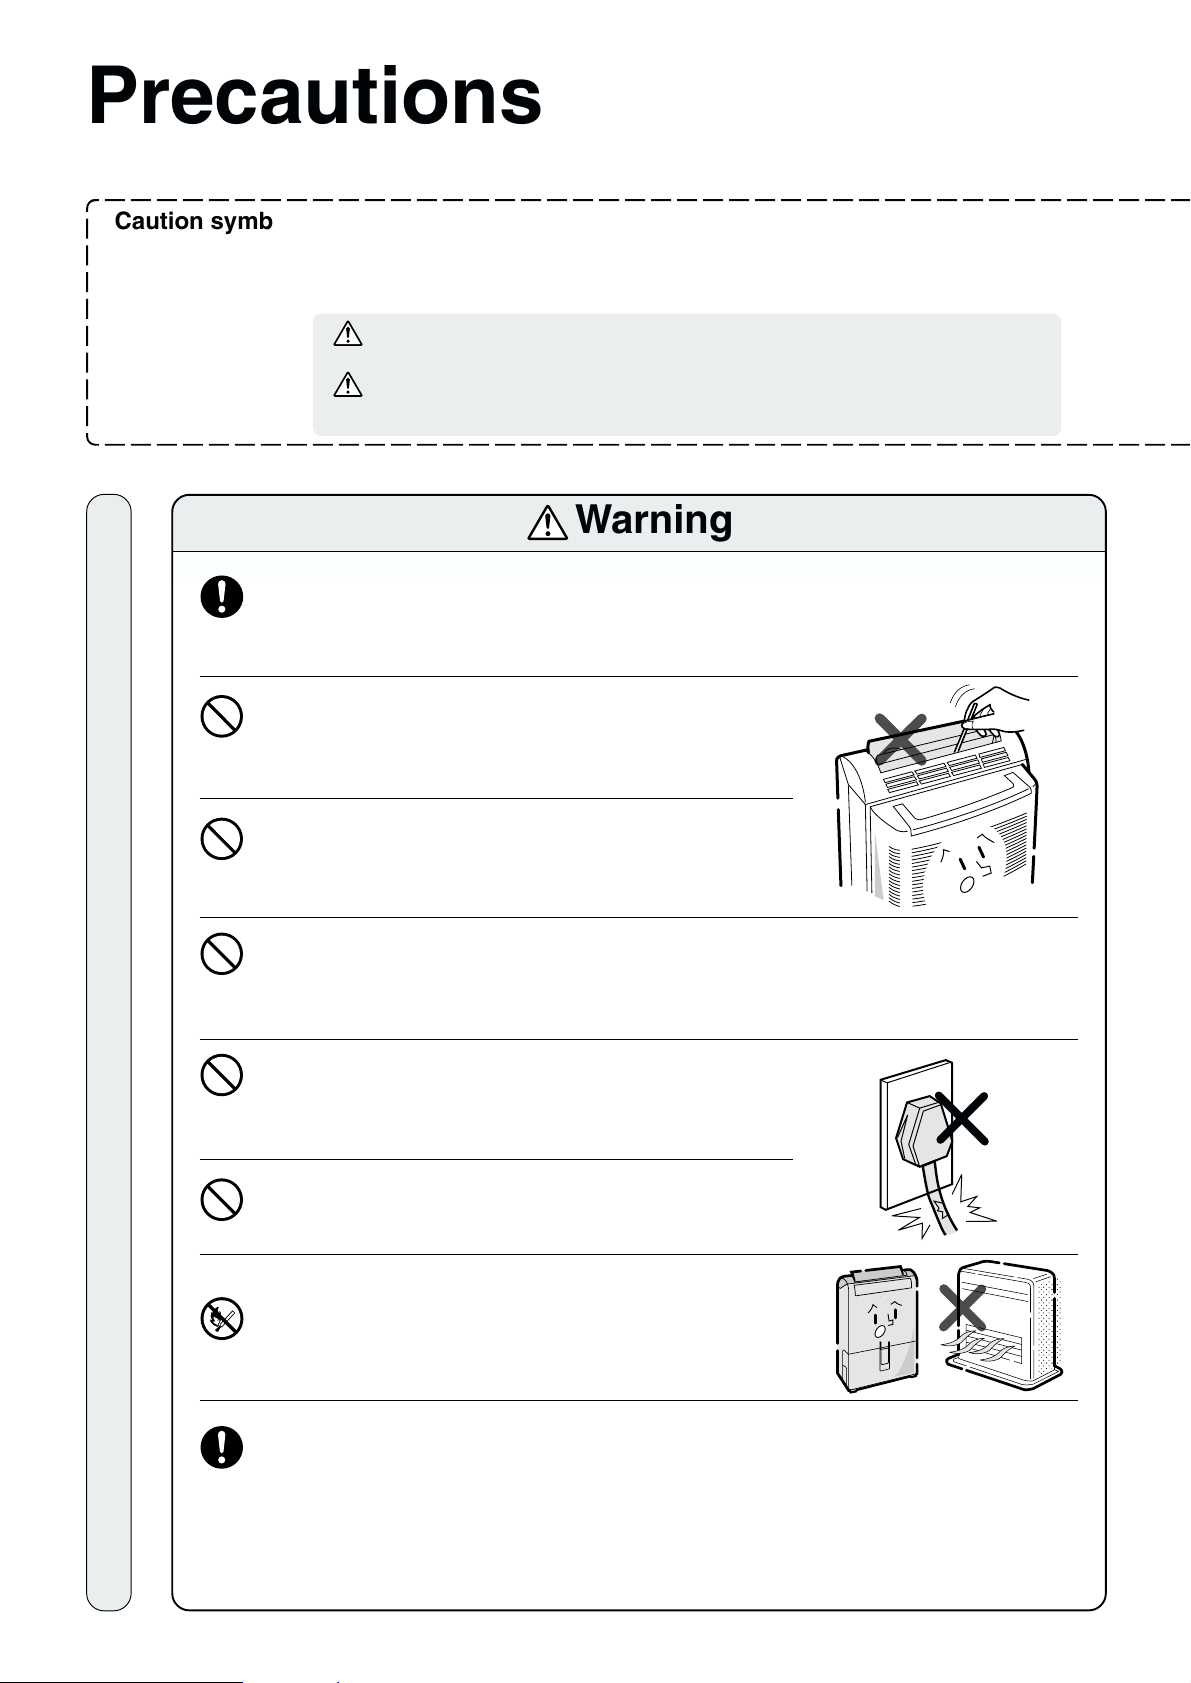
Do not stick your fingers or any foreign objects into the
air outlet or intake.
Otherwise the rotating internal fan may be damaged or cause
injury to your fingers.
Do not operate the unit at voltages other than the rated
voltage of 220V.
Using this product at any other voltage may result in electric
shock or fire.
Do not connect this product using joined electric cords
or extension cords, or sharing a power socket with other
electrical appliances.
Otherwise there is a risk of electric shock, heat or fire.
Do not modify or cause damage to the power cord in any way.
Otherwise electric shock or fire may result. Note that heat,
nipping, pulling or placing heavy objects on it may damage
the cord.
During operation
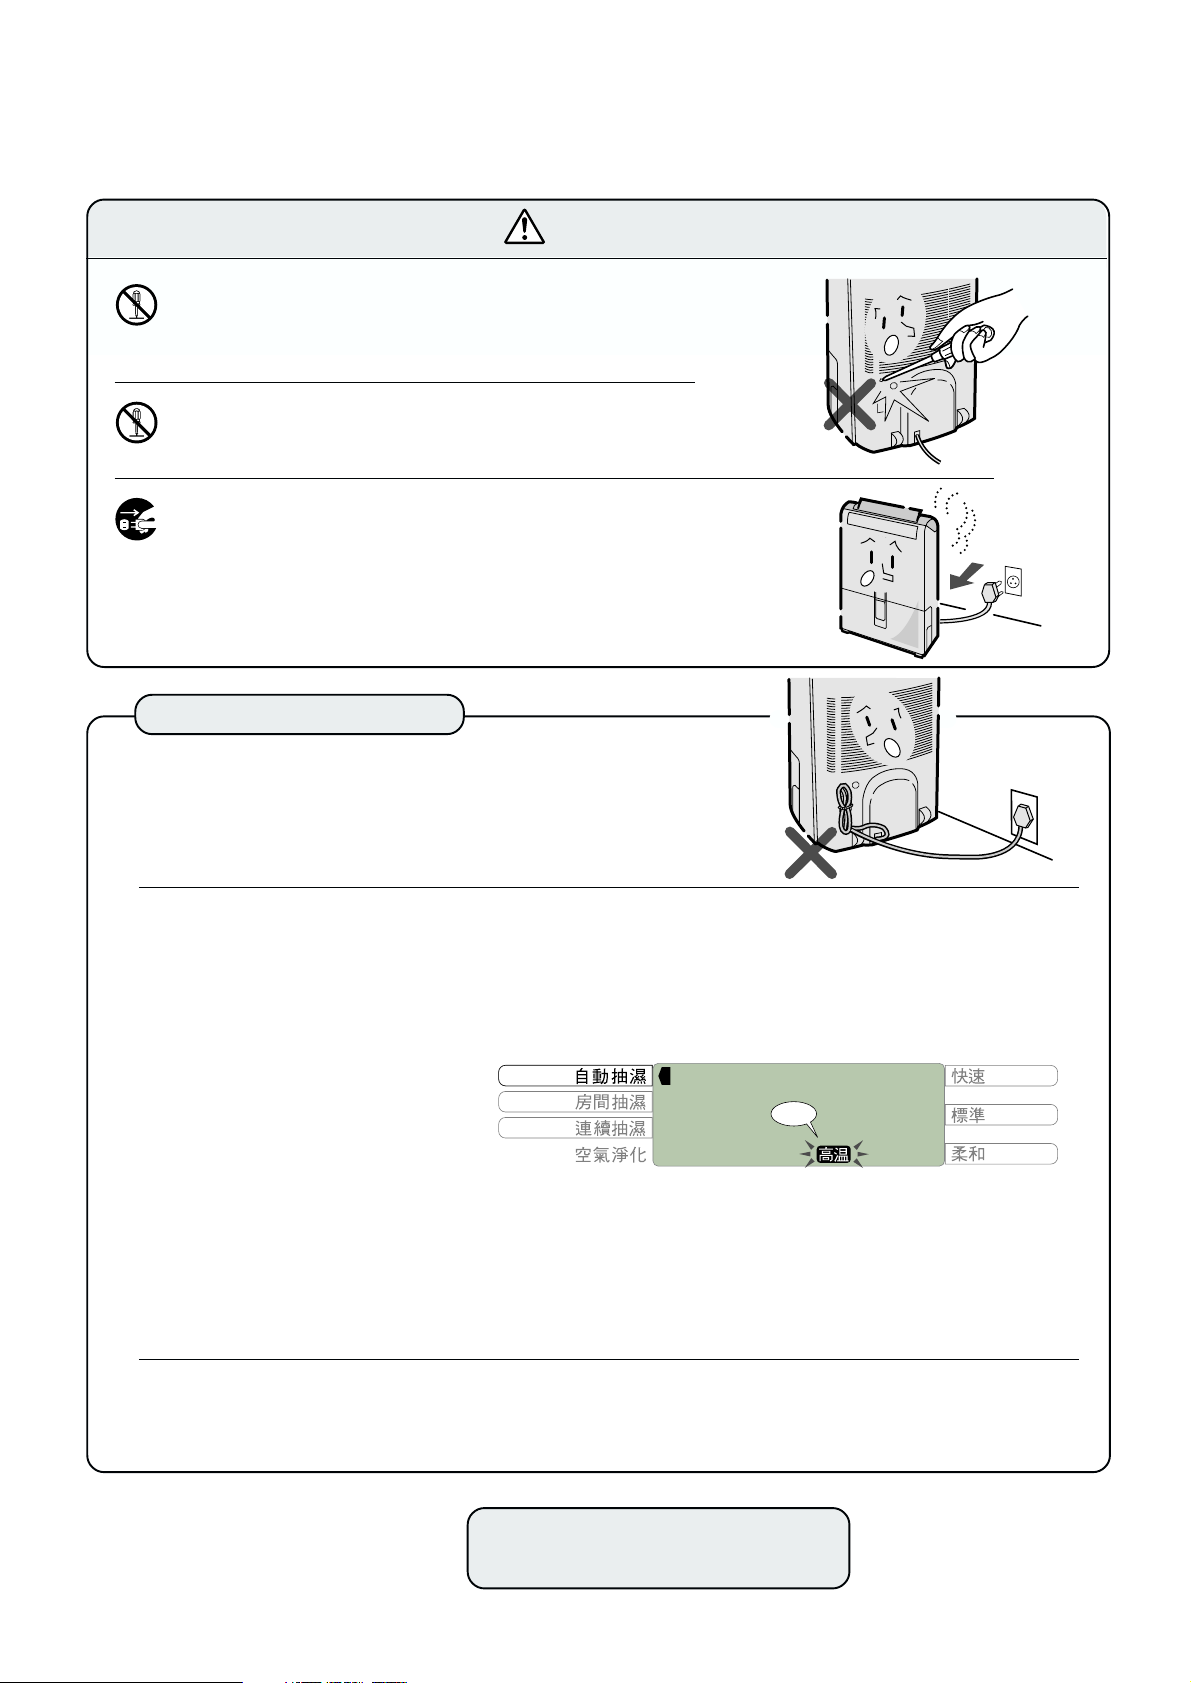
Do not try to take out the plug by pulling the power cord
in order to stop operation.
Otherwise electric shock or fire may result.
2
Do not place the unit near any heat sources.
Otherwise resin material in the product may melt and catch
fire.
Make sure that the power plug is not covered with dust
before inserting the plug into the power socket.
If there is any dust or the connection is not secure, electric
shock or fire may result.
Page 3
Meaning of the symbols
EXTRA CAUTION needed.
Actions that should be strictly avoided.
Actions that must be taken.
●
Take care to read through the precautions before commencing to use this product.
Keep this manual within easy reach so that you can refer to it at any time.
Cautions
Do not operate the unit in a closet or in a narrow, confined space between furniture.
Insufficient ventilation can result in overheating or combustion.
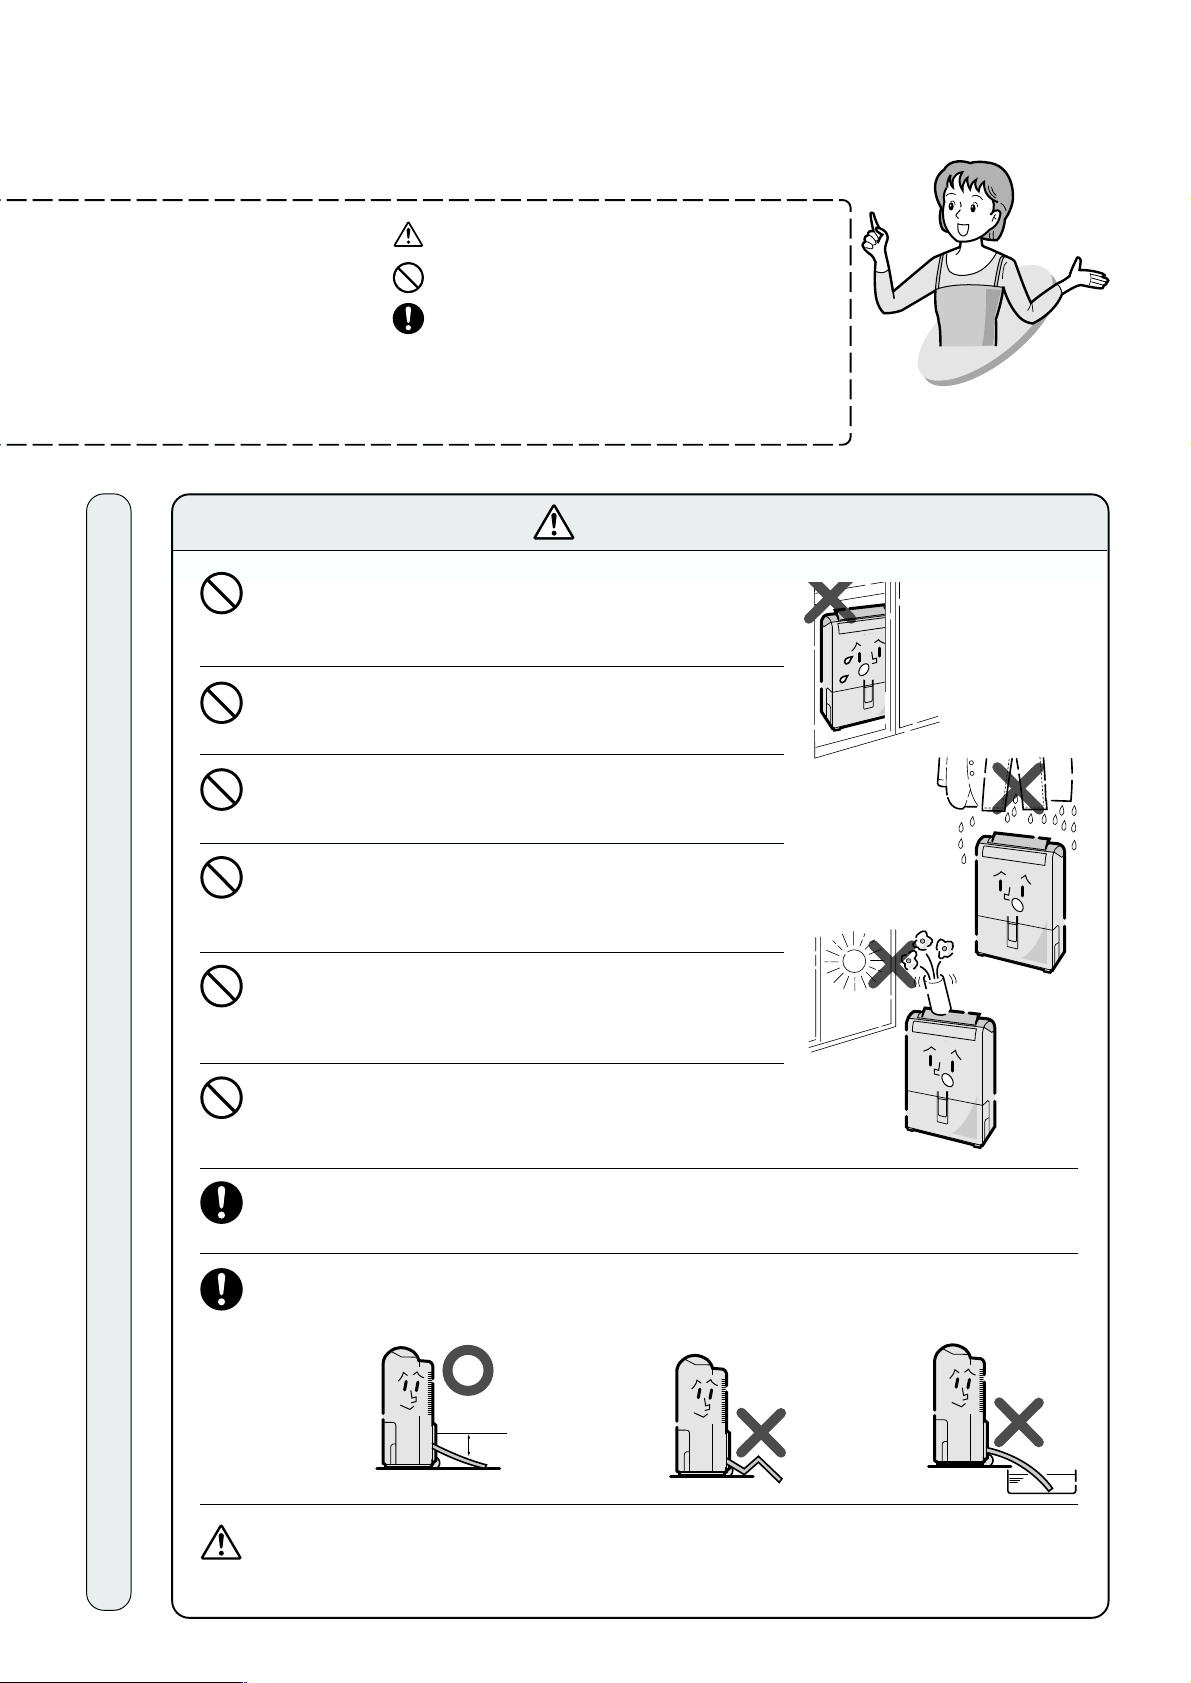
Do not install the unit in locations exposed to splashing
water.
Otherwise electric shock, short circuits or fire may result.
Do not install this unit in locations where there is any
risk of exposure to leaking oil or combustible gas.
Leaking oil or gas near the the unit may cause fire.
Do not place any vessels containing water, e.g. a vase,
on the unit.
Water spilled on the unit may impair electrical insulation, resulting in electric shock, short circuits or fire.
This product is for indoor use only. Do not install in locations exposed to direct sunlight or without shelter.
Otherwise this may lead to overheating, electric shock, short
circuits or fire.
Do not use this unit for storage of any items that require
strict temperature control, such as art works or academic
materials.
Otherwise the quality of these items may actually deteriorate.
During installation
Make sure to operate this product only on level, stable surfaces.
An uneven surface may cause stored water to spill and to make household furniture or appliances wet, or to cause electric shock, short circuits or fire.
When water is to be drained continuously, take care that the hose is not bent and that
the hose outlet is positioned below the unit.
Otherwise drained water may spill and make household appliances or furniture wet.
Lay the hose
with a downward slope.
10 cm min.
Do not
bend the
drain hose.
Do not
place the
open end of
the drain
hose in
water.
If a drain hose is used, take care that the temperature around the hose does not fall
below 0
Otherwise, water in the hose may freeze causing undrained water to leak from the unit and
make household furniture or appliances wet.
°C.
3
Page 4
Precautions
Precautions
Cautions
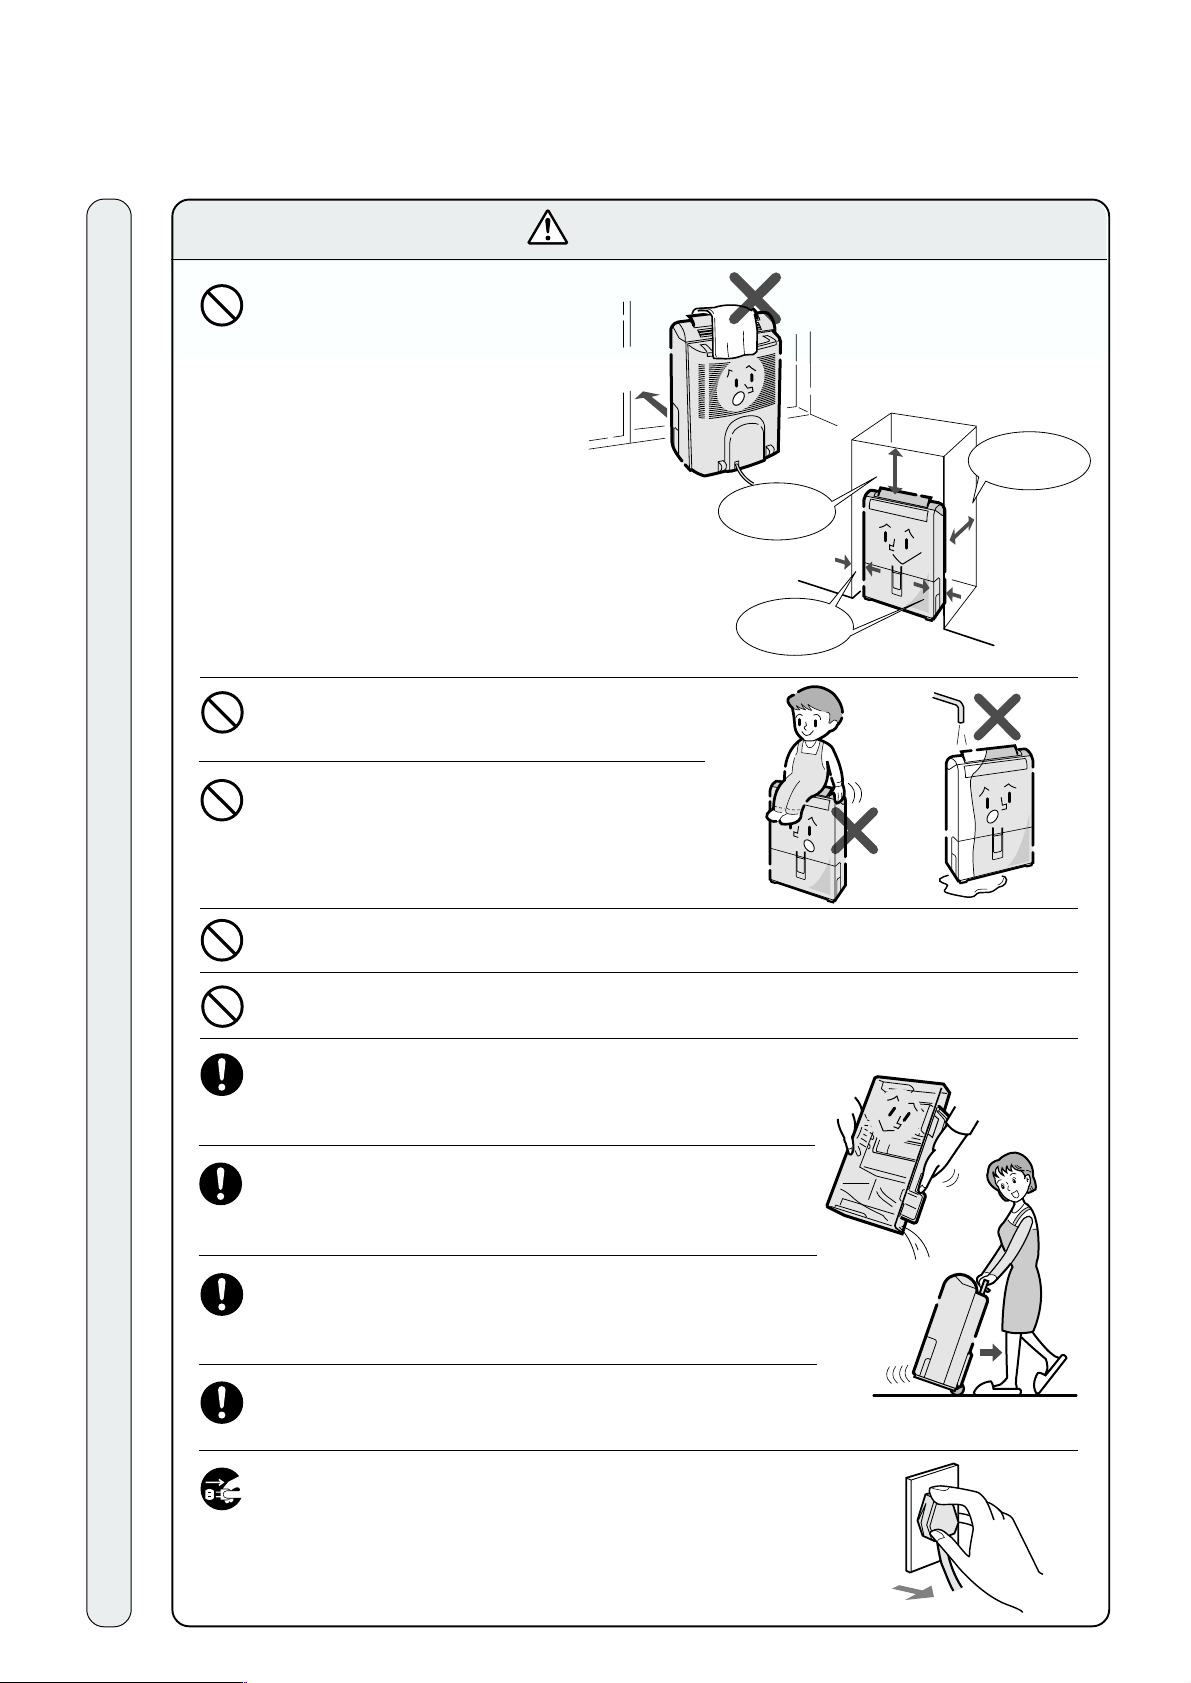
Do not obstruct the air outlet or
air intake with clothing or any
other materials.
Otherwise, air flow will be obstructed, resulting in overheating or fire.
Make sure that the airflow louver
lever is opened whenever the unit
is operating.
The airflow louver lever can also be
used as cover to protect the unit
from dirt and dust when not being
used.
When the unit is in operation, the
louver can change airflow from
diagonally-front, upward, diagonallybackward and backward directions.
Do not stand or sit on the unit.
Otherwise personal injury or damage to the unit may
result if you fall down or if the unit falls down.
5cm min.
Keep 20
cm min.
Keep 50cm
min.
Keep 20
cm min.
Do not wash the unit directly with water.
Otherwise electric shock may result.
Do not place a combustion device (e.g. stove) near the air outlet of the dehumidifier.
Otherwise incomplete combustion may result.
Take care to hold the plug firmly when unplugging the unit.
During operation
Pulling the cord may cause the wire inside to break, resulting in overheating.
Before cleaning the unit, first turn it off using the operation
key and unplug the power cord.
Otherwise the internal fan that operates when the unit is on may
cause injury.
Before moving the unit make sure that the power is turned
off and that the tank is emptied.
Otherwise spilled water may wet household appliances resulting
in electric shock, short circuits or fire.
When moving the unit, drain water first from the tank. Move
its caster by grasping the carrying handle firmly so that the
dehumidifier may not be inclined.
Otherwise this can cause injuries or damage to the floor.
4
If the unit is continuously being used for a long period of
time, make sure to inspect it regularly.
Otherwise overheating or electrical short circuits may result.
Whenever the unit is to be left unused for a long period, make
sure to unplug the unit for safety.
Otherwise, electric shock or fire may result.
Page 5
Warning
FAST
STANDARD
GENTLE
AUTO DRY
ROOM DRY
CONTINUOUS
DRY
CLEAN AIR
Blinking
Do not modify the unit. This unit should not be disassembled or repaired by persons other than a qualified
technician.
Otherwise fire, electric shock or injury may result.
If repair is required, please consult the SHARP Service
Center.
Otherwise fire, electric shock or injury may result.
When any abnormality (e.g. a burning smell) is noticed,
turn the power off, unplug the unit and consult the SHARP
Service Center.
If the unit continues to be operated despite signs of abnormality, a breakdown, electric shock or fire may result.
Cautions for use
● Do not operate this product with the power cord still wound
onto the cord clamps.
Otherwise, overheating or fire may result.
● When the unit stops operating and the liquid crystal indicator shows a blinking “High-temperature”
mark: Check whether you use it in a situation or a place as follows. It does not indicate a breakdown.
When the compression machine (part of the refrigerating cycle) reaches an abnormal high temperature, the unit stops automatically for safety. During such circumstances, it is necessary to relocate
the unit, and to re-start operation again by pushing the Power Switch after a time interval (about 40
minutes). If the “High-temperature” indicator continues to blink, consult the shop where you purchased the unit or an authorized dealer.
●
Check whether the DRY CLOTHES operation is set at “GENTLE” or if the dehumidifying operation is at “LOW”, or if
the temperature of the airflow louver of the unit is at 35°C.
●
Check whether the air outlet or intake of the unit is obstructed with clothes etc.
●
Check whether the unit is operated in a location with inadequate ventilation such as a closet or a narrow space
between furniture.
●
Check whether the unit is operated in an improper place under direct sunshine, near heating sources or air outlet of hot
wind emerging from air conditioners or oil fan heaters.
●
Check whether the unit is operated in an area of 3.3 square meter or less.
● When set to the CONTINUOUS DRY or DRY CLOTHES settings, the unit operates continuously re-
gardless of the ambient temperature or humidity. Since this may cause the room to be very warm
and dry, do not operate the unit in either of these modes for an extended period of time when people
are present in the room.
Please consult the SHARP service
center for repair if needed.
5
Page 6
Proper Uses
Proper Uses
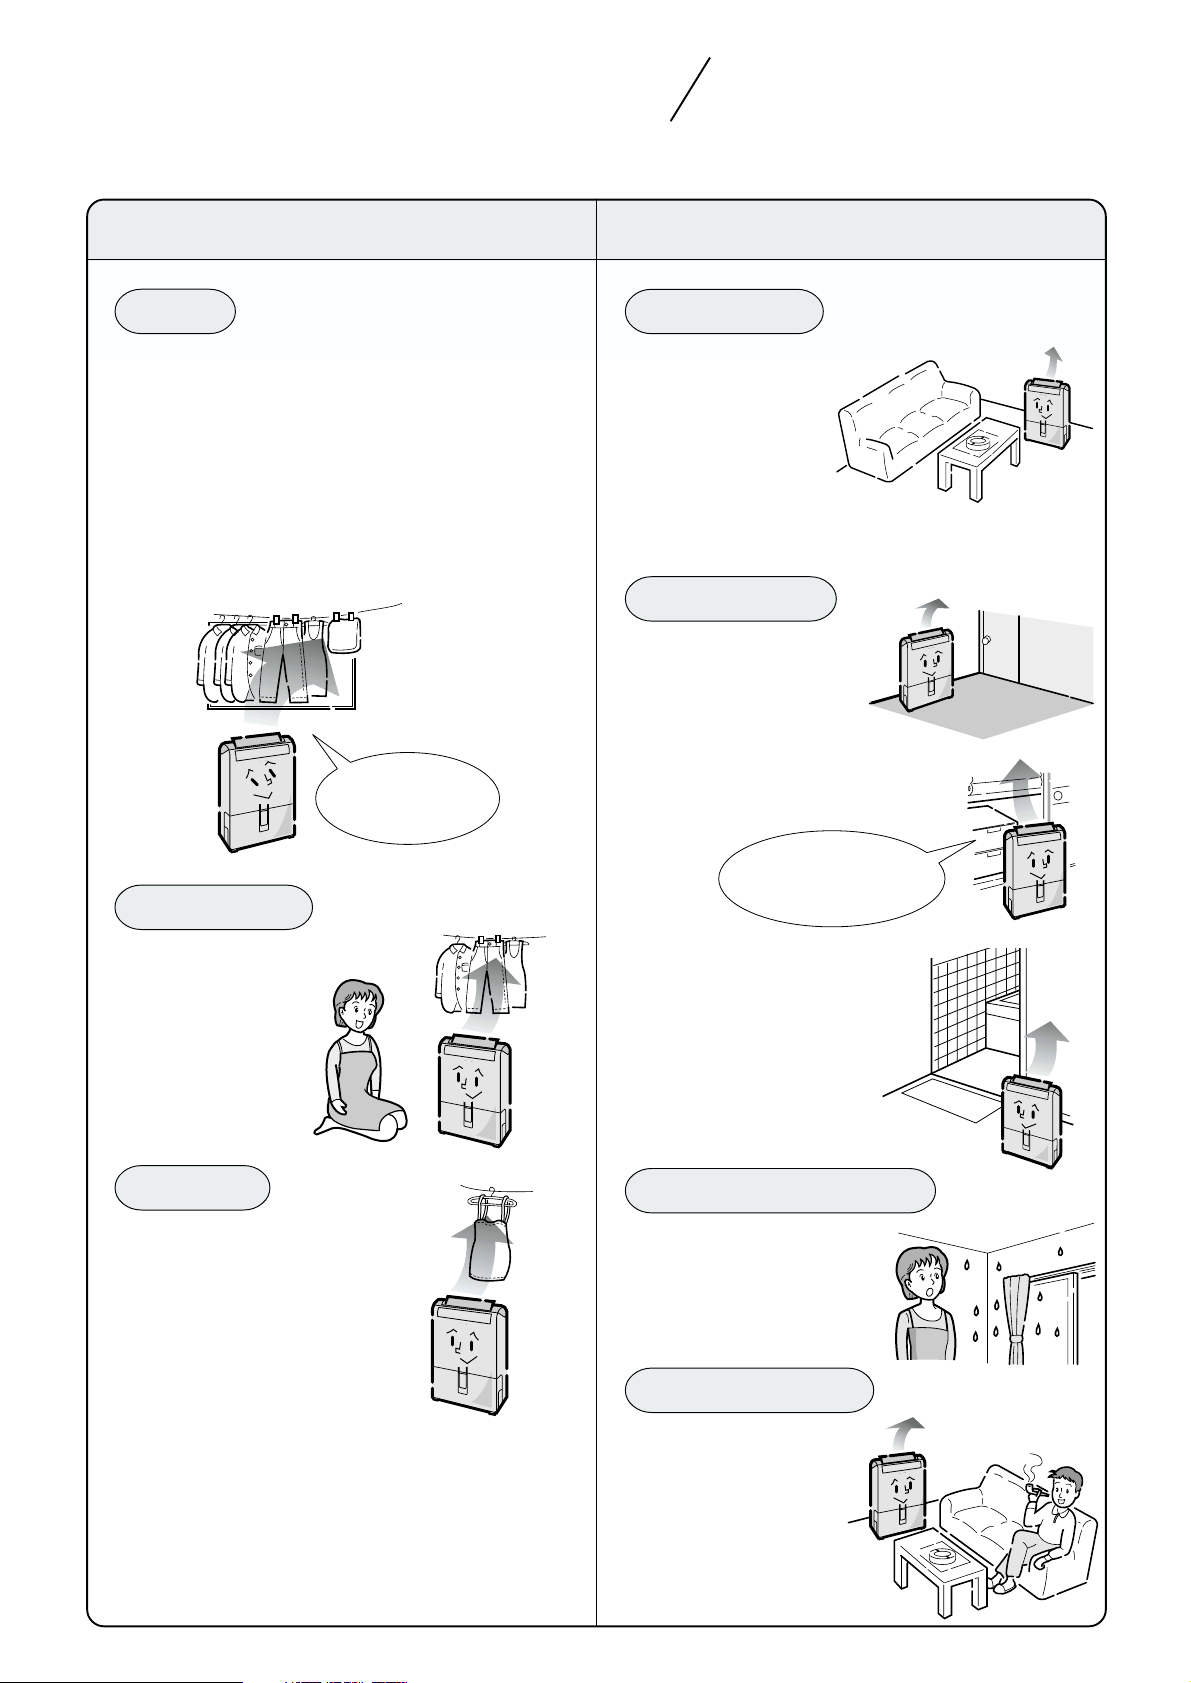
For maximum operation efficiency, please
minimize opening and closing of windows and
doors in the room where the unit is located.
Dry clothes operation
Fast
When you are in a hurry to dry large
quantities of clothes.
A strong air would normally blow in the direction set
in accordance with the mechanism of the fan. To hasten clothes drying, put them at the right side of the
unit and dry them by adjusting the direction of the
airflow louver lever so that the air will blow in that
direction.
When some clothes are not sufficiently dry, you can
dry them effectively by moving them so they can be
blown under strong air.
The air normally
blows in the
right direction.
Dehumid
Auto dry
When you want to
keep the humidity
of your living
room fresh
Also in rooms with
*
musical instruments
(piano) which are
easily damaged by
moisture.
Room dry
Dehumidifying mats
or carpets
Dehumidifying clothes in a
closet or a chest of drawers
Standard
To dry clothes under
normal situation
Gentle
To dry lingerie gently
and quietly
Open the sliding
door and operate
the unit in front of it
Preventing mold
formation
Locations with excessive
moisture levels, such as a
bathroom-dressing area and
a kitchen.
Continuous dry
Preventing dew condensation on ceilings,
walls or windows
Air cleaning
6
Removing cigarette
smoke, pollen or
dust and protecting
the room from becoming moldy.
Page 7
Preparations Before Using
Preparations Before Using
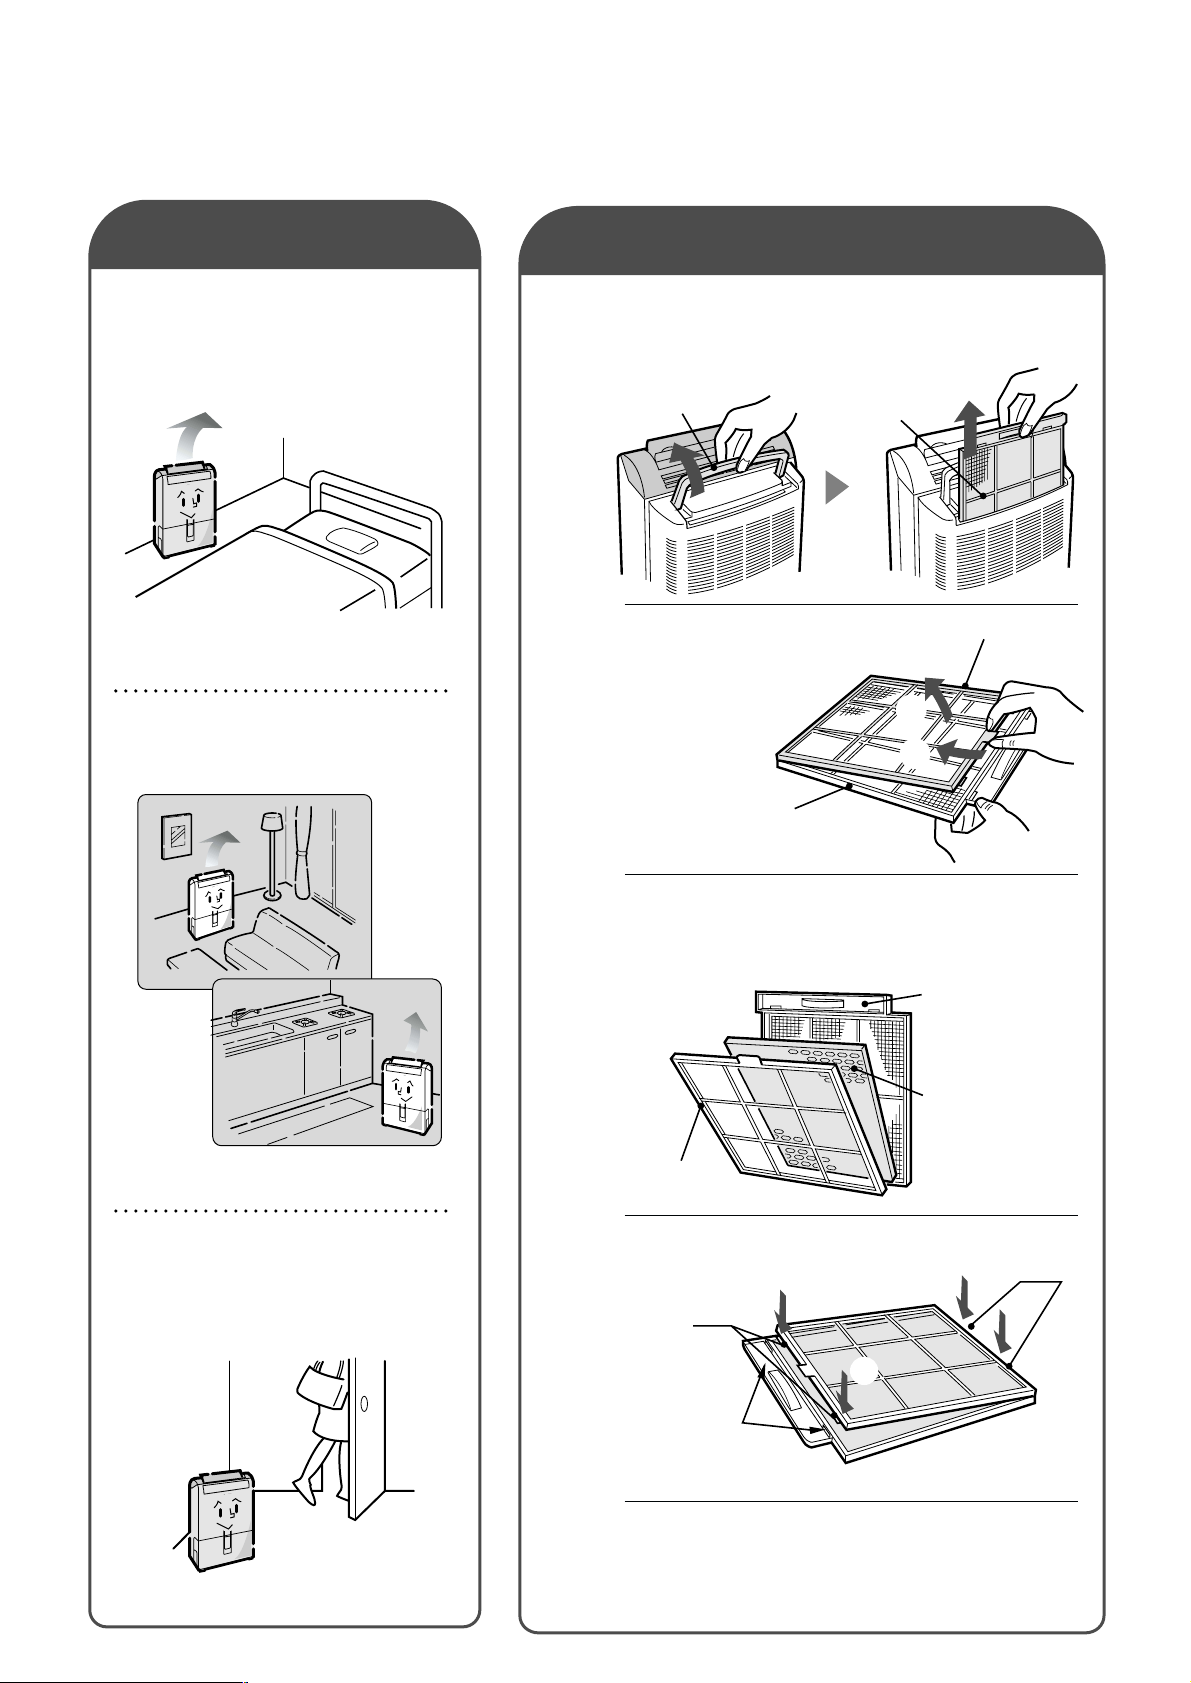
Effective uses
Dry bedding
It is efficient to dry the bedding etc.
Living room or kitchen
Dehumidify while you rest.
1
2
Installing the filter
Lift the handle.
Lift up the handle at the back of the unit, then take
out the front filter.
Handle
Remove the filter clamp.
You can remove the
filter by pushing its
clamp.
Front filter
Filter clamp
2
1
While you are away
Set timer before you leave.
Come home and experience the pleasant surroundings.
3
4
Front filter
Remove the attached filter from
the plastic bag and attach it to
the front filter.
Front filter
Air purifying filter
(black-screen
side)
Filter clamp
Install the filter clamp.
2
Pawl
2
1
Pawl
1
5
Pawl-receiving
part (2 places)
Return the handle to its original
position after installing the filter
in the unit.
7
Page 8
Part Names and Functions
Part Names and Functions
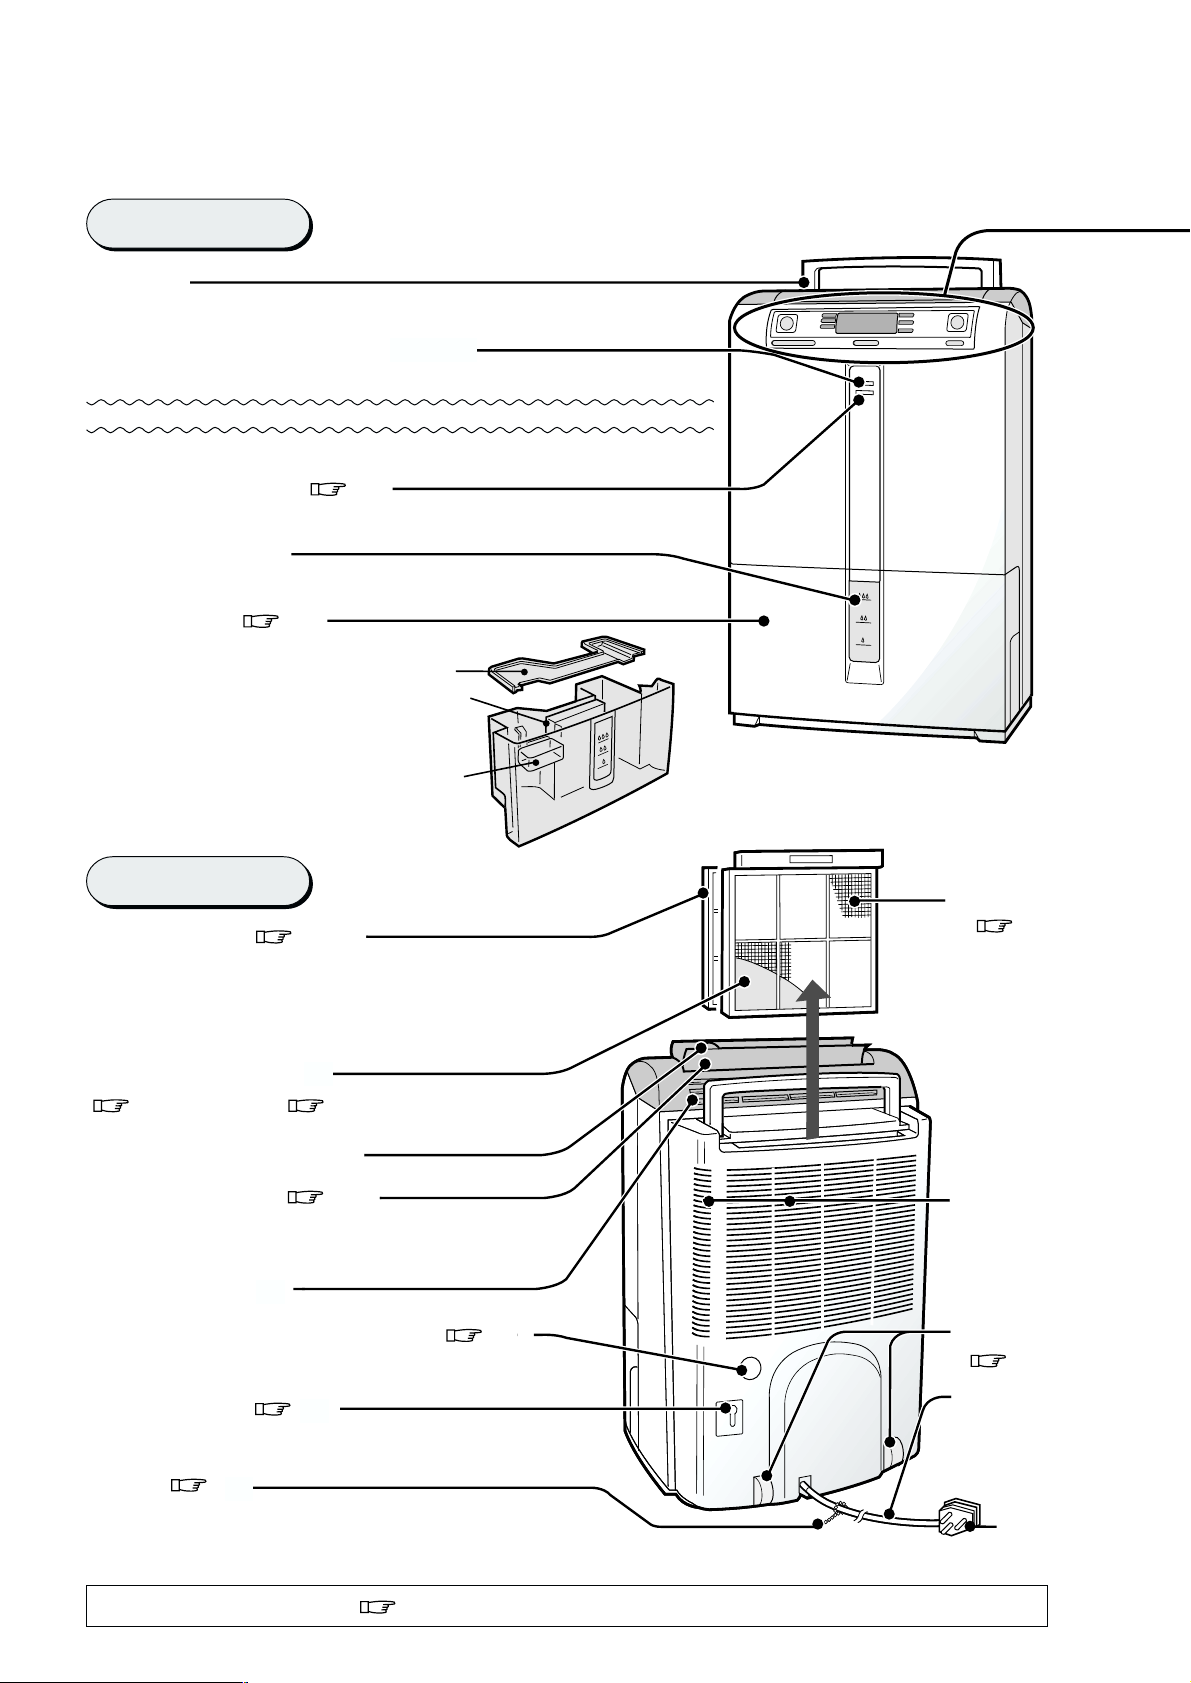
Front view
Handle
Lift when you move.
Mold multiplication indicator
This serves as a dehumidifying reminder when it turns red in room temperature of about 20°C or more and the humidity of about 70% or more.
FULL tank lamp (
When the water level reaches this FULL line, the lamp blinks in green.
16)
FULL tank line
When water reaches this FULL line, operation stops automatically.
Water tank (
Where the dehumidified
water is stored. When the
water tank reaches the
maximum line, operation
stops automatically.
16)
Tank lid
Tank handle
Float
Rear view
7, 18)
Filter clamp
Air purifying filter
(
7, 18, 19, Option
(
21)
Front filter
(
7, 18)
This removes
large dust particles passing
into the air
intake.
Airflow louver lever
13)
Airflow louver
Changes airflow outlet in 4-directions according to
usage.
(
Rear air outlet
Continuous drainage hole (
Used for draining water continuously
Cord clamp (
Hanging power supply cord together.
Band (
(Do not operate the unit with banding the cord.)
The numbers following the symbol indicate the main reference pages for more detailed information.
19)
19)
8
17)
Air intake
Caster
17)
(
Power
cord
Plug
Page 9

Control panel
(Operation Procedure
(The liquid-crystal indicator shows all indications for
explanation.)
10)
Dehumidification mode
AUTO DRY
Controls humidity automatically between 55 and
60%.
ROOM DRY
Controls humidity automatically at about 50%.
CONTINUOUS DRY
Continuous dehumidifying operation by controlling the volume of airflow at “medium” when
room temperature is 15°C or more and at “turbo
(HIGH)” when 15°C or less.
CLEAN AIR
CLEAN AIR function is operated independently.
DEHUMID SETTINGS
11, 12)
button
Switches to dehumidifying operation
mode
(
Temperature/humidity indicator
Indicates room temperature and humidity
(around the unit).
Comfort indicator (
Indicates comfort levels in a room.
13)
Airflow volume indicator
Indicates airflow volume.
DRY CLOTHES mode
FAST
CONTINUOUS DRY operation, putting the
airflow volume at HIGH.
STANDARD
CONTINUOUS DRY operation, putting the
airflow volume at MEDIUM.
GENTLE
CONTINUOUS DRY operation, putting the
airflow volume at LOW.
DRY CLOTHES
SETTINGS button
10, 12)
(
Switches to DRY CLOTHES mode.
AUTO DRY
ROOM DRY
DEHUMID
SETTINGS
CONTINUOUS
FAN SPEED
DRY
CLEAN AIR
Fan speed/HIGH
indicator
Fan speed/HIGH, ON/OFF
button
AUTO→HIGH
Fan speed/LOW
indicator
Fan speed/LOW, ON/OFF
n
butto
AUTO→LOW
The volume of airflow can be
switched only when operating in the
dehumidifying mode.
Full tank indicator
Defrosting indicator (
Indicates “Defrosting”.
15)
ON/OFFHIGH LOW
Operation indicator
( 10, 11)
The indicator lights when the
unit is in operation.
The indicator blinks under timerinput setting and lights after set
up is completed.
Power ON/OFF
button
( 10, 11)
Controlling operation of the unit
by ON/OFF.
FAST
STANDARD
GENTLE
DRY CLOTHES
SETTINGS
TIMER indicator
Timer setting
button
Sets the time to start or stop operation and can be set between
1 to 9 hours.
( 14,15)
ON/OFF TIMER
indicator
“ON” indicates the time interval until operation starts, and “OFF” indicates the time interval until operation stops.
( 14,15)
High-temperature
indicator
When the temperature inside the
unit reaches an abnormally high
temperature, operation stops for
safety and the indicator blinks.
( 5)
9
Page 10

Operation Procedure
Operation Procedure
Dry clothes operation
Operation cannot be
started unless the water
tank is installed.
(Example of indication) Operating state in STANDARD mode
FAST
STANDARD
Power ON/
OFF button
ON/ OFF
Lighting
GENTLE
2
Insert the plug into the power socket
1
2
(220V).
●
The current humidity will not be displayed accurately
for around one minute when the unit is plugged in.
This is because the humidity sensor is checking the
humidity.
●
If the “full tank indicator” blinks, empty the water tank
and reinstall the tank properly.
Press the Power ON/OFF button.
Operation indicator lights, and “STANDARD” operation
starts.
DRY CLOTHES
mode
DRY CLOTHES
DRY CLOTHES
SETTINGS
Humidity indicator blinks up and down.
Blinking
SETTINGS button
3
Pip
FAST
STANDARD
GENTLE
FAST
STANDARD
GENTLE
Press DRY CLOTHES SETTINGS
3
button and select operation
mode.
Operation mode is sequentially switched.
( 12)
STANDARD
GENTLE
FAST
STANDARD
GENTLE
FAST
Select when you want to dry
clothes under normal situation.
When you want to dry lingerie
gently and quietly.
When you are in a hurry to dry
large quantities of clothes.
Set the airflow direction of the louver.
4
When the drying clothes process is in operation, you cannot use “Fan speed/HIGH, ON/OFF” and “Fan
*
speed/LOW, ON/OFF” button.
Set the optimum direction of airflow based on the individual usage and purposes.
(
13)
Stop
Press the Power ON/OFF button again.
Operation indicator will be turned off and the operation stops.
The crystal monitor will continue to show the comfort levels,
temperature and humidity of the room even if operation stops.
FAST
STANDARD
GENTLE
10
If you press operation key again after the operation has stopped, the operation will start from the last operation
*
mode.
Page 11

Dehumidifying operation
(Example of indication) Operating state of a little high humidity in AUTO DRY mode
DEHUMID SETTINGS button
Fan speed/LOW, ON/OFF
button
DEHUMID
SETTINGS
Fan speed/LOW, ON/
OFF button
Insert the power plug into the power socket (220V).
1
Press the Power ON/OFF button.
Operation indicator lights, and “STANDARD” operation of
2
drying clothes starts. Press the DEHUMID SETTINGS
button.
When you press the operation button while inserting plug into outlet, or press it during a power failure,
the unit is set to start operation in the “STANDARD”
mode of clothes-drying process.
Press the DEHUMID SETTINGS button
and select operation mode.
3
The operation mode is sequentially switched. ( 12)
AUTO DRY
ROOM DRY
CONTINUOUS DRY
Pip
CONTINUOUS
3
FAN SPEED
CLEAN AIR
AUTO DRY
ROOM DRY
DRY
CLEAN AIR
Or
Lighting
AUTO DRY
ROOM DRY
CONTINUOUS
DRY
CLEAN AIR
ON/ OFFHIGH LOW
Power ON/
OFF button
244
(same as DRY CLOTHES operation)
FAST
STANDARD
GENTLE
Press “Fan speed/HIGH, ON/OFF” or “Fan speed/LOW, ON/OFF” button .
4
Normally, the unit will operate automatically with the volume of airflow according to each operation mode. In
case of the following condition, however, press “ HIGH” or “LOW” button.
HIGH LOW
When you need to dehumidify rapidly
The indicator lights, and the volume of airflow
changes from AUTO to the HIGH operation.
Pressing it again will return to the AUTO operation mode.
Setting the direction of airflow from the blowout louver.
Set the optimum direction of the blowout based on the individual usage and purpose. ( 13)
5
Stop
Press the Power ON/OFF button.
Operation indicator will be turned off and the operation stops.
The crystal monitor will continue to show the comfort levels,
temperature and humidity of the room even if operation stops.
When you want to dehumidify moderately.
The indicator lights, and the volume of airflow
changes from AUTO to the LOW operation.
AUTO DRY
ROOM DRY
CONTINUOUS
DRY
CLEAN AIR
If you press operation key again after the operation has stopped, the operation will start from the last operation
*
mode.
11
Page 12

Changing the Operation Mode
2
1
Pip
Changing the Operation Mode
It will be changed in the following order whenever
Dry clothes operation
pressing the DRY CLOTHES SETTINGS button. It
begins in the STANDARD operation.
(Example of indication) When DRY CLOTHES SETTING is operated.
DRY CLOTHES
SETTINGS button
Pip
2
Power ON/OFF
button
ON/ OFF
FAST
STANDARD
GENTLE
DRY CLOTHES
SETTINGS
1
STANDARD This continuously operates at STANDARD “MEDIUM” air volume.
GENTLE Select this to dry lingerie gently and quietly. This continuously operates at “LOW” air volume.
FAST
Dehumid settings
operation
(Example of indication) When DEHUMID SETTINGS operation is carried out.
Select this when you are in a hurry to dry large quantities of clothes.
This continuously operates at “HIGH” air volume.
It will be changed in the following order whenever pressing the DEHUMID SETTINGS button. It starts at the AUTO
DRY operation.
12
AUTO DRY
DEHUMID
SETTINGS
button
DEHUMID
SETTINGS
CONTINUOUS
FAN SPEED
ROOM DRY
DRY
CLEAN AIR
Power ON/
OFF button
ON/ OFFHIGH LOW
AUTO DRY Use the following conditions under a normal dehumidifying operation.
Humidity in the room is adjusted by the temperature moisture sensor.
It will be automatically controlled at a humidity of about 60% at temperature of
27°C or less and at about 55% at 28°C or more. However, dehumidifying operation occasionally vary depending upon the structure or size of the room.
ROOM DRY Humidity (around the unit) in the room can be automatically controlled to about
50% by the temperature-and-moisture sensor.
Humidity may not fall to less than 50%, depending upon operating conditions
*
(outside temperature, room size).
CONTINUOUS DEHUMID operation is continuously carried out by controlling the volume
DRY of airflow: “MEDIUM” at temperature of about 15°C or more and “HIGH” at about
15°C or less.
CLEAN AIR Select this when you want to use the unit as a CLEAN AIR device.
Only ventilation operation is available.
The CLEAN AIR function can automatically work in each mode of operation.
*
During defrosting, no other operation mode can be selected. If you select a new operation mode during defrosting,
*
the mode will switch automatically after completion of defrosting.
Page 13

How to see
indication
Dehumidifiers do not have an air-conditioning function to adjust temperature.
If room temperature is too high or too low, the comfort level indicator will
not indicate the proper comfort levels.
Indication of “standby”, “AUTO
DRY operation”, “CONTINUOUS
DRY”, “CLEAN AIR operation”
It measures comfort levels based on
(
humidity and temperature of the room.
When it is comfortable
When temperature and
humidity are comfortable
When it is a little comfortable
When temperature is too
high or too low
When it is a little uncomfortable
When humidity is a little
high
When it is uncomfortable
When humidity is high
)
Indication of “ROOM DRY in operation”
When humidity is high
Indication of “DRY CLOTHES” operation
STANDARD mode
FAST mode GENTLE mode
When humidity is a
little high
When humidity is low
Comfort levels will not be indicated in the DRY CLOTHES
*
mode and the ROOM DRY mode.
Airflow direction is switched
Airflow can be changed to upper or lower
direction when drying clothes
When using with a stand-type rack for drying clothes
Airflow louver
Stand-type rack for drying clothes
Airflow is in diagonally backward direction
when drying
clothes
Airflow is
in backward
direction
Airflow is in the diagonally
front direction
The entire room is dehumidified.
Airflow is in the backward
direction
When a closet or shoe cabinet
is dehumidified.
Do not operate a clothes-drying
process at “GENTLE” or dehumidifying function with “fan
speed/LOW”.
Airflow is in the upward direction
When you are in a hurry to dry a
small quantity of clothes.
Airflow direction can be changed by
switching the lever of the louver.
13
Page 14

How to Operate the Timer
How to Operate the Timer
To set on timer (it can be set only when the unit is shut down.)
(Example of indication) Standard operation of clothes drying mode
Display of ON TIMER after 5 hours
DEHUMID SETTINGS button
Pip
AUTO DRY
DEHUMID
SETTINGS
ROOM DRY
CONTINUOUS
DRY
CLEAN AIR
Lighting→Blinking
2
FAN SPEED
ON/OFFHIGH LOW
3
DRY CLOTHES SETTINGS
button
FAST
STANDARD
GENTLE
Lighting
DRY CLOTHES
SETTINGS
Pip
2
1
Operation indicator
Press timer setting button. You will hear beeping sounds for about one minute after
1
●
When you note that the “ON” on the liquid crystal indicator starts to blink this indicates that the timer has
been set “ON” after 1 hour.
Select set-time of TIMER since the indication shifts at an hour intervals by pressing Timer setting button
as follows:
()
pressing the key for about 5 seconds.
Timer setting
button
No indication (set release)
●
The indication will continue to shift automatically by pressing the Timer setting button.
Press DEHUMID SETTINGS button or DRY CLOTHES SETTINGS button.
●
2
Press DEHUMID SETTINGS button when you select DEHUMID operation mode other than “AUTO DRY”.
(The AUTO DRY is indicated as “ mark” on the operation mode.)
●
In case of DEHUMID operation mode, it is possible to operate by “Fan speed/LOW, ON/OFF” or “Fan
speed LOW, ON/ OFF”. Select and press either of them.
Press DRY CLOTHES SETTINGS button when you select a DRY CLOTHES mode other than
“STANDARD”.
(STANDARD is indicated as “ mark” on the operation mode.)
Press Power ON/OFF button.
●
3
The operation indicator will stop blinking when the Power ON/OFF button is pressed, and the ON TIMER
operation will be enabled or set. “ON” on the liquid-crystal indicator shifts from blinking into lighting.
●
The TIMER indicator figure will decrease sequentially by “1” following each 1 hour lapse after the
TIMER was set.
(Example) shifts to 8 hours after 9 hours.
14
Example
Attention
If you set ON TIMER operation as “after 5 hours,” The operation starts after 5 hours.
●
Dispose of water in the tank, since the ON TIMER operation cannot be set when the
Full tank lamp or Full tank indicator is on.
●
It is possible to shift from “DEHUMID SETTINGS” or “DRY CLOTHES” operation
mode after the ON TIMER operation is set. Change it by pressing either of the button.
●
You cannot change the starting time of operation after the ON TIMER operation has
been set. To reset, you need to cancel ON TIMER operation.
How to cancel ON TIMER operation
Press the power ON/OFF button.
Operation indicator, “ TIMER”, “ON after hours” on the liquid-crystal
part, and “
ON TIMER operation is released.
mark” on operation mode indicator are all turned off. Then
(Example of indication): indicating
state of ON TIMER operation release
Page 15

FAST
STANDARD
GENTLE
Lighting
To set off timer (it can be set when the unit is in operation)
(Example of indication) AUTO DRY operation at dehumidifying mode. (Indication of OFF TIMER after 1 hour)
Power ON/OFF
button
Operation
indicator
Operation indicator is lit on and is confirmed to be in operation.
1
Press TIMER button
Indicating set-time of OFF TIMER as “OFF after 1 hour”.
2
●
Select set-time of TIMER since the TIMER shifts sequentially in order as follows. (one-hour interval)
The indication automatically shifts by continuously pressing Timer setting button.
●
The TIMER indicator figure will decrease sequentially by “1” following each 1 hour lapse after the
TIMER was set. (Example) shifts to 8 hours after 9 hours.
Example
Dispose of water in the tank before setting up the TIMER.
*
(When water in the tank reaches the FULL line, the operation stops and the remaining time also stops
its lapse.)
Attention
AUTO DRY
ROOM DRY
CONTINUOUS
DRY
CLEAN AIR
PEED
ON/OFFLOW
Lighting
FAST
STANDARD
GENTLE
Timer setting button
DRY CLOTHES
SETTINGS
2
Pip
No indication (set release)
If you set OFF TIMER operation as “after 5 hours”, The operation stops after 5 hours.
●
A melody sounds for 3 seconds when OFF TIMER is completed (when operation
has stopped).
●
After timer operation has been set, the shutdown time can be changed by pressing the Timer setting button again.
To cancel Off Timer
You can cancel OFF TIMER by pushing TIMER button until no indication appears.
Defrosting
If the room temperature is below 16°C, frost may form
on the cooling device of the dehumidifier, and the automatic defrosting function will automatically switch
on.
●
During defrosting, air flow is stopped and the sound of operation will change. (The defrost indicator will turn on during
defrosting.)
●
The length of time that defrosting will operate will vary according to room temperature and humidity, but will be carried out
for 5 minutes at 45 minute intervals. (The duration of a defrost
cycle will be longer when the temperature is lower.)
(Indicating the modes in
operation as they are.)
15
Page 16

When taking out the water tank, the
front full tank green lamp will light up,
Emptying the Water Tank
Emptying the Water Tank
If the water tank fills to a level of approx. 5.7 liters, the operation stops automatically. Then an electronic beep sound will be emitted for 8 seconds, and the “full” indicator light will blink showing that the
water tank is full. Empty the tank as shown below.
the FULL tank indicator on the liquid
crystal display will start to blink, and
the unit stops its operation.
Remove the water tank.
1
Open the front door, pull out the tank by pushing up
the tank handgrip a little and take the tank out carefully by holding it with both hands. The tank weighs
about 6.6 kg when it is filled up to the limit. Be careful
to avoid getting injured when taking it out.
Water tank
Handgrip
2
3
Empty the water tank.
●
The drainage tank can be carried by holding the
tank handle.
●
Empty the water tank, clean the tank and wipe
off excess water outside the tank.
●
If water remains on the float, the automatic stop
function of the dehumidifier will not work
properly. So make sure to wipe away the water
from the float.
Tank handle
Put in the water tank.
(1) Make sure “Tank lid” fits securely in the outer of the tank.
(2) Put the water tank firmly into the unit until it touches
the back of the unit.
How to detach and install the tank lid and
float
(1) Detach the tank lid gradually from the left or right
toward the opposite side.
(2) As shown in the diagram, push the float into the
“1” direction and remove it from the hole.
(3) Draw the float out in the “2” direction while push-
ing it as it is.
(4) When attaching it, install it properly into the origi-
nal position in reversing the procedures (“2” to “1”).
●
Make sure to push the float in the
tank. Otherwise water might spill
in the unit or operation cannot
stop when the tank is filled up to
the limit. Do it carefully.
The lever of the
float must be put
over the tank lid.
The rotation must
be smooth.
Fix the tank
lid firmly into
the ditch.
Tank lid
Float
1
Water tank
Float
2
16
Cautions
●
Do not remove the water tank immediately after the unit is turned off.
Otherwise water remaining in the cooling device may drip inside the unit.
(If any water spills, wipe it off with a soft cloth. )
●
Do not touch anything inside the unit after the water tank is removed.
(Otherwise when the tank is full, the automatic stop function may not work
properly.)
●
Before moving the unit, make sure to turn it off and drain the water
from the tank.
Otherwise water may spill out onto the floor.
●
At low temperatures, water may
freeze in the unit’s cooling system instead of collecting in the
water tank. Note that this is not
a sign of failure.
Page 17

Continuous Drainage
Rear view
Continuous Drainage
Cautions when using the unit with continuous drainage
●
This dehumidifier is for home use. If you use it with continuous drainage, make sure to have a thorough check
for the following at least once every two weeks: dirty front filter, clogging of water hose, and resumption of
operation after a power failure. This will help to ensure trouble-free operation.
●
When a drain hose is to be used, make sure that the temperature around the hose does not fall below 0°C.
Water in the one might freeze causing undrained water to spill and wet household furniture or appliances.
To run the dehumidifier continuously it is necessary to have a suitable drainage point for accumulated water.
Make sure to turn the unit off and then unplug it. Then proceed as follows.
Open a drain hose hole.
1
Remove the water tank. Using a screwdriver, punch a hole at the
drain hose hole located at the back of the unit. Smoothen the
edge of the hole with a hammer etc.
Drain hose
Insert the elbow joint into a hose (available
at hardware shop),
2
and insert the hose
Commercial hose, 15mm diameter.
through the drain
hose hole.
Remove the water tank. Insert
the hose through the drain hose
hole.
Elbow
joint
Insert elbow joint into the unit.
Insert the elbow joint into the drainage outlet of the unit all the way to the
3
joint base.
Re-install the water tank.
The unit does not operate without the water tank in place.
4
(The unit is turned off with water-brimmed direction device in the unit.)
Positioning of the
drainage hose for
continuous dehumidification
The hose
must be
below the
level of the
drainage
hole.
At least 10cm
To stop continuous drainage and return
the dehumidifier to its original state
Drainage outlet
Insert more
than 10mm
into hose.
Do not bend
the hose.
Pull the hose towards you. Then remove the hose from
the continuous drainage outlet (The drainage outlet should
be sealed with sticky tape, or other suitable means.)
Front view
Elbow
joint
The end of the
hose should
not come in direct contact
with water.
Move
Move (by using caster)
Drain water from
1
the tank.
3
Incline the unit.
Incline the unit
at an angle of
20 to 30 degrees by putting
your foot on the
back of the unit.
Lift the carrying
2
Cautions
handle.
( 7)
●
Do not take out the water tank immediately after operation has stopped to prevent water leakage.
●
Move the unit by lifting it up when the floor is easily damaged or at a rugged place. Do not use
the caster on a thick-piled carpet. This can cause damage to the surface of the carpet.
Move
4
Over-inclination
might cause damage to the floor
and water to leak.
Do not place
power supply
cord between
the caster.
17
Page 18

●
For safety purposes, turn off and unplug the unit
Maintenance
Maintenance
before carrying out any maintenance.
●
For clean, sanitary and pro-long use, regular
maintenance is recommended.
Front filter
Make sure to clean the front filter once every two weeks. If the filter is clogged with fine dust, the
air flow rate will drop and dehumidification efficiency will be reduced.
Remove the front filter by lifting the handle.
1
2
Lift it up by grasping the
carrying handle at the
back of the unit.
Handle
Pull it out upward by
grasping the knob of
the filter frame at the
back of the unit.
Front filter
Remove the filter holder and the air purifying filter.
Make sure not to wash the air purifying filter with water.
Otherwise this might render the filter useless.
Air purifying filter
Filter holder
2
1
Front
filter
Wash the front filter.
3
4
A dirty front filter can be cleaned with water,
neutral detergent diluted in warm water or
with a vacuum cleaner. When cleaned with
water, dry it well in the shade.
Attach the air purifier filter to
the front filter and put it back
in the unit.
( 7)
(When washing with water)
The dirty surface should face
downward.
(When cleaning with a
vacuum cleaner)
The dirty surface should face
upward.
Main body
Wipe off any dirt from the unit using a piece of soft cloth soaked in warm water (40°C max.) or with
detergent.
●
If detergent is used, make sure to wipe off the detergent with a damp cloth.
●
The air intake and outlet become dirty easily, so make sure to clean them well.
●
To clean the water tank, use a soft sponge.
Cautions
●
If water is allowed to splash on the unit, electrical insulation may be affected and corrosion of the unit may
eventually result.
●
Use a neutral detergent (e.g. for dish washing) for cleaning.
●
Do not use the following types of cleaning agents as they will damage plastic parts.
18
Thinners, benzine, alcohol, petrol, powder soap, powder polish, alkaline washing agents, hot water, acid
or scrubbing brushes.
●
Do not scrub or expose the unit to chemically treated cloths for any prolonged period of time as this may
damage the surface of the unit.
Page 19

Changing the air purifying filter
The required frequency for changing the air purifying filter will depend on where the unit is operated.
It is highly recommended that the filter is checked regularly.
Signs that the air purifying filter needs to be changed
Generally a filter should be changed after six months from the time it is unpacked
(depending on the place and conditions of use).
●
When the unit is exposed to oily smoke or soot, filters will need to be changed at much shorter intervals.
Cautions
Air purifying filters cannot be reused even after being washed.
A reused filter is ineffective and may even result in damage to the unit.
How to replace
You are required to purchase the “air-
purifying filter,” (Model: DW-10C) as
1
options (chargeable). Refer to page 7
on “Installing the filter” for how to replace it.
Fill in a use-start date on the following
label after you have replaced the filter.
2
Date of label
If the unit is not used for a long time
Empty the water tank completely.
Remove the tank lid and float and wipe away ex-
1
cess water in the tank.
(Refer to 16 on “How to detach and install the
tank lid and float”.)
Tank lid
Float
Wind the power supply cord around the
2
clamps on the rear panel.
Clean the front filter.
Do not clean the air purifying filter with water.
3
If purifying filter becomes too dirty, please replace it
with a new one.
Storage
( 18)
(When cleaning with water)
●
Dry the unit thoroughly and cover with a sheet for dust protection. Store the unit in
a well ventilated place that is not exposed to direct sunlight.
●
If the unit is left uncovered without any protection, dust will accumulate so that the
air emitted by the unit will be dusty next time the dehumidifier is used.
Power supply cord
Front filter
Air purifying
filter (green
side)
19
Page 20

General Reference
General Reference
35
The temperature at which the unit can be operated is 5°C to 35°C.
If the room temperature is over 35°C, the built-in protection system
will automatically turn off the unit. If the room temperature is below
5°C, water may freeze and cause a failure to the unit.
○○○○○○○○○○○○○○○○○○○○○○○○○○○○○○○○○○○○○○○○○○○○○○○○○○○○○○○○○○○○○
5
5°C to 35°C
Dehumidifying operation increases room
temperature.
The dehumidifier does not have a cooling function.
As the unit produces heat during operation, room temperature may actually increase by about 2°C to 5°C (depending
on the outdoor temperature and size of the room).
No problem
○○○○○○○○○○○○○○○○○○○○○○○○○○○○○○○○○○○○○○○○○○○○○○○○○○○○○○○○○○○○○
Dehumidification capacity will vary based
on room temperature and humidity.
Dehumidification capacity will increase as temperature rises (as
shown in the chart on the right).
○○○○○○○○○○○○○○○○○○○○○○○○○○○○○○○○○○○○○○○○○○○○○○○○○○○○○○○○○○○○○
In case of upward airflow “HIGH”
23
For a humidity of 80%
21
19
17
15
13
11
9
7
0
Dehumidifying capacity (L/day)
5 10 15 20 25 30 35
Room temperature (°C)
Wait for 3 minutes before restarting the unit
If the unit is turned off, wait for at least 3 minutes before restarting operation.
If the unit is restarted immediately, the compressor will wait for 3 minutes to start up as part of the unit’s selfprotection system.
○○○○○○○○○○○○○○○○○○○○○○○○○○○○○○○○○○○○○○○○○○○○○○○○○○○○○○○○○○○○○
To shut off the tank full alarm
Follow the steps below to disable the tank full alarm:
1 Plug the power plug into the socket.
2 Simultaneously press the “DRY CLOTHES SETTINGS button” and
“Fan Speed/LOW button” for 3 seconds.
3 Remove the water tank. If the alarm does not sound, the proce-
dure is complete. If the alarm continues to sound, repeat the above
steps.
Fan speed/
LOW button
DRY CLOTHES
SETTINGS
button
20
To restore the tank full alarm, unplug the power cord.
*
Press together
for 3 seconds
Page 21

Specifications
Specifications
Model
Frequency
Rated voltage
Rated dehumidification capacity
Rated power
Stand by mode
*
Dehumidification area
Water tank capacity
Weight
Outside dimensions
Length of power supply cord
●
The capacity rating is based on a day’s operation at a temperature of 30°C and relative humidity of
80%. (AUTO DRY, ROOM DRY, CONTINUOUS DRY: FAN SPEED/HIGH ON)
●
Power consumption ratings are based on operation at a temperature of 30°C and relative humidity of
80%. (AUTO DRY, ROOM DRY, CONTINUOUS DRY: FAN SPEED/HIGH ON)
●
The dehumidification area is based on Japanese Electrical Manufacturers’ Association (JEMA) Standards.
The term “stand-by” means that the dehumidifier is kept at “OFF” position even though its plug has
*
been inserted into the power socket.
consumption
L /Day
W
W
2
m
L
kg
mm
m
(Wooden houses ~ concrete houses)
Approx. 6.4 (Automatic stop at 5.7)
380 (W) x 275 (D) x 589 (H)
Available length approx. 1.8
DW-208EX
50Hz
220V
20.0
310
3.5
25 ~ 50
13.5
Supplied Accessories
Air purifying filter
(1)
Optional Accessories
Optional Accessories
Elbow joint
(1)
Used for hose connection for
continuous water drainage.
Air purifying filter (for replacement)
(This removes the smell of cigarette smoke, fine dust etc.)
●
Model: DW-10C
To purchase this filter, specify this model number to the store where
you purchased the product or to the SHARP service center.
Printed matter
●
Operation manual
21
Page 22

MEMO
----------------------------------------------------------------------
----------------------------------------------------------------------
----------------------------------------------------------------------
----------------------------------------------------------------------
----------------------------------------------------------------------
----------------------------------------------------------------------
----------------------------------------------------------------------
----------------------------------------------------------------------
----------------------------------------------------------------------
----------------------------------------------------------------------
----------------------------------------------------------------------
----------------------------------------------------------------------
----------------------------------------------------------------------
----------------------------------------------------------------------
----------------------------------------------------------------------
----------------------------------------------------------------------
----------------------------------------------------------------------
----------------------------------------------------------------------
----------------------------------------------------------------------
----------------------------------------------------------------------
----------------------------------------------------------------------
----------------------------------------------------------------------
----------------------------------------------------------------------
----------------------------------------------------------------------
----------------------------------------------------------------------
----------------------------------------------------------------------
----------------------------------------------------------------------
----------------------------------------------------------------------
----------------------------------------------------------------------
----------------------------------------------------------------------
----------------------------------------------------------------------
----------------------------------------------------------------------
----------------------------------------------------------------------
----------------------------------------------------------------------
22
Page 23

MEMO
----------------------------------------------------------------------
----------------------------------------------------------------------
----------------------------------------------------------------------
----------------------------------------------------------------------
----------------------------------------------------------------------
----------------------------------------------------------------------
----------------------------------------------------------------------
----------------------------------------------------------------------
----------------------------------------------------------------------
----------------------------------------------------------------------
----------------------------------------------------------------------
----------------------------------------------------------------------
----------------------------------------------------------------------
----------------------------------------------------------------------
----------------------------------------------------------------------
----------------------------------------------------------------------
----------------------------------------------------------------------
----------------------------------------------------------------------
----------------------------------------------------------------------
----------------------------------------------------------------------
----------------------------------------------------------------------
----------------------------------------------------------------------
----------------------------------------------------------------------
----------------------------------------------------------------------
----------------------------------------------------------------------
----------------------------------------------------------------------
----------------------------------------------------------------------
----------------------------------------------------------------------
----------------------------------------------------------------------
----------------------------------------------------------------------
----------------------------------------------------------------------
----------------------------------------------------------------------
----------------------------------------------------------------------
----------------------------------------------------------------------
23
Page 24

Before Calling for Service
If you think the unit is not working poperly, check the following points before calling for
service.
Symptoms
Unit does not operate
when power ON/OFF button is pressed.
Dehumidification capacity
has dropped.
Humidity does not reduce
in any of the operating
mode.
Displayed humidity is
different from actual humidity.
Check Points
●
Has it been 3 minutes or more after inserting power plug? ( 20)
●
Is the water tank installed properly?
●
Is the water tank full?
●
Is the unit plugged in properly?
●
Has there been a power failure?
●
Does the time indication part of TIMER on the liquid-crystal display express
alternately the figure “
after pulling out the power plug.
●
Has the usable period (about 6 months) of the filter passed or is the filter clogged?
●
Is the front filter clogged?
●
Is the air outlet or intake obstructed?
●
Is the temperature and humidity of your room too low?
●
Is the operation mode set to air purification?
●
Is your room too big?
●
Are the windows or doors opened and closed frequently?
●
Are there any devices that produce water vapor in the same area, such as a
kerosene heater?
●
Is the operation mode set to air purification?
● Displayed humidity is not accurate when the water tank is full or when the unit
is just turned on.
● Displayed humidity indicates the ambient humidity around the unit. This may
be different to the humidity in a different location in the same room.
” • (full stop). If so, contact the shop you purchased
Operation is noisy.
Water is leaking.
The unit repeats operating
and stopping.
The “High-temperature”
indicator on the liquidcrystal display blinks and
the operation stops.
●
Is the dehumidifier properly installed on a stable base?
●
Is the floor flat?
●
When the unit starts its operation at a low temperature, the sound might increase for several seconds. (The time depends on the temperature condition.)
●
Has the unit been knocked over, or has it been tilted or dropped?
●
Is the pipe connection or hose connection for continuous drainage in place?
(
14)
●
Is humidity automatically controlled by AUTO DRY mode or ROOM DRY operation? ( 12)
●
If the “ High-temperature “ still continues to appear after checking it again
based on page 5 “Cautions for use”, contact the shop you purchased or your
dealer after pulling out power plug.
24
TINSEA015FBRZ
 Loading...