

Page 1
MODEL
OPEN/
CLOSE
OPERATE
DISPLAY DIMMER
SETUP
ZOOM
ON
SCREEN
AUDIO
TITLE
REV FWD
MENU
VIRTUAL
FUNCTION
CONTROL
SUBTITLE ANGLE
ENTER
REPEAT
A B REPEAT
PROGRAM
DIRECT
PAUSE
CLEAR
RESUME
MEMORY
RETURN
SLOW
F.ADV SLOW
MC
PLAY
STOP
STILL
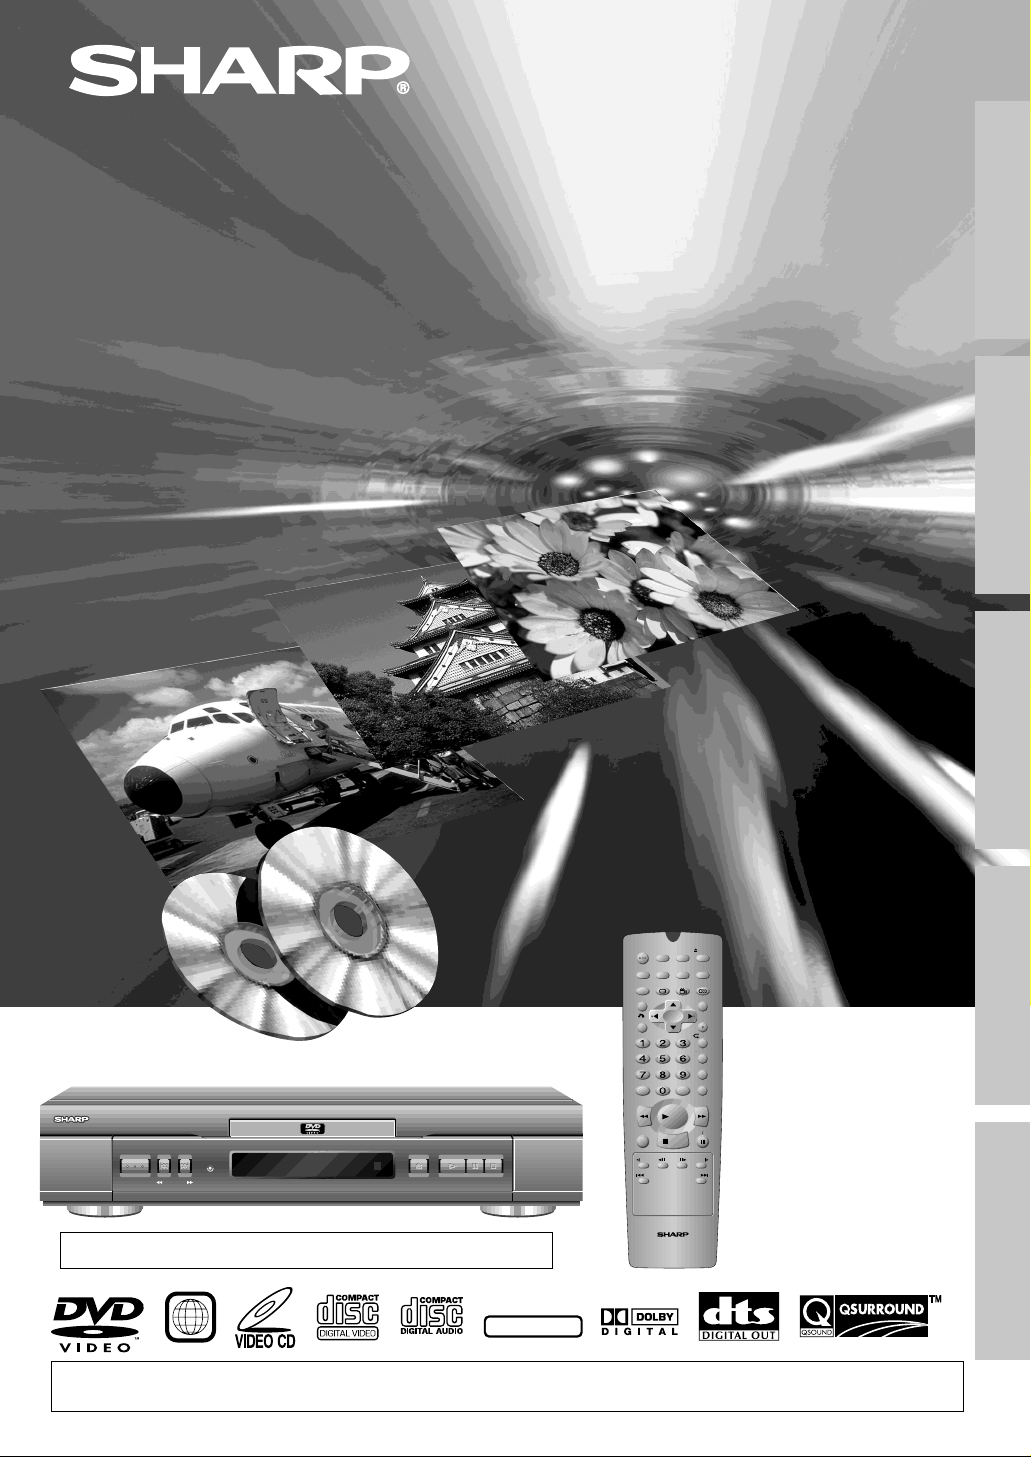
DVD VIDEO PLAYER
SKIP SKIP
DV-720H
DVD Video Player
OPERATION MANUAL
GENERAL INFORMATION
SETTING UP
BASIC OPERATIONS
OPERATE
The region number for this DVD player is 2.
STANDBY
FWDREV
2
OPEN/CLOSE
PLAY
STILL/PAUSE
STOPSKIP
NTSC/PAL
If you require any advice or assistance regarding your Sharp product, please visit our web-site
www.sharp.co.uk/support. Customers without Internet access may telephone 0990 274277 during office hour.
SPECIAL FUNCTIONS
OTHER INFORMATION
Page 2

This equipment complies with the requirements of Directives 89/336/EEC and
73/23/EEC as amended by 93/68/EEC.
Dieses Gerät entspricht den Anforderungen der EG-Richtlinien 89/336/EWG und
73/23/EWG mit Änderung 93/68/EWG.
Ce matériel répond aux exigences contenues dans les directives 89/336/CEE
et 73/23/CEE modifiées par la directive 93/68/CEE.
Dit apparaat voldoet aan de eisen van de richtlijnen 89/336/EEG en 73/23/EEG,
gewijzigd door 93/68/EEG.
Dette udstyr overholder kravene i direktiv nr. 89/336/EEC og 73/23/EEC med
tillæg nr. 93/68/EEC.
Quest’ apparecchio è conforme ai requisiti delle direttive 89/336/EEC e 73/23/
EEC, come emendata dalla direttiva 93/68/EEC.
Η εγκατάσταση αυτή ανταποκρίνεται στις απαιτήσεις των οδηγιών της
Ευρωπαϊκής Ενωσης 89/336/ΕΟΚ και 73/23/ΕΟΚ, #πως οι κανονισµοί αυτοί
συµπληρώθηκαν απ# την οδηγία 93/68/ΕΟΚ.
Este equipamento obedece às exigências das directivas 89/336/CEE e 73/23/
CEE, na sua versão corrigida pela directiva 93/68/CEE.
Este aparato satisface las exigencias de las Directivas 89/336/CEE y 73/23/
CEE, modificadas por medio de la 93/68/CEE.
Denna utrustning uppfyller kraven enligt riktlinjerna 89/336/EEC och 73/23/EEC
så som kompletteras av 93/68/EEC.
Dette produktet oppfyller betingelsene i direktivene 89/336/EEC og 73/23/EEC i
endringen 93/68/EEC.
Tämä laite täyttää direktiivien 89/336/EEC ja 73/23/EEC vaatimukset, joita on
muutettu direktiivillä 93/68/EEC.
Web-site:www.sharp.co.uk/support Help line:0990 274277 (office hours)
Page 3

SPECIAL NOTE FOR USERS IN THE U.K.
The mains lead of this product is fitted with a non-rewireable (moulded) plug incorporating a 5A fuse.
Should the fuse need to be replaced, a BSI or ASTA approved BS 1362 fuse marked or and of
the same rating as above, which is also indicated on the pin face of the plug, must be used.
Always refit the fuse cover after replacing the fuse. Never use the plug without the fuse cover fitted.
In the unlikely event of the socket outlet in your home not being compatible with the plug supplied,
cut-off the mains plug and fit an appropriate type.
DANGER: The fuse from the cut-off plug should be removed and the cut-off plug destroyed
To fit an appropriate plug to the mains lead, follow the instructions below:
IMPORTANT: The wires in the mains lead are coloured in accordance with the following code:
As the colours of the wires in the mains lead of this product may not correspond with the coloured
markings identifying the terminals in your plug, proceed as follows:
—The wire which is coloured blue must be connected to the plug terminal which is marked N or
coloured black.
—The wire which is coloured brown must be connected to the plug terminal which is marked L or
coloured red.
Ensure that neither the brown nor the blue wire is connected to the earth terminal in your three-pin
plug.
Before replacing the plug cover make sure that:
—If the new fitted plug contains a fuse, its value is the same as that removed from the cut-off plug.
—The cord grip is clamped over the sheath of the mains lead and not simply over the lead wires.
IF YOU HAVE ANY DOUBT, CONSULT A QUALIFIED ELECTRICIAN.
Note: A 3A fuse is also acceptable for a non-rewireable (moulded) plug which is used for this product.
immediately and disposed of in a safe manner.
Under no circumstances should the cut-off plug be inserted elsewhere into a 13A socket
outlet, as a serious electric shock may occur.
Blue: Neutral
Brown: Live
Web-site:www.sharp.co.uk/support Help line:0990 274277 (office hours)
GB
1
Page 4
About This Manual
C D
C D
• All mentions of “the Player” refer to the DV-720H DVD Player.
• All mentions of “the Remote” refer to the remote control unit.
• The following table describes the icons used in this Operation Manual.
Icon Meaning
Remote operation
Tips and Hints for easier operation
DVD
DVD
VIDEO
VIDEO
C D
C D
Functions for DVD
Functions for VIDEO CD
Functions for Audio CD
Quick Start Guide (the separate sheet)
GENERAL INFORMATION
SETTING UP procedure
BASIC OPERATIONS
SPECIAL FUNCTIONS
OTHER INFORMATION
Important!
Be sure to read this Operation Manual carefully before using the Player for the first time, and keep it on hand for
future reference when you experience operational problems.
GB
2 Web-site:www.sharp.co.uk/support Help line:0990 274277 (office hours)
Page 5
Contents
GENERAL INFORMATION
GENERAL INFORMATION
SAFETY INFORMATION ................................ 4
Types of Discs that Can Be Played on Your
Player ......................................................... 6
Features ......................................................... 8
Accessories ................................................... 8
Major Components........................................ 9
Remote Control Unit ................................... 12
SETTING UP
Connection .................................................. 15
Connecting a TV with AV 1 (TV) Output and AV 2
Input SCARTS ...................................................15
Connecting a TV Equipped with S-VIDEO Input or
VIDEO/AUDIO Input Jacks ................................ 17
Connecting to Audio Equipment.............................18
Setup ............................................................ 21
Switching the TV and the Player On ......................21
Power Control Operation........................................21
About the SETUP Screen ......................................22
Initial Setup (OSD LANGUAGE SETUP) ...............23
TV MODE SETUP Setting ......................................24
PARENTAL SETUP Setting .................................... 26
AUDIO SETUP Setting ...........................................30
DISC LANGUAGE Setting ..................................... 33
OSD LANGUAGE SETUP Setting ......................... 35
Display Information..................................... 36
SPECIAL FUNCTIONS
DVD
DVD Playback for Special Functions ....
DVD
About the FUNCTION CONTROL Screen ............. 43
Direct Selection of Scenes .....................................47
Selecting Scenes by Title Number.....................47
Selecting Scenes from the Menu Screen .......... 47
Direct Skip Function ..........................................48
Programmed Playback ........................................... 50
Title Programmed Playback...............................50
Chapter Programmed Playback ........................51
Repeat Playback ....................................................52
Chapter Repeat ................................................. 52
Title Repeat ....................................................... 52
Repeat off ..........................................................52
A-B Repeat ........................................................53
Resume Function ...................................................54
Angle Selection ......................................................55
Subtitle Selection ................................................... 56
Audio Selection ......................................................57
VIRTUAL DOLBY (QSURROUND) Selection ........ 58
VIDEO
VIDEO
C D
VIDEO CD and Audio CD
C D
C D
C D
Playback for Special Functions ............. 59
Direct Selection of Scenes .....................................59
Programmed Playback ........................................... 60
Track Programmed Playback ............................ 60
Repeat Playback ....................................................61
A-B Repeat ........................................................61
Disc Repeat/Track Repeat ................................62
Audio Selection ......................................................63
43
SETTING UP
BASIC OPERATIONS
SPECIAL FUNCTIONS
BASIC OPERATIONS
VIDEO
VIDEO
C D
Playback ....................... 37
DVD
DVD
Basic Play .............................................................. 37
DVD
DVD Playback ................................... 38
DVD
Fast Forward/Fast Reverse....................................38
Slow-Motion Play ................................................... 38
Still/Pause ..............................................................39
Frame Advance ......................................................39
Skip (Forward/Reverse) .........................................39
Zooming an Image .................................................40
VIDEO
VIDEO
C D
C D
Playback .................................................. 41
Fast Forward/Fast Reverse....................................41
Slow-Motion Play ................................................... 41
Still/Pause ..............................................................42
Frame Advance ......................................................42
Skip (Forward/Reverse) .........................................42
C D
C D
C D
C D
VIDEO CD and Audio CD
C D
Web-site:www.sharp.co.uk/support Help line:0990 274277 (office hours)
OTHER INFORMATION
Language Code List for Disc Language ... 64
Definition of Terms ...................................... 65
Troubleshooting .......................................... 68
Specifications .............................................. 69
Disc Handling and Maintenance ................ 70
OTHER INFORMATION
GB
3
Page 6
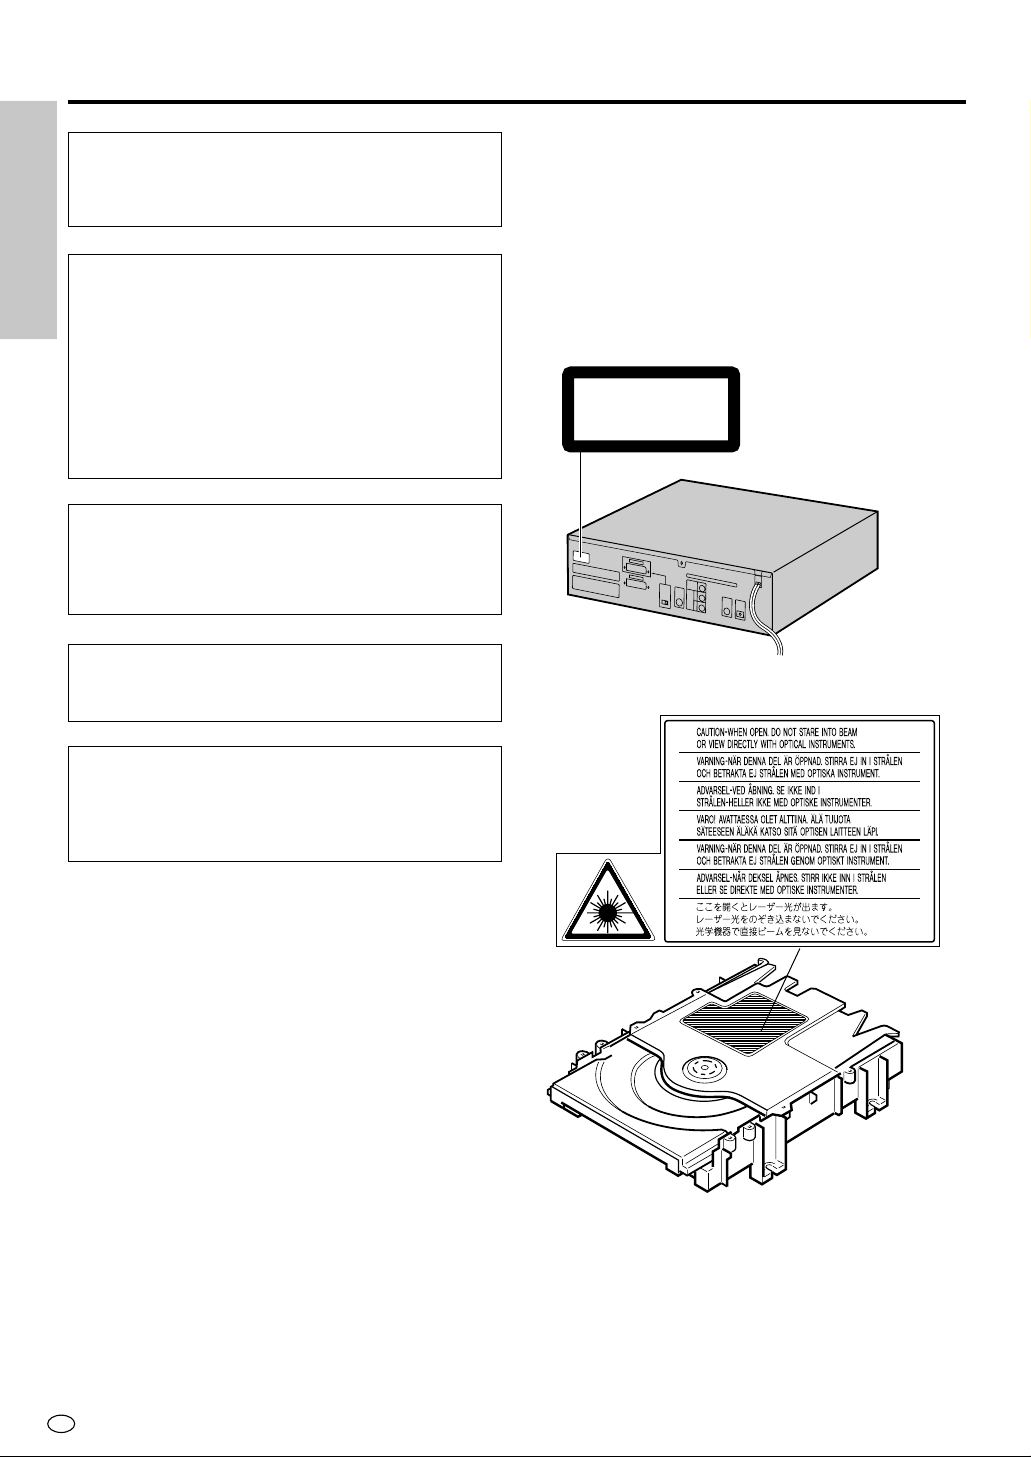
SAFETY INFORMATION
CLASS 1
LASER PRODUCT
Note:
This unit can be used only where the power
supply is AC 220V-240V, 50/60Hz. It cannot be
used elsewhere.
CAUTION:
USE OF CONTROLS OR ADJUSTMENTS OR
GENERAL INFORMATION
PERFORMANCE OF PROCEDURES OTHER
THAN THOSE SPECIFIED HEREIN MAY RESULT
IN HAZARDOUS RADIATION EXPOSURE.
AS THE LASER BEAM USED IN THIS PLAYER
IS HARMFUL TO THE EYES, DO NOT ATTEMPT
TO DISASSEMBLE THE CABINET. REFER
SERVICING TO QUALIFIED PERSONNEL ONLY.
WARNING:
TO REDUCE THE RISK OF FIRE OR ELECTRIC
SHOCK, DO NOT EXPOSE THIS EQUIPMENT
TO RAIN OR MOISTURE.
TO REDUCE THE RISK OF FIRE OR ELECTRIC
SHOCK, AND ANNOYING INTERFERENCE, USE
THE RECOMMENDED ACCESSORIES ONLY.
• This Player is classified as a CLASS 1 LASER
product.
• The CLASS 1 LASER PRODUCT label is located
on the rear cover.
• This product contains a low power laser device.
To ensure continued safety do not remove any
cover or attempt to gain access to the inside of
the product. Refer all servicing to qualified
personnel.
(Rear of product)
Laser Diode Properties
Material: AlGaInP
Wave length: 650 nm
Emission Duration: Continuous
Laser output: Max. 0.7 mW
Power Lead Protection
To avoid any malfunctions of the unit, and to protect
against electric shock, fire or personal injury, please
observe the following.
• Hold the plug firmly when connecting or
disconnecting the AC power lead.
• Keep the AC power lead away from heating
appliances.
• Never put any heavy object on the AC power lead.
• Do not attempt to repair or reconstruct the AC
power lead in any way.
GB
4
Web-site:www.sharp.co.uk/support Help line:0990 274277 (office hours)
Page 7

SAFETY INFORMATION
Location and Handling
• Do not place your Player in enclosed spaces or do
not cover it to prevent excessive temperatures
inside the unit.
• Do not place the Player in direct sunlight, or near
heat sources.
• Keep the Player away from strong magnetic fields,
i.e. loudspeakers etc.
• Do not place any object containing water or other
liquids on the Player. In the event that liquid should
enter the cabinet, unplug the Player immediately
and contact the retailer or service centre approved
by SHARP immediately.
• Do not remove the Player cabinet. Touching parts
inside the cabinet could result in electric shock and/
or damage to the Player. For service and adjustment
inside the cabinet, call a qualified dealer or service
centre approved by SHARP.
Periods of no use
When the unit is not being used, switch the unit to the
Standby mode.
When left unused for a long period of time, the unit
should be unplugged from the household AC socket.
GENERAL INFORMATION
Service
Do not attempt to service this Player yourself. Please
refer any service to the nearest service centre
approved by SHARP.
Copyright
Recording and playback of any material may require
consent.
Please refer particularly to the provisions of the
Copyright Act 1956, the Dramatic and Musical
Performers Protection Act 1958, the Performers
Protection Acts 1963 and 1972 and to any subsequent statutory enactments and orders.
Copy Protection
This Player supports Macrovision copy protection.
On DVDs that include a copy protection code, if the
contents of the DVD are copied using a VCR, the
copy protection code prevents the videotape copy
from playing normally.
Apparatus Claims of U.S.Patent Nos. 4,631,603,
4,577,216, 4,819,098 and 4,907,093 licensed for
limited viewing uses only.
No Fingers or Other Objects Inside
Do not put any foreign object on the disc tray.
Stacking
Place the unit in a horizontal position, and do not
place anything heavy on it.
Condensation
Moisture may form on the pickup lens in the following
conditions:
• immediately after a heater has been turned on.
• in a steamy or very humid room.
• when the unit is suddenly moved from a cold
environment to a warm one.
If moisture forms inside this unit, it may not operate
properly.
In this case, turn on the power and wait about one
hour for the moisture to evaporate.
Cleaning
Unplug your Player before cleaning. Use a damp
cloth for cleaning. Do not use cleaning fluids or
aerosols which could enter the unit and cause
damage, fire, or electrical shock. These substances
may also deteriorate the finish of your Player.
If there is Noise Interference on the
TV While a Broadcast is being
Received
Depending on the reception condition of the TV,
interference may appear on the TV monitor while you
watch a TV broadcast and the unit is left on. This is
not a malfunction of the unit or the TV. To watch a TV
broadcast, turn off the unit.
This product incorporates copyright protection
technology that is protected by method claims of
certain U.S. patents and other intellectual property
rights owned by Macrovision Corporation and
other rights owners. Use of this copyright
protection technology must be authorized by
Macrovision Corporation, and is intended for home
and other limited viewing uses only unless
otherwise authorized by Macrovision Corporation.
Reverse engineering or disassembly is prohibited.
Recommended Measures for
Optimum Picture Excellence
The unit is a precision device that is constructed
using extremely accurate technology.
Soiling or friction affecting the pickup lens or disc
drive can impair the image quality.
neither video or audio will be played back. To obtain
optimum picture quality, the Player should be
checked (cleaning and replacement of some parts)
every 1,000 hours. Note that this period varies
depending on the environment (temperature,
humidity, dust, etc.) in which the Player is used.
Contact your authorized Sharp supplier for details.
Do not attempt to clean the pickup lens yourself.
In the worst case,
Web-site:www.sharp.co.uk/support Help line:0990 274277 (office hours)
GB
5
Page 8
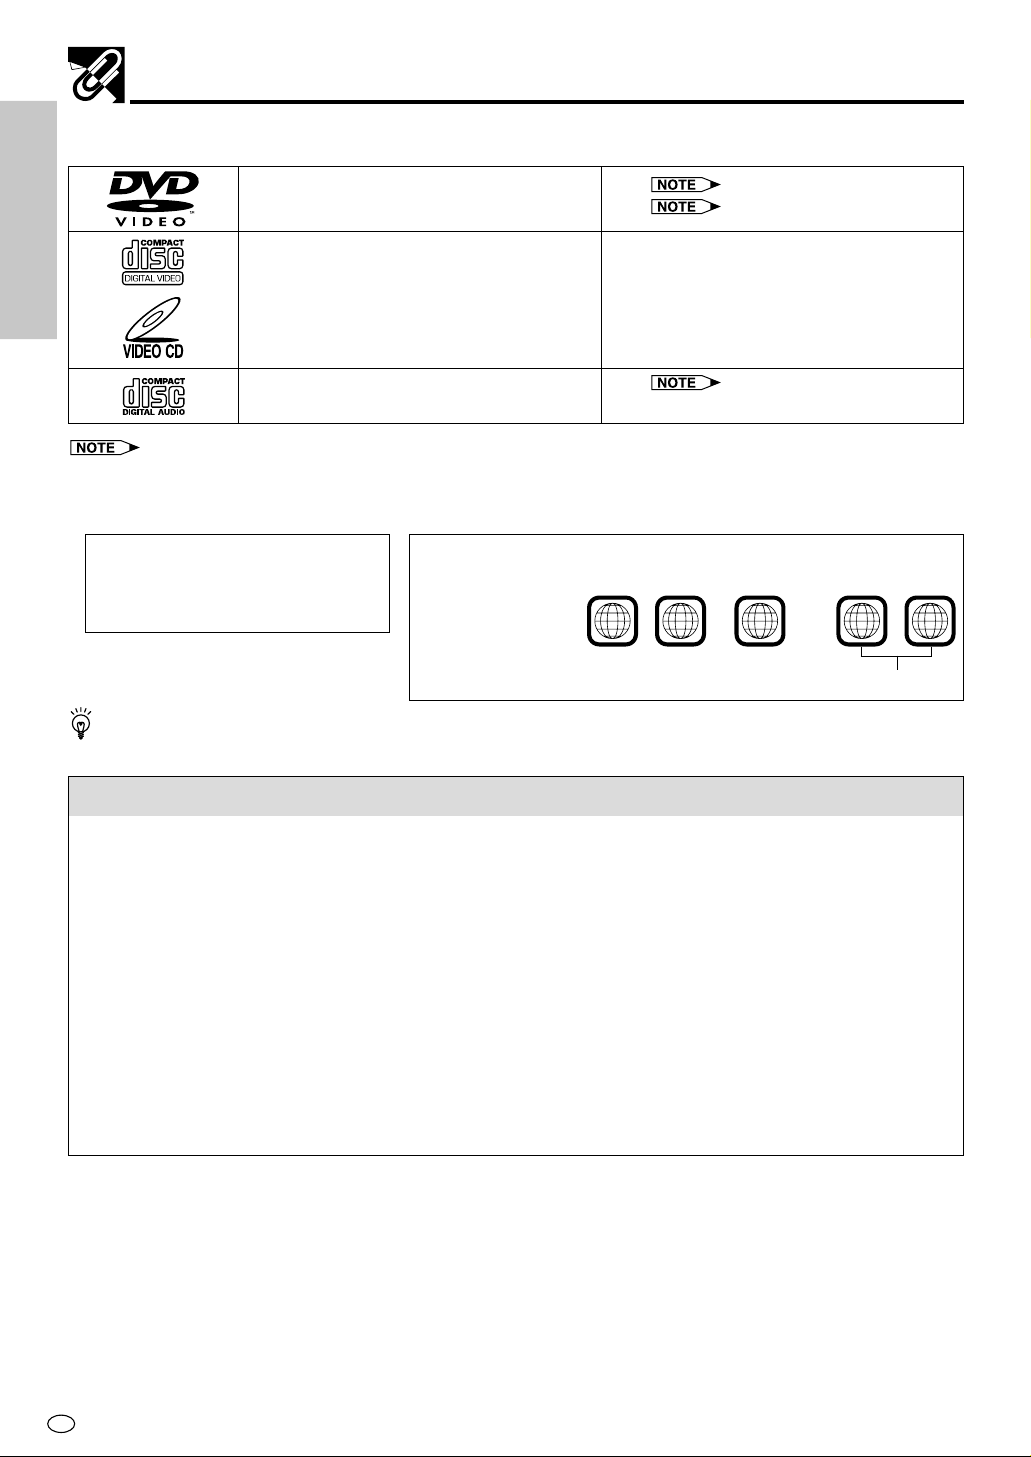
Types of Discs that Can Be Played on Your Player
The Player can play back discs bearing any of the following marks:
DVDs See 1
[8cm(3") disc/12cm(5") disc] See
VIDEO CDs
[8cm(3") disc/12cm(5") disc] • Supports until version 2.0.
GENERAL INFORMATION
2 on the next page
Audio CDs See
[8cm(3") disc/12cm(5") disc]
1
• DVD video players and discs are designed with region numbers which dictate the regions in which a disc can be played.
If the region number on the disc you want to play does not match the region number in your Player, you will not be able to
play the disc.
Samples of region number marks compatible
The region number for
this Player is
2
.
with this Player:
2
As for the list of the region number 2 countries and the world map for all region numbers, refer to page 66.
3 on the next page
1
.... ........
21
2
6
Disc playable in all regions
213
546
ALL
Discs that Cannot be Played
The following types of discs cannot be played back on this Player. In many cases, attempting to play back
such discs may result in malfunction and/or damage to this Player.
• Illegally produced, or "pirated", discs
• Photo CD, DVD-Audio, DVD-ROM, CD-ROM, CD-R, CD-RW, DVD-R, DVD-RW, S-VCD/CVD, SACD, or any
other disc with marks other than those displayed above
• Discs with unusual shapes (for example, heart-shaped or hexagonal)
• DVDs with region codes other than region number 2, such as discs intended for use in the U.S.A. (region
1) or China (region 6)
In addition to the above, when a disc is scratched, soiled, or marked with fingerprints, this Player may
determine that the disc cannot be played, and eject the disc tray. When this occurs, clean the disc referring
to the guidelines on page 70, and then try to load the disc again.
While a disc is playing, minor soiling or scratches on the disc may disrupt the image (appearing as blocks
on the screen). When the image is disrupted, the Player automatically restores the correct image after 2 or 3
seconds. However, if the normal screen does not reappear, press RESUME to bring up the normal screen
again.
GB
6
Web-site:www.sharp.co.uk/support Help line:0990 274277 (office hours)
Page 9
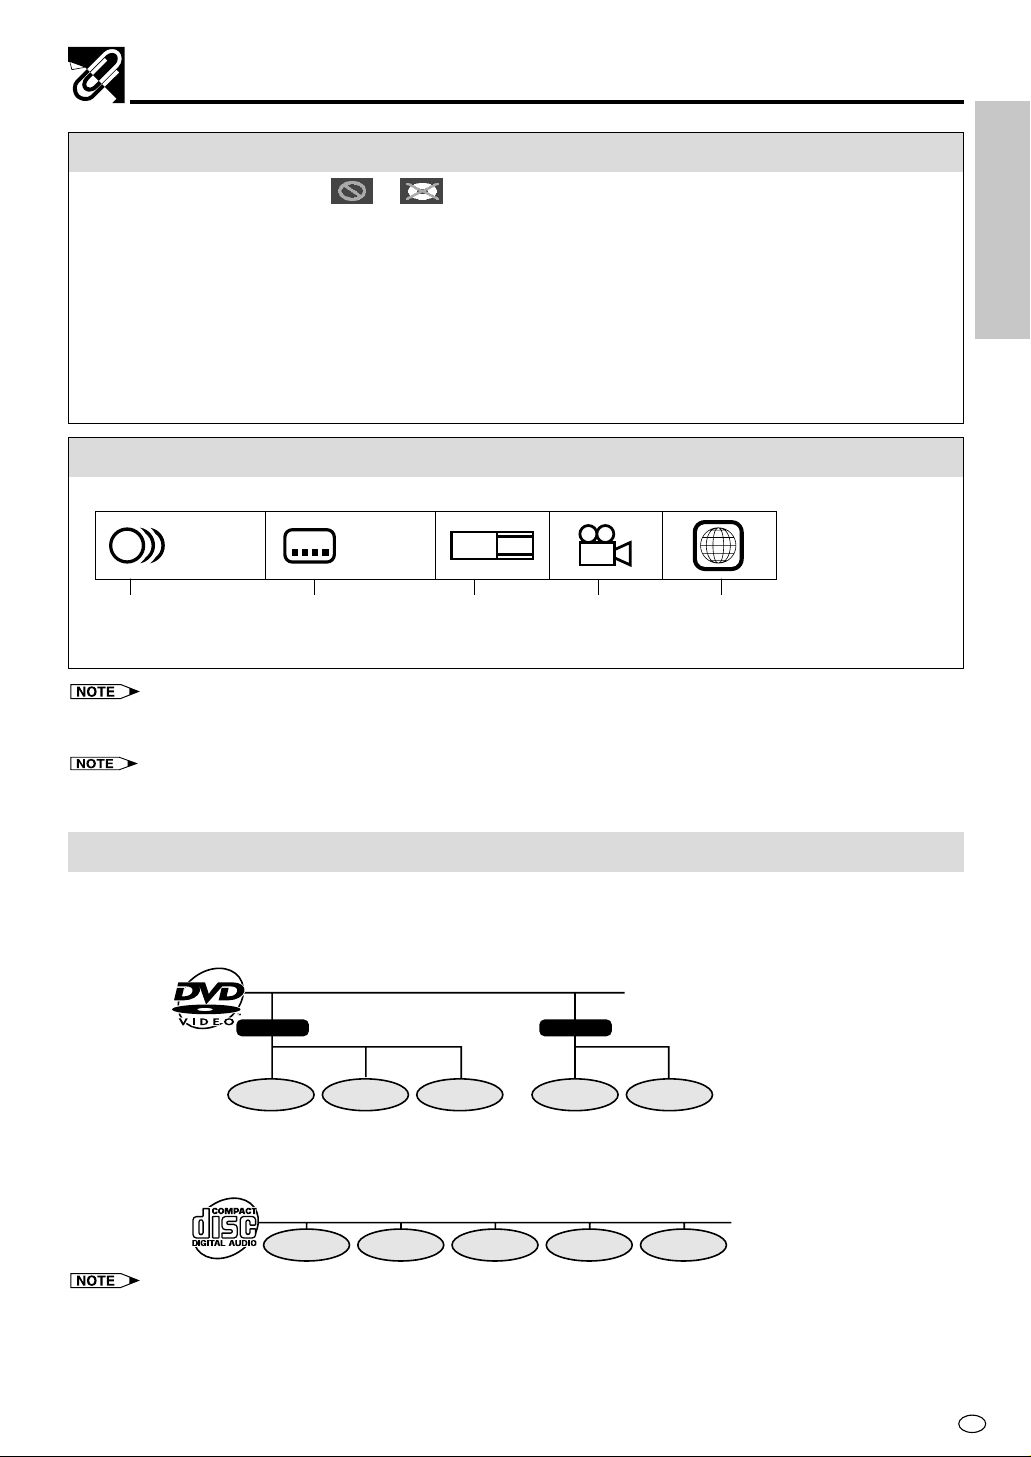
Types of Discs that Can Be Played on Your Player
Disc Function or Operation that is Not Available
In the cases listed below, the or indicator may appear on the TV screen, which indicates
that the function or operation is not available.
• When you intend to per form the function or operation on which the manufacturer restriction is imposed:
The specific functions on some DVDs and VIDEO CDs are determined by the disc manufacturer. As this
Player plays disc data in accordance with the guidelines of the disc manufacturer, some functions may not
be available on some discs. Be sure to read the documentation provided with the disc.
• When you intend to per form the functions or operations prohibited for the current disc:
The types of functions and operations that can be used for a particular disc vary depending on the
features of that disc. Some disc functions and operations may differ from the descriptions given in this
Operation Manual. In this event, follow the instructions given on the screen.
Icons Used on DVDs
Sample Icons
GENERAL INFORMATION
1. English
2
2. Chinese
Number of audio
tracks
2
• This Player supports 2-channel (L/R) audio and 5.1ch (Multi-channel) MPEG Audio 1/2 (only when the DIGITAL OUT coaxial
jack or OPTICAL DIGITAL OUT jack is used for connection). It does not support 7.1 channel MPEG Audio Version 2.0.
3
• When playing back a CD-G (Graphics) or CD EXTRA disc, the audio portion will be played, but the graphic images will not
be shown.
Type of subtitles
recorded
2
1. English
2. Chinese
LB
16:9
Screen aspect
ratio recorded
2
multiple
camera angles
2
Region code indicatorDisc with
Title, Chapter and Tracks
• DVDs are divided into “titles” and “chapters”. If the disc has more than one movie on it, each movie would be
a separate “title”. “Chapters”, on the other hand, are sections of titles.
Example: DVD
Title 1 Title 2
Chapter 1 Chapter 2 Chapter 3 Chapter 1 Chapter 2
• VIDEO CDs and Audio CDs are divided into “tracks”. You can think of a “track” as one tune on an Audio CD.
Example: VIDEO CD or Audio CD
Track 1 Track 2 Track 3 Track 4 Track 5
• Numbers identify each title, chapter, and track on a disc. Most discs have these numbers recorded on them, but some do
not.
Web-site:www.sharp.co.uk/support Help line:0990 274277 (office hours)
GB
7
Page 10
Features
DV-620H
Quick Quick
Start
GuideGuide
• Playback of DVD, VIDEO CD, and Audio CD
• Virtual Dolby Surround (QSURROUND*1) for high-quality surround sound using analogue output
• Dolby Digital*2, DTS*3, MPEG Audio digital out
*1 QSURROUND™ is a trademark of QSound Labs, Inc.
*2 Manufactured under license from Dolby Laboratories. “Dolby” and the double-D symbol (
trademarks of Dolby Laboratories. Confidential Unpublished Works. ©1992-1997 Dolby Laboratories, Inc. All
rights reserved.
GENERAL INFORMATION
*3 “DTS” and “DTS Digital Surround” are trademarks of Digital Theater Systems, Inc.
) are
Accessories
ON
SCREEN
SETUP
DISPLAY DIMMER
ZOOM
SUBTITLE ANGLE
MEMORY
PLAY
STOP
F.ADV SLOW
DVD VIDEO PLAYER
OPEN/
CLOSE
AUDIO
MENU
ENTER
REPEAT
A B REPEAT
PROGRAM
DIRECT
MC
PAUSE
STILL
OPERATE
VIRTUAL
FUNCTION
CONTROL
TITLE
RETURN
CLEAR
REV FWD
RESUME
SLOW
SKIP SKIP
Remote control unit
Two batteries
(AA, R6 or UM/SUM-3)
for the Remote control unit
Operation Manual
SCART lead
Quick Start Guide
GB
8
Web-site:www.sharp.co.uk/support Help line:0990 274277 (office hours)
Page 11
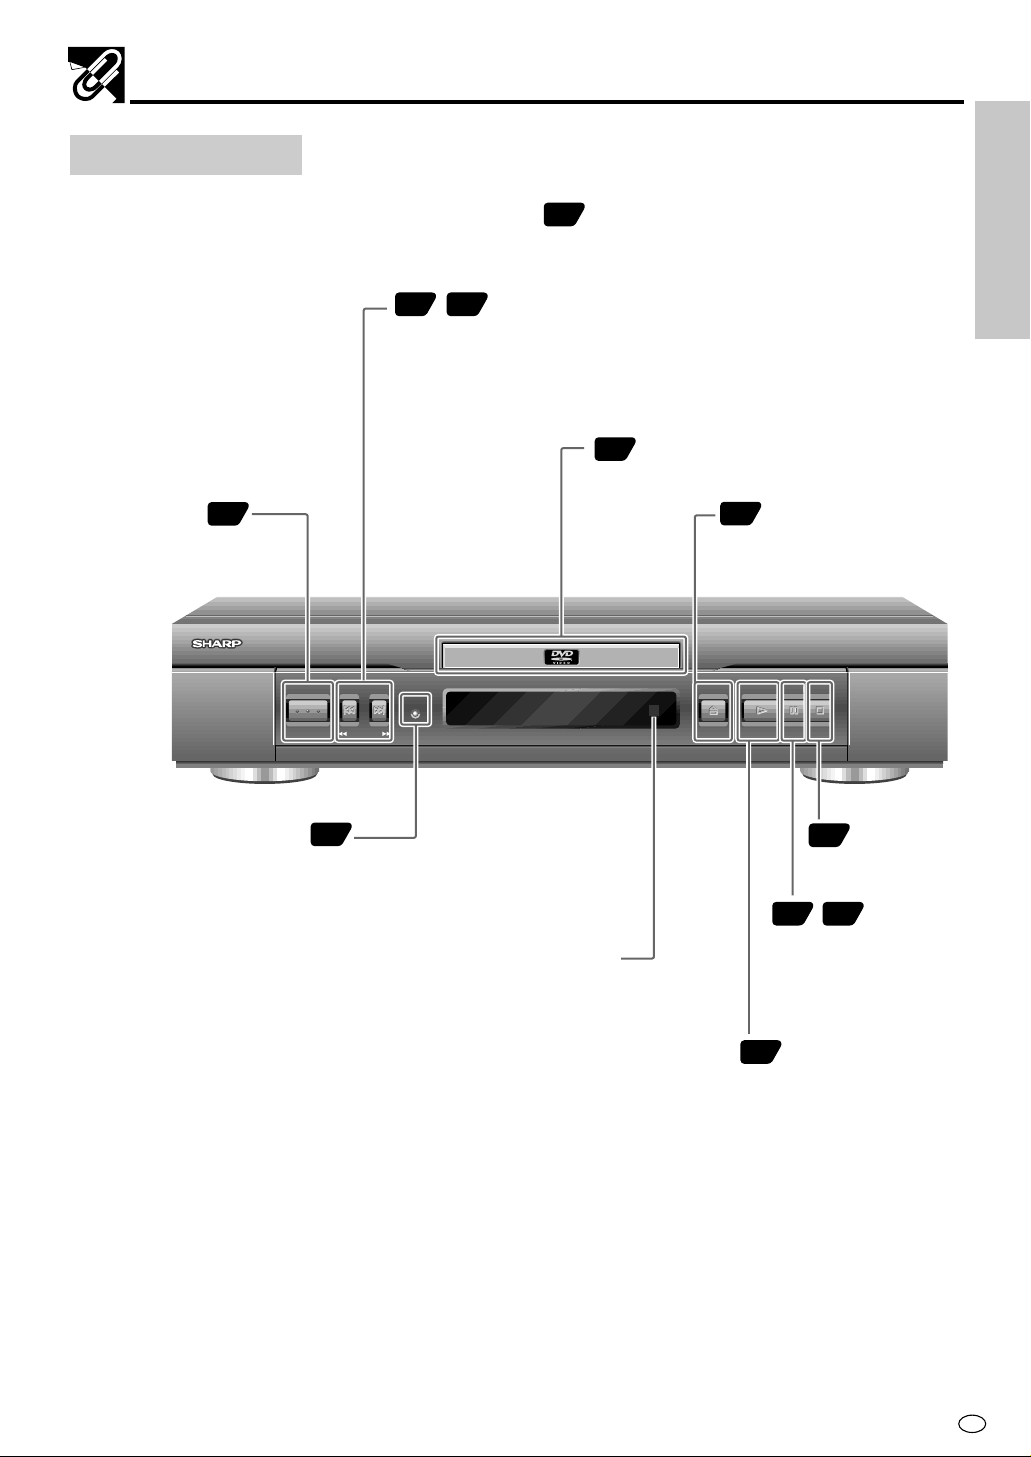
Major Components
Main Unit (Front)
Numbers in refer to the main pages
in this Operation Manual where the topic is explained.
39 , 42
À SKIP à, (REV, FWD)
Moves back or forward through the titles,
chapters or tracks on a disc.
Holding down this button for a few seconds
performs fast forward/reverse scanning.
37
Disc tray
Opens for loading or removal of a disc.
GENERAL INFORMATION
OPERATE
21
Turns the power of the
Player on and off.
STANDBY LED indicator
OPERATE
21
STANDBY
FWDREV
When the Player is connected to the
AC main supply, this indicator lights up
in Standby mode and goes out when the
Player is turned on.
Remote control sensor
Receives infrared control signals
from the Remote. Point the
Remote at this sensor to perform
Player functions.
37
î OPEN/CLOSE
Press to open or close
the disc tray.
OPEN/CLOSE
PLAY
STILL/PAUSE
STOPSKIP
37
Ë STOP
Stops playback.
39 , 42
â STILL/PAUSE
Freezes the video
image on the screen
and pauses audio
playback.
37
û PLAY
Starts playback.
Web-site:www.sharp.co.uk/support Help line:0990 274277 (office hours)
GB
9
Page 12

Major Components
Front panel Display in Main Unit
GENERAL INFORMATION
Numbers in refer to the main pages
in this Operation Manual where the topic is explained.
TITLE indicator
52
When a DVD is loaded in the
Player, this indicator appears
along with the title number.
TRACK indicator
59
When a VIDEO CD or Audio CD
is loaded in the Player, this
indicator appears along with
the track number.
CHAPTER indicator
52
When a DVD is loaded in the
Player, this indicator appears
along with the chapter number.
Operation status
36
Indicates the operation status
of the disc and Player.
Time indicator
49
Indicates the elapsed playback
time of the disc. With some
discs, this area also shows
the total play time of the disc
when playback is stopped.
OPERATE
STANDBY
FWDREV
OPEN/CLOSE
PLAY
STILL/PAUSE
STOPSKIP
50
PROGRAM indicator
Displayed during programmed
playback.
58
VIRTUAL
surround indicator
Displayed while virtual
surround processing
is being performed.
52 , 61
REPEAT indicator
Displayed during repeat playback.
ANGLE indicator
55
Appears to indicate that multiple
camera angles are recorded in the
section of the DVD that is currently
playing.
Each time DISPLAY on the Remote is pressed,
the Player’s front panel display changes. Refer
to “Display Information” on page 36.
GB
10
Web-site:www.sharp.co.uk/support Help line:0990 274277 (office hours)
Page 13
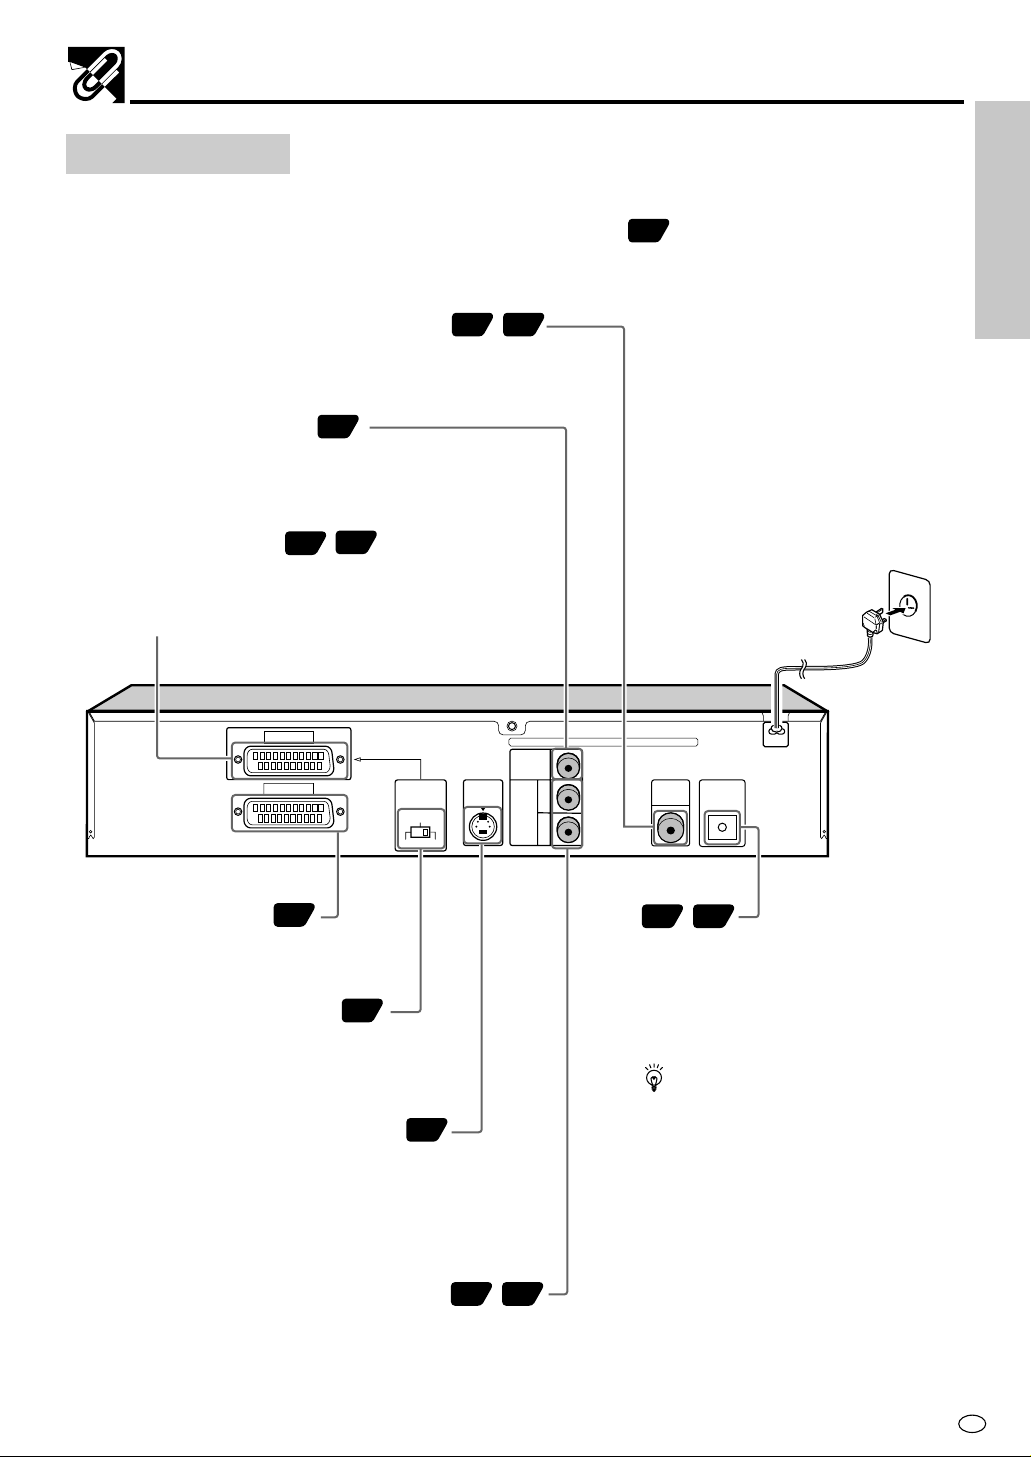
Main Unit (Rear)
Major Components
GENERAL INFORMATION
Numbers in refer to the main pages
in this Operation Manual where the topic is explained.
DIGITAL OUT (coaxial) jack
19 , 20
Connect a coaxial lead here when connecting
to a device with a coaxial digital audio input jack.
VIDEO OUT jack
17
Connect a standard video lead here when
connecting to a TV with a video input jack.
SCART AV 1 (TV) socket
15 , 16
Connect a SCART lead here to output the signal from
the Player to a TV.
Choose an appropriate signal type among VIDEO,
S-VIDEO and RGB on the OUTPUT SELECTOR.
)
AV 1(TV
S-VIDEO
VIDEO
S-VIDEO
OUT
AV 2
OUTPUT
SELECTOR
RGB
VIDEO
AUDIO
OUT
OUT
DIGITAL
L
R
OUT
OPTICAL
DIGITAL OUT
SCART AV 2 socket
Connect a SCART
15
lead
here to input
the signal from a VCR to the Player.
OUTPUT SELECTOR
15
Change the position to the signal
type (VIDEO/S-VIDEO/RGB) that
is output to a TV.
S-VIDEO OUT jack
Connect an S-VIDEO lead here
when connecting to a TV with an
S-VIDEO input jack. This type of
connection provides superior
picture quality.
AUDIO OUT jacks
Connect a standard audio lead
here when connecting to a TV or
audio equipment.
Web-site:www.sharp.co.uk/support Help line:0990 274277 (office hours)
17
17 , 18
19 , 20
OPTICAL DIGITAL
OUT jack
Connect an optical digital audio
lead here when connecting to a
device with an optical digital
audio input jack.
Remove the protective cap
before connecting the lead.
11
GB
Page 14
Remote Control Unit
Remote Control Unit
Remote Control Unit
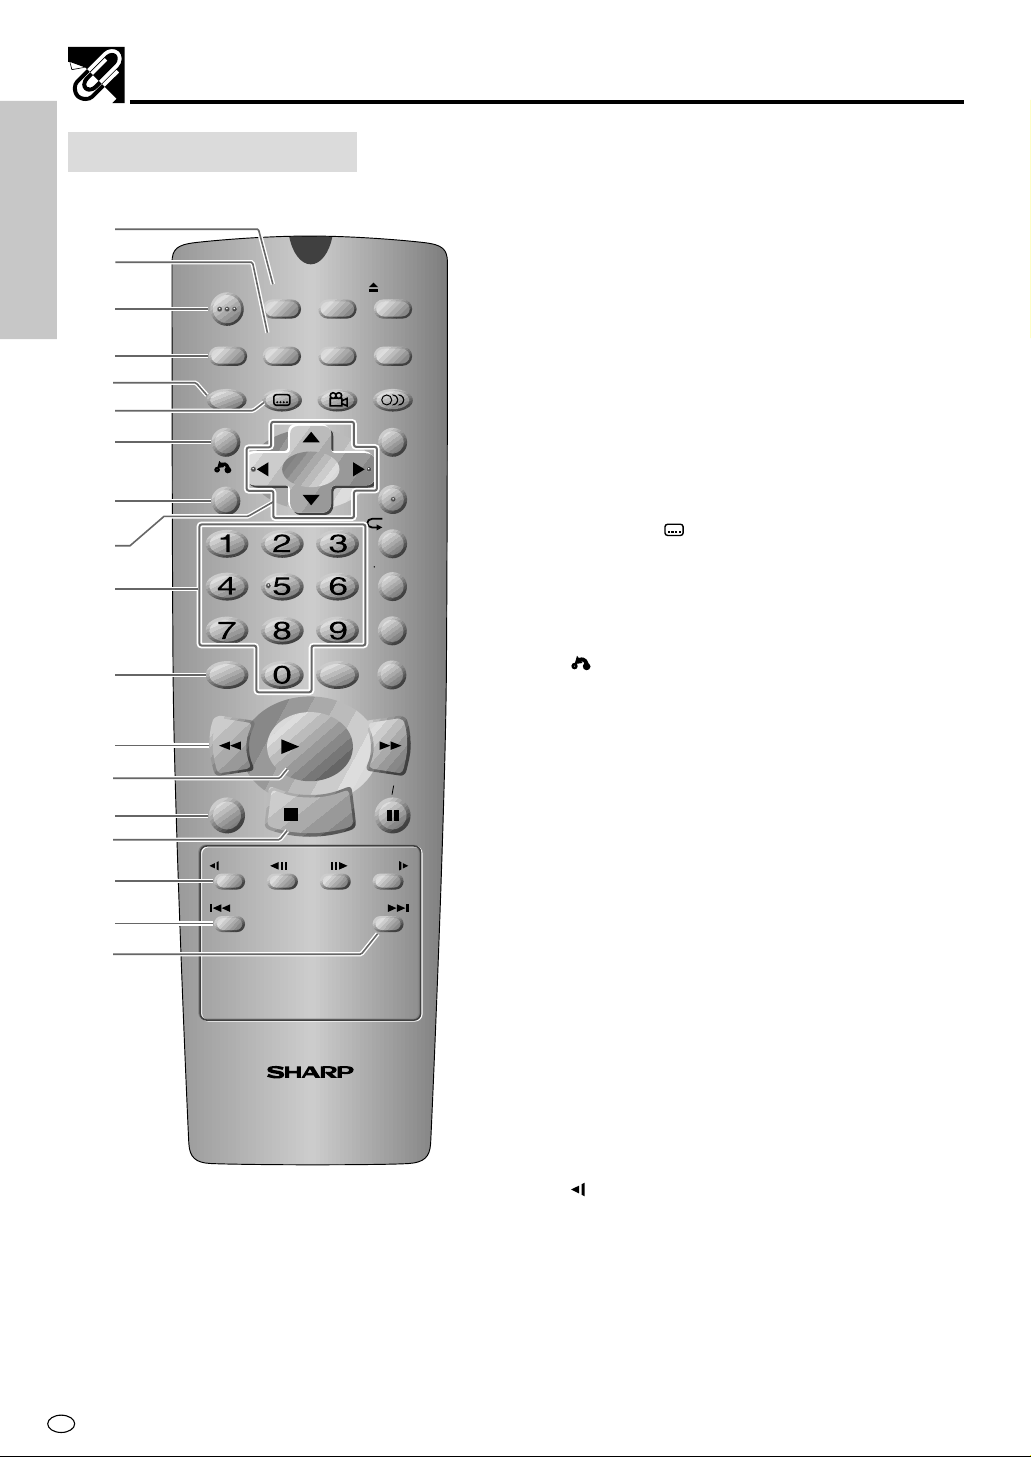
1
GENERAL INFORMATION
2
3
4
5
6
7
8
9
0
q
w
e
r
t
y
u
i
OPERATE
VIRTUAL
FUNCTION
CONTROL
TITLE
RETURN
CLEAR
REV FWD
RESUME
SLOW
SKIP SKIP
ON
SCREEN
SETUP
DISPLAY DIMMER
ZOOM
SUBTITLE ANGLE
MEMORY
MC
PLAY
STOP
F.ADV SLOW
DVD VIDEO PLAYER
OPEN/
CLOSE
AUDIO
MENU
ENTER
REPEAT
A B REPEAT
PROGRAM
DIRECT
PAUSE
STILL
1 SETUP
Opens the Player’s SETUP menu screen. (See
page 23.)
2 ZOOM
Zooms an image 1.2×, 1.5× or 2.0×. (See page
40.)
3 OPERATE
Turns the Player power on and off. (See page
21.)
4 VIRTUAL
Creates a “virtual” surround sound effect from
your stereo TV or audio system. (See page 58.)
5 FUNCTION CONTROL
Displays the FUNCTION CONTROL screen
where you can check or change various
settings. (See page 43.)
6 SUBTITLE
Selects one of the subtitle languages
programmed on a DVD. (See page 56.)
7 TITLE
Selects one of the titles on a DVD. (See page
47.)
RETURN
8
Returns to a previous menu screen on a DVD or
returns to DVD playback from the DVD menu
screen. (See page 25.)
''
""
\\
9 Cursor buttons
'/
''
",
""
\/
\\
||
|
||
Use to highlight selections on a menu screen
and make adjustments of the Player settings.
(See page 23.)
0 Number buttons
Use when creating programmes, and entering a
parental level password. (See page 26.)
q (C) CLEAR
Clears input selections and cancels certain
playback functions. (See page 50.)
ÈÈ
w
È REV
ÈÈ
Performs reverse fast audio or visual scanning.
(See pages 38 and 41.)
ûû
e
û PLAY
ûû
Starts playback. (See page 37.)
r RESUME
Restarts playback from the place where
playback was stopped. (See page 54.)
tË STOP
Stops playback. (See page 37.)
SLOW
y
Performs slow reverse playback of DVDs. (See
page 38.)
uÀ SKIP
Moves reverse through disc titles, chapters or
tracks on a disc. (See pages 39 and 42.)
i SKIP à
Moves forward through disc titles, chapter or
tracks on a disc. (See pages 39 and 42.)
GB
12
Web-site:www.sharp.co.uk/support Help line:0990 274277 (office hours)
Page 15
Remote Control Unit
GENERAL INFORMATION
OPERATE
VIRTUAL
FUNCTION
CONTROL
TITLE
RETURN
CLEAR
SETUP
ZOOM
SUBTITLE ANGLE
ON
SCREEN
DISPLAY DIMMER
A B REPEAT
PROGRAM
MEMORY
MC
REV FWD
PLAY
RESUME
STOP
SLOW
SKIP SKIP
F.ADV SLOW
DVD VIDEO PLAYER
STILL
OPEN/
CLOSE
AUDIO
MENU
ENTER
REPEAT
DIRECT
PAUSE
o
p
a
s
d
f
g
h
j
k
l
;
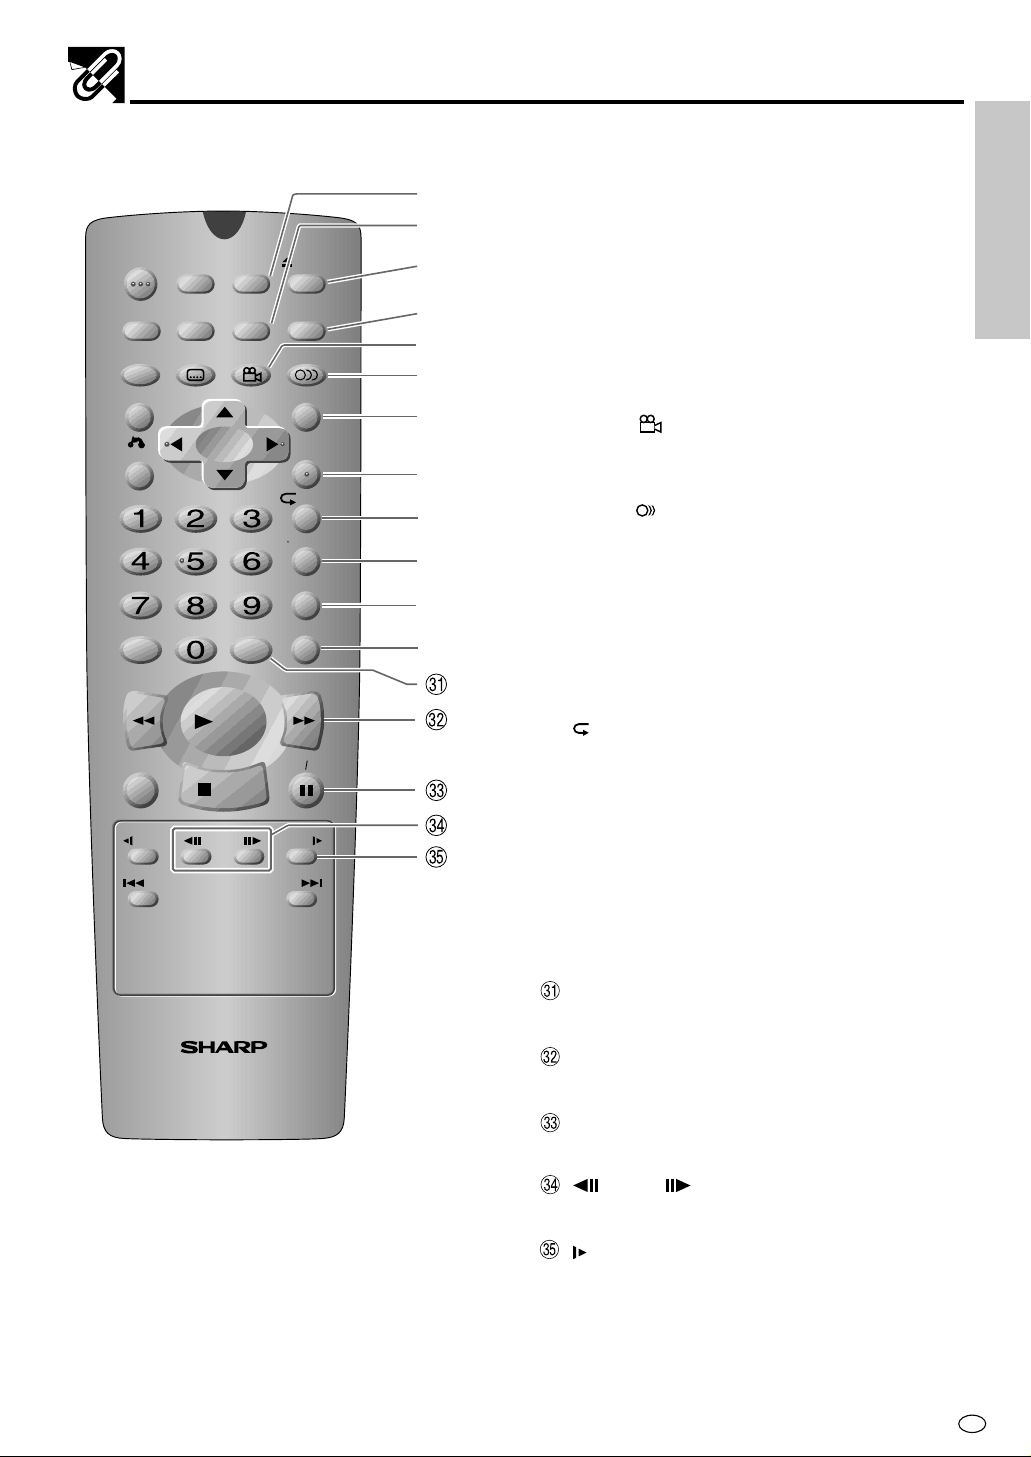
o ON SCREEN
Toggles display of on-screen indicators on and
off. (See page 36.)
p DISPLAY
Changes the mode of the front panel display.
(See page 36.)
îî
a
î OPEN/CLOSE
îî
Opens and closes the disc tray. (See page 37.)
s DIMMER
Adjusts the brightness of the front panel display
to the level you prefer.
d ANGLE
Switches the camera angle of the video
presentation when scenes with multiple camera
angles are recorded on a DVD. (See page 55.)
f AUDIO
Selects one of the audio soundtracks
programmed on a DVD or selects the audio
output mode on a VIDEO CD or Audio CD. (See
pages 57 and 63.)
g MENU
Opens and closes DVD’s menu. (See page 47.)
h ENTER
Confirms selections on a menu screen. (See
page 24.)
REPEAT
j
Performs repeat playback. (See pages 52 and
62.)
k A-B REPEAT
Performs point-to-point repeat playback. (See
pages 53 and 61.)
l PROGRAM
Enters the programmed playback mode. (See
pages 50 and 60.)
; DIRECT
Performs direct chapter selection or direct track
selection. (See pages 48 and 49.)
(M) MEMORY
Enters the number of a selected chapter or
track. (See pages 50 and 60.)
FWD è
Performs fast forward audio or visual scanning.
(See pages 38 and 41.)
â STILL/PAUSE
Freezes the video image on the screen or
pauses audio playback. (See pages 39 and 42.)
F.ADV
Performs reverse or forward frame by frame
playback. (See pages 39 and 42.)
SLOW
Performs slow forward playback of a DVD and
VIDEO CD. (See pages 38 and 41.)
Web-site:www.sharp.co.uk/support Help line:0990 274277 (office hours)
13
GB
Page 16
Remote Control Unit
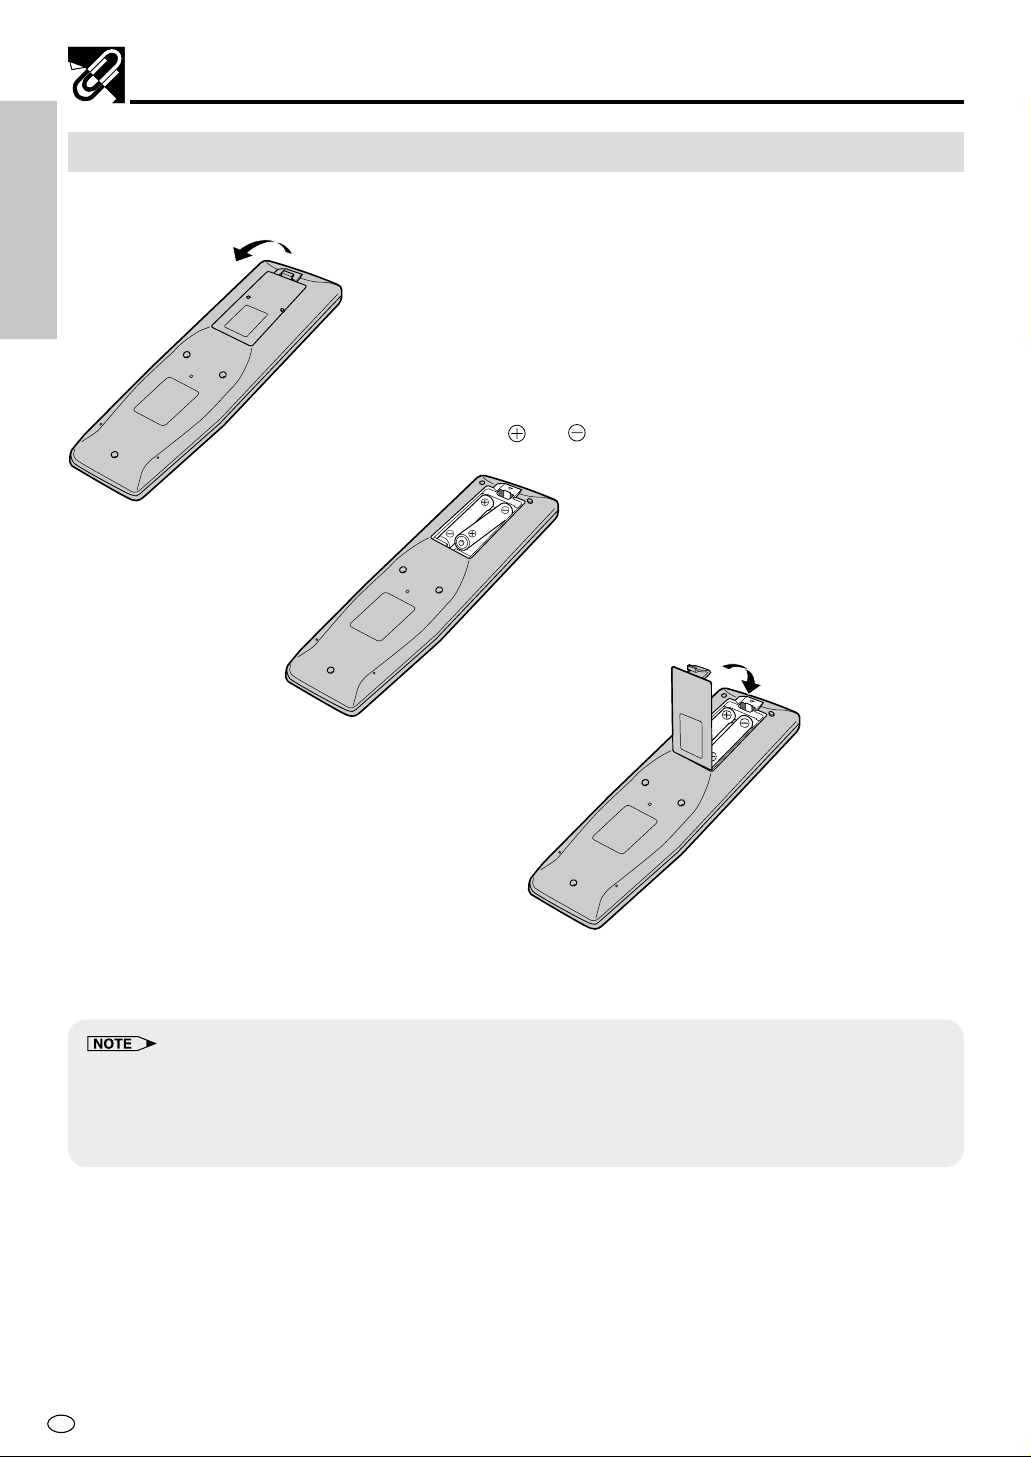
Loading the Batteries
1 Open the battery cover.
Open the lid in the direction of the arrow.
GENERAL INFORMATION
2 Load the batteries.
Load the two batteries (AA, R6 or UM/SUM-3)
supplied with the Remote so that the battery
poles
and are positioned as indicated.
3 Close the battery cover.
Press the lid in the direction of the arrow.
• Do not subject the Remote to shock, water or excessive humidity.
• The Remote may not function if the Player sensor is in direct sunlight or any other strong light.
• Incorrect use of batteries may cause them to leak or burst. Read the battery warnings and use the batteries properly.
• Do not mix old and new batteries, or mix brands in use.
• Remove the batteries if you do not use the Remote for an extended period of time.
GB
14
Web-site:www.sharp.co.uk/support Help line:0990 274277 (office hours)
Page 17
Connection
Caution:
• Be sure to turn off the Player and equipment to be connected before connecting.
• Read through the operation manual for the equipment to be connected.
•
Be sure that the colours of the jacks and plugs match up when using a VIDEO/AUDIO lead (commerially available)
• Be sure to keep the Player connection leads separate from the TV aerial lead when you install the Player,
because it may cause electrical interference when you are watching television programmes.
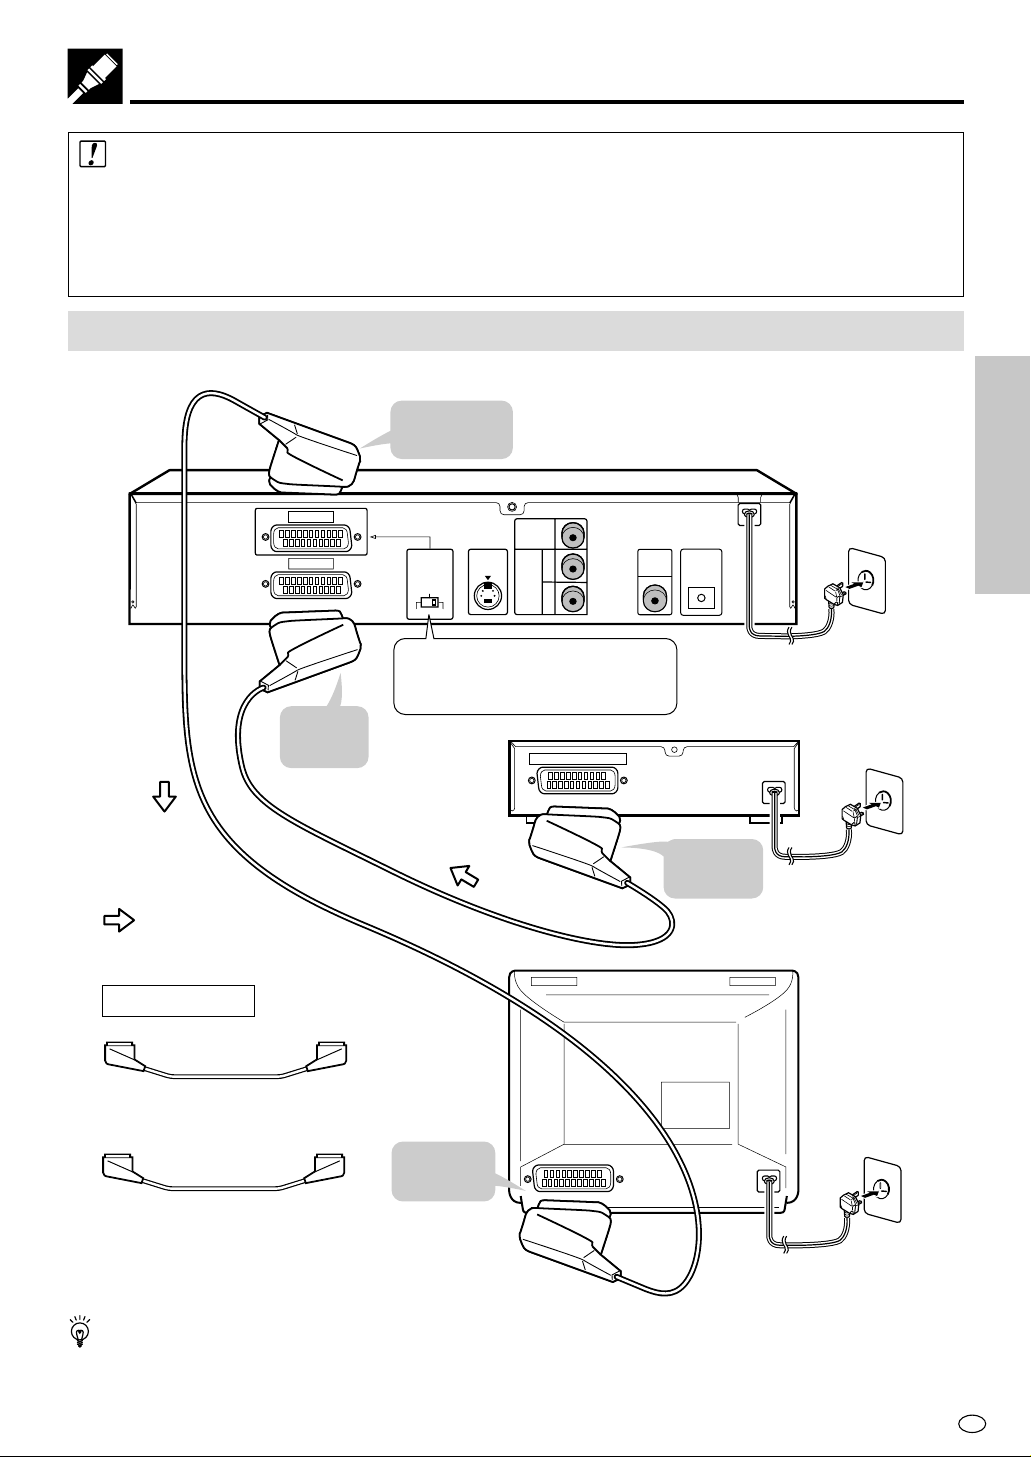
Connecting a TV with AV 1 (TV) Output and AV 2 Input SCARTS
Use the SCART leads (one SCART lead: supplied) to connect the Player to your TV and VCR.
.
: Signal flow
)
AV 1(TV
AV 2
To AV 2
SCART
To AV 1 (TV)
SCART
VIDEO
OUT
S-VIDEO
OUTPUT
SELECTOR
S-VIDEO
VIDEO
RGB
OUT
AUDIO
OUT
L
R
Change the position according to
the signal type (VIDEO/S-VIDEO/
RGB) that is output to TV.
SCART OUTPUT
DVD Player
DIGITAL
OPTICAL
OUT
DIGITAL OUT
To SCART
output
SETTING UP
VCR
TV
Required leads
SCART lead (one SCART lead:
supplied)
To SCART
input
SCART lead (the other SCART
lead: commercially available)
The factory default setting for the OUTPUT SELECTOR is “VIDEO”. If your TV supports the higher quality
modes S-VIDEO or RGB via the SCART, then please set the selector for your preference.
Web-site:www.sharp.co.uk/support Help line:0990 274277 (office hours)
15
GB
Page 18
Connection
DVD
Player
TV
VCR
If your TV has two SCART sockets
SETTING UP
AV 1(TV
AV 2
)
To AV 1 (TV)
SCART
OUTPUT
SELECTOR
S-VIDEO
VIDEO
RGB
To SCART
output
S-VIDEO
OUT
VIDEO
AUDIO
OUT
TV
OUT
L
R
SCART OUTPUT
DVD Player
DIGITAL
OPTICAL
OUT
DIGITAL OUT
VCR
Required leads
SCART lead (one SCART lead:
supplied)
SCART lead (the other SCART
lead: commercially available)
Caution:
• Do not connect the Player to a VCR. If you view the Picture
on your TV after making the connections shown on the
right, a picture noise may appear.
Connect the Player to your TV directly.
To SCART
input
GB
16
Web-site:www.sharp.co.uk/support Help line:0990 274277 (office hours)
Page 19
Connection
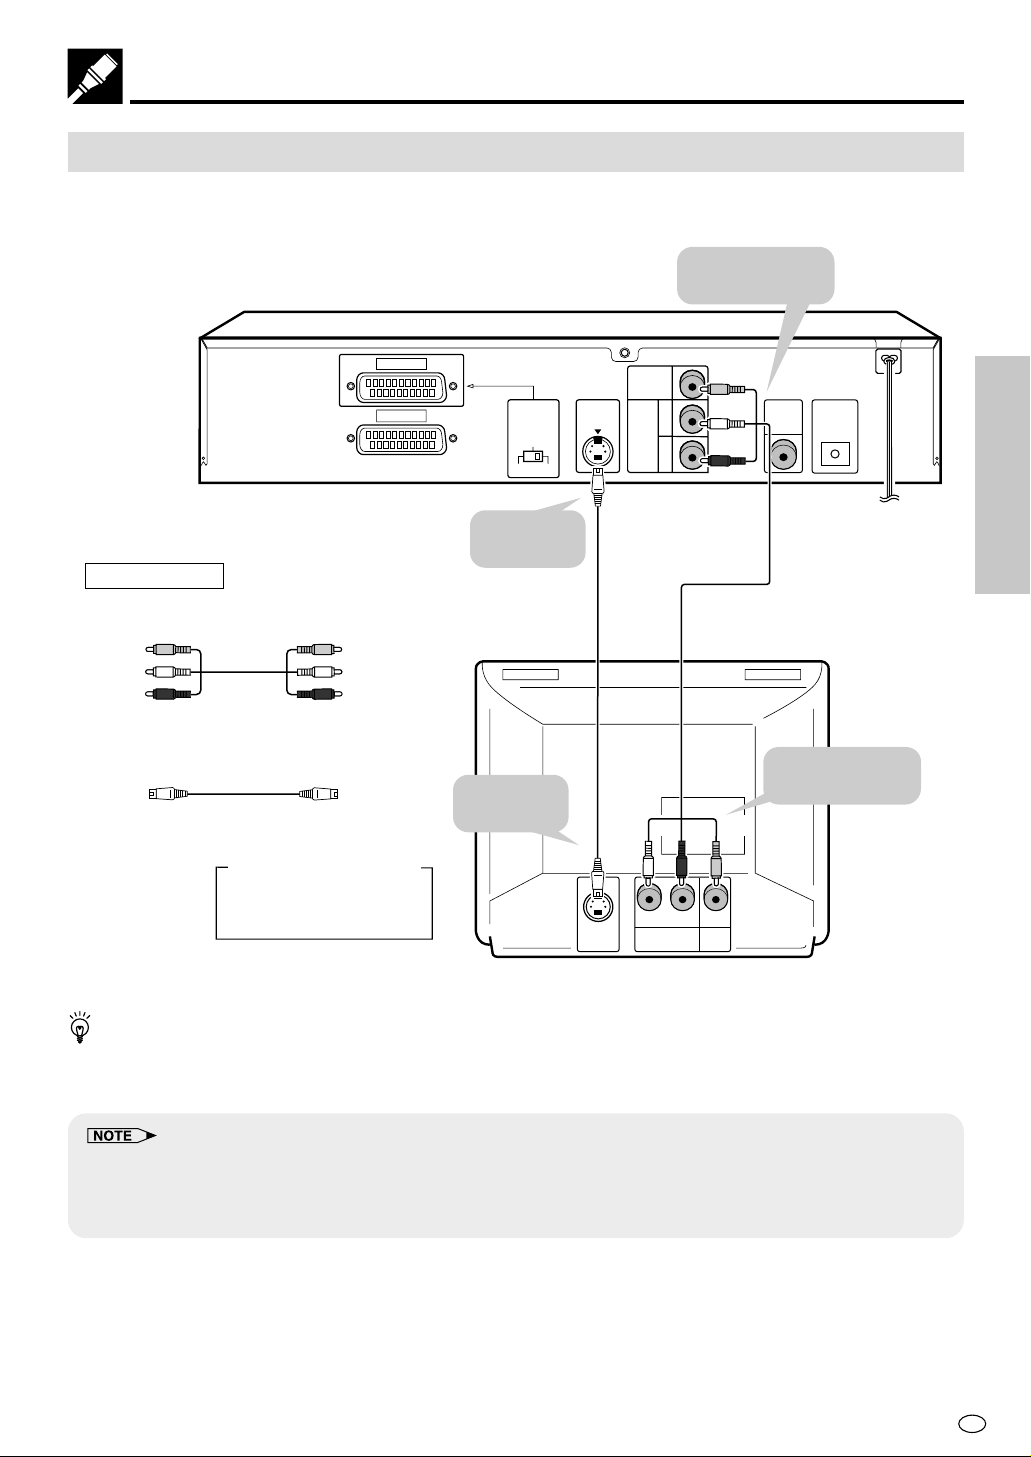
Connecting a TV Equipped with S-VIDEO Input or VIDEO/AUDIO Input Jacks
When you want to achieve a better video image by connecting a TV equipped with an S-VIDEO input connector
to the Player, you should use an S-VIDEO lead (commercially available) to connect the TV to the Player.
To VIDEO/AUDIO
OUT jacks
)
Required leads
VIDEO/AUDIO lead
(commercially available)
Yellow
White (L)
Red (R)
DVD Player
AV 1(TV
Yellow
White (L)
Red (R)
AV 2
OUTPUT
SELECTOR
S-VIDEO
VIDEO
RGB
To S-VIDEO
OUT jack
S-VIDEO lead
(commercially
available)
S-VIDEO
OUT
VIDEO
OUT
AUDIO
OUT
(Yellow)
DIGITAL
(White)
L
R
OUT
(Red)
VIDEO/AUDIO lead
(commercially available)
OPTICAL
DIGITAL OUT
SETTING UP
When making an S-VIDEO connection:
S-VIDEO lead (commercially available)
To S-VIDEO
input jack
(White)
(Red) (Yellow)
To VIDEO/AUDIO
input jacks
Jack and Plug Colours
Video: Yellow
Audio Left: White
Audio Right: Red
S-VIDEO
INPUT
LR
AUDIO
IN
VIDEO
IN
TV (with external input jacks)
• When the Player is connected to a TV using both a VIDEO lead and an S-VIDEO lead, only the S-VIDEO
connection is enabled (the VIDEO connection is disabled).
• You will not be able to hear all of the sound being output by the Player if you use the VIDEO/AUDIO lead
shown above to a monaural TV that has only one AUDIO input jack.
• Be sure that the colours of the jacks and plugs match up when connecting the lead.
• Connect the Player directly to the TV. If you attempt to view video on a TV connected via a VCR, the copy protection
function will scramble the picture.
• If you want to listen to the audio through audio equipment, connect only the S-VIDEO or VIDEO lead to the TV.
Web-site:www.sharp.co.uk/support Help line:0990 274277 (office hours)
17
GB
Page 20
Connection
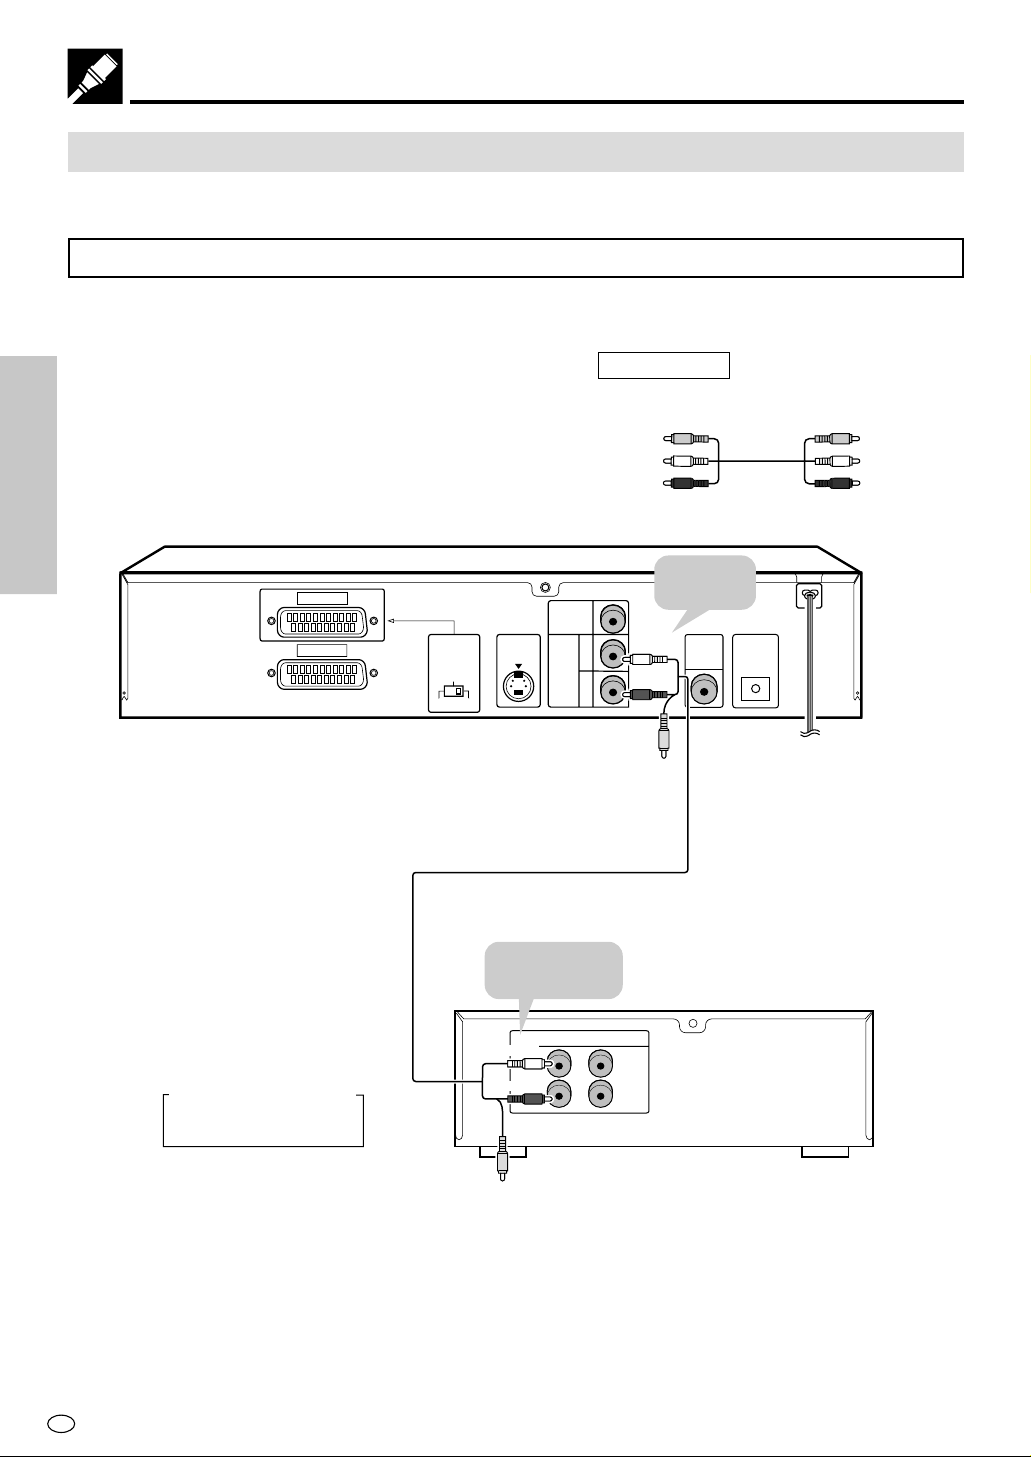
Connecting to Audio Equipment
Connecting the Player to audio equipment provides normal stereo sound plus powerful stereo sound enhanced
by Dolby Digital (5.1 channel), DTS, and MPEG Audio.
Playing 2 channel audio
■ Analogue Connection
Required lead
VIDEO/AUDIO lead (commercially available)
Yellow
White (L)
Red (R)
SETTING UP
DVD Player
AV 1(TV
AV 2
Yellow
White (L)
Red (R)
To AUDIO
)
OUTPUT
SELECTOR
S-VIDEO
VIDEO
RGB
S-VIDEO
OUT
VIDEO
AUDIO
OUT
OUT
L
R
OUT jacks
(White)
(Red)
DIGITAL
OUT
OPTICAL
DIGITAL OUT
(No need
to connect)
Jack and Plug Colours
Audio Left: White
Audio Right: Red
VIDEO/AUDIO lead
(commercially available)
To amplifier
audio input jacks
ANALOG INPUT
(White)
(Red)
L
R
Amplifier of stereo system, etc.
(No need
to connect)
GB
18
Web-site:www.sharp.co.uk/support Help line:0990 274277 (office hours)
Page 21
■ Digital Connection
You can make this connection
using either a coaxial digital
lead or an optical digital lead.
DVD Player
AV 1(TV
AV 2
Connection
Required lead
Coaxial digital lead (commercially available)
or
Optical digital lead (commercially available)
)
OUTPUT
SELECTOR
S-VIDEO
VIDEO
RGB
S-VIDEO
OUT
VIDEO
AUDIO
OUT
OUT
SETTING UP
DIGITAL
OPTICAL
L
R
OUT
DIGITAL OUT
To coaxial
DIGITAL OUT jack
or
To OPTICAL
DIGITAL OUT
jack
Coaxial digital lead
(commercially available)
Optical digital lead
To coaxial
(commercially available)
digital input jack
To optical
digital input
jack
DIGITAL IN
OPTICALCOAXIAL
Audio equipment with
optical/coaxial digital input jack
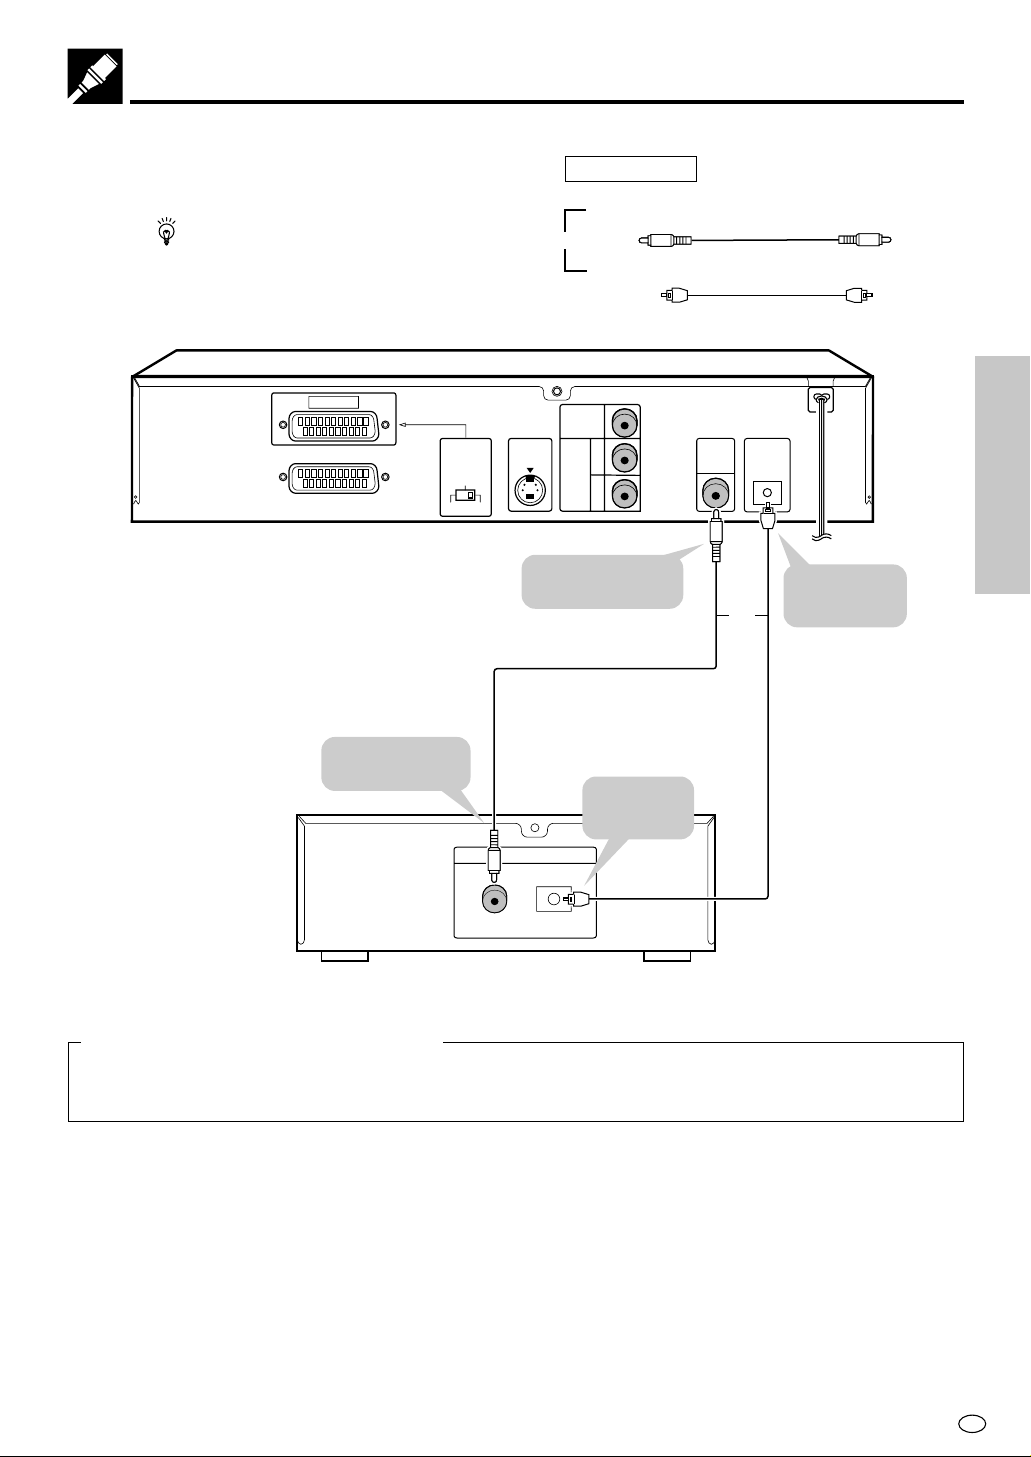
Digital Connection to an MD to Record a CD
Some Audio CDs and VIDEO CDs have a short silent section between musical tracks. When sound from discs
such as these is digitally recorded by connecting the Player directly to a digital recorder (such as an MD player),
the music may be recorded continuously and track numbers may be lost.
■ Digital Connection to Audio Equipment or MD Player without a Dolby Digital Decoder
• Audio CD or VIDEO CD
Play the disc as you normally would, with the audio mode set to “L+R” (see page 63). With a digital
connection, audio of a disc recorded with DTS sounds abnormal in this case.
• DVD
With a digital connection, audio cannot be produced from a DVD recorded with Dolby Digital (5.1 channel),
Dolby Surround (Pro Logic), DTS or MPEG Audio, so you should use an analogue connection to play such
discs. Discs with linear PCM audio should play normally.
Web-site:www.sharp.co.uk/support Help line:0990 274277 (office hours)
19
GB
Page 22
Connection
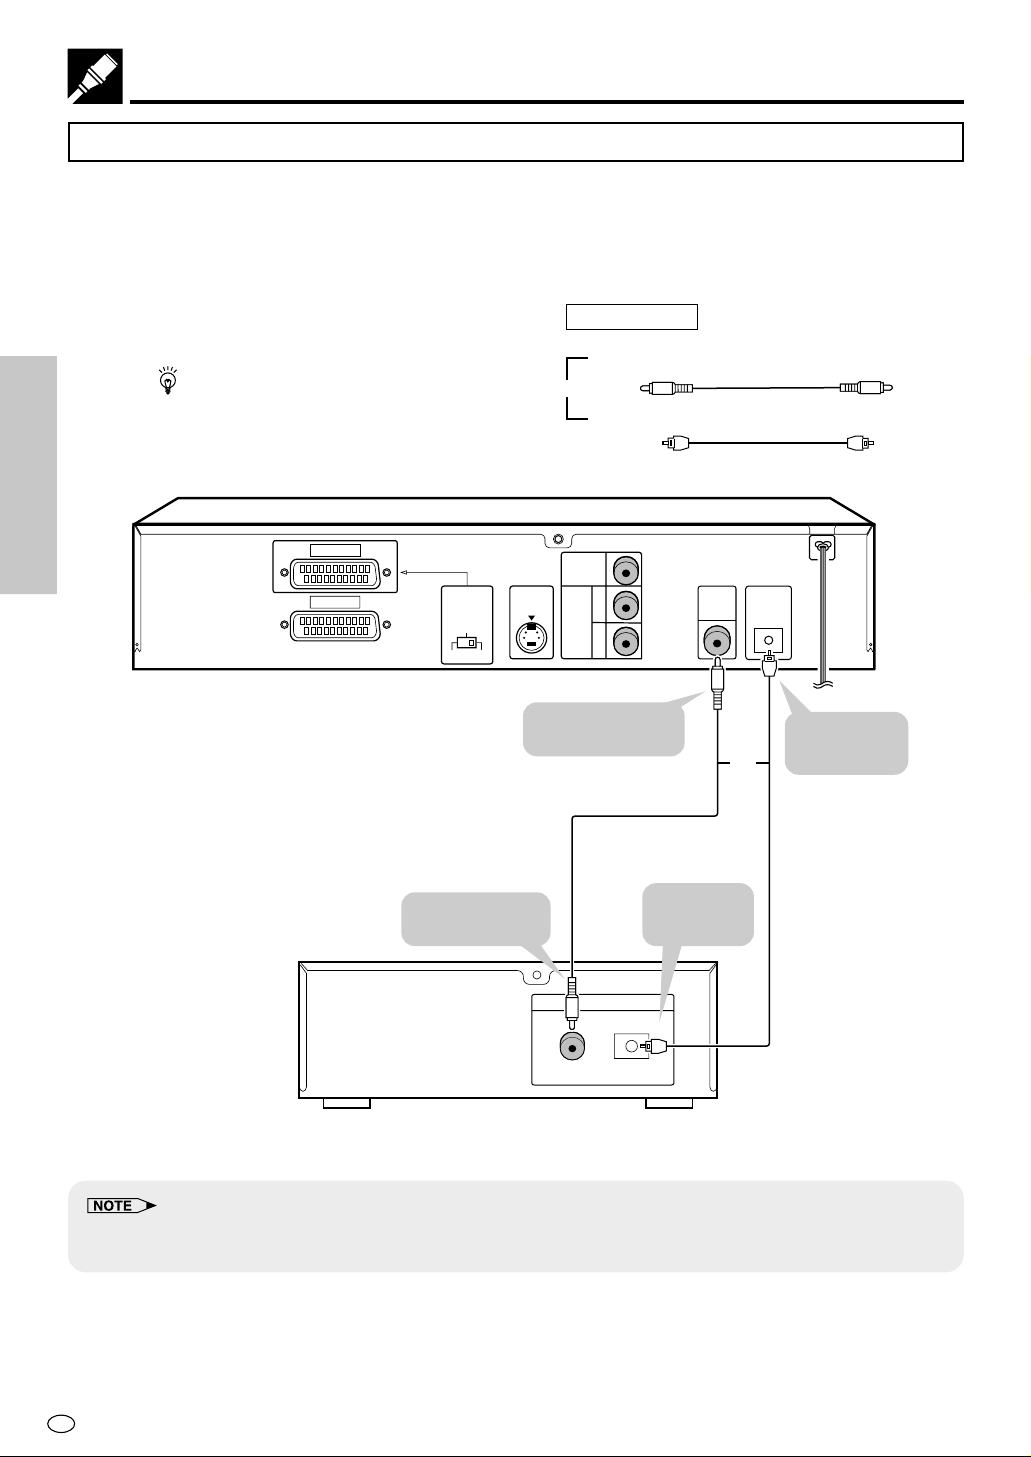
Playing Dolby Digital (5.1 channel), DTS or MPEG audio
Connecting an amplifier with a Dolby Digital/DTS/MPEG Audio digital surround processor or a Dolby Digital/
DTS/MPEG Audio surround processor to your Player’s optical/coaxial digital jack provides richer and more
powerful audio play.
■ Connection to a processor or amplifier with an optical/coaxial digital input jack
Required lead
Coaxial digital lead (commercially available)
SETTING UP
You can make this connection
using either a coaxial digital
lead or an optical digital lead.
DVD Player
AV 1(TV
AV 2
)
OUTPUT
SELECTOR
S-VIDEO
VIDEO
RGB
S-VIDEO
OUT
or
Optical digital lead (commercially available)
VIDEO
OUT
DIGITAL
OPTICAL
AUDIO
OUT
L
R
OUT
DIGITAL OUT
To coaxial
DIGITAL OUT jack
or
To OPTICAL
DIGITAL OUT
jack
Coaxial digital lead
(commercially available)
Optical digital lead
(commercially available)
To coaxial
digital input jack
To optical
digital input
jack
DIGITAL IN
OPTICALCOAXIAL
Dolby Digital (5.1ch)/
DTS/MPEG Audio processor or amplifier
• This connection is not possible if the processor or amplifier to which you want to connect does not have an optical/
coaxial digital input jack.
GB
20
Web-site:www.sharp.co.uk/support Help line:0990 274277 (office hours)
Page 23

Setup
MC
OPEN/
CLOSE
OPERATE
DISPLAY DIMMER
SETUP
ZOOM
ON
SCREEN
AUDIO
TITLE
MENU
VIRTUAL
FUNCTION
CONTROL
SUBTITLE ANGLE
RETURN
REV FWD
ENTER
REPEAT
A B REPEAT
PROGRAM
DIRECTCLEAR MEMORY
PAUSE
RESUME
SLOW
F.ADV SLOW
STILL
DVD VIDEO PLAYER
SKIP SKIP
PLAY
STOP
Switching the TV and the Player On
1 Turn on the TV and select the “VIDEO” or “AV” mode.
2 Switch the Player on by pressing OPERATE.
• The startup screen shown below appears on the TV screen.
Startup Screen
Power Control Operation
Standby mode and Active mode
This Player has these two working modes.
When turning off the Player, it goes in the Standby mode.
When turning it on, it goes in the Active mode.
These two modes work as shown on the following table.
Front Panel
Display
Active
mode
Standby
mode
• In the Active mode, all functions are available.
• In the Standby mode, you can change to the Active mode by
pressing OPERATE or î OPEN/CLOSE.
On Off On On
Off On Off Off
STANDBY
LED indicator
VIDEO Pick up
Output signal activity
DTV
POWER
CATV
STB
TV
FAVORITES
BCD
A
ENTER
VOL CH
MENU
AV MODE
MUTE
INPUT
ANT-A/B
DISPLAY
FLASHBACK
ENT.
VIEW
TWIN
CC
MTS/SAP
MODE
PICTURE
POP
SEARCH
L - TWIN ZOOM - R
TWIN CH
SELECT
SWAP FREEZE
VCR
PLAY FF
REW
VCR CH
REC
STOP
PAUSE
VCR
DDFC
POWER
G1550CE
HD-Ready TV
TV TV’s remote
OPEN/CLOSEOPERATE
OPERATE
SKIP
STANDBY
FWD
REV
OPEN/CLOSE
PLAY
STILL/PAUSE
STOP
STANDBY LED indicator
SETTING UP
How to turn off the power
Press OPERATE to turn off the Player which is in the Active mode. At
this time, the STANDBY LED indicator on the Player lights and the
Player goes in the Standby mode.
Auto power-off function
• If the Player is stopped and not used in any way for 5 minutes,
“SHARP DVD VIDEO PLAYER” appears on the Player’s front
panel display.
• After another 25 minutes of non-operation, the STANDBY LED
indicator lights and the Player enters the Standby mode
automatically.
• In the Standby mode, all buttons are disabled, except for
î OPEN/CLOSE and OPERATE.
Web-site:www.sharp.co.uk/support Help line:0990 274277 (office hours)
21
GB
Page 24

Setup
About the SETUP Screen
This section describes how to specify various basic settings using the
SETUP screen. The list below shows all the items you can set and
adjust. See the following pages for details on each setup procedure.
• The setting procedures described on the following pages are
available only in stop mode.
• The OSD (On Screen Display) screens used in this Operation
Manual are purely for the purposes of explanation. The actual
screens may differ slightly from what is shown here.
Setup item list
Main Menu
24
SETTING UP
26
30
TV MODE SETUP
• Specifies the setting for the type of TV connected
and the playback format for wide-screen video
material.
• Used to specify the colour system in accordance
with the TV connected when playing back an
NTSC disc.
PARENTAL SETUP [1 to 8 (ON)/OFF]
• Sets or changes the parental level (1 to 8).
• Sets the password used to prevent the parental
level from being changed too easily.
AUDIO SETUP
•
Use this setting for increasing the average volume
of Dolby Digital audio when playing a DVD.
• Use this setting for specifying either “BITSTREAM”
or “D-PCM”/“PCM” as the digital type output.
(Example) TV MODE SETUP
TV MODE SETUP
TV MODE:
NTSC: NTSC→PAL
TV MODE
NTSC
COMPRESSION [ON/OFF]
DIGITAL
MPEG
PS
4 : 3
4 : 3
LB
16 : 9
NTSC
NTSC→PAL
BITSTREAM
D-PCM
BITSTREAM
PCM
33
35
DISC LANGUAGE
• Use this setting for selecting languages of
subtitle, audio track and disc menu recorded on
a disc.
OSD LANGUAGE SETUP
• Use this setting for selecting OSD languages.
• Numbers in refer to the pages where the setting
procedures are described.
GB
22
Web-site:www.sharp.co.uk/support Help line:0990 274277 (office hours)
SUBTITLE
AUDIO
MENU
ENGLISH
FRANÇAIS
DEUTSCH
ITALIANO
ESPAÑOL
SVENSKA
NEDERLANDS
ENGLISH
FRENCH
GERMAN
ITALIAN
SPANISH
JAPANESE
SWEDISH
DUTCH
OTHER
Languages you
can select are
same as above.
Languages you
can select are
same as above.
Page 25

Initial Setup (OSD LANGUAGE SETUP)
When you use the Player for the first time, you should set the
language to be used for the OSD (On Screen Display).
Setup
1 Turn on your TV and select the “AV” channel.
Then press OPERATE to turn on the Player.
2 Press SETUP on the Remote while the Player is stopped.
• “
OSD LANGUAGE SETUP” screen appears.
OSD LANGUAGE SETUP
LANGUAGE: ENGLISH
ENGLISH
FRANÇAIS SVENSKA
DEUTSCH NEDERLANDS
ITALIANO
ESPANOL
~
3 Use ', ", \ or | to select the language you want to use.
• The background colour for the selected item changes to
orange.
To use French as the OSD language, select “FRANÇAIS”.
4 Press ENTER to confirm the setting.
• After the second time when you press SETUP, the screen in the
language that you selected in step 3 above appears immediately.
• You can change OSD LANGUAGE whenever you want. For details,
please refer to “OSD LANGUAGE SETUP Setting” on page 35.
OPERATE
VIRTUAL
FUNCTION
CONTROL
TITLE
RETURN
ON
SCREEN
SETUP
DISPLAY DIMMER
ZOOM
SUBTITLE ANGLE
MC
REV FWD
PLAY
RESUME
STOP
F.ADV SLOW
SLOW
SKIP SKIP
OPEN/
CLOSE
AUDIO
MENU
ENTER
REPEAT
A B REPEAT
PROGRAM
DIRECTCLEAR MEMORY
PAUSE
STILL
SETTING UP
DVD VIDEO PLAYER
Web-site:www.sharp.co.uk/support Help line:0990 274277 (office hours)
23
GB
Page 26

Setup
TV MODE SETUP Setting
Setting the TV MODE
1 While the Player is stopped, press SETUP to view the SETUP screen.
OPERATE
VIRTUAL
FUNCTION
CONTROL
TITLE
ON
SCREEN
SETUP
DISPLAY DIMMER
ZOOM
SUBTITLE ANGLE
OPEN/
CLOSE
AUDIO
MENU
When you use the Player for the first time, press SETUP. “OSD
LANGUAGE SETUP” screen appears. You should set the
language to be used for the OSD (On Screen Display). See “OSD
LANGUAGE SETUP Setting” on page 35.
2 Use ' or " to select the “ TV MODE SETUP”.
TV MODE SETUP
SETTING UP
TV MODE:
NTSC: NTSC→PAL
3 Press ENTER and then use ' or " to select “TV MODE”.
• The background colour for the selected item changes to
orange.
4 Press ENTER to display the items you can select.
5 Use ' or " to select “
4:3
4:3
LB
”, “
PS
• The background colour for the selected item changes to
orange.
4:3
(Example) Selecting “
TV MODE SETUP
TV MODE:
NTSC:
PS
”.
” or “
16:9
”.
RETURN
ENTER
REPEAT
A B REPEAT
PROGRAM
DIRECTCLEAR MEMORY
MC
REV FWD
PLAY
RESUME
STOP
F.ADV SLOW
SLOW
SKIP SKIP
DVD VIDEO PLAYER
STILL
PAUSE
Cut off when a wide-screen video
image is played.
GB
4:3
PS
•
— (Pan Scan mode): When wide-screen video material
is played, this mode clips the right and left sides of the image so
that it can be viewed on a conventional TV screen.
• Some wide-screen DVDs that do not permit Pan Scan mode
playback are automatically played in letterbox mode (black bands
top and bottom).
4:3
LB
•
— (Letterbox mode): When wide-screen video material
is played in this mode on a conventional TV screen, black
bands appear at the top and bottom of the screen.
16:9
•
— (Wide-screen TV): This is the correct mode for playing
wide-screen videos on a wide-screen TV.
• You must also set the screen mode on your wide-screen TV to “FULL”.
24
Web-site:www.sharp.co.uk/support Help line:0990 274277 (office hours)
The actual appearance of the image depends on
the screen mode setting of your wide-screen TV.
Page 27

6 Press ENTER to confirm the “TV MODE” setting.
• When you have completed the setting above, press RETURN
to exit the SETUP screen. However, if you want to specify the
“NTSC” setting in succession, proceed to step 1 below.
Setting Up for Playback of an NTSC Disc
• Before setting the “NTSC” (video signal system), perform the step 1
to 2 on the previous page.
1 Press ENTER and then use ' or " to select “NTSC”.
• The background colour for the selected item changes to
orange.
2 Press ENTER to display the items you can select.
3 Use ' or " to select “NTSC” or “NTSC→PA L ”.
(Example) Selecting “NTSC”
TV MODE SETUP
TV MODE:
NTSC: NTSC→PAL
NTSC
NTSC→PAL
OPERATE
VIRTUAL
FUNCTION
CONTROL
TITLE
RETURN
ON
SCREEN
SETUP
DISPLAY DIMMER
ZOOM
SUBTITLE ANGLE
MC
REV FWD
PLAY
RESUME
STOP
F.ADV SLOW
SLOW
SKIP SKIP
OPEN/
CLOSE
AUDIO
MENU
ENTER
REPEAT
A B REPEAT
PROGRAM
DIRECTCLEAR MEMORY
PAUSE
STILL
Setup
SETTING UP
• About the NTSC settings:
NTSC: Select this setting when you have an NTSC TV
or an NTSC-compatible Multi-System TV
connected to the Player.
NTSC→PAL: Select this setting when you have a PAL TV
connected to the Player. This setting converts
the NTSC signal to a modified PAL signal.
• When you play back the PAL discs, either setting of “NTSC→PAL” or
“NTSC” can be used on a PAL TV or a Multi System TV.
4 Press ENTER to confirm the setting.
5 If you want to exit the SETUP screen and return to the normal
screen, press RETURN.
• If you want to go on and specify other settings (PARENTAL
SETUP, AUDIO SETUP, DISC LANGUAGE or OSD
LANGUAGE SETUP), press ' or " to display other SETUP
screen without pressing RETURN.
DVD VIDEO PLAYER
Web-site:www.sharp.co.uk/support Help line:0990 274277 (office hours)
25
GB
Page 28

Setup
PARENTAL SETUP Setting
DVDs equipped with the parental lock function are rated according
to their content. The rated content allowed by a parental lock level
and the way a DVD can be controlled may vary from disc to disc.
Some discs, for example, may let you edit out violent scenes and
replace them with scenes more suitable for viewing by children. You
can also use the parental lock to disable playback of the DVD
entirely.
Setting the parental level for the first time
1 Press SETUP to display the SETUP screen.
2 Use ' or " to select the “ PARENTAL SETUP”.
SETTING UP
PARENTAL SETUP
1 2 3 4 5 6 7 8
??
LEVEL 8 FOR ADULTS
OFF
OPERATE
VIRTUAL
FUNCTION
CONTROL
TITLE
RETURN
ON
SCREEN
SETUP
DISPLAY DIMMER
ZOOM
SUBTITLE ANGLE
MC
REV FWD
PLAY
RESUME
STOP
OPEN/
CLOSE
AUDIO
MENU
ENTER
REPEAT
A B REPEAT
PROGRAM
DIRECTCLEAR MEMORY
PAUSE
STILL
3 Press ENTER to display the password specification screen.
PARENTAL SETUP
PASSWORD: ????
1 2 3 4 5 6 7 8
LEVEL 8 FOR ADULTS
OFF
4 Use the number buttons (0 to 9) to enter a 4-digit password.
PASSWORD : 1 2 3 4
• When you have finished entering your 4-digit number,
(password verification display) appears.
• Enter the numbers slowly as each number is stored separately.
• Press C (CLEAR) to return to the previous digit.
Displayed when “1234”
is being entered as the
password.
F.ADV SLOW
SLOW
SKIP SKIP
DVD VIDEO PLAYER
GB
26
Web-site:www.sharp.co.uk/support Help line:0990 274277 (office hours)
Page 29

5 To confirm your password, re-enter the numbers you entered in
MC
OPEN/
CLOSE
OPERATE
SETUP
ZOOM
ON
SCREEN
AUDIO
TITLE
MENU
VIRTUAL
FUNCTION
CONTROL
SUBTITLE ANGLE
RETURN
REV FWD
ENTER
REPEAT
A B REPEAT
PROGRAM
DIRECTCLEAR MEMORY
PAUSE
RESUME
SLOW
F.ADV SLOW
STILL
DVD VIDEO PLAYER
PLAY
STOP
DISPLAY DIMMER
SKIP SKIP
step 4 (using the number buttons).
• When the correct password is entered, the screen below
appears.
PARENTAL SETUP
SELECT LEVEL
1 2 3 4 5 6 7 8
LEVEL 8 FOR ADULTS
OFF
Setup
• If you enter the wrong number three times in succession, the
normal screen reappears.
If you forget your password, you can erase your current password by
pressing Ë STOP four times.
6 Press \ or | to change the parental level.
• Factory setting keeps parental level 8.
PARENTAL SETUP
SELECT LEVEL
1 2 3 4 5 6 7 8
LEVEL 8 FOR ADULTS
• Level 1: for most restrictive viewing → Level 8: for adult
• When the parental level is set to “OFF”, DVDs can be played
7 Once you have changed the parental level in step 6 above,
press ENTER to confirm the setting.
8 If you want to exit the SETUP screen and return to the normal
screen, press RETURN.
• If you want to go on and specify other settings, press ' or "
• You can use the parental lock function only with DVDs that are
equipped with the parental lock feature.
• On some DVDs, the parental level setting is fixed and cannot be
modified.
• Some DVDs allow the viewer to temporarily change the parental level
setting to view the original scenes. When this prompt appears, input
viewing
(The smaller the number, the greater the level of restriction.)
back regardless of the parental level.
to display other SETUP screen without pressing RETURN.
OFF
the password to view the original scenes.
Can be changed
to any number
between 1 and 8
or OFF.
SETTING UP
Web-site:www.sharp.co.uk/support Help line:0990 274277 (office hours)
27
GB
Page 30

Setup
Changing the parental level
• Before changing the parental level, perform the step 1 to 2 on page
26.
1 Press ENTER to display the password verification screen.
PARENTAL SETUP
PASSWORD:
1 2 3 4 5 6 7 8
LEVEL 8 FOR ADULTS
––––
OFF
OPERATE
VIRTUAL
FUNCTION
CONTROL
TITLE
ON
SCREEN
SETUP
DISPLAY DIMMER
ZOOM
SUBTITLE ANGLE
OPEN/
CLOSE
AUDIO
MENU
2 Use the number buttons (0 to 9) to enter the 4-digit password
that was set previously.
SETTING UP
PASSWORD :
• When you have finished entering your 4-digit number,
changes to .
3 Press \ or | to change the parental level.
• The same screen as step 6 on the previous page appears.
• If you enter the wrong number three times in succession, the
normal screen reappears.
If you forget your password, you can erase your current password by
pressing Ë STOP four times.
4 Once you have changed the parental level in step 3 above,
press ENTER to confirm the setting.
5 If you want to exit the SETUP screen and return to the normal
screen, press RETURN.
• If you want to go on and specify other settings, press ' or "
to display other SETUP screen without pressing RETURN.
RETURN
MC
REV FWD
PLAY
RESUME
STOP
F.ADV SLOW
SLOW
SKIP SKIP
DVD VIDEO PLAYER
ENTER
REPEAT
A B REPEAT
PROGRAM
DIRECTCLEAR MEMORY
PAUSE
STILL
GB
28
Web-site:www.sharp.co.uk/support Help line:0990 274277 (office hours)
Page 31

Temporary parental level setting
In addition to “PARENTAL SETUP Setting” on page 26, some DVDs
will prompt the viewer to temporarily change the parental level. In
this event, the following screen appears.
PARENTAL SETUP
TEMPORARY CHANGE?
YES
NO
OPERATE
VIRTUAL
FUNCTION
CONTROL
TITLE
ON
SCREEN
SETUP
DISPLAY DIMMER
ZOOM
SUBTITLE ANGLE
OPEN/
CLOSE
AUDIO
MENU
Setup
When this screen appears, use the procedure described below to
temporarily change the level.
1 Use ' or " to select “YES” or “NO”.
YES: Temporarily changes the parental level (sets the level to a
value other than the current setting (page 26)).
NO: Does not change the parental level (maintains the current
level (page 26)).
2 Press ENTER.
• If “NO” was selected in step 1, the normal screen reappears.
• If “YES” was selected in step 1, the following screen appears.
PARENTAL SETUP
PASSWORD:
• To temporarily change the parental level, enter your password
(page 28) and confirm the password. The setting automatically changes temporarily to the disc-specific parental level.
• When you have completed the temporary change procedure,
press ENTER. (The normal screen reappears.)
––––
RETURN
MC
REV FWD
PLAY
RESUME
STOP
F.ADV SLOW
SLOW
SKIP SKIP
DVD VIDEO PLAYER
ENTER
REPEAT
A B REPEAT
PROGRAM
DIRECTCLEAR MEMORY
PAUSE
STILL
SETTING UP
• This change only applies while the current disc is being played.
Web-site:www.sharp.co.uk/support Help line:0990 274277 (office hours)
29
GB
Page 32

Setup
AUDIO SETUP Setting
COMPRESSION ............ Use this setting for increasing the average
volume of Dolby Digital audio when playing a
DVD.
DIGITAL/MPEG ...... Use these settings for specifying the type of
digital output when playing a disc recorded
using Dolby Digital/MPEG Audio.
OPERATE
VIRTUAL
FUNCTION
CONTROL
TITLE
ON
SCREEN
SETUP
DISPLAY DIMMER
ZOOM
SUBTITLE ANGLE
OPEN/
CLOSE
AUDIO
MENU
Setting the COMPRESSION
(Dolby Digital output level)
When Dolby Digital is used to record the audio on a DVD, the average
overall volume level of the audio is relatively lower than that produced
SETTING UP
by a VIDEO CD/Audio CD. This is to provide the widest possible
dynamic range. To counteract this, your Player automatically raises the
overall average volume level of a disc recorded using Dolby Digital to a
level that is similar to that of a VIDEO CD/Audio CD.
DVDs
Dolby Digital audio
VIDEO CDs
Audio CDs
COMPRESSION:
OFF
• Low audio level
COMPRESSION:
ON
Audio level the same
•
as Audio CD, etc.
RETURN
MC
REV FWD
PLAY
RESUME
STOP
F.ADV SLOW
SLOW
SKIP SKIP
DVD VIDEO PLAYER
ENTER
REPEAT
A B REPEAT
PROGRAM
DIRECTCLEAR MEMORY
PAUSE
STILL
• OFF .............. Audio level recorded on disc is played back without
modification.
• ON ............... Dolby Digital average audio level is increased so it
sounds similar to that of a VIDEO CD/Audio CD.
1 Press SETUP to display the SETUP screen.
2 Use ' or " to select the “ AUDIO SETUP”.
AUDIO SETUP
GB
30
COMPRESSION: OFF
MPEG:
Web-site:www.sharp.co.uk/support Help line:0990 274277 (office hours)
DIGITAL:
BITSTREAM
BITSTREAM
Page 33

3 Press ENTER and then use ' or " to select “COMPRESSION”.
• The background colour for the selected item changes to orange.
4 Press ENTER to display the settings you can select.
AUDIO SETUP
COMPRESSION: OFF
ON
MPEG: OFF
DIGITAL:
OPERATE
VIRTUAL
FUNCTION
CONTROL
TITLE
ON
SCREEN
SETUP
DISPLAY DIMMER
ZOOM
SUBTITLE ANGLE
OPEN/
CLOSE
AUDIO
MENU
Setup
5 Use ' or " to select “ON” or “OFF”.
• Use of the “OFF” setting is recommended when the Player is
connected to audio equipment.
6 Press ENTER to confirm the setting.
• When you have completed the setting above, press RETURN
to exit the SETUP screen. However, if you want to specify the
“
DIGITAL” setting in succession, proceed to step 1 below.
Setting the DIGITAL OUT
When playing a disc recorded using Dolby Digital (5.1ch)/MPEG
Audio (5.1ch), you can specify either “BITSTREAM” or “D-PCM”/
“PCM” as the digital type output.
Setting the DOLBY DIGITAL
• Before setting the “ DIGITAL” , perform the step 1 to 2 on the
previous page.
1 Press ENTER and then use ' or " to select “ DIGITAL”.
• The background colour for the selected item changes to orange.
2 Press ENTER to display the settings you can select.
AUDIO SETUP
COMPRESSION: ON
MPEG:
D-PCM
DIGITAL:
BITSTREAM
BITSTREAM
RETURN
MC
REV FWD
PLAY
RESUME
STOP
F.ADV SLOW
SLOW
SKIP SKIP
DVD VIDEO PLAYER
ENTER
REPEAT
A B REPEAT
PROGRAM
DIRECTCLEAR MEMORY
PAUSE
STILL
SETTING UP
3 Use ' or " to select “BITSTREAM” or “D-PCM”.
• The factory default setting is “BITSTREAM”.
BITSTREAM: Use this setting for a digital connection of a
receiver (amplifier) equipped with a Dolby Digital
decoder.
D-PCM: Use this setting for a digital connection to the
(Down Mix PCM) PCM digital input jack of a DAT or MD, or for
a digital connection to a receiver (amplifier)
that does not have a Dolby Digital decoder.
4 Press ENTER to confirm the setting.
5 Press RETURN to exit the SETUP screen and return to normal
screen.
• When you have completed the setting above, press RETURN
to exit the SETUP screen. However, if you want to specify the
“MPEG” setting in succession, proceed to step 1 below.
Web-site:www.sharp.co.uk/support Help line:0990 274277 (office hours)
• Whenever the “COMPRESSION”
setting is “ON”, VIRTUAL DOLBY
setting is changed to “OFF”
automatically.
31
GB
Page 34

Setup
Setting the MPEG
• Before setting the “MPEG”, perform the step 1 to 2 on page 30.
1 Press ENTER and then use ' or " to select “MPEG”.
• The background colour for the selected item changes to
orange.
2 Press ENTER to display the settings you can select.
AUDIO SETUP
COMPRESSION: ON
MPEG:
PCM
3 Use ' or " to select “BITSTREAM” or “PCM”.
SETTING UP
DIGITAL:
BITSTREAM
BITSTREAM
BITSTREAM
• The factory default setting is “BITSTREAM”.
BITSTREAM: Use this setting for a digital connection of a
receiver (amplifier) equipped with an MPEG
Audio decoder.
PCM: Use this setting for a digital connection to the
PCM digital input jack of a DAT or MD, or for a
digital connection to a receiver (amplifier) that
does not have an MPEG Audio decoder.
4 Press ENTER to confirm the setting.
5 Press RETURN to exit the SETUP screen and return to normal
screen.
• If you want to go on and specify other settings, use ' or " to
display the other SETUP screen without pressing RETURN.
OPERATE
VIRTUAL
FUNCTION
CONTROL
TITLE
RETURN
ON
SCREEN
SETUP
DISPLAY DIMMER
ZOOM
SUBTITLE ANGLE
MC
REV FWD
PLAY
RESUME
STOP
F.ADV SLOW
SLOW
SKIP SKIP
DVD VIDEO PLAYER
OPEN/
CLOSE
AUDIO
MENU
ENTER
REPEAT
A B REPEAT
PROGRAM
DIRECTCLEAR MEMORY
PAUSE
STILL
When playing a disc recorded using DTS, the bitstream type
signal is output regardless of the setting of “
“MPEG”.
GB
32
Web-site:www.sharp.co.uk/support Help line:0990 274277 (office hours)
DIGITAL” and
Page 35

DISC LANGUAGE Setting
Use this setting for selecting languages of subtitle, audio track and
disc menu.
• Note that the language you select is not displayed or does
not sound if it is not recorded on the disc you are playing.
•
With some discs, it is intentionally disabled by the disc manufacturer
to change the language of the subtitle, audio track and disc menu
through this SETUP screen. When playing such discs, try using
FUNCTION CONTROL (page 45), SUBTITLE (page 56), AUDIO
(page 57), or MENU (page 47).
Setting SUBTITLE, AUDIO and MENU
languages from 8 languages
1 Press SETUP to display the SETUP screen.
2 Use ' or " to select the “ DISC LANGUAGE”.
DISC LANGUAGE
SUB TITLE:ENGLISH
AUDIO: ENGLISH
MENU: ENGLISH
OPERATE
VIRTUAL
FUNCTION
CONTROL
TITLE
RETURN
ON
SCREEN
SETUP
DISPLAY DIMMER
ZOOM
SUBTITLE ANGLE
A B REPEAT
PROGRAM
MC
REV FWD
PLAY
RESUME
STILL
STOP
OPEN/
CLOSE
AUDIO
MENU
ENTER
DIRECTCLEAR MEMORY
Setup
SETTING UP
REPEAT
PAUSE
3 Press ENTER and then use ' or " to select “SUBTITLE”,
“AUDIO” or “MENU”.
• The background colour for the selected item changes to orange.
• You can set “SUBTITLE”, “AUDIO” or “MENU” individually.
(Example) Selecting “SUBTITLE”
DISC LANGUAGE
SUB TITLE:ENGLISH
AUDIO: ENGLISH
MENU: ENGLISH
4 After selecting the item, press ENTER.
5 Select the language you want to use with ', ", \ or |.
(Example) Selecting “FRENCH”
DISC LANGUAGE
SUB TITLE:ENGLISH
ENGLISH JAPANESE
FRENCH SWEDISH
GERMAN DUTCH
ITALIAN OTHER
SPANISH
(––)
F.ADV SLOW
SLOW
SKIP SKIP
DVD VIDEO PLAYER
• If you want to use any languages which are not on OSD,
proceed to step 1 under “Selecting a language from
OTHER” on next page.
6 Press ENTER to confirm the setting.
Web-site:www.sharp.co.uk/support Help line:0990 274277 (office hours)
33
GB
Page 36

Setup
7 Repeat steps 3 to 6 above to go on with other “DISC
LANGUAGE” settings in succession.
8 If you want to exit the SETUP screen and return to the normal
screen, press RETURN.
• If you want to go on and specify other settings, press ' or "
to display other SETUP screen without pressing RETURN.
Selecting a language from OTHER
1
In step 5 on the previous page, select “OTHER” with ', ", \
and |, then press ENTER to set the “OTHER” input item (two
letters).
DISC LANGUAGE
SUB TITLE:ENGLISH
ENGLISH JAPANESE
SETTING UP
2 Example: To select “AF” (Afrikaans)
Use ' or " to select “A” as the first letter, use \ or | to move
to the second place, then use ' or " to select “F”.
• When “A” is selected for the first letter, only letters to the right of codes
beginning with “A” can be selected as the second letter. Refer to the codes
beginning with “A” on “Language Code List for Disc Language” (see
page 64).
Example: First letter-A
Second letter-A, B, F, M, R, S, Y or Z
FRENCH SWEDISH
GERMAN DUTCH
ITALIAN OTHER
SPANISH
(AA)
OPERATE
VIRTUAL
FUNCTION
CONTROL
TITLE
RETURN
ON
SCREEN
SETUP
DISPLAY DIMMER
ZOOM
SUBTITLE ANGLE
A B REPEAT
PROGRAM
MC
REV FWD
PLAY
RESUME
SLOW
SKIP
SKIP SKIP
STILL
STOP
F.ADV SLOW
OPEN/
CLOSE
AUDIO
MENU
ENTER
REPEAT
DIRECTCLEAR MEMORY
PAUSE
DISC LANGUAGE
SUB TITLE:ENGLISH
ENGLISH JAPANESE
FRENCH SWEDISH
GERMAN DUTCH
ITALIAN OTHER
SPANISH
(AA)
DISC LANGUAGE
SUB TITLE:ENGLISH
ENGLISH JAPANESE
FRENCH SWEDISH
GERMAN DUTCH
ITALIAN OTHER
SPANISH
(AF)
3 Press ENTER to confirm the setting.
4 If you want to exit the SETUP screen and return to the normal
screen, press RETURN.
• However, if you want to specify other “DISC LANGUAGE”
setting in succession, press ENTER and then select the
setting item with ' and ".
GB
34
Web-site:www.sharp.co.uk/support Help line:0990 274277 (office hours)
DVD VIDEO PLAYER
Page 37

OSD LANGUAGE SETUP Setting
ENTREE
RETOUR
CHOIX
Setup
1 Press SETUP to display the SETUP screen.
Caution:
When you use the Player for the first time, press SETUP. “OSD LANGUAGE
SETUP” screen appears. You should set the language to be used for the
OSD.
2 Use ' or " to select the “ OSD LANGUAGE SETUP”.
OSD LANGUAGE SETUP
LANGUAGE: ENGLISH
3 Press ENTER to display the languages you can select.
OSD LANGUAGE SETUP
LANGUAGE: ENGLISH
ENGLISH
FRANÇAIS SVENSKA
DEUTSCH NEDERLANDS
ITALIANO
ESPANOL
~
OPERATE
VIRTUAL
FUNCTION
CONTROL
TITLE
RETURN
ON
SCREEN
SETUP
DISPLAY DIMMER
ZOOM
SUBTITLE ANGLE
A B REPEAT
MC
REV FWD
PLAY
RESUME
STOP
F.ADV SLOW
SLOW
SKIP SKIP
OPEN/
CLOSE
AUDIO
MENU
ENTER
REPEAT
PROGRAM
DIRECTCLEAR MEMORY
PAUSE
STILL
SETTING UP
4 Use ', ", \ or | to select the language you want to use.
For example: “FRANÇAIS”
• The background colour for the selected item changes to
orange.
MENU LANGUES
LANGUE: ENGLISH
ENGLISH
FRANÇAIS SVENSKA
DEUTSCH NEDERLANDS
ITALIANO
ESPANOL
~
ENTREE
CHOIX
RETOUR
5 Press ENTER to confirm the setting.
6 If you want to exit the SETUP screen and return to the normal
screen, press RETURN.
• If you want to go on and specify other settings, press ' or "
to display the other SETUP screen without pressing RETURN.
DVD VIDEO PLAYER
Web-site:www.sharp.co.uk/support Help line:0990 274277 (office hours)
35
GB
Page 38

Display Information
Operation Mode Indicators
Each time ON SCREEN on the Remote is pressed, the display on the TV screen changes the mode in the
following sequence: Auto mode ➝ On mode ➝ Off mode.
• Auto mode ...... Displays indicators for 3 seconds when operation begins.
• On mode ......... Displays indicators continually until the operation mode is changed.
• Off mode ......... Does not display indicators.
Each time DISPLAY on the Remote is pressed, the Player’s front panel display changes the mode in the
following sequence: Time mode ➝ Operation Status mode ➝ Title mode.
• Time mode ..................... Displays the playing time*.
•
Operation Status mode
• Title mode ...................... Displays the total number of title, chapter, or tracks.
* When the disc you attempt to play has no information on time, operation status is displayed.
The Player displays the information shown below on the TV screen and on the Player’s front panel display
depending on the operation status.
Display Examples
SETTING UP
If no disc is loaded or
an unplayable disc is
loaded when the Player
is switched on.
.... Displays the operation you perform such as “PLAY”, “REV”.
TV Screen Front Panel Display Remarks
“– – – – –” appears when the tray
is closed and:
1) There is no disc in the tray.
2) The disc type is not DVD,
VIDEO CD or Audio CD.
3) The disc is not loaded
correctly (upside-down, etc.).
Tray open
Tray closed
Loading
Stopped
Playing
Still/Paused
Fast forward
Fast reverse
Slow
Playback control
Ë
û
â
è
È
/
The indicator changes to show
other indicators (total time, etc.).
When a DVD or VIDEO CD is
played back.
When an Audio CD is played back.
Does not function for VIDEO CDs
or Audio CDs.
Region (Locale) Number Error Indicator
If the region (locale) number of the disc that you attempt to play differs from the region number of the Player
(see page 6), “
cannot be played.)
GB
36
REGION CODE ERROR” appears on the TV screen and the disc tray slides out. (The disc
Web-site:www.sharp.co.uk/support Help line:0990 274277 (office hours)
Page 39

Playback
DVD
DVD
OPERATE
OPEN/CLOSE
PLAY
STILL/PAUSE
STOPSKIP
FWD
STANDBY
REV
OPEN/CLOSE
PLAY
STOP
OPERATE
1 2
Disc
VIDEO
C D
C D
C D
C D
VIDEO
Preparations
• Switch on the TV set’s power, and select the AV channel you are to
watch the DVD on. Refer to the operation manual for your TV for
details.
• Switch on the stereo system’s power if the Player has been
connected to a stereo system.
VIDEO
DVD
DVD
VIDEO
C D
C D
C D
C D
Basic Play
1 Press OPERATE.
2 Press î OPEN/CLOSE to open the disc tray.
3 Place a disc onto the tray.
• Hold the disc without touching either of its surfaces, position it
with the printed title side facing up, align it with the guides,
and place it in its proper position.
1 8 cm (3") disc 2 12 cm (5") disc
• Do not stack discs in the tray. This can damage the
Player and the discs.
4 Press î OPEN/CLOSE to close the disc tray.
5 Press û PLAY.
• Playback image appears on the screen. (No image is shown
for Audio CDs.)
• Some discs are played back automatically without pressing
û PLAY.
• Some discs prompt you to select a title. In this case, select a
title you want to view.
6 Press Ë STOP.
Playing VIDEO CDs with Playback Control (PBC)
• Pressing û PLAY begins PBC playback. Time display is not
shown for some discs.
• If you specify the track number to be played (with playback
stopped) and press û PLAY, normal playback (not PBC
playback) begins.
• If the disc is loaded upside down or is damaged, “– – – – –” appears
on the Player’s front panel display and the disc tray slides out.
• If you attempt to play a DVD with the wrong region code,
“ REGION CODE ERROR” appears on the TV screen and the disc
tray slides out.
• If the Player is stopped and not used in any way for 5 minutes, “SHARP
DVD VIDEO PLAYER” appears on the Player’s front panel display.
OPERATE
VIRTUAL
FUNCTION
CONTROL
TITLE
RETURN
ON
SCREEN
SETUP
DISPLAY DIMMER
ZOOM
SUBTITLE ANGLE
A B REPEAT
PROGRAM
MC
REV FWD
PLAY
RESUME
SLOW
SKIP SKIP
STILL
STOP
F.ADV SLOW
OPEN/
CLOSE
AUDIO
MENU
ENTER
DIRECTCLEAR MEMORY
BASIC OPERATIONS
REPEAT
PAUSE
DVD VIDEO PLAYER
Web-site:www.sharp.co.uk/support Help line:0990 274277 (office hours)
37
GB
Page 40

OPERATE
OPEN/CLOSE
PLAY
STILL/PAUSE
STOPSKIP
FWD
STANDBY
REV
PLAY
SKIP ( REV)
SKIP (FWD )
STILL/PAUSE
DVD Playback
DVD
DVD
Fast Forward/Fast Reverse
DVD
DVD
1 Press FWD
è
or È REV when a disc is playing.
• The disc begins fast scan at ×2 speed.
The speed of fast scan
X2
DVD
Fast scan image appears here.
• Three speeds are available. Each time FWDè or È REV is
pressed, the speed of fast scan changes in the following
sequence:
×2 ×8 ×32
• You can also operate this function by holding down SKIPà
(FWDè) or ÀSKIP (È REV) on the Player for two or more
seconds.
2 Press ûPLAY when you reach the desired point.
DVD
DVD
Slow-Motion Play
BASIC OPERATIONS
1 Press SLOW or SLOW in the play mode or still mode.
• Three speeds are available.
is pressed, the speed of slow-motion playback changes in the
following sequence:
×1/2 ×1/8 ×1/16*
Each time SLOW or SLOW
OPERATE
VIRTUAL
FUNCTION
CONTROL
TITLE
RETURN
ON
SCREEN
SETUP
DISPLAY DIMMER
ZOOM
SUBTITLE ANGLE
A B REPEAT
PROGRAM
MC
REV FWD
PLAY
RESUME
STILL
STOP
OPEN/
CLOSE
AUDIO
MENU
ENTER
REPEAT
DIRECTCLEAR MEMORY
PAUSE
* The reverse slow-motion playback ( SLOW) at ×1/16
speed is disabled.
2 Press û PLAY to return to the normal playback or press
â STILL/PAUSE to return to the still picture mode.
• On some discs, the fast scan function is disabled.
• Audio and subtitles are not played back during the fast scan playback.
• On some discs, the slow-motion playback functions are disabled.
• Using reverse slow-motion playback with a DVD causes frame-by-
frame reverse playback.
GB
38
Web-site:www.sharp.co.uk/support Help line:0990 274277 (office hours)
F.ADV SLOW
SLOW
SKIP SKIP
DVD VIDEO PLAYER
Page 41

DVD
OPEN/CLOSE
PLAY
STILL/PAUSE
STOPSKIP
FWD
STANDBY
REV
OPERATE
PLAY
SKIP ( REV)
SKIP (FWD )
STILL/PAUSE
DVD
Still/Pause
1 Press â STILL/PAUSE during playback.
2 If you press ûPLAY while paused (STILL/PAUSE), normal
playback resumes.
DVD
DVD
Frame Advance
1
Press F.ADV or F.ADV during playback.
• The playback is paused (STILL/PAUSE).
• The disc goes forward or backward by one frame each time
F.ADV
or F.ADV is pressed.
2 Press û PLAY to return to the normal playback.
DVD Playback
OPERATE
SETUP
ZOOM
VIRTUAL
FUNCTION
SUBTITLE ANGLE
CONTROL
TITLE
ON
OPEN/
SCREEN
CLOSE
DISPLAY DIMMER
AUDIO
MENU
DVD
DVD
DVD
DVD
Skip (Forward/Reverse)
While you are playing a disc, this function jumps to the beginning of
the next chapter (Forward) or the current chapter (Reverse) and
automatically starts playing that chapter.
1 While a disc is playing, press SKIPà or
• Playback skips forwards one chapter for each time SKIPà
is pressed. When the last chapter is reached, playback
returns to the start of the disc.
• If you press ÀSKIP and playback begins, and you then
press ÀSKIP again within 3 seconds, playback returns to
the beginning of the previous chapter.
• On discs or titles that do not have chapter settings, playback skips
forward to the next title or back to the beginning of the current title or
disc.
• On some discs, the skip functions are disabled.
• The playback image is not displayed during the skip. It resumes
during playback following the skip.
À
SKIP.
RETURN
A B REPEAT
PROGRAM
MC
REV FWD
PLAY
RESUME
SLOW
SKIP SKIP
DVD VIDEO PLAYER
STILL
STOP
F.ADV SLOW
ENTER
DIRECTCLEAR MEMORY
BASIC OPERATIONS
REPEAT
PAUSE
Web-site:www.sharp.co.uk/support Help line:0990 274277 (office hours)
39
GB
Page 42

:
1
ZOOM
DVD
DVD Playback
DVD
DVD
DVD
Zooming an Image
1 While a disc is playing, press ZOOM.
• Each press of ZOOM cycles through the zoom settings in the
following sequence:
ZOOM 1 (1.2×) → ZOOM 2 (1.5×) → ZOOM 3 (2.0×) → Off.
P S
43:
• When playing a Pan Scan disc while
“TV MODE” setting on the “TV MODE SETUP” screen, each
press of ZOOM cycles through zoom settings in the following
sequence:
ZOOM 1 (1.2×) → ZOOM 2 (1.5×) → Off.
Note that all of the above zoom factors are approximate only.
• While an image is zoomed, you can use ', ", \ and | to
shift the view and display the part you want.
is selected as the
OPERATE
SETUP
VIRTUAL ZOOM
FUNCTION
SUBTITLE ANGLE
CONTROL
TITLE
ZOOM indicator
ON
OPEN/
SCREEN
CLOSE
DISPLAY DIMMER
AUDIO
MENU
Press '.
Press
Press ZOOM.
Press \.
Press ".
BASIC OPERATIONS
• The zoom indicator changes from white to red to let you know when
you are trying to perform an illegal shift of view. If you are already at
the far left side of the image, for example, the zoom indicator will
become red when you press \.
• An image may become distorted when zoomed.
• You can cancel the zoom operation by pressing ËSTOP, MENU,
TITLE, FWDè, or È REV.
• The setting screen is cleared automatically whenever you display a
DVD screen that enables you to change the scene by pressing ', ",
\ or |.
• 1.2×, 1.5×, and 2.0× zoom are approximate magnification values only.
The actual image may be somewhat larger or smaller depending on
the recording system (NTSC or PAL) that was used to record the disc.
|.
RETURN
A B REPEAT
MC
REV FWD
PLAY
RESUME
STOP
SLOW F.ADV SLOW
SKIP SKIP
DVD VIDEO PLAYER
ENTER
REPEAT
PROGRAM
DIRECTCLEAR MEMORY
PAUSE
STILL
GB
40
Web-site:www.sharp.co.uk/support Help line:0990 274277 (office hours)
Page 43

OPERATE
OPEN/CLOSE
PLAY
STILL/PAUSE
STOPSKIP
FWD
STANDBY
REV
PLAY
SKIP ( REV)
SKIP (FWD )
STILL/PAUSE
VIDEO CD and Audio CD Playback
VIDEO
VIDEO
C D
C D
Fast Forward/Fast Reverse
C D
C D
VIDEO
VIDEO
C D
C D
C D
C D
1 Press FWD
è
or È REV when a disc is playing.
• The disc begins fast scan at ×2 speed.
The speed of fast scan
X2
VCD
Fast scan image appears here.
(No image is shown for Audio CDs.)
• Two speeds are available. Each time FWDè or È REV is
pressed, the speed of fast scan changes in the following
sequence:
×2 ×8
• You can also operate this function by holding down SKIPà
(FWDè) or ÀSKIP (È REV) on the Player for two or more
seconds.
2 Press ûPLAY when you reach the desired point.
VIDEO
VIDEO
C D
C D
Slow-Motion Play
1 Press SLOW in the play mode or still mode.
• Three speeds are available for VIDEO CDs*.
SLOW
is pressed, the speed of slow-motion playback
changes in the following sequence:
×1/2 ×1/8 ×1/16
* On VIDEO CDs, the reverse slow-motion playback
(
SLOW) is disabled.
Each time
OPERATE
VIRTUAL
FUNCTION
CONTROL
TITLE
RETURN
ON
SCREEN
SETUP
DISPLAY DIMMER
ZOOM
SUBTITLE ANGLE
A B REPEAT
PROGRAM
MC
REV FWD
PLAY
RESUME
SLOW
SKIP SKIP
STILL
STOP
F.ADV SLOW
OPEN/
CLOSE
AUDIO
MENU
ENTER
REPEAT
DIRECTCLEAR MEMORY
BASIC OPERATIONS
PAUSE
2 Press û PLAY to return to the normal playback or press
â STILL/PAUSE to return to the still picture mode.
• On some discs, the fast scan function is disabled.
• Audio is not played back during fast scan (Audio CDs).
• The current track number and playback time are not shown on the
screen for VIDEO CDs with PBC recorded (most version 2.0 discs).
• On some discs, the slow-motion playback functions are disabled.
• The slow-motion playback is disabled for Audio CDs.
Web-site:www.sharp.co.uk/support Help line:0990 274277 (office hours)
DVD VIDEO PLAYER
41
GB
Page 44

VIDEO CD and Audio CD Playback
OPERATE
OPEN/CLOSE
PLAY
STILL/PAUSE
STOPSKIP
FWD
STANDBY
REV
PLAY
SKIP ( REV)
SKIP (FWD )
STILL/PAUSE
VIDEO
VIDEO
C D
C D
C D
C D
VIDEO
C D
C D
C D
C D
VIDEO
Still/Pause
1
Press â STILL/PAUSE during playback.
2 If you press ûPLAY while paused (STILL/PAUSE), normal
playback resumes.
VIDEO
VIDEO
C D
C D
Frame Advance
1
Press F.ADV during playback.
• The playback is paused (STILL/PAUSE).
• The disc goes forward by one frame each time F.ADV
pressed.
• The reverse frame advance playback (
F.ADV) is disabled
on VIDEO CDs.
2 Press û PLAY to return to the normal playback.
is
OPERATE
VIRTUAL
FUNCTION
CONTROL
TITLE
RETURN
ON
SCREEN
SETUP
DISPLAY DIMMER
ZOOM
SUBTITLE ANGLE
OPEN/
CLOSE
AUDIO
MENU
ENTER
VIDEO
VIDEO
C D
C D
C D
C D
Skip (Forward/Reverse)
While you are playing a disc, this function jumps to the beginning of
BASIC OPERATIONS
the next track (Forward) or the current track (Reverse) and automatically starts playing that track.
1 While a disc is playing, press SKIPà or
• Playback skips forwards one track for each time SKIPà is
pressed. When the last track is reached, playback returns to
the start of the disc.
• If you press ÀSKIP and playback begins, and you then
press ÀSKIP again within 3 seconds, playback returns to
the beginning of the previous track.
• The frame advance playback functions are disabled for Audio CDs.
• On some discs, the skip functions are disabled.
• The playback image is not displayed during the skip. It resumes
during playback following the skip.
• The current track number and playback time are not shown on the
screen for VIDEO CDs with PBC recorded (most version 2.0 discs).
When VIDEO CDs are played in PBC mode:
• Pressing SKIPà causes the disc to move to the NEXT position.
• Pressing ÀSKIP causes the disc to move to the PREVIOUS position.
À
SKIP.
A B REPEAT
PROGRAM
MC
REV FWD
PLAY
RESUME
SLOW
SKIP SKIP
DVD VIDEO PLAYER
STILL
STOP
F.ADV SLOW
REPEAT
DIRECTCLEAR MEMORY
PAUSE
GB
42
Web-site:www.sharp.co.uk/support Help line:0990 274277 (office hours)
Page 45

2/5
8/30
01:30:08
2
ENGLISH
1
1
5 1ch
ON
.
DVD Playback for Special Functions
DVD
DVD
DVD
DVD
About the FUNCTION CONTROL Screen
Using FUNCTION CONTROL, you can check at a glance and change the current settings of the following
items: SUBTITLE, ANGLE, AUDIO and VIRTUAL DOLBY.
FUNCTION CONTROL also allows you three ways of direct skips (title,chapter and time).
• While the disc is playing, press FUNCTION CONTROL to display the screen shown below.
•
Pressing ' or " changes the currently selected item whose background colour is orange.
• Numbers in refer to the pages where the setting procedures are described.
1 Direct title skip
2
Direct chapter skip
3
Direct time skip
4
Subtitle
5
Angle
6
Audio
7
VIRTUAL DOLBY
Currently selected item
11
1 Direct title skip
11
• The number of the title currently played back is
displayed.
• You can skip directly to the desired title.
22
2 Direct chapter skip
22
• The number of the chapter currently played back is
displayed.
• You can skip directly to the desired chapter.
33
3 Direct time skip
33
•
Elapsed time from the beginning of the disc is displayed.
• You can skip directly to the point from which you want
to start playback.
44
4 Subtitle setting
44
• The subtitle number and language currently selected
are displayed. (When a disc with only one subtitle is
played back, “xx” is displayed.)
• You can select the desired subtitle language.
44
44
44
45
Played back image
Operation Status indicater
BIT RATE indicates the
amount of data that is
being transferred to the
Player per second.
However, note that
picture quality is not
always in proportion to
the bit rate.
55
5 Angle setting
55
• The current angle is displayed. (When a disc with
only one angle is played back, “xx” is displayed.)
• You can select the desired angle.
66
6 Audio setting
66
•
The type of audio currently selected is displayed.
• You can select the desired type of audio.
77
7 VIRTUAL DOLBY setting
77
• This function provides rich surround sound by
downmixing Dolby Digital 5.1 channel and Dolby
Surround (Pro Logic) to 2-channel audio or TV.
• You can toggle the setting between “ON” and “OFF”,
and change the level.
• When “COMPRESSION” is “ON”, this function is
disabled, which is indicated by “xx”. To use the
VIRTUAL DOLBY function, set the “COMPRESSION”
to “OFF” (see page 30).
45
45
46
SPECIAL FUNCTIONS
•
• You can cancel the FUNCTION CONTROL mode by pressing ËSTOP, MENU, TITLE, FWDè, ÈREV, VIRTUAL,
• The setting screen is cleared automatically when appears a DVD screen that prompts you to change the scene by
In FUNCTION CONTROL mode, you can return to the previous setting screen by pressing RETURN or FUNCTION CONTROL.
ZOOM, SUBTITLE, ANGLE, AUDIO or DIRECT.
pressing ', ", \, or |.
Web-site:www.sharp.co.uk/support Help line:0990 274277 (office hours)
43
GB
Page 46

DVD
DVD Playback for Special Functions
DVD
Direct skip (title/chapter/time)
Use the following procedure to perform the Direct title skip, Direct
chapter skip, or Direct time skip.
1 Press FUNCTION CONTROL during playback.
• The FUNCTION CONTROL screen appears.
2/5
8/30
01:30:08
ENGLISH
2
1
5.1chON.
1
OPERATE
VIRTUAL
FUNCTION
CONTROL
TITLE
RETURN
ON
SCREEN
SETUP
DISPLAY DIMMER
ZOOM
SUBTITLE ANGLE
OPEN/
CLOSE
AUDIO
MENU
ENTER
REPEAT
A B REPEAT
2 Use ' or " to select and then press ENTER.
(Example) Direct title skip
2/5
8/30
01:30:08
ENGLISH
2
1
5.1ch
1
.
ON
3 Use number buttons (0 to 9) to input the title number to which
you want to skip.
• You can also use ' or " to input the title number.
• When you specify the time for the direct time skip, use \ or |
to move the highlighting to the next or previous digit .
(Example) Entering title 5
5/5
8/30
01:30:08
ENGLISH
2
1
5.1ch
1
.
ON
SPECIAL FUNCTIONS
4 Press ENTER.
• The played back image changes to the beginning of the
specified title.
• You can exit the FUNCTION CONTROL screen by pressing
RETURN.
PROGRAM
DIRECTCLEAR MEMORY
MC
REV FWD
PLAY
RESUME
SLOW
SKIP SKIP
DVD VIDEO PLAYER
STILL
STOP
F.ADV SLOW
PAUSE
• The number of titles, chapters or times you can input depends on that
of the titles, chapters or times recorded on a disc you play.
• See page 48 for information about the direct skip functions using the
DIRECT button.
GB
44
Web-site:www.sharp.co.uk/support Help line:0990 274277 (office hours)
Page 47

DVD Playback for Special Functions
Subtitle/angle/audio setting
Use the following procedure to perform the Subtitle, Angle, or Audio
setting.
1 Press FUNCTION CONTROL during playback.
• The FUNCTION CONTROL screen appears.
2/5
8/30
01:30:08
ENGLISH
2
1
5.1ch
1
.
ON
2 Use ' or " to select and then press ENTER.
(Example) Subtitle setting
2/5
8/30
01:30:08
ENGLISH
2
1
5.1ch
1
.
ON
OPERATE
VIRTUAL
FUNCTION
CONTROL
TITLE
RETURN
ON
SCREEN
SETUP
DISPLAY DIMMER
ZOOM
SUBTITLE ANGLE
A B REPEAT
MC
REV FWD
PLAY
RESUME
STOP
OPEN/
CLOSE
AUDIO
MENU
ENTER
REPEAT
PROGRAM
DIRECTCLEAR MEMORY
PAUSE
STILL
DVD
DVD
3 Press ' or " to select the subtitle you want to use.
• You can set the subtitle setting to “OFF”.
• You can also toggle the setting between “ON” and “OFF” by
pressing \ or |.
(Example) Selecting “3 FRENCH”
2/5
8/30
01:30:08
3 FRENCH
1
5.1ch
1
.
ON
4 Press ENTER to confirm the setting.
• You can exit the FUNCTION CONTROL screen by pressing
RETURN.
• See page 56 about how to change the settings using the SUBTITLE
button, page 55 for the ANGLE button, and page 57 for the AUDIO
button.
F.ADV SLOW
SLOW
SKIP SKIP
DVD VIDEO PLAYER
SPECIAL FUNCTIONS
Web-site:www.sharp.co.uk/support Help line:0990 274277 (office hours)
45
GB
Page 48

DVD
DVD Playback for Special Functions
DVD
VIRTUAL DOLBY setting
Use the following procedure to change the setting between “ON”
and “OFF”, and the level for the VIRTUAL DOLBY setting.
1 Press FUNCTION CONTROL during playback.
• The FUNCTION CONTROL screen appears.
2/5
8/30
01:30:08
ENGLISH
2
1
5.1ch
1
.
ON
2 Use ' or " to select and then press ENTER.
(Example) VIRTUAL DOLBY setting
2/5
8/30
01:30:08
ENGLISH
2
1
5.1ch
1
.
ON
OPERATE
VIRTUAL
FUNCTION
CONTROL
TITLE
RETURN
ON
SCREEN
SETUP
DISPLAY DIMMER
ZOOM
SUBTITLE ANGLE
A B REPEAT
MC
REV FWD
PLAY
RESUME
STOP
OPEN/
CLOSE
AUDIO
MENU
ENTER
REPEAT
PROGRAM
DIRECTCLEAR MEMORY
PAUSE
STILL
3 Press ' or " to toggle VIRTUAL DOLBY between “ON” and
“OFF”.
4 While “ON” is selected, use \ or | to change the level setting.
2/5
8/30
01:30:08
ENGLISH
2
1
5.1ch
1
.
ON
5 Press ENTER to confirm the setting.
SPECIAL FUNCTIONS
• You can exit the FUNCTION CONTROL screen by pressing
RETURN.
• See page 58 about how to change the setting using the VIRTUAL
button.
F.ADV SLOW
SLOW
SKIP SKIP
DVD VIDEO PLAYER
GB
46
Web-site:www.sharp.co.uk/support Help line:0990 274277 (office hours)
Page 49

DVD
DVD
Direct Selection of Scenes
DVD Playback for Special Functions
DVD
DVD
Selecting Scenes by Title Number
1 Press TITLE to show the title screen.
(Example)
DISCOVERY EUROPE
1
DISCOVERY AFRICA
2
2 Use the number buttons (0 to 9) to enter the desired title, or ',
", | or \ to highlight the desired title.
3 When you press M (MEMORY), ENTER or û PLAY, the title
specified in step 2 starts playing.
Selecting Scenes from the Menu Screen
1
Press MENU to show the menu screen.
(Example)
T I T L E
12
C
MENU
tas
sihes
F
OPERATE
VIRTUAL
FUNCTION
CONTROL
TITLE
RETURN
ON
SCREEN
SETUP
DISPLAY DIMMER
ZOOM
SUBTITLE ANGLE
A B REPEAT
MC
REV FWD
PLAY
RESUME
STOP
F.ADV SLOW
SLOW
SKIP SKIP
OPEN/
CLOSE
AUDIO
MENU
ENTER
REPEAT
PROGRAM
DIRECTCLEAR MEMORY
PAUSE
STILL
gos
4
i
B
d
r
s
3
D
2 Use the number buttons (0 to 9) or ', ", | or \ to highlight the
desired title.
(Example) Title 2 selected.
T I T L E
1 2
C
3
D
gos
MENU
tas
sihes
F
4
i
B
d
r
s
3 When you press M (MEMORY), ENTER or û PLAY, title 2 starts
playing.
• These functions only operate on DVDs that have a title or menu
screen.
• Languages not provided on the disc are not displayed.
DVD VIDEO PLAYER
SPECIAL FUNCTIONS
Web-site:www.sharp.co.uk/support Help line:0990 274277 (office hours)
47
GB
Page 50

DVD
DVD Playback for Special Functions
DVD
Direct Skip Function
This function allows you to skip directly to the beginning of any title
or chapter.
• Direct Title Skip
1 While a disc is playing or is stopped, press DIRECT.
• The following screen appears when pressing DIRECT in stop
mode.
Maximum number
/5
2 Using the number buttons (0 to 9) or ', ", enter a title number.
(If you enter two or more digits, the last two digits are displayed.)
(Example) Entering title 3
3/5
3 Press ENTER to skip to the title you specified.
• If no button is pressed within 10 seconds, the specification
display disappears.
• Direct Chapter Skip
1 While a disc is playing, press DIRECT twice. (Press once for a
title and twice for a chapter.)
• This function is disabled in stop mode.
Maximum number
OPERATE
VIRTUAL
FUNCTION
CONTROL
TITLE
RETURN
ON
SCREEN
SETUP
DISPLAY DIMMER
ZOOM
SUBTITLE ANGLE
A B REPEAT
MC
REV FWD
PLAY
RESUME
STOP
F.ADV SLOW
SLOW
SKIP SKIP
DVD VIDEO PLAYER
OPEN/
CLOSE
AUDIO
MENU
ENTER
REPEAT
PROGRAM
DIRECTCLEAR MEMORY
PAUSE
STILL
3/5
––/30
01:30:00
2 Using the number buttons (0 to 9) or ', ", enter the desired
SPECIAL FUNCTIONS
chapter number. (If you enter three or more digits, the last three
digits are displayed.)
(Example) Entering chapter 15
3/5
15/30
01:30:00
3 Press ENTER to skip to the chapter you specified.
• If no button is pressed within 10 seconds, the specification
display disappears.
GB
48
Web-site:www.sharp.co.uk/support Help line:0990 274277 (office hours)
• The Direct Title Skip function does
not operate on discs on which no
titles are recorded.
• The Direct Chapter Skip function
cannot be used while a disc is
stopped.
Page 51

DVD Playback for Special Functions
• Direct Time Skip
Direct time skip lets you skip directly to a specific location on a disc.
When a disc is playing, make notes of the elapsed time at the
locations to which you later want to skip. Later you can skip directly
to a location by specifying its time.
1 While a disc is playing, press DIRECT three times. (Once for a
title, twice for a chapter and three times for a time.)
• This function is disabled in stop mode.
2 Using the number buttons (0 to 9) or ', ", enter the time.
• Use \ or | to move the highlighting to the next or previous
digit.
3/5
8/30
01:30:00
OPERATE
VIRTUAL
FUNCTION
CONTROL
TITLE
RETURN
ON
SCREEN
SETUP
DISPLAY DIMMER
ZOOM
SUBTITLE ANGLE
A B REPEAT
MC
REV FWD
PLAY
RESUME
STOP
OPEN/
CLOSE
AUDIO
MENU
ENTER
REPEAT
PROGRAM
DIRECTCLEAR MEMORY
PAUSE
STILL
DVD
DVD
3 Press ENTER to skip to the point you specified.
• If no button is pressed within 10 seconds, the specification
display disappears.
F.ADV SLOW
SLOW
SKIP SKIP
DVD VIDEO PLAYER
SPECIAL FUNCTIONS
Web-site:www.sharp.co.uk/support Help line:0990 274277 (office hours)
49
GB
Page 52

/9
PROGRAM
DVD
DVD
DVD Playback for Special Functions
DVD
DVD
DVD
Programmed Playback
The two types of programmed playback provided by this Player are
title programmed playback, chapter programmed playback.
Title Programmed Playback
1 Press PROGRAM while the disc is stopped.
• The “TITLE PROGRAM” screen appears.
TITLE PROGRAM
=TITLE
2 Use the number buttons (0 to 9) to enter the title numbers in
and then press M (MEMORY). (The highlight moves to the right
(next field).)
• If the entered title number does not exist on the disc, the
number is ignored when M (MEMORY) is pressed. Press
C (CLEAR) to clear.
(Example) Title 5 entered.
TITLE PROGRAM
5
=TITLE
TITLE PROGRAM
05
_
=TITLE
A zero (0) is automatically
inserted before the first digit.
3 Repeat step 2 for each of the titles that you want to play as part
of the programme.
• If you enter two or more digits, only the last two digits are
displayed.
• If you hold down C (CLEAR) for 2 seconds or longer while
you are entering numbers, all the entered numbers are
erased and the highlight returns to the initial (top left)
position.
• If you press C (CLEAR) while you are entering a title number,
the number entered reverts to
SPECIAL FUNCTIONS
• If you press C (CLEAR) when the Player is awaiting input
(cursor in
location.
– –
), the cursor highlight returns to the previous
– –
.
ON
OPERATE
SETUP
ZOOM
VIRTUAL
FUNCTION
SUBTITLE ANGLE
CONTROL
TITLE
RETURN
– –
OPEN/
SCREEN
CLOSE
DISPLAY DIMMER
AUDIO
MENU
ENTER
REPEAT
A B REPEAT
PROGRAM
DIRECTCLEAR MEMORY
MC
REV FWD
PLAY
RESUME
STOP
F.ADV SLOW
SLOW
SKIP SKIP
DVD VIDEO PLAYER
STILL
PAUSE
4 Press ûPLAY to begin playing the programmed titles. (Press
this button while the “TITLE PROGRAM” screen is displayed.)
• PROGRAM indicator lights on the front panel display.
5 Press
• On some discs, the programmed playback is disabled.
• Up to 20 titles can be programmed.
• To exit the “TITLE PROGRAM” screen, press RETURN or
GB
50
ËË
Ë STOP to stop programmed playback.
ËË
Web-site:www.sharp.co.uk/support Help line:0990 274277 (office hours)
ËË
Ë STOP.
ËË
Page 53

DVD
DVD
Chapter Programmed Playback
1
Press PROGRAM twice while the disc is stopped. (Press once
for a title and twice for a chapter.)
• The “CHAPTER PROGRAM” screen appears.
CHAPTER PROGRAM
=TITLE: =CHAPTER
DVD Playback for Special Functions
ON
OPERATE
VIRTUAL
FUNCTION
CONTROL
TITLE
SETUP
ZOOM
SUBTITLE ANGLE
OPEN/
SCREEN
CLOSE
DISPLAY DIMMER
AUDIO
MENU
DVD
DVD
2 First, use the number buttons (0 to 9) to specify the desired title
number and then press M (MEMORY).
3 Use the number buttons (0 to 9) to enter the chapter number in
– – –
and then press M (MEMORY). (The highlight moves to the
right (next field).)
• If the entered chapter number does not exist on the disc, the
number is ignored when M (MEMORY) is pressed. Press
C (CLEAR) to clear.
(Example) Chapter 35 entered.
A zero (0) or double-zero (00)
is automatically inserted
–
3 5
C
C
→
– –350
C
C
))((
before the first or second digit.
4 Repeat step 3 for each of the chapters that you want to play as
part of the programme.
• If you enter three or more digits, only the last three digits are
displayed.
• If you hold down C (CLEAR) for 2 seconds or longer while
you are entering numbers, all the entered numbers are
erased and the highlight returns to the initial (top left)
position.
• If you press C (CLEAR) while you are entering a chapter
number, the number entered reverts to
• If you press C (CLEAR) when the Player is awaiting input
(cursor in
– – –
), the cursor highlight returns to the previous
location.
– – –
.
RETURN
A B REPEAT
MC
REV FWD
PLAY
RESUME
STOP
F.ADV SLOW
SLOW
SKIP SKIP
DVD VIDEO PLAYER
ENTER
REPEAT
PROGRAM
DIRECTCLEAR MEMORY
PAUSE
STILL
SPECIAL FUNCTIONS
5 Press ûPLAY to begin playing the programmed chapters.
(Press this button while the “CHAPTER PROGRAM” screen is
displayed.)
• PROGRAM indicator lights on the front panel display.
6 Press
• Up to 20 chapters can be programmed.
• To exit the “CHAPTER PROGRAM” screen, press RETURN or
ËË
Ë STOP to stop programmed playback.
ËË
ËË
Ë STOP.
ËË
Web-site:www.sharp.co.uk/support Help line:0990 274277 (office hours)
51
GB
Page 54

DVD Playback for Special Functions
DVD
DVD
Repeat Playback
DVD
DVD
Chapter Repeat
1 If you press REPEAT while a disc is playing, the current chapter
is played repeatedly.
DVD
Repeat indicator
Title Repeat
2 If you press REPEAT during chapter repeat playback, the
current title is played repeatedly.
• The front panel displays are the same as for chapter repeat
playback.
DVD
Repeat indicator
OPERATE
VIRTUAL
FUNCTION
CONTROL
TITLE
RETURN
ON
SCREEN
SETUP
DISPLAY DIMMER
ZOOM
SUBTITLE ANGLE
A B REPEAT
MC
REV FWD
PLAY
RESUME
STOP
F.ADV SLOW
SLOW
SKIP SKIP
OPEN/
CLOSE
AUDIO
MENU
ENTER
REPEAT
PROGRAM
DIRECTCLEAR MEMORY
PAUSE
STILL
Repeat Off
3 Press REPEAT during title repeat playback to quit the repeat
playback operation and resume normal playback.
• The TV screen and front panel displays are the same as for
normal playback.
Each time REPEAT is pressed, the repeat playback operation
SPECIAL FUNCTIONS
changes in the following sequence:
Chapter repeat
• Repeat playback is disabled on some discs.
• On discs without chapters, the Player repeats the current title.
GB
52
Web-site:www.sharp.co.uk/support Help line:0990 274277 (office hours)
Title repeat
Off
DVD VIDEO PLAYER
Page 55

DVD Playback for Special Functions
DVD
DVD
A-B Repeat
A-B repeat allows you to repeat specified section (from A to B) on a
disc.
1 While you are playing a disc, press A-B REPEAT when you
reach the start of the section to be repeated.
A
DVD
2 While the disc is playing the same title (same chapter), press
A-B REPEAT again when you reach the end of the section to
be repeated.
A
B
DVD
OPERATE
VIRTUAL
FUNCTION
CONTROL
TITLE
RETURN
ON
SCREEN
SETUP
DISPLAY DIMMER
ZOOM
SUBTITLE ANGLE
A B REPEAT
MC
REV FWD
PLAY
RESUME
STOP
OPEN/
CLOSE
AUDIO
MENU
ENTER
REPEAT
PROGRAM
DIRECTCLEAR MEMORY
PAUSE
STILL
DVD
DVD
• The A-B repeat begins from the point where you specified in
step 1.
• To cancel A-B repeat, press A-B REPEAT again during A-B
repeat playback or press Ë STOP, TITLE or MENU.
• A-B repeat can only be used within the same title.
(On some DVDs, A-B repeat is restricted to the same chapter.)
If the start and end of the section to be repeated are in different titles/
chapters, A-B repeat is cancelled.
• If the front panel display does not show the elapsed playback time
while a disc is playing, A-B repeat playback cannot be used for that
disc.
• The A-B repeat function does not operate in scenes where different
camera angles are recorded.
F.ADV SLOW
SLOW
SKIP SKIP
DVD VIDEO PLAYER
SPECIAL FUNCTIONS
Web-site:www.sharp.co.uk/support Help line:0990 274277 (office hours)
53
GB
Page 56

DVD
DVD Playback for Special Functions
DVD
DVD
DVD
Resume Function
This function enables you to resume the playback from the location
you specify.
1 Press RESUME at the desired point during playback.
• “RESUME” appears followed by “RESUME” on the screen.
• The Player stores the location at which RESUME is pressed.
• Each press of RESUME replaces the location stored with the
last press of RESUME with the new location.
OPERATE
VIRTUAL
FUNCTION
CONTROL
TITLE
ON
SCREEN
SETUP
DISPLAY DIMMER
ZOOM
SUBTITLE ANGLE
OPEN/
CLOSE
AUDIO
MENU
3/5
8/30
01:30:00
RESUME
DVD
RESUME
Displayed for a few seconds
after you press RESUME.
2 Press
ËË
Ë STOP.
ËË
3 Press RESUME.
• Playback resumes from the location which you stored in step 1.
• The location stored in step 1 is cleared after this step is
performed.
• The continued playback described here may not be possible on some
discs (such as discs that automatically start playing when the disc tray
closes).
When you turn off the Player’s power after pressing
step 2 and then you turn it on again and press RESUME,
playback resumes from the location which you stored in step 1.
This function is disabled on some discs.
ËË
Ë STOP in
ËË
RETURN
A B REPEAT
MC
REV FWD
PLAY
RESUME
STOP
F.ADV SLOW
SLOW
SKIP SKIP
DVD VIDEO PLAYER
ENTER
REPEAT
PROGRAM
DIRECTCLEAR MEMORY
PAUSE
STILL
SPECIAL FUNCTIONS
GB
54
Web-site:www.sharp.co.uk/support Help line:0990 274277 (office hours)
Page 57

MC
OPEN/
CLOSE
OPERATE
SETUP
ZOOM
ON
SCREEN
AUDIO
TITLE
MENU
VIRTUAL
FUNCTION
CONTROL
SUBTITLE ANGLE
RETURN
REV FWD
ENTER
REPEAT
A B REPEAT
PROGRAM
DIRECTCLEAR MEMORY
PAUSE
RESUME
SLOW
F.ADV SLOW
STILL
DVD VIDEO PLAYER
PLAY
STOP
DISPLAY DIMMER
SKIP SKIP
DVD Playback for Special Functions
DVD
DVD
Angle Selection
Some DVDs contain scenes which have been shot from a number of
different angles. For these discs, the same scene can be viewed
from each of these different angles. (The recorded angles differ
depending on the disc used.)
1 While you are playing a DVD with different angles recorded,
press ANGLE to view the number of the current angle.
• If only one angle is recorded,
1
Number changes to show the number of
the current angle. (The maximum number
stipulated by the manufacturers is 9.)
xx is displayed.
DVD
DVD
Lights when different angles are recorded for the
title currently playing.
2 Use ' or " (or ANGLE) to change the scene to the next angle
in those recorded.
• About two seconds later, playback continues from the new
• If no button is pressed within 10 seconds, playback continues
Sequence of angle shots
(Example)
angle you selected.
without changing the current angle.
1
98
98
2
98
• This function can only be used for discs on which scenes shot from
multiple angles have been recorded.
SPECIAL FUNCTIONS
3
98
Web-site:www.sharp.co.uk/support Help line:0990 274277 (office hours)
55
GB
Page 58

DVD
DVD Playback for Special Functions
DVD
DVD
DVD
Subtitle Selection
1 While a DVD is playing, press SUBTITLE to display the current
language setting, as shown in the example below.
• The number of languages recorded differs depending on the
disc.
• If no subtitles are recorded on the disc,
1
xx is displayed.
OPERATE
VIRTUAL
FUNCTION
CONTROL
TITLE
ON
SCREEN
SETUP
DISPLAY DIMMER
ZOOM
SUBTITLE ANGLE
OPEN/
CLOSE
AUDIO
MENU
Number of the subtitle language
currently playing (The maximum
number of subtitle languages stipulated
by the manufacturers is 32.)
2 Press ' or " (or SUBTITLE) to switch to the next language
recorded on the disc.
• You can toggle the setting between “ON” and “OFF” by
pressing \ or |.
• About two seconds later, playback continues with the new
subtitle you selected.
• If no button is pressed within 10 seconds, playback
continues without changing the current subtitle.
(Example)
1
• This function can only be used for discs on which subtitles have been
recorded in multiple languages.
• Some DVDs are marked “Forced Display”, indicating that the subtitling
cannot be suppressed. With such discs, the subtitles will be displayed
even when you select “ OFF” display. This does not indicate a fault
with your Player.
SPECIAL FUNCTIONS
2
3 4 5 OFF
RETURN
A B REPEAT
MC
REV FWD
PLAY
RESUME
STOP
F.ADV SLOW
SLOW
SKIP SKIP
DVD VIDEO PLAYER
ENTER
REPEAT
PROGRAM
DIRECTCLEAR MEMORY
PAUSE
STILL
GB
56
Web-site:www.sharp.co.uk/support Help line:0990 274277 (office hours)
Page 59

DVD Playback for Special Functions
DVD
DVD
Audio Selection
On some discs, the sound is recorded in two or more formats of
Dolby Digital (5ch or 5.1ch), DTS, MPEG Audio, Dolby Pro Logic and
Linear PCM. Use the procedure below to select the type of playback.
1 While a disc is playing, press AUDIO to show the current audio
format number.
1
.
5 1ch
Recorded audio format number changes
sequentially. (The maximum number of
audio formats stipulated by the
manufacturers is 8.)
2 While the audio format number is displayed, press ' or " (or
AUDIO) to switch to the next audio format recorded on the disc.
• If only one audio format is recorded, the number does not
change.
• About two seconds later, playback continues in the new audio
format.
• If no button is pressed within 10 seconds, playback continues
without changing the current audio format.
OPERATE
VIRTUAL
FUNCTION
CONTROL
TITLE
RETURN
ON
SCREEN
SETUP
DISPLAY DIMMER
ZOOM
SUBTITLE ANGLE
A B REPEAT
MC
REV FWD
PLAY
RESUME
STOP
F.ADV SLOW
SLOW
SKIP SKIP
OPEN/
CLOSE
AUDIO
MENU
ENTER
REPEAT
PROGRAM
DIRECTCLEAR MEMORY
PAUSE
STILL
DVD
DVD
DVD VIDEO PLAYER
Web-site:www.sharp.co.uk/support Help line:0990 274277 (office hours)
SPECIAL FUNCTIONS
GB
57
Page 60

DVD
DVD Playback for Special Functions
DVD
DVD
DVD
VIRTUAL DOLBY (QSURROUND) Selection
This function allows you to enjoy a “surround sound” effect when you
are using an analogue connection (using AUDIO OUT on the Player)
to 2-channel audio equipment (TV, etc.).
Preparation:
• When you use the VIRTUAL DOLBY (QSURROUND) function, set
the “COMPRESSION” setting in “AUDIO SETUP” to “OFF” (see
page 30).
Refer to the table below about the types of audio format with which
VIRTUAL DOLBY (QSURROUND) works.
Types of audio recorded on the disc
OPERATE
VIRTUAL
FUNCTION
CONTROL
TITLE
RETURN
ON
SCREEN
SETUP
DISPLAY DIMMER
ZOOM
SUBTITLE ANGLE
OPEN/
CLOSE
AUDIO
MENU
ENTER
REPEAT
A B REPEAT
Dolby
Digital
Dolby
Pro Logic
Dolby Digital
2ch/Linear
PCM
MPEG Audio
Ver. 2.0/
DTS
✕✕
1 While a disc is playing, press VIRTUAL to display the current
setting.
• Pressing VIRTUAL toggles the setting between “
“
OFF”.
• When VIRTUAL is on,
VIRTUAL lights on the front panel
display.
2 While the “ ON” is displayed, press \ or | .
• The level selection indicator that shows the current level
appears.
• If no button is pressed within 10 seconds, the level selection
indicator goes off.
3 Use \ or | to change the level.
Press \. Press |.
SPECIAL FUNCTIONS
ON
ON” and
PROGRAM
DIRECTCLEAR MEMORY
MC
REV FWD
PLAY
RESUME
SLOW
SKIP SKIP
DVD VIDEO PLAYER
STILL
STOP
F.ADV SLOW
PAUSE
• Pressing ENTER makes the level indicator go off.
• If no change is made within 10 seconds after the level is set,
the level indicator goes off.
• VIRTUAL DOLBY (QSURROUND) does not operate when you set the
“COMPRESSION” setting in “AUDIO SETUP” to “ON”.
• VIRTUAL DOLBY (QSURROUND) does not operate when you are
using a Digital connection.
• QSURROUNDTM is a trademark of QSound Labs, Inc.
GB
58
Web-site:www.sharp.co.uk/support Help line:0990 274277 (office hours)
Page 61

VIDEO
VIDEO CD and Audio CD Playback for Special Functions
VIDEO
VIDEO
C D
C D
C D
C D
VIDEO
C D
C D
Direct Selection of Scenes
C D
C D
Direct Skip Function
This function allows you to skip directly to the beginning of any track
while a disc is playing or stopped.
• Direct Track Skip
1 While a disc is playing or is stopped, enter the desired track
number using the number buttons (0 to 9). (If you enter two or
more digits, the last two digits are displayed.)
(Example) Entering track 2
2/9
Maximum number
2 Press ENTER to skip to the point you specified.
• If no button is pressed within 10 seconds, the specification
display disappears.
OPERATE
VIRTUAL
FUNCTION
CONTROL
TITLE
RETURN
ON
SCREEN
SETUP
DISPLAY DIMMER
ZOOM
SUBTITLE ANGLE
A B REPEAT
MC
REV FWD
PLAY
RESUME
STOP
F.ADV SLOW
SLOW
SKIP SKIP
OPEN/
CLOSE
AUDIO
MENU
ENTER
REPEAT
PROGRAM
DIRECTCLEAR MEMORY
PAUSE
STILL
• The direct time skip function does not operate on disc on which no
times are recorded.
• The direct track function does not operate during PBC playback of a
VIDEO CD. Use the function while disc playback is stopped.
Web-site:www.sharp.co.uk/support Help line:0990 274277 (office hours)
DVD VIDEO PLAYER
SPECIAL FUNCTIONS
GB
59
Page 62

VIDEO CD and Audio CD Playback for Special Functions
C D
C D
VIDEO
VIDEO
C D
C D
VIDEO
VIDEO
C D
C D
C D
C D
Programmed Playback
This function provides track programmed playback for VIDEO CDs/
Audio CDs.
Track Programmed Playback
1
Press PROGRAM while the disc is stopped.
• The “TRACK PROGRAM” screen appears.
TRACK PROGRAM
=TRACK
2 Use the number buttons (0 to 9) to enter the track number in
and then press M (MEMORY). (The highlight moves to the right
(next field).)
• If the entered track number does not exist on the disc, the
number is ignored when M (MEMORY) is pressed. Press
C (CLEAR) to clear.
(Example) Track 7 entered.
A zero (0) is automatically
7
T
T
→
– –07
T
T
))((
inserted before the first digit.
3 Repeat step 2 for each of the tracks that you want to play as part
of the programme.
• If you enter two or more digits, only the last two digits are
displayed.
• Up to 20 tracks can be programmed.
• If you hold down C (CLEAR) for 2 seconds or longer while
you are entering numbers, all the entered numbers are
erased and the highlight returns to the initial (top left)
position.
• If you press C (CLEAR) while you are entering a track number,
the number entered reverts to
SPECIAL FUNCTIONS
• If you press C (CLEAR) when the Player is awaiting input
(cursor in
location.
• To exit the “TRACK PROGRAM” screen, press RETURN or
Ë STOP.
– –
), the cursor highlight returns to the previous
– –
.
ON
OPERATE
VIRTUAL
FUNCTION
CONTROL
TITLE
RETURN
SETUP
ZOOM
SUBTITLE ANGLE
OPEN/
SCREEN
CLOSE
DISPLAY DIMMER
AUDIO
MENU
ENTER
REPEAT
A B REPEAT
PROGRAM
DIRECTCLEAR MEMORY
MC
– –
REV FWD
PLAY
RESUME
SLOW
SKIP SKIP
DVD VIDEO PLAYER
STILL
STOP
F.ADV SLOW
PAUSE
4 Press ûPLAY to begin playing the programmed tracks. (Press
this button while the “TRACK PROGRAM” screen is displayed.)
• PROGRAM indicator lights on the front panel display.
ËË
Ë STOP to stop programmed playback.
ËË
Web-site:www.sharp.co.uk/support Help line:0990 274277 (office hours)
GB
5 Press
60
Page 63

VIDEO CD and Audio CD Playback for Special Functions
VIDEO
VIDEO
C D
C D
C D
C D
Repeat Playback
A-B Repeat
A-B repeat allows you to repeat specified section (from A to B) on a
disc.
1 While you are playing a disc, press A-B REPEAT when you
reach the start of the section to be repeated.
A
VCD
2 While the disc is playing the same track, press A-B REPEAT
again when you reach the end of the section to be repeated.
A
B
VCD
VIDEO
VIDEO
C D
C D
OPERATE
VIRTUAL
FUNCTION
CONTROL
TITLE
RETURN
ON
SCREEN
SETUP
DISPLAY DIMMER
ZOOM
SUBTITLE ANGLE
A B REPEAT
MC
REV FWD
PLAY
RESUME
STOP
OPEN/
CLOSE
AUDIO
MENU
ENTER
REPEAT
PROGRAM
DIRECTCLEAR MEMORY
PAUSE
STILL
C D
C D
• The A-B repeat begins from the point where you specified in
step 1.
• To cancel A-B repeat, press A-B REPEAT again during A-B
repeat playback or press Ë STOP or TITLE.
• A-B repeat can only be used within the same track.
If the start and end of the section to be repeated are in different
tracks, A-B repeat is cancelled.
• If the front panel display does not show the elapsed playback time
while a disc is playing, A-B repeat playback cannot be used for that
disc.
F.ADV SLOW
SLOW
SKIP SKIP
DVD VIDEO PLAYER
SPECIAL FUNCTIONS
Web-site:www.sharp.co.uk/support Help line:0990 274277 (office hours)
61
GB
Page 64

VIDEO CD and Audio CD Playback for Special Functions
C D
C D
VIDEO
VIDEO
C D
C D
VIDEO
VIDEO
C D
C D
C D
C D
Disc Repeat / Track Repeat
1 While a disc is playing, press REPEAT.
• The disc currently playing is played repeatedly.
VCD
OPERATE
VIRTUAL
FUNCTION
CONTROL
TITLE
ON
SCREEN
SETUP
DISPLAY DIMMER
ZOOM
SUBTITLE ANGLE
OPEN/
CLOSE
AUDIO
MENU
Each time REPEAT is pressed, the repeat playback
operation changes in the following sequence:
Track repeat
• The disc repeat function cannot be used on VIDEO CDs with PBC
mode playback (most version 2.0 discs).
Disc repeat
Off
• Track repeat cannot be used on some VIDEO CDs or Audio CDs.
Use the Programmed Playback function instead. (See page 60.)
RETURN
A B REPEAT
MC
REV FWD
PLAY
RESUME
STOP
F.ADV SLOW
SLOW
SKIP SKIP
DVD VIDEO PLAYER
ENTER
REPEAT
PROGRAM
DIRECTCLEAR MEMORY
PAUSE
STILL
SPECIAL FUNCTIONS
GB
62
Web-site:www.sharp.co.uk/support Help line:0990 274277 (office hours)
Page 65

VIDEO
VIDEO
C D
C D
C D
C D
Audio Selection
VIDEO CD and Audio CD Playback for Special Functions
VIDEO
VIDEO
C D
C D
C D
C D
Some VIDEO CDs and Audio CDs are recorded using two separate
channels named “L” (left) and “R” (right). The following are two
examples of how two-channel audio is used.
• Example 1: English on the L-channel and French or some other
language on the R-channel.
• Example 2: The left side of an orchestra on the L-channel and the
right side on the R-channel.
Your Player lets you select one of three audio playback types when
playing such a disc: L-channel only, R-channel only, L+R (both)
channels.
1 While a disc is playing, press AUDIO to show the current
playback type.
2 Press ' or " (or AUDIO) to change the type of Audio playback.
• The Audio playback changes as follows:
L+R L R
If no button is pressed within 10
seconds, the indicator goes off.
L+R
OPERATE
VIRTUAL
FUNCTION
CONTROL
TITLE
RETURN
ON
SCREEN
SETUP
DISPLAY DIMMER
ZOOM
SUBTITLE ANGLE
A B REPEAT
MC
REV FWD
PLAY
RESUME
STOP
F.ADV SLOW
SLOW
SKIP SKIP
OPEN/
CLOSE
AUDIO
MENU
ENTER
REPEAT
PROGRAM
DIRECTCLEAR MEMORY
PAUSE
STILL
• This function can only be used for discs on which the sound has been
recorded in multiple formats.
• To play back VIDEO CDs recorded with DTS format, audio mode
should be set to “L+R”. The Digital Out signal cannot be output
correctly if audio mode is set to “L” or “R”.
Web-site:www.sharp.co.uk/support Help line:0990 274277 (office hours)
DVD VIDEO PLAYER
SPECIAL FUNCTIONS
GB
63
Page 66

Language Code List for Disc Language
Code Language Name
AA Afar
AB Abkhazian
AF Afrikaans
AM Ameharic
AR Arabic
AS Assamese
AY Aymara
AZ Azerbaijani
BA Bashkir
BE Byelorussian
BG Bulgarian
BH Bihari
BI Bislama
BN Bengali;
Bangla
BO Tibetan
BR Breton
CA Catalan
CO Corsican
CS Czech
CY Welsh
DA Danish
DE German
DZ Bhutani
EL Greek
EN English
EO Esperanto
ES Spanish
ET Estonian
EU Basque
FA Persian
FI Finnish
FJ Fiji
FO Faroese
OTHER INFORMATION
FR French
Code Language Name
FY Frisian
GA Irish
GB Scots Gaelic
GL Galician
GN Guarani
GU Gujarati
HA Hausa
HI Hindi
HR Croatian
HU Hungarian
HY Armenian
IA Interlingua
IE Interlingue
IK Inupiak
IN Indonesian
IS Icelandic
IT Italian
IW Hebrew
JA Japanese
JI Yiddish
JW Javanese
KA Georgian
KK Kazakh
KL Greenlandic
KM Cambodian
KN Kannada
KO Korean
KS Kashmiri
KU Kurdish
KY Kirghiz
LA Latin
LN Lingala
LO Laothian
LT Lithuanian
LV Latvian, Lettish
Code Language Name
MG Malagasy
MI Maori
MK Macedonian
ML Malayalam
MN Mongolian
MO Moldavian
MR Marathi
MS Malay
MT Maltese
MY Burmese
NA Nauru
NE Nepali
NL Dutch
NO Norwegian
OC Occitan
OM (Afan) Oromo
OR Oriya
PA Panjabi
PL Polish
PS Pashto, Pushto
PT Portuguese
QU Quechua
RM Rhaeto-
Romance
RN Kirundi
RO Romanian
RU Russian
RW Kinyarwanda
SA Sanskrit
SD Sindhi
SG Sangho
SH Serbo-
Croatian
SI Singhalese
SK Slovak
Code Language Name
SL Slovenian
SM Samoan
SN Shona
SO Somali
SQ Albanian
SR Serbian
SS Siswat
ST Sesotho
SU Sundanese
SV Swedish
SW Swahili
TA Tamil
TE Telugu
TG Tajik
TH Thai
TI Tigrinya
TK Turkmen
TL Tagalog
TN Setswana
TO Tonga
TR Turkish
TS Tsonga
TT Tatar
TW Twi
UK Ukrainian
UR Urdu
UZ Uzbek
VI Vietnamese
VO Volapük
WO Wolof
XH Xhosa
YO Yoruba
ZH Chinese
ZU Zulu
GB
64
Web-site:www.sharp.co.uk/support Help line:0990 274277 (office hours)
Page 67

Definition of Terms
Angle
Chapter
Number
Compression
(Dolby Digital
output level)
Dolby Digital
(5.1 channel)
Virtual Dolby
(QSURROUND)
DTS
DVD
Recorded onto some DVDs are scenes which have been simultaneously shot from a
number of different angles (the same scene is shot from the front, from the left side, from
the right side, etc,). With such discs, the ANGLE button can be used to view the scene
from different angles.
These numbers are recorded on DVDs. A title is subdivided into many sections, each of
which is numbered, and specific parts of video presentations can be searched quickly
using these numbers.
Setting that increases the average volume of Dolby Digital audio when playing a DVD.
A sound system developed by Dolby Laboratories, Inc. that gives movie theatre
ambience to audio output when the Player is connected to a Dolby Digital 5.1 channel
processor or amplifier.
Provides rich surround sound by downmixing Dolby Digital 5.1 channel and Dolby
Surround (Pro Logic) to 2-channel audio.
This is a digital sound system developed by Digital Theater Systems, Inc. for use in
cinemas. This system uses 6 audio channels and provides accurate sound field
positioning and realistic acoustics. (By connecting a DTS Digital Surround decoder, you
can also listen to DTS Digital Surround sound.)
This refers to a high-density optical disc on which high-quality pictures and sound have
been recorded by means of digital signals.
Letter Box
4:3
LB
Linear PCM
Sound
Pan Scan
4:3
PS
Pickup
Playback
Control (PBC)
Screen size that cuts off the top and bottom of the image to allow playing of Wide (16:9)
software on a connected 4:3 TV.
Linear PCM is a signal recording format used for Audio CDs.
Screen size that cuts off the sides of the image to allow playing of Wide (16:9) software
on a connected 4:3 TV.
Laser device that reads the data from a disc for playback.
This is recorded on a VIDEO CD (version 2.0). The scenes or information to be viewed (or
listened to) can be selected interactively with the TV monitor by looking at the menu shown
on the TV monitor.
OTHER INFORMATION
Web-site:www.sharp.co.uk/support Help line:0990 274277 (office hours)
65
GB
Page 68

Definition of Terms
;;;;;;;;;;;;;;;;;;;;;;;;;;;;;;;;;;;;;;;;;;;
;;;;;;;;;;;;;;;;;;;;;;;;;;;;;;;;;;;;;;;;;;;
;;;;;;;;;;;;;;;;;;;;;;;;;;;;;;;;;;;;;;;;;;;
;;;;;;;;;;;;;;;;;;;;;;;;;;;;;;;;;;;;;;;;;;;
;;;;;;;;;;;;;;;;;;;;;;;;;;;;;;;;;;;;;;;;;;;
;;;;;;;;;;;;;;;;;;;;;;;;;;;;;;;;;;;;;;;;;;;
;;;;;;;;;;;;;;;;;;;;;;;;;;;;;;;;;;;;;;;;;;;
;;;;;;;;;;;;;;;;;;;;;;;;;;;;;;;;;;;;;;;;;;;
;;;;;;;;;;;;;;;;;;;;;;;;;;;;;;;;;;;;;;;;;;;
;;;;;;;;;;;;;;;;;;;;;;;;;;;;;;;;;;;;;;;;;;;
;;;;;;;;;;;;;;;;;;;;;;;;;;;;;;;;;;;;;;;;;;;
;;;;;;;;;;;;;;;;;;;;;;;;;;;;;;;;;;;;;;;;;;;
;;;;;;;;;;;;;;;;;;;;;;;;;;;;;;;;;;;;;;;;;;;
;;;;;;;;;;;;;;;;;;;;;;;;;;;;;;;;;;;;;;;;;;;
;;;;;;;;;;;;;;;;;;;;;;;;;;;;;;;;;;;;;;;;;;;
;;;;;;;;;;;;;;;;;;;;;;;;;;;;;;;;;;;;;;;;;;;
;;;;;;;;;;;;;;;;;;;;;;;;;;;;;;;;;;;;;;;;;;;
;;;;;;;;;;;;;;;;;;;;;;;;;;;;;;;;;;;;;;;;;;;
;;;;;;;;;;;;;;;;;;;;;;;;;;;;;;;;;;;;;;;;;;;
;;;;;;;;;;;;;;;;;;;;;;;;;;;;;;;;;;;;;;;;;;;
;;;;;;;;;;;;;;;;;;;;;;;;;;;;;;;;;;;;;;;;;;;
;;;;;;;;;;;;;;;;;;;;;;;;;;;;;;;;;;;;;;;;;;;
;;;;;;;;;;;;;;;;;;;;;;;;;;;;;;;;;;;;;;;;;;;
;;;;;;;;;;;;;;;;;;;;;;;;;;;;;;;;;;;;;;;;;;;
;
;;
Region
Number
Number identifying a geographic region of compatibility for a DVD.
The list of the region number 2 countries
Common Names Names of Nations and Areas
Albania Republic of Albania
Andorra Principality of Andorra
Austria Republic of Austria
Bahrain State of Bahrain
Belgium Kingdom of Belgium
Bosnia and Bosnia and Herzegovina
Herzegovina
Bulgaria Republic of Bulgaria
Croatia Republic of Croatia
Cyprus Republic of Cyprus
Czech The Czech Republic
Denmark Kingdom of Denmark
Egypt Arab Republic of Egypt
Finland Republic of Finland
France French Republic
Germany Federal Republic of Germany
Greece Hellenic Republic
Hungary Republic of Hungary
Iceland Republic of Iceland
Iran Islamic Republic of Iran
Iraq Republic of Iraq
Ireland Ireland
Israel State of Israel
Italy Republic of Italy
Japan Japan
Jordan Hashemite Kingdom of Jordan
Kuwait State of Kuwait
Lebanon Republic of Lebanon
Lesotho Kingdom of Lesotho
Liechtenstein Principality of Liechtenstein
Luxembourg Grand Duchy of Luxembourg
Macedonia The Former Yugoslav Republic
of Macedonia
The world map for all region numbers
Common Names Names of Nations and Areas
Malta Republic of Malta
Monaco Principality of Monaco
Netherlands Kingdom of the Netherlands
Norway Kingdom of Norway
Oman Sultanate of Oman
Poland Republic of Poland
Portugal Portuguese Republic
Qatar State of Qatar
Romania Romania
San Marino Republic of San Marino
Saudi Arabia Kingdom of Saudi Arabia
Slovakia The Slovak Republic
Slovenia Republic of Slovenia
South Africa Republic of South Africa
Spain Spain
Swaziland Kingdom of Swaziland
Sweden Kingdom of Sweden
Switzerland Swiss Confederation
Syrian Arab Republic Syrian Arab Republic
Turkey Republic of Turkey
United Arab Emirates United Arab Emirates
United Kingdom United Kingdom of Great Britain and
Vatican City State State of the City of Vatican
Yemen Republic of Yemen
Yugoslavia Federal Republic of Yugoslavia
Channel Islands* Channel Islands
Faeroe Islands* Faeroe Islands
Gibraltar* Gibraltar
Greenland* Greenland
Isle of Man* Isle of Man
Svalbard and Jan Svalbard and Jan Mayen Islands
Mayen Islands*
Northern Ireland
*Represents area name
Subtitles
Time Number
OTHER INFORMATION
GB
66
1
5
2
1
6
2
3
5
4
2
These are the printed lines appearing at the bottom of the screen which translate or
transcribe the dialogue. They are recorded on DVDs.
This indicates the play time which has elapsed from the start of a disc or a title. It can
be used to find a specific scene quickly. (It may not work with some discs.)
4
Web-site:www.sharp.co.uk/support Help line:0990 274277 (office hours)
1
1
Page 69

Definition of Terms
Title Menu
Title Number
Track Number
VIDEO CD
(VCD)
This is a menu displayed by some DVDs for selection of chapters and subtitle set. The
title menu is also called a “top menu”.
These numbers are recorded on DVDs. When a disc contains two or more movies,
these movies are numbered as title 1, title 2, etc.
These numbers are assigned to the tracks which are recorded on VIDEO CDs and
Audio CDs. They enable specific tracks to be located quickly.
This contains recordings of pictures and sound whose quality is on a par with that of
videotape. This Player also supports VIDEO CDs with playback control (version 2.0).
Web-site:www.sharp.co.uk/support Help line:0990 274277 (office hours)
67
OTHER INFORMATION
GB
Page 70

Troubleshooting
The following conditions do not always denote trouble. Therefore, perform the checks described below
before calling for service. If the problem cannot be corrected by the use of this guide, remove the main
plugs from the wall socket, and contact the dealer or supplier from whom the unit was purchased in order to
obtain service. Where this is not possible please visit our web-site www.sharp.co.uk/support.
Customers without Internet access may telephone 0990 274277 during office hour.
Certain replacement parts and accessories may be obtained from our main parts distributor, who can be
contacted on the following numbers:
W
ILLOW VALE ELECTRONICS LTD. :
0121 766 5414
In the unlikely event of this equipment requiring repair during the guarantee period, you will need to provide
proof of the date of purchase to the repairing company. Please keep your invoice or receipt, which is
supplied at the time of purchase.
The following problems do not always denote a broken Player.
Perform the checks listed below before calling for service.
Problem
• No power
• The Player is switched on but does
not operate.
• The playback image does not
appear.
• No sound is produced.
• The Remote does not work.
• The sound is not Dolby Digital (5ch
or 5.1ch).
Suggested Solution
• Is the power lead connected properly?
• Is the power lead firmly plugged into the power socket?
• One of the safety mechanisms may be operating. In this event,
unplug the Player from the power socket briefly and then plug it in
again.
• Have you loaded a disc?
• Is the disc unplayable? (See pages 6 and 7.)
• Is there dew in the Player? (See page 5.)
• Are the video and audio leads connected correctly? (See pages 15
– 20.)
• Is the disc scratched? (See pages 6 and 70.)
• Is the disc dirty? (See pages 6 and 70.)
• Is the disc loaded upside down?
• Is the input selector on the TV set to “VIDEO” or “AV ”?
• Is the audio equipment switched on and are all the components
connected properly? (Refer to the operation manuals for your
audio equipment.)
• Are the batteries loaded correctly?
• Are the batteries flat?
• Is the signal emitter on the Remote pointing at the Player?
• Is the Remote too far from the Player, or is there any obstacle
between the Remote and the Player?
• Is the disc you are playing recorded in Dolby Digital (5ch or
5.1ch)?
• Did you use AUDIO to select Dolby Digital (5ch or 5.1ch)
sound?
(See page 57.)
• The image and sound are garbled.
This unit is equipped with a microprocessor. Its performance could be adversely affected by external electrical
noise or interference. If this should happen, unplug the Player and plug it in again after a few minutes.
OTHER INFORMATION
GB
68
Web-site:www.sharp.co.uk/support Help line:0990 274277 (office hours)
• Is the disc scratched? (See pages 6 and 70.)
• Are vibrations from the speakers affecting the Player?
Page 71

Specifications
Signal System NTSC/PAL
Video input Input jack: Phono/SCART
Video output Output jack: Phono/SCART
Output level: 1 Vp-p (75Ω)
S video output Y output level: 1 Vp-p (75Ω)
C output level: 0.3 Vp-p (75Ω)
Output jack: S connector
Audio output Output jack: Phono/SCART
Output level: 2 Vrms (1 kHz, 0 dB)
Digital audio output Optical digital output: Optical jack
Coaxial digital output: Phono
Video signal horizontal resolution 500 lines (DVD)
S/N ratio 60 dB
Audio signal frequency characteristics For DVD linear PCM playback:
4 Hz to 22 kHz (48 kHz sampling)
4 Hz to 44 kHz (96 kHz sampling)
CD playback: 4 Hz to 20 kHz (EIAJ)
S/N ratio CD: 115 dB, 1 kHz (EIAJ)
Dynamic range DVD linear PCM: 103 dB (EIAJ)
CD: 103 dB (EIAJ)
Total harmonic distortion ratio CD: 0.006% (EIAJ)
Pickup Wave length: 650 nm
Laser output: Max. 0.7 mW
Operating temperature 5°C to 40°C
Storage temperature –20°C to 55°C
Power supply 220 V to 240V AC, 50/60 Hz
Power consumption 15 W
Dimensions 430 mm × 90.5 mm × 252 mm (W × H × D) (including attachments)
Weight 2.7 kg
Specifications are subject to change without notice.
Weight and dimensions are approximate.
Digital Output (Linear PCM)
• The digital output format (optical or coaxial) used in this Player is linear PCM audio sampled at
44.1 kHz or 48 kHz. Linear PCM sound for DVD video discs sampled at 96 kHz cannot be output digitally.
Check the disc jacket for information on the audio sampling used.
OTHER INFORMATION
Web-site:www.sharp.co.uk/support Help line:0990 274277 (office hours)
69
GB
Page 72

Disc Handling and Maintenance
Handling Precautions
• Hold the disc by the edges so the surface will not be soiled with
fingerprints.
Fingerprints, dirt and scratches can cause skipping and distortion.
• Do not write on the label side with a ball-point pen or other writing
utensils.
• Do not use record cleaning sprays, benzine, thinner, static electricity
prevention liquids or any other solvent.
• Be careful not to drop or bend the disc.
• Do not install more than 1 disc on the disc tray.
• Do not try to close the disc tray when the disc is not installed
properly.
• Be sure to store the disc in its exclusive case when not in use.
Then store upright.
• Do not stick paper or adhesive labels to the disc.
(
)
A
(
)
B
If the Surface is Soiled (C)
Wipe gently with a soft, damp (water only) cloth.
When wiping discs, always move the cloth from the center hole
toward the outer edge.
(If you wipe the discs using a circular motion, circular scratches are
likely to occur, which will cause noise.)
If the playing surface of a disc is soiled or scratched, the Player
may decide that the disc is incompatible and eject the disc tray,
or it may fail to play the disc correctly. Wipe any soiling off the
playing surface with a soft cloth.
A
B
Disc tray
C
Disc
If the Disc is Brought from a Cold to a Warm
Environment, Dew May Form on the Disc
Wipe this dew off with a soft, dry, lint-free cloth before using the disc.
Improper Disc Storage
You can damage discs if you store them in the following places:
• Areas exposed to direct sunlight
• Humid or dusty areas
• Areas directly exposed to a heat outlet or heating appliance
Maintenance
• Be sure to turn the Player off and disconnect the AC power lead
before maintaining the unit.
• Wipe this unit with a dry soft cloth.
If the surfaces are extremely dirty, wipe clean with a cloth which
has been dipped in a weak soap-and-water solution and wrung
OTHER INFORMATION
out thoroughly and then wipe again with a dry cloth.
• Never use alcohol, benzine, thinner, cleaning fluid or other
chemicals. And do not use compressed air to remove dust.
GB
70
Web-site:www.sharp.co.uk/support Help line:0990 274277 (office hours)
Page 73

SHARP CORPORATION
Osaka, Japan
SHARP ELECTRONICS (U.K.) LTD.
Sharp House, Thorp Road, Newton Heath
Manchester M40 5BE
TINS-3748AJZZ
Printed in Malaysia
 Loading...