

Page 1
Operation Guide
for the MultiPresenter Stick
DS1-MP10RX series
(Compatible with Ver. 1.01)
To ensure safe use of the MultiPresenter Stick, be sure to read the included Important Information before using the stick.
1
Page 2
Introduction
We greatly appreciate your purchase of this MultiPresenter Stick.
This guide provides detailed explanations of the procedure for operating the MultiPresenter Stick. Before using the MultiPresenter Stick, be sure to read the included “Important Information”.
NOTE
The explanations in this guide are based on the functions of MultiPresenter Stick firmware version “1.01”. For this reason,
the functions may differ depending on the version of the firmware of the MultiPresenter Stick you are using.
The MultiPresenter Stick has a firmware version update function. The firmware version can be updated once the initial
settings for the MultiPresenter Stick are made with the current firmware version.
IMPORTANT
A commercially available wired network adapter (a product verified by NEC) must be purchased in order to connect the
MultiPresenter Stick to a wired LAN. For details, refer to the NEC website.
http://www.nec-display.com/global/support/solution/mp10rx.html
About trademarks
• MultiPresenter is a trademark or registered trademark of NEC Display Solutions, Ltd. in Japan and other countries.
• ThetermsHDMIandHDMIHigh-DenitionMultimediaInterface,andtheHDMILogoaretrademarksorregisteredtrade-
marksofHDMILicensingAdministrator,Inc.intheUnitedStatesandothercountries.
• Windows,InternetExplorerandMicrosoftEdgeareregisteredtrademarksortrademarksoftheMicrosoftCorporationof
theUnitedStates,intheUnitedStatesandothercountries.
• Google,GooglePlay,AndroidandChromeareregisteredtrademarksortrademarksofGoogleInc.
• OSXandSafariaretrademarksofAppleInc.,registeredintheUnitedStatesandothercountries.
• iOSisatrademarkorregisteredtrademarkofCiscointheUnitedStatesandothercountries,andisusedunderlicense.
• AppStoreisaservicemarkofAppleInc.
• Wi-Fi,WPAandWPA2areregisteredtrademarksoftheWi-FiAlliance.
• Othernamesofcorporationsandproductsaretrademarksorregisteredtrademarksofsaidcorporations.
© NEC Display Solutions, Ltd. 2017 Ver.2 12/17
Reproduction and modification without the authorization of NEC Display Solutions is prohibited.
2
Page 3

Contents
1. What can be done with the MultiPresenter Stick ...................................................................................... 4
2. Packaged Items ................................................................................................................................................ 6
3. Names of parts ................................................................................................................................................. 7
4. Basic operation (from connecting to devices to displaying images) .................................................... 8
4-1. Connecting the MultiPresenter Stick to an image display device and turning on the power ..................................................8
4-2. Making the MultiPresenter Stick’s initial settings
4-2-1. Making the initial settings using a computer or smartphone ......................................................................................................................... 10
4-2-2.MakingtheinitialsettingsusingacommerciallyavailableUSBmouse ...................................................................................................... 12
4-3. Preparing the MultiPresenter application .................................................................................................................................................12
4-3-1.Usingacomputer(WindowsorOSX) ...................................................................................................................................................................... 12
4-3-2.UsinganAndroiddeviceoraniOSdevice ............................................................................................................................................................. 12
4-4. Connecting the MultiPresenter application to the MultiPresenter Stick and displaying images ......................................... 13
4-4-1.Usingacomputer(WindowsorOSX) ...................................................................................................................................................................... 13
4-4-2.UsinganAndroiddeviceoraniOSdevice ............................................................................................................................................................. 13
5. Web server functions .................................................................................................................................... 16
5-1. Connecting computers or smartphones to the MultiPresenter Stick’s web server ....................................................................16
5-1-1.Usingacomputer ............................................................................................................................................................................................................ 16
5-1-2.Usingasmartphone ....................................................................................................................................................................................................... 17
5-2.Usingawebbrowsertotransferlesbetweendevices(websharing) ..........................................................................................19
5-3. Controlling the number of panels or moderator, in the MultiPresenter Managed mode (MultiPresenter)
5-3-1. Switching from the Free mode to the Managed mode ..................................................................................................................................... 21
5-3-2. Displaying the MultiPresenter screen
5-3-3. Changing the number of panels on the screen
5-3-4. Changing the order of the images on the screen
5-4.UsingawebbrowsertochangetheMultiPresenterStick’ssettings(SETTINGStab) ................................................................ 24
5-4-1. Normal menu .................................................................................................................................................................................................................... 24
5-4-2. Moderator menu
5-4-3. Administrator menu
.............................................................................................................................................................................................................. 25
....................................................................................................................................................................................................... 26
...................................................................................................................................................................... 22
6. Setting the method of connecting to a wireless or wired LAN ............................................................. 28
6-1. Wireless LAN settings ........................................................................................................................................................................................28
6-1-1.INTELLIGENTCONNECTIONsettingitems .............................................................................................................................................................. 28
6-1-2.INFRASTRUCTUREsettingitems................................................................................................................................................................................. 29
6-1-3.SIMPLEACCESSPOINTsettingitems ........................................................................................................................................................................ 29
6-2. Wired LAN settings.............................................................................................................................................................................................30
7. Displaying the MultiPresenter Stick’s settings menu ............................................................................. 31
......................................................................................................................................9
...................... 21
.................................................................................................................................................... 22
................................................................................................................................................ 23
8. Appendix......................................................................................................................................................... 32
8-1. Troubleshooting .................................................................................................................................................................................................32
8-2. Frequently asked questions
8-3.Updatingthermwareversion .....................................................................................................................................................................36
................................................................................................................................................................................................................................ 38
Index
............................................................................................................................................................................34
ADDITIONAL EXPLANATIONS
Aboutthe“INTELLIGENTCONNECTION”and“INFRASTRUCTURE”functions ................................................................................. 9
Connecting to multiple MultiPresenter Sticks
UsingtheMultiPresenterapplicationtodisplaythewebserverscreen ........................................................................................18
About the MultiPresenter “Free mode” and “Managed mode”
.........................................................................................................................................15
...........................................................................................................21
3
Page 4
1. What can be done with the MultiPresenter Stick
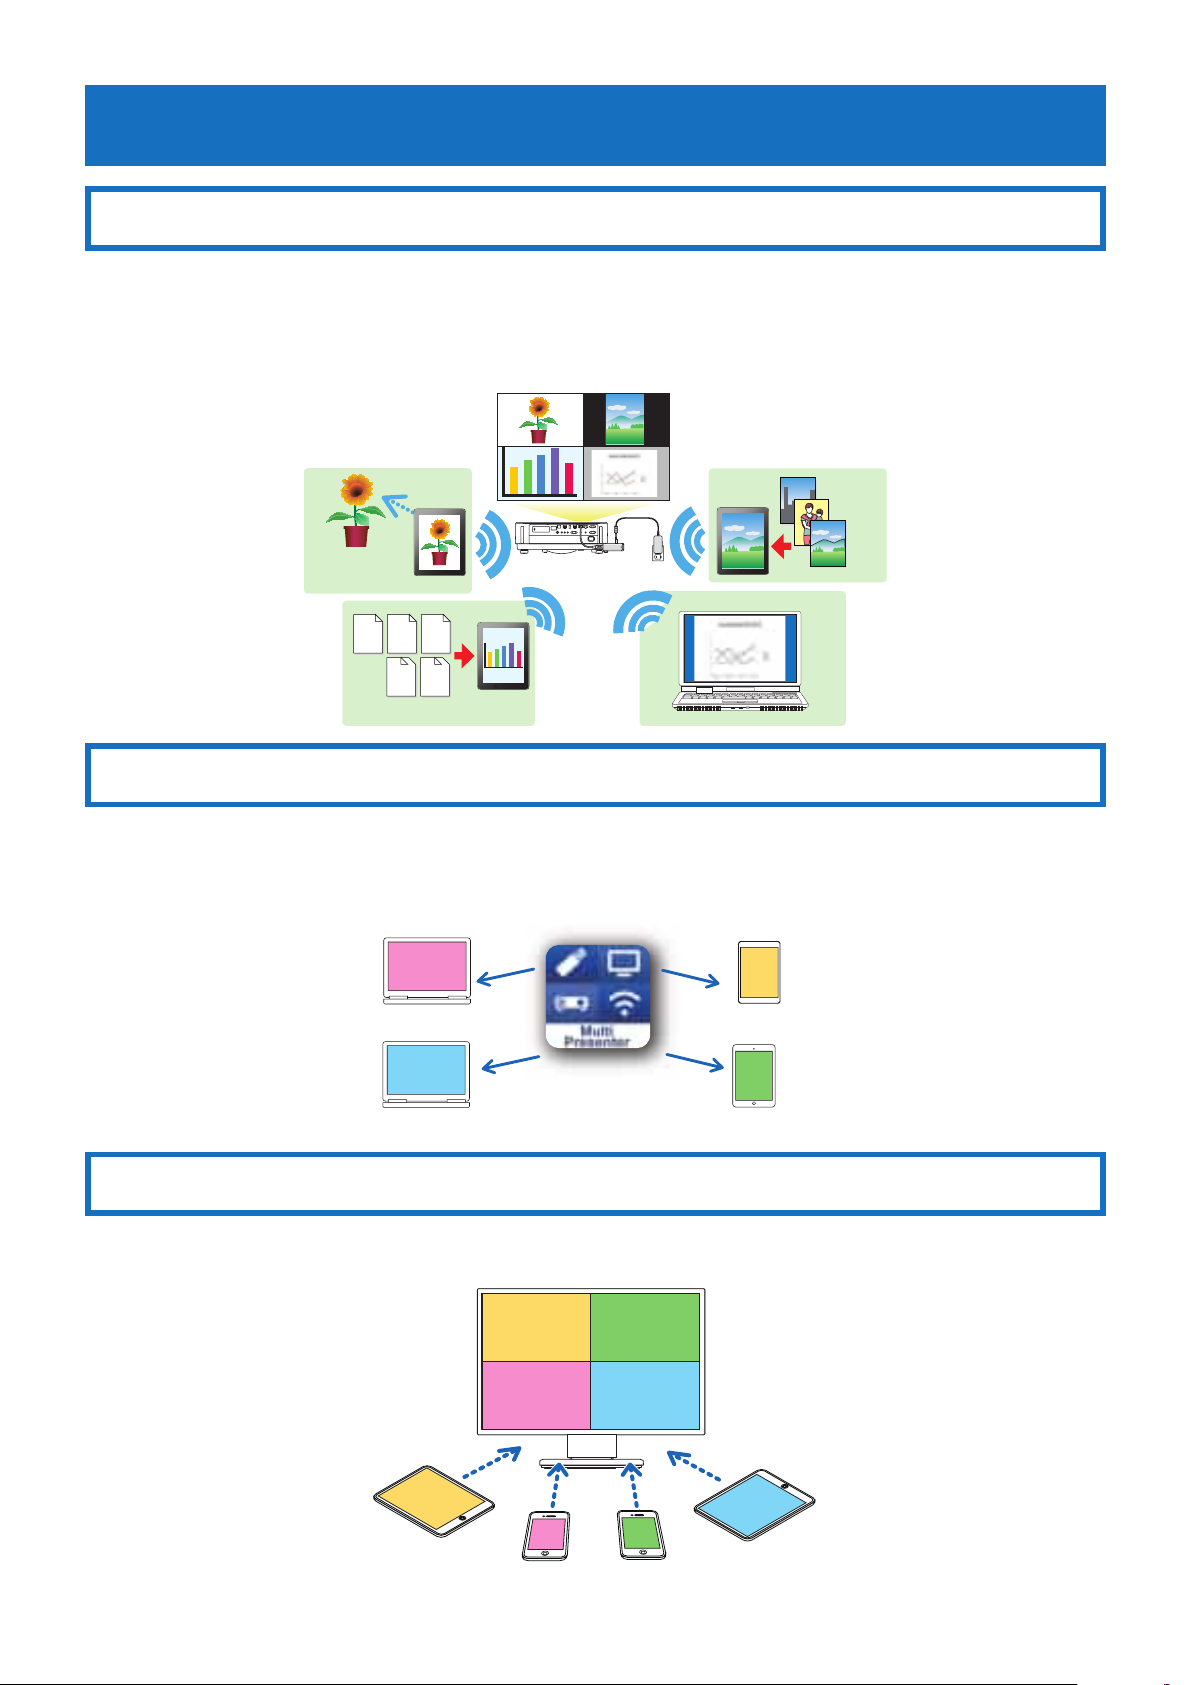
Wireless display of images
WhentheMultiPresenterStickisconnectedtotheHDMIinputportofanNECdisplayorprojector,imagesonacomputeror
smartphonecanbesenttotheMultiPresenterStickbywirelessLANanddisplayedonadisplayorprojectedfromaprojec-
tor. The MultiPresenter Stick includes a built-in wireless LAN function.
In addition, when a commercially available wired network adapter whose operation has been verified by NEC is used, the
MultiPresenter Stick can be connected to a wired LAN as well.
PDF JPEG PNG
BMP GIF
Exclusive application compatible with multiple OSs
The MultiPresenter application is used to send images from a computer or smartphone to the MultiPresenter Stick. The
MultiPresenterapplicationiscompatiblewithmultipleOSs(Windows,OSX,Android and iOS).Inaddition,variousapplications and their user’s manuals can be downloaded from the NEC website.
http://www.nec-display.com/dl/en/soft/multipresenter/index.html
AndroidWindows
OS X
iOS
Simultaneous display of the images of multiple devices
The images on multiple computers or smartphones can split and displayed simultaneously in up to 16 panels (4 vertical × 4
horizontalpanels).(NOTE:WhenusingtheINTELLIGENTCONNECTION function, up to 12 units can be connected.)
Display A
Display B
A
Display C
C
Display D
D
B
4
Page 5
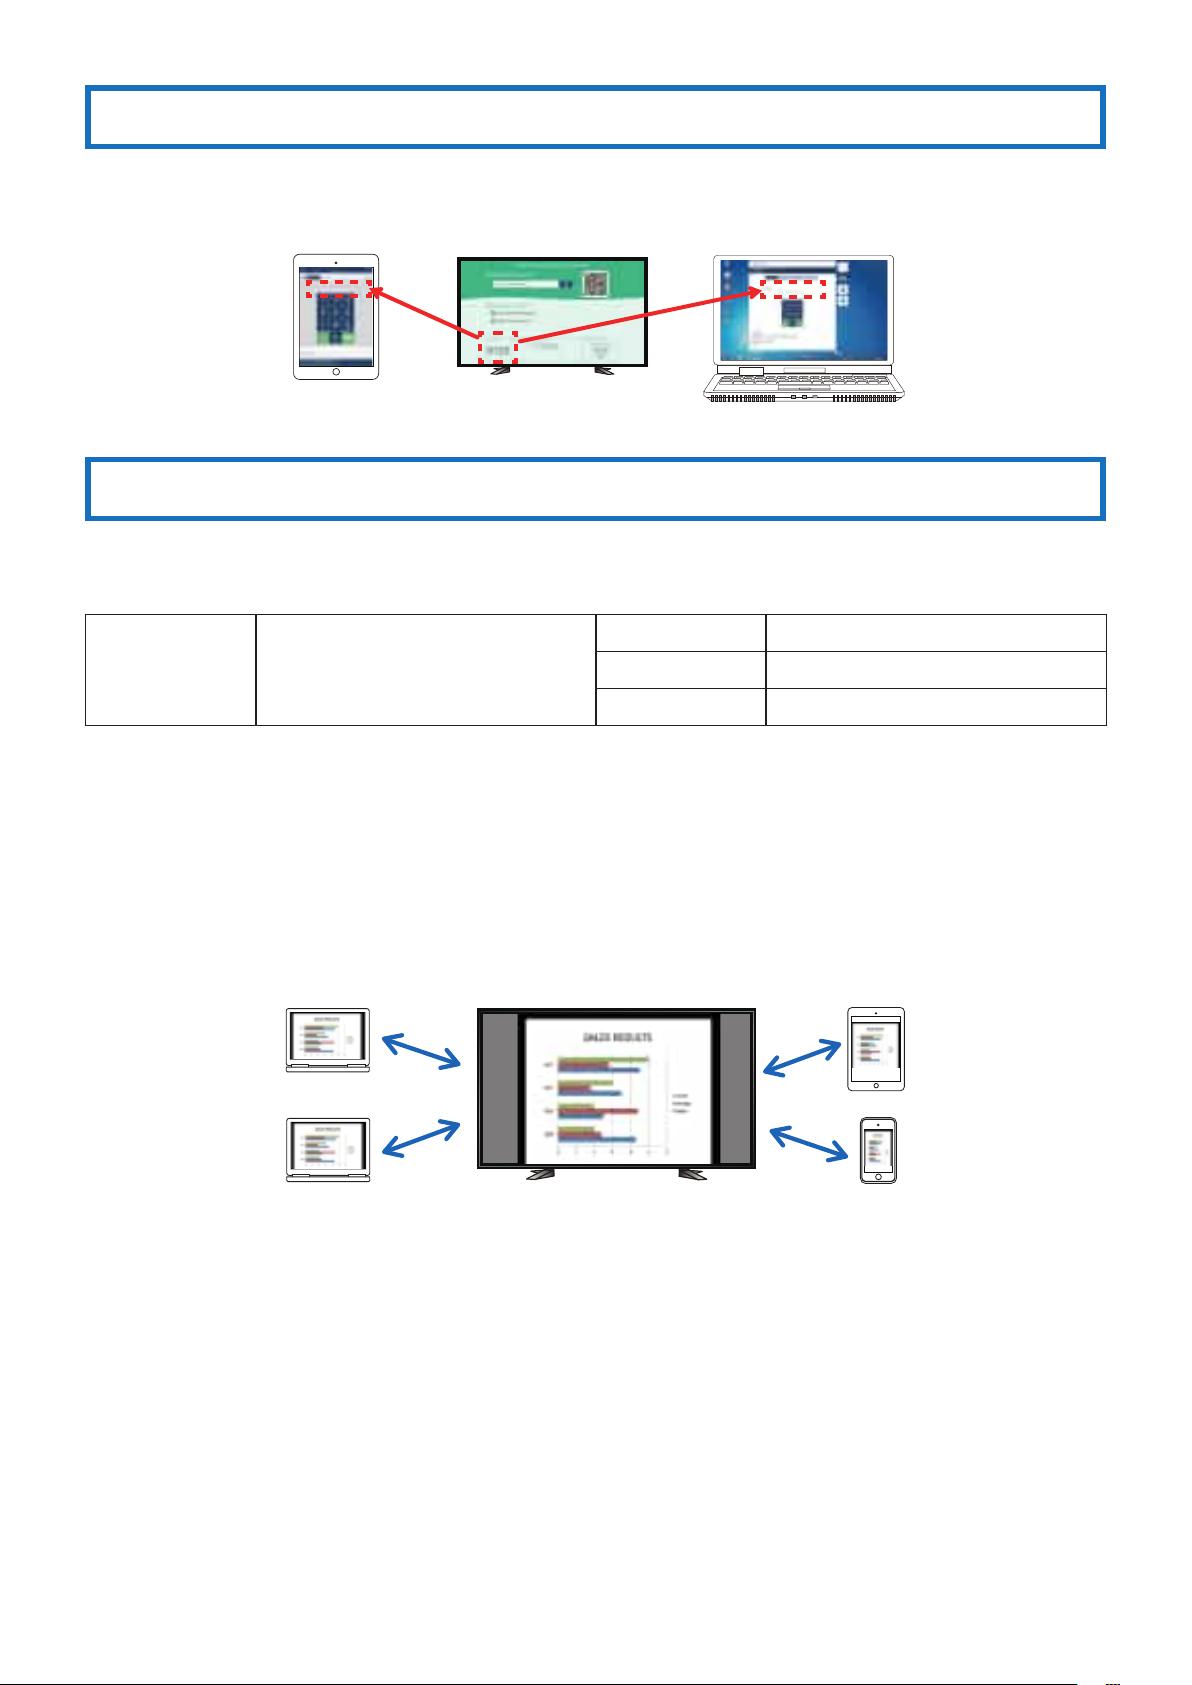
Simple connection by PIN code (4-digit number)
The unique INTELLIGENTCONNECTION function allows connection simply by inputting a PIN code (4-digit number), eliminating the need for wireless LAN connection operations. Furthermore, in addition to the INTELLIGENTCONNECTION function, it is also possible to connect to existing networks (Infrastructure function).
Android / iOS
Windows / OS X
WEB server functions
You can use your device’s web browser to connect to the MultiPresenter Stick’s web server and use the three functions below, with no need to use special file sharing software.
The web server functions are supported by the web browsers shown below.
ForOSX • Safari 6 or later
ForiOS • LatestversionofSafari
For Android
• LatestversionofGoogleChrome
For Windows
• Internet Explorer 11
• LatestversionofMicrosoft Edge
• LatestversionofGoogleChrome
(1) Web sharing
•
Screen sharing
The pictures displayed on the image display devices connected to the MultiPresenter Stick can be displayed and shared on
the web browser screens of the different participant’s devices.
•
File sharing
Files on computers or smartphones can be uploaded to the web server and files on the web server can be downloaded and
stored on computers or smartphones. The files that have been uploaded to the web server are automatically deleted when
the session is closed. (By default)
(2) MultiPresenter Managed mode
MultiPresenter has two modes: “Free” and “Managed”. The mode is set to “Free” upon shipment from the factory.
In the Free mode, when images are sent to the MultiPresenter Stick from multiple computers or smartphones, the images
received by the MultiPresenter Stick are automatically split into panels for display (up to 16 panels).
In the Managed mode, control of the images from the different devices is disabled, and the number of panels and order of
display of the images is controlled by the web browser.
(3) Settings
A web browser can be used to download the MultiPresenterapplication (forWindowsorOSX)fromthe MultiPresenter
Stick and to change the various MultiPresenter Stick settings.
5
Page 6
2. Packaged Items
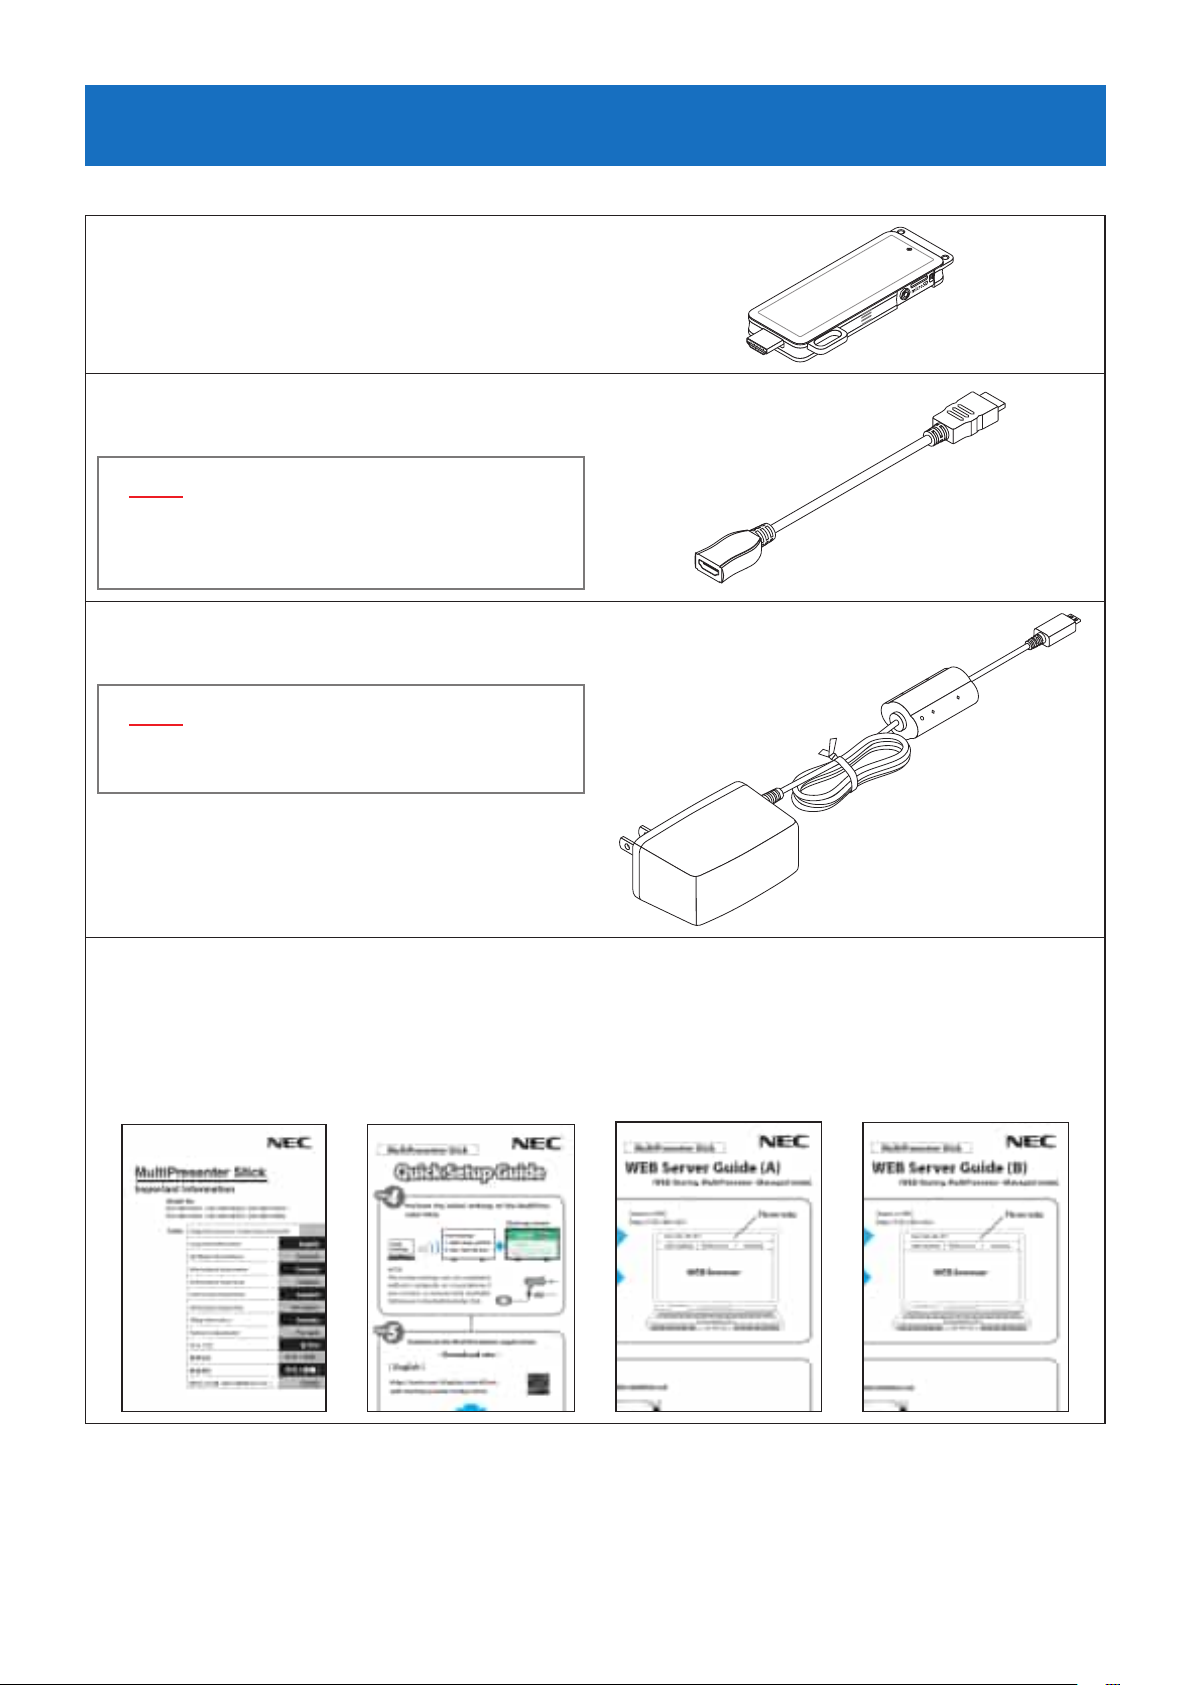
Check that all the packaged items are present.
MultiPresenter Stick 1 pc
HDMIextensioncable 1pc
NOTE
The packaged HDMIextensioncableis exclusiveuse
for the MultiPresenter Stick. Do not use it able for other
products.
AC adapter 1 pc
NOTE
The AC adapter is exclusive use for the MultiPresenter
Stick. Do not use it able for other products.
Important Information 1 copy
QuickSetupGuide 1copy
WEBServerGuide(A) 1copy
WEBServerGuide(B) 1copy
6
Page 7
3. Names of parts
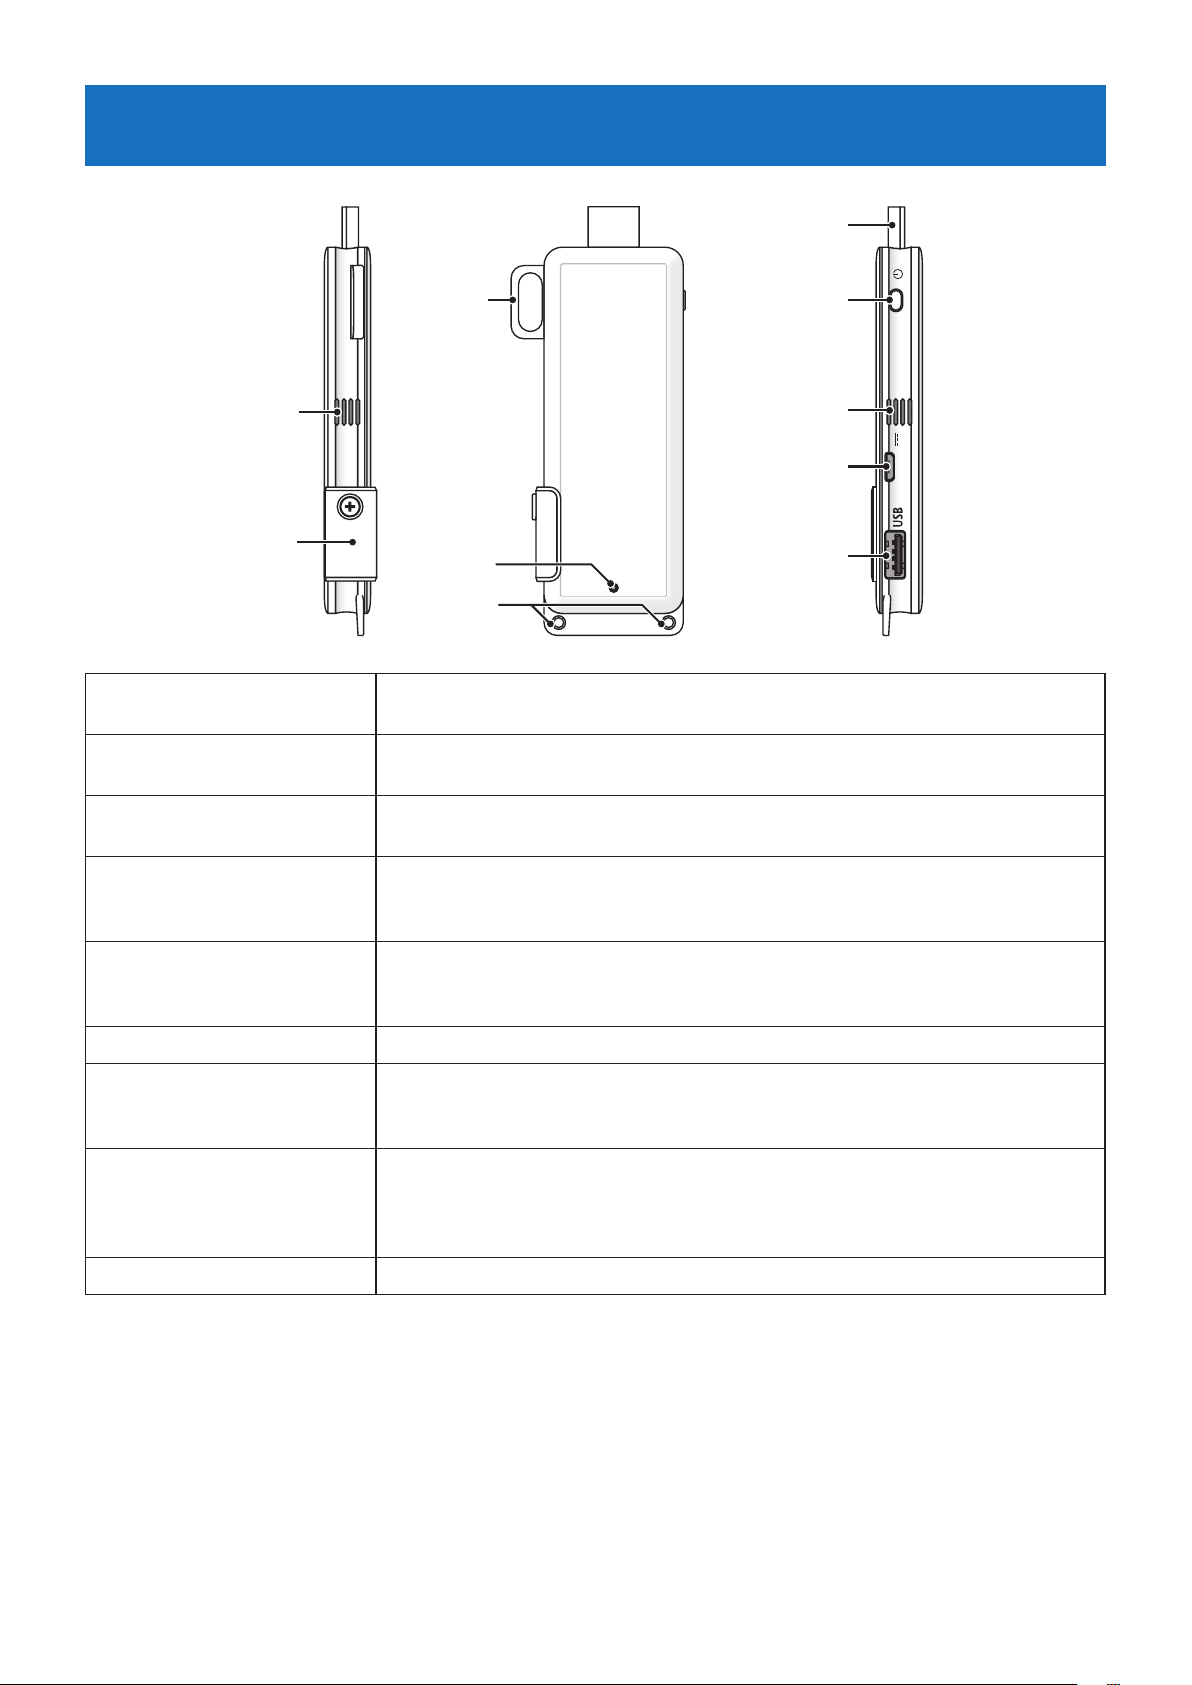
①
①
HDMIoutputport
②
Power button
③ ⑨
Exhaust vents
④
DCINjack
⑨
⑩
⑥
②
③
④
⑦
⑤
⑧
UsetheincludedHDMIextensioncabletoconnecttotheHDMIinputportonadisplay
orprojector.
This turns the power on and off.
To turn the power off, press and hold the button (for about 5 seconds).
These discharge the heat inside the frame.
NOTE:Donotblocktheexhaust vents.
Connect the included AC adapter here.
NOTE:WhenconnectingtheAC adapter to the MultiPresenter Stick, check the direc-
tionofthejack.
A USBmouse(commerciallyavailable)canbeconnectedheretomakethesettingsof
⑤
USBport
⑥
Security hanger Install a commercially available theft prevention wire here.
⑦
Power indicator
⑧
Strap holes
⑩
microSD card slot
the MultiPresenter Stick.
A wired network adapter (commercially available) can also be connected here.
This indicates the power status.
When power is on: Lit blue
Whenpoweriso:O
To fix the MultiPresenter Stick in place, put a commercially available strap, etc., through
these holes.
NOTE:Donotuseconductivewires.DoingsomaydecreasethewirelessLANsensitivity.
* This slot cannot be used. Do not remove the cover.
7
Page 8
4. Basic operation
(from connecting to devices to displaying images)
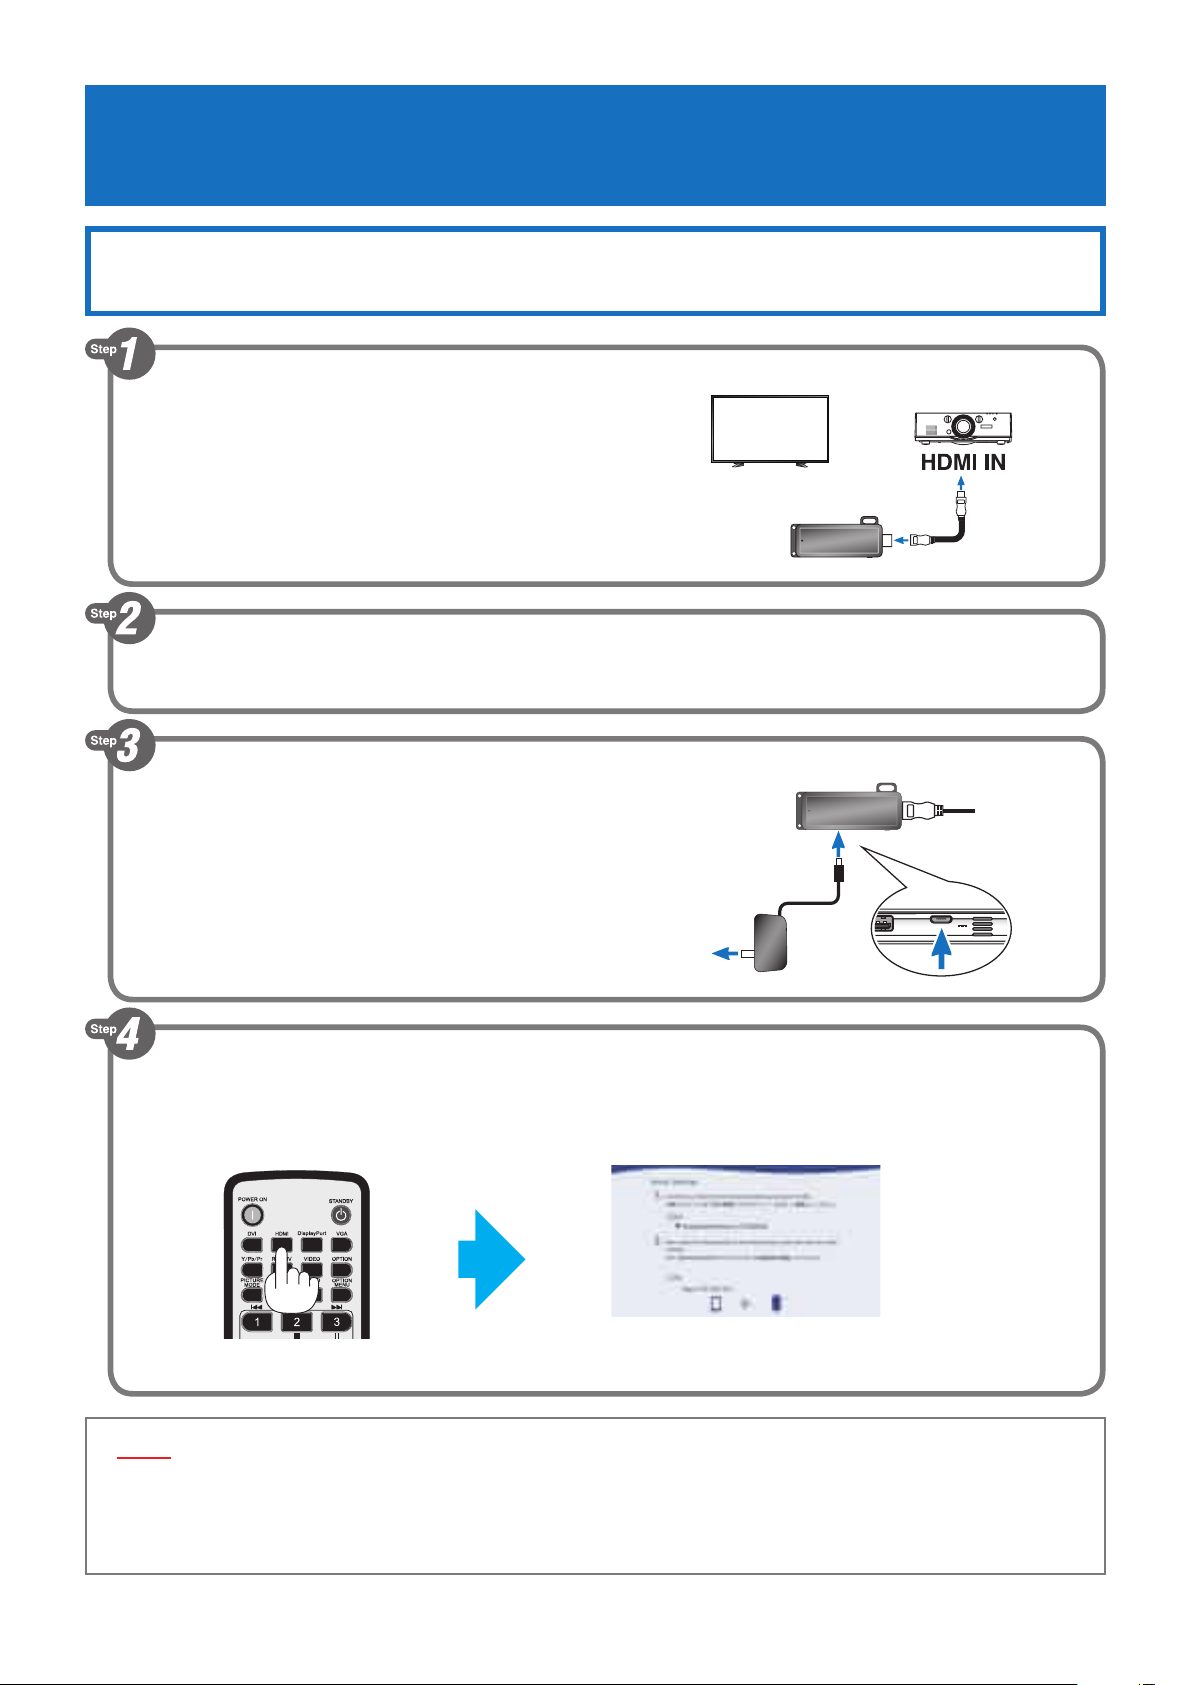
4-1. Connecting the MultiPresenter Stick to an image display device and turning
on the power
Connect the included HDMIextensioncable to the Multi-
.
1
Presenter Stick.
Connect the other end of the HDMIextensioncable to the
.
2
HDMIinputportonadisplayorprojector.
Turnonthepowerofthedisplayorprojector.
.
3
or
Connect the included AC adapter to the MultiPresenter
.
4
Stick.
Connect the AC adapter to a power outlet.
.
5
Pressthe“HDMI”buttonontheremotecontrolofthedisplayorprojector.
.
6
The MultiPresenter Stick’s initial settings screen is displayed.
• TheSSID and URLaredisplayedonthescreen.TheSSID indicates the identifier of the wireless LAN’s access
point.
This is the MultiPresenter Stick’s initial settings screen.
NOTE
• BesuretousetheincludedHDMIextensioncabletoconnecttheMultiPresenterSticktothedisplayorprojector.
• CheckthatthepowerofthedisplayorprojectorisowhenconnectingtheHDMIextensioncable.
• Donot connect ordisconnecttheHDMIextensioncable while the MultiPresenter Stick’s power is on. The images
may not be displayed properly.
8
Page 9
4-2. Making the MultiPresenter Stick’s initial settings
The MultiPresenter Stick’s initial settings can be made in two ways: by using a computer or smartphone and by connecting
a commercially available USBmouse.
When making the initial settings using a computer or smartphone, the wireless LAN connection can be made with either
the “INTELLIGENTCONNECTION” or the “INFRASTRUCTURE” function. If the initial settings were completed with “INTELLIGENT
CONNECTION” selected, the setting can be changed to “INFRASTRUCTURE” later.
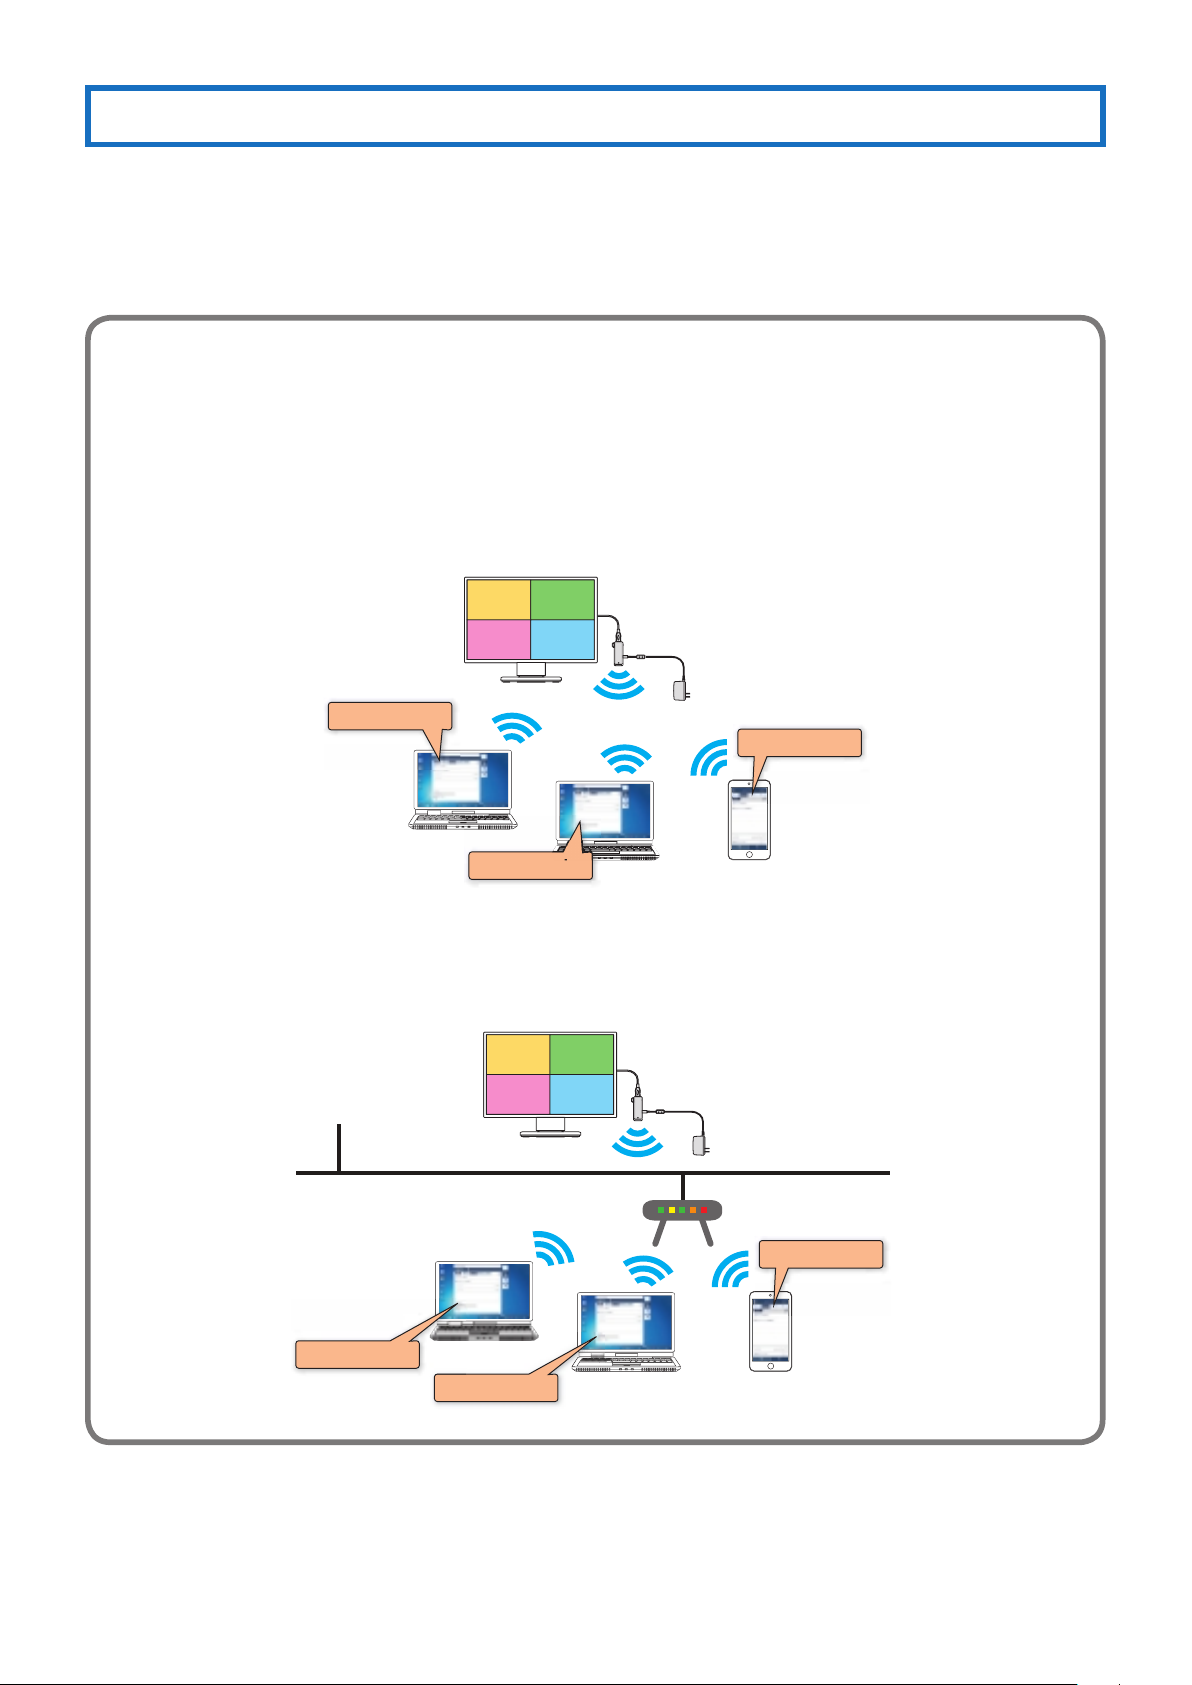
ADDITIONAL EXPLANATIONS
About the “INTELLIGENT CONNECTION” and “INFRASTRUCTURE” functions
•
About [INTELLIGENT CONNECTION (recommended)]
• TheMultiPresenterStickandcomputersorsmartphonesareconnectedwithoutusinganexisting network environment.
Example of connections
AB
CD
MultiPresenter
MultiPresenter
MultiPresenter
•
About [INFRASTRUCTURE]
• TheMultiPresenterStickisusedconnectedtoanexisting network environment.
Example of connections
AB
Internet
CD
Existing LAN
Access point
MultiPresenter
MultiPresenter
MultiPresenter
When using a commercially available USBmousewiththeMultiPresenterStick,theinitial settings can be ended after only
selectingthelanguageusedontheMultiPresenterStick’smenuscreensandothers.However,thewirelessLANconnection
method is automatically set to “INTELLIGENTCONNECTION”. In this case as well, the setting can be changed to “INFRA-
STRUCTURE” later. (→ “4-2-2. Making the initial settings using a commercially available USBmouse”onpage12)
9
Page 10
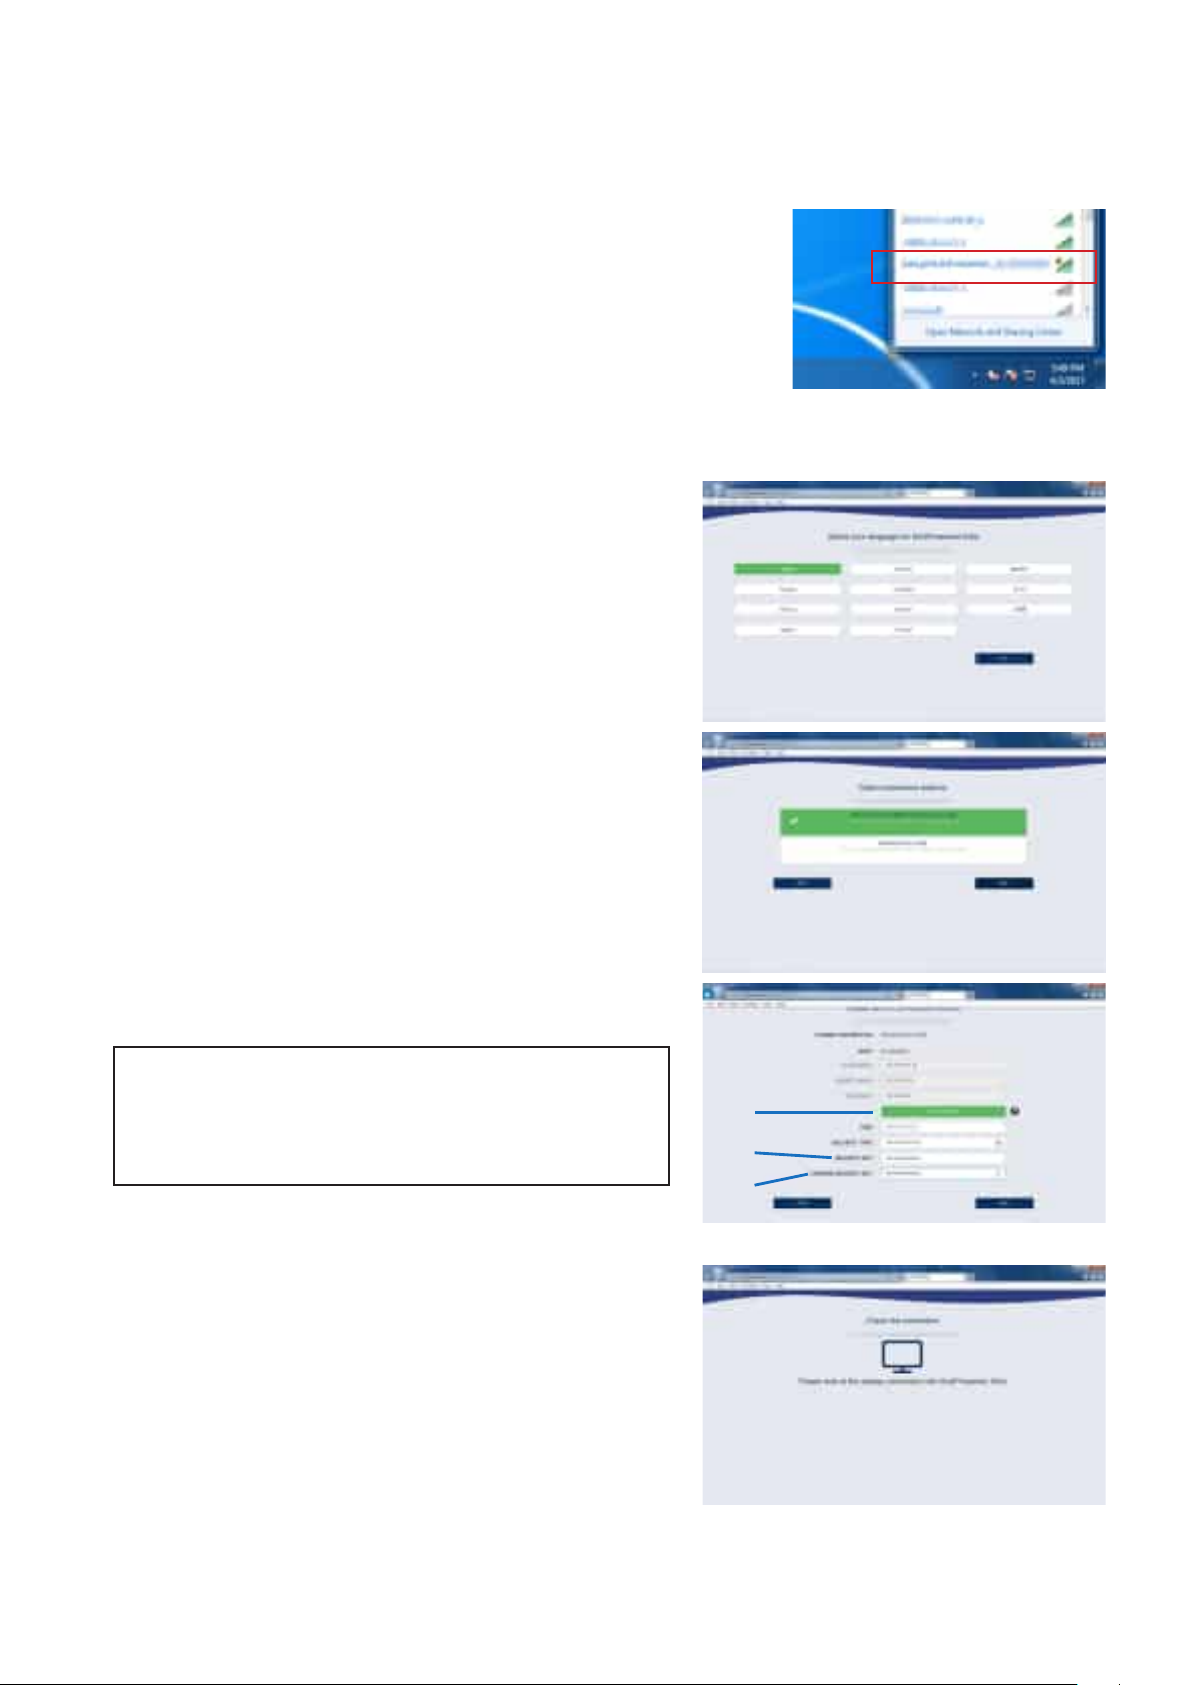
4-2-1. Making the initial settings using a computer or smartphone
First, connect the computer or smartphone to the same network as the MultiPresenter Stick (SSID displayed on the screen).
* The following explanation is for Windows 7.
Click the wireless LAN icon on the task tray.
.
1
From the list of wireless networks, select the SSID shown on the
.
2
screen(“SetupMultiPresenter_1234567890”(NOTE:the1234567890
section differs from product to product)), then click [Connect].
Launch the web browser and input the URLindicatedonthe
.
3
screen (“http://192.168.120.1”).
The language selection menu appears.
Select [English] on the web browser screen, then click [NEXT].
.
4
Select [INTELLIGENTCONNECTION (recommended)] or [INFRA-
.
5
STRUCTURE],thenclick[NEXT].
• When[INTELLIGENTCONNECTION (recommended)] was select-
ed, this completes the initial settings. Close the web browser.
Proceed to “4-3. Preparing the MultiPresenter application” on
page 12.
• When[INFRASTRUCTURE] was selected, the connection set-
tings screen appears. Proceed to step 6 below.
Follow the instructions of your network administrator for the set-
.
6
tings for connecting to an existing network.
Example of operation
①
Click [SITESURVEY] and select the SSID (access point).
②
Input the SSID’s security key (password).
③
To confirm, input the security key again.
After making the connection settings, click [NEXT].
.
7
The next screen appears.
①
②
③
10
Page 11
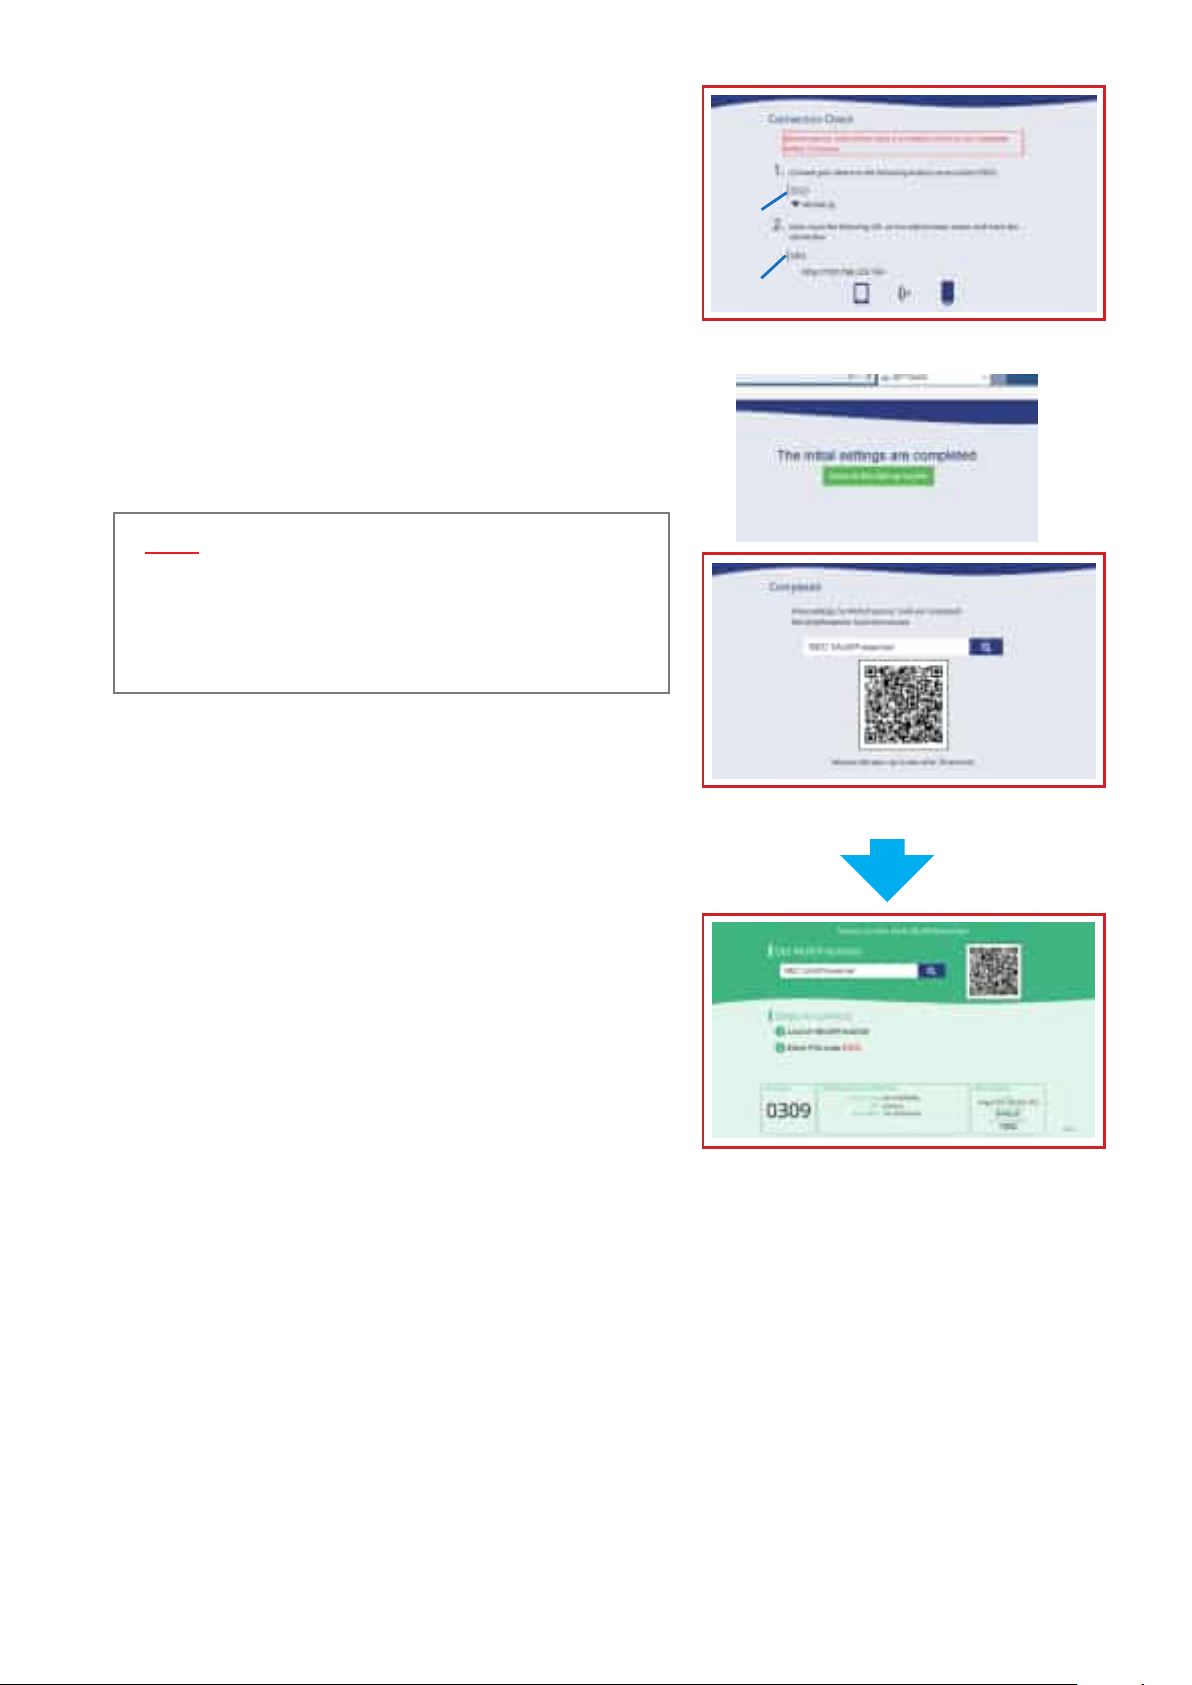
Switch the SSID of the computer or smartphone to the SSID dis-
.
8
playedonthescreenofthedisplayorprojector.
• FortheprocedureforswitchingtheSSID, see steps 1 and 2 on
the previous page.
Input the URLdisplayedon the screenofthedisplayor projector
.
9
into the web browser.
NOTE:Performsteps8 and 9 within 3 minutes of each other. If no
operation is performed within 3 minutes, start over from step 1 on
the previous page.
NOTE
• ItmaytakesometimefortheURLtobedisplayed,depending on the access point to which you are connecting.
• Iftherearemistakesintheinfrastructuresettings that were
input, connection of the access point and MultiPresenter
Stick may fail and the URLmaynotbedisplayed.
SSID
URL
Screen on the display or projector
When the screen shown at the right appears, the MultiPresenter
Stick’s initial settings are completed.
Click “Move to the start-up screen” on the web browser screen
.
10
shown on the right in step 9.
The web server screen appears.
Proceed to “4-3. Preparing the MultiPresenter application” on the
next page.
The screen at the right is referred to as the MultiPresenter Stick’s
start-up screen.
Screen on the display or projector
11
Page 12
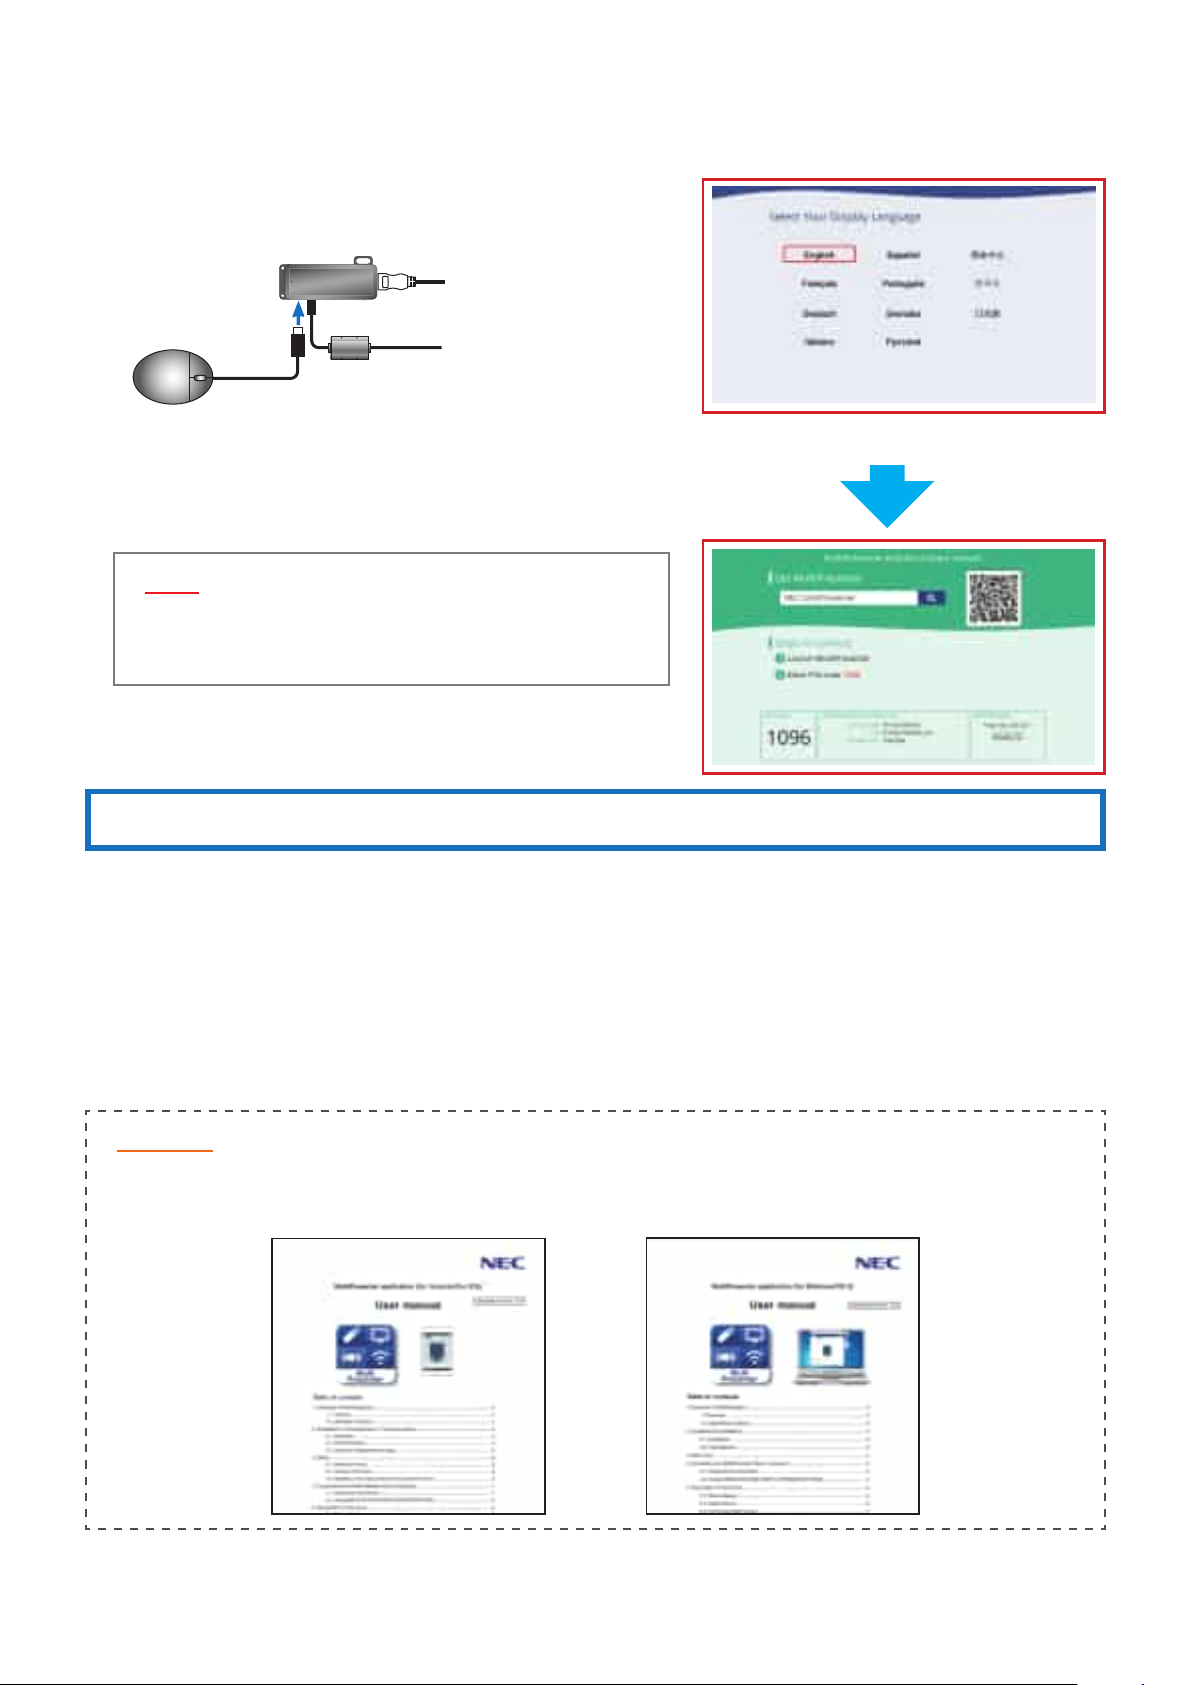
4-2-2. Making the initial settings using a commercially available USB mouse
Continued from step 6 in “4-1. Connecting the MultiPresenter Stick to an image display device and turning on the power”
on page 8.
Connect a commercially available USBmousetotheMultiPresenter
.
1
Stick’s USBport.
The MultiPresenter Stick’s language selection menu appears.
HDMI input port
AC adapter
Screen on the display or projector
Select [English] using the USBmouse.
.
2
The MultiPresenter Stick’s start-up screen appears.
This completes the initial settings of the MultiPresenter Stick.
NOTE
• Whentheinitial settings are performed using a USBmouse,
the wireless LAN connection is set to “INTELLIGENTCONNEC-
TION”.
4-3. Preparing the MultiPresenter application
4-3-1. Using a computer (Windows or OS X)
• AccesstheNECwebsite,downloadthe MultiPresenterapplicationforthecorrespondingOSandinstalltheapplication
on the computer.
http://www.nec-display.com/dl/en/soft/multipresenter/index.html
4-3-2. Using an Android device or an iOS device
• ForAndroid:AccessGooglePlay and install the MultiPresenter application on the device.
• ForiOS:Access the App Store and install the MultiPresenter application on the device.
REMARKS
• Theuser’smanualsforMultiPresenterforWindows/OSXandforMultiPresenterforAndroid/iOScanbedownloaded
from NEC’s MultiPresenter website.
12
Page 13
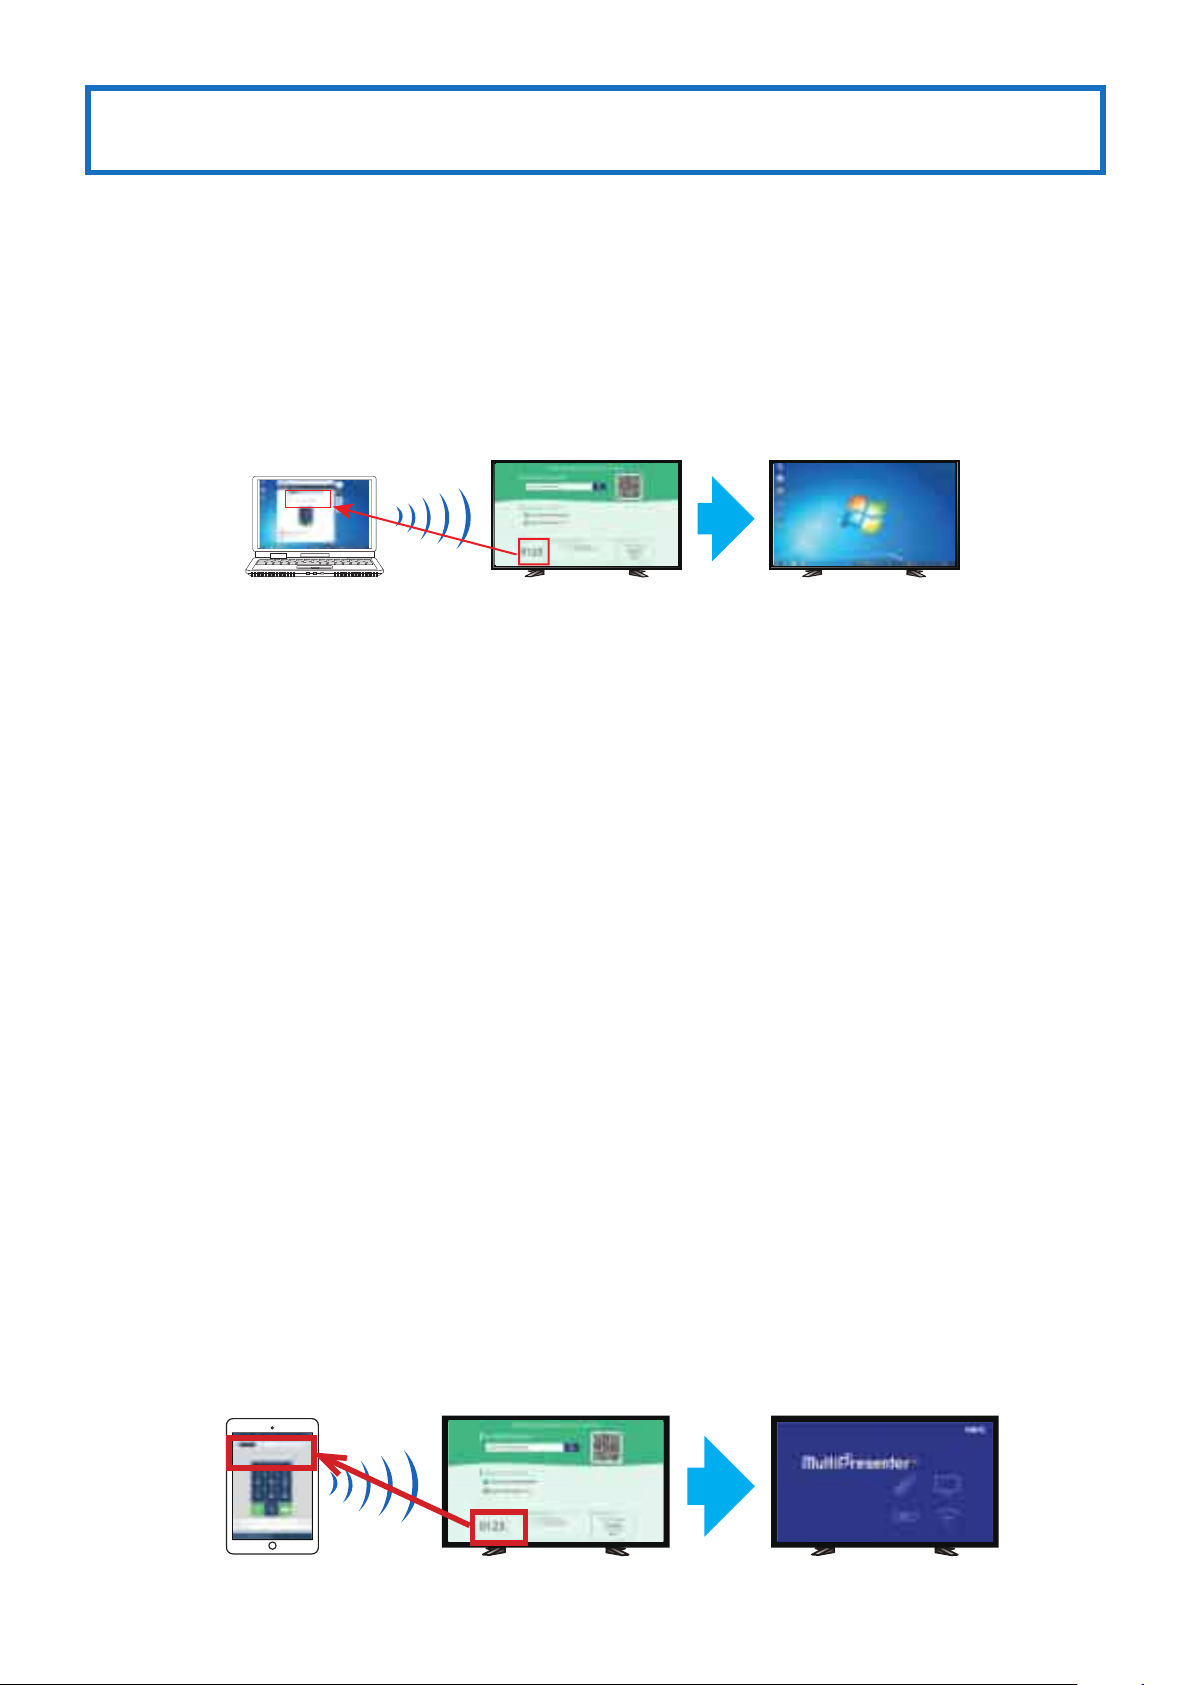
4-4. Connecting the MultiPresenter application to the MultiPresenter Stick and
displaying images
4-4-1. Using a computer (Windows or OS X)
•
Connecting with the INTELLIGENT CONNECTION function
ConnecttheMultiPresenterSticktothedisplayorprojector,turnonthepoweranddisplaythestart-upscreen.
.
1
Launch the MultiPresenter application.
.
2
The target device screen is displayed.
Input the PIN code displayed on the start-up screen on the target device screen.
.
3
Oncethe connection with theMultiPresenterStickis completed,thecomputerscreen isdisplayedonthedisplay or
projectorscreen.
PIN code input Start-up screen Sent image
•
To connect with the Infrastructure function
ConnecttheMultiPresenterSticktothedisplayorprojector,turnonthepoweranddisplaythestart-upscreen.
.
1
Connect your computer to the network to which the MultiPresenter Stick is connected.
.
2
* Check the connection information of the network to which the MultiPresenter Stick is connected with the network administrator.
Launch the MultiPresenter application.
.
3
The target device screen is displayed.
Input the PIN code displayed on the start-up screen in the target device screen.
.
4
Oncethe connection with theMultiPresenterStickis completed,thecomputerscreen isdisplayedonthedisplay or
projectorscreen.
•
Connecting with the Simple Access Point function
* For details on the Simple Access Point function, see page 28.
ConnecttheMultiPresenterSticktothedisplayorprojector,turnonthepoweranddisplaythestart-upscreen.
.
1
Connect your computer to the SSID displayed on the start-up screen.
.
2
Launch the MultiPresenter application.
.
3
The target device screen is displayed.
Input the PIN code displayed on the start-up screen in the target device screen.
.
4
Oncethe connection with theMultiPresenterStickis completed,thecomputerscreen isdisplayedonthedisplay or
projectorscreen.
4-4-2. Using an Android device or an iOS device
•
Connecting with the INTELLIGENT CONNECTION function
ConnecttheMultiPresenterSticktothedisplayorprojector,turnonthepoweranddisplaythestart-upscreen.
.
1
Launch the MultiPresenter application.
.
2
The target device screen is displayed.
Input the PIN code displayed on the start-up screen on the target device screen.
.
3
Oncethe connection with theMultiPresenterStick is completed,theapplication’sstandbyscreenisdisplayedonthe
displayorprojectorscreen.
PIN code input Start-up screen Standby screen
13
Page 14

IMPORTANT
When using an iOSdevice,theWi-Fi settings must be made manually in order to connect with reception devices (such
astheMultiPresenterStickandaprojector)bywirelessLAN.
•
Connection procedure
Onthehomescreen,tap“MultiPresenter”.
.
1
The MultiPresenter application is launched and the target device screen is displayed.
Input the PIN code displayed on the start-up screen of the reception device or on the on-screen menu in the target
.
2
device screen.
A screen with explanations on it appears.
Tap “Proceed to Wi-Fi settings”.
.
3
From the list of networks displayed on the device’s screen, select the SSID displayed on the start-up screen.
.
4
When the password screen appears on the device, input the security key displayed on the start-up screen, then tap
.
5
“Connect”.
OnceconnectedtotheselectedSSID,tap“RETURNTOMULTIPRESENTER” displayed in the upper left of the “SETTINGS”
.
6
screen.Or,pressthehomebuttontodisplaythehomescreen,thentap“MultiPresenter”.
The MultiPresenter application connects with the reception device and the MultiPresenter application’s standby
screen appears on the reception device.
•
To connect with the Infrastructure function
ConnecttheMultiPresenterSticktothedisplayorprojector,turnonthepoweranddisplaythestart-upscreen.
.
1
Connect your device to the network to which the MultiPresenter Stick is connected.
.
2
* Check the connection information of the network to which the MultiPresenter Stick is connected with the network
administrator.
Launch the MultiPresenter application.
.
3
The target device screen is displayed.
Input the PIN code displayed on the start-up screen in the target device screen.
.
4
Oncethe connection with theMultiPresenterStick is completed,theapplication’sstandbyscreenisdisplayedonthe
displayorprojectorscreen.
•
Connecting with the Simple Access Point function
* For details on the Simple Access Point function, see page 28.
ConnecttheMultiPresenterSticktothedisplayorprojector,turnonthepoweranddisplaythestart-upscreen.
.
1
Connect your device to the SSID display on the start-up screen.
.
2
Launch the MultiPresenter application.
.
3
The target device screen is displayed.
Input the PIN code displayed on the start-up screen in the target device screen.
.
4
Oncethe connection with theMultiPresenterStick is completed,theapplication’sstandbyscreenisdisplayedonthe
displayorprojectorscreen.
14
Page 15
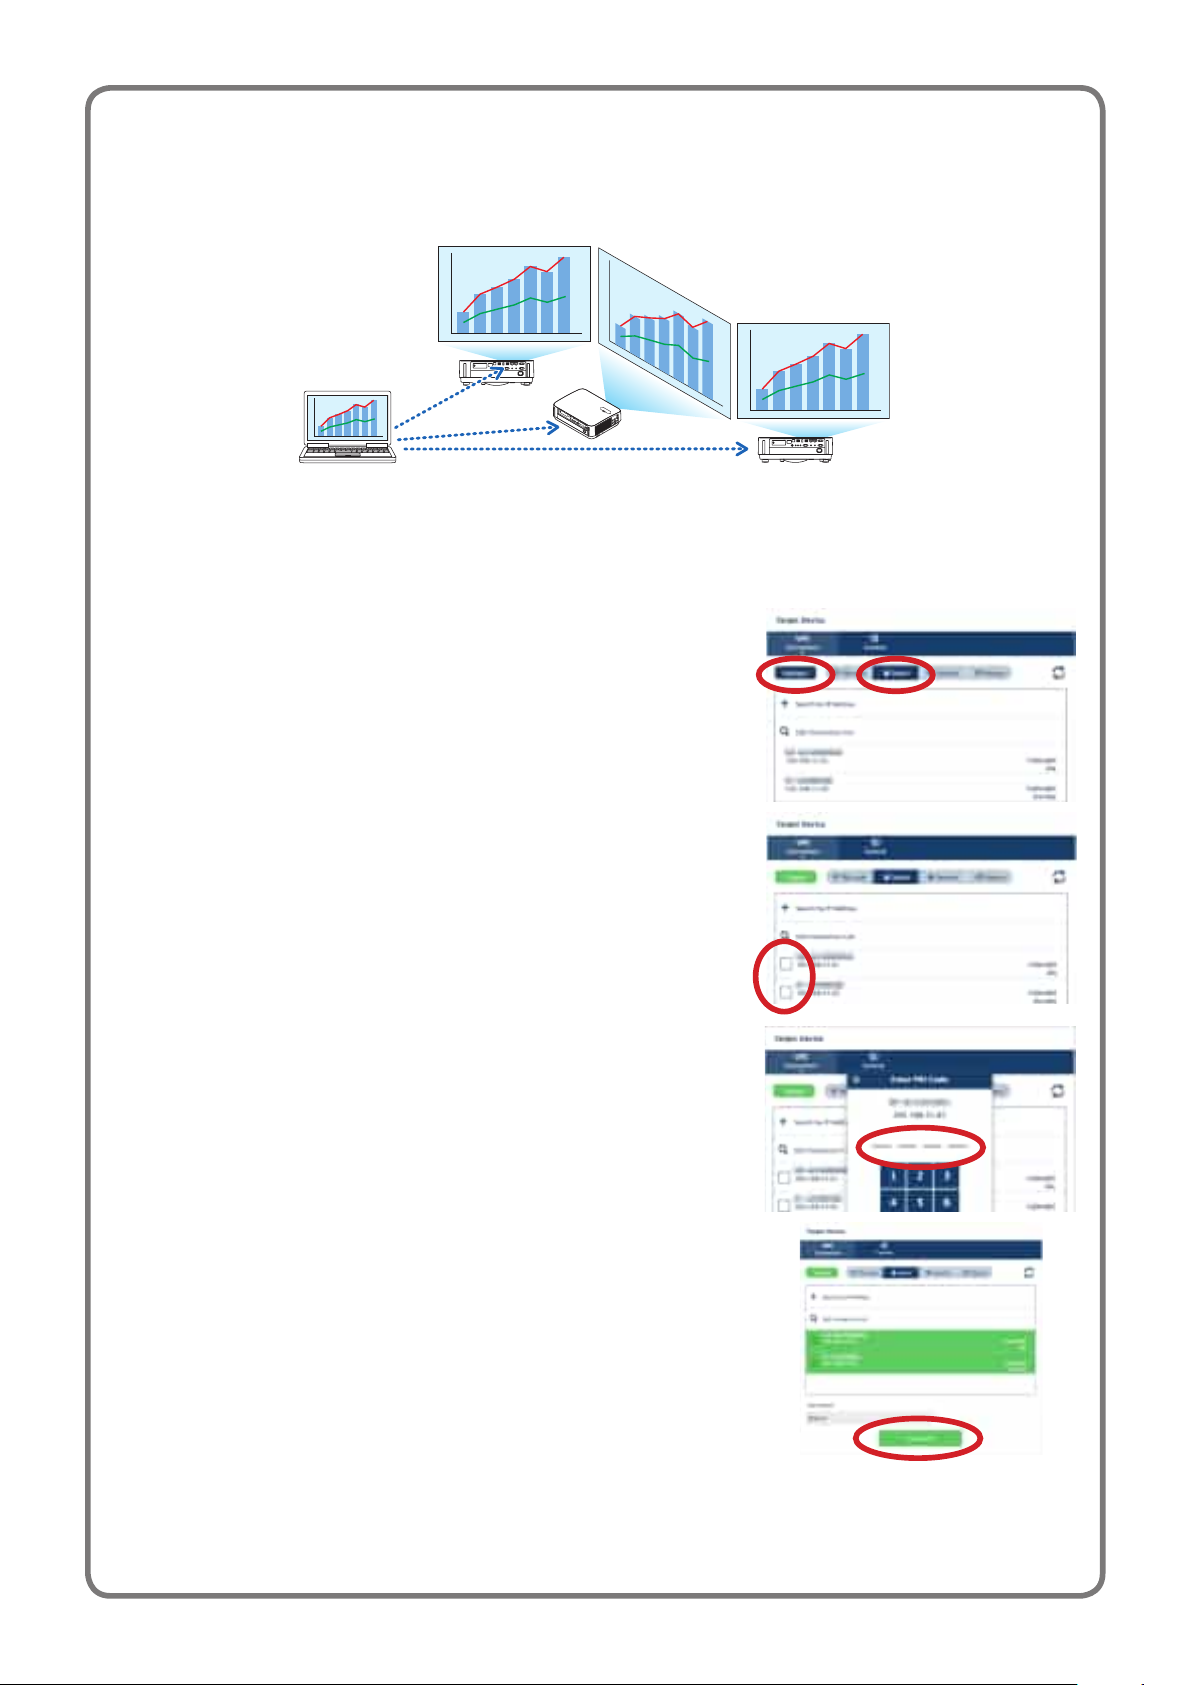
ADDITIONAL EXPLANATIONS
Connecting to multiple MultiPresenter Sticks
It is possible to connect from one computer or smartphone to multiple MultiPresenter Sticks (up to 4 units) and display their images.
OntheMultiPresenterapplication’starget device screen, perform the operation to select [Multiple].
Set the wireless LAN mode of the MultiPresenter Sticks to be connected to Infrastructure and connect all the
.
1
MultiPresenter Sticks to the same network.
Connect your computer or smartphone to the same network as the one chosen in step 1.
.
2
Launch the MultiPresenter application.
.
3
Onthetarget device screen, click [Select].
.
4
A list of connectable devices is displayed.
Click [Multiple].
.
5
Check boxes appear to the left of the devices on the list.
Click the devices you want to connect.
.
6
The PIN code input screen appears.
Input the PIN code displayed on the device’s start-up screen.
.
7
Onceall the devicestobeconnectedare checked,click[Connect] at
.
8
the bottom of the screen.
15
Page 16
5. Web server functions
5-1. Connecting computers or smartphones to the MultiPresenter Stick’s web
server
5-1-1. Using a computer
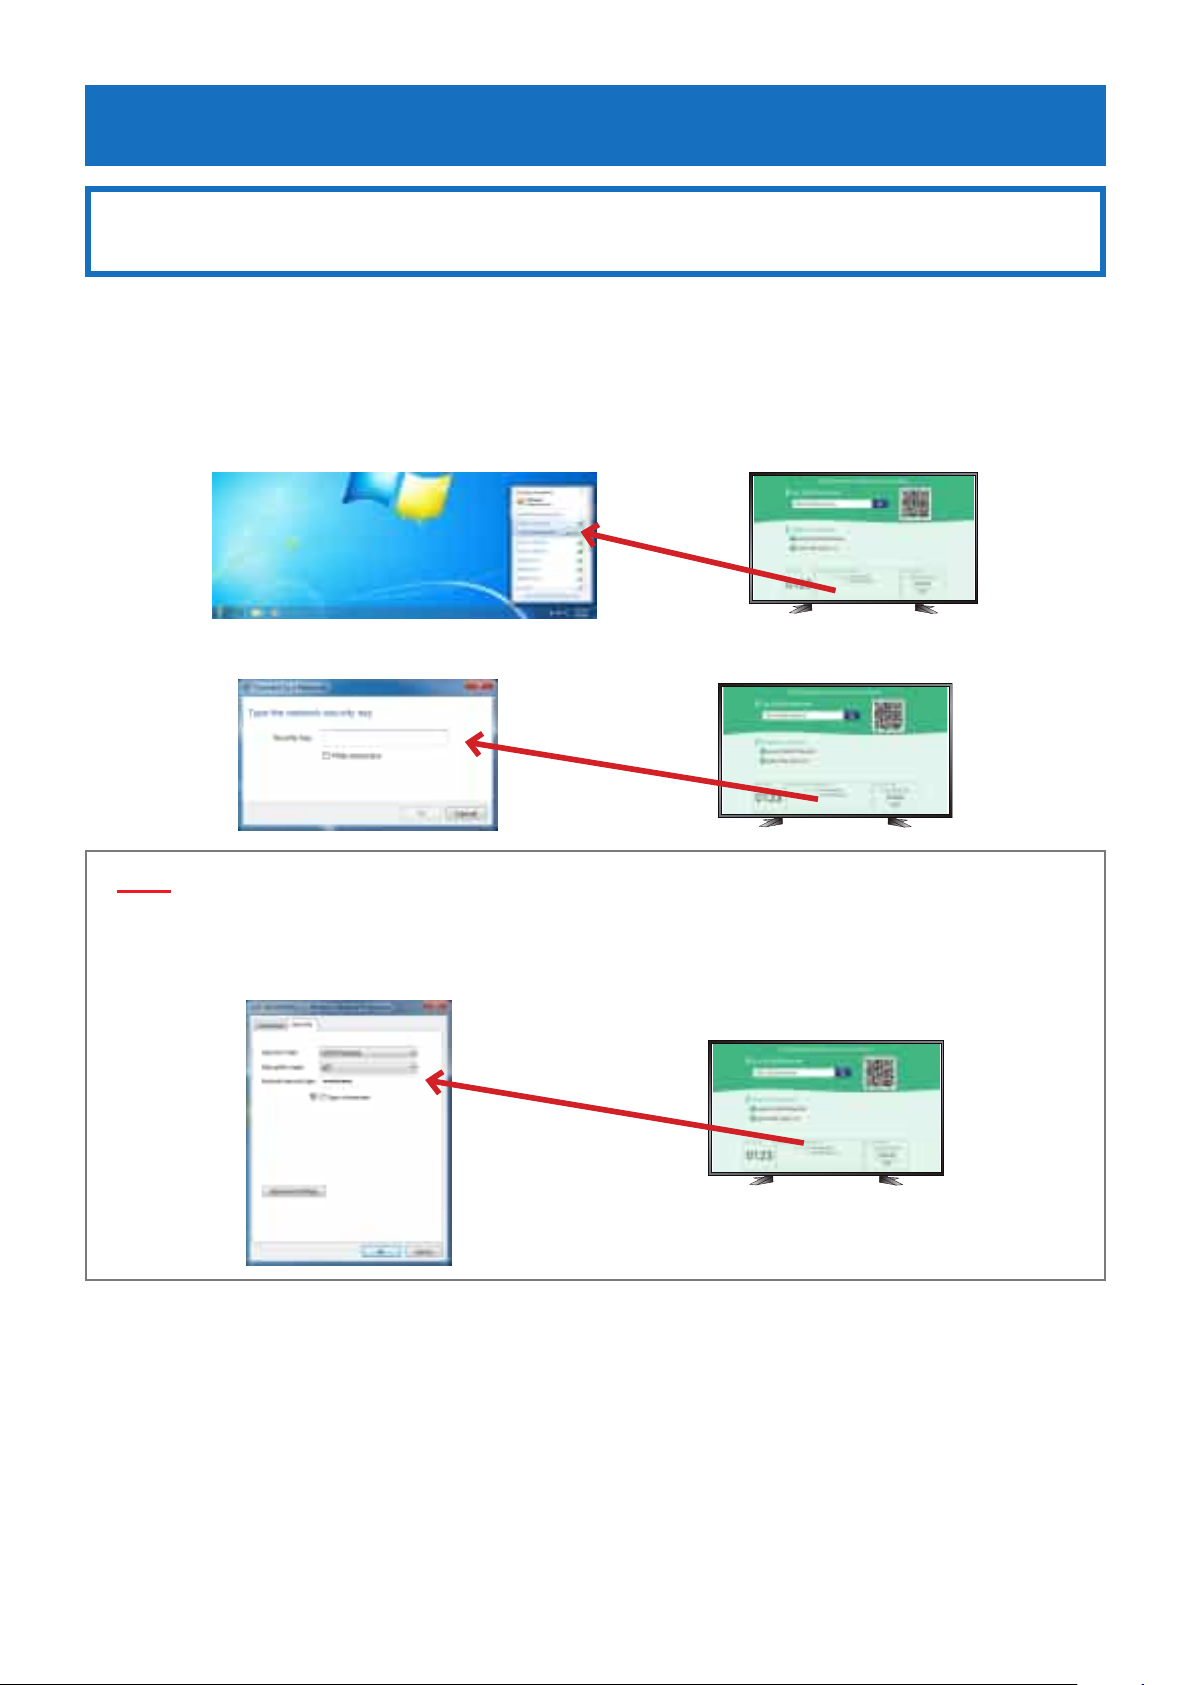
* The following is an example of the operation for Windows 7 when connected with the INTELLIGENTCONNECTION func-
tion.
This explanation starts from the point at which the MultiPresenter Stick’s start-up screen is displayed.
Click the wireless LAN icon on the task tray.
.
1
From the list of wireless networks, select the SSID displayed on the start-up screen, then click [Connect].
.
2
When connecting for the first time, the security key input screen appears.
Input the securitykey(an8-digitnumber)displayedonthestart-upscreen,thenclick[OK].
.
3
NOTE
• Ifthesecurity key has changed since you last connected to that SSID,themessage“CannotconnecttoXXXXXXXX”is
displayed. In this case, right-click the SSID on the wireless network list and select “Properties”. Input the security key (an
8-digit number) displayed on the start-up screen into the “Network security key” field of the properties window, then
click[OK].Next,clickthewirelessLANicononthetasktrayagainandselecttheSSID.
OnceconnectedtotheSSID, launch the web browser.
.
4
InputtheURLdisplayedonthestart-upscreen(http://192.168.120.1)intotheURLinputeldofthewebbrowser,then
.
5
press the Enter key.
The MultiPresenter Stick’s web server screen is displayed on the web browser.
16
Page 17
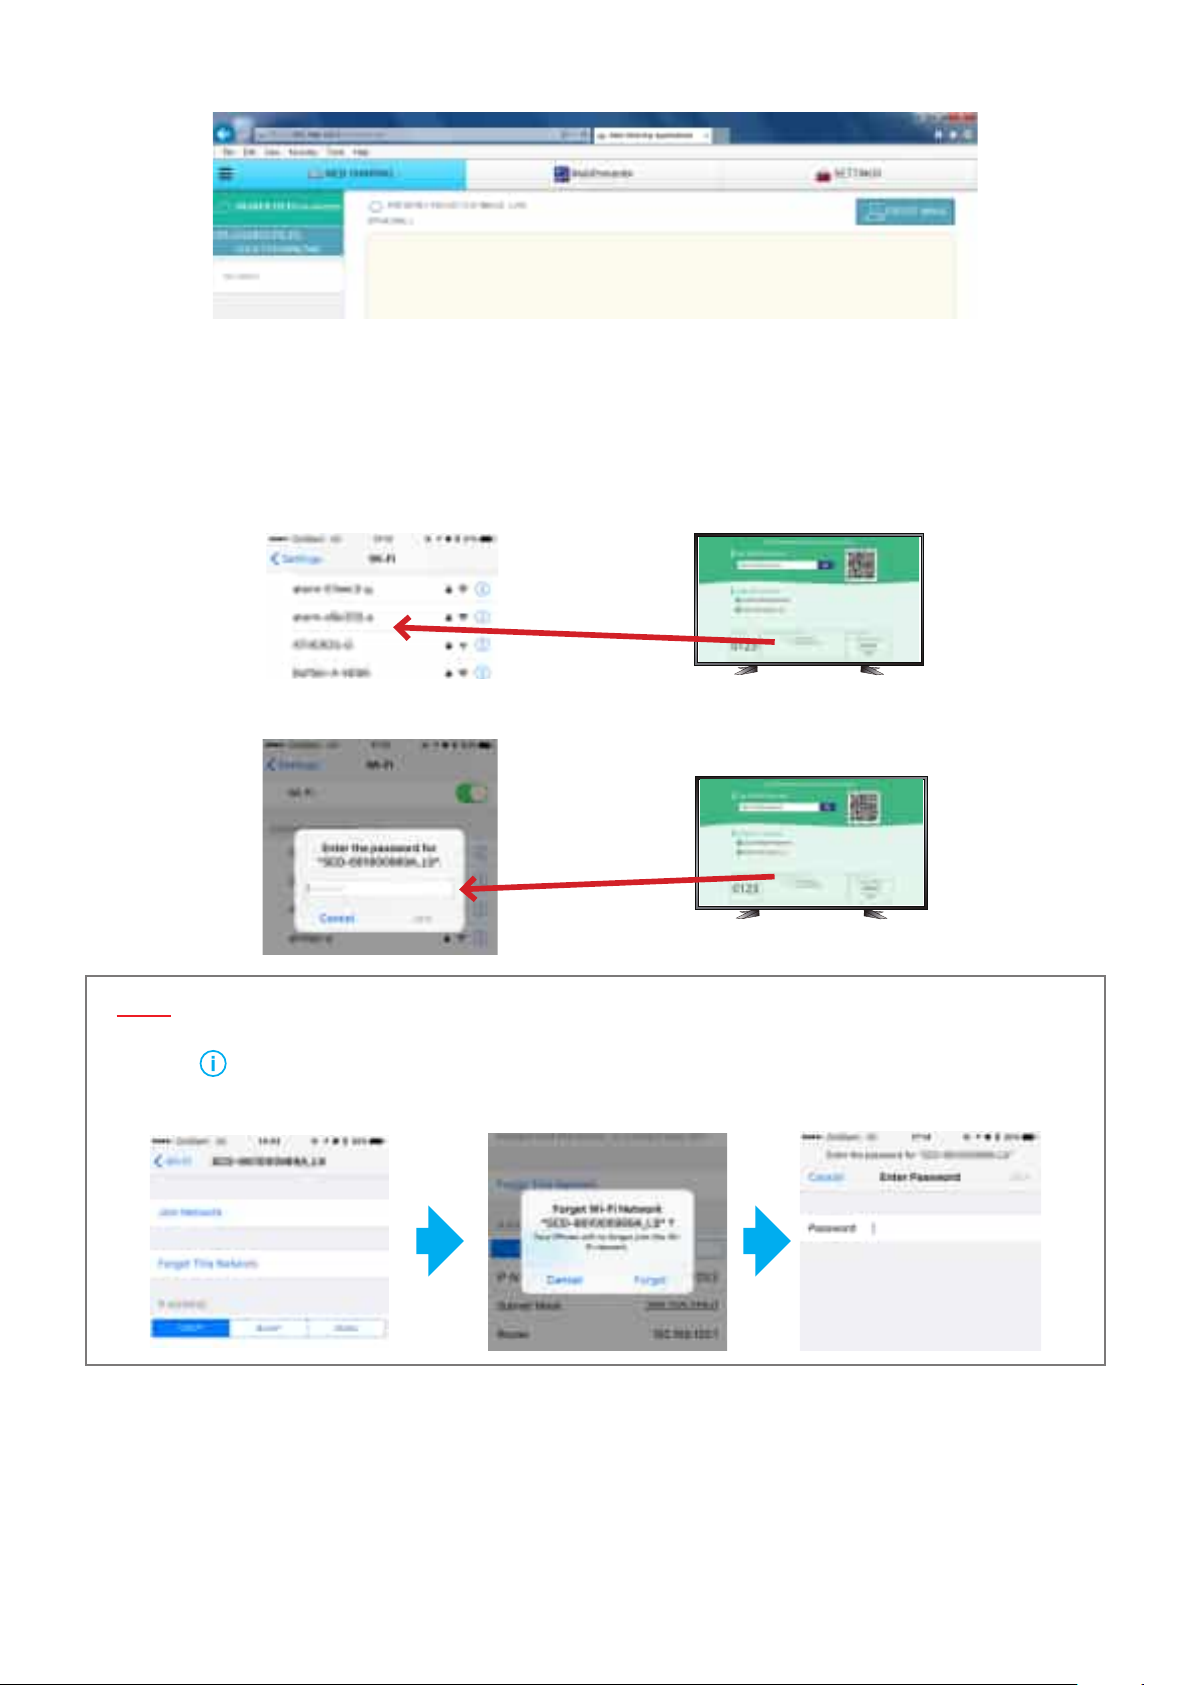
The web server screen is divided into three tabs: [WEBSHARING], [MultiPresenter] and [SETTINGS].
5-1-2. Using a smartphone
* Thefollowingisanexampleofthe operationforaniOSdevicewhen connected withtheINTELLIGENTCONNECTION
function.
This explanation starts from the point at which the MultiPresenter Stick’s start-up screen is displayed.
Onthehomescreen,tapthe“Settings” icon.
.
1
Tap “Wi-Fi”.
.
2
From the list of networks, tap the SSID displayed on the start-up screen.
.
3
When connecting for the first time, the password input screen appears.
Input the security key (an 8-digit number) displayed on the start-up screen, then tap [Join].
.
4
NOTE
• Ifthesecurity key has changed since you last connected to that SSID, it is not possible to connect to that SSID. In this
case, tap
Next tap “Connect to network”. The password input screen appears. Input the security key (an 8-digit number) dis-
played on the start-up screen, then tap [Join].
on the right of the SSID to which you want to connect. Next tap “Forget This Network”, then tap “Forget”.
After connecting to the SSID, return to the home screen and tap “Safari”.
.
5
In the SafariURLinputeld,inputtheURLdisplayedonthestart-upscreen(http://192.168.120.1),thentap“Open”.
.
6
The MultiPresenter Stick’s web server screen is displayed in Safari.
17
Page 18
The web server screen is divided into three tabs: [WEBSHARING], [MultiPresenter] and [SETTINGS].
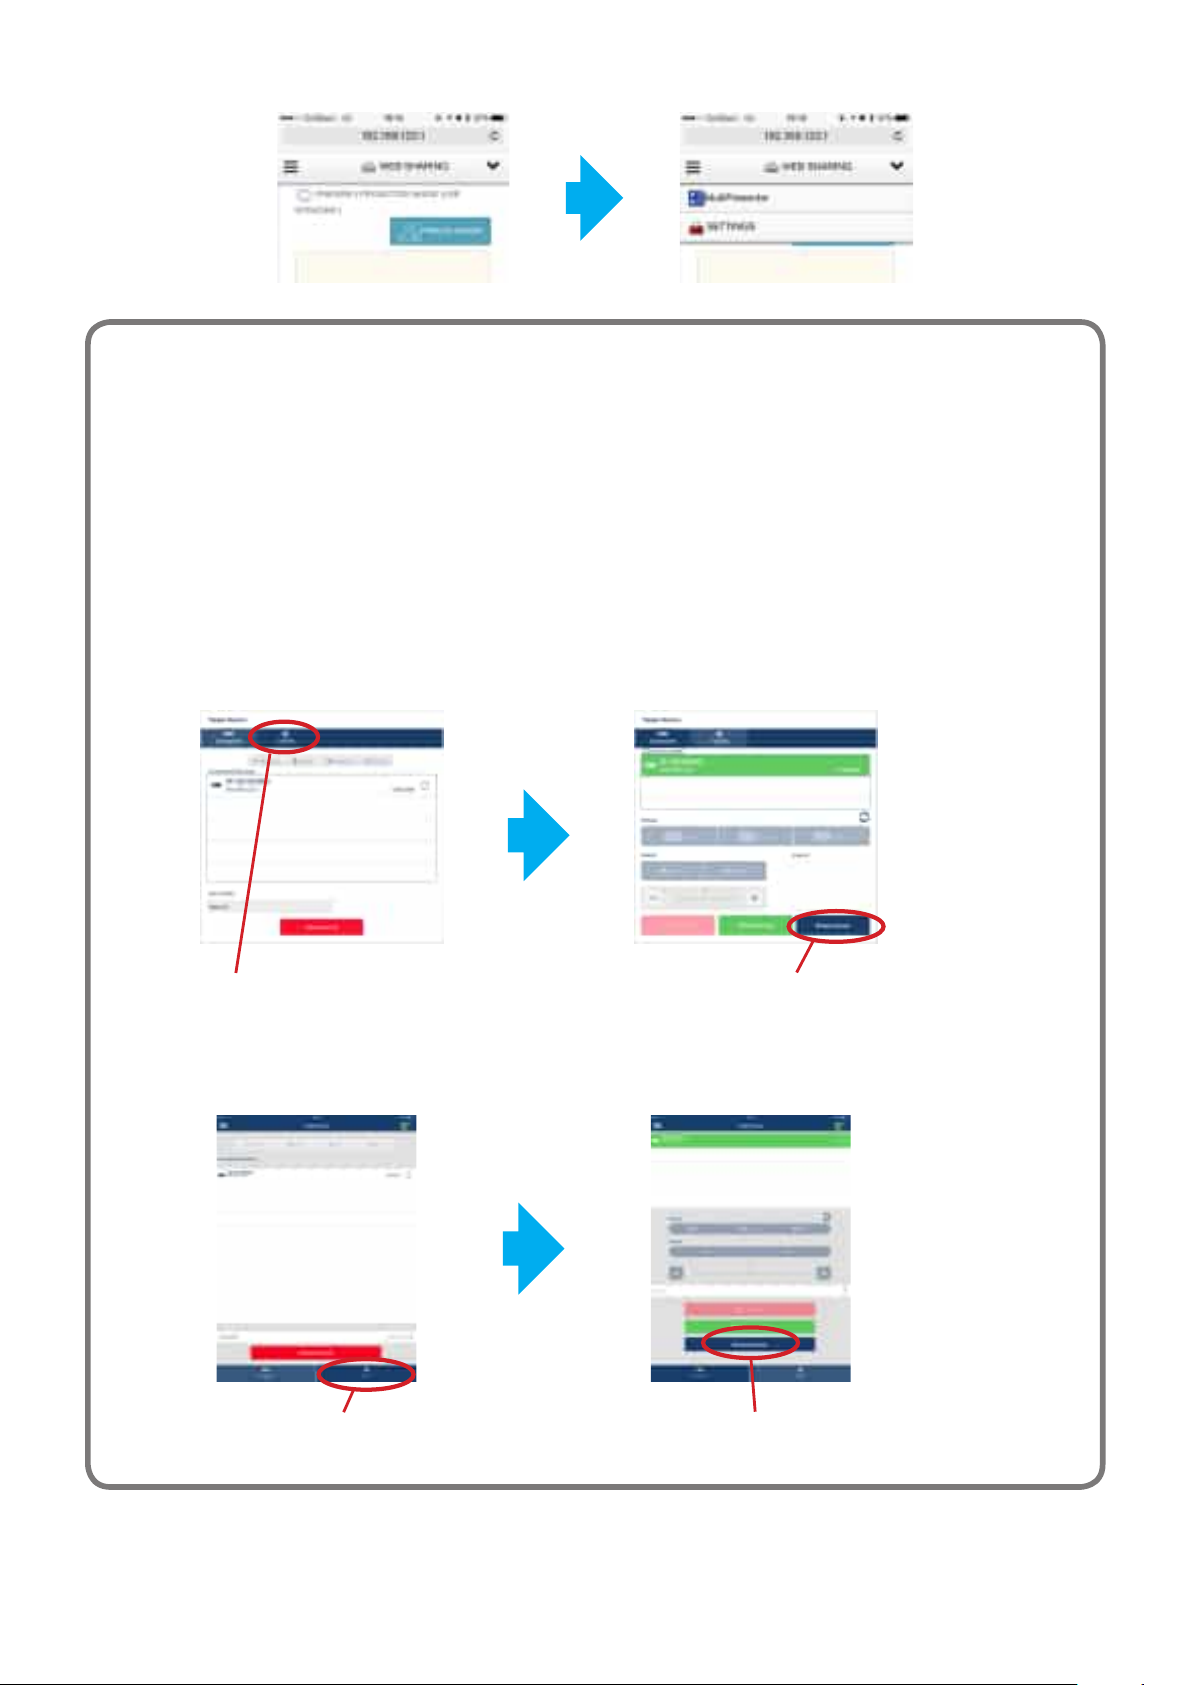
ADDITIONAL EXPLANATIONS
Using the MultiPresenter application to display the web server screen
The MultiPresenter application can be used to display the web server screen.
Connect your computer or smartphone to the network to which the MultiPresenter Stick is connected.
.
1
Launch the MultiPresenter application.
.
2
Onthetarget device screen, input the PIN code.
.
3
After connection to the MultiPresenter Stick is completed, click or tap the [Control] button on the target device
.
4
screen.
Click or tap the [Browse Server] button.
.
5
The web server screen appears.
•
For Windows/OS X
•
For iOS/Android
Target device screen
Click [Browse Server]Click [Control]
Target device screen
18
Tap [Browse Server]Tap [Control]
Page 19
5-2. Using a web browser to transfer files between devices (web sharing)
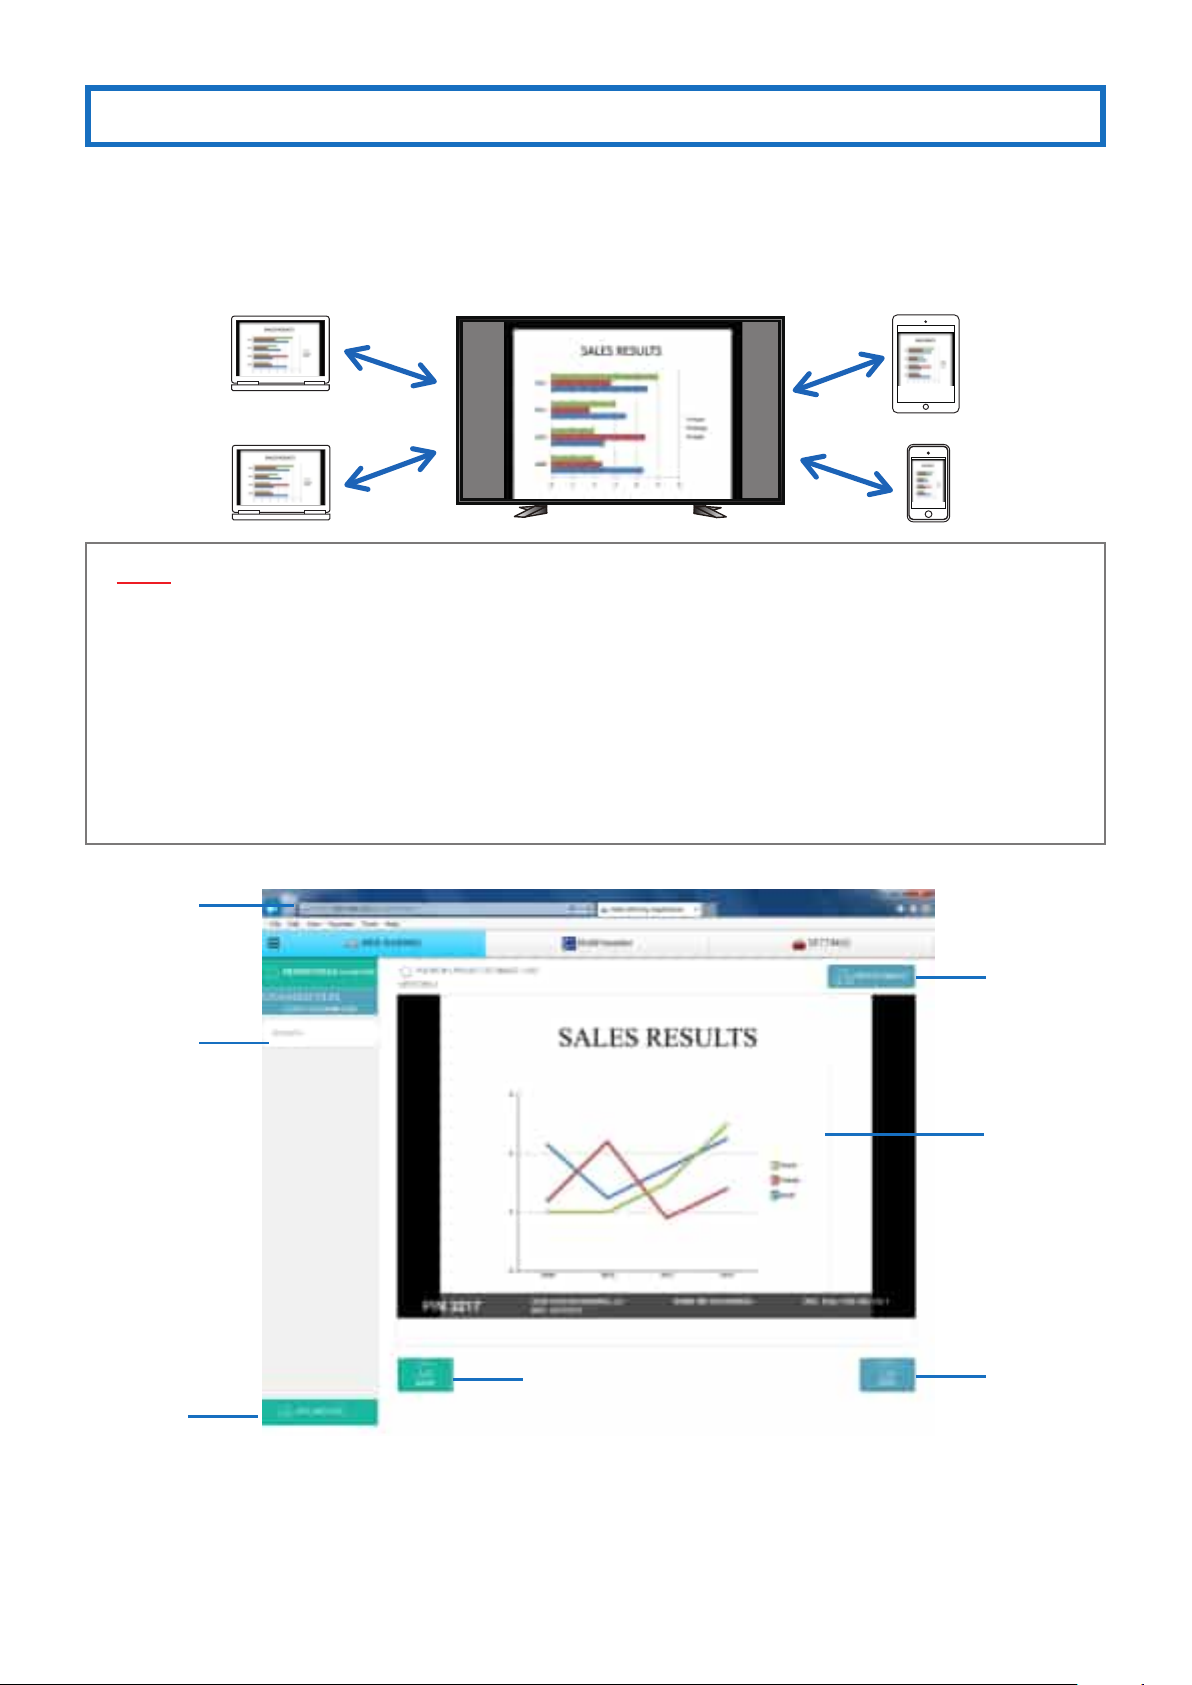
• TheimagesdisplayedwiththeMultiPresenterStickcanbe displayedforapproximately5secondseachonthe web
browser’s screen and the desired images can be saved on your device (Web Capture function).
• Textcanbeadded onthecurrentlydisplayedscreenandmemoscanbecreatedforupto10 pages.Memosyouhave
created can be saved on your device as images.
• Filesonyourdevicecanbeuploaded to the MultiPresenter Stick’s web server and shared among devices connected to
the MultiPresenter Stick on the network.
NOTE
• WhenusingSafari,thescreenmaynotbedisplayedproperly,dependingonthetimingforreloading.Tryrestarting
Safari.
• WithiOSandOSXdevices,thefunctionforsavinginJPEGformat(⑥ on the screen below and ③ on the screen on
the next page) and the function for savingmeetingsinHTMLformatonthememo creation screen (④ on the screen
on the next page) cannot be used.
• IfyouareusingInternetExplorer,storingbyright-clickingonthecurrentweb capture may not work properly. We
recommendpressingthe[FREEZEIMAGE]button(④ on the screen below) to stop the display from renewing every 5
seconds, then saving the image.
• Upto50devicescanbeconnectedtoeachMultiPresenterStick.However,thenumberofunitsthatcanbeconnected simultaneously will differ depending on the performance of the network devices being used.
③
①
②
⑥
④
⑤
⑦
19
Page 20
No. Description
①
http://<the MultiPresenter Stick’s IP address>
Displays the names of shared files stored on the MultiPresenter Stick’s web server.
Files can be downloaded to your device by clicking the file name.
②
NOTE1:Thelesstoredonthewebserverareautomaticallydeletedwhenallthesessionsareclosed.(Bydefault)
NOTE2:Aseparateapplicationmayberequiredtouselesdownloaded on a tablet devices, etc.
Calls out files to be shared from the device currently being used and uploads them to the web server.
③
The names of files that have been called out are displayed at [
Stops renewing every 5 seconds.
④
Click again to resume renewing.
⑤
References images displayed with the MultiPresenter Stick approximately every 5 seconds.
⑤
Stores (downloads) images displayed at
⑥
NOTE:NotdisplayedforiOSorOSXdevices.
⑦
Creates memos using the image currently displayed at the center.
•
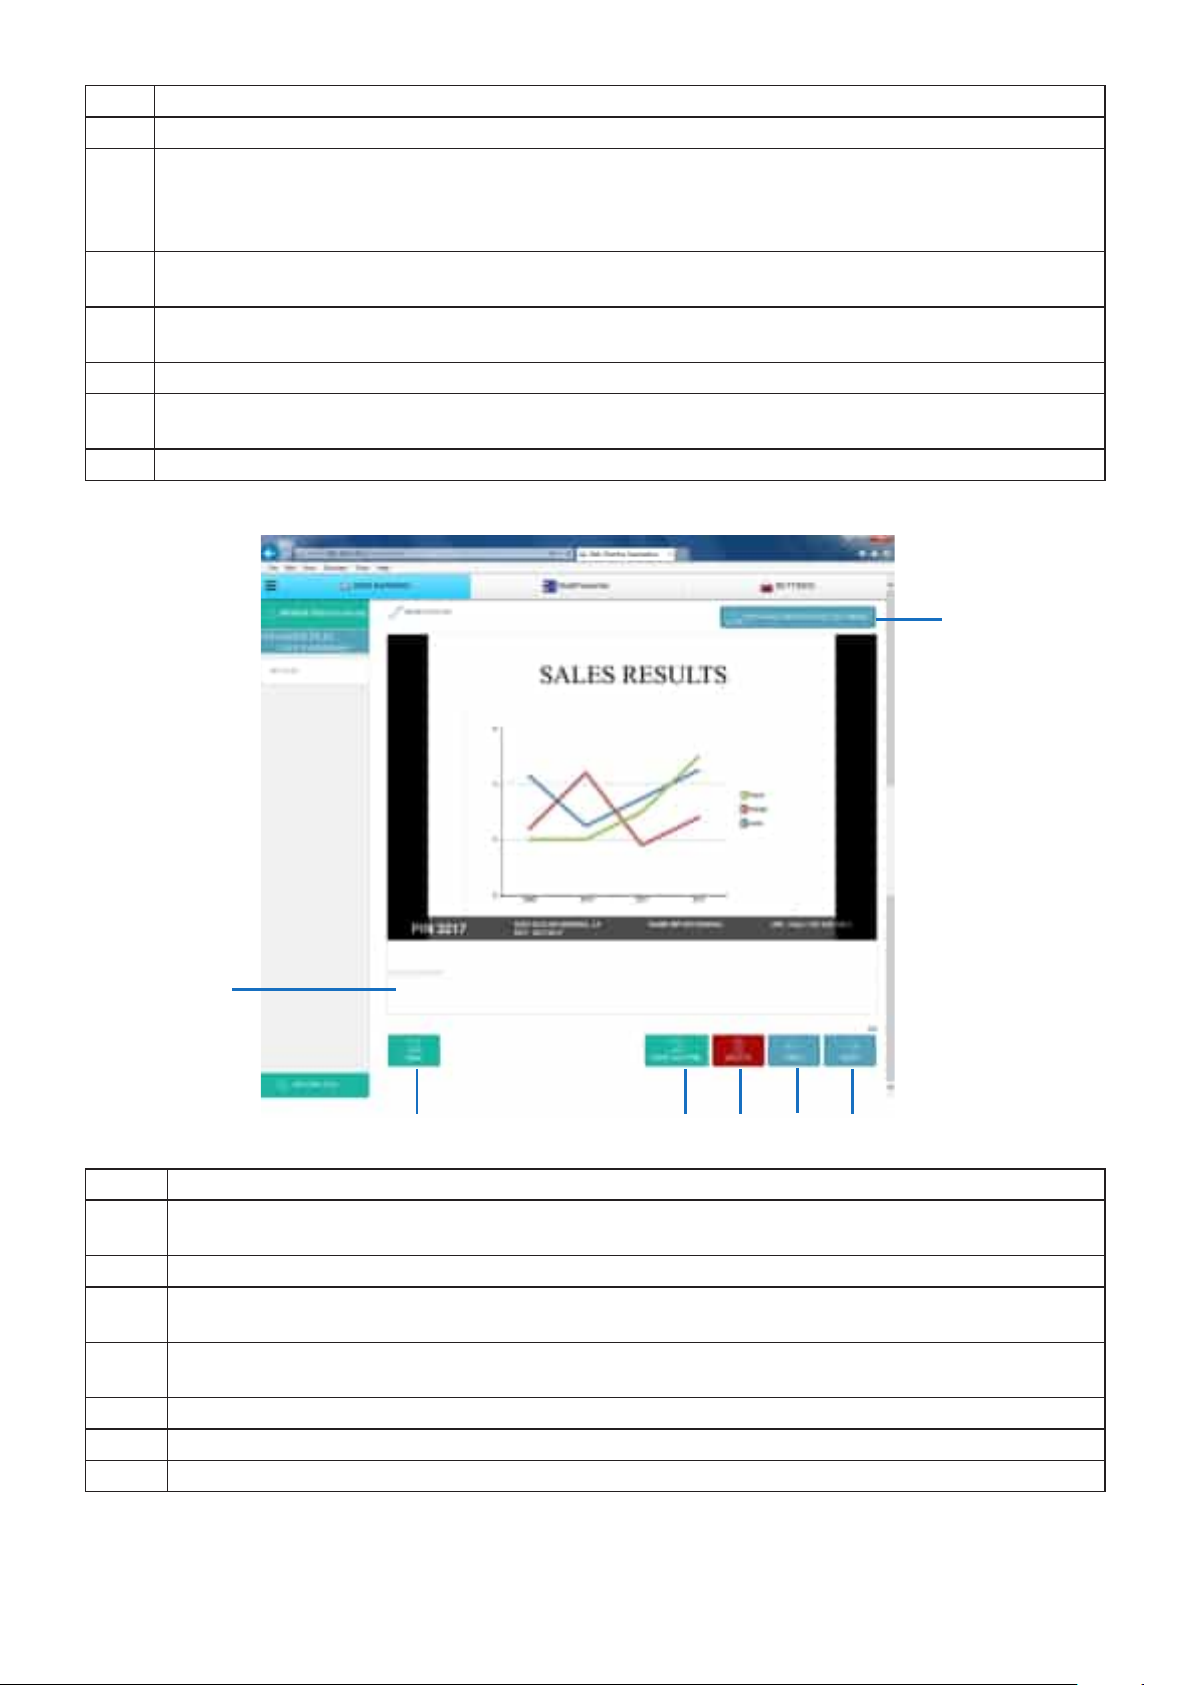
About the memo creation screen
ontoyourdeviceinJPEGformat.
UPLOADEDFILES] above.
②
①
③
No. Description
Clicktoinputtext.Aftercompletingtheinput,click[OK]ontherighttoenter.
①
* [OK]isdisplayedwhen① is clicked.
②
A new page for inputting a memo is created when the image at the center of the screen switches, etc.
SavesthepageonwhichthetexthasbeenaddedinJPEGformat.
③
NOTE:NotdisplayedforiOSorOSXdevices.
SavesallpagesinasingleleinHTMLformat.
④
NOTE:NotdisplayedforiOSorOSXdevices.
⑤
Deletes the page currently being edited or all pages.
⑥
When multiple pages have been created, returns to the previous page.
⑦
When multiple pages have been created, displays the next page.
④ ⑤ ⑥ ⑦
20
Page 21
5-3. Controlling the number of panels or moderator, in the MultiPresenter
Managed mode (MultiPresenter)
The MultiPresenter operating modes include the Free mode and the Managed mode.
ADDITIONAL EXPLANATIONS
About the MultiPresenter “Free mode” and “Managed mode”
•
Free mode
The Free mode is a mode for freely connecting from the MultiPresenter application installed on a computers or
smartphone. The screen’s split-panel pattern changes according to the number of devices that are connected. It is
also possible to switch between split panel display and full-screen display from the MultiPresenter application on a
device. The MultiPresenter Stick is set to the Free mode upon shipment from the factory.
•
Managed mode
The managed mode is a mode in which control of the screen with the MultiPresenter application is prohibited
when multiple devices are connected to the MultiPresenter Stick, like in the Free mode. The screen’s panel pattern
is changed and the display is switched between the split panel display and full-screen display from the web server’s
MultiPresenter screen.
The Managed mode can only be used on one device. If there is already a device connected in the Managed mode,
the Managed mode cannot be used on other devices.
5-3-1. Switching from the Free mode to the Managed mode
NOTE
• IfotherdevicesareconnectedtotheMultiPresenter Stick, disconnect them all. When other devices are connected to
the MultiPresenter Stick, the mode may be changed but the change does not take effect.
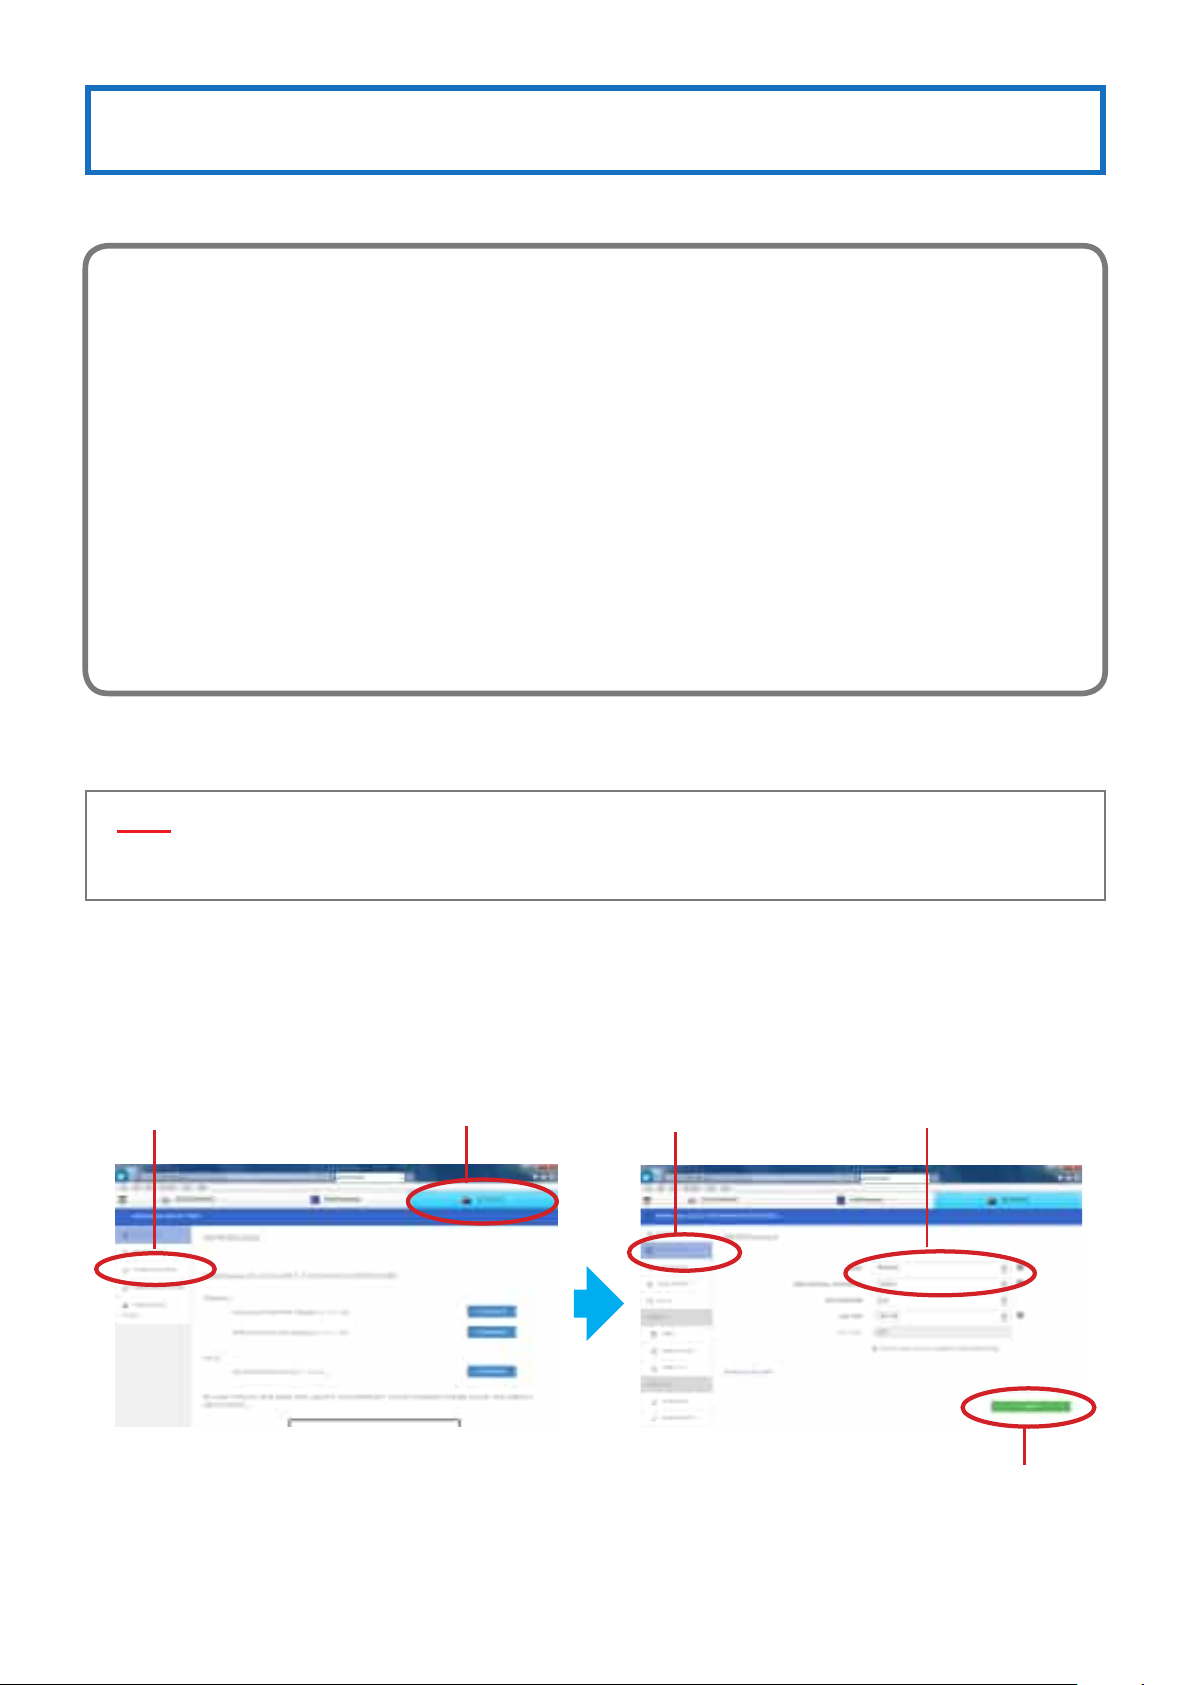
Click the [SETTINGS] tab.
.
1
Click [ADMINISTRATORMENU] on the left of the screen.
.
2
Click [MultiPresenter] on the left of the screen.
.
3
The screen for setting the MultiPresenter operating mode is displayed.
If [FREE] is displayed in the mode field, click the field and change it to [MANAGED].
.
4
Click [APPLY] in the lower right of the screen.
.
5
2
1
3 4
21
5
Page 22
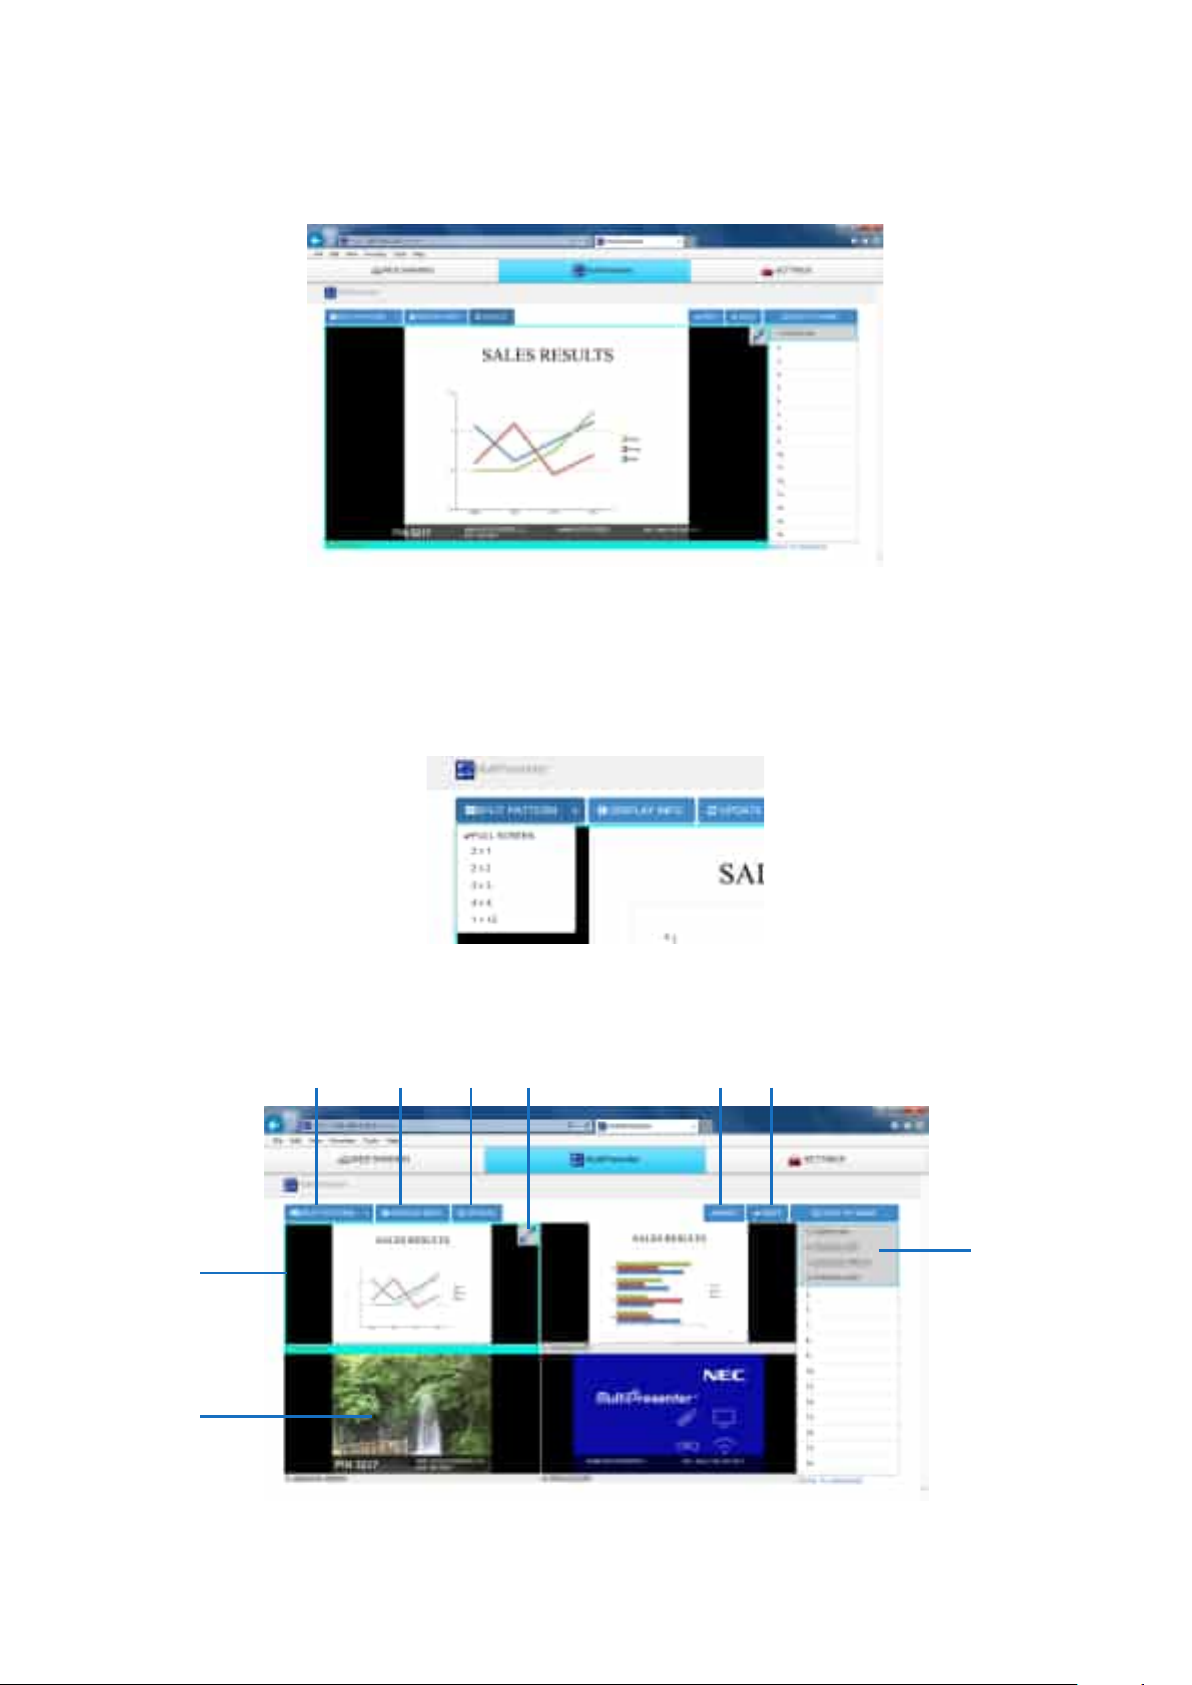
5-3-2. Displaying the MultiPresenter screen
Connect the MultiPresenter application of other devices to the MultiPresenter Stick.
.
1
In the MultiPresenter application, select the file and send the image to the MultiPresenter Stick.
.
2
Onthewebserverscreen,clickthe[MultiPresenter] tab.
.
3
A display like the one below appears.
5-3-3. Changing the number of panels on the screen
This procedure is continued from step 3 above.
Connect multiple devices to the MultiPresenter Stick and send images from the MultiPresenter application on all the
.
4
devices.
Click [SPLIT PATTERN] on the MultiPresenter screen.
.
5
A pull-down menu is displayed.
Click a pattern item on the screen.
.
6
When [2x2] is selected here, the screen changes as shown below.
•
About the split panel display screen
③ ④ ⑤ ⑥ ⑦ ⑧
②
①
⑨
22
Page 23
No./Name Description
• ThethumbnailsoftheimagessentfromtheMultiPresenterapplicationtotheMultiPresenter Stick are displayed here.
①
ThumbnailGallery
②
Focus • Thefocus is displayed with a light blue frame.
• Thestandbyscreenisdisplayedifnofileisselectedwitha MultiPresenterapplication
connected to the MultiPresenter Stick.
• ThissectionisdisplayedinblackifnoMultiPresenterapplicationisconnected.
③
SPLIT PATTERN
④
DISPLAYINFO. • Switcheswhetherornottodisplaythedeviceinformationonthescreen.
⑤
UPDATEIMAGE • Updatesthethumbnailstothelateststatus.
⑥
Maximize Screen
⑦
PREV, ⑧ NEXT
⑨
List of devices
• Changesthenumberofpanelsintowhichthescreenissplithere.Patterns2×1,2×2,3×3,
4×4 and 1+12 can be selected according to the purpose of the meeting.
• Clickthistomaximizetheimageinthefocus. Click again to return to the previous display
status.
• Whenthere aremultiplepagesofthumbnailimages,use thesetoswitchthedisplayed
page.
• ThisdisplaysthenamesofthedevicesconnectedtotheMultiPresenterStick’swebserver.
• Thepagecurrentlydisplayedonthescreenisindicatedingray.
• Thedisplaypositionscanberearrangedbydragginganddroppingdevicenamestothe
thumbnail image.
• Thedevicenamescanbesortedbynamebyclicking[SORTBYNAME].
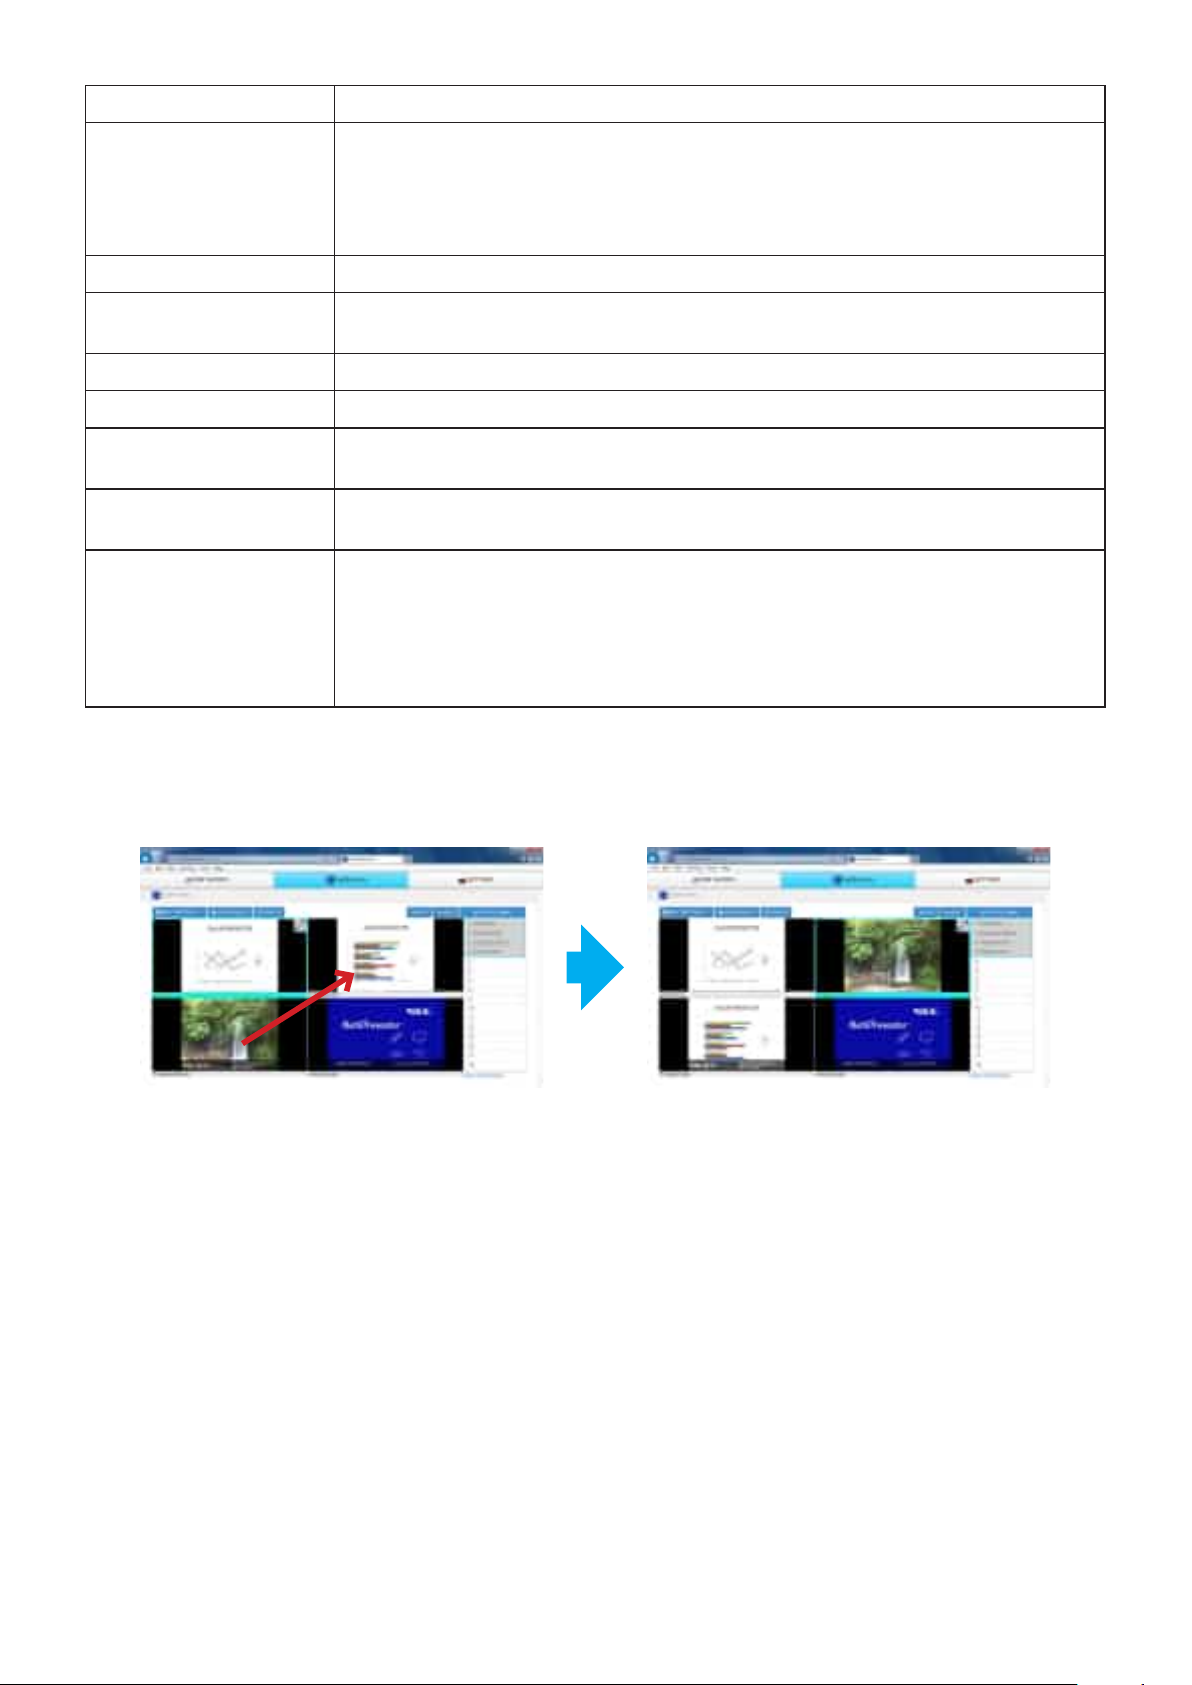
5-3-4. Changing the order of the images on the screen
Click one of the thumbnail images displayed on the MultiPresenter screen and drag and drop it to the frame to which you
want to move it.
The position in which the image is displayed is changed.
23
Page 24
5-4. Using a web browser to change the MultiPresenter Stick’s settings
(SETTINGS tab)
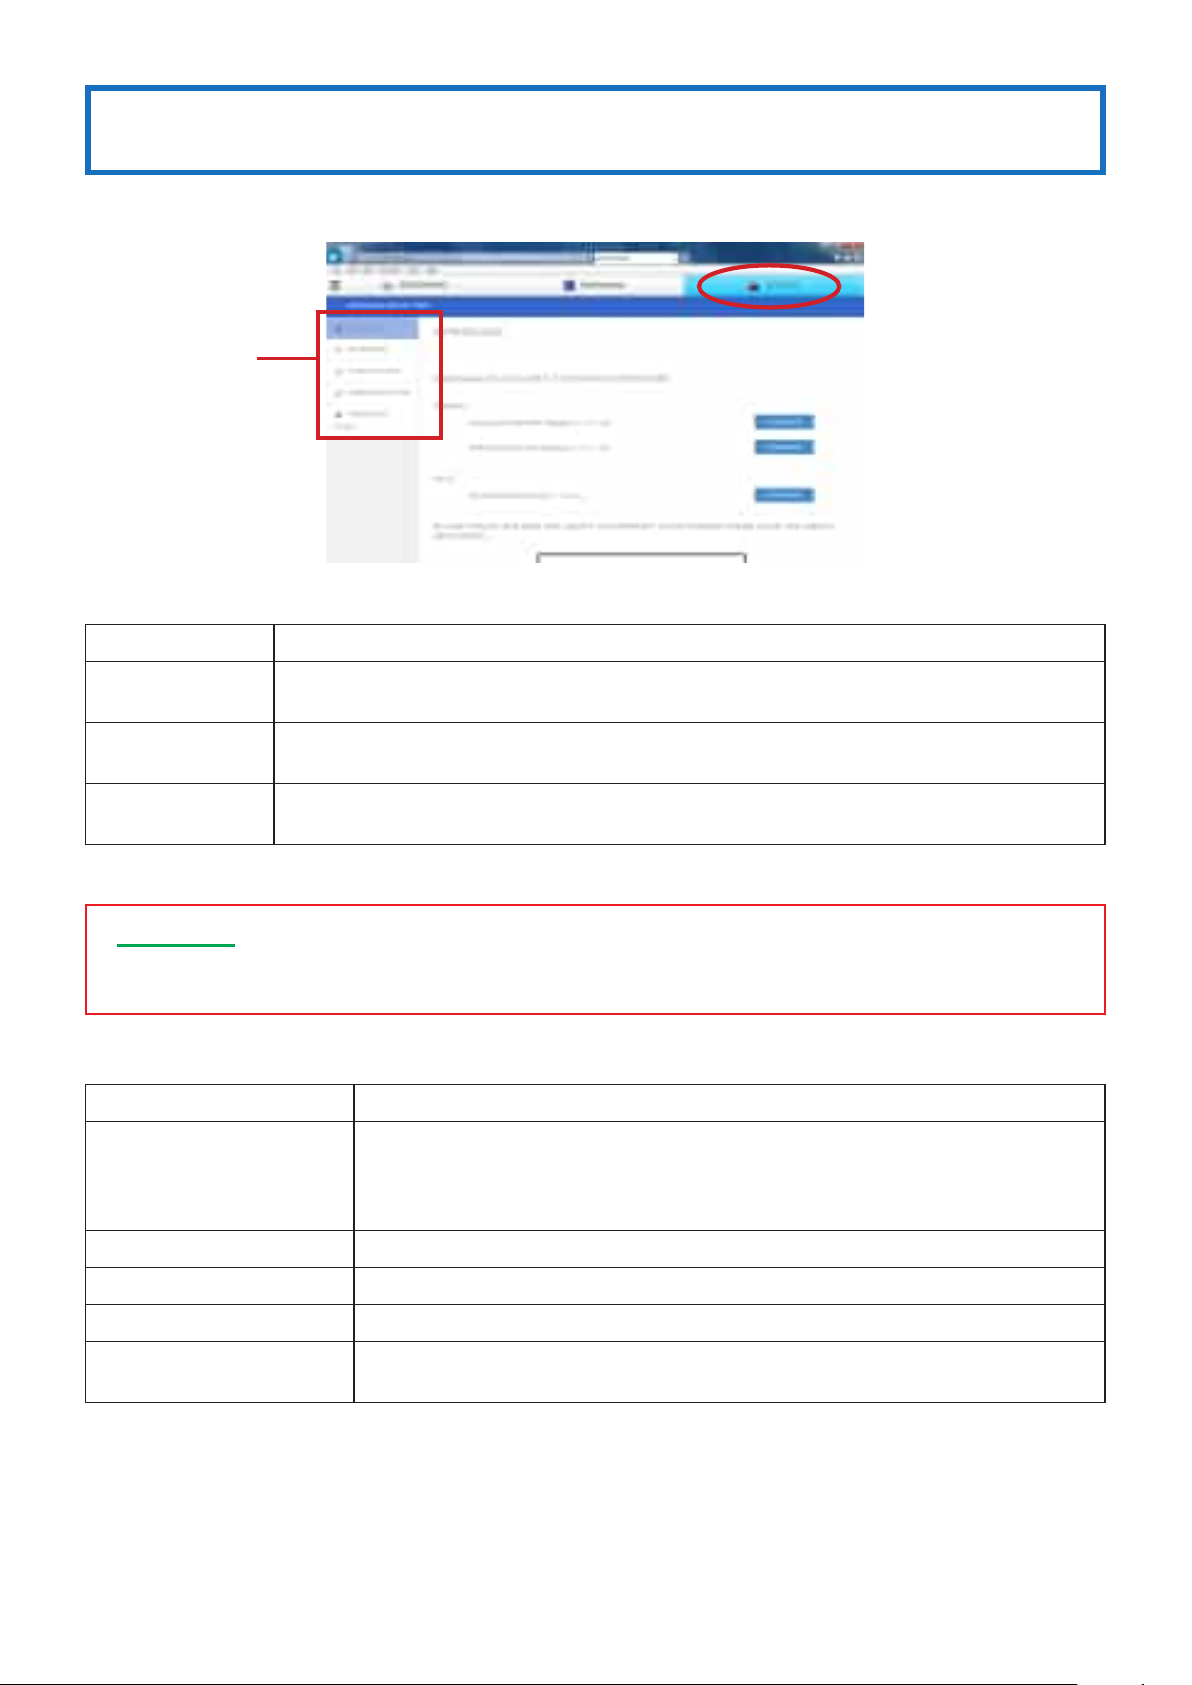
To display the settings menu, click the [SETTINGS]tabonthewebserverscreen.
Settings menu
There are three types of settings menu, depending on the user.
Types of menus Description
Normal menu
Moderator menu
Administrator menu
•
Detailed explanation of the settings menu
IMPORTANT
• Afterchangingthesettings on the settings menu, click the [APPLY] button in the lower right of that screen. The
change in the settings does not become effective unless the [APPLY] button is clicked.
This is the first menu that is displayed on the left of the screen when the [
web server screen is clicked.
This is the menu for the moderator when using the MultiPresenter Stick with multiple users connected to it. It is displayed when [
This is the menu for the administrator when using the MultiPresenter Stick with multiple users connected to it. It is displayed when [
MODERATORMENU]onthenormal menu is clicked.
ADMINISTRATORMENU]onthenormal menu is clicked.
SETTINGS] tabonthe
5-4-1. Normal menu
Menu item name Description
Displays a screen for downloading the
DOWNLOAD
INFORMATION Displays the MultiPresenter Stick’s device information and network information.
from the MultiPresenter Stick.
For the latest version of the MultiPresenterapplication (forWindows,OSX,iOSand An-
droid), see the NEC MultiPresenter website.
MultiPresenterapplication(forWindows/OSX)
MODERATORMENU Displays the Moderator menu.
ADMINISTRATORMENU Displays the Administrator menu.
OPENSOURCELICENSE
Displays a screen for downloading license information on the software used on the Multi-
PresenterStick(GPL,LGPL,andothersoftware).
24
Page 25
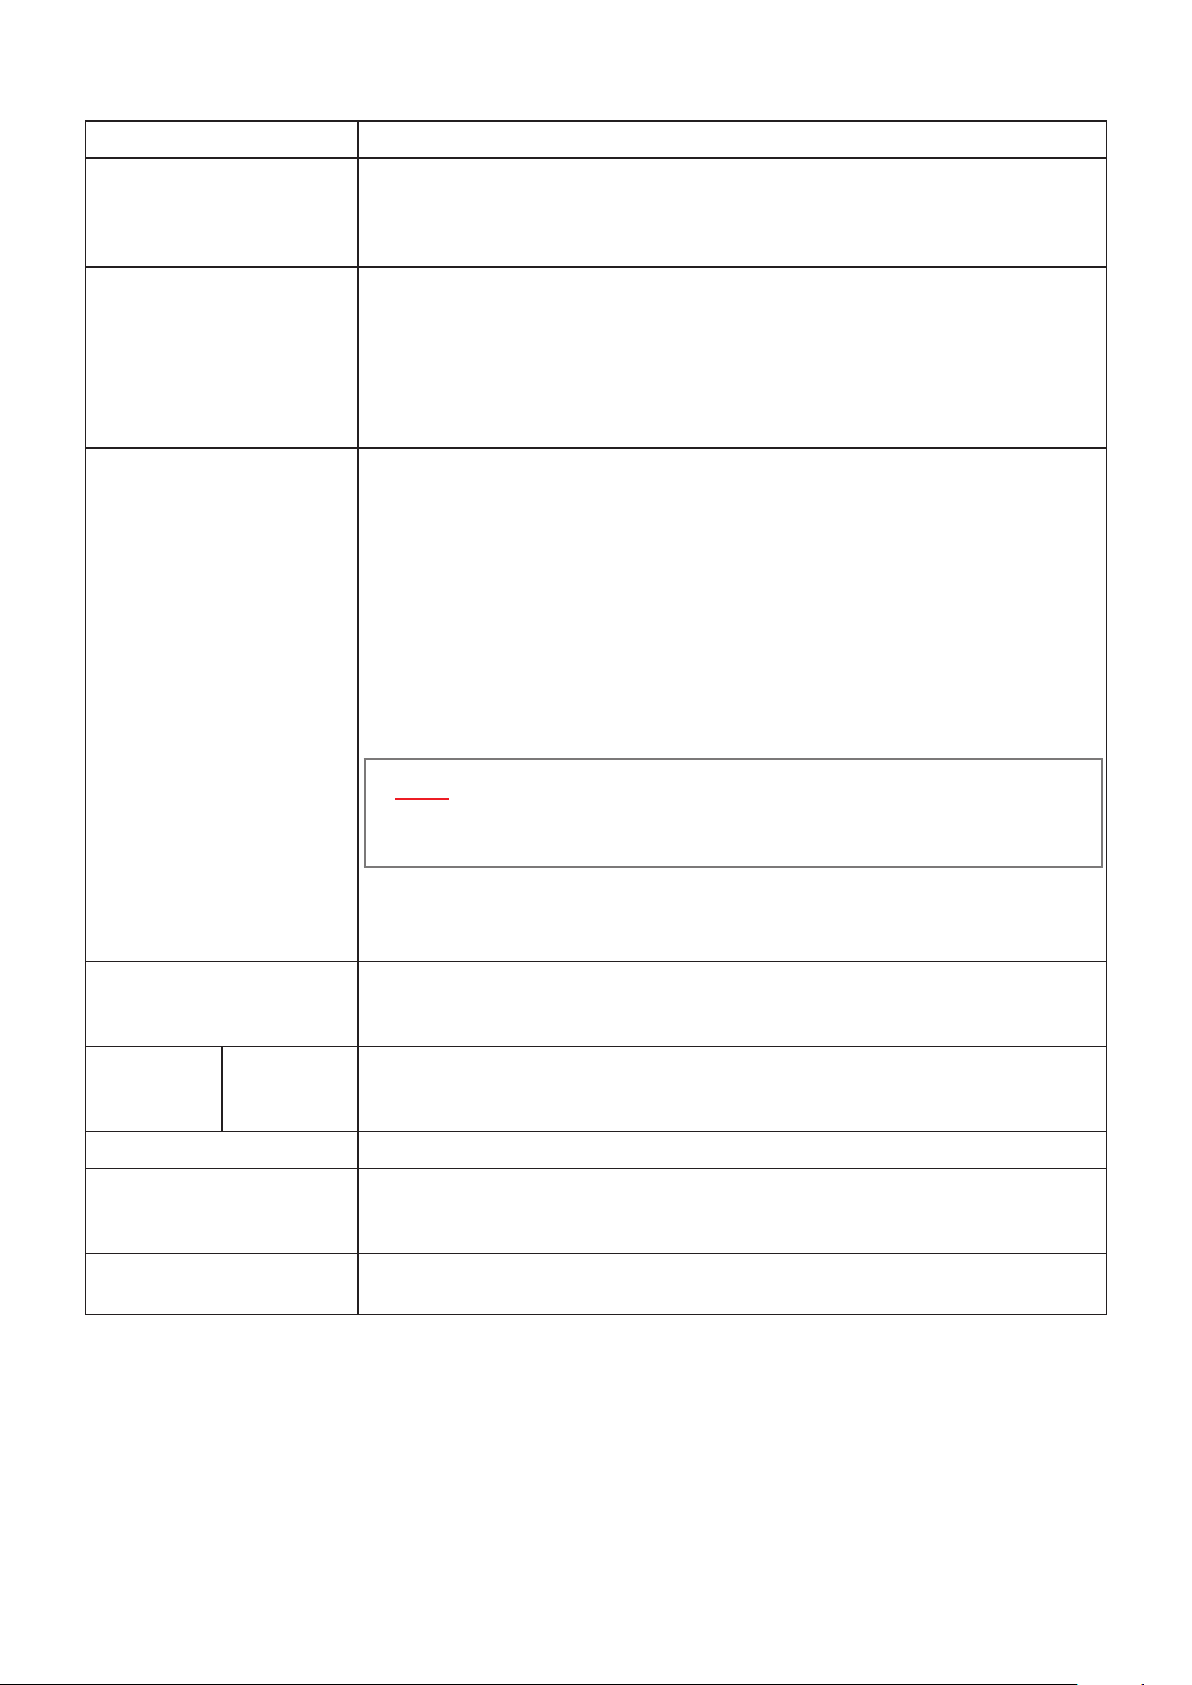
5-4-2. Moderator menu
Menu item name Description
DOWNLOAD
MultiPresenter
WEBSHARING
Displays a screen for downloading the
from the MultiPresenter Stick.
For the latest version of the MultiPresenterapplication(forWindows,OSX, iOSandAn-
droid), see the NEC MultiPresenter website.
•
MODE
Select whether to set MultiPresenter to the Free mode or Managed mode.
•
WEB CONTROL PASSWORD
When in the Managed mode, set whether to enable or disable the password used by the
moderator to connect to the web server.
•
BACKGROUND
Select whether to set the background color of the MultiPresenter screen to blue or black.
•
SCREEN SHARING
When [ENABLED] is selected, images sent from the MultiPresenter application to the MultiPresenter Stick and displayed are displayed on the web server screen. When [DISABLED]
is selected, the web server screen is not displayed.
•
ACCESS PASSWORD
Select whether or not to use a password when displaying the web sharing screen. When
[USE]isselected,theaccess password (a 4-digit number) is displayed in the lower right
of the MultiPresenter Stick’s start-up screen. If the setting is changed, the new setting becomes effective when all the sessions are closed (when all the devices are disconnected).
•
AUTO DELETE
Select whether to automatically delete the shared files when all the sessions are closed
or to keep them.
MultiPresenterapplication(forWindows/OSX)
NOTE
• Evenifsetto[DISABLED],the shared files are deleted when the MultiPresenter
Stick’s power is turned off.
•
DELETE SHARED FILES...
When the [
that time are deleted.
This is used to make settings related to the display of the MultiPresenter Stick’s start-up
GUIDEDISPLAY
PASSWORD MODERATOR
INFORMATION Displays the MultiPresenter Stick’s device information and network information.
RETURN/LOGOUT
RESTART
screen and the web server’s MultiPresenter screen. Any image file can be uploaded and
used as the wallpaper for the start-up menu.
This sets the password used when the moderator connects to the web server.
From 0 to 10 characters, consisting of letters, numbers and symbols, can be input. If no
letters are input, this means there is no password.
Returns to the normal menu.
[RETURN]isdisplayedifnomenupassword is set.
[LOGOUT]isdisplayedifamenupassword is set.
When the [RESTART] button in the lower right of the screen is clicked, the MultiPresenter
Stick is restarted. Restart the MultiPresenter Stick if its operation is unstable.
DELETESHAREDFILES...]buttononthescreenisclicked,allthelessharedat
25
Page 26

5-4-3. Administrator menu
Menu item name Description
DOWNLOAD
MultiPresenter
Displays a screen for downloading the
from the MultiPresenter Stick.
For the latest version of the MultiPresenterapplication(forWindows,OSX,iOS and An-
droid), see the NEC MultiPresenter website.
•
MODE
Select whether to set MultiPresenter to the Free mode or Managed mode.
•
WEB CONTROL PASSWORD
When in the Managed mode, set whether to enable or disable the password used by the
moderator to connect to the web server.
•
BACKGROUND
Select whether to set the background color of the MultiPresenter screen to blue or black.
•
PIN TYPE
Select the type of PIN code.
When [
ONE-TIME]isselected,whentheMultiPresenter Stick’s power is on but no function
is being used, a random PIN code is generated automatically approximately every 10 minutes.
When [STATIC] is selected, any 4-digit number can be set as the PIN code.
•
PIN CODE
If [STATIC] was selected as the PIN code type, input a 4-digit number.
•
UTILIZE PIN CODE AS CONNECTION PASSWORD
Set whether or not to use the PIN code as the password when connecting the MultiPresenter application to the MultiPresenter Stick.
When checked, the PIN code is used as the password.
When not checked, the PIN code is not used as the password.
MultiPresenterapplication(forWindows/OSX)
[Advanced settings]
•
COMMUNICATION SPEED LIMIT
Set the upper limit for the communication speed. If the communication speed is set to a
low value, transfer may not be smooth.
WEBSHARING
GUIDEDISPLAY
•
SCREEN SHARING
When [ENABLED] is selected, images sent from the MultiPresenter application to the MultiPresenter Stick and displayed are displayed on the web server screen. When [DISABLED]
is selected, the web server screen is not displayed.
•
ACCESS PASSWORD
Select whether or not to use a password when displaying the web sharing screen. When
[USE]isselected,theaccess password (a 4-digit number) is displayed in the lower right
of the MultiPresenter Stick’s start-up screen. If the setting is changed, the new setting becomes effective when all the sessions are closed (when all the devices are disconnected).
•
AUTO DELETE
Select whether to automatically delete the shared files when all the sessions are closed or
to keep them.
NOTE
• Evenifsetto[DISABLED],the shared files are deleted when the MultiPresenter
Stick’s power is turned off.
•
DELETE SHARED FILES...
When the [
that time are deleted.
This is used to make settings related to the display of the MultiPresenter Stick’s start-up
screen and the web server’s MultiPresenter screen. Any image file can be uploaded and
used as the wallpaper for the start-up menu.
DELETESHAREDFILES...]buttononthescreenisclicked,allthelessharedat
* Continued on next page.
26
Page 27
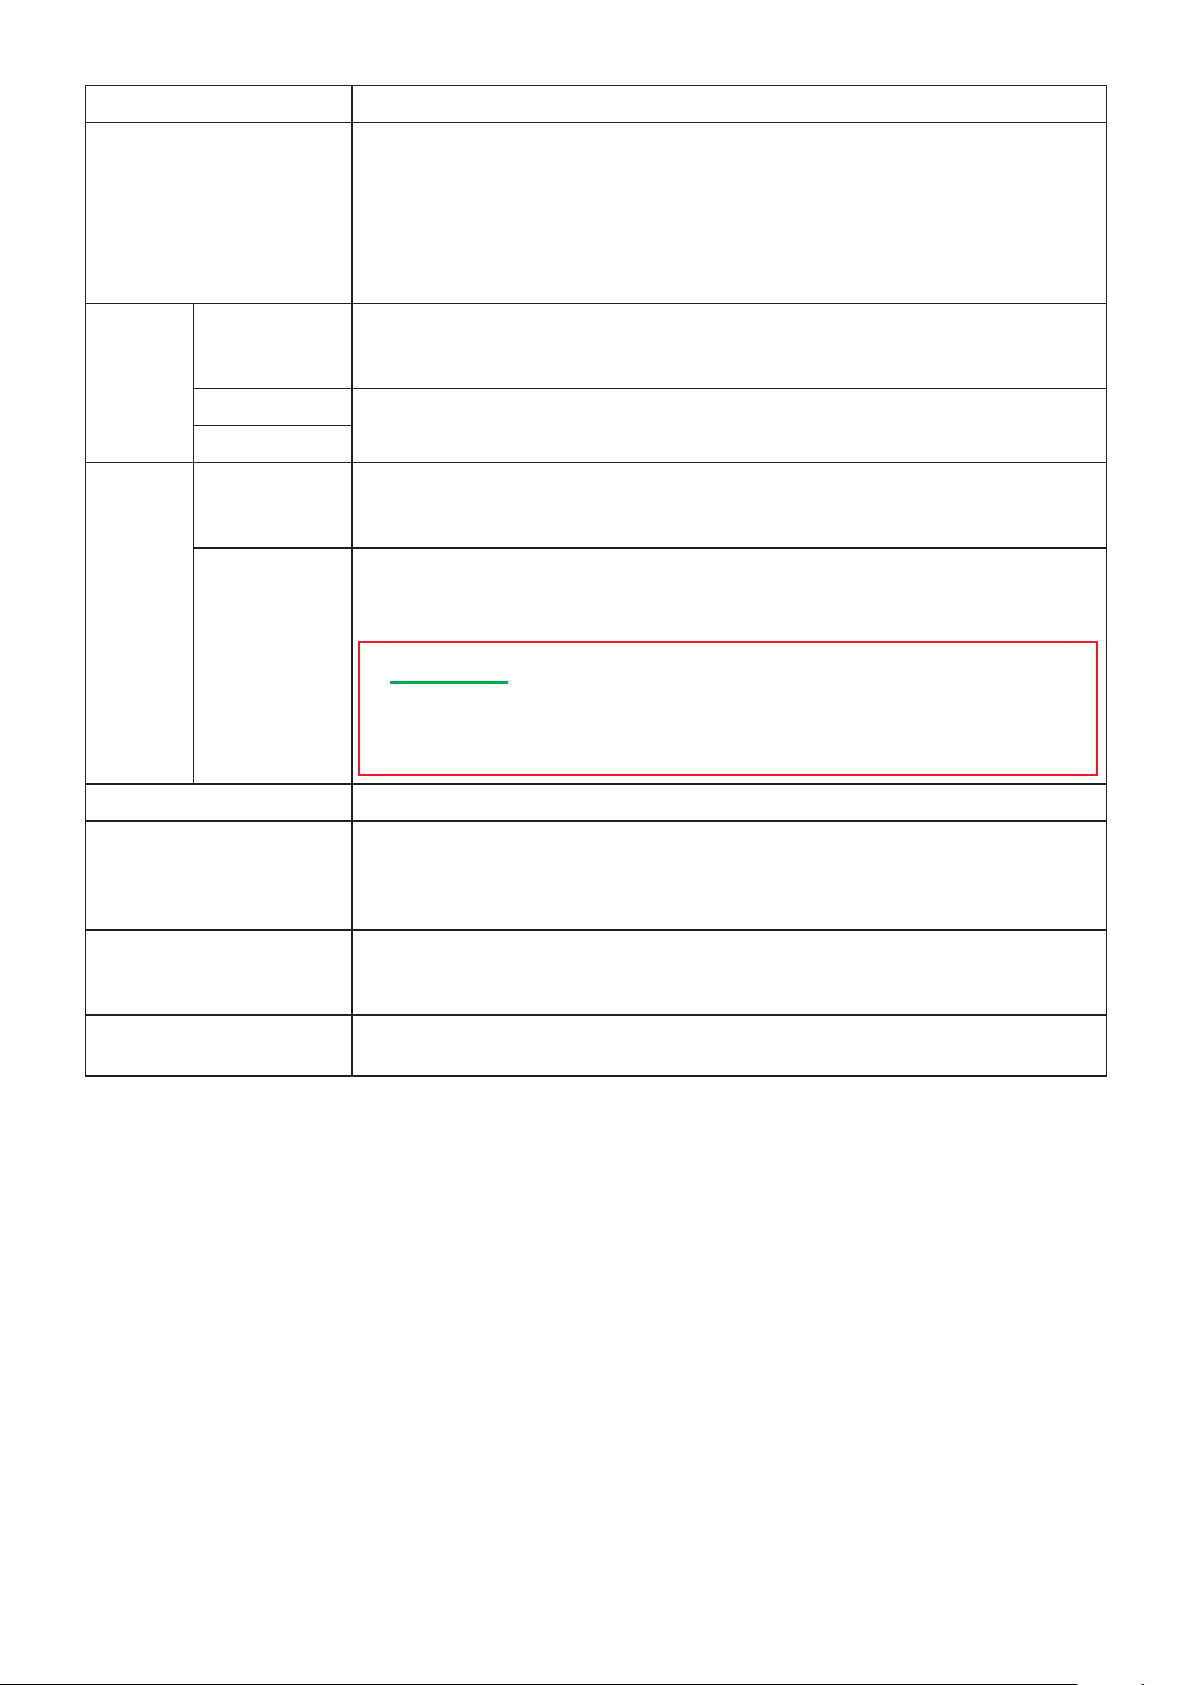
Menu item name Description
•
OUTPUT RESOLUTION
Select the resolution of the output from the MultiPresenter Stick. The resolution can be
settoAUTO,1920x1080,1280x800or1024x768.
DEVICE
NAME
NETWORK
WIRELESS LAN
WIRED LAN
MODERATOR
PASSWORD
•
DISPLAY LANGUAGE
Select the languagedisplayedonthescreen.Oneof11languages can be selected: Japa-
nese,English, French,German,Italian,Spanish,Portuguese,Swedish,Russian,Chinese
(simplied)andKorean.
Set the device name displayed for MultiPresenter application device searching and the
host name registered to the DNS via the
Stick’s serial number upon shipment from the factory.
* For an explanation, see “6. Setting the method of connecting to a wireless or wired
LAN”. (→ Page 28)
This sets the password used when the moderator connects to the web server.
From 0 to 10 characters, consisting of letters, numbers and symbols, can be input. If no
letters are input, this means there is no password.
Set the password for displaying the administrator menu.
From 0 to 10 characters, consisting of letters, numbers and symbols, can be input. If no
letters are input, this means there is no password.
DHCPserver.ThisissettotheMultiPresenter
ADMINISTRATOR
INFORMATION Displays the MultiPresenter Stick’s device information and network information.
FIRMWARE
RETURN/LOGOUT
RESTART
IMPORTANT
Note that if you forget the administrator password, it will be necessary to reset all the
settings from the MultiPresenter’s settings menu to restore the MultiPresenter Stick’s
settings to the factory defaults.
Displays the MultiPresenter Stick’s firmware version information.
Whenthe [STARTUPDATING]buttoninthelower rightofthescreenis clicked,itispossible to select the file with the latest firmware version that you have downloaded onto
your computer and update the firmware to the new version.
Returns to the normal menu.
[RETURN]isdisplayedifnomenupassword is set.
[LOGOUT]isdisplayedifamenupassword is set.
When the [RESTART] button in the lower right of the screen is clicked, the MultiPresenter
Stick is restarted. Restart the MultiPresenter Stick if its operation is unstable.
27
Page 28
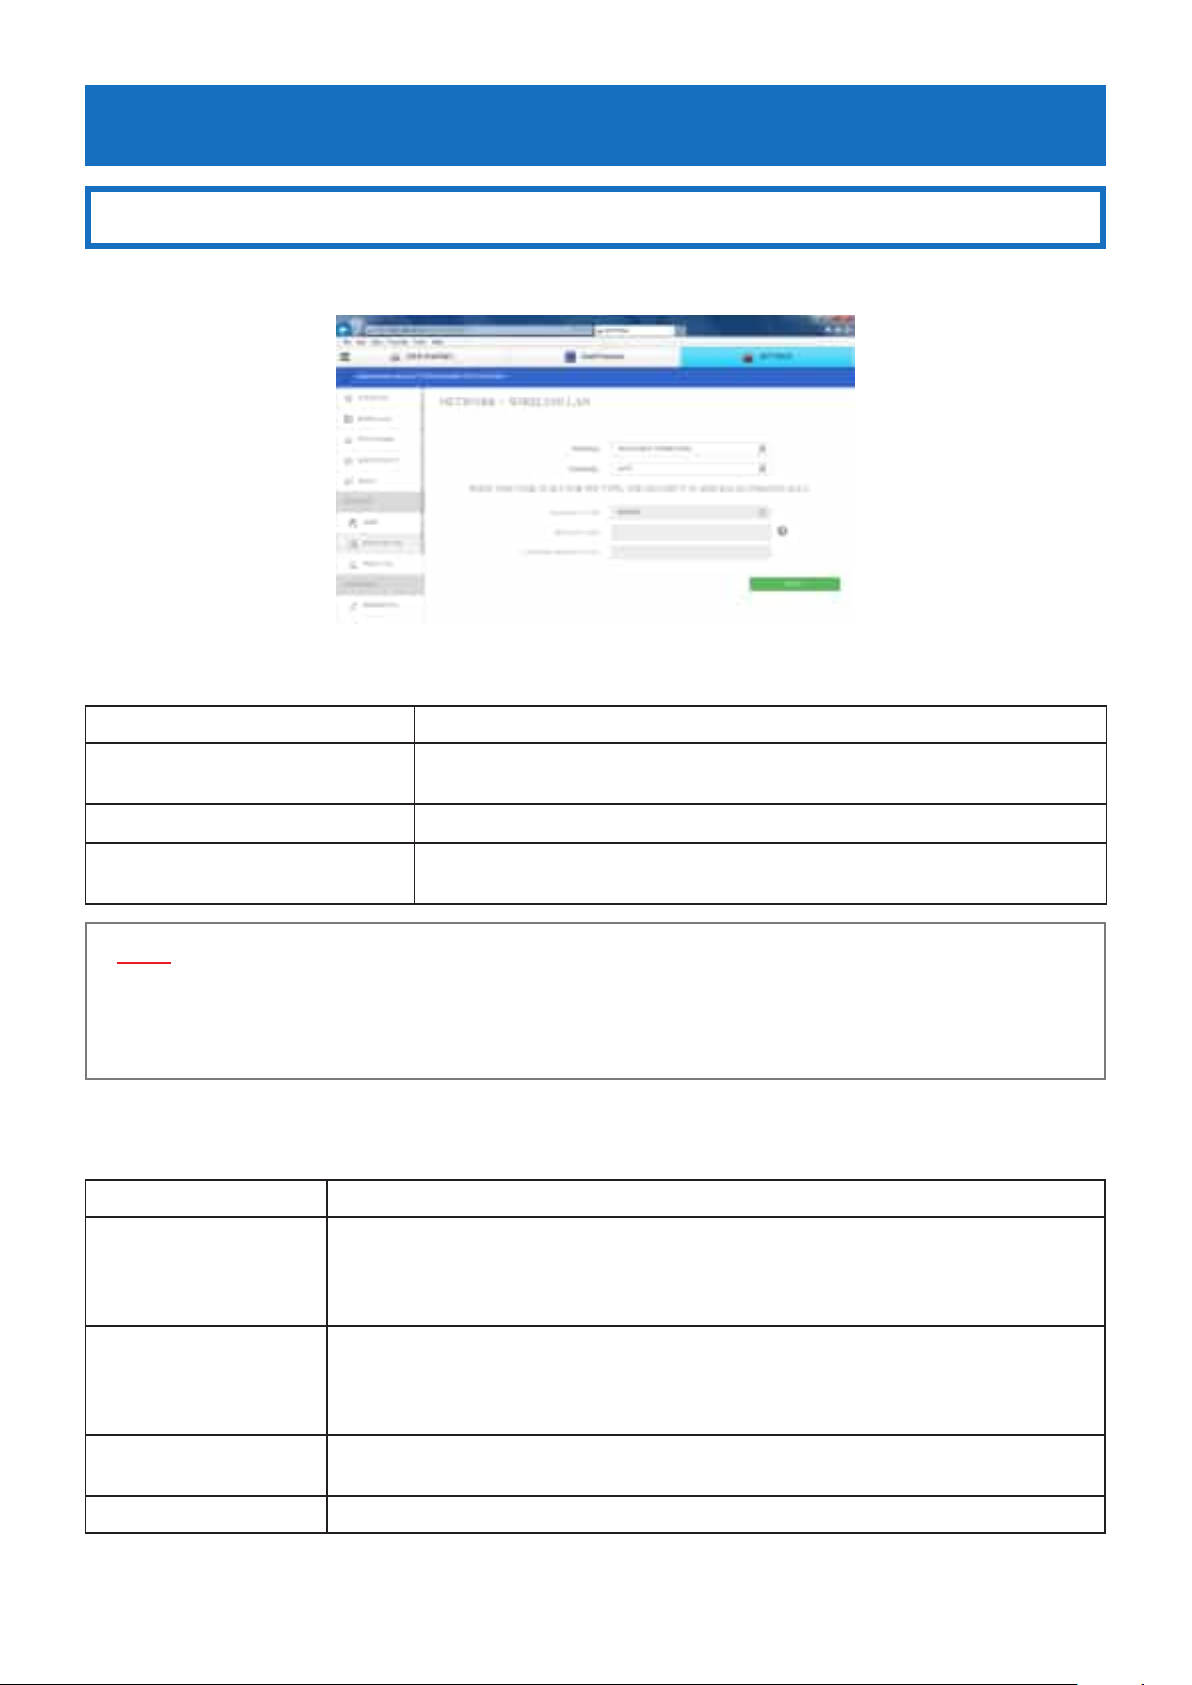
6. Setting the method of connecting to a wireless or wired LAN
6-1. Wireless LAN settings
To display the wirelessLANsettingsscreen,selectthe[SETTINGS]tabonthewebserverscreen,thenselect[ADMINISTRATOR
MENU]→ [NETWORK]→ [WIRELESS LAN], in that order.
•
About profiles
The MultiPresenter Stick’s wireless LAN function includes the three types of profiles described below.
Profile name Description
INTELLIGENT CONNECTION
INFRASTRUCTURE
SIMPLE ACCESS POINT
NOTE
• Whensetto[SIMPLE ACCESSPOINT]or[INTELLIGENTCONNECTION], the MultiPresenter Stick’s IP address is
“192.168.120.1”. The subnet mask is “255.255.255.0”.
• Whenset to[SIMPLE ACCESSPOINT]or[INTELLIGENTCONNECTION], up to 12 units can be connected simultaneously. Normally we recommend connecting up to about 8 units.
Easily connect with the MultiPresenter application installed on a computer or
smartphone.
Connect the MultiPresenter Stick to an existing access point.
Usethe MultiPresenterStickasa simple access point to connect computers or
smartphones.
6-1-1. INTELLIGENT CONNECTION setting items
Below we describe the setting items available when the [INTELLIGENTCONNECTION] profile is selected.
Menu item Description
Select the wireless channel.
CHANNEL
• When[AUTO]isselected,surroundingaccess point channels are searched for when recon-
necting to the network, and the least used of the channels (1/6/11) is selected.
• Thisissetto[AUTO]uponshipmentfromthefactory.
Select the securitytype(WPA2-PSK).
SECURITYTYPE
SECURITYKEY
CONFIRMSECURITYKEY For confirmation, input the security key again.
• [SECURITYTYPE]canbeselectedwhen[PIN TYPE] is set to [STATIC] in the [MultiPresenter]
settings.
• Thisissetto[DISABLED]uponshipmentfromthefactory.
Settheencryptionkeywhen[WPA2-PSK]isselectedfor[SECURITYTYPE].
• 8to63letters,numbersorsymbols
28
Page 29
6-1-2. INFRASTRUCTURE setting items
Below we describe the setting items available when the [INFRASTRUCTURE]prole is selected.
Menu item Description
DHCP/IP ADDRESS/
MASK/GATEWAY
SITESURVEY
SSID
SECURITYTYPE
SUBNET
Set these according to the instructions of your network administrator.
Usethistoconductasite survey and display the access points that were found.
• Upto64access points are displayed.
• Iftherearemorethanoneaccess points with the same SSID, only one is displayed.
• Thetargetaccesspointsarethosewhosesecuritysettingsareeitherdisabled,WPA2-PSK
orWPA/WPA2-PSK.
• Whentheaccess point’s security is enabled, this is indicated by a lock mark.
NOTE
• Site survey cannot be selected when a wired network adapter is connected to the
MultiPresenter Stick.
Set the SSID.
• Thisissetto[NECDS]uponshipmentfromthefactory.
• 1to32letters,numbersorsymbols
Select the security type.
[DISABLED]: Security is disabled.
[WPA2-PSK]:Thesecurity key input field is displayed.
[WPA/WPA2-PSK]:Thesecurity key input field is displayed.
• Thisissetto[DISABLED]uponshipmentfromthefactory.
• Thesecurity key consists of 8 to 63 letters, numbers or symbols.
Settheencryptionkeywhen [WPA2-PSK]or[WPA/WPA2-PSK]is selectedfor[SECURITY
SECURITYKEY
CONFIRMSECURITYKEY For confirmation, input the security key again.
TYPE].
• 8to63letters,numbersorsymbols
6-1-3. SIMPLE ACCESS POINT setting items
Below we describe the setting items available when the [SIMPLE ACCESSPOINT]profile is selected.
Menu item Description
Select the wireless channel.
CHANNEL
SSID
SECURITYTYPE
SECURITYKEY
CONFIRMSECURITYKEY For confirmation, input the security key again.
• When[AUTO]isselected,surroundingaccess point channels are searched for when re-
connecting to the network, and the least used of the channels (1/6/11) is selected.
• Thisissetto[AUTO]uponshipmentfromthefactory.
Set the SSID.
• ThisissettotheMultiPresenterStick’sserialnumberuponshipmentfromthefactory.
• 1to32letters,numbersorsymbols
Select the securitytype(WPA2-PSK).
• Thisissetto[DISABLED]uponshipmentfromthefactory.
Settheencryptionkeywhen[WPA2-PSK]isselectedfor[SECURITYTYPE].
• 8to63letters,numbersorsymbols
29
Page 30
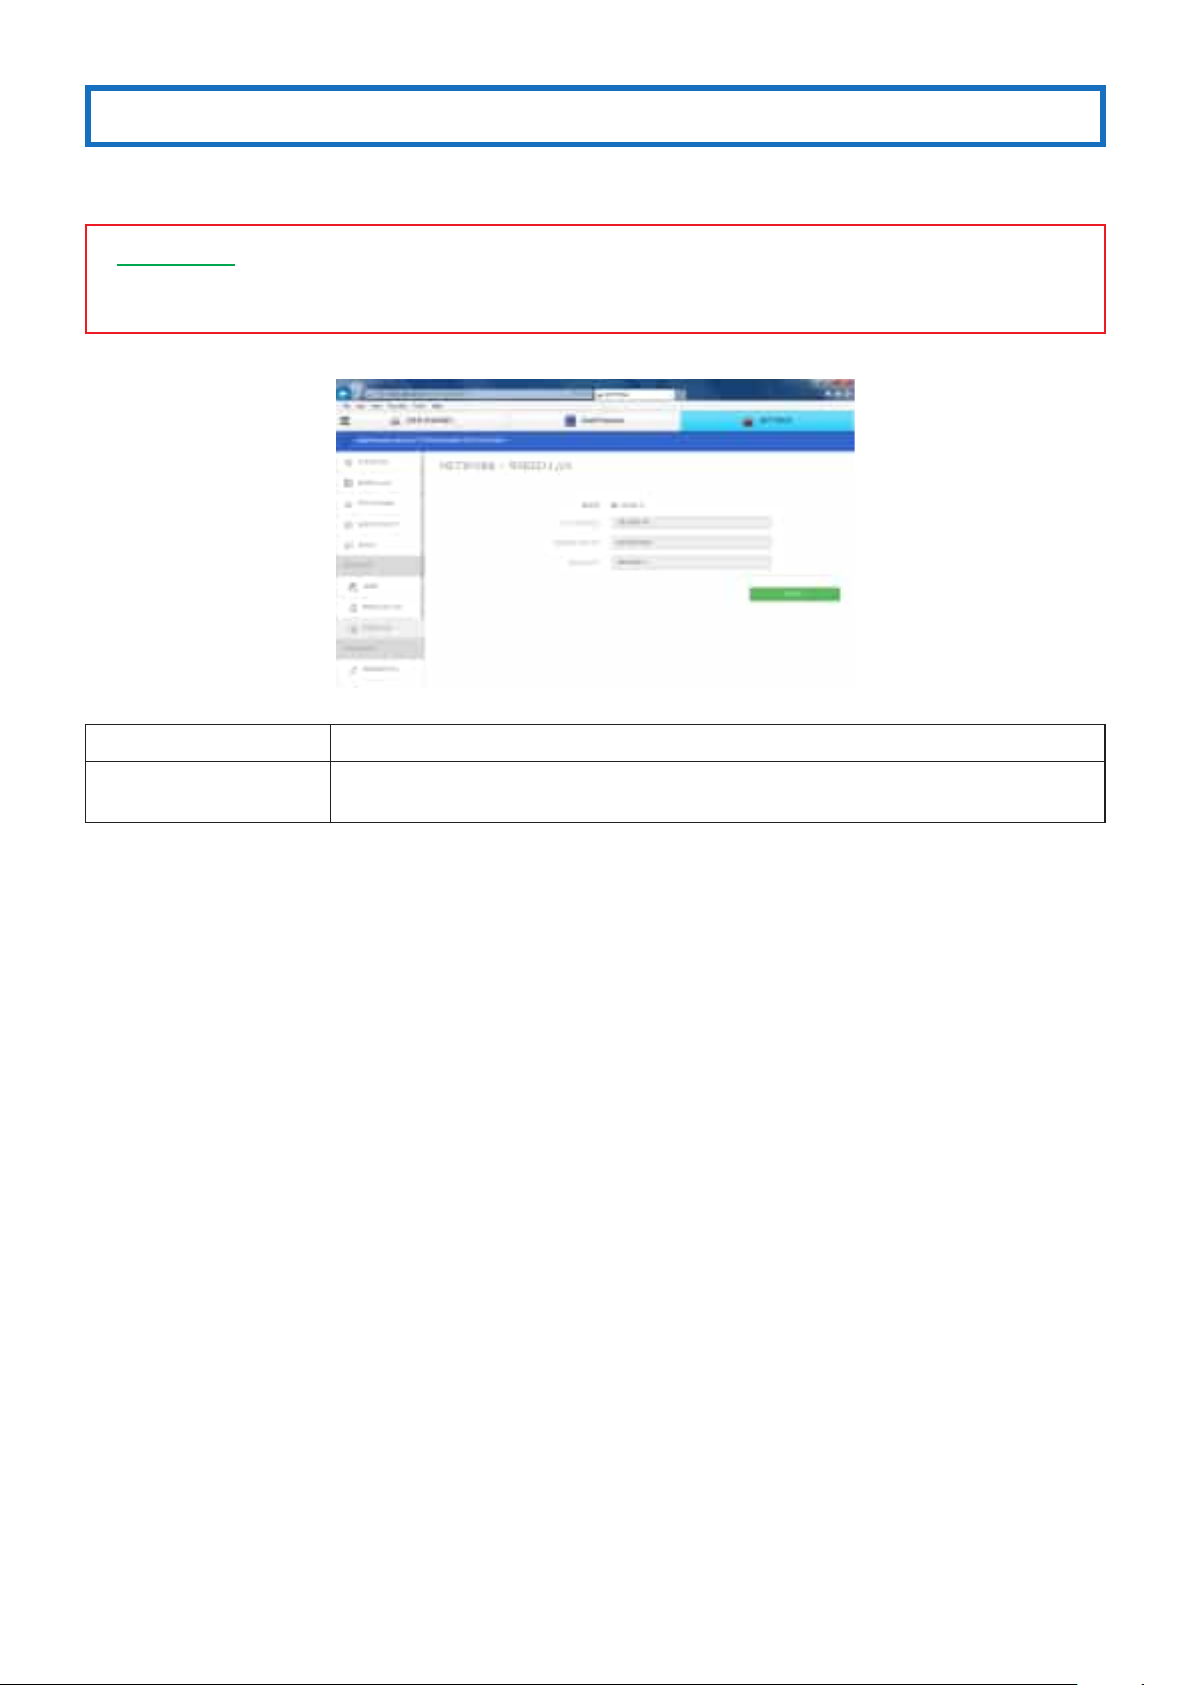
6-2. Wired LAN settings
To display the wiredLANsettingsscreen,selectthe[SETTINGS]tabonthewebserverscreen,thenselect[ADMINISTRATOR
MENU]→ [NETWORK]→ [WIRED LAN], in that order.
IMPORTANT
A commercially available wired network adapter (a product verified by NEC) must be purchased in order to connect the
MultiPresenter Stick to a wired LAN.
Menu item Description
DHCP/IP ADDRESS/
MASK/GATEWAY
SUBNET
Set these according to the instructions of your network administrator.
30
Page 31
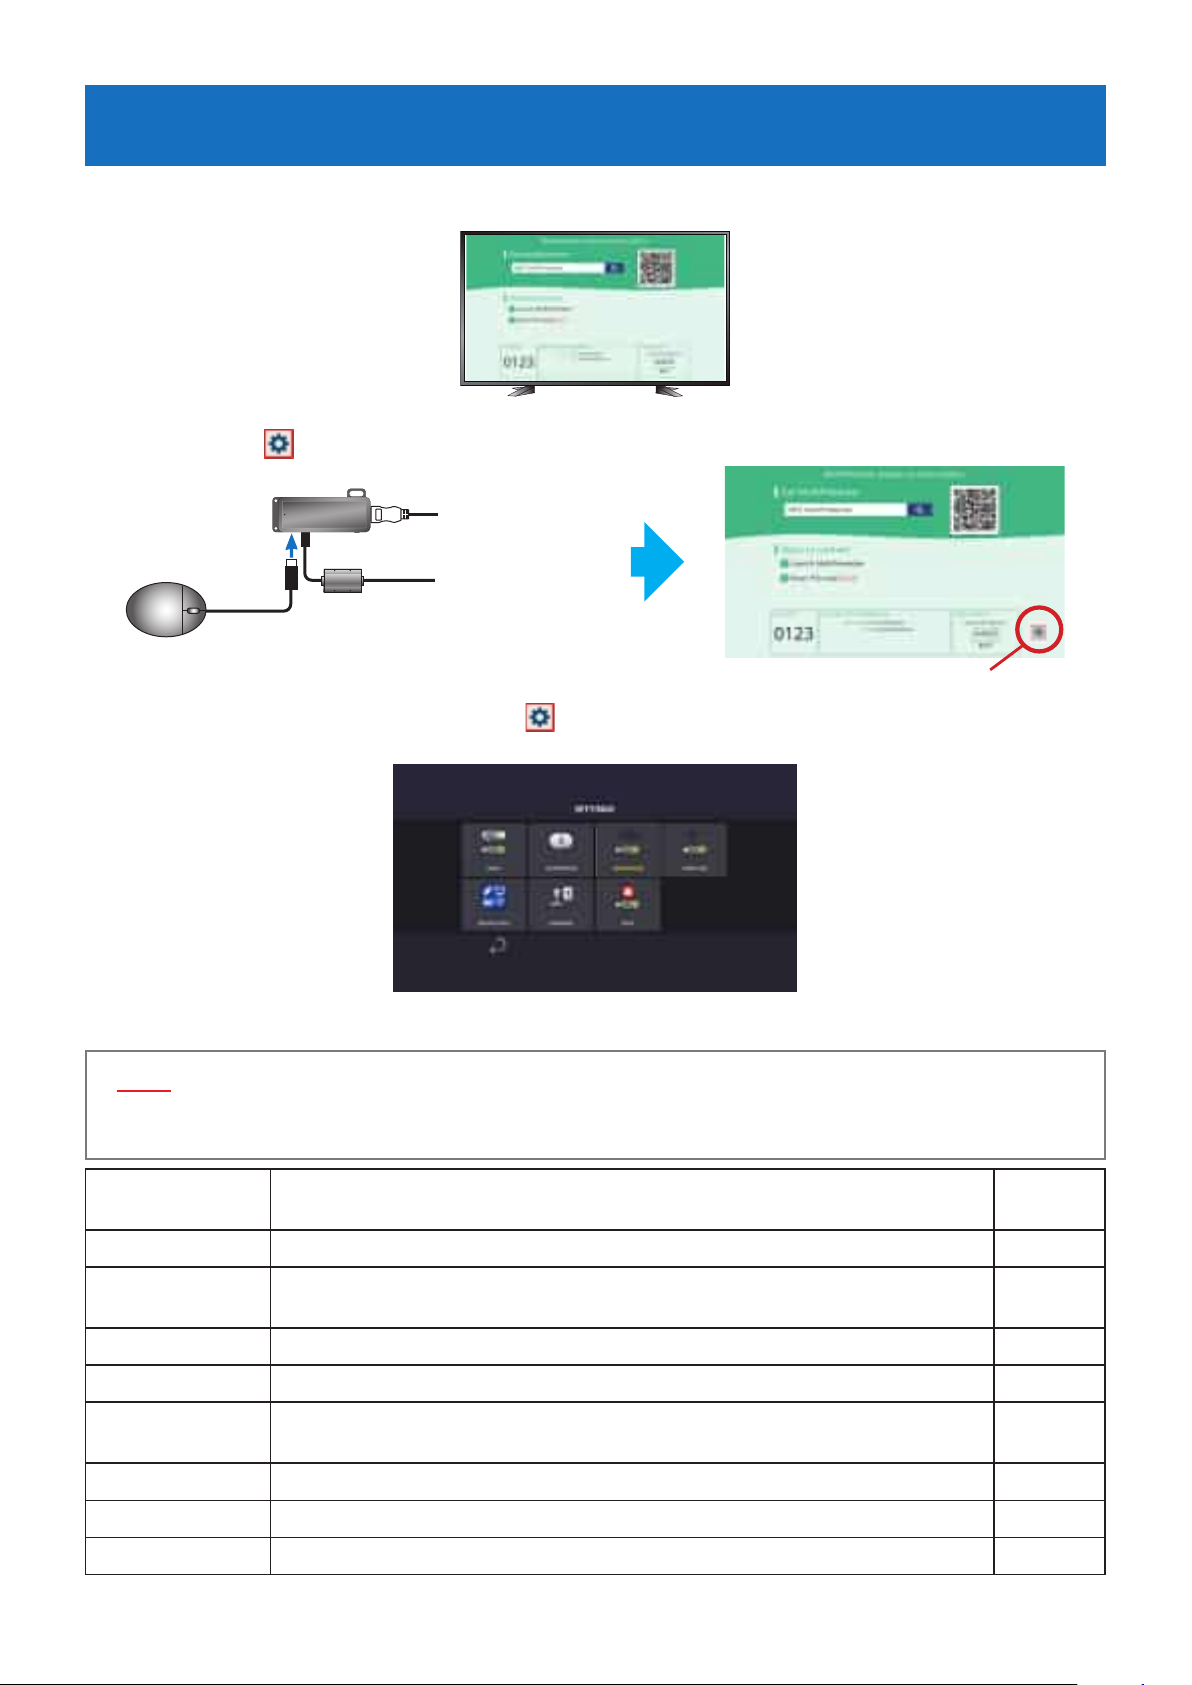
7. Displaying the MultiPresenter Stick’s settings menu
The MultiPresenter Stick’s settings menu can be displayed and the MultiPresenter Stick’s settings can be changed.
Display the MultiPresenter Stick’s start-up menu.
.
1
Connect a commercially available USBmousetotheMultiPresenter Stick.
.
2
The settings icon ( ) appears in the lower right of the start-up screen.
HDMI input port
AC adapter
Settings icon
OperatingtheUSBmouse,clickthesettings icon ( ).
.
3
The MultiPresenter Stick’s settings menu appears.
•
Settings menu functions
NOTE
• Thesettings at [SETTINGS] on the web server screen and those in the MultiPresenter Stick’s settings menu settings
are reflected on one another. For this reason, there is no need to change both settings.
Menu item Description
NAME Set the MultiPresenter Stick’s device name and host name. 27
INFORMATION
Display the information when the MultiPresenter Stick is connected to a wireless or
wired LAN.
Related
page
24
WIRELESS LAN Make the settings for connecting the MultiPresenter Stick to a wireless LAN. 28
WIRED LAN Make the settings for connecting the MultiPresenter Stick to a wired LAN. 30
MultiPresenter
LANGUAGE Set the MultiPresenter Stick’s display language. 27
RESET Reset the MultiPresenter Stick’s settings to the factory defaults. −
(Return icon) Return to the start-up screen. −
Make the settings when the MultiPresenter application is connected to the MultiPresenter Stick.
26
31
Page 32
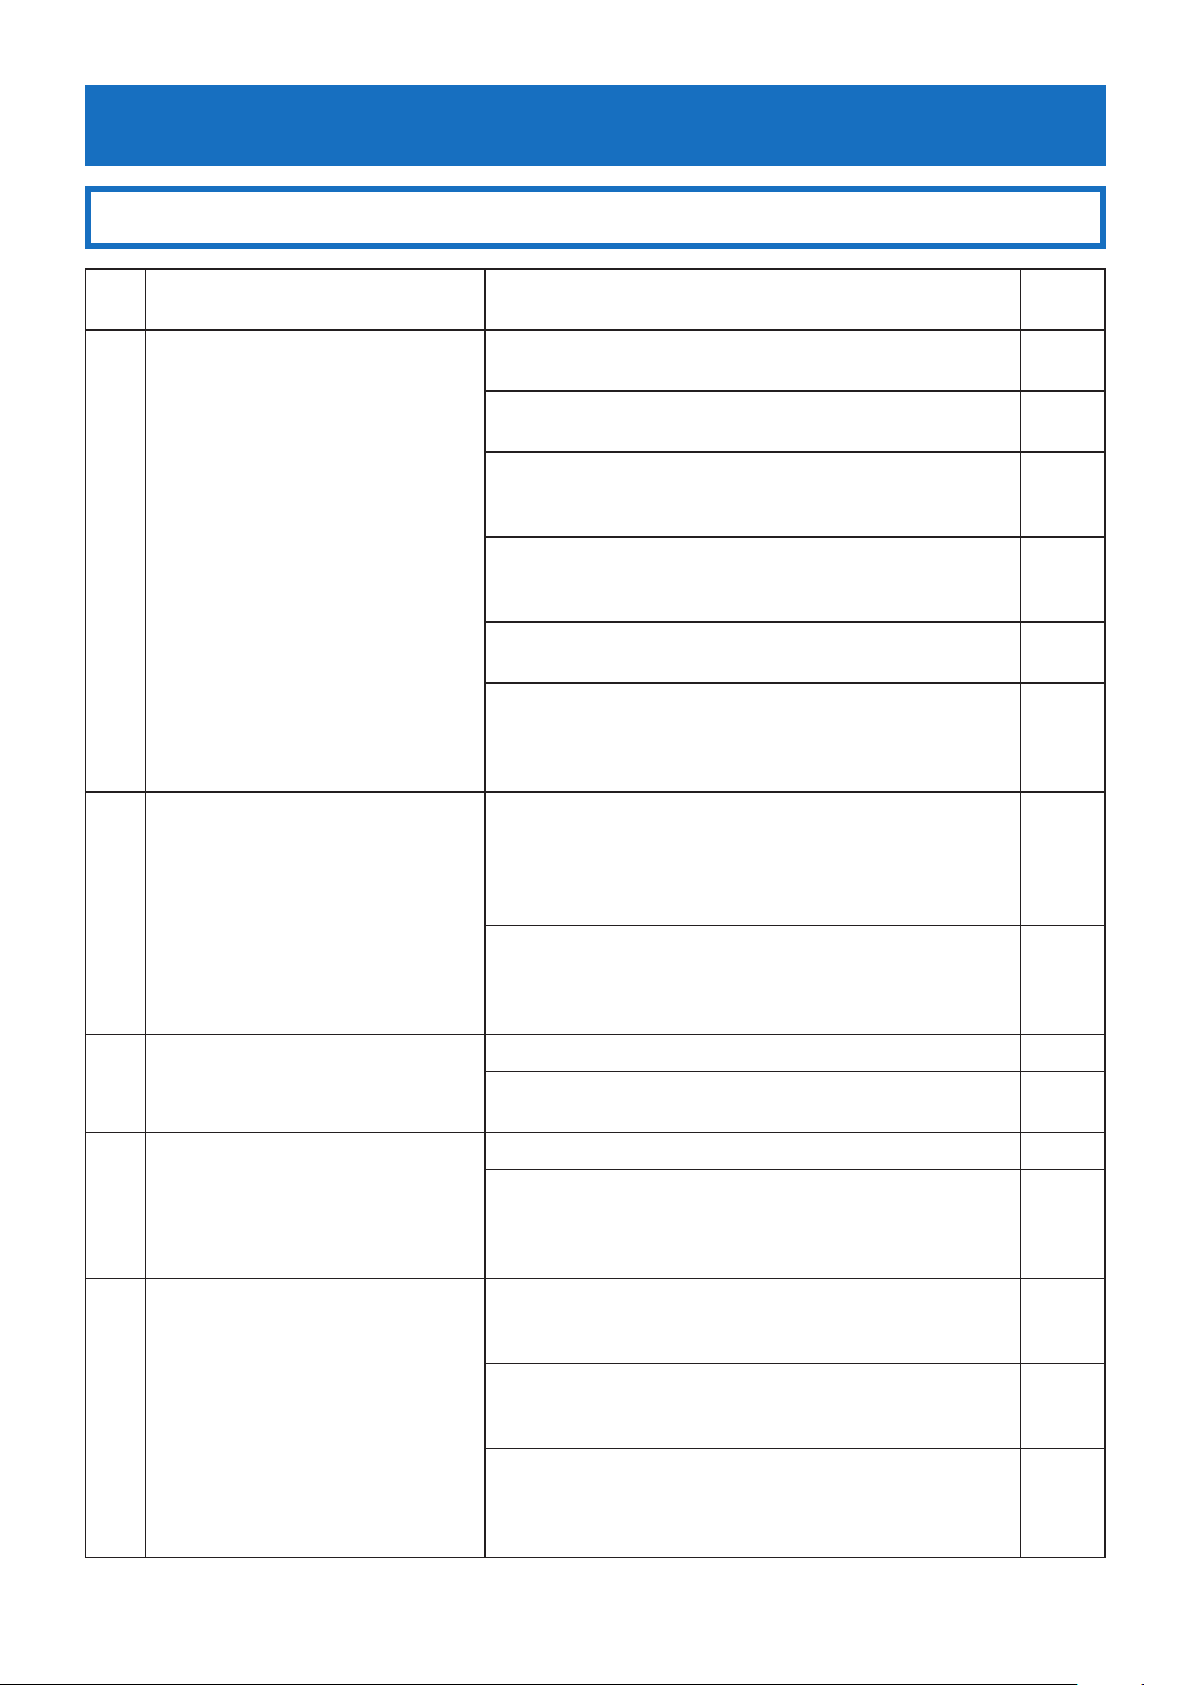
8. Appendix
8-1. Troubleshooting
No. Symptom Check
Check that the power indicator on the MultiPresenter Stick is
lit.
Check that the wireless LAN function on the device you are using is enabled.
When the MultiPresenter Stick’s wireless LAN profile is set to
[
INTELLIGENTCONNECTION] or [SIMPLEACCESSPOINT], select
It is not possible to connect to
1
the MultiPresenter Stick from the
MultiPresenter application.
Communications between the
MultiPresenter application and
2
MultiPresenter Stick are unstable.
Communications are interrupted during use.
the MultiPresenter Stick’s SSID.
When set to the Infrastructure mode, select the SSID of the
wireless LAN access point to which the MultiPresenter Stick is
connected.
When a wired network adapter is connected to the MultiPresenter Stick, the wired LAN connection has priority.
Network communications may be limited by the firewall functionoftheOSorsecuritysoftware.Inthiscase,makethenecessary settings to allow communications with the MultiPresenter
application.
To use under good wireless LAN conditions, move the MultiPresenter Stick to a position in which the signals reach it properly.
It may be difficult to receive the signals if there are obstacles
between the device you are using and the MultiPresenter Stick.
DonotputmetalobjectsintodirectcontactwiththeMultiPresenter Stick. Doing so will adversely affect antenna sensitivity.
Keepmetalobjectsatleast3mmawayfromtheMultiPresenter
Stick.
Refer to
page
7
−
13
14
13
14
30
−
−
−
The power indicator on the
3
MultiPresenter Stick does not light.
The MultiPresenter Stick's start-up
4
screen is not displayed on the image
display device.
Images are not displayed in full screen.
5
The image’s aspect ratio is off.
* Continued on next page.
Plug the AC adapter securely into the MultiPresenter Stick. 8
If the AC adapter is connected to a power tap with an on/off
function, check that the power tap's switch is turned on.
Check that the image cable is properly connected. 8
Check that the power of both the MultiPresenter Stick and the
image display device is turned on and that the input port to
which the MultiPresenter Stick is connected is selected on the
image display device.
Check whether the connected image display device is compatible with the resolutions supported by the MultiPresenter Stick
and check the image display device’s screen settings.
The resolution can also be specified at the [
TION]itemunder [SETTINGS]→ [ADMINISTRATORMENU] →
[DEVICE] on the MultiPresenter Stick’s web server screen.
Turn on the power of the image display device before connecting the AC adapter to the MultiPresenter Stick.
When the AC adapter is connected, the MultiPresenter Stick’s
power turns on automatically.
OUTPUTRESOLU-
−
8
27
27
8
32
Page 33

No. Symptom Check
As far as possible, set the MultiPresenter Stick in a position in
which it is visible from the device from which images are being
sent.
Also try moving the device from which images are being sent
Images are sometimes interrupted or
6
displayed with a delay.
closer and changing the direction of the antenna.
Such symptoms can occur happen if the network is busy. −
Refer to
page
−
7 Videos do not play smoothly.
You would like to restore the
8
MultiPresenter Stick’s settings to the
factory defaults.
You would like to limit access to web
9
share images.
You would like to limit access to the
10
administrator menu on the web server
screen.
Select the optimum channel at [CHANNEL
→
[ADMINISTRATORMENU] → [WIRELESS LAN] on the Multi-
Presenter Stick’s web server screen.
From the MultiPresenter application on the device from which
the video is being sent, select [SETTINGS] → [IMAGE], then
lower the [
values.
Notethatdependingonthe OSyouareusing,the[MAXIMUM
FRAME RATE] item may not be displayed. Also, depending on
the your wireless LAN environment, it may not be possible to
achieve good performance.
Display the MultiPresenter Stick’s settings menu and select [RESET].
Set the [
MINISTRATORMENU] → [WEBSHARING] on the MultiPresenter
Stick’s web server screen.
Set the [ADMINISTRATOR
ISTRATORMENU] → [PASSWORD] on the MultiPresenter Stick’s
web server screen.
PICTUREQUALITY] and [MAXIMUMFRAMERATE]
ACCESSPASSWORD]itemunder[SETTINGS]→ [AD-
]itemunder [SETTINGS]→ [ADMIN-
]under[SETTINGS]
28
29
−
31
26
27
33
Page 34
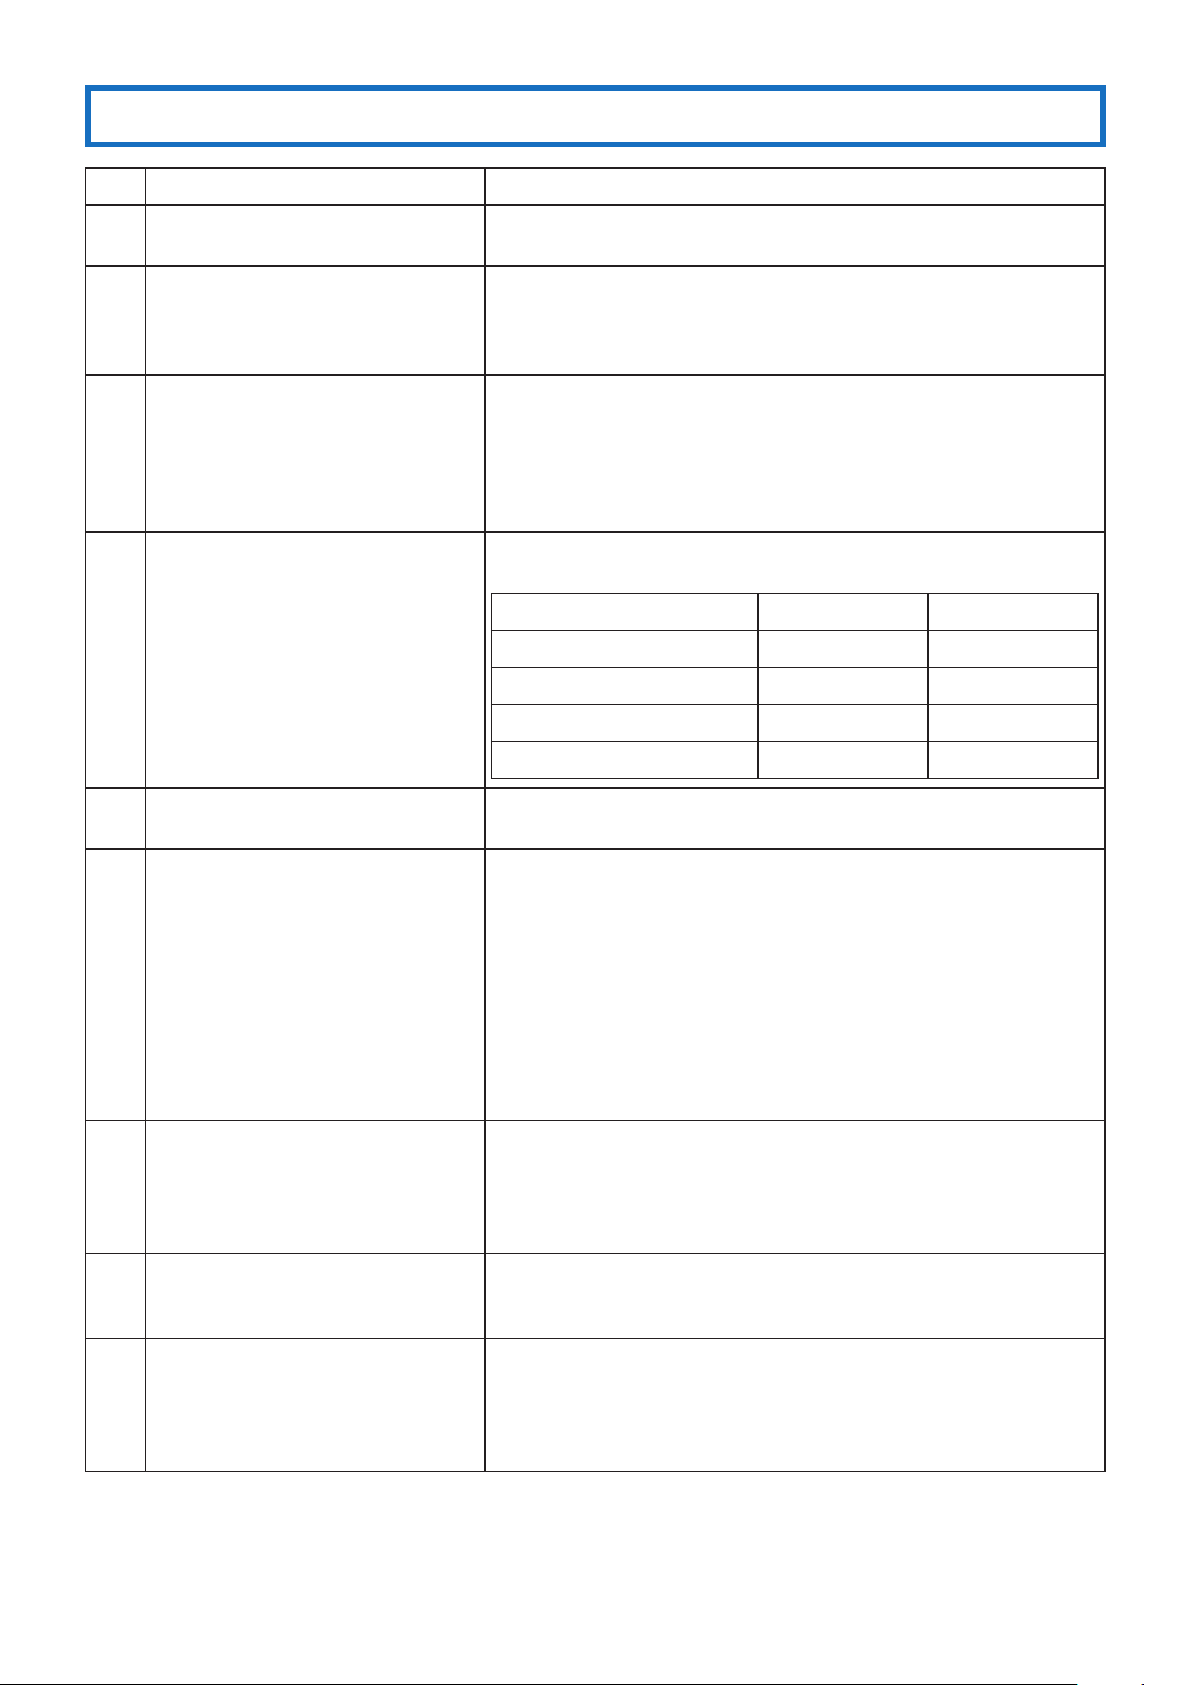
8-2. Frequently asked questions
No. Question Answer
Is it possible to play the audio along
1
with the video?
Is it possible to use the MultiPresenter
2
Stick at the same time as the Internet?
Is it possible to connect the
3
MultiPresenter Stick to a company’s
internal wireless LAN?
What protocols and port numbers does
4
the MultiPresenter Stick use?
Yes, if you use the Windows version of the MultiPresenter application.
Note that sound is only played when the image is displayed in full screen.
Access to the Internet is possible when the MultiPresenter Stick is connected to an existing network that is connected to the Internet.
When connecting the MultiPresenter Stick to an existing network by
wireless LAN, use the Infrastructure mode.
TheMultiPresenterSticksupportsIEEE802.11b/g/n2.4GHzandWPA/
WPA2-PSK.Connection is possibleifthewirelessLANnetworkallows
connection with these standards.
Notethat 5GHz,WPA/WPA2-EAP(environmentrequiringauthentication)
and wireless LAN environments requiring an authentication procedure
using a web browser are not supported.
The MultiPresenter Stick uses the protocols and port numbers shown below.
Features Protocol Port #
Image Transmission TCP 8322
ProjectorSearch UDP 5320
PC Control TCP 7142
HTTPServer HTTP 80
What encryption technology is used
5
when transmitting images?
What is the communication traffic vol-
6
ume when using Wi-Fi?
Can images be transferred simultane-
7
ously to multiple MultiPresenter Sticks?
Does the MultiPresenter Stick or the
8
MultiPresenter application ever automatically send data to external servers?
Is it possible to operate the
9
MultiPresenter Stick for 24 hours
continuously?
The transmitted data is encrypted in AES. For wireless communications,
securityisensuredbyWPA/WPA2-PSK.
The communication traffic volume when using the MultiPresenter Stick
is not fixed. It changes constantly according to the image resolution and
changes in the image.
Below are some approximate values with good signal conditions.
Network transmission quantity: [Min. 50kbps*¹ × no. transmitting devices
connected] to [Max. approx. 40Mbps*²]
*1 With no changes on the screen of the transmitting device
*2 WithFullHDresolutionandthescreenchangingconstantly(However,theapproxi-
mate maximum value will be lower than this depending on the quality and frame
rate settings on the transmitting side as well as the device’s performance and resolution.)
There are no limits by design, but the number of devices to which images
can be transferred simultaneously depends on your usage environment.
NEC recommends using a maximum of 4 MultiPresenter Sticks. The number of MultiPresenter Sticks that can be used may be lower than this
when sending videos.
The MultiPresenter application only communicates with external servers
tocheckforthelatestversion.Otherwisedataisneversentexternally.
As long as the environmental temperature is within the specified operating temperature range (0 to 40°C/32 to 104°F), there is no problem operating the MultiPresenter Stick for 24 hours continuously.
To use it for longer, please turn the power off then restart the MultiPresenter Stick as necessary.
* Continued on next page.
34
Page 35

No. Question Answer
The shared files are automatically deleted when all the web sharing devices are disconnected. (by default)
Are shared files sent from a web brows-
10
er to the MultiPresenter Stick using the
web sharing function saved as such?
Thisauto deletionfunctioncanbedisabledatthe [AUTODELETE] item
under[SETTINGS]→[ADMINISTRATORMENU]→[WEBSHARING]onthe
web server screen.
However,the sharedfilesaredeletedwhen theMultiPresenterStick’s
power is turned off.
What is the volume of files that can be
11
shared via the MultiPresenter Stick with
the web sharing function?
A total of 200 MB for all files can be saved.
There are no restrictions to the file types.
35
Page 36
8-3. Updating the firmware version
The MultiPresenter Stick’s firmware version can be updated to the latest version by selecting [ADMINISTRATORMENU] →
[FIRMWARE] on the web server screen.
IMPORTANT
• DonotturnothepoweroftheMultiPresenterStickorthecomputeryouareusingwhilethefirmware is being updated.
• Donotrefreshthepageonyourwebbrowser’scomputerwhilethefirmware is being updated.
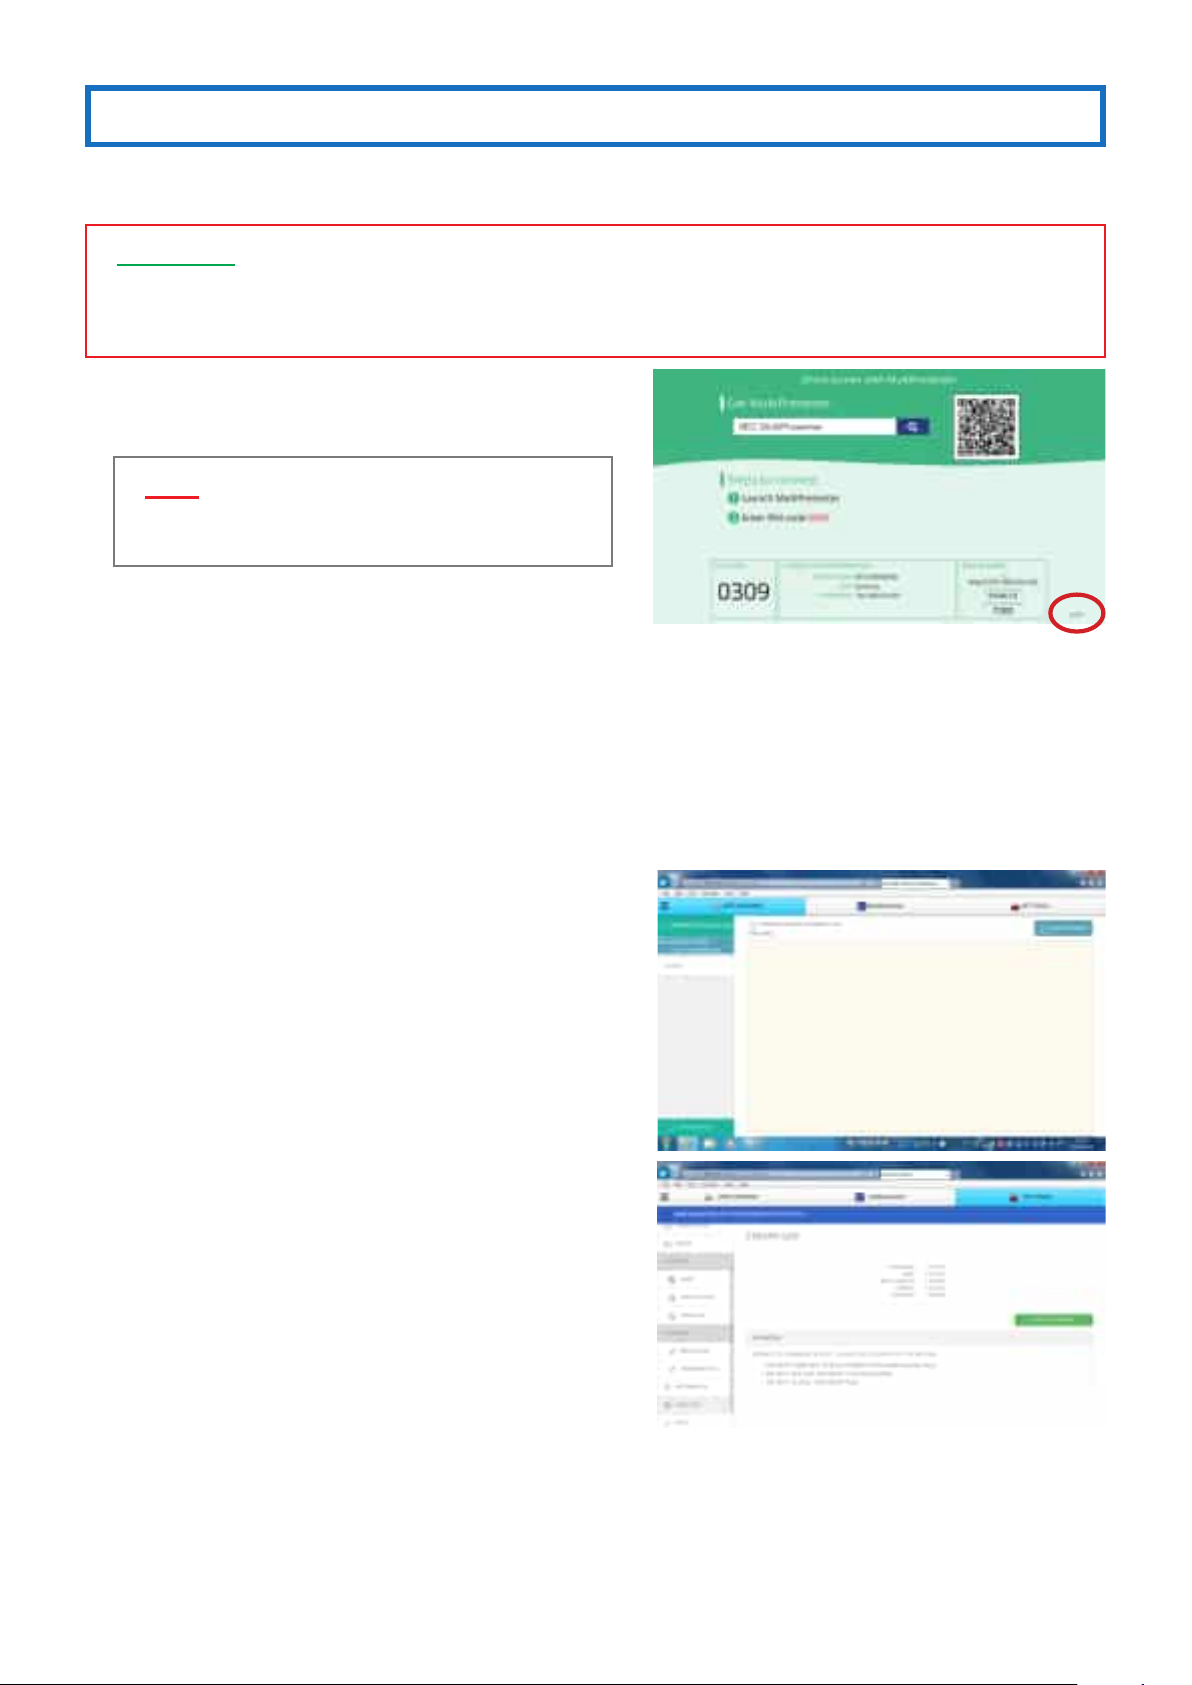
Check the MultiPresenter Stick’s firmware version number.
.
1
The version number is displayed in the lower right of the
MultiPresenter Stick’s start-up screen.
NOTE
• Forfirmware version numbers early than “1.01”, the
version number is not display on the start-up screen.
UseawebbrowseronacomputertoaccesstheNECdown-
.
2
load page.
• URL:http://www.nec-display.com/dl/en/soft/multipresenter/mp10rx/eula.html
On the download page, check whether the MultiPresenter
.
3
Stick’s firmware has been updated.
If the firmware has been updated, save the firmware update
.
4
le(e.g.:DS1-MP10RX_FIRM_Vxxxxxx.BIN)toanyfolderon
your computer.
Connect your computer to the MultiPresenter Stick over the
.
5
network and display the web server screen.
Selectthe [SETTINGS]tab→ [ADMINISTRATORMENU] →
.
6
[FIRMWARE].
A screen for updating the firmware is displayed.
Click [STARTUPDATING…] in the lower right of the firmware
.
7
screen.
The firmware select window is displayed.
36
Page 37
Select the update file saved in step 4.
.
8
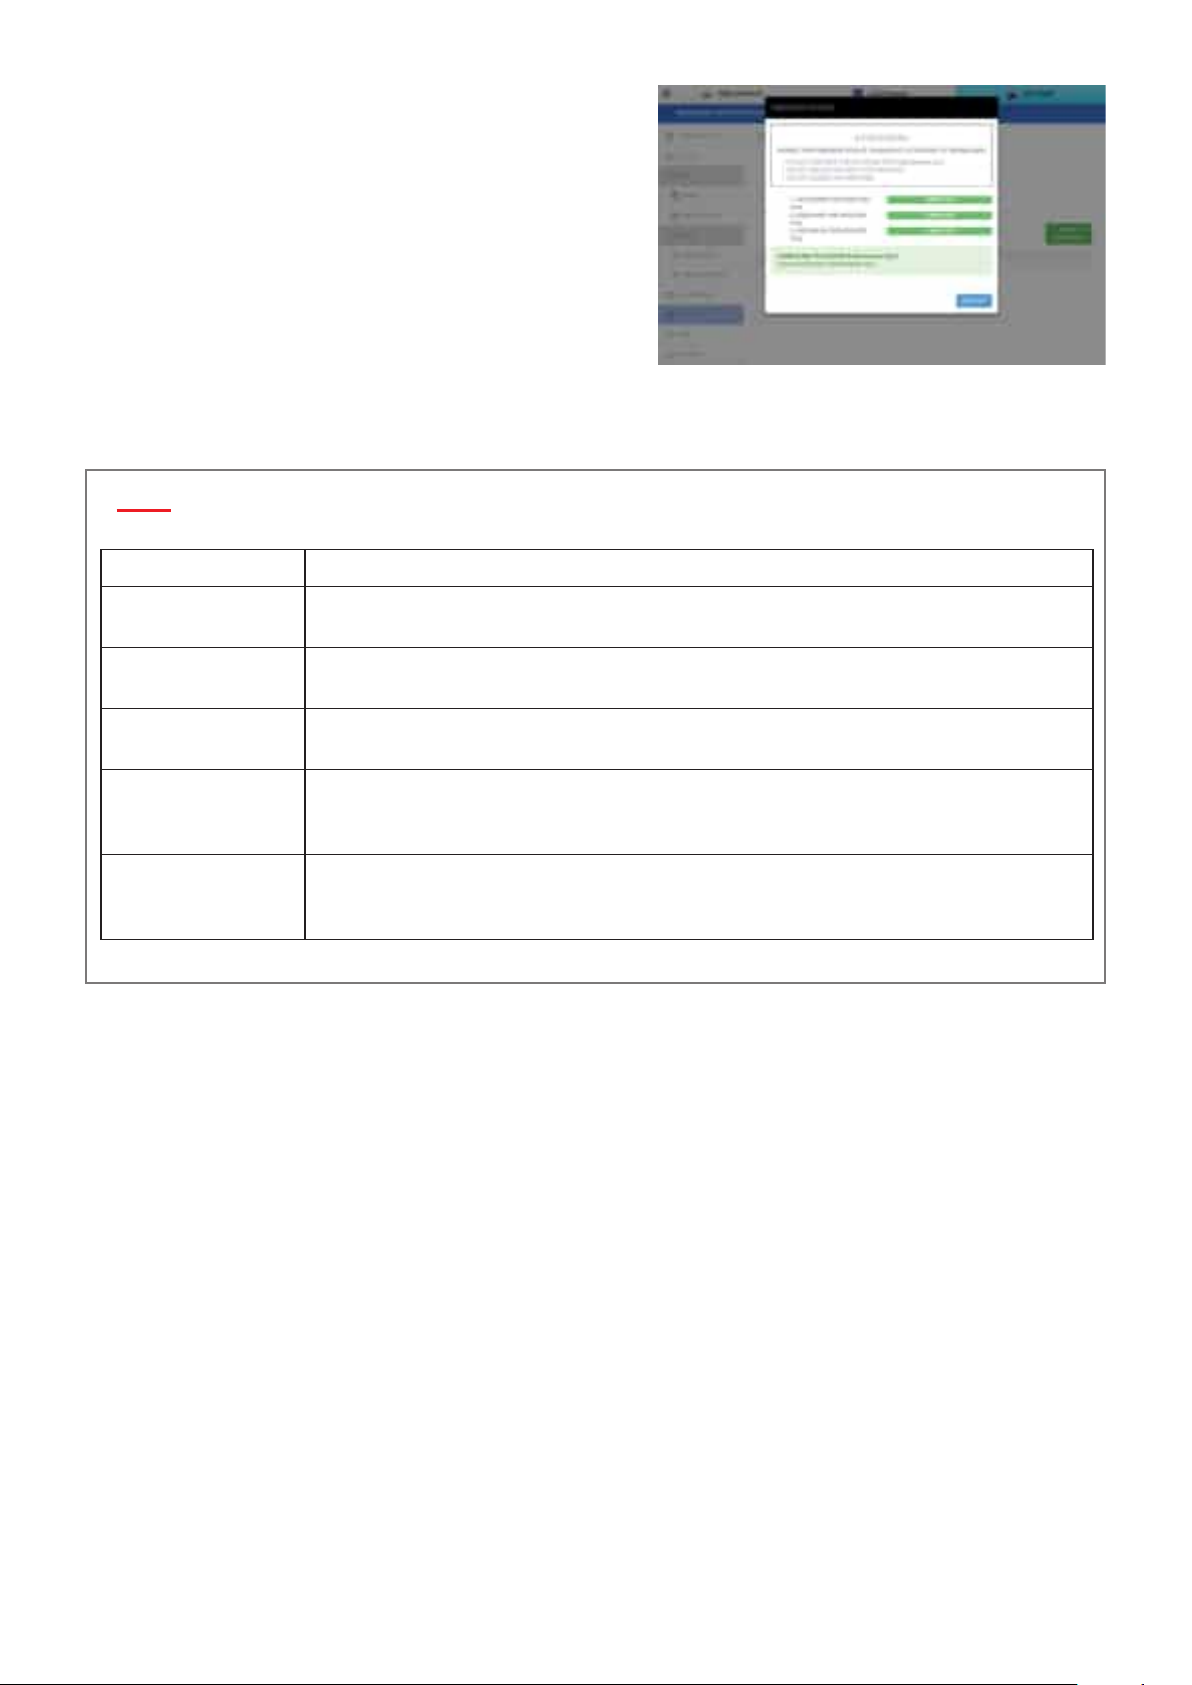
Oncetheupdateiscompletedsuccessfully,thescreenatthe
right is displayed.
Click the [RESTART] button.
.
9
When the start-up screen is displayed after restarting, check
.
10
the version number in the lower right of the screen.
NOTE
If an error occurs during updating, one of the error codes below is displayed.
Error code Description
0100000001
0100000002
0200000001
0200000002
0100000003
0200000003
0300000006
0100000004
0200000004
0300000007
If an error code other than the ones above is displayed, contact your dealer.
File is too large.
Check whether you have selected the wrong update file in the file dialog.
File extension is wrong.
Check whether you have selected the wrong update file in the file dialog.
File is damaged.
Re-download the update file.
Session has been closed.
Reconnect the MultiPresenter Stick and computer and perform the software update procedure again.
No response.
Reconnect the MultiPresenter Stick and computer and perform the software update procedure again.
37
Page 38

Index
A
AC adapter ....................................................................................... 6, 8
ACCESSPASSWORD ................................................................. 25, 26
access point .....................................................................8, 10, 28, 29
ADMINISTRATORMENU ......................................................... 24, 26
Android ....................................................................................4, 12, 13
App Store............................................................................................ 12
AUTODELETE ............................................................................. 25, 26
B
BACKGROUND ........................................................................... 25, 26
Browse Server ................................................................................... 18
C
CHANNEL ..................................................................................... 28, 29
COMMUNICATIONSPEEDLIMIT ................................................. 26
G
GATEWAY ..................................................................................... 29, 30
GoogleChrome ...................................................................................5
GooglePlay ........................................................................................ 12
GUIDEDISPLAY .......................................................................... 25, 26
H
HDMIextensioncable.................................................................. 6, 8
HDMIoutputport ..............................................................................7
I
INFRASTRUCTURE ........................................... 9, 10, 13, 14, 28, 29
initial settings .......................................................................... 8, 9, 12
INTELLIGENTCONNECTION ........................... 5, 9, 10, 12, 13, 28
Internet Explorer .................................................................................5
iOS ....................................................................................... 4, 12, 13, 14
IP ADDRESS ................................................................................. 29, 30
D
DCINjack ..............................................................................................7
DELETESHAREDFILES… ....................................................... 25, 26
DHCP ...................................................................................... 27, 29, 30
DISPLAYINFO. ................................................................................... 23
DOWNLOAD ................................................... 12, 20, 24, 25, 26, 36
E
encryption technology.................................................................. 34
error codes ......................................................................................... 37
exhaust vent .........................................................................................7
existing network environment ......................................................9
F
firewall ................................................................................................. 32
FIRMWARE ................................................................................... 27, 36
focus ..................................................................................................... 23
Free Mode ........................................................................5, 21, 25, 26
L
LANGUAGE ....................................................................10, 12, 27, 31
language selection menu ...................................................... 10, 12
list of devices ..................................................................................... 23
LOGOUT ....................................................................................... 25, 27
M
Managed Mode .............................................................. 5, 21, 25, 26
maximize screen .............................................................................. 23
MAXIMUMFRAMERATE ................................................................ 33
memo creation screen ............................................................ 19, 20
microSD card slot ...............................................................................7
Microsoft Edge ....................................................................................5
MODE ................................................................................. 5, 21, 25, 26
MODERATORMENU ................................................................. 24, 25
Multiple (MultiPresenter application) ...................................... 15
MultiPresenter ..................................................5, 17, 18, 21, 25, 26
MultiPresenter application ............4, 12, 13, 14, 18, 24, 25, 26
MultiPresenter Stick ....................................................................6, 31
38
Page 39

N
NAME ............................................................................................ 27, 31
network ............................................................. 4, 5, 9, 16, 17, 28, 30
NEXT ..................................................................................................... 23
Normal menu .................................................................................... 24
O
ONE-TIME ............................................................................................26
OPENSOURCELICENSE ................................................................. 24
OUTPUTRESOLUTION ....................................................................27
SSID ......................................................................8, 10, 11, 16, 17, 29
start-up screen ............................................................ 11, 12, 31, 36
STATIC ........................................................................................... 26, 28
strap hole ..............................................................................................7
SUBNETMASK ..................................................................... 28, 29, 30
T
target device ................................................................ 13, 14, 15, 18
thumbnail gallery ............................................................................ 23
U
P
PASSWORD ................................................................... 10, 25, 26, 27
Picture Quality .................................................................................. 33
PINCODE ...................................................................5, 13, 14, 15, 26
PIN TYPE ....................................................................................... 26, 28
power button .......................................................................................7
power Indicator ...................................................................................7
PREV ..................................................................................................... 23
PROFILE ........................................................................................ 28, 29
property .............................................................................................. 16
protocols and port numbers ....................................................... 34
R
RESET ............................................................................................ 27, 31
RESETALLSETTINGSTOTHEFACTORYSETTINGS. .............. 31
RESTART ....................................................................................... 25, 27
UPDATEIMAGE .......................................................................... 20, 23
UPLOADED ..............................................................................5, 19, 20
URL.............................................................................................8, 10, 11
USBmouse ......................................................................... 7, 9, 12, 31
USBport .......................................................................................... 7, 12
UTILIZEPINCODEASCONNECTIONPASSWORD.................26
W
WEBCAPTURE ................................................................................... 19
WEBCONTROLPASSWORD .................................................. 25, 26
WEB server function ................................................................... 5, 16
WEBSHARING ................................................... 5, 17, 18, 19, 25, 26
Wi-Fi ...............................................................................................14, 17
Wired LAN .................................................................2, 27, 28, 30, 31
Wired network adapter ....................................................2, 4, 7, 30
Wireless LAN ........................................................................ 27, 28, 31
Wireless network ...................................................................... 10, 16
S
Safari ................................................................................................5, 17
“SAVEASHTML”function .......................................................19, 20
SCREENSHARING ..................................................................... 25, 26
security hanger ...................................................................................7
SECURITYKEY ....................................................... 10, 16, 17, 28, 29
SECURITYTYPE .......................................................................... 28, 29
Select (MultiPresenter application) .......................................... 15
SETTINGS .............................................................. 5, 9, 17, 18, 24, 31
SHAREDFILES ..................................................................... 20, 25, 26
SIMPLEACCESSPOINT .............................................. 13, 14, 28, 29
SITESURVEY ............................................................................... 10, 29
split panel display screen ............................................................. 22
SPLIT PATTERN ........................................................................... 22, 23
39
 Loading...