

Page 1
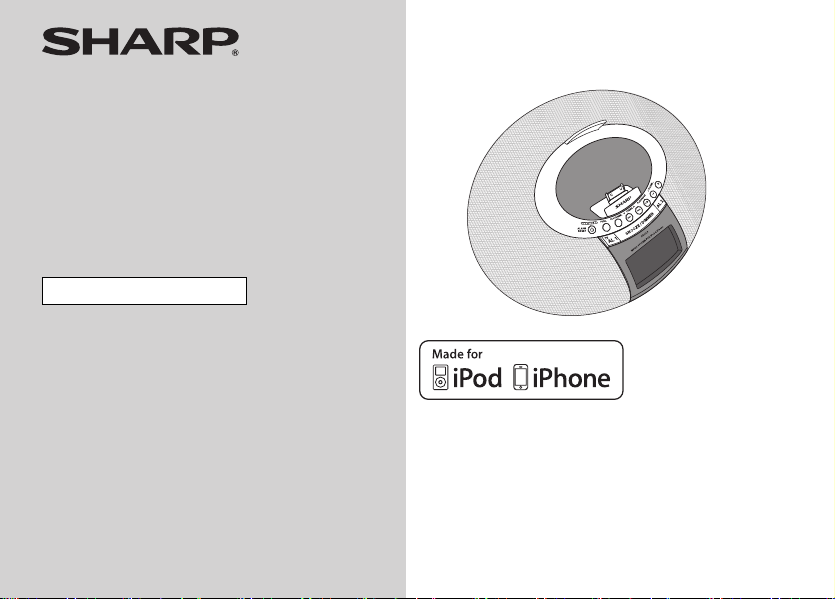
MUSIC SYSTEM FOR iPod & iPhone
MODEL
DK-CL8PH(BK)
DK-CL8PH(GR)
DK-CL8PH(PK)
OPERATION MANUAL
Thank you for purchasing this SHARP product.
To obtain the best performance from this product, please read
this manual carefully. It will guide you in operating your SHARP
product.
iPhone, iPod, iPod classic,
iPod nano, and iPod touch are
trademarks of Apple Inc.,
registered in the U.S. and
other countries.
Page 2

DK-CL8PH(BK)
DK-CL8PH(GR)
DK-CL8PH(PK)
Special notes
Warning:
● When the ON/STAND-BY button is set at STAND-BY
position, mains voltage is still present inside the unit.
When the ON/STAND-BY button is set at STAND-BY
position, the unit may be brought into operation by
the timer mode or remote control.
● This unit contains no user serviceable parts. Never
remove covers unless qualified to do so. This unit
contains dangerous voltages, always remove mains
plug from the socket before any service operation
and when not in use for a long period.
● The supplied AC/DC adaptor contains no user
servicable parts.
Never remove covers unless qualified to do so.
It contains dangerous voltages, always remove
mains plug from the main outlet socket before any
service operation or when not in use for a long
period.
●
The AC/DC adaptor supplied with the DK-CL8PH(BK)/
DK-CL8PH(GR)/DK-CL8PH(PK) must not be used with
other equipment.
● Never use an AC/DC adaptor other than the one
Important Instruction
specified. Otherwise, problems or serious hazards
may be created.
● To prevent fire or shock hazard, do not expose this
appliance to dripping or splashing. No objects filled
with liquids, such as vases, shall be placed on the
apparatus.
● Do not turn the volume on to full at switch on. Listen
to music at moderate levels.
2
Note for users in Australia:
Copyright may exist in material you wish to record.
Copying or broadcasting such material without
permission of the relevant licensees or owners of the
copyright is prohibited by law. SHARP is not in a
position to authorise the copying or broadcasting of
copyright materials and nothing in this OPERATION
MANUAL should be implied as giving that authority.
For other countries:
Audio-visual material may consist of copyrighted works
which must not be recorded without the authority of the
owner of the copyright. Please refer to the relevant
laws in your country.
“Made for iPod” and “Made for iPhone” mean that an
electronic accessory has been designed to connect
specifically to iPod or iPhone, respectively, and has
been certified by the developer to meet Apple
performance standards. Apple is not responsible for
the operation of this device or its compliance with
safety and regulatory standards. Please note that the
use of this accessory with iPod or iPhone may affect
wireless performance.
Page 3

Accessories
Please confirm that only the following accessories are included.
AC/DC adaptor x 1
Contents
■ General Information
Precautions . . . . . . . . . . . . . . . . . . . . . . . . . . . . . . . 4
Controls and indicators . . . . . . . . . . . . . . . . . . .5 - 6
Preparation for Use
■
System connections . . . . . . . . . . . . . . . . . . . . .7 - 8
Basic Operation
■
General control . . . . . . . . . . . . . . . . . . . . . . . . . . . 9
Setting the time and date . . . . . . . . . . . . . . . . . . . 10
iPod and iPhone
■
Listening to the iPod or iPhone . . . . . . . . . .11 - 12
Page
Page
■ Radio
Listening to the radio . . . . . . . . . . . . . . . . . . 13 - 14
Advanced Features
■
Alarm operation . . . . . . . . . . . . . . . . . . . . . . 14 - 15
Enhancing your system . . . . . . . . . . . . . . . . . . . . 16
References
■
Troubleshooting chart . . . . . . . . . . . . . . . . . 17 - 18
Maintenance . . . . . . . . . . . . . . . . . . . . . . . . . . . . . 19
Specifications . . . . . . . . . . . . . . . . . . . . . . . . 19 - 20
DK-CL8PH(BK)
DK-CL8PH(GR)
DK-CL8PH(PK)
General Information
3
Page 4
DK-CL8PH(BK)
DK-CL8PH(GR)
DK-CL8PH(PK)
Precautions
■ General
● Please ensure that the equipment is
positioned in a well-ventilated area
and ensure that there is at least 10
cm (4") of free space along the sides,
top and back of the equipment.
● Use the unit on a firm, level
surface free from vibration.
●
Keep the unit away from direct
sunlight, strong magnetic
fields, excessive dust, humidity
and electronic/electrical
equipment (home computers,
facsimiles, etc.) which
generate electrical noise.
● Do not place anything on top of the unit.
● Do not expose the unit to moisture, to temperatures higher
General Information
than 60°C (140°F) or to extremely low temperatures.
● If your system does not work properly, disconnect the AC/DC
adaptor from the wall socket. Plug the AC/DC adaptor back
in, and then turn on your system.
● In case of an electrical storm,
unplug the unit for safety.
● Do not use an external power supply other than the 9V DC
supplied with this unit as it may be damaged.
● SHARP is not responsible for damage due to improper use.
Refer all servicing to a SHARP authorised service centre.
4
10 cm (4")
10 cm (4")
●
Hold the AC/DC adaptor by the
head when removing it from the
wall socket, as pulling the lead
can damage internal wires.
●
The AC/DC adaptor is used as a
disconnect device and shall
always remain readily operable.
● Do not remove the outer
cover, as this may result in
electric shock. Refer internal
service to your local SHARP
service facility.
● The ventilation should not be impeded by covering the
ventilation openings with items, such as newspapers,
tablecloths, curtains, etc.
● No naked flame sources, such as lighted candles, should be
placed on the apparatus.
● Attention should be drawn to the environmental aspects of
battery disposal.
● This unit should only be used within the range of 5°C - 35°C
(41°F - 95°F).
Warning:
The voltage used must be the same as that specified on this
unit. Using this product with a higher voltage other than that
which is specified is dangerous and may result in a fire or other
type of accident causing damage. SHARP will not be held
responsible for any damage resulting from use of this unit with a
voltage other than that which is specified.
■ Volume control
The sound level at a given volume setting depends on speaker
efficiency, location and various other factors. It is advisable to
avoid exposure to high volume levels. Do not turn the volume on
to full at switch on. Listen to music at moderate levels.
Page 5
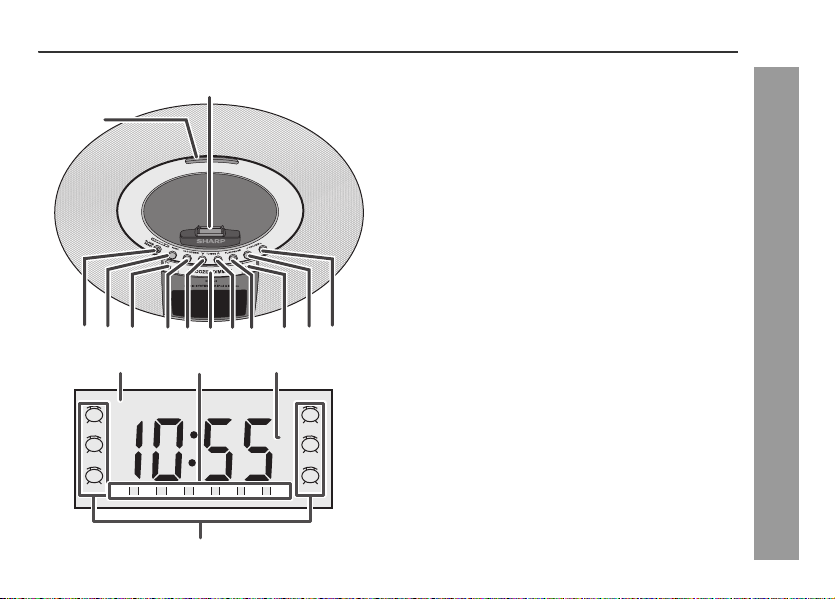
Controls and indicators
1
13
■ Top panel
1. iPod and iPhone Dock . . . . . . . . . . . . . . . . . . . .11, 12
2. Volume Up Button . . . . . . . . . . . . . . . . . . . . . . . . . . . 9
3. Volume Down Button . . . . . . . . . . . . . . . . . . . . . . . . . 9
4. Alarm 2 Button. . . . . . . . . . . . . . . . . . . . . . . . . . . 14, 15
5. Play / Pause Button. . . . . . . . . . . . . . . . . . . . . . . 14, 15
6. Preset / Track Up Button . . . . . . . . . . . . . . . . . .10, 12
7. SNOOZE / DIMMER Button . . . . . . . . . . . . . . . . . . 9, 15
8. Preset / Track Down Button . . . . . . . . . . . . . . . .10, 12
9. Clock / Memory Button . . . . . . . . . . . . . . . . . 10, 13, 14
10. Alarm 1 / TV Out Button . . . . . . . . . . . . . . . . . 7, 14, 15
11. Function Button . . . . . . . . . . . . . . . . . . . . . . . 7, 13, 16
12. ON/STAND-BY / Alarm Reset
Button . . . . . . . . . . . . . . . . . . . . . . . . . .9, 12, 13, 15, 16
13. iPod Dock Adjuster . . . . . . . . . . . . . . . . . . . . . . . . . . 11
Reference page
DK-CL8PH(BK)
DK-CL8PH(GR)
DK-CL8PH(PK)
12
iPod
Radio
Buzzer
11
1
1
1
10
9
2 34
iiPod
PM
MON
TUE
8
7
WED
THU FRI SAT SUN
1
MHz
23456
2
iPod
AM
FM
2
Radio
2
Buzzer
■ Display
1. Alarm (1 and 2) indicator. . . . . . . . . . . . . . . . . . . 14, 15
2. iPod indicator . . . . . . . . . . . . . . . . . . . . . . . . . . . . . . 11
3. FM Tuner Indicator . . . . . . . . . . . . . . . . . . . . . . . . . .13
4. Day Indicator . . . . . . . . . . . . . . . . . . . . . . . . . . . . . . . 10
Reference page
General Information
5
Page 6
DK-CL8PH(BK)
DK-CL8PH(GR)
DK-CL8PH(PK)
Controls and indicators (continued)
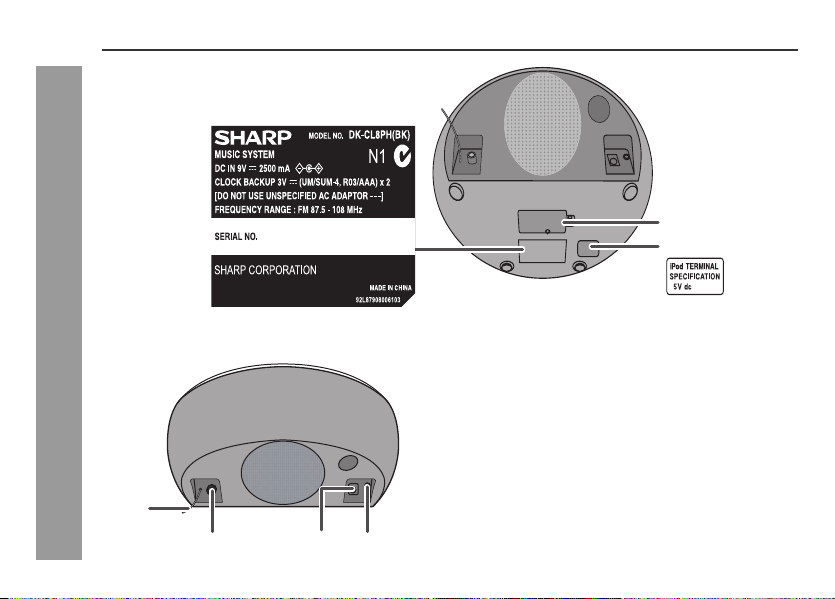
The spec label (*)
1
The iPod rating mark
General Information
1
6
The spec label illustration may be
different from the actual label used.
(*) Label is located at the bottom of the unit.
■ Bottom view
1. Battery Compartment . . . . . . . . . . . . . . . . . . . . . . . . 8
■ Rear panel
1. FM Aerial Wire (fixed) . . . . . . . . . . . . . . . . . . . . . . . . 16
2. DC Input Socket . . . . . . . . . . . . . . . . . . . . . . . . . . . . . 7
3. Audio In Socket . . . . . . . . . . . . . . . . . . . . . . . . . . . . . 16
4. Video Out Socket . . . . . . . . . . . . . . . . . . . . . . . . . . . . 7
324
1A
Reference page
Reference page
Page 7
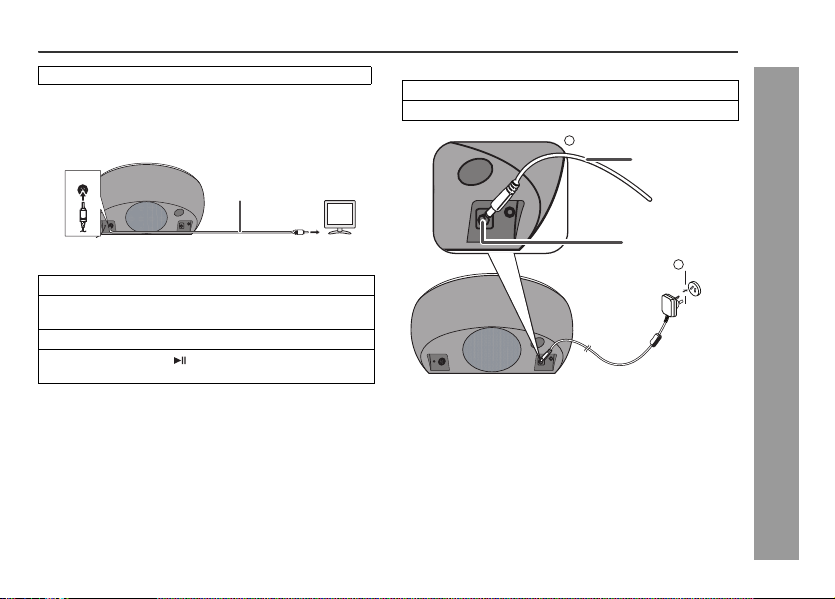
System connections
Make sure to unplug the AC/DC adaptor before making any connections.
■ Connecting iPod or iPhone to TV
Video files from iPod or iPhone can be viewed by connecting the system to
TV/monitor.
If the TV/monitor has a video input, connect it to the VIDEO OUT socket at
the back of the unit and set the TV Out on the iPod unit to “oN” position.
TUOOEDIV
Video cable
(not supplied)
TV
■ AC/DC adaptor connection
1
Plug the AC/DC adaptor cable into the DC IN sock et on the unit.
2
Plug the AC/DC adaptor into a wall socket.
1
AC/DC Adaptor
Cable
DK-CL8PH(BK)
DK-CL8PH(GR)
DK-CL8PH(PK)
To video input socket
■ Watching videos on a TV connected to iPod
1
Press the FUNC. button to select the iPod function.
2
Enter iPod or iPhone menu.
Press and hold (TV/AL1) button until “oN” appear on the display.
3
Select the desired video to be played.
4
Press the ENTER or
playback.
Notes:
●
To return to watch video on iPod or iPhone screen, return to the menu.
Press and hold (TV/AL1) button until “oFF” appear on display.
●
During iPod or iPhone video playback, press and hold the TV/AL1 button
until “oFF” appear on display will not toggle video out display between
iPod or iPhone and TV.
●
Please make sure to set iPod unit to either NTSC or PAL to match your
TV signal. Please visit Apple’s home page for further information.
●
Customer should also refer iPod and iPhone operation manual before
making video out setting.
button on iPod or iPhone to start
DC IN socket
(DC 9V)
2
wall socket
(AC 100 - 240 V, 50/60 Hz)
Notes:
●
Unplug the AC/DC adaptor from the wall socket if the unit will not be used
for a prolonged period of time.
●
Use only the supplied AC/DC adaptor. Using other AC/DC adaptor may
cause an electric shock or fire.
Preparation for Use
7
Page 8
DK-CL8PH(BK)
DK-CL8PH(GR)
DK-CL8PH(PK)
Preparation for Use
8
System connections (continued)
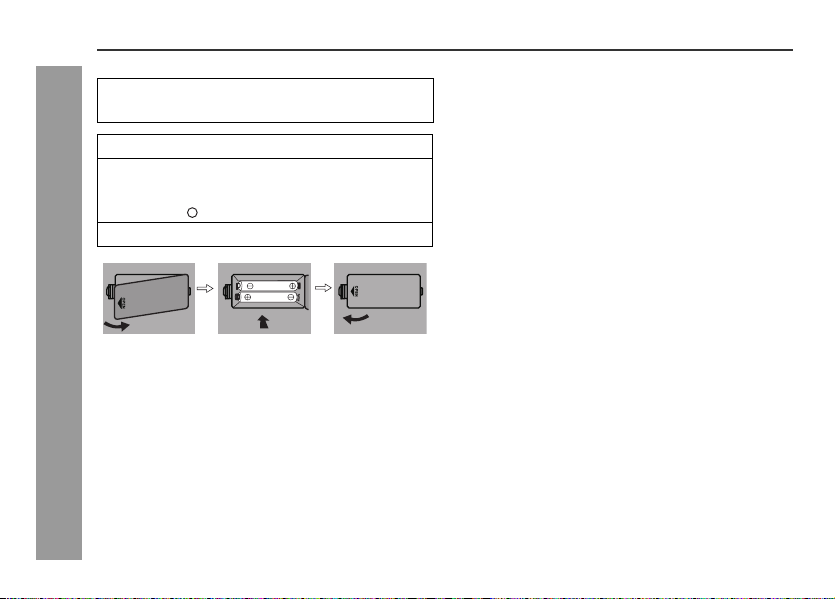
■ Install/Replace batteries
For Backup battery:
Use 2 “AAA” size batteries (UM-4, R03, HP-16 or similar).
Batteries are not included.
1 Open the battery cover.
2 Insert the batteries according to the direction
indicated in the battery compartment.
When inserting or removing the batteries, push them
towards the battery terminal.
3 Close the cover.
–
Notes:
● The battery system is use to provide continuous clock backup
operation in event of a power failure. Please make sure the
AC/DC adaptor is connected, otherwise all setting may be
lost during battery replacement.
● Remove the batteries if the unit will not be used for a long
period of time to prevent battery leakage which may cause
potential damage.
● The first time power on unit, the clock will blinking on the
display. Please set the time and date (refer page 9).
Note:
Battery life may vary depending on the temperature, battery
types and usage conditions.
Precautions for battery use:
● Installing the batteries incorrectly may cause the unit to
malfunction.
● Insert the batteries according to the direction indicated in the
battery compartment.
● Replace all old batteries with new ones at the same time.
● Do not mix old and new batteries.
● Batteries (battery pack or batteries installed) shall not be
exposed to excessive heat such as sunshine, fire or the like.
Caution:
Do not use rechargeable batteries (nickeI-cadmium battery,
etc.).
Page 9

General control
■ Display brightness control (DIMMER)
Press the SNOOZE/DIMMER button to adjust the brightness of
LCD display.
Dimmer 1
(Display is dim)
DK-CL8PH(BK)
DK-CL8PH(GR)
DK-CL8PH(PK)
ON/STAND-BY
ALARM
RESET
VOLU ME
■ To turn the power on
Press the ON/STAND-BY button to turn the power on.
The first time power is supplied to the unit, the clock will be
blinking on the display. Please set the time and date (refer page
11).
After use:
Press the ON/STAND-BY button to enter the power stand-by
mode.
Dimmer 2
Dimmer off
■ Volume auto set in
If you turn off and on the unit with the volume set to 17 or higher,
the volume starts at 16.
■ Volume control
Press the Volume button (VOLUME –) to
decrease volume and (VOLUME +) to
increase volume.
(Display gets dimmer)
(Display is bright)
■ Auto power off function
The unit will enter the stand-by mode (when iPod or iPhone is
not docked) after 15 minutes of inactivity during:
iPod or iPhone: No connection.
AUDIO IN: No detection of input signal or very low sound
Note:
However, if iPod or iPhone is docked, the unit will begin
charging.
audibility.
Basic Operation
9
Page 10

DK-CL8PH(BK)
DK-CL8PH(GR)
DK-CL8PH(PK)
Basic Operation
10
Setting the time and date
TUNING
In this example, the clock is set for the 12-H (12 hour) display.
1 In standby mode, press the CLOCK/MEM.
more than 3 seconds. The clock time display format
will blinking. Press the ( or ) button to select
12-H or 24-H for clock time display format, then press
CLOCK/MEM. to confirm.
PLAY/PAUSE
button for
2 Press the ( or ) button to adjust the hour and then
press the CLOCK/MEM. button.
PM
Press the ( or ) button once to advance the time by 1
hour. Hold it down to advance continuously.
“AM” or “PM” indicator will interchange after each 12 hour
cyclic.
3 Press the ( or ) button to adjust the minutes and
then press the CLOCK/MEM. button.
PM
Press the ( or ) button once to advance the time by
1 minute. Hold it down to advance continuously.
4 Press the ( or ) button to adjust the day and then
press the CLOCK/MEM. button.
PM
SUN
“:” will be blinking to indicate time and date setting is
completed.
Page 11

Listening to the iPod or iPhone
iPod and iPhone operations
Made for:
● iPod touch (4
● iPod touch (3
● iPod touch (2
● iPod touch (1
● iPod classic
● iPod nano (6
● iPod nano (5
● iPod nano (4
● iPod nano (3
● iPod nano (2
● iPhone 4
● iPhone 3GS
● iPhone 3G
● iPhone
Caution:
● Please update your iPod unit to the latest software version
before using it. Please visit Apple’s homepage to download
the latest version for your iPod.
Notes:
● Once the iPod or iPhone is connected to the unit it will begin
charging.
● If you have an iPod or iPhone that does not have an iPod 30
Pin connector, you can use an auxillary cable to connect it to
the AUDIO IN socket.
● The message “This accessory is not made to work with
iPhone” or similar, may appear on the iPhone screen when:
- battery is low.
- the iPhone is not properly docked (eg. slanting).
■ iPod adjuster
This unit comes with the iPod dock adjuster. iPod adaptors are
not supplied.
th
generation)
rd
generation)
nd
generation)
st
generation)
th
generation)
th
generation)
th
generation)
rd
generation)
nd
generation)
If this occurs, remove and re-dock the iPhone.
■ How to use iPod adjuster
1 Pull or push the iPod dock adjuster to move it up and
down.
iPod adjuster
2 Dock your iPod into the unit and adjust the iPod
adjuster until the iPod is firmly supported in the dock.
iPod (bottom)
iPod
connector
Dock connector
iPod
iPod dock
DK-CL8PH(BK)
DK-CL8PH(GR)
DK-CL8PH(PK)
iPod and iPhone
11
Page 12

DK-CL8PH(BK)
DK-CL8PH(GR)
DK-CL8PH(PK)
Listening to the iPod or iPhone (continued)
■ iPod or iPhone playback
1 Press the ON/STAND-BY button to turn the power on.
2 Press the FUNC. button repeatedly to select the iPod
function
3 Insert iPod or iPhone unit into the dock.
iPhone
■ Various iPod or iPhone functions
Function Button Operation
Play Press in the pause mode.
Pause Press in the playback mode.
PLAY/PAUSE
PLAY/PAUSE
iPod and iPhone
4 Press the PLAY/PAUSE button to start playback.
For iPod touch and iPhone, playback will automatically
start once the desired file is selected.
■ To disconnect iPod or iPhone
Simply remove the iPod or iPhone from the dock. It is safe to do
so even during playback.
12
Track
up/down
Fast
forward/
reverse
TV OUT Press for more than 2 seconds
TUNING
TUNING
TV
AL1
iPod and iPhone operation
The operations described above depend on the generation iPod
and iPhone you are using.
Press in the playback or pause
mode.
If you press the button in the
pause mode, press the /
button to start the desired
track.
Press and hold down in the
playback mode.
Release the button to resume
playback.
to toggle the video out display
between iPod or iPhone and
TV.
Page 13

Listening to the radio
●
This product can receive FM Stereo amd FM Monaural broadcast.
■ Programming a station
You can store 40 FM stations in memory.
1 Perform steps 1 - 3 “Tuning” on page 13.
2 Press the CLOCK/MEM. button for more than 2
seconds to enter the preset tuning saving mode.
DK-CL8PH(BK)
DK-CL8PH(GR)
DK-CL8PH(PK)
ON/STAND-BY
ALARM
RESET
TUNING
■ Tuning
1 Press the ON/STAND-BY button to turn the power on.
2 Press the FUNC. button repeatedly to select the Tuner
function.
3 Tune to the desired station.
Manual tuning:
Press the TUNING ( or ) button to tune into the
desired station.
Auto tuning:
When the TUNING ( or ) button is pressed for more
than 0.5 seconds, scanning will start automatically and the
tuner will stop at the first receivable broadcast station.
Notes:
●
When radio interference occurs, auto scan tuning may stop
automatically at that point.
●
Auto tuning will skip weak signal stations.
●
To stop the auto tuning, press the TUNING
again.
( or )
button
MON
3 Within 30 seconds, press the or button to
select the preset channel number.
Store the stations in memory, in order, starting with preset
channel 1.
4 Within 30 seconds, press the CLOCK/MEM. button to
store that station in memory .
MON MON
If the preset number indicators disappear before the
station is programmed, repeat the operation from step 2.
5 Repeat steps 1 - 4 to set other stations, or to change
a preset station.
When a new station is stored in memory, the station
previously programmed for that preset channel number
will be erased.
Radio
13
Page 14

DK-CL8PH(BK)
DK-CL8PH(GR)
DK-CL8PH(PK)
Radio / Advanced Features
14
Listening to the radio (continued)
Note:
The batteries system protects the programmed stations should
there be a power failure or the AC/DC adaptor becomes
disconnected. If the backup batteries are drain off, the
programmed stations will be erased.
■ To recall a programmed station
Press CLOCK/MEM. button then press or button
repeatedly to select the desired programmed station.
Alarm operation
■ Alarm
The unit turns on and play desired source (iPod or TUNER) or
Buzzer sound for 1 hour alarm duration.
Before setting the alarm:
Check that the clock is set to the correct time.
1
(refer page 10)
If it is not set, you cannot use the alarm function.
For iPod or iPhone playback: Insert iPod or iPhone to the
2
unit. (refer page 12)
For TUNER: Set preset memory. (refer page 13)
3
Setting the alarms
In this example, the setting is for ALARM 1. The same method
is used to set for ALARM 2.
1 In standby mode, press and hold the AL 1 button until
the alarm time blinking.
1
2 Press the ( or ) button to adjust the hour and
press the AL 1 button.
PM
Press the ( or ) button once to advance the time by
1 hour. Hold it down to advance continuously. “AM” or “PM”
indicator will interchange after each 12 hour cyclic.
Page 15

3 Press the ( or ) button to adjust the minutes and
then press the AL 1 button.
PM
Press the ( or ) button once to advance the time by 1
minute. Hold it down to advance continuously.
4 Press the ( or ) button to select the day for alarm
and then press the AL 1 button.
Weekday : MON - FRI (alarm activate from Monday to
Weekend : SAT - SUN (alarm activate from Saturday to
Everyday : MON - SUN (alarm activate daily)
5 Press the ( or ) button to select the wake up
source and then press the AL 1 button.
Friday only)
Sunday only)
1
Radio
AM
FM
MHz
Wake up source:
iPod RADIO BUZZER
Alarm icon “ ” will light up to indicate alarm setting.
1
Note:
If wake up source is set to iPod, and iPod is not present, the
alarm source will change to default Buzzer.
■ Activate and deactivate the alarm
1 In stand-by mode, press AL 1 or AL 2 button once to
deactivate current alarm times and wake up source.
2 Press AL 1 or AL 2 button again to activate the alarm
function. When the alarm setting time is activated,
alarm icon ( or ) will appear on display.
3 When alarm has started, alarm icon ( or ) will
blinking on the display.
Daily Alarm:
● During alarm function, press ALARM RESET button to stop
alarm and it will come again on the next day.
■ Snooze function
Once alarm has started, pressing the SNOOZE/DIMMER button
will stop alarm for 9 minutes.
Once the snooze time has expired, alarm will continue.
The snooze function can be operated during 1 hour alarm
duration.
1
2
1
2
ON/STAND-BY
ALARM
RESET
DK-CL8PH(BK)
DK-CL8PH(GR)
DK-CL8PH(PK)
Advanced Features
15
Page 16

DK-CL8PH(BK)
DK-CL8PH(GR)
DK-CL8PH(PK)
Advanced Features
16
Enhancing your system
The auxiliary cable is not included. Purchase a separate
auxiliary cable as shown below.
Portable audio player
Computer
To the line output
socket
Auxiliary cable
(not supplied)
■ Listening to the audio/video sounds from
portable audio player, computer etc.
1 Use the auxiliary cable to connect the portable audio
player, computer etc. to the AUDIO IN socket.
When using video equipment, connect the audio output to
this unit and the video output to a television.
2 Press the ON/STAND-BY button to turn the power on.
3 Press the FUNC. button repeatedly to select “AU”
(Audio In) function.
4 Play the connected equipment.
Note:
To prevent noise interference, place the unit away from the
television and do not make any auxiliary playback, whilst
listening to the iPod or iPhone.
Page 17

Troubleshooting chart
Many potential problems can be resolved by the owner without
calling a service technician.
If something is wrong with this product, check the following
before calling your authorised SHARP dealer or service centre.
■ General
Symptom Possible cause
● The clock is not set
to the correct time.
● When a button is
pressed, the unit
does not respond.
● No sound is heard. ● Is the volume level set to “00”?
■ Tuner
Symptom Possible cause
● The radio makes
unusual noises
continuously.
● Did a power failure occur? Reset
the clock. (Refer to page 10)
● Set the unit to the power stand-by
mode and then turn it back on.
● If the unit still malfunctions, reset it.
(Refer to page 18)
● Is the unit placed near the TV or
computer?
● Is the FM aerial placed properly?
Move the aerial away from the AC/
DC adaptor if it is located nearby.
■ iPod and iPhone
Symptom Possible cause
● No sound is produced.
No image appears on
the TV/monitor.
● iPod or iPhone will not
charge.
● “This accessory is not
made to work with
iPhone” or similar
appears on iPhone
screen.
● The iPod or iPhone unit
software version is not update
to the latest version. Please
visit Apple’s homepage.
● The iPod or iPhone is not
playing.
● The iPod or iPhone is not
properly connected to the unit.
● Is the AC/DC adaptor of the
unit plugged in?
● The video cable is not properly
connected.
● T
he TV/monitor’s input selection
is not properly set.
● The iPod or iPhone is not
making full contact with the
connector.
● Is the AC/DC adaptor of the
unit plugged in?
● Using iPod (3
● The iPod or iPhone is not
supported. Refer page 12 for
compatible models.
● The iPhone battery is low.
Please charge the iPhone.
● iPhone not properly docked.
rd
generation).
DK-CL8PH(BK)
DK-CL8PH(GR)
DK-CL8PH(PK)
References
17
Page 18

DK-CL8PH(BK)
DK-CL8PH(GR)
DK-CL8PH(PK)
References
18
Troubleshooting chart (continued)
■ Condensation
Sudden temperature changes, storage or operation in an
extremely humid environment may cause condensation inside
the cabinet.
Condensation can cause the unit to malfunction. If this happens,
leave the power on until normal playback is possible (about 1
hour).
■ If problem occurs
When this product is subject dur ing operation to strong external
interference (mechanical shock, excessive static electricity,
abnormal supply voltage due to lightning, etc.) or if it is operated
incorrectly, it may malfunction.
If such a problem occurs, do the following:
1 Set the unit to the stand-by mode and turn the power on
again.
2 If the unit is not restored in the previous operation, unplug
and plug in the unit, and then turn the power on.
Note:
If neither operation above restores the unit, remove the backup
batteries.
■ Clearing all the memory (reset)
In Audio In (AU) function, press button then press and hold
/ button for 5 seconds. Unit will display “ ” for a while and unit
will reset.
Caution:
This operation will erase all data stored in memory including
clock, alarm settings and tuner preset.
■ Before transporting the unit
Undock the iPod or iPhone from the unit. Then, set the unit to
the power standby mode. Carrying the unit with iPod or iPhone
left docked might damage the systems.
Page 19

Maintenance
■ Cleaning the unit
Periodically wipe the unit with a clean soft cloth.
Caution:
● Do not use chemicals for cleaning (petrol, paint thinner, etc.).
It may damage the unit finishing.
● Do not apply oil to the inside of the unit. It may cause
malfunctions.
Specifications
As part of our policy of continuous improvement, SHARP
reserves the right to make design and specification changes for
product improvement without prior not ice. The performance
specification figures indicated are nominal values of production
units. There may be some deviations from these values in
individual units.
■ General
Power source DC IN 9V 2500mA: AC/DC adaptor
Power
consumption
Output power Front speakers:
Speaker 2.1-way type speaker system
Speaker maximum
input power
Speaker rated
input power
Output terminals Video output: 1Vp-p
(*) This power consumption value is obtained when in the power
stand-by mode and dimmer 2.
(AC 100 - 240 V ~ 50/60 Hz)
Clock Backup: 3V (not include as
accessory AAA type battery use) x 2
Power On: 15 W
Power stand-by: 0.4 W (*)
RMS: 4 W (2 W + 2 W) (10% THD)
RMS: 2 W (1 W + 1 W) (1% THD)
Subwoofer:
RMS: 4 W (10% THD)
RMS: 2.5 W (1% THD)
Front speaker: 4cm (1 1/2")
Subwoofer: 7cm (2 3/4") Woofer
8 W/Channel
4 W/Channel
Full Range (x2)
DK-CL8PH(BK)
DK-CL8PH(GR)
DK-CL8PH(PK)
References
19
Page 20

DK-CL8PH(BK)
DK-CL8PH(GR)
DK-CL8PH(PK)
References
20
Specifications (continued)
Input terminals Auxiliary (audio signal):
Dimensions Width: 265 mm
Weight 1.18 kg (2.60 lbs.)
■ Tuner
Frequency range FM: 87.5 - 108.0 MHz
500 mV/47 k ohms
Height: 138 mm
Depth: 183 mm
Page 21

MEMO
Page 22

MEMO
Page 23

FOR LOCATION ENQUIRIES WITHIN
NEW ZEALAND
REGARDING YOUR LOCAL
SHARP CORPORATION OF NEW ZEALAND LIMITED
VISIT OUR WEBSITE AT
SHARP CUSTOMER SERVICES
TELEPHONE: 09 573 0111
FACSIMILE: 09 573 0113
FOR LOCATION ENQUIRIES WITHIN
AUSTRALIA
REGARDING YOUR LOCAL
SHARP APPROVED SERVICE CENTRE
VISIT OUR WEBSITE AT
www.sharp.net.au
OR CALL SHARP CUSTOMER CARE
1300 135 022
SHARP CORPORATION OF AUSTRALIA PTY LTD
SPform019(AUGUST 2011)
(LOCAL CALL COSTS APPLY WITHIN AUSTRALIA)
SHARP APPROVED SERVICE CENTRE
www.sharp.net.nz
CONTACT YOUR SELLING DEALER/RETAILER
OR CALL
Page 24

Congratulations on Your Purchase!
This Sharp product is warranted against faults in material and manufacture for the
period as stated in the table below.
If service is required during the warranty period, please contact your nearest Sharp
Approved Service Centre. These repairs would be carried out at no charge to the
owner, subject to the conditions specified herein.
This warranty does not extend to defects or injuries caused by or resulting from causes
not attributable to faulty parts or the manufacture of the product, including but not
limited to, defect or injury caused by or resulting from misuse, abuse, neglect, lack of
maintenance, accidental damage, improper voltage, liquid spillage, vermin infestation,
software, or any alterations made to the product which are not authorised by Sharp.
Please retain your sales documentation, as this should be produced to validate a
warranty claim. This warranty is in addition to and in no way limits, varies or excludes
any implied rights and remedies under any relevant legislation in the country of sale.
WARRANTY PERIODS
Home Theatre Projector 12 months
Audio/Home Theatre 12 months
Microwave Oven 12 months
Steam Oven 12 months
Refrigerator 24 months
DVD/Blu-ray 12 months
Air Conditioner 60 months
Portable Air Conditioner 12 months
LCD Television 36 months
Air Purifier 12 months
IMPORTANT NOTICE: This warranty applies only to products sold in Australia & New Zealand
SHAR
P
COR
PORA
TIO
N
OF
A
USTRA
LI
A
PTY. LI
M
IT
E
D
AB
N
40
00
3
03
94
05
1 Huntingwood Drive
H
u
n
t
ingwood
N
SW
214
8
SHARP
CORPORATION OF
N
EW Z
E
A
L
AND
LI
M
IT
E
D
59 Hugo Johnston Driv
e
P
e
n
ros
e
, Au
c
kland
WARRANTY
Consumer Electronic Products
SPform 040 (AUGUST 2011)
Australian customers: Our goods come with guarantees that cannot be excluded
under the Australian Consumer Law. You are entitled to a replacement or refund
for a major failure and for compensation for any other reasonably foreseeable
loss or damage. You are also entitled to have the goods repaired or replaced
if the goods fail to be of acceptable quality and the failure does not amount
to a major failure. The criteria of a major failure is defined in the Australian
Consumer Law. Should you require any assistance with a major failure please
contact Sharp Customer Care.
This warranty does not cover transportation to and from the Sharp Approved Service
Centre. Goods presented for repair may be replaced by refurbished goods of the same
type rather than being repaired. Refurbished parts may be used to repair the goods.
The repair of your goods may result in the loss of user generated data, please ensure
that you have saved this data elsewhere prior to repair.
(excluding lamps and air filters)
SHARP CORPORATION
11K R KI 1
92L87508000401
 Loading...