

Page 1

OPERATION MANUAL
BEDIENUNGSANLEITUNG
PC LINK SYSTEM
FOR EL-9400/9450
9600/9600c/9650
PC-LINK-SYSTEM
FÜR EL-9400/9450
9600/9600c/9650
ENGLISH ..................... Page 1
DEUTSCH ....................Seite 23
For WINDOWS
Für WINDOWS
CE-LK1P
Page 2

ENGLISH
PC LINK SYSTEM FOR
EL-9400/9450/9600/9600c/9650
OPERATION MANUAL
IBM is a registered trademark of International Business Machines Corporation.
Windows is a registered trademark of Microsoft Corporation.
All company and/or product names as trademarks and/or registered trademarks of
their respective holders.
Copyright © 2002 SHARP CORPORATION, Japan
1
Page 3

< INTRODUCTION >
Thank you for your purchase.
This product is supplied to customers who agree to the following items; please read
them before using this product.
We shall determine that you’ve approved them at setting up this product’s software.
Terms of Use
Sharp Corporation (hereinafter called “our Company”) shall grant a nonexclusive right
of this product “CE-LK1P” upon the following terms to you. You shall agree to the
following terms at setting up this product’s software.
•You shall use the software of this product on one Personal Computer. (hereinafter
called “PC”)
•You may make only one copy of the software on a storage medium for backup
purposes only.
•You shall not use or copy part or all of the operation manual without permission.
• Our Company shall not be held liable to anyone for failure arising out of improper
use of this product and accessories, or during use of them, nor for any damages
suffered from other malfunctions or use of this product.
• This product, including its accessories, are subject to change without notice for
product improvement.
Note
• Some of the models described in this manual may not be available in some
countries.
• “EL-94xx” refers to EL-9400/9450, and “EL-96xx” represents EL-9600/9600c/9650.
2
Page 4

CONTENTS
♦ GETTING STARTED .............................................................................................. 4
What is PC LINK? ............................................................................................ 4
Checking the Accessories ............................................................................... 5
System Requirements ..................................................................................... 5
Setting Up PC LINK ......................................................................................... 6
Connecting the EL-94xx/96xx to the PC .......................................................... 7
♦ USING PC LINK ..................................................................................................... 8
Files PC LINK can Handle ............................................................................... 8
Starting and Exiting PC LINK .......................................................................... 9
Specifying Model Type ................................................................................... 10
Creating and Saving a New Program ............................................................ 10
Sending, Receiving, and Backup Programs and Various Data ...................... 11
Opening a Saved File .................................................................................... 13
Using Edit Functions ...................................................................................... 14
Saving and Printing the Contents of the Edit Screen ..................................... 17
Screen Capture .............................................................................................. 18
Group/Ungroup .............................................................................................. 19
Converting a File ............................................................................................ 20
♦ APPENDIX ........................................................................................................... 21
Ta ble for Converting Special Symbols into TXT Letters ................................. 21
How to Proceed in the Event of Abnormal Conditions ................................... 22
3
Page 5

GETTING STARTED
What is PC LINK?
• Creates and edits EL-94xx/96xx programs on a PC.
• Receives and saves programs and various data from EL-94xx/96xx
• Makes a backup of all the contents of memory of EL-94xx/96xx.
• Sends programs and various data to EL-94xx/96xx.
• Loads image data of EL-94xx/96xx.
• Converts programs and various data files into a Text File.
Converts program text files into a Program File.
•Prints out programs and various data files.
This manual is intended for users who already understand how to use the EL-94xx/
96xx and how to operate a PC.
Also refer to the PC manual with this book.
4
Page 6

Checking the Accessories
Please check that all the following accessories are included upon purchase.
• 3.5” (90 mm) floppy disk
For IBM PC compatible computer 1
• PC LINK adaptor 1
• Converting connector for connecting the PC
For IBM PC compatible computer 1
• Communication cable CE-450L 1
• Operation manual (this book) 1
System Requirements
• 100% IBM Compatible PC
• Microsoft
•Pentium
Pentium
Pentium
®
Windows® 98/98 Second Edition/2000 Professional/Me/XP
®
150MHz or higher for Microsoft® Windows® 98/98 Second Edition
®
200MHz or higher for Microsoft® Windows® 2000 Professional/Me
®
/Celeron® Family 300MHz or higher for Microsoft® Windows® XP
• 30MB Available Hard Disk Space
• 64MB RAM for Microsoft
128MB RAM for Microsoft
®
Windows® 98/98 Second Edition/2000 Professional/Me
®
Windows® XP
• At least one 3.5” diskette drive
•1 Available Serial Port
• Mouse or Compatible Pointing Device
5
Page 7

Setting UP PC LINK
1 Installing the PC LINK Software
1. Start Windows.
2. Insert the attached floppy disk in the floppy disk drive.
3. Click the Start button, and then select Run.
4. Enter “Setup” followed by the path name of the location where the setup program
is saved.
For example, type “a:\setup”.
5. Click on the OK button.
The Setup screen appears, then follow the screen instructions for setup.
After completing the setup, the SHARP-PC LINK for EL-94xx_96xx folder is added
in the Program folder of the Start menu.
6
Page 8
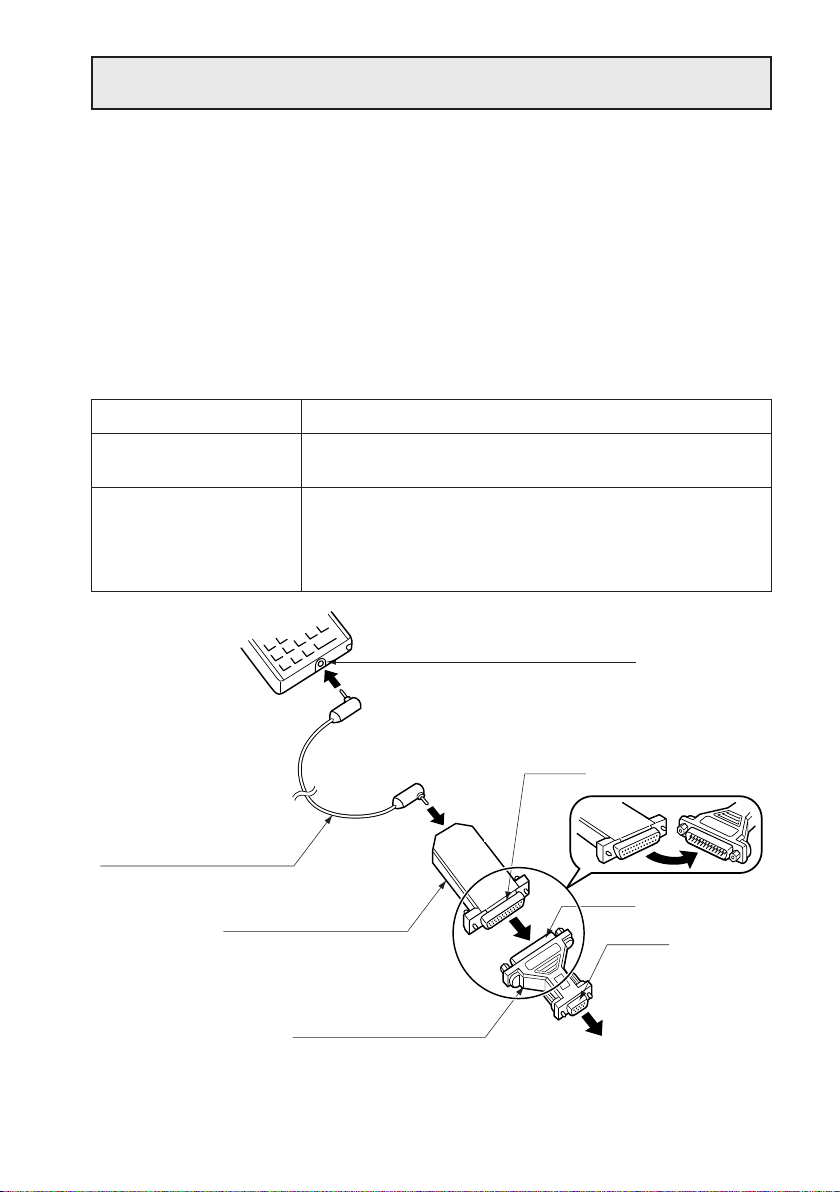
Connecting the EL-94xx/96xx to the PC
Connect the EL-94xx/96xx to the PC with the attached PC LINK adaptor.
NOTE: Push in all connectors firmly and make sure they cannot be removed by pulling
them lightly.
Also tighten the fixing screws.
1. Turn off the EL-94xx/96xx and the PC.
2. Connect one side of CE-450L to the peripheral connecting terminal (communica-
tion port) on the bottom of the EL-94xx/96xx; the other side to PC LINK adaptor.
3. The serial port shape of your PC determines connecting procedures as follows:
Shape of PC serial port
25 pin (male)
9 pin (male)
EL-94xx/96xx
CE-450L
(communication cable)
PC LINK adaptor
Connecting procedure
Connect the other side (25-pin side) of PC LINK adaptor
to the serial port for the PC.
Connect the other side (25-pin side) of PC LINK adaptor
to the 25-pin terminal of a converting adaptor. Also
connect the other side (9-pin side) of the converting
adaptor to the serial port for the PC.
Peripheral connecting terminal
25 pin
25 pin
9 pin
Converting adaptor
To PC serial port
* The illustration shows connecting procedure for PC serial port shape of 9 pin
(male).
7
Page 9

USING PC LINK
Files PC LINK can Handle
PC LINK can handle the following files listed below.
Contents of File
Backup
Group
Graph Database (GDB)
Graph Equation
Solver Equation
Picture
List
List Database (List DB)
Matrix
Program
Slide Show
Ta ble Setup
Window Setup
Data variable
Zoom
Te xt
Tagged Image Format
Bitmap
File Name on PC
backup
Set arbitrarily. (Initial value: Group)
g_data1 to g_data9, g_data0
y1 to y9, y0 / x1t to x6t / y1t to y6t /
r1 to r6 / u / v / w ← for EL-96xx only
Match it with the file name on the calculator.
pict1 to pict9, pict0
I1 to I6
I_data1 to I_data9, I_data0
mat_a to mat_j
Set arbitrarily.
Match it with the file name on the calculator.
tblsetup
winsetup
variable
zoom
Set arbitrarily.
Set arbitrarily.
Set arbitrarily.
Extension
EL-9400 EL-96xx EL-9450
g3b
g3g
g3d
g3y
g3i
g3l
g3n
g3p
g3t
g3w
g3v
g3z
txt
tif
bmp
g2b
g2g
g2d
g2y
-
g2e
g2i
g2l
g2n
-
g2m
g2p
-
g2s
g2t
g2w
g2v
g2z
←
←
←
g5b
g5g
g5d
g5y
-
g5i
g5l
g5n
-
g5p
g5s
g5t
g5w
g5v
g5z
←
←
←
8
Page 10

Starting and Exiting PC LINK
1 Starting the PC LINK
Select Start
CE-LK1P to start the PC LINK.
After the Startup screen, the Start screen is displayed with the menu bar and icons.
→→
→ Programs
→→
→→
→ SHARP PC-LINK for EL-94xx_96xx
→→
→→
→ SHARP
→→
2 Exiting the PC LINK
Select the Exit from the File menu, or double-click on the CLOSE box at the uppermost-left corner on the screen.
Note: If a communication will not be available, check the settings of the communication
(COM) port and the cable connection. If these procedures will not solve the
problem, set the Power Management and the screen saver to OFF.
(See Readme.txt for details.)
9
Page 11

Specifying Model Type
Before using the PC LINK functions, specify the Model Type (EL-9400,EL-9450,
EL-9600/9650) of your calculator.
Specifying the Model Type allows the file extension, the Key Board layout of the View
menu, and the command listing of the Func Table menu to be set to the contents of
your calculator.
1. Select the Model Type from the Tools menu.
The Model Type listing is displayed.
2. Click on the same Model as your calculator.
(While using EL-9600c, select "EL-9600/9650".)
Creating and Saving a New Program
1 Creating a New Program
NOTE: Only programs can be created.
1. Select the New from the File menu.
The Newly-Edited screen is displayed.
2. Enter a program name in Title:
3. Enter a program.
(For details on entering a program, refer to “Using Edit Functions” on page 14.)
2Saving a Created Program
1. Select the Save As... from the File menu.
The Save As screen is displayed.
2. Specify the drive and folder, and then enter the file name and extension.
The extension is different depending on your calculator.
3. Click on the OK button.
The created program is saved as a new program file with the contents specified in
2.
* Alphanumeric characters can be used for file names. If a program file stored with a file
name that consists of non-alphanumeric characters is sent to the EL-94xx/96xx, the
file name may change.
10
Page 12

Sending, Receiving, and Backup
Programs and Various Data
(1) Programs and various data can be received from the EL-94xx/96xx in order to
save them in a file. The contents saved in the file can also be sent to the EL-94xx/
96xx.
(2) Back up all data of the EL-94xx/96xx to the file. Also, restore the backup data to
the EL-94xx/96xx.
1 Setting a Communication Port
Set a communication port.
Set the communication port where the adaptor for the PC is connected.
1. Select the Communication Port from the Link menu.
A list of communication ports is displayed.
2. Click on the port to be used or Auto Setting.
2 Sending and Receiving Programs and Various Data
Programs and various data can be received from the EL-94xx/96xx and saved in a
file. Also, the file can be sent to the EL-94xx/96xx.
(1) Receiving Programs and Various Data from the EL-94xx/96xx to
be Saved in a File
1. Turn on the EL-94xx/96xx.
2. Select the Receive... from the Link menu.
The Receive File screen is displayed.
3. Specify the kind of drive, folder, and file, then select the file to be received from
the file list, and click on the Select button.
The selected file is displayed on the File Selected column.
4. Click on the OK button.
The Receiving screen is displayed on the PC screen to start receiving.
5. After the completion of receiving, the initial screen returns.
* If a file stored with a file name that consists of non-alphanumeric characters (Solver
equation, Program, Slide show) is received by a PC, the file name may change.
* If multiple Solver equation and Program files are saved on the EL-94xx/96xx with the
same file name, only the initial saved file can be received.
To receive all the files, save each file on the EL-94xx/96xx with a different file name.
11
Page 13

(2) Sending a File to the EL-94xx/96xx
NOTE: Group files, Text files, TIFF files, and Bitmap files cannot be sent to the EL-94xx/
96xx.
1. Turn on the EL-94xx/96xx.
2. Select the Send... from the Link menu.
The Send File screen is displayed.
3. Specify the kind of drive, folder, and file, then select the file to be sent from the file
list, and click on the Select button.
The selected file is displayed on the File Selected column.
4. Click on the OK button.
The Sending screen is displayed on the PC screen to start sending.
5. After the completion of sending, the initial screen returns.
3 Making a Backup
All data of the EL-94xx/96xx can be backed up to the disk, and the backed up data
can be restored to the EL-94xx/96xx.
(1) Making a Backup of All Data
1. Turn on the EL-94xx/96xx.
2. Select the Receive... from the Link menu.
The Receive File screen is displayed.
3. Specify the kind of drive, folder, then select “backup.g*b” from the file list, and click
on the Select button.
The selected “backup.g*b” is displayed on the File Selected column.
4. Click on the OK button.
The receiving screen is displayed on the PC screen to start receiving, and then all
data of the EL-94xx/96xx will be backed up.
(2) Sending Backup Data to the EL-94xx/96xx
NOTE: All the contents saved in the EL-94xx/96xx immediately before this are erased.
Perform the same procedure of “(2) Sending a file to the EL-94xx/96xx” on this page
to send the back-up file (backup.g*b) to the EL-94xx/96xx.
12
Page 14

Opening a Saved File
First, display (open) the contents of a file in order to print and edit the contents of the
saved file.
1 Displaying the Contents of a File
NOTE: The contents of Backup files, Group files, GDB files, Graph equation files, Solver
equation files, and TIFF files cannot be displayed.
(The files cannot be opened.)
1. Select the Open... from the File menu.
The Open File screen is displayed.
2. Specify the kind of drive, folder, and file, then select the file whose contents are to
be displayed from the file list.
3. Click on the OK button.
The selected file is opened with its contents displayed.
2 Printing a File
NOTE: The contents of Backup files, Group files, GDB files, Graph equation files, Solver
equation files, and TIFF files cannot be printed.
1. Display the contents of a file on the screen.
2. Select the Print... from the File menu.
The Print Setting screen is displayed.
3. If necessary, specify items such as the range and the number of copies.
4. Click on the OK button.
The Print Run screen is displayed, and then the contents displayed on the screen
are printed.
13
Page 15

Using Edit Functions
NOTE: The files that can be edited with the Edit functions are: List files, List DB files,
Matrix files (for EL-96xx only), Program files, Table setup files, Window setup
files, Data variable files and Zoom files.
The Edit functions are used for creating EL-94xx/96xx programs and editing the
contents that have already been saved as files.
1 Entering Commands, Strings, and Values on the Edit
Screen
On the Edit screen, the following three ways can be used to enter commands, strings,
and values.
•Keyboard layout
• Func Table
• PC keyboard
(1) Entering from the Keyboard Layout
Display the Keyboard layout of the calculator on the Edit screen, and then enter
necessary items such as commands.
1. Select the Key Board from the View menu.
The Keyboard layout of the calculator is displayed.
2. Move the cursor to the key on the Keyboard layout you want to enter, and then
click on it. The item is entered in the cursor position on the Edit screen.
*For some items such as “STAT PLOT”, “ZOOM”, and “CALC”, the subcategory and
minor category are displayed. In this case, select the item in the left row (the subcategory) to display the right row (the minor category), and then move the cursor to the
item in the right row that you want to enter, for double-click.
14
Page 16

(2) Entering from the Func Table
The Func Table is used to select necessary items from the list containing items such
as functions, and enter them.
1. Select the item from the major category of the Func Table menu.
Selecting the Key Pad and Func All displays the subcategory.
Selecting other than the Key Pad and Func All displays the subcategory and
minor category, respectively.
2. Perform either of the following operations, and then enter an item in the cursor
position on the Edit screen.
When only the subcategory is displayed, move the cursor to the item that you
want to enter, for double-click.
When the subcategory and minor category are displayed, select the item in the
left row (the subcategory) to display the right row (the minor category), and then
move the cursor to the item in the right row that you want to enter, for double-click.
(3) Entering from the PC Keyboard
Enter necessary items such as functions from the PC keyboard.
2 Editing
(1)Cutting a string
1. Select the string to be cut.
2. Select the Cut from the Edit menu.
The selected string is cut on the Edit screen and moved to the clipboard.
(2)Copying a string
1. Select the string to be copied.
2. Select the Copy from the Edit menu.
The selected string is copied to the clipboard.
(3)Deleting a string
1. Select the string to be deleted.
2. Select the Delete from the Edit menu, or press the Delete on the PC keyboard.
The selected string is deleted.
• Selecting Select All from the Edit menu selects all strings on the Edit screen.
15
Page 17

(4)Pasting the contents of a clipboard to the Edit Screen
The contents moved to the clipboard by “Cutting a string” and “Copying a string” can
be pasted at the cursor position on the Edit screen.
* Selecting the Paste from the Edit menu pastes the contents of the clipboard at the
cursor position on the Edit screen.
(5)Finding a string
1. Select the Find... from the Edit menu.
The Find screen is displayed.
2. Enter the string to be searched for.
If necessary, specify the option to differentiate between uppercase and lowercase.
3. Click on the Find Next button.
The cursor moves to the found string.
(6)Replacing a string
1. Select the Replace... from the Edit menu.
The Replace screen is displayed.
2. Enter the string to be searched for, and then the string after replacement.
If necessary, specify the option to differentiate between uppercase and lowercase.
3. Click on the Find Next button.
The cursor moves to the found string.
4. Perform either of the following:
Click the Find Next button to find the next string without replacing the string.
Click the Replace button to find the next string after replacing the found string.
Click the Replace All button to replace all found strings without checking.
*To return to the state immediately before making an operation (such as after making
an input error), select the Undo from the Edit menu.
16
Page 18

Saving and Printing the Contents
of the Edit Screen
1 Overwriting
NOTE: Program files can be overwritten.
• After completing edition, select the Save from the File menu.
The file is saved in the same file.
2Save As
NOTES: • List files, List DB files, Matrix files (for EL-96xx only), Table setup files, Window
setup files, Data variable files, and Zoom files which are edited with the Edit
functions, can be saved only as text files.
When a file is saved as a text file, letters are included in @s for special
symbols.
(For details on special symbols, see the “Table for Converting Special Symbols
into TXT Letters” on page 21.)
• Alphanumeric characters can be used for file names. If a program file stored
with a file name that consists of non-alphanumeric characters is sent to the EL94xx/96xx, the file name may change.
1. After completing editing, select the Save As... from the File menu.
The Save As screen is displayed.
2. Specify the drive and folder, and then enter the file name and suitable extension.
3. Click on the OK button.
The file is saved with the contents specified in step 2.
3 Printing
Perform the same procedure as in step 2 or from “2 Printing a File” on page 13, and
then print the contents displayed on the screen.
17
Page 19

Screen Capture
The screen capture function loads image data displayed on the EL-94xx/96xx on the
PC.
1 Setting a Communication Port
Perform the same procedure as in step 1 or from “1 Setting a Communication Port”
on page 11, and then set the communication port.
2 Loading Image Data
Load image data displayed on the EL-94xx/96xx.
1. Display the contents to be loaded on the EL-94xx/96xx display.
2. Select the Screen Capture from the Link menu.
The Load screen is displayed to load image data.
3. After the completion of loading, the loaded image data is displayed with the
Screen Image screen.
3Saving and Printing Image Data
Image data can be saved in a file and printed by a printer connected to the PC.
(1)Saving
1. Load the image data.
2. Select the Save As... from the File menu.
The Save As screen is displayed.
3. Specify the drive and folder, and then enter the file name and “tif” or “bmp”
extension.
4. Click on the OK button.
(2) Printing
1. Open or load the image data.
2. If necessary, specify the Print image percentage for printing.
3. Select the Print... from the File menu.
The Print Setting screen is displayed.
4. If necessary, specify items such as the range and the number of copies.
5. Click on the OK button.
The Print Run screen is displayed, and then the contents displayed on the screen
are printed.
18
Page 20

Group/Ungroup
1Group (Combine individual files into a group file)
It is possible to create a group file either by combining unrelated individual files or by
combining only related files.
1. Select the Group Files... from the Tools menu. The file selection screen to
choose which files to combine into a group file is displayed.
2. Specify drive, directory and the file type. Select the file to group from the file list
and then click the Select button. The selected file is displayed in the File Selected
column.
Continue this file selection process for each file to group.
3. After selecting all the files for file grouping, click the OK button.
The Save As screen is displayed.
4. Perform the same procedure as in step 2 or from “2 Save As” on page 17, and
save as a group file.
Note that the extension must be specified as “g3g” for the EL-9400 and as “g2g”
for the EL-96xx and as “g5g” for the EL-9450.
2 Ungroup (Ungroup a group file)
1. Select the Ungroup Files... item from the Tools menu.
The group file selection screen to choose which group file to ungroup is displayed.
2. Specify the kind of drive, folder, and file. Select a group file to ungroup from the
file list and then click the OK button.
The folder and drive selection screen to select where to save the individual files
after ungrouping is displayed.
3. Specify the folder and drive and then click the OK button.
The group file selected in step 2 is ungrouped and the individual files are saved
as specified in step 3.
19
Page 21

Converting a File
1 Converting a Program and Various Data Files into a Text
File
NOTE: The following files can be converted to text files: List files, List DB files, Matrix
files (for EL-96xx only), Program files, Table setup files, Window setup files, Data
variable files, and Zoom files.
For conversion to a text file, letters are included in @s for special symbols.
(For details on special symbols, see the “Table for Converting Special Symbols
into TXT Letters” on page 21.)
1. Open or display the contents of the file to be converted to a text file on the screen.
2. Perform the same procedure as in step 1 or from “2 Save As” on page 17; however, enter “txt” as the extension.
2 Converting a Program Text File into a Program File
Program text files can be converted into program files that can be sent to the EL94xx/96xx.
1. Open or display the contents of the program text file to be converted into a
program file.
2. Perform the same procedure as in step 1 or from “2 Save As” on page 17; however, as the extension, enter “g3p” for the EL-9400; “g2p” for the EL-96xx; “g5p” for
the EL-9450.
20
Page 22

APPENDIX
Table for Converting Special Symbols
into TXT Letters
Upon conversion to TXT, the letter is included in @s. (@ ... @)
Letter
0
1
2
3
4
5
6
7
8
9
a
b
c
d
e
r
R
g
n
E
(-)
°
r
i
∠
θ
T
π
ˆ
p
_
x
_
y
≠
TXT conversion
0
1
2
3
4
5
6
7
8
9
a
b
c
d
e
r
R
grad
n
EE
deg
rad
i
complex_angle
theta
T
pi
p_hat
x_mean
y_mean
not_=
The letter in the part is bold.
Letter
≥
≤
×
P
C
2
–1
3
⇒
10
Σ
∫
N
σ
χ
F
+
.
→
4
b
÷
int
TXT conversion
>=
<=
x
frac
Per
Com
^2
^-1
^3
sto
root
10
SIGMA
integral
N
sigma
chi
stat_F
box
cross
dot
->
^4
^b
unit
intdiv
21
Page 23

How to Proceed in the Event of
Abnormal Conditions
If this product is exposed to a powerful external electric field or shock during use, an
abnormal condition may seldom occur in which all of the keys, including the ON key
on the calculator connected, do not function. In the event of such a situation operate
the machine from the start again, or reset the calculator by the following procedure
before reoperation.
How to reset
Press the RESET switch on the back of the calculator only in the following cases.
• When an abnormal condition occurs and all the keys are inoperative.
•To clear all memory contents.
1) Press the RESET switch on the back of calculator.
(The figure shown is for EL-96xx.)
• Please use a ball-point pen when pressing the RESET switch. Do not use a sharp
point or fragile object such as a needle, a mechanical pencil, etc.
2) The display should be as shown below. Press the RESET switch again if the
display is different from what is shown below.
(The display shown is for EL-96xx.)
3) To keep the memory contents:
Press ON . The display will return to the initial display.
4) To clear all memory contents:
Press CL while the above is being displayed. All memory contents will be cleared
and the display will become as follows.
(The display shown is for EL-96xx.)
Pressing any key at this point restores the initial display.
22
Page 24

In Europe:
This equipment complies with the requirements of Directive 89/336/EEC as amended
by 93/68/EEC.
Dieses Gerät entspricht den Anforderungen der EG-Richtlinie 89/336/EWG mit
Änderung 93/68/EWG.
Ce matériel répond aux exigences contenues dans la directive 89/336/CEE modifiée
par la directive 93/68/CEE.
Dit apparaat voldoet aan de eisen van de richtlijn 89/336/EEG, gewijzigd door 93/68/
EEG.
Dette udstyr overholder kravene i direktiv nr. 89/336/EEC med tillæg nr. 93/68/EEC.
Quest’apparecchio è conforme ai requisiti della direttiva 89/336/EEC come emendata
dalla direttiva 93/68/EEC.
∏ ВБО·Щ¿ЫЩ·ЫЛ ·˘Щ‹ ·УЩ·ФОЪ›УВЩ·И ЫЩИ˜ ··ИЩ‹ЫВИ˜ ЩˆУ Ф‰ЛБИТУ ЩЛ˜ ∂˘Ъˆ·˚О‹˜
∂УˆЫЛ˜ 89/336/∂√∫, fiˆ˜ Ф О·УФУИЫМfi˜ ·˘Щfi˜ Ы˘МПЛЪТıЛОВ ·fi ЩЛУ Ф‰ЛБ›· 93/
68/∂√∫.
Este equipamento obedece às exigências da directiva 89/336/CEE na sua versão
corrigida pela directiva 93/68/CEE.
Este aparato satisface las exigencias de la Directiva 89/336/CEE, modificada por
medio de la 93/68/CEE.
Denna utrustning uppfyller kraven enligt riktlinjen 89/336/EEC så som kompletteras av
93/68/EEC.
Dette produktet oppfyller betingelsene i direktivet 89/336/EEC i endringen 93/68/EEC.
Tämä laite täyttää direktiivin 89/336/EEC vaatimukset, jota on muutettu direktiivillä 93/
68/EEC.
Page 25

SHARP CORPORATION
PRINTED IN JAPAN/GEDRUCKT IN JAPAN
02CGK (TINSZ0461THZZ)
 Loading...