

Page 1
DIGITAL CAMERA CARD
DIGITALKAMERA-KARTE
CE-AG06
OPERATION MANUAL
BEDIENUNGSANLEITUNG
•
Introduction ................................................ 2
•
Key Features ............................................. 3
•
Notice ........................................................ 4
•
Names and Functions of Parts .................. 6
•
Installing and Removing
the Digital Camera Card . 7
•
Taking Pictures .......................................... 9
•
Specifications .......................................... 14
•
Troubleshooting ....................................... 15
CE-AG06表紙 02.1.12, 1:02 PMPage 1 AdobePageMaker6.5J/PPC
page Seite
•
Vorwort ...................................................... 2
•
Hauptmerkmale ......................................... 3
•
Zur Beachtung ........................................... 3
•
Bezeichnung und Funktion der Teile ......... 6
•
Einsetzen und Herausnehmen
der Digitalkamera-Karte . 7
•
Fotografieren ............................................. 9
•
Technische Daten .................................... 14
•
Fehlersuche ............................................. 15
Page 2
In U.S.A.:
Declaration of Conformity
Digital Camera Card: CE-AG06
This device complies with Part 15 of the FCC Rules.
Operation is subject to the following two conditions: (1)
This device may not cause harmful interference, and
(2) this device must accept any interference received,
including interference that may cause undesired
operation.
Note: This equipment has been tested and found to
comply with the limits for a Class B digital device,
pursuant to Part 15 of the FCC Rules.
These limits are designed to provide reasonable
protection against harmful interference in a residential
installation. This equipment generates, uses, and can
radiate radio frequency energy and, if not installed and
used in accordance with the instructions, may cause
harmful interference to radio communications.
However, there is no guarantee that interference will
Responsible Party:
SHARP ELECTRONICS CORPORATION
Sharp Plaza, Mahwah, New Jersey 07430
TEL: 1-800-BE-SHARP
Tested To Comply With FCC Standards
FOR HOME OR OFFICE USE
WARNING - FCC Regulations state that any
unauthorized changes or modifications to this equipment
not expressly approved by the manufacturer could void
the userís authority to operate this equipment.
not occur in a particular installation. If this equipment
does cause harmful interference to radio or television
reception, which can be determined by turning the
equipment off and on, the user is encouraged to try to
correct the interference by one or more of the following
measures:
– Reorient or relocate the receiving antenna.
– Increase the separation between the equipment and
receiver.
– Connect the equipment into an outlet on a circuit
different from that to which the receiver is connected.
– Consult the dealer or an experienced radio / TV
technician for help.
CE-AG06表紙 02.1.12, 1:02 PMPage 2 AdobePageMaker6.5J/PPC
Page 3

ENGLISH
Thank you very much for choosing the SHARP
digital camera card CE-AG06.
Please read this operation manual carefully to
use the product properly. After reading, keep the
manual in a safe place for later reference.
Disclaimer
• Except as validated by the products liability law,
we do not assume any responsibility for
damages to your or third parties caused by
improper handling of the product or any of its
accessories or by their operational failures, as
well as by their use.
• This product, with its accessories inclusive, is
subject to change without notice.
CONTENTS
Introduction
Key Features .................................................. 3
Notice ............................................................. 4
Names and Functions of Parts ....................... 6
Installing and Removing the
Digital Camera Card
Installing the card in the main unit ........... 7
Removing the card from the main unit ..... 8
Taking Pictures ............................................... 9
Basic flow of photography ........................ 9
Adjusting the rotation and orientation
of the lens unit . 10
Adjusting the focus ................................. 11
Tips on taking pictures ........................... 11
Dew condensation ................................. 12
Preventing blurry pictures ...................... 12
Infrared-emitting subjects ....................... 12
Taking pictures in a room under
fluorescent light . 12
Customer care ....................................... 13
Specifications ............................................... 14
Troubleshooting ........................................... 15
.................................................... 2
.7
1
CE-AG06本文(E) 02.1.12, 1:03 PMPage 1 AdobePageMaker6.5J/PPC
Page 4

Introduction
This product (digital camera card CE-AG06) can
be used as a digital camera when inserted in a
CF card slot, as in the SL-5500.
Software installed in the main unit allows you to
transmit pictures taken with this product as email attachments. For more information, refer to
the operation manual of the main unit.
This product can be inserted in the following
models:
Supported models:
SL-5500/SL-5000 (as of January 2002)
Using this product with the SL-5000 requires
*
updating the software installed in it.
URL: http://developer.sharpsec.com
Instructions in manual focus on handling the
product, inserting it into the main unit, such as
the SL-5500 (hereafter simply called "main unit")
and removing it, and taking pictures.
For how to use the picture data that has been
recorded, refer to the operation manual of the
main unit.
2
Notice
• This product cannot be used with models other
than those listed at left (as of January 2002).
• Having this product inserted in a notebook
computer or the like can result in failure.
• The copyright law provides that pictures you took
with this product cannot be used without prior
permission of the copyright holders, except for
personal entertainment purposes.
Please remember that that taking pictures of live
performance, presentation, exhibits, etc. may be
restricted even though they are used for
personal entertainment purposes.
• Before taking any precious pictures, test-shoot
them to make sure they are saved properly.
CE-AG06本文(E) 02.1.12, 1:03 PMPage 2 AdobePageMaker6.5J/PPC
Page 5

Key Features
• The CE-AG06, when inserted into the main unit,
offers you a joy of photography instantly.
Image sensor:
CMOS Image sensor with 350,000 pixels
Maximum image resolution:
480 × 640 dots (VGA)
• Using the main unit zoom feature lets you zoom
in on your subject to a magnification of about
two.
• The close-up feature keeps you as close to your
subject as about 6 cm.
• The pictures you took can be saved to the
memory of the main unit or to an SD memory
card in the JPEG format.
Memo:JPEG is a format of image compression
for color stills.
• The rotary lens mechanism allows you to
capture your self-portraits.
• The digital camera card monitors through the
LCD screen of the main unit.
3
CE-AG06本文(E) 02.1.12, 1:03 PMPage 3 AdobePageMaker6.5J/PPC
Page 6

Notice
When using this product, please fully observe
these handling precautions to prevent failures
and other troubles.
• When carrying the main unit or leaving it out of
service, remove the product from it and insert
the included CF card slot Protection card in its
place. Keep the product removed carefully to
safeguard against undue pressure.
• Do not swing or carry the main unit with this
product inserted in it by holding the main unit
or product alone. The main unit or product may
work loose, resulting in damage. Undue force
applied to the product may impair the rotary
lens mechanism or connection terminal of the
product.
• Do not push or pull the product strongly while it
is inserted in the main unit. Damage to the
product or the main unit may result.
• Before inserting the product into the main unit,
remove the Display protection cover from the
main unit.
4
• Never remove the product or manipulate the
battery replacement switch of the main unit
while an image is being stored. These actions
may corrupt the picture data.
• Do not place the product in an unstable place.
It may fail under strong pressure or impact.
• Do not place the product on a rickety table or
in an unstable place. The precision device may
fall, resulting in failure under impact.
• Do not use the product in places where its use
is either restricted or prohibited, as in aircraft
in which it may interfere with the flight. Accidents
may result.
• The time the LCD screen takes to get its
brightness stabilized varies depending on the
ambient temperature. Wait for a while until the
brightness gets stabilized.
• Do not aim the lens at the sun. Color distortion
or seizure may result.
• Be careful when using the product not to apply
force to the digital camera cable. Undue force
applied to the product may impair the
connection terminal and other parts of the main
CE-AG06本文(E) 02.1.12, 1:03 PMPage 4 AdobePageMaker6.5J/PPC
Page 7

unit. Avoid also applying undue force from the
rotary lens mechanism.
• Do not touch the lens with a pointed object or
bare hands. The lens may be flawed or stained.
If the lens gets dirty, lightly wipe it with a cotton
swab or any other soft material.
• Do not leave the product in a place exposed to
direct sunlight, in a car, near a heater, or in any
other place that may become hot. Such location
can be a source of failure.
• Avoid using or leaving the product in a dusty or
damp place. Such location can be a source of
failure.
• Do not put the product in a back pocket of your
pants or in a breast pocket. Undue force applied
to the product may result in damage.
• The product is not of waterproof construction.
Avoid using or storing the product where it may
be splashed with water or other liquids.
Rainwater, water splashes, juice, coffee, steam,
and sweat can also be possible sources of
failure.
• Do not drop or give a strong shock to the
product. Failures, such as the loss of focus and
inability to insert the product into the main unit,
may result.
• Never touch the connection terminal. The
product may be disabled under electrostatic
influences. Also, never allow foreign matter
inside the product to avoid possible failures.
•Avoid using the product for applications
requiring more critical reliability than general
equipment.
• Although the CMOS Image sensor is made of
advanced precision technology, some pixels
may look constantly bright or dark spots.
• The card unit may get somewhat heated after
extended periods of service, but this is not a
failure.
5
CE-AG06本文(E) 02.1.12, 1:03 PMPage 5 AdobePageMaker6.5J/PPC
Page 8
Names and Functions of Parts
Focus dial
Turn the dial to focus on your
subject to shoot (see page 11).
Card unit
6
CE-AG06本文(E) 02.1.12, 1:03 PMPage 6 AdobePageMaker6.5J/PPC
Lens
Lens unit
The lens unit rotates. Rotate
it to aim at you subject to
shoot (see page 10).
Shutter release button
Press to take a picture and save the
picture data.
Page 9
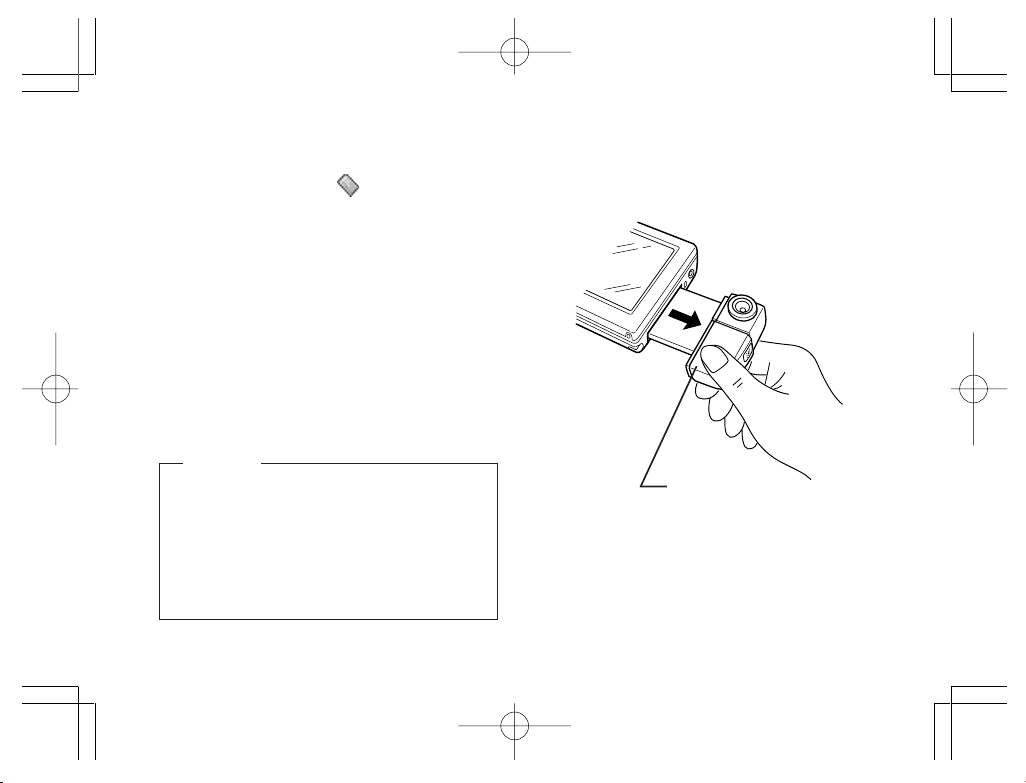
Installing and Removing the Digital Camera Card
Installing the card in the main unit
. Remove the Display protection cover from the
1
main unit.
. Turn the main unit on.
2
. If a card is already inserted in the CF card
3
slot of the main unit, remove it.
• Refer to the operation manual of the main
unit when removing cards.
. Insert this product (CE-AG06) fully straight
4
into the CF card slot of the main unit.
• The stylus supplied with the main unit cannot
be detached once the product is inserted into
it. Have the stylus detached beforehand as
Caution
Having this product inserted in a notebook
computer or the like can result in failure. Never
insert the product in other than the models
specified by us.
CE-AG06本文(E) 02.1.12, 1:03 PMPage 7 AdobePageMaker6.5J/PPC
needed.
• Insert the product into the main unit with the
"SHARP CE-AG06 DIGITAL CAMERA"
making face up.
7
Page 10
Removing the card from the main unit
. Exit all applications running on the main unit.
1
. Tap the CF card icon ( ) in the lower right
2
corner of the LCD screen to see a popup
menu. Then, tap "Eject card" on this menu.
• The CF card icon disappears.
. With the main unit turned on, remove the
3
product from it by pulling it straight.
. Insert the CF card slot Protection card into
4
the CF card slot of the main unit.
Caution
• Do not remove the product from the main unit
by holding its lens unit.
Pulling the lens can result in a fracture or
otherwise in damage or failure.
• When not using the product, remove it from
the main unit and attach the Display
protection cover in its place.
8
CE-AG06本文(E) 02.1.12, 1:03 PMPage 8 AdobePageMaker6.5J/PPC
Hold around this
area
Page 11

Taking Pictures
Basic flow of photography
. Insert the product into the main unit (see page
1
7).
. Launch the Camera Application from the main
2
unit (refer to the documentation that comes
with the Camera Application).
A digital camera screen (or the LCD screen
in which your subject is imaged) is displayed.
. Set the destination to which to save the picture
3
data, the picture size (resolution) and other
relevant picture characteristics from the main
unit and check that the picture counter does
not equal 0.
. Turn the lens unit or the focus dial to optimize
4
the image of your subject appearing on the
LCD screen of the main unit (see pages 10
and 11).
. Press the shutter release button.
5
The picture data you shot is saved.
CE-AG06本文(E) 02.1.12, 1:03 PMPage 9 AdobePageMaker6.5J/PPC
Caution
• Be careful not to block the lens with your fingers
or other objects when taking pictures.
• You cannot take pictures while image data
saving is in progress.
Memo
• For instructions on operating the main unit and
viewing and using saved picture data, refer to
the operation manual of the main unit.
• Pictures you shot are saved compressed in the
JPEG data. When JPEG picture data plays, it
may look somewhat coarser than in the actual
image viewed in step 4.
9
Page 12
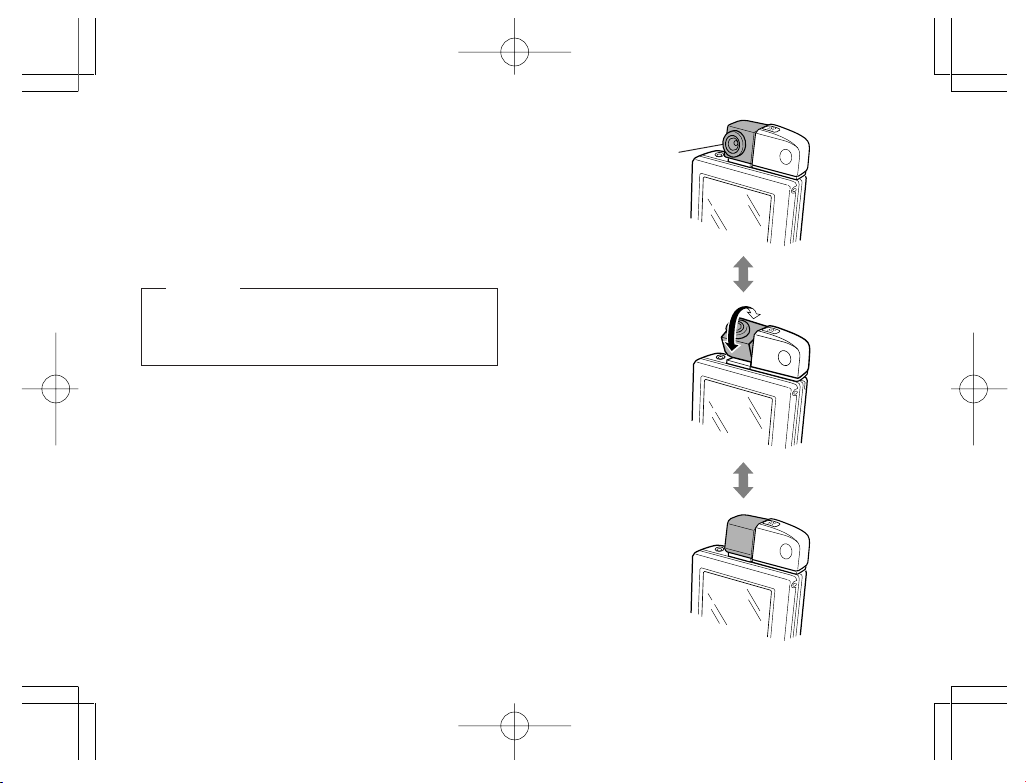
Adjusting the rotation and
orientation of the lens unit
The lens unit rotates. Holding the main unit, aim
the lens unit at your subject for adjustment.
Caution
Do not turn the lens unit past its range of rotation,
which spans about 180° from the position shown
in Figure A to that in Figure B.
• Do not force the lens unit to rotate.
• You can orient the lens unit at yourself to
capture your self-portraits.
10
(Figure A)
Lens unit
(Figure B)
CE-AG06本文(E) 02.1.12, 1:03 PMPage 10 AdobePageMaker6.5J/PPC
Page 13

Adjusting the focus
Turn the focus dial to optimize the image of your
subject appearing on the LCD screen of the main
unit.
Focusdial
Caution
Do not force the dial to turn. Turning the dial past
its range of rotation can result in failure.
Memo
Take close-up pictures (about 6 cm apart) with
the focus dial turned to the ( ) mark. Check the
LCD screen of the main unit to make sure that
your subject is in focus.
CE-AG06本文(E) 02.1.12, 1:03 PMPage 11 AdobePageMaker6.5J/PPC
Tips on taking pictures
• If you take a picture in a dark environment, its
image may look coarse, but this is not a failure.
• When you press the shutter release button, the
image you shot stays still on the LCD screen
for a while until its save is completed, when
the screen is restored, allowing you take the
next picture.
• If you sway the main unit up and down or to left
and right, the display may look jerky as if a video
is fed frame by frame, but this is not a failure.
• Aiming the lens at the CRT tube of a TV receiver
or the display monitor of a computer will display
horizontal streaks on the LCD screen. Similar
streaks will also appear in the image you shot,
but this is not a failure.
• Close-up images may look distorted in their
peripheral area like a barrel due to the
characteristics of the lens, but this is not a
failure.
• Particularly bright parts of a subject, such as
the filament of an incandescent lamp, may look
dark, but this is not a failure.
• If you shoot a moving subject, it may look
distorted in form, but this is not a failure.
11
Page 14

Dew condensation
If this product is quickly moved from a cold place
into a warm place, the temperature difference will
cause dew to condense inside and outside the
product. Generally, allow the product to stand for
about 1 hour at the ambient temperature before
use.
Preventing blurry pictures
Moving the main unit when you press the shutter
release button to take a picture could give a blurry
image to the picture. In picture taking in a dimly
lit place, the shutter speed will slow down. Hold
the main unit steady so your subject imaged on
the LCD screen won’t move.
Infrared-emitting subjects
If you shoot a source of infrared rays, such as a
stove, the picture may look inappropriately colored, but the image you shot has been saved
exactly in the color as you saw it on the LCD
screen of the main unit.
12
Taking pictures in a room under
fluorescent light
If you use this product in a room under fluorescent light, subtle changes in brightness or hue,
or horizontal streaks in varying shades of light
contrast may appear in the picture. This phenomenon is the result of the product sensing a subtle,
human-insensible flickering of the fluorescent
light depending on the timing of photography.
When shooting a subject, check the image and
hue of its image on the LCD screen. Enhanced
shot clarity will benefit from using a commercial
video light.
CE-AG06本文(E) 02.1.12, 1:03 PMPage 12 AdobePageMaker6.5J/PPC
Page 15

Customer care
• To the main unit and the lens unit, lightly wipe
with a clean, soft dry cloth, such as a cotton
swab.
• Never use organic solvents, such as thinner or
benzine, and wet cloths for cleaning. Use of
these materials may degenerate or discolor the
main unit and the lens unit.
• When leaving the product out of service for
extended periods of time, remove it from the
main unit and store it to protect the lens (see
page 8).
Caution
When the product has been removed from the
main unit, do not touch the card terminal. Static
electricity may cause the product to fail.
13
CE-AG06本文(E) 02.1.12, 1:03 PMPage 13 AdobePageMaker6.5J/PPC
Page 16

Specifications
Model CE-AG06 Product name Digital camera card
Image sensor 1/4-type primary color RGB filter CMOS Image sensor with 350,000 (effective
Lens Monofocus lens F3.4 f=3.85 mm (equivalent to 40 mm on a 35 mm camera)
Shutter speed Automatic (1/10 to 1/15,750 second)
Focus mode Manual
Focus range Approx. 6 cm to infinity
Exposure control Electronic shutter
White balance Automatic
Monitor Subjects (images) are displayed on the main unit screen.
Picture storage Internal memory or SD memory card of the main unit.
Recording format JPEG
Image resolution VGA (480 × 640 dots), HVGA (480 × 320 dots), QVGA (240 × 320 dots),
I/O interface
Power Supplied from the main unit
Operating temperature
and humidity
Dimensions 24.5 mm (W) × 55.4 mm (D) × 14 mm (H) (excluding projections)
Weight Approx. 25 g (0.88 oz)
Accessory Operation manual (this book)
14
CE-AG06本文(E) 02.1.12, 1:03 PMPage 14 AdobePageMaker6.5J/PPC
310,000) square pixels
1/8 VGA (240 × 160 dots), 1/16 VGA (120 × 160 dots)
Compact card type
0 to 40°C (32 to 104°F), 35 to 85%RH
0.64” (W) × 2.18” (D) × 0.55” (H)
Page 17

Troubleshooting
If you are experiencing difficulties with the camera card, check the following table for possible solutions before requesting repair services:
Problem Cause and solution
Nothing appears on
the LCD screen (the
LCD screen looks
black or green).
The LCD screen
turned whitish.
The product shuts off
unexpectedly.
CE-AG06本文(E) 02.1.12, 1:03 PMPage 15 AdobePageMaker6.5J/PPC
• The product may not be connected properly. Check that it is fully inserted in the
CF card slot of the main unit.
• Check that the battery (rechargeable) loaded in the main unit are not weak or
depleted.
Low or depleted battery loaded in the main unit can disable the product from
working correctly.
• Dew condensation can make the LCD screen looks whitish, detracting from its
visibility. Leave the main unit off for about1 hour and turn it on again, making sure
that fogging has been removed before use.
• Check that it is fully inserted in the CF card slot of the main unit.
• Check that the battery (rechargeable) loaded in the main unit are not weak or
depleted.
Low or depleted battery loaded in the main unit can disable the product from
working correctly.
15
Page 18

Problem Cause and solution
Picture is not clear.
Cannot take a picture.
16
• Check that the lens is not dirty. If the lens gets dirty, clean it with a cotton swab or
any other soft material.
• Check that the focus is adjusted correctly. Turn the focus dial for adjustment (see
page 11).
• Haven’t you photograph any source of infrared emission? When a source of
infrared emission is shot, its colors may not look right.
• When you photograph a brightly shining object, horizontal lines will appear in the
resultant picture. This is caused by high contrast against the background and is
not a failure.
• When you photograph with an AC adapter, noises from external sources, such
as input power, may cause small shiny spots to appear on the LCD screen, but
this is not a failure.
• Check that the main unit has enough memory to photograph. Delete unnecessary
data or transfer it to the SD memory card to make more memory space available
in the main unit.
CE-AG06本文(E) 02.1.12, 1:03 PMPage 16 AdobePageMaker6.5J/PPC
Page 19

MEMO
17
CE-AG06本文(E) 02.1.12, 1:03 PMPage 17 AdobePageMaker6.5J/PPC
Page 20

MEMO
18
CE-AG06本文(E) 02.1.12, 1:03 PMPage 18 AdobePageMaker6.5J/PPC
Page 21

DEUTSCH
Wir danken Ihnen für den Kauf der SHARP
Digitalkamera-Karte CE-AG06.
Bitte lesen Sie diese Bedienungsanleitung
aufmerksam durch, um das Produkt korrekt zu
benutzen. Bewahren Sie die Bedienungsanleitung
nach dem Lesen für späteres Nachschlagen an
einem sicheren Platz auf.
Haftungsablehnungserklärung
• Mit Ausnahme der Gültigkeitserklärung durch
das Produkthaftungsgesetz übernehmen wir
keine Verantwortung für Schäden, die dem
Benutzer oder Dritten durch die unsachgemäße
Handhabung des Produktes oder eines seiner
Zubehörteile, oder durch ihren Betriebsausfall
sowie durch ihren Gebrauch entstehen.
• Wir behalten uns das Recht vor, Änderungen
an diesem Produkt und seinem Zubehör ohne
Vorankündigung vorzunehmen.
INHALT
Vorwort
Hauptmerkmale ................................................ 3
Zur Beachtung ................................................. 3
Bezeichnung und Funktion der Teile ................ 6
Einsetzen und Herausnehmen
der Digitalkamera-Karte ... 7
dem Hauptgerät ... 8
Fotografieren .................................................... 9
Leuchtstofflampenlicht ... 12
Technische Daten .......................................... 14
Fehlersuche ................................................... 15
............................................................. 2
Einsetzen der Karte in das Hauptgerät ........ 7
Herausnehmen der Karte aus
Grundlegender Ablauf der Aufnahme ........... 9
Drehen und Ausrichten des Objektivteils.... 10
Scharfeinstellung ........................................ 11
Tipps zum Fotografieren............................. 11
Kondensation ............................................. 12
Verhüten von unscharfen Bildern ............... 12
Infrarot-emittierende Motive ....................... 12
Innenaufnahmen unter
Pflege ......................................................... 13
1
CE-AG06本文(G) 02.1.12, 1:04 PMPage 1 AdobePageMaker6.5J/PPC
Page 22

Vorwort
Dieses Produkt (Digitalkamera-Karte CE-AG06)
kann als Digitalkamera verwendet werden, wenn
es in einen CF-Erweiterungssteckplatz, wie beim
SL-5500, eingesetzt wird. Die im Hauptgerät
installierte Software ermöglicht es Ihnen, die mit
diesem Produkt aufgenommenen Bilder als EMail-Anhang zu versenden. Weitere Informationen
dazu finden Sie in der Bedienungsanleitung des
Hauptgerätes.
Dieses Produkt kann in die folgenden Modelle
installiert werden:
Unterstützte Modelle:
SL-5500/SL-5000 (Stand Januar 2002)
Soll dieses Produkt mit dem SL-5000
*
verwendet werden, muss die darin installierte
Software aktualisiert werden.
URL: http://developer.sharpsec.com
Die Anweisungen in der Anleitung konzentrieren
sich auf die Handhabung des Produktes, das
Einsetzen in das Hauptgerät, wie z.B. den SL-5500
(im Folgenden einfach "Hauptgerät" genannt),
sowie das Herausnehmen und Fotografieren.
Informationen über die Weiterverwendung der
aufgezeichneten Bilddaten entnehmen Sie bitte
der Bedienungsanleitung des Hauptgerätes.
2
Zur Beachtung
• Dieses Produkt kann nur mit den links
aufgelisteten Modellen verwendet werden
(Stand Januar 2002).
• Wird dieses Produkt in einen NotebookComputer oder dergleichen eingesetzt, kann
es zu einer Störung kommen.
• Das Urheberrechtsgesetz schreibt vor, dass
die mit diesem Produkt aufgenommenen
Bilder nicht ohne vorherige Genehmigung des
Urheberrechtinhabers verwendet werden
können, außer für persönliche
Unterhaltungszwecke.
Bitte beachten Sie, dass das Fotografieren
von Live-Darbietungen, Präsentationen,
Ausstellungen usw. eingeschränkt sein kann,
selbst wenn die Bilder nur für persönliche
Unterhaltungszwecke verwendet werden.
• Bevor Sie wichtige Ereignisse aufnehmen,
sollten Sie Probeaufnahmen machen, um
sicherzugehen, dass die Bilder einwandfrei
gespeichert werden.
CE-AG06本文(G) 02.1.12, 1:04 PMPage 2 AdobePageMaker6.5J/PPC
Page 23

Hauptmerkmale
• Sie brauchen das Produkt CE-AG06 nur in das
Hauptgerät einzusetzen, und schon können Sie
fotografieren.
Bildsensor:
CMOS-Bildsensor mit 350.000 Pixeln
Maximale Bildauflösung:
480 × 640 Punkte (VGA)
• Bei Verwendung der Zoomfunktion des
Hauptgerätes können Sie Ihr Motiv bis auf das
Zweifache vergrößern.
• Bei Verwendung der Makro-Funktion können Sie
bis auf etwa 6 cm an das Motiv herangehen.
• Die aufgenommenen Bilder können entweder im
Hauptgerät oder auf einer SD-Speicherkarte im
JPEG-Format gespeichert werden.
Anmerkung:
JPEG ist ein Bildkomprimierungsformat für
Farbstandbilder.
• Der drehbare Objektivmechanismus ermöglicht
es Ihnen, sich in Selbstporträts aufzunehmen.
• Das Bild der Digitalkamera-Karte wird auf dem
LCD-Bildschirm des Hauptgerätes angezeigt.
CE-AG06本文(G) 02.1.12, 1:04 PMPage 3 AdobePageMaker6.5J/PPC
Bitte beachten Sie unbedingt die folgenden
Vorsichtsmaßnahmen beim Gebrauch des
Produktes, um Ausfall und andere Störungen zu
verhüten.
• Wenn Sie das Hauptgerät transportieren oder
unbenutzt lassen, nehmen Sie das Produkt
heraus, und setzen Sie an seiner Stelle die CFPlatzhalterkarte ein. Bewahren Sie das
herausgenommene Produkt sorgfältig auf, um es
vor Beschädigung zu schützen.
• Unterlassen Sie Schwingen des Hauptgerätes
oder Halten des Hauptgerätes nur am Produkt,
wenn dieses Produkt eingesetzt ist. Das
Hauptgerät oder das Produkt könnte sich sonst
lösen und beschädigt werden.
Übermäßige Druckausübung auf das Produkt
kann eine Beschädigung des drehbaren
Objektivmechanismus oder des Anschlussteils
des Produktes zur Folge haben.
• Unterlassen Sie starkes Drücken oder Ziehen
des Produktes, während es in das Hauptgerät
eingesetzt ist. Es könnte sonst zu einer
Beschädigung des Produktes oder des
Hauptgerätes kommen.
Zur Beachtung
3
Page 24

•Entfernen Sie den Display-Schutz vom
Hauptgerät, bevor Sie das Produkt in das
Hauptgerät einsetzen.
• Unterlassen Sie das Entfernen des Produktes
oder das Verstellen des Batteriewechselschalters
am Hauptgerät, während ein Bild gespeichert
wird. Durch diese Handlungen können die
Bilddaten verfälscht werden.
• Legen Sie das Produkt nicht in instabilem Zustand
ab. Starke Druck- oder Stoßeinwirkung kann eine
Störung zur Folge haben.
• Legen Sie das Produkt nicht auf einen wackligen
Tisch oder eine instabile Unterlage. Das
Präzisionsgerät könnte sonst herunterfallen, und
die Aufprallwirkung könnte zu einer Störung
führen.
• Benutzen Sie das Produkt nicht an Orten, an
denen seine Benutzung entweder einschränkt
oder verboten ist, wie z.B. in einem Flugzeug,
wo es den Flugbetrieb beeinträchtigen kann.
Missachtung kann Unfälle zur Folge haben.
• Die Zeit bis zur Stabilisierung der Helligkeit des LCDBildschirms hängt von der Umgebungstemperatur
ab. Warten Sie eine Weile, bis sich die Helligkeit
stabilisiert.
4
• Richten Sie das Objektiv nicht auf die Sonne.
Es kann sonst zu Farbverzerrungen oder
Einbrenneffekten kommen.
• Achten Sie darauf, dass die Digitalkamera-Karte
während der Benutzung keinem übermäßigen
Druck ausgesetzt wird. Übermäßige
Druckausübung auf das Produkt kann zu einer
Beschädigung des Anschlussteils und anderer
Teile des Hauptgerätes führen. Vermeiden Sie
auch übermäßige Druckausübung auf den
drehbaren Objektivmechanismus.
• Unterlassen Sie das Berühren des Objektivs mit
einem spitzen Gegenstand oder mit bloßen
Fingern. Das Objektiv könnte sonst beschädigt
oder beschmutzt werden. Falls das Objektiv
schmutzig wird, wischen Sie es leicht mit einem
Wattebausch oder einem anderen weichen
Material ab.
• Lassen Sie das Produkt nicht an einem Ort liegen,
der direktem Sonnenlicht oder hohen Temperaturen
ausgesetzt ist, z.B. in einem Auto oder in der Nähe
einer Heizung. Solche Orte können die Ursache für
einen Ausfall sein.
• Vermeiden Sie die Benutzung oder Aufbewahrung
des Produktes an einem staubigen oder feuchten
CE-AG06本文(G) 02.1.12, 1:04 PMPage 4 AdobePageMaker6.5J/PPC
Page 25

Ort. Solche Orte können die Ursache für einen Ausfall
sein.
• Bewahren Sie das Produkt nicht in einer
Gesäßtasche Ihrer Hose oder in einer
Brusttasche auf. Übermäßige Druckausübung auf
das Produkt kann Beschädigung zur Folge haben.
• Das Produkt ist nicht wasserdicht konstruiert.
Vermeiden Sie die Benutzung oder
Aufbewahrung des Produktes an Orten, an denen
es mit Wasser oder anderen Flüssigkeiten
bespritzt werden kann. Regenwasser,
Wasserspritzer, Saft, Kaffee, Dampf und Schweiß
können ebenfalls eine Störung des Produktes
verursachen.
• Das Produkt darf nicht fallen gelassen oder
starken Erschütterungen ausgesetzt werden. Es
besteht sonst die Gefahr, dass die Schärfe nicht
mehr eingestellt oder das Produkt nicht mehr in
das Hauptgerät eingesetzt werden kann.
• Berühren Sie niemals den Anschlussteil.
Elektrostatische Entladung kann einen Ausfall des
Produktes zur Folge haben. Achten Sie auch
darauf, dass keine Fremdkörper in das Produkt
gelangen, um mögliche Störungen zu vermeiden.
• Vermeiden Sie die Verwendung des Produktes
für Anwendungen, die eine höhere Zuverlässigkeit
erfordern, als das mit dieser Ausrüstung möglich
ist.
• Obwohl der CMOS-Bildsensor unter Einsatz
moderner Präzisionstechnik gefertigt wird,
können vereinzelte Pixel als permanente helle
oder dunkle Punkte vorhanden sein.
• Der Kartenteil dieses Produktes kann sich bei
längerer Benutzung leicht erwärmen, was jedoch
keine Störung darstellt.
5
CE-AG06本文(G) 02.1.12, 1:04 PMPage 5 AdobePageMaker6.5J/PPC
Page 26

Bezeichnung und Funktion der Teile
Fokussierring
Drehen Sie diesen Ring, um das
aufzunehmende Motiv scharf
einzustellen (siehe Seite 11).
Kartenteil
6
CE-AG06本文(G) 02.1.12, 1:04 PMPage 6 AdobePageMaker6.5J/PPC
Objektiv
Objektivteil
Der Objektivteil ist drehbar.
Drehen Sie diesen Teil, um das
Objektiv auf das Aufnahmeobjekt
zu richten (siehe Seite 10).
Auslöser
Drücken Sie den Auslöser, um ein Bild
aufzunehmen und die Bilddaten zu
speichern.
Page 27

Einsetzen und Herausnehmen der Digitalkamera-Karte
Einsetzen der Karte in das
Hauptgerät
. Entfernen Sie den Display-Schutz vom
1
Hauptgerät.
. Schalten Sie das Hauptgerät ein.
2
. Falls bereits eine Karte in den CF-
3
Erweiterungssteckplatz des Hauptgerätes
eingesetzt ist, nehmen Sie diese heraus.
• Informationen zum Herausnehmen von
Karten finden Sie in der
Bedienungsanleitung des Hauptgerätes.
. Schieben Sie dieses Produkt (CE-AG06) bis
4
zum Anschlag gerade in den CFErweiterungssteckplatz des Hauptgerätes
ein.
Vorsicht
Wird dieses Produkt in einen NotebookComputer oder dergleichen eingesetzt, kann
es zu einer Störung kommen. Setzen Sie das
Produkt niemals in andere Geräte als die von
uns angegebenen ein.
CE-AG06本文(G) 02.1.12, 1:04 PMPage 7 AdobePageMaker6.5J/PPC
• Der mit dem Hauptgerät gelieferte Stift kann
nicht abgenommen werden, nachdem das
Produkt eingesetzt worden ist. Nehmen Sie
den Stift bei Bedarf vorher ab.
• Schieben Sie das Produkt so in das
Hauptgerät ein, dass die Aufschrift "SHARP
CE-AG06 DIGITAL CAMERA" nach oben
zeigt.
7
Page 28

Herausnehmen der Karte aus dem
Hauptgerät
. Beenden Sie alle auf dem Hauptgerät
1
laufenden Anwendungen.
. Tippen Sie auf das Symbol der CF-Karte
2
( ) in der unteren rechten Ecke des LCDBildschirms, um ein Kontextmenü
aufzurufen. Tippen Sie dann auf "Karte
auswerfen" in diesem Menü.
• Das Symbol der CF-Karte verschwindet.
. Ziehen Sie das Produkt bei eingeschaltetem
3
Hauptgerät gerade heraus.
. Schieben Sie die CF-Platzhalterkarte in den
4
CF-Erweiterungssteckplatz des
Hauptgerätes ein.
Vorsicht
• Ziehen Sie das Produkt nicht am Objektivteil
aus dem Hauptgerät heraus.
Ziehen am Objektivteil kann einen Bruch oder
eine sonstige Beschädigung oder Störung zur
Folge haben.
• Wenn Sie das Produkt nicht benutzen,
nehmen Sie es aus dem Hauptgerät heraus,
und bringen Sie an seiner Stelle den Display-
8
Schutz an.
Diesen Bereich
halten
CE-AG06本文(G) 02.1.12, 1:04 PMPage 8 AdobePageMaker6.5J/PPC
Page 29

Fotografieren
Grundlegender Ablauf der Aufnahme
. Setzen Sie das Produkt in das Hauptgerät
1
ein (siehe Seite 7).
. Starten Sie die Anwendung "Kamera" im
2
Hauptgerät (Schlagen Sie in der mit der
Anwendung "Kamera" gelieferten
Dokumentation nach).
Der Digitalkamera-Bildschirm (Zustand, in
dem das Motiv auf dem LCD-Bildschirm des
Hauptgerätes abgebildet wird) erscheint.
. Stellen Sie den Zielspeicher, in dem die
3
Bilddaten gespeichert werden sollen, die
Bildgröße (Auflösung) und andere relevante
Bildeigenschaften am Hauptgerät ein, und
vergewissern Sie sich, dass der Bildzähler
nicht auf "0" steht.
. Drehen Sie den Objektivteil und den
4
Fokussierring, bis das Motiv auf dem LCDBildschirm des Hauptgerätes scharf
abgebildet wird (siehe die Seiten 10 und 11).
. Drücken Sie den Auslöser.
5
Die aufgenommenen Bilddaten werden
gespeichert.
CE-AG06本文(G) 02.1.12, 1:04 PMPage 9 AdobePageMaker6.5J/PPC
Vorsicht
• Achten Sie darauf, dass Sie das Objektiv
während der Aufnahme nicht mit Ihren Fingern
oder anderen Gegenständen verdecken.
• Es kann nicht fotografiert werden, während der
Bilddaten-Speichervorgang läuft.
Anmerkung
• Anweisungen zur Bedienung des Hauptgerätes
sowie zum Betrachten und Benutzen der
gespeicherten Bilddaten finden Sie in der
Bedienungsanleitung des Hauptgerätes.
• Die aufgenommenen Bilder werden als
komprimierte JPEG-Daten gespeichert. Die
wiedergegebenen JPEG-Bilddaten können
etwas gröber als das in Schritt 4 angezeigte
tatsächliche Bild erscheinen.
9
Page 30

Drehen und Ausrichten des
Objektivteils
Der Objektivteil ist drehbar. Halten Sie das
Hauptgerät, und richten Sie den Objektivteil auf
das Motiv aus.
Vorsicht
Drehen Sie den Objektivteil nicht über seinen
Drehbereich hinaus, der von der in Abbildung A
gezeigten Position bis zu der in Abbildung B
gezeigten Position etwa 180° umfasst.
• Drehen Sie den Objektivteil nicht gewaltsam.
• Sie können den Objektivteil auf sich selbst
richten, um sich in Selbstporträts zu
fotografieren.
10
(Abbildung A)
Objektivteil
(Abbildung B)
CE-AG06本文(G) 02.1.12, 1:04 PMPage 10 AdobePageMaker6.5J/PPC
Page 31

Scharfeinstellung
Drehen Sie den Fokussierring, um das auf dem
LCD-Bildschirm des Hauptgerätes angezeigte
Motiv scharf einzustellen.
Fokussierring
Vorsicht
Drehen Sie den Ring nicht gewaltsam. Wird der
Ring über seinen Drehbereich hinaus gedreht,
kann es zu einer Beschädigung kommen.
Anmerkung
Drehen Sie den Fokussierring für
Makroaufnahmen (aus etwa 6 cm Abstand) auf
das Symbol ( ). Prüfen Sie anhand des Bilds
auf dem LCD-Bildschirm des Hauptgerätes, ob
das Motiv scharf eingestellt ist.
Tipps zum Fotografieren
• Wenn Sie in dunkler Umgebung fotografieren,
kann das Bild grob erscheinen, was aber keine
Störung darstellt.
• Wenn Sie den Auslöser drücken, bleibt das
aufgenommene Bild noch eine Weile auf dem
LCD-Bildschirm sichtbar, bis der
Speichervorgang beendet ist. Sobald die
Bildanzeige verschwindet, können Sie das
nächste Bild aufnehmen.
• Wenn Sie das Hauptgerät vertikal oder
horizontal schwenken, kann die Anzeige
abgehackt erscheinen, wie wenn ein Video mit
Einzelbildschaltung wiedergegeben wird, was
jedoch keine Störung darstellt.
• Wird das Objektiv auf die Kathodenstrahlröhre
eines Fernsehgerätes oder Computer-Monitors
gerichtet, erscheinen horizontale Streifen auf
dem LCD-Bildschirm. Ähnliche Streifen
erscheinen auch auf dem aufgenommenen Bild,
was jedoch keine Störung darstellt.
• Nahaufnahmen können aufgrund der
Eigenschaften des Objektivs tonnenförmige
Randverzeichnungen aufweisen, was jedoch
keine Störung darstellt.
11
CE-AG06本文(G) 02.1.12, 1:04 PMPage 11 AdobePageMaker6.5J/PPC
Page 32

• Besonders helle Teile eines Motivs, wie z.B. der
Glühfaden einer Glühlampe, können dunkel
erscheinen, was jedoch keine Störung darstellt.
• Wenn Sie ein bewegtes Motiv aufnehmen, kann
seine Form verzerrt erscheinen, was jedoch
keine Störung darstellt.
Kondensation
Wird dieses Produkt schnell von einem kalten zu
einem warmen Ort gebracht, bewirkt der
Temperaturunterschied die Bildung von
Kondensation auf der Innen- und Außenseite des
Produktes. Lassen Sie in diesem Fall das Produkt
etwa 1 Stunde lang in der neuen
Umgebungstemperatur liegen, bevor Sie es
benutzen.
Verhüten von unscharfen Bildern
Wird das Hauptgerät während der Betätigung des
Auslösers bewegt, kann das aufgenommene Bild
unscharf werden. Wenn Sie bei schwacher
Beleuchtung fotografieren, verlängert sich die
Verschlusszeit. Halten Sie das Hauptgerät ruhig,
so dass sich das auf dem LCD-Bildschirm
abgebildete Motiv nicht bewegt.
12
Infrarot-emittierende Motive
Wenn Sie eine Infrarotlichtquelle, wie z.B. einen
Ofen, aufnehmen, können sich die Farben des
Bildes unnatürlich verändern, aber das
aufgenommene Bild wird mit genau den Farben
gespeichert, die auf dem LCD-Bildschirm des
Hauptgerätes zu sehen waren.
Innenaufnahmen unter
Leuchtstofflampenlicht
Wenn Sie dieses Produkt in einem Raum mit
Leuchtstofflampenlicht benutzen, können feine
Veränderungen der Helligkeit oder des Farbtons,
oder horizontale Streifen in verschiedenen
Kontraststufen im Bild erscheinen. Dieses
Phänomen ist darauf zurückzuführen, dass das
Produkt je nach dem Zeitpunkt der Aufnahme das
feine Flimmern der Leuchtstofflampe, das vom
menschlichen Auge nicht wahrnehmbar ist,
erfasst. Wenn Sie unter solchen Bedingungen
fotografieren, überprüfen Sie das Motiv und den
Farbton des Bildes auf dem LCD-Bildschirm. Um
die Qualität der Aufnahme zu verbessern, ist die
Verwendung einer im Fachhandel erhältlichen
Videoleuchte zu empfehlen.
CE-AG06本文(G) 02.1.12, 1:04 PMPage 12 AdobePageMaker6.5J/PPC
Page 33

Pflege
• Wischen Sie Hauptgerät und Objektivteil zum
Reinigen leicht mit einem sauberen, weichen
und trockenen Tuch oder Wattebausch ab.
• Verwenden Sie niemals organische
Lösungsmittel, wie Verdünner oder Benzol,
oder ein nasses Tuch zum Reinigen. Die
Verwendung solcher Materialien kann zu einer
Verschlechterung oder Verfärbung des
Hauptgerätes und des Objektivteils führen.
• Wenn Sie das Produkt längere Zeit unbenutzt
lassen, nehmen Sie es aus dem Hauptgerät
heraus, und bewahren Sie es zum Schutz des
Objektivs an einem sicheren Ort auf (siehe
Seite 8).
Vorsicht
Vermeiden Sie beim Herausnehmen des
Produktes aus dem Hauptgerät eine Berührung
der Kartenkontakte. Statische Elektrizität kann
eine Störung des Produktes verursachen.
13
CE-AG06本文(G) 02.1.12, 1:04 PMPage 13 AdobePageMaker6.5J/PPC
Page 34

Technische Daten
Modell CE-AG06 Produktbezeichnung Digitalkamera-Karte
Bildsensor 1/4-Zoll-Primärfarben-RGB-Filter-CMOS-Bildsensor mit 350.000 (effektiv 310.000)
Objektiv Monofokus-Objektiv F3,4 f=3,85 mm (entspricht 40 mm bei einer 35-mm-Kamera)
Verschlusszeit Automatisch (1/10 bis 1/15.750 Sekunde)
Scharfeinstellung Manuell
Scharfeinstellbereich ca. 6 cm bis unendlich
Belichtungsregelung Elektronischer Verschluss
Weißabgleich Automatisch
Monitor Motive (Bilder) werden auf dem Bildschirm des Hauptgerätes angezeigt.
Bildspeicherung Interner Speicher oder SD-Speicherkarte des Hauptgerätes
Aufnahmeformat JPEG
Bildauflösung VGA (480 × 640 Punkte), HVGA (480 × 320 Punkte), QVGA (240 × 320 Punkte),
E/A-Schnittstelle
Stromversorgung Versorgung über Hauptgerät
Betriebstemperatur
und -luftfeuchtigkeit
Abmessungen 24,5 mm (B) × 55,4 mm (T) × 14 mm (H) (ohne vorstehende Teile)
Gewicht ca. 25 g
Zubehör Bedienungsanleitung (vorliegendes Heft)
14
CE-AG06本文(G) 02.1.12, 1:04 PMPage 14 AdobePageMaker6.5J/PPC
quadratischen Pixeln
1/8 VGA (240 × 160 Punkte), 1/16 VGA (120 × 160 Punkte)
Kompaktkartentyp
0 bis 40 °C, 35 bis 85 % RH
Page 35

Fehlersuche
Falls Sie Schwierigkeiten mit der Kamerakarte haben, suchen Sie in der folgenden Tabelle nach
möglichen Lösungen, bevor Sie den Kundendienst anrufen:
Problem Ursachen und Lösungen
Nichts erscheint auf
dem LCD-Bildschirm
(der LCD-Bildschirm
ist schwarz oder
grün).
Der LCD-Bildschirm
hat eine weißliche
Farbe angenommen.
Das Produkt schaltet
sich plötzlich aus.
CE-AG06本文(G) 02.1.12, 1:04 PMPage 15 AdobePageMaker6.5J/PPC
• Das Produkt ist möglicherweise nicht richtig angeschlossen. Prüfen Sie nach, ob
es vollständig in den CF-Erweiterungssteckplatz des Hauptgerätes eingeführt ist.
• Prüfen Sie nach, ob die in das Hauptgerät eingesetzte Batterie (wiederaufladbar)
schwach oder erschöpft ist.
Eine schwache oder erschöpfte Batterie im Hauptgerät kann den einwandfreien
Betrieb des Produkts verhindern.
• Kondensation kann den LCD-Bildschirm weißlich erscheinen lassen und seine
Ablesbarkeit beeinträchtigen. Lassen Sie das Hauptgerät etwa 1 Stunde lang
ausgeschaltet, und nehmen Sie es erst wieder in Betrieb, nachdem Sie sich
vergewissert haben, dass die Kondensation verdunstet ist.
• Prüfen Sie nach, ob es vollständig in den CF-Erweiterungssteckplatz des
Hauptgerätes eingeführt ist.
• Prüfen Sie nach, ob die in das Hauptgerät eingesetzte Batterie (wiederaufladbar)
schwach oder erschöpft ist.
Eine schwache oder erschöpfte Batterie im Hauptgerät kann den einwandfreien
Betrieb des Produkts verhindern.
15
Page 36

Problem Ursachen und Lösungen
Das Bild ist unscharf.
Es erfolgt keine
Aufnahme.
16
• Prüfen Sie nach, ob das Objektiv verschmutzt ist. Falls das Objektiv schmutzig
wird, wischen Sie es leicht mit einem Wattebausch oder einem anderen weichen
Material ab.
• Prüfen Sie nach, ob die Schärfe korrekt eingestellt ist. Drehen Sie den
Fokussierring für die Scharfeinstellung (siehe Seite 11).
• Haben Sie eine Infrarotlichtquelle aufgenommen? Wenn eine Infrarotlichtquelle
aufgenommen wird, können die Farben verfälscht werden.
• Wenn Sie ein hell leuchtendes Objekt fotografieren, erscheinen horizontale Linien
im resultierenden Bild. Dies ist auf den hohen Kontrast zum Hintergrund
zurückzuführen und stellt keine Störung dar.
• Wenn Sie mit einem AC-Adapter fotografieren, kann Rauschen von externen
Störquellen, wie z.B. dem Eingangsstrom, das Auftreten von kleinen hellen
Flecken auf dem LCD-Bildschirm verursachen, was aber keine Störung darstellt.
• Prüfen Sie nach, ob genügend freier Speicherplatz im Hauptgerät zum
Fotografieren vorhanden ist. Löschen Sie unnötige Daten, oder übertragen Sie
die Daten zur SD-Speicherkarte, um mehr Speicherplatz im Hauptgerät zur
Verfügung zu haben.
CE-AG06本文(G) 02.1.12, 1:04 PMPage 16 AdobePageMaker6.5J/PPC
Page 37

17
CE-AG06本文(G) 02.1.12, 1:04 PMPage 17 AdobePageMaker6.5J/PPC
Page 38

In Europe:
This equipment complies with the requirements of Directive 89/336/EEC as amended by
93/68/EEC.
Dieses Gerät entspricht den Anforderungen der EG-Richtlinie 89/336/EWG mit Änderung
93/68/EWG.
Ce matériel répond aux exigences contenues dans la directive 89/336/CEE modifiée par
la directive 93/68/CEE.
Dit apparaat voldoet aan de eisen van de richtlijn 89/336/EEG, gewijzigd door 93/68/EEG.
Dette udstyr overholder kravene i direktiv nr. 89/336/EEC med tillæg nr. 93/68/EEC.
Quest’ apparecchio è conforme ai requisiti della direttiva 89/336/EEC come emendata
dalla direttiva 93/68/EEC.
Este equipamento obedece às exigências da directiva 89/336/CEE na sua versão corrigida
pela directiva 93/68/CEE.
Este aparato satisface las exigencias de la Directiva 89/336/CEE modificada por medio de
la 93/68/CEE.
Denna utrustning uppfyller kraven enligt riktlinjen 89/336/EEC så som kompletteras av 93/
68/EEC.
Dette produktet oppfyller betingelsene i direktivet 89/336/EEC i endringen 93/68/EEC.
Tämä laite täyttää direktiivin 89/336/EEC vaatimukset, jota on muutettu direktiivillä 93/68/
EEC.
CE-AG06表紙 02.1.12, 1:02 PMPage 3 AdobePageMaker6.5J/PPC
Page 39

In U.S.A.:
LIMITED WARRANTY
SHARP ELECTRONICS CORPORATION warrants to the first
consumer purchaser that this Sharp brand product (the “Product”),
when shipped in its original container, will be free from defective
workmanship and materials, and agrees that it will, at its option, either
repair the defect or replace the defective Product or part thereof with
a new or remanufactured equivalent at no charge to the purchaser
for parts or labor for the period(s) set forth below.
This warranty does not apply to any appearance items of the Product
nor to the additional excluded item(s) set forth below nor to any
Product the exterior of which has been damaged or defaced, which
has been subjected to improper voltage or other misuse, abnormal
service or handling, or which has been altered or modified in design
or construction.
In order to enforce the rights under this limited warranty, the purchaser
should follow the steps set forth below and provide proof of purchase
to the servicer.
The limited warranty described herein is in addition to whatever implied
warranties may be granted to purchasers by law. ALL IMPLIED
WARRANTIES INCLUDING THE WARRANTIES OF
MERCHANTABILITY AND FITNESS FOR USE ARE LIMITED TO
THE PERIOD(S) FROM THE DATE OF PURCHASE SET FORTH
BELOW. Some states do not allow limitations on how long an implied
warranty lasts, so the above limitation may not apply to you.
Neither the sales personnel of the seller nor any other person is
authorized to make any warranties other than those described herein,
or to extend the duration of any warranties beyond the time period
described herein on behalf of Sharp..
The warranties described herein shall be the sole and exclusive
warranties granted by Sharp and shall be the sole and exclusive
remedy available to the purchaser. Correction of defects, in the
manner and for the period of time described herein, shall constitute
complete fulfillment of all liabilities and responsibilities of Sharp to
TO OBTAIN SUPPLY, ACCESSORY OR PRODUCT INFORMATION, CALL 1-800-BE-SHARP.
the purchaser with respect to the Product, and shall constitute full
satisfaction of all claims, whether based on contract, negligence, strict
liability or otherwise. In no event shall Sharp be liable, or in any way
responsible, for any damages or defects in the Product which were
caused by repairs or attempted repairs performed by anyone other
than an authorized servicer. Nor shall Sharp be liable or in any way
responsible for any incidental or consequential economic or property
damage. Some states do not allow the exclusion of incidental or
consequential damages, so the above exclusion may not apply to
you.
THIS WARRANTY GIVES YOU SPECIFIC LEGAL RIGHTS. YOU
MAY ALSO HAVE OTHER RIGHTS WHICH VARY FROM STATE
TO STATE.
Your Product : Digital Camera Card
Warranty Period for this One (1) year parts and labor from date
Product : of purchase.
Additional Items Excluded Any consumable items such as paper,
from Warranty Coverage : maintenance cartridge, ink cartridges
Where to Obtain Service : At a Sharp Authorized Servicer located
What to do to Obtain Service
supplied with the Product or to any
equipment or any hardware, software,
firmware, fluorescent lamp, power cords,
covers, rubber parts, or peripherals other
than the Product.
in the United States. To find out the
location of the nearest Sharp Authorized
Servicer, call Sharp toll free at 1-800BE-SHARP.
: Ship (prepaid) or carry in your Product
to a Sharp Authorized Servicer. Be sure
to have proof of purchase available. If
you ship or mail the Product, be sure it
is packaged carefully.
CE-AG06表紙 02.1.12, 1:02 PMPage 4 AdobePageMaker6.5J/PPC
Page 40

SHARP CORPORATION
PRINTED IN JAPAN / GEDRUCKT IN JAPAN
CE-AG06表紙 02.1.12, 1:02 PMPage 5 AdobePageMaker6.5J/PPC
02A-032LP
 Loading...