

Page 1
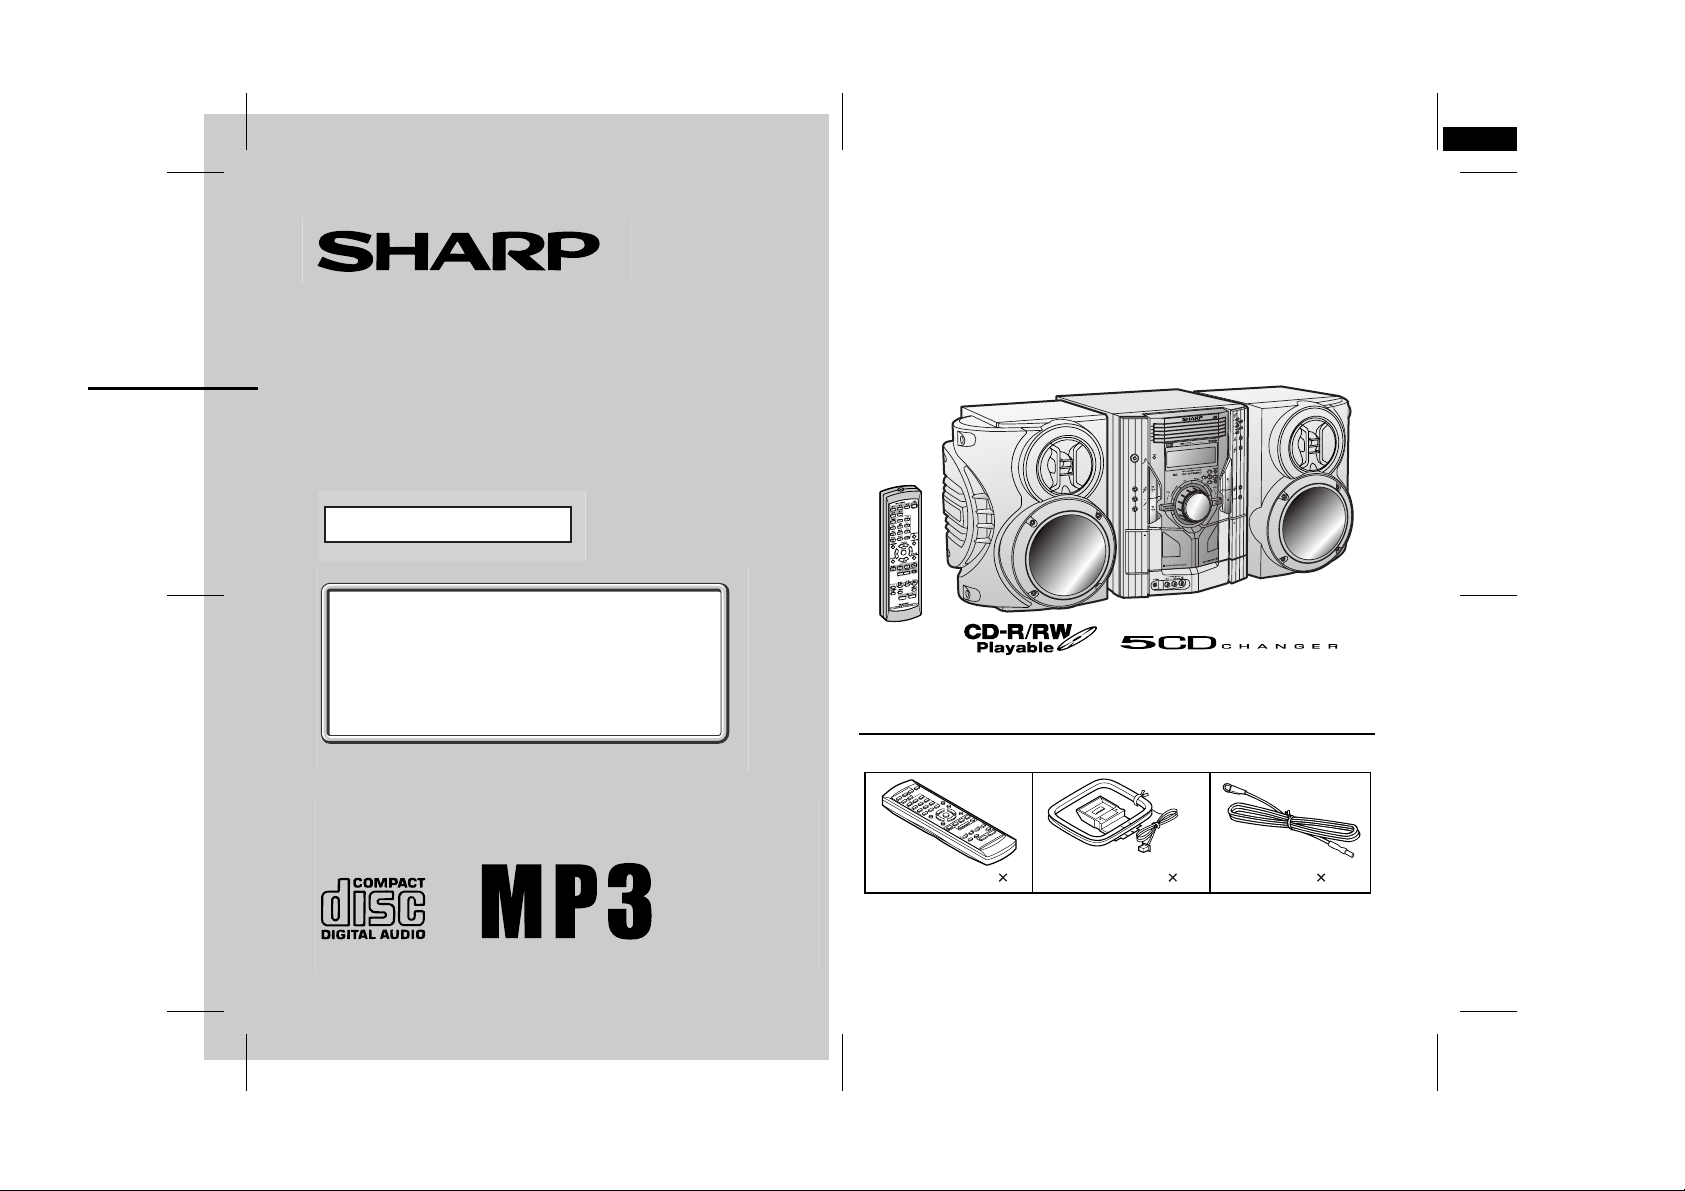
CD-MPS660E (E) TINSEA026AWZZ
Thank you for purchasing this SHARP product.
To obtain the best performance from this product, please read this
manual carefully. It will guide you in operating your SHARP product.
1
MINI COMPONENT SYSTEM
MODEL
CD-MPS660E
OPERATION MANUAL
If you require any advice or assistance regarding
your Sharp product, please visit our web-site
www.sharp.co.uk/customersupport.
Customers without Internet access may telephone
08705 274277 during office hours (or (01) 676 0648
if telephoning from Ireland).
0301
CD-MPS660E Mini Component System consisting of CD-MPS660E
(main unit) and CP-MPS660E (speaker system).
Accessories
Please confirm that the following accessories are included.
Remote control 1 AM loop aerial 1 FM aerial 1
Note:
Only the above accessories are included.
04/3/5 CD-MPS660E(E)_FR.fm
TINSEA026AWZZ
Page 2

CD-MPS660E
Important Instruction
Special notes
NOTES FOR USERS IN THE U.K. AND IRELAND
The mains lead of this product is fitted with a non-rewireable
(moulded) plug incorporating a 3A fuse. Should the fuse need to
be replaced, a BSI or AST A approved BS 1362 fuse marked
and of the same rating as above, which is also indicated on
the pin face of the plug must be used.
Always refit the fuse cover after replacing the fuse. Never use
the plug without the fuse cover fitted.
In the unlikely event of the socket outlet in your home not being
compatible with the plug supplied, cut-off the mains plug and fit
an appropriate type.
DANGER:
The fuse from the cut-off plug should be removed and the cut-off
plug destroyed immediately and disposed of in a safe manner.
Under no circumstances should the cut-off plug be inserted elsewhere into a 13A socket outlet as a serious electric shock may
occur.
To fit an appropriate plug to the mains lead, follow the instructions below:
IMPORTANT:
The wires in the mains lead are coloured in accordance with the
following code:
Blue : Neutral
Brown : Live
As the colours of the wires in the mains lead of this product may
not correspond with the coloured markings identifying the terminals in your plug, proceed as follows:
● The wire which is coloured blue must be connected to the plug
terminal which is marked N or coloured black.
● The wire which is coloured brown must be connected to the
plug terminal which is marked L or coloured red.
Ensure that neither the brown nor the blue wire is connected to
the earth terminal in your three pin plug.
or
Before replacing the plug cover, make sure that:
● If the new fitted plug contains a fuse, its value is the same as
that removed from the cut-off plug.
● The cord grip is clamped over the sheath of the mains lead
and not simply over the lead wires.
IF YOU HAVE ANY DOUBT, CONSULT A QUALIFIED ELECTRICIAN.
SERVICE INFORMATION
In the unlikely event of your equipment requiring repair, please
contact the dealer or supplier from whom it was purchased. Where
this is not possible, please visit our web-site www. sharp.co.uk/
customersupport.
Customers without internet access may telephone 08705
274277 during office hours (or (01) 676 0648 if telephoning
from lreland).
Please note; all calls will be charged at local rate.
Certain replacement parts and accessories may be obtained from
our main parts distributor.
WILLOW VALE ELECTRONICS LTD.
In the unlikely event of this equipment requiring repair during the
guarantee period, you will need to provide proof of the date of
purchase to the repairing company.
Please keep your invoice or receipt, which is supplied at the
time of purchase.
0121 766 5414
0301
2
04/3/5 CD-MPS660E(E)1.fm
TINSEA026AWZZ
Page 3

Contents
CD-MPS660E
Warning:
When the ON/STAND-BY button is set at STAND-BY position,
!
mains voltage is still present inside the unit. When the ON/
STAND-BY button is set at STAND-BY pos ition, the unit may be
brought into operation by the timer mode or remote control.
This unit contains no user serviceable parts. Never remove cov-
!
ers unless qualified to do so. This unit contains danger ous voltages, always remove mains plug from the socket before any
service operation and when not in use for a long period.
To prevent fire or shock hazard, do not expose this appliance to
!
dripping or splashing. No objects filled with liquids, such as
vases, should be placed on the apparatus.
CAUTION
This product is classified as a CLASS 1 LASER product.
!
This product contains a low power laser devi ce. To ensure con-
!
tinued safety do not remove any c over or att empt to gai n a ccess
to the inside of the product. Refer all s ervicing to qualified personnel.
NOTES
Recording and playback of a ny material may require consent, which
!
SHARP is unable to give. Please refer particularly to the provisions
of the Copyright Act 1956, the Dramatic and Musical Performers
Protection Act 1958, the Performers Protection Acts 1963 and 1972
and to any subsequent statutory enactments and orders.
This equipment complies with the requirements of Directives 89/
!
336/EEC and 73/23/EEC as amended by 93/68/EEC.
Page
"
General Information
Precautions . . . . . . . . . . . . . . . . . . . . . . . . . . . . . . . . . . . . . . . . . 3
Controls and ind ic a t or s . . . . . . . . . . . . . . . . . . . . . . . . . . . . .4 - 7
"
Preparation for Use
System connect ions . . . . . . . . . . . . . . . . . . . . . . . . . . . . . . .8 - 10
Remote cont r ol . . . . . . . . . . . . . . . . . . . . . . . . . . . . . . . . . . . . . 11
"
Basic Operation
General contr ol . . . . . . . . . . . . . . . . . . . . . . . . . . . . . . . . . . . . . 12
Setting the cloc k . . . . . . . . . . . . . . . . . . . . . . . . . . . . . . . . . . . . 13
"
CD or MP3 disc Playback
Listening to a CD or MP3 disc . . . . . . . . . . . . . . . . . . . . . .14 - 16
Advanced CD or MP3 disc playback . . . . . . . . . . . . . . . . .17 - 19
MP3 navigation (onl y for MP3 files) . . . . . . . . . . . . . . . . . .20 - 23
"
Radio
Listening to the r ad io . . . . . . . . . . . . . . . . . . . . . . . . . . . . . 24, 25
"
Tape Playback
Listening to a cassette tape (TAPE 1 or TAPE 2) . . . . . . . 26, 27
" Tape Recording
Recording on a cassette tape . . . . . . . . . . . . . . . . . . . . . . .27 - 29
"
Advanced Features
Timer and sleep operation . . . . . . . . . . . . . . . . . . . . . . . . .30 - 33
Enhancing your system . . . . . . . . . . . . . . . . . . . . . . . . . . . 34, 35
Important Instruction
"
References
Troubleshooti ng c ha r t . . . . . . . . . . . . . . . . . . . . . . . . . . . . .35 - 37
Maintenance . . . . . . . . . . . . . . . . . . . . . . . . . . . . . . . . . . . . . . . . 38
Specificati ons . . . . . . . . . . . . . . . . . . . . . . . . . . . . . . . . . . . . . . 39
TERMS OF GUARANTEE . . . . . . . . . . . . . . . . . . . . . .Back cover
04/3/5 CD-MPS660E(E)1.fm
TINSEA026AWZZ
3
Page 4
CD-MPS660E
General Information
4
Precautions
"
General
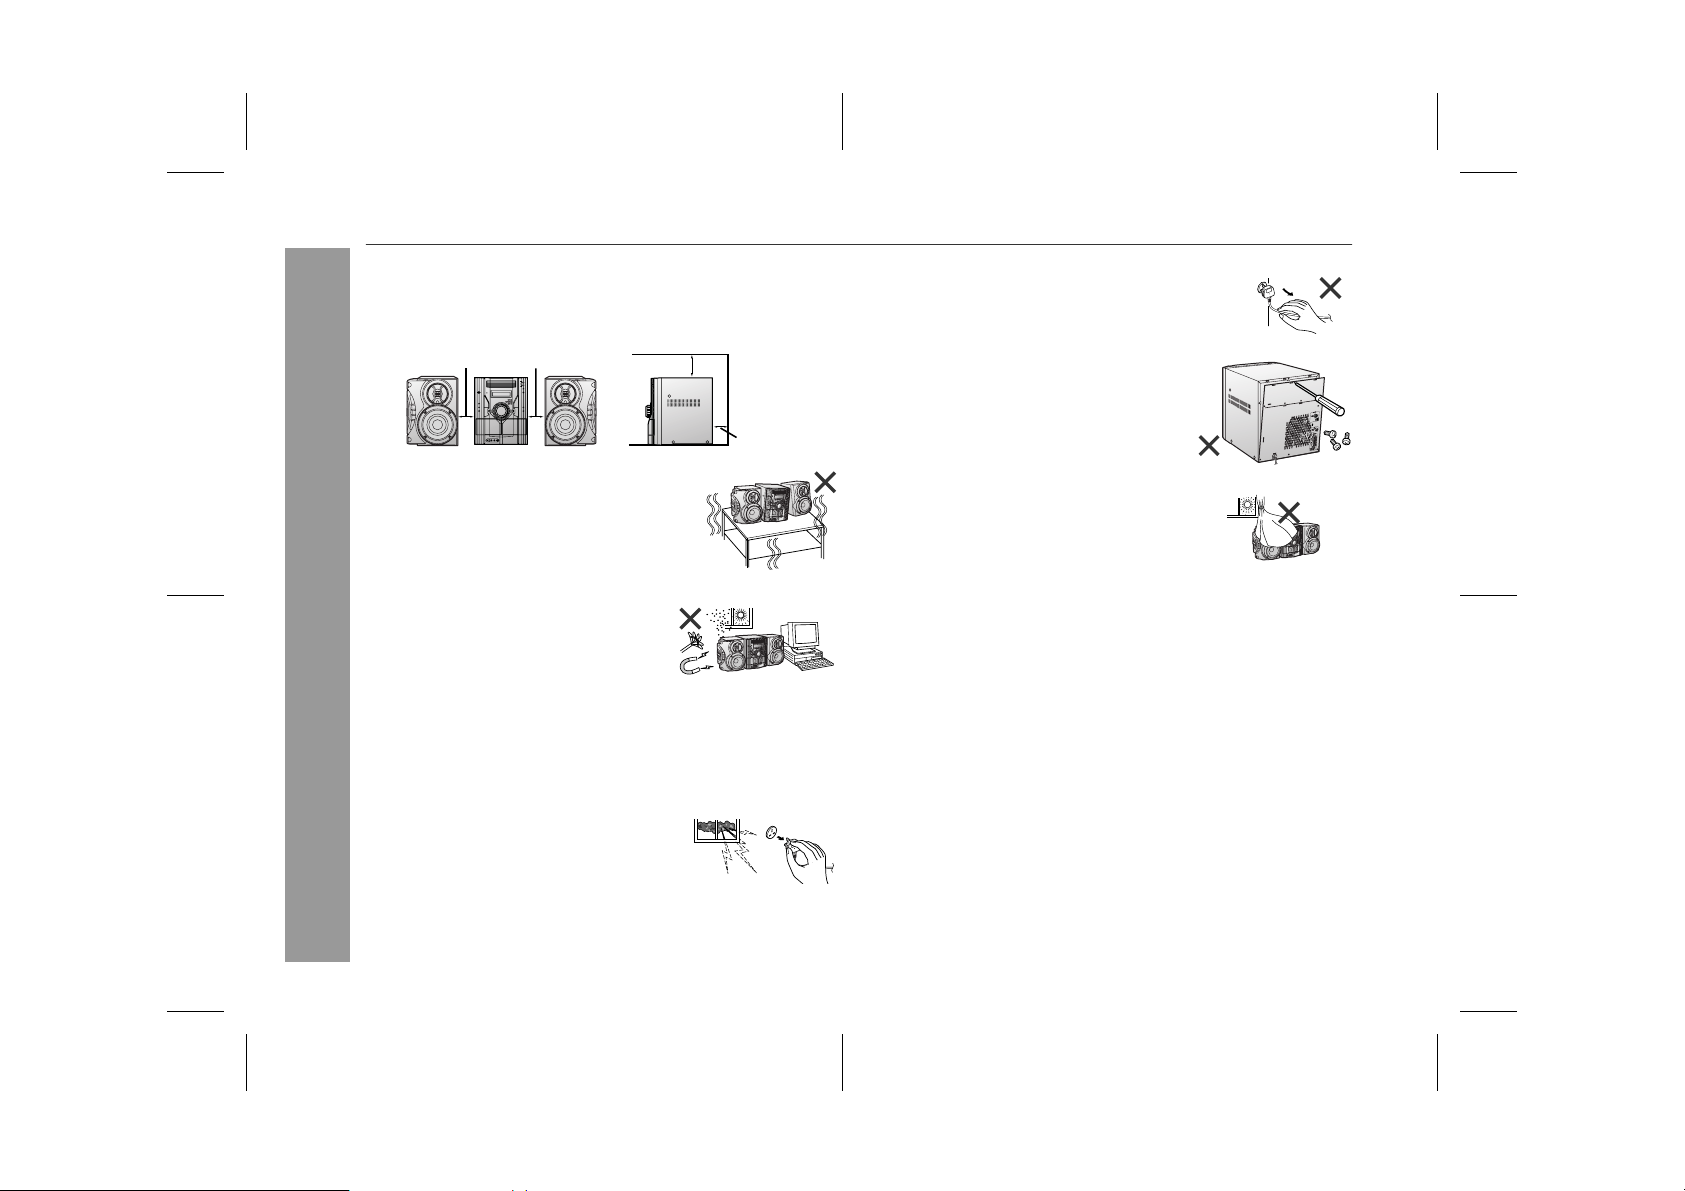
Please ensure that the equipment is positioned i n a well venti-
!
lated area and ensure that there is at least 10 cm (4") of free
space along the sides, top and back of the equipment.
10 cm (4") 10 cm (4")
Use the unit on a firm, level surface free from
!
vibration.
Keep the unit away from direct sunlight,
!
strong magnetic fields, excessive dust,
humidity and electronic/electrical equipment (home computers, facsimiles, etc.)
which generate electrical noise.
Do not place anything on top of the unit.
!
Do not expose the unit to moisture, to temperatures higher than
!
60°C (140°F) or to extremely low temperatures.
If your system does not work properly, disconnect the AC power
!
lead from the wall socket. Plug the AC power lead back in, an d
then turn on your system.
In case of an electrical storm, unplug the
!
unit for safety.
10 cm (4")
10 cm (4")
Hold the AC power plug by the head when
!
removing it from the wall socket, as pulling
the lead can damage internal wires.
!
Do not remove the outer cover, as this
may result in electric shock. Refer internal service to your local SHARP service
facility.
The ventilation should not be impeded by
!
covering the ventilation openings with
items, such as newspapers, tablecloths,
curtains, etc.
No naked flame sources, such as lighted candles, should be
!
placed on the apparatus.
Attention should be drawn to the environmental aspects of bat-
!
tery disposal.
The apparatus is designed for use in moderate climate.
!
This unit should only be used within the range of 5°C - 35°C
!
(41°F - 95°F).
Warning:
The voltage used must be the same as that specified on this unit.
Using this product with a higher voltage other than that which is
specified is dangerous and may result in a fire or other type of accident causing damage. SHARP will not be held responsible for any
damage resulting from use of this unit with a voltage other than that
which is specified.
"
Volume control
The sound level at a given volume setting d epends on speaker effi ciency, location, and various ot her factors. It is advisable to avoi d
exposure to high volume levels. D o not turn the vol ume on to full at
switch on and listen to music at moderate levels.
04/3/5 CD-MPS660E(E)1.fm
TINSEA026AWZZ
Page 5
CD-MPS660E (E) TINSEA026AWZZ
2
Controls and indic at ors
1
2
3
4
5
6
7
8
9
10
11
12
CD-MPS660E
"
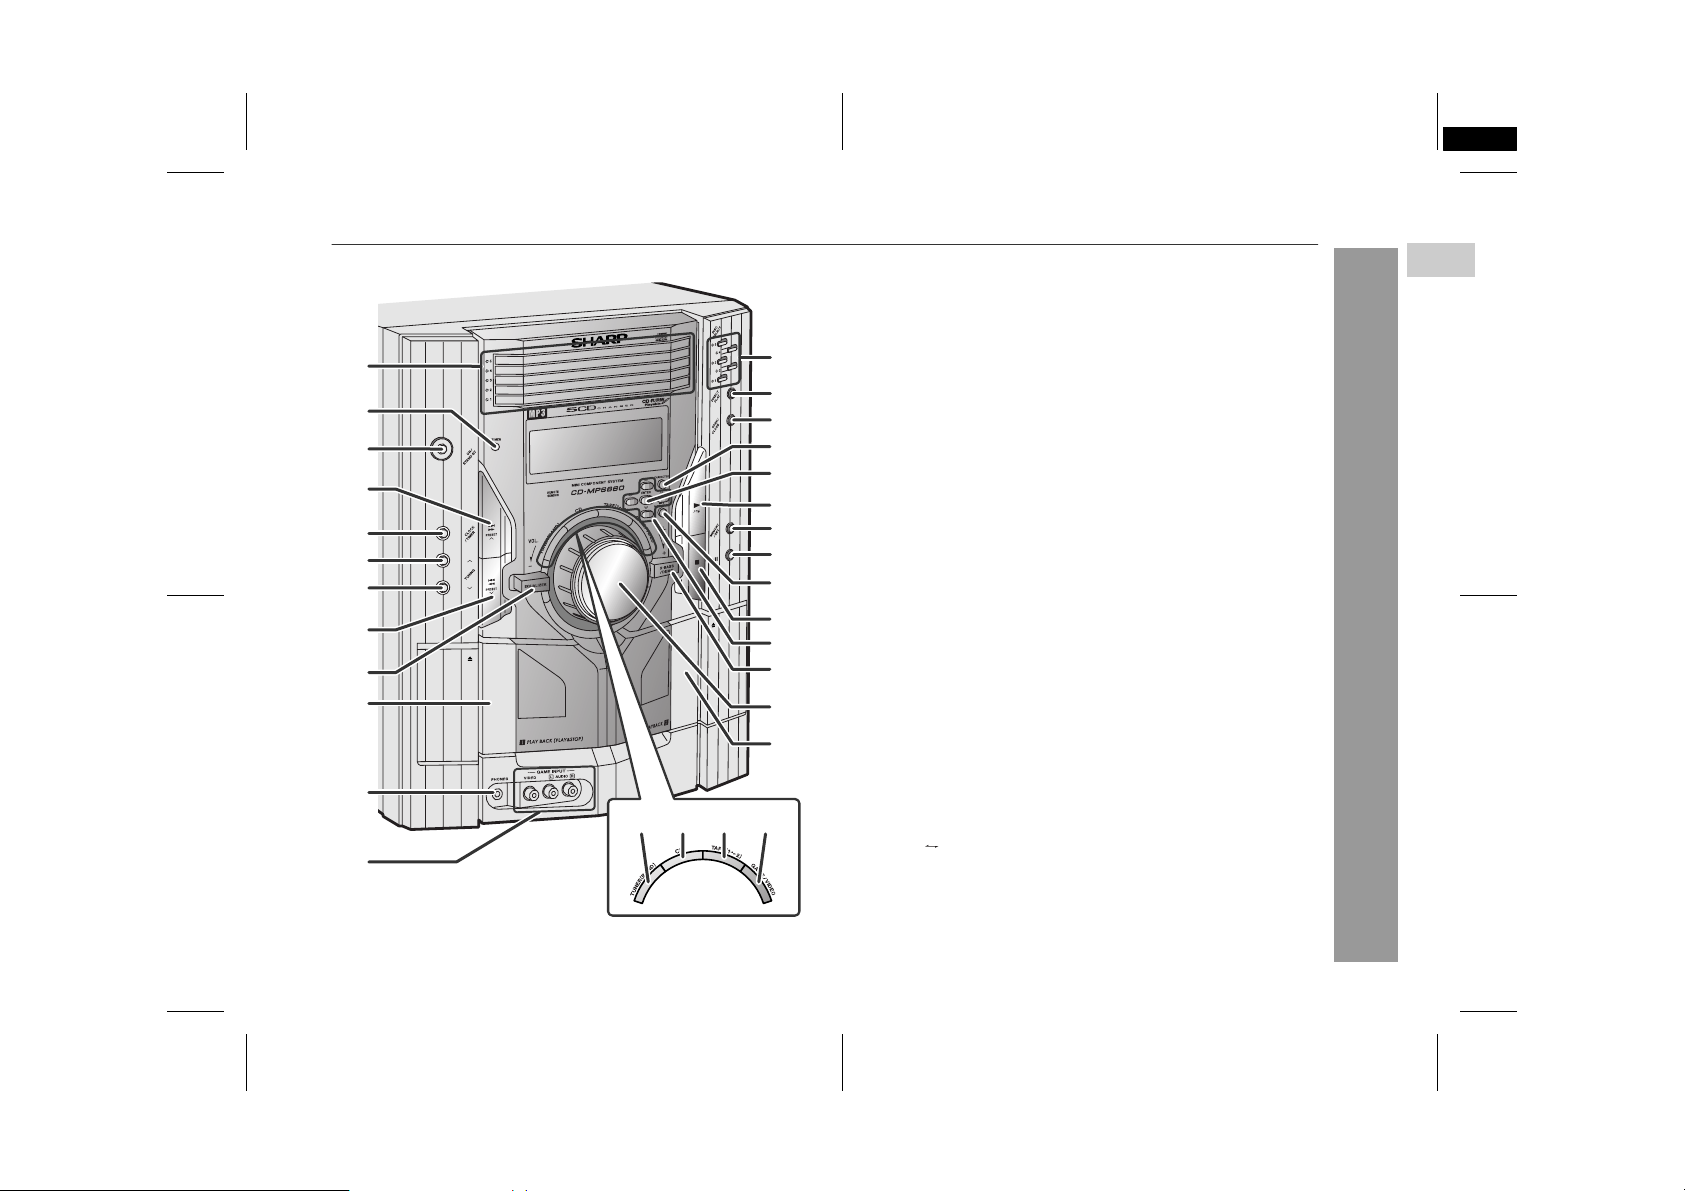
Front panel
1.Disc Trays . . . . . . . . . . . . . . . . . . . . . . . . . . . . . . . . . . . . . . . 15
2.Timer Indicator . . . . . . . . . . . . . . . . . . . . . . . . . . . . . . . . . . . 31
13
14
15
16
17
18
19
20
21
22
23
24
25
26
28 29 3027
3.On/Stand-by Button . . . . . . . . . . . . . . . . . . . . . . . . . . . . . . . 12
4.Disc Track Up or Fast Forward, Tape 2 Fast Forward,
Tuner Preset Up, Time Up Button . . . . . . . . . . 13, 16, 25, 27
5.Clock/Timer Button . . . . . . . . . . . . . . . . . . . . . . . . . 13, 30, 33
6.Tuning Up Button . . . . . . . . . . . . . . . . . . . . . . . . . . . . . . . . . 24
7.Tuning Down Button . . . . . . . . . . . . . . . . . . . . . . . . . . . . . . 24
8.Disc Track Down or Fast Reverse, Tape 2 Rewind,
Tuner Preset Down, Time Down Button . . . . . 13, 16, 25, 27
9.Equaliser Mode Select Button . . . . . . . . . . . . . . . . . . . . . . 12
10.Tape 1 Cassette Compartment . . . . . . . . . . . . . . . . . . . . . . 26
11.Headphone Socket . . . . . . . . . . . . . . . . . . . . . . . . . . . . . . . . 35
12.Game/Video Input Sockets . . . . . . . . . . . . . . . . . . . . . . . . . 34
13.Disc Number Select Buttons . . . . . . . . . . . . . . . . . . . . . . . . 15
14.Disc Direct Play Button . . . . . . . . . . . . . . . . . . . . . . . . . . . . 17
15.Disc Tray Open/Close Button . . . . . . . . . . . . . . . . . . . . . . . 15
16.Character Button . . . . . . . . . . . . . . . . . . . . . . . . . . . . . . . . . 22
17.Enter Button . . . . . . . . . . . . . . . . . . . . . . . . . . . . . . . . . . . . . 21
18.Disc Play or Repeat, Tape Play Butt on . . . . . . . . . 15, 18, 26
19.Memory/Set Button . . . . . . . . . . . . . . . . 13, 19, 23, 2 5 , 3 0 , 3 3
20.Tape 2 Record Pause Button . . . . . . . . . . . . . . . . . . . . 28, 29
21.MP3 Disc Navigation Mode Sele c t Bu tt on . . . . . . . . . . . . . 21
22.Disc or Tape Stop Button . . . . . . . . . . . . . . . . . . . . . . . 16, 27
23.Cursor Buttons . . . . . . . . . . . . . . . . . . . . . . . . . . . . . . . . . . . 21
24.Extra Bass/Demo Mode Button . . . . . . . . . . . . . . . . . . 10, 12
25.Volume Control . . . . . . . . . . . . . . . . . . . . . . . . . . . . . . . . . . 12
26.Tape 2 Cassette Compartment . . . . . . . . . . . . . . . . . . . . . . 26
27.Tuner (Band) Button . . . . . . . . . . . . . . . . . . . . . . . . . . . . . . 24
28.CD Button . . . . . . . . . . . . . . . . . . . . . . . . . . . . . . . . . . . . . . . 15
29.Tape (1 2) Button . . . . . . . . . . . . . . . . . . . . . . . . . . . . . . . 26
30.Game/Video Button . . . . . . . . . . . . . . . . . . . . . . . . . . . . . . . 34
Reference page
General Information
1
04/3/5 CD-MPS660E(E)1.fm
5
TINSEA026AWZZ
Page 6
CD-MPS660E
General Information
Controls and indicators (continued)
4 532167 8
9
12
1110
13
1
2
14 15 16
18
17
3
4
5
6
"
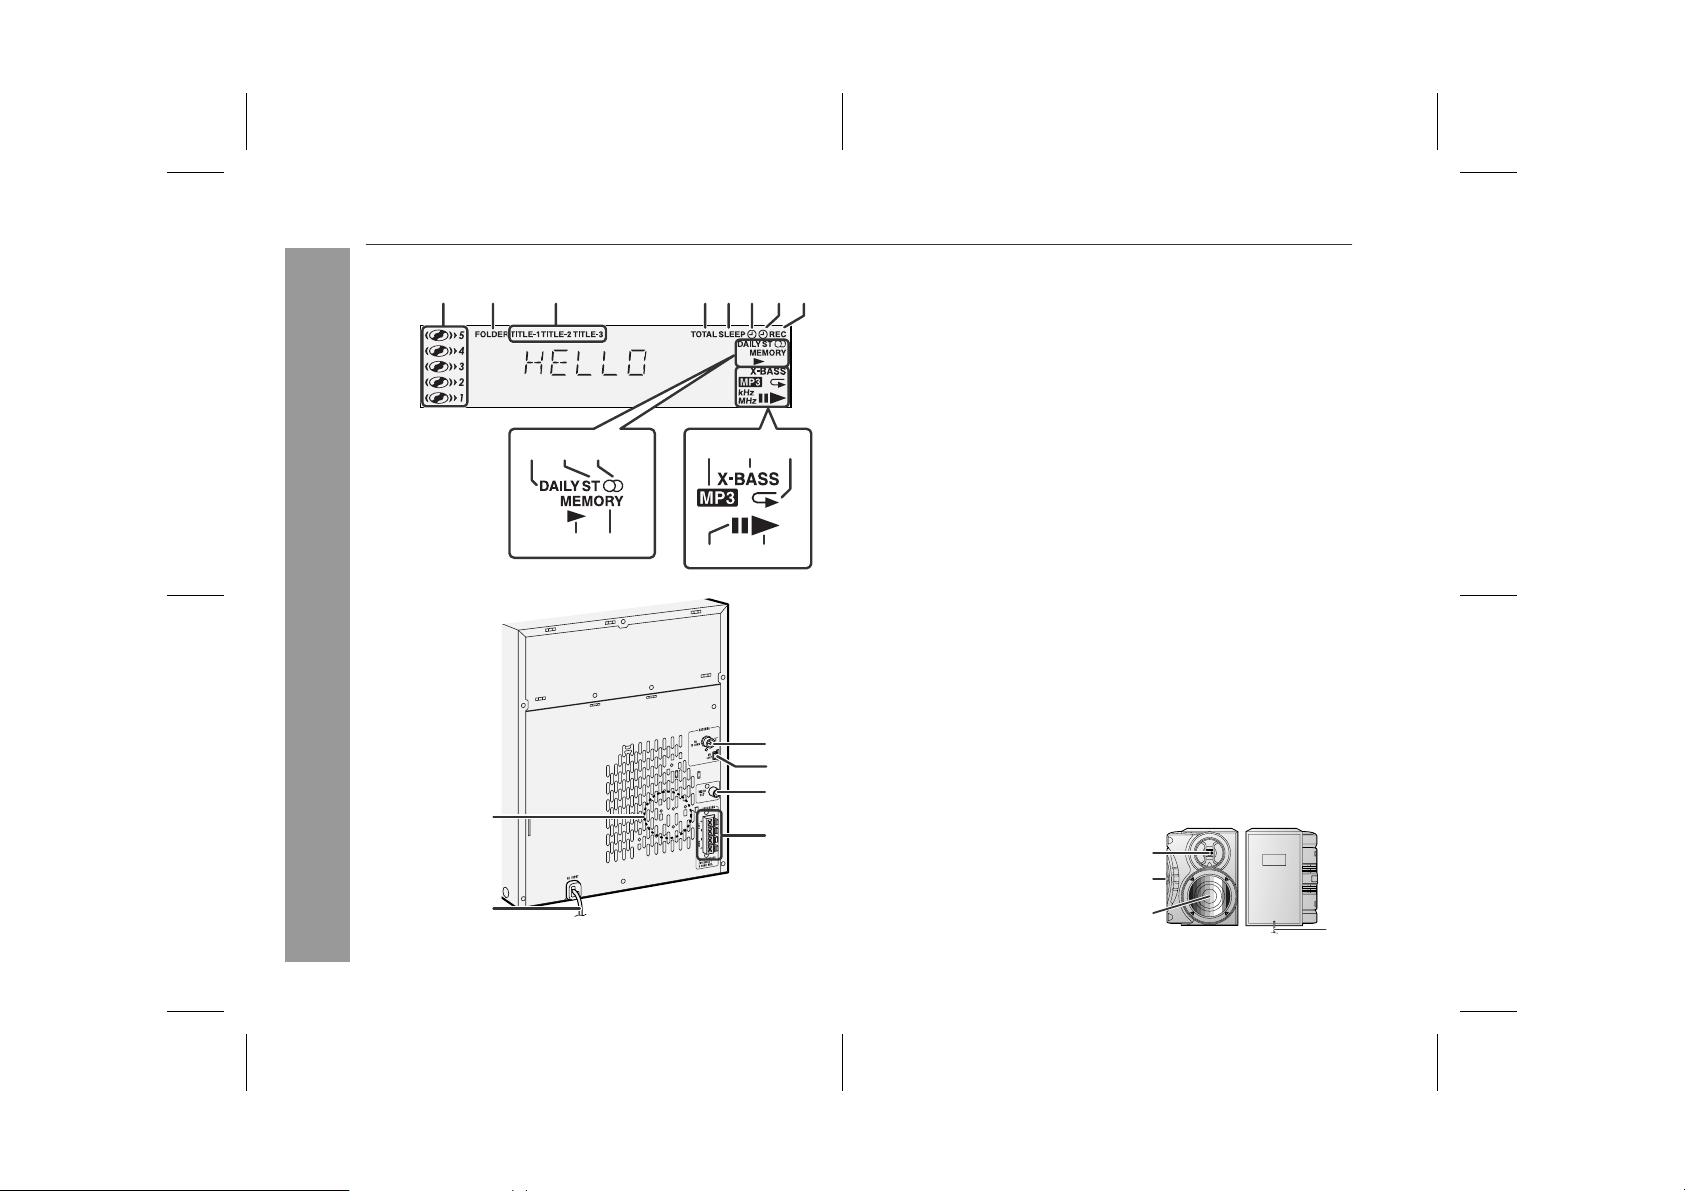
Display
1.Disc Number Indicat o rs . . . . . . . . . . . . . . . . . . . . . . . . . . . . 17
2.MP3 Folder Indic a tor . . . . . . . . . . . . . . . . . . . . . . . . . . . . . . 20
3.MP3 Title Indic a t o rs . . . . . . . . . . . . . . . . . . . . . . . . . . . . . . . 20
4.MP3 Total Indicat or . . . . . . . . . . . . . . . . . . . . . . . . . . . . . . . 21
5.Sleep Indicator . . . . . . . . . . . . . . . . . . . . . . . . . . . . . . . . . . . 33
6.Timer Play Indica t or . . . . . . . . . . . . . . . . . . . . . . . . . . . . . . . 31
7.Timer Recording Indicator . . . . . . . . . . . . . . . . . . . . . . . . . . 31
8.Tape 2 Record Indica t or . . . . . . . . . . . . . . . . . . . . . . . . . . . 28
9.Daily Timer Indica t or . . . . . . . . . . . . . . . . . . . . . . . . . . . . . . 31
10.FM Stereo Mode Indicator . . . . . . . . . . . . . . . . . . . . . . . . . . 24
11.FM Stereo Receiving Indicator . . . . . . . . . . . . . . . . . . . . . . 24
12.Tape Play Indica t or . . . . . . . . . . . . . . . . . . . . . . . . . . . . . . . 26
13.Memory Indicator . . . . . . . . . . . . . . . . . . . . . . . . . . . . . . 19, 23
14.MP3 Disc Indicator . . . . . . . . . . . . . . . . . . . . . . . . . . . . . . . . 15
15.Extra Bass Indicator . . . . . . . . . . . . . . . . . . . . . . . . . . . . . . . 12
16.Disc Repeat Play Indicator . . . . . . . . . . . . . . . . . . . . . . . . . 18
17.Disc Pause Indi c a tor . . . . . . . . . . . . . . . . . . . . . . . . . . . . . . 16
18.Disc Play Indicator . . . . . . . . . . . . . . . . . . . . . . . . . . . . . . . . 1 5
"
Rear panel
1.Cooling Fan . . . . . . . . . . . . . . . . . . . . . . . . . . . . . . . . . . . . . . 10
2.AC Power Lead . . . . . . . . . . . . . . . . . . . . . . . . . . . . . . . . . . . 10
3.FM 75 Ohms Aerial Socket . . . . . . . . . . . . . . . . . . . . . . . . . . 9
4.AM Loop Aerial Socket . . . . . . . . . . . . . . . . . . . . . . . . . . . . . 9
5.Video Output Socket . . . . . . . . . . . . . . . . . . . . . . . . . . . . . . 34
6.Speaker Terminals . . . . . . . . . . . . . . . . . . . . . . . . . . . . . . . . . 9
"
Speaker system
1. Tweeter
2. Passive Radiator
3.Woofer
4. Speaker Wire
1
2
Reference page
Reference page
3
4
6
04/3/5 CD-MPS660E(E)1.fm
TINSEA026AWZZ
Page 7
CD-MPS660E
10
11
12
13
14
"
1
2
15
3
4
16
5
6
7
8
9
17
18
19
20
21
22
23
24
25
26
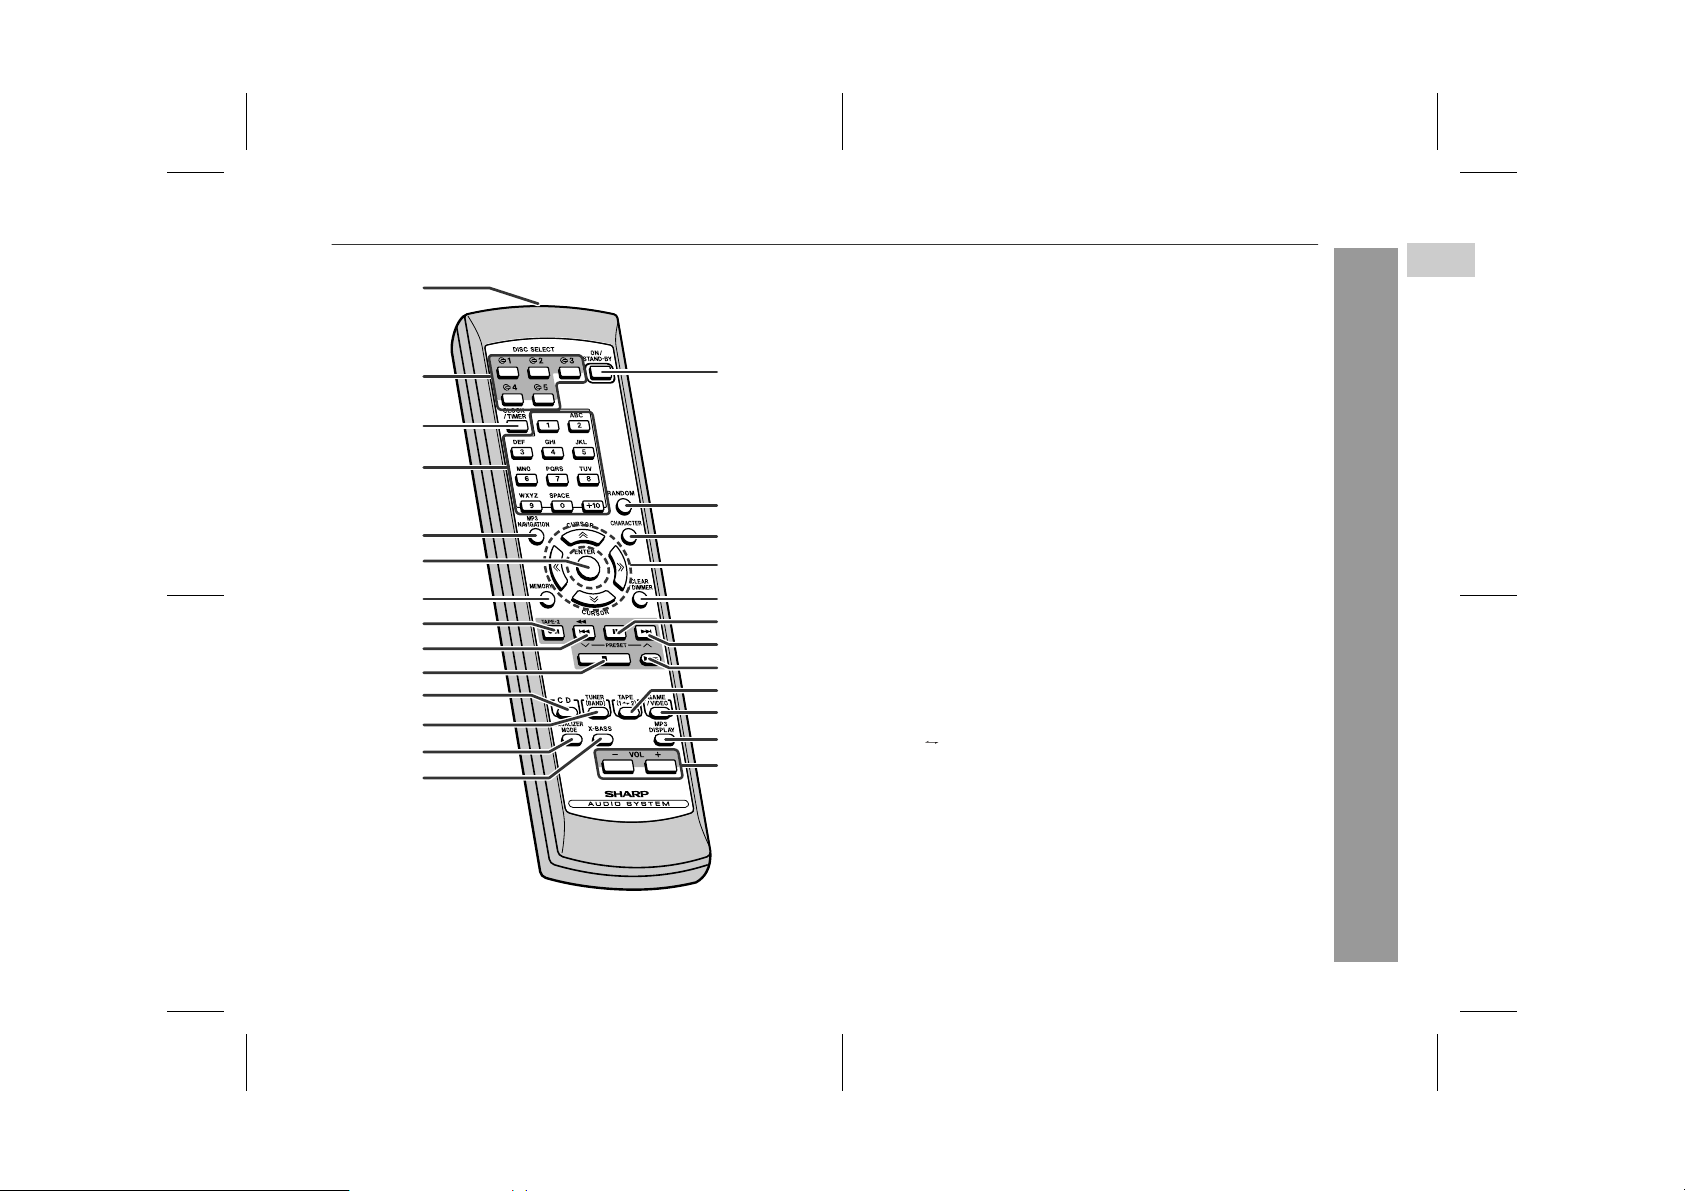
Remote control
Reference page
1.Remote Control Transmitter . . . . . . . . . . . . . . . . . . . . . . . . 11
2.Disc Number Select Buttons . . . . . . . . . . . . . . . . . . . . . . . . 15
3.Clock/Timer Button . . . . . . . . . . . . . . . . . . . . . . . . . 13, 30, 33
4.Character Input/Disc Direct Search Buttons . . . . . . . . 17, 22
5.MP3 Disc Navigation Mode Selec t Bu tt on . . . . . . . . . . . . . 21
6.Enter Button . . . . . . . . . . . . . . . . . . . . . . . . . . . . . . . . . . . . . 21
7.Memory/Set Butt on . . . . . . . . . . . . . . . . 13, 19, 23, 25, 3 0 , 3 3
8.Tape 2 Record Pause Button . . . . . . . . . . . . . . . . . . . . 28, 29
9.Disc Track Down or Fast Reverse, Tape 2 Rewind,
Tuner Preset Down, Time Down Button . . . . . 13, 16, 25, 27
10.Disc or Tape Stop Button . . . . . . . . . . . . . . . . . . . . . . . 16, 27
11.CD Button . . . . . . . . . . . . . . . . . . . . . . . . . . . . . . . . . . . . . . . 15
12.Tuner (Band) Button . . . . . . . . . . . . . . . . . . . . . . . . . . . . . . 24
13.Equaliser Mode Select Button . . . . . . . . . . . . . . . . . . . . . . 12
14.Extra Bass Button . . . . . . . . . . . . . . . . . . . . . . . . . . . . . . . . 12
15.On/Stand-by Button . . . . . . . . . . . . . . . . . . . . . . . . . . . . . . . 12
16.Disc Random Button . . . . . . . . . . . . . . . . . . . . . . . . . . . . . . 18
17.Character Button . . . . . . . . . . . . . . . . . . . . . . . . . . . . . . . . . 22
18.Cursor Buttons . . . . . . . . . . . . . . . . . . . . . . . . . . . . . . . . . . . 21
19.Disc Clear/Dimmer Button . . . . . . . . . . . . . . . . . . . . . . 12, 19
20.Disc Pause Button . . . . . . . . . . . . . . . . . . . . . . . . . . . . . . . . 16
21.Disc Track Up or Fast Forward, Tape 2 Fast Forward,
Tuner Preset Up, Time Up Button . . . . . . . . . . 13, 16, 25, 27
22.Disc Play or Repeat, Tape Play Butt on . . . . . . . . . 15, 18, 26
23.Tape (1 2) Button . . . . . . . . . . . . . . . . . . . . . . . . . . . . . . . 26
24.Game/Video Button . . . . . . . . . . . . . . . . . . . . . . . . . . . . . . . 34
25.MP3 Disc Display Button . . . . . . . . . . . . . . . . . . . . . . . . . . . 16
26.Volume Up and Down Buttons . . . . . . . . . . . . . . . . . . . . . . 12
General Information
1
04/3/5 CD-MPS660E(E)1.fm
7
TINSEA026AWZZ
Page 8
CD-MPS660E
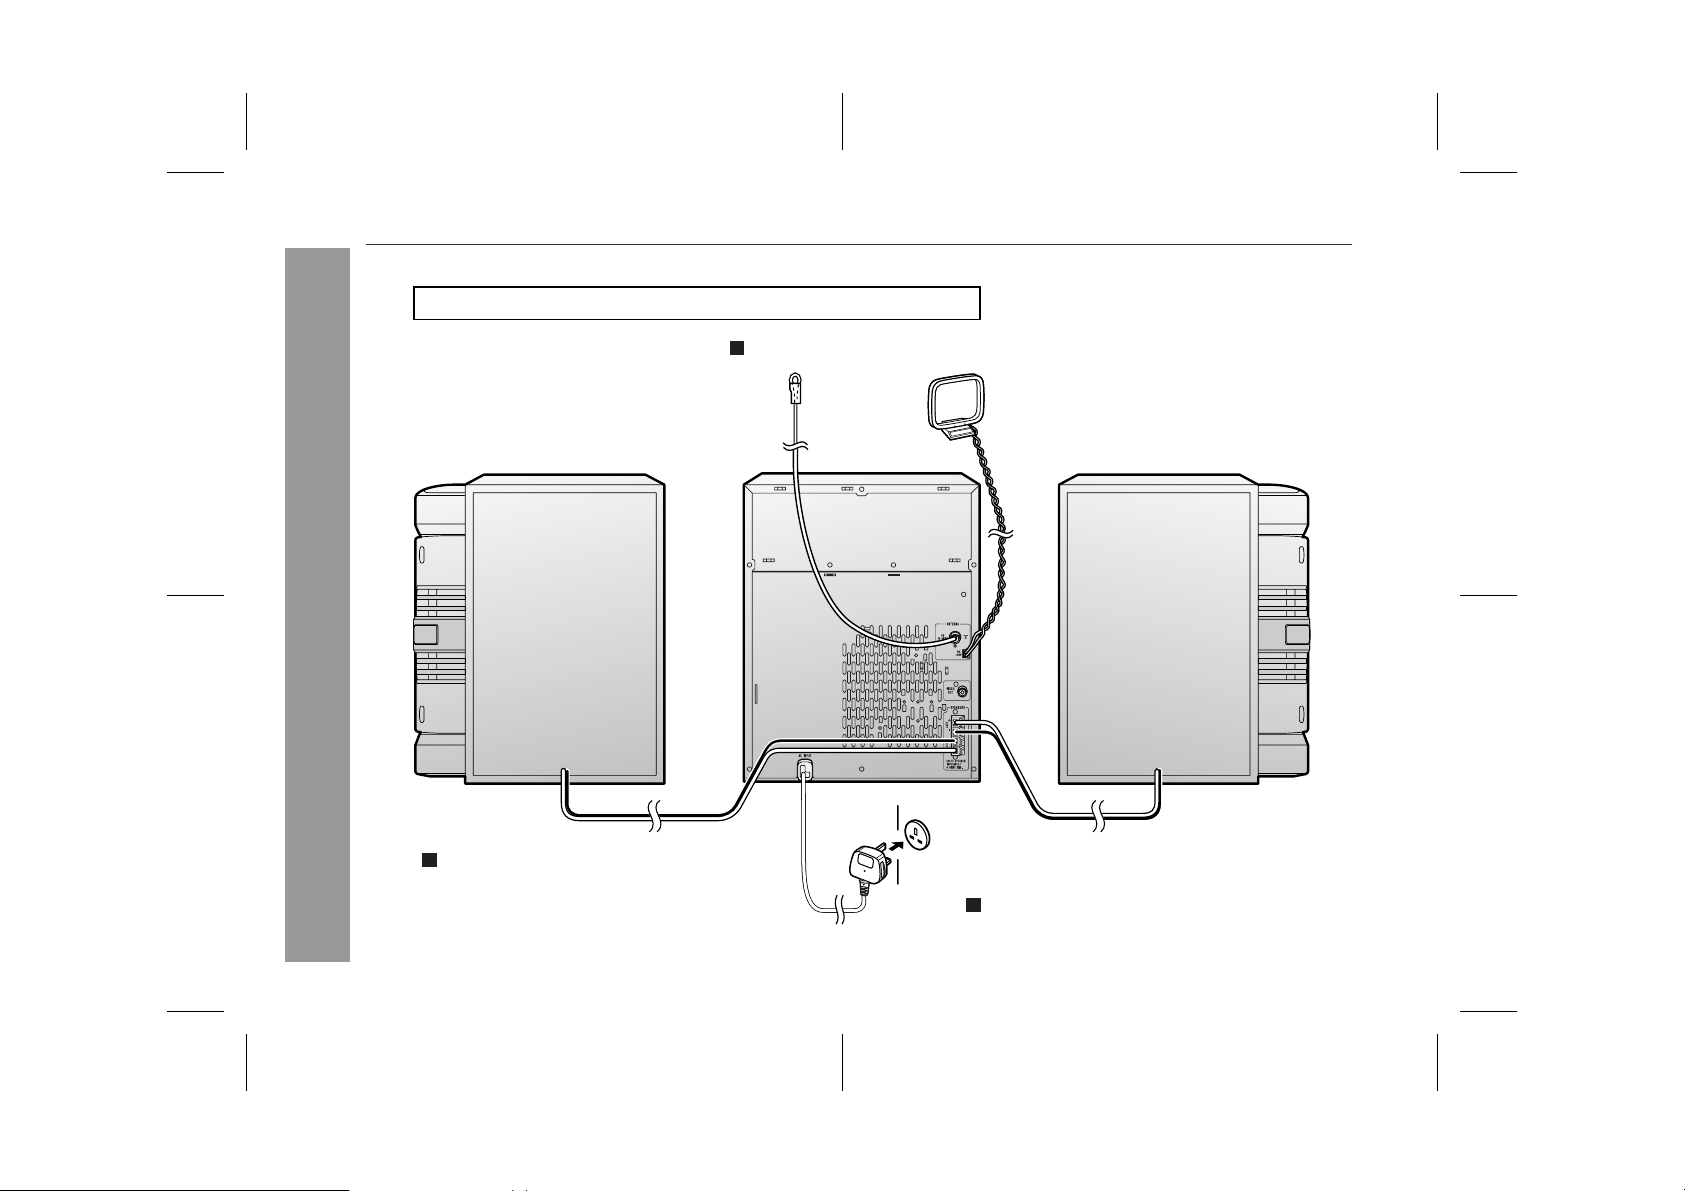
System connections
Make sure to unplug the AC power lead before making any connections.
Aerial connection (see page 9)
Preparation for Use
FM aerial
Right speaker
Speaker connection (see page 9)
AM loop aerial
Left speaker
Wall socket
(AC 230 - 240 V, 50 Hz)
AC power connection (see page 10)
8
04/3/5 CD-MPS660E(E)1.fm
TINSEA026AWZZ
Page 9
CD-MPS660E
"
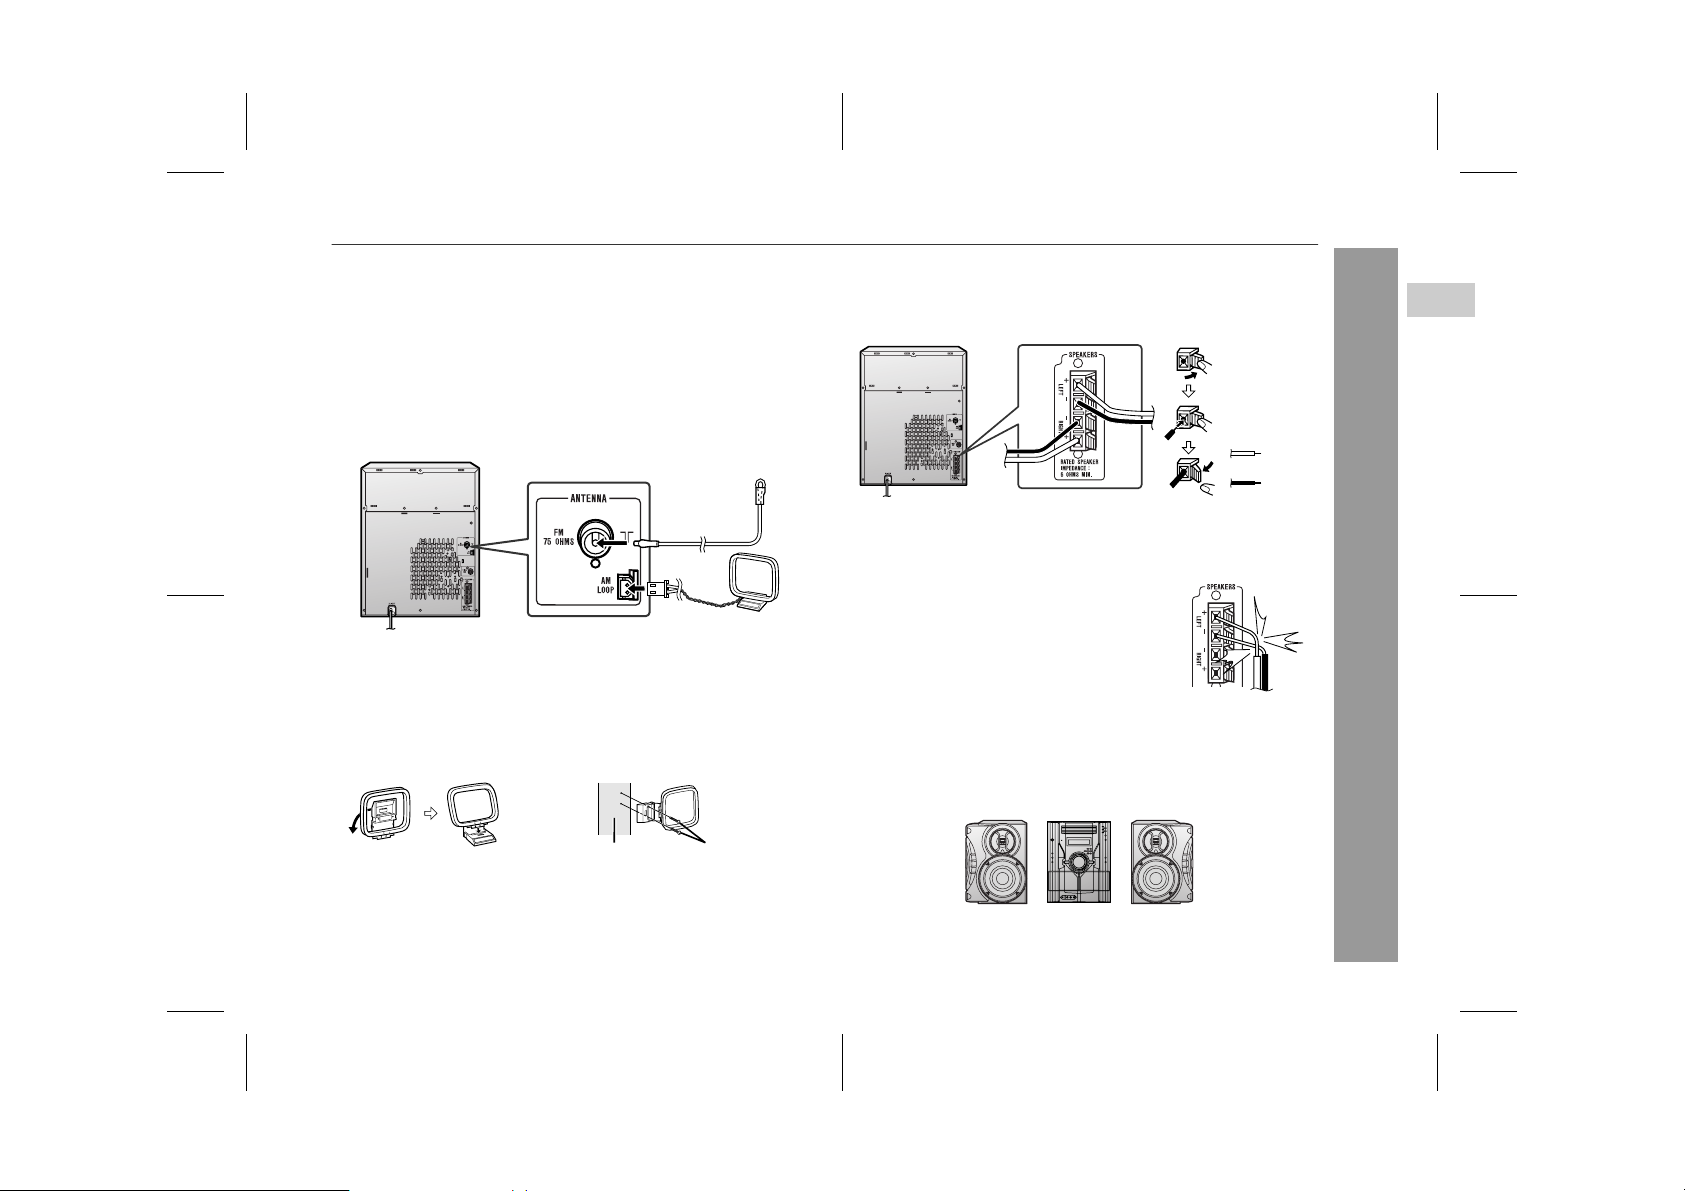
Aerial connection
Supplied FM aerial:
Connect the FM aerial wire to the FM 75 OHMS socket and position
the FM aerial wire in the direction where the strongest signal can be
received.
Supplied AM loop aerial:
Connect the AM loop aerial to t he AM LOOP socket. Position the
AM loop aerial for optimum reception. Place the AM loop aerial on a
shelf, etc., or attach it to a stand or a wall with screws (not supplied).
Note:
Placing the aerial on the unit or near the AC power lead may cause
noise pickup. Place the aerial away from the unit for better reception.
Installing the AM loop aerial:
< Assembling > < Attaching to the wall >
"
Speaker connection
Connect the black wire to the minus (-) terminal, and the red wire to
the plus (+) terminal.
Red
Black
Caution:
Use speakers with an impedance of 6 ohms or more, as lower im-
!
pedance speakers can damage the unit.
Do not mistake the right and the left chan-
!
nels. The right speaker is the one on the right
side when you face the unit.
!
Do not let the bare speaker wires touch
each other.
Do not stand or sit on the speakers. You may
!
be injured.
Incorrect
"
Placing the speaker system
The left and right speakers have indi vidual shapes. For best performance, place the speakers according to the diagram below.
Left speaker Right speaker
2
Preparation for Use
Wall Screws (not supplied)
Note:
The speaker grilles are not removable.
04/3/5 CD-MPS660E(E)1.fm
9
TINSEA026AWZZ
Page 10
CD-MPS660E
System connections (continued)
"
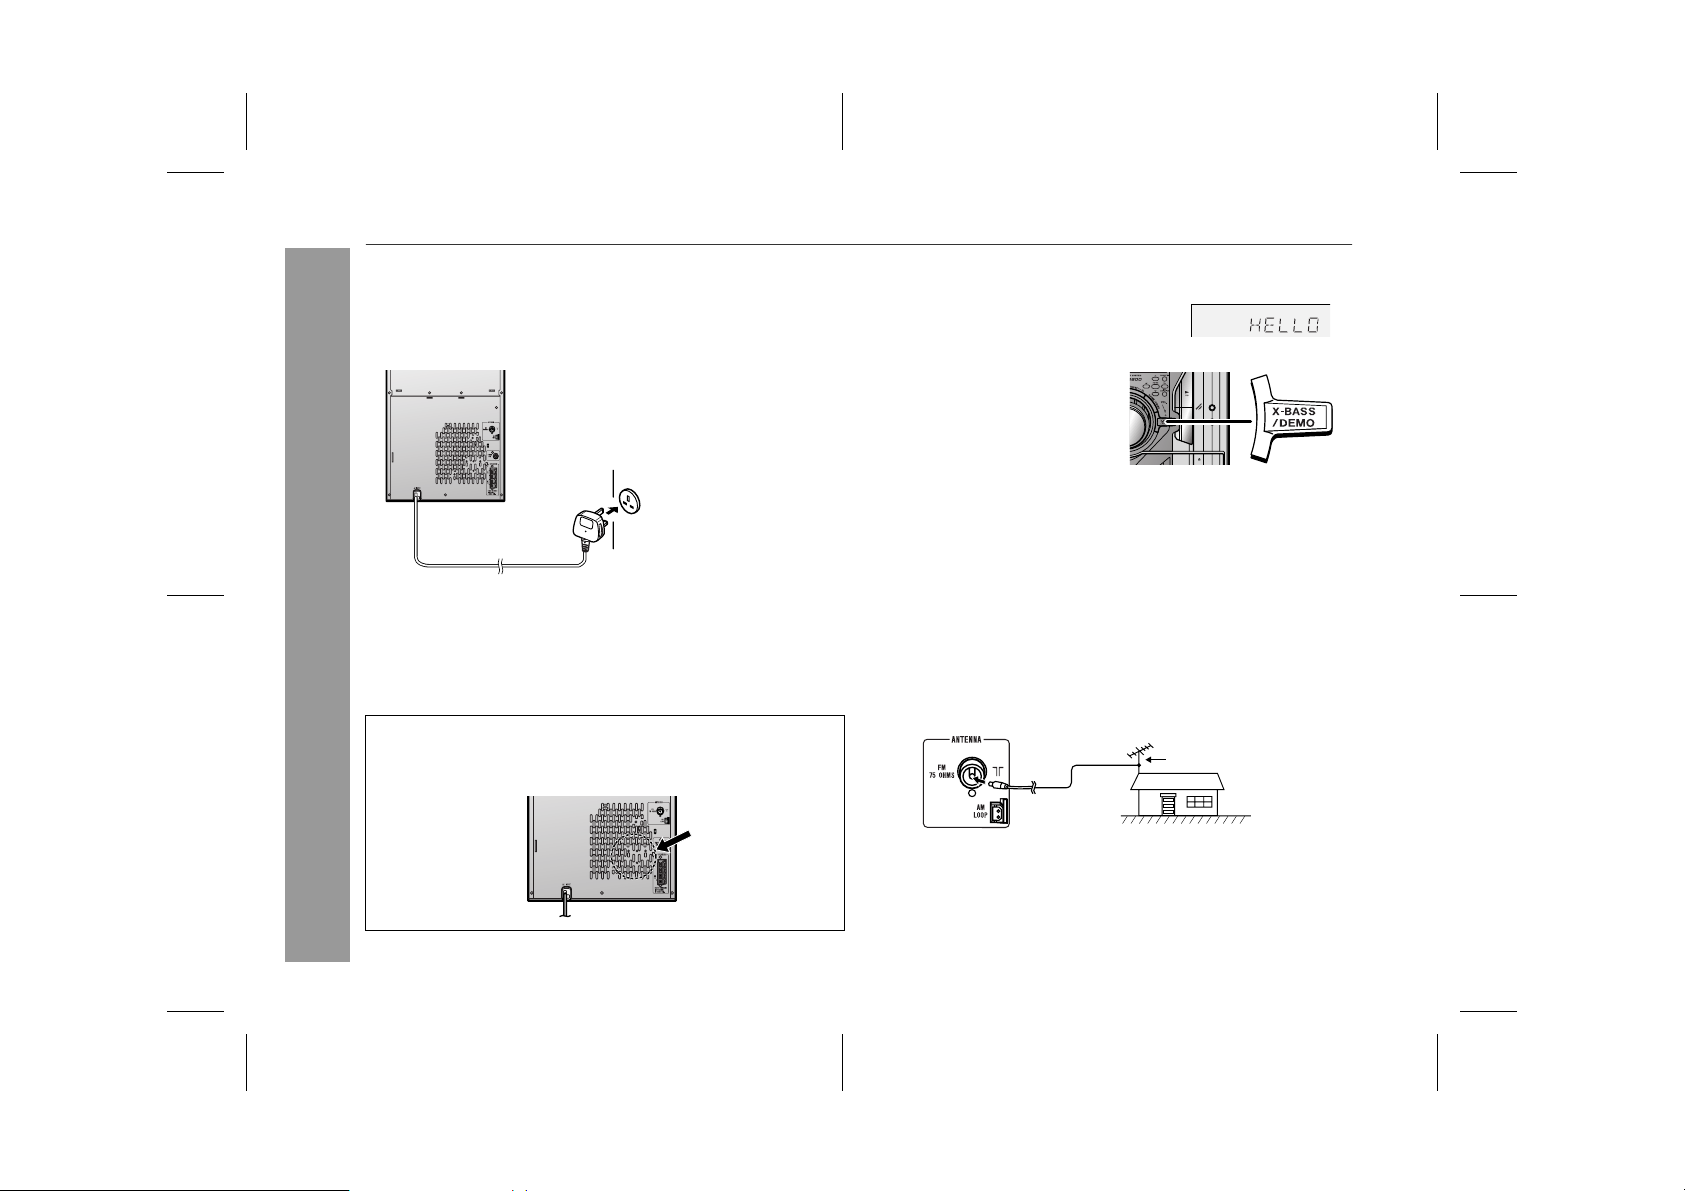
AC power connection
After checking all the connections have been made correctly, plug
the AC power lead of this unit into the wall socket. If you plug in the
unit first, the unit will enter the demonstration mode.
Wall socket
(AC 230 - 240 V, 50 Hz)
Notes:
The unit will start the tape initialisation when plugged in to the AC
!
socket. During this process, initialising sound will be heard and
the unit cannot be turned on. Wait until the process is finished.
Unplug the AC power lead from the wall socket if the unit will not
!
be in use for a prolonged period of time.
Preparation for Use
Cooling fan:
This product is equipped with a cooling fan inside, which begins to
run at a specified volume level for better heat radiation.
"
Demonstration mode
The first time the unit is plugged in, the
unit will enter the demonstration mode.
You will see words scroll.
To cancel the demonstration
mode:
When the unit is in the power standby mode (demonstration mode),
press the X-BASS/DEMO button.
The demonstration mode will be
cancelled and the display will disappear.
To return to the demonstration mode:
When the unit is in the power stand-by mode, press the X-BASS/
DEMO button again.
Note:
When the power is on, the X-BASS/DEMO button can be used to select the extra bass mode.
"
External FM aerial
Use an external FM aerial if you require better reception.
Consult your dealer.
External FM aerial
10
04/3/5 CD-MPS660E(E)1.fm
TINSEA026AWZZ
Page 11
Remote control
CD-MPS660E
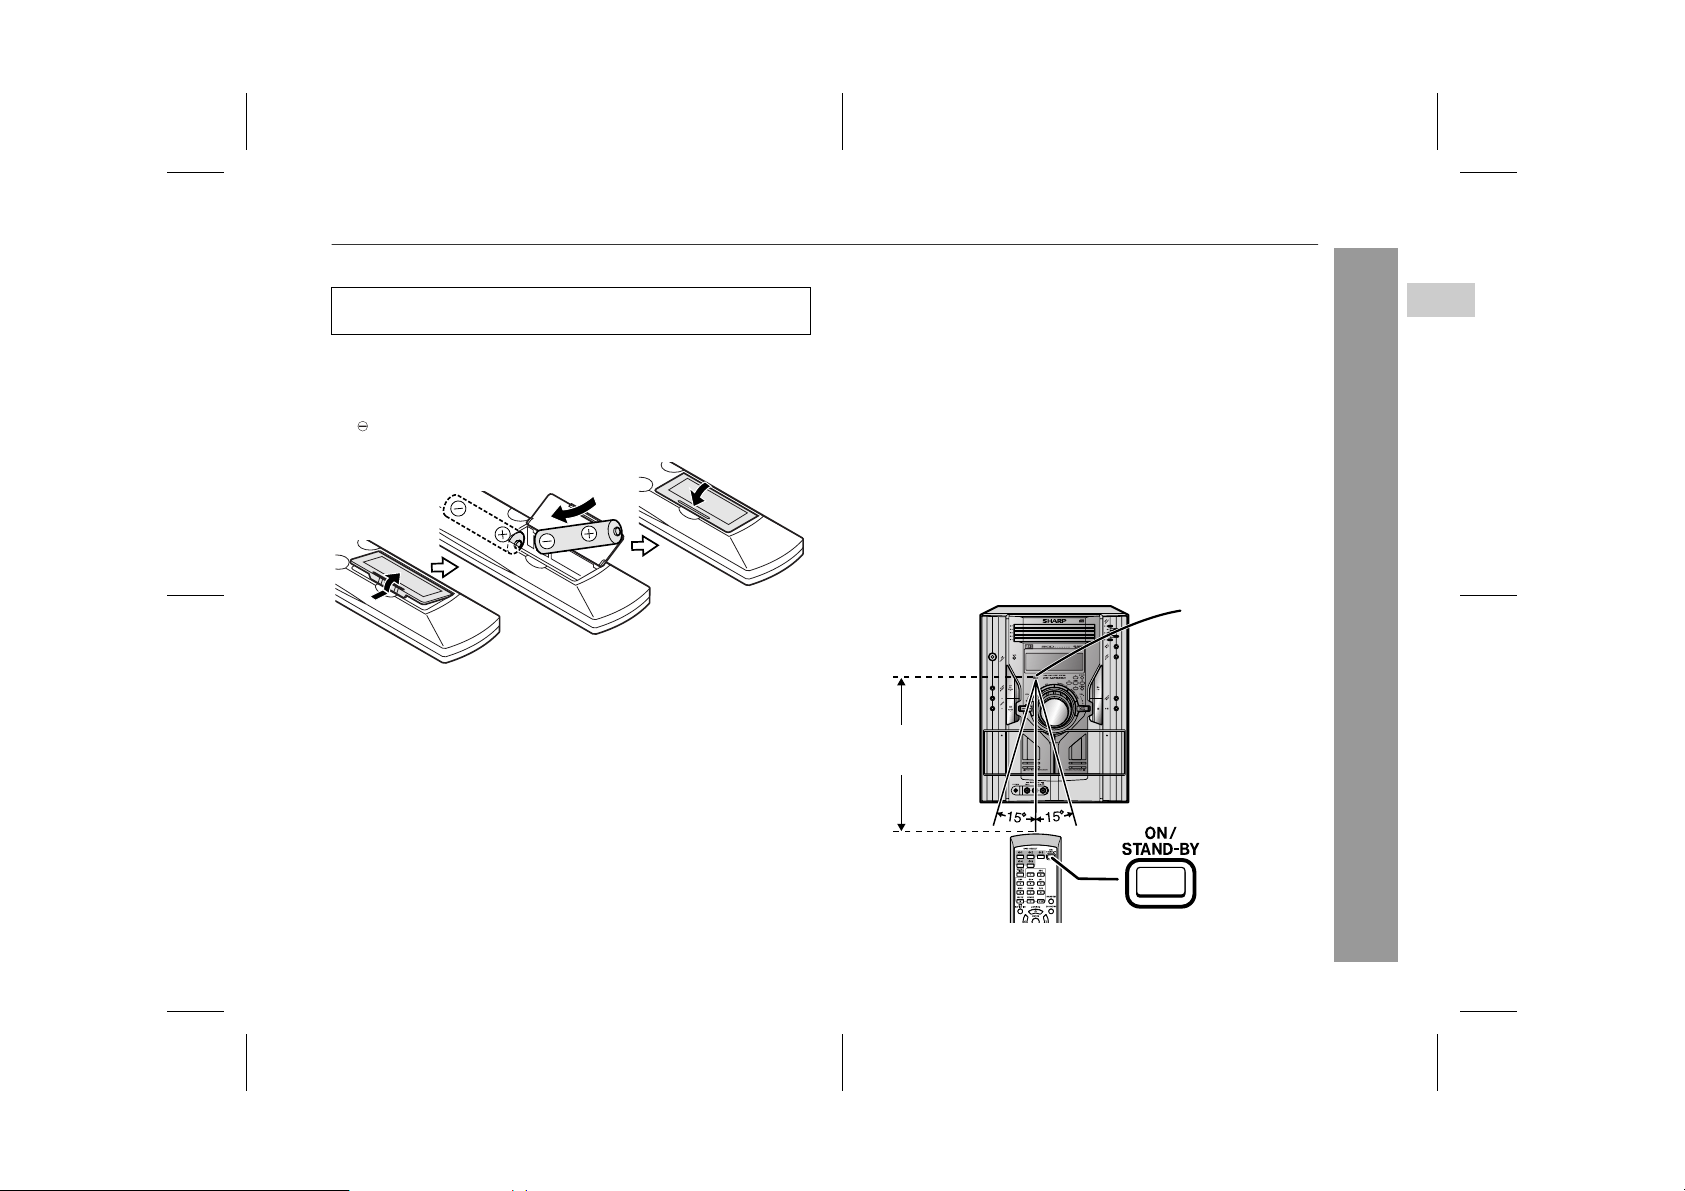
! Battery installation
Use 2 "AA" size batteries (UM/SUM-3, R6, HP-7 or similar).
Batteries are not included.
1 Open the battery cover.
2 Insert the batteries according to the direction indicated in
the battery compartment.
When inserting or removing the batteries, push them towards the
battery terminals.
3 Close the battery cover.
Precautions for battery use:
Replace all old batteries with new ones at the same time.
"
Do not mix old and new batteries.
"
Remove the batteries if the unit is not to be used for long per iod s
"
of time. This will prevent potential damage due to battery leakage.
Caution:
Do not use rechargeable batteries (nickel-cadmium battery, etc.).
"
Installing the batteries i ncorrectly may ca use t he unit t o mal func-
"
tion.
Notes concerning use:
Replace the batteries if the operating distance is reduced or if the
"
operation becomes erratic.
Periodically clean the transmitter on the remote control and the
"
sensor on the unit with a soft cloth.
Exposing the sensor on the unit to strong light may i nterfere with
"
operation. Change the lighting or the direction of the unit.
Keep the remote control away from moisture, heat, shock, and
"
vibrations.
! Test of the remote control
Check the remote control af ter checking all the connections (see
pages 8 - 10).
Point the remote control directly at the remote sensor on the unit.
The remote control can be used within the range shown below:
Press the ON/STAND-BY button. Does the power turn on? Now,
you can enjoy music.
Remote sensor
0.2 m - 6 m
(8" - 20')
2
Preparation for Use
04/3/5 CD-MPS660E(E)2.fm
11
TINSEA026AWZZ
Page 12
CD-MPS660E
Basic Operation
12
General control
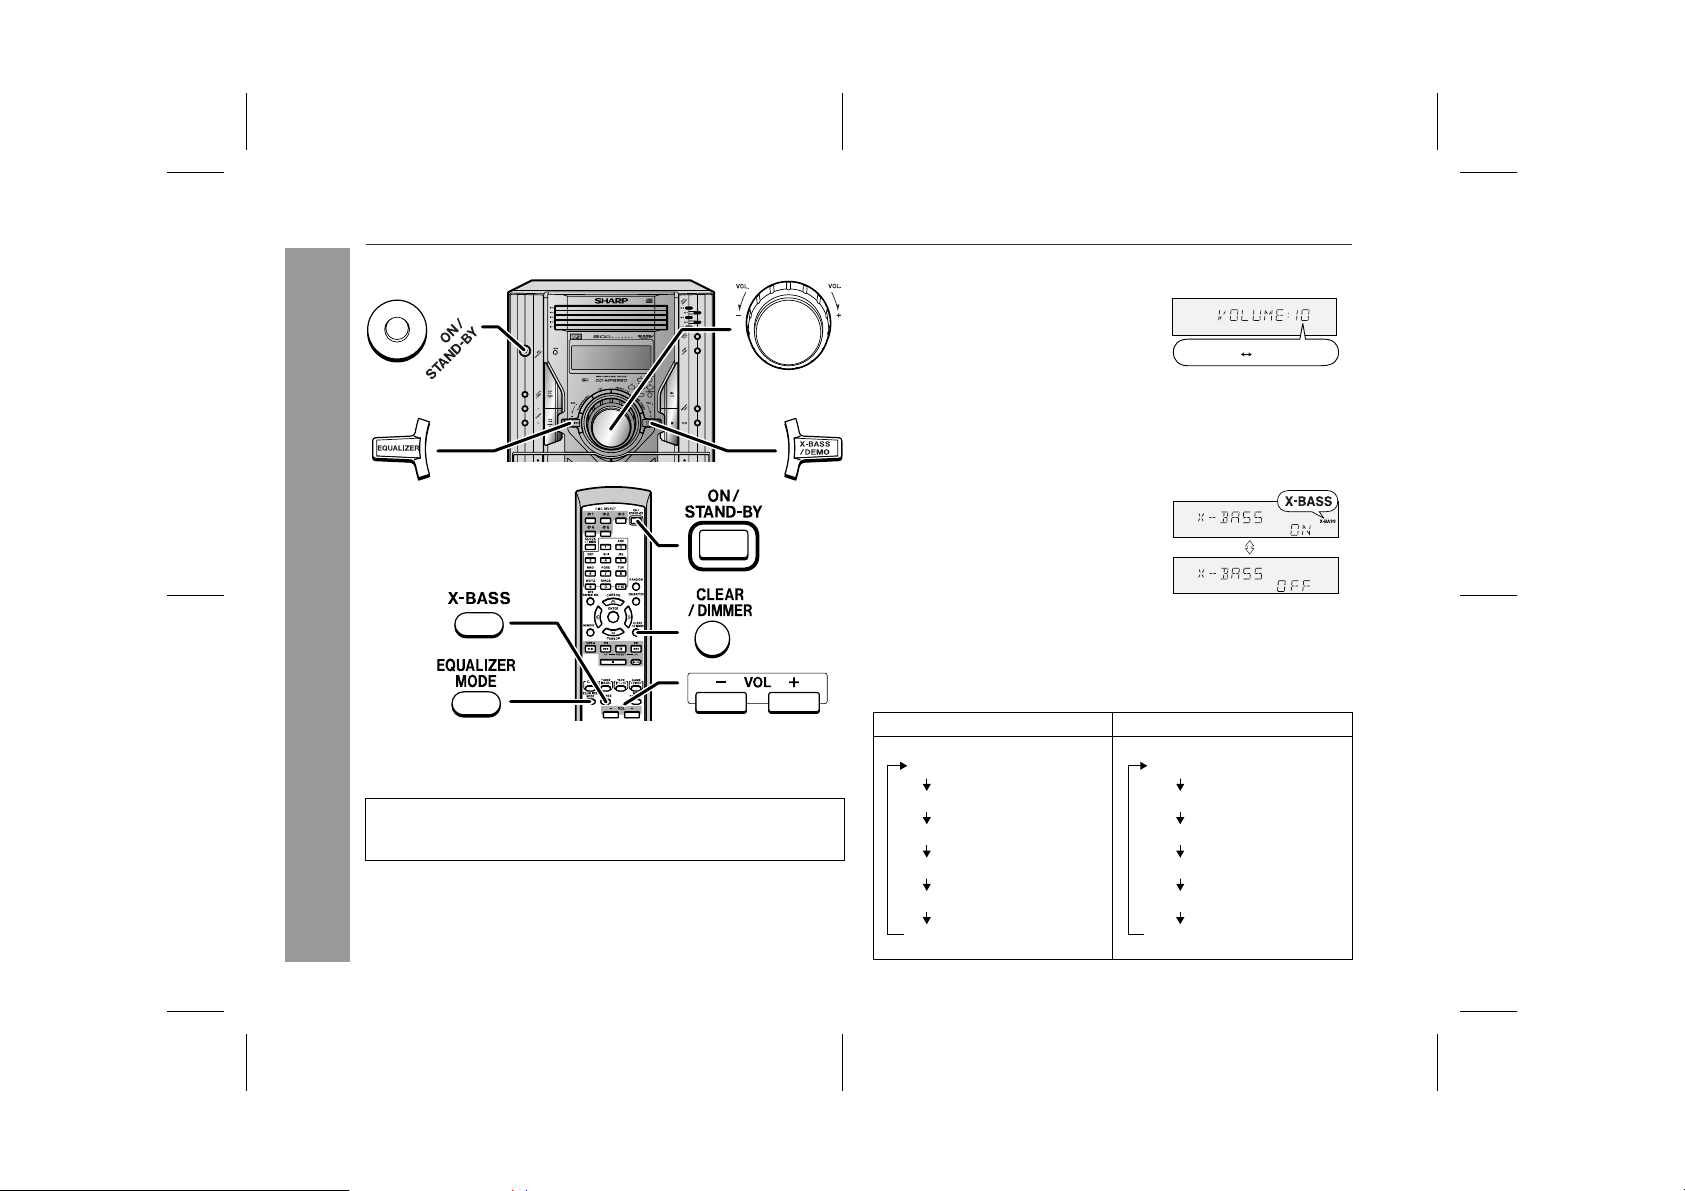
! To turn the power on
Press the ON/STAND-BY button to turn the power on.
After use:
Press the ON/STAND-BY button to enter the power stand-by
mode.
! Illumination light control
When the power is turned on, light illuminates around the display.
To turn on/off the light, hol d down the CLEAR/DIMMER button on
the remote control for 2 seconds or more.
! Volume control
Main unit operation:
When the VOLUME control is turned
clockwise, the volume will increase.
When it is turned anti-clockwise, the volume will decrease.
Remote control operation:
Press the VOLUME (+ or -) button to increase or decrease the volume.
.....
30 MAXIMUM0
! Bass control (X-BASS)
When the power is first turned on, the
unit will enter the extra bass mode which
emphasises the bass frequencies, and
"X-BASS" will appear. To cancel the extra bass mode, press the X-BASS/DEMO
(X-BASS) button.
! Equaliser
When the EQUALIZER (EQUALIZER MODE) button is pressed, the
current mode setting will be displayed. To change to a different
mode, press the EQUALIZER (EQUALIZER MODE) button repeatedly until the desired sound mode appears.
In CD/TUNER/TAPE mode In GAME/VIDEO mode
FLAT
ROCK
CLASSIC
POPS
VOCAL
JAZZ
The sound is not
modified.
Bass and treble are
emphasised.
Treble is cut a little.
Bass and treble are
slightly emphasised.
Vocals (midrange
tones) are emphasised.
Treble is slightly
emphasised.
FLAT
ROCK
CLASSIC
ACTION
SPORTS
RACING
The sound is not
modified.
Bass and treble
are emphasised.
Treble is cut a
little.
Bass is emphasised.
Vocals and treble
are emphasised.
Bass and treble are
emphasised more.
04/3/5 CD-MPS660E(E)2.fm
TINSEA026AWZZ
Page 13
CD-MPS660E (E) TINSEA026AWZZ
3
Setting the clock
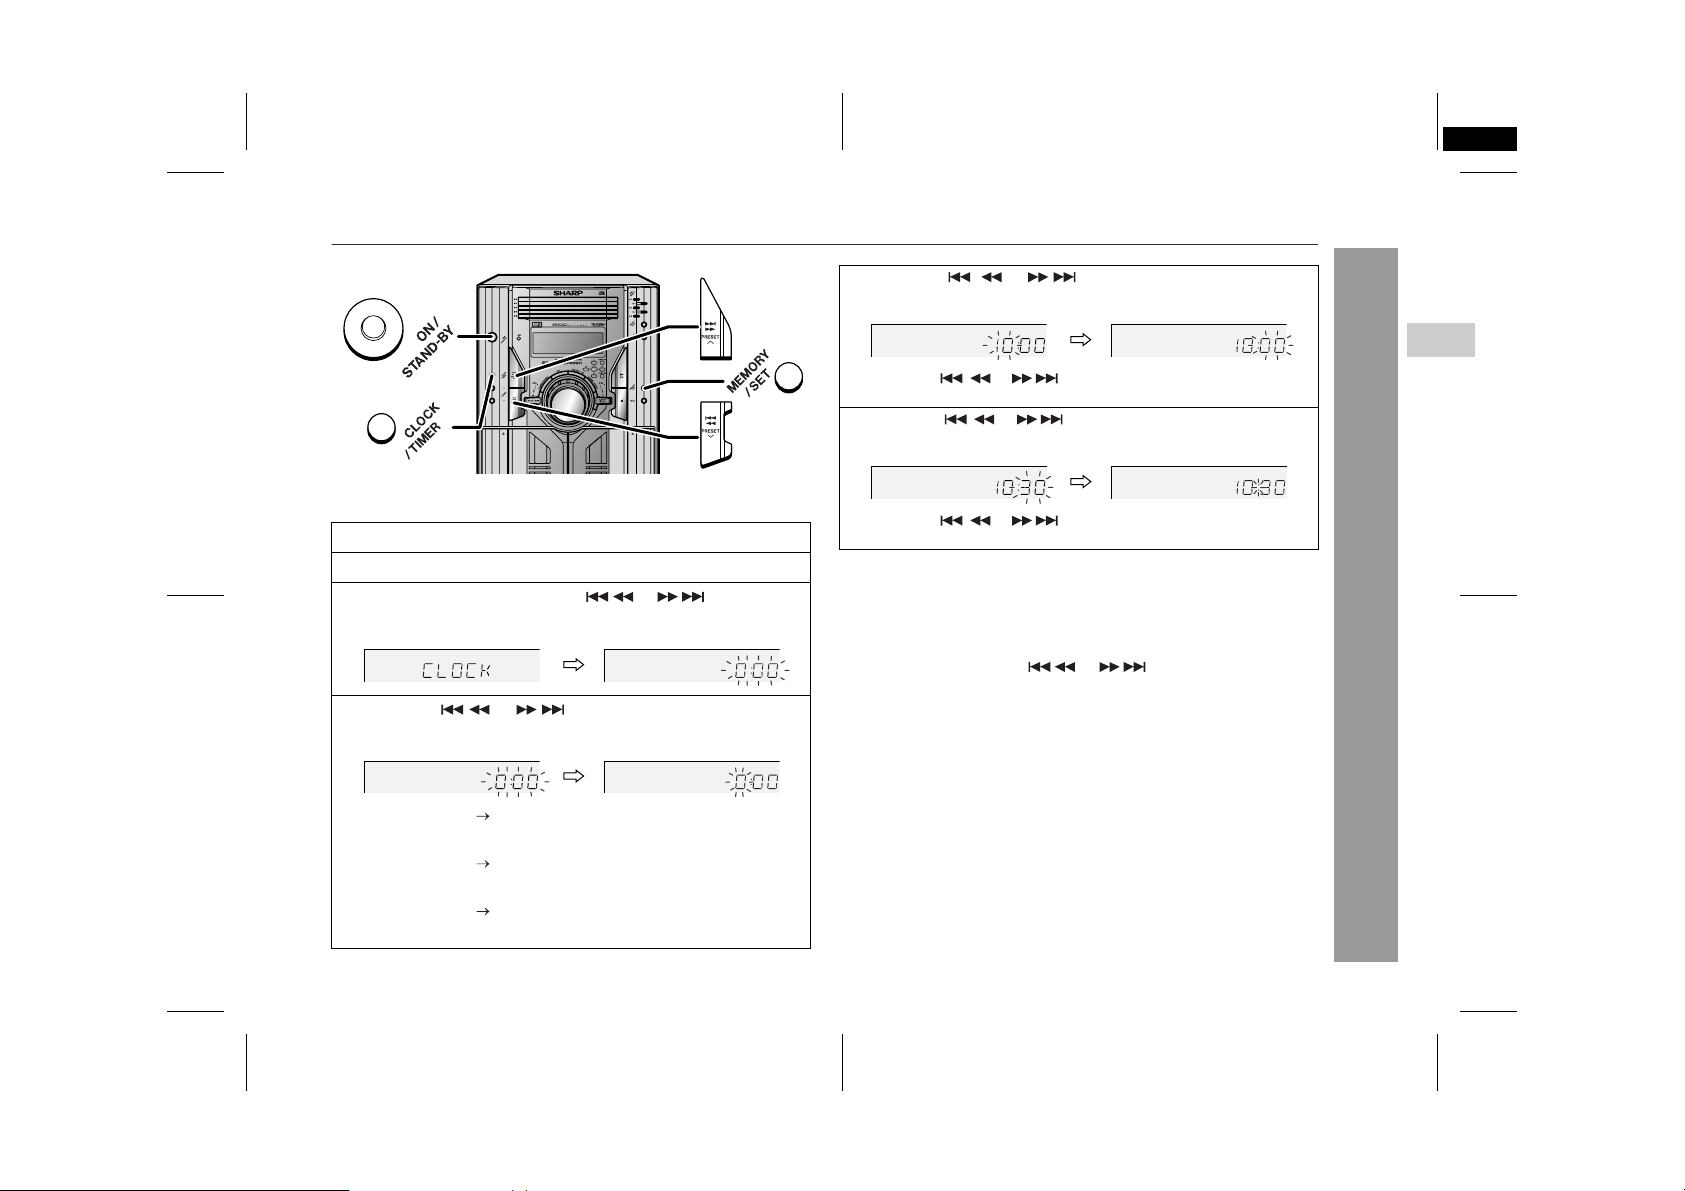
In this example, the clock is set for the 24-hour (0:00) display.
1
Press the ON/STAND-BY button to turn the power on.
2
Press the CLOCK/TIMER button.
3
Within 10 seconds, press the or button to select "CLOCK", and press the MEMORY/SET button.
4
Press the or button to select 24-hour or 12hour display and then press the MEMORY/SET button.
"0:00" The 24-hour display will appear.
(0:00 - 23:59)
"AM 12:00" The 12-hour display will appear.
(AM 12:00 - PM 11:59)
"AM 0:00" The 12-hour display will appear.
(AM 0:00 - PM 11:59)
5
Press the or button to adjust the hour and
then press the MEMORY/SET button.
Press the or button once to advance the time by
1 hour. Hold it down to advance continuously.
6
Press the or button to adjust the minutes and
then press the MEMORY/SET button.
Press the or button once to advance the time by
1 minute. Hold it down to change the time in 5-minute intervals.
To confirm the time display:
[When the unit is in the stand-by mode]
Press the CLOCK/TIMER button.
The time display will appear for about 10 seconds.
[When the power is on]
Press the CLOCK/TIMER button.
Within 10 second s, press the or button to display the time.
The time display will appear for about 10 seconds.
Note:
The "CLOCK" will appear or time will flash to confirm the time display when the AC power supply is restored after a power failure or
unplugging the unit. If incorrect, readjust the clock as follows.
To readjust the clock:
Perform "Setting the clock" from step 1. If the "CLOCK" does not
appear in step 3, step 4 (for selecting the 24-hour or 12-hour display) will be skipped.
To change the 24-hour or 12-hour display:
1 Clear all the programmed contents. [Refer to "Clearing all the
memory (reset)" on page 37 for details.]
2 Perform "Setting the clock" from step 1.
Note:
The clock can also be set with the remote control.
CD-MPS660E
3
Basic Operation
13
04/3/5 CD-MPS660E(E)2.fm
TINSEA026AWZZ
Page 14
CD-MPS660E
CD or MP3 disc Playback
Listening to a CD or MP3 disc
This system can also play audio CD-R and CD-RW discs, but cannot record.
Some audio CD-R and CD-RW discs may not be playable due to the
state of the disc or the equipment used for recording.
MP3 is a form of compression. It is an acronym which stands
for MPEG Audio Layer 3.
MP3 is a type of audio code which is processed by significant
compression from the original audio source with very little loss
in sound quality.
Notes:
"
" " indicator will li ght up after the unit r eads infor mation on an
MP3 disc.
"
This system supports MPEG 1 Layer 3, MPEG 2 Layer 3, and
VBR files.
"
During VBR file playback, time counter in the displ ay may differ
from its actual playback time.
Auto power on function:
When you press any of the following buttons, the unit turns on.
"
CD button (main unit and remote control): The u nit turns on and
the "CD" function is activated.
"
/ button (main unit and remote control): The unit turns on
and playback of the last function starts (CD/TAPE/TUNER/
GAME).
14
04/3/5 CD-MPS660E(E)2.fm
TINSEA026AWZZ
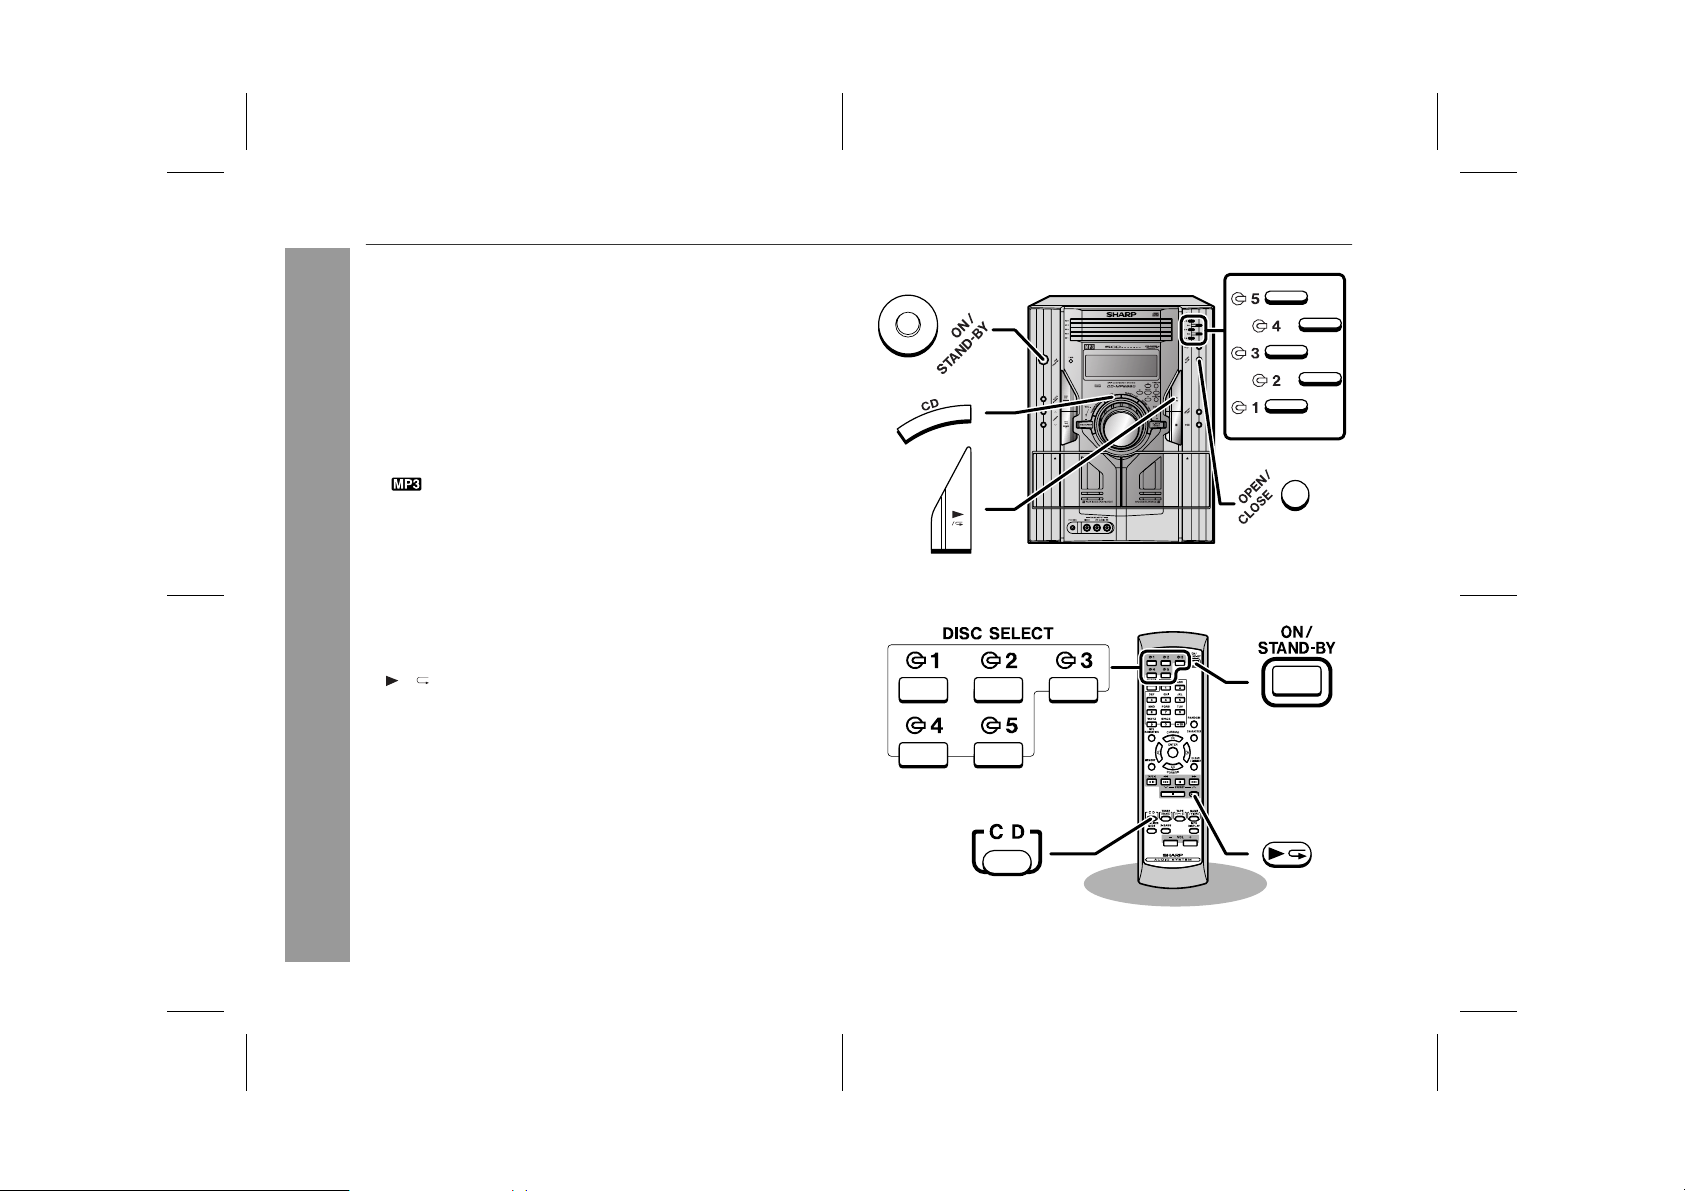
Page 15
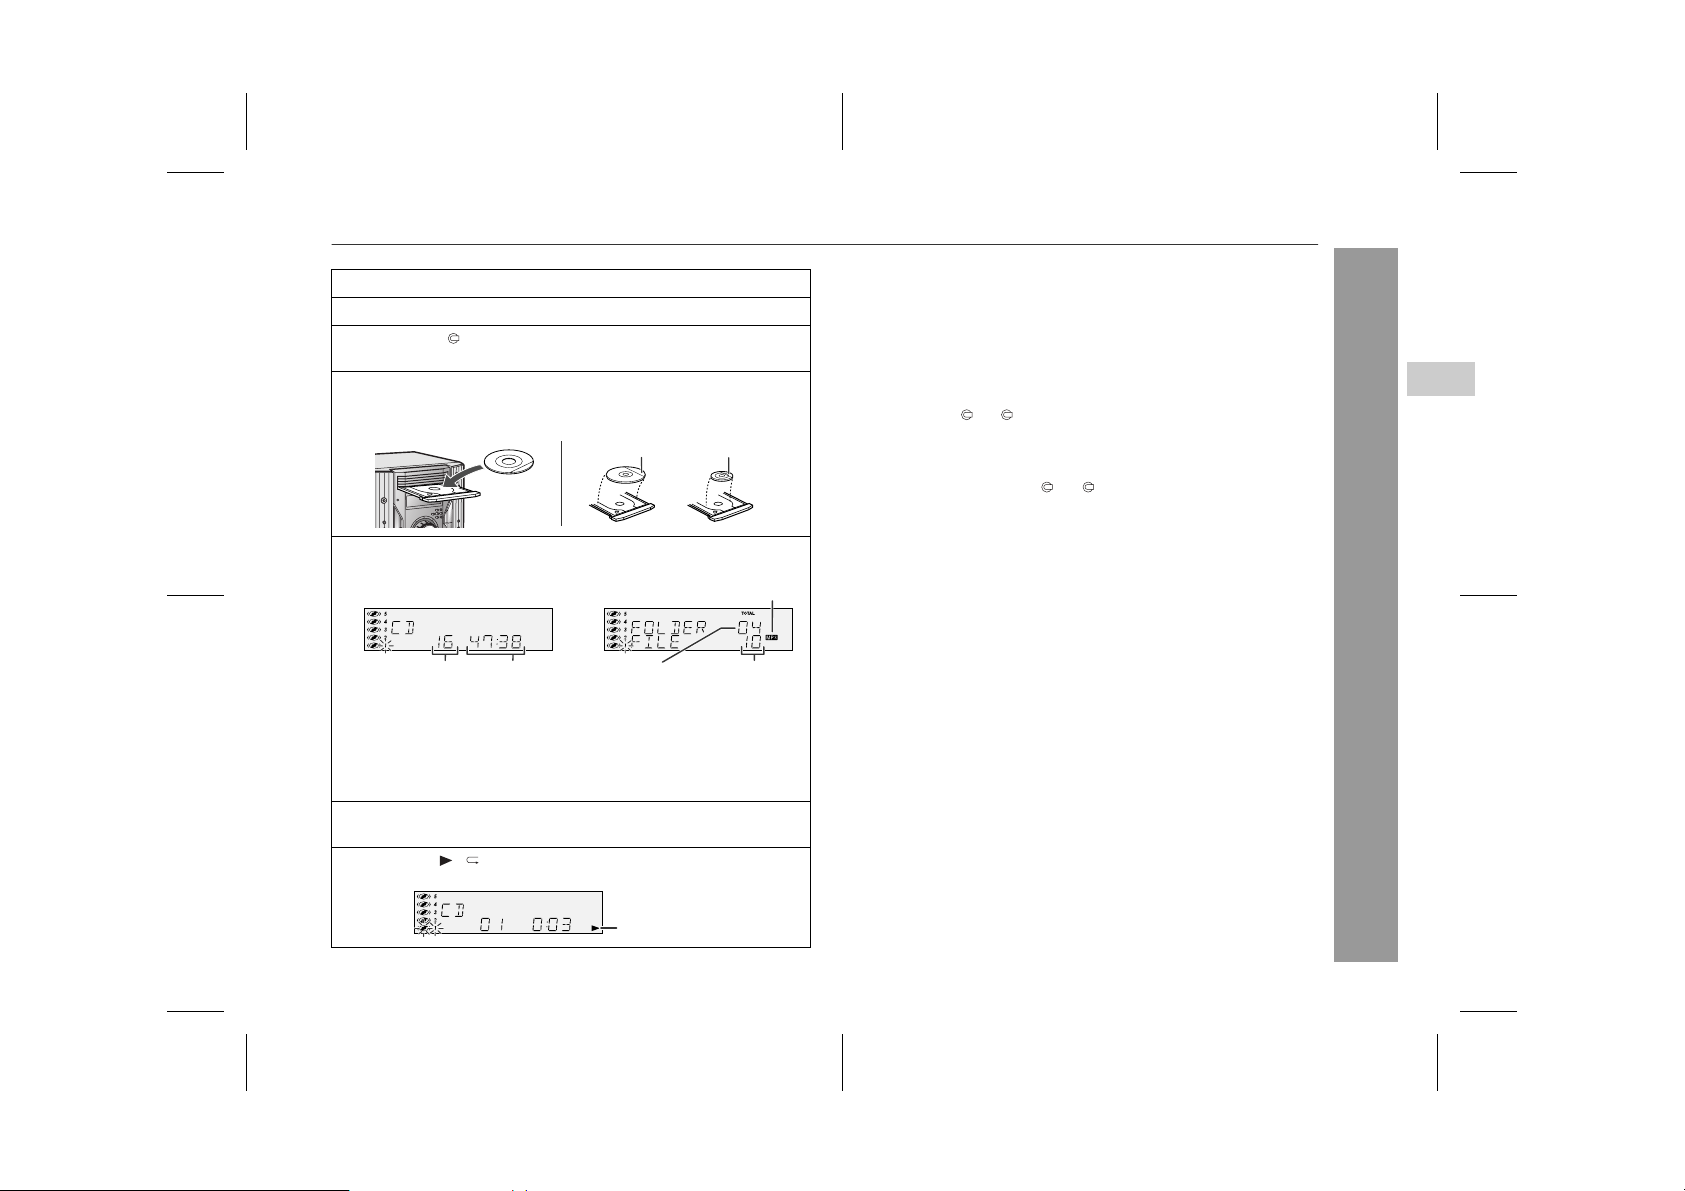
1
Press the ON/STAND-BY button to turn the power on.
2
Press the CD button.
3
Press the 1 button and within 5 seconds, press the
OPEN/CLOSE button to open the disc tray 1.
4
Place the disc on the disc tray 1, label side up.
Be sure to place 8 cm (3") disc in the middle of the disc trays.
12 cm (5") 8 cm (3")
"
Playback will begin from track 1 on the disc 1. After that disc finishes playing, the next disc will automatically play.
"
After the last track on the fifth disc is played, the unit will stop
automatically.
"
When there is no disc in one of the disc trays (1 - 5), the empty
tray will be skipped to the next tray with a disc.
To exchange other discs whilst playing a disc:
Press one of the 1 - 5 buttons for the stopped disc and within 5
seconds, press the OPEN/CLOSE button and exchange discs.
To remove the discs:
In the stop mode, press the 1 - 5 button and within 5 seconds,
press the OPEN/CLOSE button.
CD-MPS660E
4
5
Press the OPEN/CLOSE button to close the disc tray 1.
[CD]
Total number of
tracks on the disc
whose number
is flashing
"
Due to the structure of its disc information, it takes longer to
read an MP3 disc than a normal CD (approximately 20 to 90
seconds).
6
You can place discs on the trays 2 - 5 by following steps 3
- 5.
7
Press the / button to start playback.
Total playing
time of the disc
whose number
is flashing
[MP3]
Total number
of folders
MP3 disc indicator
Disc play indicator
Total number
of files
Caution:
"
Do not place two discs in one disc tray.
"
Do not play discs with special shapes (heart- or octagon-shaped)
as it may cause malfunctions.
"
Do not push the disc tray whilst it is moving.
"
If the power fails whilst the tray is open, wait until the power is
restored.
"
If the disc tray is stopped with f orce, "ER-CD20" will appear on
the display for 3 seconds and the unit will not function. If this
occurs, press the ON/STAND-BY button to enter the power
stand-by mode and then turn the power on again.
"
If TV or radio interference occurs during CD operation , move the
unit away from the TV or radio.
"
If a disc is damaged, dirty, or loaded upside down, the disc will
skip or not play.
04/3/5 CD-MPS660E(E)2.fm
TINSEA026AWZZ
CD or MP3 disc Playback
15
Page 16
CD-MPS660E
Listening to a CD or MP3 disc (continued)
!
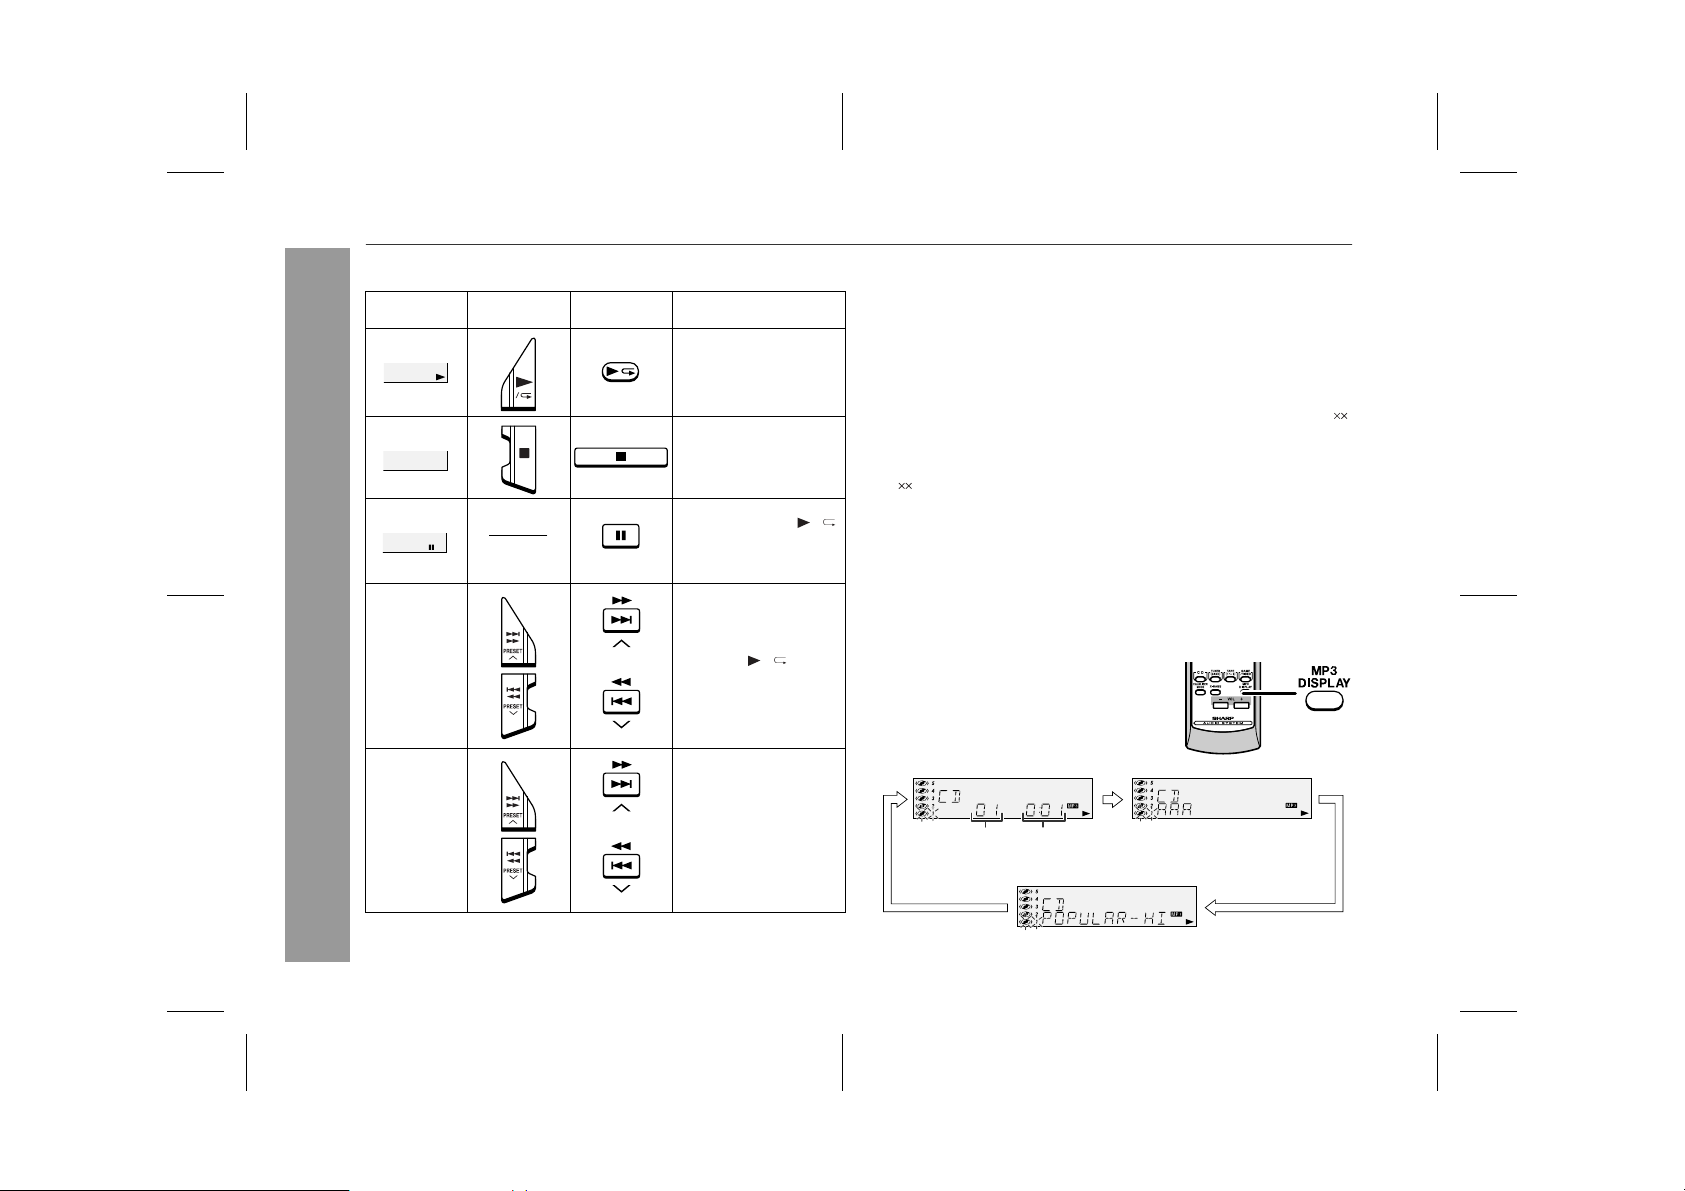
Various disc functions
Function Main unit Remote
Play Press in the stop
Stop Press in the playback
Pause Press in the playback
Track up/
Track down
CD or MP3 disc Playback
Fast forward/Fast
reverse
control
Operation
mode.
mode.
mode. Press the /
button to resume playback from the paused
point.
Press in the playback
or stop mode.
If you press the button
in the stop mode,
press the / button
to start the desired
track.
Press and hold down
in the playback mode.
Release the button to
resume playback.
Notes:
"
Track up/track down is possible only within individual discs.
"
The sound is heard during fast forward/fast reverse with a CD,
but not with an MP3 disc. For fast forwar d or fast reverse of an
MP3 disc, refer to playback time on the display.
Notes for CD:
"
Fast forward/fast reverse is possible only within individual discs.
"
When the end of the last track is reached during fast forward, "
END" will appear on the display and CD operation will be paused.
When the beginning of the first track is reached during fast reverse, the unit will enter the playback mode.
( : Last track number)
Notes for MP3 discs:
"
Fast forward/fast reverse is possible only within individual tracks.
"
When the end of the track is reached during fast forward, the next
track will be played. Playback of the track will begin when its
beginning is reached during fast reverse.
!
To change the display (MP3 discs only)
Whilst a disc is playing, press the MP3 DISPLAY button.
Each time the button is pressed, the display
will change as follows.
Track number
Elapsed
playback time
Folder name
16
File name
04/3/5 CD-MPS660E(E)2.fm
TINSEA026AWZZ
Page 17
Advanced CD or MP3 disc playback
CD-MPS660E
!
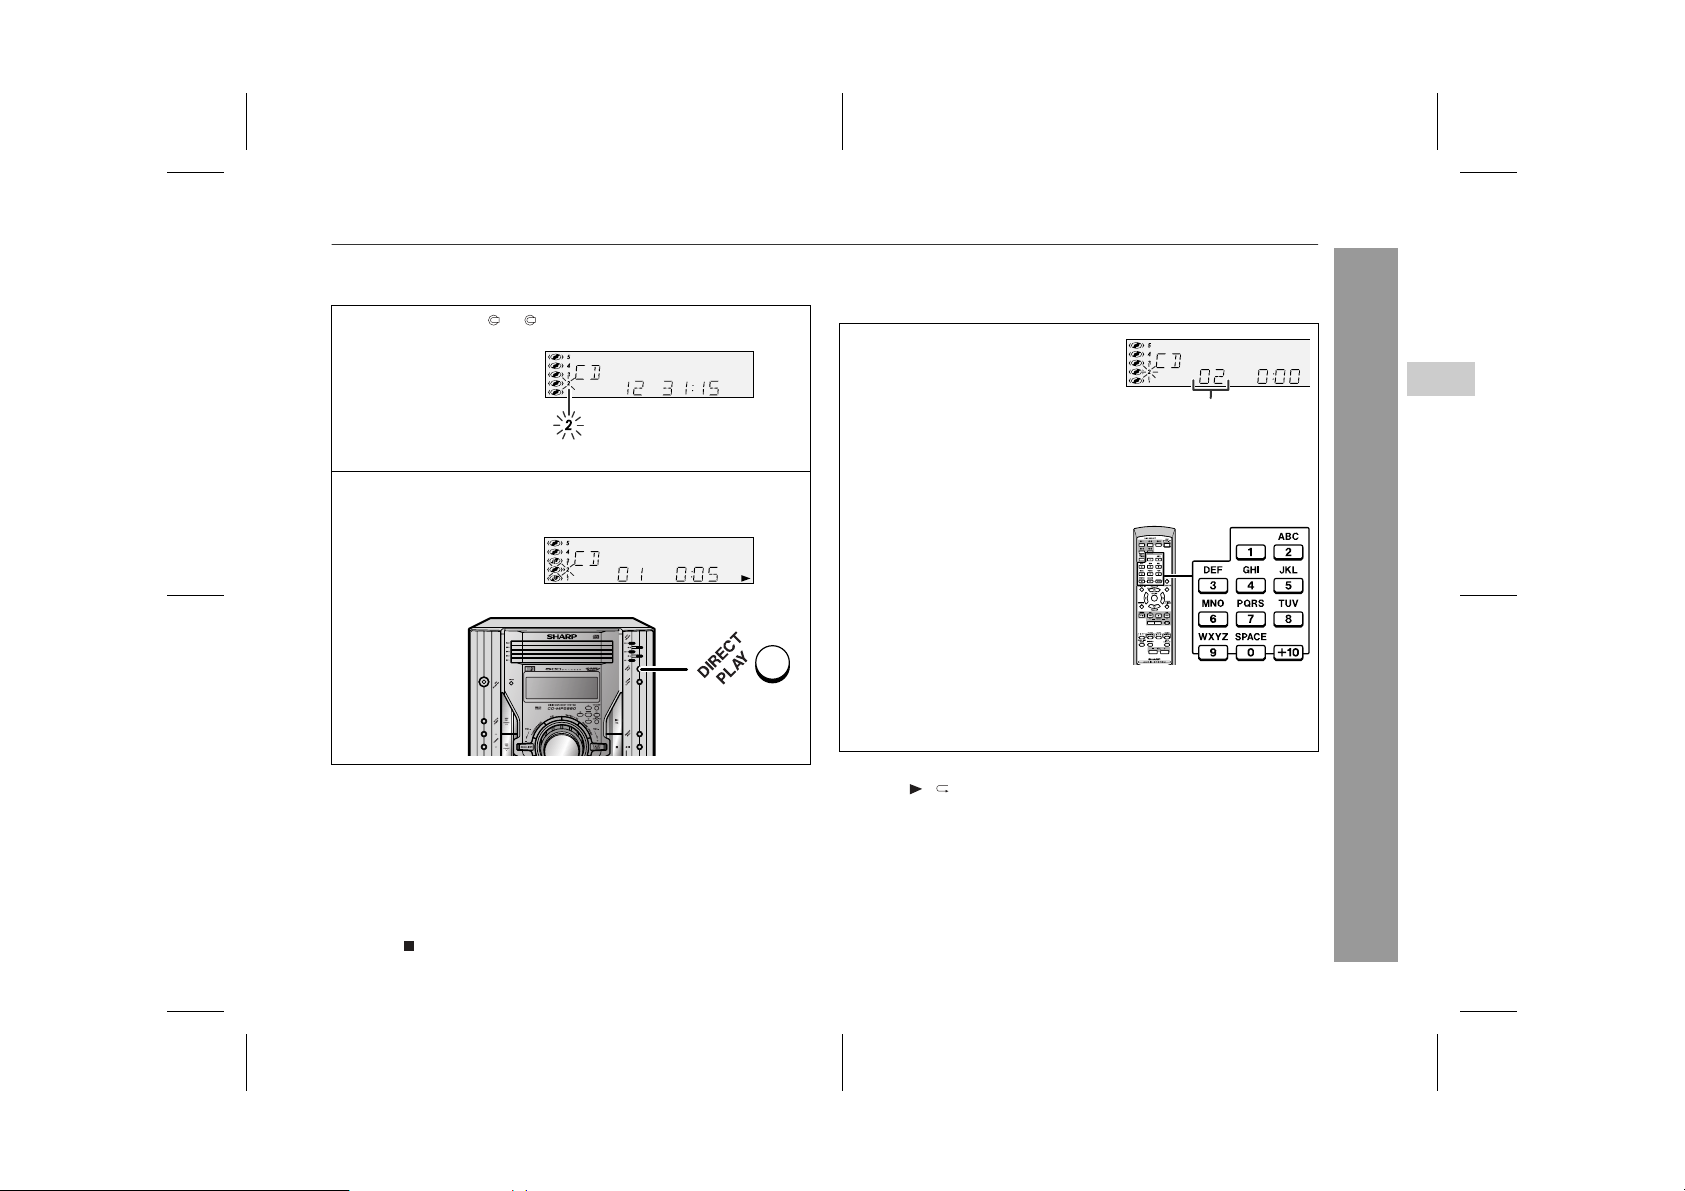
To specify a disc to play
You can play a disc by specifying the disc number.
1
Press one of the 1 - 5 buttons to select the desired disc.
Selected disc number
2
Within 5 seconds, press the DIRECT PLAY button on the
main unit.
"
Playback will begin from track 1 on the chosen disc.
"
After the last track on the chosen disc is played, the unit stops
automatically.
Note:
If a disc tray with no disc is selected, playback will not start and the
disc indicator will go out.
!
Direct track search
By using the direct search buttons, the desired tracks on the current
disc can be played.
Use the direct search buttons on
the remote control to select the desired track whilst playing the selected disc.
Selected track number
"
The direct search buttons allow you to select up to number 9.
"
When selecting number 10 or higher, use the "+10" button.
A. For example, to choose 13
1 Press the "+10" button once.
2 Press the "3" button.
B. For example, to choose 30
1 Press the "+10" button three times.
2 Press the "0" button.
If the direct search buttons are pressed whilst the disc is stopped,
press the / button to start the desired track on the current disc.
Notes:
"
A track number higher than the number of tracks on the disc cannot be selected.
"
During random play, direct search is not possible.
4
CD or MP3 disc Playback
To stop playback:
Press the button.
04/3/5 CD-MPS660E(E)2.fm
17
TINSEA026AWZZ
Page 18
CD-MPS660E
Advanced CD or MP3 disc playback (continued)
18
!
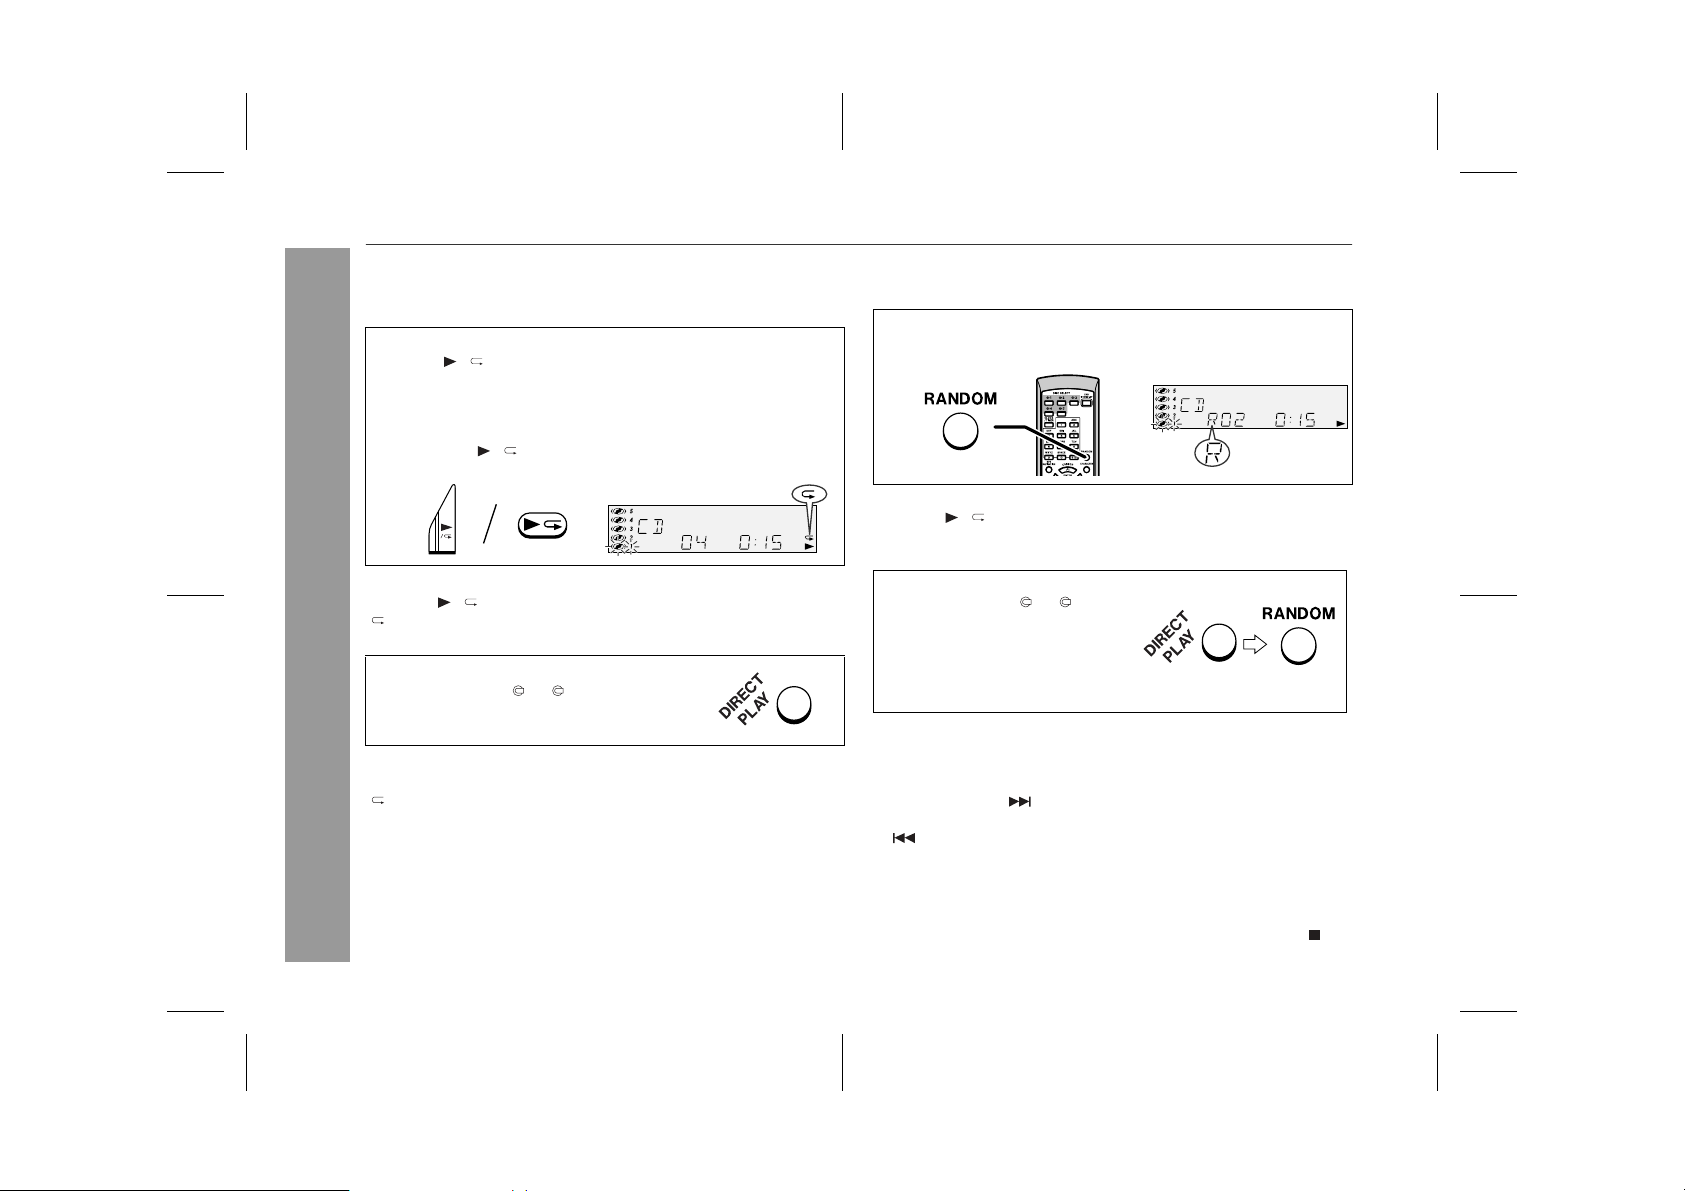
Repeat play
Repeat play can play all 5 discs, al l tracks on a chosen disc, or a
programmed sequence continuously.
To repeat all tracks on up to 5 discs:
Press the / button twice.
To repeat desired tracks:
Perform steps 1 - 6 in "Programmed play" section on page 19 and
then press the / button twice.
To cancel repeat play:
Press the / button again.
" " will go out.
To repeat all tracks on the chosen disc:
1 Press one of the 1 - 5 buttons.
2 Within 5 seconds, press the DIRECT PLAY
CD or MP3 disc Playback
button twice.
To cancel repeat play:
Press the DIRECT PLAY button again.
" " will go out.
!
Random play
The tracks on the disc(s) can be played in random or der automat ical ly.
To random play all tracks on up to 5 discs:
Press the RANDOM button on the remote control.
To cancel random play:
Press the / button.
"R" will go out.
To random play all tracks on the chosen disc:
1 Press one of the 1 - 5 but-
tons.
2 Within 5 seconds, press the DI-
RECT PLAY button.
3 Press the RANDOM button on
the remote control.
To cancel random play:
Press the DIRECT PLAY button.
"R" will go out.
Notes:
"
If you press the button during random play, you can move to
the next track by the random operation. On the other hand, the
button does not allow you to move to the prev ious tr ack. The
beginning of the track being played will be located.
"
In random play, the unit will select and play tracks automatically.
(You cannot select the order of the tracks.)
Caution:
After performing repeat or random play, be sure to press the button. Otherwise, the disc(s) will play continuously.
04/3/5 CD-MPS660E(E)2.fm
TINSEA026AWZZ
Page 19
CD-MPS660E
!
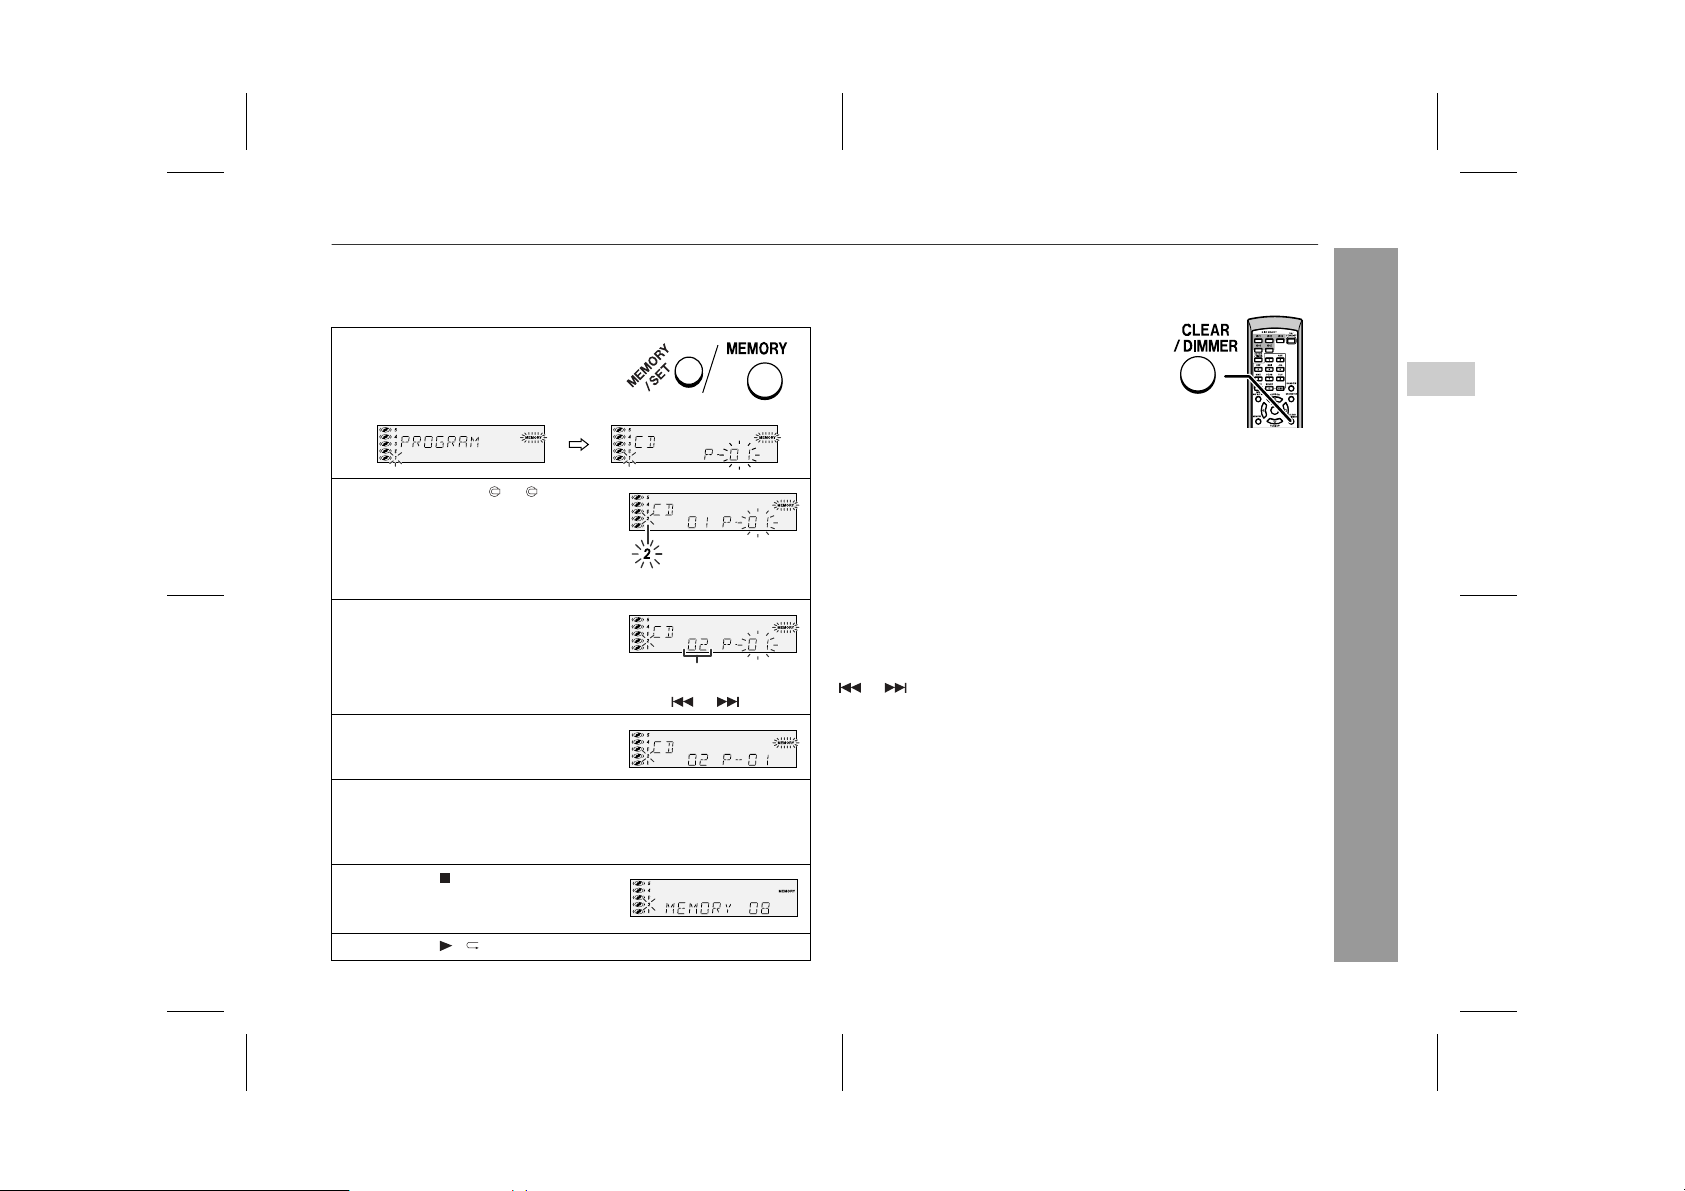
Programmed play
You can choose up to 32 selections for playback in the order you
like.
1
Whilst in the stop mode, press
the MEMORY/SET (MEMORY)
button to enter the programming
save mode.
2
Press one of the 1 - 5 buttons
to select the desired disc.
Selected disc number
3
Press the direct search buttons
on the remote control to select
the desired track.
Selected track number
You can also select a track by pressing the or button.
4
Press the MEMORY/SET (MEMORY) button to save the track
number.
5
Repeat steps 2 - 4 for other tracks. Up to 32 tracks can be
programmed.
If you make a mistake, the programmed tracks can be cleared
by pressing the CLEAR/DIMMER button.
6
Press the button.
The total number of memo ry will appear.
7
Press the / button to start playback.
To clear the programmed selections:
Press the CLEAR/DIMMER button on the remote control whilst the "MEMORY" indicator
is flashing.
Each time the button is pressed, one track will
be cleared, beginning with the last track programmed.
To cancel the programmed play mode:
Whilst in the stop mode and the "MEMORY" indicator is lit, press the
CLEAR/DIMMER button on the remote control. The "MEMORY"
indicator will disappear and all the programmed contents will be
cleared.
Adding tracks to the programme:
If a programme has been previously stored, the "MEMORY" indicator will be displayed. Then follow steps 1 - 6 to add tracks. The new
tracks will be stored after the last track of the original programme.
To check which tracks are programmed:
Whilst the unit is stopped in the programmed p lay mode, press the
or button.
Notes:
"
When a disc with programmed tr acks is ejected, t he programme
is automatically cancelled.
"
Even if you press the ON/STAND-BY button to enter the stand-by
mode or change the function from CD to another, the programmed selections w ill no t be cle ar ed.
"
During the programme operation, random play is not possible.
"
During programmed play, the DIRECT PLAY button will not work.
4
CD or MP3 disc Playback
19
04/3/5 CD-MPS660E(E)2.fm
TINSEA026AWZZ
Page 20
CD-MPS660E
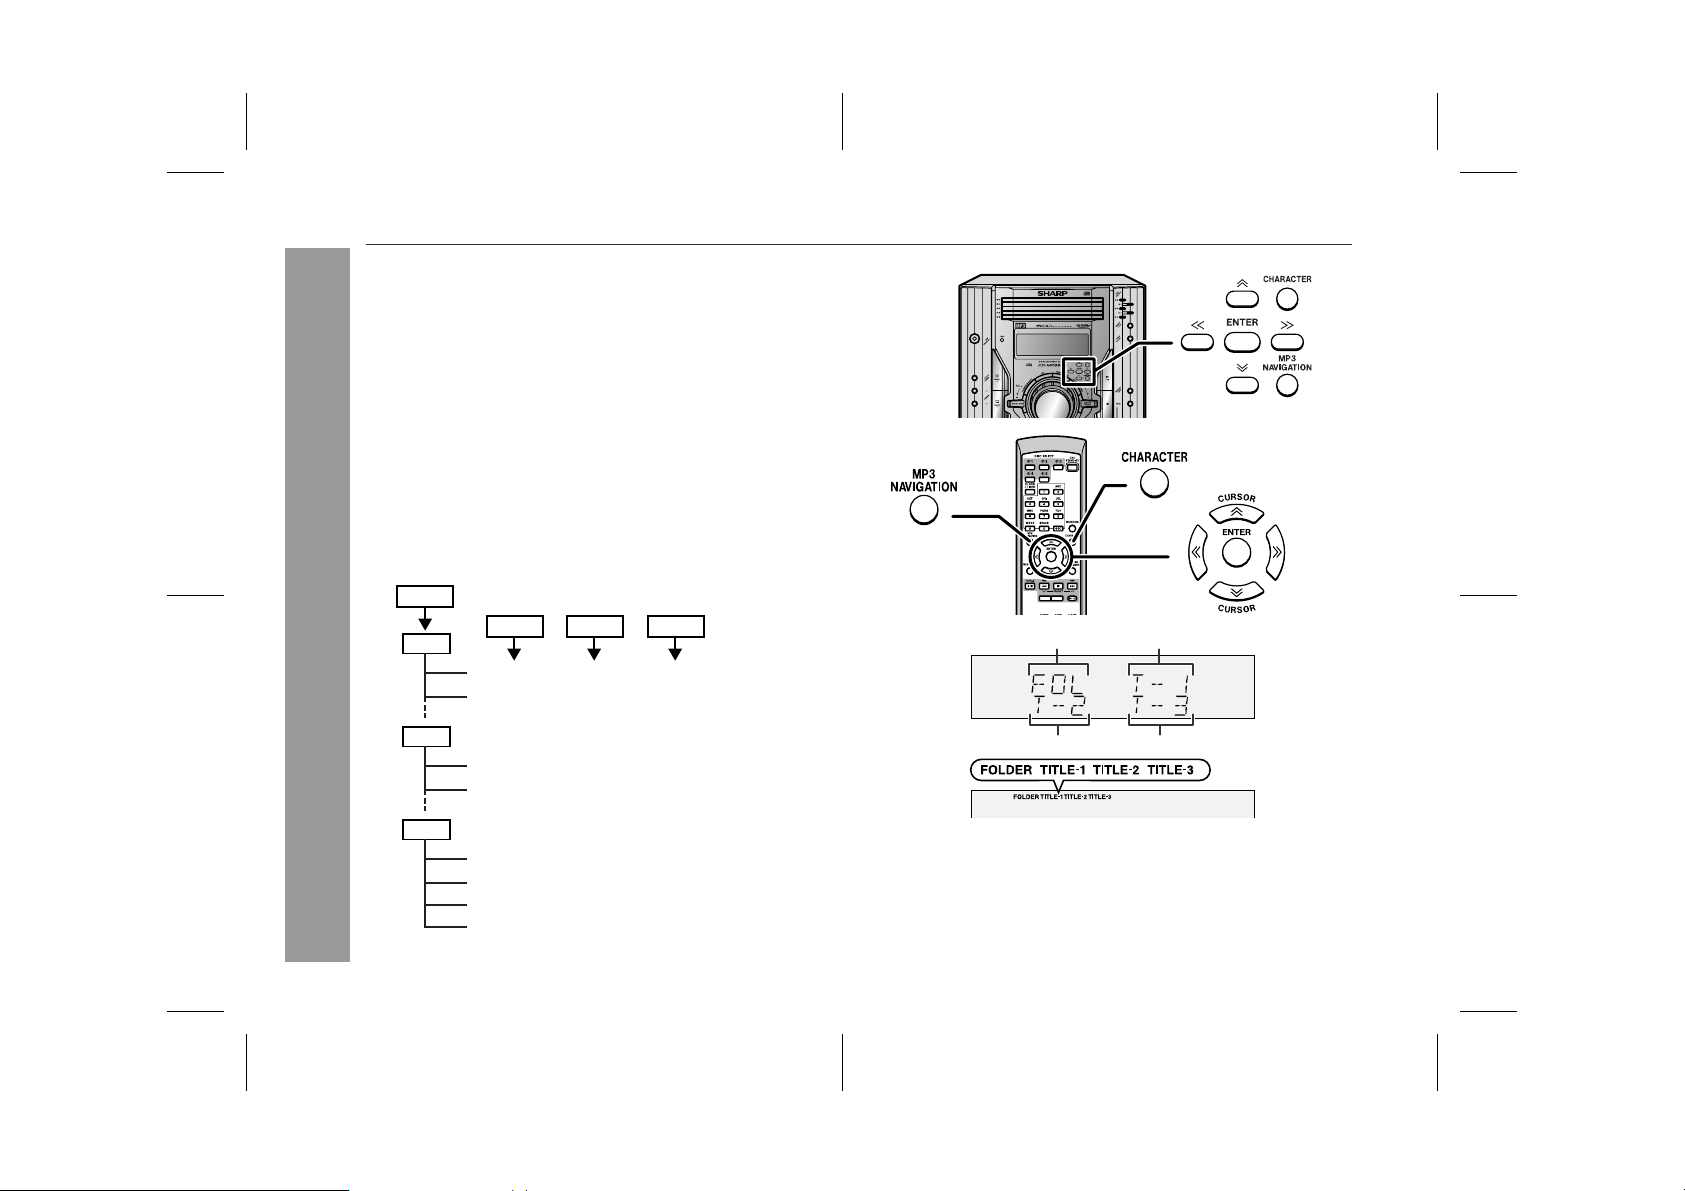
MP3 navigation (only for MP3 files)
MP3 navigation:
You can search and play fi les by folder o r title. For example, whe n
you assign three titles to a file, ent er gen re (such as jazz ) as tit le 1,
album name as title 2, and music title as ti tle 3 to search the file by
any title.
"
You can search and play files by folder or title 1/2/3 within one
MP3 disc (see page 21).
"
By entering a name, you can search fil es by folder or title 1/2/3
within one MP3 disc (see page 22).
"
Folders or titles can be programmed within one MP3 disc (see
page 23).
When you enter file names on your PC, connect words with
hyphens. This product recognises the first word as title 1, second
one as title 2, and third one as t itl e 3. Up to three words can be recognised.
Example:
Folder
Title 1 Title 2 Title 3
AAA
(POPULAR-HITS 1-A MUSIC.mp3)
(POPULAR-HITS 2-B MUSIC.mp3)
(File name)
Folder Title 1
20
CD or MP3 disc Playback
BBB
CCC
(JAZZ-HITS 1-A MUSIC.mp3)
(JAZZ-HITS 2-B MUSIC.mp3)
(ROCK-HITS 1-A MUSIC.mp3)
(ROCK-HITS 2-B MUSIC.mp3)
(ROCK-HITS 3-C MUSIC.mp3)
(ROCK-HITS 4-D MUSIC.mp3)
Notes:
"
MP3 files must have the extension ".mp3".
"
Up to 100 folders or 300 files can be read on the unit. If either
limit is exceeded, no more folders/files are displayed.
"
This unit recognises and displays up to 48 characters for folder
names, and up to 32 characters for title 1/2/3.
"
All file/folder names appear in uppercase.
04/3/5 CD-MPS660E(E)2.fm
Title 2 Title 3
TINSEA026AWZZ
Page 21
CD-MPS660E
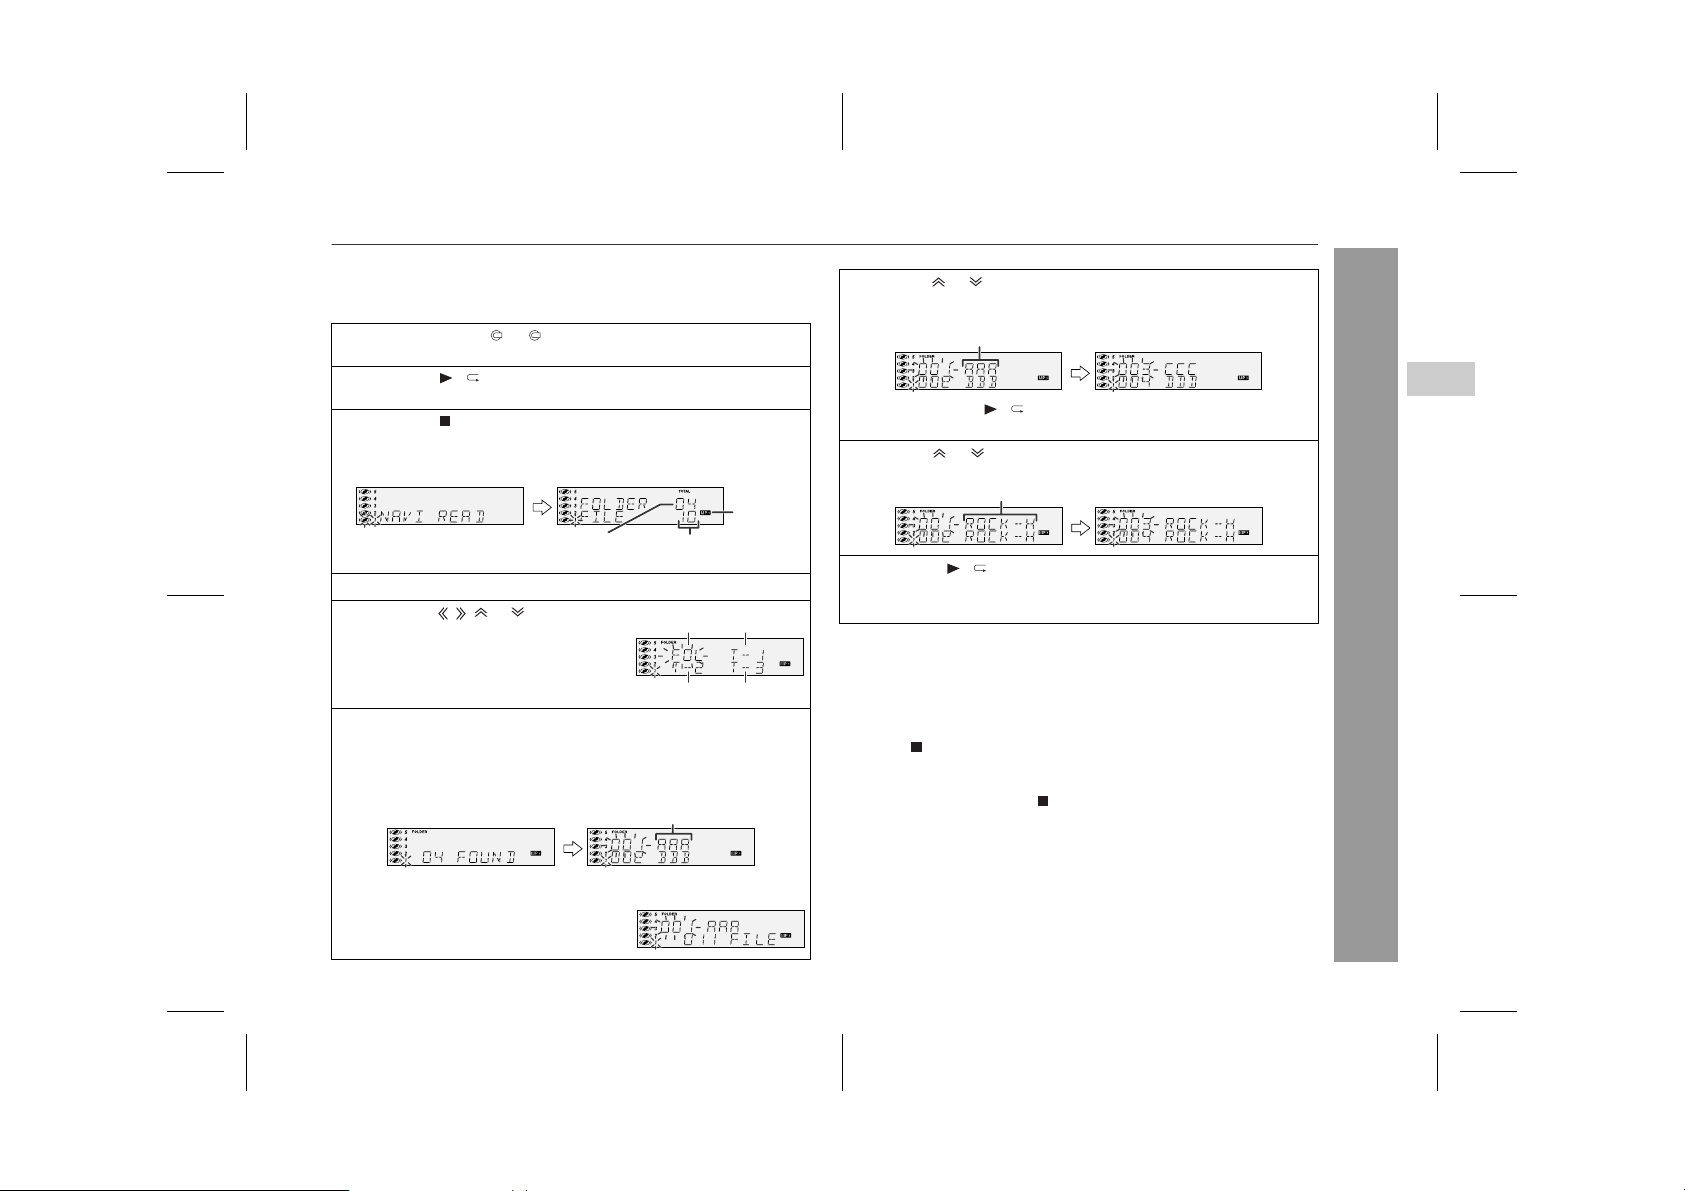
! File search (by folder or title 1/2/3)
You can search and play files by folder or title 1/2/3 within one MP3
disc.
1
Press one of the 1 - 5 buttons to select a disc tray containing an MP3 disc.
2
Press the / button, and the unit starts to read the MP3
disc.
3
Press the button to stop playback.
"NAVI READ" appears and the display shows the total number
of folders and files on the selected disc.
MP3 disc
indicator
Total number
of folders
4
Press the MP3 NAVIGATION button.
5
Press the , , or button to select "FOL", "T-1", "T-2" or "T-3".
To search files by folder name, se-
lect "FOL" (will flash).
The following steps describe file search by folder:
6
Press the ENTER button.
The total number of folders (or titles) appears for 2 seconds,
and names of the first 2 folders (or titles) are displayed.
The MP3 NAVIGATION button allows you to go one step back.
"
Press the MP3 DISPLAY button to
"
check the number of files.
Total number
of files
Folder Title 1
Title 2 Title 3
Folder name
7
Use the or button to scroll and select a folder (or title),
and then press the ENTER button.
Folder name
If you press the / button instead of the ENTER button, all
files in the selected folder (or title) are played.
8
Use the or button to scroll and select a file.
File name
9
Press the / button to start playback.
The unit plays from the selected file to the last file in the selected folder (or title), and the previous display returns.
File search by title 1/2/3:
In step 5, select "T-1", "T-2" or "T-3" and follow the same st eps
"
as file search by folder.
The unit searches all files on the disc, regardless of the folder.
"
To stop playback:
Press the button.
To exit the MP3 navigation mode:
In the stop mode, press the button.
Notes:
In the MP3 navigation mode, direct play and direct search func-
"
tions are disabled.
If a folder, title or file name does not appear, or appears incor-
"
rectly, remove and reinsert the disc and try again.
If you press the RANDOM button in the stop mode, the MP3 nav-
"
igation mode will be cancelled.
4
CD or MP3 disc Playback
21
04/3/5 CD-MPS660E(E)3.fm
TINSEA026AWZZ
Page 22

CD-MPS660E
MP3 navigation (only for MP3 files) (continued)
22
! Character search (for folder or title 1/2/3)
By entering a name, you can search files by folder or title 1/2/3
within one MP3 disc.
1
Perform steps 1 - 3 in "File search (by folder or title 1/2/3)"
on page 21.
2
Press the MP3 NAVIGATION button.
3
Press the , , or button to select "FOL", "T-1", "T-2" or "T-3".
To search files by folder name, select "FOL" (will fl a sh ) .
4
Press the CHARACTER button for 2 seconds.
The display will be ready for editing characters.
1st row: String table
2nd row: Input editor (8 digits)
5
Press the or button to select the desired alphabet.
Press the or button to go to the next page of character
display.
6
Press the CHARACTER button and the active character will
be entered in the 2nd row of the display.
Folder Title 1
Title 2 Title 3
CD or MP3 disc Playback
To delete an entered character, move the cursor to the character with the or button and press the CLEAR/DIMMER button on the remote control.
7
Repeat steps 5 and 6 to enter characters.
In the folder (or title) name search, you do not have to enter the
full name. The unit searches for names beginning with the entered characters.
8
When finished, press the ENTER button. The unit searches
for the same name within folders (or titles).
If the search word is not in the folder (or title) name, "NOT
FOUND" appears and the menu returns.
9
Use the or button to scroll and select a folder (or title).
10
Press the / button to start playback.
All files in the selected folder (or title) are played, and the previous display returns.
To exit the MP3 navigation mode:
In the stop mode, press the button.
Notes:
The unit searches regardless of the case, and found names
"
appear in uppercase.
Some symbols do not appear properly.
"
Character entry with direct buttons:
The direct buttons on the remote
control can also be used for character entry.
In step 5 on the left, use buttons 0 9 to enter alphabets.
Alphabet types change as you press
a button.
For example, press "2" four times to enter "C".
2 A B C
Characters:
1 2 ABC 3 DEF 4 GHI 5 JKL 6 MNO
: indicates a space.
7 PQRS
8 TUV
9 WXYZ
0
04/3/5 CD-MPS660E(E)3.fm
TINSEA026AWZZ
Page 23
CD-MPS660E
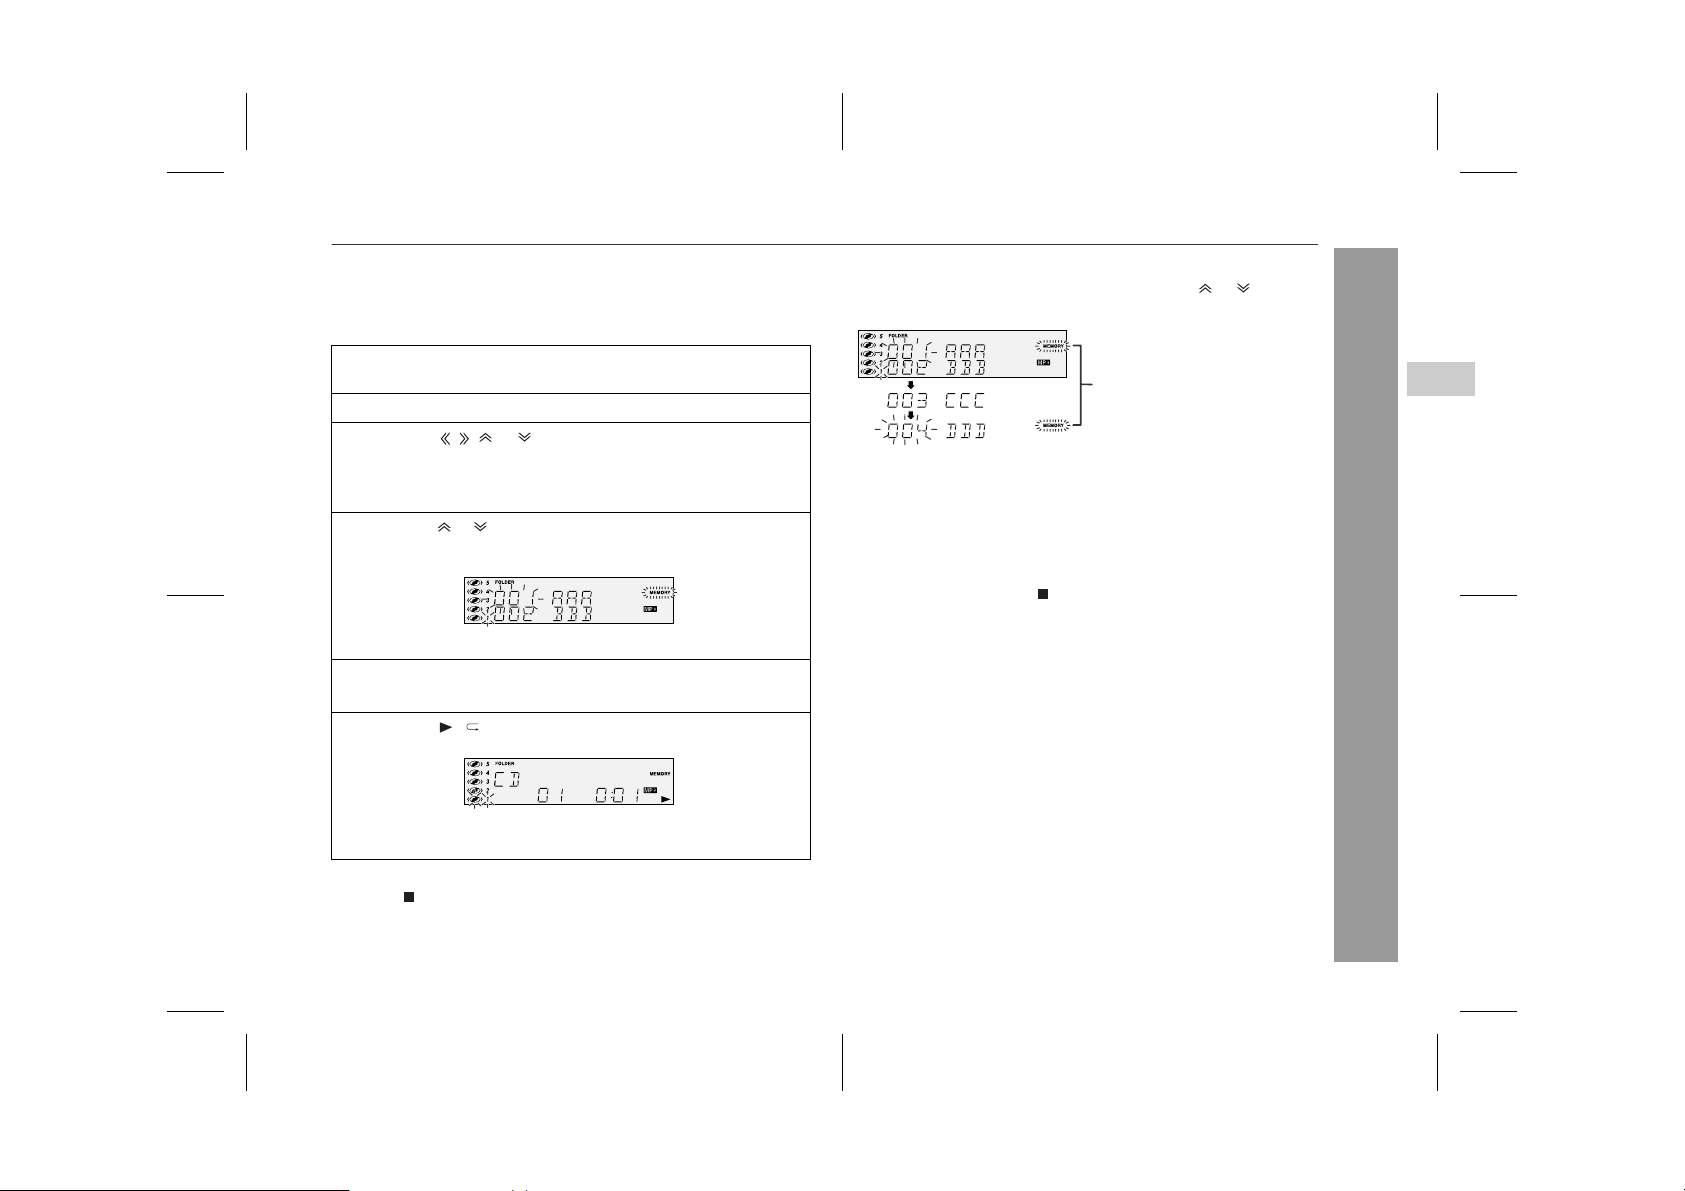
! Programmed play (for folder, title 1/2/3)
Folders or titles can be programmed within one MP3 disc.
Folder, title 1, title 2 and title 3 cannot be programmed together
simultaneously.
1
Perform steps 1 - 3 in "File search (by folder or title 1/2/3)"
on page 21.
2
Press the MP3 NAVIGATION button.
3
Press the , , or button to select "FOL", "T-1", "T-2"
or "T-3" and then press the ENTER button.
The total number of folders (or titles) appears for 2 seconds,
and names of the first 2 folders (or titles) are displayed.
4
Press the or button to select the desired folder (or title)
and then press the MEMORY button.
The folder (or title) is memorised with all the files.
5
Repeat step 4 for other folders (or titles).
Up to 10 folders (or 10 titles) can be programmed.
6
Press the / button to start playback.
Programmed play will always start from the smallest folder (or
title) number.
To stop playback:
Press the button.
The programmed contents are not cleared.
"
To check, add or delete programmed contents:
In the stop mode, select a folder (or title) with th e or button. If
the folder (or title) is programmed, "MEMORY" flashes.
Flashes if the folder (or title)
is programmed
When you press the MEMORY button with "MEMORY" flas hing,
"
the folder (or title) is removed from the programme.
If you press the MEMORY button with "MEMORY" off, the f older
"
(or title) is added to the programme.
To clear all programmes, press the CLEAR/DIMMER button in
"
the stop mode.
To exit the MP3 navigation mode:
In the stop mode, press the button.
The programmed contents are cleared.
"
Notes:
The programmed contents are cleared when you eject a disc,
"
play another disc, switch the function, or enter the stand-by mode
with the ON/STAND-BY button.
During programmed play, the DIRECT PLAY button on the main
"
unit will not work.
If you press the RANDOM button in the stop mode, the MP3 nav-
"
igation mode will be cancelled.
If tracks are programmed using track numbers (see "Programmed play" on page 19):
In the MP3 navigation mode, only programmes by folder (or title)
name are played. When you exit the mode, the programmes by
folder (or title) name are cleared.
Even when you exit the MP3 navigation mode, programmes by track
number are retained, and you can play tracks according to the numbers.
(Programmes by track number are c leared when you remove the
disc.)
4
CD or MP3 disc Playback
23
04/3/5 CD-MPS660E(E)3.fm
TINSEA026AWZZ
Page 24
CD-MPS660E
Radio
Listening to the radio
Auto power on function:
When you press any of the following buttons, the unit turns on.
TUNER (BAND) button (main unit and remote control): The unit
"
turns on and the "TUNER" function is activated.
/ button (main unit and remote control): The unit turns on
"
and playback of the last function starts (CD/TAPE/TUNER/
GAME).
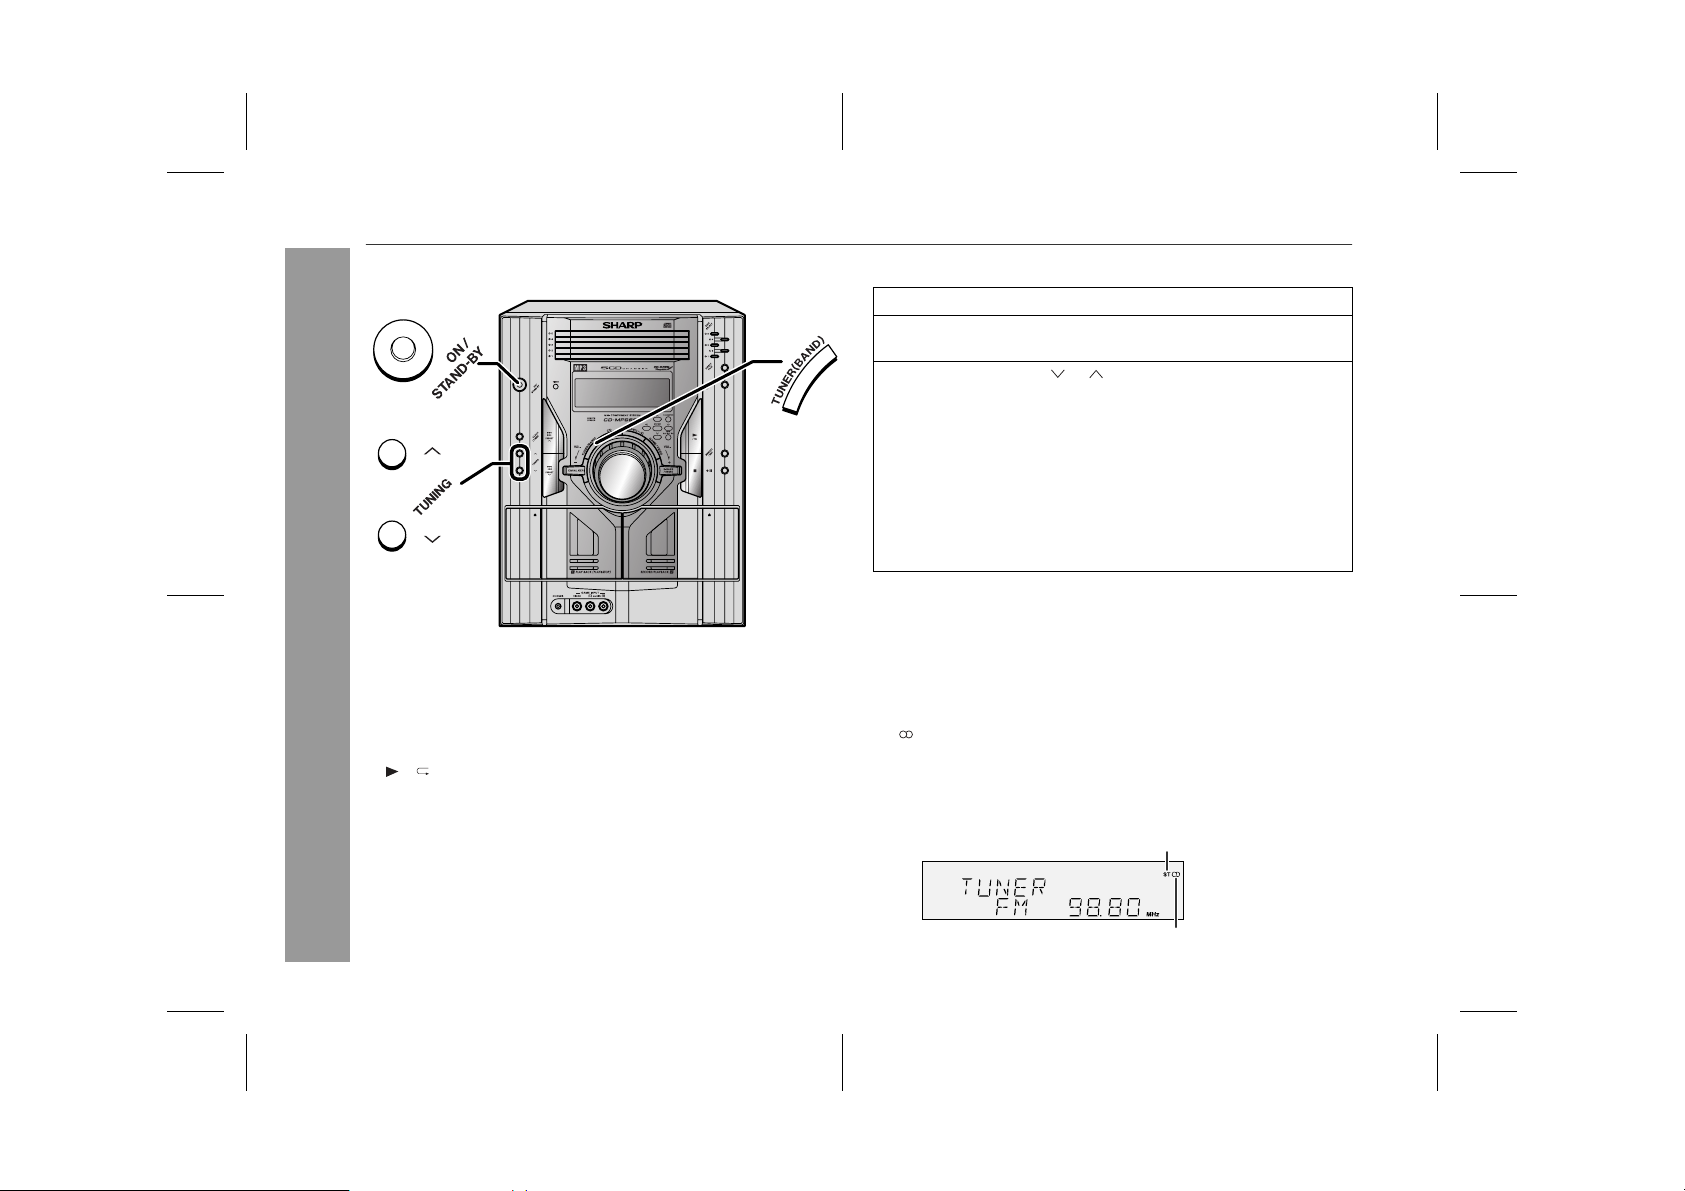
! Tuning
1
Press the ON/STAND-BY button to turn the power on.
2
Press the TUNER (BAND) button repeatedly to select the
desired frequency band (FM or AM).
3
Press the TUNING ( or ) button to tune in to the desired
station.
Manual tuning:
Press the TUNING button as many times as required to tune in
to the desired station.
Auto tuning:
When the TUNING button is pressed for more than 0.5 seconds, scanning will start automatically and the tuner will stop at
the first receivable broadcast station.
Notes:
When radio interference occurs, auto scan tuning may stop auto-
"
matically at that point.
Auto scan tuning will skip w e a k si gn al stat io n s .
"
To stop the auto tuning, press the TUNING button again.
"
To receive an FM stereo transmission:
Press the TUNER (BAND) button to display the "ST" indicator.
" " will appear when an FM broadcast is in stereo.
"
If the FM reception is weak, press the TUNER (BAND) button to
"
extinguish the "ST" indicator. The reception changes to monaural, and the sound becomes clearer.
FM stereo mode indicator
24
FM stereo receiving indicator
04/3/5 CD-MPS660E(E)3.fm
TINSEA026AWZZ
Page 25
CD-MPS660E
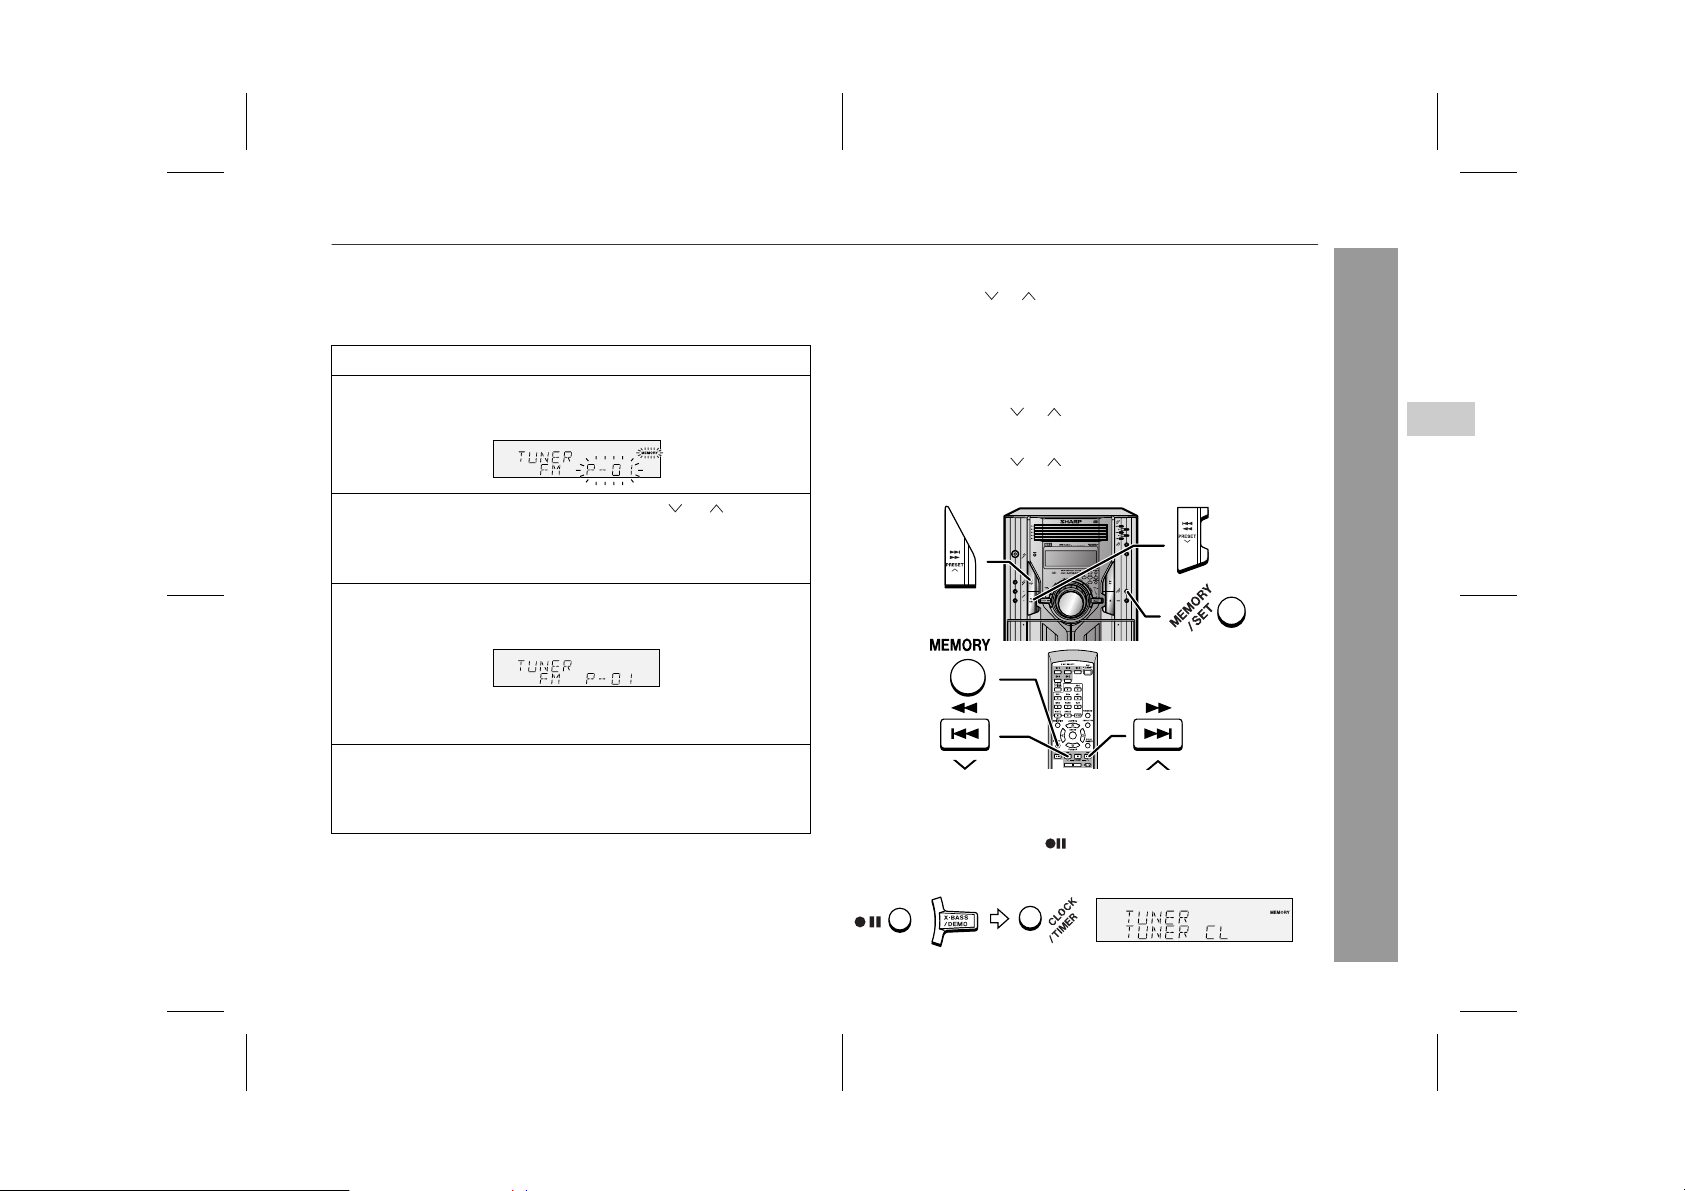
! Memorising a station
You can store 40 AM and FM stations in memory and recall them at
the push of a button. (Preset tuning)
1
Perform steps 1 - 3 in "Tuning" on page 24.
2
Press the MEMORY/SET (MEMORY) button to enter the
preset tuning saving mode.
3
Within 30 seconds, press the PRESET ( or ) button to
select the preset channel number.
Store the stations in memory, in order, starting with preset
channel 1.
4
Within 30 seconds, press the MEMORY/SET (MEMORY)
button to store that station in memory.
If the "MEMORY" and preset number indicators go out before
the station is memorised, repeat the operation from step 2.
5
Repeat steps 1 - 4 to set other stations, or to change a preset station.
When a new station is stored in memory, the station previously
memorised will be erased .
Note:
The backup function protects the memorised stations for a few
hours should there be a power failure or the AC power lead disc onnection.
! To recall a memorised station
Press the PRESET ( or ) button for less than 0.5 seconds to select the desired station.
! To scan the preset stations
The stations saved in memory can b e scanned automa tically. (Preset memory scan)
1 Press the PRESET ( or ) button for more than 0.5 seconds.
The preset number will flash and the programmed stations will be
tuned in sequentially, for 5 seconds each.
2 Press the PRESET ( or ) button again when the desired sta-
tion is located.
To erase entire preset memory
!
1 Press the ON/STAND-BY button to enter the stand-by mode.
2 Whilst pressing down the button and the X-BASS/DEMO but-
ton, press the CLOCK/TIMER button until "TUNER CL" appears.
5
Radio
04/3/5 CD-MPS660E(E)3.fm
25
TINSEA026AWZZ
Page 26
CD-MPS660E
Listening to a cassette tape (TAPE 1 or TAPE 2)
Before playback:
For playback, use normal or low-noise tapes for
"
the best sound. (Metal or CrO tapes are not recommended.)
Do not use C-120 tapes or poor-quality tapes, as
"
they may cause malfunctions.
Before loading a tape into the cassette compartment,
"
tighten the slack with a pen or a pencil.
Tape Playback
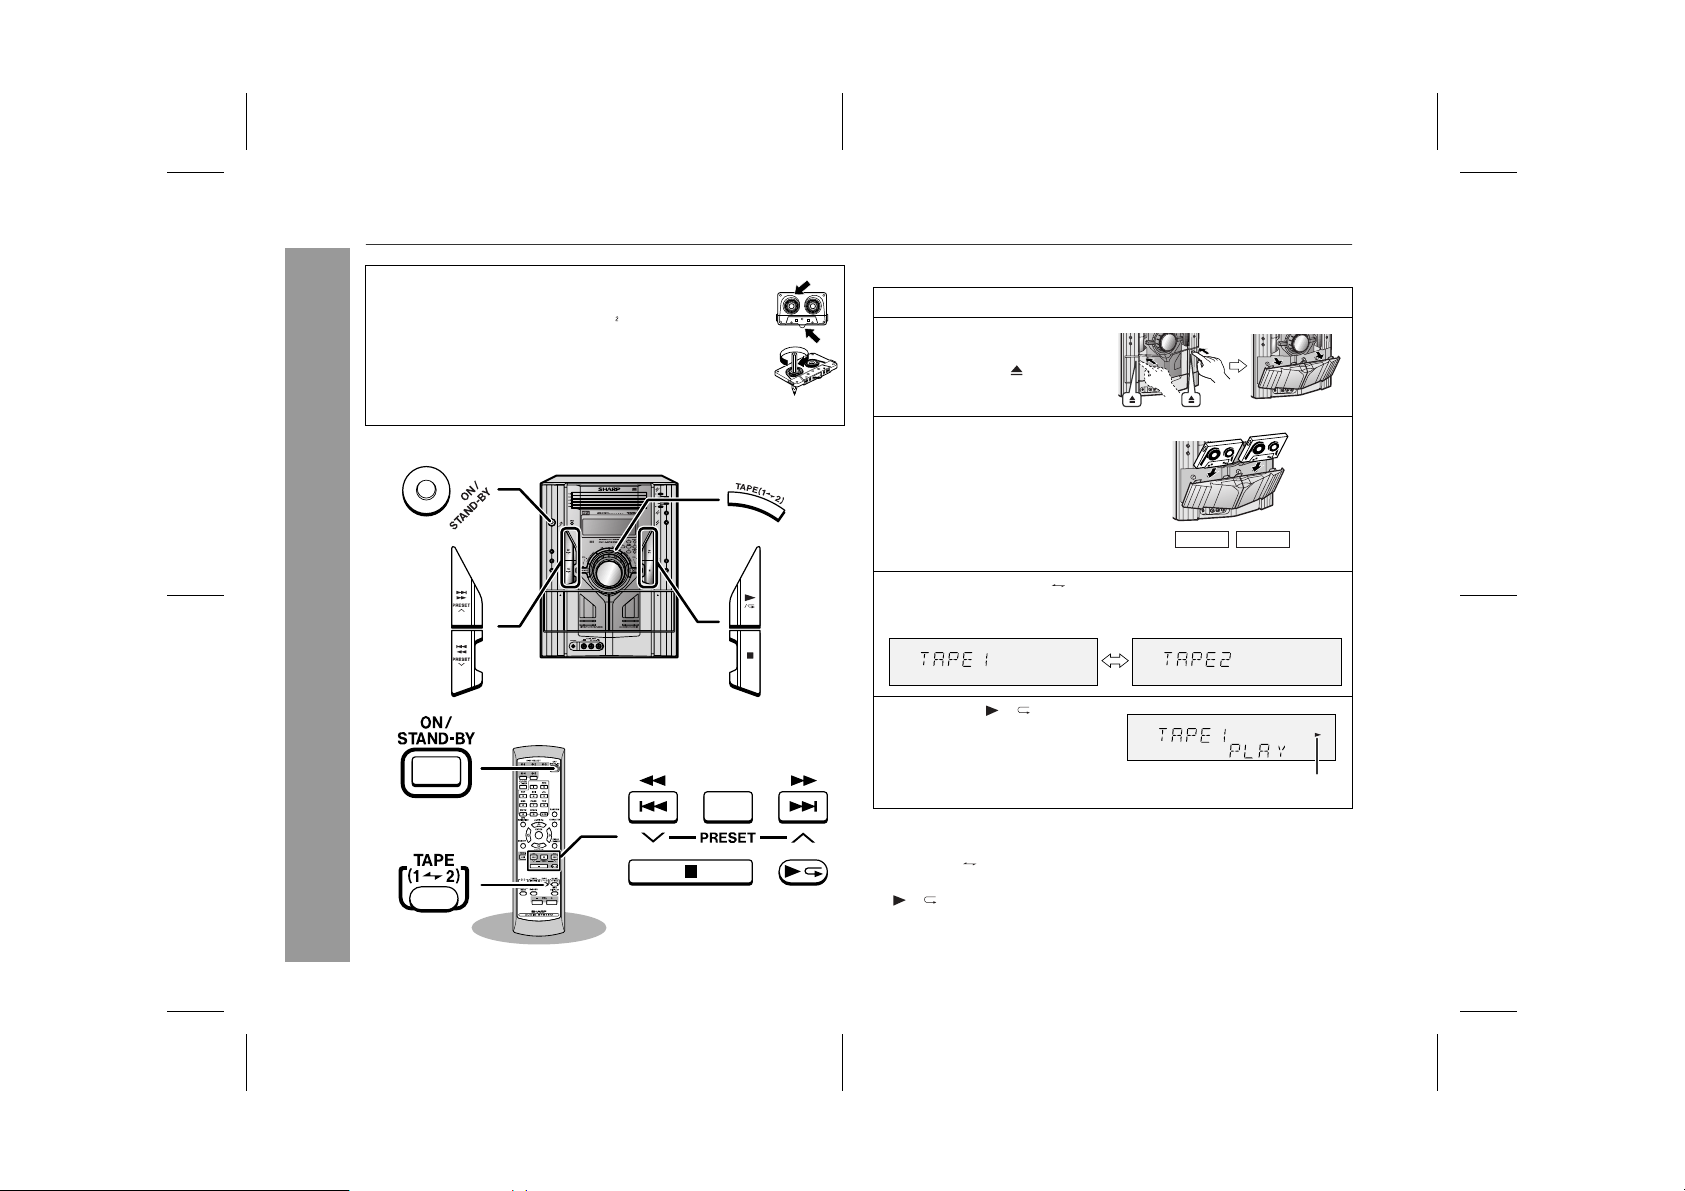
! Tape playback
1
Press the ON/STAND-BY button to turn the power on.
2
Open the cassette compartment by pushing the
area marked " ".
3
Load a cassette into the
TAPE 1 compartment or
TAPE 2 compartment with
the side to be played facing toward you.
TAPE 1 TAPE 2
4
Press the TAPE (1 2) button to select the cassette you
want to listen to.
5
Press the / button to
start playback.
Tape play indicator
Auto power on function:
When you press any of the following buttons, the unit turns on.
TAPE (1 2) button (main unit and remote control): The unit
"
turns on and the "TAPE" function is activated.
/ button (mai n unit and remote control): The unit turns on
"
and playback of the last function starts (CD/TAPE/TUNER/
GAME).
26
04/3/5 CD-MPS660E(E)3.fm
TINSEA026AWZZ
Page 27

Recording on a cassette tape
CD-MPS660E
! Various tape functions
Function Main unit Remote
Play Press in the stop
Stop Press in the playback,
Fast forward/Fast
rewind
(TAPE 2
only)
Caution:
To remove the cassette, press t he button, and then open the
"
compartment.
Before changing from one tape operat i on to another, press the
"
button.
If a power failure occurs during tape operation, the tape head will
"
remain engaged with the tape and the cassette door will not
open. In this case, wait until the power is restored.
control
Operation
mode.
fast forward or fast rewind mode.
Press in the playback
or stop mode.
Before recording:
When recording important selections, make a preliminary test to
"
ensure that the desired material is properly recorded.
SHARP is not liable for damage or loss of your recording arising
"
from malfunction of this unit.
The volume and sound controls can be adjusted with no effect
"
on the recorded signal (Variable Sound Monitor).
For recording, use only normal tapes. Do not use metal or
"
CrO tapes.
Erase-prevention tab of cassette tapes:
When recording on a cassette tape, make sure that the erase-
"
prevention tabs are not removed. Cassettes have removable
tabs that prevent accidental recording or erasing.
To protect the recorded sound, remove the tab after recording.
"
Cover the tab hole with adhesive tape to record on the tape without the tab.
Side A
Tab for side B
Tab for side A
6
Tape Recording
04/3/5 CD-MPS660E(E)3.fm
27
TINSEA026AWZZ
Page 28
CD-MPS660E
Tape Recording
Recording on a cassette tape (continued)
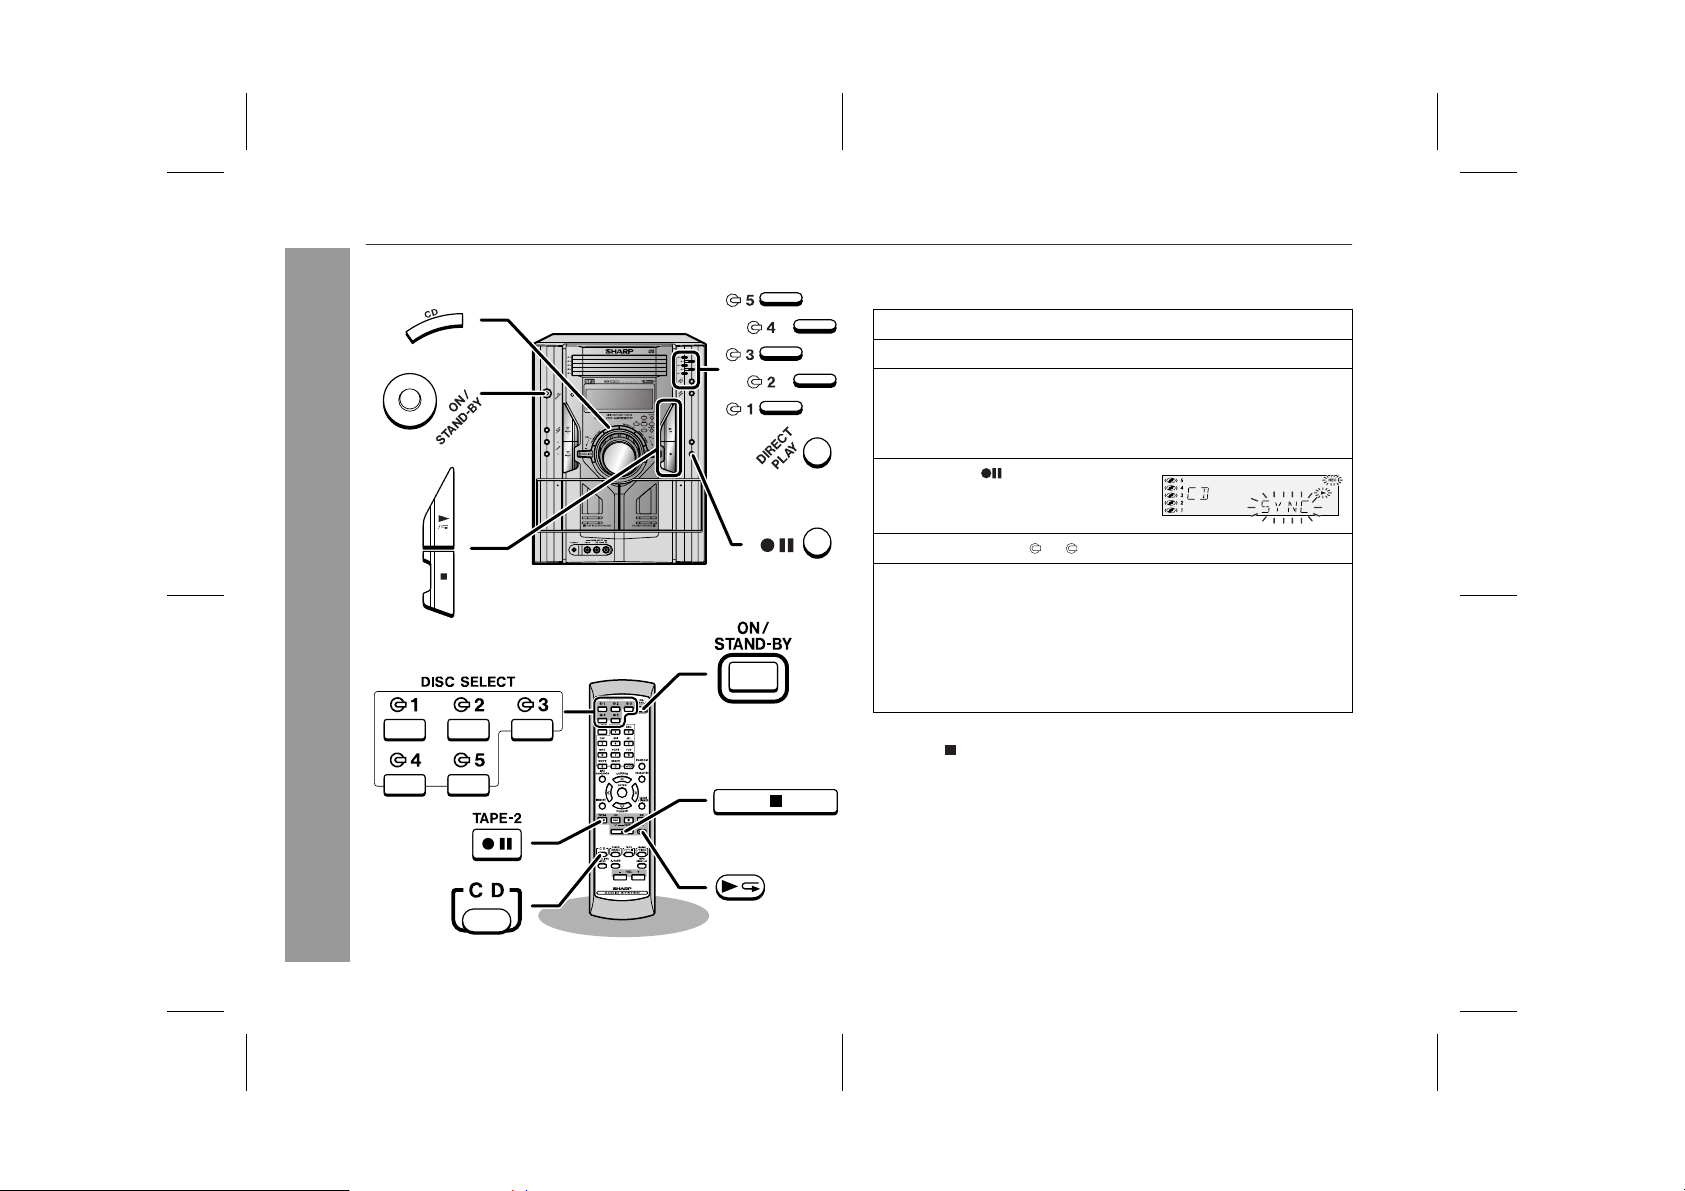
! Recording from a CD or MP3 disc
You can record the desired disc using the DIRECT PLAY button.
1
Press the ON/STAND-BY button to turn the power on.
2
Press the CD button.
3
Load a cassette into the TAPE 2 cassette compartment
with the side to be recorded on facing you.
Wind past the leader of the tape, on which recording cannot be
performed.
4
Press the button.
Recording will be paused.
5
Press one of the 1 - 5 buttons to select the desired disc.
6
Within 5 seconds, press the DIRECT PLAY button to st art
recording.
Recording is started from the selected disc. When the play-
"
back of the last track is finished or the end of the tape is
reached, the disc and the cassette will stop automatically.
Playback of the disc will start approximately 7 seconds after
"
the tape starts.
To stop recording:
Press the button.
The disc and tape will stop.
28
04/3/5 CD-MPS660E(E)3.fm
TINSEA026AWZZ
Page 29
CD-MPS660E
Sequential recording from several discs:
1 Perform steps 1 - 5 in "Recording from a CD or MP3 disc" on page
28.
2 Within 5 seconds, press the / button.
To perform programmed recordi ng:
1 Programme discs and tracks (see pages 19, 23).
2 Press the button.
3 Press the / button.
To stop recording:
Press the button.
The disc and tape will stop.
! Recording from the radio
1
Tune in to the desired station (see page 24).
2
Load a cassette into the TAPE 2 cassette compartment
with the side to be recorded on facing you.
Wind past the leader of the tape, on which recording cannot be
performed.
3
Press the button.
Recording will be paused.
4
Press the / button to start recording.
To interrupt recording:
Press the button.
To resume recording, press the / button.
To stop recording:
Press the button.
Note:
If you hear a whistling noise whilst recording an AM station, move
the AM loop aerial.
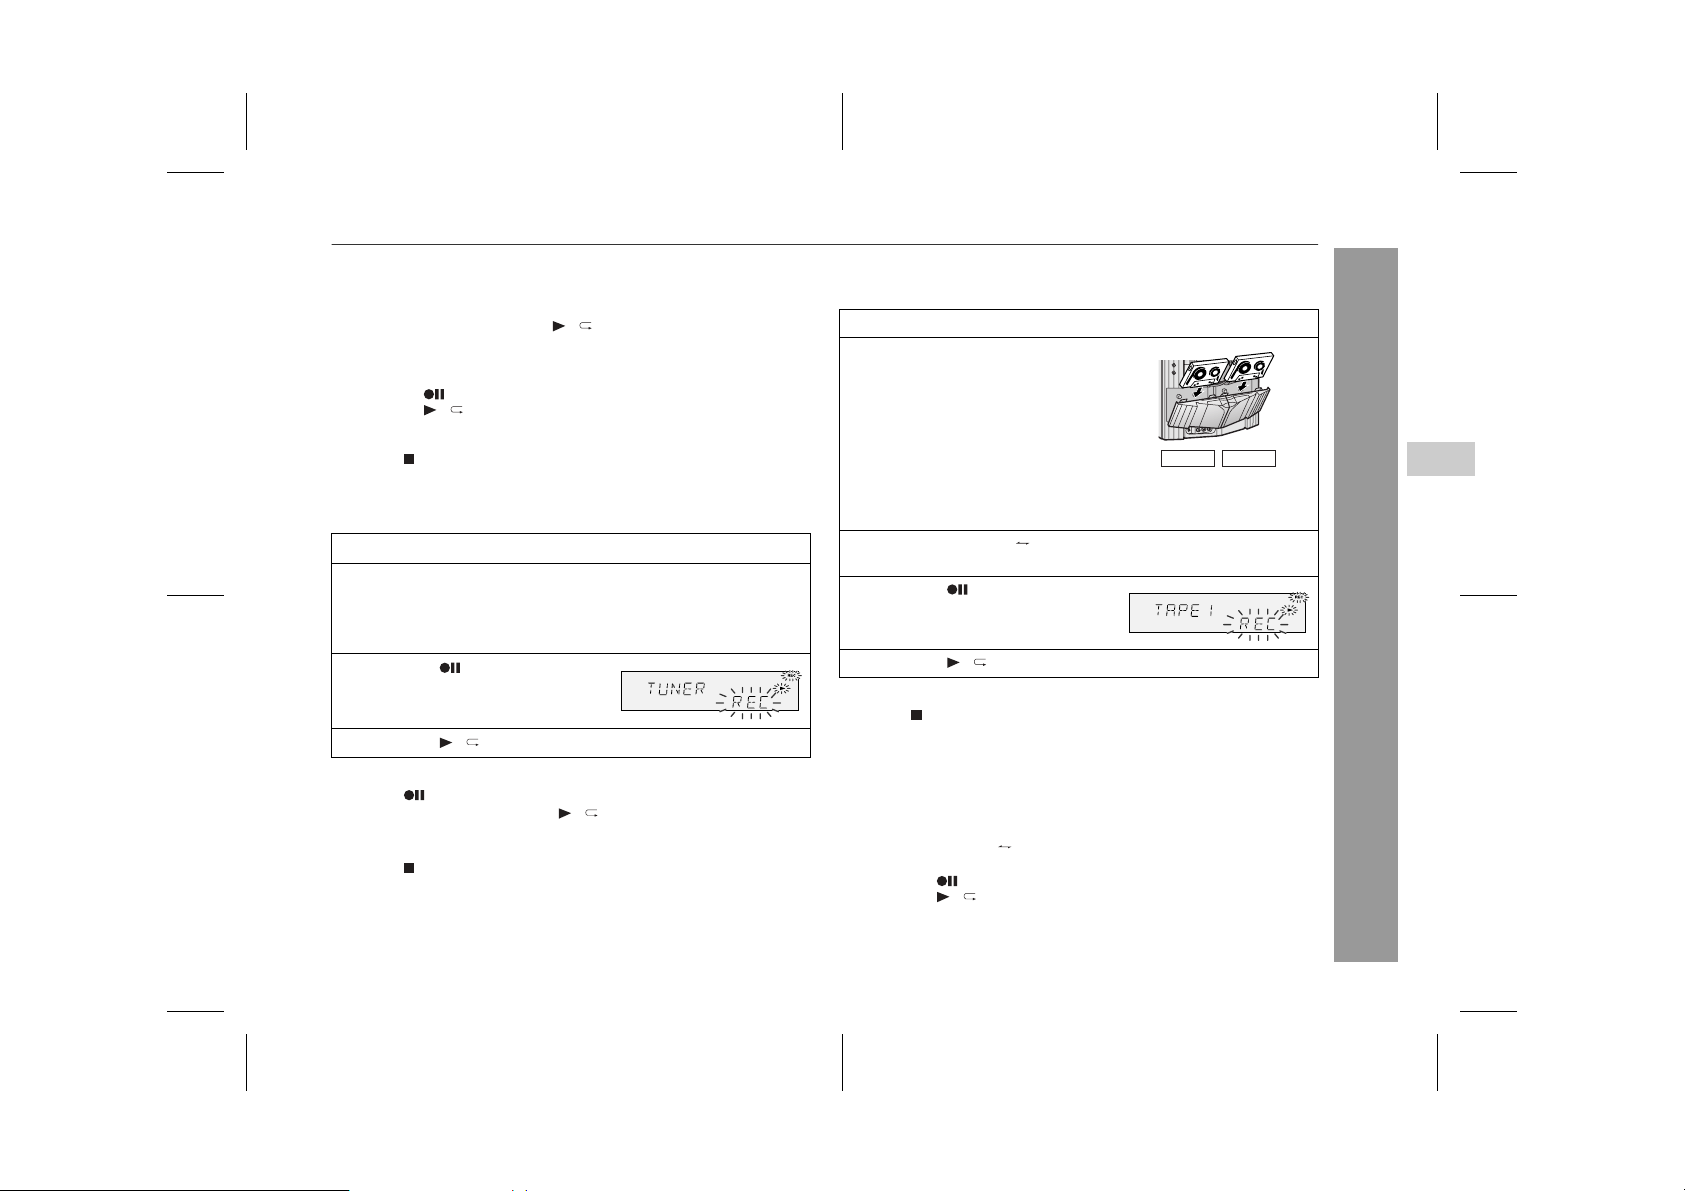
! Dubbing from tape to tape
You can record from TAPE 1 to TAPE 2.
1
Press the ON/STAND-BY button to turn the power on.
2
Load a prerecorded cassette
into the TAPE 1 cassette com-
partment. Insert a blank tape
into the TAPE 2 cassette compartment.
TAPE 1 TAPE 2
It is recommended that the recording tape is the same length as
the master tape.
3
Press the TAPE (1 2) button until "TAPE 1" appears on
the display.
4
Press the bu tton.
Recording will be paused.
5
Press the / button to start dubbing.
To stop dubbing:
Press the button.
TAPE 1 and TAPE 2 will simultaneously stop.
! Erasing recorded tapes
1 Load the tape to be erased into the TAPE 2 cassette compart-
ment with the side to be erased facing toward you.
2 Press the TAPE (1 2) button until "TAPE 2" appears on the dis-
play.
3 Press the button.
4 Press the / button to start erasing.
Note:
Make sure that the TAPE 1 is not in use.
6
Tape Recording
29
04/3/5 CD-MPS660E(E)3.fm
TINSEA026AWZZ
Page 30
CD-MPS660E
Advanced Features
30
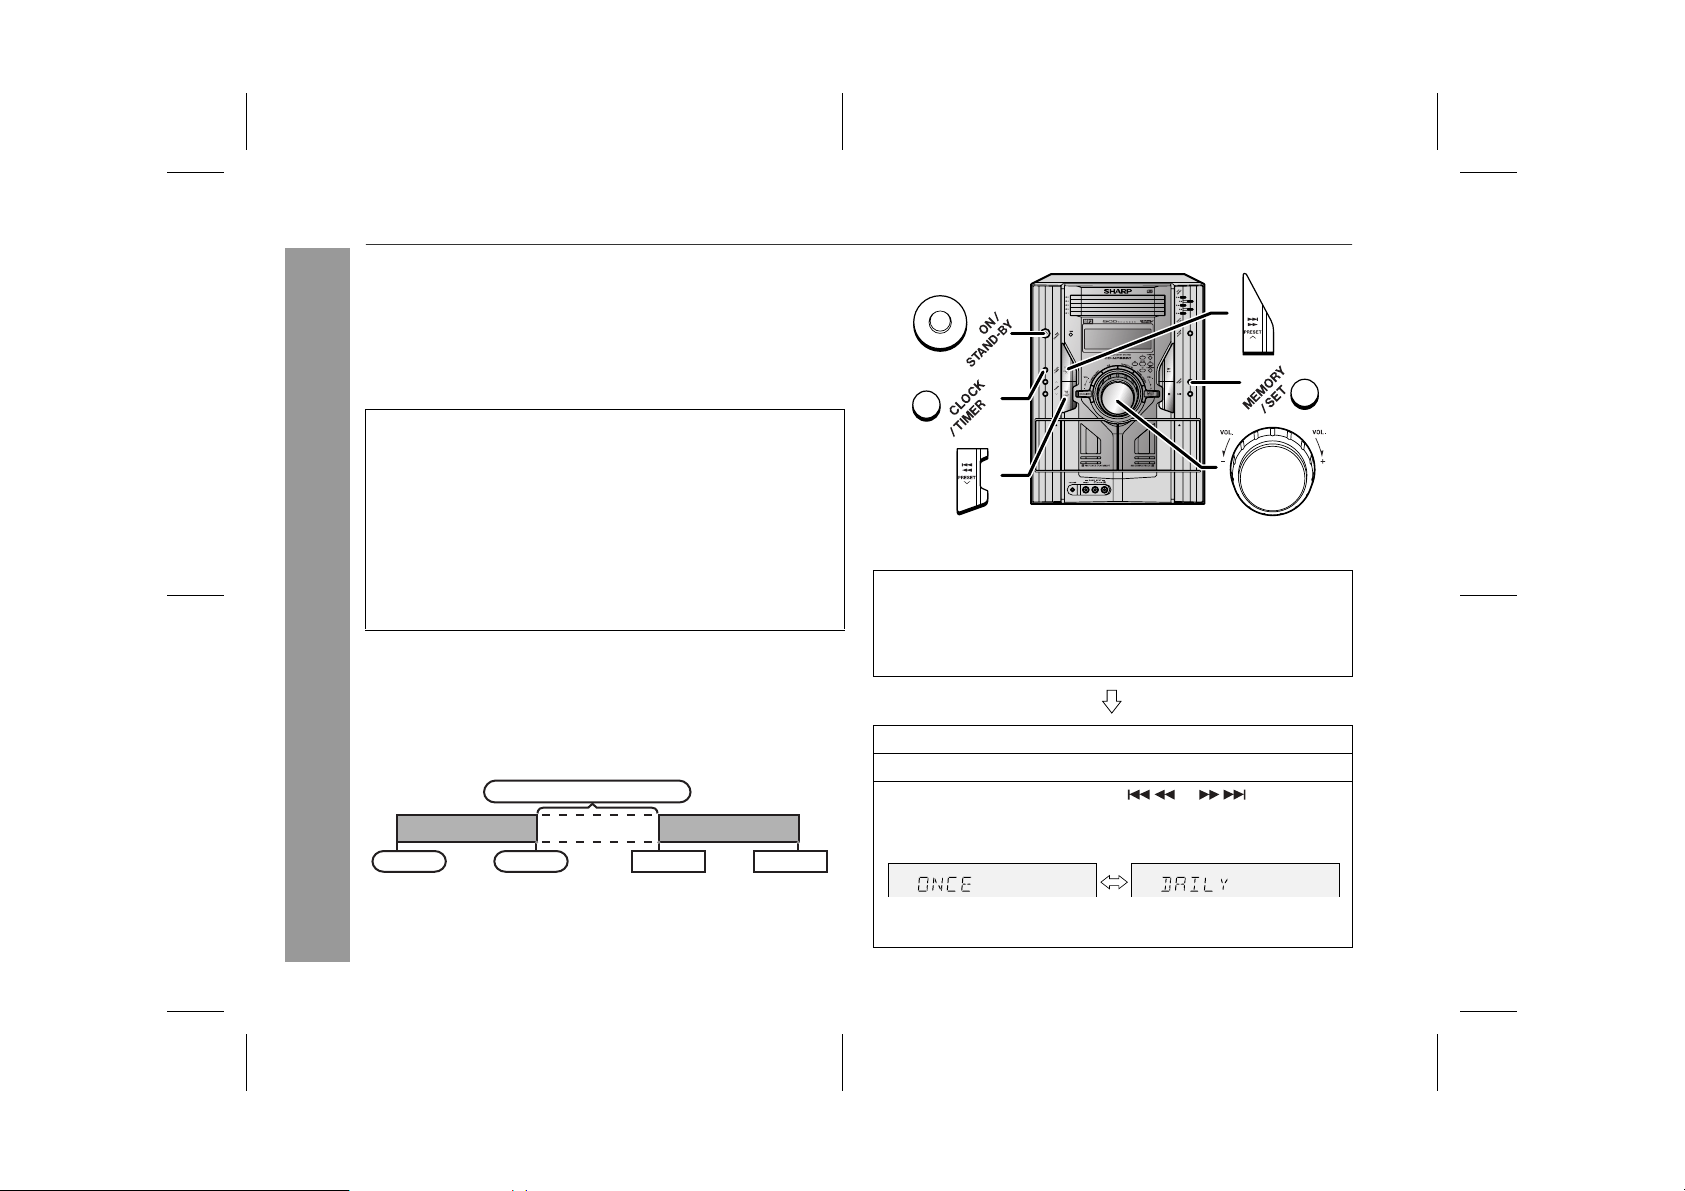
Timer and sleep operation
Timer playback:
The unit turns on and plays the desired source (CD, MP3 disc,
tuner, tape) at a preset time.
Timer recording:
The unit turns on and starts recording from the tuner at the preset
time.
This unit has 2 types of timer: ONCE TIMER and DAILY TIMER.
Once timer: Once timer play or once timer recording works for
For example, if you are away but want to record a programme on a
radio station.
Daily timer: Daily timer play or daily timer recording works at
For example, set the timer as a wake-up call every morning.
Using the once timer and daily timer in combination:
For example, use the once timer to record a radio programme, an d
use the daily timer to wake up.
1 Set the daily timer (pages 30 - 32).
2 Set the once timer (pages 30 - 32).
Start
Note:
When set times for the daily timer and once timer ov erlap, the onc e
timer takes priority. Allow an interval of at least 1 minute between
operations.
one time only at a preset time.
the same preset time every day.
1 minute or more
Daily timer
Stop Start Stop
Once timer
! Timer playback or timer recording
Before setting timer:
1 Check that the clock is set to the correct time (refer to page 13).
If it is not set, you cannot use the timer function.
2 For timer playback: Load a cassette or discs to be played.
For timer recording: Load a cassette for recording in the cas-
1
Press the ON/STAND-BY button to turn the power on.
2
Press the CLOCK/TIMER button.
3
Within 10 seconds, press the or button to select "ONCE" or "DAILY", and press the MEMORY/SET button.
Set the clock to the correct time if "ONCE" or "DAILY" does not
appear.
sette compartment.
04/3/5 CD-MPS660E(E)3.fm
TINSEA026AWZZ
Page 31
CD-MPS660E
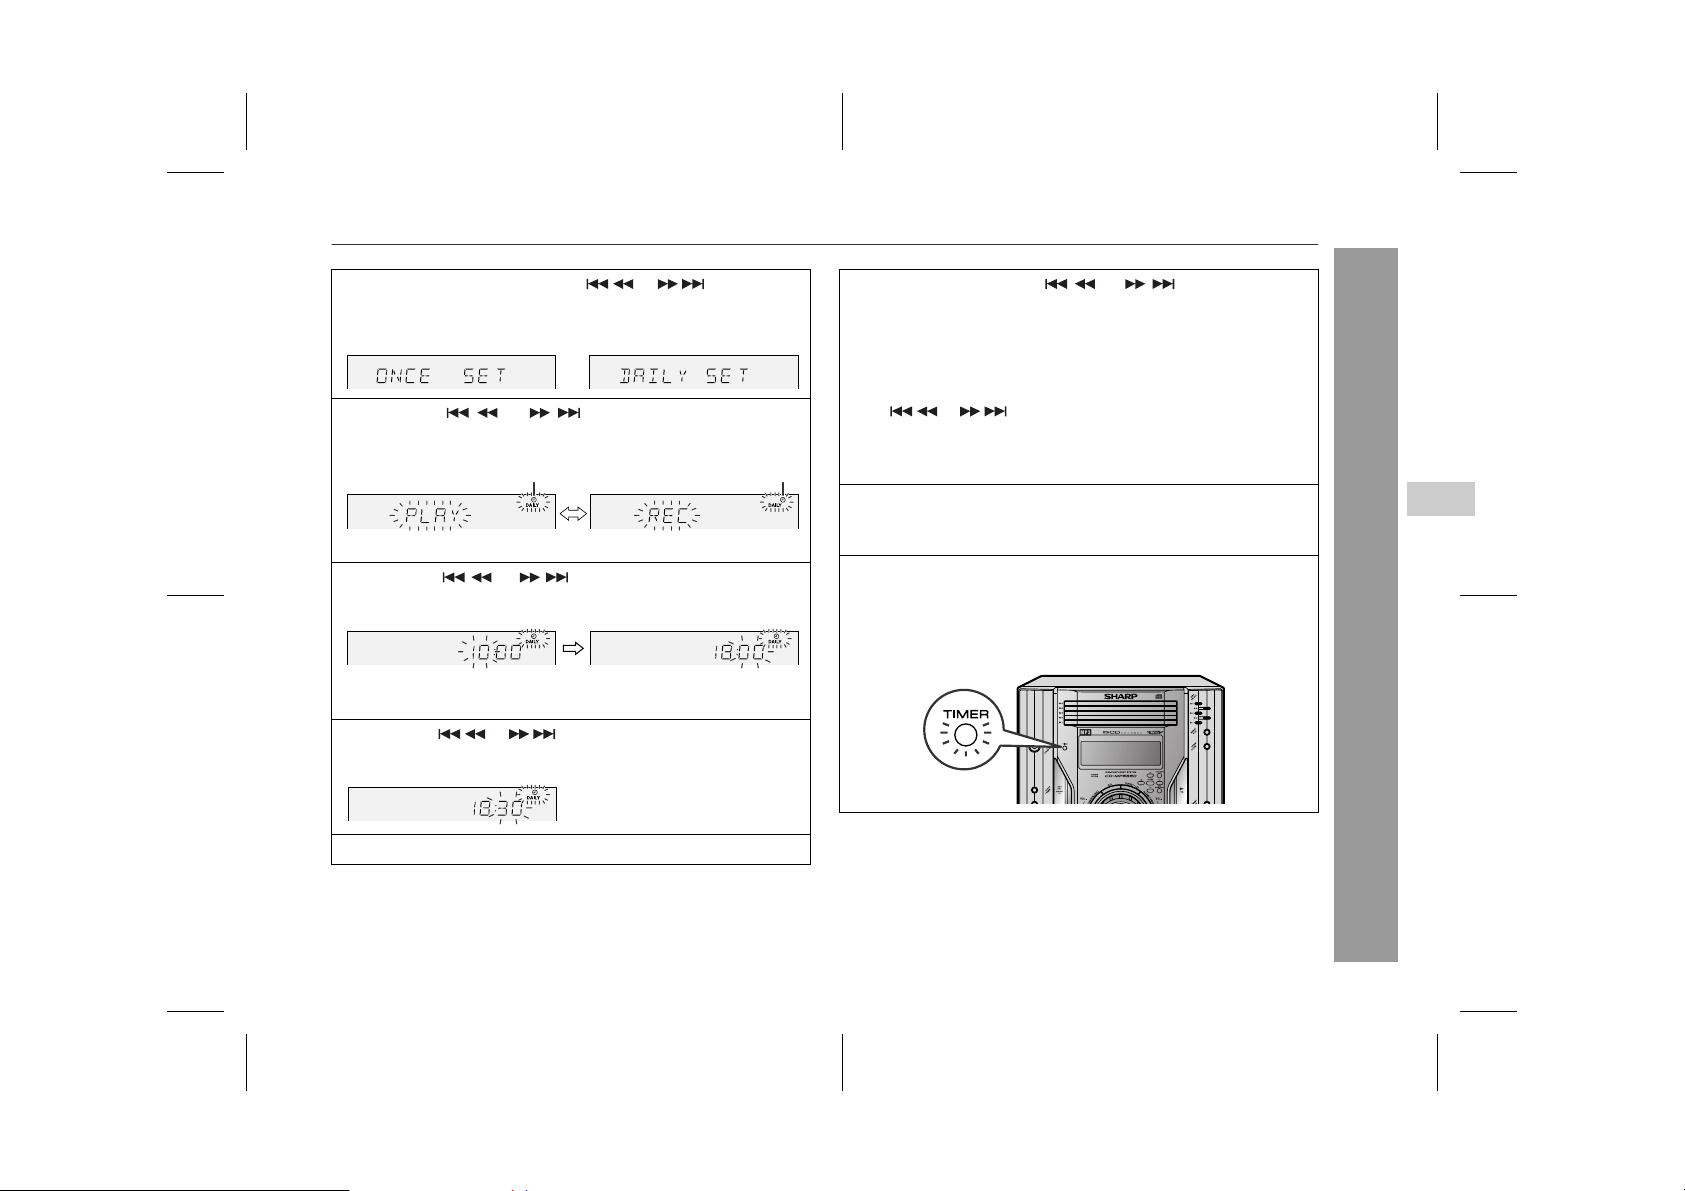
4
Within 10 seconds, press the or button to select "ONCE SET" or "DAILY SET", and press the MEMORY/
SET button.
5
Press the or button to select "PLAY" or
"REC", and press the MEMORY/SET button.
White Red
The illustrations show the d aily time r set ting .
6
Press the or button to adjust the hour and
then press the MEMORY/SET button.
The illustrations show th e timer playback se tting in the daily timer mode.
7
Press the or button to adjust the minutes and
then press the MEMORY/SET button.
8
Set the time to finish as in steps 6 and 7 above.
9
Switch input with the or button, and then
press the MEMORY/SET button.
To select the timer playback source: CD, TUNER, TAPE 1 or
TAPE 2.
To select the timer recording source: TUNER.
When you select the tuner, select a station by pressing the
!
or button, and then press the MEMORY/SET
button.
If a station has not been programmed, "NO PRESET" will be
!
displayed and timer setting will be cancelled.
10
Adjust the volume using the VOLUME control, and then
press the MEMORY/SET button.
Do not turn the volume up too high.
11
Press the ON/STAND-BY button to enter the power standby mode.
The "TIMER" indicator lights up and the unit is ready for timer
playback or timer recording.
Continued to the next page
7
Advanced Features
04/3/5 CD-MPS660E(E)3.fm
31
TINSEA026AWZZ
Page 32
CD-MPS660E
Timer and sleep operation (continued)
12
When the preset time is reached, playback or recording will
start.
The volume will increase gradually until it reaches the preset
volume.
13
When the timer end time is reached, the system will enter
the power stand-by mode automatically.
Once timer:
The timer will be cancelled.
Daily timer:
The timer will operate at the same time every day. It will continue until the daily timer setting is cancelled. Cancel the daily timer when it is not in use.
Note:
When performing timer playback or recording using another unit connected to the GAME INPUT sockets, select "GAME" in step 9.
This unit will turn on or enter the power stand-by mode automatically,
however, the connected unit will not turn on or off.
Advanced Features
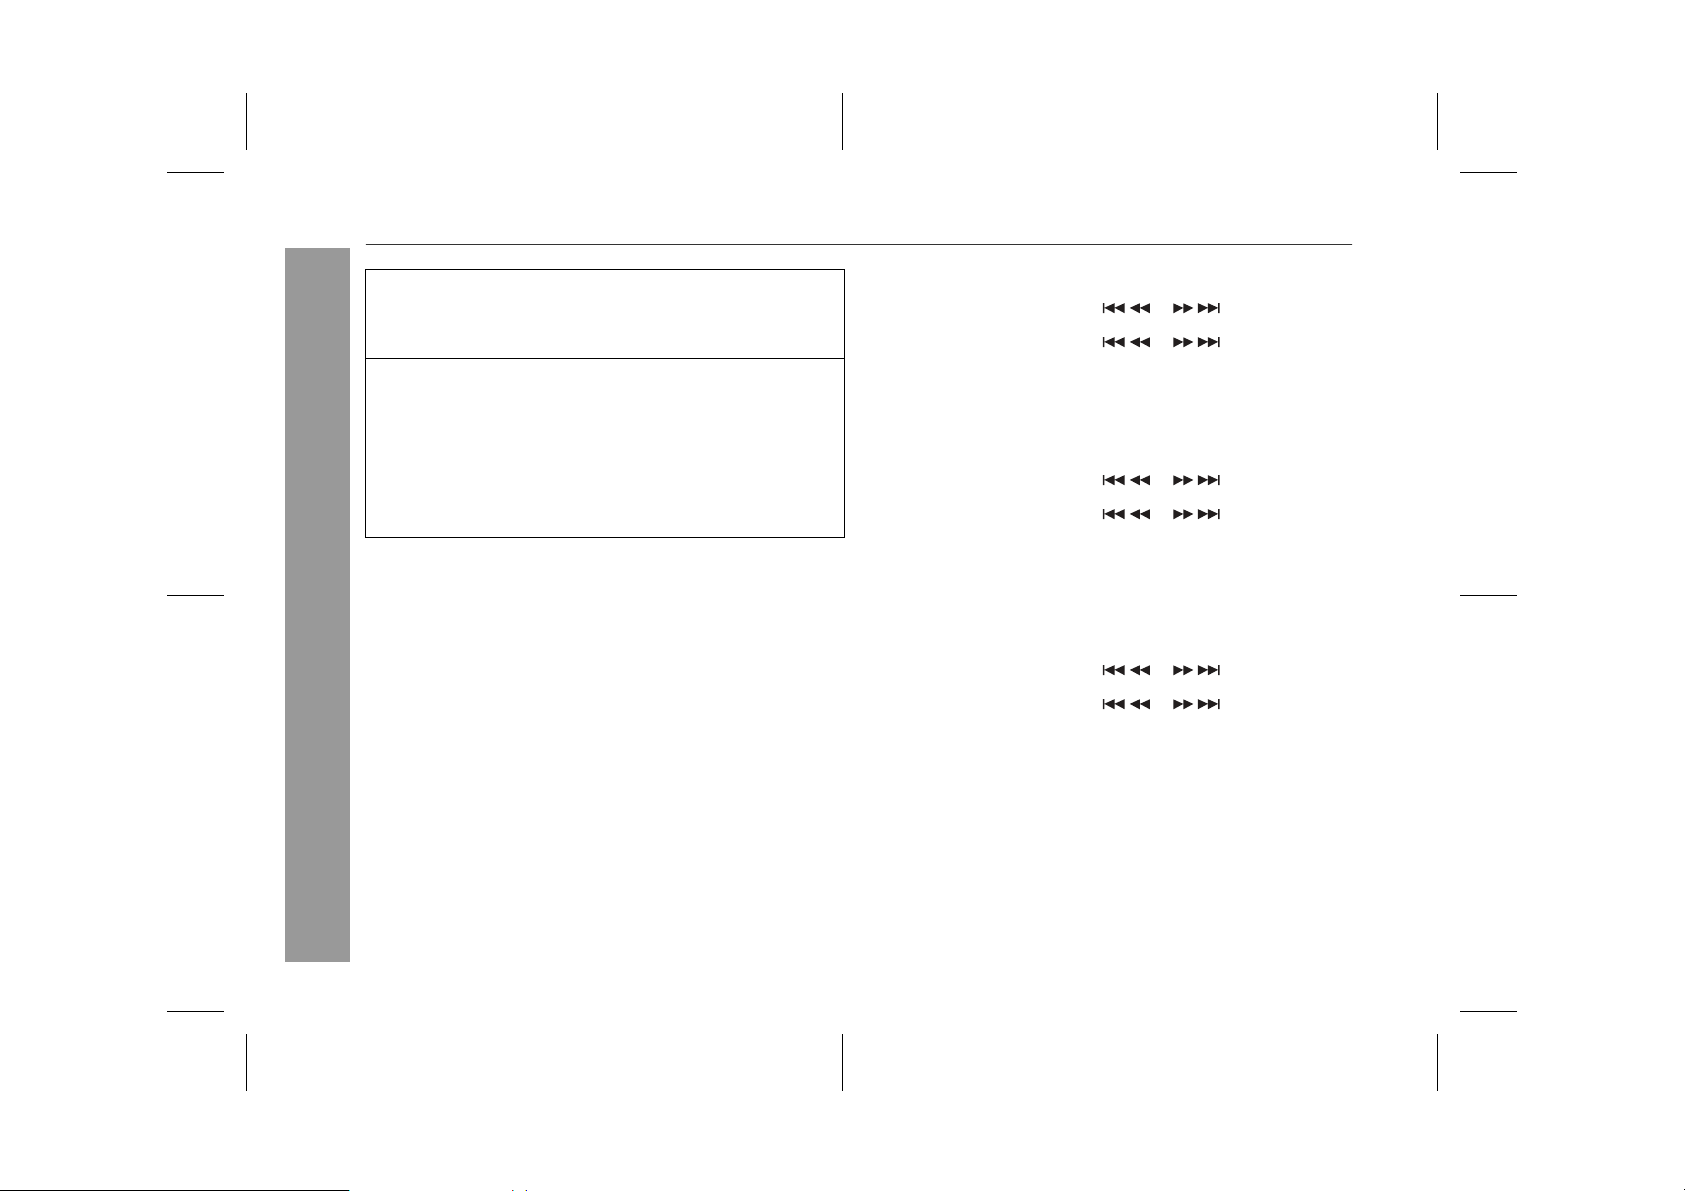
Checking the timer setting in the timer stand-by mode:
1 Press the CLOCK/TIMER button.
2 Within 10 seconds, press the or button to select
"ONCE" or "DAILY", and press the MEMORY/SET button.
3 Within 10 seconds, press the or button to select
"ONCE CALL" or "DAILY CALL", and press the MEMORY/SET
button.
The unit returns to the timer stand-by mode after displaying the
settings in order.
Cancelling the timer setting in the timer stand-by mode:
1 Press the CLOCK/TIMER button.
2 Within 10 seconds, press the or button to select
"ONCE" or "DAILY", and press the MEMORY/SET button.
3 Within 10 seconds, press the or button to select
"ONCE OFF" or "DAILY OFF", and press the MEMORY/SET button.
Timer will be cancelled (the settin g will not be cancelled).
Reusing the memorised timer setting:
The timer setting will be memorised once it is entered. To reuse the
same setting, perform the following operations.
1 T urn the power on and press the CLOCK/TIMER button.
2 Within 10 seconds, press the or button to select
"ONCE" or "DAILY", and press the MEMORY/SET button.
3 Within 10 seconds, press the or button to select
"ONCE ON" or "DAILY ON", and press the MEMORY/SET button.
4 Press the ON/STAND-BY button to enter the power stand-by
mode.
Note:
The timer can also be set with the remote control.
32
04/3/5 CD-MPS660E(E)3.fm
TINSEA026AWZZ
Page 33
CD-MPS660E
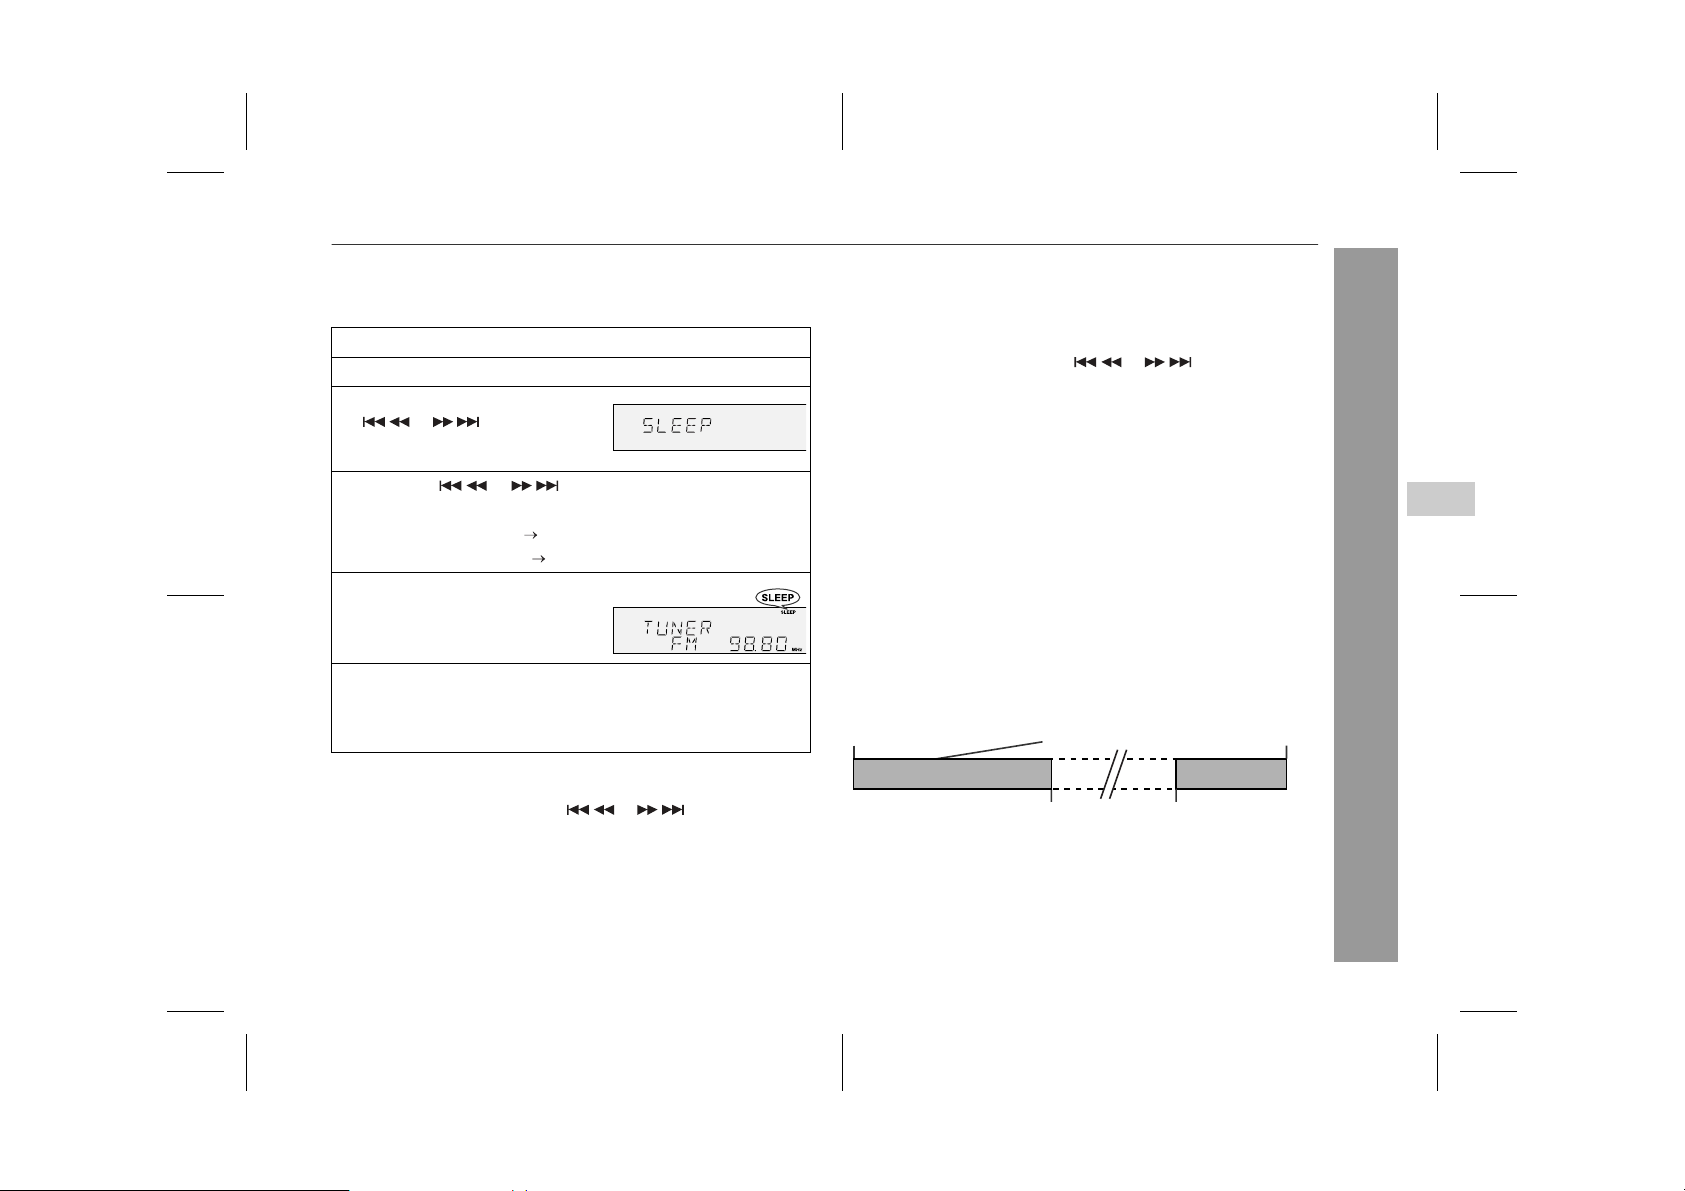
" Sleep operation
The radio, CD, MP3 disc and cassette tape can all be turned off
automatically.
1
Play back the desired sound source.
2
Press the CLOCK/TIMER button.
3
Within 10 seconds, press the
or button to select
"SLEEP", and press the MEMORY/SET button.
4
Press the or button to select the time.
(Maximum: 3 hours - Minimum: 1 minute)
3 hours - 5 minutes 5-minute intervals
!
5 minutes - 1 minute 1-minute intervals
!
5
Press the MEMORY/SET button.
"SLEEP" will appear.
6
The unit will enter the power stand-by mode automatically
after the preset time has elapsed.
The volume will be turned down 1 minute before the sleep operation finishes.
To confirm the remaining sleep time:
1 Whilst "SLEEP" is indicated, press the CLOCK/TIMER button.
2 Within 10 seconds, press the or button to select
"SLEEP X : XX".
"X : XX" is remaining sleep time.
The remaining sleep time is displayed for about 10 seconds.
!
You can change the remaining sleep time whilst it is displayed by
!
pressing the MEMORY/SET button.
To cancel the sleep operation:
Press the ON/STAND-BY button whilst "SLEEP" is indicated.
To cancel the sleep operation without setting the system to the
stand-by mode, proceed as follows.
1 Whilst "SLEEP" is indicated, press the CLOCK/TIMER button.
2 Within 10 seconds, press the or button to select
"SLEEP OFF", and press the MEMORY/SET button.
" To use timer and sleep operation together
Sleep and timer playback:
For example, you can fall asleep listening to the radio and wake up
to CD in the next morning.
Sleep and timer recording:
For example, you can fall asleep listening to the CD and record
radio programmes whilst sleeping.
1 Set the sleep time (see left, steps 1 - 5).
2 Whilst the sleep timer is set, set the timer playback or recording
(steps 2 - 10, pages 30 - 31).
Timer playback or
Sleep timer setting
1 minute - 3 hours Desired time
Sleep operation will
automatically stop.
Caution:
When using the cassette deck, be sure the tape length is long
enough to perform both functions. If you want to sleep and wake up
listening to a tape, and the length of the tape is shorter than the
sleep timer setting, timer playback or recording will not be possible.
recording setting
End time
Timer playback or recording
start time
7
Advanced Features
04/3/5 CD-MPS660E(E)3.fm
33
TINSEA026AWZZ
Page 34
CD-MPS660E
Enhancing your syst em
Advanced Features
34
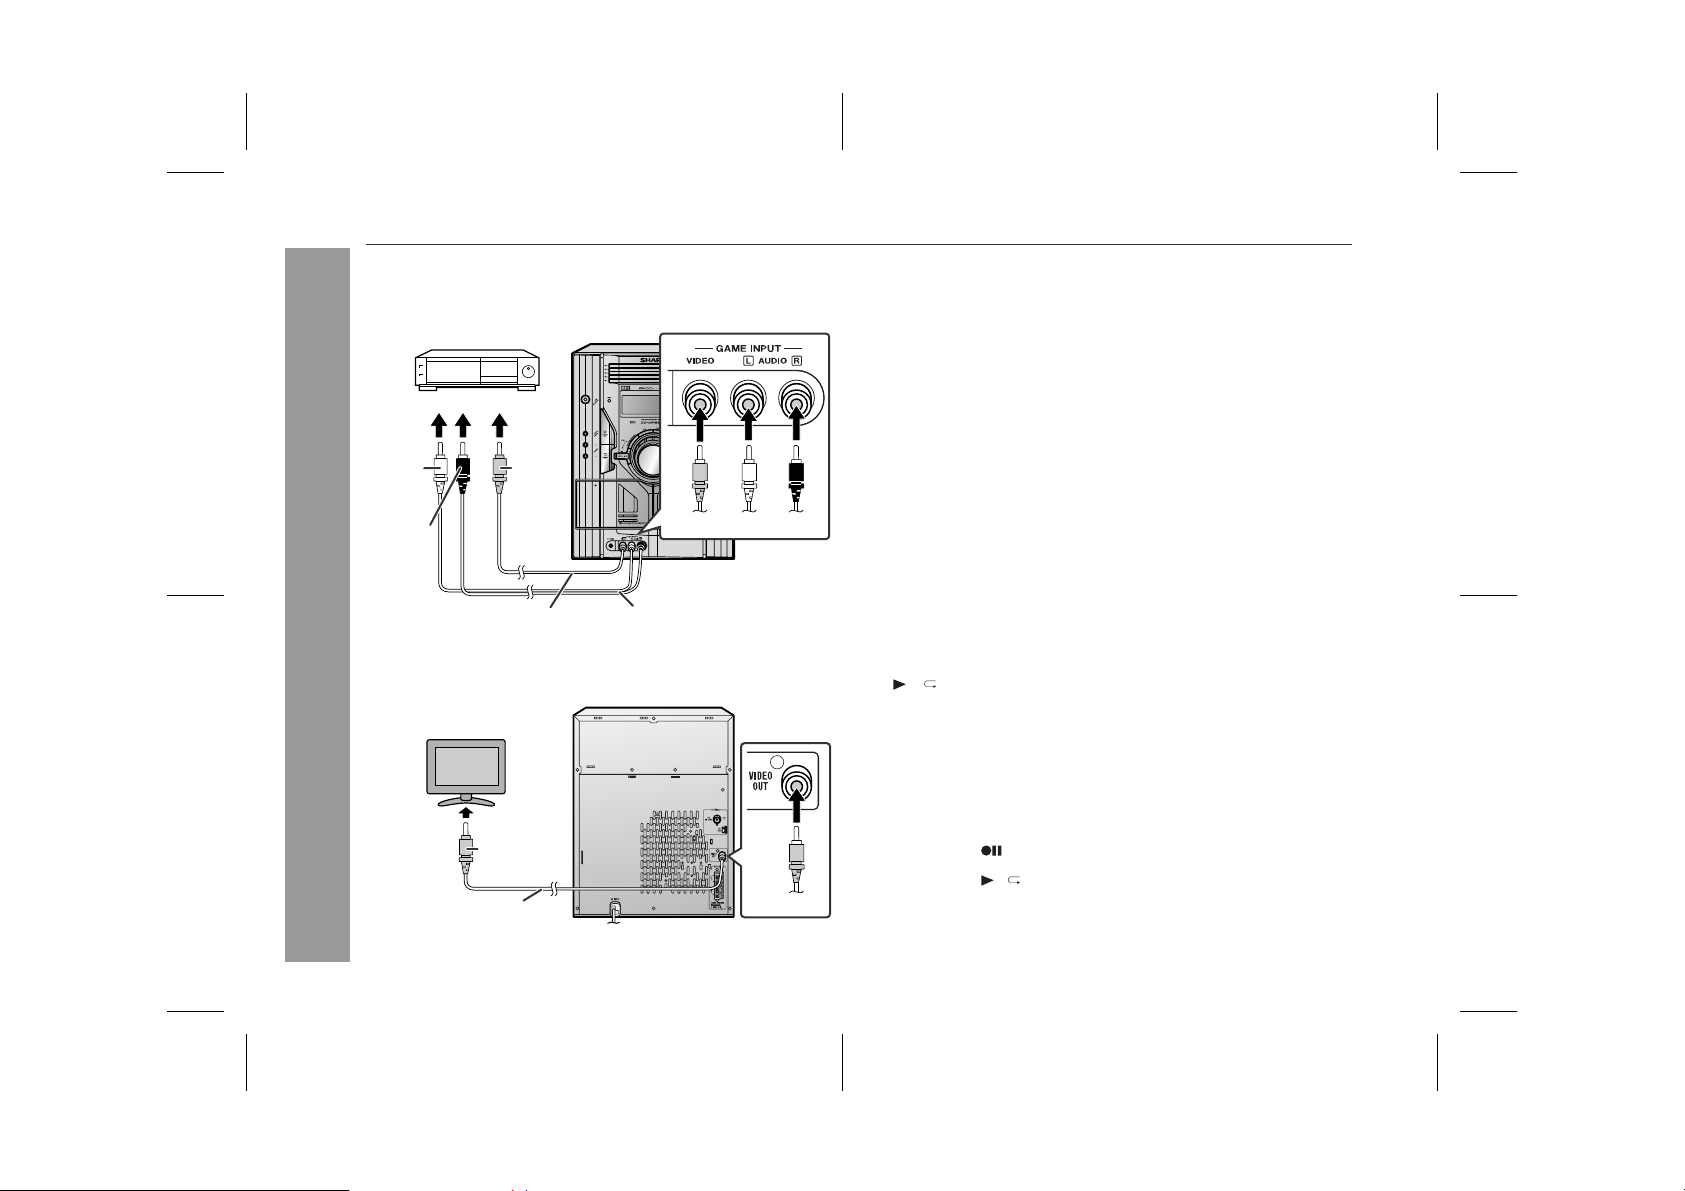
The connection lead is not included. Purchase a commercially available lead as shown below.
Game system, VCR,
DVD player, etc.
To the line output sockets
TV
Yellow
Yellow
Video cable
(not supplied)
RedWhiteYellow
RCA lead
(not supplied)
Yellow
White
Red
To video
input socket
Video cable
(not supplied)
" Listening to sounds of game, VCR, DVD, etc.
1
Connect a video game system, VCR, DVD, etc. to the front
GAME INPUT (VIDEO, AUDIO L and R) sockets.
2
Connect a TV to the rear VIDEO OUT socket.
Switch the TV input to auxiliary.
3
Press the ON/STAND-BY button to turn the power on.
4
Press the GAME/VIDEO button.
5
Play the connected equipment.
You can enjoy sounds from the supplied speakers and images
on the TV.
Note:
To prevent noise interference, place the unit away from the television.
Auto power on function:
When you press any of the following buttons, the unit turns on.
GAME/VIDEO button (main unit and remote control): The unit
!
turns on and the "GAME" function is activated.
/ button (mai n unit and remote control): The unit turns on
!
and playback of the last function starts (CD/TAPE/TUNER/
GAME).
" To record sounds of game, VCR, etc.
1
Insert a cassette in the TAPE 2 cassette compartment.
2
Press the GAME/VIDEO button.
3
Press the button.
4
Press the / button.
5
Start the game system, VCR, etc.
04/3/5 CD-MPS660E(E)3.fm
TINSEA026AWZZ
Page 35
Troubleshootin g chart
CD-MPS660E
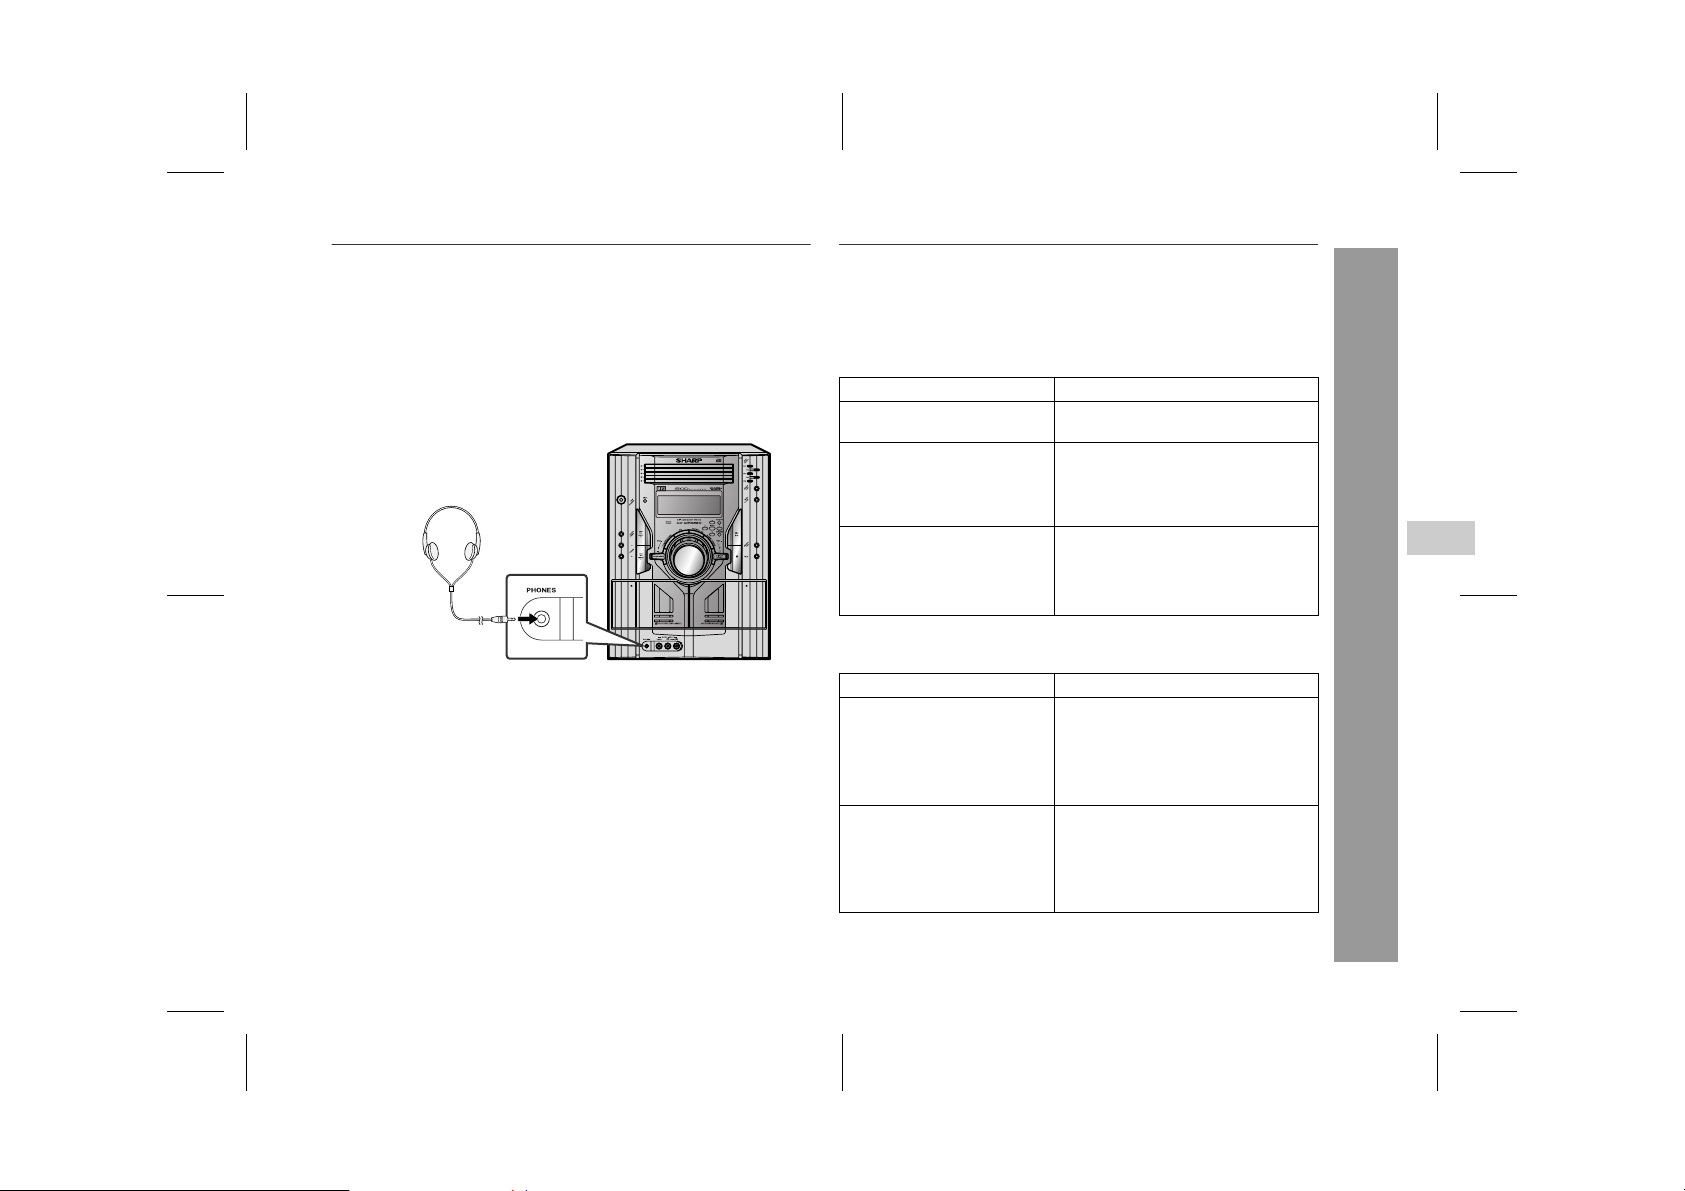
" Headphones
Before plugging in or unplugging the headphones, reduce the
!
volume.
Be sure your headphones have a 3. 5 mm (1/8") diameter plug
!
and are between 16 ohms and 50 ohms impedance. The recom mended impedance is 32 ohms.
Plugging in the headphones disconne cts the speakers automati-
!
cally. Adjust the volume using the VOLUME control.
Many potential problems can be resolved by the owner without calling a service technician.
If something is wrong with this product, check the following before
calling your authorised SHARP dealer or service centre.
" General
Symptom Possible cause
The clock is not set to the
!
correct time.
When a button is pressed,
!
the unit does not respond.
No sound is heard.
!
Did a power failure occur? Reset
!
the clock. (Refer to page 13.)
Set the unit to the power stand-
!
by mode and then turn it back on.
If the unit still malfunc tions, reset
!
it. (Refer to page 37.)
Is the volume level set to "0"?
!
Are the headphones connected?
!
Are the speaker wires discon-
!
nected?
" CD player
Symptom Possible cause
Playback does not start.
!
Playback stops in the mid-
!
dle or is not performed
properly.
Playback sounds are
!
skipped, or stopped in the
middle of a track.
Is the disc loaded upside down?
!
Does the disc satisfy the stan-
!
dards?
Is the disc distorted or
!
scratched?
Is the unit located near excessive
!
vibrations?
Is the disc very dirty?
!
Has condensation formed inside
!
the unit?
8
References
04/3/5 CD-MPS660E(E)3.fm
35
TINSEA026AWZZ
Page 36
CD-MPS660E
Troubleshooting chart (continued)
" Cassette deck
Symptom Possible cause
Cannot record.
!
Cannot record tracks with
!
proper sound quality.
Cannot erase completely.
!
Sound skipping.
!
Cannot hear treble.
!
Sound fluctuation.
!
Cannot remove the tape.!If a power failure occurs during
!
" Remote control
References
!
Symptom Possible cause
The remote control does
not operate.
Is the erase-prevention tab re-
!
moved?
Is it a normal tape? (You cannot
!
record on a metal or CrO tape.)
Is there slack in the tape?
!
Is the tape stretched?
!
Are the capstans, pinch rollers,
!
or heads dirty?
playback, the heads remain engaged with the tape. Do not open
the compartment with great
force.
Is the AC power lead of the unit
!
plugged in?
Is the battery polarity correct?
!
Are the batteries dead?
!
Is the distance or angle incor-
!
rect?
Does the remote control sensor
!
receive strong light?
" Tuner
Symptom Possible cause
The radio makes unusual
!
noises continuously.
Is the unit placed near the TV or
!
computer?
Is the FM aerial or AM loop aerial
!
placed properly? Move the aerial
away from the AC power lead if
it's located nearby.
" Condensation
Sudden temperature changes, storage or operation i n an extremel y
humid environment may cause condensation inside the cabinet (CD
pickup, tape heads, etc.) or on the transmitter on the remote control.
Condensation can cause the unit to malfunction. If this happens,
leave the power on with no disc (or cassette) i n the unit until normal
playback is possible (about 1 hour). Wipe off any condensation on
the transmitter with a soft cloth before operating the unit.
36
04/3/5 CD-MPS660E(E)3.fm
TINSEA026AWZZ
Page 37
CD-MPS660E
" If trouble occurs
When this product is subjected to strong external interference
(mechanical shock, excessive static electricity, abnormal supply
voltage due to lightning, etc.) or if it is operated inc orrectly, it may
malfunction.
If such a problem occurs, do the following:
1 Set the unit to the stand-by mode and turn the power on again.
2 If the unit is not restored in the previous operation, unplug and
plug in the unit, and then turn the power on.
Note:
If neither operation above restores the unit , clear al l the memory b y
resetting it.
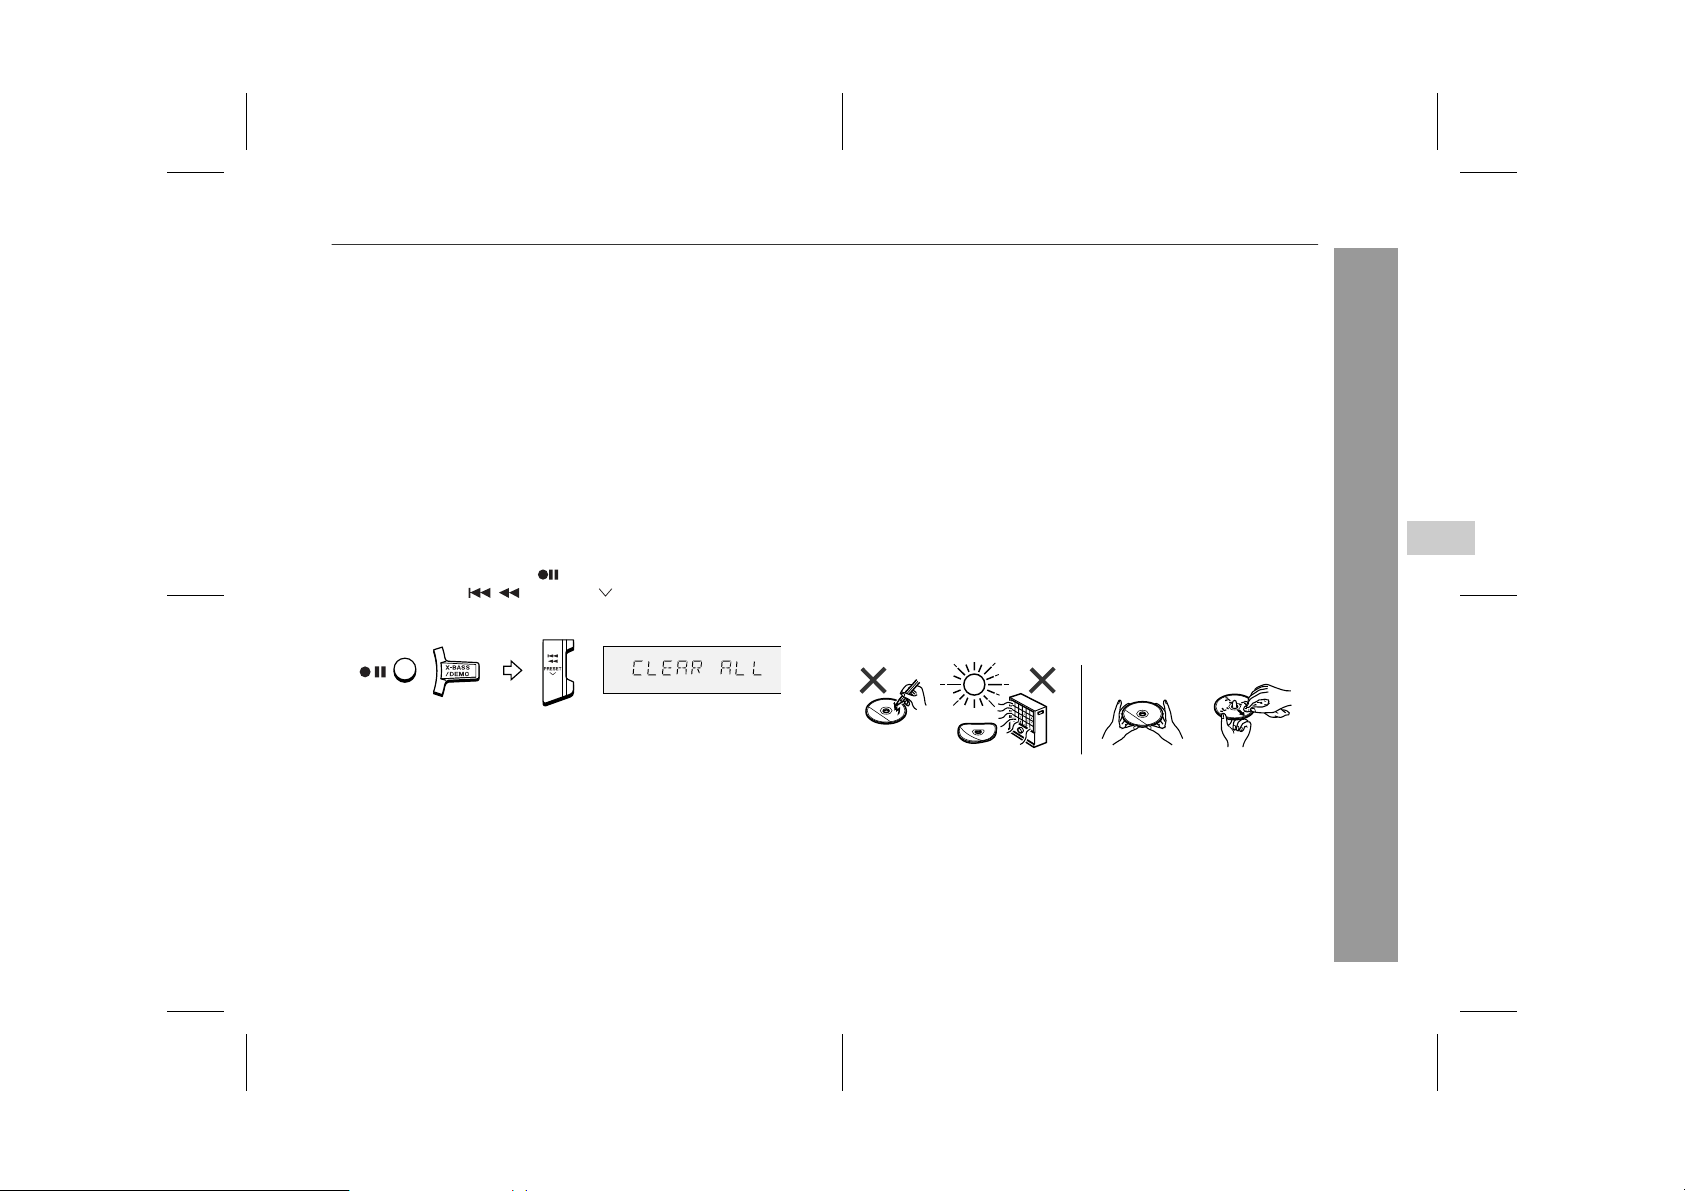
" Clearing all the memory (reset)
1 Press the ON/STAND-BY button to enter the power stand-by
mode.
2 Whilst pressing down the button and the X-BASS/DEMO but-
ton, press the PRESET button until "CLEAR ALL"
appears.
Caution:
This operation will erase all data stored in memory including clock,
timer settings, tuner preset, and CD programme.
" Before transporting the unit
Remove all CDs from the unit. Make sure there is no CD in the disc
tray. Then, set the unit to the power stand-by mode. Carrying the
unit with discs left inside can damage the unit.
" Care of compact discs
Compact discs are fairly resistant t o damage, however mistracking
can occur due to an accumulation of dirt on the disc surface. Follow
the guidelines below for maximum enjoyment from your CD collection and player.
Do not write on either side of the disc, particularl y the non-label
!
side from which signals are read. Do not mark this surface.
Keep your discs away from direct sunlight, heat, and exces sive
!
moisture.
Always hold the CDs by the edges. Fingerprints, dirt, or water on
!
the CDs can cause noise or mistracking. If a CD is dirty or does
not play properly, clean it with a soft, dry cloth, wiping straight out
from the centre, along the radius.
NO YES
Correct
8
References
04/3/5 CD-MPS660E(E)3.fm
37
TINSEA026AWZZ
Page 38
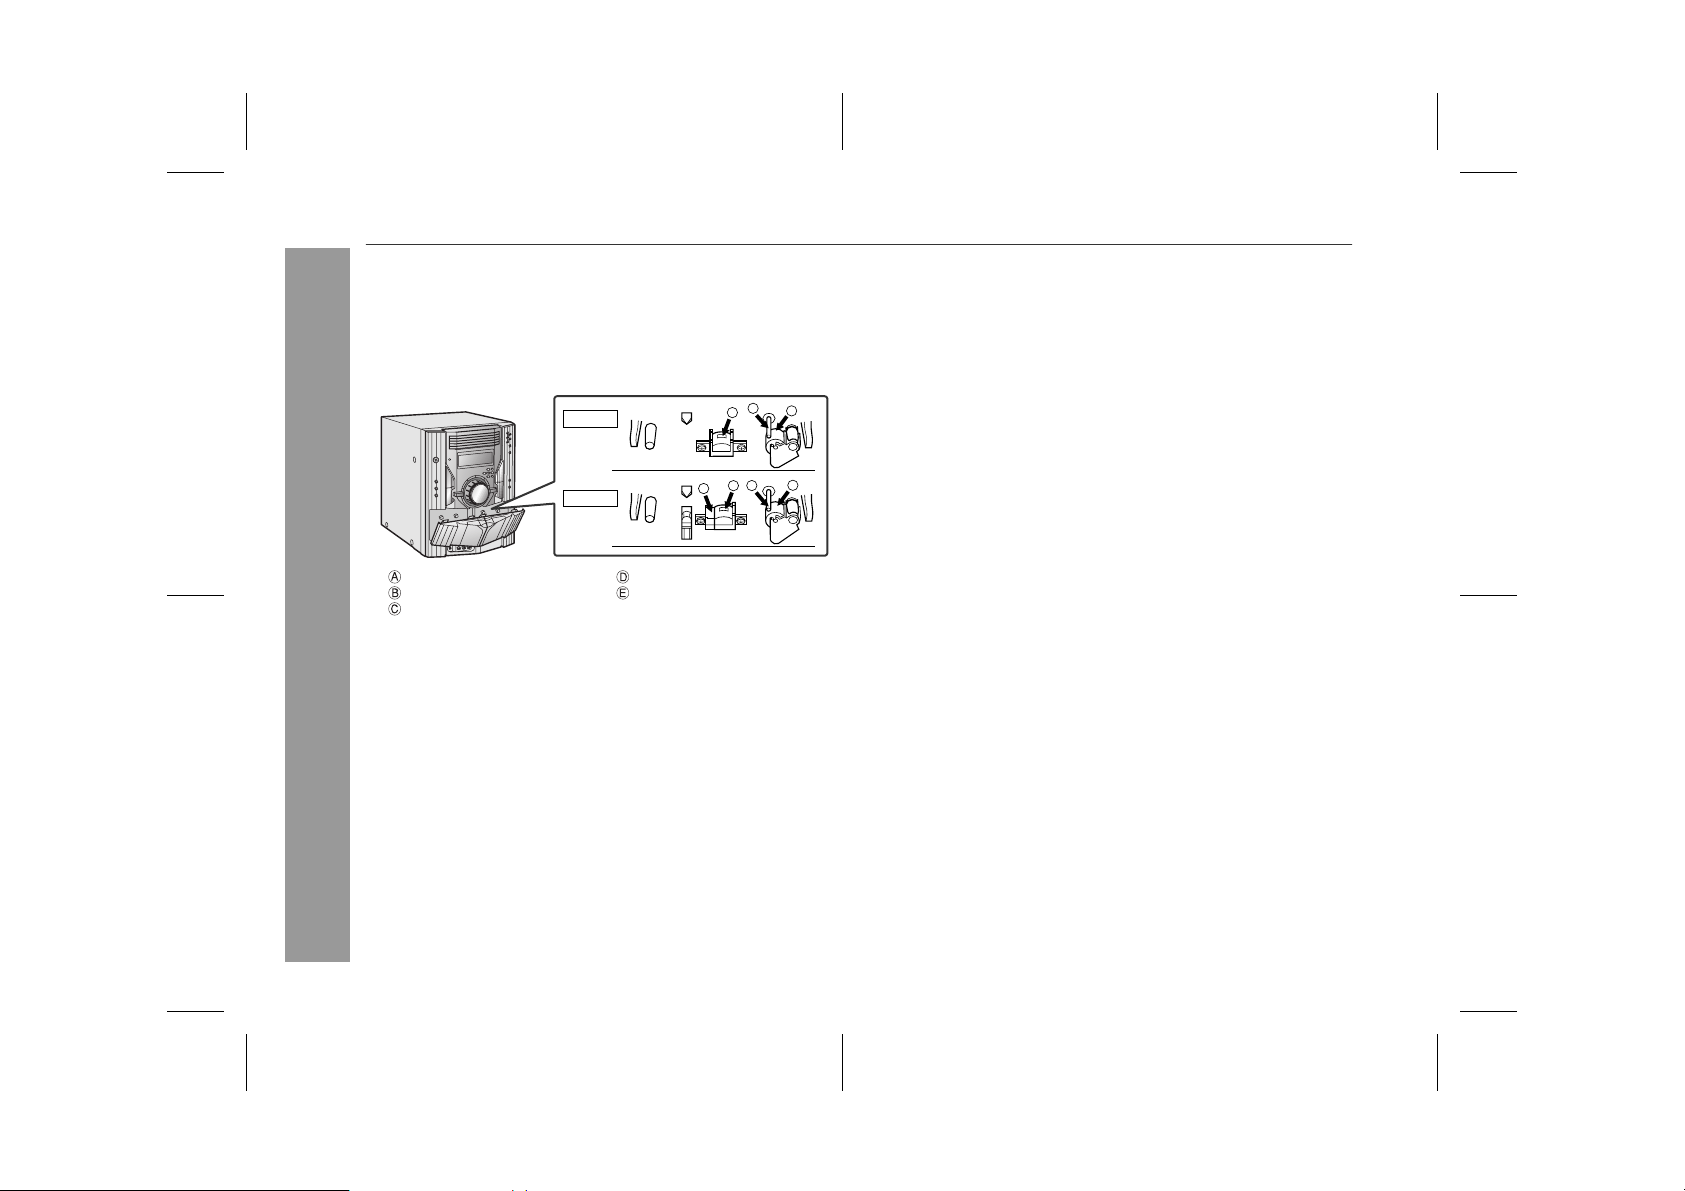
CD-MPS660E
Maintenance
" Cleaning the tape-handling parts
Dirty heads, capstans or pinch rollers can ca use poor sound and
!
tape jams. Clean these parts with a cotton swab moistened with
commercial head/pinch roller cleaner or isopropyl alcohol.
When cleaning the heads, pinch rollers, etc., unplug the unit
!
which contains high voltages.
TAPE 1
TAPE 2
Playback head Erase head
Capstan Recording/Playback head
Pinch roller
After long use, the deck's heads and capstans may become
!
magnetised, causing poor sound. Demagnetise these parts once
References
every 30 hours of playing/recording time by using a commercial
tape head demagnetiser. Read the demagnetiser's instru ctions
carefully before use.
D
" Cleaning the CD pickup lens
Poor performance during CD playback (skipping or jumping) can be
caused by a dirty or contaminated CD laser pick up lens. If this happens then the use of a commercially available CD lens cleaning
discs may restore normal operation. Contact your supplier or l ocal
CD software dealer to obtain CD lens cleaning discs. Ensure all
included instructions/documentation are carefully followed.
B
C
A
" Cleaning the cabinet
Periodically wipe the cabinet with a soft cloth and a diluted s oap
C
B
E
solution, then with a dry cloth.
Caution:
Do not use chemicals for cleaning (petrol, paint thinner, etc.) . It
!
may damage the cabinet finish.
Do not apply oil to the ins ide of the unit. It may cause m alfunc-
!
tions.
38
04/3/5 CD-MPS660E(E)3.fm
TINSEA026AWZZ
Page 39
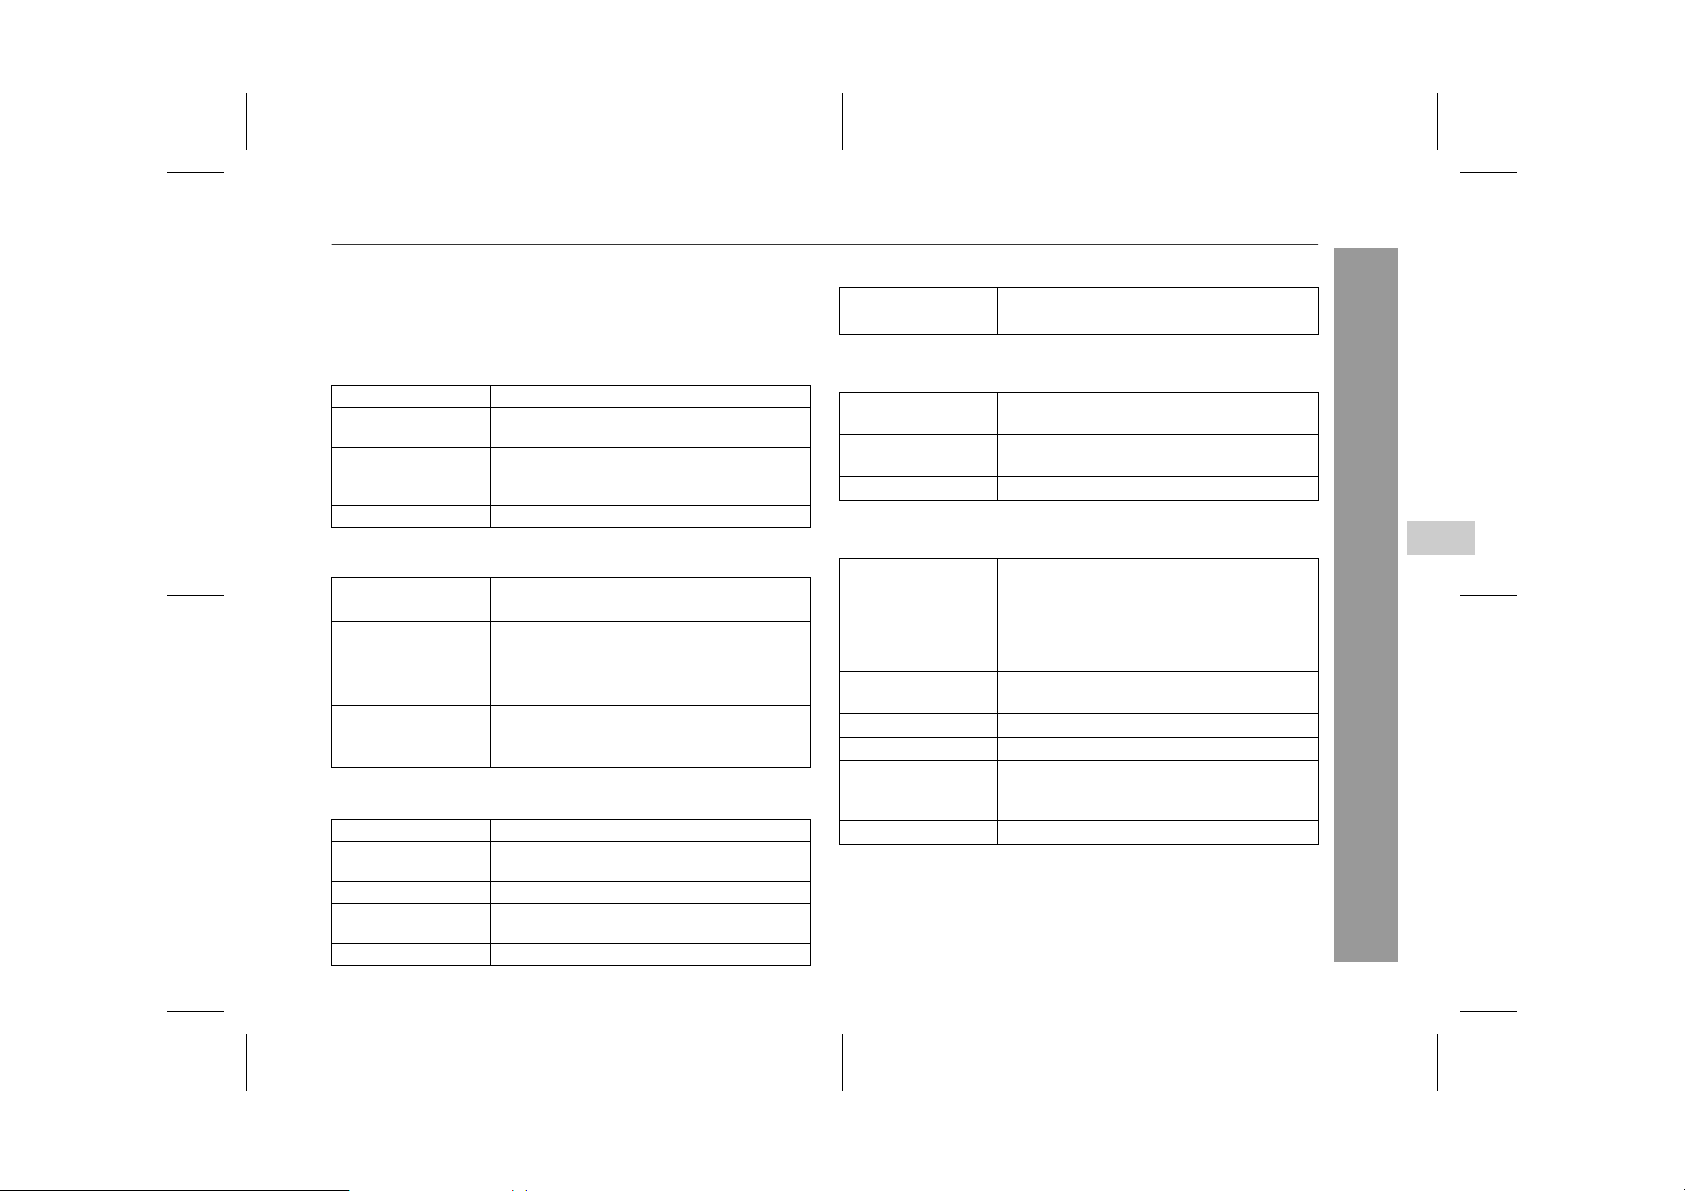
Specifications
CD-MPS660E
As part of our policy of continuous improvement, SHARP reserves
the right to make design and specification changes for product
improvement without prior notice. The performance specification figures indicated are nominal values of production units. There may be
some deviations from these values in individual units.
" General
Power source AC 230 - 240 V, 50 Hz
Power
consumption
Dimensions Width: 260 mm (10-1/4")
Weight 7.8 kg (17.2 lbs.)
" Amplifier
Output power RMS: 240 W (120 W + 120 W) (10 % T.H.D.)
Output terminals Speakers: 6 ohms
Input terminals Game/ Auxiliary (audio signal):
" CD player
Type 5-disc multi-play compact disc player
Signal readout Non-contact, 3-beam semiconductor laser
D/A converter 1-bit D/A converter
Frequency
response
Dynamic range 90 dB (1 kHz)
110 W
Height: 330 mm (13")
Depth: 326 mm (12-7/8")
RMS: 160 W (80 W + 80 W) (0.9 % T.H.D.)
Headphones: 16 - 50 ohms
(recommended: 32 ohms)
Video output: 1Vp-p
500 mV/ 47 k ohms
Game/Video: 1Vp-p
pickup
20 - 20,000 Hz
" Tuner
Frequency range FM: 87.5 - 108.0 MHz
AM: 522 - 1,620 kHz
" Cassette deck
Frequency
response
Signal/noise ratio 55 dB (TAPE 1, playback)
Wow and flutter 0.3 % (WRMS)
50 - 14,000 Hz (normal tape)
50 dB (TAPE 2, recording/playback)
" Speaker
Type 2-way type speaker system with passive
Maximum input
power
Rated input power 120 W
Impedance 6 ohms
Dimensions Width: 252 mm (9-7/8")
Weight 3.6 kg (7.9 lbs.)/each
radiator
5 cm (2") tweeter
13 cm (5-1/8") woofer
10 cm (4") passive radiator
240 W
Height: 330 mm (13")
Depth: 249 mm (9-13/16")
8
References
39
04/3/5 CD-MPS660E(E)3.fm
TINSEA026AWZZ
Page 40
TERMS OF GUARANTEE
Sharp Electronics (UK) Ltd. (“Sharp”) guarantees to provide for the repair, or at its option the replacement, of this product subject to the conditions listed below:-
1. This guarantee shall only apply to faults which are due to inferior workmanship or materials. It does
not cover faults or damage caused by accident, misuse, fair wear and tear, neglect, tampering with
the product, or repair other than by a Service Facility appointed by Sharp.
2. As this product is intended for private domestic use only, the guarantee will not apply if the product
is used in the course of a business, trade or profession.
3. To benefit from this guarantee, any fault which occurs must be notified to Sharp, or its appointed
Service Facility within one year from the date this product was purchased. Proof of purchase must
be provided.
4. The guarantee does not cover carriage costs, audio tapes, compact discs or batteries.
5. In the unlikely event of this product requiring repair, please contact the supplier from whom it was
purchased. Where this is not possible, please contact the Sharp Customer Information Centre on
the telephone number given below.
6. No person has any authority to vary the terms or conditions of this guarantee.
7. This guarantee is offered as an additional benefit to your statutory rights, and does not affect these
rights in any way.
If you have any difficulty operating this product, or would like information on other Sharp products,
please telephone the Sharp Customer Information Centre on the number given below.
Sharp Customer Information Centre - Telephone 08705 274277
(or (01) 676 0648 if telephoning from Ireland)
0312
SHARP ELECTRONICS (U.K.) LTD.
Sharp House, Thorp Road, Newton Heath, Manchester, M40 5BE
SHARP CORPORATION
0401_A5
04/3/5 CD-MPS660E(E)_BA.fm
TINSEA026AWZZ
04C R YT 1
TINSEA026AWZZ
 Loading...