

Page 1
ENGLISH
MODEL
CD-DH899N
MINI COMPONENT SYSTEM
OPERATION MANUAL
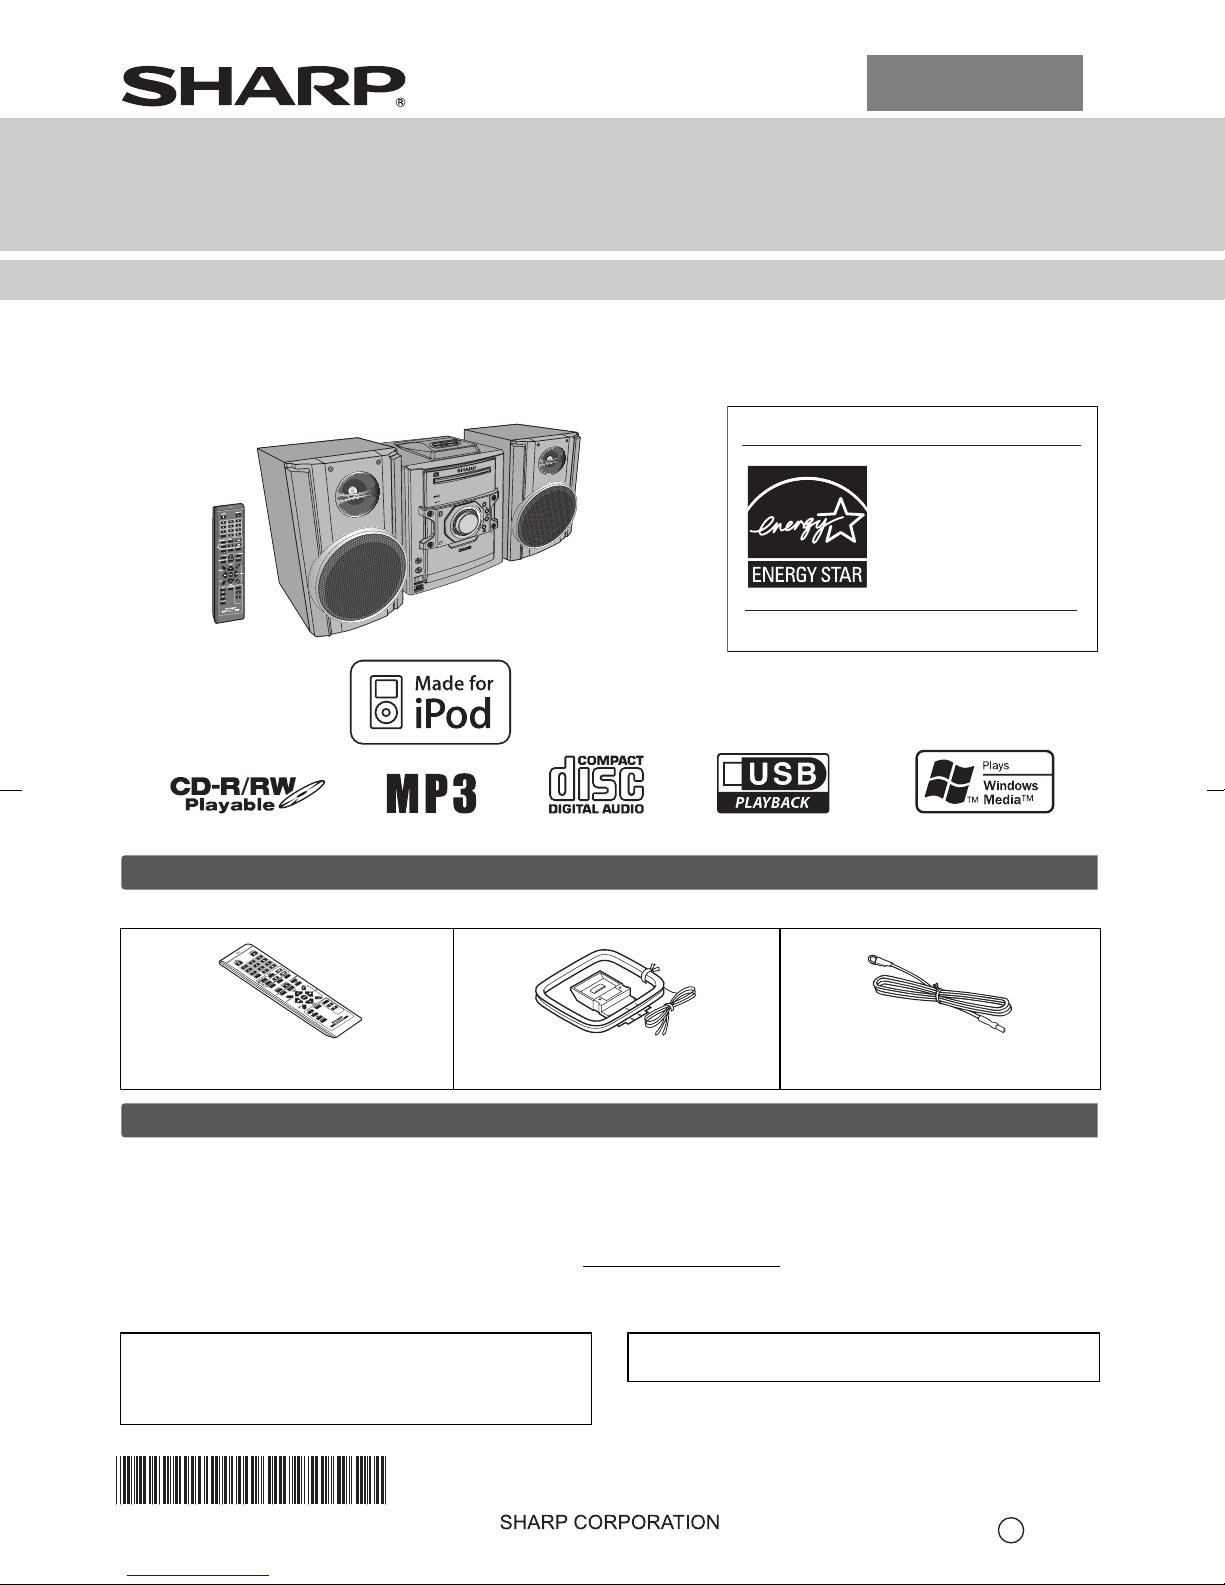
CD-DH899N Mini Component System consisting of CD-DH899N (main unit) and CP-DH899N (speaker system).
ENERGY STAR® Program Information
T SYSTE M
CD-DH899
MINI CO MPONEN
ION
FUNCT
POWER
ON/STAND-BY
VOL
H
S
U
P
N
E
P
CD
B
US
E
P
TA
IN
AUDIO
NES
PHO
O
ENERGY STAR® is a U.S. registered mark.
Products that have earned
the ENERGY STAR
designed to protect the
environment through
superior energy efficiency.
®
are
iPod is a trademark of Apple Inc.,
registered in the U.S. and other countries.
Accessories
Please confirm that only the follo wing accessories are included.
D
B
C
S
U
Remote control x 1
RRMCGA205AWSA
E
P
TA
AM loop antenna x 1
QANTLA004AWZZ
FM antenna x 1
92LFANT1535A
Special Note
Supply of this product does not convey a license nor imply any right to distribute content created with this product in
revenue-generating broadcast systems (terrestrial, satellite, cable and/or other distribution channels), revenuegenerating streaming applications (via Internet, intranets and/or other networks), other revenue-generating content
distribution systems (pa y-audio or audio-on-dema nd applications and t he lik e) or on revenue-gen erating ph ysical media
(compact discs, digital versatile discs, semiconductor chips, hard drives, memory cards and the like). An independent
license for such use is required. For details, please visit ht tp://mp3licensing.com
MPEG Layer-3 audio coding technology licensed from Fraunhofer IIS and Thomson.
“Made for iPod” means that an electronic accessory has
been designed to connect specifically to iPod and has
been certified by the developer to meet Apple
performance standards.
TINSZA643AWZZ
Apple is not responsible for the operation of this device
or its compliance with safet y and regulatory standards.
Printed in Malaysia
10B R M
1
Page 2
For U.S. customer only
CONSUMER LIMITED WARRANTY
SHARP ELECTRONICS CORPORATION warrants to the first consumer purchaser that this Sharp brand product (the
"Product"), when ship in its original container, will be free from defective workmanship and materials, and agrees that it will,
at its option, either repair the defect or replace the defective Product or part thereof with a new or remanufactured equivalent
at no charge to the purchaser for parts or labor for the period(s) set forth below.
This warranty does not apply to any appearance items of the Product nor to the additional excluded item(s) set forth below
nor to any Product the exterior of which has been damaged or defaced, which has been subjected to improper voltage or
other misuse, abnormal service or handling, or which has been altered or modified in design or construction.
In order to enforce the rights under this limited warranty, the purchaser should follow the steps set forth below and provide
proof of purchase to the servicer.
The limited warranty described herein is in addition to whatever implied warranties may be granted to purchasers by law.
ALL IMPLIED WARRANTIES INCLUDING THE WARRANTIES OF MERCHANTABILITY AND FITNESS FOR USE ARE
LIMITED TO THE PERIOD(S) FROM THE DATE OF PURCHASE SET FORTH BELOW. Some states do not allow
limitations on how long an implied warranty lasts, so the above limitation may not apply to you.
Neither the sales personnel of the seller nor any other person is authorized to make any warranties other than those
described herein, or to extend the duration of any warranties beyond the time period described herein on behalf of Sharp.
The warranties described herein shall be the sole and exclusive warranties granted by Sharp and shall be the sole and
exclusive remedy available to the purchaser. Correction of defects, in the manner and for the period of time described
herein, shall constitute complete fulfillment of all liabilities and responsibilities of Sharp to the purchaser with respect to the
Product, and shall constitute full satisfaction of all claims, whether based on contract, negligence, strict liability or otherwise.
In no event shall Sharp be liable, or in any way responsible, for any damages or defects in the Product which were caused
by repairs or attempted repairs performed by anyone other than an authorized servicer. Nor shall Sharp be liable or in any
way responsible for any incidental or consequential economic or property damage. Some states do not allow the exclusion
of incidental or consequential damages, so the above exclusion may not apply to you.
THIS WARRANTY GIVES YOU SPECIFIC LEGAL RIGHTS. YOU MAY ALSO HAVE OTHER RIGHTS WHICH VARY
FROM STATE TO STATE.
Model Specific Section
Your Product Model Number & Description:
Warranty Period for this Product:
Additional Item(s) Excluded from Warranty Coverage
(if any):
Where to Obtain Service:
What to do to Obtain Service:
TO OBTAIN SUPPLY, ACCESSORY OR PRODUCT INFORMATION, CALL 1-800-BE-SHARP
SHARP ELECTRONICS CORPORATION
Sharp Plaza, Mahwah, New Jersey 07495-1163
System connections
Precautions
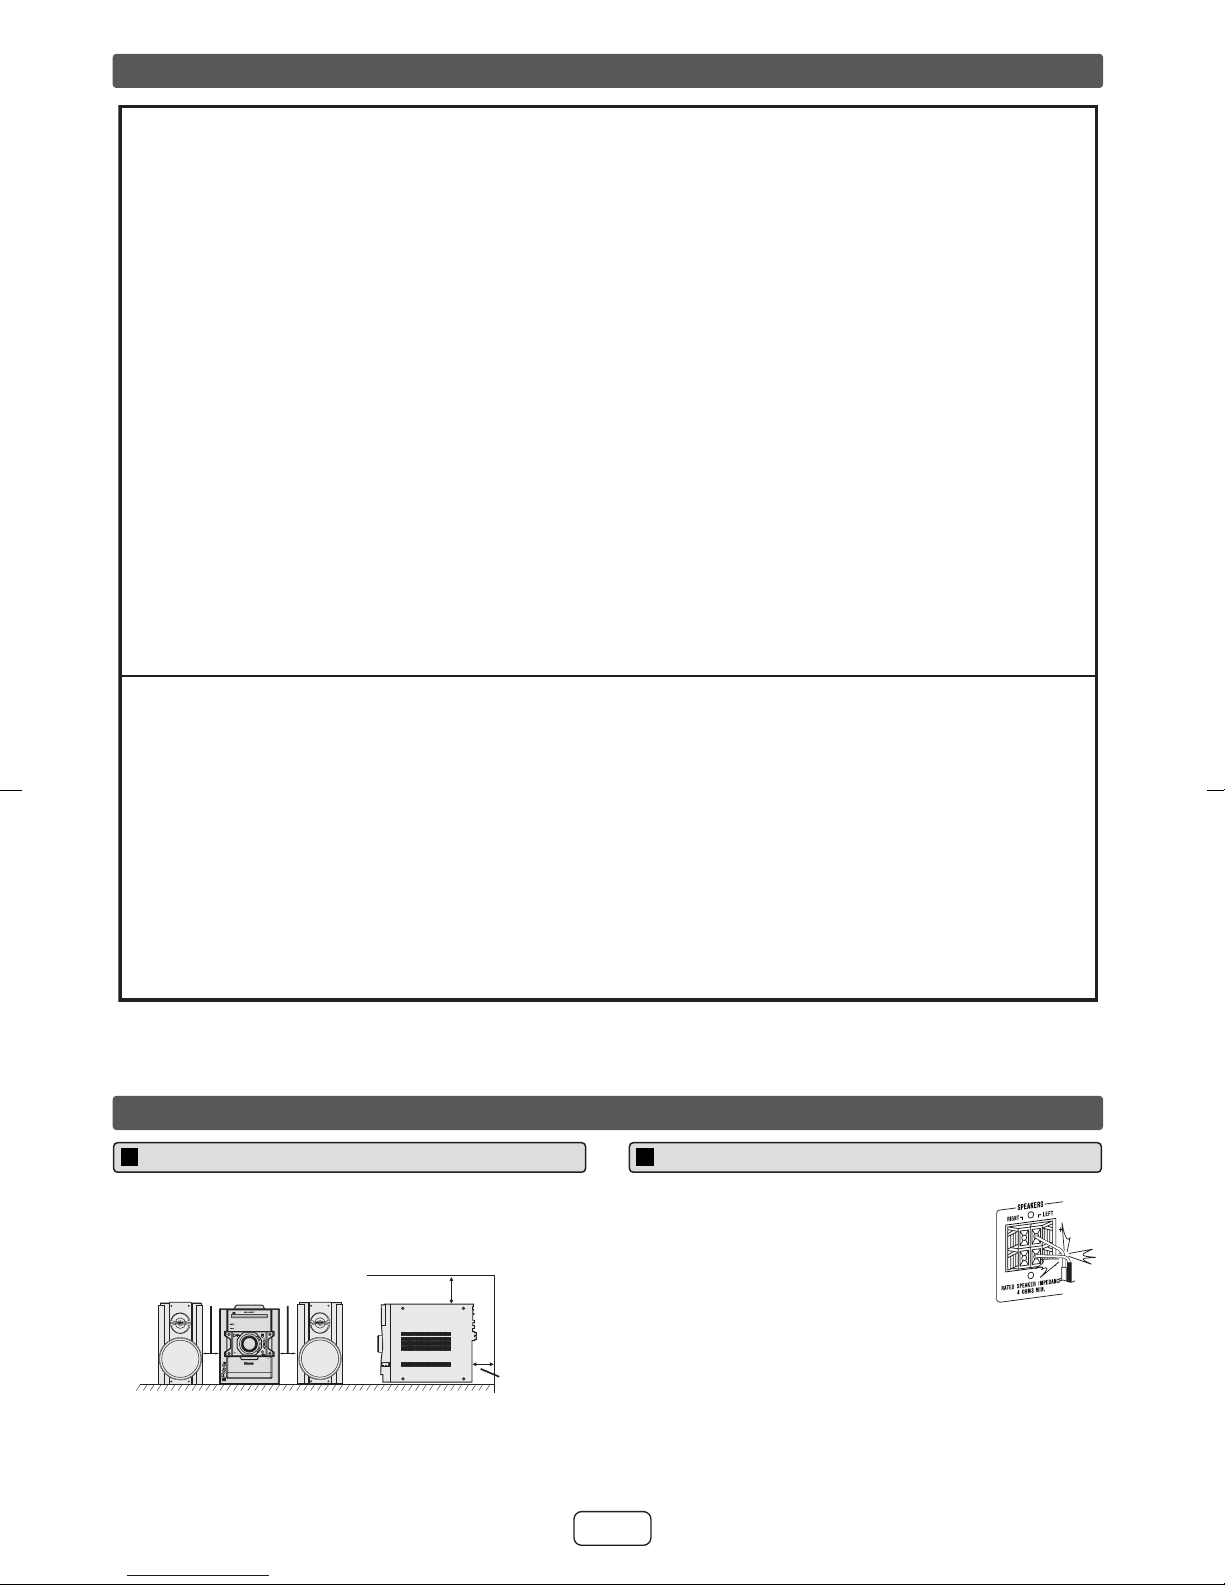
● Please ensure that the equipment is positioned in a
well ventilated area and ensure th at there is at least
(4") 10 cm of free space along the sides, top and back
of the equipment.
(4") 10 cm
MINI COMPONENT SYSTEM
CD-DH899
POWER
ON/STAND-BY
AUDIO IN
PHONES
(4") 10 cm
FUNCTION
VOL
PUSH
OPEN
4" (10 cm)
(4") 10 cm
CD-DH899N Mini Component System
(Be sure to have this information available when you need
service for your Product.)
One (1) year parts and labor from the date of purchase.
Non-functional accessories, supplies, and consumable
items.
At a Sharp Authorized Servicer located in the United States.
To find a location of the nearest Sharp Authorized Servicer,
call Sharp toll free at 1-800-BE-SHARP.
Ship prepaid or carry in your Product to a Sharp Authorized
Servicer. Be sure to have Proof of Purchase available. If
you ship the Product, be sure it is insured and packaged
securely.
Speaker connection
● Connect the black wire to the minus (–)
terminal, and the red wire to the plus (+)
terminal.
● Use speakers with an impedance of 4
ohms or more, as lower impedance
speakers can damage the unit.
● Do not make a mistake when connecting
Incorrect
the right and left speakers. The right
speaker is the one on the right side
when you face the unit.
● Do not let the bare speaker wires touch each other.
● Do not allow any objects to fall into or to be placed in
the bass reflex ducts.
● Do not stand or si t on th e speakers. You may be
injured.
E-1
Page 3
System connections (continued)
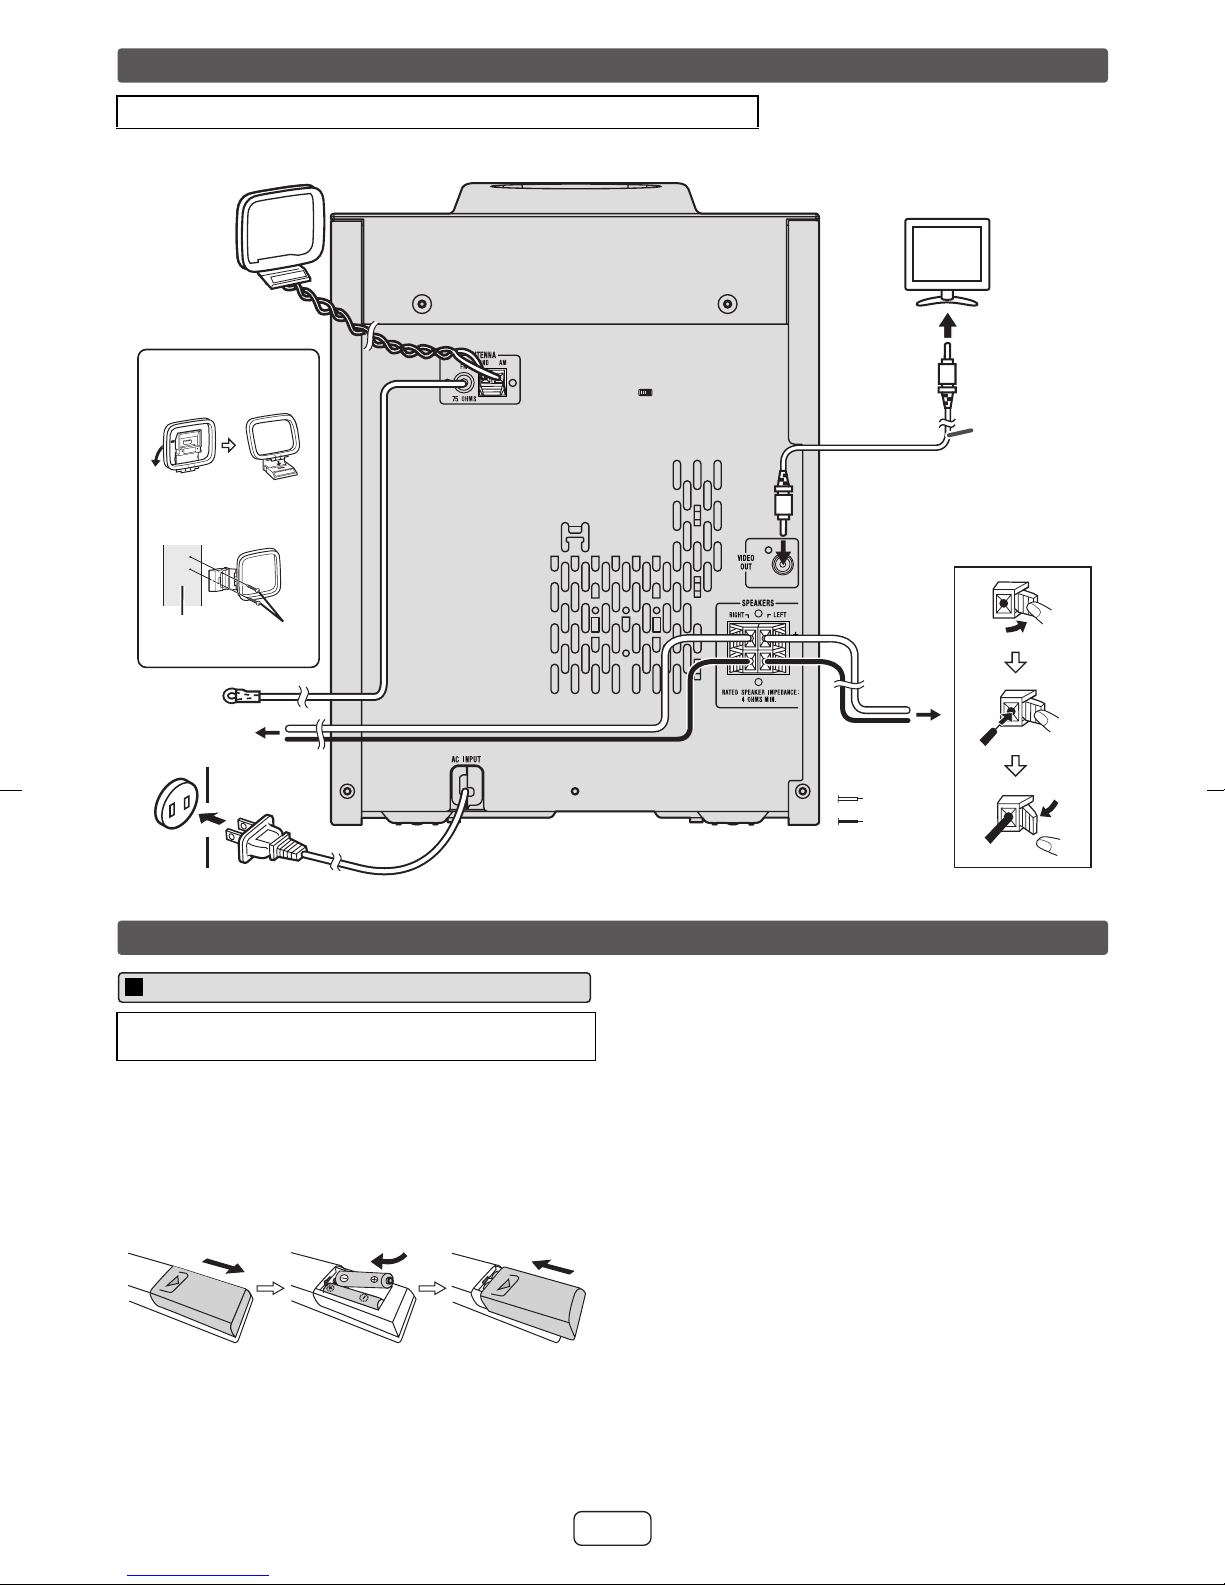
Make sure to unplug the AC power cord before ma king any connections.
AM loop antenna
TV
Installing the AM loop
antenna
< Assembling >
< Attaching to
the wall >
wall
FM antenna
Right speaker
AC outlet (AC 120 V ~ 60 Hz)
screws
(not supplied)
Remote control
Battery installation
Use 2 “AAA” size batteries (UM/SUM-4, R3, HP-16 or
similar). Batteries are not inc l uded.
Open the battery cover.
1
Insert the batteries according to the direction indicated
2
in the battery compartment.
When inserting or removing the batteries, push them
toward the (–) battery terminals.
Close the cover.
3
To video
input jack
Video cable
(not supplied)
Left
speaker
Red
Black
Caution:
● Replace all old batteries with new ones at th e same
time.
● Do not mix old and new batteries.
● Remove the batteries if the unit will not be used for a
long period of time. This will prevent potential damage
due to battery leakage.
● Do not use rechargeable batteries (nickel-cadmium
battery, etc.).
● Installing the batteries incorrectly may cause the unit to
malfunction.
● Batteries (battery pack or batteries installed) shall not
be exposed to excessive heat such as sunshine, fire or
the like.
Notes concerning use:
● Replace the batteries if the operating distance is
reduced or if the operation becomes erratic. Purchase
2 “AAA” size batteries (UM/SUM-4, R3, HP-16 or
similar).
● Periodically clean the transmitter on the remote control
and the sensor on the unit with a soft cloth.
● Exposing the sensor on the unit to strong light may
interfere with operation. Change the lighting or the
direction of the unit if this occurs.
● Keep the remote control away from moisture, heat,
shock, and vibrations.
E-2
Page 4
General control
MINI COMPONENT SYSTEM
CD-DH899
POWER
ON/STAND-BY
POWER
ON/STAND-BY
CD
USB
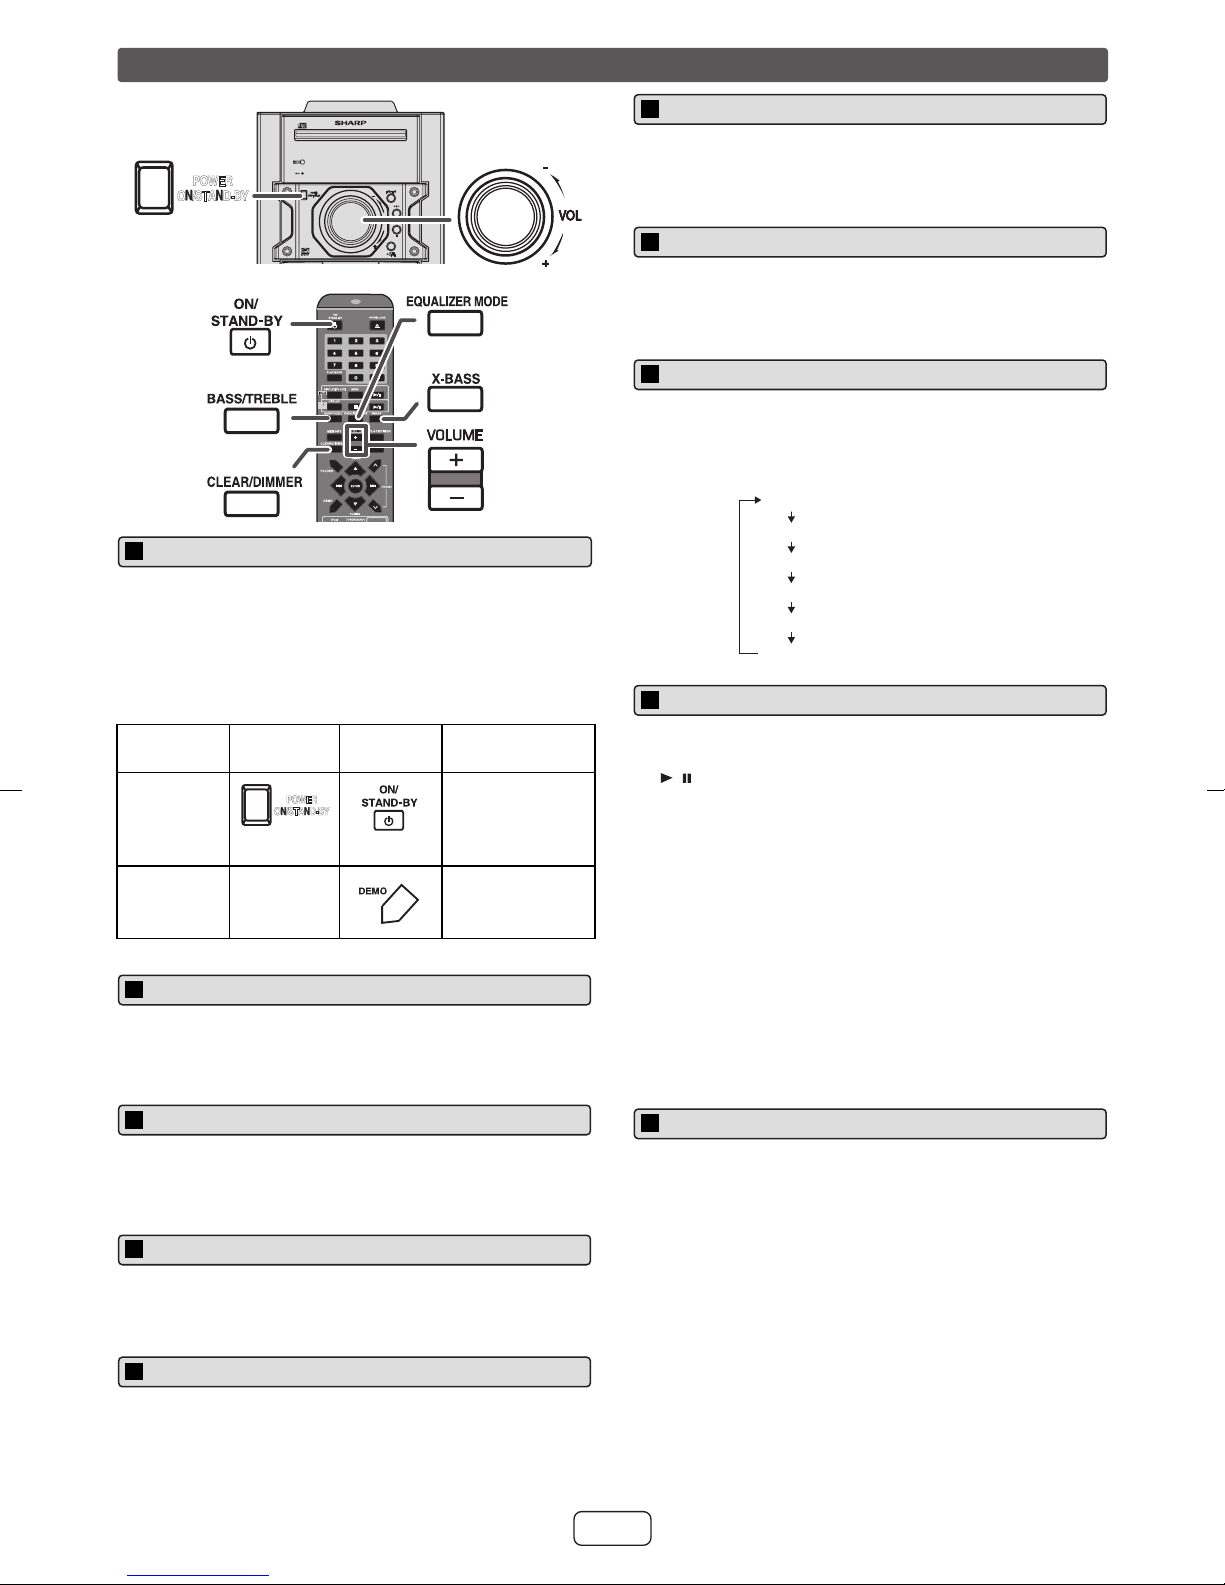
To turn the power on
The first time the unit is plugged in, the unit will enter the
demonstration mode.
1 Press the DEMO button to cancel the demonstration
mode.
2 Press the ON/STAND-BY button to turn the power on.
FUNCTION
VOL
TAPE
Bass control
1 Press the BASS/TREBLE button to select “BASS”.
2 Within 5 seconds, press the VOLUME (+ or –) button to
adjust the bass.
Treble control
1 Press the BASS/TREBLE button to select “TREBLE”.
2 Within 5 seconds, press the VOLUME (+ or –) button to
adjust the treble.
Equalizer
When the EQUALIZER MODE button is pressed, the
current mode setting will be displayed. To change to a
different mode, press the EQUALIZER MODE button
repeatedly until the desired sound mode appears.
No equalization.
FLAT
GAME
CLASSIC
POPS
VOCAL
JAZZ
No equalization.
For game.
For rock music.
For classical music.
For classical music.
For pop music.
For pop music.
Vocals are enhanced.
Vocals are enhanced.
For jazz.
For jazz.
Auto power on function
Function Main unit Remote
Operation
control
Power on /
off
POWER
ON/STAND-BY
Press to turn the
power on or to
go to stand-by
mode.
Demo on /
off
____
Press to enter to
demonstration
on or off mode.
Display brightness control
To dim the display brightness, hold down the CLEAR/
DIMMER button on the remote control for 2 seconds or
more.
Volume auto fade-in
If yo u tur n of f and on the main unit with the volume set to
27 or higher , the v olume starts at 16 and fades in to the last
set level.
Volume control
Turn the volume knob toward VOL +/– (on main unit) or
press VOLUME +/– (on remote control) to increase or
decrease the volume.
When you press any of these buttons during stand-by
mode, the unit turns on.
● / button on the main unit : The unit turns on and
playback of the last function will start (iPod, CD,
TUNER, USB, TAPE, AUDIO IN).
● iPod button on the remote control : The unit turns on
and iPod function is activated.
● CD button on the remote control : The unit turns on and
CD function is activated.
● TUNER button on the remote contr ol : The unit turns on
and TUNER function is activated.
● USB button on the remote control : The unit turns on
and USB function is activated.
● TAPE button on the remote control: The unit turns on
and TAPE fu
nction is
activated.
● AUDIO IN button on the remote control : The unit turns
on and AUDIO IN function is activated.
Auto power off function
In the stop mode of di sc, USB or tape operation, the main
unit enters the stand-by mode after 15 minutes of inactivity.
X-Bass control
When the power is first turned on, the unit will enter the
extra bass mode which emphasizes the bass frequencies,
and “X-BASS” will appear. To cancel the extra bass mode,
press the X-BASS button on the remote control.
E-3
Page 5
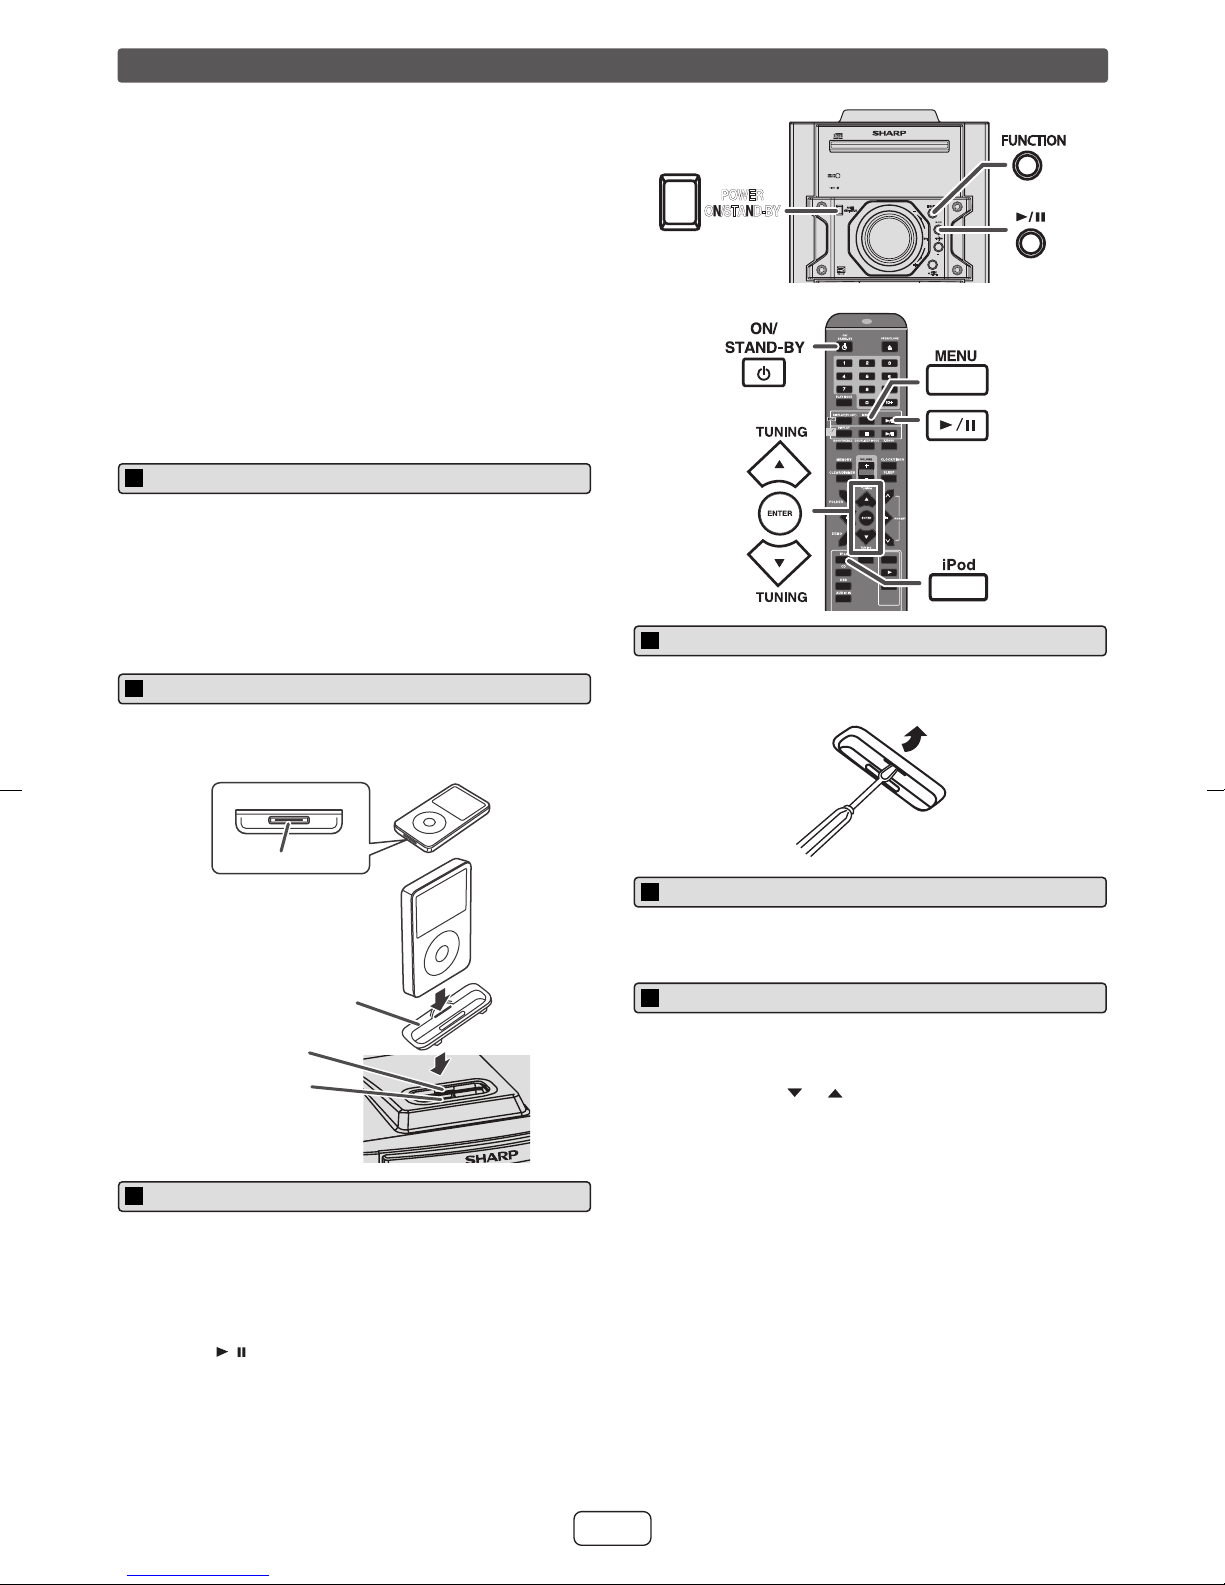
Listening to the iPod
Supported iPod models:
●
iPod nano (software 1.2 above)
●
iPod mini (software 1.2 above)
●
iPod (5th generation) (software 1.3 above) (Dock c onnector equipped
Click Wheel model)
●
iPod (4th generation) (software 3.0.2 above) (Dock connector
equipped Click Wheel model)
●
iPod nano (2nd generation) (software 1.0.0 above)
●
iPod nano (3rd generation) (software 1.0.3 above)
●
iPod nano (4th generation) (software 1.0.3 above)
●
iPod classic (software 1.0.3 above)
●
iPod touch (software 1.1 above)
●
iPod touch (2nd generation) (software 2.1 above)
Caution:
Please update your iPod unit to the latest software ver sion from Apple’s
homepage before using it.
iPod adaptor connection
Notes:
●
iPhone is not supported by this system.
●
You can use an audio cable to connect your iPod to the AUDIO IN
jack if:
1.
your iPod adaptor does not fit into the iPod do ck on the main unit.
2.
you have an iPod that does not have an iPod adaptor.
3.
you have an iPod that does not have an iPod 30 pin connector.
MINI COMPONENT SYSTEM
CD-DH899
POWER
ON/STAND-BY
POWER
ON/STAND-BY
CD
USB
TAPE
To remove iPod adaptor
FUNCTION
VOL
To insert iPod adaptor
1
Press the ON/STAND-BY button to turn the power on.
2
Insert the iPod adaptor into the iPod dock and connect your iPod.
iPod (bottom)
iPod
Dock connector
iPod adaptor
(not supplied)
iPod dock
iPod connector
iPod playback
1
Press the ON/STAND-BY button to turn the power on.
2
Press the iPod button on the remote control or FUNCTION button
repeatedly on the main unit to select iPod function.
3
Insert iPod unit in iPod dock of main unit.
4
Press the / button to start playback.
Notes:
●
Once the iPod is connected to the unit it will begin charging.
●
The iPod unit cannot be charged while the main unit is in the stand-
by mode or during USB mode.
●
Please make sure to set iPod unit to either NTSC or PAL to match
your TV signal. Please visit Apple’s homepage for further information.
Insert the tip of a screwdriv er (“–” type, small) into the iP od adaptor hole
as shown and lift upward to remove.
To disconnect iPod
Simply remov e the iP od fr om the iP od doc k. It i s saf e to do so ev en during
playback.
Navigating the iPod menus
1
Press the MENU button to view the menu on iPod unit. Press it
again to go back to previous menu.
2
Use the TUNING ( or ) button on the remote control to select
an item on the menu and then press ENTER button.
Note:
When navigating the iPod menus with remote con trol, do not operate any
of the buttons on the iPod unit. The volume level is adjusted by pressing
the VOL (+ or –) button on the main unit or the remote control. Adjusting
the volume on the iPod unit gives no effect.
iPod operation:
The operations described below depend on the generation iPod you are
using.
System on operation:
When the main unit is powered on, the iPod unit will automatically power
on when docked in the unit (including TIMER function/exclude USB
function).
System off (stand-by operation):
When the main unit is turned to stand-by mode, the docked iPod unit will
automatically turn to stand-by mode.
E-4
Page 6
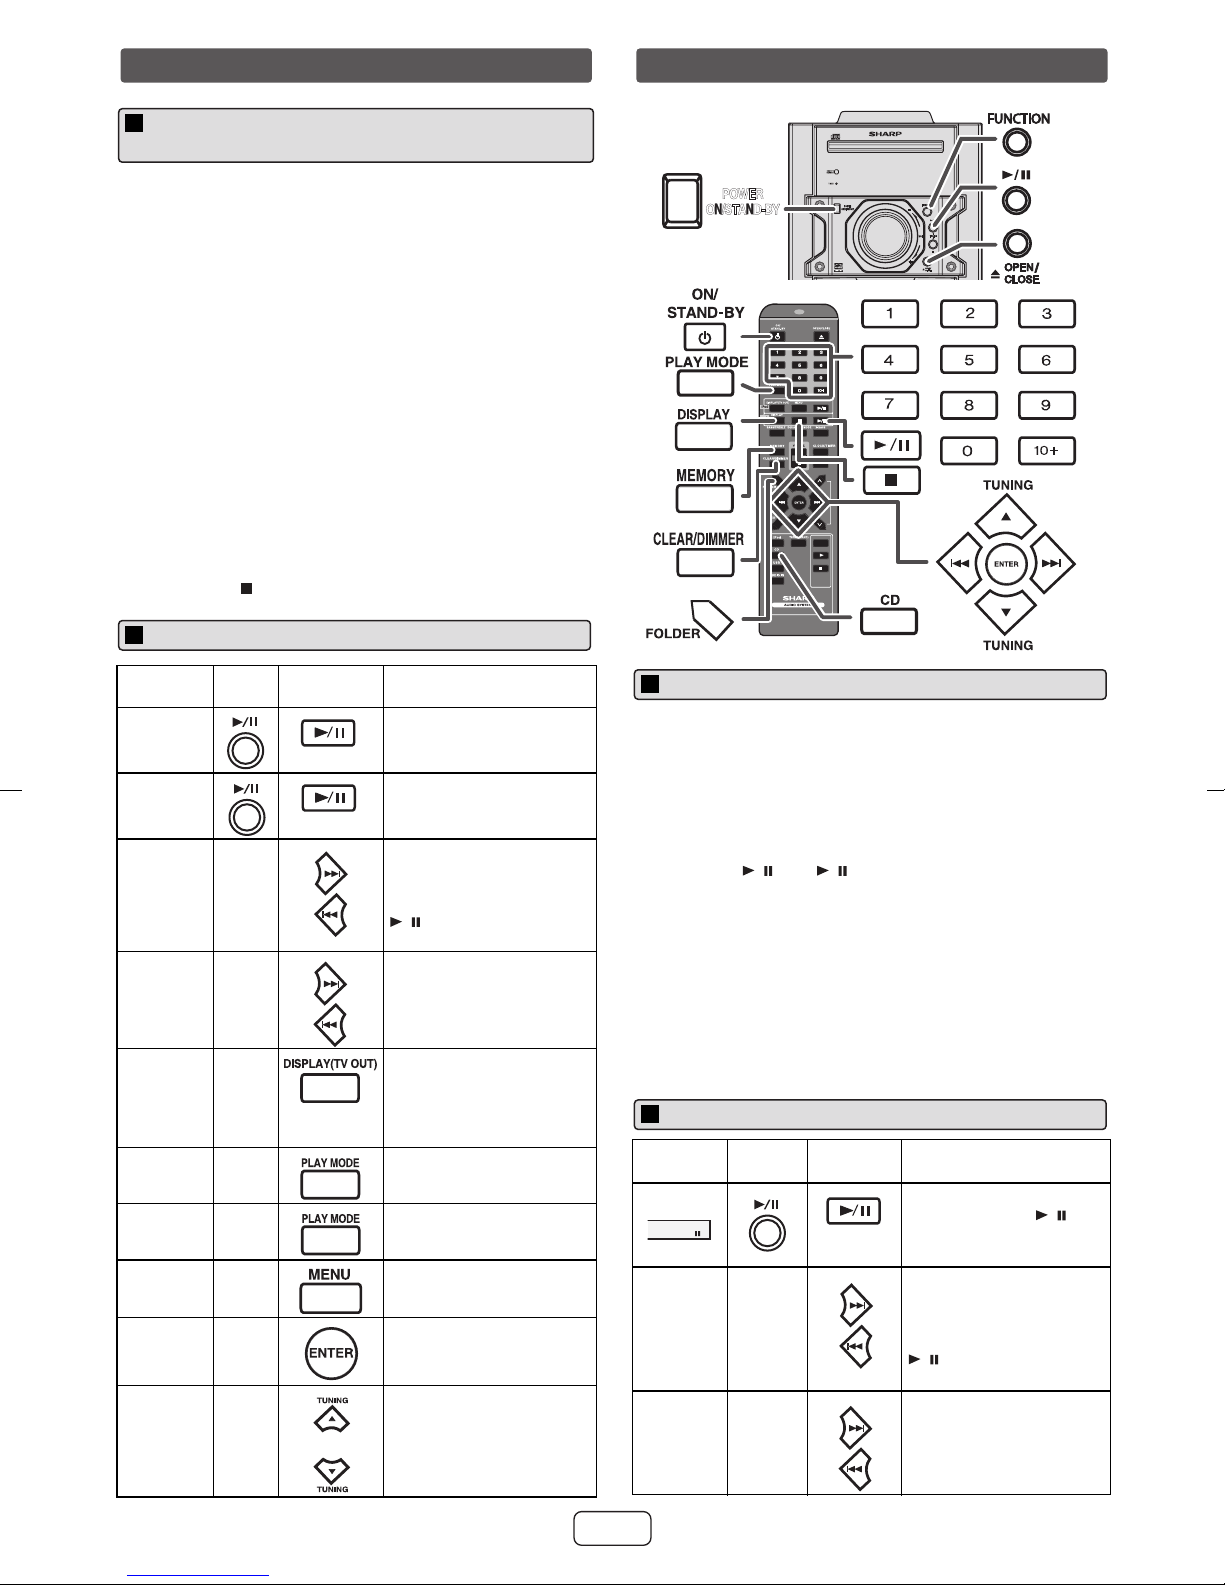
Listening to the iPod (continued)
Watching videos on a TV connected to
iPod
1
Press the DISPLA Y (TV OUT) button for more than 2 seconds.
“TV DISP” will appear on display.
2
Press the ENTER button to start playback.
Notes:
●
If the TV Out setting is already turned on at video menu, th e
video is automatically displayed on the TV screen when
ENTER key is pressed.
●
To return to watching video on iPod screen, press the MENU
button to enter video menu. Then press the DISPLAY (TV
OUT) button for more than 2 seconds until “iPodDISP”
appears.
●
During iPod video playback, pressing the DISPLAY (TV OUT)
button will not toggle video out display between iPod and TV.
iPod playback detection function:
Once the play button on the iPod unit is pressed, the main unit will
automatically change to iPod function overriding the previous
function selected.
Caution:
●
Unplug all accessories for the iPod before inserting it into the
iPod dock.
●
Stop button ( ) at main unit is invalid during iPod function.
Various iPod functions
Listening to a CD or MP3/ WMA di sc
MINI COMPONENT SYSTEM
CD-DH899
POWER
ON/STAND-BY
CD
USB
POWER
ON/STAND-BY
TAPE
FUNCTION
VOL
Function Main
unit
Play
Pause
Track up/
____
down
Fast
____
forward/
reverse
Display
Repeat
Shuffle
iPod
____
____
____
____
Menu
iPod
____
Enter
iPod
____
Cursor
Up/Down
Remote
control
Operation
Press in the pause mode.
Press in the playback
mode.
Press in the playback or
pause mode.
If you press the button in
the pause mode, press the
/ button to start the
desired track.
Press and hold down in the
playback mode.
Release the button to
resume playback.
iPod back light ON.
Press for more than 2
seconds to toggle the video
t display be
ou
tween iPod or
TV.
Press to toggle repeat
mode.
Press and hold down to
toggle shuffle mode.
Press to view the iPod
menu during iPod function.
Press to confirm the
selection.
Press to select the iPod
menu.
Disc playback
1
Press the ON/STAND-BY button to turn the power on.
2
Press the CD button on the remote co ntrol or FUNCTION
button repeatedly on the main unit to select CD function.
3
Press the OPEN/CLOSE button to open the disc tray.
4
Place the disc on the disc tray, label side up.
5
Press the OPEN/CLOSE button to close the disc tray.
6
Press the / (CD / ) button to start playback. After the
last track is played, the unit will stop automatically.
Notes for CD or MP3/WMA disc:
●
When the end of the last track is reached during fast forward,
“END” will appear on the display and CD operat ion will be
paused. When the beginning of the first track is reached
during fast reverse, the unit will enter the playback mode (only
for CD).
●
Rewritable multi-session discs with unfinished writing, can
still be played.
Various disc functions
Function Main
unit
Pause
Track up/
____
down
Fast
____
forward/
reverse
Remote
control
Operation
Press in the playback
mode. Press the /
button to resume playback
from the paused point.
Press in the playback or
stop mode.
If you press the button in
the stop mode, press the
/ button to start the
desired track.
Press and hold down in the
playback mode.
Release the button to
resume playback.
E-5
Page 7
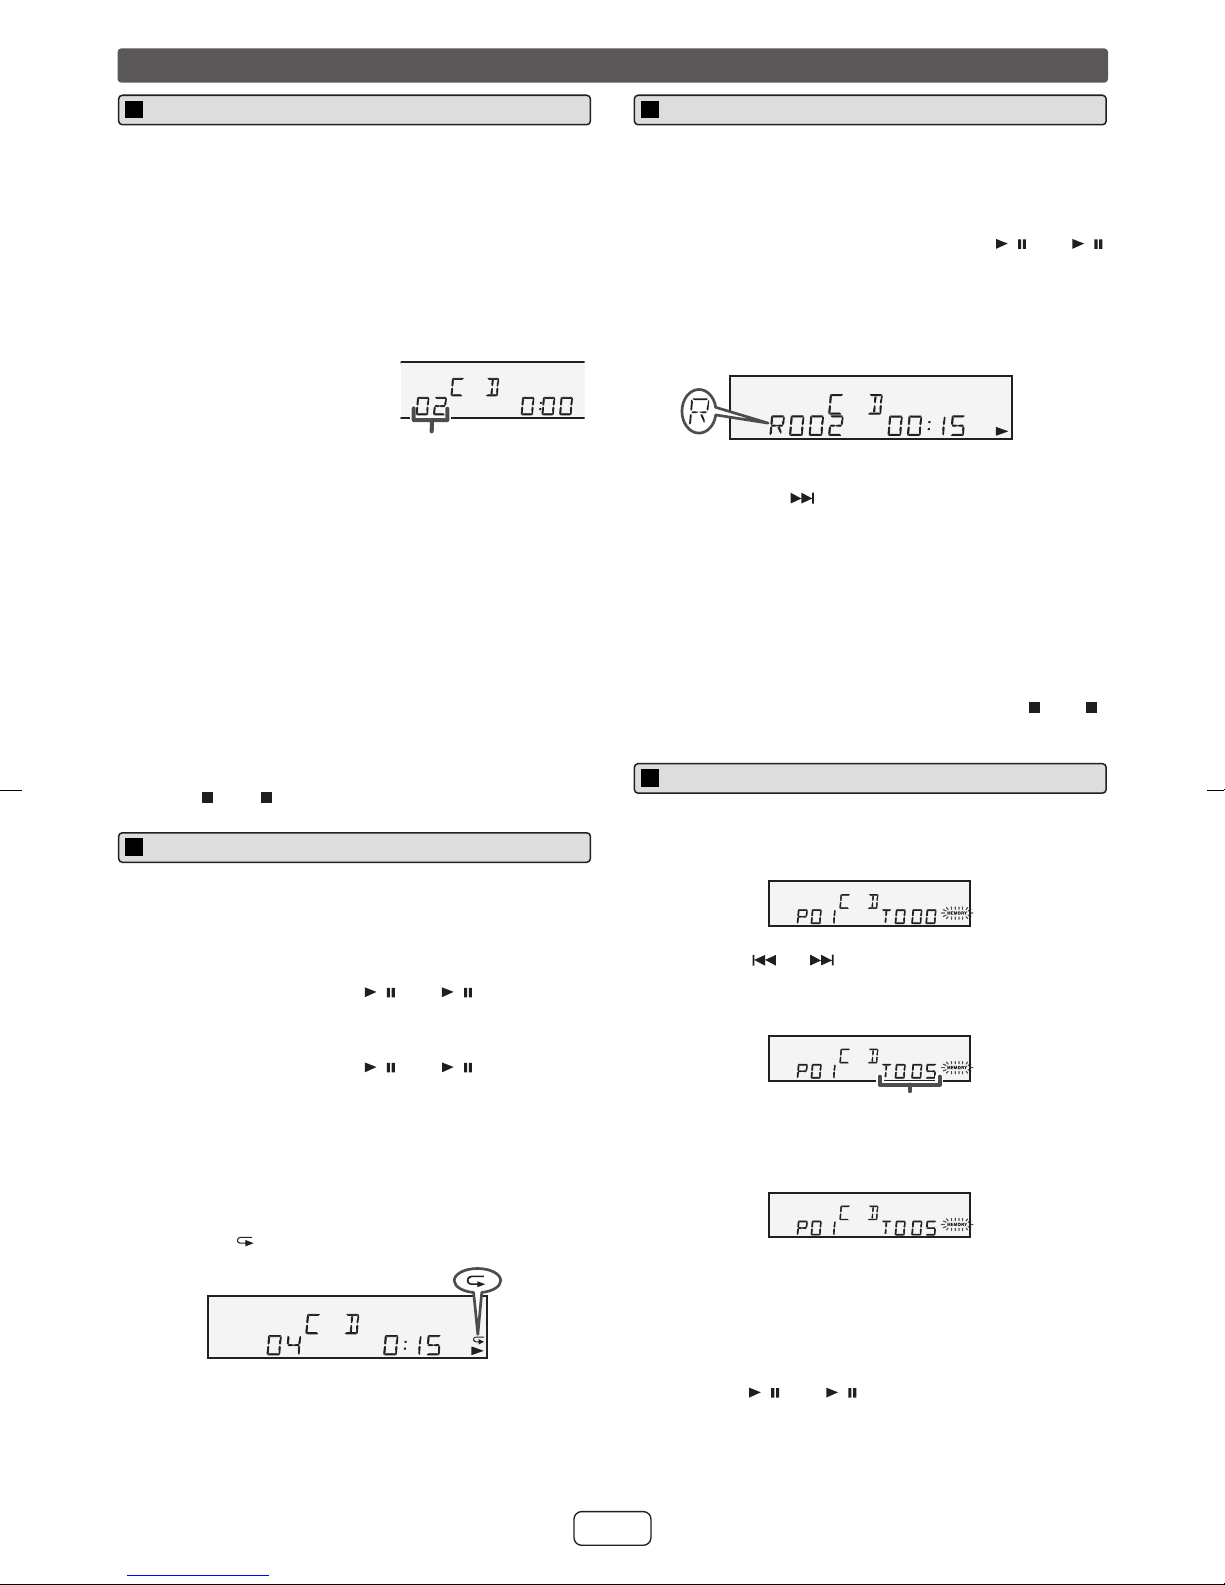
Listening to a CD or MP3/WMA disc (continued)
Direct track search
By using the Direct Search buttons, the desired tracks on
the current disc can be played.
Use the Direct Search buttons on the remote control to
select the desired track while playing the selected
disc.
● The Direct Search buttons allow you to select up to
number 9.
● When selecting number 10 or higher, use the “10+”
button.
A. For example, to choose 13
1 Press the “10+” button once.
2 Press the “1” button.
Selected track number
3 Press the “3” button.
B. For example, to choose 130
1 Press the “10+” button twice.
2 Press the “1” button.
3 Press the “3” button.
4 Press the “0” button.
Notes:
● A track number higher than the number of tracks on the
disc cannot be selected.
● During random play, direct search is not possible.
Random play
The tracks on the disc can be played in random order
automatically.
To random play all tracks:
Press and hold down PLAY MODE button on the remote
control until “RANDOM” appears. Press the / (CD / )
button.
To cancel random play:
Press and hold the PLAY MODE button until “NORMAL”
appears and “R” disappears.
Notes:
● If you press the button during random play, you can
move to the track selected next by the random
operation. On the other h and, the button does not allow
you to move to the previous track. The beginning of the
track being played will be located.
● In random play, the unit will select and play tracks
automatically. (You cannot
tracks
.)
Caution:
After performing repeat play, be sure to press the (CD )
button. Otherwise, the disc will play continuously.
select the order of the
To stop playback:
Press the (CD ) button.
Repeat play
Repeat play can play one tr ack, all tracks or a programmed
sequence continuously.
To repeat one track:
Press the PLAY MODE button repeatedly until “1REPEAT” appears. Press the / (CD / ) button.
To repeat all tracks:
Press the PLAY MODE button repeatedly until “ALL
REPEAT” appears. Press the / (CD / ) button.
To repeat desired tracks:
Perform steps 1 - 5 in “Progr ammed play” section on pages
6 - 7 and then press the PLAY MODE button repeatedly
until “ALL REPEAT” appears.
To cancel repeat play:
Press the PLAY MODE button repeatedly until “NORMAL”
appears and “ ” disappears.
Programmed play (CD)
1 While in the stop mode, press the MEMORY button on
the remote control to enter the programing sav e mode .
2 Press the or buttons on the remote control to
select the desired track.
Selected track number
3 Press the MEMORY button to save the tr ack number.
4 Repeat steps 2 - 3 for other tr acks. Up to 32 tracks can
be programmed. If you want to check the programmed
tracks, press the MEMORY button repeatedly. If you
make a mistake, the programmed tracks can be
cleared by pressing the CLEAR/DIMMER button.
5 Press the / (CD / ) button to start playback.
E-6
Page 8
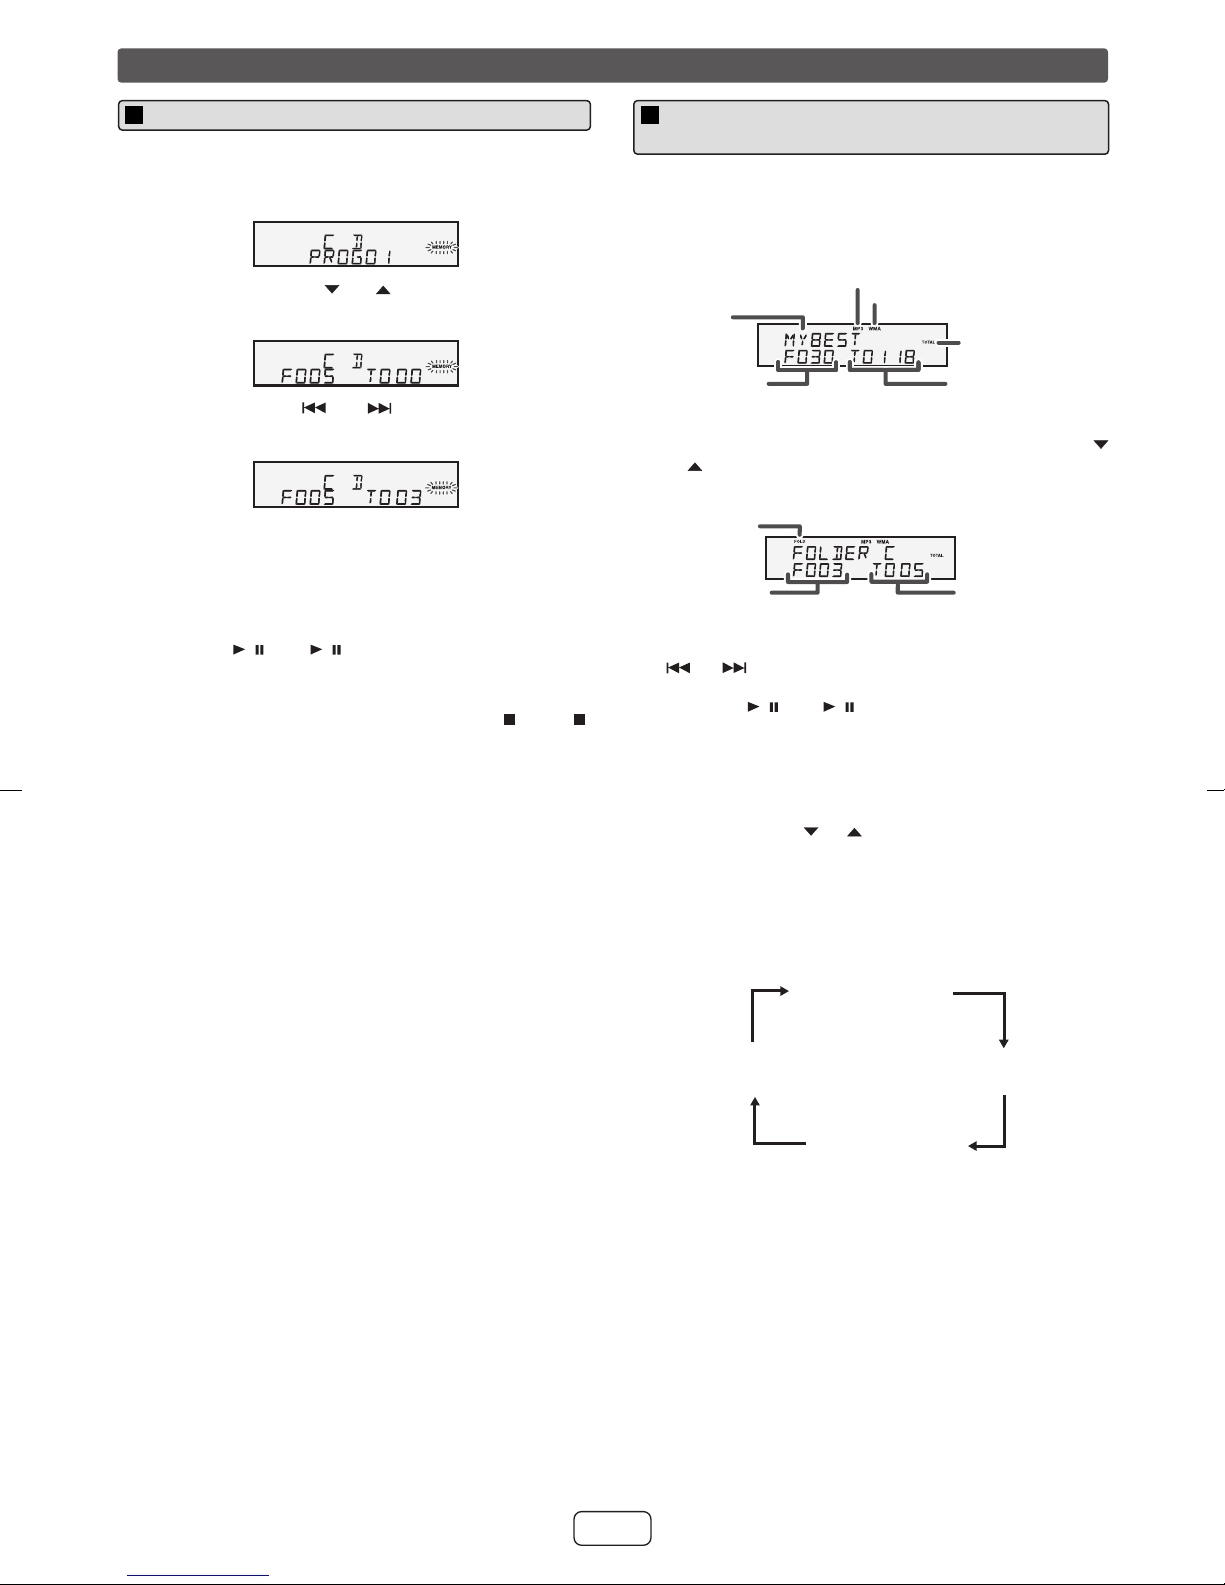
Listening to a CD or MP3/WMA disc (continued)
Programmed play (MP3/WMA)
1 While in the stop mode, press the MEMORY button to
enter the programing save mode.
2 Press the TUNING ( or ) button on the remote
control to select the desired folder.
Then press the or button on the remote
control to select the desired tracks.
3 Press the MEMORY button to save the folder and
track number.
4 Repeat steps 2 – 3 for other folder/tracks. Up to 32
tracks can be programmed.
5 Press the / (CD / ) button to start playback.
To cancel the programmed play mode:
During programmed stop mode, press the (CD )
button. The display will show “MEM CLEAR” and all the
programmed contents will be cleared.
Adding tracks to the program:
If a program has been previously stored, the “MEMORY”
indicator will be displayed. Then follow steps 1 - 3 to add
tracks. The new tracks will be stored after the last track o f
the previous program.
Notes:
● When a disc is ejected, the program is automatically
canceled.
● If you press the ON/STAND-BY button to enter the
stand-by mode or change the function from CD to
another, the programmed selections will be cleared.
● During the program operation, random play is not
possible.
Procedure to playback MP3/WMA disc
with folder mode on
To play back CD-R/RW.
1 Press the CD button, and load an MP3/WMA disc.
After disc is loaded, disc info will be displayed.
MP3 indicator
WMA indicator
Disc
Name
Total number
of folder
TOTAL indicator
Total number of
files
2 Press the FOLDER button, and press the TUNING (
or ) button on the remote control to select desired
playback folder. (Folder mode on)
FOLDER
indicator
FOLDER
number
First track
number in the
folder
3 Select desired file to be played back by pressing the
or button.
4 Press the / (CD / ) button. Playback will start and
file name will be displayed.
● Title, A rtist and Album name are displayed if they
are recorded on the disc.
● In c ase of playback with the folder mode on, press
the TUNING ( or ) button on the remote control,
and the folder can be selected even though it is in
playback/pause mode. It will continue playback/
pause mode in the 1st track of the selected folder.
● Display content can be changed by pressing the
DISPLAY button.
File name display
Album display
Title display
Artist display
Note:
If “NO SUPPORT” is displayed, it means “Copyright
protected WMA file” or “Not supported playback file” is
selected.
E-7
Page 9
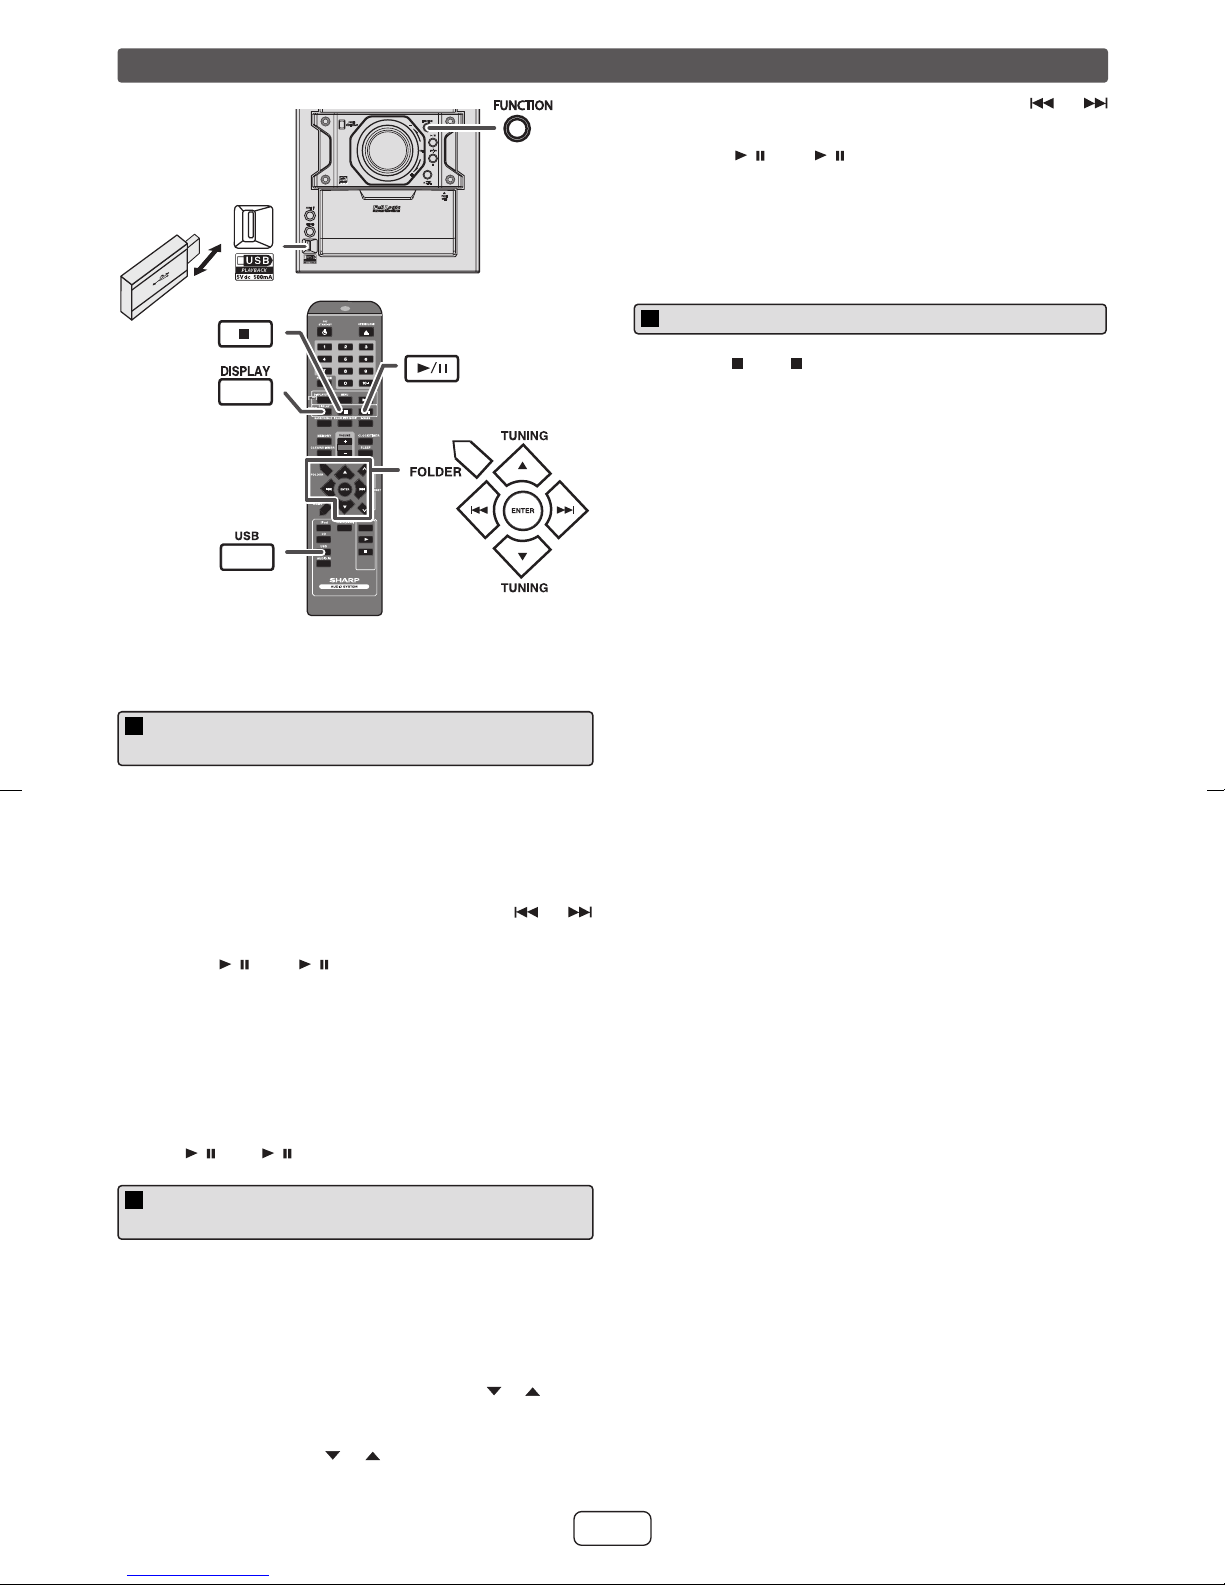
Listening to USB mass storage device/MP3 player
3
POWER
ON/STAND-BY
AUDIO IN
PHONES
CD
USB
FUNCTION
VOL
PUSH
OPEN
TAPE
Note:
This USB mass storage device or MP3 player is not compatible with MTP
and AAC file systems.
To playback USB/MP3 player with folder
mode off
1
Press the USB button on the remote control or FUNCTION button
repeatedly on main unit to select USB function. Connect the USB
memory device that has MP3/WMA format files on the unit. When the
USB memory is connected to the main unit, the device information
will be displayed.
2
Select desired file to be played back by pressing the or
button.
3
Press the / (USB / ) button. Playback will start and the file
name will be displayed.
●
Title, Artist and Album name are displayed if they are recorded
in the USB memory device.
●
Display content can be changed by pressing the DISPLAY
button.
Note:
To pause playback:
Press the / (USB / ) button.
To playback USB/MP3 player with folder
mode on
Select desired file to be played back by pressing the or
button.
4
Press the / (USB / ) button. Playback will start and the file
name will be displayed.
●
Title, Artist and Album name are displayed if they are recorded
in the USB memory device.
●
Display content can be changed by pressing the DISPLAY
button.
To remove USB memory device
1
Press the (USB ) button to stop playback.
2
Disconnect USB memory device from the USB terminal.
Notes:
●
SHARP will not be held liable for the loss of data while the USB
memory device is connected to the audio system.
●
This USB memory’s format supports FAT 16 or FAT 32.
●
SHARP cannot guarantee that all USB memory devices will work on
this audio system.
●
USB cable is not recommended for use in this audio system to
connect to USB memory device. Use of the USB cable will affect the
performance of this audio system.
●
This USB memory cannot be operated via USB hub or external HDD-
storage.
●
The USB terminal in this unit is not intended for a PC connection but
is used for music streaming with a USB memory device.
●
If unplayable file is played on this product, “NO SUPPORT” is
indicated.
●
This product relates to USB mass storage devices and MP3 players.
It may however face some irregularities due to various unforeseen
reasons from some devices. Should this happen, turn off the unit and
then turn it on again.
●
The USB port is only intended f or direct connection to a USB memory
device without any cable.
●
Playback order for MP3 files may differ depending on the writing
software used during file download.
●
Bitrate which is supported by MP3 is 32~320 kbps, WMA is 64~160
kbps.
●
Playlists are not supported on this unit.
●
This unit can display Folder Name or File Name up to 32 characters.
●
Folders with non playable files are also counted.
●
The display playback time may not be displayed correctly when
playing back a variable bitrate file.
●
The ID3TAG information supported are TITLE, ARTIST and ALBUM
only. Title name, artist name and album name can be displayed by
pressing the DISPLAY button during file playback or pause mode.
●
WMA meta tag also supports title, artist and album name which are
recorded in WMA files. Copyright protected WMA files cannot be
played back.
1
Press the USB button on the remote control or FUNCTION button
repeatedly on main unit to select USB function. Connect the USB
memory device that has MP3/WMA format files on the unit. When the
USB memory is connected to the main unit, the device information
will be displayed.
2
Press the FOLDER button, and press the TUNING ( or ) button
on the remote control to select desired playback folder. To start
playback with folder mode on, go to step 4. To change the playback
folder, press the TUNING ( or ) button on the remote control to
select another folder.
The following functions are the same as CD operations:
Direct track search . . . . . . . . . . . . . . . . . . . . . . . . . . . . . . . . . . . . . . . .6
Repeat play . . . . . . . . . . . . . . . . . . . . . . . . . . . . . . . . . . . . . . . . . . . . . .6
Random play. . . . . . . . . . . . . . . . . . . . . . . . . . . . . . . . . . . . . . . . . . . . .6
Programmed play. . . . . . . . . . . . . . . . . . . . . . . . . . . . . . . . . . . . . . . . . 6
Note:
If USB memory device is not connected, “NO MEDIA” will be shown on
the display.
E-8
Page 10
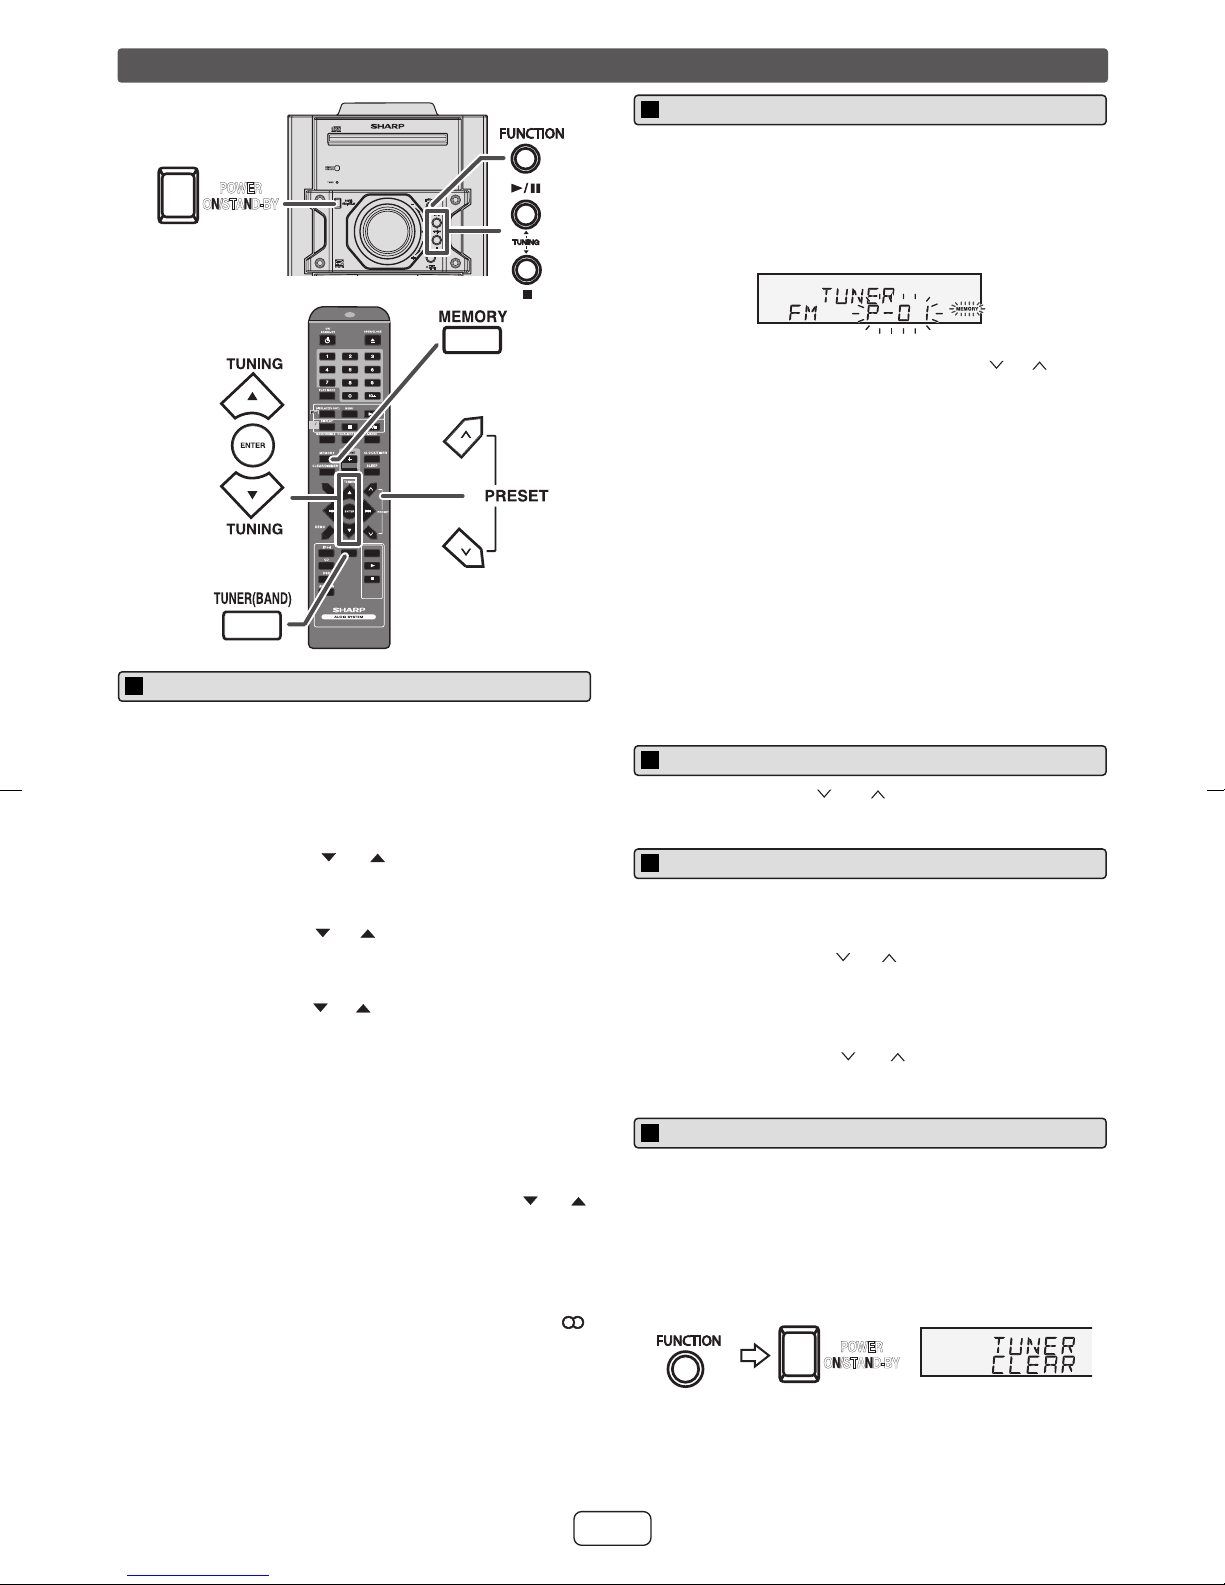
Listening to the radio
MINI COMPONENT SYSTEM
CD-DH899
POWER
ON/STAND-BY
POWER
ON/STAND-BY
CD
USB
Memorising a station
You can store 40 AM and FM stations in memory and recall
them at the push of a button. (Preset tuning)
FUNCTION
VOL
1 Perform steps 1 - 3 in “Tuning”.
2 Press the MEMORY button.
3 Within 30 seconds, press the PRESET ( or ) button
to select the preset channel number. Store the stations
in memory, in order, starting with preset channel 1.
4 Within 30 seconds, press the MEMORY button to store
that station in memory. If the “MEMORY” and preset
number indicators disappear before the station is
memorized, repeat the operation from step 2.
TAPE
Tuning
1 Press the ON/STAND-BY button to turn the power on.
2 Press the FUNCTION button on the main unit or
TUNER (BAND) button on the remote control
repeatedly to select the desired frequency band (FM
stereo, FM mono or AM).
3 Press the TUNING ( or ) button to tune in to the
desired station.
Manual tuning:
Press the TUNING ( or ) button repeatedly to tune
in to the desired station.
Auto tuning:
When the TUNING ( or ) button is pressed for more
than 0.5 seconds, scanning will start automatically and
the tuner will stop at the first receivable broadcast
station.
Notes:
● When radio interference occurs, auto scan tuning may
stop automatically at that point.
● Auto scan tuning will skip weak signal stations.
● To stop the auto tuning, press the TUNING ( or )
button again.
To receive an FM stereo transmission:
● Press the FUNCTION button on main unit or TUNER
(BAND) button on remote control repeatedly to select
stereo mode and “ST” indicator will be displayed. “ ”
will appear when an FM broadcast is in stereo.
● If the FM reception is weak, press the TUNER (BAND)
button to extinguish the “ST” indicator. The reception
changes to monaural, and the sound becomes clearer.
5 Repeat steps 1 - 4 to set other stations, or to change a
preset station. When a new station is stored in the
memory, the station previously memorized for that
preset channel number will be erased.
Note:
The backup function protects the memorized stations for a
few hours should there be a power f ailure or the AC power
cord become disconnected.
To recall a Memorized station
Press the PRESET ( or ) button for less than 0.5
seconds to select the desired station.
To scan the preset stations
The stations saved in the memory can be scanned
automatically. (Preset memory scan)
1 Press the PRESET ( or ) button for more than 0.5
seconds. The preset number will flash and the
programmed stations will be tuned in sequentially, f or 5
seconds each.
2 Press the PRESET ( or ) button again when the
desired station is located.
To erase entire preset memory
1 Press the ON/STAND-BY button to enter the stand-by
mode.
2 While pressing down the FUNCTION button, press the
POWER ON/STAND-BY button until “TUNER CLEAR”
appears.
POWER
ON/STAND-BY
E-9
Page 11
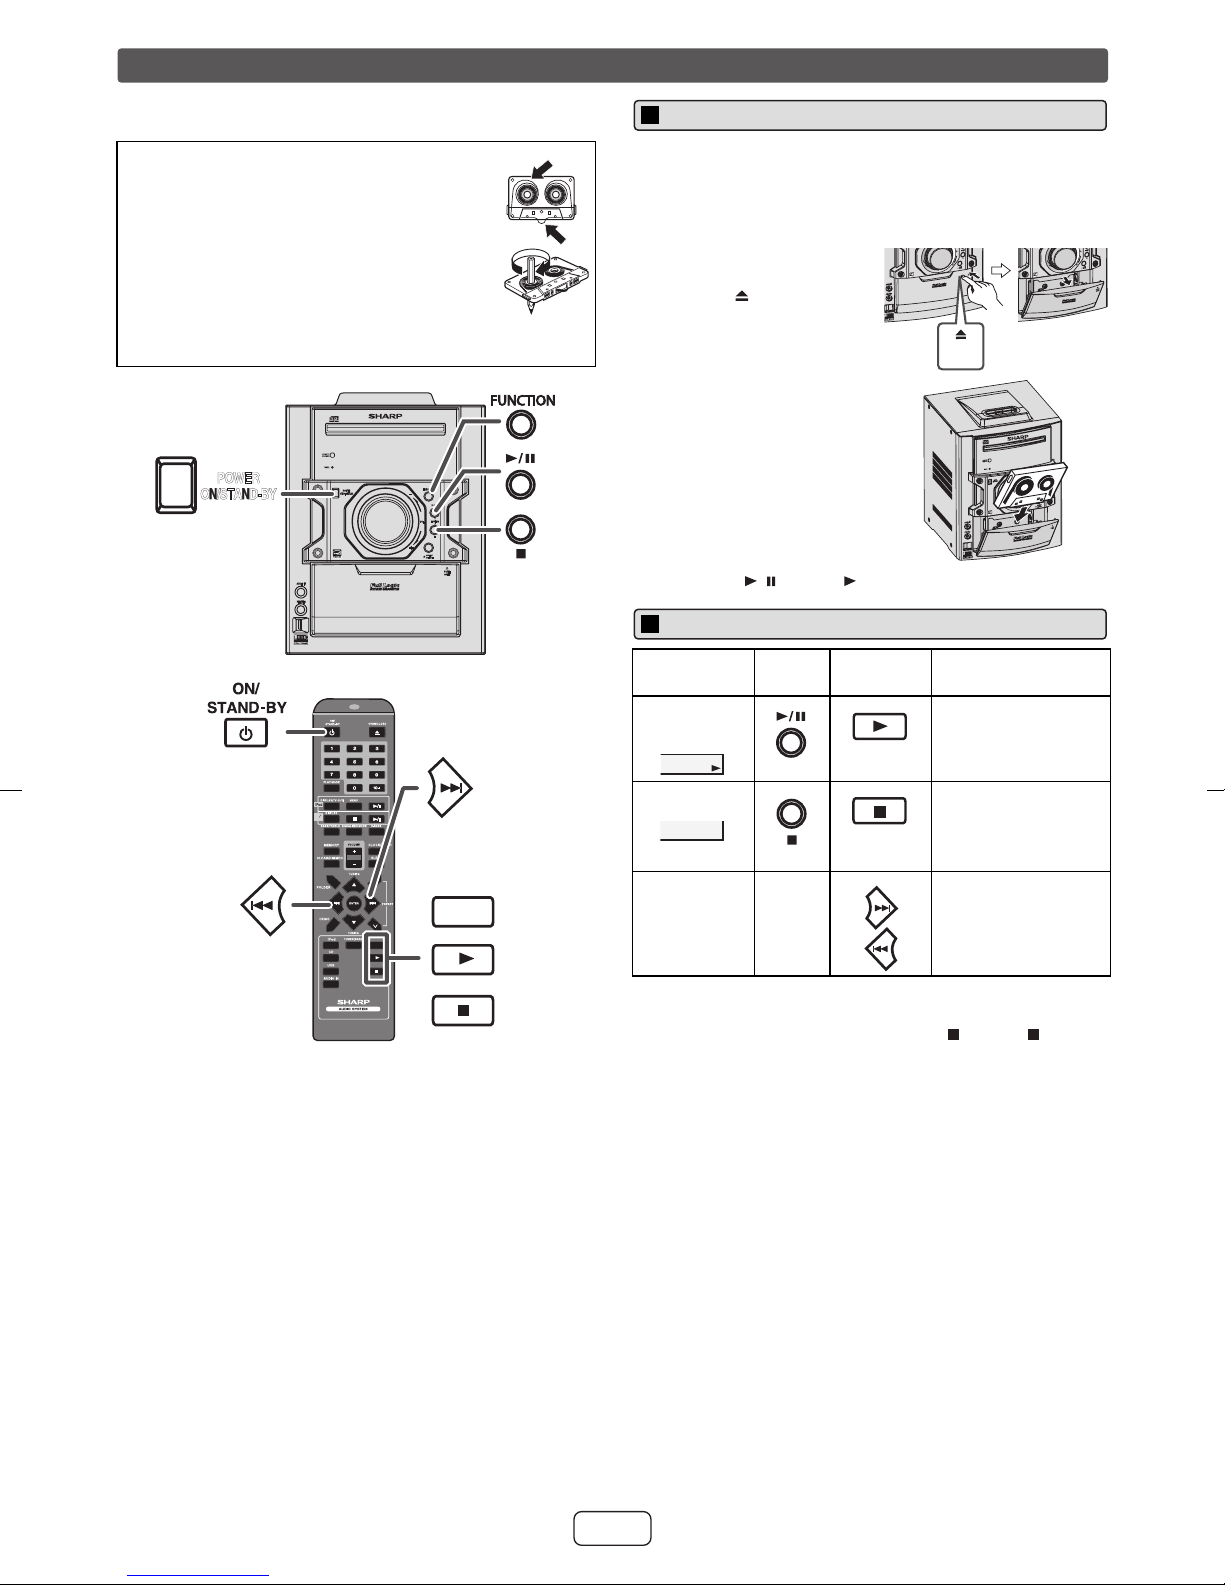
Listening to a cassette tape
Note:
Tape recording function is not available in this unit.
Before playback:
● For playback, use normal or low-noise
tapes for the best sound. (Metal or
tapes are not recommended.)
CrO
2
● Do not use C-120 tapes or poor-quality
tapes, as they may cause malfunctions.
● Before loading a tape into the cassette
compartment, tighten the slack with a pen
or a pencil.
MINI COMPONENT SYSTEM
CD-DH899
POWER
ON/STAND-BY
POWER
ON/STAND-BY
AUDIO IN
PHONES
FUNCTION
VOL
PUSH
OPEN
Tape playback
1 Press the ON/STAND-BY button to turn the power on.
2 Press the FUNCTION button on main unit repeatedly
or TAPE button on remote control to select TAPE
function.
3 Open the cassette door
by pushing the area
marked “ PUSH OPEN”.
OL
V
O IN
AUDI
ES
PHON
PUSH
OPEN
VOL
4 Load a cassette into the
cassette compartment.
STEM
SY
ONENT
P
COM
H899
CD-D
MINI
N
O
TI
NC
U
F
ER
W
O
P
Y
-B
D
N
A
T
/S
N
O
VOL
OPEN/
CLOSE
O IN
AUDI
ES
PHON
5 Press the / (TAPE ) button to start playback.
Various tape functions
PUSH
OPEN
Function Main
unit
Tape
playback
Remote
control
Operation
Press in the stop
mode.
Stop Press in the
CD
USB
playback, fast
forward or fast
rewind mode.
TAPE
Fast
forward/
TAPE
Fast rewind
____ Press in the
playback or stop
mode.
Caution:
● To remove the cassette, press the (TAPE ) button,
and then open the compartment.
● If a power failure occurs during tape operation, the tape
head will remain engaged with the tape and the
cassette door will not open. In this case, wait until the
power is restored.
E-10
Page 12
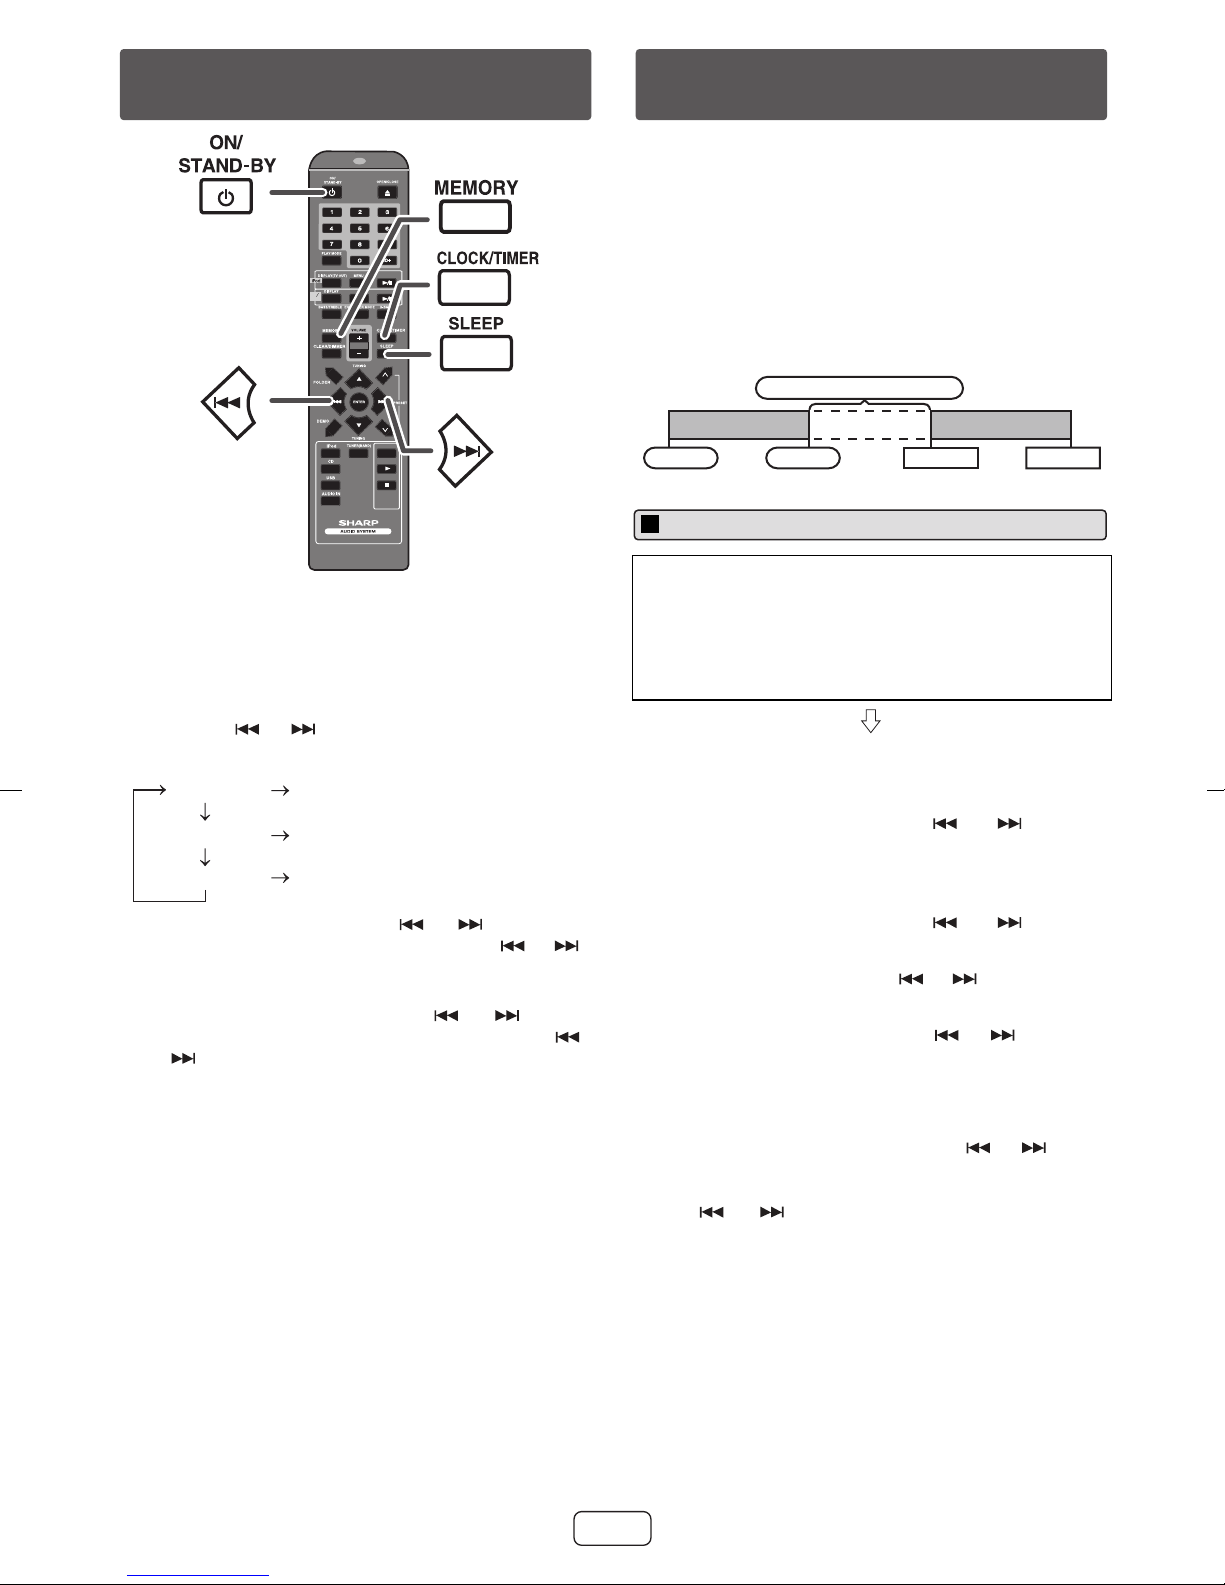
Setting the clock (Remote control
only)
Timer and sleep operation (Remote
control only)
Once timer:
Once timer play works for one time only at a preset time.
Daily timer:
Daily timer play works at the same preset time every day.
For example, set the timer as a wake-up call every
morning.
CD
USB
TAPE
In this example, the clock is set for the 12-h our (AM 12:00)
display.
1 Press the ON/STAND-BY button to turn the power on.
2 Press the CLOCK/TIMER button.
3 Within 10 seconds, press the MEMORY button.
Press the or button to select 12-hour or
24-hour display and then press the MEMORY button.
“AM 12:00”
“AM 0:00”
“0:00”
The 12-hour display will appear.
(AM 12:00 - PM 11:59)
The 12-hour display will appear.
(AM 0:00 - PM 11:59)
The 24-hour display will appear.
(0:00 - 23:59)
4 To adjust the hour, pr e ss the or button and
then press the MEMOR Y button. Press the or
button once to advance the time by 1 hour. Hold it
down to advance continuously.
5 To adjust the minutes, press the or button
and then press the MEMORY button. Press the
or button once to advance the time by 1 minute.
To confirm the time display:
Press the CLOCK/TIMER button. The time display will
appear for about 5 seconds.
Note:
The “CLOCK” will appear or time will be displayed when
the AC power supply is restored after a power failure or
unplugging the unit. If incorrect, readjust the clock as
follows.
To readjust the clock:
Perform “Setting the clock” from step 1. If the “CLOCK”
does not appear in step 2, step 3 (for selecting the 12-hour
or 24-hour display) will be skipped.
To change the 12-hour or 24-hour display:
1 Clear all the programmed contents. [Refer to “Factory
reset, clearing all memory” on page 14 for details.]
2 Perform “Setting the clock” from step 1 onwards.
Using the once timer and daily timer in combination:
For example, use the once timer to listen a radio program,
and use the daily timer to wake up.
1 minute or more
Daily timer
Start
Stop
Once timer
Start
Stop
Timer playback
Before setting timer:
● Check that the clock is set to the correct time (refer to
page 11). If it is not set, you cannot use the timer
function.
● For timer playback: Plug in USB or load disc/cassette
or dock iPod to be played.
1 Press the ON/STAND-BY button to turn the power on.
2 Press and hold the CLOCK/TIMER button.
3 Within 10 seconds, press the or button to
select “ONCE SET” or “DAILY SET”, and press the
MEMORY button. Set the clock to the correct time if
“ONCE SET” or “DAILY SET” does not appear.
4 Within 10 seconds, press the or button to
select “TIMER SET”, and press the MEMORY button.
5 To adjust the hour, press the or button and then
press the MEMORY button.
6 To adjust the minutes, press the or button and
then press the MEMORY button.
7 Set the time to finish as in steps 5 and 6 above.
8 To select the timer playback source (CD, TUNER, USB,
iPod, TAPE or AUDIO IN), press t he or button.
Press the MEMORY button.
When you select the tuner, select a station by pressing
the or button, and then press the MEMORY
button. If a station has not been programmed, “NO
PRESET” will be displayed and timer setting will be
canceled.
9 Adjust the volume using the VOLUME control, and then
press the MEMORY button. Do not turn the volume up
too high.
10 Press the ON/STAND-BY button to enter the power
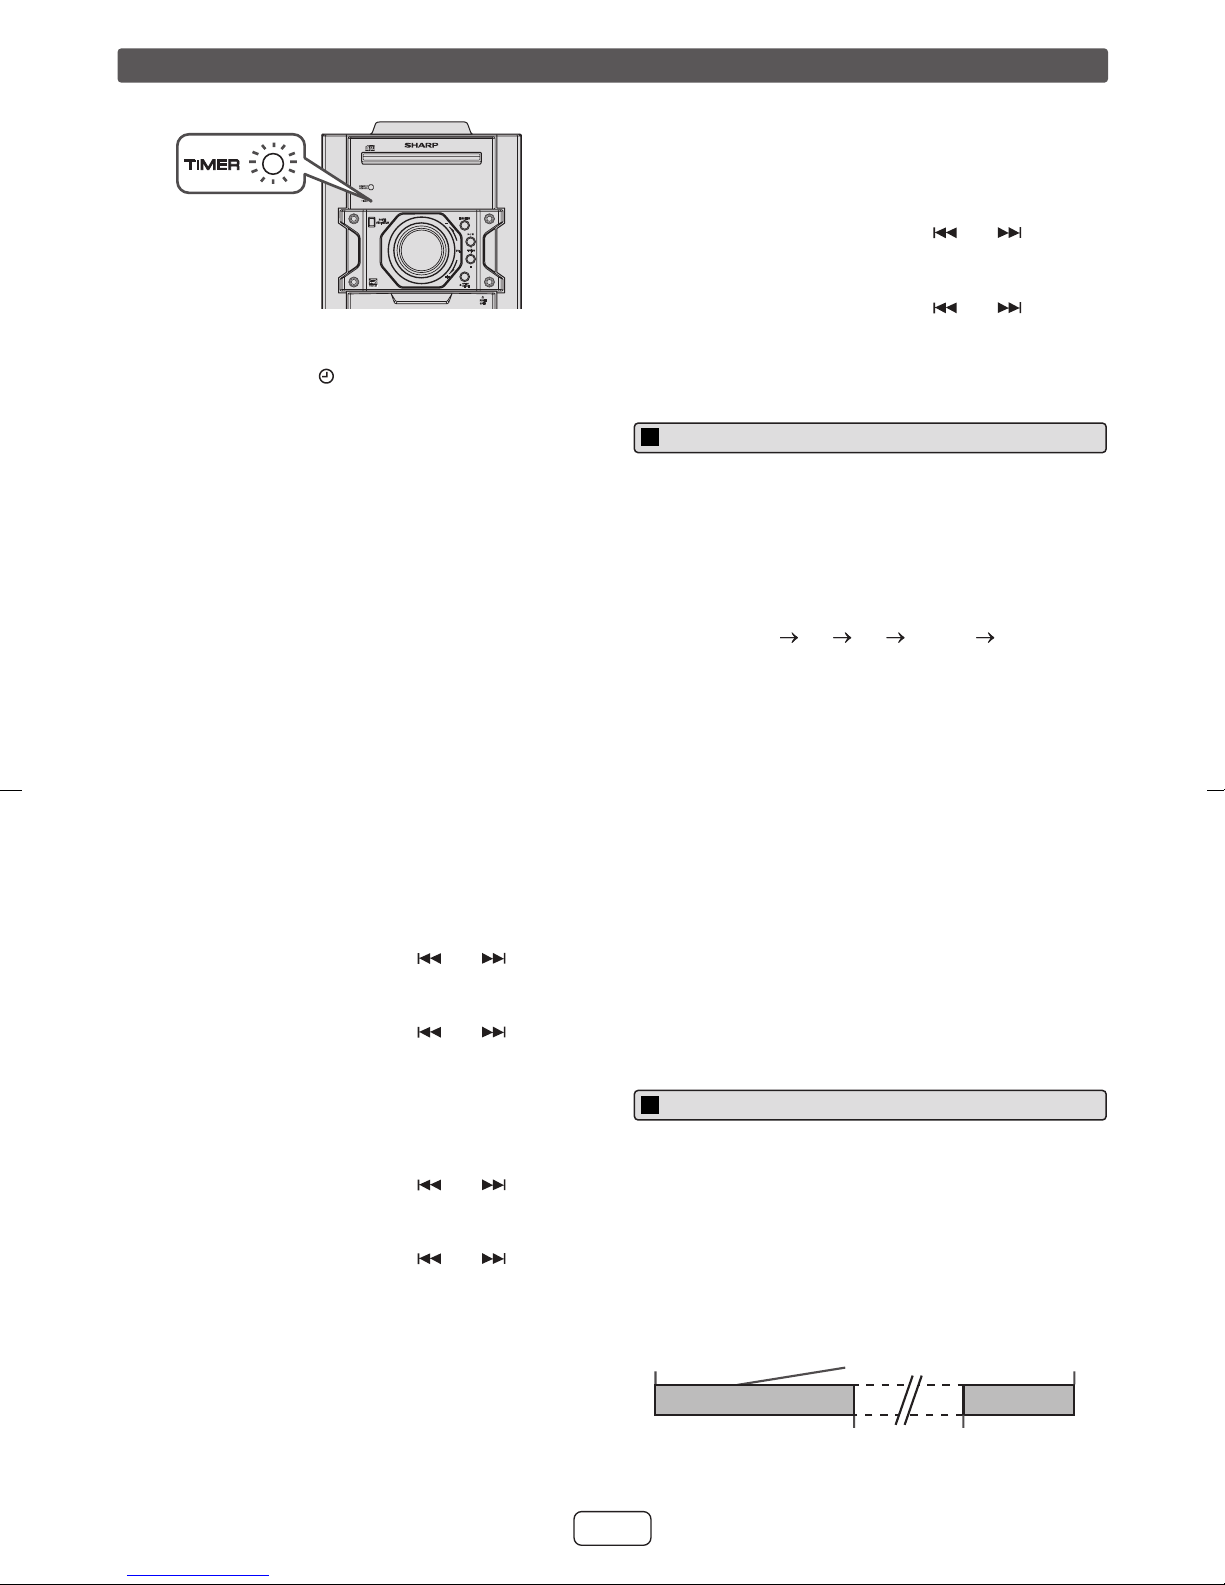
stand-by mode. The “TIMER” indicator lights up and
the unit is ready for timer playback.
E-11
Page 13
Timer and sleep operation (Remote contr ol only) (continued)
Reusing the memorized timer setting:
The timer setting will be memorized once it is entered. To
reuse the same setting, perform the following operations.
MINI COMPONENT SYSTEM
CD-DH899
POWER
ON/STAND-BY
FUNCTION
VOL
PUSH
OPEN
11 When the preset time is reached, playback will start.
The volume will increase gradually until it reaches the
preset volume. The “ ” indicator will blink during timer
playback.
The “DAILY” indicator will blink during timer playback.
12 When the timer end time is reached, the system will
enter the power stand-by mode automatically.
Once timer:
The timer will be canceled.
Daily timer:
The timer operates at the same time every day. It will
continue until the daily timer setting is canceled. Cancel
the daily timer when it is not in use.
1 Turn the power on and press and hold down the
CLOCK/TIMER button.
2 Within 10 seconds, press the or button to
select “ONCE SET” or “DAILY SET”, and press the
MEMORY button.
3 Within 10 seconds, press the or button to
select “TIMER ON”, and press the MEMORY button.
4 Press the ON/STAND-BY button to enter the power
stand-by mode.
Sleep operation
The radio, compact disc, iPod and USB can all be turned
off automatically.
1 Play back the desired sound source.
2 Press the SLEEP button.
3 Within 10 seconds, press the SLEEP button repeatedly
to select the time.
10 20 30 ....... 80 90
Notes:
● When performing timer playback using another unit
connected to the USB terminal or AUDIO IN jack, select
“USB” or “AUDIO IN” in step 8.
● This unit will turn on or enter the power stand-by mode
automatically. However, the connected unit will not turn
on or off. To stop the timer playback, follow step
“Canceling the timer setting” of this page.
Checking the timer setting:
1 Turn the power on and press and hold down the
CLOCK/TIMER button.
2 Within 10 seconds, press the or button to
select “ONCE SET” or “DAILY SET”, and press the
MEMORY button.
3 Within 10 seconds, press the or button to
select “TIMER CALL”, and press the MEMORY button.
Canceling the timer setting:
1 Turn the power on and press and hold down the
CLOCK/TIMER button.
2 Within 10 seconds, press the or button to
select “ONCE SET” or “DAILY SET”, and press the
MEMORY button.
3 Within 10 seconds, press the or button to
select “TIMER OFF”, and press the MEMORY button.
Timer will be canceled (the setting will not be
canceled).
4 “SLEEP” will appear.
5 The unit will enter the power stand-by mode
automatically after the preset time has elapsed. The
volume will be tur ned down 1 m inute before the sleep
operation finishes.
To confirm the remaining sleep time:
1 While “SLEEP” is indicated, press the SLEEP button.
To cancel the sleep operation:
Press the ON/STAND-BY button while “SLEEP” is
indicated. To cancel the sleep operation without setting the
unit to the stand-by mode, proceed as follows.
1 While “SLEEP” is indicated, press the SLEEP button.
2 Within 10 seconds, press the SLEEP button repeatedly
to select “SLEEP 00”.
To use timer and sleep operation together
Sleep and timer playback:
For example, you can fall asleep listening to the radio and
wake up to CD in the next morning.
1 Set the sleep time (see above, steps 1 - 5).
2 While the sleep timer is set, set the timer playback
(steps 2 - 9, page 11).
Sleep timer
setting
Timer playback
setting
End
time
E-12
90 minutes
Sleep operation will
automatically stop
Desired time
Timer playback
start time
Page 14
Enhancing your system
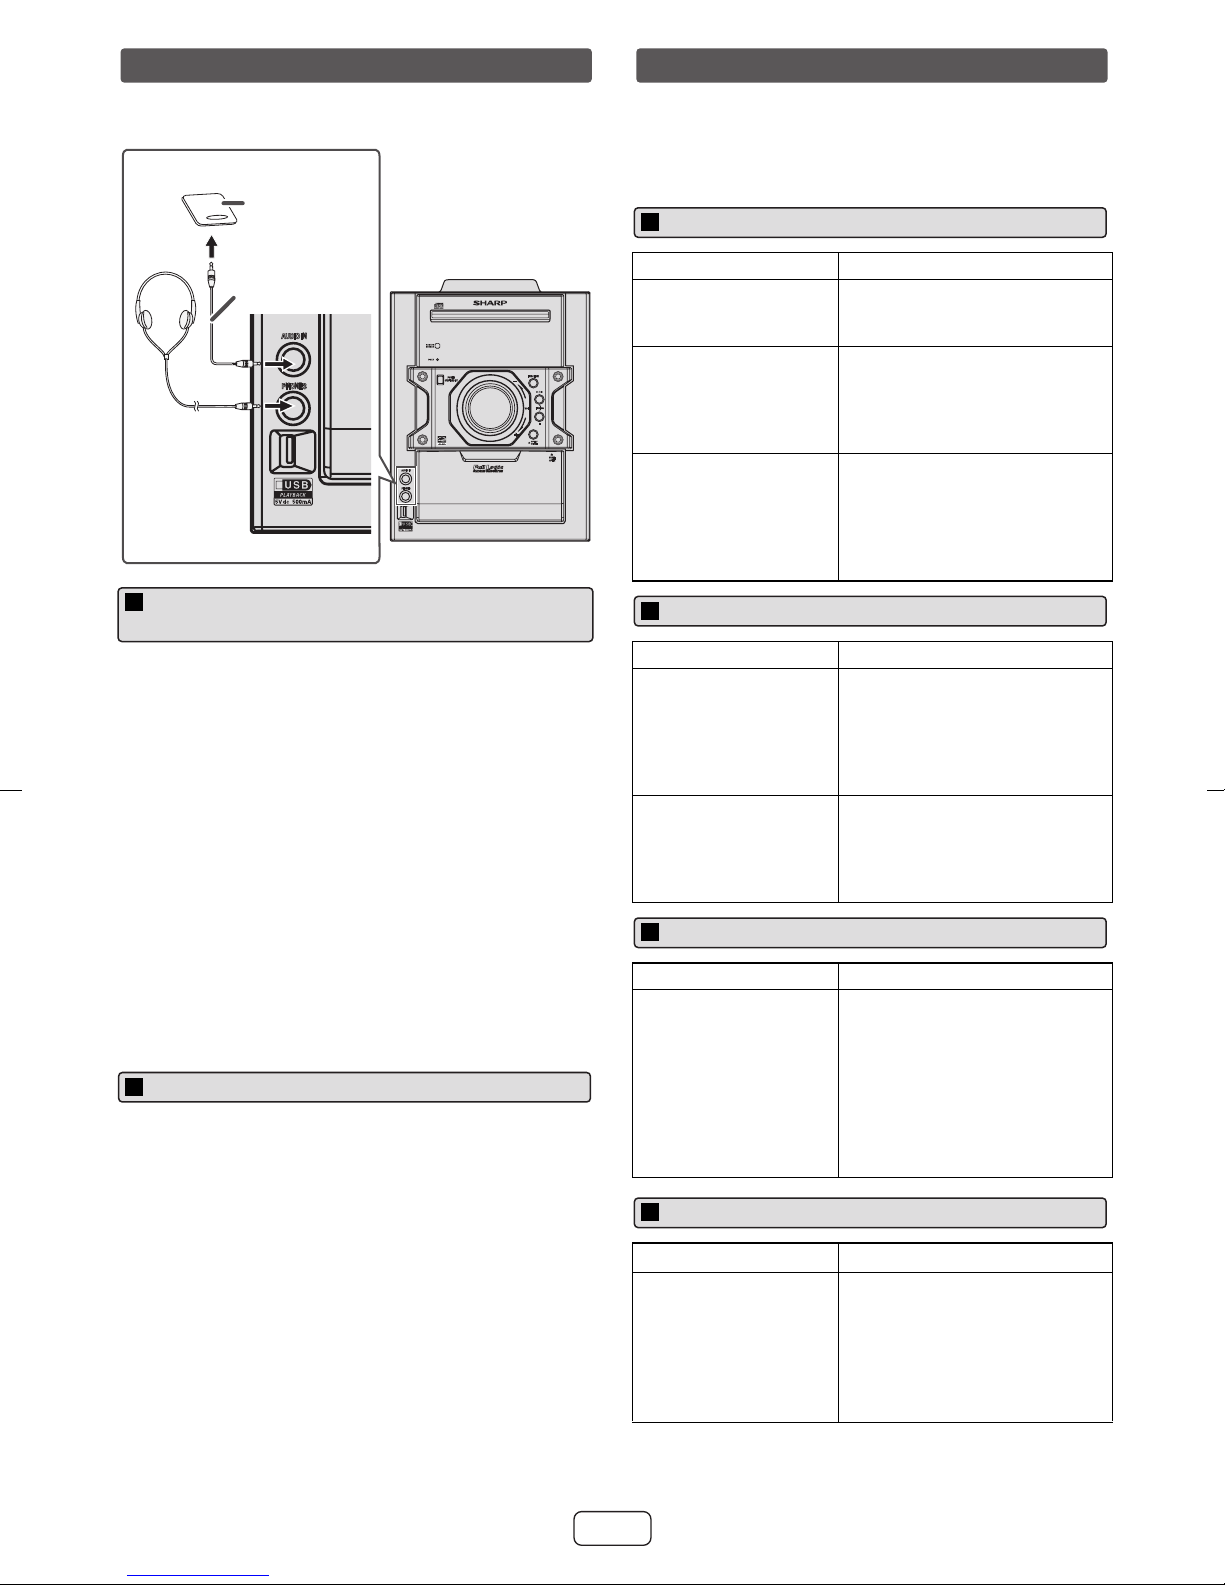
The connection cord is not included. Purchase a
commercially available cord as shown below.
Portable audio
player, etc.
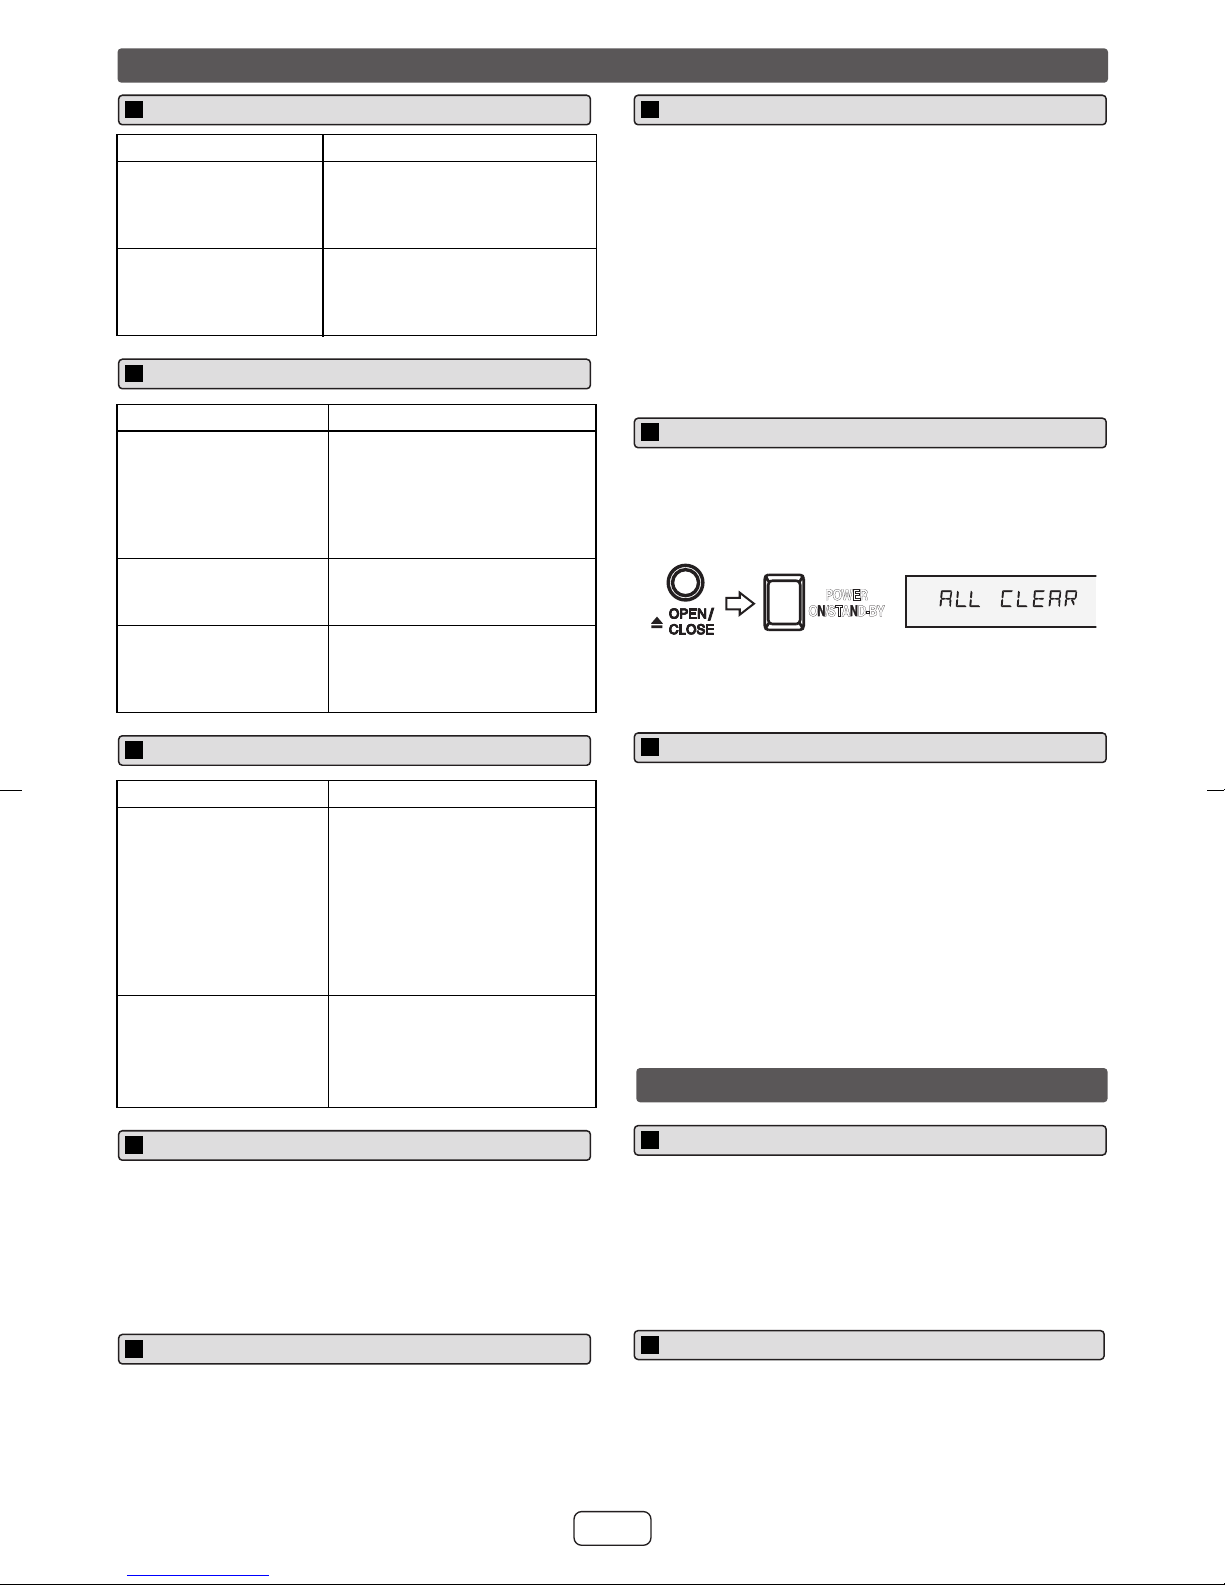
Troubleshooting chart
Many potential problems can be resolved by the owner
without calling a service technician.
If something is wrong with this product, check the f ollowing
before calling your authorized SHARP dealer or service
center.
General
Audio cable
(not supplied)
MINI COMPONENT SYSTEM
AUDIO IN
PHONES
AUDIO IN
PHONES
CD-DH899
POWER
ON/STAND-BY
FUNCTION
VOL
PUSH
OPEN
Listening to the playback sounds of
portable audio player, etc.
1 Use a connection cord to connect the portable audio
player etc. to the AUDIO IN jack. When using video
equipment, connect the audio output to this unit and
the video output to a television.
2 Press the ON/STAND-BY button to turn the power on.
3 Press the AUDIO IN button on the remote control or
FUNCTION button repeatedly on main unit to select
AUDIO IN function.
4 Play the connected equipment. If volume level of the
connected device is too high, sound distortion may
occur. Should this happen, lower the volume of the
connected device. If volume level is too low, increase
the volume of the connected device.
Note:
To preven t noise interf erence , place the unit away from the
television.
Headphones
● Do not turn the volume on to full at switch on and listen
to music at moderate levels. Excessive sound pressure
from earphones and headphones can cause hearing
loss.
● Before plugging in or unplugging the headphones,
reduce the volume.
● Be sure your headphones have a 1/8" (3.5 mm)
diameter plug and impedance between 16 and 50
ohms. The recommended impedance is 32 ohms.
● Plugging in the headphones disconnects the speakers
automatically. Adjust the volume using the VOLUME
control.
Symptom Possible cause
● The clock is not set
to the correct time.
● Did a power failure occur?
Reset the clock. (Refer page
11)
● When a button is
pressed, the unit
does not respond.
● Set the unit to the power
stand-by mode and then turn
it back on.
● If the unit still malfunctions,
reset it. (Refer page 14)
● No sound is heard. ● Is the volume level set to
“0”?
● Are the headphones
connected?
● Are the speaker wires
disconnected?
CD player
Symptom Possible cause
● Playback does not
start.
● Playback stops in
the middle or is not
performed properly.
● Is the disc loaded upside
down?
● Does the disc satisfy the
standards?
● Is the disc distorted or
scratched?
● Playback sounds
are skipped, or
stopped in the
middle of a track.
● Is the unit located near
excessive vibrations?
● Is the disc very dirty?
● Has condensation formed
inside the unit?
Remote control
Symptom Possible cause
● The remote control
does not operate.
● Is the AC power cord of the
unit plugged in?
● Is the battery polarity
correct?
● Are the batteries dead?
● Is the distance or angle
incorrect?
● Does the remote control
sensor receive strong light?
Tuner
Symptom Possible cause
● The radio makes
unusual noises
continuously.
● Is the unit placed near the
TV or computer?
● Is the FM antenna or AM
loop antenna placed
properly? Move the antenna
away from the AC power
cord if it is located nearby.
E-13
Page 15
Troubleshooting chart (continued)
Cassette deck
Symptom Possible cause
●
Sound skipping.
●
Cannot hear treble.
●
Sound Fluctuation.
●
Cannot remove the tape.●If a power failure occurs during
●
Is there any slack?
●
Is the tape stretched?
●
Are the capstans, pinch rollers or
heads dirty?
playback, the heads remain
engaged with the tape. Do not open
the compartment with great force.
USB
Symptom Possible cause
●
Device cannot be
detected.
●
Playback does not start.
●
Wrong time display.
●
Wrong file name display.
●
Is there any MP3/WMA file
available?
●
Is the device properly connected?
●
Is it an MTP device?
●
Does the device contain AAC file
only?
●
Is it a copyright protected WMA
file?
●
Is it a false MP3 file?
●
Is Variable Bitrate file being played
back?
●
Is the File Name written in
Chinese or Japanese characters?
If problem occurs
When this product is subjected to strong external interference
(mechanical shock, excessive static electricity, abnormal supply voltage
due to lightning, etc.) or if it is operated incorrectly, it may malfunction.
If such a problem occurs, do the following:
1
Set the unit to the stand-by mode and turn the power on again.
2
If the unit is not restored in the previous operation, unplug and plug
in the unit again, and then turn the power on.
Note:
If neither operation above restores the unit, clear all the memory by
resetting it.
Factory reset, clearing all memory
1
Press the ON/STAND-BY button to enter the power stand-by mode.
2
While pressing down the OPEN/CLOSE button, press th e POW ER
ON/STAND-BY button until “ALL CLEAR” appears.
POWER
ON/STAND-BY
Caution:
This operation will erase all data stored in memory including clock, timer
settings, tuner preset, and CD program.
iPod
Symptom Possible cause
●
No sound is produced.
No image appears on the
TV/monitor.
●
iPod will not charge.
●
The iPod is not playing.
●
The iPod is not properly
connected to the unit.
●
Is the AC power cord of the unit
plugged in?
●
The video cable is not properly
connected.
●
The TV/monitor’s input selection is
not properly set.
●
Wrong iPod adaptor is used.
●
The iPod is not making full contact
with the iPod connector.
●
The main unit is in stand-by mode.
●
Using 3rd generation iPod.
Condensation
Sudden temperature changes, storage or operation in an extremely
humid environment may cause condensation inside the cabinet (CD
pickup, etc.) or on the transmitter on the remote control. Condensation
can cause the unit to malfunction. If this happens, leav e the power on with
no disc in the unit until normal playback is possible (about 1 hour). Wipe
off any condensation on the transmitter with a soft cloth before operating
the unit.
Care of compact discs
Compact discs are fairly resistant to damage, however mistracking can
occur due to an accumulation of dirt on the disc surface. Follow the
guidelines below for maximum enjoyment from your CD collection and
player.
●
Do not write on either side of the disc, particularly the non-label side
from which signals are read. Do not mark this surface.
●
Keep your discs away from direct sunlight, heat and excessive
moisture.
●
Always hold the CDs by the edges. Fingerprints, dirt or water on the
CDs can cause noise or mistracking. If a CD is dirty or does not play
properly, clean it with a soft, dry cloth, wiping straight out from the
center, along the radius.
Maintenance
Cleaning the cabinet
Periodically wi pe the cabinet with a soft cloth and a diluted soap solution,
then with a dry cloth.
Caution:
●
Do not use chemicals for cleaning (gasoline, paint thinner, etc.). It
may damage the cabinet.
●
Do not apply oil to the inside of the unit. It may cause malfunctions.
Before transporting the unit
Remove the iPod, USB memory device and disc from the unit. Then, set
the unit to the power stand-by mode. Carrying the unit with iPod or USB
memory device left docked or discs left inside can damage the unit.
Cleaning the CD pickup lens
In order to ensure proper operation of the CD player, preventative
maintenance (cleaning of the laser pickup lens) should be performed
periodically . Lens cle aners are commercially available . Contact y our local
CD software dealer for options.
E-14
Page 16
Specifications
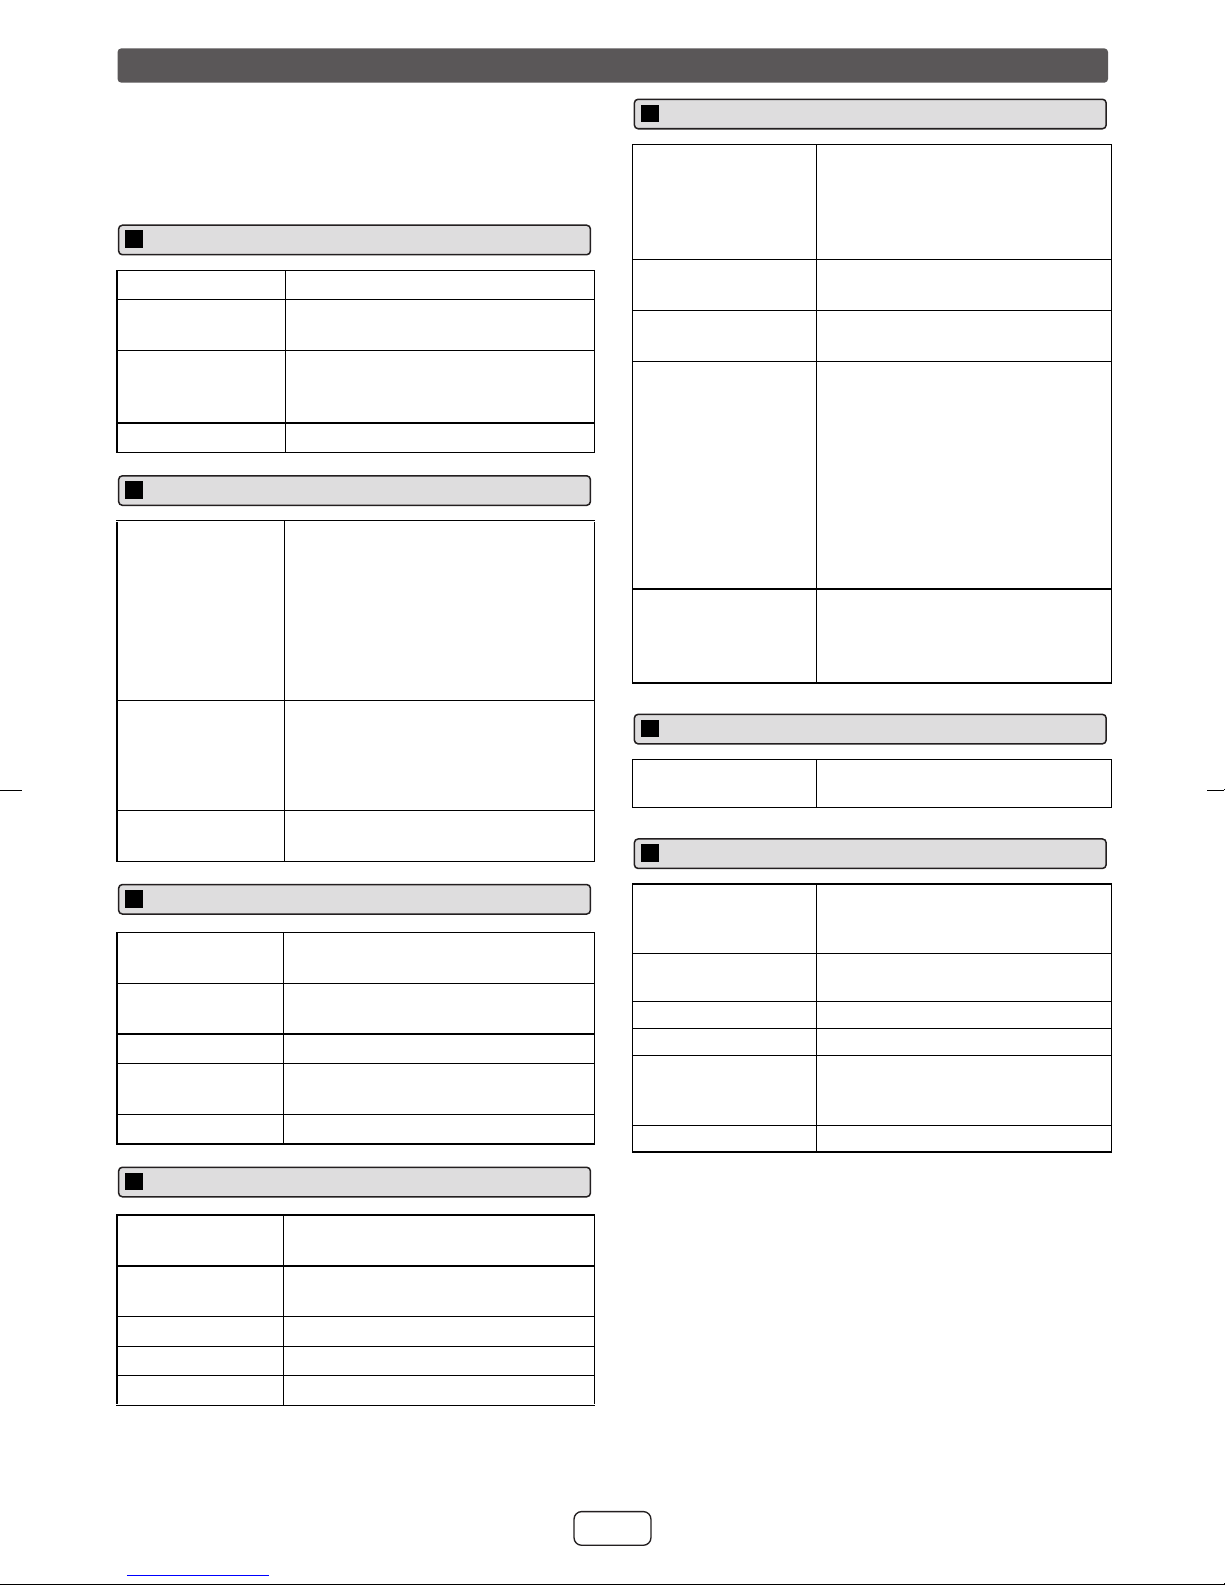
As part of our policy of continuous improvement, SHARP
reserves the right to make design and specification
changes for product improvem ent without prior notice . The
performance specification figures indicated are nominal
values of production units. There may be some deviations
from these values in individual units.
General
Power source AC 120 V ~ 60 Hz
Power
consumption
Dimensions Width: 9 - 7/16" (240 mm)
Weight 13.32 lbs. (6.04 kg)
Amplifier
Output power PMPO:4200 watts
Output terminals Speakers: 4 ohms
Input terminals Audio In (audio signal):
72 W
Height: 12 - 7/16" (315.5 mm)
Depth: 11 - 5/32" (283.2 mm)
RMS: Total 300 watts
(150 watts per channel into 4
ohms at 1 kHz, 10% total
harmonic distortion)
FTC: 120 watts minimum RMS per
channel into 4 ohms from
100 Hz to 20 kHz, 10% total
harmonic distortion.
Headphones: 16 - 50 ohms
(recommended: 32 ohms)
Video output : 1 Vp-p
250 mV/47 k ohms
USB
USB host interface ● Complies with USB 1.1 (Full
Speed)/ 2.0 Mass Storage
Class.
● Support Bulk only and CBI
protocol.
Support file ● MPEG 1 Layer 3
● WMA (Non DRM)
Bitrate support ● MP3 (32 ~ 320 kbps)
● WMA (64 ~ 160 kbps)
Other ● Maximum total number of
MP3/WMA files is 1024.
● Maximum total number of
folders is 255 INCLUSIVE of
root directory.
● The ID3TAG information
supported are TITLE, ARTIST
and ALBUM only.
● Supports ID3TAG version 1
and version 2.
File system
support
● Support USB devices with
Microsoft Windows/DOS/FAT
12/ FAT 16/ FAT 32.
● 2 kbyte block length for sector.
Tuner
Frequency range FM: 87.5 - 108.0 MHz
AM: 530 - 1,720 kHz
Speaker
CD player
Type Single disc multi-play compact disc
player
Signal readout Non-contact, 3-beam
semiconductor laser pickup
D/A converter Multi bit D/A converter
Frequency
response
Dynamic range 90 dB (1 kHz)
20 - 20,000 Hz
Cassette deck
Frequency
response
Signal/noise
ratio
Wow and flutter 0.35% (WRMS)
Tape Speed 4.76 cm/sec. (1 - 7/8 ips)
Heads Playback
50 - 14,000 Hz (normal tape)
50 dB (playback)
Type 2-way type speaker system
2" (5 cm) tweeter
6-5/16" (16 cm) woofer
Maximum input
power
Rated input power 150 W
Impedance 4 ohms
Dimensions Width: 7-7/8" (200 mm)
Weight 6.8 lbs. (3.1 kg)/each
300 W
Height: 13" (330 mm)
Depth: 8-11/16" (220.5 mm)
E-15
 Loading...