

Page 1
BL682
®
GUIDE DU PROPRIÉTAIRE
OWNER’S GUIDE
GUÍA DEL USUARIO
®
HELP
LINE
1-877-646-5288
www.ninjakitchen.com
Page 2

IMPORTANT SAFETY INSTRUCTIONS
For Household Use Only
WHEN USING ELECTRICAL APPLIANCES,
BASIC SAFETY PRECAUTIONS SHOULD
ALWAYS BE FOLLOWED, INCLUDING THE
FOLLOWING:
READ ALL INSTRUCTIONS BEFORE
®
|
USING YOUR NUTRI NINJA
NINJA®
BLENDER SYSTEM WITH AUTO-iQ™
TECHNOLOGY.
POLARIZED PLUG
WARNING: To reduce the risk of electric
shock, this appliance has a polarized plug (one
blade is wider than the other). This plug will fit
into a polarized outlet only one way. If the plug
does not fit fully into the outlet, reverse the
plug. If it still does not fit, contact a qualified
electrician to install the proper outlet. DO NOT
modify the plug in any way.
WARNING:
TO REDUCE THE RISK OF FIRE, ELECTRIC SHOCK
OR INJURY:
1 To protect against electrical shock, do not
submerge the appliance or allow the power
cord to come into contact with water or any
other liquid.
2 DO NOT allow young children to operate the
appliance or use as a toy. Close supervision
is necessary when any appliance is used by
or near children.
3 Never leave an appliance unattended when in
use.
4 Turn the appliance Off and remove the power
cord from the electrical outlet when not in
use, before assembling or disassembling
parts and before cleaning. To unplug, grasp
the plug and pull from the electrical outlet.
Never pull from the power cord.
5 DO NOT abuse the power cord. Never carry
the appliance by the power cord or yank it
to disconnect from electrical outlet; instead
grasp the plug and pull to disconnect.
6 DO NOT operate any appliance with a
damaged cord or plug, or after the appliance
malfunctions, has been dropped or damaged
in any manner. This appliance has no
serviceable parts. Return the appliance to
EURO-PRO Operating LLC for examination,
repair or adjustment.
7 DO NOT let the power cord hang over
the edge of table or counter or touch hot
surfaces such as the stove.
8 Always use appliance on a dry, level surface.
2
1-877-646-5288
Page 3

English
9 Keep hands, hair, clothing, as well as utensils
out of container while processing to reduce the
risk of severe injury to persons or damage to
the appliance. A scraper may be used but only
when the appliance is not running.
10 CAUTION: Blade assemblies are sharp and
removable, handle with care. When handling
the blade assemblies, always hold by the
shaft.
11 Avoid contact with moving parts.
12 DO NOT attempt to sharpen blades.
13 DO NOT use the appliance if blade assembly
is bent or damaged.
14 To reduce risk of injury, never place the blade
assembly on base without pitcher or bowl
properly attached.
15 DO NOT operate this appliance on or near
any hot surfaces (such as gas or electric
burner or in a heated oven).
16 The use of attachments or accessories
including canning jars, not recommended by
the manufacturer may result in fire, electric
shock or personal injury.
17 DO NOT remove the container from the motor
base while the appliance is in operation.
18 To reduce the risk of injury, NEVER operate
the appliance without the lid in place; DO
NOT try to defeat the interlock mechanism;
make sure that the attachment is properly
installed before operating the appliance.
19 DO NOT expose containers to extreme
temperaturechanges.
20 CAUTION: DO NOT BLEND HOT LIQUIDS.
21 DO NOT overfill.
22 Never feed food by hand. Always use the
food pusher.
23 DO NOT operate the appliance empty.
24 To reduce the risk of burns, always allow the
appliance to cool before taking off parts and
before cleaning.
25 In the event that the unit overloads, the
control panel lights will flash and the unit
will shut down. Unplug the appliance and let
it cool down for approximately 15 minutes
before using again.
26 THIS PRODUCT IS INTENDED FOR
HOUSEHOLD USE ONLY. Do not use this
appliance for anything other than its intended
use. Do not use outdoors.
27 The maximum rating is based on the 6-Blade
Assembly (pitcher) that drives the greatest
power and other recommended attachments
may draw significantly less power or current.
WARNING: Extension cords are
not recommended for use with this
product.
SAVE THESE
INSTRUCTIONS
www.ninjakitchen.com
3
Page 4

CONSIGNES DE SÉCURITÉ IMPORTANTES
Pour usage domestique seulement
LORS DE L’USAGE D’UN APPAREIL
ÉLECTRIQUE, DES MESURES DE
SÉCURITÉ ÉLÉMENTAIRES DEVRAIENT
TOUJOURS ÊTRE RESPECTÉES, Y
COMPRIS LES MESURES SUIVANTES :
LISEZ TOUTES LES CONSIGNES
AVANT D’UTILISER VOTRE SYSTÈME
MD
MÉLANGEUR NUTRI NINJA
AVEC LA TECHNOLOGIE AUTO-iQ
| NINJAMD
MC
.
FICHE POLARISÉE
AVERTISSEMENT : Afin de réduire les
risques d’électrocution, cet appareil a été
muni d’une fiche polarisée (une lame est
plus large que l’autre). Cette fiche ne peut
être insérée que d’un seul côté dans une
prise polarisée. Si la fiche ne s’insère pas
complètement dans la prise de courant,
inversez-la. Si elle ne s’adapte toujours
pas, contactez un électricien compétent
afin d’installer la prise murale appropriée.
N’altérez la fiche d’AUCUNE façon.
AVERTISSEMENT :
POUR RÉDUIRE LE RISQUE D’INCENDIE,
D’ÉLECTROCUTION ET DE BLESSURES
1 Pour éviter les risques d’électrocution,
n’immergez pas l’appareil et assurez-vous
que le cordon d’alimentation n’entre pas en
contact avec l’eau ou un autre liquide.
2 NE PERMETTEZ PAS aux jeunes enfants
d’utiliser l’appareil ou de s’en servir comme
jouet. Une surveillance étroite est nécessaire
lors de l’usage de tout appareil par des
enfants ou près d’eux.
3 Ne laissez jamais l’appareil sans surveillance
pendant l’utilisation.
4 Veuillez éteindre l’appareil (position « Off ») et
débrancher le cordon d’alimentation de la prise
de courant lorsqu’il n’est pas utilisé et avant le
nettoyage, l’assemblage ou le démontage des
pièces. Pour débrancher l’appareil, tirez sur la
fiche et retirez-la de la prise d’alimentation. Ne
tirez jamais sur le cordon.
5 PRENEZ SOIN du cordon d’alimentation. Ne
transportez jamais l’appareil en le tenant par
le cordon. Ne débranchez jamais l’appareil
de l’alimentation électrique en tirant sur le
cordon. Pour débrancher l’appareil, tirez sur
la fiche et retirez-la de la prise d’alimentation.
6 N’UTILISEZ PAS l’appareil si sa fiche ou
son cordon est endommagé(e), s’il a fait
défaut ou s’il a été échappé ou endommagé.
Retournez l’appareil à EURO-PRO Operating
LLC pour vérification, réparation ou réglage.
7 NE LAISSEZ PAS le cordon traîner sur le
dessus d’une table ou d’un comptoir. Ne
le laissez pas entrer en contact avec des
surfaces chaudes, comme la cuisinière.
:
4
1-877-646-5288
Page 5

8 Posez toujours l’appareil sur une surface
sèche et de niveau.
9 Afin de réduire le risque de blessures graves ou
de dommages à l’appareil, gardez les mains, les
cheveux, les vêtements et les ustensiles hors
du récipient pendant l’utilisation. Vous pouvez
utiliser une raclette, mais seulement lorsque le
mélangeur est éteint.
10 MISE EN GARDE : Les ensembles de lames
sont tranchants et amovibles. Manipulezles avec soin. Tenez toujours l’arbre en
manipulant les ensembles de lames.
11 Évitez le contact avec les pièces mobiles.
12 NE TENTEZ PAS d’affûter les lames.
13 N’UTILISEZ PAS l’appareil si l’ensemble de
lames est tordu ou endommagé.
14 Afin de réduire le risque de blessure, ne
placez jamais l’ensemble de lame sur sans
que le pichet ou le bol soit correctement
installé.
15 N’UTILISEZ PAS cet appareil sur ou près
des surfaces chaudes (telles qu’un brûleur à
gaz ou électrique ou dans un four chauffé).
16 L’usage des attachements accessoires,
y compris les pots de conserve n’est pas
recommandé par le fabricant du fait qu’il
peut causer un incendie, un choc électrique
ou une blessure corporelle.
17 N’ENLEVEZ PAS le contenant de la base
moteur pendant que l’appareil est en marche.
18 Afin de réduire le risque de blessure,
N’UTILISEZ JAMAIS l’appareil sans
le couvercle en place. N’ALLEZ PAS à
l’encontre du mécanisme de verrouillage
; assurez-vous que l’attachement soit
correctement monté avant d’utiliser l’appareil.
19 N’EXPOSEZ PAS les récipients aux
Français
changements de température extrêmes.
20 MISE EN GARDE : NE MÉLANGEZ PAS
LES LIQUIDES CHAUDS.
21 NE REMPLISSEZ PAS excessivement le
récipient.
22 Ne remplissez jamais le récipient à la main.
Utilisez le poussoir.
23 N’UTILISEZ PAS l’appareil lorsqu’il est vide.
24 Afin de réduire le risque de brûlures,
permettez toujours à l’appareil de refroidir
avant de retirer les pièces et le nettoyer.
25 Dans le cas d’une surcharge, les indicateurs
du panneau de commande de l’appareil
clignoteront et l’appareil arrêtera. Débranchez
l’appareil et laissez-le refroidir pendant environ
15 minutes avant de l’utiliser de nouveau.
26 CE PRODUIT EST CONÇU POUR L’USAGE
À DOMICILE SEULEMENT. N’utilisez pas
l’appareil à d’autres fins que celles prévues.
N’utilisez pas l’appareil à l’extérieur.
27 La notation maximale est basée sur l’ensemble
de 6 lames (pichet) qui procure le plus de
puissance. D’autres attachements recommandés
peuvent nécessiter significativement moins de
puissance ou de courant.
AVERTISSEMENT : Il n’est
pas recommandé d’utiliser des rallonges
électriques pour brancher cet appareil.
VEUILLEZ
CONSERVER CES
DIRECTIVES
www.ninjakitchen.com
5
Page 6

INSTRUCCIONES IMPORTANTES DE SEGURIDAD
Para uso doméstico solamente
AL USAR APARATOS ELÉCTRICOS,
SIEMPRE DEBE SEGUIR PRECAUCIONES
BÁSICAS DE SEGURIDAD, INCLUYENDO
LAS SIGUIENTES:
LEA TODAS LAS INSTRUCCIONES ANTES
®
DE USAR SU NUTRI NINJA
DE LICUADORA NINJA
I SISTEMA
®
CON AUTO-iQMR
TECHNOLOGY.
ENCHUFE POLARIZADO
ADVERTENCIA: Para reducir el riesgo
de una descarga eléctrica, este artefacto
posee un enchufe polarizado (una pata
es más ancha que la otra). Este enchufe
sólo puede conectarse a un tomacorriente
polarizado de una sola forma. Si el
enchufe no entra completamente en el
tomacorriente, inviértalo. Si aun así no entra
completamente, llame a un electricista
calificado para que instale un tomacorriente
apropiado. NO intente modificar el
enchufe de ninguna manera.
ADVERTENCIA:
PARA REDUCIR EL RIESGO DE INCENDIO,
DESCARGA ELÉCTRICA O DAÑOS PERSONALES:
1 Para protegerse de una descarga eléctrica,
no sumerja el artefacto ni permita que el
cable de alimentación entre en contacto con
agua o cualquier otro líquido.
2 NO permita que los niños pequeños usen el
artefacto o que lo traten como un juguete.
Tenga mucho cuidado al utilizar cualquier
aparato eléctrico cerca de niños.
3 Nunca deje un artefacto desatendido cuando
lo use.
4 Apague el artefacto y desenchufe el cable
de alimentación del tomacorriente cuando no
lo use, antes de colocarle o quitarle partes y
antes de limpiarlo. Para desenchufarlo, sujete
el enchufe y retírelo del tomacorriente. Nunca
tire del cable de alimentación.
5 NO maltrate el cable de alimentación. Nunca
levante el artefacto por el cable, o tire del
cable para desconectarlo del tomacorriente;
agárrelo por el enchufe y tire para
desconectarlo.
6 NO utilice ningún artefacto si el cable o
el enchufe están dañados o luego de una
falla, o si ha sufrido cualquier tipo de daño.
Retórnelo a EURO-PRO Operating LLC para
que sea examinado, reparado o ajustado.
7 NO permita que el cable cuelgue por el
borde de la mesa o mesada, o que toque
superficies calientes como la estufa.
8 Use siempre el artefacto sobre una superficie
seca y nivelada.
6
1-877-646-5288
Page 7

9 Mantenga sus manos, cabello, ropa y
utensilios fuera del recipiente al procesar
para reducir la posibilidad de daños graves a
personas o de dañar la unidad. Puede utilizar
una espátula, pero únicamente cuando el
artefacto no esté funcionando.
10 CUIDADO: Las cuchillas son filosas y
removibles, manéjelas con cuidado. Al
manipular las cuchillas, agárrelas siempre
por el vástago.
11 Evite tocar las partes móviles.
12 NO intente afilar las cuchillas.
13 NO use el artefacto si las cuchillas están
dobladas o dañadas.
14 Para reducir el riesgo de heridas, nunca
coloque las cuchillas en la base sin tener la
jarra o el tazón correctamente colocados.
15 NO use este artefacto sobre o cerca de
superficies calientes (como una estufa
eléctrica o de gas, o en un horno caliente).
16 El uso de accesorios no recomendados
por el fabricante puede causar incendios,
descargas eléctricas o daños personales.
17 NO saque la jarra de la base del motor
mientras el artefacto esté funcionando.
18 Para reducir el riesgo de heridas, NUNCA
use el artefacto sin la tapa colocada;
NO intente alterar el mecanismo de
traba; verifique que los accesorios estén
correctamente instalados antes de usar el
artefacto.
19 NO exponga los recipientes a cambios
bruscos de temperatura.
20 CUIDADO: NO LICÚE LÍQUIDOS CALIENTES.
21 NO la llene de más.
22 Nunca introduzca los alimentos con la mano.
Use siempre el accesorio para empujar.
23 NO haga funcionar este artefacto cuando
esté vacío.
24 Para reducir el riesgo de quemaduras,
siempre deje que el artefacto se enfríe antes
de remover partes o de limpiarlo.
25 Si la unidad se sobrecarga, las luces del
panel de control parpadearán y la unidad se
apagará. Desenchufe el artefacto y déjelo
enfriar durante unos 15 minutos antes de
usarlo nuevamente.
26 ESTE PRODUCTO ELÉCTRICO ES PARA
USO DOMÉSTICO SOLAMENTE. No utilice
este artefacto para ningún otro destino distinto
al indicado. No lo utilice en el exterior.
27 La especificación máxima se basa en el
uso del accesorio de 6 cuchillas (jarra) que
consume la mayor cantidad de corriente
y otros accesorios recomendados pueden
llegar a consumir mucha menos corriente.
ADVERTENCIA: No se
recomienda usar cables de extensión
con este producto.
CONSERVE ESTAS
INSTRUCCIONES
Español
www.ninjakitchen.com
7
Page 8

THIS BOOK COVERS MODEL NUMBERS:
BL682 30
TECHNICAL SPECIFICATIONS
Voltage: 120V~, 60Hz.
Power: 1500 Watts
Pitcher Capacity: 72 ounces (9 cups, 2.1 L)
64 liquid ounces (8 cups, 1.9 L)
Bowl Capacity: 64 ounces (8 cups, 1.9 L)
Nutri Ninja®Cup Capacity: 18 ounces (2.25 cups, 500 mL)
24 ounces ( 3 cups, 700 mL)
32 ounces (4 cups, 950 mL)
Euro-Pro, Auto-iQ, Nutri Ninja, Pro Extractor Blades and Ninja are trademarks of Euro-Pro Operating LLC.
CE MANUEL CONCERNE LE MODÈLE :
BL682 30
SPÉCIFICATIONS TECHNIQUES
Tension: 120V~, 60Hz.
Alimentation: 1500 Watts
Capacité du pichet: 2,1 L (9 tasses, 72 oz)
1,9 L de liquide (8 tasses, 64 oz)
Capacité du bol 1,9 L (8 tasses, 64 oz.)
Capacité de la tasse Nutri Ninja®: 500 mL (2.25 tasses, 18 oz.)
700 mL (3 tasses, 24 oz.)
950 mL (4 tasses, 32 oz.)
Euro-Pro, Auto-iQ, Nutri Ninja, Pro Extractor Blades et Ninja sont des marques de commerce d’Euro-Pro Operating LLC.
ESTE MANUAL CUBRE EL MODELO:
BL682 30
ESPECIFICACIONES TÉCNICAS
Voltaje: 120 V, 60 Hz
Potencia: 1500 Vatios
Capacidad de la jarra: 72 onzas (9 tazas) (2,1 L)
64 onzas líquidas (8 tazas) (1,9 L)
Capacidad del tazón: 64 onzas (8 tazas) (1,9 L)
Nutri Ninja® Capacidad del recipiente: 18 onzas (2,25 tazas) (500 mL)
24 onzas (3 tazas) (700 mL)
32 onzas (4 tazas) (950 mL)
Euro-Pro, Auto-iQ, Nutri Ninja, Pro Extractor Blades y Ninja son marcas registradas de Euro-Pro Operating LLC.
8
1-877-646-5288
Page 9

Contents
English
Thank you for
purchasing the
®
Nutri Ninja
®
Ninja
|
Blender
System with
Auto-iQ™
Technology.
Merci d’avoir
acheté le système
mélangeur
MD
Nutri Ninja
MD
Ninja
|
avec
la technologie
AUTO-iQMC.
Getting to Know Your Nutri Ninja® | Ninja® Blender System with Auto-iQ™ Technology ....10
Using the Nutri Ninja® | Ninja® Kitchen Blender System with Auto-iQ™ Technology .........12
Assembly and Use for the Ninja® Blender ....................................................................13
Assembly and Use for the Food Processor ...................................................................15
Assembly and Use for the Nutri Ninja® Cups ................................................................17
Speed Settings & Uses ...............................................................................................18
Care & Maintenance ..................................................................................................20
Troubleshooting Guide ................................................................................................21
Replacement Parts .....................................................................................................21
Warranty & Registration ..............................................................................................23
Français Español
Table des matières
Comprendre votre système mélangeur Nutri NinjaMD | NinjaMD avec la technologie Auto-iQMC...24
Utiliser le système mélangeur Nutri NinjaMD | NinjaMD avec la technologie Auto-iQMC. ........26
Montage et utilisation du mélangeur NinjaMD ................................................................27
Montage et utilisation du robot culinaire ......................................................................29
Montage et utilisation du Nutri NinjaMD .........................................................................31
Réglages de vitesse et usages ....................................................................................32
Soins et entretien .......................................................................................................34
Guide de dépannage ..................................................................................................35
Pièces de remplacement ............................................................................................35
Garantie et enregistrement .........................................................................................37
Gracias por
haber comprado
el sistema de
licuadora Ninja
®
Nutri Ninja®
con Auto-iQMR
Technology.
Índice
Partes de su Nutri Ninja® | Sistema de licuadora Ninja® con Auto-iQMR Technology ........38
Uso de la Nutri Ninja® | Sistema de licuadora de cocina Ninja® con Auto-iQMR Technology. ..40
Armado y uso de la licuadora Ninja® ...........................................................................41
Armado y uso del procesador de alimentos ..................................................................43
Armado y uso de la Nutri Ninja® ..................................................................................45
Ajustes de velocidad y usos ........................................................................................46
Cuidado y mantenimiento ...........................................................................................48
Guía de diagnóstico de problemas...............................................................................49
Partes de repuesto .....................................................................................................49
Garantía y registro ......................................................................................................51
www.ninjakitchen.com
9
Page 10

Getting To Know Your Nutri Ninja® | Ninja® Blender System with Auto-iQ™ Technology
a
b
f
c
d e
h
g
j
l
k
m
i
a Jumbo Multi-Serve 32 oz. Nutri
Ninja® Cup
b Regular 24 oz. Nutri Ninja® Cup
c Small 18 oz. Nutri Ninja® Cup
d Pro Extractor Blades™
e Sip & Seal™ Lids (x3)
10
1-877-646-5288
f Food Processor Bowl
g Food Processor Lid
h Dough Blade (food processor)
i Chopping Blade (food processor)
j Blender Pitcher
k Blender Lid
l Stacked Blades (blender)
m Motor Base
NOTE: Blades are not
interchangeable.
Page 11
The Nutri Ninja® | Ninja® Blender System with Auto-iQ™ Technology is a professional, high powered innovative tool with
a sleek design and outstanding performance, a true asset to any kitchen. The Nutri Ninja® | Ninja® Blender System with
Auto-iQ™ Technology features intelligent programs that combine unique pulsing, blending and pausing patterns that do
the work for you! Get great results every time with no guesswork required! For best results, be sure to carefully read all
the instructions contained in the manual before using this appliance.
Nutri Ninja® | Ninja® Blender System with Auto-iQ™ Technology Features:
• Patent Pending Ninja™ Blade Technology
• BPA Free Blender Pitcher, Nutri Ninja
• Drip-Free Pour Spout
• Total Crushing
™
Technology
• LED Control Panel with Timer
• Sturdy, Non-Slip Base
• Smart Lid technology for easy release
• 3 speeds: Low, Medium, & High
• 5 Auto-iQ
™
settings - Auto-iQ™ Frozen Drinks/Smoothies, Auto-iQ™ Food Puree, Nutri Ninja® Auto-iQ™ Blend,
Nutri Ninja® Auto-iQ™ Ultra Blend and Auto-iQ™ Pulse
• Nutri Ninja
®
Nutrient & Vitamin Extraction
®
Cups, Food Processor Bowl and Lids
English
www.ninjakitchen.com
11
Page 12
Using the Nutri Ninja® | Ninja® Blender System with Auto-iQ™ Technology
PLEASE KEEP THESE IMPORTANT
SAFEGUARDS IN MIND WHEN USING THE
APPLIANCE:
IMPORTANT: Never add ingredients into the
container before placing the blade in first.
IMPORTANT: Blades are not interchangeable.
IMPORTANT: DO NOT attempt to operate the
appliance without the lid on.
IMPORTANT: Never run the appliance empty.
CAUTION: DO NOT PROCESS HOT FOODS OR
HOT LIQUIDS.
CAUTION: Never remove the container while the
appliance is still running.
WARNING: Never leave the appliance unattended
while in use.
CAUTION: If using
the pour spout,
ensure the lid
is fully locked
onto the blender
pitcher.
CAUTION: If
pouring with
the lid removed,
ALWAYS remove
the blade
assembly first.
CAUTION: Blade assemblies are sharp and
removable, handle with care. When handling the
blade assemblies, always hold them by the shaft.
BEFORE FIRST USE
1 Remove all packaging material and labels from the
appliance.
2 Wash the lids, blender pitcher, food processor bowl,
Nutri Ninja
a soft cloth. Use caution when washing the blade
assemblies as the blades are very sharp.
3 Rinse and dry thoroughly.
4 The blender pitcher, food processor bowl, Nutri Ninja
cups, lids and blades, are all dishwasher safe. It is
recommended that the lids and blades be placed on the
top rack. Ensure that the blades are removed from the
containers before placing in the dishwasher.
5 Wipe the motor base clean with a damp cloth.
®
cups and blades in warm, soapy water with
®
12
1-877-646-5288
Page 13
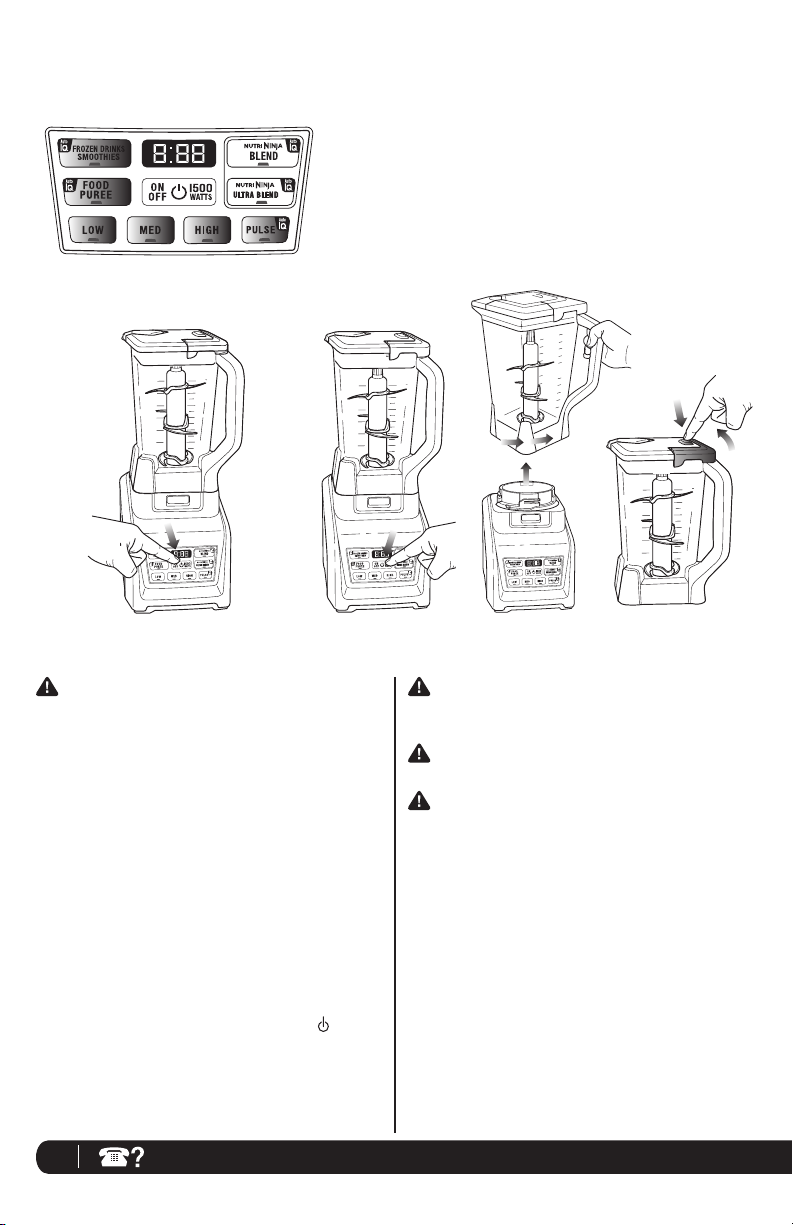
Assembly and Use for the Blender
HIGH
PULSE
LOW
DOUGH
SMOOTHIE
SINGLE
SERVE
PUREE
FROZEN
BLENDING
ASSEMBLY
English
Fig. 1
Fig. 4a
Fig. 4b
Use caution when handling the blade assemblies
as the blades are very sharp.
WARNING: Never leave the appliance unattended while
in use.
IMPORTANT: Make sure that the motor base is
plugged in for use.
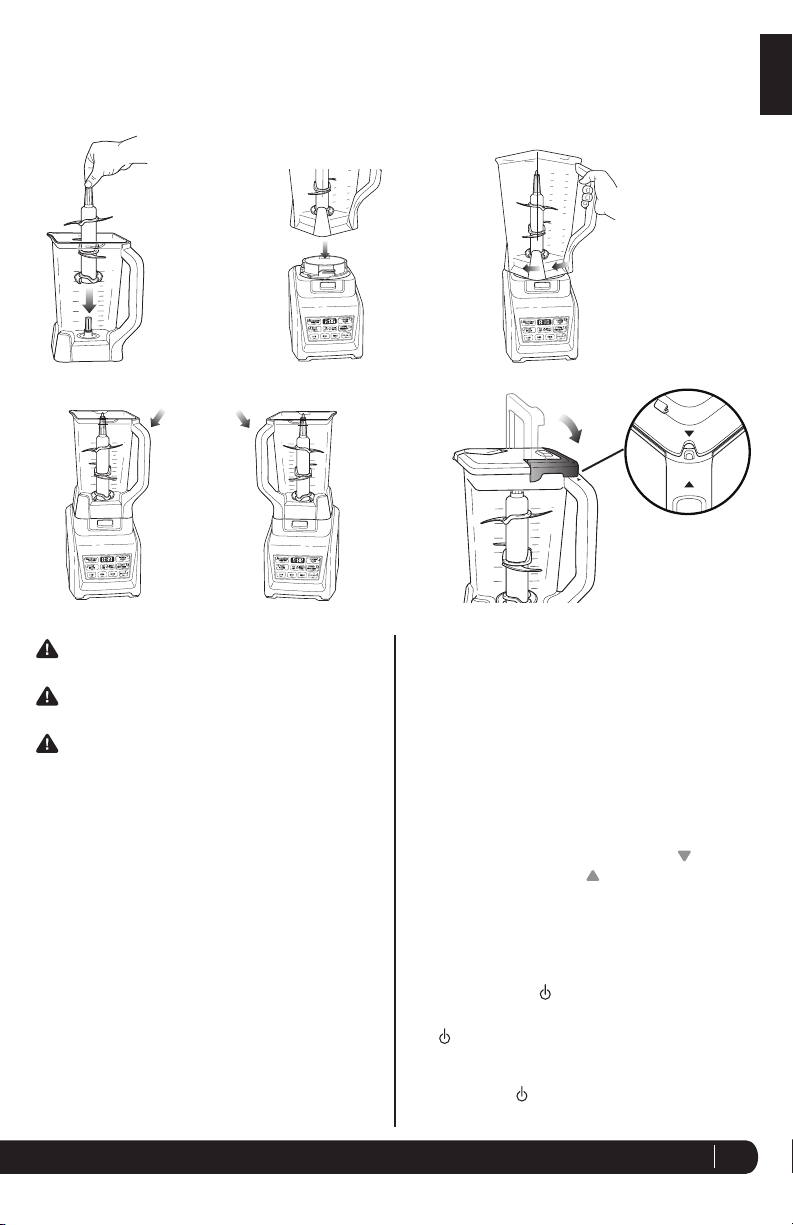
1 Holding the Stacked Blade Assembly by the top of the
shaft, place it onto the drive gear inside the pitcher.
Ensure that the attachment is seated properly and is
standing upright. (Fig. 1)
NOTE: The blade will fit loosely on the drive gear.
2 Place the motor base on a clean, dry, level surface such
as a counter or table top.
3 Align and lower the Pitcher onto the motor base.
(Fig. 2) Handle should be aligned slightly to the right
of the “LOCK” symbol on the motor base.
4 Rotate the pitcher clockwise until it locks in place, you
will hear a click when the lock is engaged. (Fig. 3)
5 The pitcher can be placed on the motor base two ways;
the handle can be on the front right corner or the front
left corner. (Fig. 4a, Fig. 4b)
Fig. 2
Fig. 3
Fig. 5a
6 Add the ingredients to the pitcher, making sure that
they do not exceed the highest measured marking line
on the side of the pitcher.
NOTE: If you need to add additional ingredients while
the appliance is processing, open the pour spout cap
and pour the ingredients in through the opening.
NOTE: When blending any kind of liquids, such as
mixtures of any drinks or smoothies, do not exceed the
“MAX” liquid mark (64 ounces) on the pitcher
7 Holding the lid by the handle in the upright position, place
it on top of the pitcher aligning the triangle ( ) located
on the lid with the triangle ( ) located on the pitcher’s
handle. (Fig. 5a) Press the handle down until you hear
a click. The triangles on the lid and the blender handle
MUST be aligned in order for the blender to turn on.
(Fig. 5b)
8 Plug the power cord into the electrical outlet and press
the power button ( ).
NOTE: As a safety feature, the power light
( ) will flash and the motor will not work if the
pitcher and lid are not installed correctly. When
the pitcher and lid are installed properly, the
power light ( ) will be solid, indicating that the
appliance is ready for use.
Fig. 5b
www.ninjakitchen.com
13
Page 14
Assembly and Use for the Blender - cont.
USE
Fig. 6
REMOVAL
WARNING: Never leave the appliance unattended while
in use.
NOTE: Nutri Ninja® | Ninja® Blender System with Auto-
iQ™ Technology can sense which jar is on the motor
base. The function lights will illuminate depending on
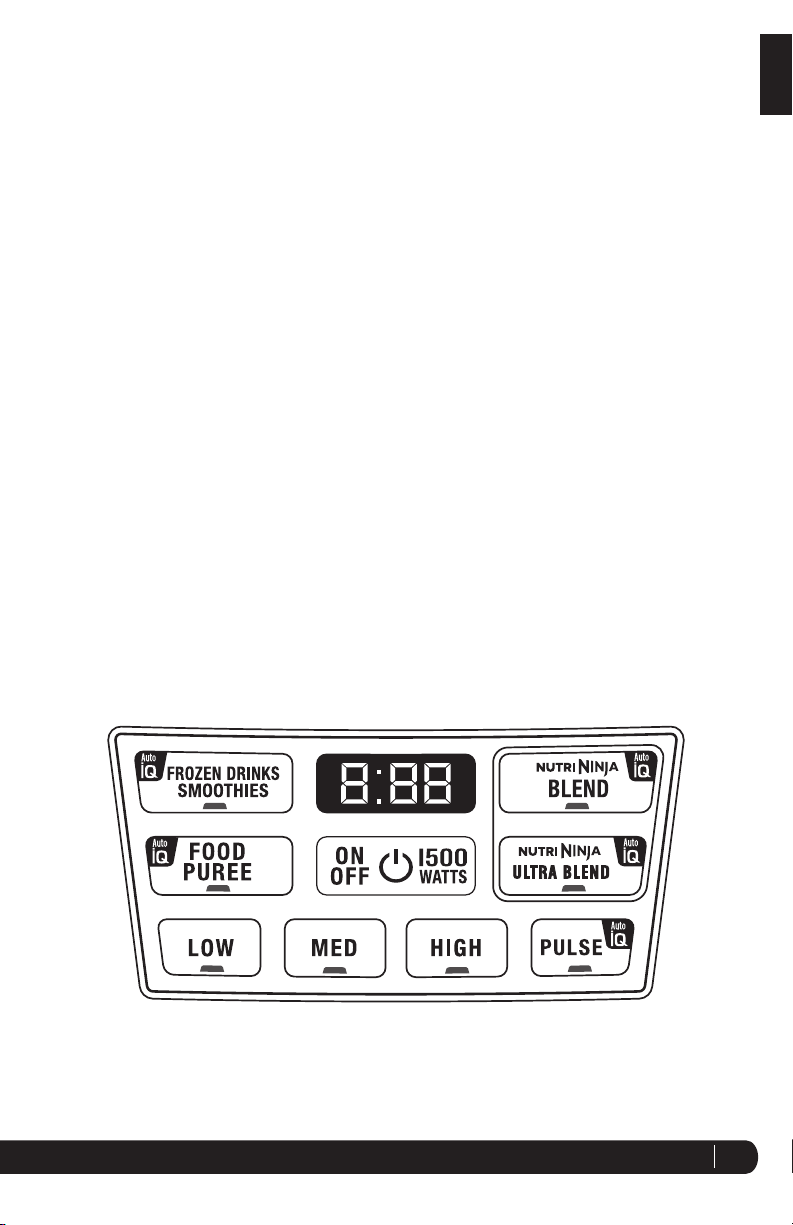
which jar is placed on the motor base. (Fig. 6)
9 Press the power button to turn on the unit. Select
the speed or Auto-iQ™ program that best suits your
needs. The Auto-iQ™ program will stop the appliance
automatically at the end of the program. (Fig. 7)
NOTE: Pulse ingredients for even chopping by
holding the Auto-iQ™ Pulse button until your desired
consistency is reached.
10 To pause the appliance, press the selected speed or
Auto-iQ™ Program a second time. (Fig. 8)
11 When you have reached your desired consistency, stop
the appliance by pressing the power button ( ) and
wait for the blade to stop turning. (Fig. 8)
12 Turn the pitcher counter clockwise to remove and then
lift off the base. (Fig. 9)
14
1-877-646-5288
Fig. 8
CAUTION: Never insert your hands in the pitcher as the
blades are sharp. Always use a spatula to dislodge food
that has stuck to the sides of the pitcher.
CAUTION: If using the pour spout, ensure that the lid is
fully locked onto the blender pitcher.
CAUTION: If pouring with the lid removed, ALWAYS
remove the blade assembly first before pouring.
13 Depending on the consistency of the contents in the
container, open the pour spout cap and use the spout
to empty liquid contents.
14 For thicker consistencies, remove the lid and blade
attachment carefully (by its shaft), then empty contents
from the container. To remove the lid, press the release
button on the lid and pull the lid handle up to a 90°
angle ands lift the lid off the blender pitcher. (Fig. 10)
15 Make sure that the unit is unplugged when not in use.
Fig. 9Fig. 7 Fig. 10
Page 15
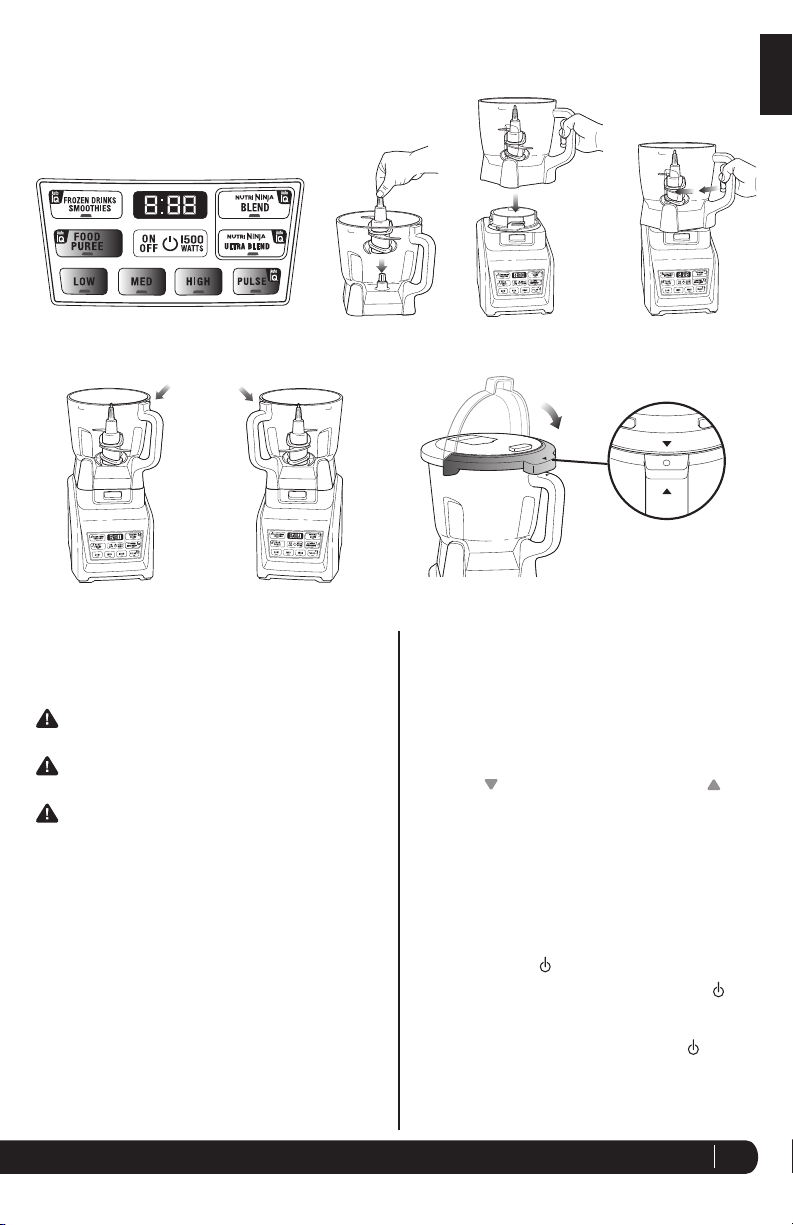
Assembly and Use for the Processor Bowl
ASSEMBLY
English
Fig. 1
Fig. 5a Fig. 5b
NOTE: Nutri Ninja® | Ninja® Blender System with Auto-
iQ™ Technology can sense which jar is on the motor
base. The function lights will illuminate depending on
which jar is placed on the motor base. (Fig. 1)
Use caution when handling the blade assemblies
as the blades are very sharp.
WARNING: Never leave the appliance unattended while
in use.
IMPO RTANT: Make sure that the motor base is
plugged in for use.
1 Holding the desired blade by the top of the shaft, place
it onto the drive gear inside the bowl. Ensure that the
attachment is seated properly and is standing upright.
(Fig. 2)
NOTE: The blade will fit loosely on the drive gear.
2 Place the motor base on a clean, dry, level surface such
as a counter or table top.
3 Align and lower the Processor Bowl onto the motor
base. (Fig. 3) Handle should be aligned slightly to the
right of the “LOCK” symbol on the motor base.
4 Rotate the bowl clockwise until it locks in place, you will
hear a click when the lock is engaged. (Fig. 4)
5 The bowl can be placed on the motor base two ways;
Fig. 2
Fig. 3
Fig. 4
Fig. 6b
Fig. 6a
the handle can be on the front right corner or the front
left corner. (Fig. 5a, Fig. 5b)
6 Add the ingredients to the bowl, making sure that they
do not exceed the highest measured marking line on
the side of the bowl.
7 Holding the lid by the handle in the upright position,
place it on top of the Processor Bowl aligning the
triangle (
) located on the lid with the triangle ( )
located on the Processor Bowl handle. (Fig. 6a) Press
the handle down until you hear a click.
The triangles on the lid and the Processor Bowl handle
MUST be aligned in order for the blender to turn on.
(Fig. 6b)
NOTE: The 64 oz. bowl is not intended for blending
drinks. Do not overfill.
8 Plug the power cord into the electrical outlet and press
the power button ( ).
NOTE: As a safety feature, the power button ( ) will
flash and the motor will not work if the bowl and lid
are not installed correctly. When the bowl and lid
are installed properly, the power button ( ) will be
solid, indicating that the appliance is ready for use.
www.ninjakitchen.com
15
Page 16

Assembly and Use for the Processor Bowl - cont.
Use caution when handling the blade assemblies as the blades are very sharp.
REMOVAL
Fig. 1
USE
Fig. 2 Fig. 3
USING THE CHOPPING BLADE ASSEMBLY
WARNING: Never leave the appliance unattended while
in use.
1 Holding the Chopping Blade assembly by the shaft,
place it onto the gear shaft inside the bowl. Ensure that
the attachment fits around the gear shaft and that it is
standing straight.
2 Add the ingredients and secure the bowl lid onto the
bowl. (Fig. 1)
3 Plug the power cord into the electrical outlet and press
on the power button (
4 Select the speed or Auto-iQ
your needs. Pulse ingredients for even chopping by
holding the Auto-iQ™ Pulse button until your desired
consistency is reached.
NOTE: Please refer to “Speed Settings & Uses” chart
for suggested uses and speeds.
5 When you have reached your desired consistency, stop
the appliance by pressing the power button (
wait for the blade to stop turning. (Fig. 2)
6 To remove the lid, press the release button on the lid
and pull the lid handle up to a 90° angle. (Fig. 2)
7 Turn the bowl counter-clockwise and lift it to remove it
from the motor base. (Fig. 3)
CAUTION: If pouring from the bowl, ALWAYS remove
the blade assembly first before pouring.
).
™
program that best suits
) and
USE
Fig. 4
USING THE DOUGH BLADE
WARNING: Never leave the appliance unattended while
in use.
1 Place the motor base on a clean, dry, level surface such
as a counter or table top. (Fig. 4) Press down on the
motor base to adhere it to a counter or table top to give
the unit a better grip using the suction cups.
2 Secure the bowl onto the motor base.
3 Holding the dough blade by the shaft, place it onto the
gear shaft inside the bowl. Ensure that the attachment
fits around the gear shaft and that it is standing straight.
4 Add the ingredients and secure the bowl lid onto the bowl.
5 Plug the power cord into the electrical outlet and press
on the power button (
suits your needs.
NOTE: Please refer to “Speed Settings & Uses” chart
for suggested uses and speeds.
6 Once finished making dough, stop the appliance by
pressing the power button (
stop turning. To remove the lid, press the release button
on the lid and pull the lid handle up to a 90° angle.
(Fig. 2)
7 Turn the bowl counter-clockwise and lift it to remove it
from the motor base. (Fig. 3)
). Select the speed that best
) and wait for the blade to
16
1-877-646-5288
Page 17

Assembly and Use for the Nutri Ninja® Cups
Use caution when handling the blade assemblies as the blades are very sharp.
ASSEMBLY USE REMOVAL
Fig. 1
English
Fig. 2 Fig. 3
NOTE: Nutri Ninja® | Ninja® Blender System with Auto-iQ™
Technology can sense which jar is on the motor base. The
function lights will illuminate depending on which jar is
placed on the motor base. (Fig. 1)
WARNING: Never leave the appliance unattended while
in use.
IMPORTANT: Make sure that the motor base is
plugged in for use.
1 Place the motor base on a clean, dry, level surface such
as a counter or table top.
2 Add ingredients to the Nutri Ninja
®
cup.
3 Place the Pro Extractor Blades™ onto the cup and
tightly screw it on clockwise until you have a good seal.
(Fig. 2)
4 Turn the Nutri Ninja
®
cup upside down and place it
onto the motor base, aligning the tabs on the cup with
the motor base. Rotate the Nutri Ninja® cup clockwise
until it locks in place, you will hear a click when the
lock is engaged. (Fig. 3)
Fig. 4 Fig. 5 Fig. 6
5 Press the power button on, and select the speed or
™
Auto-iQ
program that suits your needs.
™
The Auto-iQ
program will stop the appliance
automatically at the end of the program. (Fig. 4)
6. To pause the appliance, press the selected speed or
7 Once you have reached your desired consistency, turn
™
Auto-iQ
Program a second time.
the power button off. Turn the Nutri Ninja
®
cup counter-
clockwise and pull straight up to remove. (Fig. 5, Fig. 6)
NOTE: Do not overfill! To avoid spilling, do not add
ingredients past the “Max Liquid” line.
8 Turn the cup upright and remove the Pro Extractor
Blades™ by twisting the blade assembly counter
clockwise.
9 Place the Sip & Seal
™
lid onto the Nutri Ninja® cup,
twist to seal and enjoy!
10 Make sure that the motor base is unplugged when
not in use.
www.ninjakitchen.com
17
Page 18

Programs, Speed Settings & Uses for the Blender Pitcher
FUNCTION CONTAINER
Frozen Drinks /
Ice Crush
Blender Pitcher Stacked Blade
BLADE
TYPE
Pureeing Blender Pitcher Stacked Blade Auto-iQ
SPEED or
PROGRAM
Auto-iQ™ Frozen Drinks/
Smoothies
™
Food Puree
Programs, Speed Settings & Uses for the Food Processor Bowl
FUNCTION CONTAINER
Mincing
Kneading and
Dough Mixing
Processing
Emulsifying
Grinding
Grating
Chopping
Batters
Food Processor
Bowl
Food Processor
Bowl
Food Processor
Bowl
Food Processor
Bowl
Food Processor
Bowl
Food Processor
Bowl
Food Processor
Bowl
Food Processor
Bowl
BLADE
TYPE
Chopping
Blade
Dough Blade Low
Chopping
Blade
Chopping
Blade
Chopping
Blade
Chopping
Blade
Chopping
Blade
Dough Blade Low
SPEED or
PROGRAM
Auto-iQ™ Pulse
™
Food Puree
Auto-iQ
Low
Medium
High
Low
Medium
Medium Meat
™
Pulse
Auto-iQ
High
™
Pulse
Auto-iQ
TYPE OF FOOD
Ice
Frozen Drinks
Smoothies
Smoothies
Soups
Milkshakes
TYPE OF FOOD
Onion
Garlic
Herbs
Bread Dough
Pie Dough
Pizza Dough
Pretzel Dough
Cookie Dough
Pâtés
Stewed Fruits
Dips
Apple Sauce
Spreads
Baby Food
Salad Dressings
Dips
Sauces
Grated Cheese
Bread Crumbs
Spices
Salsa
Vegetables
Nuts
Cake Mixes
Batters
18
1-877-646-5288
Page 19

Programs, Speed Settings & Uses for the Nutri Ninja® Cup
English
FUNCTION CONTAINER
Smoothies Nutri Ninja® Cup
Green Smoothies Nutri Ninja
Grating Nutri Ninja
Chopping Nutri Ninja
®
®
®
Cup
Cup
Cup
BLADE
TYPE
Pro Extractor
Blades™
Pro Extractor
Blades™
Pro Extractor
Blades™
Pro Extractor
Blades™
SPEED or
PROGRAM
Nutri Ninja® Auto-iQ™
Blend
Nutri Ninja® Auto-iQ™
Ultra Blend
Auto-iQ™ Pulse
High
Auto-iQ™ Pulse
High
TYPE OF FOOD
Smoothies
Frappes
Milkshakes
Protein Drinks
Frozen Fruits
Frozen Vegetables
Kale
Celery
Spinach
Seeds
Ice
Grated Cheese
Bread Crumbs
Spices
Salsa
Vegetables
Nuts
www.ninjakitchen.com
19
Page 20

Care & Maintenance
HOW TO CLEAN
CAUTION: Make sure that the motor base is unplugged
from the power source before inserting or removing any
attachment and before cleaning.
CAUTION: DO NOT immerse the motor base into water or
any other liquid.
1 Separate/remove all parts from each other.
2 Clean the motor base with a damp cloth and wipe dry.
3 Place the blender pitcher, Nutri Ninja
processor bowl in the dishwasher. Place the lids and
attachments on the top rack. Use caution when
handling the blade assemblies as the blades are
very sharp.
NOTE: You may also wash the containers by filling ¾ of
the container with warm water and a drop of dish washing
detergent, placing the corresponding lid on the container
and pressing the Auto-iQ
™
clean, remove the container from the motor base. Rinse
the container, attachment and lid under running water.
Allow all the parts to dry before storing.
Please call customer service if any servicing needs to be
performed on the appliance at 1-877-646-5288.
®
cup and food
Pulse button a few times. Once
HOW TO STORE
1 Store the
Nutri Ninja® | Ninja® Blender System with
™
Auto-iQ
Technology
upright with the pitcher on the
motor base, 6-Blade assembly inside the pitcher and lid on
the pitcher. Do not place anything on top. Store the bowl
with the 4-Blade assembly inside and the lid on top. S
the Nutri Ninja® cup and the rest of the attachments
along side the appliance or in a cabinet where they will
not be damaged and won’t cause a hazard.
RESETTING THE MOTOR THERMOSTAT
The Nutri Ninja® | Ninja® Blender System with
1
Unplug the appliance from the electrical outlet.
2
Remove and empty the container and ensure that no
3
Allow the appliance to cool for approximately 15
4
Re-install the container onto the base and re-plug the
5
™
Technology features a unique safety system
Auto-iQ
which prevents damage to the unit’s motor and
drive system should you inadvertently overload your
appliance. If the appliance is being overloaded,
the motor will stop. Allow the appliance to
cool for approximately 15 minutes. To reset the
appliance, follow the resetting procedure below:
food is jamming the cutting blades or attachments.
minutes.
appliance into the electrical outlet.
Proceed to use the appliance as before making sure not
to exceed the recommended maximum capacities.
tore
20
1-877-646-5288
Page 21

Troubleshooting Guide
PROBLEMS POSSIBLE REASONS & SOLUTIONS
Motor Doesn’t Start or
Attachment Doesn’t Rotate.
Food is Unevenly Chopped.
Make sure the container is securely placed on motor base.
Make sure the lid is securely on container in the correct position (align
arrows).
The appliance is turned “Off”. Press the power button (
Check that the plug is securely inserted into the electrical outlet.
Check the fuse or circuit breaker.
The unit has overloaded. The appliance will stop and the power light will
flash. Unplug and wait approximately 15 minutes before using again.
The unit has overheated. Unplug and wait approximately 15 minutes before
using again.
Check to make sure the unit is not overloaded.
Either you are chopping too much food at one time, or the pieces are not of
even size and processing smaller amounts per batch.
) to turn “On”.
English
Food is Chopped Too Fine or is
Too Watery.
Food Collects On Lid or On the
Sides of the Container.
You Cannot Achieve Snow
From Solid Ice.
Motor Base Won’t Stick to
Counter or Table Top.
You get an “Err” Message
You have a blinking red light
Replacement Parts
The food has been over processed. Use Auto-iQ™ Pulse button for
controlled processing.
The mixture is too thick. Add more liquid.
Do not use ice that has been sitting out or has started to melt. Use ice
straight from the freezer.
Start with a few pulses and then go to a continuous blending cycle.
Make sure surface and suction feet are wiped clean. Suction feet will only
stick to smooth surfaces. Suction feet WILL NOT stick on some surfaces
such as, wood, tile and non-polished finishes.
DO NOT attempt to use appliance when the motor base is stuck to a
surface that is not secure, (cutting board, platter, plates, etc.).
Your Ninja is able to detect which jar is on the base. You may be trying
to use a program that is not designed for the jar you have installed. The
programs will light up indicating which programs are available for each jar.
The unit is not installed properly. For your safety the unit will only be able to
be turned on when it is properly assembled. Please refer to the assembly
pages of this inspiration guide for assistance.
ORDERING REPLACEMENT PARTS
To order additional parts and attachments, please visit our website: www.ninjakitchen.com
or feel free to contact customer service: 1-877-646-5288.
www.ninjakitchen.com
21
Page 22

Notes
22
1-877-646-5288
Page 23

ONE (1) YEAR LIMITED WARRANTY
EURO-PRO Operating LLC warrants this product to be free from material defects and workmanship for a period of one (1)
year from the date of purchase when utilized for normal household use, subject to the following conditions, exclusions and
exceptions.
The liability of EURO-PRO Operating LLC is limited solely to the cost of the repair or replacement of the unit at our option.
This Limited Warranty does not cover normal wear of parts and does not apply to any unit that has been tampered with or
used for commercial purposes. This Limited Warranty does not cover damage caused by misuse, abuse, negligent handling or
damage due to faulty packaging or mishandling in transit. This Limited Warranty does not cover damage or defects caused by
or resulting from damages from shipping or repairs, service or alteration to the product or any of its parts, which have been
performed by a repair person not authorized by EURO-PRO Operating LLC.
If your appliance fails to operate properly while in use under normal household conditions within the warranty period, return
the complete appliance and accessories, freight prepaid. For assistance with warranty service options or customer support,
please call our customer care and product specialists at , call 1 (877) 646-5288 or visit our website www.ninjakitchen.com.
If the appliance is found to be defective in material or workmanship, EURO-PRO Operating LLC will repair or replace it free of
charge. Proof of purchase is required and a fee of $19.95 will apply to cover the cost of return freight. *
This Limited Warranty is extended to the original purchaser of the unit and excludes all other legal, implied and/or conventional
warranties. The responsibility of EURO-PRO Operating LLC if any, is limited to the specific obligations expressly assumed
by it under the terms of this Limited Warranty. In no event is EURO-PRO Operating LLC liable for incidental or consequential
damages to anyone of any nature whatsoever. Some states do not permit the exclusion or limitation of incidental or
consequential damages, so the above may not apply to you.
English
This Limited Warranty gives you specific legal rights, and you may also have other rights which vary from state to state or from
province to province.
*IMPORTANT: Carefully pack item to avoid damage in shipping. Be sure to include proof of purchase date and
to attach tag to item before packing with your name, complete address and phone number with a note giving
purchase information, model number and what you believe is the problem with the item. We recommend you
insure the package (as damage in shipping is not covered by your Limited Warranty). Mark the outside of your
package “ATTENTION CUSTOMER SERVICE”.
Product Registration
Please visit www.ninjakitchen.com or call 1-877-646-5288 to register your new Ninja™ product within ten (10) days of
purchase. You will be asked to provide the store name, date of purchase and model number along with your name and address.
The registration will enable us to contact you in the unlikely event of a product safety notification. By registering you
acknowledge to have read and understood the instructions for use, and warnings set forth in the accompanying instructions.
www.ninjakitchen.com
23
Page 24

Comprendre votre système mélangeur Nutri NinjaMD | NinjaMD
avec la technologie Auto-iQ
a
b
f
MC
c
d e
h
g
j
l
k
m
i
a Tasse géante Nutri Ninja
MD
de
950mL pour portions mutliples
b Tasse Régulière Nutri NinjaMD de 700 mL
MD
c Petite Tasse Nutri Ninja
d Pro Extractor Blades
MC
de 500 mL
e Couvercles Sip & SealMC (x3)
24
1-877-646-5288
f Bol du robot culinaire
g Couvercle du robot culinaire
h Lame à pâte (robot culinaire)
i Lame à hancher (robot culinaire)
j Pichet du mélangeur
k Couvercle du mélangeur
l Lames superposées (mélangeur)
m Base moteur
REMARQUE: Les lames ne sont
pas interchangeables.
Page 25

Le Système mélangeur Nutri NinjaMD | NinjaMD avec la technologie AUTO-iQMC est un outil professionnel et innovant
offrant une conception sophistiquée et une performance exceptionnel. Un vrai atout pour toutes les cuisines. Le
Système mélangeur Nutri NinjaMD | NinjaMD fonctionne selon des programmes intelligents qui combinent des séquences
de pulsation, de mélange et d’arrêt qui font tout le travail pour vous! Profitez d’excellents résultats chaque fois - pas de
devinettes! Pour les meilleurs résultats, lisez toutes les directives dans ce manuel avant d’utiliser cet appareil.
Le Système mélangeur Nutri NinjaMD | NinjaMD avec la technologie Auto-iQMC offre les
fonctionnalités suivantes :
• Technologie Ninja
• Pichet de mélangeur, tasses Nutri Ninja
• Bec verseur anti-égouttement
• Technologie Total Crushing
• Panneau de commande avec minuterie
• Base solide et antidérapante
• Technologie Smart Lid pour un dégagement facile
• 3 vitesses : Basse, moyenne et haute
• 5 réglages Auto-iQ
Blend, Nutri NinjaMD Auto-iQMC Ultra Blend and Auto-iQMC Pulse
• Extraction de nutriments et vitamines Nutri Ninja
MC
avec brevet en attente
MD
, bol de robot culinaire et couvercles sans BPA
MD
MC
– Auto-iQMC Frozen Drinks/Smoothies, Auto-iQMC Food Puree, Nutri NinjaMD Auto-iQMC
MD
Français
www.ninjakitchen.com
25
Page 26

Utiliser le Système mélangeur Nutri NinjaMD | NinjaMD avec
la technologie Auto-iQ
MC
VEUILLEZ CONSIDÉRER CES DIRECTIVES DE
SÉCURITÉ IMPORTANTES AVANT D’UTILISER
L’APPAREIL:
IMPORTANT : Ne mettez jamais les ingrédients
dans le réservoir avant d’insérer les lames.
IMPORTANT : Les lames ne sont pas
interchangeables.
IMPORTANT : Ne tentez pas d’utiliser l’appareil
sans le couvercle.
IMPORTANT : N’UTILISEZ PAS L’APPAREIL
LORSQU’IL EST VIDE.
MISE EN GARDE : NE PAS TRANSFORMER LES
ALIMENTS OU LES LIQUIDES CHAUDS.
MISE EN GARDE : N’enlevez pas le récipient
lorsque l’appareil est en marche.
AVERTISSEMENT : Ne laissez pas l’appareil sans
surveillance.
MISE EN GARDE:
Assurez-vous
que le couvercle
soit entièrement
verrouillé sur
le pichet du
mélangeur
lorsque vous
utilisez le bec
verseur.
MISE EN GARDE :
Assurez-vous de
TOUJOURS retirer
l’ensemble de
lames avant de
verser le contenu
sans couvercle.
MISE EN GARDE : Les ensembles de lames sont
tranchants et amovibles. Manipulez-les avec
soin. Tenez toujours l’arbre en manipulant les
ensembles de lames.
AVANT L’UTILISATION
1 Retirez tous les matériaux d’emballage et les étiquettes
de l’appareil.
2 Lavez les couvercles, le pichet du mélangeur, le bol du
robot culinaire, les tasses Nutri NinjaMD et les lames dans
de l’eau chaude et savonneuse avec un linge doux.
3 Rincez et séchez complétement les morceaux.
4 Le pichet du mélangeur, le bol du robot culinaire,
les tasses Nutri Ninja
peuvent tous aller au lave-vaisselle. Il est recommandé
de placer les couvercles et les lames dans le panier
supérieur. Assurez-vous de retirer les lames des
récipients avant de les placer dans le lave-vaisselle.
5 Essuyez la base moteur avec un linge humide.
MD
, les couvercles et les lames
26
1-877-646-5288
Page 27

Montage et utilisation du mélangeur
HIGH
PULSE
LOW
DOUGH
SMOOTHIE
SINGLE
SERVE
PUREE
FROZEN
BLENDING
MONTAGE
Français
Fig. 1
Fig. 4a
Fig. 4b
Exercez une prudence extrême lorsque vous
manipulez les ensembles de lames, puisque
celles-ci sont très tranchantes.
AVERTISSEMENT : Ne laissez jamais l’appareil sans
surveillance pendant l’utilisation.
IMPORTANT : Assurez-vous que la base moteur soit
branchée pour l’utilisation.
1 En tenant l’ensemble de lames superposées au haut de
l’arbre, placez-le sur l’engrenage à l’intérieur du pichet.
Assurez-vous que l’attachement soit correctement
installé et qu’il est positionné à l’endroit. (Fig. 1)
REMARQUE : La lame repose lâchement sur l’engrenage.
2 Placez la base moteur sur une surface propre, sèche et
plane, telle qu’un comptoir ou une table.
3 Alignez et faites baisser le pichet dans la base moteur.
(Fig. 2) La poignée devrait être légèrement alignée à
la droite du symbole VERROUILLER « LOCK » sur la
base moteur.
4 Tournez le pichet dans le sens horaire jusqu’à ce qu’il
soit verrouillé en place. Vous entendrez un clic lorsque
le verrou s’enclenche. (Fig 3)
5 On peut placer le pichet sur la base moteur de deux
façon; soit avec la poignée au coin avant droit ou au
coin avant gauche. (Fig. 4a, Fig 4b)
Fig. 2
Fig. 3
Fig. 5a
6 Mettez les ingrédients dans le pichet, en vous assurant
qu’ils ne dépassent pas la ligne de mesure la plus
haute sur le bord du pichet.
REMARQUE : si vous devez ajouter des ingrédients
additionnels lorsque l’appareil est en marche, retirez
le bouchon du bec verseur et versez les ingrédients au
travers de l’ouverture.
REMARQUE : En mélangeant des liquides, tels que des
mélanges de breuvage ou de frappé, ne dépassez pas
la marque de liquide « MAX » (1,9 L) sur le pichet.
7 En tenant le couvercle à l’endroit par sa poignée, placez-
le sur le haut du pichet, en alignant le triangle ( ) sur le
couvercle avec le triangle ( ) sur la poignée du pichet.
(Fig. 5a) Exercez de la pression sur la poigne, jusqu’à ce
que vous entendiez un clic. Les triangles sur le couvercle
et la poignée du mélangeur DOIVENT s’aligner afin que
l’appareil puisse être mis en marche. (Fig. 5b)
8 Branchez le fil d’alimentation dans la prise électrique et
appuyez sur le bouton d’alimentation ( ).
REMARQUE : Pour votre sécurité, l’indicateur
d’alimentation ( ) clignotera et le moteur ne
fonctionnera pas si le pichet et le couvercle ne sont
pas correctement installés. Lorsqu’ils sont bien
installés, l’indicateur s’allumera ( ) solidement,
vous signalant que l’appareil est prêt à l’utilisation.
Fig. 5b
www.ninjakitchen.com
27
Page 28

Montage et utilisation du mélangeur – suite
UTILISATION
Fig. 6
ENLÈVEMENT
AVERTISSEMENT : Ne laissez pas l’appareil sans
surveillance.
REMARQUE : Le Système mélangeur Nutri NinjaMD |
NinjaMD avec la technologie Auto-iQMC peut détecter
lequel des récipients est dans la base moteur. Les
indicateurs de fonction s’illumineront selon le récipient
que vous placez sur la base moteur. (Fig. 6)
9 Appuyez sur le bouton d’alimentation pour mettre
l’unité en marche. Sélectionnez la vitesse ou le
programme Auto-IQMC qui convient le mieux à
vos besoins. Le programme Auto-iQMC arrêtera
automatiquement l’appareil à la fin du programme.
(Fig. 7)
10 Pour mettre l’appareil en pause, appuyez une deuxième
fois sur la vitesse ou le programme Auto-IQMC souhaité.
11 Une fois la consistance réalisée, appuyez sur le bouton
d’alimentation pour arrêter l’appareil, et attendez que
les lames cessent de tourner (Fig. 8)
12 Tournez le pichet dans le sens antihoraire pour
l’enlever, et retirez-le ensuite de la base (Fig. 9)
28
1-877-646-5288
Fig. 8
MISE EN GARDE : N’insérez jamais vos mains dans
le pichet puisque les lames sont tranchantes. Utilisez
toujours une spatule pour dégager les aliments qui
s’adhèrent aux bords du pichet.
MISE EN GARDE : Assurez-vous que le couvercle
soit entièrement verrouillé sur le pichet du mélangeur
lorsque vous utilisez le bec verseur.
MISE EN GARDE : Assurez-vous de TOUJOURS retirer
l’ensemble de lames avant de verser le contenu sans
couvercle.
13 Dépendamment de la consistance des ingrédients, ouvrez
et utilisez le bec verseur pour verser le contenu liquide.
14 Dans le cas de consistances plus épaisses, enlevez
soigneusement le couvercle et l’ensemble de lames
(par son arbre), et versez le contenu du récipient.
Pour enlever le couvercle, appuyez sur le bouton de
dégagement sur le couvercle et mettez la poignée
à un angle de 90o. Retirez le couvercle du pichet de
mélangeur. (Fig 10)
15 Assurez-vous que l’appareil soit débranché lorsque
vous ne l’utilisez pas.
Fig. 9Fig. 7 Fig. 10
Page 29

Montage et utilisation du bol du robot culinaire
MONTAGE
Français
Fig. 1
Fig. 5a Fig. 5b
REMARQUE : Le Système mélangeur Nutri NinjaMD |
NinjaMD avec la technologie Auto-iQMC peut détecter
lequel des récipients est dans la base moteur. Les
indicateurs de fonction s’illumineront selon le récipient
que vous placez sur la base moteur. (Fig. 1)
Exercez une prudence extrême lorsque vous
manipulez les ensembles de lames, puisque
celles-ci sont très tranchantes.
AVERTISSEMENT : Ne laissez pas l’appareil sans
surveillance.
IMPORTANT : Assurez-vous que la base moteur soit
branchée pour l’utilisation.
1 En tenant l’ensemble de lames superposées au haut
de l’arbre, placez-le sur l’engrenage à l’intérieur du
bol. Assurez-vous que l’attachement soit correctement
installé et qu’il est positionné à l’endroit. (Fig. 2)
REMARQUE : La lame repose lâchement sur l’engrenage.
2 Placez la base moteur sur une surface propre, sèche et
plane, telle qu’un comptoir ou une table.
3 Alignez et faites baisser le bol dans la base moteur.
(Fig. 3) La poignée devrait être légèrement alignée à la
droite du symbole VERROUILLER « LOCK » sur la base
moteur.
Fig. 2
Fig. 3
Fig. 4
Fig. 6b
Fig. 6a
4 Tournez le bol dans le sens horaire jusqu’à ce qu’il soit
verrouillé en place. Vous entendrez un clic lorsque le
verrou s’enclenche. (Fig 4)
5 On peut placer le bol sur la base moteur de deux façon;
soit avec la poignée au coin avant droit ou au coin avant
gauche. (Fig. 5a, Fig 5b)
6 Mettez les ingrédients dans le bol, en vous assurant
qu’ils ne dépassent pas la ligne de mesure la plus
haute sur le bord du pichet.
7 En tenant le couvercle à l’endroit par sa poignée,
placez-le sur le haut du bol, en alignant le triangle
(
) sur le couvercle avec le triangle ( ) sur la poignée
du bol. (Fig. 6a) Exercez de la pression sur la poigne,
jusqu’à ce que vous entendiez un clic. Les triangles sur
le couvercle et la poignée du bol DOIVENT s’aligner
afin que l’appareil puisse être mis en marche. (Fig. 6b)
REMARQUE : Le bol de 64 oz n’est pas conçu pour le
mélange des breuvages. Ne pas remplir excessivement.
8 Branchez le fil d’alimentation dans la prise électrique et
appuyez sur le bouton d’alimentation ( ).
REMARQUE : Pour votre sécurité, l’indicateur
d’alimentation ( ) clignotera et le moteur ne
fonctionnera pas si le bol et le couvercle ne sont
pas correctement installés. Lorsqu’ils sont bien
installés, l’indicateur s’allumera ( )solidement,
vous signalant que l’appareil est prêt à l’utilisation.
www.ninjakitchen.com
29
Page 30

Montage et utilisation du bol du robot culinaire – suite
Exercez une prudence extrême lorsque vous manipulez les ensembles de lames, puisque celles-ci sont
très tranchantes.
UTILISATION
Fig. 1
Fig. 2 Fig. 3
ENLÈVEMENT
UTILISER L’ENSEMBLE DE LAMES À HACHER
AVERTISSEMENT : Ne laissez pas l’appareil sans
surveillance.
1 En tenant l’ensemble de lames à hacher au haut de l’arbre,
placez-le sur l’engrenage à l’intérieur du bol. Assurez-vous
que l’attachement soit correctement installé et qu’il est
positionné à l’endroit. (Fig. 2)
2 Ajoutez les ingrédients et sécurisez le couvercle sur le bol.
(Fig. 1)
3 Branchez le fil d’alimentation dans la prise électrique et
appuyez sur le bouton d’alimentation (
4 Sélectionnez la vitesse ou le programme Auto-iQ
convient le mieux à vos besoins. Employez des pulsations
pour uniformément hacher les aliments en appuyant
sur le bouton de pulsation Auto-iQMC jusqu’à ce que la
consistance souhaitée soit atteinte.
REMARQUE : Consultez le tableau « Réglages de vitesse
et usages » pour les usages et les vitesses recommandés.
5 Lorsque vous atteignez la consistance souhaitée, arrêtez
l’appareil en appuyant sur le bouton d’alimentation (
attendez que les lames cessent de tourner. (Fig. 2)
6 Pour enlever le couvercle, appuyez sur le bouton de
dégagement sur le couvercle et tirez sur la poignée à un
angle de 90
7 Tournez le bol dans le sens antihoraire et tirez-le pour
l’enlever de la base moteur. (Fig. 3)
MISE EN GARDE : Assurez-vous de TOUJOURS retirer
l’ensemble de lames avant de verser le contenu du bol.
o
. (Fig. 2)
).
MC
qui
), et
UTILISATION
Fig. 4
UTILISER LA LAME DE PÂTE
MISE EN GARDE : Ne laissez pas l’appareil sans
surveillance.
1 Placez la base moteur sur une surface propre, sèche
et plane, telle qu’un comptoir ou une table. (Fig. 4)
Exercez de la pression sur la base moteur pour qu’elle
s’adhère au comptoir ou à la table, ou installez-la
encore plus solidement avec les ventouses.
2 Sécurisez le bol dans la base moteur.
3 En tenant la lame de pâte au haut de l’arbre, placez-le
sur l’engrenage à l’intérieur du bol. Assurez-vous que
l’attachement soit correctement installé et qu’il est
positionné à l’endroit.
4 Ajoutez les ingrédients et sécurisez le couvercle sur le
bol.
5 Branchez le fil d’alimentation dans la prise électrique et
appuyez sur le bouton d’alimentation (
la vitesse qui convient le mieux à vos besoins.
REMARQUE : Consultez le tableau « Réglages de vitesse
et usages » pour les usages et les vitesses recommandés.
6 Une fois la pâte confectionnée, arrêtez l’appareil en
appuyant sur le bouton d’alimentation et attendez que
les lames cessent de tourner. Pour enlever le couvercle,
appuyez sur le bouton de dégagement (
couvercle et tirez sur la poignée à un angle de 90o.
7 Tournez le bol dans le sens antihoraire et tirez-le pour
l’enlever de la base moteur. (Fig. 3)
). Sélectionnez
) sur le
30
1-877-646-5288
Page 31

Montage et utilisation des tasses Nutri Ninja
MD
Exercez une prudence extrême lorsque vous manipulez les ensembles de lames, puisque celles-ci sont
très tranchantes.
MONTAGE UTILISATION ENLÈVEMENT
Fig. 2 Fig. 3
REMARQUE : Le Système mélangeur Nutri NinjaMD |
NinjaMD avec la technologie Auto-iQMC peut détecter lequel
des récipients est dans la base moteur. Les indicateurs de
fonction s’illumineront selon le récipient que vous placez sur
la base moteur. (Fig. 1)
AVERTISSEMENT : Ne laissez pas l’appareil sans
surveillance.
IMPORTANT : Assurez-vous que la base moteur soit
branchée pour l’utilisation.
1 Placez la base moteur sur une surface propre, sèche
et plane, telle qu’un comptoir ou une table.
2 Ajoutez les ingrédients à la tasse Nutri Ninja
3 Placez les Pro Extractor Blades
MC
dans la tasse et
vissez-la fermement dans le sens horaire, jusqu’à ce
qu’elle soit bien scellée (Fig. 2)
4 Inversez la tasse Nutri Ninja
MD
et placez-la sur la
base moteur, en alignant les onglets de la tasse avec
la base moteur. Tournez la tasse Nutri NinjaMD dans
le sens horaire jusqu’à ce qu’elle soit verrouillée
en place. Vous entendrez un clic lorsque le verrou
s’enclenche. (Fig. 3)
MD
.
Fig. 1
Fig. 4 Fig. 5 Fig. 6
5 Sélectionnez la vitesse ou le programme Auto-iQMC
qui convient le mieux à vos besoins. Le programme
Auto-iQMC arrêtera automatiquement l’appareil à la fin
du programme. (Fig. 4)
6 Pour mettre l’appareil en pause, appuyez une deuxième
fois sur la vitesse ou le programme Auto-iQ
MC
souhaité.
7 Une fois la consistance réalisée, appuyez sur le bouton
d’alimentation pour arrêter l’appareil. Tournez la tasse
Nutri Ninja
MD
dans le sens antihoraire et tirez-la vers le
haut pour l’enlever. (Fig. 5, Fig. 6)
REMARQUE : Ne remplissez pas excessivement la
tasse! Pour éviter les débordements, ne dépassez pas
la marque de liquide « MAX » sur la tasse.
8 Mettez la tasse à l’endroit et retirez les Pro Extractor
MC
Blades
en tournant l’ensemble de lames dans le sens
antihoraire.
9 Mettez le couvercle Sip & Seal
MC
sur la tasse Nutri
NinjaMD. Vissez pour sceller et dégustez!
10 Assurez-vous que la base moteur soit débranchée
lorsque vous ne l’utilisez pas.
Français
www.ninjakitchen.com
31
Page 32

Programmes, réglages de vitesse et usages du mélangeur
FONCTION RÉCIPIENT
Breuvages gelés /
Broyage de glace
Purées
Pichet du
mélangeur
Pichet du
mélangeur
TYPE DE
LAME
Lame
superposée
Lame
superposée
VITESSE ou
PROGRAMME
Auto-iQMC Frozen Drinks/
Smoothies
MC
Auto-iQ
Food Puree
TYPE
D’ALIMENTS
Breuvages gelés
Frappés
Frappés
Soupes
Laits frappés
Programmes, réglages de vitesse et usages du pichet du robot culinaire
FONCTION RÉCIPIENT
Hachage fin
Pétrissage et
malaxage des
pâtes
Transformation
Émulsion
Broyage
Râpage
Hachage
Pâtes
Bol du robot
culinaire
Bol du robot
culinaire
Bol du robot
culinaire
Bol du robot
culinaire
Bol du robot
culinaire
Bol du robot
culinaire
Bol du robot
culinaire
Bol du robot
culinaire
TYPE DE
LAME
Lame à
hachage
Lame à pâte Bas
Lame à
hachage
Lame à
hachage
Lame à
hachage
Lame à
hachage
Lame à
hachage
Lame à pâte Bas
VITESSE ou
PROGRAMME
Auto-iQMC Pulse
MC
Food Puree
Auto-iQ
Bas
Moyen
Haut
Bas
Moyen
Moyen Viande
MC
Pulse
Auto-iQ
Haut
MC
Pulse
Auto-iQ
D’ALIMENTS
Oignon
Fines herbes
Pâte à pain
Pâte à tarte
Pâte à pizza
Pâte à bretzel
Pâte à biscuits
Compotes aux
Trempettes
Compotes aux
pommes
Tartinades
Nourriture pour
Vinaigrettes
Sauces
Fromage râpé
Chapelure
Épices
Légumes
Mélanges à
gâteau
Glace
TYPE
Ail
Pâtés
fruits
bébés
Salsa
Noix
Pâtes
32
1-877-646-5288
Page 33

Programmes, réglages de vitesse et usages de la tasse Nutri Ninja
MD
FONCTION RÉCIPIENT
Frappés
Frappés verts
Râpage
Hachage
Tasse Nutri
MD
Ninja
Tasse Nutri
MD
Ninja
Tasse Nutri
MD
Ninja
Tasse Nutri
MD
Ninja
TYPE DE
LAME
Pro Extractor
MC
Blades
Pro Extractor
MC
Blades
Pro Extractor
MC
Blades
Pro Extractor
MC
Blades
VITESSE ou
PROGRAMME
Nutri NinjaMD Auto-iQMC
Blend
Nutri NinjaMD Auto-iQMC
Ultra Blend
Auto-iQMD Pulse
Haut
Auto-iQMC Pulse
Haut
TYPE
D’ALIMENTS
Frappés
Laits frappés
Breuvages
protéinés
Fruits congelés
Légumes
congelés
Chou frisé
Céleri
Épinards
Graines
Glace
Fromage râpé
Chapelure
Épices
Salsa
Légumes
Noix
Français
www.ninjakitchen.com
33
Page 34

Soins et entretien
COMMENT NETTOYER
MISE EN GARDE : Assurez-vous que la base moteur soit
débranchée de la source d’alimentation avant d’insérer
ou retirer un attachement quelconque et avant de
nettoyer l’appareil.
MISE EN GARDE : N’immergez PAS la base moteur
dans l’eau ou dans un autre liquide quelconque.
1 Séparez/retirez l’une de l’autre toutes les pièces.
2 Nettoyez la base moteur avec un linge humide et essuyez-la.
3 Le pichet du mélangeur, le bol du robot culinaire et les
tasses Nutri Ninja
Il est recommandé de placer les couvercles et les
attachements dans le panier supérieur. Exercez une
prudence extrême lorsque vous manipulez les
ensembles de lames, puisque celles-ci sont très
tranchantes.
REMARQUE : Vous pouvez également laver les contenant
en les remplissant à ¾ d’eau chaude et une goutte de
savon liquide vaisselle, et en plaçant ensuite le couvercle
correspondant sur le récipient et appuyant quelques fois
sur le bouton Pulsation Auto-iQ
retirez le récipient de la base moteur. Rincez le contenant,
l’attachement et le couvercle sous de l’eau coulante.
Laissez sécher toutes les pièces avant de les ranger.
Veuillez appeler le service à la clientèle dans le cas où
l’appareil nécessite des réparations, en composant le
1-877-646-5288
MD
peuvent tous aller au lave-vaisselle.
MC
. Une fois qu’i est propre,
COMMENT RANGER
1 Rangez
le Système mélangeur Nutri NinjaMD | NinjaMD
avec la technologie Auto-iQ
MC
à l’endroit avec le pichet
sur la base moteur, l’ensemble de 6 lames à l’intérieur
du pichet, et le couvercle sur le pichet. Ne placez rien sur
le haut de l’appareil. Rangez le bol avec l’ensemble de 4
lames à l’intérieur et le couvercle sur le haut. Rangez la
tasse Nutri NinjaMD et le reste des attachements à côté de
l’appareil ou dans une armoire, là où il ne peut pas être
endommagé ni poser de danger
RÉINITIALISER LE THERMOSTAT DU MOTEUR
Le Système mélangeur Nutri NinjaMD | NinjaMD avec
la technologie Auto-iQ
sécurité qui prévient les dommages au moteur et au
système d’entraînement de l’appareil en cas que vous le
surchargiez. Le moteur arrêtera vous surchargez l’appareil.
Laissez l’appareil refroidir pendant environ 15 minutes.
Suivez la procédure suivante pour réinitialiser l’appareil :
1 Débranchez l’appareil de la prise électrique.
2 Enlevez et videz l’appareil, vous assurant qu’il n’y
a aucuns aliments qui bloquent les lames ou les
attachements.
3 Laissez l’appareil refroidir pendant environ 15 minutes.
4 Réinstallez le récipient dans la base et rebranchez
l’appareil dans la prise électrique.
5 Continuez à utiliser l’appareil comme avant, en
vous assurant de ne pas dépasser les capacité
recommandes.
MC
est doté d’un système de
34
1-877-646-5288
Page 35

Guide de dépannage
PROBLÈMES RAISONS POSSIBLES ET SOLUTIONS
Le moteur ne démarre pas ou
les lames ne tournent pas.
Les aliments ne sortent pas
uniformément hachés.
Vérifiez que le contenant soit sécurisé sur la base moteur.
Assurez-vous que le couvercle soit bien en place sur le contenant et dans la
bonne position (alignez les flèches.
L’appareil est en mode « Arrêt » (On). Appuyez sur le bouton d’alimentation pour
le mettre « En marche » (Off).
Vérifiez que la fiche soit correctement insérée dans la prise électrique.
Inspectez le fusible ou le disjoncteur.
L’appareil fut surchargé.
Débranchez l’appareil et laissez-le refroidir pendant environ 15 minutes avant de
l’utiliser de nouveau.
Vérifiez que l’appareil ne fut pas surchargé.
Vous tentez d’hacher trop d’aliments en même temps, ou les pièces sont trop
grosses. Tentez de couper les aliments en plus petites pièces de taille uniforme,
et de transformer de plus petits montants.
Français
Les aliments sortent trop
finement hachés ou trop
liquides.
Des aliments s’accumulent
sur le couvercle ou sur les
bords du récipient.
Vous n’arrivez pas à
transformer la glace solide
en neige.
La base moteur ne s’adhère
pas au comptoir ou à la table.
Vous voyez un message « Err ».
Vous voyez un indicateur
rouge clignotant
Pièces de remplacement
Les aliments furent excessivement transformés. Employez le bouton Pulsation
Auto-iQMC pour une transformation plus contrôlée.
Le mélange est trop épais. Ajoutez plus de liquide.
N’utilisez pas de la glace qui fut laissée hors du congélateur ou qui commence à
fondre. Utilisez de la glace provenant directement du congélateur. Commencez
avec quelques pulsations et passez ensuite à un cycle de broyage continuel.
Assurez-vous que la surface et les pieds de succion soient propres. Les pieds
de succions ne s’adhèreront qu’aux surfaces lisses. Les pieds de succion ne
s’adhèreront PAS à certaines surfaces telles que le bois, la tuile et les finitions
non-polies. Ne tentez PAS d’utiliser l’appareil lorsque la base moteur est adhérée
à une surface non sécuritaire (planche à découper, plateau, assiettes, etc.)
Votre Ninja peut détecter lequel des récipients est installé sur la base. Il se
peut que vous tentiez d’utiliser un programme qui n’est pas conçu pour le
récipient en question. Les indicateurs s’illumineront, vous montrant lesquels des
programmes sont disponibles pour chaque récipient.
L’appareil fut incorrectement installé. Pour votre sécurité, vous ne pouvez
allumer l’appareil que lorsqu’il est bien monté. Veuillez consulter les pages sur le
montage de ce guide de l’utilisateur pour de l’aide.
COMMANDER DES PIÈCES DE REMPLACEMENT
Pour commander des pièces de remplacement, veuillez visiter notre site web : www.ninjakitchen.com
ou contacter le service à la clientèle : 1-877-646-5288.
www.ninjakitchen.com
35
Page 36

Notes
36
1-877-646-5288
Page 37

GARANTIE LIMITÉE D’UN (1) AN
EURO-PRO Operating LLC garantit que ce produit est exempt de défauts de matériaux et de main d’œuvre pendant un (1)
an à partir de la date d’achat, à condition qu’il soit utilisé à des fins domestiques normales, et conformément aux conditions,
exclusions et exception suivantes.
La responsabilité d’EURO-PRO Operating LLC se limite au coût des réparations ou du remplacement de l’appareil, à sa
discrétion. Cette garantie limitée ne couvre pas l’usure normale des pièces et ne s’applique pas aux appareils ayant été altérés ou
utilisés à des fins commerciales. Cette garantie limitée ne couvre pas les dommages causés par une mauvaise utilisation, l’usage
abusif, la négligence lors de la manipulation, un emballage inadéquat ou la mauvaise manipulation en transit. Cette garantie limitée
ne couvre pas les dommages ou défauts causés par ou résultant du transport, des réparations, ou de l’entretien ni de l’altération
du produit ou de ses pièces, effectués par un réparateur non autorisé par EURO-PRO Operating LLC.
Si votre appareil ne fonctionne pas correctement dans des conditions d’utilisation domestique normales, et ce, pendant la
période de garantie, vous pouvez retourner l’appareil et les accessoires avec la preuve et la date d’achat, port payé. Pour le
Service à la clientèle ou pour parler à nos spécialistes de produits, appelez le 1-877-646-5288 ou visitez notre site Web :
www.euro-pro.com (en anglais).
S’il s’avérait que l’appareil présente une défectuosité matérielle ou de fabrication, EURO-PRO Operating LLC le réparera ou
le remplacera sans frais. Vous devez inclure une preuve d’achat et un montant de 19,95 $ pour couvrir les frais d’expédition de
transport de retour. *
Cette garantie limitée s’applique à l’acheteur original de l’appareil et exclut toutes les autres garanties juridiques, implicites
ou conventionnelles. Le cas échéant, la responsabilité d’EURO-PRO Operating LLC se limite aux obligations spécifiques
expressément énoncées au titre de cette garantie limitée. En aucun cas EURO-PRO Operating LLC ne peut être tenue
responsable d’incidents ou de dommages indirects à quiconque et de toute nature que ce soit. Certains états et certaines
provinces n’autorisent pas l’exclusion ou la limitation de dommages accessoires ou indirects; dans ce cas, cette disposition ne
s’appliquerait pas. La garantie limitée vous confère des droits juridiques auxquels peuvent s’ajouter d’autres droits qui varient
d’un État à l’autre et d’une province à l’autre.
Français
*IMPORTANT : Emballez soigneusement l’appareil pour éviter tout dommage lors du transport. Assurez-vous que
la preuve d’achat soit incluse et qu’une étiquette indiquant votre nom, adresse complète et numéro de téléphone,
ainsi qu’une note avec les renseignements sur l’achat, le numéro de modèle et le problème, soient attachées à
l’appareil. Nous vous recommandons d’assurer votre colis (puisque les dommages lors du transport ne sont pas
couverts par la garantie limitée). Indiquez sur l’extérieur de votre colis « ATTENTION : SERVICE À LA CLIENTÈLE ».
Enregistrement du produit
Veuillez visiter www.ninjakitchen.com ou composer le 1-877-646-5288 pour enregistrer votre nouveau produit NinjaMD dans
les dix (10) jours suivant l’achat. Vous devrez fournir le nom du magasin, la date d’achat, le numéro de modèle, ainsi que votre
nom et adresse.
L’enregistrement nous permettra de vous contacter dans l’éventualité peu probable d’un avis sur la sécurité du produit. En
enregistrant votre produit, vous reconnaissez avoir lu et compris les instructions d’utilisation et les consignes de sécurité
énoncées dans ce document.
www.ninjakitchen.com
37
Page 38

Partes de su Nutri Ninja® I Sistema de licuadora Ninja® con Auto-iQMR Technology
a
b
f
c
d e
h
g
j
l
k
m
i
a Taza Nutri Ninja® Jumbo multi-uso
de 32 oz.
b Taza Nutri Ninja® Regular de 24 oz.
c Taza Nutri Ninja® Pequeña de 18 oz
d Pro Extractor Blades
MR
e Tapas Sip & SealMR (x3)
38
1-877-646-5288
f Tazón del procesador de alimentos
g Tapa del procesador de alimentos
h Cuchilla para amasar (procesador
de alimentos)
i Cuchilla para picar (procesador de
alimentos)
j Jarra de la licuadora
k Tapa de la licuadora
l Cuchillas apiladas (licuadora)
m Base del motor
NOTE: NOTA: Las cuchillas no son
intercambiables.
Page 39

La Nutri Ninja® | Sistema de licuadora Ninja® con tecnología AUTO-iQMR es una herramienta profesional, de alta potencia
e innovadora con un diseño elegante y un rendimiento increíble, un excelente agregado para cualquier cocina. La
Nutri Ninja® | Sistema de licuadora Ninja® con tecnología AUTO-iQMR viene con programas inteligentes que combinan
patrones exclusivos de pulsos, licuado y pausas, que hacen el trabajo por usted. ¡Excelentes resultados todo el tiempo
sin necesidad de adivinar! Para obtener los mejores resultados, asegúrese de leer todas las instrucciones contenidas en
el manual antes de usar este artefacto.
Características de la Nutri Ninja® I Sistema de licuadora Ninja® con Auto-iQMR Technology:
• Tecnología de cuchillas Ninja® con patente pendiente
• Jarra de licuadora sin BPA, tazas Nutri Ninja
• Pico vertedor sin derrames
• Tecnología Total Crushing
MR
• Panel de control LED con temporizador
• Base robusta, antideslizante
• Tecnología de tapa inteligente para liberación rápida
• 3 velocidades: Low, Medium y High (Baja, media y alta)
• 5 ajustes con Auto-iQ
MR
: Auto-iQMR Frozen Drinks/Smoothies, Auto-iQMR Food Puree, Nutri Ninja® Auto-iQMR Blend,
Nutri Ninja® Auto-iQMR Ultra Blend y Auto-iQ
• Extracción de nutrientes y vitaminas Nutri Ninja
®
, tazón para procesador de alimentos y tapas
MR
Pulse
®
Español
www.ninjakitchen.com
39
Page 40

Uso de la
Nutri Ninja® I Sistema de licuadora Ninja® con Auto-iQMR Technology
TENGA EN CUENTA ESTAS MEDIDAS DE
SEGURIDAD AL UTILIZAR EL ARTEFACTO:
IMPORTANTE: Nunca agregue ingredientes en el
recipiente antes de colocarle las cuchillas.
IMPORTANTE: Las cuchillas no son
intercambiables.
IMPORTANTE: NO intente utilizar el artefacto sin
la tapa colocada.
IMPORTANTE: Nunca haga funcionar el
artefactovacío.
CUIDADO: NO PROCESE COMIDA O LÍQUIDOS
CALIENTES.
CUIDADO: Nunca saque el recipiente mientras el
artefacto esté funcionando.
ADVERTENCIA: Nunca deje el artefacto
desatendido mientras esté funcionando.
CUIDADO: Si usa
el pico vertedor,
verifique que la
tapa esté trabada
en la jarra de la
licuadora.
Si vierte sin la
tapa colocada,
SIEMPRE remueva
previamente las
cuchillas.
CUIDADO: Las cuchillas son filosas y removibles,
manéjelas con cuidado. Al manipular las
cuchillas, agárrelas siempre por el vástago.
ANTES DE USARLA POR PRIMERA VEZ
1 Saque todo el material de embalaje y etiquetas del
artefacto.
2 Lave las tapas, la jarra, el tazón, las tazas Nutri Ninja
y las cuchillas con agua tibia y jabón, usando un trapo
suave. Tenga cuidado al lavar las cuchillas ya que
son muy filosas.
3 Enjuáguelas y séquelas completamente.
4 La jarra de licuadora, el tazón del procesador, las tazas
Nutri Ninja
®
, las tapas y las cuchillas son aptos para
lavavajillas. Le recomendamos colocar las tapas y las
cuchillas en el estante de arriba. Asegúrese de sacar
las cuchillas de los recipientes antes de colocarlos en el
lavavajillas.
5 Limpie la base del motor con un trapo húmedo.
®
40
1-877-646-5288
Page 41

Armado y uso de la licuadora
HIGH
PULSE
LOW
DOUGH
SMOOTHIE
SINGLE
SERVE
PUREE
FROZEN
BLENDING
ARMADO
Español
Fig. 1
Fig. 4a
Fig. 4b
Tenga cuidado al manipular las cuchillas ya que
son muy filosas.
ADVERTENCIA: Nunca deje el artefacto desatendido
mientras esté funcionando.
IMPORTANTE: Verifique que la base del motor esté
enchufada y lista para usar.
1 Sosteniendo el mecanismo de cuchillas apiladas por
la parte superior del vástago, colóquelo sobre el eje
del motor, dentro de la jarra. Verifique que quede
correctamente colocado y en posición vertical. (Fig. 1)
NOTA: La cuchilla se apoyará sin quedar ajustada
sobre el eje del motor.
2 Coloque la base del motor sobre una superficie limpia,
seca y nivelada como una mesada o mesa.
3 Coloque la jarra sobre la base del motor. (Fig. 2).
El mango debe quedar levemente inclinado hacia la
derecha del símbolo de “TRABA” en la base del motor.
4 Gire la jarra en sentido horario hasta que se trabe en su
lugar. Escuchará un clic cuando se trabe. (Fig. 3)
5 La jarra se puede colocar en la base del motor de dos
formas distintas; el mango puede quedar en la esquina
delantera derecha o en la delantera izquierda.
(Fig. 4a, Fig. 4b)
Fig. 2
Fig. 3
Fig. 5a
6 Agregue los ingredientes a la jarra, teniendo cuidado
para no exceder la línea de máximo que está en el
costado de la jarra.
NOTA: Si necesita agregar ingredientes adicionales
mientras el artefacto esté funcionando, abra el pico
vertedor y vierta los ingredientes por la abertura.
NOTA: Al licuar cualquier tipo de líquido, como mezclas
para bebidas o batidos, no exceda la marca de “MAX”
(64 onzas) de la jarra.
7 Sosteniendo la tapa por el mango en posición vertical,
colóquela sobre la jarra alineando el triángulo ( )
ubicado en la tapa con el triángulo ( ) ubicado en el
mango de la jarra. (Fig. 5a). Presione el mango hacia
abajo hasta que haga clic. Los triángulos de la tapa y de
la licuadora DEBEN estar alineados para que funcione la
licuadora. (Fig. 5b)
8 Enchufe el cable de alimentación en el tomacorriente y
presione el botón de encendido ( ).
NOTA: Como medida de seguridad, la luz
de encendido ( ) parpadeará y el motor no
funcionará si la jarra y la tapa no están bien
colocadas en su lugar. Cuando la jarra y la
tapa están bien colocadas, la luz de encendido
( ) permanecerá encendida, y el artefacto estará
listo para usar.
Fig. 5b
www.ninjakitchen.com
41
Page 42

Armado y uso de la licuadora - cont.
USO
Fig. 6
EXTRACCIÓN
ADVERTENCIA: Nunca deje el artefacto desatendido
mientras esté funcionando.
NOTA: El Nutri Ninja® I Sistema de licuadora Ninja® con
Auto-iQMR Technology puede detectar el tipo de jarra
instalada en la base del motor. Las luces de función se
encenderán dependiendo del tipo de jarra colocada.
(Fig. 6)
9
Presione el botón de encendido para encender la unidad.
Seleccione la velocidad o el programa Auto-iQMR de acuerdo
con sus necesidades. El programa Auto-iQMR apagará el
artefacto automáticamente al finalizar el programa. (Fig. 7
NOTA: Pulse los ingredientes para que se piquen de
forma pareja manteniendo presionado el botón
iQMR
hasta lograr la consistencia deseada.
10 Para pausar la unidad, presione la velocidad o el programa
Auto-iQMR seleccionado por segunda vez. (Fig. 8)
11 Cuando haya alcanzado la consistencia deseada,
apague el artefacto presionando el botón de encendido
( ) y espere a que la cuchilla se detenga. (Fig. 8)
12 Gire la jarra en sentido contra horario y sáquela de la
base. (Fig. 9)
42
1-877-646-5288
Auto-
Fig. 8
CUIDADO: Nunca inserte sus manos en la jarra ya que
las cuchillas son muy filosas. Use siempre una espátula
para desprender comida que haya quedado atascada
dentro de la jarra.
CUIDADO: Si usa el pico vertedor, verifique que la tapa
esté trabada en la jarra de la licuadora.
CUIDADO: Si vierte sin la tapa colocada, SIEMPRE
remueva previamente las cuchillas.
13 Dependiendo de la consistencia del contenido, use el
pico vertedor para vaciar los líquidos.
)
14 Para consistencias más espesas, saque
cuidadosamente la tapa y las cuchillas (por su vástago),
luego vacíe el interior del recipiente. Para remover la
tapa, presione el botón de liberación de la tapa, tire del
mango de la tapa hacia arriba hasta un ángulo de 90°
y saque la tapa. (Fig. 10)
15 Verifique que la unidad esté desenchufada cuando no
la utilice.
Fig. 9Fig. 7 Fig. 10
Page 43

Armado y uso del tazón para procesar alimentos
ARMADO
Español
Fig. 1
Fig. 5a Fig. 5b
NOTE: El Nutri Ninja® I Sistema de licuadora Ninja® con
Auto-iQMR Technology puede detectar el tipo de jarra
instalada en la base del motor. Las luces de función se
encenderán dependiendo del tipo de jarra colocada.
(Fig. 1)
Tenga cuidado al manipular las cuchillas ya que
son muy filosas.
ADVERTENCIA: Nunca deje el artefacto desatendido
mientras esté funcionando.
IMPORTANTE: Verifique que la base del motor esté
enchufada y lista para usar.
1 Sosteniendo el mecanismo de cuchillas deseado
por la parte superior del vástago, colóquelo sobre el
eje del motor, dentro del tazón. Verifique que quede
correctamente colocado y en posición vertical. (Fig. 2)
NOTA: La cuchilla se apoyará sin quedar ajustada
sobre el eje del motor.
2 Coloque la base del motor sobre una superficie limpia,
seca y nivelada como una mesada o mesa.
3 Alinee y coloque el tazón del procesador sobre la base
del motor. (Fig. 3). El mango debe quedar levemente
inclinado hacia la derecha del símbolo de “TRABA” en
la base del motor.
Fig. 2
Fig. 3
Fig. 4
Fig. 6b
Fig. 6a
4 Gire el tazón en sentido horario hasta que se trabe en
su lugar. Escuchará un clic cuando se trabe. (Fig. 4)
5 El tazón se puede colocar en la base del motor de
dos formas distintas; el mango puede quedar en la
esquina delantera derecha o en la delantera izquierda.
(Fig. 5a, Fig. 5b)
6 Agregue los ingredientes al tazón, teniendo cuidado
para no exceder la línea de máximo que está en el
costado del tazón.
7 Sosteniendo la tapa por el mango en posición vertical,
colóquela sobre el tazón del procesador alineando el
triángulo (
) ubicado en la tapa con el triángulo ( )
ubicado en el mango del tazón. (Fig. 6a). Presione el
mango hacia abajo hasta que haga clic. Los triángulos
de la tapa y del tazón DEBEN estar alineados para que
funcione la licuadora. (Fig. 6b)
NOTA: El tazón de 64 oz. no está diseñado para licuar
bebidas. No lo llene de más.
8 Enchufe el cable de alimentación en el tomacorriente y
presione el botón de encendido ( ).
NOTA: Como medida de seguridad, el botón de
encendido ( ) parpadeará y el motor no funcionará
si el tazón y la tapa no están bien colocados en
su lugar. Cuando el tazón y la tapa estén bien
colocados, el botón de encendido ( ) permanecerá
iluminado, y el artefacto estará listo para usar.
www.ninjakitchen.com
43
Page 44

Armado y uso del tazón del procesador - cont.
Tenga cuidado al manipular las cuchillas ya que son muy filosas.
EXTRACCIÓN
Fig. 1
USO
Fig. 2 Fig. 3
USO DE LA CUCHILLA PARA PICAR
ADVERTENCIA: Nunca deje el artefacto desatendido
mientras esté funcionando.
1 Sosteniendo el conjunto de cuchillas para picar por el
vástago, colóquelo sobre el eje del motor, dentro del tazón.
Verifique que el accesorio quede bien ajustado sobre el eje
del motor y de que el vástago quede derecho.
2 Agregue los ingredientes y asegure la tapa sobre el
tazón. (Fig. 1)
3 Enchufe el cable de alimentación en el tomacorriente y
presione el botón de encendido (
4 Seleccione la velocidad o el programa Auto-iQ
acuerdo con sus necesidades. Pulse los ingredientes para
que se piquen de forma pareja manteniendo presionado el
botón Auto-iQMR hasta lograr la consistencia deseada.
NOTA: Consulte el cuadro de “Velocidades y usos” por
usos y velocidades sugeridas.
5 Cuando haya alcanzado la consistencia deseada,
apague el artefacto presionando el botón de encendido
(
) y espere a que la cuchilla se detenga. (Fig. 2)
6 Para remover la tapa, presione el botón de liberación de
la tapa y tire del mango de la tapa hacia arriba hasta un
ángulo de 90°. (Fig. 2)
7 Gire el tazón en sentido contra horario y levántelo para
sacarlo de la base del motor. (Fig. 3)
CUIDADO: Si vierte desde el tazón, SIEMPRE remueva
previamente las cuchillas.
).
MR
de
USO
Fig. 4
USANDO EL ACCESORIO PARA AMASAR
ADVERTENCIA: Nunca deje el artefacto desatendido
mientras esté funcionando.
1 Coloque la base del motor sobre una superficie limpia,
seca y nivelada como una mesada o mesa. (Fig. 4).
Presione la base del motor hacia abajo para que se
adhiera a la mesada o la mesa, para que la unidad se
agarre mejor con las ventosas.
2 Coloque el tazón sobre la base del motor.
3 Sosteniendo el accesorio para amasar por el vástago,
colóquelo sobre el eje del motor, dentro del tazón.
Verifique que el accesorio quede bien ajustado sobre el
eje del motor y de que el vástago quede derecho.
4 Agregue los ingredientes y asegure la tapa sobre el tazón.
5 Enchufe el cable de alimentación en el tomacorriente
y presione el botón de encendido (
velocidad que se adapte mejor a sus necesidades.
NOTA: Consulte el cuadro de “Velocidades y usos” por
usos y velocidades sugeridas.
6 Cuando haya terminado de amasar, apague el artefacto
presionando el botón de encendido (
la cuchilla se detenga. Para remover la tapa, presione
el botón de liberación de la tapa y tire del mango de la
tapa hacia arriba hasta un ángulo de 90°. (Fig. 2)
7 Gire el tazón en sentido contra horario y levántelo para
sacarlo de la base del motor. (Fig. 3)
). Seleccione la
) y espere a que
44
1-877-646-5288
Page 45

Armado y uso de las tazas Nutri Ninja
®
Tenga cuidado al manipular las cuchillas ya que son muy filosas.
ARMADO USO EXTRACCIÓN
Español
Fig. 1
Fig. 2 Fig. 3
NOTA: El Nutri Ninja® I Sistema de licuadora Ninja® con
Auto-iQMR Technology puede detectar el tipo de jarra
instalada en la base del motor. Las luces de función se
encenderán dependiendo del tipo de jarra colocada. (Fig. 1)
ADVERTENCIA: Nunca deje el artefacto desatendido
mientras esté funcionando.
IMPORTANTE: Verifique que la base del motor esté
enchufada y lista para usar.
1 Coloque la base del motor sobre una superficie limpia,
seca y nivelada como una mesada o mesa.
2 Agregue los ingredientes en la taza Nutri Ninja
®
.
3 Coloque la cuchilla extractora Pro sobre la taza y
ajústela bien en sentido horario hasta obtener un buen
cierre. (Fig. 2)
4 Dé vuelta la taza Nutri Ninja
®
y colóquela sobre la
base del motor, alineando las pestañas de la taza con
la base del motor. Gire la taza Nutri Ninja® en sentido
horario hasta que se trabe en su lugar. Escuchará un
clic cuando se trabe. (Fig. 3)
Fig. 4 Fig. 5 Fig. 6
5 Presione una vez el botón de encendido y seleccione
la velocidad o el programa Auto-iQ
sus necesidades. El programa Auto-iQ
MR
de acuerdo con
MR
apagará el
artefacto automáticamente al finalizar el programa.
(Fig. 4)
6. Para pausar la unidad, presione la velocidad o el
programa Auto-iQ
MR
seleccionado por segunda vez.
7 Una vez que haya alcanzado la consistencia deseada,
apague el botón de encendido. Gire la taza Nutri Ninja
en sentido contra horario y levántela para removerla.
(Fig. 5, Fig. 6)
NOTA: ¡No la llene de más! Para evitar derrames, no
agregue ingredientes por encima de la línea de “Max
Liquid”.
8 Dé vuelta la taza y remueva la cuchilla extractora Pro
girando la cuchilla en sentido contra horario.
9 ¡Coloque la tapa Sip & Seal
MR
sobre la taza Nutri Ninja®,
gírela para cerrarla y disfrute!
10 Verifique que la base del motor esté desenchufada
cuando no la utilice.
www.ninjakitchen.com
®
45
Page 46

Programas, ajustes de velocidad y usos de la jarra de la licuadora
FUNCIÓN RECIPIENTE
Bebidas
congeladas /
Hielo molido
Hacer puré
Jarra de la
licuadora
Jarra de la
licuadora
TIPO DE
CUCHILLA
Cuchilla
apilada
Cuchilla
apilada
Auto-iQMR Frozen Drinks/
Auto-iQ
Programas, ajustes de velocidad y usos del Tazón
del Procesador de Alimentos
FUNCIÓN RECIPIENTE
Picado
Amasar y
mezclar masa
Procesado
Emulsionar
Moler
Rallar
Cortar en trozos
pequeños
Mantequillas
Tazón del Procesador
de Alimentos
Tazón del Procesador
de Alimentos
Tazón del Procesador
de Alimentos
Tazón del Procesador
de Alimentos
Tazón del Procesador
de Alimentos
Tazón del Procesador
de Alimentos
Tazón del Procesador
de Alimentos
Tazón del Procesador
de Alimentos
TIPO DE
CUCHILLA
Cuchilla para
picar
Cuchilla para
amasar
Auto-iQMR Food Puree
Cuchilla para
picar
Cuchilla para
picar
Cuchilla para
picar
Cuchilla para
picar
Cuchilla para
picar
Cuchilla para
amasar
VELOCIDAD o
PROGRAMA
Smoothies
MR
Food Puree
VELOCIDAD o
PROGRAMA
Auto-iQMR Pulse
Low (Baja)
Low (Baja)
Medium (Mediana)
High (Alta)
Low (Baja)
Medium (Mediana)
Medium (Mediana) Carne
Auto-iQMR Pulse
High (Alta)
Auto-iQMR Pulse
Low (Baja)
TIPO DE
ALIMENTO
Hielo
Bebidas
congeladas
Batidos
Batidos
Sopas
Malteadas
TIPO DE
ALIMENTO
Cebolla
Ajo
Hierbas
Masa para pan
Masa para torta
Masa para pizza
Maza para pretzel
Masa para galletitas
Paté
Frutas para compota
Mezclas para mojar
Puré de manzana
Cremas para untar
Comida para bebé
Aderezos para
ensalada
Mezclas para mojar
Salsas
Queso rallado
Pan rallado
Especies
Salsa
Verduras
Fruta seca
Mezclas para torta
Mantequillas
46
1-877-646-5288
Page 47

Programas, ajustes de velocidad y usos de la Taza Nutri Ninja
®
FUNCIÓN RECIPIENTE
Batidos Taza Nutri Ninja
Batidos de
verduras
Rallar Taza Nutri Ninja
Cortar en trozos
pequeños
Taza Nutri Ninja
Taza Nutri Ninja
CUCHILLA
Pro Extractor
®
Pro Extractor
®
Pro Extractor
®
Pro Extractor
®
TIPO DE
MR
Blades
MR
Blades
MR
Blades
MR
Blades
VELOCIDAD o
PROGRAMA
Nutri Ninja® Auto-iQMR
Blend
Nutri Ninja® Auto-iQMR
Ultra Blend
Auto-iQMR Pulse
High (Alta)
Auto-iQMR Pulse
High (Alta)
TIPO DE
ALIMENTO
Batidos
Frappés
Malteadas
Bebidas con
proteína
Fruta congelada
Verduras
congeladas
Col rizada
Apio
Espinaca
Semillas
Hielo
Queso rallado
Pan rallado
Especies
Salsa
Verduras
Fruta seca
Español
www.ninjakitchen.com
47
Page 48

Cuidado y Mantenimiento
LIMPIEZA
CUIDADO: Verifique que la base del motor esté
desenchufada del tomacorriente antes de colocar o sacar
cualquier accesorio y antes de limpiarla.
CUIDADO: NO sumerja la base con el motor en agua o
ningún otro líquido.
1 Separe/remueva todas las partes.
2 Limpie la base del motor con un trapo húmedo y séquela.
3 Coloque la jarra de la licuadora, la taza Nutri Ninja
tazón del procesador en el lavavajillas. Coloque las tapas y
los accesorios en el estante superior. Tenga cuidado al
manipular las cuchillas ya que son muy filosas.
NOTA: También puede lavar la licuadora llenando ¾ de
la jarra con agua tibia y una gota de detergente para
lavavajillas, colocando la tapa en la jarra y pulsando el
botón de
Auto-iQMR Pulse varias veces. Una vez que esté
limpia, saque el recipiente de la base del motor. Enjuague
el recipiente, los accesorios y la tapa en agua corriente.
Deje que todas las partes se sequen antes de guardarlas.
Llame a nuestro servicio al cliente si necesita cualquier
reparación del artefacto al 1-877-646-5288.
®
y el
ALMACENAMIENTO
1 Guarde el Nutri Ninja® I Sistema de licuadora Ninja® con
Auto-iQMR Technology en posición vertical con la jarra
sobre la base del motor, el accesorio de 6 cuchillas dentro
de la jarra y con la tapa colocada. No le coloque nada
encima. Guarde el tazón con el accesorio de 4 cuchillas
adentro y con la tapa puesta. Guarde la taza Nutri Ninja®
y el resto de los accesorios junto con el artefacto, o en un
armario donde no se dañen ni representen ningún peligro.
PARA REINICIAR EL TERMOSTATO DEL MOTOR
El
Nutri Ninja® I Sistema de licuadora Ninja® con
MR
Technology
iQ
tiene un sistema exclusivo de seguridad
que evita daños al motor y al sistema de engranajes
de la unidad en caso de sobrecargas. Si el artefacto se
sobrecarga, el motor se detiene automáticamente. Deje
que el artefacto se enfríe durante 15 minutos.
Para reiniciar el artefacto, siga este procedimiento:
1
Desenchufe la unidad del tomacorriente.
2
Saque y vacíe el recipiente y verifique que no haya
quedado comida atascando las cuchillas o los
accesorios.
3
Deje que el artefacto se enfríe durante 15 minutos.
4
Vuelva a colocar el recipiente sobre la base del motor y
vuelva a enchufar el artefacto en el tomacorriente.
5 Siga usando el artefacto como antes, sin exceder su
capacidad máxima.
Auto-
48
1-877-646-5288
Page 49

Guía de diagnóstico de problemas
PROBLEMAS POSIBLE CAUSA Y SOLUCIÓN
Verifique que el recipiente esté correctamente colocado sobre la base del motor.
Verifique que la tapa esté colocada en el recipiente en la posición correcta
(flechas alineadas).
El artefacto está apagado. Presione el botón de encendido ( ) para encenderlo.
El motor no arranca o los
accesorios no rotan.
Verifique que el cable esté bien enchufado en el tomacorriente.
Verifique su fusible o la llave general.
La unidad se recalentó. La unidad se apagará y la luz de encendido parpadeará.
Desenchúfela y espere unos 15 minutos antes de usarla nuevamente.
La unidad se recalentó. Desenchúfela y espere unos 15 minutos antes de usarla
nuevamente.
Verifique que la unidad no esté sobrecargada.
Español
Los alimentos no se pican
parejos.
Los alimentos se pican
demasiado o salen muy
aguados.
Se acumula la comida en la
tapa o en los costados del
recipiente.
No puede hacer nieve a partir
de hielo sólido.
La base del motor no se
adhiere a la mesada o la mesa.
Aparece un mensaje “Err”
Aparece una luz roja
parpadeando
Está picando demasiada comida junta o los trozos no son del mismo tamaño y
está procesando muy poco alimento a la vez.
Los alimentos se procesaron de más. Use el botón Auto-iQMR
La mezcla es demasiado densa. Agregue más líquido.
No use hielo que se haya dejado afuera o que haya comenzado a derretirse.
Use hielo directamente del congelador.
Comience con unos pocos pulsos y luego siga con un ciclo de licuado continuo.
Verifique que las patas con ventosa estén limpias. Las patas con ventosa
solo se adhieren a superficies lisas. Las patas con ventosa NO se adhieren a
ciertas superficies como madera, baldosas y acabados sin pulir.
NO intente usar el artefacto cuando la base del motor esté adherida a una
superficie que no sea segura (tabla para cortar, bandeja, plato, etc.).
Su Ninja puede detectar el tipo de jarra colocada en la base. Puede estar
tratando de usar un programa que no está diseñado para la jarra que
tiene instalada. Los programas se encenderán para indicar los que están
disponibles para cada jarra.
La unidad no está armada correctamente. Por su seguridad, solo podrá
encender la unidad cuando esté correctamente armada. Consulte las páginas
de armado de este manual por asistencia.
Pulse para mayor control.
Partes de repuesto
COMPRA DE PARTES DE REPUESTO
Para comprar partes y accesorios adicionales, visite nuestro sitio Web: www.ninjakitchen.com
o llame a servicio al cliente: 1-877-646-5288.
www.ninjakitchen.com
49
Page 50

Notas
50
1-877-646-5288
Page 51

GARANTÍA LIMITADA DE UN (1) AÑO
EURO-PRO Operating LLC garantiza este producto contra defectos de materiales y mano de obra por un término de un
(1) año a partir de la fecha de compra original, siempre que sea utilizado para uso doméstico normal, sujeto a las siguientes
condiciones, exclusiones y excepciones.
La responsabilidad de EURO-PRO Operating LLC se limita únicamente al costo de reparación o reemplazo de la unidad, a
nuestro criterio. Esta garantía limitada no cubre el desgaste normal de las partes y no cubre ninguna unidad que haya sido
alterada o utilizada con fines comerciales. Esta garantía limitada no cubre daños ocasionados por uso inadecuado, abuso,
negligencia o daños causados por embalaje inapropiado o maltrato durante el transporte. Esta garantía limitada no cubre
daños o defectos causados o resultantes durante el transporte para su reparación o alteraciones del producto o cualquiera de
sus partes, realizadas por una persona no autorizada por EURO-PRO Operating LLC.
Si su artefacto no funciona correctamente al utilizarlo bajo condiciones domésticas normales dentro del período de garantía,
devuelva el artefacto completo y los accesorios, pagando el envío. Por asistencia con opciones del servicio de garantía o para
soporte al cliente, llame a nuestro centro de atención al cliente y especialistas de productos al 1877646-5288 o visite nuestro
sitio web en www.ninjakitchen.com.
Si el artefacto presenta un defecto de materiales o mano de obra, EURO-PRO Operating LLC lo reparará o remplazará sin
cargo. Se requiere comprobante de compra y se aplica un cargo de $19,95 para cubrir el costo del envío de vuelta. *
Esta garantía limitada es válida para el comprador original del producto y excluye cualquier otra garantía legal, implícita y/o
convencional. La responsabilidad de EURO-PRO Operating LLC, de existir, se limita a las obligaciones específicas asumidas
expresamente bajo los términos de esta garantía limitada. Bajo ninguna circunstancia EURO-PRO Operating LLC será
responsable por daños incidentales o indirectos a cualquiera, de ninguna clase. Algunos estados no permiten la exclusión o
limitación de daños consiguientes o incidentales, por lo tanto lo anterior puede no ser válido para usted.
Esta garantía limitada le otorga derechos legales específicos, y usted puede también tener otros derechos los que varían de
estado a estado o de provincia a provincia.
*IMPORTANTE: Embale el producto cuidadosamente para evitar daños durante el transporte. Asegúrese de
incluir un comprobante de la fecha de compra y de colocarle una etiqueta al producto con su nombre, dirección
completa y número de teléfono, una nota proporcionando información de la compra, número de modelo y una
descripción del problema que tenga la unidad. Le recomendamos asegurar el paquete (puesto que la garantía
limitada no cubre daños de envío). Escriba en el exterior del paquete “ATTENTION CUSTOMER SERVICE”.
Español
Registro del producto
Visite www.ninjakitchen.com o llame al 1-877-646-5288 para registrar su nuevo producto Ninja® dentro de los diez (10) días
siguientes a la compra. Se le preguntará el nombre de la tienda, la fecha de compra y el número de modelo, junto con su
nombre y su dirección.
El registro nos permitirá contactarnos con usted en caso de existir alguna notificación de seguridad con respecto al
producto. Al registrarlo, usted reconoce haber leído y comprendido las instrucciones de uso y advertencias incluidas en estas
instrucciones.
www.ninjakitchen.com
51
Page 52

Euro-Pro Operating LLC
US: Newton, MA 02459
CAN: Ville St-Laurent, QC H4S 1A7
1-877-646-5288
www.ninjakitchen.com
Copyright / Droit d’auteur / Derechos reservados © Euro-Pro Operating LLC 2014
Euro-Pro, Auto-iQ, Nutri Ninja, Pro Extractor Blades and Ninja are
trademarks of Euro-Pro Operating LLC.
Euro-Pro, Auto-iQ, Nutri Ninja, Pro Extractor Blades et Ninja sont
des marques de commerce d’Euro-Pro Operating LLC.
Euro-Pro, Auto-iQ, Nutri Ninja, Pro Extractor Blades y Ninja son
marcas registradas de Euro-Pro Operating LLC.
Illustra tions may differ from a ctual product. We are c onstantly striv ing to improve our produ cts, therefore the sp ecifications
contained herein are subject to change without notice.
Les illustr ations peuvent être d ifférentes des pro duits réels. Nous no us efforçons sans c esse d’améliorer nos pro duits et, de
ce fait, les s pécifications dé crites dans ce guide so nt sujettes à des chang ements sans préavis .
El dibujo pue de no ser igual al produc to real. Nosotros no s esforzamos cons tantemente en mejor ar nuestros produc tos, por
lo tanto la s especificacione s aquí indicadas puede n cambiar sin previo avis o.
Printed in China
Imprimé en C hine
Impreso en C hina
BL682_30_IB_E_F_S_140617_1
 Loading...