

Page 1
AY-XP18GR
SPLIT TYPE
ROOM AIR CONDITIONER
AY-XP24GR
AY-XPM18HR
OPERATION MANUAL
CLIMATISEUR INDIVIDUEL
EN DEUX PARTIES
MODE D’EMPLOI
ACONDICIONADOR DE AIRE
DE DOBLE SERVICIO
MANUAL DE INSTRUCCIONES
CONDIZIONATORE D’ARIA
DA CAMERA TIPO SPLIT
MANUALE DI ISTRUZIONI
AR CONDICIONADO DE SALA
DE DUAS UNIDADES
MANUAL DE OPERAÇÃO
SPL∑T KL∑MA
ENGLISH
ENGLISH
FRANÇAIS
ESPAÑOL
ITALIANO
PORTUGUÊS
Air Conditioner
* Plasmacluster is a trademark of Sharp Corporation.
KULLANMA KILAVUZU
TÜRKÇE
Page 2
Attention: Your product is
marked with this symbol. It
means that used electrical
and electronic products
should not be mixed with
general household waste.
There is a separate
collection system for these
products.
A. Information on Disposal for Users (private households)
1. In the European Union
Attention: If you want to dispose of this equipment, please do not use the ordinary dust
bin!
Used electrical and electronic equipment must be treated separately and in
accordance with legislation that requires proper treatment, recovery and recycling of
used electrical and electronic equipment.
Following the implementation by member states, private households within the EU
states may return their used electrical and electronic equipment to designated
collection facilities free of charge*. In some countries* your local retailer may also
take back your old product free of charge if you purchase a similar new one.
*) Please contact your local authority for further details.
If your used electrical or electronic equipment has batteries or accumulators, please
dispose of these separately beforehand according to local requirements.
By disposing of this product correctly you will help ensure that the waste undergoes
the necessary treatment, recovery and recycling and thus prevent potential negative
effects on the environment and human health which could otherwise arise due to
inappropriate waste handling.
2. In other Countries outside the EU
If you wish to discard this product, please contact your local authorities and ask for the
correct method of disposal.
For Switzerland: Used electrical or electronic equipment can be returned free of
charge to the dealer, even if you don’t purchase a new product. Further collection
facilities are listed on the homepage of
. Information on Disposal for Business Users.
B
www.swico.ch or www.sens.ch.
1. In the European Union
If the product is used for business purposes and you want to discard it:
Please contact your SHARP dealer who will inform you about the take-back of the
product. You might be charged for the costs arising from take-back and recycling.
Small products (and small amounts) might be taken back by your local collection
facilities.
For Spain: Please contact the established collection system or your local authority for
take-back of your used products.
2. In other Countries outside the EU
If you wish to discard of this product, please contact your local authorities and ask for
the correct method of disposal.
EN
Page 3
ENGLISH
Thank you for purchasing a SHARP air conditioner. Please read this manual carefully
before operating the product.
CONTENTS
•
IMPORTANT SAFETY INSTRUCTIONS
• PART NAMES...........................................E-3
• SETTING AIR PURIFYING FILTER..........E-5
• USING THE REMOTE CONTROL............ E-6
• BASIC OPERATION .................................E-8
•
ADJUSTING THE AIR FLOW DIRECTION .....
• PROGRESSIVE AIRFLOW.......................E-11
• FULL POWER OPERATION.....................E-11
IMPORTANT SAFETY INSTRUCTIONS
....E-1
E-10
• PLASMACLUSTER OPERATION.............E-12
• SELF CLEAN OPERATION ......................E-13
• ONE-HOUR OFF TIMER .......................... E-13
• TIMER OPERATION.................................E-14
• AUXILIARY MODE....................................E-16
• MAINTENANCE........................................E-16
•
ADDITIONAL NOTES ON OPERATION .........
• TIPS ON SAVING ENERGY.....................E-18
• BEFORE CALLING FOR SERVICE..........E-19
E-18
ENGLISH
WARNINGS FOR USE
Do not pull or deform the power supply cord. Pulling and misuse of the power supply cord
1
can result in damage to the unit and cause electrical shock.
Be careful not to expose your body directly to the outlet air for a long time. It may affect
2
your physical conditions.
When using the air conditioner for infants, children, elderly, bedridden, or disabled people
3
make sure the room temperature is suitable for those in the room.
Never insert objects into the unit. Inserting objects can result in injury due to the high
4
speed rotation of internal fans.
Ground the air conditioner without fail. Do not connect the grounding wire to gas pipe,
5
water pipe, lightning rod or telephone grounding wire. Incomplete grounding may cause
electric shock.
If anything is abnormal with the air conditioner (ex. a burning smell), stop the operation
6
immediately and turn the circuit breaker OFF.
The appliance shall be installed in accordance with national wiring regulations. Improper
7
cable connection can cause the power supply cord, plug and the electrical outlet to
overheat and cause fire.
If the supply cord is damaged, it must be replaced by the manufacturer or its service agent
8
or a similarly qualified person in order to avoid a hazard. Use only the manufacturespecified power cord for replacement.
WARNINGS FOR INSTALLATION/REMOVAL/REPAIR
• Do not attempt to install/remove/repair the unit by yourself. Incorrect work will cause electric
shock, water leak, fire etc. Consult your dealer or other qualified service personnel for the
installation/removal/repair of the unit.
E-1
Page 4

IMPORTANT SAFETY INSTRUCIONS
CAUTIONS FOR USE
Open a window or door periodically to ventilate the room, especially when using gas
1
appliances. Insufficient ventilation may cause oxygen shortage.
Do not operate the buttons with wet hand. It may cause electric shock.
2
For safety, turn the circuit breaker off when not using the unit for an extended period of
3
time.
Check the outdoor unit mounting rack periodically for wear and to make sure it is firmly
4
in place.
Do not put anything on the outdoor unit nor step on it. The object or the person may fall
5
down or drop, causing injury.
This unit is designed for residential use. Do not use for other applications such as in a
6
kennel or greenhouse to raise animals or grow plants.
Do not place a vessel with water on the unit. If water penetrates into the unit, electrical
7
insulations may deteriorate and cause electric shock.
Do not block the air inlets nor outlets of the unit. It may cause insufficient performance
8
or troubles.
Be sure to stop the operation and turn the circuit breaker off before performing any
9
maintenance or cleaning. A fan is rotating inside the unit and you may get injured.
Do not splash or pour water directly on the unit. Water can cause electrical shock or
10
equipment damage.
This appliance is not intended for use by young children or infirm persons without
11
supervision.
Young children should be supervised to ensure that they do not play with the appliance.
This appliance is unfit for use in Nordic region.
12
CAUTIONS FOR LOCATION/INSTALLATION
• Make sure to connect the air conditioner to power supply of the rated voltage and
frequency.
Use of a power supply with improper voltage and frequency can result in equipment
damage and possible fire.
• Do not install the unit in a place where inflammable gas may leak. It may cause fire.
Install the unit in a place with minimal dust, fumes and moisture in the air.
• Arrange the drain hose to ensure smooth drainage. Insufficient drainage may cause wetting
of the room, furniture etc.
• Make sure a leak breaker or a circuit breaker is installed, depending on the installation
location, to avoid electrical shock.
E-2
Page 5

PART NAMES
INDOOR UNIT
1
2
3
4
5
6
7
8
9
0
q
w
e
r
t
y
1 Air Purifying Filters
2 Inlet (Air)
3 Open Panel
4 AUX. Button
5 Air Filters
6 Receiver Window
7 Power Supply Cord
(AY-XP18GR only)
8 Indicator
9 Vertical Adjustment Louvres
0 Horizontal Adjustment
Louvres
q Outlet (Air)
w Remote Control
e FULL POWER Lamp
(green )
r SELF CLEAN Lamp
(green )
t PLASMACLUSTER Lamp
(blue)
y TIMER Lamp (orange )
u OPERATION Lamp (red )
ENGLISH
u
NOTE: -Actual units might vary slightly from those shown above.
E-3
Page 6
PART NAMES
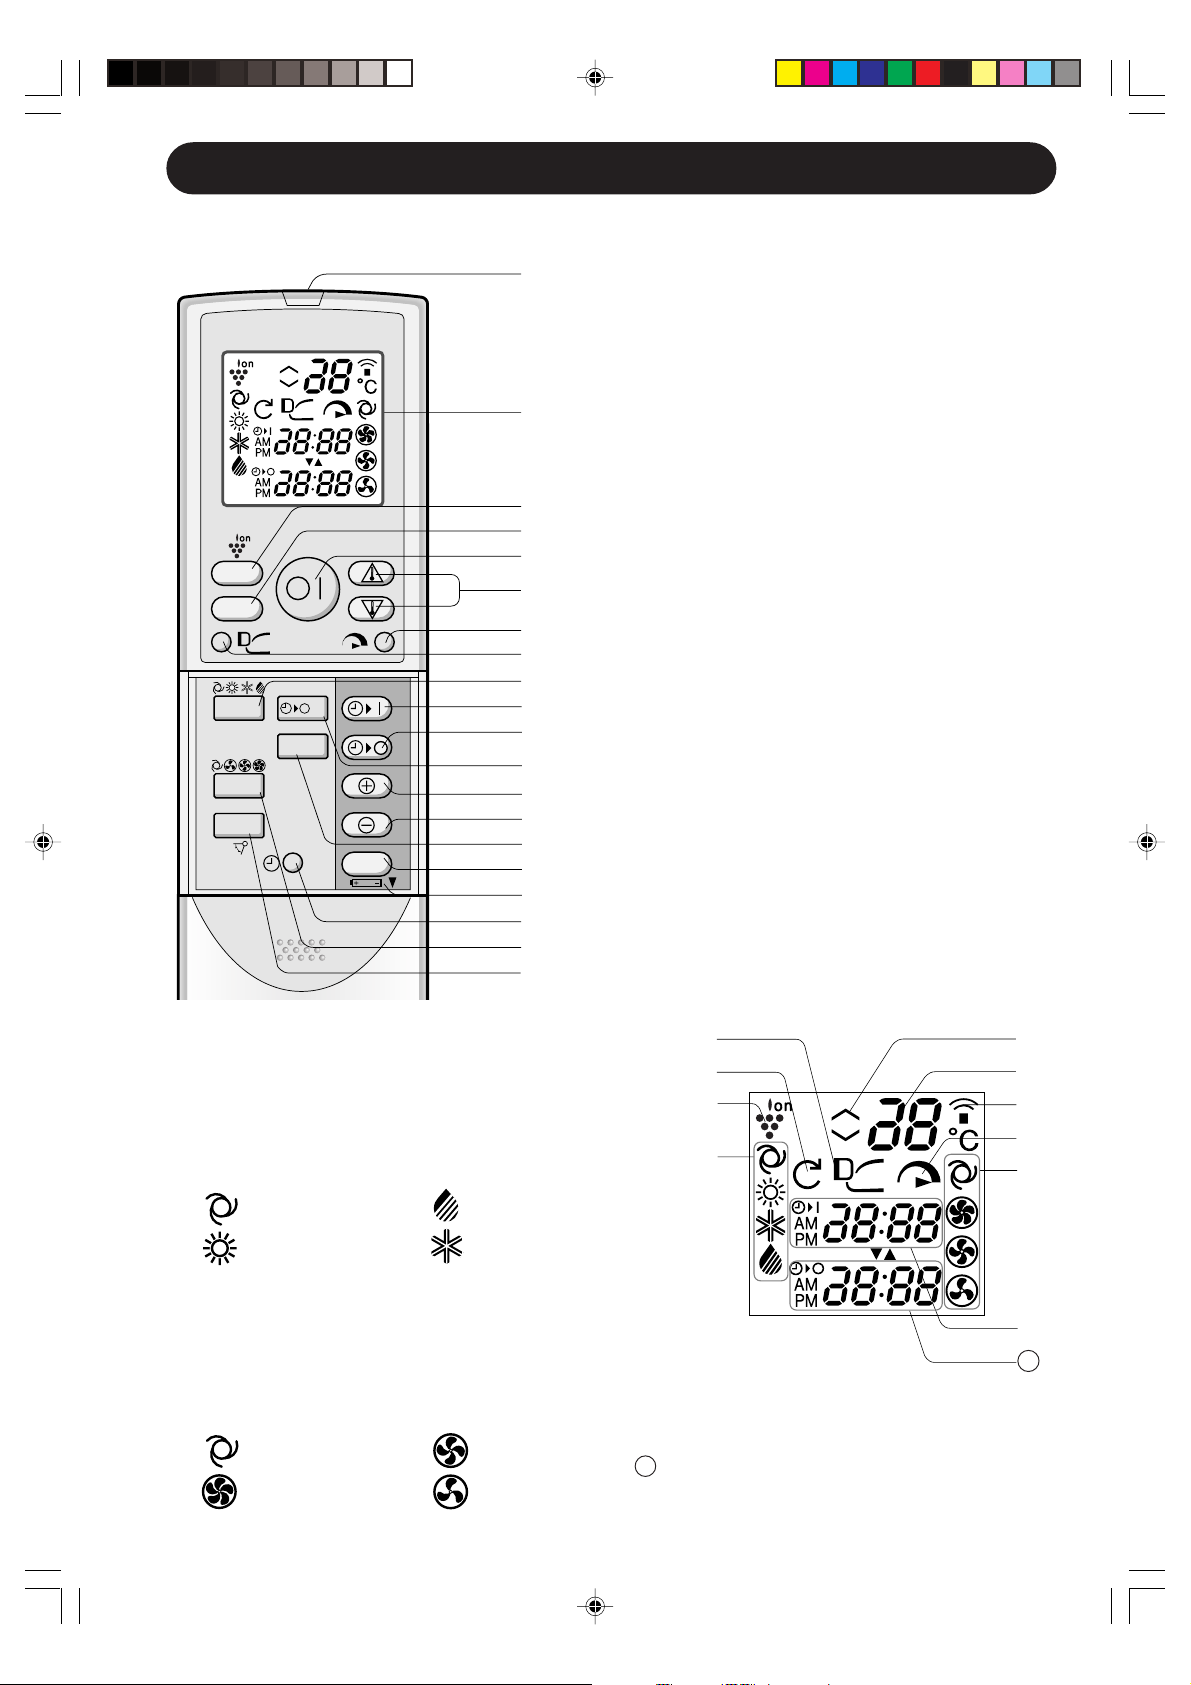
REMOTE CONTROL
1
2
1 TRANSMITTER
2 DISPLAY (Liquid Crystal Display)
3 PLASMACLUSTER Button
4 DISPLAY Button
5 ON/OFF Button
6 THERMOSTAT Button
3
7 FULL POWER Button
8 PROGRESSIVE AIRFLOW Button
9 MODE Button
0 TIMER ON Button (for setting the timer)
q TIMER OFF Button (for setting the timer)
w ONE-HOUR OFF TIMER Button
e TIME ADVANCE Button
r TIME REVERSE Button
t SELF CLEAN Button
y TIMER SET/CANCEL Button
u Indicates BATTERY COMPARTMENT is
below this mark
i CLOCK Button
o FAN Button
p SWING Button
DISPLAY
MODE
FAN
SWING
1h
CLEAN
SET/C
4
5
6
7
8
9
0
q
w
e
r
t
y
u
i
o
p
L.C.D. REMOTE CONTROL DISPLAY
a PROGRESSIVE AIRFLOW SYMBOL
s SELF CLEAN SYMBOL
d PLASMACLUSTER SYMBOL
f MODE SYMBOLS
: AUTO : DRY
a
s
d
f
g
h
j
k
l
: HEAT : COOL
g THERMOSTAT SETTING FOR AUTO AND
DRY MODES
h TEMPERATURE INDICATOR
j TRANSMITTING SYMBOL
k FULL POWER SYMBOL
l FAN SPEED SYMBOLS
: AUTO : LOW
: HIGH : SOFT
; TIMER ON INDICATOR/CLOCK
Indicates the on timer preset time or current
time.
31
TIMER OFF INDICATOR
Indicates the preset time for off timer or onehour off timer.
E-4
;
31
Page 7
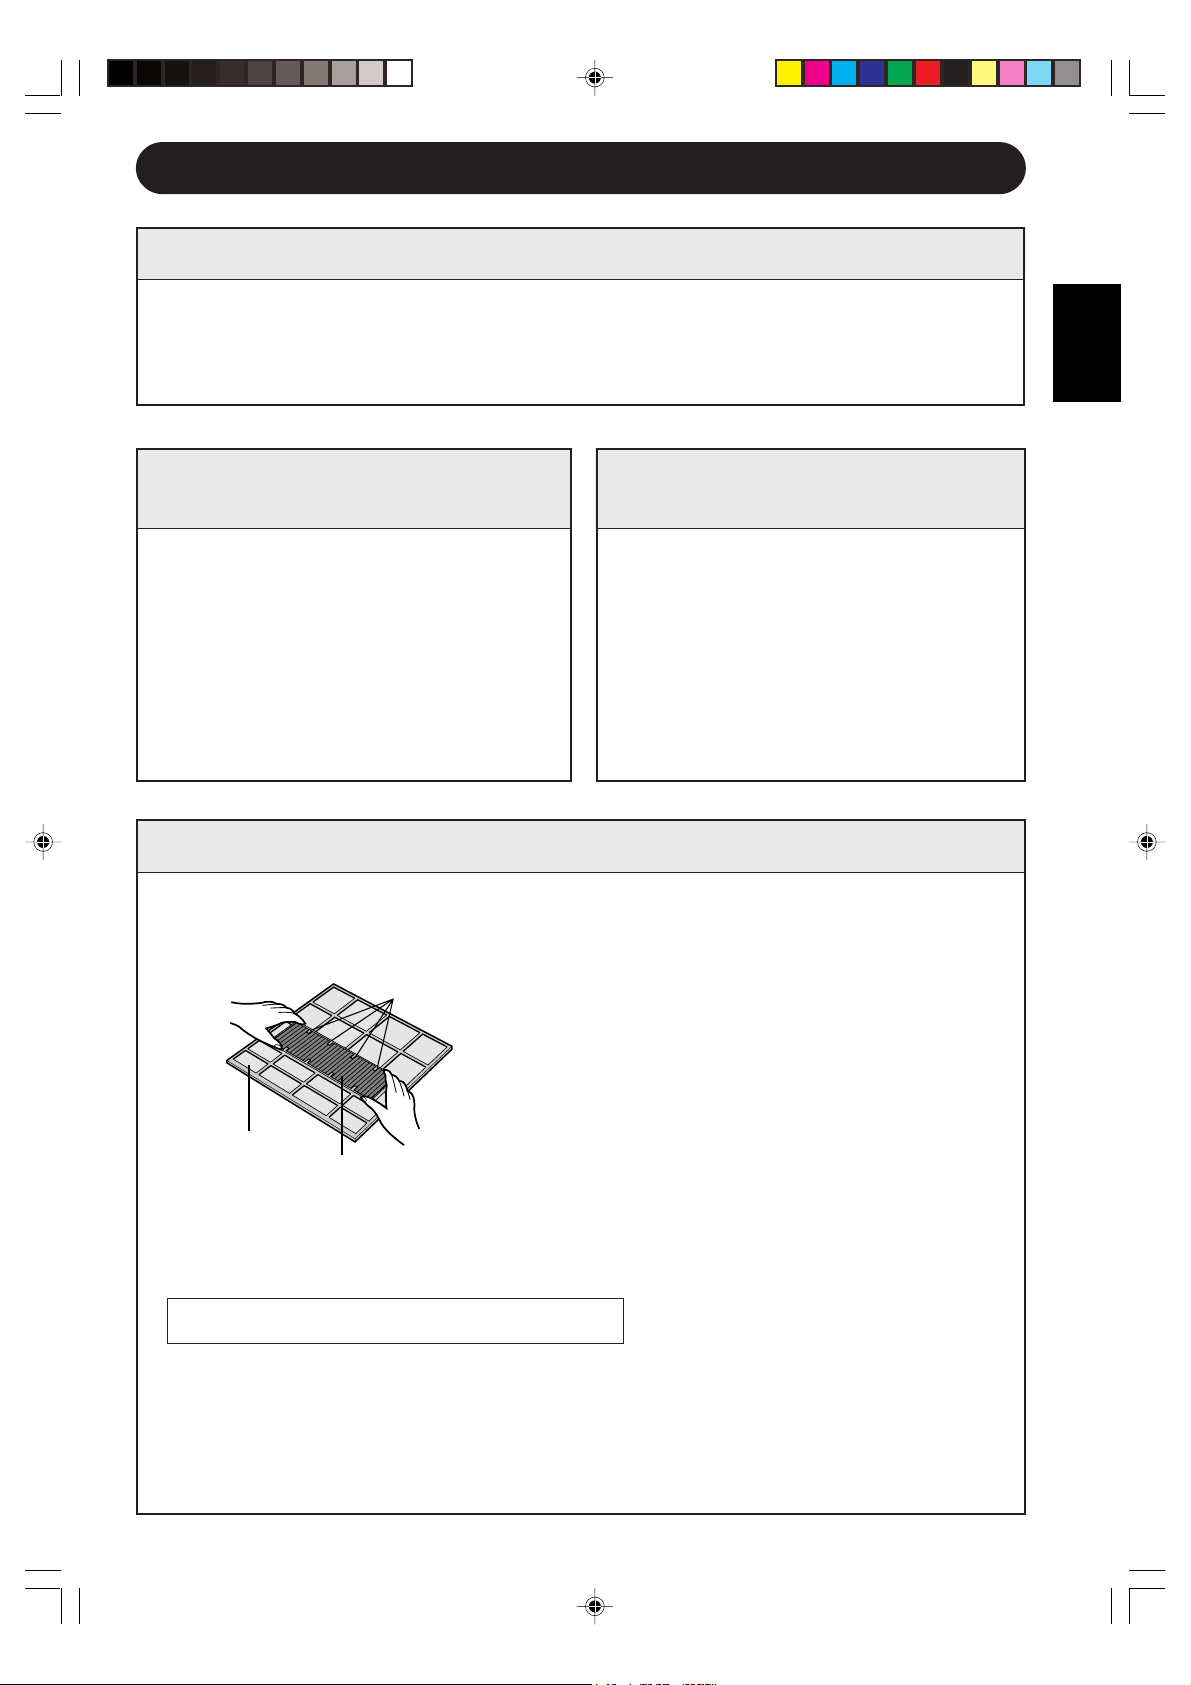
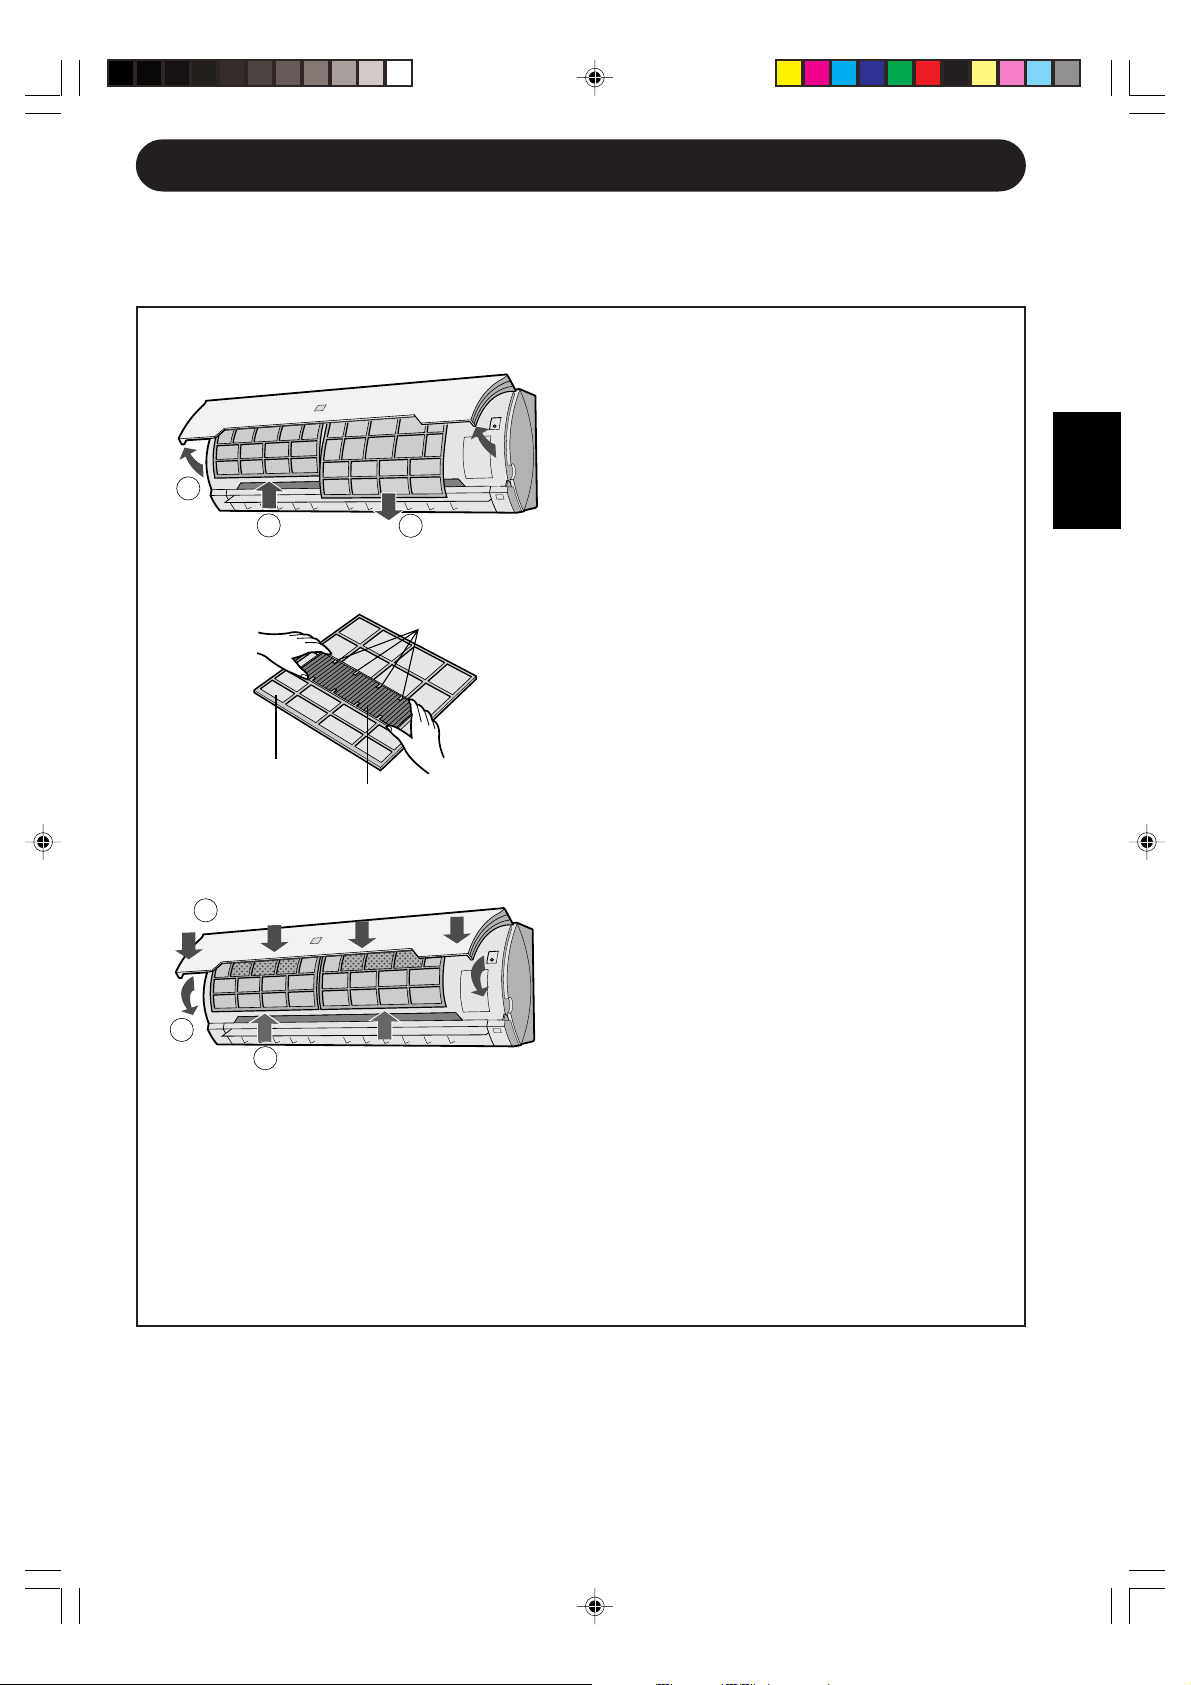
SETTING AIR PURIFYING FILTER
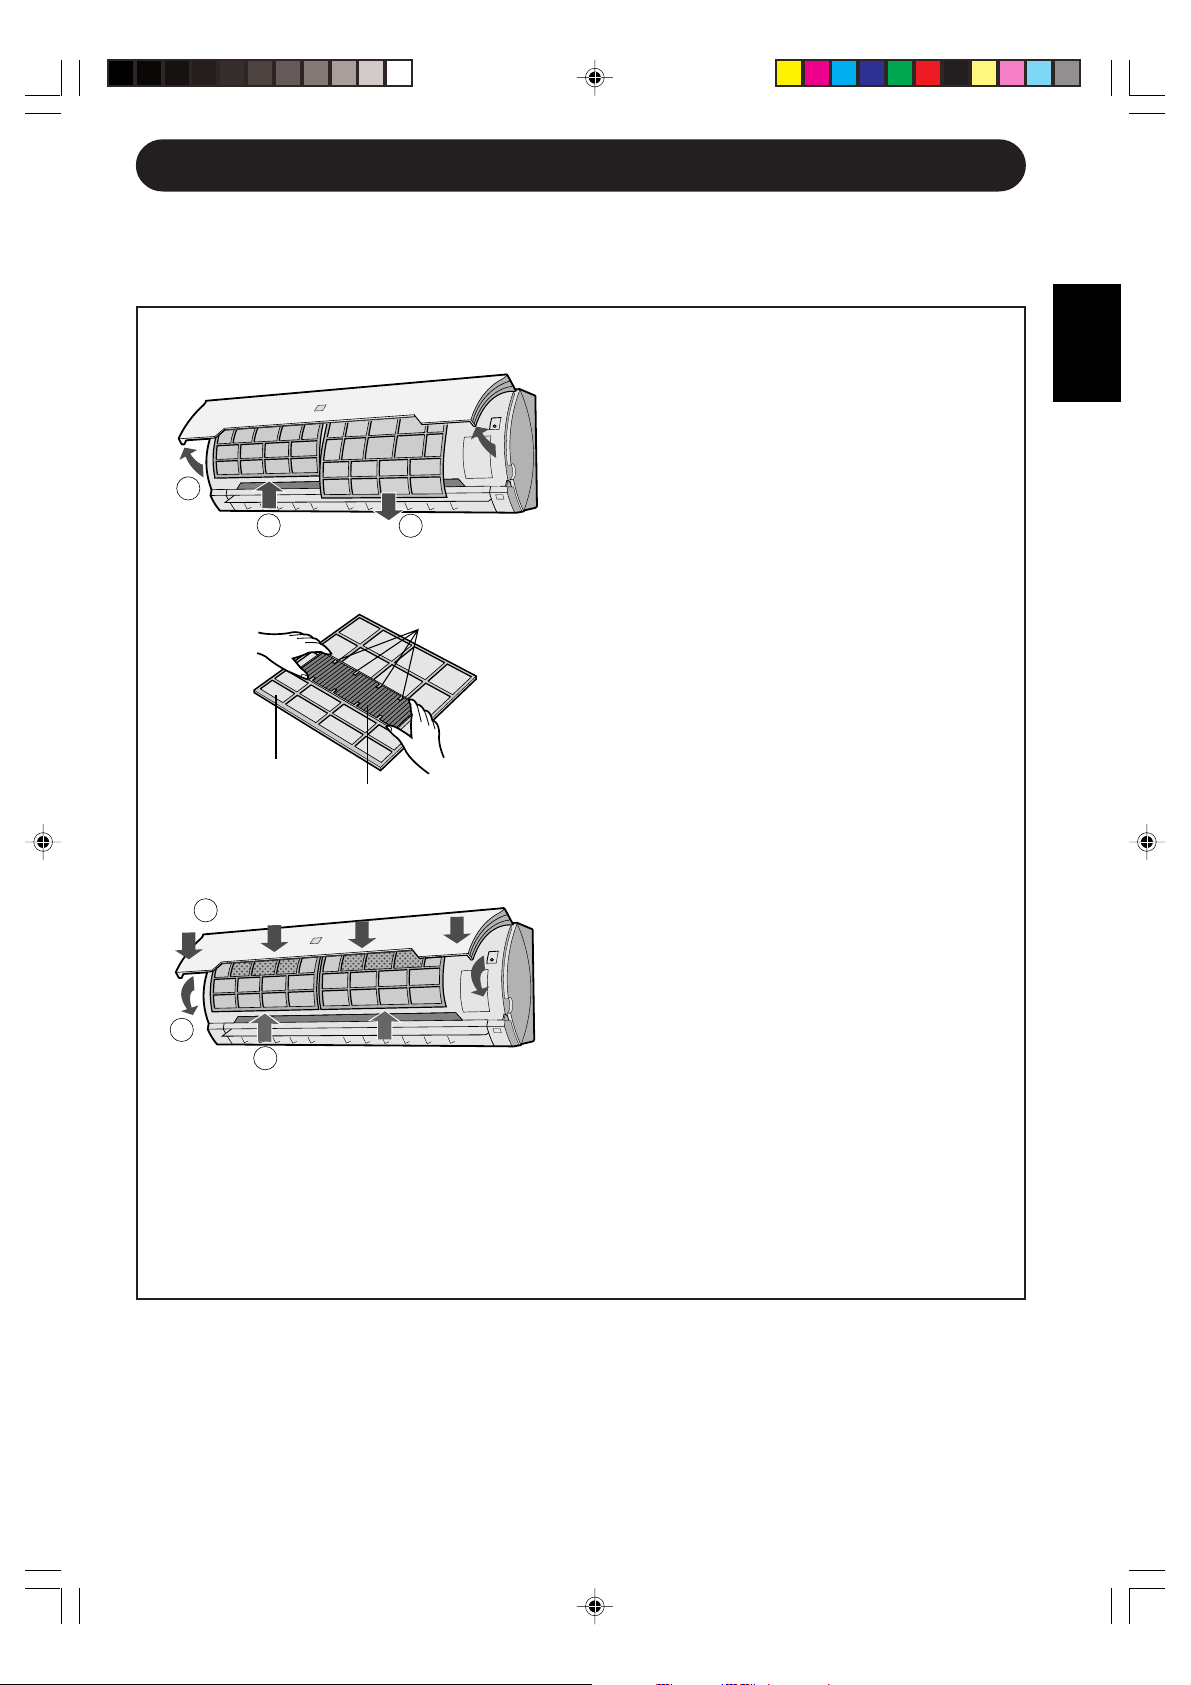
The air purifying filters are packed as accessory of this unit. During operation of the
air conditioner, the filters remove dust and tobacco smoke from the air and
discharges clean air.
Take out the air filters.
1
1 Open the open panel.
2 Push the air filters up slightly to
unlock them.
3 Pull the air filters down to remove
1
them.
ENGLISH
2
Air filter
3
2
1
3
Filter stopper
Air purifying filter
Set the air purifying filter under the
2
filter stoppers located on the air filter.
Reinstall the air filters
3
1 Reinstall the air filters in the origi-
nal positions.
2 Close the open panel.
3 Push the arrow-marked of the
panel firmly to lock it in place.
Precautions
• The filters are sealed in a plastic bag to keep their dust collection effect.
Do not open the bag until using the filters. (Otherwise the filters life may get shorter.)
• Do not expose the filters to direct sunlight. (Otherwise they may deteriorate.)
E-5
Page 8

USING THE REMOTE CONTROL
+
+
-
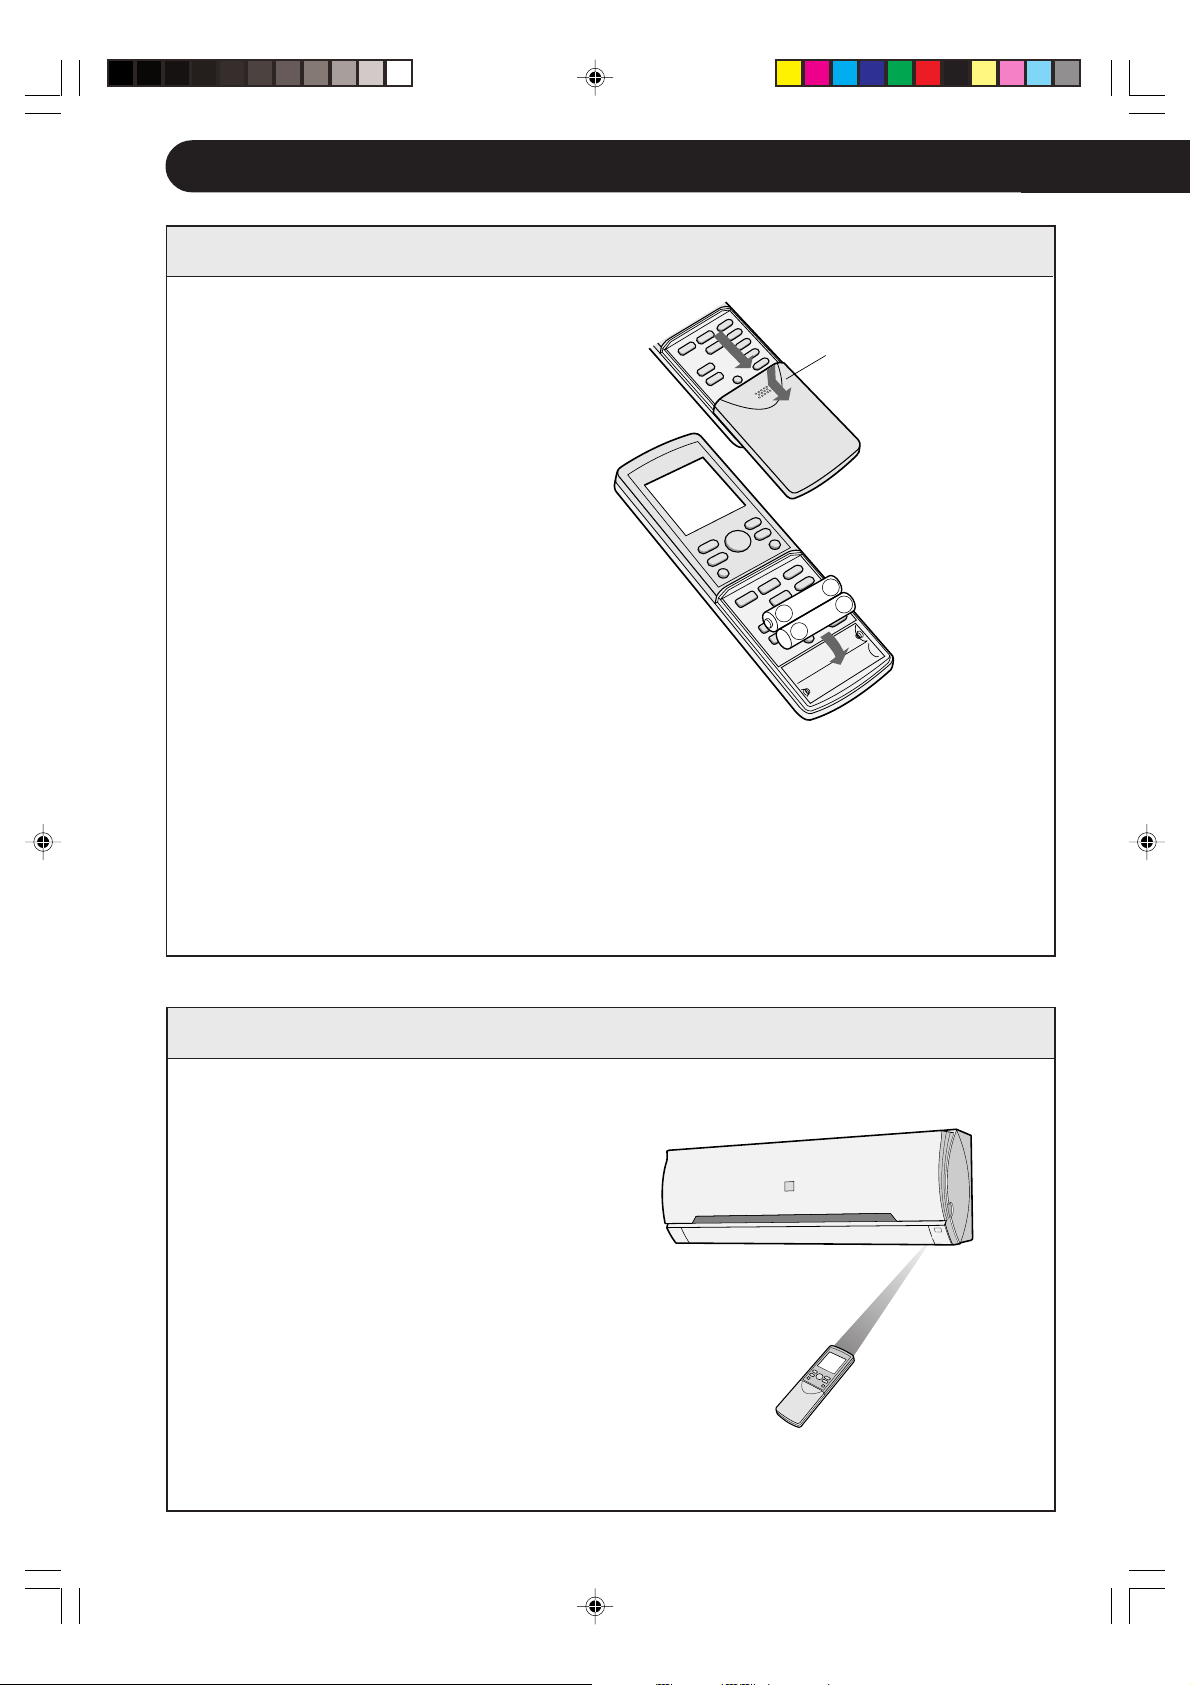
LOADING BATTERIES Use two size-AAA (R03) batteries.
Remove the remote control
1
cover.
Insert batteries in the compart-
2
ment, making sure the ± and
— polarities are correctly align-
ed.
• The display indicates “AM
6:00” when batteries are properly installed.
Reinstall the cover.
3
NOTES:
• The battery life is approximately one year in normal use.
• When you replace the batteries, always change both batteries, and make sure they
are the same type.
• If the remote control does not operate properly after replacing the batteries, take
out the batteries and reinstall them again after 30 seconds.
• If you will not be using the unit for a long time, remove the batteries from the remote
control.
Remote control
cover
HOW TO USE THE REMOTE CONTROL
Point the remote control towards
the unit’s signal receiver window
and press the desired button. The
unit generates a beep when it receives the signal.
• Make sure there is no curtain or other
object between the remote control and the
unit.
• The remote control can send signals from
up to 7 metres away.
E-6
Page 9

CAUTION
• Do not allow the signal receiver window to receive strong direct sunlight, since it can
adversely affect its operation. If the signal receiver window is exposed to direct sunlight,
close a curtain to block the light.
• Using a fluorescent lamp with a quick starter in the same room may interfere with
transmission of the signal.
• The unit can be affected by signals transmitted from the remote control of a television,
VCR or other equipment used in the same room.
• Do not leave the remote control in direct sunlight or near a heater. Also, protect the unit
and remote control from moisture and shock which can discolour or damage them.
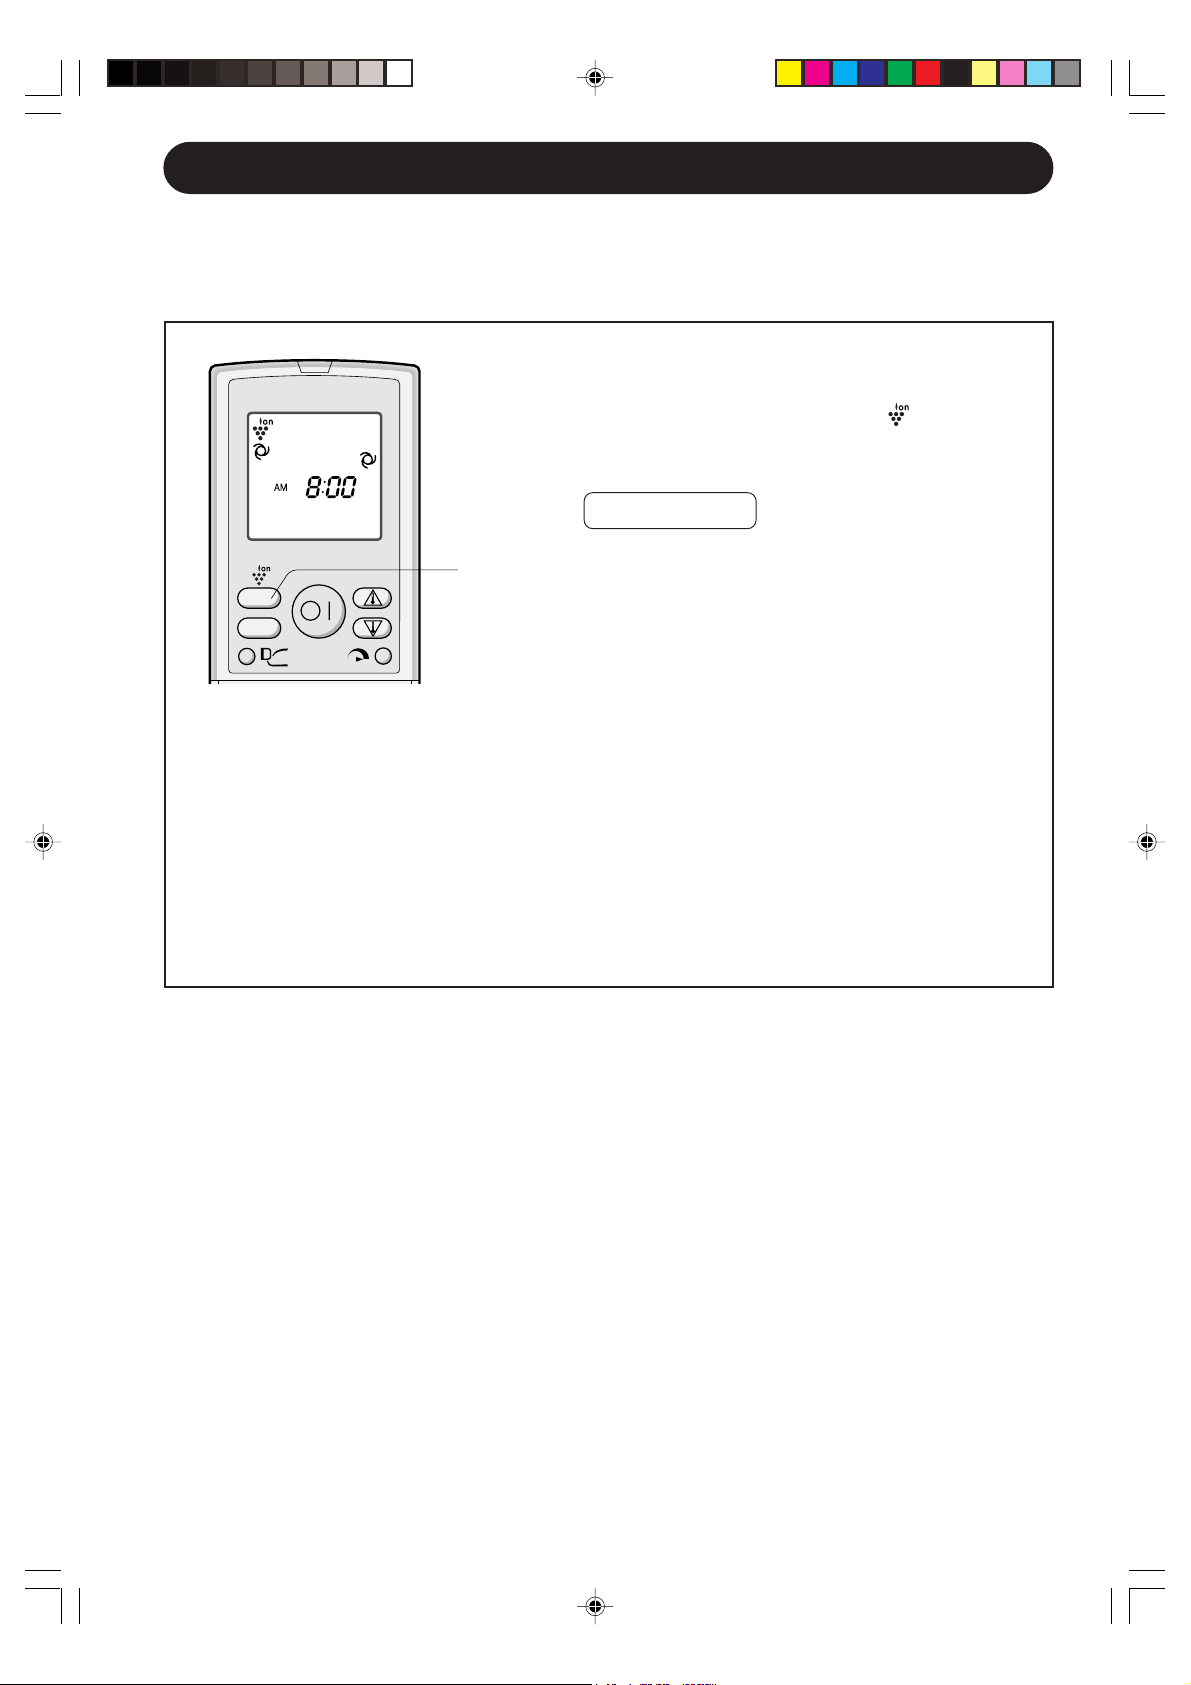
SET CURRENT CLOCK TIME
ENGLISH
There are two clock modes:
12-hour mode and 24-hour
mode.
MODE
FAN
SWING
1h
CLEAN
SET/C
2
3
1
Example: 5 o’clock in the afternoon
Clock Display
12-hour mode PM 5:00
24-hour mode 17:00
To set to the 12-hour mode, press the
1
CLOCK button once in the first step.
To set to the 24-hour mode, press the
CLOCK button twice in the first step.
Press the TIME ADVANCE or REVERSE
2
button to set the current time.
• Keep the button pressed to advance or
reverse the time display quickly.
Press the SET/C button.
3
• The colon (:) blinks to indicate that the
clock is functioning.
NOTE:
• The current time cannot be set when the timer
is operating.
E-7
Page 10
BASIC OPERATION
2
5
DISPLAY
3
1
MODE
FAN
SWING
1h
CLEAN
4
SET/C
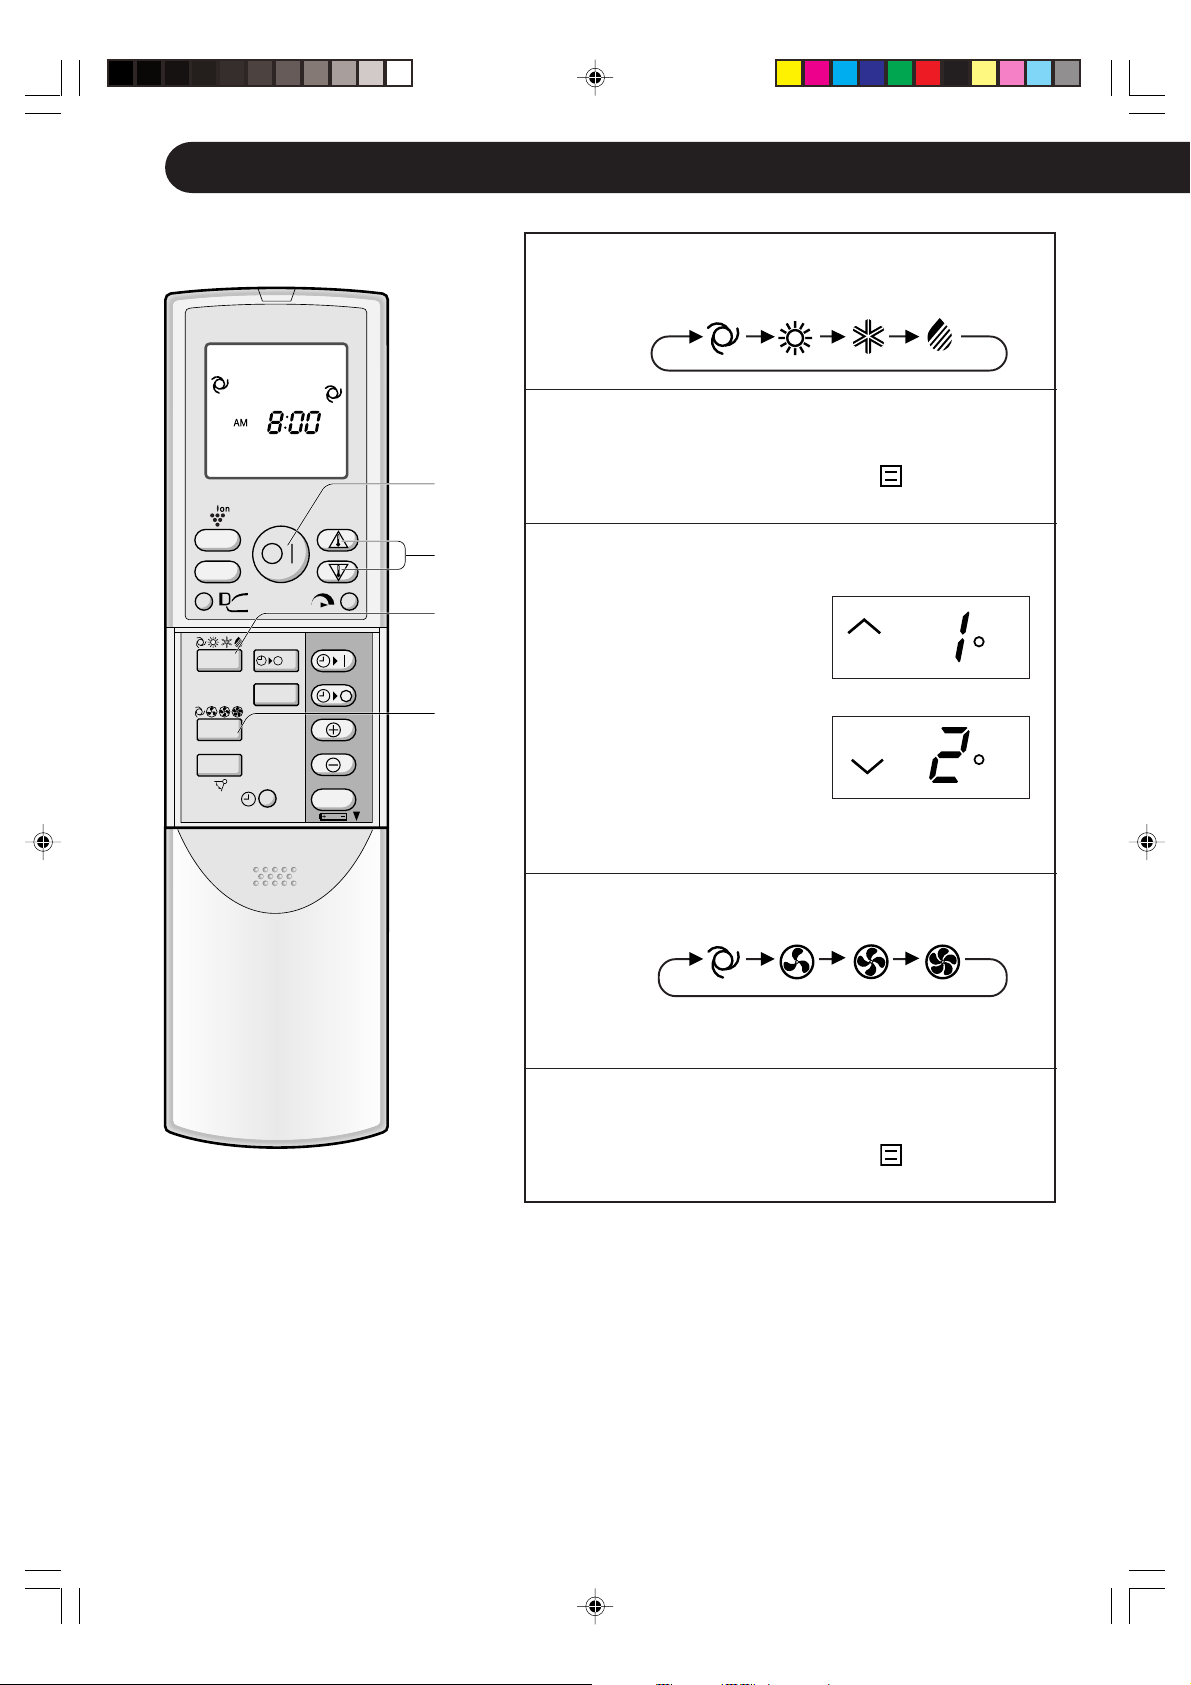
Press the MODE button to select the op-
1
eration mode.
AUTO HEAT COOL DRY
Press the ON/OFF button to start opera-
2
tion.
• The red OPERATION lamp ( ) on the unit
will light.
Press the THERMOSTAT button to set the
3
desired temperature.
• In the AUTO and DRY
modes, the temperature can be changed
in 1°C increments
within the range of 2°C
higher to 2°C lower
from the temperature
automatically determined by the air conditioner.
• In the COOL and HEAT modes, the temperature can be set within the range of 18 to 32°C
(Example: 1°C higher)
(Example: 2°C lower)
C
C
Press the FAN button to set the desired fan
4
speed.
• In the DRY mode, the fan speed is preset to
AUTO and cannot be changed.
To turn off the unit, press the ON/OFF but-
5
ton again.
• The red OPERATION lamp ( ) on the unit
will turn off.
AUTO SOFT LOW HIGH
When using your air-conditioner with multi-system
(AY-XPM18HR)
With a multi system air conditioner, multiple indoor units can be connected to one outdoor
unit. When the setting mode differs among indoor unit(s), the indoor unit(s) operated later
may not work.
• When the indoor unit(s) is/are operating in HEAT mode, the remaining unit(s) can not operate in
COOL or DRY mode.
• When the indoor unit(s) is/are operating in COOL or DRY mode, the remaining unit(s) can not
operate in HEAT mode.
When the mode of the indoor unit(s) later operated is/are different from those which is /are in
operation, after a few seconds, a long BEEP will be emitted and the OPERATION lamp and
TIMER lamp will blink alternately. This shows that the later operated unit(s) is/are not working. In
such case, change the mode to the same mode which the other indoor unit(s) is/are operating in.
E-8
Page 11

TIPS ABOUT AUTO MODE
(AY-XP18GR,AY-XP24GR)
In the AUTO mode, the temperature setting and mode are automatically selected according to the room temperature and outdoor temperature when the
unit is turned on.
Modes and Temperature Settings
Outdoor temp.
281810034
Cool
(25°C)
Heat
(22°C)
29
(24°C)
21
Indoor temp.
Cool
(24°C)
Heat
Heat
(23°C)
the figures in ( ) are temperature settings
Dry
Room temp.
( )
–2°C
• During operation, if the outdoor temperature changes, the temperature settings will
automatically slide as shown in the chart.
• During seasons when you need COOLING at daytime and HEATING at night, or if
the room temperature should become extremely higher than the temperature setting, due to supplementary heating equipment, the mode will automatically switch
between HEAT and COOL mode to keep the comfortable room temperature. (MODE
CHANGEOVER)
Cool
(26°C)
ENGLISH
TIPS ABOUT AUTO MODE
(AY-XPM18HR)
In the AUTO mode, the temperature setting and mode are automatically selected according to the room temperature and outdoor temperature when the
unit is turned on.
Modes and Temperature Settings
Outdoor temp.
281810034
Cool
(25°C)
26
(24°C)
Indoor temp.
Cool
Heat
Heat
(23°C)
the figures in ( ) are temperature settings
Heat
(22°C)
(24°C)
Dry
Room temp.
( )
–2°C
• During operation, if the outdoor temperature changes, the temperature settings will
automatically slide as shown in the chart.
• Mode of the unit operated first will have priority over unit(s) without reference to the
chart.
Cool
(26°C)
E-9
Page 12
ADJUSTING THE AIR FLOW DIRECTION
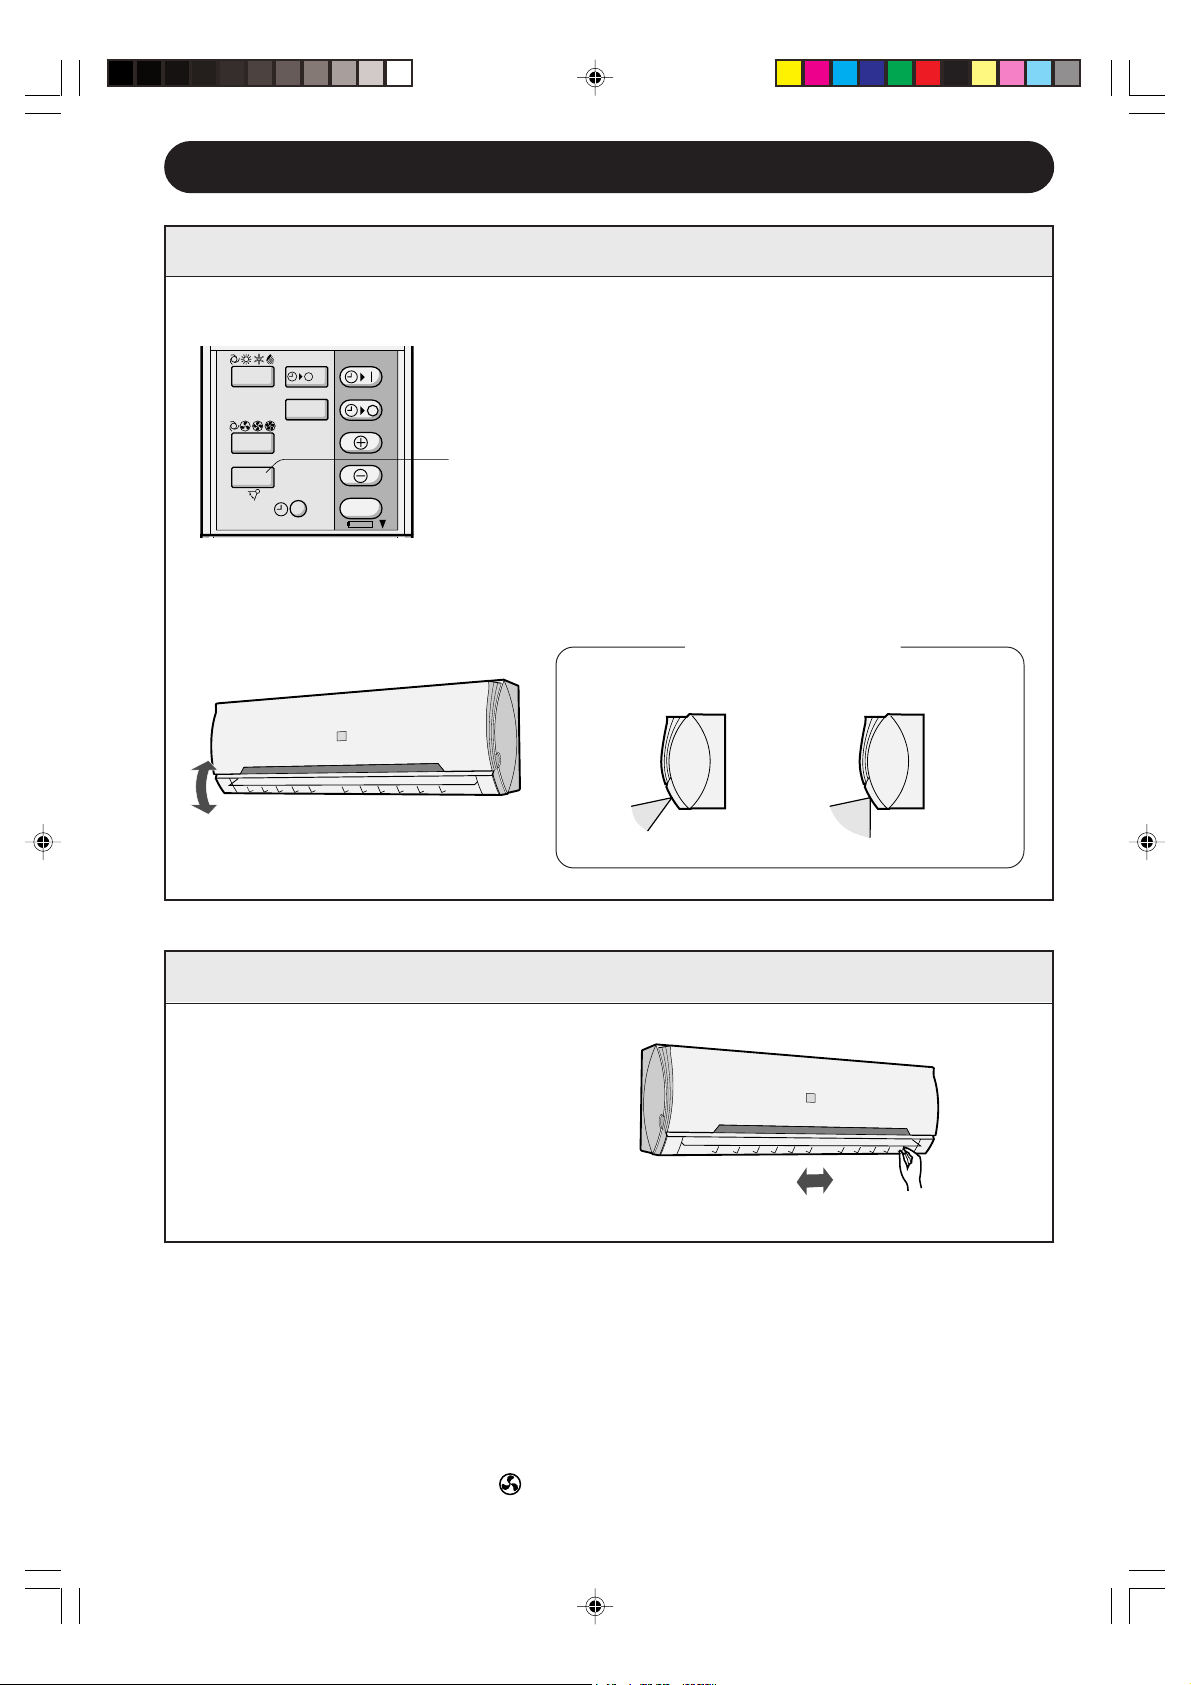
VERTICAL AIR FLOW DIRECTION
Press the SWING button on the remote
1
control once.
MODE
FAN
SWING
CLEAN
1h
1
SET/C
2
• The vertical adjustment louvre will change its
angle continuously.
Press the SWING button again when the
2
vertical adjustment louvre is at the desired
position.
• The louvre will stop moving within the range
shown in the diagram.
• The adjusted position will be memorized and
will be automatically set to the same position
when operated the next time.
Adjustment range
COOL and DRY modes
HORIZONTAL AIR FLOW DIRECTION
Hold the horizontal adjustment
louvre as shown in the diagram
and adjust the air flow direction.
HEAT mode
CAUTION
Never attempt to adjust the vertical adjustment louvre manually.
• Manual adjustment of the vertical adjustment louvre can cause the unit to malfunction
when the remote control is used for adjustment.
• When the vertical adjustment louvre is positioned at the lowest position in the COOL or
DRY mode for an extended period of time, condensation may result.
Do not adjust the horizontal adjustment louvre to the extreme left or right in the COOL mode
with the fan speed set to “SOFT (
Condensation may form on the louvres.
)” for an extended period of time.
E-10
Page 13
PROGRESSIVE AIRFLOW
Press the PROGRESSIVE AIRFLOW button during cooling or dry operation when you do
not want to feel cold air. Vertical adjustment louvre is set obliquely upward to deliver
cool air to the ceiling.
Press the button during heating operation. Vertical adjustment louvre is set downward
to deliver the warm air down to the floor and warm you.
During operation, press the PROGRESSIVE
1
AIRFLOW button.
• The remote control will display .
AM
TO CANCEL
Press the PROGRESSIVE AIRFLOW button.
NOTES:
DISPLAY
• The PROGRESSIVE AIRFLOW setting is cancelled when
1
you press FULL POWER button while PROGRESSIVE
AIRFLOW is set.
• If you want PROGRESSIVE AIRFLOW operation in FULL
POWER mode, press PROGRESSIVE AIRFLOW button
during FULL POWER operation.
FULL POWER OPERATION
In this operation, the air conditioner works at maximum power to makes the room
cool or warm so rapidly that you can use it just after you come home.
ENGLISH
To activate the FULL POWER operation, press the
1
FULL POWER button during operation.
• The remote control will display .
• The temperature display will go off.
AM
• The green FULL POWER lamp ( ) on the unit will
light up.
TO CANCEL
Press the FULL POWER button again.
DISPLAY
• FULL POWER operation will also be cancelled when
the operation mode is changed, or when the unit is
1
turned off.
• The green FULL POWER lamp ( ) on the unit will
turn off.
NOTE:
• You can not set the temperature or fan speed during the FULL POWER operation.
E-11
Page 14
PLASMACLUSTER OPERATION
The Plasmacluster Ion generator inside the air conditioner will release positive and
negative plasmacluster ions into the room.
Approximately the same numbers of positive and negative ions released into the air will
reduce some airborne mold.
During operation, press the PLASMACLUSTER
1
button.
• The remote control will display “ ”
• The blue PLASMACLUSTER lamp on the unit will
light up.
TO CANCEL
Press the PLASMACLUSTER button again.
1
DISPLAY
• The PLASMACLUSTER lamp on the unit will turn
off.
NOTES:
• Use of the PLASMACLUSTER operation will be memorized, and it will be activated the next
time you turn on the air conditioner.
• To turn off the PLASMACLUSTER lamp, press the DISPLAY button.
To perform the PLASMACLUSTER operation without accompanying heat, cool
or dry mode, press the PLASMACLUSTER button while the unit is not operating.
• The mode symbol of the remote control will go off and fan speed can not be set to AUTO.
E-12
Page 15

SELF CLEAN OPERATION
SELF CLEAN operation will provide effect to reduce the growth mold fungus, and to dry
inside of the air conditioner unit with Plasmacluster ions. This operation is accompanied
by FAN or HEAT mode. Utilize the operation at seasonal change over terms.
Mold fungus already grown can not be eliminated by this operation.
Press the SELF CLEAN button when the unit is not
1
operating.
• The remote control displays “ ”.
• The red OPERATION lamp ( ), the green SELF
CLEAN lamp ( ) and the blue PLASMACLUSTER lamp
on the unit will light up.
• The unit will stop operation after forty minutes.
TO CANCEL
ENGLISH
MODE
FAN
1h
CLEAN
Press the SELF CLEAN button.
Alternatively, turn the unit off by pressing the ON/OFF
1
button.
• The red OPERATION lamp ( ), the green SELF CLEAN
lamp ( ) and the blue PLASMACLUSTER lamp on the
unit will turn off.
NOTE:
• You cannot set the temperature, fan speed, air flow direction or timer setting during the SELF
CLEAN operation.
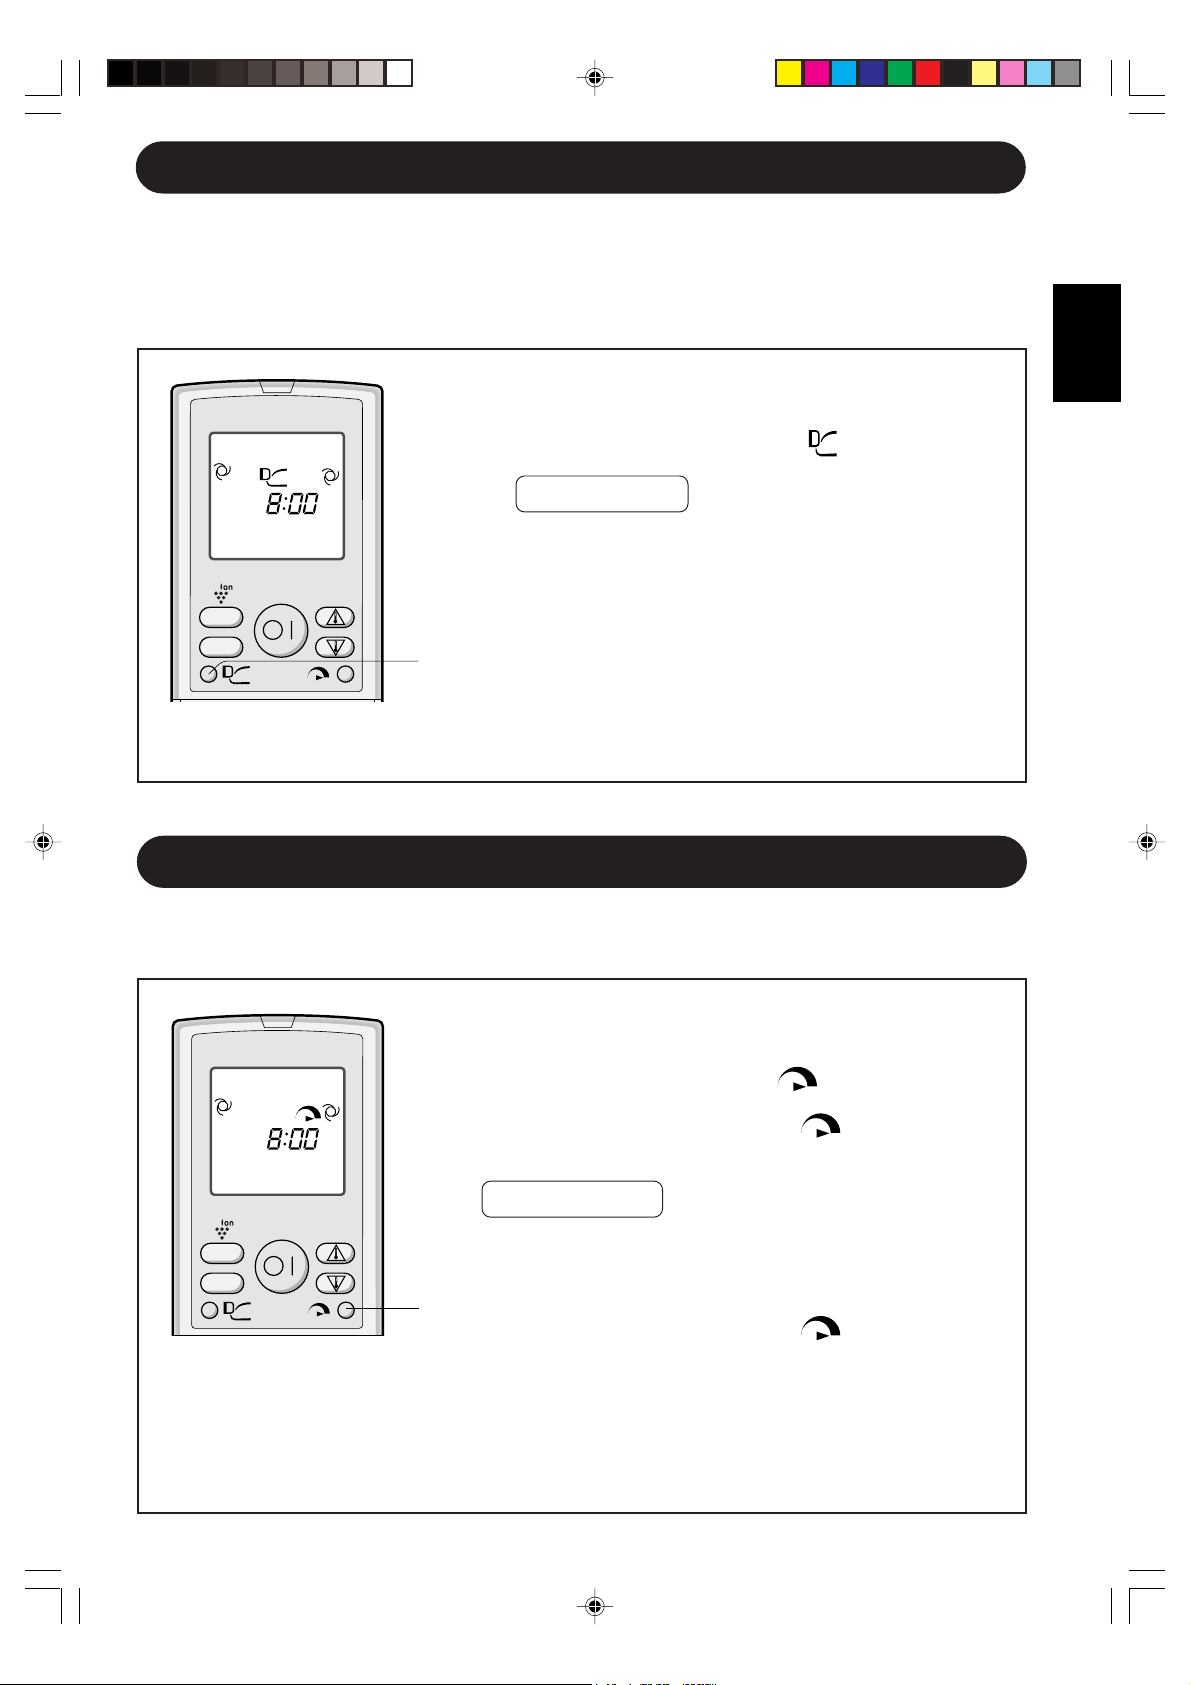
ONE-HOUR OFF TIMER
When the ONE-HOUR OFF TIMER is set, the unit will automatically turn off after one
hour.
Press the ONE-HOUR OFF TIMER button.
1
• The remote control displays “ ”.
• The orange TIMER lamp ( ) on the unit will light up.
• The unit will stop operating after one hour.
TO CANCEL
Press the TIMER CANCEL (SET/C) button.
• The orange TIMER lamp ( ) on the unit will turn off.
MODE
1h
CLEAN
Alternatively, turn the unit off by pressing the ON/
1
OFF button.
• The red OPERATION lamp ( ) and the orange
TIMER lamp ( ) on the unit will turn off.
NOTES:
• The ONE-HOUR OFF TIMER operation has priority over TIMER ON and TIMER OFF
operations.
• If the ONE-HOUR OFF TIMER is set while the unit is not operating, the unit will operate for
an hour at the formerly set condition.
• If you wish to operate the unit for another hour before the ONE-HOUR OFF TIMER is
activated, press the ONE-HOUR OFF TIMER button again during operation.
• If TIMER ON and/or TIMER OFF are set, TIMER CANCEL button cancels every setting.
E-13
Page 16
TIMER OPERATION
NOTE:
Before setting the timer, make sure the clock is properly set with the current time.
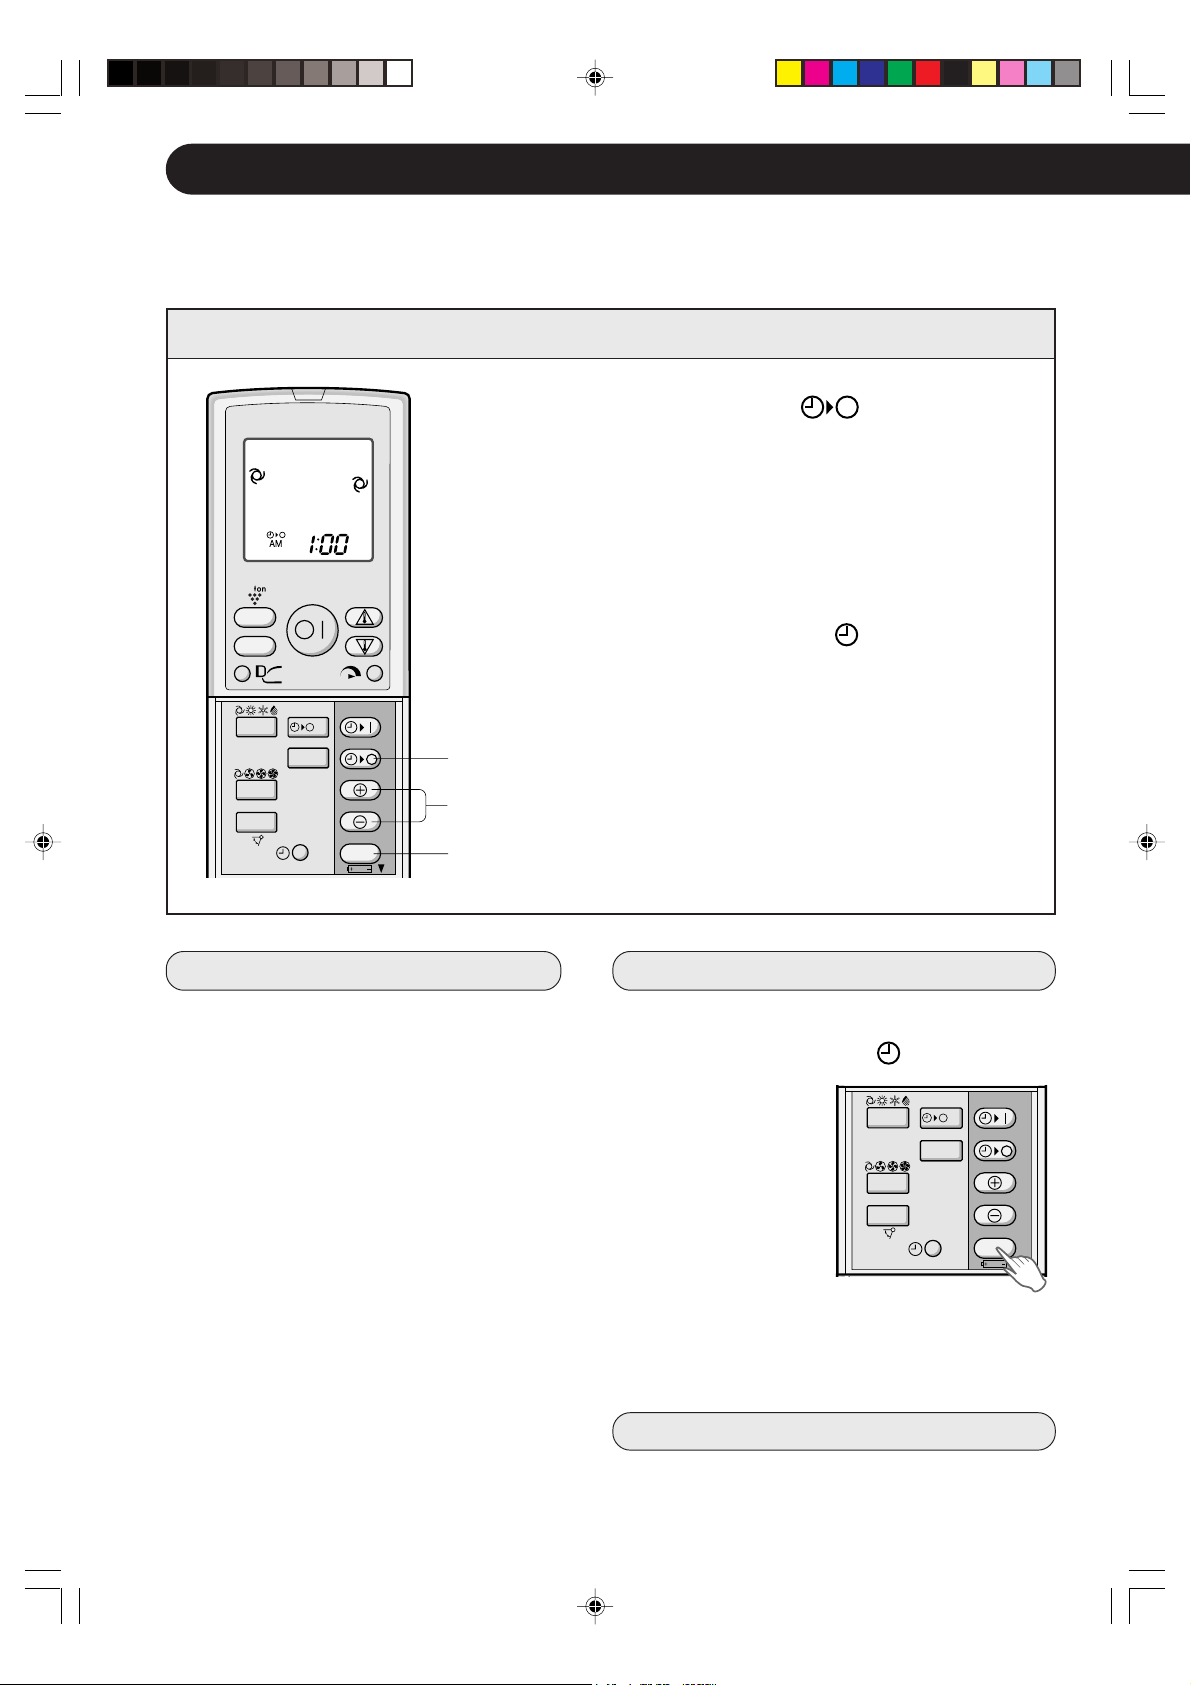
TIMER OFF
Press the TIMER OFF ( ) button.
1
The TIMER OFF indicator will blink; press the
2
TIME ADVANCE or REVERSE buttons to set
the desired time. (The time can be set in 10minute increments.)
Point the remote control at the signal receiver
3
window on the unit and press the TIMER SET
(SET/C) button.
DISPLAY
MODE
FAN
SWING
1h
CLEAN
SET/C
1
2
3
• The orange TIMER lamp ( ) on the unit will
light.
• The unit will generate a beep when it receives the
signal.
TIPS ABOUT TIMER OFF OPERATION
When the TIMER OFF mode is set, the
temperature setting is automatically
adjusted to prevent the room from becoming excessively hot or too cold while
you sleep. (Auto Sleep function)
COOL/DRY MODE:
• One hour after the time operation begins, the
temperature setting rises 1°C higher than
the original temperature setting.
HEAT MODE:
• One hour after the timer operation begins,
the temperature setting drops 3°C lower
than the original thermostat setting.
TO CANCEL TIMER MODE
Press the TIMER CANCEL (SET/C) button.
• The orange TIMER lamp ( ) on the unit will
turn off.
•
The current clock
time will be displayed
on the remote control.
MODE
FAN
SWING
1h
CLEAN
NOTE:
If any TIMER ON, TIMER OFF and ONE-HOUR
OFF TIMER are set, the TIMER CANCEL button
cancels all settings.
TO CHANGE TIME SETTING
Cancel the TIMER setting first, then set it
again.
E-14
SET/C
Page 17
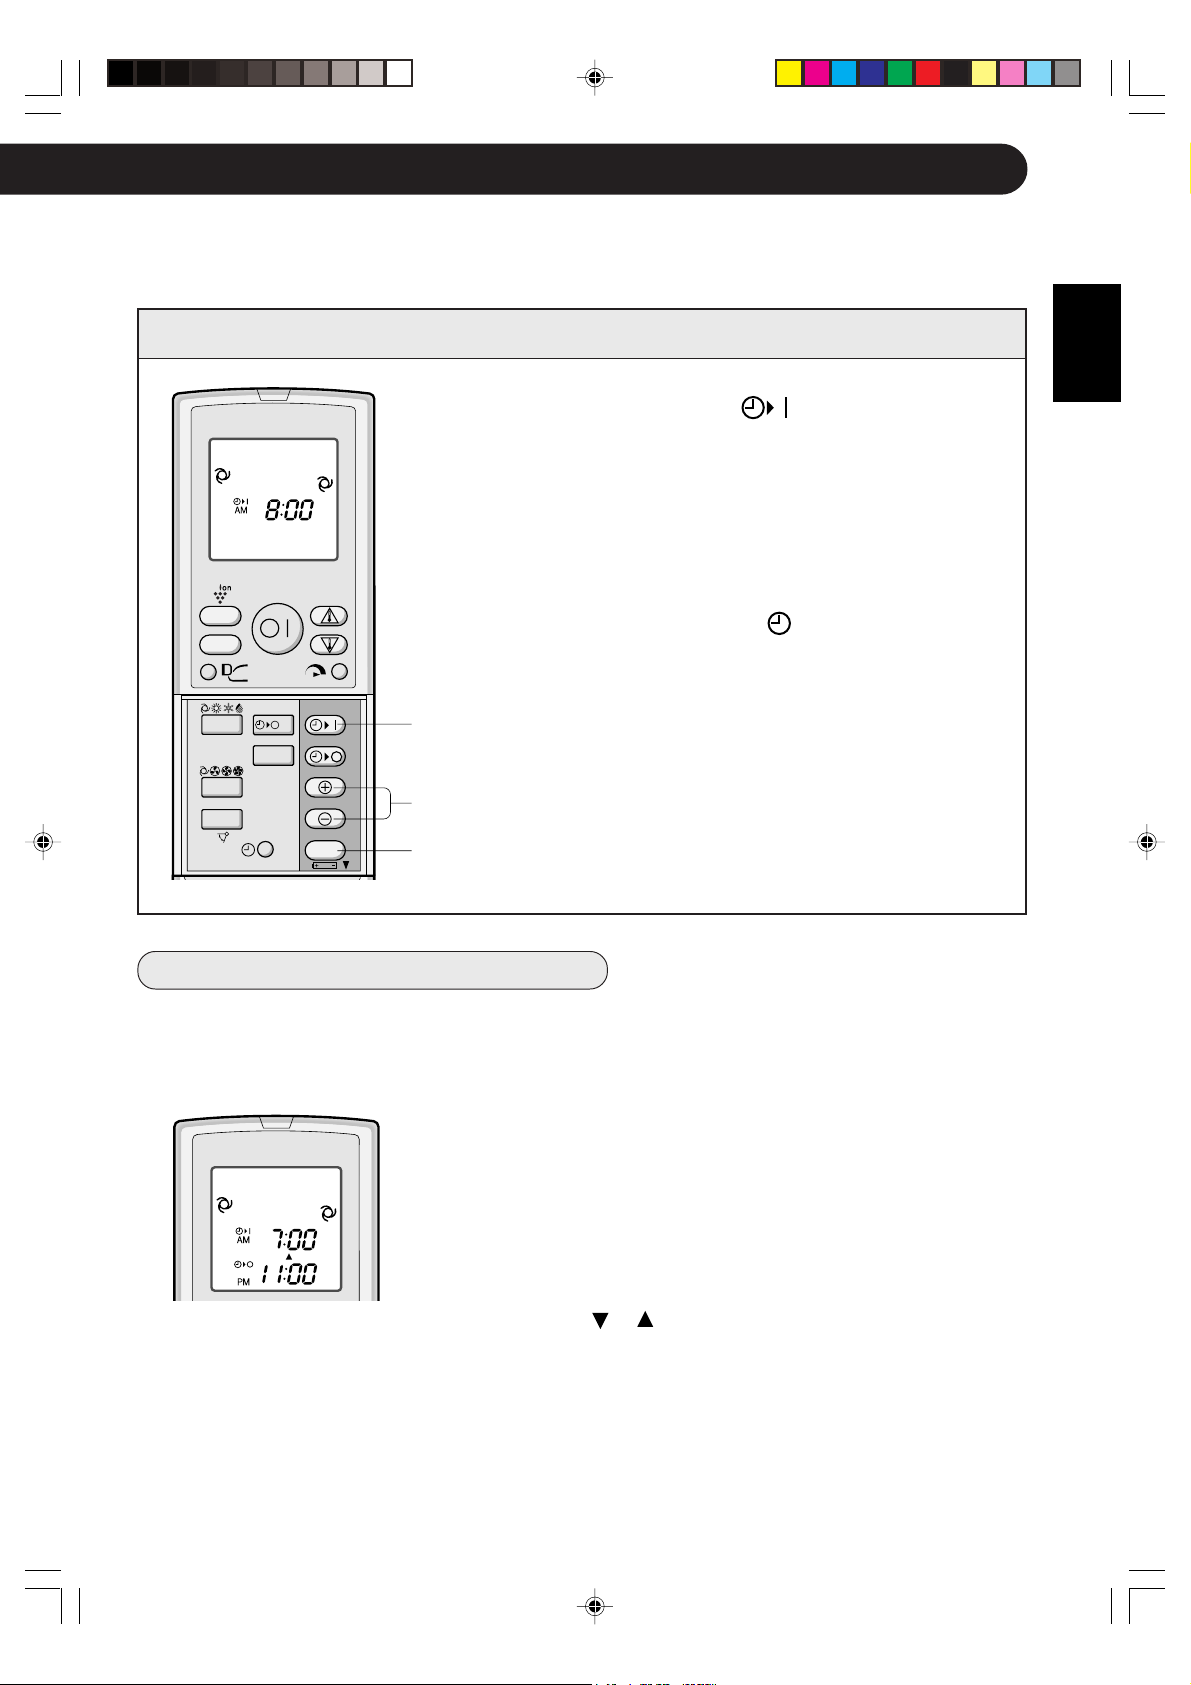
TIMER ON
DISPLAY
MODE
FAN
SWING
1h
CLEAN
SET/C
1
2
3
Press the TIMER ON ( ) button.
1
The TIMER ON indicator will blink; press the
2
TIME ADVANCE or REVERSE buttons to set
the desired time. (The time can be set in 10minute increments.)
Point the remote control at the signal receiver
3
window on the unit and press the TIMER SET
(SET/C) button.
• The orange TIMER lamp ( ) on the unit will light.
• The unit will generate a beep when it receives the
signal.
Select the operation condition.
4
NOTE:
The unit will turn on prior to the set time to allow the room
to reach the desired temperature by the programmed
time. (Awaking function)
ENGLISH
COMBINED USE OF ON AND OFF TIMERS
You can use the ON and OFF timers in combination.
Example:
To stop operation at 11:00 p.m. and resume operation (With the same mode and temperature settings)
to bring the room temperature to the desired level
by 7:00 a.m.
Set the TIMER OFF to 11:00 p.m. during opera-
1
tion.
Set the TIMER ON to 7:00 a.m.
2
The arrow (
and the TIMER OFF indicator shows which timer will
activate first.
or ) between the TIMER ON indicator
NOTES:
• You cannot programmed the ON-TIMER and OFF-TIMER to operate the unit at different
temperatures or other settings.
• Either timer can be programmed to activate prior the other.
E-15
Page 18
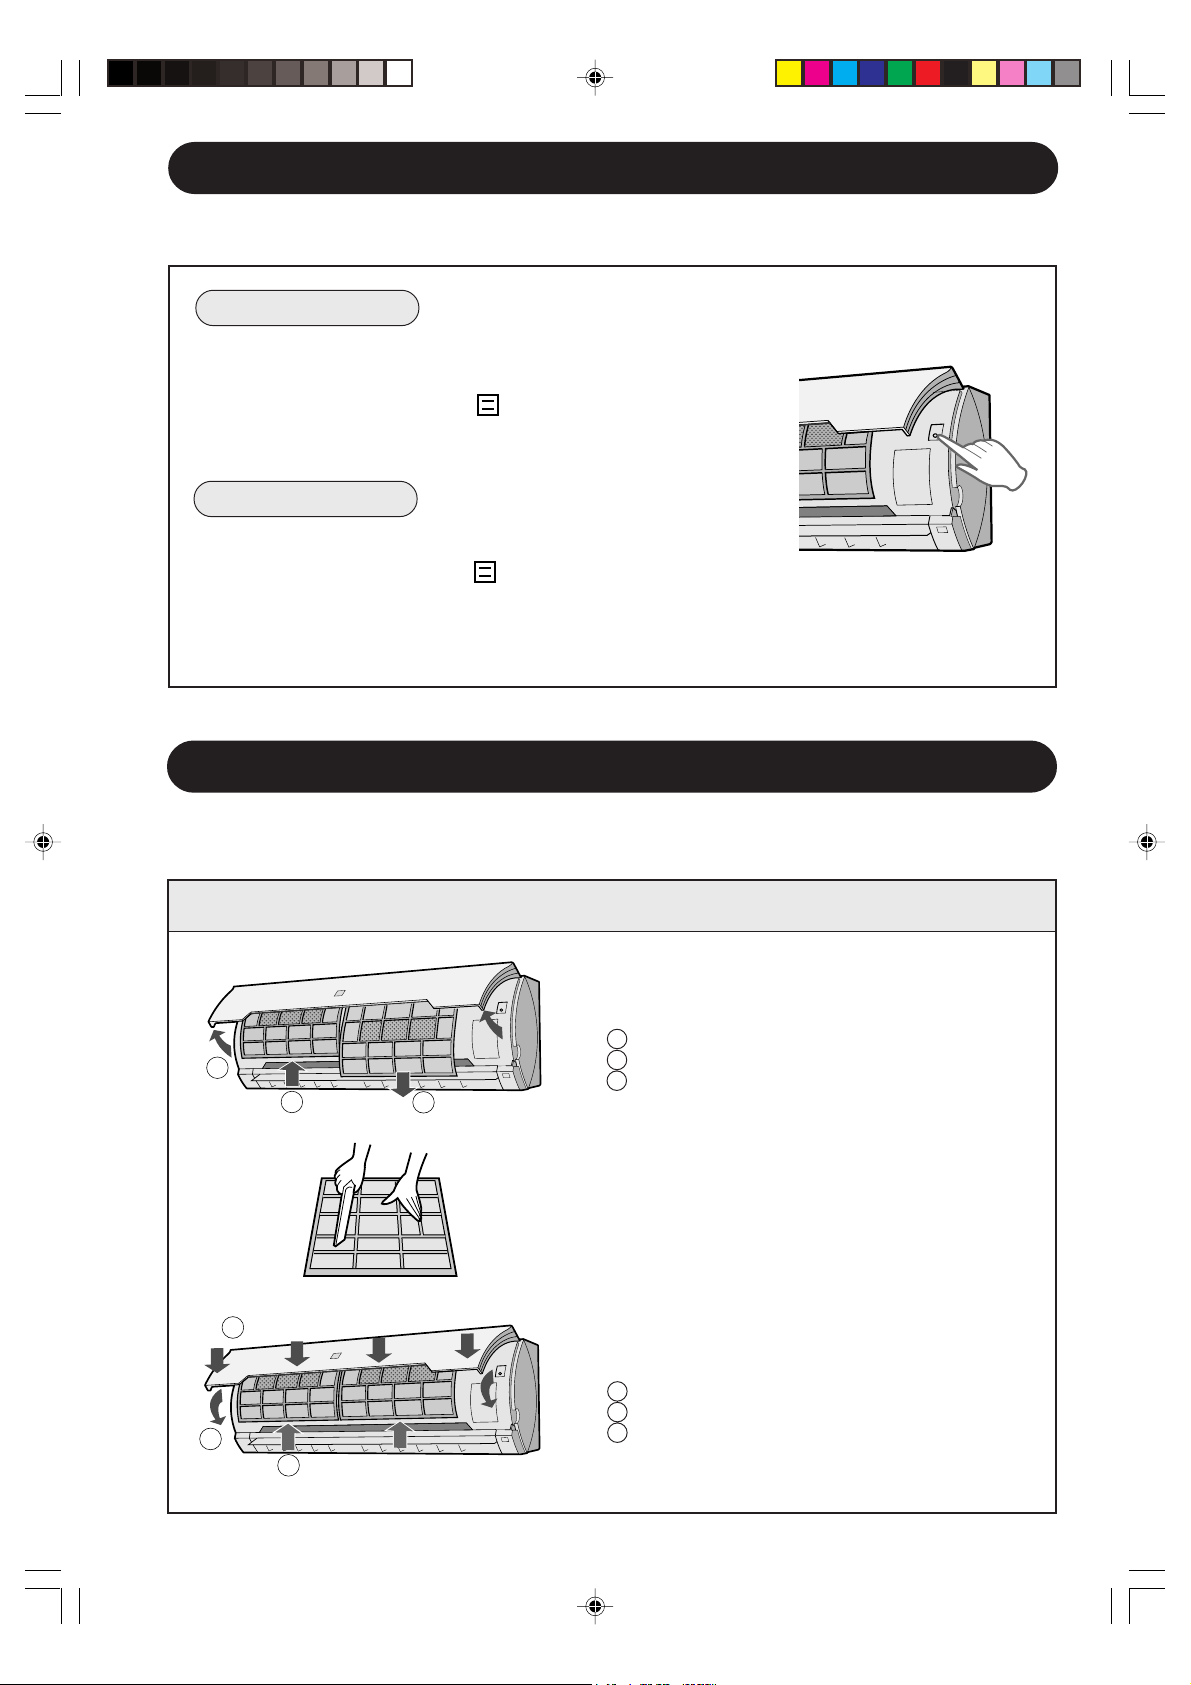
AUXILIARY MODE
AUXILIARY MODE
Use this mode when the remote control is not available.
TO TURN ON
Lift the open panel of the indoor unit and press the AUX.
button on the operation panel.
• The red OPERATION lamp ( ) on the unit will light and the
unit will start operating in the AUTO mode.
• The fan speed and temperature setting are set to AUTO.
TO TURN OFF
Press the AUX. button on the operation panel again.
• The red OPERATION lamp ( ) on the unit will turn off.
NOTE:
If the AUX. button is pressed during normal operation, the unit will turn off.
MAINTENANCE
Be sure to disconnect the power cord from the wall outlet or turn off the circuit
breaker before performing any maintenance.
CLEANING THE FILTERS
1
2
3
3
The air filters should be cleaned every two weeks.
TURN OFF THE UNIT
1
REMOVE THE FILTERS
2
1 Lift the open panel.
2 Push the air filters up slightly to unlock them.
3 Pull the air filters down to remove them.
TAKE OFF THE AIR PURIFYING
3
FILTERS FROM THE AIR FILTERS
CLEAN THE FILTERS
4
Use a vacuum cleaner to remove dust. If the
filters are dirty, wash them with warm water
and a mild detergent. Dry filters in the shade
before reinstalling.
REINSTALL THE AIR PURIFYING
5
FILTERS
REINSTALL THE FILTERS
6
1 Reinstall the filters in the original positions.
2 Close the front panel.
2
1
3 Push the arrow-marked of the panel firmly
to lock it in place.
E-16
Page 19
MAINTENANCE
CLEANING THE UNIT AND THE REMOTE CONTROL
• Wipe them with a soft cloth.
• Do not directly splash or pour water on them. We can cause electrical shock or
equipment damage.
• Do not use hot water, thinner, abrasive powders or strong solvents.
ENGLISH
MAINTENANCE AFTER AIR
CONDITIONER SEASON
Operate the unit in the SELF
1
CLEAN OPERATION to allow the
mechanism to thoroughly dry.
Stop the operation and unplug the
2
unit. Turn off the circuit breaker, if
you have one exclusively for the
air conditioner.
Clean the filters, then reinstall
3
them.
MAINTENANCE BEFORE
AIR CONDITIONER SEASON
Make sure that the air filters are
1
not dirty.
Make sure that nothing obstructs
2
the air inlet or outlet.
Check the outdoor mounting rack
3
periodically for wear and to make
sure it is firmly in place.
CHANGING THE AIR PURIFYING FILTERS
The filters should be changed every 3 ~ 6 months
REMOVE THE AIR FILTERS
Filter stopper
1
CHANGE THE AIR PURIFYING
2
FILTERS
1 Take off the old filters from the air filters.
2 Set the new air purifying filters, under the
filter stoppers located on the air filters.
Air filter
Air purifying filter
NOTE:
• The dirty air purifying filters are not washable for reuse.
The new filters are available at your nearest dealer.
Replacement filter: Type AZ-F1800C
Disposal of Filters
Please dispose of replaced filters according to the local disposal laws and regulations.
Air Purifying Filter materials:
• Filter: Polypropylene
• Frame: Polyester
REINSTALL THE AIR FILTERS
3
E-17
Page 20

ADDITIONAL NOTES ON OPERATION
OPERATING TEMPERATURE RANGE
• The built-in protective device may prevent the unit
from operating when used
out of this range.
• Condensation may form
on the air outlet if the unit
operates continuously in
the COOL or DRY mode
when humidity is over 80
percent.
COOLING
HEATING
INDOOR TEMP.
upper limit 32˚C
lower limit 21˚C
upper limit 27˚C24˚C
lower limit - –15˚C
46˚C (AY-XP18GR,AY-XP24GR)
43˚C (AY-XPM18HR)
–10˚C (AY-XP18GR)
21˚C (AY-XP24GR,AY-XPM18HR)
OUTDOOR TEMP.
WHEN POWER FAILURE OCCURS
This air conditioner has a memory function to store settings when a power failure occurs.
After power recovery, the unit will automatically re-start in the same settings which were active before
the power failure, except for timer settings.
If the timers were set before a power failure, they will need to be re-set after power recovery.
PREHEATING FUNCTION
In the HEAT operation, the indoor fan may not start for two to five minutes after the unit is turned on
to prevent cold air from blowing out of the unit.
DE-ICING FUNCTION
• When ice forms on the heat exchanger in the outdoor unit during the HEAT operation, an automatic
de-icer provides heat for about 5 to 10 minutes to remove the ice. During de-icing, the inside and
outside fans stop operating.
• After de-icing is completed, the unit automatically resumes operation in the HEAT mode.
HEATING EFFICIENCY
• The unit employs a heat pump that draws heat from the outside air and releases it into the room.
The outside air temperature therefore greatly affects the heating efficiency.
• If the heating efficiency is reduced due to low outside temperatures, use an additional heater.
• It takes time to warm up and heat the entire room because of the forced air circulation system.
TIPS ON SAVING ENERGY
Below are some simple ways to save energy when you use your air conditioner.
SET THE CORRECT TEMPERATURE
• Setting the thermostat 1°C higher than the desired temperature in the COOL mode and 2°C lower
in the HEAT mode will save approximately 10 percent in power consumption.
• Setting the temperature lower than necessary during cooling operation will result in increased
power consumption.
BLOCK DIRECT SUNLIGHT AND PREVENT DRAFTS
• Blocking direct sunlight during cooling operation will reduce power consumption.
• Close the windows and doors during cooling and heating operations.
SET PROPER AIR FLOW DIRECTION TO OBTAIN THE BEST AIR
CIRCULATION
KEEP FILTER CLEAN TO ENSURE THE MOST EFFICIENT OPERATION
MAKE MOST OF THE TIMER OFF FUNCTION
DISCONNECT THE POWER CORD WHEN THE UNIT IS NOT USED FOR AN
EXTENDED PERIOD OF TIME
• The indoor unit still consumes a small amount of power when it is not operating.
E-18
Page 21
BEFORE CALLING FOR SERVICE
The following conditions do not denote equipment malfunctions
UNIT DOES NOT OPERATE
The unit will not operate if it is turned on immediately
after it is turned off. The unit will not operate
immediately after the mode is changed. This is to
protect the internal mechanisms. Wait 3 minutes
before operating the unit.
UNIT DOES NOT SEND OUT WARM AIR
The unit is preheating or de-icing.
ODORS
Carpet and furniture odors that entered into the
unit and the air conditioner's inner component
odors at the early stage of installation may be sent
out from the unit.
CRACKING NOISE
The unit may produce a cracking noise. This sound
is generated by the friction of the front panel and
other components expanding or connecting due to a
temperature change.
A LOW BUZZING NOISE EMITTED
This is a sound emitted when the unit is generating
Plasmacluster ions.
SWISHING NOISE
The soft, swishing noise is the sound of the refrigerant flowing inside the unit.
WATER VAPOUR
• In the COOL and DRY operation, water vapour
can sometimes be seen at the air outlet due to
the difference between the room air temperature and the air discharged by the unit.
• In the HEAT operation, water vapour may flow
out of the outdoor unit during de-icing.
THE OUTDOOR UNIT DOES NOT
STOP
After stopping the operation, the outdoor unit will
rotate its fan for about a minute to cool down the
unit.
ODOR EMITTED FROM THE
PLASMACLUSTER AIR OUTLET
This is the smell of ozone generated from the
Plasmacluster ion generator. The ozone concentration is very small, posing no adverse effect on
your health. The ozone discharged into the air
rapidly decomposes, and its density in the room
will not increase.
ENGLISH
(AY-XPM18HR only)
INDOOR UNIT BECOMES WARM
EVEN WHEN IDLE
This is because the refrigerant also flows through
the idle indoor unit's pipes when the other unit is
operated in HEAT mode.
INDOOR UNIT BECOMES WARM
EVEN WHEN NOT DURING HEATING
OPERATION
When the PLASMACLUSTER button is pressed
while the unit is not operating, the
PLASMACLUSTER operation will be performed
without accompanying air conditioning mode (e.g.
HEATING or COOLING). At this time, you may feel
warm air coming out from the unit air outlet if
HEATING is performed with units in other rooms.
Indoor fan will decrease its rotating speed and will
turn ON and OFF depending on the room temperature.
UNIT DOES NOT OPERATE IN YOUR
REQUESTED MODE
• When one indoor unit is operating in COOL or
DRY mode, you can not operate the other unit
in HEAT mode. (After a few seconds, a long
BEEP will be emitted, and the OPERATION
lamp and TIMER lamp will blink alternately.)
• When one indoor unit is operating in HEAT
mode, you can not operate the other unit in
COOL nor DRY mode. (After a few seconds, a
long BEEP will be emitted, and the OPERATION lamp and TIMER lamp will blink alternately.)
UNIT DOES NOT SEND OUT AIR
(PLASMACLUSTER operation without accompanying air conditioning
mode, SELF CLEAN operation)
The other unit(s) is/are de-icing.
E-19
Page 22
BEFORE CALLING FOR SERVICE
If the unit appears to be malfunctioning, check the following points before calling for
service.
IF THE UNIT FAILS TO OPERATE
Check to see if the circuit breaker has tripped or the fuse has blown.
IF THE UNIT FAILS TO COOL (OR HEAT) THE ROOM EFFECTIVELY
Check the filters. If dirty, clean
them.
Make sure windows and doors
are closed tightly.
Check the outdoor unit to make
sure nothing is blocking the air inlet or outlet.
A large number of people in the
room can prevent the unit from
achieving the desired temperature.
Check the thermostat is proper
setting.
Check whether any heat-generating appliances are operating in the room.
IF THE UNIT FAILS TO RECEIVE THE REMOTE CONTROL SIGNAL
Check whether the remote control batteries have become old
and weak.
Please call for service when OPERATION Lamp, TIMER Lamp or PLASMACLUSTER Lamp on the
indicator panel blink.
Try to send the signal again with
the remote control pointed properly towards the unit’s signal receiver window.
Check whether the remote control batteries are installed with
the polarities properly aligned.
E-20
Page 23

Page 24
Attention : votre produit
comporte ce symbole. Il
signifie que les produits
électriques et électroniques
usagés ne doivent pas être
mélangés avec les déchets
ménagers généraux. Un
système de collecte séparé
est prévu pour ces produits.
A. Informations sur la mise au rebut à l'intention des utilisateurs privés
(ménages)
1. Au sein de l'Union européenne
Attention : si vous souhaitez mettre cet appareil au rebut, ne le jetez pas dans une
poubelle ordinaire !
Les appareils électriques et électroniques usagés doivent être traités séparément et
conformément aux lois en vigueur en matière de traitement, de récupération et de
recyclage adéquats de ces appareils.
Suite à la mise en oeuvre de ces dispositions dans les Etats membres, les ménages
résidant au sein de l'Union européenne peuvent désormais ramener gratuitement*
leurs appareils électriques et électroniques usagés sur des sites de collecte désignés.
Dans certains pays*, votre détaillant reprendra également gratuitement votre ancien produit si
vous achetez un produit neuf similaire.
*) Veuillez contacter votre administration locale
pour plus de renseignements.
Si votre appareil électrique ou électronique usagé comporte des piles ou des
accumulateurs, veuillez les mettre séparément et préalablement au rebut
conformément à la législation locale en vigueur.
En veillant à la mise au rebut correcte de ce produit, vous contribuerez à assurer le
traitement, la récupération et le recyclage nécessaires de ces déchets, et préviendrez
ainsi les effets néfastes potentiels de leur mauvaise gestion sur l'environnement et la
santé humaine.
2. Pays hors de l'Union européenne
Si vous souhaitez mettre ce produit au rebut, veuillez contacter votre administration
locale qui vous renseignera sur la méthode d'élimination correcte de cet appareil.
Suisse : les équipements électriques ou électroniques usagés peuvent être ramenés
gratuitement au détaillant, même si vous n'achetez pas un nouvel appareil. Pour
obtenir la liste des autres sites de collecte, veuillez vous reporter à la page d'accueil
du site
www.swico.ch ou www.sens.ch .
. Informations sur la mise au rebut à l'intention des entreprises
B
1. Au sein de l'Union européenne
Si ce produit est utilisé dans le cadre des activités de votre entreprise et que vous
souhaitiez le mettre au rebut :
Veuillez contacter votre revendeur SHARP qui vous informera des conditions de
reprise du produit. Les frais de reprise et de recyclage pourront vous être facturés.
Les produits de petite taille (et en petites quantités) pourront être repris par vos
organisations de collecte locales.
Espagne : veuillez contacter l'organisation de collecte existante ou votre
administration locale pour les modalités de reprise de vos produits usagés.
2. Pays hors de l'Union européenne
Si vous souhaitez mettre ce produit au rebut, veuillez contacter votre administration
locale qui vous renseignera sur la méthode d'élimination correcte de cet appareil.
FR
Page 25

FRANÇAIS
Nous vous remercions de l’achat d’un climatiseur SHARP. Lire attentivement ce manuel
avant d’utiliser l’appareil.
TABLE DES MATIERES
• CONSIGNES DE SECURITE
IMPORTANTES ........................................F-1
• NOMENCLATURE ....................................F-3
• MISE EN PLACE DU FILTRE
PURIFICATEUR D’AIR .............................F-5
• UTILISATION DE LA TELECOMMANDE ....F-6
• FONCTIONNEMENT DE BASE................F-8
• REGLAGE DE LA DIRECTION
DU DEBIT D’AIR .......................................F-10
• DEBIT D’AIR PROGRESSIF.....................F-11
• FONCTIONNEMENT A PLEIN REGIME ....F-11
• FONCTIONNEMENT DU
PLASMACLUSTER ...................................F-12
• OPERATION DE NETTOYAGE
AUTOMATIQUE ........................................F-13
• ARRET APRES UNE HEURE...................F-13
• FONCTIONNEMENT DE
LA MINUTERIE .........................................F-14
• MODE AUXILIAIRE...................................F-16
• ENTRETIEN..............................................F-16
• AUTRES REMARQUES SUR LE
FONCTIONNEMENT ................................F-18
• CONSEILS SUR LES ECONOMIES
D’ENERGIE...............................................F-18
• AVANT D’APPELER LE SERVICE
APRES-VENTE .........................................F-19
CONSIGNES DE SECURITE IMPORTANTES
AVERTISSEMENTS
Ne pas tirer ou déformer le cordon d’alimentation. Le fait de tirer sur le cordon
1
d’alimentation ou une mauvaise utilisation de ce dernier peut endommager l’appareil et
provoquer une électrocution.
Veiller à ne pas exposer votre corps directement à l’air évacué pendant une longue
2
période. Il risque d’affecter votre état physique.
Lors de l’utilisation du climatiseur pour des nourrissons, de jeunes enfants, des
3
personnes âgées, des personnes alitées ou handicapées, s’assurer que la température
de la pièce est appropriée aux personnes qui se trouvent dans la pièce.
FRANÇAIS
Ne jamais insérer d’objet dans l’appareil. Le fait d’insérer des objets peut provoquer des
4
blessures à cause de la rotation à grande vitesse des ventilateurs internes.
Mettre le climatiseur sans faille à la terre. Ne pas connecter le fil de mise à la terre à un
5
tuyau de gaz, un tuyau d’eau, un paratonnerre ou un fil de mise à la terre du téléphone.
Une mise à la terre incomplète risque de provoquer un choc électrique.
Si l’on constate n’importe quelle anomalie sur le climatiseur (ex : une odeur de brûlé),
6
l’arrêter immédiatement et couper le disjoncteur.
L’appareil doit être installé conformément aux réglementations de câblage nationales.
7
Une connexion de câble incorrecte peut provoquer une surchauffe du cordon
d’alimentation, de la fiche et de la prise électrique et provoquer un incendie.
Si le cordon d’alimentation est endommagé, il doit être remplacé par le fabricant ou son
8
agent d’entretien ou encore une personne possédant des qualifications similaires afin
d’éviter tout danger. Utiliser uniquement le cordon d’alimentation spécifié par le fabricant
pour le remplacement.
MISES EN GARDE POUR L’INSTALLATION/LE DEMONTAGE/
LA REPARATION
• Ne pas essayer d’installer/démonter/réparer soi-même l’appareil. Un fonctionnement
inadéquat peut provoquer des décharges électriques, des fuites d’eau, des incendies etc.
Consulter votre revendeur ou un service de dépannage qualifié pour les opérations
d’installation/démontage/réparation de cette unité.
F-1
Page 26

CONSIGNES DE SECURITE IMPORTANTES
PRECAUTIONS D’EMPLOI
Ouvrir périodiquement une fenêtre ou une porte pour aérer la pièce, en particulier lors
1
de l’utilisation d’appareils à gaz. Une ventilation insuffisante risque de provoquer un
manque d’oxygène.
Ne pas utiliser les touches avec les mains mouillées. Cela risque de provoquer une
2
électrocution.
Par mesure de sécurité, couper le disjoncteur lorsque l’appareil n’est pas utilisé pendant
3
une période prolongée.
Vérifier périodiquement l’usure du rack de montage de l’unité extérieure afin de s’assurer
4
qu’il est fixé fermement en place.
Ne rien placer sur l’unité extérieure et ne pas marcher dessus. L’objet ou la personne
5
risque de basculer ou de tomber, provoquant des blessures.
Cet appareil est conçu pour une utilisation privée. Ne pas l’utiliser pour d’autres
6
applications, comme par exemple dans un chenil ou une serre pour l’élevage d’animaux
ou la culture de plantes.
Ne pas placer de récipient contenant de l’eau sur l’appareil. Si de l’eau pénètre dans
7
l’appareil, l’isolation électrique risque d’être détériorée et de provoquer une électrocution.
Ne pas bloquer les entrées et sorties d’air de l’appareil. Cela risque de provoquer un
8
fonctionnement insuffisant ou des pannes.
S’assurer d’arrêter l’utilisation et de couper le disjoncteur avant d’effectuer la maintenance
8
ou le nettoyage. Un ventilateur tourne à l’intérieur de l’appareil et risque de vous blesser.
Ne pas éclabousser ou verser de l’eau directement sur l’appareil. L’eau risque de
10
provoquer une électrocution ou d’endommager l’appareil.
Cet appareil n’est pas destiné à être utilisé par des enfants en bas âge ou des personnes
11
handicapées sans surveillance.
Les jeunes enfants doivent être surveillés afin de s’assurer qu’ils ne jouent pas avec
l’appareil.
Cet appareil n’est pas conçu pour être utilisé dans une région polaire.
12
PRECAUTIONS POUR L’EMPLACEMENT/INSTALLATION
• S’assurer de connecter le climatiseur à une alimentation de tension et de fréquence
appropriées.
L’utilisation d’une alimentation ayant une tension et une fréquence incorrectes peut
endommager l’appareil et provoquer un incendie.
• Ne pas installer l’appareil dans un endroit ou l’air est peu chargé en poussières, fumées et
humidité. Il risque de provoquer un incendie.
Installer l’appareil dans un endroit peu poussiéreux, sans fumées ni humidité dans l’air.
• Arranger le flexible de vidange pour assurer un écoulement normal. Un écoulement
insuffisant risque de mouiller la pièce, les meubles etc.
• S’assurer qu’un disjoncteur de fuite ou un disjoncteur de circuit est installé, en fonction de
l’emplacement d’installation, pour éviter une électrocution.
F-2
Page 27

NOMENCLATURE
UNITE INTERIEURE
1
1 Filtres purificateurs d’air
2 Bouche d’entrée (Air)
2
3 Panneau d’ouverture
3
4 Touche AUX.
4
5 Filtres à air
5
6 Fenêtre de réception
7 Cordon d’alimentation
6
7
8
9
0
q
w
(AY-XP18GR uniquement)
8 Voyant
9 Volets d’aération à réglage
vertical
0 Volets d’aération à réglage
horizontal
q Bouche de sortie (Air)
w Télécommande
FRANÇAIS
e Voyant PLEIN REGIME
(vert )
r Voyant de NETTOYAGE
e
r
t
y
u
AUTOMATIQUE (vert )
t Voyant de PLASMACLUSTER
(bleu)
y Voyant de MINUTERIE
(orange )
u Voyant de MARCHE (rouge )
REMARQUE : Les unités réelles peuvent varier
légèrement de celles montrées ci-dessus.
F-3
Page 28

NOMENCLATURE
TELECOMMANDE
DISPLAY
MODE
FAN
SWING
1h
CLEAN
SET/C
1
2
3
4
5
6
7
8
9
0
q
w
e
r
t
y
u
i
o
p
1 EMETTEUR
2 AFFICHAGE (Affichage à cristaux liquides)
3 Touche PLASMACLUSTER
4 Touche DISPLAY
5 Touche MARCHE/ARRET
6 Touche de THERMOSTAT
7 Touche PLEIN REGIME
8 Touche de DEBIT D’AIR PROGRESSIF
9 Touche MODE
0 Touche de MARCHE DE LA MINUTERIE
(pour régler la minuterie)
q Touche d’ARRET DE LA MINUTERIE
(pour régler la minuterie)
w Touche d’ARRET APRES UNE HEURE
e Touche d’AVANCE DU TEMPS
r Touche de RECUL DU TEMPS
t Touche de NETTOYAGE AUTOMATIQUE
(CLEAN)
y Touche de REGLAGE/ANNULATION DE LA
MINUTERIE (SET/C)
u Indique que le COMPARTIMENT DES PILES
est en dessous de cette marque
i Touche d’HORLOGE
o Touche VENTILATEUR (FAN)
p Touche SWING
AFFICHAGE A.C.L. DE
LA TELECOMMANDE
a SYMBOLE DE DEBIT D’AIR PROGRESSIF
s SYMBOLE DE NETTOYAGE AUTOMATIQUE
d SYMBOLE DU PLASMACLUSTER
f SYMBOLES DE MODE
: AUTO : SEC
: CHAUFFAGE : FRAIS
g REGLAGE DU THERMOSTAT POUR LES
MODES AUTO ET SEC
h VOYANT DE TEMPERATURE
j SYMBOLE DE TRANSMISSION
k SYMBOLE PLEIN REGIME
l SYMBOLES DE VITESSE DU
VENTILATEUR
: AUTO : BASSE
: HAUTE : FAIBLE
F-4
a
s
d
f
; INDICATEUR DE MARCHE DE LA
MINUTERIE/HORLOGE
Indique l’heure préréglée de mise en marche de
la minuterie ou l’heure courante.
31
INDICATEUR D’ARRET DE LA MINUTERIE
Indique l’heure préréglée d’arrêt de la minuterie
ou l’arrêt de la minuterie au bout d’une heure.
g
h
j
k
l
;
31
Page 29
MISE EN PLACE DU FILTRE PURIFICATEUR D’AIR
Les filtres purificateurs d’air sont emballés comme des accessoires à cet appareil.
Pendant le fonctionnement du climatiseur, le filtre élimine de l’air la poussière et la
fumée de cigarette et génère de l’air propre.
Retirer les filtres à air.
1
1 Ouvrir le panneau d’ouverture.
2 Pousser les filtres à air légèrement
vers le haut pour les déverrouiller.
3 Tirer les filtres à air vers le bas
1
2
3
Taquet de filtre
2
pour les démonter.
Placer le filtre purificateur d’air sous
les butées de filtre situées sur le filtre
à air.
FRANÇAIS
Filtre à air
Filtre purificateur d’air
Réinstaller les filtres à air.
3
1 Réinstaller les filtres à airs dans
leur position de départ.
3
2
1
2 Fermer le panneau d’ouverture.
3 Appuyer fermement sur la flèche
située sur le panneau pour le
verrouiller.
Précautions
• Les filtres sont emballés dans un sac en plastique scellé afin de préserver leur
capacité de collecte de la poussière.
Ne pas ouvrir le sac avant l’utilisation des filtres. (Sinon, la durée de vie des filtres
sera plus courte.)
• Ne pas exposer les filtres directement à la lumière du soleil. (Sinon, ils pourraient
se détériorer.)
F-5
Page 30
UTILISATION DE LA TELECOMMANDE
+
+
-
CHARGER LES BATTERIES Utiliser deux piles de format AAA (R03).
Retirer le couvercle de la télécom-
1
mande.
Insérer les piles dans le compar-
2
timent, en s’assurant que les polarités ± et — sont alignées correctement.
• L’affichage indique “AM 6:00”
lorsque les piles sont insérées
correctement.
Remettre le couvercle en place.
3
REMARQUES :
• La durée de service des piles est d’environ un an dans des conditions d’utilisation
normales.
• Lors du remplacement des piles, toujours remplacer les deux piles en même
temps, et s’assurer qu’elles sont du même type.
• Si la télécommande ne fonctionne pas correctement après le remplacement des
piles, sortir les piles et les remettre en place 30 secondes plus tard.
• Si l’appareil ne sera pas utilisé pendant une longue période, enlever les piles de la
télécommande.
Couvercle
de la télécommande
COMMENT UTILISER LA TELECOMMANDE
Pointer la télécommande vers la
fenêtre de réception du signal de
l’appareil et appuyer sur la touche
désirée. L’appareil émet un bip
lorsqu’il reçoit le signal.
• S’assurer qu’il n’y a pas de rideau ou d’autre
objet entre la télécommande et l’appareil.
• La télécommande peut envoyer des
signaux d’une distance de 7 mètres.
F-6
Page 31

ATTENTION
• Ne pas exposer la fenêtre de réception du signal aux rayons directs du soleil, étant donné
qu’ils peuvent gêner son fonctionnement. Si la fenêtre de réception du signal est exposée
aux rayons directs du soleil, tirer le rideau pour bloquer la lumière.
• Le fait d’utiliser une lampe fluorescente avec un démarreur rapide dans la même pièce
risque de créer des interférences avec la transmission du signal.
• L’appareil peut être affecté par les signaux transmis par la télécommande d’un téléviseur,
d’un magnétoscope ou d’un autre équipement utilisé dans la même pièce.
• Ne pas laisser la télécommande exposée aux rayons directs du soleil ou près d’un radiateur. Protéger également l’appareil et la télécommande contre l’humidité et les chocs
qui peuvent décolorer ou endommager l’appareil.
REGLER L’HEURE ACTUELLE DE L’HORLOGE
FRANÇAIS
Il y a deux modes d’horloge :
le mode 12 heures et le mode
24 heures.
MODE
FAN
SWING
1h
CLEAN
SET/C
2
3
1
Exemple : 5 heures de l’après-midi
Horloge Affichage
Mode 12 heures PM 5:00
Mode 24 heures 17:00
Pour régler le mode 12 heures, appuyer
1
une fois sur la touche d’HORLOGE dans
la première étape.
Pour régler le mode 24 heures, appuyer
deux fois sur la touche d’HORLOGE
durant la première étape.
Appuyer sur la touche d’AVANCE DU
2
TEMPS ou de RECUL DE TEMPS pour
régler l’heure courante.
• Maintenir la touche enfoncée pour avancer
ou reculer rapidement l’affichage de l’heure.
Appuyer sur la touche SET/C.
3
• Les deux points (:) clignotent pour indiquer
que l’horloge fonctionne.
REMARQUE :
• L’heure courante ne peut pas être réglée
lorsque la minuterie fonctionne.
F-7
Page 32

FONCTIONNEMENT DE BASE
Appuyer sur la touche MODE pour sélec-
1
tionner le mode de fonctionnement.
Appuyer sur la touche MARCHE/ARRET
2
pour commencer l’utilisation.
AUTO CHAUFFAGE FRAIS SEC
DISPLAY
MODE
FAN
SWING
1h
CLEAN
SET/C
2
5
3
1
4
• Le voyant rouge de MARCHE ( ) s’allume
sur l’appareil.
Appuyer sur la touche de THERMOSTAT
3
pour régler la température souhaitée.
• En modes AUTO et
SEC, la température
peut être changée par
pas de 1°C dans une
plage allant de 2°C de
plus ou 2°C de moins
que la température déterminée automatiquement par le climatiseur.
• En mode FRAIS et
CHAUFFAGE, la température peut être réglée
entre 18 et 32°C.
Appuyer sur la touche FAN pour régler la
4
vitesse désirée du ventilateur.
• En mode SEC, la vitesse du ventilateur est pré-
réglée sur AUTO et ne peut pas être modifiée.
AUTO FAIBLE BASSE HAUTE
(Exemple : 1°C de plus)
(Exemple : 2°C de moins)
C
C
Pour éteindre l’appareil, appuyer à nouveau
5
sur la touche MARCHE/ARRET.
• Le voyant rouge de MARCHE ( ) s’éteint sur
l’appareil.
Lors de l’emploi de votre climatiseur avec un système multiple
(AY-XPM18HR)
Avec un climatiseur multi-système, des unités intérieures multiples peuvent être connectées à
un appareil extérieur. Si le mode réglé diffère entre l’(es) unité(s) intérieure(s), alors l’(es) unité(s)
intérieure(s) mise(s) en marche plus tard risque(nt) de ne pas fonctionner.
• Si l’(es) unité(s) intérieure(s) est/sont en mode CHAUFFAGE, l’(es) unité(s) restante(s) ne peuvent
pas marcher en mode FRAIS ou SEC.
• Si l’(es) unité(s) intérieure(s) est/sont en mode FRAIS ou SEC, l’(es) unité(s) restante(s) ne
peuvent pas marcher en mode CHAUFFAGE.
Si le mode de(s) unité(s) intérieure(s) activée(s) plus tôt est/sont différents de celle(s) déjà en
marche, un long BIP sonore se fera entendre, puis le voyant de MARCHE et le voyant de la
MINUTERIE clignoteront simultanément. Ceci indique que l’(es) unité(s) mise(s) en marche en
dernier n’est/ne sont pas en marche. Dans ce cas, il est nécessaire de changer le mode pour le
même mode que celui dans lequel l’(es) autre(s) unité(s) d’intérieur opère(nt).
F-8
Page 33

CONSEILS A PROPOS DU MODE AUTO
(AY-XP18GR,AY-XP24GR)
En mode AUTO, les réglages de température et de mode sont sélectionnés
automatiquement en fonction de la température de la pièce et de la température
extérieure lorsque l’appareil est allumé.
Modes et réglages de température
281810034
Frais
(25°C)
(22°C)
29
21
Temp. int.
Chauffage
(24°C)
Frais
(24°C)
Chauffage
(23°C)
Les chiffres entre ( ) sont les réglages de température
Sec
Temp. de la pièce
( )
–2°C
Chauffage
• Pendant le fonctionnement, si la température extérieure varie, les réglages de
température glisseront automatiquement comme indiqué sur le tableau.
• Pendant les saisons où vous avez besoin de REFROIDISSEMENT pendant la journée
et de CHAUFFAGE pendant la nuit, ou si la température de la pièce devient beaucoup
plus élevée que la température réglée en raison de la présence d’un autre appareil
de chauffage, le mode commutera automatiquement entre CHAUD et FROID pour
conserver une température agréable dans la pièce. (INVERSION DE MODE)
Temp. ext.
Frais
(26°C)
FRANÇAIS
CONSEILS A PROPOS DU MODE AUTO
(AY-XPM18HR)
En mode AUTO, les réglages de température et de mode sont sélectionnés
automatiquement en fonction de la température de la pièce et de la température
extérieure lorsque l’appareil est allumé.
Modes et réglages de température
281810034
Frais
(25°C)
26
Temp. int.
Chauffage
(24°C)
Frais
(24°C)
Chauffage
Chauffage
(23°C)
(22°C)
Les chiffres entre ( ) sont les réglages de température
Sec
Temp. de la pièce
( )
–2°C
• Pendant le fonctionnement, si la température extérieure varie, les réglages de
température glisseront automatiquement comme indiqué sur le tableau.
• Le mode de l’unité activée en premier aura la priorité sur l’(es) autre(s) unité(s)
sans référence au tableau.
Temp. ext.
Frais
(26°C)
F-9
Page 34

REGLAGE DE LA DIRECTION DU DEBIT D’AIR
DIRECTION VERTICALE DU DEBIT D’AIR
Appuyer une fois sur la touche SWING de
1
la télécommande.
MODE
FAN
SWING
CLEAN
1h
1
SET/C
2
• Le volet de réglage vertical d’aération change
continuellement d’angle.
Appuyer à nouveau sur la touche SWING
2
lorsque volet de réglage vertical est à la
position désirée.
• Le volet d’aération arrête de se déplacer dans
l’intervalle indiqué sur le schéma.
• La position ajustée sera mémorisée et réglée
automatiquement à la même position lors de
l’utilisation suivante.
Intervalle de réglage
Modes FRAIS et SEC
Mode CHAUFFAGE
DIRECTION HORIZONTALE DU DEBIT D’AIR
Tenir le volet de réglage horizontal de l’aération comme indiqué
sur le schéma et ajuster la direction du débit d’air.
ATTENTION
Ne jamais essayer d’ajuster le volet d’aération à réglage vertical manuellement.
• Un réglage manuel du volet d’aération à réglage vertical peut provoquer un mauvais
fonctionnement de l’appareil lorsque la télécommande est utilisée pour le réglage.
• Lorsque le volet d’aération à réglage vertical est positionné à la position la plus basse en
mode FRAIS ou en mode SEC pendant une période prolongée, de la condensation risque
de se former.
Ne pas placer le volet d’aération à réglage horizontal en position extrême de gauche ou de
droite en mode FRAIS lorsque la vitesse du ventilateur est placée sur “FAIBLE (
pendant une longue durée.
De la condensation risque de se former sur les volets d’aération.
)”
F-10
Page 35

DEBIT D’AIR PROGRESSIF
Appuyer sur la touche de DEBIT D’AIR PROGRESSIF pendant le refroidissement ou le
mode sec lorsque l’on ne veut pas sentir d’air froid. Le volet de réglage vertical est
tourné de manière oblique vers le haut pour envoyer l’air frais vers le plafond.
Appuyer sur la touche pendant l’opération de chauffage. Le volet de réglage vertical est
dirigé vers le bas afin d’envoyer l’air chaud directement sur vous pour qu’il vous
réchauffe.
Pendant le fonctionnement, appuyer sur la touche
1
de DEBIT D’AIR PROGRESSIF.
• La télécommande affiche “ ”.
AM
POUR ANNULER
Appuyer sur la touche de DEBIT D’AIR PROGRESSIF.
REMARQUES :
DISPLAY
• Le paramétrage DEBIT D’AIR PROGRESSIF est annulé
1
lorsque l’on appuie sur la touche PLEIN REGIME alors
que le DEBIT D’AIR PROGRESSIF est activé.
• Si l’on veut un DEBIT D’AIR PROGRESSIF en mode
PLEIN REGIME, appuyer sur la touche de DEBIT D’AIR
PROGRESSIF pendant le fonctionnement à PLEIN
REGIME.
FONCTIONNEMENT A PLEIN REGIME
Dans ce mode de fonctionnement, le climatiseur fonctionne à plein régime pour
rafraîchir ou réchauffer l’atmosphère de la pièce si rapidement que vous pouvez
vous contenter de le mettre en marche juste au moment où vous rentrez chez vous.
Pour activer le fonctionnement en PLEIN REGIME,
1
appuyer sur la touche PLEIN REGIME pendant le
fonctionnement.
• La télécommande affiche “ ”.
AM
• L’affichage de température s’éteint.
• Le voyant vert de PLEIN REGIME ( ) de l’appareil
s’allumera.
FRANÇAIS
POUR ANNULER
Appuyer à nouveau sur la touche PLEIN REGIME.
DISPLAY
• Le fonctionnement en PLEIN REGIME est également
1
annulé lorsque le mode de fonctionnement est modifié
ou quand l’appareil est éteint.
• Le voyant vert PLEIN REGIME ( ) sur l’appareil
s’éteindra.
REMARQUE :
• Pendant le fonctionnement à PLEIN REGIME, vous ne pouvez pas régler la température ni
la vitesse du ventilateur.
F-11
Page 36

FONCTIONNEMENT DU PLASMACLUSTER
L’ionisateur Plasmacluster à l’intérieur du climatiseur va délivrer des ions dans la pièce.
Une même quantité d’ions négatifs et positifs permettent de réduire la quantité de
champignons de moisissure formés dans l’air.
Pendant le fonctionnement, appuyer sur la
1
touche PLASMACLUSTER.
• La télécommande affiche “ ”.
• Le voyant bleu de PLASMACLUSTER s’allume
sur l’appareil.
POUR ANNULER
Appuyer à nouveau sur la touche PLASMA-
1
DISPLAY
REMARQUES :
• Le réglage du fonctionnement du PLASMACLUSTER sera mémorisé et fonctionnera dans le
même mode, à la prochaine activation du climatiseur.
• Pour éteindre le voyant de PLASMACLUSTER, appuyer sur la touche DISPLAY.
Pour faire fonctionner le PLASMACLUSTER sans mode chauffage, frais ou
sec, appuyer sur le bouton de PLASMACLUSTER pendant que l’appareil ne
fonctionne pas.
• Le symbole de mode sur la télécommande disparaîtra et la vitesse du ventilateur ne pourra
pas être réglée sur AUTO.
CLUSTER.
• Le voyant de PLASMACLUSTER situé sur
l’appareil s’éteindra.
F-12
Page 37

OPERATION DE NETTOYAGE AUTOMATIQUE
La fonction de NETTOYAGE AUTOMATIQUE permet de réduire la prolifération des moisissures
dans l’air, et de sécher l’intérieur du climatiseur grâce aux ions Plasmacluster. Cette opération
est accompagnée du mode VENTILATEUR ou CHAUFFAGE. Utiliser cette opération à chaque
changement de saison.
Les champignons de moisissure déjà présents ne peuvent pas être éliminés par cette opération.
Appuyer sur la touche CLEAN lorsque l’appareil n’est
1
pas en marche.
• La télécommande affiche “ ”.
• Le voyant rouge de MARCHE ( ), le voyant vert de
NETTOYAGE AUTOMATIQUE (
PLASMACLUSTER s’allumeront sur l’appareil.
• L’appareil s’arrêtera de fonctionner au bout de quarante
minutes.
POUR ANNULER
) et le voyant bleu de
FRANÇAIS
MODE
FAN
1h
CLEAN
REMARQUE :
• Pendant l’opération de NETTOYAGE AUTOMATIQUE vous ne pouvez pas régler la température,
la vitesse du ventilateur, la direction du débit d’air et la minuterie.
Appuyer sur la touche CLEAN.
Enfin appuyer à nouveau sur la touche MARCHE/
1
ARRET pour éteindre l’appareil.
• Le voyant rouge de MARCHE ( ), le voyant vert de
NETTOYAGE AUTOMATIQUE ( ) et le voyant bleu de
PLASMACLUSTER s’éteindront sur l’appareil.
ARRET APRES UNE HEURE
Lorsque la minuterie d’ARRET APRES UNE HEURE est activée, l’appareil s’arrête de
fonctionner après une heure.
Appuyer sur la touche d’ARRET APRES UNE HEURE.
1
• La télécommande affiche “ ”.
•
Le voyant orange de MINUTERIE ( ) s’allume sur l’appareil.
• L’appareil s’arrête après une heure.
POUR ANNULER
Appuyer sur la touche d’ANNULATION DE LA MINUTERIE (SET/C).
• Le voyant lumineux orange de MINUTERIE ( )
MODE
1h
CLEAN
1
REMARQUES :
• Le fonctionnement de la minuterie d’ARRET APRES UNE HEURE a la priorité sur les
fonctionnements MARCHE DE LA MINUTERIE et ARRET DE LA MINUTERIE.
• Lorsque la minuterie d’ARRET APRES UNE HEURE est réglée pendant que l’appareil ne
fonctionne pas, l’appareil fonctionne pendant une heure avec la condition réglée précédemment.
•
Si l’on veut utiliser l’appareil une autre heure avant que la minuterie d’ARRET APRES UNE HEURE
soit activée, appuyer à nouveau sur la touche d’ARRET APRES UNE HEURE pendant l’utilisation.
• Si MARCHE DE LA MINUTERIE et/ou ARRET DE LA MINUTERIE sont réglés, la touche
d’ANNULATION DE LA MINUTERIE annule chaque réglage.
s’éteint sur l’appareil.
Enfin appuyer à nouveau sur la touche MARCHE/
ARRET pour éteindre l’appareil.
• Le voyant lumineux rouge de MARCHE( ) et le voyant
lumineux orange de MINUTERIE ( ) s’éteignent sur
l’appareil.
F-13
Page 38

FONCTIONNEMENT DE LA MINUTERIE
REMARQUE :
Avant de régler la minuterie, s’assurer que l’horloge est réglée correctement à l’heure courante.
MINUTERIE DESACTIVEE
Appuyer sur la touche d’ARRET DE LA MINU-
1
DISPLAY
MODE
FAN
SWING
1h
CLEAN
SET/C
1
2
3
TERIE (
Le voyant ARRET DE LA MINUTERIE commence
2
à clignoter ; appuyer sur la touche d’AVANCE DU
TEMPS ou de RECUL DE TEMPS pour régler
l’heure courante. (L’heure peut être réglée par
incréments de 10 minutes.)
Pointer la télécommande sur la fenêtre de
3
réception du signal de l’appareil et appuyer sur
la touche de REGLAGE DE LA MINUTERIE
(SET/C).
• Le voyant orange de MINUTERIE ( ) s’allume
sur l’appareil.
• L’appareil émet un bip lorsqu’il reçoit le signal.
).
CONSEILS A PROPOS DE L’ARRET
DE LA MINUTERIE
Lorsque le mode ARRET DE LA MINUTERIE est activé, la température est automatiquement réglée afin d’éviter que la
pièce ne soit ni trop chaude, ni trop froide
lors de votre sommeil. (Fonction de veille
automatique)
MODE FRAIS/SEC :
• Une heure après le début du fonctionnement,
la température augmente de 1° C plus haut
que le réglage original du thermostat.
MODE DE CHAUFFAGE :
• Une heure après le début du fonctionnement,
la température chute de 3° C plus bas que le
réglage original du thermostat.
POUR ANNULER LE MODE MINUTERIE
Appuyer sur la touche d’ANNULATION DE
LA MINUTERIE (SET/C).
•
Le voyant lumineux
orange de MINUTERIE
( ) s’éteint sur
l’appareil.
• L’heure d’horloge courante sera affichée sur
la télécommande.
MODE
FAN
SWING
1h
CLEAN
REMARQUE :
Si MARCHE DE LA MINUTERIE, ARRET DE LA
MINUTERIE ou ARRET APRES UNE HEURE est
réglé, la touche d’ANNULATION DE LA MINUTERIE
annule tous les réglages.
POUR MODIFIER LE REGLAGE D’HEURE
Annuler d’abord le réglage MINUTERIE, puis
le régler à nouveau.
F-14
SET/C
Page 39

MARCHE DE LA MINUTERIE
Appuyer sur la touche de MARCHE DE LA
1
MINUTERIE (
Le voyant MARCHE DE LA MINUTERIE com-
2
mence à clignoter ; appuyer sur la touche
d’AVANCE DU TEMPS ou de RECUL DE
TEMPS pour régler l’heure courante. (L’heure
peut être réglée par incréments de 10 minutes.)
Pointer la télécommande sur la fenêtre de
3
réception du signal de l’appareil et appuyer sur
DISPLAY
MODE
FAN
SWING
1h
CLEAN
SET/C
1
2
3
la touche de REGLAGE DE LA MINUTERIE
(SET/C).
• Le voyant orange de MINUTERIE ( ) s’allume sur
l’appareil.
• L’appareil émet un bip lorsqu’il reçoit le signal.
Sélectionner la condition de fonctionnement.
4
REMARQUE :
L’appareil s’allume avant l’heure réglée afin de permettre
à la pièce d’atteindre la température désirée à l’heure
programmée. (Fonction de réveil)
).
FRANÇAIS
UTILISATION COMBINEE DES MINUTERIES MARCHE/ARRET
On peut utiliser les minuteries MARCHE et ARRET combinées.
Exemple :
Si l’on veut arrêter le fonctionnement à 11:00 p.m. et le
reprendre plus tard (avec les mêmes réglages de mode
et de température) pour amener la température
ambiante au niveau désiré vers 7:00 a.m.
Régler ARRET DE LA MINUTERIE à 11:00 p.m.
1
pendant le fonctionnement.
Régler MARCHE DE LA MINUTERIE à 7:00 a.m.
2
La flèche (
MINUTERIE et le voyant ARRET DE LA MINUTERIE
montre quelle minuterie sera activée en premier.
ou ) entre le voyant MARCHE DE LA
REMARQUES :
• On ne peut pas programmer les minuteries MISE EN MARCHE et ARRET pour faire fonctionner
l’appareil à différentes températures ou d’autres réglages.
• Chaque minuterie peut être programmée pour être activée avant l’autre.
F-15
Page 40

MODE AUXILIAIRE
MODE AUXILIAIRE
Utiliser ce mode si la télécommande n’est pas disponible.
POUR ALLUMER
Soulever le panneau ouvert de l’unité intérieure et appuyer
sur la touche AUX. du panneau de commande.
• Le voyant rouge de MARCHE ( ) s’allume sur l’appareil et
l’appareil commence à fonctionner en mode AUTO.
• La vitesse du ventilateur et le réglage de température sont en
position AUTO.
POUR ETEINDRE
Appuyer à nouveau sur la touche AUX. du panneau de
commande.
• Le voyant rouge de MARCHE ( ) s’éteint sur l’appareil.
REMARQUE :
Si la touche AUX. est enfoncée pendant le fonctionnement normal, l’appareil s’éteint.
ENTRETIEN
S’assurer de débrancher le cordon d’alimentation de la prise murale ou couper le disjoncteur avant d’effectuer les travaux d’entretien.
NETTOYAGE DES FILTRES
1
2
1
2
3
3
4
3
5
6
2
1
Les filtres à air doivent être nettoyés
toutes les deux semaines.
ETEINDRE L’APPAREIL
ENLEVER LES FILTRES
1
Soulever le panneau d’ouverture.
Pousser les filtres à air légèrement vers le
2
haut pour les déverrouiller.
3 Tirer les filtres à air vers le bas pour les
retirer.
RETIRER LES FILTRES PURIFICATEURS
D’AIR DES FILTRES A AIR
NETTOYER LES FILTRES
Utiliser un aspirateur pour éliminer la poussière.
Si les filtres sont encrassés, les laver avec de
l’eau chaude et un détergent doux. Sécher les
filtres à l’ombre avant de les remettre en place.
REINSTALLER LES FILTRES
PURIFICATEURS D’AIR
REINSTALLER LES FILTRES
1 Réinstaller les filtres dans leurs positions
d’origine.
2
Fermer le panneau avant.
Appuyer fermement sur la flèche située sur le
3
panneau pour le verrouiller.
F-16
Page 41

ENTRETIEN
NETTOYER L’APPAREIL ET LA TELECOMMANDE
• Essuyer avec un chiffon doux.
• Ne pas éclabousser avec de l’eau ou verser de l’eau dessus. Cela peut provoquer
une électrocution ou endommager l’appareil.
• Ne pas utiliser de l’eau chaude, un diluant, des poudres abrasives ou des solvants forts.
ENTRETIEN APRES LA
SAISON DE CLIMATISATION
Faire fonctionner l’appareil en mode
1
de NETTOYAGE AUTOMATIQUE
pour permettre au mécanisme
d’être séché complètement.
Arrêter le fonctionnement et débran-
2
cher l’appareil. Couper le disjoncteur, si on en a un exclusivement
pour le climatiseur.
Nettoyer les filtres, puis les réinstaller.
3
ENTRETIEN AVANT LA
SAISON DE CLIMATISATION
S’assurer que les filtres à air ne
1
sont pas encrassés.
S’assurer qu’aucun objet ne bloque
2
l’entrée ou la sortie d’air.
Vérifier périodiquement l’usure du
3
rack de montage extérieur afin de
s’assurer qu’il est fermement mis
en place.
CHANGEMENT DES FILTRES PURIFICATEURS D’AIR
Les filtres doivent être changés tous les 3 à 6 mois
RETIRER LES FILTRES A AIR
Taquet de filtre
Filtre à air
Filtre purificateur d’air
1
CHANGER LES FILTRES
2
PURIFICATEURS D’AIR
1 Retirer les vieux filtres des filtres à air.
2 Placer les nouveaux filtres purificateurs
d’air, sous les butées de filtre situées sur
les filtres à air.
Réinstaller les filtres à air.
3
FRANÇAIS
REMARQUE :
• Les filtres de purification de l’air sale ne peuvent pas être lavés pour être réutilisés.
Les nouveaux filtres sont disponibles chez votre distributeur le plus proche.
Filtre de rechange : Type AZ-F1800C
Mise au rebut des filtres
Veuillez toujours suivre les lois et réglementations en vigueur lors de la mise au rebut des
filtres.
Matériaux de composition du filtre purificateur d’air :
• Filtre : Polypropylène
• Cadre : Polyester
F-17
Page 42

AUTRES REMARQUES SUR LE FONCTIONNEMENT
PLAGE DE TEMPERATURES DE SERVICE
TEMP. INT. TEMP. EXT.
REFROIDISSEMENT
CHAUFFAGE
limite supérieure
limite inférieure
limite supérieure
limite inférieure
32°C
21°C
27°C 24°C
- –15°C
46°C (AY-XP18GR,AY-XP24GR)
43°C (AY-XPM18HR)
–10°C (AY-XP18GR)
21°C (AY-XP24GR,AY-XPM18HR)
• Le dispositif de protection
intégré peut empêcher
cette unité de fonctionner
quand celle-ci est utilisée
hors de cette plage.
• De la condensation peut se
former sur la sortie d’air si
cette unité fonctionne
continuellement en mode
FRAIS ou SEC et que
l’humidité dépasse les 80
pour-cent.
EN CAS DE PANNE DE COURANT
Ce climatiseur est équipé d’une fonction de mémoire pour mémoriser les réglages en cas d’une
panne de courant.
Lorsque le courant est rétabli, l’appareil redémarrera automatiquement avec les mêmes réglages qui
étaient actifs avant la panne de courant, excepté les réglages de la minuterie.
Si les minuteries ont été réglées avant une panne de courant, elles devront être réglées à nouveau
lorsque le courant est rétabli.
FONCTION DE PRECHAUFFAGE
En mode CHAUFFAGE, le ventilateur intérieur peut ne pas démarrer pendant deux à cinq minutes
après l’allumage de l’appareil pour éviter que de l’air froid soit soufflé de l’appareil.
FONCTION DE DEGIVRAGE
• Lorsque de la glace se forme sur l’échangeur de chaleur dans l’unité extérieure en mode
CHAUFFAGE, un dégivreur automatique fournit la chaleur pendant environ 5 à 10 minutes pour
éliminer la glace. Pendant le dégivrage, les ventilateurs intérieur et extérieur s’arrêtent de fonctionner.
• Après le dégivrage, l’appareil reprend automatiquement le fonctionnement en mode CHAUFFAGE.
RENDEMENT DE CHAUFFE
• L’appareil utilise une pompe à chaleur qui aspire la chaleur de l’air extérieur et la libère dans la
pièce. La température extérieure de l’air affecte ainsi considérablement le rendement de chauffe.
• Si le rendement de chauffe est réduit à cause de températures extérieures basses, utiliser un
chauffage d’appoint.
• Il faut du temps pour préchauffer et chauffer toute la pièce, à cause du système de circulation d’air forcée.
CONSEILS SUR LES ECONOMIES D’ENERGIE
Quelques méthodes simples sont décrites ci-dessous pour économiser de l’énergie
lorsque le climatiseur est utilisé.
REGLER LA TEMPERATURE APPROPRIEE
• Le fait de régler le thermostat à une température de 1°C supérieure à celle de la température
souhaitée en mode FRAIS et de 2°C inférieure en mode CHAUFFAGE permet une économie
d’environ 10 pour-cent de sa consommation électrique.
• Le fait de régler la température à un niveau inférieur que nécessaire pendant la climatisation
augmente la consommation électrique.
BLOQUER LES RAYONS DIRECTS DU SOLEIL ET EVITER LES COURANTS D’AIR
• Le fait de bloquer les rayons directs du soleil pendant la climatisation réduira la consommation
électrique.
• Fermer les fenêtres et les portes pendant les opérations de refroidissement et de chauffage.
REGLER LA DIRECTION APPROPRIEE DU DEBIT D’AIR POUR OBTENIR LA
MEILLEURE CIRCULATION D’AIR
MAINTENIR LE FILTRE PROPRE AFIN D’ASSURER UN FONCTIONNEMENT OPTIMAL
OPTIMISER L’UTILISATION DE LA FONCTION DE MINUTERIE D’ARRET
DEBRANCHER LE CORDON D’ALIMENTATION LORSQUE L’APPAREIL N’EST
PAS UTILISE PENDANT UNE PERIODE PROLONGEE
• L’unité intérieure continue à consommer une faible quantité d’électricité lorsqu’elle ne fonctionne pas.
F-18
Page 43

AVANT D’APPELER LE SERVICE APRES-VENTE
Les conditions suivantes ne signifient pas un mauvais fonctionnement de l’appareil.
L’APPAREIL NE FONCTIONNE PAS
L’appareil ne fonctionne pas s’il est allumé
immédiatement après sa mise hors circuit.
L’appareil ne fonctionne pas immédiatement après
le changement de mode. Cela sert à protéger le
mécanisme interne. Attendre 3 minutes avant de
faire fonctionner l’appareil.
L’APPAREIL N’ENVOIE PAS D’AIR CHAUD
L’appareil est en cours de préchauffage ou de
dégivrage.
ODEURS
Des odeurs de moquette et de meubles qui entrent
dans l’appareil et des odeurs des composants
internes du climatiseur au début de l’installation
peuvent être dégagées de l’appareil.
BRUIT DE CRAQUEMENT
L’appareil risque de produire un bruit de craquement.
Ce son est généré par la friction du panneau avant
et par la dilatation ou la connexion des autres
composants suite à une variation de température.
UN FAIBLE BOURDONNEMENT EST EMIS
Ce son se fait entendre lorsque l’appareil génère
des groupes d’ions plasma.
LEGER BRUISSEMENT
Le bruit de bruissement doux est produit par le
réfrigérant circulant à l’intérieur de l’appareil.
VAPEUR D’EAU
•
Dans les modes FRAIS et SEC, de la vapeur d’eau
peut parfois être constatée à la bouche de sortie
d’air en raison de la différence entre la température
ambiante et celle de l’air dégagé par l’appareil.
•
En mode CHAUFFAGE, de la vapeur d’eau risque de s’échapper de l’unité extérieure pendant
le dégivrage.
L’UNITE EXTERIEURE NE S’ARRETE
PAS
Après l’arrêt du fonctionnement, l’unité extérieure
fait tourner le ventilateur pendant environ une
minute pour refroidir l’appareil.
ODEUR EMISE PAR LA SORTIE
D’AIR DU PLASMACLUSTER
Cette odeur est celle de l’ozone généré par le
générateur d’ions plasma. La densité d’ozone
est très faible et n’affectera pas votre santé.
L’ozone dispersée dans l’air se décomposera
rapidement et sa densité dans la pièce
n’augmentera pas.
FRANÇAIS
(AY-XPM18HR uniquement )
L’UNITE INTERIEURE CHAUFFE
MEME LORSQU’ELLE N’EST PAS
EN MARCHE
Ceci est dû au fait que le réfrigérant coule
également dans les tuyaux de l’unité intérieure au
repos lorsque l’autre unité fonctionne en mode
CHAUFFAGE.
L’UNITE INTERIEURE CHAUFFE
MEME LORSQU’ELLE N’EST PAS
EN COURS DE CHAUFFAGE
Lorsqu’on appuie sur la touche PLASMACLUSTER
alors que l’appareil ne fonctionne pas, le fonctionnement de PLASMACLUSTER démarrera sans le
mode de climatisation de l’air (c-à-d CHAUFFAGE
ou REFROIDISSEMENT). Vous pourrez sentir à
ce moment l’air chaud émis de la bouche de sortie
d’air si le CHAUFFAGE est effectué avec des appareils dans d’autres pièces. Le ventilateur intérieur
réduira sa vitesse de rotation et se mettra en position marche et arrêt en fonction de la température
de la pièce.
L’APPAREIL NE FONCTIONNE PAS
DANS LE MODE DESIRE
• Si une unité intérieure est en mode FRAIS ou
SEC, vous ne pouvez pas faire fonctionner
l’autre unité en mode CHAUFFAGE. (Après
quelques secondes, un long BIP sonore se fera
entendre, puis le voyant de MARCHE ainsi que
le voyant de la MINUTERIE clignoteront
simultanément.)
• Lorsqu’une unité intérieure fonctionne en mode
CHAUFFAGE, vous ne pouvez pas faire
fonctionner l’autre unité en mode FRAIS ou
SEC. (Après quelques secondes, un long BIP
sonore se fera entendre, puis le voyant de
MARCHE ainsi que le voyant de la MINUTERIE
clignoteront simultanément.)
L’APPAREIL N’EXPULSE PAS L’AIR
(Fonctionnement de PLASMACLUSTER sans être accompagné du mode
de climatisation, opération de
NETTOYAGE AUTOMATIQUE)
L’(es) autre(s) unité(s) est/sont en cours de
dégivrage.
F-19
Page 44

AVANT D’APPELER LE SERVICE APRES-VENTE
Si l’appareil semble mal fonctionner, vérifier les points suivants avant de faire appel
au service après-vente.
SI L’APPAREIL NE FONCTIONNE PAS
Vérifier si le disjoncteur a été déclenché ou si le fusible est grillé.
SI L’APPAREIL NE REFROIDIT PAS (OU NE CHAUFFE PAS) LA PIECE CORRECTEMENT
Vérifier les filtres. S’ils sont encrassés, les nettoyer.
S’assurer que les fenêtres et les
portes sont bien fermées.
Vérifier l’unité extérieure pour
s’assurer que rien ne bloque l’entrée
ou la sortie d’air.
La présence d’un grand nombre de
personnes dans la pièce peut
empêcher que l’appareil atteigne la
température désirée.
Vérifier si le thermostat est réglé
correctement.
Vérifier si des appareils qui génèrent de la chaleur fonctionnent
dans la pièce.
SI L’APPAREIL N’ARRIVE PAS A RECEVOIR LE SIGNAL DE TELECOMMANDE
Vérifier que les piles de la télécommande ne sont pas usagées
ou faibles.
Essayer d’envoyer à nouveau le signal avec la télécommande pointée
correctement vers la fenêtre de
réception du signal de l’appareil.
Veuillez contacter un centre d’entretien lorsque le voyant de MARCHE, le voyant de MINUTERIE ou
le voyant de PLASMACLUSTER clignote sur le panneau indicateur.
Vérifier si les piles de la télécommande sont mises en place
et si elles sont alignées correctement selon leur polarité.
F-20
Page 45

Page 46

Atención: su producto está
marcado con este símbolo.
Significa que los productos
eléctricos y electrónicos
usados no deberían
mezclarse con los residuos
domésticos generales.
Existe un sistema de
recogida independiente
para estos productos.
A. Información sobre eliminación para usuarios particulares
1. En la Unión Europea
Atención: si quiere desechar este equipo, ¡por favor no utilice el cubo de la basura
habitual!
Los equipos eléctricos y electrónicos usados deberían tratarse por separado de
acuerdo con la legislación que requiere un tratamiento, una recuperación y un
reciclaje adecuados de los equipos eléctricos y electrónicos usados.
Tras la puesta en práctica por parte de los estados miembros, los hogares de
particulares dentro de los estados de la Unión Europea pueden devolver sus equipos
eléctricos y electrónicos a los centros de recogida designados sin coste alguno *.
En algunos países* es posible que también su vendedor local se lleve su viejo producto sin
coste alguno si Ud. compra uno nuevo similar.
*) Por favor, póngase en contacto con su autoridad local para obtener más detalles.
Si sus equipos eléctricos o electrónicos usados tienen pilas o acumuladores, por favor
deséchelos por separado con antelación según los requisitos locales.
Al desechar este producto correctamente, ayudará a asegurar que los residuos
reciban el tratamiento, la recuperación y el reciclaje necesarios, previniendo de esta
forma posibles efectos negativos en el medio ambiente y la salud humana que de otra
forma podrían producirse debido a una manipulación de residuos inapropiada.
2. En otros países fuera de la Unión Europea
Si desea desechar este producto, por favor póngase en contacto con las autoridades
locales y pregunte por el método de eliminación correcto.
Para Suiza: Los equipos eléctricos o electrónicos pueden devolverse al vendedor sin
coste alguno, incluso si no compra ningún nuevo producto. Se puede encontrar una
lista de otros centros de recogida en la página principal de
www.swico.ch o
www.sens.ch.
B
. Información sobre Eliminación para empresas usuarias
1. En la Unión Europea
Si el producto se utiliza en una empresa y quiere desecharlo:
Por favor póngase en contacto con su distribuidor SHARP, quien le informará sobre la
recogida del producto. Puede ser que le cobren los costes de recogida y reciclaje.
Puede ser que los productos de tamaño pequeño (y las cantidades pequeñas) sean
recogidos por sus centros de recogida locales.
Para España: por favor, póngase en contacto con el sistema de recogida establecido
o con las autoridades locales para la recogida de los productos usados.
2. En otros países fuera de la Unión Europea
Si desea desechar este producto, por favor póngase en contacto con sus autoridades
locales y pregunte por el método de eliminación correcto.
ES
Page 47

ESPAÑOL
Gracias por la compra de este acondicionador de aire SHARP. Antes de usar el producto
lea el manual detenidamente.
ÍNDICE
• INSTRUCCIONES IMPORTANTES
DE SEGURIDAD ............................................... S-1
• DESIGNACIÓN DE LAS PIEZAS ....................... S-3
• CONFIGURACIÓN DEL FILTRO
PURIFICADOR DE AIRE ................................... S-5
• USO DEL MANDO A DISTANCIA ...................... S-6
• FUNCIONAMIENTO BÁSICO ............................ S-8
• REGLAJE DE LA DIRECCIÓN DE
LA CORRIENTE DE AIRE ................................. S-10
• CORRIENTE DE AIRE PROGRESIVA .............. S-11
•
FUNCIONAMIENTO A CAPACIDAD MÁXIMA ....
FUNCIONAMIENTO DEL PLASMACLUSTER ....
•
• FUNCIÓN DE LIMPIEZA AUTOMÁTICA ............ S-13
S-11
S-12
• FUNCIÓN DE DESACTIVACIÓN POR
TEMPORIZADOR DE UNA HORA .................... S-13
• FUNCIONAMIENTO CON EL
TEMPORIZADOR ............................................. S-14
• MODO AUXILIAR .............................................. S-16
• MANTENIMIENTO ............................................ S-16
• OBSERVACIONES ADICIONALES SOBRE
EL FUNCIONAMIENTO .................................... S-18
• ALGUNOS CONSEJOS PARA AHORRAR
ENERGÍA ......................................................... S-18
• ANTES DE LLAMAR AL DEPARTAMENTO
DE SERVICIO TÉCNICO .................................. S-19
INSTRUCCIONES IMPORTANTES DE SEGURIDAD
ADVERTENCIAS PARA EL USO
No deforme o tire del cable de alimentación. Estirar y mal utilizar el cable de suministro
1
de alimentación puede ocasionar daños o descargas eléctricas.
Tenga cuidado de no exponer su cuerpo directamente a la salida de aire durante un largo
2
tiempo. Esto puede afectar a su condición física.
Al usar el acondicionador de aire para recién nacidos, niños, ancianos, personas
3
postradas en cama o inválidas, asegúrese de que la temperatura de la habitación sea
la adecuada para ellos.
ESPAÑOL
Nunca inserte objetos dentro de la unidad. El insertar objetos puede causar heridas
4
debido a la rotación a alta velocidad de los ventiladores internos.
Conecte a tierra el acondicionador de aire sin falta. No conecte el cableado a tierra con
5
la tubería de gas, tubería de agua, barra pararrayos o cable a tierra del teléfono. Una
conexión incompleta a tierra puede causar descargas eléctricas.
Si sucede algo anormal con el acondicionador de aire (por ej. se detecta un olor a
6
quemado), detenga inmediatamente la operación y desactive el cortacircuitos.
El aparato se debe instalar de acuerdo con las regulaciones nacionales de cableado. La
7
inapropiada conexión del cable puede ocasionar un sobrecalentamiento del cable de
suministro de alimentación, del enchufe y del tomacorriente, y causar un incendio.
Si el cable de alimentación está dañado, éste deberá ser reemplazado por el fabricante,
8
por un técnico de servicio autorizado o por una persona similarmente cualificada, para
evitar situaciones peligrosas. Utilice para reemplazo sólo el cable de alimentación
especificado por el fabricante.
ADVERTENCIAS PARA LA INSTALACIÓN/DESMONTAJE/
REPARACIÓN
• No trate de instalar/desmontar/reparar la unidad por su propia cuenta. La elaboración de un
trabajo incorrecto ocasionará descargas eléctricas, fugas de agua, incendios, etc. Consulte
a su distribuidor o a personal de servicio cualificado para que realice la instalación/
desinstalación/reparación de la unidad.
S-1
Page 48

INSTRUCCIONES IMPORTANTES DE SEGURIDAD
PRECAUCIONES PARA EL USO
Abrir periódicamente una ventana o una puerta para ventilar la habitación, sobre todo si
1
se usan aparatos que funcionan con gas. Una ventilación insuficiente puede causar
escasez de oxigeno.
No opere los botones con las manos mojadas. Esto puede causar descargas eléctricas.
2
Por seguridad, desconece el cortacircuito cuando no esté utilizando la unidad por un
3
período de tiempo prolongado.
Verifique periódicamente la rejilla de montaje de la unidad exterior para saber si hay
4
desgaste y para cerciorarse de que está asegurada en su lugar.
No coloque nada en la unidad exterior ni se ponga encima. El objeto o la persona puede
5
caerse, causando lesiones.
Esta unidad está diseñada para uso doméstico. No la utilice para otras aplicaciones tales
6
como perreras donde se crían animales o invernaderos.
No coloque vasijas con agua sobre la unidad. Si el agua penetra dentro de la unidad, los
7
aislamientos eléctricos pueden deteriorarse y causar descargas eléctricas.
No bloquee las entradas ni las salidas de aire de la unidad. Esto puede ocasionar
8
funcionamiento insuficiente o problemas.
Asegúrese de detener la operacióon y desconectar el cortacircuito antes de llevar a cabo
9
cualquier mantenimiento o limpieza. Existe un ventilador rotando en el interior de la
unidad y usted podría resultar herido.
No rocíe o derrame agua directamente sobre la unidad. El agua puede causar descargas
10
eléctricas o daños al equipo.
Este aparato no está diseñado para el uso sin supervisión por parte de niños o personas
11
enfermas.
Los niños deben ser supervisados para asegurarse de que no jueguen con el aparato.
Este aparato no es apto para uso en la región nórdica.
12
PRECAUCIONES PARA UBICACIÓN/INSTALACIÓN
• Asegúrese de conectar el acondicionador de aire a la fuente de alimentación de la tensión
y la frecuencia correcta.
La utilización de una fuente de alimentación con un voltaje y frecuencias inadecuados
puede ocasionar daños en el equipo e incluso causar un incendio.
• No instale el aparato en lugares donde puede haber fuga de gases. Esto puede causar
incendios.
Instale el aparato en un lugar poco polvo, vapores y humedad.
• Coloque la manguera de drenaje de tal forma que se asegure un drenaje fluido. Un drenaje
insuficiente puede causar humedecimiento de la habitación, muebles etc.
• Asegúrese de que se ha instalado un interruptor automático de perdidas o un cortacircuito,
dependiendo de la ubicación de la instalación, para evitar descargas eléctricas.
S-2
Page 49

DESIGNACIÓN DE LAS PIEZAS
UNIDAD INTERIOR
1
2
3
4
5
6
7
8
9
0
q
w
e
r
t
y
u
1 Filtros purificadores de aire
2 Entrada de aire
3 Panel de apertura
4 Tecla AUX.
5 Filtros de aire
6 Célula receptora
7 Cable de la fuente de
alimentación
(sólo para el modelo AY-XP18GR)
8 Indicador
9
Deflectores de ajuste vertical
0
Deflectores de ajuste horizontal
q Salida de aire
w Mando a distancia
e Lámpara de CAPACIDAD
MÁXIMA (verde )
r Lámpara de LIMPIEZA
AUTOMÁTICA (verde )
t
Lámpara de PLASMACLUSTER
(azul)
y
Lámpara de TEMPORIZADOR
(anaranjada )
u Lámpara de
FUNCIONAMIENTO (roja )
ESPAÑOL
NOTA: Los aparatos pueden diferir ligeramente de los indicados en las ilustraciones.
S-3
Page 50

DESIGNACIÓN DE LAS PIEZAS
MANDO A DISTANCIA
1 TRANSMISOR
2 PANTALLA (de cristal líquido)
3 Tecla PLASMACLUSTER
4 Tecla de VISUALIZACIÓN (DISPLAY)
5 Tecla de CONEXIÓN/DESCONEXIÓN
6 Tecla del TERMOSTATO
7 Tecla de CAPACIDAD MÁXIMA
8
Tecla de CORRIENTE DE AIRE PROGRESIVA
9 Tecla de MODO (MODE)
0 Tecla de ACTIVACIÓN POR TEMPORIZADOR
(para regularlo)
q Tecla de DESACTIVACIÓN POR
TEMPORIZADOR (para regularlo)
w Tecla TEMPORIZADOR DE UNA HORA
e Tecla de HORAS AVANCE
r Tecla de HORAS RETROCESO
t Tecla de LIMPIEZA AUTOMÁTICA (CLEAN)
y Tecla de AJUSTE/CANCELACIÓN DEL
TEMPORIZADOR (SET/C)
u Indica que el COMPARTIMIENTO DE PILAS
está por debajo de esta marca
i Tecla de RELOJ
o Tecla de VENTILACIÓN (FAN)
p Botón de CORRIENTE DE AIRE (SWING)
DISPLAY
MODE
FAN
SWING
1h
CLEAN
SET/C
1
2
3
4
5
6
7
8
9
0
q
w
e
r
t
y
u
i
o
p
PANTALLA DE VISUALIZACIÓN L.C.D. DEL MANDO A DISTANCIA
a
s
a
SÍMBOLO DE CORRIENTE DE AIRE PROGRESIVA
s
SÍMBOLO DE LIMPIEZA AUTOMÁTICA
d
SÍMBOLO DEL PLASMACLUSTER
f
SÍMBOLOS DE MODO
d
f
: AUTOMÁTICO : DESHUMECTAR
: CALENTAR : ENFRIAR
g
AJUSTE DEL TERMOSTATO PARA LOS
MODOS AUTOMÁTICO Y DESHUMECTAR
h
INDICADOR DE TEMPERATURA
j
SÍMBOLO DE TRANSMISIÓN
;
k
SÍMBOLO DE CAPACIDAD MÁXIMA
l
SÍMBOLOS DE VELOCIDAD DEL VENTILADOR
: AUTOMÁTICO : BAJA
: ALTA : SUAVE
INDICADOR DE ACTIVACIÓN POR TEMPORIZADOR/RELOJ
Indica la hora programada para el
temporizador, o la hora actual.
31INDICADOR DE DESACTIVACIÓN POR TEMPORIZADOR
Indica la hora programada para la desactivación
por temporizador o de una hora de éste.
S-4
g
h
j
k
l
;
31
Page 51

CONFIGURACIÓN DEL FILTRO PURIFICADOR DE AIRE
Los filtros purificadores de aire vienen empacados como accesorios de esta unidad.
Durante el funcionamiento del acondicionador de aire, los filtros eliminan el polvo y
el humo del tabaco del aire y liberan aire limpio.
Saque los filtros.
1
1 Abra el panel de apertura.
2 Empuje los filtros de aire ligera-
mente hacia arriba para soltarlos.
3 Para sacarlos, tire de los filtros
1
hacia abajo.
2
Filtro de aire
Filtro purificador de aire
3
2
1
3
Topes del filtro
Coloque el filtro purificador de aire de-
2
bajo de los topes del filtro localizados
sobre el filtro de aire.
Reinstale los filtros de aire.
3
1 Reinstale los filtros de aire en las
posiciones originales.
2 Cierre el panel de apertura.
3 Empuje firmemente la marca de la
flecha del panel para asegurarlo
en su sitio.
ESPAÑOL
Precauciones
• Los filtros se encuentran sellados en una bolsa de plástico para evitar su efecto de
recogida de polvo.
No abra la bolsa hasta que vaya a utilizar los filtros. (De lo contrario la vida de los
filtros podría verse reducida).
• No exponga los filtros directamente a la luz solar. (De lo contrario se podrían
deteriorar).
S-5
Page 52

USO DEL MANDO A DISTANCIA
+
+
-
FORMA DE COLOCAR LAS PILAS
Retire la cubierta del mando a
1
distancia.
Inserte las pilas en el comparti-
2
miento, asegúrese de que las
polaridades ± y — están correctamente alineadas.
• Si las pilas están bien colocadas, en el visualizador aparecerá “AM 6:00”.
Coloque de nuevo la cubierta
3
en su sitio.
Use dos pilas tamaño AAA (R03).
Cubierta del mando
a distancia
NOTAS:
• Las pilas alcanzan para un año de uso normal, aproximadamente.
• Al sustituir las pilas, siempre cambie ambas pilas y asegúrese de que son del
mismo tipo.
• Si el mando a distancia no funciona apropiadamente después de sustituir las
pilas, retírelas y espere unos 30 segundos e introdúzcalas nuevamente.
• Cuando no vaya a usar el aparato durante largo tiempo, saque las pilas del
mando a distancia.
FORMA DE USAR EL MANDO A DISTANCIA
Apunte el mando a distancia hacia
la ventana receptora de señal de la
unidad y pulse la tecla deseada.
Cuando la unidad reciba la señal,
producirá un sonido audible.
• Cerciórese de que no haya cortinas u otros
objetos entre el mando a distancia y la
unidad.
• El mando a distancia puede enviar señales
hasta a 7 metros de distancia.
S-6
Page 53

PRECAUCIÓN
• No permita que la ventana receptora de señal reciba la luz directa del sol, ya que esto
puede deteriorar su funcionamiento. Si la ventana receptora de señal es expuesta a la
luz solar directa, utilice una cortina para bloquear la luz.
• El uso de una lámpara fluorescente con interruptor rápido en la misma habitación puede
interferir con la transmisión de la señal.
• La unidad puede ser afectada por las señales transmitidas del mando a distancia de la
televisión, de la videograbadora o de otros aparatos usados en la misma habitación.
• No deje nunca el mando a distancia expuesto directamente a los rayos del sol, ni cerca
de un calentador. Igualmente, proteja la unidad y el mando a distancia contra la
humedad y los golpes, para evitar que se decoloren o se averíen.
AJUSTAR LA HORA
ESPAÑOL
Existen dos modos para ajuste
de la hora: ciclo de 12 horas y
ciclo de 24 horas.
MODE
FAN
SWING
1h
CLEAN
SET/C
2
3
1
Ejemplo: 5 de la tarde
Reloj Visualizador
Modo de 12 horas PM 5:00
Modo de 24 horas 17:00
Para ajustar el modo de 12 horas, pulse
1
la tecla de RELOJ una vez.
Para ajustar el modo de 24 horas, pulse
la tecla de RELOJ dos veces.
Pulse las teclas de AVANCE o RETRO-
2
CESO DE HORAS para ajustar la hora
actual.
• Mantenga la tecla pulsada para avanzar o
retroceder la visualización del tiempo
rápidamente.
Pulse la tecla SET/C.
3
• Los dos puntos (:) parpadean para indicar
que el reloj está funcionando.
NOTA:
• Mientras el aparato este funcionando con
temporizador, no es posible ajustar la hora
actual.
S-7
Page 54

FUNCIONAMIENTO BÁSICO
Pulse la tecla MODE para elegir el modo
1
de funcionamiento.
AUTOMÁTICO CALENTAR ENFRIAR DESHUMECTAR
Pulse la tecla de CONEXIÓN/DESCONEXIÓN
2
comenzar el funcionamiento.
• La lámpara roja de FUNCIONAMIENTO ( ) en
2
la unidad se iluminará
DISPLAY
MODE
FAN
SWING
1h
CLEAN
SET/C
5
3
1
4
Pulse la tecla TERMOSTATO para regular la
3
temperatura deseada.
•
En los modos AUTOMÁTICO y DESHUMECTAR,
la temperatura se puede
cambiar en incrementos
de 1°C dentro del margen
de 2°C más alto a 2°C más
bajo de la temperatura
determinada automáticamente por el acondicionador de aire.
•
En los modos ENFRIAR y
CALENTAR, la temperatura se puede ajustar
dentro del margen de 18 a
32°C.
Pulse la tecla FAN para regular la velocidad
4
del ventilador deseada.
• Cuando la unidad funciona en el modo
AUTOMÁTICA SUAVE BAJA ALTA
DESHUMECTAR, la velocidad del ventilador se ajusta
a AUTOMÁTICO y no se puede modificar.
(Ejemplo: 1°C más)
(Ejemplo: 2°C menos)
C
C
Para desconectar la unidad, pulse la tecla de
5
CONEXIÓN/DESCONEXIÓN nuevamente.
• La lámpara roja de FUNCIONAMIENTO ( ) en
la unidad se apagará.
Al utilizar un acondicionador de aire con sistemas múltiples
(AH-XPM18HR)
Con un acondicionador de aire con sistemas múltiples, es posible conectar las unidades
interiores a una unidad exterior. Cuando el modo de ajuste sea diferente entre la(s) unidad(es)
interior(es), puede que no funcione(n) la(s) unidad(es) interior(es) que se opere(n) después.
• Cuando la(s) unidad(es) interior(es) está(an) funcionando en el modo CALENTAR, la(s) unidad(es)
restante(s) no puede(n) funcionar en el modo ENFRIAR o DESHUMECTAR.
• Cuando la(s) unidad(es) interior(es) está(n) funcionando en el modo ENFRIAR o DESHUMECTAR,
no pueden funcionar la(s) unidad(es) restante(s) en el modo CALENTAR.
Cuando el modo de la(s) unidad(es) interior(es) operada(s) después es(son) diferente(s) del(de los)
que está(n) funcionando, después de transcurridos unos cuantos segundos, se emitirá un largo
pitido y la lámpara de FUNCIONAMIENTO y la lámpara de TEMPORIZADOR parpadearán
alternadamente. Este muestra que la(s) unidad(es) operada(s) después no está(n) funcionando. En
tal caso, cambie el modo al mismo modo en el cual está(n) funcionando la(s) otra(s) unidad(es)
interior(es).
S-8
Page 55

NOTAS SOBRE EL MODO AUTOMÁTICO
(AY-XP18GR,AY-XP24GR)
En el modo AUTOMÁTICO, los ajustes de temperatura y modo son regulados
automáticamente dependiendo de la temperatura de la habitación y la temperatura
exterior cuando la unidad está activada.
Ajustes de los modos y la temperatura
281810034
Enfriar
(25°C)
Calentar
(22°C)
29
Calen-
tar
21
(24°C)
Temp. interior
Enfriar
(24°C)
Calen-
tar
(23°C)
En las figuras en ( ) son ajustes de temperatura
Deshumectar
Temp. de la habitación
( )
–2°C
• Durante el funcionamiento, si la temperatura exterior cambia, los ajustes de
temperatura cambiarán automáticamente como se muestra en el diagrama.
• Durante las estaciones en las cuales necesite ENFRIAR durante el día y CALENTAR
en la noche, o si la temperatura de la habitación llega a ser extremadamente más
alta que la temperatura ajustada, debido a equipos calentadores suplementarios, el
modo automáticamente se conmutará entre el modo CALENTAR y ENFRIAR para
mantener una temperatura ambiente agradable. (CAMBIO DE MODO)
Temp. exterior.
Enfriar
(26°C)
ESPAÑOL
NOTAS SOBRE EL MODO AUTOMÁTICO
(AY-XPM18HR)
En el modo AUTOMÁTICO, los ajustes de temperatura y modo son regulados
automáticamente dependiendo de la temperatura de la habitación y la temperatura
exterior cuando la unidad está activada.
Ajustes de los modos y la temperatura
281810034
Enfriar
(25°C)
26
Calen-
tar
(24°C)
Temp. interior
Enfriar
(24°C)
Calen-
Calen-
tar
(22°C)
Deshumectar
Temp. de la habitación
( )
–2°C
tar
(23°C)
En las figuras en ( ) son ajustes de temperatura
• Durante el funcionamiento, si la temperatura exterior cambia, los ajustes de
temperatura cambiarán automáticamente como se muestra en el diagrama.
• El modo de la unidad que se operó primero tendrá prioridad sobre la(s) otra(s)
unidad(es) sin referencia al diagrama.
Temp. exterior
Enfriar
(26°C)
S-9
Page 56

REGLAJE DE LA DIRECCIÓN DE LA CORRIENTE DE AIRE
DIRECCIÓN DE LA CORRIENTE DE AIRE VERTICAL
Pulse una vez la tecla SWING en el mando
1
a distancia.
MODE
FAN
SWING
CLEAN
1h
1
SET/C
2
• El deflector de ajuste vertical cambiará su
ángulo continuamente.
Pulse nuevamente la tecla SWING cuando
2
el deflector de ajuste vertical esté en la posición deseada.
• El deflector detendrá su movimiento dentro
del margen mostrado en el diagrama.
• La posición ajustada será memorizada y ajustada automáticamente a la misma posición la
próxima vez que se opere el aparato.
Margen de ajuste
Modos ENFRIAR
y DESHUMECTAR
Modo CALENTAR
DIRECCIÓN DE LA CORRIENTE DE AIRE HORIZONTAL
Sostenga los deflectores de
ajuste horizontal como se
muestra en el diagrama y ajuste
la dirección de la corriente de
aire.
PRECAUCIÓN
No trate nunca de graduar manualmente el deflector de ajuste vertical.
• Si se ajusta el deflector de ajuste vertical de forma manual, puede suceder que la unidad
falle posteriormente al querer manejarla con el mando a distancia.
•
Si el deflector de ajuste vertical se ha regulado en la posición más baja en el modo
ENFRIAR o DESHUMECTAR por un periodo largo de tiempo, puede formarse condensación.
No realice el ajuste horizontal del deflector hacia el extremo izquierdo o derecho en el modo
ENFRIAR teniendo ajustada la velocidad del ventilador a “SUAVE (
prolongado período de tiempo.
Puede que se forme condensación en los deflectores.
)” durante un
S-10
Page 57

CORRIENTE DE AIRE PROGRESIVA
Pulse la tecla de CORRIENTE DE AIRE PROGRESIVA durante la operación de enfriamiento o
deshumectación cuando no desee sentir aire frío. El deflector de ajuste vertical se coloca de
forma oblicua hacia arriba para enviar el aire frío hacia el techo.
Pulse el botón durante la operación de calentamiento. El deflector de ajuste vertical se coloca
hacia abajo para enviar el aire caliente hacia abajo en dirección al suelo y así proporcionarle calor.
Durante el funcionamiento, pulse la tecla de
1
CORRIENTE DE AIRE PROGRESIVA.
•
En el mando a distancia se visualiza la indicación “ ”.
AM
CANCELAR
Pulse la tecla de CORRIENTE DE AIRE
PROGRESIVA.
NOTAS:
• El ajuste de la CORRIENTE DE AIRE PROGRESIVA se
DISPLAY
1
cancelará cuando pulse el botón de CAPACIDAD MÁXIMA
mientras que esté ajustada la CORRIENTE DE AIRE
PROGRESIVA.
• Si desea realizar la operación de CORRIENTE DE AIRE
PROGRESIVA en el modo de CAPACIDAD MÁXIMA,
pulse la tecla de CORRIENTE DE AIRE PROGRESIVA
durante la operación de CAPACIDAD MÁXIMA.
FUNCIONAMIENTO A CAPACIDAD MÁXIMA
En esta operación, el acondicionador de aire trabaja a la capacidad máxima para
enfriar la habitación o calentarla tan rápidamente que puede utilizarlo justo cuando
llega usted a su casa.
Para activar la función de CAPACIDAD MÁXIMA,
1
pulse la tecla de CAPACIDAD MÁXIMA teniendo la
unidad ya conectada.
ESPAÑOL
• En el mando a distancia se visualiza la indicación “ ”.
AM
• Desaparece la indicación de temperatura.
• La lámpara verde de CAPACIDAD MÁXIMA ( ) de
la unidad se iluminará.
CANCELAR
DISPLAY
Pulse de nuevo la tecla de CAPACIDAD MÁXIMA.
• La función de CAPACIDAD MÁXIMA se cancelará
1
también cuando el modo de operación cambie o cuando
la unidad se apague.
• La lámpara verde de CAPACIDAD MÁXIMA ( ) de
la unidad se apagará.
NOTA:
• No puede ajustar la temperatura o la velocidad del ventilador durante el funcionamiento
a CAPACIDAD MÁXIMA.
S-11
Page 58

FUNCIONAMIENTO DEL PLASMACLUSTER
El generador de iones Plasmacluster que se encuentra dentro del acondicionador de
aire, liberará en la habitación iones plasmacluster positivos y negativos.
La liberación en el aire de aproximadamente el mismo número de iones negativos y
positivos reducirá el moho transportado en el aire.
Durante el funcionamiento, pulse la tecla
1
PLASMACLUSTER.
• En el mando a distancia se visualiza la indicación
“ ”.
• La lámpara azul PLASMACLUSTER de la unidad
se iluminará.
CANCELAR
1
DISPLAY
Pulse nuevamente la tecla PLASMACLUSTER.
• La lámpara de PLASMACLUSTER en la unidad
se apaga.
NOTAS:
• La utilización del funcionamiento del PLASMACLUSTER se memorizará y se activará la
próxima vez que active el acondicionador de aire.
• Desactive la lámpara de PLASMACLUSTER, pulse la tecla de DISPLAY.
Para llevar a cabo el funcionamiento del PLASMACLUSTER sin que funcione
en conjunto el modo calentar, enfriar o deshumectar, pulse la tecla PLASMACLUSTER cuando la unidad no esté en funcionamiento.
• El símbolo de modo del mando a distancia se apagará y la velocidad del ventilador no se
podrá ajustar en AUTOMÁTICO.
S-12
Page 59

FUNCIÓN DE LIMPIEZA AUTOMÁTICA
La operación de LIMPIEZA AUTOMÁTICA provocará la reducción en el crecimiento del
hongo del moho y secará por dentro el acondicionador de aire con los iones Plasmacluster.
Esta operación está acompañada por el modo VENTILACIÓN o CALENTAR. Utilice el
funcionamiento con el cambio estacional sobre los términos.
Los hongos de moho ya formados no se pueden eliminar con esta operación.
Pulse la tecla CLEAN cuando la unidad no está en
1
funcionamiento.
• El mando a distancia visualiza “ ”.
• La lámpara roja de FUNCIONAMIENTO ( ), la lámpara
verde de LIMPIEZA AUTOMÁTICA ( ) y la lámpara
azul PLASMACLUSTER en la unidad se encenderán.
•
La unidad dejará de funcionar después de cuarenta minutos.
CANCELAR
MODE
FAN
1h
CLEAN
Pulse la tecla CLEAN.
En forma alternativa, apague la unidad pulsando la
1
tecla de CONEXIÓN/DESCONEXIÓN.
• La lámpara roja de FUNCIONAMIENTO ( ), la lámpara
verde de LIMPIEZA AUTOMÁTICA( ) y la lámpara
azul PLASMACLUSTER en la unidad se apagarán.
NOTA:
• No puede usted ajustar la temperatura, la velocidad del ventilador, la dirección del flujo de
aire o el ajuste del temporizador durante la operación de LIMPIEZA AUTOMÁTICA.
FUNCIÓN DE DESACTIVACIÓN POR TEMPORIZADOR DE UNA HORA
Al usar el TEMPORIZADOR DE UNA HORA, la unidad se apagará automáticamente
después de transcurrida una hora.
Pulse la tecla TEMPORIZADOR DE UNA HORA.
1
• El mando a distancia visualiza “ ”.
• La lámpara anaranjada ( ) del TEMPORIZADOR en
la unidad se ilumina.
• La unidad se detendrá después de una hora.
CANCELAR
Pulse la tecla CANCELACIÓN DEL TEMPORIZADOR (SET/C).
• La lámpara anaranjada de TEMPORIZADOR ( ) en
MODE
1h
CLEAN
1
NOTAS:
• La función de TEMPORIZADOR DE UNA HORA tiene prioridad sobre las funciones de ACTIVACIÓN
POR TEMPORIZADOR y DESACTIVACIÓN POR TEMPORIZADOR.
• Si se ajusta el TEMPORIZADOR DE UNA HORA mientras la unidad no está funcionando, ésta
funcionará durante una hora en la condición antes ajustada.
• Si desea que la unidad funcione una hora antes de que se active el TEMPORIZADOR DE UNA
HORA, entonces pulse nuevamente la tecla DESACTIVACIÓN POR TEMPORIZADOR DE UNA
HORA mientras esté funcionando la unidad.
• Si se ajusta la ACTIVACIÓN o DESACTIVACIÓN POR TEMPORIZADOR, con la tecla de AJUSTE/
CANCELACIÓN DEL TEMPORIZADOR cualquier ajuste será cancelado.
la unidad se apaga.
En forma alternativa, apague la unidad pulsando la
tecla de CONEXIÓN/DESCONEXIÓN.
•
La lámpara roja de FUNCIONAMIENTO ( ) y la lámpara
anaranjada de TEMPORIZADOR ( ) se apagarán.
ESPAÑOL
S-13
Page 60

FUNCIONAMIENTO CON EL TEMPORIZADOR
NOTA:
Antes de programar el temporizador‚ asegúrese de que el reloj esté ajustado apropiadamente con la hora actual.
DESACTIVACIÓN POR TEMPORIZADOR
Pulse la tecla de DESACTIVACIÓN POR TEM-
1
DISPLAY
MODE
FAN
SWING
1h
CLEAN
SET/C
1
2
3
PORIZADOR (
El indicador de DESACTIVACIÓN POR TEM-
2
PORIZADOR parpadeará; pulse las teclas de
AVANCE o RETROCESO DE HORAS para
ajustar la hora deseada. (El tiempo puede regularse en incrementos de 10 minutos).
Apunte el mando a distancia a la célula
3
receptora de señal en la unidad y pulse la tecla
de AJUSTE DEL TEMPORIZADOR (SET/C).
• En la unidad la lámpara anaranjada de TEMPORIZADOR ( ) se iluminará.
• Cuando la unidad recibe la señal emite un sonido.
).
CONSEJOS SOBRE CANCELAR EL
SERVICIO CON EL TEMPORIZADOR
Al elegir el modo DESACTIVACIÓN POR
TEMPORIZADOR, la regulación de la
temperatura se ajusta automáticamente
para evitar que la temperatura suba o baje
excesivamente mientras usted duerme.
(Función de desconexión automática
nocturna)
MODO ENFRIAR/DESHUMECTAR:
• Una hora después de comenzar el servicio
con el temporizador, la temperatura sube
1°C por encima de la regulada.
MODO CALENTAR:
• Una hora después de comenzar el servicio
con el temporizador, la temperatura baja
3°C por debajo de la regulada en el
termostato.
CANCELACIÓN DEL MODO DE
TEMPORIZADOR
Pulse la tecla CANCELACIÓN DEL TEMPO-
RIZADOR (SET/C).
•
La lámpara anaranjada
de TEMPORIZADOR
( ) en la unidad se
apaga.
•
En el mando a distancia
se visualizará la hora
actual.
MODE
FAN
SWING
1h
CLEAN
SET/C
NOTA:
Si se ajusta alguna de las funciones ACTIVACIÓN
POR TEMPORIZADOR, DESACTIVACIÓN POR
TEMPORIZADOR y DESACTIVACIÓN POR
TEMPORIZADOR DE UNA HORA, la tecla de
CANCELACIÓN TEMPORIZADOR (SET/C)
cancelará todos los ajustes.
PARA MODIFICAR EL REGLAJE DE LA HORA
Cancelar primero la función de TEMPORIZADOR y ajustarla de nuevo.
S-14
Page 61

ACTIVACIÓN POR TEMPORIZADOR
Pulse la tecla de ACTIVACIÓN POR TEMPO-
DISPLAY
MODE
FAN
SWING
1h
CLEAN
SET/C
1
2
3
1
RIZADOR (
El indicador de ACTIVACIÓN POR TEMPO-
2
RIZADOR parpadeará; pulse las teclas de
AVANCE o RETROCESO DE HORAS para
ajustar la hora deseada. (El tiempo puede
regularse en incrementos de 10 minutos).
Apunte el mando a distancia a la ventana
3
receptora de señal en la unidad y pulse la tecla
de AJUSTE DEL TEMPORIZADOR (SET/C).
• En la unidad la lámpara anaranjada de TEMPORIZADOR ( ) se iluminará.
• Cuando la unidad recibe la señal emite un sonido.
Elija el modo de funcionamiento.
4
NOTA:
Antes de regular el periodo de funcionamiento, la unidad
se activará para permitir que en la habitación se alcance
la temperatura deseada en el tiempo programado.
(Función de reloj despertador)
).
ESPAÑOL
USO COMBINADO DE LAS FUNCIONES ACTIVACIÓN
Y DESACTIVACIÓN POR TEMPORIZADOR.
Usted puede combinar las funciones de ACTIVACIÓN y DESACTIVACIÓN
del temporizador.
Ejemplo:
Suspender el funcionamiento a las 11:00 p.m. y reanudarlo (con los mismos reglajes de modo y temperatura)
para que la temperatura del cuarto alcance el nivel
deseado a las 7:00 a.m.
Ajuste la función de DESACTIVACIÓN POR TEMPO-
1
RIZADOR para las 11:00 p.m. durante el funcionamiento.
Ajuste la función de ACTIVACIÓN POR TEMPORI-
2
ZADOR para las 7:00 a.m.
Las flechas (
CIÓN y DESACTIVACIÓN POR TEMPORIZADOR
señalan qué función se activará primero.
o ) entre los indicadores de ACTIVA-
NOTAS:
• No es posible programar la ACTIVACIÓN POR TEMPORIZADOR y la DESACTIVACIÓN POR
TEMPORIZADOR para operar la unidad a temperaturas diferentes o con otros ajustes.
• No es necesario conservar un orden cronológico para la programación de funciones.
S-15
Page 62

MODO AUXILIAR
MODO AUXILIAR
Use este modo si no dispone de un mando a distancia.
ACTIVACIÓN
Levante el panel de apertura de la unidad interna y pulse
la tecla AUX. en el panel de operaciones.
• Se encenderá la lámpara roja de FUNCIONAMIENTO ( )
que está en la unidad y ésta comenzará a funcionar en el
modo AUTOMÁTICO.
• La velocidad del ventilador y el reglaje de la temperatura se
ajustan al modo AUTOMÁTICO.
DESACTIVACIÓN
Pulse nuevamente la tecla AUX. en el panel de operaciones.
• La lámpara roja de FUNCIONAMIENTO ( ) en la unidad se
apagará.
NOTA:
Si la tecla AUX. se pulsa durante el funcionamiento normal, la unidad se apagará.
MANTENIMIENTO
Asegúrese de desconectar el cable de alimentación del enchufe o apagar el
cortacircuito antes de realizar cualquier mantenimiento.
LIMPIEZA DE LOS FILTROS
1
2
3
3
Los filtros de aire deben limpiarse cada dos semanas.
DESCONECTE LA UNIDAD
1
SAQUE LOS FILTROS
2
1
Levante el panel de apertura.
2
Empuje los filtros de aire ligeramente hacia
arriba para soltarlos.
3
Para sacarlos, tire de los filtros hacia abajo.
SAQUE DE LOS FILTROS DE AIRE LOS
3
FILTROS PURIFICADORES DE AIRE
LIMPIEZA DE LOS FILTROS
4
Use un aspirador para retirar el polvo. Si los
filtros están sucios, lávelos con agua tibia y un
detergente suave. Seque los filtros a la sombra
antes de volverlos a instalar.
REINSTALE LOS FILTROS
5
PURIFICADORES DE AIRE
REINSTALACIÓN DE LOS FILTROS
6
1
Reinstale los filtros en las posiciones originales.
2
2
1
Cierre el panel frontal.
3
Empuje firmemente la marca de la flecha del
panel para asegurarlo en su sitio.
S-16
Page 63

MANTENIMIENTO
LIMPIEZA DE LA UNIDAD Y DEL MANDO A DISTANCIA
• Límpielos con un paño suave.
• No rocíe o derrame agua directamente sobre ellos. Puede producirse una
descarga eléctrica o daño del equipo.
• No utilice agua caliente, diluyente, polvos abrasivos o disolventes fuertes.
MANTENIMIENTO DESPUÉS
DE UTILIZAR EL
ACONDICIONADOR DE AIRE
Haga funcionar la unidad en
1
OPERACIÓN DE LIMPIEZA
AUTOMÁTICA para permitir al
mecanismo que se seque bien.
Detenga el funcionamiento de la
2
unidad y desenchúfela. Desactive
el cortacircuito, si tiene uno exclusivamente para el acondicionador
de aire.
Limpie los filtros, luego reinstálelos.
3
MANTENIMIENTO ANTES DE
UN PERÍODO DE USO DEL
ACONDICIONADOR DE AIRE
Asegúrese de que los filtros de
1
aire no estén sucios.
Asegúrese de que nada obstruye
2
las entradas o salidas de aire.
Verifique periódicamente la rejilla
3
de montaje de la unidad exterior
para saber si hay desgaste y para
cerciorarse de que está asegurada en su lugar.
CAMBIO DE LOS FILTROS PURIFICADORES DE AIRE
Los filtros deben cambiarse cada 3 ~ 6 meses.
SAQUE LOS FILTROS DE AIRE
Tapa del filtro
Filtro de aire
Filtro purificador de aire
1
CAMBIE LOS FILTROS
2
PURIFICADORES DE AIRE
1 Saque de los filtros de aire los filtros viejos.
2 Coloque los filtros purificadores de aire
nuevos, debajo de los topes de filtro localizados en los filtros de aire.
REINSTALE LOS FILTROS DE AIRE
3
ESPAÑOL
NOTA:
• Un filtro purificador de aire sucio, no se puede lavar para ser reutilizado.
Los filtros nuevos los puede solicitar a su distribuidor más cercano.
Filtro de reemplazo: Tipo AZ-F1800C
Desecho de los filtros
Deseche los filtros cambiados de acuerdo a las leyes y regulaciones locales.
Materiales del filtro purificador de aire:
• Filtro: Polipropileno
• Marco: Poliéster
S-17
Page 64

OBSERVACIONES ADICIONALES SOBRE EL FUNCIONAMIENTO
GAMA DE TEMPERATURA DE FUNCIONAMIENTO
• El dispositivo protector incorporado en el aparato puede
impedir que éste continúe
funcionando, cuando se use
fuera de este margen.
• En la salida de aire puede
formarse condensación, si el
aparato funciona continuamente en el modo ENFRIAR
o DESHUMECTAR, cuando
la humedad ambiental es superior a un 80%.
ENFRIAR
CALENTAR
límite superior
límite inferior
límite superior
límite inferior
TEMP. INTERIOR
32°C
21°C
27°C 24°C
- –15°C
–10°C (AY-XP18GR)
TEMP. EXTERIOR
46°C (AY-XP18GR,AY-XP24GR)
43°C (AY-XPM18HR)
21°C (AY-XP24GR,AY-XPM18HR)
FALLO DE CORRIENTE
Este acondicionador de aire tiene una función de memoria automática para almacenar la configuración cuando
ocurra un fallo de corriente.
Después de retornar la corriente, el aparato se reinicializará automáticamente al mismo ajuste que estaba
activo antes del fallo de la corriente, excepto los ajustes de reloj.
Si los relojes fueron ajustados antes del fallo de corriente, es necesario reajustarlos después de volver la
corriente.
FUNCIÓN DE PRECALENTAMIENTO
A
l funcionar en el modo CALENTAR, puede suceder que el ventilador interno tarde de dos a cinco minutos en
comenzar a funcionar, después de haber conectado el aparato; esto tiene por objeto impedir que el aire frío salga
fuera del aparato antes de que haya alcanzado la temperatura suficiente.
FUNCIÓN DE DESHIELO
• Al formarse hielo en el intercambiador térmico que hay en la unidad exterior al funcionar en el modo CALENTAR,
un descongelador automático proporciona calor durante unos cinco a diez minutos, para retirar el hielo. Durante el
deshielo el ventilador interior y el ventilador exterior dejan de funcionar.
• Una vez terminado el deshielo, el aparato continua funcionando en el modo CALENTAR.
EFICACIA DEL CALENTAMIENTO
• El aparato emplea una bomba calorífica que extrae el calor del aire exterior, y lo despide dentro de la
habitación. Por eso, la temperatura del aire exterior influye considerablemente la eficacia del calentamiento
del aparato.
• Si el proceso de calentamiento es reducido debido a temperaturas bajas exteriores, utilice un calentador
adicional.
• Hasta poder calentar la habitación completa puede tardar tiempo dado que el aparato emplea un circuito de
circulación forzada del aire.
ALGUNOS CONSEJOS PARA AHORRAR ENERGÍA
A continuación se dan algunos consejos sencillos para ahorrar energía al usar el acondicionador de aire.
REGULE LA TEMPERATURA CORRECTA
• Al ajustar el termostato 1°C más que la temperatura deseada en el modo ENFRIAR y 2°C menos en el modo
CALENTAR ahorrará aproximadamente un 10 porciento en consumo de corriente.
• Si se regula una temperatura más baja que lo necesario para enfriar la habitación, aumentará el consumo de
corriente.
BLOQUEE LOS RAYOS SOLARES DIRECTOS Y PREVENGA CORRIENTES DE AIRE
• Si bloquea la exposición del aparato a los rayos solares directos cuando utilice el aparato para enfriamiento,
reducirá el consumo de corriente.
• Cierre las ventanas y puertas durante las operaciones de enfriar y calentar.
PARA OBTENER UNA OPTIMA CIRCULACIÓN DEL AIRE, REGULE
DEBIDAMENTE EL SENTIDO DE LA CORRIENTE DE AIRE
PARA OBTENER UN FUNCIONAMIENTO EFICIENTE DEL APARATO,
MANTENGA EL FILTRO SIEMPRE LIMPIO
APROVECHE AL MÁXIMO LAS FUNCIONES DE DESACTIVACIÓN POR TEMPORIZADOR
CUANDO NO SE VAYA A USAR EL APARATO DURANTE MUCHO TIEMPO,
DESCONECTE EL CABLE DE ALIMENTACIÓN
• La unidad interior consume una pequeña cantidad de energía incluso al no estar funcionando.
S-18
Page 65

ANTES DE LLAMAR AL DEPARTAMENTO DE SERVICIO TÉCNICO
Las siguientes condiciones no significan mal funcionamiento del equipo.
LA UNIDAD NO FUNCIONA
La unidad no funcionará inmediatamente después
de encenderla. La unidad no funcionará inmediatamente después de que el modo de servicio se
haya cambiado. Esto sucede con el fin de proteger
los mecanismos internos. Espere 3 minutos antes
de operar la unidad.
NO SALE AIRE CALIENTE
La unidad se encuentra en servicio de precalentamiento o deshielo.
OLORES
Olores a alfombra y muebles que penetran en la
unidad y los olores de los componentes internos
del acondicionador de aire pueden salir de la
unidad durante la etapa inicial de instalación.
RUIDOS DE CRUJIDOS
La unidad puede producir un sonido de crujidos.
Este sonido es generado por la fricción del panel
frontal, expansión de otros componentes o la
conexión debida a cambios de temperatura.
SE EMITE UN ZUMBIDO BAJO
Este es un sonido emitido cuando la unidad está
generando iones Plasmacluster.
RUIDOS DE SILBIDOS
Los ruidos suaves, de silbidos son los sonidos del
refrigerante fluyendo en el interior de la unidad.
VAPOR DE AGUA
• En los modos ENFRIAR y DESHUMECTAR, se
puede ver algunas veces vapor de agua en las
salidas de aire debido a diferencias entre la
temperatura ambiente del aire y la temperatura
del aire descargado por la unidad.
• En el modo CALENTAR, puede fluir vapor de
agua de la unidad exterior durante el deshielo.
LA UNIDAD EXTERIOR NO SE
DETIENE
Después de detener el funcionamiento, el ventilador
de la unidad exterior rotará durante aproximadamente un minuto para enfriar la unidad.
OLOR EMITIDO DESDE LA SALIDA
DE AIRE DEL PLASMACLUSTER
Este es el olor de ozono que produce el generador
iónico Plasmacluster. La concentración de ozono
es muy baja, no produciendo efectos perjudiciales
para su salud. El ozono descargado en el aire se
descompone rápidamente y su densidad en la
habitación no aumentará.
ESPAÑOL
(Sólo para el modelo AY-XPM18HR)
LA UNIDAD INTERIOR SE CALIENTA
AÚN ESTANDO INACTIVA
Esto se debe a que el refrigerante también fluye a
través de las tuberías de la unidad interior inactivas
cuando la otra unidad está funcionando en el modo
CALENTAR.
LA UNIDAD INTERIOR SE CALIENTA
AUN CUANDO NO SE LLEVA A CABO
CALENTAMIENTO
Cuando se pulsa la tecla PLASMACLUSTER
mientras la unidad no está funcionando, el funcionamiento del PLASMACLUSTER se realizará sin
el modo de acondicionamiento de aire, (esto es,
CALENTAR o ENFRIAR). En este momento, puede
sentir el aire caliente saliendo del orificio de salida
de aire de la unidad si el CALENTAMIENTO se
lleva a cabo con unidades en otras habitaciones.
El ventilador interior disminuirá su velocidad de
rotación y se encenderá y apagará dependiendo
de la temperatura de la habitación.
LA UNIDAD NO FUNCIONA EN EL
MODO SOLICITADO
• Cuando una unidad interior está funcionando en
el modo ENFRIAR o DESHUMECTAR, no podrá
operar la otra unidad en el modo CALENTAR.
(Después de transcurridos unos cuantos segundos, se emitirá un largo pitido y la lámpara de
FUNCIONAMIENTO y la lámpara de TEMPORIZADOR parpadearán alternadamente).
• Cuando una unidad interior está funcionando
en el modo CALENTAR, no podrá operar la
otra unidad en el modo ENFRIAR ni DESHUMENCTAR. (Después de transcurridos unos
cuantos segundos, se emitirá un largo pitido y
la lámpara de FUNCIONAMIENTO y la lámpara
de TEMPORIZADOR parpadearán alternadamente).
LA UNIDAD NO EXPULSA AIRE
CALIENTE (funcionamiento de
PLASMACLUSTER sin el modo de
acondicionamiento de aire,
operación de LIMPIEZA
AUTOMÁTICA)
La(s) otra(s) unidad(es) se está(n) descongelando.
S-19
Page 66

ANTES DE LLAMAR AL DEPARTAMENTO DE SERVICIO TÉCNICO
Si la unidad parece estar funcionando mal, verifique los siguientes puntos antes de
llamar al servicio técnico.
SI LA UNIDAD NO FUNCIONA
Verifique si el cortacircuito se ha disparado o si el fusible se ha fundido.
SI LA UNIDAD NO ENFRÍA (O CALIENTA) LA HABITACIÓN EFICAZMENTE
Examine los filtros. Si están
sucios, límpielos.
Cerciórese de que las ventanas
y puertas estén bien cerradas.
Examine la unidad exterior para
asegurarse de que la salida y
entrada de aire no está obstruida.
Si hay muchas personas dentro
de la habitación, puede que la
unidad no alcance la temperatura
deseada.
Examine el termostato para ver
si está bien regulado.
Verifique si hay otros aparatos
calefactores que estén funcionando dentro de la habitación.
LA UNIDAD NO RECIBE LA SEÑAL DEL MANDO A DISTANCIA
Verifique si las pilas del mando
a distancia están viejas o
descargadas.
Llame por favor al personal de mantenimiento cuando la lámpara de FUNCIONAMIENTO, la
lámpara de TEMPORIZADOR o la lámpara de PLASMACLUSTER parpadee en el panel indicador.
Trate de enviar la señal de nuevo
apuntando el mando a distancia
hacia la célula receptora de la
unidad.
Verifique si las pilas del mando
a distancia están instaladas
con las polaridades alineadas
en forma adecuada.
S-20
Page 67

Page 68

Attenzione: Il dispositivo è
contrassegnato da questo
simbolo, che segnala di non
smaltire le apparecchiature
elettriche ed elettroniche
insieme ai normali rifiuti
domestici. Per tali prodotti è
previsto un sistema di
raccolta a parte.
A. Informazioni sullo smaltimento per gli utenti (privati)
1. Nell'Unione europea
Attenzione: Per smaltire il presente dispositivo, non utilizzare il normale bidone della
spazzatura!
Le apparecchiature elettriche ed elettroniche usate devono essere gestite a parte e in
conformità alla legislazione che richiede il trattamento, il recupero e il riciclaggio
adeguato dei suddetti prodotti.
In seguito alle disposizioni attuate dagli Stati membri, i privati residenti nella UE
possono conferire gratuitamente le apparecchiature elettriche ed elettroniche usate a
centri di raccolta designati*.
In alcuni paesi*, anche il rivenditore locale può ritirare gratuitamente il vecchio prodotto se
l'utente acquista un altro nuovo di tipologia simile.
*) Per maggiori informazioni si prega di contattare l'autorità locale competente.
Se le apparecchiature elettriche o elettroniche usate hanno batterie o accumulatori, l'utente
dovrà smaltirli a parte preventivamente in conformità alle disposizioni locali.
Lo smaltimento corretto del presente prodotto contribuirà a garantire che i rifiuti siano
sottoposti al trattamento, al recupero e al riciclaggio necessari prevenendone il
potenziale impatto negativo sull'ambiente e sulla salute umana, che potrebbe derivare
da un'inadeguata gestione dei rifiuti.
2. In paesi che non fanno parte dell'UE
Se si desidera eliminare il presente prodotto, contattare le autorità locali e informarsi
sul metodo di smaltimento corretto.
Per la Svizzera: Le apparecchiature elettriche o elettroniche usate possono essere
restituite gratuitamente al rivenditore, anche se non si acquista un prodotto nuovo.
Altri centri di raccolta sono elencati sulle homepage di
www.swico.ch o di www.sens.ch.
. Informazioni sullo smaltimento per gli utenti commerciali
B
1. Nell'Unione europea
Se il prodotto è impiegato a scopi commerciali, procedere come segue per eliminarlo.
Contattare il proprio rivenditore SHARP che fornirà informazioni circa il ritiro del
prodotto. Potrebbero essere addebitate le spese di ritiro e riciclaggio. Prodotti piccoli
(e quantitativi ridotti) potranno essere ritirati anche dai centri di raccolta locali.
Per la Spagna: Contattare il sistema di raccolta ufficiale o l'ente locale preposto al
ritiro dei prodotti usati.
2. In paesi che non fanno parte dell'UE
Se si desidera eliminare il presente prodotto, contattare le autorità locali e informarsi
sul metodo di smaltimento corretto.
IT
Page 69

ITALIANO
Grazie per aver acquistato il condizionatore d’aria SHARP. Leggete attentamente questo
manuale prima di usare il prodotto.
SOMMARIO
• IMPORTANTI ISTRUZIONI PER LA
SICUREZZA ..............................................I-1
• NOMI DEI COMPONENTI ........................I-3
• IMPOSTAZIONE DEL FILTRO DI
DEPURAZIONE ARIA ...............................I-5
• USO DEL TELECOMANDO......................I-6
• FUNZIONI DI BASE ..................................I-8
• REGOLAZIONE DELLA DIREZIONE
DEL FLUSSO D’ARIA ...............................I-10
• FLUSSO D’ARIA PROGRESSIVO ...........I-11
• FUNZIONAMENTO A PIENA POTENZA..I-11
• FUNZIONAMENTO DEL
PLASMACLUSTER ...................................I-12
• OPERAZIONE DI AUTO PULIZIA ............I-13
• TIMER DI SPEGNIMENTO DOPO
UN’ORA .................................................... I-13
• FUNZIONAMENTO DEL TIMER...............I-14
• MODALITÀ AUSILIARIA ...........................I-16
• MANUTENZIONE .....................................I-16
• ULTERIORI NOTE RIGUARDANTI IL
FUNZIONAMENTO ...................................I-18
• SUGGERIMENTI PER RISPARMIARE
ENERGIA ..................................................I-18
• PRIMA DI RICHIEDERE ASSISTENZA....I-19
IMPORTANTI ISTRUZIONI PER LA SICUREZZA
AVVERTIMENTI PER L’USO
Non tirate o deformate il cavo di alimentazione. Se si tira o si usa erratamente il cavo,
1
l’unità si può danneggiare e provocare scosse elettriche.
Fate attenzione a non esporvi direttamente all’uscita dell’aria per un lungo periodo di
2
tempo. Potrebbe pregiudicare la vostra salute.
Quando usate il condizionatore d’aria per bambini, anziani, persone a letto o disabili,
3
assicuratevi prima che la temperatura della stanza sia adatta per tali persone.
ITALIANO
Non inserite mai oggetti nell’unità. Ciò potrebbe portare a lesioni a causa dell’alta velocità
4
di rotazione delle ventole interne.
Collegate correttamente il condizionatore d’aria a terra. Non collegate il cavo a terra al
5
tubo del gas, al tubo dell’acqua, al parafulmini o al cavo a terra del telefono. Un
collegamento a terra incompleto potrebbe causare scosse elettriche.
In caso di qualsiasi anomalia nel condizionatore d’aria (per esempio odore di bruciato),
6
arrestate immediatamente la funzione e spegnete l’interruttore di circuito.
L’apparecchio deve essere installato in conformità con i regolamenti di connessione
7
elettrica nazionali.
del cavo di alimentazione, della spina e della presa elettrica e causare un incendio.
Se il cavo di alimentazione è danneggiato, deve essere sostituito dal produttore o dal suo
8
rappresentante o da una persona simile qualificata in modo da evitare qualunque
pericolo. Sostituite il cavo di alimentazione solo con un altro specificato dal produttore.
Un collegamento scorretto del cavo può provocare il surriscaldamento
AVVERTIMENTI PER L’INSTALLAZIONE/RIMOZIONE/
RIPARAZIONE
• Non cercate di installare/rimuovere/riparare l’unità da soli. Un uso scorretto causerà scosse
elettriche, perdite d’acqua, incendi ecc. Consultate il vostro rivenditore o altro personale di
servizio qualificato per l’installazione/rimozione/riparazione dell’unità.
I-1
Page 70

IMPORTANTI ISTRUZIONI PER LA SICUREZZA
PRECAUZIONI PER L’USO
Aprite una finestra o una porta periodicamente per ventilare la stanza, specialmente
1
quando si usano apparecchi a gas. Una ventilazione insufficiente potrebbe causare
mancanza d’ossigeno.
Non toccate i tasti con le mani bagnate. Ciò potrebbe provocare una scossa elettrica.
2
Per sicurezza, spegnete l’interruttore del circuito quando non si usa l’unità per un lungo
3
periodo di tempo.
Controllate la cremagliera di montaggio dell’unità esterna periodicamente ed assicuratevi
4
che sia ben fissata.
Non collocate niente sull’unità esterna e non calpestatela. L’oggetto o la persona
5
potrebbero cadere, provocando lesioni.
Questa unità è stata progettata per l’uso in aree residenziali. Non usatela in canili o serre
6
per allevare animali o coltivare piante.
Non collocate contenitori d’acqua sull’unità. Se l’acqua penetra nell’unità, l’isolamento
7
elettrico si potrebbe rovinare causando una scossa elettrica.
Non bloccate gli sbocchi d’uscita ed entrata dell’aria dell’unità. Ciò potrebbe
8
comprometterne il funzionamento o provocare guasti.
Assicuratevi di spegnere l’apparecchio e l’interruttore di circuito prima di eseguire lavori
9
di manutenzione o pulizia. La ventola che gira all’interno dell’unità potrebbe provocarvi
lesioni.
Non spruzzate o gettate acqua direttamente sull’unità. L’acqua potrebbe causare una
10
scossa elettrica o danni all’apparecchio.
Questo apparecchio non deve essere usato da bambini o persone inferme senza
11
supervisione.
Assicuratevi che i bambini non giochino con l’apparecchio.
Questo apparecchio non è adatto per l’uso in regioni nordiche.
12
PRECAUZIONI PER IL LUOGO DI MONTAGGIO/
INSTALLAZIONE
• Assicuratevi di collegare il condizionatore d’aria ad una presa di corrente di voltaggio e
frequenza giusta.
L’uso di una presa di corrente dal voltaggio e frequenze errate potrebbe risultare dannoso
all’apparecchio e provocare un incendio.
• Non installate l’unità in un luogo dove ci potrebbero essere perdite di gas infiammabile.
Ciò potrebbe provocare incendi.
Non collocate l’unità in luoghi nei quali l’aria contiene polvere, fumi oppure umidità in misura
eccessiva.
• Sistemate il tubo di drenaggio in modo tale da assicurare un drenaggio corretto. Un drenaggio
insufficiente potrebbe far fuoriuscire acqua nella stanza, bagnare i mobili ecc.
• Assicuratevi di installare un interruttore differenziale o magnetotermico a seconda del luogo
d’installazione, per evitare scosse elettriche.
I-2
Page 71

NOMI DEI COMPONENTI
UNITÀ INTERNA
1
2
3
4
5
6
7
8
9
0
q
w
e
r
t
y
u
1 Filtri di depurazione aria
2 Presa (d’aria)
3 Pannello aperto
4 Tasto AUX.
5 Filtri dell’aria
6 Finestra ricevitore
7 Cavo d’alimentazione
(soltanto AY-XP18GR)
8 Indicatore
9 Deflettore di regolazione
verticale
0 Deflettore di regolazione
orizzontale
q Uscita (d’aria)
w Telecomando
ITALIANO
e Spia di PIENA POTENZA
(verde )
r Spia di AUTO PULIZIA
(verde )
t Spia PLASMACLUSTER (blu)
y Spia TIMER (arancione )
u Spia di FUNZIONAMENTO
(rossa )
NOTA: Le unità reali potrebbero variare leggermente da quelle mostrate sopra.
I-3
Page 72

NOMI DEI COMPONENTI
TELECOMANDO
1
2
3
4
5
DISPLAY
MODE
FAN
SWING
1h
CLEAN
SET/C
6
7
8
9
0
q
w
e
r
t
y
u
i
o
p
1 TRASMETTITORE
2 DISPLAY (display a cristalli liquidi)
3 Tasto PLASMACLUSTER
4 Tasto DISPLAY
5 Tasto d’ACCENSIONE/SPEGNIMENTO
6 Tasto TERMOSTATO
7 Tasto di PIENA POTENZA
8Tasto FLUSSO D’ARIA PROGRESSIVO
9 Tasto del MODO (MODE)
0 Tasto TIMER ATTIVATO
(per impostare il timer)
q Tasto TIMER DISATTIVATO
(per impostare il timer)
w
Tasto TIMER DI SPEGNIMENTO DOPO UN’ORA
e Tasto di AVANZAMENTO DELL’ORA
r Tasto di ARRETRAMENTO DELL’ORA
t Tasto di AUTO PULIZIA (CLEAN)
y
Tasto IMPOSTAZIONE/CANCELLA TIMER (SET/C)
u Indica che il VANO BATTERIA è al di sotto
di questa marcatura
i Tasto OROLOGIO
o Tasto VENTOLA (FAN)
p Tasto ROTAZIONE (SWING)
DISPLAY LDC DEL TELECOMANDO
a SIMBOLO FLUSSO D’ARIA PROGRESSIVO
s SIMBOLO DI AUTO PULIZIA
d SIMBOLO PLASMACLUSTER
f SIMBOLI DEL MODO
: AUTOMATICO : DEUMIDIFICAZIONE
:
RISCALDAMENTO
: RINFRESCAMENTO
g IMPOSTAZIONE DEL TERMOSTATO PER
I MODI AUTOMATICO E IN DEUMIDIFICAZIONE
h INDICATORE DI TEMPERATURA
j SIMBOLO DI TRASMISSIONE
k SIMBOLO DI PIENA POTENZA
l SIMBOLI DI VELOCITÀ DELLA VENTOLA
: AUTOMATICO : BASSO
: ALTO : MODERATO
I-4
a
s
d
f
g
h
j
k
l
;
31
;
INDICATORE/OROLOGIO DI TIMER ATTIVATO
Indica l’ora preselezionata per l’attivazione
del timer o l’ora attuale.
31INDICATORE DI DISATTIVAZIONE TIMER
Indica l’ora preselezionata per la disattivazione
del timer o per la disattivazione dopo un’ora.
Page 73

IMPOSTAZIONE DEL FILTRO DI DEPURAZIONE ARIA
I filtri di depurazione aria sono impacchettati come accessorio di quest’unità. Durante il funzionamento del condizionatore d’aria, il filtro rimuove polvere e fumo di
tabacco dall’aria e rilascia aria pulita.
Estraete i filtri dell’aria.
1
1 Sollevate il pannello aperto.
2 Spingete i filtri leggermente verso
l’alto per sbloccarli.
3 Spingeteli verso il basso per rimuo-
1
verli.
Filtro dell’aria
3
2
2
Filtro di depurazione aria
1
3
Tappo del filtro
Posizionate il filtro di depurazione aria
2
sotto i tappi del filtro che si trovano
sul filtro dell’aria.
Reinstallate i filtri dell’aria
3
1 Reinstallate i filtri nella posizione
originale.
2 Chiudete il pannello aperto.
3 Spingete nella direzione della
freccia marcata sul pannello in
maniera decisa per bloccarlo al
suo posto.
ITALIANO
Precauzioni
• I filtri sono sigillati in sacchetti di plastica per mantenere il loro effetto d’accumulo
della polvere.
Non aprite il sacchetto prima di utilizzare i filtri (altrimenti la durata dei filtri potrebbe
risultare inferiore).
• Non esponete i filtri alla luce diretta del sole (altrimenti potrebbero deteriorarsi).
I-5
Page 74

USO DEL TELECOMANDO
+
+
-
INSERIMENTO DELLE BATTERIE
Utilizzate due batterie di dimensioni AAA (R03).
Togliete il coperchio del telecomando.
1
Inserite le batterie nel comparto,
2
assicurandovi che le polarità ± e —
siano allineate correttamente.
• Il display indica “AM 6:00” quando le
batterie sono inserite correttamente.
Rimettete il coperchio.
3
Coperchio
telecomando
NOTE:
• In condizioni di uso normali, le batterie durano circa un anno.
• Quando cambiate le batterie, utilizzate sempre due batterie dello stesso tipo.
• Se il telecomando non funziona correttamente dopo aver sostituito le batterie,
estraetele e rimettetele al loro posto dopo circa 30 secondi.
• Se non intendete usare l’unità per un lungo periodo di tempo, togliete le batterie dal
telecomando.
COME USARE IL TELECOMANDO
Puntate il telecomando verso la finestra di ricezione del segnale
dell’unità e premete il tasto desiderato. L’unità emette un segnale
acustico “bip” quando riceve il
segnale.
• Assicuratevi che non ci siano una tenda o
altri oggetti tra il telecomando e l’unità.
• Il telecomando può inviare segnali fino ad
una distanza di 7 metri.
I-6
Page 75

PRECAUZIONI
• Evitate di esporre la finestra di ricezione alla luce solare diretta, in quanto ne può
danneggiare il funzionamento. Se la finestra di ricezione del segnale è esposta alla luce
solare diretta, chiudete la tenda per bloccare la luce.
• L’uso di una lampada fluorescente con una reattanza d’accensione rapida nello stesso
locale può interferire con la trasmissione del segnale.
• L’unità può essere influenzata da segnali trasmessi dal telecomando di un televisore,
videoregistratore o altre attrezzature usate nella stessa stanza.
• Non lasciate il telecomando esposto alla luce solare diretta o vicino ad un radiatore.
Inoltre, proteggete l’unità e il telecomando da umidità e scosse che potrebbero scolorirli o
danneggiarli.
IMPOSTAZIONE DELL’ORA ATTUALE
ITALIANO
Ci sono due modalità orologio:
modalità a 12 ore e modalità
a 24 ore.
MODE
FAN
SWING
1h
CLEAN
SET/C
2
3
1
Esempio: ore 17 del pomeriggio
Orologio Display
Modalità a 12 ore PM 5:00
Modalità a 24 ore 17:00
Per impostare la modalità a 12 ore,
1
premete il tasto OROLOGIO una volta al
primo passaggio.
Per impostare la modalità a 24 ore,
premete il tasto OROLOGIO due volte al
primo passaggio.
Premete il tasto di AVANZAMENTO
2
DELL’ORA o ARRETRAMENTO per
impostare l’ora attuale.
• Tenete il tasto premuto per far avanzare o
retrocedere velocemente il display dell’ora.
Premete il tasto SET/C.
3
• I due punti (:) lampeggiano per indicare
che l’orologio funziona.
NOTA:
• Quando è in funzione il timer, l’ora attuale non
può essere impostata.
I-7
Page 76

FUNZIONI DI BASE
2
5
DISPLAY
3
1
MODE
FAN
SWING
1h
CLEAN
4
SET/C
Premete il tasto MODE per selezionare la
1
modalità di funzionamento.
AUTO- RISCALDA- RINFRESCA- DEUMIDIFI-
MATICO MENTO MENTO CAZIONE
Premete il tasto d’ACCENSIONE/SPEGNI-
2
MENTO per iniziare il funzionamento.
• La spia rossa di FUNZIONAMENTO ( ) sull’unità
si illuminerà.
Premete il tasto TERMOSTATO per impo-
3
stare la temperatura desiderata.
• Nelle modalità AUTOMATICO e DEUMIDIFICAZIONE, la temperatura può essere
cambiata in incrementi di
1°C entro l’intervallo
compreso tra 2°C superiore e 2°C inferiore
rispetto alla temperatura
determinata automaticamente dal condizionatore d’aria.
• Nella modalità RINFRESCAMENTO e RISCALDAMENTO, la temperatura può essere impostata
nell’intervallo compreso tra 18 e 32°C.
(Esempio: 1°C superiore)
(Esempio: 2°C inferiore)
C
C
Premete il tasto FAN per impostare la velo-
4
cità della ventola desiderata.
AUTOMATICA MINIMA MEDIA MASSIMA
• In modalità DEUMIDIFICAZIONE, la velocità della
ventola è preselezionata su AUTOMATICA e non
può essere cambiata.
Per spegnere l’unità, premete nuovamente
5
il tasto d’ACCENSIONE/SPEGNIMENTO.
• La spia rossa di FUNZIONAMENTO ( ) sull’unità
si spegnerà.
In caso di utilizzo del condizionatore d’aria con un sistema multiplo
(AY-XPM18HR)
Con un condizionatore d’aria con sistema multiplo, è possibile collegare più unità interne ad
un’unità esterna. Quando la modalità di impostazione è diversa nelle varie unità interne, le
unità utilizzate successivamente potrebbero non funzionare.
• Quando le unità interne vengono utilizzate nella modalità RISCALDAMENTO, le unità rimanenti
non funzioneranno nelle modalità RINFRESCAMENTO o DEUMIDIFICAZIONE.
• Quando le unità interne vengono utilizzate in modalità RINFRESCAMENTO o DEUMIDIFICAZIONE, le unità rimanenti non funzioneranno in modalità RISCALDAMENTO.
Quando la modalità delle unità interne utilizzata per ultima è diversa da quella attiva correntemente,
verrà emesso un lungo BIP e le spie di FUNZIONAMENTO e TIMER lampeggeranno alternativamente. Ciò mostra che le unità utilizzate l’ultima volta non funzionano. In tal caso, cambiate la
modalità alla stessa modalità con la quale sono utilizzate le altre unità interne.
I-8
Page 77

SUGGERIMENTI SULLA MODALITÀ AUTOMATICO
(AY-XP18GR,AY-XP24GR)
Nella modalità AUTOMATICO, le impostazioni della temperatura e la modalità
vengono selezionate automaticamente in funzione della temperatura della
stanza e della temperatura esterna al momento dell’accensione dell’unità.
Modalità e impostazioni della temperatura
281810034
(22°C)
Rinfresca-
mento
(25°C)
29
Riscalda-
mento
21
(24°C)
Temp. interna
Rinfrescamento
(24°C)
Riscalda-
mento
(23°C)
Le cifre in ( ) sono impostazioni della temperatura
Deumidificazione
Temp. stanza
( )
–2°C
Riscaldamento
• Durante il funzionamento, se la temperatura esterna cambia, le impostazioni della
temperatura cambieranno automaticamente come mostrato in tabella.
• Durante le stagioni che richiedono il RINFRESCAMENTO durante il giorno e il
RISCALDAMENTO durante la notte, o se la temperatura della stanza dovesse
diventare molto più alta della temperatura impostata in seguito all’uso di ulteriori
fonti di calore, il modo commuterà automaticamente tra RISCALDAMENTO e
RINFRESCAMENTO per mantenere una temperatura della stanza confortevole.
(CAMBIO MODALITÀ)
Temp. esterna
Rinfresca-
mento
(26°C)
ITALIANO
SUGGERIMENTI SULLA MODALITÀ AUTOMATICO
(AY-XPM18HR)
Nella modalità AUTOMATICO, le impostazioni della temperatura e la modalità
vengono selezionate automaticamente in funzione della temperatura della
stanza e della temperatura esterna al momento dell’accensione dell’unità.
Modalità e impostazioni della temperatura
281810034
Rinfresca-
mento
(25°C)
26
Riscalda-
mento
(24°C)
Temp. interna
Rinfrescamento
(24°C)
Riscalda-
Riscalda-
mento
(22°C)
Deumidificazione
Temp. stanza
( )
–2°C
mento
(23°C)
Le cifre in ( ) sono impostazioni della temperatura
• Durante il funzionamento, se la temperatura esterna cambia, le impostazioni della
temperatura cambieranno automaticamente come mostrato in tabella.
• Il modo dell’unità operata per prima hanno la priorità su altre unità senza fare
riferimento alla scheda.
Temp. esterna
Rinfresca-
mento
(26°C)
I-9
Page 78

REGOLAZIONE DELLA DIREZIONE DEL FLUSSO D’ARIA
DIREZIONE VERTICALE DEL FLUSSO D’ARIA
Premete il tasto SWING sul telecomando
1
una volta.
MODE
FAN
SWING
CLEAN
1h
1
SET/C
2
• Il deflettore di regolazione verticale cambierà
l’angolo continuamente.
Premete il tasto SWING nuovamente
2
quando il deflettore di regolazione verticale
è alla posizione desiderata.
• Il deflettore smetterà di muoversi all’interno
della gamma mostrata nel diagramma.
• La posizione regolata verrà memorizzata e
verrà automaticamente impostata la volta
successiva.
Gamma di regolazione
Modalità
RINFRESCAMENTO
e DEUMIDIFICAZIONE
Modalità
RISCALDAMENTO
DIREZIONE ORIZZONTALE DEL FLUSSO D’ARIA
Tenete il deflettore di regolazione
orizzontale come mostrato nel
diagramma e regolate la direzione del flusso d’aria.
PRECAUZIONI
Non tentate mai di regolare manualmente il deflettore di regolazione verticale.
• La regolazione manuale può causare malfunzionamento dell’unità quando si usa il
telecomando per la regolazione.
• Quando il deflettore di regolazione verticale è posizionato nella parte bassa nella modalità
RINFRESCAMENTO o DEUMIDIFICAZIONE per un lungo periodo di tempo, si potrebbe
formare della condensa.
Non regolate la leva di regolazione automatica all’estrema sinistra o all’estrema destra nella
modalità RINFRESCAMENTO con la velocità della ventola impostata su “MODERATO (
per un periodo di tempo prolungato.
Si potrebbe formare della condensa sulle leve di ventilazione.
)”
I-10
Page 79

FLUSSO D’ARIA PROGRESSIVO
Premete il tasto FLUSSO D’ARIA PROGRESSIVO durante la operazioni di rinfrescamento
o deumidificazione quando non volete sentire l’aria fredda. Il deflettore di regolazione
verticale è posizionato obliquamente rivolto verso l’alto per mandare aria fredda al soffitto.
Premete il tasto durante l’operazione di riscaldamento. Il deflettore di regolazione
verticale è posizionato verso il basso per mandare aria calda al pavimento e riscaldarvi.
Durante il funzionamento, premete il tasto FLUSSO
1
D’ARIA PROGRESSIVO.
• Il telecomando attiverà il display “ ”.
AM
PER CANCELLARE
Premere il tasto FLUSSO D’ARIA PROGRESSIVO.
NOTE:
DISPLAY
• L’impostazione del FLUSSO D’ARIA PROGRESSIVO è
1
cancellata quando premete il tasto di PIENA POTENZA
mentre FLUSSO D’ARIA PROGRESSIVO è impostato.
• Se desiderate il funzionamento del FLUSSO D’ARIA
PROGRESSIVO in modalità PIENA POTENZA, premete
il tasto FLUSSO D’ARIA PROGRESSIVO durante il
funzionamento a PIENA POTENZA.
FUNZIONAMENTO A PIENA POTENZA
In questa modalità, il condizionatore d’aria funziona a piena potenza e rinfresca o
riscalda l’ambiente così velocemente che potete usarlo non appena rientrate a casa.
Per attivare il funzionamento a PIENA POTENZA,
1
premete il tasto di PIENA POTENZA durante il funzionamento.
• Il telecomando visualizzerà “ ”.
AM
• Il display della temperatura scomparirà.
• La spia verde di PIENA POTENZA ( ) sull’unità si
illuminerà.
ITALIANO
PER CANCELLARE
DISPLAY
Premete nuovamente il tasto di PIENA POTENZA.
• Il funzionamento a PIENA POTENZA verrà cancellato
1
anche quando si cambia il modo di funzionamento o si
spegne l’unità.
• La spia verde di PIENA POTENZA ( ) sull’unità si
spegnerà.
NOTA:
• Non è possibile impostare la temperatura o la ventola e la velocità della stessa durante
l’operazione PIENA POTENZA.
I-11
Page 80

FUNZIONAMENTO DEL PLASMACLUSTER
Il generatore di ioni Plasmacluster all’interno del condizionatore d’aria rilascerà ioni al
plasma (plasmacuster) positivi e negativi nella stanza.
Approssimativamente lo stesso numero di ioni positivi e negativi rilasciati nell’aria
ridurrà alcuni funghi causati dall’aria.
Durante il funzionamento, premere il tasto
1
PLASMACUSTER.
• Il telecomando visualizzerà “ ”.
• La spia blu PLASMACUSTER sull’unità si illuminerà.
PER CANCELLARE
1
DISPLAY
Premete nuovamente il tasto PLASMACLUSTER.
• La spia PLASMACLUSTER sull’unità si spegnerà.
NOTE:
• L’utilizzo della funzione PLASMACLUSTER verrà memorizzato e sarà attivato la prossima
volta che si accende il condizionatore d’aria.
• Per spegnere la spia PLASMACLUSTER, premete il tasto DISPLAY.
Per avviare il funzionamento del PLASMACLUSTER senza i modi di accompagnamento di riscaldamento, rinfrescamento o deumidificazione, premete il tasto
PLASMACLUSTER quando l’unità non è in funzionamento.
• Il simbolo della modalità del telecomando si spegne e la velocità della ventola non può
essere impostata su AUTOMATICA.
I-12
Page 81

OPERAZIONE DI AUTO PULIZIA
L’operazione AUTO PULIZIA consentirà di ridurre la crescita dei funghi della muffa e di
asciugare la parte interna del condizionatore d’aria con ioni al plasma (plasmacluster).
Questa operazione può essere eseguita in modalità VENTOLA e RISCALDAMENTO.
Eseguite l’operazione ad ogni cambio di stagione.
I funghi della muffa già cresciuti non possono essere eliminati con questa operazione.
Premete il tasto CLEAN quando l’unità non è in funzione.
1
• Il telecomando visualizza “ ”.
• La spia rossa di FUNZIONAMENTO (
di AUTO PULIZIA (
sull'unità si illumineranno.
• L’unità smetterà di funzionare dopo quaranta minuti.
) e la spia blu PLASMACLUSTER
PER CANCELLARE
Premete il tasto CLEAN.
MODE
FAN
1h
CLEAN
In alternativa, spegnete l’unità premendo il tasto
d’ACCENSIONE/SPEGNIMENTO.
1
• La spia rossa di FUNZIONAMENTO ( ), la spia verde
di AUTO PULIZIA ( ) e la spia blu PLASMACLUSTER
sull’unità si spegneranno.
NOTA:
• Non potete impostare la temperatura, la velocità della ventola, la direzione dell’aria e
l’impostazione del timer durante l’operazione di AUTO PULIZIA.
), la spia verde
ITALIANO
TIMER DI SPEGNIMENTO DOPO UN’ORA
Quando è impostato il TIMER DI SPEGNIMENTO DOPO UN’ORA, l’unità si spegnerà
automaticamente dopo un’ora.
Premete il tasto TIMER DI SPEGNIMENTO DOPO
1
UN’ORA.
• Il telecomando visualizza “ ”.
• La spia arancione TIMER ( ) sull’unità si illuminerà.
• L’unità smetterà di funzionare dopo un’ora.
PER CANCELLARE
Premete il tasto CANCELLA TIMER (SET/C).
• La spia arancione TIMER ( ) sull’unità si spegnerà.
In alternativa, spegnete l’unità premendo il tasto
MODE
1h
CLEAN
NOTE:
• L’operazione TIMER DI SPEGNIMENTO DOPO UN’ORA ha priorità sulle operazioni di
TIMER ATTIVATO e DISATTIVATO.
• Se il TIMER DI SPEGNIMENTO DOPO UN’ORA viene impostato mentre l’unità non è in
funzione, l’unità funzionerà per un’ora in base alle condizioni impostate precedentemente.
• Se desiderate operare l’unità per un’altra ora prima che la modalità TIMER DI
SPEGNIMENTO DOPO UN’ORA si attivi, premete il tasto durante il funzionamento.
• Se sono impostati TIMER ATTIVATO e/o TIMER DISATTIVATO, il tasto CANCELLA
TIMER cancella ogni impostazione.
1
d’ACCENSIONE/SPEGNIMENTO.
• La spia rossa di FUNZIONAMENTO ( ) e la spia
arancione TIMER ( ) sull’unità si spegneranno.
I-13
Page 82

FUNZIONAMENTO DEL TIMER
NOTA:
Prima di impostare il timer, assicuratevi che l’orologio sia impostato con l’ora giusta.
DISATTIVAZIONE TIMER
Premete il tasto TIMER DISATTIVATO ( ).
1
L’indicatore TIMER DISATTIVATO lampegge-
2
rà; premete i tasti AVANZAMENTO DELL’ORA
o ARRETRAMENTO per impostare l’ora desiderata. (L’ora può essere impostata in incrementi
di 10 minuti.)
Puntate il telecomando verso la finestra di
3
ricezione del segnale sull’unità e premete il
DISPLAY
MODE
FAN
SWING
1h
CLEAN
SET/C
1
2
3
tasto IMPOSTAZIONE TIMER (SET/C).
• La spia arancione TIMER ( ) sull’unità si
illuminerà.
• Un segnale acustico “bip” verrà emesso dall’unità
interna quando riceverà il segnale.
SUGGERIMENTI SUL FUNZIONAMENTO
DI DISATTIVAZIONE TIMER
Quando è impostato la modalità TIMER
DISATTIVATO, l’impostazione della
temperatura della stanza viene regolata
automaticamente per evitare che la stanza
diventi eccessivamente calda o fredda
mentre dormite. (Funzione Auto Sleep)
MODO RINFRESCAMENTO/
DEUMIDIFICAZIONE:
• Un’ora dopo l’inizio del funzionamento con
timer, la temperatura aumenta di 1°C rispetto
all’impostazione originale del termostato.
MODO DI RISCALDAMENTO:
• Un’ora dopo l’inizio del funzionamento con
timer, la temperatura si abbassa di 3°C rispetto all’impostazione originale del termostato.
PER CANCELLARE IL MODO TIMER
Premete il tasto CANCELLA TIMER (SET/C).
• La spia arancione TIMER ( ) sull’unità si
spegnerà.
•
L’ora corrente verrà
visualizzata sul telecomando.
MODE
FAN
SWING
1h
CLEAN
NOTA:
Se è impostato uno dei modi TIMER ATTIVATO,
TIMER DISATTIVATO e SPEGNIMENTO DOPO
UN’ORA, il tasto CANCELLA TIMER (SET/C)
cancella tutte le impostazioni.
PER CAMBIARE L’IMPOSTAZIONE DELL’ORA
Cancellate innanzitutto l’impostazione TIMER
e poi impostate il nuovo orario.
I-14
SET/C
Page 83

ATTIVAZIONE TIMER
DISPLAY
MODE
FAN
SWING
1h
CLEAN
SET/C
1
2
3
Premete il tasto TIMER ATTIVATO ( ).
1
L’indicatore TIMER ATTIVATO lampeggerà;
2
premete i tasti AVANZAMENTO DELL’ORA o
ARRETRAMENTO per impostare l’ora desiderata. (L’ora può essere impostata in incrementi
di 10 minuti.)
Puntate il telecomando verso la finestra di
3
ricezione del segnale sull’unità e premete il tasto
IMPOSTAZIONE TIMER (SET/C).
• La spia arancione TIMER ( ) sull’unità si illuminerà.
• Un segnale acustico “bip” verrà emesso dall’unità
interna quando riceverà il segnale.
Selezionate la modalità di funzionamento.
4
NOTA:
L’unità si accenderà prima dell’ora impostata per
permettere che la stanza raggiunga la temperatura desiderata all’ora programmata. (Funzione risveglio)
ITALIANO
USO COMBINATO DEL TIMER ATTIVATO E DISATTIVATO
Potete usare il timer ATTIVATO e DISATTIVATO in combinazione.
Esempio:
Se si vuole arrestare il funzionamento alle 11:00 p.m. e
riprenderlo (nella stessa modalità e con le stesse
impostazioni di temperatura) per portare la temperatura
della stanza al livello desiderato per le 7:00 a.m.
Impostate TIMER DISATTIVATO sulle 11:00 p.m.
1
durante il funzionamento.
Impostate TIMER ATTIVATO sulle 7:00 a.m.
2
La freccia (
ATTIVATO e TIMER DISATTIVATO mostra quale timer
si attiva prima.
oppure ) tra gli indicatori TIMER
NOTE:
• Non potete programmare il TIMER ATTIVATO e TIMER DISATTIVATO per far funzionare l’unità a
temperature differenti o con altre impostazioni.
• Ciascuno dei due timer può essere programmato in modo tale che si attivi prima dell’altro.
I-15
Page 84

MODALITÀ AUSILIARIA
MODALITÀ AUSILIARIA
Usate questo modo quando il telecomando non è disponibile.
PER ACCENDERE
Sollevate il pannello aperto dell’unità interna e premete il
tasto AUX. sul pannello operativo.
• La spia rossa di FUNZIONAMENTO ( ) sull’unità si illuminerà
e l’unità comincerà il funzionamento nel modo AUTOMATICO.
• La velocità della ventola e l’impostazione della temperatura
sono impostate su AUTOMATICO.
PER SPEGNERE
Premete nuovamente il tasto AUX. sul pannello operativo.
• La spia rossa di FUNZIONAMENTO ( ) sull’unità si spegnerà.
NOTA:
Se viene premuto il tasto AUX. durante il normale funzionamento, l’unità si spegnerà.
MANUTENZIONE
Assicuratevi di scollegare il cavo di alimentazione o di spegnere l’interruttore
dell’impianto prima di eseguire qualsiasi lavoro di manutenzione.
PULIZIA DEI FILTRI
1
2
3
3
I filtri dell’aria dovrebbero essere puliti ogni due settimane.
SPEGNETE L’UNITÀ
1
RIMUOVETE I FILTRI
2
1 Sollevate il pannello aperto.
2 Spingete i filtri leggermente verso l’alto per
sbloccarli.
3 Spingeteli verso il basso per rimuoverli.
TOGLIETE I FILTRI DI DEPURAZIONE
3
ARIA DAI FILTRI DELL’ARIA
PULITE I FILTRI
4
Usate un aspirapolvere per togliere la polvere.
Se i filtri sono sporchi, lavateli con acqua
tiepida e un detergente delicato. Asciugate
i filtri all’ombra prima di reinstallarli.
REINSTALLATE I FILTRI DI
5
DEPURAZIONE ARIA
REINSTALLATE I FILTRI
6
1 Reinstallate i filtri nella posizione originale.
2
1
2 Chiudete il pannello anteriore.
3 Spingete in maniera decisa nella direzione
della freccia marcata sul pannello per
bloccarlo in posizione.
I-16
Page 85

MANUTENZIONE
PULIZIA DELL’UNITÀ E DEL TELECOMANDO
• Strofinateli con un panno morbido.
• Non schizzate o gettate acqua direttamente su di essi. Ciò potrebbe causare
scossa elettrica o provocare danni all’attrezzatura.
• Non usate acqua calda, diluenti, polvere abrasiva o solventi forti.
MANUTENZIONE UNA VOLTA
TERMINATA LA STAGIONE DEL
CONDIZIONATORE D’ARIA
Operate l’unità con l’OPERAZIONE
1
DI AUTO PULIZIA per permettere
al meccanismo di asciugare
completamente.
Arrestate il funzionamento e scol-
2
legate l’unità. Spegnete l’interruttore di circuito se ne avete uno
esclusivamente per il condizionatore d’aria.
Pulite i filtri e poi reinstallateli.
3
MANUTENZIONE PRIMA
DELLA STAGIONE DEL
CONDIZIONATORE D’ARIA
Assicuratevi che i filtri dell’aria non
1
siano sporchi.
Assicuratevi che l’entrata e l’uscita
2
dell’aria non siano ostruite.
Controllate la cremagliera di mon-
3
taggio dell’unità esterna periodicamente ed assicuratevi che sia ben
fissata.
SOSTITUZIONE DEI FILTRI DI PURIFICAZIONE ARIA
I filtri dovrebbero essere sostituiti ogni 3 ~ 6 mesi.
RIMUOVETE I FILTRI DELL’ARIA
1
SOSTITUITE I FILTRI
2
DI DEPURAZIONE ARIA
1 Rimuovete i vecchi filtri dai filtri dell’aria.
2 Posizionate i nuovi filtri di depurazione
aria sotto i tappi del filtro che si trovano
sul filtro dell’aria.
REINSTALLATE I FILTRI DELL’ARIA
3
Filtro
dell’aria
Tappo del filtro
Filtro di
depurazione aria
ITALIANO
NOTA:
• I filtri sporchi di depurazione aria non possono essere lavati per il riutilizzo.
I nuovi filtri sono disponibili dal rappresentante più vicino a voi.
Filtro di sostituzione: tipo AZ-F1800C
Smaltimento dei filtri
Smaltite i filtri sostituiti in base alle normative e alle leggi locali sullo smaltimento.
Materiali del filtro di depurazione aria:
• Filtro: polipropilene
• Struttura: poliestere
I-17
Page 86

ULTERIORI NOTE RIGUARDANTI IL FUNZIONAMENTO
CAMPO DELLA TEMPERATURA OPERATIVA
RINFRES
CAMENTO
RISCALDAMENTO
-
Limite massimo
Limite minimo
Limite massimo
Limite minimo
TEMP. INTERNA
32°C
21°C
27°C 24°C
- –15°C
–10°C(AY-XP18GR)
46°C(AY-XP18GR,AY-XP24GR)
43°C(AY-XPM18HR)
21°C(AY-XP24GR,AY-XPM18HR)
TEMP. ESTERNA
• Il sistema di protezione incorporato potrebbe interrompere
il funzionamento dell’unità
quando la si utilizza fuori da
questo campo di variazione.
• Si potrebbe formare della condensa sull’uscita dell’aria se
l’unità opera in modo continuo
nella modalità RINFRESCAMENTO o DEUMIDIFICAZIONE quando l’umidità è al di
sopra dell’80%.
SE SI VERIFICA UN GUASTO DELL’ALIMENTAZIONE
Se si verifica un guasto dell’alimentazione, il condizionatore d’aria è dotato di una funzione di
memoria che memorizza le impostazioni.
Dopo il ripristino dell’alimentazione, l’unità riprenderà il funzionamento con le stesse impostazioni di
prima, fatta eccezione per il funzionamento con il timer.
Se i timer sono stati impostati prima del guasto dell’alimentazione, dovranno essere reimpostati
dopo il ripristino dell’alimentazione.
FUNZIONE DI PRERISCALDAMENTO
Durante il modo di funzionamento RISCALDAMENTO, la ventola interna potrebbe non funzionare
per due-cinque minuti dopo aver acceso l’unità al fine di evitare che esca aria fredda dalla stessa.
FUNZIONE DI SBRINAMENTO
• Quando sullo scambiatore di calore dell’unità esterna si forma del ghiaccio durante la modalità di
funzionamento RISCALDAMENTO, un sistema di sbrinamento automatico fornisce calore per circa
5-10 minuti per eliminare il ghiaccio. Durante lo sbrinamento, le ventole interne ed esterne si fermano.
• Una volta completato lo sbrinamento, l’unità riprende il funzionamento automaticamente nel modo
RISCALDAMENTO.
EFFICIENZA DEL RISCALDAMENTO
• L’unità usa una pompa di calore che raccoglie calore dall’aria esterna e lo diffonde nella stanza. Di
conseguenza, la temperatura dell’aria esterna influisce notevolmente sulla efficienza di
riscaldamento.
• Se la capacità di riscaldamento è notevolmente ridotta a causa di una bassa temperatura esterna,
utilizzate un riscaldatore addizionale.
• Per riscaldare tutto l’ambiente occorrerà del tempo, in quanto l’unità adotta un sistema a circolazione forzata.
SUGGERIMENTI PER RISPARMIARE ENERGIA
Qui di seguito sono presentati alcuni semplici metodi per risparmiare energia durante l’uso del condizionatore d’aria.
IMPOSTATE LA TEMPERATURA CORRETTA
• Impostando il termostato 1°C in più della temperatura desiderata nella modalità RINFRESCAMENTO
(e 2°C in meno nella modalità RISCALDAMENTO) si risparmierà circa il 10 percento di energia.
• Impostando una temperatura più bassa del necessario durante l’operazione di rinfrescamento, si
consumerà più energia.
RIPARATE DALLA LUCE SOLARE DIRETTA ED EVITATE CORRENTI D’ARIA
• Evitando la luce solare diretta durante l’operazione di rinfrescamento si risparmierà energia.
• Chiudete le finestre e le porte durante le operazioni di rinfrescamento e riscaldamento.
IMPOSTATE LA GIUSTA DIREZIONE DEL FLUSSO D’ARIA PER OTTENERE
LA MIGLIOR CIRCOLAZIONE D’ARIA
MANTENETE IL FILTRO PULITO PER GARANTIRE UN FUNZIONAMENTO PIÙ EFFICACE
RICAVATE IL MASSIMO VANTAGGIO DALLA FUNZIONE DI TIMER DISATTIVATO
DISINSERITE IL CAVO DI ALIMENTAZIONE QUANDO L’UNITÀ NON VIENE
USATA PER UN LUNGO PERIODO DI TEMPO
• L’unità interna continua a consumare una piccola quantità di energia quando non è in funzione.
I-18
Page 87

PRIMA DI RICHIEDERE ASSISTENZA
Le condizioni seguenti non significano malfunzionamento
L’UNITÀ NON FUNZIONA
L’unità non funziona se accesa subito dopo averla
spenta. L’unità non funziona immediatamente dopo
aver cambiato la modalità. Ciò al fine di proteggere
il meccanismo interno. Attendere 3 minuti prima
che l’unità funzioni.
L’UNITÀ NON EMETTE ARIA CALDA
L’unità è in fase di preriscaldamento o di sbrinamento.
ODORI
L’unità potrebbe emettere gli odori, filtrati dentro
l’unità, dei tappeti e dei mobili e gli odori dei componenti interni nelle prime fasi di installazione.
SCRICCHIOLÌO
L’unità potrebbe produrre degli scricchiolìi. Questi
suoni sono generati dalla frizione del pannello
anteriore e degli altri componenti che si espandono
in seguito a cambiamento della temperatura.
VIENE EMESSO UN LEGGERO RUMORE
Questo è un suono emesso quando l’unità sta
generando ioni Plasmacluster.
SIBILO
Il suono delicato, tipo sibilo, è prodotto dal refrigerante che scorre all’interno dell’unità.
VAPORE ACQUEO
• Nel modo di funzionamento RINFRESCAMENTO e DEUMIDIFICAZIONE si può vedere
del vapore acqueo fuoriuscire dall’uscita dell’aria
in seguito alla differenza tra la temperatura
ambiente e l’aria rilasciata dall’unità.
• Nel modo di funzionamento RISCALDAMENTO,
del vapore acqueo può fuoriuscire dall’unità
esterna durante lo sbrinamento.
L’UNITÀ ESTERNA NON SI
ARRESTA
Dopo aver arrestato il funzionamento, la ventola
dell’unità esterna girerà per circa un minuto per
raffreddare l’unità.
ODORI EMESSI DAL GENERATORE
PLASMACLUSTER
Si tratta dell’odore dell’ozono generato dal generatore di ioni Plasmacluster. La concentrazione di
ozono è minima, quindi non è pericolosa per la
salute. La scarica di ozono nell’aria svanisce
rapidamente e la sua densità all’interno della
stanza non aumenta.
ITALIANO
(Soltanto AY-XPM18HR)
L’UNITÀ INTERNA SI SCALDA ANCHE
QUANDO IN ATTESA
Questo accade poiché il refrigerante scorre anche
attraverso i tubi non in funzione dell’unità interna
quando l’altra unità è operata in modo RISCALDAMENTO.
L’UNITÀ INTERNA SI SCALDA ANCHE
SE NON STA EFFETTUANDO
L’OPERAZIONE DI RISCALDAMENTO
Quando premete il tasto PLASMACLUSTER
mentre l’unità non è in funzione, l’operazione
PLASMACLUSTER verrà effettuata senza l’avvio
di alcuna funzione di condizionamento (ad es.
RISCALDAMENTO o RINFRESCAMENTO). A
questo punto, potreste sentire dell’aria calda uscire
dalle uscite d’aria dell’unità se viene operato
RISCALDAMENTO con unità in altre stanze. La
ventola diminuirà la velocità di rotazione e si
accenderà e spegnerà a seconda della temperatura della stanza.
L’UNITÀ NON FUNZIONA NELLA
MODALITÀ RICHIESTA
• Quando un’unità esterna funziona nella modalità RINFRESCAMENTO o DEUMIDIFICAZIONE, non potete utilizzare l’altra unità nella
modalità RISCALDAMENTO (dopo alcuni
secondi, verrà emesso un lungo BIP e le spie di
FUNZIONAMENTO e TIMER lampeggeranno
alternativamente).
• Quando un’unità esterna è utilizzata nella modalità RISCALDAMENTO, non potete utilizzare
l’altra unità nella modalità RINFRESCAMENTO
o DEUMIDIFICAZIONE (dopo alcuni secondi,
verrà emesso un lungo BIP e le spie di FUNZIONAMENTO e TIMER lampeggeranno alternativamente).
L’UNITÀ NON EMETTE ARIA
(operazione PLASMACLUSTER
senza l’avvio di alcuna funzione
di condizionamento, e dell’
operazione di AUTOPULITURA).
Le altre unità sono in fase di sbrinamento.
I-19
Page 88

PRIMA DI RICHIEDERE ASSISTENZA
Se vi sembra che l’unità non funzioni correttamente, controllate seguenti punti prima
di richiedere assistenza.
SE L’UNITÀ NON FUNZIONA
Controllate che l’interruttore del circuito non sia saltato o che non sia bruciato un fusibile.
SE L’UNITÀ NON RAFFREDDA (O RISCALDA) L’AMBIENTE EFFICACEMENTE
Controllate i filtri. Puliteli se
sono sporchi.
Assicuratevi che porte e finestre siano ben chiuse.
Controllate l’unità esterna e
assicuratevi che l’uscita o l’entrata
dell’aria non siano ostruite.
Se nella stanza ci sono tante
persone, è possibile che l’unità
non riesca a raggiungere la
temperatura desiderata.
Controllate che il termostato sia
impostato correttamente.
Controllate che nella stanza
non sia in funzione un’altra
fonte di calore supplementare.
SE L’UNITÀ NON RICEVE IL SEGNALE DEL TELECOMANDO
Controllate che le batterie del
telecomando non siano vecchie o deboli.
Si prega di richiedere il servizio di manutenzione nel caso in cui lampeggino le spie FUNZIONAMENTO, TIMER o PLASMACLUSTER sull’indicatore.
Provate a inviare nuovamente il
segnale puntando il telecomando
correttamente verso la finestra di
ricezione del segnale dell’unità.
Controllate che le polarità delle
batterie siano allineate correttamente.
I-20
Page 89

Page 90

Atenção: O seu produto
está identificado com este
símbolo. Significa que os
produtos eléctricos e
electrónicos não devem ser
misturados com o lixo
doméstico comum. Existe
um sistema de recolhas
específico para estes
produtos.
A. Informações sobre a Eliminação de Produtos para os Utilizadores
(particulares)
1. Na União Europeia
Atenção: Se quiser eliminar este equipamento, não o deve fazer juntamente com o
lixo doméstico comum!
O equipamento eléctrico e electrónico deve ser tratado separadamente e ao abrigo da
legislação aplicável que obriga a um tratamento, recuperação e reciclagem
adequados de equipamentos eléctricos e electrónicos usados.
Após a implementação desta legislação por parte dos Estados-membros, todos os
cidadãos residentes na União Europeia poderão entregar o seu equipamento eléctrico
e electrónico usado em estações de recolha específicas a título gratuito*.
Em alguns países* o seu revendedor local também pode recolher o seu equipamento usado a
título gratuito na compra de um novo equipamento.
*) Contacte as entidades locais para mais informações.
Se o seu equipamento eléctrico e electrónico usado funcionar a pilhas ou baterias, deverá
eliminá-las em separado, conforme a legislação local, e antes de entregar o seu equipamento.
Ao eliminar este produto correctamente estará a contribuir para que o lixo seja
submetido aos processos de tratamento, recuperação e reciclagem adequados. Desta
forma é possível evitar os efeitos nocivos que o tratamento inadequado do lixo
poderia provocar no ambiente e na saúde.
2. Em outros Países fora da UE
Se quiser eliminar este produto, contacte as entidades locais e informe-se sobre o
método correcto para proceder à sua eliminação.
Na Suíça: O equipamento eléctrico e electrónico é aceite, a título gratuito, em
qualquer revendedor, mesmo que não tenha adquirido um novo produto.
encontrar uma lista das estações de recolha destes equipamentos na página da Web
www.swicho.ch ou www.sens.ch.
Poderá
B. Informações sobre a Eliminação de Produtos para UtilizadoresEmpresas.
1. Na União Europeia
Se o produto for usado para fins comerciais e quiser eliminá-lo:
Contacte o seu revendedor SHARP que irá informá-lo sobre a melhor forma de
eliminar o produto. Poderá ter de pagar as despesas resultantes da recolha e
reciclagem do produto. Alguns produtos mais pequenos (e em pequenas
quantidades) poderão ser recolhidos pelas estações locais.
Na Espanha: Contacte o sistema de recolhas público ou as entidades locais para
mais informações sobre a recolha de produtos usados.
2. Em outros Países fora da UE
Se quiser eliminar este produto, contacte as entidades locais e informe-se sobre o
método correcto para proceder à sua eliminação.
PT
Page 91

PORTUGUÊS
Agradecemo-lhe ter adquirido um aparelho de ar condicionado SHARP. Por favor, leia
cuidadosamente este manual antes de fazer funcionar o aparelho.
CONTEÚDO
• INSTRUÇÕES DE SEGURANÇA
IMPORTANTES ......................................... P-1
• NOMES DAS PEÇAS ................................ P-3
• INSTALAÇÃO DO FILTRO
DE PURIFICAÇÃO DE AR ........................ P-5
•
UTILIZAÇÃO DO CONTROLO REMOTO .....
• FUNCIONAMENTO BÁSICO..................... P-8
• REGULAÇÃO DA DIRECÇÃO
DO FLUXO DO AR .................................. P-10
• FLUXO DE AR PROGRESSIVO.............. P-11
• MODO DE FUNCIONAMENTO
A PLENA FORÇA .................................... P-11
P-6
• OPERAÇÃO DO PLASMACLUSTER.........P-12
• OPERAÇÃO DE AUTO LIMPEZA ..............P-13
• TEMPORIZADOR DE UMA HORA............. P-13
• FUNCIONAMENTO
COM TEMPORIZADOR .............................. P-14
•
MODO DE FUNCIONAMENTO AUXILIAR....
• MANUTENÇÃO........................................... P-16
• NOTAS SUPLEMENTARES SOBRE O
FUNCIONAMENTO .................................... P-18
•
SUGESTÕES PARA POUPAR ENERGIA ....
• ANTES DE CHAMAR O SERVIÇO DE
ASSISTÊNCIA TÉCNICA ...........................P-19
INSTRUÇÕES DE SEGURANÇA IMPORTANTES
CUIDADOS PARA A SUA UTILIZAÇÃO
Não puxar ou deformar o cabo de fornecimento de energia. Puxar o cabo de fornecimento
1
de energia e a sua má utilização poderão resultar em danos para a unidade e causar
choque eléctrico.
Ser cuidadoso em não expor o seu corpo directamente sob a saída de ar durante um
2
período prolongado. Poderá afectar a sua condição física.
Quando utilizar o ar condicionado para bebés, crianças, idosos, acamados ou pessoas
3
deficientes, assegure-se de que a temperatura ambiente é apropriada para os que se
encontrarem no compartimento.
P-16
P-18
PORTUGUÊS
Nunca introduzir objectos na unidade. A introdução de objectos poderá resultar em
4
ferimentos devidos à elevada velocidade de rotação das ventoinhas internas.
Não se esquecer de ligar o aparelho de ar condicionado à terra. Não ligar o fio de terra
5
à tubagem de gás, canalização de água, pára-raios ou cabo de terra telefónico. A ligação
de terra incompleta poderá causar choque eléctrico.
Se algo estiver anormal com o ar condicionado (p. ex. um cheiro a queimado), parar
6
imediatamente o funcionamento e DESLIGAR o disjuntor corta-circuitos.
O aparelho deverá ser instalado de acordo com os regulamentos nacionais de instalações
7
eléctricas. A ligação inadequada do cabo poderá causar o sobreaquecimento do cabo
de fornecimento de energia, da ficha e da tomada eléctrica de parede e causar um
incêndio.
Se o cabo de alimentação estiver danificado, deverá ser substituído pelo fabricante ou
8
um seu agente de serviço ou pessoal identicamente qualificado a fim de evitar riscos.
Para substituição, utilizar apenas o cabo de energia especificado pelo fabricante.
ATENÇÃO PARA A INSTALAÇÃO/REMOÇÃO/REPARAÇÃO
• Não tente instalar/remover/reparar a unidade você mesmo(a). Um trabalho incorrecto
poderá provocar choque eléctrico, fugas de água, fogo etc. Consulte o seu revendedor ou
outro pessoal de assistência qualificado para a instalação/remoção/reparação do aparelho.
P-1
Page 92

INSTRUÇÕES DE SEGURANÇA IMPORTANTES
PRECAUÇÕES COM A UTILIZAÇÃO
Abrir periodicamente uma janela ou uma porta para ventilar o compartimento,
1
especialmente quando utilizar electrodomésticos a gás. A ventilação insuficiente
poderá causar redução de oxigénio.
Não utilizar os botões com a mão molhada. Poderá causar choque eléctrico.
2
Para segurança, desligar o disjuntor corta-circuitos quando não utilizar a unidade por
3
um período longo de tempo.
Verificar periodicamente o desgaste do chassis de montagem da unidade externa e
4
certificar-se de que se encontra firmemente na posição.
Não colocar nada sobre a unidade externa nem a pisar. O objecto ou a pessoa poderão
5
cair, causando ferimentos.
Esta unidade foi concebida para utilização residencial. Não utilizar para outras aplicações
6
tais como num canil ou estufa para criação de animais ou plantas.
Não colocar um recipiente com água na unidade. Se a água penetrar na unidade, os
7
isolamentos eléctricos poder-se-ão deteriorar e causar choque eléctrico.
Não bloquear as entradas nem as saídas de ar da unidade. Poderá causar um
8
desempenho insuficiente ou problemas.
Assegure-se que o aparelho não está em funcionamento e desligue o disjuntor corta-
9
circuitos antes de executar qualquer manutenção ou limpeza. Uma ventoinha roda no
interior da unidade e você poderá ficar ferido.
Não espalhar ou verter água directamente sobre a unidade. A água poderá causar
10
choque eléctrico ou danos do equipamento.
Este electrodoméstico não foi concebido para utilização por crianças pequenas ou
11
pessoas doentes sem supervisão.
As crianças pequenas deverão ser supervisionadas para assegurar que elas não
brincam com o electrodoméstico.
Este electrodoméstico é inapropriado para utilização na região nórdica.
12
PRECAUÇÕES COM A COLOCAÇÃO/INSTALAÇÃO
• Assegurar-se de que liga o ar condicionado à corrente com a tensão e frequência
definidas.
A utilização de corrente com tensão e frequência inadequadas poderá resultar em danos
no equipamento e possível incêndio.
• Não instalar a unidade num local onde possam existir fugas de gás inflamável. Poderá
causar um incêndio.
Instalar a unidade num local com um mínimo de poeira, vapores e humidade no ar.
• Dispor o tubo de drenagem para assegurar a drenagem suave. Uma drenagem insuficiente
poderá provocar que o compartimento, mobiliário, etc. fiquem molhados.
• Assegurar-se de que se encontra instalado um disjuntor diferencial ou um corta-circuitos,
dependendo do local de instalação, para evitar o choque eléctrico.
P-2
Page 93

NOMES DAS PEÇAS
UNIDADE INTERIOR
1
2
3
4
5
6
7
8
9
0
q
w
e
r
t
y
u
1 Filtros de Purificação de ar
2 Entrada (Ar)
3 Painel de abrir
4 Botão AUX.
5 Filtros de ar
6 Janela receptora
7 Cabo de ligação à corrente
(Apenas AY-XP18GR)
8 Indicador
9 Reguladores verticais
0 Reguladores horizontais
q Saída (Ar)
w Controlo remoto
e Lâmpada PLENA FORÇA
(verde )
r Lâmpada AUTO LIMPEZA
(verde )
t Lâmpada PLASMACLUSTER
(azul)
y Lâmpada TEMPORIZADOR
(laranja )
u Lâmpada FUNCIONAMENTO
(vermelha )
PORTUGUÊS
NOTA: As unidades reais poderão variar ligeiramente em relação às apresentadas acima.
P-3
Page 94

NOMES DAS PEÇAS
TAMPA DO CONTROLO REMOTO
1 TRANSMISSOR
2 MOSTRADOR LCD (de cristais líquidos)
3 Botão PLASMACLUSTER
4 Botão MOSTRADOR (DISPLAY)
5 Botão LIGAR/DESLIGAR
6 Botão TERMOSTATO
7 Botão PLENA FORÇA
8 Botão FLUXO DE AR PROGRESSIVO
9 Botão MODO (MODE)
0 Botão LIGAR TEMPORIZADOR
q Botão DESLIGAR TEMPORIZADOR
w Botão TEMPORIZADOR DE UMA HORA
e Botão AVANÇAR HORA
r Botão RECUAR HORA
t Botão AUTO LIMPEZA (CLEAN)
y Botão DEFINIR/ANULAR TEMPORIZADOR
u Indica que o COMPARTIMENTO DAS
i Botão RELÓGIO
o Botão VENTOINHA (FAN)
p Botão OSCILAÇÃO (SWING)
DISPLAY
MODE
FAN
SWING
1h
CLEAN
SET/C
1
2
3
4
5
6
7
8
9
0
q
w
e
r
t
y
u
i
o
p
(para regular o temporizador)
(para regular o temporizador)
(SET/C)
PILHAS se encontra debaixo desta marca
MOSTRADOR LCD DO CONTROLO REMOTO
a SÍMBOLO DE FLUXO DE AR PROGRESSIVO
s SÍMBOLO DE AUTO LIMPEZA
d SÍMBOLO PLASMACLUSTER
f SÍMBOLOS DE MODOS DE FUNCIONAMENTO
: AUTO : SECAR
: CALOR : FRIO
g
REGULAÇÃO DO TERMOSTATO PARA MODOS
DE FUNCIONAMENTO AUTOMÁTICO E SECAR
h INDICADOR DE TEMPERATURA
j SÍMBOLO DE TRANSMISSÃO
k SÍMBOLO DE PLENA FORÇA
l
SÍMBOLOS DA VELOCIDADE DA VENTOINHA
: AUTO : LENTO
: ALTO : SUAVE
; INDICADOR LIGAR TEMPORIZADOR/
RELÓGIO
Indica o tempo de ligação do temporizador
ou a hora actual.
31
INDICADOR DESLIGAR TEMPORIZADOR
Indica o tempo de desligamento do temporizador
ou a regulação do temporizador para uma hora.
P-4
a
s
d
f
g
h
j
k
l
;
31
Page 95

INSTALAÇÃO DO FILTRO DE PURIFICAÇÃO DE AR
Os filtros de purificação de ar são apresentados como acessório nesta unidade.
Durante o funcionamento do ar condicionado, os filtros retiram a poeira e o fumo de
tabaco do ar e debitam ar limpo.
Retire os filtros de ar.
1
1 Abra o painel de abrir.
2 Empurre os filtros ligeiramente
para cima a fim de os desencaixar.
3 Puxe os filtros de ar para baixo a
1
fim de os poder tirar.
2
Filtro de ar
3
2
1
3
Batente do filtro
Filtro de purificação de ar
Instale o filtro de purificação de ar
2
sob os batentes do filtro localizados
no filtro de ar.
Reinstale os filtros de ar.
3
1 Recoloque os filtros na posição
inicial.
2 Feche o painel de abrir.
3 Empurre com força para o engatar
devidamente no seu lugar.
PORTUGUÊS
Precauções a tomar
• Os filtros estão selados num saco plástico para preservar o seu efeito de recolha
de poeira.
Não abra o saco até precisar de usar os filtros. (Caso contrário, a vida dos filtros
poderá ser encurtada.)
• Não exponha os filtros à luz solar directa. (Caso contrário poderão deteriorar-se.)
P-5
Page 96

UTILIZAÇÃO DO CONTROLO REMOTO
+
+
-
CARREGAR AS PILHAS Use duas pilhas AAA (R03).
Retire a tampa do controlo
1
remoto.
Insira as pilhas no compar-
2
timento assegurando que os
pólos ± e — fiquem correctamente posicionados.
• Se as pilhas estiverem devidamente instaladas aparecerá
no mostrador “AM 6:00”.
Recoloque a tampa.
3
NOTAS:
• A duração de vida útil das pilhas é de aproximadamente um ano, sob condições
normais de utilização.
• Ao substituir estas pilhas, faça-o sempre por duas novas e use sempre do mesmo
tipo.
• Se o controlo remoto não funcionar normalmente, depois de ter substituído as
pilhas, tire-as e volte a colocá-las após 30 segundos.
• Se não pretender utilizar a unidade por um período mais prolongado, retire as
pilhas do controlo remoto.
Tampa do controlo
remoto
COMO UTILIZAR O CONTROLO REMOTO
Aponte o controlo remoto na
direcção do receptor da unidade e
carregue no botão que pretende
accionar. Ouvir-se-á um som
quando a unidade receber o sinal.
• Assegure-se de que não há qualquer
objecto, como p.ex., cortinas, entre o
controlo remoto e a unidade.
• O controlo remoto funciona até uma
distância de sete metros.
P-6
Page 97

ATENÇÃO
• Não exponha a janela receptora directamente à luz do sol forte, pois os raios solares
podem afectar o funcionamento correcto. Caso seja necessário, feche as cortinas para
evitar essa exposição directa.
• Se utilizar uma lâmpada fluorescente com um arrancador rápido no mesmo quarto em
que se encontra o ar condicionado, podem surgir interferências durante a transmissão
do sinal.
• A unidade pode ser afectada por sinais emitidos pelo controlo remoto de um televisor,
de um videogravador ou de outro equipamento que seja utilizado no mesmo quarto.
• Não deixe o controlo remoto exposto à luz directa do sol ou perto de um aquecimento.
Proteja também a unidade e o controlo remoto contra humidade e impactos, pois estes
poderão provocar a sua descoloração ou danificá-los.
ACERTAR AS HORAS DO RELÓGIO
Existem dois tipos de funcionamento: relógio de 12 horas
e relógio de 24 horas.
MODE
FAN
SWING
1h
CLEAN
SET/C
2
3
1
Exemplo: 5 horas da tarde
Relógio Mostrador
Relógio de 12 horas PM 5:00
Relógio de 24 horas 17:00
Para activar o relógio de 12 horas carre-
1
gue uma vez no botão RELÓGIO no
primeiro passo.
Para activar o relógio de 24 horas, carregue duas vezes no botão RELÓGIO no
primeiro passo.
Carregue nos botões de AVANÇAR ou
2
RECUAR A HORA para acertar a hora
do relógio.
• Mantenha o respectivo botão premido para
avançar ou recuar rapidamente a hora
visualizada.
Carregue no botão SET/C.
3
• Os dois pontos (:) piscam para indicar que
o relógio está a funcionar.
NOTA:
• Estando programado o modo de temporizador,
o relógio não pode ser acertado.
PORTUGUÊS
P-7
Page 98

FUNCIONAMENTO BÁSICO
Carregue no botão MODE para escolher o
1
modo de funcionamento.
Carregue no botão LIGAR/DESLIGAR para
2
activar a função.
AUTO CALOR FRIO SECAR
DISPLAY
MODE
FAN
SWING
1h
CLEAN
SET/C
2
5
3
1
4
• A lâmpada vermelha ( ) de FUNCIONAMENTO da unidade acender-se-á.
Carregue no botão de TERMOSTATO para regu-
3
lar a temperatura desejada.
• Em modos AUTO e
SECAR, a temperatura pode ser alterada
em incrementos de
1°C dentro da gama
de 2°C acima a 2°C
abaixo da temperatura automaticamente
determinada pelo ar
condicionado.
•
Nos modos FRIO e CALOR, a temperatura pode
ser definida dentro da gama de 18 a 32°C.
Carregue no botão FAN para determinar a
4
velocidade desejada da ventoinha.
AUTO SUAVE LENTO RÁPIDO
•
No modo SECAR, a velocidade da ventoinha encontrase ajustada em AUTO e não pode ser alterada.
(Exemplo: 1°C mais alta)
C
(Exemplo: 2°C mais baixa)
C
Para desligar a unidade, carregue
5
novamente no botão LIGAR/DESLIGAR.
• A lâmpada vermelha ( ) de FUNCIONAMENTO na unidade apaga-se.
Quando usar o seu ar condicionado com multi sistema
(AY-XPM18HR)
Com um ar condicionado multi sistema, podem ser ligadas múltiplas unidades interiores à unidade
exterior. Quando o modo definido for diferente entre as unidade interiores, a(s) unidade(s)
interior(es) comandada(s) em último lugar podem não funcionar.
• Quando a(s) unidade(s) interior(es) estiver(em) a funcionar em modo CALOR, a(s) outra(s) unidade(s)
não pode(m) funcionar em modo FRIO ou SECAR.
• Quando a(s) unidade(s) interior(es) estiver(em) a funcionar em modo FRIO ou SECAR, a(s) outra(s)
unidade(s) não pode(m) funcionar em modo CALOR.
Quando o modo da(s) unidade(s) interior(es) operada(s) em último lugar for(em) diferente(s) da(s) que já
está/estão em operação, após alguns segundos, será emitido um longo BIP e as lâmpadas
FUNCIONAMENTO e TEMPORIZADOR piscam alternadamente. Isto indica que a(s) unidade(s) operada(s) em último lugar não está/estão a funcionar. Nesse caso, mude o modo para o mesmo modo no qual
está/ão a(s) unidade(s) interior(es) a funcionar.
P-8
Page 99

SUGESTÕES REFERENTES AO MODO AUTO
(AY-XP18GR,AY-XP24GR)
No modo AUTO, a temperatura e o modo são seleccionados automaticamente
consoante a temperatura ambiente e a temperatura exterior no momento em que
a unidade é ligada.
Modos e regulações de temperatura
Temp. exterior
Frio
(26°C)
29
Calor
(24°C)
21
Temp. interior
281810034
Frio
(24°C)
Calor
(23°C)
Os valores entre ( ) são temperaturas reguladas
Secar
Temperatura ambiente
( )
–2°C
Frio
(25°C)
Calor
(22°C)
• Durante o funcionamento, se se alterar a temperatura exterior, as regulações da
temperatura deslocar-se-ão automaticamente conforme mostra a tabela.
• Durante as estações em que necessita ARREFECIMENTO durante o dia e
AQUECIMENTO à noite ou se a temperatura ambiente se tornar extremamente mais
elevada do que a temperatura regulada, devido a equipamento de aquecimento
suplementar, o modo trocará automaticamente entre os modos de CALOR e FRIO
para manter o compartimento a uma temperatura agradável. (MUDANÇA DE MODO)
SUGESTÕES REFERENTES AO MODO AUTO
(AY-XPM18HR)
PORTUGUÊS
No modo AUTO, a temperatura e o modo são seleccionados automaticamente
consoante a temperatura ambiente e a temperatura exterior no momento em
que a unidade é ligada.
Modos e regulações de temperatura
Temp. exterior
Frio
(26°C)
26
Calor
(24°C)
Temp. interior
281810034
Frio
(24°C)
Calor
(23°C)
Calor
(22°C)
Os valores entre ( ) são temperaturas reguladas
Secar
Temperatura ambiente
( )
–2°C
Frio
(25°C)
• Durante o funcionamento, se se alterar a temperatura exterior, as regulações da
temperatura deslocar-se-ão automaticamente conforme mostra a tabela.
• O modo da unidade ligada em primeiro lugar, terá prioridade sobre a(s) unidade(s)
sem referência à tabela.
P-9
Page 100

REGULAÇÃO DA DIRECÇÃO DO FLUXO DO AR
DIRECÇÃO DO FLUXO VERTICAL DO AR
Carregue uma vez no botão SWING no con-
1
trolo remoto.
MODE
FAN
SWING
CLEAN
1h
1
SET/C
2
• O regulador vertical modificará continuamente o seu ângulo.
Carregue mais uma vez no botão SWING
2
assim que o regulador vertical alcançar a
posição desejada.
• O regulador parará dentro da margem apresentada no diagrama.
• A posição ajustada será memorizada e será
automaticamente regulada na mesma posição
quando funcionar na próxima vez.
Margem de regulação
Modo FRIO e SECAR
Modo CALOR
DIRECÇÃO DO FLUXO HORIZONTAL DO AR
Segure nas palhetas de regulação horizontais como ilustrado e
regule a direcção do fluxo do ar.
ATENÇÃO
Nunca tente ajustar manualmente a palheta de ajuste vertical.
• O ajuste manual destas palhetas pode mais tarde provocar o mau funcionamento da
unidade ao ser comandada por controlo remoto.
• Quando os modos FRIO e SECAR são utilizados por um período prolongado com as
palhetas de regulação verticais ajustadas numa posição muito virada para baixo, pode
formar-se água de condensação.
Não regule o ajuste da persiana horizontal demasiadamente para a direita ou esquerda no
modo FRIO com a velocidade de ventoinha “SUAVE (
Condensação poderá formar-se nas persianas.
)” durante um longo período de tempo.
P-10
 Loading...