

Page 1
AY-AP7FHR
AY-AP9FHR
AY-AP12FHR
AY-AP7FHR
AY-AP9FHR
AY-AP12FHR
SPLIT TYPE
ROOM AIR CONDITIONER
OPERATION MANUAL
CONDIZIONATORE D’ARIA
DA CAMERA TIPO SPLIT
MANUALE DI ISTRUZIONI
AR CONDICIONADO DE SALA
DE DUAS UNIDADES
MANUAL DE OPERAÇÃO
ENGLISH
AE-A7FHR
AE-A9FHR
AE-A12FHR
*Plasmacluster is a trademark of
SHARP Corpration.
(AY-AP7FHR/AY-AP9FHR)
(AY-AP12FHR)
ITALIANO
PORTUGUÊS
INDOOR UNIT
UNITÀ INTERNA
UNIDADE INTERIOR
OUTDOOR UNIT
UNITÀ ESTERNA
UNIDADE EXTERIOR
Page 2

A. Information on Disposal for Users (private households)
1. In the European Union
Attention: If you want to dispose of this equipment, please do not use the ordinary dust
bin!
Used electrical and electronic equipment must be treated separately and in
accordance with legislation that requires proper treatment, recovery and recycling of
used electrical and electronic equipment.
Following the implementation by member states, private households within the EU
states may return their used electrical and electronic equipment to designated
collection facilities free of charge*.
In some countries* your local retailer may also
take back your old product free of charge if you purchase a similar new one.
*) Please contact your local authority for further details.
If your used electrical or electronic equipment has batteries or accumulators, please
dispose of these separately beforehand according to local requirements .
By disposing of this product correctly you will help ensure that the waste undergoes
the necessary treatment, recovery and recycling and thus prevent potential negative
effects on the environment and human health which could otherwise arise due to
inappropriate waste handling.
2. In other Countries outside the EU
If you wish to discard this product, please contact your local authorities and ask for the
correct method of disposal.
For Switzerland: Used electrical or electronic equipment can be returned free of
charge to the dealer, even if you don’t purchase a new product. Further collection
facilities are listed on the homepage of
www.swico.ch
or www.sens.ch.
B. Information on Disposal for Business Users.
1. In the European Union
If the product is used for business purposes and you want to discard it:
Please contact your SHARP dealer who will inform you about the take-back of the
product. You might be charged for the costs arising from take-back and recycling.
Small products (and small amounts) might be taken back by your local collection
facilities.
For Spain: Please contact the established collection system or your local authority for
take-back of your used products.
2. In other Countries outside the EU
If you wish to discard of this product, please contact your local authorities and ask for
the correct method of disposal.
Attention: Your product is
marked with this symbol. It
means that used electrical
and electronic products
should not be mixed with
general household waste.
There is a separate
collection system for these
products.
Page 3
ENGLISH
E-1
ENGLISH
Thank you for purchasing a SHARP air conditioner. Please read this manual carefully
before operating the product.
• IMPORTANT SAFEY INSTRUCTIONS .... E-1
• ADDITIONAL NOTES ON OPERATION .. E-3
• TIPS ON SAVING ENERGY.....................E-3
• PART NAMES........................................... E-4
• USING THE REMOTE CONTROL ........... E-7
• BASIC OPERATION ................................. E-8
•
ADJUSTING THE AIR FLOW DIRECTION ..
E-9
CONTENTS
• PLASMACLUSTER OPERATION ....................E-10
• TURBO OPERATION .......................................E-11
• ONE-HOUR OFF TIMER ..................................E-11
• TIMER OPERATION.........................................E-12
• AUXILIARY MODE ...........................................E-14
• MAINTENANCE................................................E-15
• BEFORE CALLING FOR SERVICE .................E-16
IMPORTANT SAFETY INSTRUCTIONS
WARNINGS FOR USE
1
Do not pull or deform the power supply cord. Pulling and misuse of the power supply cord
can result in damage to the unit and cause electrical shock.
2
Be careful not to expose your body directly to the outlet air for a long time. It may affect
your physical conditions.
3
When using the air conditioner for infants, children, elderly, bedridden, or disabled people
make sure the room temperature is suitable for those in the room.
4
Never insert objects into the unit. Inserting objects can result in injury due to the high
speed rotation of internal fans.
5
Ground the air conditioner without fail. Do not connect the grounding wire to gas pipe,
water pipe, lightning rod or telephone grounding wire. Incomplete grounding may cause
electric shock.
6
If anything is abnormal with the air conditioner (ex. a burning smell), stop the operation
immediately and turn the circuit breaker OFF.
7
The appliance shall be installed in accordance with national wiring regulations. Improper
cable connection can cause the power supply cord, plug and the electrical outlet to
overheat and cause fire.
8
If the supply cord is damaged, it must be replaced by the manufacturer or its service agent
or a similarly qualified person in order to avoid a hazard. Use only the manufacturespecified power cord for replacement.
WARNINGS FOR INSTALLATION / REMOVAL / REPAIR
• Do not attempt to install/remove/repair the unit by yourself. Incorrect work will cause electric
shock, water leak, fire etc. Consult your dealer or other qualified service personnel for the
installation/removal/repair of the unit.
This equipment complies with the requirements of Directives 89/336/EEC and 73/23/
EEC as amended by 93/68/EEC.
Page 4

IMPORTANT SAFETY INSTRUCTIONS
CAUTIONS FOR USE
1
Open a window or door periodically to ventilate the room, especially when using gas
appliances. Insufficient ventilation may cause oxygen shortage.
2
Do not operate the buttons with wet hand. It may cause electric shock.
3
For safety, turn the circuit breaker off when not using the unit for an extended period of
time.
4
Check the outdoor unit mounting rack periodically for wear and to make sure it is firmly
in place.
5
Do not put anything on the outdoor unit nor step on it. The object or the person may fall
down or drop, causing injury.
6
This unit is designed for residential use. Do not use for other applications such as in a
kennel or greenhouse to raise animals or grow plants.
7
Do not place a vessel with water on the unit. If water penetrates into the unit, electrical
insulations may deteriorate and cause electric shock.
8
Do not block the air inlets nor outlets of the unit. It may cause insufficient performance
or troubles.
9
Be sure to stop the operation and turn the circuit breaker off before performing any
maintenance or cleaning. A fan is rotating inside the unit and you may get injured.
10
Do not splash or pour water directly on the unit. Water can cause electrical shock or
equipment damage.
11
This appliance is not intended for use by young children or infirm persons without
supervision.
Young children should be supervised to ensure that they do not play with the appliance.
CAUTIONS FOR LOCATION / INSTALLATION
• Make sure to connect the air conditioner to power supply of the rated voltage and
frequency.
Use of a power supply with improper voltage and frequency can result in equipment
damage and possible fire.
• Do not install the unit in a place where inflammable gas may leak. It may cause fire.
Install the unit in a place with minimal dust, fumes and moisture in the air.
• Arrange the drain hose to ensure smooth drainage. Insufficient drainage may cause wetting
of the room, furniture etc.
• Make sure a leak breaker or a circuit breaker is installed, depending on the installation
location, to avoid electrical shock.
E-2
Page 5
ENGLISH
E-3
INDOOR TEMP. OUTDOOR TEMP.
COOLING
upper limit
32˚C D.B. 43˚C D.B.
23˚C W.B. -
lower limit
21˚C D.B. 21˚C D.B.
15˚C W.B. -
HEATING
upper limit
27˚C D.B. 24˚C D.B.
- 18˚C W.B.
lower limit
20˚C D.B. -8.5˚C D.B.
- -9.5˚C W.B.
ADDITIONAL NOTES ON OPERATION
OPERATING TEMPERATURE RANGE
• The built-in protective device may prevent the unit
from operating when used
out of this range.
• Condensation may form on
the air outlet if the unit operates continuously in the
COOL or DRY mode when
humidity is over 80 percent.
D.B. = Dry-bulb W.B. = Wet-bulb
PREHEATING FUNCTION
In the HEAT operation, the indoor fan may not start for two to five minutes after the unit is turned on
to prevent cold air from blowing out of the unit.
DE-ICING FUNCTION
• When ice forms on the heat exchanger in the outdoor unit during the HEAT operation, an
automatic de-icer provides heat for about 5 to 10 minutes to remove the ice. During de-icing, the
inside and outside fans stop operating.
• After de-icing is completed, the unit automatically resumes operation in the HEAT mode.
HEATING EFFICIENCY
• The unit employs a heat pump that draws heat from the outside air and releases it into the room.
The outside air temperature therefore greatly affects the heating efficiency.
• If the heating efficiency is reduced due to low outside temperatures, use an additional heater.
• It takes time to warm up and heat the entire room because of the forced air circulation system.
WHEN POWER FAILURE OCCURS
This air conditioner has a memory function to store settings when a power failure occurs.
After power recovery, the unit will automatically re-start in the same settings which were active before
the power failure, except for timer settings.
If the timers were set before a power failure, they will need to be re-set after power recovery.
TIPS ON SAVING ENERGY
Below are some simple ways to save energy when you use your air conditioner.
SET THE CORRECT TEMPERATURE
• Setting the thermostat 1°C higher than the desired temperature in the COOL mode and 2°C lower
in the HEAT mode will save approximately 10 percent in power consumption.
• Setting the temperature lower than necessary during cooling operation will result in increased
power consumption.
BLOCK DIRECT SUNLIGHT AND PREVENT DRAFTS
• Blocking direct sunlight during cooling operation will reduce power consumption.
• Close the windows and doors during cooling and heating operations.
SET PROPER AIR FLOW DIRECTION TO OBTAIN THE BEST AIR
CIRCULATION
KEEP FILTER CLEAN TO ENSURE THE MOST EFFICIENT OPERATION
MAKE MOST OF THE TIMER OFF FUNCTION
DISCONNECT THE POWER CORD WHEN THE UNIT IS NOT USED FOR AN
EXTENDED PERIOD OF TIME
• The indoor unit still consumes a small amount of power when it is not operating.
Page 6
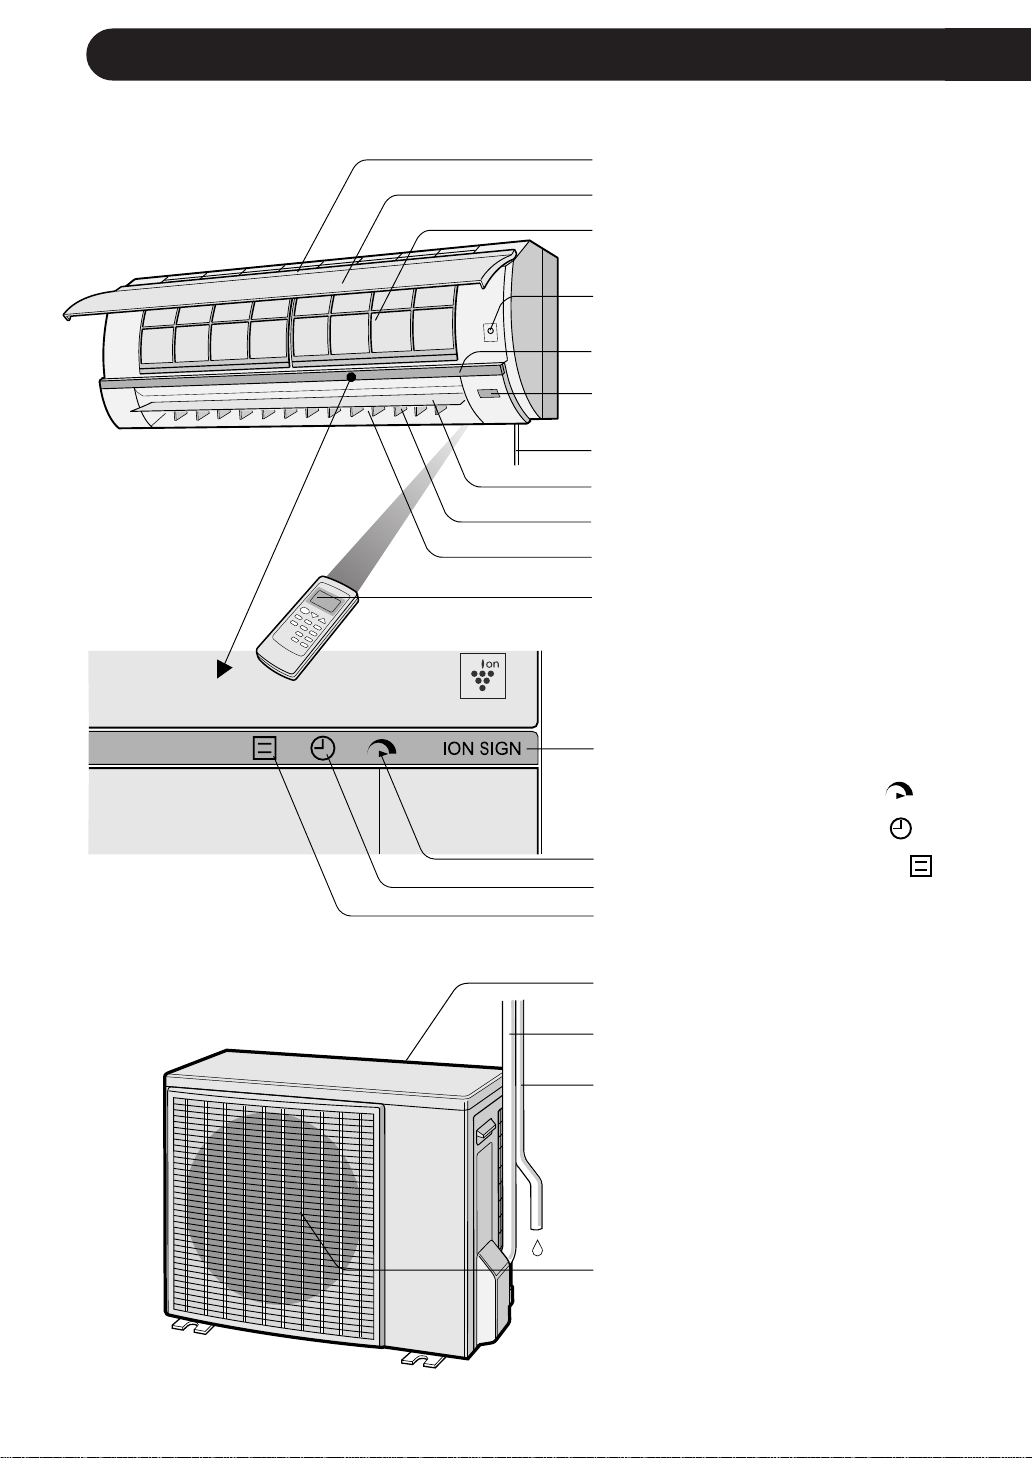
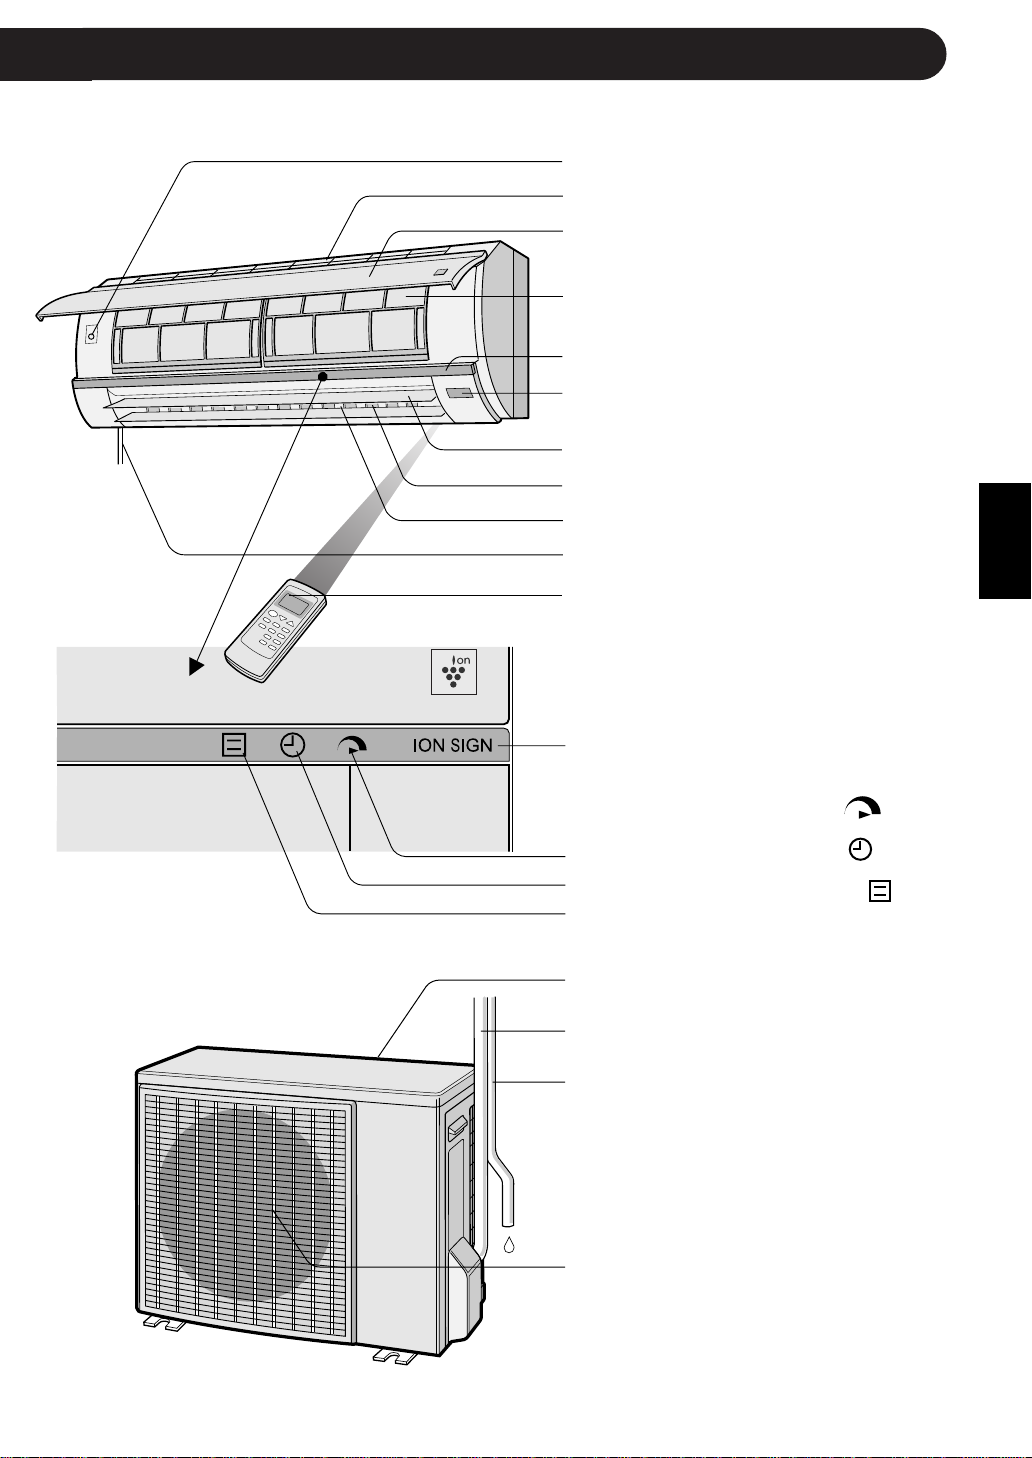
PART NAMES
1 Inlet (Air)
2 Open Panel
3 Air Filters
4 AUX. Button
5 Indicator
6 Receiver Window
7 Power Supply Cord
8 Vertical Adjustment Louvre
9 Horizontal Adjustment Louvres
0 Outlet (Air)
q Remote Control
w PLASMACLUSTER Lamp (blue)
e TURBO Lamp (green
)
r TIMER Lamp (orange
)
t OPERATION Lamp (red
)
OUTDOOR UNIT
NOTE: Actual units might vary slightly from those shown above.
INDOOR UNIT (AY-AP7FHR/AY-AP9FHR)
1
2
3
4
5
6
7
8
9
0
q
y Inlet(Air)
u Refrigerant Tube and
Interconnecting Cord
i Drainage Hose
o Outlet(Air)
E-4
w
e
r
t
y
u
i
o
Page 7
ENGLISH
1 AUX. Button
2 Inlet (Air)
3 Open Panel
4 Air Filters
5 Indicator
6 Receiver Window
7 Vertical Adjustment Louvres
8 Horizontal Adjustment Louvres
9 Outlet (Air)
0 Power Supply Cord
q Remote Control
w PLASMACLUSTER Lamp
(blue)
e TURBO Lamp (green
)
r TIMER Lamp (orange
)
t OPERATION Lamp (red )
OUTDOOR UNIT
NOTE: Actual units might vary slightly from those shown above.
INDOOR UNIT (AY-AP12FHR)
y Inlet (Air)
u Refrigerant Tube and
Interconnecting Cord
i Drainage Hose
o Outlet (Air)
1
2
3
4
5
6
7
8
9
0
q
w
e
r
t
y
u
i
o
E-5
Page 8
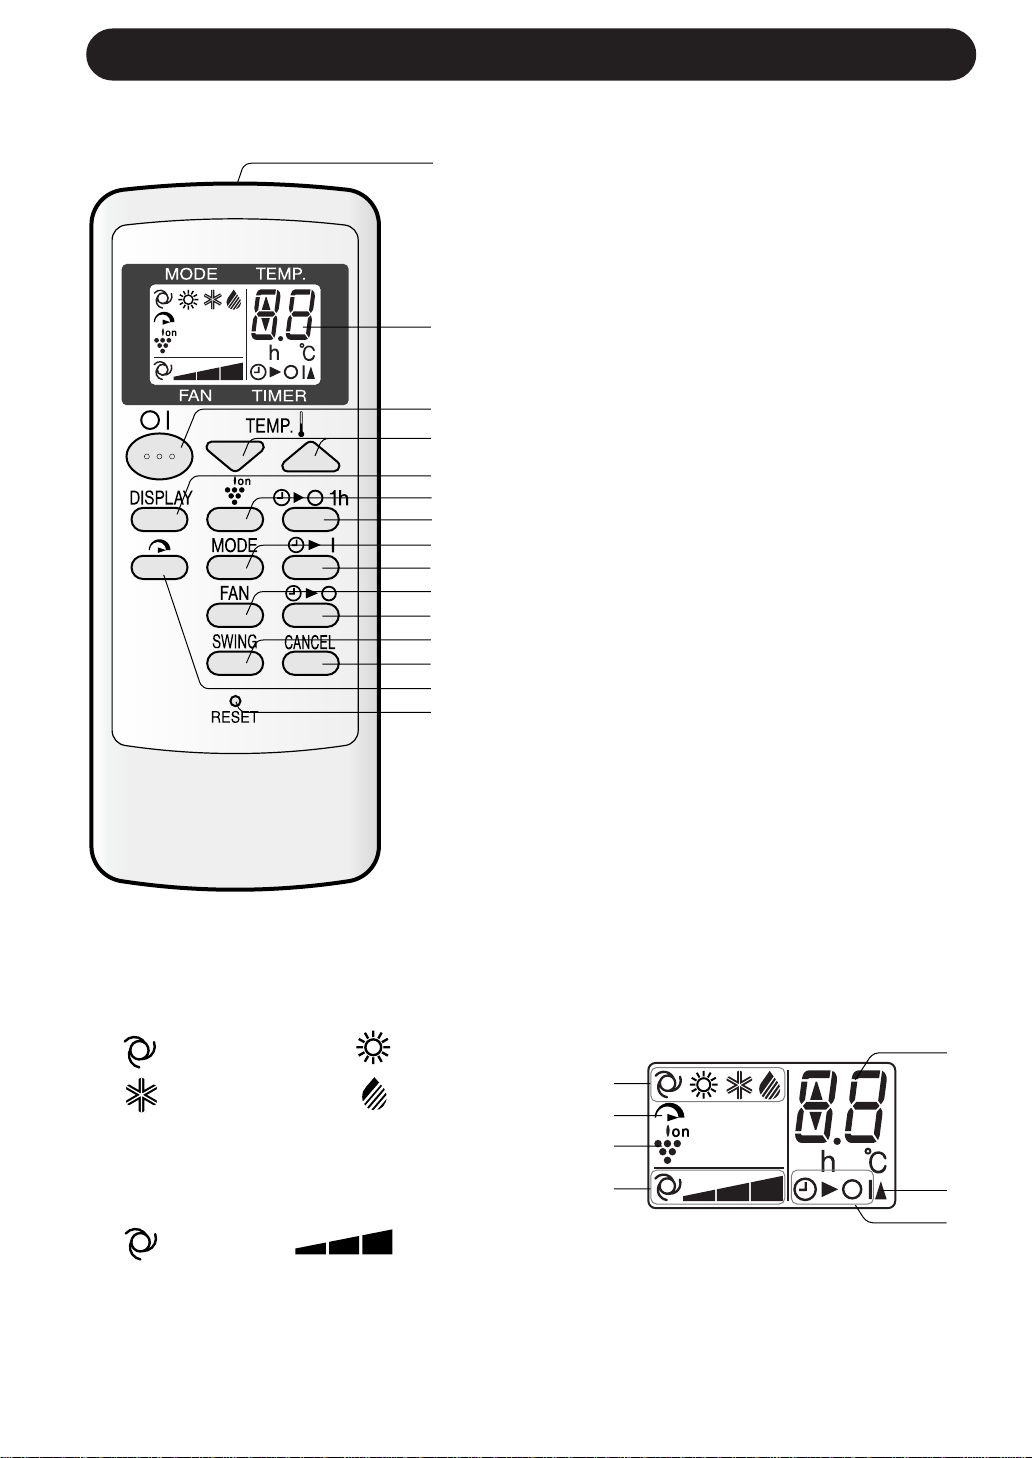
REMOTE CONTROL
1 TRANSMITTER
2 DISPLAY (Liquid Crystal Display)
3 ON/OFF Button
4 TEMP. Button
5 DISPLAY Button
6 PLASMACLUSTER Button
7 ONE-HOUR OFF TIMER Button
8 MODE Button
9 TIMER ON Button (for setting the timer)
0 FAN Button
q TIMER OFF Button (for setting the timer)
w SWING Button
e TIMER CANCEL Button
r TURBO Button
t RESET Button
y MODE SYMBOLS
: AUTO : HEAT
: COOL : DRY
u TURBO SYMBOL
i PLASMACLUSTER SYMBOL
o FAN SPEED SYMBOLS
: AUTO : Manual setting
p TEMPERATURE AND TIMER COUNT DOWN
INDICATOR
a TRANSMITTING SYMBOL
s TIMER ON/TIMER OFF INDICATOR
Indicates when timer on or timer off is set.
L.C.D. REMOTE CONTROL DISPLAY
1
2
3
4
5
6
7
8
9
0
q
w
e
r
t
y
u
i
o
p
a
s
PART NAMES
E-6
Page 9

ENGLISH
1
Remove the battery cover at the back
of the remote control.
2
Insert batteries in the compartment,
making sure the ± and — polarities
are correctly aligned.
• Lines will be indicated on the display
when batteries are properly installed.
3
Reinstall the battery cover.
4
Press the RESET button using a thin
stick.
USING THE REMOTE CONTROL
E-7
NOTES:
• The battery life is approximately one year in normal use.
• When you replace the batteries, always change both batteries, and make sure
they are the same type.
• If the remote control does not operate properly after replacing the batteries, press
the RESET button using a thin stick.
• If you will not be using the unit for a long time, remove the batteries from the
remote control.
Point the remote control towards the
unit’s signal receiver window and
press the desired button. The unit
generates a beep when it receives
the signal.
• Make sure there is no curtain or other
object between the remote control and
the unit.
• The remote control can send signals from
up to 7 metres away.
LOADING BATTERIES Use two size-AAA (R03) batteries.
HOW TO USE THE REMOTE CONTROL
Remote control
cover
{
{
|
|
CAUTION
• Do not allow the signal receiver window to receive strong direct sunlight, since it can
adversely affect its operation. If the signal receiver window is exposed to direct sunlight,
close a curtain to block the light.
• Using a fluorescent lamp with a quick starter in the same room may interfere with
transmission of the signal.
• The unit can be affected by signals transmitted from the remote control of a television,
VCR or other equipment used in the same room.
• Do not leave the remote control in direct sunlight or near a heater. Also, protect the unit
and remote control from moisture and shock which can discolour or damage them.
Page 10
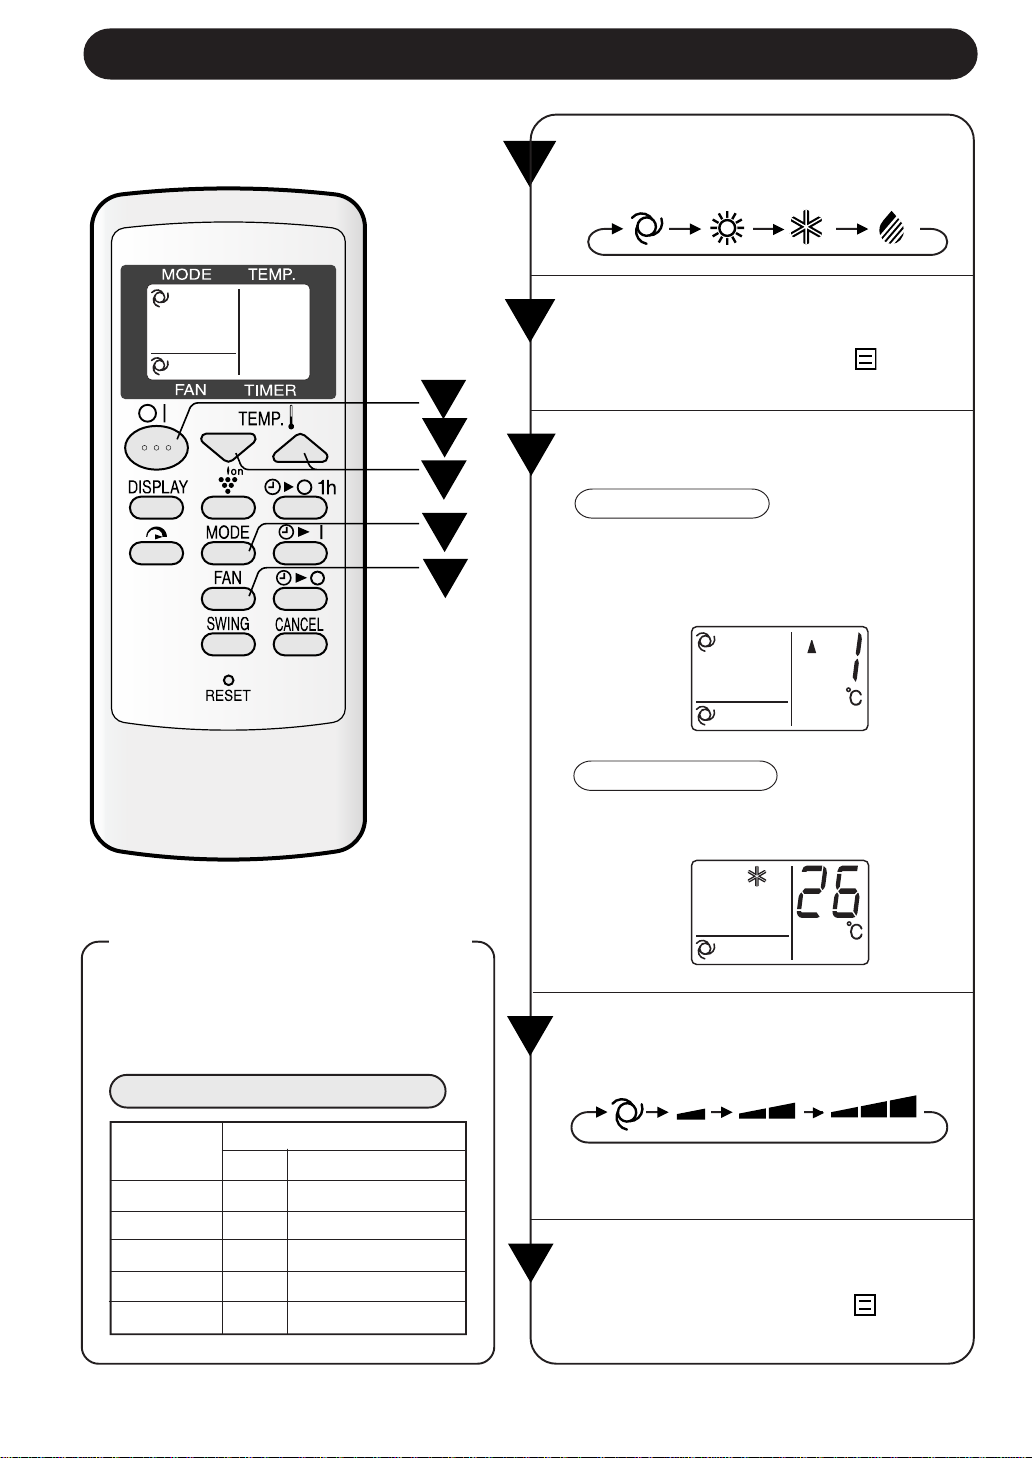
Press the TEMP. button to set the
desired temperature.
AUTO/DRY MODE
The temperature can be changed in 1°C
increments within the range of 2°C higher
to 2°C lower from the temperature automatically determined by the air conditioner.
COOL/HEAT MODE
The temperature can be set within the
range of 18 to 32°C.
1
E-8
BASIC OPERATION
2
Press the ON/OFF button to start
operation.
• The red OPERATION lamp (
) on the
unit will light.
3
4
Press the MODE button to select
the operation mode.
AUTO HEAT COOL DRY
5
Press the FAN button to set the
desired fan speed.
AUTO SOFT LOW HIGH
• In the DRY mode, the fan speed is preset to AUTO and cannot be changed.
Automatic Operation
Mode
Temperature Setting
Below 21°C
HEAT 23°C
21°C-24°C
DRY
Room Temp. at start-up
24°C-26°C COOL
24°C
26°C-28°C COOL
25°C
Above 28°C COOL
26°C
Modes and Temperature Settings
Room temp.
at operation
start-up
TIPS ABOUT AUTO MODE
In the AUTO mode, the temperature setting and mode are automatically selected
according to the room temperature when
the unit is turned on.
To turn off the unit, press the ON/
OFF button again.
• The red OPERATION lamp (
) on the
unit will turn off.
1
4
5
2
3
Page 11
ENGLISH
E-9
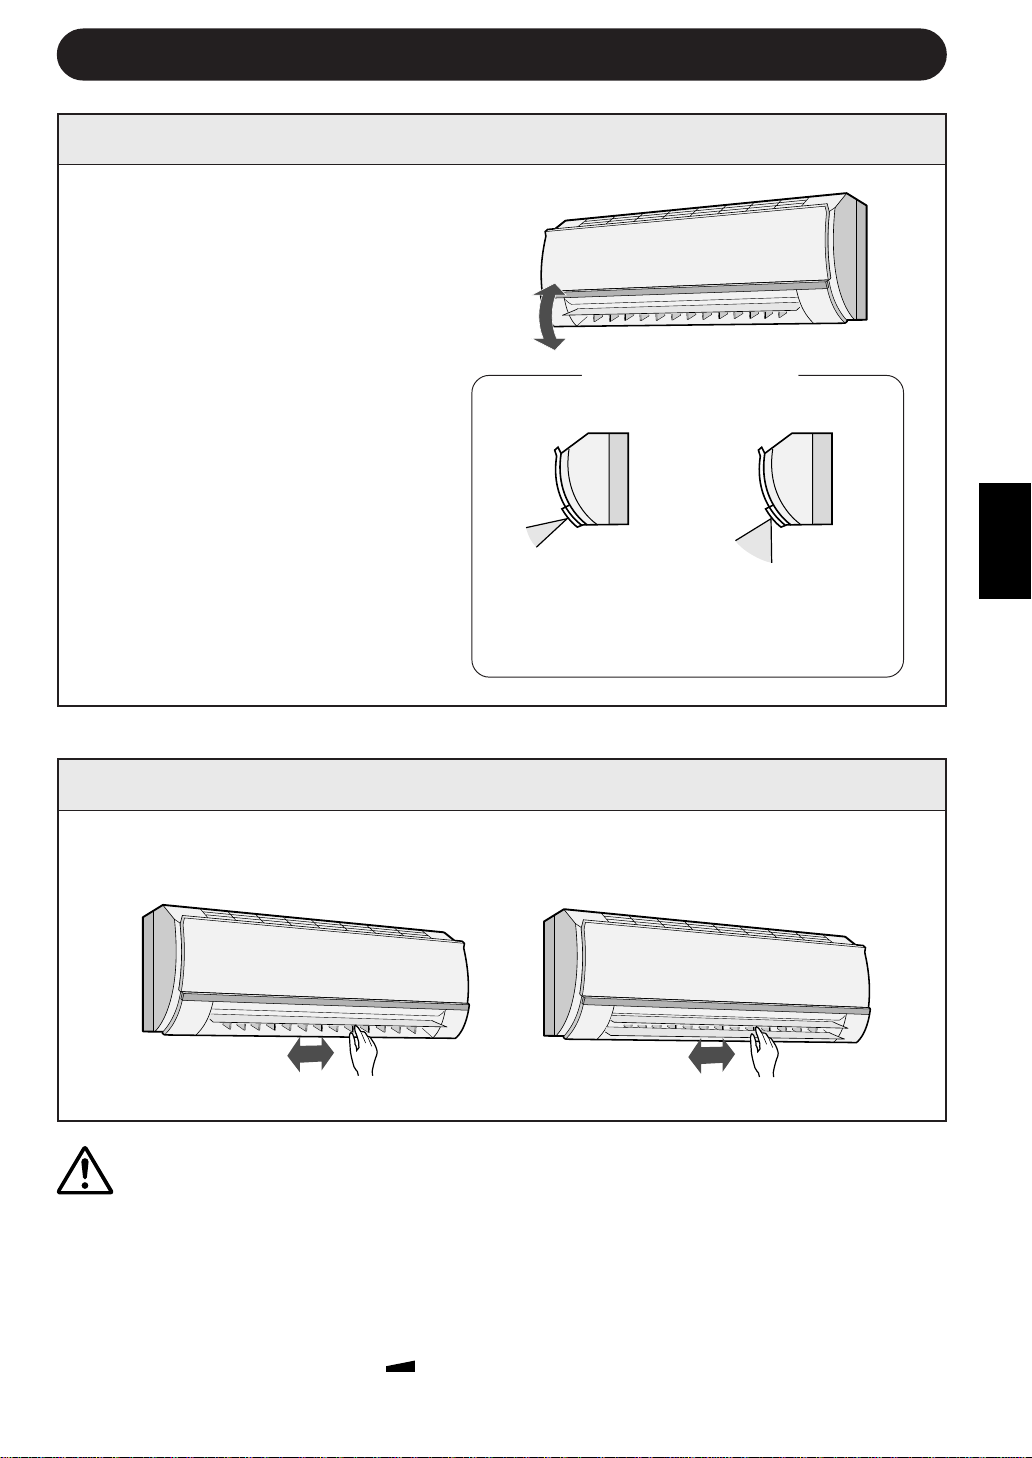
ADJUSTING THE AIR FLOW DIRECTION
VERTICAL AIR FLOW DIRECTION
The adjustment range
is narrower the SWING
range in order to prevent condensation from
dripping.
Hold the horizontal adjustment louvre as shown in the diagram and adjust the air
flow direction.
Press the SWING button on the remote control once.
• The vertical adjustment louvre will
change its angle continuously.
Press the SWING button again
when the vertical adjustment louvre
is at the desired position.
• The louvre will stop moving within
the range shown in the diagram.
• The adjusted position will be
memorized and will be automatically set to the same position when
operated the next time.
Adjustment range
HORIZONTAL AIR FLOW DIRECTION
CAUTION
Never attempt to adjust the vertical adjustment louvres manually.
• Manual adjustment of the vertical adjustment louvre can cause the unit to malfunction
when the remote control is used for adjustment.
• When the vertical adjustment louvre is positioned at the lowest position in the COOL or
DRY mode for an extended period of time, condensation may result.
Do not adjust the horizontal adjustment louvre to the extreme left or right in the COOL mode
with the fan speed set to "SOFT(
)" for an extended period of time.
Condensation may form on the louvres.
COOL and DRY modes HEAT mode
The range is wide
and air flow can be
directed toward the
floor.
(AY-AP7FHR/AY-AP9FHR) (AY-AP12FHR)
Page 12
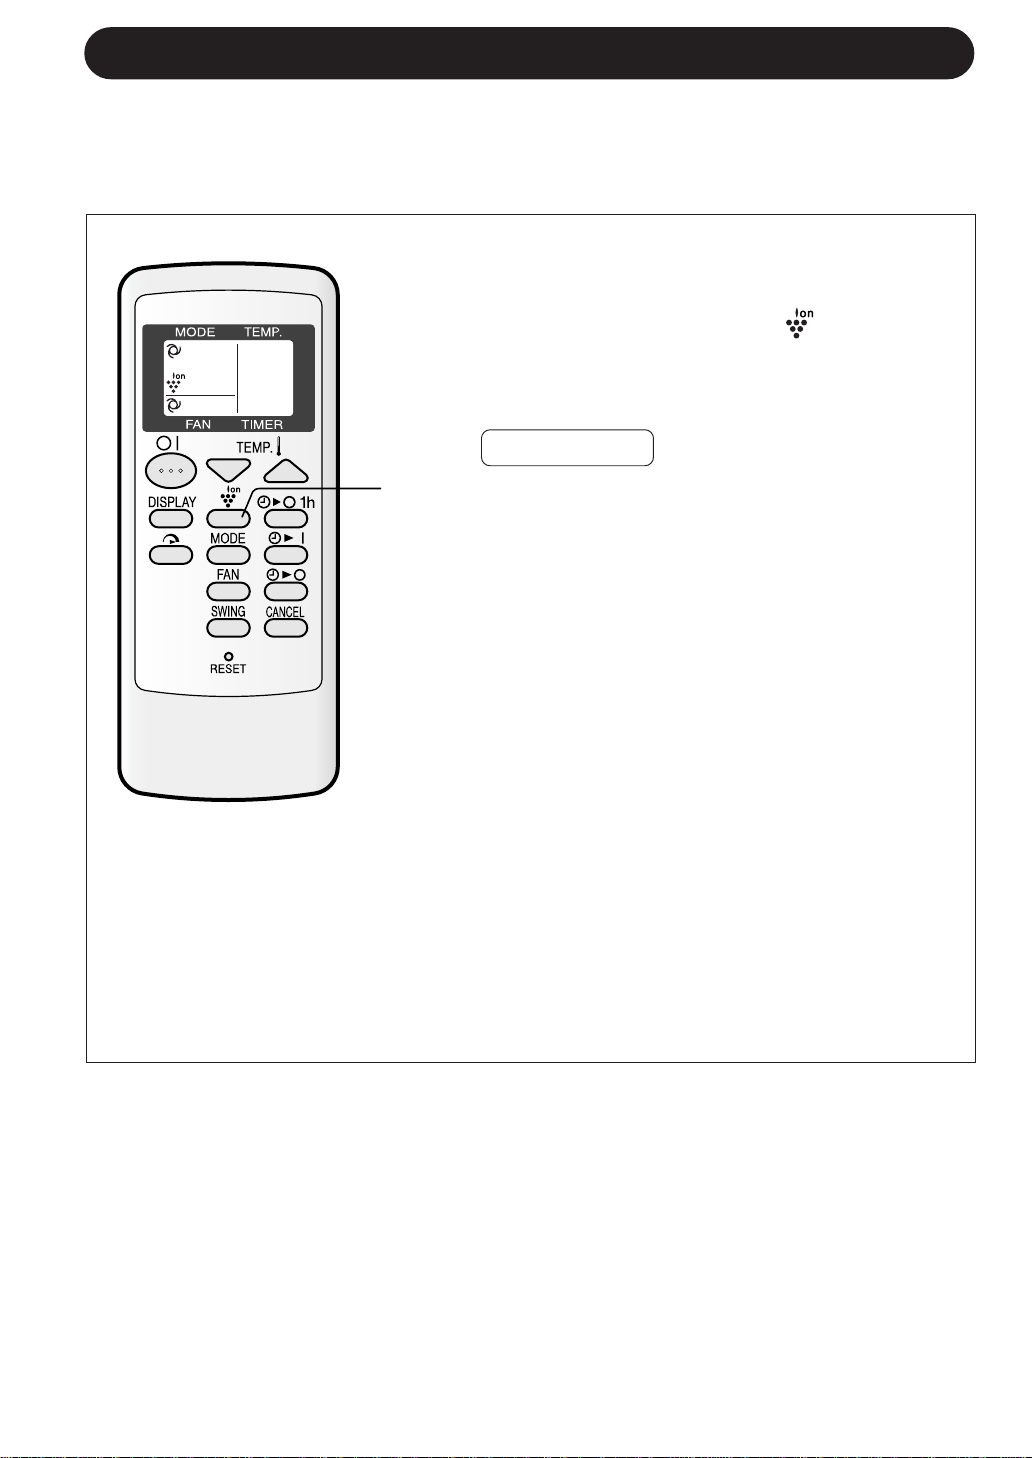
1
During operation, press the PLASMACLUSTER
button.
• The remote control will display "
".
• The blue PLASMACLUSTER lamp on the unit will
light up.
TO CANCEL
Press the PLASMACLUSTER button again.
• The PLASMACLUSTER lamp on the unit will turn
off.
1
NOTES:
• Use of the PLASMACLUSTER operation will be memorized, and it will be activated the next
time you turn on the air conditioner.
• To turn off the PLASMACLUSTER lamp, press the DISPLAY button.
• When the PLASMACLUSTER button is pressed while the unit is not operating, the
PLASMACLUSTER operation will be performed without accompanying air conditioning mode
(eg, HEATING or COOLING). The mode symbol of the remote control will go off and the fan
speed can not be set AUTO.
PLASMACLUSTER OPERATION
The Plasmacluster ion generator inside the air conditioner will release positive and
negative Plasmacluster ions into the room.
Approximately the same numbers of positive and negative ions released into the air will
reduce some airborne mold.
E-10
Page 13
ENGLISH
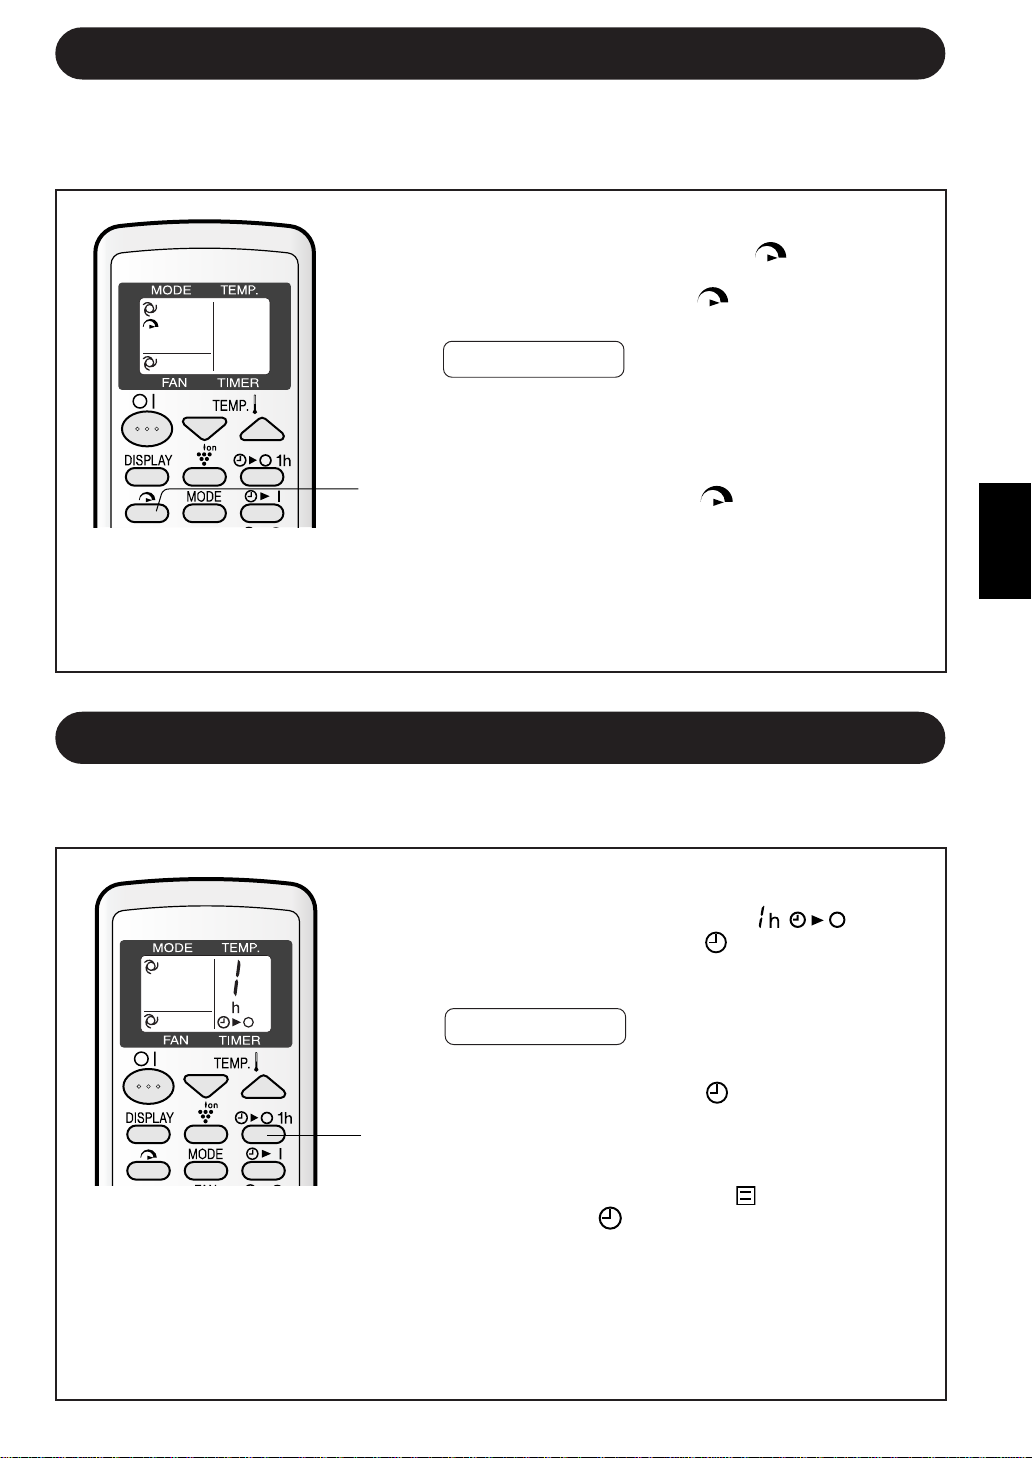
TURBO OPERATION
1
Press the TURBO button during operation.
• The remote control will display "
".
• The temperature display will go off.
• The green TURBO lamp (
) on the unit will light
up.
TO CANCEL
1
In this operation, the air conditioner fan works at "extra high" speed with a setting
temperature of 15°C in COOL and DRY modes and 32°C in HEAT mode to rapidly cool
or heat the room.
Press the TURBO button again.
• TURBO operation will also be cancelled when the
operation mode is changed, or when the unit is
turned off.
• The green TURBO lamp (
) on the unit will turn
off.
E-1 1
1
Press the ONE-HOUR OFF TIMER button.
• The remote control will display “
”.
• The orange TIMER lamp (
) on the unit will light
up.
• The unit will stop operating after one hour.
TO CANCEL
Press the CANCEL button.
• The orange TIMER lamp (
) on the unit will turn
off.
Alternatively, turn the unit off by pressing the
ON/OFF button.
• The red OPERATION lamp (
) and the orange
TIMER lamp (
) on the unit will turn off.
1
When the ONE-HOUR OFF TIMER is set, the unit will automatically turn off after one
hour.
ONE-HOUR OFF TIMER
NOTES:
• The ONE-HOUR OFF TIMER operation has priority over TIMER ON and TIMER OFF
operations.
• If the ONE-HOUR OFF TIMER is set while the unit is not operating, the unit will operate for
an hour at the formerly set condition.
• If you wish to operate the unit for another hour before the ONE-HOUR OFF TIMER is
activated, press the ONE-HOUR OFF TIMER button again during operation.
NOTES:
• You cannot set the temperature or fan speed during TURBO operation.
• After the unit has run for 30 minutes in TURBO operation, the fan setting will become the
"HIGH" speed, and temperature setting will become 18°C in COOL and DRY modes.
• To turn off the TURBO lamp, press the DISPLAY button.
Page 14
E-12
The unit will turn off automatically according to your setting.
Timer duration can be set from a minimum half an hour (30 minutes) to a maximum
of 12 hours.
Up to 9.5 hours, you can set in half-hour (30-minute) increments, and from 10 to 12
hours, in 1-hour increments.
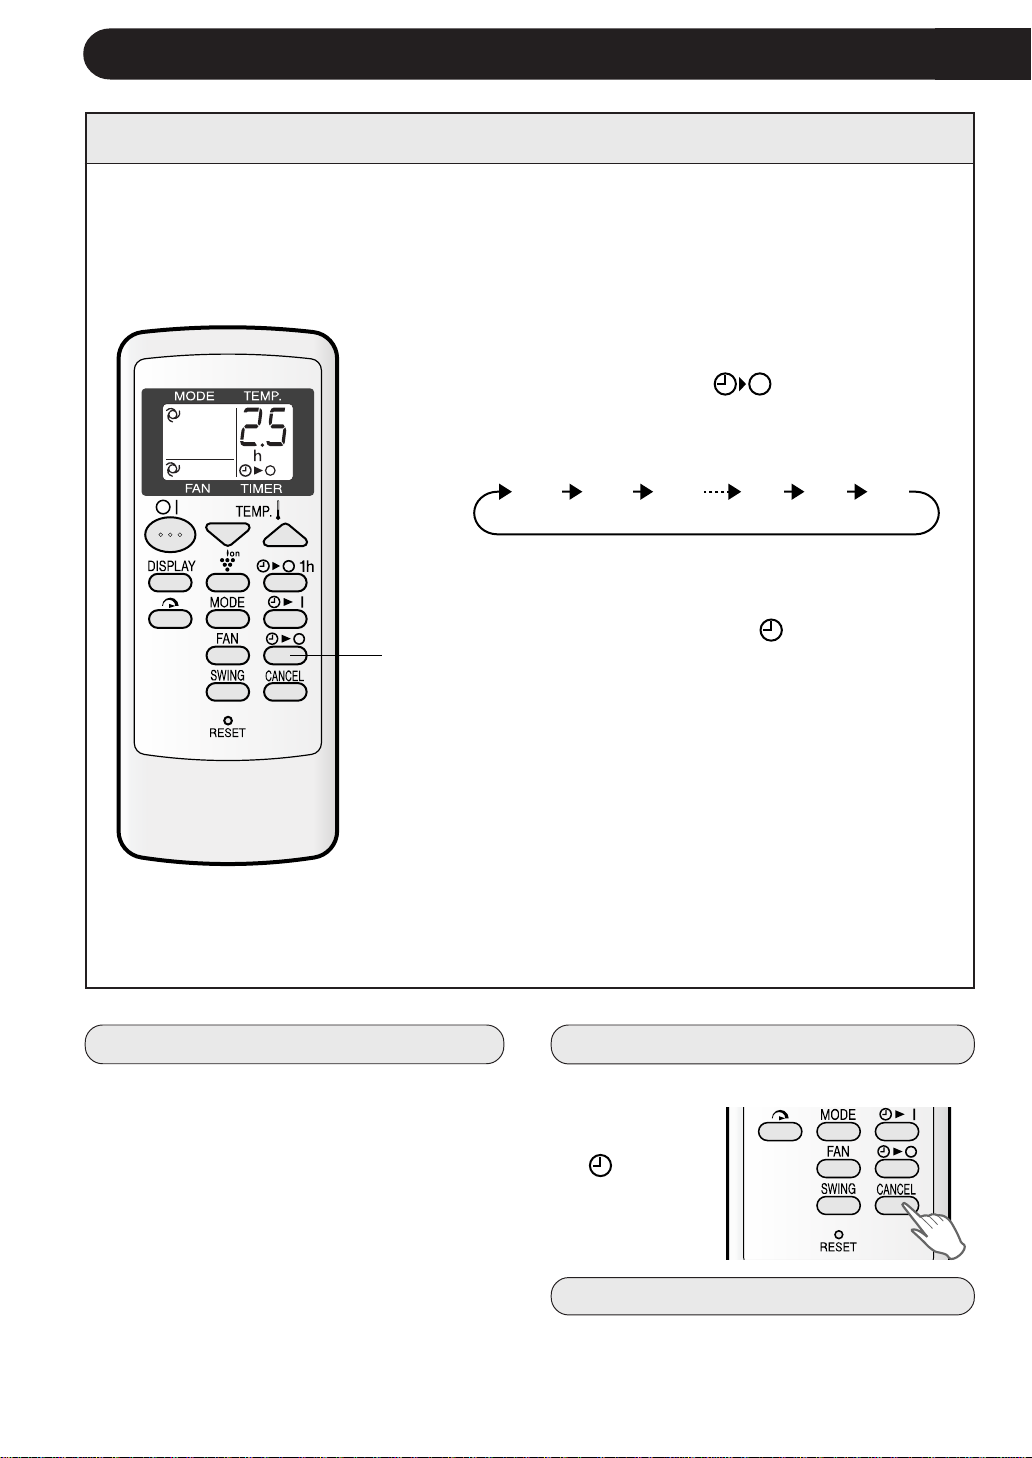
TIMER OPERATION
TIMER OFF
When the TIMER OFF is set, the temperature
setting is automatically adjusted to prevent
the room from becoming excessively cold
while you sleep. (Auto Sleep function)
COOL/DRY MODE:
• One hour after the timer operation begins,
the temperature setting rises 1°C higher
than the original temperature setting.
HEAT MODE:
• One hour after the timer operation begins,
the temperature setting drops 3°C lower
than the original temperature setting.
1
TO CANCEL TIMER
TIPS ABOUT TIMER OFF OPERATION
Point the remote control at the signal receiver window on the unit.
1
Press the TIMER OFF (
) button and set
the time as desired.
• The time setting will change as you press the
button as follows,
Hold the button down to speed through the
settings.
• The orange TIMER lamp (
) on the unit
will light.
• The unit will generate a beep when it receives the signal.
• The time setting will count down to show the
remaining time.
Display shown when you
set the unit to ture off 2.5
hours later.
Press the CANCEL button.
• The orange
TIMER lamp
(
) on the
unit will turn
off.
TO CHANGE TIMER SETTING
Press the TIMER button which you wish to
change, (TIMER OFF or TIMER ON) and
change the time setting.
0.5h 1.0h 1.5h 10h 11h 12h
Page 15
ENGLISH
The unit will turn on automatically according to your setting.
Timer duration can be set from a minimum of half an hour (30 minutes) to a
maximum of 12 hours.
Up to 9.5 hours, you can set in half-hour (30 minute) increments, and from 10 to 12
hours, in 1-hour increments.
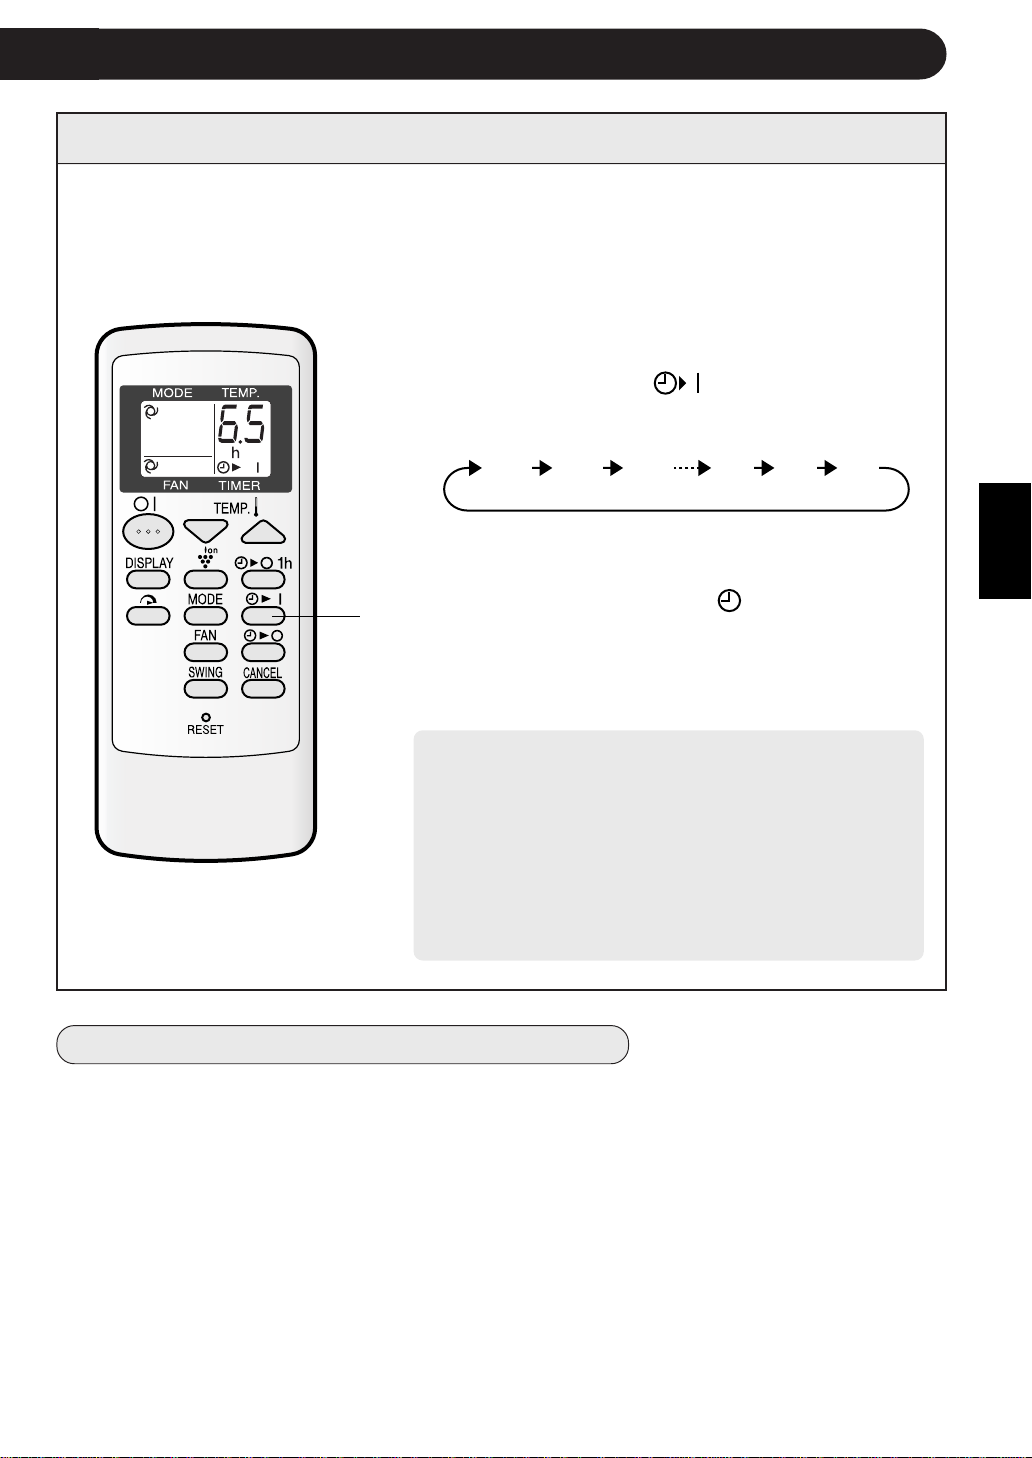
TIMER ON
1
Point the remote control at the signal reciever window
on the unit.
1
Press the TIMER ON (
) button.
• The time setting will change as you press the
button as follows.
Hold the button down to speed through the setting.
• The orange TIMER lamp (
) on the unit will
light.
• The unit will generate a beep when it receives
the signal.
• The time setting will count down to show the
remaining time.
Select the mode, temperature and fan speed setting as desired.
• When the temperature is set with the TIMER ON, the
temperature will show in the display for 5 seconds
and then return to the time display.
• If you do not change the setting, the unit will operate
using the most recent settings.
• The unit will turn on prior to the set time to allow the
room to reach the desired temperature by the programmed time. (Awaking function)
Display shown when you
set the unit to reach the
desired room temperature
6.5 hours later.
E-13
0.5h 1.0h 1.5h 10h 11h 12h
NOTES ON TIMER SETTING AND OPERATION
• The latest time setting will be memorized and will appear on the remote control display
the next time you set the TIMER OFF or TIMER ON.
• The TIMER OFF and TIMER ON can not be set together.
Only the most recent TIMER setting will be valid.
• While ONE-HOUR OFF TIMER is set, the TIMER OFF and TIMER ON setting are
unavailable.
• If the ONE-HOUR OFF TIMER is set while the TIMER OFF or TIMER ON is activated,
the TIMER ON or TIMER OFF setting will be cancelled.
Page 16
E-14
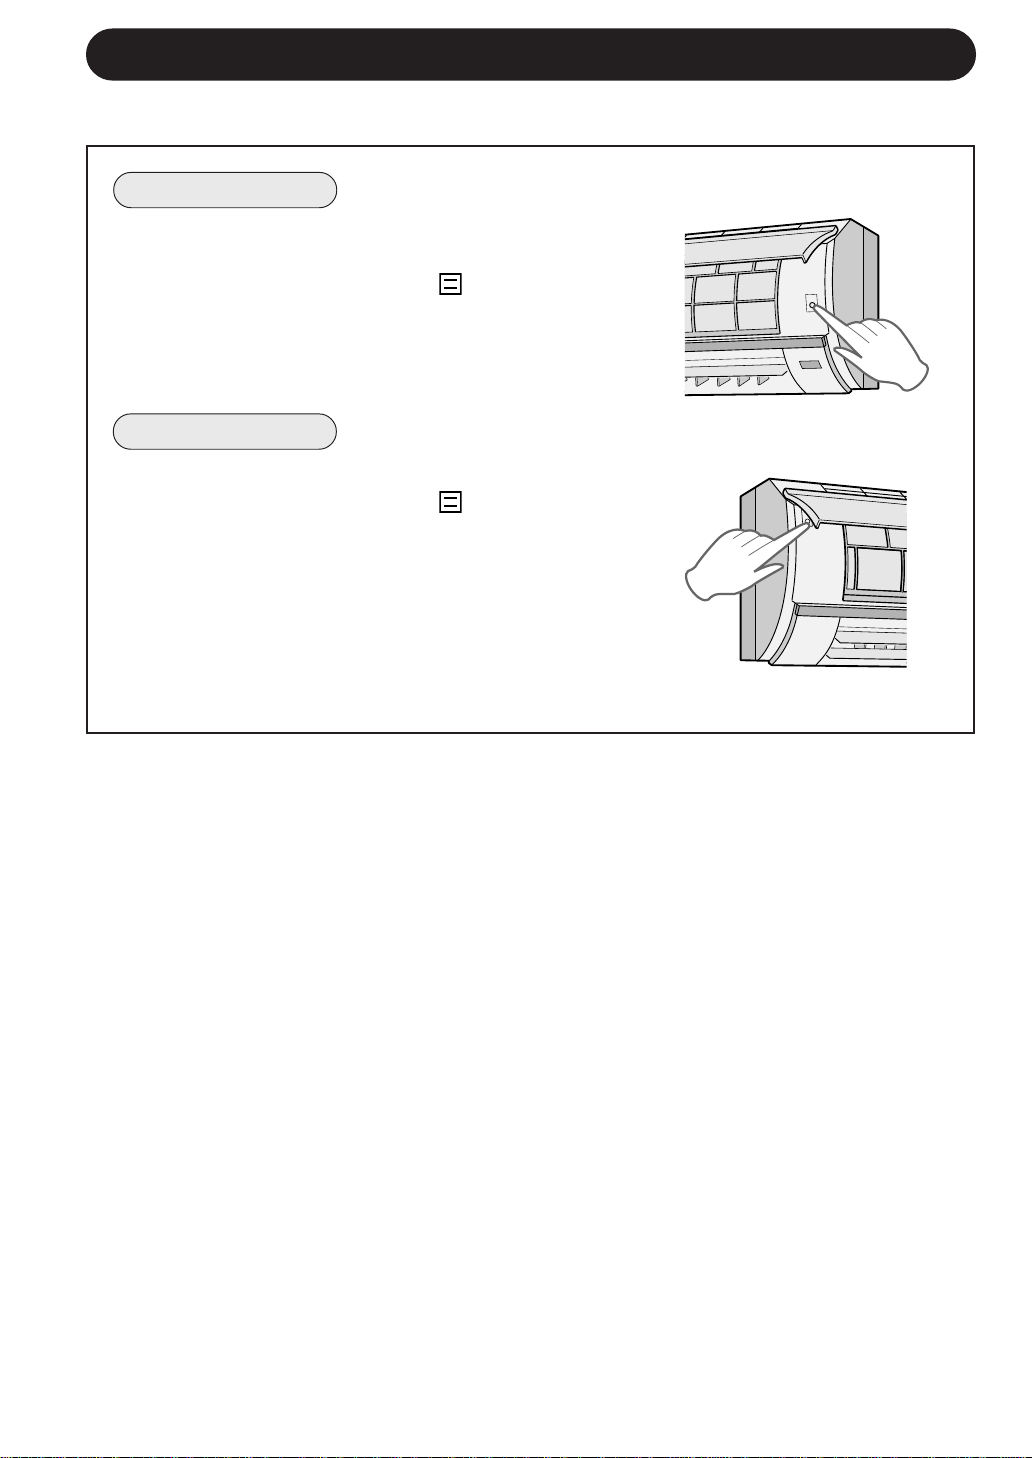
AUXILIARY MODE
Use this mode when the remote control is not available.
TO TURN ON
Lift the front panel of the indoor unit and press the
AUX. button on the operation panel.
• The red OPERATION lamp (
) on the unit will
light and the unit will start operating in the AUTO
mode.
• The fan speed and temperature setting are set to
AUTO.
TO TURN OFF
Press the AUX. button on the operation panel again.
• The red OPERATION lamp (
) on the unit will
turn off.
NOTE:
If the AUX. button is pressed during normal operation, the unit will turn off.
(AY-AP7FHR/AY-AP9FHR)
(AY-AP12FHR)
Page 17
ENGLISH
E-15
CLEANING THE UNIT AND THE REMOTE CONTROL
Be sure to disconnect the power cord from the wall outlet or turn off the circuit
breaker before performing any maintenance.
MAINTENANCE AFTER AIR
CONDITIONER SEASON
1
Operate the unit in the COOL
mode, temperature setting 32°C,
for about half a day to allow the
mechanism to thoroughly dry.
2
Stop the operation and unplug the
unit. Turn off the circuit breaker, if
you have one exclusively for the air
conditioner.
3
Clean the filters, then reinstall
them.
MAINTENANCE BEFORE
AIR CONDITIONER SEASON
1
Make sure that the air filters are
not dirty.
2
Make sure that nothing obstructs
the air inlet or outlet.
3
Check the outdoor mounting rack
periodically for wear and to make
sure it is firmly in place.
• Wipe them with a soft cloth.
• Do not directly splash or pour water on them, or it can cause electrical shock or
equipment damage.
• Do not use hot water, thinner, abrasive powders or strong solvents.
MAINTENANCE
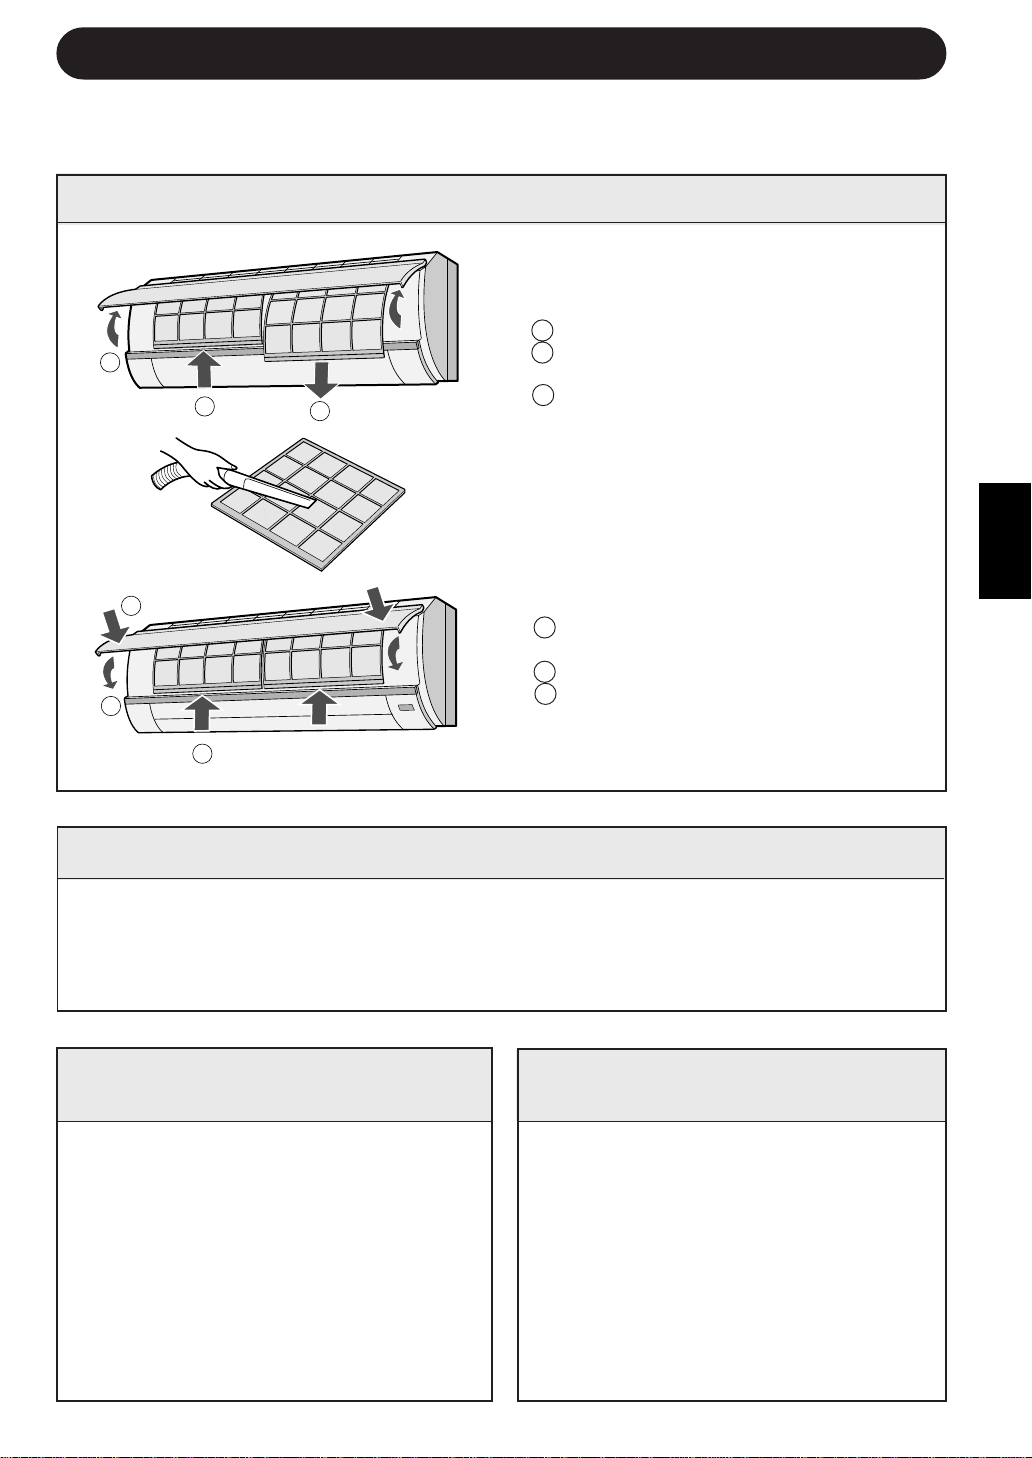
CLEANING THE FILTERS
The air filters should be cleaned every two weeks.
1
TURN OFF THE UNIT
2
REMOVE THE FILTERS
1 Lift the open panel.
2 Push the air filters up slightly to un-
lock them.
3 Pull the air filters down to remove
them.
3
CLEAN THE FILTERS
Use a vacuum cleaner to remove dust.
If the filters are dirty, wash them with
warm water and a mild detergent. Dry
filters in the shade before reinstalling.
4
REINSTALL THE FILTERS
1 Reinstall the filters in the original po-
sitions.
2 Close the open panel.
3 Push the arrow-marked points shown
left firmly to lock it in place.
3
1
2
1
2
3
Page 18
E-16
BEFORE CALLING FOR SERVICE
IF THE UNIT FAILS TO RECEIVE THE REMOTE CONTROL SIGNAL
Check whether the remote control batteries have become old
and weak.
Try to send the signal again with
the remote control pointed properly towards the unit’s signal receiver window.
Check whether the remote control batteries are installed with
the polarities properly aligned.
The following conditions do not denote equipment malfunctions
UNIT DOES NOT OPERATE
The unit will not operate if it is turned on immediately
after it is turned off. The unit will not operate
immediately after the mode is changed. This is to
protect the internal mechanisms. Wait 3 minutes
before operating the unit.
UNIT DOES NOT SEND OUT WARM AIR
The unit is preheating or de-icing.
CRACKING NOISE
The unit may produce a cracking noise. This sound
is generated by the friction of the front panel and
other components expanding or connecting due to a
temperature change.
If the unit appears to be malfunctioning, check the following points before calling for
service.
IF THE UNIT FAILS TO OPERATE
Check to see if the circuit breaker has tripped or the fuse has blown.
IF THE UNIT FAILS TO COOL (OR HEAT) THE ROOM EFFECTIVELY
Check the filters. If dirty, clean
them.
Check the outdoor unit to make
sure nothing is blocking the air inlet or outlet.
Check the thermostat is proper
setting.
Make sure windows and doors
are closed tightly.
A large number of people in the
room can prevent the unit from
achieving the desired temperature.
Check whether any heat-generating appliances are operating in the room.
ODORS
Carpet and furniture odors that entered into the
unit and the air conditioner's inner component
odors at the early stage of installation may be sent
out from the unit.
Please call for service when TEMPERATURE INDICATOR on the indicator panel blink.
A LOW BUZZING NOISE EMITTED
This is a sound emitted when the unit is generating
Plasmacluster ions.
SWISHING NOISE
The soft, swishing noise is the sound of the refrigerant flowing inside the unit.
WATER VAPOUR
• In the COOL and DRY operation, water vapour
can sometimes be seen at the air outlet due to
the difference between the room air temperature and the air discharged by the unit.
• In the HEAT operation, water vapour may flow
out of the outdoor unit during de-icing.
ODOR EMITTED FROM THE
PLASMACLUSTER AIR OUTLET
This is the smell of ozone generated from the
Plasmacluster Ion generator. The ozone
concentration is very small, posing no adverse
effect on your health. The ozone discharged into
the air rapidly decomposes, and its density in the
room will not increase.
Page 19

ENGLISH
Page 20

A. Informazioni sullo smaltimento per gli utenti (privati)
1. Nell'Unione europea
Attenzione: Per smaltire il presente dispositivo, non utilizzare il normale bidone della
spazzatura!
Le apparecchiature elettriche ed elettroniche usate devono essere gestite a parte e in
conformità alla legislazione che richiede il trattamento, il recupero e il riciclaggio
adeguato dei suddetti prodotti.
In seguito alle disposizioni attuate dagli Stati membri, i privati residenti nella UE
possono conferire gratuitamente le apparecchiature elettriche ed elettroniche usate a
centri di raccolta designati*.
In alcuni paesi*, anche il rivenditore locale può ritirare gratuitamente il vecchio prodotto se
l'utente acquista un altro nuovo di tipologia simile. *) Per maggiori informazioni si prega di
contattare l'autorità locale competente.
Se le apparecchiature elettriche o elettroniche usate hanno batterie o accumulatori, l'utente
dovrà smaltirli a parte preventivamente in conformità alle disposizioni locali.
Lo smaltimento corretto del presente prodotto contribuirà a garantire che i rifiuti siano
sottoposti al trattamento, al recupero e al riciclaggio necessari prevenendone il
potenziale impatto negativo sull'ambiente e sulla salute umana, che potrebbe derivare
da un'inadeguata gestione dei rifiuti.
2. In paesi che non fanno parte dell'UE
Se si desidera eliminare il presente prodotto, contattare le autorità locali e informarsi
sul metodo di smaltimento corretto.
Per la Svizzera: Le apparecchiature elettriche o elettroniche usate possono essere
restituite gratuitamente al rivenditore, anche se non si acquista un prodotto nuovo.
Altri centri di raccolta sono elencati sulle homepage di
www.swico.ch
o di www.sens.ch.
B. Informazioni sullo smaltimento per gli utenti commerciali
1. Nell'Unione europea
Se il prodotto è impiegato a scopi commerciali, procedere come segue per eliminarlo.
Contattare il proprio rivenditore SHARP che fornirà informazioni circa il ritiro del
prodotto. Potrebbero essere addebitate le spese di ritiro e riciclaggio. Prodotti piccoli
(e quantitativi ridotti) potranno essere ritirati anche dai centri di raccolta locali.
Per la Spagna: Contattare il sistema di raccolta ufficiale o l'ente locale preposto al
ritiro dei prodotti usati.
2. In paesi che non fanno parte dell'UE
Se si desidera eliminare il presente prodotto, contattare le autorità locali e informarsi
sul metodo di smaltimento corretto.
Attenzione: Il dispositivo è
contrassegnato da questo
simbolo, che segnala di non
smaltire le apparecchiature
elettriche ed elettroniche
insieme ai normali rifiuti
domestici. Per tali prodotti è
previsto un sistema di
raccolta a parte.
Page 21

ITALIANO
I-1
ITALIANO
Grazie per aver acquistato il condizionatore d’aria SHARP. Leggete attentamente questo
manuale prima di usare il prodotto.
• IMPORTANTI ISTRUZIONI PER
LA SICUREZZA .......................................... I-1
• ULTERIORI NOTE RIGUARDANTI
IL FUNZIONAMENTO................................. I-3
• SUGGERIMENTI PER
RISPARMIARE ENERGIA .......................... I-3
• NOMI DEI COMPONENTI .......................... I-4
• USO DEL TELECOMANDO ....................... I-7
• FUNZIONI DI BASE.................................... I-8
• REGOLAZIONE DELLA DIREZIONE
DEL FLUSSO D’ARIA................................. I-9
INDICE
• FUNZIONAMENTO DEL
PLASMACLUSTER....................................I-10
• FUNZIONAMENTO TURBO ......................I-11
• TIMER DI SPEGNIMENTO DOPO
UN’ORA .....................................................I-11
• FUNZIONAMENTO DEL TIMER ...............I-12
• MODO AUSILIARIO...................................I-14
• MANUTENZIONE ......................................I-15
• PRIMA DI RICHIEDERE ASSISTENZA ....I-16
IMPORTANTI ISTRUZIONI PER LA SICUREZZA
AVVERTIMENTI PER L’USO
1
Non tirate o deformate il cavo di alimentazione. Se si tira o si usa erratamente il cavo,
l’unità si può danneggiare e provocare scosse elettriche.
2
Fate attenzione a non esporvi direttamente all’uscita dell’aria per un lungo periodo di
tempo. Potrebbe danneggiare la vostra salute.
3
Nel caso si usi il condizionatore d’aria in presenza di neonati, bambini, persone anziane,
persone costrette a stare a letto o persone con handicap fisici, assicuratevi prima che la
temperatura della stanza sia confortevole per tali persone.
4
Non inserite mai oggetti nell’unità. Ciò potrebbe portare a lesioni a causa dell’alta velocità
di rotazione dei ventilatori interni.
5
Collegate correttamente il condizionatore d’aria a terra. Non collegate il cavo a terra al
tubo del gas, al tubo dell’acqua, al parafulmini o al cavo a terra del telefono. Un collegamento a terra incompleto potrebbe causare scossa elettrica.
6
In caso di anomalie del condizionatore d’aria (ad esempio, odore di bruciato), interrompete
subito l’uso e SPEGNETE l’interruttore di circuito.
7
L’apparecchio deve essere installato in conformità con i regolamenti di connessione
elettrica nazionali. Un collegamento scorretto del cavo può provocare il surriscaldamento
del cavo di alimentazione, della spina e della presa elettrica e causare un incendio.
8
Se è danneggiato il cavo di alimentazione, bisogna far sostituire lo stesso dal fabbricante
o da un centro di assistenza o da una persona qualificata per evitare eventuali rischi.
Sostituite il cavo di alimentazione solo con un altro specificato dal produttore.
AVVERTIMENTI PER L’INSTALLAZIONE/RIMOZIONE/
RIPARAZIONE
• Non cercate di installare/rimuovere/riparare l’unità senza assistenza. Un uso errato causerà
scosse elettriche, perdite d’acqua, incendi e così via. Consultate il vostro rivenditore o
dell’altro personale di servizio qualificato per l’installazione/rimozione/riparazione dell’unità.
Questo apparecchio è conforme ai requisiti delle Direttive 89/336/EEC e 73/23/EEC
come emendate da 93/68/EEC.
Page 22

IMPORTANTI ISTRUZIONI PER LA SICUREZZA
PRECAUZIONI PER L’USO
1
Aprite una finestra o una porta periodicamente per ventilare la stanza, specialmente
quando si usano apparecchi a gas. Una ventilazione insufficiente potrebbe causare mancanza di ossigeno.
2
Non toccate i tasti con mani bagnate. Ciò potrebbe provocare una scossa elettrica.
3
Per sicurezza, spegnete l’interruttore del circuito quando non usate l’unità per un lungo
periodo di tempo.
4
Controllate la cremagliera di montaggio dell’unità esterna periodicamente ed assicuratevi
che sia ben fissata.
5
Non urtate l’unità esterna e non collocate alcun oggetto sopra di essa, poiché potrebbe
cadere causando lesioni personali.
6
Questa unità è stata progettata per l’uso in aree residenziali. Non usatela in canili o serre
per allevare animali o coltivare piante.
7
Non collocate contenitori d’acqua sull’unità. Se l’acqua penetra nell’unità, l’isolamento
elettrico si potrebbe rovinare causando una scossa elettrica.
8
Non bloccate gli sbocchi d’uscita ed entrata dell’aria dell’unità. Ciò potrebbe comprometterne il funzionamento o provocare guasti.
9
Assicuratevi di spegnere l’apparecchio e l’interruttore di circuito prima di eseguire lavori
di manutenzione o pulitura. Il ventilatore che gira all’interno dell’unità potrebbe provocarvi
lesioni.
10
Non spruzzate o gettate acqua direttamente sull’unità. L’acqua potrebbe causare una
scossa elettrica o danni all’apparecchio.
11
Questo apparecchio non deve essere usato da bambini o persone inferme senza supervisione.
Assicuratevi che i bambini non giochino con l’apparecchio.
PRECAUZIONI PER IL LUOGO DI MONTAGGIO/
INSTALLAZIONE
• Assicuratevi di collegare il condizionatore d’aria ad una presa di corrente di voltaggio e
frequenza giusta.
L’uso di una presa di corrente dal voltaggio e frequenze errate potrebbe risultare dannoso
all’apparecchio e provocare un incendio.
• Non installate l’unità in un luogo dove ci potrebbero essere perdite di gas infiammabile.
Ciò potrebbe provocare incendi.
Non collocate l’unità in luoghi nei quali l’aria contiene polvere, fumi oppure umidità in misura
eccessiva.
• Sistemate il tubo di drenaggio in modo tale da assicurare un drenaggio corretto. Un drenaggio
insufficiente potrebbe far fuoriuscire acqua nella stanza, bagnare i mobili e così via.
• Assicuratevi di installare un interruttore differenziale o magnetotermico a seconda del luogo
d’installazione, per evitare scosse elettriche.
I-2
Page 23

ITALIANO
I-3
TEMP. INTERNA TEMP. ESTERNA
RAFFREDDA-
limite 32°C B.A. 43°C B.A.
MENTO
superiore 23°C B.U. -
limite 21°C B.A. 21°C B.A.
inferiore 15°C B.U. -
RISCALDA-
limite 27°C B.A. 24°C B.A.
MENTO
superiore - 18°C B.U.
limite 20°C B.A. -8,5°C B.A.
inferiore - -9,5°C B.U.
ULTERIORI NOTE RIGUARDANTI IL FUNZIONAMENT O
INTERVALLO DELLA TEMPERATURA DI ESERCIZIO
• Il sistema di protezione incorporato potrebbe interrompere
il funzionamento dell’unità
quando la si utilizza fuori da
questo intervallo.
•
Si potrebbe formare della
condensa sull’uscita dell’aria
se l’unità opera in modo
continuo nel modo RINFRESCAMENTO o DEUMIDIFICAZIONE quando l’umidità è
al di sopra dell’80%.
B.A. = Bulbo asciutto B.B. = Bulbo bagnato
FUNZIONE DI PRERISCALDAMENTO
Nel modo di RISCALDAMENTO, il ventilatore interno potrebbe non funzionare per due – cinque minuti dopo l’accensione dell’unità per evitare che esca aria fredda.
FUNZIONE DI SBRINAMENTO
• Quando sullo scambiatore di calore dell’unità esterna si forma del ghiaccio nel modo di funzionamento
RISCALDAMENTO, un sistema di sbrinamento automatico fornisce calore per circa 5-10 minuti per
eliminare il ghiaccio. Durante lo sbrinamento, i ventilatori interni ed esterni si fermano.
• Una volta completato lo sbrinamento, l’unità riprende il funzionamento automaticamente nel modo
RISCALDAMENTO.
EFFICIENZA DEL RISCALDAMENTO
• L’unità usa una pompa di calore che raccoglie calore dall’aria esterna e lo diffonde nella stanza. Di
conseguenza, la temperatura dell’aria esterna influisce notevolmente sull’efficacia del riscaldamento.
• Se la capacità di riscaldamento è notevolmente ridotta a causa di una bassa temperatura esterna,
utilizzate un riscaldatore addizionale.
•
Per riscaldare tutto l’ambiente occorrerà del tempo, in quanto l’unità adotta un sistema a circolazione forzata.
SE SI VERIFICA UN GUASTO DELL’ALIMENTAZIONE
Se si verifica un guasto dell’alimentazione, il condizionatore d’aria è dotato di una funzione di memoria
che memorizza le impostazioni.
Dopo il ripristino dell’alimentazione, l’unità riprenderà il funzionamento con le stesse impostazioni di
prima, fatta eccezione per il funzionamento con il timer.
Se i timer sono stati impostati prima del guasto dell’alimentazione, dovranno essere reimpostati dopo
il ripristino dell’alimentazione.
SUGGERIMENTI PER RISPARMIARE ENERGIA
Qui di seguito sono presentati alcuni semplici metodi per risparmiare energia durante l’uso del condizionatore d’aria.
IMPOSTATE LA TEMPERATURA CORRETTA
•
Impostando il termostato 1°C in più della temperatura desiderata nel modo RINFRESCAMENTO (e 2°C
in meno nel modo RISCALDAMENTO) si risparmierà circa il 10 percento di energia.
• Impostando una temperatura più bassa del necessario durante l’operazione di raffreddamento, si
consumerà più energia.
RIPARATE DALLA LUCE SOLARE DIRETTA ED EVITATE CORRENTI D’ARIA
• Evitando la luce solare diretta durante l’operazione di raffreddamento si risparmierà energia.
• Chiudete le finestre e le porte durante le operazioni di raffreddamento e riscaldamento.
IMPOSTATE LA GIUSTA DIREZIONE DEL FLUSSO D’ARIA PER OTTENERE
LA MIGLIOR CIRCOLAZIONE D’ARIA
MANTENETE IL FILTRO PULITO PER GARANTIRE UN FUNZIONAMENTO PIÙ EFFICACE
RICAVATE IL MASSIMO VANTAGGIO DALLA FUNZIONE DI TIMER DISATTIVATO
DISINSERITE IL CAVO DI ALIMENTAZIONE QUANDO L’UNITÀ NON VIENE
USATA PER UN LUNGO PERIODO DI TEMPO
• L’unità interna continua a consumare una piccola quantità di energia quando non è in funzione.
Page 24

NOMI DEI COMPONENTI
1 Entrata (dell’aria)
2 Pannello aperto
3 Filtri dell’aria
4 Tasto AUX.
5 Indicatore
6 Finestra di ricezione
7 Cavo d’alimentazione
8 Deflettori di regolazione
verticale
9 Deflettori di regolazione
orizzontale
0 Uscita (d’aria)
q Telecomando
w Spia PLASMACLUSTER (blu)
e Spia TURBO (verde
)
r Spia TIMER (arancione
)
t Spia di FUNZIONAMENTO
(rossa
)
UNITÀ ESTERNA
NOTA: Le unità effettive potrebbero differire leggermente da quelle illustrate sopra.
UNITÀ INTERNA (AY-AP7FHR/AY-AP9FHR)
1
2
3
4
5
6
7
8
9
0
q
y Entrata (dell’aria)
u Tubo refrigerante e cavo
di interconnessione
i Tubo di drenaggio
o Uscita (d’aria)
I-4
w
e
r
t
y
u
i
o
Page 25

ITALIANO
1 Tasto AUX.
2 Entrata (dell’aria)
3 Pannello aperto
4 Filtri dell’aria
5 Indicatore
6 Finestra di ricezione
7 Deflettori di regolazione
verticale
8 Deflettori di regolazione
orizzontale
9 Uscita (d’aria)
0 Cavo d’alimentazione
q Telecomando
w Spia PLASMACLUSTER
(blu)
e Spia TURBO (verde
)
r Spia TIMER (arancione
)
t Spia di FUNZIONAMENTO
(rossa
)
UNITÀ ESTERNA
NOTA: Le unità effettive potrebbero differire leggermente da quelle illustrate sopra.
UNITÀ INTERNA (AY-AP12FHR)
y Entrata (dell’aria)
u Tubo refrigerante e cavo
di interconnessione
i Tubo di drenaggio
o Uscita (d’aria)
w
e
r
t
y
u
i
o
I-5
1
2
3
4
5
6
7
8
9
0
q
Page 26

TELECOMANDO
1 TRASMETTITORE
2 DISPLAY (display a cristalli liquidi)
3 Tasto d’ACCENSIONE/SPEGNIMENTO
4 Tasto TEMP.
5 Tasto DISPLAY
6 Tasto PLASMACLUSTER
7 Tasto TIMER DI SPEGNIMENTO DOPO
UN’ORA
8 Tasto MODE (MODO)
9 Tasto TIMER ATTIVATO
(per impostare il timer)
0 Tasto FAN (VENTILATORE)
q Tasto TIMER DISATTIVATO
(per impostare il timer)
w Tasto SWING (ROTAZIONE)
e Tasto CANCEL (ANNULLA)
r Tasto TURBO
t Tasto RESET
y SIMBOLI DEL MODO
: AUTOMATICO : RISCALDAMENTO
: RINFRESCA- : DEUMIDIFI-
MENTO CAZIONE
u SIMBOLO TURBO
i SIMBOLO PLASMACLUSTER
o SIMBOLI DI VELOCITÀ DEL VENTILATORE
: AUTO- : Impostazione manuale
MATICO
p INDICATORE CONTEGGIO TIMER E TEMPERATURA
a SIMBOLO DI TRASMISSIONE
s INDICATORE TIMER ATTIVATO/DISATTIVATO
Indica quando il timer è attivato o disattivato.
DISPLAY LDC DEL TELECOMANDO
NOMI DEI COMPONENTI
I-6
1
2
3
4
5
6
7
8
9
0
q
w
e
r
t
y
u
i
o
p
a
s
Page 27

ITALIANO
1
Rimuovete il coperchio delle batterie
sul retro del telecomando.
2
Inserite le batterie nel comparto, assicurandovi che le polarità ± e — siano
allineate correttamente.
• Quando le batterie vengono installate
correttamente, le linee verranno indicate sul display.
3
Reinserite il coperchio delle batterie.
4
Premete il tasto RESET utilizzando un
bastoncino sottile.
USO DEL TELECOMANDO
I-7
NOTE:
• In condizioni di uso normali, le batterie durano circa un anno.
• Quando cambiate le batterie, utilizzate sempre due batterie dello stesso tipo.
• Se il telecomando non funziona correttamente dopo avere sostituito le batterie,
premere il tasto RESET utilizzando un bastoncino.
• Se non intendete usare l’unità per un lungo periodo di tempo, togliete le batterie dal
telecomando.
Puntate il telecomando verso la finestra di ricezione del segnale
dell’unità e premete il tasto desiderato. L’unità emette un segnale acustico “bip” quando riceve il segnale.
• Assicuratevi che non ci siano una tenda
o altri oggetti tra il telecomando e l’unità.
• Il telecomando può inviare segnali fino ad
una distanza di 7 metri.
INSERIMENTO DELLE BATTERIE
Utilizzate due batterie di dimensioni AAA (R03).
COME USARE IL TELECOMANDO
Coperchio del
telecomando
PRECAUZIONI
• Evitate di esporre la finestra di ricezione alla luce solare diretta, in quanto ne può danneggiare il funzionamento. Se la finestra di ricezione del segnale è esposta alla luce solare
diretta, chiudete la tenda per bloccare la luce.
• L’uso di una lampada fluorescente con una reattanza d’accensione rapida nello stesso
locale può interferire con la trasmissione del segnale.
• L’unità può essere influenzata da segnali trasmessi dal telecomando di un televisore,
videoregistratore o altre attrezzature usate nella stessa stanza.
• Non lasciate il telecomando esposto alla luce solare diretta o vicino ad un radiatore. Inoltre,
proteggete l’unità e il telecomando da umidità e scosse che potrebbero scolorirli o danneggiarli.
Page 28

Premete il tasto TEMP. per impostare la temperatura desiderata.
MODO AUTOMATICO/
DEUMIDIFICAZIONE
La temperatura può essere cambiata in
incrementi di 1°C entro l’intervallo di 2°C
superiore e 2°C inferiore alla temperatura
determinata automaticamente dal condizionatore dell’aria.
MODO RINFRESCAMENTO/
RISCALDAMENTO
La temperatura può essere impostata in
un intervallo compreso tra 18 e 32°C.
1
I-8
FUNZIONI DI BASE
2
Premete il tasto d’ACCENSIONE/
SPEGNIMENTO per accendere
l’unità.
• La spia rossa di FUNZIONAMENTO
(
) sull’unità si illuminerà.
3
4
Premete il tasto MODE per selezionare il modo di funzionamento.
AUTO- RISCALDA- RINFRESCA- DEUMIDIFI-
MATICO MENTO
MENTO CAZIONE
5
Premete il tasto FAN per impostare
la velocità del ventilatore desiderata.
AUTO- MODE- BASSO ALTO
MATICO RATO
• Nel modo DEUMIFICAZIONE, la velocità
del ventilatore è preselezionata su AUTOMATICO e non può essere cambiata.
Sotto RISCALDA-
23°C
21°C MENTO
Da 21°C DEUMIDIFI- Temperatura del-
a 24°C CAZIONE la stanza all’avvio
Da 24°C RINFRES-
24°C
a 26°C CAMENTO
Da 26°C RINFRES-
25°C
a 28°C CAMENTO
Sopra RINFRESCA-
26°C
28°C MENTO
Modo e impostazioni della temperatura
Temperatura della
stanza
all’avvio
SUGGERIMENTI SUL
MODO AUTOMATICO
Nel modo AUTOMATICO l’impostazione e
il modo della temperatura vengono selezionati automaticamente in base alla temperatura della stanza nel momento in cui
l’unità viene accesa.
Per spegnere l’unità, premete nuovamente il tasto d’ACCENSIONE/
SPEGNIMENTO.
• La spia rossa di FUNZIONAMENTO (
)
sull’unità si spegnerà.
1
4
5
2
3
Impostazione
della temperatura
Modo
Funzionamento automatico
Page 29

ITALIANO
I-9
REGOLAZIONE DELLA DIREZIONE DEL FLUSSO D’ARIA
DIREZIONE VERTICALE DEL FLUSSO D’ARIA
L’intervallo di regolazione è più limitato dell’intervallo SWING per
evitare che si formi della
condensa a causa dello
sgocciolamento.
Tenete il deflettore di regolazione orizzontale come mostrato nello schema e regolate la direzione del flusso d’aria.
Premete il tasto SWING sul telecomando una volta.
• Il deflettore di regolazione verticale cambierà l’angolo continuamente.
Premete il tasto SWING nuovamente
quando il deflettore di regolazione
verticale si trova nella posizione desiderata.
• Il deflettore smetterà di muoversi
all’interno dell’intervallo mostrato
nello schema.
• La posizione regolata verrà memorizzata e verrà automaticamente
impostata la volta successiva.
Intervallo di regolazione
DIREZIONE ORIZZONTALE DEL FLUSSO D’ARIA
PRECAUZIONI
Non tentate mai di regolare manualmente i deflettori di regolazione verticale.
• La regolazione manuale può causare malfunzionamento dell’unità quando si usa il telecomando per la regolazione.
• Quando il deflettore di regolazione verticale è posizionato nella parte bassa nel modo
RINFRESCAMENTO o DEUMIDIFICAZIONE per un lungo periodo di tempo, si potrebbe
formare della condensa.
Non regolate il deflettore di regolazione automatica all’estrema sinistra o all’estrema destra
nel modo RINFRESCAMENTO con la velocità della ventola impostata su “MODERATO
(
)” per un periodo di tempo prolungato.
Si potrebbe formare della condensa sui deflettori di ventilazione.
Modo RINFRESCA- Modo
MENTO e DEUMI- RISCALDAMENTO
DIFICAZIONE
L’intervallo è ampio
e il flusso di aria può
essere diretto verso
il pavimento.
(AY-AP7FHR/AY-AP9FHR) (AY-AP12FHR)
Page 30

1
Durante il funzionamento, premete il tasto PLASMACUSTER.
• Il telecomando attiverà il display “
”.
• La spia blu PLASMACUSTER sull’unità si illuminerà.
PER ANNULLARE
Premete nuovamente il tasto PLASMACLUSTER.
• La spia PLASMACLUSTER sull’unità si spegnerà.
1
NOTE:
• L’utilizzo della funzione PLASMACLUSTER verrà memorizzato e sarà attivato la prossima
volta che si accende il condizionatore d’aria.
• Per spegnere la spia PLASMACLUSTER, premete il tasto DISPLAY.
• Se premete il tasto PLASMACLUSTER quando l’unità non è in funzione, il PLASMACLUSTER
funzionerà anche se il modo dell’aria condizionata non è impostato (ad esempio, RISCALDAMENTO o RINFRESCAMENTO). Il simbolo del modo del telecomando si spegne e la velocità del ventilatore non può essere impostata su AUTOMATICO.
FUNZIONAMENTO DEL PLASMACLUSTER
Il generatore di ioni Plasmacluster all’interno del condizionatore d’aria rilascerà ioni al
plasma (plasmacuster) positivi e negativi nella stanza.
Approssimativamente lo stesso numero di ioni positivi e negativi rilasciati nell’aria
ridurranno alcuni funghi causati dall’aria.
I-10
Page 31

ITALIANO
FUNZIONAMENTO TURBO
1
Premete il tasto TURBO durante il funzionamento.
• Il telecomando attiverà il display “
”.
• Il display della temperatura scomparirà.
• La spia verde TURBO (
) sull’unità si illuminerà.
PER ANNULLARE
1
In questo modo di funzionamento, la ventola del condizionatore d’aria funziona ad
“altissima” velocità con una temperatura impostata di 15°C nei modi RINFRESCAMENTO e DEUMIDIFICAZIONE e di 32°C nel modo RISCALDAMENTO per raffreddare
e riscaldare rapidamente la stanza.
Premete nuovamente il tasto TURBO.
• Il funzionamento TURBO verrà annullato quando
viene modificato il modo di funzionamento modalità
di funzionamento o quando l’unità viene spenta.
• La spia verde TURBO (
) sull’unità si spegnerà.
I-1 1
1
Premete il tasto TIMER DI SPEGNIMENTO
DOPO UN’ORA.
• Il telecomando attiverà il display “
”.
• La spia arancione TIMER (
) sull’unità si illuminerà.
• L’unità smetterà di funzionare dopo un’ora.
PER ANNULLARE
Premete il tasto CANCEL.
• La spia arancione TIMER (
) sull’unità si speg-
nerà.
In alternativa, spegnete l’unità premendo il tasto
d’ACCENSIONE/SPEGNIMENTO.
• La spia rossa di FUNZIONAMENTO (
) e la spia
arancione TIMER (
) sull’unità si spegneranno.
1
Quando è impostato il TIMER DI SPEGNIMENTO DOPO UN’ORA, l’unità si spegnerà
automaticamente dopo un’ora.
TIMER DI SPEGNIMENTO DOPO UN’ORA
NOTE:
• L’operazione TIMER DI SPEGNIMENTO DOPO UN’ORA ha priorità sulle impostazioni TIMER
ATTIVATO e TIMER DISATTIVATO.
• Se il TIMER DI SPEGNIMENTO DOPO UN’ORA viene impostato mentre l’unità non è in
funzione, l’unità funzionerà per un’ora in base alle condizioni impostate precedentemente.
• Se desiderate utilizzare l’unità per un’altra ora prima che il modo TIMER DI SPEGNIMENTO
DOPO UN’ORA si attivi, premete il tasto durante il funzionamento.
NOTE:
• Non potete impostare la temperatura o la velocità della ventola durante il funzionamento
TURBO.
• Quando l’unità funziona per oltre 30 minuti nel modo TURBO, l’impostazione della ventola
diventerà “ALTO” e l’impostazione della temperatura passerà a 18°C nel modo RINFRESCAMENTO e RISCALDAMENTO.
• Per spegnere la spia TURBO, premete il tasto DISPLAY.
Page 32

I-12
L’unità si spegnerà automaticamente in base all’impostazione scelta.
La durata del timer può essere impostata da un minimo di mezz’ora (30 minuti) a un
massimo di 12 ore.
Potete eseguire l’impostazione in incrementi di mezz’ora (30 minuti) fino a 9,5 ore e
in incrementi di 1 ora da 10 a 12 ore.
FUNZIONAMENTO DEL TIMER
TIMER DISATTIVATO
Quando viene impostato TIMER DISATTIVATO, l’impostazione della temperatura viene regolata automaticamente per evitare
che la stanza diventi eccessivamente fredda
quando dormite. (Funzione Auto Sleep)
MODO RINFRESCAMENTO/
DEUMIDIFICAZIONE:
• Un’ora dopo l’attivazione del timer, l’impostazione della temperatura aumenta di 1°C
rispetto all’impostazione della temperatura
iniziale.
MODO DI RISCALDAMENTO:
• Un’ora dopo l’attivazione del timer, l’impostazione della temperatura diminuisce di
3°C rispetto all’impostazione della temperatura iniziale.
1
PER DISATTIVARE IL TIMER
SUGGERIMENTI SUL FUNZIONAMENTO
DI DISATTIVAZIONE TIMER
Puntate il telecomando verso la finestra di ricezione
del segnale sull’unità.
1
Premete il tasto TIMER DISATTIVATO (
)
e impostate l’ora richiesta.
• L’impostazione dell’ora cambia quando premete
il tasto come segue.
Tenete premuto il tasto per scorrere le impostazioni velocemente.
• La spia arancione TIMER (
) sull’unità si illu-
minerà.
• Un segnale acustico “bip” verrà emesso dall’unità
interna quando riceverà il segnale.
• L’impostazione dell’ora scorrerà per indicare il
tempo rimanente.
Sul display è indicato che
l’unità è stata impostata per
spegnersi dopo 2,5 ore.
Premete il tasto CANCEL.
• La spia arancione TIMER
(
) sull’unità
si spegnerà.
PER MODIFICARE L’IMPOSTAZIONE
DEL TIMER
Premete il tasto TIMER da modificare (TIMER DISATTIVATO o TIMER ATTIVATO)
e modificate l’impostazione dell’ora.
0.5h 1.0h 1.5h 10h 11h 12h
Page 33

ITALIANO
L’unità si accenderà automaticamente in base all’impostazione scelta.
La durata del timer può essere impostata da un minimo di mezz’ora (30 minuti) a un
massimo di 12 ore.
Potete eseguire l’impostazione in incrementi di mezz’ora (30 minuti) fino a 9,5 ore e
in incrementi di 1 ora da 10 a 12 ore.
TIMER A TTIVA TO
1
Puntate il telecomando verso la finestra di ricezione
del segnale sull’unità.
1
Premete il tasto TIMER ATTIVATO (
).
• L’impostazione dell’ora cambia quando premete
il tasto come segue.
Tenete premuto il tasto per scorrere le impostazioni
velocemente.
• La spia arancione TIMER ( ) sull’unità si illuminerà.
• Un segnale acustico “bip” verrà emesso dall’unità
interna quando riceverà il segnale.
• L’impostazione dell’ora scorrerà per indicare il
tempo rimanente.
Selezionate il modo, l’impostazione della temperatura e la velocità della ventola in base alle vostre
esigenze.
• Quando la temperatura è impostata con il TIMER ATTIVATO, sul display verrà visualizzata la temperatura per
5 secondi prima di tornare alla visualizzazione dell’ora.
• Se non modificate l’impostazione, l’unità funzionerà utilizzando le impostazioni più recenti.
• L’unità si accenderà prima dell’ora impostata per permettere che la stanza raggiunga la temperatura desiderata
all’ora programmata. (Funzione risveglio)
Display visualizzato quando
si imposta l’unità, in modo
da raggiungere la temperatura richiesta dopo 6,5
ore.
I-13
0.5h 1.0h 1.5h 10h 11h 12h
NOTE SULL’IMPOSTAZIONE DELL’ORA E IL FUNZIONAMENTO
• L’impostazione dell’ora più recente verrà memorizzata e visualizzata sul display del telecomando quando TIMER DISATTIVATO o TIMER ATTIVATO vengono impostati la volta
successiva.
• TIMER ATTIVATO e TIMER DISATTIVATO non possono essere impostati insieme.
Sarà valida solo l’impostazione del TIMER più recente.
• Quando è impostato TIMER DI SPEGNIMENTO DOPO UN’ORA, le impostazioni TIMER
DISATTIVATO e TIMER ATTIVATO non sono disponibili.
• Se viene impostato TIMER DI SPEGNIMENTO DOPO UN’ORA quando TIMER DISATTIVATO o TIMER ATTIVATO è attivo, l’impostazione TIMER ATTIVATO o TIMER DISATTIVATO verrà annullata.
Page 34

I-14
MODO AUSILIARIO
Usate questo modo quando il telecomando non è disponibile.
PER ACCENDERE
Sollevate il pannello anteriore dell’unità interna e premete il tasto AUX. sul pannello operativo.
• La spia rossa di FUNZIONAMENTO (
) sull’unità
si illuminerà e l’unità comincerà il funzionamento
nel modo AUTOMATICO.
• La velocità del ventilatore e l’impostazione della temperatura sono impostate su AUTOMATICO.
PER SPEGNERE
Premete nuovamente il tasto AUX. sul pannello operativo.
• La spia rossa di FUNZIONAMENTO (
) sull’unità
si spegnerà.
NOTA:
Se viene premuto il tasto AUX. durante il normale funzionamento, l’unità si spegnerà.
(AY-AP7FHR/AY-AP9FHR)
(AY-AP12FHR)
Page 35

ITALIANO
I-15
PULIZIA DELL’UNITÀ E DEL TELECOMANDO
Assicuratevi di scollegare il cavo di alimentazione o di spegnere l’interruttore dell’impianto
prima di eseguire qualsiasi lavoro di manutenzione.
MANUTENZIONE UNA VOL TA
TERMINA TA LA STAGIONE DEL
CONDIZIONATORE D’ARIA
1
Utilizzate l’unità nel modo RINFRESCAMENTO con la temperatura impostata su 32°C per mezza
giornata per consentire la completa
asciugatura del meccanismo.
2
Arrestate il funzionamento e scollegate l’unità. Spegnete l’interruttore
di circuito se ne avete uno esclusivamente per il condizionatore d’aria.
3
Pulite i filtri e poi reinstallateli.
MANUTENZIONE PRIMA
DELLA STAGIONE DEL
CONDIZIONATORE D’ARIA
1
Assicuratevi che i filtri dell’aria
non siano sporchi.
2
Assicuratevi che l’entrata e l’uscita
dell’aria non siano ostruite.
3
Controllate la cremagliera di montaggio dell’unità esterna periodicamente ed assicuratevi che sia
ben fissata.
• Strofinateli con un panno morbido.
• Non schizzate o versate acqua sui componenti, poiché possono verificarsi scosse
elettriche o danno all’apparecchiatura.
• Non usate acqua calda, diluenti, polvere abrasiva o solventi forti.
MANUTENZIONE
PULIZIA DEI FILTRI
I filtri dell’aria dovrebbero essere puliti ogni due settimane.
1
SPEGNETE L’UNITÀ
2
RIMUOVETE I FILTRI
1 Sollevate il pannello aperto.
2 Spingete i filtri leggermente verso l’al-
to per sbloccarli.
3 Spingete i filtri verso il basso per rimuo-
verli.
3
PULITE I FILTRI
Usate un aspirapolvere per togliere la
polvere. Se i filtri sono sporchi, lavateli
con acqua tiepida e un detergente delicato. Asciugate i filtri all’ombra prima di
reinstallarli.
4
REINSTALLATE I FILTRI
1 Reinstallate i filtri nella posizione
originale.
2 Chiudete il pannello aperto.
3 Premere i punti indicati dalla freccia
mostrati a sinistra per bloccarlo in
posizione.
3
1
2
1
2
3
Page 36

I-16
PRIMA DI RICHIEDERE ASSISTENZA
SE L’UNITÀ NON RICEVE IL SEGNALE DEL TELECOMANDO
Controllate che le batterie del
telecomando non siano vecchie o deboli.
Provate a inviare nuovamente il
segnale puntando il telecomando
correttamente verso la finestra di
ricezione del segnale dell’unità.
Controllate che le polarità delle
batterie siano allineate correttamente.
Le condizioni seguenti non significano malfunzionamento
L’UNITÀ NON FUNZIONA
L’unità non funziona se accesa subito dopo averla
spenta. L’unità non funziona immediatamente dopo
aver cambiato il modo. Ciò al fine di proteggere il
meccanismo interno. Attendere 3 minuti prima che
l’unità funzioni.
L’UNITÀ NON EMETTE ARIA CALDA
L’unità è in fase di preriscaldamento o di sbrinamento.
SCRICCHIOLÌO
L’unità potrebbe produrre degli scricchiolìi. Questi
suoni sono generati dalla frizione del pannello
anteriore e degli altri componenti che si espandono
in seguito a cambiamento della temperatura.
Se l’unità non funziona correttamente, controllate i seguenti punti prima di richiedere
assistenza.
SE L’UNITÀ NON FUNZIONA
Controllate che l’interruttore del circuito non sia saltato o che non sia bruciato un fusibile.
SE L’UNITÀ NON RAFFREDDA (O RISCALDA) L’AMBIENTE EFFICACEMENTE
Controllate i filtri. Puliteli se sono
sporchi.
Controllate l’unità esterna e assicuratevi che l’uscita o l’entrata
dell’aria non siano ostruite.
Controllate che il termostato sia
impostato correttamente.
Assicuratevi che porte e finestre
siano ben chiuse.
Se nella stanza ci sono tante persone, è possibile che l’unità non
riesca a raggiungere la temperatura desiderata.
Controllate che nella stanza
non sia in funzione un’altra
fonte di calore supplementare.
ODORI
L’unità potrebbe emettere gli odori, filtrati dentro
l’unità, dei tappeti e dei mobili e gli odori dei componenti interni nelle prime fasi di installazione.
Si prega di richiedere assistenza quando la spia di FUNZIONAMENTO e la spia TIMER nel pannello
dell’indicatore lampeggia.
VIENE EMESSO UN LEGGERO
RUMORE
Questo è un suono emesso quando l’unità sta
generando ioni Plasmacluster.
SIBILO
Il suono delicato, tipo sibilo, è prodotto dal refrigerante che scorre all’interno dell’unità.
VAPORE ACQUEO
• Nel modo di funzionamento RINFRESCAMENTO e DEUMIDIFICAZIONE si può vedere
del vapore acqueo fuoriuscire dall’uscita dell’aria
in seguito alla differenza tra la temperatura
ambiente e l’aria rilasciata dall’unità.
• Nel modo di funzionamento RISCALDAMENTO,
del vapore acqueo può fuoriuscire dall’unità esterna durante lo sbrinamento.
ODORI EMESSI DALLA PRESA
PLASMACLUSTER
Si tratta dell’odore dell’ozono generato dal generatore di ioni Plasmacluster. La concentrazione di
ozono è minima, quindi non è pericolosa per la salute. La scarica di ozono nell’aria svanisce rapidamente e la sua densità all’interno della stanza non
aumenta.
Page 37

ITALIANO
Page 38

A. Informações sobre a Eliminação de Produtos para os Utilizadores
(particulares)
1. Na União Europeia
Atenção: Se quiser eliminar este equipamento, não o deve fazer juntamente com o
lixo doméstico comum!
O equipamento eléctrico e electrónico deve ser tratado separadamente e ao abrigo da
legislação aplicável que obriga a um tratamento, recuperação e reciclagem
adequados de equipamentos eléctricos e electrónicos usados.
Após a implementação desta legislação por parte dos Estados-membros, todos os
cidadãos residentes na União Europeia poderão entregar o seu equipamento eléctrico
e electrónico usado em estações de recolha específicas a título gratuito*.
Em alguns países* o seu revendedor local também pode recolher o seu equipamento usado a
título gratuito na compra de um novo equipamento. *) Contacte as entidades locais para
mais informações.
Se o seu equipamento eléctrico e electrónico usado funcionar a pilhas ou baterias, deverá
eliminá-las em separado, conforme a legislação local, e antes de entregar o seu equipamento.
Ao eliminar este produto correctamente estará a contribuir para que o lixo seja
submetido aos processos de tratamento, recuperação e reciclagem adequados. Desta
forma é possível evitar os efeitos nocivos que o tratamento inadequado do lixo
poderia provocar no ambiente e na saúde.
2. Em outros Países fora da UE
Se quiser eliminar este produto, contacte as entidades locais e informe-se sobre o
método correcto para proceder à sua eliminação.
Na Suíça: O equipamento eléctrico e electrónico é aceite, a título gratuito, em
qualquer revendedor, mesmo que não tenha adquirido um novo produto. Poderá
encontrar uma lista das estações de recolha destes equipamentos na página da Web
www.swicho.ch ou www.sens.ch.
B. Informações sobre a Eliminação de Produtos para UtilizadoresEmpresas.
1. Na União Europeia
Se o produto for usado para fins comerciais e quiser eliminá-lo:
Contacte o seu revendedor SHARP que irá informá-lo sobre a melhor forma de
eliminar o produto. Poderá ter de pagar as despesas resultantes da recolha e
reciclagem do produto. Alguns produtos mais pequenos (e em pequenas
quantidades) poderão ser recolhidos pelas estações locais.
Na Espanha: Contacte o sistema de recolhas público ou as entidades locais para
mais informações sobre a recolha de produtos usados.
2. Em outros Países fora da UE
Se quiser eliminar este produto, contacte as entidades locais e informe-se sobre o
método correcto para proceder à sua eliminação.
Atenção: O seu produto
está identificado com este
símbolo. Significa que os
produtos eléctricos e
electrónicos não devem ser
misturados com o lixo
doméstico comum. Existe
um sistema de recolhas
específico para estes
produtos.
Page 39

PORTUGUÊS
P-1
PORTUGUÊS
Agradecemo-lhe ter adquirido um aparelho de ar condicionado SHARP. Por favor, leia
cuidadosamente este manual antes de fazer funcionar o aparelho.
• INSTRUÇÕES DE SEGURANÇA
IMPORTANTES .........................................P-1
• NOTAS SUPLEMENTARES SOBRE
O FUNCIONAMENTO ...............................P-3
• SUGESTÕES PARA POUPAR
ENERGIA...................................................P-3
• NOMES DAS PEÇAS ................................P-4
• UTILIZAÇÃO DO CONTROLO
REMOTO ...................................................P-7
• FUNCIONAMENTO BÁSICO.....................P-8
• REGULAÇÃO DA DIRECÇÃO
DO FLUXO DO AR ....................................P-9
CONTEÚDO
• FUNCIONAMENTO DO
PLASMACLUSTER...................................P-10
• FUNCIONAMENTO TURBO.....................P-11
• TEMPORIZADOR DE UMA HORA...........P-11
• FUNCIONAMENTO COM
TEMPORIZADOR .....................................P-12
• MODO DE FUNCIONAMENTO
AUXILIAR..................................................P-14
• MANUTENÇÃO ........................................P-15
• ANTES DE SOLICITAR ASSISTÊNCIA ...
P-16
INSTRUÇÕES DE SEGURANÇA IMPORTANTES
CUIDADOS PARA A SUA UTILIZAÇÃO
1
Não puxar ou deformar o cabo de fornecimento de energia. Puxar o cabo de fornecimento
de energia e a sua má utilização poderão resultar em danos para a unidade e causar
choque eléctrico.
2
Ser cuidadoso em não expor o seu corpo directamente sob a saída de ar durante um
período prolongado. Poderá afectar a sua condição física.
3
Quando utilizar o ar condicionado para bebés, crianças, idosos, acamados ou pessoas
deficientes, assegure-se de que a temperatura ambiente é apropriada para os que se
encontrarem no compartimento.
4
Nunca introduzir objectos na unidade. A introdução de objectos poderá resultar em
ferimentos devidos à elevada velocidade de rotação das ventoinhas internas.
5
Não se esquecer de ligar o aparelho de ar condicionado à terra. Não ligar o fio de terra
à tubagem de gás, canalização de água, pára-raios ou cabo de terra telefónico. A ligação de terra incompleta poderá causar choque eléctrico.
6
Se algo estiver anormal com o ar condicionado (p. ex. um cheiro a queimado), parar
imediatamente o funcionamento e DESLIGAR o disjuntor corta-circuitos.
7
O aparelho deverá ser instalado respeitando os regulamentos nacionais de instalações
eléctricas. A ligação inadequada do cabo poderá causar o sobreaquecimento do cabo de
fornecimento de energia, da ficha e da tomada eléctrica de parede e causar um incêndio.
8
Se o cabo de alimentação estiver danificado, deverá ser substituído pelo fabricante ou
pelo seu agente de serviço ou pessoa identicamente qualificada a fim de evitar uma
situação de perigo. Para substituição, utilizar apenas o cabo de energia especificado
pelo fabricante.
ATENÇÃO PARA A INSTALAÇÃO/REMOÇÃO/REPARAÇÃO
• Não tente instalar/remover/reparar a unidade você mesmo(a). Um trabalho incorrecto poderá provocar choque eléctrico, fugas de água, fogo etc. Consulte o seu revendedor ou outro
pessoal de assistência qualificado para a instalação/remoção/reparação do aparelho.
Este equipamento cumpre os requisitos das Directivas 89/336/EEC e 73/23/EEC
conforme a sua emenda 93/68/EEC.
Page 40

INSTRUÇÕES DE SEGURANÇA IMPORTANTES
PRECAUÇÕES COM A UTILIZAÇÃO
1
Abrir periodicamente uma janela ou uma porta para ventilar o compartimento, especialmente quando utilizar electrodomésticos a gás. A ventilação insuficiente poderá
causar redução de oxigénio.
2
Não utilizar os botões com as mãos molhadas. Poderá causar choque eléctrico.
3
Para segurança, desligar o disjuntor corta-circuitos quando não utilizar a unidade por um
período longo de tempo.
4
Verificar periodicamente o desgaste do chassis de montagem da unidade exterior e
certificar-se de que se encontra firmemente na posição.
5
Não colocar nada sobre a unidade exterior nem a pisar. O objecto ou a pessoa poderão
cair, causando ferimentos.
6
Esta unidade foi concebida para utilização residencial. Não utilizar para outras aplicações tais como num canil ou estufa para criação de animais ou plantas.
7
Não colocar um recipiente com água na unidade. Se a água penetrar na unidade, os
isolamentos eléctricos poder-se-ão deteriorar e causar choque eléctrico.
8
Não bloquear as entradas nem as saídas de ar da unidade. Poderá causar um desempenho insuficiente ou problemas.
9
Assegure-se que o aparelho não está em funcionamento e desligue o disjuntor cortacircuitos antes de executar qualquer manutenção ou limpeza. Uma ventoinha roda no
interior da unidade e você poderá ficar ferido.
10
Não espalhar ou verter água directamente sobre a unidade. A água poderá causar
choque eléctrico ou danos do equipamento.
11
Este electrodoméstico não foi concebido para utilização por crianças pequenas ou
pessoas doentes sem supervisão.
As crianças pequenas deverão ser supervisionadas para assegurar que elas não
brincam com o electrodoméstico.
PRECAUÇÕES COM A COLOCAÇÃO/INSTALAÇÃO
• Assegurar-se de que liga o ar condicionado ao fornecimento de energia de tensão e
frequência taxadas.
A utilização de corrente com tensão e frequência inadequadas poderá resultar em danos
no equipamento e possível incêndio.
• Não instalar a unidade num local onde possam existir fugas de gás inflamável. Poderá
causar um incêndio.
Instalar a unidade num local com um mínimo de poeira, vapores e humidade no ar.
• Dispor o tubo de drenagem para assegurar uma boa drenagem. Uma drenagem insuficiente
poderá provocar que o compartimento, mobiliário, etc. fiquem molhados.
• Assegurar-se de que se encontra instalado um disjuntor diferencial ou um corta-circuitos,
dependendo do local de instalação, para evitar o choque eléctrico.
P-2
Page 41

PORTUGUÊS
P-3
TEMP. INTERIOR TEMP. EXTERIOR
ARREFECI-
limite 32°C D.B. 43°C D.B.
superior 23°C W.B. -
MENTO
limite 21°C D.B. 21°C D.B.
inferior 15°C W.B. -
AQUECI-
limite 27°C D.B. 24°C D.B.
superior - 18°C W.B.
MENTO
limite 20°C D.B. -8,5°C D.B.
inferior - -9,5°C W.B.
NOTAS SUPLEMENT ARES SOBRE O FUNCIONAMENTO
GAMA DE TEMPERATURA DE SERVIÇO
• O dispositivo de protecção
instalado pode impedir o
funcionamento da unidade
ao ser usada fora desta
gama.
• Se o ar tiver uma humidade
superior a 80% pode formarse condensação na saída de
ar se a unidade for usada
constantemente no modo
FRIO ou SECAR.
D.B. = Ampola seca W.B. = Ampola húmida
FUNÇÃO DE PRÉ-AQUECIMENTO
No modo de funcionamento CALOR, a ventoinha interior pode não ligar por dois a cinco minutos
depois da unidade ser ligada, a fim de evitar a circulação de ar frio.
FUNÇÃO DE DESCONGELAÇÃO
• Se durante o funcionamento em CALOR se formar gelo no permutador térmico dentro da unidade
exterior, um descongelador automático gera calor por cinco a dez minutos afim de remover esse
gelo. Durante o processo da descongelação, as ventoinhas exterior e interior, deixam de funcionar.
• Depois da descongelação estar terminada, a unidade retoma automaticamente o funcionamento
no modo CALOR.
EFICÁCIA DO AQUECIMENTO
• A unidade dispõe de uma bomba de calor que puxa o calor do ar exterior e liberta-o para o interior. Por
consequência, a eficácia do aquecimento depende em grande parte da temperatura do ar exterior.
• Se a temperatura exterior for muito baixa, diminui a eficácia do aquecimento, demorando algum
tempo a aquecer o espaço a climatizar.
• Demora algum tempo até o aparelho aquecer e, por sua vez, aquecer o quarto, dado que esta
unidade funciona com um sistema de circulação de ar forçado.
AO OCORRER UMA FALTA DE CORRENTE
Este ar condicionado tem uma função de memória para o caso de haver uma falta de corrente.
Depois de a corrente voltar, a unidade é automaticamente reiniciada com as mesmas regulações que
estavam activas antes da falta de corrente, excepto as regulações do temporizador.
Se os temporizadores estiverem activados, terão de ser reactivados depois de a corrente ter voltado.
SUGESTÕES PARA POUPAR ENERGIA
A seguir, encontrará algumas maneiras simples de poupar energia ao usar o seu ar
condicionado.
REGULAR A TEMPERATURA CORRECTA
• Regulando o termostato no modo FRIO para uma temperatura 1°C acima da temperatura desejada
e 2°C abaixo no modo CALOR pode economizar-se aproximadamente 10 por cento de electricidade.
• Regulando a temperatura durante o arrefecimento para um valor mais frio do que o necessário, o
consumo de corrente será mais elevado.
EVITAR EXPOSIÇÃO DIRECTA AO SOL E CORRENTES DE AR
• Evitando que os raios de sol entrem directamente no quarto durante o arrefecimento, pode reduzirse o consumo de corrente.
• Feche portas e janelas durante as operações de arrefecimento e aquecimento.
REGULE A DIRECÇÃO DO FLUXO DE AR PARA OBTER A MELHOR
CIRCULAÇÃO DO AR
MANTENHA O FILTRO LIMPO PARA ASSEGURAR O FUNCIONAMENTO PERFEITO
APROVEITE AO MÁXIMO A FUNÇÃO DESLIGAMENTO POR TEMPORIZADOR
RETIRE O CABO DE ALIMENTAÇÃO DE REDE SEMPRE QUE A UNIDADE
NÃO SEJA UTILIZADA POR UM PERÍODO PROLONGADO
• A unidade interior continua a consumir um pouco de corrente mesmo não estando a funcionar.
Page 42

NOMES DAS PEÇAS
1 Entrada (Ar)
2 Painel aberto
3 Filtros de ar
4 Botão AUX.
5 Indicador
6 Janela receptora
7 Cabo de ligação à corrente
8 Palhetas verticais
9 Palhetas horizontais
0 Saída (Ar)
q Controlo remoto
w Lâmpada PLASMACLUSTER
(azul)
e Lâmpada TURBO (verde
)
r Lâmpada de TEMPORIZADOR
(laranja
)
t Lâmpada de FUNCIONA-
MENTO (vermelha
)
UNIDADE EXTERIOR
NOTA: As unidades reais podem divergir ligeiramente daquelas acima ilustradas.
UNIDADE INTERIOR (AY-AP7FHR/AY-AP9FHR)
1
2
3
4
5
6
7
8
9
0
q
y Entrada (Ar)
u Tubo de refrigeração e cabo
de interligação
i Mangueira de drenagem
o Saída (Ar)
P-4
w
e
r
t
y
u
i
o
Page 43

PORTUGUÊS
1 Botão AUX.
2 Entrada (Ar)
3 Painel aberto
4 Filtros de ar
5 Indicador
6 Janela receptora
7 Palhetas verticais
8 Palhetas horizontais
9 Saída (Ar)
0 Cabo de ligação à corrente
q Controlo remoto
w Lâmpada PLASMACLUSTER
(azul)
e Lâmpada TURBO (verde
)
r Lâmpada de TEMPORIZADOR
(laranja
)
t Lâmpada de FUNCIONAMENTO
(vermelha
)
UNIDADE EXTERIOR
NOTA: As unidades reais podem divergir ligeiramente daquelas acima ilustradas.
UNIDADE INTERIOR (AY-AP12FHR)
y Entrada (Ar)
u Tubo de refrigeração e cabo
de interligação
i Mangueira de drenagem
o Saída (Ar)
1
2
3
4
5
6
7
8
9
0
q
w
e
r
t
y
u
i
o
P-5
Page 44

CONTROLO REMOTO
1 TRANSMISSOR
2 MOSTRADOR LCD (de cristais líquidos)
3 Botão LIGAR/DESLIGAR
4 Botão TEMP.
5 Botão MOSTRADOR (DISPLAY)
6 Botão PLASMACLUSTER
7 Botão TEMPORIZADOR DE UMA HORA
8 Botão MODE
9 Botão LIGAR POR TEMPORIZADOR
(para regular o temporizador)
0 Botão VENTOINHA (FAN)
q Botão DESLIGAR POR TEMPORIZADOR
(para regular o temporizador)
w Botão DIRECCIONAR (SWING)
e Botão CANCELAR TEMPORIZADOR
(CANCEL)
r Botão TURBO
t Botão REINICIAR (RESET)
y SÍMBOLOS DE MODO
: AUTO : CALOR
: FRIO : SECAR
u SÍMBOLO TURBO
i SÍMBOLO PLASMACLUSTER
o SÍMBOLOS DA VELOCIDADE DA VENTOINHA
: AUTO : Regulação manual
p INDICADOR DE TEMPERATURA E CONTAGEM
DECRESCENTE DO TEMPORIZADOR
a SÍMBOLO DE TRANSMISSÃO
s INDICADOR DE LIGAR/DESLIGAR POR TEMPORIZADOR
Indica quando o temporizador está regulado para ligar ou desligar.
MOSTRADOR LCD DO CONTROLO REMOTO
1
2
3
4
5
6
7
8
9
0
q
w
e
r
t
y
u
i
o
p
a
s
NOMES DAS PEÇAS
P-6
Page 45

PORTUGUÊS
1
Remova a tampa das pilhas na parte
posterior do controlo remoto.
2
Insira as pilhas no compartimento assegurando que os pólos ± e — fiquem correctamente posicionados.
• Aparecerão linhas no mostrador quando as pilhas estiverem instaladas correctamente.
3
Reinstale a tampa das pilhas.
4
Prima o botão RESET com um palito
afiado.
UTILIZAÇÃO DO CONTROLO REMOTO
P-7
NOTAS:
• A duração de vida útil da pilha é de aproximadamente um ano sob condições
normais de utilização.
• Ao substituir estas pilhas, faça-o sempre por duas novas e use sempre do mesmo tipo.
• Se o controlo remoto não funcionar correctamente depois de substituir as baterias,
prima o botão RESET com um palito afiado.
• Se não pretender utilizar a unidade por um período mais prolongado, retire as
pilhas do controlo remoto.
Aponte o controlo remoto na direcção do receptor da unidade e carregue no botão que pretende accionar. Ouvir-se-á um som quando a
unidade receber o sinal.
• Assegure-se de que não há qualquer
objecto, como por ex., cortinas, entre o
controlo remoto e a unidade.
• O controlo remoto funciona até uma
distância de sete metros.
INSTALAR AS PILHAS Use duas pilhas AAA (R03).
COMO UTILIZAR O CONTROLO REMOTO
Controlo remoto
tampa
ATENÇÃO
• Não exponha a janela receptora à insolação demasiado forte ou directa, pois os raios
solares podem afectar o funcionamento correcto. Caso seja necessário, feche as cortinas
para evitar essa exposição directa.
• Se utilizar uma lâmpada fluorescente com um arrancador rápido no mesmo quarto em que
se encontra o ar condicionado, podem surgir interferências durante a transmissão do sinal.
• A unidade pode ser afectada por sinais emitidos pelo telecomando de um televisor, de um
videogravador ou de outro equipamento que seja utilizado no mesmo quarto.
• Não deixe o controlo remoto exposto à insolação directa ou perto de um aquecimento.
Proteja também a unidade e o controlo remoto contra humidade e impactos, pois estes
poderão provocar a sua descoloração ou danificá-los.
Page 46

Prima o botão TEMP. para regular
a temperatura desejada.
MODO AUTO/SECAR
A temperatura pode ser alterada em
incrementos de 1°C dentro da gama de
2°C a cima ou 2°C a baixo da temperatura
determinada automaticamente pelo ar
condicionado.
MODO FRIO/CALOR
A temperatura pode ser regulada dentro
da gama de 18 a 32°C.
1
P-8
FUNCIONAMENTO BÁSICO
2
Carregue no botão LIGAR/DESLIGAR para activar a função.
• A lâmpada vermelha de FUNCIONAMENTO (
) da unidade acender-se-á.
3
4
Carregue no botão MODE para
escolher o modo de funcionamento.
AUTO CALOR FRIO SECAR
5
Carregue no botão FAN para determinar a velocidade desejada da
ventoinha.
AUTO SUAVE LENTO RÁPIDO
• No modo SECAR, a velocidade da ventoinha encontra-se ajustada em AUTO
e não pode ser alterada.
Modo
Regulação
da temperatura
Abaixo CA-
23°C
de 21°C LOR
21°C-24°C
SE- Temp. da sala
CAR no início
24°C-26°C FRIO 24°C
26°C-28°C FRIO 25°C
Acima
FRIO 26°C
de 28°C
Modos e regulações de temperatura
Temperatura
do quarto no
início do funcionamento
SUGESTÕES SOBRE
O MODO AUTO
No modo AUTO, a temperatura e o modo
são seleccionados automaticamente consoante a temperatura ambiente no momento em que a unidade é ligada.
Para desligar a unidade, carregue
novamente no botão LIGAR/DESLIGAR.
• A lâmpada vermelha de FUNCIONAMENTO (
) na unidade apaga-se.
1
4
5
2
3
Funcionamento automático
Page 47

PORTUGUÊS
P-9
REGULAÇÃO DA DIRECÇÃO DO FLUXO DO AR
DIRECÇÃO DO FLUXO VERTICAL DO AR
A margem de regulação é mais restrita que
a margem SWING para
evitar a formação de
água de condensação.
Segure nas palhetas de regulação horizontais como ilustrado e regule a direcção
do fluxo do ar.
Carregue uma vez no botão SWING
no controlo remoto.
• As palhetas verticais modificarão
continuamente o seu ângulo.
Carregue mais uma vez no botão
SWING assim que as palhetas verticais alcançarem a posição desejada.
• As palhetas pararão dentro da margem apresentada no diagrama.
• A posição ajustada será memori-
zada e será automaticamente regulada na mesma posição quando
funcionar na próxima vez.
Margem de regulação
DIRECÇÃO DO FLUXO HORIZONTAL DO AR
ATENÇÃO
Nunca tente ajustar a palheta de regulação vertical manualmente.
• O ajuste manual destas palhetas pode mais tarde provocar o mau funcionamento da unidade ao ser comandada por controlo remoto.
• Quando os modos FRIO e SECAR são utilizados por um período prolongado com as
palhetas de regulação verticais ajustadas numa posição muito virada para baixo, pode
formar-se água de condensação.
Não regule o ajuste da persiana horizontal demasiadamente para a direita ou esquerda no modo
FRIO com a velocidade de ventoinha “SUAVE (
)” durante um longo período de tempo.
Condensação poderá formar-se nas palhetas.
Modos FRIO e SECAR Modo CALOR
A margem é mais
ampla de forma a
poder dirigir o fluxo
de ar para o chão.
(AY-AP7FHR/AY-AP9FHR) (AY-AP12FHR)
Page 48

1
Durante a operação, prima o botão PLASMACLUSTER.
• O controlo remoto mostrará “
”.
• A lâmpada azul PLASMACLUSTER iluminar-se-á
na unidade.
PARA TERMINAR
Pressione de novo o botão de PLASMACLUSTER.
• A lâmpada PLASMACLUSTER da unidade apaga.
1
NOTAS:
• A utilização da operação PLASMACLUSTER será memorizada e será activada na próxima
vez que ligar o ar condicionado.
• Para desligar a lâmpada PLASMACLUSTER, prima o botão DISPLAY.
• Quando o botão PLASMACLUSTER é premido enquanto o aparelho não estiver a funcionar,
a operação PLASMACLUSTER será executada sem acompanhar o modo de ar condicionado
(p.ex. AQUECIMENTO ou ARREFECIMENTO). O símbolo de modo do controlo remoto apagará
e a velocidade da ventoinha não pode ser regulada em AUTO.
FUNCIONAMENTO DO PLASMACLUSTER
O gerador de iões Plasmacluster dentro do ar condicionado libertará iões Plasmacluster
positivos e negativos para dentro da sala.
Aproximadamente o mesmo número de iões positivos e negativos libertados reduzem
os fungos no ar.
P-10
Page 49

PORTUGUÊS
FUNCIONAMENTO TURBO
1
Prima o botão TURBO durante a operação.
• O controlo remoto mostrará “
”.
• O mostrador da temperatura desligar-se-á.
• A lâmpada verde TURBO (
) na unidade acen-
dese.
PARA TERMINAR
Pressione de novo o botão TURBO.
• O funcionamento do TURBO também será cancelado quando for mudado o modo de funcionamento
ou quando a unidade for desligada.
• A lâmpada verde TURBO (
) na unidade apaga-
se.
1
Nesta operação, a ventoinha do ar condicionado funciona a velocidade “super
elevada” com uma regulação de temperatura de 15°C nos modos FRIO e SECO e
32°C em modo CALOR para arrefecer ou aquecer rapidamente a sala.
NOTAS:
• Não pode definir a temperatura nem a velocidade da ventoinha durante a operação do TURBO.
• Após a unidade funcionar durante 30 minutos em modo TURBO, a regulação da ventoinha
passa à velocidade “RÁPIDO”, e a temperatura fica definida em 18°C nos modos FRIO e
SECAR.
• Para desligar a lâmpada TURBO, prima o botão DISPLAY.
P-11
1
Carregue no botão TEMPORIZADOR DE UMA
HORA.
• O controlo remoto mostrará “
”.
• A lâmpada laranja de TEMPORIZADOR (
) ilu-
minar-se-á na unidade.
• A unidade trabalhará durante uma hora.
PARA TERMINAR
Pressione o botão CANCEL.
• A lâmpada laranja de TEMPORIZADOR (
) des-
ligar-se-á na unidade.
Alternativamente, desligue a unidade pressionando o botão de LIGAR/DESLIGAR.
• A lâmpada vermelha de FUNCIONAMENTO (
) e a
lâmpada laranja de TEMPORIZADOR (
) desligar-
se-ão na unidade.
1
Se o TEMPORIZADOR DE UMA HORA for activado, a unidade desligará automaticamente ao fim de uma hora.
TEMPORIZADOR DE UMA HORA
NOTAS:
• O funcionamento do TEMPORIZADOR DE UMA HORA tem prioridade sobre o funcionamento
de LIGAR POR TEMPORIZADOR e DESLIGAR POR TEMPORIZADOR.
• Se for regulado o TEMPORIZADOR DE UMA HORA enquanto a unidade não estiver a
funcionar, a unidade não funcionará durante uma hora nas condições previamente reguladas.
• Se desejar fazer funcionar a unidade durante uma outra hora antes de activar TEMPORIZADOR DE UMA HORA, pressione de novo o botão TEMPORIZADOR DE UMA HORA
durante o funcionamento.
Page 50

P-12
A unidade desligará automaticamente de acordo com a sua regulação.
A duração do temporizador poderá ser definida desde um mínimo de meia hora (30
minutos) até um máximo de 12 horas.
Até 9,5 horas, poderá definir por incrementos de meia hora (30 minutos), e de 10 a
12 horas, por incrementos de 1 hora.
FUNCIONAMENTO COM TEMPORIZADOR
DESLIGAR POR TEMPORIZADOR
Quando está activo o modo de funcionamento
DESLIGAR POR TEMPORIZADOR a temperatura do quarto é regulada automaticamente para evitar que o quarto fique demasiado frio enquanto você está a dormir.
(Função automática nocturna)
MODO FRIO/SECAR:
• Uma hora depois do temporizador ter começado a funcionar, a temperatura sobe 1°C
para além da temperatura regulada.
MODO CALOR:
•
Uma hora depois de o temporizador ter começado a funcionar, a temperatura passa 3°C
abaixo da temperatura inicialmente regulada.
1
PARA CANCELAR O TEMPORIZADOR
SUGESTÕES SOBRE DESLIGAMENTO
POR TEMPORIZADOR
Aponte o controlo remoto para a janela de recepção
do sinal da unidade.
1
Pressione o botão DESLIGAR POR TEMPORIZADOR (
) e regule o tempo como desejar.
• A definição do tempo mudará quando pressionar
o botão da seguinte forma.
Mantenha o botão premido para avançar rapidamente nas definições.
• A lâmpada laranja de TEMPORIZADOR (
)
na unidade acender-se-á.
• Ouve-se um som a título de confirmação de
que a unidade está a receber o sinal.
• O tempo definido decrescerá indicando o tempo
remanescente.
Mostrador apresentado
quando regular a unidade
para desligar 2,5 horas
mais tarde.
Pressione o botão CANCEL.
• A lâmpada laranja de TEMPORIZADOR
(
) desligarse-á na unidade.
PARA MODIFICAR A HORA
Pressione o botão TEMPORIZADOR que
deseja alterar, DESLIGAR POR TEMPORIZADOR ou LIGAR POR TEMPORIZADOR
e altere a definição do tempo.
0.5h 1.0h 1.5h 10h 11h 12h
Page 51

PORTUGUÊS
A unidade ligará automaticamente de acordo com a sua regulação.
A duração do temporizador poderá ser definida desde um mínimo de meia hora (30
minutos) até um máximo de 12 horas.
Até 9,5 horas, poderá definir por incrementos de meia hora (30 minutos), e de 10 a 12
horas, por incrementos de 1 hora.
LIGAR POR TEMPORIZADOR
1
Aponte o controlo remoto para a janela de recepção
do sinal da unidade.
1
Carregue no botão LIGAR POR TEMPORIZADOR
(
).
• A definição do tempo mudará quando pressionar
o botão da seguinte forma.
Mantenha o botão premido para avançar rapidamente nas definições.
• A lâmpada laranja de TEMPORIZADOR (
)
na unidade acender-se-á.
• Ouve-se um som a título de confirmação de que
a unidade está a receber o sinal.
• O tempo definido decrescerá indicando o tempo
remanescente.
Seleccione o modo, temperatura e regulação da
velocidade da ventoinha conforme desejar.
• Quando a temperatura for regulada com LIGAR POR
TEMPORIZADOR, a temperatura aparecerá no mostrador durante 5 segundos e depois voltará a indicação da hora.
• Se não alterar a definição, a unidade funcionará usando a definição mais recente.
• A unidade ligar-se-á antes da hora pré-definida para
assim possibilitar que a temperatura desejada no
quarto seja realmente alcançada na hora programada.
(Função de acordar)
Mostrador apresentado
quando regular a unidade
para atingir a temperatura
da sala desejada 6,5 horas mais tarde.
P-13
0.5h 1.0h 1.5h 10h 11h 12h
NOTAS SOBRE A REGULAÇÃO E FUNCIONAMENTO DO TEMPORIZADOR
• A última definição será memorizada e aparecerá no mostrador do controlo remoto da próxima vez que regular o DESLIGAR POR TEMPORIZADOR ou o LIGAR POR TEMPORIZADOR.
• O DESLIGAR POR TEMPORIZADOR e o LIGAR POR TEMPORIZADOR não podem ser
definidos em conjunto.
Será válida apenas a definição mais recente do TEMPORIZADOR.
• Enquanto estiver definido TEMPORIZADOR DE UMA HORA, as definições de DESLIGAR
POR TEMPORIZADOR e LIGAR POR TEMPORIZADOR não estão disponíveis.
• Quando for activado o TEMPORIZADOR DE UMA HORA, enquanto o DESLIGAR POR
TEMPORIZADOR ou LIGAR POR TEMPORIZADOR estiverem activados, o LIGAR POR
TEMPORIZADOR ou o DESLIGAR POR TEMPORIZADOR serão cancelados.
Page 52

P-14
MODO DE FUNCIONAMENTO AUXILIAR
Use este modo de funcionamento quando não tiver o controlo remoto à disposição.
PARA ACTIVAR
Levante o painel frontal da unidade interior e prima o
botão AUX. no painel de operação.
• A lâmpada vermelha de FUNCIONAMENTO (
)
na unidade acende e a unidade começa a funcionar
no modo AUTO.
• A velocidade da ventoinha e a regulação da temperatura são ajustadas em AUTO.
PARA DESACTIVAR
Carregue novamente no botão AUX. no painel de
comando.
• A lâmpada vermelha de FUNCIONAMENTO (
)
na unidade apaga-se.
NOTA:
Se o botão AUX. for premido durante o funcionamento
normal, a unidade é desligada.
(AY-AP7FHR/AY-AP9FHR)
(AY-AP12FHR)
Page 53

PORTUGUÊS
P-15
LIMPEZA DA UNIDADE E DO CONTROLO REMOTO
Antes de efectuar qualquer trabalho de manutenção no aparelho, assegure-se de que
a ficha do cabo de alimentação de rede foi retirada da tomada ou desligue o disjuntor
do circuito de corrente.
MANUTENÇÃO APÓS A ÉPOCA
DE AR CONDICIONADO
1
Deixe a unidade trabalhar aproximadamente meio dia no modo
FRIO, com a temperatura regulada em 32°C, para permitir que o
mecanismo seque devidamente.
2
Interrompa o funcionamento e des-
ligue a unidade. Desligue o disjun-
tor de corrente se tiver um exclusivamente para o ar condicionado.
3
Limpe os filtros e, a seguir, volte a
instalá-los.
MANUTENÇÃO ANTES DE
ÉPOCA DE AR CONDICIONADO
1
Assegure-se de que os filtros de
ar não estão sujos.
2
Assegure-se de que não está
nada a obstruir a entrada e a saída de ar do aparelho.
3
Controle periodicamente a armação de montagem exterior, a fim
de detectar eventuais sinais de
desgaste e para assegurar que
fica fixa no seu lugar.
• Limpe-os com um pano macio.
• Não borrife nem deite água por cima destes, pois tal poderá provocar choque
eléctrico ou danos no equipamento.
• Não use água quente, diluente, pós abrasivos ou solventes fortes.
MANUTENÇÃO
LIMPEZA DOS FILTROS
Os filtros de ar devem ser limpos de duas em duas
semanas.
1
DESLIGAR A UNIDADE
2
RETIRAR OS FILTROS
1 Levante o painel.
2 Empurre os filtros ligeiramente para
cima a fim de os desencaixar.
3 Puxe os filtros de ar para baixo a fim
de os poder tirar.
3
LIMPE OS FILTROS
Use um aspirador para retirar o pó. Se
os filtros estiverem sujos, lave-os com
água morna e um detergente suave.
Seque os filtros à sombra antes de os
voltar a instalar.
4
REINSTALE OS FILTROS
1 Recoloque os filtros na posição inicial.
2 Feche o painel aberto.
3 Carregue firmemente nos pontos mar-
cados com uma seta apresentados à
esquerda para bloquear no seu lugar.
3
1
2
1
2
3
Page 54

P-16
ANTES DE SOLICITAR ASSISTÊNCIA
SE A UNIDADE NÃO RECEBER O SINAL DO CONTROLO REMOTO
Verifique se as pilhas do controlo remoto estão descarregadas ou fracas.
Tente emitir novamente o sinal
com o controlo remoto a apontar
devidamente na direcção da janela receptora do aparelho.
Verifique se as pilhas do controlo
remoto estão colocadas com a
polaridade correcta.
As condições de funcionamento seguidamente descritas não denunciam avarias do
equipamento.
UNIDADE NÃO FUNCIONA
A unidade não funcionará se for ligada imediatamente após ter sido desligada. A unidade não funcionará imediatamente após o modo de funcionamento ter sido alterado. Esta característica é para
proteger o mecanismo interno. Espere 3 minutos
até colocar a unidade em funcionamento.
NÃO SAI AR QUENTE DA UNIDADE
A unidade está na fase de pré-aquecimento ou de
descongelação.
RUÍDO A ESTALAR
A unidade poderá produzir um ruído a estalar. Este
som é gerado pela fricção do painel frontal e outros
componentes a dilatarem-se ou a unirem-se devido
à mudança de temperatura.
Se o aparelho parecer estar a funcionar mal, verifique os pontos seguidamente referidos antes de solicitar assistência técnica.
SE A UNIDADE NÃO FUNCIONA
Verifique se o disjuntor de corrente actuou ou se o fusível se fundiu.
SE A UNIDADE NÃO ARREFECER (OU AQUECER) O QUARTO DEVIDAMENTE
Controle os filtros. Se estiverem
sujos, limpe-os.
Controle a unidade exterior para
verificar se não está alguma coisa a
obstruir a entrada ou a saída de ar.
Verifique se o termostato está
devidamente regulado.
Assegure-se de que as janelas
e as portas estão bem fechadas.
Havendo muitas pessoas no
quarto, pode acontecer que a
temperatura desejada não seja
alcançada.
Verifique se estão quaisquer
aparelhos que produzam calor
a funcionar no quarto.
CHEIROS
Cheiros das carpetes ou dos móveis e que tenham
penetrado na unidade e cheiros dos componentes
mais internos do ar condicionado na fase inicial da
instalação poderão ser emitidos pela unidade.
Por favor, chame o Serviço de Assistência Técnica quando ficar intermitente a lâmpada de FUNCIONAMENTO e lâmpada de TEMPORIZADOR no painel dos indicadores.
É EMITIDO UM ZUMBIDO BAIXO
Este é o som emitido quando a unidade está a gerar
iões Plasmacluster.
RUÍDO SIBILANTE
O ruído suave e sibilante que se ouve é o ruído do
agente de refrigeração a correr dentro da unidade.
VAPOR DE ÁGUA
• No modo de funcionamento FRIO e SECAR,
pode-se verificar por vezes a existência de vapor de água na saída de ar devido à diferença
de temperatura entre o ar interior do quarto e o
ar descarregado pela unidade.
• No modo de funcionamento CALOR, pode sair
vapor de água da unidade durante a descongelação.
ODOR EMITIDO PELA SAÍDA DE AR
DO PLASMACLUSTER
Este é um cheiro a ozono gerado a partir do gerador
de iões Plasmacluster. A concentração do ozono é
muito baixa, não tendo qualquer efeito adverso sobre
a sua saúde. O ozono libertado para o ar decomporse-á rapidamente, e a sua densidade na sala não
aumentará.
Page 55

PORTUGUÊS
Page 56

SHARP CORPORATION
TINSEA406JBRZ 05BO TH 1
Printed in Thailand
Page 57

documentation manual, user maintenance, brochure, user reference, pdf manual
This file has been downloaded from:
User Manual and User Guide for many equipments like mobile phones, photo cameras, monther board, monitors, software, tv, dvd, and othes..
Manual users, user manuals, user guide manual, owners manual, instruction manual, manual owner, manual owner's, manual guide,
manual operation, operating manual, user's manual, operating instructions, manual operators, manual operator, manual product,
 Loading...