

Page 1
SHARI?
SPLIT TYPE “I
ROOM AIR CONDITIONER
OPERATION MANUAL
Thank you for purchasing a Sharp Split
Type Room Air Conditioner. Please read
this manual carefully before operating the
air conditioner, and keep this manual and
the Installation Manual as handy
references.
CONTENTS r\
0
MAIN FEATURES
l
PRECAUTIONS FOR USE ~.r~.,.~~~rrbr. . . . . b . . . . . 3
l
TIPS ON SAVING ENERGY ai.rrbrrr.a . . . . . . . . . . l . 3
0
PART NAMES
0
USING THE REMOTE CONTROL . . . . . . . . . . . . . . 8
0
BASIC OPERATION
AUTO MODE
HEAT MODE
COOL MODE . . . . . . ..‘..*.tr.‘r~~~~~~8bb~&~b~b....‘.
DRY MODE
FAN ONLY MODE ’ “<“.q’- ’ ,5
. . . . . . ..r..........o....*.*.......*.,1. 2
. . . . . . . . . . . . . . . ..~i.r...r.‘.tr..‘............ 4
. I-
..*.......‘.‘r.rr.‘lrr~~cb~b.~*~*...*~. IO
,I b
. . . ..*.....*.*.*rr..$.~~s*..~...*..~.,. 12
:, lb,% : * 1
-” f* >*z.
. . . . ..r..*.i.trrrtrr~lbbli~~~~m~b.b~b~~~kbd’ 14
. . ?I:” ,
PAGE
.i,‘,iil.lii,l,liJilrSlsrllrctl
0
ADJUSTING THE AIR FLOW, D!,~EGTION 16
0
SAVE MODE
0
TIMER OPERATION
TIMER ON
. . . . . . . . . . ..rr~..~~~.~b.~b~~~~~bi~b~~b~~.~..b 17
. . . . . . . ..rb~.~.icrir~~~k#b~i~brPl.ib~.r~.ic 18
. ^ ;.
;*<,‘2 &P‘ ’
( <,/- ,..5_._’
* .,’
t :_
‘
TIMER OFF . . . . . . . . . . . ..r.r.r~t~~~~~.~~~..~‘..~.b... 19
l
ONE-HOUR TIMER ’ ‘: . . . . . . ..c..~LI~.~.rl~~~b~b.........
0
USING THE AUXILIARY MODE ~~..r~..ir.i..r 22
l
USING TEST RUN MODE
l
IMPORTANT OPERATIONAL POINTS l ., 23
0
MAINTENANCE . . . . . . . . . . . . ..~r.‘...*irrr..............
l
ADDITIONAL NOTES ON OPERATION .a. 26
0
BEFORE CALLING FOR SERVICE . . . . . . . . . . 27
0
SPECIFICATIONS ..*,..,.r.,..*..“r..‘*.....*...,... 28
.!..*,.,..,..,; . . ...*... 22
13
21
24
-
Page 2
AUTOMATIC OPERATION
(When the mode is set to AUTO.)
When using the AUTO mode,the temperature setting and mode
(HEAT,COOL or DRY) are automatically selected based on the room
temperature when the unit is turned on.
AUTO SLEEP FUNCTION (TIMER OFF)
When this feature is selected, the air conditioner will automatically
vary the room temperature while you sleep to prevent you from
becoming too hot or too cold.
WAKE UP FUNCTION (TIMER ON)
When this feature is selected, the unit will automatically turn on up
to 30 mins before the pre-programmed time so that the room tem-
perature reaches the desired level by the time you wake up.
ONE-HOUR TIMER
At the press of one button, the unit can be programmed to turn off
after one hour.
2
WARNING:
For your safety ensure that your new air conditioner is installed by a licenced
electrical contractor in accordance with the SAA WIRING RULES.
CAUTION:
To ensure that your warranty is not cancelled, both the indoor/outdoor units
and supply/interconnecting cables must be installed with the application of
GOOD WORKMANSHIP.
Page 3
USE A 230-240 VOLT POWER CIRCUIT ONLY.
Using a power circuit with improper voltage and frequency can result in damage to the unit and
possibly fire. Use a circuit with a 230-240 volt (+lO%) rating.
VENTILATE THE ROOM OCCASIONALLY DURING USE.
Open the window or door periodically to ventilate the room, especially when using gas appliances.
DO NOT INSERT OBJECTS INTO THE INLET OR OUTLET.
Inserting objects into the unit could result in injury due to rotation of the high-speed fans.
DO NOT PULL, HANG ON, OR OTHERWISE MISUSE THE POWER CORD.
Pulling the power cord may result in damage or electrical shock. Do not misuse the power cord.
WHEN USING THE AIR CONDITIONER FOR INFANTS, CHILDREN, OR
ELDERLY, BEDRIDDEN, OR DISABLED PEOPLE.
Make sure the room temperature is suitable for those in the room.
ALWAYS USE A FUSE WITH THE CORRECT CURRENT RATING.
This unit is designed for human comfort. Do not use for applications such as a kennel or
nursery to raise animals or plants.
Below are some simple ways to save energy when you use your air conditioner.
SET THE CORRECT TEMPERATURE
l Setting the thermostat 1 “C higher in COOL mode, and 2°C lower in HEAT mode than the desired
temperature will result in a 10% saving in electricity.
l Setting the temperature colder than necessary during cooling will result in excess power
consumption.
l Make an effective use of the SAVE MODE. (Refer to page 17)
KEEP OUT DIRECT SUNLIGHT AND DRAFTS
+ Keeping out direct sunlight when cooling will aid in reducing the power consumption.
l Close the windows and doors when heating and cooling the room.
SET PROPER AIR FLOW DIRECTION
l Set the louvres to obtain the best air circulation.
KEEP FILTER CLEAN
l Keep the filter clean to ensure the most efficient operation.
MAKE MOST OF TIMER
l Make the most of the AUTO SLEEP (TIMER OFF) function.
UNPLUG THE POWER CORD WHEN THE UNIT IS NOT TO BE USED FOR AN
EXTENDED PERIOD
l Unplug the power cord when the unit is not to be used for a long period of time. The indoor unit
still consumes a small amount of power when it is not operating.
3
Page 4
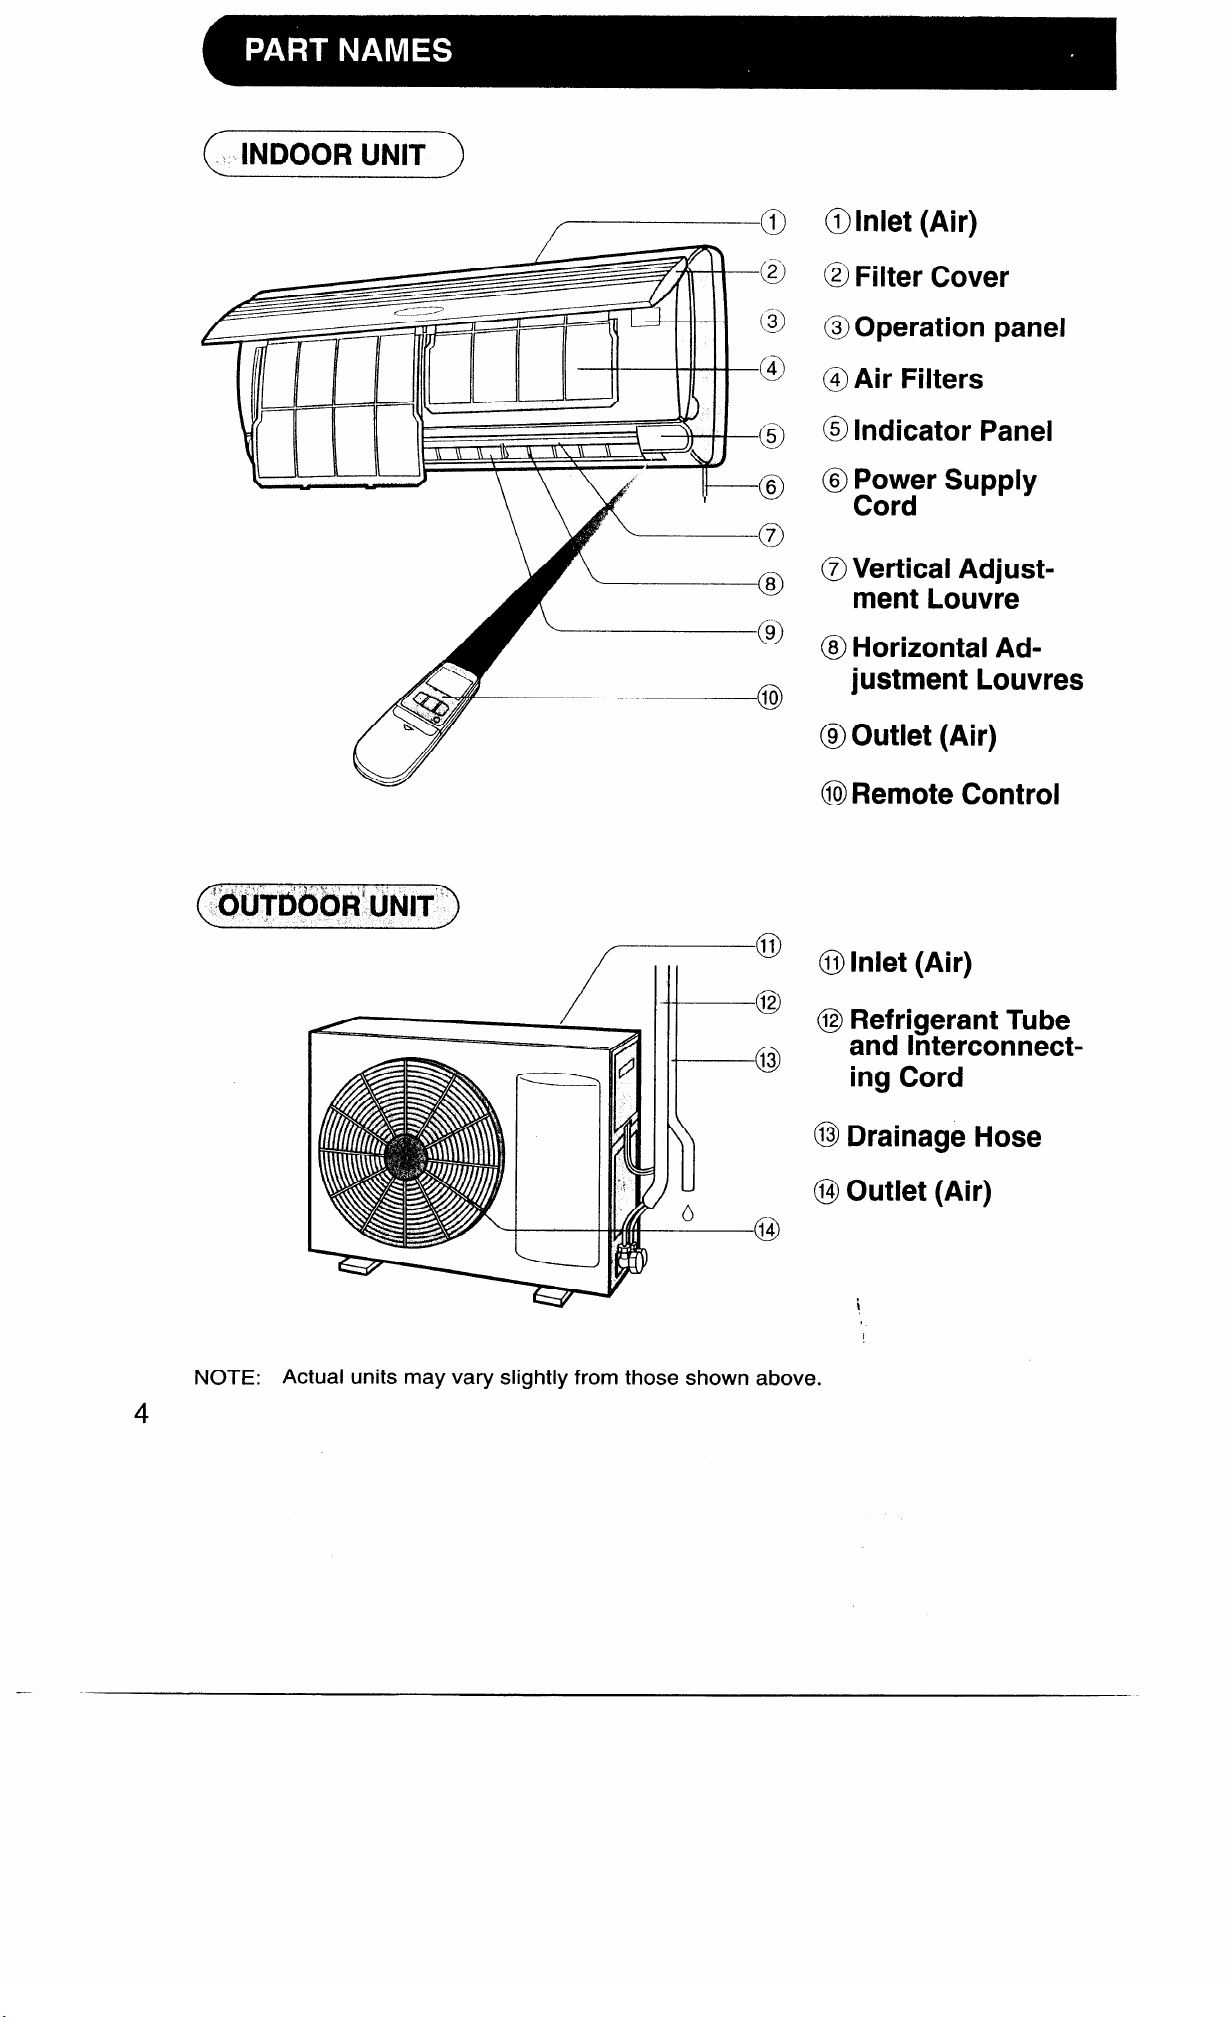
( INDOOR UNIT >
@Inlet (Air)
@ Filter Cover
@Operation panel
@I Air Filters
@ Indicator Panel
@ Power Supply
Cord
@Vertical Adjust-
ment Louvre
@ Horizontal Ad-
justment Louvres
@ Outlet (Air)
@I Remote Control
@Inlet (Air)
@ Refrigerant Tube
and Interconnecting Cord
@ Drainage Hose
@I Outlet (Air)
4
NOTE: Actual units may vary slightly from those shown above.
Page 5
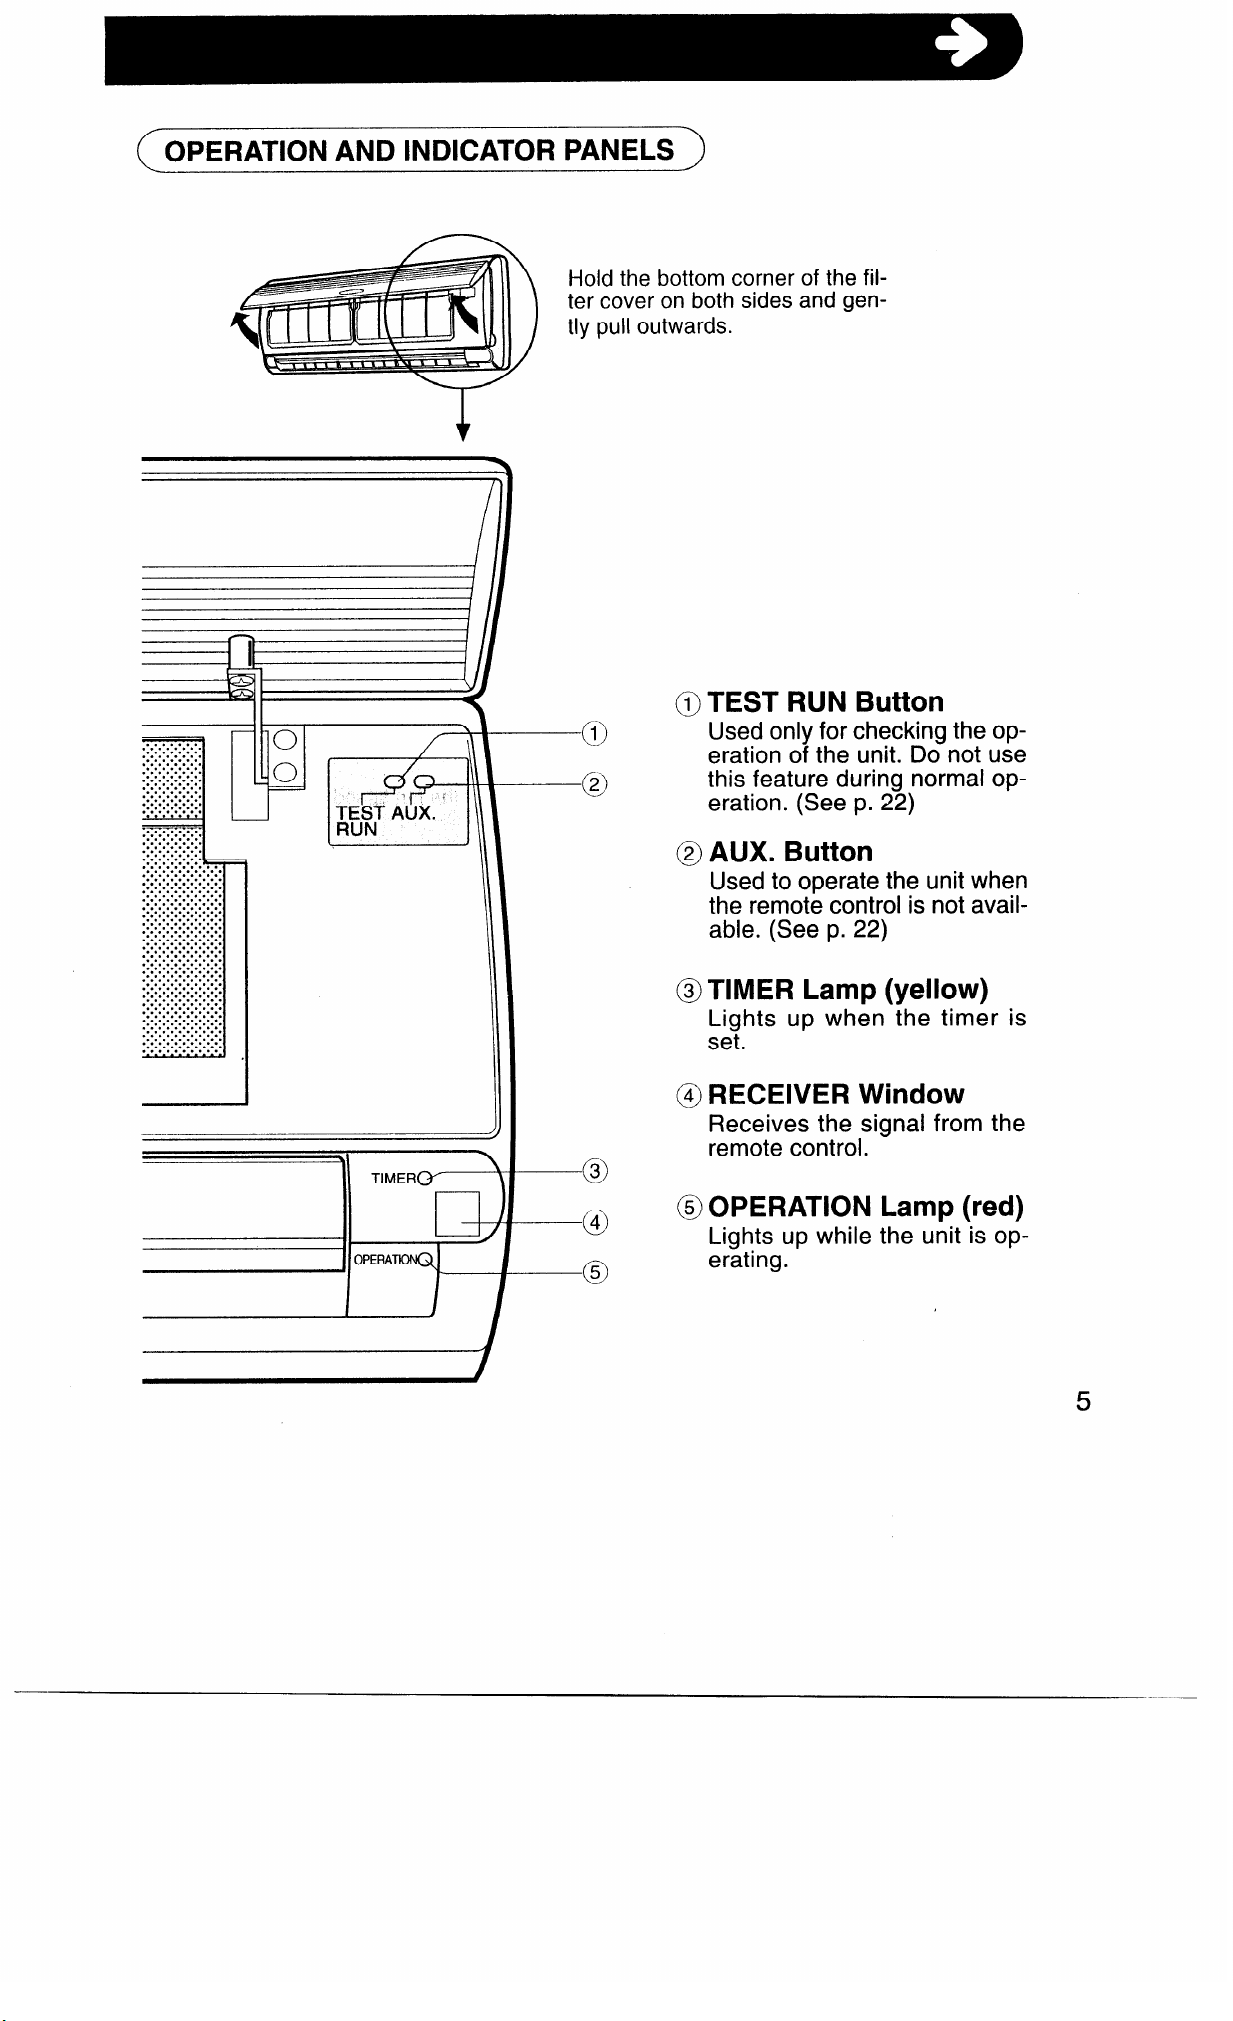
( OPERATION AND INDICATOR PANELS )
Hold the bottom corner of the fil-
ter cover on both sides and gently pull outwards.
A TEST RUN Button
c!l
.;_;_;_;T;‘. .
........
.......
‘::.*.~:::
........
.......
........
.......
..........
..........
..........
..........
..........
..........
..........
..........
..........
..........
..........
..........
..........
..........
..........
..........
..........
..........
..........
..........
..........
..........
..........
..........
..........
..........
..........
..........
..........
..........
..........
..........
..........
..........
..........
..........
..........
..........
..........
. . . . . . . . . .
. . ........
. . . . . . . . . .
. . . . . ... . .
2
cl
@TIMER Lamp (yellow)
Used only for checking the operation of the unit. Do not use
this feature during normal operation. (See p. 22)
AUX. Button
Used to operate the unit when
the remote control is not available. (See p. 22)
Lights up when the timer is
set.
@J RECEIVER Window
Receives the signal from the
remote control.
@OPERATION
Lights up while
erating.
Lamp (red)
the unit is op-
5
Page 6
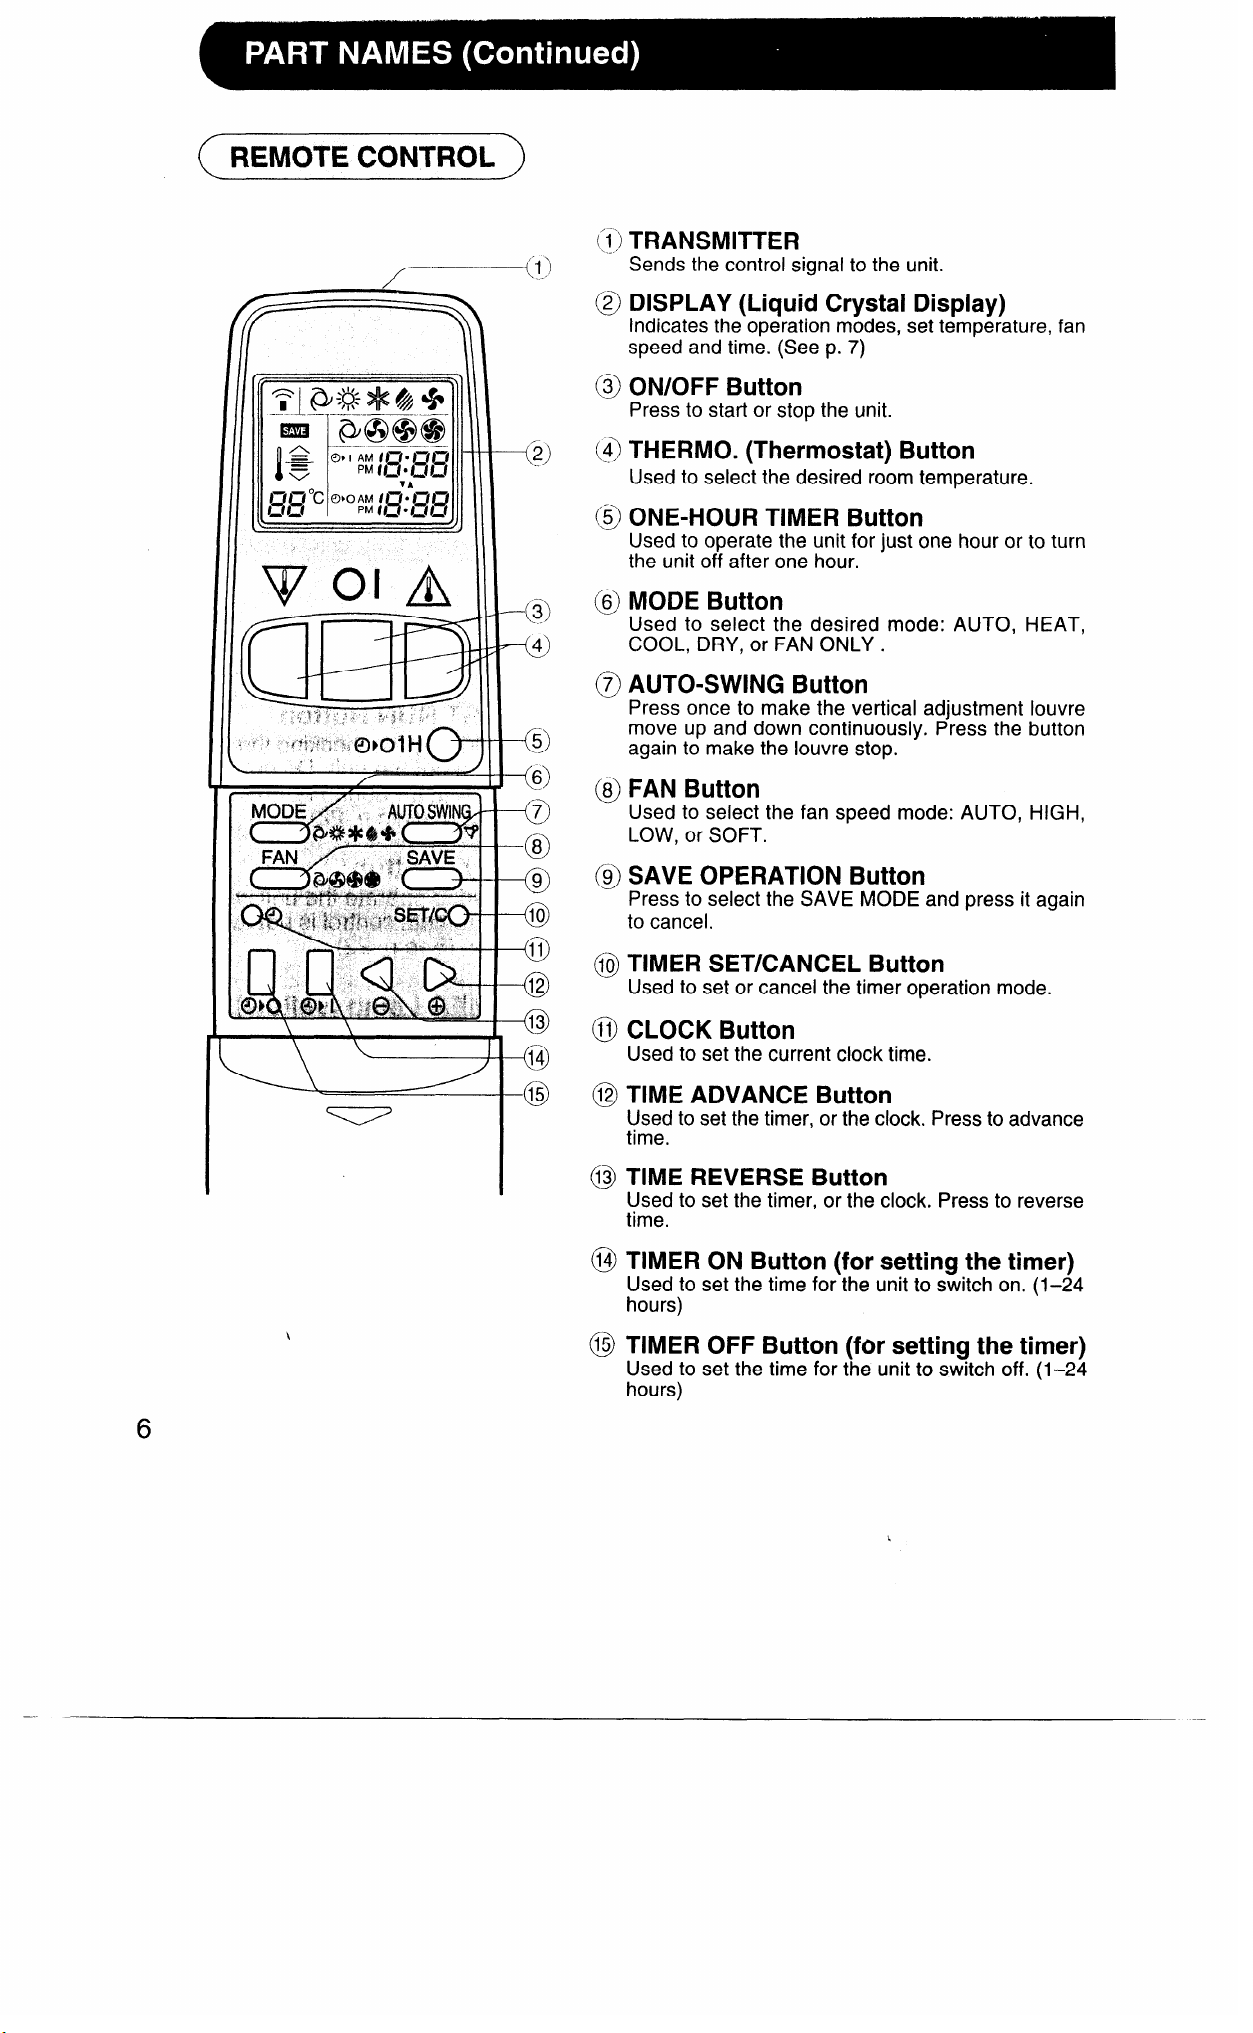
( REMOTE CONTROL )
(:i: TRANSMITTER
Sends the control signal to the unit.
@ DISPLAY (Liquid Crystal Display)
Indicates the operation modes, set temperature, fan
speed and time. (See p. 7)
@ ON/OFF Button
Press to start or stop the unit.
-0
-0
-0
-0
-a
0
-0
3
%I
-0
-0
-c)
-15
0
2
. .
5
6
7
9
10
11
12
13
14
(4) THERMO. (Thermostat) Button
. . ,
Used to select the desired room temperature.
@ ONE-HOUR TIMER Button
Used to operate the unit for just one hour or to turn
the unit off after one hour.
@ MODE Button
Used to select the desired mode: AUTO, HEAT,
COOL, DRY, or FAN ONLY.
a AUTO-SWING Button
Press once to make the vertical adjustment louvre
move up and down continuously. Press the button
again to make the louvre stop.
@ FAN Button
Used to select the fan speed mode: AUTO, HIGH,
LOW, or SOFT.
SAVE OPERATION Button
9
0
Press to select the SAVE MODE and press it again
to cancel.
TIMER SET/CANCEL Button
lb
0
Used to set or cancel the timer operation mode.
11
CLOCK Button
0
Used to set the current clock time.
12
TIME ADVANCE Button
0
Used to set the timer, or the clock. Press to advance
time.
6
13
TIME REVERSE Button
0
Used to set the timer, or the clock. Press to reverse
time.
14
TIMER ON Button (for setting the timer)
0
Used to set the time for the unit to switch on. (l-24
hours)
15
TIMER OFF Button (for setting the timer)
0
Used to set the time for the unit to switch off. (l-24
hours)
Page 7
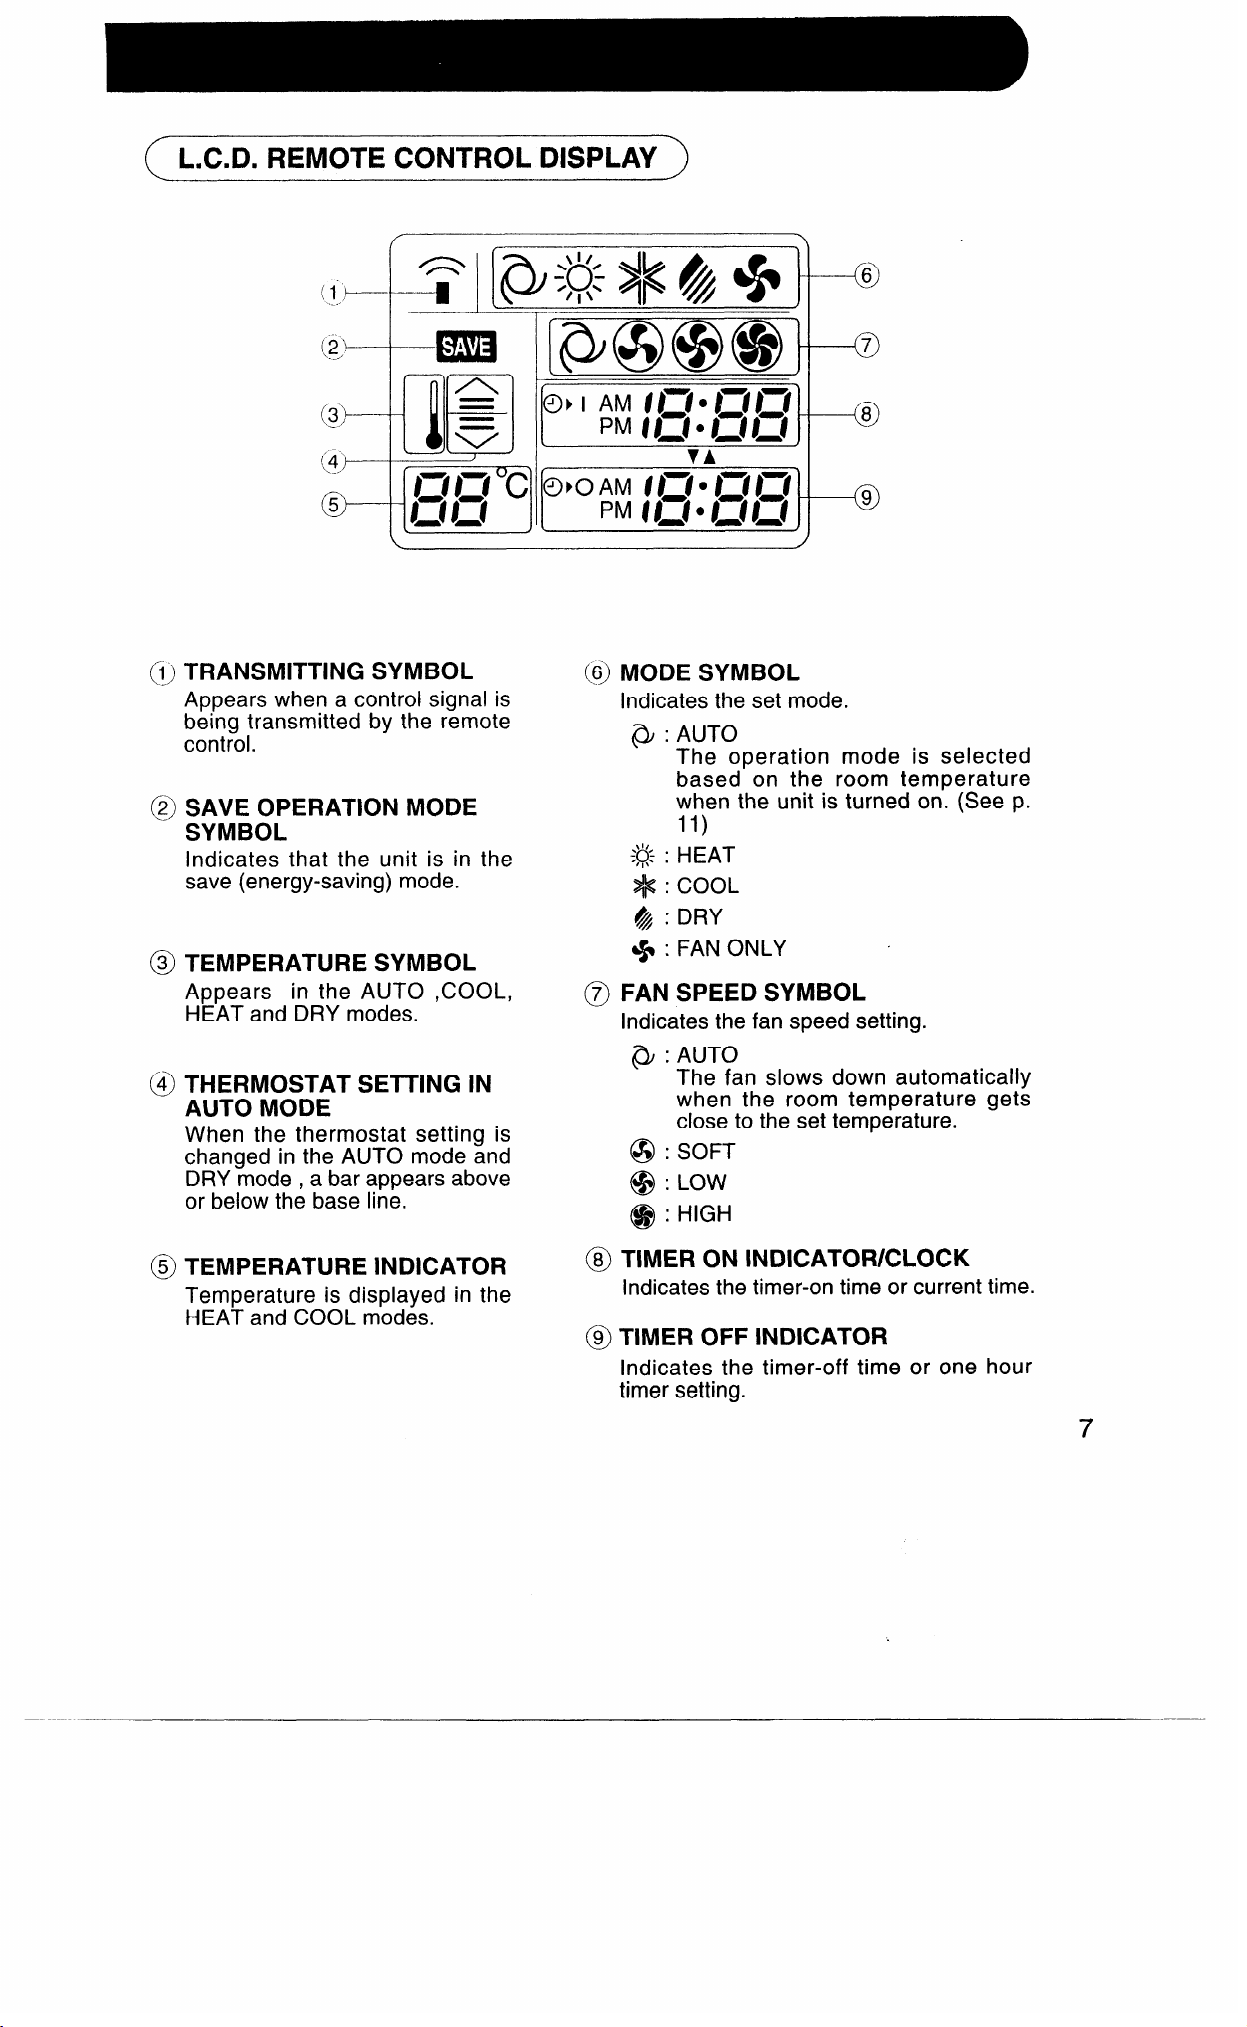
( L.C.D. REMOTE CONTROL DISPLAY>
(i., TRANSMITTING SYMBOL
Appears when a control signal is
being transmitted by the remote
control.
@ SAVE OPERATION MODE
SYMBOL
indicates that the unit is in the
save (energy-saving) mode.
@I TEMPERATURE SYMBOL
Appears in the AUTO ,COOL,
HEAT and DRY modes.
@ THERMOSTAT SETTING IN
AUTO MODE
When the thermostat setting is
changed in the AUTO mode and
DRY mode , a bar appears above
or below the base line.
@ MODE SYMBOL
Indicates the set mode.
0 : AUTO
The operation mode is selected
based on the room temperature
when the unit is turned on. (See p.
11)
# : HEAT
>* : COOL
& : DRY
$Q : FAN ONLY
a FAN SPEED SYMBOL
Indicates the fan speed setting.
@ : AUTO
The fan slows down automatically
when the room temperature gets
close to the set temperature.
@ : SOFT
@ : LOW
@ : HIGH
.
@ TEMPERATURE INDICATOR
Temperature is displayed in the
HEAT and COOL modes.
@I TIMER ON INDICATOR/CLOCK
Indicates the timer-on time or current time.
@ TIMER OFF INDICATOR
Indicates the timer-off time or one hour
timer setting.
7
Page 8

LOADING BATTERIES
Use two high-quality size-AAA (R03)
batteries.
1 Open the remote control cover by sliding
it in the direction of the arrow.Remove
the cover by pressing the mark “77 ”
and carefully pulling it in the direction of
the arrow.
2 Insert the batteries in the compartment,
making sure the @ and @ polarities are
properly aligned.
l The remote control automatically re-
sets when the batteries are loaded.
l AM 6:00 will appear on the display
when the batteries are properly loaded.
3 Replace the cover.
NOTES:
l The battery life is approximately one year with normal use.
l When you replace the batteries, always use two new ones of the same type.
l When the batteries are replaced,AM 6:00 will appear on the display.
l If the remote control does not operate normally after replacing the batteries, take
off the batteries and replace them again after 20 seconds.
remote control
8
HOW TO USE THE REMOTE CONTROL
Point the remote control towards the
unit’s receiver window and press the desired button. A beep will sound when the
unit receives the signal.
l Make sure no objects, such as a curtain,
are between the remote control and the
unit.
l The remote control operates from up to 7
meters away.
Page 9
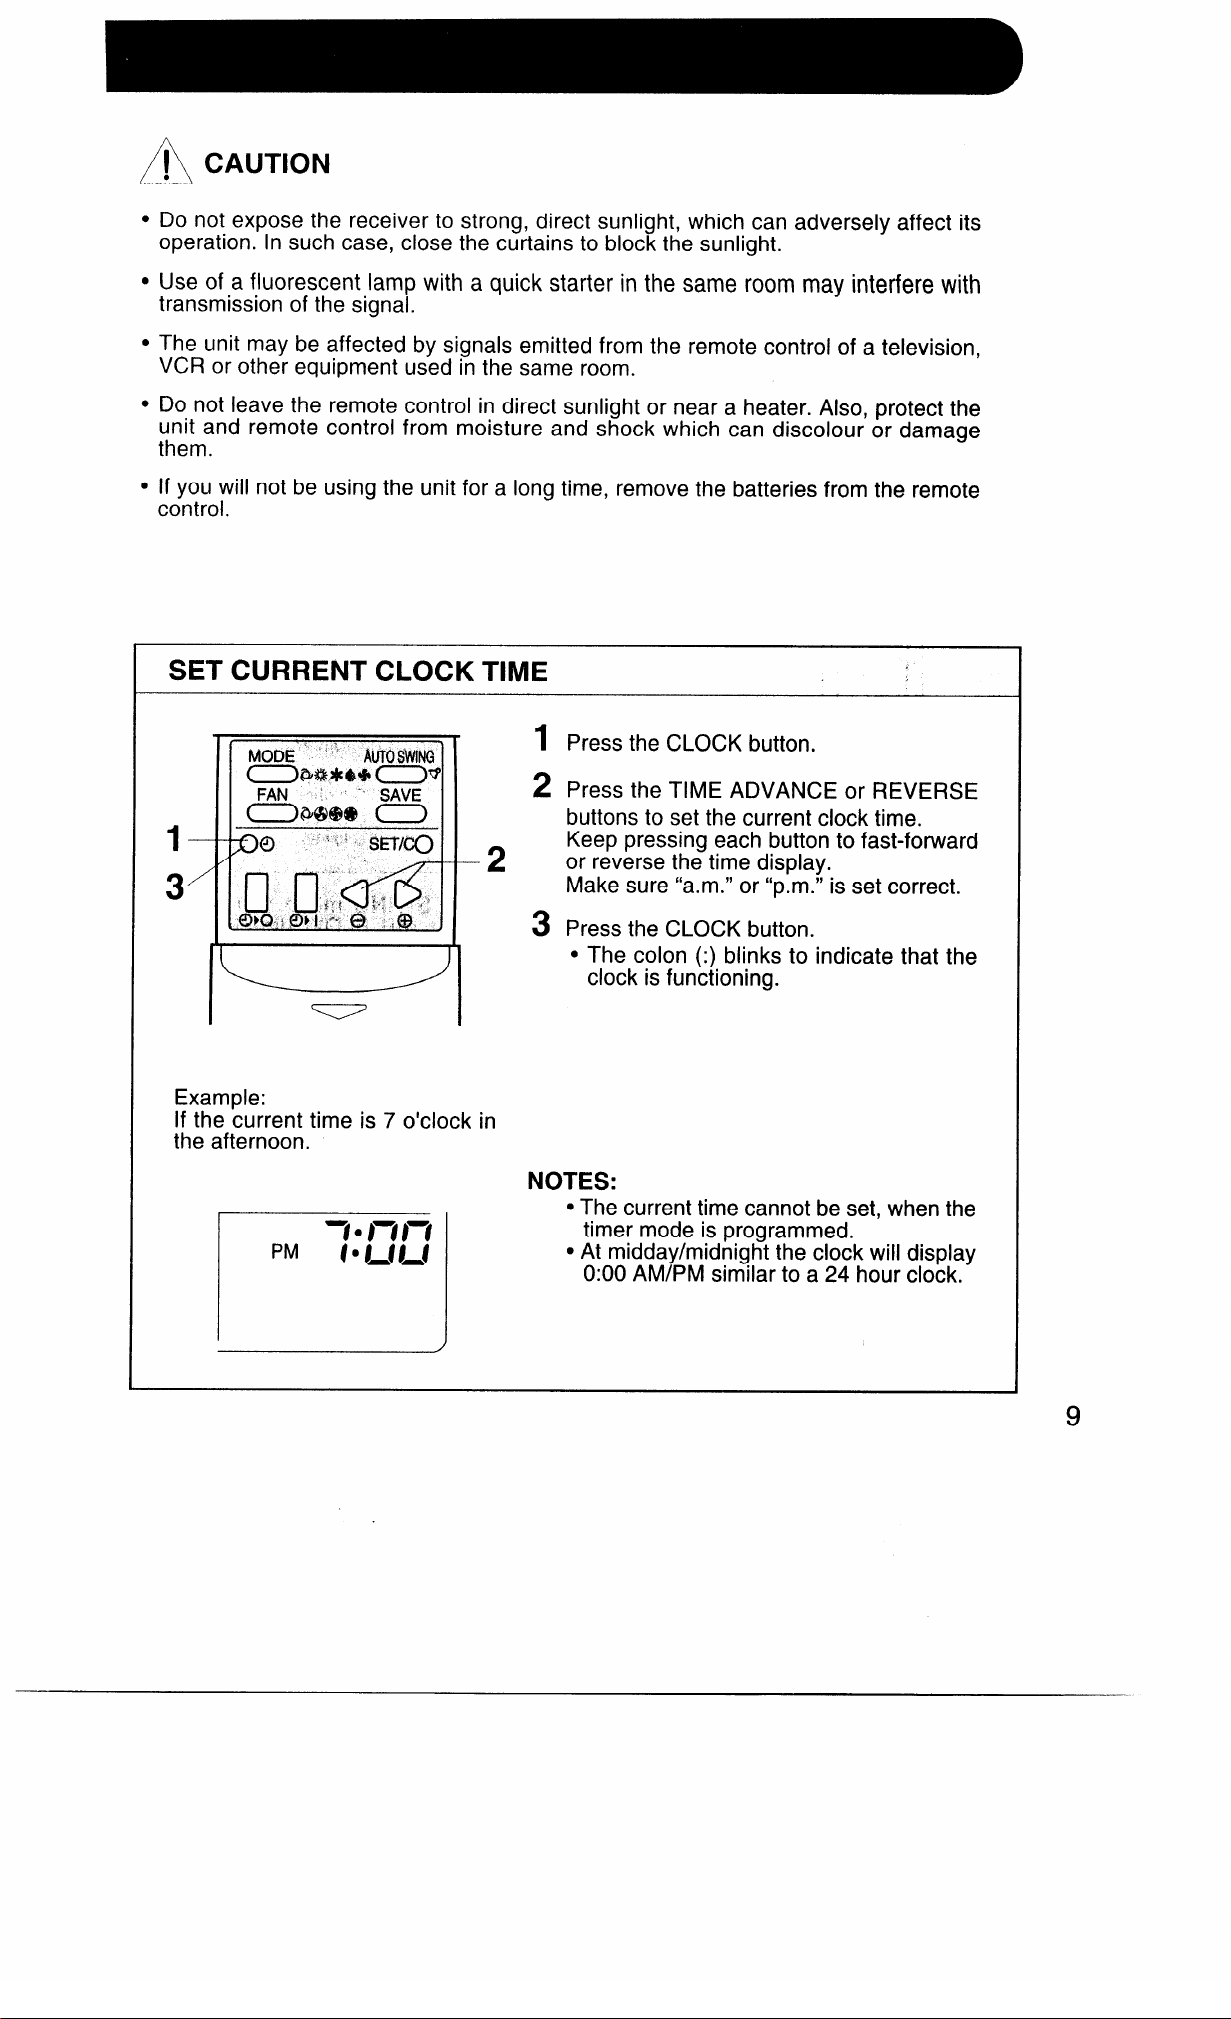
t CAUTION
4
.
Do not expose the receiver to strong, direct sunlight, which can adversely affect its
operation. In such case, close the curtains to block the sunlight.
Use of a fluorescent lamp with a quick starter in the same room may interfere with
transmission of the signal.
The unit may be affected by signals emitted from the remote control of a television,
VCR or other equipment used in the same room.
Do not leave the remote control in direct sunlight or near a heater. Also, protect the
unit and remote control from moisture and shock which can discolour or damage
them.
If you will not be using the unit for a long time, remove the batteries from the remote
control.
SET CURRENT CLOCK TIME
Example:
If the current time is 7 o’clock in
the afternoon.
1 Press the CLOCK button.
2 Press the TIME ADVANCE or REVERSE
buttons to set the current clock time.
Keep pressing each button to fast-forward
2
or reverse the time display.
Make sure “a.m.” or “p.m.” is set correct.
3 Press the CLOCK button.
l The colon (:) blinks to indicate that the
clock is functioning.
NOTES:
l The current time cannot be set, when the
timer mode is programmed.
l At midday/midnight the clock will display
0:OO AM/PM similar to a 24 hour clock.
9
Page 10

(- AUTOMATIC OPERATION MODE -)
In this mode, the temperature setting and mode (HEAT,COOL or DRY) are automatically selected depending on the room temperature when the unit is turned on.
r Press the MODE button to select the
AUTO mode. (Q)
r Press the ON/OFF button to start op-
eration.
l The red OPERATION lamp of the
unit will light up.
A
-v
-v
V
-
V
-
V
Press the FAN button to set the de-
7
sired fan speed.
Adjust the thermostat setting, if de-
sired, by pressing the THERM0 buttons.
The indicator bars represent changes
in temperature as follows:
-- 1°C lower
TP----- 2°C lower
The AIR SWING mode can be selected, or AIR FLOW direction ad-
justed by pressing the “AUTO SWING”
button . (See p. 16 for detail)
To turn off the unit, press the ON/OFF
7
button again.
l The red OPERATION lamp of the
unit will go out.
--__ _
NOTES:
The temperature indicator does not appear
on the display in the AUTO mode.
In the DRY mode, the fan speed cannot be
changed.
/
10
Page 11

HOW THE AUTOMATIC OPERATION MODE WORKS
In AUTO MODE, the HEAT, COOL, or DRY mode is selected based on the
room temperature when the unit is turned on.
Room temp.
when the unit
turned on
Below 21 “C
21”-24°C
24’-26OC
26’-28OC
Above 28°C
Automatic Operation
Mode Selected Thermostat Setting
.___ __---
HEAT
DRY
COOL 24OC
COOL 25°C
COOL 26°C
Room Temp. at start-up
23°C
11
Page 12

Press the MODE button to select the
HEAT mode. ( T# )
Press the ON/OFF button to start op-
eration.
l The red OPERATION lamp of the
I
unit will light up.
Press the THERM0 button to set the
desired temperature.
l The recommended temperature
range is from 20 to 23°C.
vv
-
V
( AUTOMATIC DE-ICE FUNCTION )
A
Press the FAN button to set the desired fan speed.
The AIR SWING mode can be selected, or AIR FLOW direction ad-
justed by pressing the “AUTO SWING”
button . (See p. 16 for detail)
To turn off the unit, press the ON/OFF
button again.
l The red OPERATION lamp of the
unit will go out.
NOTES:
l The indoor fan will not rotate until the unit
has pre-heated.
During long periods of heating, ice may gradually form on the outdoor heat
exchanger,reducing the performance.
This unit has an automatic de-ice feature which will supply heat to the outdoor unit for
2-lominutes when a reduction in performance occurs.
During this period, the indoor and outdoor fans are stopped to prevent cold drafts.
NOTES:
, A slight hissing noise may be heard originating from the indoor unit during de-icing.
12
Page 13

(COOL MODE >
-v
-v
V
-
V
-
A
V
T
Press the MODE button to select the
r
COOL mode. (
7 Press the ON/OFF button to start op-
eration.
l The red OPERATION lamp of the
unit will light up.
Press the THERM0 button to set the
7
desired temperature.
l The recommended temperature
range is from 26 to 28°C. If the temperature is set below 21°C in the
COOL mode, a protective mechanism may interrupt operation.
Press the FAN button to set the de-
V
sired fan speed.
The AIR SWING mode can be selected, or AIR FLOW direction adjusted by pressing the”AUT0 SWING”
button. (See p. 16 for detail)
To turn off the unit, press the ON/OFF
r
button again.
l The red OPERATION lamp of the
unit will go out.
c /
Y
13
Page 14

/
In the DRY mode, the air condi-tioner reduces the humidity in the
room without lowering the room
temperature.
Press the MODE button to select the
DRY mode. ( & )
l The fan speed and temperature set-
tings are set automatically.
Press the ON/OFF button to start op-
r
eration.
l The red OPERATION lamp of the
unit will light up.
Adjust the thermostat setting, if desired, by pressing the THERM0 buttons.
The indicator bars represent changes
in temperature as follows.
- 1°C lower
e-
The AIR SWING mode can be selected, or AIR FLOW direction adjusted by pressing the”AUT0 SWING”
button. (See p. 16 for detail)
To turn off the unit, press the ON/OFF
button again.
l The red OPERATION lamp of the
unit will go out.
NOTES:
Since operation is automatically controlled in
the DRY mode, you cannot change the fan
speed setting.
2°C lower
14
Page 15

(FAN ONLY MODE )
/
Press the MODE button to select the
r
FAN ONLY mode. ( * )
Press the ON/OFF button to start op-
r
eration.
l The red OPERATION lamp of the
unit will light up.
Press the FAN button to set the de-
v
sired fan speed.
l Fan speed AUTO ( QJ ) cannot be
set.
The AIR SWING mode can be selected, or AIR FLOW direction ad-
justed by pressing the “AUTO SWING”
button. (See p. 16 for detail)
To turn off the unit, press the ON/OFF
v
button again.
l The red OPERATION lamp of the
unit will go out.
I
15
-
Page 16

VERTICAL AIR FLOW
The direction of the air flow is automatically preset for the optimum
effect in each mode as follows;
1 COOL and DRY mode 1 Horizontal air flow 1
HEAT and FAN ONLY mode Diagonal air flow (45’1
The air flow direction can be changed as desired.
I
AIR SWING MODE
Press the AUTO SWING
button once.
The vertical adjustment
louvre will swing continuously within the range
shown.
HOW TO ADJUST THE AIR FLOW DIRECTION
COOL and DRY mode HEAT and FAN ONLY mode
The range is more narrow to
prevent condensation from
forming.
Adjustment range
P
The range is wider for increased air circulation.
\
,
Press the AUTO SWING button once. The vertical adjustment louvre will move up
and down.
Press the AUTO SWING button again when the desired position is reached and the
louvre will stop.
HORIZONTAL AIR FLOW I .
l-fold the horizontal adjustment louvre levers as
shown and adjust the air flow direction. There are
four louvre levers.
Never attempt to adjust the vertical adjustment louvre manually.
Manual adjustment of this louvre can cause the unit to malfunction when
controlled later.
When the COOL or DRY modes are used for an extended period of time
vertical adjustment louvre manually adjusted so that the air flows downward,
sation may form.
remote-
with the
conden-
Page 17

Designed for greater energy efficiency, use of this mode reduces power
consumption and offers energy savings by up to 10% compared with the
normal operation.
1 To activate the SAVE mode, press the
SAVE button during operation.
l SAVE is displayed on the remote con-
trol.
l The temperature display disappears.
2 To cancel the save mode, press the SAVE
button again.
*The SAVE display disappears and the unit
returns to the former mode.
(ADVANTAGE,$W USING SAVE MODE)
The save mode reduces power consumption
by approximately 10% compared with the normal operation.
Power consumption
approx. 10% reduction
l mmmmmm
I
I
I
Begining of SAVE MODE
NOTES:
l You cannot use the SAVE mode during the DRY and FAN ONLY mode.
l You cannot set the temperature during the SAVE operation.
17
Page 18

NOTE:
Before setting the timer, check to see if the current clock time is properly set.
“WAKE UP” FUNCTION (TIMER ON MODE)
Use the “WAKE UP” function to turn the unit on at a programmed time.
1
Press the TIMER ON ( 0, 1 ) button.
2
The TIMER ON indicator will blink; press the TIME
ADVANCE or REVERSE buttons to set the desired
time. (The time can be set by 10 minutes.)
Point the remote control at the receiver window of
3
the unit and press the TIMER SET (SET/C) button.
4
Select the operation you wish to program.
Operation mode setting + MODE BUTTON
Fan speed setting -+ FAN BUTTON
Temperature setting (The temperature is set automatically in AUTO MODE.) -+ THERM0 BUTTON
l The yellow TIMER lamp on the unit lights up.
l An audible sound indicates that the unit has re-
ceived the signal.
l The unit will turn on prior to the time set to allow
the room to reach the desired temperature by the
programmed time.
18
( TO CANCEL TIMER MODE )
Press the TIMER CANCEL button “SET/C”.
The yellow TIMER lamp of the unit will go out.
The current clock time will be displayed on the
remote control.
( TO CHANGE TIME SETTING >
First, cancel the TIMER, and then set it again.
CHANGE FAN SPEED, MODE, AND/OR THERMOSfIT SETTING
TO
AFTER
Press each button to change the settings as desired.
SETTING TIMER
Page 19

“AUTO SLEEP” FUNCTION (TIMER OFF MODE)
Use the “AUTO SLEEP” function to turn the unit off at a programmed time.During
this mode,the room temperature is automatically adjusted slightly to prevent
the room from becoming too hot or too cold while you sleep.(See explanation
below)
1
Press the TIMER OFF (a,O) button during
operation.
2
The TIMER OFF indication will blink; press the
TIME ADVANCE or REVERSE buttons to set the
desired shut-off time. (The time can be set by IO
minutes .)
Point the remote control at the receiver window of
3
the unit and press the TIMER SET(SET/C) button.
l The yellow TIMER lamp on the unit lights up.
l An audible sound indicates that the unit has
recieved the signal.
3
2
1
( HOW THE “AUTO SLEEP” FUNCTION WORKS :,
When the “AUTO SLEEP” FUNCTION is selected;
( DURING COOL/DRY MODE )
One hour after timer operation has begun,
the temperature rises 1°C higher than the
thermostat setting to prevent the room from
getting too cool for sleeping.
( DURING HEAT MODE )
One hour after timer operation has begun,
the temperatures drops 3 “C lower than the
thermostat setting to prevent the room from
getting too warm for sleeping.
NOTE:
The “AUTO SLEEP” function will not activate during the FAN ONLY mode.
Timer operation starts Operation OFF
A
Timer operation starts
Timer duration
Timer duration
THERMO.
setting
I
Operation OFF
19
Page 20

(COMBINED USE OF ON AND OFF TIMERS)
Stop + ON + OFF
To obtain the desired room temperature by
530 p.m. and to stop operation at 1 I:00 p.m.
1 Set the TIMER ON to 5:30 p.m.
l The yellow TIMER lamp on the unit lights up.
l An audible sound indicates that the unit has
received the signal.
2 Set the TIMER OFF to 1l:OO p.m.
l An audible sound indicates that the unit has
received the signal.
3 Select the operation you wish to program.
Operation mode setting -+ MODE BUTTON
Fan speed setting + FAN BUTTON
Temperature setting --+ THERM0 BUTTON
Operation -+ OFF -+ ON
Stop operation at II:00 p.m. and resume op-
eration (using the same settings) to obtain the
desired room temperature by 7:00 a.m.
1 Set the TIMER OFF to II:00 p.m. during opera-
tion.
l The yellow TIMER lamp on the unit lights up.
l An audible sound indicates that the unit has
received the signal.
2 Set the TIMER ON to 7:00 a.m.
l An audible sound indicates that the unit has
received the signal.
The arrows (v or A)between the TIMER ON indicator and TIMER OFF indicator
shows which timer will activate first.
TO CANCEL THE COMBINED TIMER
Press the TIMER CANCEL button (SET/C).
Both TIMER ON and TIMER OFF will be canceled. The yellow TIMER lamp of the unit
will go out and the current clock time will be displayed on the remote controller.
NOTES:
l You cannot program the ON and OFF timers to different temperatures or other
settings.
l Either timer can be programmed prior to the other.
20
Page 21

When ONE-HOUR TIMER is set, the unit will turn off automatically after
one hour.
1 Press the ONE HOUR TIMER button.
l “1 H” will be displayed on the remote control.
l The unit will operate for one hour.
2 To turn off the unit within one hour, press the
ON/OFF button.
l The OPERATION lamp on the unit will go out.
If you wish to operate the unit addition-
ally for another one hour, press the ONE-
HOUR TIMER button again during op-
eration.
NOTES:
l When the ONE HOUR TIMER button is pressed in the stop mode, the unit begins
operating and turns off automatically after one hour.
l The ONE HOUR TIMER operation has priority over other timer operations, such as
the TIMER ON and TIMER OFF.
I
Example 1:
If the timer off is set to II:00 p.m. (A)
and the ONE HOUR TIMER button is pressed at 8:00 p.m. (B),
operating
I
t
PM8:OO PM9:OO
B
0
the unit will turn off at 9:00 p.m. The TIMER OFF indicator of the remote control will
reappear after the “1 H” indicator goes off. The TIMER OFF will be activated if you turn on
the unit again before 11:OO p.m.
4
not operating
0
4
PM1 I:00
A
Example 2:
If the timer on is set to 8:00 a.m. (A)
and the ONE HOUR TIMER button is pressed at 500 a.m. (B),
operating
4 4
AM300 AM6:OO
B
0
the unit will operate for one hour from 5:00 a.m. to 6:00 a.m. The TIMER ON indicator of
the remote control will reappear after the “1 H” indicator goes off. The unit wi!l turn on when
the TIMER ON (8:00 a.m ) activates.
operating
4
AM8:OO
A
0
21
Page 22

Use this mode when the remote control is not available.
TO TURN ON
Lift the panel of the indoor unit and press the AUX. button
on the operation panel.
l The red OPERATION lamp on the unit will light up and
the unit will start operating in the AUTO mode.
l The fan speed and temperature setting are set to AUTO.
(~)
Press the AUX. button on the operation panel again.
l The red OPERATION lamp on the unit will go out.
NOTE:
If the AUX. button is pressed during normal operation, the
unit will turn off.
22
Use this mode to check the operation of the unit. Since the thermostat
control does not function and runs in a continuous operation mode, do not
use this mode during the normal operation.
Make sure the unit is turned off before conducting this test.
TO TURN ON
Lift the panel of the indoor unit and press the TEST RUN
button on the operation panel.
l The red OPERATION lamp on the unit will blink and the
unit will start operating in the COOL mode.
( TO TURN OFF )
Press the TEST RUN button on the operation panel again.
l The red OPERATION lamp on the unit will go out.
NOTE:
To conduct a test run in the HEAT mode, press the MODE
button on the remote control to set the HEAT( +$jz ) mode.
Page 23

DURING THE AIR CONDITIONER OPERATION
l A built-in protective device may prevent the unit from operating when the
ambient temperature is extremely high or low.
l Dew may form on the air outlet when the unit operates continuously in the COOL
or DRY mode when the humidity is over 80%.
3-MINUTE PROTECTION
After the unit has been turned off, a protective mechanism prevents it from being
turned on again for three minutes.
FAN SPEED
l When the fan speed is set to AUTO in the COOL mode, the fan speed automati-
cally decreases as the room temperature nears the thermostat setting.
l When the room temperature reaches the thermostat setting in the HEAT mode,
the compressor stops and the indoor fan changes to the SOFT setting or stops.
l In the DRY mode, the fan speed is controlled automatically.
PREHEATING FUNCTION
In the HEAT operation, the indoor fan may not start for 2-5 minutes after the unit is
turned on to prevent the air from circulating before the unit is sufficiently warmed
UP*
DE-ICING FUNCTION
l When ice forms on the heat exchanger in the outdoor unit during the HEAT
operation, an automatic de-icer provides heat for about 2-10 minutes to remove
the ice. During de-icing, the inside and outside fans stop operating.
l After de-icing is completed, the unit automatically resumes operation in the
HEAT mode.
HEATING EFFICIENCY
l The unit employs a heat pump that draws heat from the outside air and releases
it into the room. The outside air temperature therefore greatly affects the heating
efficiency.
l If low outside temperatures adversely affect the heating efficiency, use an
additional heater.
l It takes time to warm up and heat the entire room because this unit employs a
forced air circulation design. To warm up the room in advance, use the timer in
the HEAT operation.
23
Page 24

Be sure to unplug the power cord from the wall outlet or turn off the circuit
breaker before performing any maintenance.
CLEANING THE FILTERS
The air filters should be cleaned every 2
weeks. Clean the filters once a week, how-
ever, if there is a lot of dust in the room.
TURN OFF THE UNIT.
v
REMOVE THE FILTERS.
V
1 Lift up the cover.
2 Push the air filters up slightly to un-
lock them.
3 Pull the air filters down to remove
them.
AVOID SPLASHING UNIT
WITH WATER
Do not splash or pour
water on the unit or
the remote control. It
could result in electri-
cal shock or damage
to the product.
To clean the unit or
the remote control,
wipe them with a soft
cloth.
w
v
A
v
v
CLEAN THE FILTERS
Use a vacuum cleaner to remove the
dust. If the filter is dirty, wash it with
warm water and a mild detergent. Dry
the filters in the shade before reinstall-
ing.
REINSTALL THE FILTERS
1 Align and fit the filters in place.
2 Close the cover.
3 Push the centre of the cover firmly
to lock it in place.
DO NOT USE HOT WATER
OR SOLVENTS
Do not use hot water, thinner,
abrasive powders or strong
solvents to clean the unit or the
remote control.
24
Page 25

SEASONAL POSTOPERATION CHECK
SEASONAL INSPECTION
RUN FAN FOR HALF A DAY
When you have finished using the unit
for the season, run it in the FAN ONLY
mode for about half a day to allow the
mechanism to thoroughly dry.
TURN OFF CIRCUIT BREAKER
If you are using the home circuit
breaker exclusively for the air condi-
tioner, turn off the air conditioner, then
turn off the circuit breaker.
CLEAN FILTERS
Clean the filters, then reinstall them.
ALWAYS INSTALL THE
FILTERS
If the unit operates without a filter in
place, dust can enter the machine
and damage it.
DO NOT BLOCK AIR INLET
AND OUTLET
Blocking the air inlet and outlet can
result in poor operation.
CHECK OUTDOOR UNIT
MOUNTING RACK
Check the outdoor mounting rack periodically for wear and to make sure
it is firmly in place.
25
_
Page 26

THE FOLLOWING ARE NORMAL CONDITIONS FOR THE UNIT.
UNIT DOES NOT OPERATE
If you restart the air conditioner within 3
minutes after turning it off, or change the
mode during operation, a protective device will work to shut off the unit for 3
minutes.
WARM AIR DOESN’T COME OUT
Warm air does not come out of the air
outlets in the preheating or the de-icing
operation.
LOW NOISE
A soft, swishing noise can be heard during operation or immediately after the
unit is turned off. This is the sound of the
circulating refrigerant.
WATER VAPOUR
l In the COOL and DRY operation, wa-
ter vapour can sometimes be seen
coming from the air outlet due to the
difference in temperature between the
room air and the outlet air.
l In HEAT operation, water vapour
may come out of the outdoor unit
during the de-icing operation.
26
ODORS
Odors present in the room, such as
those from the carpet or furniture, may
be emitted from the unit.
INDOOR UNIT FAN SPEED
When using the air swing mode, the
speed of the indoor fan may vary slightly
as the louvre moves up and down.
Page 27

If the unit appears to be malfunctioning, check the following points before
calling for service.
IF THE UNIT FAILS TO OPERATE
Check to see if the circuit breaker has tripped or the fuse has blown.
I
IF THE UNIT FAILS TO COOL THE ROOM PROPERLY
I
I
Check the filter. If it’s
dirty, clean it.
Make sure all windows
and doors are closed
tightly. Air entering from
outside can prevent the
room from cooling suffi-
ciently.
UNIT FAILS TO RECEIVE THE REMOTE CONTROL
Check whether the remote control batteries
have become old and
weak.
Check the outdoor unit to
make sure nothing is
blocking the air inlet or
outlet.
A large number of people
in the room can prevent
the desired temperature
from being reached.
Check whether the remote
control batteries are installed in the proper polar-
ity.
Check whether the thermostat is set properly. If
it is set too high in the
COOL mode or too low
in the HEAT mode, the
unit may fail to operate
properly.
The use of heat-generating appliances in the
room will adversely af-
fect cooling efficiency.
Try to send the signal
again with the remote
control pointed properly
towards the unit’s re-
ceiver window.
PRECAUTIONS FOR INSTALLATION
r
( LOCATION 1
l The unit may not function well in locations where there is excessive dust, fumes or
moisture in the air.
( REMOVAL )
l Do not attempt to remove the unit yourself. Consult your dealer or other qualified
service personnel for assistance.
27
Page 28

Models
I
Rated A.C.voltage
Rated frequency 50Hz
1 Cooling Capacity ( 3.50kW
1 Heating Capacity 1 4.1OkW
AY-A126J
AE-A126J
230-240V
28
SHARP CORPORATION
OSAKA, JAPAN
TINSEA JBRO (TL) 6C0 0
 Loading...