

Page 1

SERVICE MANUAL
CODE : 00ZARP13//A1E
PRINTER & NETWORK UNIT
FOR AR-650
AR-P13
AR-NC4T
MODEL
CONTENTS
SOFTWARE
[1] Features and Specifications . . . . . . . . . . . . . . . . . . . . . . . . . . . . 1-1
[2] Setup. . . . . . . . . . . . . . . . . . . . . . . . . . . . . . . . . . . . . . . . . . . . . . 2-1
[3] Setting NOS(Server Setup). . . . . . . . . . . . . . . . . . . . . . . . . . . . . 3-1
[4] Utility . . . . . . . . . . . . . . . . . . . . . . . . . . . . . . . . . . . . . . . . . . . . . . 4-1
[5] Status Display and the Solutions. . . . . . . . . . . . . . . . . . . . . . . . . 5-1
[6] Troubleshooting. . . . . . . . . . . . . . . . . . . . . . . . . . . . . . . . . . . . . . 6-1
HARDWARE
[1] Summary. . . . . . . . . . . . . . . . . . . . . . . . . . . . . . . . . . . . . . . . . . . 1-1
[2] Circuit Description. . . . . . . . . . . . . . . . . . . . . . . . . . . . . . . . . . . . 2-1
AR-SM3
[3] Print Data Flow . . . . . . . . . . . . . . . . . . . . . . . . . . . . . . . . . . . . . . 3-1
[4] The Arrangement Plan of Principal Elements . . . . . . . . . . . . . . . 4-1
[5] Interface Signal . . . . . . . . . . . . . . . . . . . . . . . . . . . . . . . . . . . . . . 5-1
[6] Troubleshooting. . . . . . . . . . . . . . . . . . . . . . . . . . . . . . . . . . . . . . 6-1
[7] Unpacking and Installation . . . . . . . . . . . . . . . . . . . . . . . . . . . . . 7-1
Parts marked with “ “ are important for maintaining the safety of the set.
Be sure to replace these parts with specified ones for maintaining the safety and performance of the set.
This document has been published to be used for
SHARP CORPORATION
after sales service only.
The contents are subject to change without notice.
Page 2

SOFT WARE
Chapter 1 Features and Specifications
1. Summary ......................................................................... 1-1
2. Features .......................................................................... 1-1
3. Specifications ................................................................. 1-2
Page 3

1. Summary
The printer board is connected to the system board in the copier with a PCI bus. The printer functions are provided as
corresponding with the system board. The pr inter board receives the print data from computers connected in local or
network. The print data are conv erted to compressed graphic data and sent to the system board. If the printer is connected
in network, it can be used in conjunction with the Print Server Card.
2. Features
(1) High-speed printing
The 64-bit RISC microprocessor “PowerPC603e-200MHz” is installed as the CPU, enabling high-speed processing
and printing of complex print data at 80ppm (AR-650).
(2) Printing up to LEDGER or A3 size
Printable page size range from STATEMENT to LEDGER or A5 to A3 sized pages. LEDGER or A3 sized drawings
and diagrams can be printed at full size.
(3) High-quality printing
The print resolution of 600 dpi meets the requirements of high-quality images created by word processing, DTP,
CAD applications, etc. The smoothing function allo ws the outline of characters and dr awing to be printed smoothly.
(2400dpi or equivalent)
(4) Supporting, PCL-5e, PCL-XL, and PDL
PCL-5e, PCL-XL and PDL are provided as standard printer drivers. Therefore, a pr inter dr iver suitable to the print
contents can be used for printing. PDL is compatib le with P ostScript lev el2 printer so that the printer can be used for
professional DTP document printing.
(5) Variety of Internal Fonts
45 fonts for PCL-5e, and 35 fonts for PDL are installed in the printer.
(6) Finisher and Saddle-Stitch Finisher
In this mode, printed documents can be sorted and stapled. When the Saddle Stitch Finisher is used, saddle
stitching and stapling can be done like magazine binding.
(7) Duplex Printing, Layout Printing, Cover Sheet, and Private Print
Printing on both sides of paper can be performed automatically to reduce paper consumption.
Several reduced pages (2 to 16 pages) can be printed on one sheet.
Printing or insertion of a front cover, insertion of dividing sheet at designated places can be done.
Print data can be assigned password to and can be printed by your entering password in the control panel of the
copier. You can get the printed paper whenever you want to.
(8) Supporting Network (Optional)
This supports 100BASE-TX, 10BASE-T/2 of Ethernet, and Token Ring as the varieties of selection for network
interface. The printer is compatible with TCP/IP, IPX/SPX and AppleTalk protocols. The printer can be used as a
network printer in the environments of NetWare, Windows 95/98/NT 4.0/2000 and Mac OS 8.0/8.5/8.6/9.0. In
Windows 95/98/NT 4.0/2000 network environments, data can be output to the printer e ven in a peer-to-peer network
based on an exclusive utility without going through a server.
1-1
Page 4

3. Specifications
Printer Board
Product Name AR-P13
Applicable Product AR-650
Print Method Indirect Electrostatic Photographic (Dry Method)
Print Speed Max. 80 ppm
Resolution 600dpi
Paper Size FOLIO, LEDGER, LEGAL, LETTER, STATEMENT, COMPUTER, 13inch LG, 8.5SQ, A3, A4, A5, B4, B5
Emulation PCL-5e, PCL-XL, PDL (PostScript level 2)
CPU PowerPC 603e-200MHz
First cache Instruction 16KB
Data 16KB
RAM Standard SDRAM: 16MB
Option SDRAM SO-DIMM x 1: 32MB
Bank x 1, Clock x 2
ROM Program Flash ROM SIMM x 1: 8MB
Interface Standard Parallel Interf ace (IEEE-1284, Centronics-type 36 pins) : Standard mode, Nibble mode, ECP Mode
Network Board Interface : DPO (Ethernet, Token Ring)
Compression Support Rector
Size 230mm x 173mm
Operable Condition Temperature: 0 to 50°C (32F. to 122F. )
Humidity: 5 to 95% (No condensation)
Power Supply: 3.3V±5%, 5.0V±5%
Power Consumption Max. 3A (3.3V)
Min. 1A (5.0V)
1-2
Page 5

Print Server Card
Product Name AR-NC4T
Applicable Model AR-P13
Network Type 10BASE-T/100BASE-TX
Trans. Speed 10/100Mbps
Interface 10BASE-T/100BASE-TX:
RJ-45 Connector x 1
Indicator Lamp LED (Green) x 1
LED (Amber) x 1
Size 127mm x 127mm
Operable Conditions Temperature: 0 to 50°C (32F.~122F.)
Humidity: 5 to 80% (No condensation)
1-3
Page 6

Chapter 2 Setup
1. Example of Connecting the Printer.............................. 2 -1
1.1 Example of Connecting in Local Mode
(Parallel connection).................................................................. 2-1
1.2 Example of Connection in a Client-server T ype Netw ork........ 2-1
1.3 Example of Connecting in a Peer -to-peer T ype Netw ork......... 2-2
2. Setup Flow ......................................................................2-3
2.1 Setup Flow List........................................................................... 2-3
2.2 Utility List.................................................................................... 2-4
Page 7

1. Examples of Connecting the Printer
The printer can be used in local connection (parallel connection), client-server type network, and peer-to-peer type network. The
optional Print Server Card is necessary when the printer is connected in client-server type or peer-to-peer type network.
1.1 Example of Connecting in Local Mode (Parallel Connection)
The printer is connected directly to a computer (PC/A T machine, or its equiv alent) using a parallel interface on-board as the default
interface. An optional parallel cab le is necessary .
Print Job
Computer
1.2 Example of Connection in a Client-server T ype Netw ork
The printer is shared with more than one computer connected though a server computer (NetWare server and Windows NT
server.)
NetWare 3.x
NetWare 4.x (NDS mode or a bindery emulation mode)
NetWare 5.xJ (NDS mode or NDPS mode)
Windows NT 4.0 (TCP/IP printing service)
Print Job
Windows NT server
NetWare server
Windows 95
Client
Windows 98
Client
Windows NT 4.0
Client
2-1
Windows 2000
Client
Page 8

1.3 Example of Connecting in a Peer -to-peer T ype Network
The printer is shared without going through a server computer in a peer-to-peer network for TCP/IP, IPX/SPX, and AppleTalk
(Ethernet). For Windows 95/98/NT 4.0/2000, the peer-to-peer utility should be installed in each computer connected to the printer .
Peer-to-peer utility f or TCP/IP
Peer-to-peer utility f or IPX/SPX
Macintosh
Client
Windows 95
Client
Windows 98
Client
Windows NT 4.0
Client
Print Job
Windows 2000
Client
2-2
Page 9

2. Setup Flow
The setup flow is different depending on the network condition. Please refer to the Setup Flow List below for the setup suited to the
network condition of the computer.
2.1 Setup Flow List
(TCP/IP
Printing)
(NDS) (Bindery)
Local Peer-to-peer Server
Procedure Utility Connection for TCP/IP for IPX/SPX AppleTalk NetWare 3.x NetWare 4.x NetWare 4.x Windows NT
Open the package --- O O O O O O O O
--- --- --- --- --- --- --- O
/NT4.0/2000
Windows 95/98
Printer driver for
utility for IPX/SPX
NetWare WebPage --- --- O --- O (---) O (---) O (---) ---
AppleTalk WebPage --- --- --- O --- --- --- ---
Install the MAP MA P --- --- --- --- --- (O) --- (O) --- (O) ---
MAP Setup MAP --- --- --- --- --- (O) --- (O) --- (O) ---
Install the printer board --- O O O O O O O
Install the network board --- --- O O O O O O
Setting IP address, Subnet mask, Control panel --- O O O O (---) O (---) O (---) O
Network settings TCP/IP WebPage --- O --- --- --- --- O ---
Gateway address
Server settings (Print server, Queue, NOS --- --- - -- --- O O O ---
and Printer)
Install the peer-to-peer TCP/IP The peer-to-peer --- O --- --- --- --- --- ---
utility utility for TCP/IP
IPX/SPX The peer-to-peer --- --- O --- --- --- --- ---
in the printer properties (Server)
Installation of the printer driver and Setup
O O O --- O O O O
/NT4.0/2000
Windows 95/98
Printer driver for
Font Navigator --- --- --- --- --- --- --- (O)
Install Font Navigator
Installation of the printer driver and Setup
in the printer properties (Clients)
AppleTalk
Printer driver for --- --- --- O --- -- - --- ---
Install Font Navigator for clients Font Navigator O O O --- O O O O
The units in brackets have no TCP/IP environment and apply to the NetWare environment.
2-3
Page 10

2.2 Utility List
Utility
Control Panel System-board Unnecessary Control Panel --- O O Setting IP address, subnet mask and gateway ad-
WebPage Printer-board Unnecessary Computer --- O O Custom setting in network, default setting for
Peer-to-peer CD-ROM Necessary Computer --- --- O Making the printer usable in peer-to-peer.
utility
Printer Driver CD-ROM Necessary Computer O O O Making the printer usable with various functions.
MAP CD-ROM Necessary Computer --- O --- Operating the MAP when there is not the TCP/IP
Font Navigator CD-ROM Necessary Computer O O O Installing the bit-map fonts to the computer to dis-
Stored Installing in Start Client Peer-
Location Computers Control
ROM dress, setting emulation, administering print jobs,
ROM (Necessary printer, administering print jobs, and displaying
setting in a com- the print information.
puter)
Local
Server to-peer
Description
test printing, and switching on-line/off-line.
Selection of printer drivers for printing conditions.
protocol in the NetWare network.
Setting the NetWare instead of WebPage.
play the internal fonts on the screen clearly.
2-4
Page 11

Chapter 3 Setting NOS (Server Setup)
1. NetWare 3.x Setup .......................................................... 3 -1
1.1 Setting up NetW are with WebP a ge or MAP............................... 3-1
1.2 Setting up with PCONSOLE....................................................... 3-2
1.2.1 Selecting File Server................................................................................... 3-2
1.2.2 Creating a Print Queue ............................................................................... 3-2
1.2.3 Creating the Print Ser ver............................................................................ 3-2
1.2.4 Creating the Printer..................................................................................... 3-2
1.2.5 Assigning a Print Queue ............................................................................. 3-3
1.3 Notify Option .............................................................................. 3-4
1.3.1 Setting Procedure ....................................................................................... 3-4
1.4 Identify the Preferred File Server .............................................. 3-4
1.5 Identify the Primary File Server................................................. 3-5
1.5.1 Setting Procedure ....................................................................................... 3-5
2. NetWare 4.x Setup in NDS Mode................................... 3-6
2.1 Setting up NetW are with WebP a ge or MAP............................... 3-6
2.2 Setting up NetW are Administrator............................................ 3-7
2.2.1 Starting the NetWare Administrator............................................................ 3-7
2.2.2 Creating a Print Queue ............................................................................... 3-7
2.2.3 Creating the Printer..................................................................................... 3-7
2.2.4 Assigning a Print Queue ............................................................................. 3-7
2.2.5 Creating the Print Ser ver............................................................................ 3-8
2.2.6 Allocating the Printer................................................................................... 3-8
Page 12

3. NetWare 4.x Setup in Bindery Mode ............................ 3 -9
3.1 Confirming Bindery Context ..................................................... 3-9
3.2 Setting up NetW are with WebP a ge or MAP............................... 3-9
3.3 Setting up with PCONSOLE..................................................... 3-10
3.3.1 Starting PCONSOLE ................................................................................ 3-10
3.3.2 Creating a Print Queue ............................................................................. 3-10
3.3.3 Creating the Print Ser ver.......................................................................... 3-10
3.3.4 Creating the Printer................................................................................... 3-10
3.3.5 Assigning the Print Queue ........................................................................ 3-11
3.4 Changing the File Server ......................................................... 3-11
3.5 Changing the Priority of Print Queue...................................... 3-12
3.6 Setting with Notify Options ..................................................... 3-12
4. NetWare 5.xJ in NDS Mode .........................................3-13
5. NetWare 5.xJ in NDPS Mode....................................... 3-13
5.1 Setting up NetW are with We bPa ge or MAP............................. 3-13
5.2 Setting up NetW are Administrator.......................................... 3-13
5.2.1 Starting NetWare Administrator................................................................ 3-13
5.2.2 Setup 1: Creating NDPS Broker................................................................ 3-13
5.2.3 Setup 2: Creating NDPS Manager ............................................................ 3-14
5.2.4 Setup 3: Installing the printer driver .......................................................... 3-14
5.2.5 Setup 4: Creating NDPS Printer................................................................ 3-14
5.2.6 Setup 4.1: In case of LPR in TCP/IP......................................................... 3-14
5.2.7 Setup 4.2: In case of Queue based .......................................................... 3-14
5.2.8 Setup 5: Setup NDPS Printer.................................................................... 3-15
6. Using Windows NT 4.0................................................. 3-16
6.1 Before Setting up ..................................................................... 3-16
6.2 Setting up the TCP/IP Printing Service.................................... 3-16
Page 13

1. NetWare 3.x Setup
The followings must be set up to use this machine as a network printer in the Netware 3.x network.
• This machine
Select the “Network setup - Setup NetW are” menu in WebP age (URL for an administrator), and set up each item.
Or select the “Protocols - Setup NetWare” menu for MAP, and set up each item.
• NetWare server
Log in to the NetWare server with “Supervisor” from a client computer.
Use the “PCONSOLE” command, and add the print server.
* Set up this machine in the print ser ver mode. It cannot be set up in the remote server mode.
• Customizing the NetWare Server
Set up “Notify Options”, as required.
SUPPLEMENTS:
• WebPage is an Web-based utility installed in this machine. This machine can be set up
by controlling the setup pa ges through the a WWW browser installed in the computer.
See “Chapter 4 Utility - WebPage” for further information.
• MAP is a utility that allows you to call and use a setting page via the IPX/SPX protocol.
See “Chapter 4 Utility - MAP” for further information.
• WebPage should be normally used to set up this machine. Use MAP in the network
where the TCP/IP protocol is not used, and if WebPage cannot be used. WebPage is
optimized for this machine.
1.1 Setting up NetW are with WebP age or MAP
The following contents f or NetW are 3.x must be set up:
When W ebPage is used:
• Pr int Server Name Enter the name of the pr int server to be created.
• Preferred File Ser ver Name Enter the name of the file server to be logged in.
• Bindery Mode Be sure to set to “Enable”.
When MAP is used:
• Pr int Server Name Enter the name of the pr int server to be created.
• Preferred File Ser ver Name Enter the name of the file server to be logged in.
• Disable Bindery Be sure to set to “OFF”.
Set other items corresponding to requirements.
3-1
Page 14

1.2 Setting up with PCONSOLE
Work on the workstation.
1.2.1 Selecting File Server
Select the file server when the print server will be created.
(1) Log in for the NetWare server with “Supervisor”.
(2) Type “PCONSOLE” in DOS prompt and press the [Enter] key.
(3) Choose [Change Current File Server] from the [Available Options] menu.
• If you do not have to change the File Server, skip to “Creating a print queue”.
(4) A list of file servers is displayed.
(5) Select the file server on which you want to install the print server and press the [Enter] key.
• If the name of the file server you want is not displayed, press the [Insert] key to get a list of file servers.
(6) Log into the file server.
(7) Press the [Esc] key to return to the [Available Options] menu.
1.2.2 Creating a Print Queue
(1) Choose [Print Queue Information] from the [Available Options] menu and press the [Enter] key.
(2) Print Queue appears.
(3) Press the [Insert] key.
(4) Enter the print queue name at [New Print Queue Name] and press the [Enter] key.
(5) Press the [Esc] key.
(6) The display returns to showing the [Available Options] menu.
1.2.3 Creating the Print Server
(1) Choose [Print Server Information] from the [Available Options] menu and press the [Enter] key.
(2) Print Server appears.
(3) Press the [Insert] key.
(4) Enter print server name at [New Print Server Name] and press the [Enter] key.
1.2.4 Creating the Printer
(1) Choose the created print server and press the [Enter] key.
(2) The [Print Server Information] menu appears.
(3) Choose [Print Server Configuration] from the [Print Ser ver Information] menu and press the [Enter] key.
(4) The [Print Server Configuration] menu appears.
(5) Choose [Printer Configuration] from the [Printer Server Configuration] menu and press the [Enter] key.
(6) Configured Printers appears.
(7) Select a printer number, for which [Not Installed] is displayed, from the [Configured Printers] and press the [Enter] key.
(8) Printer X Configuration appears. (X is the printer number selected.)
(9) Enter the printer name and press the [Enter] key.
(10) Confirm the [Type] field is highlighted, and press the [Enter] key.
(11) Choose [Remote Other/Unknown] and press the [Enter] key.
(12) Press the [Esc] key.
(13) Choose [Yes] and press the [Enter] key.
(14) The pr inter is added to [Configured Printers].
(15) Press the [Esc] key.
(16) The display returns to showing the [Print Ser ver Configuration] menu.
3-2
Page 15

1.2.5 Assigning a Print Queue
(1) Choose [Queues Serviced by Printer] from the [Print Ser ver Configuration] menu.
(2) Defined Printers appears.
(3) Select a created printer from [Defined Printers] and press the [Enter] key.
(4) The assigning queue screen appears.
(5) Press the [Insert] key.
(6) Available Queues appears.
(7) Select a created queue.
• Up to 10 queues can be selected. When more than one queue is to be selected, the priority must be decided in
advance.
(8) Enter the priority and press the [Enter] key.
(9) The queue is assigned.
• When assigning more than one queue, repeat steps 5 through 9.
(10) Press the [Esc] key six times.
(11) When [Exit PConsole] appears, choose [Yes] and press the [Enter] key.
SUPPLEMENT:
To install a print server on more than one file server, perform the procedures of NetWare 3.x
Set up: Creating the print queue, Creating the print server , Creating the printer, and Assigning
a print queue for each file server. You must use the same name and password for the print
server (or not password) on all file servers. If you use a password, specify it on each file server
usingthe Change Password option on the Print Server Inf ormation men u of the PCONSOLE
utility.
3-3
Page 16

1.3 Notify Option
The print server enables the notification of users or user groups with Notify options if a problem occurs with the printer.
The print server supports the enhanced Notify options for printers, including informing users when:
• The pr inter is off-line.
• Paper jamming occurs.
• The cover is opened.
• The pr inter is out of paper.
• Manual feeding is required.
• A form change is required.
• The pr inter has an engine failure.
1.3.1 Setting Procedure
(1) Select the [Print Server Information] from the [Available Options] menu.
(2) Select the print server you want to set “NOTIFY” from the [Print Server] menu.
(3) Select [Print Server Configuration] menu from the [Print Server Information].
(4) Choose the [Notify List for Printer] in the [Print Server Configuration] menu.
(5) Select the printer from the [Defined Printer] list.
(6) The Screen appears (which is blank for an initial installation.)
(7) Press the [Insert] key.
(8) View a list of the [Notify Candidates].
(9) Set the [First] and the [Next] intervals in the [Notify Intervals] screen.
• It is recommended that you use the default. The [First] inter vals is the number of seconds the network waits
before it notifies candidates about a print job problem occurs. The [Next] interval specifies how often in seconds
candidates are notified. Enter a number for each interval and press the [Enter] key.
(10) Press the [Esc] key and then choose [Yes] after asked “Save Changes”. Press the [Esc] key at each screen until you
reach the [Print Server Configuration] menu. If you have finished the configuration, press the [Esc] key to save
changes.
1.4 Identify the Preferred File Server
File server auto-searching is omitted and the time for starting up the printer is shor tened by appointing the preferred file
sever.
When the Print Server Card comes up, it automatically searches for and is attached to the file servers. The extent of automatic
searching is limited as follows extents:
• Hops Up to four hops
• Ticks Up to eight ticks
The preferred file server can be identified at [Preferred File Server] of WebP age. If a pref erred file server is identified, the Print
Server Card will attach to this identified file server instead of initiating the automatic search. If the preferred file server is also a
primary file server (for example, has file servers listed under file servers to be serviced), the Print Server Card will attach
directly to these file servers.
NOTE:
If the setting items of [Preferred File Server] are mistaken, problems may occur during printing
in NetWare.
3-4
Page 17

1.5 Identify the Primary File Server
The benefits of identifying the primary file server are:
• A file ser ver not in the available extent for automatic search can be connected.
• A faster setup for starting the printer is performed. A computer will access to the primary file server and search the list
of file servers to be serviced. After searching is complete, the computer will connect directly to the file servers in the
list.
1.5.1 Setting Procedure
(1) Select [File Server To Be Serviced] from the [Print Ser ver Configuration] menu. The list of the file ser vers to be
serviced by the primary ser ver appears.
(2) Press the [Insert] key, then the [Available File Servers] list appears.
(3) Select the name of the file server to be serviced and press the [Enter] key, then the selected name of the file server is
added to the [File Server To Be Serviced] list.
(4) After adding the desired file server to the list, press the [Esc] key to go back to the menu.
(5) Install the Print Server Card to each of the primary file servers.
SUPPLEMENTS:
• The primary server can appoint file servers within the limitation for automatic search.
It is recommended to appoint the file servers as close as possible.
• After the primary file server and the list of the file servers to be serviced are found, automatic search is dropped and the print server will go to those file servers listed and to no
others.
3-5
Page 18

2. NetWare 4.x Setup in NDS Mode
The followings must be set up to use this machine as a network printer in the Netware 4.x network.
• This machine
Select the “Network setup - Setup NetW are” menu in WebP age (URL for an administrator), and set up each item.
Or select the “Protocols - Setup NetWare” menu for MAP, and set up each item.
• NetWare server
Log in to the NetWare server with “Admin” from a client computer.
Use the “NetWare Administrator” for the GUI utility, or “PCONSOLE” command for the CUI utility, and add the print
server.
* Set up this machine in the print ser ver mode. It cannot be set up in the remote server mode.
SUPPLEMENTS:
• WebPage is an Web-based utility installed in this machine. This machine can be set up
by controlling the setup pa ges through the a WWW browser installed in the computer.
See “Chapter 4 Utility - WebPage” for further information.
• MAP is a utility that allows you to call and use a setting page via the IPX/SPX protocol.
See “Chapter 4 Utility - MAP” for further information.
• WebPage should be normally used to set up this machine. Use MAP in the network
where the TCP/IP protocol is not used, and if WebPage cannot be used. WebPage is
optimized for this machine.
2.1 Setting up NetW are with WebP age or MAP
The following contents f or NetWare 4.x m ust be setup.
When W ebPage is used:
• Pr int Server Name Enter the name of the pr int server to be created.
• Preferred NDS ContextEnter the NDS context (full path) to be connected.
• Preferred NDS Tree Enter the NDS tree to be connected.
• Bindery Mode Be sure to set “Disable”.
When MAP is used:
• Pr int Server Name Enter the name of the pr int server to be created.
• Preferred NDS ContextEnter the NDS context (full path) to be connected.
• Preferred NDS Tree Enter the NDS tree to be connected.
• Disable Bindery Be sure to set “ON”.
Set other items corresponding to requirements.
3-6
Page 19

2.2 Setting up NetW are Administrator
Work on the workstation.
2.2.1 Starting the NetWare Administrator
(1) Log into the NetWare servers as the “Admin”.
(2) Start the NetWare Administrator.
• The NetWare Administrator is found in the Public directory of the SYS volume. Open the Public directory with
Explorer and start “Nwadmn3x.exe”.
• If you are using the IntranetWare on Windows 95 or Windows 98, start “Nwadmin95.exe” found in the Win95
directory of the Public directory.
2.2.2 Creating a Print Queue
(1) Click on the container object to create the printer.
(2) Choose [Create] in the [Object] menu.
(3) The Class of New Object window appears.
(4) Choose [Print Queues] and click on [OK].
(5) Create Print Queues appears.
(6) Enter the name of the print queue at [Print Queue Name].
(7) Click on Browse of [Print Queue Volume].
(8) The Select Object window appears.
(9) Select a volume to create a print queue from [Available objects] and click on [OK].
(10) Click on [Create].
(11) The pr int queue is created.
2.2.3 Creating the Printer
(1) Click on the container object to create the printer.
(2) Choose [Create] in the [Object] menu.
(3) The Class of New Object window appears.
(4) Choose Printer and click on [OK].
(5) The Create Printer window appears.
(6) Enter the name of the printer at [Printer name].
(7) Tur n on the check box for [Define additional properties] and click on [Create].
(8) The details of the created printer are displayed.
2.2.4 Assigning the Print Queue
(1) Click on [Assignments].
(2) The screen switches to Assignments.
(3) Click on [Add].
(4) The Select Object window appears.
(5) Select a created queue from [Available objects] and click on [OK].
(6) Click on [Configuration].
(7) The screen switches to Configuration.
(8) Click on “ ” of [Printer type] and choose [Other/Unknown].
(9) Click on [OK].
(10) The pr inter is created.
3-7
Page 20

2.2.5 Creating the Print Server
(1) Click on the container object to create the printer.
(2) Choose [Create] in the [Object] menu.
(3) The Class of New Object window appears.
(4) Choose [Print Server] and click on [OK].
(5) The Create Print Server window appears.
(6) Enter the name of the print server at [Print Ser ver name].
(7) Tur n on the check box for [Define additional properties] and click on [Create].
(8) The details of the created print server are displayed.
2.2.6 Allocating the Printer
(1) Click on [Assignments].
(2) The screen switches to Assignments.
(3) Click on [Add].
(4) The Select Object window appears.
(5) Select a created printer from [Available objects] and click on [OK].
(6) The printer name is displayed at [Printer].
(7) Click on [OK].
(8) The print server is created.
3-8
Page 21

3. NetWare 4.x Setup in Bindery Mode
The followings must be set up to use this machine as a network printer in the Netware 4.x bindery emulation mode network.
The printer server is set in the bindery mode when you want to preserve the environment of the existing Netware 3.x or also
allow clients of NetWare 3.x to use the print server.
• This machine
Select the “Network setup - Setup NetW are” menu in WebP age (URL for an administrator), and set up each item.
Or select the “Protocols - Setup NetWare” for MAP, and set up each item.
• NetWare server
Log in to the NetWare server with “Admin” from a client computer.
Use the “PCONSOLE” command, and add the print server.
* To set up in the binder y emulation mode, log in through the bindery connection. After logging in to the server,
press [F4] in console to switch to the bindery mode.
* Set up this machine in the print ser ver mode. It cannot be set up in the remote server mode.
• Customizing the NetWare Server
Set up “Notify Options”, as required.
SUPPLEMENTS:
• WebPage is an Web-based utility installed in this machine. This machine can be set up
by controlling the setup pa ges through the a WWW browser installed in the computer.
See “Chapter 4 Utility - WebPage” for further information.
• MAP is a utility that allows you to call and use a setting page via the IPX/SPX protocol.
See “Chapter 4 Utility - MAP” for further information.
• WebPage should be normally used to set up this machine. Use MAP in the network
where the TCP/IP protocol is not used, and if WebPage cannot be used. WebPage is
optimized for this machine.
3.1 Confirming Bindery Context
Before using the print server in the bindery mode, the bindery context must be stored in the NetWare 4.x server. Check if
the bindery context exists there. For the bindery mode, refer to the Operator’s Manual for NetWare.
3.2 Setting up NetW are with WebP age or MAP
The following contents f or NetWare 4.x m ust be setup:
When W ebPage is used:
• Pr int Server Name Enter the name of the pr int server to be created.
• Preferred File Ser ver Name Enter the name of the file server to be logged in.
• Bindery Mode Be sure to Set “Enable”.
When MAP is used:
• Pr int Server Name Enter the name of the pr int server to be created.
• Preferred File Ser ver Name Enter the name of the file server to be logged in.
• Disable Bindery Be sure to Set “OFF”.
Set other items corresponding to requirements.
3-9
Page 22

3.3 Setting up with PCONSOLE
3.3.1 Starting PCONSOLE
Work on the workstation.
(1) Log in for the NetWare server with “Admin”.
(2) Type “PCONSOLE” at the DOS prompt and press the [Enter] key.
SUPPLEMENTS:
• To use the bindery service, log in through bindery connection.
• When you have logged in the NDS mode, press [F4] key to switch to the bindery mode.
3.3.2 Creating a Print Queue
(1) Choose [Print Queues] and press the [Enter] key.
(2) Print Queues appears.
(3) Press the [Insert] key.
(4) Enter print queue name at [New Print Queue Name] and press the [Enter] key.
(5) Press the [Esc] key.
(6) The display returns to showing the [Available Options] menu.
3.3.3 Creating the Print Server
(1) Choose [Print Servers] from the [Available Options] menu and press the [Enter] key.
(2) The message “Bindery Emulation is used in NetWare 4 server...” is displayed.
(3) Press the [Enter] key.
(4) Print Servers appears.
(5) Press the [Insert] key.
(6) Enter the print server name at [New Print Server Name] and press the [Enter] key.
3.3.4 Creating the Printer
(1) Choose the created print server and press the [Enter] key.
(2) The [Print Server Information] menu appears.
(3) Choose the printer from the [Printer Server Information] menu and press the [Enter] key.
(4) Defined Printers appears.
(5) Press the [Insert] key.
(6) Enter the printer name at Printer and press the [Enter] key.
3-10
Page 23

3.3.5 Assigning the Print Queue
(1) Select a created printer and press the [Enter] key.
(2) Printer XXXXX Configuration (XXXXX is the name of the printer created) appears.
(3) Enter printer number at [Printer number].
(4) Select the Parallel at [Printer Type] and press [Enter] key.
(5) Choose [Other/Unknown] from Printer Type and press the [Enter] key.
(6) Choose [See List of Assign Print Queues] and press the [Enter] key.
(7) NetWare Server\Print Queue appears.
(8) Press the [Insert] key.
(9) Select a created queue from [Available Print Queues] and press the [Enter] key.
• Up to 10 queues can be selected. When more than one queue is to be selected, the priority must be decided in
advance.
(10) Enter the pr ior ity and press the [Enter] key.
(11) The queue is assigned.
• When assigning more than one queue, repeat steps 5 through 9.
(12) Press the [Esc] key twice.
(13) When [Save Changes?] appears, choose [Yes] and press the [Enter] key.
(14) Press the [Esc] key four times.
(15) When [Exit?] appears, choose [Yes] and press the [Enter] key.
3.4 Changing the File Server
A file server can be specified as the current file server. To change the file ser ver, use the following procedures:
(1) Log into the current file server and start the PCONSOLE utility.
(2) Select the [Change Current File Server] at the [Available Options] menu.
(3) Press the [Insert] key to display the list of available file servers.
(4) Select the file server to be set as the current file server, then press [Enter].
(5) Enter your user name and press the [Enter] key. If the user name requires a password, the Password screen is
displayed. Enter the password and press [Enter].
(6) Select [Change Current File Server] at [Available Options] menu. The list of connected file servers is displayed.
(7) Select the current file server from the [File server/Username] screen.
3-11
Page 24

3.5 Changing the Priority of Print Queue
When you print a file, your system sends the file to a print queue. The print server assigned to that queue extracts the print job
and sends it to the assigned printer. If a print server is serving queues on multiple file servers, y ou must assign queues to the
printer on each file server. T o change the print queues, use the f ollowing procedures:
(1) Start the PCONSOLE utility.
(2) Select [Print Server] in the [Available Options] menu.
(3) Select the [Print Server] from the list.
(4) Select [Print Server Information] from the menu.
(5) Select [Queues Serviced by Printer] from the menu.
(6) Select a printer from the [Defined Printers] list.
(7) Press the [Insert] key on the [File Server/Queue/Priority] screen.
(8) The [Available Queues] list appears.
(9) Select a queue from the list.
(10) Press the [Enter] key at the [Prior ity] screen to leave the priority setting with “1”.
• The highest pr ior ity queue is 1; 10 is the least.
• T o change the priority of a queue, press the [Enter] key at the [File Server/Queues/Priority] screen to display the
Priority setting screen. Press the back-arrow key to delete the current setting. Type a new number from 1 to 10
and press [Enter].
(11) Repeat steps 9 and 10 to assign others to the printer.
(12) Press the [Esc] key and save all changes.
3.6 Setting with Notify Options
You can specify users or groups of users to be notified if a print job problem occurs. If a print server is serving queues on
multiple file servers, you must set up a Notify list for each file server. To set up Notify, follow the procedures below.
(1) Start the PCONSOLE utility.
(2) Select [Print Servers] in the [Available Options] menu.
(3) When a message appears, press the [Enter] key.
(4) Select print server in the [Print Ser ver] menu.
(5) Select [Printers] in the [Print Server Information] menu.
(6) Select printers in the [Defined Printers] menu.
(7) Select [Notification] in the [Printer XXXX Configuration] menu (XXXX the name of the printer).
(8) Select server in [NetWare Server/Object to be Notified/Object Type/First/Next/State], and then press the [Enter] key.
(9) The Notify Intervals screen displays.
(10) Select the user or user group from the Notify Candidates screen.
(11) The Notify Intervals screen displays.
(12) Enter a number for the First and Next intervals for notifying users about printer problems and press [Enter] key.
• The First interval is the number of seconds the network waits before it notifies users about a print job problem.
• The Next interval specifies how often in seconds users are notified.
(13) Press the [Esc] key and save all changes.
(14) Press the [Esc] key until you see the prompt to exit PCONSOLE. Select Yes and press the [Enter] key.
3-12
Page 25

4. NetWare 5.xJ in NDS Mode
To use this machine as a network printer in the NetWare 5.xJ NDS mode netw ork, the same settings made for the NetWare
4.xJ must be made. F or details, refer to Chapter 3 Setting NOS (Server Setup) in NetW are 4.xJ NDS Mode .
5. NetWare 5.xJ in NDPS Mode
5.1 Setting up NetW are with WebP age or MAP
The following contents f or NetWare 4.x m ust be setup.
When W ebPage is used:
• Print Server Name Enter the name of the print server to be created.
• Preferred NDS Context Enter the NDS context (full path) to be connected.
• Preferred NDS Tree Enter the NDS tree to be connected.
• Bindery Mode Be sure to set “Disable”.
When MAP is used:
• Print Server Name Enter the name of the print server to be created.
• Preferred NDS Context Enter the NDS context (full path) to be connected.
• Preferred NDS Tree Enter the NDS tree to be connected.
• Disable Bindery Be sure to set “ON”.
Set other items corresponding to requirements.
5.2 Setting up NetW are Administrator
5.2.1 Starting NetWare Administrator
This is performed on the workstation.
(1) Log in for the NetWare server as an Administrator .
(2) Start NetWare Administrator .
• NetWare Administrator is found in the Public directory of the SYS volume. Open the Public directory Explorer and
startup Nwadmin3x.exe.
• If you are using IntranetWare on Windows 95 or Windows 98, startup Nwadmin95.ex e located in the Win95 directory
of the public directory .
5.2.2 Setup 1: Creating NDPS Broker
When the server is installed as supporting NDPS service, the NDPS Broker is created as def ault.
(1) Click the container object to create the NDPS Broker .
(2) Choose Create in the Object menu.
(3) The Class of New Object window appears.
(4) Choose NPDS Broker and click on [OK].
(5) Create NDPS Broker Object appears.
(6) Enter the name of the NDPS BROKER and RMS Volume, and click [Create].
(7) The NDPS Broker is created.
3-13
Page 26

5.2.3 Setup 2: Creating NDPS Manager
(1) Choose Create in the Object menu.
(2) The Class of New Object window appears.
(3) Choose NPDS Manager and click [OK].
(4) The Create NDPS Manager Object screen appears.
(5) Enter the names of NDPS Manager, Resident Server and Database V olume, and clic k [Create].
(6) The NDPS Manager is created.
5.2.4 Setup 3: Installing the printer driver
(1) Double-click the Broker icon.
(2) Click [Resource Management (RMS)].
(3) Click [Add Resources...].
(4) Select the applicable OS : Windows 95/98 or Windows NT. Click [Add...].
(5) Click on [Browse].
(6) Browse the .inf file to install or enter the file name, and click [OK].
(7) Choose a printer to be installed in Resources, and click [OK].
(8) The printer appears in Current Resources.
5.2.5 Setup 4: Creating NDPS Printer
(1) Choose Create in the Object menu.
(2) The Class of New Object window appears.
(3) Choose NDPS Printer and click [OK].
(4) Enter the name in NDPS Printer and click [Create].
(5) Enter the names of in Printer Agent (P A) Name field. Enter the NDPS Manager name or click the browse button to locate
it. Choose “No v ell Printer Gateway” in the Gate w a y Types and clic k [OK].
(6) Click [OK] to load the NDPS Manager to the server.
• It takes maximum 60 minutes to complete initializing the NDPS Manager.
(7) Choose “((NONE))” in Printer Type and “Novell Port Handler” in P ort Handler Type, and click [OK].
5.2.6 Setup 4.1: In case of LPR in TCP/IP
(1) Check Remote (LPR on IP) in Connection Type, click [Next].
(2) Enter the IP address assigned this machine in the Host Address. Type in “PORT_PASSTHROUGH” in the Printer Name,
and click [Finish].
• It takes about 60 seconds to load the Printer Agent.
(3) Choose the printer driver to be installed in Printer Drivers, and click [Continue].
(4) Information message about installed driver appears.
• It takes about 60 seconds to complete the creation of the NDPS Printer Object in NDS mode.
(5) NDPS Printer Object is created.
5.2.7 Setup 4.2: In case of Queue based
(1) Check Forward Jobs to a Queue in Connection T ype, clic k [Ne xt].
(2) Enter the NDS queue in Queue Name, and enter the queue user name or click the browse button to locate it.
(3) Choose the printer driver to be installed in Printer Drivers, and click on [Continue].
(4) Information message about installed driver appears.
• It takes about 60 seconds to complete the creation of the NDPS Printer Object in NDS mode.
(5) NDPS Printer Object is created.
3-14
Page 27

5.2.8 Setup 5: Setup NDPS Printer
(1) Double-click [NDPS Printer] created.
(2) Click NDPS Remote Printer Management.
(3) Check the “Install to workstations in this container” in Remote W orkstation Printer Options.
(4) Click on [Update Driver].
(5) Click on [OK].
3-15
Page 28

6. Using Windows NT 4.0
6.1 Before Setting up
• Connect this machine and the computer to the network.
• T urn on the power of this machine.
• Assign the IP address to this machine.
• Check that TCP/IP Protocol and Microsoft TCP/IP Printing are installed in Windows NT. If not, install them.
• Set up the TCP/IP network setting at WebP age.
6.2 Setting up the TCP/IP Printing Services
Log in for Windo ws NT with “Administrator” group or user of “Po werUsers” group.
(1) Click on the Start button and choose [Settings].
(2) Choose [Printers].
(3) Double-click on [Add Printer].
(4) Add Printer Wizard is started.
(5) Make sure that [My computer] is selected and click on the [Next] button.
(6) Click on [Add P ort...].
(7) Choose [LPR Port] from [Availab le Printer Ports].
(8) Click on [New P ort...].
(9) Enter at fields as following:
• Name or address of server providing Ipd: IP address for this machine
• Name or printer or print queue on that server:PORT1(Must be entered in the capital letter .)
(10) Click on [OK].
(11) Click on [Close].
(12) The port is added to [Available Po rts] of Add Printer Wizard.
(13) Make sure that the check box for the added port is turned on, then click on [Next].
(14) Click on [Have Disk...].
(15) Insert the CD-ROM.
(16) Specify the folder that contains the driver for Windows NT 4.0 at [Copy manufacturer’s files from].
• When the PCL-5e driver is installed and CD-ROM drive is D driv e , enter “D:\DRIVER\ENGLISH\NT4_0\PCL5E”.
• Refer to Readme file in CD-ROM for the configuration of CD-ROM contents.
(17) Click on [OK].
(18) Select the pr inter dr iver to be installed.
(19) Click on [Next].
(20) Change Printer name if necessary, and click on [Next].
(21) Click on [Next].
(22) Choose [Yes] or [No] as your choice if you wish to perform test printing or not, and click on [Finish].
(23) The pr inter is created.
3-16
Page 29

Chapter 4 Utility
1. Control Panel .................................................................. 4-1
1.1 Functions List of Control P anel................................................. 4-2
1.2 Control P anel Screen Transition T ree........................................ 4-6
1.2.1 When the Printer is on-line ......................................................................... 4-6
1.2.2 When the Printer is off-line ......................................................................... 4-7
2. WebPage.......................................................................... 4-9
2.1 Requirements ............................................................................. 4-9
2.2 How to Start.............................................................................. 4-10
2.3 Password .................................................................................. 4-10
2.4 Description of Screen .............................................................. 4-11
2.5 Selecting the Language ........................................................... 4-12
2.6 Function List............................................................................. 4-12
2.6.1 Menu List .................................................................................................. 4-12
2.6.2 Function List for Administrator Menu........................................................ 4-13
2.6.3 Function List for Serviceman Menu .......................................................... 4-18
2.6.4 Function List for User Menu...................................................................... 4-19
3. MAP ............................................................................... 4-21
3.1 Install MAP ............................................................................... 4-21
3.1.1 Requirements ........................................................................................... 4-21
3.1.2 Password for MAP .................................................................................... 4-21
3.1.3 Installing MAP........................................................................................... 4-21
3.2 Setup NetWare at MAP ............................................................ 4-22
3.2.1 Start MAP ................................................................................................. 4-22
3.2.2 NetWare Setup ......................................................................................... 4-23
3.3 The Setting List of MAP .......................................................... 4-24
3.3.1 System...................................................................................................... 4-24
3.3.2 Protocols................................................................................................... 4-25
3.3.3 Printer ....................................................................................................... 4-25
Page 30

4. Peer-to-peer Utility ....................................................... 4-26
4.1 Requirements ........................................................................... 4-26
4.2 Installation ................................................................................ 4-26
4.2.1 Before Installing ........................................................................................ 4-26
4.2.2 Installation of the Peer-to-peer Utility for IPX/SPX.................................... 4-27
4.2.3 Installation of the Peer-to-peer Utility for TCP/IP ...................................... 4-28
4.3 P eer-to-peer Utility Settings.................................................... 4-28
4.3.1 Changing the Port Name .......................................................................... 4-29
4.3.2 Manual Setting of a Port ........................................................................... 4-30
4.4 Uninstalling............................................................................... 4-30
4.4.1 Uninstalling the Peer-to-peer Utility for IPX/SPX....................................... 4-30
4.4.2 Uninstalling the Peer-to-peer Utility for TCP/IP ......................................... 4-30
5. Printer Driver ................................................................ 4-31
5.1 Organization of Printer Driver ................................................ 4-31
5.1.1 Windows 95/98/NT 4.0/2000 .................................................................... 4-31
5.1.2 Macintosh ................................................................................................. 4-31
5.2 Requirements........................................................................... 4-32
5.3 Installation................................................................................ 4-32
5.3.1 [Printer Setup] Menu................................................................................. 4-32
5.3.2 Plug-and-Play ........................................................................................... 4-33
5.3.3 Installing the Printer Dr iver to Windows 95/98 .......................................... 4-33
5.3.4 Installing the Printer Driver to Windows NT 4.0 ........................................ 4-34
5.3.5 Installing the Printer Driver to Windows 2000 ........................................... 4-35
5.3.6 Installing the Printer Driver to Windows 2000 (Print out using the IPP).... 4-36
5.3.7 Installing the Printer Driver to Macintosh .................................................. 4-37
5.4 User Information Setup............................................................ 4-38
5.5 Setting up Options ................................................................... 4-38
5.6 Uninstalling the Printer Driver................................................. 4-39
5.7 Printer Driver Setting ............................................................... 4-40
5.7.1 Windows 95/98/NT 4.0/2000..................................................................... 4-40
5.7.2 Macintosh ................................................................................................. 4-44
5.8 List of Internal Fonts................................................................ 4-45
5.8.1 List of Internal Fonts ................................................................................. 4-45
5.8.2 Applicable Screen Font Table.................................................................... 4-46
Page 31

6. Font Navigator..............................................................4-47
6.1 Installing Font Navigator ......................................................... 4-47
6.2 Uninstalling Font Navigator..................................................... 4-48
6.3 Run Font Navigator.................................................................. 4-48
6.4 Description of Screen .............................................................. 4-49
6.5 Getting Started with Font Navigator ....................................... 4-49
6.5.1 Installing Fonts.......................................................................................... 4-49
6.5.2 View F ont Samples .................................................................................. 4-50
6.5.3 Print Font Samples ................................................................................... 4-50
6.5.4 Search for Fonts ....................................................................................... 4-50
6.5.5 Uninstall Fonts .......................................................................................... 4-50
6.5.6 Using Help................................................................................................. 4-50
7. Updating Firmware....................................................... 4-51
7.1 Updating the Firmware on Printer Board................................ 4-51
7.1.1 Before Updating the Firmware.................................................................. 4-51
7.1.2 Updating from WebPage ........................................................................... 4-51
7.1.3 Updating from Local Computer................................................................. 4-52
7.2 Updating the Firmware on Print Server Card ......................... 4-53
7.2.1 Flash Update v1.XX for IPX connection.................................................... 4-53
7.2.2 FTP Download Utility v1.XX for FTP connection....................................... 4-53
8. Status Report ................................................................ 4-54
Page 32

1. Control Panel
Some basic printer functions are performed on the control panel of this machine.
Press the [PRINTER/NETWORK] button on the control panel to display the printer functions screen on the display panel.
SUPPLEMENTS:
• Assign the IP address, subnet mask, and gatewa y address on the Contr ol Panel fir st when
the printer is used in network, WebPage to be available.
• WebPage is the Web utility installed on printer board. TCP/IP custom settings, NetWare
settings, and the printer functions settings are operated at WebPage.
4-1
Page 33

1.1 Functions List of Control P anel
listed starting with a job which is being currently printed. Status fields are described as “Printing”,
“Wait”, “Suspend” or “∗∗∗∗ (Private print job)”.
when [Next] is pressed.
when [Prev] is pressed.
print job by pressing the [DELETE] button. When pressing [DELETE], the “Delete?” screen ap-
pears.
selected. When pressing [PRINT], the “Pass word” screen appears.
XX / XX The page number of job list /the number of all pages of the job list
[Next] When the job list is more than one page, the [Next] b utton appears. The next page is displa y ed
[Prev] When the job list is more than one page, the [Prev] button appears . The previous page is displayed
[DELETE] When pressing any print job and the print job is selected, [DELETE] button appears. Deleting a
[PRINT] This button is used to perform the private print job. This button appears the private print job is
[CLEAR] Re-enter password when you miss entering it.
Password Passwor d Enter the password you set in the Printer Properties. P assword can be entered by numeric ke ys .
The print job deleted is wiped out from the JOB LIST .
[SET] Private Print job proceeds.
[CANCEL] Cancel the Enter the password and return to the “JOB LIST” screen.
[Cancel] Deleting a print job is canceled and the display returns to the JOB LIST screen.
Delete? [Delete] Deleting a selected print job and returning to the JOB LIST screen.
[Off Line] Switch to off-line, and SETTING and UTILITY tabs are displayed. When the printer is off-line, the
the button is pressed.
button is shaded. The print job cannot be received from computers in network and parallel.
when the button is touched. Unable to set up 255.255.255.255 and 0.0.0.0 for Subnet Mask.
[IP Address] The IP Address currently set up is mentioned on ICON. IP Address screen is made to appear
when the button is touched. Unable to set up 0.0.0.0 for IP Address.
[Subnet Mask] The Subnet Mask currently set up is mentioned on ICON. The Subnet Mask screen appears
[Gateway] The Gateway address screen appears when the button is pressed.
JOB LIST O O JOB LIST PRINT JOB LIST The job status list. This list of up to 5 jobs can be displayed on one screen. Up to 190 print jobs are
Function Menu ON OFF Screen Tab / Icon Description
4-2
ON/OFF O O ON/OFF [On Line] Switch to on-line. When the printer is on-line, the button is shaded.
SETTING --- O SETTING [Emulation] The emulation currently set up is mentioned on ICON. Emulation screen is made to appear when
Page 34
The button is shaded when selected.
[PDL] Select this when using PDL mode only for printing. The b utton is shaded when selected.
The button is shaded when selected.
[PCL] Select this when using PCL mode only for printing. The b utton is shaded when selected.
[HEX Dump] Select this when printing HEX code for received print jobs is required.
[CANCEL] Cancel the setup and return to the SETTING screen.
[SET] Set the selected emulation mode. This is not displa yed while perf orming hardware resetting.
resetting.
[ ] Move the cursor to the left.
[ ] Move the cursor to the right.
[CANCEL] Cancel the setup and return to the SETTING screen.
[SET] Assign the entered IP Address to the printer board. This is not displa yed while perf orming hardware
Mask.
ware resetting.
[ ] Move the cursor to the left.
[ ] Move the cursor to the right.
[CANCEL] Cancel the setup and return to the SETTING screen.
[SET] Assign the entered Subnet Mask to the printer board. This is not displayed while performing hard-
SETTING --- O Emulation [Auto] Select this for auto-distinction for using either PCL or PDL. This is set as the default.
Function Menu ON OFF Screen Tab / Icon Description
IP Address Address Field Enter IP Address by numeric keys. Unable to set up 0.0.0.0 for IP Address.
Subnet Mask Address Field Enter Subnet Mask by numeric keys. Unable to set up 255.255.255.255 and 0.0.0.0 for Subnet
4-3
Page 35

hardware resetting.
[ ] Move the cursor to the left.
[ ] Move the cursor to the right.
[CANCEL] Cancel the setup and return to the SETTING screen.
[SET] Assign the entered Gatewa y address to the printer board. This is not displa yed while perf orming
[Function] Function screen appears.
[PDL Test] Print PDL Test, then the display returns to the UTILITY screen.
[PCL Test] Print PCL Test, then the display returns to the UTILITY screen.
[Job List] Print Job List, then the display returns to the UTILITY screen.
appears.
appears.
Address buttons become invisible, and the printer will be made compulsorily be off-line. “Execute?”
screen appears.
[Fonts List] Print Fonts List, then the display returns to the UTILITY screen.
[CANCEL] Cancel the Test Printing, then display returns to the UTILITY screen.
[Force-Delete] Select this for compulsory deleting of a print job currently received. The “Execute?” screen
[Reset] Select this when performing hardware resetting for the printer board. The Emulation and IP
[CANCEL] Cancel executing function and the display returns to the UTILITY screen.
[Cancel] Cancel executing function and the display returns to the UTILITY screen.
SETTING --- O Gateway Address Field Enter Gateway by numeric keys.
Function Menu ON OFF Screen Tab / Icon Description
Test Printing [Setting List] Print Setting List, then the display returns to the UTILITY screen.
UTILITY -- - O UTILITY [T est Printing] Test Printing screen appears.
Function [Force-Print] Select this for compulsory printing of a print job currently received. The “Ex ecute?” screen
Execute? [Execute] Execute Function and the display returns to the UTILITY screen.
4-4
Page 36

SUPPLEMENTS:
[Hardware Reset]
After setting the network setup, the hardware resetting (or restarting) should be performed for
the setting to be effective.
During resetting, print jobs from both parallel and network computers cannot be spooled and
SET button disappears from the Control Panel.
[Auto-Assigning for IP Address]
When the IP address for this machine is assigned at DHCP server, please assign same IP address every time.
The way of auto-assigning is the following:
• Set the IP address at DHCP server and assign the same IP address every time.
• Set the IP address at WebPage and save the IP address assigned to the machine itself.
• Set the default setting. (Refer to the chapter for WebPage.)
4-5
Page 37

1.2 Control P anel Screen T ransition Tree
1.2.1 When the Printer is on-line:
Press the [PRINTER/NETWORK] button.
[Delete]............... Selected print job is deleted and the display returns to the
........................... JOB LIST screen.
[Cancel] .............. Cancel deletion and the display returns to the JOB LIST
........................... screen.
Receiving print jobs.
[ON/OFF] [JOB LIST]
[On Line]
[Next]
[Next]
[Prev]
[Prev]
Selecting a print job.
[SET] .................. Private Print job proceeds and the display returns to the
........................... JOB LIST screen.
Selecting a private print job.
[DELETE]
[DELETE]
[Off Line]
4-6
Page 38

1.2.2 When the Printer is off-line:
[SETTING] [ON/OFF]
○○○○○
[SET] .................. Save new IP Address and the display returns to the SETTING screen.
[CANCEL] .......... Cancel the setup of new IP Address and the display returns to the SETTING screen.
[IP Address]
JOB LIST screen is the same as when the printer is on-line.
Refer to “When the Printer is on-line.”
If the IP Address is set as 0.0.0.0, the [SET]
button disappears.
[SET] .................. Save new Subnet Mask and the display returns to the SETTING screen.
[CANCEL] .......... Cancel the setup of new Subnet Mask and the display returns to the SETTING screen.
[Subnet Mask]
If the Subnet Mask is set as 255.255.255.255 or
0.0.0.0, the [SET] button disappears.
[SET] .................. Save new Gateway address and the display returns to the SETTING screen.
[CANCEL] .......... Cancel the setup of new Gateway address and the display returns to the SETTING screen.
[Gateway]
[SET] .................. Save new Emulation mode and the display returns to the SETTING screen.
[CANCEL] .......... Cancel the setup of new Emulation and the display returns to the SETTING screen.
[Emulation]
4-7
Page 39

[Execute] ............ Execute Function and the display returns to the UTILITY screen.
[Cancel] .............. Cancel executing Function and the display returns to the UTILITY screen.
[Function]
[Force-Print]
[Force-Delete]
[Reset]
[Test Printing]
[Setting List] ......................Prints the Setting List and the display returns to the UTILITY screen.
[PDL Test] .......................... Prints the PDL Test and the display returns to the UTILITY screen.
[PCL Test] .......................... Prints the PCL Test and the display returns to the UTILITY screen.
[Job List]............................ Prints the Job List and the display returns to the UTILITY screen.
[Font List] ..........................Prints the Font List and the display returns to the UTILITY screen.
[CANCEL] ......................... Cancel the Test Print and the display returns to the UTILITY screen.
4-8
Page 40

2. WebPage
WebPage is an W eb-based utility installed in this machine.
This machine has the W eb server function. Thus in the network where the TCP/IP protocol is used, WebP age installed in the
printer board is accessible from a computer in the network.
Printer function settings, status checking, and network setting can be performed through a WWW browser installed in a
computer.
2.1 Requirements
• OS Windows Windows 95/98/NT 4.0/2000, Mac OS 8.0/8.5/8.6/9.0
• WWW browser Netscape Navigator 4.0 or later version
Internet Explorer 4.0 or later version
• Protocol TCP/IP
SUPPLEMENTS:
• To use WebPage, assigning an IP address to this machine is necessary.
• In order to access this machine from computers not connected in the same netw ork as
this machine in (the assigned IP address for this mac hine is different fr om the network
address), it is necessary to set up the Gate wa y at TCP/IP settings.
4-9
Page 41

2.2 How to Start
Start the WWW browser and enter URL for WebP age. Se veral URLs are prepared f or each user depending on usage.
”xxx.xxx.xxx.xxx” is the IP Address assigned to this machine. URL for Serviceman is available only when the machine is
started up in the ser viceman mode.
USERS URL Available Function
Customer http://xxx.xxx.xxx.xxx Confirmation of printer status
Confirmation and canceling of print job
Administrator http://xxx.xxx.xxx.xxx/adm Confirmation of printer status
Confirmation and canceling of print job
Settings for printer function
Settings for network
Settings for WebP age
Serviceman http://xxx.xxx.xxx.xxx/srv Confirmation of printer status
Confirmation and canceling of print job
Settings for printer function
Settings for network
Settings for WebP age
Resetting the counter
Updating Firmware
NOTE:
T o start up the machine in the serviceman mode, hold do wn both “0” and “5” ke ys at the Contr ol
Panel, and then turn the mac hine power on. The machine starts up in the test mode. Then
press both the “0” and “9” keys at the same time and the machine will enter serviceman mode.
2.3 Password
Administrators and Servicemen need to enter the password to restrict the access when changing the setup.
• Administrator’s password can be edited at will.
• When the administrator forgets the password, the password can be renewed using the Master password.
• When changing the settings at Ser viceman menu, the Ser viceman password is necessary.
USERS
Administrator (Default) password
Master password 1048f504
Serviceman s1058001
PASSWORD
4-10
Page 42

2.4 Description of Screen
(1)
(2)
(3)
(4)
(5)
(1) SHARP Logo Go to the SHARP homepage by clicking here.
(2) Select Language WebPage is expressed in the selected language. The default language f or W ebPage can
be set at the W ebPage SETUP in the Administrator menu.
(3) Menu Menu is listed. Once clicking on the menu, the details of each menu are displayed in
Control Panel. The [Administrator] menu is displayed at URL for Administrators and
Servicemen, and the [Ser vice] menu is displayed at URL for Servicemen. About
descriptions of each menu, refer to Function List.
(4) Status Display Communication: Indicates the status as either On-line or Off-line for this machine.
Switching On/Off-line can be operated at the Control Panel of the
machine.
Copier Status: Indicates the state of this machine and shows error messages.
(5) Control Panel Displays the details and information for each menu.
SUPPLEMENT:
To update the displays, click on the frame to be updated and click on the updating b utton of the
WWW browser .
4-11
Page 43

2.5 Selecting the Language
Select the language in which W ebPage is to be e xpressed.
(1) Select the desired language from the list box.
(2) Click on [CHANGE].
(3) WebPage will be e xpressed in the selected language.
• The language on starting WebPage can be set in WebPage SETUP in the Administrator menu. English is set as the
default language.
• English, French, German, and Italian are installed as the standards for the language. To display in any other language,
language files must be downloaded to Flash ROM on the printer board.
2.6 Function List
2.6.1 Menu List
The menu is different on each URL for Customers, Administrators, and Servicemen.
URL for Servicemen is available only when the machine is started up in the serviceman mode.
Customer
O O O Copier The state of optional equipment for the printer is display-
O O O Printing JOB A list of up to 190 print jobs currently spooled is displa yed.
O O O Printer Information about the settings for printer functions are
— O O Administrator The menu for Administrator is displayed, such as the
— — O Service The menu for Servicemen is displayed, such as print
Administrator
Serviceman Menu Details
Configurations ed in graphics and lists. The paper size on a tray, the
location, and the Administrator name are also displayed.
Information displayed.
set- tings of the printer function, network and WebP age.
counter resetting and updating Firmware.
4-12
Page 44
2.6.2 Function List for Administrator Menu
Submenu Items Description
Print Log Print Log of latest 190 jobs is displayed.
(latest 190 jobs) User Name User name set at pr inter dr iver is informed.
Group Number Group number set at printer driver is informed.
Document Name The document name requested for printing is informed.
Date MM/DD The date of receiving the print job is informed.
Time The time of receiving the print job is informed.
Paper Size Paper size for print jobs is informed.
Pages The number of pages for print jobs is informed.
Job Status The job status is informed. “Printing,” “Wait” , “Suspend” , “Complete” ,
“Delete” or “∗∗∗∗ (Private Print Job)” is informed.
Delete Clic k on this to delete a print job . The Job Delete screen appears. Delete
buttons are not displayed for the print jobs whose printing is already completed or deleted.
BACK Return to top page.
Job Delete The selected print job is deleted.
User Name User name set at the printer driver is informed.
Group Number Group number set at the printer driver is informed.
Document Name The document name requested for printing is informed.
Date MM/DD The date of receiving the print job is informed.
Time The time of receiving the print job is informed.
Paper Size Paper size for print jobs is informed.
Pages The number of pages for print jobs is informed.
Job Status The job status is informed.
DELETE The print job is deleted by clicking. The Job status of the deleted print job
is changed to “Delete”.
BACK Return to Print Log Screen.
WebPage Settings for WebPage and System Information.
SETUP Installation Site Enter the location for this machine. The input characters are limited to 32
bytes.
Administrator Enter the administrator name. The input char acters are limited to 32 bytes.
Refresh Rate The status monitor and updating interval are set here.
The interval can be set from 10 to 600 sec.
Language Select the described language. WebPage is displayed in the selected
language every time it is opened.
Banner Page Print Available when this machine is connected in LPR before a print job is
sent.
Start Page Print Set this to print starting page or not.
Print Log Order Select “Normal” or “Reverse” to decide the display order of the Printing
JOB.
Administrator Password Enter the administrator password. The password described with “∗”.
SETUP Set up the entered information as conclusion.
BACK Return to Administrator menu.
4-13
Page 45

Submenu Items Description
Printer SETUP Settings for printer functions. This applies only for print jobs received without print style data. Printer
driver settings are usually applied.
Printer SETUP Number of Set the number of printing copies. Sets the extent of 1 to 999 pieces.
Copies “1” is set as the default.
Paper Size Set the printing paper size. “LT” is set as the default.
Location Select the tray from which paper is fed. “Auto Select” is set as the default.
Sort Mode Set the sort and staple functions. “None” is set as the default.
Hole Punch Select the position for the holes. “None” is set as the default.
Destination Set the location where copies are output. “Auto Select” is set as the de-
fault.
Duplex Pr inting Set Duplex printing and the binding method. “None” is set as the de-
fault.
Orientation Set the printing direction. “Por trait” is set as the default.
Printing Order Set the printing order of pages. “Reverse” is set as the default.
Smoothing Set whether or not smoothing function is used. “ON” is set as default.
Emulation Mode Select Emulation Mode. “Auto Select” is set as the default.
PCL SETUP Symbol Set Set Symbol Set. “ROMAN-8” is set as the default.
Font Number Set PCL font number in extent of 0 to 999. “0” is set as the default.
Font Pitch (inch) Set PCL font pitch in extent of 0.44 to 99.99 inches.
“10.00” is set as the default.
Font Size (point) Set PCL font size in extent of 4.00 to 999.75 points.
“12.00” is set as the default.
Page Length (line) Set the number of lines for a page in extent of 5 to 128 lines.
“60” is set as default.
Parallel SETUP Timeout (sec.) Set the Timeout value in extent of 1 to 300 sec. for when printing is per-
formed from the computers connected in parallel port. If the time that
sending print job is paused is over the set time, the print job will be can-
celed. “30” is set as the default.
Administrator Password Enter the administrator password. The password described with “∗”.
SETUP Setup the entered information as conclusion.
DEFAULT Set it to default settings.
BACK Return to Administrator menu.
Printer Reset Perform hardware resetting. Restart the printer board.
Administrator Password Enter the administrator password. The password described with “∗”.
RESET Submit the printer reset.
BACK Return to Administrator menu.
Device Status Up to 8 device status log lists are displayed.
Log Status Code -
Date YY/MM/DD Time -
4-14
Page 46

Submenu Items Description
Device Status Remarks -
Log BACK Retur n to Administrator menu.
Printing The printing number of sheets of printer outputs is informed. The counter in each group can be reset at will.
Counter Printing Counter The pr inting number of sheets of printer outputs, not of copies, is in
formed. Only Servicemen can reset the counters.
Total Counter The total copying number of sheets, printer outputs and copies, is in-
formed. This cannot be reset.
Group Counter Group Number The printing number of sheets in each group is informed. Resetting can
be performed by clicking [RESET]. The number of sheets printed from un-
specified group users and system printing such as test printing is informed
in an undefined group.
Number of Pages Count the number of printing sheets for each group.
RESET Reset the counter for each group.
All Group Counter Reset Reset the counter for all groups.
Group Counter Resetting the group counter. The printing counter and the total counter are not changed if the group counters
Reset are reset.
Group Number The group number is set when installing printer drivers is informed.
Number of Pages The printing number of sheets is informed.
Administrator Password Enter the administrator password. The password described with "∗".
RESET Reset a group counter.
BACK Return to the Printing Counter menu.
All Group All group counters are reset. The printing counter and the total counter are not changed if the all group
Counter Reset counters are reset.
Administrator Password Enter the administrator password. The password described with "∗".
RESET Reset all group counters.
BACK Return to the Printing Counter menu.
Network SETUP Performing network settings.
Network T ype The network type of Print Server Card being used, Token Ring or Ethernet,
is informed.
MAC Address The MAC address of Print Server Card is informed.
TCP/IP SETUP Set the TCP/IP for this machine. TCP/IP SETUP screen appears.
NetWare SETUP Set the NetWare for this machine. NetWare SETUP screen appears.
AppleTalk SETUP Set the AppleTalk for this machine. AppleTalk SETUP screen appears.
BACK Return to Administrator menu.
TCP/IP SETUP Set the TCP/IP for this machine.
DHCP An effective DHCP server is necessary. Assign the IP address for this
machine automatically.
Save IP Address Available when the DHCP server is active (Enable). Save the IP address
assigned at the DHCP server. Setting it "Save" is recommended.
IP Address Enter the IP address of this machine. 0.0.0.0 cannot be set for the IP
address.
4-15
Page 47

Submenu Items Description
TCP/IP SETUP Subnet Mask Enter the subnet mask. 255.255.255.255 and 0.0.0.0 cannot be set for
the subnet mask.
Gateway Address Enter the router address when using a router in network.
Peer To Peer Port No. Using the default setting is recommended in general.
Administrator Password Enter the administrator password. The password described with “∗”.
SETUP Set up the entered information as the conclusion. Hardware resetting is
necessary to be performed for the settings to be effective.
BACK Return to Administrator menu.
NetWare SETUP Set the NetWare for this machine.
NetWare Effective NetWare and IPX/SPX protocol.
Print Server Name Enter the print server name.
Preferred File Server Set this only when setting is performed in the bindery mode.
Entering the preferred file server name. When starting Print Server Card,
connect to the preferred file server without auto-searching for file servers.
Preferred NDS Context Set this only when setting is performed in the NDS mode.
Enter the context for a print server .
Preferred NDS T ree Set this only when setting is performed in the NDS mode.
Enter the directories where the print server is located.
Print Queue Scan Rate Set the time interval for the print server to scan the print queues in the
range of 1 to 255 seconds.
Bindery Mode Set “Disable” the bindery mode to be ineffective.
Administrator Password Enter the administrator password. The password described with “∗”.
SETUP Set up the entered information as conclusion. Hardware resetting is nec-
essary to be performed for the settings to be effective.
BACK Return to Administrator menu.
AppleTalk SETUP Set the AppleTalk for this machine.
AppleTalk SETUP Set “Use” to use AppleTalk.
Printer Name The pr inter name is indicated. No setting can be made.
Zone Name Enter the zone in which this printer is located.
SETUP Set up the entered information as conclusion. Hardware resetting is nec-
essary to be performed for the settings to be effective.
BACK Return to Administrator menu.
Test Print Printout the reports about this machine.
Setting List Print out the setting reports for the printer function and network.
Font List Print out the Font list in each font that can be confirmed at the Inter nal
Font of the Printer Information menu.
Device Status Log Print out the Device Status Log that can be confirmed at the Device
status log of the Administrator menu.
Print Log Print out up to 190 print records.
PCL Test Print out a sample in the PCL mode.
PDL Test Print out a sample in the PDL mode.
4-16
Page 48

Submenu Items Description
Test Print PRINT Print out the details checked.
BACK Return to Administrator menu.
Password Change the Administrator Password.
Change Current Password Enter the current administrator password. The password is described as
“∗”.
New Password Enter new administrator password. The password is described as “∗”.
Confirmation Enter the new administrator password again for confirmation. The pass-
word is described as “∗”.
CHANGE Change to the entered new Administrator Password.
BACK Return to the Administrator menu.
4-17
Page 49

2.6.3 Function List for Serviceman Menu
Service menu Items Description
Reset Printing Counter Reset the printing counter. Available when the machine is in the serviceman mode.
Printing Counter The current printing number of sheets is displayed.
Technician Password Enter the Serviceman Password.
RESET Reset the printing number of sheets.
BACK Return to Service menu.
Printer F-ROM Update Download the firmware from computers or FTP servers.
FTP Address Enter the FTP address whrere the firmware is.
FTP User ID Enter the name to log into the FTP server.
FTP Password Enter the FTP password.
FTP File Name Enter the file name to be downloaded from the FTP
server.
Technician Password Enter the Serviceman Password. The password is de-
scribed as “∗”.
UPDATE Submit downloading of the firmware.
Local File Name Enter the file name to be downloaded.
Technician Password Enter the Serviceman Password. The password is de-
scribed as “∗”.
UPDATE Update the firmware.
BACK Return to the Serviceman menu.
4-18
Page 50

2.6.4 Function List for User Menu
Menu Screen Items Description
Copier Copier The state of optional equipment is displayed in an image and a list, and the composition
Configurations Configurations of optional equipment and paper siz e are automatically perceived.
Cassette Available trays are perceived automatically and
displayed.
Paper Size The paper size placed on each tray is automatically
perceived and displayed.
Paper Rest Shows how much paper is left in each cassette using
5-level images.
Option The option installed state is displayed in the f o rm of an
image.
Sheet Cassette Shows cassette that supplies sheets.
Installation Site The location of this machine is informed. The details
set in W ebPage SETUP at Administr ator menu are
informed.
Administrator Administrator of this machine is informed. The details
set in W ebPage SETUP at Administr ator menu are
informed.
Printing JOB Printing JOB The print job status spooled in HDD of this machine is listed. Up to 190 print jobs can be
spooled.
User Name User name set at printer dr iver is informed.
Group Number Group number set at printer driver is informed.
Document Name The document name requested for printing is informed.
Date MM/DD The date of receiving pr int job is informed.
Time The time of receiving print job is informed.
Paper Size Paper size for print jobs is informed.
Pages The number of pages for print jobs is informed.
Job Status The job status is informed. “Printing”, “W ait”, “Suspend”,
or “∗∗∗∗ (Private Print Job)” is informed.
Delete Click on this to delete a print job. The Job Delete screen
appears.
Job Delete The selected print job is deleted.
User Name User name set at printer dr iver is informed.
Group Number Group number set at printer driver is informed.
Document Name The document name requested for printing is informed.
Date MM/DD The date of receiving pr int job is informed.
Time The time of receiving print job is informed.
Paper Size Paper size for print jobs is informed.
Pages The number of pages for print jobs is informed.
Job Status The job status is informed.
4-19
Page 51

Menu Screen Items Description
Printing JOB Job Delete DELETE The print job is deleted by clicking. The [DELETE] but-
ton disappears once it has been clicked.
BACK Return to Printing JOB Screen.
Printer Printer The status of printer function settings is informed. Settings are performed at Printer
Information Information SETUP in Administrator menu.
Printer Number of The number of printing copies.
copies
Paper Size The size of paper selected.
Location The selected tray from which paper is fed.
Sort Mode Setting of sort and staple functions.
Hole Punch The position for the holes.
Destination The location of where copies are output.
Duplex Printing Duplex printing and binding method.
Orientation The printing direction.
Printing Order The printing order of pages.
Smoothing Selected smoothing ON or OFF status.
Emulation Mode Selected Emulation.
PCL Symbol Set Setting of Symbol Set.
Font Number PCL font number.
Font Pitch (inch) PCL font pitch.
Font Size (point) PCL font size.
Page Length The number of lines for a page.
(line)
Parallel Timeout (sec.) Timeout is informed when the printing is performed from
the computers connected in parallel ports. If the time
that sending a print job is paused is over the set time,
the print job will be canceled.
Internal Font The list of Resident Font is displayed.
Internal Font The sorted list in each emulation of Internal Font installed in this machine is displayed.
Emulation Emulation Mode which can use Internal Font.
Internal Font The list of Internal Font can be used in each Emula-
tion Mode.
BACK Return to Printer Information Screen.
4-20
Page 52

3. MAP
3.1 Install MAP
MAP (IPX/SPX Management Access Program) is a utility that communicates with the Print Server Card installed in this machine via IPX/SPX protocol. MAP also allo ws the setup page of the Print Server Card to be used through a WWW browser . The
same items in the setup page of the Print Server Card can be set up, as in one of W ebPage . This machine can be set up e ven
in the network where TCP/IP protocol cannot be used.
NOTE:
• Use WebPage when your computer and the printer are connected in network with the
TCP/IP protocol.
• There are some different items that can be setup in MAP and not in WebPage.
Please do not change any other items except the items at the NetWare Setup page of MAP.
3.1.1 Requirements
OS Windows 95/98/NT 4.0/2000
Protocols IPX/SPX and TCP/IP m ust be installed.
*TCP/IP must be installed but it is unnecessary to set up.
WWW Browser Internet Explorer 4.0 or later version, Netscape Navigator 4.0 or later
3.1.2 Password for MAP
To change some settings at MAP, the password must be entered to submit the change.
• Password for MAP : sysadm
CAUTION:
Do not forget the passw ord. Otherwise, you can no longer change the settings at MAP.
3.1.3 Installing MAP
1. Star t Windows on a personal computer or a workstation.
2. Insert the provided CD-ROM into the CD-ROM drive.
3. Click on the [Setup Utilities] button.
4. Click on the [MAP Setup] button.
5. Click on the [Setup] button.
• The setup program starts.
6. Read the description displayed on Setup Program screen for MAP, then click on [Next].
• The Setup Program will be interrupted and edit the program being operated by clicking on [Cancel].
• The Setup Program will forward to next step of installation by clicking on [Next].
7. Read “MAP Installation Notes” and then click on [Yes].
8. Assign the path where you want to install, then click on [Next].
9. Assign the name of the Program Folder of MAP to be placed on Start menu, then click on [Next].
• Installation begins.
10. Click on [OK] after the message that the installation is completed is displayed.
• Remove the CD-ROM from the drive after the installation is completed.
4-21
Page 53

3.2 Setup NetWare at MAP
3.2.1 Start MAP
1. Select [Programs] from [Start] menu.
2. Select [MAP], and click on [MAP].
• MAP star ts, and the list of print ser vers discriminated by SAP and IP print servers discriminated by the serial
number is displayed on Web browser.
3. Select this machine from the lists.
• The name of assigned pr int server is displayed. The print server name can be confirmed at “Setup NetWare”.
( P4-23) The default name of a print server is “SHA_XXXXXX”. (XXXXXX is the Serial No. of the Network
board.)
• Y our computer is no w connected to the printer in network, and “Network Configuration” menu screen is displa yed
on Web browser.
4-22
Page 54

3.2.2 NetWare Setup
Start MAP and open the Setup NetWare page and setup the NetWare to make the printer operable in the NetW are en vironment.
1. Select the “Setup NetWare” from the “Network Configuration” menu screen.
2. Enter each field that applies:
Enable NetWare To use the printer under the operation of the NetWare server or the Peer-to-Peer Utility
(IPX/SPX), check it on.
Print Server Name Enter the name of the print server to be created. It must match the setting of the
NetWare. “SHA_XXXXXX” is set as default name. This is assigned for the port name
printed to when the Peer-to-P eer Utility (IPX/SPX) is used.
Print Server Passw ord Please do not change the setting in general.
Pass word Retype Please do not change the setting in general.
Preferred File Server Enter the file server name preferred. It is available only in bindery mode.
Preferred NDS Context Enter the NDS Context preferred. It is available only in NDS mode.
Preferred NDS Tree Enter the tree name of NDS preferred. It is available only in NDS mode.
Print Queue Scan Rate Set the time interval for the print server to scan the print queues in the range of 1 to 255
seconds. It is set to 1 second as default setting.
Ethernet F r ame Type Select a frame type you want to preferentially retrieve when more than one frame type
of NetWare are used. Usually, use the default setting.
Disable Bindery Check it on only when using in the NDS mode of Netware 4.x. Check it off when using
NetWare 3.x or Netware 4.x in the bindery mode.
3. Enter the password.
• The password is described as “∗”.
4. Click on “Accept Setting”.
• Click on “Clear Inputs” if you want to cancel the entered settings and re-enter them.
5. The entered settings are applied and the message “Update Successful” is displayed.
6. Power OFF the machine, then pow er ON again to restart the machine.
4-23
Page 55

3.3 The Setting List of MAP
There are some differences in set-up pages that can be started up between in MAP and in W ebPage .
Do not change any settings except the NetWare setup pages.
3.3.1 System
System-related settings.
Reset Initialize the Print Server Card. It can enable the settings. (The printer itself is not initialized.)
Factory Defaults Returns to a default setting.
Unit Status Confir m settings for protocols (Novell NetWare, TCP/IP, or AppleTalk). Settings for each protocol can
be changed in the items of “Protocol group”.
Novell NetWare:
File Server Display the server connected.
File Server Status Display the connection status to the server.
Queue Name Display a supported queue name.
Queue Status Display the status of a connected queue.
TCP/IP:
IP Address Display the set IP address.
Subnet Mask Display the set subnet mask.
Default Gateway Address Display the set gateway address.
(If necessary)
Base Port Number Do not change the setting in general.
DHCP Display DHCP Enable/Disable.
(Dynamic Host Configuration Protocol)
Banner Do not change setting in general.
AppleTal k Display a printer name and zone name that the printer belongs to via
AppleTalk set in this machine.
Network Address Display a serial number and MAC address of the installed Print Server Card.
Change Password Set a password to be used.
4-24
Page 56

3.3.2 Protocols
Describe the settings for each protocol here.
Setup NetWare Enable NetWare To use the printer under the operation of NetWare server or Peer-to-Peer
Utility (IPX/SPX), check it on.
Print Server Name Enter the name of the pr int ser ver to be created. It must match the setting
of NetWare. “SHA_XXXXXX” is set as default name. This is assigned for
the port name printed to when the Peer-to-Peer Utility (IPX/SPX) is used.
Print Server Pass word Please do not change the setting in general.
Password Retype Please do not change the setting in general.
Preferred File Server Enter the file server name to be prior. It is available only in bindery mode.
Preferred NDS Context Enter the NDS Context to be prior. It is available only in NDS mode.
Preferred NDS Tree Enter the tree name of NDS to be prior. It is available only in NDS mode.
Print Queue Scan Rate Set the time interval for the print server to scan the print queues in the range
of 1 to 255 seconds. It is set to 1 second as default setting.
Ethernet Frame Type Select a frame type you want to preferentially retrieve when more than one
frame type of NetWare are used.
Usually, use the default setting.
Disable Bindery Check it on only when using in the NDS mode of NetWare 4.x. Check it off
when using NetWare 3.x or NetWare 4.x in the bindery mode.
Setup TCP/IP Enable TCP/IP Check it on when using this machine in the TCP/IP environment.
Subnet Mask Assign the Subnet Mask.
Default Gateway Assign the Default Gateway Address.
DHCP (Dynamic Host Configuration Protocol)
Set the DHCP is valid or not. (DHCP is valid as default setting)
Base Port Number Please do not change the setting in general.
Enable LPD Banner Operate the setting for output of banner pages when lpr printing is performed.
NIC Port Please do not change the setting in general.
Setup AppleTalk Enable AppleTalk Check it on when using this machine in the AppleTalk environment.
Zone Name Enter a zone name that this machine belongs to.
Printer Name Display the printer name of this machine. No setting can be made.
3.3.3 Printer
Communication Test can be performed.
Test Pr inter Select “ASCII” in general, then enter the password and click on “Start Test”.
Test data are pr inted out.
Configure Status Page Setting of the printout of Status page.
The Status page is printed out when starting the printer ON if “Printer Status Page on Startup” is checked
on.
Printer Status The printer status can be confirmed.
4-25
Page 57

4. Peer-to-peer Utility
The peer-to-peer utility allows this machine to be used as a network printer for Windows 95/98/NT 4.0/2000 in the peer-to-peer
network with no server computer. Installing the peer-to-peer utility allows print data from a computer to be sent directly to this
machine.
Install the peer-to-peer utility to each computer from which you would like to send print data to this machine. There are two
types of the peer-to-peer utility: for TCP/IP protocol and for IPX/SPX protocol.
Choose either one according to the network protocol that you use.
4.1 Requirements
• OS Windows 95/98/NT 4.0/2000
• Protocol IPX/SPX (“PeerToPeer-IPX”, utility for IPX/SPX )
TCP/IP (“IP-P2P”, utility for TCP/IP )
SUPPLEMENTS:
• When using the peer-to-peer utility for IPX/SPX protocol, assign the IP address to this
machine before setting it in a computer.
• When using the peer-to-peer utility for TCP/IP protocol, select “USE” f or “NetWare” at the
NetWare Setting of Network SETUP in WebPage (URL for an administrator) before setting it in a computer.
4.2 Installation
4.2.1 Before Installing
Confirm the following before starting the installation.
For TCP/IP Protocol:
• Connect both the pr inter and your computer to the network.
• Set an IP address to this pr inter.
• Check if the “TCP/IP” protocol has been installed in the Windows OS of your computer. If not install it.
For IPX/SPX Protocol:
• The “Use Netware” in W ebPage m ust be check ed on.
• Connect both the printer and your computer to the network.
• T urn ON the power of the printer .
• Check if the “IPX/SPX compatible protocol” has been installed in Windo ws OS of your computer .
4-26
Page 58

4.2.2 Installation of the Peer-to-peer Utility for IPX/SPX
(1) Insert the CD-ROM into the CD-ROM drive.
• The menu screen appears.
(2) Click on the [Setup Utilities].
(3) Click on the [IPX/SPX Peer-to-Peer capability software Setup] button.
(4) Click on the [Setup] button.
• The setup program starts.
(5) Click on [Next].
(6) Installation Notes are displayed.
(7) Click on [Yes].
(8) The files are installed.
(9) The completion message is displayed. If necessary, select whether the “Readme.txt” is displayed or not, then click on
[Finish].
(10) When the “Readme.txt” is selected to be displayed, the text is displayed.
(11) Next, installing the printer dr iver.
SUPPLEMENTS:
• Even when the Peer-to-Peer Utility for IPX/SPX is installed, it will not be registered in the
Start Menu.
• When the printer driver has been installed before installing the Peer-to-Peer Utility, the
printer port of the printer should be selected.
4-27
Page 59

4.2.3 Installation of the Peer-to-peer Utility for TCP/IP
(1) Insert the CD-ROM into the CD-ROM drive.
• The menu screen appears.
(2) Click on the [Setup Utilities].
(3) Click on the [IP Peer-to-Peer capability software Setup] button.
(4) Click on the [Setup] button.
• The setup program starts.
(5) Click on [Next].
(6) Installation Notes are displayed.
(7) Click on [Yes].
(8) If necessary, change the folder for the files to be installed, then click on the [Next] button.
(9) Click on [Next].
(10) The files are installed.
(11) The completion message is displayed.
(12) Click on [OK].
SUPPLEMENT:
After the Peer-to-P eer utility for TCP/IP is installed, “IP-P2P” is added to the Start Menu.
4.3 Peer-to-peer Utility Settings
When the Peer-to-Peer utility has been installed, the peer-to-peer utility port is added to [Print to the following port] in the
printer property. Then the peer-to-peer utility port can be selected. The default name of the port is “SHA_XXXXXX”. (XXXXXX
indicates a serial number of the Print Server Card.)
When installing the printer driver, select this port for [Print to the following port].
SUPPLEMENT:
• If a port for the Peer-to-P eer utility cannot be ad ded automaticall y, restart the computer .
• When using the Peer-to-P eer utility for IPX/SPX, and if a port cannot be added even when
the computer is restarted, use the Peer -to-Peer utility for TCP/IP.
4-28
Page 60

4.3.1 Changing the Port Name
The port name can be changed when using the utility for TCP/IP. The def ault name of the port is “SHA_XXXXXX”.
IMPORTANT:
Perf orm the settings bef ore installing printer drivers f or this printer.
(1) Click on [Start], then select [Programs].
(2) Select [IP-P2P], and click on [IP-P2P].
(3) “IP-PeerToPeer Setup” begins.
(4) In the field of “Max Hops for Search”, input a value of 0 to 15, to specify the range for the printer to be searched.
•0:
Searches only the network to which the workstation is directly connected.
• 2 to 14:
Searches the network to which the workstation is directly connected and the networks which are accessible
within 2 routers.
• 15:
Searches all the networks that are connected.
(5) Usually, use the “IP Port Base” as it is. It is the default port number of the print server.
(6) From the “Printer Names”, select the port name required to be displayed.
• [based on Ser ial Number]
To be displayed with the serial number of the network interface.
• [based on IP Address]
To be displayed with the IP address of this printer, which is the default selection.
• [based on DNS Name]
To be displayed with the domain name assigned to this printer when the Domain Server is activated.
• [based on unit name]
To be displayed with the unit name (printer name).
(7) Click on [OK].
4-29
Page 61

4.3.2 Manual Setting of a Por t
When the port is not automatically displayed even after the Peer-to-Peer utility for TCP/IP has been installed, perform the
following:
(1) Click on [Start], then select [Programs].
(2) Point [IP-P2P], then click on [IP-P2P].
• IP-Peer To Peer Setup starts.
(2) Start [IP-P2P](IP-PeerToPeer Setup) from the [Start] menu.
(3) Click on [Printers].
(4) Fill the field of each necessary item.
• [IP Address]
Input the IP address of the printer.
• [Name]
Input any printer name you desire. The port name will be the input here.
•[Port]
Usually, this does not need to be set. Input the value obtained by adding 1(one) to the “Peer To Peer Port No.” at
the W ebPage, “TCP/IP SETUP” in the Netw ork SETUP of Administrator menu.
• [Description]
If necessary, input a comment for the printer.
(5) Click on [Add].
(6) The printer is added to the [Available Printers] list.
• If an addition has been made by mistake, click on the added printer then click on [Remove].
(7) Click on [OK] to close the [Printers] window.
(8) Click on [OK].
4.4 Uninstalling
If it is necessary to delete the Peer-to-Peer utility, perform the followings.
4.4.1 Uninstalling the Peer-to-peer Utility for IPX/SPX
Run the “Uninstal.exe” in the CD-ROM to uninstall.
4.4.2 Uninstalling the Peer-to-peer Utility for TCP/IP
Uninstall by performing [Add/Remove Programs] on the Control Panel.
NOTE:
Open the [Details] tab of the printer driver property, and make sure to change to “LPT1” for
[Print to the following port] before uninstalling the P eer -to-Peer Utility. Uninstalling may not be
completed correctly if the port is appointed at the port for the Peer-to-P eer utility.
4-30
Page 62

5. Printer Driver
The printer driver needs to be installed to use the printer function of this machine from your computer.
The printer drivers are contained in the applied CD-ROM.
5.1 Organization of Printer Drivers
Several printer drivers are available for this machine. Please use one or more printer drivers according to an OS that you
use and your printing purposes.
5.1.1 Windows 95/98/NT 4.0/2000
Install one of or several printer drivers according to your needs from the printer drivers described below.
PCL-5e: The PCL-5e driver is recommended for those who perform large volumes of text printing and regard the print
speed as important.
PCL-XL: The PCL-XL driver is used when mainly graphics are printed and the best use of the printer capabilities is desired
by the user.
PDL: The PDL driver is compatible with PostScript Level 2 printer. It is recommended for printing at high resolution
from PostScript-capable applications and printing a document with EPS images.
SUPPLEMENTS:
• PCL-5e, PCL-XL, and PDL driver s ma y be installed in one computer.
• This machine automatically switches its operation mode, depending on a print job (printer
driver in use). If data cannot be printed properly using a particular printer driver, or in
other words, if an unexpected character list is printed, make sure that “emulation” is set
to “Auto” by clicking on [Control Panel] - [Setting].
5.1.2 Macintosh
Use the LaserWriter 8 installed as a standard driver for Mac OS. The PPD file needs to be installed from the CD-ROM in
order to enable features specific to this machine.
SUPPLEMENT:
The PPD (PostScript Printer Description) file contains descriptions of printer -specific functions
and information. This file is used to make printer-specific functions available and to allow optimum printing. Install the PPD file, and y ou can select this machine from [Selector] in the [Apple]
menu.
4-31
Page 63

5.2 Requirements
The printer driver can be used in the following requirements:
• Hardware
Display Resolution: 640 x 480 dots or more
•OS
Windows 95/98/NT 4.0/2000
Mac OS 8.0/8.5/8.6/9.0
NOTES:
• The printer driver is provided for each OS. Be cer tain to use the right printer driver for
your OS. No other printer can be used.
• This CD-ROM contains a “README” file, which describes precautions on the printer driv-
ers and various applications to keep in mind. Please read it before installing the printer
driver.
5.3 Installation
5.3.1 [Printer Setup] Menu
For Windows 95/98/NT 4.0/2000, install the printer driver from the “Printer Setup” menu in the CD-ROM. Then select
“Printer Driver Setup”. Or install the printer driver b y clicking on [Start] - [Setting] - [Printer], double-clicking on “Add Printer”,
and then starting up the Add Printer wizard.
SUPPLEMENTS:
• To use the Peer-to-Peer utility, install it prior to the printer driver. If installing the printer
driver first, “Print to the following port” added by the Peer-to-Peer utility may not be displayed. Restart the computer to display it successfully.
• The attached CD-ROM supports “Autorun”. When the CD-ROM is inserted, the “Printer
Setup” menu appears automatically. Unless the “Printer Setup” menu appears automatically, start up [auto.exe] located in the “Menu” f older in the CD-R OM.
• Macintosh does not have the “Printer Setup”.
• The compressed printer driver is saved for a language, OS, and emulation in the “Service”
folder in the CD-ROM. If a computer that y ou would like to install the printer driver to does
not have a CD-ROM drive, or if it has to be provided in a floppy disk, it can be copied for
distribution. Since the printer driver is a self-extracting file, just double-click on it to
decompress the printer driver .
4-32
Page 64

5.3.2 Plug-and-Play
When this machine is connected to a computer in the local mode, and when the computer is turned on for the first time, this
machine can be detected automatically by the Plug-and-Play function.
The Plug-and-Play functions when the following requirements are met:
• A computer supports the Plug-and-Play function.
• Windows 95/98 is installed to a computer.
• This machine is connected in the local mode (parallel mode) via a printer cable.
When the “New Hardware” dialog box appears, install the printer driver in the CD-ROM according to the instruction.
• When the “Device Driver Wizard” dialog box appears, clic k on [Cancel], and install the printer driver in the normal way.
5.3.3 Installing the Printer Driver to Windows 95/98
(1) Insert the CD-ROM into the CD-ROM drive of the computer.
(2) Click on [Setup printer driver].
(3) Click on [Install].
(4) Click on [Add Printer].
(5) Click on [Next].
(6) Select the way of connection (local or network) between the printer and your computer.
• When selecting “Local printer”, go to Step 13.
(7) Click on [Next].
(8) Input the network path or network queue name of this printer in the field of [Network path or queue name].
• Select whether or not pr inting is performed through MS-DOS applications.
(9) Click on the [Browse].
(10) Click on the network printer to highlight it, then click on the [OK].
(11) Click on [Next].
(12) Click on [Have Disk ... ].
(13) Click on [Browse] to designate the path that contains a driver to be installed in [Copy manufacture’s files from].
• Confirm how the printer drivers are organized in the “Read me first” menu screen in the CD-ROM.
(14) Click on [OK].
(15) The pr inter to be used in displayed.
Click on [NEXT].
• [Network pr inter] is selected in Step 7: Go to Step 18.
(16) In the [Available Ports] screen, select the port to be used:
• When the machine is connected to your computer via a printer cable:
Select “LPT1 Printer Port”
• When the machine is connected to a peer-to-peer network:
Select the port added in “Peer-to-Peer Utility” Settings.
(17) Click on [Next].
(18) If necessary, change the [Printer name], then click on [Next].
(19) Select for a print test or not, then click on [Finish].
(20) After the pr inter dr iver is installed, click on [OK] to close the dialog box.
4-33
Page 65

5.3.4 Installing the Printer Driver to Windows NT 4.0
(1) Insert the CD-ROM into the CD-ROM drive of the computer.
(2) Click on [Setup printer driver].
(3) Click on [Install].
(4) Click on [Add Printer].
(5) Setting how the printer is to be controlled:
• My Computer
Select this when this printer is directly connected to the computer via a printer cable and is controlled by this
computer, or when this printer is connected to a peer-to-peer network.
• Network pr inter ser ver
Select this when this printer is connected to a client-server network and is controlled by the NT server.
(6) Click on [Next].
• When [My Computer] is selected, go to Step 9.
(7) Select this machine, which is shared with network computers, and then click on the [OK].
(8) Click on [Finish].
• If a network pr inter also uses Windows NT, the pr inter driver installed in the network computer is copied to your
computer.
(9) Selecting the port to be used, in the [Available ports] screen:
• When the pr inter is connected to the computer via a pr inter cable:
Select [LPT1 Local Port].
• When the pr inter is connected to a peer-to-peer network:
Select the port added in the “Peer-to-Peer Utility” Settings.
(10) Click on [Next].
(11) Click on [Have Disk ... ].
(12) Make sure that [Copy manufacturer’s files from] is set with the folder in which the printer driver for Windows NT is
located from the CD-ROM drive.
(13) Click on [OK].
(14) Select the printer to be used, then click on [Next].
(15) If necessary, change [Printer name], then click on [Finish].
(16) Select [Not shared], then click on [Next].
(17) Select whether or not the test page will be pr inted, then click on [Finish].
(18) After the pr inter dr iver is installed, click on [OK] to close the dialog box.
4-34
Page 66

5.3.5 Installing the Printer Driver to Windows 2000
(1) Insert the CD-ROM into the CD-ROM drive of the computer.
(2) Click on [Start], select [Settings], then click on [Printers].
(3) Double-click on the [Add Printer] icon.
(4) Click on [Next].
(5) Select how the printer is to be controlled.
• Local pr inter
Select “Local printer” when this printer is directly connected to the computer via a printer cable, or when this
printer is connected to a Peer-to-Peer network.
• Network pr inter
Select “Network printer” when this printer is connected to the client-server network and is controlled by the NT
server.
* This printer does not support the Plug-and Play provided by Windows 2000. Do not check the “Automatically detect
and install my Plug and Play printer” checkbox.
(6) Click on [Next].
• Go to Step 10 when “Local printer” is selected.
• Go to Step 7 when “Network printer” is selected.
(7) Select how to locate the printer.
(8) Make a selection and click on [Next].
(9) Click on and highlight the printer to be installed, and then click on [Next].
(10) Select whether this pr inter is to be used as the default printer or not.
• Make a choice only when another printer driver has already been installed in the computer.
(11) Click on [Finish].
• The pr inter dr iver is installed.
(12) Select the port to be used on the [Select the Printer Port] screen.
• Select “LPT1 Printer Port” when this printer is directly connected to the computer via the printer cable.
• Select the por t added in “Configuring the Peer-to-Peer Utility for TCP/IP” when this printer is connected to the
Peer-to-Peer network for TCP/IP.
• Select the port added in “Configuring the Peer-to-Peer Utility for IPX/SPX” when this printer is connected to the
Peer-to-Peer network for IPX/SPX.
(13) Click on [Next].
(14) Click on [Have Disk...].
(15) In “Copy manufacturer’s files from:”, enter the name of the folder where the printer driver for Windows NT 4.0 is
contained.
(16) Click on [OK].
(17) Select the printer to be used, then click on [Next].
(18) If necessary, change “Printer name”, then click on [Next].
(19) Select “Do not share this printer”, then click on [Next].
(20) Select whether or not the test print is to be performed, then click on [Next].
(21) Click on [Finish].
(22) Click on [Yes] to complete installation. Note that though the [Digital Signature Not F ound] screen appears , there is no
impact upon the printer driver installation.
4-35
Page 67

5.3.6Installing the Pr inter Driver to Windows 2000 (Print out usint the IPP)
IPP is supported in the Windows 2000. When the printer is connected on the Internet or on the intranet, printing can be
performed using the IPP.
NOTES:
Before printing that performed from Windows 2000 using IPP, attach the optional Print Server Card
(AR-NC4T) to the copier.
(1) Insert the CD-ROM into the CD-ROM drive of the computer.
(2) Click on [Start].
(3) Choose [Settings].
(4) Double-click on [Add Printer].
(5) Click on [Next].
(6) Make sure that [Network printer] is selected nad click on [Next].
(7) Select “Connect to a printer on the Internet or on your intranet” and enter “http://xxx.xxx.xxx.xxx:631/nic/Print” at URL.
• “xxx.xxx.xxx.xxx” is the IP address of the machine.
(8) Click on [OK] to install the printer driver.
(9) Click on [Have Disk...].
(10) In “Copy Manu facture’ s file form, ” enter the name of the f older where the printer driver for Windo ws NT4.0 is contained.
(11) Click on [OK].
(12) Select the printer driver to be installed and click on [OK].
(13) Note that through the [Digital Signature Not Found] screen appears, there is no impact upon the printer driver installation.
Click on [Yes] to complete installation.
(14) Click on [Next].
• When any other printer driver has already been installed, select whether or not this printer is to be used as the default
driver. If “Yes” is selected, this printer’s name will be displayed as the first printer for printing documents through
applications.
(15) Click on [Finish].
4-36
Page 68

5.3.7Installing the Printer Driver to Macintosh
Copy the PPD file to the System Folder .
(1) Insert the CD-ROM into the CD-ROM drive.
(2) Double-click on the boot drive icon, and the System Folder appears.
Open the Extensions Folder in the System Folder .
(3) Double-click on the CD-ROM icon, and open the English F older in the PPD F older .
(4) Drag and drop the PPD file “SHARP AR-650”, which is located in the English folder , into the Printer Description File Folder
in the Extensions Folder .
• The PPD file is added in the system.
Select this machine from the Selector.
SUPPLEMENTS:
• This machine is used as a network printer connected via AppleTalk (Ethernet) for
Macintosh. And “Ethernet” must be selected for “Connect via” in the AppleTalk setting in
your computer. First connect your computer to the network via Ethernet. And select
“Ethernet” for “Connect via” in the AppleTalk setting in [Control Panel].
• Set the items in “Network Setup - Setup AppleTalk” in WebPage (URL for an administrator).
21
(1) Click on the [Apple] menu, and select [Selector].
• “Selector” appears.
(2) Make sure that “Active” is selected for “AppleTalk”.
• If “Inactive” is selected for “AppleTalk”, please click on “Active”.
• If “Active” is selected for “AppleTalk”, but no other Macintosh on the network is displayed, please confirm that the
network cable is properly connected and set.
(3) Select a zone that this machine belongs to from “AppleTalk Zone”.
This appears only when several zones exist on the same network.
Please ask an administrator which zone this machine belongs to.
(4) Select “LaserWriter8”.
The printer list appears in “Select a PostScript printer”.
(5) Select this machine from the printer list, and click on [Create].
“Select a PostScript Printer Description (PPD)” appears.
(6) Select “SHARP AR-650”, and click on [Select].
The printer is created on the desktop.
If the options, such as the finisher are installed to this machine, perform “Options Setup” next.
4-37
Page 69

5.4 User Information Setup
Setting up user information allows you to view y our print jobs easily in “Print Job” menu in WebPage (URL f or users), and to
confirm total number of sheets printed per group in “Print Counter” menu in WebPage (URL for an administrator). A group
number and user name displayed in W ebPage are entered.
The paper system that is mainly used is also selected.
(1) Insert the CD-ROM into the CD-ROM drive.
(2) Click on [Setup printer driver].
(3) Click on [User Information Setup].
(4) Select the printer on which the user information is set, and click on [Next].
(5) Enter a number in [Group] and a name in [User name].
(6) Select the paper system mainly used (A4 or LETTER).
(7) Click on [Next].
(8) The message indicating that setup of the user information is completed is displayed.
SUPPLEMENT:
User Information is set only f or Windows 95/98/NT 4.0/2000. Ho we ver, for Windows NT 4.0/2000,
only [Group Number] can be set.
5.5 Setting up Options
After installing the printer driver, set the options. If the options, such as the finisher, are installed to this machine, they need
to be added in the printer driver. Other items that can be set in the pr inter dr iver vary depending on options setup.
What option is installed to this machine can be confirmed in the “System Configuration” menu in W ebPage (URL for users).
For Windows 95/98/NT 4.0/2000
Open the printer driver property, and set items in the [Option] tab . When several printer drivers are installed, set the options
for each printer driver.
For Macintosh
In such case as the PPD file is installed for the first time, proceed to step (3) since the “Installable Options” setting screen
appears after the file is installed.
(1) Select this machine from the “Selector” screen, and click on [Reset].
(2) Click on [Configure].
The “Installable Options” setting screen appears.
(3) Select items according to the options being used currently , and click on [OK].
• Finisher
If the finisher is installed to this machine, select “Installed”.
(4) Click on [OK].
The “Installable Options” screen is closed.
(5) Exit the Selector.
4-38
Page 70

5.6 Uninstalling the Printer Driver
For Windows 95/98/NT 4.0/2000
The printer driver can be uninstalled using the CD-ROM.
(1) Insert the CD-ROM into the CD-ROM drive.
(2) Click on [Remove printer driver].
(3) Select the printer driver to be deleted.
(4) Confirm that you can delete the selected printer driver and click on [Yes].
(5) The message indicating that deletion of the printer driver is completed is displayed. Then click on [OK].
For Macintosh
Drag and drop the printer into the trash can, which was created on the desktop when the printer driver was installed.
4-39
Page 71

5.7 Printer Driver Setting
5.7.1 Windows 95/98/NT 4.0/2000
This is a list of settings in the printer driver property for Windows 95/98/NT 4.0/2000.
Tabs Items Functions PDL PCL-5e PCL-XL
Details Print to the follow- Select “LPT1” if the printer is connected in Local. Select O O O
(P orts) ing port “SHA_XXXXXX” if the Peer-to-Peer utility is installed and
the port is added automatically. When assigning the
shared printer or the print queues, select such as
“\\SERVER_NAME\PRINT_QUE”. When deleting the
Peer-to-Peer utility, change the port to “LPT1” before uninstalling.
*Refer to Windows Help for other items.
Option Option Set the details in accordance with the Copier O O O
configurations at W ebPage . The details are changed
depending on the System composition. The optional
equipment set is displayed as an image.
Destination The destination tray can be specified. O O O
Paper Paper Size Select the paper size. LEDGER, LEGAL, LETTER, O O O
STATEMENT, COMPUTER, 13inch LG, 8.5SQ, FOLIO, A3,
A4, A5, B4, and B5 can be selected. When setting
Enlarge/Reduce Printing, this will be done in the printer
size set for enlarge/reduce printing.
Location Default location of feeder O O O
Number of Copies Default number of copies to be printed O O O
Orientation Set “Portrait” or “Landscape.” O O O
Printing Order Select “Normal” for printing from page 1 and “Reverse” O O O
for printing from last page.
Enlarge/Reduce Enlarges/reduces the composition in print. The Enlarge/ O O O
Printing Reduce Printing screen appears. This is not available with
PCL-5e if the Graphic mode is set with Raster at Print
Quality tab.
Enlarge/Reduce Paper Size The paper size set for the document to be printed. O O O
Printing Actual Size Select this for printing actual size. O O O
Output Paper Size The document is enlarged or reduced according to the O O O
size selected here.
Zoom The document is enlarged or reduced according to the O O O
entered ratio.
Information Entered details are informed. O O O
Margin Binding Margin Set the direction and width of the binding margin. O O O
Paper Margin Set the margin space around paper. O O O
Output Sort Mode Check this to use sort mode and set the patter n of sorting O O O
and stapling (when the Finisher is installed).
When the Saddle Stitch Finisher is installed, saddle stitch-
ing and stapling can be done like magazine binding.
Hole Punch Check this to use the hole punch function, and select the O O O
position for the holes.
4-40
Page 72

Tabs Items Functions PDL PCL-5e PCL-XL
Output Duplex Printing Check this to operate duplex printing and select the way of O O O
binding duplex-printed pages.
Layout Printing Check this to print multiple pages on one page and select O O O
the pattern.
Special Printing Rotation, Mirror image, and Negative image can be O
printed. A special printing screen appears.
Special printing Rotation Printing Printing the rotated composition. O
Mirror Image Printing the reversed image vertically. O
Printing
Negative Image Pr inting the reversed image in black and white. O
Printing
Cover Sheet Cover Sheet Check this when a cover sheet is attached. Select a blank O O O
cover sheet is inserted or a printed cover sheet is inserted
as desire. Selects the cassette that supplies paper for the
cover sheet. Check Adding Blank Back Cover when a back
cover sheet is added.
Sheet Inser tion Check this when a sheet is inserted. Select a blank O O O
sheet without printing is inserted or a printed sheet is
inserted as desire. Select the page where the sheet is
inserted and the cassette that supplies paper.
Save Click on this after setting Insert Page and Location for O O O
the dividing sheet, and the settings become effective.
Delete Click on this after selecting the sheet to be shown in O O O
Information, and the saved dividing sheet will be deleted.
Delete All Click on this to delete all saved dividing sheets. O O O
Information Information regarding the created dividing sheet (page and O O O
location) is shown.
Watermark Watermar k Print the specified text on the first page or all pages of the O O O
document. Available watermarks are “COPY, Company
Confidential, Confidential, Company Private, Company
Proprietary, Draft, Copyright, File Copy, Final, Preliminar y,
For Internal Use Only, Proof, Sample, Review Copy, Top
Secret and Urgent”.
New Register the new Watermark. Up to 29 Watermarks can O O O
be registered. Not for NT
Edit Edit the registered Watermark. O O O
Not for NT
Delete Delete the registered Watermark. Having clicking once on O O O
Delete the confirmation message appears, and the Not for NT
Watermark will be deleted by clicking on Delete at the
confirmation dialogue.
Watermark Detail Create or edit Watermarks by clicking on [New] or [Edit]. O O O
Register the new or edited Watermark by clicking on Not for NT
[Save]. Avoid creating new or editing Watermarks by
clicking on [Cancel].
4-41
Page 73

Tabs Items Functions PDL PCL-5e PCL-XL
Print Quality Gray Scale Print the color documents on the gray scale. O O O
•PDL
[Use Printer Settings] Use the printer default setting.
[Use Settings Below] Set the number of screen lines and
angles at will.
•PCL-5e
Select [None], [Coarse], or [Fine]. An output image is
displayed.
•PCL-XL
Select [Normal] or [Lineart].
An output image is displayed.
Graphics This designates which configuration is to be used for O
sending the graphics information to the printer.
[Raster]
Printing all the graphics as raster images. Layout Printing
is not possible.
[HPGL/2]
Printing some geometrical patterns faster. Print Text as
Graphics is not possible.
Bitmap This compresses and transfers bitmaps. When O
Compression compressed, the transfer time may be shortened.
Print Quality TrueType Options Set them using Tr ueType fonts. O O
•PDL
[Always use Printer Fonts]
The printing time will be shortened, but the output may be
different from the display.
(Not available for Windows NT 4.0/2000)
[Always use TrueType Fonts]
Check this to substitute all Tr ueType fonts into images for
printing.
[Use Font Substitution Table]
Check this to apply the setting in the substitution table for
printing to substitute the TrueType fonts for resident fonts.
•PCL-5e
[Download as Tr ueType]
Download the TrueType fonts as soft fonts.
[Download as Bit Image]
Download the TrueType fonts as images. Printing may
take a longer time.
Edit Font Make the correspondence between TrueType font and O
Substitution Table Internal Font when you select [Use Font Substitution
Table]. The font substitution table appears.
Run Font Manager Start Font manager and install fonts in the computer to O O O
display the Internal Font on the screen.
Print Text as This can be checked on when the Graphics is set as O
Graphics “Raster”.
Use Smoothing Check this when the smoothing function is used. O O O
Functions
Font Substitution For this TrueType Display the current substitution table. Select the items to O
Table font / Use Printer be changed.
font
4-42
Page 74

Tabs Items Functions PDL PCL-5e PCL-XL
Font Substitution TrueType Font / Displays the current status of the substitution table. O
Table Printer Font Select a TrueT ype f ont to be replaced, and the printer font
to be replaced is displayed on the right.
Substitution Select the substituted printer font or the sending type for O
Printer Font the TrueType font to be substituted.
PDL Print PDL Print the error information when printing is finished. O
Information
Job Timeout Set the time interval for sending a print job from the com- O
puter to the printer. If the sending time is greater than the
time interval set, printing the document is avoided.
Do not set at “0” when the printers in used in the network
connection.
Output to Select “Printer” to send print data and print them out, and O
select “Encapsulated PDL file” to save as PDL file without
any printing out.
Other Group Number The identified group number for such as printing informa- O O O
tion at WebPage. It can be changed if it has not been
set yet or if it is set at “0”.
User Name The identified user name for such as printing information O O O
at WebPage. It can be changed if it has not been set
yet or if it is left blank. (Windows 95/98)
The user name of the computer is displayed. It cannot be
set. (Windows NT 4.0/2000)
Save Define the entered values. This b utton appears only O O O
when the Group number and User name have not been
set. The confirmation screen appears by clicking.
To define the entered values, click on [OK] on the confir-
mation screen.
Restore Global Setting in the Pr inter Properties are set to the defaults O O O
Defaults except Group Number, User Name, Saved Water-marks,
and Option Tab Page.
Version Information Display the version information for the printer driver. O O O
Private Print Enable the Private Print. O O O
Password is assigned to print job in the Private Print.
The Private Print proceeds once password has been enter-
ed in the control panel of the copier. Without entering
password, the print job data is still spooled in the copier.
Password Setting Set Password for the Private Print. O O O
Numeric number (4 digits) is valid for password.
Password can not be set without the Group name and the
User name settings completed.
4-43
Page 75

5.7.2 Macintosh
Out of setting items in the print dialog box, “Printer Specific Options”, which are the items specific to this machine, is listed
below . The other setting items are common in Laser Writer 8.
Item Functions
Paper Source This selects the paper source.
• Auto Select
As the default setting, this is selected. It automatically selects the cassette to feed paper,
according to the paper size.
• Upper Cassette
Feeds paper from the Upper Cassette.
• Middle Cassette
Feeds paper from the Middle Cassette.
• Lower Cassette
Feeds paper from the Lower Cassette.
• Large Capacity Feeder
Feeds paper from the Large Capacity Feeder.
• Manual Feed Unit
Feeds paper from the Manual Feed Unit.
Destination This selects the destination of printed paper.
• Auto Select or Tray
As default setting, this is selected. The printed paper is ejected on the tray when no finisher
is installed.
The printed paper is ejected on Tray 2 of the finisher when the finisher is installed.
•Tray 1
Available only when the finisher is installed.
Select this when printed paper is to be ejected on Tray 1 (upper tray) of the finisher.
•Tray 2
Available only when the finisher is installed.
Select this when printed paper is to be ejected on Tray 2 (lower tray) of the finisher.
Printing Order This sets the order of printing.
• Normal
A text created in application software is printed from the first to the last pages.
• Reverse (Default)
It is set with “Reverse (Default)” when shipped from the factory.
A text created in application software is printed from the last to the first pages.
As the printed paper comes out with the printed side up, setting to “Reverse” will sort all
the pages in the normal order from the first page on top.
Sort Mode This sets sorting and stapling.
• None
Sheets of paper are ejected without being sorted.
• Sort
“Sort” is selected as default setting.
Select this for sort-printing only (1,2,3..., 1,2,3...).
• Upper Left (available only when the Finisher is installed)
Select this for sort-printing and stapling Upper Left (to staple at 1 position on the upper left).
• Upper Right (available only when the Finisher is installed)
Select this for sort-printing and stapling Upper Right (to staple at 1 position on the upper right side).
• Left (Double) (available only when the Finisher is installed)
Select this for sort-printing and stapling Left (Double) (to staple at 2 positions on the left).
• Top (Double) (available only when the Finisher is installed)
Select this for sort-printing and stapling Top (Double) (to staple at 2 positions at the top of the paper.)
Hole Punch This selects the position for the holes.
• None
Ejects paper without punching holes.
• Left
The holes are punched on the left of the paper.
•Top
The holes are punched at the top of the paper.
4-44
Page 76

5.8 List of Internal Fonts
5.8.1 List of Internal Fonts
Emulation Font Name Emulation Font Name
PDL Dutch 801 SW A
Dutch 801 SWA Italic
Dutch 801 SWA Bold
Dutch 801 SWA Bold Italic
Swiss 721 SWA
Swiss 721 SWA Italic
Swiss 721 SWA Bold
Swiss 721 SWA Bold Italic
Courier SWA
Courier SWA Italic
Courier SWA Bold
Courier SWA Bold Italic
Symbol Set SWA
Zapf Calligraphic 801 SWA
Zapf Calligraphic 801 SWA Italic
Zapf Calligraphic 801 SWA Bold
Zapf Calligraphic 801 SWA Bold Italic
ITC Bookman SWA
ITC Bookman SWA Italic
ITC Bookman SWA Bold
ITC Bookman SWA Bold Italic
Swiss 721 Narrow SWA
Swiss 721 Narrow SWA Italic
Swiss 721 Narrow SWA Bold
Swiss 721 Narrow SWA Bold Italic
Century Schoolbook SWA
Century Schoolbook SWA Italic
Century Schoolbook SWA Bold
Century Schoolbook SWA Bold Italic
ITC Avant Garde SWA
ITC Avant Garde SW A Italic
ITC Avant Garde SWA Bold
ITC Avant Garde SWA Bold Italic
ITC Zapf Chancery SWA Italic
ITC Zapf Dingbats SWA
PCL Dutch™ 801 Roman SWC
Dutch 801 Italic SWC
Dutch 801 Bold SWC
Dutch 801 Bold Italic SWC
Swiss™ 742 SWC
Swiss 742 Italic SWC
Swiss 742 Bold SWC
Swiss 742 Bold Italic SWC
Swiss 742 Condensed SWC
Swiss 742 Condensed Italic SWC
Swiss 742 Condensed Bold SWC
Swiss 742 Condensed Bold Italic SWC
Incised 901 SWC
Incised 901 Italic SWC
Incised 901 Bold SWC
Zapf Humanist 601 SWC
Zapf Humanist 601 Italic SWC
Zapf Humanist 601 Bold SWC
Zapf Humanist 601 Bold Italic SWC
Aldine 430 Original Garamond SWC
Aldine 430 Original Garamond Italic SWC
Aldine 430 Original Garamond Bold SWC
Aldine 430 Original Garamond Bold Italic SWC
Fixed Pitch 810 Courier Roman SWC
Fixed Pitch 810 Courier Bold SWC
Fixed Pitch 810 Courier Italic SWC
Fixed Pitch 810 Courier Bold Italic SWC
Fixed Pitch 850 Letter Gothic 12 pitch/text SWC
Fixed Pitch 850 Letter Gothic Bold 12 pitch/text
SWC
Fixed Pitch 850 Letter Gothic Italic 12 pitch/text
SWC
Flareserif 821 SWC
Flareserif 821 Extra Bold SWC
Clarendon 701 Clarendon Condensed SWC
Ribbon 131 SWC
Audrey Two SWC
Swiss721 SWM
Swiss721 SWM Italic
Swiss721 SWM Bold
Swiss721 SWM Bold Italic
Dutch801 SWM
Dutch801 SWM Italic
Dutch801 SWM Bold
Dutch801 SWM Bold Italic
Symbol Set SWA
MoreWingbats SWM
4-45
Page 77

5.8.2 Applicable Screen Font Table
This table shows the fonts that this machine contains and the applicab le screen f onts installed as standard in the Macintosh
system.
Macintosh Standard Fonts Adobe Fonts Internal Fonts
Courier Courier Cour ier SWA
Courier-Oblique Courier SWA Italic
Courier-Bold Courier SWA Bold
Courier-Bold Oblique Courier SWA Bold Italic
Helvetica Helvetica Swiss 721 SWA
Helvetica-Oblique Swiss 721 SWA Italic
Helvetica-Bold Swiss 721 SWA Bold
Helvetica-Bold Oblique Swiss 721 SWA Bold Italic
Times Times ® Roman Dutch 801 SWA
Times-Italic Dutch 801 SWA Italic
Times-Bold Dutch 801 SWA Bold
Times-Bold Italic Dutch 801 SWA Bold Italic
Symbol Symbol Symbol Set SWA
- Paltino ® - Roman Zapf Calligraphic 801 SWA
- Paltino-Italic Zapf Calligraphic 801 SWA Italic
- Paltino-Bold Zapf Calligraphic 801 SWA Bold
- Paltino-Bold Italic Zapf Calligraphic 801 SWA Bold Italic
- Bookman-Light ITC Bookman SWA
- Bookman-Light Italic ITC Bookman SWA Italic
- Bookman-Demi ITC Bookman SWA Bold
- Bookman-Demi Italic ITC Bookman SWA Bold Italic
- Helvetica-Narrow Swiss 721 Narrow SWA
- Helvetica-Narrow-Oblique Swiss 721 Narrow SWA Italic
- Helvetica-Narrow-Bold Swiss 721 Narrow SWA Bold
- Helvetica-Narrow-Bold Oblique Swiss 721 Narrow SWA Bold Italic
- New Century Schlbk-Roman Centur y Schoolbook SWA
- New Century Schlbk-Italic Century Schoolbook SWA Italic
- New Century Schlbk-Bold Century Schoolbook SWA Bold
- New Century Schlbk-Bold Italic Century Schoolbook SWA Bold Italic
- AvantGarde-Book ITC Avant Garde SWA
- AvantGarde-Book Oblique ITC Avant Garde SWA Italic
- AvantGarde-Demi ITC Avant Garde SWA Bold
- AvantGarde-Demi Oblique ITC Avant Garde SWA Bold Italic
- Zapf Chancery-Medium Italic ITC Zapf Chancery SWA Italic
- Zapf Dingbats ITC Zapf Dingbats SWA
4-46
Page 78

6. Font Navigator
Font Navigator is a f ont manager f or Windows 95/98/NT 4.0/2000, that giv es you a quic k and easy wa y to find fonts to install,
installs those fonts, and views and prints font samples.
SUPPLEMENTS:
• With Font Navigator, you receive a set of fonts, which Font Navigator installs when you
run the setup. Typically, the fonts are TrueType fonts that match the fonts in your printer.
Other TrueType fonts, which you can use for both the screen and printer, may come with
Font Navigator.
• WYSIWYG Support makes what you see on the screen match what you get from your
printer. It ensures that the same line breaks, pag e breaks, and appearance of your
documents will be the same both on the screen and in your printouts.
6.1 Installing Font Navigator
(1) Insert the CD-ROM into the CD-ROM drive.
• The menu screen appears.
(2) Click on the [Setup Font Navigator].
(3) Click on the [Setup].
• The Font Navigator Setup Wizard appears.
(4) Click on [Next].
• The [License Agreement] screen appears.
(5) Select the installing location.
[Destination Directory]
Specify the location for installing Font Navigator . The default location is C:\F ontNav .
[Browse...]
For changing the installing location, click on this button. The [Browse f or Directory] is displayed. Select the desired location, then click on the [OK].
(6) Click on [Yes].
• Installation of “Font Navigator” begins.
(7) Installation is complete.
• Restarting Windows dialogue appears. Clic k on [Yes] to restart the computer.
SUPPLEMENT:
After installing the printer driver, set up the optional equipment installed with this machine at
the driver properties at first. The details which can be set at the drivers are different depending
on what optional equipment is installed. The configuration of optional equipment can be
confirmed in the Copier Configurations menu of WebPage.
4-47
Page 79

6.2 Uninstalling Font Navigator
There is no attached uninstaller.
NOTE:
Do not delete the Font Navigator folder. Also, do not delete the Fonts and Cache folders in the
Font Navigator folder. If you do, you will remove fonts from your disk, and you may have to
reformat any documents that use these fonts.
6.3 Run Font Navigator
Follow the instructions below when you run Font Navigator for the first time.
(1) Select [Font Navigator] from the Start menu.
• The Font Navigator starts, and displays the Font Na vigator Wizard.
(2) Select the drives that Font Navigator searches for fonts.
• It runs only the very first time you run Font Navigator .
(3) Click on [Finish].
• Font Navigator automatically searches fonts in selected drives.
4-48
Page 80

6.4 Description of Screen
Go to a different f older
list box
Contents of
[Selected Files]
Font Sample
Viewer
• Go to a different folder list box The current font’s catalog name displayed. Change this to view a different
catalog of font’ s lists or font’s lists in other folders.
• Contents of [Selected File] List of the contents is displayed. Only folders and fonts can be displayed.
Installed fonts are checkmarked on icons.
• List of Installed Fonts The list of fonts has already been installed.
• Font Sample Viewe r Displays the font sample.
List of Installed Fonts
6.5 Getting Started with Font Navigator
6.5.1 Installing Fonts
• Select one or more fonts to install from the List of Contents (the list box on the left).
• Then drag the selected fonts to the List of Installed Fonts (the list box on the right).
SUPPLEMENTS:
You can also install fonts:
• Selecting a font from the List of Contents (the list box on the left) and click [Install Font]
to install.
• Selecting a font from the List of Contents (the list box on the right) and press the [Insert]
key.
4-49
Page 81

6.5.2 View Font Samples
• Click a font in the List of Contents or List of Installed Fonts list.
This lets you view up to four samples in the Font Sample viewer (the window at the bottom of Font Navigator).
6.5.3 Print Font Samples
• Click a font in the List of Contents or List of Installed Fonts.
• Choose [Print Samples] in the [File] menu.
• Click [OK] in the [Print Samples] dialog box to print the samples.
6.5.4 Search for Fonts
You can search for fonts on flopp y disks , CD-R OMs, your hard disk, or network.
There are two ways to search for fonts.
• Use the [Find Fonts] option in the [File] menu.
• Use the [Go to a different folder list box] in the toolbar .
SUPPLEMENTS:
Each method of searching for fonts has its own advantages. In both cases, you search for fonts
so that you can install them, view them, or print samples of them. The fonts you search for
appear in the List of Contents.
• Use the [Find Fonts] option in the [File] menu to find fonts and update the Font Catalog.
The Font Catalog includes all the available fonts that you can install (or view and print
samples of).
• Use the [Go to a different folder list box] to display fonts in a single folder, rather than all
the fonts in the Font Catalog.
6.5.5 Uninstall Fonts
• Select a font or more fonts to be uninstalled from the [Installed Fonts].
• Choose [Uninstall Font] in the [File] menu or press the [Delete] key to uninstall selected fonts.
6.5.6 Using Help
For more information about Font Na vigator , choose Help Topics in the Help menu.
4-50
Page 82

7. Update Firmware
7.1 Updating the Firmware on Printer Board
7.1.1 Before Updating the Firmware
Before updating the firmware in Printer Board, the machine has to be started in the ser viceman mode.
The procedure for starting the machine in the serviceman mode is following:
1. Hold down “0” and “5” buttons at the same time and turn the machine ON. “Test mode” is displayed on the Control
Panel.
2. Hold down “0” and “9” b uttons at the same time . The “Test mode” message disappears and now the machine is in the
serviceman mode.
7.1.2 Updating from WebPage
The firmware can be updated from WebP age when the printer is connected in network and set up for W ebPage applicable . The
procedure for updating the firmware from W ebPage is the f ollowing. The machine has to be in the serviceman mode to perform
the updating of the firmware. (Refer to 7.1.1 “Before Updating the Firmware”)
1. Star t the machine in the serviceman mode.
2. Open the URL for serviceman at WebP age on W eb browser .
• URL for serviceman is “http://xxx.xxx.xxx.xxx/srv/”. (xxx.xxx.xxx.xxx is the IP Address assigned to the machine.)
3. Click on “Update”. The Update screen appears.
• Update form FTP ser ver.
Enter Serviceman password, FTP Address, FTP User ID, FTP Password, and FTP file name, and then press
“Update”. Updating firmware is started and the message “F-ROM updating” is displayed on the Control Panel
and WebP age.
• Update from Local File
Enter Serviceman password and Local File Name, and then press the “Update”. Updating firmware is started
and the message “F-ROM updating” is display ed on the Control Panel and WebP age.
4. The message “F-ROM update completed” is displa yed on the Control Panel and W ebPage after updating the firmware is
completed.
5. Perform Printer Reset, or turn the machine OFF, then ON to restart it.
4-51
Page 83

7.1.3 Updating from Local Computer
Update the firmware from the computer connected in Parallel. The machine has to be in the serviceman mode to perform
the updating of the firmware. (Refer to 7.1.1 “Before Updating the Firmware”)
1. Set to “Standard (Output Only), EPP, EPC” at Parallel Port setting of BIOS on your computer if not.
2. Copy the update file to the local hard disk of the computer if it is in other devices.
3. Start DOS prompt.
4. Change the directory to where the copy of the update file is located, and then enter “copy /b xxx.up lpt1:” at DOS
prompt. Updating firmware is start and the message “F-ROM updating” is displayed on Control Panel.
• xxx is the update file name.
5. The message “F-ROM update completed” is displayed on Control Panel after updating the firmware is completed.
6. Perform the Printer Reset, or turn the machine OFF, then ON to restart it.
SUPPLEMENT:
• The updating results can be confirmed by the Setting List printed out at WebPage or
Control P anel.
• After the updating is completed and performing the Printer Reset, or turning the power
OFF then ON, the “Printer error (Error code: P52)” error may occur.
Please restart the machine again if this error occurs.
4-52
Page 84

7.2 Updating the Firmware on Print Server Card
Updating of the firmware is performed on a computer connected in network with Print Server Card. Install the F-ROM utility to
perform updating of the firmware. There are 2 attached utilities, f or IPX and FTP connection to update the firmware.
7.2.1 Flash Update v1.XX for IPX connection
This program uses an IPX connection to download and install a new executable code version into the your print server or Print
Server Card. To run this program, both your computer and the Print Server Card must hav e IPX (Nov ell) enabled.
1. Double-click on the icon of “Flash_up.exe” to start Flash Update utility.
• You must have supervisor rights on a Novell Server to use this program.
2. Select the Print Server Card from the list showed all the print server and Print Server Card units on your network.
• The units are listed by 3-letter code, follows by a 6-digit serial number.
3. Locate and then select the update file you want to use to update the firmware.
4. Click on [OK].
• Updating fir m ware is star ted.
5. The result of the download to the Print Server Card is listed.
6. “Successful” appears next to the Print Server Card’s serial number if the updating is successfully completed.
7.2.2 FTP Download Utility v1.XX for FTP connection
This program uses an FTP connection to download and install a new executable code version into your print server or Print
Server Card. To run this program, both y our computer and the Print Server Card must hav e TCP/IP enabled and must have
been assigned a valid IP address.
Passw ord for FTP Download : sysadm
1. Double-click on the icon of “Ftpdl.exe” to start FTP Download utility.
2. Go to the File menu and click on [Download].
• The Select a file to download screen appears.
3. Locate and then select the update file you want to use to update the firmware.
4. Click on [OK].
• The IP Address screen appears.
5. Enter the IP Address assigned to the machine, and then click on [OK].
• If the computer and pr inter are on different subnets, subnet masks and default routers (gateway address) may
also need to be entered.
• The Password screen appears.
6. Enter the serviceman password, then click on [OK].
• The ser viceman password is “sysadm”. The entered password is described with “∗”.
7. Updating firmware is start.
4-53
Page 85

8. Status Report
The Status/Configuration report is sent as a print job to the printer when the print server is turned on, if it is set ON with “Printing
a start page” at the WebP age SETUP.
It is strongly recommended that you review this report immediately after installation and any time the setup has been
changed. If the report does not include a protocol that was configured, check that the procedure was done properly.
4-54
Page 86

Chapter 5 Status Display and the Solutions
1. Control Panel .................................................................. 5-1
2. WebPage (Status Message)........................................... 5-2
3. WebPage (Message Displayed Area) ............................ 5-4
Page 87

1. Control Panel
Error Message Error Type Description of Causes Solution
Displayed
Printer is under preparation Printer is being started The printer is under warm-up. Waiting to finish warm-up.
Printer error DMA Buffer Error The necessary buffer cannot be Turn OFF the power of this machine and restart
(Error code : P05) maintained when accessing DMA. again.
Printer error Command Submit Error The command cannnot be submitted. Turn OFF the power of this machine and restart again.
(Error code : P09)
Printer error Detect Timeout The system detects PCI timeout. H/W reset or turn OFF the power of this machine and
(Error code : P00) restart again.
Printer error Detect Timeout The printer detects PCI timeout. H/W reset or turn OFF the power of this machine and
(Error code : P50) restart again.
Printer error Fatal Error The printer board detects a fatal H/W reset or turn OFF the power of this machine and
(Error code : P56) error. restart again.
Printer error PCI Interface Error The sequence PCI timeout error H/W reset or turn OFF the power of this machine and
(Error code : P55) occurs three times. restart again.
Printer error Print Server Card Error PRINT SERVER CARD error is H/W reset or turn OFF the power of this machine and
(Error code : P54) detected (only whenthe Print Server restart again.
Card is in use).
Printer error NvRAM Error NvRAM error in the printer board H/W reset. All settings are revised to defaults except
(Error code: P52) is detected. IP Address.
Printer error Deficiency of Memory Failed to maintain the memory while The error is automatically cleared. LED and the message (Error code: P51) rasterizing. is restored with H/W reset.
Printer error Expanded Memory
(Error code : P57) Error memory of the printer board.
F-ROM update error Fail F-ROM update Updating F-ROM has failed. Retry the operation referring to “7. Update Firmware of
F-ROM update completed Complete F-ROM Updating F-ROM is completed. H/W reset or turn OFF the power of this machine and
F-ROM updating Start F-ROM update Updating F-ROM has started. —
Wait Warming up. War m-up is underway. It will be recovered automatically.
Add paper When there is no paper on the Add paper.
Wait adding toner. When toner has run out. Add toner.
Close LCF Door. When the door of the LCF is open. Close the door of Large-capacity Feeder.
Set correct cassette. Desig nated paper size and pape r size Set the correct cassette.
Remove paper from Paper is remaining in the Auto Duplex Remove paper from the Auto Duplex Unit.
duplexer. Unit.
Reboot the machine. Turn OFF the power of the machine and restart again.
Invalid password. Wrong password. Press the [CLEAR] button in the password screen of
Try again. the Control Panel.
When an error occurs in the expanded
cassette.
in the cassette are different.
H/W reset or replace the memory.
of Chapter 4”.
restart again.
5-1
Page 88

2. WebPage (Status Message)
Message Displayed PCI Information Status Solution
READ Y Following errors cannot be applied. —
Reboot the Machine (SCR06, 0Ch, D1) Reboot W arning T urn the power OFF and restart.
Wa it (SCR06, 0Ch, D0) During FSMS —
Call for Service (SCR06,08h,D0) Errors that cannot be Contact the maintenance service.
recovered
Printer Error : P05 (STER-D0~D6=04h) DMA Buffer Error Turn OFF the power of this machine and
restart again.
Printer Error : P09 (STER- D0~D6 =08h) Com mand Subm it T urn OFF the power of this machine and
Error restart again.
Printer Error : P50 (SS04-06h) PCI Timeout Error H/W reset or turn OFF the power of this
machine and restart again.
Printer Error : P51 (SS04-00h) Deficiency of Memory H/W reset or turn OFF the power of this
machine and restart again.
Printer Error : P56 (SS04,05h) Fetal Error H/W reset or turn OFF the power of this
machine and restart again.
Printer Error : P55 (SS04-04h) PCI Interface Error H/W reset or turn OFF the power of this
machine and restart again.
Printer Error : P54 (SS04-03h) PRINT SERVER CARD Error H/W reset or turn OFF the power of this
machine and restart again.
Printer Error : P52 (SS04-01h) NvRAM Error H/W reset. All settings are revised to defaults
except IP Address.
Printer Error : P57 (SS04-07h) Expanded Memory Error H/W reset or replace the memory.
Set Developer Unit. (SCR06,04h,D0) No developer unit Install the developer unit correctly.
Set Maincharger Unit. (SCR06,04h,D1) No maincharger unit Install the maincharger unit correctly.
Dispose of Used Toner. (SCR06,04h,D3) Toner bag full Replace the toner bag.
Misfeed in Copier. (SCR06,00h,D0~D4) Jam Status Remove the jammed paper referring to [HELP]
on the Control Panel.
Finisher not Ready . (SCR06,05h,D1,D2) Finisher Error The finisher is not installed correctly or the tray
capacity is exceeded. Remove paper from the
finisher and make sure that the finisher installed
correctly.
Stapler not ready . (SCR06,0Bh,D3) No Stapler Install the Stapler correctly.
Examine Stapler. (SCR06,06h,D0) Staples Jam Remove jammed staples.
Set Staple Cartridge. (SCR06,0Bh,D2) No Staples Supply staples.
Please Dispose of Hole Punch Dust (SCR06, 0Bh, D6) Hole Punch Unit Full Dispose of hole punch dust.
Add Toner. (SCR06,04h,D2) No toner Supply toner.
Close Cove r. (SCR06,01h,D0,D1,D2,D3,D4 & SCR06, Close the cover of the machine.
0Bh,D1) Cover Open
Add Paper . (SCR06,02h &03h) No Paper Supply paper.
Warming Up (SCR06, 09h, D0) W arming Up The printer is being started. W ait f or a while .
Time for P eriodic Maintenance. (SCR06,0Bh,D4) Periodic maintenance Contact the maintenance service for periodic
is necessary. inspection.
T oner near Empty (SCR06,0Bh,D5) Toner Near Empty Supply toner .
5-2
Page 89

Displayed only Serviceman menu
Message Displayed PCI Information Status Solution
F-ROM Up-date Error (SS04-53h) F-ROM Update Failure Retry the operation referring to “7. Update
Firmware of Chapter 4”.
F-ROM Up-date Completed (SS04-52h) Complete F-ROM Update H/W reset or turn OFF the power of this
machine and restart again.
F-ROM Updating (SS04-51h) Start F-ROM Update ---
5-3
Page 90

3. WebPage (Messag e Displayed Area)
The messages are displayed when anything is changed in at WebP age and any b uttons are clicked. The list of the messages
is as follows.
Item Button Message displayed Conclusion
T est Printing PRINT Request has been Received Print
ERR O R Unable to print
Password Change CHANGE Password has been changed Password change complete
Invalid Password Wrong password
ERR OR Incomplete change
WebP age SETUP SETUP Request has been Received Setup complete
Invalid P assword Wrong password
Invalid Setting There is an invalid setting
ERR OR Incomplete setting
Printer SETUP SETUP Request has been Received Setup complete
Invalid Password Wrong password
Invalid Setting There is invalid setting
ERR OR Incomplete setting
DEFAULT Restore to Default Settings Change to default settings
Invalid Password Wrong password
ERR OR Incomplete default settings
Printer Reset RESET Invalid Password Wrong password
ERR OR Incomplete admitting
Network SETUP SETUP Reset the Printer to Enable Setup complete
(TCP/IP,NetWare, Setting
AppleTalk) Invalid Password Wrong password
Invalid Setting There is an invalid setting
ERR OR Incomplete setting
Group Counter Reset RESET Request has been Received Request admitted
Invalid Password Wrong password
ERR OR Incomplete admitting
All Group Counter RESET Request has been Received Request admitted
Reset Invalid Password Wrong password
ERR OR Incomplete admitting
Job Delete DELETE Request has been Received Deletion complete
ERR O R Incomplete deleting
Reset Printing Counter RESET Request has been Received Request admitted
Invalid Password Wrong password
5-4
Page 91

Chapter 6 Troubleshooting
1. Troubleshooting.............................................................. 6-1
2. Limitations ...................................................................... 6-2
2.1 When using the machine in both parallel connection
and network connection ............................................................ 6-2
2.2 Limitation on the printer functions .......................................... 6-2
2.3 When printing by bypass .......................................................... 6-2
2.4 Using the printer function concurrently with the
copying function........................................................................ 6-2
Page 92

1. Troubleshooting
Trouble Causes Solution
Unable to print The printer power is turned OFF . T urn ON the printer power.
The cables are not connected properly. Connect the printer cable and the network cable
properly.
The cable is inappropriate. Use the appropriate cable. Change the cable
if the cable is considered to be broken.
Network is Off-Line. Change to On-Line on control panel.
Out of paper Add paper.
Forced to pause errors. Confirm the error type and follow the solution.
Unable to print in net- The network setting in WebPage is incorrect. Set the network setting in WebPage correctly.
work environment. The network setting in computers is incorrect. Set the network setting in computers correctly.
The network setting in AppleTalk is incorrect. Set the network setting in AppleTalk correctly.
IP Address for the printer is incorrect. Assign the IP Address for the printer correctly.
Unable to access Top- Wrong URL. Enter the correct URL.
Access Setting for proxy is wrong. Confirm the network settings for the WWW browser
are correct.
Network cables are not connected properly to the Confirm the network cables connected correctly.
printer or computers.
Printer resetting has been performed. Wait for the printer reset is completed.
Wrong network settings for the computer. Set the network settings properly.
IP Address is not assigned to the printer. Assign the IP Address on control panel.
IP Address assigned to the printer is inappropriate. Confirm the IP Address has been assigned wrong
or same as one that has already been used.
If so, change to an appropriate address.
Unable to operate Printing can be performed in TCP/IP printing Banner printing is available only for LPR printing
banner printing (LPR printing). in TCP/IP of Windows NT.
“There is not enough There is not enough free space in HDD. Create some more free space in the HDD and tr y
space to install these installation again.
option(s). Please free
up some disk space
or modify your
selection.” message is
displayed and
installation
cannot be operated.
“The selected printer An appointed driver is already installed for the A dr iver is already installed for the printer. If you
driver has already been printer. would like to update the driver to the latest version,
installed. After deleting install a new one after deleting the existing driver.
the current printer driver,
install again.” message
is displayed.
Unable to add a port This is not checked with [Use NetWare] at the NetWare Check with [Use NetW are] at the NetW are
(SHA_XXXXXX) for SETUP in Network SETUP in WebPage. SETUP in Network SETUP in WebP age.
Peer-to-P eer Utility for
IPX/SPX.
6-1
Page 93

2. Limitations
2.1 When using the machine in both parallel connection and
network connection
• While one pr int job is spooled, the other print job cannot be accepted. Wait for a while and then start again from
beginning.
2.2 Limitation on the printer functions
• A pr int job exceeding 480 pages will be divided.
• Up to 190 print jobs can be spooled in this machine.
2.3 When printing by bypass
• When printing by bypass, printing does not star t until the Start button of the machine is pressed.
• When the message “Place paper on the bypass tray” is displayed on the message display panel, place the paper and
press the Start button. However, paper on the bypass tray may be automatically fed according to settings.
2.4 Using the printer function concurrently with the copying function
• If an error such as running out of paper occurs in the copying function mode, the printer function cannot be used until
the copying function error is corrected.
• Dur ing copying, printing cannot be performed in the printer function mode.
6-2
Page 94

HARD WARE
Chapter 1 Summary
1. Summary ......................................................................... 1-1
Page 95

1. Summary
The summaries of the printer boards (AR-P13) and the Print Server Card (AR-NC4T) are presented in this chapter .
Printer Board
• Transmitting, compressing, and converting print data.
• Printer Utility Function • Control of the Print Server Card.
• HTTP Server Function • Parallel Interface (comply with IEEE-1284)
Computer
Printer Board
Print
Server
Card
AR-650
Print Server Card
• Administration of Network Setting
• Print Server Card
AR-NC4T: 10/100BASE-TX
1-1
Page 96

Chapter 2 Circuit Description
1. Circuit Description ......................................................... 2-1
Page 97
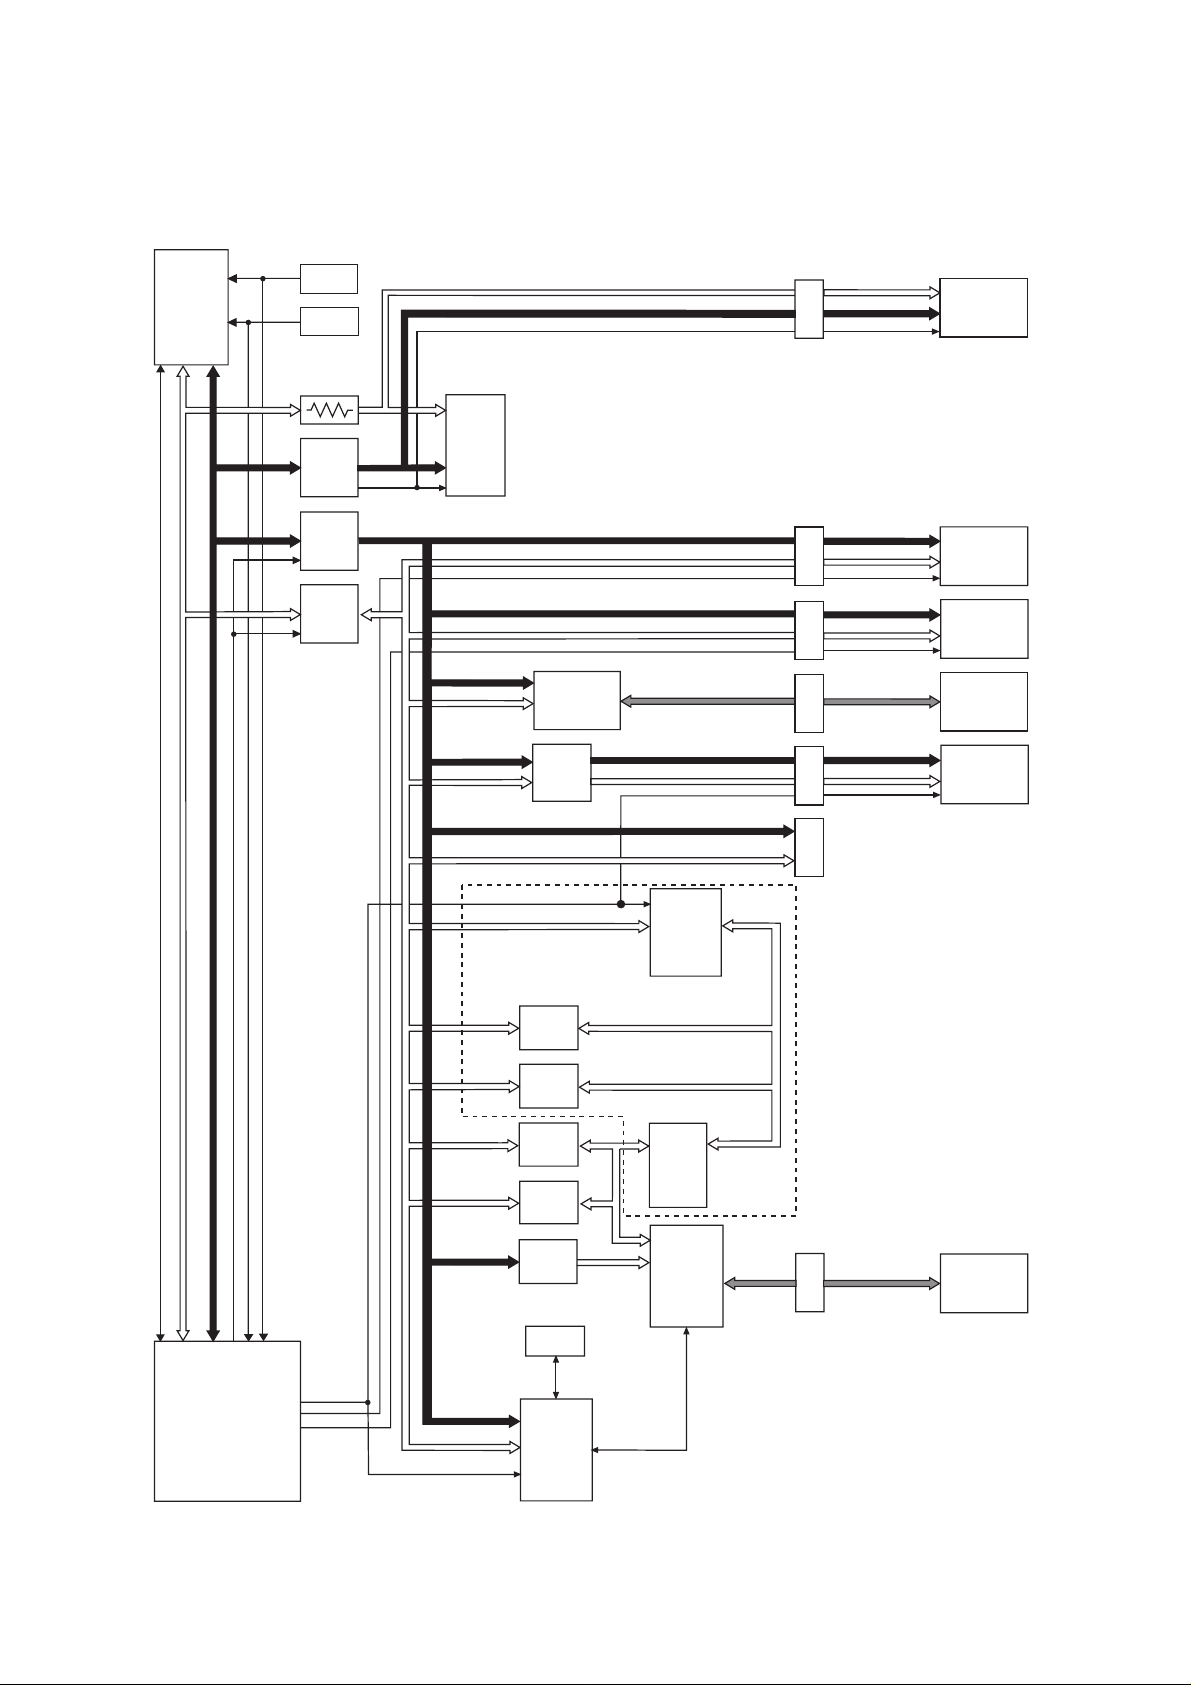
1. Circuit Description
The electric circuits of the printer function are described in this chapter.
U24
Power PC
200MHz
PD0~63
PA0~31
PD0~63
PA0~31
PA0~31
PD0~63
U4
Reset IC
U43
Clock GEN.
U23,27
SDRAM
Address
Buffer
U18~21
System
Address
Buffer
U44~46
Data Bus
Transceiver
MD0~63
MA0~12
SD0~63
BA0
U51,52
SDRAM
16MB
SA25~31
SD0~15
SA15~31
SD15~31
Parallel
Controller
U31~34,
36,37
Buffer
U26
SA16~31
SD16~31
J9
J8
J6
J10
J2
J3
Ethernet Connector
IEEE-1284
MD0~63
MA0~12
BA0
SA0~31
SD0~63
SA0~31
SD0~63
SA15~31
ND0~15
SDRAM
DIMM
ROM SIMM 0
(PROGRAM x1)
HDD
Not used
Computer
Print
Server
Card
PA0~31
PD0~63
U25
Double Finger
SD0~31
SD32~63
SD0~15
SD16~31
SA23~29
SD0~7
SA6,7,15,22,28~31
RECTOR
U41,42
Buffer
U15,16
Buffer
U11
Transceiver
U12
Transceiver
U8
Buffer
U7
EEPROM
U3
PLD
RD0~31
RD0~31
LD0~15
LD16~31
SD0~7
LD0~31
LA23~29
LD0~31
U13 RD0~31
RECTOR
RD0~31
U38,39
Buffer
U2
PCI
I/F
Controller
PCI Bus
J1
J5
AR-650
2-1
Page 98

The Printer Board is mainly composed of Pow erPC 603e (U24) and Double Finger (U25).
The data bus in the Printer Board branches off to a local data bus and a system data bus. These are connected in alternating
connection with a Bus Transceiver.
The local data bus is a 64-bit data bus directly connected to the P owerPC 603e . Double Finger , SDRAM (U51,52), and SDRAM
DIMM are connected to this bus.
The system data bus is a 32-bit data bus connected to Program ROM SIMM, Parallel Controller (U26), PLD (U3), RECTOR
(U13) and the Print Server Card Interface (J2).
SDRAM and SDRAM DIMM are used as main memories for the system and are controlled by Double Finger.
Program ROM SIMM stores the operating programs of the system and some parts of the standard font data and is controlled
by Double Finger.
The Parallel Interface circuit is composed of Parallel Controller, Parallel Interface (J10), and other peripheral ICs, and controls
parallel communication with computers and operates the sending and receiving of print data, command signals and status
signals. The Parallel Interface is corresponding to Compatible mode, Nibble mode, and ECP mode in compliance with IEEE-
1284.
Engine Interface circuit is composed of the PLD, Engine Interface (J1,5) and other peripheral ICs, and it controls the PCI bus
communication with System Board installed in the machine itself and operates the sending and receiving of print data, command signals and status signals. The sending/receiving of print data, and command/status signals are operated in DMA
transfer.
EEPROM (U7) stores the setting information for the printer designated by the users and in controlled by the PLD.
The Compressing Data circuit is composed of the RECTOR (U13), and other peripheral ICs, and it con verts the print data to LZ
format-compressed data.
The Print Server Card is composed of the Network Control IC and other peripheral ICs, and operates the transmitting of print data
and command/status signals through the Local Area Network.
2-2
Page 99

Chapter 3 Print Data Flow
1. Print Data Flow ............................................................... 3-1
1.1 Local (Parallel) Connection ..................................................... 3-1
1.2 Network Connection ................................................................ 3-2
Page 100

1. Print Data Flow
The flow of print data sent from computers is presented in this chapter classified by the ways of connection.
1.1 Local (Parallel) Connection
Printer Board
U7
EEPROM
4Kbit
Not used
Program
ROM SIMM
8Mbyte
J8 J6
U24
PowerPC 603e
3
U51,52
SDRAM
16Mbyte
2
U26
PARALLEL
CONTROLLER
U25
DOUBLE FINGER
J10J1,5
J2
1
Computer
AR-650
4
U13
RECTOR
5
U3
PLD
6
U2
PCI
I/F
Controller
System
Board
Printer
Engine
(1) The Parallel Controller (U26) receiv es the print data and command signals transmitted through the P arallel Interface (J10)
from a computer.
(2) The print data and command signals are transmitted to the PowerPC 603e (U24) by Double Finger (U25).
(3) The PowerPC 603e processes and analyzes the print data relying on the command signals and the print settings saved
in EEPROM (U7). When printing with Internal Font, the font data are retrieved from Program ROM SIMM.
The analyzed print data are transmitted and saved in SDRAM (U51,52) by Double Finger.
(4) The saved data are transmitted to the RECTOR (U13) by Double Finger.
(5) The RECTOR (U13) compresses the print data. The compressed data are transmitted to PLD (U3) by Double Finger.
(6) PLD transmits the print data via PCI I/F Controller (U2) to the System Board of the machine in DMA through the Engine
Interface (J1,5). The System Board comes into oper ation to activ ate the Printer Engine and the transmitted print data are
printed.
3-1
 Loading...