


MODEL
AR-NB3
NETWORK EXPANSION KIT
OPERATION MANUAL
(for network scanner)
Page
•
INTRODUCTION ..................... 1
•
CONTENTS ............................. 2
•
BEFORE USING THE NETWORK
SCANNER FUNCTION
•
HOW TO USE THE NETWORK
SCANNER FUNCTION..............15
•
KEY OPERATOR PROGRAMS
•
TROUBLESHOOTING .......... 34
•
SPECIFICATIONS................. 38
................. 3
... 32

INTRODUCTION
The optional network expansion kit (AR-NB3) enables the machine to be used as a network scanner.
• To use the network scanner function, the dual function board (AR-EB9) must be installed in the machine.
• Use the machine's [USB-2:] port to connect the machine to the network expansion kit.
The network scanner function cannot be used if the network expansion kit is connected to the [USB-1:] port on the
machine.
Note
• This manual only explains the network scanner function that can be used when the optional network expansion kit
is installed. For information on copier functions, adding paper and toner, removing misfeeds, using peripheral
equipment, and other general information, please refer to the "Operation manual (for general information and
copier)" that accompanies the machine. For information on the network printer function, please refer to the
"Operation manual (for network printer)" in the network expansion kit (AR-NB3).
• For information on installing the drivers and software cited in this manual, see the separate "Software setup
guide".
• For information on the operating system, please refer to your operating system manual or the online Help function.
• The explanations of screens and procedures in this manual are primarily for Windows
in other versions of the operating systems.
• This manual refers to the digital multifunctional system equipped with the network function as "the machine".
• This manual refers to the Reversing single pass feeder as the "RSPF" and the Single pass feeder as the "SPF".
Unless specific mention is made, both the RSPF and the SPF are referred to simply as "SPF".
• Wherever "AR-XXXX" appears in this manual, please substitute your model name for "XXXX".
• The indicators of the operation panel may differ depending on the country and region.
®
XP. The screens may vary
• In some regions the "Key operator's guide" cited in this manual is a separate manual, and in other regions the
"Key operator's guide" is included in the "Operation manual (for general information and copier)".
•
The "Dual function board" cited in this manual can be installed as an option in some models and is pre-installed
standard in other models. For detailed information, please refer to "3. PERIPHERAL DEVICES AND SUPPLIES"
in the "Operation manual (for general information and copier)".
•
The fax function is not available in some countries and regions.
Trademark Acknowledgments
• Sharpdesk is a trademark of Sharp Corporation.
•Microsoft
Windows
Microsoft Corporation in the U.S.A. and other countries.
• Netscape Navigator is a trademark of Netscape Communications Corporation.
• Macintosh, Power Macintosh, Mac OS, LaserWriter, and AppleTalk are registered trademarks of Apple Computer,
Inc.
• IBM, PC/AT, and PowerPC are trademarks of International Business Machines Corporation.
•PostScript
• Acrobat
Adobe, the Adobe logo, Acrobat and the Acrobat logo are trademarks of Adobe Systems Incorporated.
• NetWare is a registered trademark of Novell, Inc.
• Agfa and the Agfa Rhombus, are registered trademarks of Agfa-Gevaert A.G.
• All other trademarks and copyrights are the property of their respective owners.
®
, Windows®, Windows® 95, Windows® 98, Windows® Me, Windows NT® 4.0, Windows® 2000,
®
XP, Windows® Server 2003 and Internet Explorer® are registered trademarks or trademarks of
®
is a registered trademark of Adobe Systems Incorporated.
®
Reader Copyright© 1987-2002 Adobe Systems Incorporated. All rights reserved.
The display screens, messages, and key names shown in the manual may differ from those on the actual machine
due to product improvements and modifications.
1

CONTENTS
INTRODUCTION ........................................................................................................................................ 1
BEFORE USING THE NETWORK
1
ABOUT THE NETWORK SCANNER
FUNCTION ......................................................... 3
SETTINGS AND PROGRAMMING REQUIRED
FOR THE NETWORK SCANNER FEATURE ... 4
● HOW TO ACCESS THE WEB PAGE AND
ABOUT THE WEB PAGE (FOR USERS).......... 5
● STORING DESTINATIONS ..............................6
ABOUT THE WEB PAGE (FOR THE
ADMINISTRATOR) .......................................... 11
● BASIC SETTINGS FOR NETWORK
● VARIOUS SERVER SETTINGS .....................13
● PROTECTING INFORMATION
2
SCANNER FUNCTION
VIEW HELP ......................................................4
SCANNING .....................................................12
PROGRAMMED IN THE WEB PAGE
([Passwords]) ..................................................14
HOW TO USE THE NETWORK
SCANNER FUNCTION
3
KEY OPERATOR PROGRAM LIST ................ 32
USING THE KEY OPERATOR PROGRAMS.. 33
4
TROUBLESHOOTING ..................................... 34
● MAXIMUM RESOLUTION ............................. 35
● DISPLAY MESSAGES................................... 35
● IF YOUR E-MAIL IS RETURNED .................. 35
● IMPORTANT POINTS WHEN USING SCAN TO
CHECKING THE IP ADDRESS ....................... 37
5
KEY OPERATOR PROGRAMS
TROUBLESHOOTING
E-MAIL ........................................................... 36
SPECIFICATIONS
A LOOK AT THE MACHINE............................ 16
● OPERATION PANEL ......................................16
● SCAN MODE (BASE SCREEN) .....................18
● AUDITING MODE ...........................................19
SENDING AN IMAGE ...................................... 20
● BASIC TRANSMISSION PROCEDURE.........20
●
SELECTING A DESTINATION (USING THE
[ADDRESS] KEY)............................................... 22
● TRANSMITTING A TWO-SIDED ORIGINAL..25
CHECKING THE SIZE OF A PLACED
ORIGINAL ........................................................ 26
STORING SCANNING SETTINGS .................. 26
● MANUALLY SETTING THE SCANNING
SIZE ................................................................26
● SELECTING THE COLOUR MODE ...............27
● SELECTING THE RESOLUTION ...................27
● SELECTING THE FILE FORMAT...................28
● SETTING THE LIGHT SOURCE COLOUR ....29
● ADJUSTING THE THRESHOLD VALUE .......29
● ENABLING SCANNING MARGINS (VOID
AREA) .............................................................30
● IMAGE ORIENTATION AND STANDARD
ORIGINAL PLACEMENT ORIENTATION ......31
● ENTERING CHARACTERS............................31
2
BEFORE USING THE NETWORK
1
SCANNER FUNCTION
ABOUT THE NETWORK SCANNER FUNCTION
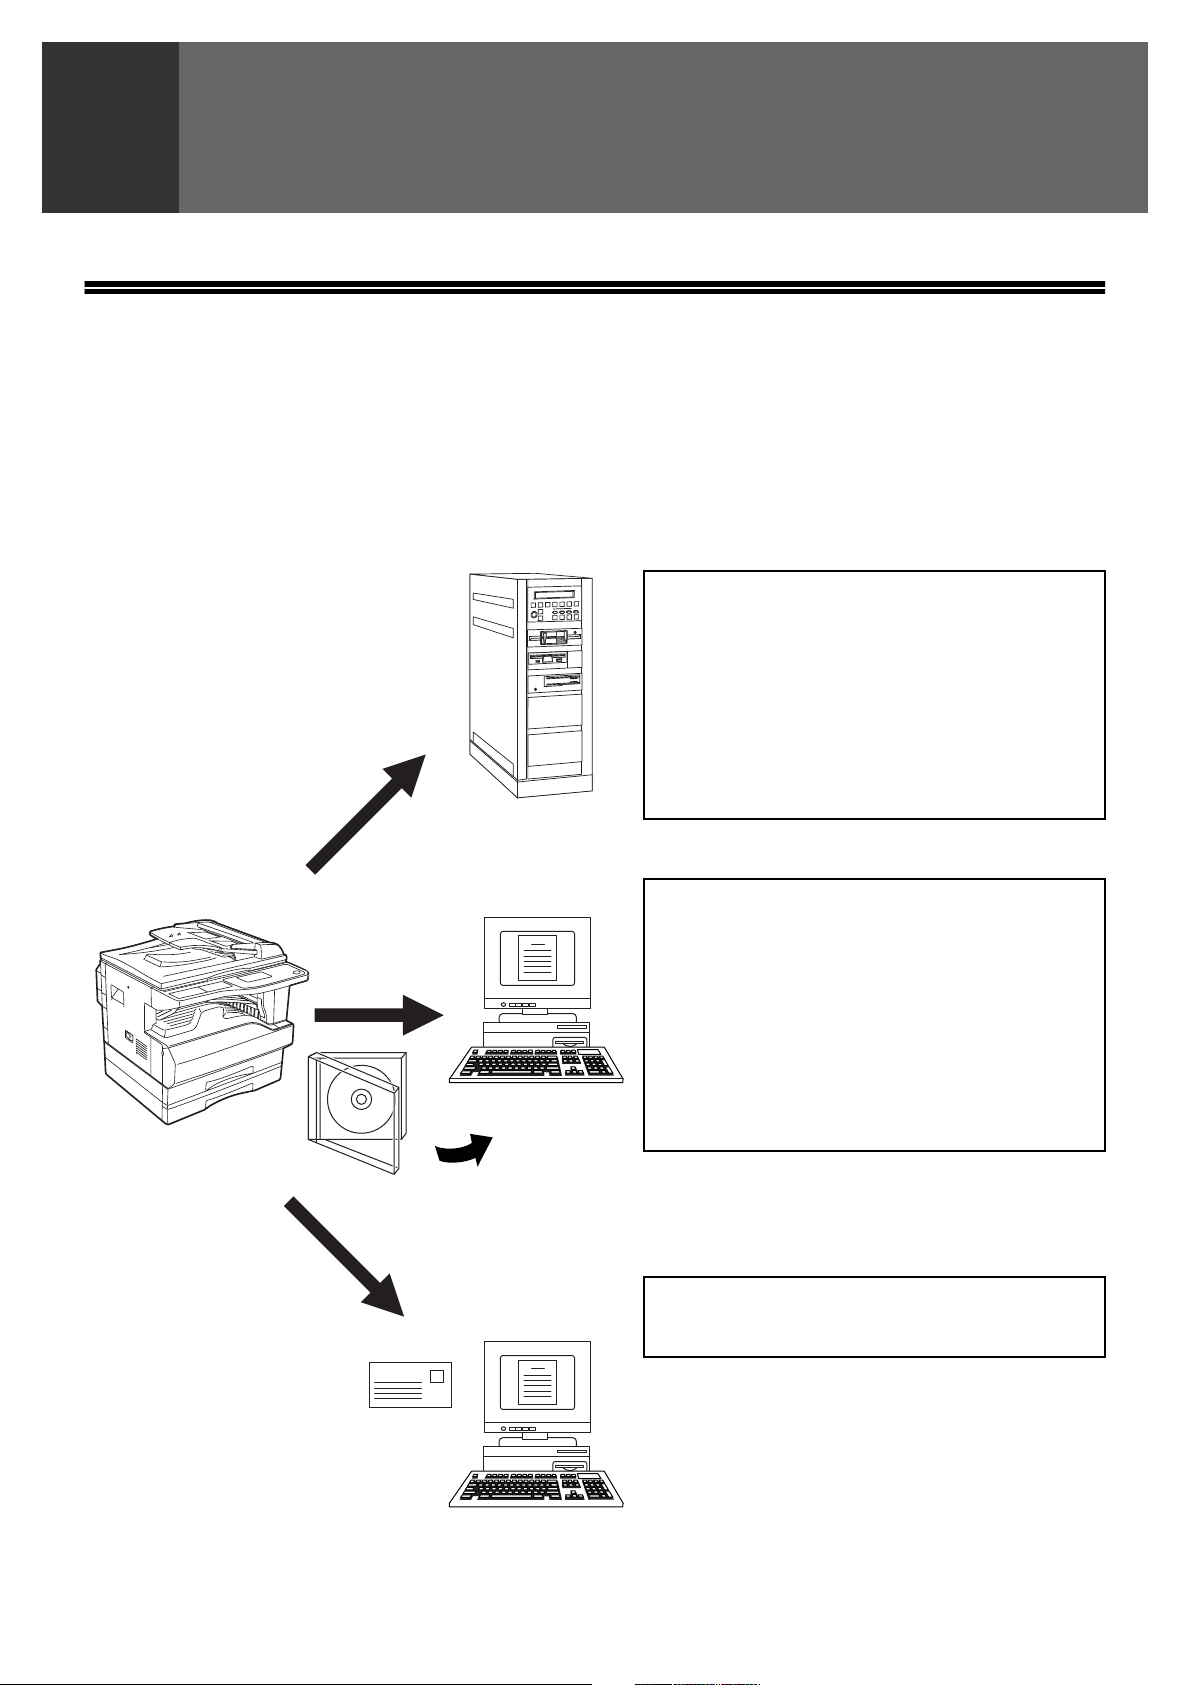
When the network expansion kit is installed in the machine, a document or photo can be scanned into an image file
and sent over a network or the Internet to a file server, e-mail destination, or your own computer.
You can select from the following transmission methods as the destination where you wish to send the scanned
image, depending on where you wish to send the scanned image data.
1. The scanned image can be sent to a memory
storage device on a network (a designated
directory on an FTP server). (This is called
"Scan to FTP"
When sending a scanned image to an FTP
server, an e-mail message can also be sent to
a preset e-mail address to inform the recipient
of the location of the scanned image data. (This
is called
manual.)
in this manual.)
"Scan to FTP (Hyperlink)"
in this
2. A scanned image can be sent to a computer
connected to the same network as the
machine. (This is called
this manual.)
*Before Scan to Desktop can be performed, the
software in the CD-ROM that accompanies the
network expansion kit (AR-NB3) must be
installed. For the procedure for installing the
software, see the "Sharpdesk installation
guide".
3. The scanned image can be sent to an e-mail
recipient. (This is called
this manual.)
"Scan to Desktop"
"Scan to E-mail"
in
in
3
SETTINGS AND PROGRAMMING REQUIRED FOR THE NETWORK SCANNER FEATURE
To use the Network Scanner feature, settings for the SMTP server, DNS server, and destination addresses must be
configured.
To configure the settings, use a computer that is connected to the same network as the machine to access the
machine's Web server. The Web page can be viewed with your Web browser (Internet Explorer 5.5 or later
(Windows)/5.1 or later (Macintosh), or Netscape Navigator 6.0 or later).
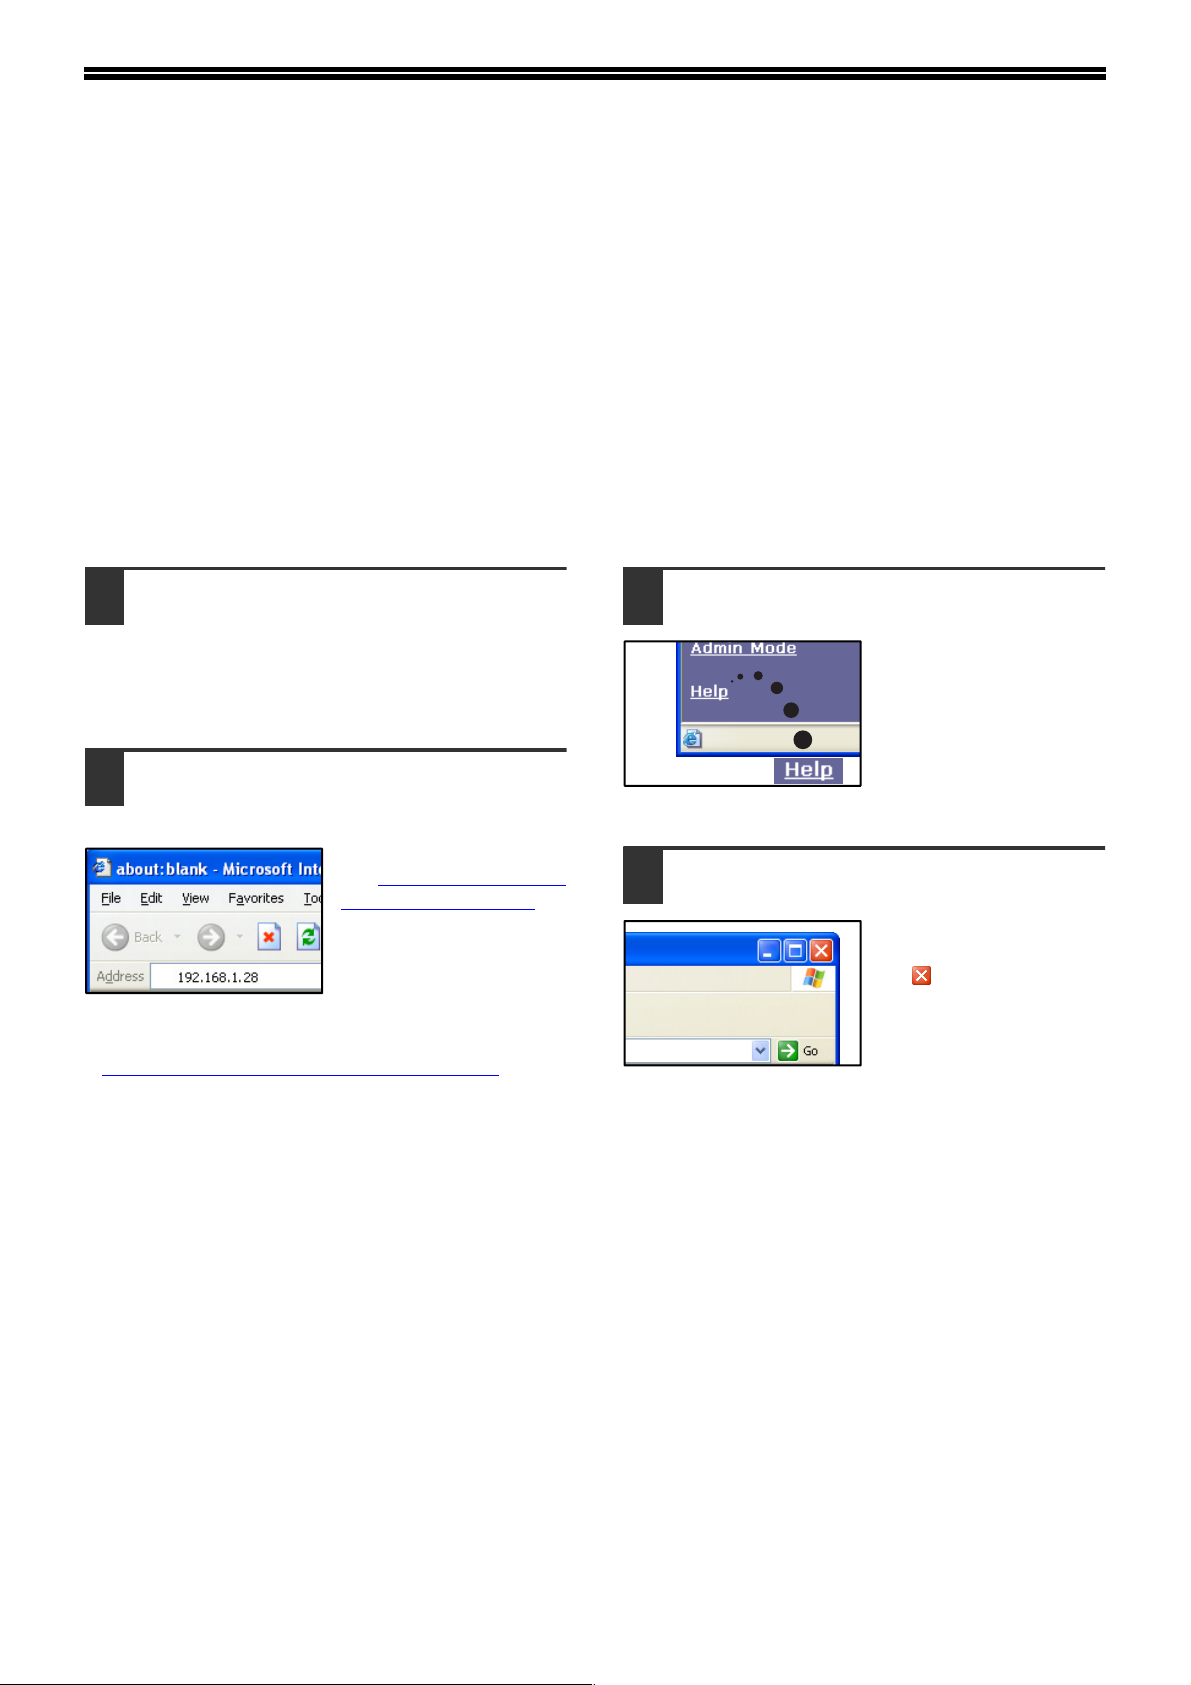
HOW TO ACCESS THE WEB PAGE AND VIEW HELP
Use the following procedure to access the Web pages. [Help] can be clicked at the bottom of the menu frame to view
information on the various function settings that can be operated remotely over the network from the machine's Web
pages. For the settings of each function, see the explanations in Help.
Open the Web browser on your
1
computer.
Supported browsers:
Internet Explorer 5.5 or later (Windows)/
5.1 or later (Macintosh)
Netscape Navigator 6.0 or later
In the "Address" field of your Web
2
browser, enter the IP address of the
machine.
To check the IP address,
see "
CHECKING THE IP
ADDRESS" (page 37).
When the connection is complete, the Web page will
appear in your Web browser.
☞ABOUT THE WEB PAGE (FOR USERS) (page 5)
Click [Help] under the menu frame.
3
For an explanation of a
function or setting in the
Web page, click the
corresponding item in the
Help screen.
Close the Web page.
4
When you have finished
using the Web page, click
the (close) button in
the top right corner of the
page.
4
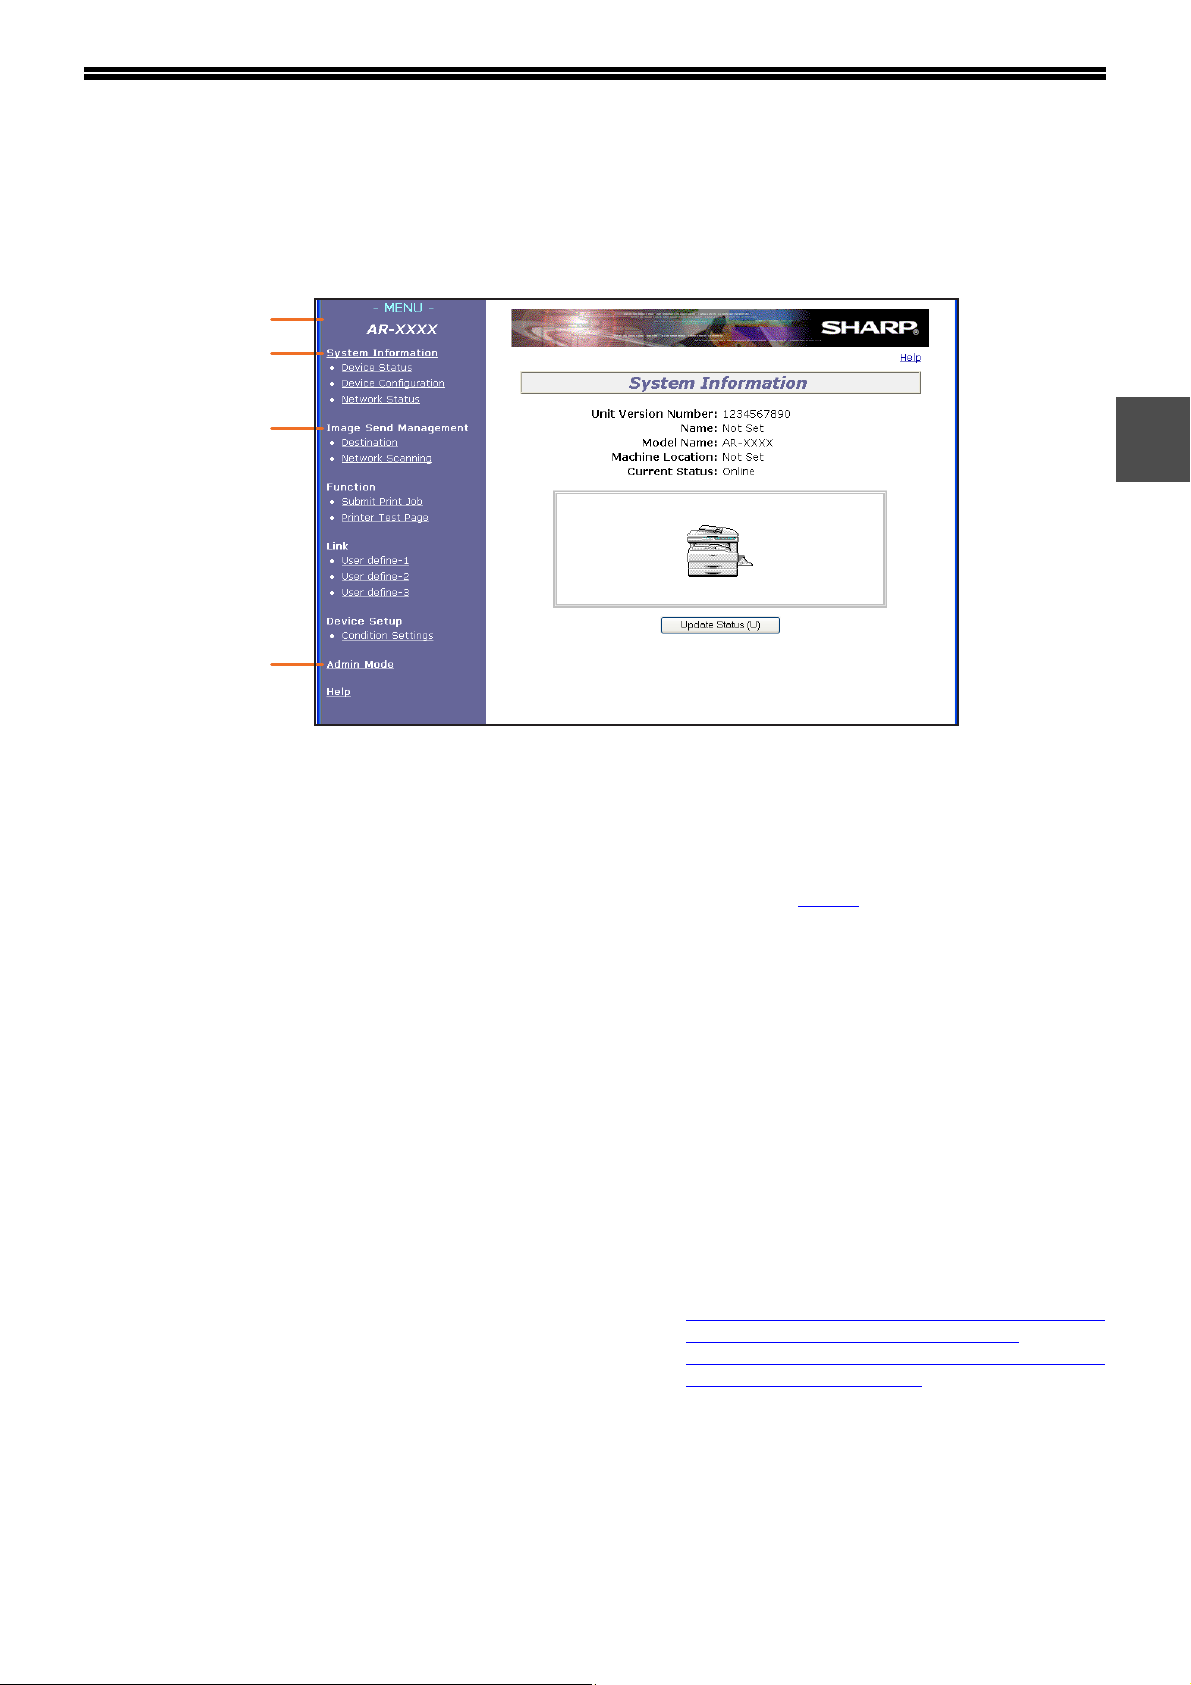
ABOUT THE WEB PAGE (FOR USERS)
When you successfully connect to the Web server in the machine, the following page will appear in your browser.
A menu frame appears on the left side of the page. When you click an item in the menu, a screen appears in the
right frame that allows you to establish settings for that item.
For detailed explanations of the procedures for configuring settings, click [Help] in the menu frame.
(1)
(2)
(3)
(4)
1
(1) Menu frame
The various settings appear in this frame. Click a
menu item to configure the corresponding setting.
(2) System Information
This shows the model name and current status of
the machine.
• Device Status
This shows information on the machine's paper
trays and output trays, toner and other supplies,
and the total sheet usage count.
Out of paper and other warnings appear in red.
• Device Configuration
Shows what options are installed.
• Network Status
Shows general information as well as the status
of TCP/IP, NetWare, AppleTalk, and NetBEUI.
(3) Image Send Management
This is the base screen for storing, editing, and
deleting destination information.
• Destination (page 6
Store destinations for Scan to FTP, Scan to
FTP (Hyperlink), Scan to Desktop, and Scan to
E-mail. You can also edit or delete previously
stored destination information.
•
Network Scanning (changing custom index names)
This enables to change custom index names.
Click the [Submit] button to store the entered
information as index names.
The custom index consists of six indexes. A
6-character index name can be stored for each
index, allowing destinations to be grouped.
(4) Admin Mode
Click here to open the adminstrator Web page
and enter the administrator user name and
password.
☞PROTECTING INFORMATION PROGRAMMED IN
THE WEB PAGE ([Passwords]) (page 14)
☞ABOUT THE WEB PAGE (FOR THE
ADMINISTRATOR) (page 11)
)
5
BEFORE USING THE NETWORK SCANNER FUNCTION
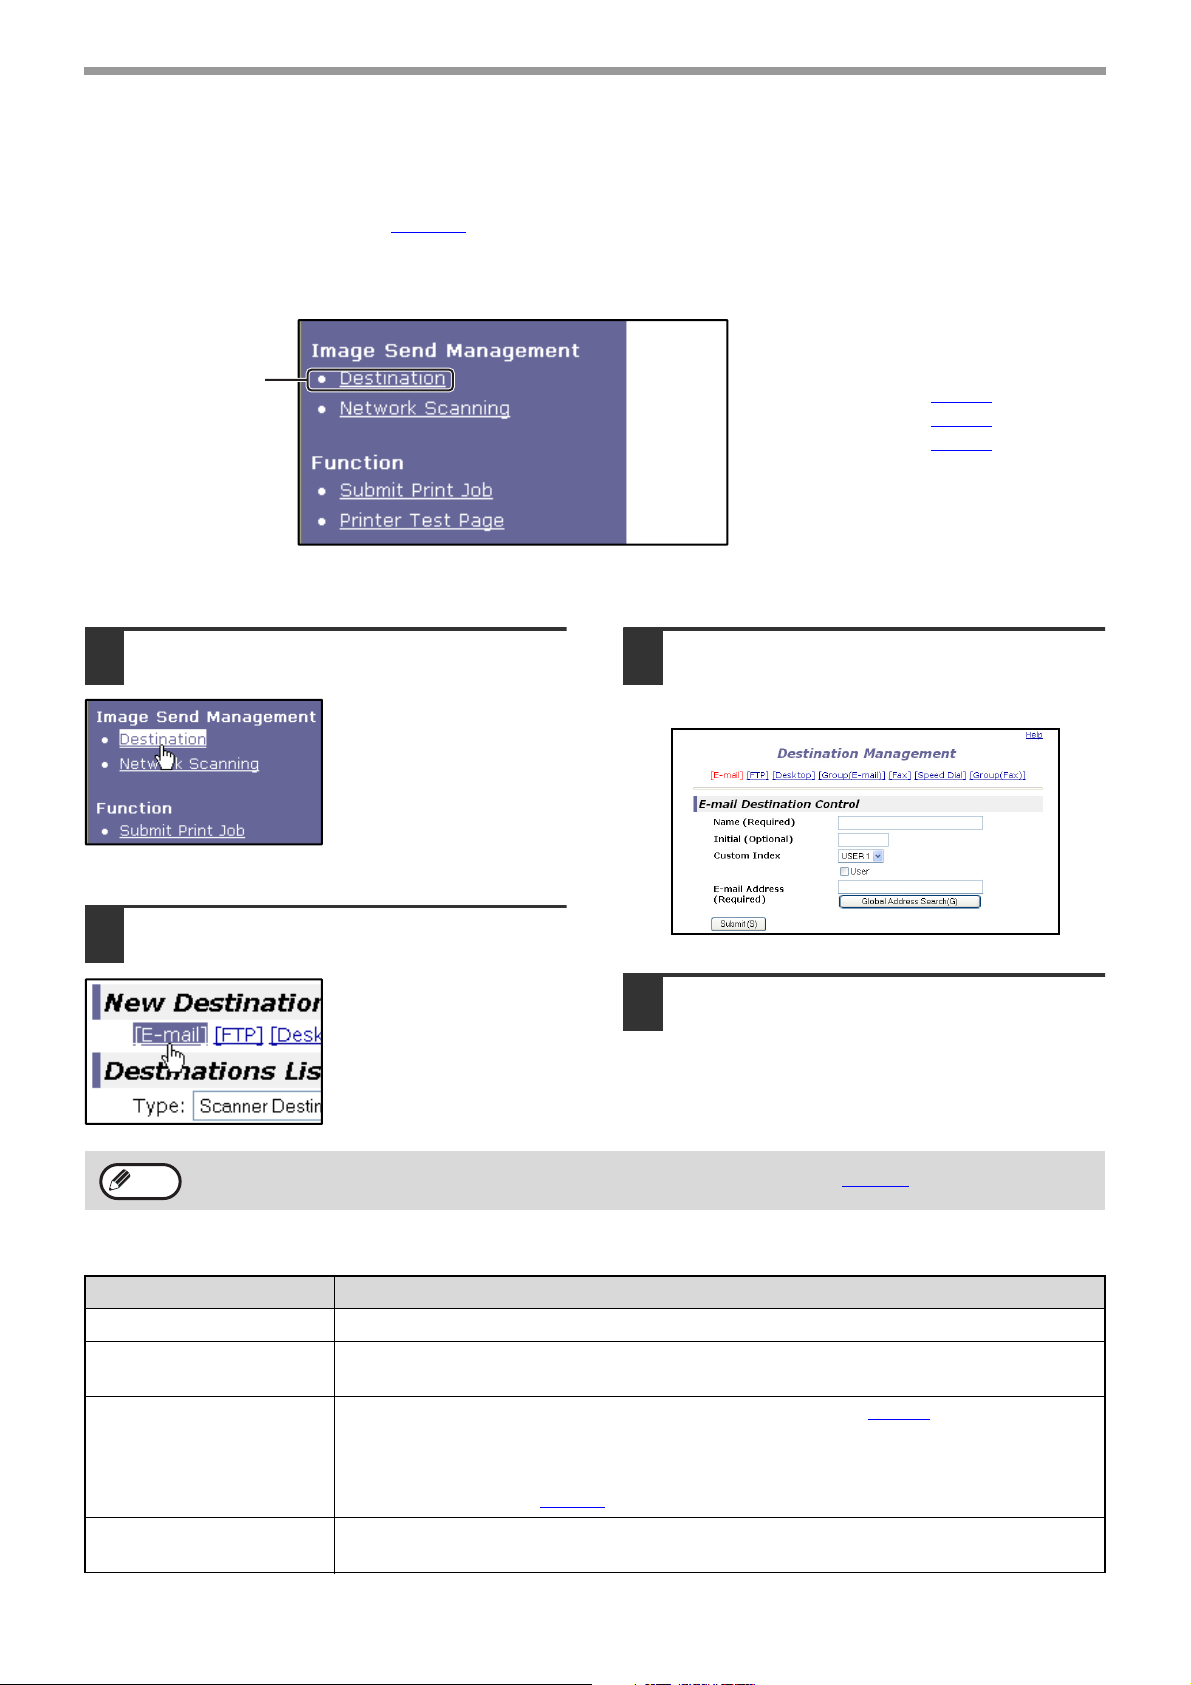
STORING DESTINATIONS
To store scanning destinations, click [Destination] in the Web page menu frame. This screen can also be used to
edit or delete stored destinations. (Page 10
A total of 200 destinations* can be stored, including E-mail, FTP, Desktop, and Group destinations.*
* Multiple e-mail addresses can be stored as a group (up to 100). Note that this may reduce the maximum number of
destinations (normally 200) that can be stored.
)
Click here to store
destinations.
Storing destinations for Scan to E-mail
Click [Destination] in the menu frame
1
of the Web page.
Click [E-mail].
2
3
E-mail: See below
FTP: See page 7
Desktop: See page 8
Group (E-mail): See page 9
.
.
.
Enter the destination information.
For each setting, see the following table.
When you have finished entering the
4
information, click [Submit].
The entries will be stored.
Note
To perform Scan to E-mail, the SMTP server settings must first be established. (Page 13)
E-mail destination information
Item Description
Name (Required) Enter the name of the destination (up to 36 characters).
Initial (Optional)
Custom Index Names can be assigned to the custom indexes as desired (page 5), allowing
E-mail Address
(Required)
Enter initial text for the destination (maximum of 10 characters). When the destination list is
displayed in the destination control screen, the initial text is used to group the destinations.
convenient grouping of destinations.
Drop down list: Select a custom index for the destination to be stored.
User checkbox:
Enter the e-mail address of the destination (up to 64 characters). If an LDAP server is being used,
you can click the [Global Address Search] button to search for an address on the LDAP server.
When this is selected, the destination is stored in the user tab of the address
book. (Page 22
)
6

BEFORE USING THE NETWORK SCANNER FUNCTION
Storing destinations for Scan to FTP
Click [Destination] in the menu frame
1
of the Web page.
Click [FTP].
2
Note
If you select the "Enable Hyperlink to FTP server to be e-mailed" checkbox and select a previously stored recipient (page
6) from "E-mail Destination", an e-mail will be sent to the recipient informing them of the file format and location of the
scanned image data (Scan to FTP (Hyperlink)). A hyperlink to the file server to which the scanned image data was sent
appears in the e-mail, and the recipient can click the hyperlink to go directly to the location where the image data is stored.
Enter the destination information.
3
For the settings, see the following table.
When you have completed all the
4
entries, click [Submit].
The entries will be stored.
1
FTP destination information
Item Description
Name (Required) Enter the name of the destination (up to 36 characters).
Initial (Optional)
Custom Index Names can be assigned to the custom indexes as desired (page 5), allowing
Hostname or IP Address
(required)*
User Name (Optional) Enter the login user name for the FTP server (maximum of 32 characters).
Password (Optional) Enter the login password for the FTP server (maximum of 32 characters).
Directory (Optional) If you wish to specify a destination directory on the FTP server, enter the directory
Enable Hyperlink to FTP
server to be e-mailed
(Checkbox)*
E-mail Destination
1
2
Enter initial text for the destination (maximum of 10 characters). When the destination list is
displayed in the destination control screen, the initial text is used to group the destinations.
convenient grouping of destinations.
Drop down list: Select a custom index for the destination to be stored.
User checkbox:
Enter the IP address or host name of the FTP server (maximum of 127 characters).
(maximum of 200 characters).
When you send a scanned file to an FTP server, you can have a transmission
notification automatically sent to the file recipient by e-mail. To have transmission
notifications sent, select the checkbox. The FTP server name will appear in the
transmission notification as a hyperlink.
Select the recipient that you wish to notify of the file transmission to the FTP server. To select
a recipient here, the recipient's e-mail address must have been previously stored. (Page 6
When this is selected, the destination is stored in the user tab of the address
book. (Page 22
)
)
*1 If you entered a host name in "Hostname or IP Address", you will need to enter the DNS server settings. (Page 13)
*2 To perform Scan to FTP (Hyperlink), you must also enter the settings for the e-mail server.
7
BEFORE USING THE NETWORK SCANNER FUNCTION
Storing destinations for Scan to Desktop
The destination for Scan to Desktop is stored by the Sharp Network Scanner Tool Setup Wizard when "Network
Scanner Tool" is installed in your computer. For this reason, there is no need to store the Scan to Desktop
destination in the Web page. (The Network Scanner Tool is on the "Sharpdesk" CD-ROM that accompanies the
Network Expansion Kit.)
For information on Scan to Desktop system requirements, installing the Network Scanner Tool, and storing
the destination, see the "Sharpdesk installation guide" that accompanies the network expansion kit.
Normally your computer is stored as the destination by the method indicated above.
The following page for storing Scan to Desktop destination information appears when [Destination] is selected in the
menu frame, followed by [Desktop]. This page is used mainly by the system administrator in the following circumstance.
• When another machine that also has the network expansion kit is added to your network and you wish to send an
image scanned on the new machine to a destination stored on the existing machine
See "
Editing and deleting programmed transmission destinations" (page 10) to select the Scan to Desktop
destination information that you wish to use on the new machine and enter the displayed information in this screen in
the new machine. (When you have completed all entries, click [Submit].)
If there are several destinations that you wish to use on the new machine, repeat this procedure as needed.
If the information entered here differs from the information entered on the host computer, transmission/reception will
not be possible.
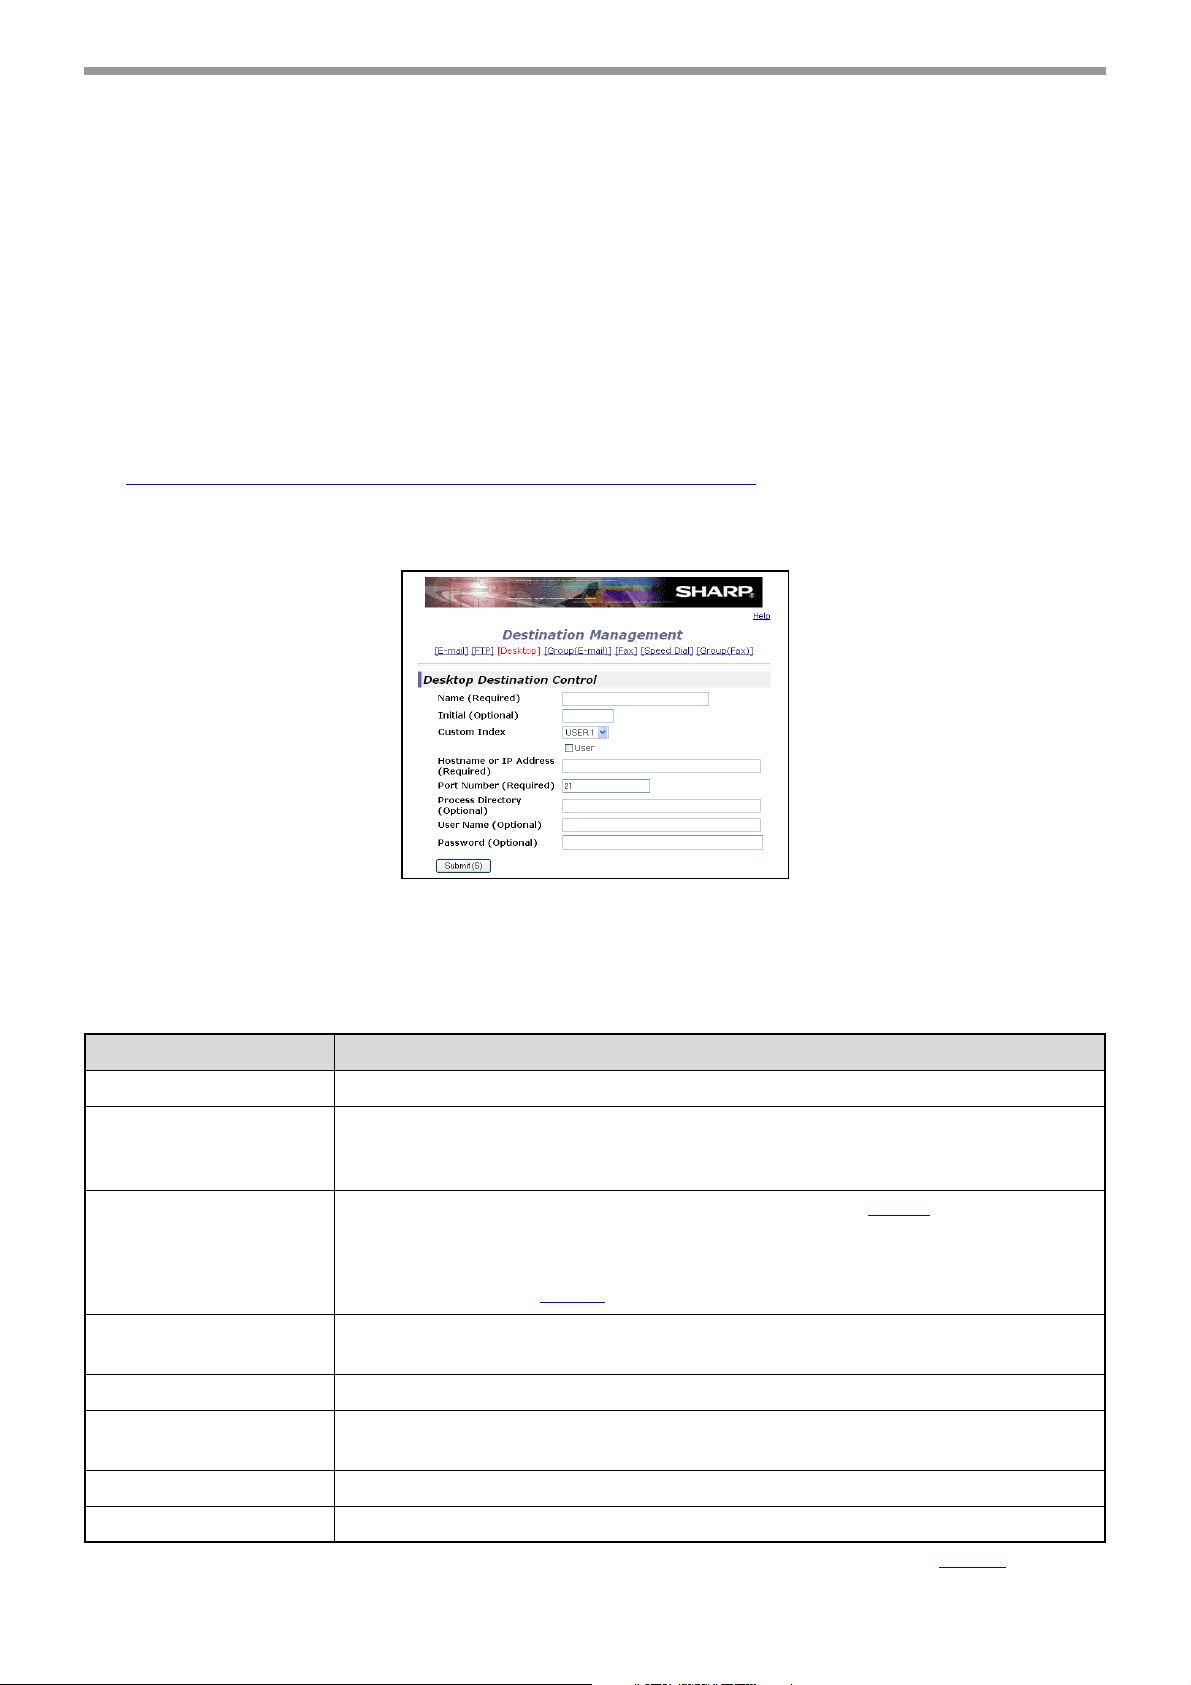
For the settings, see the following table.
Scan to Desktop destination information
Item Description
Name (Required) Enter the name of the destination (up to 36 characters).
Initial (Optional) Enter initial text for the destination (maximum of 10 characters). When the destination
list is displayed in the destination control screen, the initial text is used to group the
destinations.
Custom Index Names can be assigned to the custom indexes as desired (page 5
convenient grouping of destinations.
Drop down list: Select a custom index for the destination to be stored.
User checkbox:
Hostname or IP Address
(Required)*
Port Number (Required) Enter a port number from 0 to 65535 for the desktop network scanner tool.
Process Directory
(Optional)
Enter the IP address or host name of the FTP server (maximum of 127 characters).
Enter the destination directory name for the file (maximum of 200 characters). The file
will be processed in this directory after it is received.
When this is selected, the destination is stored in the user tab of the address
book. (Page 22
)
), allowing
User Name (Optional) Enter the login user name for the network scanner tool (maximum of 32 characters).
Password (Optional) Enter the login password for the network scanner tool (maximum of 32 characters).
* If you entered a host name in "Hostname or IP Address", you will need to enter the DNS server settings. (Page 13)
8
BEFORE USING THE NETWORK SCANNER FUNCTION
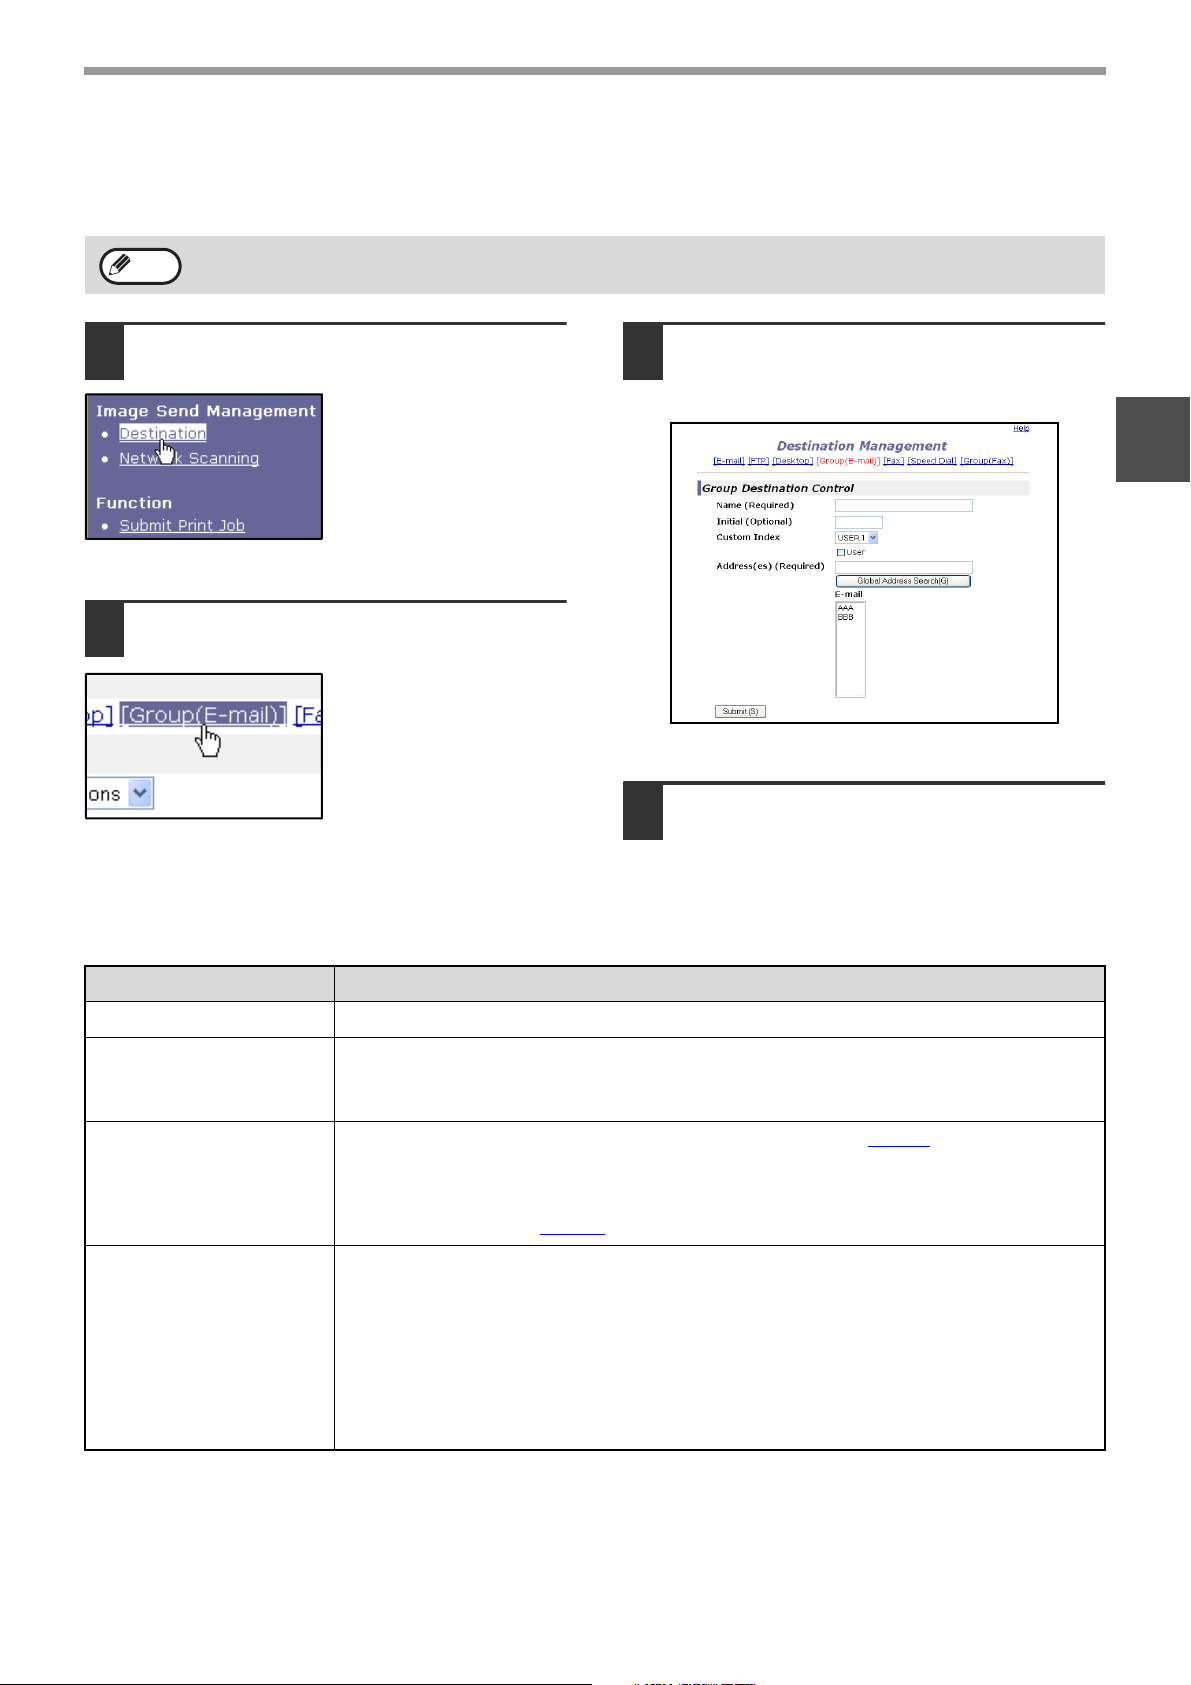
Storing Groups (Scan to E-mail)
You can send a scanned image to multiple e-mail destinations in a single Scan to E-mail operation. If you frequently
transmit to a fixed group of destinations, you can store the destinations as a group.
Note
Click [Destination] in the menu frame
1
of the Web page.
Click [Group(E-mail)].
2
Up to 100 destinations can be stored in one group.
Enter the destination information.
3
For the settings, see the following table.
When you have completed all of the
4
entries, click [Submit].
The entries will be stored.
1
Storing a group of destinations
Item Description
Name (Required) Enter a name for the group (up to 36 characters).
Initial (Optional) Enter initial text for the destinations (maximum of 10 characters). When the
destination list is displayed in the destination control screen, the initial text is used to
group the destinations.
Custom Index Names can be assigned to the custom indexes as desired (page 5
convenient grouping of destinations.
Drop down list: Select a custom index for the destination to be stored.
User checkbox:
Address(es) (Required) Select the address of each destination from the "E-mail" list box. Programmed e-mail
destinations appear in each of the destination lists. To select multiple destinations,
click each address while holding down the [Ctrl] key on the keyboard. If you need to
cancel an address that has been selected, click the address again while holding down
the [Ctrl] key.
If an LDAP server is being used, you can click the [Global Address Search] button to
search for an address on the LDAP server. Multiple e-mail addresses can be entered.
Separate the e-mail addresses with a comma (,), semi-colon (;), space ( ), or colon (:).
When this is selected, the destination is stored in the user tab of the address
book. (Page 22
)
), allowing
9
BEFORE USING THE NETWORK SCANNER FUNCTION
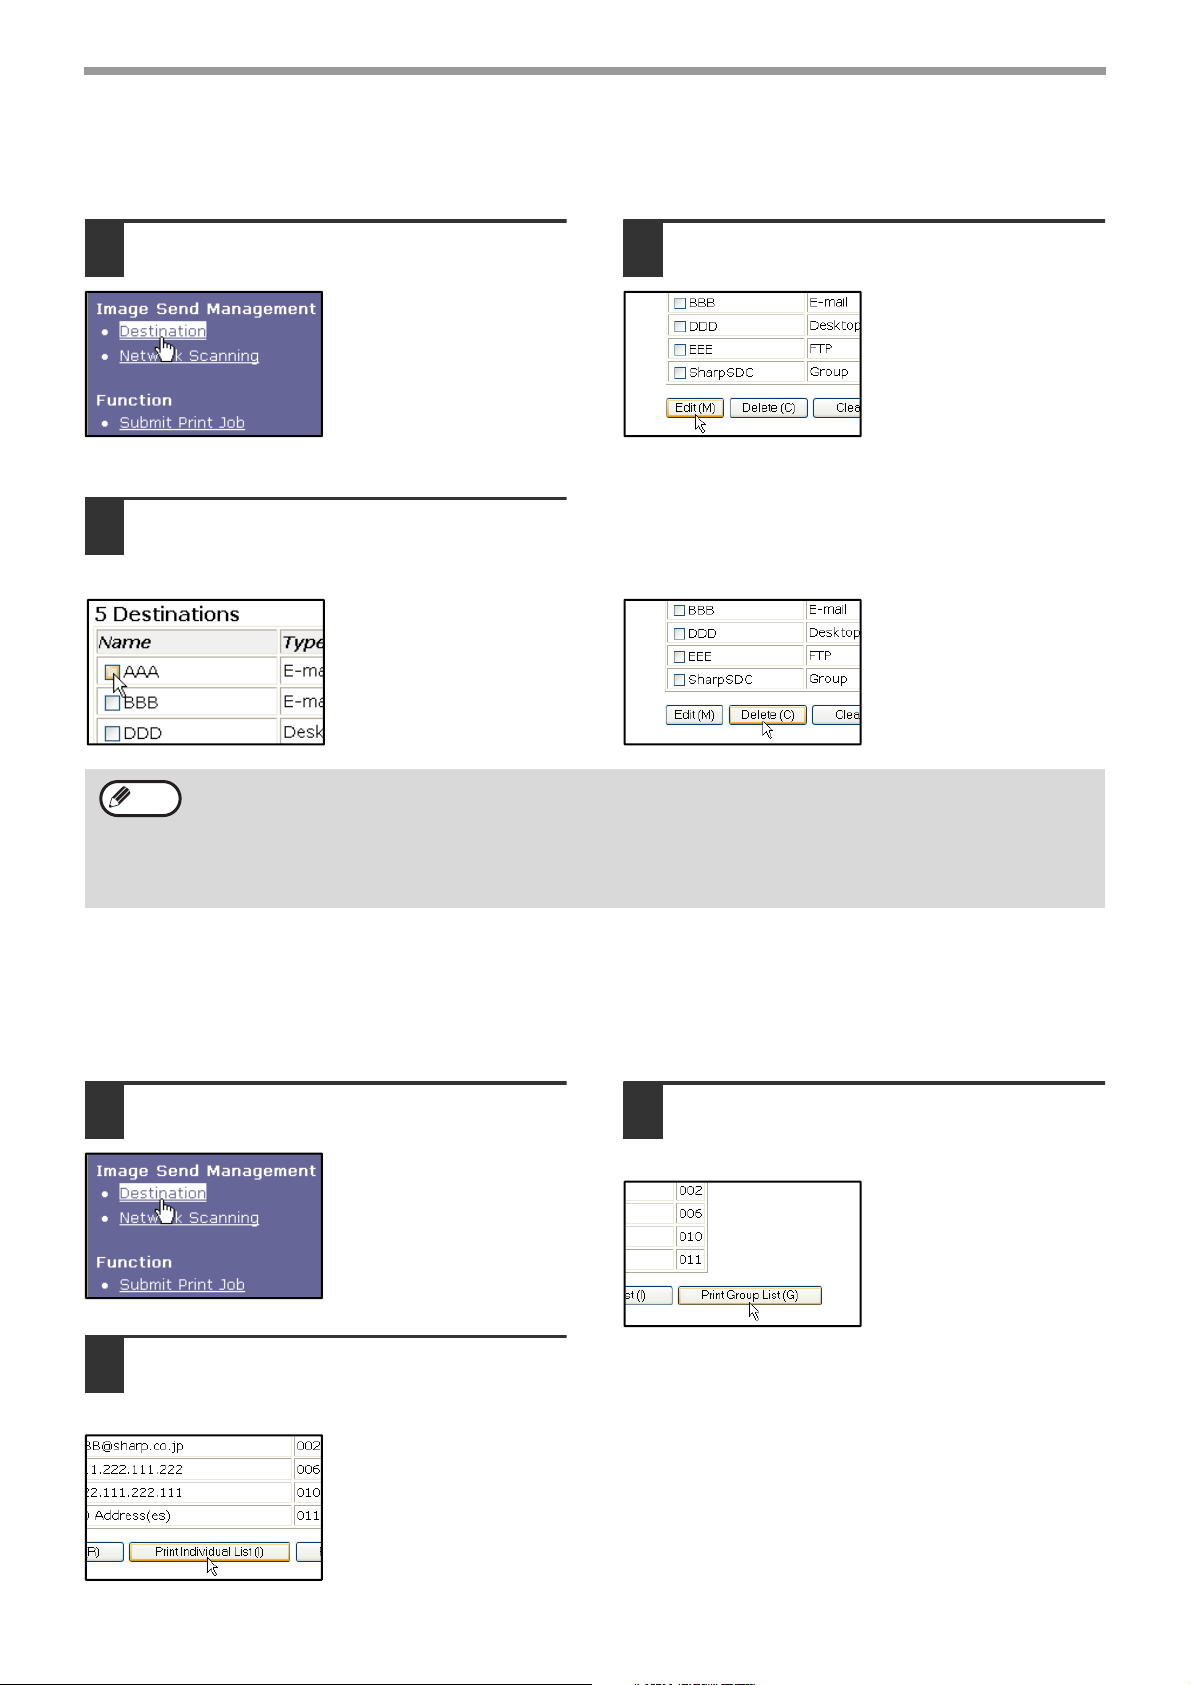
Editing and deleting programmed transmission destinations
To edit or delete programmed destinations, click [Destination] in the menu frame of the Web page.
Click [Destination] in the menu frame
1
of the Web page.
In the Destinations List, click the
2
checkbox of the destination that you
want to edit or delete.
Note
If you attempt to delete a programmed destination in the following situations, a warning message will appear and
deletion will not be possible.
• The destination is included in a group.
If the destination is being used for a current transmission, cancel the transmission or wait until it is completed and
then delete the destination. If the destination is included in a group, delete the destination from the group and
then delete the destination.
To edit the selected destination, click [Edit]
3
at the bottom of the Destinations List.
The programming screen
of the destination
selected in step 2
appears. Edit the
information in the same
way as you initially stored
it.
When finished, be sure to click [Submit] to save
your changes.
To delete the selected destination,
4
click [Delete] at the bottom of the
Destinations List.
A message appears
asking you to confirm the
deletion. Click [Yes] to
delete.
Printing lists of programmed destinations
You can print lists showing the destinations that have been programmed.
The following lists can be printed.
•
Print individual list: Shows the information programmed in e-mail, FTP, desktop, and group destinations.
• Print group list: Shows only the information programmed in group (e-mail) destinations.
Click [Destination] in the menu frame
1
of the Web page.
To print the individual list, click [Print
2
Individual List] at the bottom of the
destinations list.
To print the group list, click [Print
3
Group List] at the bottom of the
destinations list.
10
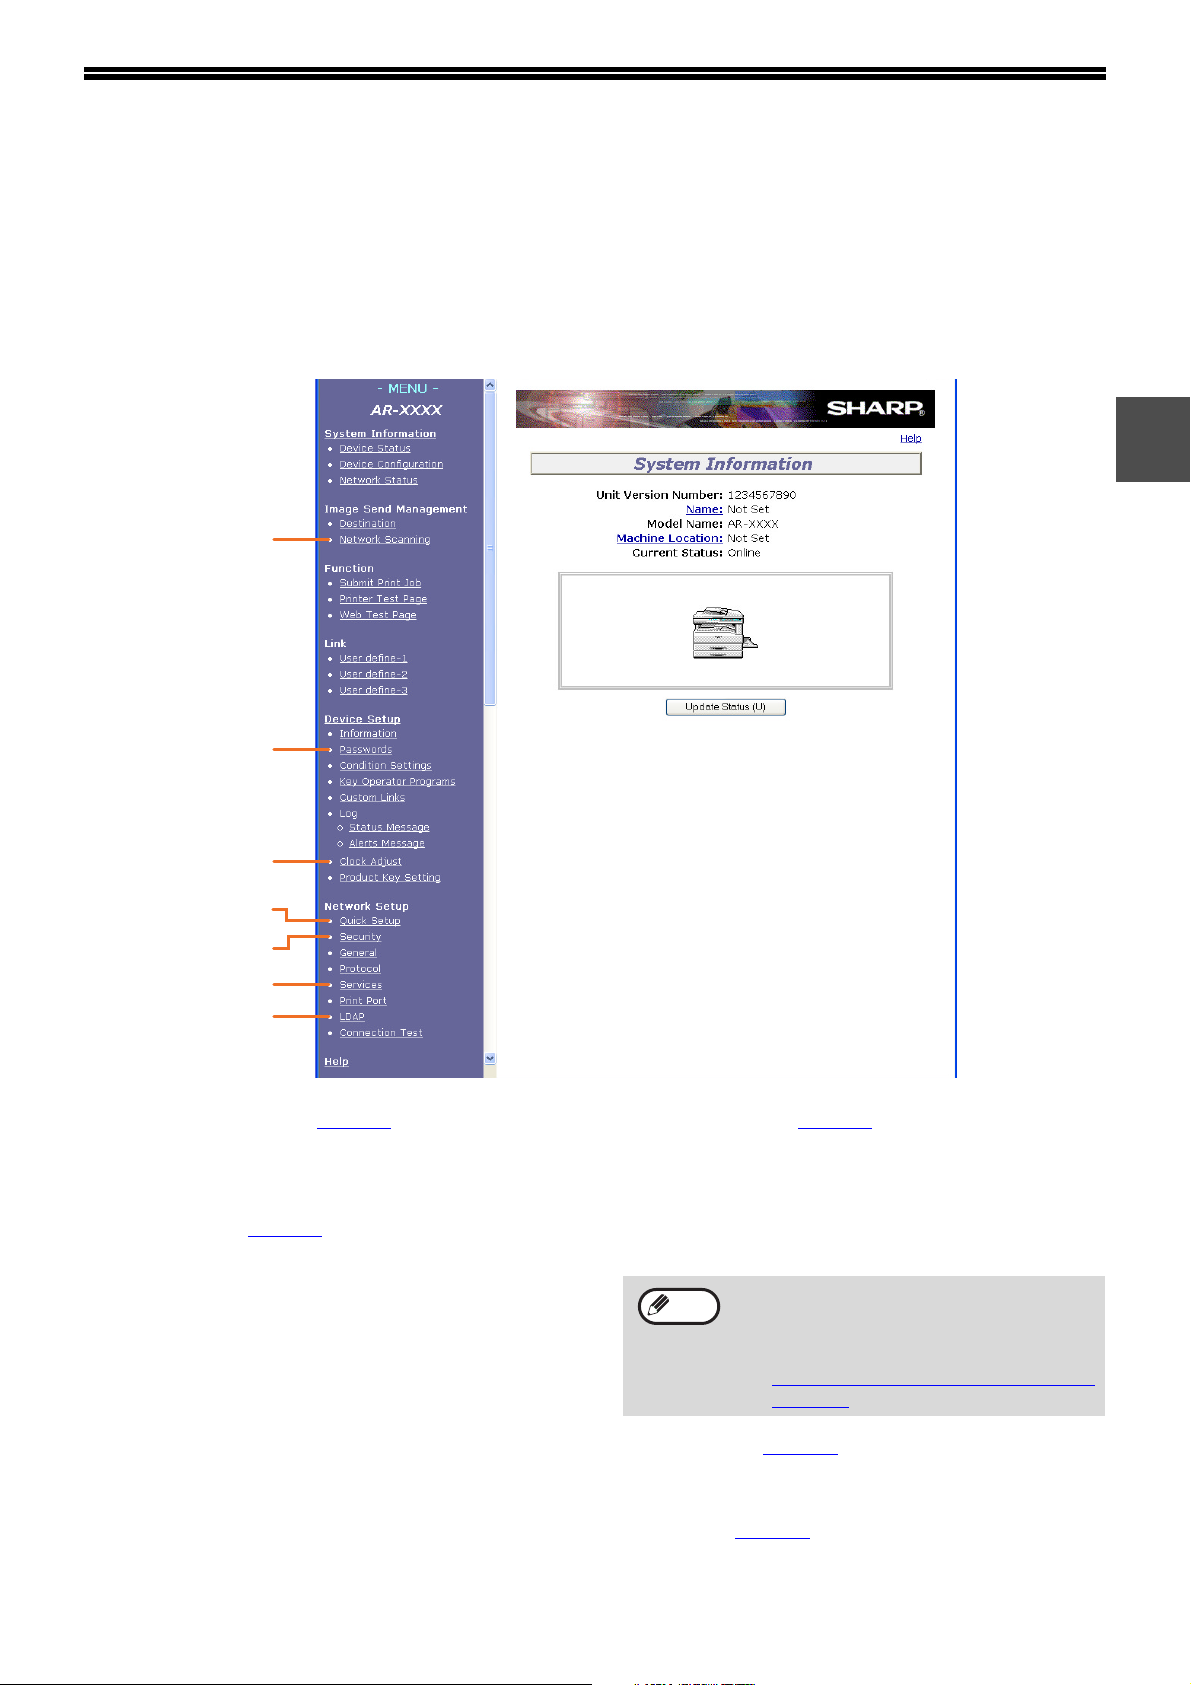
ABOUT THE WEB PAGE (FOR THE ADMINISTRATOR)
In addition to the menu that appear in the user Web page, the Web page for the administrator also shows menus
that can only be established by the administrator.
A menu frame appears on the left side of the page. When you click an item in the menu, a screen appears in the
right frame that allows you to configure settings for that item.
Settings that can only be configured by the administrator are explained here.
(1)
1
(2)
(3)
(4)
(5)
(6)
(7)
(1) Network Scanning (page 12
This lets you select transmission methods for the
network scanner function and configure settings
for Scan to E-mail.
(2) Passwords (page 14
The administrator can establish passwords to
protect the Web site. Enter the password that you
wish to establish and click the [Submit] button.
A password can be set for the administrator and
users.
(3) Clock Adjust
This is used to set the time in the machine. Make
sure the time is set correctly when performing
Scan to E-mail.
This setting does not appear on models that have
the fax function. If your model has the fax
function, see the "Operation manual (for
facsimile)" to set the time at the operation panel
of the machine.
)
)
(4) Quick Setup (page 13
This is used to configure basic settings for the
SMTP, DNS, and LDAP servers.
(5) Security
Port numbers can be changed or disabled for
security purposes.
Note
(6) Services (page 13
This is used to configure advanced SMTP and DNS
server settings as needed for each transmission method.
(7) LDAP (page 13)
This is used to configure advanced settings for
global address searches.
If "HTTP" is disabled, it will not be possible
to open the Web page. To open the Web
page in this case, the network expansion kit
must be reset.
☞ How to reset the network expansion kit
(page 37)
)
)
11

BEFORE USING THE NETWORK SCANNER FUNCTION
BASIC SETTINGS FOR NETWORK SCANNING
Click [Network Scanning] in the menu frame and configure the required settings. A password is required to access
this screen. (Page 14
each of the items, click [Help] in the menu frame.
) These settings should only be configured by the network administrator. For explanations of
Click [Network Scanning] in the menu
1
frame.
The Network Scanning
setup page appears.
Select the transmission methods that
2
you wish to use.
Select the scanner delivery methods that you
want to use. In the "Enable Scanner Delivery to:"
field, click the checkbox next to each method that
you want to use so that a checkmark appears in
the checkbox.
All transmission methods are initially selected
(factory default settings).
Set a limit for the size of image files.
4
To prevent the transmission of excessively large
files by Scan to E-mail, you can set a size limit.
If the image file created from the scanned image
is larger than the set limit, the image file is
discarded. The limit can be set from 1 MB to 10
MB in increments of 1 MB.
The factory default setting is [Unlimited]. If you
wish to set a limit, remove the checkmark from
the [Unlimited] checkbox and enter the desired
limit.
Select the method for assigning a file
5
name to a scanned image.
Select the method for assigning a file name to a
scanned image. In "File Naming", click the items
that you wish to use in the file name. "Destination
Name" and "Date & Time" are initially selected.
Note
If you are going to send images to the same
recipient more than once, we recommend
that you also select "Session Page Counter"
or "Unique Identifier" to prevent sending
multiple files with the same name, which
would result in each successive file
overwriting the previous file.
Configure the Advanced Setup
3
settings.
Select advanced functions that can be used for
Scan to E-mail.
If you wish to BCC a copy of a Scan to E-mail
transmission to an e-mail address, select the
[Bcc] checkbox and enter the e-mail address.
Selecting an e-mail subject (only used
6
for Scan to E-mail).
The setting is used to enter the subject that
appears in the recipient's e-mail program when
you perform Scan to E-mail. (This setting is not
necessary if you will not be using Scan to E-mail.)
Enter a subject (maximum of 80 characters). If
nothing is entered, "Scanned image from <Device
Name>*" will appear.
* The name that appears in Device Name is the name
stored in "Name" in the screen that appears when
you click [System Information] in the menu frame. If a
name has not been stored, the product name will
appear.
Click [Submit].
7
After entering the
settings, be sure to click
[Submit] to store them.
12

BEFORE USING THE NETWORK SCANNER FUNCTION
VARIOUS SERVER SETTINGS
The procedures for using [Quick Setup] are explained here. [Quick Setup] is used to quickly configure only the
required settings for "SMTP", "DNS", and "LDAP" servers. These settings are normally configured first.
SMTP server: SMTP is used to transmit e-mail that is sent using Scan to E-mail or Scan to FTP (Hyperlink). To use
these transmission methods, your SMTP server settings must be configured.
DNS server: If you entered a host name in "Primary SMTP Server" or "Secondary SMTP Server" of "SMTP", you
must also configure your DNS server settings.
You will also need to configure your DNS server settings if host names will be entered in "Hostname
or IP Address" when storing destinations for Scan to FTP (Scan to FTP (Hyperlink)) or Scan to
Desktop.
LDAP server: If mail addresses are managed on your network by an LDAP server, the e-mail addresses stored in
the LDAP server can be used for Scan to E-mail.
To allow the machine to use the e-mail addresses in the LDAP server, the LDAP server settings must
be configured in the Web page.
Configuring SMTP, DNS and LDAP server settings.
1
Click [Quick Setup] in the menu frame.
1
Enter the required information in
2
"SMTP", "DNS" and "LDAP".
For explanations of each setting, click [Help] in
the upper right-hand corner of the window.
Note
If you need to configure advanced settings for the SMTP, DNS, and LDAP servers, follow the procedures below.
• Configuring SMTP and DNS server settings
Click [Services] in the menu frame to display the services setup screen. Select the desired server and then
configure the required parameters for that server.
• Configuring LDAP server settings
Click [LDAP] in the menu frame to display the LDAP setup screen. Configure the required parameters.
When you have completed all of the
3
entries, click [Submit].
The entries will be stored.
13

BEFORE USING THE NETWORK SCANNER FUNCTION
PROTECTING INFORMATION PROGRAMMED IN THE WEB PAGE ([Passwords])
The settings and information programmed in the Web page can be protected by establishing passwords (click
[Passwords] in the menu frame). The administrator must change the factory default password to a new password.
The administrator should also take care to remember the new password. From now on, the new password must be
entered each time you wish to configure settings in the Web pages.
A password can be set for the administrator and users.
Click [Passwords] in the menu frame.
1
Enter the current password in "Admin
2
Password".
When establishing a password for the first time,
enter "Sharp" in "Admin Password".
Caution
Be sure to enter "S" in upper case
and "harp" in lower case (passwords
are case sensitive).
Enter passwords in "User Password"
3
and "Admin Password".
• A maximum of 7 characters and/or numbers
can be entered for each password (passwords
are case sensitive).
• Be sure to enter the same password in
"Confirm Password" as you did in "New
Password".
When you have completed all entries,
4
click [Submit].
The entered password is stored.
After setting the password, turn the machine
power off and then back on.
When prompted to enter the password, a user
should enter "user" in "User Name" and an
administrator should enter "admin" in "User Name".
The appropriate password should be entered in
"Password". For more information, click [Help] in the
upper right-hand corner of the window.
14

HOW TO USE THE NETWORK
2
This chapter explains how to use the network scanner function at the operation panel of the machine after the
settings have been configured in the Web page. The network scanner function is used to convert paper-based
information such as a photo or document into image data for transmission over a corporate network (intranet) or the
Internet to an FTP server or computer. When transmitting an image using the network scanner function, the
destination is specified by selecting a previously stored destination at the operation panel.
There are three methods for transmitting images:
1.The scanned image can be sent to a designated directory on an FTP server. (Scan to FTP)
2.The scanned image can be sent to a computer desktop on the network. (Scan to Desktop)
3.The scanned image can be sent to an e-mail recipient. (Scan to E-mail)
Note
SCANNER FUNCTION
Before Scan to Desktop can be performed, the software in the CD-ROM that accompanied the network
expansion kit (AR-NB3) must be installed. (For the procedure for installing the software, see the "Sharpdesk
installation guide".)
15

A LOOK AT THE MACHINE
OPERATION PANEL
(1)
26 27 28 29 30
ABCDE
31 32 33 34 35
FGH I J
36 37 38 39 40
KLMNO
(1) Keys for the fax function
(when the fax option is installed)
These keys are used in fax mode. For more
information, see the "Operation manual (for
facsimile)".
(2) Display (page 18
)
This displays the base screen and the function
settings screen.
The indicators of the operation panel may differ
depending on the country and region.
(3) [BACK] key
In a setting or programming screen, this key is
used to move back to the previous screen.
(4) [OK] key
This key is used to enter a setting that has been
selected with the arrow ( ) or other keys.
(5) Numeric keys
These are used to enter destination addresses,
address search characters, and numeric values
for various settings.
For more information on entering characters, see
ENTERING CHARACTERS" (page 31).
"
(6) [C] key
This is used to clear a mistake while entering
destination addresses, address search
characters, and numeric values for various
settings. One digit is cleared each time the key is
pressed.
The key is also used to cancel a job.
41 42 43 44 45
PQR TS
46 47 48 49 50
U V W XYZ SP
SPEAKER
REDIAL/PAUSE SPEED
SHIFT
COMM. SETTING
SYMBOL
SPACE/–
COPY
PRINT
SCAN
FAX
ON LINE
LINE
DATA
DATA
(8) (9)
(7) [CA] key
This is used to cancel a transmission or
programming operation. When pressed during a
programming operation, the operation is
cancelled and the display returns to the base
screen described on page 18
.
This key is also used to cancel a resolution,
paper size, or special function setting that was
selected at the time of transmission.
(8) [MODE SELECT] keys (step 1 on page 20
Use these keys to change current operation
mode.
(9) [SCAN] key
Press to switch to scan mode. The initial screen
of scan mode will appear in the display.
(10) [COLOUR MODE] key (page 27
)
Use this key to select "COLOUR", "GRAY", or
"B/W" for the scanning mode.
(11) [RESOLUTION] key (page 27
)
Use this key to select the scanning resolution.
(12) [ADDRESS] key (page 22
)
Use this key to search for destination addresses
such as e-mail address in the address directory.
)
16

HOW TO USE THE NETWORK SCANNER FUNCTION
(2) (3) (4) (5) (6) (7)
FAX STATUS
COPY
EXPOSURE
SCAN
COLOUR MODE
FAX
PROGRAM
(10)
RATIO
ADDRESS
AUTO
IMAGE
FORMAT
BROADCAST
SELECT
RESOLUTION
(11) (12) (13) (14) (15) (16) (17) (18)
2-SIDED
OUTPUT
COPY
ORIGINAL SIZE DUPLEX SCAN
PAPER
COPY
(13) [FORMAT] key (page 28)
When you send an image to one or more
recipients using Scan to E-mail or Scan to FTP,
the [FORMAT] key enables you to temporarily
override the individual file format settings (file
type / compression mode) stored for each
recipient and send the image to all of the
recipients using a single file format setting.
(14) [ORIGINAL SIZE] key (page 26
)
This is used to set the size of the original to be
transmitted.
(15) [DUPLEX SCAN] key (page 25
)
Press this key to use the duplex scan function.
(when the RSPF is installed)
(16) [SPECIAL FUNCTION] key
This key is used to select a special transmission
function, configure function settings, and access
the key operator programs.
BACK
OK
SPECIAL FUNCTION
ABC DEF
JKLGHI MNO
TUVPQRS WXYZ
_
@.-
ACC. #-C
READ-END
(17) Arrow keys ( )
These are used to select items and move through
pages.
(18) [START] key ( )
This is used at the following times:
(1) When starting transmission
(2) When scanning an original
(3) When configuring and storing settings
Note
• When the auto power shut-off function
activates, all lights except the mode key
indicators go off. For information on auto
power shut-off, see the "Operation
manual (for general information and
copier)".
• For information on the keys and indicators
which are used for the copy function and
other functions, see "OPERATION
PANEL" in the manual for each function.
2
17

HOW TO USE THE NETWORK SCANNER FUNCTION
SCAN MODE (BASE SCREEN)
The base screen of scan mode is displayed by pressing the [SCAN] key from the base screen of copy mode, print
mode, or fax mode.
Note
If a screen appears asking you what type of connection you are using after you press the [SCAN] key, select
"NETWORK" with the [ ] or [ ] key and press the [OK] key.
Base screen of scan mode
(1)
(2)
(3)
(4)
(5)
(1) Message display
Messages appear here to indicate the current
status of the machine.
(2) Destination display
This shows the selected destination.
There are four scanner transmission modes:
Scan to E-mail, Scan to FTP, Scan to FTP
(Hyperlink), and Scan to Desktop.
This shows the currently selected destination and
transmission mode.
(3) Colour mode display
This shows the currently selected colour mode for
scanning.
(4) File type display
This shows the image data file type to be created.
Ready to scan.
XXXXX
PDF MULTI
A4
(6)
COLOUR 150dpi
(5) Original display (page 26
This displays an icon to indicate the original
scanning mode when an original has been
placed.
: One-sided scanning in the SPF.
: Document glass
: Two-sided scanning in the RSPF.
The size of the original is also displayed.
(6) Transmission mode display
When appears to the right of the icon, the [ ]
key can be pressed to show a list of the currently
selected destinations.
A destination can also be deleted in this screen.
(7) Resolution display
The shows the scanning resolution.
(8) File creation display
This shows the currently selected file creation
method.
(7)
(8)
)
18

HOW TO USE THE NETWORK SCANNER FUNCTION
ABC DEF
JKLGHI MNO
TUVPQRS WXYZ
@.-
_
ACC. #-C
READ-END
OK
@.-
_
ACC. #-C
READ-E
AUDITING MODE
Auditing mode is used to restrict the use of scan mode to valid accounts (up to 50 accounts can be created) and to
keep a count of pages transmitted by each account.
Using audit mode
When auditing mode is enabled, the account number entry screen is displayed. Enter your account number
(five-digit identification number) as explained below before performing a scanner operation.
Enter your account
number.
ACCOUNT #:-----
Enter your account number (five
1
digits) with the numeric keys.
Enter your account
number.
ACCOUNT #: ---
• As the account number is entered, the hyphens (-)
change to asterisks ( ). If you enter an incorrect
digit, press [C] key and re-enter the correct digit.
• After you enter your account number, the base
screen of scan mode (page 18
Note
• If you enter an account number for copy
mode has also been programmed for
scan mode, you can change to scan mode
after completing the copy operation and
continue with the scan operation without
re-entering your account number.
If you enter an account number for copy
mode that has not been programmed for
scan mode, enter your account number
for scan mode after you press the [SCAN]
key to change to scan mode.
• When "ACC. # SECURITY" is enabled in
the key operator programs (see the "Key
operator's guide"), the message "Please
see your key operator for assistance" will
appear for one minute if an invalid
account number is entered three times in
a row. During that time operation of the
machine will not be possible.
) appears.
When you have finished using scan
2
mode, press the [ACC.#-C] key ( ).
2
19

SENDING AN IMAGE
COPY
LINE
DATA
SCAN
FAX
PRINT
EXP
AUTO
IMAGE
OUTPUT
2-SIDED
COPY
SPE
FORMAT
BROADCAST
ORIGINAL SIZE DUPLEX SCAN
COPY
EXPOSURE
PAPER
SELECT
COP
RAT
SCAN
FAX
COLOUR MODE
PROGRAM
RESOLUTION
ADDR
COPY
EXPOSURE
PAPER
SELECT
COP
RAT
SCAN
FAX
COLOUR MODE
PROGRAM
RESOLUTION
ADDRE
EXPOSURE
PAPER
SELECT
COPY
RATIO
AUT
IMAG
COLOUR MODE
PROGRAM
FORM
BROADC
RESOLUTION
ADDRESS
COPY
RATIO
AUTO
IMAGE
OUTPUT
2-SID
COP
FORMAT
BROADCAST
ADDRESS
ORIGINAL SIZE DUPLEX
PAPER
SELECT
COPY
RATIO
AUTO
IMAGE
OUTP
GRAM
FORMAT
BROADCAST
RESOLUTION
ADDRESS
ORIGINA
BASIC TRANSMISSION PROCEDURE
Make sure the machine is in scan
1
mode.
When the SCAN indicator is lit,
the machine is in scan mode.
If the indicator is not lit, press
the [SCAN] key. If auditing
mode has been enabled for
the scan function in the key
operator programs, a
message will appear prompting you to enter your
account number when you switch to scan mode. Enter
your account number (five digits) with the numeric
keys. (Page 19
Place the original(s) in the document
2
)
feeder tray or on the document glass.
For detailed information on placing an original, see "4.
COPY FUNCTIONS" of the "Operation manual (for
general information and copier)".
If you are using the document glass to send multiple
pages, place the first page first.
Note
Check the original size. If the original
3
You cannot place originals in both the
document feeder tray and on the document
glass and send them in a single transmission.
is a non-standard size or the size was
not detected correctly, press the
[ORIGINAL SIZE] key.
If needed, select the resolution setting
5
(page 27).
RESOLUTION
100dpi
150dpi
200dpi
300dpi
The initial factory setting is [150dpi].
If needed, select the format (page 28).
6
FORMAT
PDF
PDF G3
MULTI
ALL PAGES 1FILE
The initial factory setting is [PDF].
Note
Press the [ADDRESS] key.
7
• Information on the destination can be
stored in the Web page.
• The sender name is normally set to the
name stored in "Reply E-mail Address" in
"SMTP Setup" in the Web page.
ORIGINAL SIZE
AB
A3
B4
A4
When the [ORIGINAL SIZE] key is pressed, the size
selection screen appears. See "
MANUALLY SETTING
THE SCANNING SIZE" (page 26) to set the original size.
If needed, select the colour mode
4
(page 27).
COLOUR MODE
COLOUR
GRAY
B/W
To adjust the colour mode, press the [COLOUR
MODE] key. (See "
MODE" (page 27).)
20
SELECTING THE COLOUR
DESTINATION SELECT
ADDRESS BOOK
ADDRESS ENTRY
ADDRESS SEARCH

HOW TO USE THE NETWORK SCANNER FUNCTION
WXYZ
@.-
_
WXYZ
@.-
_
@.-
_
READ-END
Select the destination selection
8
method (page 22).
Select from the following three destination selection methods:
• "ADDRESS BOOK" (page 22
Select one of the stored destinations directly from
the operation panel.
• "ADDRESS ENTRY" (page 23
Directly enter the e-mail address. (Only for Scan to
E-mail.)
• "ADDRESS SEARCH" (page 24
Access a directory data base on the Internet or your
intranet and search for a destination e-mail address.
During a global address search, multiple addresses
can be entered to perform a broadcast transmission.
When you have finished searching for the destination,
you will return to the following base screen.
)
)
)
Ready to scan.
XXXXX
COLOUR 150dpi
PDF MULTI
A4
Using the SPF
Press the [START] key ( ).
9
Using the document glass
Press the [START] key ().
9
Reading P-xxx
XXXXX
COLOUR 150dpi
PDF MULTI
A4
Scanning begins.
If you have another page to scan, change
10
pages and then press [START] key
()
.
[START]:CONTINUE
[#]:READ-END
COLOUR 150dpi
PDF MULTI
A4
•
Repeat this sequence until all pages have been scanned.
• You can change the colour mode and resolution
setting as needed for each page. (page 27
• If no action is taken for one minute (the [START] key
( ) is not pressed), scanning automatically ends
and transmission begins.
)
2
Scanning begins.
If scanning is completed
normally, the following
screen is appears briefly
and then the display
returns to the base screen.
Note
Reading P-xxx
XXXXX
COLOUR 150dpi
PDF MULTI
A4
When the final original page has been
11
scanned, press the [READ-END] key ( ).
[START]:CONTINUE
[#]:READ-END
COLOUR 150dpi
PDF MULTI
Complete.
XXXXX
COLOUR 150dpi
PDF MULTI
Open the SPF and remove the document. When the
original is removed or any key operation is performed,
the display returns to the base screen.
A4
A4
• Cancelling transmission
To cancel the transmission while "Reading" appears or before the key is pressed, press the [C] or [CA] key.
• If the power is turned off or a power failure occurs while a document is being scanned in the SPF, the machine
will stop and a document misfeed will occur. After the power is restored, remove the misfed original as
explained in "REMOVING MISFEEDS" in "2. TROUBLESHOOTING AND MAINTENANCE" in the "Operation
manual (for general information and copier)".
When performing a Scan to E-mail transmission, note the following points:
•
Be careful not to send image data files that are too large. Your mail server's system administrator may have placed a limit
on the amount of data that can be sent in one e-mail transmission. If this limit is exceeded, the e-mail will not be delivered
to the recipient. Even if there is no limit and your e-mail is successfully delivered, a large data file may take a long time to
be received and place a heavy burden on the recipient's network, depending on the recipient's network (Internet)
environment. If large image data files are repeatedly sent, the resulting burden on the network may slow down the speed of
other, unrelated data transmissions and in some cases, may even cause the mail server or network to go down. In cases
where you need to send a large file or multiple images, try lowering the resolution or reducing the scanned original size.
21

HOW TO USE THE NETWORK SCANNER FUNCTION
PAPER
SELECT
COPY
RATIO
AUTO
IMAGE
OUTP
GRAM
FORMAT
BROADCAST
RESOLUTION
ADDRESS
ORIGINA
GHI
OK
BACK
GH
PQR
2-SIDED
COPY
SPECIAL FUNCTION
@.-
_
ACC. #-C
READ-E
SELECTING A DESTINATION (USING THE [ADDRESS] KEY)
A destination can be selected using one of three methods: Selecting from "ADDRESS BOOK", using "ADDRESS
ENTRY", or "ADDRESS SEARCH".
"ADDRESS BOOK"
Perform steps 1 to 6 of "BASIC
1
TRANSMISSION PROCEDURE" (page 20).
Press the [ADDRESS] key.
2
DESTINATION SELECT
ADDRESS BOOK
ADDRESS ENTRY
ADDRESS SEARCH
The address selection
screen appears
Press the [OK] key.
3
USER
PPD
SALES
[#]:LIST DETAIL
[ ]:SELECT ON/OFF
Press the key.
5
A checkmark appears by the
selected destination. To
cancel the selection, press the
key once again to remove
the checkmark.
To select multiple
destinations, repeat steps 4
and 5.
Press the [OK] key.
6
OK
Only one destination can be selected for a Scan to
FTP or Scan to Desktop transmission.
Continue from step 9 of "BASIC
7
Multiple destinations can be
selected for a Scan to E-mail
transmission. (Maximum of
20.)
TRANSMISSION PROCEDURE" (page 21).
Change tabs as needed with the [ ] or
4
[ ] key and select the desired
destination with the [ ] or [ ] key.
USER
PPD
SALES
SUPPORT
[ ]:SELECT ON/OFF
• The [USER] tab changes as follows each time you
press the [ ] key:
[USER]
→
To move backwards through the tabs, press the [ ]
key.
• You can switch between information on the selected
destination and the destination list by pressing the
key.
→
[ABCD]→[EFGHI]→[JKLMN]→[OPQRST]
[UVWXYZ]→[USER]→[ABCD]→...
8
Note
Cancelling transmission
• To cancel the transmission while
"Reading" appears or before the key is
pressed, press the [C] or [CA] key.
• If the power is turned off or a power failure
occurs while a document is being
scanned in the SPF, the machine will stop
and a document misfeed will occur. After
the power is restored, remove the
document as explained in "ORIGINAL
MISFEED IN THE SPF" in "Operation
manual (for general information and
copier)".
22

"ADDRESS ENTRY"
PAPER
SELECT
COPY
RATIO
AUTO
IMAGE
OUTP
GRAM
FORMAT
BROADCAST
RESOLUTION
ADDRESS
ORIGINA
GH
PQR
2-SIDED
COPY
SPECIAL FUNCTION
GHI
OK
BACK
ABC DEF
JKLGHI MNO
TUVPQRS WXYZ
@.-
_
ACC. #-C
READ-END
OK
HOW TO USE THE NETWORK SCANNER FUNCTION
Perform steps 1 to 6 of "BASIC
1
TRANSMISSION PROCEDURE" (page 20).
Press the [ADDRESS] key
2
DESTINATION SELECT
ADDRESS BOOK
ADDRESS ENTRY
ADDRESS SEARCH
The address selection
screen appears.
Select "ADDRESS ENTRY" with the
3
[ ] key.
DESTINATION SELECT
ADDRESS BOOK
ADDRESS ENTRY
ADDRESS SEARCH
Press the [OK] key.
4
ADDRESS ENTRY
Enter the destination address.
5
To enter characters, see
"
ENTERING CHARACTERS"
(page 31).
If you make a mistake, press
the [C] key and to clear the
mistake.
Press the [OK] key.
6
OK
Ready to scan.
ppdl@sharp.corp
COLOUR 150dpi
PDF MULTI
The base screen
appears.
To enter another address, repeat
7
steps 2 through 6.
Multiple destinations can be selected for a Scan to
E-mail transmission. (Maximum of 20.)
Continue from step 9 of "BASIC
8
TRANSMISSION PROCEDURE" (page 21).
A4
9
10
2
The e-mail address entry
screen appears.
[10-key]:ENTRY
23

HOW TO USE THE NETWORK SCANNER FUNCTION
PAPER
SELECT
COPY
RATIO
AUTO
IMAGE
OUTP
GRAM
FORMAT
BROADCAST
RESOLUTION
ADDRESS
ORIGINA
GH
PQR
2-SIDED
COPY
SPECIAL FUNCTION
GHI
OK
BACK
ABC DEF
JKLGHI MNO
TUVPQRS WXYZ
@.-
_
ACC. #-C
READ-END
OK
GH
PQR
2-SIDED
COPY
SPECIAL FUNCTION
"ADDRESS SEARCH" search
Perform steps 1 to 6 of "BASIC
1
TRANSMISSION PROCEDURE" (page 20).
Press the [ADDRESS] key
2
DESTINATION SELECT
ADDRESS BOOK
ADDRESS ENTRY
ADDRESS SEARCH
Select "ADDRESS SEARCH" with the
3
[ ] key.
DESTINATION SELECT
ADDRESS BOOK
ADDRESS ENTRY
ADDRESS SEARCH
Press the [OK] key.
6
OK
SEARCH RESULT
Tanaka a
Tanaka b
Tanaka c
The search results
appear.
Select the desired destination with the
7
[] or [] key.
Tanaka d
SEARCH RESULT
Tanaka a
Tanaka b
Tanaka c
Tanaka d
Press the [OK] key.
8
Press the [OK] key.
4
ADDRESS SEARCH
_
The address search
screen appears.
Enter the search characters.
5
[10-key]:ENTRY
To enter characters, see
"
ENTERING CHARACTERS"
(page 31).
If you make a mistake, press
the [C] key to clear the
mistake.
OK
Ready to scan.
Tanaka c
COLOUR 150dpi
PDF MULTI
The base screen
appears.
To perform another search, repeat
9
steps 2 through 8.
Multiple destinations can be selected for a Scan to
E-mail transmission. (Maximum of 20.)
Continue from step 9 of "BASIC
10
TRANSMISSION PROCEDURE" (page 21).
A4
24

HOW TO USE THE NETWORK SCANNER FUNCTION
COPY
LINE
DATA
SCAN
FAX
PRINT
EXP
AUTO
IMAGE
OUTPUT
2-SIDED
COPY
SPE
FORMAT
BROADCAST
ORIGINAL SIZE DUPLEX SCAN
OUTPUT
2-SIDED
COPY
SPECIAL FUNCTI
ORIGINAL SIZE DUPLEX SCAN
GH
PQR
2-SIDED
COPY
SPECIAL FUNCTION
GHI
OK
BACK
TRANSMITTING A TWO-SIDED ORIGINAL
Follow these steps to automatically transmit a two-sided original. (This is only possible on models that have an RSPF installed.)
Note
Make sure the machine is in scan
1
Do not use an original that is not a standard size (A3, B4, A4, A4R, B5, B5R, A5, 11" x 17", 8-1/2" x 14", 8-1/2" x
13", 8-1/2" x 11", 8-1/2" x 11"R, or 5-1/2" x 8-1/2").
Otherwise a scanning error or cut-off image may result.
mode.
When the SCAN indicator is lit, the
machine is in scan mode. If the
indicator is not on, press the [SCAN]
key. If auditing mode has been
enabled for the scan function in the
key operator programs, a message
will appear prompting you to enter
your account number when you switch to scan mode. Enter your
account number (five digits) with the numeric keys. (Page 19
Place the original(s) in the document
2
)
feeder tray.
For information on placing an original, see "4. COPY
FUNCTIONS" of the "Operation manual (for general
information and copier)".
Check the original size.
3
ORIGINAL SIZE
AB
A3
B4
A4
Select "2-SIDED" with the [ ] or [ ]
5
key.
DUPLEX SCAN
1-SIDED
2-SIDED
Press the [OK] key.
6
The duplex original type
selection screen appears.
Select booklet or tablet for the duplex
7
original type with the [ ] or [ ] key.
DUPLEX STYLE
BOOKLET
2
Press the [ORIGINAL SIZE] key to open the original
size selection screen. See "
SCANNING SIZE" (page 26) to set the original size.
4
The duplex mode
selection screen appears.
MANUALLY SETTING THE
Press the [DUPLEX SCAN] key.
DUPLEX SCAN
1-SIDED
2-SIDED
•
Note
Two-sided scanning is not possible when "COLOUR MODE" is set to "COLOUR" or "GRAY".
• Booklets and tablets
Two-sided originals that are bound at the side are booklets, and two-sided
originals that are bound at the top are tablets.
• Two-sided scanning mode turns off after the transmission is finished. Two-sided
scanning mode can also be cancelled by pressing the [CA] key.
• Two-sided scanning is only possible when an RSPF is used. Automatic scanning
of both sides of an original is not possible when the document glass is used.
• Two-sided scanning of originals longer than A3 (11" x 17") is not possible.
To cancel two-sided scanning, select "1-SIDED" in step 5 and then press the [OK] key.
•
Press the [OK] key.
8
OK
You will return to the base screen and the duplex
scanning mode icon will appear.
Continue from step 4 of "BASIC
9
TRANSMISSION PROCEDURE" (page 20).
BOOKLET TABLET
25

CHECKING THE SIZE OF A PLACED
AUTO
IMAGE
OUTPUT
2-SIDED
COPY
SPE
FORMAT
BROADCAST
ORIGINAL SIZE DUPLEX SCAN
GH
PQR
2-SIDED
COPY
SPECIAL FUNCTION
GHI
OK
BACK
ORIGINAL
When a standard-size* original is placed in the document feeder tray or on the
document glass, the original size is automatically detected (automatic original detection
function) and displayed in the original display. Make sure that the size has been
detected correctly.
(1) When an original is placed, an icon appears to indicate the original scanning mode.
: One-sided scanning from the SPF
: Scanning from the document glass
: Two-sided scanning from the RSPF
(2) The original size is displayed.
If a non-standard size original is placed or if you wish to change the scanning size, follow the steps below to
manually set the original scanning size.
Note
* Standard sizes:
The following sizes are standard sizes: A3, B4, A4, A4R, B5, B5R, A5 (11" x 17", 8-1/2" x 14", 8-1/2" x 13", 8-1/2"
x 11", 8-1/2" x 11"R, 5-1/2" x 8-1/2"). If a non-standard size original (including a special size) is placed, a
standard size close to the original size may appear, or the original size may not be displayed.
Ready to scan.
XXXXX
COLOUR 150dpi
PDF MULTI
A4
(1) (2)
STORING SCANNING SETTINGS
Sets of scanning settings (scan size, colour mode, resolution, file type, etc.) can be stored for use in various
scanning applications.
MANUALLY SETTING THE SCANNING SIZE
If you load an original that is not a standard size, or the original size is not correctly detected, be sure to press the
[ORIGINAL SIZE] key and set the original size manually.
Perform the following steps after loading the document in the document feeder tray or on the document glass.
Press the [ORIGINAL SIZE] key.
1
ORIGINAL SIZE
AB
A3
B4
The original size
selection screen will
appear.
Select the original size with the [ ] or
2
[ ] key.
A4
ORIGINAL SIZE
AB
A3
B4
The selected original size
is highlighted.
A4
To select an INCH size, press the [ ] key and go to
step 4.
ORIGINAL SIZE
INCH
11x17
1
8 x14
2
1
8 x13
When the [ ] key is
pressed, the original size
selection screen for INCH
sizes appears.
Press the [OK] key.
3
You will return to the base
screen and the selected original
size will appear in the original
display.
2
26

HOW TO USE THE NETWORK SCANNER FUNCTION
COPY
EXPOSURE
PAPER
SELECT
COP
RAT
SCAN
FAX
COLOUR MODE
PROGRAM
RESOLUTION
ADDR
COPY
EXPOSURE
PAPER
SELECT
COP
RAT
SCAN
FAX
COLOUR MODE
PROGRAM
RESOLUTION
ADDRE
GH
PQR
2-SIDED
COPY
SPECIAL FUNCTION
GHI
OK
BACK
EXPOSURE
PAPER
SELECT
COPY
RATIO
AUT
IMAG
COLOUR MODE
PROGRAM
FORM
BROADC
RESOLUTION
ADDRESS
GH
PQR
2-SIDED
COPY
SPECIAL FUNCTION
Selecting an INCH original size
Press the [OK] key.
5
Select the original size with the [ ] or
4
[ ] key.
OK
ORIGINAL SIZE
INCH
You will return to the base
screen and the selected original
size will appear in the original
display.
11x17
1
8 x14
2
1
8 x13
2
To return to the selection of inch original sizes, press
the [ ] key and return to step 2.
Note
To cancel a manual original size setting,
press the [CA] key.
If it is not possible to select the actual original
size, select a size that is larger than the actual
original size. If a smaller size is selected, part
of the original will not be transmitted.
SELECTING THE COLOUR MODE
After placing the original, you can select an appropriate colour mode for the original type. Place the original in the
document feeder tray or on the document glass (steps 1 to 3 on page 20
The factory default setting for the colour mode is "COLOUR". To change the colour mode, follow these steps.
Press the [COLOUR MODE] key.
1
COLOUR: Select this mode for colour originals.
GRAY : Select this mode for a black and white
COLOUR MODE
COLOUR
B/W : Select this mode when you wish to scan a
GRAY
B/W
) and then follow the steps below.
photograph or when a monochrome image
is needed.
photo in monochrome or when you wish to
make text clearer.
2
The colour mode
selection screen appears.
Select the colour mode with the [ ] or
2
[ ] key.
COLOUR MODE
Press the [OK] key.
3
You will return to the base
screen and the selected mode
will appear in the colour mode
display.
COLOUR
GRAY
Two-sided scanning is not possible when
"COLOUR MODE" is set to "COLOUR" or "GRAY".
The selected mode is
highlighted.
B/W
Note
SELECTING THE RESOLUTION
The scanning resolution can be selected. After selecting scan mode and placing the original (steps 1 to 3 on page
20), perform the procedure below.
The factory default setting for the resolution is "150dpi" (e-mail/FTP mode).
If you need to change the resolution, follow these steps.
Press the [RESOLUTION] key.
1
The resolution selection
screen appears.
RESOLUTION
100dpi
150dpi
200dpi
300dpi
Select the resolution with the [ ] or
2
[ ] key.
RESOLUTION
100dpi
150dpi
200dpi
The selected resolution is
highlighted.
300dpi
27

HOW TO USE THE NETWORK SCANNER FUNCTION
GHI
OK
BACK
COPY
RATIO
AUTO
IMAGE
OUTPUT
2-SID
COP
FORMAT
BROADCAST
ADDRESS
ORIGINAL SIZE DUPLEX
GH
PQR
2-SIDED
COPY
SPECIAL FUNCTION
GHI
OK
BACK
Press the [OK] key.
3
Note
You will return to the base
screen and the selected
resolution will appear in the
resolution display.
Resolution
• The default resolution setting is 150 dpi.
For typical text documents, a resolution of
200 dpi or 300 dpi produces sufficiently
legible image data. (A resolution of 200
dpi corresponds to the generally used
"FINE" in fax mode.
For this reason, the 600 dpi setting should
only be used in cases where high-clarity
image reproduction is required, such as
an original that includes photographs or
illustrations.
When an original is scanned at the maximum
•
resolution (600 dpi), the amount of memory
available, the original size, the colour mode,
and other setting conditions may cause the
resolution to change. For information on the
setting conditions, see "
RESOLUTION" (page 35).
MAXIMUM
SELECTING THE FILE FORMAT
After selecting scan mode and placing the original (steps 1 to 3 on page 20), perform the procedure below.
The factory default settings are "PDF" for the file type and "MULTI" for the file creation method (multiple scanned
images are combined into one file).
If you need to change the file format, follow these steps.
Press the [FORMAT] key.
1
FORMAT
PDF
PDF G3
The format selection
screen appears.
Select the file type with the [ ] or [ ]
2
key.
ALL PAGES 1FILE
MULTI
FORMAT
PDF
PDF G3
MULTI
The selected file type is
highlighted.
To set the file creation method, press the [ ] or [ ]
key.
ALL PAGES 1FILE
FORMAT
PDF
PDF G3
SINGLE
1PAGE 1FILE
When "SINGLE" is selected, a one-page file is created
for the scanned image.
When "MULTI" is selected, all scanned images can be
combined into a single file, or one file can be created
for each page (pages 2 to 6).
Press the [OK] key.
3
You will return to the base
screen and the selected format
will appear in the file type and
file creation method display.
Note
• When the file type is set to "JPEG", the file
creation method can only be set to
"SINGLE".
• To open the scanned image without using
the software program in the accompanied
CD-ROM, the recipient must have a
viewer program that can open the image
format (file type) that was selected as
explained above.
If the recipient cannot open the image, try
sending the image in a different format.
28

HOW TO USE THE NETWORK SCANNER FUNCTION
2-SIDED
COPY
SPECIAL FUNCTION
ACC.
GH
PQR
2-SIDED
COPY
SPECIAL FUNCTION
GHI
OK
BACK
2-SIDED
COPY
SPECIAL FUNCTION
ACC.
GH
PQR
2-SIDED
COPY
SPECIAL FUNCTION
SETTING THE LIGHT SOURCE COLOUR
When scanning in black and white mode, you can set the light source colour.
For example, if you do not wish to scan the red parts of an original, set the light source colour to "RED". ("WHITE"
will cause all colours to be scanned.)
Select scan mode, place the original (steps 1 to 3 on page 20
The factory default setting for the light source colour is "WHITE".
If you need to change the light source colour, follow these steps.
), and then follow the procedure below.
Note
Press the [SPECIAL FUNCTION] key in
1
The light source colour can only be selected when the colour mode is set to "B/W". (Page 27)
scan mode.
Perform this operation from the
base screen of scan mode.
When the [SPECIAL
FUNCTION] key is pressed, the
special function menu appears.
(To select scan mode, see step
1 on page 20
Select "LIGHT SOURCE" with the [ ]
2
.)
or [ ] key.
SPECIAL FUNCTION
B/W THRESHOLD
LIGHT SOURCE
VOID AREA
PAPER SIZE SET
Press the [OK] key.
3
Select the desired light source colour
4
with the [ ] or [ ] key.
LIGHT SOURCE
WHITE
RED
GREEN
BLUE
Press the [OK] key.
5
2
OK
The setting is stored and you
return to the base screen.
ADJUSTING THE THRESHOLD VALUE
When scanning in black and white mode, you can adjust the threshold value. As the threshold value is increased,
black becomes stronger. As the threshold value is decreased, white becomes stronger.
Select scan mode, place the original (steps 1 to 3 on page 20
The factory default setting for the threshold value is "128".
To change the threshold value, follow these steps:
Note
Press the [SPECIAL FUNCTION] key in
1
The threshold value can only be adjusted when the colour mode is set to "B/W". (Page 27)
scan mode.
Perform this operation from the
base screen of scan mode.
When the [SPECIAL
FUNCTION] key is pressed, the
special function menu appears.
(To select scan mode, see step
1 on page 20
.)
), and then follow the procedure below.
Select "B/W THRESHOLD" with the
2
[] or [] key.
SPECIAL FUNCTION
B/W THRESHOLD
LIGHT SOURCE
VOID AREA
PAPER SIZE SET
29

HOW TO USE THE NETWORK SCANNER FUNCTION
GHI
OK
BACK
2-SIDED
COPY
SPECIAL FUNCTION
ACC.
GH
PQR
2-SIDED
COPY
SPECIAL FUNCTION
GHI
OK
BACK
Press the [OK] key.
3
Select the desired threshold value
4
Press the [OK] key.
5
OK
The set value is stored and you
return to the base screen.
with the [ ] or [ ] key.
B/W THRESHOLD
The default setting is "128". White becomes stronger
as the displayed value approaches "1". Black becomes
stronger when the displayed value approaches "254".
128
(1~254)
ENABLING SCANNING MARGINS (VOID AREA)
When this function is enabled, margins (void areas that are not scanned) are created around the edges of the machine's
maximum scanning area.
Select scan mode, place the original (steps 1 to 3 on page 20), and then follow the procedure below.
The factory default setting for the void area is "ON" (enabled).
If you need to change the void area setting, follow these steps.
Void area: 2.5 mm (7/64") from the top and bottom edges
3.0 mm (1/8") from the left and right edges
Press the [SPECIAL FUNCTION] key in
1
Press the [OK] key.
3
scan mode.
Perform this operation from the
base screen of scan mode.
When the [SPECIAL
FUNCTION] key is pressed, the
special function menu appears.
(To select scan mode, see step
1 on page 20
Select "VOID AREA" with the [ ] or
2
.)
Select "ON" or "OFF" with the [ ] or
4
[ ] key.
[ ] key.
VOID AREA
SPECIAL FUNCTION
B/W THRESHOLD
ON
OFF
LIGHT SOURCE
VOID AREA
PAPER SIZE SET
30
Press the [OK] key.
5
OK
The setting is stored and you
return to the base screen.

HOW TO USE THE NETWORK SCANNER FUNCTION
IMAGE ORIENTATION AND STANDARD ORIGINAL PLACEMENT ORIENTATION
When using the document glass, the original should be placed face down in the far left corner of the glass with the
top edge of the original at the left edge of the glass.
When using the SPF, the original should be placed face up in the middle of the document feeder tray, with the top of
the original to the right.
Document glass SPF Scanning result
2
Long horizontal originals of size A3, B4, 11" x 17", or 8-1/2" x 14" can only be placed as shown below. For this
reason, the scanned image will be rotated 90° when viewed on a computer.
Document glass SPF Scanning result
ENTERING CHARACTERS
Characters are entered by pressing the numeric keys on the operation panel. The letters entered with each numeric
key are shown below.
Characters that can be entered
ABC DEF
JKLGHI MNO
TUVPQRS WXYZ
_
@.-
READ-ENDACC.#-C
Key
1 1 1 Space
2 a bc 2 ABC ABC2a bc
3 def 3DEF DEF3def
4 ghi 4GHI GHI 4ghi
5 j kI 5JKL JKL5j kl
6 mno6MNO MNO6mno
7 p q r s 7 P QRS PQRS 7 p q r s
8 tuv8TUV TUV8tuv
9 wxyz9WXYZ WXYZ9wxyz
0 00
# @.-_ #@.-_/!"$%&'()+,:;=>?[]{} *
Directly entering an e-mail
address
_-.@ * } {][?>=;:,+)('&%$"!/_-.@#
Searching for an address on an
LDAP server
Note
To enter two characters in succession that require the same key, press the [ ] key to move the cursor after
entering the first character.
Example: Entering "ab" (when directly entering an e-mail address)
Press the [2] key once, press the [ ] key once to move the cursor, and then press the [2] key twice.
31

KEY OPERATOR PROGRAMS
3
The key operator programs allow the administrator of the machine (key operator) to enable and disable functions to
suit the needs of the workplace. This chapter explains the key operator programs for the network scanner functions.
For key operator programs for general use of the machine, see the "Key operator's guide". To access the key
operator programs, the key operator code must be entered.
For the initial key operator code set at the factory, see "PROGRAMMING A KEY OPERATOR CODE" in the
"Key operator's guide".
KEY OPERATOR PROGRAM LIST
The key operator programs for the network and printer functions are shown in the following table.
Factory default settings are indicated in bold.
Mode Program Settings Explanation
SCANNER DISABLE USB SCAN YES,
INITIAL COND. COLOR MODE This is used to change the
FORMAT
RESOLUTION
NO
Select whether or not
scanning from a computer
and scanning from the
machine are disabled when a
USB connection is used.
When "YES" is selected, USB
scanning is disabled.
default settings for the color
mode, format, and resolution.
(For more information, see
"
STORING SCANNING
SETTINGS" (page 26).)
32

USING THE KEY OPERATOR PROGRAMS
2-SIDED
COPY
SPECIAL FUNCTION
ACC.
GH
PQR
2-SIDED
COPY
SPECIAL FUNCTION
GHI
OK
BACK
ABC DEF
JKLGHI MNO
TUVPQRS WXYZ
@.-
_
ACC. #-C
READ-END
OK
Press the [SPECIAL FUNCTION] key.
1
The special function
screen will appear.
Select "KEY OPERATOR PRG." with
2
the [ ] or [ ] key.
SPECIAL FUNCTION
PAPER SIZE SET
DISPLAY CONTRAST
TOTAL COUNT
KEY OPERATOR PRG.
Press the [OK] key.
3
Select the desired mode with the [ ]
5
or [ ] key.
MODE SELECT
KEY OP. # CHANGE
COPIER
PRINTER
SCANNER
Press the [OK] key.
6
OK
SCANNER
DISABLE USB SCAN
INITIAL COND.
The settings of the
selected mode will
appear.
Example: The screen when "SCANNER" is selected.
3
Enter key operator
code.
KEY OPERATOR CODE:
The key operator code
entry screen appears.
Enter the key operator code with the
4
numeric keys.
-----
MODE SELECT
KEY OP. # CHANGE
COPIER
PRINTER
SCANNER
• " " will appear for each digit will enter.
• The mode selection screen will appear.
Select the desired program with the
7
[] or [] key.
• If a checkbox appears to the left of the program
name, the program is enabled by pressing the [OK]
key to make a checkmark appear. The program is
disabled by pressing the [OK] key once again to
clear the checkmark. After making the selection, go
to step 9.
• If a checkbox does not appear by a program, press
the [OK] key to display the settings screen for the
program.
Press the [OK] key and follow the
8
instructions in the program screen.
OK
To use another program for the same
9
mode, select the desired program with
the [ ] or [ ] key.
To use a program for a different mode, press the
[BACK] key and select the desired mode. Press the
[CA] key to exit the key operator programs.
33

TROUBLESHOOTING
4
TROUBLESHOOTING
If a problem or question arises, try to solve the situation using the following information before contacting your
authorised SHARP dealer.
Image transmission problems are explained here.
For image scanning problems, see the "Operation manual (for general information and copier)".
Problem Cause and solution
The original scan size setting is smaller than the actual original
size.
→
Set the actual original size (page 26).
If you have intentionally set a smaller size than the actual original size,
The scanned image is clipped.
place the original taking into account the guides for the set original
size. For example, if the actual size is A4 (8-1/2" x 11") and you
selected B5 (5-1/2" x 8-1/2") for the size setting, place the original so
that the part that you wish to scan is within the B5 (5-1/2" x 8-1/2") area
indicated by the guides at the far left corner of the document glass.
The received image data
cannot be opened.
When the same file name is
used for two successive Scan
to FTP transmissions, the
second file is not sent.
The recipient does not receive
a transmitted data.
The recipient does not receive
data sent by e-mail (Scan to
E-mail).
The viewer program used by the recipient does not support the
format of the received image data.
→
Try selecting a different file type (TIFF, JPEG, or PDF) and/or a different
compression format (None, G3, or G4) for the image data.
Otherwise, have the recipient use Sharpdesk or a viewer program that
supports the above combinations of file types and compression formats.
The first file may still remain in the cache of the file server client. Disable
use of the cache in the client software.
There is a mistake in the stored destination information or the
wrong destination was selected.
→
Make sure that the correct destination information is stored. If there is a
mistake, correct it. (Page 10
* If delivery by e-mail (Scan to E-mail) is unsuccessful, an error
message such as "Undelivered Message" may be sent to the
designated administrator's e-mail address. This information may help
you determine the cause of the problem.
Check the Web page to see if a limit has been set for the size of image
files sent using Scan to E-mail (the factory default setting is "Unlimited").
A limit can be set from 1 MB to 10 MB. Consult the administrator of the
Web page to select a suitable limit. (Page 12
The amount of data that can be sent in one e-mail transmission is
sometimes limited by the administrator of the mail server. Even if the file
size is within the limit explained above, if it exceeds the limit set by the
administrator of the mail server, the file will not be delivered to the
recipient.
Decrease the amount of data sent in the e-mail transmission (reduce the
number of pages scanned). (Ask your mail server administrator what the
data limit is for one e-mail transmission.)
)
)
Transmission takes a long
time.
34
When there is a large amount of image information, the data file is also
large and transmission takes a long time.

TROUBLESHOOTING
MAXIMUM RESOLUTION
When scanning takes place with the resolution set to the maximum resolution (600 dpi), the resolution may change
depending on the amount of memory available, the original size, the colour mode, and other scanning conditions. The
table below shows the relation between the possible scanning area and the scanning conditions. (Note that the following
examples are for standard memory in the machine and 128 MB or more of memory in the network expansion kit.)
(dpi)
Models without the two-sided printing function
Colour Grey B/W Colour Grey B/W
A3 150
B4
A4, A4R
B5, B5R
A5, A5R
11" x 17" 150 300
8-1/2" x 14"
8-1/2" x 13"
8-1/2" x 11"
8-1/2" x 11"R
200
300
200 400 400
300
400
Models with the two-sided printing function
300
200
400
300
400
300
300
5-1/2" x 8-1/2"
5-1/2" x 8-1/2"R
: Scanning is possible at the maximum resolution (600 dpi).
300 400
DISPLAY MESSAGES
If a transmission error occurs when you send a scanned image, a message informing you of the error and an error
code will appear in the display on the machine.
Error Code Solution Page
CE-00
CE-01
CE-02
CE-04
CE-03
CE-05
CE-09
CE-11
CE-12
Turn off the power and then turn it back on. Consult with your network administrator to
make sure that no problems exist on the network or in the server. If the error is not
cleared after turning the power off and on, turn off the power and contact your dealer.
The scanned image was not sent because a connection to the server could not be
established. Make sure that the SMTP server settings or Scan to FTP destination
settings in the Web page are correct.
The procedure for configuring the SMTP server is explained in "VARIOUS SERVER
SETTINGS", and the procedure for editing Scan to FTP destination information is
explained in "Editing and deleting programmed transmission destinations
information on the settings to be entered, see Help in the Web page.
The scanned image was not sent because the server was busy or there was too much
traffic on line. Wait briefly and then try again.
The scanned image was not sent because the directory of the destination FTP server was not
correct. Make sure that the correct FTP server information is configured in the Web page.
The size of the scanned image file exceeds the limit set in "Maximum Size of E-mail
attachments" in the Web page. Reduce the number of original pages scanned into the
file, or change the limit set in "Maximum Size of E-mail attachments".
The memory became full during scanning. Scan less pages, lower the resolution, or
change the colour mode so that the file size is smaller, and try scanning again.
The maximum number of destinations of a global address search has been exceeded.
Increase the number of search characters to narrow the range of the global address search.
". For
–
10
, 13
–
10
12
27, 28
24
4
IF YOUR E-MAIL IS RETURNED
If a Scan to E-mail transmission is not successful, an e-mail informing you of this fact is sent to the return address configured
in the SMTP server. If this happens, read the e-mail and determine the cause of the error, and then repeat the transmission.
35

TROUBLESHOOTING
IMPORTANT POINTS WHEN USING SCAN TO E-MAIL
Be careful not to send image data files that are too large.
Your mail server's system administrator may have placed a limit on the amount of data that can be sent in one e-mail
transmission. If this limit is exceeded, the e-mail will not be delivered to the recipient. Even if there is no limit and
your e-mail is successfully delivered, a large data file may take a long time to be received and place a heavy burden
on the recipient's network, depending on the recipient's network (Internet) connection environment.
If large image data files are repeatedly sent, the resulting burden on the network may slow down the speed of other,
unrelated data transmissions and in some cases, may even cause the mail server or network to go down.
The following table shows the approximate file sizes when the A4 (8-1/2" x 11") size originals (one page each)
shown below are scanned.
File size of text original A
Resolution
75 dpi Approx. 10 KB Approx. 125 KB Approx. 140 KB
300 dpi Approx. 34 KB
* All sizes are for image files created in TIFF G4 format.
If multiple images are scanned, the file size will be approximately (Size of each image as indicated above) x (Number of images
scanned).
Caution
Although the actual limitation depends on your network environment, a general guideline for the maximum file size
for Scan to E-mail is 2000 KB (2 MB). In cases where you need to send multiple images in one transmission, try
such measures as lowering the resolution mode.
The scan resolution will vary depending on the scanning area and how much memory in the machine is free.
During network scanning, the resolution may change automatically because enhancement is not performed. To
scan an A3 original in colour at 600 dpi without enhancement, the 256 MB optional memory on the dual function
board and the 128 MB additional memory on the network expansion kit are required as a minimum.
when scanned
B/W Grey Colour
Approx. 1430 KB (approx. 1.43 MB) Approx. 1440 KB (approx. 1.44 MB)
File size of photo original B when scanned
Original image samples
The original images shown below are samples to help you understand the above explanations. Note that these
images are smaller than the actual originals (the actual originals are A4 or 8-1/2" x 11").
Text original A Photo original B
36

CHECKING THE IP ADDRESS
There are several settings where the IP address must be entered or checked.
To check the IP address of the machine, hold down the status button on the network expansion kit at least 2
seconds to print out a Printer Setting List.
Status button
Caution
How to reset the network expansion kit
To reset the network expansion kit, power on the machine while holding down the status button on the network
expansion kit.
Network scanner destination information and scanning settings will remain after the network expansion kit is
reset, however, the network settings and network printer settings will revert to the factory default settings.
4
37

SPECIFICATIONS
5
For information on power requirements, power consumption, dimensions, weight, and other specifications that are
common to all features of the machine, refer to the "Operation manual (for general information and copier)".
Type
Scanning resolution
(Primary scanning x Secondary
scanning)
Interface
Network protocol
Supported client PC operating
systems
File formats
Remarks
Two-sided originals
Optical resolution
File creation method
Scan destinations
Colour scanner
75x75, 100x100, 150x150, 200x200, 300x300, 400x400, 600x600 dpi
LAN connection 10Base-T/100Base-TX
NetWare, NetBEUI, EtherTalk, TCP/IP, SMTP, LDAP, FTP
Windows 95, Windows 98, Windows Me, Windows NT Workstation4.0
(Service Pack 5 or later), Windows 2000 Professional, Windows XP Home
Edition, Windows XP Professional, Windows 2000 Server, Windows
Server 2003
File types: PDF, TIFF, JPEG
Compression modes: None, G3, G4
Possible
600dpi
One file per each 1 to 6 pages/One file for all pages
Scan to FTP
Scan to Desktop
Scan to E-mail
Management system
Recommended Web browser
Supported mail system
Number of destinations
Utilities
* A total of 200 destinations can be stored, including E-mail, FTP, Desktop, Fax, and Group destinations. Among these, multiple
e-mail addresses (up to 100) can be stored as a group. Note that this may reduce the maximum number of destinations
(normally 200) that can be stored.
Some discrepancies may exist in the illustrations and content due to improvements to the machine.
Uses built-in Web server
Internet Explorer 5.5 or later (Windows)/5.1 or later (Macintosh),
Netscape Navigator 6.0 or later
Mail server that supports SMTP, mail server that supports POP3
200 maximum*
Sharpdesk
38

OPERATION MANUAL (for network scanner)
SHARP CORPORATION
ARNB3-EX-SCANNER
 Loading...