

Sharp AR-M256,AR-M316 Key Operator's Manual

DIGITAL MULTIFUNCTIONAL
SYSTEM
KEY OPERATOR'S GUIDE
• PURPOSE OF THE KEY
OPERATOR PROGRAMS
• PROGRAMMING A KEY
OPERATOR CODE
•
USING THE KEY
OPERATOR PROGRAMS
• KEY OPERATOR
PROGRAM LIST
• GENERAL PROGRAMS
• PROGRAMS FOR
COPY MODE
• PROGRAMS FOR
PRINT MODE
•
PROGRAMS FOR NETWORK
SCANNER MODE
1
1
2
4
8
15
16
20
Page
MODEL
AR-M256
AR-M316

The key operator code is initially set to "00000" at the factory.

1
PURPOSE OF THE KEY OPERATOR
PROGRAMS
The key operator programs are used by the key operator (administrator of the machine) to customize certain
features of the machine to better meet the needs of users.
This guide explains key operator programs that are common to all functions of the multifunction system (copy
function, fax function, printer function, and network scanner function), as well as programs that are specific to the
copy function, printer function, and network scanner function. Programs that are specific to the fax function are
explained in the following manual:
• Fax function ............."AR-FX7 Operation manual" (Chapter 8)
In order to access the key operator programs, the key operator code must be entered.
PROGRAMMING A KEY OPERATOR CODE
The key operator code is a 5-digit number that must be entered in order to access the key operator programs. The
key operator (administrator of the machine) should change the default key operator code that was set at the factory
to a new 5-digit number. Be sure to remember the new key operator code, as it must be entered each time the key
operator programs are subsequently used. (Only one key operator code can be programmed.)
To change the key operator code, see "USING THE KEY OPERATOR PROGRAMS" on the following page.
The key operator code is initially set to "00000" at the factory.
2
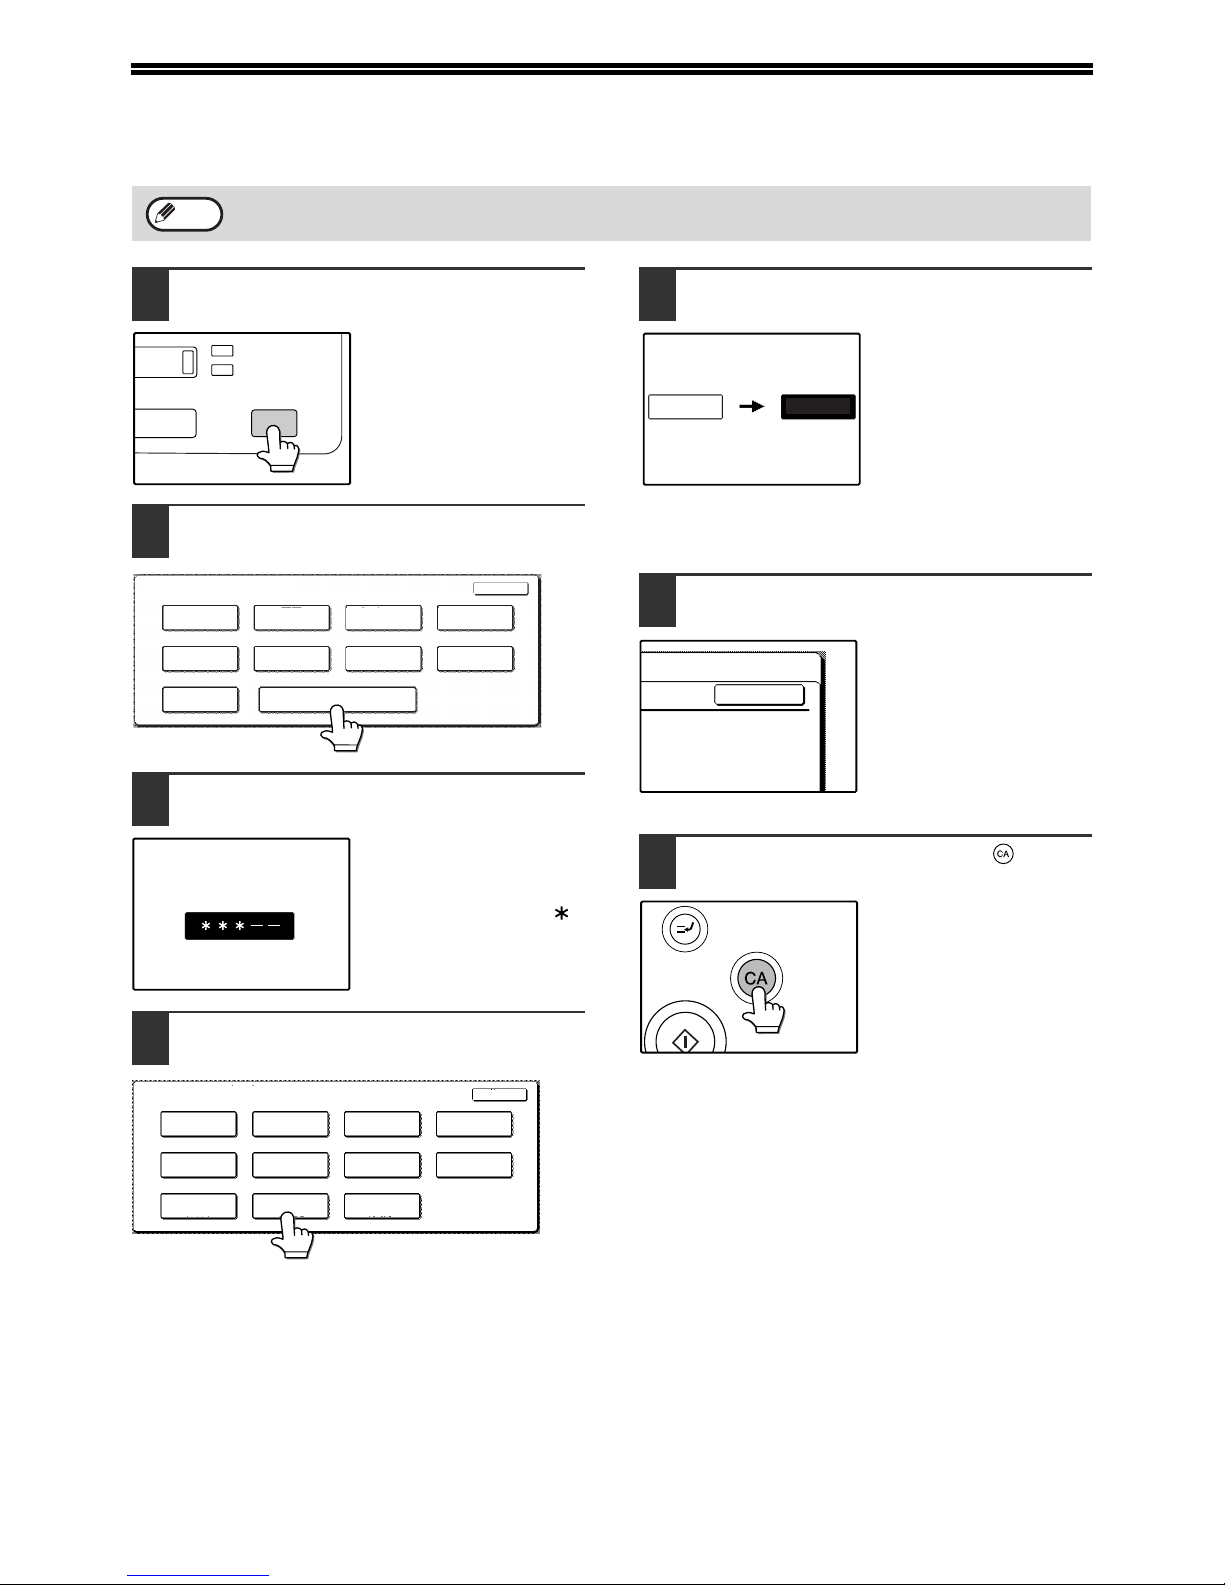
USING THE KEY OPERATOR PROGRAMS
1
Press the [CUSTOM SETTINGS] key.
2
Touch the [KEY OPERATOR
PROGRAMS] key.
3
Use the numeric keys to enter the
five-digit key operater code.
Each time a digit is
entered, the dash (-) that
indicates the digit will
change to an asterisk ( ).
The factory default setting
for the key operator code
is 00000.
4
Touch a key to select the desired
category of key operator programs.
Example:
To change the key operator code, touch the [KEY
OPERATOR CODE CHANGE] key.
• Each time you need to configure a program, use this
procedure to select the program.
• In the following steps, the setting screen for the
selected program appears. Refer to the explanation
of the program to select the desired setting (the
explanations of the programs begin on page 8).
5
Use the numeric keys to enter the new
5-digit key operator code.
Use a number for the key
operator code that has not
been programmed as an
account number for
auditing mode (a number
that has been
programmed as an
account number cannot
be used). The entered number will be the new key
operator code. Be sure to remember this number.
6
Touch the [OK] key. You will return to
the screen of step 4.
This completes the
procedure for changing
the key operator code. If
you wish to configure
another program, touch
the key of the desired
program in the screen of
step 4.
7
Press the [CLEAR ALL] key ( ) to
exit the program.
When using the key operator programs for the first time, change the factory default key operator code to a new
code. (Step 3 to step 5)
Note
DATA
LINE
STATUS
CUSTOM SETTINGS
KEY OPERATOR PROGRAMS
ADDRESS
CONTROL
TRAY SETTINGS
TOTAL COUNT
DISPLAY
CONTRAST
LIST PRINT
CLOCK
KEYBOARD
SELECT
RECEIVE MODE
FAX DATA
FORWARD
CUSTOM SETTINGS
EXIT
KEY OPERATOR CODE
KEY OPERATOR PROGRAMS
EXIT
ACCOUNT
CONTROL
ENERGY SAVE
OPERATION
SETTINGS
DEVICE CONTROL
COPY SETTINGS PRINT SETTINGS
SCANNER
SETTINGS
FAX SETTINGS
LIST PRINT
KEY OPERATOR
CODE CHANGE
PRODUCT KEY
00000
-----
OK
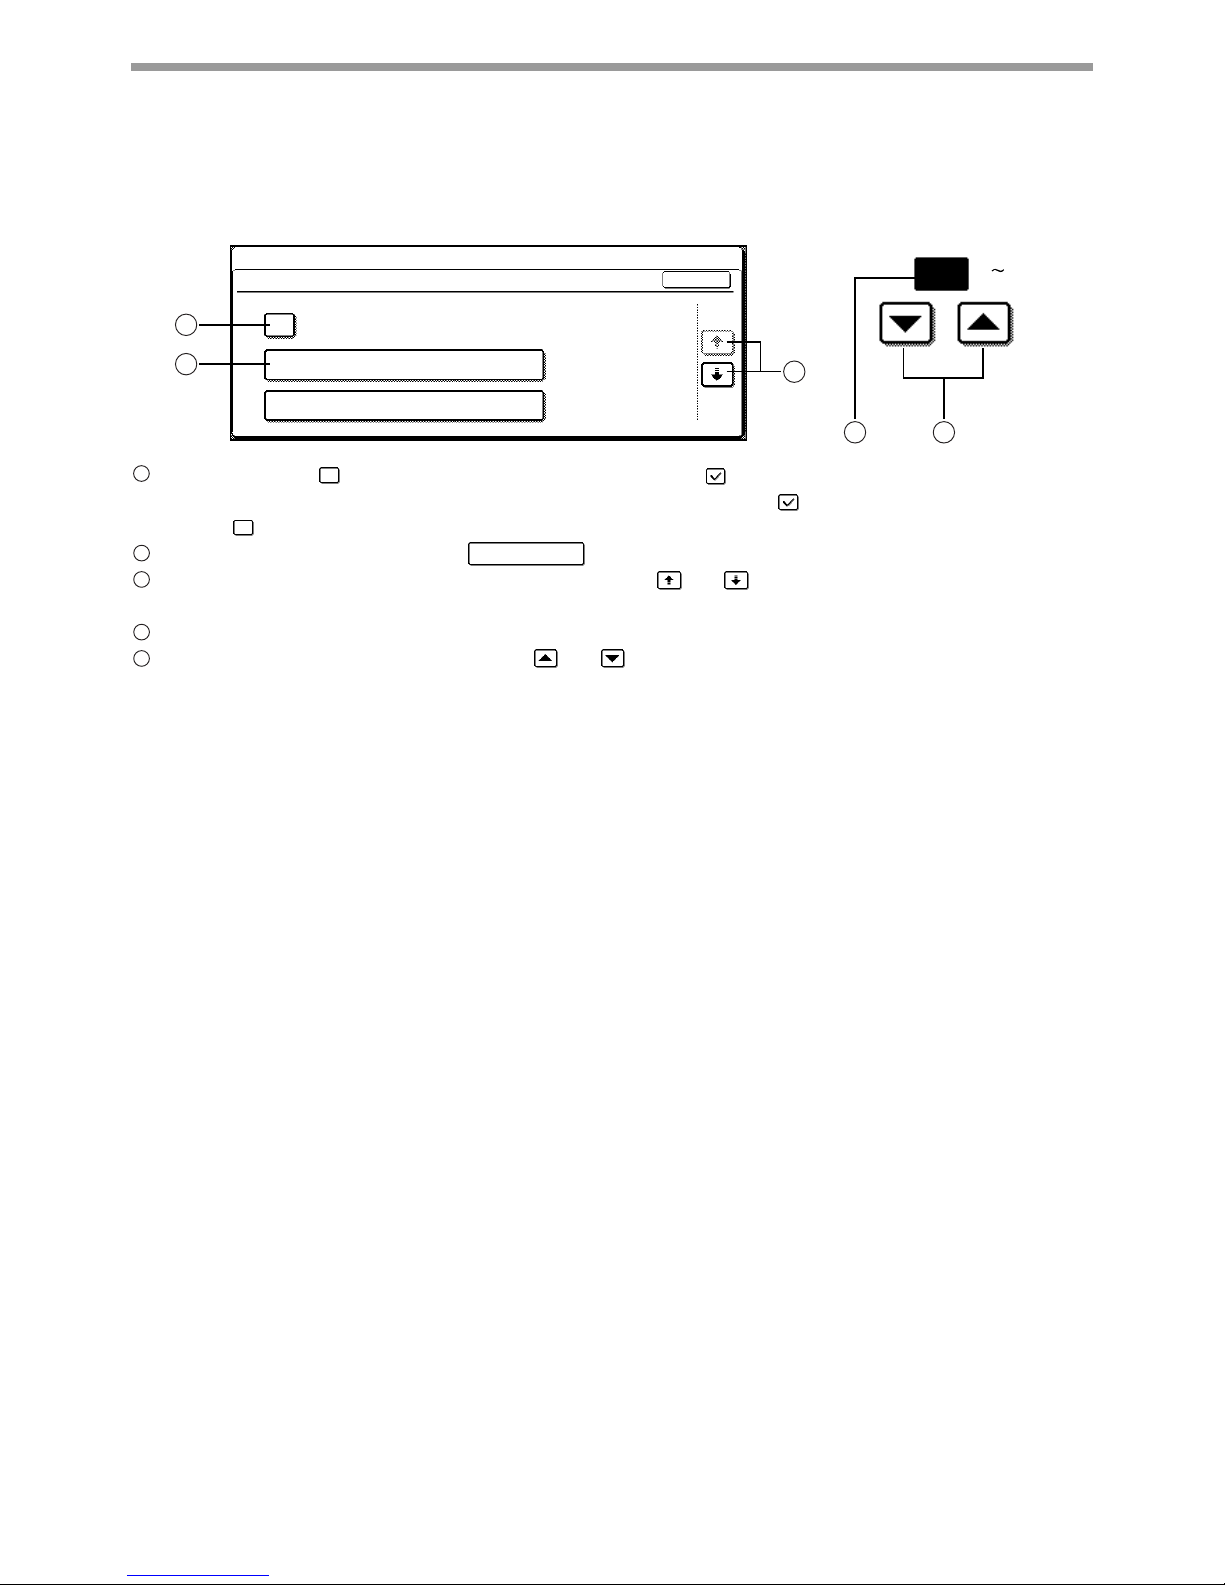
3
USING THE KEY OPERATOR PROGRAMS
KEYS USED IN KEY OPERATOR PROGRAMS
Example: Auditing mode
When a checkbox ( ) appears in front of a setting, a checkmark ( ) will appear when the checkbox is touched.
This indicates that the setting is enabled. If a checkbox with a checkmark ( ) is touched, the checkmark is
cleared ( ) and the setting is disabled.
When a key that appears in the form is touched, the setting screen of that key will appear.
If the settings continue on the following screen(s), touch the and keys to move back and forth through the
screens. To return to the category selection screen, touch the [OK] key.
The currently set numerical value is displayed.
Numerical values can be set by touching the and keys.
20
(1 999)
1
2
3
4 5
OK
RESETTING ACCOUNT
TOTAL PAGES PER ACCOUNT
AUDITING MODE
ACCOUNT CONTROL
KEY OPERATOR PROGRAMS
1/3
The following keys appear in screens that
require the entry of numerical values.
1
2
X X X
3
4
5

4
KEY OPERATOR PROGRAM LIST
GENERAL PROGRAMS
PROGRAMS FOR COPY MODE
The key operator programs that can be accessed depend on the optional equipment that is installed.
Note
Program name
Factory default
settings
Page
ACCOUNT CONTROL
AUDITING MODE Disabled 8
TOTAL PAGES PER
ACCOUNT
—8
RESETTING ACCOUNT — 8
ACCOUNT NUMBER
CONTROL
—9
ACCOUNT LIMIT SETTING
—9
ACCOUNT NUMBER
SECURITY
Disabled 9
CANCEL JOBS OF
INVALID ACCOUNTS
*4
Disabled 9
ENERGY SAVE
AUTO POWER SHUT-OFF Enabled 10
AUTO POWER SHUT-OFF
TIMER
60 (min.) 10
PREHEAT MODE SETTING
15 (min.) 10
TONER SAVE MODE
Disabled 10
OPERATION SETTINGS
AUTO CLEAR SETTING 60 (sec) 11
MESSAGE TIME SETTING 6 (sec) 11
KEYS TOUCH SOUND • KEYS TOUCH
SOUND: Short
• KEYS TOUCH
SOUND AT
INITIAL POINT:
Disabled
11
TOUCH KEY OPERATION
SETTING
• Time to entry:
0.0 (sec)
• DISABLE AUTO
KEY REPEAT:
Disabled
11
DISABLE INTERRUPT
PRINT JOB
Disabled 11
STREAM FEEDING MODE
Disabled 12
DISPLAY LANGUAGE
SETTING
ENGLISH 12
DISABLE DISPLAY
TIMEOUT
Disabled 12
DISABLING OF TRAY
SETTINGS
Disabled 12
DISABLING OF CLOCK
ADJUSTMENT
Disabled 12
DEVICE CONTROL
DISABLING OF
DOCUMENT FEEDER
Disabled 12
DISABLING OF DUPLEX Disabled 12
DISABLING OF STAPLER
*2
Disabled 12
OUTPUT TRAYS
*3
PAT T E R N 1 13
OFFSET FUNCTION
SETTING
Enabled 13
MEMORY FOR PRINTER
• 50%
• MEMORY AREA
FOR PRINT
HOLD
*4
: 30%
13
DISABLING OF CENTRE
TRAY COUNTING
Disabled 13
RETURN FROM COPY
MODE TIMING
60 (sec) 13
MIX SIZE ORIGINAL
FEEDING MODE
Disabled 13
SECURITY SETTINGS — 13
KEY OPERATOR CODE CHANGE
00000 14
PRODUCT KEY
*4
PS3 EXPANSION KIT
*4
—14
NETWORK SCANNER
EXPANSION KIT
*5
—14
E-MAIL ALERT AND STATUS
*4
—14
SERIAL NUMBER — 14
Program name
Factory default
settings
Page
COPY SETTINGS
INITIAL STATUS SETTINGS — 15
ROTATION COPY SETTING Enabled 15
EXPOSURE ADJUSTMENT • Document
glass: 3
• Document
feeder: 3
*2
15
AUTO PAPER SELECTION
SETTING
PLAIN PAPER 15
SETTING A MAXIMUM
NUMBER OF COPIES
999 15
SORT AUTO SELECT Enabled 15
DISABLING DELETION OF
JOB PROGRAMS
Disabled 15
CARD SHOT SETTINGS — 15
Program name
Factory default
settings
Page

5
KEY OPERATOR PROGRAM LIST
PROGRAMS FOR PRINT MODE
PROGRAMS FOR NETWORK SCANNER MODE
Program name
Factory default
settings
Page
PRINT SETTINGS
DEFAULT SETTINGS
PROHIBIT NOTICE PAGE
PRINTING
Disabled 16
PRINT DENSITY LEVEL 3 16
PROHIBIT TEST PAGE
PRINTING
*4
Disabled 16
ROTATED PRINT Enabled 16
FORCED OUTPUT OF
PRINT
Disabled 16
EXCLUDE BYPASS-TRAY
FROM ATS
Enabled 16
DISABLE DEFAULT
SETTING CHANGES
*4
Disabled 16
INTERFACE SETTINGS
HEXADECIMAL DUMP
MODE
*4
Disabled 17
I/O TIMEOUT 180 (sec)
60 (sec)
*4
17
PARALLEL PORT
EMULATION SWITCHING
*4
AUTO 17
USB PORT EMULATION
SWITCHING
*4
PCL 17
NETWORK PORT
EMULATION SWITCHING
*4
AUTO 17
PORT SWITCHING
METHOD
*4
SWITCH AT
END OF JOB
18
ENABLE PARALLEL
PORT
*4
Enabled 18
ENABLE USB PORT
*4
Enabled 18
ENABLE NETWORK
PORT
*4
Enabled 18
ENABLE ECP
*4
Disabled 18
NETWORK SETTINGS
*4
IP ADDRESS SETTING
DHCP: Enabled
18
ENABLE TCP/IP Enabled 18
ENABLE NetWare Enabled 18
ENABLE EtherTalk Enabled 19
ENABLE NetBEUI Enabled 19
RESET THE NIC — 19
INITIALISE AND/OR STORE SETTINGS
*4
RESTORE FACTORY
DEFAULTS
—19
STORE CURRENT
CONFIGURATION
—19
RESTORE
CONFIGURATION
—19
Program name
Factory default
settings
Page
SCANNER SETTINGS
*1
INITIAL FILE FORMAT
SETTING
• File type: TIFF
• Compression
mode: G4
• Number of pages
per file: All
20
INITIAL QUALITY
SETTING
• Original image
type: Text/Photo
• Exposure: Auto
20
INITIAL RESOLUTION
SETTING
300 dpi 20
DEFAULT DISPLAY
SETTINGS
CONDITION
SETTINGS
20
THE NUMBER OF DIRECT
ADDRESS / SENDER KEYS
DISPLAYED SETTING
8 (keys) 20
*1 Appears when the scanner function is enabled.
*2 Appears when a FINISHER is installed.
*3 Can be enabled when the printer or fax function is
enabled and a JOB SEPARATOR TRAY KIT or
FINISHER is installed.
*4 Appears when the PRINTER EXPANSION KIT is
installed.
*5 Appears when the PRINTER EXPANSION KIT and
EXPANSION MEMORY are installed.

6
KEY OPERATOR PROGRAM LIST
KEY OPERATOR PROGRAM MENU
The key operator programs are arranged in the following menu.
Refer to this menu when enabling or disabling the settings that are explained beginning on page 8.
* Some programs contain an additional level of settings (setting screen).
Level 1 Level 2 Level 3
ACCOUNT CONTROL AUDITING MODE
TOTAL PAGES PER ACCOUNT
RESETTING ACCOUNT
ACCOUNT NUMBER CONTROL
ACCOUNT LIMIT SETTING
ACCOUNT NUMBER SECURITY
CANCEL JOBS OF INVALID ACCOUNTS
ENERGY SAVE AUTO POWER SHUT-OFF
AUTO POWER SHUT-OFF TIMER
PREHEAT MODE SETTING
TONER SAVE MODE
OPERATION SETTINGS AUTO CLEAR SETTING
MESSAGE TIME SETTING
KEYS TOUCH SOUND
TOUCH KEY OPERATION SETTING
DISABLE INTERRUPT PRINT JOB
STREAM FEEDING MODE
DISPLAY LANGUAGE SETTING
DISABLE DISPLAY TIMEOUT
DISABLING OF TRAY SETTINGS
DISABLING OF CLOCK ADJUSTMENT
DEVICE CONTROL
DISABLING OF DOCUMENT FEEDER
DISABLING OF DUPLEX
DISABLING OF STAPLER
OUTPUT TRAYS
OFFSET FUNCTION SETTING
MEMORY FOR PRINTER
DISABLING OF CENTRE TRAY COUNTING
RETURN FROM COPY MODE TIMING
MIX SIZE ORIGINAL FEEDING MODE
SECURITY SETTINGS SSL SETTINGS
KEY OPERATOR CODE CHANGE
ENABLE IPsec
PRODUCT KEY PS3 EXPANSION KIT
NETWORK SCANNER EXPANSION KIT
E-MAIL ALERT AND STATUS
SERIAL NUMBER
COPY SETTINGS INITIAL STATUS SETTINGS
ROTATION COPY SETTING
EXPOSURE ADJUSTMENT
AUTO PAPER SELECTION SETTING
SETTING A MAXIMUM NUMBER OF COPIES
SORT AUTO SELECT
DISABLING DELETION OF JOB PROGRAMS
CARD SHOT SETTINGS
Enter Key Operator Code
 Loading...