

Page 1

SOFTWARE
SETUP GUIDE
DIGITAL MULTIFUNCTIONAL
SYSTEM
Page
• INTRODUCTION
• CONTENTS
•
INSTALLING THE SOFTWARE
(THAT ACCOMPANIES
THE MACHINE)
•
INSTALLING THE SOFTWARE
(FOR OPTIONS)
•
TROUBLESHOOTING
USEFUL INFORMATION
AND
1
5
7
20
39
Page 2

Warranty
While every effort has been made to make this document as accurate and helpful as possible, SHARP Corporation
makes no warranty of any kind with regard to its content. All information included herein is subject to change without
notice. SHARP is not responsible for any loss or damages, direct or indirect, arising from or related to the use of this
operation manual.
© Copyright SHARP Corporation 2004. All rights reserved. Reproduction, adaptation or translation without prior
written permission is prohibited, except as allowed under copyright laws.
Note
• This manual assumes that the personnel who are installing this product and the users of the product have a
working knowledge of Windows and Macintosh computers.
• For information on the operating system, please refer to your operating system manual or the online Help function.
• Some of the windows that appear in this manual may vary depending on your computer type and settings.
• In some regions the "Key operator's guide" cited in this manual is a separate manual, and in other regions the
"Key operator's guide" is included in the "Operation manual (for general information and copier)".
• The dual function board mentioned in this manual can be installed as an option on some models and is installed
standard on other models. For more information, see "3. PERIPHERAL DEVICES AND SUPPLIES" of the
"Operation manual (for general information and copier)".
Trademark Acknowledgments
• Sharpdesk is a trademark of Sharp Corporation.
•Microsoft
Windows
Microsoft Corporation in the U.S.A. and other countries.
• IBM, PC/AT, and PowerPC are trademarks of International Business Machines Corporation.
• Macintosh, Power Macintosh, Mac OS, LaserWriter, and AppleTalk are registered trademarks of Apple Computer,
Inc.
•PostScript
• Acrobat
Adobe, the Adobe logo, Acrobat, and the Acrobat logo are trademarks of Adobe Systems Incorporated.
• NetWare is a registered trademark of Novell, Inc.
• Agfa and the Agfa Rhombus are registered trademarks of Agfa-Gevaert A.G.
• All other trademarks and copyrights are the property of their respective owners.
The display screens, messages, and key names shown in the manual may differ from those on the actual machine due to
product improvements and modifications.
®
, Windows®, Windows® 95, Windows® 98, Windows® Me, Windows NT® 4.0, Windows® 2000,
®
XP, Windows® Server 2003 and Internet Explorer® are registered trademarks or trademarks of
®
is a registered trademark of Adobe Systems Incorporated.
®
Reader Copyright© 1987-2002 Adobe Systems Incorporated. All rights reserved.
Page 3

INTRODUCTION
Thank you for purchasing this product. This manual explains how to install the printer driver and utilities that are
required for the printer and scanner functions.
The optional network expansion kit (AR-NB3) enables the machine to be used as a network scanner and network
printer. The optional PS3 expansion kit (AR-PK1/N) enables the machine to be used as a PostScript compatible
printer. When the machine is used as a PostScript printer, printing is possible in both a Windows and a Macintosh
environment. Note that printing in a Macintosh environment is only possible via a network connection. (Parallel and
USB ports cannot be used in a Macintosh environment.)
Note
Where "AR-XXXX" appears in this manual, please substitute the name of your model for "XXXX". For the name
of the model that you are using, see "DIFFERENCES BETWEEN MODELS" in the "Operation manual (for
general information and copier)".
Software setup guide (this manual)
Explains the procedures for installing the software in the "Software" CD-ROMs that accompany the machine and the
optional network expansion kit (AR-NB3).
To use the machine as a printer or scanner, see this manual and the online manuals.
Using the standard printer function and scanner function
• Operation manual (for printer and scanner)
This is an online manual that can be found in the "Software CD-ROM (1)" that accompanies the machine.
This manual contains information necessary for using the machine as a printer and scanner, including printing by
means of the standard printer driver, printing by means of the SPLC printer driver that can be used when the dual
function board is installed, scanning using Button Manager, troubleshooting, and key operator programs for the
printer and network functions.
Using the network printer function
• Operation manual (for network printer)
This is an online manual that can be found in the "Software CD-ROM (1)" that accompanies the network expansion kit.
This manual contains information necessary for using the machine as a printer, including printing condition
settings, printing using the PCL5e and PCL6 printer drivers, and the PS printer driver, troubleshooting, and key
operator programs for the printer and network functions.
Using the network scanner function
• Operation manual (for network scanner)
This is an online manual that can be found in the "Software CD-ROM (1)" that accompanies the network
expansion kit.
Read this manual for information on using Scan to FTP, Scan to E-mail, and other network scanner functions.
The following help files are installed when the software on the "Software CD-ROM (1)" that
accompanies the network expansion kit is installed:
• Printer Status Monitor Help file
• Printer Administration Utility Help file
Online manual contained in the "Network Utilities CD-ROM"
• Print Server Card Online Manual
SOFTWARE LICENSE
The SOFTWARE LICENSE will appear when you install the software from the CD-ROM. By using all or any portion
of the software on the CD-ROM or in the machine, you are agreeing to be bound by the terms of the SOFTWARE
LICENSE.
The explanations in this manual are based on American English and the North American version of the software.
Software for other countries and regions may vary slightly from the North American version.
1
Page 4
ABOUT THE CD-ROMS
This product includes CD-ROMs that are provided standard with the machine and CD-ROMs that are provided with
the optional network expansion kit (AR-NB3).
For Windows
■ CD-ROM provided standard with the machine
There are two CD-ROMs that are provided with the machine.
"Software CD-ROM (1)"
• MFP driver (Printer driver / Scanner driver)
• Button Manager
• Sharpdesk (Desktop Document
Management Software)
Software CD-ROM (1)
This CD-ROM contains a wizard-type installer for installation of the utilities below and the online manual "Operation
Manual (for printer and scanner)".
For the procedure for installing the software, see page 7 of this manual.
"Software CD-ROM (2)"
• Internet Explorer 6.0 SP1
MFP Driver
• Printer driver
The printer driver enables you to use the printer function of the machine.
There are two types of printer drivers for the machine: a standard printer driver and a printer driver* that is used
when the dual function board is installed.
* When the dual function board is installed, "(EB)" appears in the name of the installed printer driver. Furthermore,
the printer driver for the dual function board enables a faster printing speed.
• Scanner driver
The scanner driver allows you to use the scanning function of the machine with TWAIN-compliant and
WIA-compliant applications.
Button Manager
Button Manager is a software utility that allows you to use the [SCAN] key on the machine to scan a document.
Acrobat Reader 5.0
This program is used to view the online manuals on your computer screen.
Sharpdesk
Sharpdesk is an integrated software environment that makes it easy to manage document and image files and
launch applications.
Online Manual
This is a manual in PDF format that is viewed using Adobe Acrobat Reader. To view the online manual "Operation Manual (for
printer and scanner)" on the CD-ROM, specify the following path. (Note that "R" represents the letter of your CD-ROM drive.)
R:\Manual\EnglishA*\AR_161_162_163.pdf
* "English A" in North America. "English" in Europe.
Note
The scanning feature can only be used with computers that are running Windows 98/Me/2000/XP and are
connected to the machine by a USB cable. If you are running Windows 95/NT 4.0 or are connected by a parallel
cable, only printing is available.
Software CD-ROM (2)
This CD-ROM contains a minimal version of Internet Explorer 6.0 SP1. For the installation procedure, double-click
"Readme.txt" in the root folder of the "Software CD-ROM (2)" to view the Readme file.
2
Page 5

■ CD-ROMS in the network expansion kit (AR-NB3)
The optional network expansion kit includes the following four CD-ROMs:
1. "Software CD-ROM (1)" included in
the network expansion kit
• PCL5e and PCL6 drivers, and PS driver
• Printer Status Monitor
• Printer Administration Utility
• NICManager
• Macintosh PPD File
2. "Network Utilities" CD-ROM
This CD-ROM contains utilities for using
the machine as a network printer and an
online manual.
3. "Sharpdesk" CD-ROM
• Sharpdesk (Desktop Document
Management Software)
• Network Scanner Tool
• SHARP TWAIN AR/DM (TWAIN driver)
• OmniPage Pro Trial (ScanSoft, inc.)
4. "Software CD-ROM (2)"
• Internet Explorer 6.0 SP1
1. "Software CD-ROM (1)" included in the network expansion kit
This CD-ROM contains a wizard-type installer for installation of the following utilities, and online manuals.
For the procedure for installing the software, see page 20 of this manual.
Printer driver
Contains the PCL5e and PCL6 printer drivers, and the PS printer driver that are needed to use this product.
Printer Status Monitor*
When using the printer in a network environment, this provides messages and displays that allow you to monitor
the status of the printer.
Printer Administration Utility*
When using the printer in a network environment, this administration utility makes it possible to configure printer
settings and monitor the printer from a computer. (This utility is for use by system administrators.)
NICManager
Use this program to configure and check the IP address when the machine is connected to a network.
Acrobat Reader 5.0
This program is used to view the online manuals on your computer screen.
To install Acrobat Reader, see page 42 of this manual.
Online Manuals
Manuals in PDF format that are viewed using Adobe Acrobat Reader. To view the online manuals on the
CD-ROM, specify the following paths. (Note that "R" represents the letter of your CD-ROM drive.)
• For network printer: R:\Manual\EnglishA*
• For network scanner: R:\Manual\EnglishA*
1
In order to use the Printer Status Monitor and Printer Administration Utility, the machine must be connected to
*
a network.
2
*
"English A" in North America. "English" in Europe.
1
1
2
\OnlineManual\AR_NB3_Prn.pdf
2
\OnlineManual\AR_NB3_Scn.pdf
2. "Network Utilities" CD-ROM
This CD-ROM contains an online manual and utilities for using the machine as a network printer.
Please read before using (Readme):
This contains information on the contents of the "Network Utilities" CD-ROM, how to use the utilities, how to view
the online manual, and limitations.
Print Server Card Quick Setup:
This is a wizard-type utility for Windows 95, Windows 98, Windows Me, Windows NT 4.0, Windows 2000,
Windows XP, and Windows Server 2003 that allows you to conveniently configure the print server.
Print Server Card Standard Setup:
This installs and launches "NICManager", which enables administration and configuration of advanced print
server settings.
Online Manual:
This manual in PDF format explains how to use the "Network Utilities" CD-ROM.
3
Page 6

3. "Sharpdesk" CD-ROM
Sharpdesk is an integrated software environment that makes it easy to manage document and image files, and
launch applications.
For information on the "Sharpdesk" CD-ROM and how to install Sharpdesk, see the "Sharpdesk installation
guide" that accompanies the machine.
Sharpdesk (Desktop Document Management Software)
Sharpdesk is used to manage images scanned from the machine and files created in various software
programs.
Network Scanner Tool
This is a utility that helps you use Scan to Desktop. The utility allows you to configure settings to receive
scanned images from the machine to your computer. You can have Sharpdesk launch automatically when your
computer receives a scanned image from the machine.
SHARP TWAIN AR/DM
This is used to acquire black and white images from a TWAIN interface into TWAIN-compliant software
applications.
OmniPage Pro Trial (ScanSoft, inc.)
This is used to scan text printed on paper and convert the image data into text data by means of OCR (Optical
Character Recognition).
4. "Software CD-ROM (2)"
This CD-ROM contains a minimal version of Internet Explorer 6.0 SP1. For the installation procedure,
double-click "Readme.txt" in the root folder of the "Software CD-ROM (2)" to view the Readme file.
Using the machine in a macintosh environment
To use the machine as a printer for the Macintosh, the PS3 expansion kit (AR-PK1/N) must be installed.
Install the PPD file needed to use the machine as a printer from the "Software CD-ROM (1)" that accompanies the
network expansion kit (AR-NB3).
1. "Software CD-ROM (1)" that accompanies the network expansion kit
This CD-ROM contains the software that is needed to use the machine in a Macintosh environment and the
online manuals "Operation Manual (for network printer)" and "Operation Manual (for network scanner)".
To open the online manual "Operation Manual (for network printer)", double-click the [AR-NB3 Printer Manual]
folder, the [EnglishA]* folder, and then the [Printer Manual] icon.
To open the online manual "Operation Manual (for network scanner)", double-click the [AR-NB3 Scanner Manual]
folder, the [EnglishA]* folder, and then the [Scanner Manual] icon.
For the procedure for installing the software, see page 32 of this manual.
*"English A" in North America. "English" in Europe.
PPD file
This file contains printer information necessary for printing.
Acrobat Reader 4.05
This program is used to view the online manuals on your computer screen.
To install Acrobat Reader, see page 42 of this manual.
Note
The PPD file on the "Software CD-ROM (1)" that accompanies the network expansion kit cannot be used when
the machine is connected to your computer with a USB or parallel cable.
2. "Network Utilities" CD-ROM that accompanies the network
expansion kit
This CD-ROM contains utilities required when using the machine as a printer in a Macintosh environment.
PSC Setup Utility
This is a utility that lets you configure the machine's network settings from a Macintosh.
Online Manual
This manual in PDF format explains how to use the "Network Utilities" CD-ROM.
4
Page 7

CONTENTS
INTRODUCTION ........................................................................................................................................ 1
● SOFTWARE LICENSE ..................................................................................................................................... 1
● ABOUT THE CD-ROMS ................................................................................................................................... 2
1
BEFORE INSTALLATION ......................................................................................................................... 7
● HARDWARE AND SOFTWARE REQUIREMENTS ......................................................................................... 7
● INSTALLATION ENVIRONMENT AND USEABLE SOFTWARE ..................................................................... 7
INSTALLING THE SOFTWARE ................................................................................................................ 7
● INSTALLATION USING THE INSTALLER ....................................................................................................... 7
● INSTALLATION METHOD 1 ............................................................................................................................. 8
● INSTALLATION METHOD 2 ........................................................................................................................... 10
● INSTALLATION METHOD 3 ........................................................................................................................... 12
● INSTALLATION METHOD 4 ........................................................................................................................... 14
● USING THE MACHINE AS A SHARED PRINTER VIA A SERVER............................................................... 16
SETTING UP BUTTON MANAGER ........................................................................................................ 18
● WINDOWS XP ................................................................................................................................................ 18
● WINDOWS 98/ME/2000 ................................................................................................................................. 19
2
INSTALLATION FOR A NETWORK CONNECTION .............................................................................. 20
INSTALLING THE SOFTWARE (THAT ACCOMPANIES THE MACHINE)
INSTALLING THE SOFTWARE (FOR OPTIONS)
SETUP IN A WINDOWS ENVIRONMENT
HARDWARE AND SOFTWARE REQUIREMENTS ................................................................................ 21
SETTING THE IP ADDRESS OF THE MACHINE................................................................................... 21
INSTALLING THE SOFTWARE .............................................................................................................. 24
● INSTALLING THE PRINTER DRIVER (STANDARD INSTALLATION).......................................................... 24
● CUSTOM INSTALLATION .............................................................................................................................. 26
● USING THE MACHINE AS A SHARED PRINTER VIA A SERVER............................................................... 28
● INSTALLING THE PS DISPLAY FONTS........................................................................................................ 30
USING THE PPD FILE............................................................................................................................. 31
●
Installing the resident font information (only when the PPD file is installed in Windows 95/98/Me)
.............................. 31
5
Page 8

SETUP IN A MACINTOSH ENVIRONMENT
HARDWARE AND SOFTWARE REQUIREMENTS ................................................................................ 32
APPLETALK SETTINGS ......................................................................................................................... 32
INSTALLING THE PPD FILE................................................................................................................... 32
● INSTALLATION IN MAC OS X ....................................................................................................................... 32
● INSTALLATION IN MAC OS 8.6 TO 9.2.2...................................................................................................... 34
● INSTALLING THE SCREEN FONTS (MAC OS 8.6 - 9.2.2) ........................................................................... 34
CONFIGURING THE PRINTER DRIVER ................................................................................................ 35
● MAC OS X V10.2 TO 10.3.4 ........................................................................................................................... 35
● MAC OS X v10.1.5.......................................................................................................................................... 37
● MAC OS 8.6 TO 9.2.2 ..................................................................................................................................... 38
3
TROUBLESHOOTING ............................................................................................................................. 39
CONFIGURING THE PRINTER DRIVER ................................................................................................ 42
INSTALLING ACROBAT READER ......................................................................................................... 42
CHECKING THE IP ADDRESS ............................................................................................................... 43
HARDWARE AND SOFTWARE REQUIREMENTS ................................................................................ 43
CONNECTING TO A COMPUTER .......................................................................................................... 44
TROUBLESHOOTING AND USEFUL INFORMATION
6
Page 9

INSTALLING THE SOFTWARE (THAT
1
ACCOMPANIES THE MACHINE)
BEFORE INSTALLATION
HARDWARE AND SOFTWARE REQUIREMENTS
Before installing the software, see "HARDWARE AND SOFTWARE REQUIREMENTS" on page 43 to make sure
your computer meets the hardware and software requirements.
INSTALLATION ENVIRONMENT AND USEABLE SOFTWARE
The software that can be installed varies depending on your operating system version and type of connection to the machine.
MFP Driver
Printer driver Scanner driver
Windows 98/Me/2000/XP
USB 2.0 connection*
Windows 95/98/Me/NT 4.0/2000/XP
Parallel connection
*1 Windows 98/Me does not support USB 2.0. A USB 2.0 connection can be used in Windows 98/Me, however, the performance
will be the same as USB 1.1. The print speed based on USB 2.0 specifications can only be attained if your computer is
running Windows 2000/XP, you are using a cable that supports USB 2.0, and the cable is connected to a USB 2.0 port on
your computer. If the connection is made through a hub, the hub must support USB 2.0.
USB 2.0 (Hi-Speed) can be used when the dual function board is installed.
When the machine is connected using a parallel cable, the Print Status Window can only be used when the parallel port is set to ECP mode.
*2
*3 The printer driver that is installed varies depending on the type of connection between the machine and your computer.
*4 Sharpdesk can be installed when using a parallel cable, however, the machine's scanner function cannot be used. Windows
95 and Windows NT 4.0 are not supported.
1
Available*
2,3
Available Available Available
Not Available Not Available Available
Button
Manager
Sharpdesk
*4
INSTALLING THE SOFTWARE
Note
INSTALLATION USING THE INSTALLER
The software programs installed and the steps for installation vary depending on the version of Windows you are running and
the type of connection to your computer. Refer to the following table for the appropriate procedure for your environment.
Type of connection
USB cable connection* (standard installation)
USB cable connection* (custom installation)
Parallel cable connection (custom installation) INSTALLATION METHOD 4 (pages 14 to 15)
* Windows 95 and Windows NT 4.0 are not supported.
• The scanner feature only works when using a USB cable.
•
If an error message appears, follow the instructions on the screen to solve the problem. After the problem is solved,
continue the installation procedure. Depending on the problem, you may have to exit the installer. In this case, click
the [Cancel] button to quit the installer and then reinstall the software from the beginning after solving the problem.
• When installing Sharpdesk, if Internet Explorer 5.5 or later is not installed on your computer, see the Internet
Explorer installation procedure in the Readme file (Readme.txt) in the root folder of the "Software CD-ROM (2)".
If you are only going to install Sharpdesk after installing Internet Explorer (for example, when the other
components have already been installed), perform a custom installation (follow steps 2 through 7 in
"INSTALLATION METHOD 2" and then install only Sharpdesk in steps 11 and 12).
Windows version
Windows XP
INSTALLATION METHOD 1
INSTALLATION
METHOD 2 (pages
10 to 11)
Windows
2000/98/Me
(pages
INSTALLATION
METHOD 3 (pages
12 to 13)
8 to 9)
Windows 95/NT 4.0
7
Page 10
INSTALLING THE SOFTWARE (THAT ACCOMPANIES THE MACHINE)
INSTALLATION METHOD 1
Use this procedure to install the software in the following environments:
1. The printer is connected by USB cable.
2. Windows version: Windows 98/Windows Me/Windows 2000*/Windows XP*
The following procedure uses Windows XP as an example. Follow the same steps to install the software on other
operating systems.
Note
* To install the software, you must have administrator's rights.
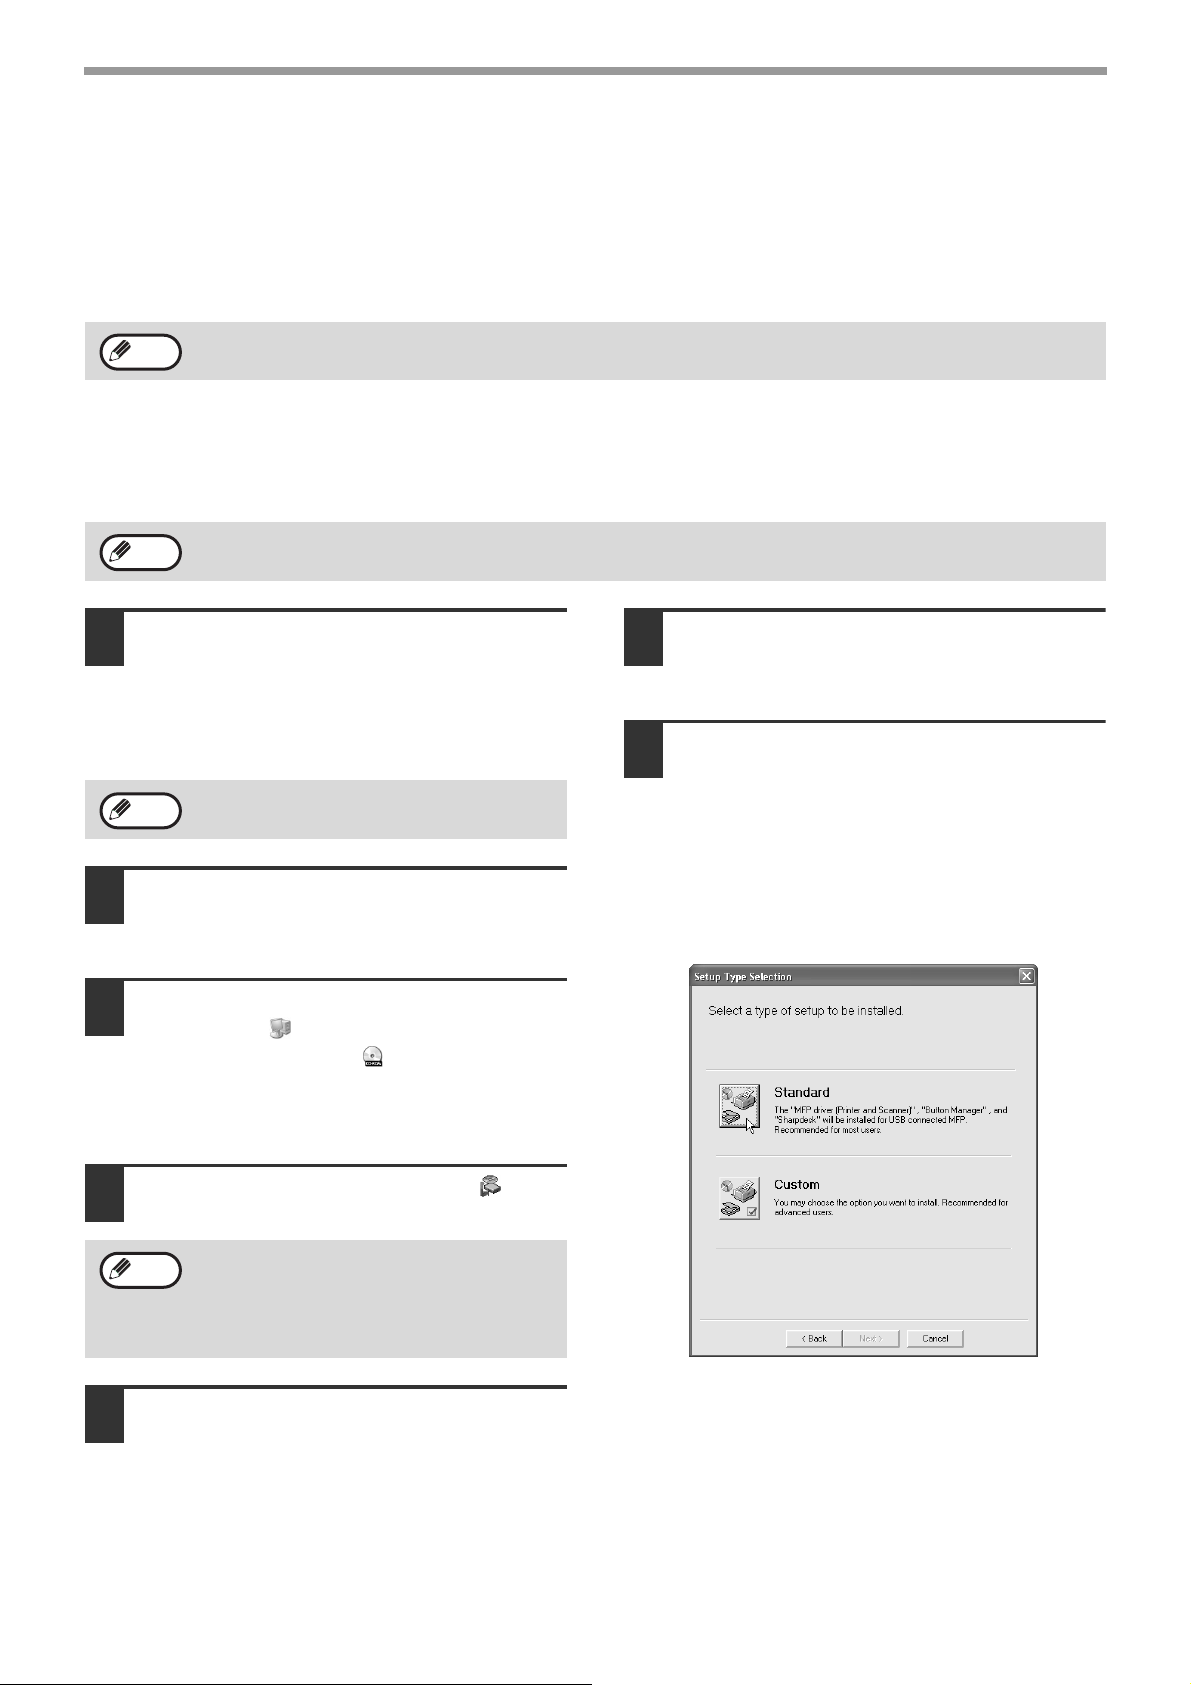
Standard installation (only when using a USB cable)
The procedure for a standard installation of the software is explained below.
The standard installation procedure is normally used when the machine is connected by a USB cable and you wish
to install all the software components.
Note
Make sure that the USB cable is not
1
connected to the machine.
If the cable is connected, a Plug and Play window
will appear. If this happens, click the [Cancel]
button to close the window and disconnect the
cable.
Note
Insert the "Software CD-ROM (1)" that
2
accompanies the machine into your
computer's CD-ROM drive.
If the machine is used as a shared printer via a server or is connected by a parallel cable and you only wish to
install certain components, select "Custom installation". (Pages 10 to 17)
Read the message in the "Welcome"
6
window and then click the [Next]
button.
Click the [Standard] button.
7
The cable will be connected in step 9.
After the "Integrated Installer is preparing..."
message appears, the software components
below will be automatically installed. Follow the
on-screen instructions.
• MFP Driver
• Button Manager
• Sharpdesk
Click the [start] button, click [My
3
Computer] ( ), and then double-click
the [CD-ROM] icon ( ).
In Windows 98/Me/2000, double-click [My
Computer], and then double-click the [CD-ROM]
icon.
Double-click the [Setup] icon ( ).
4
Note
The "SOFTWARE LICENSE" window
5
If the language selection screen appears
after you double click the [Setup] icon,
select the language that you wish to use and
click the [Next] button. (Normally the correct
language is selected automatically.)
will appear. Make sure that you
understand the contents of the license
agreement and then click the [Yes]
button.
8
Page 11
INSTALLING THE SOFTWARE (THAT ACCOMPANIES THE MACHINE)
When the "Finish" screen appears,
8
click the [Close] button.
When "Now connect the MFP interface cable to
the PC." appears, click the [OK] button.
Caution
Note
Connect the machine to your
9
If you are using Windows 2000/XP
If a warning message regarding the
Windows logo test or digital signature
appears, be sure to click the [Continue
Anyway] or [Yes] button.
After the installation, a message prompting
you to restart your computer may appear. If
this message appears, click the [Yes] button
to restart your computer.
computer with the USB cable. (Page
44)
Make sure that the machine is powered on. The
machine is found and a plug and play window
appears. Follow the on-screen instructions.
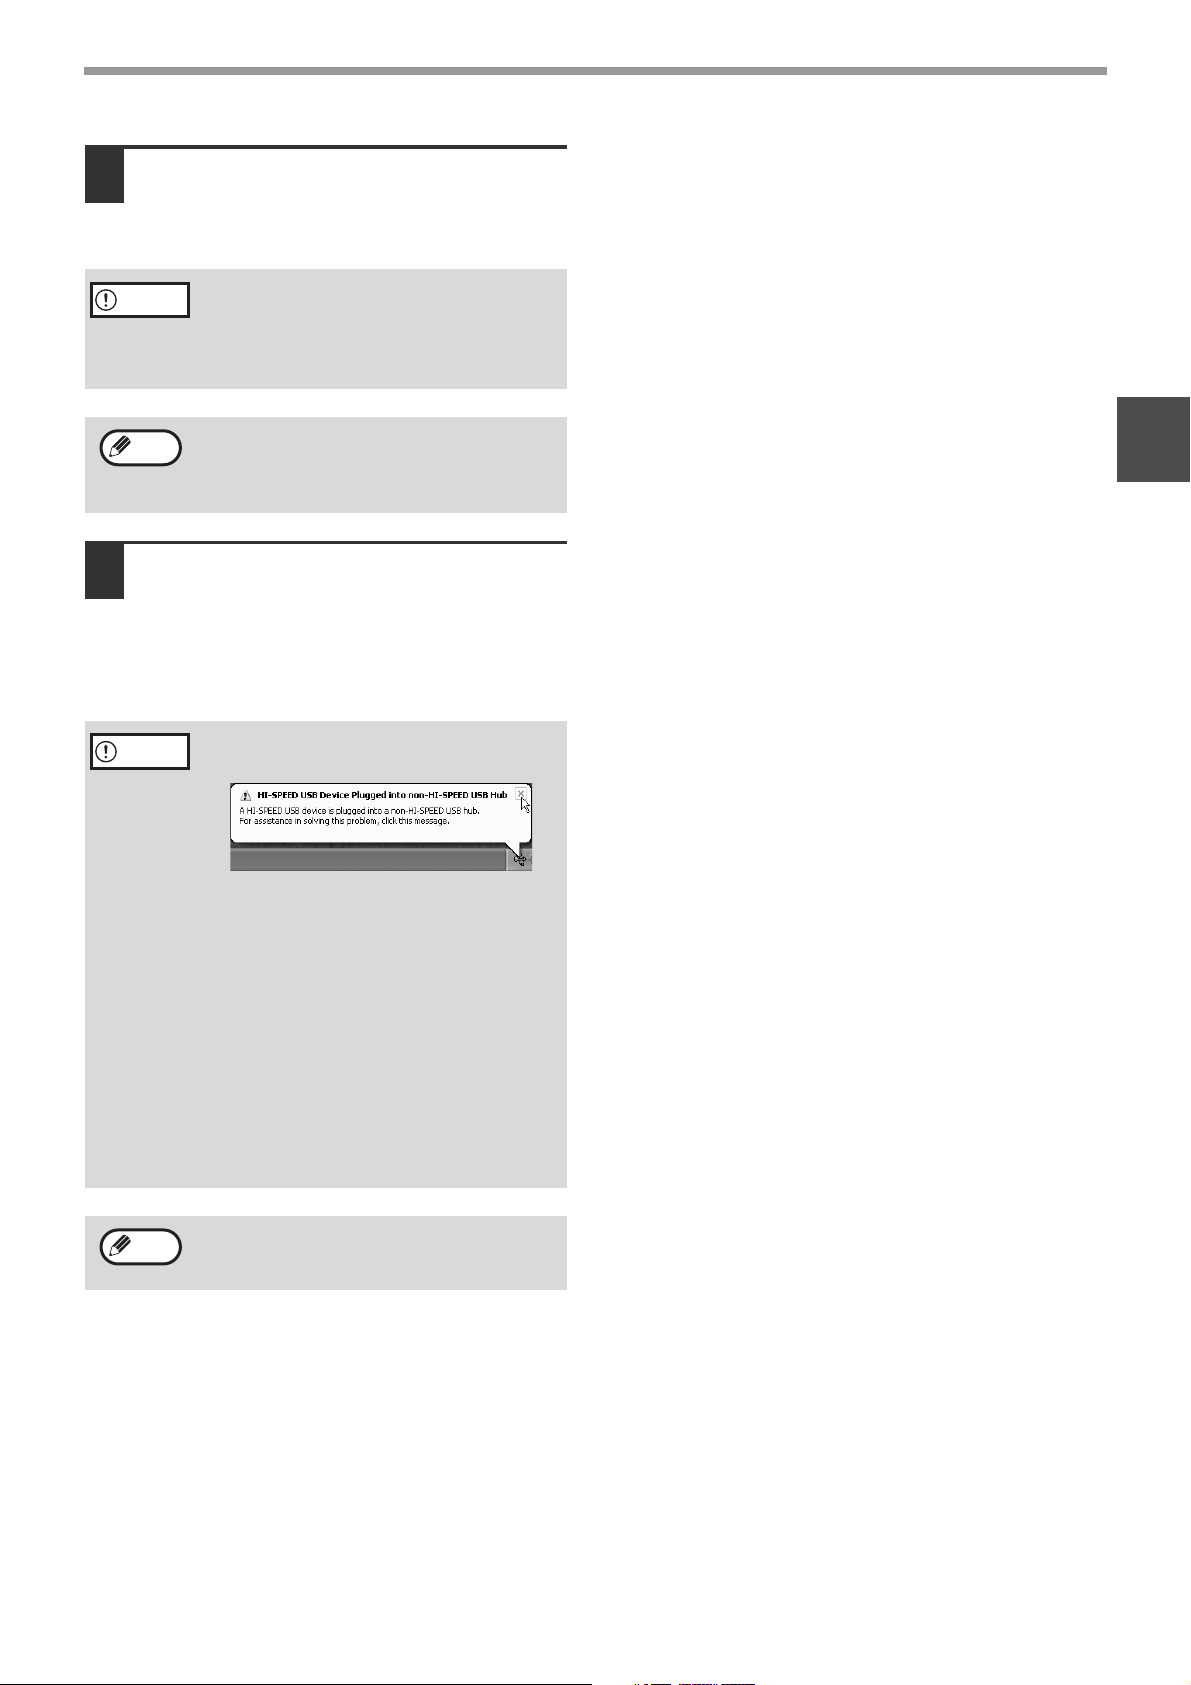
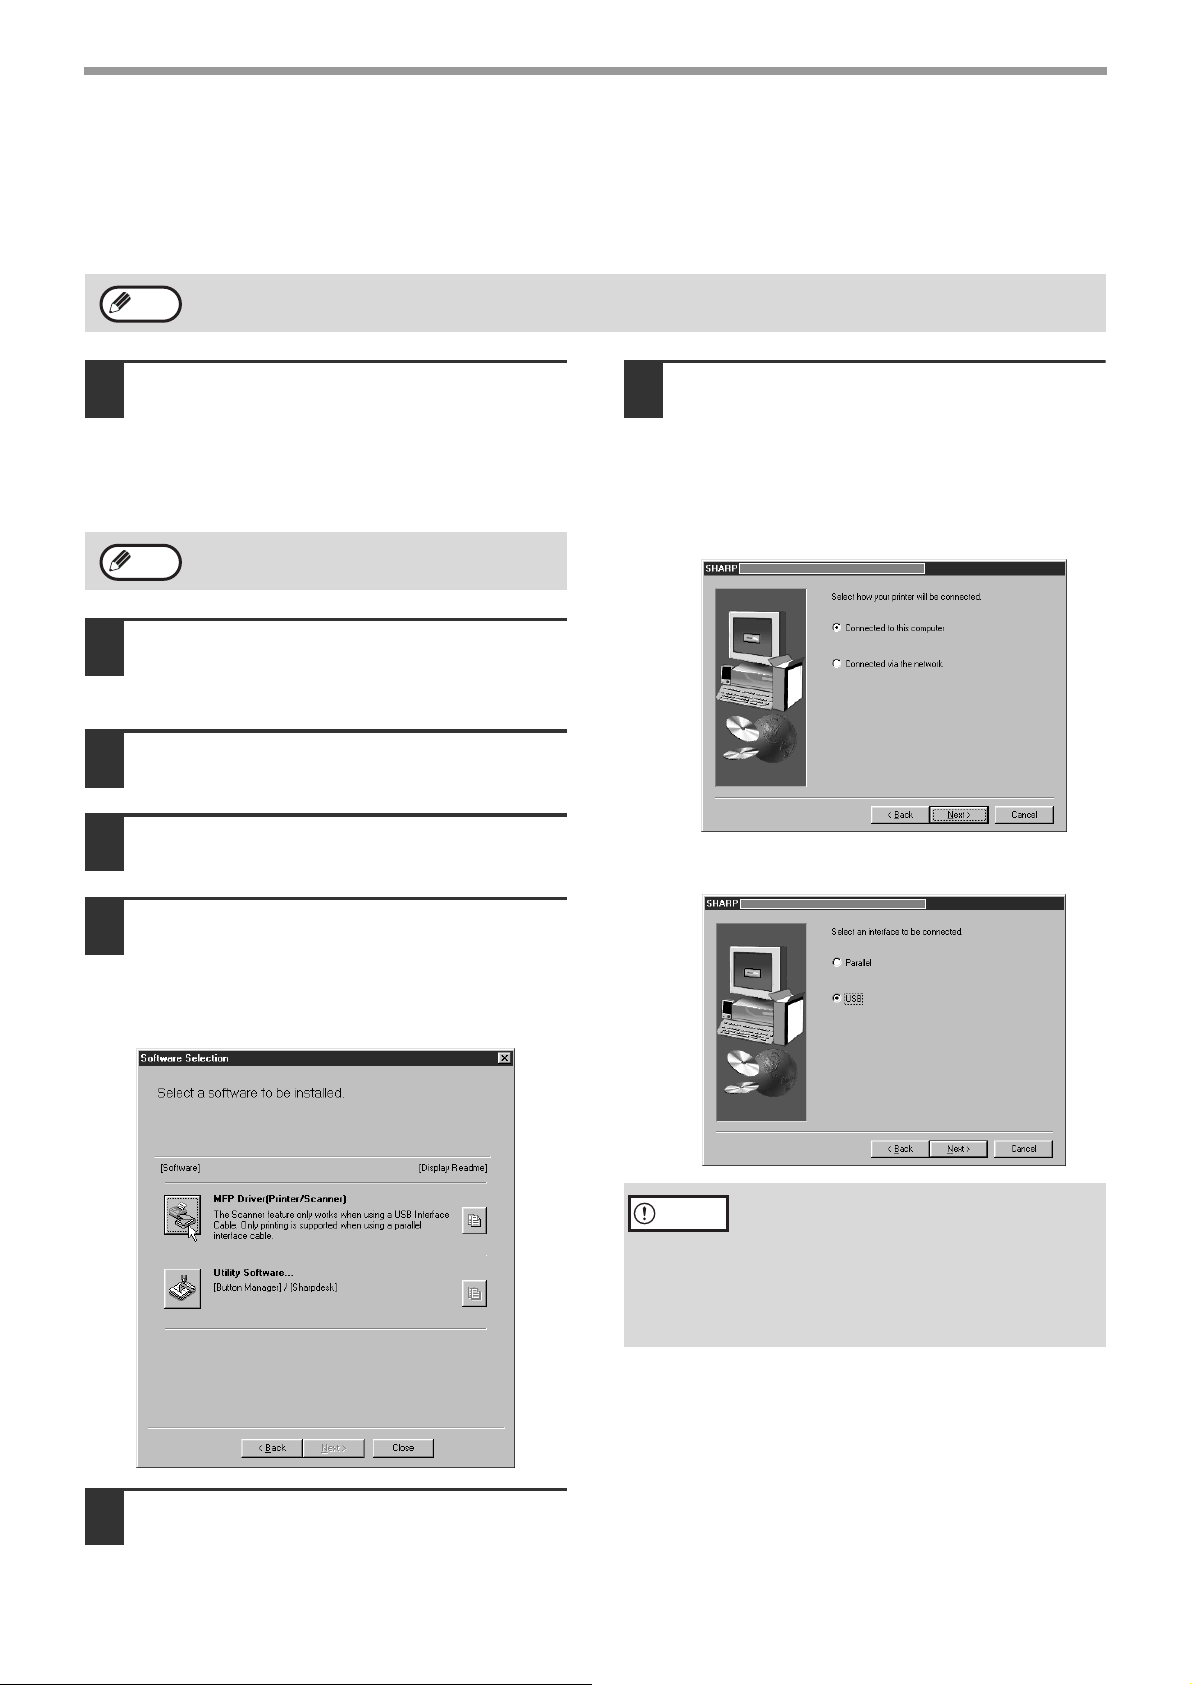
Caution
• If the following message appears
on your computer screen, close it.
1
A window regarding "HI-SPEED USB
Device" will then appear. Close the
window.
This message appears when the
machine's USB 2.0 mode is not set to
"Hi-Speed". For information on switching
the USB 2.0 mode, see the "Key operator's
guide".
• If you are using Windows 2000/XP
If a warning message regarding the
Windows logo test or digital signature
appears, be sure to click the [Continue
Anyway] or [Yes] button.
Note
This completes the installation.
• After installing the MFP Driver, see "CONFIGURING
THE PRINTER DRIVER" (page 42) to configure the
printer driver settings.
• After installing Button Manager, see "SETTING UP
BUTTON MANAGER" (page 18) to set up Button
Manager.
If the dual function board is installed, the
"AR-XXXX (EB)" printer driver and scanner
driver will be installed.
9
Page 12
INSTALLING THE SOFTWARE (THAT ACCOMPANIES THE MACHINE)
INSTALLATION METHOD 2
Use this procedure to install the software in the following environments:
1. The printer is connected by USB cable or parallel cable.
2. Windows version: Windows XP
Note
To install this software, you must have administrator's rights.
Custom installation
Installation methods 2 through 4 are for custom installations of the software. If the machine is used as a shared
printer via a server or is connected by a parallel cable and you only wish to install required software components,
select "Custom installation".
Make sure that the USB or parallel
1
cable is not connected to the machine
and your computer.
If the cable is connected, a Plug and Play window
will appear. If this happens, click the [Cancel]
button to close the window and disconnect the
cable.
Note
Insert the "Software CD-ROM (1)" that
2
accompanies the machine into your
computer's CD-ROM drive.
The cable will be connected in step 14.
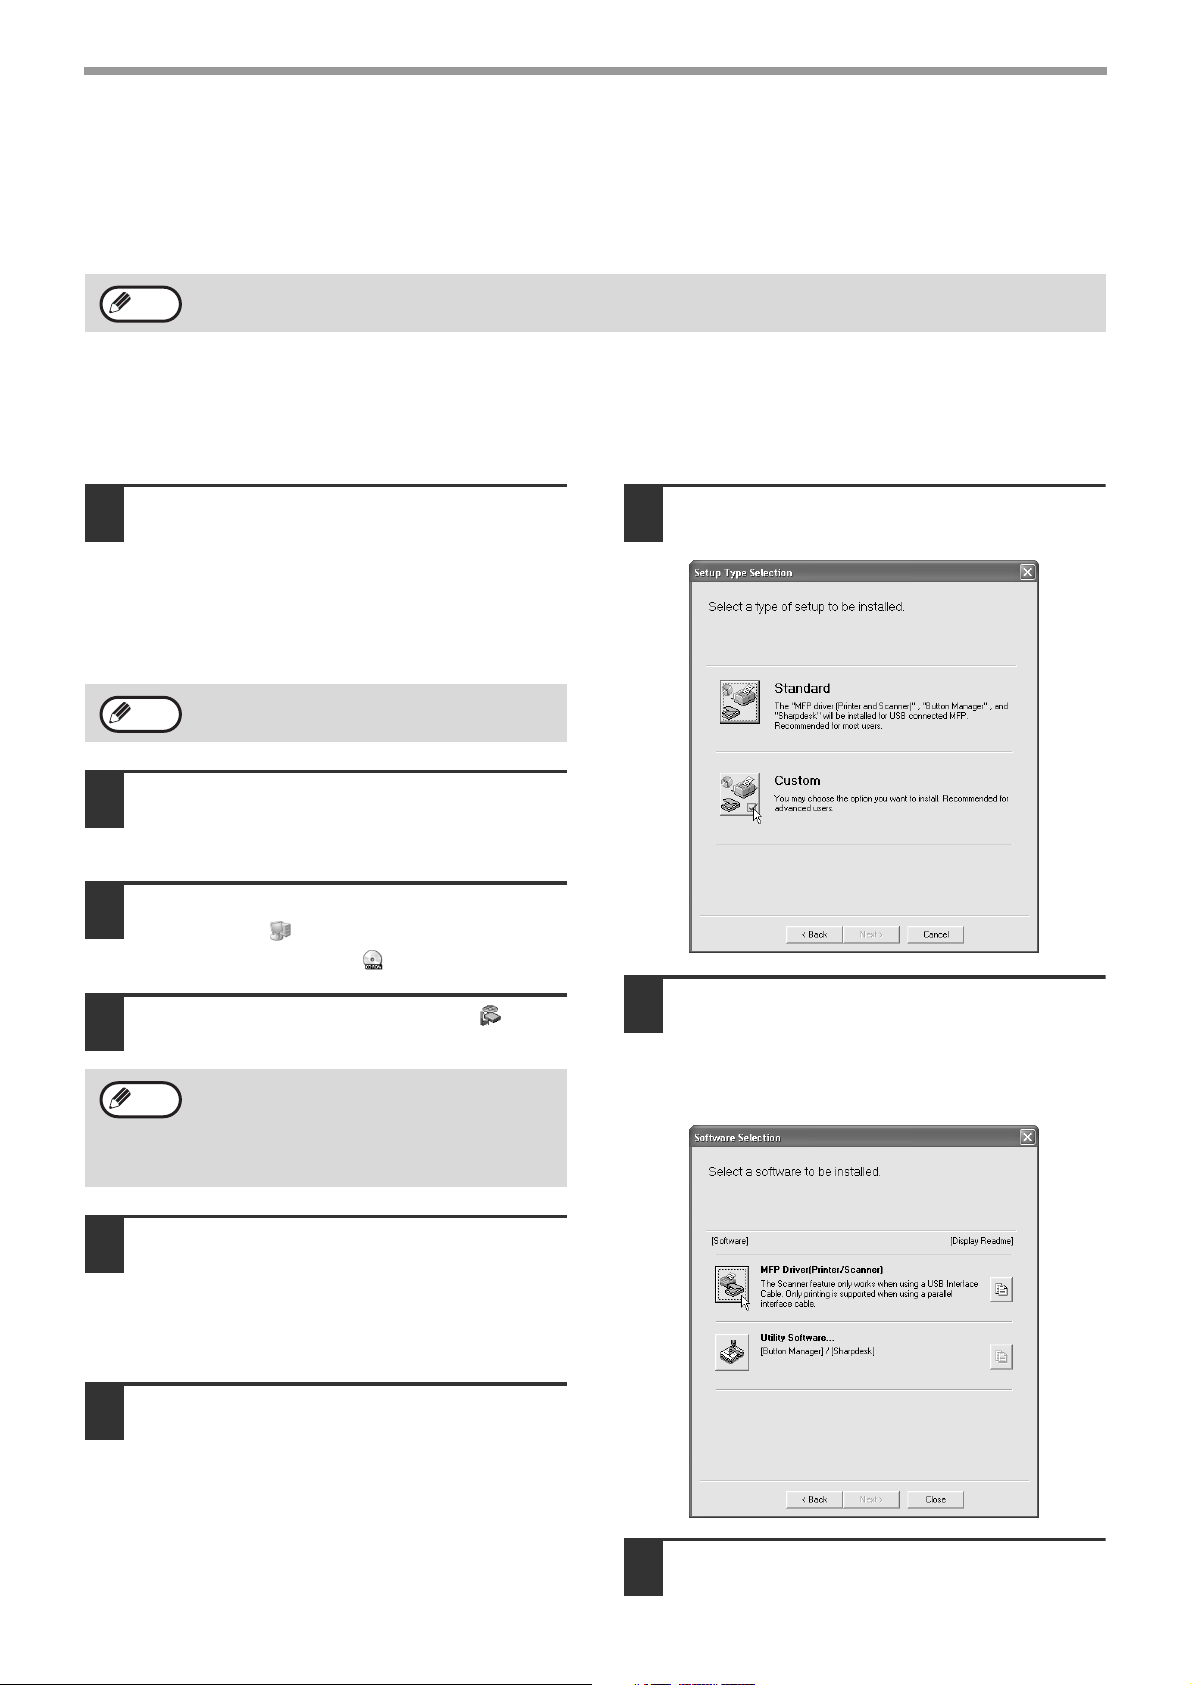
Click the [Custom] button.
7
Click the [start] button, click [My
3
Computer] ( ), and then double-click
the [CD-ROM] icon ( ).
Double-click the [Setup] icon ( ).
4
Note
The "SOFTWARE LICENSE" window
5
will appear. Make sure that you
understand the contents of the license
agreement and then click the [Yes]
button.
Read the message in the "Welcome"
6
window and then click the [Next]
button.
If the language selection screen appears
after you double click the [Setup] icon,
select the language that you wish to use and
click the [Next] button. (Normally the correct
language is selected automatically.)
If you wish to install the MFP driver,
8
click the [MFP Driver (Printer/Scanner)]
button.
To view information on the software, click the
[Display Readme] button.
10
Click the [Next] button.
9
Page 13
INSTALLING THE SOFTWARE (THAT ACCOMPANIES THE MACHINE)
The files required for installation of
10
the MFP driver are copied (if "MFP
Driver" was selected in Step 8).
Follow the on-screen instructions.
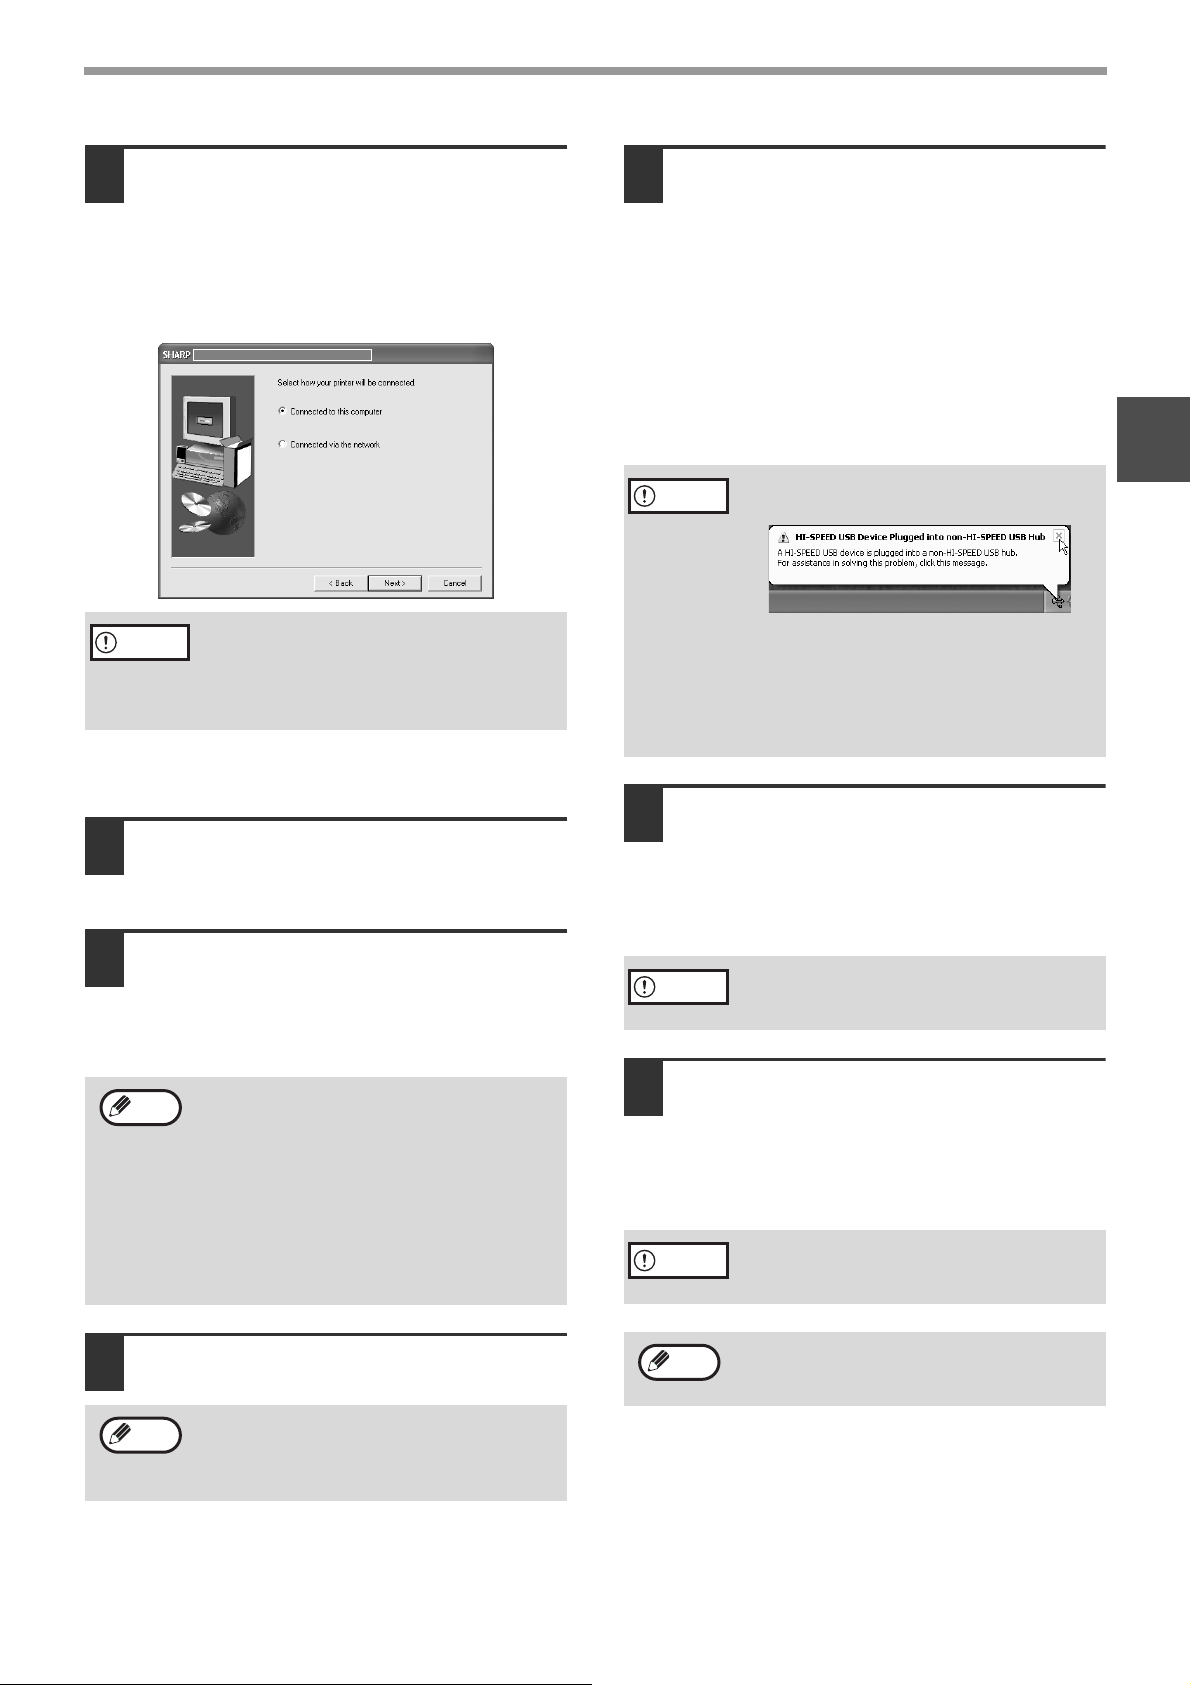
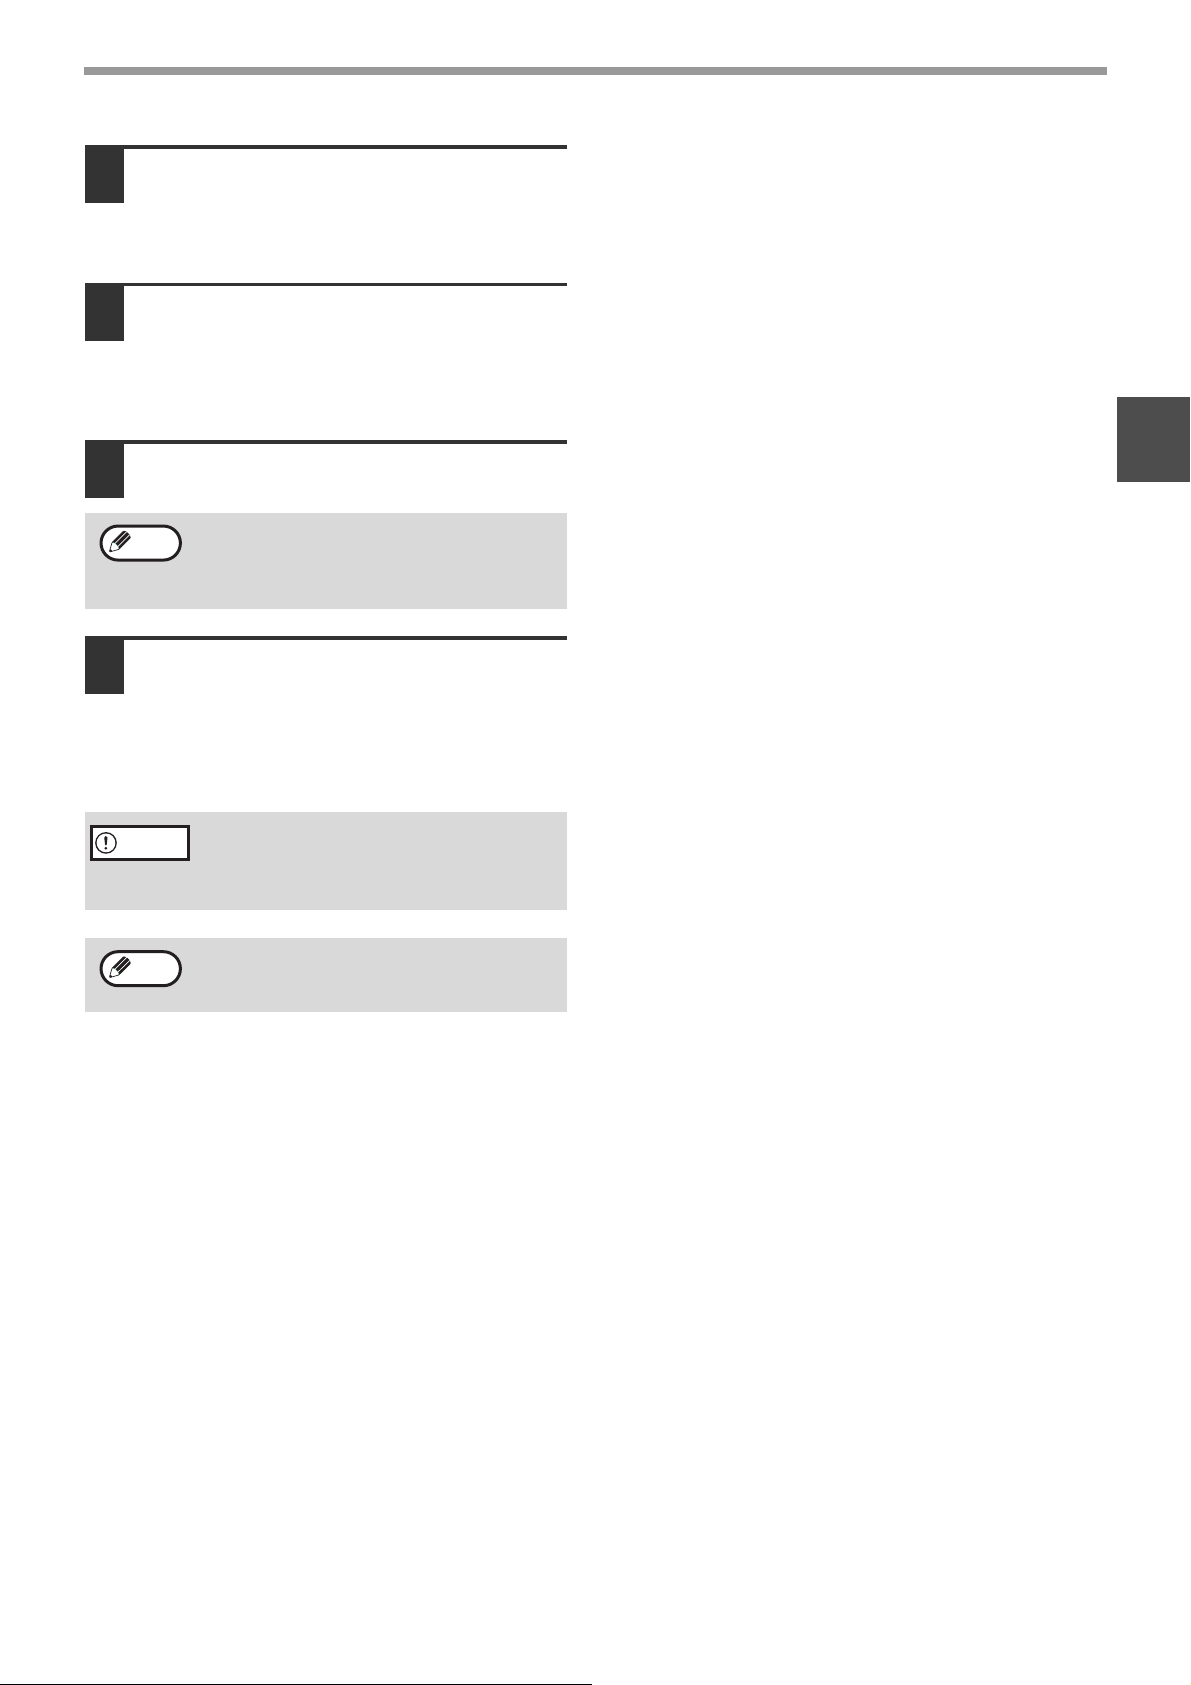
When you are asked how the printer is
connected, select [Connected to this computer]
and click the [Next] button.
Caution
When "The installation of the SHARP software is
complete" appears, click the [OK] button.
If you wish to install Button Manager
11
If a warning message regarding the
Windows logo test appears while the MFP
driver files are being copied (the warning
message may appear several times), be
sure to click the [Continue Anyway] button.
or Sharpdesk, click the [Utility
Software] button in step 8.
Click the [Button Manager] or
12
[Sharpdesk] button.
To view information on the software, click the
[Display Readme] button.
Follow the on-screen instructions.
Note
• If you are using a parallel cable, do not
select "Button Manager". This feature is
not supported when a parallel cable is
used.
• When a message appears prompting you
to connect the USB cable, click the [OK]
button. For the software that can be
installed, see "INSTALLATION
ENVIRONMENT AND USEABLE
SOFTWARE" (page 7).
Connect the machine to your
14
computer with the interface cable.
(Page 44)
• If you are using a USB cable, make sure the
machine power is turned on and then connect
the cable.
•
If you are using a parallel cable, turn off both the
machine power and the computer power and then
connect the cable. Turn the machine power on
first and then turn on your computer. The machine
is found and a plug and play window appears. If
you are using a parallel cable, go to step 16.
Caution
Installation of the scanner driver
15
If the following message appears on
your computer screen, close it.
•
A window regarding "HI-SPEED USB
Device" will then appear. Close the window.
•
This message appears when the machine's
USB mode is not set to "Hi-Speed" mode.
For information on switching the USB 2.0
mode, see the "Key operator's guide".
begins. (only when using a USB cable).
"SHARP AR-XXXX" will appear in the "Found New
Hardware Wizard" dialog box. Select [Install the
software automatically (Recommended)], click the
[Next] button, and follow the on-screen instructions.
Caution
Installation of the printer driver
16
If a warning window appears regarding the
"Windows logo test", be sure to click the
[Continue Anyway] button.
begins.
"SHARP AR-XXXX" will appear in the "Found New
Hardware Wizard" dialog box. Select [Install the
software automatically (Recommended)], click the
[Next] button, and follow the on-screen instructions.
Caution
If a warning window appears regarding the
"Windows logo test", be sure to click the
[Continue Anyway] button.
1
Click the [Close] button.
13
Note
After the installation, a message prompting
you to restart your computer may appear. In
this case, click the [Yes] button to restart
your computer.
Note
This completes the installation.
• If you installed the MFP Driver, see "CONFIGURING
THE PRINTER DRIVER" (page 42) to configure the
printer driver settings.
• If you installed Button Manager, see "SETTING UP
BUTTON MANAGER" (page 18) to set up Button
Manager.
If the dual function board is installed, the
"AR-XXXX (EB)" printer driver and scanner
driver will be installed.
11
Page 14
INSTALLING THE SOFTWARE (THAT ACCOMPANIES THE MACHINE)
INSTALLATION METHOD 3
Use this procedure to install the software in the following environments:
1. The printer is connected by USB cable.
2. Windows version: Windows 98/Windows Me/Windows 2000*
Note
Make sure that the USB cable is not
1
connected to the machine.
If the cable is connected, a Plug and Play window
will appear. If this happens, click the [Cancel]
button to close the window and disconnect the
cable.
Note
Insert the "Software CD-ROM (1)" that
2
accompanies the machine into your
computer's CD-ROM drive.
Double-click [My Computer] and then
3
double-click the [CD-ROM] icon.
Follow steps 4 through 7 in
4
"INSTALLATION METHOD 2".
* To install this software, you must have administrator's rights.
The cable will be connected in step 11.
The files required for installation of
7
the MFP driver are copied (if "MFP
Driver" was selected in Step 5).
Follow the on-screen instructions.
When you are asked how the printer is
connected, select [Connected to this
computer] and click the [Next] button.
When the interface selection screen appears,
select [USB].
If you wish to install the MFP driver,
5
click the [MFP Driver (Printer/Scanner)]
button.
To view information on the software, click the
[Display Readme] button.
Caution
When "The MFP driver installation is complete."
appears, click the [OK] button.
If you are using Windows 2000
If you are using Windows 2000 and a
warning message regarding the digital
signature appears while the MFP driver files
are being copied (the warning message may
appear several times), be sure to click the
[Continue Anyway] button.
Click the [Next] button.
6
12
Page 15
INSTALLING THE SOFTWARE (THAT ACCOMPANIES THE MACHINE)
If you wish to install Button Manager
8
or Sharpdesk, click the [Utility
Software] button in step 5.
If you do not wish to install either, go to step 10.
Click the [Button Manager] or
9
[Sharpdesk] button.
• To view information on the software, click the
[Display Readme] button.
• Follow the on-screen instructions.
Click the [Close] button.
10
Note
Connect the machine to your
11
After the installation, a message prompting
you to restart your computer may appear. In
this case, click the [Yes] button to restart
your computer.
computer with the USB cable. (Page
44)
Make sure that the machine is powered on. The
machine is found and a plug and play window
appears. Follow the on-screen instructions.
Caution
Note
If you are using Windows 2000
If a warning message regarding the digital
signature appears, be sure to click the [Yes]
button.
If the dual function board is installed, the
"AR-XXXX (EB)" printer driver and scanner
driver will be installed.
1
This completes the installation.
• If you installed the MFP Driver, see "CONFIGURING
THE PRINTER DRIVER" (page 42) to configure the
printer driver settings.
• If you installed Button Manager, see "SETTING UP
BUTTON MANAGER" (page 18) to set up Button
Manager.
13
Page 16

INSTALLING THE SOFTWARE (THAT ACCOMPANIES THE MACHINE)
INSTALLATION METHOD 4
Use this procedure to install the software in the following environments:
1.The printer is connected by parallel cable.
2.Windows version: Windows 95/Windows 98/Windows Me/Windows NT 4.0*/Windows 2000*
Note
Make sure that the parallel cable is not
1
connected to the machine and your
computer before proceeding.
If the cable is connected, a Plug and Play window
will appear. If this happens, click the [Cancel]
button to close the window and disconnect the
cable.
Note
Insert the "Software CD-ROM (1)" that
2
accompanies the machine into your
computer's CD-ROM drive.
Double-click [My Computer] and then
3
double-click the [CD-ROM] icon.
Follow steps 4 through 7 in
4
"INSTALLATION METHOD 2".
* To install this software, you must have administrator's rights.
The cable will be connected in step 17.
Installation of the MFP driver (printer
7
driver) begins (if "MFP Driver" was
selected in Step 5).
Follow the on-screen instructions. If you are using
Windows 95/NT 4.0, go to step 10.
When you are asked how the printer is
8
connected, select [Connected to this
computer] and click the [Next] button.
If you wish to install the MFP driver,
5
click the [MFP Driver (Printer/Scanner)]
button.
To view information on the software, click the
[Display Readme] button.
When the interface selection screen
9
appears, select [Parallel] and click the
[Next] button.
Click the [Next] button.
6
14
Page 17

INSTALLING THE SOFTWARE (THAT ACCOMPANIES THE MACHINE)
Select the printer port and click the
10
[Next] button.
Select [LPT1] for the printer port.
Note
When asked to select the printer
11
If [LPT1] does not appear, another printer or
peripheral device is using [LPT1]. In this
case continue the installation, and after the
installation is finished, change the port
setting so that the machine can use [LPT1].
This procedure is explained in "Another
printer is using the parallel port (when using
a parallel cable)" (page 41).
driver to install, select the appropriate
printer driver based on whether or not
the dual function board is installed,
and then click the [Next] button.
If the dual function board is not installed, be sure
to select [For standard model].
Caution
If the dual function board is not installed and
you select the printer driver for the dual
function board, printing will not be possible.
Click the [Sharpdesk] button.
16
• To view information on the software, click the
[Display Readme] button.
• Follow the on-screen instructions.
Note
When the "Finish" screen appears,
17
• In Windows 95/NT 4.0, the [Button
Manager] button does not appear.
• In Windows 98/Me/2000, do not select the
[Button Manager] button (Button Manager
is not supported when a parallel cable is
used).
click the [Close] button.
When "Now connect the MFP interface cable to
the PC." appears, click the [OK] button.
Note
Turn off the power of the machine and
18
After the installation, a message prompting
you to restart your computer may appear. In
this case, click the [Yes] button to restart
your computer.
your computer, and connect the
machine to your computer with the
parallel cable. (Page 44)
After connecting the machine to your computer,
turn on the power of the machine and then start
up your computer.
This completes the installation.
If you installed the MFP driver, see "CONFIGURING
THE PRINTER DRIVER" (page 42) to configure the
printer driver settings.
1
When the model selection window
12
appears, select model name of your
machine and click the [Next] button.
Click the [Yes] button.
13
When "The MFP driver installation is
14
complete." appears, click the [OK]
button.
If you wish to install Sharpdesk, click
15
the [Utility Software] button in step 5.
If you do not wish to install Sharpdesk, go to step
18.
Note
In Windows 95/NT 4.0, the [Utility Software]
button does not appear.
15
Page 18

INSTALLING THE SOFTWARE (THAT ACCOMPANIES THE MACHINE)
USING THE MACHINE AS A SHARED PRINTER VIA A SERVER
The machine can be used as a shared printer in a Windows 95/98/Me/NT 4.0/2000/XP network environment. Note
that the Windows network environment must already be established.
Follow these steps to install the printer driver in the client computer.
Ask your network administrator for the server name and printer name of the machine on the network.
Note
Insert the "Software CD-ROM (1)" that
1
accompanies the machine into your
computer's CD-ROM drive.
Click the [start] button, click [My
2
Computer] ( ), and then double-click
the [CD-ROM] icon ( ).
In Windows 95/98/Me/NT 4.0/2000, double-click
[My Computer] and then double-click the
[CD-ROM] icon.
Follow steps 4 through 7 in
3
"INSTALLATION METHOD 2".
Click the [MFP Driver (Printer/Scanner)]
4
button.
To view information on the software, click the
[Display Readme] button.
For the procedure for configuring settings in the printer server, see the "Operation manual (for printer and
scanner)".
The "printer server" explained here is a computer that is connected to the machine, and "clients" are other
computers connected to the same network as the printer server.
The files required for installation of
6
the MFP driver are copied (if "MFP
Driver" was selected in Step 4).
Follow the on-screen instructions.
When you are asked how the printer is
connected, select [Connected via the
network] and click the [Next] button.
Click the [Next] button.
5
When you are asked to select the
7
printer port to be used, click the [Add
Network Port] button.
16
Page 19

Select the network printer that is
8
shared and click the [OK] button.
INSTALLING THE SOFTWARE (THAT ACCOMPANIES THE MACHINE)
1
Note
In the printer port selection window,
9
verify the network printer that is
shared and click the [Next] button.
When the model selection window
10
appears, select model name of your
machine and click the [Next] button.
Follow the on-screen instructions.
Caution
Click the [Close] button.
11
This completes the installation.
Ask your network administrator for the
server name and printer name of the
machine on the network.
If you are using Windows 2000/XP.
If a warning message regarding the
Windows logo test or digital signature
appears, be sure to click the [Continue
Anyway] or [Yes] button.
17
Page 20

SETTING UP BUTTON MANAGER
Button Manager is a software program that works with the scanner driver to enable scanning from the operation
panel of the machine.
To scan using the operation panel of the machine, Button Manager must be linked with the destination that appears
in the display. Follow the steps below to link Button Manager to machine scanner events.
Note
If computers are connected to both of the USB ports on the machine, separate Button Manager settings are
required for USB-1 and USB-2. (when the dual function board is installed.)
WINDOWS XP
Click the [start] button, click [Control
1
Panel], click [Printers and Other
Hardware], and then click [Scanners
and Cameras].
Click the [SHARP AR-XXXX] icon and
2
select [Properties] from the [File]
menu.
In the "Properties" screen, click the
3
[Events] tab.
Select [SC1:] from the "Select an
4
event" pull-down menu.
Select [Start this program] and then
5
select [Sharp Button Manager G] from
the pull-down menu.
Click the [Apply] button.
6
Repeat Steps 4 through 6 to link
7
Button Manager to [SC2:] through
[SC6:].
• Select [SC2:] from the "Select an event"
pull-down menu. Select [Start this program],
select [Sharp Button Manager G] from the
pull-down menu, and then click the [Apply]
button. Do the same for each ScanMenu
through [SC6:].
• When the settings have been completed, click
the [OK] button to close the screen.
Button Manager is now linked to the machine scan
destinations SC1 to SC6.
• The scan settings for each of scan destinations SC1
through SC6 can be changed in the setting window
of Button Manager.
•
For the default settings for destinations SC1 to SC6 and
the procedures for configuring Button Manager
settings, see "Scanning from the Operation Panel of the
Machine" and "Button Manager Settings" in "Operation
Manual (for printer and scanner)" in the "Software
CD-ROM (1)" that accompanies the machine.
18
Page 21

INSTALLING THE SOFTWARE (THAT ACCOMPANIES THE MACHINE)
WINDOWS 98/ME/2000
Click the [Start] button, select
1
[Settings], and then click [Control
Panel].
Double-click the [Scanners and
2
Cameras] icon.
Note
Select [SHARP AR-XXXX] and click
3
the [Properties] button.
In Windows Me, right click [SHARP AR-XXXX]
and click [Properties] in the menu that appears.
In the "Properties" screen, click the
4
[Events] tab.
Select [SC1:] from the "Scanner
5
events" pull-down menu.
If the [Scanners and Cameras] icon does
not appear in Windows Me, click [view all
Control Panel options].
Select [Sharp Button Manager G] in
6
"Send to this application".
Note
Click the [Apply] button.
7
If other applications are shown, deselect the
checkboxes for the other applications and
leave only the Button Manager checkbox
selected.
1
Repeat Steps 5 through 7 to link
8
Button Manager to [SC2:] through
[SC6:].
• Select [SC2:] from the "Scanner events"
pull-down menu. Select [Sharp Button Manager
G] in "Send to this application" and click the
[Apply] button. Do the same for each scan
destination through [SC6:].
• When the settings have been completed, click
the [OK] button to close the screen.
Note
Button Manager is now linked to the machine scan
destinations SC1 to SC6.
• The scan settings for each of scan destinations SC1
through SC6 can be changed in the setting window
of Button Manager.
• For the default settings for destinations SC1 to SC6
and the procedures for configuring Button Manager
settings, see "Scanning from the Operation Panel of
the Machine" and "Button Manager Settings" in
"Operation Manual (for printer and scanner)" in the
"Software CD-ROM (1)" that accompanies the
machine.
In Windows 2000, restart your computer.
19
Page 22

INSTALLING THE SOFTWARE
2
(FOR OPTIONS)
INSTALLATION FOR A NETWORK CONNECTION
The procedures for installing the software when the machine is used as a network printer using the optional network
expansion kit (AR-NB3) are explained in this chapter. Refer to the following table for the installation procedure to
follow depending on whether you are using a Windows environment (TCP/IP network) or a Macintosh environment.
Operating system Procedure to follow
Windows (1) SETTING THE IP ADDRESS OF THE MACHINE (page 21)
(2) INSTALLING THE SOFTWARE (page 24)
Macintosh (1) INSTALLING THE PPD FILE (page 32)
(2) CONFIGURING THE PRINTER DRIVER (page 35)
About network environments
There are several types of network environments. Typical environments include the following:
• Windows network environment
• NetWare network environment
• UNIX network environment
• Macintosh network environment
This manual explains peer-to-peer and server-client network connections in a Windows environment.
If the machine is used in a different network environment, see the online manual ("Print Server Card User's Manual")
on the "Network Utilities" CD-ROM.
Network connection examples
Peer-to-peer Server-client
Computer running
Windows
Computer running
Windows
Computer running
Windows
Computer running
Windows
For the procedure for installing the
printer driver, see "INSTALLING THE
PRINTER DRIVER (STANDARD
INSTALLATION)" and "CUSTOM
INSTALLATION" (pages 24 to 27) in
this manual.
Example: Windows Server 2003
environment
For the procedures for configuring
server settings when the machine
is used on a server-client type
network, see "Operation Manual
(for printer and scanner)" on the
"Software CD-ROM (1)" that
accompanies the machine.
For the procedure for installing the printer driver, see
"USING THE MACHINE AS A SHARED PRINTER
VIA A SERVER" (pages 28 to 29) in this manual.
20
TCP/IP protocol
Microsoft Printing Protocol
Page 23

SETUP IN A WINDOWS ENVIRONMENT
HARDWARE AND SOFTWARE REQUIREMENTS
Before installing the software, see "HARDWARE AND SOFTWARE REQUIREMENTS" on page 43 to make sure
your computer meets the hardware and software requirements.
SETTING THE IP ADDRESS OF THE MACHINE
Before installing the printer driver, be sure to set the IP address of the machine. Consult your network administrator
for the correct IP address, subnet mask, and default gateway to be entered.
assign an IP address to the machine, the following procedure is not necessary.
assigned to the machine by DHCP, see "CHECKING THE IP ADDRESS" (page 43).)
If a DHCP server will automatically
(To check the IP address
Caution
Make sure that the LAN cable is
1
connected to the machine and then
power on the machine.
Insert the network expansion kit
2
"Software CD-ROM (1)" into your
computer's CD-ROM drive.
Click the [start] button, click [My
3
Computer] ( ), and then double-click
the [CD-ROM] icon ( ).
In Windows 95/98/Me/NT 4.0/2000, double-click
[My Computer] and then double-click the
[CD-ROM] icon.
If the machine is used in a DHCP environment, the machine's IP address may change
automatically. If this happens, printing will no longer be possible. In this event, use a WINS
server or do not use the machine in a DHCP environment.
Double-click the [Setup] icon ( ).
4
Note
The "SOFTWARE LICENSE" window
5
will appear. Make sure that you
understand the contents of the license
agreement and then click the [Yes]
button.
Read the message in the "Welcome"
6
window and then click the [Next]
button.
If the language selection screen appears
after you double click the [Setup] icon,
select the language that you wish to use and
click the [Next] button. (Normally the correct
language is selected automatically.)
21
Page 24

SETUP IN A WINDOWS ENVIRONMENT
Click the [Administrator Tools] button.
7
Click the [NICManager] button.
8
Click the [Print Server Card Setup]
10
button.
If the machine is being used in a DHCP
environment or the IP address has otherwise
already been set, go to step 15.
If the IP address has not been set (the
11
IP address is set to "0.0.0.0"), a
message will appear prompting you to
set the IP address. Click the [Yes]
button.
Enter the IP address and click the
12
[OK] button.
• The machine's IP address is changed.
• If a password entry screen appears while the IP
address is being changed, enter the password
and click the [OK] button.
• The password for this machine has been
initially set to "Sharp".
The printer or printers connected to
9
the network will be detected. Click the
printer to be configured (the machine).
Select [AR-XXXX] here.
Note
If the machine is not found, make sure that
the machine is powered on and that your
computer and the machine are connected to
the network, and then search again.
Restart the machine.
13
Power off the machine and then power it back on.
Select [Search] from the [File] menu,
14
select the machine, and then click the
[Print Server Card Setup] button.
Enter your password in the password
15
entry screen and click the [OK]
button.
• The Print Server Card Setup window will
appear.
• The password for the machine has been initially
set to "Sharp".
• If the [Guest user] checkbox is selected, the
settings can be viewed but not configured.
Click the [TCP/IP] tab.
16
22
Page 25

Configure the settings and then click
17
the [Update] button.
Be sure to ask your network administrator for the
correct IP address, subnet mask, and default
gateway to be entered.
Your changes to the settings appear.
18
Make sure that the changes are
correct and then click the [OK] button.
SETUP IN A WINDOWS ENVIRONMENT
2
Restart the machine.
19
Power off the machine and then power it back on.
Select [Search] from the [File] menu.
20
The IP address that you entered will appear.
Make sure that it is correct.
This completes the procedure for setting the IP
address.
23
Page 26

INSTALLING THE SOFTWARE
INSTALLING THE PRINTER DRIVER (STANDARD INSTALLATION)
Note
Caution
Insert the network expansion kit
1
"Software CD-ROM (1)" into your
computer's CD-ROM drive.
Click the [start] button, click [My
2
Computer] ( ), and then double-click
the [CD-ROM] icon ( ).
In Windows 95/98/Me/NT 4.0/2000, double-click
[My Computer] and then double-click the
[CD-ROM] icon.
Double-click the [Setup] icon ( ).
3
Note
The "SOFTWARE LICENSE" window
4
will appear. Make sure that you
understand the contents of the license
agreement and then click the [Yes]
button.
If you wish to install the display font or specify the machine's IP address by direct entry when installing the printer
driver, select [Custom installation]. (Page 26)
To use the machine as a network printer in Windows NT 4.0, "TCP/IP Protocol" must be installed on your
computer. If this is not installed, see Windows NT 4.0 Help to install them.
If the language selection screen appears
after you double click the [Setup] icon,
select the language that you wish to use and
click the [Next] button. (Normally the correct
language is selected automatically.)
Click the [Printer Driver] button.
6
To view information on the software, click the
[Display Readme] button.
• If you wish to install the printer status monitor,
click the [Printer Status Monitor] button in this
window and follow the on-screen instructions.
• If you wish to install the printer administration
utility, click the [Administrator Tools] button in
this window and then click the [Printer
Administration Utility] button and follow the
on-screen instructions.
Read the message in the "Welcome"
5
window and then click the [Next]
button.
24
Click the [Next] button.
7
Click the [Standard installation]
8
button.
Page 27

SETUP IN A WINDOWS ENVIRONMENT
Printers connected to the network are
9
detected. Select the machine and click
the [Next] button.
Note
A confirmation window will appear.
10
If the machine is not found, make sure that
the machine is powered on and that the
machine and your computer are connected
to the network, and then search again. If the
machine is still not found, use the custom
installation procedure to directly specify the
IP address. (Page 26)
Check the contents and then click the
[Next] button.
Check the contents of the window and
13
click the [Next] button.
Installation of the printer driver begins.
Caution
When "The installation of the SHARP
14
If you are using Windows 2000/XP/Server
2003
If a warning message regarding the
Windows logo test or digital signature
appears, be sure to click the [Continue
Anyway] or [Yes] button.
software is complete" appears, click
the [OK] button.
Click the [Close] button.
15
Note
This completes the installation of the software.
After installation, see "CONFIGURING THE PRINTER
DRIVER" (page 42) to check the printer driver settings.
After the installation, a message prompting
you to restart your computer may appear. In
this case, click the [Yes] button to restart
your computer.
2
When the printer driver selection
11
window appears, select the printer
driver to be installed and click the
[Next] button.
Select the checkboxes of the printer drivers to be
installed.
Note
Select whether or not you wish the
12
To use the PS printer driver, the PS3
expansion kit must be installed.
printer to be your default printer and
click the [Next] button.
If you are installing multiple printer drivers, select
the printer that you wish to use as your default
printer.
If you do not wish to set either printer driver as
the default printer, select [No].
Note
If you installed the PS printer driver, the PS
display font can be installed from the
"PRINTER UTILITIES" CD-ROM that
accompanies the PS3 expansion kit. (Page
30)
25
Page 28

SETUP IN A WINDOWS ENVIRONMENT
CUSTOM INSTALLATION
If you wish to install the display font or specify the machine's IP address by direct entry when installing the printer
driver, select [Custom installation].
Insert the network expansion kit
1
"Software CD-ROM (1)" into your
computer's CD-ROM drive.
Click the [start] button, click [My
2
Computer] ( ), and then double-click
the [CD-ROM] icon ( ).
In Windows 95/98/Me/NT 4.0/2000, double-click
[My Computer] and then double-click the
[CD-ROM] icon.
Double-click the [Setup] icon ( ).
3
Note
The "SOFTWARE LICENSE" window
4
will appear. Make sure that you
understand the contents of the license
agreement and then click the [Yes]
button.
Read the message in the "Welcome"
5
window and then click the [Next]
button.
Click the [Printer Driver] button.
6
If the language selection screen appears
after you double click the [Setup] icon,
select the language that you wish to use and
click the [Next] button. (Normally the correct
language is selected automatically.)
• If you wish to install the printer status monitor,
click the [Printer Status Monitor] button in this
window and follow the on-screen instructions.
• If you wish to install the printer administration
utility, click the [Administrator Tools] button in
this window and then click the [Printer
Administration Utility] button and follow the
on-screen instructions.
Click the [Next] button.
7
Click the [Custom installation] button.
8
Select [LPR Direct Print] and click the
9
[Next] button.
Printers connected to the network are
10
detected. Select the machine and click
the [Next] button.
To view information on the software, click the
[Display Readme] button.
26
If you wish to directly specify the IP address, click
the [Specify Address] button, enter the IP
address, and click the [Search] button.
Page 29

SETUP IN A WINDOWS ENVIRONMENT
A confirmation window appears.
11
Check the contents and then click the
[Next] button.
When the printer driver selection
12
window appears, select the printer
driver to be installed and click the
[Next] button.
Select the checkboxes of the printer drivers to be
installed.
Note
Select whether or not you wish the
13
printer to be your default printer and
click the [Next] button.
If you are installing multiple printer drivers, select
the printer that you wish to use as your default
printer.
If you do not wish to set either printer driver as
the default printer, select [No].
To use the PS printer driver, the PS3
expansion kit must be installed.
Check the contents of the window and
16
click the [Next] button.
Installation of the printer driver begins.
Caution
When "The installation of the SHARP
17
software is complete" appears, click
the [OK] button.
Click the [Close] button.
18
Note
This completes the installation.
After the installation, see "CONFIGURING THE
PRINTER DRIVER" (page 42) to check the printer
driver settings.
Note
If you are using Windows 2000/XP/Server
2003
If a warning message regarding the
Windows logo test or digital signature
appears, be sure to click the [Continue
Anyway] or [Yes] button.
After the installation, a message prompting
you to restart your computer may appear. In
this case, click the [Yes] button to restart
your computer.
If you installed the PS printer driver, the PS
display font can be installed from the
"PRINTER UTILITIES" CD-ROM that
accompanied the PS3 expansion kit. (Page
30)
2
When the printer name window
14
appears, click the [Next] button.
If you wish to change the printer name, enter the
desired name.
Select whether or not you wish to
15
install the display font and click the
[Next] button.
27
Page 30

SETUP IN A WINDOWS ENVIRONMENT
USING THE MACHINE AS A SHARED PRINTER VIA A SERVER
If the printer server in a Windows NT server environment, NetWare server environment, or other environment is
configured to share the printer (the machine), follow the steps below to install the printer driver in each client
computer.
Ask your network administrator for the server name and printer name of the machine on the network.
Note
Insert the network expansion kit
1
"Software CD-ROM (1)" into your
computer's CD-ROM drive.
Click the [start] button, click [My
2
Computer] ( ), and then double-click
the [CD-ROM] icon ( ).
In Windows 95/98/Me/NT 4.0/2000, double-click
[My Computer] and then double-click the
[CD-ROM] icon.
Double-click the [Setup] icon ( ).
3
Note
For the procedures for configuring settings on the printer server, see "Operation Manual (for printer and
scanner)" on the "Software CD-ROM (1)" that accompanies the machine.
"Print server" as explained here is a computer that is directly connected to the machine, and a "Client" is any
other computer that is connected to the same network.
If the language selection screen appears
after you double click the [Setup] icon,
select the language that you wish to use and
click the [Next] button. (Normally the correct
language is selected automatically.)
Click the [Printer Driver] button.
6
To view information on the software, click the
[Display Readme] button.
The "SOFTWARE LICENSE" window
4
will appear. Make sure that you
understand the contents of the license
agreement and then click the [Yes]
button.
Read the message in the "Welcome"
5
window and then click the [Next]
button.
• If you wish to install the printer status monitor,
click the [Printer Status Monitor] button in this
window and follow the on-screen instructions.
• If you wish to install the printer administration
utility, click the [Administrator Tools] button in
this window and then click the [Printer
Administration Utility] button and follow the
on-screen instructions.
Click the [Next] button.
7
Click the [Custom installation] button.
8
28
Page 31

SETUP IN A WINDOWS ENVIRONMENT
Select [Shared Printer] and click the
9
[Next] button.
For the port to be used, select the
10
machine (configured as a shared
printer), and click the [Next] button.
You can also click the [Add Network Port] button
and select the printer to be shared (the machine)
by browsing the network in the window that
appears.
Note
If the shared printer does not appear in the
list, check the settings on the printer server.
Follow the on-screen instructions.
13
Note
This completes the installation.
After installation, see "CONFIGURING THE PRINTER
DRIVER" (page 42) to check the printer driver settings.
Note
After the installation, a message prompting
you to restart your computer may appear. In
this case, click the [Yes] button to restart
your computer.
If you installed the PS printer driver, the PS
display font can be installed from the
"PRINTER UTILITIES" CD-ROM that
accompanied the PS3 expansion kit. (Page
30)
2
When the model selection window
11
appears, select model name of your
machine and click the [Next] button.
When the printer driver selection
12
window appears, select the printer
driver to be installed and click the
[Next] button.
Be sure to select the same printer driver as that
of the shared printer (the machine).
29
Page 32

SETUP IN A WINDOWS ENVIRONMENT
INSTALLING THE PS DISPLAY FONTS
The fonts used by the PS printer driver are contained in the "PRINTER UTILITIES" CD-ROM that accompanied the
PS3 expansion kit (AR-PK1/N). Install these fonts as needed for the PS printer driver.
Insert the PS3 expansion kit
1
(AR-PK1/N) "PRINTER UTILITIES"
CD-ROM into your computer's
CD-ROM drive.
If your computer is configured for CD-ROM auto
start, the installation window appears. Go to step
4.
Click the [start] button, click [My
2
Computer] ( ), and then double-click
the [CD-ROM] icon ( ).
In Windows 95/98/Me/NT 4.0/2000, double-click
[My Computer] and then double-click the
[CD-ROM] icon.
Double-click the [Setup] icon ( ).
3
Note
Select [PS Display Font] and click the
4
[Next] button.
Caution
If the language selection screen appears
after you double click the [Setup] icon,
select the language that you wish to use and
click the [Next] button. (Normally the correct
language is selected automatically.)
• Do not select [PS Printer Driver].
• The PS printer driver for the
machine is installed from the
"Software CD-ROM (1)" that
accompanies the network
expansion kit (AR-NB3).
Follow the on-screen instructions.
5
30
Page 33

USING THE PPD FILE
The PPD file enables the machine to print using the standard PS driver of the operating system. Install the PPD file
as needed.
Use the Add Printer Wizard in Windows to install the PPD file.
Be sure to read the Readme file (Readme.txt) before installing the PPD file. The Readme file is in the "EnglishA" or
"English" folder. For the location of the folder, see step 4.
Click the [start] button, click [Control
1
Panel], click [Printers and Other
Hardware], and then click [Printers
and Faxes].
• In Windows 95/98/Me/NT 4.0/2000, click the
[Start] button, select [Settings], and then click
[Printers].
• In Windows Server 2003, click the [Start] button
and then click [Printers and Faxes].
Insert the network expansion kit
2
"Software CD-ROM (1)" into your
computer's CD-ROM drive.
Click [Add a printer] in [Printer Tasks].
3
• In Windows 95/98/Me/NT 4.0/2000,
double-click the [Add Printer] icon.
• The "Add Printer Wizard" will appear.
Follow the on-screen instructions.
4
When you are asked to specify the path of the
PPD file, enter the path as follows.
(Substitute the letter of your CD-ROM drive for
"R" in the following paths.)
Operating system PPD file path
Windows 95/98/Me R:\Drivers\Printer
\EnglishA*\PPD\9XME
Windows NT 4.0 R:\Drivers\Printer
\EnglishA*\PPD\NT40
Windows 2000/XP/Server
2003
* "English A" in North America. "English" in Europe.
R:\Drivers\Printer
\EnglishA*\PPD\2KXP
Installing the resident font information (only when the
2
PPD file is installed in Windows 95/98/Me)
If you have installed the PPD file in Windows 95/98/Me and will be using the resident fonts, you must install the
resident font information. Follow the procedure below to install the resident font information.
Note
Insert the network expansion kit
1
"Software CD-ROM (1)" into your
computer's CD-ROM drive.
Double-click [My Computer] ( ) and
2
then double-click the [CD-ROM] icon
().
Double-click the [Drivers] folder, the
3
[Printer] folder, the [EnglishA] folder
(for regions other than the U.S.,
double-click the [English] folder), the
[PPD] folder, the [9XME] folder, and
then [PFMSetup.exe].
• If you are using Windows 2000, Windows XP, Windows Server 2003, the resident font information is
automatically installed when the PPD file is installed.
• Before installing the resident font information, be sure to install the PPD file.
Follow the on-screen instructions.
4
After the resident font information has
5
been installed, restart your computer.
Note
If printer resident fonts cannot be specified
from an application, the resident font
information has not been installed or the
information has been corrupted. In this
case, reinstall the resident font information.
31
Page 34

SETUP IN A MACINTOSH ENVIRONMENT
HARDWARE AND SOFTWARE REQUIREMENTS
Before installing the PPD file for Macintosh, see "HARDWARE AND SOFTWARE REQUIREMENTS" on page 43 to
make sure your computer meets the hardware and software requirements.
Operating system Mac OS 8.6 to 9.2.2, 10.1.5 and 10.2 to 10.2.8 (excluding 10.2.2), 10.3 to
10.3.4
CPU and RAM The requirements of the operating system must be satisfied.
APPLETALK SETTINGS
After connecting the machine to the network, configure AppleTalk settings as required for your network environment.
To configure the settings, see the online manual on the "Network Utilities" CD-ROM.
INSTALLING THE PPD FILE
In order to print from a Macintosh, the PPD file must be installed. Follow the steps below to install the PPD file.
INSTALLATION IN MAC OS X
Insert the network expansion kit
1
"Software CD-ROM (1)" into your
computer's CD-ROM drive.
Double-click the [CD-ROM] icon ( )
2
on the desktop.
Double-click the [MacOSX] folder.
3
Double-click the folder of the
4
operating system version you are
using.
• In Mac OS X v10.1.5, double-click the [Version
10.1] folder.
• In Mac OS X v10.2 to 10.2.8 (excluding 10.2.2),
double-click the [Version 10.2] folder.
• In Mac OS X v10.3 to 10.3.4, double-click the
[Version 10.3] folder.
32
Double-click the [AR-NB3-1] icon ( ).
5
Note
• If the "Authenticate" window appears,
enter the password and click the [OK]
button.
• If you are using Mac OS X v10.1.5, click
the lock icon ( ), enter the password,
and click the [OK] button.
Page 35

Click the [Continue] button.
6
The License Agreement window will
7
appear. Make sure that you
understand the contents of the license
agreement and then click the
[Continue] button.
A message will appear asking you if you agree to
the terms of the license. Click the [Agree] button.
SETUP IN A MACINTOSH ENVIRONMENT
2
Caution
Select the hard disk in which you wish
8
to install the PPD file and click the
[Continue] button.
Be sure to select the hard disk in which your
operating system is installed.
Click the [Install] button.
9
Installation of the PPD file begins.
If a different language appears,
switch to English.
Note
When the message "The software was
10
successfully installed" appears in the
installation window, click the [Close]
button.
This completes the installation of the software.
If you are using Mac OS X v10.3 to 10.3.4 ,
the "Authenticate" window will appear. Enter
the password and click the [OK] button.
33
Page 36

SETUP IN A MACINTOSH ENVIRONMENT
INSTALLATION IN MAC OS 8.6 TO 9.2.2
Insert the network expansion kit
1
"Software CD-ROM (1)" into your
computer's CD-ROM drive.
Double-click the [CD-ROM] icon ( )
2
on the desktop.
Double-click the [MacOS] folder.
3
Double-click the [Installer] icon ( ).
4
The installer window will appear.
Click the [Install] button.
5
The License Agreement window will
6
appear. Make sure that you
understand the contents of the license
agreement and then click the [Yes]
button.
Read the message in the window that
7
appears and click the [Continue]
button.
Installation of the PPD file begins.
After the installation, a message prompting you to
restart your computer will appear. Click the [OK]
button and restart your computer.
This completes the installation of the software.
Note
If you are using Mac OS 8.6 to 9.2.2, make sure that "LaserWriter8" has been installed and that the
"LaserWriter8" checkbox is selected ( ) in "Extensions Manager" in "Control Panels". If not, install it from the
system CD-ROM supplied with your Macintosh computer.
INSTALLING THE SCREEN FONTS (MAC OS 8.6 - 9.2.2)
Macintosh screen fonts are contained in the [Font] folder of the "PRINTER UTILITIES" CD-ROM that accompanies
the PS3 expansion kit (AR-PK1/N). The screen fonts are installed by copying the required screen font suitcase
folders to your Macintosh.
Copy the screen fonts to the following folder:
• Mac OS 8.6 to 9.2.2: [Fonts] folder in the [System Folder]
Note
If you experience problems that may be due to the installed screen fonts, immediately delete the copied font
suitcase folder from the system.
34
Page 37

CONFIGURING THE PRINTER DRIVER
Follow the steps below to configure the machine's printer driver.
MAC OS X V10.2 TO 10.3.4
Make sure that the machine is
1
powered on.
Select [Applications] from the [Go]
2
menu.
Double-click the [Utilities] folder.
3
Double-click the [Print Center] icon
4
().
• In Mac OS X v10.3 to 10.3.4, double-click the
[Printer Setup Utility] icon.
• The "Printer List" window appears.
Click the machine's model name in the
7
list.
The name of the machine that appears is the
name that was entered in the AppleTalk settings
when the network settings were configured.
Unless the name was changed when configuring
the settings, it will be [SCxxxxxx] (where "xxxxxx"
is a sequence of characters that varies
depending on your machine).
Select [Sharp] in the [Printer Model]
8
menu.
The PPD file selection window appears.
2
Note
Click [Add].
5
Select [AppleTalk] in the menu at the
6
top of the window.
A list of printers connected to the network will
appear.
Note
If this is the first time you are installing a
printer driver on your computer, a
confirmation message will appear. Click the
[Add] button.
If multiple AppleTalk zones are displayed,
select the zone which includes the printer.
Select the PPD file for your model.
9
35
Page 38

SETUP IN A MACINTOSH ENVIRONMENT
Click the [Add] button.
10
The machine is added to the list of printers.
Click the name of the machine in the
11
"Printer List" window, and select
[Show Info] from the [Printers] menu.
The "Printer info" window will appear.
Select [Installable Options] from the
12
menu.
Set the printer configuration based on
13
the options that have been installed,
and then click the [Apply Changes]
button.
Close the window.
14
This completes the configuration of the printer
driver.
36
Page 39

MAC OS X v10.1.5
SETUP IN A MACINTOSH ENVIRONMENT
Make sure that the machine is
1
powered on.
Select [Applications] from the [Go]
2
menu.
Double-click the [Utilities] folder.
3
Double-click the [Print Center] icon
4
().
The "Printer List" window appears.
Note
If this is the first time you are installing a
printer driver on your computer, a
confirmation message will appear. Click the
[Add] button.
Click the machine's model name in the
7
list.
The name of the machine that appears is the
name that was entered in the AppleTalk settings
when the network settings were configured.
Unless the name was changed when configuring
the settings, it will be [SCxxxxxx] ("xxxxxx" is a
sequence of characters that varies depending on
your machine).
Click the [Printer Model] menu and
8
select [Other] from the list of PPD
files.
The PPD file selection window will appear.
2
Click the [Add Printer] button.
5
Select [AppleTalk] in the menu at the
6
top of the window.
A list of printers connected to the network will
appear.
Note
If multiple AppleTalk zones are displayed,
select the zone which includes the printer.
Click the startup disk name and then
9
[Library], [Printers], [PPDs],
[Contents], [Resources], [en.lproj],
and select the PPD file of your model.
Click the [Choose] button.
10
Click the [Add] button.
11
This completes the configuration of the printer
driver.
37
Page 40

SETUP IN A MACINTOSH ENVIRONMENT
MAC OS 8.6 TO 9.2.2
Select [Chooser] from the Apple
1
Menu.
Click the [LaserWriter 8] icon.
2
• The model name of your network-connected
machine ([SCxxxxxx]) appears in the "Select a
PostScript Printer" list on the right.
The name of the machine that appears is the
name that was entered in the AppleTalk
settings when the network settings were
configured. Unless the name was changed
when configuring the settings, it will be
[SCxxxxxx] ("xxxxxx" is a sequence of
characters that varies depending on your
machine).
• If multiple AppleTalk zones are displayed,
select the zone which includes the printer.
Click the machine's model name
3
([SCxxxxxx]) in the "Select a
PostScript Printer" list.
Configure the printer driver based on
6
the options that have been installed
and then click the [OK] button.
Click the [OK] button to close the
7
dialog box.
Click the Close box ( ) to close the
8
"Chooser".
This completes the configuration of the printer
driver.
Click the [Create] button.
4
• If the "Select a PostScript Printer Description
File" dialog box appears, select the PPD file of
your model and then click the [Select] button.
• If the "Select a PostScript Printer Description
File" dialog box does not appear, follow these
steps to select the PPD file manually when you
return to the "Chooser" dialog box.
(1) Verify that the machine is selected in the
"Select a PostScript Printer" list, and then
click the [Setup] button and the [Select PPD]
button.
(2) Select the PPD file of your model, and then
click the [Open] (or [Select]) button.
(3) Click the [OK] button.
Verify that the machine is selected in
5
the "Select a PostScript Printer" list,
and then click the [Setup] button and
the [Configure] button.
38
Page 41

TROUBLESHOOTING AND
3
USEFUL INFORMATION
TROUBLESHOOTING
If the software does not install correctly or if you need to remove the software, check the following items on your
computer.
Troubleshooting information can also be found in the README files for each of the software programs. To view a
README file for a software program, click the [Display Readme] button in the software selection window that
appears during installation.
Removing the software
To remove a printer driver or a utility that has been installed using the installer, follow the procedure below.
Windows environment
Click the [start] button and then click
1
[Control Panel].
• In Windows 95/98/Me/NT 4.0/2000, click the
[Start] button, select [Settings], and then click
[Control Panel].
Click [Add or Remove Programs].
2
MACINTOSH ENVIRONMENT(Mac OS 8.6 to
9.2.2)
Insert the "Software CD-ROM (1)" into
1
your CD-ROM drive.
Double-click the [CD-ROM] icon ( )
2
on the desktop and double-click the
[Mac OS] folder.
• In Windows 95/98/Me/NT 4.0/2000,
double-click the [Add/Remove Programs] icon.
Select the driver or utility that you
3
wish to remove from the list, and click
the appropriate button to remove it.
• For more information, see the manual or help
files for your operating system.
Restart your computer.
4
Double-click the [Installer] icon ( ).
3
Select [Remove] from the Install menu
4
and then click the [Remove] button.
Note
There is no remove tool for Mac OS X.
The PPD file for Mac OS X has been copied
to the following folder in the startup disk:
[Library] - [Printers] - [PPDs] - [Contents] [Resources] - [En.lproj]
Delete the SHARP PPD file in this folder.
39
Page 42

TROUBLESHOOTING AND USEFUL INFORMATION
MFP driver does not install
(Windows 2000/XP)
If the MFP driver does not install in Windows 2000/XP,
follow these steps to check your computer's settings.
Click the [start] button and then click
1
[Control Panel].
In Windows 2000, click the [Start] button, select
[Settings], and then click [Control Panel].
Click [Performance and Maintenance]
2
and then click [System].
In Windows 2000, double-click the [System] icon.
Click the [Hardware] tab and then
3
click the [Driver Signing] button.
Check the settings for "What action
4
do you want Windows to take?" ("File
signature verification" in Windows
2000).
Plug and play screen does not
appear (when using a USB cable)
If the Plug and Play screen does not appear after you
connect the machine to your computer with a USB
cable and turn on the machine, follow the steps below
to verify that the USB port is available.
Click the [start] button, click [Control
1
Panel], and then click [Performance
and Maintenance].
In Windows 98/Me/2000, click the [Start] button,
select [Settings], and then click [Control Panel].
Click [System], click the [Hardware]
2
tab, and click the [Device Manager]
button.
"Universal Serial Bus controllers" will appear in
the list of devices.
Note
• In Windows 98/Me, double-click the
[System] icon and click the [Device
Manager] tab.
• In Windows 2000, double-click the
[System] icon, click the [Hardware] tab,
and click the [Device Manager] button.
• If the [System] icon does not appear in
Windows Me, click [view all Control Panel
options].
If the [Block] has been selected, it will not be
possible to install the MFP driver. To select
[Warn] and then install the MFP driver, see
"INSTALLING THE SOFTWARE" (page 7).
Click the icon ( ) beside "Universal
3
Serial Bus controllers".
Two items should appear: your controller chipset
type and Root Hub. If these items appear, you
can use the USB port. If the "Universal Serial Bus
controllers" shows a yellow exclamation point or if
the above two items do not appear, you must
check your computer manual for USB
troubleshooting or contact your computer
manufacturer.
Once you have verified that the USB
4
port is enabled, see "INSTALLING
THE SOFTWARE" (page 7) to install
the MFP driver.
40
Page 43

TROUBLESHOOTING AND USEFUL INFORMATION
The MFP driver cannot be correctly
installed by Plug and Play (Windows
2000/XP)
In Windows 2000/XP, if the MFP driver cannot be
correctly installed by Plug and Play (for example, Plug
and Play takes place without copying the required files
for the MFP driver installation from the installer), follow
these steps to remove unneeded devices. To install
the MFP driver, see "INSTALLING THE SOFTWARE"
(page 7).
Click the [start] button, click [Control
1
Panel], and then click [Performance
and Maintenance].
In Windows 2000, click the [Start] button, select
[Settings], and then click [Control Panel].
Click [System], click the [Hardware]
2
tab, and click the [Device Manager]
button.
Note
Click the icon ( ) beside "Other
3
devices".
In Windows 2000, double-click the [System]
icon, click the [Hardware] tab, and click the
[Device Manager] button.
Another printer is using the parallel
port (when using a parallel cable)
If another printer is using the parallel port and printing
is not possible using the machine, follow the steps
below to change the port setting of the other printer
driver, and make sure that the port of the printer driver
for the machine is set to "LPT1".
Click the [start] button, click [Control
1
Panel], click [Printers and Other
Hardware], and then click [Printers
and Faxes].
In Windows 95/98/Me/NT 4.0/2000, click the [Start]
button, select [Settings], and then click [Printers].
Click the icon of the printer driver for
2
which you wish to change the port
setting, and select [Properties] from
the [File] menu.
Click the [Ports] tab. In Windows
3
95/98/Me, click the [Details] tab.
Select [FILE:] in the [Print to the
4
following port] list box, and click the
[OK] button.
3
If "AR-XXXX Scanner" and "SHARP AR-XXXX"
appear, select and delete both these items.
Note
To install the MFP driver, see
4
"INSTALLING THE SOFTWARE" (page
7).
If "Other devices" does not appear, close
the "Device Manager" window.
Click the [SHARP AR-XXXX] icon and
5
select [Properties] from the [File]
menu.
Click the [Ports] tab. In Windows
6
95/98/Me, click the [Details] tab.
Select [LPT1] in the "Print to the
7
following port" list and click the [OK]
button.
Note
In the event that you need to use the other
printer, repeat the above steps to set the port
of the machine to [FILE:], and change the port
setting of the other printer back to [LPT1].
41
Page 44

CONFIGURING THE PRINTER DRIVER
After installing the MFP driver (printer driver) or the printer driver for an option, make sure that the printer driver is set as the
default printer and that the number of trays on the machine and the paper size of each tray are configured in the printer driver.
Click the [start] button, click [Control
1
Panel], click [Printers and Other
Hardware], and then click [Printers
and Faxes].
• In Windows 95/98/Me/NT 4.0/2000, click the
[Start] button, select [Settings], and then click
[Printers].
• In Windows Server 2003, click the [Start] button
and then click [Printers and Faxes].
Click the "SHARP AR-XXXX" printer
2
driver icon and select [Set as Default
Printer].
Click the [SHARP AR-XXXX] printer
3
driver icon and select [Properties]
from the [File] menu.
If you are using Windows NT 4.0/2000/XP/Server
2003, go to step 5.
In Windows 95/98/Me, click the [Setup]
4
tab.
Click the [Configuration] tab and
5
configure the printer driver based on
the options that have been installed.
Be sure to select the correct printer configuration.
If not, printing may not take place correctly.
Note
Click the [Set Tray Status] button and
6
select the size of paper that is loaded
in each tray.
Select a tray in the "Paper source" menu, and
select the size of paper loaded in that tray from
the "Set Paper Size" menu.
Caution
• Click the [OK] button in the "Set Tray Status"
• Click the [OK] button in the printer properties
To automatically configure the settings
based on the detected machine status, click
the [Auto Configuration] button. Note that for
the MFP driver (printer driver), this is only
effective when a USB cable is connected.
If the dual function board is not installed, be sure
to configure the above "Set Tray Status"
settings, and then when printing specify a tray
other than [Auto Select] in "Paper Source" in the
[Paper] tab of the printer driver setup screen.
window.
window.
INSTALLING ACROBAT READER
To view the Online Manual, Acrobat Reader must be installed on your computer. If you do not have Acrobat Reader,
follow the steps below to install it.
Windows environment
Insert the CD-ROM into the CD-ROM
1
drive.
Click the [Start] button, click [My
2
Computer] ( ), and then double-click
the [CD-ROM] icon ( ).
In Windows 95/98/Me/NT 4.0/2000, double-click
[My Computer] and then double-click the
[CD-ROM] icon.
Double-click the [Acrobat] folder and
3
then double-click [ar500enu.exe].
Follow the on-screen instructions to install
Acrobat Reader.
Macintosh environment
Insert the network expansion kit
1
"Software CD-ROM (1)" into your
computer's CD-ROM drive.
Double-click the [CD-ROM] icon ( )
2
on the desktop.
Double-click the [Acrobat Reader]
3
folder and then double-click the
[English] folder.
Double-click the [Reader Installer]
4
icon.
Follow the on-screen instructions to install the
Acrobat Reader.
42
Page 45

CHECKING THE IP ADDRESS
There are several settings where the IP address must be entered or checked.
To check the IP address of the machine, hold down the status button on the network expansion kit for at least 2
seconds to print out a Printer Setting List.
Status button
Caution
HOW TO RESET THE NETWORK EXPANSION KIT
To reset the network expansion kit, power on the machine while holding down the status button on the network
expansion kit.
After the network expansion kit is reset, network scanner destination information and scan settings will remain,
however, the network settings and network printer settings will revert to the factory default settings.
HARDWARE AND SOFTWARE REQUIREMENTS
Before installing the software from the CD-ROM that is provided standard with the machine or the CD-ROM that is
provided with the optional network expansion kit (AR-NB3), make sure that your computer satisfies the following
requirements.
Windows (standard
machine system)
Operating system*
Computer type IBM PC/AT compatible computer
1
Windows 95*
Windows NT Workstation 4.0 (Service Pack 5 or later)*
Windows 2000 Professional*
Windows XP Home Edition*
Windows Server 2003*
2,3
, Windows 98, Windows Me,
4
, Windows XP Professional*4,
4
, Windows 2000 Server*
5
Windows (options) Macintosh (options)
3,4
5,
Mac OS 8.6 to 9.2.2,
10.1.5, 10.2 to 10.2.8
,
(excluding 10.2.2),
10.3 to 10.3.4
3
Equipped standard with a
USB 2.0*
bi-directional parallel port
(IEEE1284 compliant).
Display 800 x 600 dots (SVGA), 256 colors (or higher)
Hard disk free space 150 MB or more
Other hardware
requirements
*1 Printing is not available in MS-DOS mode.
*2 If you are installing the Printer Administration Utility in Windows 95, a system file must be updated before the utility can be
installed. For more information, click the "Display Readme" button in the Software Selection window of the installer.
*3 USB is not supported.
*4 Administrator's rights are required to install the software.
*5 The MFP driver, Button Manager, and other software on the "Software CD-ROM (1)" that is provided standard with the
machine are not supported.
*6 The machine's USB 2.0 port will transfer data at the speed specified by the USB 2.0 (Hi-Speed) standard only if the Microsoft
USB 2.0 driver is preinstalled in the computer, or if the USB 2.0 driver for Windows 2000 Professional/XP that Microsoft
provides through "Windows Update" is installed.
*7 Compatible with models preinstalled with Windows 98, Windows Me, Windows 2000 Professional, Windows XP Professional
or Windows XP Home Edition, Windows Server 2003, and which are equipped standard with a USB interface.
6
/1.1*7 port or a
An environment that allows any of the above operating systems to fully operate
Equipped with a
10Base-T/100Base-TX LAN
board
An environment on
which any of the
operating systems
listed above can fully
operate
43
Page 46

CONNECTING TO A COMPUTER
Connecting a usb cable
Please purchase a USB cable (shielded) that complies
with the following standard.
The USB interface on the machine complies with the
USB 2.0*/1.1 standard.
* when the dual function board is installed.
USB-2:
USB 2.0 port
USB-1:
USB 1.1 port
Note
• The machine's USB 2.0 port will transfer data at the speed specified by the USB 2.0 only if the Microsoft USB
2.0 driver is preinstalled in the computer, or if the USB 2.0 driver for Windows 2000 Professional/XP that
Microsoft provides through "Windows Update" is installed.
• To obtain the full USB 2.0 data transfer speed, "USB2.0 mode" in the machine's key operator programs must
be set to "Hi-Speed". For more information, see the "Key operator's guide".
• Use the machine's "Hi-Speed" mode only when using a computer that is running Windows 2000/XP/Server
2003.
• Even when the Microsoft USB 2.0 driver is used, it may not be possible to obtain full USB 2.0 speed if a PC
card supporting USB 2.0 is used. To obtain the latest driver (which may enable a higher speed), contact the
manufacturer of your PC card.
• The cable can also be inserted into a USB 1.1 port. However, performance will be the same as USB 1.1.
Connecting a parallel cable
Please purchase a Centronics cable (shielded) that
complies with the following standard.
The parallel port on the machine complies with
IEEE-STD-1284-1994 ECP.
Connector type (on the machine):
36-pin Amphenol female connector
Connecting to a network connector
If the machine will be used as a network computer,
read the online manual on the "Network Utilities"
CD-ROM that accompanies the network expansion kit
(AR-NB3).
Use a network cable that is shielded.
44
Page 47

Page 48

SOFTWARE SETUP GUIDE
SHARP CORPORATION
This manual has been printed using a vegetable-based soy oil ink
to help protect the environment.
Printed on 100% post-consumer recycled paper
PRINTED IN JAPAN
2004L DSC1
TINSE1339QSZZ
 Loading...