

Page 1

MODEL
AL-841
DIGITAL LASER COPIER/
PRINTER/SCANNER
PRINTER/SCANNER
OPERATION MANUAL
●
GETTING STARTED
Page
2
●
PRINTING
●
SCANNING
●
TROUBLE?
●
APPENDIX
12
18
20
24
Page 2

♠♠♠♠♠♠♠♠♠♠♠♠♠♠♠♠♠♠♠♠♠♠♠♠♠♠♠♠♠♠♠♠♠♠♠♠♠♠♠♠♠♠♠♠♠♠♠
♠
♠
♠
This device complies with Part 15 of the FCC rules. Operation is subject to the
following two conditions: (1) This device may not cause harmful interference,
and (2) this device must accept any interference received, including interference
that may cause undesired operation.
WARNING:
FCC Regulations state that any unauthorized changes or modifications to this
equipment not expressly approved by the manufacturer could void the user’s
authority to operate this equipment.
Note:
This equipment has been tested and found to comply with the limits for a Class
B digital device, pursuant to Part 15 of the FCC Rules. These limits are
designed to provide reasonable protection against harmful interference in a
residential installation. This equipment generates, uses and can radiate radio
frequency energy and, if not installed and used in accordance with the
instructions, may cause harmful interference to radio communications.
However, there is no guarantee that interference will not occur in a particular
installation. If this equipment does cause harmful interference to radio or
television reception, which can be determined by turning the equipment off and
on, the user is encouraged to try to correct the interference by one or more of
the following measures:
●
Reorient or relocate the receiving antenna.
●
Increase the separation between the equipment and receiver.
●
Connect the equipment into an outlet on a circuit different from that to which
the receiver is connected.
●
Consult the dealer or an experienced radio/TV technician for help.
♠♠♠♠♠♠♠♠♠♠♠♠♠♠♠♠♠♠♠♠♠♠♠♠♠♠♠♠♠♠♠♠♠♠♠♠♠♠♠♠♠♠♠
♠
♠
♠
♠
♠
♠
♠
♠♠♠♠♠♠♠♠♠♠♠♠♠♠♠♠♠♠♠♠♠♠♠♠♠♠♠♠♠♠♠♠♠♠♠♠♠♠♠♠♠♠
♠
♠
♠
♠
♠♠♠♠♠♠♠♠♠♠♠♠♠♠♠♠♠♠♠♠♠♠♠♠♠♠♠♠♠♠♠♠♠♠♠♠♠♠♠♠♠♠♠♠♠♠♠
Shielded cables must be used with this equipment to maintain compliance
with FCC regulations.
Page 3

CONTENTS
1 GETTING STARTED
2 PRINTING
INTRODUCTION 2
– Making floppy disks from CD-ROM 3
MAIN FEATURES 3
CONNECTING THE INTERFACE CABLE 4
INSTALLING THE PRINTER DRIVER SOFTWARE 5
– Description of the printer driver 5
– Checking the hardware and software requirements 5
– Installing the printer driver 5
– “SHARP AL-841” driver group 11
PRINTING A PAGE 12
– Executing printing 12
– Indicators on the operation panel 13
SETTING PRINT CONDITIONS FROM PRINTER DRIVER 14
PRINTING FROM AN MS-DOS APPLICATION 16
– Print setting from the MS-DOS prompt 16
– Setting on the front panel 17
– Software printer setting 17
SCANNING
3
SCANNING AN IMAGE 18
– Scanning from a TWAIN-compatible application 19
– Exiting from AL-841 TWAIN software 19
TROUBLE?
4
TROUBLESHOOTING 20
USING OTHER INSTALLED DRIVERS 22
UNINSTALLING DRIVERS 23
APPENDIX
5
PRINTER SPECIFICATIONS 24
SCANNER SPECIFICATIONS 25
PARALLEL INTERF ACE 26
PRINT AREA 27
1
Page 4
1
1
This chapter provides basic information for using the SHARP AL-841 and its f eatures .
GETTING STARTED
Getting Started
INTRODUCTION
This manual describes only the printer and scanner features of the AL-841. To get full use of all
printer and scanner features, familiarize y ourself with this manual.
For quick ref erence during machine use, keep this man ual in a handy location.
For a description of other features, refer to their separate manuals.
Conventions used in this manual
In this manual, the following icons are used to pro vide the user with information pertinent to the
use of the machine.
Cautions the user that damage to the machine or one of its components may
result if the contents of the caution are not properly followed.
Notes provide information relevant to the machine regarding specifications,
functions, performance, operation and such, that may be useful to the user.
●
When you try to execute printing while copying is being performed, printing
will be executed after copying is finished.
●
When you try to make a copy while printing is being performed, printing will
be interrupted and you can make a copy. Printing will be resumed after copying
is finished.
T rademark acknowledgments
Windows, MS-DOS, Windows NT and Windows Printing System are trademarks of Microsoft
Corporation in the U.S.A. and other countries.
IBM, PC/AT and OS/2 are trademarks of International Business Machines Corporation.
HP, LaserJet and PCL are tr ademarks of Hewlett-Packard Company.
All other trademarks and copyrights are the property of their respective owners.
2
Page 5
Making floppy disks from CD-ROM
The driver data in the CD-ROM can be copied to floppy disks .
Windows 95/Windows 98/Windows NT 4.0:
Insert the installation CD-ROM into the CD-ROM drive.
1
INTRODUCTION
Double-click My Computer, Al_841 (CD-ROM), and Makedisk.
2
Double-click Makedisk.exe.
3
Follow the on-screen instructions.
4
Windows 3.1x:
Insert the installation CD-ROM into the CD-ROM drive.
1
Double-click the File Manager in the Main windo w of Pr ogram Mana ger and select
2
CD-ROM and the Makedisk directory .
Double-click Makedisk.exe.
3
Follow the on-screen instructions.
4
MAIN FEATURES
1
Getting Started
Printing from Windows 3.1x, Windows 95, Windows 98, and Windows
NT 4.0 applications
●
High-speed and high-quality printing can be performed from Windows 3.1x, Windows 95,
Windows 98, and Windows NT 4.0 applications through the SHARP GDI (Gr aphics Device
Interface) system.
●
Since print data is processed in the computer, waiting time during printing is short.
Scanning from Windo ws 3.1x, Windows 95, Windows 98, and Windo ws
NT 4.0 applications
●
The SHARP TWAIN interface software enables the AL-841 to perform high-quality
monochrome scanning directly from a TW AIN-compatib le application.
TWAIN is an application prog ramme interface (API) standard which is used to
scan images from scanners. The SHARP TWAIN interface software supports
the TWAIN standard, version 1.6.
3
Page 6

1
Getting Started
CONNECTING THE INTERF ACE CABLE
To use the AL-841 as a laser printer or scanner, connect it to your computer using a parallel
interface cable.
Use the parallel interface cable included with the AL-841.
For specifications of the parallel interf ace, see page 26.
Check that the power s witches of both the machine and the computer are in the OFF
1
position.
Plug the parallel interface cable into the printer interf ace connector. F asten the two bail
2
clips at the side of the printer connector to hold the interface connector in place.
Plug the other end of the cable into the parallel interface connector on y our computer .
3
(Refer to your computer manual f or details .)
Parallel interface
connector
Cable
Interface connector
Bail clip
This machine sends and receives data bi-directionally and at high speed. Some
switch box es and pass-through devices cannot support high-speed, bi-directional
transfer of data, and using them ma y cause printing errors.
4
Page 7
INSTALLING THE PRINTER DRIVER SOFTWARE
Description of the printer driver
The printer driver is the software program which runs the printer. It conv erts the data in your file
into information that the printer can understand. It also controls communication between the
printer and computer as the data is printed.
1
Checking the hardware and software requirements
You will need the following hardware and software in order to install the printer driver.
Computer type IBM PC/AT or compatible computer equipped with ECP
mode-equivalent bi-directional parallel interface and CDROM drive
Windows type Windows 3.1x, Windows 95, Windows 98, Windows NT
4.0
CPU 486DX 66MHz or better
Physical RAM Windows 95, Windows 3.1x: 8MB (16MB or more is
recommended.)
Windows NT 4.0: 12MB (16MB or more is recommended.)
Windows 98: 16MB (32MB or more is recommended.)
Virtual storage (swap file) 8MB or more
Display 640 x 480 dots (VGA) or better
Hard disk free space 11MB or more
The printer driver included in this product cannot be used under Windows NT
3.5x, OS/2, pure MS-DOS and other operating systems which are not described
above.
Getting Started
Installing the printer driver
The software for your machine is provided on the CD-R OM which was packed with y our machine.
Before installing the printer driver, be sure to chec k the f ollo wing items.
●
Is the machine connected properly to the computer?
●
Does the machine have paper?
●
Is there another GDI printer driver or Windows Printing System printer driver already
installed? If installed, change the printer port setting. For instructions on changing the
printer port setting, see USING OTHER INSTALLED DRIVERS on page 22.
The TWAIN software is automatically installed at the same time you install the
printer driver. See page 18.
5
Page 8
INSTALLING THE PRINTER DRIVER SOFTWARE
Windows 95/Windows NT 4.0:
Load paper into the paper tray of the machine. For instructions on loading paper, see
1
the section LOADING COPY PAPER in the copier operation manual.
Turn on the machine.
2
1
Getting Started
Turn on your computer and start Windows.
3
Before installing the printer driver , be sure to close all other applications which
may be open.
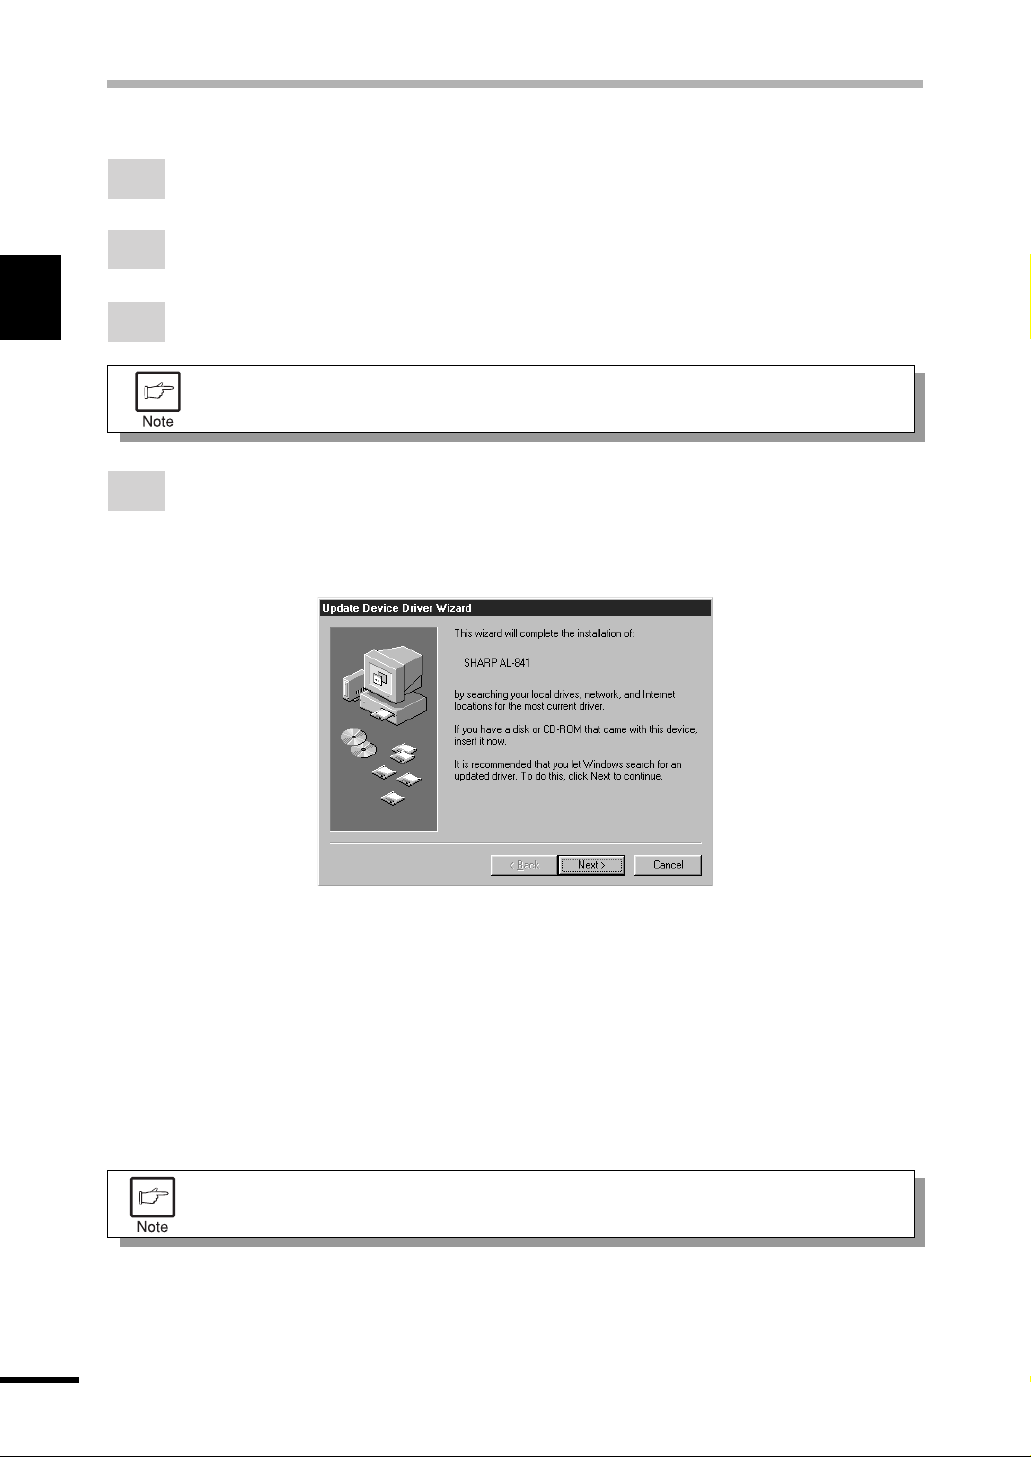
When using Windows 95 on a personal computer with plug & pla y*, the “Update Device
4
Driver Wizard” window will appear. Insert the installation CD-ROM into the CD-ROM
drive. Click the Next b utton and follow the on-screen instructions. If the “Cop ying Files”
window appears during this operation, enter R:\ (if the CD-ROM is designated as
drive R), click the OK button and f ollo w the on-screen instructions.
●
If you use Windo ws 95 and the “New Hardware Found” window will appear, select
Driver from Disk Provided by Hardware Manufacturer and then click the OK
button. Proceed to step 6.
●
If you use Windows 95 and the screen sho wn abov e or the “Ne w Hardware F ound”
window does not appear , proceed to step 5.
●
If you use Windo ws NT 4.0, proceed to step 5.
* Plug & Play
This feature is effective if both the computer and peripheral equipment are equipped
with an IEEE 1284 compliant parallel interface.
The screen displayed depends on the v ersion of Windows you are using.
6
Page 9
INSTALLING THE PRINTER DRIVER SOFTWARE
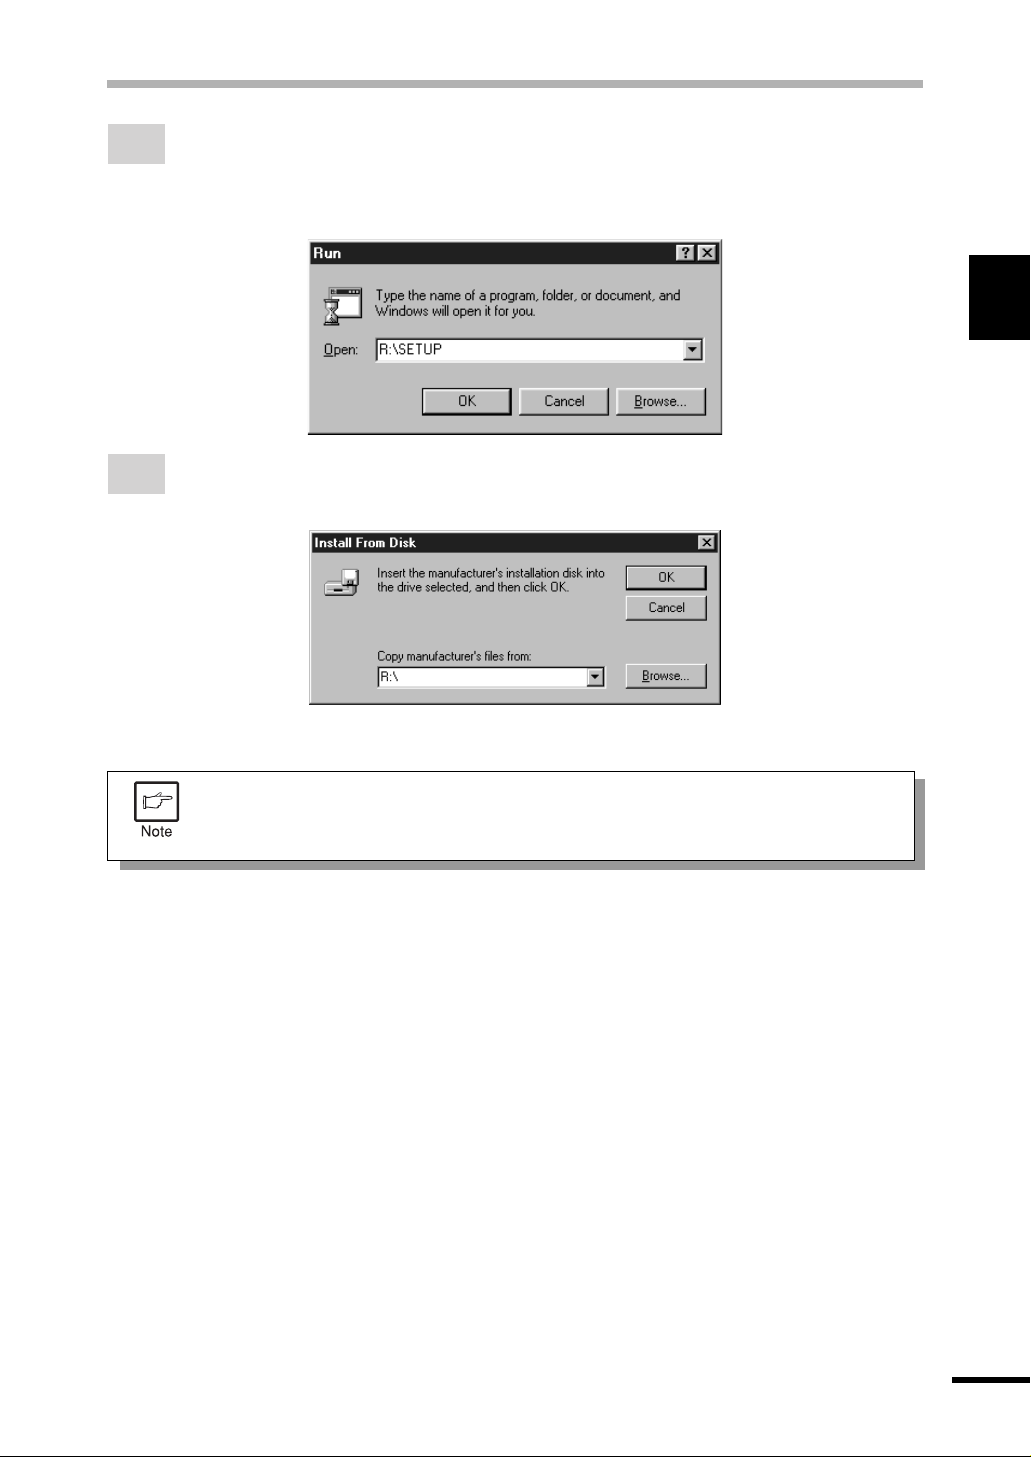
Insert the installation CD-ROM into the CD-ROM drive.
5
Click the Start button and select Run. When the screen shown below appears, type
R:\SETUP (if the CD-ROM is designated as drive R) and click the OK button. Follow
the on-screen instructions.
The “Install From Disk” window will appear. Insert the installation CD-ROM into the
6
CD-ROM drive. Type R:\ (if the CD-ROM is designated as drive R) and click the OK
button. F ollow the on-screen instructions.
1
Getting Started
If you have an y problem with the test print, see TROUBLESHOO TING on page
20 and check the symptoms and solutions. Print the test page again after
removing the problem.
7
Page 10
INSTALLING THE PRINTER DRIVER SOFTWARE
Windows 98:
Load paper into the paper tray of the machine. For instructions on loading paper, see
1
the section LOADING COPY PAPER in the copier operation manual.
Turn on the machine.
2
1
Getting Started
Turn on your computer and start Windows.
3
Before installing the printer driver , be sure to close all other applications which
may be open.
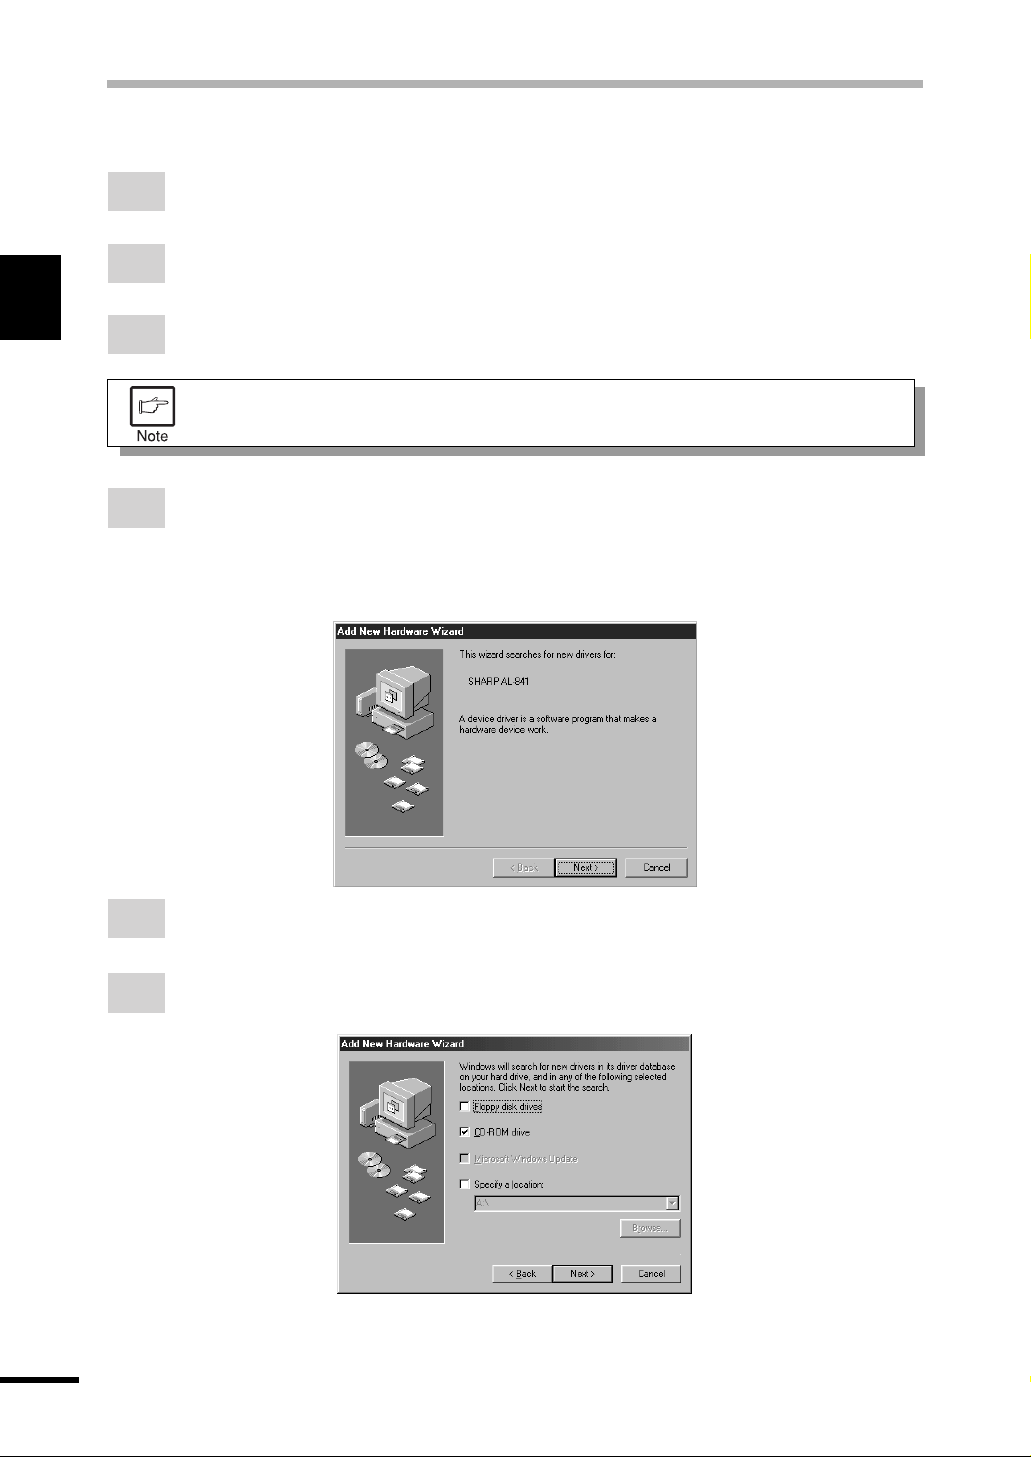
When using Windows 98 on a personal computer with plug & play*, the “Add New
4
Hardware Wizard” window will appear . Click the Ne xt button and follow the on-screen
instructions.
●
If the “Add New Hardware Wizard” window does not appear , proceed to step 8.
* Plug & Play: F or plug & pla y information, see page 6.
Select Search for the best driver for your device and click the Next button.
5
Insert the installation CD-ROM into the CD-ROM drive. Select CD-ROM drive and
6
click the Next button.
8
Page 11

INSTALLING THE PRINTER DRIVER SOFTWARE
Windows driver file search will find the device “SHARP AL-841”. Click the Ne xt button
7
and follow the on-screen instructions.
Insert the installation CD-ROM into the CD-ROM drive. Click the Start button and
8
select Run. When the windo w shown below appears, type R:\SETUP (if the CD-ROM
is designated as drive R) and click the OK button. Follow the on-screen instructions.
If you have an y problem with the test print, see TROUBLESHOO TING on page
20.
1
Getting Started
9
Page 12

INSTALLING THE PRINTER DRIVER SOFTWARE
Windows 3.1x:
Load paper into the paper tray of the machine. For instructions on loading paper, see
1
the section LOADING COPY PAPER in the copier operation manual.
Turn on the machine and then start Windows on your computer .
2
1
Getting Started
Before installing the printer driver , be sure to close all other applications which
may be open.
Insert the installation CD-ROM into the CD-ROM drive.
3
Choose File from the Menu bar in Program Manager, and then choose the Run…
4
command.
Type R:\SETUP (if the CD-ROM is designated as drive R) in the command line box
5
and then click the OK button.
Follow the on-screen instructions.
6
10
Page 13

INSTALLING THE PRINTER DRIVER SOFTWARE
“SHARP AL-841” driver group
When the drivers are installed, the SHARP AL-841 driver group will be created. This
group allows the following functions to be executed.
DOS Emulation HELP
DOS Emulation Setup
See page 17.
Readme
The latest information on the printer driver and the TWAIN driver is included in this
note. Read the Readme first.
Status Monitor HELP
Status Monitor
The printer state and information on current printing are displayed on the status monitor
window . When printing starts, the status monitor screen will appear on the computer
display.
Uninstall AL-841
The printer driver and the TWAIN driver can be uninstalled.
If the drivers are uninstalled, printing and scanning cannot be performed on the
machine.
1
Getting Started
●
Be sure to read “Readme” found in the driv er group before starting to print or
scan from application programs.
●
If you uninstall the printer driver , the TWAIN driver is uninstalled at the same
time.
11
Page 14

2
Printing
2
PRINTING
PRINTING A PAGE
The printing method is described below. Read the description with the operation manual f or the
application to be used.
●
Before you can use this machine as a printer, you must install the supplied
SHARP printer driver. Once this softw are has been installed, you can control
the printing of your documents from the printer driver which appears on your
computer screen. See INSTALLING THE PRINTER DRIVER SOFTWARE
on page 5.
●
When using multiple printers, you must change the printer setting from the
control panel to change the printer to be used. This machine cannot be used
with other GDI printers and printers that use the Windows Printing System.
For details, see USING O THER INSTALLED DRIVERS on page 22.
Executing printing
Ensure that paper of the desired size is loaded in the paper tray. (See the section on
1
LOADING COPY PAPER in the copier operation manual.)
To print onto special papers such as transparency film, labels, thick paper and
envelopes, specify “Manual F eed” as the paper source using the printer driver,
and feed it one sheet at a time.
Turn on the machine. The ready ( ) indicator will light up.
2
Select the settings for printing such as the number of sets and paper type from the
3
application. See SETTING PRINT CONDITIONS FR OM PRINTER DRIVER on page 14.
Before printing, ensure that the AL-841 has been selected as the printer.
Print the file from your software application.
4
●
If copying is being performed when printing is started, copying will continue.
After copying is complete, printing will be e xecuted when the clear ( ) key is
pressed twice or approximately 60 seconds (auto clear time)* has elapsed.
* The auto clear time varies with a user program setting. See the copier
operation manual.
●
Preheat mode and auto power shut-off mode will be canceled when printing
is started.
12
Page 15

PRINTING A PAGE
●
If the paper size specified from the software application is larger than the
paper size in the machine, the image ma y be printed onto two sheets of paper.
●
If the paper size specified from the software application is larger than the
paper size in the machine, part of the image that is not transferred to the
paper may remain on the surface of the drum. In this case, the other side of
the paper may become dirty. If this occurs, change to the correct size paper
and print two or three pages to clean the image.
Indicators on the operation panel
The ON LINE indicator and the ready ( ) indicator indicate the state of the machine.
Ready indicator
ON LINE
indicator
Power save
indicator
Ready indicator
On: Indicates the machine is ready for printing or
scanning (online), or printing is being
performed.
Off: Indicates copying is being performed, scanner
data is being read, or the machine is in the
auto power shut-off mode.
ON LINE indicator
On: Indicates the machine is ready for printing or
scanning (online), printing is being performed,
or scanner data is being read.
Blinking: Indicates a copy job has interrupted a print
job.
Off: Indicates copying is being performed.
Power sa ve indicator
On:
Indicates the machine is in a power save mode .
2
Printing
13
Page 16

2
Printing
SETTING PRINT CONDITIONS FROM PRINTER
DRIVER
The setting method for items in the printer driver are described below.
Also refer to the printer driver help for more inf ormation.
Before setting the printer driver , check the f ollo wing items.
●
The AL-841 printer driver has been installed in the computer to be used. If not, see
INSTALLING THE PRINTER DRIVER SOFTWARE on page 5.
●
The AL-841 has been selected as the default printer on the computer to be used.
Windows 95/Windows 98/Windows NT 4.0:
Click the Start button of the computer and then select Printers from Settings.
1
If you use Windo ws 95/Windows 98, right-click the SHARP AL-841 icon in the Printer
2
folder and select Properties in the menu.
If you use Windows NT 4.0, right-click the SHARP AL-841 icon in the Printer folder
and select Document Defaults in the menu.
For this description, it is assumed that the mouse is configured for right hand
operation.
14
Page 17

The properties of the SHARP AL-841 printer driver will be displayed. If y ou use Windows
3
95/Windows 98, click the Driver Setup tab to displa y the following screen.
Driver Setup tabs
By selecting a different
tab other driver settings
can be changed.
Example: Resolution
changes can be made
by selecting the Image
Quality tab.
SETTING PRINT CONDITIONS FROM PRINTER DRIVER
* Screen on Windows 95
Apply button
The settings which
have been selected
by each tab will be
saved.
*This button is not
displayed on
Windows NT4.0.
2
Printing
OK button
All driver settings which have been
selected by each tab will be saved
and the properties will be
terminated.
Cancel button
The settings which have been selected by
each tab will be canceled and the properties
will be terminated.
However, the settings which have been
saved will not be canceled.
Windows 3.1x:
Double-click the Print Manager icon in the Main window of Pr ogram Manager.
1
Select Options in the Print Manager and then select Printer Setup.
2
Select SHARP AL-841 in the Installed Printers: and clic k the Setup button.
3
Defaults button
The settings which have
been selected by each tab
will be returned to their
default state.
Default All button
All settings which have been selected
by all tabs will be returned to their
default state.
The properties of the SHARP AL-841 will be displayed.
4
15
Page 18

PRINTING FROM AN MS-DOS APPLICATION
You can execute printing from an MS-DOS application which has been executed from the MSDOS prompt in Windows .
This machine can only print from applications run from the MS-DOS prompt in
Windows. It cannot print when running in native MS-DOS mode.
2
Printing
Print setting from the MS-DOS prompt
Windows 95/Windows 98 has the item, “Spool MS-DOS print jobs” in the por t settings. If this
setting is not selected, the machine will not operate properly. Use the following procedure to
check the setting.
Click the Start button.
1
Select Settings and then click Printers.
2
Right-click the AL-841 icon in the printer dialog box and click Properties.
3
For this description, it is assumed that the mouse is configured for right hand
operation.
Click the Details tab in the Properties dialog box.
4
Click the Port Settings button.
5
16
Check that “Spool MS-DOS print jobs” is checked in the port setting dialog box.
6
Page 19

PRINTING FROM AN MS-DOS APPLICATION
Settings on the front panel
Paper size, tray selection, and other options are set from the front panel. Use the following
procedure to start the front panel.
Windows 95/Windows 98/Windows NT 4.0:
Click Start, Program, SHARP AL-841, and DOS Emulation Setup.
1
Windows 3.1x:
Double-click the DOS Emulation Setup icon in the SHARP AL-841 in Program
1
Manager.
Software printer setting
Set your MS-DOS application to use the following model printer .
HP LaserJet Series II (PCL4)
If this printer is not listed on the application’s printer setup, choose a PCL4 compatib le printer .
2
Printing
17
Page 20

3
Scanning
3
SCANNING
SCANNING AN IMAGE
Before you can scan images using the AL-841 from a TW AIN-compatible application, you m ust
install the supplied SHARP TW AIN interface softw are. This softw are is automatically installed at
the same time you install the SHARP printer driver provided on CD-ROM. See INSTALLING
THE PRINTER DRIVER SOFTWARE on page 5.
●
Be sure to read “Readme” in the driver group before scanning images from
application programs.
●
When using the AL-841 as a scanner, y ou must make sure that your computer
Printer Port is configured for ECP mode. If the computer is set to a mode
other than ECP mode, change the mode to ECP mode. The method f or setting
ECP mode differs depending on your computer. Refer to the documentation
for your computer.
●
Refer to the TWAIN help for more information.
●
For inf ormation about the state of operation panel indicators when using the
scanner function, see Indicators on the operation panel on page 13.
●
Preheat mode and auto power shut-off mode will be canceled when scanning
is started.
18
Page 21

Scanning from a TWAIN-compatible application
Menu names and their options are different f or each application.
When multiple sources are availab le, choose a command to select a scanning device
1
from the application’s men u and select SHARP AL841 TWAIN_xx.
Choose a command to acquire image from the application’s menu. AL-841 TWAIN
2
software starts.
SCANNING AN IMAGE
3
Scanning
Place the original and press the Preview button.
3
Set scanning parameters as necessary .
4
Press the Scan button.
5
You exit from AL-841 TWAIN software and the scanned image appears in the
application’s window .
Exiting from AL-841 TWAIN software
To terminate AL-841 TWAIN software, click on the close box while AL-841 TWAIN window is
active.
19
Page 22

4
TROUBLE?
TROUBLESHOOTING
Some problems are common to the copier, printer and scanner features, so also check
TROUBLESHOOTING of the copier oper ation manual.
“Copier” in the column “See page:” indicates the description is in the copier
operation manual.
4
Trouble?
Problem Possible cause Solution
Printer
driver
cannot be
installed.
Paper does
not feed into
the machine.
The machine
does not
print.
Hard disk free space is not
sufficient for installation of
the printer driver.
The operating system is not
proper.
Paper is not set correctly.
Too much paper in the paper
tray.
The interface cable might
not be connected properly.
The interface cable is
defective.
The port setting is incorrect.
The TD cartridge or drum
cartridge is not installed
properly.
Delete unnecessary files and
application software to increase hard
disk free space. (The driver requires
at least 11MB free space.)
Use Windows 3.1x, Windows 95,
Windows 98 or Windows NT 4.0.
Insert the paper correctly.
Remove excessive paper from the
paper tray. For envelopes,
transparency film, and labels, feed
one sheet at a time.
Check the interface connection.
Check the cable with a computer and
printer which you know work. If
printing is still not possible, the
interface cable is defective.
Check the printer settings in the
Windows Control panel to make sure
that the print job is being sent to the
correct port (for example, LPT1).
Ensure that the TD cartridge and
drum cartridge are installed properly.
See
page:
5
5
Copier*
Copier*
4
–
–
Copier*
Copier*
1
1
2
3
20
The machine may be
configured incorrectly.
The printer driver may be
incorrectly installed.
Check the application to make sure
that all the print settings are correct.
Reinstall the printer driver software
and try printing a test page.
–
5
Page 23

TROUBLESHOOTING
Problem Possible cause Solution
The machine
prints wrong
data or
incorrect
characters.
Printing is
too slow.
The machine
does not
print the full
image.
The interface cable might
not be connected properly.
The interface cable is not
IEEE-1284 compliant or a
switch box / pass-through
device does not respond to
high speed data transfer.
If using Windows 3.1x, Print
Manager may be disabled.
There may be too many
applications open.
The resolution is set to
600dpi.
The computer may have
insufficient random-access
memory (RAM).
The page layout is too
complex.
Resolution is set to 600dpi.
Page orientation setting may
be incorrect.
Check the interface cable
connection.
Use the interface cable included with
the AL-841. Remove any switch box /
pass-through device connected
between the computer and the AL-
841. See the parallel interface
specifications.
Double-click the Printers icon in
Control Panel and check the Use
Print Manager box.
Close all unnecessary applications
before printing.
Set the resolution to 300dpi.
Install more random-access memory
(RAM) in your computer.
Simplify the page layout.
Set resolution to 300dpi.
Change the page orientation with the
printer driver.
See
page:
4
4, 26
–
–
14
5
–
14
14
4
Trouble?
There may be too many
applications open.
The paper in the machine
may be larger than the
paper size specified in your
application or printer driver.
The interface cable is not
IEEE-1284 compliant or a
switch box / pass-through
device does not respond to
high speed data transfer.
The CPU specifications may
be incorrect.
The computer may have
insufficient random-access
memory (RAM).
The machine
does not
scan.
*1 See the section on LOADING COPY PAPER.
*2 See the section on TD CARTRIDGE REPLACEMENT .
*3 See the section on DRUM CARTRIDGE REPLA CEMENT.
The interface cable might
not be connected properly.
Close all unnecessary applications
before printing.
Load the correct paper into the
machine.
Use the interface cable included with
the AL-841. Remove any switch box /
pass-through device connected
between the computer and the AL-
841. See the parallel interface
specifications.
Check that the CPU of your
computer is 486DX 66MHz or better.
Install more random-access memory
(RAM) in your computer.
Check the interface connection.
–
–
4, 26
5
5
4
21
Page 24

USING OTHER INSTALLED DRIVERS
If you use another GDI printer or Windows Printing Systems printer, interf erence between printers
may occur and printing may not be perf ormed properly.
To use another GDI printer or a Windows Printing System printer, you must change the port
setting of the printer driver using the following procedure.
If another printer does not operate properly when the AL-841 printer driver is
set to “FILE”, uninstall the AL-841 printer driver .
To uninstall the driver, see UNINSTALLING DRIVERS on page 23.
If after uninstalling the AL-841 printer driver, the printer still does not operate
properly , reinstall the printer driver y ou are using.
Windows 95/Windows 98/Windows NT 4.0:
4
Trouble?
Click the Start button.
1
Select Settings and then click Printers.
2
Right-click the AL-841 icon in the printer dialog box and then click Properties.
3
For this description, it is assumed that the mouse is configured for right hand
operation.
Click the Details tab (Ports tab – on Windows NT4.0) in the Properties dialog box,
4
select FILE: in the Print to the follo wing port list box, and click the OK b utton.
Right-click the icon of the printer to be used and click Properties.
5
Click the Details tab (Ports tab – on Windows NT4.0) in the Properties window , select
6
LPT1 (or the currently used port), and click the OK button.
T o use the AL-841 again, perf orm the same procedure but select the port to be
used (for example , LPT1) in step 4.
22
Page 25

Windows 3.1x:
Double-click the Control P anel icon in the Main windo w of Pr ogram Manager.
1
Double-click the Printers icon. The Printers window will then open.
2
Select AL-841, and then click the Connect button.
3
Select File from the list of options in the P orts window, and then click the OK button.
4
Select the new printer you would like to use from the list in the Installed Printers
5
window , and then click the Connect b utton.
Select the printer port to use for the new printer, and then click the OK button.
6
USING OTHER INSTALLED DRIVERS
4
Click the Set As Default Printer button, and then click the Close b utton.
7
T o use the AL-841 again, perf orm the same procedure but select the port to be
used (for example , LPT1) in step 4.
UNINSTALLING DRIVERS
If the printer driver and TWAIN driver are not installed correctly or if you no longer use this
machine, uninstall the printer driver and TWAIN driver from your computer using the following
procedure.
If using Windows 95/Windows 98/Windows NT 4.0, click Star t, Program, SHARP
1
AL-841, and Uninstall AL-841.
If using Windows 3.1x, doub le-click the SHARP AL-841 icon in Program Manager and
double-click the Uninstall AL-841 icon.
When the “Confirm File Deletion” window appears , click the Yes button.
2
Trouble?
When the “Remove Programs From Your Computer” window appears, click the OK
3
button.
The printer driver and the TWAIN driver are uninstalled at the same time.
23
Page 26

5
APPENDIX
PRINTER SPECIFICATIONS
Resolution 600dpi or 300dpi can be selected
Page description language SHARP GDI
Page orientation Portrait or landscape
First print time Approx. 20 seconds*
Print speed Max. 8 pages per min ute (letter or A4)
Interface port Bi-directional parallel interface (IEEE 1284 compliant)
5
Appendix
Memory 6MB
*First print time may differ depending on operating conditions, such as power-supply voltage
and room temperature.
Also the time may differ depending on data quantity to be printed and applications.
As a part of our policy of continuous improvement, SHARP reserves the right to
make design and specification changes for product improv ement without prior
notice. The performance specification figures indicated are nominal values of
production units. There ma y be some deviations from these v alues in individual
units.
24
Page 27

SCANNER SPECIFICATIONS
Scanning method Flatbed scanner with moving scanning head
Light source Fluorescent lamps
Sensor CCD
Scanning range Max. 8.3inch (W) x 13.8inch (H)
Resolution 300dpi, 400dpi (standard) or 600dpi (pseudo-resolution)
can be selected
Output data 1bit
Scanning speed 0.85ms/line (Data transfer time is not included.)
Interface IEEE 1284 compliant parallel interface (ECP mode only)
As a part of our policy of continuous improvement, SHARP reserves the right to
make design and specification changes for product improv ement without prior
notice. The performance specification figures indicated are nominal values of
production units. There ma y be some deviations from these v alues in individual
units.
5
Appendix
25
Page 28

PARALLEL INTERFACE
This machine uses a bi-directional parallel interface. Use the interf ace cable attached to the AL-
841.
●
For specifications of the parallel interf ace of your computer , see its operation
manual.
●
Use the parallel interface cable specified b y SHARP for prev ention of external
radio wav e interf erence. For details, contact y our SHARP dealer.
5
Appendix
Connector
36-pin DDK 57LE-40360-730B (D29)
female connector or equivalent connector
Cable
Shielded type bi-directional parallel
interface
For best results, use a printer interface
cable which is IEEE 1284 compliant.
Pin configuration
The pin numbers and signal names are
listed in the following table .
Pin No. Signal name Pin No. Signal name
1 STB 19 GND (STB RET)
2 DATA1 20 GND (DATA1 RET)
3 DATA2 21 GND (DATA2 RET)
4 DATA3 22 GND (DATA3 RET)
5 DATA4 23 GND (DATA4 RET)
6 DATA5 24 GND (DATA5 RET)
7 DATA6 25 GND (DATA6 RET)
8 DATA7 26 GND (DATA7 RET)
9 DATA8 27 GND (DATA8 RET)
10 ACKNLG 28 GND (ACKNLG RET)
11 BUSY 29 GND (BUSY RET)
12 PE (P aper End) 30 GND (PE RET)
13 SLTC 31 INPRM
14 AUT O LF 32 FAULT
15 (NC) 33 (NC)
16 GND (0 V) 34 (NC)
17 FG 35 +5V
18 +5V 36 SLTC IN
18
36 19
1
26
Page 29

PRINT AREA
The print area of this machine is shown below .
Portrait
E
D C
E
B
A
600 dpi
Paper size
Letter 5100 4904 6600 6400 100 96 100
Legal 5100 4904 8400 8200 100 96 100
Invoice 3300 3104 5100 4900 100 96 100
A4 4960 4760 7015 6815 100 100 100
A5 3496 3296 4960 4760 100 100 100
B5 4299 4104 6070 5870 100 95 100
Folio 5100 4904 7800 7600 100 96 100
Foolscap 5100 4904 7440 7240 100 96 100
F
E
G
ABCDEFG
Landscape
E
B A
G
F
D
C
Paper size
Print area
Dots
5
Appendix
300 dpi
Paper siz e
ABCDEFG
Letter 2550 2456 3300 3200 50 44 50
Legal 2550 2456 4200 4100 50 44 50
Invoice 1650 1552 2550 2450 50 48 50
A4 2480 2384 3507 3407 50 46 50
A5 1748 1648 2480 2380 50 50 50
B5 2149 2056 3035 2935 50 43 50
Folio 2550 2456 3900 3800 50 44 50
Foolscap 2550 2456 3720 3620 50 44 50
Dots
27
Page 30

SOFTWARE LICENSE
PLEASE READ THIS LICENSE CAREFULLY BEFORE USING THE SOFTWARE. BY USING THE
SOFTWARE, YOU ARE AGREEING TO BE BOUND BY THE TERMS OF THIS LICENSE.
1. License. The application, demonstration, system and other software accompanying this
License, whether on disk, in read only memory, or on any other media (the “Software”) and related
documentation are licensed to you by SHARP. You own the disk on which the Software is recorded
but SHARP and/or SHARP’S Licensors retain title to the Software and related documentation. This
License allows you to use the Software on one or more computers connected to a single printer and
make one copy of the Software in machine-readable form for backup purposes only. You must
reproduce on such copy the SHARP copyright notice, the copyright notice of SHARP’S Licensors
and any other proprietary legends of SHARP and/or its Licensors that were on the original copy of
the Software. You may also transfer all your license rights in the software, the backup copy of the
Software, the related documentation and a copy of this License to another party, provided the other
party reads and agrees to the terms and conditions of this License.
2. Restrictions. The Software contains copyrighted material, trade secrets and other proprietary
material which is owned by SHARP and/or its Licensors and in order to protect them you may not
decompile, reverse engineer, disassemble or otherwise reduce the Software to a humanperceivable form. You may not modify, network, rent, lease, loan, distribute or create derivative
works based upon the Software in whole or in part. You may not electronically transmit the Software
from one computer to another or over a network.
3. Termination. This license is effective until terminated. You may terminate this License at any
time by destroying the Software and related documentation and all copies thereof. This License will
terminate immediately without notice from SHARP and/or SHARP’S Licensors if you fail to comply
with any provision of this License. Upon termination you must destroy the Software and related
documentation and all copies thereof.
4. Export Law Assurances. You agree and certify that neither the Software nor any other technical
data received from SHARP, nor the direct product thereof, will be exported outside the United States
except as authorized and as permitted by the laws and regulations of the United States. If the
Software has been rightfully obtained by you outside of the United States, you agree that you will not
re-export the Software nor any other technical data received from SHARP, nor the direct product
thereof, except as permitted by the laws and regulations of the United states and the laws and the
regulation of the jurisdiction in which you obtained the Software.
5. Government End Users. If you are acquiring the Software on behalf of any unit or agency of the
United States Government, the following provisions apply. The Government agrees:
(i) if the Software is supplied to the Department of Defense (DoD), the Software is classified as
“Commercial Computer Software” and the Government is acquiring only “restricted rights” in the
Software and its documentation as that term is defined in Clause 252.227-7013 (c)(1) of the DFARS;
and
(ii) if the Software is supplied to any unit or agency of the United States Government other than DoD,
the Government’s rights in the Software and its documentation will be as defined in Clause 52.22719 (c)(2) of the FAR or, in the case of NASA, in Clause 18-52.227-86 (d) of the NASA Supplement to
the FAR.
6. Limited Warranty on Media. SHARP warrants the disks on which the Software is recorded to be
free from defects in materials and workmanship under normal use for a period of ninety (90) days
from the date of purchase as evidenced by a copy of the receipt. The entire liability of SHARP and/
or its Licensors and your exclusive remedy will be replacement of the disk which fails to meet the
limited warranty provided by this Clause 6. A disk will be replaced when it is returned to SHARP or a
SHARP authorized representative with a copy of the receipt. SHARP will have no responsibility to
replace a disk damaged by accident, abuse or misapplication.
ANY IMPLIED WARRANTIES ON THE DISKS, INCLUDING THE IMPLIED WARRANTIES OF
MERCHANTABILITY AND FITNESS FOR A PARTICULAR PURPOSE, ARE LIMITED IN
DURATION TO NINETY (90) DAYS FROM THE DATE OF DELIVERY. THIS WARRANTY GIVES
YOU SPECIFIC LEGAL RIGHTS, AND YOU MAY ALSO HAVE OTHER RIGHTS WHICH VARY
FROM JURISDICTION TO JURISDICTION.
Page 31

7. Disclaimer of Warranty on Software. You expressly acknowledge and agree that use of the
Software is at your sole risk. The software and related documentation are provided “AS IS” and
without warranty of any kind and SHARP and SHARP’S Licensor(s) (for the purpose of provisions 7
and 8, SHARP and SHARP’S Licensor(s) shall be collectively referred to as “SHARP”)
EXPRESSLY DISCLAIM ALL WARRANTIES, EXPRESS OR IMPLIED, INCLUDING, BUT NOT
LIMITED TO, THE IMPLIED WARRANTIES OF MERCHANTABILITY AND FITNESS FOR A
PARTICULAR PURPOSE. SHARP DOES NOT WARRANT THAT THE FUNCTIONS
CONTAINED IN THE SOFTWARE WILL MEET YOUR REQUIREMENTS, OR THAT THE
OPERATION OF THE SOFTWARE WILL BE UNINTERRUPTED OR ERROR-FREE, OR THAT
DEFECTS IN THE SOFTWARE WILL BE CORRECTED. FURTHERMORE, SHARP DOES NOT
WARRANT OR MAKE ANY REPRESENTATIONS REGARDING THE USE OR THE RESULTS
OF THE USE OF THE SOFTWARE OR RELATED DOCUMENTATION IN TERMS OF THEIR
CORRECTNESS, ACCURACY, RELIABILITY, OR OTHERWISE. NO ORAL OR WRITTEN
INFORMATION OR ADVICE GIVEN BY SHARP OR A SHARP AUTHORIZED
REPRESENTATIVE SHALL CREATE A WARRANTY OR IN ANY WAY INCREASE THE SCOPE
OF THIS WARRANTY. SHOULD THE SOFTWARE PROVE DEFECTIVE, YOU (AND NOT
SHARP OR A SHARP AUTHORIZED REPRESENTATIVE) ASSUME THE ENTIRE COST OF ALL
NECESSARY SERVICING, REPAIR OR CORRECTION, SOME JURISDICTIONS DO NOT
ALLOW THE EXCLUSION OF IMPLIED WARRANTIES, SO THE ABOVE EXCLUSION MAY NOT
APPLY TO YOU.
8. Limitation of Liability. UNDER NO CIRCUMSTANCES INCLUDING NEGLIGENCE, SHALL
SHARP BE LIABLE FOR ANY INCIDENTAL, SPECIAL OR CONSEQUENTIAL DAMAGES THAT
RESULT FROM THE USE OR INABILITY TO USE THE SOFTWARE OR RELATED
DOCUMENTATION, EVEN IF SHARP OR A SHARP AUTHORIZED REPRESENTATIVE HAS
BEEN ADVISED OF THE POSSIBILITY OF SUCH DAMAGES. SOME JURISDICTIONS DO NOT
ALLOW THE LIMITATION OR EXCLUSION OF LIABILITY FOR INCIDENTAL OR
CONSEQUENTIAL DAMAGES SO THE ABOVE LIMITATION OR EXCLUSION MAY NOT APPLY
TO YOU.
In no event shall SHARP’S total liability to you for all damages, losses, and causes of action (whether
in contract, tort (including negligence) or otherwise) exceed the amount paid by you for the Software.
9. Controlling Law and Severability. For a portion of the Software related with Apple Macintosh
and Microsoft Windows, this license shall be governed by and construed in accordance with the laws
of the state of California and Washington, respectively. If for any reason a court of competent
jurisdiction finds any provision of this License, or portion thereof, to be unenforceable, that provision
of the License shall be enforced to the maximum extent permissible so as to effect the intent of the
parties, and the remainder of this License shall continue in full force and effect.
10. Complete Agreement. This License constitutes the entire agreement between the parties with
respect to the use of the Software and related documentation, and supersedes all prior or
contemporaneous understandings or agreements, written or oral, regarding such subject matter.
No amendment to or modification of this License will be binding unless in writing and signed by a duly
authorized representative of SHARP.
Page 32

AL-841
SHARP CORPORATION
PRINTED IN CHINA
99M
TINSE7318XCZZ
KS
 Loading...