

AL-1217D
AL-1457D
AL-1555
DIGITAL LASER COPIER
OPERATION MANUAL
WBAHJDJQ KFPTHZSQ RJGBHJDFKMZSQ FGGFHFN
РУКОВОДСТВО ПО ЭКСПЛУАТАЦИИ
DIGITÁLIS LÉZERSUGARAS MÁSOLÓ
HASZNÁLATI UTASÍTÁS
GBRUSCZ H
DIGITÁLNÍ LASEROV
CYFROWA KOPIARKA LASEROWA
DIGITÁLNA LASEROVÁ KOPÍRKA
Ý
KOPÍROVACÍ STROJ
NÁVOD K OBSLUZE
INSTRUKCJA OBS£UGI
NÁVOD NA OBSLUHU
PL
SK
CLASS 1 LASER PRODUCT
LASER KLASSE 1
LUKOAN 1 LASERLAITE
KLASS 1 LASERAPPARAT
LAITTEEN KÄYTTÄMINEN
VAROITUS!
MUULLA KUIN TÄSSÄ
KÄYTTÖOHJEESSA MAINITULLA
TAVALLA SAATTAA ALTISTAA
KÄYTTÄJÄN
TURVALLISUUSLUOKAN 1
YLITTÄVÄLLE
NÄKYMÄTTÖMÄLLE
LASERSÄTEILYLLE.
CAUTION
Laserstrahl
VORSICHT
ADVARSEL
OM APPARATEN ANVÄNDS PÅ
ANNAT SÄTT ÄN I DENNA
BRUKSANVISNING
SPECIFICERATS, KAN
ANVÄNDAREN UTSÄTTAS FÖR
OSYNLIG LASERSTRÅLNING,
SOM ÖVERSKRIDER GRÄNSEN
FÖR LASERKLASS 1.
INVISIBLE LASER RADIATION WHEN OPEN AND INTERLOCKS DEFEATED.
AVOID EXPOSURE TO BEAM.
UNSICHTBARE LASERSTRAHLUNG WENN ABDECKUNG GEÖFFNET UND
SICHERHEITSVERRIEGELUNG ÜBERERÜCKT. NICHT DEM STRAHL AUSSETZEN.
USYNLIG LASERSTRÅLING VED ÅBNING, NÅR SIKKERHEDSAFBRYDERE ER
UDE AF FUNKTION. UNDGA UDSAETTELSE FOR STRÅLING.
ADVERSEL
VARNING
VARO!
CLASS 1
LASER PRODUCT
LASER KLASSE 1
VARNING
USYNLIG LASERSTRÅLING NÅR DEKSEL ÅPNES OG SIKKERHEDSLÅS BRYTES.
UNNGÅ EKSPONERING FOR STRÅLEN.
OSYNLIG LASERSTRÅLNING NÄR DENNA DEL ÄR ÖPPNAD OCH SPÄRRAR ÄR
URKOPPLADE. STRÅLEN ÄR FARLIG. BETRAKTA EJ STRÅLEN.
AVATTAESSA JA SUOJALUKITUS OHITETTAESSA OLET ALTTIINA NÄKYMÄTÖNTÄ
LASERSÄTEILYLLE. ÄLÄ KATSO SÄTEESEEN.
Caution
This product contains a low power laser
device. To ensure continued safety do not
remove any cover or attempt to gain access
to the inside of the product. Refer all servicing
to qualified personnel.
Pozor
Tento výrobek obsahuje laser nízkého
výkonu. Pro zajitìní trvalé bezpeènosti
nesundávejte ádné kryty pøístroje ani se
nesnate dostat se k vnitøním èástem.
Vekeré servisní práce pøenechte výluènì
kvalifikovaným osobám.
Внимание
В данном изделии используется лазер низкой
мощности. В целях безопасности не снимайте
крышки и панели и не пытайтесь проникнуть
внутрь изделия. Доверьте все работы по
обслужтиванию аппарата квалифицированным
специалистам
.
Uwaga
Produkt zawiera urz¹dzenie laserowe
niskiej mocy. W celu zachowania
bezpieczeñstwa nie zdejmuj ¿adnej
pokrywy i nie próbuj dostaæ siê do wnêtrza.
Prace serwisowe zlecaj tylko
wykwalifikowanemu personelowi.
Figyelem
A termék alacsony energiájú lézereszközt
tartalmaz. A folyamatos biztonság
érdekében ne távolítson el bármilyen fedõt
vagy próbáljon a termék belsejéhez
férkõzni. Hagyjon mindenfajta szerelést
a szakemberekre.
Pozor
Tento výrobok obsahuje laser nízkého
výkonu. Pre zaistenie trvalej bezpeènosti
neodstraòujte iadne kryty prístroja, ani sa
nesnate dosta k vnutorným èastiam.
Vetky servisné práce prenechajte výluène
kvalifikovaným osobám.
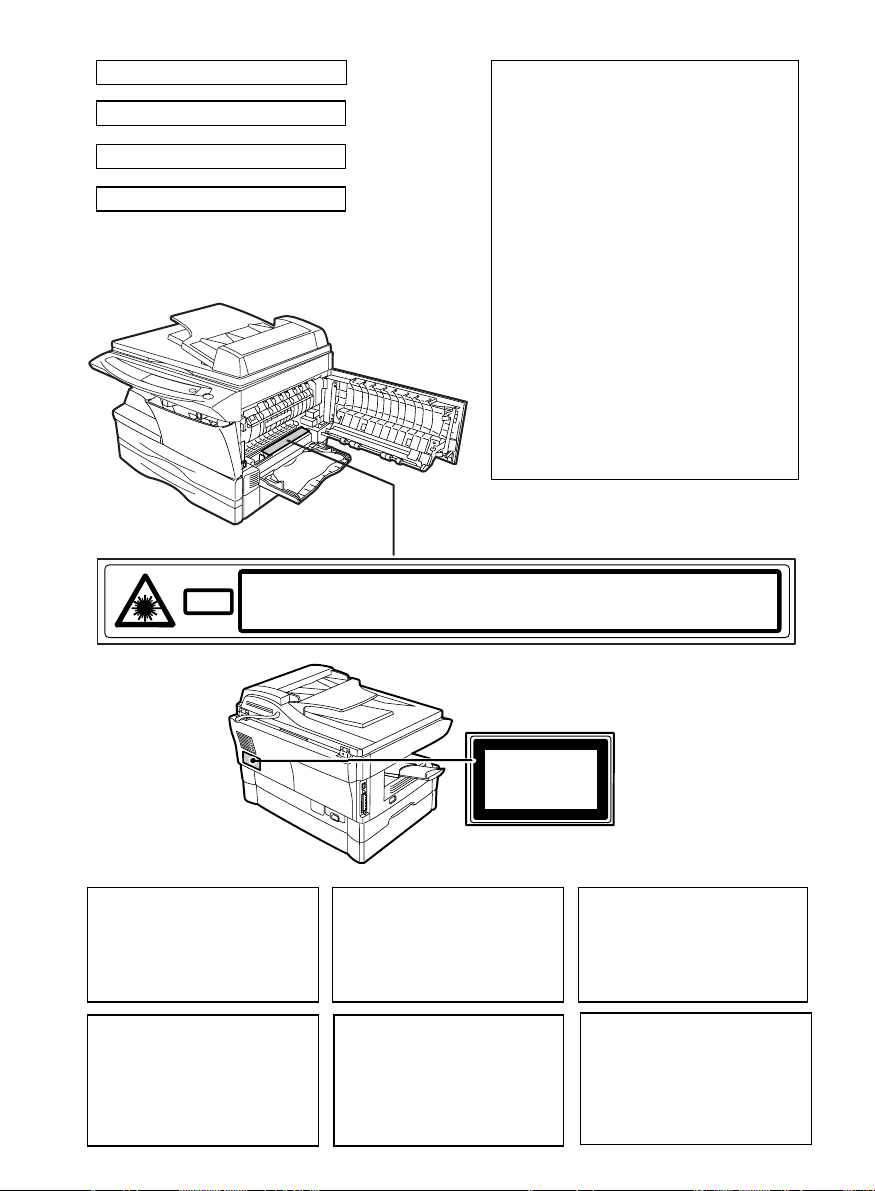
CAUTIONS
Caution label on the unit
The label ( ) in the fusing area of the unit indicates the following:
: Caution, risk of danger
: Caution, hot surface
Cautions on using
Follow the cautions below when using this unit.
Warning:
• The fusing area is hot. Exercise care in this area when removing misfed paper.
• Do not look directly at the light source. Doing so may damage your eyes.
• Do not switch the unit rapidly on and off. After turning the unit off, wait 10 to 15
seconds before turning it back on.
• Unit power must be turned off before installing any supplies.
Caution:
• Place the unit on a firm, level surface.
• Do not install the unit in a humid or dusty location.
• When the unit is not used for a long time, for example for consecutive holidays,
turn the power switch off and remove the power cord from the outlet.
• When moving the unit, be sure to turn the power switch off and remove the power
cord from the outlet.
• Do not cover the unit with a dust cover, cloth or plastic film while the power is on.
Doing so may prevent heat radiation, damaging the unit.
• Use of controls or adjustments or performance of procedures other than those
specified herein may result in hazardous radiation exposure.
• The socket-outlet shall be installed near the unit and shall be easily accessible.
Important points when selecting an installation site
Do not install your unit in areas that are:
• damp, humid, or very dusty
• exposed to direct sunlight
• poorly ventilated
• subject to extreme temperature or humidity changes, e.g., near an air conditioner
or heater.
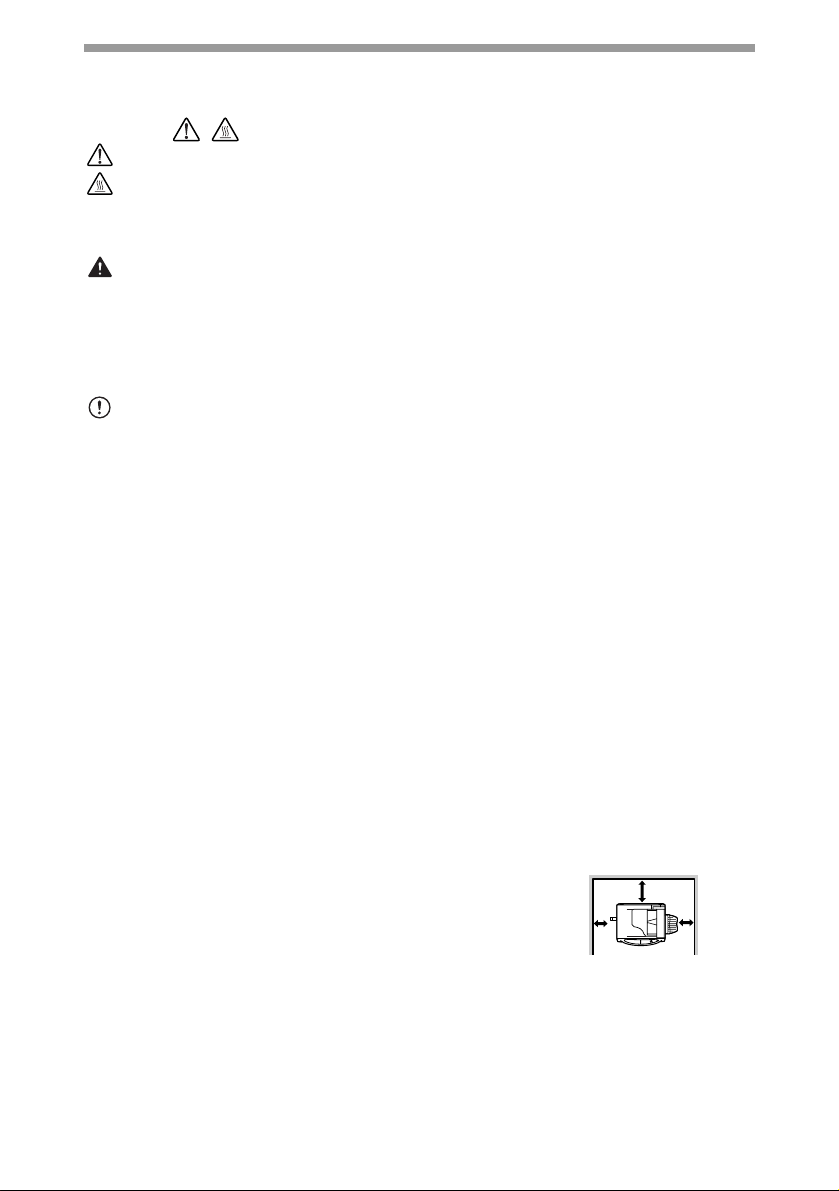
Be sure to allow the required space around the
machine for servicing and proper ventilation.
10cm
20cm
10cm
1
Cautions on handling
Be careful in handling the unit as follows to maintain the performance of this unit.
Do not drop the unit, subject it to shock or strike it against any object.
Do not expose the drum cartridge to direct sunlight.
• Doing so will damage the surface (green portion) of the drum cartridge, causing
smudges on copies.
Store spare supplies such as drum cartridges and TD cartridges in a dark
place without removing from the package before use.
• If they are exposed to direct sunlight, smudges on copies may result.
Do not touch the surface (green portion) of the drum cartridge.
• Doing so will damage the surface of the cartridge, causing smudges on copies.
Cautions on laser
Wave length 770 nm – 795 nm
Pulse times 11.82 µs / 7 mm
Output power 0.17 mW ± 0.01 mW
Trademark acknowledgements
• Microsoft and Windows are trademarks of Microsoft Corporation in the U.S.A. and
other countries.
• IBM and PC/AT are trademarks of International Business Machines Corporation.
• Adobe and Acrobat are trademarks of Adobe Systems Incorporated.
• All other trademarks and copyrights are the property of their respective owners.
As an ENERGY STAR
this product meets the ENERGY STAR
efficiency.
In some areas, the "POWER" switch positions are marked "I" and "O" on the copier
instead of "ON" and "OFF".
The symbol "O" denotes the copier is not completely de-energized but in a stand-by
condition at this "POWER" switch position.
If your copier is so marked, please read "I" for "ON" and "O" for "OFF".
Caution!
For a complete electrical disconnection, pull out the main plug.
The socket-outlet shall be installed near the equipment and shall be easily
accessible.
®
Partner, SHARP has determined that
®
guidelines for energy
2

CONTENTS
1 INTRODUCTION
USING THE MANUALS.................4
PART NAMES ............................... 5
OPERATION PANEL..................... 6
2 SETTING UP THE UNIT
SETUP PROCEDURE...................7
CHECKING PACKED
COMPONENTS AND
ACCESSORIES............................. 8
PREPARING THE UNIT FOR
INSTALLATION .............................8
INSTALLING THE TD
CARTRIDGE................................10
CONNECTING THE POWER
CORD .......................................... 12
3 LOADING PAPER
PAPER.........................................14
LOADING THE PAPER TRAY ....... 15
BYPASS FEED
(including special paper).............. 17
4
INSTALLING THE SOFTWARE
SOFTWARE FOR THE SHARP
PERSONAL MFP SERIES ..........19
HARDWARE AND SOFTWARE
REQUIREMENTS........................ 20
BEFORE INSTALLATION ...........20
INSTALLING THE SOFTWARE ..22
INDICATORS ON THE
OPERATION PANEL................... 32
USING THE PRINTER MODE..... 33
USING THE SCANNER MODE... 35
HOW TO USE THE ONLINE
MANUAL...................................... 43
USING OTHER INSTALLED
DRIVERS..................................... 44
CONNECTING THE
INTERFACE CABLE.................... 45
5 MAKING COPIES
COPY FLOW ...............................46
ORIGINAL PLACEMENT.............47
SET THE COPY QUANTITY .......49
EXPOSURE ADJUSTMENT/
PHOTO COPYING.......................49
REDUCTION/ENLARGEMENT/
ZOOM ..........................................51
SELECTING THE TRAY
(AL-1457D, AL-1555) ...................51
6 SPECIAL FUNCTIONS
TWO SIDED COPYING ...............52
DESCRIPTION OF SPECIAL
FUNCTIONS ................................ 54
TONER SAVE MODE ..................54
USER PROGRAMS .....................55
DISPLAYING TOTAL NUMBER
OF COPIES .................................56
7 MAINTENANCE
TD CARTRIDGE
REPLACEMENT ..........................57
DRUM CARTRIDGE
REPLACEMENT ..........................58
CLEANING THE UNIT .................59
8
TROUBLESHOOTING THE UNIT
TROUBLESHOOTING.................61
STATUS INDICATORS................62
MISFEED REMOVAL ..................63
9 APPENDIX
SPECIFICATIONS ....................... 68
ABOUT SUPPLIES AND
OPTIONS.....................................70
MOVING AND STORING
THE UNIT ....................................71
INDEX ..........................................72
1
2
3
4
5
6
7
8
SOFTWARE LICENSE ................75
9
3

1
This chapter provides basic information for using the unit.
INTRODUCTION
USING THE MANUALS
In addition to this printed manual an online manual is also provided. To get full use of all
features and functions of this product, be sure to familiarise yourself with both manuals.
This printed manual provides all installation and setup instructions as well as instructions
in the use of all copier functions. The online manual contains the following information.
Online manual
Provides you with information on how to specify preferences and troubleshooting. Check
the online manual when you use this unit after all the initial setup is completed.
How to use the online manual
Explains how to use the online manual.
Print
Provides information on how to print a document.
Scan
Explains how to scan using the scanner driver and how to adjust the settings for
the Button Manager.
Troubleshooting
Provides instructions on how to solve driver or software problems.
Conventions used in this manual and online manual
• This operation manual explains the operation of the AL-1217D, AL-1457D and AL1555 models. In cases where the operation is the same, the AL-1555 is used.
• Illustrations of driver screens and other computer screens show the screens that
appear in Windows XP Home Edition. Some of the names that appear in these
illustrations may differ slightly from the screens that appear in other operating systems.
• This operation manual refers to the Single Pass Feeder as the "SPF", and the
Reverse Single Pass Feeder as the "RSPF".
• In this manual, the following icons are used to provide the user with information
pertinent to the use of the unit.
Warns the user that injury may result if the contents of the warning
are not properly followed.
Cautions the user that damage to the unit or one of its components
may result if the contents of the caution are not properly followed.
Notes provide information relevant to the unit regarding
specifications, functions, performance, operation and such, that
may be useful to the user.
Indicates a letter displayed in the display.
4
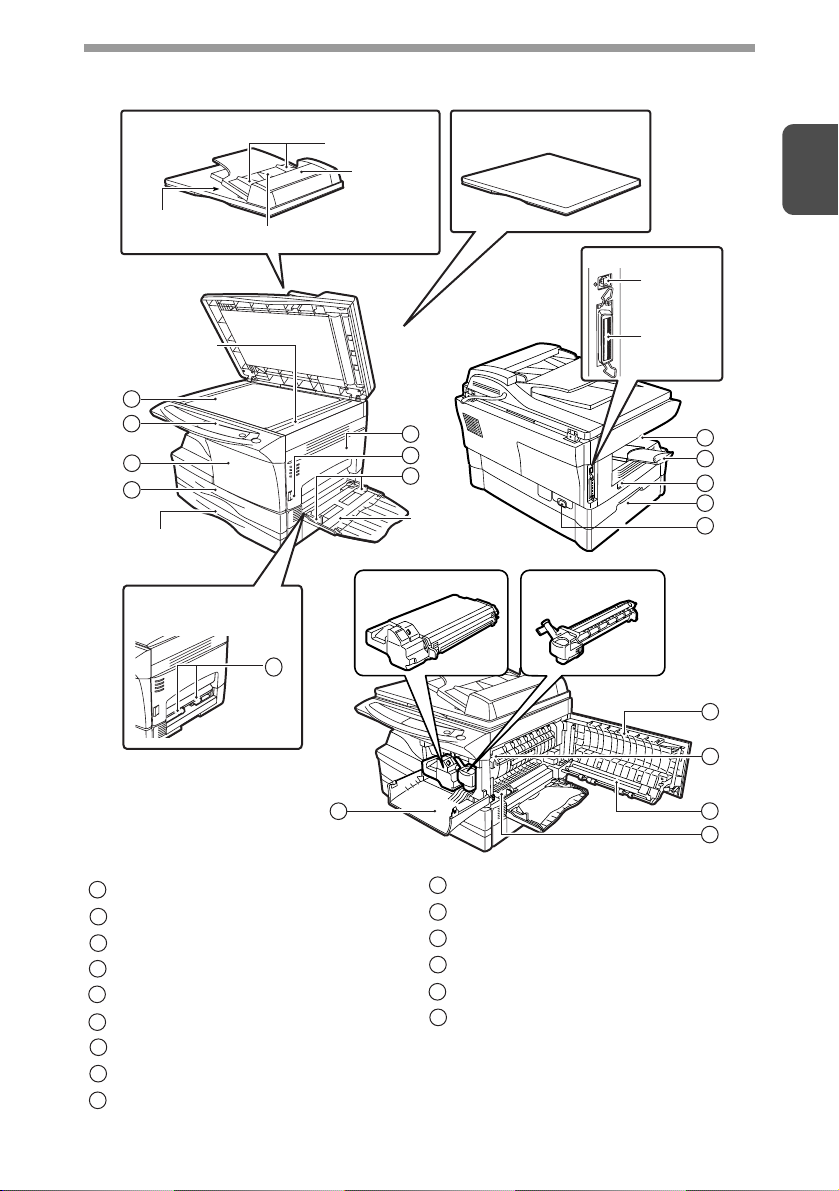
PART NA M ES
SPF (AL-1457D)
RSPF (AL-1555)
Original
exit area
SPF (AL-1457D)
RSPF (AL-1555)
scan area
1
2
3
4
Paper tray 2
(AL-1555)
Single bypass
(AL-1217D)
Original guide
Feeding
roller cover
Original feeder tray
TD cartridge Drum cartridge
7
Original cover
(AL-1217D)
5
6
7
Multi-bypass
tray
(AL-1457D, AL-1555)
1
Interface
USB
interface
Parallel
interface
8
9
10
11
12
Original table
1
Operation panel
2
Front cover
3
Paper tray
4
Side cover
5
Side cover open button
6
Bypass paper guides
7
Paper output tray
8
Paper output tray extension
9
5
13
3
Power switch
10
Handle
11
Power cord socket
12
Fusing unit release lever
13
Transfer charger
14
Charger cleaner
15
14
15
5
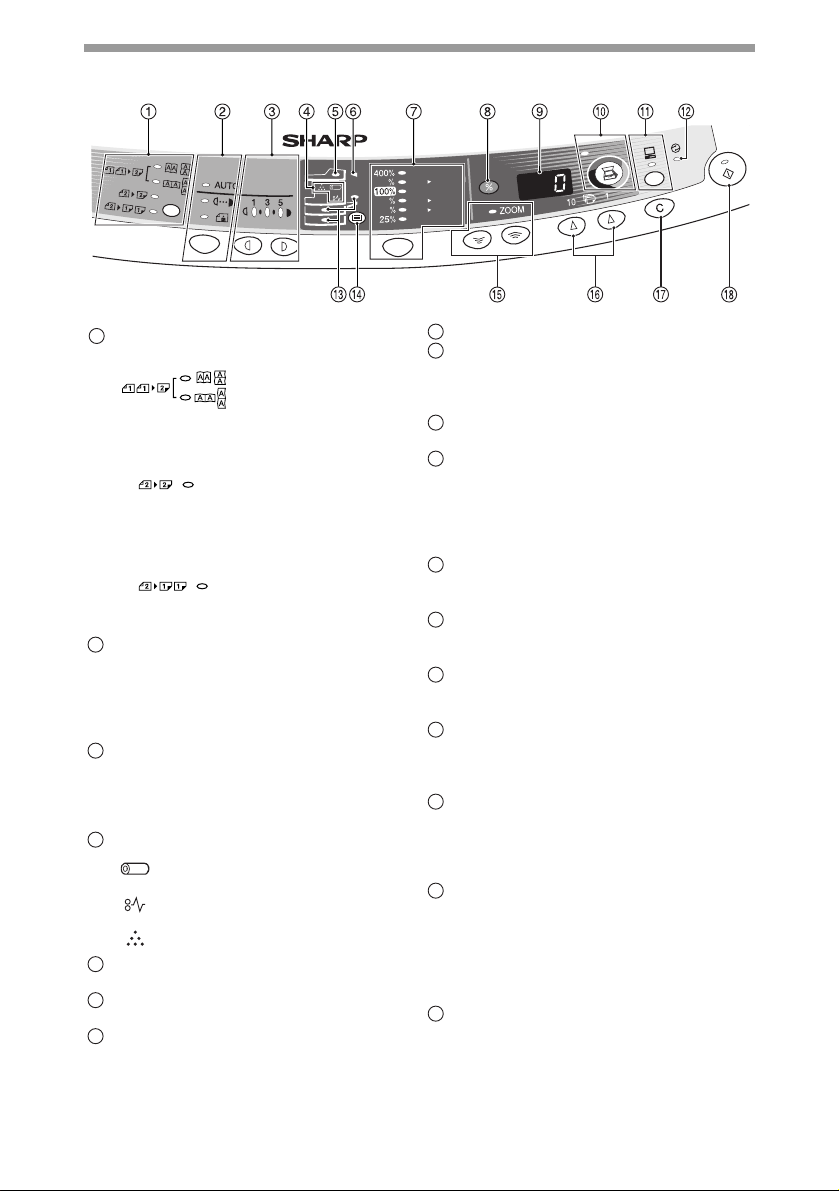
OPERATION PANEL
Original to copy key and indicators
1
Exposure mode selector key and
2
indicators
Use to sequentially select the exposure
modes: AUTO, MANUAL or PHOTO.
Selected mode is shown by a lit
indicator. (p.49)
Light and dark keys and indicators
3
Use to adjust the MANUAL or PHOTO
exposure level. Selected exposure level is
shown by a lit indicator. (p.49) Use to start
and terminate user program setting. (p.55)
Alarm indicators
4
Drum replacement required
indicator (p.58)
Misfeed indicator (p.63)
TD cartridge replacement
required indicator (p.57)
SPF indicator (p.48) (AL-1457D)
5
RSPF indicator (p.48) (AL-1555)
SPF misfeed indicator (p.66) (AL-1457D)
6
RSPF misfeed indicator (p.66) (AL-1555)
Copy ratio selector key and
7
indicators
Use to sequentially select preset
reduction/enlargement copy ratios.
Selected copy ratio is shown by a lit
indicator. (p.51)
Two-sided copies from
one-sided originals.
Turn on Long Edge or
Turn on Short Edge
can be selected.
Two-sided copies from
two-sided originals. (Can
be selected only when
the RSPF is used.)
(AL-1555)
Single-sided copies
from two-sided
originals. (Can be
selected only when the
RSPF is used.)
(AL-1555)
AL-1555
141
86
70
A5
A4
A4
B5
A4
A5
Copy ratio display (%) key (p.51)
8
Display
9
Displays the specified copy quantity,
zoom copy ratio, user program code,
and error code.
SCANNER key and indicator
10
(p.32, p.39)
ONLINE key and indicator (p.32)
11
Lights up when the unit is used as a
printer and scanner. For description of
the ONLINE indicator, see
"INDICATORS ON THE OPERATION
PANEL" (p.32).
Power save indicator
12
Lights up when the unit is in a power
save mode. (p.54, p.55)
Paper feed location indicators
13
Light up to show the selected paper
feed station.
Tray select key (AL-1457D, AL-1555)
14
Use to select a paper feed station
(paper tray or multi-bypass tray). (p.51)
ZOOM keys and indicator
15
Use to select any reduction or
enlargement copy ratio from 25% to
400% in 1% increments. (p.51)
Copy quantity keys
16
• Use to select the desired copy
quantity (1 to 99). (p.49)
• Use to make user program entries.
(p.55)
Clear key
17
• Press to clear the display, or press
during a copy run to terminate
copying. (p.49)
• Press and hold down during standby
to display the total number of copies
made to date. (p.56)
Start key and indicator
18
• Copying is possible when the
indicator is on.
• Press to start copying.
• Use to set a user program. (p.55)
6
2
Follow the installation procedure below to use the unit properly.
If the unit does not function properly during setup or use, or if a function
cannot be used, see "TROUBLESHOOTING THE UNIT" (p.61).
SETTING UP THE UNIT
SETUP PROCEDURE
When using the unit for the first time, setup the unit following the procedure shown below.
1 Open the package, and make sure that all the accessories are
supplied with the unit. (p.8)
2 Remove the protective materials. (p.9)
3 Install the TD cartridge. (p.10)
4 Load the paper in the paper tray (p.15) or the multi-bypass
5 Insert the attached power cord into the power cord socket at the
6 Connect the power cord
7 Install the software.*2 (p.19)
1.
tray*
(p.17)
rear of the unit.
. (p.12)
2
8 Connect the interface cable*2 (p.45) and turn on the unit. (p.12)
9 Now, you can copy (p.46), print (p.33), or scan (p.35) your
document.
*1The multi-bypass tray is only included with the AL-1457D and AL-1555.
*2If you are only using the unit for copying, skip this step.
7

CHECKING PACKED COMPONENTS AND
ACCESSORIES
Open the carton and check if the following components and accessories are
included.
If anything is not included or is damaged, contact your authorised service
representative.
Operation manual
AL-1217D
AL-1457D
AL-1555
Software CD-ROM
Drum cartridge
(installed in unit)
TD cartridge
PREPARING THE UNIT FOR INSTALLATION
Be sure to hold the handles on
1
both sides of the unit to unpack
the unit and carry it to the
installation location.
8
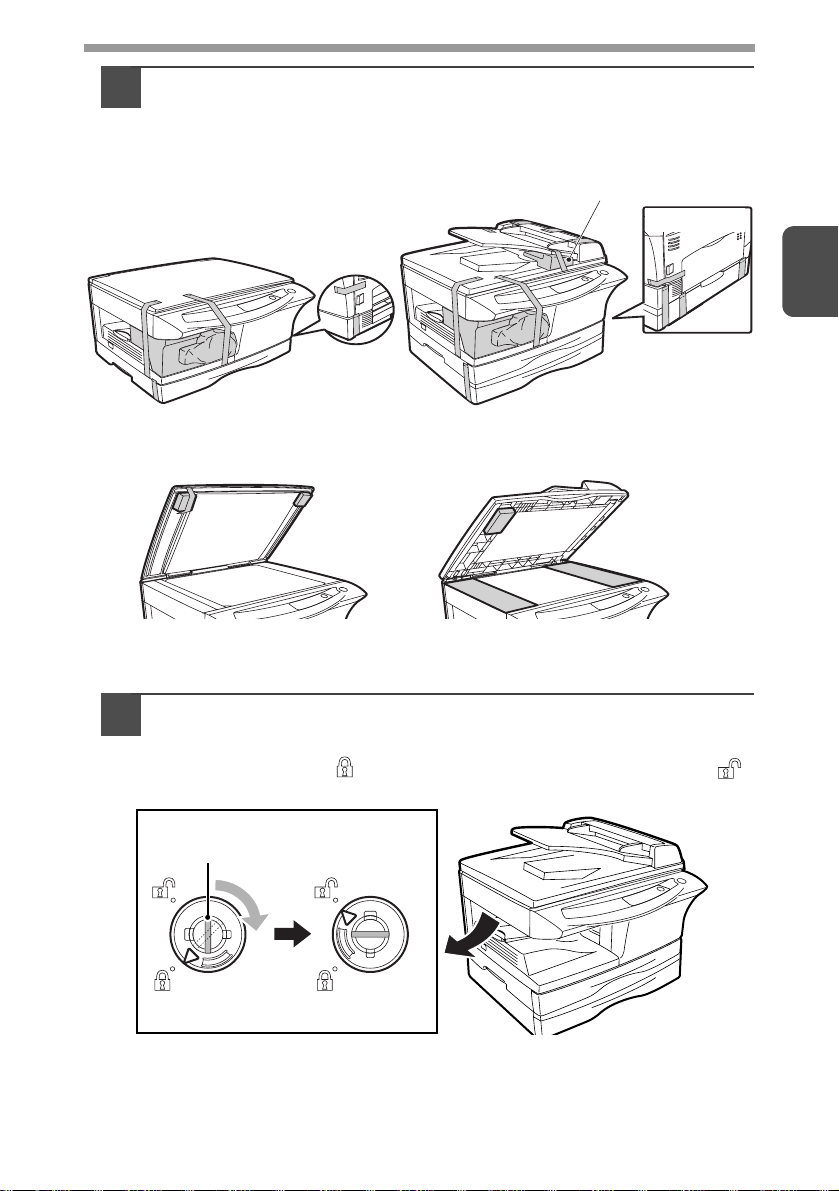
Remove all pieces of tape shown in the illustration below. Then
2
open the original cover/SPF/RSPF and remove protective
materials. After that, take out the bag containing the power
cord and TD cartridge.
(AL-1555 only)
(AL-1555)
2
AL-1217D
AL-1217D
Release the scan head locking switch.
3
The scan head locking switch is under the original table.
If the switch is locked ( ), the unit will not operate. Unlock the switch ( )
as shown below.
Grasp here and turn in
the direction of the arrow.
AL-1457D, AL-1555
AL-1457D, AL-1555
Lock Unlock
9
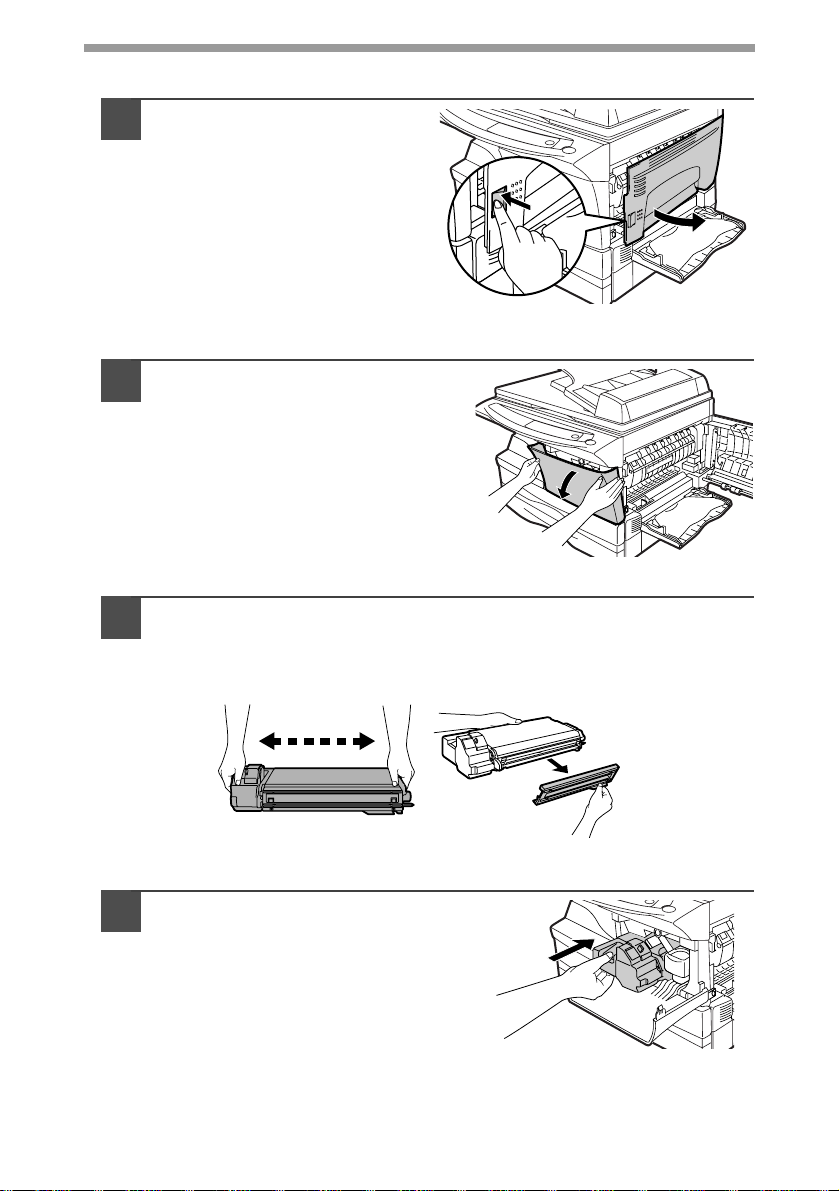
INSTALLING THE TD CARTRIDGE
Open the multi-bypass tray
1
(AL-1457D, AL-1555, p.17),
and then open the side
cover.
Push gently on both sides of the
2
front cover to open the cover.
Remove the TD cartridge from the bag. Hold the cartridge on
3
both sides and shake it horizontally four or five times. Hold the
tab of the protective cover and pull the tab to your side to
remove the cover.
10
4 or 5 times
Gently insert the TD cartridge
4
until it locks in place while
pushing the lock release button.
Close the front cover and then
5
the side cover by pressing the
round projections near the
side cover open button.
When closing the covers, be
sure to close the front cover
securely and then close the
side cover. If the covers are
closed in the wrong order, the
covers may be damaged.
2
11
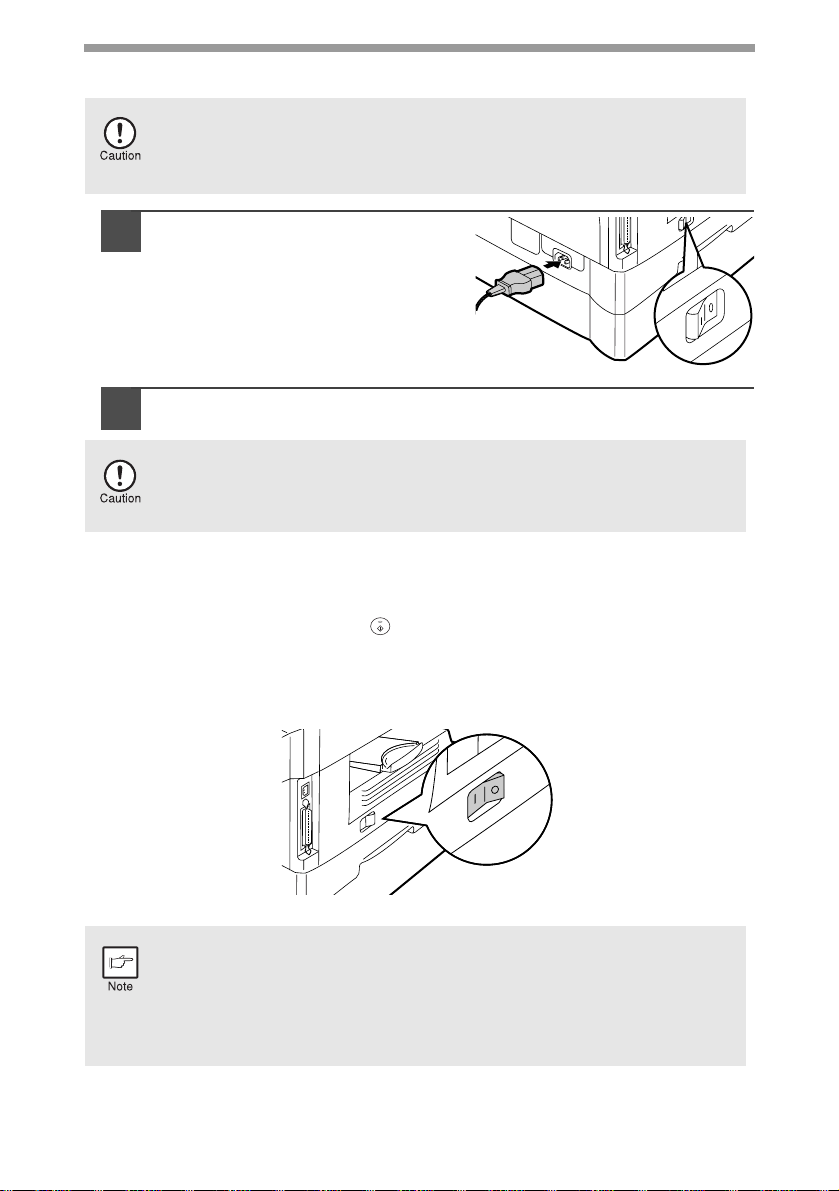
CONNECTING THE POWER CORD
If you use the unit in a country other than the country where the unit was
purchased, you will need to make sure that your local power supply is
compatible with your model. If you plug the unit into an incompatible
power supply, irreparable damage to the unit will result.
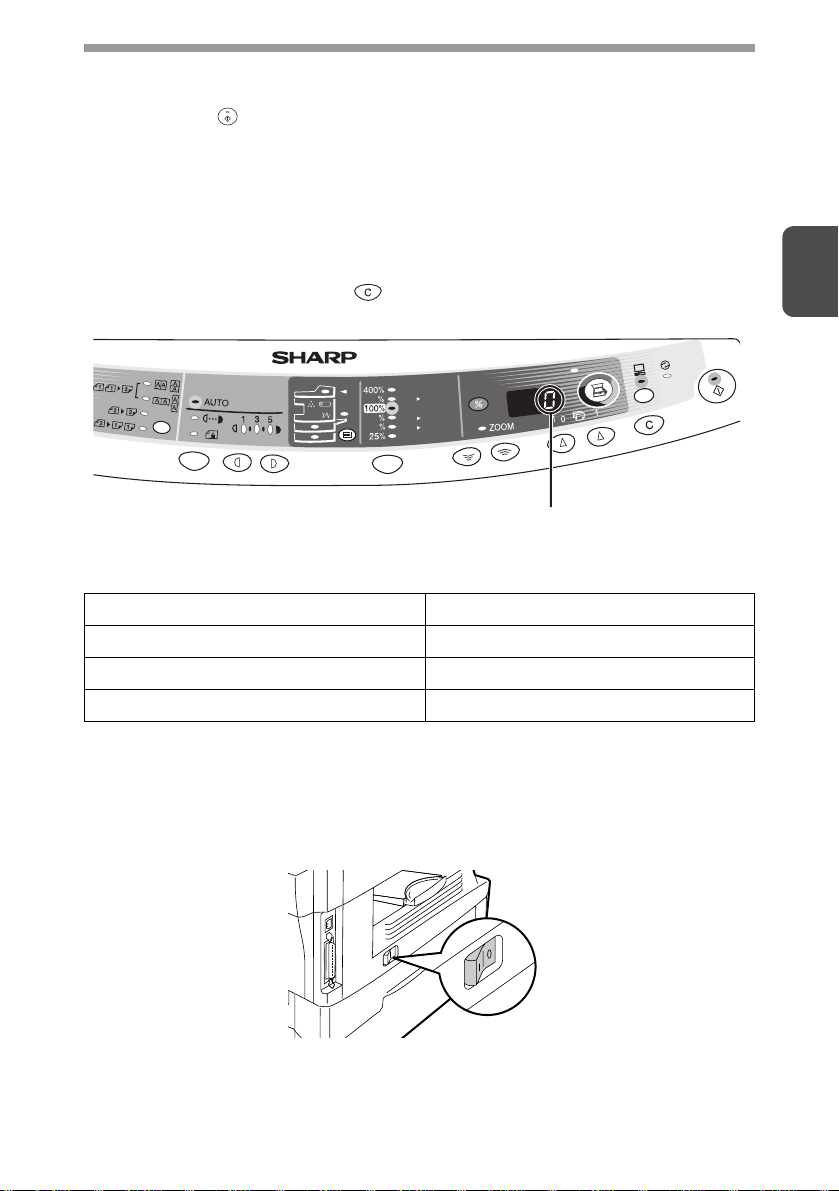
Ensure that the power switch of
1
the unit is in the OFF position.
Insert the attached power cord
into the power cord socket at the
rear of the unit.
Plug the other end of the power cord into the nearest outlet.
2
Only insert the power cord into a properly grounded wall socket.
Do not use extension cords or power strips.
Power on
Ensure that the power switch of the unit is in the OFF position. Plug the other end of
the power cord into the nearest outlet. Turn the power switch on the left side of the
unit to the "ON" position. The start ( ) indicator will light up and other indicators
which show the initial settings of the operation panel will also light up to indicate the
ready condition. For the initial settings, see the "Initial settings of operation panel"
described on the next page.
12
• The unit will enter a power save mode once the set time has elapsed
without any unit operation. The settings of the power save modes can
be modified. See "USER PROGRAMS" (p.55).
• The unit will return to the initial settings a preset amount of time after
the end of copy or scanner job. The preset amount of time (auto clear
time) can be changed. See "USER PROGRAMS" (p.55).
About the scan head
The scan head lamp remains on constantly when the unit is in the ready condition
(when the start ( ) indicator is illuminated).
The unit adjusts the scan head lamp periodically to maintain copying quality. At this
time, the scan head moves automatically. This is normal and does not indicate unit
trouble.
Initial settings of operation panel
When the unit power is on, the operation panel will revert to the initial settings when
the time set with the "Auto clear time" setting (p.55) elapses after a copy or scanner
job is finished, or when the clear ( ) key is pressed twice.
The initial settings of the operation panel are shown below.
AL-1555
A5
A4
141
A4
B5
86
A4
A5
70
"0" is displayed in the display.
When copying is begun in this state, the settings in the following table are used.
Copy quantity 1 copy
Exposure adjustment AUTO
Zoom 100%
Tray Paper tray
2
Power off methods
If not used for a certain period of time, the unit will automatically enter auto power
shut-off mode (p.55) in order to minimise power consumption. In cases where the
machine will not be used for a long time, turn off the power switch and remove the
power cord from the outlet.
13

3
Follow the steps below to load paper into the tray.
LOADING PAPER
PAP ER
For best results, use only paper recommended by SHARP.
Type of paper
feeding
Paper tray Standard paper A4
Single bypass/
Multi-bypass
tray
* Do not use non-standard envelopes, and envelopes that have metal clasps, plastic
snappers, string closures, windows, linings, self-adhesive, patches or synthetic
materials. Do not use envelopes that are filled with air or envelopes that have
labels or stamps attached. These will cause physical damage to the unit.
** For paper weighing from 104g/m
fed through the single bypass or the multi-bypass tray.
• Special papers such as transparency film, labels and envelope must be fed one
sheet at a time through the single bypass or the multi-bypass tray.
Type of media Size Weight
56g/m
Standard paper and
thick paper
Special
media
Transparency
film
Envelope* International DL
2
A5
B5
Letter
Legal
Invoice
A4
A5
A6
B5
B6
Letter**
Legal
Invoice
A4
Letter
International C5
Commercial 10
Monarch
to 128g/m2, A4 is the maximum size that can be
80g/m
52g/m
128g/m2**
2
2
2
to
to
14
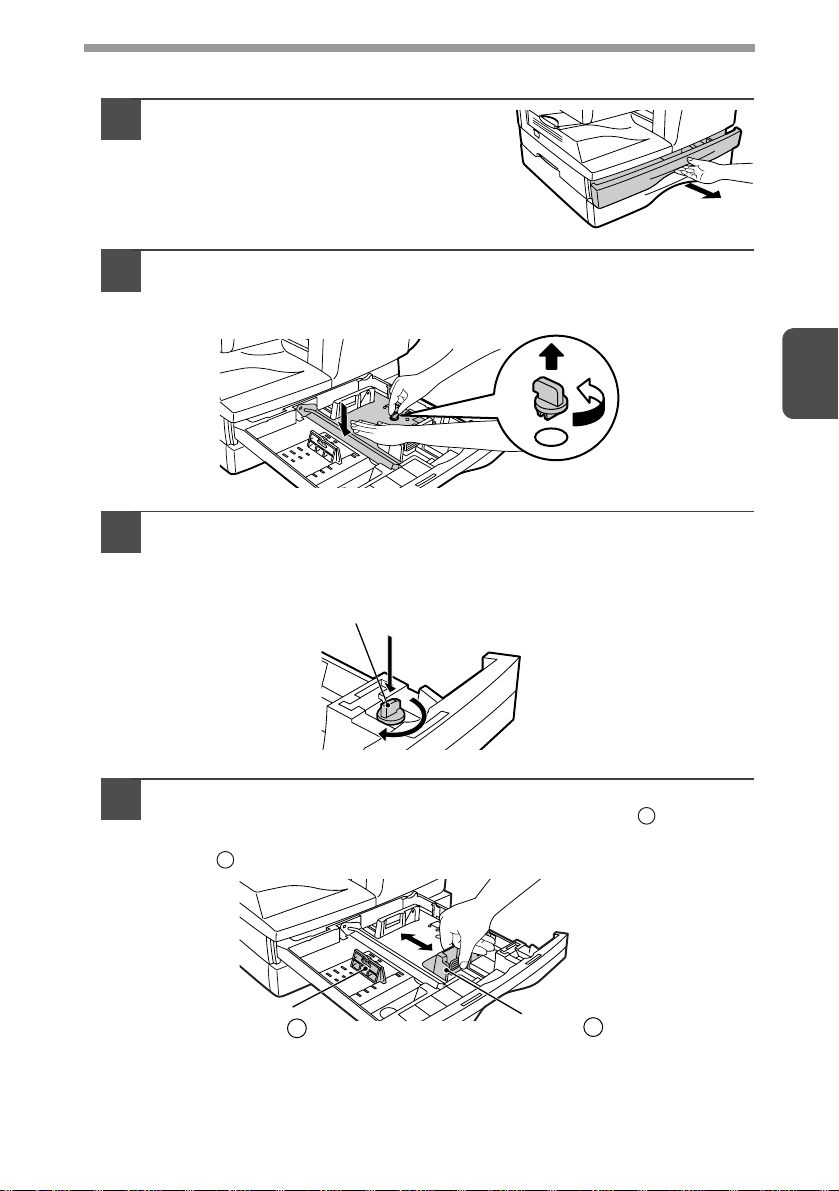
LOADING THE PAPER TRAY
Raise the handle of the paper tray
1
and pull the paper tray out until it
stops.
Remove the pressure plate lock. Rotate the pressure plate lock
2
in the direction of the arrow to remove it while pressing down
the pressure plate of the paper tray.
Store the pressure plate lock which has been removed in step 2.
3
To store the pressure plate lock, rotate the lock to fix it on the
relevant location.
Pressure plate lock
3
Adjust the paper guides on the paper tray to the copy paper
4
width and length. Squeeze the lever of paper guide and slide
the guide to match with the width of the paper. Move paper
guide to the appropriate slot as marked on the tray.
B
Paper
guide B
Paper
guide A
A
15
Fan the paper and insert it into the tray. Make sure the edges go
5
under the corner hooks.
Do not load paper above the maximum height line ( ). Exceeding
the line will cause a paper misfeed.
Gently push the paper tray back into the unit.
6
• After loading paper, to cancel the blinking without restarting
copying, press the clear ( ) key. The in the display will go out
and the start ( ) indicator will light up.
• Be sure that paper is free of rips, dust, wrinkles, and curled or bent
edges.
• Make sure all the paper in the stack is the same size and type.
• When loading paper, ensure there is no space between the paper and
the guide, and check if the guide is not set too narrow causing the
paper to bend. Loading paper in these ways will result in document
skew or a paper jam.
• When not using the unit for an extended period, remove all paper from
the paper tray and store it in a dry place. If paper is left in the unit for
an extended period, the paper will absorb moisture from the air,
resulting in paper jams.
• When adding new paper to the paper tray, remove the old paper
already contained in the tray. Placing new paper on top of the paper
already contained in the tray may result in feeding two sheets at one
time.
16
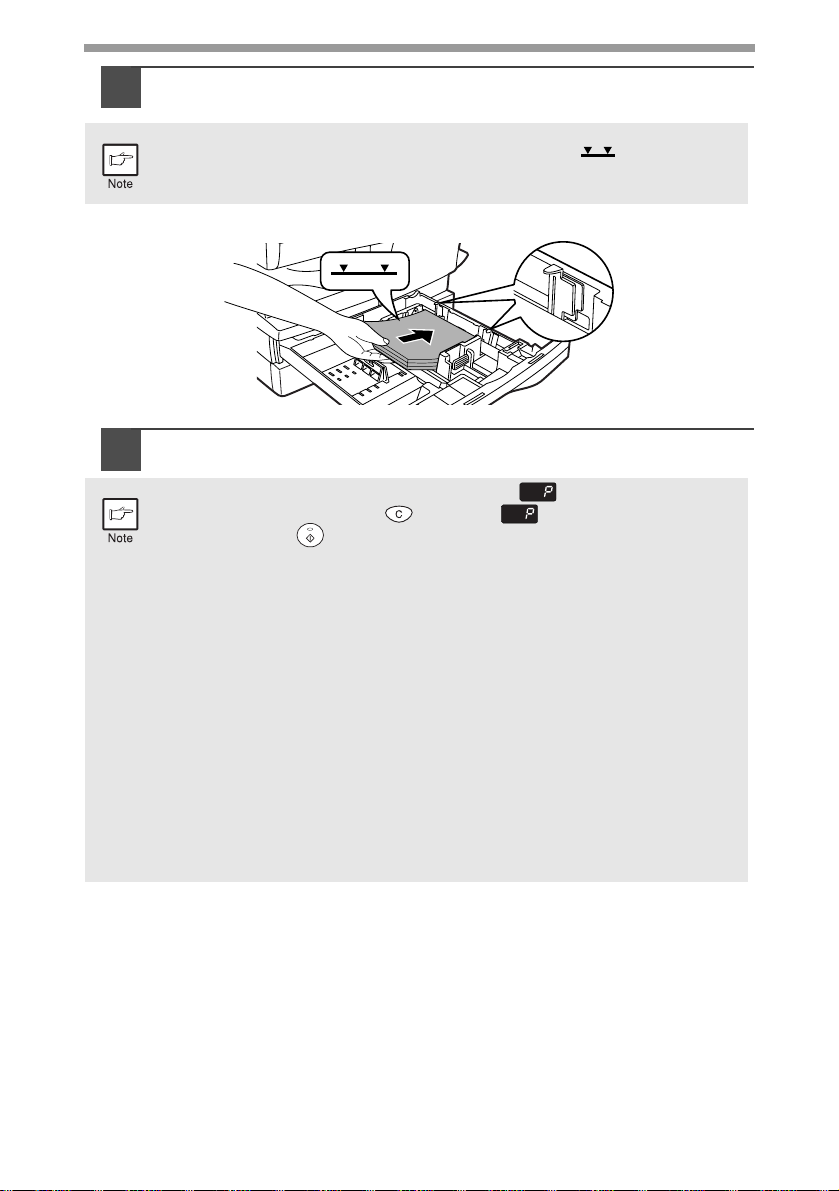
BYPASS FEED (including special paper)
The multi-bypass tray (AL-1457D, AL-1555) or the single bypass (AL-1217D) can be used to
feed standard paper, transparency film, labels, envelopes, and other special purpose paper.
Paper measuring from A6 to A4 and in the weight range of 52g/m2 to 128g/m2 can be used
in this tray. (For paper weighing from 104
• The multi-bypass tray (AL-1457D, AL-1555) can hold maximum of 50
sheets of paper. (Capacity will vary depending on the type of paper
loaded.) The single bypass (AL-1217D) can hold one sheet of paper.
• The original image must be smaller than the paper or media for
copying. If the original image is bigger than the paper or media, this
may cause smudges on the edges of the copies.
The multi-bypass tray (AL-1457D, AL-1555)
Open the multi-bypass tray and extend the tray.
1
To close the multibypass tray, perform
step 1 and then step
2 in the illustration
and push the round
projections at the
right of the tray until
they click.
g
/m2 to 128g/m2, A4 is the maximum size.)
3
Set the paper guides to the paper width. Insert the paper (print
2
face down) all the way into the multi-bypass tray.
Print face
• Paper must be fed narrow side into the feed slot.
Special papers such as transparency film ,labels and envelopes
•
must be fed one sheet at a time through the multi-bypass tray.
• When copying onto transparency film, remove each copy
promptly. Do not let copies stack up.
Press the tray select ( ) key to select the multi-bypass tray.
3
17
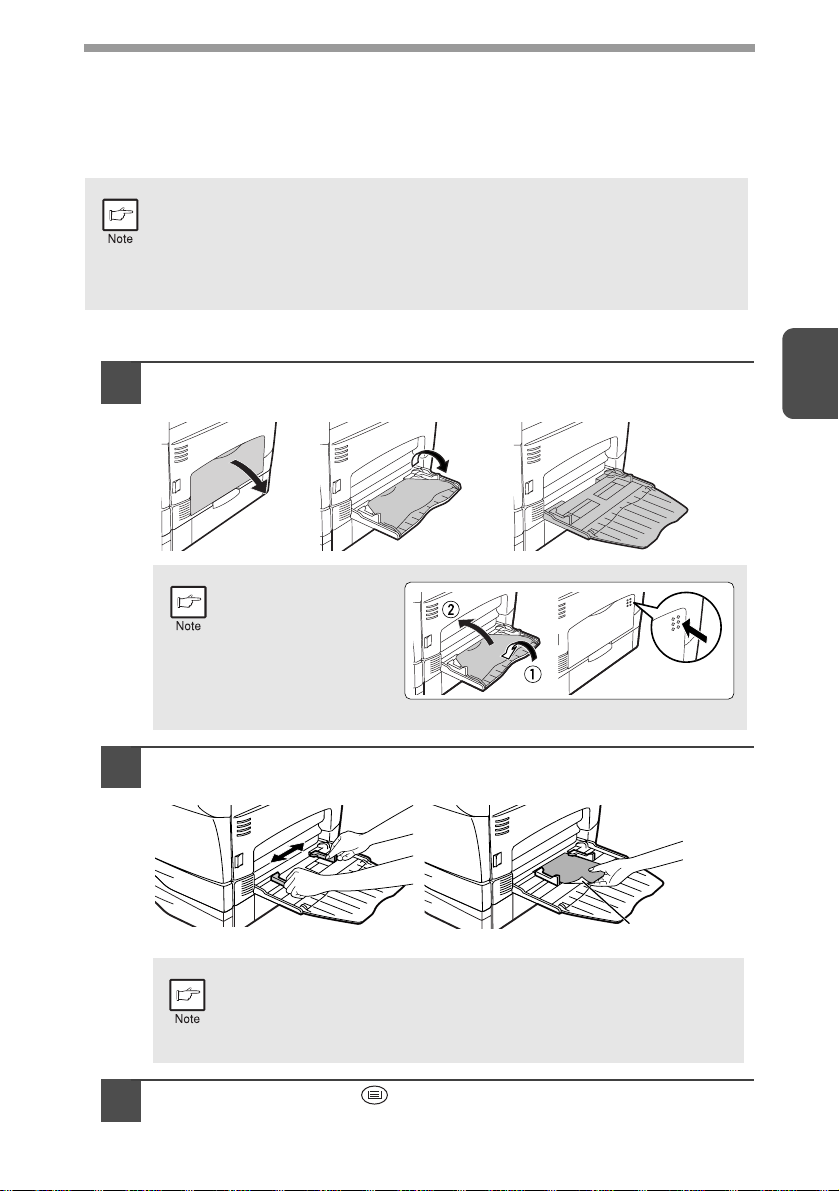
The single bypass (AL-1217D)
• If you insert a sheet of paper into the single bypass when multiple
copies have been set with the copy quantity setting (p.49), the copy
quantity setting will change to "0" and only one copy will be made.
• When copying onto transparency film, remove each copy promptly.
Do not let copies stack up.
Select copy settings before you begin the copy job.
1
For information on the copy settings, see "MAKING COPIES" (p.46)". For
information on the print settings, see the online manual or the Help file for
the printer driver, and then begin printing from the single bypass.
Set the paper guides to the paper width. Insert a single sheet of
2
copy or print paper (print face down) into the feed slot of the
single bypass.
Using copy mode
When you insert the paper, the machine will automatically draw in the paper
and begin copying.
Using printer mode
After appears in the display, wait until the Paper feed location indicator for
the single bypass illuminates and insert the paper. The machine will
automatically draw in the paper and begin printing.
18
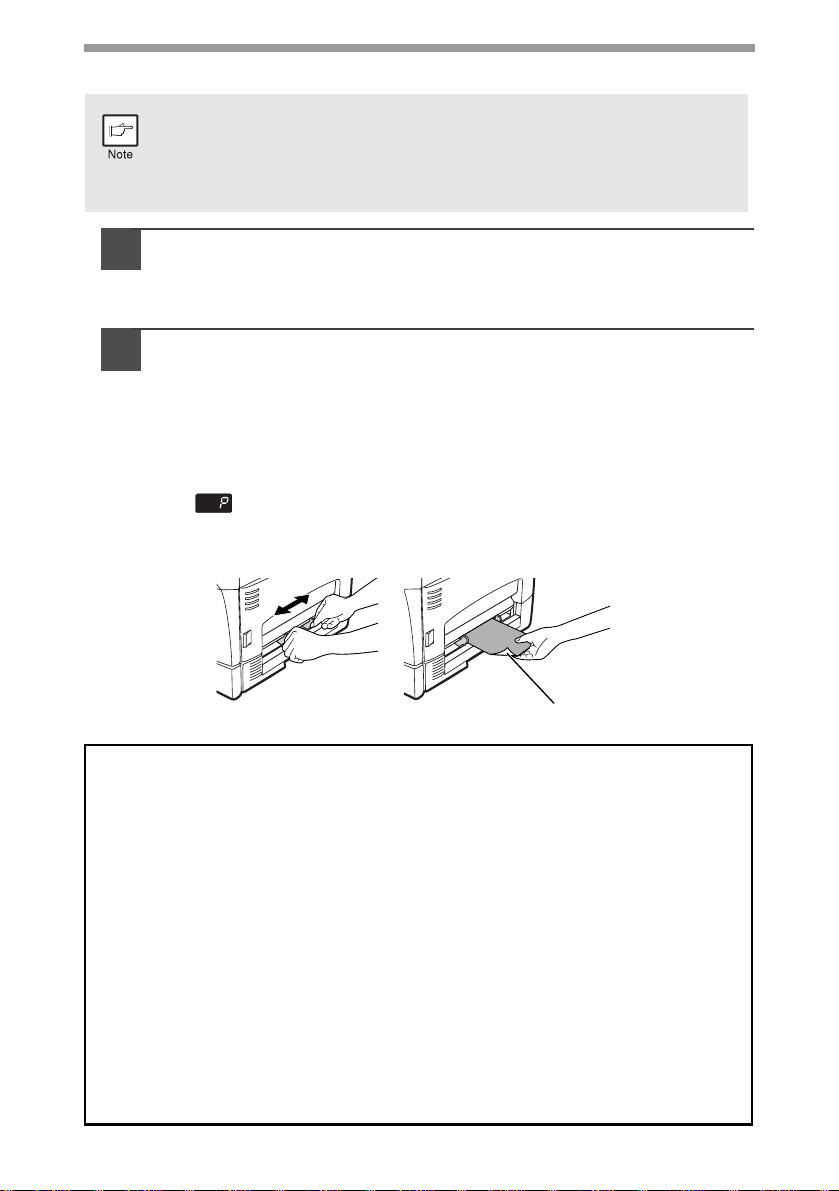
(AL-1217D)
Print face
Note for loading envelopes
• Envelopes must be fed narrow side into the feed slot one at a time.
• Do not use non-standard envelopes, and envelopes that have metal clasps,
plastic snappers, string closures, windows, linings, self-adhesive, patches or
synthetic materials. Do not use envelopes that are filled with air or envelopes that
have labels or stamps attached.
• Envelopes of which the surface is not flat because of embossing may cause the
copies/prints to become smudged.
• Under high humidity and temperature conditions the glue flaps on some
envelopes may become sticky and be sealed closed when copied/printed.
• Use only envelopes which are flat and crisply folded. Curled or poorly formed
envelopes may be poorly copied/printed or may cause misfeeds.
• Be sure to select either Com10, DL, C5 or Monarch on the paper size setting of
the printer driver. (For detailed information on printer driver, refer to the online
manual.)
• It is recommended that you perform a test copy/print before performing the actual
copied/printed job.

4
This chapter explains how to install the software that allows the AL-1217D, AL1457D and AL-1555 to be used as a printer and scanner, and the procedures for
using the printer and scanner functions. The following term is used in this chapter.
CD-ROM
Means the supplied CD-ROM with the SHARP Personal MFP series software.
INSTALLING THE SOFTWARE
SOFTWARE FOR THE SHARP PERSONAL MFP
SERIES
The supplied CD-ROM includes software for this unit.
MFP driver
Scanner driver
Permits you to operate scanning function of this unit with TWAIN-compliant and
WIA-compliant application.
Printer driver
Enables you to use the printer function of this unit with your computer.
Print Status Window
The print state and information on current printing are displayed on the status
monitor window.
Sharpdesk
An integrated software environment that makes it easy to manage document and
image files and launch applications.
Button Manager
Button Manager enabling the SCANNER ( ) key located on the unit.
4
The scanning feature is only available with Windows 98/Me/2000/XP
using a USB connection. For users running Windows 95/NT 4.0 or using
a parallel connection, only printing is available.
19
HARDWARE AND SOFTWARE REQUIREMENTS
Check the following hardware and software requirements in order to install the software.
Computer type IBM PC/AT or compatible computer equipped with a
USB1.1*
2
Operating system*
Windows 95, Windows 98, Windows Me, Windows NT
Workstation 4.0 (ServicePack 5 or later)*
Professional*
Home Edition*
1
or bi-directional parallel interface (IEEE 1284)
3
3
, Windows XP Professional*3, Windows XP
3
, Windows 2000
Display 800 x 600dots (SVGA) display with 256 colours (or better)
Hard disk free space
Other requirement
for hardware
*1Compatible with Windows 98, Windows Me, Windows 2000 Professional, Windows XP
Professional or Windows XP Home Edition preinstalled model with USB interface
equipped as standard.
2
Printing is unavailable in MS-DOS mode.
*
3
The administrator's authorisation is required to install this software using this installer.
*
150MB or more
An environment on which any of the operating systems listed
above can fully operate
BEFORE INSTALLATION
The following table shows the drivers and software that can be installed for each
version of Windows and interface connection method.
MFP Driver
Printer driver/
Print Status
Scanner driver
Window
Users of Windows
98/Me/2000/XP who
will use the USB
Available Available Available
interface connection
Users of Windows
98/Me/2000/XP who
will use the parallel
interface connection
Available*
1
Not Available
Windows 95/NT 4.0
users
*1When the unit is connected through the parallel port, the Print Status Window can only
be used when the parallel port is set to ECP mode. To set the parallel port mode, refer
to your computer manual or ask the manufacturer of your computer.
2
Sharpdesk can be installed when using a parallel interface connection, however, the
*
unit’s scanner function cannot be used.
Is there another GDI printer driver or a Windows Printing System printer
driver already installed? If installed, change the printer port setting. For
the change of the printer port setting, see "USING OTHER INSTALLED
DRIVERS" (p.44).
Button
Manager
Not
Available
Sharpdesk
Available*
2
20

Flow of installation
Refer to the following table and then begin installation.
Operating
system
Windows XP
Windows 98
Windows Me
Windows 2000
Windows 95/
NT 4.0
Interface Reference pages for how to install
USB/
Parallel
USB
Parallel
USB
Parallel
USB
Parallel
Parallel
Installing onto Windows XP (USB/parallel interface)
(p.22)
Installing onto Windows 98/Me/2000 (USB interface) (p.26)
Installing onto Windows 95/98/Me/NT4.0/2000
(Parallel interface) (p.29)
Installing onto Windows 98/Me/2000 (USB interface) (p.26)
Installing onto Windows 95/98/Me/NT4.0/2000
(Parallel interface) (p.29)
Installing onto Windows 98/Me/2000 (USB interface) (p.26)
Installing onto Windows 95/98/Me/NT4.0/2000
(Parallel interface) (p.29)
Installing onto Windows 95/98/Me/NT4.0/2000
(Parallel interface) (p.29)
4
21
INSTALLING THE SOFTWARE
The following term is used in this section.
MFP
Means the unit as a printer and scanner.
• For this description, it is assumed that the mouse is configured for
right hand operation.
• To print or scan, the MFP must be in the online state.
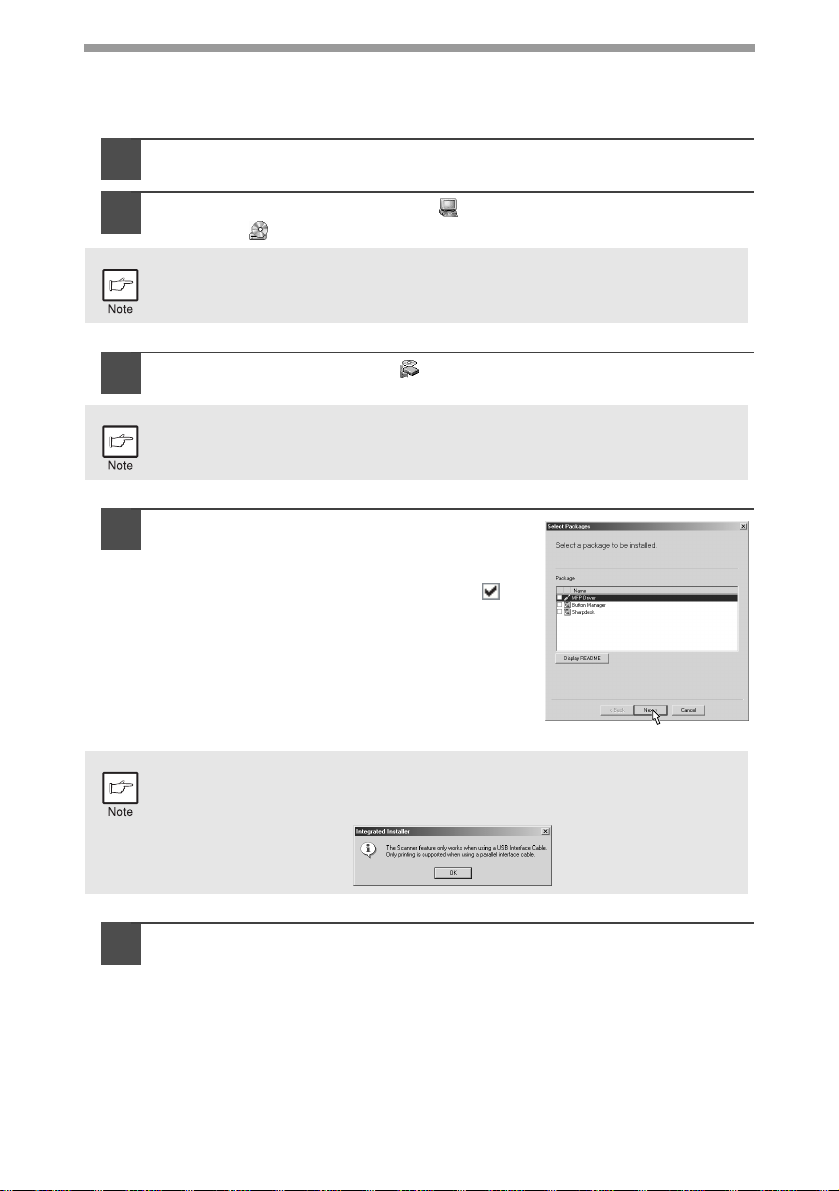
• The scanner feature only works when using a USB interface cable.
• If any error message appears, solve the problem following the
instructions on the screen. After your problem is solved, the installing
procedure will be continued. Depending on your problem, you may
have to exit the installer. In this case, click the "Cancel" button to exit
the installer. After solving your problem, reinstall the software from the
beginning.
Installing onto Windows XP (USB/parallel interface)
Before starting the installation, make sure the USB or parallel interface cable is not
connected to the MFP.
Insert the supplied CD-ROM into your CD-ROM drive.
1
Click the "start" button, click "My Computer" ( ), and then
2
double-click the CD-ROM ( ) icon.
When any of "Found New Hardware Wizard" messages appear during
the software installation, be sure to click the "Cancel" button.
22
Double-click the "setup" ( ) icon.
3
If the language selection screen appears after you double click the
"setup" icon, select the language you wish to use and click the "Next"
button. (Normally, the correct language is selected automatically.)
Select the software packages to be
4
installed, and then click the "Next"
button.
The software packages with checkmark ( )
on the list on the screen will be installed.
Click the "Display README" button to show
the information on the selected package.
• If you are using the parallel interface connection, do not select the
Button Manager checkbox because this feature is not supported with
the parallel interface.
• If the following screen appears, click the "OK" button. Review the
contents in "BEFORE INSTALLATION" (p.20), and then select only
appropriate the software packages to be installed.
Review the software packages to be
5
installed on the screen, and then click
the "Start" button.
The software packages to be installed will be
displayed on the screen. If inappropriate
packages are displayed, click the "Back" button
to select appropriate packages again.
Copying files for MFP driver installation (This step will start if it
6
was selected in step 4).
After confirming the message in the "Welcome" window, click the
1
"Next" button.
A dialog box appears asking you to verify that the USB or parallel
2
interface cable is not connected to the MFP. Make sure that the
interface cable is not connected and click the "Next" button.
Click the "Next" button in the dialog box to
3
install the MFP driver or Cancel to quit the
installation.
The setup program will start to copy the files.
If the following screen appears while the files are
being copied (the message may appear more
than once), click "Continue Anyway".
When the "The MFP driver installation is complete." dialog box
4
appears, click the "OK" button.
The Button Manager installer will start.
4
23
Begin installation of the Button Manager (This step will start if it
7
was selected in step 4).
After confirming the message in the "Welcome" window, click the
1
"Next" button.
Read the message in the "Please read the following information."
2
window, and then click the "Next" button.
When a message appears that lets you specify the location for the
3
software to be installed, click the "Next" button.
If the program displays "Do you want the Button Manager added to
4
Windows Startup?", check "Yes" and click the "OK" button.
The setup program will start to copy the files.
Click the "Finish" button when the message informs you that
5
setup is successful.
The Sharpdesk installer will start.
Begin installation of the Sharpdesk (This step will start if it was
8
selected in step 4).
After confirming the message in the "Welcome to Sharpdesk
1
installation" window, click the "Next" button.
Read the message in the "Information" window, and then click the
2
"Next" button.
When the "Choose Destination Location" window appears, click
3
the "Next" button.
When the "Select Program Folder" window appears, click the
4
"Next" button.
The setup program will start to copy the files.
Click the "Finish" button when the message informs you that
5
Setup is complete.
24
Click the "Close" button when the
9
message informs you that "Setup has
finished". When the "Now connect the
MFP interface cable to the PC" dialog
box appears, click the "OK" button.
After the installation, a message to
restart your computer may be
displayed. In this case, click the "Yes"
button to restart your computer.

Make sure that the power of the MFP is turned on, and then
10
connect the USB interface cable or parallel interface cable.
(p.45)
Windows will detect the MFP and the Plug and Play screen will appear. If
you are using Windows XP with the parallel interface, go to step 12.
Begin installation of the scanner driver.
11
12
"SHARP AL-xxxx" (where xxxx is the model name of your MFP)
1
will appear in the "Found New Hardware Wizard" dialog box.
Select "Install the software automatically (Recommended)" and
click the "Next" button.
The "Hardware Installation" dialog box will appear. Click the
2
"Continue Anyway" button.
When installation of the driver is completed, click the "Finish"
3
button to finish the scanner driver installation.
Begin installation of the printer driver.
"SHARP AL-xxxx" (where xxxx is the model name of your MFP)
1
will appear in the "Found New Hardware Wizard" dialog box.
Select "Install the software automatically (Recommended)" and
click the "Next" button.
The "Hardware Installation" dialog box will appear. Click the
2
"Continue Anyway" button.
When installation of the driver is completed, click the "Finish"
3
button to finish the printer driver installation.
You have completed the installation of all the software.
4
25
Installing onto Windows 98/Me/2000 (USB interface)
Before starting the installation, make sure the USB interface cable is not connected
to the MFP.
Insert the supplied CD-ROM into your CD-ROM drive.
1
Double-click "My Computer" ( ), and then double-click the
2
CD-ROM ( ) icon.
When any of "Hardware Found", or "Found New Hardware Wizard"
messages appear during the software installation, be sure to click the
"Cancel" button.
Double-click the "setup" ( ) icon.
3
If the language selection screen appears after you double click the
"setup" icon, select the language you wish to use and click the "Next"
button. (Normally, the correct language is selected automatically.)
Select the software packages to be
4
installed, and then click the "Next"
button.
The software packages with checkmark ( )
on the list on the screen will be installed. Click
the "Display README" button to show the
information on the selected package.
26
If the following screen appears, click the "OK" button. Review the
contents in "BEFORE INSTALLATION" (p.20), and then select the
appropriate driver software packages to be installed.
Review the software packages to be installed on the screen,
5
and then click the "Start" button.
The software packages to be installed will be displayed on the screen. If
inappropriate packages are displayed, click the "Back" button to select
appropriate packages again.

Copying files for MFP driver installation.
6
After confirming the message in the "Welcome" window, click the
1
"Next" button.
A dialog box appears asking you to verify that the interface cable
2
is not connected to the MFP. Make sure that the interface cable is
not connected and click the "Next" button.
Click the "Next" button in the dialog box
3
showing the files to be copied for installation
of the MFP driver.
The setup program will start to copy the files.
In Windows 2000, if the following screen appears
while the files are being copied (the message
may appear more than once), click "Yes" in
Windows 2000.
The following screen appears when all of
4
the files for the USB interface connection
have been copied. If you are not using a
parallel interface cable for connection to the
MFP, please click the "No" button.
When the "The MFP driver installation is complete." dialog box
5
appears, click the "OK" button.
The Button Manager installer will start.
Begin installation of the Button Manager (This step will start if it
7
was selected in step 4).
After confirming the message in the "Welcome" window, click the
1
"Next" button.
Read the message in the "Please read the following information."
2
window, and then click the "Next" button.
When a message appears that lets you specify the location for the
3
software to be installed, click the "Next" button.
If the program displays "Do you want the Button Manager added to
4
Windows Startup?", check "Yes" and click the "OK" button.
The setup program will start to copy the files.
Click the "Finish" button when the message to inform you of the
5
completion of the installation appears.
The Sharpdesk installer will start.
4
27
Begin installation of the Sharpdesk (This step will start if it was
8
selected in step 4).
After confirming the message in the "Welcome to Sharpdesk
1
installation" window, click the "Next" button.
Read the message in the "Information" window, and then click the
2
"Next" button.
When the "Choose Destination Location" window appears, click
3
the "Next" button.
When the "Select Program Folder" window appears, click the
4
"Next" button.
The setup program will start to copy the files.
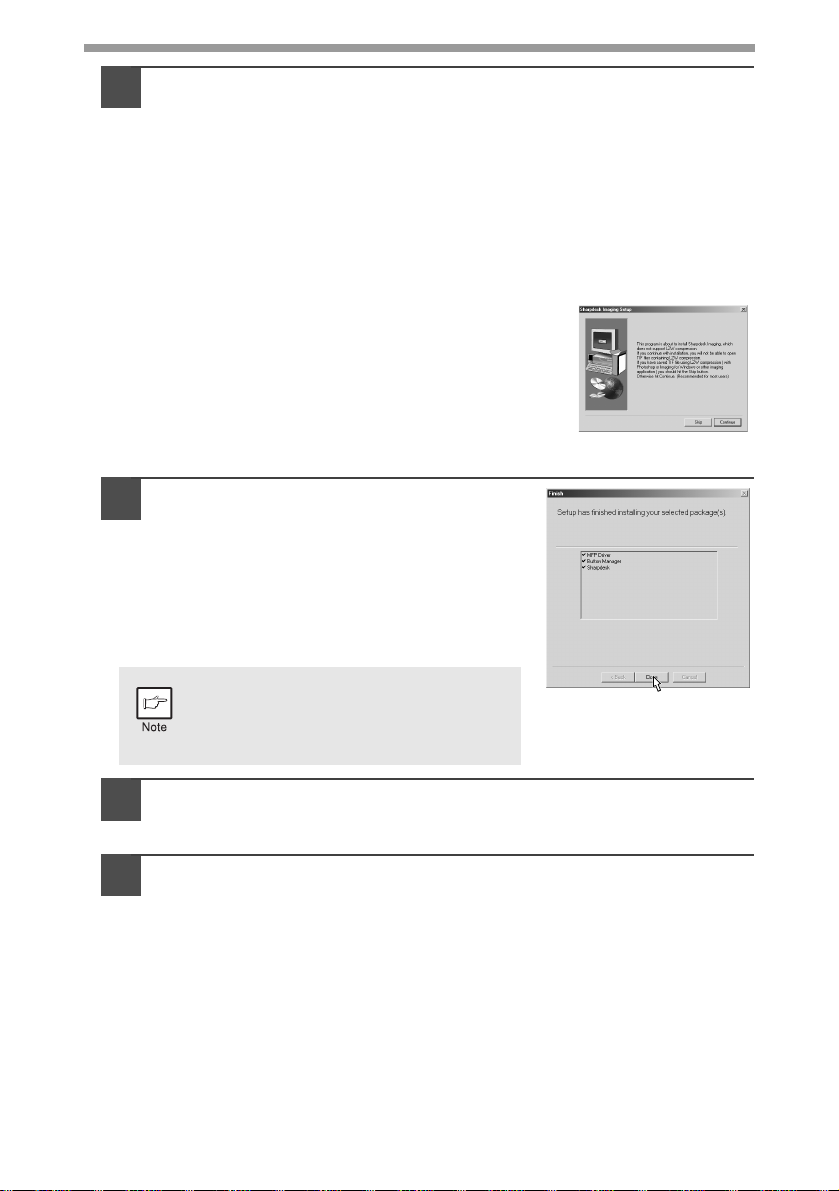
If the dialog box asking "This program is
about to install Sharpdesk imaging, which
does not support LZW compression."
appears, answer the question to continue the
Sharpdesk installation.
Click the "Finish" button when the message
5
to inform you of the completion of the installation appears.
Click the "Close" button when the
9
message to inform you of the
completion of the installation appears.
When the "Now connect the MFP
interface cable to the PC." dialog box
or "After Windows system restarts..."
dialog box appears, click the "OK"
button.
28
After the installation, a message to
restart your computer may be
displayed. In this case, click the "Yes"
button to restart your computer.
Make sure that the power of the MFP is turned on, and then
10
connect the USB interface cable. (p.45)
Windows will detect the MFP and the Plug and Play screen will appear.
Follow the instructions in the Plug and Play screen that
11
appears in your version of Windows to begin the installation.
You have completed the installation of the software.

Installing onto Windows 95/98/Me/NT4.0/2000
(Parallel interface)
Before starting the installation, make sure the USB or parallel interface cable is not
connected to the MFP.
Insert the supplied CD-ROM into your CD-ROM drive.
1
Double-click "My Computer" ( ), and then double-click the
2
CD-ROM ( ) icon.
When any of "Hardware Found", or "Found New Hardware Wizard"
messages appear during the software installation, be sure to click the
"Cancel" button.
Double-click the "setup" ( ) icon.
3
If the language selection screen appears after you double click the
"setup" icon, select the language you wish to use and click the "Next"
button. (Normally, the correct language is selected automatically.)
Select the software packages to be
4
installed, and then click the "Next"
button.
The software packages with checkmark ( )
on the list on the screen will be installed.
Click the "Display README" button to show
the information on the selected package.
In Windows 95/NT 4.0, "Button
Manager" does not appear. In
Windows 98/Me/2000, do not select
the "Button Manager" checkbox.
because this is not supported when
using the parallel interface.
4
The next screen appears. Make sure that the parallel interface
5
cable is not connected, and click "OK".
Windows 95/NT 4.0 Windows 98/Me/2000
Check the contents of the package on the screen, and then
6
click the "Start" button.
The software packages to be installed will be displayed on the screen. If
inappropriate packages are displayed, click the "Back" button to select only
appropriate software packages.
29

Copying files for MFP driver installation and parallel interface
7
setup (This step will start if it was selected in step 4).
After confirming the message in the "Welcome" window, click the
1
"Next" button.
A dialog box appears asking you to verify that the USB or parallel
2
interface cable is not connected to the MFP. Make sure that the
interface cable is not connected and click the "Next" button.
Click the "Next" button in the dialog box to
3
install the MFP driver or Cancel to quit the
installation.
The setup program will start to copy the files.
In Windows 2000, if the following screen appears
while the files are being copied (the message
may appear more than once), click "Yes" in
Windows 2000.
The following screen appears. Click the "Yes" button, and then the
4
Model screen will appear. Select the model number that is the
same as the model name of your MFP and click the "Next" button.
Be sure to select the displayed model number that is the same as the
MFP's model name. If they are not the same, the driver will not be
installed correctly.
Establish the printer settings and click the
5
"Next" button.
Select "LPT1" for the port to be used. If "LPT1"
does not appear, it is likely that another printer or
peripheral device is using "LPT1". Check your
other printers and peripheral devices, and change
the port setting as needed so no device is using
"LPT1". If you wish the MFP to be your default
printer, select "Yes". If not, select "No".
When the "Setup has completed gathering all necessary installation
6
information" dialog box appears, click the "Yes" button.
The parallel interface driver is installed.
When the "The MFP driver installation is complete." dialog box
7
appears, click the "OK" button.
The Sharpdesk installer will start.
30

Begin installation of the Sharpdesk (This step will start if it was
8
selected in step 4).
After confirming the message in the "Welcome to Sharpdesk
1
installation" window, click the "Next" button.
Read the message in the "Information" window, and then click the
2
"Next" button.
When the "Choose Destination Location" window appears, click
3
the "Next" button.
When the "Select Program Folder" window appears, click the
4
"Next" button.
The setup program will start to copy the files.
If the dialog box asking "This program is
about to install Sharpdesk imaging, which
does not support LZW compression."
appears, answer the question to continue
the Sharpdesk installation.
Click the "Finish" button when the
5
message to inform you of the completion of the installation
appears.
Click the "Close" button when the
9
message to inform you of the
completion of the installation appears.
When the "Now connect the MFP
interface cable to the PC." dialog box
or "After Windows system restarts..."
dialog box appears, click the "OK"
button.
4
After the installation, a message to
restart your computer may be
displayed. In this case, click the "Yes"
button to restart your computer.
Make sure that the power of the MFP is turned on, and then
10
connect the parallel interface cable. (p.45)
You have completed the installation of all the software.
31

INDICATORS ON THE OPERATION PANEL
The ONLINE indicator and the start ( ) indicator indicate the state of the printer or
scanner.
SCANNER indicator
ONLINE indicator
Start indicator
Power save indicator
Start indicator
On: Indicates the unit is ready for copying or scanning is being performed.
Blinking: The indicator blinks in the following situations:
Off: The indicator is off in the following situations:
ONLINE indicator
The ONLINE key is pressed and on line and off line are changed.
On: Indicates the unit is ready for printing or scanning is being performed.
Blinking: Printing or data is being received from a computer.
Off: Copying is being performed. (Off line)
Power save indicator
On: Indicates the unit is in a power save mode.
Blinking: Indicates that the unit is initialising (when the side cover is opened and
SCANNER indicator
On: The SCANNER ( ) key has been pressed and the unit is in scanner
Blinking: A scan job is being executed from the computer, or scan data is stored
Off: The unit is in the copy mode.
• When a print job is interrupted.
• When reserving a copy job.
• When toner is being replenished during a copy or print job.
• During copying or scanning.
• The unit is in the auto power shut-off mode.
• When a misfeed or error has occurred.
(On line)
closed or the power turned off and on).
mode.
in the unit's memory.
32

USING THE PRINTER MODE
For problems with the printer function, see the online manual or the help
file for the driver.
Opening the printer driver from the start menu
Open the printer driver setup screen by either of the methods shown below.
Click the "start" button.
1
Click "Control Panel", select "Printers and Other Hardware",
2
and then click " Printers and Faxes.
On Windows 95/98/Me/NT4.0/2000, select "Settings" and click "Printers".
Click the "SHARP AL-xxxx" (where xxxx is the model name of
3
your unit) printer driver icon in the "Printers" window and from
the "File" menu select "Properties".
Click "Printing Preferences" button in the "General" tab.
4
On Windows 95/98/Me, click the "Setup" tab.
The printer driver setup screen will appear.
How to print
Make sure that the paper of the desired size and type is loaded
1
in the tray.
The procedure for loading paper is the same as for loading copy paper. See
"LOADING PAPER" (p.14).
Open the document you intend to print, and select "Print" from
2
the application's "File" menu.
On windows NT 4.0, select "Document Defaults" to open the
printer driver setup screen.
Refer to the Windows manual or help file for more information
on the "General" tab, "Details" tab, "Color Management" tab and
"Sharing" tab.
4
33

Make sure that "SHARP AL-xxxx" (where xxxx is the model
3
name of your unit) is selected as the current printer. If you
intend to change any print setting, click the "Preferences"
button to open the setting dialog.
On Windows 95/98/Me/NT 4.0, click the "Properties" button.
On Windows 2000, the "Properties" button does not appear. Set your
preferences by switching the tab in the "Print" dialog box.
Specify the print settings including the number of copies,
4
media type, and print quality, and then click the "Print" button
to start printing.
On Windows 95/98/Me/NT 4.0, click the "OK" button to start printing.
For details on print settings, see the online manual or the help file for the
printer driver.
• If copying is being performed when printing is started, copying will
continue. After copying is complete, printing will be executed when the
clear ( ) key is pressed twice, the ONLINE key is pressed to switch
the unit to the online state or approximately 60 seconds (auto clear
time)* elapse.
* The auto clear time varies with a user program setting. See "USER
PROGRAMS" (p.55).
• Preheat mode and auto power shut-off mode will be cancelled when
printing is started.
• If the paper size specified from the software application is larger than
the paper size in the printer, part of the image that is not transferred to
the paper may remain on the surface of the drum. In this case, the
backside of the paper may become dirty. If this occurs, change to the
correct size paper and print two or three pages to clean the image.
• If you start a print job while a scan job or copy job is in progress, the
print data will be stored in the unit's memory. When the scan job or
copy job is completed, printing will begin.
34

USING THE SCANNER MODE
The scanner driver for this unit includes an STI (Still image) driver and WIA
(Windows Image Acquisition) driver. You can install software that supports the STI
driver and WIA driver to enable scanning using the operation panel of the unit.
For problems with the scanner function, see the online manual or the
help file for the driver.
Using the Button Manager
Setting up the Button Manager
The Button Manager accessory software supports the STI driver and WIA driver. Setup
that is required in Windows to use the Button Manager is explained in the following.
Windows XP
Click the "start" button, select "Control Panel" and click
1
"Printers and Other Hardware", and then click "Scanners and
Cameras" in the start menu. Right click the "SHARP AL-xxxx"
(where xxxx is the model name of your unit) icon and click
"Properties" in the menu that appears.
In the "Properties" screen, click the
2
"Events" tab.
4
Click the "Select an event" button and
3
select "ScanMenu SC1" from the pull-down
menu. Select "Button Manager (SHARP
Personal MFP series)" in "Start this
program" and click "Apply".
Repeat Step3 to set "ScanMenu SC2" through "ScanMenu SC6".
4
Click the "Select an event" button and select "ScanMenu SC2" from the pulldown menu. Select "Button Manager (SHARP Personal MFP series)" in
"Start this program" and click "Apply". Do the same for each ScanMenu
through "ScanMenu SC6".
When the settings have been completed, click the "OK" button to close the
screen. When the settings have been completed in Windows, start the
Button Manager. Adjust detailed settings and then scan an image from the
unit. For the procedures for starting Button Manager and adjusting settings,
see "Scan Parameter Settings Dialog Box" (p.37).
35

Windows 98/Me/2000
To scan directly into an application using the Button Manager on Windows 98,
Windows Me and Windows 2000. Set the Event Manager properties to send only to
Button Manager as shown below.
Click the "Start" button, select "Control Panel" from "Settings",
1
and open "Scanners and Cameras" in start menu.
In Windows Me, it occasionally happens that the "Scanners and
Cameras" icon does not appear immediately after installation of the
MFP driver is completed. If the icon does not appear, click "View all
Control Panel options" in the Control Panel and display the "Scanner
and Cameras" icon.
Select "AL-xxxx" (where "xxxx" is the model name of your
2
unit), and click the "Properties" button.
In Windows Me, right click "AL-xxxx" (where "xxxx" is model name of your
unit) and click "Properties" in the menu that appears.
In the "Properties" screen, click the
3
"Events" tab.
36
Click the "Scanner events" button and
4
select "ScanMenu SC1" from the pull-down
menu. Select "Button Manager (SHARP
Personal MFP series)" in "Send to this
application" and click "Apply".
If other application are shown,
deselect the checkboxes for the other
applications and leave only the Button
Manager checkbox selected.
Repeat Step4 to set "ScanMenu SC2" through "ScanMenu
5
SC6".
Click the "Scanner events" and select "ScanMenu SC2" from the pull-down
menu. Select "Button Manager (SHARP Personal MFP series)" in "Start this
program" and click "Apply". Do the same for each ScanMenu through
"ScanMenu SC6".
When the settings have been completed, click the "OK" button to close the
screen. When the settings have been completed in Windows, start the
Button Manager. Adjust detailed settings and then scan an image from the
unit. For the procedures for starting Button Manager and adjusting settings,
see "Scan Parameter Settings Dialog Box" (Next page).

Scan Parameter Settings Dialog Box
After you have completed the Button Manager settings in
Windows, configure the scan settings in Button Manager.
To configure the scan settings in Button Manager, right click
the ( ) icon in the Taskbar and select "Setting" from the
menu that appears.
For details on configuring the scan settings in Button
Manager, see the online manual or the help file.
This is the corresponding setting in the Button
Manager to automatically send multiple images
from the SPF in full colour at 75 dpi to
Sharpdesk using the operation panel "SC1"
SCANNER ( ) key selection.
This dialog shows the SC1 event set to go directly to Button Manager.
With the Button Manager set to send the image to Sharpdesk. (factory
default setting) Sharpdesk will open after acquiring the image
automatically.
Flow of the Button Manager setting
The Button Manager can directly handle a AL-xxxx (where xxxx is the model name of
your unit) series device event and start your selected application according to the
scan setting made on the AL-xxxx (where xxxx is the model name of your unit) front
panel (SC1, SC2, SC3, SC4, SC5, SC6).
This will scan directly into your application from the device.
4
Scanner ALxxxx (where
xxxx is the
model name
of your unit)
SCANNER
key pressed.
Event
Manager
Windows OS
Button
Manager
No Selection
dialog is
displayed.
User
selected
application
The user
application
opens.
37

The settings for the Windows Event Manager for
the SHARP AL-xxxx (where xxxx is the model
name of your unit) device allow the user to take
advantage of the Sharp Button Manager to take
control of events from Windows and send
scanned images to any application that can be
selected in Button Manager.
This can be done with the Windows OS showing
the Event Manager selection dialog or directly
into a selected application if the Button Manager
is the only allowed handler for device events
from the SHARP AL-xxxx (where xxxx is the
model name of your unit).
This is done by changing the Windows device
settings for the AL-xxxx (where xxxx is the model
This is the Control Panel
Properties dialog for "Scanners and
Cameras".
name of your unit) in the Scanner and Camera
device settings in the Control Panel.
All About The Windows Event Manager and scanner events in
Windows 98, Windows Me, Windows 2000 and Windows XP.
Windows Platforms provide a mechanism for software to handle external events for
a scanner device like the SHARP AL-xxxx (where xxxx is the model name of your
unit) series products. This mechanism is controlled by the device manager on a
device basis. Applications that can handle events from a scanner/camera device
register with the Windows Event Manager and shown as available in the registered
applications. The path an event takes to get to the user's selected application
depends upon the event settings for the device.
38
Scanner ALxxxx (where
xxxx is the
model name
of your unit)
SCANNER
key pressed.
Event
Manager
Windows OS
Event
Manager
selection
dialog
Displayed on
screen
This is the Windows Event Manager
Selection Dialog.
Shown are two applications registered
to handle the scanner event from the
AL-xxxx (where xxxx is the model name
of your unit) device.
User selects
an
application.
The user
application
opens.

Using the SCANNER key to begin scanning
• Scanning is not possible during a copy job.
•
If the SCANNER ( ) key is pressed during a print job, the scan job will
be stored.
•
When scanning an original that has been placed in the SPF/RSPF, only
one original can be placed unless you are using Sharpdesk.
Press the SCANNER ( ) key.
1
The unit enters scan mode.
Place the original you wish to scan on the original table/SPF/
2
RSPF.
For the procedure for placing the original, see "ORIGINAL PLACEMENT"
(p.47).
Press the right copy quantity key to
3
display the number of the application that
you wish to use for scanning.
The application numbers are initially as follows.
4
Application
number
SC1 Sharpdesk (Full colour) (if installed)
SC2 Sharpdesk (Monochrome) (if installed)
SC3
SC4 Fax (if a fax program is installed)
SC5 OCR (if an OCR program is installed)
SC6 Microsoft Word (if installed)
To check the settings, see "Scan Parameter Settings Dialog Box" (p.37) and
then open the settings window of the Button Manager.
E-mail (your standard e-mail program in the
Windows OS you are using)
Application launched
39

Press the start ( ) key.
4
Scanning will start and the scanned data will be transferred to the
application.
• If the following screen appears, select
Button Manager and click "OK". Button
Manager starts and the application
associated with Button Manager starts. If
you want only Button Manager to start in
this case, set up Button Manager for use in
Windows as explained in "Setting up the
Button Manager" (p.35).
• If step 4 is performed with the "Show
TWAIN setting screen when scanning"
checkbox selected in the Scan Parameter Setting Dialog Box (p.37),
the TWAIN settings screen (p.41) will automatically appear. Check the
settings, and then press the start ( ) key again or click the "Scan"
button in the TWAIN setting screen to start scanning. The scanned
data will be transferred to the application.
Opening the scanner driver and scanning from your computer
Follow the steps below to open the scanner driver setup screen. As an example, this
instruction is given using Sharpdesk as an image capture application.
• Scanning is not possible during a copy and print job.
• The method for starting the scanner driver differs depending on the
type of application. Refer to the manual or the help file of your
application.
• When using the scanner driver to scan an original that has been
placed in the SPF/RSPF. If you perform a pre-scan (see the online
manual or the help file for the scanner driver), the original in the SPF/
RSPF will be output to the exit area after scanning. To scan the
original after the pre-scan, place the original in the SPF/RSPF once
again.
40
Using the SHARP TWAIN
Place the original(s) you wish to scan on the original table/SPF/
1
RSPF.
For the procedure for placing the original, see "ORIGINAL PLACEMENT"
(p.47).
After starting Sharpdesk, click the
2
"File" menu and select "Select
Scanner".
Click here

Select "SHARP Personal MFP
3
series", and click the "Select"
button.
If you use more than one scanning device, select the scanner
you want to use through the application. The method for
accessing the "Select Scanner" option, depends upon the
application. For more information, see the online manual or the
help file of your application.
Select "Acquire Image" from
4
the "File" menu, or click the
"Acquire" button ( ) .
Set the configuration for scanning (refer to the online manual
5
and help file), and click the "Scan" button.
Scan is started.
Click here
4
41

Scanning with the "Scanner and Camera Wizard" in Windows XP
Windows XP includes as a standard feature an image scanning function. The
procedure for scanning with the "Scanner and Camera Wizard" is explained here.
To cancel scanning, click the "Cancel" button in the screen that is
displayed.
Place the original you wish to scan on the original table/SPF/RSPF.
1
For the procedure for placing the original, see "ORIGINAL PLACEMENT"
(p.47).
Click the "start" button , select
2
"Control Panel", and click "Printers
and Other Hardware", and then click
"Scanners and Cameras" in the start
menu. Click the "SHARP AL-xxxx"
(where xxxx is the model name of your
unit) icon and click "Get picture" in
"Imaging Tasks".
The "Scanner and Camera Wizard"
3
appears. Click "Next" and establish the
basic settings for scanning.
For information on the settings, see the
Windows XP help file. After completing each
setting, click "Next".
42
Select a name, format, and folder for the
4
scanned image.
For information on the image name, file format,
and folder, see the Windows XP help file.
Scanning begins. When scanning ends,
5
select the next task you wish to perform.
For information on each selection, see the
Windows XP help file. To quit the "Scanner and
Camera Wizard", select "Nothing. I’m finished
working with these pictures." and click "Next".
Click "Finish" in the screen that appears.
6
The "Scanner and Camera Wizard" closes and the scanned image is saved.

HOW TO USE THE ONLINE MANUAL
The online manual provides detailed instructions for operating the unit as the printer
or scanner and a list of methods for dealing with printing or scanner problems.
To access the online manual, your computer must have Acrobat Reader 5.0 or a
later version. If it is not installed, refer to "Installing Acrobat Reader" (below).
Turn on your computer.
1
Insert the supplied CD-ROM into your CD-ROM drive.
2
Click the "start" button, click "My Computer" ( ), and then
3
double-click the CD-ROM ( ) icon.
On Windows 95/98/Me/NT 4.0/2000, double-click "My Computer" ( ), and
then double-click the CD-ROM ( ) icon.
Double-click the "Manual" folder,
4
double-click "English" and then
double-click the
"AL_1217D_1457D_1555.pdf" icon.
The following window will appear.
Click the to read the online manual.
5
To close the online manual, click the ( ) button located at the top-right of
the window.
• The online manual can be printed out using Acrobat Reader. SHARP
recommends printing out the sections which you refer to regularly.
• Refer to "Help" of Acrobat Reader for more details on the operation
and function of Acrobat Reader.
AL-1217D_1457D_1555 SERIES
4
Installing Acrobat Reader
Turn on your computer.
1
Insert the CD-ROM into the CD-ROM drive.
2
Click the "start" button, click "My Computer" ( ), and then
3
double-click the CD-ROM ( ) icon.
Windows95/98/Me/NT4.0/2000, double-click "My Computer" ( ), and then
double-click the CD-ROM ( ) icon.
Double-click the "Acrobat" folder, and then double-click the
4
"ar500enu.exe" icon.
Follow the on-screen instructions to install Acrobat Reader.
43

USING OTHER INSTALLED DRIVERS
If you use another GDI printer or a Windows Printing System printer, interference
between printers may occur and printing may not be performed properly. To use
another GDI printer or a Windows Printing System printer, you must change the port
setting of the printer driver using the following procedure.
If another printer does not operate properly when the SHARP Personal
MFP series printer driver is set to "FILE" as described below, uninstall
the SHARP Personal MFP series printer driver. To uninstall the printer
driver, see the online manual.
Click the "start" button.
1
Click "Control Panel", click "Printer and Other Hardware" and
2
then click "Printer and Faxes".
On Windows 95/98/Me/NT4.0/2000, select "Settings" and then click
"Printers".
Right-click the "SHARP AL-xxxx" (where
3
xxxx is the model name of your unit) icon in
the printer dialog box and then click
"Properties".
44
Click the "Ports" tab ("Details" tab - on Windows 95/98/Me) in
4
the "Properties" dialog box, select "FILE:" in the "Print to the
following port" list box, and click the "OK".
Right-click the icon of the printer to be used and click
5
"Properties".
Click the "Ports" tab ("Details" tab - on Windows 95/98/Me) in
6
the "Properties" window, select "LPT1" (or the currently used
port), and click the "OK" button.
To use the SHARP Personal MFP series again, perform the same
procedure but select the port to be used (for example, LPT1) in step 4.

CONNECTING THE INTERFACE CABLE
This unit includes both USB and parallel interface connectors.
Interface cables for connecting the unit to your computer are not included with this
unit. Please purchase the appropriate cable for your computer.
I
•
If you intend to use the unit as a scanner, it must be connected to
your computer with a USB interface cable. The scanner function
cannot be used if the unit is connected with a parallel cable.
• USB is available with a PC/AT compatible computer that was
originally equipped with USB and had Windows 98, Windows Me,
Windows 2000 Professional, Windows XP Professional or Windows
XP Home Edition preinstalled.
• Do not connect the interface cable before installing the MFP driver.
The interface cable should be connected during installation of the
MFP driver. (p.22)
Connecting the USB interface cable
Obtain a shielded USB interface cable.
1
Insert the cable into the USB interface
2
connector located on the rear of the
unit.
4
Insert the other end of the cable into the interface connector of
3
your computer, or the USB hub connected to your computer.
Connecting the parallel interface cable
Obtain an IEEE1284 shielded parallel interface cable.
1
Ensure that your computer and unit are turned off.
2
Insert the cable into the parallel
3
interface connector located on the
rear of the unit, and fasten with
clasps.
Insert the other end of the cable into the interface connector of
4
your computer.
45

5
This chapter explains basic and other copying functions.
The unit is equipped with a one-page memory buffer. This memory allows the unit to
scan an original once only and make up to 99 copies. This feature improves
workflow, reduces operation noise from the copier, and provides higher reliability by
reducing wear and tear on the scanning mechanism.
If the unit does not function properly during use, or if a function cannot
be used, see "TROUBLESHOOTING THE UNIT" (p.61).
MAKING COPIES
COPY FLOW
1 Make sure that paper has been loaded in the paper tray (p.15)
or multi-bypass tray (p.17), and check the paper size (p.14).
If paper is not loaded, see page 15. If you are using the single bypass, check
the paper size and then proceed to the next step without loading paper.
2 Place the original.
If you are using the original table, see "Using the original table" (p.47).
If you are using the SPF, see "Using the SPF/RSPF" (p.48).
When copying onto paper larger than A4, pull out the paper output tray
extension.
46
3 Select the copy settings.
If you wish to copy using the initial settings (p.13), proceed to the next step.
To set the number of copies, see page 49.
To adjust the resolution and contrast settings, see page 49.
To enlarge or reduce the copy, see page 51.
To change the tray used, see page 51. (AL-1457D, AL-1555)
To print on both sides of the paper, see page 52.
4 Start copying.
Press the start ( ) key.
If you are using the single bypass
Do not press the start ( ) key. Insert a
sheet of paper into the single bypass.
(Page 18)
Multiple copies are not possible
using the single bypass.

Do not insert paper in the single bypass when a copy job from the paper
tray is in progress. This will cause a misfeed.
• If you start a print job while a copy job is in progress, the print job will
begin when the copy job is completed.
• The scanning function cannot be used while a copy job is in progress.
About interrupt copying
If you press the start ( ) key to begin a copy job while a print job using the paper
tray or multi-bypass tray is in progress, the copy job will begin automatically after the
print data in the unit's memory is printed (interrupt copying). When this is done, the
print data remaining in the computer is not sent to the unit. When the copy job ends,
press the clear ( ) key twice, or press the ON LINE key once to change the unit to
the online state (p.32), or wait until the set auto clear time (p.55) elapses. The
remaining print data will be sent to the unit and printing will resume. Interrupt copying
is not possible during a print job using the single bypass.
ORIGINAL PLACEMENT
Using the original table
• The original table can read up to A4 original.
• Image loss 4mm can occur at the leading and trailing edges of the
copies. Also image loss 4.5mm in total can occur along the other
edges of the copies. It can be 6 mm (max.) at the trailing edge of the
second copy of two-sided copying.
• When copying a book or an original which has been folded or a
crumpled original, press down the original cover lightly. If the original
cover is not securely closed, the copies may be striped or blurred.
• The original cover can be simply lifted straight up and reattached to
allow copying of a large original (AL-1217D)
Open the original cover/SPF/RSPF, and place the original.
1
Place an original face down on the original table. Align it with
2
the original scale and the centring ( ) mark. Gently close the
original cover/SPF/RSPF.
Original scale
mark
5
47

Setting a large original (AL-1217D)
The original cover can be removed to allow copying of bulky objects.
Simply lift the original cover straight
1
up.
To reattach the original cover, reverse the above procedure.
2
Using the SPF/RSPF
The SPF is designed to hold up to 30 originals measuring from A5 to A4 and
weighting from 52g/m
• Before feeding originals in the original feeder tray, be sure to remove
any staples or paper clips from them.
• Before placing curled or wavy originals into the original feeder tray, be
sure to flatten them. If not, original misfeeds may result.
• The SPF/RSPF ( ) indicator on the operation panel will light up. If
this indicator does not light up, the originals are not properly set or the
SPF/RSPF is not properly closed.
• Badly damaged originals may misfeed in the SPF/RSPF. It is
recommended that such originals be copied from the original table.
• Special originals such as transparency film should not be fed through
the SPF/RSPF, but should be placed directly on the original table.
• Image loss (max. 4 mm) can occur at the leading and trailing edges of
the copies. Also image loss (max. 4.5 mm in total) can occur along the
other edges of the copies. It can be 6 mm (max.) at the trailing edge of
the second copy of two-sided copying.
• To stop continuous copying using the SPF/RSPF, press the clear
()
• Copying using one-sided to one-sided mode (AL-1555) :
Ensure that no indicator is lit among the original to copy indicators.
key.
2
to 90g/m2.
48
Make sure that no original is left on the original table.
1
Adjust the original guides to the size
2
of originals.
Set the originals face up in the
3
original feeder tray.
Original face up

Stream feeding mode
The stream feeding mode allows easy operation of continuous copying from the SPF/
RSPF. If the stream feeding mode has been enabled using user program No.4, the
SPF/RSPF ( ) indicator will blink approximately 5 seconds after the last original has
been fed by the SPF/RSPF. While this indicator is blinking, any new originals placed in
the original feeder tray will be fed and copied automatically. If the stream feeding
mode has been disabled, the start ( ) key must be pressed each time the originals
are set even immediately after completion of a copy run from the SPF/RSPF. The
default setting of the stream feeding mode is "ON". See "USER PROGRAMS" (p.55).
SET THE COPY QUANTITY
Set the number of copies using the two copy quantity ( , ) keys when copying
from the original table or copying from SPF/RSPF.
• Press the clear ( ) key to clear an entry if a mistake is made.
• A single copy can be made with the initial setting, i.e., when "0" is
displayed.
• Press the right copy quantity key to set the unit digit
from 0 to 9. This key will not change the tens digit.
• Press the left copy quantity key to set the tens digit
from 1 to 9.
Tens digit Unit digit
EXPOSURE ADJUSTMENT/PHOTO COPYING
Exposure adjustment
Copy density adjustment is not required for most originals in the automatic exposure
mode. To adjust the copy density manually or to copy photographs, the exposure
level can be adjusted in two steps manually.
5
The copy resolution used for AUTO and MANUAL ( ) mode can be
changed. (p.55)
Press the exposure mode selector key to
1
select the MANUAL ( ) mode or
PHOTO ( ) mode.
Use the light ( ) and dark ( ) keys to
2
adjust the exposure level. If exposure level
2 is selected, the two left-handmost
indicators for that level will light up
simultaneously. Also, if level 4 is selected,
the two right-handmost indicators for that
level will light up simultaneously.
49

Automatic exposure adjustment
This automatic exposure level will remain in effect until you change it
again by this procedure.
The automatic exposure level can be adjusted to suit your copying needs. This level is
set for copying from the original table and copying from the SPF/RSPF respectively.
When adjusting the automatic exposure level for copying from
1
the SPF/RSPF, place an original in the original feeder tray and
make sure that the SPF/RSPF ( ) indicator lights up. When
adjusting the level for copying from the original table, make
sure that no original is left in the original feeder tray.
Press the exposure mode selector key to
2
select the PHOTO ( ) mode.
Press and hold down the exposure mode
3
selector key for approximately 5 seconds.
The PHOTO ( ) indicator will go out and
the AUTO indicator will begin to blink. One
or two light and dark indicators
corresponding to the automatic exposure
level which has been selected will light up.
50
Press the light ( ) or dark ( ) key to
4
lighten or darken the automatic exposure
level as desired. If exposure level 2 is
selected, the two left-handmost indicators
for that level will light up simultaneously.
Also, if level 4 is selected, the two righthandmost indicators for that level will
light up simultaneously.
Press the exposure selector key. The AUTO indicator will stop
5
blinking and light up steadily.

REDUCTION/ENLARGEMENT/ZOOM
Three preset reduction ratios and two enlargement ratios can be selected. The zoom
function enables copy ratio selection from 25% to 400% in 1% increments.
Set the original and check the paper size.
1
Use the copy ratio selector key and/or ZOOM ( , ) keys to
2
select the desired copy ratio.
• To verify a zoom setting without changing the zoom ratio,
press and hold down the copy ratio display (%) key. When the
key is released, the display will return to the copy quantity
display.
• To reset the ratio to 100%, press the copy ratio selector key
repeatedly until the 100% indicator lights up.
Set the reduction/enlargement ratio.
3
To decrease or increase the zoom ratio rapidly, press and hold
down the ZOOM ( ) or ( ) key. However the value will
stop at the preset reduction or enlargement ratios. To move
beyond these ratios, release the key and then press and hold it
down again.
To select a preset copy ratio:
Preset reduction and enlargement ratios are:
25%, 70%, 86%, 141%, and 400%.
A5
A4
141
A4
B5
86
A4
A5
70
5
To select a zoom ratio:
When a ZOOM (
ZOOM indicator will light up and the zoom ratio will
be displayed in the display.
or ) key is pressed, the
A4
B5
4
A5
SELECTING THE TRAY (AL-1457D, AL-1555)
Press the tray select ( ) key.
Each time you press the tray select ( ) key, the location
indicated by the paper feed location indicator changes in
the following order: paper tray, multi-bypass tray.
AL-1555
141
86
70
A5
A4
A4
B5
A4
A5
51

6
This chapter describes the special functions of this unit. Use these functions as
needed.
TWO SIDED COPYING
When copying from the SPF/RSPF, two-side originals can be copied automatically
without having to manually turn them over. Automatic two-sided copying can also be
performed without using the SPF/RSPF. When copying from one-sided originals to
two-sided copies, copying orientation can be selected between Turn on Long Edge
and Turn on Short Edge.
• When making two-sided copies from the original table, the paper size
• When making two-sided copies, the multi-bypass tray cannot be used.
• When using two-sided invoice size originals from the SPF/RSPF, be
SPECIAL FUNCTIONS
must be A4, letter. When making two-sided copies from the SPF/
RSPF, A4, B5, A5, letter, legal, and invoice sizes can be used. Nonstandard size paper cannot be used.
sure to place them in the landscape orientation. Otherwise, an original
misfeed will occur.
52
A
A A
A A
A
Turn on Short EdgeTurn on Long Edge
Making two-sided copies
Place the original on the original table or in the SPF/RSPF. (see
1
"ORIGINAL PLACEMENT" (p.47).
Select two-sided copy mode.
2
A
A

A: When copying in a one-sided to two-sided mode:
Use the original to copy key to select the desired one-sided to two-sided
copying mode (Turn on Long Edge or Turn on Short Edge). See the
illustrations on page 52.
B: When copying in the two-sided to two-sided mode:
Use the original to copy key to select the two-sided to two-sided copying
mode. The originals must be set in the SPF/RSPF before this mode can
be set (step 3) on page 48 (AL-1555).
C: When copying in the two-sided to one-sided mode:
Use the original to copy key to select the two-sided to one-sided copying
mode. The originals must have been set in the SPF/RSPF in step 3 on
page 48 (AL-1555).
A BC
Select the copy settings. See "SET THE COPY QUANTITY"
3
(p.49), "EXPOSURE ADJUSTMENT/PHOTO COPYING" (p.49),
and "REDUCTION/ENLARGEMENT/ZOOM" (p.51).
Using the original table
If you are using the original table, copying is only possible in one sided to
two-sided mode ("A" above).
Press the start ( ) key.
1
The original is scanned into the unit's memory.
Place the original that you wish to copy onto the rear side of the
2
paper, and press the start ( ) key again.
Copying begins.
Using the SPF/RSPF
Press the start ( ) key. Copying begins in the selected two-sided copy mode.
6
1
2
3
4
53

DESCRIPTION OF SPECIAL FUNCTIONS
Toner save mode (page 54)
Reduces toner consumption by approximately 10%.
Power save modes (page 55)
The unit has two power save modes of operation: preheat mode and auto power
shut-off mode.
Preheat mode
When the unit enters the preheat mode, the power save ( ) indicator will light up
and other indicators will remain on or off as before. In this condition, the fuser in
the unit is maintained at a lower heat level, thereby saving power. To copy from
the preheat mode, make desired copier selections and press the start ( ) key
using the normal copying procedure.
Auto power shut-off mode
When the unit enters the auto power shut-off mode, the power save ( ) indicator
will light up and other indicators will go out. The auto power shut-off mode saves
more power than the preheat mode but requires a longer time before starting
copying. To copy from the auto power shut-off mode, press the start ( ) key.
Then make desired copier selections and press the start ( ) key using the
normal copying procedure.
Auto clear (page 55)
The unit returns to the initial settings a preset amount of time after the end of copy, or
scanner operation. This preset amount of time (auto clear time) can be changed.
Stream feeding mode (page 55)
For description of the stream feeding mode, see "Stream feeding mode" (p.49).
Resolution of AUTO & MANUAL mode (page 55)
You can set the copy resolution used for AUTO and MANUAL ( ) exposure
mode.
54
TONER SAVE MODE
Press the exposure mode selector key
1
to select the manual ( ) mode.

Press and hold down the exposure mode
2
selector key for approximately 5 seconds.
The MANUAL ( ) indicator will go out
and the PHOTO ( ) indicator will begin
to blink. The
marked "5" will light up, indicating the
standard toner mode is active.
To enter the toner save mode, press the
3
light ( ) key. The light and dark
indicator marked "1" will light up,
indicating the toner save mode is
selected.
Press the exposure mode selector key. The PHOTO ( )
4
indicator will stop blinking and light up steadily. The light and
dark indicator marked "3" will light up. The toner save mode is
now active.
To return to the standard mode, repeat the procedure but use the dark
( ) key to select exposure level "5" in step 3.
light and dark
indicator
USER PROGRAMS
The user programs allow the parameters of certain functions to be set, changed, or
canceled as desired.
6
Setting the power save modes, auto clear time, stream
feeding mode and resolution of AUTO & MANUAL mode
Press and hold down the light ( ) and dark ( ) keys
1
simultaneously for more than 5 seconds until all the alarm
indicators ( , , ) blink and " " appears in the display.
Use the left copy quantity ( ) key to select a user program
2
number (1: auto clear time, 2: preheat mode, 3: auto power
shut-off timer, 4: stream feeding mode, 5: auto power shut-off
mode 6: resolution of AUTO & MANUAL mode). The selected
number will blink in the left side of the display.
Press the start ( ) key. The entered program number will be
3
steadily lit and the currently selected parameter number for the
program will blink on the right side of the display.
Select the desired parameter using the right copy quantity ( )
4
key. The entered parameter number will blink on the right of the
display.
55

Program
No.
1 Auto clear time
2 Preheat mode *0 30sec., 1 60sec., 2 90sec.
3
4
5
6
* Factory default settings are indicated with an asterisk (*).
Press the start ( ) key. The right-hand number in the display
5
Mode Parameters
0 OFF, 1 10sec., 2 30sec.
*3 60sec., 4 90sec., 5 120sec.
Auto power shut- off
timer
Stream feeding
mode
Auto power shut- off
mode
Resolution of AUTO
& MANUAL mode
Program No. 4 can be selected on when your unit has the SPF/
RSPF.
0 2min., *1 5min., 2 15min.
3 30min. 4 60 min. 5 120min.
0 OFF, *1 ON
0 OFF, *1 ON
*0 300dpi, 1 600dpi
will be steadily lit and the entered value will be stored.
To change the setting or to set another mode, press the clear
( ) key. The unit will return to step 2.
56
Press the light ( ) or dark ( ) key to return to the normal
6
copy mode.
DISPLAYING TOTAL NUMBER OF COPIES
Use the following procedure to display the total number of copies.
Press and hold down the clear ( ) key for approximately 5 seconds.
The total number of copies will appear in two steps, each with three
digits.
Example: Total number of copies is 1,234.

7
This chapter describes how to replace the TD cartridge and drum cartridge, and how
to clear the unit.
Be sure to use only genuine SHARP parts and supplies.
MAINTENANCE
TD CARTRIDGE REPLACEMENT
The TD cartridge replacement required ( ) indicator will light up when toner is
needed. For more information on purchasing the TD cartridge, see "ABOUT
SUPPLIES AND OPTIONS" (p.70). If copying is continued while the indicator is lit,
copies will gradually become lighter until the unit stops and the indicator begins
blinking. Replace the old TD cartridge by following the procedure below.
• After the unit stops, it may be possible to make a few more copies by
taking the TD cartridge out of the unit, shaking it horizontally, then
reinstalling it. If copying is not possible after this operation, replace the
TD cartridge.
• During long copy run of a dark original, the start ( ) indicator may
blink, the indicator light up, and the unit stop, even though toner is left.
The unit will feed toner up to 2 minutes and then the start ( )
indicator will light up. Press the start ( ) key to restart copying.
Open the multi-bypass tray (AL-1457D, AL-1555), side cover,
1
and front cover, in that order.
To open the multi-bypass tray, see "The multi-bypass tray (AL-1457D, AL-
1555)" (p.17). To open the side cover and front cover, see "INSTALLING
THE TD CARTRIDGE" (p.10).
Gently pull the TD cartridge out
2
while pressing the lock release
button.
Dispose of the old TD cartridge in accordance with local regulations.
Install a new TD cartridge. To install the new cartridge, see
3
"INSTALLING THE TD CARTRIDGE" (p.10).
Lock release button
7
57

Close the front cover and then the side cover by pressing the
4
round projections near the side cover open button. The indicator
( ) will go out and the start ( ) indicator will light up.
When closing the covers, be sure to close the front cover securely and
then close the side cover. If the covers are closed in the wrong order,
the covers may be damaged.
DRUM CARTRIDGE REPLACEMENT
The useful life of the drum cartridge is approximately 18,000 copies. When the internal
counter reaches approximately 17,000 copies, the drum replacement required ( )
indicator will light up indicating that replacement of the drum cartridge will be needed
soon. For more information on purchasing the drum cartridge, see "ABOUT
SUPPLIES AND OPTIONS" (p.70). When the indicator begins to blink, the unit will
stop operating until the cartridge is replaced. Replace the drum cartridge at this time.
Do not remove the protective cover on the drum portion (black paper) of
a new drum cartridge before use. The cover protects the drum against
external light.
Remove the TD cartridge (see "TD CARTRIDGE
1
REPLACEMENT" (p.57)).
Hold the drum cartridge handle and
2
gently pull the cartridge out.
Drum cartridge handle
58
Dispose of the old TD cartridge in accordance with local regulations.
Remove the new drum cartridge from the protective bag and
3
remove the protective cover from the cartridge. Then gently
install the new drum cartridge.
Do not touch the surface of the drum (green portion) of the
cartridge. Doing so may cause smudges on the copies.

Gently install the TD cartridge. To install the TD cartridge, see
4
"INSTALLING THE TD CARTRIDGE" (p.10).
Close the front cover and then the side cover by pressing the
5
round projections near the side cover open button. The drum
replacement required ( ) indicator will go out and the start
( ) indicator will light up.
When closing the covers, be sure to close the front cover securely and
then close the side cover. If the covers are closed in the wrong order,
the covers may be damaged.
CLEANING THE UNIT
Proper care is essential in order to get clean, sharp copies. Be sure to take a few
minutes to regularly clean the unit.
• Before cleaning, be sure to turn the power switch off and remove the
power cord from the outlet.
• Do not use thinner, benzene or other volatile cleaning agents. Doing
so may cause deformation, discoloration, deterioration or malfunction.
Cabinet
Wipe the cabinet with a soft, clean cloth.
Original table and the back side of the original cover/SPF/RSPF
Stains on the glass, SPF/RSPF scanning window (AL-1457D, AL-1555), cover or
SPF/RSPF roller will also be copied. Wipe the glass, SPF/RSPF scanning window,
cover and SPF/RSPF roller with a soft, clean cloth. If necessary, dampen the cloth
with a glass cleaner.
Original table/scanning window Original cover/SPF/RSPF
SPF/RSPF roller
Scanning window
7
59

Transfer charger
If copies start becoming streaky or blotchy, the transfer charger may be dirty. Clean
the charger using the following procedure.
Turn the power switch off. (p.13)
1
Ensure that the multi-bypass tray is open (AL-1457D, AL-1555)
2
and then open the side cover while pressing the side cover
open button.
Take the charger cleaner out by holding the tab. Set the charger
3
cleaner onto the right end of the transfer charger, gently slide
the cleaner to the left end, and then remove it. Repeat this
operation two or three times.
Slide the charger cleaner from the right end to the left end along
the groove of the transfer charger. If the cleaner is stopped on
the way, smudges on copies may occur.
60
Return the charger cleaner
4
to its original position.
Close the side cover by
pressing the round
projections near the side
cover open button.
Turn the power switch on. (p.12)
5

8
TROUBLESHOOTING THE UNIT
This chapter describes misfeed removal and troubleshooting.
For problems with the printer function or the scanner function, see the online manual
or the Help file for the printer/scanner driver.
TROUBLESHOOTING
If any problem occurs, check the list below before contacting your authorised service
representative.
Problem Possible cause Solution Page
Unit plugged in? Plug the unit into a grounded outlet. 12
Unit does not
operate.
Blank copies
Copies are too
dark or too light.
Dust, dirt,
smudges appear
on copies.
Striped copies Is transfer charger clean? Clean the transfer charger. 60
Paper misfeeds
frequently.
Images rub off the
copy easily.
Power switch on? Turn the power switch on. 12
Side cover closed securely? Gently close the side cover. 10
Front cover closed? Gently close the front cover and then
Is the original placed face
down on the original table or
face up in the SPF/RSPF?
Is original image too dark or
too light?
Is the unit in the automatic
exposure mode?
Is the unit in the photo
exposure mode?
Original table or original
cover dirty?
Original smudged or
blotchy?
Non-standard paper used? Use standard paper. If using special
Paper curled or damp? Store paper flat in the wrapper in a
Pieces of paper inside unit? Remove all pieces of misfed paper. 63
Paper guides in the paper
tray not set properly?
Too much paper in the
paper tray or multi-bypass
tray?
Is the paper too heavy? Use paper within the specified range. 14
Paper damp? Replace with dry paper. If the unit is
close the side cover.
Place the original face down on the
original table or face up in the SPF/
RSPF.
Adjust the exposure manually.
Adjust the automatic exposure level.
Cancel the photo exposure mode.
Clean regularly.
Use a clean original.
papers, feed the paper through the
single bypass/multi-bypass tray.
dry location.
Set the guides properly depending on
the paper size.
Remove excessive paper from the
tray. 15, 17
not used for long time, remove the
paper from the paper tray and store it
in its wrapper in a dry location.
10
47, 48
49
50
49
59
–
14
–
15, 17
8
71
61

STATUS INDICATORS
When the following indicators light up or blink on the operation panel or the following
alphanumeric codes appear in the display, solve the problem immediately referring
to both the table below and the relevant page.
Be sure to use only genuine SHARP parts and supplies.
Indication Cause and remedy Page
Steadily
Drum replacement
required indicator
TD cartridge
replacement
required indicator
Misfeed indicator Blinking
SPF/RSPF misfeed
indicator
Power save indicator is
steadily lit.
The paper tray indicator is
blinking.
"CH" is blinking in the
display.
"CH" is steadily lit in the
display.
"P" is blinking in the display.
A letter and a number appear
alternately.
A letter and a number appear
alternately.
lit
Blinking
Steadily
lit
Blinking
Blinking
Replacement of drum cartridge will be needed
soon. Prepare a new cartridge.
Drum cartridge must be replaced. Replace it with
a new one.
Replacement of TD cartridge will be needed
soon. Prepare a new cartridge.
TD cartridge must be replaced. Replace it with a
new one.
A misfeed has occurred. Remove the misfed
paper referring to the description of "MISFEED
REMOVAL".
An original misfeed has occurred in the SPF/
RSPF. Remove the misfed originals referring to
the description of "E: Misfeed in the SPF (AL1457D), RSPF (AL1555)".
The unit is in the preheat mode. Press any key to
cancel the preheat mode.
The unit is in the auto power shut-off mode.
Press the start ( ) key to cancel the auto power
shut-off mode.
The paper tray is not installed properly. Push the
tray into the unit securely.
The TD cartridge is not installed. Check if the
cartridge is installed. If "CH" is blinking even if a
cartridge is installed properly, contact your
authorised service representative.
Side cover is open. Close the side cover
securely by pressing the round projections near
the side cover open button.
The paper tray or multi-bypass tray is empty.
Load paper.
A misfeed has occurred in the paper tray, single
bypass or multi-bypass tray. Remove the misfed
paper.
The scan head locking switch is locked. Unlock
the scan head locking switch and turn the power
switch off/on.
The unit will not function. Turn the power switch
off and then switch it on, and if there is again an
error, remove the power cord from the outlet,
and contact your authorized service
representative.
70
58
70
57
63
66
54
54
–
57
–
15, 17
63
9
–
62

MISFEED REMOVAL
When the misfeed ( ) indicator blinks or blinks in the display, the unit will
stop because of a misfeed. If a misfeed occurs when using the SPF/RSPF, a number
may appear in the display after a minus sign. This indicates the number of the
originals that must be returned to the original feeder tray after a misfeed. Return the
required number of originals. Then this number will disappear when copying is
resumed or the clear ( ) key is pressed. When the SPF/RSPF misfeeds an
original sheet, the unit will stop and the SPF/RSPF misfeed ( ) indicator will blink,
while the misfeed ( ) indicator will remain off. For a misfeed of originals in the SPF/
RSPF, see "E: Misfeed in the SPF (AL-1457D), RSPF (AL1555)" (p.66).
Open the multi-bypass tray (AL-1457D, AL-1555), and side
1
cover, in that order.
To open the multi-bypass tray, see "The multi-bypass tray (AL-1457D, AL-
1555)" (p.17). To open the side cover, see "INSTALLING THE TD
CARTRIDGE" (p.10).
Check the misfeed location. Remove the misfed paper
2
following the instructions for each location in the illustration
below. If the misfeed ( ) indicator blinks, proceed to "A:
Misfeed in the paper feed area" (p.64).
If the misfed paper is seen from
this side, proceed to "C: Misfeed
in the transport area". (p.65)
If paper is misfed here, proceed
to "D: Misfeed in the lower
paper feed area". (p.66)
If paper is misfed here, proceed to "B:
Misfeed in the fusing area". (p.64)
If paper is misfed here, proceed to "A:
Misfeed in the paper feed area". (p.64)
8
63

A: Misfeed in the paper feed area
Gently remove the misfed paper from the paper feed area as
1
shown in the illustration. When the misfeed ( ) indicator
blinks, and the misfed paper is not seen from the paper feed
area, pull out the paper tray and remove the misfed paper. If the
paper cannot be removed, proceed to "B: Misfeed in the fusing
area".
The fusing unit is hot. Do not touch the fusing unit when
removing misfed paper. Doing so may cause a burn or other
injury.
• Do not touch the surface of the drum (green portion) of the
drum cartridge when removing the misfed paper. Doing so
may damage the drum and cause smudges on copies.
• If the paper has been fed through the multi-bypass tray, do
not remove the misfed paper through the multi-bypass tray.
Toner on the paper may stain the paper transport area,
resulting in smudges on copies.
64
Close the side cover by pressing the round projections near
2
the side cover open button. The misfeed ( ) indicator will go
out and the start ( ) indicator will light up.
B: Misfeed in the fusing area
Lower the fusing unit release
1
lever.
Fusing unit release lever

Gently remove the misfed paper
2
from under the fusing unit as shown
in the illustration. If the paper
cannot be removed, proceed to "C:
Misfeed in the transport area".
The fusing unit is hot. Do not
touch the fusing unit when
removing misfed paper. Doing
so may cause a burn or other
injury.
• Do not touch the surface of the drum (green portion) of the
drum cartridge when removing the misfed paper. Doing so
may cause smudges on copies.
• Do not remove the misfed paper from above the fusing unit.
Unfixed toner on the paper may stain the paper transport
area, resulting in smudges on copies.
Raise the fusing unit release lever and then close the side
3
cover by pressing the round projections near the side cover
open button. The misfeed ( ) indicator will go out and the
start ( ) indicator will light up.
C: Misfeed in the transport area
Lower the fusing unit release lever.
1
See "B: Misfeed in the fusing area" (p.64).
Open the front cover.
2
To open the front cover, see "INSTALLING THE TD CARTRIDGE" (p.10).
Rotate the feeding roller in
3
the direction of the arrow
and gently remove the
misfed paper from the exit
area.
Feeding roller
4
5
Raise the fusing unit release lever, close the front cover and
4
then close the side cover by pressing the round projections
near the side cover open button. The misfeed ( ) indicator
will go out and the start ( ) indicator will light up.
8
65

When closing the covers, be sure to close the front cover securely and
then close the side cover. If the covers are closed in the wrong order,
the covers may be damaged.
D: Misfeed in the lower paper feed area (AL-1555)
Open the lower side cover
1
(under the manual tray) and
remove the misfed paper. If
blinks and the misfed
paper is not seen from the
area of the lower side cover,
pull out the lower paper tray
and remove the misfed
paper. Then close the lower
paper tray.
Close the lower side cover.
2
Close the side cover by pressing the round projections near
3
the side cover open button. The misfeed ( ) indicator will go
out and the start ( ) indicator will light up.
E: Misfeed in the SPF (AL-1457D), RSPF (AL1555)
An original misfeed may occur at one of three locations: if the misfed original is seen
from the original feeder tray, (A) in the original feeder tray; if the misfed original is not
seen from the original feeder tray, (B) in the exit area or (C) under the feeding roller.
Remove the misfed original following the instructions for each location.
(A) Open the feeding roller cover and pull the original gently to the left and out
from the original feeder tray. Close the feeding roller cover. Open and close
the SPF/RSPF to clear the SPF/RSPF misfeed ( ) indicator. If the misfed
original cannot be easily removed, proceed to (C).
66
Feeding roller cover

(B) Open the SPF/RSPF and rotate the roller rotating knob to remove the
misfed original from the exit area. If the misfed original cannot be easily
removed, proceed to (C).
Roller rotating knob
(AL-1555)
With the RSPF, pull out the reversing tray to remove the misfed original.
With the RSPF, after removing the misfed original from the exit area,
be sure to insert the reversing tray into the exit area until it locks in
place.
Reversing tray
(C) If the original does not move easily into the exit area, remove it in the
direction of the arrow while rotating the knob.
A number may appear in the display after a minus sign, indicating the
number of the originals that must be returned to the original feeder tray.
Open and close the SPF/RSPF to clear the SPF/RSPF misfeed ( )
indicator, and then return the required number of originals. Then press
the start ( ) key to resume copying.
8
67

9
APPENDIX
SPECIFICATIONS
Model AL-1217D AL-1457D AL-1555
Type Digital multifunctional system, desk-top type
Copy system Dry, electrostatic transfer
Originals Sheets, bound documents
Printer function Available
Scanner function Available
Paper tray 250 sheets 250 sheets x 2
Single bypass, Multi-bypass
tray
Paper output tray 100 sheets
SPF/RSPF — SPF RSPF
Original sizes
Original feed
Copy/printing size A6 to A4 *
Image loss
Copy speed 12 pages/min. 14 pages/min. 15 pages/min.
Print speed 12 pages/min. (A4)
Continuous copying/printing Max. 99 pages subtractive counter
First-copy/print time
(Approximately)
Copy ratio
Exposure
system
Fusing system Heat rollers
Development system Magnetic brush development
Light source Cold cathode fluorescent lamp
Resolution
Gradation
Bit depth 1 bit or 8 bit/pixel
Original table/
SPF/RSPF
Original table 1 sheet
SPF/RSPF — Up to 30 sheets
Original table
SPF/RSPF — Moving original
Copier
Printer 600dpi
Scanner 600 x 1200dpi
Scan 256 levels
Output 2 levels
Single bypass (1
sheet)
Max. A4
1
Max. 3 mm (Original table) *
Max. 4 mm (SPF/RSPF) *
Max. 4.5 mm *
Max. 6 mm *
9.6 seconds *
(paper:A4, exposure mode:AUTO, copy ratio:100% )
Variable:25% to 400% in 1% increments (total 376 steps)
Fixed: 25%, 70% 86%, 100%, 141%, 400%
Moving optical source, slit exposure (stationary platen) with
automatic exposure
600 x 300dpi (Auto/Manual mode)
600 x 600dpi (Photo mode)
4
3
5
Multi-bypass tray
(50 sheets)
2
2
68

Model AL-1217D AL-1457D AL-1555
Sensor Colour CCD
Scanning speed Max. 2.88ms/line
Memory 8 MB 16 MB
Power supply
Power consumption 1000 W
Overall
dimensions
Weight (Approximately) *
Unit
dimensions
Operating conditions
Emulation SHARP GDI
Interface port
Noise level
Emission concentration
(measurement according to
RAL-UZ 62)
*1Feed paper lengthwise only.
2
*
Leading and trailing edges.
3
*
Along the other edges in totals.
4
*
The trailing edge of the second (Two-sided copy mode).
5
*
Data transmission time is not included. (Only for printer)
6
*
Not including TD and drum cartridges.
Width (mm) 607.6 607.6 809.0
Depth (mm) 462.5 492.5
Width (mm) 518.0
Depth (mm) 462.5 492.5
Height (mm) 295.6 380.4 465.4
Local voltage ±10% (For this copier’s power supply requirement,
see the name plate located on the back of the unit.)
6
16kg 19kg 23kg
Temperature: 10°C to 30°C
Humidity: 20% to 85%
USB interface (USB1.1 Standard) /
IEEE1284-compliant bi-directional parallel interface (Only for
printer)
Sound Power Level L
Copying: 6.0 [B], Standby: 3.7 [B]
Sound Pressure Level LpA (bystander positions)
Copying: 46 [dB (A)], Standby: 23 [dB (A)]
Noise emission measurement in accordance with ISO 7779.
Ozone: less than 0.02 mg/m
Dust: less than 0.075 mg/m
Styrene: less than 0.07 mg/m
wA (1B=10dB)
3
3
3
As a part of our policy of continuous improvement, SHARP reserves the
right to make design and specification changes for product improvement
without prior notice. The performance specification figures indicated are
nominal values of production units. There may be some deviations from
these values in individual units.
9
69

ABOUT SUPPLIES AND OPTIONS
When ordering supplies, please use the correct part numbers as listed below.
Be sure to use only genuine SHARP parts and supplies.
For best copying results, be sure to use only SHARP Genuine
Supplies which are designed, engineered, and tested to maximise the
life and performance of SHARP copiers. Look for the Genuine
Supplies label on the toner package.
Supply list
Supply Part number Usable life
TD cartridge AL-110DC Approx. 4,000 sheets*
Drum cartridge AL-100DR Approx. 18,000 sheets
* Based on copying onto letter-type paper at 5% toned area
(The life of the TD cartridge which has been included in the unit at the factory is
approximately 2,000 sheets.)
Interface cable
Please purchase the appropriate cable for your computer.
Parallel interface cable
IEEE 1284-Shielded type bi-directional parallel interface cable (2m Max.)
USB interface cable
Shielded twisted pair cable, high-speed transmission equivalent (2m Max.)
70

MOVING AND STORING THE UNIT
Moving instructions
When moving the unit, follow the procedure below.
When moving this unit, be sure to remove the TD cartridge in advance.
Turn the power switch off and remove the power cord from the
1
outlet.
Open the side cover and front cover, in that order. Remove the
2
TD cartridge and close the front cover and side cover, in that
order.
To open and close the side cover and front cover, and to remove the TD
cartridge, see "TD CARTRIDGE REPLACEMENT" (p.57).
Raise the handle of the paper tray and pull the paper tray out
3
until it stops.
Push the centre of the pressure plate down until it locks in
4
place and lock the plate using the pressure plate lock which
has been stored in the front of the paper tray.
Push the paper tray back into the unit.
5
Lock the scan head locking switch (p.9).
6
When shipping the unit, the scan head locking switch must be locked to
prevent shipping damage.
Close the multi-bypass tray (AL-1457D, AL-1555) and attach the
7
packing materials and tape which were removed during
installation of the unit. See "PREPARING THE UNIT FOR
INSTALLATION" (p.8).
Pack the unit into the carton. See "CHECKING PACKED
8
COMPONENTS AND ACCESSORIES" (p.8).
Proper storage
Store the supplies in a location that is:
• clean and dry,
• at a stable temperature,
• not exposed to direct sunlight
Store paper in the wrapper and lying flat.
• Paper stored out of the wrapper or in packages standing on end may curl or get
damp, resulting in paper misfeeds.
9
71

INDEX
A
Acrobat Reader .................................43
Alarm indicator
- Drum replacement required
indicator.............................. 6, 58, 62
- Misfeed indicator ................ 6, 62, 63
- TD cartridge replacement required
indicator.............................. 6, 57, 62
Appendix ........................................... 69
Auto clear time ..................................55
Auto power shut-off mode ................. 55
Automatic exposure adjustment ........50
B
Before installation.............................. 20
Button Manager...........................19, 35
Bypass feed....................................... 17
Bypass paper guides............... 5, 17, 18
C
Cautions
- Handling .........................................2
- Label...............................................1
- Laser .............................................. 2
- Using ..............................................1
Charger cleaner............................. 5, 60
Checking packed components and
accessories ......................................... 8
Cleaning the unit
- Cabinet ......................................... 59
- Original cover ............................... 59
- Original table ................................ 59
- SPF/RSPF ....................................59
- SPF/RSPF scanning widow ......... 59
- Transfer charger ........................... 60
Clear key .................................6, 47, 56
Connecting the interface cable
- Parallel interface cable ................. 45
- USB interface cable...................... 45
Conventions used in this manual and
online manual ...................................... 4
Copy flow...........................................46
Copy quantity .................................... 49
Copy quantity key....................6, 49, 55
Copy ratio display key ................... 6, 51
Copy ratio selector indicator.......... 6, 51
Copy ratio selector key.................. 6, 51
D
Dark key ........................................ 6, 49
Display................................................. 6
Displaying total number of copies ..... 56
Disposing of TD cartridge..................57
Drum cartridge......................... 5, 58, 71
Drum cartridge replacement.............. 58
Drum replacement required
indicator................................... 6, 58, 62
E
Exposure adjustment......................... 49
Exposure mode indicator............... 6, 49
Exposure mode selector key ......... 6, 49
F
Flow of installation............................. 21
Front cover .......................................... 5
Fusing unit release lever ............... 5, 64
H
Handle .................................................5
Hardware and software
requirements ..................................... 20
How to print .......................................33
How to use the online manual ........... 43
I
Indicators on the operation panel ...... 32
Initial settings of operation panel....... 13
Installing the software.................. 19, 22
Installing the TD cartridge .................10
Interface
- Parallel interface........................... 45
- USB interface ............................... 45
Interface cable................................... 67
Interrupt copying................................ 47
Introduction..........................................4
L
Light and dark indicator ................. 6, 49
Light key ........................................6, 49
Loading paper ................................... 14
Loading the paper tray ......................15
72

M
Making copies ................................... 46
MFP driver
- Print Status Window ..................... 19
- Printer driver .................................19
- Scanner driver ..............................19
Misfeed indicator ..................... 6, 62, 63
Misfeed removal
- Fusing area ..................................64
- Lower paper feed area ................. 66
- Paper feed area............................ 64
- SPF/RSPF ....................................66
- Transport area ..............................65
Moving instructions............................ 71
Multi-bypass tray ........................... 5, 17
N
Name
- Operation panel ..............................6
- Part names ..................................... 5
O
ONLINE indicator ..........................6, 32
ONLINE key .................................. 6, 32
Online manual ............................... 4, 43
Opening the printer driver.................. 33
Opening the scan driver .................... 40
Operation panel............................... 5, 6
Original placement
- Original table ................................ 47
- SPF/RSPF ....................................48
Original table .................................5, 47
P
Paper................................................. 14
Paper feed location indicator......... 6, 51
Paper output tray................................. 5
Paper output tray extension ..........5, 46
Paper tray...................................... 5, 15
Parallel interface cable ................ 45, 70
Photo copying.................................... 49
Power cord socket...............................5
Power off ...........................................13
Power on ...........................................12
Power save indicator ..................... 6, 32
Power switch .................................5, 12
Preheat mode .................................... 55
Preparing the unit for installation......... 8
Printer driver...................................... 19
Proper storage................................... 71
R
Reduction/enlargement/zoom ........... 51
S
Scan head locking switch .................... 9
Scanner driver ................................... 19
SCANNER indicator ...................... 6, 32
SCANNER key .............................. 6, 39
Scanning from your computer ...........40
Scanning with the "Scanner and
Camera Wizard" ................................ 42
Setting up the unit ............................... 7
Setup procedure.................................. 7
Sharpdesk ......................................... 19
Side cover ........................................... 5
Side cover open button .......................5
Single bypass ................................ 5, 18
Software for the SHARP Personal
MFP series ........................................ 19
Specifications ....................................68
SPF/RSPF..................................... 5, 48
SPF/RSPF indicator ...................... 6, 48
SPF/RSPF misfeed indicator... 6, 62, 66
Start indicator ................................ 6, 32
Start key ..................................6, 46, 56
Status indicators................................ 62
Stream feeding mode ............ 49, 54, 55
Supplies and options ......................... 70
Supply list
- Drum cartridge.............................. 70
- TD cartridge.................................. 70
T
TD cartridge............................. 5, 10, 57
TD cartridge replacement..................57
TD cartridge replacement required
indicator................................... 6, 57, 62
Transfer charger............................ 5, 60
Tray select key .............................. 6, 51
Troubleshooting................................. 61
Troubleshooting the unit.................... 61
73

U
USB interface cable..................... 45, 70
Using other installed drivers .............. 44
Using the manuals............................... 4
Using the printer mode ...................... 33
Using the scanner mode ................... 35
Using the SHARP TWAIN ................. 40
INDEX BY PURPOSE
Z
ZOOM indicator ............................. 6, 51
ZOOM key ..................................... 6, 51
Checking the package.........................8
Cleaning the unit
- Cabinet ......................................... 59
- Original cover ............................... 59
- Original table ................................ 59
- SPF/RSPF ....................................59
- Transfer changer ..........................60
Connecting the interface cable
- Parallel interface cable ................. 45
- USB interface cable...................... 45
Copying .............................................46
Displaying total number of copies...... 56
Enlarging/reducing copies ................. 51
Installing the software
- Acrobat ......................................... 43
- Button Manager ............................ 19
- MFP driver....................................19
- Sharpdesk ....................................19
Installing the TD cartridge ................. 10
Loading paper
- Multi-bypass tray .......................... 17
- Paper tray .....................................15
- Single bypass ...............................18
Loading the original
- Original table ................................ 47
- SPF/RSPF ....................................48
Moving the unit .................................. 71
Opening the printer driver.................. 33
Power off ...........................................13
Power on ...........................................12
Preparing for installation...................... 8
Printing .............................................. 33
Removing paper jams
- Fusing area .................................. 64
- Lower paper feed area ................. 66
- Paper feed area............................ 64
- SPF/RSPF.................................... 66
- Transport area..............................65
Replacing the drum cartridge ............58
Replacing the TD cartridge................ 57
Scanning
- Button Manager ............................ 39
- Scanner and Camera Wizard ....... 42
- SHARP TWAIN ............................40
Selecting the tray............................... 51
Setting the copy quality
- AUTO ........................................... 50
- MANUAL ...................................... 49
- PHOTO.........................................49
Setting the copy quantity ................... 49
Setting the toner save mode .............54
Setting the user program...................55
Setting up the Button Manager.......... 35
Storing the unit ..................................71
Two-sided copying ............................ 52
Using other installed drivers .............. 44
Using the online manual.................... 43
74

SOFTWARE LICENSE
PLEASE READ THIS LICENSE CAREFULLY BEFORE USING THE SOFTWARE. BY
USING THE SOFTWARE, YOU ARE AGREEING TO BE BOUND BY THE TERMS OF
THIS LICENSE.
1. License.
The application, demonstration, system and other software accompanying this License, whether on disk,
in read only memory, or on any other media (the "Software") and related documentation are licensed to
you by SHARP. You own the disk on which the Software is recorded but SHARP and/or SHARP'S
Licensors retain title to the Software and related documentation. This License allows you to use the
Software on one or more computers connected to a single printer and make one copy of the Software in
machine-readable form for backup purposes only. You must reproduce on such copy the SHARP
copyright notice, the copyright notice of SHARP’S Licensors and any other proprietary legends of
SHARP and/or its Licensors that were on the original copy of the Software. You may also transfer all
your license rights in the software, the backup copy of the Software, the related documentation and a
copy of this License to another party, provided the other party reads and agrees to the terms and
conditions of this License.
2. Restrictions.
The Software contains copyrighted material, trade secrets and other proprietary material which is owned
by SHARP and/or its Licensors and in order to protect them you may not decompile, reverse engineer,
disassemble or otherwise reduce the Software to a human-perceivable form. You may not modify,
network, rent, lease, loan, distribute or create derivative works based upon the Software in whole or in
part. You may not electronically transmit the Software from one computer to another or over a network.
3. Termination.
This license is effective until terminated. You may terminate this License at any time by destroying the
Software and related documentation and all copies thereof. This License will terminate immediately
without notice from SHARP and/or SHARP’S Licensors if you fail to comply with any provision of this
License. Upon termination you must destroy the Software and related documentation and all copies
thereof.
4. Export Law Assurances.
You agree and certify that neither the Software nor any other technical data received from SHARP, nor
the direct product thereof, will be exported outside the United States except as authorized and as
permitted by the laws and regulations of the United States. If the Software has been rightfully obtained by
you outside of the United States, you agree that you will not re-export the Software nor any other
technical data received from SHARP, nor the direct product thereof, except as permitted by the laws and
regulations of the United States and the laws and the regulation of the jurisdiction in which you obtained
the Software.
5. Government End Users.
If you are acquiring the Software on behalf of any unit or agency of the United States Government, the
following provisions apply. The Government agrees:
(i) if the Software is supplied to the Department of Defense (DoD), the Software is classified as
"Commercial Computer Software" and the Government is acquiring only "restricted rights" in the
Software and its documentation as that term is defined in Clause 252.227-7013 (c)(1) of the
DFARS; and
(ii) if the Software is supplied to any unit or agency of the United States Government other than DoD,
the Government's rights in the Software and its documentation will be as defined in Clause 52.22719 (c)(2) of the FAR or, in the case of NASA, in Clause 18-52.227-86 (d) of the NASA
Supplement to the FAR.
75

6. Limited Warranty on Media.
SHARP warrants the disks on which the Software is recorded to be free from defects in materials and
workmanship under normal use for a period of ninety (90) days from the date of purchase as evidenced
by a copy of the receipt. The entire liability of SHARP and/or its Licensors and your exclusive remedy
will be replacement of the disk which fails to meet the limited warranty provided by this Clause 6. A disk
will be replaced when it is returned to SHARP or a SHARP authorized representative with a copy of the
receipt. SHARP will have no responsibility to replace a disk damaged by accident, abuse or
misapplication.
ANY IMPLIED WARRANTIES ON THE DISKS, INCLUDING THE IMPLIED WARRANTIES OF
MERCHANTABILITY AND FITNESS FOR A PARTICULAR PURPOSE, ARE LIMITED IN
DURATION TO NINETY (90) DAYS FROM THE DATE OF DELIVERY. THIS WARRANTY GIVES
YOU SPECIFIC LEGAL RIGHTS, AND YOU MAY ALSO HAVE OTHER RIGHTS WHICH VARY
FROM JURISDICTION TO JURISDICTION.
7. Disclaimer of Warranty on Software.
You expressly acknowledge and agree that use of the Software is at your sole risk. The software and
related documentation are provided "AS IS" and without warranty of any kind and SHARP and SHARP'S
Licensor(s) (for the purpose of provisions 7 and 8, SHARP and SHARP'S Licensor(s) shall be
collectively referred to as "SHARP") EXPRESSLY DISCLAIM ALL WARRANTIES, EXPRESS OR
IMPLIED, INCLUDING, BUT NOT LIMITED TO, THE IMPLIED WARRANTIES OF
MERCHANTABILITY AND FITNESS FOR A PARTICULAR PURPOSE. SHARP DOES NOT
WARRANT THAT THE FUNCTIONS CONTAINED IN THE SOFTWARE WILL MEET YOUR
REQUIREMENTS, OR THAT THE OPERATION OF THE SOFTWARE WILL BE
UNINTERRUPTED OR ERROR-FREE, OR THAT DEFECTS IN THE SOFTWARE WILL BE
CORRECTED. FURTHERMORE, SHARP DOES NOT WARRANT OR MAKE ANY
REPRESENTATIONS REGARDING THE USE OR THE RESULTS OF THE USE OF THE
SOFTWARE OR RELATED DOCUMENTATION IN TERMS OF THEIR CORRECTNESS,
ACCURACY, RELIABILITY, OR OTHERWISE. NO ORAL OR WRITTEN INFORMATION OR
ADVICE GIVEN BY SHARP OR A SHARP AUTHORIZED REPRESENTATIVE SHALL CREATE A
WARRANTY OR IN ANY WAY INCREASE THE SCOPE OF THIS WARRANTY. SHOULD THE
SOFTWARE PROVE DEFECTIVE, YOU (AND NOT SHARP OR A SHARP AUTHORIZED
REPRESENTATIVE) ASSUME THE ENTIRE COST OF ALL NECESSARY SERVICING, REPAIR
OR CORRECTION, SOME JURISDICTIONS DO NOT ALLOW THE EXCLUSION OF IMPLIED
WARRANTIES, SO THE ABOVE EXCLUSION MAY NOT APPLY TO YOU.
8. Limitation of Liability.
UNDER NO CIRCUMSTANCES INCLUDING NEGLIGENCE, SHALL SHARP BE LIABLE FOR
ANY INCIDENTAL, SPECIAL OR CONSEQUENTIAL DAMAGES THAT RESULT FROM THE
USE OR INABILITY TO USE THE SOFTWARE OR RELATED DOCUMENTATION, EVEN IF
SHARP OR A SHARP AUTHORIZED REPRESENTATIVE HAS BEEN ADVISED OF THE
POSSIBILITY OF SUCH DAMAGES. SOME JURISDICTIONS DO NOT ALLOW THE
LIMITATION OR EXCLUSION OF LIABILITY FOR INCIDENTAL OR CONSEQUENTIAL
DAMAGES SO THE ABOVE LIMITATION OR EXCLUSION MAY NOT APPLY TO YOU.
In no event shall SHARP'S total liability to you for all damages, losses, and causes of action (whether in
contract, tort (including negligence) or otherwise) exceed the amount paid by you for the Software.
9. Controlling Law and Severability.
For a portion of the Software related with Apple Macintosh and Microsoft Windows, this license shall be
governed by and construed in accordance with the laws of the state of California and Washington,
respectively. If for any reason a court of competent jurisdiction finds any provision of this License, or
portion thereof, to be unenforceable, that provision of the License shall be enforced to the maximum
extent permissible so as to effect the intent of the parties, and the remainder of this License shall continue
in full force and effect.
10. Complete Agreement.
This License constitutes the entire agreement between the parties with respect to the use of the Software and
related documentation, and supersedes all prior or contemporaneous understandings or agreements, written
or oral, regarding such subject matter. No amendment to or modification of this License will be binding
unless in writing and signed by a duly authorized representative of SHARP.
76

D ztrjnjhsü cnhfzfü gjpbwbb dsrk.xfntky gbnfzby j,jpzfxtzs zf rjgbhjdfkmzjv fggfhfnt cbvdjkfvb
4I 4 b 4
4 dvtcnj 4JÎ4 b 4JÆÆ47
Cbvdjk 4
dsrkþ xtz bp ctnb7 Tckb rjgbhjdfkmzsq fggfhfn j,jpzfxtz nfrbv j,hfpjv, nj cbvdjk 4I4 jpzfxftn
DRKÞ XTZJ, f cbvdjk 4
ВНИМАНИЕ:
Для полного выключения копира необходимо отключить его от сети.
Копир необходимо располагать поблизости от сетевой розетки, доступ к которой должен
быть свободным.
4 jpzfxftn, xnj rjgbhjdfkmzsq fggfhfn d pnjv gjkjötzbb ctntdjuj dsrkþ xfntky zt
4 jpzfxftn DSRKÞ XTZJ7
ИНФОPMAЦИЯ O CEPTИФИКАЦИИ ПPOДУКЦИИ
ЭЛЕКТРОСТАТИЧЕСКОЕ
КОПИРОВАЛЬНОЕ УСТРОЙСТВО
МОДЕЛЬ
AL1217D, AL1457D, AL1555 ШАРП
ME10
Ceртифицирован Компанией CEPTИНФО
Oфициальным представителем ГОССТАНДАРТА России
Модель AL1217D, AL1457D, AL1555 ШАРП
соответствует требованиям
нормативных документов:
по безопасности
ГОСТ Р МЭK 609502002
ГОСТ P 51318.2299 (класс A)
ГОСТ P 51318.2499
ВНИМАНИЕ!
Благодарим Вас за приобретение копировального аппарата фирмы SHARP. Прежде, чем Вы начнете
работать, пожалуйста, прочтите следующие рекомендации.
1. Что такое техническое обслуживание?
Дла того, чтобы всегда получать хорошие копии, аппарат требует соответствующего обслуживания
квалифицированным сервисным инженером. Для чего нужно техническое обслуживание?
Фотопроводящий барабан, проявитель и другие установленные в аппарате части имеют собственные
сроки службы и должны быть заменены новыми по достижении конца срока службы.
Кроме того, если Вы делаете копии длительное время, некоторые детали аппарата изнашиваются и внутри
может накапливаться пыль. Поэтому аппарат нуждается в профилактическом обслуживании, в процессе
которого специалист по сервису заменяет части или проверяет, регулирует и очищает аппарат, что
позволит изготовлять хорошие копии стабильного качества.
Цикл обслуживания является различным для разных моделей копировальных аппаратов.
2. Система обслуживания и регистрации покупки
Пожалуйста, тщательно расспросите Вашего дилера о системе обслуживания и об условиях гарантии,
которая распространяется на Вас, а также спросите о местонахождении ближайшего к Вам
сервисного центра. Для того, чтобы Вам было просто сообщить данные об аппарате в случае появления
неисправности, пожалуйста, сохраняйте талон регистрации покупки, который просите обязательно
заполнить при получении аппарата.
Cnhfzf-bpujnjdbntkm : Ghjbpdtltzj dj Ôhfzöbb
Ôbhvf-bpujnjdbntkm : IFHG Rjhgjhtqiz
Þ hblbxtcrbq flhtc bpujnjdbntky :
- Zfufqrt-xj, F,tzj-re,
Jcfrf 5545-8522, Ygjzby
Во исполнение Статьи 5 Закона Российской Федерации «О защите прав потребителей», а также
Указа Правительства Российской Федерации №720 от 16 июня 1997г. устанавливается срок
службы данной модели 7 лет с момента производства при условии использования в строгом
соответствии с инструкцией по эксплуатации и применяемыми техническими стандартами.


МЕРЫ ПРЕДОСТОРОЖНОСТИ
Taбличкa с предупреждениями нa aппрaт
В тaбличк
cледyющие предyпреждения :
Меры предосторожности при работе с копиром
При работе с данным аппаратом следуйте приведенным ниже правилам.
• Секция термозакрепления нагревается до высокой температуры. Будьте особенно
внимательны, извлекая из нее застрявший лист.
• Не смотрите прямо на источник света, это может негативно отразиться на Вашем зрении.
• Не допускайте быстрого включения$выключения аппарата. После выключения
питания подождите 10$15 секунд перед тем, как повторно его включить.
• Перед установкой любого дополнительного приспособления питание копира
должно быть выключено.
• Установите копир на прочной и ровной поверхности.
• Не допускайте установки во влажном или запыленном помещении.
• Если копир не будет использоваться длительное время, например, в течение
выходных дней, выключите питание и извлеките шнур питания из розетки.
• При перемещении копира также необходимо выключить питание и вытащить вилку из розетки.
• Не накрывайте копир защитной противопылевой крышкой, тканью или пленкой, если
питание включено $ нарушение процесса выделения тепла может привести к
повреждению аппарата.
• Использование органов управления копиром, регулировок или иных операций
способом, не описываемым в данном руководстве, может привести к случайному
выбросу излучения.
• Сетевая розетка должна быть установлена рядом с аппаратом и доступ к ней не
должен быть ограничен препятствиями.
Важные особенности, которые необходимо принять во
внимание при выборе места установки копира.
Не допускайте размещения копира в местах:
• сырых, влажных или сильно запыленных,
• доступных прямым солнечным лучам,
• плохо проветриваемых,
• подверженных резким изменениям температуры или влажности, например, рядом с
кондиционером или нагревательным прибором.
Убедитесь в том, что уровень напряжения и тока в розетке соответствует
необходимым требованиям. Проверьте правильность заземления розетки.
Примечание
е
(), нa
: Внимание, мож
: Внимание,пов
xо
жящейся в секции термозакрепления, пр иводятcя
е
т быть омасно дия зд
ерx
ность нaгревaется до высокой температyры
оро
вья
Будьте осторожны:
Внимание:
Используйте для подключения аппарата индивидуальную розетку. Если к
той же розетке будет подключен осветительный электроприбор, то может
наблюдаться мигание света.
е
1

Меры предосторожности при обращении с копиром
Будьте внимательны при обращении с аппаратом для поддержания его
производительности.
Не допускайте падения копира или его удара о поверхность другого предмета.
Не допускайте попадания прямых солнечных лучей на поверхность картриджа
барабана.
• В противном случае будет повреждена рабочая поверхность барабана (зеленого
цвета), что приведет к появлению пятен на копиях.
Не прикасайтесь к рабочей поверхности барабана (зеленого цвета).
• Это может привести к повреждению картриджа и появлению пятен на копиях.
Будьте внимательны при обращении с лазером
Длина волны 770 нм – 795 нм
Пульсация 11.82 мксек / 7 мм
Выходная мощность 0.17 мВт ± 0.01 мВт
Надлежащее хранение расходных материалов
Храните расходные материалы (буиагу картриджи тонера) в местах:
• чистых и сухих
• с постоянной температурой
• не подверженных воздействию прямых солнечных лучей.
Храните бумагу в упаковке, в лежачем положении.
• Бумага без упаковки или в стоячем положении может скручиваться или впитывать
влагу, что приведет к застреванию листов в аппарате.
Примечания касательно торговых марок
• Microsoft и Windows являются торговыми марками Microsoft Corporation,
зарегистрированными в США и других странах.
• IBM и PC/AT являются торговыми марками International Business Machines
Corporation.
• Adobe и Acrobat являются торговыми марками Adobe Systems Incorporated.
• Все прочие торговые марки и копирайты являются собственностью
соответствующих правообладателей.
As an ENERGY STAR® Partner, SHARP has determined that
this product meets the ENERGY STAR
®
guidelines for energy
efficiency.
В некоторых регионах позиции выключателя питания копира обозначаются вместо
“ON” (“ВКЛ.”) и “OFF” (“ВЫКЛ.”) символами “I” и “О”.
Символ “О” указывает на то, что внутри копира сохраняется некоторый уровень
напряжения и сам аппарат находится в режиме готовности к работе.
Если Ваш копир имеет такую маркировку, помните о том, что “I” соответствует “ВКЛ.”,
а “О” “ВЫКЛ.”
Внимание!
Для полного отключения копира необходимо отключить шнур питания от
розетки.
Розетка должна быть установлена рядом с копиром и доступ к ней должен быть
беспрепятственным.
2

СОДЕРЖАНИЕ
1 ВВЕДЕНИЕ
О ПОЛЬЗОВАНИИ ДАННЫМ
РУКОВОДСТВОМ ......................4
НАИМЕНОВАНИЕ УЗЛОВ И
ДЕТАЛЕЙ ..................................5
ПАНЕЛЬ УПРАВЛЕНИЯ ..............6
2 ЗАГРУЗКА БУМАГИ
БУМАГА.....................................7
ЗАГРУЗКА ЛОТКА......................8
ПЕРЕКЛЮЧАТЕЛЬ ФИКСАТОРА
СКАНИРУЮЩЕЙ ГОЛОВКИ.......9
ПОДАЧА ЧЕРЕЗ ПОЛИСТНОЕ
УСТРОЙСТВО (включая
специальные материалы)........10
ПОДКЛЮЧЕНИЕ ШНУРА
ПИТАНИЯ ................................10
3 ИЗГОТОВЛЕНИЕ КОПИЙ
ПОТОЧНОЕ КОПИРОВАНИЕ .... 11
ПОДКЛЮЧЕНИЕ ШНУРА ПИТАНИЯ.12
РАЗМЕЩЕНИЕ ОРИГИНАЛОВ .14
УСТАНОВКА КОЛИЧЕСТВА КОПИЙ15
РЕГУЛИРОВКА ЭКСПОЗИЦИИ/
КОПИРОВАНИЕ В РЕЖИМЕ ФОТО15
УМЕНЬШЕНИЕ/УВЕЛИЧЕНИЕ/
МАСШТАБИРОВАНИЕ .............17
4 УСТАНОВКА ПРОГРАММ
ПРОГРАММЫ ДЛЯ SHARP
PERSONAL MFP SERIES...........19
ТРЕБОВАНИЯ К АППАРАТНЫМ
СРЕДСТВАМ И ПРОГРАММНОМУ
ОБЕСПЕЧЕНИЮ ......................20
ПЕРЕД ТЕМ, КАК ПРИСТУПИТЬ К
УСТАНОВКЕ ............................20
УСТАНОВКА ПРОГРАММНОГО
ОБЕСПЕЧЕНИЯ .......................22
ИНДИКАТОРЫ НА ПАНЕЛИ
УПРАВЛЕНИЯ..........................32
РАБОТА В РЕЖИМЕ ПРИНТЕРА33
РАБОТА В РЕЖИМЕ СКАНЕРА..35
КАК ПОЛЬЗОВАТЬСЯ
ИНТЕРАКТИВНЫМ РУКОВОДСТВОМ 43
ИСПОЛЬЗОВАНИЕ ДРУГИХ
УСТАНОВЛЕННЫХ ДРАЙВЕРОВ... 44
ПОДКЛЮЧЕНИЕ КАБЕЛЯ
ИНТЕРФЕЙСА .........................45
5 ИЗГОТОВЛЕНИЕ КОПИЙ
ПОТОЧНОЕ КОПИРОВАНИЕ .... 46
РАЗМЕЩЕНИЕ ОРИГИНАЛОВ. 47
УСТАНОВКА КОЛИЧЕСТВА КОПИЙ 49
РЕГУЛИРОВКА ЭКСПОЗИЦИИ /
КОПИРОВАНИЕ В РЕЖМЕ ФОТО . 49
УМЕНЬШЕНИЕ/УВЕЛИЧЕНИЕ/
МАСШТАБИРОВАНИЕ ............. 51
ВЫБОР ЛОТКА ПОДАчИ
(AL1457D, AL1555) ............... 47
6 СПЕЦИАЛЬНЫЕ ФУНКЦИИ
ДВУСТОРОННЕЕ КОПИРОВАНИЕ . 52
ОПИСАНИЕ СПЕЦИАЛЬНЫХ
ВОЗМОЖНОСТЕЙ................... 54
РЕЖИМ ЭКОНОМИИ ТОНЕРА.. 54
ПРОГРАММЫ ПОЛЬЗОВАТЕЛЯ 55
ОБОЗНАЧЕНИЕ ОБЩЕГО
КОЛИЧЕСТВА ИЗГОТОВЛЕННЫХ
КОПИЙ НА ДИСПЛЕЕ .............. 56
7 УХОД ЗА АППАРАТОМ
ЗАМЕНА КАРТРИДЖА ТП ........ 57
ЗАМЕНА КАРТРИДЖА БАРАБАНА58
ЧИСТКА АППАРАТА.................. 59
8
УСТРАНЕНИЕ НЕПОЛАДОК
ПРЕЖДЕ ЧЕМ ОБРАТИТЬСЯ К
СПЕЦИАЛИСТУ....................... 61
ИНДИКАТОРЫ СОСТОЯНИЯ
АППАРАТА............................... 62
ИЗВЛЕЧЕНИЕ ЗАСТРЯВШЕГО
ЛИСТА .................................... 63
9 ПРИЛОЖЕНИЕ
СПЕЦИФИКАЦИЯ ................... 68
ИНФОРМАЦИЯ О РАСХОДНЫХ
МАТЕРИАЛАХ И
ДОПЛНИТЕЛЬНЫХ
ПРИНАДЛЕЖНОСТЯХ ............. 70
ТРАНСПОРТИРОВКА И
ХРАНЕНИЕ АППАРАТА ............. 71
СПИСОК ТЕРМИНОВ В
АЛФАВИТНОМ ПОРЯДКЕ........ 72
ЛИЦЕНЗИЯ НА ИСПОЛЬЗОВАНИЕ
ПРОГРАММНОГО ОБЕСПЕЧЕНИЯ
1
2
3
4
5
6
7
8
9
75
3

1
В настоящей главе приводятся основные сведения о работе с аппаратом.
ВВЕДЕНИЕ
О ПОЛЬЗОВАНИИ ДАННЫМ РУКОВОДСТВАМИ
В дополнение к печатному Руководству пользователю предлагается также интерактивное Руководство. Для полного
ознакомления с возможностями аппарата и его функциями ознакомьтесь с обоими вариантами Руководства. В
печатном варианте дано описание установки аппарата и его настроек, а также приводится описание использования
всех его функциональных возможностей. Интерактивный вариант содержит информацию, приведенную ниже.
Интерактивное Руководство
Предоставляет Вам сведения об установке оптимальных вариантов для работы, а также о
возможных неполадках и способах их устранения. Обратитесь к этому Руководству после
того, как все начальные установки копира будут завершены.
Как пользоваться интерактивным Руководством
Приводятся объяснения по возможностям использования данного варианта Руководства.
Печать
Приводится информация о том, как правильно распечатать документ.
Сканирование
Объясняются процесс сканирования при помощи установленного драйвера сканера и способы
регулирования установок для утилиты Button Manager.
Возможные неполадки
Приводятся сведения о разрешении проблем, связанных с функционированием драйвера или
программного обеспечения.
Условные обозначения, принятые в данном
Руководстве и в интерактивном Руководстве
• В данном Руководстве объясняются операции с моделями AL1217D, AL1457D и AL1555.
Если операция аналогична для всех моделей, приводится пример с использованием AL
1555.
• На иллюстрациях интерфейсов драйвера и других компьютерных интерфейсов показаны варианты
для ОС Windows XP Home Edition. Отдельные наименования могут при этом слегка отличаться от
интерфейсов, появляющихся на экране при использовании других операционных систем.
• В Руководствах для обозначения Полистного Устройства Подачи Оригиналов используется
сокращение “SPF”, а для Полистного Устройства Подачи Оригиналов с Переворотом – “RSPF”.
• Для дополнительных сведений и примечаний касательно копира используются следующие пиктограммы:
Информирует пользователя о возможных негативных последствиях для
Осторожно
Внимание
Примечание
здоровья в результате несоблюдения приведенного предупреждения.
Информирует о возможности повреждения аппарата или отдельных его узлов в
результате несоблюдения правил, приведенных в данном пункте.
Приводится полезная дополнительная информация касательно спецификации,
функционирования аппарата, методов проведения операций и т.п.
Обозначает буквенный символ, появляющийся на дисплее.
4

НАИМЕНОВАНИЕ УЗЛОВ И ДЕТАЛЕЙ
SPF (AL'1457D)
RSPF (AL'1555)
Секция вывода
оригиналов
Лоток подачи оригиналов
Секция
сканирования
SPF (AL'1457D)
RSPF (AL'1555)
1
2
3
4
Лоток 2
(AL'1555)
Полистное устройство
подачи бумаги (AL'1217D)
7
Направляющие
Крышка секции
подающего
валика
Крышка
оригиналодержателя
(AL'1217D)
5
6
7
Универсальное
устройство
подачи бумаги (AL'1457D, AL'1555)
Картридж ТП Картридж
1
Интерфейс
Интерфейс
USB
Паралл.
интерфейс
8
9
10
11
12
барабана
Стол оригиналодержателя
11
Панель управления
22
Передняя панель корпуса
33
Лоток для бумаги
44
Боковая панель корпуса
55
Фиксатор боковой панели
66
корпуса
Направляющие полистного
77
устройства подачи
Выводной лоток
88
5
13
3
Удлинение выводного лотка
99
Выключатель питания
1010
Ручка для транспортировки
1111
Гнездо подключения шнура
1212
питания
Рычажок фиксатора узла
1313
термозакрепления
Коротрон
1414
Чистящее устройство коротрона
1515
14
15
5

ПАНЕЛЬ УПРАВЛЕНИЯ
AL-1555
141
86
70
A5
A4
A4
B5
A4
A5
Кнопка и индикаторы режимов
1
копирования
Кнопка и индикаторы выбора
2
режима экспонирования
Используются для последовательного
выбора режима экспозиции:
АВТОМАТИЧЕСКИЙ, РУЧНОЙ или ФОТО.
Выбранный режим указывается
загоревшимся индикатором.(стр. 49)
Кнопки и индикаторы Светлее и Темнее
3
Используются для регулировки экспозиции в
режиме РУЧНОЙ или ФОТО. Выбранный
уровень указывается
индикатором.(стр. 49)
отключают программы пользователя. (стр. 55)
Предупреждающие индикаторы
4
Индикатор необходимости замены
проявителя (стр. 58)
2сторонние копии с
1сторонних оригиналов.
Возможен выбор режима
подачи оригинала широкой
или узкой стороной.
2сторонние копии с
2сторонних оригиналов.
(Может быть выбран только
при наличии RSPF.) (AL1555)
1сторонние копии с 2
сторонних оригиналов.
(Может быть выбран только
при наличии RSPF.)(AL1555)
загоревшимся
. Активизируют и
Индикатор застревания (стр. 63)
Индикатор замены картриджа
тонера (стр. 57)
Индикатор наличия SPF (стр. 48) (AL1457D)
5
Индикатор наличия RSPF (стр. 48) (AL1555)
Индикатор застревания листа в
SPF(стр. 66) (AL1457D)
6
Индикатор застревания листа в
RSPF (стр. 66) (AL1555)
Кнопка и индикаторы масштаба
7
копирования
Используется для последовательного выбора
установленных масштабов копирования. Выбранное
значение масштаба обозначается загоранием
соответствующего индикатора (стр. 51).
Кнопка дисплея масштаба
8
копирования (%) (стр. 51)
Дисплей
9
Показывает данные о количестве копий,
масштабе, номере программы
пользователя и коде ошибки.
Кнопка и индикатор СКАНЕР
10
(стр. 31 и 38)
Кнопка и индикатор ONLINE
11
Загорается при использовании аппарата в
качестве принтера и сканера. Подробнее
об индикаторе интерактивного режима см.
в разделе “ИНДИКАТОРЫ ПАНЕЛИ
УПРАВЛЕНИЯ” (стр. 31).
Индикатор энергосберегающего режима
12
Загорается при переключении аппарата в
энергосберегающий режим. (стр. 54 и 55)
Индикаторы устройства подачи бумаги
13
Загораются, указывая на устройство, из
которого подается бумага.
Кнопка выбора лотка
14
(AL1457D, AL1555)
Используется для выбора устройства подачи бумаги
(лоток или универсальное устройство подачи) (стр. 53)
Кнопки и индикатор МАСШТАБ
15
Используются для выбора любого масштаба копий
в интервале от 25% до 400% с шагом в 1%. (стр. 51)
Кнопки установки количества копий
16
• Используются для выбора нужного
тиража копий (от 1 до 99). (стр. 49)
• Используются для установок параметров
программ пользователя. (стр. 55)
Кнопка сброса
17
• Для сброса значений на дисплее или
для завершения операции во время
копирования. (стр. 49)
• Нажимается и удерживается в режиме
готовности "standby" для демонстрации
общего количества копий, изготовленных
на данный момент времени. (стр. 56)
Кнопка и индикатор Старт
18
• При загоревшемся индикаторе
возможна операция копирования.
• Нажатием на кнопку начинается
копирование.
• Используются для установки
программ пользователя. (стр. 55)
6

2
Для функционирования аппарата надлежащим образом необходимо при его
установке выполнить процедуру установки в соответствии с приведенным
ниже описанием.
Примечание
УСТАНОВКА АППАРАТА
Если при установке или работе аппарата наблюдаются
неполадки, либо если одна из функций не активизируется,
обратитесь к разделу “УСТРАНЕНИЕ НЕПОЛАДОК” (стр. 61).
ПРОЦЕДУРА УСТАНОВКИ
Если Вы используете аппарат впервые, произведите его установку в
соответствии с указаниями, приведенными ниже.
2
1
Универсальное устройство подачи входит только в комплект поставки
*
модели AL"1457D и AL"1555.
2
*
Если Вы собираетесь использовать аппарат только для копирования,
пропустите этот этап операции.
7

ПРОВЕРКА КОМПЛЕКТНОСТИ
УПАКОВКИ
Откройте упаковку и проверьте наличие указанных на рисунке
принадлежностей.
Если какая"либо из принадлежностей отсутствует или повреждена,
свяжитесь с ближайшим уполномоченным представителем по сервисному
обслуживанию.
Руководство по эксплуатации
AL1217D
AL1457D
AL1555
CDROM с программным
обеспечением
Картридж барабана
(Установлен в аппарате)
Картридж ТП (Тонера/проявителя)
ПОДГОТОВКА АППАРАТА К УСТАНОВКЕ
Убедитесь в том, что аппарат
1
при извлечении из упаковки и
переноске к месту установки
удерживается за ручки с обеих
сторон.
8

Удалите все фиксирующие куски упаковочной ленты, как
2
это показано на рисунке ниже. Откройте крышку
оригиналодержателя/SPF/RSPF и удалите все защитные
материалы. Извлеките небольшую упаковку со шнуром
питания и картриджем ТП.
(Только для AL"1555)
AL-1555
AL-1217D
AL-1457D/AL-1555
2
ПЕРЕКЛ
AL-1217D
ЮЧ
АТЕЛ
Ь Ф
ИКСАТОРА СКАНИРУ
AL-1457D/AL-1555
ЮЩЕЙ
ТОЛОВКИ
Фиксатор расположен под столом оригиналодержателя. При фиксации переключателя
() узел
не
работает. Освободите переключатель (), как это показано ниже.
Возьмитесь здесь и поверните
в направлении, указанном стрелкой.
Фиксация
Освобождение
9

УСТАНОВКА КАРТРИДЖА ТП (ТОНЕРА<ПРОЯВИТЕЛЯ)
Откиньте лоток
1
универсального
устройства подачи
бумаги (AL<1457D, AL<
1555, стр. 17), а затем
откройте боковую панель
корпуса.
Нажмите аккуратно на оба
2
края передней панели
корпуса с тем, чтобы открыть
ее.
Достаньте картридж ТП из упаковки. Удерживая
3
картридж с обеих сторон, аккуратно встряхните его в
горизонтальном направлении 4<5 раз. Удерживая
пластинку защитной крышки картриджа, потяните ее к
себе и снимите крышку.
4 или 5 раз
10
Аккуратно введите картридж
4
ТП внутрь копира до полной
фиксации, нажимая при этом
на кнопку фиксатора.

Закройте переднюю
5
панель корпуса, а затем
боковую панель, нажимая
на круглые выступы рядом
с кнопкой фиксации
боковой панели.
Индикатор () погаснет и
загорится индикатор старт
().
6
При закрывании панелей
Внимание
корпуса убедитесь в
надежности фиксации
передней панели, и только
потом закрывайте боковую
панель. Если панели
закрыты в ненадлежащем
порядке, то возможно их
повреждение.
2
11

ПОДКЛЮЧЕНИЕ ШНУРА ПИТАНИЯ
Подключайте аппарат к источнику питания с надлежащим
Внимание
заземлением. Не пользуйтесь удлинителями или тройниками при
подключении копира к сети.
Убедитесь в том, что
1
выключатель копира установлен
в положении OFF (ВЫКЛ.).
Вставьте шнур питания в гнездо,
расположенное на задней
панели аппарата.
2
Подключите шнур питания к ближайшей сетевой розетке.
2
Включение питания
Убедитесь в том, что выключатель копира установлен в положении OFF (ВЫКЛ.).
Вставьте шнур питания в гнездо, расположенное на задней панели аппарата.
Подключите шнур питания к ближайшей сетевой розетке. Установите выключатель
копира в положение “ON” (“ВКЛ.”). На панели управления загорится индикатор начала
работы ( )
работы копира. Аппарат готов к началу работы. Подробнее о начальных установках см.
на следующей странице в разделе “Начальные установки на операционной панели” .
и другие индикаторы, указывающие на начальные установки режимов
12
Примечание
•
Аппарат переключится в энергосберегающий режим, если на протяжении
определенного установленного интервала времени не будет выполнена
какая2либо операция. Установка этого интервала времени может быть
изменена. См. раздел “ПРОГРАММЫ ПОЛЬЗОВАТЕЛЯ” (стр. 55).
•
Аппарат возвратится в режим начальных установок после истечения установленного
интервала времени по завершении операции копирования или сканирования.
Данный интервал времени (время автоматического сброса) может быть изменен.
См. раздел “ПРОГРАММЫ ПОЛЬЗОВАТЕЛЯ” (стр. 55).

Информация о сканирующей головке
Источник света, расположенный внутри сканирующей головки, включен постоянно в
режиме готовности аппарата к работе (при активизированном индикаторе Старт).
Для сохранения качества копирования периодически осуществляется
автоматическая регулировка источника света сканирующей головки. При
этом наблюдается автоматическое перемещение головки. Эта операция
является стандартной и не указывает на неполадки в работе копира.
Начальные установки на операционной панели
При включенном питании копира, после определенного промежутка
времени (установка “Время автоматического сброса” на стр. 55),
истекшего по завершении операции копирования или сканирования
(или после двойного нажатия на кнопку сброса ()), на
операционной панели произойдет возврат к начальным установкам.
Значения начальных установок приводятся ниже.
AL-1555
A5
A4
141
A4
B5
86
A4
A5
70
2
На дисплее появится значение “0”
Если копирование производится в режиме начальных установок, то
используются значения установок, указанные в таблице.
Количество копий 1 копия
Регулировка экспозиции Автоматическая
Масштаб копии 100%
Устройство подачи бумаги Лоток
Способы выключения питания
Если копир не используется в течение определенного промежутка времени, то
он автоматически переключится в режим автоматического выключения
питания (стр. 55) для экономии расхода электроэнергии. Если предполагается
не использовать аппарат в течение длительного времени, отключите его с
помощью выключателя и извлеките шнур питания из розетки.
.
13

3
Для загрузки бумаги в лоток следуйте приведенному ниже описанию.
ЗАГРУЗКА БУМАГИ
БУМАГА
Для оптимальных результатов следуйте рекомендациям специалистов SHARP.
Устройство
подачи бумаги
Лоток Стандартная бумага
Полистное
устройство
подачи
Материалы для копии Формат Плотность
A4
A5
B5
Letter
Legal
Invoice
Стандартная бумага и
бумага большой
плотности
Спец.
материалы
Прозрачная
пленка
A4
A5
A6
B5
B6
Letter**
Legal
Invoice
A4
Letter
От 56 г/м
2
80 г/м
От 52 г/м
128 г/м
2
до
2
до
2
**
14
Конверты* International DL
International C5
Commercial 10
Monarch
* Не используйте конверты нестандартных форматов и конверты с металлическими
защелками, пластмассовыми фиксаторами, проволочками, окошками, наклейками,
внутренним покрытием, а также самоклеящиеся конверты и конверты из
синтетических материалов. Не пользуйтесь конвертами, заполненными воздухом, а
также конвертами с наклеенными марками. Все вышеперечисленные виды
конвертов могут вызвать повреждение аппарата.
** Для бумаги плотностью от 104 до 128 г/м
возможным при подаче через устройство полистной подачи или универсальное
устройство подачи.
• Специальные материалы, такие как прозрачная пленка, наклейки и конверты,
должны подаваться поодиночке через устройство полистной подачи или
универсальное устройство подачи только поочередно (по одному листу).
2
формат А4 является максимально

ЗАГРУЗКА ЛОТКА
Приподнимите лоток за ручку и
1
выдвиньте до упора.
Удалите фиксатор пластины.
2
Поверните фиксатор пластины в направлении, указанном
стрелкой при одновременном нажатии на пластину.
Сохраните на месте фиксатор пластины, извлеченный на
3
этапе 2 операции. Для этого поверните его в положение
фиксации.
Фиксатор пластины давления на стопу
3
Отрегулируйте направляющие по формату бумаги. Надавите на
4
рычажок направляющей и сместите ее в положение,
соответствующее ширине листа. Переместите направляющую
в нужную щель в соответствии с метками на лотке
Направляющая В
Направляющая А
.
15

Распушите стопу бумаги и установите ее в лотке. Убедитесь в
5
том, что верхняя часть стопы не выступает за пределы,
ограниченные угловыми сгибами
Не загружайте стопу, превышающую по высоте линию
Примечание
Примечание
предельного уровня (), в противном случае возможно
застревание листа
Аккуратно возвратите лоток в исходное положение внутри
6
копира
.
• После загрузки бумаги для сброса мигающего индикатора
без возобновления операции копирования нажмите на кнопку
сброса (). Индикатор на дисплее погаснет, после чего
загорится индикатор Старт” ().
• Убедитесь в отсутствии порезов, сгибов и пыли на листах, а
также в отсутствии скручиваний и сгибов по их краям
• Убедитесь в том, что бумага в стопе одного формата и одного
сорта.
• При загрузке убедитесь в отсутствии зазора между краями
стопы и направляющими, проверьте правильность положения
направляющих, не допуская изгиба стопы при упоре в слишком
близко установленную направляющую. В противном случае
возможен перекос листа при подаче или его застревание.
• Если предполагается, что копир не будет использован в течение
длительного времени, извлеките всю бумагу из лотка и храните
ее в сухом месте. Если Вы оставите бумагу в лотке, то она может
впитать влагу из воздуха, что приведет к дальнейшему ее
застреванию в копире.
• При добавлении бумаги в лоток извлеките оставшуюся в нем
пачку. Размещение новой порции поверх уже используемой
бумаги может привести к одновременной подаче двух листов.
.
.
.
16

ПОДАЧА ЧЕРЕЗ ПОЛИСТНОЕ УСТРОЙСТВО
(включая специальные материалы)
Универсальное устройство подачи (AL1457D, AL1555) и полистное устройство подачи (AL1217D)
могут быть использованы для подачи стандартной бумаги, прозрачной пленки, наклеек, конвертов и
других специальных материалов. Бумага форматом от А6 до А4 и весом от 52 до 128 г/м
подаваться из лотка (для бумаги от 104 до 128 г/м
•
В универсальное устройство подачи (AL1457D, AL1555) может быть загружено
до 50 листов бумаги (это количество зависит от вида бумаги). В полистное
Примечание
устройство подачи (AL1217D) бумага подается по одному листу.
• Изображение на оригинале не должно быть большим, чем
формат материала, на котором производится копирование, в
противном случае на краях копии могут появиться грязные пятна.
2
максимальным форматом является А4).
2
может
Универсальное устройство подачи (AL*1457D, AL*1555)
Откиньте лоток устройства и вытащите пластину удлинителя лотка.
1
Для того, чтобы
закрыть устройство,
выполните операцию
Примечание
Установите направляющие по ширине подаваемого
2
листа. Поместите на лоток лист (запечатываемой
стороной вниз), ориентируя его в нужном направлении.
Примечание
1, а затем 2 (см.
рисунок) и нажимайте
на круглый выступ с
правого края лотка до
тех пор, пока не
услышите щелчок.
Запечатываемая
сторона
• Лист должен подаваться в щель устройства узкой стороной.
• Прозрачная пленка, наклейки и прочие специальные
материалы должны подаваться полистно.
• При копировании на прозрачную пленку сразу убирайте
каждую готовую копию из приемного лотка. Не допускайте
образования стопы копий. При подаче конверта убедитесь в
его прямоугольности и отсутствии воздуха внутри.
.
3
Нажмите на кнопку выбора устройства подачи() для
3
того, чтобы выбрать универсальное устройство подачи.
17

Устройство полистной подачи (AL1217D)
Если Вы подаете бумагу через устройство полистной
подачи при установке получения нескольких копий с
Примечание
оригинала (стр. 49), счетчик количества копий на панели
переключится на “0” и будет изготовлена только одна
копия
.
Выберите установки копирования и печати
1
перед началом операции.
Подробнее об установках копирования см. раздел
“ИЗГОТОВЛЕНИЕ КОПИЙ” (стр. 46). С информацией об
установках печати познакомьтесь в Интерактивном
руководстве или в файле Help (Справка) драйвера принтера,
после чего начните операцию печати с полистного устройства
Установите направляющие по ширине листа,
2
введите лист копии или отпечатка
(запечатываемой стороной вниз) в щель
полистного устройства.
В режиме копирования
При введении листа в устройство лист автоматически подается в копир и
начинается операция копирования.
В режиме принтера
После появления индикатора
загорится индикатор подачи через полистное устройство и введите
лист в устройство. Лист автоматически будет подан в копир и
начнется операция печати.
н
а дисплее подождите пока
.
18
(AL-12117D)
Примечания о загрузке конвертов
• Конверты должны подаваться поочередно узкой стороной в щель устройства.
• Не используйте конверты нестандартных форматов и конверты с
металлическими защелками, пластмассовыми фиксаторами, проволочками,
окошками, наклейками, внутренним покрытием, а также самоклеящиеся
конверты и конверты из синтетических материалов. Не пользуйтесь
конвертами, заполненными воздухом, а также конвертами с наклеенными
марками.
• Конверты, поверхность которых недостаточно плоская изза выступов, могут
быть отпечатаны с пятнами.
• При высокой температуре и влажности клеевое покрытие отдельных конвертов
может стать липким и вызвать их заклеивание при печати.
• Используйте только плоские конверты с четкими сгибами. Изогнутые конверты
или конверты неправильной формы могут быть плохо запечатаны или вызовут
застревание.
• Выберите при установке формата бумаги для драйвера принтера либо Com 10,
DL, C5, либо Monarch. (Подробнее о драйвере принтера см. в Интерактивном
руководстве).
• Рекомендуется перед началом новой операции по распечатке произвести
пробную операцию печати.
Запечатываемая сторона

4
В данной главе приводятся сведения об установке необходимого программного обеспечения,
позволяющего использовать копир вместе с компьютером. Также содержится информация об
использовании Интерактивного руководства и о значении терминов, используемых далее в главе.
CDROM
Teрмин означает CDROM с программным обеспечением для многофункционального
устройства (MFP).
УСТАНОВКА ПРОГРАММ
ПРОГРАММНОЕ ОБЕСПЕЧЕНИЕ ДЛЯ
МНОГОФУНКЦИОНАЛЬНОГО УСТРОЙСТВА MFP
Ha поставляемом диске CDROM записано программное обеспечение для аппарата.
Драйвер MFP
Драйвер сканера
Позволяет производить сканирование на Вашем аппарате из TWAINсовместимого и
WIAсовместимого приложения.
Драйвер принтера
Позволяет использовать аппарат в качестве принтера при подключении Вашего
компьютера.
Окно состояния печати
В этом окне на мониторе отображается состояние процесса печати и информация о
текущей операции.
Программа Sharpdesk
Встроенная программная среда, упрощающая работу с документами и графическими
файлами и облегчающая активизацию приложений.
Утилита Button Manager
Утилита Button Manager позволяет производить сканирование с помощью кнопки
SCANNER ( ), расположенной на панели управления аппарата.
4
Примечание
Сканирование возможно в ОС Windows 98/Me/2000/XP при
использовании соединения USB. Пользователи при установке ОС
Windows 95/NT 4.0 или при использовании параллельного
интерфейса могут производить только печать.
19

ТРЕБОВАНИЯ К АППАРАТНЫМ СРЕДСТВАМ И
ПРОГРАММНОМУ ОБЕСПЕЧЕНИЮ
Перед установкой программного обеспечения сверьтесь со следующей таблицей.
Тип компьютера
Операционная
система*
Дисплей 800 x 600 точек (SVGA) дисплей, 256 цветов (или более)
Свободное
пространство на ЖД
Другие требования к
оборудованию
1
*
2
*
*3Для установки программ при помощи этого установщика необходимо разрещение
2
Совместимым с моделью с предустановленной ОС Windows 98, Windows Me,
Windows 2000 Professional, Windows XP Professional или Windows XP Home Edition и
оборудованной USB интерфейсом в качестве стандартной установки.
В режиме MSDOS печать невозможна.
администратора системы.
IBM PC/AT или совместимый компьютер, оборудованный USB1.1*1
или 2направленным параллельным интерфейсом (IEEE 1284)
Windows 95, Windows 98, Windows Me, Windows NT Workstation
4.0 (ServicePack 5 или позднее)*
Windows XP Professional*3, Windows XP Home Edition*3
150MБ или более
Среда, в которой может без ограничений работает любая из
перечисленных выше операционных систем
3
, Windows 2000 Professional,
ПЕРЕД НАЧАЛОМ УСТАНОВКИ
В таблице приводятся драйверы и программное обеспечение, возможное для
установки в различных версиях Windows, а также методы подключения интерфейса.
Драйвер MFP
Драйвер
принтера / Окно
состояния печати
Пользователи Windows
98/Me/2000/XP при
подключении
интерфейса USB
Пользователи Windows
98/Me/2000/XP при
подключении
параллельного
интерфейса
Пользователи Windows
95/NT 4.0
1
*
При подключении аппарата через параллельный порт Окно состояния печати может
быть использовано только при установке параллельного порта в режиме ECP. Для
установки режима параллельного порта обратитесь к инструкции для Вашего
компьютера или к его изготовителю.
2
*
Программа Sharpdesk может быть установлена при использовании параллельного
интерфейса, однако, при этом сканирование будет невозможно.
Возможно*
Драйвер
сканера
Возможно Возможно Возможно
1
Невозможно
Button
Manager
Невозможно Возможно*
Sharpdesk
2
20
Внимание
•
Если Вы используете часть памяти компьютера в качестве RAM,
распределение памяти для драйвера принтера может оказаться
недостаточным. В этом случае необходимо уменьшить объем RAM
или не использовать ее вообще. Более подробные сведения
содержатся в документации Вашей ОС Windows.
•
Установлен ли уже другой драйвер принтера GDI или системный
драйвер печати Windows? Если да, измените установку порта
принтера. Об изменении этой установки смотрите в разделе
"ИСПОЛЬЗОВАНИЕ ДРУГИХ УСТАНОВЛЕННЫХ ДРАЙВЕРОВ" (стр. 44).
 Loading...