

Page 1
Page 2
Contents
How to Use the Online Manual
How to Use the Online Manual 1
Print
Printer Driver Settings 2
Outline of the Printer Driver
Starting the Printer Driver (Windows 95/98/Me/NT 4.0)
Starting the Printer Driver (Windows 2000/XP)
Printer Driver Functions
"Paper/Quality" Tab Settings (Windows 95/98/Me/NT 4.0)
"Paper/Quality" Tab Settings (Windows 2000/XP)
"Advanced Options" Settings (Windows 2000/XP)
"Layout" Tab Settings
"Scaling" Tab Settings
"Watermark" Tab Settings
"Utility" Tab Settings
Print 27
Printing Overview
Basic Printin g
Printing a Watermark
Enlarge/Reduce the Printed Image
Printing Multiple Pages on One Page
Make a Poster
Printing a Photograph
Print Status Window 34
Outline of the Print Status Window
Print Status Window Functions
Understanding Error Message s
"Maintenance" Tab
"Options" Tab
Sharing Printer 39
Sharing the Printer using Windows Networking
Shared Printer Settings
Client Settings
Scanning
Scanning 42
Outline of the Scanner Driver
Starting the Scanner Driver
Scanning an Image
Scanner Driver Functions
"Standard" Scan Preferences
Contents
"Professional" Scan Preferences ("Main" Tab)
"Professional" Scan Preferences ("Image" Tab)
"Professional" Scan Preferences ("Preference" Tab)
"Standard Mode Setting" Dialog Box
Preview Screen
Variation Preview Screen
Default Settings for the Scanner Driver
Button Manager 56
Outline of Button Manager
Button Manager Functions
Button Manager Settings
"Scan Setup" Settings
"Application Selection" Settings
Default Setting for Each Function
Maintenance
Time to Change the Ink Tank 63
Changing the Ink Tank 64
Test Print Head 67
Cleaning the Print Head 68
Changing the Print Head 69
Aligning the Print Head 72
Troubleshooting
Identifying Unit Problems 74
Check the Connection bet ween the Unit and Computer
Check Your Computer 76
Failed to Install the Device Driver (when the USB is connected)
Failed to Install the Device Driver (Windows 2000/XP)
Faint, Uneven or Smeared Print Output 79
Characters or Graphics are not Printed in Correct Position
Printed Lines are not Straight, or Have Blank Spaces 81
Unit does not Print in Colour 82
Nothing Prints 83
Poor Scanning Result 84
The Scanned Image is Incorrectly Positioned 85
Unable to Scan the Image 86
Uninstalling AJ-6110 Software 87
Reinstalling AJ-6110 Software 88
75
80
Page 3
How to Use the Online Manual
How to Use the Online Manual
This Online Manual provides instruction for the operation of your new unit. It is designed to assist you in the operation of
the Online Manual and provide you with all relevant information.
For more information about computers, operating systems and Acrobat Reader, please refer to the relevant manual or
help file.
How to Control the Online Manual
Click this button to display the Index of the Online
Manual. From the Index you can jump to various pages.
Click this button to display the Table of
Contents of the Online Manual. From the Table
of Contents you can jump to various pages.
Following links
Links can connect parts of a document to other parts for fur ther information. In this document, green coloured letters are linked areas.
To follow a link, select the hand tool ( ), a zoom tool, or a selection tool. Position the pointer over the linked area on the page until the pointer
changes to a hand with a pointing finger ( ). Then click the link.
Using Bookmarks
This online manual has Bookmarks on th e main pages of ea ch section. You c an move to the desir ed pages by simp ly clicking i ts bookmark. To us e
Bookmarks, show the bookmarks by clicking the "Book marks" tab of t he "Show/Hide Navigat ion Pane" icon ( ), and then click the b ookmark of the
destination page.
Takes you back page by page. To return to the previous link,
click the ( ) button on the menu bar of the Acrobat Reader.
1
Takes you forward page by page.
How to Print Out the Online Manual
In order to print out a hard copy of the Online Manual for your reference, go to Acrobat Reader, click the "File" menu,
and select "Print". After specifying the printer setting, click the "OK" button to print.
In this online manual, screen images and operating procedures are mainly for Windows Me. With other versions of Windows,
some screen images may be different from those in this manual.
1
Page 4
Outline of the Printer Driver
Printer Driver Settings
What is the Printer Driver?
A printer driver is a program designed t o convert print data from any application into data understandable by the printer
so that the printer can quickly and efficiently print out the data.
The five tabs of this printer driver are shown below.
Windows 95/98/Me/NT 4.0 Windows 2000/XP
By clicking the tabs displayed above, you will jump to a detailed description.
The items shown below can be setup on each tab.
Tab Name Setup Items
Paper/Quality
Layout Orientation, Copies, Page Order, Collate, N-Up Printing
Scaling Zoom, Fit to Paper Size, Poster Printing
Watermark Watermark, Text, Size, Angle, Edit Colour, Edit Fonts
Utility Maintenance, About
Windows 95/98/Me/NT 4.0
Paper Source, Media, Paper Size, Banner Printing, Print Quali ty, Colour
Windows 2000/XP
Paper Source, Media, Quality Settings, Colour, Advanced
2
Page 5
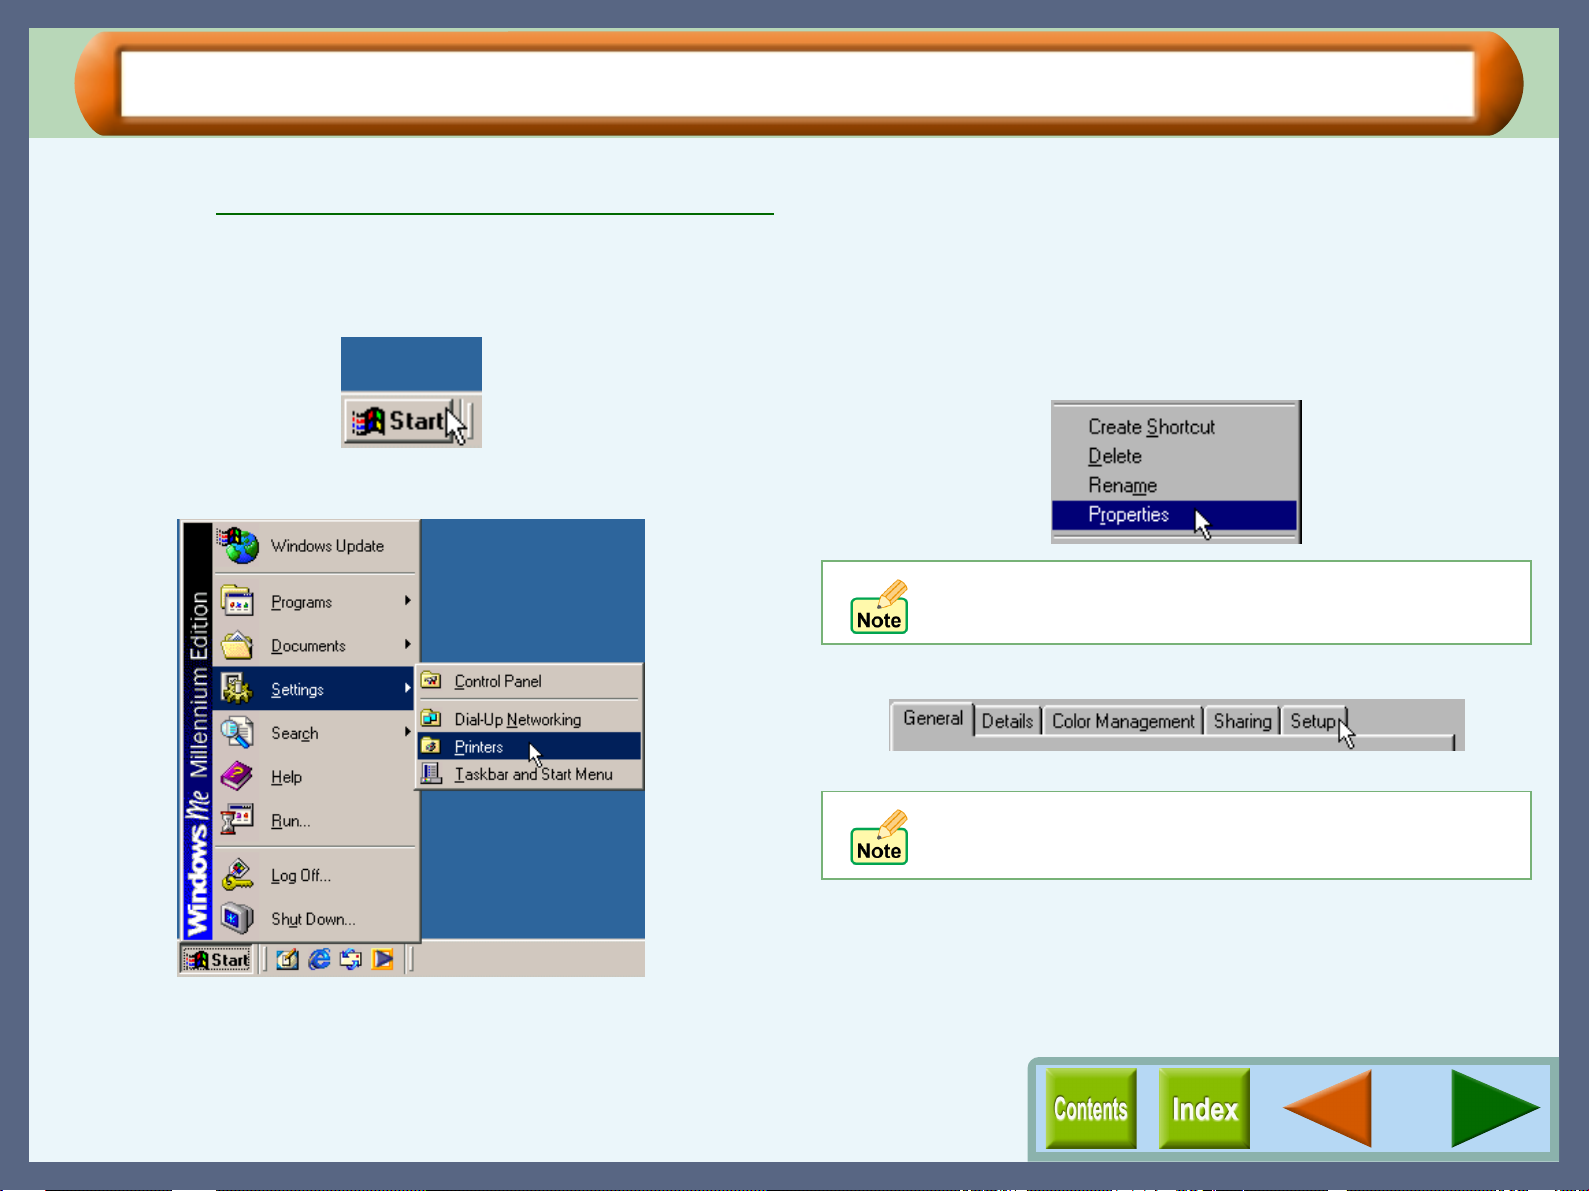
Starting the Printer Driver (Windows 95/98/Me/NT 4.0) (part 1)
Open the printer driver setup screen by either of the methods shown below.
Reference: Starting the Printer Driver through an Application
Starting the Printer Driver using the "Start" Button
Printer Driver Settings
1111
2222
Click the "Start" button.
Select "Settings" and click "Printers".
3333
4444
Click the "SHARP AJ-6110" printer driver icon in
the "Printers" window and from the "File" menu
select "Properties".
On Windows NT 4.0, select "Document Defaults" to
open the printer driver setup screen.
Click the "Setup" tab.
The printer driver setup screen will appear.
Refer to the Windows manual or help file for more
information on th e "General" tab, " Details" tab, "C olour
Management" ta b and "Sharing" tab.
3
Page 6
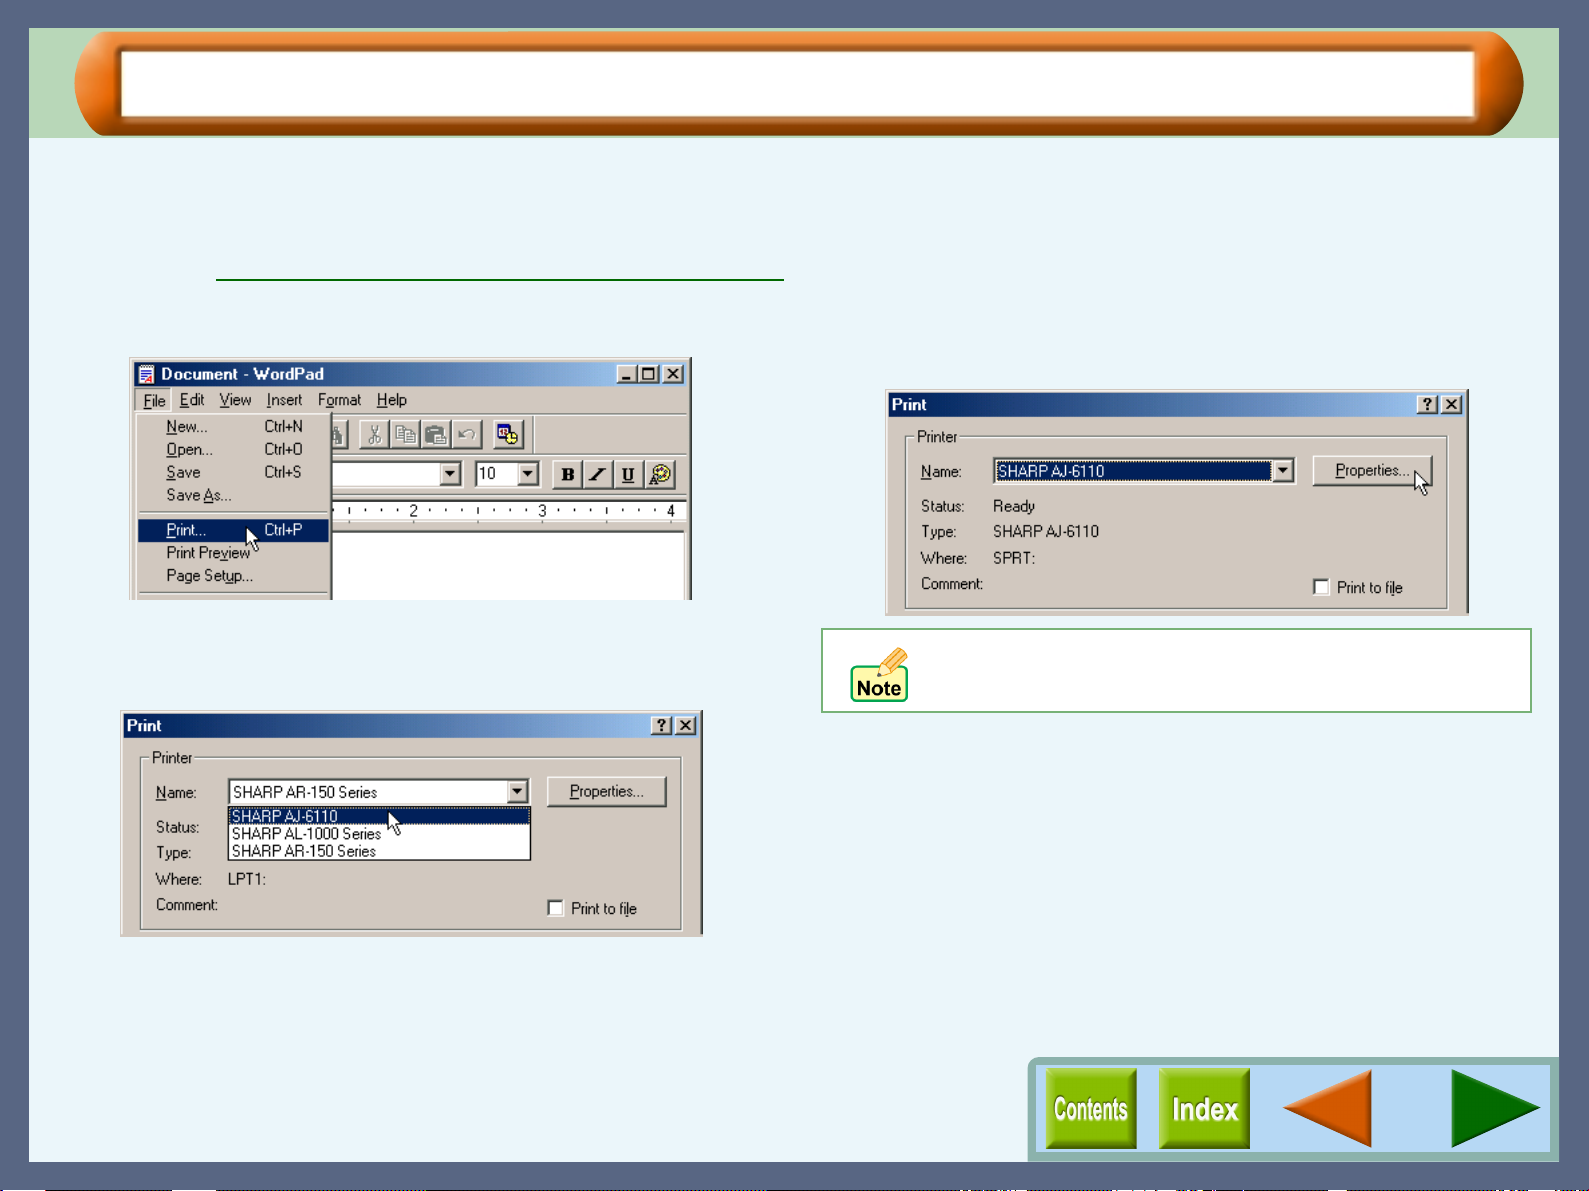
Starting the Printer Driver (Windows 95/98/Me/NT 4.0) (part 2)
Starting the Printer Driver through an Application
Follow the steps shown below to open the printer driver setup screen through WordPad. First, activate WordPad. (Click
the "Start" button, select "Programs" , select "Accessories" and then click "WordPad".)
Reference: Starting the Printer Driver using the "Start" Button
Printer Driver Settings
1111
2222
Go to "File" menu in WordPad, and select "Print".
Select "SHARP AJ-6110" from the Printer Name
drop-down list.
3333
Click the "Properties" button to open the printer
driver setup screen.
If the dialog box is setup through an application, all
settings will be void when you quit the application.
4
Page 7
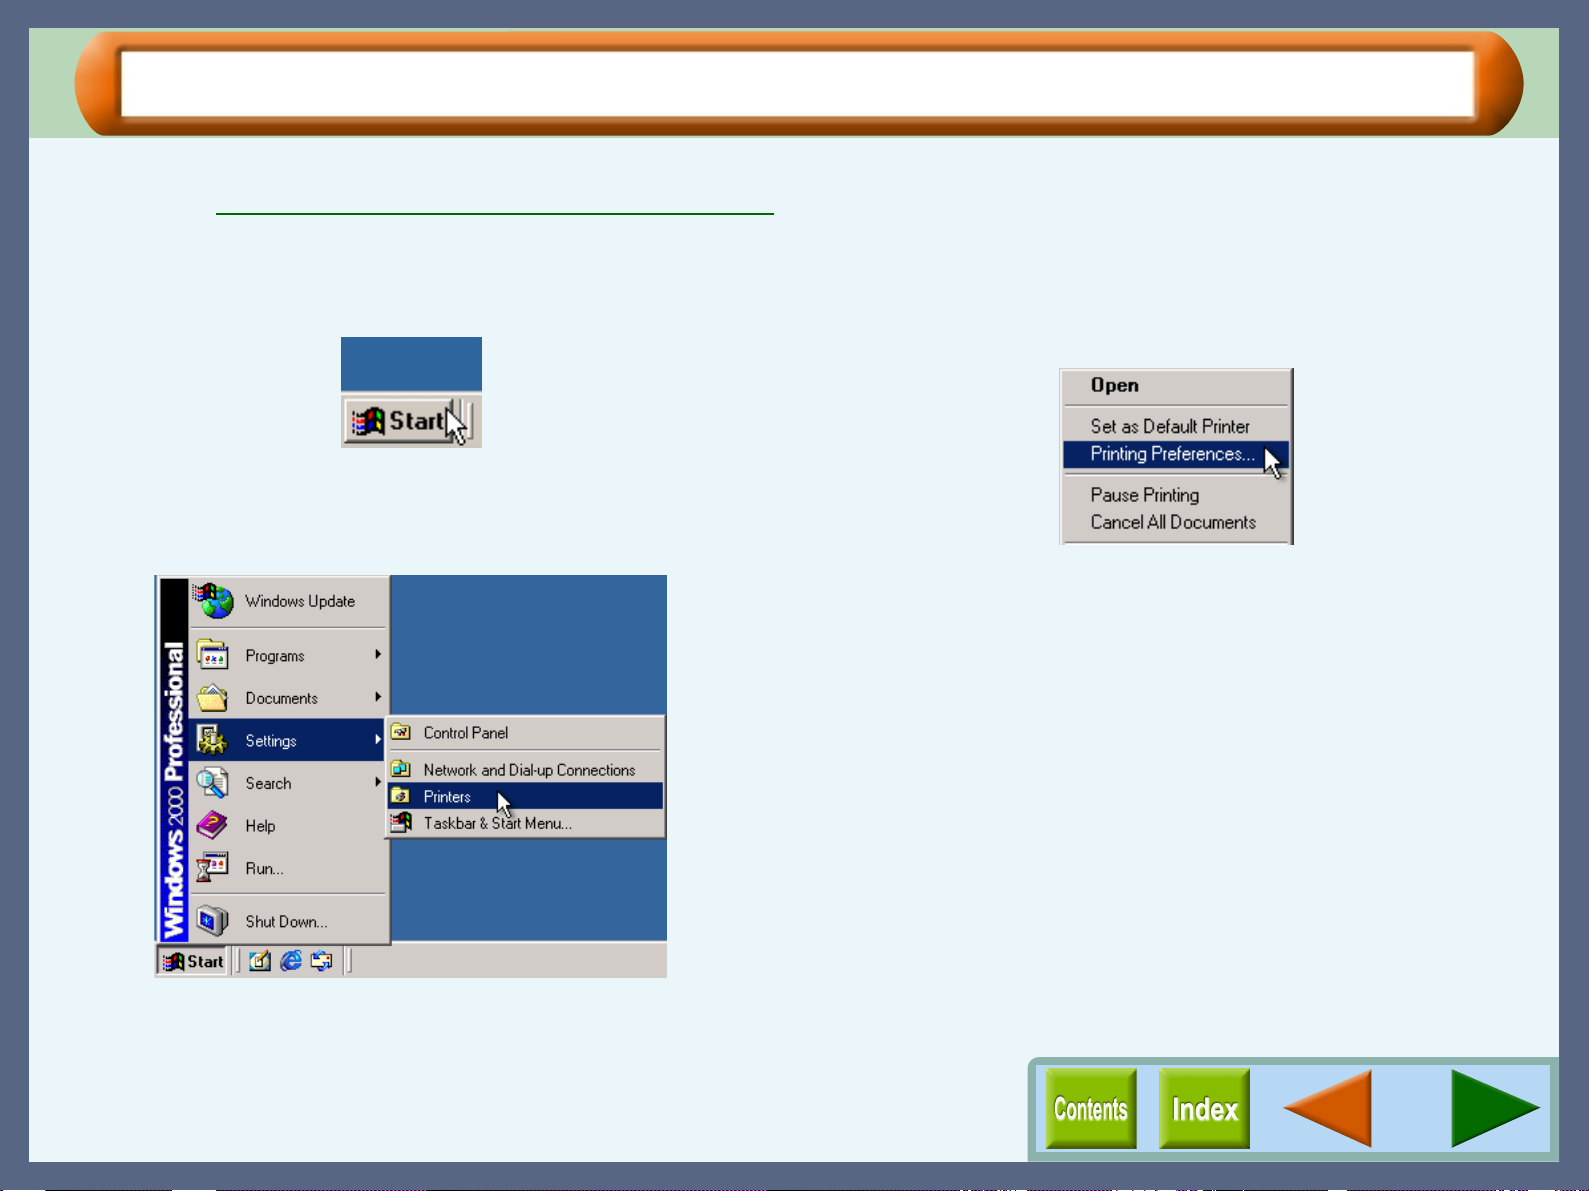
Starting the Printer Driver (Windows 2000/XP) (part 1)
Open the printer driver setup screen by either of the methods shown below.
Reference: Starting the Printer Driver through an Application
Starting the Printer Driver using the "Start" Button
Printer Driver Settings
1111
2222
Click the "Start" button.
Select "Settings" and click "Printers".
On Windows XP, click "Control Panel", click "Printers and
Other Hardware", and then click "Printers and Faxes".
3333
Click the "SHARP AJ-6110" printer driver icon and
from the "File" menu select "Printing Preferences".
The printer driver setup screen will appear.
5
Page 8
Starting the Printer Driver (Windows 2000/XP) (part 2)
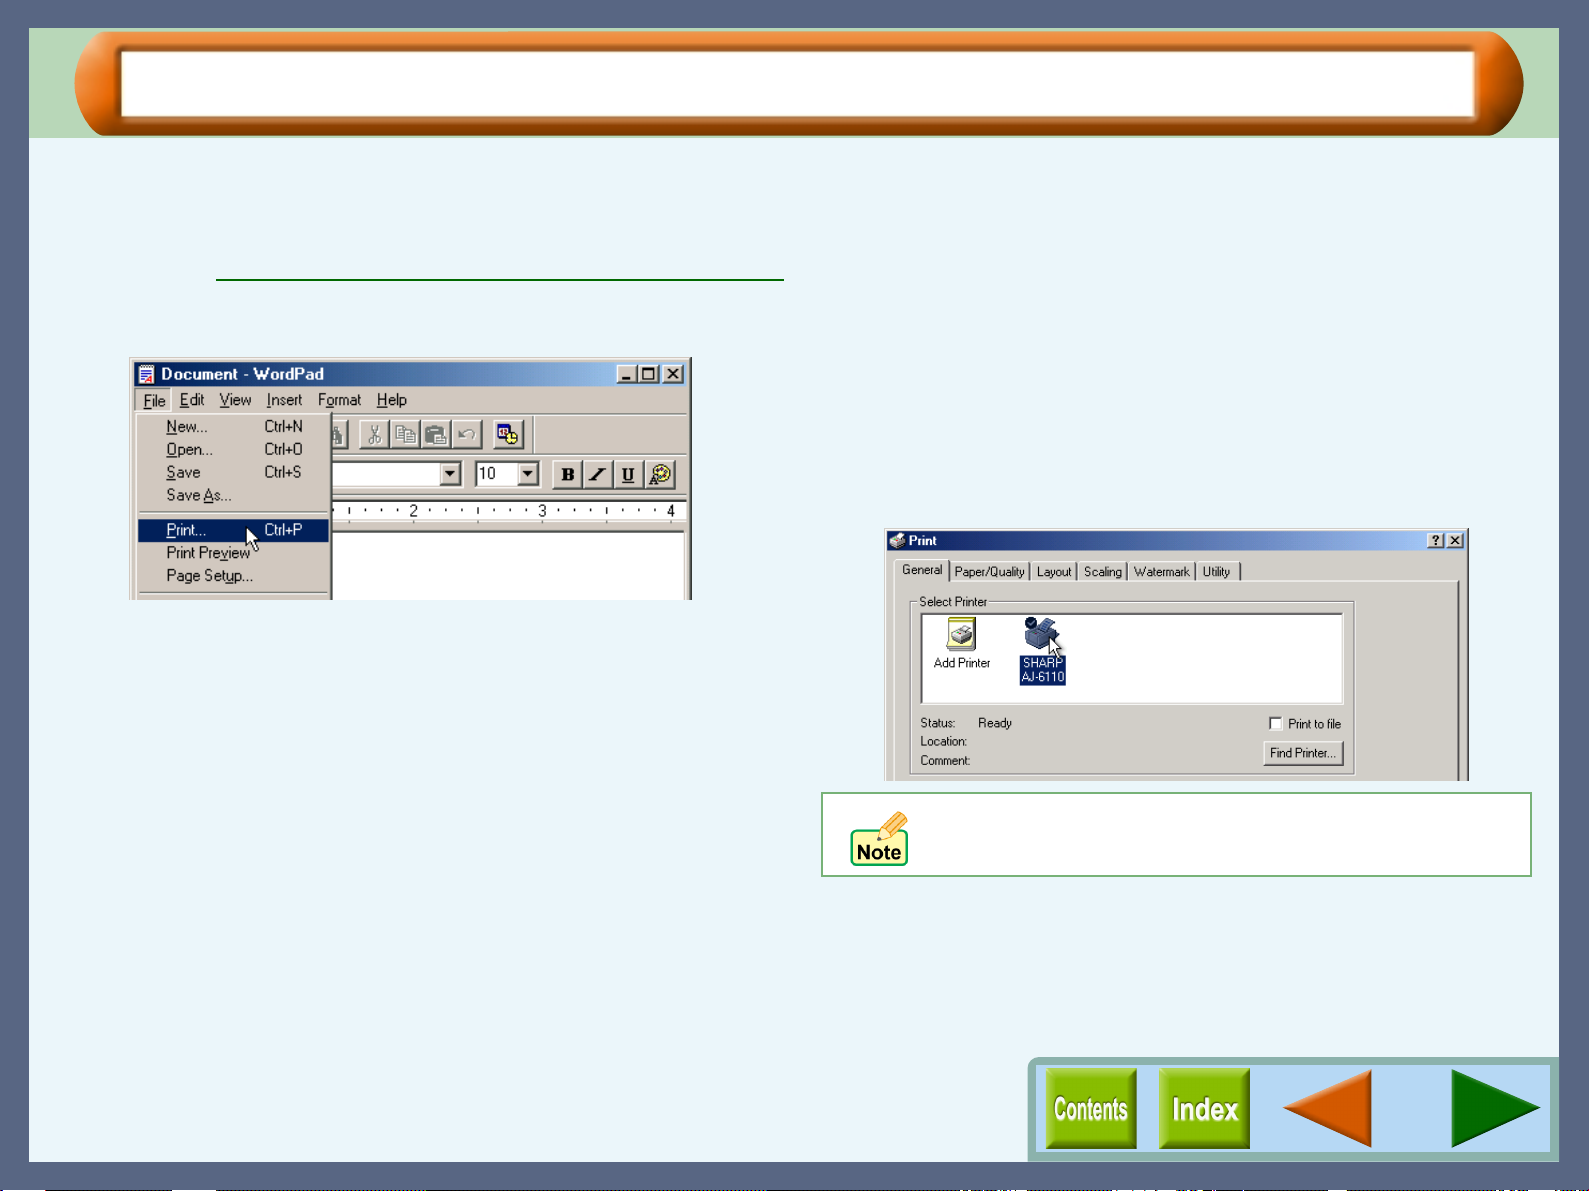
Starting the Printer Driver through an Application
Follow the steps shown below to open the printer driver setup screen through WordPad. First, activate WordPad. (Click
the "Start" button, select "Programs" ("All Programs" on Windows XP), select "Accessories" and then click "WordPad".)
Reference: Starting the Printer Driver using the "Start" Button
Printer Driver Settings
1111
Go to "File" menu in WordPad, and select "Print".
2222
Select "SHARP AJ-6110" printer driver icon from
"Select Printer" area.
You can setup the preferences for the printer driver through
the five tabs of "Paper/Quality", "Layout", "Scaling",
"Watermark", and "Utility".
On Windows XP, click the "Preferences" button to open the
printer driver setup screen.
If the dialog box is setup through an application, all
settings will be void when you quit the application.
6
Page 9
Printer Driver Functions
Tab
Index which allows you to
switch between the various
setup screens.
Check button
Allows you to select one
item from a list of options.
Check box
Click this option to
activate/deactivate each
function.
"OK" button
Click this button to save
your settings, and exit the
dialog box.
"Cancel" button
Click this button to exit the dialog box
without making any changes to the settings.
"Apply" button
Click to save your settings
without closing the dialog box.
Windows NT 4.0 does not
have the "Apply" button on
each screen.
Printer Driver Settings
Quit button
Click this button to quit the
printer driver setup screen.
( ) button
After clicking this button, click
the preference located in the
dialog box you want to know
more about, and receive a
basic explanation.
Basic explanation is also
available by right-clicking
on the preference you want
to know.
Drop-down list
Allows you to make one
selection from a list of choices.
Click the ( ) button to display
your choices.
"Defaults" button
Returns settings to default
mode of the tab. Refer to the
information page for each tab
to check the values of the
default settings.
7
Page 10
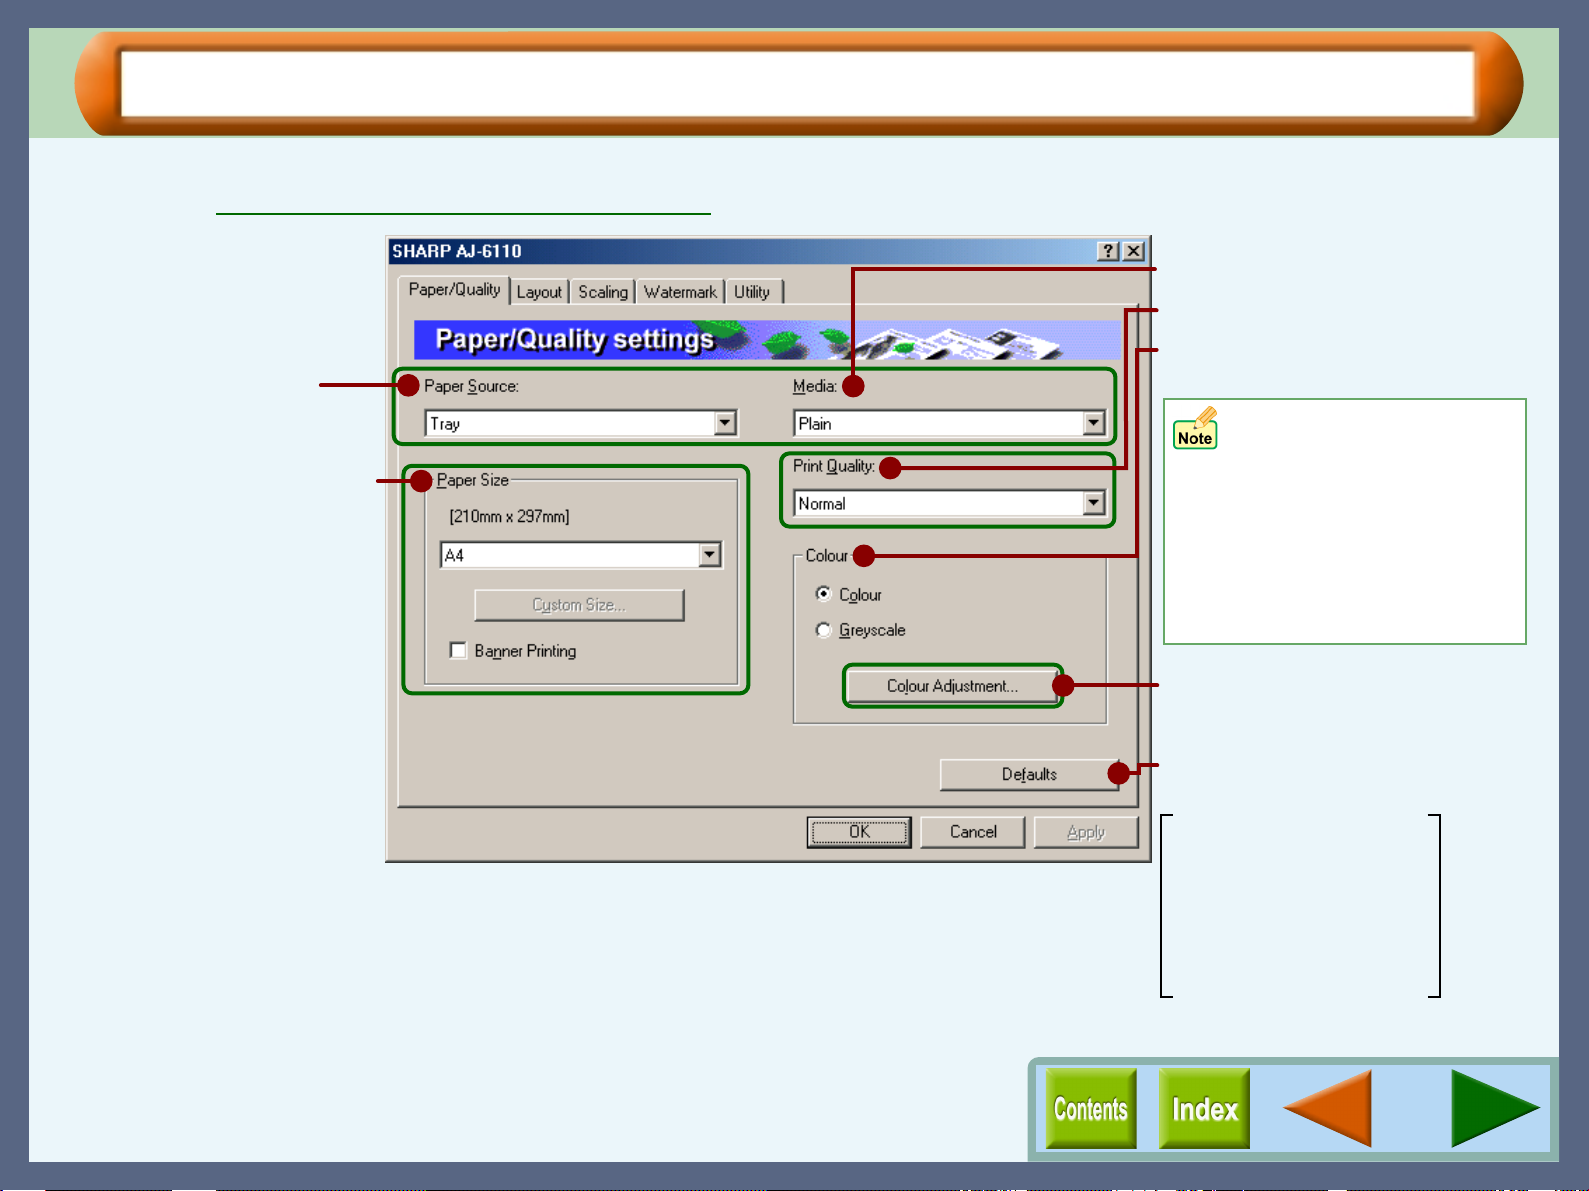
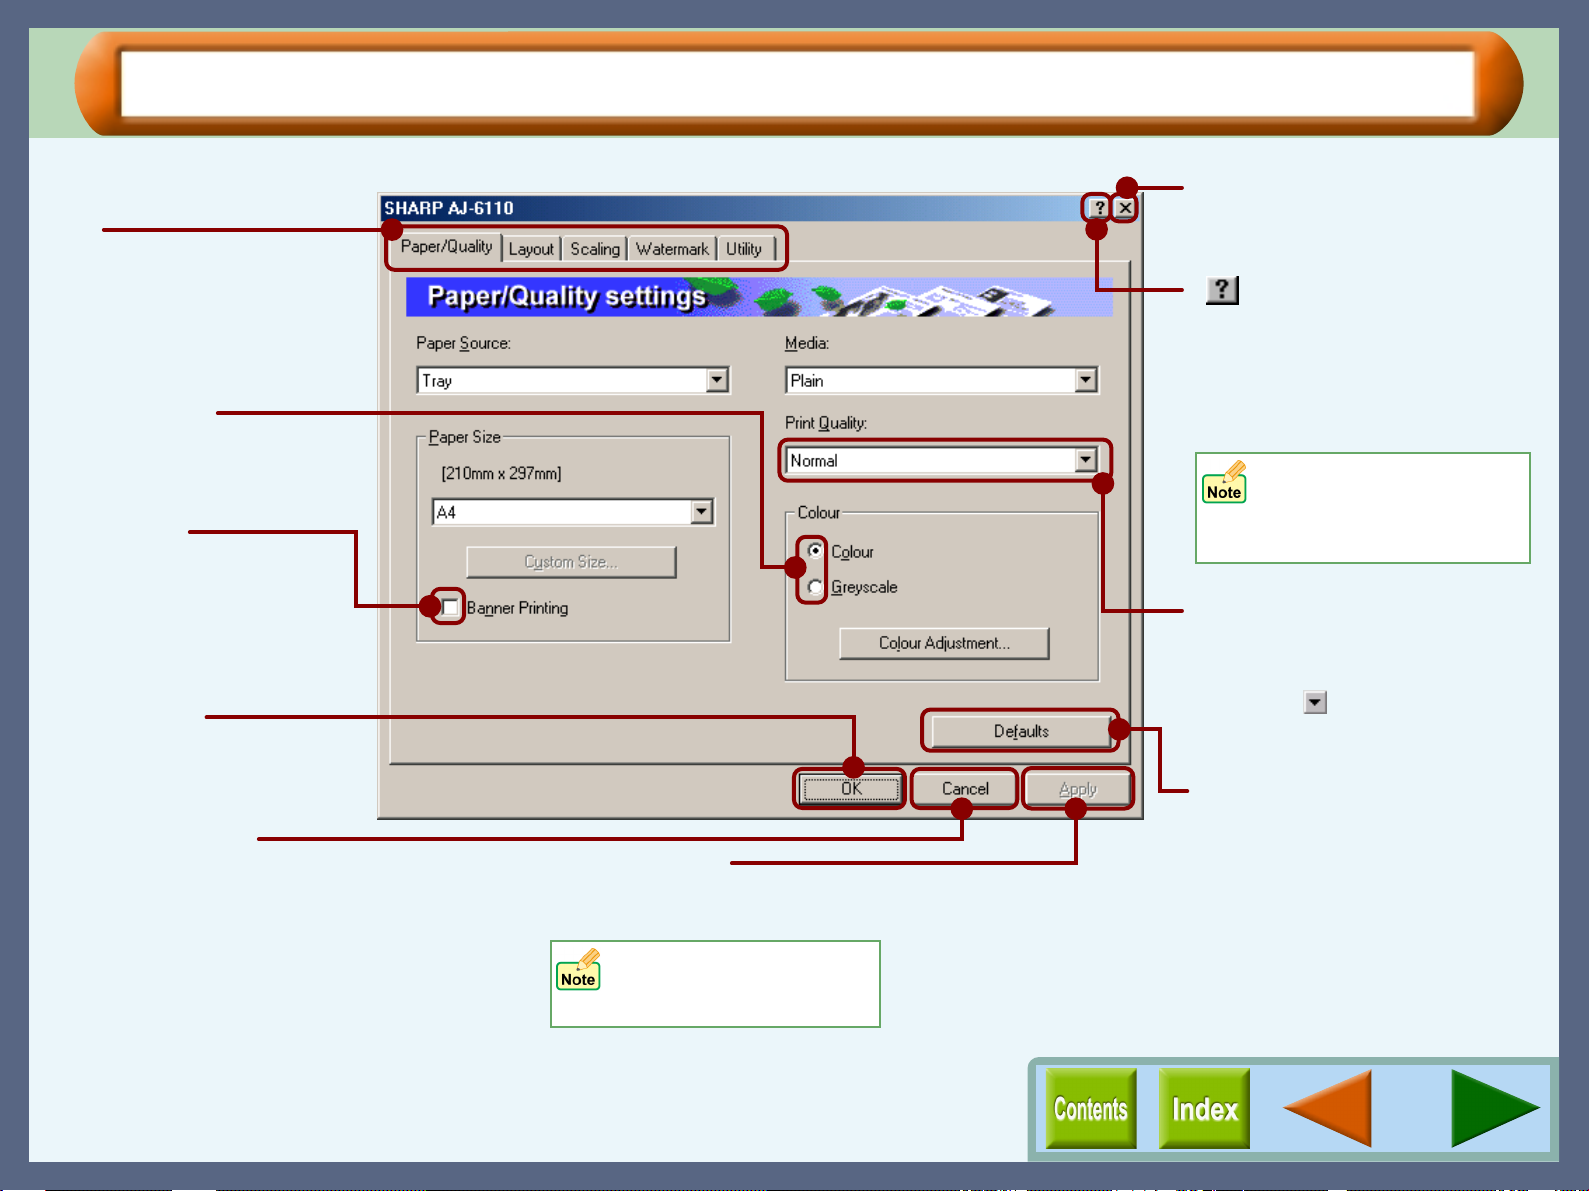
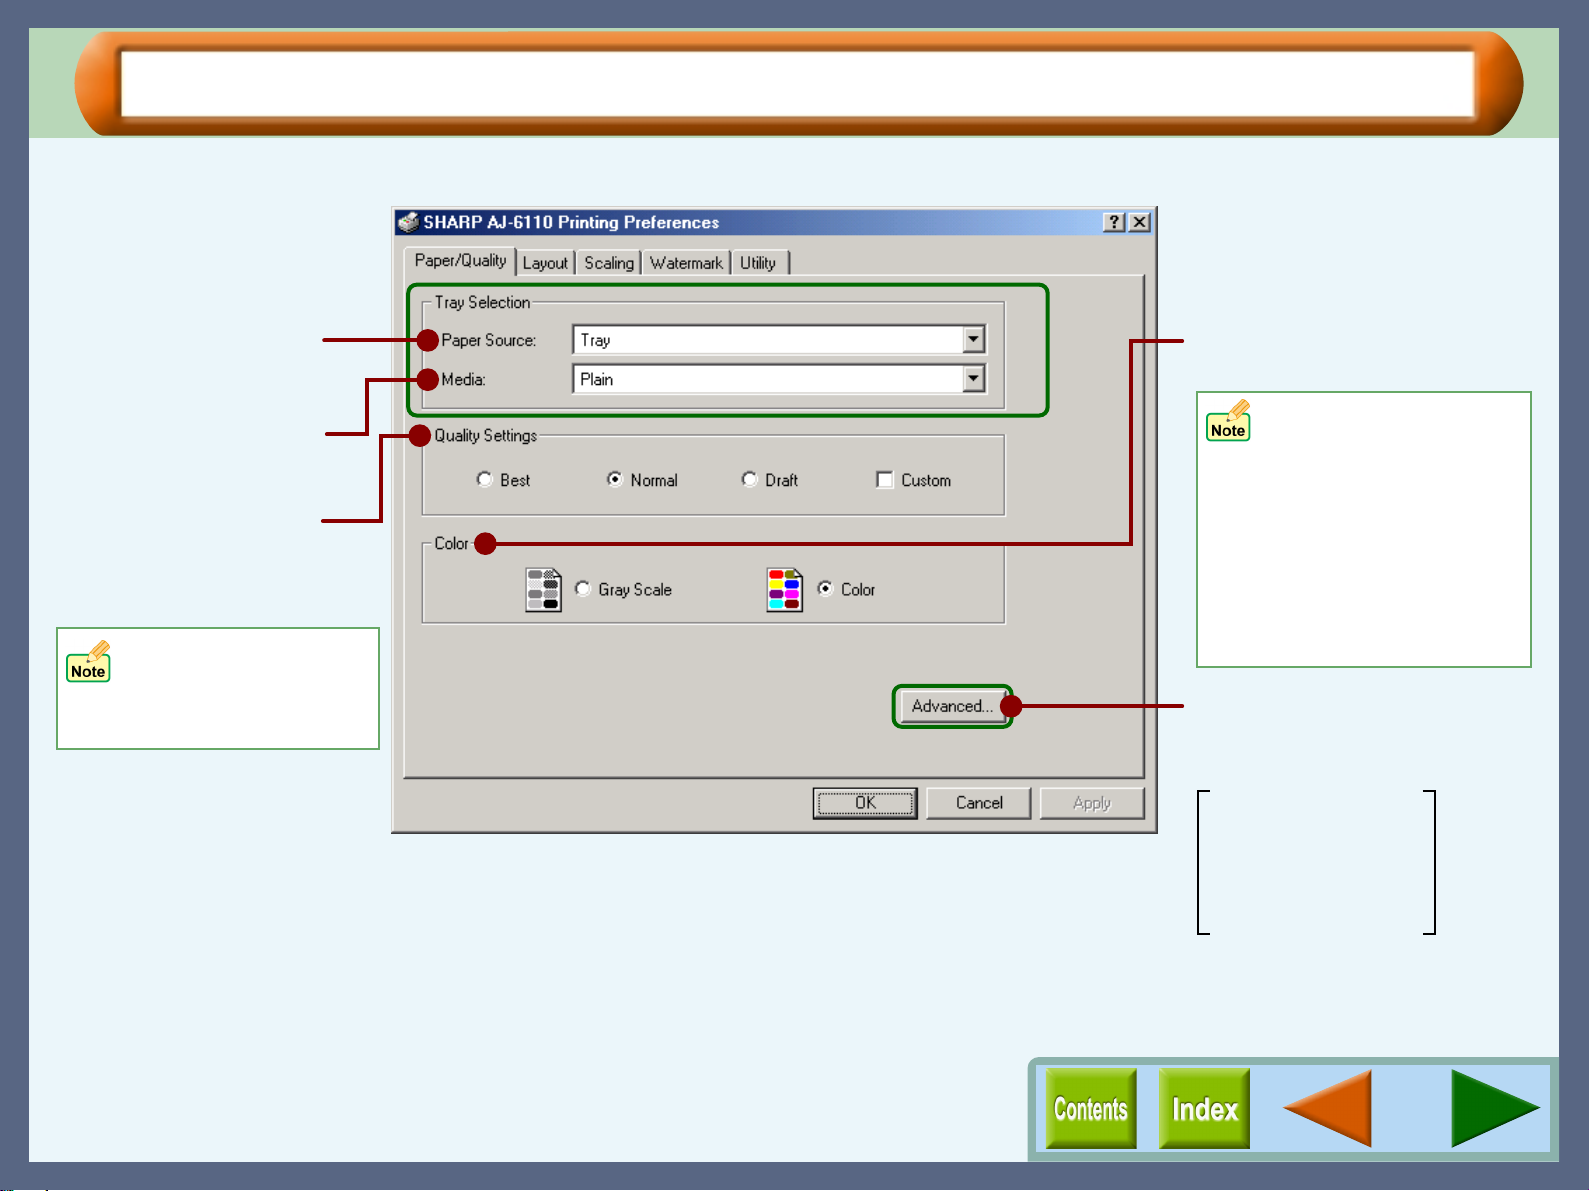
"Paper/Quality" Tab Settings (Windows 95/98/Me/NT 4.0) (part 1)
On this tab, specify settings related to paper or print quality.
Reference: Quality guaranteed area and printable area
Select the paper source.
Select the paper size for your
document.
Printer Driver Settings
Select the type of paper.
This option sets printing quality.
Set printer output preferences to
colour or greyscale.
When printing colour data
in greyscale mode, a small
amount of colour ink will
still be utilised. For this
reason, output colouration
will appear slightly different
from that obtained when
printing monochrome data.
On the above screen, click on options shown in the green boxes
to make additional changes.
Open to set output quality and
adjust colours.
Returns all user modified settings
back to default settings of this tab.
Paper Source: Tray
Media: Plain
Paper Size: A4 or Letter
Banner Printing: Off
Print Quality: Normal
Colour: Colour
8
Page 11

"Paper/Quality" Tab Settings (Windows 95/98/Me/NT 4.0) (part 2)
Paper Source
Select "Tray" or "Bypass" for your print job.
Printer Driver Settings
Media Description Media Usage
Tray
Paper is fed to the printer from the paper tray.
Bypass
Paper will be fed to the printer fro m the byp ass tra y. Only one
sheet can be loaded into the bypass tray. To prepare for printing
from the bypass tray, ope n the b ypass tray, al ign the pape r alon g
the paper guide and press the START button ( ) when prompted
by a message from the unit. The paper will be fed slightly into the
unit and print job preparation w ill t h en be comple ted.
When printing one page:
After loading paper into the bypass tray as described above, and
depressing the unit's S TAR T bu tto n ( ), select "Bypass" as the
setting for "Paper Source" to start the printing job.
When printing more than one page:
"Please set a sheet of paper on bypass and press the START
button" message will appear on the print status window wh en
printing of the f irst page has com pleted. Load the paper agai n for
the next page, and then press the START button ( ). Repeat
this process for each page.
Make sure to insert banner paper through the bypass tray.
Max. 5 sheets of banner paper can be set to the bypass
tray.
Media
Select the type of paper to be used. Select from "Plain",
"Coated", "Photo", "Transparency", "T-shirt transfer", and
"Card Stock". Insert the paper that was selected into the tray.
For more information on various paper types, refer to the
following table.
Plain Normal office paper
(copier paper and high
quality paper)
Coated The print side of coated
paper is whiter.
Photo The print side of photo
paper is glossy.
Transparency Overhead presentation on
clear film. The print side of
transparency film is
rougher.
T-shirt transfer This media is to be
transferred to cloth
materials by an iron.
Card Stock Thick plain paper Card printing
Corporate documents
Graphics, Images
Photographs
Overhead presentations
T-shirt, Place mat
! Be sure to use Sharp recommended OHP films
when you select "Transparency".
! If you select "T-shirt transfer", the original image will
be reversed on the printed media to make a proper
image on the T-shirt.
! When "Card Stock" is selected, be sure to turn the
paper knob to ( ) setting to feed the thicker card
stock.
! Depending on th is "Media" setting, some of the "Print
Quality" settings cannot be selected.
9
Page 12
"Paper/Quality" Tab Settings (Windows 95/98/Me/NT 4.0) (part 3)
Printer Driver Settings
Paper Size
Select an appropriat e paper size for your document from dr op-down
list.
Paper
Ledger (Fit to Page)
Letter
Legal
Executive
*
A4
A5
A6
B4 (Fit to Page)
B5
COM10
DL
C6
Invitation A2
Index card 5" x 8"
Index card 4" x 6"
Index card 3" x 5"
Custom
When "Ledger (Fit to Page)", "A3 (Fit to Page)" or "B4 (Fit
*
*
11" x 17"
*
8.5" x 11"
8.5" x 14"
7.25" x 10.5"
297mm x 420mmA3 (Fit to Page)
210mm x 297mm
148mm x 210mm
105mm x 148mm
257mm x 364mm
182mm x 257mm
4.125" x 9.5"
110mm x 220mm
114mm x 162mm
4.375" x 5.75"
5" x 8"
4" x 6"
3" x 5"
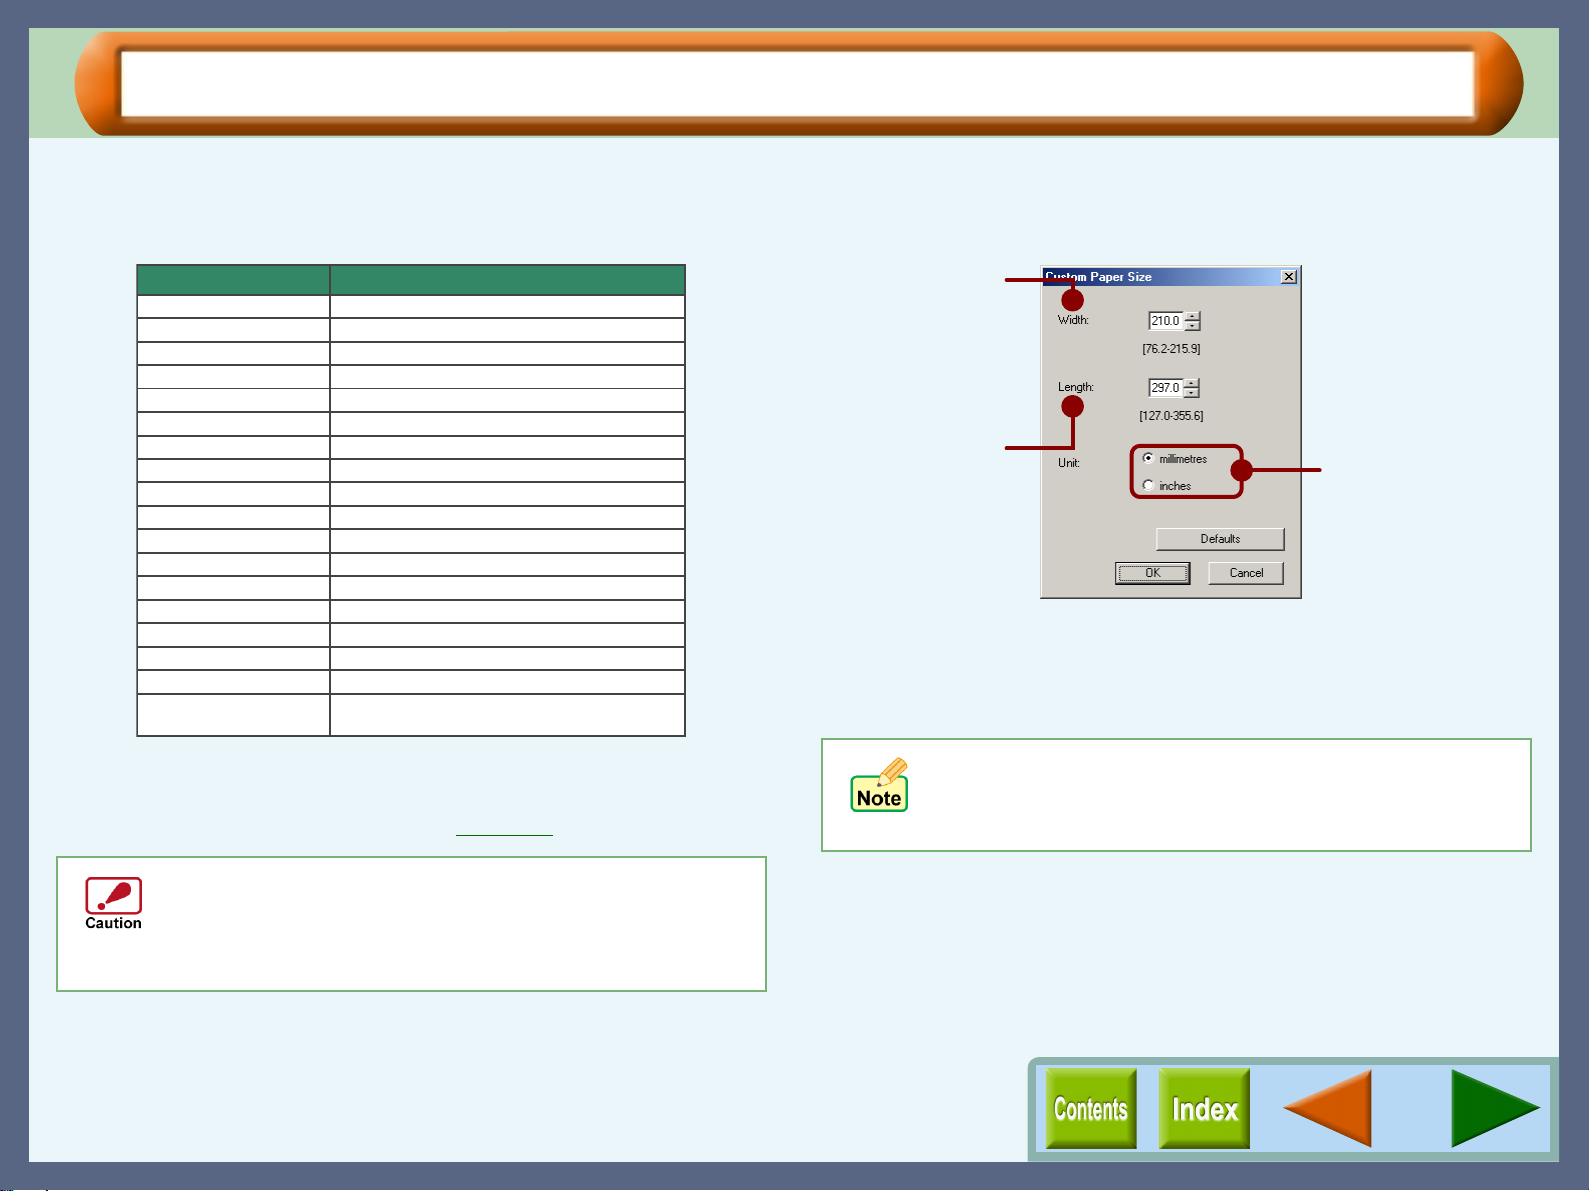
Min. : 76.2mm x 127.0mm (3.00" x 5.00")
Max. : 215.9mm x 355.6mm (8.50" x 14.00")
to Page)" is selected, the printing image will be sized to fit
A4 or Letter size. If you want the image to be sized to fit
other sizes of paper, select the "Fit to Page" box.
Size
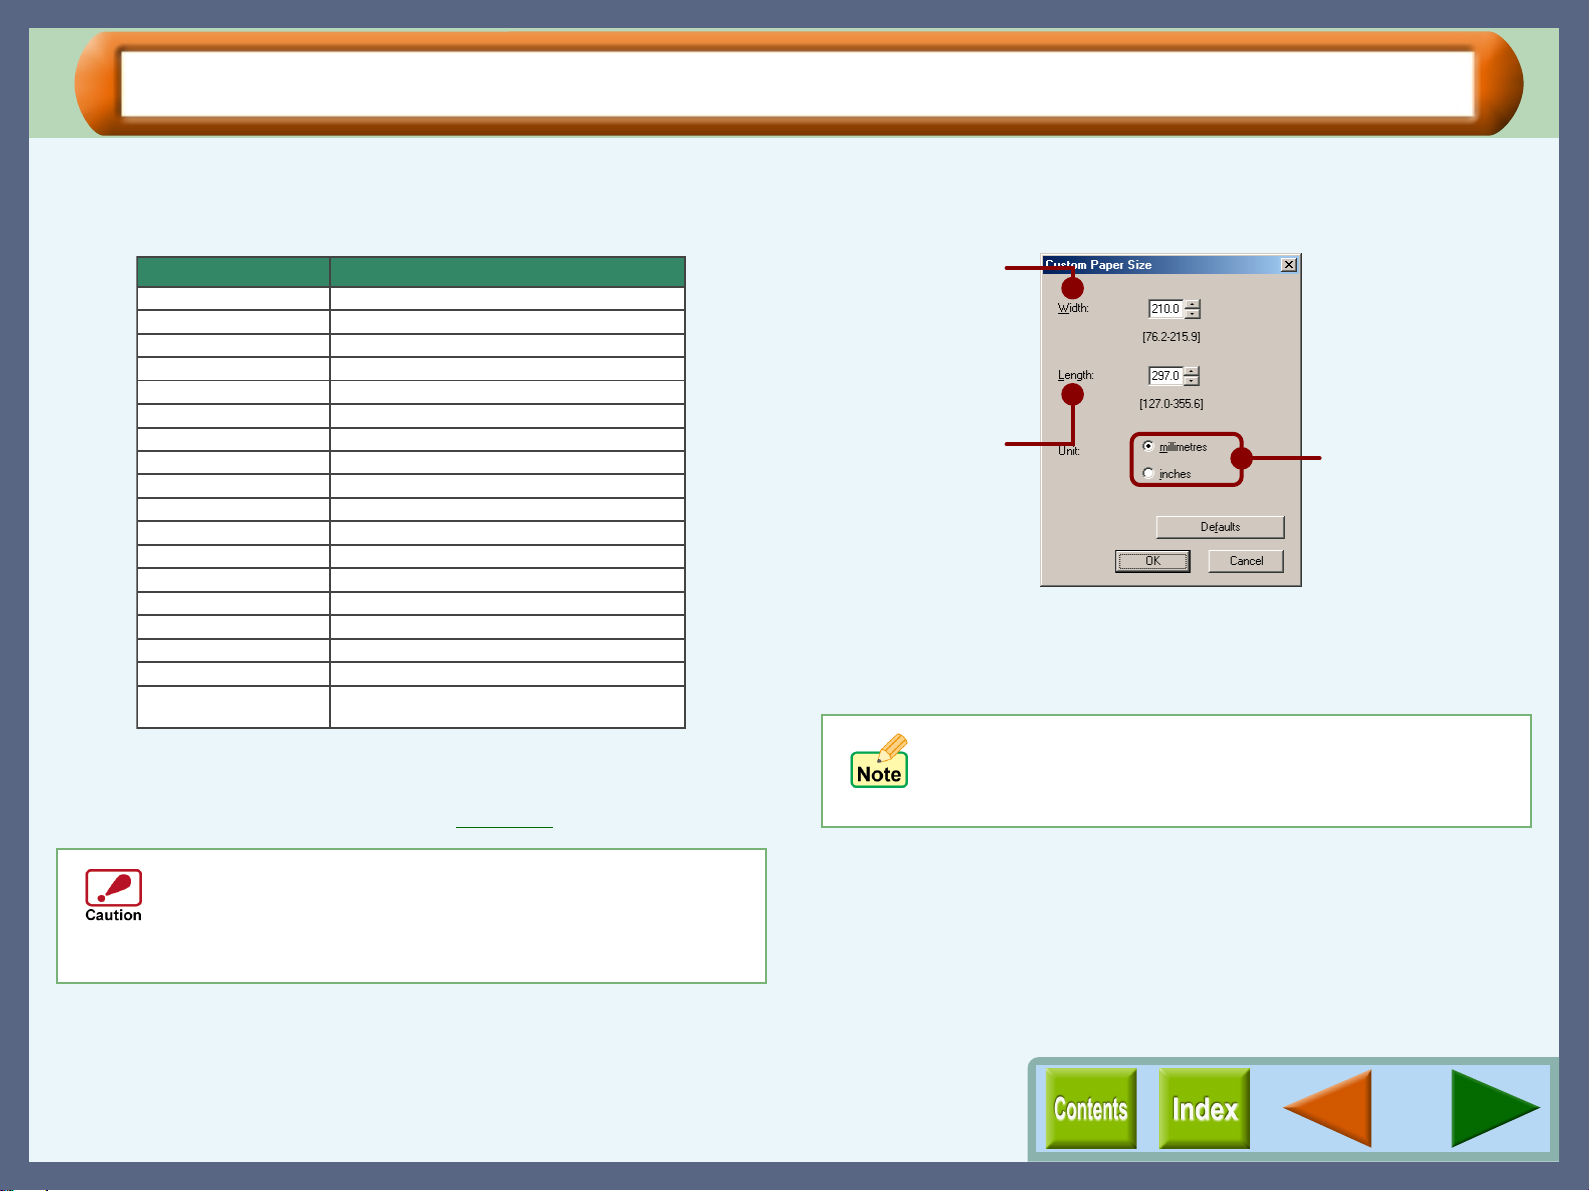
"Custom Size" button
Select "Custom" for "Paper Size" and then click this button to set
custom paper sizes for your document.
Click the up and down
arrows of the spin box, or
enter a number to
customize the width to
the custom paper you
wish to use.
Click the up and down
arrows of the spin box, or
enter a number to
customize the length to
the custom paper you
wish to use.
Select the units of
measurement for paper
size settings: either
"millimetres" or "inches".
Banner Printing
Enable/disable "Banner Printing" setting. When this setting is
enabled, you can print up to 5 pages of A4 or letter size data
continuously without any white blanks on the pag e borders.
!
When "Banner Printing" is enabled, "Bypass" is
automatically selected for "Paper Source" .
! "Banner Printing" is available when "A4" or "Let ter" is
selected for "Paper Size".
Generally, load the paper whose size corresponds to the
size you select for the " Paper Size". If you set di fferent size
of paper into the tray, you may fai l to pri nt successf ully. For
the detail of paper setting, refer to "LOADING PAPER" in
the Setup Guide and Operation Manual.
10
Page 13

"Paper/Quality" Tab Settings (Windows 95/98/Me/NT 4.0) (part 4)
Printer Driver Settings
Print Quality
This option sets printing speed and quality. You can trade off
speed for quality. "Draft" is the fastest and lowest quality,
"Best" is the slowest and best quality.
Draft
Sharp Rapid
Normal
Best
* The print quality also depends on the specified (loaded) paper type.
! If lines are broken when printing with "Draft", change
the setting to any other option.
! Some of the settings cannot be sele cted d epending
on the "Media".
Select this option when you want to print text data
with high speed. If you print graphics, illustrations, or
lines with this option, the print quality is low.
Select this option when you want to print a document
containing graphics or illustrations with high speed.
This option provides a lower print quality than
"Normal" or "Best".
This option offers you normal print quality with normal
print speed.
Select this option when you want to get high print
quality for photographs or images.
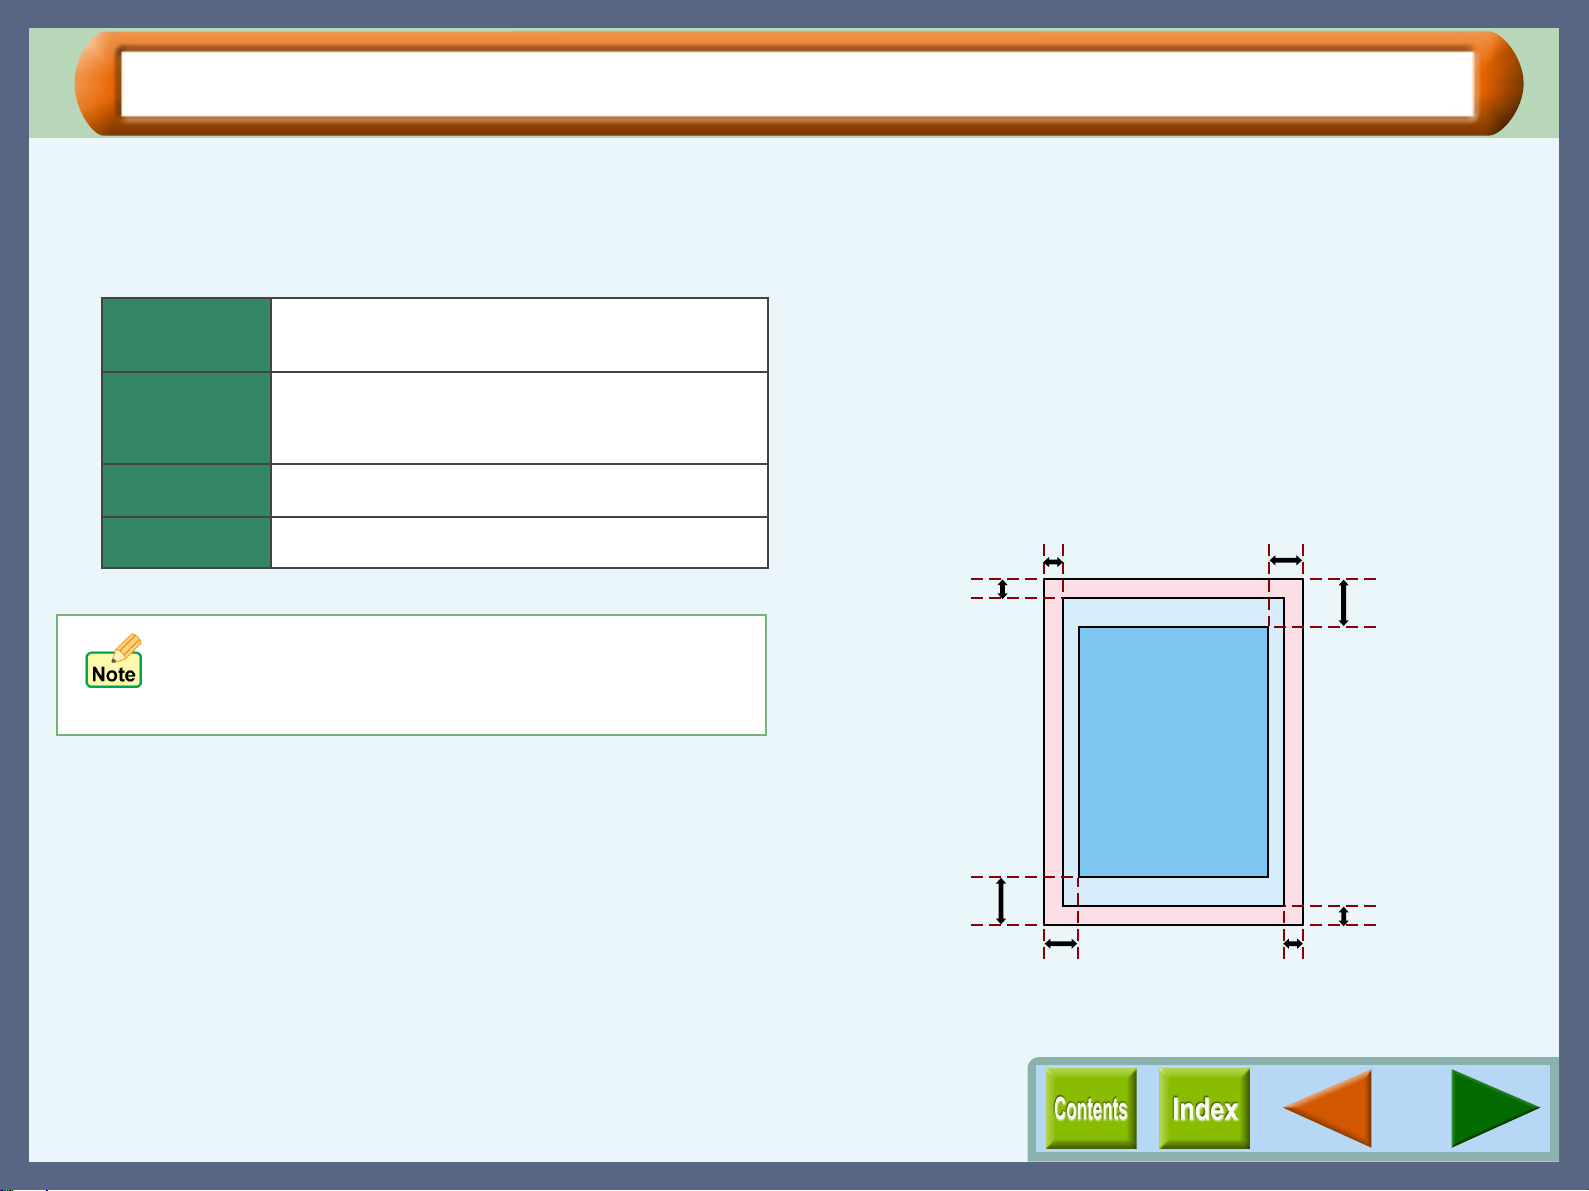
Quality guaranteed area and printable area
This printer can print onto the following area of the paper. It is
recommended that you specify margins from your application
to fit within the quality guaranteed area.
Quality guaranteed area
Guaranteed area is inside 19mm from the top / bottom edge of
the paper, and 10mm from the right / left edge of the paper.
Printable area
The void area of the print er d river is 3 mm fr om th e pap er ed ges.
The print quality may be degraded outside the guaranteed area
according to the contents of your document.
3mm
3mm
Printable area
Quality
guaranteed area
10mm
19mm
19mm
Printable area
10mm
3mm
3mm
11
Page 14
"Paper/Quality" Tab Settings (Windows 95/98/Me/NT 4.0) (part 5)
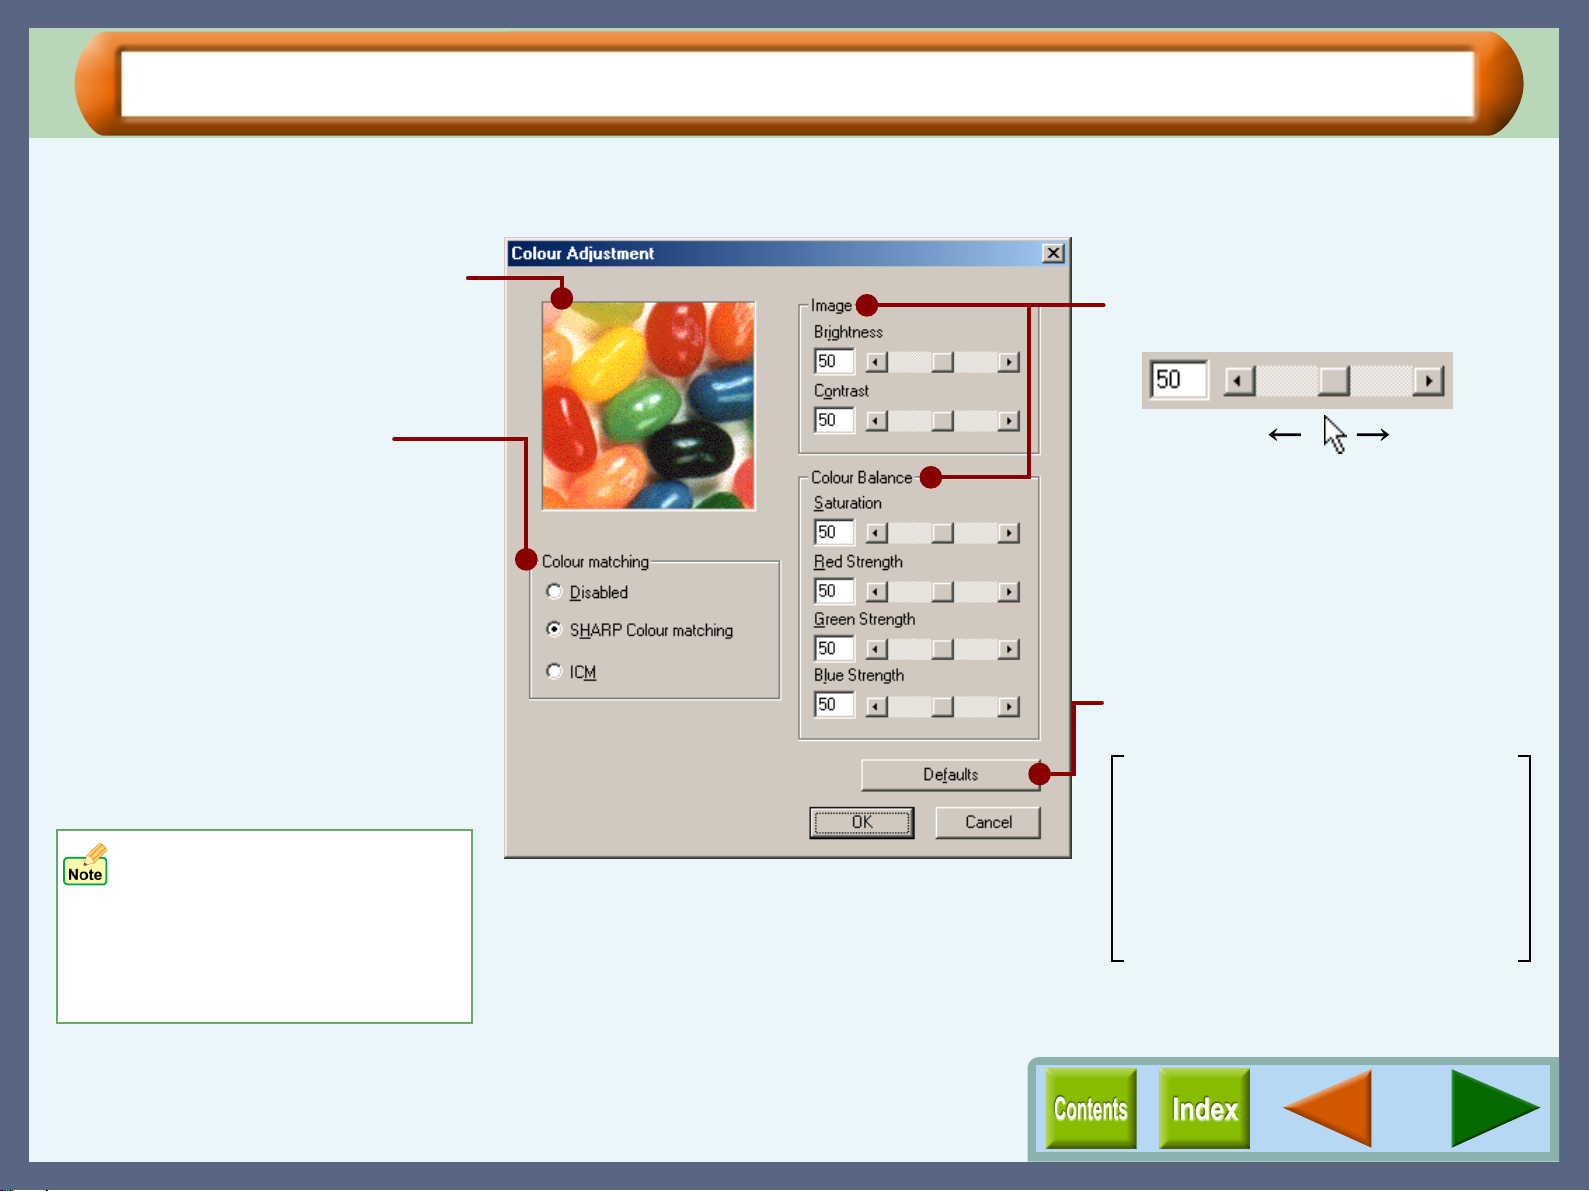
"Colour Adjustment" Settings
Set the colour matching as well as the brightness, contrast and colour balance of an image.
Check your colour image preferences
using this screen.
Set the brightness, contrast and colour
balance level of your print job here.
Printer Driver Settings
Allows you to select the Colour
Management System.
The Colour Management System
enables you to adjust the image colour
on your display to the result of the print
job.
SHARP Colour matching
Select this option to utilise SHARP's
original Colour Management System.
ICM
Select this option to utilise Windows
standard Colour Management
System.
• By selecting "ICM", both the
"Image" and "Colour Balance"
options become disabled.
• The "ICM" setting is
unavailable with Windows 95
or NT 4.0.
0% 100%
Directly enter the figure or move the
scroll bar.
Returns all user modified settings back
to default settings of this dialog box.
Colour matching: SHARP Colour matching
Brightness: 50%
Contrast: 50%
Saturation: 50%
Red Strength: 50%
Green Strength: 50%
Blue Strength: 50%
12
Page 15
"Paper/Quality" Tab Settings (Windows 2000/XP) (part 1)
On this tab, specify settings related to paper or print quality.
Printer Driver Settings
Select the paper source.
Select the type of paper.
This option sets printing
quality.
Select from "Best", "Normal",
and "Draft".
"Custom" is selected
automatically by changing
the "Print Quality" of
"Advanced" settings.
On the above screen, click on options shown in the green boxes
to make additional changes.
Set printer output preferences
to colour or greyscale.
When printing colour
data in greyscale mode,
a small amount of colour
ink will still be utilised.
For this reason, output
colouration will appear
slightly different from that
obtained when printing
monochrome data.
Click this button when
you intend to change the
settings below.
Paper Size,
Custom Size,
Banner Printing,
Print Quality,
Colour Adjustment
13
Page 16

"Paper/Quality" Tab Settings (Windows 2000/XP) (part 2)
Paper Source
Select "Tray" or "Bypass" for your print job.
Printer Driver Settings
Media Description Media Usage
Tray
Paper is fed to the printer from the paper tray.
Bypass
Paper will be fed to the printer fro m the byp ass tra y. Only one
sheet can be loaded into the bypass tray. To prepare for printing
from the bypass tray, ope n the b ypass tray, al ign the pape r alon g
the paper guide and press the START button ( ) when prompted
by a message from the unit. The paper will be fed slightly into the
unit and print job preparation w ill t h en be comple ted.
When printing one page:
After loading paper into the bypass tray as described above, and
depressing the unit's S TAR T bu tto n ( ), select "Bypass" as the
setting for "Paper Source" to start the printing job.
When printing more than one page:
"Please set a sheet of paper on bypass and press the START
button" message will appear on the print status window wh en
printing of the f irst page has com pleted. Load the paper agai n for
the next page, and then press the START button ( ). Repeat
this process for each page.
Make sure to insert banner paper through the bypass tray.
Max. 5 sheets of banner paper can be set to the bypass
tray.
Media
Select the type of paper to be used. Select from "Plain",
"Coated", "Photo", "Transparency", "T-shirt transfer", and
"Card Stock". Insert the paper that was selected into the tray.
For more information on various paper types, refer to the
following table.
Plain Normal office paper
(copier paper and high
quality paper)
Coated The print side of coated
paper is whiter.
Photo The print side of photo
paper is glossy.
Transparency Overhead presentation on
clear film. The print side of
transparency film is
rougher.
T-shirt transfer This media is to be
transferred to cloth
materials by an iron.
Card Stock Thick plain paper Card printing
Corporate documents
Graphics, Images
Photographs
Overhead presentations
T-shirt, Place mat
! Be sure to use Sharp recommended OHP films
when you select "Transparency".
! If you select "T-shirt transfer", the original image will
be reversed on the printed media to make a proper
image on the T-shirt.
! When "Card Stock" is selected, be sure to turn the
paper knob to ( ) setting to feed the thicker card
stock.
! Depending on th is "Media" setting, some of the "Print
Quality" settings on the "Advanced Op tions" cannot
be selected.
14
Page 17

"Advanced Options" Settings (Windows 2000/XP) (Part 1)
Printer Driver Settings
This dialog box appe ars when you click the "Advanc ed" button on the "Paper/Qual ity" tab. You can make detailed
settings fo r printing on this dialog box.
Reference: Quality guaranteed area and printable area
Select the paper size for your document.
Allows you to customize the size of the paper.
Enable/disable banner printing.
This option sets printing quality.
Open to set output quality and adjust colours.
On the above screen, click on options shown in
the green boxes to make additional changes.
15
Page 18
"Advanced Options" Settings (Windows 2000/XP) (Part 2)
Printer Driver Settings
Paper Size
Select an appropriate paper size for your document from dropdown list.
Paper
Ledger (Fit to Page)
Letter
Legal
Executive
*
A4
A5
A6
B4 (Fit to Page)
B5
COM10
DL
C6
Invitation A2
Index card 5" x 8"
Index card 4" x 6"
Index card 3" x 5"
Custom
When "Ledger (Fit to Page)", "A3 (Fit to Page)" or "B4 (Fit
*
*
11" x 17"
*
8.5" x 11"
8.5" x 14"
7.25" x 10.5"
297mm x 420mmA3 (Fit to Page)
210mm x 297mm
148mm x 210mm
105mm x 148mm
257mm x 364mm
182mm x 257mm
4.125" x 9.5"
110mm x 220mm
114mm x 162mm
4.375" x 5.75"
5" x 8"
4" x 6"
3" x 5"
Min. : 76.2mm x 127.0mm (3.00" x 5.00")
Max. : 215.9mm x 355.6mm (8.50" x 14.00")
to Page)" is selected, the printing image will be sized to fit
A4 or Letter size. If you want the image to be sized to fit
other sizes of paper, select the "Fit to Page" box.
Size
"Setup" button (Custom Size)
Select "Custom" for "Paper Size" and then click this button to
set custom paper sizes for your document.
Click the up and down
arrows of the spin box, or
enter a number to
customize the width to
the custom paper you
wish to use.
Click the up and down
arrows of the spin box, or
enter a number to
customize the length to
the custom paper you
wish to use.
Select the units of
measurement for paper
size settings: either
"millimetres" or "inches".
Banner Printing
Enable/disable "Banner Printing" setting. When this setting is
enabled, you can print up to 5 pages of A4 or letter size data
continuously without any white blanks on the page borders.
! When "Banner Printing" is enabled, "Bypass" is
automatically selected for "Paper Source" .
! "Banner Printing" is available when "A4" or "Let ter" is
selected for "Paper Size".
Generally, load the paper whose size corresponds to the
size you select for the " Paper Size". If you set di fferent size
of paper into the tray, you may fai l to pri nt successf ully. For
the detail of paper setting, refer to "LOADING PAPER" in
the Setup Guide and Operation Manual.
16
Page 19
"Advanced Options" Settings (Windows 2000/XP) (Part 3)
Printer Driver Settings
Print Quality
This option sets printing speed and quality. You can trade off
speed for quality. "Draft" is the fastest and lowest quality,
"Best" is the slowest and best quality.
Draft
Sharp Rapid
Normal
Best
* The print quality also depends on the specified (loaded) paper type.
! If lines are broken when printing with "Draft", change
the setting to any other option.
! Some of the settings cannot be sele cted d epending
on the "Media" setting on the "Paper/Quality" tab.
Select this option when you want to print text data
with high speed. If you print graphics, illustrations, or
lines with this option, the print quality is low.
Select this option when you want to print a document
containing graphics or illustrations with high speed.
This option provides a lower print quality than
"Normal" or "Best".
This option offers you normal print quality with normal
print speed.
Select this option when you want to get high print
quality for photographs or images.
Quality guaranteed area and printable area
This printer can print onto the following area of the paper. It is
recommended that you specify margins from your application
to fit within the quality guaranteed area.
Quality guaranteed area
Guaranteed area is inside 19mm from the top / bottom edge of
the paper, and 10mm from the right / left edge of the paper.
Printable area
The void area of the print er d river is 3 mm fr om th e pap er ed ges.
The print quality may be degraded outside the guaranteed area
according to the contents of your document.
3mm
3mm
Printable area
Quality
guaranteed area
10mm
19mm
19mm
Printable area
10mm
3mm
3mm
17
Page 20
"Advanced Options" Settings (Windows 2000/XP) (Part 4)
"Colour Adjustment" Settings
Set the colour matching as well as the brightness, contrast and colour balance of an image.
Check your colour image preferences
using this screen.
Allows you to select the Colour
Management System.
The Colour Management System
enables you to adjust the image colour
on your display to the result of the print
job.
SHARP Colour matching
Select this option to utilise SHARP's
original Colour Management System.
ICM
Select this option to utilise Windows
standard Colour Management
System.
Set the brightness, contrast and colour
balance level of your print job here.
Directly enter the figure or move the
scroll bar.
Returns all user modified settings back
to default settings of this dialog box.
Printer Driver Settings
0% 100%
By selecting "ICM", both the
"Image" and "Colour Balance"
options become disabled.
Colour matching: SHARP Colour matching
Brightness: 50%
Contrast: 50%
Saturation: 50%
Red Strength: 50%
Green Strength: 50%
Blue Strength: 50%
18
Page 21
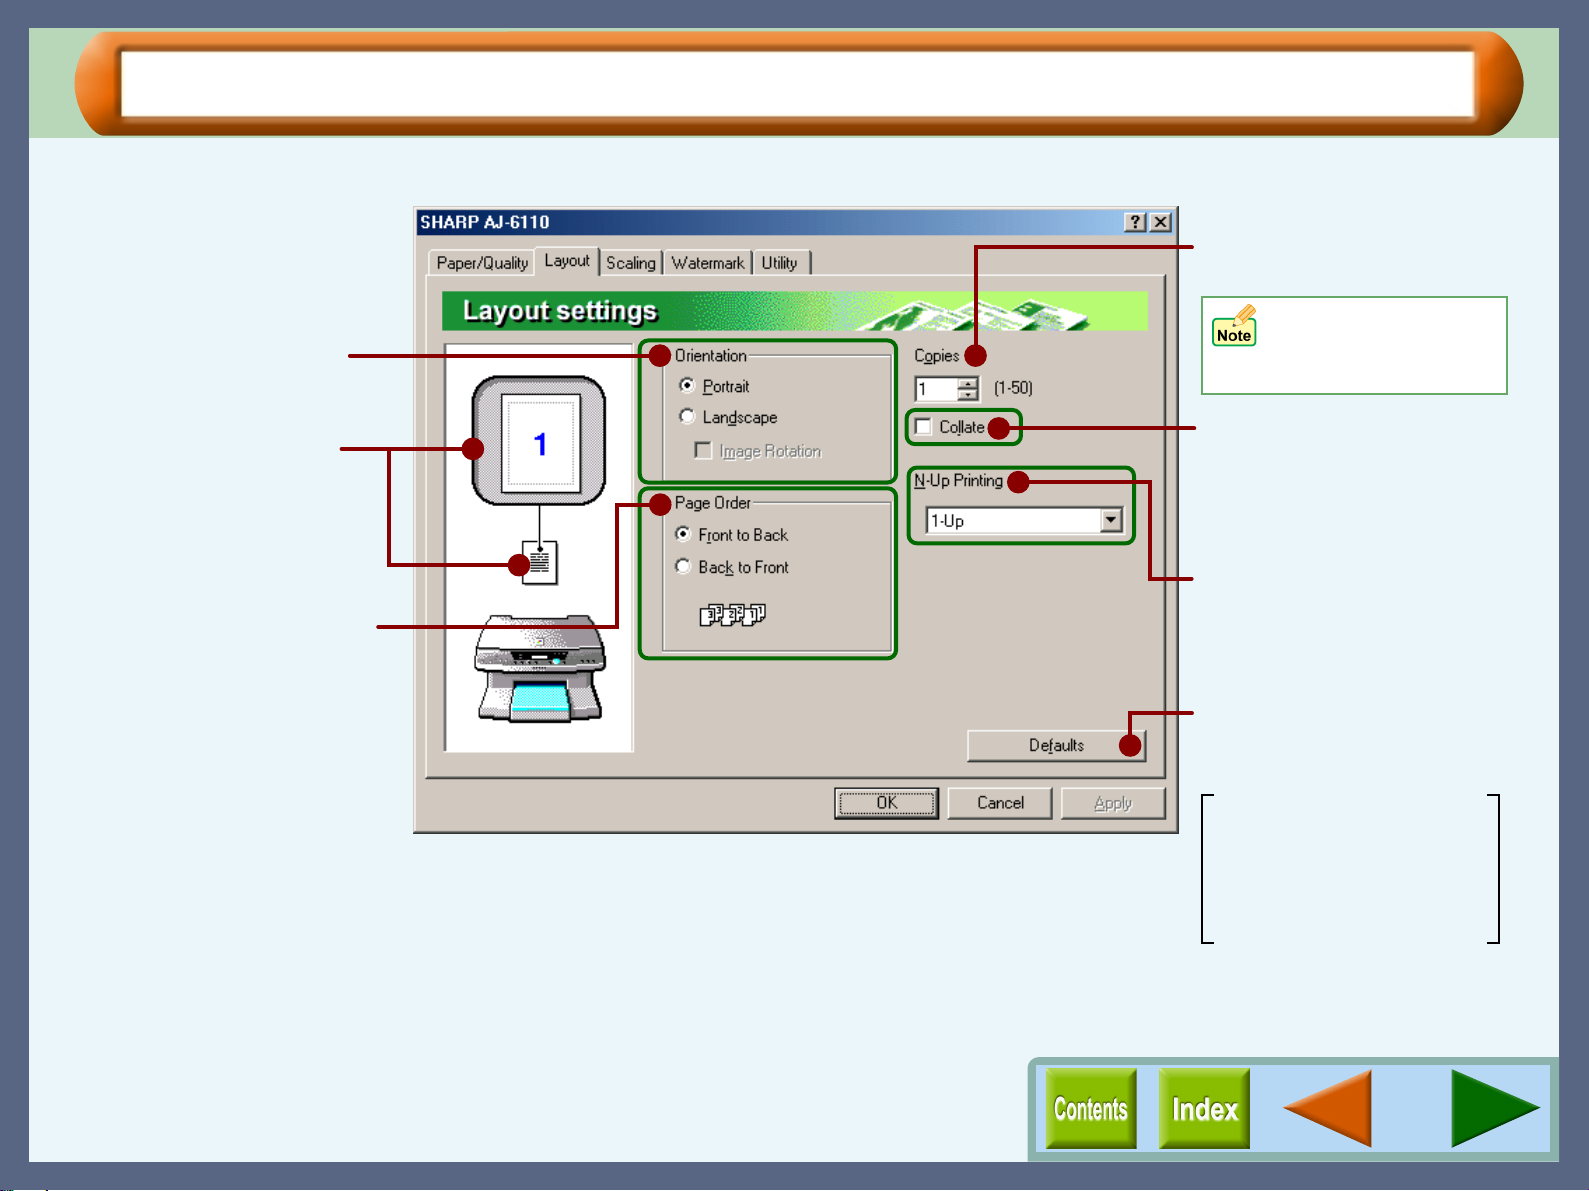
"Layout" Tab Settings (part 1)
On this tab, specify a preferred option for each setting for output layout.
Select the orientation for
your documents.
Printer Driver Settings
Set the number of copies
between 1 - 50.
Not available when
"Banner Printing" is
enabled.
The settings you made at
"Banner Printing",
"Orientation", "N-Up Printing"
and "Poster Printing" are
shown in this image.
Choose the output order of
pages when printing
multiple pages.
On the above screen, click on options shown in the green boxes
to make additional changes.
Check this box when you
want to print multiple pages
of document as collated
sets.
Set this feature to place
multiple reduced pages onto
a single page.
Returns all user modified
settings back to default
settings of this tab.
Orientation: Portrait
Page Order: Front to Back
Copies: 1
Collate: Off
N-Up Printing: 1-Up
19
Page 22
"Layout" Tab Settings (part 2)
Printer Driver Settings
Orientation
Set the orientation for your documents either to "Portrait" or
"Landscape".
Portrait
Check this setting to print your documents vertically.
Landscape
Check this setting to print your documents horizontally.
Image Rotation
Enable/disable "Ima ge Rotation" whic h rotates the printed ima ge
by 180 degree. This function is available if "Landscape" is
selected for the "Orientation".
Image Rotation: On
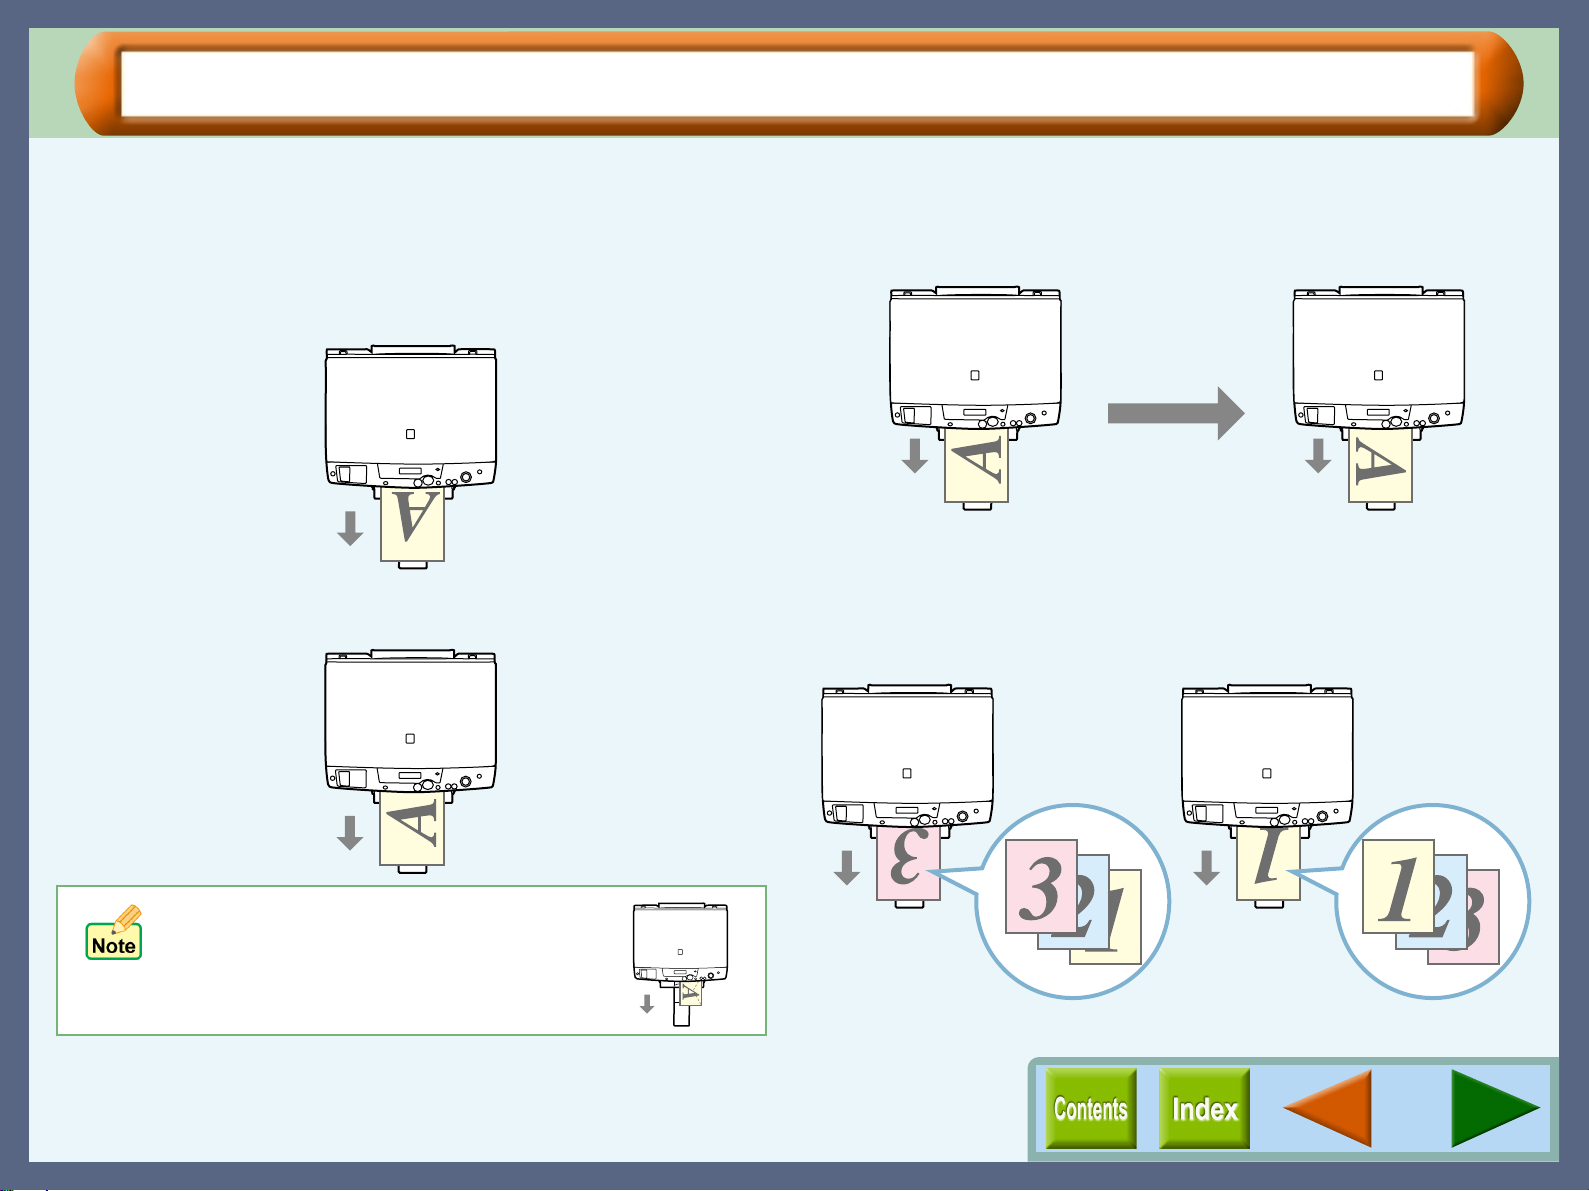
Page Order
Use this setting to specify the output order of multiple pages.
You can select "Front to Back" or "Back to Front".
Front to Back Back to Front
If "COM10", "DL", "C6", or "Invitation
A2" is selected for the "Paper Size"
setting and set to "Landscape", the
paper will be output in the orientation
shown in the right illustration.
20
Page 23
"Layout" Tab Settings (part 3)
Printer Driver Settings
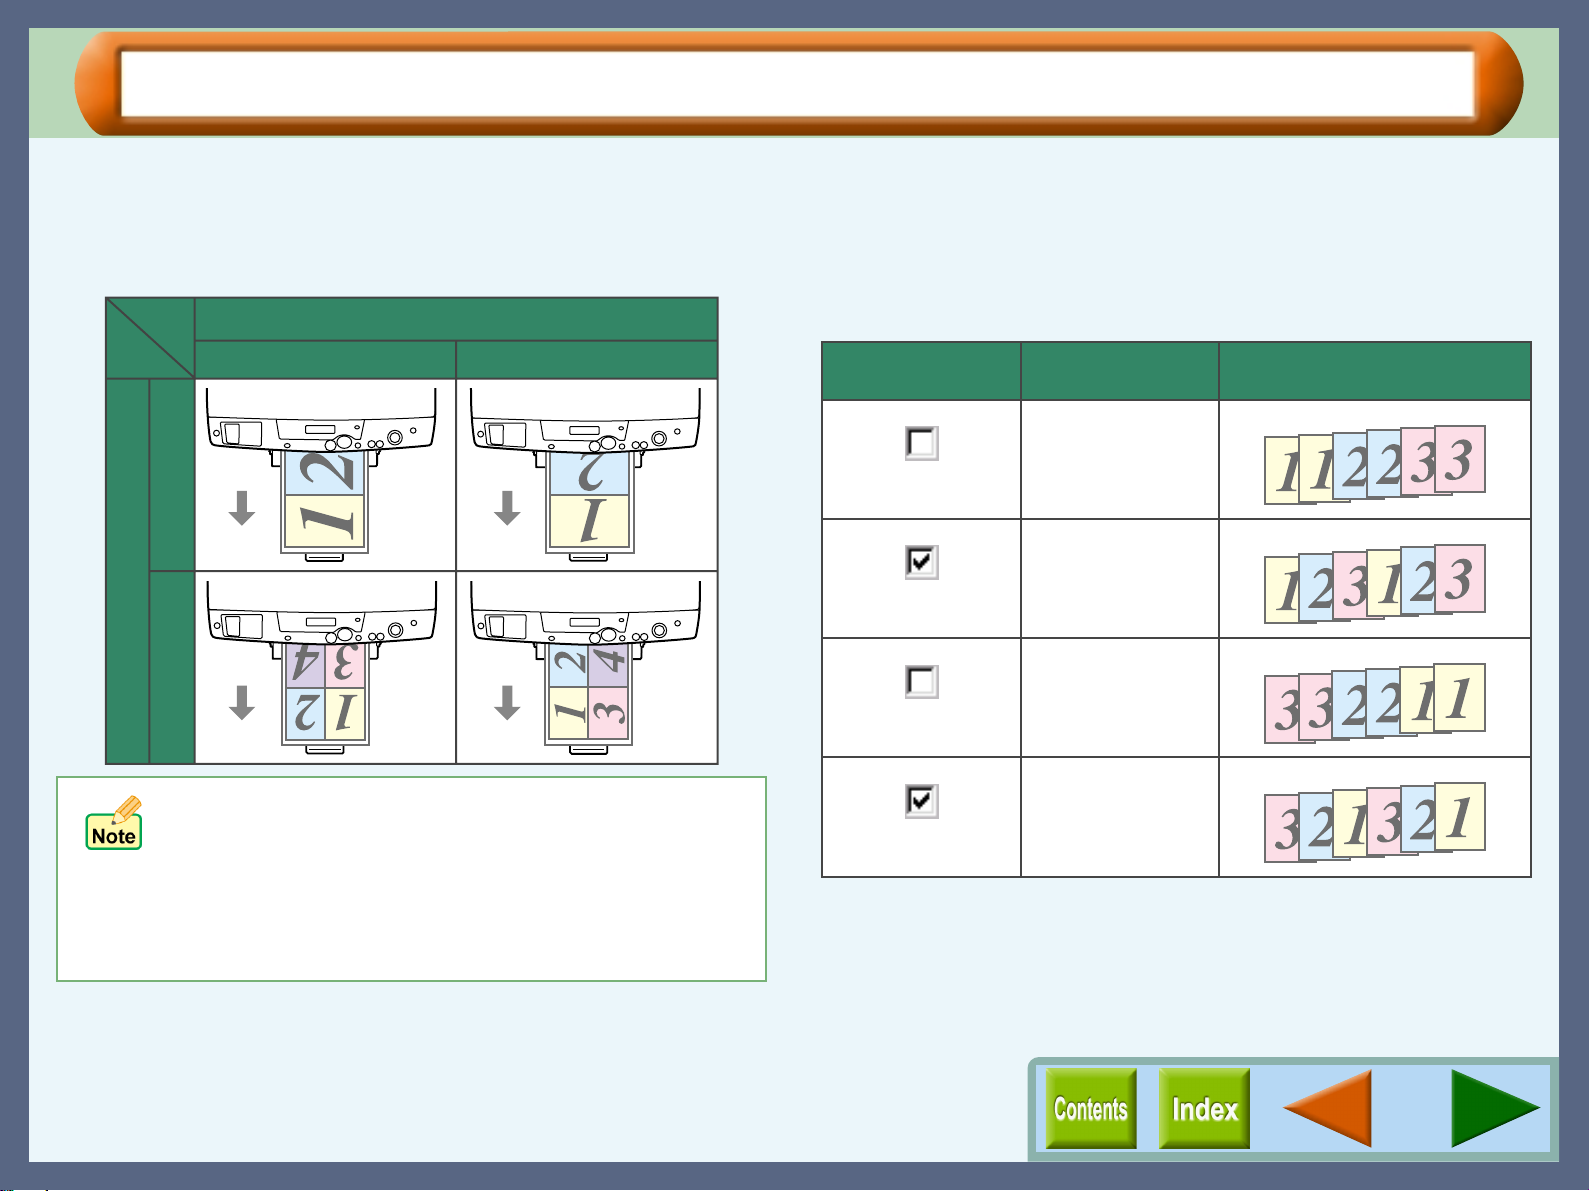
N-Up Printing
Set this feature to place multiple reduced pages onto a single
page. Select the "2-Up" option to copy two pages or the "4-Up"
option to copy four pages onto a single printed page.
Orientation
Portrait Landscape
N-Up Printing
4-Up 2-Up
Collate
When multiple copies are printed, this setting places each copy
in numerical order.
For more detailed information, refer to the table below.
Example: When printing out two copies of a three-page document.
Collate Page Order Output Result
Front to Back
Front to Back
Back to Front
! The illustrations above assume that the paper size
selected for "Paper Si ze" setti ng co rre sponds to th e
size of paper in the tray.
! When "Ledger (Fit to Pag e)", "A3 (Fit to Pa ge)", "B 4
(Fit to Page)", "COM10", "DL", "C6", "Invitation A2"
or "Custom" is selected for "Paper Size", "N-Up
Printing" is not available.
Back to Front
21
Page 24
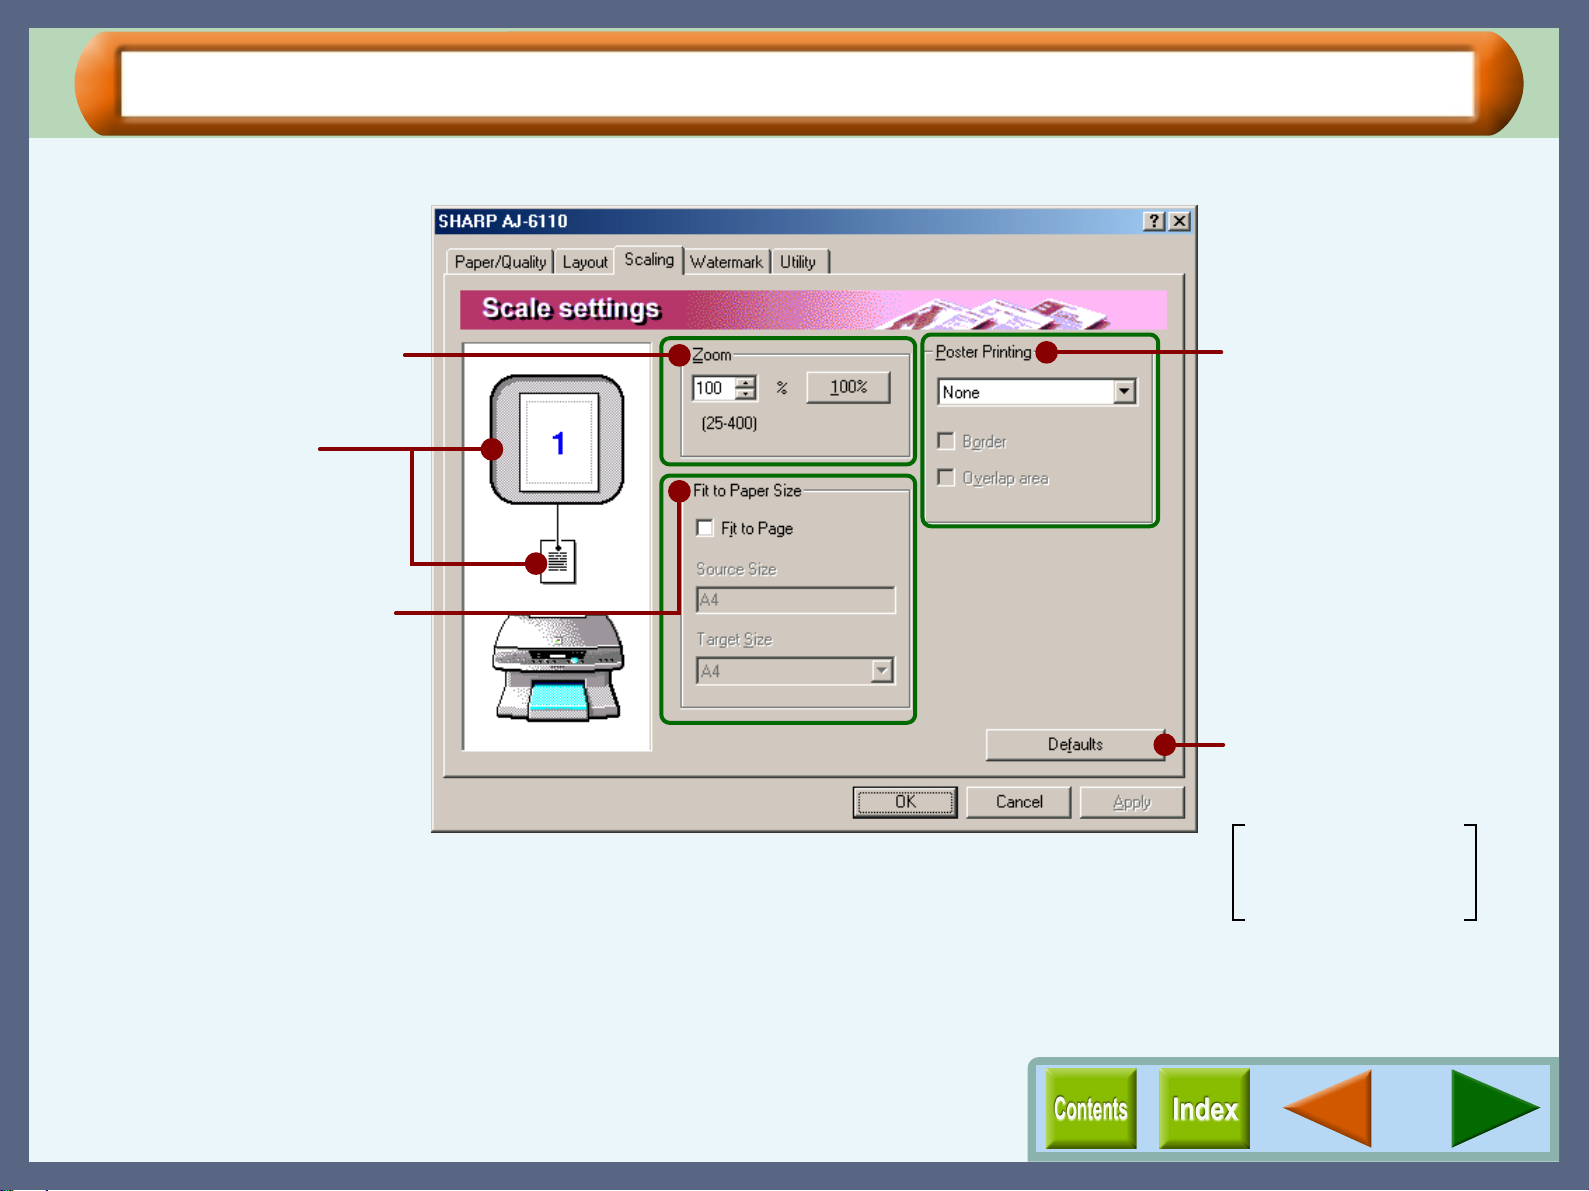
"Scaling" Tab Settings (part 1)
Printer Driver Settings
On this tab, set the preferences for enlarging/reducing your document and poster printing.
Allows you to reduce or enlarge
the size of the print.
The settings you made at
"Banner Printing", "Orientation",
"N-Up Printing" and "Poster
Printing" are shown in this image.
Enlarges/reduces the image to
fit to the size of paper in the
printer.
On the above screen, click on options shown in the green boxes
to make additional changes.
Enables you to print an
enlarged image of onepage document onto
separated multiple sheets
(4, 9, or 16 sheets).
Returns all user modified
settings back to default
settings of this tab.
Zoom: 100%
Fit to Page: Off
Poster Printing: None
22
Page 25
"Scaling" Tab Settings (part 2)
Printer Driver Settings
Zoom
Allows you to reduce or enlarge the size of the print from 25%
to 400% in 1% increments.
"100%" button
Click to return to 100% (default setting).
"Zoom" setting is not available when any of "Banner
Printing", "Fit to Paper Size", "N-Up Printing", or
"Poster Printing" setting is enabled.
Fit to Paper Size
Fit to Page
Check this box to fit the document size to the paper size in the
printer automatically.
Source Size
The specified "Paper Size" appears in this box. Make sure that
the size appearing in this box corresponds to the do cument siz e.
Target Size
Select the size of the paper loaded in the printer.
! When "COM10 ", "DL", "C6" or "Invitation A2" is
selected for "Paper Size", "Zoom" and "Fit to Paper
Size" settings are disabled.
! "Fit to Paper Size" setting is no t availa ble when any
of "Banner Printing", "N-Up Printing", or "Poster
Printing" setting is enabled.
Poster Printing
Select the number of sheets for "Poster Printing". "2 x 2" (4 sheets),
"3 x 3" (9 sheets), and "4 x 4" (16 sheets) are available.
Border
The border of each sheet is printed as shown in the illustration below
when this option is checked. This setting is usef ul for cropping margins
or pasting the sheets to each other.
Border
Overlap area
Check this option to print overlapped images on multiple sheets. Use
this setting when you intend to paste the sheets without any space on
the joint.
The same portion
of the image is
printed on both
sheets.
!
When "Ledger (Fit to Page)", "A3 (Fit to Page)", "B4 (Fit
to Page)", "COM10", "DL", "C6", "Invitation A2" or
"Custom" is selected for " Paper Size", "Poster Printing" is
not available.
!
"Poster Printing" setting is not available when any of
"Banner Printing", "Fit to Paper Size", or "N-Up Printing"
setting is enabled.
23
Page 26
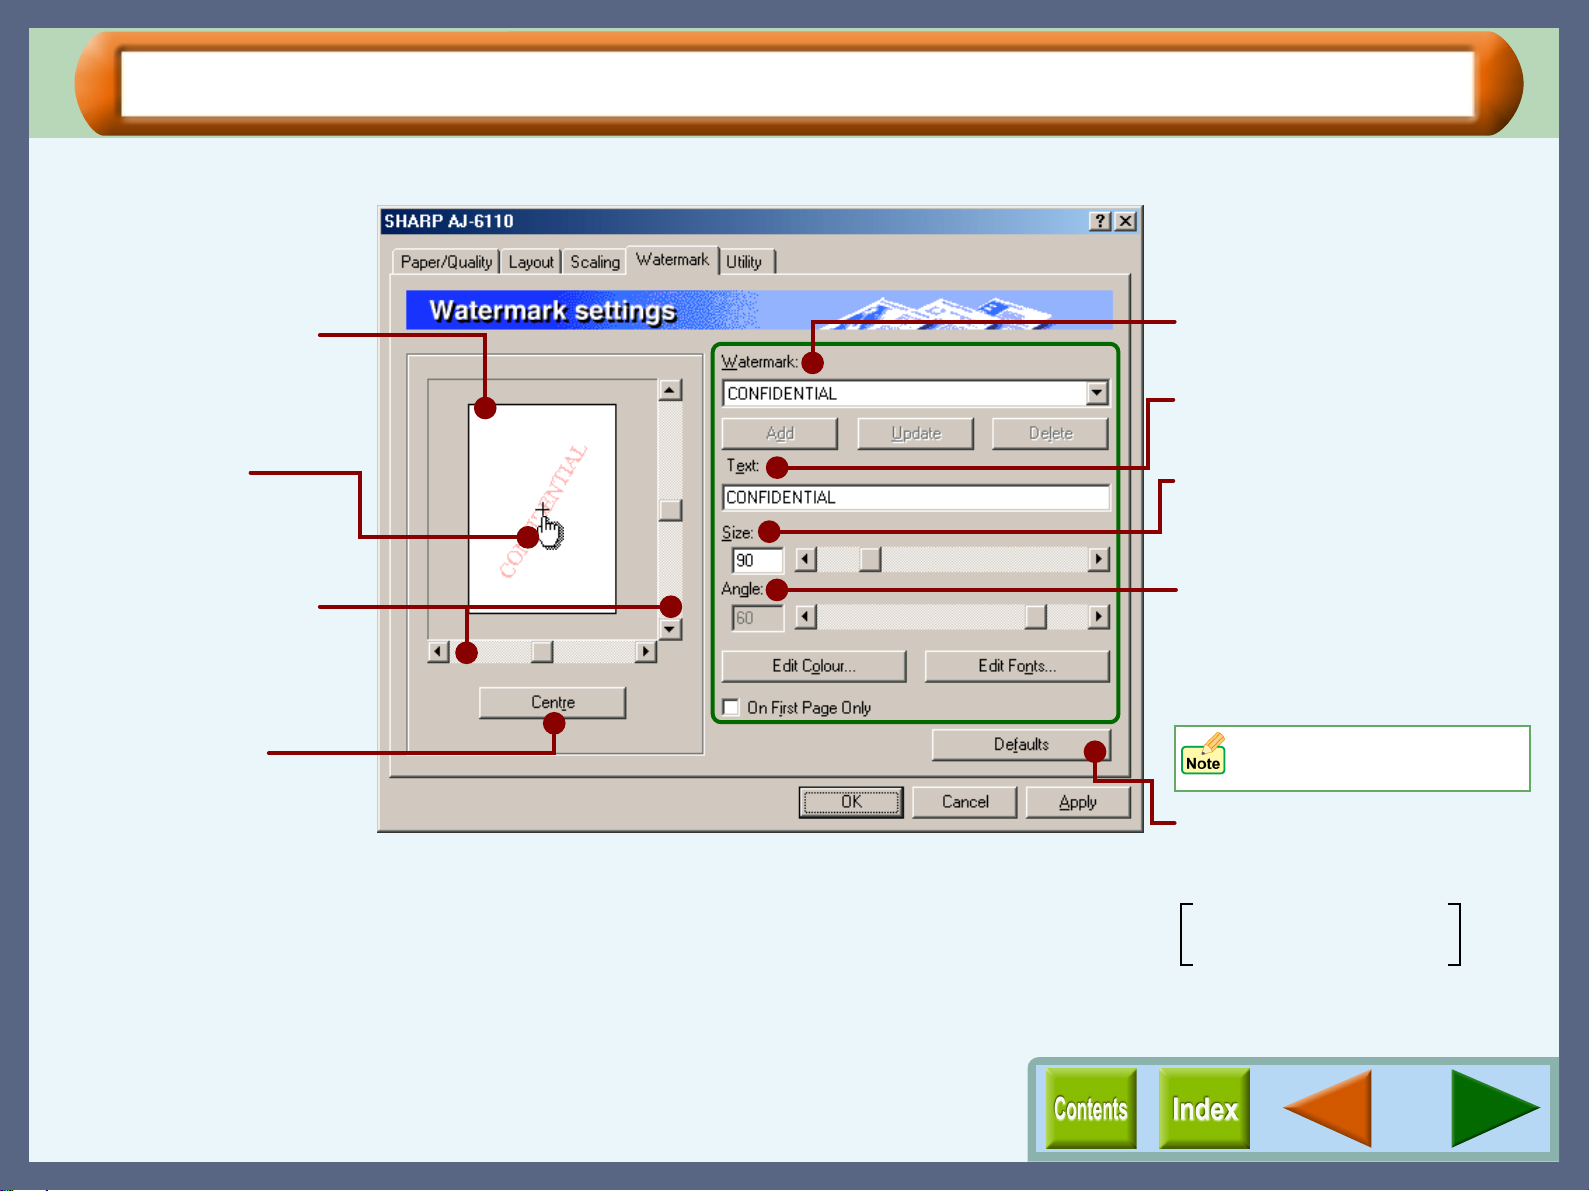
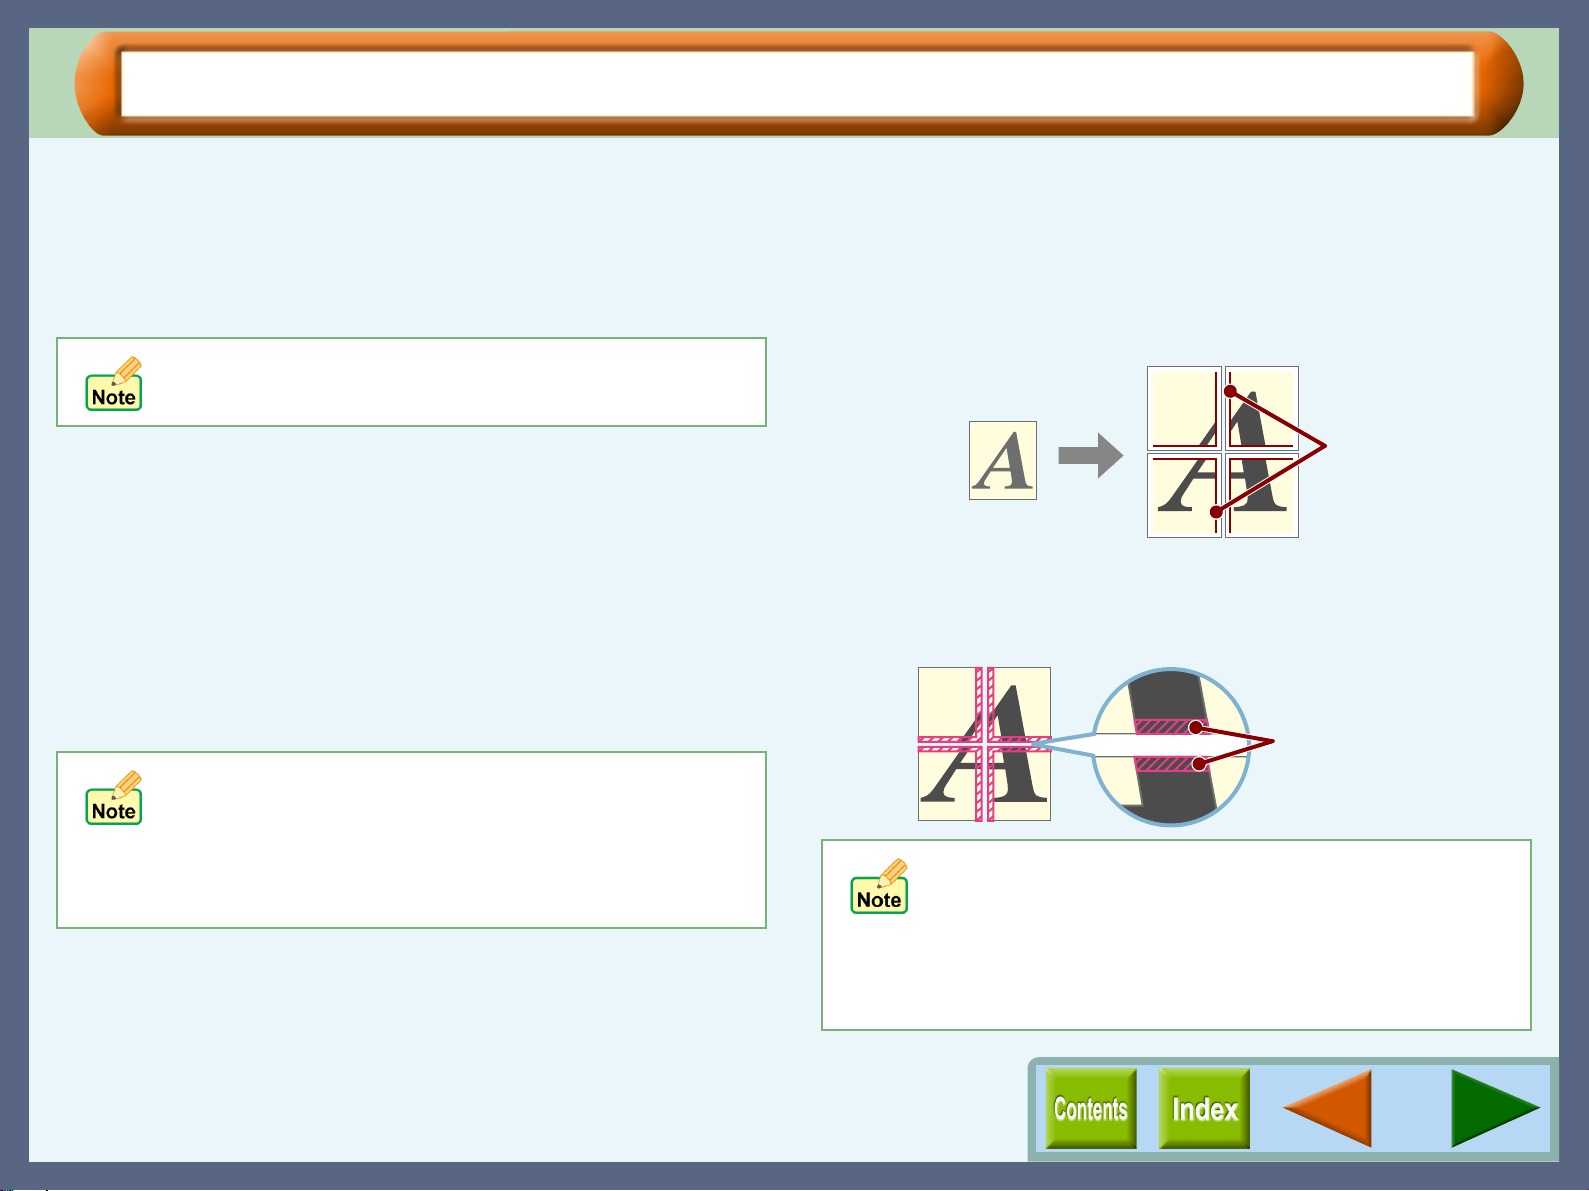
"Watermark" Tab Settings (part 1)
Use this screen to set watermarks.
Printer Driver Settings
Use this screen to view
how the watermark will
appear on your
document.
You can drag the
watermark to your
favourite place by using
the mouse.
Move the location of the
watermark using the
scroll bar.
Click this button to
centre a watermark in
the middle of the
document.
On the above screen, click on options shown in the green boxes
to make additional changes.
Select the type of watermark.
Create your original watermark
in this box.
Use the scroll bar or enter a
figure to set the font size of a
watermark from 6 to 500 points.
Use the scroll bar to set the
print angle of a watermark from
-90 to 90 degree.
(The angle can be set in 15
degree multiples.)
You cannot type the desired
angle value in this field.
Returns all user modified
settings back to default settings
of this tab.
Watermark: (None)
On First Page Only: Off
24
Page 27
"Watermark" Tab Settings (part 2)
Printer Driver Settings
Watermark
Select a watermark from the drop-down list. Select from "TOP
SECRET", "CONFIDENTIAL", "DRAFT", "ORIGINAL" and
"COPY". No watermark will appear on the document if
"(None)" is selected.
Text
To add a new wat ermar k, t ype i n the pre ferr ed cha racte rs in thi s
box, and then click the "Add" button.
To change your original watermark, select the watermark to be
changed from the drop-down list of "Watermark", change the
characters appearing in this box appropriately, and then click the
"Update" button.
"Update" button
Select your original watermark from the drop-down list. After
adjusting the size and angle to suit your preferences, click the
"Update" button to save.
You cannot permanently save changes to the size and
angle of a default watermark using this button. To
permanently save all new changes, use the "Add" button.
"Add" button
Enter your text over the currently displayed text and click this
button to add a new watermark.
After selecting a watermark from the drop-down list and setting its
size and angle, click this button to add new changes.
"Delete" button
To remove your original watermark from the drop-down list,
select it and click this button.
Default watermarks cannot be deleted.
"Edit Colour" button
For setting the colour of a w a ter mar k, cl ick thi s b utt on t o d isp lay
the "Colour" dialog box.
For more informat ion on this dialog box, click the ( ) button, and
then point and click on the item that you want information on.
"Edit Fonts" button
To adjust the font style of a watermark, click this b utton to display
the "Font" dialog box.
For more informat ion on this dialog box, click the ( ) button, and
then point and click on the item that you want information on.
On First Page Only
Check this box to ensure a watermark is printed only on the first
page of the document. By leaving this box unchecked, the
watermark will appear on every page o f the printed document.
25
Page 28
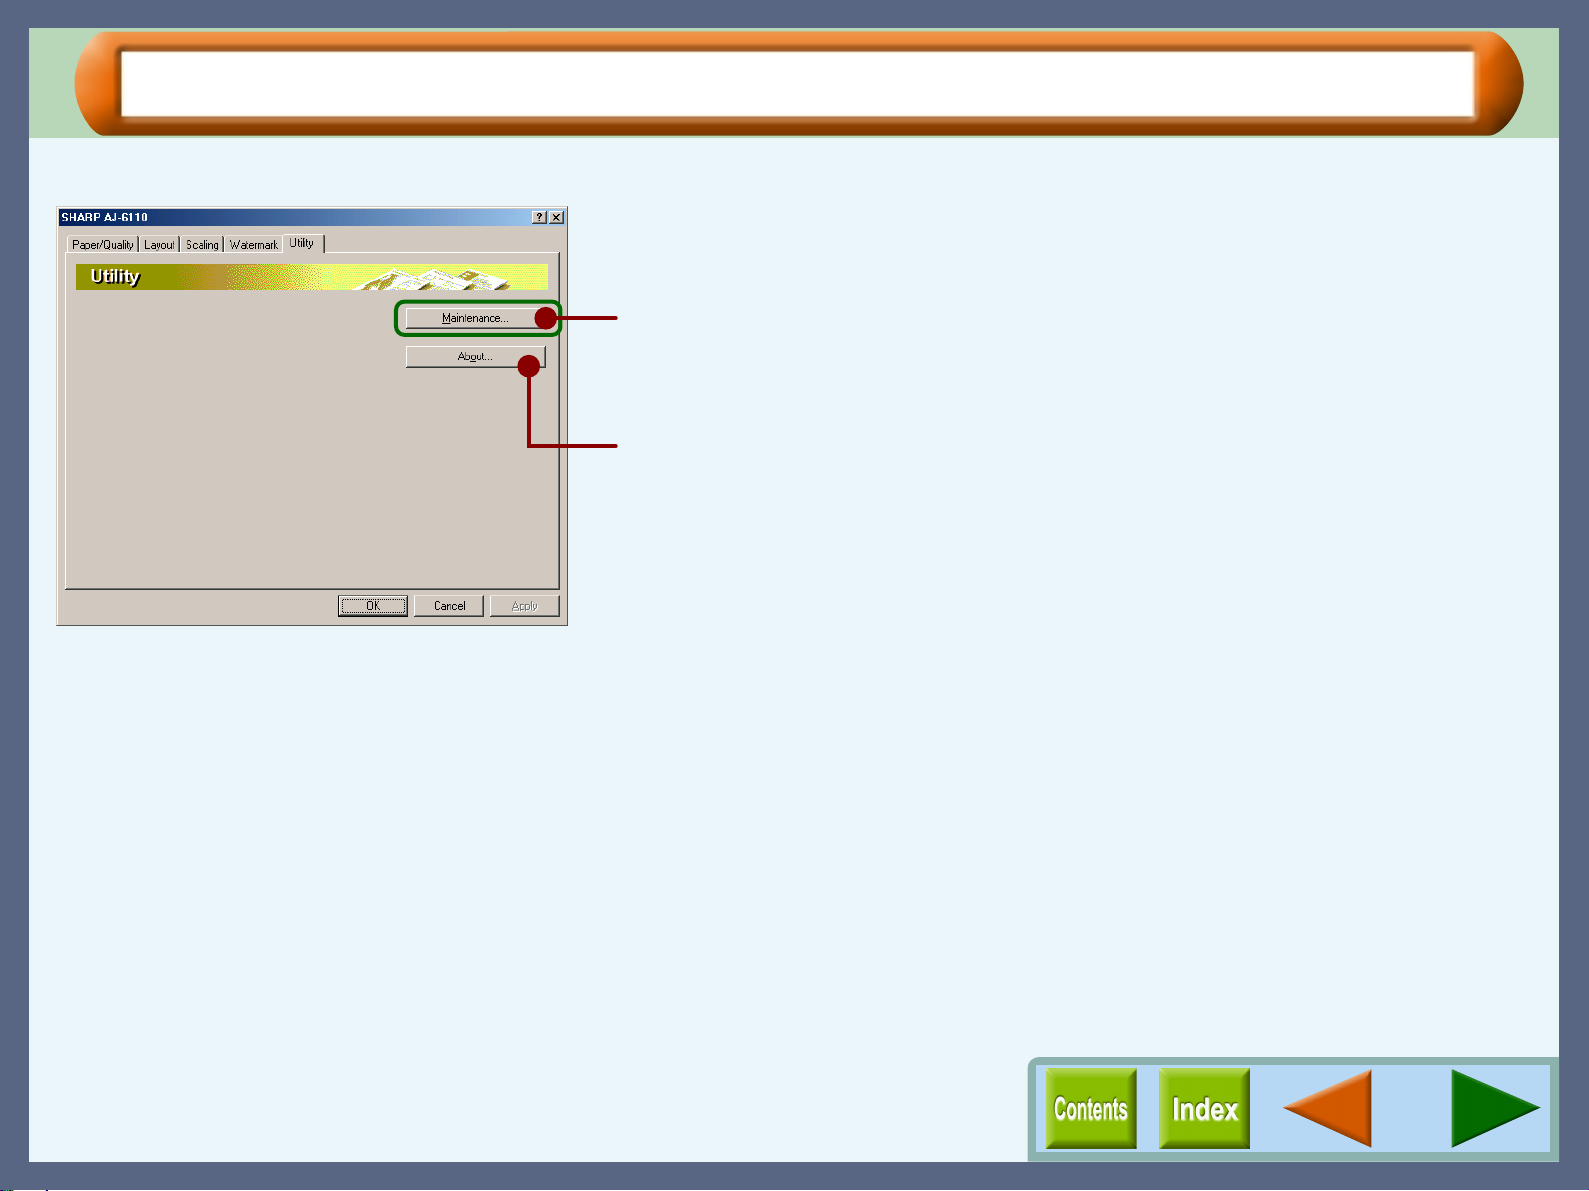
"Utility" Tab Settings
On this tab, you can open the "Maintenance" tab of the print status window.
"Maintenance" button
Click to access maintenance options.
"About" button
Click this button to display the "About" dialog box for information on the driver
name and version.
On the above screen, click on options shown in
the green boxes to make additional changes.
Printer Driver Settings
26
Page 29

Printing Overview
The flow chart shown below provides printing overview.
Reference: For more information on printing, refer to Basic Printing.
Ensure printing has been completed before turning the power off. Do not remove the power cord before turning the printer off.
When printing from paper tray When printing from bypass tray
Prepare the document you intend to print
Load paper into the paper tray
Reference:
For more detail, refer to the "LOADING PAPER INTO THE
PAPER TRAY" in the Setup Guide and Operation Manual.
Open the printer driver setup screen and set the print preferences
Reference:
Basic Printing, Printing a Watermark, Enlarge/Reduce the Printed Image,
Printing Multiple Pages on One Page, Make a Poster, Printing a Photograph
Send print data from your computer
Load a single sheet of paper into the tray then press the START button
Reference:
For more detail, refer to the "LOADING THE BYPASS TRAY WITH
PAPER" in the Setup Guide and Operation Manual.
Printing
Exit printing
27
Page 30

Basic Printing
This is a printing example using Word Pad to print a document onto A4 size paper.
Print
1111
2222
3333
Start WordPad, make a new file, and enter the text
you intend to print.
Select "Print" from the application's "File" menu.
Click here.
Make sure that "SHARP AJ-6110" is selected as the
current printer. If you intend to change any print
setting, click the "Properties" button to open the
setting dialog.
On Windows XP, click the "Preferences" button.
Identify the current printer
1
in this box.
4444
Click the "OK" button in the "Print" dialog box.
On Windows 2000/XP, click the "Print" button.
Click here.
Printing starts according to your preferences.
Click this button to change
2
any print preference.
Reference:Printer Driver Settings
Windows 2000 does not have the "Properties" button
on this dialog box. Switch to the desired tab by clicking
it to specify printer settings.
28
Page 31

Printing a Watermark
Print
To print a watermark, for example "CONFIDENTIAL", on your document, refer to the following steps. Open the
printer driver and click the "Watermark" tab.
Reference: See Starting the Printer Driver through an Application (Windows 95/98/Me/NT 4.0, Windows 2000/XP) for details
on how to open the printer driver.
How to Print a Watermark
From the "Watermark" drop-down list, select the watermark, for example "CONFIDENTIAL", you wish to print on your
document, and start printing.
Reference: See the "Watermark" Tab Settings for details on how to create your own watermarks.
Print sample
29
Page 32

Enlarge/Reduce the Printed Image
You can enlarge or reduce the size of your document from 25% to 400% in 1% increments.
To use this function, open the printer driver setup screen, select the "Scaling" tab, and type a percentage, or click
the arrows in the "Zoom" box to change the setting.
Reference: See the "Scaling" Tab Settings for details on "Zoom" option.
Automatic Zooming to the Loaded Paper
This printer driver can adjust the zoom ratio for printing according to the paper loaded in the printer.
Follow the steps shown below to use this function. The instruction below assumes that you intend to print an A4 size
document onto an A6 size paper.
Print
1111
2222
Click the "Scaling" tab in the printer driver setup
screen.
Check the "Fit to Page" box.
Make sure that the paper size shown in the "Source Size" box
corresponds to the document size.
If the paper size shown in the "S ou rce Size" box does
not correspond to the document size, change the
"Paper Size" setting to match the document size.
3333
A4 size document (Source Size)
Select the paper size for "Target Size", which
corresponds to the size of paper in the printer.
Now, the printed image will automatically fit the paper set in
the printer.
Source Size: A4
Target Size: A6
A6 size paper (Target Size)
30
Page 33

Printing Multiple Pages on One Page
Print
This feature allows you to print two or four document pages onto a single page.
To use this function, open the printer driver setup screen, select "2-Up" or "4-Up" for "N-Up Printing" on the
"Layout" tab.
Reference: See the "Layout" Tab Settings for details on the "N-Up Printing" option.
For "2-Up" printing For "4-Up" printing
"2-Up" Printing
"2-Up" printing places two pages of the document stack onto a
single printed page.
"4-Up" Printing
"4-Up" printing places four pages of the document stack onto
a single printed page.
31
Page 34

Make a Poster
You can print an enlarged image onto multiple separated s heets of paper. (4, 9, or 16 shee ts available)
Open the original fi le to print with this functio n, load the paper whose size corresponds to the docu ment size, and
then follow the steps shown below. The follo wing instructio n assumes that you intend to print the enla rged image
onto 4 sheets.
Print
1111
2222
Click the "Scaling" tab in the printer driver setup
screen, and select "2 x 2" from the "Poster
Printing" drop-down list.
Select "3 x 3" or "4 x 4" when printing onto 9 or 16
sheets respectively.
Check the "Border" box and "Overlap area" box.
Checking the "Border" box enables you to print borders on
each sheet of the output. Checking the "Overlap area" box
enables you to print the overlapped portion onto two
consecutive sheets.
3333
Cut out the output along the border on each sheet.
Cut along this border.
When you have not checked "Overlap area", it is
recommended not to cut off one of the margins of the two
sheets to be pasted so that you can paste them easily.
Paste the sheets by the overlapped portions.
4444
Reference:Poster Printing
Now, you can print with "Poster Printing" function. After all
necessary sheets have been printed, go to the next step.
Use this portion to paste
the sheets to each other.
Now, you have completed making a poster.
32
Page 35

Printing a Photograph
To ensure pictures taken with a digital camera are printed clearly, use photo quality paper and follow the
instructions below.
When loading photo paper into the paper tray, insert the glo ssy side face down. When lo ading photo pape r into the bypass tray,
insert the glossy side face up.
Print
1111
2222
3333
Click the "Paper/Quality" tab in the printer driver
setup screen, and set the "Media" option to
"Photo".
Set the "Print Quality" option to "Best".
On Windows 2000/XP, set the "Quality Settings" option to
"Best".
Check if the "Colour" option is set to "Colour".
The result of setting the preferences as shown from Step 1 to
Step 3 are displayed below.
Windows 95/98/Me/NT 4.0
Windows 2000/XP
If required, you m ay adjust the image or colour balance
through clicking the "Colour Adjustment" button. For
details, see the "Colour Adjustment" Settings
(Windows 95/98/Me/NT 4.0, Windows 2000/XP).
33
Page 36

Outline of the Print Status Window
What is the Print Status Window?
The print status window is a program designed to show the remaining ink levels and current printer status including the
document name being printed and error messages. It also controls head cleaning and head position adjustment.
The print status window contains status win dow and th ree t abs. Th e status windo w displays Normal, Warning and Fault
type messages.
Reference: Print Status Window Functions, Understanding Error Messages, "Maintenance" Tab, "Op tions" Tab
Starting the Print Status Window
The default setting of the print status window is to open automatically when printing starts.
Print Status Window
To open the print status window while the printer is not working, select "Utility" tab from the printer driver setup screen,
and then click the "Maintenance" button.
34
Page 37

Print Status Window Functions
The functions of the print status window are shown below.
Print Status Window
Program icon
This icon informs you of the print
status.
Reference:
Understanding Error Messages
Status icon
This icon informs you of the print
status.
Reference:
Understanding Error Messages
Tab
Index which allows you to switch
between the three setup screens.
"Cancel Job" button
Click this button during printing to
cancel the job that is currently being
executed.
"Close" button
Click this button to close the print
status window.
Minimize button
Click this button to minimize the print
status window into the task bar.
Quit button
Click this button to quit the print
status window.
Status window
Provides details on the current
status of the print job.
Document Name
Displays the name of the active print
job.
"Help" button
Click this button to display help file
for the print status window.
35
Page 38

Understanding Error Messages
The status ic on and program icon provide you with information on printer status.
Understanding the Status and Program Icon
Refer to the table below for an explanation of the printer condition.
Program icon Status icon Condition
None Normal
Fault
Printing has stopped because of a
problem.
Follow the instruction on the s tatus
window to solve the problem
immediately.
Print Status Window
Warning
A problem requires your attention.
Follow the instruction on the s tatus
window to solve the problem as
soon as possible.
36
Page 39

"Maintenance" Tab
Print Status Window
Click this tab to conduct print head maintenance, and to check the amount of available ink.
Remaining ink indicator window
This window indicates the level of ink remaining in the printer. A message
appears when the ink tank is nearly empty. Prepare a new ink tank and replace
it when required.
Reference: Changing the Ink Tank
If you install an ink tank other than as requested by the system, the
window may not indicate the level of ink remaining correctly.
Auto head cleaning
Click the "Start" button to initiate cleaning of the print head. After the dialog box
for selecting which print head to clean appears, click the "OK" button.
Reference: Cleaning the Print Head
Test print head
Click the "Start" button to print a test page which lets you check the print
quality. After the confirmation dialog box appears, click the "OK" button.
Reference: Test Print Head
Print alignment patterns
Click the "Start" button to print a test chart to align the print head. After the
confirmation dialog box appears, click the "OK" button. The "Align print head"
dialog box opens and a test chart is printed.
Reference: Aligning the Print Head
When cleaning and aligning the print head, the printer cannot perform
other operations.
37
Page 40

"Options" Tab
Allows you to select when to display the print status window.
Select one option from the thre e shown below.
Display Print Status Window when printing
The print status window will be displayed automatically at the start of the print
job. It will close automatically when the print job is finished.
Always display Print Status Window
The print status window will be displayed all the time. It will stay open even
after the print job is finished.
Print Status Window Off
The print status window will not be displayed even while printing if this option is
selected.
Print Status Window
"About" button
Click for details on the version of the print status window.
38
Page 41
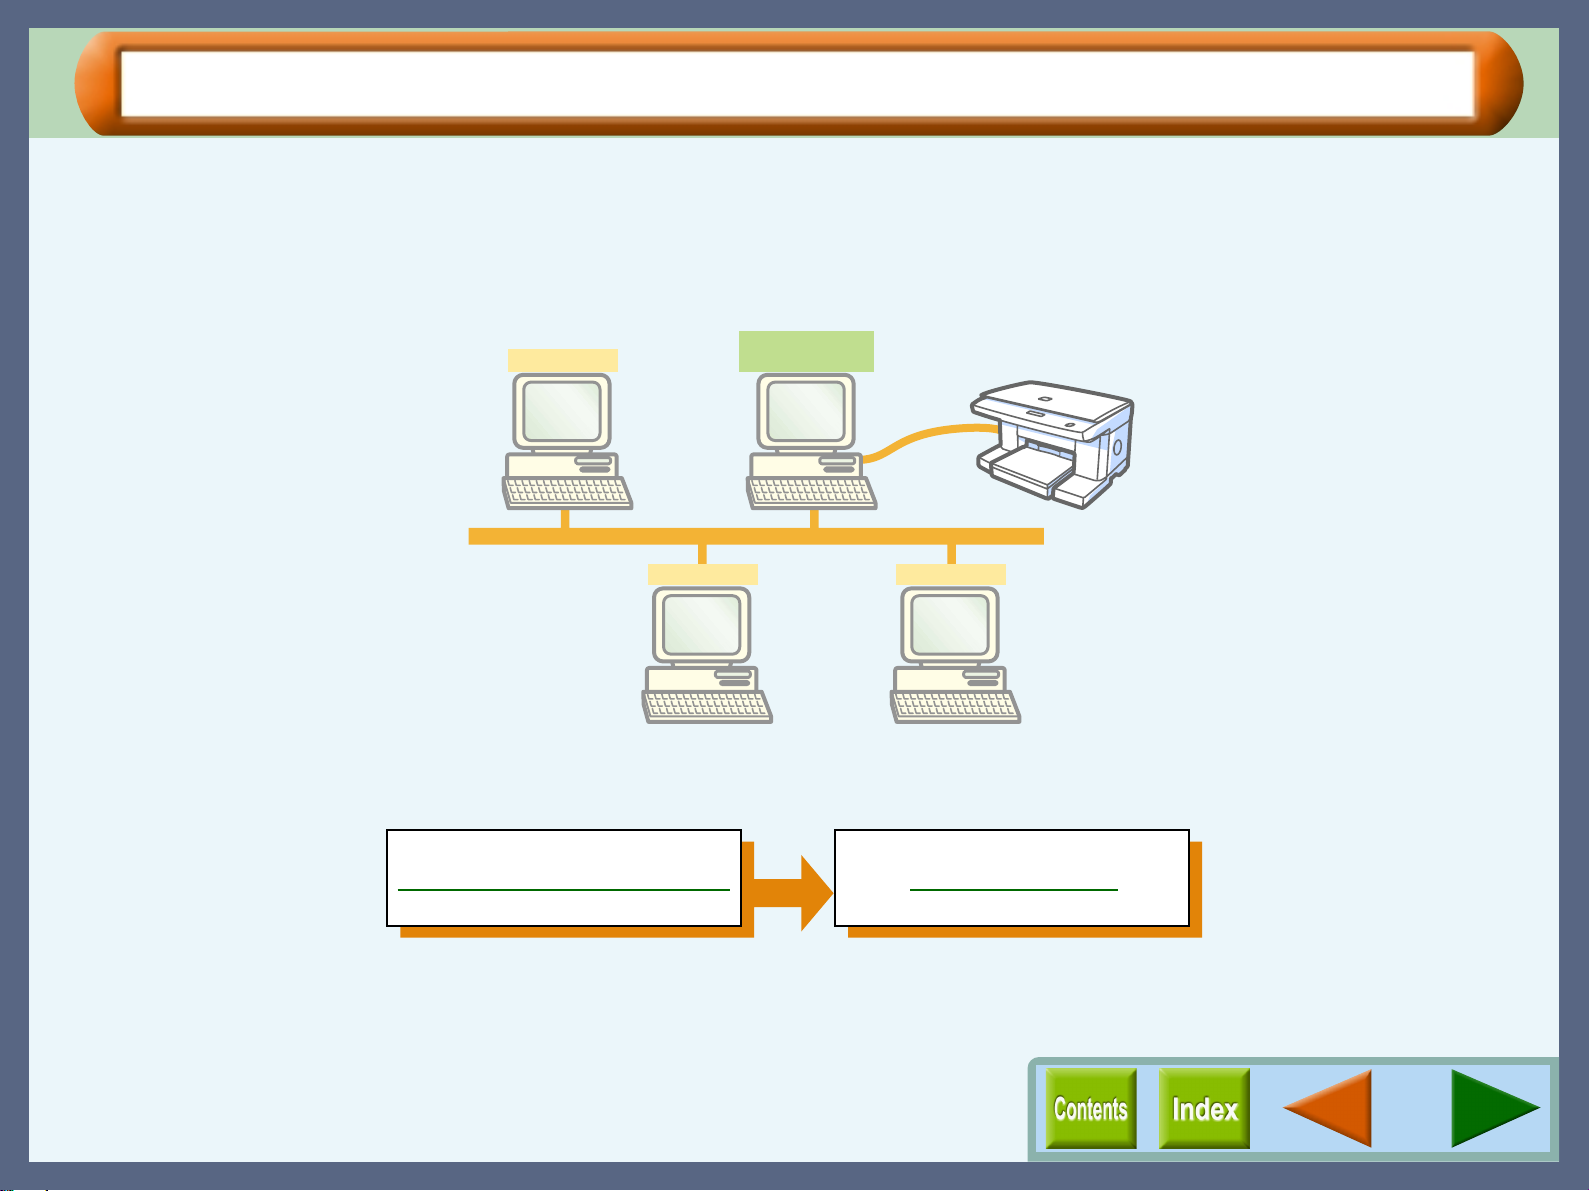
Sharing the Printer using Windows Networking
Sharing Printer
Using Windows networking, it i s very easy to share the printer .
We will explain how to connect the printer using a Peer To Peer connection. Our explanation, shown below, is
based on the following assumptio ns ; there is an establi sh ed network in place. T hi s w or ks w i th Wind ow s 95, 98,
Me, NT 4.0, 2000 and XP.
Client with
Client
Client Client
shared printer
Shared printer
With Peer To Peer connections, the print server is a client to which a printer is directly connected, and a "Client"
is any computer, which is connected to the same network.
Shared Printer Settings Client Settings
39
Page 42

Shared Printer Settings
For sharing a printer on a Window s operating syst em, follow the setup procedures below.
If your operating system is Windows 95/9 8/Me, start f ro m step 1 to set up the network. If your operating system is Windo ws NT
4.0, 2000 or XP, open the control panel, and then start from step 6.
On the computer to which the print er is directly connected
Sharing Printer
1111
2222
3333
4444
5555
Click the "Start" button, select "Settings", and then
click "Control Panel".
Double-click the "Network" icon.
The "Network" dialog box will appear.
If the "Network" icon does not appear on Windows Me,
click "view all Control Panel options" to view it.
Click the "File and Print Sharing" button.
Enable "I want to be able to allow others to print to
my printer(s)." by clicking the check box ( ), and
then click "OK" button.
Click the "OK" button in the "Network" dialog box.
If a message appears asking you to restart the
computer, click the "Yes" button and restart the
computer. Then, open the printer folder and continue
the setup procedures from Step 6.
6666
7777
8888
Double-click the printer icon in the control panel.
On Windows XP, click "Printers and Other Hardware", and
then click "Printers and Faxes".
Right-click the "SHARP AJ-6110" printer driver
icon, and select "Sharing" from the pop-up menu.
Enable the check button for sharing ( ), input your
preferences, and click "OK" button.
For information on the various preferences available,
click the ( ) button located at the top-right of the
dialog box. Then, click the option you want to know
more about, for a pop-up explanation to appear.
You have completed the setup procedures for the shared
printer.
Reference:Client Settings
40
Page 43

Client Settings
After installing the printer driver on the client computer, follow the setup procedures below. For details on
installing the p rinter driver, refer to "INSTALLING TH E SO F TWA R E" in th e S etu p G uide and Operati on Manual.
This page provides steps for Windows 95/98/Me users only. If your operating system is Windows NT 4.0, 2000 or XP, refer to
the operation manual or the help file of your operating system.
Sharing Printer
1111
2222
3333
Click the "Start" button, select "Settings", and then
click "Printers".
Right-click the "SHARP AJ-6110" printer driver
icon, and select "Properties" from the pop-up
menu.
Click the "Details" tab, and click the "Add Port"
button.
4444
5555
Type the port name as shown below or click
"Browse" button and double-click Server's
computer name and then click "Sharp".
\\Client with shared printer\Sharp
Computer name
Input your options, and click the "OK" button.
For information on the various preferences available,
click the ( ) button located at the top-right of the
dialog box. Then, click the option you want to know
more about, for a pop-up explanation to appear.
Printer name
41
Page 44
Outline of the Scanner Driver
Scanning
What is the Scanner Driver?
The SHARP scanner driver conforms to TWAIN, the industry standard, making it compatible with a variety of TWAINcompliant applications. This driver consists of "Set-up" and "Display image" screens, both of which have two screens
respectively as shown below.
Reference: Starting the Scanner Driver, Scanner Driver Functions
Set-up screen Display image screen
"Standard" screen
The four buttons enable you
to set the scan type easily.
Click any of the screens displayed above to jump to its detailed description.
TWAIN is an industry standar d for in terfa ce of imag e data p rocessi ng de vices includ ing sca nner s. By insta lling a TW AIN dri ver
onto your computer, you can scan and work with images using a variety of TWAIN-compliant applications. This allows you not
only to scan images ef ficiently, bu t also to eli minate any necessi ty of switchi ng among vari ous image ac quiring appl ications and
plug-in drivers depending on your job.
"Professional" screen
Use three tabs for scan
setting in detail.
Preview screen
Displays preview image,
allowing you to set the
scanning area.
Variation preview screen
Displays nine different preview
images, allowing you to set
"Brightness" and "Contrast".
42
Page 45

Starting the Scanner Driver
Follow the steps shown below to run the scanner driver setup s creen. As an example, this instruction is give n
using Sharpdesk as a data pr ocessing application.
Reference: Refer to Scanning an Image for the detail of scanning process.
The method for starting the scanner driver differs depending on the type of application. Refer to the manual or the help file of
your application.
Scanning
1111
2222
After starting Sharpdesk, click the "File" menu and
select "Select Scanner".
Click here.
Select "SHARP TWAIN AJ2", and click the "Select" button.
Click here.
! Depending on your syste m, "SHARP TWAIN AJ2 1 .0
(32-32)" may appear in the "Select Source" screen.
! If you use more than one scanning device, select the
scanner you want to use through the application. The
method for accessing the "Select Scanner" option,
depends upon the applica tion. For more information,
refer to the manual or the help file of your application.
3333
Select "Acquire Image" from the "File" menu, or
click the "Acquire" button ( ).
The scanner driver setup screen will appear.
43
Page 46

Scanning an Image
Below is a step-by-step guide for acquiring a scanned image to the Sharpdesk desktop screen using Sharpdesk.
It is assumed that the scanner d river has been in stalled without changing the de fault setting, and Sharpdesk is
running.
Scanning
1111
2222
3333
4444
Place a document on the original table.
Reference:For information on setting a document for
scanning, refer to "MAKING COPIES" in
the Setup Guide and Operation Manual.
From Sharpdesk, select "Acquire Image" from the
"File" menu, or click the "Acquire" button ( ).
Click the "Preview" button ( ).
The preview image will appear.
If the rotation or angle of the image is different, reset
the document, and click the "Pre vi ew " bu tton agai n .
Specify the scanning area, and set the scan
preferences.
To specify the scanning area, follow the steps on the Preview
Screen, or use the "Auto Scan Area Judgement" button (),
or "Image Area
To set the scan preferences, use the four buttons displayed on
the "Standard" screen
go to the "Professional" screen
contrast of the scanned document, refer to Variation Preview
Screen.
".
. To set your scan preferences in detail,
. To adjust the brightness and
5555
Click the "Scanning" button ( ) after setting your
preferences.
To cancel your scanning job after clicking the "Scanning"
button, press the [Esc] key on your keyboard.
When you close the scanner driver after scanning, the image
data will appear as a new file in Sharpdesk.
Setting a large ar ea with full colour togeth er with a high
resolution setting, makes the d ata size large, resu lting
in extended scanning times. It is recommended to set
the scanning preferences depending on the type of
original to be scanned, i.e., Text, Text/Graphics,
Photograph, Colour, Black & White.
44
Page 47

Scanner Driver Functions
"Scanning Source" menu
For this model, this setting is fixed to "Platen".
Scanning
Quit button
Click this button to quit the scanner driver.
"Scanning Mode" menu
Switch the scanning mode between the
"Standard" and "Professional" screen.
Reference:
"Standard" Scan Preferences
"Professional" Scan Preferences
"Preview Screen" button ( )
"Variation Preview Screen" button ( )
Switch the display between the Preview
Screen and Variation Preview Screen.
Reference:
Preview Screen
Variation Preview Screen
"Scanning" button
Click to scan a document or image according
to your preferences. Before clicking the
"Scanning" button, check if your preferences
are set correctly.
"Help" button
Click to display the help file for the scanner
driver.
"Auto Scan Area Judgement" button
Click when the preview screen is displayed to
automatically set the scanning area.
Click the "Auto Scan Area
Judgement" button to adjust
the scanning area
automatically.
Entire preview screen
"Preview" button
Previews the document.
If "Preview" is cancelled by
immediately pressing the [Esc] key,
there may be no images displayed
on the preview screen.
To cancel your scanning job after
clicking the "Scanning" button, press
the [Esc] key on your keyboard.
45
Page 48

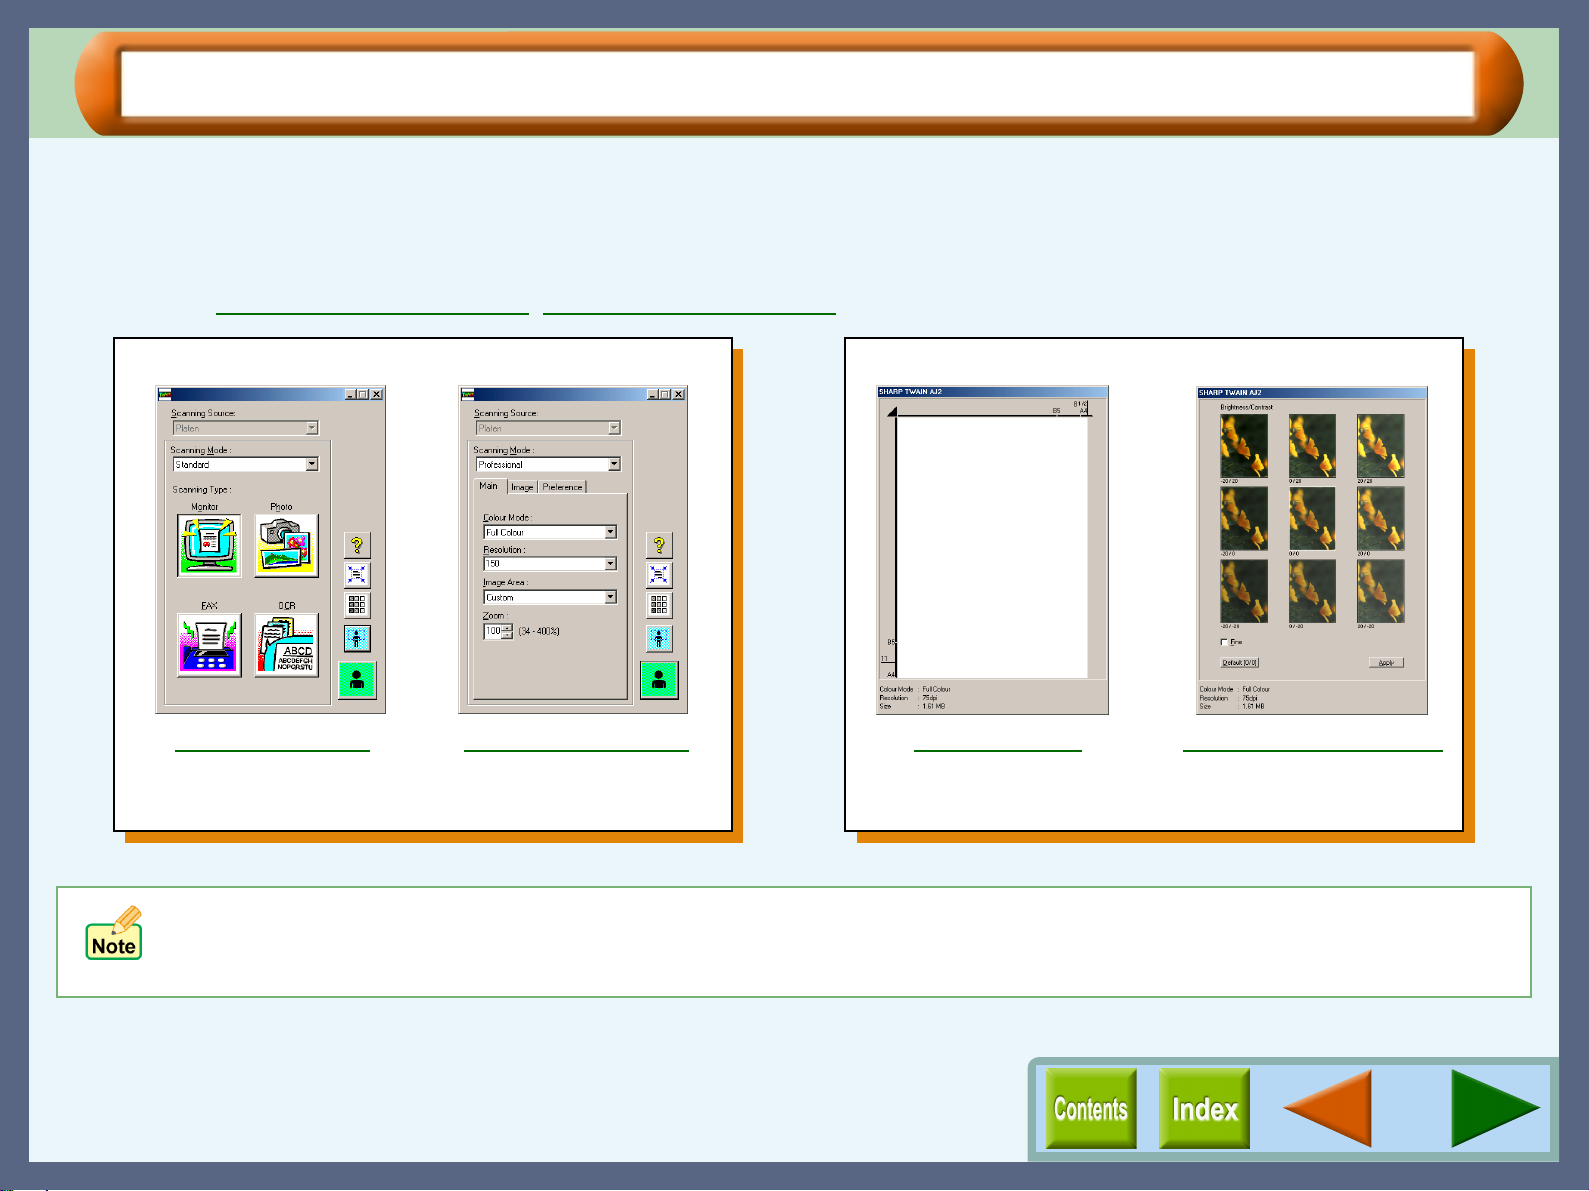
"Standard" Scan Preferences
Scanning
By default, four scan settings are specified for the four buttons on this screen respectively. You can access the
most frequently used settings with a simple click.
The following settings for scanning through the "Standard" screen are fixe d.
Colour Matching: For Printer, Quick Scan : On, Zoom: 100%, Reverse: Off, Auto Contrast/Brightne ss Adjustment: On, Edge: Normal
"Scanning T ype" b utton
Select from "Monitor", "Photo", "FAX" , and "OCR" button.
Default settings and possible usage for each button are shown below.
Button
Monitor
Photo
FAX
OCR
Default setting
Colour Mode: Full Colour
Resolution: 75dpi
Colour Mode: Full Colour
Resolution: 200dpi
Colour Mode: Greyscale
Resolution: 200dpi
Colour Mode: Mono 2 gradation
Resolution: 300dpi
Auto Threshold: On
• The preferences for the four buttons listed above can be altered on the
"Professional" screen. Click the "Preference" tab and then click the
"Standard Mode Setting" button.
• When the "Auto Threshold" setting is activated, the preview image may
be different from the scanned image.
• When the "Auto Threshold" setting is deactivated, the "B/W Threshold"
will be 128.
Sets preferences for a scanned item to be
displayed as desktop image, or showed onscreen.
Sets preferences to scan and print a
picture, image, etc.
Sets preferences to send a pamphlet,
catalogue, etc, by FAX after scanning.
Sets preferences for a scanned item to be
displayed in text data format.
Possible usage
46
Page 49

"Professional" Scan Preferences ("Main" Tab) (part 1)
Scanning
By setting the "Scanning Mode" menu to "Professional", the "Professional" screen will be displayed. Use this
screen to specify more detailed settings than the "Standard" screen.
Image Area
Use to specify the scanning area.
Click the ( ) button, and select the size from
Tab
Index which allows you to switch between the
three setup screens.
Colour Mode
Use to set the colour mode for scanning.
Resolution
Use to set the scan resolution.
Click the ( ) button, and select from "75",
"150", "300", "600", or input the required
figure into the box. (50dpi - 9600dpi)
The available values vary depending on the
size of the scanning area. If you want to scan
with high resolution, set the scanning area as
small as possible.
• When you change the value for
"Resolution" while "Zoom" is
specified to other than 100%, the
"Zoom" setting will revert to 100%.
• When a high resolution setting is
selected, the scan data increases
and a very long time may be
required to complete scanning. Be
sure to select a resolution setting
that is appropriate for your purpose.
On the above screen, click on options shown in
the green boxes to make additional changes.
"A4", "B5", "Letter", "Post card" and "Custom".
• When you select "Custom", specify
the scanning area by dragging the
preferred area.
(Up to 21.6cm x 29.8cm)
•
The available values vary depending on
the setting for "Resolution" and "Zoom".
Example:
With "Resolution":9600dpi, "Zoom":100%,
the maximum scanning area is 4.9cm x
4.9cm.
Reference:
Refer to Preview Screen for more information
on setting the scanning area.
Zoom
Maximize/Minimize the image to be scanned
without changing the resolution setting.
Click the ( ) button to increase or decrease
the setting figure, or input the required figure
into the box provided.
The available values vary depending
on the specified value for "Resolution"
and the size of the scanning area.
47
Page 50

"Professional" Scan Preferences ("Main" Tab) (part 2)
Colour Mode
Setting Explanation Possible usage
Scanning
Full Colour Scans a document according to the computer's ability to
display 16,770,000 colours (each contain ing 256
individual tones). When using a computer that can
display 65,000 colours or more, colours closely
resembling those shown in the document will be
selected.
256 Colour Scans a document as image data using 256 colours of
16,770,000 available colours of a computer.
Greyscale Makes a greyscale image. Produces an image like a
black and white photograph, in 256 levels.
Mono Diffusion Scans a document using black and white, cr eating a half
tone image.
Mono 2 gradation Scans a document into black and white using the
threshold set on "Image" tab.
Select this option when working with photograp hs or documents that
require professional results.
Select this option when you send the data through the Internet, as
the size of 256 colour data is smaller than full colour data.
Select this option when you send a document, which has
photograph or illustrati on such as pamphlets or catalogues, through
facsimile.
Select this option when you scan th e originals containing the shaded
drawings. This option is also useful when you print out the scanned
data in monochrome, because the file size is small.
Select this option when you scan an image, which consists of
characters and line art. This optio n is also usef ul when you need to
recognise characters to use OCR software.
48
Page 51

"Professional" Scan Preferences ("Image" Tab) (part 1)
Use this screen to adjust brightness, contrast and threshold settings.
Scanning
B/W Threshold
Sets the threshold when you select "Mono 2
gradation" for "Colour Mode" on the "Main"
tab. Move the slide bar to the left or right to
decrease or increase the threshold, or input a
figure directly into the setting box (1 - 254).
The threshold setting is used to grade an
image containing many colours into black and
white. Increase the threshold and the areas
shown in black will increase. On the other
hand, decrease the threshold to increase
areas represented in white.
Specify the value for "B/W Threshold"
setting to let your OCR software read
text data clearly. The text data cannot
be recognised correctly when the data
includes blurred or faint characters.
Reverse
When using the "Mono Diffusion" or "Mono 2
gradation" colour mode setting, select this
function to convert black areas into white,
and white areas into black.
Auto Contrast/Brightness Adjustment
By checking this function, the brightness and
contrast levels used for scanning are
automatically adjusted to the most
appropriate setting.
•
This setting is unavailable when the
"Colour Mode" is set to "Mono 2
gradation".
• By displaying the variation preview
screen, this setting is automatically
turned off ( ).
"Auto Threshold" button
When using the "Mono 2 gradation" colour
mode to scan a document, click this button
and the threshold setting is automatically
adjusted to the most appropriate setting. The
"B/W Threshold" setting will also change
automatically after adjusting this preference.
Edge
Set the method for processing the edge of
scanned images.
Document Data after selecting the
"Reverse" setting.
This setting can only be used when
the "Colour Mode" is set to "Mono
Diffusion" or "Mono 2 gradation".
On the above screen, click on options shown in
the green boxes to make additional changes.
Colour Matching
Use this option to specify the colour matching
method.
49
Page 52

"Professional" Scan Preferences ("Image" Tab) (part 2)
Edge
Click the ( ) button to select from the drop-down list.
Setting Explanation
None Edge is not emphasised.
Normal Edge is emphasised slightly.
Sharp Edge is emphasised strongly.
Blur Edge is shaded off.
This setting is unav ailable when the "Colour Mode" is
set to "Mono Diffusion" or "Mono 2 gradation".
Colour Matching
Click the ( ) button to select from the drop-down list.
Setting Explanation
For Printer Sharp's original colour matching function; matche s
colours with the printer.
For CRT Sharp's original colour matching f unction; matches
colours displayed on a CRT monitor.
For LCD Sharp's original colour matching function; matches
colours displayed on a LCD monitor.
ICM Select to utilise Windows standard colour
management system.
Scanning
! This setting is un available when the "Colour Mod e" is
set to "Mono 2 gradation".
! The "ICM" setting is unavailable with Windows 95 or
NT 4.0.
50
Page 53

"Professional" Scan Preferences ("Preference" Tab)
Scanning
This screen al lows the scanning speed to be set and permits the loading and sa ving of settings values.
"Load User Settings" button
By clicking this button, settings saved
previously can be loaded. Choose the name
of the previously saved setting from the list
then click the "Open" button.
"Save User Settings" button
Click this button to save existing settings or to
delete settings that have been previously saved.
To save new settings, click the "Save" button
after entering the file name. When updating
settings that have been previously saved,
choose the desired setting name then click the
"Save" button. If settings are updated and the
file name is not changed, but is kept as "User
Defaults", then these settings will then be used
as the default settings, beginning from the next
time the scanner driver is activated. To delete
settings from the list, choose the file name
containing the unwanted settings, then click the
"Delete" button.
• Settings for "Scanning Mode" and
"Image Area" cannot be saved.
• "User Defaults" cannot be deleted.
• A maximum of 10 files can be saved.
"Standard Mode Setting" button
Click this button to make changes to any of
the "Monitor", "Photo", "FAX" or "OCR"
settings shown on the "Standard" screen.
On the above screen, click on options shown
in the green boxes to make additional
changes.
Quick Scan
Select your scanning priority, by choosing
either quicker scanning or scanning with
better image quality. If priority is placed on
scanning with better image quality, then
remove the check mark from this box.
If the colour mode is set to "Mono 2
gradation", then this setting will not
be available.
"Factory Defaults" button
If this button is clicked, then the dialog box
shown below will be displayed. If the "OK"
button is clicked, then all settings values
within both the "Standard" screen and the
"Professional" screen, as well as the settings
values for "User Defaults" will be returned to
their default values.
Click this button if you do not
want to return your preferences
to the default settings.
Reference:
For details on the various default settings,
refer to Default Settings for the Scanner
Driver.
"About" button
Click for details on the version of the scanner
driver.
51
Page 54
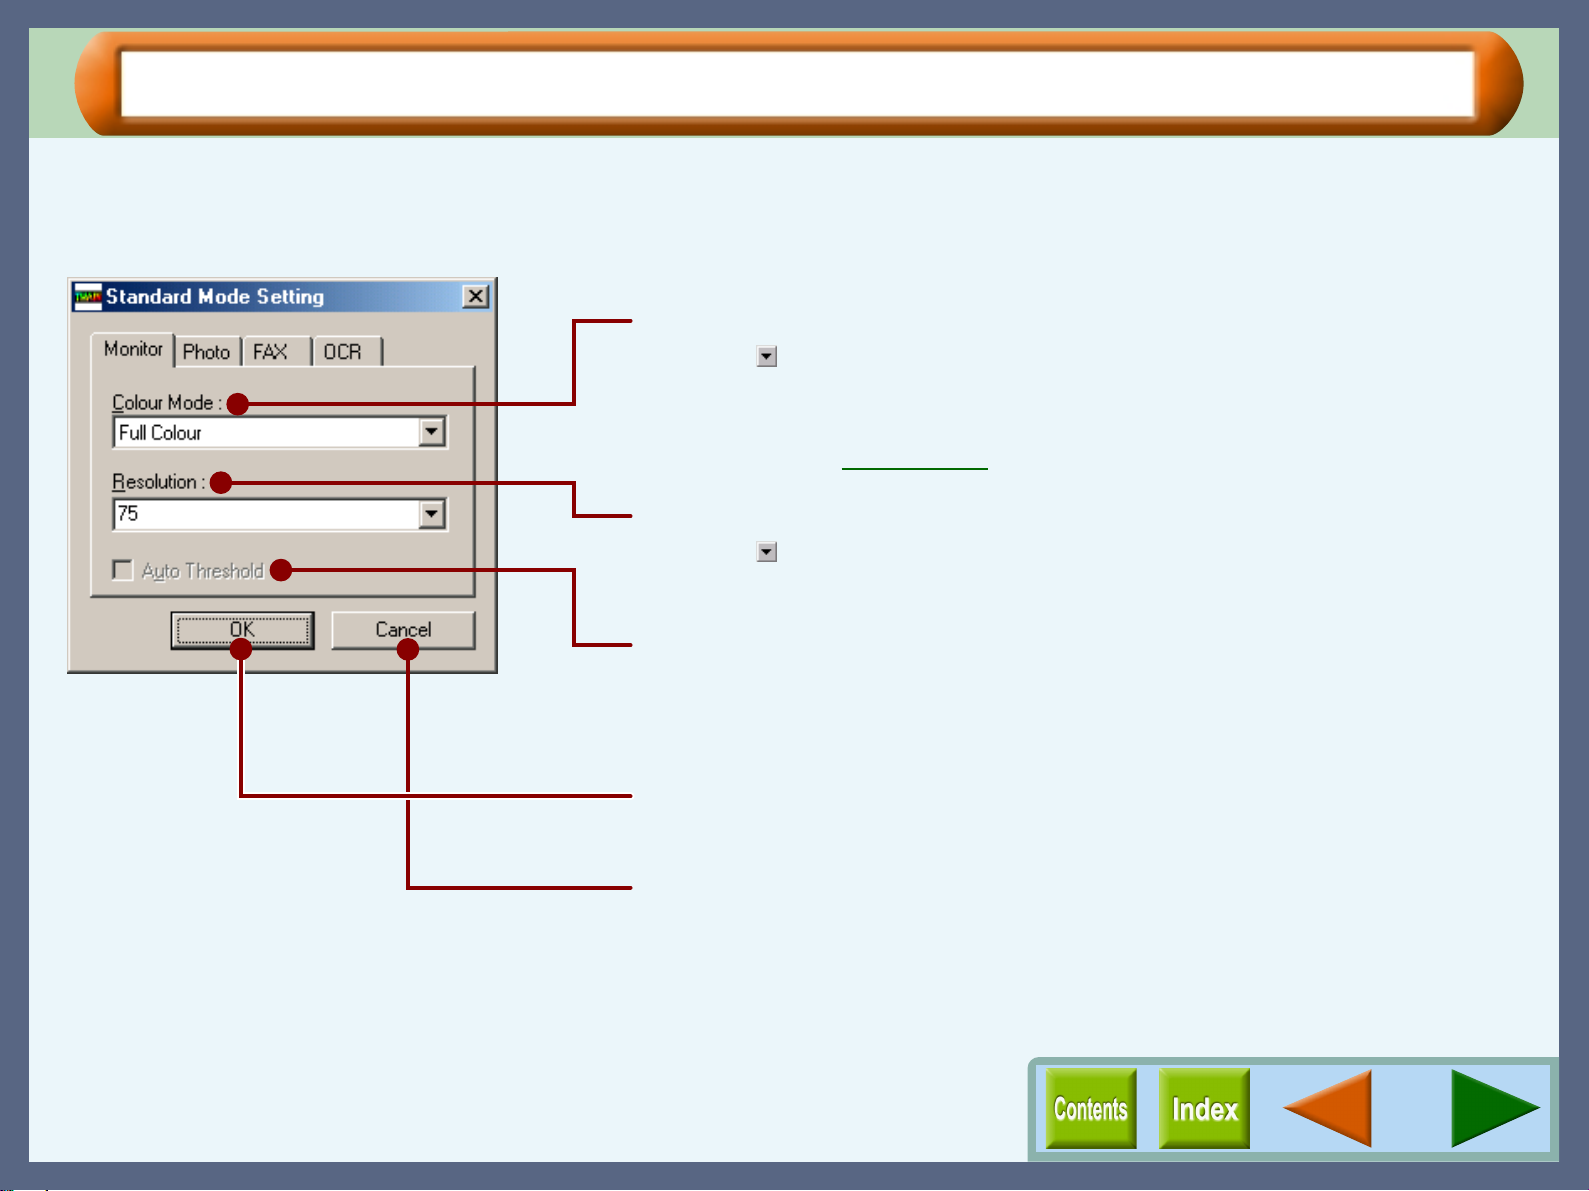
"Standard Mode Setting" Dialog Box
Scanning
Click the "Standard Mode Setting" button to display the dialog box shown below.
On this dialog, you can change the preferences of four buttons including "Monitor", "Photo", "FAX", and "OCR"
on the "Standard" screen. Select the corresponding tab to change the desired preferences.
Colour Mode
Click the ( ) button to select the desired colour mode from "Full Colour",
"256 Colour", "Greyscale", "Mono Diffusion", and "Mono 2 gradation".
Reference:
Refer to the Colour Mode for details on each setting.
Resolution
Click the ( ) button to select the desired resolution from "75", "150", "300",
and "600" or input the required figure into the box (50dpi - 600dpi).
Auto Threshold
When "Mono 2 gradation" is selected for "Colour Mode" setting, check this
option to automatically set the threshold setting to the most appropriate
setting.
"OK" button
Click to save each of the changed settings.
"Cancel" button
Click to close without saving the changed settings.
52
Page 55

Preview Screen
Scanning
Click the "Preview" button ( ) to display a preview image on the preview scree n. Specify the sc anning area on
this screen following the steps shown below.
If the variation preview screen is displayed, switch to the preview screen by clicking the "Preview Screen" button ( ).
Setting the Scanning Area
1111
2222
3333
4444
5555
Click the "Preview" button ( ) to preview the
document.
A preview image will appear on the preview screen.
Move the mouse cursor onto the preview image.
Click a scan starting point on the image.
Keep pressing the mouse button when selecting the area you
want to scan.
Drag the cursor to the bottom-right of the screen.
The area to be scanned will be indicated by a rectangular
shaped broken line. This area becomes the scanning area.
After selecting the scanning area, release the
mouse button.
To cancel the selected area to be scanned, click a spot
outside the scanning ar ea or double-click a spo t inside
the area.
Altering the scanning area
The ( ) symbol will appear when
the cursor is placed on the left or
right border of the scanning area.
On the other hand, the ( ) symbol
will appear when the cursor is
placed on the top or bottom border
of the scanning area. By dragging
any of the four corners of the image,
a ( , ) symbol will appear. The size
of the image will be maximized or
minimized according to the direction
in which the symbol is moved.
Moving the scanning area
The ( ) symbol will appear when
the cursor is placed within the
scanning area after the area being
specified by dragging. Move the
image to adjust the scanning area.
Displays the colour mode,
resolution, and size of the data.
53
Page 56

Variation Preview Screen
Scanning
After clicking the "Previ ew" button ( ) and previe wing the document, click the "Variat ion Preview Screen" butt on
( ) to display the variation pre view screen. Nine images, which have different variatio ns of brightness and
contrast, will be displayed on this screen. By clicking on one of the images, the scan settings will be changed to
correspond to the selected image.
! This setting is unavailable when the "Colour Mode" is set to "Mono 2 gradation".
! After opening the variation preview screen, click the "Preview Screen" button ( ) to display the preview screen.
Brightness/Contrast
The figure shown on the left at the bottom of each
individual preview image indicates the brightness
level for scanning. The figure on the right displays
the contrast level.
Fine
By switching this check box on ( ), the
"Brightness" and "Contrast" levels will be adjusted
in multiples of five, and when switched off ( ),
multiples of twenty.
"Default" button
Click this button to return both "Brightness" and
"Contrast" levels for the centre image to 0.
Displays the colour mode, resolution, and size of
the data.
"Apply" button
To update the preview image, click this button
after adjusting the "Brightness" and "Contrast"
levels for the selected image.
The current preview image appears in the centre. Eight
preview images with different "Brightness/Contrast"
settings appear around it. If you wish to change the
"Brightness/Contrast" setting, click the preview image
with the desired brightness and contrast. That image
will appear in the centre, and the corresponding
"Brightness/Contrast" setting will be used for scanning.
•
If none of the preview images is suitable
for your image, click the image that is
closest. The "Brightness" and "Contrast"
values below that image will be applied to
the central image, and the values of the
surrounding images will increase or
decrease in multiples of 20 (multiples of 5
if the "Fine" check box is selected ( )).
Repeat this step until a preview image
appears that is suitable for your image.
•
The range of possible settings for both the
"Brightness" and the "Contrast" is -125 to
125.
54
Page 57

Default Settings for the Scanner Driver
The default settings for the scanner driver are shown below.
Scanning
"Standard" screen
Setting Default setting
Monitor Colour Mode: Full Colour
Resolution: 75dpi
Photo Colour Mode: Full Colour
Resolution: 200dpi
FAX Colour Mode: Greyscale
Resolution: 200dpi
OCR Colour Mode: Mono 2 gradation
Resolution: 300dpi
Auto Threshold: On
"Professional" screen ("Main" tab)
Setting Default setting
Colour Mode Full Colour
Resolution 150dpi
Image Area Custom
Zoom 100%
"Professional" screen ("Image" tab)
Setting Default setting
Auto Contrast/Brightness
Adjustment
B/W Threshold 128
Reverse Off( )
Edge Normal
Colour Matching For Printer
On( )
"Professional" screen ("Preference" tab)
Setting Default setting
Quick Scan On( )
Standard Mode Setting The Colour Mode and Resolution
settings are the same as Monitor,
Photo, Fax, and OCR default settings
shown on the "Standard" screen.
Auto Threshold: On ( ) (OCR only)
Variation preview screen
Setting Default setting
Fine Off( )
Brightness/Contrast 0/0
55
Page 58

Outline of Button Manager
Button Manager
What is Button Manager?
Button Manager is a utility software t o link scanning functions to " SCAN" button on the unit. This sof tware enables you to
set scanning functions to five differen t scan menus, which will be linked the "SCAN" button on the unit.
Reference: Refer to "USING THIS UNIT WITH YOUR COMPUTER" in the Setup Guide and Operation Manual for details on
accessing the scan menu from the unit.
By default, the following functions are set for each menu.
Scan menu Function Explanation
ScanMenu 1 File Starts Sharpdesk automatically, and then sends scanned image to the desktop of Sharpdesk.
ScanMenu 2 Email Starts your Email software automatical ly, and then sends scanned image to t he Email software
as an attachment.
ScanMenu 3 FAX Starts your PC-FAX software automatically, and then sends scanned image to the PC-FAX
software.
ScanMenu 4 OCR Starts your OCR software automat icall y, and t hen s ends scanned i mage to t he OCR soft ware.
ScanMenu 5 Word Starts Microsoft Word automatically, and then sends scanned image to Microsoft Word.
Application* Sends scanned image to the selected application.
* You can select five functions out of six listed above as scan menus.
The "Application" function is not selected as the default setting.
You can specify and change your five scan menu options from six functions listed above. Refer to Button Manager
Settings to specify and change the scan menu options.
Close the source application before using the "SCAN" button on the unit.
56
Page 59

Button Manager Functions
The functions of Button Manager are shown below.
Tab
Click to set scan menu
options.
Button Manager
Quit button
Click this button to quit Button
Manager.
"Scan Setup" area
Set the scan conditions.
Some applications may limit
your choice of settings.
"Application Selection" area
Select the start-up application here.
"OK" button
Click to save your
settings, and exit the
dialog box.
"Cancel" button
Click this button to exit
the dialog box without
making any changes to
the settings.
On the above screen, click on options shown in the green boxes to
make additional changes.
"Help" button
Click this button to display the help file
for Button Manager.
"Apply" button
Click to save your settings without
closing the dialog box.
57
Page 60

Button Manager Settings
Button Manager
After being installed, Button Manager normally keeps active under the Windows operating system. Follow the
steps shown below to set scan options as you like.
1111
2222
3333
Right-click the Button Manager icon ( ) on the
task bar.
If the Button Manager icon does not appear on the task
bar, click the "Start" button, select "Programs" ("All
Programs" on Windows XP), select "SHARP AJ-6110",
and then click "Button Manage r" to start Button Ma nager.
Select "Settings" from the displayed pop-up menu.
The setting screen of Button Manager will open.
Click the tab of the scan menu you want to set up.
4444
5555
6666
Set up the start-up application in the "Application
Selection" area.
Reference:"Application Selection" Settings
Set up the "Colour Mode", "Edge Enhancement"
and other scan settings in the "Scan Setup" area.
Reference:"Scan Setup" Settings
Click the "OK" button.
You have completed the settings.
! Ensure that Button Manager has been started before
using the "SCAN" button.
! You may experience slight problems on your computer
(e.g. skipping while playing audi o CD or DVD, etc.) whi le
Button Manager is active. In this case, right-click the
Button Manager icon on the taskbar and then click
"Monitor" to remove the check mark. When the check
mark is removed, the "SCAN" button on the unit cannot
be used for scanning. If you need to use the "SCAN"
button for scanning, select "Monitor" once again.
Click "Monitor" to
2
remove the check
mark.
Right-click the Button
1
Manager icon to
display the menu.
58
Page 61

"Scan Setup" Settings
Button Manager
You can setup scanning preferences for each scan menu at the "Scan Setup" area.
Reference: The default settings vary depending on the specified functions, which have been selected from "File", "Email", "Fax"
and so on at the "Application Selection" area. Refer to Default Setting for Each Function
settings.
Colour Mode
Use to select the scan colour mode. Click the ( ) button to select
from "Monochrome", "Greyscale", "256 Colour", and "Full Colour".
for the details on the default
Edge Enhancement
Set the scan quality of the outline of the image
here. Click the ( ) button to select from "None",
"Normal", "Sharp", and "Blur".
When the colour mode is set to
"Monochrome", this option is unavailable.
Scanning Area
Use to set the size of the image to be
scanned. Click the ( ) button to
select from "A4", "B5", and "Letter".
Resolution
Set the scan resolution quality here. Click the ( ) button to select
from "75", "100", "150", "200", "300", "400", and "600".
Colour Matching
Use to correctly match the colours of the image to be scanned. Click
the ( ) button to select from "For Printer", "For CRT", "For LCD", and
"ICM".
Only "Monochrome" is available when "OCR" is selected in
the "Application Selection" area.
Dynamic Threshold
When the colour mode is set to "Monochrome", and this option is checked
on ( ), the unit will process the text and image data separately, and the
threshold is automatically selected to the most appropriate quality setting.
If not checked on, the threshold is set to "128".
Reverse
When the colour mode is set to
"Monochrome", and this option is
checked on ( ), the black and
white tone is reversed.
Background Removal
Check this option on ( ) to
automatically remove the background
of the image to be scanned.
Quick Scan
Select this check box when you wish to complete
the scan quickly. Remove the check mark when
you desire better image quality.
When the colour mode is set to
"Monochrome", this option is unavailable.
• When the colour mode is set to "Monochrome", this option
is unavailable.
•
The "ICM" setting is unavailable with Windows 95 or NT 4.0.
59
Page 62
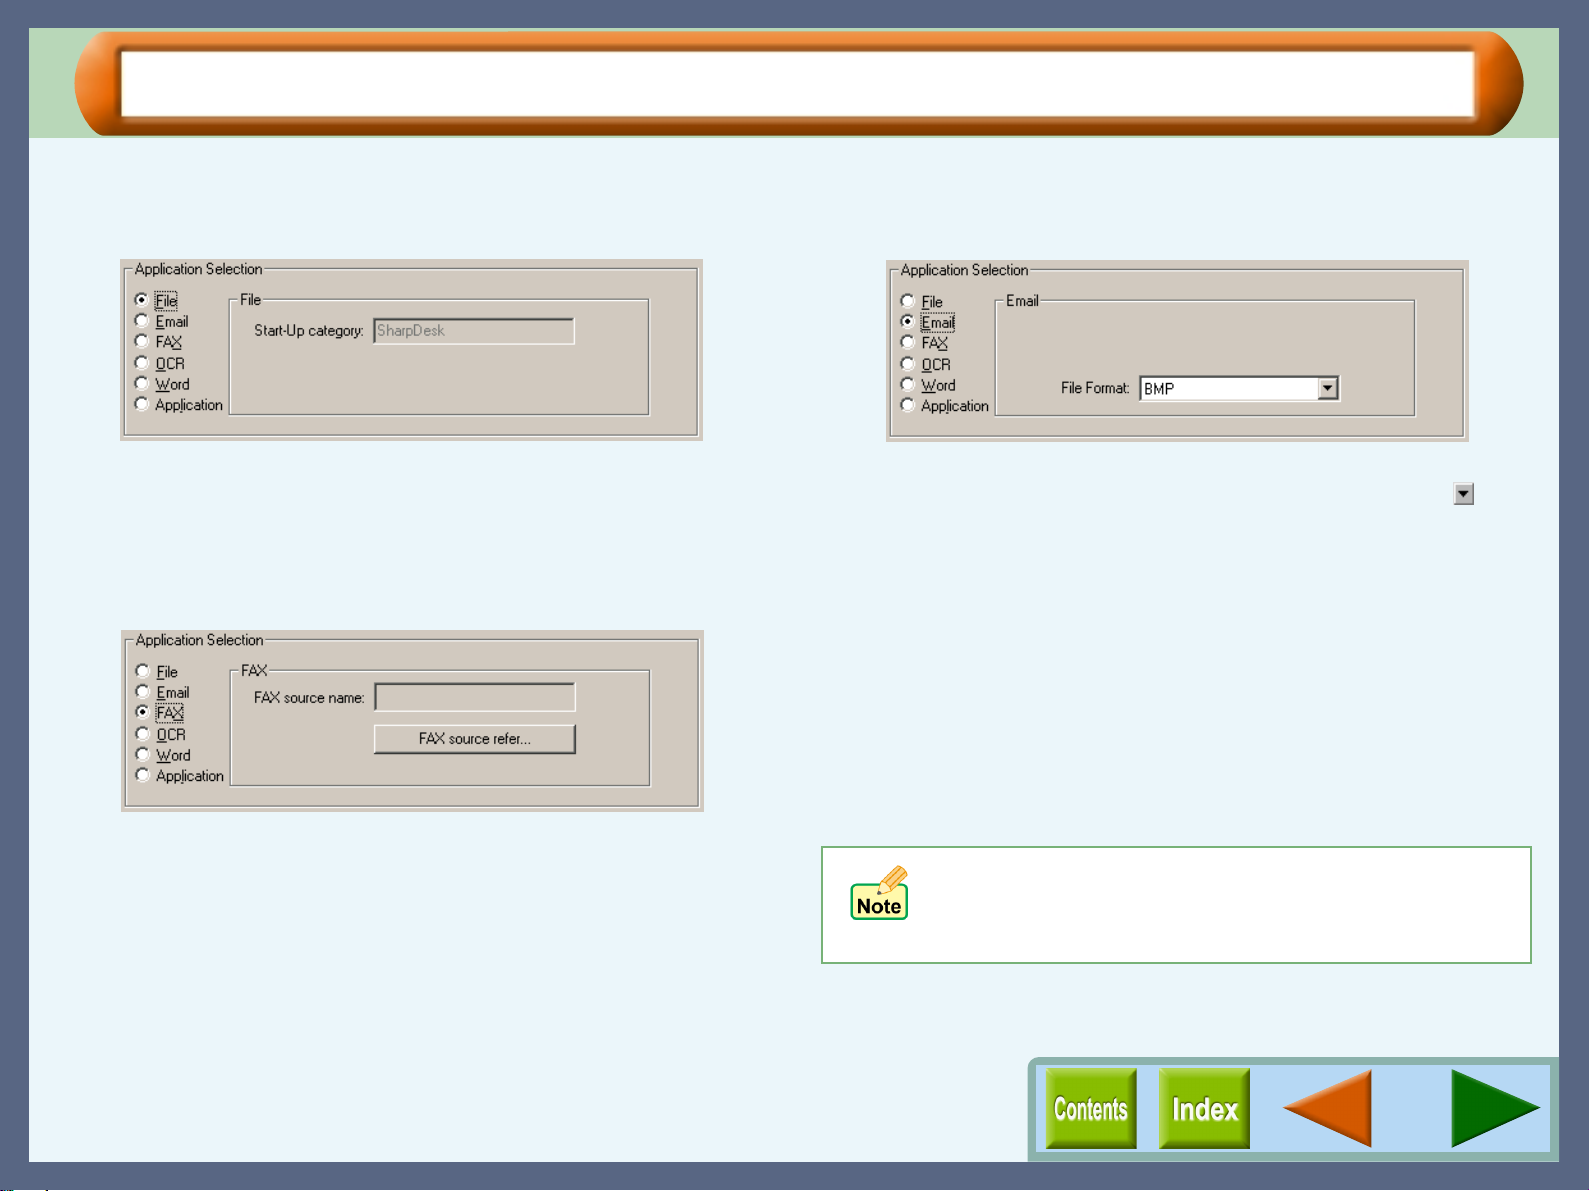
"Application Selection" Settings (part 1)
Button Manager
Use the "Application Selection" area to specify the start-up application starting from the scan menu.
"File" settings
Start-Up category
"SharpDesk" will be specified automatically. Your scanned image
is saved as a TIFF file on Sharpdesk. The file name is created
automatically.
"FAX" settings
FAX source name
The name of the FAX software you are using will be displayed.
"FAX source refer" button
By clicking this button, "FAX Source" dialog box will appea r.
Select the FAX software you intend to use, and click "OK" button.
The selected item will appear in the "FAX source name" box. The
file name is created automati ca l ly.
"Email" settings
File Format
Select the format for the scanned image here. Click the ( )
button to select from "BMP" an d "TIFF". The file name is created
automatically.
To specify the file format on your Mail application:
To open your MAPI-compliant Mail application automatically by
selecting "Email" setting, set the necessary pre ferences on you r
Mail application beforehand.
For example, if you use Outlook Express on your computer,
select "Options" from "Tools" menu on the menu bar, select
"General" tab, and then specify r equ i red settings. For the detail,
refer to the operation manual or the help file of your Mail
application.
If any MAPI-compliant mail application, for example,
Outlook, Outlook Express, Netscape Messenger, or
Eudora, has not been installed, you cannot make the
"Email" setting.
60
Page 63

"Application Selection" Settings (part 2)
Button Manager
"OCR" settings
Start-Up Application
Displays the path for your OCR software.
"Refer" button
Select your OCR software. Click the "Refer" button to open a
dialog box, on which you can select the OCR software.
Start-Up Option
Specify initial settings for the selected OCR software.
File Format
Select the format for the scanned image here. Click the ( )
button to select from "BMP" and "TI FF". The file name is cr eated
automatically.
"Word" settings
The setting options for "Word" do not appear.
"Application" settings
Start-Up Application
Displays the path for the selected appl ication.
"Refer" button
Select the application. Click the "Refer" button to open a dialog
box, on which you can select the ap plication.
Start-Up Option
Specify initial settings for the selected application.
File Format
Select the format for the scanned image here. Click the ( )
button to select from "BMP" an d "TIFF". The file name is created
automatically.
With computers which have been installed with more
than one version of Microsoft Word, when you try to
open Microsoft Word using "SCAN" butto n, your
computer will automatically activate the version which
was used previously. (Microsoft Word 95 is not
available.)
61
Page 64

Default Setting for Each Function
Button Manager
The default s ettings for eac h of the functio ns in the "Scan Setup" area are shown below.
Function Colour Mode Edge Enhancement Scanning Area Resolution Colour Matching
File Full Colour None A4 75dpi For CRT
Email Full Colour None A4 75dpi For CRT
FAX Greyscale None A4 200dpi For CRT
OCR Monochrome Not available A4 300dpi Not available
Word Full Colour None A4 75dpi For CRT
Application Full Colour None A4 75dpi For CRT
Function Dynamic Threshold Reverse Background Removal Quick Scan
File Not available Not available Off( ) On( )
Email Not available Not available Of f( ) On( )
FAX Not available Not available Off( ) On( )
OCR On( ) Off( ) On( ) Not available
Word Not available Not available Off( ) On( )
Application Not available Not available Of f( ) On( )
62
Page 65

Time to Change the Ink Tank
Maintenance
In the cases sho wn below, clic k the "Main tenance" ta b of the print status wi ndow to find th e colour of the ink tank
necessary to be chan ge d, and then change it.
Reference: Changing the Ink Tank
The "Out of ink" error message is displayed on the
print status window.
If the "Out of ink" error message appears on the print status
window, more than two of the ink tanks are out of ink. Check
the ink indicators to find the empty ones, and then immediately
replace them with new ones. If the error message indicates the
colour of the empty ink tank (see sample message below),
replace the ink tank indicated in the message.
"Out of ink - xxxx" - One of the ink colours including cyan,
yellow, magenta, and black is displayed as "xxxx" in this
message.
The "Ink low" error message is displayed on the print
status window.
When an ink tank is near empty, the status icon on the print
status window is changed into ( ). If the "Ink low" error
message appears, more than two of the ink tanks are near
empty. Check the ink indicators to find the ones which are near
empty, and replace them with new ones as soon as possible.
If the error message indicates the colour of the near-empty ink
tank (see sample message below), replace the ink tank
indicated in the message.
"Ink low - xxxx" - One of the ink colours including cyan,
yellow, magenta, and black is displayed as "xxxx" in this
message.
Refer to the table below to check the life of each ink
tank.
Supply
Ink tank (Magenta)
* When using 20.3cm x 25.4cm (8" x 10") size paper at 5% image
area in normal usage.
Part Number
AJ-T20BRInk tank (Black-Regular)
AJ-T20BInk tank (Black-High Capacity)
AJ-T20C
AJ-T20M
AJ-T20YInk tank (Yellow)
Ink life*
400 sheets
700 sheets
350 sheetsInk tank (Cyan)
350 sheets
350 sheets
63
Page 66

Changing the Ink Tank (part 1)
Ensure the unit is turned on be fore following the steps be low on ho w to change the ink tank.
During ink tank replacement, if the front cover is left open for more than 8 minutes, the carriage will automatically return to its
home position in order to prote ct the print hea d. To return th e carriage to the ce ntre position, close the front cove r, and then open
it again.
Maintenance
1111
Turn the front cover locking knob with one hand
and lift the front cover with the other hand, while
keeping the knob in the unlocked position.
The carriage will automatically move to the centre position.
Reference:
Do not put your hands into the unit until the carriage
stops at the centre position. Doing so may hurt your
hands. Do not try to move the carriage manually by
force, you may damage the unit.
See "INSTALLING THE PRINT HEADS AND
THE INK TANKS" in the Setup Guide and
Operation Manu al for mor e deta i l on ho w to
open the front cover.
3333
Remove the old ink tank.
While pressing the tab forward, remove the ink tank.
Press the tab forward.
Do not lift the print
head latch.
Example: Releasing the yellow ink
2222
Open the maintenance cover.
64
Page 67

Changing the Ink Tank (part 2)
Maintenance
4444
5555
Unpack the ink tank from its protective wrapping
and slowly remove the tape.
Example: Removing the tape of the yellow ink tank
! Be sure to install a new ink tank. Do not use an ink tank
that was once installed and then removed from the print
head. Using such ink tank prevents the system to show
an accurate amount of available ink on your computer.
Besides, print quality with such ink tank is not
guaranteed.
! Hold the tank upright when removing the tape. Do not
touch the uncovered opening on the ink tank, as ink will
get on your hands.
! Ensure that there are no pieces of tape remaining on the
ink tank.
Turn the ink tank upside down.
6666
Insert the ink tank to the print head of
corresponding number.
Make sure that each tab
3
securely locks the ink tank
Match the ink tank number
1
to the print head number.
Hook the projection on the ink tank
2
here to fix it.
Example: Inserting the yellow ink tank
by pressing here.
Do not touch this area.
The unit may not print if it is dirty.
Make sure that the numbers on the i nk tank s correspond to
the numbers on the print heads. If they do not corresp ond to
each other, print problems will occur.
65
Page 68

Changing the Ink Tank (part 3)
Maintenance
7777
8888
Close the maintenance cover.
Close the front cover.
Press both edges of the font cover with both of your hands
until it locks.
9999
10
10
1010
Confirm on the display panel that ink tanks have
been securely set to the unit.
If a message appears, which lets you know that any of ink
tanks have not been installed in their correct positions, open
the front cover and confirm that all the ink tanks are properly
inserted.
Follow the message on the operation panel to
complete the ink tank replacement.
Reference:For more detail, refer to "THE INK TANK" in
the Setup Guide and Operation Manual.
During ink tank replacement, if the front cover is left
open for more than 8 minutes, the carriage will
automatically return to its home position in order to
protect the print head. To return the carriage to the
centre position, close the fron t cover , and then open it
again.
66
Page 69

Test Print Head
If you are not satisfied with the print quality, print a test page following the steps shown below.
Maintenance
1111
2222
3333
4444
Make sure that A4 sized paper is set in the tray.
Click the "Utility" tab in the printer driver setup
screen, and then click "Maintenance" button.
Click the "Start" button of "Test print head".
Click the "OK" button.
A test page will be printed.
5555
6666
7777
Check the result of the test page.
If the print quality is poor, go to the next step.
RGBCMYK
Colour Black
Click the "Start" button of "Auto head cleaning" to
clean the print heads.
If you cannot get a good result printing a test page even after
cleaning the print head 3 times, change the print head.
Reference:Cleaning the Print Head
Change the print head.
Replace the black print head if a white line(s) appears in the
"Black" results in the figure of step 5. If you find a white
line(s) in the "Colour" results in the same figure, replace the
colour print head.
Reference:Changing the Print Head
Poor result Fine result
67
Page 70

Cleaning the Print Head
If the test page from "Test print head" is faint or uneven, confirm that you are printing on the correct side of the
paper, and the driver setting and ink levels are correct. If these items are OK, then follow the steps below to clean
the print head.
Maintenance
1111
2222
3333
Click the "Utility" tab in the printer driver setup
screen, and then click "Maintenance" button.
Click the "Start" button of "Auto head cleaning".
Click the "OK" button to clean both the black print head
and the colour print head.
You can save the ink
consumption by checking the
box for the print head which
has poorer print result.
Cleaning the print head will begin.
4444
5555
Click the "Start" button of "Test print head", and
then click "OK" button on the confirmation dialog
box to print a test page.
Check if the test page was printed clearly.
If print quality is poor, return to step 2 and follow the
procedures again.
Do not clean the print head more than 3 times.
Excessive cleaning of the print head wa stes in k.
Reference:If print quality is still poor, refer to Changing
the Print Head.
The unit cannot perform other operations while
cleaning the print head.
68
Page 71

Changing the Print Head (part 1)
If print quality is poor after cleaning the print head 3 times, the print head may be worn.
Ensure the unit is turned on before following the steps below on how to change the print head.
Maintenance
1111
Refer to the table on the right to check the life of each print head.
Turn the front cover locking knob with one hand
and lift the front cover with the other hand, while
keeping the knob in the unlocked position.
The carriage will automatically move to the centre position.
Reference:
Do not put your hands into the unit until the carriage
stops at the centre position. Doing so may hurt your
hands. Do not try to move the carriage manually by
force, you may damage the unit.
See "INSTALLING THE PRINT HEADS AND
THE INK TANKS" in the Setup Guide and
Operation Manu al for mor e deta i l on ho w to
open the front cover.
2222
3333
Part NumberSupply
AJ-H20BPrint head (Black)
AJ-H20CPrint head (Colour)
When using 20.3cm x 25.4cm (8" x 10") size paper at 5% image area in normal usage.
*
Open the maintenance cover.
Raise the print head latch.
Raise the latch until it comes to a complete halt.
Raise this latch.
Print head life*
10,000 sheets
10,000 sheets
During print head replacem ent, if the fron t cover is left
open for more than 8 minutes with the print head latch
closed, the carriage will automatically return to its
home position in order to protect the print head. To
return the carriage to the centre position, cl ose the
front cover, and then open it again.
69
Page 72

Changing the Print Head (part 2)
Maintenance
4444
5555
Remove the old black or colour print head with the
ink tank(s) still inserted.
Lift it straight up to remove.
Remove the new print head from its protective
case.
Do not touch the metal portion of
the print head. Doing so may lead
to improper printing.
6666
7777
Insert the new print head.
Be careful not to damage the print head. If any part is
damaged, the unit may not work properly.
Lower the print head latch.
Lower the latch until it is properly fixed into position.
70
Page 73

Changing the Print Head (part 3)
Maintenance
8888
9999
10
10
1010
Remove the ink tank(s) from the old print head and
insert into the new print head.
Reference:For details on inserting and removing the
ink tank, see Changing the Ink Tank
Close the maintenance cover.
Close the front cover.
Press both edges of the font cover with both of your hands
until it locks.
.
11
11
1111
12
12
1212
Follow the message on the operation panel to
complete the ink tank replacement.
Reference:For more detail, refer to "THE PRINT
HEAD" in the Setup Guide and Operation
Manual.
To maintain print quality after changing the print
head, always align the print head.
Click the "Start" button of "Print alignment patterns" located
in the "Maintenance" dialog box of the print status window
to align the print head.
To keep good print quality, keep all the ink tanks
installed to the corresponding p rint head.
13
13
1313
Reference:Aligning the Print Head
Print a test page by clicking the "Start" button of
"Test print head".
Make sure that the test page was printed clearly.
Reference:Test Print Head
71
Page 74

Aligning the Print Head (part 1)
Align the print head after installing or changing the print head, or if printed lines are not straight, or have blank
spaces. Follow the steps below to align the print head.
Maintenance
1111
2222
3333
4444
Make sure that A4 sized paper is set in the tray.
Click the "Utility" tab in the printer driver setup
screen, and then click "Maintenance" button.
Click the "Start" button of "Print alignment
patterns".
Click the "OK" button.
5555
Check the test chart results, and change the
preferences to the best setting for each pattern.
Select a pattern sample for "Pattern A".
1111
Seventeen block figures with a vertical line on each
vertical side ( ) are printed in pattern A. Of the
seventeen figures determine which block is most nearly
centred between the vertical lines and select the
corresponding number.
Example:
The "Align print head" dialog box will appear, and a test
chart will be printed.
-8
A
-8 -7 -6 -5 -4 -3 -2 -1 0 +1 +2 +3 +4 +5 +6 +7 +8
+8
72
Page 75

Aligning the Print Head (part 2)
Maintenance
Select a pattern sample for "Pattern B".
2222
Seventeen block figures with a horizontal line on each
horizontal side ( ) are printed in pattern B. Of the
seventeen figures determine which block is most nearly
centred between the horizontal lines and select the
corresponding number.
Example:
-6 +8
B
-8 -7 -6 -5 -4 -3 -2 -1 0 +1 +2 +3 +4 +5 +6 +7 +8
Select a pattern sample for "Pattern C".
3333
Thirteen lines are printed in pattern C. Of the thirteen
lines determine which line is the straightest and select
the corresponding number.
Example:
Cracked line
-6
C
+1
Straight line
6666
Select a pattern sample for "Pattern D".
4444
Thirteen lines are printed in pattern D. Of the thirteen
lines determine which line is the straightest and select
the corresponding number.
Example:
-6
-6 -5 -4 -3 -2 -1 0 +1 +2 +3 +4 +5 +6
Click the "OK" button in the "Align print head"
dialog box.
The print head will align itself.
! If you cannot find any satisfa ctory pattern sample for
each of "Pattern A" to "Pattern D" setting s, select the
best ones among the printed pattern samples, and
then go back to step 3.
! The unit cannot perform other operations while
aligning the print head.
D
+1
Straight lineCracked line
-6 -5 -4 -3 -2 -1 0 +1 +2 +3 +4 +5 +6
73
Page 76
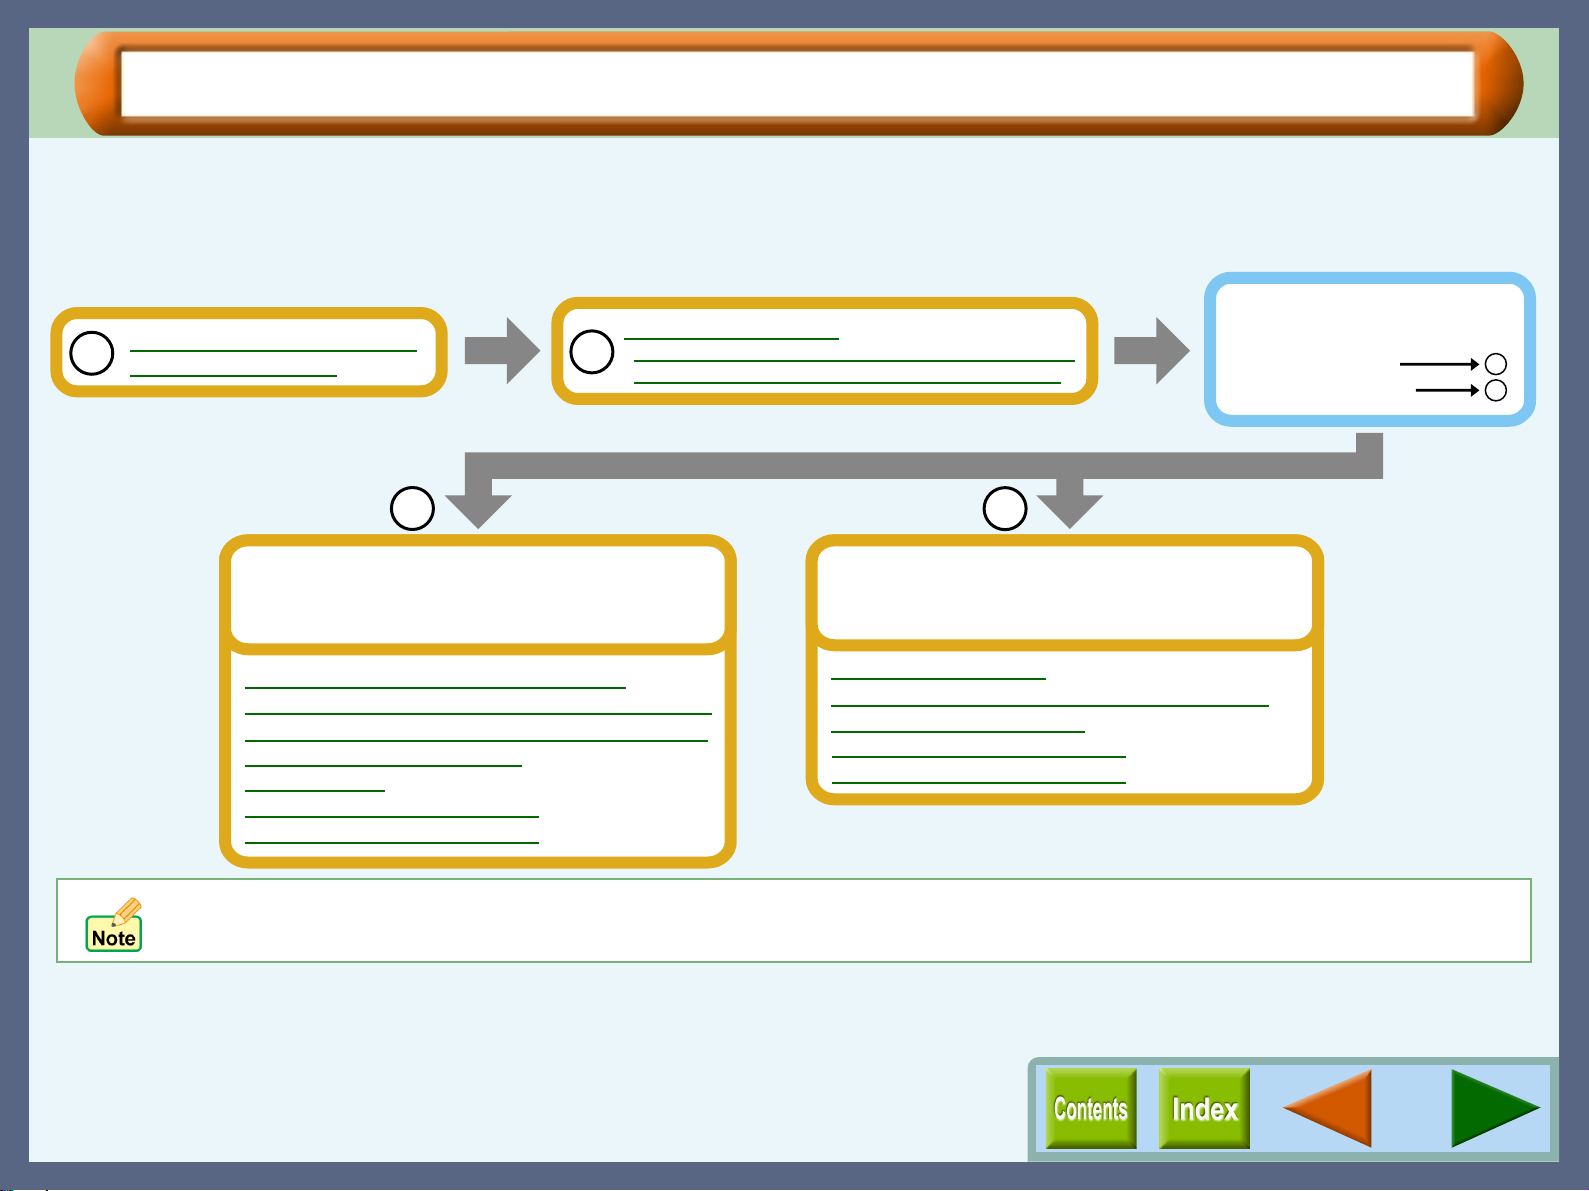
Identifying Unit Problems
Troubleshooting
When any trouble has occurred in the unit, first, verify whether you can make a copy or not with the unit. Check
the items shown below when the unit does not work properly but it can make a copy.
Reference: If any copier trouble occurs, refer to "TROUBLESHOOTING" in the Setup Guide and Operation Manual.
What type of trouble do
Check the Connection between
1
the Unit and Computer
Check Your Computer
Failed to Install the Device Driver (when the USB is connected)
2
Failed to Install the Device Driver (Windows 2000/XP)
you have?
• Printing trouble
• Scanning trouble
A
B
A
Printing trouble
When one of the troubles listed below occurs while
printing, check the corresponding item.
Faint, Uneven or Smeared Print Output
Characters or Graphics are not Printed in Correct Position
Printed Lines are not Straight, or Have Blank Spaces
Unit does not Print in Colour
Nothing Prints
Uninstalling AJ-6110 Software
Reinstalling AJ-6110 Software
Make sure that th e unit is not wor king. You cannot pr int or scan data from your computer whil e the unit is maki ng copies or setting
copier preferences.
When one of the troubles listed below occurs while
scanning data, check the corresponding item.
Poor Scanning Result
The Scanned Image is Incorrectly Positioned
Unable to Scan the Image
Uninstalling AJ-6110 Software
Reinstalling AJ-6110 Software
B
Scanning trouble
If you fail to solve the problem after verifying all the items listed above, please contact your authorised SHARP
service cent re.
74
Page 77
Check the Connection between the Un it and Computer
Troubleshooting
CHECK1 Is the interface cable compatible with the
unit and computer?
Interface cables compatible with this unit are USB and
parallel cables. Check which type of cable is supported
by your computer, and then purchase one of the
following cables accordingly:
USB cable
Shielded twisted pair cable (2m (6feet) Max.: highspeed transmission equivalent)
Parallel interface cable
IEEE 1284 - Shielded type bi-directional parallel
interface cable (2m (6feet) Max.)
CHECK2 Is the interface cable connected securely?
Check if the interface cable is securely plugged into the
connectors of the unit and computer. It is also advisable
to ensure that the connector pins are not bent.
Reference:See "CONNECTING THE INTERFACE
CABLE" in the Setup Guide and Operation
Manual for more details on interface
connection.
If the USB cable becomes disconnected
If the USB cable becomes disconnected, even only once
during the unit's operation, then printing and scanning may be
disrupted.
If this occurs, check the USB cable and ensure that it is
securely connected, then restart the computer.
CHECK3 Are any other USB peripherals being
connected along with the unit?
If other USB peripherals are connected through the
same hub, disconnect them to see if the problem still
exists.
75
Page 78

Check Your Computer
Reference: Failed to Install the Device Driver (when the USB is connected)
Troubleshooting
CHECK1 Is there enough computer memory or hard
disk space?
To use this unit, you must have an adequate amount of
hard disk space. If there is insufficient hard disk space,
delete unnecessary files to increase the free space of the
hard disk. If there is insufficient memory, close
unnecessary applications to increase memory available
for printing or scanning. If you are still unable to print
or scan, install more memory into your computer.
CHECK2 Is your hard disk fragmented?
When data is frequently stored/deleted, the hard disk
may become fragmented causing a reduction in
printing or scanning speed. In this case it is
recommended to defragment your hard disk. You may
use the Windows tools or a commercially available
hard disk defragmenting tool.
CHECK3 If your computer is connected to the unit
through the parallel port, is the parallel port
(LPT) mode set to other than EPP mode?
The unit may not operate correctly if the parallel port
mode is set to EPP mode. To set the parallel port mode
to a mode other than EPP mode, refer to your computer
manual or ask the manufacturer of the computer. ECP
mode is recommended to obtain the best performance
from the unit. Note that some computers may use
different names for the modes.
If you are using Windows XP, the "Found New
Hardware Wizard" may appear after you change t he
port setting. In this case, click the "Cancel" button to
close the wizard, and then reinstall the "Device Driver"
as explained in "INSTALLING THE SOFTWARE" in
the Setup Guide and Operation Manual.
76
Page 79

Failed to Instal l the Device Driv er (when the USB is connected)
Troubleshooting
If the device driver cannot b e install ed while this unit i s connec ted to the compute r with a USB cable, mak e sure
to enable the USB port refer rin g to the steps shown below.
1111
2222
Click the "Start" button, select "Settings", and then
click "Control Panel".
On Windows XP, click the "Start" button, click "Control
Panel", and then click "Performance and Maintenance".
Double-click the "System" icon and click the
"Device Manager" tab.
"Universal Serial Bus controllers" will appear in the list of
devices.
3333
4444
Click the ( ) icon beside the "Universal Serial Bus
controllers".
Two items will display, your Controller chipset type and
Root Hub. If these items appear, you can use USB port. If the
"Universal Serial Bus controllers" shows a yellow
exclamation point or does not appear, you must check your
computer manual for USB troubleshooting or contact your
computer manufacturer.
When you make sure that the USB port is enabled,
install the device driver, referring to "INSTALLING
THE SOFTWARE" in the Setup Guide and
Operation Manual.
! If the "System" icon does not appear on Windows Me,
click "view all Control Panel options" to view it.
! On Windows 2000, double-click the "System" icon, click
the "Hardware" tab, and click the "Device Manager"
button.
! On Windows XP, click "System", click the "Hardware" ta b,
and click the "Device Manager" button.
77
Page 80

Failed to Install the Device Driver (Windows 2000/XP)
If the device driver cannot be installed under Windows 2000/XP, chec k your computer's settings acc ording to the
following procedure.
Troubleshooting
1111
2222
3333
Click the "Start" button, select "Settings", and then
click "Control Panel".
On Windows XP, click the "Start" button, and then click
"Control Panel".
Double-click the "System" icon.
On Windows XP, click "Performance and Maintenance",
and then click "System".
Click the "Hardware" tab, and then click the "Driver
Signing" button.
The following dialog box will open.
4444
Check the "File signature verification" ("What
action do you want Windows to take?" on Windows
XP).
If the option "Block" has been selected for your computer,
then the device driver will not be installable. Select the
option "Warn" and then install the device driver as explained
in "INSTALLING THE SOFTWARE" in the Setup Guide
and Operation Manual.
78
Page 81

Faint, Uneven or Smeared Print Output
Troubleshooting
If the print output is faint or uneven
If print output is faint or uneven, refer to checks 1 to 3 below for
possible remedies.
CHECK1 Has the paper been inserted into the printer
with the print side facing the right way?
Some types of paper have only one printable side. Print
quality will suffer if paper is loaded in the tray with the
print side facing the wrong way.
CHECK2 Has the printer driver been specified to suit
both paper and the print job?
Open the printer driver setup screen, and follow the
steps listed below.
1111
Is the paper specif ied in the printer driver set up screen
the same as that loaded in the tray?
Click the "Paper/Quality" tab, and check if the "Media"
setting matches the paper inserted in the tray.
2222
Have you selected the print quality setting for the
highest speed printing in the printer driver setup
screen?
If the "Print Quality" setting is set to the highest speed
printing, you can print at higher speed but print quality may
suffer as a result.
Specify the "Print Quality" setting except "Draft" on
Windows 95/98/Me/NT 4.0, or "Quality Settings" except
"Draft" on Windows 2000/XP, and then print again.
If the print output is smeared
First turn the paper knob to the ( ) setting and print again. If
the print output is still smeared,
CHECK1 Is the paper curled?
If the paper is curled, straighten it up and set it to the
unit again.
CHECK2 Is the paper too thick or too thin?
Only paper weighing from 60g/m2 to 200g/m2 (16 lbs.
to 110 lbs. index) can be used for printing.
CHECK3 Did you set sufficient margins in the paper
settings of your application?
If the margins are set outside of the quality guaranteed
area, smudges or smears may appear at the upper and
lower edges of the paper.
Set margins from your application to fit within the
quality guaranteed area.
Reference:Quality guaranteed area (Windows 95/98/
Me/NT 4.0, Windows 2000/XP)
CHECK3 Did you get a clear result for your test
page?
Print a test page to check the print quality. To print a
test page, click the "Start" button of "Test print head"
on the "Maintenance" tab of the print status window.
Reference:Test Print Head
79
Page 82

Characters or Graphics are not Printed in Correct Position
If a document is printed skewed or partly off the paper, follow the steps listed below.
Troubleshooting
CHECK1 Is the paper size loaded in the tray the
same as that specified in the pr inter driver?
Check if the "Paper Size" options suit the size of the
paper loaded in the tray.
If the "Fit to Page" setting is activated, make sure that
the paper size selected from the drop-down list of the
"Target Size" option is the same as the size of the
loaded paper.
CHECK2 Is the orientation of document setting
correct?
Click the "Layout" tab in the printer driver setup
screen, and verify if the "Orientation" option is set to
your requirements.
CHECK3 Is the paper loaded correctly?
If a document is physically damaged when it is output
or the image is skewed on the paper, discard the
damaged sheet, reinsert the paper supply and print
again. Insert the paper so that there is no visible space
between the paper and the paper guides.
Reference:See "LOADING PAPER" in the Setup
Guide and Operation Manual for more
details on inserting paper.
CHECK4 Did you correctly specify the margins for
the application in use?
Check the layout of the document margins and the
paper size settings for the application you are using.
Also check if the print settings are specified correctly
to suit the paper size.
Reference:Quality guaranteed area (Windows 95/98/
Me/NT 4.0, Windows 2000/XP)
80
Page 83

Printed Lines are not Straight, or Have Blank Spaces
When printed lines are not straight, or have blank spaces, follow the steps listed below.
Troubleshooting
1111
2222
Specify the print quality setting in the printer
driver.
On Windows 95/98/Me/NT 4.0
Click the "Paper/Quality" tab in the printer driver setup
screen, and check if the "Print Quality" option is set to
"Sharp Rapid", "Normal" or "Best".
On Windows 2000/XP
Click the "Paper/Quality" tab in the printer driver setup
screen, and check if the "Quality Settings" option is set to
"Normal" or "Best".
Reference:"Paper/Quality" Tab Settings (Windows
95/98/Me/NT 4.0, Windows 2000/XP)
If you change the setting as described above and printed lines
are still poor, go to step 2.
Align the print head.
Click the "Maintenance" tab of the print status window and
then click "Start" button of "Print alignment patterns" to
align the print head.
Reference:Aligning the Print Head
81
Page 84

Unit does not Print in Colour
If you are unable to print a document in colour, refer to the check list below.
CHECK1 Is the printer driver set to the colour print
option?
Click the "Paper/Quality" tab in the printer driver setup
screen, and change the "Colour" setting to "Colour".
Reference:"Paper/Quality" Tab Settings (Windows
95/98/Me/NT 4.0, Windows 2000/XP)
CHECK2 Does the application you are using support
colour printing?
Some applications may not support colour printing.
Use an application that supports colour printing.
For more information, see your application's manual or
help file.
Troubleshooting
82
Page 85

Nothing Prints
Troubleshooting
If nothing prints even when the unit is turned on, please wait a few moments. The printer needs a longer time to
process multicoloured or intricate data. If the unit still does not print, refer to the check list below.
CHECK1 Is the correct print port "SPRT" selected?
Make sure that "SPRT" is selected by following the
steps below.
1111
Click the "Start" button, select "Se ttings" and then click
"Printers".
On Windows XP, click the "Start" button, click "Control
Panel", click "Printers and Other Hardware", and then click
"Printers and Faxes".
2222
Right-click the "SHARP AJ-6110" printer d river icon,
and then click "Propertie s".
3333
Click the "Details" tab if any of Windows 95/98/Me or
NT 4.0 are utilised. Click the "Ports" tab if Windows
2000/XP is utilised.
If "SPRT" has not been selected on the settings screen, then
select "SPRT".
CHECK2 Is your printer selected correctly in the
current application for the print job?
When choosing "Print" from the "File" menu located in
applications, be sure you have selected the "SHARP
AJ-6110" displayed in the "Print" dialog box.
Check here.
CHECK3 Has the printer driver been installed
properly?
Check if the printer driver has been installed, following
the steps listed below.
Click the "Start" button, select "Settings" and then
1111
click "Printers".
On Windows XP, click the "Start" button, click
"Control Panel", click "Printers and Other Hardware",
and then click "Printers and Faxes".
Check if the "SHARP AJ-6110" printer driver icon
2222
is shown.
If you still cannot print after confirming the "SHARP
AJ-6110" printer driver icon, the printer driver may not
have been installed correctly. In this case, delete AJ6110 software and then reinstall it.
Reference:Uninstalling AJ-6110 Software
AJ-6110 Software
, Reinstalling
If your operating system is Windows 2000/XP, make
sure that "SHARP AJ-6110" printer driver icon is
selected as the current printer.
83
Page 86

Poor Scanning Result
Troubleshooting
If you get poor quality as a result of scanning job, and you cannot improve the quality by changing preferences,
refer to the c heck list shown below.
CHECK1 Is the original clean?
Check your original before scanning. If any dust sticks
to the original, you cannot obtain a clean result. In
addition, make sure that the original table is also clean.
CHECK2 Have you specified the suitable
resolution?
Make sure that the value for the "Resolution" setting in
the scanner driver satisfies the requirement of the set
original.
Reference:"Professional" Scan Preferences (Main)
CHECK3 Have you specified suitable value for the
"B/W Threshold" setting?
When you scan with "Mono 2 gradation" colour mode,
make sure that a suitable value is specified for the
"B/W Threshold" setting. A larger threshold value
makes your output darker, whilst a small threshold
value makes it lighter. To adjust the threshold
automatically, click the "Auto Threshold" button on the
"Image" tab of "Professional" screen.
Reference:"Professional" Scan Preferences (Image)
CHECK4 Have you adjusted the brightness and
contrast suitably?
If you get output which seems to have unsuitable
brightness or contrast as a result of scanning job, for
example, too bright output, activate the "Auto
Contrast/Brightness Adjustment" setting on the
"Image" tab of the "Professional" screen. Click the
"Variation Preview Screen" button
brightness and the contrast viewing the scanned output
image on the screen.
to adjust the
CHECK5 Has "Quick Scan" been selected?
If scanning is performed when the "Quick Scan" option
has been selected, image quality may be degraded. This
is because the scanned data is transferred using JPEG
compression. If image quality is poor, then perform
scanning again without selecting the "Quick Scan"
option. ("Quick Scan" is selected by default.)
Reference:
"Professional" Scan Preferences (Preference)
84
Page 87

The Scanned Image is Incorrectly Positioned
If the scanne d image is incorrectly positi oned, refer to the check list shown below.
CHECK1 Have you placed the original straight?
Place the original straight on the original table.
Reference:
CHECK2 Have you set the original correctly on the
original table?
Place the original on the original table in the direction
as shown in the illustration below.
Refer to "ORIGINAL PLACEMENT" in the
Setup Guide and Operation Manual for the
detail on how to set the origina l .
Align the corner of the original with ( ) mark.
11
B5 A4
Troubleshooting
B5
A4
8
1/2
85
Page 88

Unable to Scan the Image
Troubleshooting
If you cannot scan the image, tur n off your compute r. Press the power button on the unit to turn it off, unplug the unit fr om
the power source, and then plug it back in. Restart your computer. Try scanning again. If scanning is still not possible,
refer to the check list below.
CHECK1
CHECK2
Reference:
CHECK3
CHECK4
CHECK5
Is your application compliant to TWAIN?
If your application is not compliant to TWAIN, the
application cannot acquire images. Make sure that your
application is compliant to TWAIN.
Have you selected the scanner driver of this
unit on your application?
Make sure that the "SHARP TWAIN AJ2" is selected on
your application.
Starting the Scanner Driver
Have you specified all scanning preferences
appropriately?
Setting a large area with full colour together with a high
resolution setting, mak es the data size large, resulting in
extended scanning times. It is recommended to set the scanning
preferences depending on the type of origi nal to be scanned,
i.e., Text, Text/Graphics, Photograph, Colour, Black & White.
Is there enough computer memory?
Your computer may not have enough available memory to hold
the document you want to scan. Lower th e resolution rate.
If your computer is connected to the unit
through the parallel port, is the computer's
parallel port (LPT) setting correct?
Scanning may not take place correctly if the parallel port is
set to EPP mode. Refer to your computer manual or ask the
manufacturer of the computer, and then set the parallel port
to a mode other than EPP mode. For maximum scanning
speed, we recommend ECP mode.
If you are using Windows XP, the "Found New Hardware
Wizard" may appear after you change the port setting. In
this case, click the "Cancel" button to close the wizard,
and then reinstall the "Device Driver" as explained in
"INSTALLING THE SOFTWARE" in the Setup Guide and
Operation Manual.
CHECK6
CHECK7
Reference:
CHECK8
CHECK9
Reference:
Do you have "Administrator" authorization?
In order for this unit to perform scanning under Windows
NT 4.0, the user must be logged on as "Administrator".
Has the specified period of program timeout
already elapsed?
Neither printing nor scanning job can be sent to the unit
from your computer during the specified period of program
timeout after copying.
To send a printing or scanning job immediately, press the
CLEAR/STOP button ( ) on the unit twice to clear all the
settings for the unit.
For more detail, refer to " FUNCTIONS SET BY
THE USER" in the Setu p Guide and Op eration
Manual.
c
Is one computer connected to the unit's USB
port and another computer connected to the
unit's parallel port?
If so, an error will occur on one of the computers when the
"SCAN" button is pressed on the unit to begin scanning.
Disconnect either of the computers and then perform the
scan again.
Have the scanner driver and Button Manager
been installed properly?
If normal scanning still cannot be performed even after
confirming the items on the above check list, delete AJ6110 software and then reinstall it.
Uninstalling AJ-6110 Software, Reinstalling
AJ-6110 Software
86
Page 89

Uninstalling AJ-6110 Software
If printing or sc anning is no t possible, or Button Manag er does not func tion correct ly, check t he items in "Nothing
Prints" or "Unable to Scan the Image". If you st ill cannot solve the pro blem, follow the steps bel ow to uninstall AJ-
6110 software (printer driver, Button Manager, scanner driver, and de vice driver), and then reins tall it.
Reference: Reinstalling AJ-6110 Software
! Before uninstalling AJ-6110 software, close all applications.
! When uninstalling AJ-6110 software, be sure to uninstall the printer driver first.
Troubleshooting
Uninstalling the Printer Driver
1111
2222
Click the "Start" button, select "Settings", and then
click "Printers".
On Windows XP, click the "Start" button, click "Control
Panel", click "Printers and Other Hardware", and then click
"Printers and Faxes".
Right-click the "SHARP AJ-6110" printer driver
icon, and select "Delete" from the pop-up menu.
Click the "Yes" button in the confirmation dialog box.
3333
Uninstalling Button Manager, the Scanner Driver, and
the Device Driver
1111
2222
3333
Click the "Start" button, select "Programs" ("All
Programs" on Windows XP), select "SHARP AJ6110", and then click "Uninstall AJ-6110".
Click the "Yes" button in the confirmation dialog
box.
Follow the on-screen instructions to uninstall AJ-6110
software.
When the restart confirmation dialog box appears,
click the "Yes" button to restart your computer.
After restarting your computer, refer to the instructions for
"Reinstalling AJ-6110 Software
", and then reinstall it.
You have successfully completed uninstalling the printer
driver. Next, uninstall Button Manager, the scanner driver,
and the device driver.
87
Page 90

Reinstalling AJ-6110 Software
After Uninstalling AJ -6 11 0 Softwar e and restarting your compute r, make sure the unit's power is on, and then
follow the steps below to reinstall AJ-611 0 software (device driver, scanner driver , printer driver, and Button
Manager) by following the procedure below.
Troubleshooting
1111
2222
3333
Insert the supplied CD-ROM, and then double-click
the "My Computer" ( ) icon, double-click the CDROM ( ) icon, and then double-click the "Setup"
( ) icon.
On Windows XP, insert the supplied CD-ROM, and then
click the "Start" button, click "My Computer", double-click
the CD-ROM icon, and then double-click the "Setup" icon.
When the language selection screen appears, click
the "Next" button.
Check the boxes for "Device Driver", "Scanner
Driver", "Printer Driver" and "Button Manager",
and then click the "Next" button.
4444
Perform the reinstallation by following the onscreen instructions.
For more details, refer to the instructions on "INSTALLING
THE SOFTWARE" in the Setup Guide and Operation
Manual.
88
Page 91

Index
Index
Advanced Options 15
A
Application Selection 60
Auto Contrast/Brightness Adjustment
Auto head cleaning 37
Auto Threshold 49
B/W Threshold 49
B
Background Removal 59
Banner Printin g (Windows 2000/XP)
Banner Printing (Windows 95/98/Me/NT 4.0)
Collate 21
C
Colour Adjustment (Windows 2000/XP)
Colour Adjustment (Windows 95/ 98/ Me /N T 4.0 )
Colour Matching
Button Manager 59
Printer Driv er (Windows 2000/XP)
Printer Driver (Windows 95/98/Me/NT 4.0)
Scanner Driver 50
Colour Mode
Button Manager 59
Scanner Driver 48
Default Settings
D
Button Manager 62
Scanner Driver 55
Dynamic Threshold 5 9
Edge 50
E
Edge Enhancement 59
Factory Defaults 51
F
Fit to Paper Size 23
Image 49
I
Image Area 47
Ink tank
Changing 64
Indicator window 37
Layout 19
L
Load User Settings 51
49
16
10
18
12
18
12
Main 47
M
Maintenance 37
Media (Windows 2000/XP) 14
Media (Windows 95/98/Me/NT 4.0) 9
N
N-Up Printing 21
Options 38
O
Orientation 20
Page Order 20
P
Paper Size (Windows 2000/XP) 16
Paper Size (Windows 95/98/Me/NT 4.0)
Paper Source (Windows 2000/XP) 14
Paper Source (Windows 95/98/Me/NT 4.0)
Paper/Quality (Windows 2000/XP) 13
Paper/Quality (Windows 95/98/Me/NT 4.0)
Poster Printing 23
Preference 51
Print alignment patterns 37
Print head
Alignment 72
Changing 69
Cleaning 68
Print Quality (Windows 2000/XP) 17
Print Quality (Windows 95/98/Me/NT 4.0)
Print Status Window 34
Printable area (Windows 2000/XP) 17
Printable area (Windows 95/98/Me/NT 4.0)
Printing
Photograph 33
Poster 32
Watermark 29
Professional 47
Quality guaranteed area (Windows 2000/XP)
Q
Quality gua ranteed area (Windows 95/9 8/ M e/NT 4.0)
Quality Settings 13
10
11
11
17
11
Quick Scan
Button Manager 59
Scanner Driver 51
Resolution
R
Button Manager 59
Scanner Driver 47
Reverse
Button Manager 59
Scanner Driver 49
Save User Settings 51
S
Scaling 22
Scan Setup 59
9
8
Scanning Area 59
Scanning Mode 45
Scanning Type 46
Sharing Printer 39
Standard 46
Standard Mode Setting 52
Starting
Button Manager 58
Printer Driver (W in do w s 200 0/X P )
Printer Driver (Windows 95/98/Me/NT 4.0)
Scanner Driver 43
Test print head 67
T
Troubleshooting 74
Uninstalling
U
Button Manager 87
Printer Driver 87
Scanner Driver 87
W
Watermark 24
Zoom
Z
Printer Driver 23
Scanner Driver 47
5
3
 Loading...