

Page 1

MODEL
AJ-6020
COLOUR INKJET MULTIFUNCTION
SETUP GUIDE AND
OPERATION MANUAL
Page
INTRODUCTION
SETTING UP THE UNIT
LOADING PAPER
INSTALLING THE
SOFTWARE
OPERATION PANEL
MAKING COPIES
FUNCTIONS SET BY
THE USER
USING THIS UNIT WITH
YOUR COMPUTER
USER MAINTENANCE
TROUBLESHOOTING
APPENDIX
20
25
46
49
63
69
71
78
84
4
6
Page 2

This equipment complies with the requirements of Directives 89/336/EEC and 73/23/EEC as amended by
93/68/EEC.
Dieses Gerät entspricht den Anforderungen der EG-Richtlinien 89/336/EWG und 73/23/EWG mit Änderung
93/68/EWG.
Ce matériel répond aux exigences contenues dans les directives 89/336/CEE et 73/23/CEE modefiées par la
directive 93/68/CEE.
Dit apparaat voldoet aan de eisen van de richtlijnen 89/336/EEG en 73/23/EEG, gewijzigd door 93/68/EEG.
Dette udstyr overholder kravene i direktiv nr. 89/336/EEC og 73/23/EEC med tillæg nr. 93/68/EEC.
Quest’ apparecchio è conforme ai requisiti delle direttive 89/336/EEC e 73/23/EEC, come emendata dalla
direttiva 93/68/EEC.
Este equipamento obedece às exigências das directivas 89/336/CEE e 73/23/CEE, na sua versão corrigida
pela directiva 93/68/CEE.
Este aparato satisface las exigencias de las Directivas 89/336/CEE y 73/23/CEE, modificadas por medio de
la 93/68/CEE.
Denna utrustning uppfyller kraven enligt riktlinjerna 89/336/EEC och 73/23/EEC så som kompletteras av
93/68/EEC.
Dette produktet oppfyller betingelsene i derektivene 89/336/EEC og 73/23/EEC i endringen 93/68/EEC.
Tämä laite täyttää direktiivien 89/336/EEC ja 73/23/EEC vaatimukset, joita on muutettu direktiivillä
93/68/EEC.
The CE mark logo label is affixed on an equipment in case that the directives
described in the above sentence are applicable to the product. (This sentence is not
applicable in any country where the above directives are not required.)
Page 3

Cautions
Follow the cautions below when using this unit.
! The unit is affect ed by the envi ronm ent in w hich it is inst alled. Do not insta ll you r unit
in the following area.
−Dusty areas
If dust enters the interior of the unit, damage or poor-quality output can result.
−Areas in direct sunlight
Prolonged exposure to direct sunlight can cause distortion to some parts which
may result in poor quality output.
−Excessively hot, cold, humi d, or dry areas (f or example, nea r heaters, humi difiers,
or air conditioners ) may result in damp paper, or condensa tion within the interna l
mechanisms causing misfeeds, or dirty output.
! Operating Conditions
Temperature : 10-35 degrees Celsius (50-95 degrees Fahrenheit)
Relative humidity : 20%-85%
Note : When the temperature reaches 30 degrees Celsius (86 degrees Fahrenheit),
the relative humidity must be 60% or less.
! The power outlet should be near the equipment, and should be easily accessible.
! When movi ng th e un it, be s ure to fir s t tu rn the p owe r s wi tch off, and then re move t he
power cord from the outlet.
! Place the unit on a firm, level surface.
! Be sure to use genuine SHARP ink tanks.
! If you get ink spots on your skin, wash with water as soon as possible.
! Store spare ink tanks out of the reach of children.
! For the disposal of the spent ink tank, pack it in a plastic bag.
Page 4

CONTENTS
INTRODUCTION
MAIN FEATURES............................................................................................ 4
USING THE MANUALS................................................................................... 5
SETTING UP THE UNIT
CONFIRMING THE CONTENTS..................................................................... 6
PART NAMES AND FUNCTIONS................................................................... 7
UNPACKING.................................................................................................... 9
ATTACHING THE TRAYS............................................................................. 10
CONNECTING THE INTERFACE CABLE .................................................... 11
CONNECTING THE POWER CORD ............................................................ 12
INSTALLING THE PRINT HEADS AND THE INK TANKS............................ 13
ALIGNING THE PRINT HEADS .................................................................... 17
LOADING PAPER
LOADING PAPER INTO THE PAPER TRAY................................................ 20
LOADING THE BYPASS TRAY WITH PAPER ............................................. 23
INSTALLING THE SOFTWARE
SOFTWARE FOR THE AJ-6000 SERIES ..................................................... 25
HARDWARE AND SOFTWARE REQUIREMENTS...................................... 26
BEFORE INSTALLATION.............................................................................. 26
INSTALLING THE "AJ-6000 SERIES DRIVER"............................................ 27
INSTALLING THE "AJ-6000 SERIES SOFTWARE" ..................................... 37
INSTALLING THE PRINTER DRIVER .......................................................... 39
HOW TO USE THE ONLINE MANUAL......................................................... 44
HOW TO PRINT ............................................................................................ 45
BONUS SOFTWARE..................................................................................... 45
OPERATION PANEL
PART NAMES AND FUNCTIONS................................................................. 46
BASIC FUNCTIONS AND DISPLAY PANEL................................................. 47
HOW TO CHANGE SETTINGS FROM THE OPERATION PANEL.............. 48
MAKING COPIES
NORMAL COPYING................................ ....... ...... ....... ...... ....... ...... ............... 49
ORIGINAL PLACEMENT............................................................................... 50
MAKING SELECTIONS FOR COPYING.............................................. ....... .. 5 3
REDUCING/ENLARGING THE IMAGE SIZE FOR COPYING...................... 56
BRIGHTNESS AND INTENSITY SELECTIONS ........................................... 59
ADDING ANNOTATION TO COPIES............................................................ 60
2
Page 5

FUNCTIONS SET BY THE USER
SAVING THE USER DEFAULT SETTINGS.................................................. 63
RESETTING THE USER DEFAULT SETTINGS........................................... 64
PROGRAM TIMEOUT .................................... ...... ....... ...... ....... ...... ...... ....... .. 6 4
SLEEP MODE................................................................................................ 65
CHANGING THE PAPER DEFAULT SETTING ............................................ 65
CHANGING THE LANGUAGE SETTING...................................................... 66
RESETTING ALL SETTING VALUES TO THE FACTORY DEFAULT VALUES
HOW TO USE THE "CLEAR/STOP" BUTTON.............................................. 68
....... 67
USING THIS UNIT WITH YOUR COMPUTER
USING THE SCANNER MODE..................................................................... 69
USING THE PRINTER MODE....................................................................... 70
RESERVING COPY AND SCAN JOBS......................................................... 70
INTRODUCTION
SETTING UP THE UNIT
LOADING PAPER
INSTALLING
THE SOFTWARE
USER MAINTENANCE
THE INK TANK .............................................................................................. 71
THE PRINT HEAD......................................................................................... 73
PRINTING A TEST PAGE ............................................................................. 76
CLEANING AND STORING THE UNIT......................................................... 77
TROUBLESHOOTING
CANCELLING AN ERROR MESSAGE ......................................................... 78
IDENTIFYING UNIT PROBLEMS.................................................................. 80
APPENDIX
SPECIFICATIONS......................................................................................... 84
SUPPLIES ..................................................................................................... 86
PAPER TYPE ....................... ...... ....... ...... ....... ............................................. .. 8 6
INTERFACE CABLE...................................................................................... 86
INDEX............................................................................................................ 87
SOFTWARE LICENSE .................................................................................. 89
OPERATION PANEL
MAKING COPIES
FUNCTIONS SET
BY THE USER
USING THIS UNIT WITH
YOUR COMPUTER
USER MAINTENANCE
TROUBLESHOOTING
APPENDIX
3
Page 6

INTRODUCTION
This unit is a full co lour multifunctional periphera l, providing you with copier, print er, and
scanner functions.
MAIN FEATURES
Copier features
! High-speed copying at 12cpm (monochrome), or 7cpm (colour).
! A scan once print many (SOPM) feature
! A varie ty of funct ions incl uding poste rs and r evers ing s canne d ima ges e nable you to
use this unit for various purposes.
*2
provides high productivity.
Printer features
! High-speed printing at 12ppm (monochrome), or 7ppm (colour).
! 1200dpi printing with smoothing produces outstanding quality images (Standard
resolution is 600dpi).
! A variety of editing functions such as adding watermarks or multiple printing onto one
page.
Scanner features
! High quality scanning at 600dpi with a broad range of colour reproduction.
! Easy operation with just pressing the scan button on the unit.
! This unit s upports TWAIN, making it com patible with a variety of TWAIN-co mpliant
applications.
General features
! For black out put, car bon black ink provi des clea r copyin g/pri nting qua lity comp arable
to laser copier/printer level.
! Each ink tank is independent, they can be used until completely spent, ensuring
minimum waste of ink . The print head is also fully d etachable, requiring no spec ial
tools for replacement.
! The unit is eq uipped with a 15 0 sheet capa city paper tray , allowing the use r to copy/
print big jobs without constantl y refil ling the tra y.
! USB interface
is also equipped as standard.
! The SPF (Single Pass Feeder) can hold up to 20 originals, eliminating your bothering
to feed your original one by one.
!
The output tray is located inside the unit, making this unit compact to save office space.
! Designed to save energy with low power consumption.
! This unit can be used with Windows 9 5, W indows 98, Wi ndow s Me , Wi nd ows NT 4 .0
and Windows 2000.
*1
When using SHARP original data with A4/8.5"x11" pa per in the fastest mode
(copying from the original table) or draft mode (printer).
*2
By storing the s canne d data in me mory , this unit can m ake m ult iple copie s with
only scanning once.
*3
USB can only be used with compu ters which have a USB interface and have
Windows 98, Windows Me or Windows 2000 preinstalled.
*4
Peripherals can be plugged or unplugged while the computer and they are
connected to a power source.
*3
enables you to make simple Hotplug*4 connections. Parallel interface
*1
*1
4
Page 7

USING THE MANUALS
In addition to this printed manual an Online Manual is also provided.
To get full use of al l features and functions o f this product, be sure to familiarise yourself
with both manuals. This pr inted manual provides all installatio n and setup instructions as
well as instructions in the use of all copier functions.
The Online Manual contains the following information.
Online Manual
Provides you with information on how to specify preferences and troubleshooting. Check the
Online Manual when you use this unit after all the initial setup is completed.
How to Use the Online Manual
Explains how to use the Online Manual.
Print
Provides information on how to print a document.
Scanning
Explains how to scan using a TWAIN driver.
Utility Software
Provides information on Copy JX2 and Button Manager.
Maintenance
Provides informati on on how to change and align the unit's supplies. Instructi ons for
maintaining the unit are also provided.
Troubleshooting
Provides instructions on how to solve machine problems.
Conventions used in this manual and Online Manual
In this manual, the following icons are used to provide the user with information pertinent to
the use of the unit.
Warns the user that injur y may r es ult if the co nten ts o f the wa rning are
not properly followed.
Cautions the user that damage to the machine or one of its
components may resul t if the contents o f the caution are not p roperly
followed.
Notes provide information relevant to the machine regarding
specifications, functions, performance, o peration and such, that may
be useful to the user.
Trademark acknowledgements
Microsoft and Windows are trademarks of Microsoft Corporation in the U.S.A. and other countries.
IBM and PC/AT are trademarks of International Business Machines Corporation.
Adobe and Acrobat are trademarks of Adobe Systems Incorporated.
All other trademarks and copyrights are the property of their respective owners.
Copyright (c) 1997-1998 Parallel Technologies, Inc.
PTI and PPIT are trademarks of Parallel Technologies, Inc.
PC multi-channel MFP high performance drivers by Parallel Technologies, Inc.
"The Parallel Port Experts"
WWW.LPT.COM
5
Page 8
SETTING UP THE UNIT
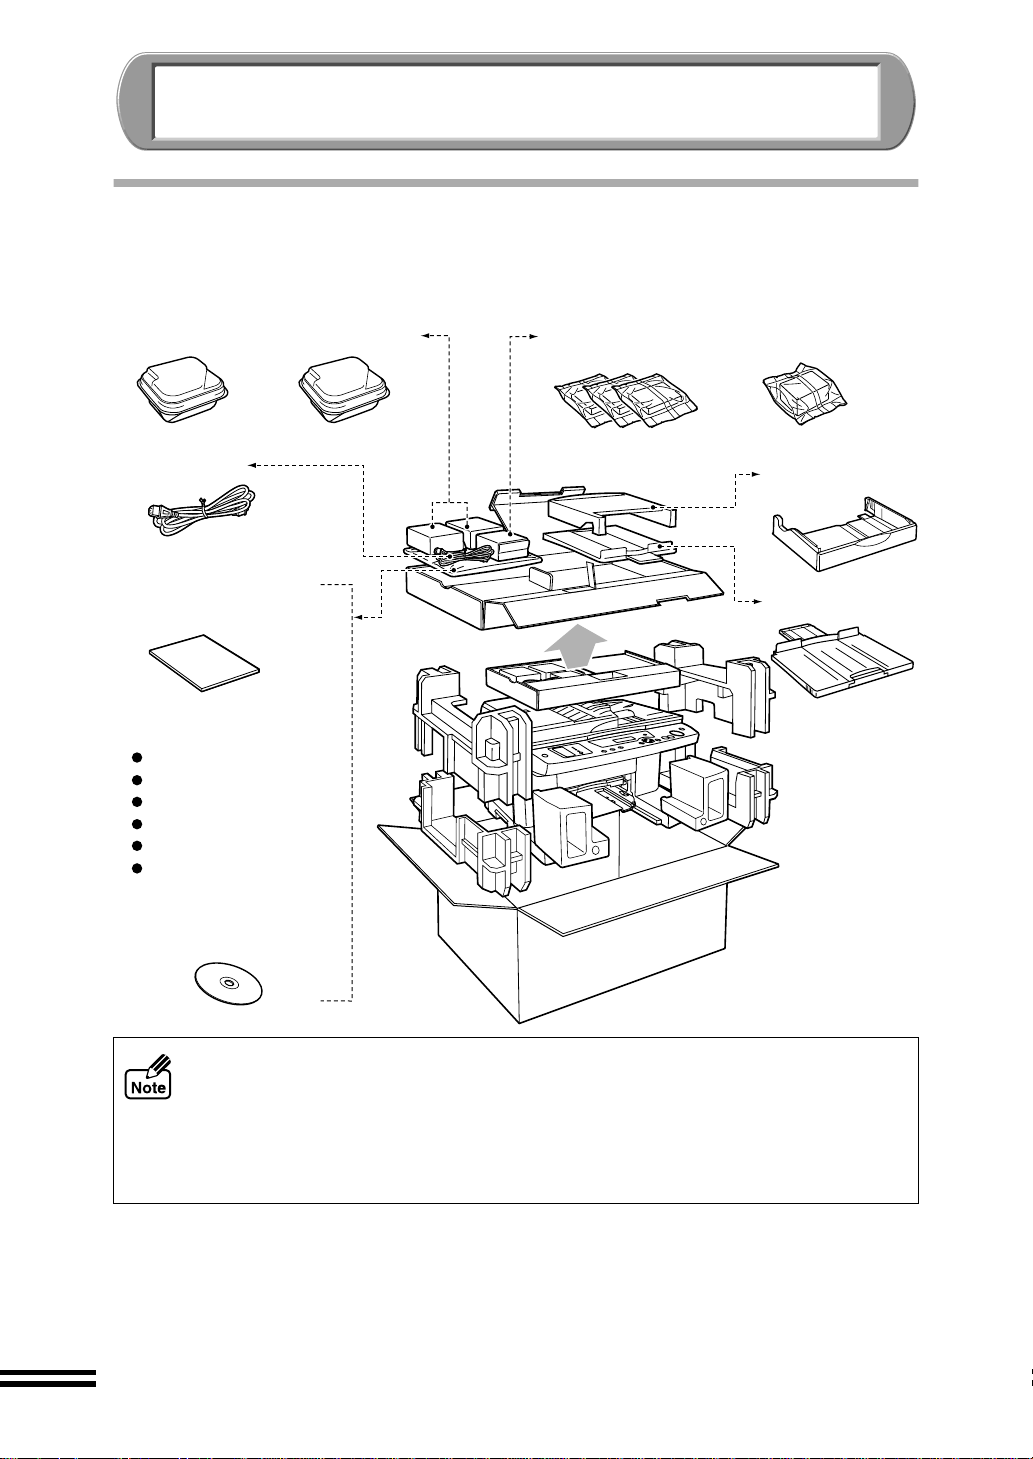
CONFIRMING THE CONTENTS
The following items are packed with the unit in the box.
If any of the items are missing, please contact your point of purchase.
Colour print head
Power cord
Operation Manual
(this manual)
AJ-6020 Software
CD-ROM
Printer Driver
TWAIN Driver
Utility Software
Sharpdesk
Online Manual
MGI PhotoSuite III SE *
* For the information about
these programs, refer to
their instructions.
Black print head
Colour ink tanks
(magenta, yellow, cyan)
Black ink tank
Paper tray
Output tray
! Interface cables for connecting the unit to your computer are not included.
Please purchase the appropriate cable for your computer.
! Do not un pac k the print heads and the ink tank s until ready to inst all th em i n t he
unit.
! The box and protec ti ve materi als wi ll be nee ded for fu tur e tran spo r tati on. Do not
throw them away.
6
Page 9
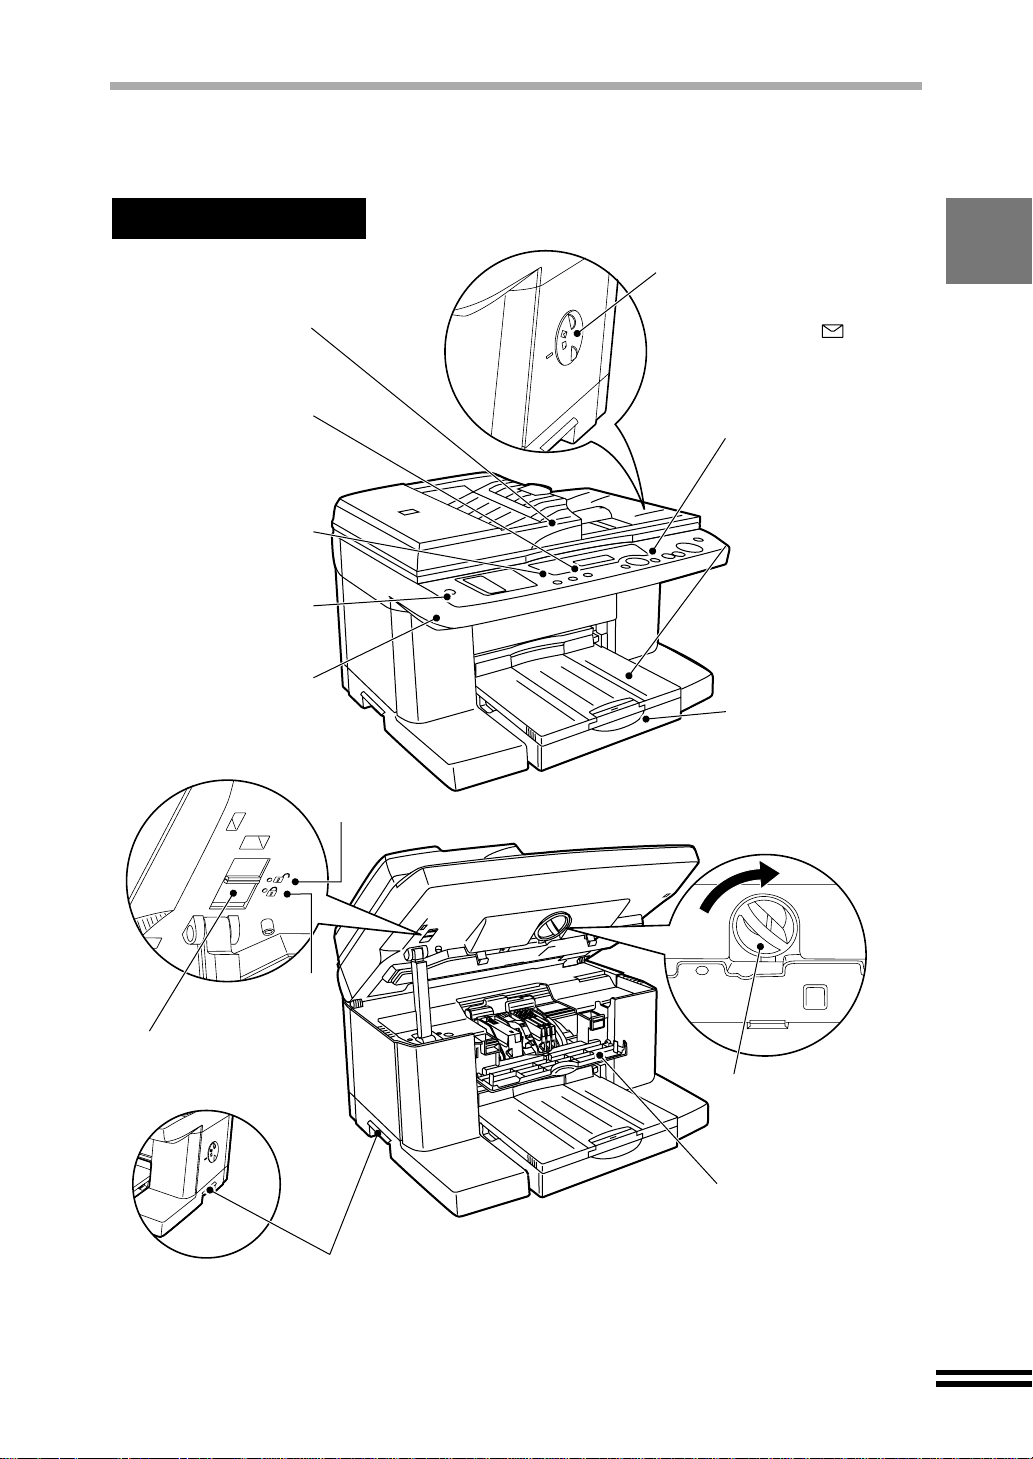
PART NAMES AND FUNCTIONS
The following illustrations show the names and locations of the main machine parts.
Front Side
Paper knob
When copying or printing onto thick
SPF
(Single pass feeder)
Refer to the next page
for the SPF.
Display panel
Displays the status of
the unit, copier settings
and the number of
copies.
ERROR indicator
Lights up when an error
occurs.
Power button
Press to turn the power
on or off.
Front cover
Open this cover to
change the ink tanks or
print heads.
Released
paper or printing onto an envelope
adjust the knob to the setting.
(Return the knob to its original
setting after copying or printing.)
Operation panel
Use this panel to specify
your preferences for
copying and for setting
up the unit.
Output tray
The document is
deposited onto the tray
after copying or printing.
Pull out the output tray
extension when using
paper longer than the
output tray.
Paper tray
Holds up to 150 sheets of
paper. Adjustable to suit
a variety of paper sizes.
Load the paper so that
the side to be printed or
copied onto is face down.
Locked
Scan head locking switch
Lock the scan head
when moving this unit.
Handles
Front cover locking knob
Turn this knob to the
right to open the front
cover.
Maintenance cover
Open this cover to
change the ink tanks or
print heads.
7
Page 10
PART NAMES AND FUNCTIONS
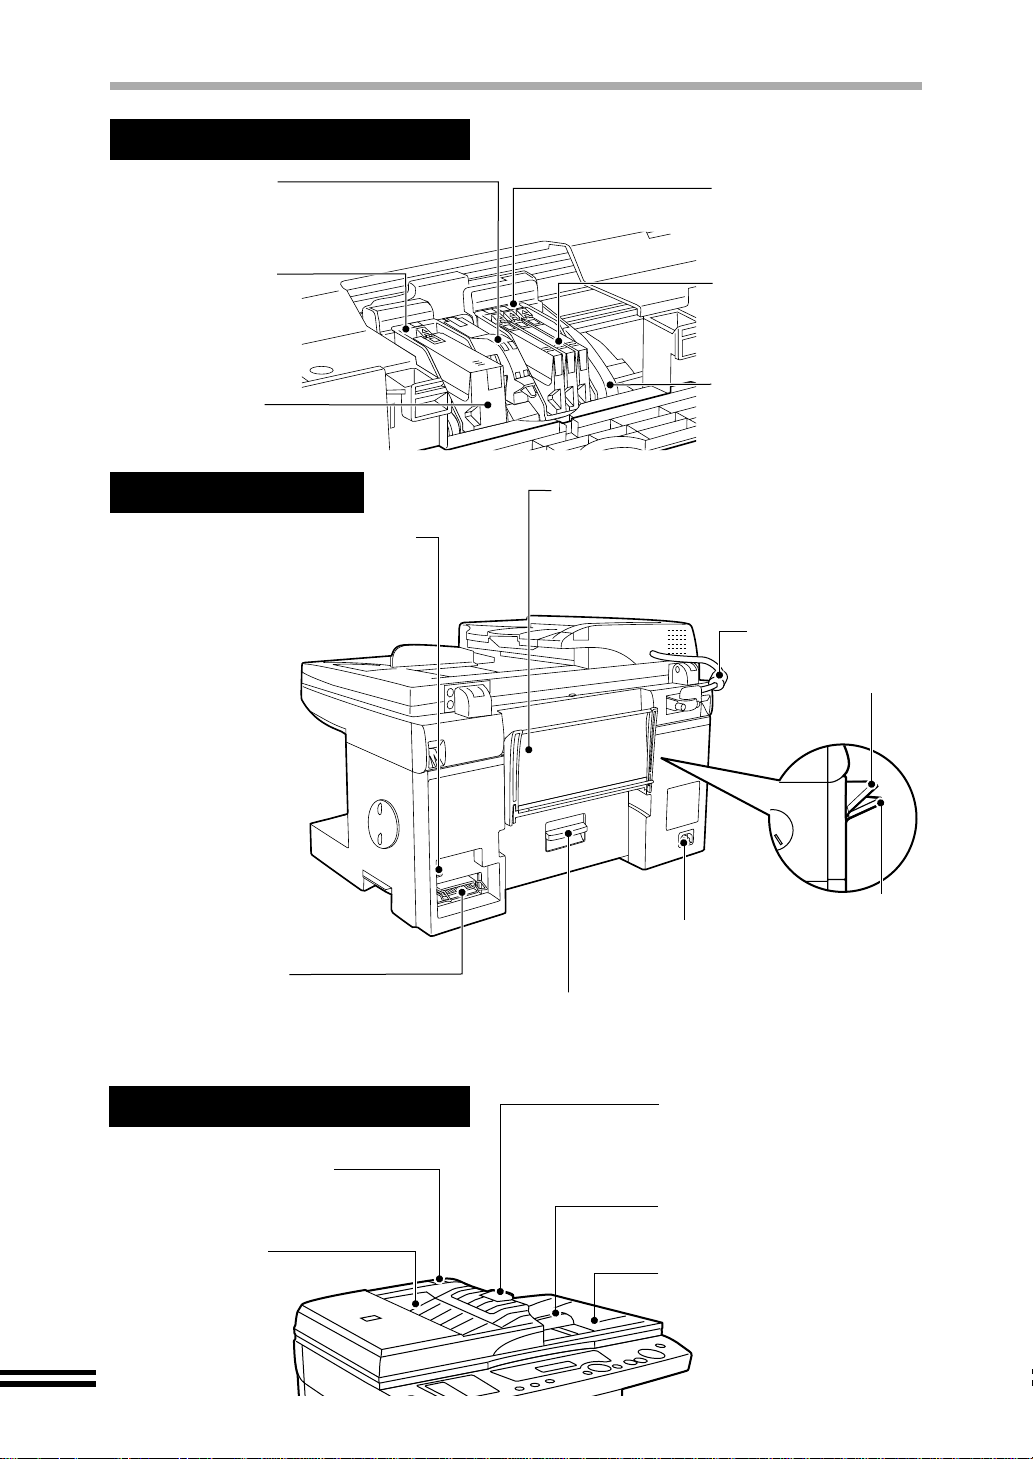
Print heads and Ink tanks
Print head latch
Use this to remove or install
the print heads.
Black print head
Applies ink onto the
paper.
Black ink tank
Rear Side
USB interface connector (B type)
Use if you will be using a USB cable
to connect the unit to your computer.
It is possible to insert the cable after
the unit has been switched on.
Colour print head
Applies ink onto the
paper.
Cyan ink tank
Yellow ink tank
Magenta ink tank
Carriage
Bypass tray
Use this tray to copy or print on a single page.
Insert paper into the tray copy or print side up.
When copying or printing onto thick paper,
open the tray until it reaches position 2.
(The tray has two stop positions.)
SPF connection
cable
Position 1
Parallel interface
connector (36pin)
Use if you will be using a parallel interface
cable (IEEE1284) to connect the unit to your
computer.
SPF (Single pass feeder)
Original release button
Depress this button to remove
the jammed original.
SPF output tray
When using the SPF,
the original exits here
after being copied or
scanned.
8
Position 2
Power socket
Plug the power cord into the
socket.
Jam cover
Open this cover to remove
jammed paper.
SPF output tray extension
Open the SPF output tray
extension by pressing the edge
to place a large sized original in
the SPF.
Original guide
Align the original guide to the
placed original.
SPF input tray
Place originals to be copied or
scanned face down here.
Page 11
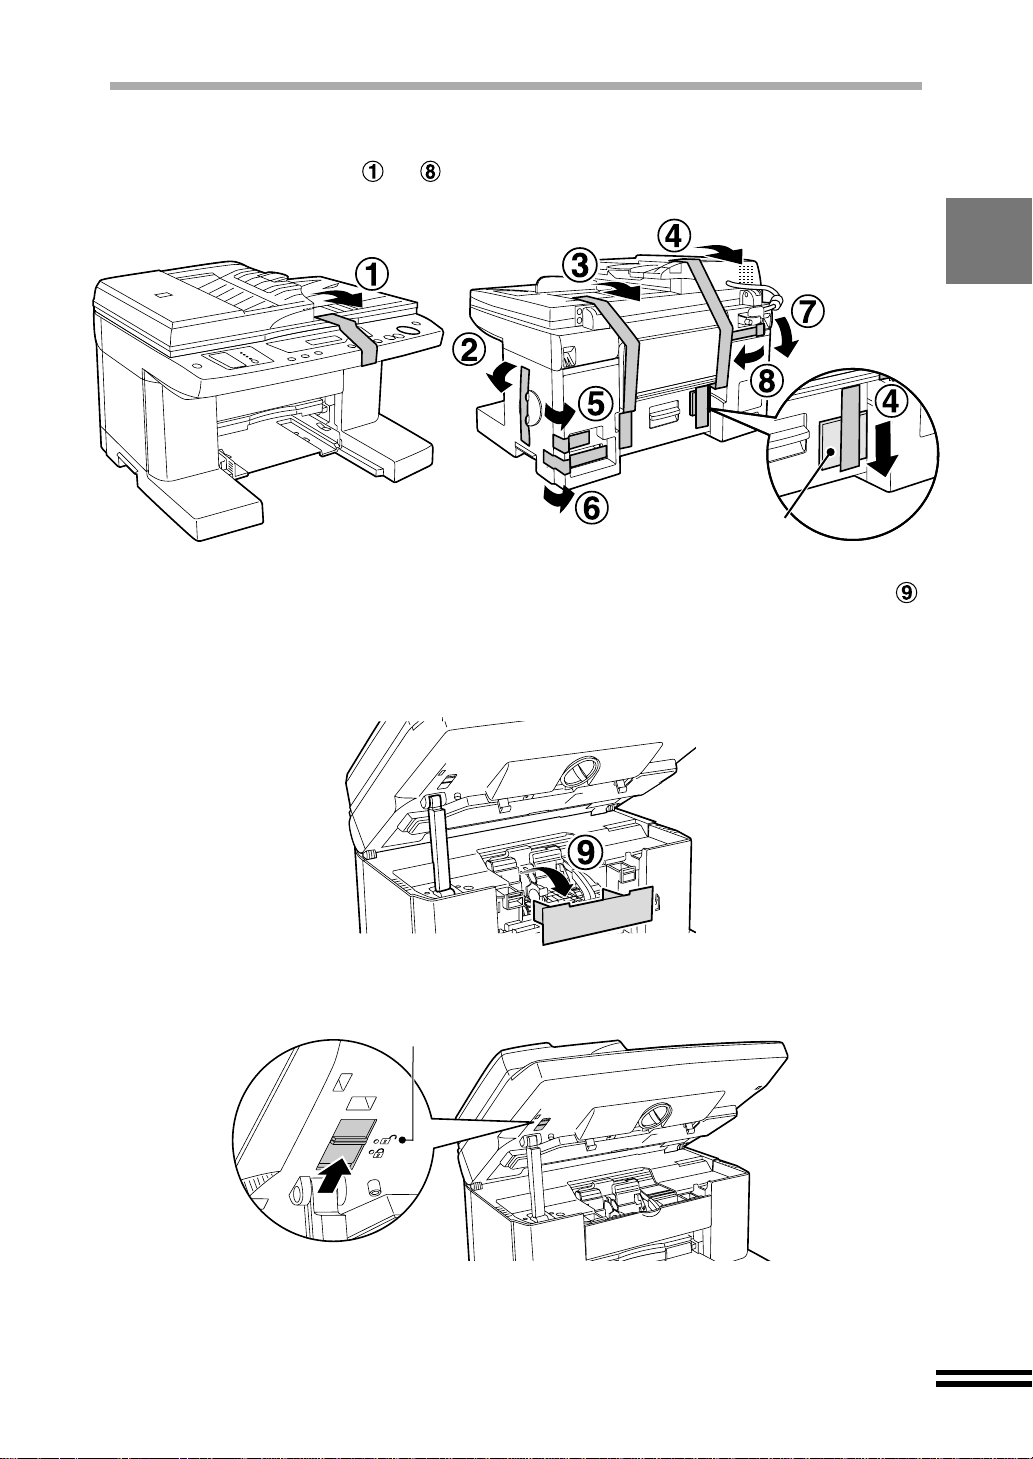
UNPACKING
Remove tapes to shown in the illustrations.
1
Open the front cover, and remove the protective material
2
shown in the illustration.
Refer to step 4 of "INSTALLING THE PRINT HEADS AND THE INK TANKS" for
details on how to open the front cover. (See page 13)
Remove the protective
material.
Release the scan head locking switch.
3
Released
Close the front cover.
4
Refer to step 13 of "INSTALLING THE PRINT HEADS AND THE INK TANKS" for
details on how to close the front cover. (See page 16)
9
Page 12
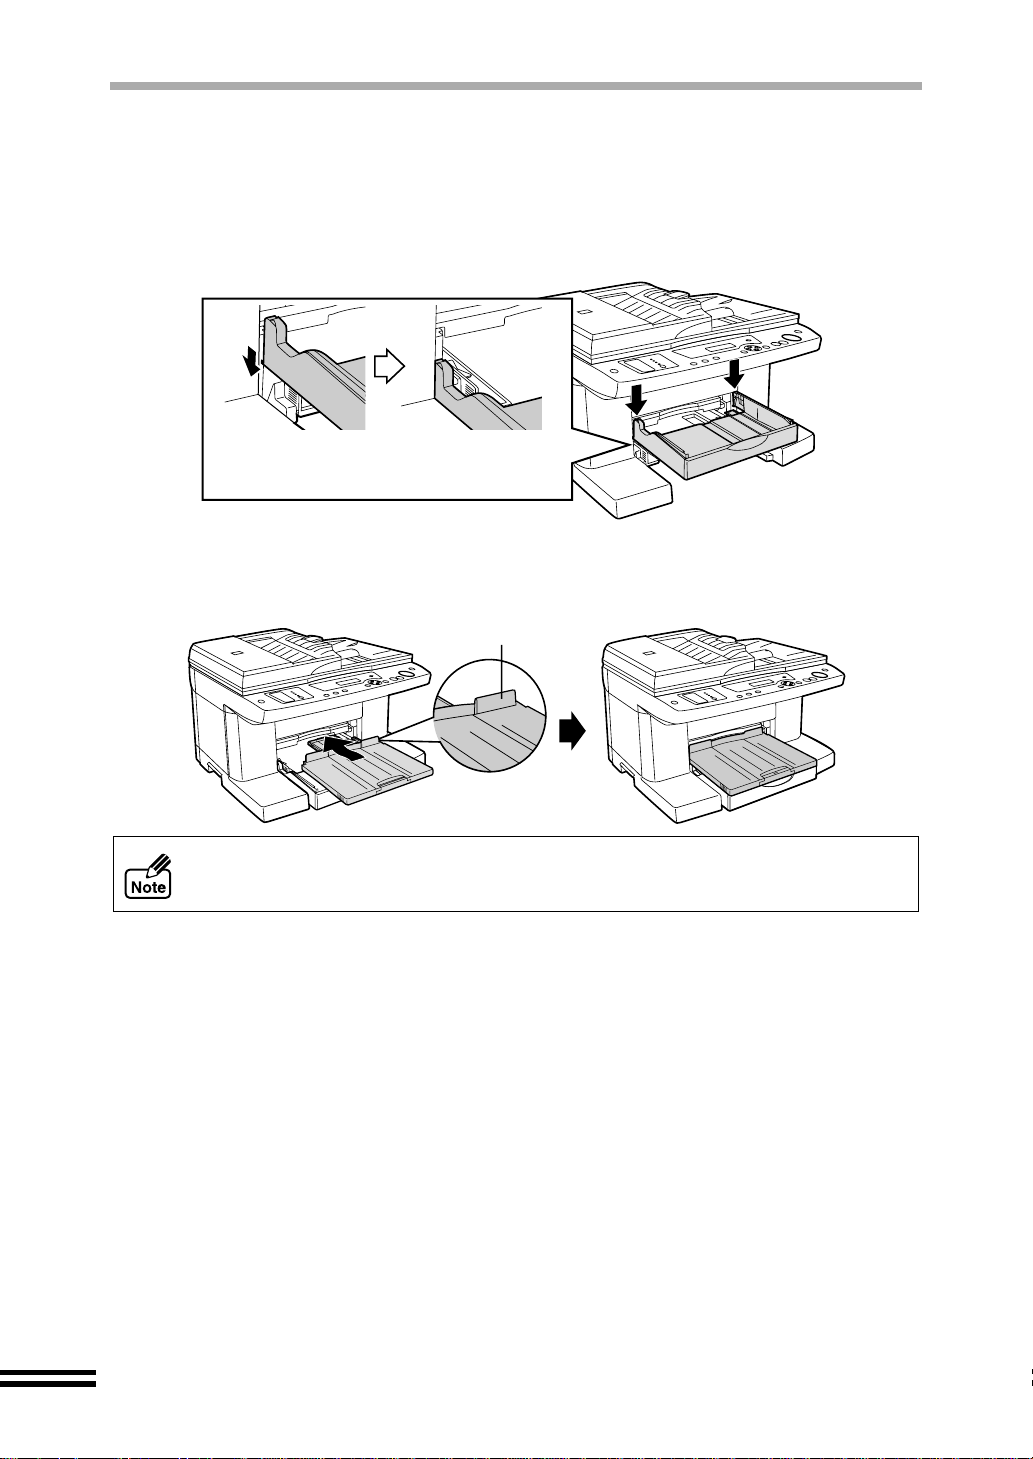
ATTACHING THE TRAYS
Attach the paper tray and the output tray to the front of the unit.
Follow the steps shown below.
Attach the paper tray by firmly pushing down both edges.
1
Make sure that the paper tray has been
securely attached to the body.
Attach the output tray as shown in the illustration.
2
Place this projection
toward the unit.
10
Refer to "LOADING PAPER" for more information. (See page 20)
Page 13
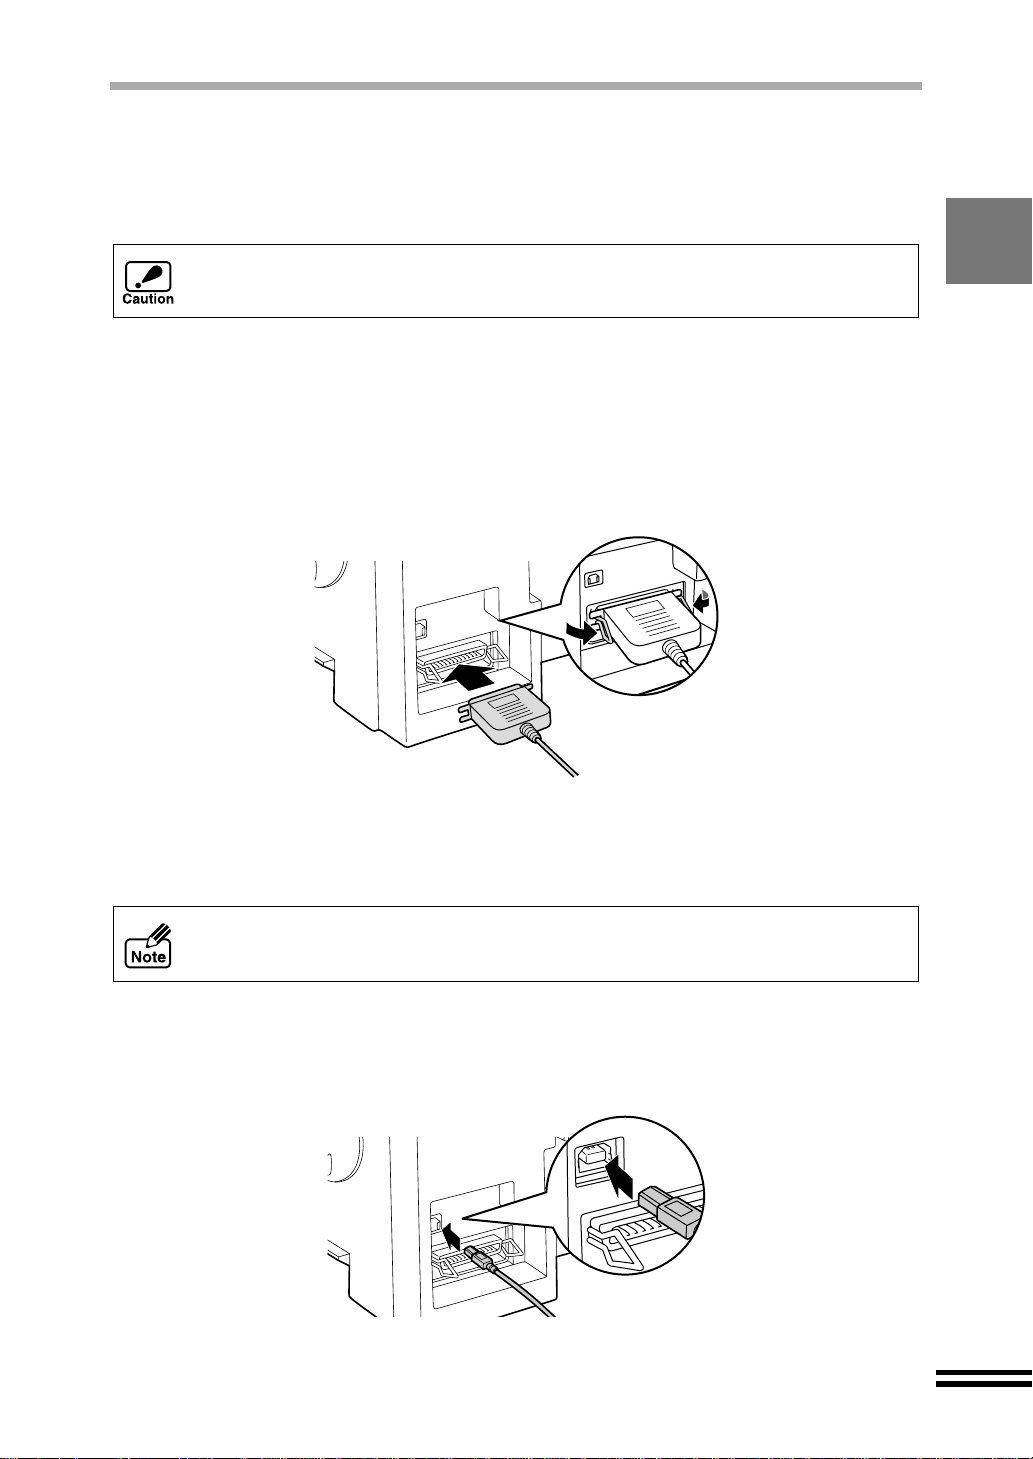
CONNECTING THE INTERFACE CABLE
This unit includes both USB and parallel interface connectors.
Interface cables for connecting the unit to your co mputer are not included with this unit .
Please purchase the appropriate cable for your computer.
Do not connect both the USB interface cable and the parallel interface cable to this
unit at the same time.
Connecting the parallel interface cable
Obtain an IEEE1284 shielded parallel interface cable.
1
Ensure that your computer and unit are turned off .
2
Insert the cable int o the parallel inte rface connector loc ated on
3
the rear of the unit, and fasten with clasps.
Insert the other end of the cable into the interface connector of
4
your computer.
Connecting the USB interface cable
USB is available w ith a PC/AT compatible com puter that was originally equi pped
with USB and had Windows 98, Windows Me or Windows 2000 preinstalled.
Obtain a shielded USB interface cable.
1
Insert the cable into the USB interface connector located on the
2
rear of the unit.
Insert the other end of the cable into the interface connector of
3
your computer, or the USB hub connected to your computer.
11
Page 14
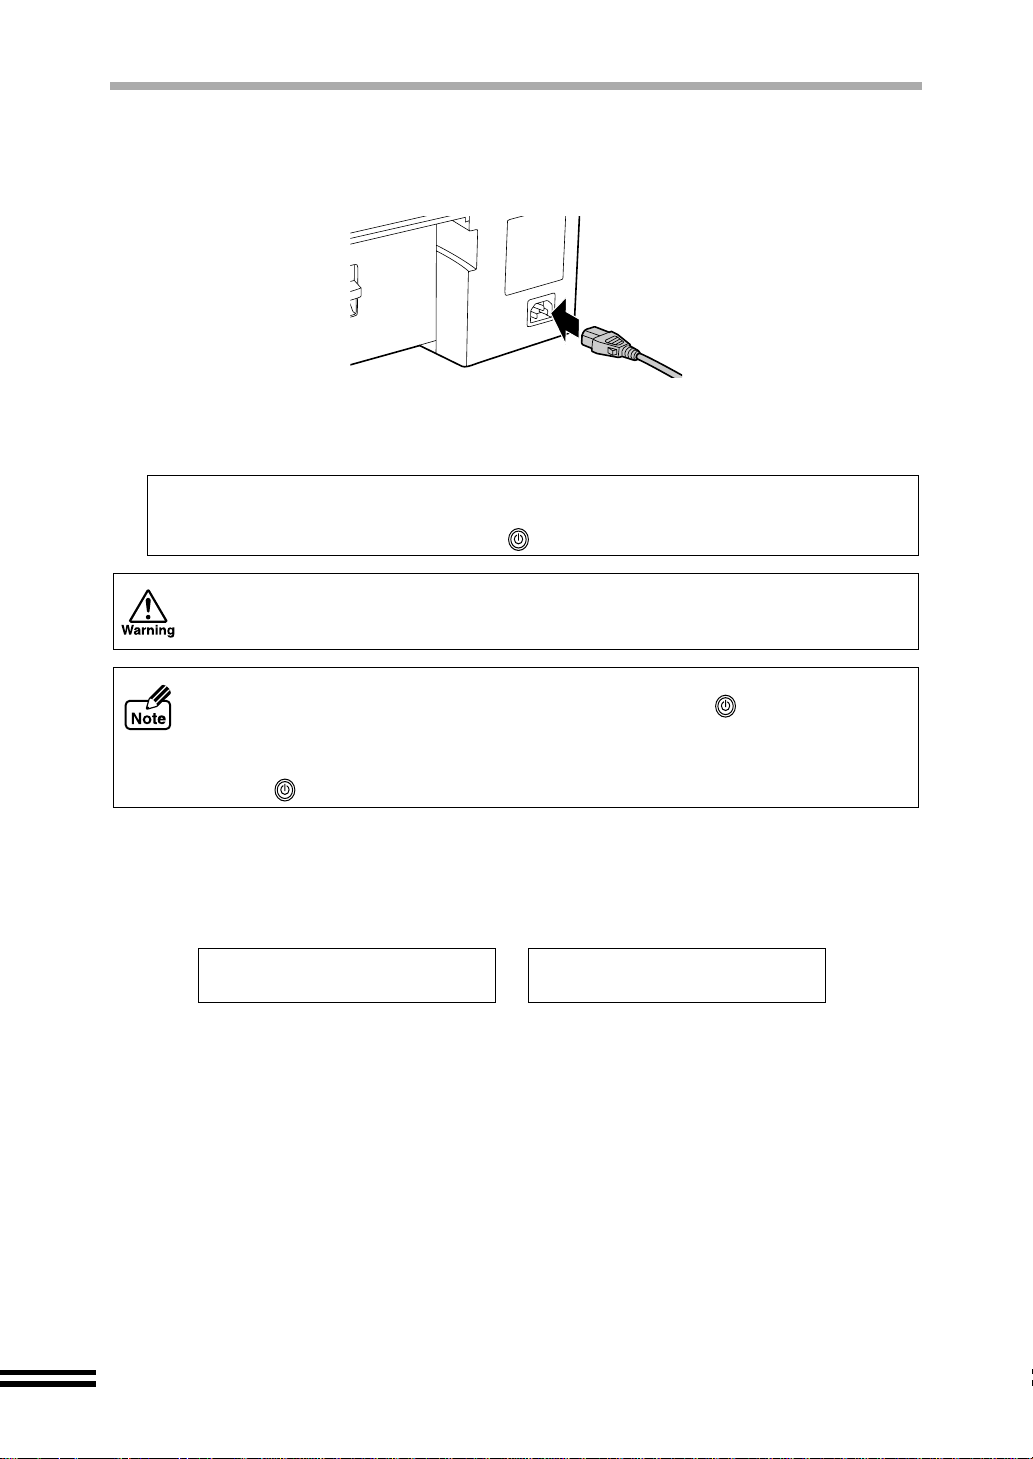
CONNECTING THE POWER CORD
Insert the power cord into the socket on the rear of the unit.
1
Connect the other end of the power cord to an outlet.
2
The unit will be turned on automatically.
Auto Shut Off
The unit automatically turns off the power when 60 minutes have elapsed after the last
operation. Press the "POWER" button ( ) to turn on the unit again.
Do not connect the unit to other tha n a local volta ge outlet. Plugging the unit into
an incompatible power supply may cause irreparable damage.
! Be sure that the plug in the outlet is readily accessible to all persons. Power is
present in the product even if the "POWER" button ( ) is off in order to
maintain good copy or print quality.
! To comp letely shut off the power, first t urn off the power using the "POWER"
button ( ). Then unplug the power cord.
How to deal with error messages during the initial setup
The following mess ag es ma y a ppe ar on the dis pl ay pa nel whe n y ou tur n o n th e un it for the
first time after purchasing.
Unable to Copy,
Missing print head
These error messages will remain until the setup process is complete.
If any other messages a ppear , refer to "CANCELLIN G AN E RROR MESS AGE" (S ee page
78).
Shipping Lock is on;
Unlock to operate
12
Page 15
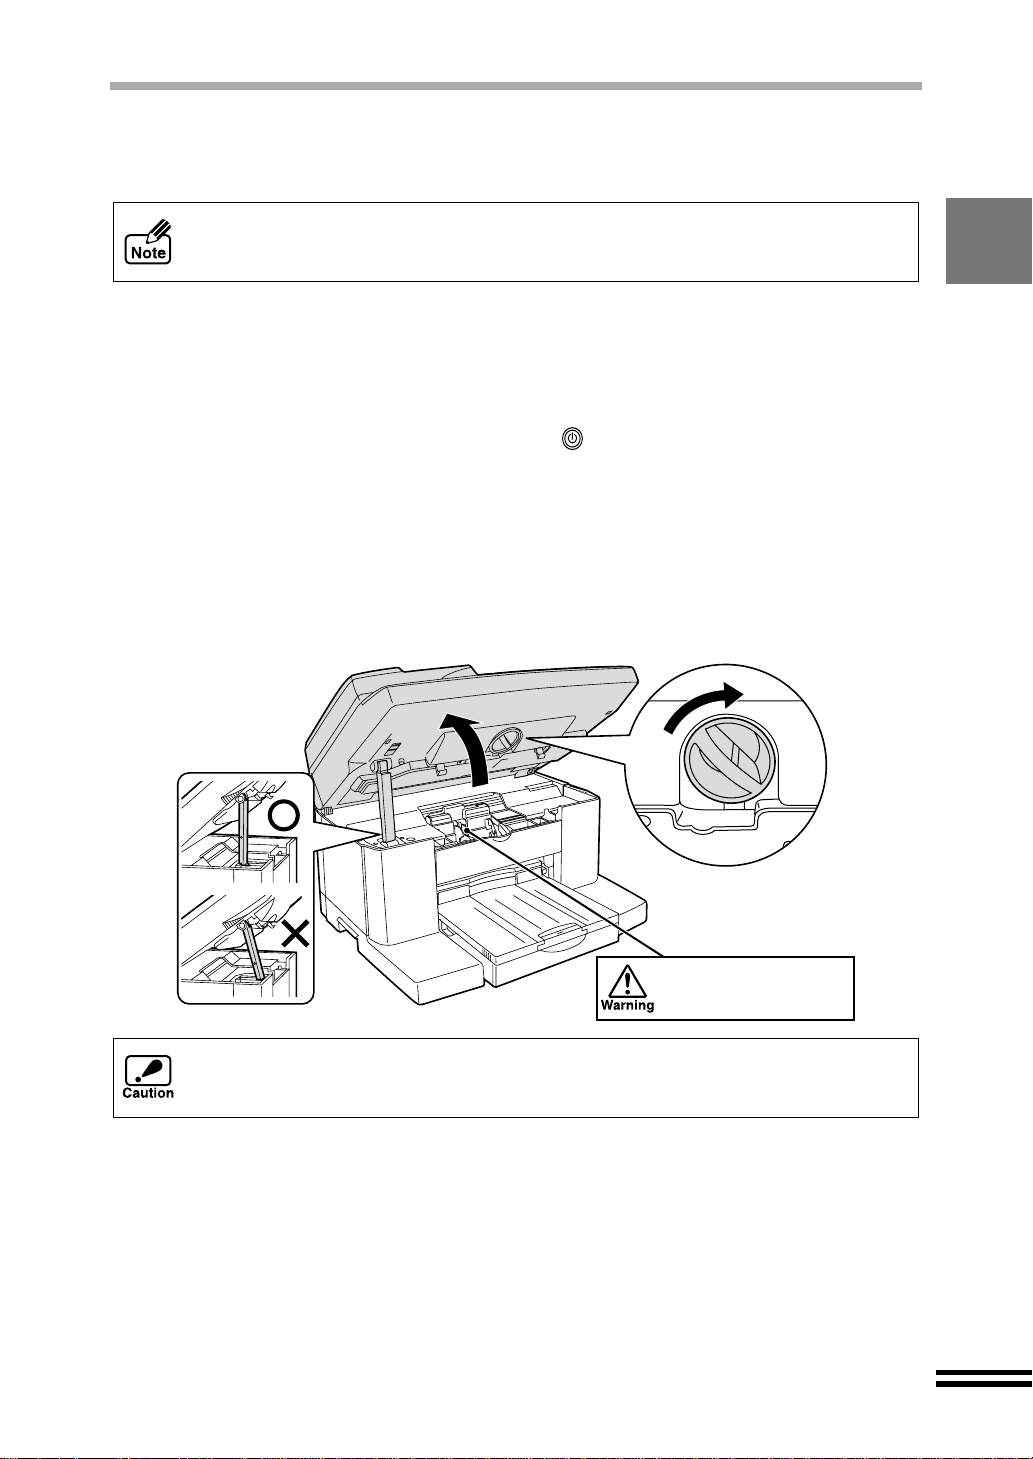
INSTALLING THE PRINT HEADS AND THE INK
TANKS
This section describes how to install the print heads and ink tanks when you install
them for the first time aft er purchasing this unit. Refe r to "THE INK TANK" (See
page 71) or "THE PRINT HEAD" (See page 73) when they need to be changed.
Make sure that the scan head locking switch is released.
1
Refer to step 3 of "UNPACKING". (See page 9)
Make sure that the power is on.
2
For the location of the "POWER" button ( ). (See page 46)
Load paper following the steps shown in "LOADING PAPER".
3
(See page 20)
Turn the front cover locking knob with one hand and lift the
4
front cover with the other hand, while keeping the knob in the
unlocked position.
Do not move the
carriage manually by
force.
Keep the front cover open securely while installing print heads and ink tanks. You may
get your hand caught between the body and the front cover of the unit if you install
them with the front cover half open as shown in the illustration marked with an "X".
13
Page 16
INSTALLING THE PRINT HEADS AND THE INK TANKS
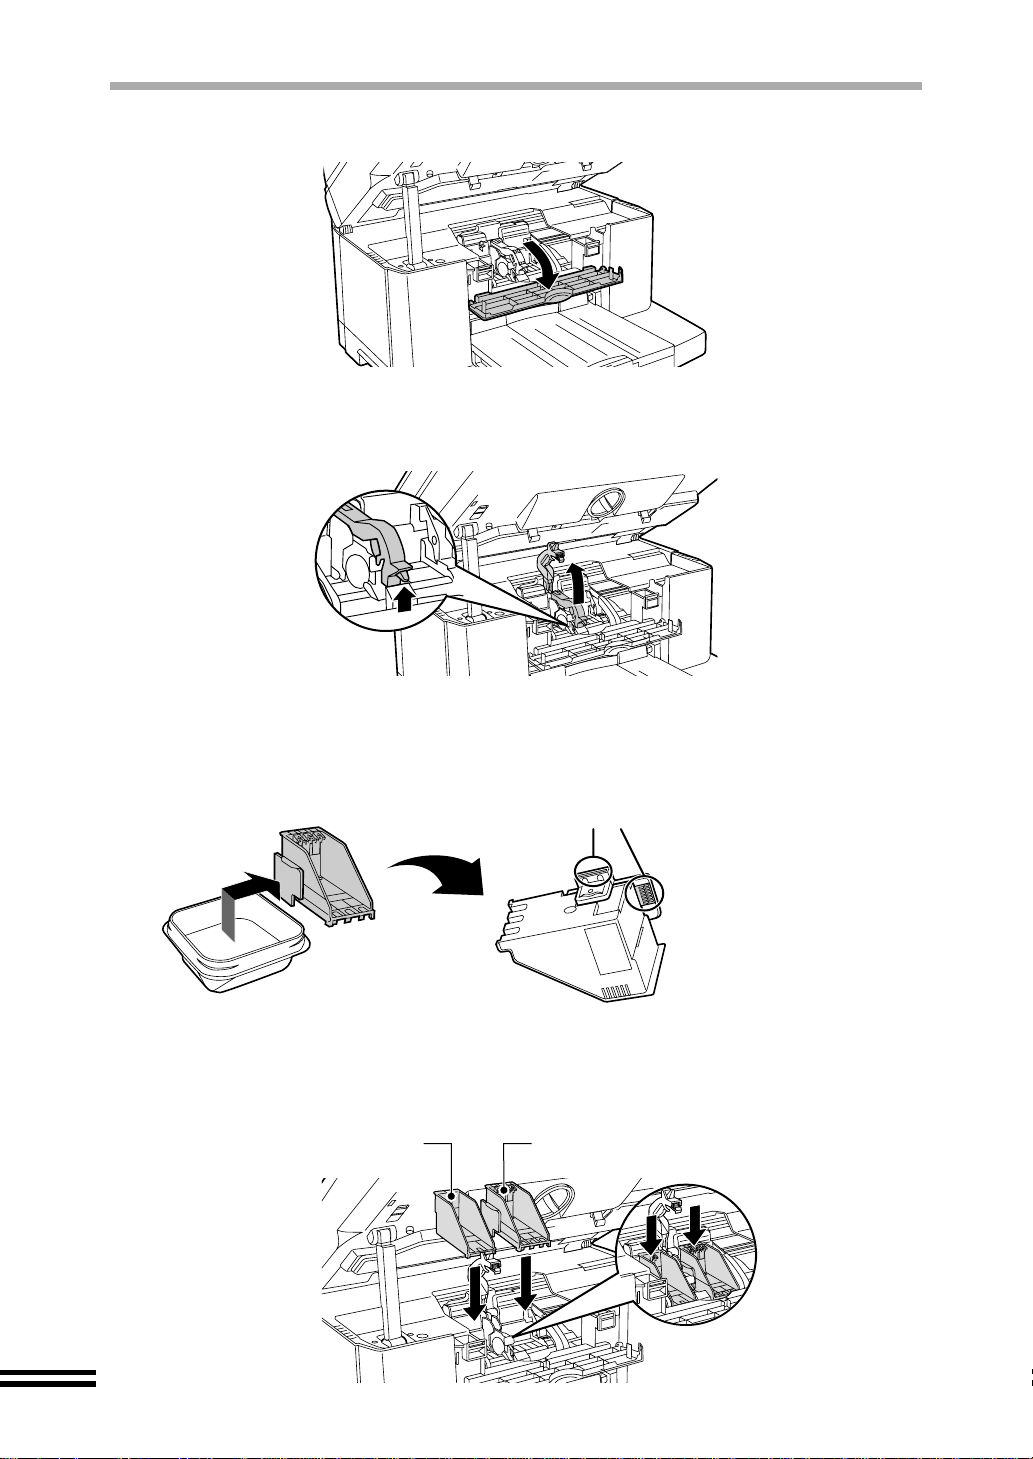
Open the maintenance cover.
5
Raise the print head latch.
6
Raise the latch until it comes to a complete halt.
Remove the print heads from their protective cases.
7
Do not touch the metal portion of the print
head. Doing so may make the head
inoperable.
Insert the print heads.
8
Insert the black print hea d in to the lef t carria ge openi ng, and th e colo ur print head
into the right carriage opening.
Black print head Colour print head
14
Page 17
INSTALLING THE PRINT HEADS AND THE INK TANKS
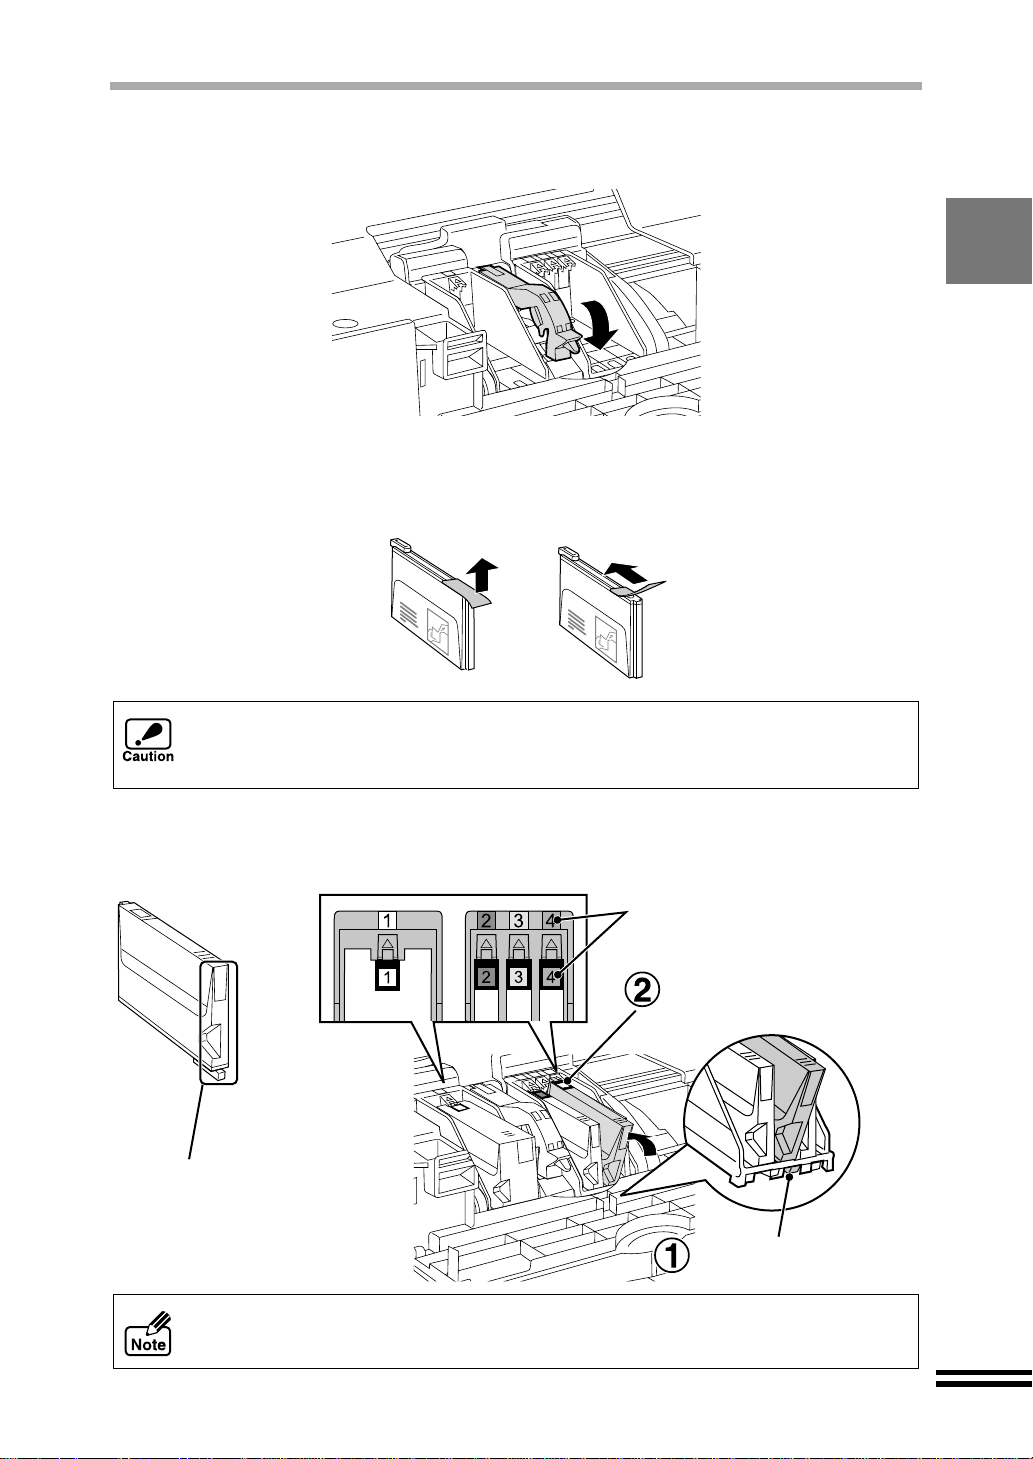
Lower the print head latch.
9
Lower the latch until it clicks into the latched position.
10
Unpack the ink tanks from their protective wrapping and slowly
remove the tape.
! Hold the in k tank upright when remov ing the tape. Do not touch the unc overed
opening on the ink tank, as ink will get on your hands.
! Ensure that there are no pieces of tape remaining on the ink tank.
11
Turn the ink tanks upside down, and then immediately insert
each of them to the print head of the corresponding number.
Match the ink tank number
to the print head number.
Make sure that each tab
securely locks the ink tank
by pressing here.
Do not touch this area.
The unit may not copy
if it is dirty.
Ensure the number on each prin t head corresponds to the num ber on each ink
tank.
Properly align the tab
when inserting the ink tank.
15
Page 18
INSTALLING THE PRINT HEADS AND THE INK TANKS
12
13
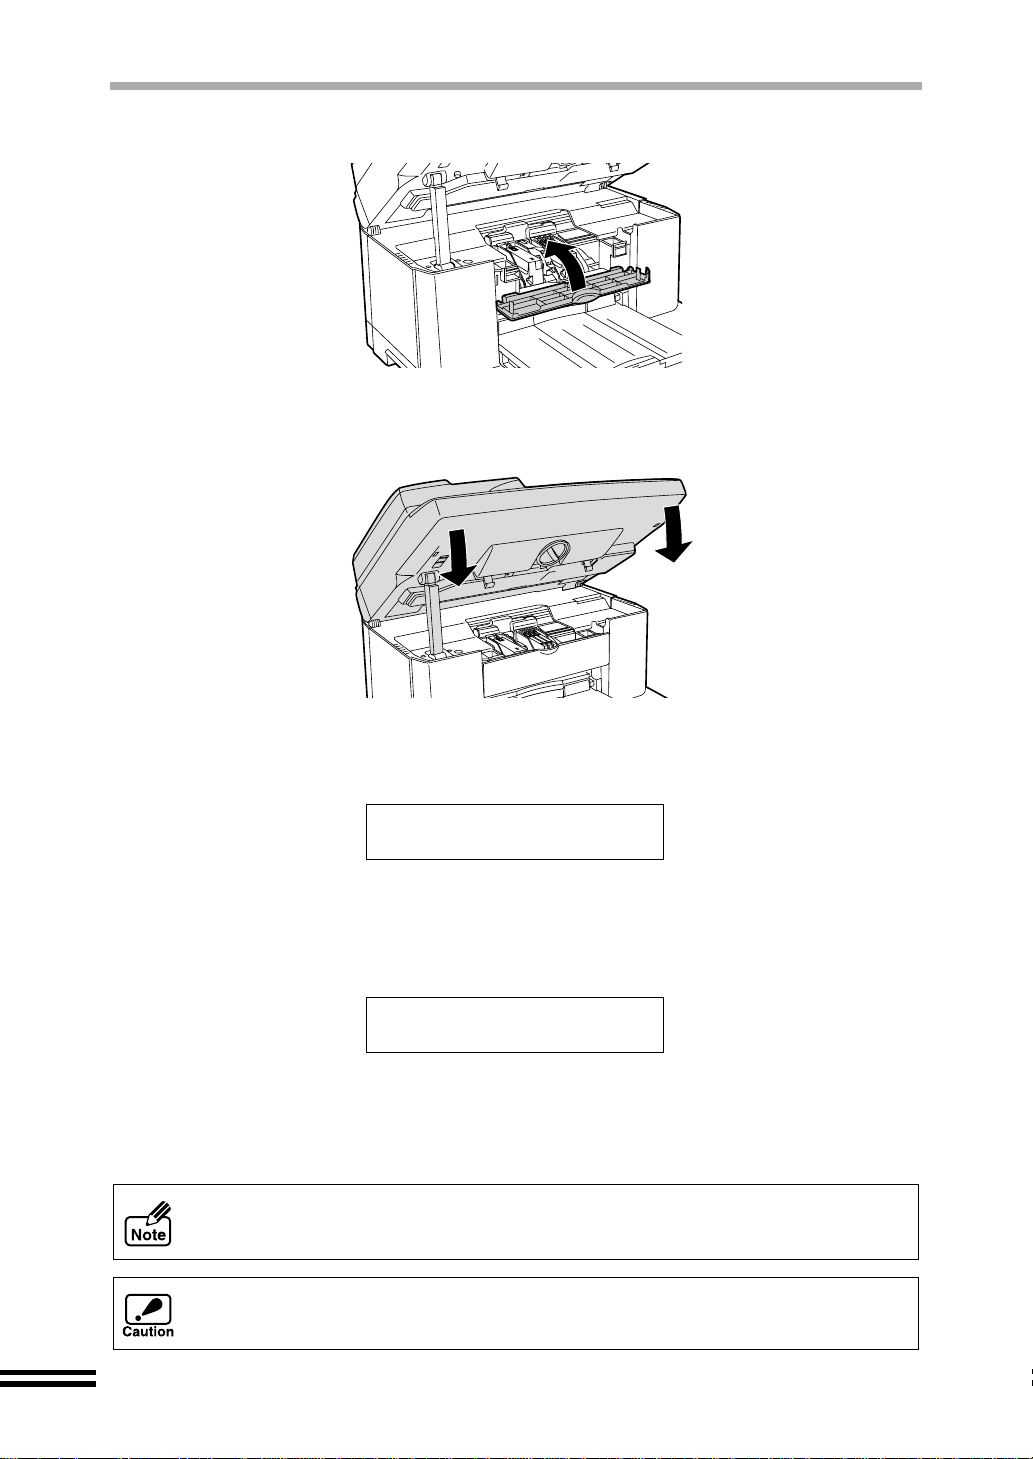
Close the maintenance cover.
Close the front cover.
Press both edges of the front cover with both of your hands until it locks.
14
15
16
The unit will automatically start a sequence to clean the print
heads and the following message will appear.
Cleaning the Print
Head
...
After the cleaning sequence is complete, the machine will
automatically print the alignment patterns while the following
message appears.
Printing
Alignment Patterns
Align the print heads following the procedure "ALIGNING THE
PRINT HEAD". Since the patterns have been already printed,
start with step 5 on page 18.
To ensure that the ink heads do not become dry, always leave the ink tanks
installed. If not, poor output will result.
During ink tank repla cement, if the c over is lef t open for mo re than 8 minute s, the
carriage will automatically return to its home position.
...
16
Page 19
ALIGNING THE PRINT HEADS
The print heads must be aligned after being installed into the unit, or if lines are printed
unevenly. (See the illustration o n page 19) Follo w the steps listed below to align t he print
heads.
Insert paper into the unit
1
Refer to "LOADING PAPER" for more information (See page 20).
Press the "MENU" button a nd the n re peatedl y press the or
2
"ARROW" buttons until "Maintenance" is displayed on the first
line of the display panel.
3.Maintenance
1.Clean PrintHead1
Repeatedly press the or "ARROW" buttons until "Align
3
Print Head" appears on the second line of the display panel.
3.Maintenance
6.Align Print Head
Press the "ENTER" button.
4
The message shown below will appear on the di splay panel and alignment patterns will
be automatically printed.
Printing
Alignment Patterns
...
17
Page 20
ALIGNING THE PRINT HEADS
After printing of the alignment patterns is complete, the foll owing
5
messages will appear.
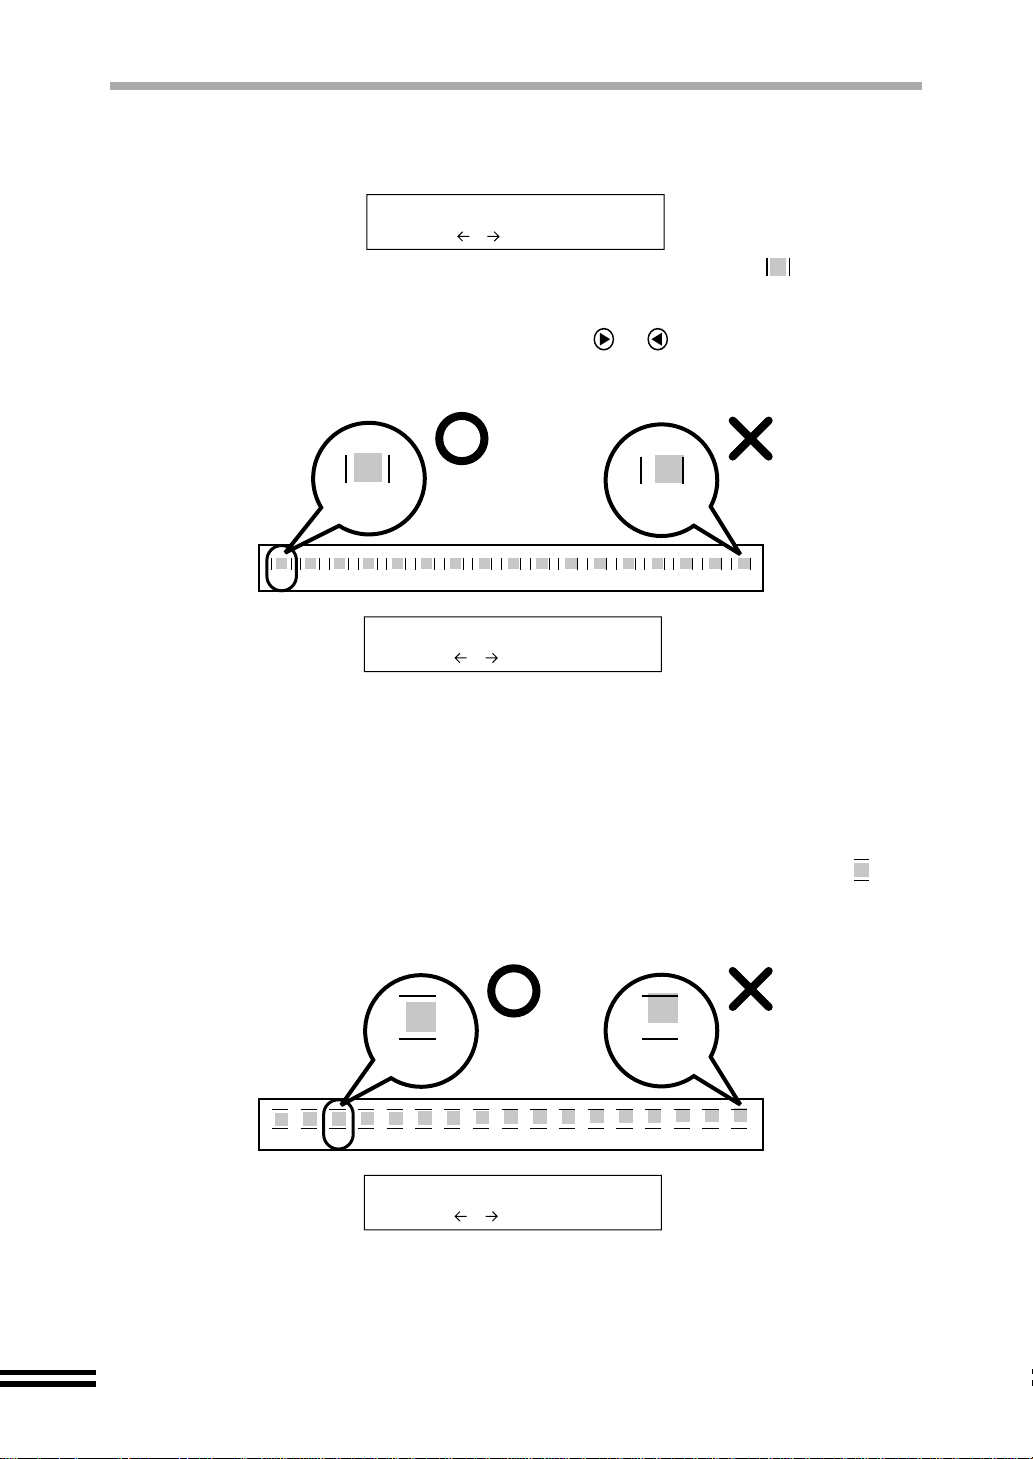
Seventeen block figures with a vertical line on each vertical side ( ) are printed in
pattern A. Of the sev enteen figures d etermine whi ch block is mo st nearly centr ed
between the vertical lines and note the corresponding number.
Enter the number by repeatedly pressing the or "ARROW" buttons until the
selected number is shown on the lower line of the display panel.
Example
Select A pattern
0 - +
-8
+8
A
-8 -7 -6 -5 -4 -3 -2 -1 0 +1 +2 +3 +4 +5 +6 +7 +8
Select A pattern
-8 - +
In the example shown above, "-8" shows the most appropriate
selection. Therefore, select "-8" to show on the display panel, and
then press the ENTER button.
After selecting "A pattern", select the best number for "B
6
pattern" in the same way.
Seventeen block figures with a horizontal line on each horizontal side ( ) are
printed in pattern B. Of the seventeen figures determine which block is most nearly
centred between the horizontal lines and note the corresponding number.
Example
-6 +8
B
18
-8 -7 -6 -5 -4 -3 -2 -1 0 +1 +2 +3 +4 +5 +6 +7 +8
Select B pattern
-6 - +
In the example shown above, "-6" shows the most appropriate
selection. Therefore, select "-6" to show on the display panel, and
then press the ENTER button.
Page 21
ALIGNING THE PRINT HEADS
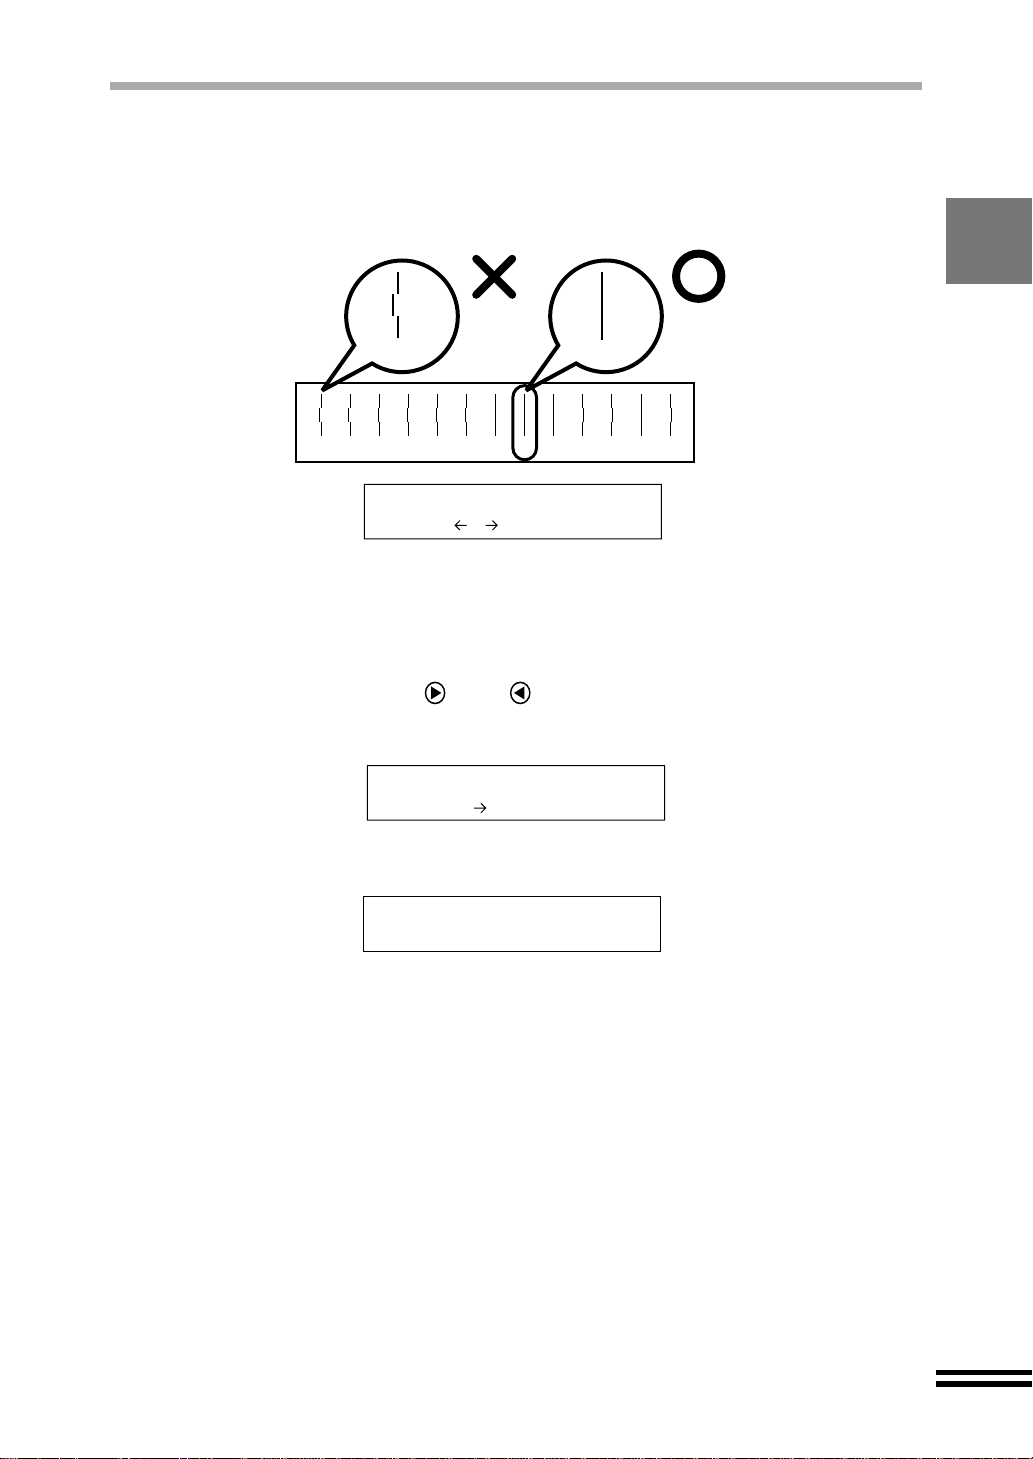
After selecting "B pattern", select the best number for "C
7
pattern" and "D pattern" in the same way.
Thirteen lines are printed in pattern C and pattern D. Of the thirteen lines
determine which line is the straightest and note corresponding number.
Example
-6 +1
-6 -5 -4 -3 -2 -1 0 +1 +2 +3 +4 +5 +6
C or D
Select C pattern
+1 - +
In the example shown above, "+1" shows the straightest line.
Therefore, select "+1" to show on the display panel, and then
press the ENTER button.
A message will appear asking you to confirm the alignment
8
selections. Use the and to select "2. Yes" or "1. No" and
then press the "ENTER" button.
Are you sure?
2.Yes
If "2. Yes" was selected the selected alignment values will be in effect and the
following message will appear.
Ready to Copy
100% A4 0
If "1. No" was selected the message of step 5 will appear.
Print a test page to check print quality.
9
For details refer to "PRINTING A TEST PAGE". (See page 76)
19
Page 22
LOADING PAPER
Follow the steps below to load paper into the paper tray or bypass tray.
For detailed information of paper types, see page 86.
LOADING PAPER INTO THE PAPER TRAY
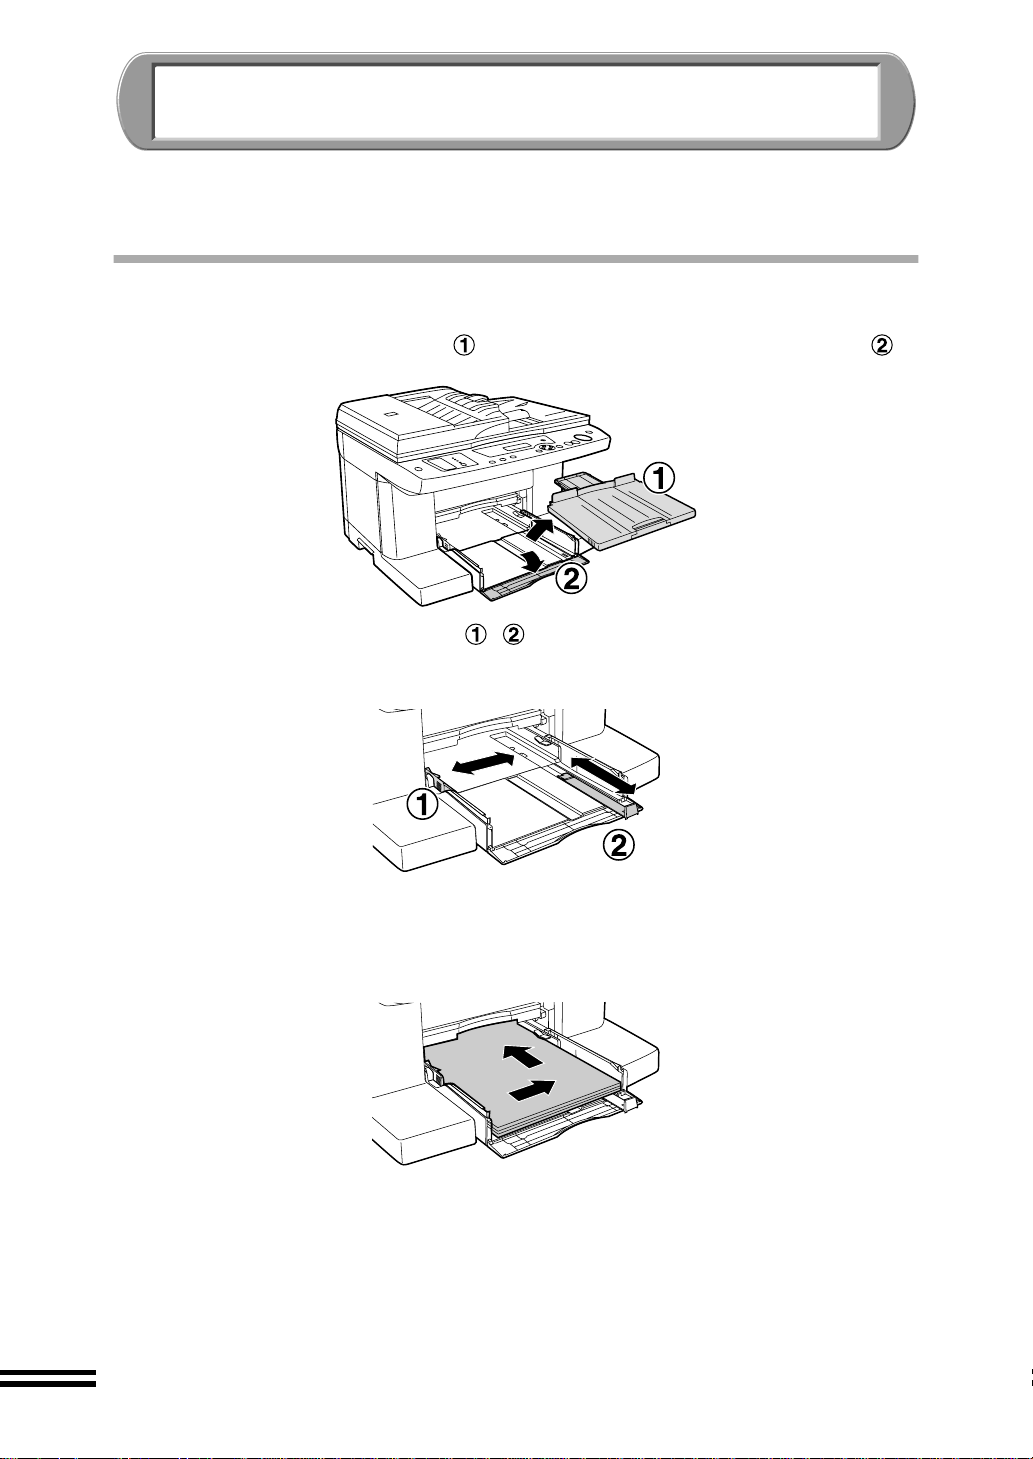
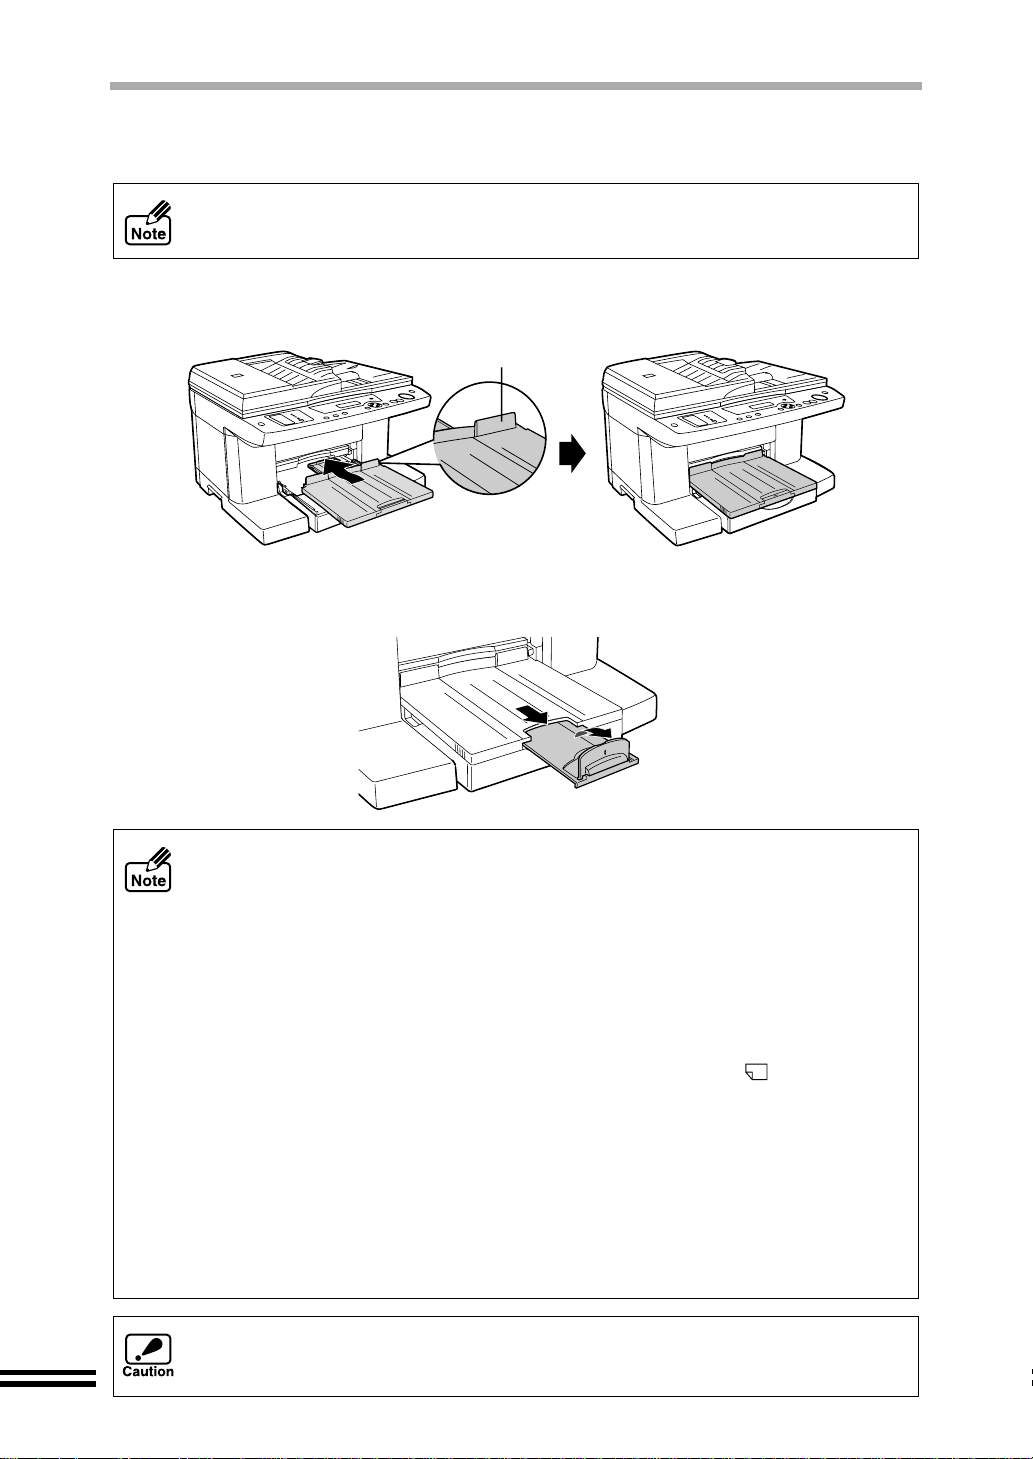
Remove the output tray , and open the front lid of paper tray .
1
Open the guides wide ( , ) enough to allow easy loading of
2
the paper.
20
Load the paper.
3
Load the paper so that the s ide to be p rinted o r copied onto is face down into the
paper tray. Push the paper to the right and rear sides of the tray.
Page 23
LOADING PAPER INTO THE PAPER TRAY
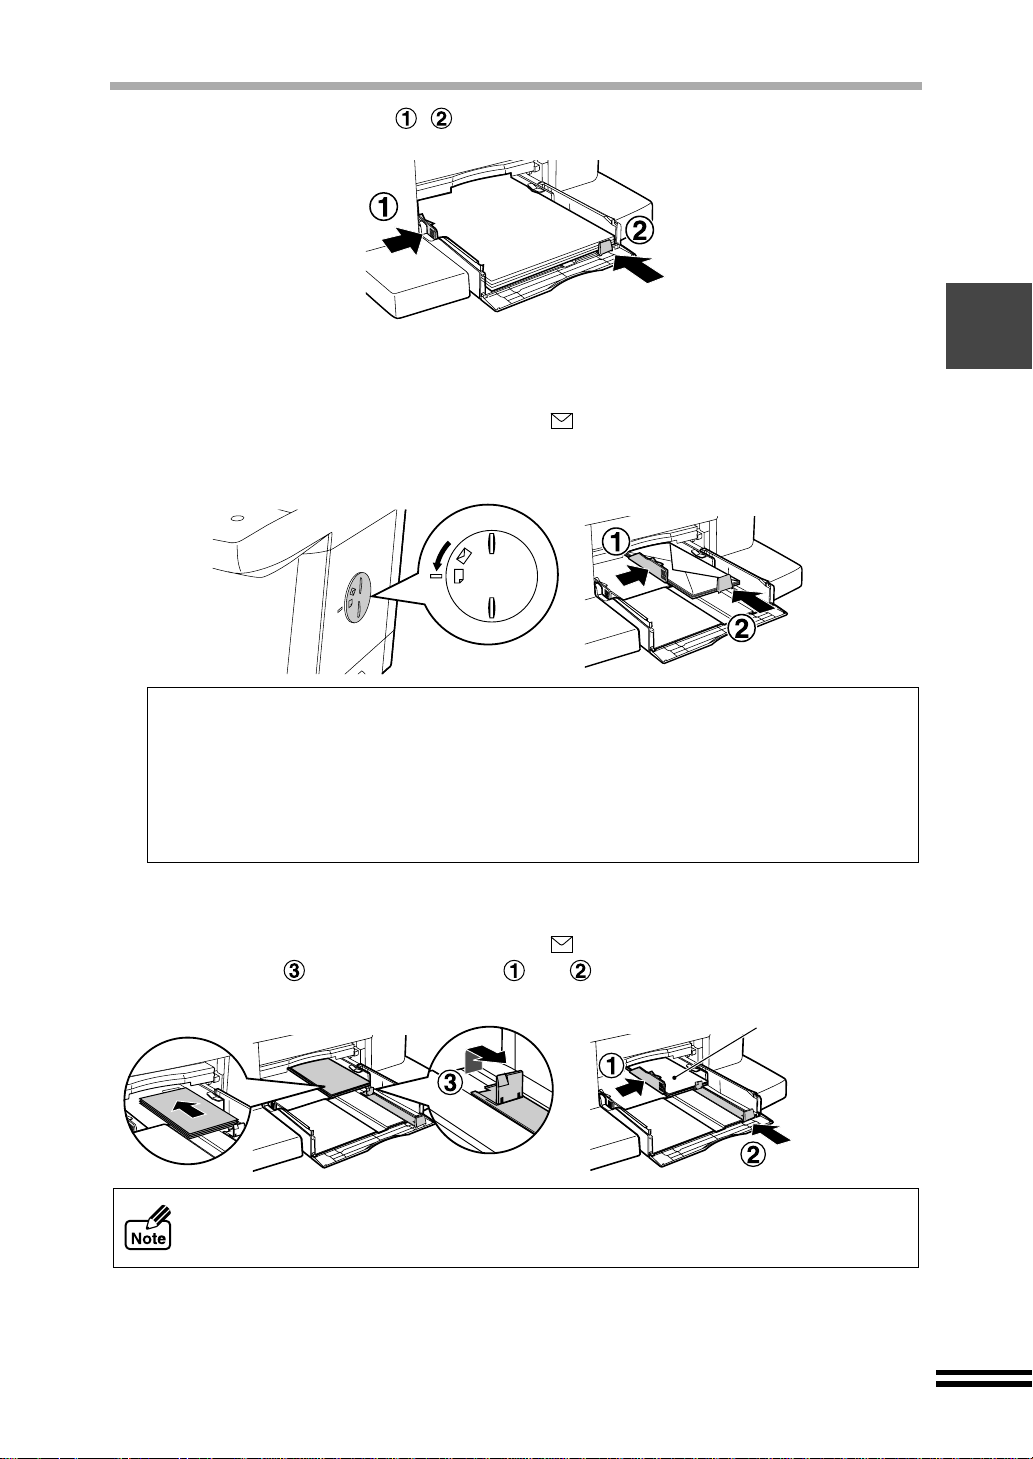
Move the guides ( , ) to touch the edges of the paper.
4
(For printing only)
When loading envelopes
Set the paper knob to the "Thick Paper ( )" setting.
Load the envelope f ace down with the flap to the ri ght, and then a djust the pap er
guides to the width of the envelope.
Note for loading envelopes
! When loading envelopes into the paper tray, load them in portrait direction.
! Do not use non-standard envelopes, envelopes with clasps, or window envelopes.
! Be sure to select each of Com10, DL, C6, and Invitation A2 on the paper size setting
of the printer driver. (For detailed information on printer driver, re fer to the Online
Manual.)
(For printing only)
When loading index cards, postcards or birthday cards
Set the paper knob to the "Thick Paper ( )" setting.
Set guide up, and then fit guide and against the loaded cards.
Be sure to load in
portrait direction.
Most paper and enve lopes will be fed correctly from the paper tray. Howev er, if
paper or envelopes are parti cularly stiff or heavy the y should be fed one at a time
through the bypass tray. This will avoid wrinkling or misfeeding.
21
Page 24
LOADING PAPER INTO THE PAPER TRAY
Close the front lid of the paper tray by firmly pushing on it's
5
right edge.
If the length of the paper is longer than the tray, keep the front lid of the tray open
while printing.
Attach the output tray.
6
Place this projection
toward the unit.
Pull out the output tray extension to the paper size, and then
7
raise the paper stop guide.
22
! Be sure that paper is free of rips, dust, wrinkles, and curled or bent edges.
! Make sure all the paper in the stack is the same size and type.
! Fan the paper and tap it against a flat surface to ensure it is even before loading
into the unit.
2
! The paper tray can hold up to 150 sheets of 20lbs. (75g/m
to keep the total thickness of the loaded paper stack below 15mm.
! Ensure the re i s no spa ce be twee n th e paper and the guide s and tha t th e gu id es
are not set too tight against the paper causing the paper to buckle.
! The paper knob should alw ays be set to the "Nor mal P aper ( )" setti ng except
while printing on thick paper.
! When not using the unit for an extended period, remove all paper from the paper
tray and store it in a dry p lace. If paper is l eft in the unit for an extende d period,
the paper will absorb moisture from the air, resulting in paper jams.
! When adding new paper to the paper tray, remove the old paper already
contained in the tray, place it on top of the new paper. Then load it all into the
paper tray. Placing new paper on top of th e paper already c ontained in the tr ay
may result in feeding two sheets at one time.
The original image must be sm al ler than the paper in the tray. If the original ima ge
is larger than the paper, th is may cause s mudges on t he edges of the o utput a nd
may make the machine dirty inside.
) plain paper. Be sure
Page 25
LOADING THE BYPASS TRAY WITH PAPER
If you wish to print on ba nner paper or anothe r paper type not loaded i nto the main paper
tray, use the bypass feed. Only one sheet of paper (or up to 5 sheets of banner paper (only
for printing)) can be placed in the bypass tray at a time.
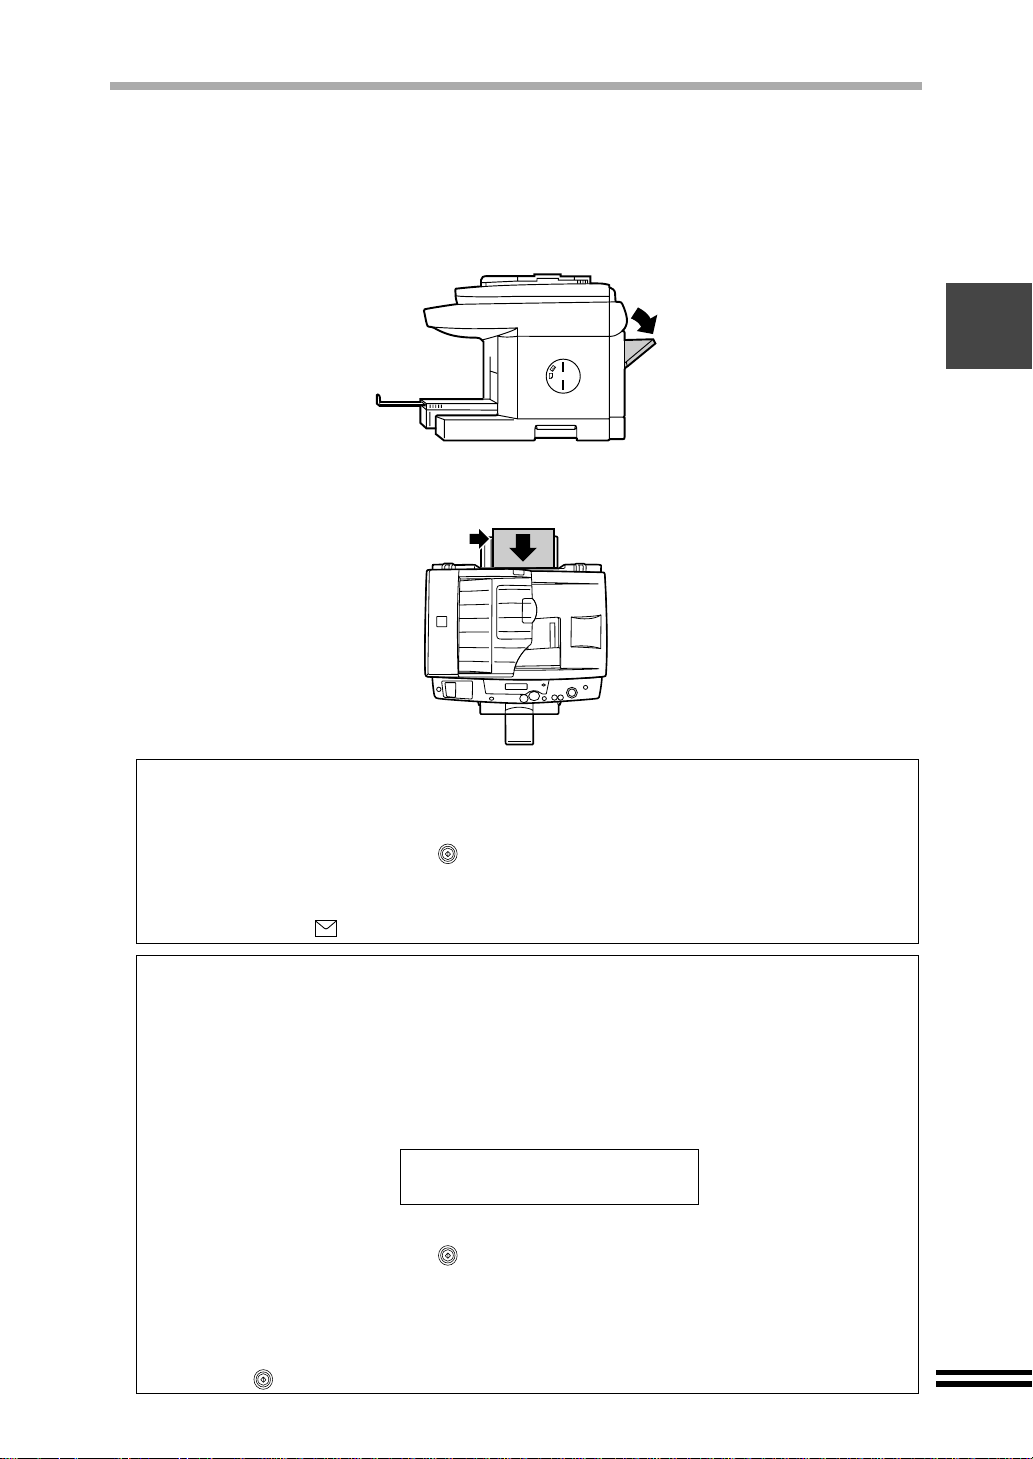
Open the bypass tray located on the rear of the unit.
1
Load the paper so that the side to be printed or copied onto is face up.
2
Align the paper with the right side of the bypass tray.
To use the bypass tray in the copy mode
To use the bypass tray in the copy mode, follow the steps shown below.
1) Open the bypass tray to set paper, referring step 1 and 2 above.
2)
Press the "START" button ( ).
Paper will be automatically fed into the unit to be copied.
You cannot make multipl e co pi es usi ng th e by pass tray. S et the pape r knob to the
"Thick Paper ( )" setting when copying onto thick paper. (See page 7.)
To use the bypass tray in the printer mode
To use the bypass tray in the printer mode, follow the steps shown below.
1)
Select the bypass tray as a paper source on the printer driver, and send the print job.
For details of the printer driver setup, refer to "Printer Properties" in the Online Manual.
"Please set a sheet of paper on bypass and press the START button" message will
appear on the Print Status Window (See Online Manual). And the following message
will appear on the display panel.
Load selected paper
into bypass slot
2) Open the bypass tray to set paper, referring step 1 and 2 above.
3)
Press the "START" button ( ).
The unit will start printing.
When printing more than one page:
The message described above will also appear when printing of the first page has
been completed. Load the paper again for the next page, and then press the
button ( ). Repeat this process for each page.
"START"
23
Page 26
LOADING THE BYPASS TRAY WITH PAPER
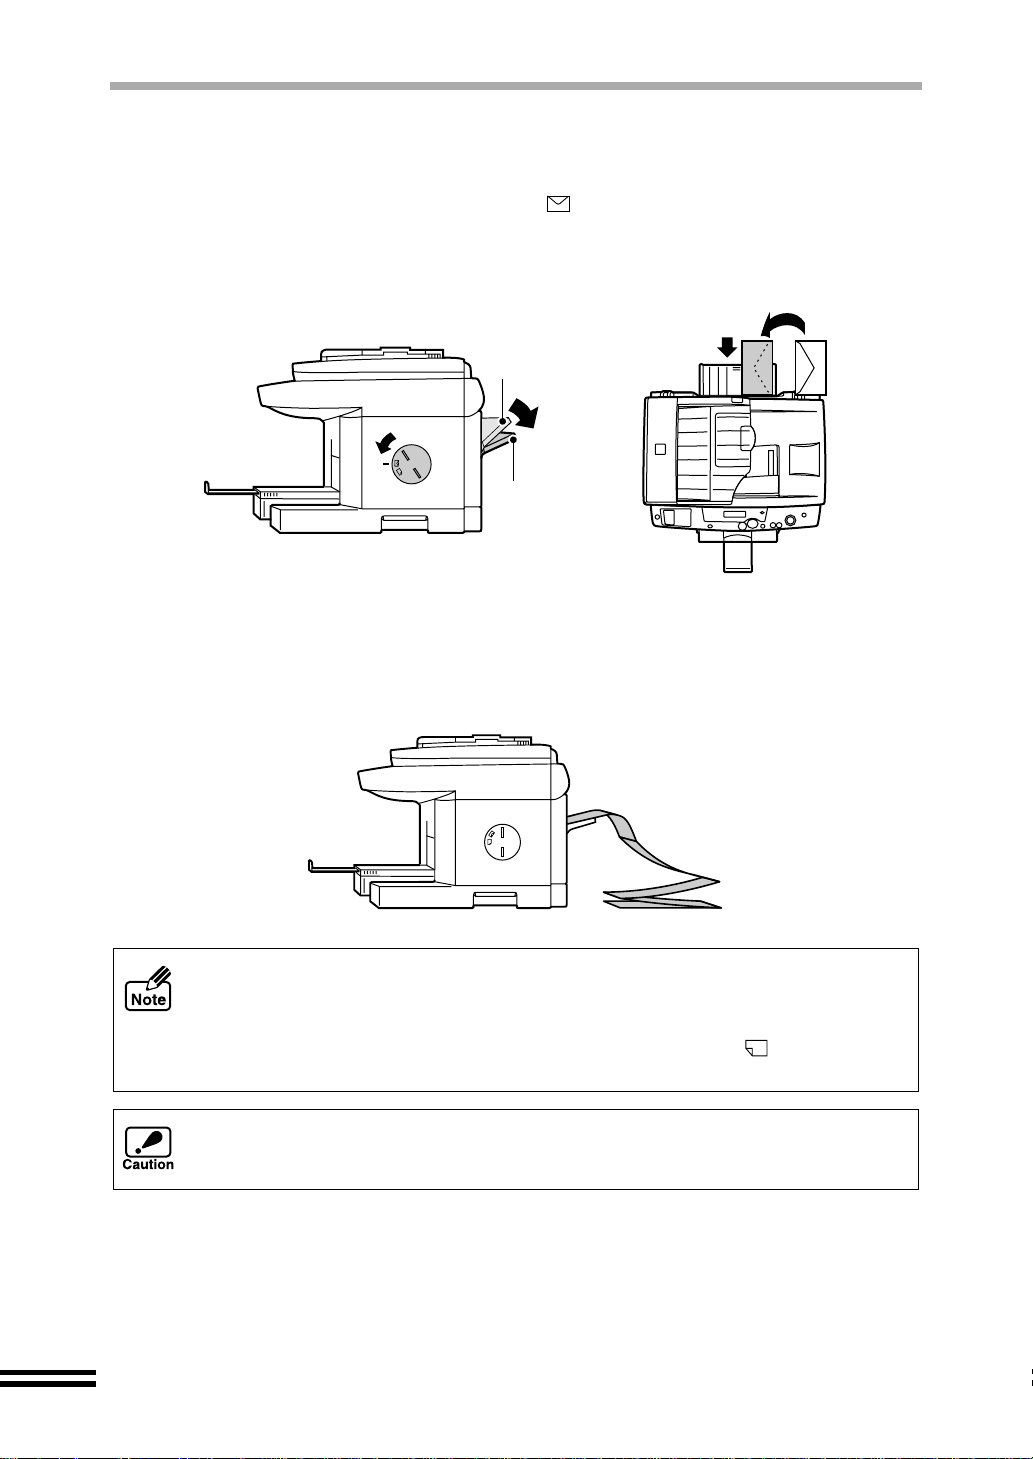
(For printing only)
When loading an envelope
Open the bypass tray until it reaches position 2 (the tr ay has two sto p positions),
set the paper knob to the "Thick Paper ( )"setting.
Load the envelope print side up with the flap to the rig ht, and position aga inst the
right edge of the tray as sh own bellow. R efer to "Notes f or loading enve lopes" on
page 21.
(For printing only)
When loading banner paper
Open the bypass tr ay until i t reache s position 2, and set the pape r along the righ t
side edge of the tray.
Position 1
Position 2
24
! Maximum 5 sheets of banner paper can be used.
! When printing onto banner paper, be sure to use an application software
supporting banner paper.
! The paper knob should alw ays be set to the "Nor mal P aper ( )" setti ng except
while printing on thick paper.
The original image must be sm al ler than the paper in the tray. If the original ima ge
is larger than the paper, th is may cause s mudges on t he edges of the o utput a nd
may make the machine dirty inside.
Page 27

INSTALLING THE SOFTWARE
This chapter provides y ou with information on how to install re quired software to use this
unit with your computer. Information on how to use the Online Manual is also provided.
The following terms are used in this chapter.
CD-ROM
Means the supplied CD-ROM with the AJ-6000 Series Software.
Drive D (the field to be typed "D:\...")
This assumes that your computer's CD-ROM drive is drive D.
(If your computer's CD-ROM drive letter is not Drive D, change the CD-ROM drive letter to
correspond to the letter of your CD-ROM drive.)
SOFTWARE FOR THE AJ-6000 SERIES
The supplied CD-ROM includes software for this unit. To install the software onto your
computer, see the next page.
Sharpdesk
Utility software integrating a varie ty of user softwar e.
Utility Softw a re
Button Manager
Utility software enabling the "Scan" button located on the unit.
Copy JX2
Utility software allowi ng you to conduct simple editin g procedures on a scanned
original.
Driver software
AJ-6000 series dr iver
Driver software is the basic driver which lets you connect this unit and your
computer to operate the unit.
SHARP TWAIN driver
Permits you to operate scanning function of this unit with TWAIN-compliant
application.
Printer driver
Enables you to use the printer function of this unit with your computer.
BONUS SOFTWARE
PhotoSuite III SE
25
Page 28

HARDWARE AND SOFTWARE REQUIREMENTS
Check the following hardware and software requirements in order to install the AJ-6000
series drivers and software.
Computer type
Operating system
Display 640 x 480dots (VGA) or better
Hard disk free space 80MB or more
Other requirement for hardware An environment on which any of the operating
*1
Compatible with W indows Me, Wind ows 98 o r Windows 2000 prei nstalled m odel with
USB interface equipped as standard.
*2
At least 800 x 600dots (SVGA) is required to use Sharpdesk.
IBM PC/AT or compatible computer equipped with a
*1
USB
or bi-directional parallel interface (IEEE 1284)
Windows Me, Win dows 98, W indow s 95, W indows 2 000,
Windows NT 4.0 (Service Pack 3 or later)
systems listed above can fully operate
*2
BEFORE INSTALLATION
Follow the steps shown below to install software.
Install the AJ-600 0 serie s driv ers a fter conf irming t he operat ing
1
system installed on your computer.
Operating system
Windows Me
Windows 98
Windows 95
Windows 2000
Windows NT 4.0
Interface Reference pages for how to install
USB/Parallel
USB/Parallel
Parallel
USB
Parallel
Parallel
Installing onto Windows Me (See page 27)
Installing onto Windows 98 (See page 28)
Installing onto Windows 95 (See page 29)
Installing onto Windows 2000 (USB interface)
(See page 31)
Installing onto Windows 2000 (Parallel interface)
(See page 32)
Installing onto Windows NT 4.0 (See page 33)
26
Install the AJ-6000 series software, which includes Button
2
Manager, Copy JX2, SHARP TWAIN, Sharpdesk, and the Online
Manual. (See page 37 - 38.)
Install the printer driver.
3
Operating system
Windows Me
Windows 98
Windows 95
Windows 2000
Windows NT 4.0
Install the bonus software. (See page 45.)
4
Interface Reference pages for how to install
USB/Parallel
USB/Parallel
Parallel
USB/Parallel
Parallel
Installing onto Windows Me/98/95
(See page 39)
Installing onto Windows 2000/NT 4.0
(See page 41)
Page 29

INSTALLING THE "AJ-6000 SERIES DRIVER"
Installing onto Windows Me
Make sure that the unit is connected to your computer.
1
Turn on the unit, and then turn on your computer.
2
"Add New Hardware Wizard" window will appear.
If "Add New Hardware Wizard" does not appear, go to "Installing through Add New
Hardware" (page 34) when using USB cable, go to "Installing through Setup"
(page 36) when using parallel cable.
Insert the supplied CD-ROM into your CD-ROM drive.
3
Check the radio button for "Automatic search for a better driver
4
(Recommended)", and then click the "Next" button.
Select the appropriate driver, and click the "Next" button.
5
If your unit is conne cted by USB cable, select
D:\DRIVERS\MFP-PS\ENGLISH\WIN98\SCUSUSB.INF). On the other hand,
unit is connected by parallel cable, select
D:\DRIVERS\MFP-PS\ENGLISH\WIN98\SCUSMFP.INF).
("D" is changed to correspond to the letter of your CD-ROM drive.)
Click the "Finish" button.
6
Click the "Yes" button when a message that prompts you to
7
reboot your computer appears.
You have completed the installation of the AJ-6000 series driver.
After installing th e AJ-6000 se ries drive r, install A J-6000 se ries software r eferring
to page 37.
"SHARP AJ-6020 USB" (Location:
"SHARP AJ-6020" (Location:
if your
27
Page 30

INSTALLING THE "AJ-6000 SERIES DRIVER"
Installing onto Windows 98
Make sure that the unit is connected to your computer.
1
Turn on the unit, and then turn on your computer.
2
On this step, "Add New Hardware Wizard" will appear.
If "Add New Hardware Wizard" does not appear, go to "Installing through Add New
Hardware" (page 34) when using USB cable, go to "Installing through Setup"
(page 36) when using parallel cable.
Click the "Next" button.
3
Insert the supplied CD-ROM into your CD-ROM drive.
4
Check the radio button for "Search for the best d river for your
5
device (Recommended)", and then click the "Next" button.
Select the "Specify a location:", type "D:\DRIVERS\MFP-PS\
6
ENGLISH\WIN98", and then click the "Next" button.
(Change "D" to correspond to the letter of your CD-ROM drive.)
Click the "Next" button.
7
Click the "Finish" button.
8
Click the "Yes" button when a message that prompts you to
9
reboot your computer appears.
You have completed the installation of the AJ-6000 series driver.
After installing th e AJ-6000 se ries drive r, install A J-6000 se ries software r eferring
to page 37.
28
Page 31
Installing onto Windows 95
Make sure that the unit is connected to your computer.
1
Turn on the unit, and then turn on your computer.
2
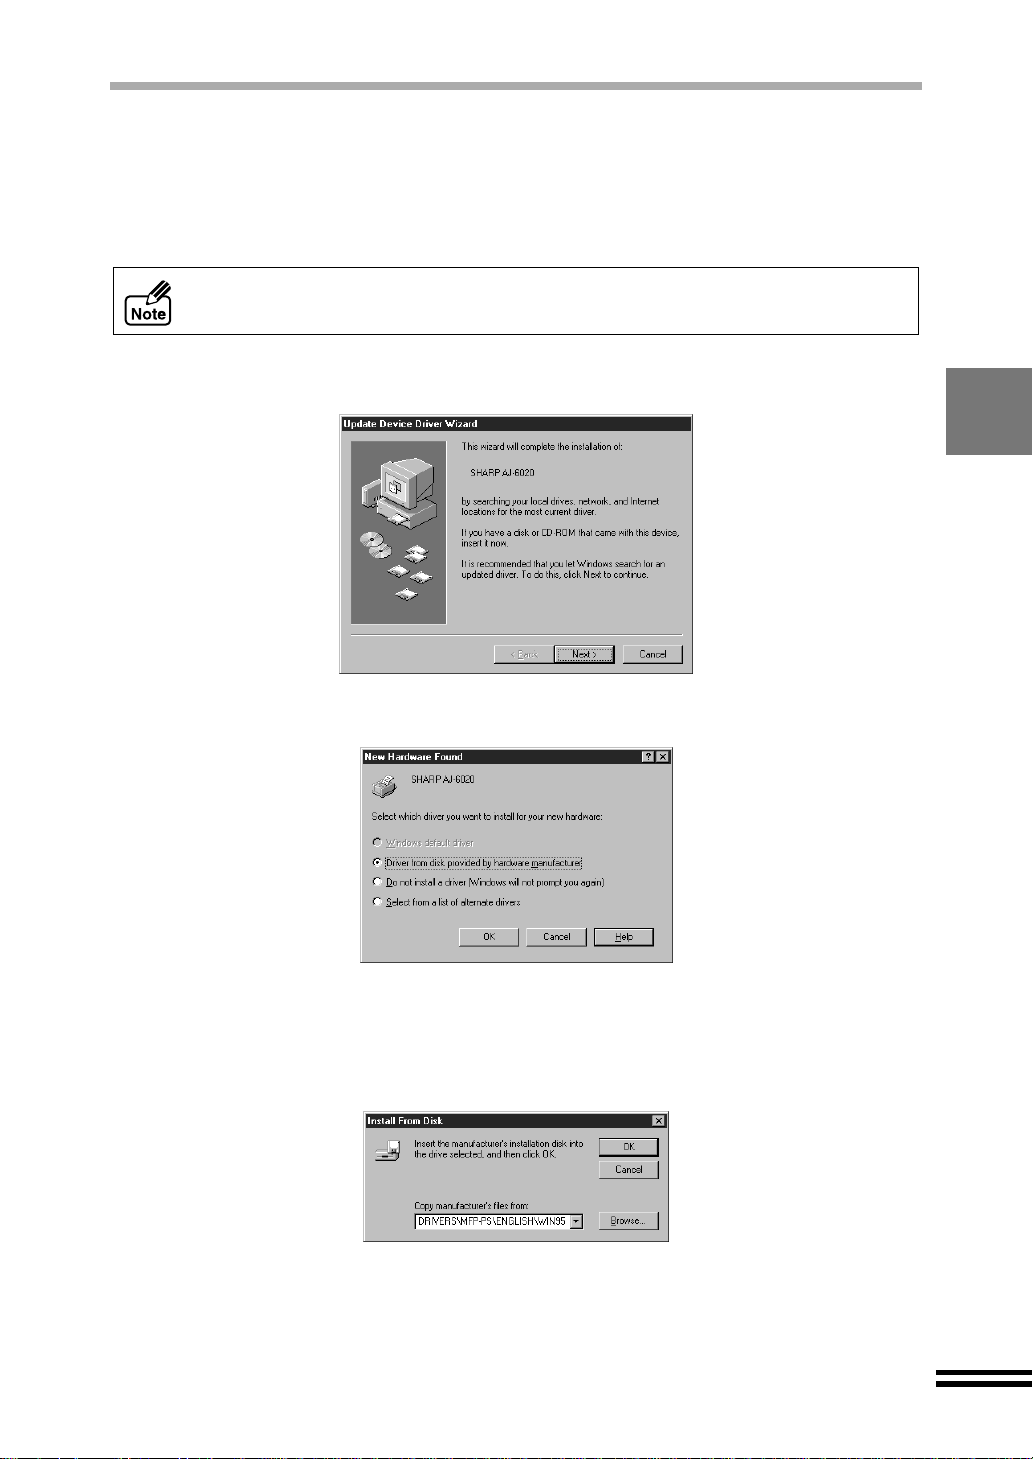
"Update Device Driver Wizard" or "New Hardware Found" window will appear.
If neither of "Update Device Driver Wizard" nor "New Hardware Found" wizard
appear, refer to "Installing through Setup". (See page 36)
If the "Update Device Driver Wizard" window appears, click the
"Next" button and proceed to step 3.
INSTALLING THE "AJ-6000 SERIES DRIVER"
If the "New Hardware Found" window appears, perform the
following steps and proceed to step 6.
1.
Check the radio button for "Driver from disk provided by hardware manufacturer",
and click the "OK" button.
2.
Insert the supplied CD-ROM into your CD-ROM drive.
3.
Type "D:\DRIVERS\MFP-PS\ENGLISH\WIN95", and then click the "OK" button.
(Change "D" to correspond to the letter of your CD-ROM drive.)
The setup program will start to copy the files.
Go to step 6.
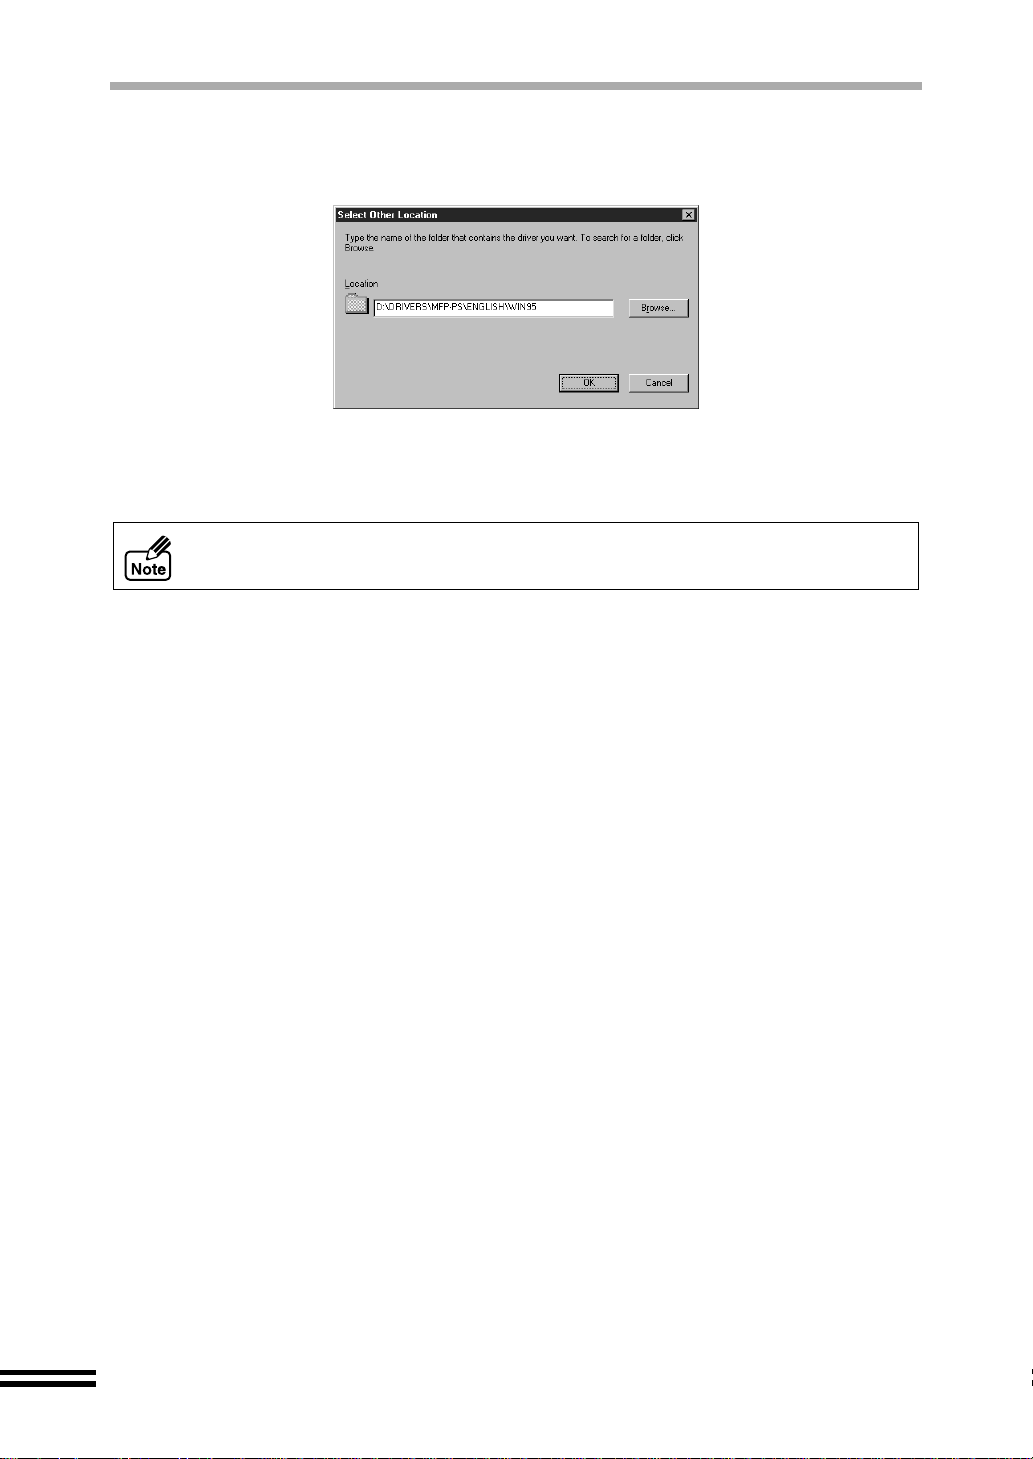
Click the "Other Locations" button.
3
Insert the supplied CD-ROM into your CD-ROM drive.
4
29
Page 32
INSTALLING THE "AJ-6000 SERIES DRIVER"
Type "D:\DRIVERS\MFP-PS\ENGLISH\WIN95", and then click
5
the "OK" button.
(Change "D" to correspond to the letter of your CD-ROM drive.)
The setup program will start to copy the files.
Check the radio button for "Yes", and click the "Finish" button.
6
You have completed the installation of the AJ-6000 series driver.
After installing th e AJ-6000 se ries drive r, install A J-6000 se ries software r eferring
to page 37.
30
Page 33

INSTALLING THE "AJ-6000 SERIES DRIVER"
Installing onto Windows 2000 (USB interface)
Make sure that the unit is connected to your computer.
1
Turn on the unit, and then turn on your computer.
2
On this step, "Found New Hardware Wizard" will appear.
Click the "Cancel" button.
3
Insert the supplied CD-ROM into your CD-ROM drive.
4
The driver will be automatically installed.
The icon shown below appears when the driver has been successfully installed.
If the driver has not been installed automatically, follow the steps shown below.
1) Click the "Start" button, and select "Run".
2) Type "D:\USBSETUP", and then click the "OK" button.
(Change "D" to correspond to the letter of your CD-ROM drive.)
You have completed the installation of the AJ-6000 series driver.
After installing th e AJ-6000 se ries drive r, install A J-6000 se ries software r eferring
to page 37.
31
Page 34
INSTALLING THE "AJ-6000 SERIES DRIVER"
Installing onto Windows 2000 (Parallel interface)
Make sure that the unit is connected to your computer.
1
Turn on the unit, and then turn on your computer.
2
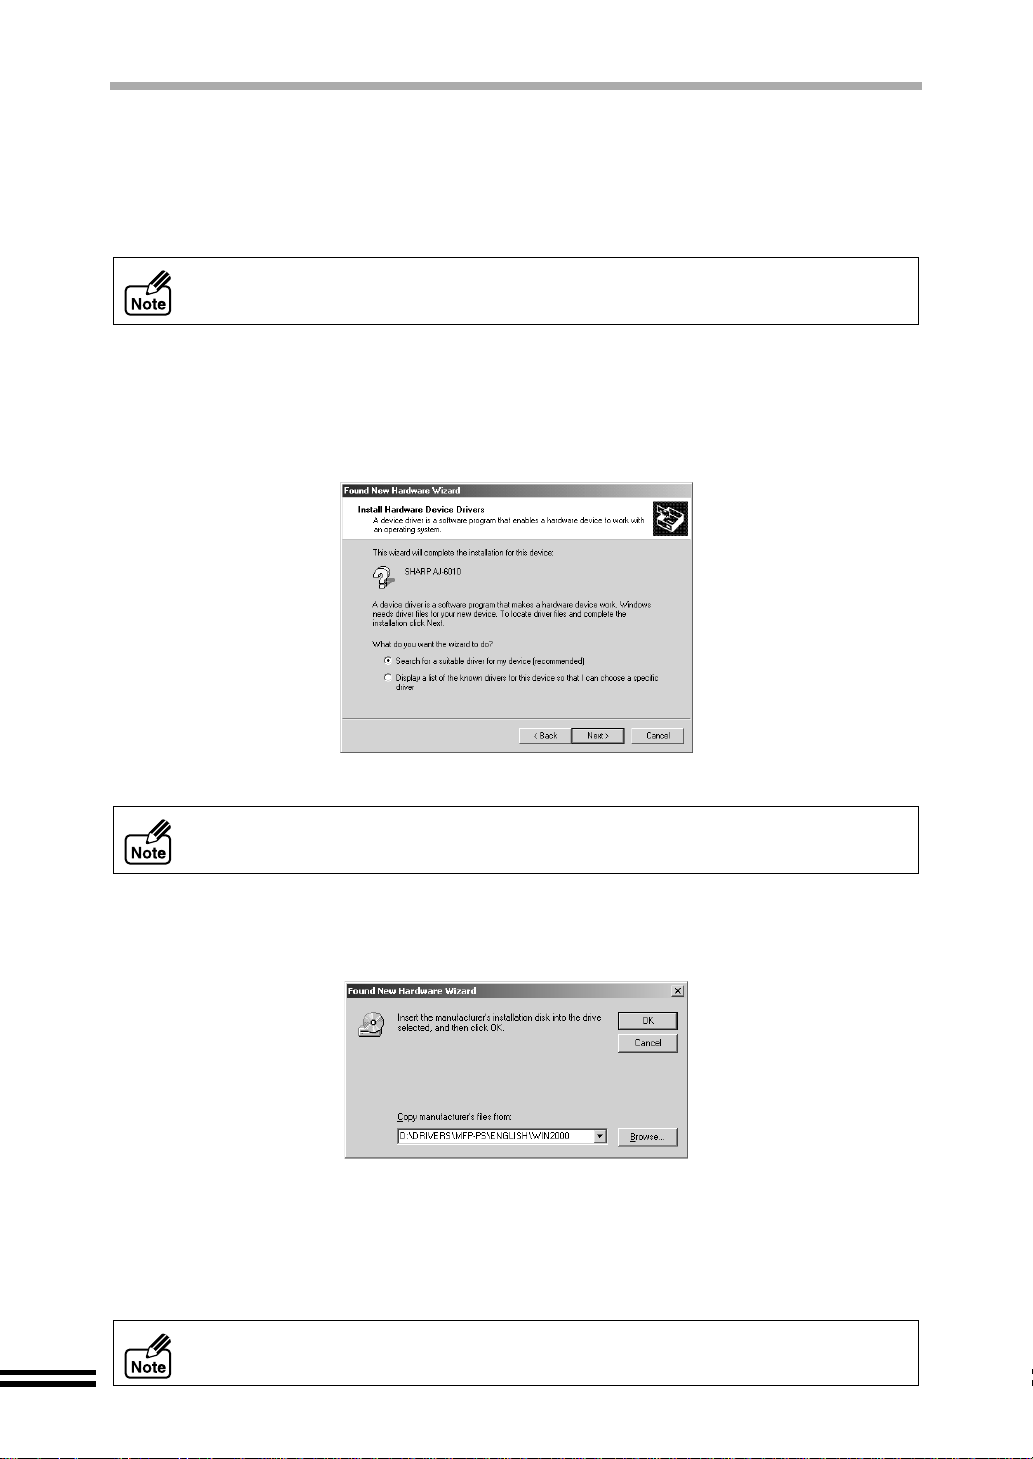
On this step, "Found New Hardware Wizard" will appear.
If
"Found New Hardware Wizard"
(See page 36)
Click the "Next" button.
3
Insert the supplied CD-ROM into your CD-ROM drive.
4
Check the radio button for "Search for a suitable driver for my
5
device (recommended)", and then click the "Next" button.
does not appear,
go to "Installing through Setup".
Select the "Specify a location", and then click the "Next" button.
6
To install the driver successfully, be sure to select the "Specify a location".
Type "D:\DRIVERS\MFP-PS\ENGLISH\WIN2000" and click the
7
"OK" button.
(Change "D" to correspond to the letter of your CD-ROM drive.)
Click the "Next" button.
8
Click the "Finish" button.
9
10
Restart your computer.
You have completed the installation of the AJ-6000 series driver.
After installing th e AJ-6000 se ries drive r, install A J-6000 se ries software r eferring
to page 37.
32
Page 35
Installing onto Windows NT 4.0
Make sure that the unit is connected to your computer.
1
Turn on the unit, and then turn on your computer.
2
Insert the supplied CD-ROM into your CD-ROM drive.
3
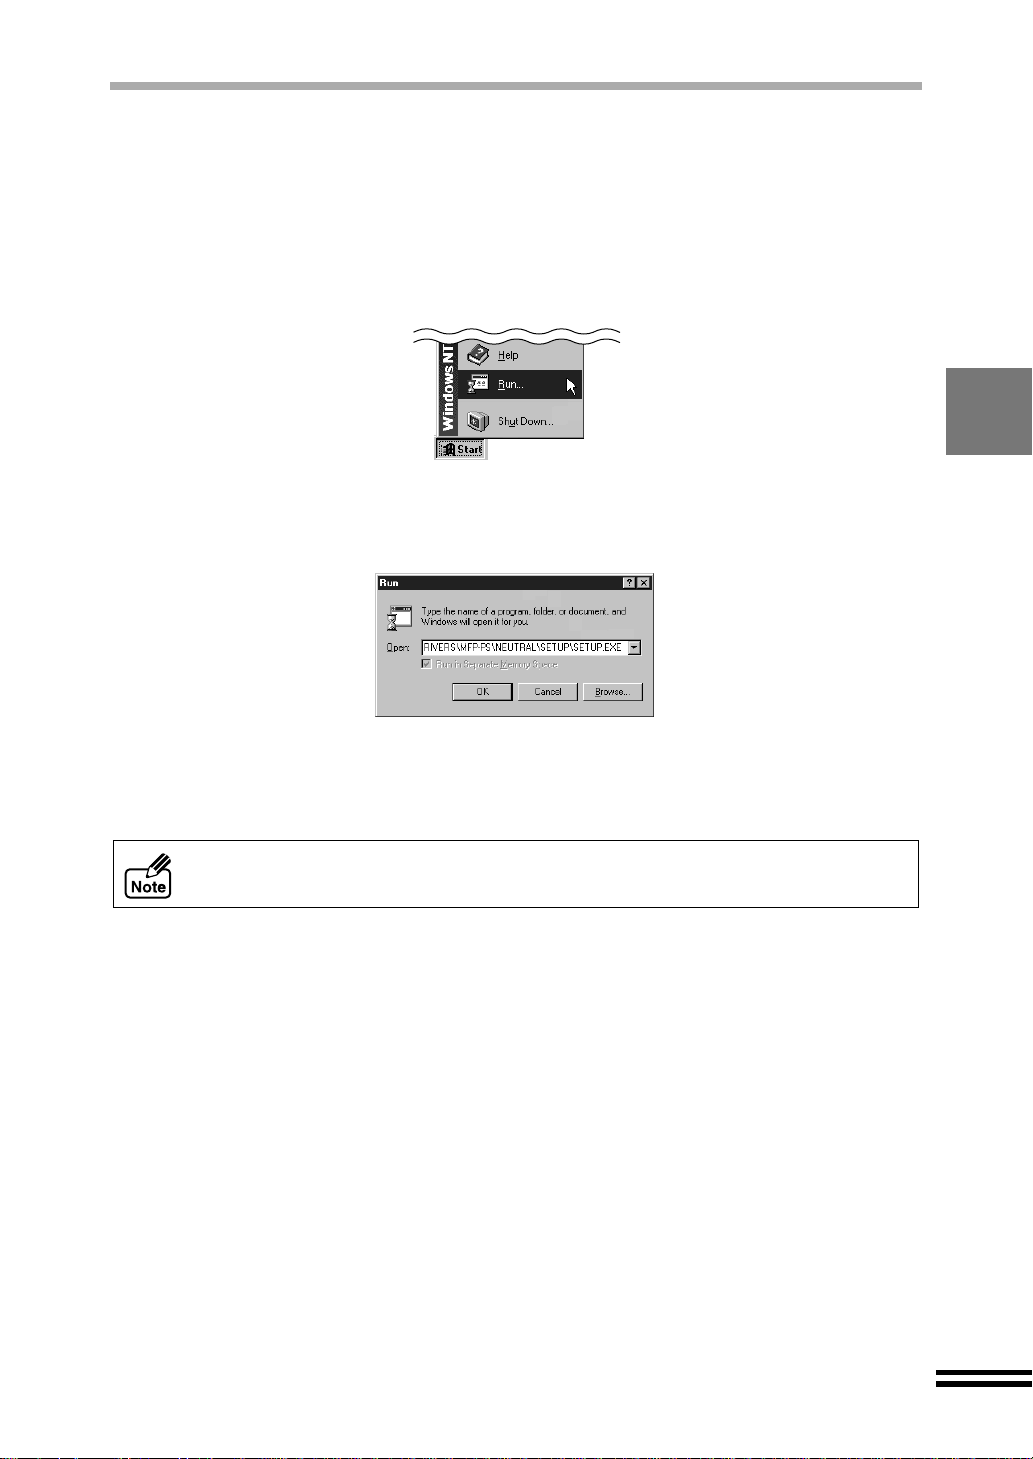
Click the "Start" button, and select "Run".
4
Type "D:\DRIVERS\MFP-PS\NEUTRAL\SETUP\SETUP.EXE", and
5
then click the "OK" button.
(Change "D" to correspond to the letter of your CD-ROM drive.)
INSTALLING THE "AJ-6000 SERIES DRIVER"
The setup program will start to copy the files.
Restart your computer.
6
You have completed the installation of the AJ-6000 series driver.
After installing th e AJ-6000 se ries drive r, install A J-6000 se ries software r eferring
to page 37.
33
Page 36

INSTALLING THE "AJ-6000 SERIES DRIVER"
Installing through "Add New Hardware" (Windows Me/98,
USB interface)
If the driver failed to be installed when connected by the USB cable and following the
procedures outlined in "Insta lling onto Windows Me" (page 27 ) or "Insta lling onto Windows
98" (page 28), or you want to reinstall the driver, follow the instructions below.
The screen images in this section are those of Windows 98.
Make sure that the unit is connected to your computer.
1
Turn on the unit, and then turn on your computer.
2
Click the "Start" button, select "Settings" and then click
3
"Control Panel".
Double-click the "Add New Hardware" icon.
4
If the
"
Add New Hardware" icon does not app ear on Windows Me, c lick "view all
Control Panel options
Click the "Next" button.
5
Click the "Next" button.
6
If "SHARP AJ-6020" windo w appears, cl ick the "Next" button, and t hen follow the
procedure from step 3 in "Installing onto Windows Me" (page 27) or step 4 in
"Installing onto Windows 98" (page 28).
Check the radio button for "No, I want to select the hardware
7
from a list", and click the "Next" button.
"
to view it.
34
Page 37

8
9
10
11
INSTALLING THE "AJ-6000 SERIES DRIVER"
Select "Universal serial bus controller", and click the "Next"
button.
Click the "Have Disk" button.
Insert the supplied CD-ROM into your CD-ROM drive.
Type "D:\DRIVERS\MFP-PS\ENGLISH\WIN98\SCUSUSB.INF", and
then click the "OK" bu tton.
(Change "D" to correspond to the letter of your CD-ROM drive.)
12
13
14
15
Select "SHARP AJ-6020 USB", and click the "Next" button.
Click the "Next" button.
Click the "Finish" button.
Restart your computer.
You have completed the installation of the AJ-6000 series driver.
After installing th e AJ-6000 se ries drive r, install A J-6000 se ries software r eferring
to page 37.
35
Page 38

INSTALLING THE "AJ-6000 SERIES DRIVER"
Installing through "Setup" (Parallel interface)
If the driver failed to be instal led when conn ected by the paral lel interface, follow the steps
shown below. The steps also help you reinstall the driver when necessary.
The screen images in this section are those of Windows 98.
Make sure that the unit is connected to your computer.
1
Turn on the unit, and then turn on your computer.
2
Insert the supplied CD-ROM into your CD-ROM drive.
3
Click the "Start" button, and select "Run".
4
Type "D:\DRIVERS\MFP-PS\NEUTRAL\SETUP\SETUP.EXE", and
5
then click the "OK" button.
(Change "D" to correspond to the letter of your CD-ROM drive.)
The setup program will start to copy the files.
If your operating system is Windows Me/98/2000, restart your computer. With
Windows 95, go to step 6.
Check the radio button for "Yes", and click the "Finish" button.
6
You have completed the installation of the AJ-6000 series driver.
After installing th e AJ-6000 se ries drive r, install A J-6000 se ries software r eferring
to the next page.
36
Page 39
INSTALLING THE "AJ-6000 SERIES SOFTWARE"
The screen images in this section are those of Windows 98.
The AJ-6000 series software is provided on a CD-ROM.
Confirm that the CD-ROM is in the CD-ROM drive.
1
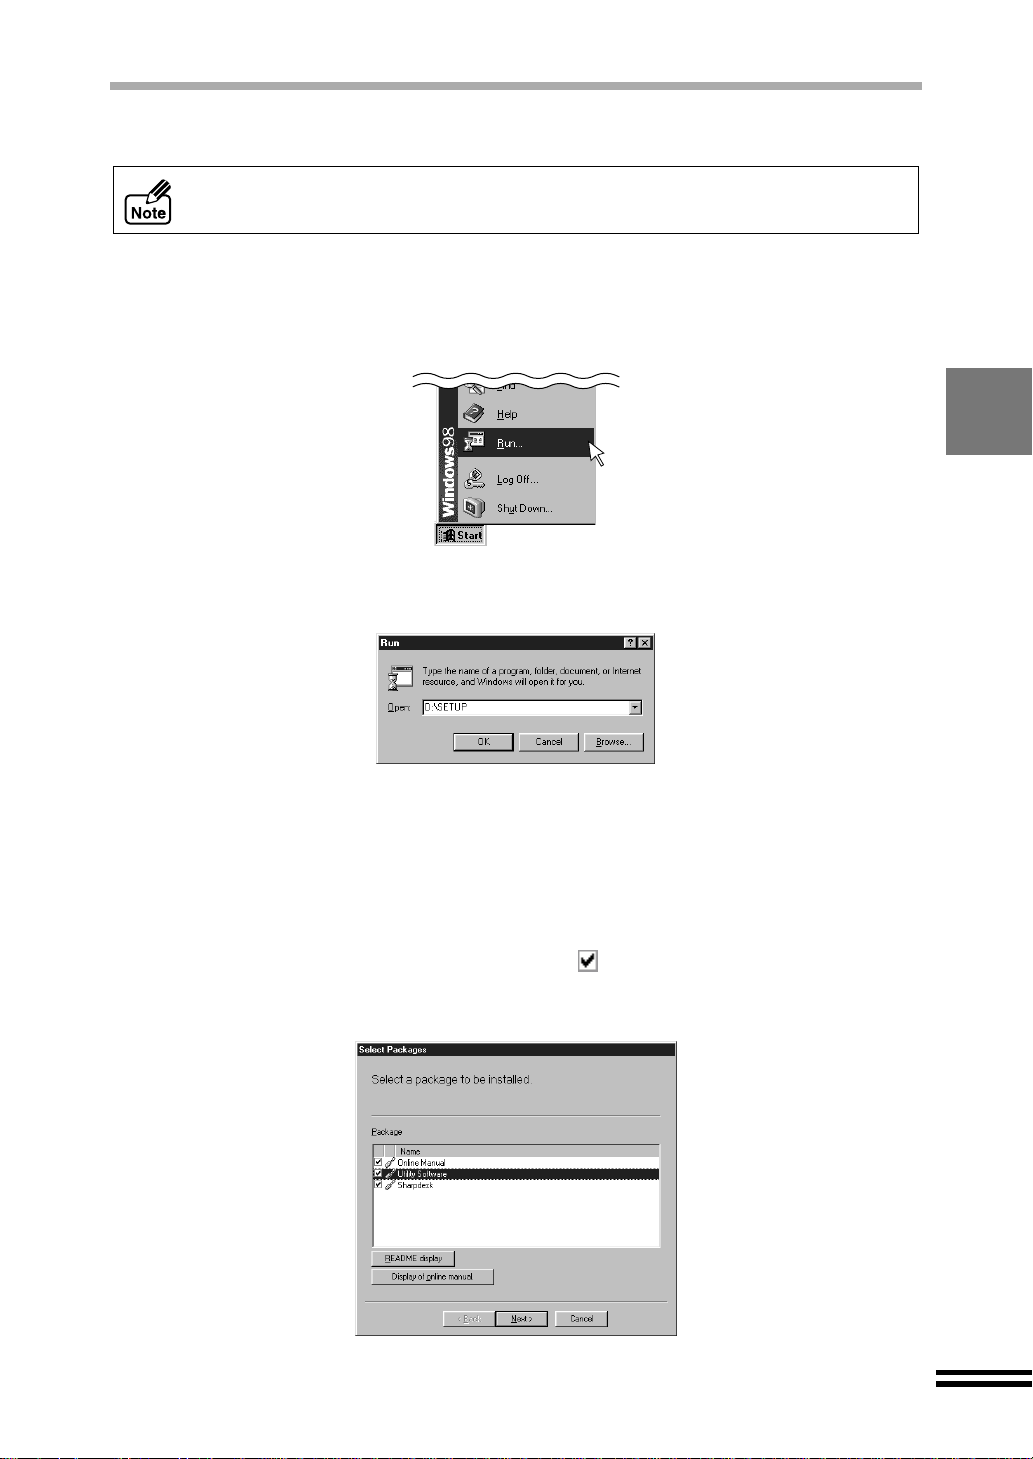
Click the "Start" button, and select "Run".
2
Type "D:\SETUP", and then click the "OK" button.
3
(Change "D" to correspond to the letter of your CD-ROM drive.)
Check if the appropriate language has been selected, and then
4
click the "Next" button.
Normally, the correct language is selected automatically.
Select the software packages to be installed, and then click the
5
"Next" button.
The software packages with checkmark ( ) on the list on the screen will be
installed.
Normally, all the software packages are checked by default.
Click the "README display" button to show the information on the selected package.
("README" for Online Manual is not provided.)
37
Page 40
INSTALLING THE "AJ-6000 SERIES SOFTWARE"
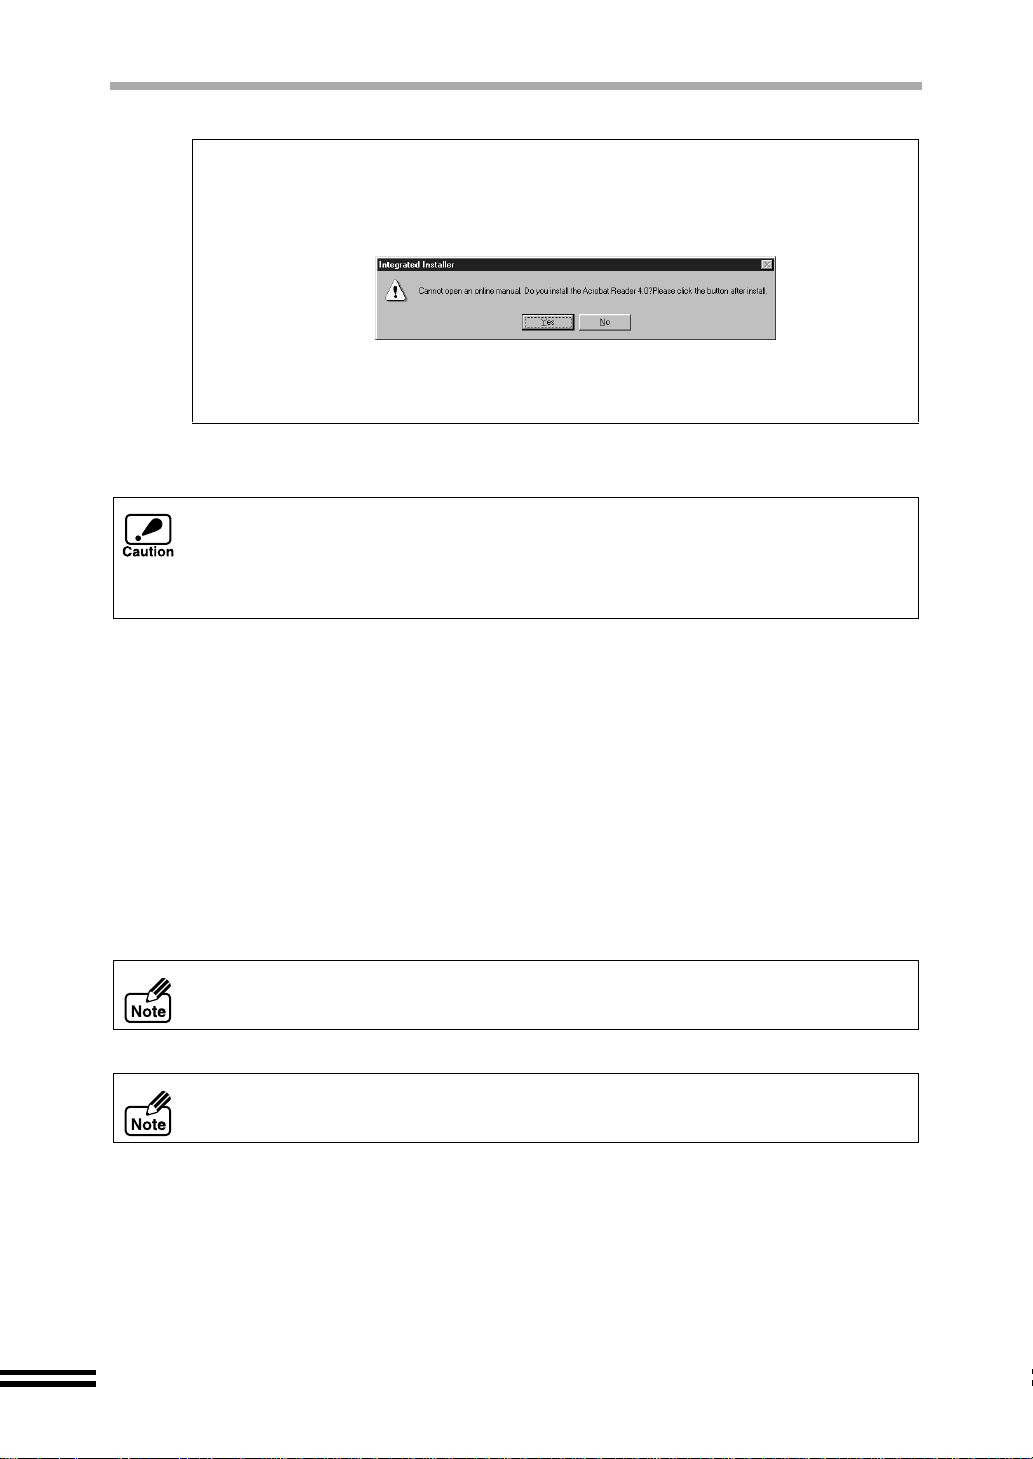
To display the Online Manual, click the "Display of online manual" button.
If Acrobat Reader is not inst alled in your computer, install it foll owing the steps
below.
1) Click the "Display of online manual" button.
The screen shown below will be displayed.
2) Click the "Yes" button.
The installation of Acrobat Reader will start.
Follow the on-screen instructions to install Acrobat Reader.
You can install the software without reading the Online Manual.
Refer to "HOW TO USE THE ONLINE MANUAL" (page 44) when y ou need to r ead it .
If any error message app ears, solve th e problem follo wing the instr uctions on the
screen. After your problem is solved, the installing procedure will be continued.
Depending on your p roblem, yo u may ha ve to exit th e installe r. In this case, clic k
the "Cancel" button to exit the installer. After solving your p roblem, reinstall t he
software from the beginning.
Check the contents of the package on the screen, and then click
6
the "Start" button.
The software packages to be installed will be displayed on the screen. If
inappropriate packages are displayed, click the "Back" button to select appropriate
packages again.
Once the installatio n starts, each installer of the sel ected software packages will
run automatically. F ollow the on-screen instructions to in stall the AJ-6000 series
software.
Click the "Close" button when the me ss age to inform you of the
7
completion of the installation appears.
After the installation, a message to restart your computer may be displayed. In this
case, click the "Yes" button to restart your computer.
You have completed the installation of the AJ-6000 series software.
After installing the AJ-6000 series software, install the printer driver referring to the
next page.
38
Page 41
INSTALLING THE PRINTER DRIVER
Installing onto Windows Me/98/95
The screen images in this section are those of Windows 98.
Make sure that the unit is connected to your computer.
1
Turn on the unit, and then turn on your computer.
2
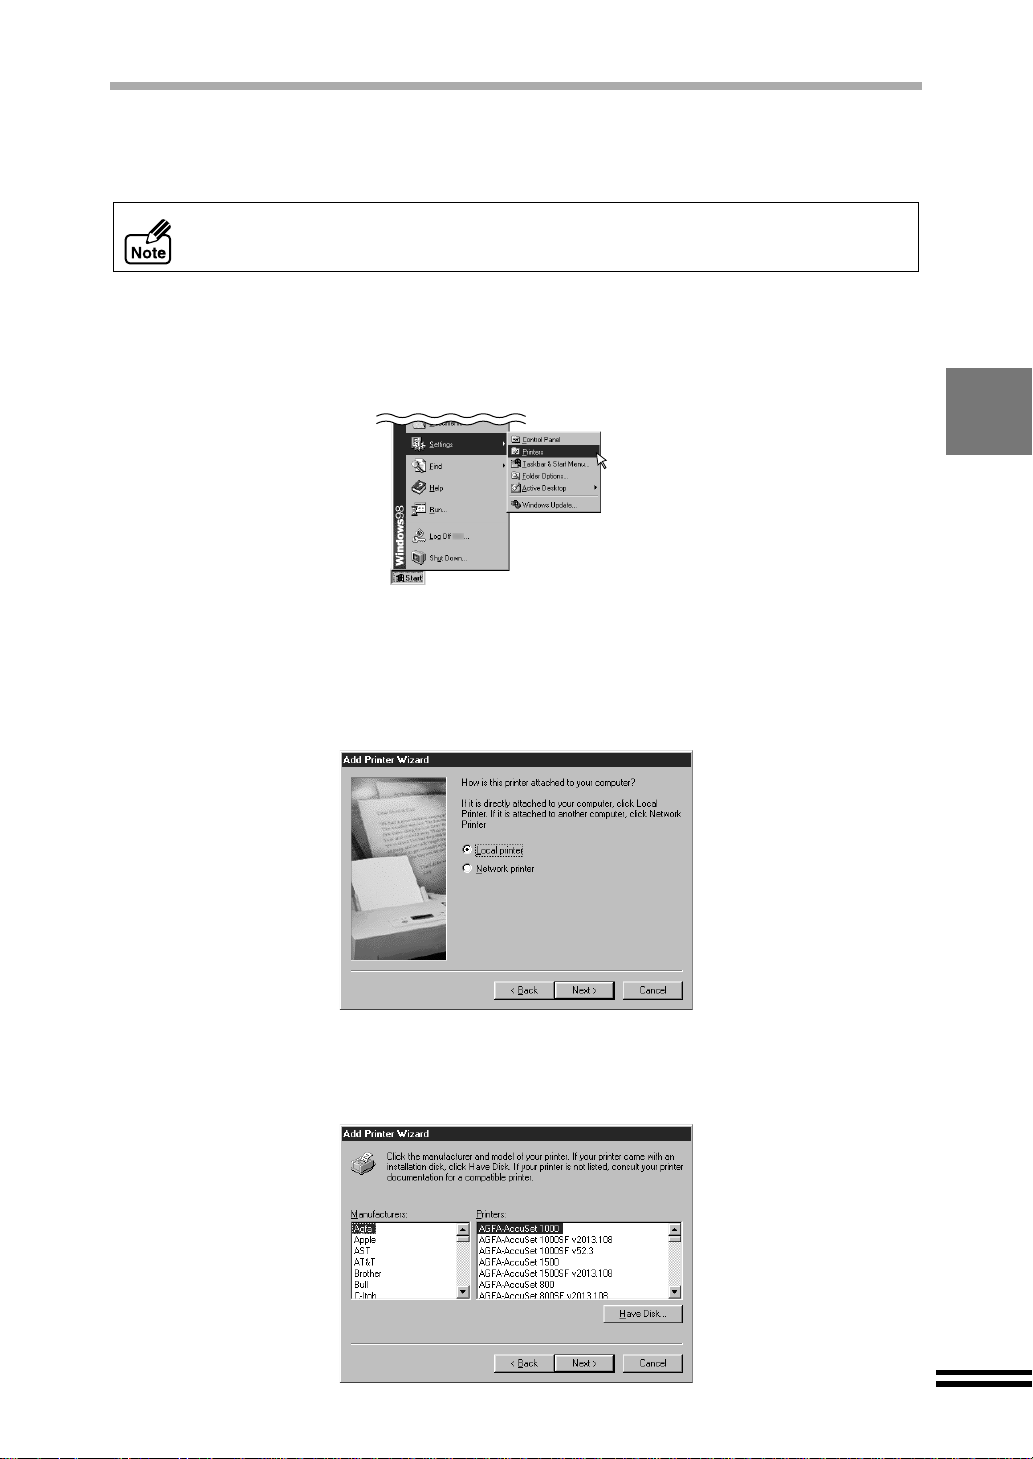
Click the "Start" button, select "Settings" and then click "Printers".
3
When the "Printers" window appears, double-click the "Add
4
Printer" icon.
Click the "Next" button.
5
Check the radio button for "L ocal p rinter", and click the "Next" b utton.
6
Refer to "Sharing Print er" in the Online M anual for the infor mation on how to use
this printer shared.
Click the "Have Disk" button.
7
39
Page 42

INSTALLING THE PRINTER DRIVER
Confirm that the CD-ROM is in the CD-ROM drive.
8
Type "D:\DRIVERS\PRINTER\ENGLISH\WIN9X", and then click
9
the "OK" button.
(Change "D" to correspond to the letter of your CD-ROM drive.)
10
11
Select "SHARP AJ-6020", and then click the "Next" button.
Select "SPRT", and click the "Next" button.
40
12
Click the "Finish" button.
If the program displ ays "Do you want your W indows-based programs to use this
printer as the default printer?", check "Yes".
You have completed the installation of the printer driver.
Page 43
Installing onto Windows 2000 / NT 4.0
The screen images on this section are those of Windows 2000.
Make sure that the printer is connected to your computer.
1
Turn on the printer, and then turn on your computer.
2
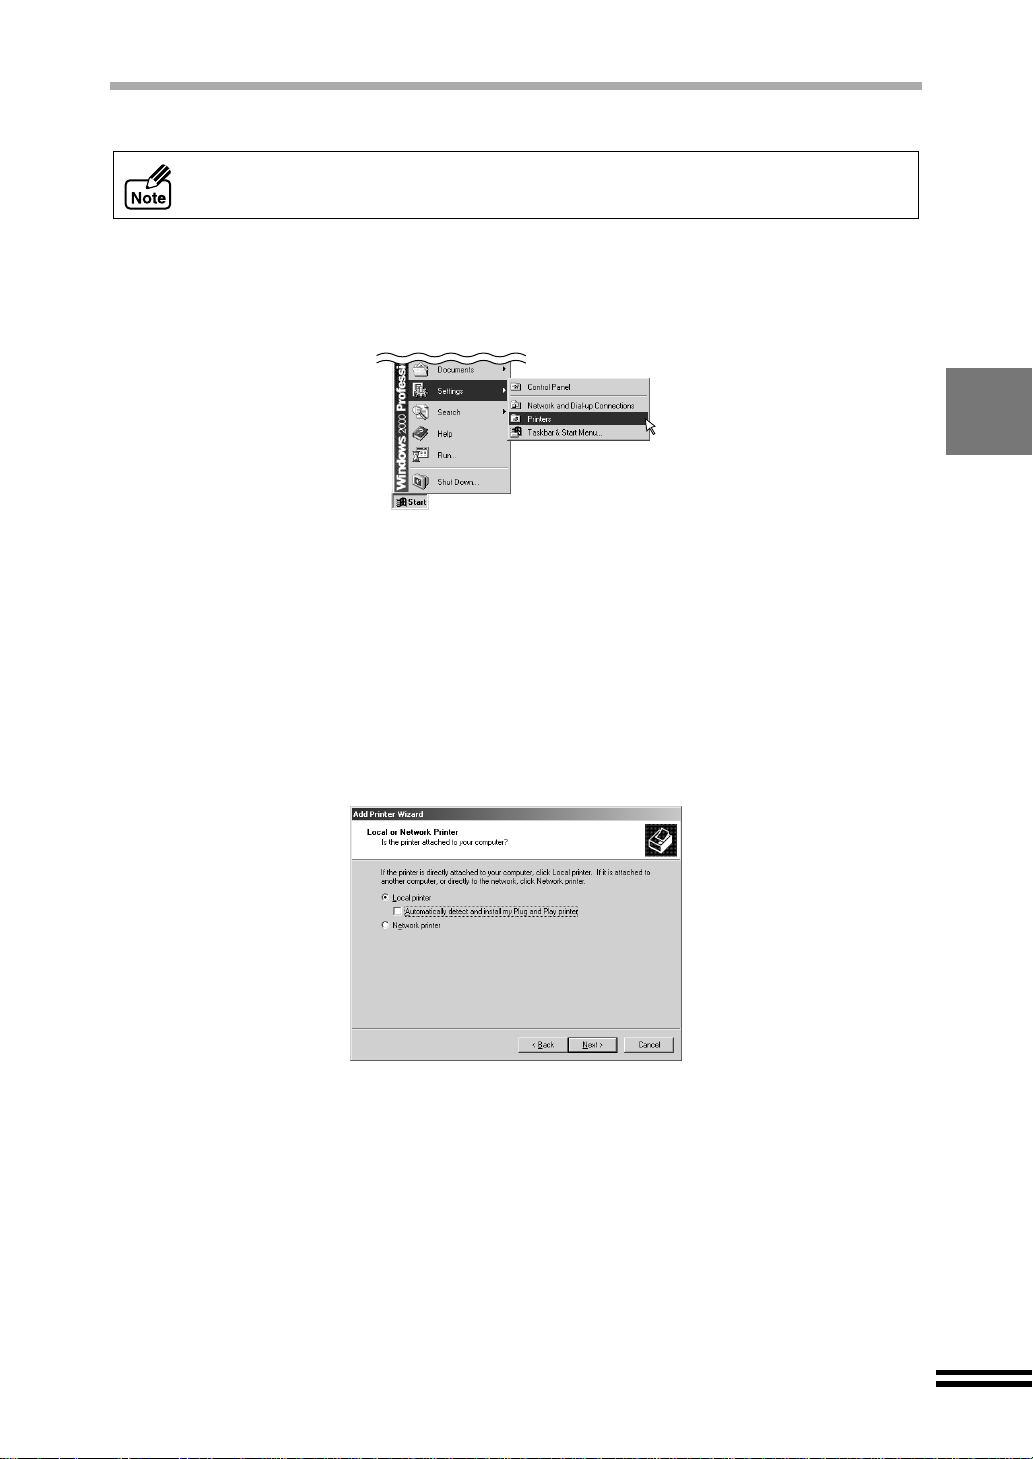
Click the "Start" button, select "Settings" and then click "Printers".
3
When the "Printers" window appears, double-click the "Add
4
Printer" icon.
On Windows 2000, "Welcome to the Add Printer Wizard" window
5
will appear. Click the "Next" button.
On Windows NT 4.0, the screen will not appear. Go on to the next step.
INSTALLING THE PRINTER DRIVER
Check the radio button for "Local printer", and click the "Next"
6
button.
On Windows NT 4.0, check "My Computer" and then click the "Next" button.
Refer to "Sharing Print er" in the Online M anual for the infor mation on how to use
this printer shared.
41
Page 44

INSTALLING THE PRINTER DRIVER
Select "SPRT", and click the "Next" button.
7
Click the "Have Disk" button.
8
Insert the supplied CD-ROM into your CD-ROM drive, type
9
"D:\DRIVERS\PRINTER\ENGLISH\WIN2000", and then click the
"OK" button.
On Windows NT 4.0, type "D:\DRIVERS\PRINTER\ENGLISH\WINNT40", and
then click the "OK" button.
(Change "D" to correspond to the letter of your CD-ROM drive.)
42
10
Select "SHARP AJ-6020", and then click the "Next" button.
Page 45

INSTALLING THE PRINTER DRIVER
11
12
13
14
15
Click the "Next" button.
If the program displ ays "Do you want your W indows-based programs to use this
printer as the default printer?", check "Yes".
Check the radio button for "Do not share this printer" and click
the "Next" button.
On Windows NT 4.0, check "Not shared", and click the "Next" button.
Refer to "Sharing Print er" in the Online M anual for the infor mation on how to use
this printer shared.
Check "Yes", and click the "Next" button.
On Windows NT 4.0, check "Yes", and click the "Finish" button.
You have completed the installation of the printer driver.
After confirming the message on the screen, click the "Finish"
button.
If "Digital Signature Not Found" window appears, click the
"Yes" button.
This window will not affect your operation.
You have completed the installation of the printer driver.
43
Page 46

HOW TO USE THE ONLINE MANUAL
The Online Manual provides you with information neces sary to operate this unit from your
computer including how to use the utility software, and how to setup the printer driver.
To access the Online Manual, your computer must have Acrobat Reader 4.0 or a later
version installe d. If it is not installed in your computer yet, instal l it referring to step 5 of
"INSTALLING THE AJ-6000 SERIES SOFTWARE". (See page 37)
If the Online Manual has already been installed in your computer
Follow the step s shown be low if you h ave alrea dy install ed the Onl ine Manual in step 5 o f
"INSTALLING THE AJ-6000 SERIES SOFTWARE".
Click the "Start" button. Select the "Online Manual" from the
1
"SHARP AJ-6000 Series".
Click the to read the Online Manual.
2
To close the Online Manual, click the button located at the top-right of the
window.
If the Online Manual has not been i nstalle d in your c omputer yet
Follow the steps shown below if you have not installed the Online Manual in step 5 of
"INSTALLING THE AJ-6000 SERIES SOFTWARE".
Insert the supplied CD-ROM into your CD-ROM drive.
1
Click the "Start" button, and select "Run".
2
Type "D:\SETUP", and then click the "OK" button.
3
(Change "D" to correspond to the letter of your CD-ROM drive.)
44
Check if the appropriate language has been selected, and then
4
click the "Next" button.
Normally, the correct language is selected automatically.
Click the "Display of online manual" button.
5
Click the to read the Online Manual.
6
To close the Online Manual, click the button located at the top-right of the
window.
! The Online Manual can be printed out using Acrobat Reader. SHARP
recommends printing out the sections which you refer to regularly.
! Refer to "Help" of Acrobat Reader for more details.
Page 47

HOW TO PRINT
Make sure that the paper of the desired size and type is loaded
1
in the tray.
Open the document you intend to print, and select "Print" from
2
the application's "File" menu.
Verify the "Printer Name" is set to "SHARP AJ-6020" and click
3
the "Properties" button.
Specify the print settings including the number of copies,
4
media type, and print quality, and then click the "OK" button to
start printing.
For more information on print settings, refer to the Online Manual.
BONUS SOFTWARE
PhotoSuite III SE
If you want to install this applicat ion onto you r computer, set the supplie d CD-ROM in yo ur
CD-ROM drive, and then follow the steps shown below.
Click the "Start" button, and select "Run".
1
Type "D:\MGI\PS3\SETUP.EXE", and then click the "OK" button.
2
(Change "D" to correspond to the letter of your CD-ROM drive.)
Follow the on-screen instructions to install PhotoSuite III SE.
To use PhotoSuite III SE, Internet Explorer 4.0 or a later version should be already
installed in your computer. Internet Explorer is automatically installed when
installing Sharpdesk. (See page 37)
45
Page 48
OPERATION PANEL
Check the names and function of the parts on the operation panel.
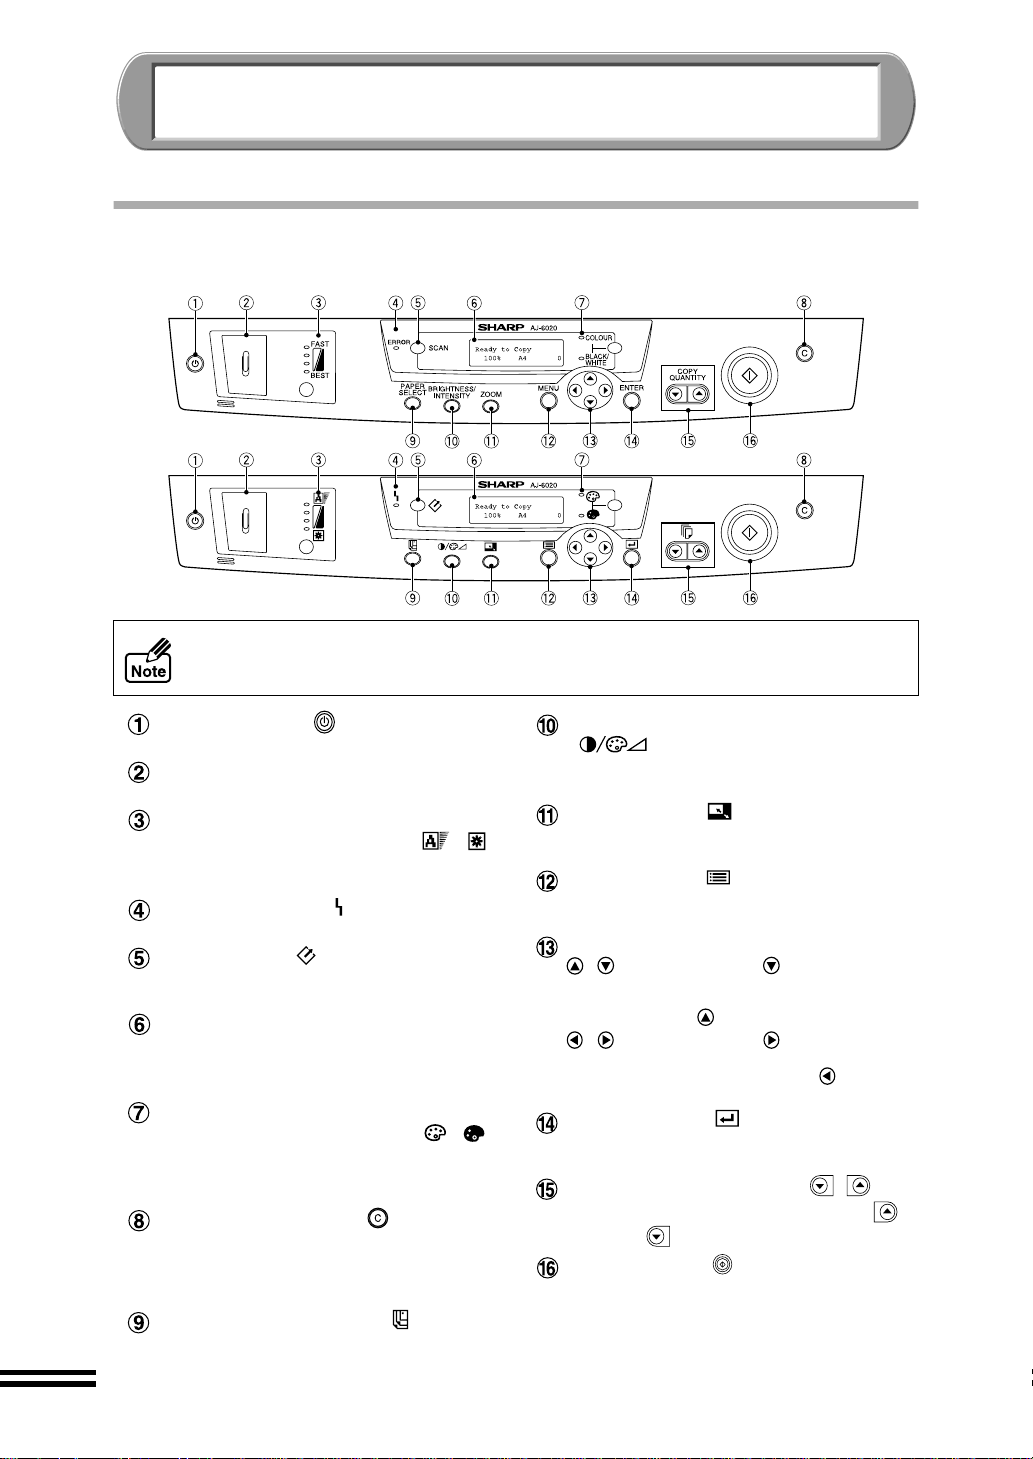
PART NAMES AND FUNCTIONS
Refer to the illustration of the operation panel on your unit.
POWER button ()
Use to turn the unit on/off. (See page 12)
Paper clip tray
Keep paper clips here.
COPY QUALITY button/
COPY QUALITY indicators (, )
Use this button to select the required copy
quality. (See page 55)
ERROR indicator ()
Lights up when an error occurs. (See page 78)
SCAN button ()
Use to switch the unit to the scanner mode.
(See page 69)
Display panel
Displays the status of the unit, setting
values and the selected number of copies.
(See the next page)
COLOUR MODE button/
COLOUR MODE indicators (, )
Use this button to select colour or black/
white. (will not be lit while in the scanner
mode.) (See page 55)
CLEAR/STOP button ()
Press this button to return the number of
copies to "0" or to cance l copying. Press th e
button twice to return the copy settings to
the user defaults. (See page 68)
PAPER SELECT button ()
Use to select the paper s ize and pape r type.
(See page 53, 54)
BRIGHTNESS/INTENSITY button
()
Use to set the brightn ess and intensity. (See
page 59)
ZOOM button ()
Use to adjust the reduction/enlargement
copy ratio setting. (See page 56)
MENU button ()
Use to change th e u se r pro gram s et ting s or
select maintenance programs.
ARROW button
, button Use the ( ) bu tton to scrol l
, button Use the ( ) bu tton to scrol l
forward through the copier
setting selection and the
( ) button to scroll back.
forward through the setting
values and the ( ) button
to scroll back.
ENTER button ()
Use this button to enter the selected value
for each setting.
COPY QUANTITY button (, )
Set the number of copies usi ng increase
()
decrease
buttons. (See page 55)
()
START button ()
Press to start copying. (See page 49) This
button is also used to reactivate the unit
from the sleep mode. (See page 65)
/
46
Page 49

BASIC FUNCTIONS AND DISPLAY PANEL
This unit can be used as a copier, a scanner, and a printer. The display panel shows
currently selected function. All the three functions are available when the display panel
shows the ready message.
Ready
Copy
Printer
Scanner
Ready to Copy
100% A4 0
Ready to Copy
100% A4 0
Copying
100% A4 0
Ready to Copy
100% A4 0
Printing
Ready to program
Ready to Copy
100% A4 0
Scanning
Ready to Copy
100% A4 0
Scan using:
1.ScanMenu 1
...
...
...
The ready message is displayed when
the unit is ready for use as a copier,
printer or scanner.
The unit will start copying when the
START button ( ) is pressed.
While the unit is copying, the unit cannot
be used as a printer or a scanner.
The unit will return to the ready state
after copying is complete.
When the unit receives a print job from
your computer it will start to print.
While the unit is printing, the unit cannot
be used as a copier or a scanner.
The unit will return to the ready state
after the print job is complete.
When the unit receives a scanning job
from your computer it will start to scan.
By pressing the SCAN button on the
unit, the display will change.
By pressing the START button ( ) on
the unit, scanning starts.
While scanning, the unit cannot be used
as a copier or a printer.
The unit will return to the ready state
after the scan job is complete.
Scanning
ScanMenu 1
...
! While the unit is printing, either a copying or scanning job can be sent to the unit.
In this case the unit will perform the copying or scanning job after the printing job
has been completed. (See page 70)
! When the uni t is con nec te d to a p ower o utl et, a pri nti ng o r sc an nin g j obs can be
sent to the unit at any time, even if the power switch is off.
! Neither a printi ng nor a scan ning jo b can be sent to th e unit from your com puter
during the specified period of program timeout after copying. (See page 64)
47
Page 50
HOW TO CHANGE SETTINGS FROM THE
OPERATION PANEL
You can change your copier setting s for "PAPER SELECT", "BRIGHT NESS/INTENSITY",
"ZOOM" and "MENU". T o change each set ting, press the relevant button on ce, and press
the or "ARROW" buttons until the de sir ed i tem na me app ear s on th e fi rst li ne in the
display panel. Use the or "ARROW" buttons to adjust the sett ing values disp layed
on the second line of the display panel. After selecting the desired setting, press the
"ENTER" button.
You can switch to different setting items by pressing "PAPER SELECT",
"BRIGHTNESS/INTENSITY", "ZOOM", or "MENU" buttons instead of using the
or "ARROW" buttons.
Example: Setting the "Paper Size"
1) Press the "PAPER SELECT" button.
Ready to Copy
100% A4 0
2) Press the or "ARROW" button s unti l the "Paper Size" setting i s dis play ed on the
first line of the display panel.
The "Paper Type" setting screen will switch to the "Paper Size" setting screen.
1.Paper Type
1.Plain Paper
Repeatedly press the or "ARROW" buttons until the desire d pape r size app ear s .
The value will be entered to the newly selected paper size by pressing the "ENTER"
button.
2.Paper Size
3.A4
Press "CLEAR/STOP" button ( ) to exit the setting mode without making an
entry.
1.Paper Type
1.Plain Paper
2.Paper Size
3.A4
2.Paper Size
4.A5
48
Page 51

MAKING COPIES
In this chapter, you will learn a variety of copying operations.
NORMAL COPYING
Make sure that the supplied power cord is plugged into a power
source. (See page 12) The unit will automatically turn on the power
when it is plugged into a power source. If the power cord is plugged
into a power source and the unit is still off, press the "POWER"
button ( ) to turn on the unit.
Make sure that
1
the power is on.
When the unit is turned on, the following messages and values will
appear on the display panel, and the unit will be enabled.
Warming up
100% A4 0
Ready to Copy
100% A4 0
...
Place the original.
2
Making selections
3
for copying.
If no changes are made
in this step, copies will be
made using the currently
set system defaults. (See
page 63)
Start copying.
4
! When using t he bypas s tray for co py ing , inser t onl y on e sh eet of paper at a tim e
and then pres s the "START" button ( ). The paper will be automatically fed into
the unit, and copying will start. You cannot make multiple copies using the
bypass tray. When using card stock type paper or thick paper for copying, set the
paper knob to ( ). (See page 21)
! To get better copy result, it is recommended to set the same size of copy papers
in the paper tray as the originals. When the paper size is different from the
original size, use the "Zoom" function to adjust the original image to the paper.
Refer to "ORIGINAL PLACEMENT". (See page 50)
To change the original type setting, refer to "How to set the
original type". (See page 53)
To change the paper type setting, refer to "How to set the paper
type". (See page 53)
To change the paper size setting, refer to "How to set the paper
size". (See page 54)
To set the copy quantity, refer to "How to set the copy quantity".
(See page 55)
To select colour or black/white copy, refer to "How to select colour
or black/white copy". (See page 55)
To select the copy quality, refer to "How to select the copy quality".
(See page 55)
To change the zoom setting, refer to "REDUCING/ENLAGING
THE IMAGE SIZE FOR COPYING". (See page 56)
To change the brightness setting, refer to "Setting brightness".
(See page 59)
To change the intensity setting, refer to "Setting intensity (Colour
copy mode only)". (See page 59)
To add an annotation, refer to "ADDING ANNOTATION TO
COPIES". (See page 60)
Press the "START" button ( ).
The unit will start copying.
49
Page 52

ORIGINAL PLACEMENT
Using the original table
Open the SPF, and place the original.
1
When placing the original, place the original face down on the original table against
the guides as shown in the illustration.
Align the corner of the original with the ( ) mark.
Place the original face down
on the original table.
50
Gently close the SPF.
2
The unit can read up to A4/8.5" x 11" original.
Page 53

Using the SPF (Single pass feeder)
! Be sure to only place originals that are within the size and weight limits.
Otherwise, original jams may result.
! Do not disconnect the SPF connection cable. If the SPF connection cable is
disconnected, it is impossible to use the SPF.
! Be sure to remove any clips or staples from orig inals before placing them .
! If originals of varying sizes are placed in the SPF, an original jam may occur.
! When using the SPF, the "AutoFit", "Poster", and "Repeat Image" settings
accessed through the "ZOOM" button are unavailable. (See page 56)
Originals placed in the SPF have copy priority over an original placed on the
original table.
Originals that can be placed
A maximum of 20 sheets can be placed in the SPF. The sheets must be loose and
all of the same size.
Original size and weights
Original size
ORIGINAL PLACEMENT
A5
Original weights (thickness)
2
60g/m
(16lbs.)
Originals that cannot be used
The following origin als cannot be us ed. Using these ori ginals will resul t in original
jams or smudging.
! OHP film, tracing paper, transpare nt or se mi-tr an sp arent or igi na ls
! Carbon paper
! Thermal paper
! Crumpled, folded or torn originals
! Originals with multiple wholes for filing
! Originals printed using an ink ribbon
! Glossy and slippery paper including photographic paper
Open the original guide wide enough to allow easy placing of
1
A4
(8.5" x 14")
2
90g/m
(24lbs.)
originals.
51
Page 54

ORIGINAL PLACEMENT
Place originals face down into SPF input tray and move the original
2
guide to touch the edge of originals.
Make sure that originals placed to the bottom of SPF input tray.
Copy side and order
Abra la extensión de la bandeja de
salidad SPF para colocar un original de
tamaño grande.
A4
1/2
8
Mueva la guía para tocar los
bordes de los originales.
Third original
Second original
First original
Set the originals face down.
Copy of the
first original
Copy of the
second
original
Copy of the
third
original
You will get the copies face up in
reserve order.
Caution on making multiple copies from the SPF
You cannot make multiple copies of some originals, for example a large sized high-resolution colour
images, from the SPF. If such originals are set on the SPF for a multiple copy job, the following
message appears.
Memory full, Press
Start to resume
52
Press the "START" button ( ) or "CLEAR/STOP" button ( ) to clear this message. Remove
the originals from the SPF, and then place them one sheet at a time on the original table, setting
the copy quantity to the desired number. Otherwise, set the whole set of originals in the SPF to
make a single copy, and repeat this process to make the desired set of copies.
Page 55
MAKING SELECTIONS FOR COPYING
To make selections, follow the steps below.
A "Default setting" used in this chapter means a factory default setting.
How to set the original type
Press the "MENU" button, and repeatedly press the or
1
"ARROW" buttons until the "Original Type" setting is displayed on
the first line of the display panel.
1.Original Type
1.Auto Exposure
Repeatedly press the or "ARROW" buttons to display the type
2
of original to be used on the second line of the display.
Select from "1. Auto Exposure" (Default setting), "2. Text/Graphics" or
"3. Photo/Halftone". If "1. Auto Exposure" is selected the machine will
automatically judge the original type.
Press the "ENTER" button.
3
A checkmark ( ) will appear, indicating the select ed type. After displaying the
selected value for one second, the display will return to the ready message.
1.Original Type
2.Text/Graphics
How to set the paper type
Press the "PAPER SELECT" button, and repeatedly press the or
1
"ARROW" buttons until the "Paper Type" setting is displayed on
the first line of the display panel.
1.Paper Type
1.Plain Paper
Repeatedly press the or "ARROW" buttons to display the
2
paper type to be used on the second line of the display.
The paper selections are listed below.
Paper type Description
1. Plain Paper
(Default setting)
2. Coated Paper Select this type when copying onto coated paper.
3. Photo Paper Select this type when copying onto photo quality paper.
4. Transparency Select this type when copying onto OHP paper.
5. Iron-on
6. Card Stock
Select this type when copying onto normal paper.
Select this type when copying onto T-shirt transfer paper.
Select this type when copying onto Cardstock paper.
53
Page 56
MAKING SELECTIONS FOR COPYING
Press the "ENTER" button.
3
A checkmark ( ) will appear, i ndicatin g the sel ected pape r type. After display ing
the selected value for one second, the display will return to the ready message.
1.Paper Type
2.Coated Paper
How to set the paper size
Press the "PAPER SELECT" button, and repeatedly press the or
1
"ARROW" buttons until the "Paper Size" setting is displayed on
the first line of the display panel.
2.Paper Size
3.A4
Repeatedly press the or "ARROW" buttons to display the
2
paper size to be used on the second line of the display.
Select from "1. 8.5x11", "2. 8.5x14", "3. A4" (Default setting), "4. A5" and
"5. B5".
Press the "ENTER" button.
3
A checkmark ( ) will appear, indicating the selected size. After displaying the
selected value for one second, the display will return to the ready message.
2.Paper Size
4.A5
When using the by pass tray for c opying, insert only one shee t of paper at a time
and then press the "START" button ( ). The paper will be automat ical ly fed into
the unit, and copying w ill s tart. You c ann ot m ak e mu lti pl e copi es usi ng th e b yp as s
tray. When using c ard stock type p aper or thick pa per for copying, s et the paper
knob to ( ). (See page 21)
54
Page 57

MAKING SELECTIONS FOR COPYING
How to set the copy quantity
A single copy can be made with the default setting, i.e., when "0" is displayed.
Use the ( ), ( ) "COPY QUANTITY" buttons to set the copy quantity.
Set the number of copies using the increase
( ) / decrease ( ) buttons.
Repeatedly pressing the buttons will increase/decrease
the display in increments of 1.
If either button is pressed and held down, the display will
change in increments of one until 5 is reached and then
will change in increments of 5. (Ex. 10. 15, 20 ...)
During Copying
During copying, t he copy quantit y display will decrease by 1 e ach time a copy is
made.
Example: If the number of copies is set to "2".
Copying
100% A4 2
...
Copying
100% A4 1
First page
completed
...
Ready to Copy
100% A4 2
Second page
completed
! To cancel a multiple copy job, press the "CLEAR/STOP" button ( ).
! You can se t the nu mber of copies up to 50. If yo u wan t to c hang e the num ber of
copies, press the "CLEAR/STOP" button ( ) and set the required number of
copies.
How to select colour or black/white copy
You can switch modes by pressing the "COLOUR MODE" button.
When the upper colour mode indicator is
illuminated, the unit will copy in multicolour.
When the lower indicator is illuminated, the
unit will copy in black and white. Default
setting is "COLOUR"
How to select the copy quality
Copy quality can be selected in four increments.
You can select the copy quali ty by pres si ng the "COPY QUALITY" button.
The selections allow you to trade off between
speed and image quality.
Default setting
Example: Moving the indicator upward increases
the speed but decreases the image quality.
! Some of the quality settings cannot be selected depending on the "Paper Type".
! To copy a m onochrome original with the "best" quality, the unit uses colour ink
even if in the "BLACK/WHITE MODE". To make a clear copy, use the "COLOUR
MODE".
55
Page 58

REDUCING/ENLARGING THE IMAGE SIZE FOR
COPYING
The image size can be reduced/enlarged for cop ying between 25% and 400%. Fu nctions
such as "Poster", "Repeat Image", and "Mirror" are available.
Press the "ZOOM" button, and then repeatedly press the or
1
"ARROW" buttons until the desired function is displayed.
5.Repeat Image
100% - +
The default settings of reducing/enlarging operation are shown below.
Zoom function Default Description
1. Variable (Default setting) 100%
2. Zoom *91%
Displays the paper size currently selected.
3. AutoFit
4. Poster
5. Repeat Image 100% Copies multiple pages onto a single page.
6. Mirror 100% Copies the original as mirror image.
7. Custom 50%
8. A4 to A5 (AB type) *70%
9. B5 to A5 (AB type) *81%
10. B5 to A4 (AB type) *115%
11. A5 to A4 (AB type) *141%
8. Zoom (Inches) *64%
9. Zoom (Inches) *78%
10. 95 percent (Inches) *95%
11. 5.5x8.5 to 8.5x11 (Inches) *129%
12. Double Size *200% Doubles both the length and width.
*When these value s are c ha nge d us ing the or "ARROW" button s, the setti ng n ame
will be changed to "Variable".
400%
(Reduces/enlarges the size of the output image
to fit the printable area of the paper loaded in
the unit.)
Enlarges the size of the image for printing onto
multiple pages. (See next page)
These values are available when A4 sized
paper is selected as default. (See page 65)
These values are available when 8.5" x 11" sized
paper is selected as default. (See page 65)
56
! Reduction/enlargement copy ratios cannot be specified when "AutoFit" is
selected.
! The "Poster" setting is unavailable when copying from the bypass tray.
Page 59
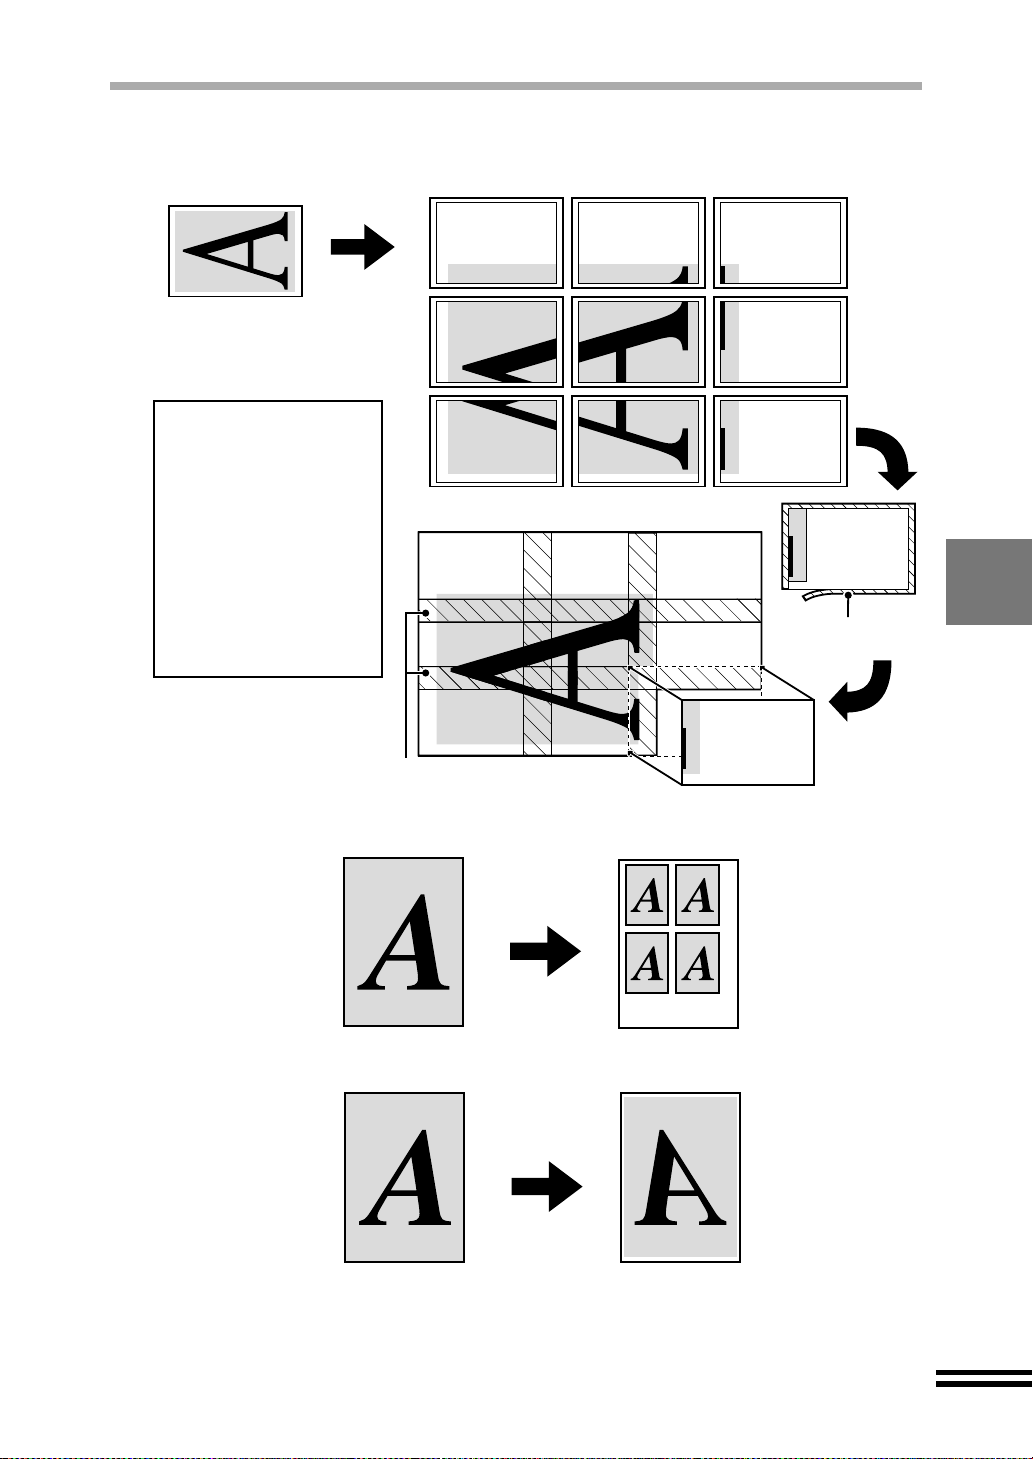
Example:"Poster" setting
For this
Original
In the example, the
printable area of the
original image is enlarged
by 200%. The machine will
automatically determine
the required number of
copy sheets required to
contain the composite
image. To assemble the
sheets to make the final
poster, it will be necessary
to trim the edges of the
paper.
example the
enlargement is
set to 200%.
REDUCING/ENLARGING THE IMAGE SIZE FOR COPYING
Copy
Trim the margin
area.
Overlap area
Example:"Repeat Image" setting
Original
Example:"Mirror" setting
Connect
all the
pages.
Copy
CopyOriginal
57
Page 60

REDUCING/ENLARGING THE IMAGE SIZE FOR COPYING
To change the reduction/enlargement ratio, repeatedly press the
2
or "ARROW" buttons, and set the reduction/enlargement ratio to
the desired setting (25% to 400%).
5.Repeat Image
30% - +
Press the "ENTER" button.
3
A checkmark ( ) will appear, indicating the sel ected value. After displ aying the
selected value for one second, the display will return to the ready message.
5.Repeat Image
30% - +
Ready to Copy
R 30% A4 0
To make quick zoom ratio adjustments
Press the "ZOOM" button, and then repeatedly press the or
1
"ARROW" buttons until the preset ratio which is near to the desired
value is displayed.
Repeatedly press the or "ARROW" buttons to reduce/enlarge
2
the zoom ratio to the desired value.
58
Page 61

BRIGHTNESS AND INTENSITY SELECTIONS
Setting brightness
Follow the steps shown below to make the image lighter or darker.
Press the "BRIGHTNESS/INTENSITY" button and repeatedly press
1
the or "ARROW" buttons until "Brightness" is shown on the
first line of the display panel.
1.Brightness
3.Normal
Repeatedly press the or "ARROW" buttons until the desired
2
setting value is displayed on the second line of the display panel.
Select from "1. Lightest", "2. Lighter", "3. Normal" (Default setting), "4. Darker"
and "5. Darkest".
Press the "ENTER" button.
3
A checkmark ( ) will appear, indicating the sel ected value. After displ aying the
selected value for one second, the display will return to the ready message.
1.Brightness
4.Darker
Setting intensity (Colour copy mode only)
Follow the steps shown below to adjust the intensity of the image.
Press the "BRIGHTNESS/INTENSITY" button, and repeatedly press
1
the or "ARROW" buttons until "Intensity" is shown on the
first line of the display panel.
2.Intensity
3.Normal
Repeatedly press the or "ARROW" buttons until the desired
2
setting value is displayed on the second line of the display panel.
Select from "1. Least Colour", "2. Less Colour", "3. Normal" (Default setting),
"4. More Colour" and "5. Most Colour".
Press the "ENTER" button.
3
A checkmark ( ) will appear, indicating the sel ected value. After displ aying the
selected value for one second, the display will return to the ready message.
2.Intensity
4.More Colour
59
Page 62

ADDING ANNOTATION TO COPIES
The annotation fe ature allows the placement of on e of three annotations on copies . The
annotation can be placed in any one of six positions on the copy. If "1. None" (default
setting) is selected, no annotation will appear on the copy.
Selecting the print pattern
Select an annotation for your document.
Press the "MENU" button, and repeatedly press the or
1
"ARROW" buttons until "Annotation" is shown on the first line of
the display panel.
11.Annotation
1.Print Pattern
Repeatedly press the or "ARROW" buttons until "Print
2
Pattern" is shown on the second line of the display panel.
Press the "ENTER" button.
3
1.Print Pattern
1.None
Repeatedly press the or "ARROW" buttons until the desired
4
setting value is displayed on the second line of the display panel.
Select from "1. None" (Default setting), "2. Confidential", "3. Draft" and
"4. Urgent".
Press the "ENTER" button.
5
1.Print Pattern
2.Confidential
A checkmark ( ) will appear , indicatin g the selected anno tation. After d isplaying
the selected value for one second, the display will return to the ready message.
Unless you change the print position from the factory default setting, the
annotation will be print ed at the top right of the paper. For information on setting
the print position, refer to "Selecting the print position". (See the next page)
! The size of the annotation characters cannot be changed.
! The size of the annotation is not changed even if you reduce or enlarge the copy
image by "Zoom" function.
60
Page 63

Selecting the print position
Select a print position for the annotation.
Press the "MENU" button, and repeatedly press the or
1
"ARROW" buttons until "Annotation" is shown on the first line of
the display panel.
11.Annotation
1.Print Pattern
Repeatedly press the or "ARROW" buttons until "Print Position"
2
is shown on the second line of the display panel.
Press the "ENTER" button.
3
2.Print Position
1.Top/Right
Repeatedly press the or "ARROW" buttons until the desired
4
position name appears on the second line of the display panel.
ADDING ANNOTATION TO COPIES
Select from "1. Top/Right" (Default setting), "2. Top/Centre", "3. Top/Left",
"4. Bottom/Right", "5. Bottom/Centre" and "6. Bottom/Left".
Press the "ENTER" button.
5
2.Print Position
5.Bottom/Centre
A checkmark ( ) will appear, indicating the selected position. After displaying the
selected value for one second, the display will return to the ready message.
! The desired annotation will appear on your copy output when "Annotation" is
enabled. To make copies without the annotation it is necessary to select "1.
None" for the "Print Pattern" setting.
! If you select "4. Bottom/Right", "5. Bottom/Centre" or "6. Bottom/Left" for the
"Print Position" when making reduced copy, the annotation is placed off the
normal position. In this case, the copy result from the SPF is a little different from
the result from the original table.
61
Page 64
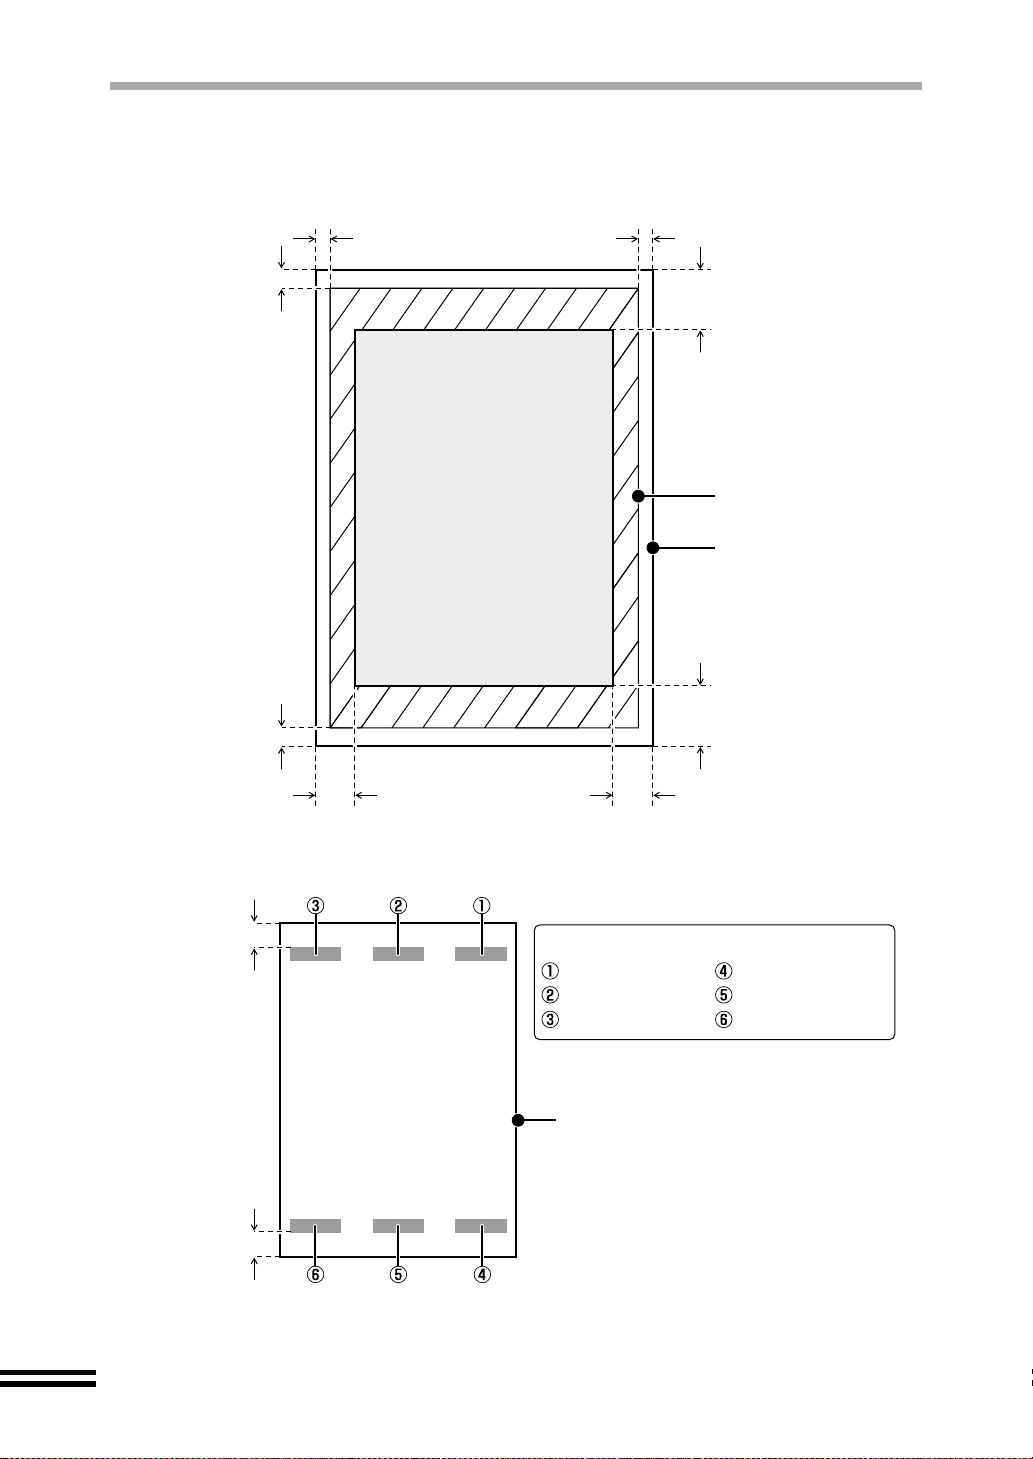
ADDING ANNOTATION TO COPIES
Guaranteed area and printable area
This unit can copy onto the following area of the paper. To make a clear copy, it is
recommended to fit the original image within the quality guaranteed area.
3mm 3mm
3mm
19mm
Quality guaranteed area
3mm
The print position of the annotation
14mm
The print position of each value
10mm10mm
1.Top/Right
2.Top/Centre
3.Top/Left
Printable area
Paper size
19mm
4.Bottom/Right
5.Bottom/Centre
6.Bottom/Left
62
Paper size
14mm
Page 65

FUNCTIONS SET BY THE USER
Depending on your particular needs, you can save regularly used settings, and change the
functions of this unit.
SAVING THE USER DEFAULT SETTINGS
You can save the current settings on the unit as user default settings. Follow the steps shown
below.
You can save the fo llowing settings as user defau lt settings; "Paper Type", "Pa per Size",
"Colour Mode", "Copy Quality", "Brightness", "Intensity", "Zoom" and "Original Type". These
settings will remain even after once the power is turned off.
Press the "MENU" button, and repeatedly press the or
1
"ARROW" buttons until "Feature Defaults" is shown on the first
line of the display panel.
4.Feature Defaults
1.Save new
Repeatedly press the or "ARROW" buttons until "Save
2
New" is shown on the second line of the display panel.
Press the "ENTER" button.
3
The current settings will be saved as the user default settings. The following
message will appear for one second after the "ENTER" but ton is pr esse d. Th e un it
will soon return to the ready state.
Saving new default
settings
! If you do not sav e the des ired setti ngs by "S ave new", th e prev ious settin gs set
as defaults will remain in effect.
! The following settings are saved each time they are specified, and cannot return
to the default settings unless you run the Reset Factory function;
"Program Timeout", "Sleep Mode", "Paper Default" and "Language".
...
63
Page 66
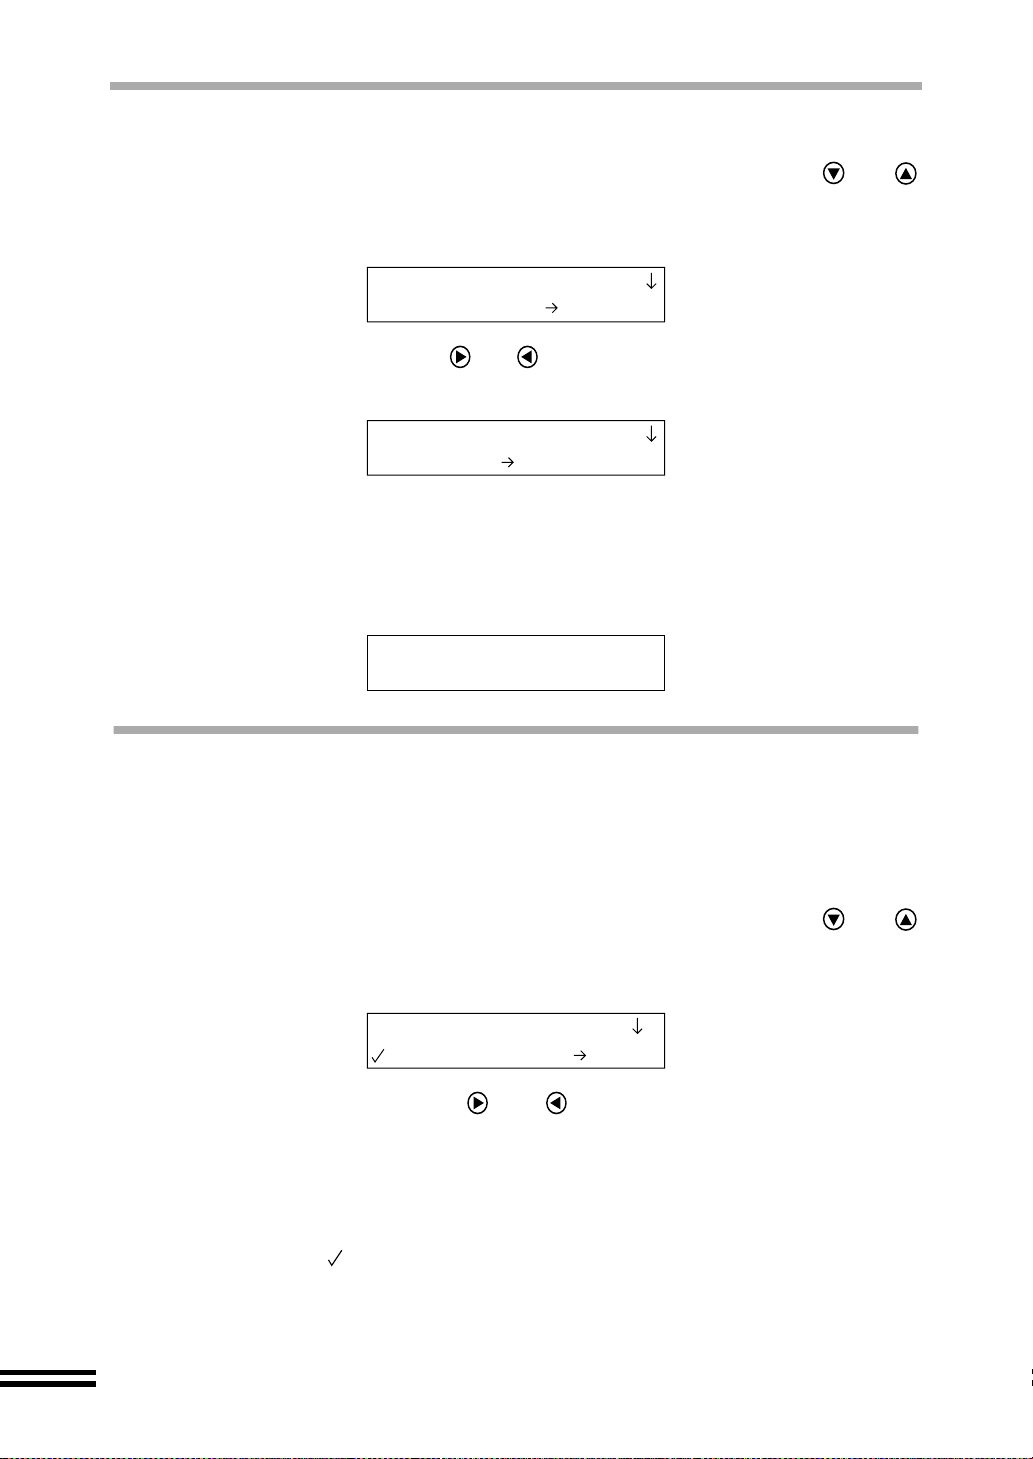
RESETTING THE USER DEFAULT SETTINGS
Press the "MENU" button, and repeatedly press the or
1
"ARROW" buttons until "Feature Defaults" is shown on the first
line of the display panel.
4.Feature Defaults
1.Save new
Repeatedly press the or "ARROW" bu ttons until "Reset"
2
is shown on the second line of the display panel.
4.Feature Defaults
2.Reset
Press the "ENTER" button.
3
The settings saved as the user default settings will return to the values of the
factory default setting.
The following mes sage will appear for one se cond after the "ENTER" bu tton is
pressed. The unit will soon return to the ready state.
Resetting feature
defaults
...
PROGRAM TIMEOUT
The following settings will return to the user default settings a specified time out period after
the last copying operation; "Paper Type", "Paper Size", "Colour Mode", "Copy Quality",
"Brightness", "Inte nsity", "Zo om" and "Origi nal Type". Fol low the steps shown belo w to set
the timeout period.
Press the "MENU" button, and repeatedly press the or
1
"ARROW" buttons until "Program Timeout" is shown on the
first line of the display panel.
5.Program Timeout
1.60 seconds
Repeatedly press the or "ARROW" buttons until the
2
desired value appears on the second line of the display panel.
Select from "1. 60 seconds" (Default setting), "2. 90 seconds", "3. 30 seconds",
"4. 15 seconds" and "5. None".
Press the "ENTER" button.
3
A checkmark ( ) will be added to show the selec ted setting. After dis playing the
selected value for one second, the display will return to the ready message.
64
Page 67
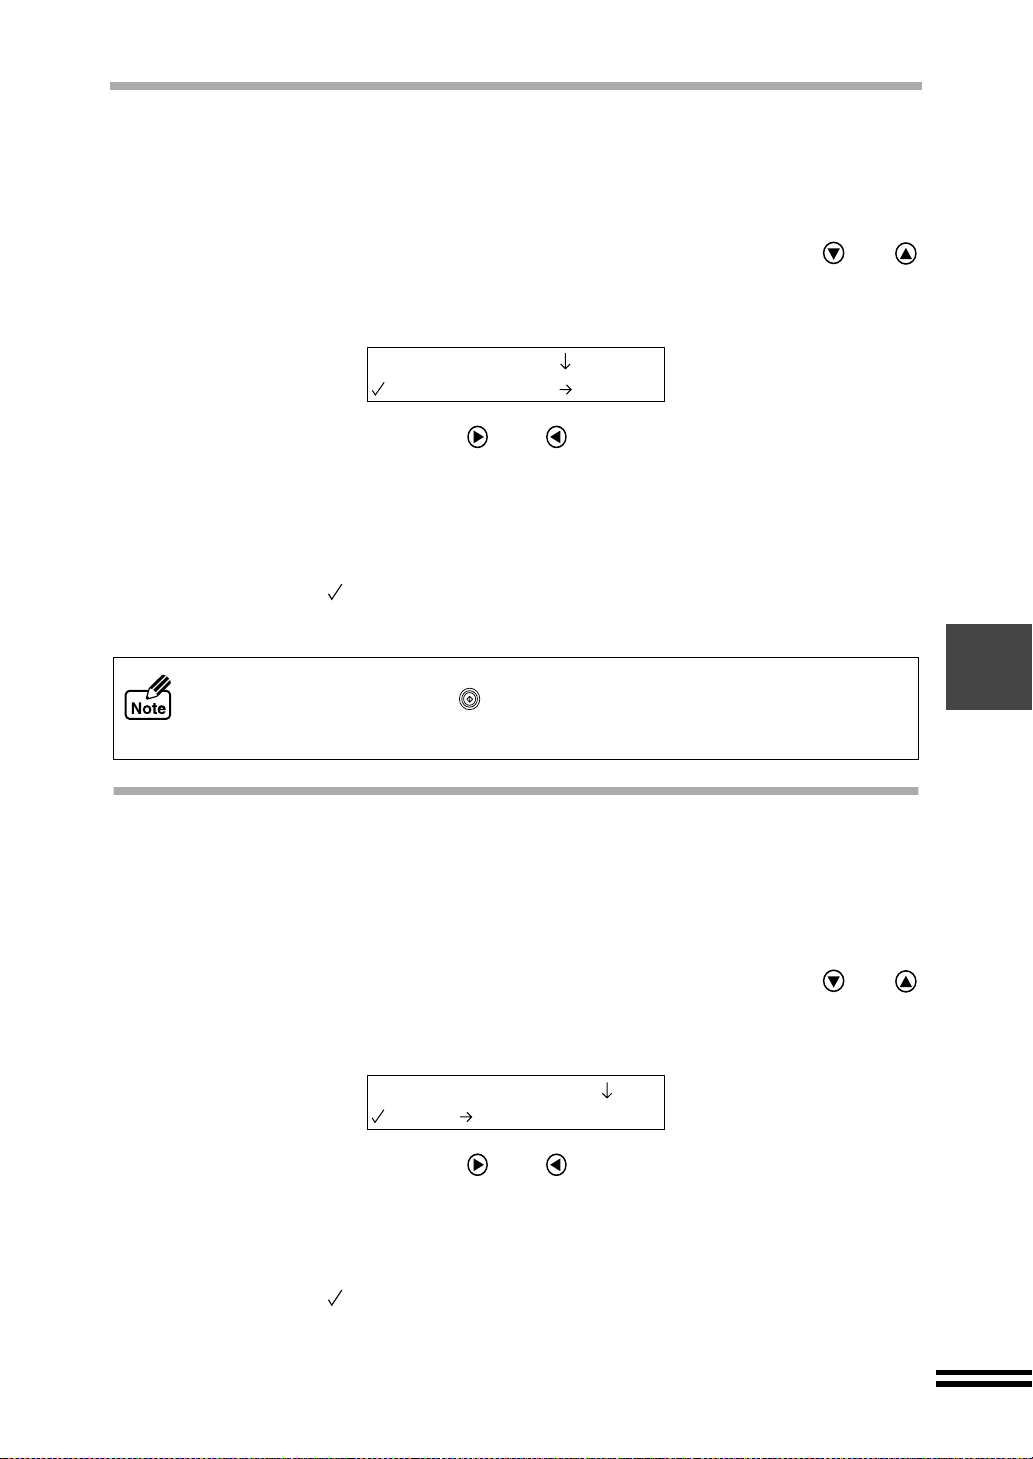
SLEEP MODE
When the unit is left idle for a specified p eriod of time, i t will automatic ally enter the sleep
mode to save energy . Follow the steps below to set the tim e to elapse before the sleep
mode is entered.
Press the "MENU" button, and repeatedly press the or
1
"ARROW" buttons until "Sleep Mode" is shown on the first line
of the display panel.
6.Sleep Mode
1.5 minutes
Repeatedly press the or "ARROW" buttons until the
2
desired value appears on the second line of the display panel.
Select from "1. 5 minut es" (Default setting), "2. 10 minutes", "3. 15 minutes"
and "4. None".
Press the "ENTER" button.
3
A checkmark ( ) will be added to show the selec ted setting. After dis playing the
selected value for one second, the display will return to the ready message.
To make the unit ready from the sleep mode...
Press the "START" button ( ). The unit will also return to the ready state
automatically when y ou initiate a scan or print job from your com puter, open the
front cover, place the original in the SPF, or set paper on the bypass tray.
CHANGING THE PAPER DEFAULT SETTING
Use this function to change the default s etting for paper. The r eduction/enlargement copy
ratio settings will also be changed aut omatically. Refer to "REDUCING/ENLARGING THE
IMAGE SIZE FOR COPYING" for more in formation on mak ing changes to thes e settings.
(See page 56) Follow the steps listed below to change the paper default setting.
Press the "MENU" button, and repeatedly press the or
1
"ARROW" button until "Paper Default" is shown on the first line
of the display panel.
7.Paper Default
2.A4
Repeatedly press the or "ARROW" buttons until the
2
desired value appears on the second line of the display panel.
Select from "1. 8.5x11" and "2. A4" (Default setting) setting values.
Press the "ENTER" button.
3
A checkmark ( ) will be added to show the selec ted setting. After dis playing the
selected value for one second, the display will return to the ready message.
65
Page 68
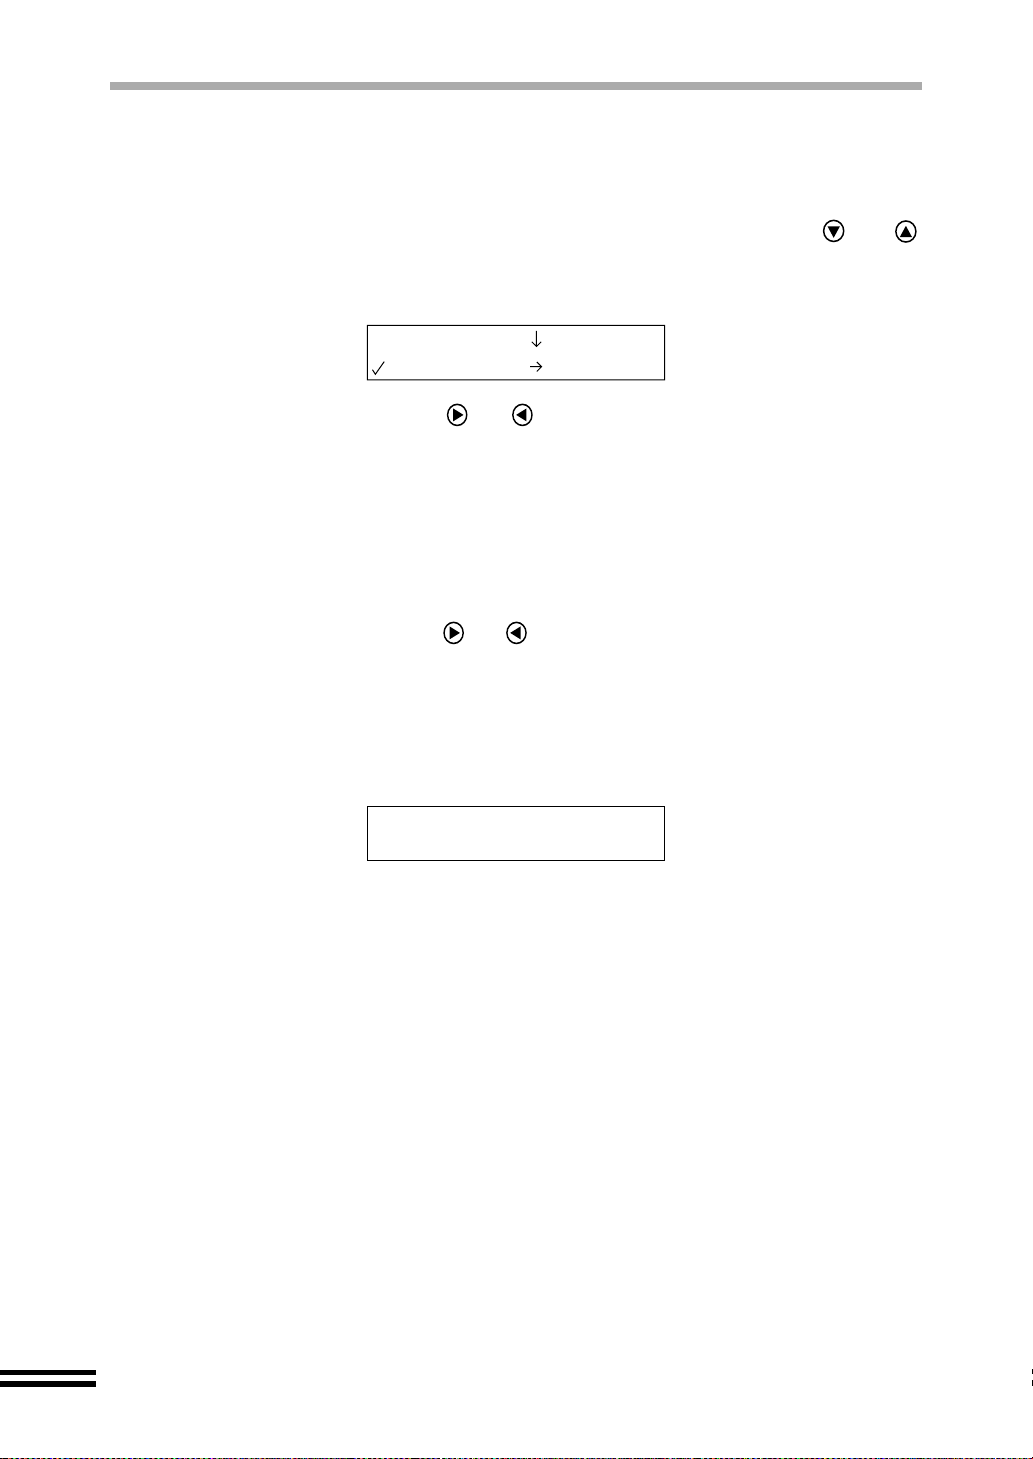
CHANGING THE LANGUAGE SETTING
Use this function to change the language shown in the display panel. Follow the steps
shown below to change the language setting.
Press the "MENU" button, and repeatedly press the or
1
"ARROW" buttons until "Language" is shown on the first line of
the display panel.
9.Language
2.English
Repeatedly press the or "ARROW" butt ons until it shows
2
the desired language setting on the second line of the display
panel.
Select from "1. American English", "2. English" (Default setting),
"3. Français", "4. Español", " 5. Italiano", "6. Deutsch", "7. Nederlands", and
"8. Svenska".
Press the "ENTER" button.
3
Repeatedly press the or "ARROW" buttons to display
4
"2. Yes" or "1. No" on the second line of the display panel.
Press the "ENTER" button.
5
When you select "2. Yes ", the follo wing mess age will ap pear on the disp lay pa nel
to inform you that the unit is updating the display language. The unit will
automatically return to the ready state.
Updating display
language
If "1. No" was sel ected in step 4 th e display will im mediately return t o the ready
message.
...
66
Page 69

RESETTING ALL SETTING VALUES TO THE
FACTORY DEFAULT VALUES
This function will return all current settings and the user defaults to the factory default
settings. Follow the steps shown be low to retur n all c hanged se ttings t o the fact ory defa ult
settings.
Press the "MENU" button, and repeatedly press the or
1
"ARROW" buttons until "Reset Factory" is shown on the first
line of the display panel.
8.Reset Factory
Press the "ENTER" button.
2
Repeatedly press the or "ARROW" button to display
3
"2. Yes" or "1. No" on the second line of the display panel.
Press the "ENTER" button.
4
When selecting "2. Yes", the following message will appear on the display panel to
inform you that all the setting valu es will return to their factory defaults. Th e unit
will automatically return to the ready state.
Resetting Factory
Defaults
...
If "1. No" was sel ected in step 3 th e display will im mediately return t o the ready
message.
67
Page 70

HOW TO USE THE "CLEAR/STOP" BUTTON
"CLEAR/STOP" button functions
Operation Function
Clears the number
of copies setting
Clears setting
Press once
Press Twice
Clears setting in the
scanning mode
Stops copying
Resets after an error
Clears reserved jobs
Clears all setting
values
Function
Display Description
Example:
Ready to Copy
100% A4 10
Ready to Copy
100% A4 0
Example:
2.Paper Size
3.A4
Ready to Copy
100% A4 0
Example:
Scan using:
5.ScanMenu 5
Ready to Copy
100% A4 0
Example:
Copying
...
100% A4 10
Ready to Copy
100% A4 10
Cancels an error message and resets the machine to the ready
state after an error has been remedied.
Example:
Printing
...
Waiting to copy
Printing
...
Ready to program
Returns the settings to the user default settings. (When the user
settings have not been entered, the settings will be returned to
the factory default settings.)
Returns the number of copies to
"0" when number of copies set is
more than "0".
During selection of a setting,
returns to the ready message.
Returns to the ready state from
the scan selection.
Stops a copy job in progress.
Restart copying by pressing the
START button ( ).
Clears any reserved jobs while in
progress or warming-up.
68
Page 71
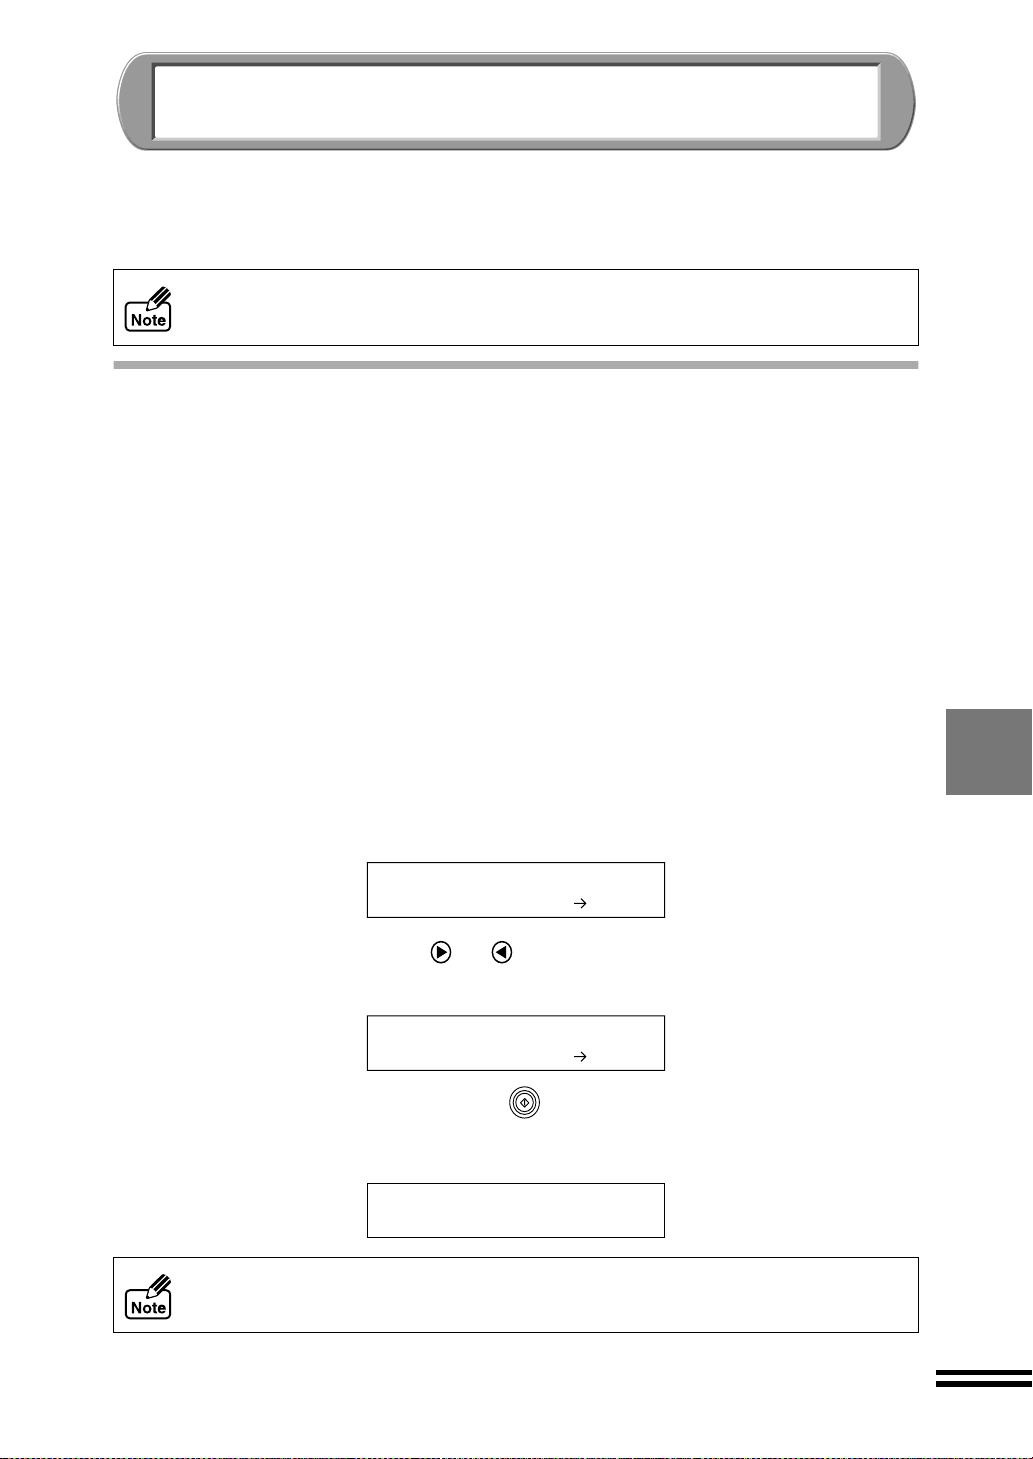
USING THIS UNIT WITH YOUR C OMPUTER
This unit can be used as a scanne r or colour printer when connected to your computer.
When using the unit as a scanner or printer, ensure it is correctly connected to your
computer, and inst all the software contained on the CD-ROM, which is included with the
unit. (See page 25)
If an error message appe ars on your compute r screen, or in the dis play panel of
the unit while using the scanner or printer function, refer to "CANCELLING AN
ERROR MESSAGE" (See page 78) or "Troubleshooting" in the Online Manual.
USING THE SCANNER MODE
This unit can be used as a scanne r after installing the SHARP TWAIN driver onto yo ur
computer. Refer to "Scanning" in the Online Man ual for informat ion on using th e unit as a
scanner.
Place originals for scan ning in the sa me way as f or copyin g. Press the "SCAN" button on
the unit to start up the application software for scanning.
The unit possesses five different scan menus, with five corresponding types of application
software. Refer to "Button Manager" in the Online Manual, for information on the types of
application software available. To acquire the scanned image into Microsoft Word on your
computer press the
is set as the default setting.
"SCAN"
button and follow the steps below. Make sure that "5. ScanMenu 5"
Place the original on the original table (See page 50) or the SPF.
1
(See page 51)
Press the "SCAN" button.
2
The unit will switch from the copy mode to the scan mode with the following
message.
Scan using:
1.ScanMenu 1
Repeatedly press the or "ARROW" buttons until
3
"ScanMenu 5" is displayed on the second line of the display panel.
Scan using:
5.ScanMenu 5
Press the "START" button ( ).
4
The message shown below will appear in the display panel, and scanning will
start. The scanned image will be pasted on the document of "Microsoft word".
Scanning
...
ScanMenu 5
To cancel a scanning job, press the "Esc" key on your keyboard.
69
Page 72

USING THE PRINTER MODE
The unit can be used as a printer after installing the printer driver onto your computer. Refer
to "Print" in the Online Manual for information on using the unit as a printer. Load paper into
the unit for printing in the same way as for copying.
RESERVING COPY AND SCAN JOBS
Reserving a copy job
While the unit is printing, make copy settings, and press the "START" button ( ) to
reserve the job. After printing is completed, copying will start. The messages will change as
below.
Printing
...
Ready to program
Printing
...
Waiting to Copy
Make the copy settings and press the START button
( ) to reserve the job.
After printing is completed, copying will start.
Reserving a scan job
While the unit is printing, make the scan setting using the "SCAN" button, and press the
"START" button ( ) to reserve the job, after printing is completed, scanning will start.
Printing
...
Ready to program
Printing
...
Waiting to Scan
You cannot send a copy or scan job while printing from the bypass tray.
Make the scan settings, and press the START button
( ) to reserve the job.
After printing is completed, scanning will start.
70
Page 73

USER MAINTENANCE
This chapter provides you with maintenance information. Follow the steps to change the ink
tanks or print heads and to clean or align the print heads by entering control panel
commands. The level of ink remaining for each ink tank can also be determined.
When the unit is c onnec ted to a com puter, the main tena nce com mands can be m ade from
the computer. See "Maintenance" section on the Online Manual for details.
THE INK TANK
Changing the ink tank
When a message appear s on the contr ol panel infor ming that the ink is low in an ink ta nk,
copying can be continu ed, but it is recommended that the tank be repla ced as soon as
possible. When the "ERROR" indicator lights and the message "Unable to Copy" is
displayed, the designated ink tank must be replaced.
Make sure that the power is on.
1
Open the front cover. (See page 13)
2
Open the maintenance cover. (See page 14)
3
Remove the old ink tank.
4
Press the tab to release the ink tank and remove the tank.
Press this tab.
Example: Releasing the yellow ink tank
Unpack a new ink tank from its protective wrapping and slowly
5
remove the tape. (See page 15)
Insert the new ink tank. (See page 15)
6
Close the maintenance cover. (See page 16)
7
Close the front cover. (See page 16)
8
71
Page 74

THE INK TANK
Make sure that the display panel shows the following message.
9
If all the ink tanks have been replaced...
The unit automatically cleans both of the print heads.
If the black ink tank has been replaced...
Repeatedly press or "ARROW" buttons to di splay "1. No" on the second
line and press the "ENTER" button. The unit will clean the black print head.
Cleaning the Print
Head
...
New colour ink?
1.No
If a colour ink tank has been replaced...
Repeatedly press or "ARROW" buttons to di splay "1. No" on the second
line and press the "ENTER" button. The unit will clean the colour print head.
New black ink?
1.No
If the front cover is opened and then closed without replacing any ink tank...
Repeatedly press or "ARROW" buttons to di splay "1. No" on the second
line and press the "ENTER" button. The unit will not clean the print head and
return to the ready state.
New ink cartridge?
1.No
If a message appears warni ng y ou that a n in k ta nk is not i nst all ed corr ectly , r etu rn
to step 2 and follow the procedures again.
Cleaning the Print
Head
...
Cleaning the Print
Head
...
Ready to Copy
100% A4 0
Checking the level of remaining ink
To check the level of remaining ink, follow the steps below.
Press the "MENU" button, and repeatedly press the or
1
"ARROW" buttons until "Ink Levels" is displayed on the first
line of the display panel.
72
2.Ink Levels
1.Black 100%
Repeatedly press the or "ARROW" buttons until the ink
2
you want to check is shown on the second line of the display
panel.
Select from "1. Blac k", "2. Cyan", "3. Magenta" and "4. Y ellow". The ink ta nk
you selected will be displayed.
2.Ink Levels
4.Yellow 65%
Page 75

THE PRINT HEAD
Clean the print head
If the test page or copies are faint or uneven, first make sure that you are copying on the correct
side of the paper, and the ink levels are sufficient. If these items are OK, follow the steps below
to clean the print heads.
For print head cle aning, four quality le vels are available. Chec k the copy result, and then
select the most suitable value.
Press the "MENU" button, and repeatedly press the or
1
"ARROW" button until "Maintenance" is displayed on the first
line of the display panel.
From the chart below, select the condition which best describes
2
the copies being produced. Then repeatedly press the or
"ARROW" buttons until the selected number appears on the
second line of the display panel.
Condition of print result Setting values for print head cleaning
Faint or blurred image when printing
after a long period of no use, or even
after cleaning the print head with the
values of "Clean PrintHead 2-4".
Slightly faint or blurred image 2.Clean PrintHead 2
Faint or blurred image 3.Clean PrintHead 3
Conspicuously faint or blurred image 4.Clean PrintHead 4
1.Clean PrintHead 1
3.Maintenance
2.Clean PrintHead2
Press the "ENTER" button.
3
The message show n below will appear in th e display panel, and cl eaning of the
print head will start. After finis hin g the c lea nin g ope ratio n, the uni t wil l retur n to the
ready state.
Cleaning the Print
Head
...
If cleaning was done by the "Clean PrintHead 1" selection , no
4
test page will be printed. For the other selections, a test page
will automatically be printed after cleaning.
For details refer to "PRINTING A TEST PAGE". (See page 76)
Do not clean the print head mor e than five times. Excessi ve cleaning of the print
head wastes ink. If you ca nnot get a good result a fter cleani ng the p rint head five
times, change the print head. (See the next page)
73
Page 76

THE PRINT HEAD
Changing the print head
Even after cleaning a nd aligning the print head, if c opy quality remains poor , you have to
change the print head. Follow the steps below to change the print head.
Make sure that the power is on.
1
Open the front cover. (See page 13)
2
Open the maintenance cover. (See page 14)
3
Raise the print head latch. (See page 14)
4
Remove the old black or colour print head with the ink tank still
5
inserted.
lift it straight up to remove.
6
7
8
9
10
11
Remove the new print head from its protective case. (See page 14)
Insert the new print head. (See page 14)
Lower the print head latch. (See page 15)
Remove the ink tank(s) from the old print head (See page 71) and
insert them into the newly inserted print head (See page 15).
Close the maintenance cover. (See page 16)
Close the front cover. (See page 16)
If a message appears warning you that any of the ink tanks are not installed
correctly, return to step 2 and follow the procedures again.
74
Page 77

THE PRINT HEAD
12
Repeatedly press or "ARROW" buttons to display "1. Yes"
or "2. No" on the second line of the display panel, and press the
"ENTER" button.
If all the print heads have been
replaced...
New Black head?
1.Yes
Select "Yes".
New Colour head?
1.Yes
Select "Yes".
Cleaning the Print
Head
...
Printing
Alignment Patterns
After cleaning all the print heads, the unit
will begin to print the alignment patterns
for print head alignment. Align the print
heads after that. (See page 17)
...
If only the black print head has
been replaced...
New Black head?
1.Yes
Select "Yes".
New Colour head?
2.No
Select "No".
New colour ink?
1.No
Select "No".
Cleaning the Print
Head
...
Printing
Alignment Patterns
After cleaning the black print head, the
unit will begin to print the alignment
patterns for print head alignment. Align
the print head after that. (See page 17)
...
If only the colour print head has
been replaced...
If the print head latch is moved up
and down without replacing any
print head or ink tanks...
New Black head?
2.No
Select "No".
New Colour head?
1.Yes
Select "Yes".
New black ink?
1.No
Select "No".
Cleaning the Print
Head
...
Printing
Alignment Patterns
...
After cleaning the colour print head, the
unit will begin to print the alignment
patterns for print head alignment. Align
the print head after that. (See page 17)
Be sure to align the print head when you move the print head latch. Whenever you
raise or lower the pri nt head latch, th e alig nment of the print h eads chang es slightly .
New Black head?
2.No
Select "No".
New Colour head?
2.No
Select "No".
New ink cartridge?
1.No
Select "No".
Run alignment?
1.Yes
Select "Yes".
Printing
Alignment Patterns
...
The unit will begin to print the alignment
patterns for print head alignment. Align
the print heads after that.
(See page 17)
13
Print a test page to check copy quality. (See the next page)
75
Page 78

PRINTING A TEST PAGE
After changing an ink tank , aligning or changing th e print head, print a test pag e to check
print quality. Follow the steps below to print a test page.
Press the "MENU" button, and repeatedly press the or
1
"ARROW" buttons until "Maintenance" appears on the first line
of the display panel.
3.Maintenance
1.Clean PrintHead1
Repeatedly press the or "ARROW" buttons until
2
"Print Test Page" appears on the second line of the display
panel.
3.Maintenance
5.Print Test Page
Press the "ENTER" button.
3
The message shown below will appear in the display panel, and a test page will be
printed. After printing, the unit will return to the ready state.
Printing
Test Page
...
If a white line(s) appears in printed
areas, the print head(s) must be
cleaned.
76
Page 79

CLEANING AND STORING THE UNIT
Refer to the information below to clean the unit or store it for an extended period of time.
Cleaning the cabinet
Wipe it with a soft, clean and dry dust free cloth.
Cleaning the inside of the unit
If any smudges are sticky and hard to remove, wipe them with a cloth dampened with water.
! When wiping inside the unit, be careful not to hurt yourself on the internal parts.
! Never wipe the area around the print heads in the unit. Doing so will damage the
print heads.
Never wipe the portion
around the print heads.
Cleaning the original table and the back side of the SPF
Wipe it with a soft, clean and dry dust free cloth.
Storing the unit
Store the unit in its original shipping box to keep the machine free of dust or other
contaminants.
77
Page 80

TROUBLESHOOTING
When an error message appears, or you believe the unit is malfunctioning, refer to this
"TROUBLESHOOTIN G" guide for assistance. Before co ntacting your point of purchase in
relation to a problem, try the remedies below.
CANCELLING AN ERROR MESSAGE
To cancel an error message after a problem has been solved, either p ush the "CLEAR/
STOP" button ( ) or the "START" ( ) button .
Error message Problem and solution
Copy Mode
Unable to Copy,
Out of xxxxx Ink
Printer Mode
Unable to Print,
Out of xxxxx Ink
Load paper; press
Start to resume
Load selected paper
into bypass slot
Copy Mode
Unable to Copy,
Missing xxxxx ink
Printer Mode
Unable to Print
Missing xxxxx ink
Copy Mode
Unable to Copy,
Missing print head
Printer Mode
Unable to Print
Missing print head
Copy Mode
Unable to Copy,
Incompatible ink
Printer Mode
Unable to Print
Incompatible ink
Shipping Lock is on;
Unlock to operate
No PC communication;
Check cable
Cover open; press
tab to remove ink
Clear paper jam
Start to resume
Reset paper knob
Start to resume
Adjust paper knob
for thicker paper
Reset paper knob
for normal paper
Poster not
From Bypass
The indicated ink tank is out of ink, and must be changed. (The
ink colour that is empty is indicated by xxxxx.)
The unit is out of paper. Load appropriate paper.
The indicated ink tank is not installed correctly. Reinstall the ink
tank. (The ink colour that is not installed correctly is indicated by
xxxxx.)
The print head is not set correctly. Reset the print head.
The unit is unable to print as the ink tank inserted is not
compatible with this machine. Use SHARP ink tanks only.
The scan head locking switch is not released.
The unit is not correctly connected to your computer. Check if the
USB interface, or parallel interface is connected. (The ERROR
indicator will not light when this error occurs.)
Close the front cover.
A paper jam has occurred. Remove the jammed paper.
The Paper knob is not set correctly. For Cardstock paper set it to
( ), For all other types of paper, set it to ( ).
The "Poster" setting is unavailable with the bypass tray. Load
paper into the paper tray, and set the "Poster" setting.
Page
Page 71
Page 20
Page 13
Page 13
Page 71
Page 7
Page 11
Page 16
Page 82
Page 21
Page 56
78
Page 81
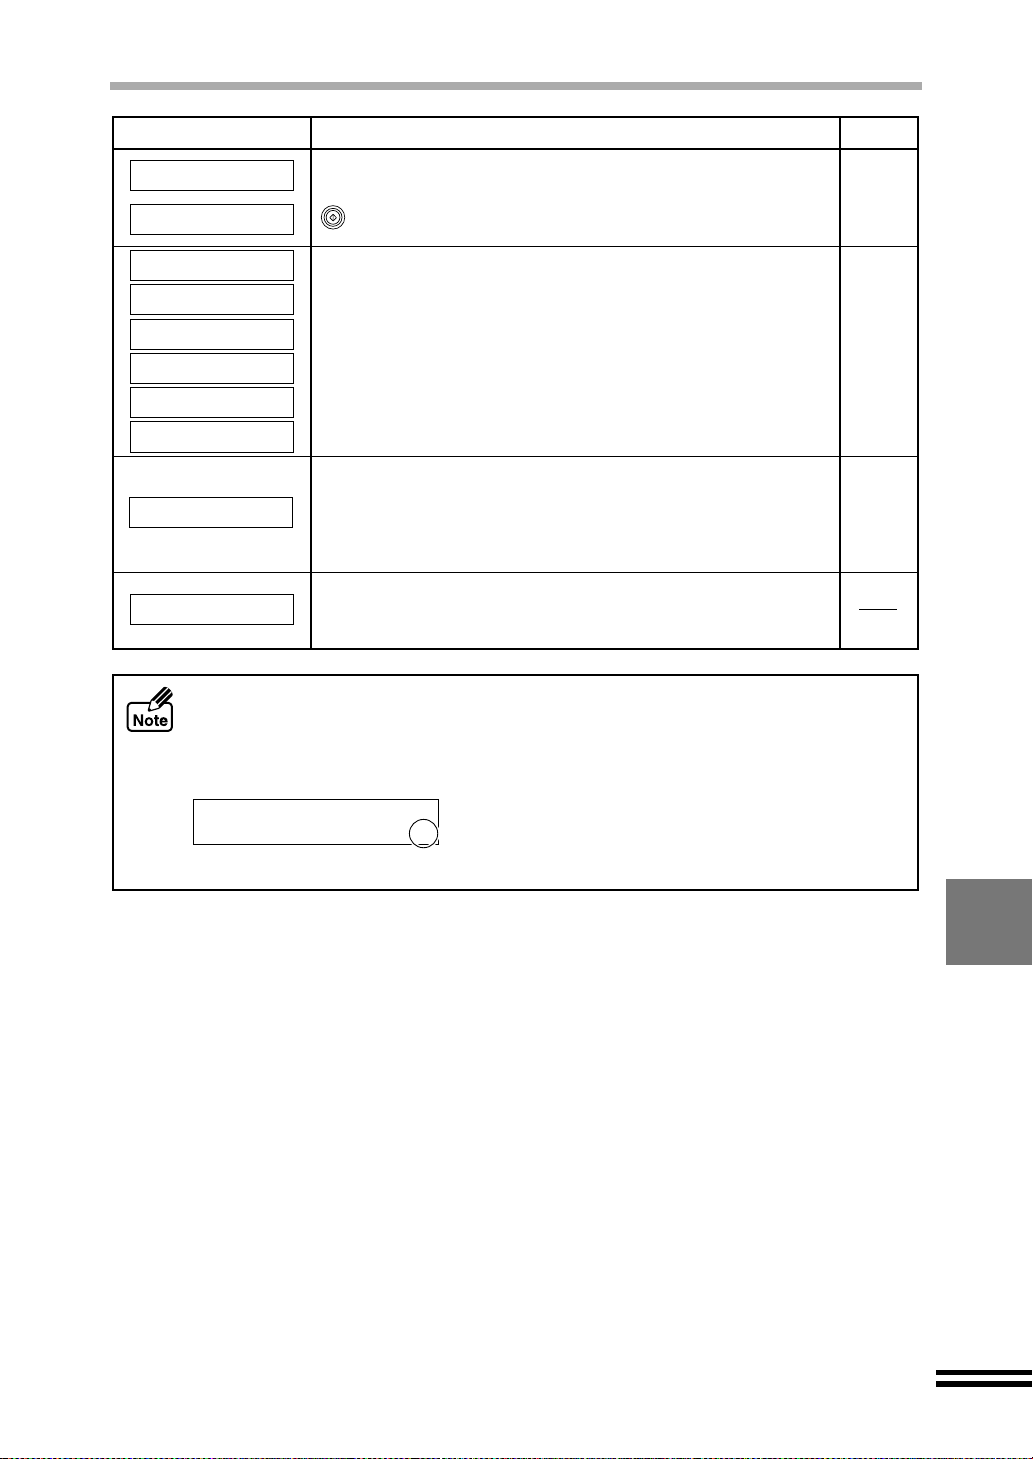
CANCELLING AN ERROR MESSAGE
Error message Problem and solution
Document feeder jam;
Clear original
When Ready, Press
Start to resume
3.AutoFit
Not Available
4.Poster
Not Available
5.Repeat Image
Not Available
AutoFit not
available with SPF
Poster not
available with SPF
Repeat not
available with SPF
Memory full, Press
Start to resume
System error xxxx
Refer to user guide
When using the SPF, if any of the following troubles occurs such as ink shortage, paper
jam, or original jam, a corresponding message appears on the display, indicating a minus
number at the end.
An original has jammed in the SPF. After removing the jammed
original, place the original again, and press the START button
( ) to restart copying.
When using the SPF, the "AutoFit", "Poster", and "Repeat Image"
settings accessed through the ZOOM button are unavailable.
Remove the originals from the SPF, and then place them one
sheet at a time on the original table, setting the copy quantity to
the desired number. Otherwise, set the whole set of originals in
the SPF to make a single copy, and repeat this process to make
the desired set of copies.
Unplug the power cord from the outlet and plug again after a few
seconds. If this message still appears, stop using the unit and
contact your point of purchase or the nearest service support centre.
Page
Page 83
Page 51
Page 52
Example: When paper jam occurred
Clear paper jam
Start to resume -2
Return the indicated number of originals to the SPF.
For more information on the possible cause of errors, refer to "IDENTIFYING UNIT
PROBLEMS". (See the next page)
79
Page 82

IDENTIFYING UNIT PROBLEMS
When an error message appears, or you believe the unit is not operating normally (e.g. copy
quality is poor, etc.), refer to the guide below before contacting your nearest service centre.
Refer to "Troubleshooting" on the Online Manual for problems about printing and scanning.
Problems Check Point Remedy
The unit does not
operate
Paper feeding or
jamming
problems occu r.
Is the power cord firmly plugged
into an electrical socket?
Is the front cover or the
maintenance cover open?
Has a paper jam occurred in the
paper tray?
Is an original jammed in the SPF? Remove the jammed original (See
Is there too much paper in the
paper tray?
Have two or more sheets been
fed into the machine?
Are the paper guides aligned
correctly against the loaded
paper?
Is the bypass tray set to the
appropriate position for thick
paper?
Is the loaded paper too thick or
too thin?
Ensure that the power plug is
plugged in correctly.
Ensure that the covers are
properly closed.
Remove the jammed paper. (See
page 82)
page 83).
The paper tray can hold up to 150
sheets of 75g/m
paper, and the bypass tray can
hold 1 sheet of paper only. If too
much paper is loaded into the tray,
paper supply problems will occur.
Remove some of the paper from
the paper tray.
If more than one sheet of paper is
loaded into the body from the tray
concurrently, paper supply trouble
will occur. Always fan the paper
and tap the stack against a flat
surface before loading into the
tray.
If the paper guides are set too
narrow for the loaded paper, the
paper may not be supplied
smoothly. On the other hand, if
the paper guides are set too wide,
the paper may be supplied
crookedly. Be sure to align the
guides correctly to the loaded
paper.
When loading thick paper via the
bypass tray, open the tray until it
reaches position 2 (the tray has two
stop positions) stop, and set the
paper knob to ( ). (See page 7)
Only use paper meeting the
SHARP specifications for
thickness. (See page 86)
2
(20lbs.) plain
80
Page 83
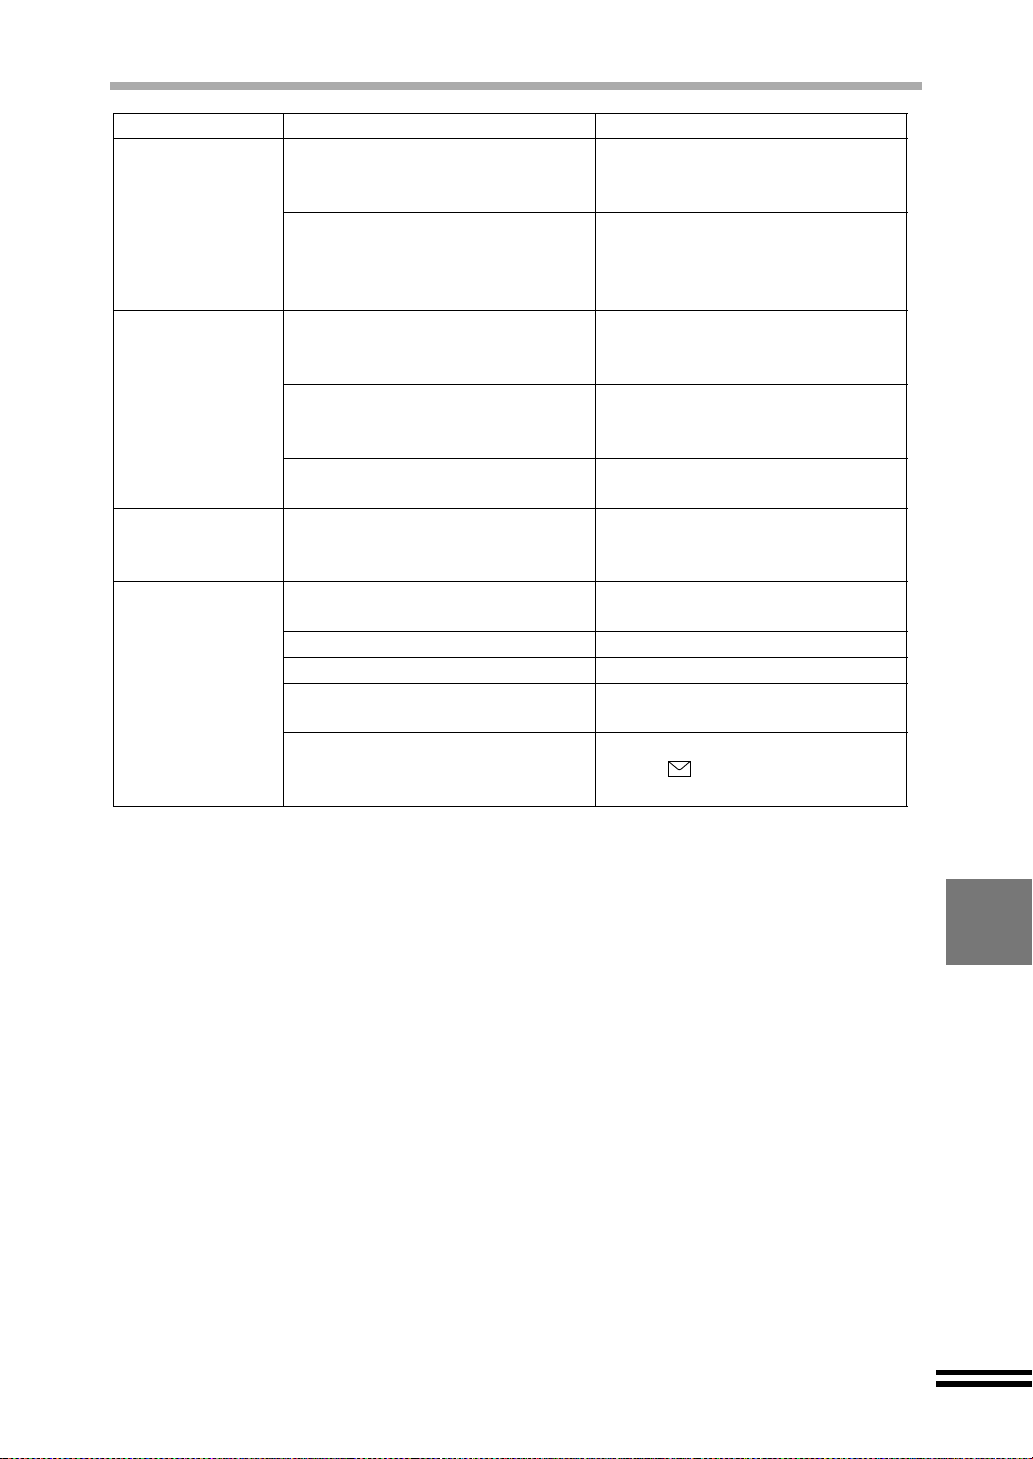
IDENTIFYING UNIT PROBLEMS
Problems Check Point Remedy
Paper feeding or
jamming
problems occu r.
The SPF does
not run smoothly.
Copies are too
light or too dark.
Dirty spots or
white lines
appear on copies.
Is the unit on a flat surface? The unit must be placed on a flat
surface in order to operate
correctly.
Is the paper curled or folded? Using curled or previously copied
paper may cause paper supply
problems. The use of new paper
is recommended.
Have you inserted too many
pages into the SPF?
Is the end of the original
protruding into the SPF.
Is the original guide aligned
correctly to the placed original?
Check the "Brightness" and
"Intensity" setting.
Is the original table glass or the
back side of the SPF clean?
Is the original stained or marked? Use a better quality original.
Is the print head dirty?
Have you aligned the print heads
correctly?
Is the paper too thick? Turn the paper knob to "Thick
The SPF can hold up to 20
sheets. Placing over 20 sheets
will cause paper supply problems.
Insert the original correctly. Fan
the original before placing into the
SPF.
Be sure to align the original guide
correctly to the placed original.
Change the "Brightness" and
"Intensity" settin gs appropr ia tely .
(See page 59)
Clean the original table glass.
(See page 77)
Clean the print head. (See page 73)
Align the print heads. (See page
17)
Paper ( )" setting.
Use paper of 60g/m
2
- 200g/m2.
81
Page 84

IDENTIFYING UNIT PROBLEMS
Removing jammed paper
Remove the jammed paper.
1
Open the jam cov er ( ) on the rear side of t he unit by lifting its tab, an d then
remove the jammed paper ( ).
If you are unable to remove the jammed paper in this manner, go on to step 2.
Take off the output tray to remove the jammed paper.
2
Under certain circumstances, the jammed paper can also be accessed by
removing the paper tray.
82
Close the jam cover and attach the output tray.
3
Press the "START" button ( ) to restart copying.
4
When the message shown below appears on the display, return the indicated
number of originals to the SPF, and then press the "START" button ( ).
Clear Paper Jam
Start to resume -1
If the jammed paper cannot be removed easily, do not pull the paper too hard as it
may tear, or you may damage the unit. Do not reuse any sheets of paper that have
jammed.
Page 85

Removing jammed original
Remove the jamme d original.
1
Remove the original fr om the SPF i nput tray whil e depressi ng the ori ginal relea se
button.
Keep pressing the
original release button
until you remove the
original.
When failed to remove the original from the SPF input tray, remove it from the SPF
output tray.
IDENTIFYING UNIT PROBLEMS
Do not pull the original by force. Doing so may tear the original to cause a problem.
Return the number of originals indicated at the end of the
2
message on the display, and then press the "START" button ( )
to restart copying.
83
Page 86

APPENDIX
This chapter shows specifications of the unit, supplies, and how to store the supplies.
SPECIFICATIONS
AJ-6020
Scanner
Flat-bed
50dpi – 9600dpi
10bit
Colour CCD
4.2ms/line
215mm x 297mm
Sheet, Book,
Max. A4/8.5" x11"
25% – 400%
Type
Scanner type
Copy/Printing technology
Copy/Printing resolution
Scanning resolution
Bit depth
Sensor
Copy/Printing speed*
Scanning speed*
Scan area
Void area
Original
Paper
Continuous copy/printing
Zoom
Print description language
Interface
1
Mono
Colour
2
Min.
Recommendation
Copier Printer
Desktop
Flat-bed
On demand, thermal inkjet
Max. 1200dpi x 1200dpi
600dpi
10bit
Colour CCD
Max. 12.0cpm
Max. 7.0cpm
215mm x 297mm
Top 3mm, Bottom 3mm, Left 3mm, Right 3mm
Top 19mm, Bottom 19mm, Left 10mm, Right 10mm
Sheet, Book,
Max. A4/8.5"x11"
Max. 215.9mm x 355.6mm
(8.5"x14")
Min. A5
(148mm x 210mm)
50 sheets
25% – 400%
Max. 12.0ppm
Max. 7.0ppm
Max.*3 215.9mm x 355.6mm
(8.5"x14")
Min. 76.2mm x 127mm
(3"x5")
50 sheets
25% – 200%
Host based printing
system
IEEE1284-compliant bi-directional parallel interface
USB interface (B type)
84
*1 When using SHARP original data with A4/8.5"x11" paper in the fastest mode (copying from the
original table) or draft mode (printer).
2
*
When scanning from the original table with 600dpi.
(Data transmission time is not included.)
3
*
For the Bypass Tray, the maximum paper size is 5-sheeted A4/8.5"x11" banner.
Page 87

SPECIFICATIONS
Paper tray capacity
Paper tray*
Output tray*
Bypass tray
7
Ink life*
Black
Colour
Dimensions (W x D*8 x H)
Weight
Power supply
4
Max. 150 sheets of plain paper*
5
Max. 50 sheets of plain paper*
1 sheet
700 sheets
350 sheets
480mm x 397mm x 337mm (18.9" x 15.6" x 13.3" )
12.8kg (28.2lbs.)
Local voltage ±10% (For this copier's power supply requirement,
6
6
see the name plate located on the back of the unit.)
Power consumption
Operation condition
Storage condition
Noise level
Temperature
Relative humidity
Temperature
Relative humidity
Max. 75W
10 C˚– 35 C˚ (50 F˚– 95 F˚)
20% - 85%
-25 C˚– 40 C˚ (-13 F˚– 104 F˚)
15% – 90%
Sound Power Level L
WA (1B=10db)
Copying: 6.4[B], Standby: Background noise level
Sound Pressure Level L
PA (bystander positions)
Copying: 48dB(A)], Standby: Background noise level
Noise emission measurement in accordance with ISO 7779.
*4 Holds up to total thickness of 15mm paper stack.
5
*
Holds up to total thickness of 5mm paper stack.
6
*
With 75g/m2 (20lbs.) plain paper.
7
*
When using 20.3cm x 25.4cm (8" x 10") size paper at 5% image area in normal usage.
8
*
The SPF connection cable is not included.
SPF (Single pass feeder)
2
– 90g/m2 (16lbs.– 24lbs.)
Original
Weight
Size
Capacity
*9 With 60g/m2 – 90g/m2 (16lbs.– 24lbs.) plain paper.
60g/m
Max. A4/8.5" x 14"
20 sheets*
9
85
Page 88

SUPPLIES
Ink tank (Black)
Ink tank (Cyan)
Ink tank (Magenta)
Ink tank (Yellow)
Print head (Black type)
Print head (Colour type)
! When storing spare ink tanks and print heads, leave them unopened in their
packaging until you are ready to use them.
! For best results, use ink tanks within 6 months of installation.
PAPER TYPE
Plain paper
Coated paper
Photo paper
Transparency*
T-shirt transfer
Label
Banner
Envelope
Card
60g/m
(16lbs. – 110lbs. index)
75g/m
Max. size A4x5 (8.5"x11"x5)
75g/m
110g/m
Max. thickness: 0.3mm
2
– 200g/m
2
(20lbs.)
2
– 90g/m2 (20lbs. – 24lbs.)
2
– 200g/m2 (110lbs. index)
2
Part NumberSupply
AJ-T20B
AJ-T20C
AJ-T20M
AJ-T20Y
AJ-H20B
AJ-H20C
NoteWeightPaper type
Use whiter side for copying/printing.
Use glossy side for copying/printing.
Use rougher side for copying/printing.
Use for printing only.
Insert through bypass tray.
Use for printing only.
Use for printing only.
*Be sure to use Sharp recommended transparent films.
As a part of our polic y of continuous improvement , SHARP reserves the right to
make design and specification changes for product improvement without prior
notice. The performance specification figures indicated are nominal values of
production units. Ther e may be some deviations from these values in individual
units.
INTERFACE CABLE
Please purchase the appropriate cable for your computer.
Parallel interface cable
IEEE 1284 - Shielded type bi-directional parallel interface cable (2m (6 feet) Max.)
USB cable
Shielded twisted pair cable (2m (6 feet) max.: high-speed transmission equivalent)
86
Page 89

INDEX
A
Acrobat Reader................................ 38, 44
Aligning the print head ........................... 17
Annotation setting .......................... ....... . 60
Appendix................................................ 84
Attaching the trays ................................. 10
Arrow button..................................... 46, 48
AutoFit.................................................... 56
B
Banner paper ...................................23, 24
Black ink tank................................. 6, 8, 86
Black print head ........................... 8, 14, 86
Brightness........................................ 46, 59
Brightness/Intensity button......... 46, 48, 59
Bypass tray ........................................8, 23
C
Card ....................................................... 21
Cabinet................................................... 77
Carriage ................................................... 8
Changing the ink tank ............................ 71
Changing the print head......................... 74
Clean the print head............................... 73
Clear/Stop button ............................. 46, 68
Colour ink tank............................... 6, 8, 86
Colour mode button.......................... 46, 55
Colour mode indicators .................... 46, 55
Colour print head.......................... 8, 14, 86
Confirming the contents ........................... 6
Connecting
− Parallel interface cable...................... . 11
− Power cord......................................... 12
− USB interface cable ........................... 11
Copy quality button ..........................46, 55
Copy quality indicators.....................46, 55
Copy quantity button ........................ 46, 55
D
Display panel................................ 7, 46, 47
E
Enter button ..................................... 46, 48
Envelope.......................................... 21, 24
Error indicator............................... 7, 46, 78
Error message.................................. 12, 78
F
Factory default settings.......................... 67
Front cover................................... 7, 13, 16
Front cover locking knob.................... 7, 13
Front side................................................. 7
Functions set by the user....................... 63
G
Guide......................................................20
H
Hardware requirements..........................26
I
IEEE1284...............................8, 11, 84, 86
Ink tank.........................6, 8, 13, 15, 71, 86
Installing
− Acrobat Reader..................................38
− AJ-6000 series driver .........................27
− AJ-6000 series software.....................37
− Ink tank...............................................13
− Online Manual....................... ....... ......37
− Print head...........................................13
− Printer driver.......................................39
Intensity............................................ 46, 59
Interface cable..................................11, 86
Introduction...............................................4
J
Jam cover...........................................8, 82
L
Language setting....................................66
Level of remaining ink ............................72
Loading paper
− Bypass tray ........................................23
− Paper tray........................................... 20
M
Main features............................................4
Maintenance...........................................71
Maintenance cover.......................7, 14, 16
Making copies ........................................49
Menu button .....................................46, 48
Mirror................................................56, 57
N
Normal copying ......................................49
O
Online Manual ..............................5, 37, 44
Operation panel..................................7, 46
Original placement .................................50
Original guide .....................................8, 51
Original release button.......................8, 83
Original table ....................................50, 77
Original type ...........................................53
Output tray......................................6, 7, 20
Output tray extension.............................22
87
Page 90

INDEX
P
Paper clip tray.......................... ...... ....... . 46
Paper default setting......... ....... ...... ....... . 65
Paper knob................................... 7, 21, 24
Paper size................................ ...... ....... . 54
Paper size setting..................... ...... ....... . 54
Paper tray....................................... 6, 7, 20
Paper type ...... ....... ...... ...... ....... ...... ....... . 53
Paper type setting.................... ...... ....... . 53
Parallel interface .......................... 8, 11, 26
Part names and functions
− Front side.............................................7
− Operation panel ......................... ....... . 46
− Print heads and ink tanks..................... 8
− Rear side.............................................. 8
− SPF...................................................... 8
Poster............................................... 56, 57
Power button................................ 7, 12, 46
Power cord......................................... 6, 12
Power socket............................................ 8
Print head..................... 6, 8, 13, 14, 73, 86
Print head latch ...................... 8, 14, 15, 74
Print pattern............................................ 60
Print position ............................ ...... ....... . 61
Printing
− How to print........................................ 45
Program timeout..................................... 64
U
Unpacking ................................................9
USB interface ...............................8, 11, 26
User default setting ..........................63, 64
User maintenance ..................................71
Using this unit with your computer .........69
Z
Zoom button...............................46, 48, 56
R
Reduce/Enlarge .....................................56
Repeat image................................... 56, 57
Reset factory.......................................... 67
Resetting the user default settings......... 64
S
Software requirements........................... 26
Scan head locking switch..................... 7, 9
Setting brightness .......................... ....... . 59
Setting intensity........................ ...... ....... . 59
Setting up the unit .................................... 6
Sleep mode............................................ 65
Specifications.........................................84
SPF.............................................. 8, 51, 77
SPF input tray .................................... 8, 52
SPF connection cable .............................. 8
SPF output tray.................................. 8, 52
SPF output tray extension..................8, 52
Start button ................................ 46, 49, 65
Supplies ................................................. 86
T
Test page............................................... 76
Thick paper ......................................21, 23
Tray.................................................. 10, 20
Troubleshooting ..................................... 78
88
Page 91

SOFTWARE LICENSE
PLEASE READ THIS LICENSE CAREFULLY BEFORE USING THE SOFTWARE.
BY USING THE SOFTWARE, YOU ARE AGREEING TO BE BOUND BY THE
TERMS OF THIS LICENSE.
1. License.
The application, demonstration, system and other software accompanying this License, whether
on disk, in read only memory, or on any other media (the "Software") and related documentation
are licensed to you by SHARP. You own the disk on which the Software is recorded but SHARP
and/or SHARP'S Licensors retain title to the Software and related documentation. This License
allows you to use the Software on one or more computers connected to a single printer and make
one copy of the Software in machine-readable form for backup purposes only. You must
reproduce on such copy the SHARP copyright notice, the copyright notice of SHARP'S Licensors
and any other proprietary legends of SHARP and/or its Licensors that were on the original copy
of the Software. You may also transfer all your license rights in the software, the backup copy of
the Software, the related documentation and a copy of this License to another party, provided the
other party reads and agrees to the terms and conditions of this License.
2. Restrictions.
The Software contains copyrighted material, trade secrets and other proprietary material which is
owned by SHARP and/or its Licensors and in order to protect them you may not decompile,
reverse engineer, disassemble or otherwise reduce the Software to a human-perceivable form. You
may not modify, network, rent, lease, loan, distribute or create derivative works based upon the
Software in whole or in part. You may not electronically transmit the Software from one
computer to another or over a network.
3. Termination.
This license is effective until terminated. You may terminate this License at any time by
destroying the Software and related documentation and all copies thereof. This License will
terminate immediately without notice from SHARP and/or SHARP'S Licensors if you fail to
comply with any provision of this License. Upon termination you must destroy the Software and
related documentation and all copies thereof.
4. Export Law Assurances.
You agree and certify that neither the Software nor any other technical data received from
SHARP, nor the direct product thereof, will be exported outside the United States except as
authorized and as permitted by the laws and regulations of the United States. If the Software has
been rightfully obtained by you outside of the United States, you agree that you will not re-export
the Software nor any other technical data received from SHARP, nor the direct product thereof,
except as permitted by the laws and regulations of the United States and the laws and the
regulation of the jurisdiction in which you obtained the Software.
5. Government End Users.
If you are acquiring the Software on behalf of any unit or agency of the United States
Government, the following provisions apply. The Government agrees:
(i) if the Software is supplied to the Department of Defense (DoD), the Software is classified as
"Commercial Computer Software" and the Government is acquiring only "restricted rights" in
the Software and its documentation as that term is defined in Clause 252.227-7013 (c)(1) of
the DFARS; and
(ii) if the Software is supplied to any unit or agency of the United States Government other than
DoD, the Government's rights in the Software and its documentation will be as defined in
Clause 52.227-19 (c)(2) of the FAR or, in the case of NASA, in Clause 18-52.227-86 (d) of
the NASA Supplement to the FAR.
89
Page 92

6. Limited Warranty on Media.
SHARP warrants the disks on which the Software is recorded to be free from defects in materials
and workmanship under normal use for a period of ninety (90) days from the date of purchase as
evidenced by a copy of the receipt. The entire liability of SHARP and/or its Licensors and your
exclusive remedy will be replacement of the disk which fails to meet the limited warranty
provided by this Clause 6. A disk will be replaced when it is returned to SHARP or a SHARP
authorized representative with a copy of the receipt. SHARP will have no responsibility to
replace a disk damaged by accident, abuse or misapplication.
ANY IMPLIED WARRANTIES ON THE DISKS, INCLUDING THE IMPLIED
WARRANTIES OF MERCHANTABILITY AND FITNESS FOR A PARTICULAR PURPOSE,
ARE LIMITED IN DURATION TO NINETY (90) DAYS FROM THE DATE OF DELIVERY.
THIS WARRANTY GIVES YOU SPECIFIC LEGAL RIGHTS, AND YOU MAY ALSO HAVE
OTHER RIGHTS WHICH VARY FROM JURISDICTION TO JURISDICTION.
7. Disclaimer of Warranty on Software.
You expressly acknowledge and agree that use of the Software is at your sole risk. The software and
related documentation are provided "AS IS" and without warranty of any kind and SHARP and
SHARP'S Licensor(s) (for the purpose of provisions 7 and 8, SHARP and SHARP'S Licensor(s) shall
be collectively referred to as "SHARP") EXPRESSLY DISCLAIM ALL WARRANTIES, EXPRESS
OR IMPLIED, INCLUDING, BUT NOT LIMITED TO, THE IMPLIED WARRANTIES OF
MERCHANTABILITY AND FITNESS FOR A PARTICULAR PURPOSE. SHARP DOES NOT
WARRANT THAT THE FUNCTIONS CONTAINED IN THE SOFTWARE WILL MEET YOUR
REQUIREMENTS, OR THAT THE OPERATION OF THE SOFTWARE WILL BE
UNINTERRUPTED OR ERROR-FREE, OR THAT DEFECTS IN THE SOFTWARE WILL BE
CORRECTED. FURTHERMORE, SHARP DOES NOT WARRANT OR MAKE ANY
REPRESENTATIONS REGARDING THE USE OR THE RESULTS OF THE USE OF THE
SOFTWARE OR RELATED DOCUMENTATION IN TERMS OF THEIR CORRECTNESS,
ACCURACY, RELIABILITY, OR OTHERWISE. NO ORAL OR WRITTEN INFORMATION OR
ADVICE GIVEN BY SHARP OR A SHARP AUTHORIZED REPRESENTATIVE SHALL CREATE
A WARRANTY OR IN ANY WAY INCREASE THE SCOPE OF THIS WARRANTY. SHOULD
THE SOFTWARE PROVE DEFECTIVE, YOU (AND NOT SHARP OR A SHARP AUTHORIZED
REPRESENTATIVE) ASSUME THE ENTIRE COST OF ALL NECESSARY SERVICING, REPAIR
OR CORRECTION, SOME JURISDICTIONS DO NOT ALLOW THE EXCLUSION OF IMPLIED
WARRANTIES, SO THE ABOVE EXCLUSION MAY NOT APPLY TO YOU.
8. Limitation of Liability.
UNDER NO CIRCUMSTANCES INCLUDING NEGLIGENCE, SHALL SHARP BE LIABLE
FOR ANY INCIDENTAL, SPECIAL OR CONSEQUENTIAL DAMAGES THAT RESULT FROM
THE USE OR INABILITY TO USE THE SOFTWARE OR RELATED DOCUMENTATION,
EVEN IF SHARP OR A SHARP AUTHORIZED REPRESENTATIVE HAS BEEN ADVISED OF
THE POSSIBILITY OF SUCH DAMAGES. SOME JURISDICTIONS DO NOT ALLOW THE
LIMITATION OR EXCLUSION OF LIABILITY FOR INCIDENTAL OR CONSEQUENTIAL
DAMAGES SO THE ABOVE LIMITATION OR EXCLUSION MAY NOT APPLY TO YOU. In no
event shall SHARP'S total liability to you for all damages, losses, and causes of action (whether in
contract, tort (including negligence) or otherwise) exceed the amount paid by you for the Software.
9. Controlling Law and Severability.
For a portion of the Software related with Apple Macintosh and Microsoft Windows, this license
shall be governed by and construed in accordance with the laws of the state of California and
Washington, respectively. If for any reason a court of competent jurisdiction finds any provision
of this License, or portion thereof, to be unenforceable, that provision of the License shall be
enforced to the maximum extent permissible so as to effect the intent of the parties, and the
remainder of this License shall continue in full force and effect.
10. Complete Agreement.
This License constitutes the entire agreement between the parties with respect to the use of the
Software and related documentation, and supersedes all prior or contemporaneous understandings or
agreements, written or oral, regarding such subject matter. No amendment to or modification of this
License will be binding unless in writing and signed by a duly authorized representative of SHARP.
90
Page 93

SHARP CORPORATION
PRINTED IN CHINA
K
2001A
TINSE0056ESZZ
KS
 Loading...