

Page 1

MODEL
AJ-6000
COLOUR INKJET COPIER
OPERATION MANUAL
Page
GETTING STARTED
SETTING UP THE UNIT
LOADING PAPER
OPERATION PANEL PART
NAMES AND FUNCTIONS
COPYING
USER PROGRAM
USER MAINTENANCE
TROUBLESHOOTING
APPENDIX
4
6
19
23
31
43
50
60
64
Page 2

This equipment complies with the requirements of Directives 89/336/EEC and 73/23/EEC as amended by
93/68/EEC.
Dieses Gerät entspricht den Anforderungen der EG-Richtlinien 89/336/EWG und 73/23/EWG mit Änderung
93/68/EWG.
Ce matériel répond aux exigences contenues dans les directives 89/336/CEE et 73/23/CEE modifiées par la
directive 93/68/CEE.
Dit apparaat voldoet aan de eisen van de richtlijnen 89/336/EEG en 73/23/EEG, gewijzigd door 93/68/EEG.
Dette udstyr overholder kravene i direktiv nr. 89/336/EEC og 73/23/EEC med tillæg nr. 93/68/EEC.
Quest’ apparecchio è conforme ai requisiti delle direttive 89/336/EEC e 73/23/EEC, come emendata dalla
direttiva 93/68/EEC.
Este equipamento obedece às exigências das directivas 89/336/CEE e 73/23/CEE, na sua versão corrigida
pela directiva 93/68/CEE.
Este aparato satisface las exigencias de las Directivas 89/336/CEE y 73/23/CEE, modificadas por medio de
la 93/68/CEE.
Denna utrustning uppfyller kraven enligt riktlinjerna 89/336/EEC och 73/23/EEC så som kompletteras av
93/68/EEC.
Dette produktet oppfyller betingelsene i derektivene 89/336/EEC og 73/23/EEC i endringen 93/68/EEC.
Tämä laite täyttää direktiivien 89/336/EEC ja 73/23/EEC vaatimukset, joita on muutettu direktiivillä
93/68/EEC.
Page 3

Cautions
Follow the cautions below when using this unit.
! The unit is affect ed by the envi ronm ent in w hich it is inst alled. Do not insta ll you r unit
in the following area.
−Dusty areas
If dust enters the internal parts of the unit, damage or poor-quality output can
result.
−Areas in direct sunlight
Direct sunlight can distort the plastic parts of the unit and result in poor-quality
output.
−Excessively hot, cold, humi d, or dry areas (f or example, nea r heaters, humi difiers,
or air conditioners)
This may result in damp paper, condensation within the internal mechanisms,
misfeeds, and dirty output.
Temperature : 10-35 degrees Celsius (50-95 degrees Fahrenheit)
Relative humidity : 20%-85%
Note : When the temperature reaches 30 degrees Celsius (86 degrees Fahrenheit),
the relative humidity must be 60% or less.
! The power outlet should be installed near the equipment, and should be easily
accessible.
! When movi ng th e un it, be s ure to fir s t tu rn the p owe r s wi tch off, and then re move t he
power cord from the outlet.
! Place the unit on a firm, level surface.
! Be sure to use only ink tanks of SHARP genuine supplies.
! If you get ink spots on your skin, wash them with water as soon as possible.
! Store the spare ink tanks out of the reach of children.
Page 4

CONTENTS
GETTING STARTED
MAIN FEATURES............................................................................................ 4
USER'S MANUAL............................................................................................ 5
SETTING UP THE UNIT
CONFIRMING THE CONTENTS..................................................................... 6
PART NAMES AND FUNCTIONS................................................................... 7
UNPACKING.................................................................................................... 9
ATTACHING THE TRAYS............................................................................. 10
CONNECTING THE POWER CORD ............................................................ 11
INSTALLING THE PRINT HEADS AND THE INK TANKS............................ 12
ALIGNING THE PRINT HEADS .................................................................... 16
LOADING PAPER
LOADING PAPER INTO THE PAPER TRAY................................................ 19
LOADING THE BYPASS TRAY WITH PAPER ............................................. 22
OPERATION PANEL PART NAMES AND FUNCTIONS
OPERATION PANEL PART NAMES AND FUNCTIONS.............................. 23
OUTLINE OF DISPLAY PANEL .................................................................... 24
OUTLINE OF SETTING OPTIONS................................................................ 26
POWER SAVE MODES / PROGRAM TIMEOUT.......................................... 30
COPYING
NORMAL COPYING................................ ....... ...... ....... ...... ....... ...... ............... 31
REDUCING/ENLARGING THE IMAGE SIZE FOR COPYING...................... 35
SETTING UP THE PREFERENCES FOR COPIED IMAGES....................... 37
ADDING AN ANNOTATION ON YOUR COPY ............................................. 39
2
Page 5

USER PROGRAM
SAVING THE USER DEFAULT SETTING .................................................... 43
RESETTING THE USER DEFAULT SETTING............................................. 44
PROGRAM TIMEOUT .................................... ...... ....... ...... ....... ...... ...... ....... .. 4 4
SLEEP MODE................................................................................................ 45
CHANGING THE PAPER DEFAULT SETTING ............................................ 46
CHANGING THE LANGUAGE SETTING...................................................... 46
RESETTING ALL OPTIONS TO THE FACTORY DEFAULT SETTING........ 47
HOW TO USE THE "CLEAR/STOP" BUTTON.............................................. 48
USER MAINTENANCE
THE INK TANK .............................................................................................. 50
THE PRINT HEAD......................................................................................... 52
PRINTING A TEST PAGE ............................................................................. 57
CLEANING AND STORING THE UNIT......................................................... 58
TROUBLESHOOTING
CANCELLING AN ERROR MESSAGE ......................................................... 60
IDENTIFYING UNIT PROBLEMS.................................................................. 61
APPENDIX
SPECIFICATIONS......................................................................................... 64
SUPPLIES ..................................................................................................... 65
PAPER TYPE ....................... ...... ....... ...... ....... ............................................. .. 6 5
GETTING STARTED
SETTING UP THE UNIT
LOADING PAPER
OPERATION PANEL PART
NAMES AND FUNCTIONS
COPYING
USER PROGRAM
USER MAINTENANCE
INDEX............................................................................................................ 66
TROUBLESHOOTING
APPENDIX
3
Page 6

GETTING STARTED
MAIN FEATURES
! High-speed copying of 12cpm (monochrome), or 7cpm (colour).
*2
! Scan once print many (SOPM) feature
! Its variety of functions including editing posters and reversing scanned images enable
you to use this unit for various purposes.
! Carbon black ink enables clear copying quality of laser copier level.
! Each ink tank is independent, they can be used until completely spent, ensuring
minimum waste of ink . The print head is also fully d etachable, requiring no spec ial
tools for replacement.
! The unit is e qui ppe d w ith a 150 sheets capacit y pap er tr ay , allo wing the user to copy
big jobs without constantly refilling the tray.
! The output tray is located inside the unit, making this unit compact to save your office
space.
! Designed to save energy with small power consumption.
*1
When using SHARP original data with A4/8.5"x11" paper in the fastest mode.
*2
By storing the s canne d data in me mory , this unit can m ake m ult iple copie s with
only scanning once.
allows excellent copying productivity.
*1
4
Page 7

USER'S MANUAL
The contents of this manual are as follows.
GETTING STARTED
Provides you with information on how to use this manual, a list of cautions, main feature
of the unit, and other useful tips that will help you set up the unit.
SETTING UP THE UNIT
Lists the setup procedures including how to install the print heads and the ink tanks.
LOADING PAPER
Explains how to insert paper into the unit, and other requirements for copying.
OPERATION PANEL PART NAMES AND FUNCTIONS
Explains the names and functions of buttons on the operation panel.
COPYING
Provides information on how to make a copy and how to setup preferences for copying.
USER PROGRAM
Explains how to save the desire d setting values as well as how to change the defa ult
settings.
USER MAINTENANCE
Provides information on daily maintenance including print head cleaning and alignment,
and ink tank or print head replacement.
TROUBLESHOOTING
Provides instructions for how to solve problems.
APPENDIX
Provides you with information on unit specifications and unit supplies.
Conventions used in this manual
In this manual, the following icons are used to provide the user with information pertinent to
the use of the unit.
Warns the user that injur y may r es ult if the co nten ts o f the wa rning are
not properly followed.
Cautions the user that damage to the machine or one of its
components may resul t if the contents o f the caution are not p roperly
followed.
Notes provide information relevant to the machine regarding
specifications, functions, performance, o peration and such, that may
be useful to the user.
5
Page 8
SETTING UP THE UNIT
Here we explain how to install the print heads and the ink tanks, after removing the unit from
its packaging.
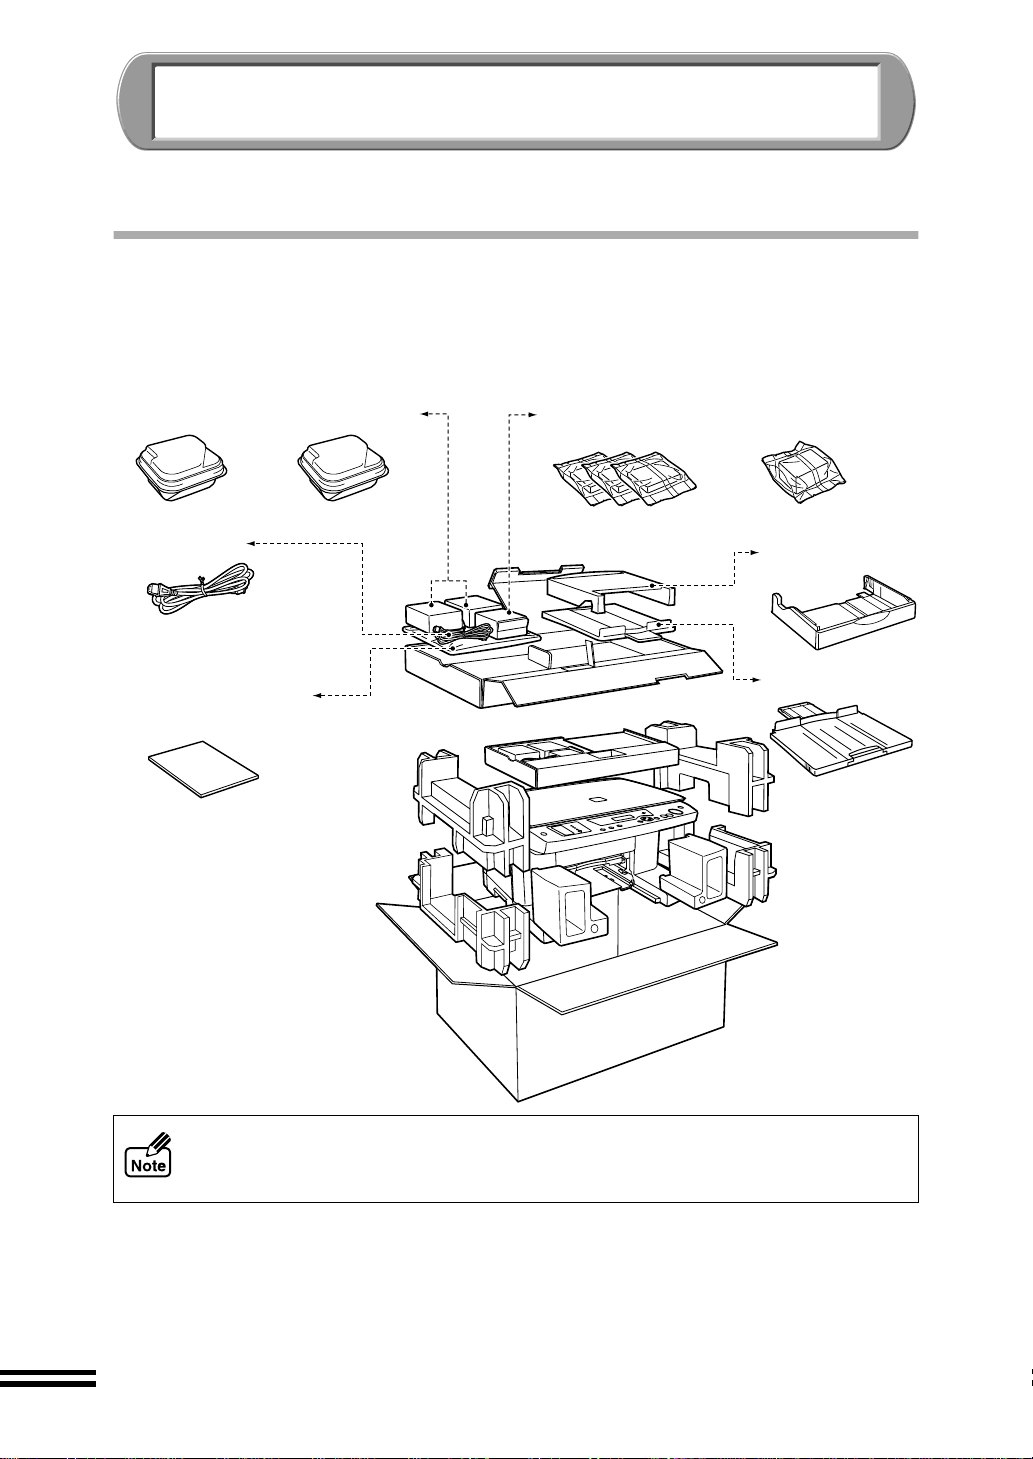
CONFIRMING THE CONTENTS
The following items are packed with the unit in the box.
If any of the following items are missing, please contact your point of purchase or your
nearest authorised SHARP service centre.
Colour print head
Power cord
Operation Manual
(this manual)
Black print head
Colour ink tanks
(magenta, yellow, cyan)
Black ink tank
Paper tray
Output tray
! Do not unpack the print heads and ink tanks until installing them in the unit.
! The box and protective materials maybe needed for transportation. Do not throw
them away.
6
Page 9
PART NAMES AND FUNCTIONS
The following illu str at ion sh ows the p art na mes an d fun cti on of th e uni t. B efo re operating, it
is advisable to familiarise yourself with the unit.
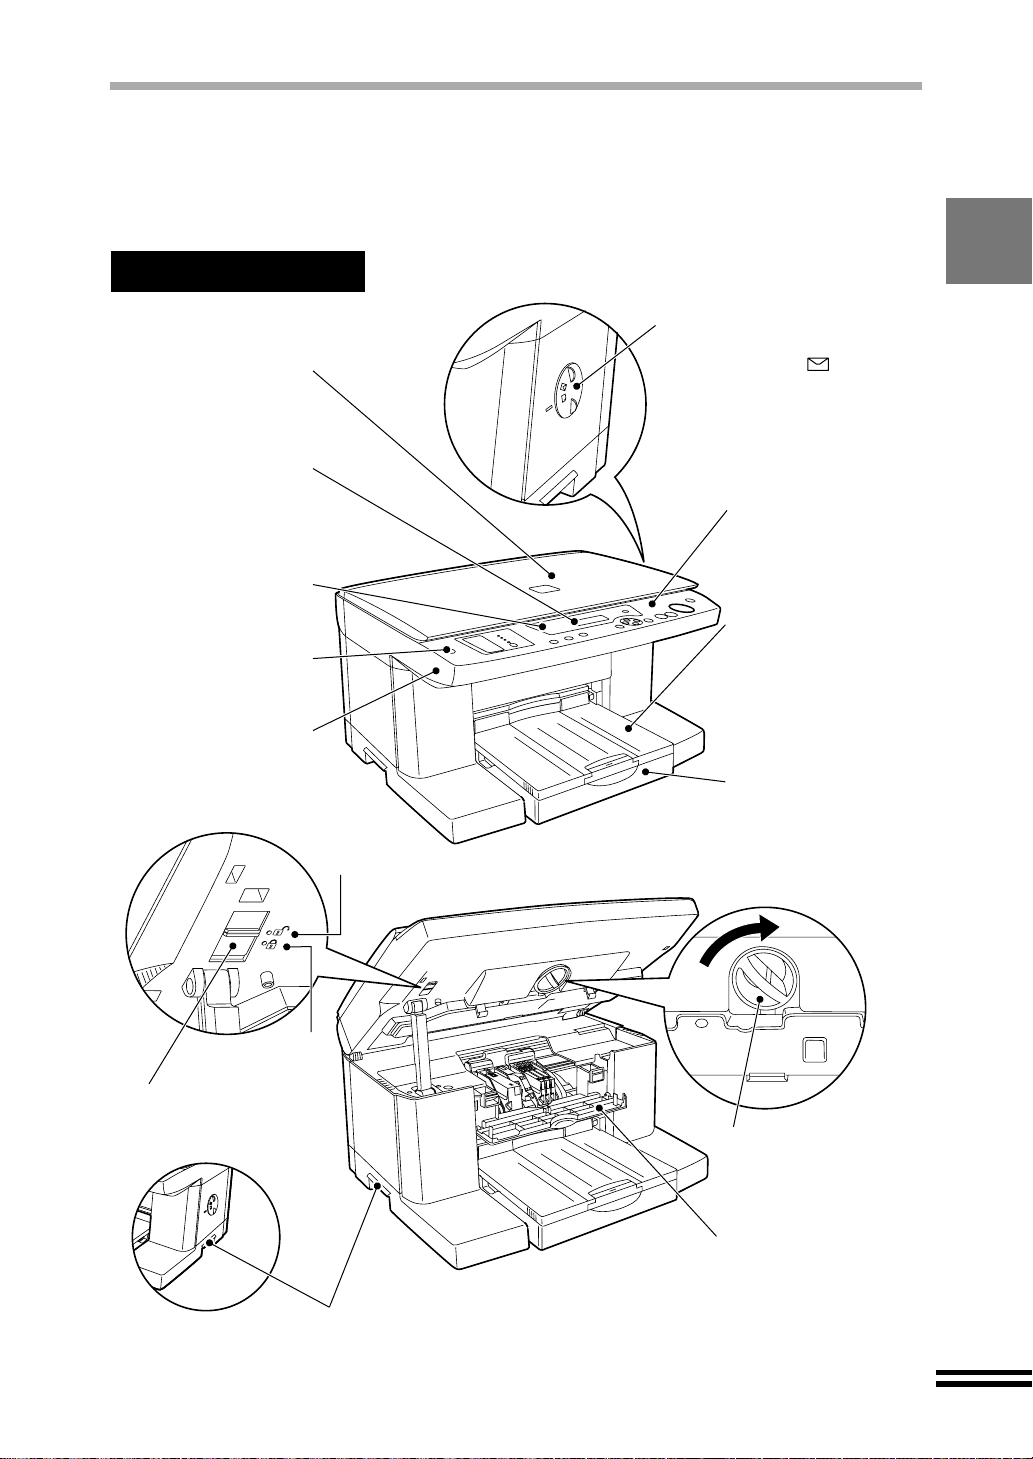
The illustration below shows the unit with all the parts installed.
Front Side
Paper knob
When copying onto thick paper,
Original cover
Open this cover to set
an original for copying.
Display panel
Displays the status of
the unit, setting options
and the number of
copies.
ERROR indicator
Lights up when an error
occurs.
Power button
Press to turn the power
on or off.
Front cover
Open this cover to
change the ink tanks or
print heads.
Released
adjust the knob to setting.
(Return the knob to its original
setting after copying.)
Operation panel
Use this panel to specify
your preferences for
copying and setting up
the unit.
Output tray
The document is
deposited onto the tray
after copying. Pull out
the output tray
extension when using
copy paper longer than
the output tray.
Paper tray
Holds up to 150 paper.
Adjustable to suit a variety
of paper sizes. Load the
paper so that the side to be
copied onto is face down.
Locked
Scan head locking switch
Lock the scan head when
moving this unit.
Handles
Front cover locking knob
Turn this knob to the
right to open the front
cover.
Maintenance cover
Open this cover to
change the ink tanks or
print heads.
7
Page 10
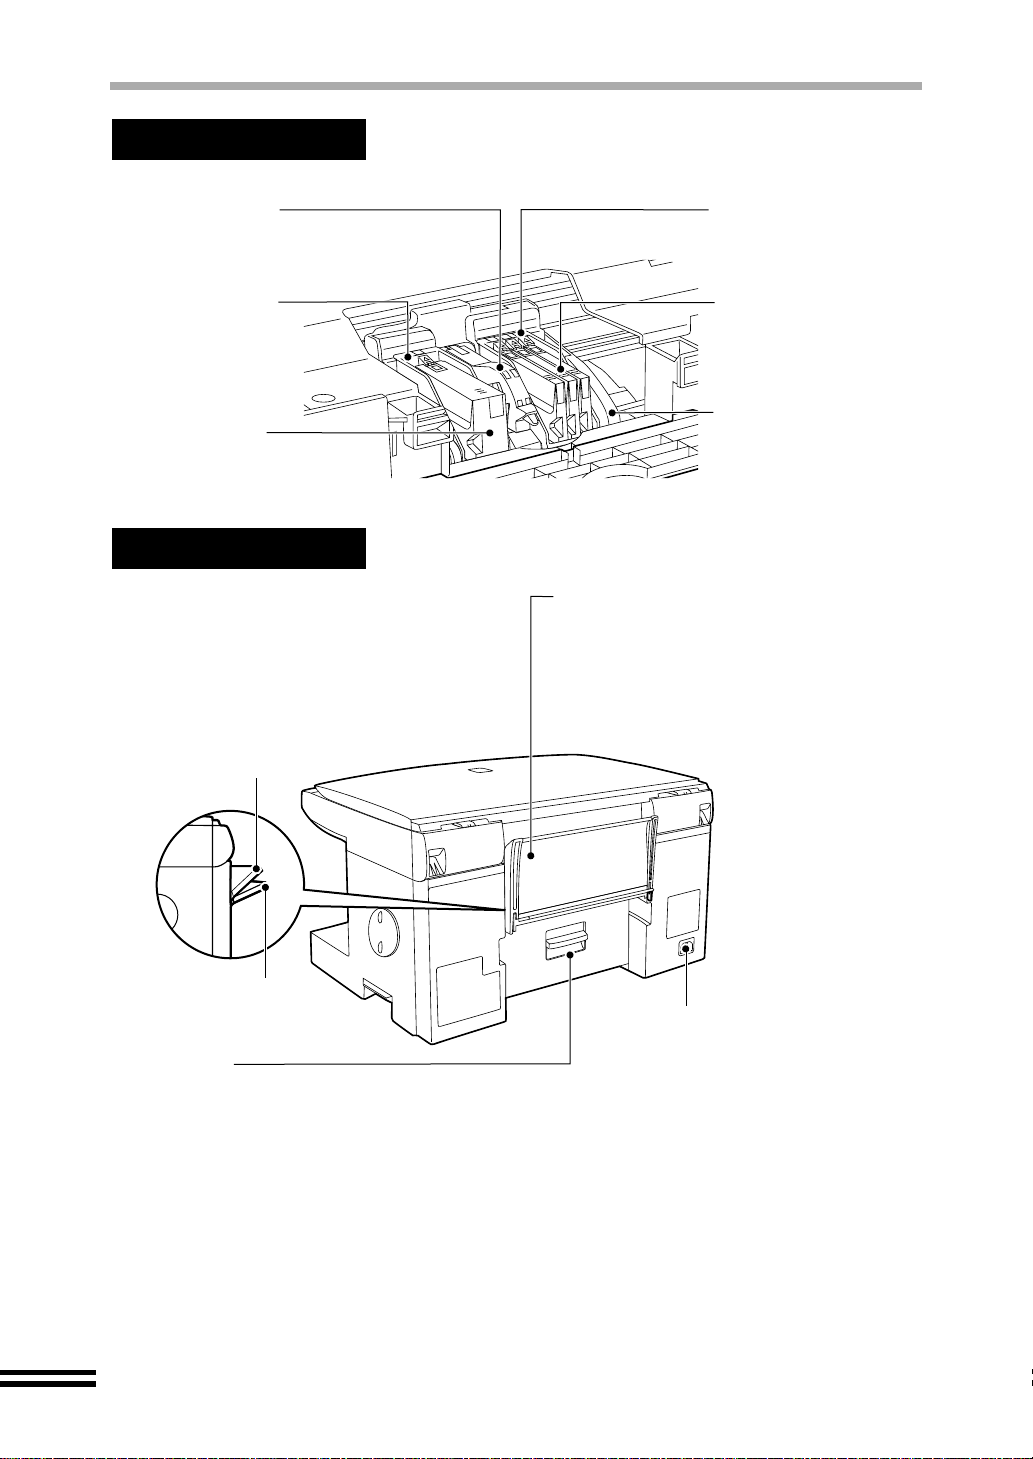
PART NAMES AND FUNCTIONS
Internal Part
Print head latch
Use this to attach/detach print
heads.
Black print head
Applies ink onto the
paper.
Black ink tank
Rear Side
Position 1
Colour print head
Applies ink onto the
paper.
Cyan ink tank
Yellow ink tank
Magenta ink tank
Carriage
Bypass tray
Use this tray to copy on a single page. Insert
paper into the tray copy side up. When
copying onto thick paper, open the tray until
it reaches position 2. (The tray has two stop
positions.)
Jam cover
Open this cover to remove
jammed paper.
8
Position 2
Power socket
Plug the power cord into the
socket.
Page 11
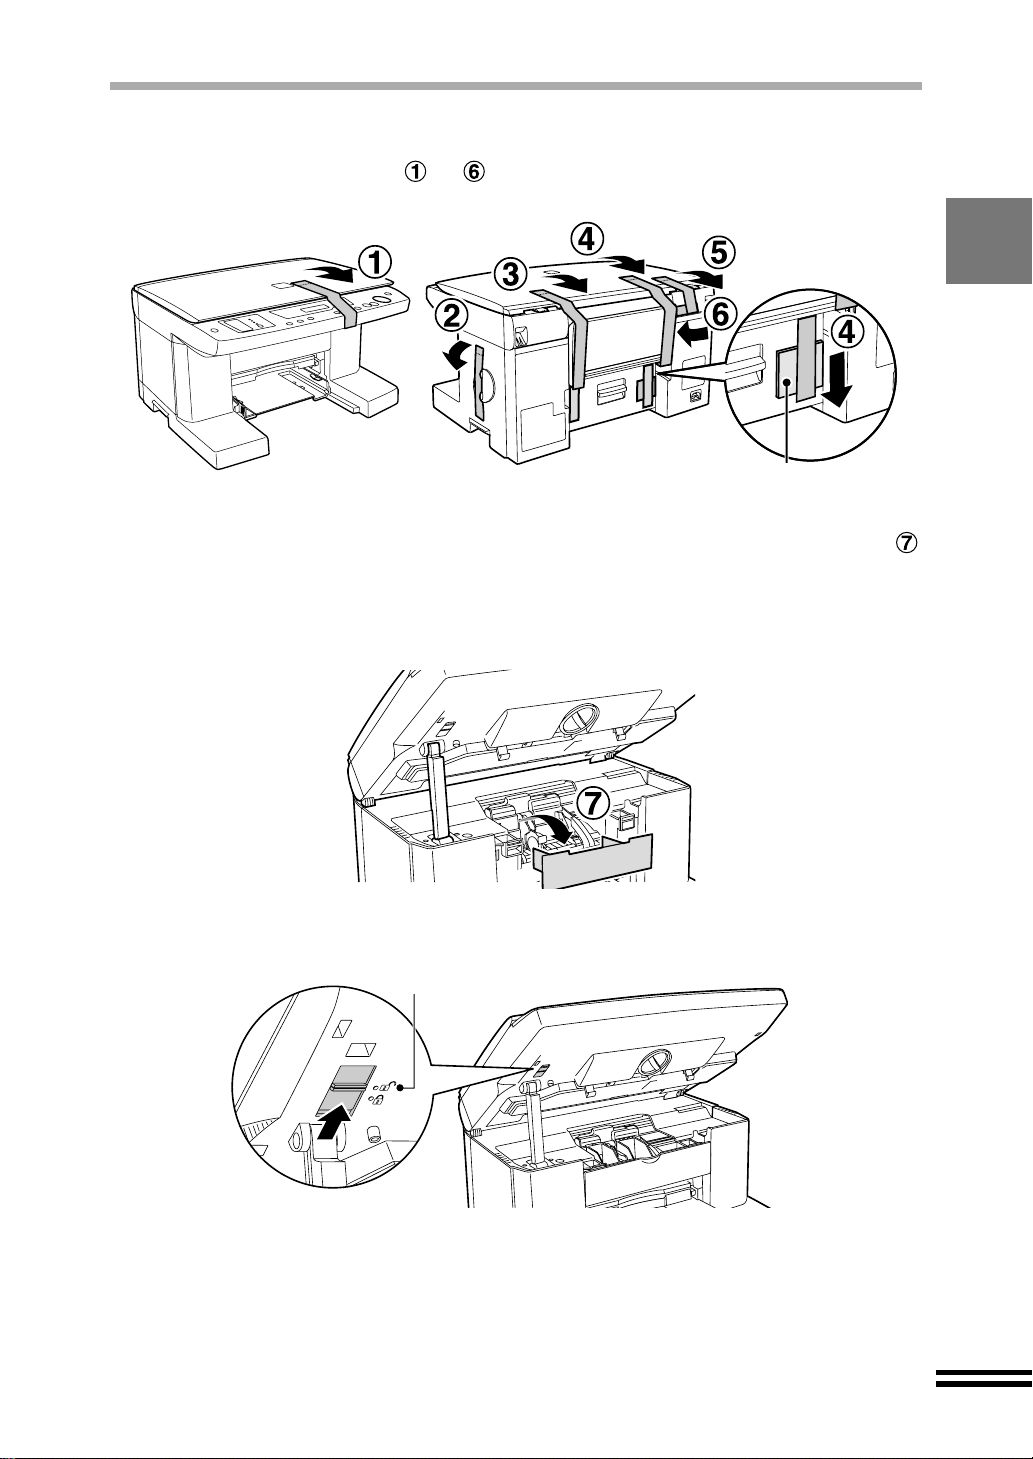
UNPACKING
Remove the tapes to shown in the illustrations.
1
Open the front cover, and remove the protective material
2
shown in the illustration.
Refer to step 4 of "INSTALLING THE PRINT HEADS AND THE INK TANKS" for
details on how to open the front cover. (See page 12)
Remove the protective
material.
Release the scan head locking switch.
3
Released
Close the front cover.
4
Refer to step 13 of "INSTALLING THE PRINT HEADS AND THE INK TANKS" for
details on how to close the front cover. (See page 60)
9
Page 12
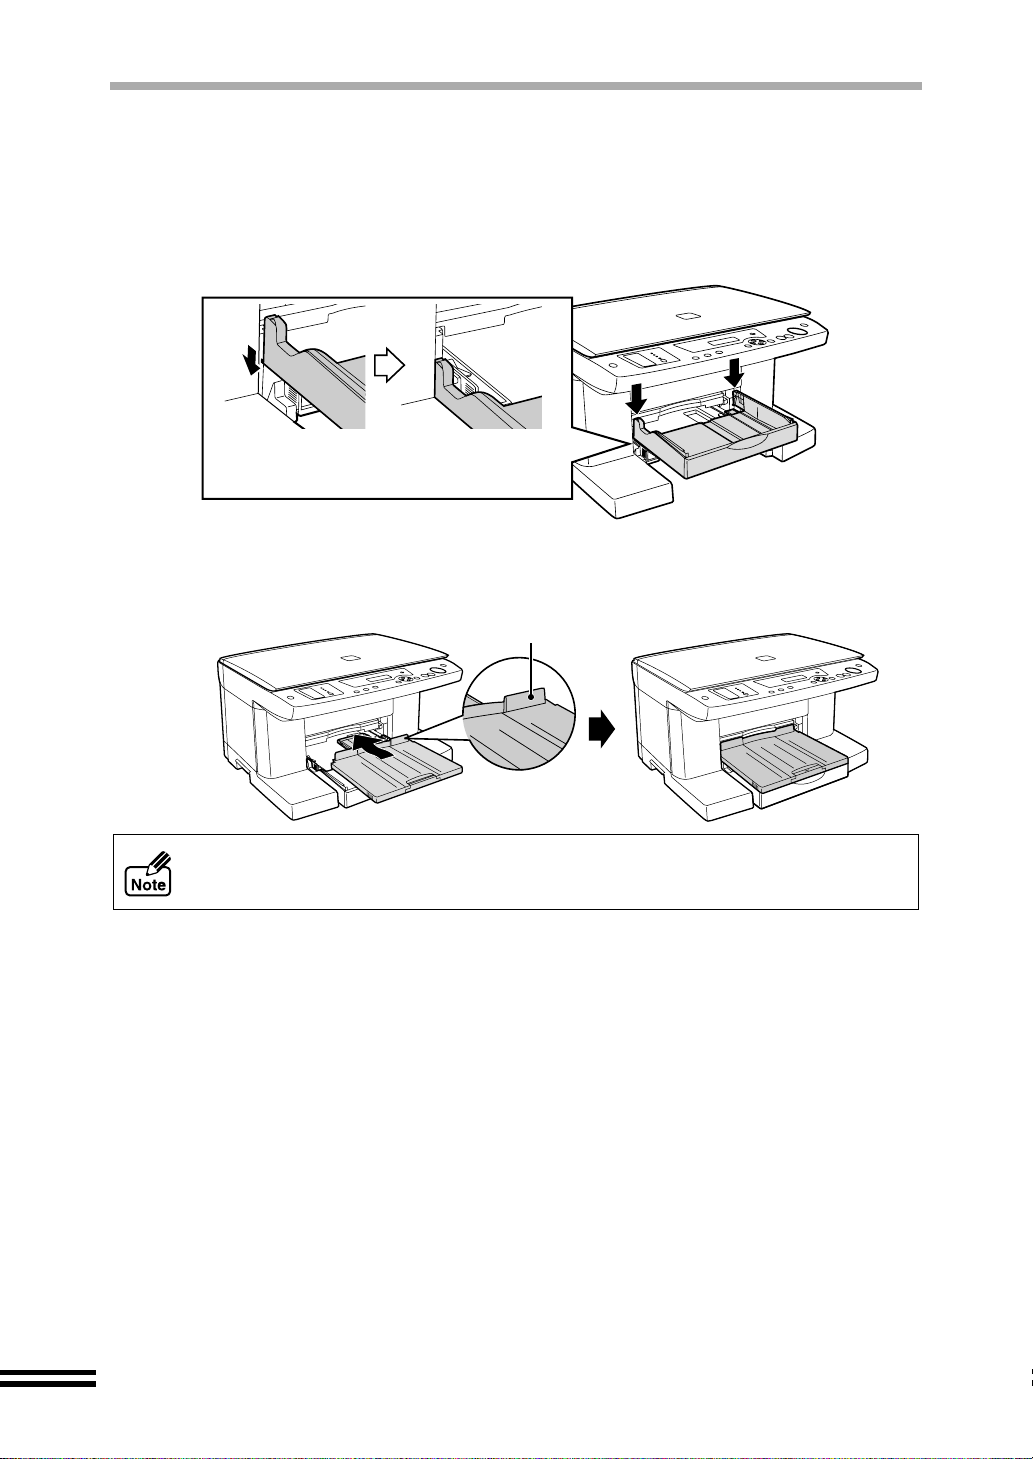
ATTACHING THE TRAYS
Attach the paper tray and the output tray to the front of the unit.
Follow the steps shown below.
Attach the paper tray by firmly pushing down both edges.
1
Make sure that the paper tray has been
securely attached to the body.
Attach the output tray as shown in the illustration.
2
Place this projection
toward the unit.
10
Refer to "LOADING PAPER" for more information (See page 19).
Page 13
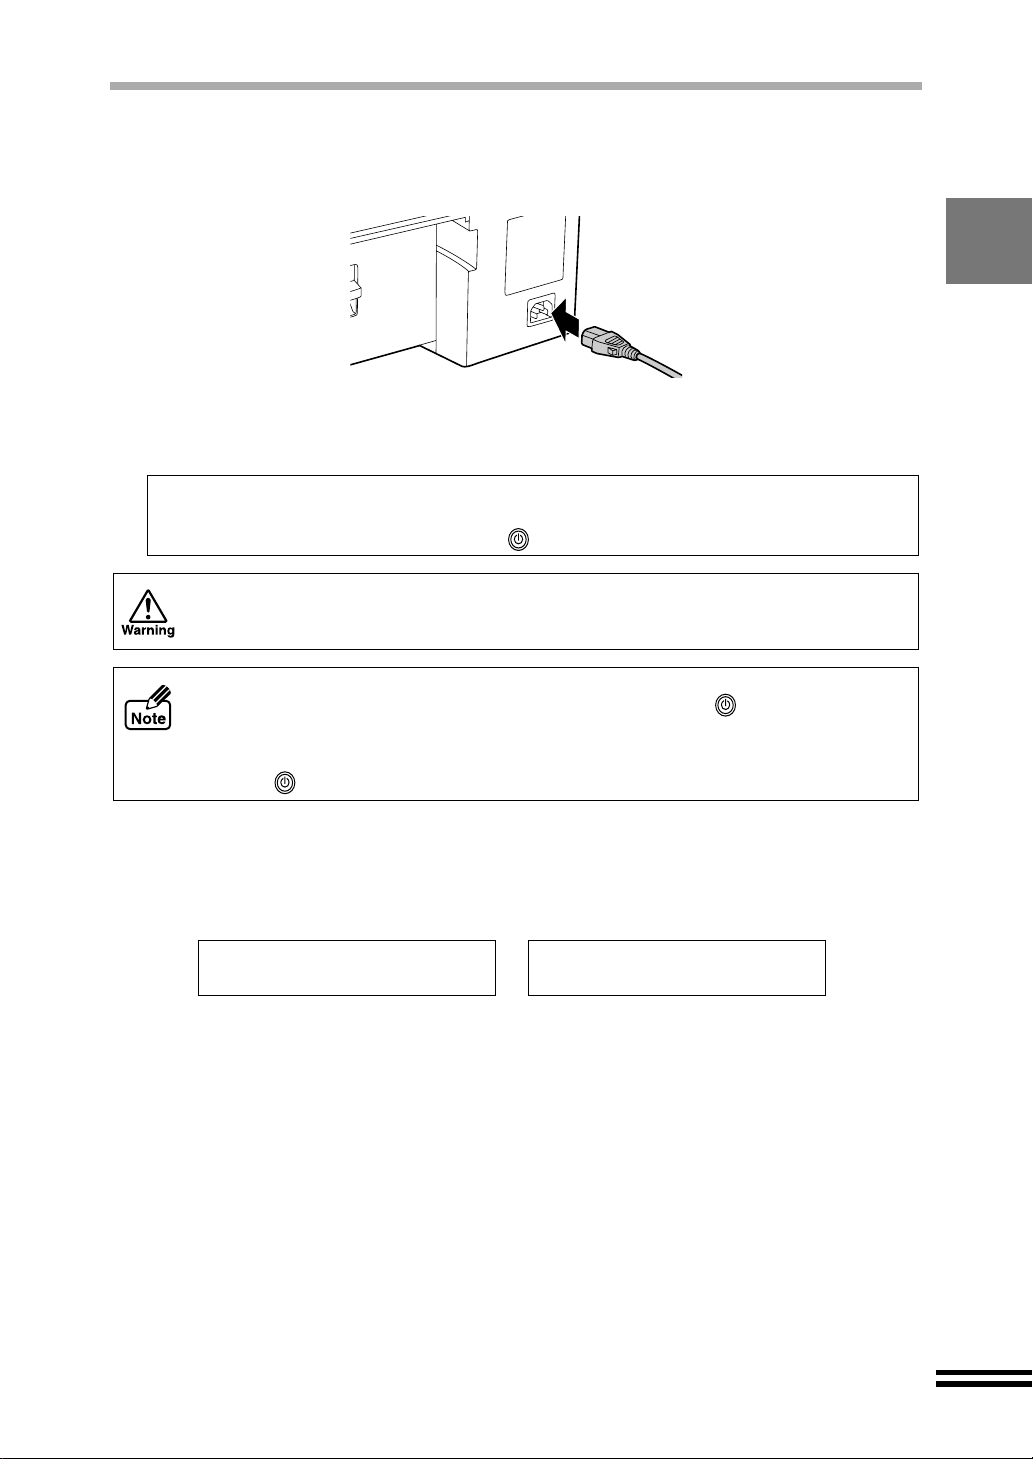
CONNECTING THE POWER CORD
Insert the power cord into the socket on the rear of the unit.
1
Connect the other end of the power cord to an outlet.
2
The unit will be turned on automatically.
Auto Shut Off
The unit automatically turns off the power when 60 minutes have elapsed after the last
operation. Press the "POWER" button ( ) to turn on the unit again.
Do not connect the unit to other than 100V-240V outlet. Plugging the unit into
incompatible power supply may cause irreparable damage or fire.
! Be sure that the plug in the outlet is readily accessible to all persons. Power is
present in the product even if the "POWER" button ( ) is off in order to
maintain good copy or print quality.
! To comp letely shut off the power, first t urn off the power using the "POWER"
button ( ). Then unplug the power cord.
How to deal with error messages during the initial setup
The following mess ag es ma y a ppe ar on the dis pl ay pa nel whe n y ou tur n o n th e un it for the
first time after purchasing.
Unable to Copy,
Missing print head
These error messages will automatically disappear when the unit completes the setup
process.
If any other messages a ppear , refer to "CANCELLIN G AN E RROR MESS AGE" (S ee page
60).
Shipping Lock is on;
Unlock to operate
11
Page 14
INSTALLING THE PRINT HEADS AND THE INK
TANKS
Follow the steps below to install the print heads and the ink tanks.
This section describes how to install the print heads and ink tanks when you install
them for the first time aft er purchasing this unit. Refe r to "THE INK TANK" (See
page 50) and "THE PRINT HEAD" (See page 52) for the information on replacing
the ink tank or print head in the unit with new ones.
Make sure that the scan head fixing switch is released.
1
Refer to step 3 of "UNPACKING". (See page 9)
Make sure that the power is on.
2
Refer to "OPERATION PANEL PART NAMES AND FUNCTIONS" for detail on how
to turn on the power when you turn on the unit. (See page 23)
Load paper following the steps shown in "LOADING PAPER".
3
(See page 19)
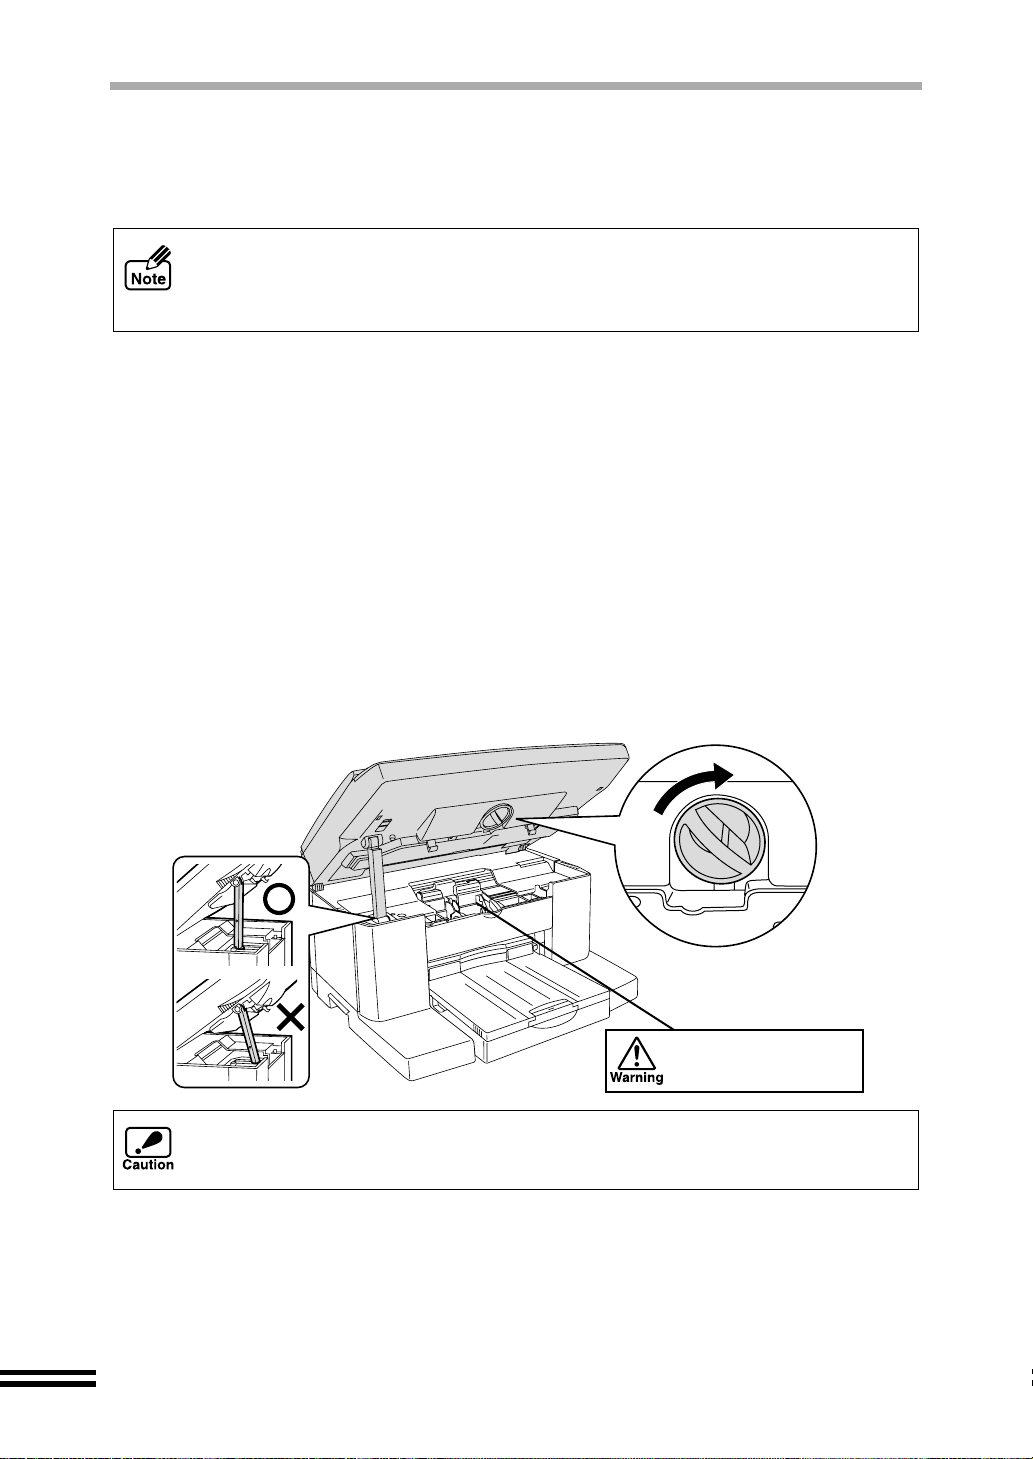
Turn the front cover locking knob with one hand and lift the
4
front cover with the other hand, while keeping the knob in the
unlocked position.
12
Do not move the
carriage manually by
force.
Keep the front cover open securely while installing print heads and ink tanks. You may
get your hand caught between the body and the front cover of the unit if you install
them with the front cover half open as shown in the illustration marked with an "X".
Page 15
INSTALLING THE PRINT HEADS AND INK TANKS
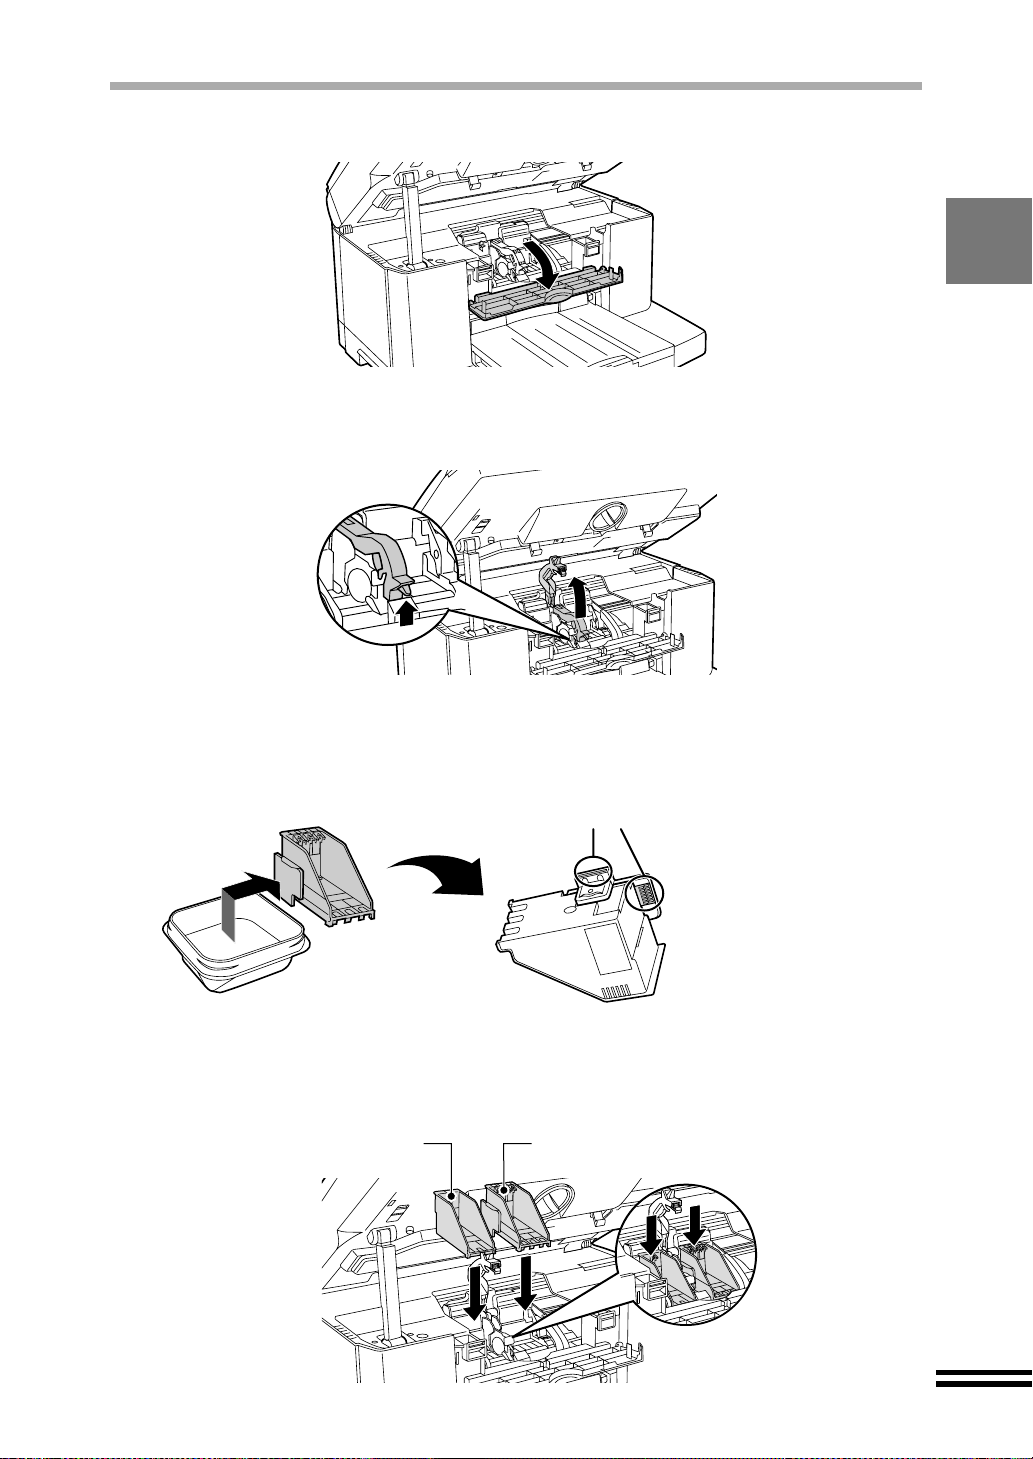
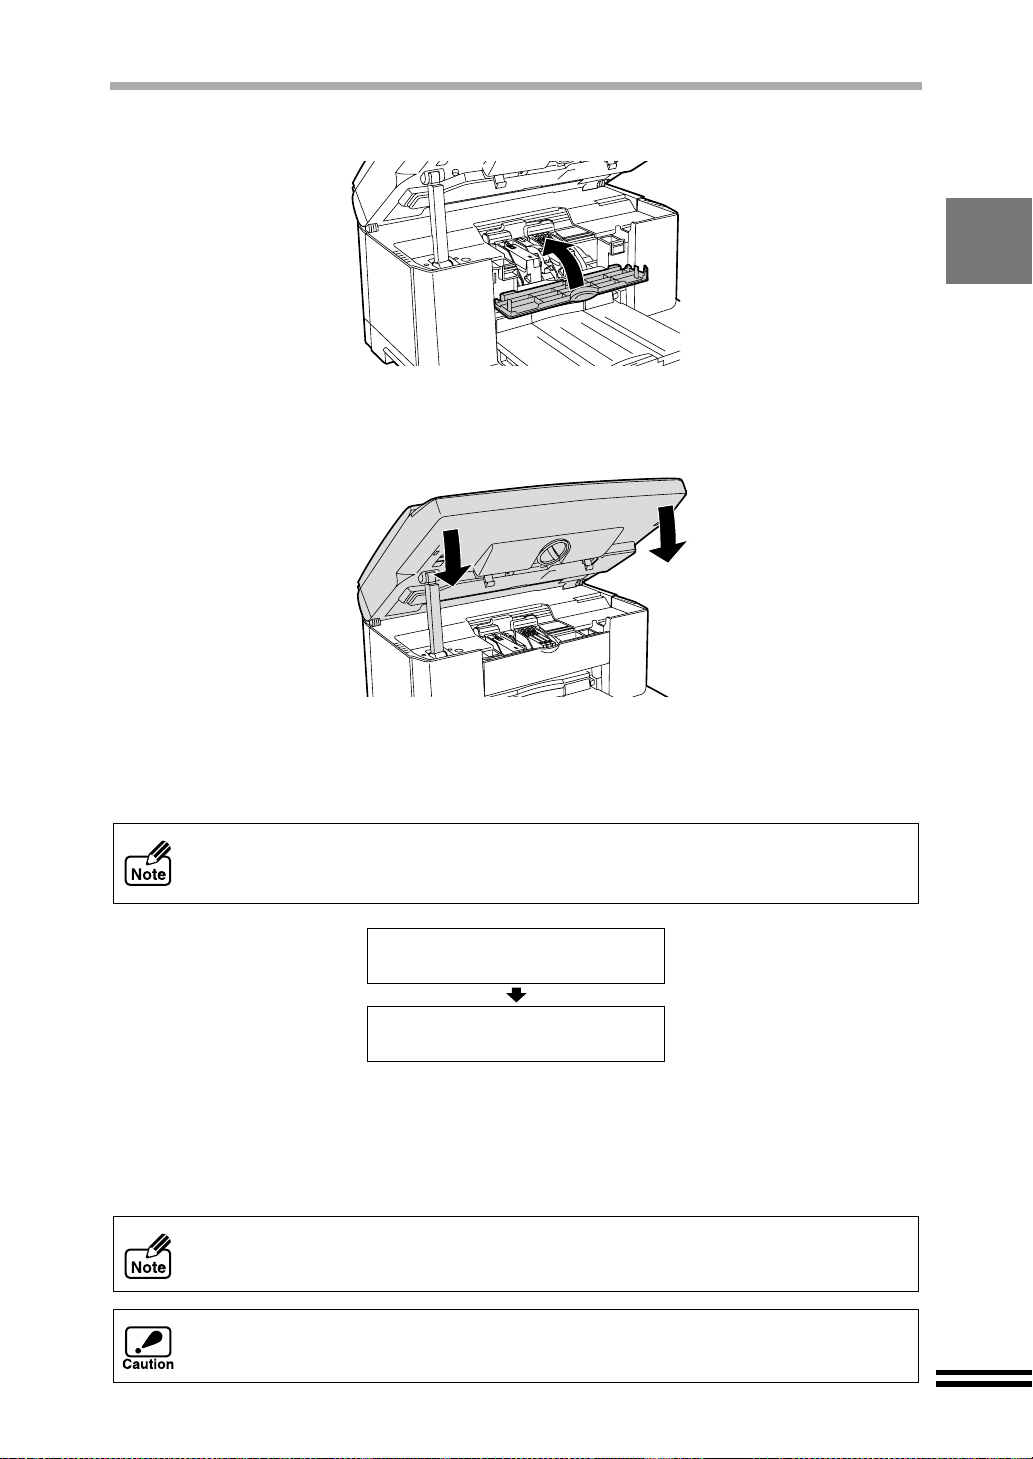
Open the maintenance cover.
5
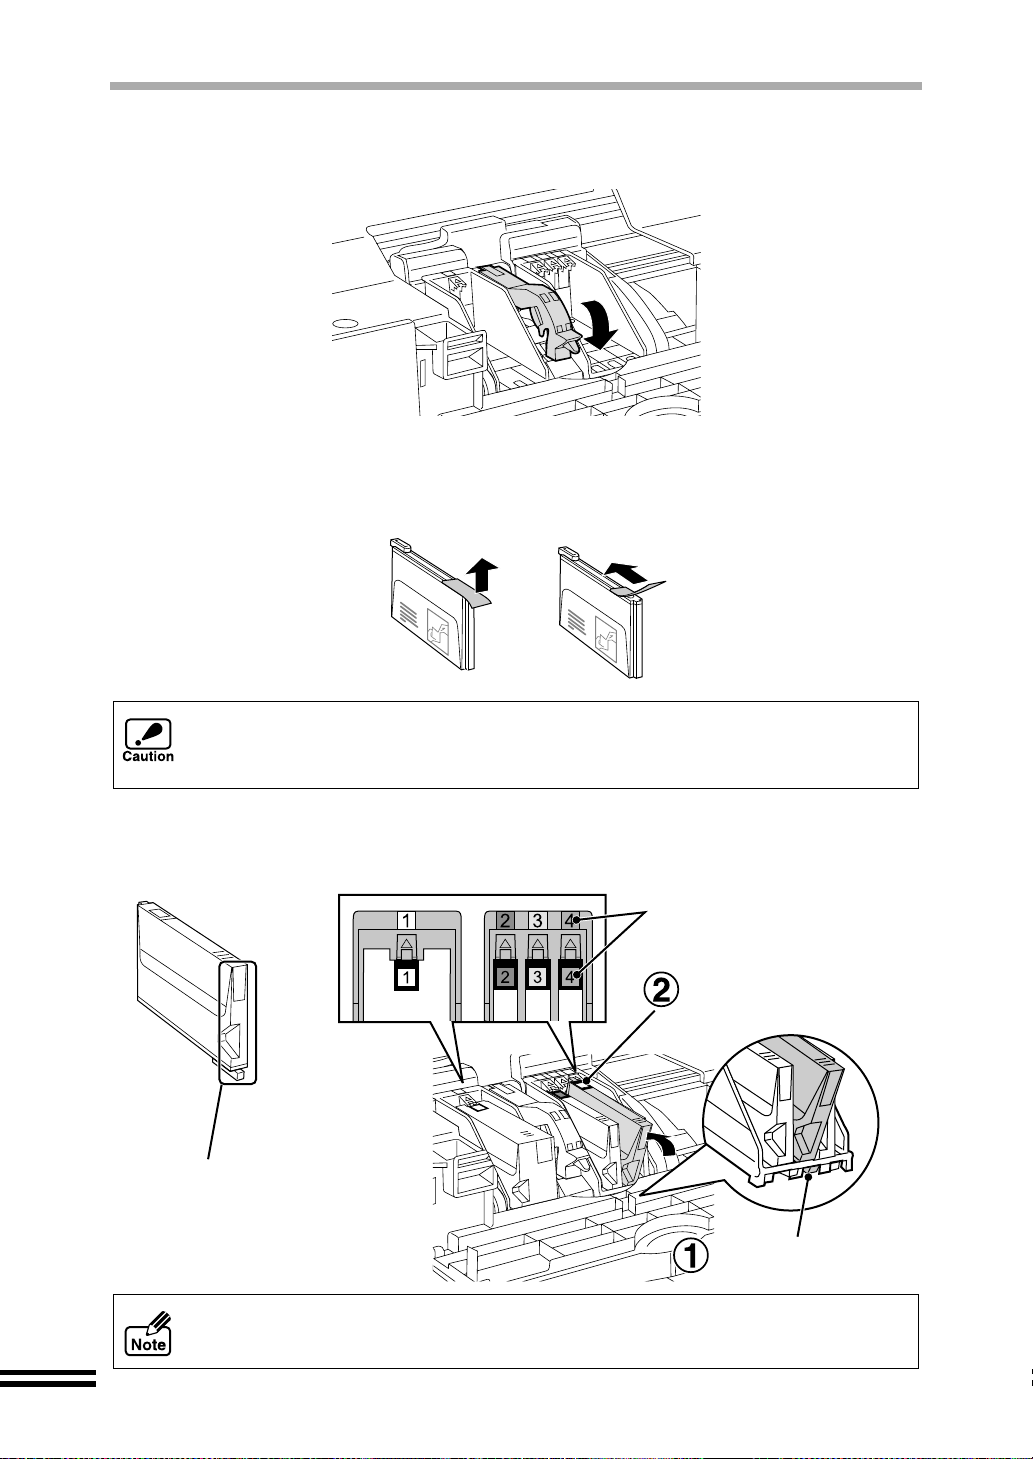
Raise the print head latch.
6
Raise the latch until it comes in contact with the front cover.
Remove the print heads from their protective cases.
7
Do not touch the metal portion of the print
head. Doing so may make the head
inoperable.
Insert the print heads.
8
Insert the black print hea d in to the lef t carria ge openi ng, and th e colo ur print head
into the right carriage opening.
Black print head Colour print head
13
Page 16
INSTALLING THE PRINT HEADS AND INK TANKS
a
Lower the print head latch.
9
Lower the latch until it clicks into the latched position.
10
Unpack the ink tanks from their protective wrapping and slowly
remove the tape.
! Hold the in k tank upright when remov ing the tape. Do not touch the unc overed
opening on the ink tank, as ink will get on your hands.
! Ensure that there are no pieces of tape remaining on the ink tank.
11
Turn the ink tanks upside down, and then immediately insert
each of them to the print head of corresponding number.
Match the ink tank number
to the print head number.
Make sure that each tab
securely locks the ink tank
by pressing here.
14
Do not touch this area.
The unit may not copy
if it is dirty.
Properly align the tab
when inserting the ink t
Ensure the number on each prin t head corresponds to the num ber on each ink
tank.
Page 17
INSTALLING THE PRINT HEADS AND INK TANKS
12
13
Close the maintenance cover.
Close the front cover.
Press both edges of the front cover with both of your hands until it locks.
14
15
Confirm on the display panel that print heads and ink tanks
have been securely s et to the unit.
The unit automatically aligns the print heads, and a test chart will be printed.
If a message appea rs, which lets you know that any of print heads or ink ta nks
have not been installed in their right p ositions, g o back to th e step 1 to rep eat the
procedure.
Cleaning the Print
Head
Printing
Alignment Patterns
Align the print heads following the procedure shown in
"ALIGNING THE PRINT HEAD" (See the next page). Start from
step 4 to perform the alignment.
To keep good print head quality, keep all the ink tanks installed to the
corresponding print head.
...
During ink tank repla cement, if the c over is lef t open for mo re than 8 minute s, the
carriage will automatically return to its home position.
15
Page 18
ALIGNING THE PRINT HEADS
The print heads mu st be adjusted after being inst alled to the unit, or when lines appear
unevenly or with spaces on the output. Follow the steps listed below to adjust the print
heads.
Insert paper into the unit
1
Refer to "LOADING PAPER" for more information (See page 19).
Press the "MENU" button, and keep pressing the (or )
2
"ARROW" button until "Maintenance" is displayed on the first
line of the display panel.
3.Maintenance
1.Clean PrintHead1
Press the (or ) "ARROW" button until "Align Print Head"
3
appears on the second line of the display panel.
3.Maintenance
6.Align Print Head
Press the "ENTER" button.
4
The message shown below will appear in the display panel. As a part of the
procedures for aligning the print heads, a test chart will be printed.
Printing
Alignment Patterns
...
16
Page 19
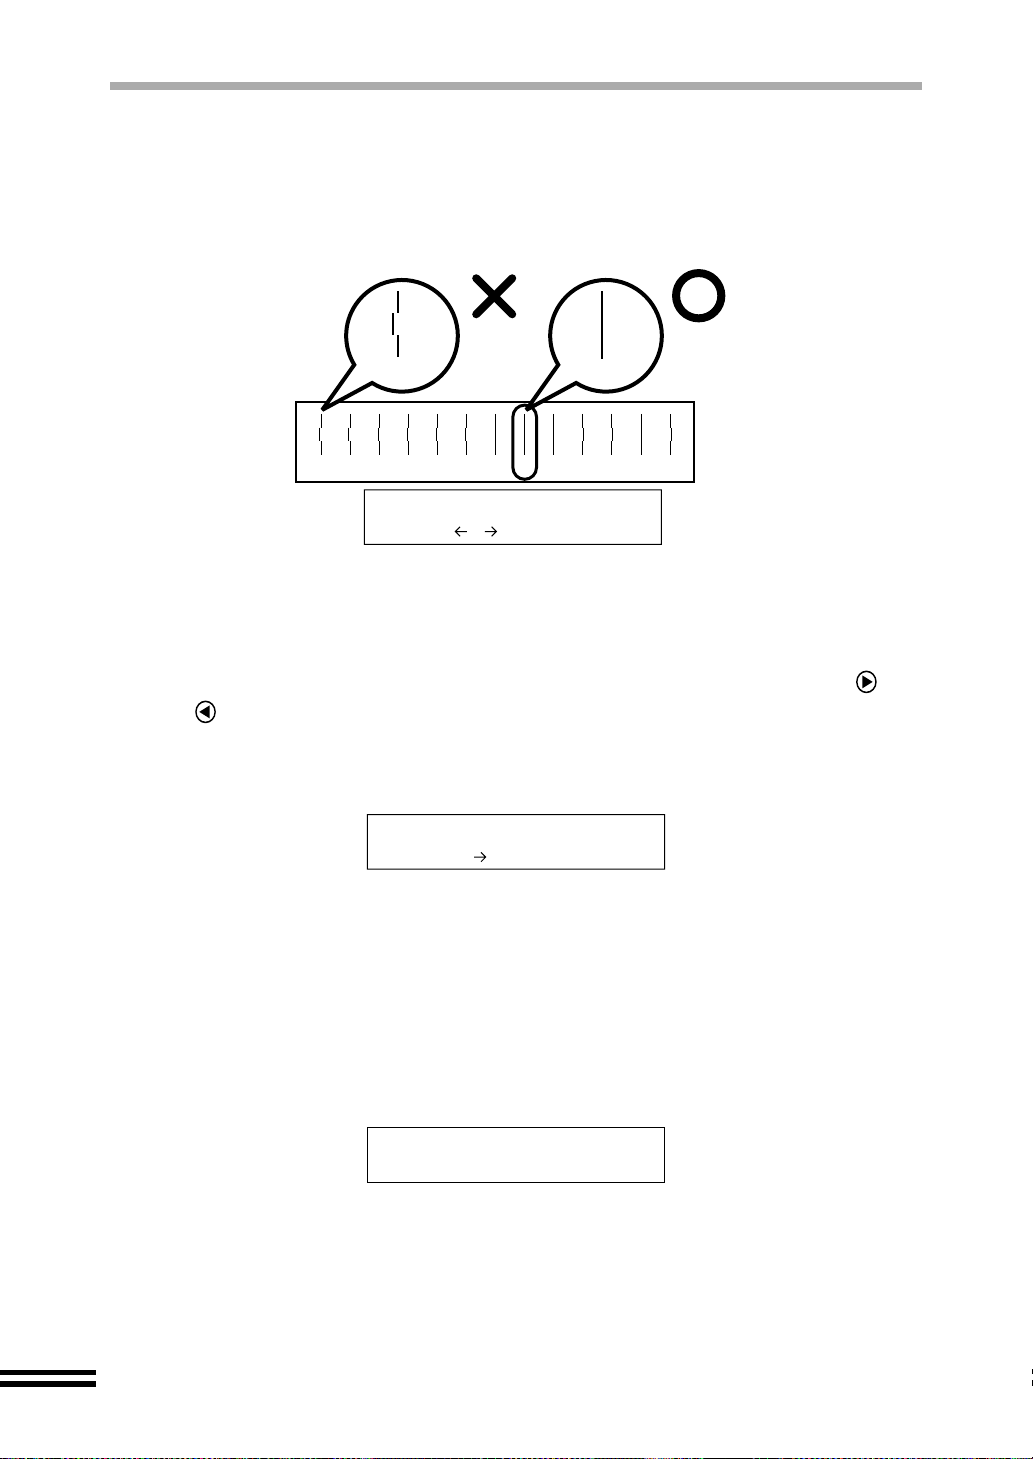
ALIGNING THE PRINT HEADS
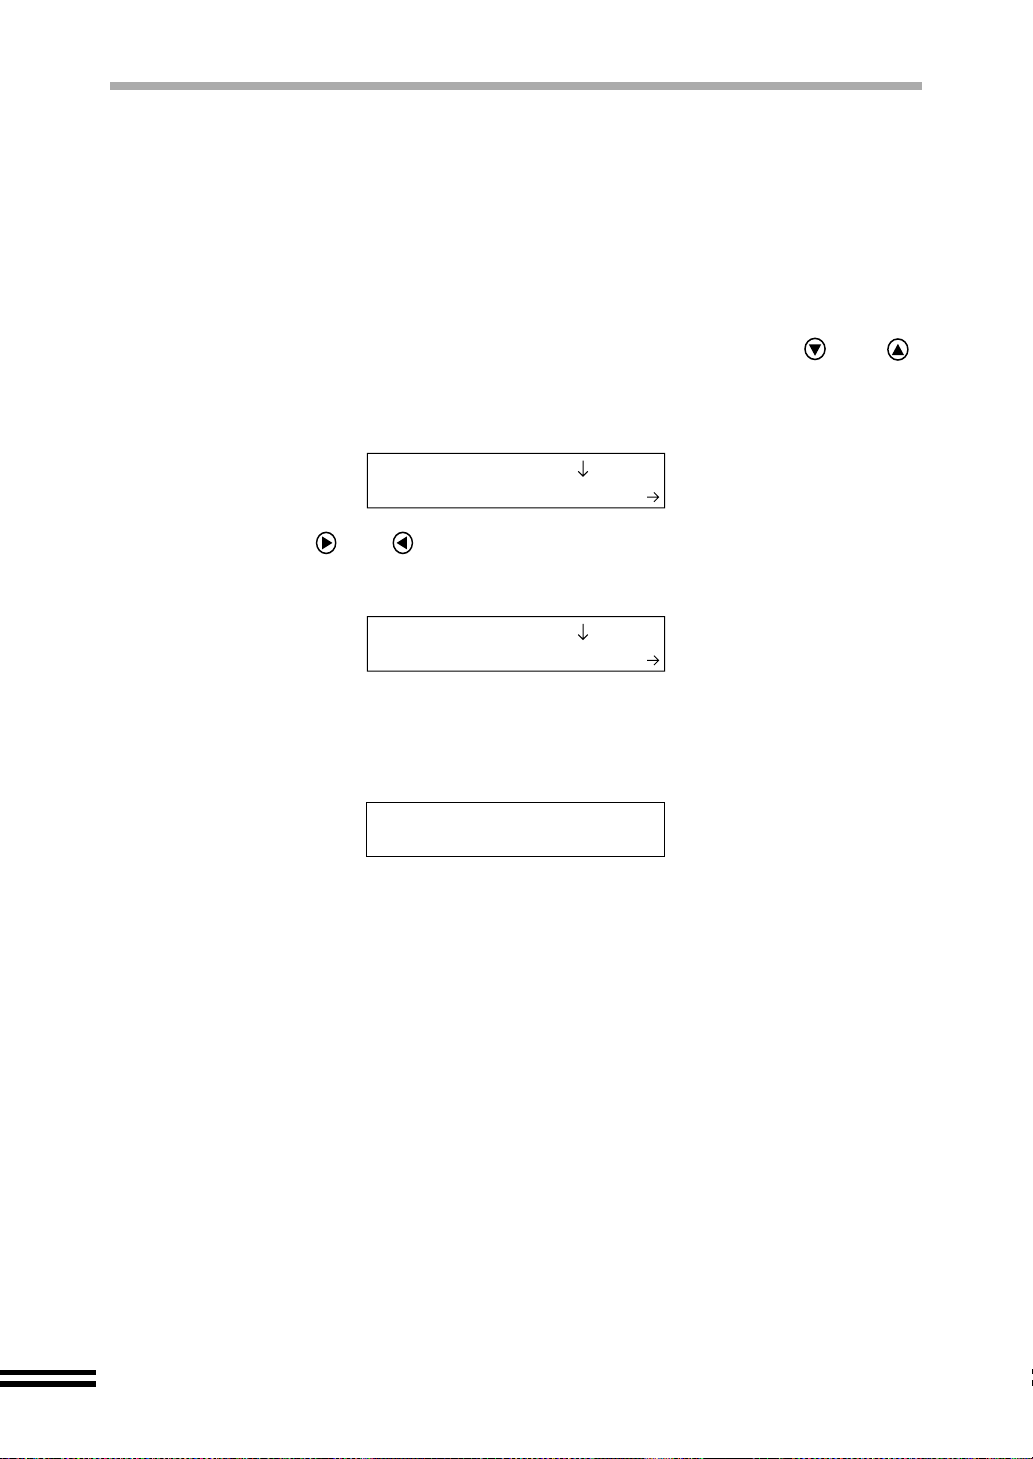
After aligning the print heads, the message shown below (A
5
pattern) will appear in the display panel. Referring to the test chart
results, use the (or ) "ARROW" button to display the best
value (select from -8 to +8) on the second line of t he di splay panel.
Now press the "ENTER" button.
Select A pattern
0 - +
Look at the chart A on your test chart. Select the number under
the pattern sample, in which is located the closest to the centre
of the two vertically parallel lines.
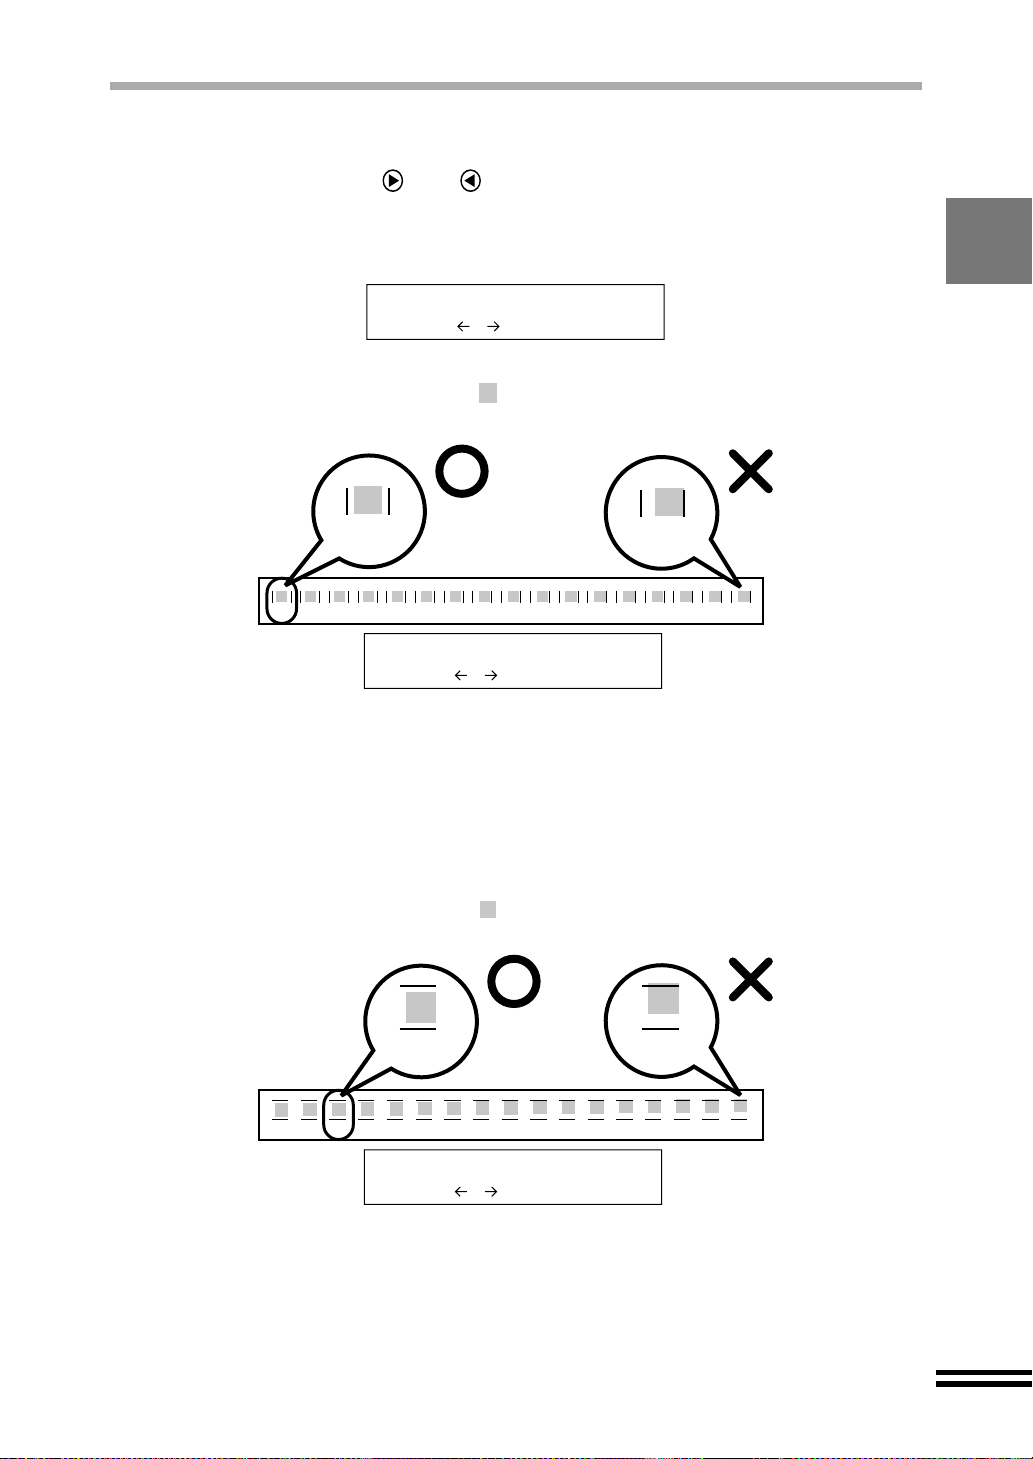
Example
-8
-8 -7 -6 -5 -4 -3 -2 -1 0 +1 +2 +3 +4 +5 +6 +7 +8
+8
Select A pattern
-8 - +
In the example shown above, "-8" shows the most appropriate
chart. Therefore, select "-8" to show on the display panel, and
then press the ENTER button.
Specify the best value for "B Pattern" setting in the same manner.
6
(select from -8 to +8)
Look at the chart B on your test chart. Select the number under
the pattern sample, in which is located the closest to the centre
of the two horizontally parallel lines.
Example
-6 +8
-8 -7 -6 -5 -4 -3 -2 -1 0 +1 +2 +3 +4 +5 +6 +7 +8
Select B pattern
-6 - +
In the example shown above, "-6" shows the most appropriate
chart. Therefore, select "-6" to show on the display panel, and
then press the ENTER button.
17
Page 20
ALIGNING THE PRINT HEADS
Specify the best values for "C Pattern", "D Pa ttern" settings in
7
the same manner. (select from -6 to +6)
Look at the chart C and D on your test chart. Select the
numbers under the pattern samples, which have the straightest
lines.
Example
-6 -5 -4 -3 -2 -1 0 +1 +2 +3 +4 +5 +6
In the example shown above, "+1" shows the straightest line.
Therefore, select "+1" to show on the display panel, and then
press the ENTER button.
-6 +1
Select C pattern
+1 - +
8
9
10
A message asking you to confirm your settings will appear. If
you have entered the desired settings, keep pressing the (or
) "ARROW" button until "2. Yes" a ppears on the second line
of the display panel. Press the "ENTER" button to activate the
new print head setting.
Are you sure?
2.Yes
After "1.No" appears on the seco nd line of the display panel and you press the
"ENTER" button, the message appearing in step 5 will appear in the display panel.
Print a test page to check print quality.
For details refer to "PRINTING A TEST PAGE". (See page 55)
Make sure that the following parameters appear on the display
panel.
Ready to Copy
100% A4 0
18
Page 21

LOADING PAPER
Follow the steps below to load paper into the paper tray or bypass tray.
You can load plain paper and othe r special paper. For detailed information on paper type,
see page 65.
LOADING PAPER INTO THE PAPER TRAY
Remove the output tray , and open the front lid of paper tray .
1
Adjust the guides and shown in the illustration to the width
2
of the paper.
Load the paper.
3
Load the paper so that the side to be copied onto is face down. Make sure to push
the paper to the right side and the rear side of the tray.
19
Page 22

LOADING PAPER INTO THE PAPER TRAY
Move the guides ( , ) to touch the edges of the paper.
4
When loading thick paper
Set the paper knob to the "Thick Paper ( )" setting.
Most paper will be fed correctly from the paper tray. However, if paper is
particularly sti ff or heavy, it sho uld be fed one at a time through th e bypass tray.
This will avoid wrinkling or misfeeding.
Close the front lid of the paper tray by firmly pushing on it’s
5
right edge.
If the length of the paper is longer than the tray, keep the front lid of the tray open
while copying.
Attach the output tray.
6
Place this projection
toward the unit.
20
Page 23

LOADING PAPER INTO THE PAPER TRAY
Pull out the output tray extension to the proper position, and
7
then raise the paper stop guide.
! Be sure that paper is free of rips, dust, wrinkles, and curled or bent edges.
! Make sure all the paper in the stack is the same size and type.
! Fan the paper and tap it against a flat surface before loading into the unit.
2
! The paper tray can hold up to 150 sheets of 75g/m
to keep total thickness of the loaded paper stack below 15mm (0.59").
! When loading paper, ensure there is no space between the paper and the guide,
and check if the gu ide is not set too narro w causing t he paper to ben t. Loading
paper in these ways will result in document skew or a paper jam.
! The paper knob should alw ays be set to the "Nor mal P aper ( )" s etting exc ept
unless while printing on thick paper.
!
After loading the different type or size of paper from previous ones, change the
corresponding settings referring to step 3 of "NORMAL COPYING". (See page 31)
! When not using the unit for an extended period, remove all paper from the paper
tray and store it in a dry p lace. If paper is l eft in the unit for an extende d period,
the paper will absorb moisture from the air, resulting in paper jams.
! When adding new paper to the paper tray, remove the old paper already
contained in the unit, add it onto the new paper. Then load into the paper tra y.
Placing new paper on top of the pap er stack already contain ed in the tray may
result in feeding two sheets at one time.
(20lbs.) plain paper. Be sure
21
Page 24

LOADING THE BYPASS TRAY WITH PAPER
If you wish to print on another paper type not loaded into the main paper tray, use the
bypass feed. Only one sheet of paper can be placed in the bypass tray at a time.
Open the bypass tray located on the rear of the unit.
1
Load the paper so that the side to be copied onto is face up.
2
Align the paper with the right side of the bypass tray.
22
When loading thick paper
Open the bypass tray until it reaches position 2 (the tray has two positions), set the
paper knob to the "Thick Paper ( )"setting.
Load the thick paper copy side up with the flap to the r ight, and then adjus t the opposite
side to the right edge of the tray.
Position 1
Position 2
! The paper knob should a lways b e se t to th e "Normal paper ( )" setti ng exc ept
while printing on thick paper.
!
After loading the different type or size of paper from previous ones, change the
corresponding settings referring to step 3 of "NORMAL COPYING". (See page 31)
The original image must be sm al ler than the paper in the tray. If the original ima ge
is larger than the paper, th is may cause s mudges on t he edges of the o utput a nd
may make the machine dirty inside.
Page 25

OPERATION PANEL PART NAMES AND FUNCTIONS
Check the names and functions of the parts on the operation panel.
OPERATION PANEL PART NAMES AND FUNCTIONS
Refer to the illustration of the operation panel on your unit.
POWER button
Use to turn the unit on/off. (See page 30)
Paper clip tray
Keep paper clips here.
COPY QUALITY button/
COPY QUALITY indicator
Use this button to select the required copy
quality. (See page 34)
ERROR indicator
Turn on this lamp when an error occurs.
(See page 60)
Display panel
Displays the status of the unit, setting
options and the numbe r of pa ges to c opi es .
(See the next page)
COLOUR MODE button/
COLOUR MODE indicat or
Use this button to select colour or black/
white. (See page 34)
CLEAR/STOP button
Press this button to return the number of
copies to "0". Yo u can also pres s this button to
cancel copying. Press the button twice to
return some of the copy settings to the user
default mode. (See page 49)
PAPER SELECT button
Use to select the pa per size and paper type.
(See page 37)
BRIGHTNESS/INTENSITY button
()
Use to set the brightness and intensity.
(See page 35)
()
()
()
(, )
(, )
()
ZOOM button
Use to adjust the reduce/enlarge
percentage setting. (See page 35)
MENU button
Use to change the user program settings or
maintain the unit. (See page 43)
ARROW button
, button
, button
ENTER button
Use this button to fix the selected value for
each setting.
COPY QUANTITY button
Set the num ber of copie s using increa se ( ) /
decrease ( ) button. Simply press the button to
reduce/increase in multiples of "1", and depress
the button for multiples of "5". (See page 34)
START button
Press to start copying. ( See page 34 ) This but ton
is also used to reactivate the unit from the sleep
mode. (See page 46)
()
()
Use the ( ) button to scroll
forward thro ugh the copier
settings, and the ( ) button to
scroll back.
Use the ( ) button to scroll
forward through the setting
values, and the ( ) button to
scroll back. This button can
also be utilised to reduce and
increase the setting value.
Simply press the button to
reduce/increase in mu ltip le s
of "1", and de press the b utton
for multiples of "5".
()
(, )
()
23
Page 26

OUTLINE OF THE DISPLAY PANEL
The display panel indicates the status of the unit with four styles of display as shown below.
Displaying the ready message
Ready to Copy
Indicates the status of the copier.
100% A4 0
Displays the number of copies.
Displays the paper size.
Indicates the reduction/enlargement copy ratio setting.
One of the following characters is displayed when the
setting is active.
"Poster" setting
"Repeat Image" setting R
"Mirror" setting M
Refer to page 35 for the detail of "Poster", "Repeat Image",
and "Mirror" settings.
Displaying the setting options
Example 1:
Displays the setting options.
1.Paper Type
1.Plain Paper
Use the , ARROW buttons to scroll through the
displayed setting options.
Use the , ARROW buttons to scroll through the
displayed setting values.
P
24
Example 2:
1.Variable
100% - +
Displays the setting values.
Displays ( ) when the current setting value appears.
Use the , ARROW buttons to adjust the displayed
setting values.
Page 27

OUTLINE OF THE DISPLAY PANEL
Displaying the status messages
Displays the status of the unit including the warning for no paper, no ink, paper jam and so on.
Example:
Unable to Copy,
Out of Black Ink
Load Paper; Press
Start to resume
Displaying the scrolling screens
When the following items are displayed, the scroll function is accessible for use.
If the unit is ready and any value for copying setting is different from the user default setting,
an asterisk mark will be added to the value and the display will be automatically scrolled.
Example: "Brightness" and "Intensity" settings are different from the user default
setting (See page 43).
Ready to Copy
100% A4 0
Ready to Copy
0
Ready to Copy
Lightest 0
Ready to Copy
0
Ready to Copy
Most Colour 0
Ready to Copy
0
This asterisk mark is
displayed when the
current values are
different from user
default settings.
The automatic scroll function shows the settings in the following order; "1. Zoom/
Paper Size", "2. Brightness", and "3. Intensity".
When the unit is ready, the displa y panel will sh ow the ink colour of low level as scro lling
automatically.
Example: If the black ink is low, the display panel will scroll as shown below.
Ready to Copy
100% A4 0
100% A4 0
Black Ink low
100% A4 0
100% A4 0
The automatic scroll function shows the ink colour in the following order; "1. Black",
"2. Cyan", "3. Magenta", and "4. Yellow".
25
Page 28

OUTLINE OF SETTING OPTIONS
You can change your copier setting s for "PAPER SELECT", "BRIGHT NESS/INTENSITY",
"ZOOM" and "MENU". T o change each set ting, press the relevent button on ce, and press
the (or ) "ARROW" button until the desir ed option name appea rs on the first line in
the display panel. Use the (or ) "ARROW" button to adjust the setting values
displayed on the secon d line of the dis play panel. Aft er select ing the desi red setting, pr ess
the "ENTER" button.
You can switch to different setting options by pressing "PAPER SELECT",
"BRIGHTNESS/INTENSITY", "ZOOM", or "MENU" buttons instead of using the
(or ) "ARROW" button.
"PAPER SELECT" button functions
Setting option
(Appears on the first line.)
(Appears on the second line.)
Setting value
1. Paper Type
(See page 32)
2. Paper Size
1. Plain Paper
1. 8.5x11 2. 8.5x14 3. A4 4. A5
2. Coated Paper
3. Photo Paper
4. Transparency
Default setting value: 1. Plain Paper
(See page 33)
"BRIGHTNESS/INTENSITY" button functions
Setting option
(Appears on the first line.)
1. Brightness
(See page 37)
2. Intensity
(See page 38)
1. Lightest 2. Lighter
1. Least Colour
2. Less Colour
(Appears on the second line.)
Setting value
3. Normal
3. Normal
4. Darker
4. More Colour 5. Most Colour
5. Iron-on
5. B5
Default setting value: 3. A4
5. Darkest
Default setting value: 3. Normal
Default setting value: 3. Normal
6. Card Stock
26
Page 29

"ZOOM" button functions (See page 35)
Setting option
(Appears on the first line.)
(Appears on the second line.)
Setting value
OUTLINE OF SETTING OPTIONS
1. V ariable
2. Zoom
3. AutoFit
4. Poster
5. Repeat Image
6. Mirror
7. Custom
8. A4 to A5
*
8. Zoom
Use the , ARROW buttons to specify the setting between 25% - 400%.
Fixed reduction/enlargement copy ratios: 91%
Displays the paper size currently selected.
Use the , ARROW buttons to specify the setting between 25% - 400%.
Reduction/enlargement copy ratios: 400%
Use the , ARROW buttons to specify the setting between 25% - 400%.
Reduction/enlargement copy ratios: 100%
Use the , ARROW buttons to specify the setting between 25% - 400%.
Reduction/enlargement copy ratios: 100%
Use the , ARROW buttons to specify the setting between 25% - 400%.
Reduction/enlargement copy ratios: 50%
Fixed reduction/enlargement copy ratios: 70%
*
Fixed reduction/enlargement copy ratios: 64%
9. B5 to A5
*
9. Zoom
10. B5 to A4
*
10. 95 percent
11. A5 to A4
*
11. 5.5x8.5 8.5x11
12. Double Size
* The setting options and reduction/enlargement copy ratios shown above are fixed value when
"8.5X11" is selected for the "Paper Default" settings. (See page 47)
Fixed reduction/enlargement copy ratios: 81%
*
Fixed reduction/enlargement copy ratios: 78%
Fixed reduction/enlargement copy ratios: 115%
*
Fixed reduction/enlargement copy ratios: 95%
Fixed reduction/enlargement copy ratios: 141%
*
Fixed reduction/enlargement copy ratios: 129%
Fixed reduction/enlargement copy ratios: 200%
27
Page 30

OUTLINE OF SETTING OPTIONS
"MENU" button functions
Setting option
(Appears on the first line.)
Setting value
(Appears on the second line.)
1.Original Type
(See page 32)
2. Ink Levels
(See page 52)
3. Maintenance
(See page 52)
4. Feature Defaults
(See page 43)
5. Program Timeout
(See page 45)
6. Sleep Mode
(See page 46)
7. Paper Default
(See page 47)
1. Auto
1. Black 2. Cyan 3. Magenta 4. Yellow
1. Clean PrintHead 1 2. Clean PrintHead 2 3. Clean PrintHead 3 4. Clean PrintHead 4
1. Save new
1. 60 seconds
1. 5 minutes
1. 8.5x11 2. A4
2. Text/Graphics
2. Reset
2. 90 seconds
2. 10 minutes
3. Photo/Halftone
3. 30 seconds
3. 15 minutes
4. 15 seconds
Default setting value: 1. 60 seconds
4. None
Default setting value: 1. 5 minutes
Default setting value: 1. Auto
5. Print Test Page
Default setting value: 2. A4
6. Align Print Head
5. None
28
8. Reset Factory
(See page 48)
9. Language
(See page 47)
10. Print Demo Page
11. Annotation
(See page 39)
None
1. American English
7. Nederlands
None
1. Print Pattern
2. Print Position
2. English
8. Svenska
3. Fançais
1. None
1. Top/Right
4. Bottom/Right
2. Confidential
2. Top/Centre
5. Bottom/Centre
4. Español 5. Italiano 6. Deutsch
Default setting value: 2. English
3. Draft 4. Urgent
Default setting value: 1. None
3. Top/Left
6. Bottom/Left
Default setting value: 1. Top/Right
Page 31

Example: Setting the "Paper Size"
1) Press the "PAPER SELECT" button.
OUTLINE OF SETTING OPTIONS
Ready to Copy
100% A4 0
1.Paper Type
1.Plain Paper
2) Press the "ARROW" button.
The "Paper Type" setting screen will switch to the "Paper Size" setting screen.
To go back to the previous setting
option, press ARROW button.
1.Paper Type
1.Plain Paper
2.Paper Size
3.A4
Keep pressing the "ARROW" button until the desired paper size appears. The value
will be fixed to the newly selected paper size by pressing the "ENTER" button.
To go back to the previous setting
value, press ARROW button.
2.Paper Size
3.A4
2.Paper Size
4.A5
Press the "CLEAR/STOP" button ( ) to exit the setting.
29
Page 32

POWER SAVE MODES / PROGRAM TIMEOUT
To reduce overall power consumption, this unit has the "SLEEP MODE" (See page 45) and
the "Auto Shut Off" mode.
Sleep Mode
The following message appears in the display panel while the unit is in the sleep mode.
Sleep Mode; press
Start to begin
Auto Shut Off
The unit automatical ly turns off the power when 60 minutes pa st after the last operation.
Press the "POWER" button ( ) to turn on the unit again.
Program Timeout
When the unit is lef t idl e fo r a spe ci fie d pe ri od a fter c omp let ing cop y j ob, the c ur rent s ett ing
values including reduction/enlargement copy ratio and brightness settings will be cancelled.
These values will return to the initially saved user default settings. (See page 42)
30
Page 33

COPYING
In this chapter, you will learn a variety of copying operations.
NORMAL COPYING
Make sure that the power is on.
1
Make sure that the supplied power code is plugged into a power source. (See
page 11) The unit wi ll automatically turn on the power when it is plugged into a
power source. If the power code is plugged into a power source and the unit is still
off, press the "POWER" button ( ) to turn on the unit.
When the unit is turned on , the following me ssages and values wil l appear on the
display panel, and the unit will be enabled.
Warming up
100% A4 0
Ready to Copy
100% A4 0
Load the original.
2
Loading an original
1)
Open the original cover, and load the original.
When loading the original, place the original face down on the original table and
fit to the scale size shown on the original table.
Place the original face down
on the original table.
Align the corner of the original with the ( ) mark.
31
Page 34

NORMAL COPYING
Gently close the original cover.
2)
The unit can read up to A4 size (Max. 216mm x 297mm) original.
Setting the original type setting
To change the setting, follow the steps below.
1)
Press the "MENU" button, and keep pressing the (or ) "ARROW" button
until the "Original Type" setting is displayed on the first line of the display panel.
1.Original Type
1.Auto Exposure
2)
Keep pressi ng th e (or ) "ARROW" button to adjust the second line shown
of the display panel until it corresponds to the required original type.
Select the desired type from "1. Auto Exposure" (Default setting), "2. Text/
Graphics" and "3. Photo/Halftone" setting values.
3)
Press the "ENTER" button.
A checkmark ( ) will ap pear, indicating the s ele cte d ty pe . A fter d is pl aying the
selected value for one second, the display will return to the ready message.
1.Original Type
2.Text/Graphics
Select the "Paper Type" and "Paper Size" settings to correspond
3
with the paper inse rte d in to th e unit.
To change the setting, follow the steps below.
1)
Press the "PAPER SELECT" button, and keep pressing the (or )
"ARROW" button until the "Paper Ty pe" setti ng is display ed on the fir st line of
the display panel.
1.Paper Type
1.Plain Paper
32
Page 35

NORMAL COPYING
Keep pressing the (or ) "ARROW" button to adjust the second line of the
2)
display panel until it corresponds to the inserted paper type.
The paper setting values are listed below.
Paper type Description
1. Plain Paper
(Default setting)
2. Coated Paper Select this type when copying onto coated paper.
3. Photo Paper Select this type when copying onto photo quality paper.
4. Transparency Select this type when copying onto OHP paper.
5. Iron-on
6. Card Stock
3)
Press the "ENTER" button.
A checkmark ( ) will appear, indicating the selected paper type. After
displaying the selected value for one second, the display will return to the ready
message. Next, specify the paper size.
4)
Press the "PAPER SELECT" button, and keep pressing the (or )
"ARROW" buttons until the "P ape r Siz e" setti ng is dis pl ayed on the first line o f
the display panel.
Select this type when copying onto normal paper.
Select this type when copying onto T-shirt transfer paper.
Select this type when copying onto Cardstock paper.
2.Paper Size
3.A4
5)
Keep pressing the (or ) "ARROW" button to adjust the second line of the
display panel until it corresponds to the size of the inserted paper.
Select the desired size from "1. 8.5x11", "2. 8.5x14", "3. A4" (Default setting),
"4. A5" and "5. B5" setting values.
6)
Press the "ENTER" button.
A checkmark ( ) will appe ar, i ndica ting the se lecte d size. A fter d ispl aying the
selected value for one second, the display will return to the ready message.
When using the Bypass Tray for cop ying, inser t only one she et of pape r at a time
and then pr es s t he "START" button ( ). The paper will be automatically supplied
to the unit, and copy ing wil l sta rt. Yo u c ann ot m ak e c opies of o ri ginal s whi ch have
more than two p ages from th e bypass t ray. When u sing card stock type paper or
thick paper for copying, set the paper knob to ( ). (See page 20)
33
Page 36

NORMAL COPYING
Set the number of copies.
4
If you make a single copy, go to step 5.
If you make multiple copi es, use the ( ), ( ) "COPY QUANTITY" buttons to
specify the number of copies.
Set the number of copies using the increase
( ) / decrease ( ) buttons.
Repeatedly pressing the buttons will increase/decrease
the display in increments of 1.
If either button is pressed and held down, the display will
change in increments of one until 5 is reached and then
will change in increments of 5. (Ex. 10. 15, 20 ...)
! To cancel a multiple copy job, press the "CLEAR/STOP" button ( ).
! You can se t the nu mber of copies up to 50. If yo u wan t to c hang e the num ber of
copies, press the "CLEAR/STOP" button ( ) and set the required number of
copies.
Use the "COLOUR MODE" button to select colour or black/white.
5
You can switch the colour mode indicator by pressing the "COLOUR MODE"
button.
When the upper colour mode indicator is
illuminated, the unit will copy in multicolour.
When the lower indicator is illuminated, the
unit will copy in black and white. Default
setting is "COLOUR"
Use the "COPY QUALITY" button to select copy quality.
6
You can switch the copy quality indicator by pressing "COPY QUALITY" button.
Select the copy quality from four options.
The selections allow you to trade off between
speed and image quality.
Default setting
Example: Moving the indicator upward increases
the speed but decreases the image quality.
Press the "START" button ( ).
7
The unit will start copying. If the unit is set to copy multiple copies, the display
panel will change according to the copy process, as shown below.
Example: If the number of copies is set to "2".
Copying
...
100% A4 2
First page
completed
Copying
100% A4 1
...
Ready to Copy
100% A4 2
Second page
completed
34
! Some of the quality settings cannot be selected depending on the "Paper Type".
! To copy a m onochrome original with the "best" quality, the unit uses colour ink
even if in the "BLACK/WHITE MODE". To make a clear copy, use the "COLOUR
MODE".
Page 37

REDUCING/ENLARGING THE IMAGE SIZE FOR
COPYING
The image size can be redu ced/enlarged for copying between 25% and 400%. You can
also use useful functions such as "Poster", "Repeat Image", and "Mirror" functions.
Set the original on the original table and make sure that the desired
1
size of paper is set in any of the paper trays.
To confirm the s elected paper size, press the "PAPER SELECT" button on the
operation panel, and then keep pressing the (or ) "ARROW" button until the
setting name "Paper Size" setting appears on the first line of the display panel. The
specified paper size will appear on the second line. To change the paper size
setting, refer to the steps on page 33.
Press the "ZOOM" button, and then keep pressing the (or )
2
"ARROW" button until the desired option item is displayed.
5.Repeat Image
100% - +
The default settings of reducing/enlarging operation are shown below.
Zoom setting Default setting
1. Variable (Default setting) 100%
2. Zoom *91%
Displays the paper size currently selected. (Reduces/
3. AutoFit
4. Poster
5. Repeat Image 100% (Copies multiple pages onto a single page.)
6. Mirror 100% (Copies the original as mirror image.)
7. Custom 50%
8. A4 to A5 (AB type) *70%
9. B5 to A5 (AB type) *81%
10. B5 to A4 (AB type) *115%
11. A5 to A4 (AB type) *141%
8. Zoom (Inches) *64%
9. Zoom (Inches)
10. 95 percent (Inches) *95%
11. 5.5x8.5 8.5x11 (Inches)
12. Double Size *200%
Enlarges the size of the output image to fit the printable
area of the paper supplied to the unit.)
400% (Enlarges the size of the output image, and divides it
when copying)
These values are available when A4 sized
paper is selected as default.
*78%
*129%
These values are available when 8.5" x 11"
sized paper is selected as default.
*When these values are changed using (or ) "ARROW" button, setting the name will
be changed to "Variable".
! Reduction/enlargement copy ratios cannot be specified when "AutoFit" is
selected.
! The "Poster" setting is unavailable when copying from the bypass tray.
35
Page 38

REDUCING/ENLARGING THE IMAGE SIZE FOR COPYING
Example:"Poster" setting
For this
Original
In the example, the
printable area of the
original image is enlarged
by 200%. The machine will
automatically determine
the required number of
copy sheets required to
contain the composite
image. To assemble the
sheets to make the final
poster, it will be necessary
to trim the edges of the
paper.
example the
enlargement
is set to
200%.
Copy
Trim the margin
area.
Overlap area
Example:"Repeat Image" setting
Original
Example:"Mirror" setting
Connect all
the pages.
Copy
CopyOriginal
36
Page 39

REDUCING/ENLARGING THE IMAGE SIZE FOR COPYING
To change the reduction/enlargement ratio option, keep pressing
3
the (or ) "ARROW" button, and set the reduction/enlargement
ratio to the desired setting (25% - 400%).
5.Repeat Image
30% - +
Press the "ENTER" button.
4
A checkmark ( ) will appear, indicating the s elected value. After d isplaying the
selected value for one second, the display will return to the ready message.
5.Repeat Image
30% - +
Ready to Copy
R 30% A4 0
After the number of copies entry, and selecting the colour mode
5
and copy quality settings, press the "START" button ( ).
You get copies with the selected reduction/enlargement ratio preference.
To make quick zoom ratio adjustments
Press the "ZOOM" button, and then keep pressing the (or )
1
"ARROW" buttons until the preset ratio which is near to the
desired value is displayed.
Keep pressing the (or ) "ARROW" buttons to reduce/
2
enlarge the zoom ratio to the desired value.
SETTING UP THE PREFERENCES FOR
COPIED IMAGES
Setting brightness
Follow the steps shown below to make the image lighter or darker.
Set the original on the original table and make sure that the desired
1
size of paper is set in any of the paper trays.
See page 33 to confirm the paper sizes in the unit.
Press the "BRIGHTNESS/INTENSITY" button and keep pressing
2
the (or ) "ARROW" button until "Brightness" is shown on
the first line of the display panel.
1.Brightness
3.Normal
37
Page 40

SETTING UP THE PREFERENCES FOR COPIED IMAGES
Keep pressing the (or ) "ARROW" button until the desired
3
setting value is displayed on the second line of the display panel.
Select the desire d value from "1. Lightest", "2. Lighter", "3. Normal" (Default
setting), "4. Darker" and "5. Darkest" setting value.
Press the "ENTER" button.
4
A checkmark ( ) will appear, ind icating the select ed values. After disp laying the
selected value for one second, the display will return to the ready message.
After the number of copies entry, and specifying the colour mode
5
and copy quality settings, press the "START" button ( ).
You get copies with the specified brightness preference.
Setting intensity (Colour copy mode only)
Follow the steps shown below to adjust the intensity of the image.
Set the original on the original table and make sure that the desired
1
size of paper is set in any of the paper trays.
See page 33 to confirm the paper sizes in the unit.
Press the "BRIGHTNESS/INTENSITY" button, and keep pressing
2
the (or ) "ARROW" button until "Intensity" is shown on the
first line of the display panel.
2.Intensity
3.Normal
Keep pressing the (or ) "ARROW" button until the desired
3
setting value is displayed on the second line of the display panel.
Select the desired value fro m "1. Least Colour", "2. Less Colour", "3. Normal"
(Default setting), "4. More Colour" and "5. Most Colour" setting values.
Press the "ENTER" button.
4
A checkmark ( ) will appear, indicating the s elected value. After d isplaying the
selected value for one second, the display will return to the ready message.
2.Intensity
4.More Colour
After the number of copies entry, and specifying the copy quality
5
setting, press the "START" button ( ).
38
You get copies with contrast preference.
Page 41

ADDING AN ANNOTATION ON YOUR COPY
The annotation setting enables you to print one of the preset annotations on one of the
preset positions. Follow the steps shown below to select the a nnotation and position for
your document.
Selecting the print pattern
Select an annotation for your document.
Set the original on the original table and make sure that the desired
1
size of paper is set in any of the paper trays.
See page 33 to confirm the paper sizes in the unit.
Press the "MENU" button, and keep pressing the (or )
2
"ARROW" button until "Annotation" is shown on the first line of the
display panel.
11.Annotation
1.Print Pattern
Keep pressing the (or ) "ARROW" button until "Print Pattern"
3
is shown on the second line of the display panel.
Press the "ENTER" button.
4
1.Print Pattern
1.None
Keep pressing the (or ) "ARROW" button until the desired
5
setting value is displayed on the second line of the display panel.
Select the desired a nno tation fro m "1. None" (Defau lt set ting), "2 . Confidential",
"3. Draft" and "4. Urgent".
39
Page 42

ADDING AN ANNOTATION ON YOUR COPY
Press the "ENTER" button.
6
1.Print Pattern
2.Confidential
A checkmark ( ) will app ear, indica ting the selected annotation. Afte r displaying
the selected value for one second, the display will return to the ready message.
Unless you change the print position from the factory default setting, the
annotation will be print ed at the top right of the paper. For information on setting
the print position, refer to "Selecting the print position" shown below.
After the number of the copies entry, and specifying the colour
7
mode and copy quality setting, press the "START" button ( ).
You get copies with the selected annotation.
! The size of the annotation characters cannot be changed.
! The size of the annotation is not changed even if you reduce or enlarge the copy
image by "Zoom" function.
Selecting the print position
Select a print position for your document.
Set the original on the original table and make sure that the desired
1
size of paper is set in any of the paper trays.
See page 33 to confirm the paper sizes in the unit.
Press the "MENU" button, and keep pressing the (or )
2
"ARROW" button until "Annotation" is shown on the first line of the
display panel.
11.Annotation
1.Print Pattern
Keep pressing the (or ) "ARROW" button until "Print Position"
3
is shown on the second line of the display panel.
Press the "ENTER" button.
4
2.Print Position
1.Top/Right
Keep pressing the (or ) "ARROW" button until the desired
5
position name appears on the second line of the display panel.
40
Select the desir ed value from "1. Top/Right" ( Default setting), "2. Top/Centre",
"3. Top/Left", "4. Bottom/Right", "5. Bottom/Centre" and "6. Bottom/Left".
Page 43

ADDING AN ANNOTATION ON YOUR COPY
Press the "ENTER" button.
6
2.Print Position
5.Bottom/Centre
A checkmark ( ) will appear, indicating the selected position. After displaying the
selected value for one second, the display will return to the ready message.
After the number of the copies entry, and specifying the colour
7
mode and copy quality setting, press the "START" button ( ).
You get copies with the annotation in the selected position.
! The desired annotation will appear on your copy output when "Annotation" is
enabled. To make copies without the annotation it is necessary to select "1.
None" for the "Print Pattern" setting.
! If you select "4. Bottom/Right", "5. Bottom/Centre" or "6. Bottom/Left" for the
"Print Position" when making reduced copy, the annotation is placed off the
normal position.
Guaranteed area and printable area
This unit can copy onto the following area of the paper. To make a clear copy, it is
recommended to fit the original image within the quality guaranteed area.
3mm 3mm
3mm
3mm
Quality guaranteed area
19mm
Printable area
Paper size
19mm
10mm10mm
41
Page 44

ADDING AN ANNOTATION ON YOUR COPY
The print position of the annotation
14mm
14mm
The print position of each value
1.Top/Right
2.Top/Centre
3.Top/Left
Paper size
4.Bottom/Right
5.Bottom/Centre
6.Bottom/Left
42
Page 45

USER PROGRAM
Depending on the user environment, you can save regularly used settings, and change the
factory default settings to suit individual conditions.
SAVING THE USER DEFAULT SETTING
You can save the current settings on the unit as user default settings. Follow the steps shown
below.
You can save the following settings as user default settings; colour mode, copy quality,
brightness, intensity, zoom, and original type. These settings will remain even after once the
power is turned off. (See the next page.)
Press the "MENU" button, and keep pressing the (or )
1
"ARROW" button until "Feature Defaults" is shown on the first
line of the display panel.
4.Feature Defaults
1.Save new
Keep pressing the (or ) "ARROW" buttons until "Save
2
new" is shown on the second line of the display panel.
Press the "ENTER" button.
3
Save the current s ettings as the us er default setti ngs. The follo wing messag e will
appear for one seco nd after the "ENTER" button is pressed. The unit wi ll soon
return to be ready.
Saving new default
settings
! If you do not sav e the des ired setti ngs by "S ave new", th e prev ious settin gs set
as defaults will remain in effect.
! The following settings are saved each time they are specified, and cannot return
to the default settings unless you run the Reset Factory function;
"Program Timeout", "Sleep Mode", "Paper Default" and "Language".
...
43
Page 46

The condition of the setting values
Setting option
Colour mode
Copy quality
Brightness
Intensity
Zoom
Original Type
Paper Type
Paper Size
Copy Quantity
Program Timeout
Sleep Mode
Paper Default Setting
Language
Annotation
Factory default
setting
COLOUR
The third indicator
3. Normal
3. Normal
1. Variable
1. Auto
1. Plain Paper
3. A4
0
2. 60 seconds
1. 5 minutes
2. A4
2. English
1. Print Pattern: 1. None
2. Print Position: 1. Top/Right
User default
setting
Saving the
"Feature Defaults"
Setting value is saved
as a user default setting.
Resetting the
"Feature Defaults"
Return to factory
default setting.
Unable to be saved.
Saved every time the different value is selected.
Unable to be saved.
SAVING THE USER DEFAULT SETTING
Program timeout mode
starts
After pressing twice
the "CLEAR/STOP"
button (
After turning off the power
Return to user default
settings.
1. Print Pattern: 1. None
2. Print Position: 1. Top/Right
)
0
"Reset Factory"
(See page 48)
Return to factory
default settings.
The following settings are saved each time they are specified, and cannot return to
the default settings unless you run the "Reset Factory"; "Paper Type", "Paper Size",
"Program Timeout", "Sleep Mode", "Paper Default", "Language".
RESETTING THE USER DEFAULT SETTING
Press the "MENU" button, and keep pressing the (or )
1
"ARROW" button until "Feature Defaults" is shown on the first
line of the display panel.
4.Feature Defaults
1.Save new
Keep pressing the (or ) "ARROW" button until "Reset" is
2
shown on the second line of the display panel.
4.Feature Defaults
2.Reset
44
Page 47

RESETTING THE USER DEFAULT SETTING
Press the "ENTER" button.
3
The settings saved as the user default settings will return to the values of the
factory default setting.
The following mes sage will appear for one se cond after the "ENTER" bu tton is
pressed. The unit will soon return to be ready.
Resetting feature
defaults
...
PROGRAM TIMEOUT
The following settings wil l return to the user defa ult settings whe n the unit i s left id le for the
specified period after the last copying operation; colour mode, copy quality, brightness,
intensity, zoom, and original type. (See the previous page) Follow the steps shown below to
set the time to elapse before switching over to the program timeout function
Press the "MENU" button, and keep pressing the (or )
1
"ARROW" buttons until "Program Timeout" is shown on the
first line of the display panel.
5.Program Timeout
1.60 seconds
Keep pressing the (or ) "ARROW" butto n until the desired
2
value appears on the second line of the display panel.
Select the desired va lue from "1. 60 seconds"(Default s etti ng), "2. 90 seconds",
"3. 30 seconds" and "4. 15 seconds" setting values.
Press the "ENTER" button.
3
A checkmark ( ) will be added to show th e selected setting. Af ter displaying the
selected value for one second, the display will return to the ready message.
45
Page 48

SLEEP MODE
When the unit is left idle for the sp ecifi ed pe riod of tim e, th e unit wil l a utom ati ca lly e nter the
sleep mode to save energy. Follow the steps listed below to set the time to elapse befo re
switching over to the sleep mode function.
Press the "MENU" button, and keep pressing the (or )
1
"ARROW" button until "Sleep Mode" is shown on the first line
of the display panel.
6.Sleep Mode
1.5 minutes
Keep pressing the (or ) "ARROW" butto n until the desired
2
value appears on the second line of the display panel.
Select the desi red value from "1. 5 minutes" (Default setting), "2. 10 minutes",
"3. 15 minutes" and "4. None" setting values.
Press the "ENTER" button.
3
A checkmark ( ) will be added to show th e selected setting. Af ter displaying the
selected value for one second, the display will return to the ready message.
To make the unit ready from the "Sleep Mode"...
Press the "START" button ( ), ope n t he front cove r, or set pap er on the b ypass
tray.
46
Page 49

CHANGING THE PAPER DEFAULT SETTING
Use this function to c hange the default settin g for paper used by the unit . The reduction/
enlargement copy ratio settings will also changed automatically. Refer to "REDUCING/
ENLARGING THE IMAG E S IZE FOR COPY ING" for m ore infor mation on ma king chang es
to these settings. (See page 35) Follow the step s listed belo w to change the pa per default
setting.
Press the "MENU" button, and keep pressing the (or )
1
"ARROW" button until "Paper Default" is shown on the first line
of the display panel.
7.Paper Default
2.A4
Keep pressing the (or ) "ARROW" butto n until the desired
2
value appears on the second line of the display panel.
Select the desired market from "1. 8.5x11"and "2. A4" (Default setting) setting
values.
Press the "ENTER" button.
3
A checkmark ( ) will be added to show th e selected setting. Af ter displaying the
selected value for one second, the display will return to the ready message.
CHANGING THE LANGUAGE SETTING
Use this function to change the language shown in the display panel. Follow the steps
shown below to change the language setting.
Press the "MENU" button, and keep pressing the (or )
1
"ARROW" button until "Language" is shown o n the first line of
the display panel.
9.Language
2.English
Keep pressing the (or ) "ARROW" button until it shows the
2
desired language setting on the second line of the display
panel.
Select the desire d language from "1. American English", "2. Englis h" (Default
setting), "3. Français", "4. Español", "5. Italiano", "6. Deutsch",
"7. Nederlands", and "8. Svenska" setting values.
Press the "ENTER" button.
3
Keep pressing the (or ) "ARROW" button to display
4
"2. Yes" or "1. No" on the second line of the display panel.
47
Page 50

CHANGING THE LANGUAGE SETTING
Press the "ENTER" button.
5
When you select "2. Yes ", the follo wing mess age will ap pear on the disp lay pa nel
to inform you that the unit is updating the display language. The unit will
automatically return to be ready.
Updating display
language
After displaying the selected "1. No", the display will return to the ready message.
...
RESETTING ALL OPTIONS TO THE FACTORY
DEFAULT SETTING
By using this fu nction, the cur rent settings a nd the user default setting s will be returned to
the factory defa ult settings . Follow t he steps shown below to return all chan ged settings to
the factory default settings.
Press the "MENU" button, and keep pressing the (or )
1
"ARROW" button until "Reset Factory" is shown on the first line
of the display panel.
8.Reset Factory
Press the "ENTER" button.
2
Keep pressing the (or ) "ARROW" button to display
3
"2. Yes" or "1. No" on the second line of the display panel.
Press the "ENTER" button.
4
When selecting "2. Yes", the following message will appear on the display panel to
inform you that all the setting valu es will return to their factory defaults. Th e unit
will automatically return to be ready.
Resetting Factory
Defaults
After displaying the selected "1. No", the display will return to the ready message.
...
48
Page 51

HOW TO USE THE "CLEAR/STOP" BUTTON
"CLEAR/STOP" button functions
Operation Function
Clears the number
of copies setting
Clears setting options
Press once
Stops copying
Clears a part of error
messages
Press twice
Clears all setting
values
Display Description
Example:
Ready to Copy
100% A4 10
Ready to Copy
100% A4 0
Example:
2.Paper Size
3.A4
Ready to Copy
100% A4 0
Example:
Copying
...
100% A4 10
Ready to Copy
100% A4 10
Cancels the error message after solving your problem.
Returns the settings to the user default settings. (When the user
settings have not been entered, the settings will be returned to
the factory default settings.)
Returns the specified number of
copies to "0" when the number of
copies has been set larger than "0".
During selection of a setting option,
returns to the ready message.
Stop copying when in progress.
Restarts a copying by pressing
START button ( ).
49
Page 52

USER MAINTENANCE
This chapter provides you with the daily maintenan ce information. You will learn how to
maintain the unit and the accessories. Fol low the steps shown in this chapter to change,
clean or align the print heads or ink tanks.
THE INK TANK
Read below for information on the ink tank.
Changing the ink tank
When the ERROR indicator on the unit lights, and an error message appears informing you
that no ink remains, change the ink tank specified in the error mess age. Follow the steps
shown below to c hange the ink tan k. When a message appears wa rning y ou that th e level
of remaining ink is low (e.g. "Yellow Ink Low"), it is recommended to change the appropriate
ink tank as so on as possible.
Make sure that the power is on.
1
Open the front cover.
2
Refer to "INSTALLING THE PRINT HEA DS AND THE INK TANK S" for details on
how to open the front cover. (See page 12)
Open the maintenance cover.
3
Refer to "INSTALLING THE PRINT HEA DS AND THE INK TANK S" for details on
how to open the maintenance cover. (See page 13)
Remove the old ink tank.
4
Press the tab to release the ink tank and removed the tank.
Press this tab.
Example: Releasing the yellow ink tank
Unpack the ink tank from its protective wrapping and slowly
5
remove the tape.
Refer to "INSTALLING THE PRINT HEADS AND THE INK TANKS" for details.
(See page 14)
Insert the new ink tank.
6
Refer to "INSTALLING THE PRINT HEA DS AND THE INK TANK S" for details on
how to insert the ink tank. (See page 14)
50
Page 53

THE INK TANK
Close the maintenance cover.
7
Refer to "INSTALLING THE PRINT HEA DS AND THE INK TANK S" for details on
how to close the maintenance cover. (See page 15)
Close the front cover.
8
Refer to "INSTALLING THE PRINT HEA DS AND THE INK TANK S" for details on
how to close the front cover. (See page 15)
Make sure that the display panel shows the following message,
9
and then clean the print head.
When all the ink tanks have been replaced...
The unit automatically cleans both of the print heads.
Cleaning the Print
Head
...
When the black ink tank has been replaced...
Keep pressing (or ) "ARROW" button to display " 1. No" on t he second l ine
and press the "ENTER" button. The unit cleans the black print head. When you
display "2. Yes" on the second line and press the "ENTER" button, the unit cleans
both of the black and colour print heads.
New colour ink?
1.No
When the colour ink tank has been replaced...
Keep pressing (or ) "ARROW" button to display " 1. No" on t he second l ine
and press the "ENTER" button. The uni t cleans the colo ur print head. Wh en you
display "2. Yes" on the second line and press the "ENTER" button, the unit cleans
both of the black and colour print heads.
New black ink?
1.No
When the front cover is opened and then closed without replacing any ink
tank...
Keep pressing (or ) "ARROW" button to display " 1. No" on t he second l ine
and press the "ENTER" button. The unit will not clean the print head and return to
be ready. When you display "2. Yes" on the second line and press the "ENTER"
button, the unit will clean both of the black and colour print heads.
New ink cartridge?
1.No
If a message appears warnin g you that in k tan k is not attach ed co rrectly, return to
step 2 and follow the procedures once more.
Cleaning the Print
Head
...
Cleaning the Print
Head
...
Ready to Copy
100% A4 0
51
Page 54

THE INK TANK
Checking the level of remaining ink
To check the level of remaining ink, follow the steps below.
Press the "MENU" button, and keep pressing the (or )
1
"ARROW" button until "Ink Levels" is displayed on the first line
of the display panel.
2.Ink Levels
1.Black 100%
Keep pressing the (or ) "ARROW" buttons until the ink you
2
want to check is shown on the second line of the display panel.
Select to the d esired ink tank from "1. Black", "2. Cyan", "3. Magenta" and "4.
Yellow" options. The ink tank you selected will be displayed.
2.Ink Levels
4.Yellow 65%
THE PRINT HEAD
Clean the print head
If the test page and a result of a copy are faint or uneven, make sure that you are copying on the
correct side of the paper, and ink levels are sufficient. If these items are OK, then follow the
steps below to clean the print head.
For the print head clean ing, four quality levels are available. Check the copy result, and
then select the most suitable value.
Press the "MENU" button, and keep pressing the (or )
1
"ARROW" button until "Maintenance" is displayed on the first
line of the display panel.
Keep pressing the (or ) "ARROW" button until "Clean
2
PrintHead 1" appears on the second line of the display panel.
You can select the quality level of print head cleaning from the values shown in the
table below.
Condition of print result Setting values for print head cleaning
Faint or blurred image when printing
after a long period of no use, or even
after cleaning the print head with the
values of "Clean PrintHead 2-4".
Slightly faint or blurred image 2.Clean PrintHead 2
Faint or blurred image 3.Clean PrintHead 3
Conspicuously faint or blurred image 4.Clean PrintHead 4
1.Clean PrintHead 1
52
3.Maintenance
2.Clean PrintHead2
Page 55

THE PRINT HEAD
Press the "ENTER" button.
3
The message show n below will appear in th e display panel, and cl eaning of the
print head will start. After finishing cleaning operation, the unit will return to be
ready.
Cleaning the Print
Head
...
Print a test page when "Clean PrintHead 1" is selected. A test
4
page is printed automatically when "Clean PrintHead 2-4" are
selected. Check copy quality the printed test page.
For details refer to "PRINTING A TEST PAGE". (See page 57)
Do not clean the print head mor e than five times. Excessi ve cleaning of the print
head wastes ink. If you ca nnot get a good result a fter cleani ng the p rint head five
times, change the print head. (See below)
Changing the print head
After long periods of use, the print head will become damaged.
Even after cleaning a nd aligning the print head, if c opy quality remains poor , you have to
change the print h ead as it has become damaged. Follow the s teps below to change the
print head.
Make sure that the power is on.
1
Open the front cover.
2
Refer to "INSTALLING THE PRINT HEA DS AND THE INK TANK S" for details on
how to open the front cover. (See page 12)
Open the maintenance cover.
3
Refer to "INSTALLING THE PRINT HEA DS AND THE INK TANK S" for details on
how to open the maintenance cover. (See page 13)
Raise the print head latch.
4
Refer to "INSTALLING THE PRINT HEA DS AND THE INK TANK S" for details on
how to raise the latch. (See page 13)
Remove the old black or colour print head with the ink tank still
5
inserted.
lift it straight up to remove.
53
Page 56

THE PRINT HEAD
Remove the new print head from its protective case.
6
Refer to "INSTALLING THE PRINT HEADS AND THE INK TANKS" for details.
(See page 13)
Insert the new print head.
7
Refer to "INSTALLING THE PRINT HEA DS AND THE INK TANK S" for details on
how to insert the new print head. (See page 13)
Lower the print head latch.
8
Refer to "INSTALLING THE PRINT HEADS AND THE INK TANKS" for details.
(See page 14)
Remove the ink tanks from the old print head and insert them
9
into the newly inserted print head.
Refer to "Changing the ink tan k" for deta il on how to remov e the ink tank from the
print head. (See page 50) And refer to "INSTALLING THE P RINT HEADS AND
THE INK TANKS" for detai ls on how to inser t ink tank into pri nt head. (See page
12)
10
11
12
Close the maintenance cover.
Refer to "INSTALLING THE PRINT HEA DS AND THE INK TANK S" for details on
how to close the maintenance cover. (See page 15)
Close the front cover.
Refer to "INSTALLING THE PRINT HEA DS AND THE INK TANK S" for details on
how to close the front cover. (See page 15)
If a message appears warning you that any of the ink tanks are not attached
correctly, return to step 2 and follow the procedures once more.
Keep pressing (or ) "ARROW" button to display "1. Yes" or
"2. No" on the second line of the display panel, and press the
"ENTER" button.
When all the print heads have been replaced...
New Black head?
1.Yes
Select "Yes".
New Colour head?
1.Yes
Select "Yes".
Cleaning the Print
Head
...
After cleaning the all print heads, the unit will begin to print the alignment
patterns for print head alignment. Align the print heads after that.
Printing
Alignment Patterns
...
54
Refer to "ALIGNING THE PRINT HEADS" for how to al ign the print heads. (See
page 16)
Page 57

THE PRINT HEAD
When the black print head has been replaced...
New Black head?
1.Yes
Select "Yes".
New Colour head?
2.No
Select "No".
New colour ink?
1.No
When the black print head and the colour ink tank have been replaced at the same time, instead of
this message, the following message will appear to inform you that the unit is cleaning the print head.
Select "No".Select "Yes".
Cleaning the Print
Head
...
Printing
Alignment Patterns
...
After cleaning all the print heads, the
unit will begin to print the
patterns
for print head alignment.
alignment
Align the print head after that.
Cleaning the Print
Head
...
Printing
Alignment Patterns
...
After cleaning the black print head, the
unit will begin to
patterns
for print head alignment.
print the
alignment
Align the print head after that.
Refer to "ALIGNING THE PRINT HEADS" for how to al ign the print heads. (See
page 16)
When the colour print head has been replaced...
New Black head?
2.No
Select "No".
New Colour head?
1.Yes
Select "Yes".
New black ink?
1.No
When the colour print head and the black ink tank have been replaced at the same time, instead of
this message, the following message will appear to inform you that the unit is cleaning the print head.
Select "No".Select "Yes".
Cleaning the Print
Head
...
Printing
Alignment Patterns
...
After cleaning all the print heads, the
unit will begin to print the
patterns
for print head alignment.
alignment
Align the print head after that.
Cleaning the Print
Head
...
Printing
Alignment Patterns
...
After cleaning the colour print head, the
unit will begin to
patterns
for print head alignment.
print the
alignment
Align the print head after that.
Refer to "ALIGNING THE PRINT HEADS" for how to al ign the print heads. (See
page 16)
55
Page 58

THE PRINT HEAD
When the print head latch is moved up and down without replacing any print head.
New Black head?
2.No
Select "No".
New Colour head?
2.No
Select "No".
When all the ink tanks are replaced after opening the front cover.
Cleaning the Print
Head
The unit automatically cleans all the print heads.
When the black ink tank is replaced after opening the front cover.
New colour ink?
1.No
Select "No".
Cleaning the Print
Head
The unit cleans only the black
print head.
When the colour ink tanks are replaced after opening the front cover.
New black ink?
1.No
Select "No".
Cleaning the Print
Head
The unit cleans only the colour
print head.
...
...
...
Selected "Yes".
Cleaning the Print
Head
...
The unit cleans all the print
heads.
Selected "Yes".
Cleaning the Print
Head
...
The unit cleans all the print
heads.
56
13
When either of the ink tanks isn't replaced after opening the front cover.
New ink cartridge?
1.No
Selected "Yes".
Select "No".
This unit does not clean
the print heads.
Cleaning the Print
Head
...
The unit cleans all the print
heads.
Run alignment?
1.Yes
Select "Yes".
Select "No".
The unit will begin to print the alignment
patterns for print head alignment. Align
the print heads after that.
Printing
Alignment Patterns
...
The unit will return to be ready.
*Be sure to align the print
heads when you move the
print head latch. Whenever
you raise or lower the print
head latch, the print heads
slip off the right position.
The unit automatically aligns the print head when the print head has been
replaced. Refer to "ALIGNING THE PRINT HEADS" for how to align the print
heads. (See page 16)
Print a test page to check copy quality.
For details refer to "PRINTING A TEST PAGE". (See the next page)
Page 59

PRINTING A TEST PAGE
After changing the ink tank, aligning or cha nging the pr int head, pri nt a test pag e to check
print quality. Follow the steps below to print a test page.
Press the "MENU" button, and keep pressing the (or )
1
"ARROW" button until "Maintenance" appears on the first line
of the display panel.
3.Maintenance
1.Clean PrintHead1
Keep pressing the (or ) "ARROW" button until "Print Test
2
Page" appears on the second line of the display panel.
3.Maintenance
5.Print Test Page
Press the "ENTER" button.
3
The message shown below will appear in the display panel, and a test page will be
printed. After printing, the unit will return to be ready.
Printing
Test Page
...
A white line as shown in the illustration
indicates poor result of the test page.
You must clean the print head in this case.
(See page 52)
57
Page 60

CLEANING AND STORING THE UNIT
Refer to the information below to clean the unit or store it for an extended period of time.
Before cleaning, be sure to turn off the power using the "POWER" button ( ) and
then unplug the power cord.
Cleaning the cabinet
If the cabinet becomes dirty, wipe it with a soft, clean and dry cloth without any waste
thread.
Cleaning the inside of the unit
If the smudge is sticky and hard to remove, wipe it with firmly squeezed wet cloth.
!
When wiping inside the unit, be careful not to hurt yourself with projections inside it.
! Never wip e the portion a round the p rint heads i n the unit. Do ing so will d amage
the print heads.
Never wipe the portion
around the print heads.
Cleaning the original table and original cover
If the cabinet becomes dirty, wipe it with a soft, clean and dry cloth without any waste
thread.
58
Page 61

CLEANING AND STORING THE UNIT
Storing the unit
To ensure no dust or foreign substances enter the machine during storage, follow the steps
below.
Remove the power cord and secure with tape.
59
Page 62

TROUBLESHOOTING
When an error message app ears, or you believe the unit is sufferin g from a malfunction,
refer to the "TROUBLESHOOTING" gui de for assistance. Before contacting your point of
purchase in relation to a problem, refer to the guide below for a possible remedy.
Error message Problem and solution
Unable to Copy,
Out of xxxxx Ink
Load paper; press
Start to resume
Unable to Copy,
Missing xxxxx ink
Unable to Copy,
Missing print head
Unable to Copy,
Incompatible ink
Shipping Lock is on;
Unlock to operate
Cover open; press
tab to remove ink
Clear paper jam
Start to resume
Reset paper knob
Start to resume
Adjust paper knob
for thicker paper
Reset paper knob
for normal paper
Poster not
From Bypass
System error xxxx
Refer to user guide
Pull out power plug.
Remove paper jam.
The displayed ink tank is out of ink. Change the displayed ink tank.
(The ink colour that is empty is indicated on xxxxx.)
The unit is out of paper. Load appropriate paper.
The displayed ink tank is not attached correctly. Attach the ink
tank correctly. (The ink colour that is not attached correctly is
indicated on xxxxx.)
The print head is not set correctly. Reset the print head.
The unit is unable to copy as the ink tank inserted is not
compatible. Use SHARP ink tanks only.
The lock of the scan head is not released.
Close the front cover.
A paper jam has occurred. Remove the jammed paper.
The Paper knob is not set correctly. For Cardstock paper set to
( ),and for all other types of paper, set to ( ).
The "Poster" setting is unavailable with the bypass tray. Load
paper into the paper tray, and set the "Poster" setting.
Unplug the power cord from the outlet and plug again after a few
seconds. If this message still appears, stop using the unit and
contact your point of purchase or the nearest service support centre.
Unplug the power cord from the outlet, remove all the jammed
paper and then plug the power cord.
Page
Page 50
Page 19
Page 12
Page 12
Page 50
Page 9
Page 15
Page 62
Page 20
Page 35
Page 62
CANCELLING AN ERROR MESSAGE
If the ERROR indicator lights, or an error message appears in the display panel, after
dealing with the cause of the problem , press the "CLEAR/STOP" button ( ) or "START"
button ( ). For more information on the possible cause of an error, refer to "IDENTIFYING
UNIT PROBLEMS". (See the next page)
60
Page 63

IDENTIFYING UNIT PROBLEMS
When an error mess age appears, or you believe the uni t is not operating normally (e.g.
copy quality is poor , etc.), refer to the guid e below before contacti ng your nearest service
centre.
The Unit does not operate
If the unit does not operate, first check if the power cord is inserted correctly.
Check 1 Is the power cord firmly plugged into an electrical socket?
Check if the power plug is plugged in correctly.
Check 2 Is the front cover or the maintenance cover open?
If the front cover or mai ntenance cover is open, the unit can not copy an ori ginal. Starti ng
copying, always check if the front cover or the maintenance cover is closed firmly.
Paper problems
If you encounter paper loading/copy out problems, refer to the guide below.
Check 1 Is there too much paper in the paper tray?
Tray 1 can hold up to 150 sheets of plain paper (75g/m2), and the bypass tray can hold
1 sheet of paper only. If too much paper is loaded into the tray, paper supply problems
will occur. Remove some of the paper from the paper tray.
Check 2 Is more than two sheets of paper loaded in the body from the tray?
If more than one s heet o f pap er is loaded i nto th e bod y from the tray conc urrentl y, pa per
supply trouble will occur. Fan the paper and tap them against a flat surface before
loading into the tray.
Check 3 Are the paper guides aligned correctly to the loaded paper?
If the paper guides are set too narrow for the loaded paper, the paper may not be
supplied smoothly. On the other hand, if the paper guides are set too wide, the paper
may be supplied crookedly. Be sure to align the guides correctly to the loaded paper.
Check 4 Is the bypass tray set to the appropriate position for thick paper?
When loading thi ck paper vi a the bypass t ray, open the tray until i t reaches po sition2 (the
tray has two positions), and set the paper knob to ( ).
Check 5 Is the loaded paper too thick or too thin?
Only use paper meeting the SHARP specifications for thickness. The use of nonstandard paper is not recommended.
Check 6 Is the unit on a flat surface?
The unit will not operate correctly when placed on an une ve n surface. Use the unit on a
flat surface.
Check 7 Is the paper curled or folded?
Using curled or old paper may cause paper supply problems. The use of new paper is
recommended.
Check 8 Did you fan the paper before placing into the tray?
Fan the paper, and tap the edge against a flat surface to even the stack before loading
into the unit.
61
Page 64

IDENTIFYING UNIT PROBLEMS
Copying does not run smoothly
Check 1 Have you specified the paper size preference?
After loading differ ent si ze of p aper, m ake s ure to cha nge th e pape r size settin g throu gh
the paper size setting option.
Check 2 Have you changed the "Brightness" or "Intensity" setting options?
Change the "Brightness" and "Intensity" settings appropriately.
Check 3 Is the original table glass dirty?
Clear the dirty portions on the original table glass.
Check 4 Is the original stained or marked?
Use a better quality original.
Check 5 Is the print head dirty?
Clean the print head. (See page 52)
Check 6 Have you align the print heads correctly?
Align the print heads. (See page 16)
Check 7 Is the paper too thick?
Turn the paper knob to "Thick Paper ( )" position.
Use paper of 60g/m
2
- 200g/m2.
Unable to copy
Check 1 Has a paper jam occurred in the paper tray?
Follow the steps below to remove the jammed paper.
Remove the jammed paper.
1)
Open the jam cover on the rear side of the unit by lifting its tab, and then
remove the jammed paper.
If you are unable to remove the jammed paper in this manner, go on to step 2.
62
Page 65

IDENTIFYING UNIT PROBLEMS
Take off the output tray to remove the jammed paper.
2)
Under certain circumstances, the jammed paper can also be accessed by
removing the paper tray.
3)
After closing the jam cover and attaching the output tray, press the "START"
button ( ).
Make sure the "Clear Paper Jam..." message in the display panel has
disappeared.
If the jammed paper cannot be removed easily, do not pull the paper too hard as it
may tear, or you may damage the unit. Do not reuse any sheets of paper that have
jammed.
63
Page 66

APPENDIX
This chapter shows specifications of the unit, supplies, and how to store the supplies.
SPECIFICATIONS
AJ-6000Model
Type
Scanner type
Copy technology
Copy resolution
Scanning resolution
Bit depth
Sensor
1
Copy speed*
Mono
Colour
Scan width
Void area
Min.
Recommendation
Original
Paper
Width
Length
Warm-up time*
2
Continuous copy
Zoom
Paper tray capacity
Paper tray*
Output tray*
Bypass tray
Ink life*
6
Black
Colour
Dimensions (W x D x H)
Weight
Power supply
Power consumption
Operation condition
Idle
Normal
Temperature
Relative humidity
Storage condition
Temperature
Relative humidity
Noise level
1
When using SHARP original data with A4/8.5"x11" paper in the fastest mode.
*
2
*
The values may differ depending on the operating conditions and supplied power voltage.
3
*
Holds up to total thickness of 15mm (0.59") paper stack.
4
*
Holds up to total thickness of 5mm (0.2") paper stack.
5
*
With 75g/m2 (20lbs.) plain paper.
6
*
When using 20.3cm x 25.4cm /8" x 10" size paper at 5% image area in normal usage.
Desktop
Flat-bed
On demand, thermal inkjet
Max. 1200dpi x 1200dpi
600dpi
10bit
Colour CCD
Max. 12.0cpm
Max. 7.0cpm
Max. 216mm x 297mm (8.5" x 11.7")
Top 3mm (0.12"), Bottom 3mm (0.12"),
Left
3mm (0.12")
, Right
3mm (0.12")
Top 19mm (0.75"), Bottom 19mm (0.75"),
Left 10mm (0.39"), Right 10mm (0.39")
Sheet, Book, Max. A4/8.5" x11"
Max. 215.9mm, Min. 182mm
Max. 355.6mm, Min. 257mm
About 10 sec.
50 sheets
25% – 400%
3
Max. 150 sheets of plain paper*
4
Max. 50 sheets of plain paper*
5
5
1 sheet
700 sheets
350 sheets
480mm x 397mm x 274mm (18.9" x 15.6" x 10.8")
12kg (26.4lbs.)
Local voltage ±10% (For this copier's power supply requirement,
see the name plate located on the back of the unit.)
19.00W
50.00W
10 ˚C – 35 ˚C (50 ˚F – 95 ˚F)
20% - 85%
-25 ˚C – 40 ˚C (-13 ˚F – 104 ˚F)
15% – 90%
WA
Sound Power Level L
(1B=10dB)
Copying: 6.6[B], Standby: Background noise level
PA
Sound Pressure Level L
(bystander positions)
Copying: 52[dB(A)], Standby: Background noise level
Noise emission measurement in accordance with ISO 7779.
64
Page 67

SUPPLIES
Ink tank (Black)
Ink tank (Cyan)
Ink tank (Magenta)
Ink tank (Yellow)
Print head (Black type)
Print head (Colour type)
! When storing spare ink tanks and print heads, leave them unopened in their
packaging until you are ready to use them.
! For best results, use ink tanks within 6 months of installation.
PAPER TYPE
Part NumberSupply
AJ-T20B
AJ-T20C
AJ-T20M
AJ-T20Y
AJ-H20B
AJ-H20C
2
– 200g/m
Plain paper
Coated paper
Photo paper
Transparency*
T-shirt transfer
Label
*Be sure to use Sharp recommended transparent films.
60g/m
(16lbs. – 110lbs. index)
2
As a part of our polic y of continuous improvement , SHARP reserves the right to
make design and specification changes for product improvement without prior
notice. The performance specification figures indicated are nominal values of
production units. Ther e may be some deviations from these values in individual
units.
NoteWeightPaper type
Use whiter side for copying.
Use glossy side for copying.
Use rougher side for copying.
65
Page 68

INDEX
A
Aligning the print head ........................... 16
Annotation setting .......................... .. 28, 39
Arrow button..................................... 23, 26
AutoFit.................................................... 35
B
Black ink tank......................... 9, 14, 50, 60
Black print head ......................... 13, 52, 60
Brightness........................................ 26, 37
Brightness/Intensity button... 23, 26, 37, 38
Bypass tray .................................. 8, 19, 21
C
Cabinet................................................... 58
Carriage .............................................8, 12
Clear/Stop button ....................... 23, 44, 49
Colour ink tank........................... 14, 50, 60
Colour mode button.......................... 23, 34
Colour mode indicators .................... 23, 34
Colour print head........................ 13, 52, 60
Confirming the contents ........................... 6
Connecting
− Power cord......................................... 11
Copy quality button ..........................23, 34
Copy quality indicator....................... 23, 34
Copy quantity button ........................ 23, 34
Copying.................................................. 31
D
Display panel................................ 7, 23, 24
Displaying the scrolling .......................... 25
Displaying the status messages............. 25
E
Enter button ..................................... 23, 26
Error indicator............................... 7, 23, 60
Error message.................................. 11, 60
I
Ink tank.........................6, 8, 12, 14, 50, 60
Installing
− Ink tank...............................................14
− Print head........................................... 12
− Tray....................................................10
Intensity............................................ 26, 38
Internal part..............................................8
J
Jam cover.................................................8
L
Language setting..............................28, 47
Level of remaining ink ......................28, 52
Loading an original.................................31
Loading paper
− Bypass tray ........................................21
− Paper tray...........................................19
M
Main features............................................4
Maintenance.....................................28, 50
Maintenance cover...........................13, 15
Menu button .....................................23, 28
Mirror................................................35, 36
N
Normal copying ......................................31
O
Operation panel..................................7, 23
Original cover ...................................31, 58
Original table ....................................31, 58
Original type .....................................28, 31
Output tray................................................7
Output tray extension.............................21
F
Factory default settings.................... 28, 48
Front cover......................................... 7, 12
Front cover fixing knob........................... 12
Front side............................................... 17
G
Guide ..................................................... 19
66
Page 69

P
Paper clip tray.......................... ...... ....... . 23
Paper default setting ........................ 28, 47
Paper knob................................... 7, 20, 22
Program timeout............................... 28, 45
Paper size................................ ...... ....... . 32
Paper size setting............................. 26, 32
Paper type ...... ....... ...... ...... ....... ...... ....... . 65
Paper type setting ............................ 26, 32
Part names and functions
− Front side............................................. 7
− Internal part............. ...... ....... ...... ....... ... 8
− Operation panel ................... ...... ....... . 23
− Rear side..............................................8
Poster............................................... 35, 36
Power button................................ 7, 11, 23
Power cord............................................. 11
Power socket.......................................... 11
Print head..................... 6, 8, 12, 16, 52, 60
Print head latch ................................ 13, 53
Print pattern............................................ 39
Print position ............................ ...... ....... . 40
INDEX
R
Ready message..................................... 24
Rear side.................................................. 8
Reduce/Enlarge .....................................35
Repeat image................................... 35, 36
Resetting the user default setting........... 44
S
Scan head fixing switch............................ 9
Setting brightness .......................... ....... . 37
Setting options ................................. 24, 26
Sleep mode...................................... 28, 46
Specifications.........................................64
Start button ................................ 23, 34, 46
Supplies ................................................. 65
T
Test page............................................... 57
Thick paper ......................................20, 22
Tray............................................ 10, 19, 21
U
Unpacking................................................ 9
User default setting .............. 25, 28, 43, 44
User maintenance..................................50
User program......................................... 43
Z
Zoom button............................... 23, 27, 35
67
Page 70

SHARP CORPORATION
PRINTED IN CHINA
2001C
TINSE0026ESZZ
KS
 Loading...