

Page 1

OPERATION MANUAL
GEBRAUCHSANLEITUNG
MODE D’EMPLOI
MANUAL DE MANEJO
Supplied parts /
MAIN UNIT WALL BRACKET
WANDHALTERUNG FÜR HAUPTGERÄT
SUPPORT MURAL POUR UNITÉ PRINCIPALE
SOPORTE DE PARED UNIDAD CENTRAL
MODEL MODELL
MODÈLE
MODELO
AD-AS10WA
ENGLISH /
Thank you for purchasing this SHARP product.
To obtain the best performance from this product, please read this manual carefully.
It will guide you in operating your SHARP product.
Precautions /
Warning
Install brackets properly by following the operation manual.
Improper installation may cause the main unit to fall leading to injury or damage
to the unit.
To ensure a proper installation, contact your dealer or installer.
During installation, be careful not to pinch your fingers.
The wall should be strong enough to support the weight of the main unit.
(Install into a reinforced area of the wall, e.g., stud.)
Do not put any extra load on the wall brackets. It may cause the main unit to fall
leading to injury or damage to the unit.
Do not modify or change the brackets. It may cause the main unit to fall leading
to injury or damage to the unit.
Caution
This main unit wall bracket is designed exclusively for SHARP’s SD-AS10
(SD-AS10H/SD-AS10W). Use with other products may result in instability
causing injury.
Do not block the ventilation openings of the main unit with anything as this can
cause excessive heat buildup leading to damage to the unit.
Carefully select a mounting position so the unit does not cause any bodily injury.
Never step on or hang from the wall mount bracket as this may cause injury or
damage to the unit. Pay especially close attention to children.
Check the wall strength. SHARP is not liable for accidents caused by insufficient strength of the wall or improper mounting.
Improper installation may cause the main unit to fall.
If you need assistance in installation, contact your dealer or installer.
Wall bracket x 1 Main unit bracket x 1
Screw
(3 mm in diameter x 12 mm) x 2
(3/32” x 1/2”)
(4 mm in diameter x 8 mm) x 2
(1/8” x 3/8”)
Pattern paper x 1 Operation manual x 1
Prepare for mounting /
Screws to mount the wall bracket on the wall are not supplied. Purchase by yourself
according to the material of the wall.
Screw (commercially available) x 6
Consult your dealer or installer about the type.
Dowel (commercially available) x 6 (For concrete walls)
Consult your dealer or installer about the type.
Adhesive tape
Cushions or soft cloths
Tools (including Phillips screwdriver)
Mounting on a wooden wall
Mount on a sturdy part with thickness
of 5 cm (2”) or more.
Do not mount on a thin wall (plywood)
or plaster board.
6
6
5 cm (2") or more
5-6 mm (1/4")
40-50 mm
(1-5/8"- 2")
4-5 mm
(1/8"- 1/4")
9-13 mm
(3/8"- 1/2")
TINSZA122AWZZ
04K R YT
1
Printed in Malaysia
Geduckt in Malaysia
Imprimé en Malaisie
Impreso en Malaysia
5-6 mm (1/4")
Mounting on a concrete wall
Drill holes in the wall and hammer dowels (commercially available) into them.
Drive screws (commercially available) into the dowels.
Hammer in dowels until the open ends are even with the wall.
50-60 mm (2” - 2-3/8”)
8-10 mm (3/8”)
Dowel
(commercially available)
Screw
(commercially available)
Page 2
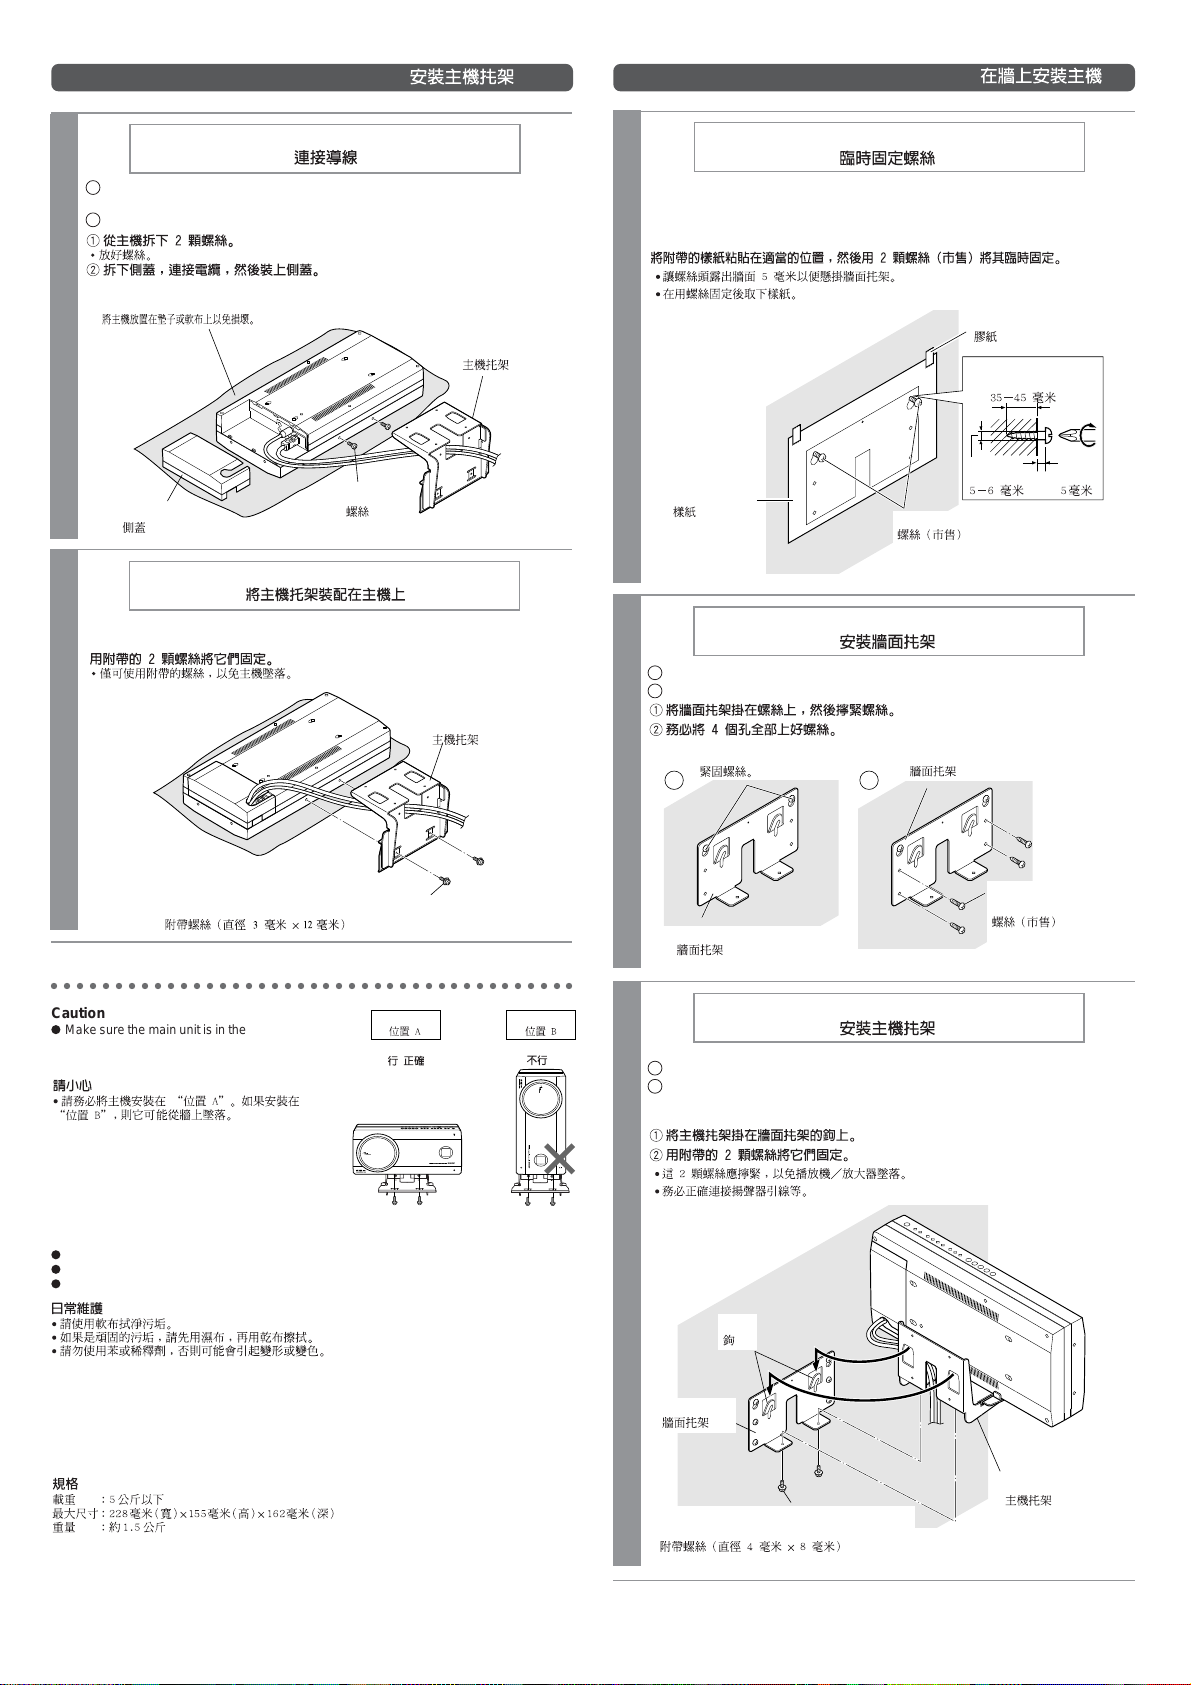
Installing the main unit bracket /
Mounting the main unit on the wall /
Connecting leads
1 Remove the 2 screws from the main unit.
• Keep the screw.
2 Remove the side cover, connect the cables and attach the side cover .
Place the main unit on a cushion or soft cloth to avoid damage.
1
Side cover
Screw
Main unit bracket
Attach the main unit bracket to the main unit
Secure them with the supplied 2 screws.
• Use only the supplied screws to prevent the main unit from falling.
Main unit bracket
2
Fixing screws temporarily
Adhere the supplied paper pattern at an appropriate position and fix
temporarily with 2 screws (commercially available).
• Leave the screw heads 5 mm (1/4”) above the wall to hang the wall bracket.
• Remove the pattern paper after fixing with the screws.
Adhesive tape
1
Pattern paper
Screw (commercially available)
35-45 mm
(1-3/8" - 1-3/4")
5-6 mm
(1/4")
5 mm
(1/4")
Mounting the wall bracket
1 Hang the wall bracket on the screws and tighten them.
2 Make sure all four holes are screwed.
Tighten the screws securely . Wall bracket
1 2
2
Supplied screw (3 mm in diameter x 12 mm)
○○○○○○○○○○○○○○○○○○○○○○○○○○○○○○○○○○○○○○○○○
Caution
Make sure the main unit is in the “Position A”.
If mounted in the “Position B”, it may fall from
the wall.
Maintenance
Use a soft cloth to wipe off dirt.
If the dirt is persistent, use a water dampened cloth and finish with a dry cloth.
Do not use benzine or thinner. Deformation or discoloration may result.
Specifications
Load capacity : 5 kg (11.0 lbs.) or less
Maximum dimensions : 228 mm (W) x 155 mm (H) x 162 mm (D)
Weight : Approx. 1.5 kg (3.3 lbs.)
(9” (W) x 6-1/8” (H) x 6-3/8” (D) )
(3/32” x 1/2”)
Position A
YES Correct
Position B
NO
Screw
(commercially available)
Wall bracket
Mounting the main unit bracket
1 Hang the main unit bracket on the hooks of the wall bracket.
2 Secure them with the supplied 2 screws.
• The 2 screws should be tightened to prevent the main unit from falling.
• Make sure speaker leads, etc. are properly connected.
3
Hook
Wall bracket
Supplied screw (4 mm in diameter x 8 mm)
(1/8” x 3/8”)
Main unit bracket
Page 3

DEUTSCH / FRANÇAIS / ESPAÑOL
5
Vielen Dank für den Kauf dieses SHARP-Produktes.
Lesen Sie dieses Handbuch sorgfältig durch, um eine bestmögliche Leistung zu erreichen.
Es führt Sie in den Betrieb dieses Produkts von SHARP ein.
Nous vous remercions d’avoir porté votre choix sur ce produit SHARP . Pour en tirer le meilleur
parti, veuillez lire ce mode d’emploi très attentivement.
Muchas gracias por haber adquirido este producto SHARP.
Lea atentamente este manual para conseguir el mejor rendimiento del aparato. Le servirá
también como guía operativa de este producto SHARP.
Zur Beachtung / Précautions / Precauciones
Warnung
Nach der Gebrauchsanleitung sind die Halterungen richtig zu montieren.
Falsche Installation kann Fall des Hauptgeräts verursachen, was zu Personenoder Geräteschäden führen kann.
Um eine richtige Installation zu sichern, wenden Sie sich an Ihren Händler oder
Installateur.
Beim Montieren darauf achten, daß Sie sich die Finger nicht klemmen.
Die Wand muß fest genug sein, um das Gewicht des Hauptgeräts tragen zu
können.
(Dies an einem verstärkten Bereich der Wand wie z.B. Wandpfosten montieren.)
Keine zusätzliche Last auf die Wandhalterungen ausüben. Es kann Fall des
Hauptgeräts verursachen, was zu Personen- oder Geräteschäden führen kann.
Niemals die Halterungen modifizieren oder ändern. Es kann Fall des Hauptgeräts
verursachen, was zu Personen- oder Geräteschäden führen kann.
Vorsicht
Diese Wandhalterung für Hauptgerät ist ausschließlich für SD-AS10 (SDAS10H/SD-AS10W) von SHARP bestimmt. Bei der Verwendung mit anderen
Produkten kann es zur Instabilität kommen, wodurch Verletzungsgefahr
entsteht.
Niemals die Belüftungsöffnungen des Hauptgeräts blockieren, da es übermäßige
Wärmeerzeugung verursachen kann, wodurch Feuergefahr entsteht.
Eine Montageposition sorgfältig auswählen, um Personenschänden zu vermeiden.
Niemals auf die Halterungen für Hauptgerät steigen oder davon hängen, da es
zu Personen- oder Geräteschäden führen. Insbesondere auf die Kinder
achtpassen.
Die Wandfestigkeit überprüfen. SHARP kann nicht für Unfälle haftbar
gemacht werden, die aus ungenügender Wandfestigkeit bzw. falscher Installation resultieren.
Falsche Installation kann dazu führen, daß das Hauptgerät fällt.
Wenn Sie eine Installationshilfe brauchen, wenden Sie sich an Ihren Händler
oder Installateur.
Avertissement
Bien monter des supports en suivant le mode d’emploi.
Mal installé, l’appareil principal peut tomber causant une blessure ou un
endommagement.
Pour bien assurer l’installation, contacter le revendeur ou l’installateur.
Lors de l’installation, veiller à ne pas se faire pincer les doigts.
Le mur devra être assez solide pour supporter le poids de l’appareil principal.
(Monter l’appareil sur une zone renforcée, sur une fiche par exemple.)
Ne mettre aucune charge supplémentaire aux supports. L’appareil principal peut
causer, en tombant, une blessure ou un endommagement.
Ne pas modifier ni changer les supports. L’appareil principal peut causer, en
tombant, une blessure ou un endommagement.
Attention
Le support mural pour unité principale a été conçu exclusivement pour le
modèle SD-AS10 (SD-AS10H/SD-AS10W) de Sharp. L’emploi d’autres
produits peut causer l’instabilité qui pourrait provoquer des incidents.
Ne pas obstruer l’ouverture de ventilation de l’appareil principal. La chaleur excessive peut endommager ce dernier.
Bien choisir un endroit pour le montage de l’appareil pour éviter tout risque de
blessure ou de casse.
Ne pas monter sur l’appareil fixé ni s’y raccrocher pour éviter tout risque de
blessure ou de casse. Attention surtout aux enfants.
Bien vérifier le mur. SHARP n’est pas tenu responsable pour des accidents
causés par la solidité insuffisante du mur ou une mauvaise installation.
Mal installé, l’appareil principal risque de tomber.
Si on a besoin d’assistance, s’adresser au revendeur ou à l’installateur.
Advertencia
Instale correctamente soportes siguiendo el manual de manejo.
Si se cayera la unidad principal debido a una instalación incorrecta, podrían
producirse heridas o daños al aparato.
Para asegurar una instalación correcta, póngase en contacto con su distribuidor
o instalador.
Durante la instalación, tenga cuidado de no pillarse los dedos.
La pared debe ser suficientemente fuerte para sujetar el peso de la unidad
principal.
(Instálela en una parte reforzada de la pared, p. ej., taco.)
No imponga ninguna carga extra a los soportes de pared. Podría ocasionar la
caída de la unidad principal y podrían producirse heridas o daños al altavoz.
No modifique ni cambie los soportes. Podría ocasionar la caída de la unidad
principal y podrían producirse heridas o daños al altavoz.
Aviso
Este soporte de pared unidad central está exclusivamente diseñado para
SHARP SD-AS10 (SD-AS10H/SD-AS10W). El empleo de productos no
especificados puede ocasionar la inestabilidad que causarán heridas.
No bloquee las aberturas de ventilación de la unidad principal con ninguno porque
puede causar la acumulación excesiva de calor y podrían producirse daños al
aparato.
Seleccione cuidadosamente una posición de montaje para que el aparato no
cause heridas físicas.
No pise ni se cuelgue del soporte de pared porque podrían producirse heridas o
daños al aparato. Tenga especialmente cuidado con los niños.
Compruebe la resistencia de la pared. SHARP no se hace responsable de
los accidentes causados por una resistencia insuficiente de la pared, ni
por un montaje inadecuado.
Un montaje inadecuado podría causar la caída de la unidad principal.
Si necesita ayuda en la instalación, póngase en contacto con su distribuidor
o instalador.
Mitgelieferte T eile / Pièces livrées / Piezas suministradas
Wandhalterung x 1
Support mural x 1
Soporte de pared x 1
Schraube
(3 mm im Durchmesser x 12 mm) x 2
(4 mm im Durchmesser x 8 mm) x 2
Vis
(3 mm en diamètre x 12 mm) x 2
(4 mm en diamètre x 8 mm) x 2
Tornillo
(3 mm de diámetro x 12 mm ) x 2
(4 mm de diámetro x 8 mm ) x 2
Musterpapier x 1
Maquette x 1
Papel de plantilla x 1
Halterung für Hauptgerät x 1
Support pour unité principale x 1
Soporte de la unidad central x 1
Gebrauchsanleitung x 1
Mode d’emploi x 1
Manual de manejo x 1
V orbereitung für die Montage / Préparer l’installation / Prepare el montaje
Es gehören Schrauben zum Montieren der Wandhalterung an der Wand nicht zum
Lieferumfang. Kaufen Sie diese nach dem Wandmaterial.
Aucunes vis ne sont livrées pour la fixation des supports muraux au mur. S’en procurer
selon la nature du mur.
No se suministran los tornillos para montar el soporte de pared en la pared. Cómprelos
según el material de la pared.
Schraube (im Handel erhältlich) x 6
Für den Typ Ihren Händler oder Installateur konsultieren.
Vis (vendue dans le commerce) x 6
Se renseigner auprès du revendeur ou de l’installateur.
Tornillo (de venta en las tiendas del ramo) x 6
Consulte a su distribuidor o instalador sobre el tipo.
Dübel (im Handel erhältlich) x 6 (Für Betonwand)
Für den Typ Ihren Händler oder Installateur konsultieren.
Tampon (vendu dans le commerce) x 6 (Pour un mur en béton)
Se renseigner auprès du revendeur ou de l’installateur.
Taco (de venta en las tiendas del ramo) x 6 (Para paredes de hormigón)
Consulte a su distribuidor o instalador sobre el tipo.
Klebeband Kissen oder weiche Tücher Werkzeuge (einschließlich Kreuzschlitzschraubenzieher)
Bande adhésive Coussinets ou chiffon doux Outils (tournevis à tête cruciforme, etc.)
Cinta adhesiva Almohadillas o paños suaves Herramientas (incluyendo un destornillador de cabeza en cruz)
Montieren an einer Holzwand
Die Wandhalterung am robusten Teil
mit einer Stärke von 5 cm oder mehr
montieren.
Niemals sie direkt an einer dünnen
Wand (Sperrholz) oder
Gipskartonplatte anbringen.
Fixation sur un mur en bois
Choisir un endroit solide ayant une
épaisseur d’au moins 5 cm.
Éviter un mur mince (contre-plaqué) ou
en plâtre.
Montaje en una pared de madera
Monte en una parte sólida con un
espesor de 5 cm o más.
No monte directamente en una pared
delgada (madera laminada) ni de
cartón-yeso.
Montieren an einer Betonwand
Löcher in die Wand bohren und Dübel (im Handel erhältlich) darin einschlagen.
Schrauben (im Handel erhältlich) in die Dübel schlagen.
Die Dübel einschlagen, bis die offenen Enden mit der Wand abschließen.
Fixation sur un mur en béton
Percer des trous et enfoncer des tampons (vendus dans le commerce) avec un marteau.
Visser des vis dans les tampons.
Les tampons devront être complètement plantés.
Montaje en una pared de hormigón
Abra agujeros en la pared e introduzca tacos (de venta en las tiendas del ramo) en los
agujeros. Introduzca tornillos (de venta en las tiendas del ramo) en los tacos.
Martillee los tacos hasta que los extremos abiertos estén al mismo nivel que la pared.
50-60 mm
8-10 mm
Dübel(im Handel erhältlich)
Tampon(vendu dans le commerce)
Taco(de venta en las tiendas del ramo)
-6 mm
5-6 mm
5 cm oder mehr
5 cm ou plus
5 cm o más
Schraube(im Handel erhältlich)
Vis(vendue dans le commerce)
T ornillo(de venta en las tiendas del ramo)
40-50 mm
4-5 mm
9-13 mm
Page 4

Montieren der Halterungen für Hauptgerät
Montage du support pour unité principale
Instalación del soporte de la unidad central
Montieren des Hauptgeräts an der Wand
Fixation de l’appareil au mur
Montaje de la unidad principal en la pared
Anschließen der Kabel
Raccordement des fils
Conexión de los cables
1 Die 2 Schrauben aus dem Hauptgerät herausdrehen.
• Die Schrauben aufbewahren.
2 Die Seitenabdeckung entfernen, und die Kabel anschließen; danach
die Seitenabdeckung erneut montieren.
1 Retirer les 2 vis qui fixent l’appareil principal.
• Conserver ces vis.
2 Retirer le couvercle latéral, raccorder les câbles et remettre le
couvercle en place.
1 Extraiga los 2 tornillos de la unidad principal.
• Conserve el tornillo.
2 Extraiga la cubierta lateral, conecte los cables y fije la cubierta lateral.
Das Hauptgerät auf ein Kissen oder ein weiches Tuch stellen, um Geräteschäden zu vermeiden.
1
Poser l’appareil principal sur un coussinet ou un chiffon.
Ponga la unided principal en una almohadilla o un paño suave para evitar daños.
Schraube
Seitenabdeckung
Couvercle latéral
Cubierta lateral
Die Halterung für Hauptgerät am Hauptgerät befestigen
Una el soporte de la unidad central a la unidad principal
Diese mit den mitgelieferten 2 Schrauben sichern.
•
Nur die mitgelieferten Schrauben verwenden, um zu verhindern, daß das Hauptgerät fällt.
On les joindra avec 2 vis fournies.
• Utiliser seulement les vis fournies pour éviter la chute de l’appareil.
Fíjelos con seguridad con los 2 tornillos suministrados.
• Emplee sólo los tornillos suministrados para evitar la caída de la unidad principal.
Attacher le support à l’appareil principal
Vis
Tornillo
2
Halterung für Hauptgerät
Support pour unité principale
Soporte de la unidad central
Halterung für Hauptgerät
Support pour unité principale
Soporte de la unidad central
Vorübergehendes Befestigen mit den Schrauben
Fijación provisional de los tornillos
Das mitgelieferte Musterpapier an einer passenden Position kleben und
mit 2 Schrauben (im Handel erhältlich) vorübergehend befestigen.
• Ein Abstand von 5 mm muß zwischen den Schraubenköpfen und der Wand bleiben,
um die Wandhalterung zu hängen.
• Nach dem Befestigen mit den Schrauben ist das Musterpapier zu beseitigen.
Présenter la maquette contre le mur et la fixer temporairement avec 2
vis (vendues dans le commerce).
• La tête de vis devra alors se trouver à 5 mm du mur.
• Après le vissage, retirer la maquette.
Adhiera el papel de plantilla suministrado en una posición apropiada y
fije temporalmente con 2 tornillos (de venta en las tiendas del ramo).
1
•
Deje las cabezas de tornillo sobresaliendo de 5 mm de la pared para colgar el soporte de pared.
• Extraiga el papel de plantilla después de haber fijado con los tornillos.
Musterpapier
Maquette
Papel de plantilla
1 Die Wandhalterung auf die Schrauben hängen und sie festziehen.
2 Sicherstellen, daß alle vier Löcher geschraubt sind.
1 Accrocher le support mural aux vis et serrer ces dernières.
2 On vissera obligatoirement les quatre endroits.
1 Cuelgue el soporte de pared en los tornillos y apriételos.
2 Asegúrese de que estén enroscados todos los cuatro agujeros.
Die Schrauben festziehen.
2
Bien serrer les vis.
Apriete con seguridad los tornillos.
1 2
Vissage temporaire
Klebeband
Bande adhésive
Cinta adhesiva
5-6 mm
Schraube (im Handel erhältlich)
Vis (vendue dans le commerce)
Tornillo (de venta en las tiendas del ramo)
Montieren der Wandhalterung
Montage du support mural
Montaje del soporte de pared
Wandhalterung
Support mural
Soporte de pared
35-45 mm
5 mm
Wandhalterung
Support mural
Mitgelieferte Schraube (3 mm im Durchmesser x 12 mm)
Vis fournie (3 mm en diamètre x 12 mm)
Tornillo suministrado (3 mm de diámetro x 12 mm)
○○○○○○○○○○○○○○○○○○○○○○○○○○○○○○○○○○○○○○○○○
Vorsicht
Sicherstellen, daß das Hauptgerät sich in der
“Position A” befindet. Wenn es in der “Position
B” montiert wird, kann es von der Wand fallen.
Attention
Vérifier que l’appareil principal se trouve en
“Position A”. En “Position B”, il peut se produire
une chute.
Precaución
Asegúrese de que la unidad principal sea en
la“Posición A”. Si se monte en la “Posición B”,
podría caerse de la pared.
Position A
Position A
Posición A
JA Richtig
OUI Correct
SÍ Correcto
Position B
Position B
Posición B
NEIN
NON
NO
Soporte de pared
1 Die Halterung für Hauptgerät auf die Haken der Wandhalterung hängen.
2 Diese mit den mitgelieferten 2 Schrauben sichern.
• Die 2 Schrauben anziehen, um zu verhindern, daß das Hauptgerät fällt.
• Sicherstellen, daß die Lautsprecherkabel usw. richtig angeschlossen sind.
1 Accrocher le support pour unité principale au support mural.
2 On les joindra avec 2 vis fournies.
• Les 2 vis devront être bien serrées pour empêcher l’appareil de tomber.
• Vérifier le bon raccordement des fils, etc.
1
Cuelgue el soporte de la unidad central en los ganchos del soporte de pared.
2Fíjelos con seguridad con los 2 tornillos suministrados.
• Los 2 tornillos se deben apretar para evitar la caída de la unidad principal.
• Asegúrese de que estén conectados correctamente los cables de altavoz, etc.
3
Wartung
Staub mit einem weichen Tuch abwischen.
Wenn noch vorhanden, Staub mit einem mit Wasser angefeuchteten T uch reinigen und mit
einem trockenen nachwischen.
Kein Benzin oder Verdünnungsmittel verwenden. Es kann zur Beeinflussung von Oberfläche und Farbe führen.
Entretien
Nettoyer avec un chiffon doux.
Si la saleté résiste, utiliser un chiffon légèrement humide puis essuyer avec un chiffon sec.
Éviter d’employer du pétrole ou du diluant. Il peut se produire une déformation ou une décoloration.
Mantenimiento
Frote con un paño suave para sacar la suciedad.
Si la suciedad es persistente, emplee un paño mojado con agua y termine con un paño seco.
No emplee bencina ni diluyente. Podría ocasionar deformación o decoloración.
Technische Daten
Tragfähigkeit: 5 kg oder weniger / Max. Abmessungen: 228 mm (B) x 155 mm (H) x 162 mm (T) / Gewicht: ca. 1,5 kg
Fiche technique
Capacité de charge: 5 kg ou moins / Dimensions maximales: 228 mm (L) x155 mm (H) x162 mm (P) / Poids: 1,5 kg environ
Especificaciones técnicas
Capacida de carga: 5 kg o menos / Dimensiones máximas: 228 mm (An) x 155 mm (Al) x 162 mm (Prof) / Peso: Aprox. 1,5 kg
Wandhalterung
Support mural
Soporte de pared
Mitgelieferte Schraube (4 mm im Durchmesser x 8 mm)
Vis fournie (4 mm en diamètre x 8 mm)
Tornillo suministrado (4 mm de diámetro x 8 mm)
Schraube
(im Handel erhältlich)
Vis
(vendue dans le commerce)
Tornillo
(de venta en las tiendas del ramo)
Montieren der Halterung für Hauptgerät
Montage du support pour unité principale
Montaje del soporte de la unidad central
Haken
Crochet
Gancho
Halterung für Hauptgerät
Support pour unité principale
Soporte de la unidad central
 Loading...