

Page 1

LED BACKLIGHT TV
OPERATION MANUAL
Please choose your favourite page from the content.
If you want to close the operation manual, press the
(HOME) button.
Also, if you want to return to the previously displayed page,
press the (BACK) button.
ENGLISH | FRANÇAIS | PORTUGUÊS | РУССКИЙ | 中文 | INDONESIA | ภาษาไทย | TIẾNG VIỆT | ﻲﺑرﻋ | АҒЫЛШЫН | O'ZBEK TILIDA
>>
Page 2

1. Part Names
1-1. TV
1-3. Remote Control Unit
2. Watching TV
2-1. Displaying an External Equipment
Image
2-2. Initial Installation
3. Direct Button Operation
3-1. Changing Channels
3-2. Changing Volume
3-3. MUTE
3-4. AD/MPX
3-5. BROWSER
3-6. YouTube
3-7. HOME
4. On-Screen Display Menu
4-1. Introduction
4-3. On-Screen Display Menu Operation
4-4. Menu Operation Buttons
4-5. Initial setup
4-16. Information
4-22. Picture settings
4-24. Audio settings
4-25. Smart TV
4-30. System options
5. Enjoying Photo/Music/Video Playback
5-1. Preparation
5-3. USB Media Player
5-4. Selecting the Folders to Play Back
5-6. Playing Back Files on a USB Memory
Device/Home Network Server
6. Using LINK Operation
6-1. Controlling HDMI Equipment Using
LINK Operation
7. Using a PC
7-1. Control of the TV
7-7. PC Compatibility Chart
8. Using the Internet
8-1. Connecting to the Internet
8-4. Smart TV
8-7. Entering Text (Software Keyboard)
8-9. Using the Browser
8-14. Using Keyboard and Mouse
8-15. Using Applications via the Internet
9. Appendix
9-1. Troubleshooting
9-3. Troubleshooting - Error Message
9-4. Information on the Software License
for This Product
10. Trademarks
11. Specifications
11-1. TV
11-2. Wireless LAN
12. Dimensional Drawings
12-1. 4T-C50AH1X
Contents
EN Contents
ENGLISH | FRANÇAIS | PORTUGUÊS | РУССКИЙ | 中文 | INDONESIA | ภาษาไทย | TIẾNG VIỆT | ﻲﺑرﻋ | АҒЫЛШЫН | O'ZBEK TILIDA
>><<
Page 3
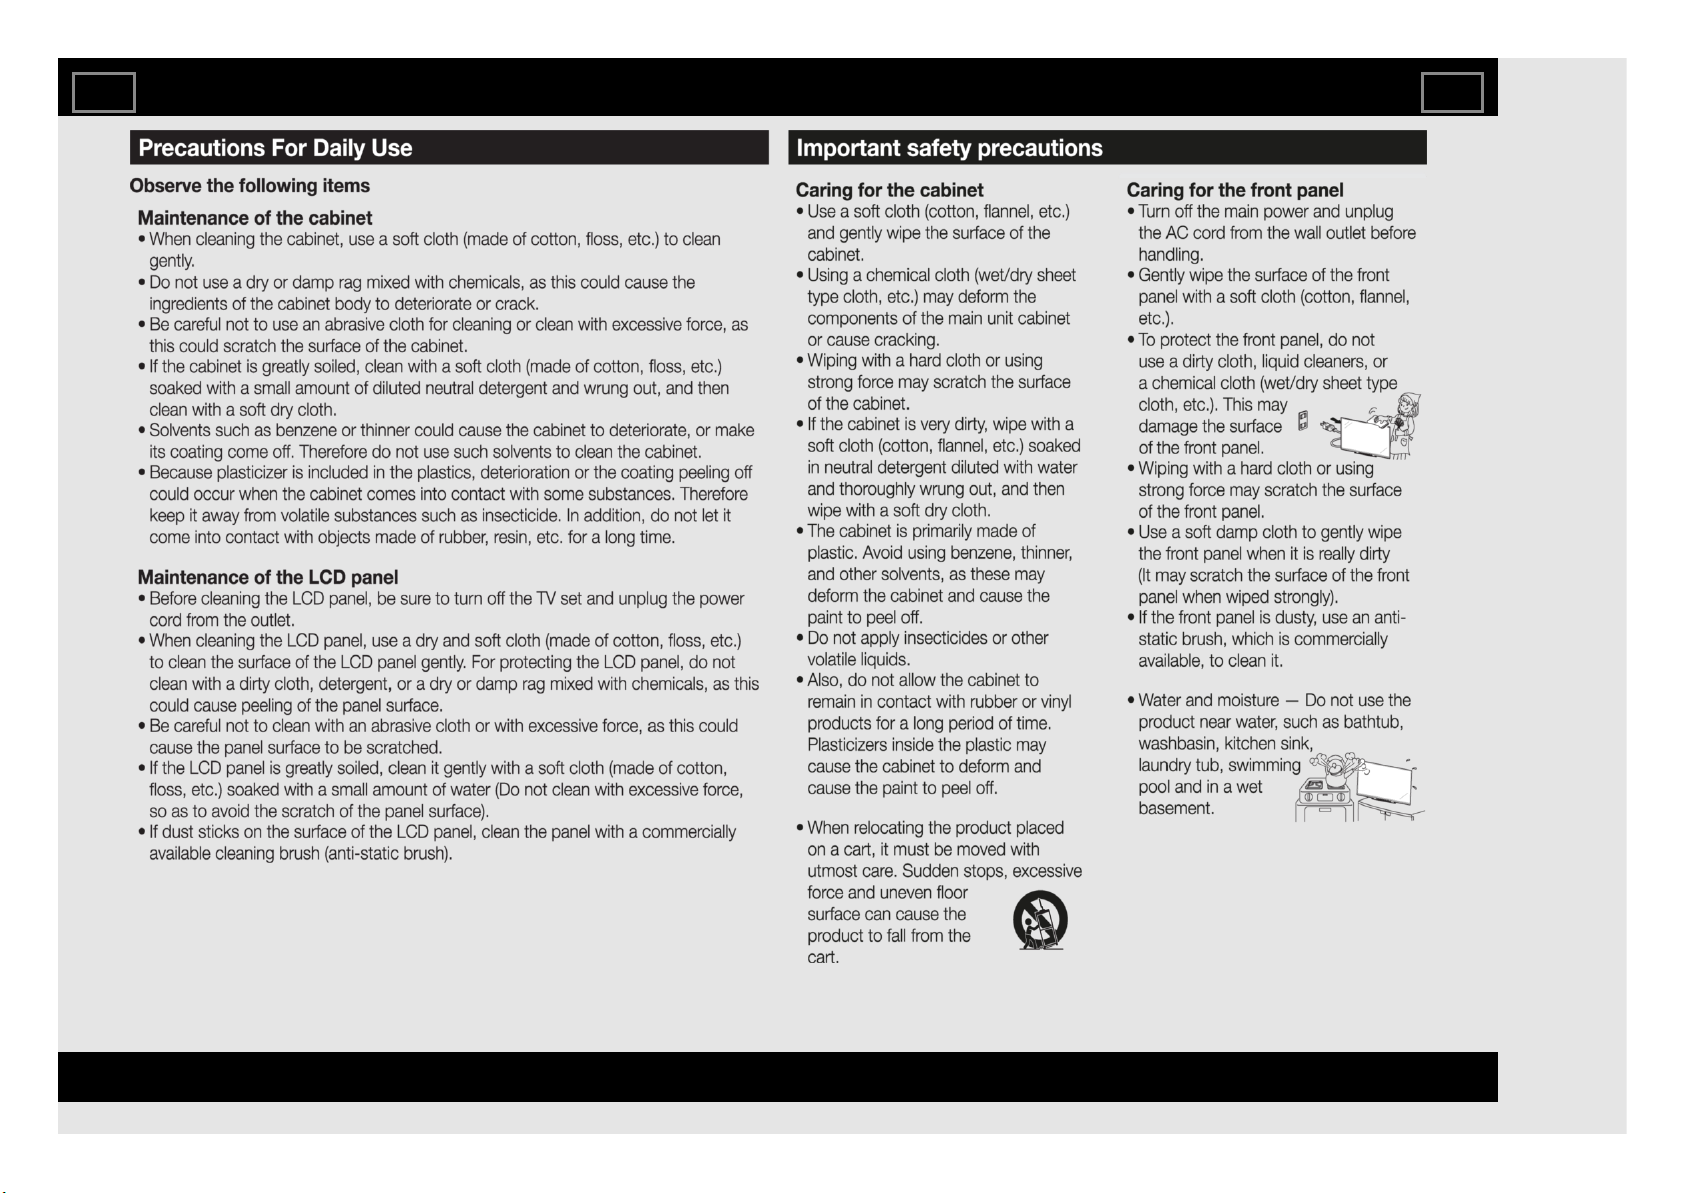
IMPORTANT INFORMATION
EN Important1
ENGLISH | FRANÇAIS | PORTUGUÊS | РУССКИЙ | 中文 | INDONESIA | ภาษาไทย | TIẾNG VIỆT | ﻲﺑرﻋ | АҒЫЛШЫН | O'ZBEK TILIDA
>><<
Page 4
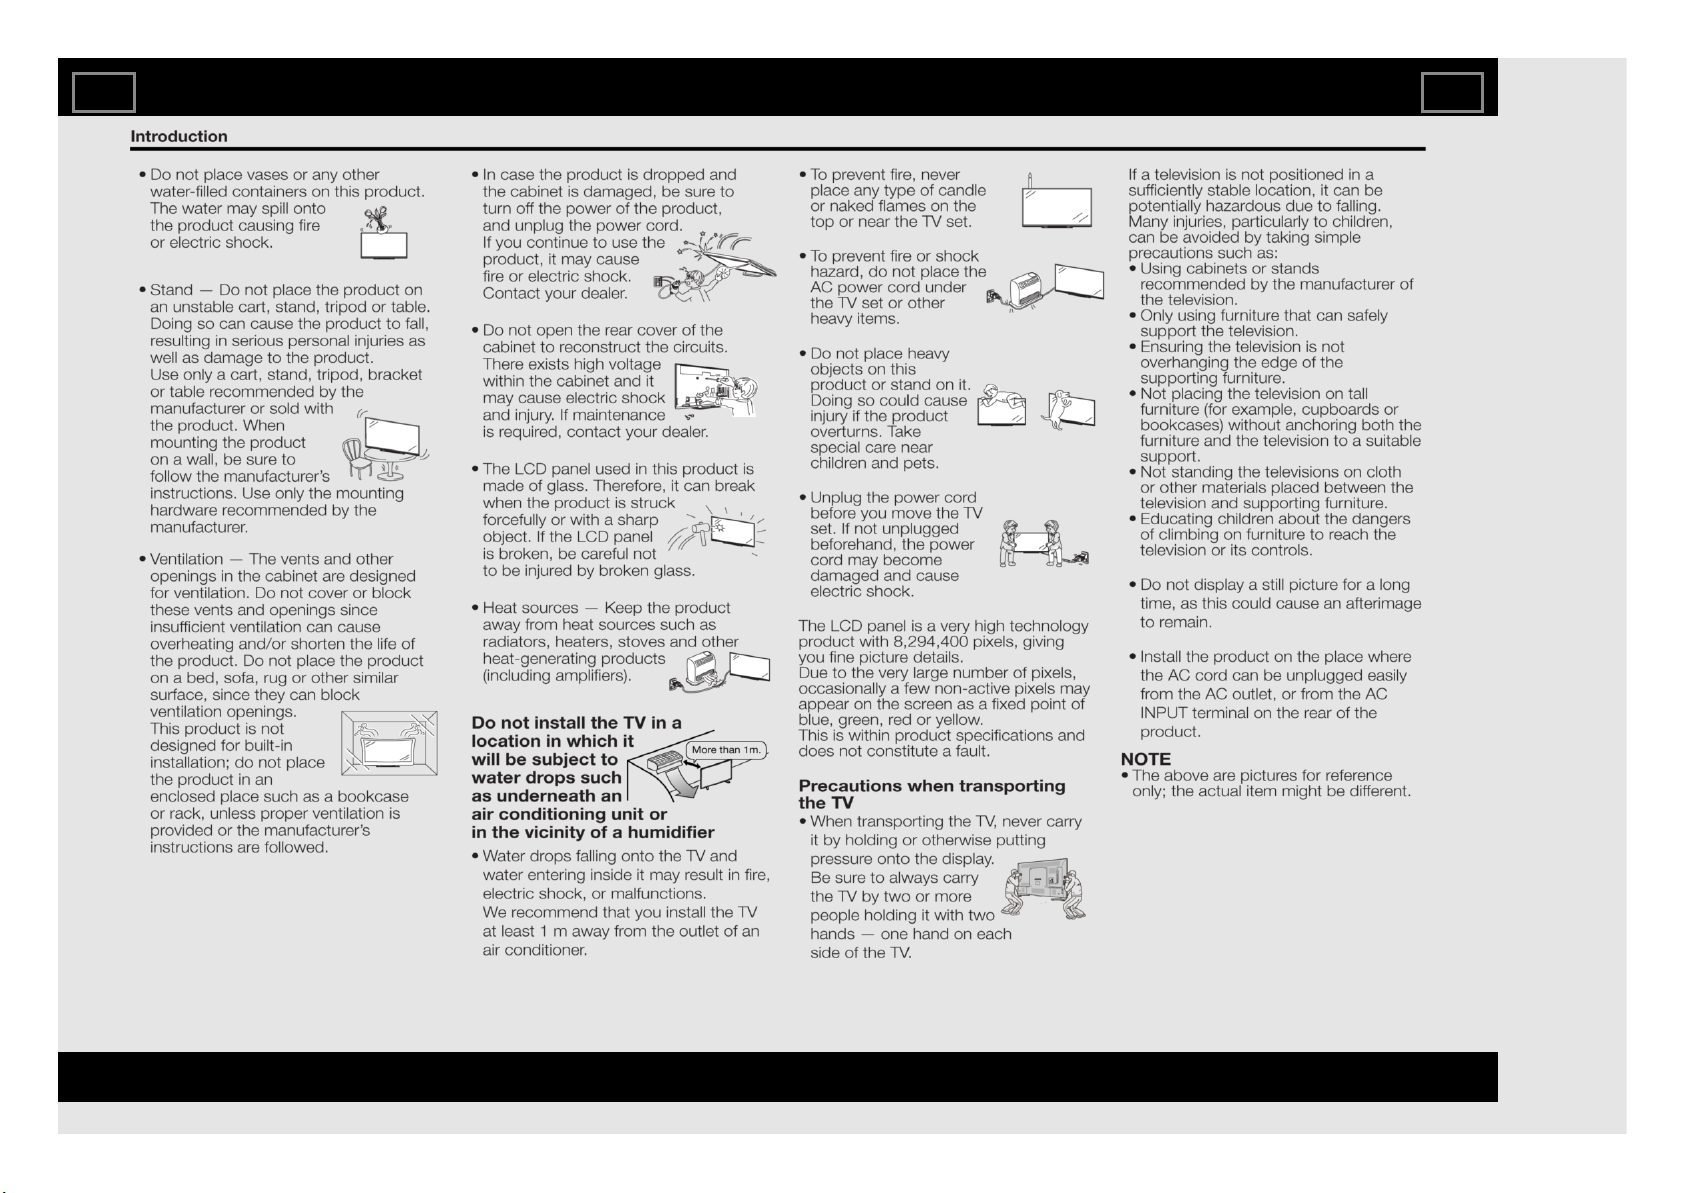
IMPORTANT INFORMATION
EN Important2
ENGLISH | FRANÇAIS | PORTUGUÊS | РУССКИЙ | 中文 | INDONESIA | ภาษาไทย | TIẾNG VIỆT | ﻲﺑرﻋ | АҒЫЛШЫН | O'ZBEK TILIDA
>><<
Page 5
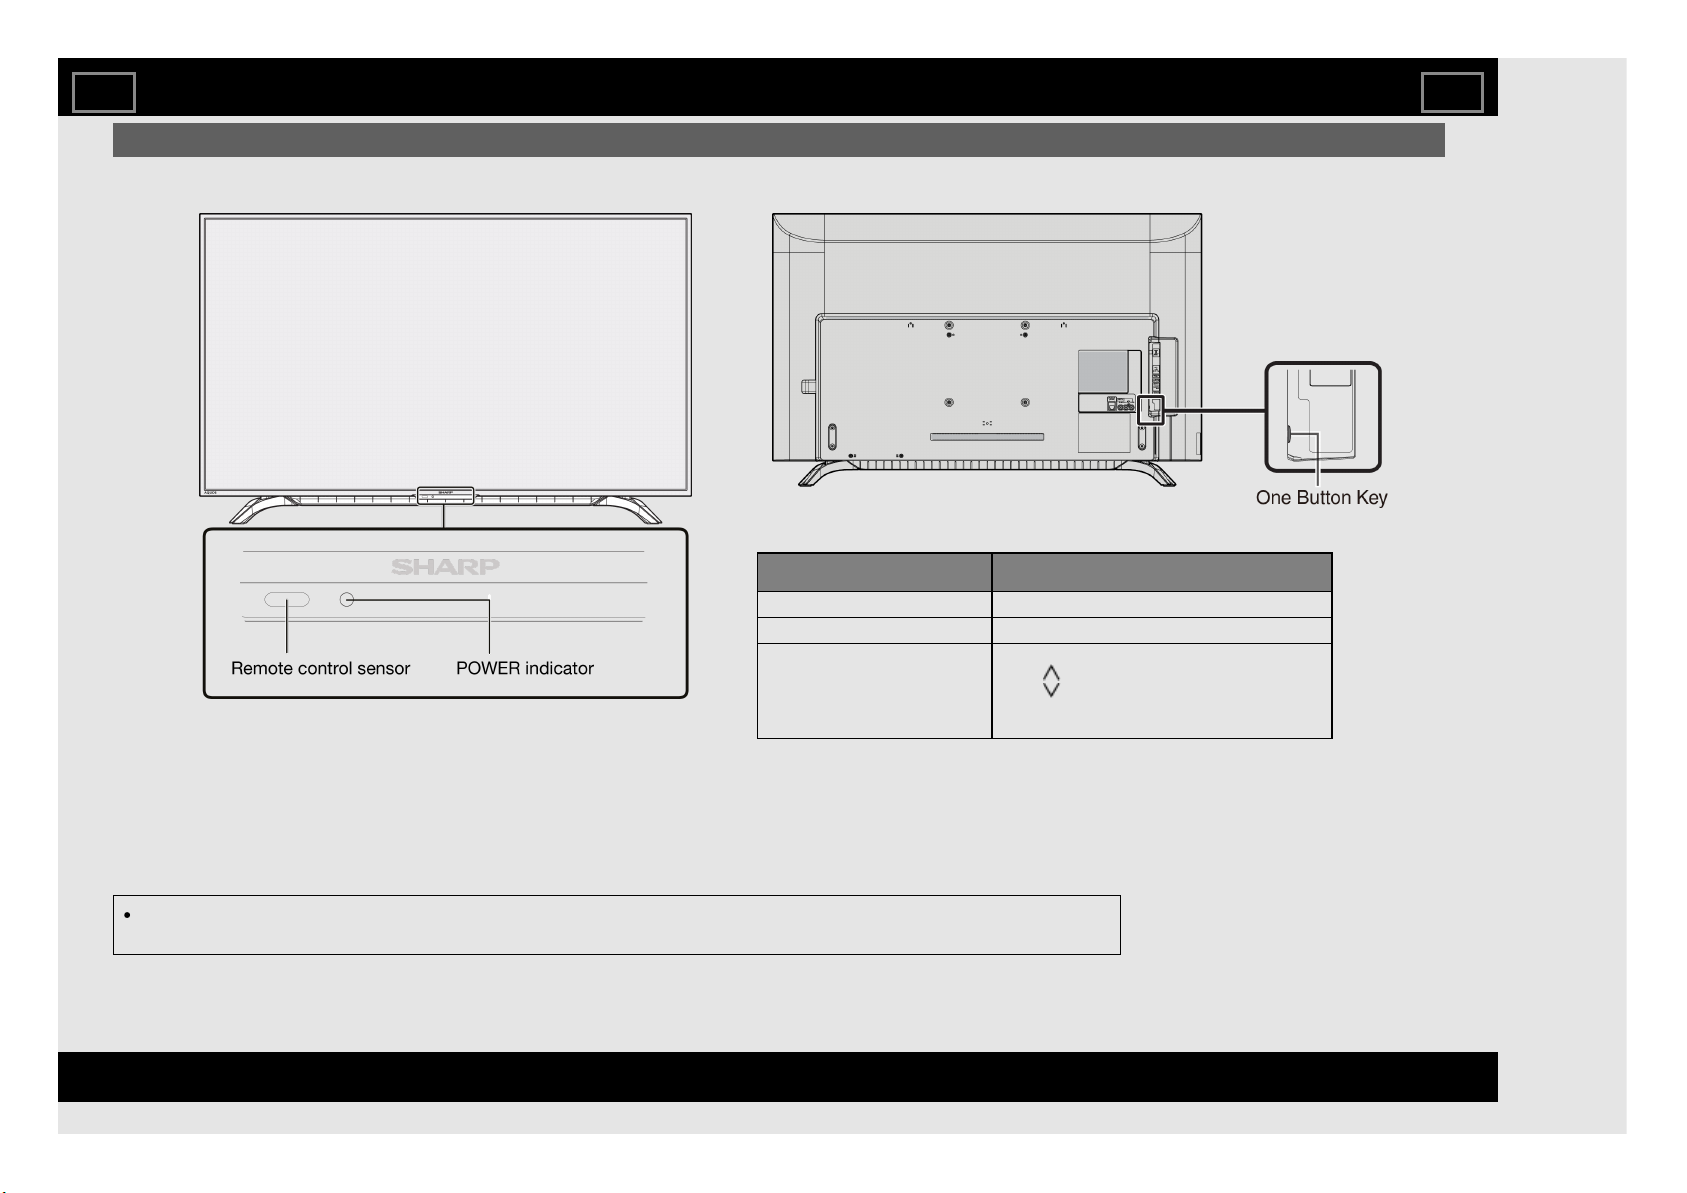
TV
(Front)
(Side)
The illustrations and on-screen displays in this operation manual are for explanation purposes and may vary slightly
from the actual operations.
Part Names
One Button Key Functions Descriptions
Single Press On/Off (No OSD display)
Long Press Sub-menu display on TV screen (10s timeout)
Function During
Menu
1. INPUT*
2. CH *
3. CH *
4. VOL +*
5. VOL -*
* Single Press: Scroll Down
* Hold Press: Select item
EN 1-1
ENGLISH | FRANÇAIS | PORTUGUÊS | РУССКИЙ | 中文 | INDONESIA | ภาษาไทย | TIẾNG VIỆT | ﻲﺑرﻋ | АҒЫЛШЫН | O'ZBEK TILIDA
>><<
Page 6
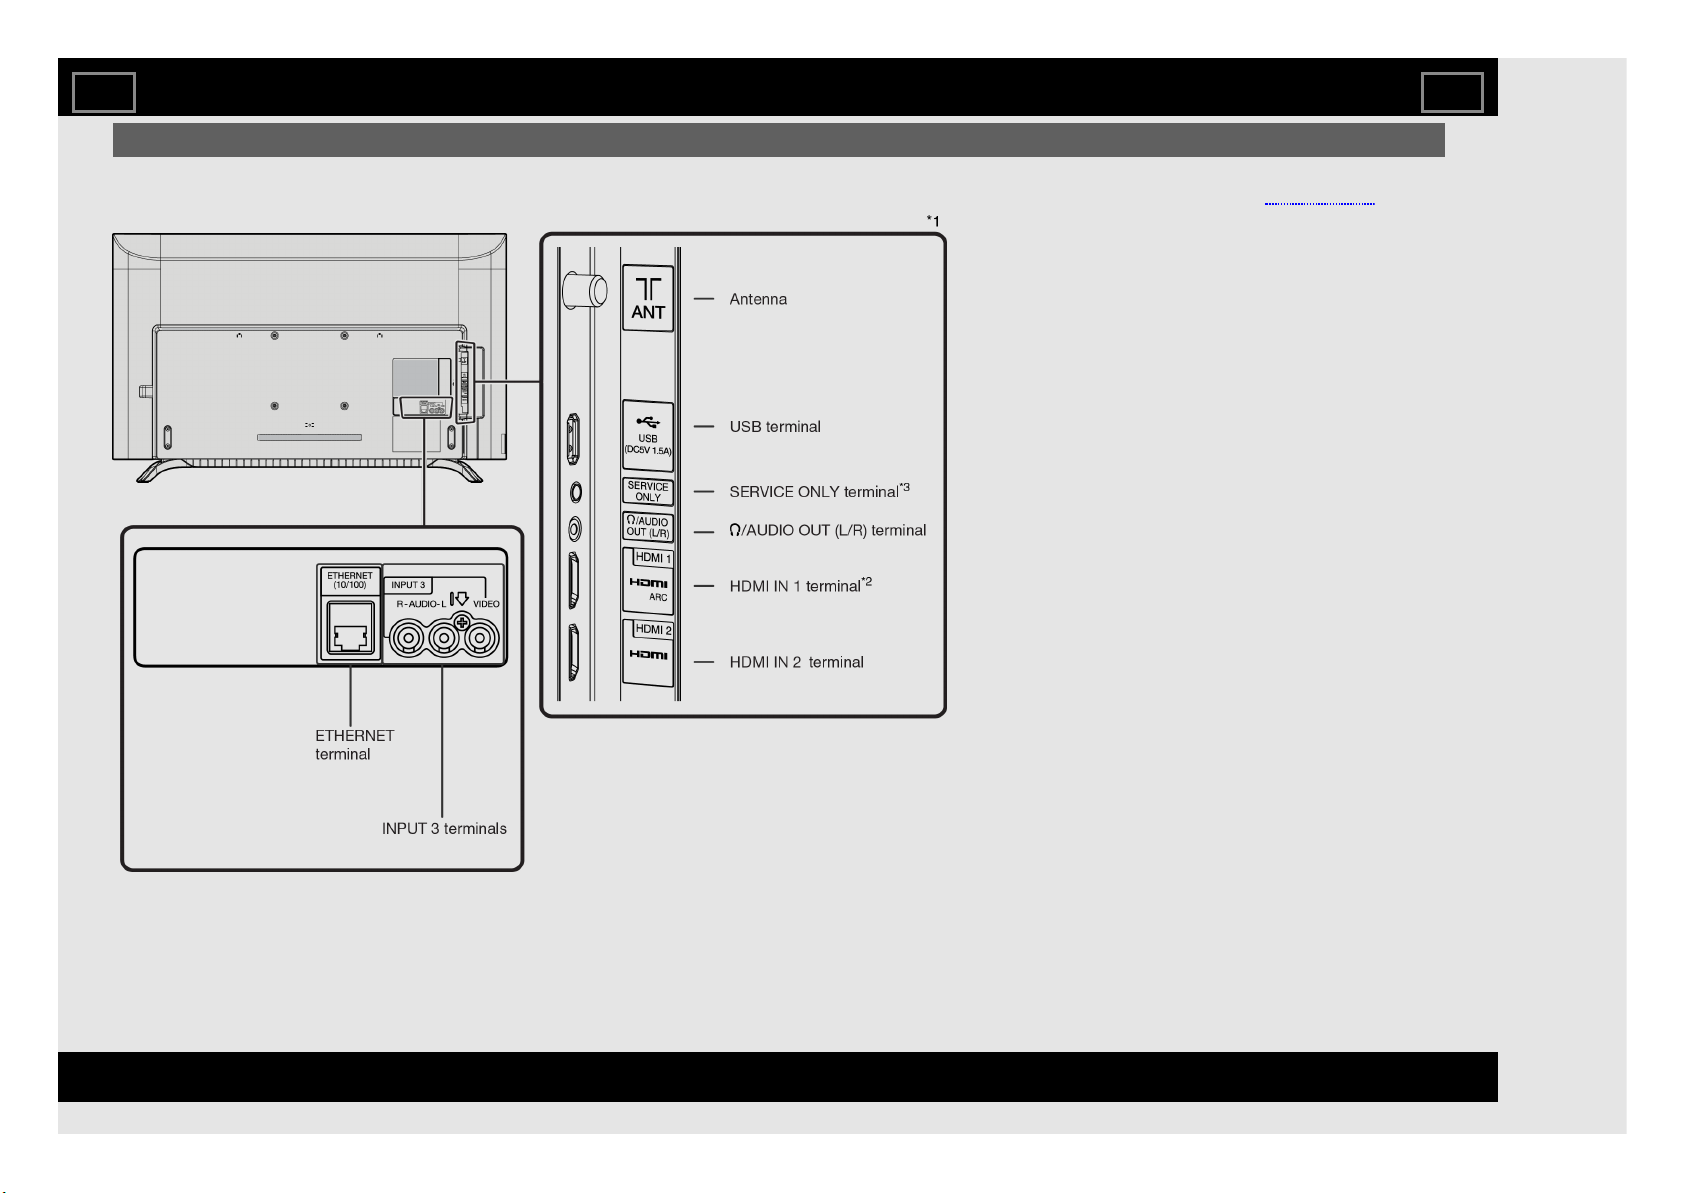
TV (Continue)
(Rear)
*1 See the Setup Guide. And see page 6-1
for external equipment connection.
*2 Use HDMI IN 1 to connect ARC-
compatible equipment.
*3
Usually do not connect anything to this
terminal as it reserved only for service
personnel.
Part Names
EN 1-2
ENGLISH | FRANÇAIS | PORTUGUÊS | РУССКИЙ | 中文 | INDONESIA | ภาษาไทย | TIẾNG VIỆT | ﻲﺑرﻋ | АҒЫЛШЫН | O'ZBEK TILIDA
>><<
Page 7

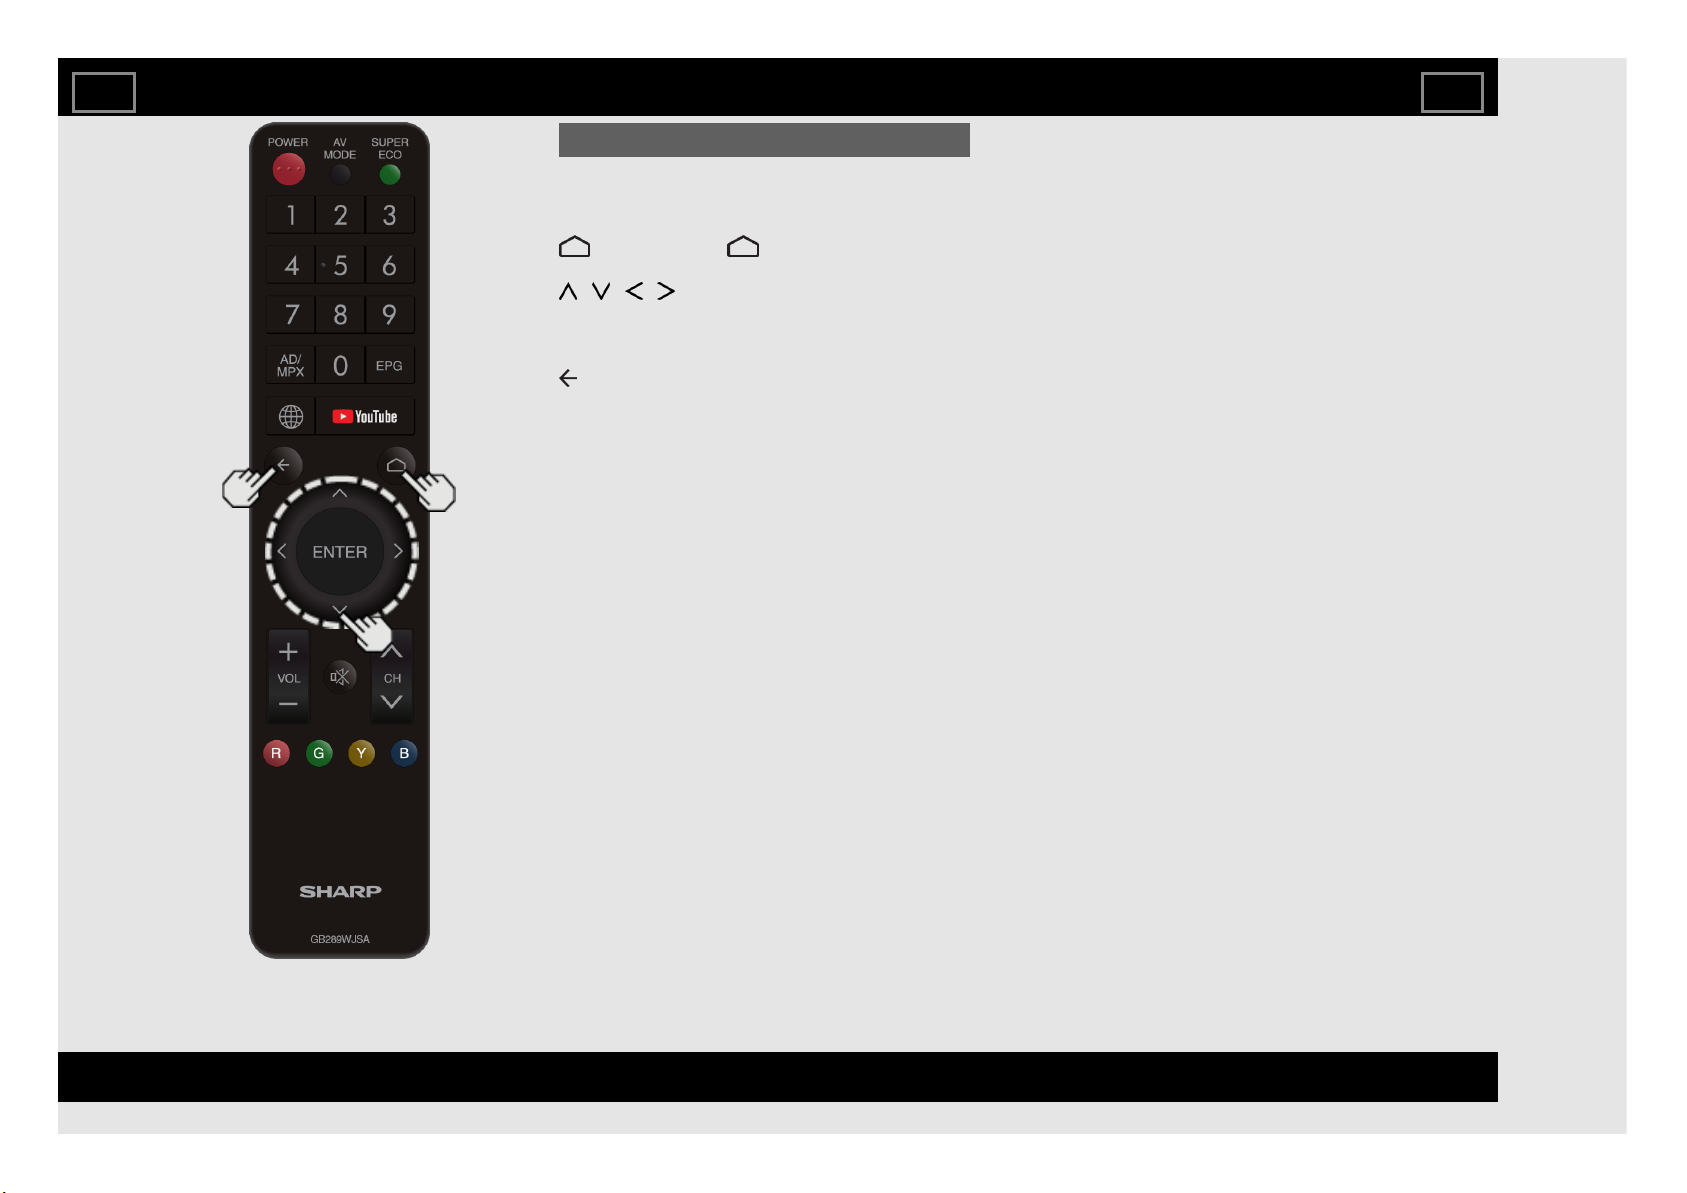
Remote Control Unit
1 POWER: Switch the TV power on or enter standby.
2 0-9: Set the channel. (See page 3-1.)
3 AD/MPX: Select the sound multiplex mode and audio description.
(See page 3-4.)
4 (BROWSER): Display the BROWSER screen.
5 (BACK) : Return to the previous screen.
6 / / / , ENTER: Select a desired item on the screen.
7 VOL+/-: Set the volume. (See page 3-2.)
8 R, G, Y, B: The coloured buttons are correspondingly used to select the
coloured items on the screen.
9 AV MODE: Select the video setting. (See page 4-22.)
10 SUPER ECO: Reduce backlight brightness to save power consumption.
11 EPG
DTV: Display the EPG screen.
12 YouTube: Display the YouTube screen.
13 (HOME): Display the HOME screen. (See page 3-7.)
14 (MUTE): Mute the sound. (See page 3-3.)
15 CH / : Select the channel. (See page 3-1.)
Part Names
EN 1-3
ENGLISH | FRANÇAIS | PORTUGUÊS | РУССКИЙ | 中文 | INDONESIA | ภาษาไทย | TIẾNG VIỆT | ﻲﺑرﻋ | АҒЫЛШЫН | O'ZBEK TILIDA
>><<
Page 8
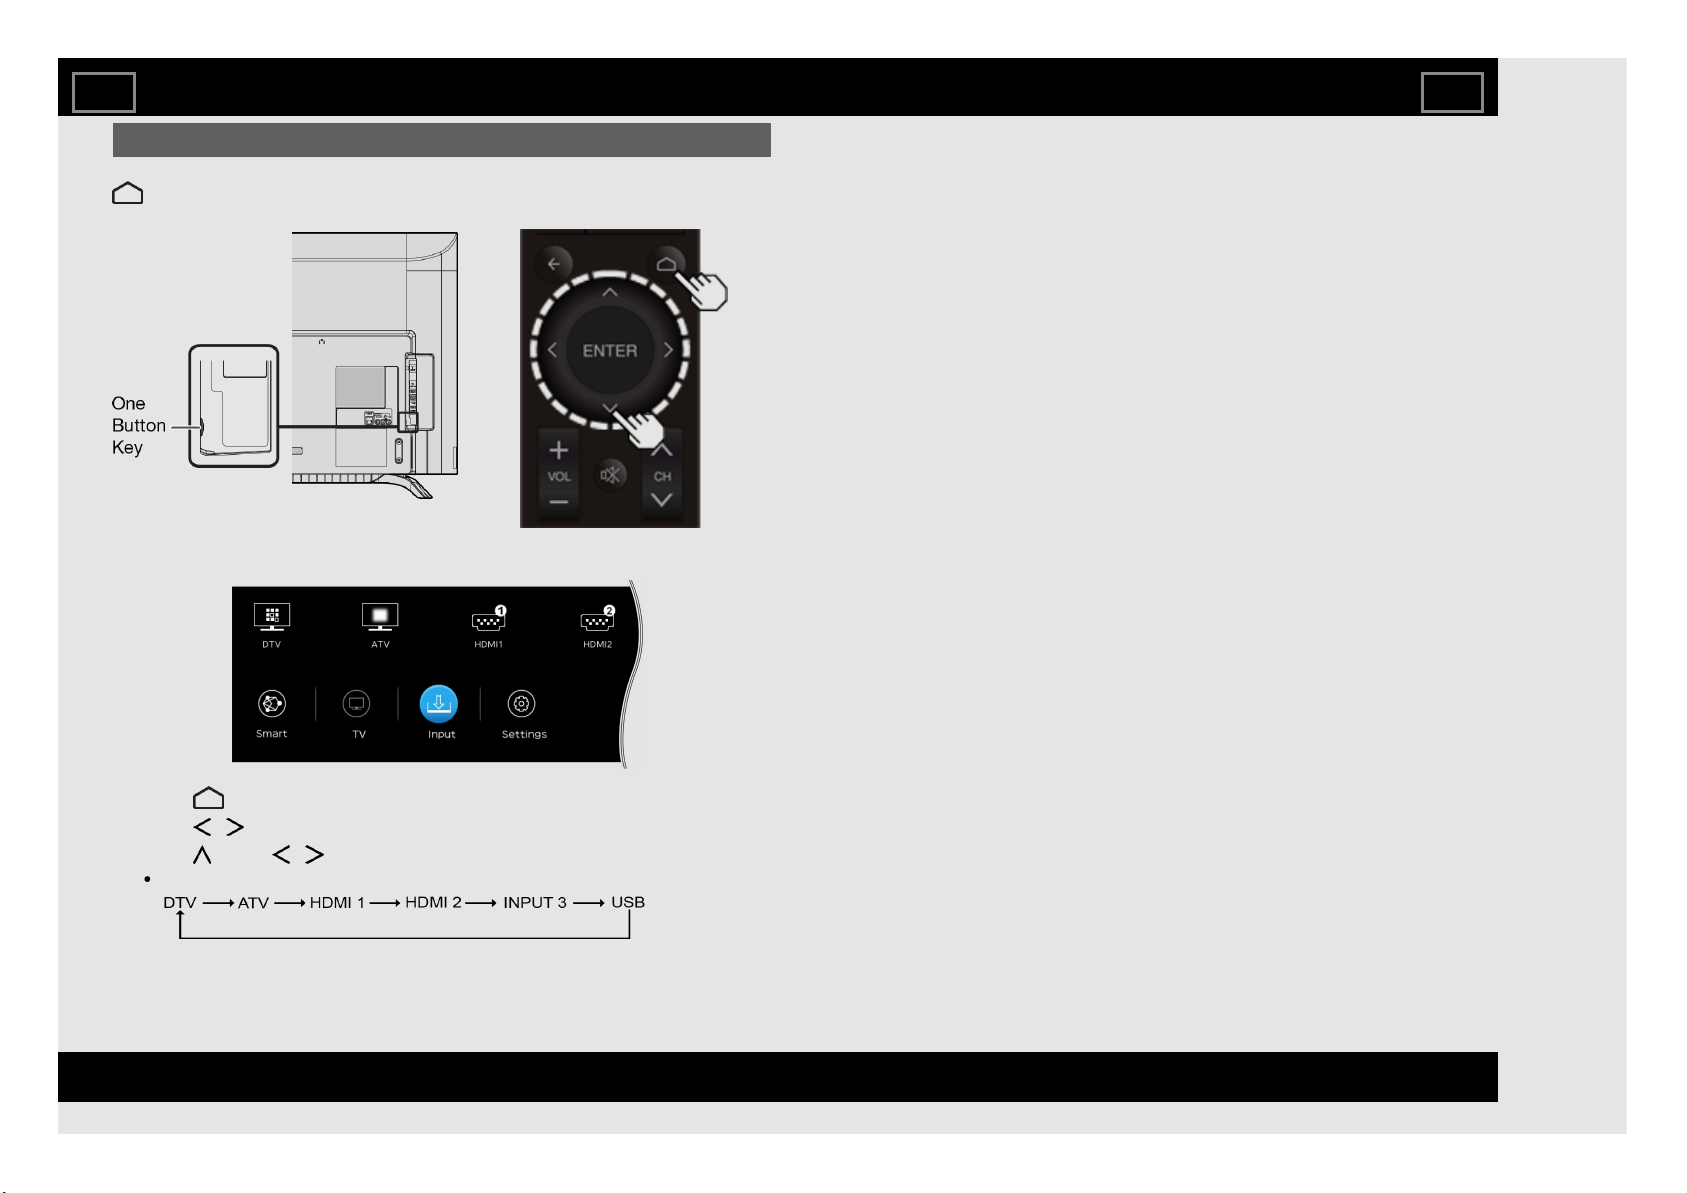
Displaying an External Equipment Image
To view external source images, select the input source by pressing
(HOME) on the remote control unit or One Button Key on the TV.
Watching TV
Example
1 Press (HOME) to display the HOME screen.
2 Press / to select "Input".
3 Press , press / to select the input source, and then press ENTER.
An image from the selected source automatically displays.
EN 2-1
ENGLISH | FRANÇAIS | PORTUGUÊS | РУССКИЙ | 中文 | INDONESIA | ภาษาไทย | TIẾNG VIỆT | ﻲﺑرﻋ | АҒЫЛШЫН | O'ZBEK TILIDA
>><<
Page 9
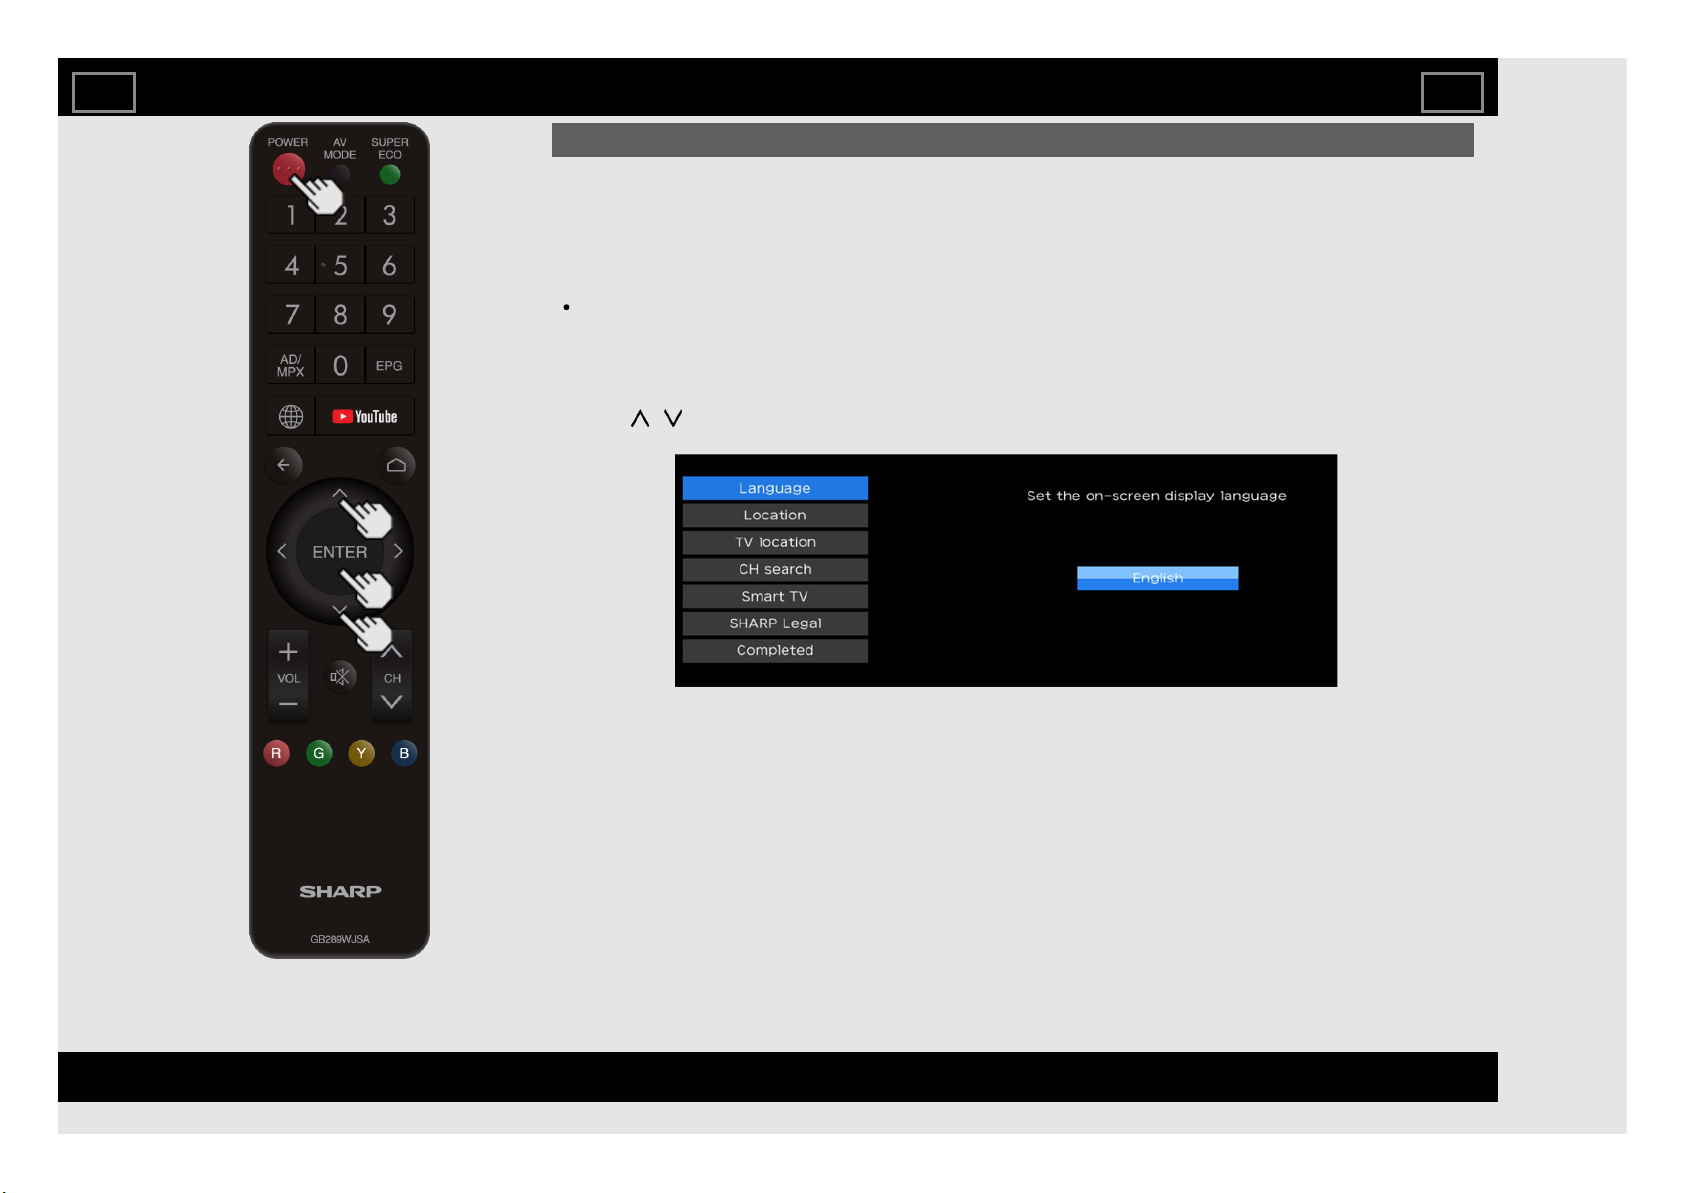
Initial Installation
Perform the following steps before you press POWER on the remote control unit.
1. Insert the batteries into the remote control unit.
2. Connect the antenna cable to the TV.
3. Plug in the AC cord to the AC outlet.
4. Press POWER on the remote control.
The initial auto installation wizard appears. Press ENTER to start the wizard.
Language (Language setting)
Select from among 13 languages. (English, Simplified Chinese, Arabic, French, Portuguese, Russian,
Persian, Thai, Vietnamese, Indonesian, Hebrew, Hindi and Malay)
1 Press / to select the desired language listed on the screen, and then press ENTER.
Watching TV
EN 2-2
ENGLISH | FRANÇAIS | PORTUGUÊS | РУССКИЙ | 中文 | INDONESIA | ภาษาไทย | TIẾNG VIỆT | ﻲﺑرﻋ | АҒЫЛШЫН | O'ZBEK TILIDA
>><<
Page 10
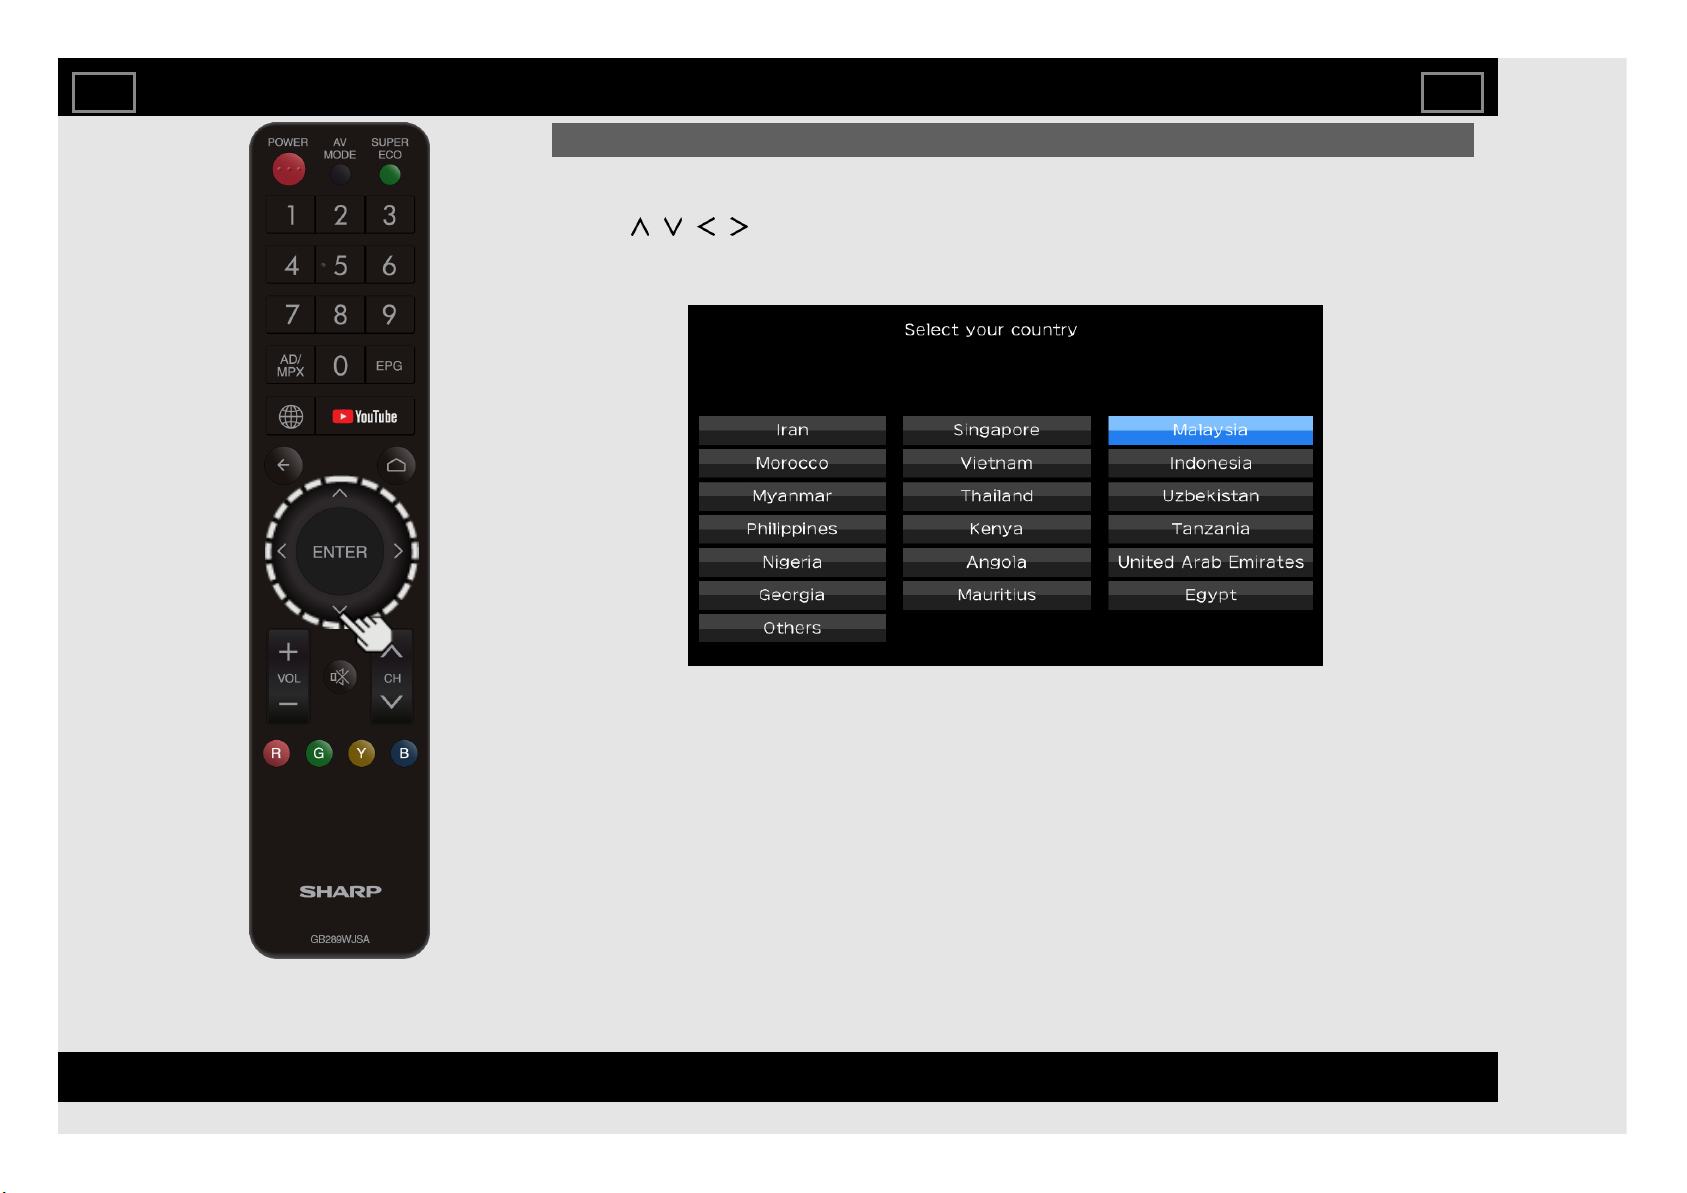
Initial Installation (Continue)
Location
Make settings for the country where you use the TV.
2 Press / / / to select "Iran", "Singapore", "Malaysia", "Morocco", "Vietnam", "Indonesia",
"Myanmar", "Thailand", "Uzbekistan", "Philippines", "Kenya", "Tanzania", "Nigeria", "Angola", "United Arab
Emirates", "Georgia", "Mauritius", "Egypt" or "Others", and then press ENTER.
Watching TV
EN 2-3
ENGLISH | FRANÇAIS | PORTUGUÊS | РУССКИЙ | 中文 | INDONESIA | ภาษาไทย | TIẾNG VIỆT | ﻲﺑرﻋ | АҒЫЛШЫН | O'ZBEK TILIDA
>><<
Page 11
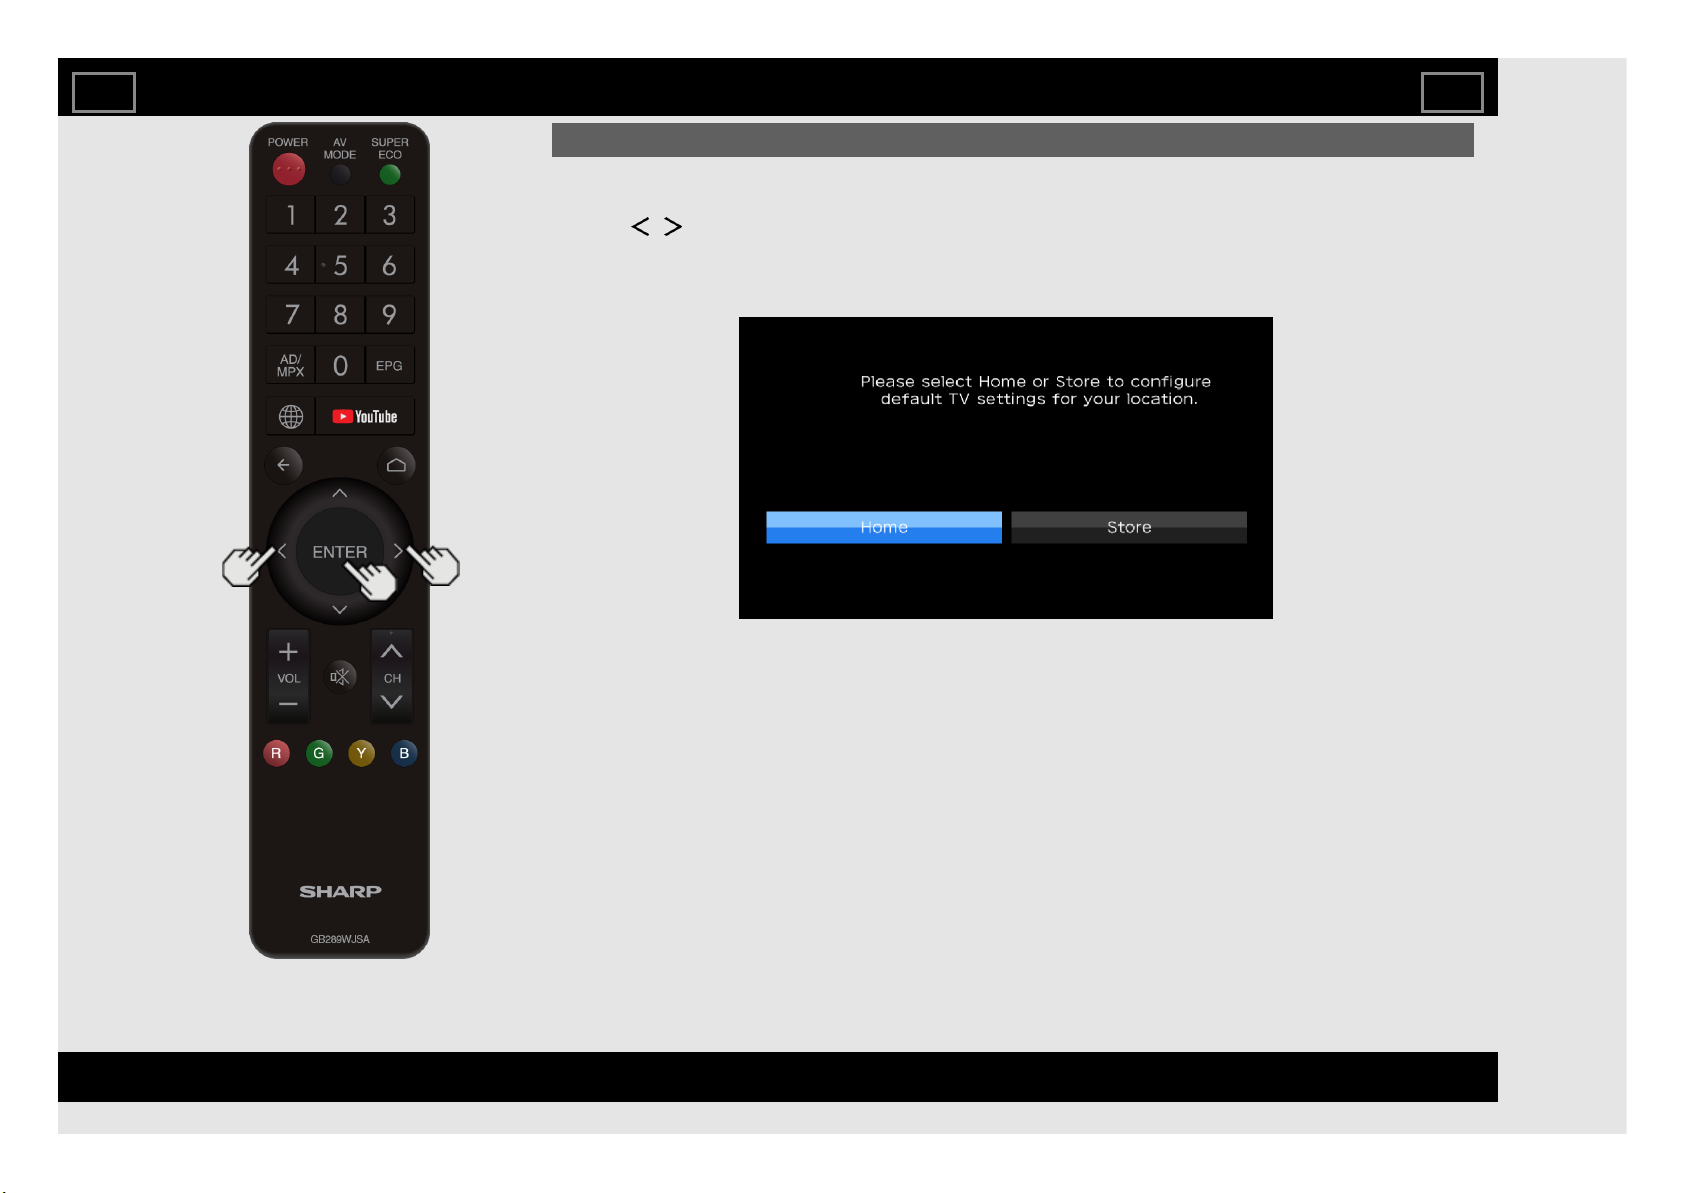
Initial Installation (Continue)
TV location
Select "Home" or "Store" for the location where you plan to install the TV.
3 Press / to select "Home" or "Store". Press ENTER to enter the setting.
Home: AV Mode is set to "STANDARD".
Store: AV Mode is set to "DYNAMIC (Fixed)".
Watching TV
EN 2-4
ENGLISH | FRANÇAIS | PORTUGUÊS | РУССКИЙ | 中文 | INDONESIA | ภาษาไทย | TIẾNG VIỆT | ﻲﺑرﻋ | АҒЫЛШЫН | O'ZBEK TILIDA
>><<
Page 12

Initial Installation (Continue)
CH search (Channel search)
Channel auto search makes the TV look for all channels viewable in the set area.
4 Press / to select "DTV", "ATV", or "DTV+ATV" in "Search type", and then press ENTER.
5 Press / to select "Start", and then press ENTER for searching receivable channels.
The Channel search will start automatically.
To exit the Channel search screen, select "Cancel", and then press ENTER.
Watching TV
EN 2-5
ENGLISH | FRANÇAIS | PORTUGUÊS | РУССКИЙ | 中文 | INDONESIA | ภาษาไทย | TIẾNG VIỆT | ﻲﺑرﻋ | АҒЫЛШЫН | O'ZBEK TILIDA
>><<
Page 13
Initial Installation (Continue)
Smart TV
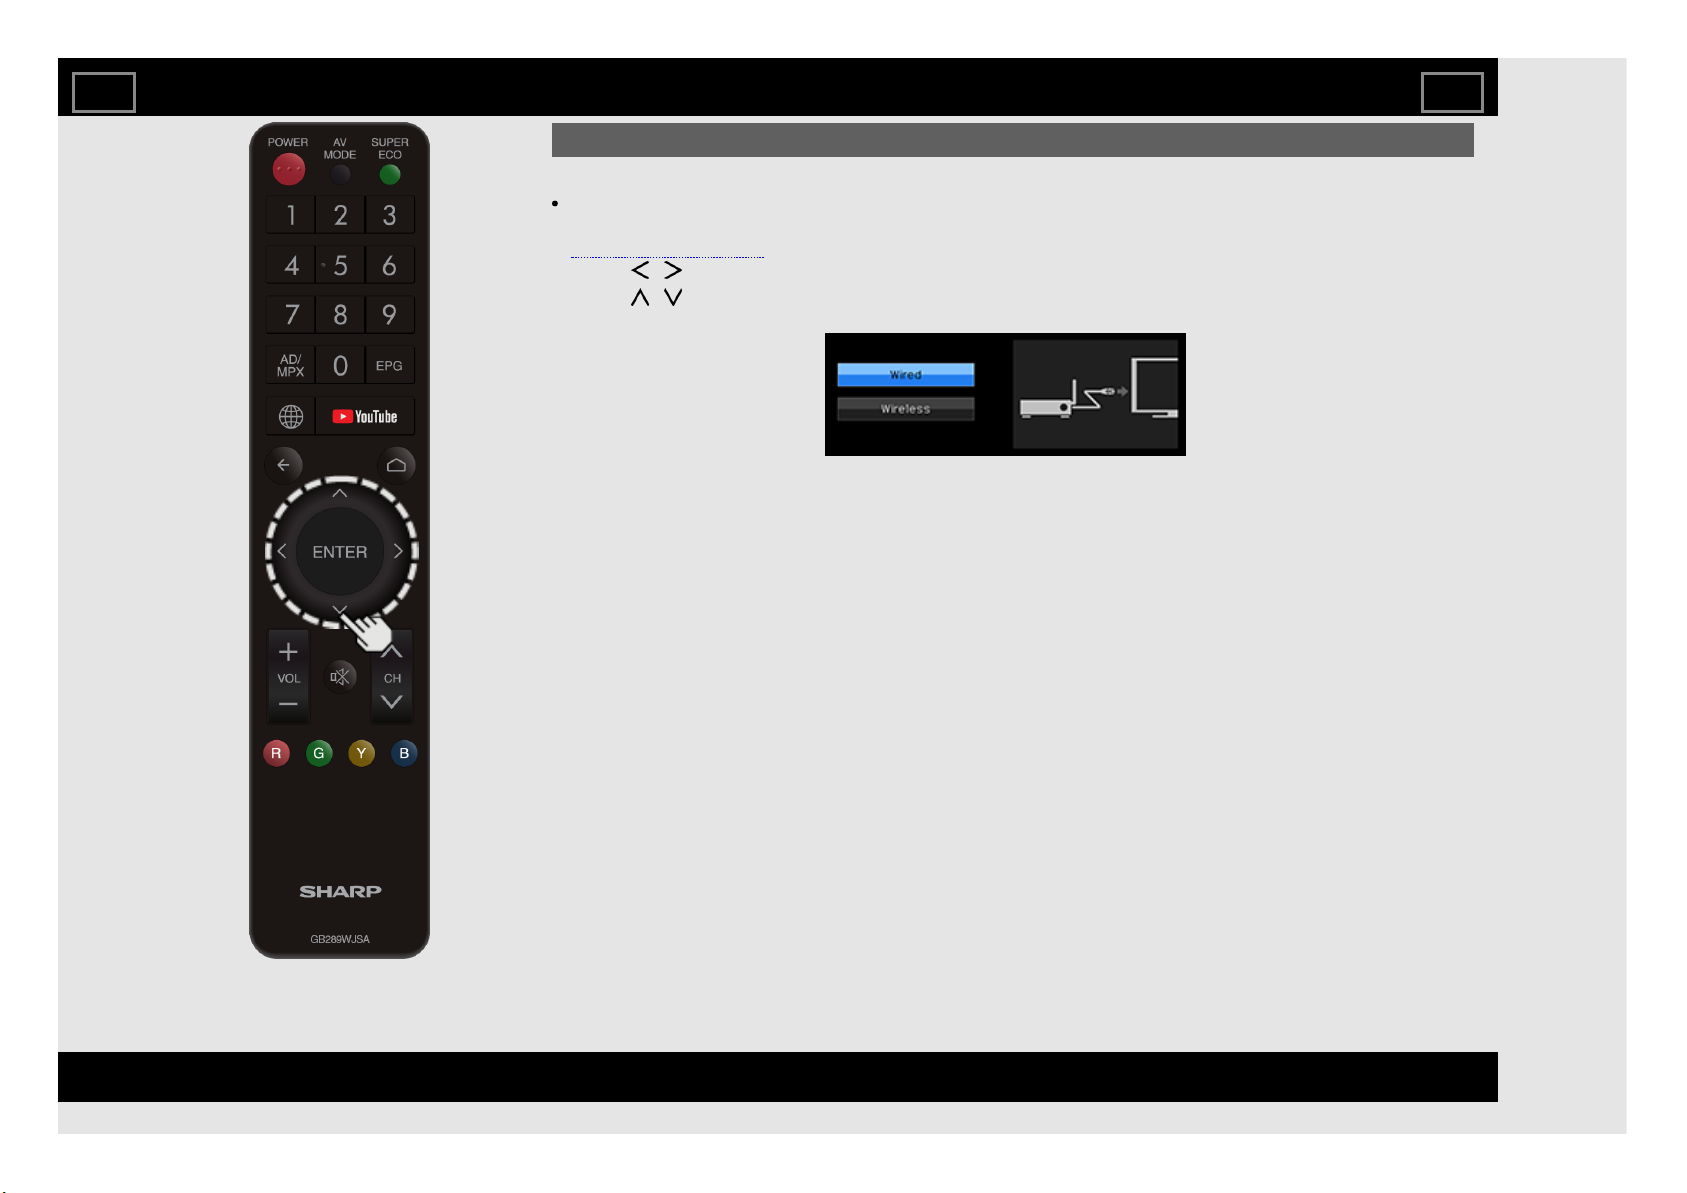
Wireless LAN connection is possible only when the WPS (push button) method is used. If any other
method is used, make settings by Smart TV > Internet Setup.
(See pages 8-4 to 8-6.)
6 Press / to select "Yes", and then press ENTER.
7 Press / to select "Wired" or "Wireless", and then press ENTER.
Watching TV
EN 2-6
ENGLISH | FRANÇAIS | PORTUGUÊS | РУССКИЙ | 中文 | INDONESIA | ภาษาไทย | TIẾNG VIỆT | ﻲﺑرﻋ | АҒЫЛШЫН | O'ZBEK TILIDA
>><<
Page 14
Initial Installation (Continue)
Connection using an ETHERNET cable:
Select "Wired" and press ENTER.
Confirm that the TV is properly connected with the router, and then press "Next". Follow the instructions
on the display to perform the connection test.
Wireless LAN connection by the WPS method:
Select "Wireless" and press ENTER.
Follow the instructions on the display, and finalize the connection after testing its viability.
NOTE
After you finish configuring the network settings, configure the "TV name setting".
(See page 4-27)
When you change the network settings, refer to Smart TV > Internet Setup.
(See pages 8-4 to 8-6.)
SHARP Legal
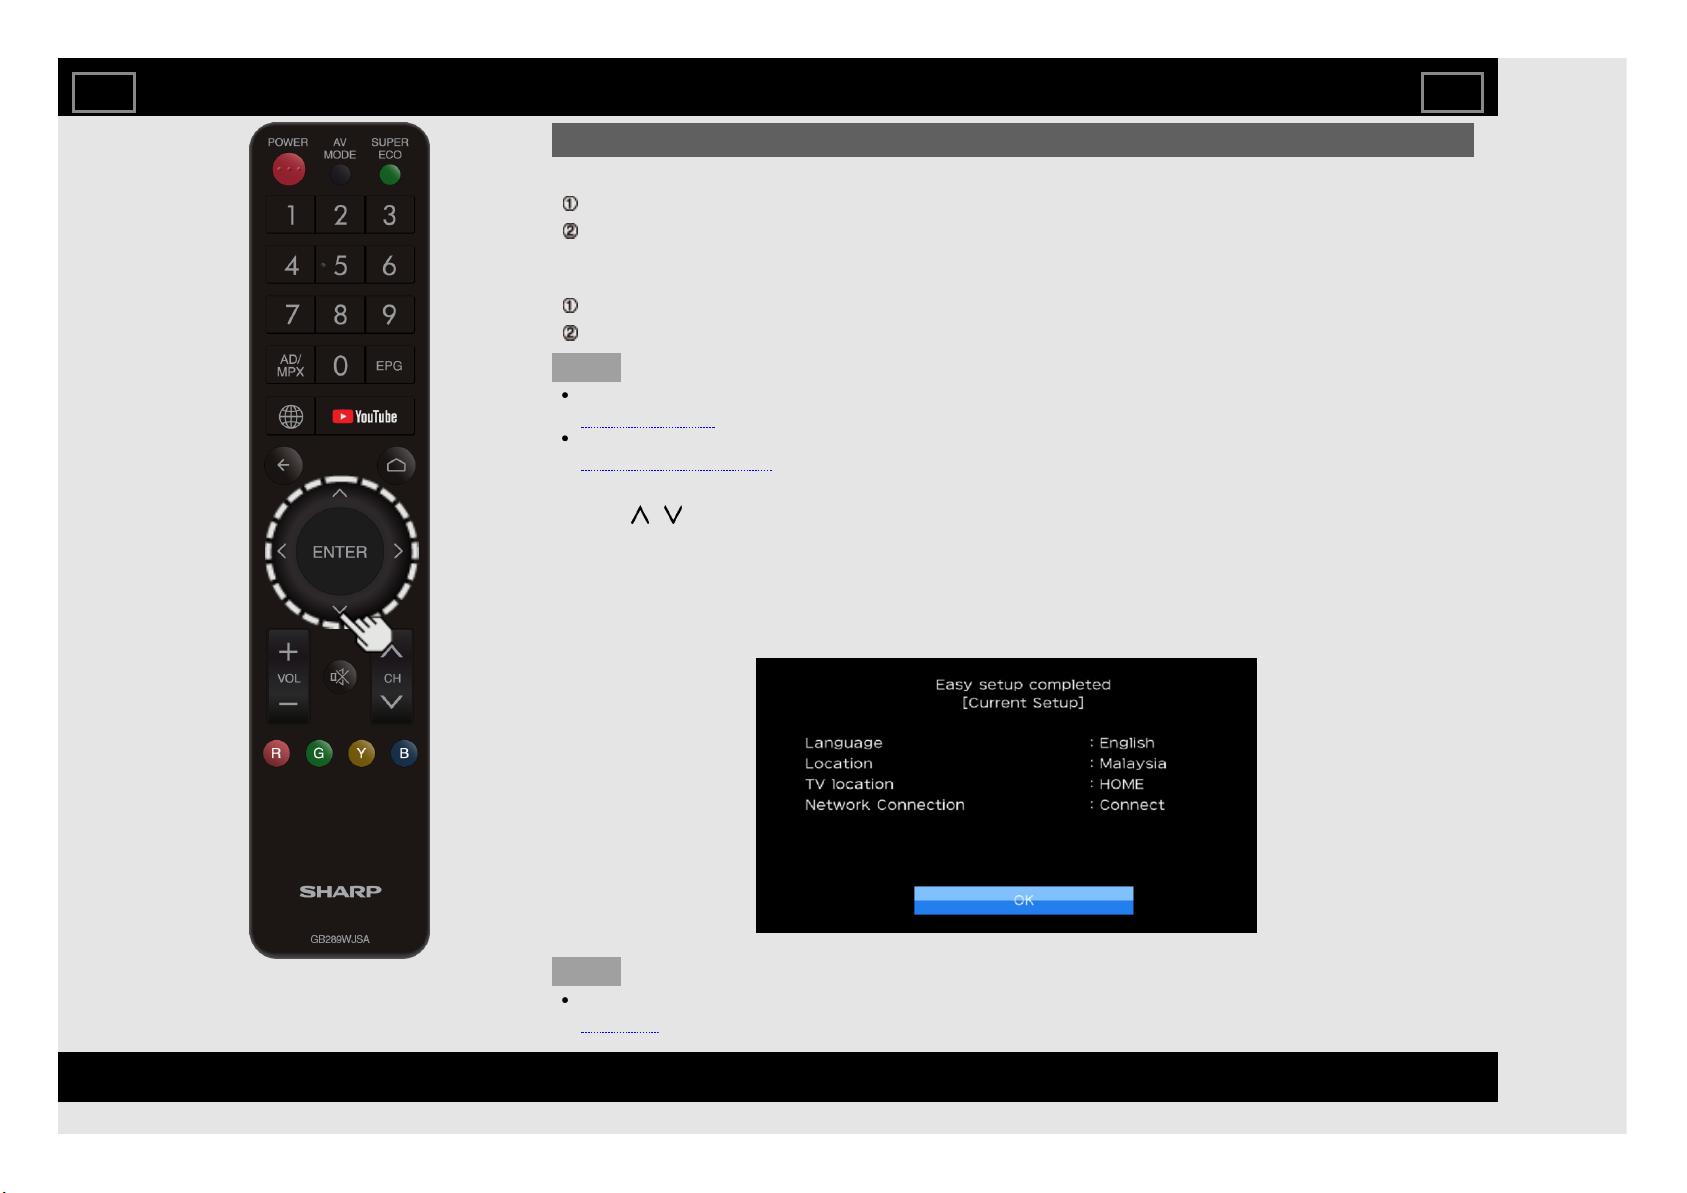
8 Press / to view Sharp Terms of Use and Sharp Privacy Policy.
Completed
9 The settings confirmation screen is displayed. Confirm the information displayed on the screen, click "OK"
will complete the Easy Setup procedure.
Examples of the settings confirmation screen
NOTE
For changing the settings of the Initial Installation, perform "Easy setup" on the Initial Setup menu on
page 4-5.
Watching TV
EN 2-7
ENGLISH | FRANÇAIS | PORTUGUÊS | РУССКИЙ | 中文 | INDONESIA | ภาษาไทย | TIẾNG VIỆT | ﻲﺑرﻋ | АҒЫЛШЫН | O'ZBEK TILIDA
>><<
Page 15

Changing Channels
You can change channels in several ways.
Method 1
Using CH / on the remote control unit or
on the TV.
Method 2
Using remote control buttons 0-9.
Examples:
To select a 1 or 2-digit channel number
(e. g., Channel 5):
Press 5 ENTER
To select a 3-digit channel number (e. g.,
Channel 115):
Press 1 1 5 ENTER
NOTE
When selecting a 1-digit channel number, it
is not necessary to press 0 before the
number.
When you enter 0-9 only, channel selection
will be made if there is no operation within a
few seconds.
If you push "0" by itself, nothing will
happen.
Complete the above steps within a few
seconds.
Direct Button Operation
EN 3-1
ENGLISH | FRANÇAIS | PORTUGUÊS | РУССКИЙ | 中文 | INDONESIA | ภาษาไทย | TIẾNG VIỆT | ﻲﺑرﻋ | АҒЫЛШЫН | O'ZBEK TILIDA
>><<
Page 16
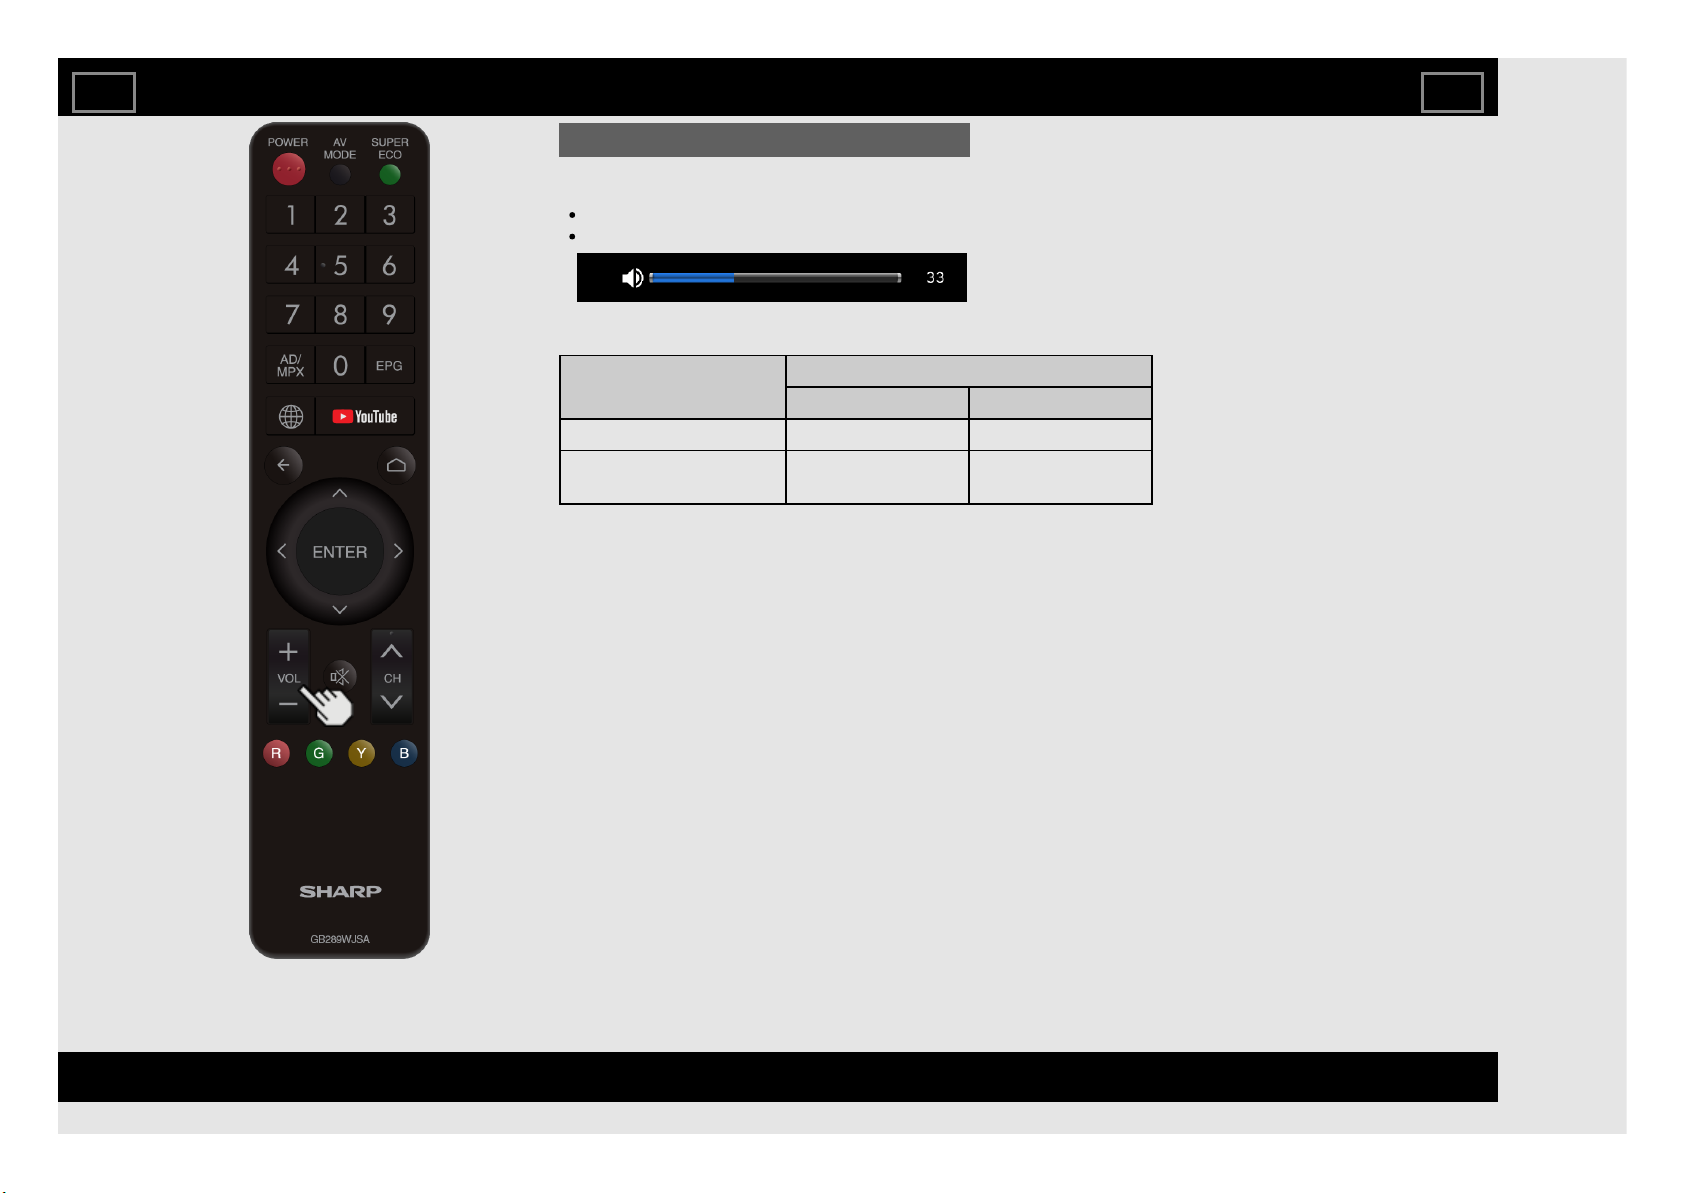
Changing Volume
You can change the volume by pressing
VOL+/- on the TV or on the remote control unit.
To increase the volume, press VOL +.
To decrease the volume, press VOL -.
Audio status
Output device
Audio Output Select
Audio Out Headphone
TV Speaker Variable Sound Mute
AUDIO OUT /
HEADPHONE
Fixed Sound
(Volume MAX)
Variable Sound
Direct Button Operation
EN 3-2
ENGLISH | FRANÇAIS | PORTUGUÊS | РУССКИЙ | 中文 | INDONESIA | ภาษาไทย | TIẾNG VIỆT | ﻲﺑرﻋ | АҒЫЛШЫН | O'ZBEK TILIDA
>><<
Page 17
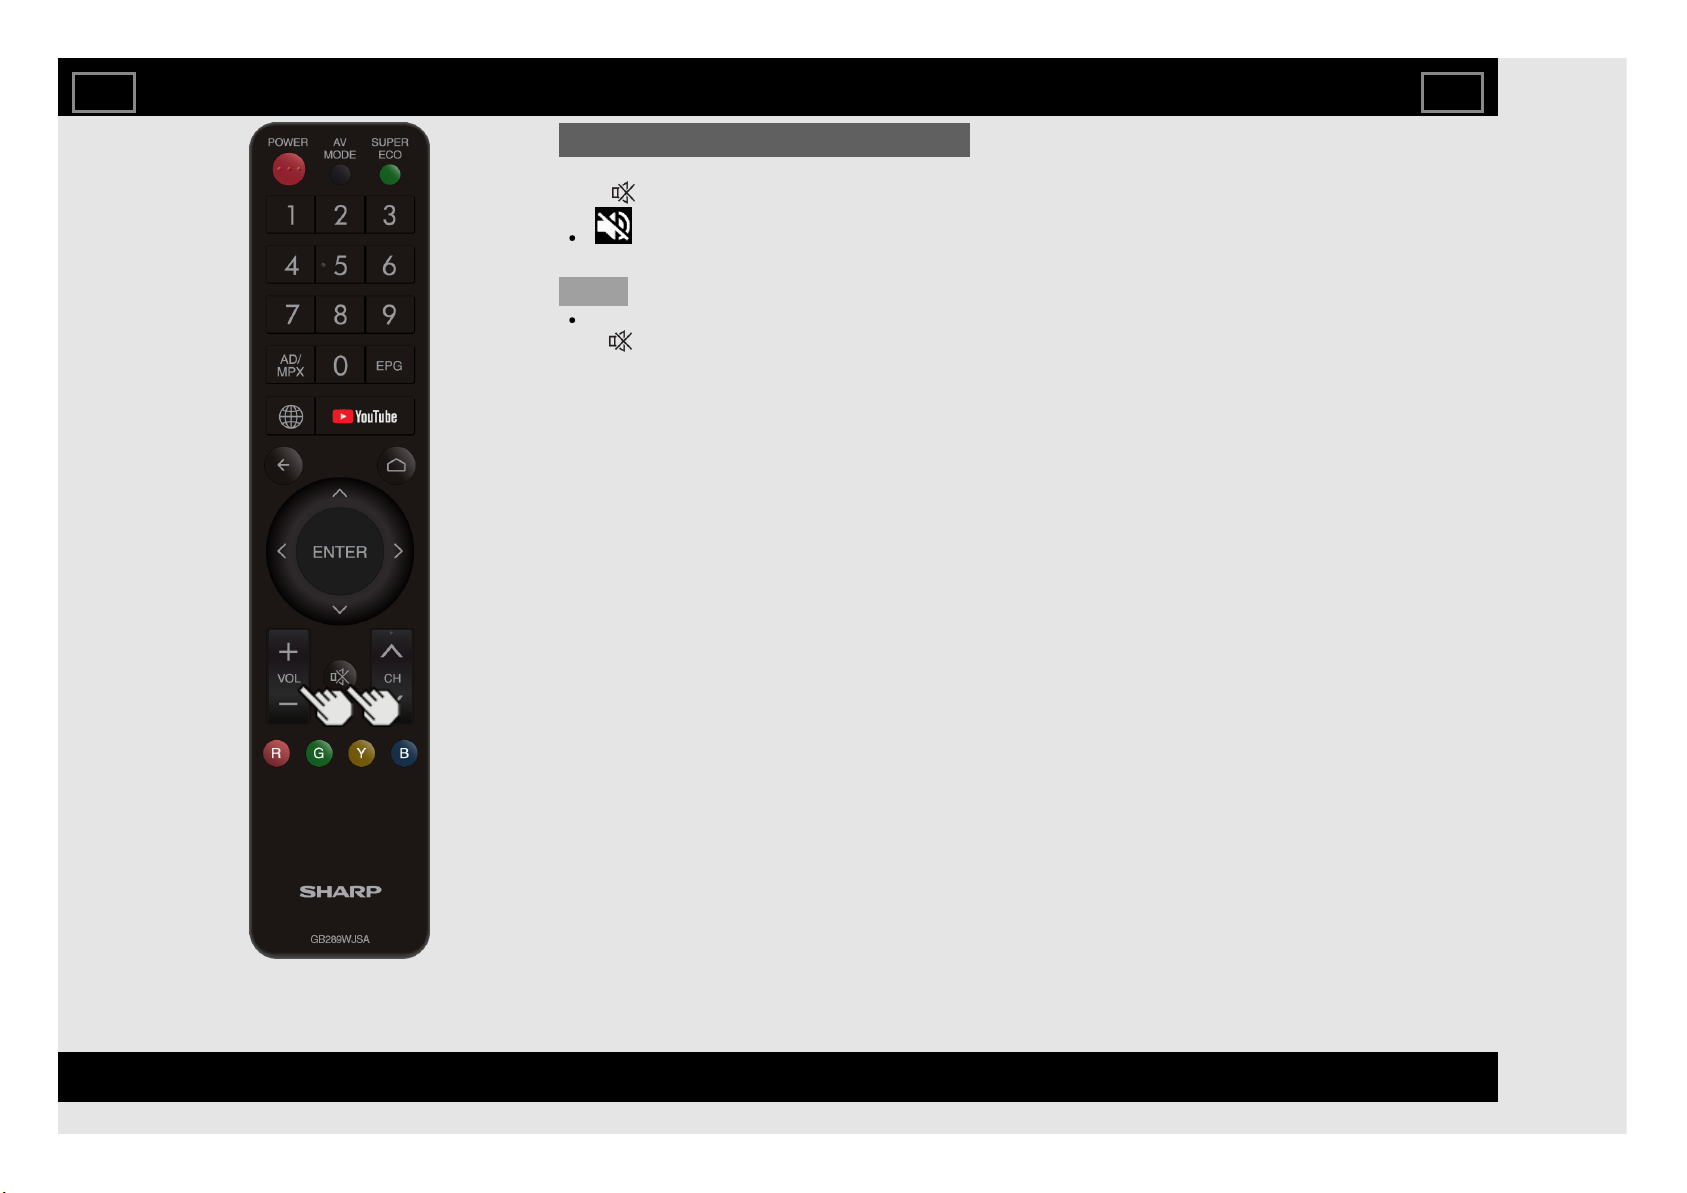
MUTE
Mutes the current sound output.
Press (MUTE).
will be displayed on the screen for 30
minutes.
NOTE
Mute can be cancelled by pressing VOL+/-
or (MUTE).
Direct Button Operation
EN 3-3
ENGLISH | FRANÇAIS | PORTUGUÊS | РУССКИЙ | 中文 | INDONESIA | ภาษาไทย | TIẾNG VIỆT | ﻲﺑرﻋ | АҒЫЛШЫН | O'ZBEK TILIDA
>><<
Page 18
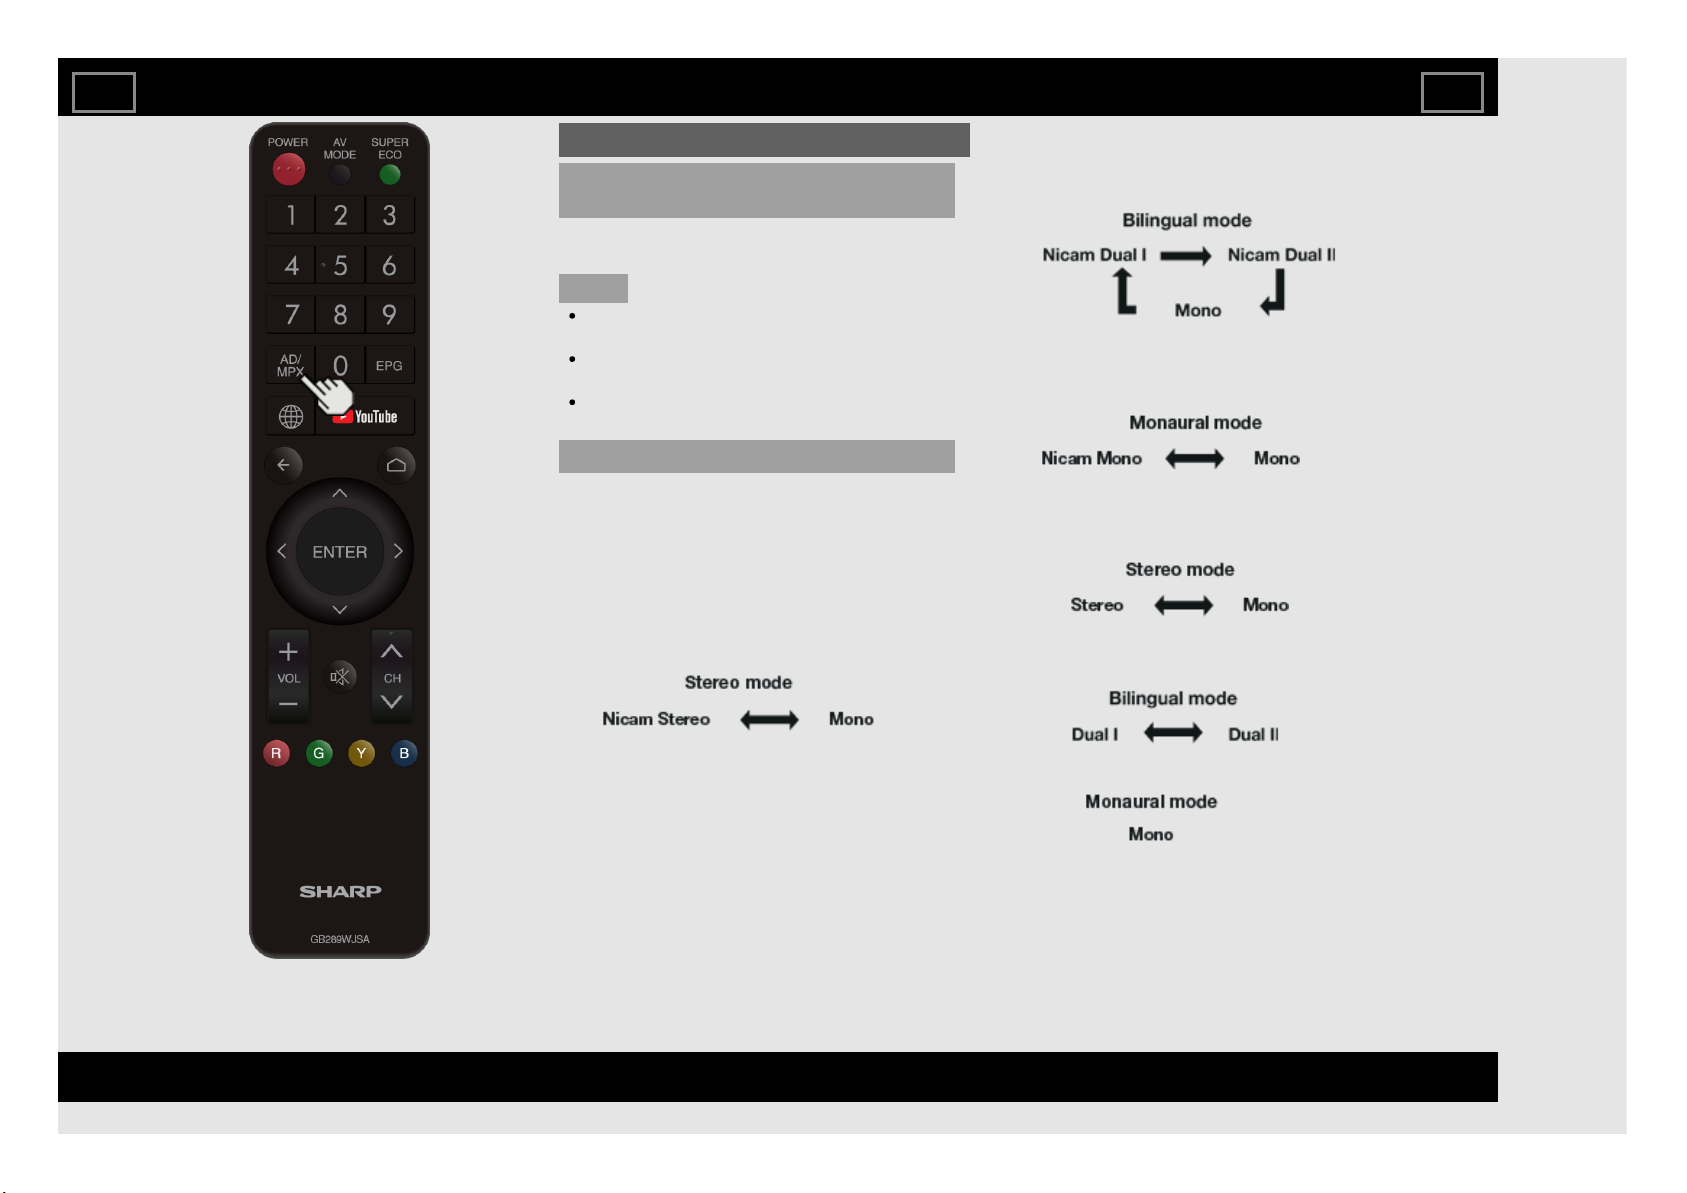
AD/MPX
Switching the digital audio format (DTV
only)
If multi sound modes are received, each time
you press AD/MPX the mode switches.
NOTE
The sound mode screen disappears in
three seconds.
Selectable items vary depending on the
received broadcasts.
The audio description sound is selected
depending on the main audio.
Switching the analogue audio format
You can switch between multiple audio modes
when watching a multiple audio or stereo
broadcast programme.
In the NICAM TV broadcasts
When receiving a stereo signal
Each time you press AD/MPX, the mode
switches between Nicam Stereo and Mono.
When receiving a bilingual signal
Each time you press AD/MPX, the mode
switches among Nicam Dual I, Nicam Dual II
and Mono.
When receiving a monaural signal
Each time you press AD/MPX, the mode
switches between Nicam Mono and Mono.
In the TV mode of A2 TV broadcasts
When receiving a stereo signal
Each time you press AD/MPX, the mode
switches between Stereo and Mono.
When receiving a bilingual signal
Each time you press AD/MPX, the mode
switches among Dual I and Dual II.
When receiving a monaural signal
When you press AD/MPX, “Mono” displays.
Direct Button Operation
EN 3-4
ENGLISH | FRANÇAIS | PORTUGUÊS | РУССКИЙ | 中文 | INDONESIA | ภาษาไทย | TIẾNG VIỆT | ﻲﺑرﻋ | АҒЫЛШЫН | O'ZBEK TILIDA
>><<
Page 19
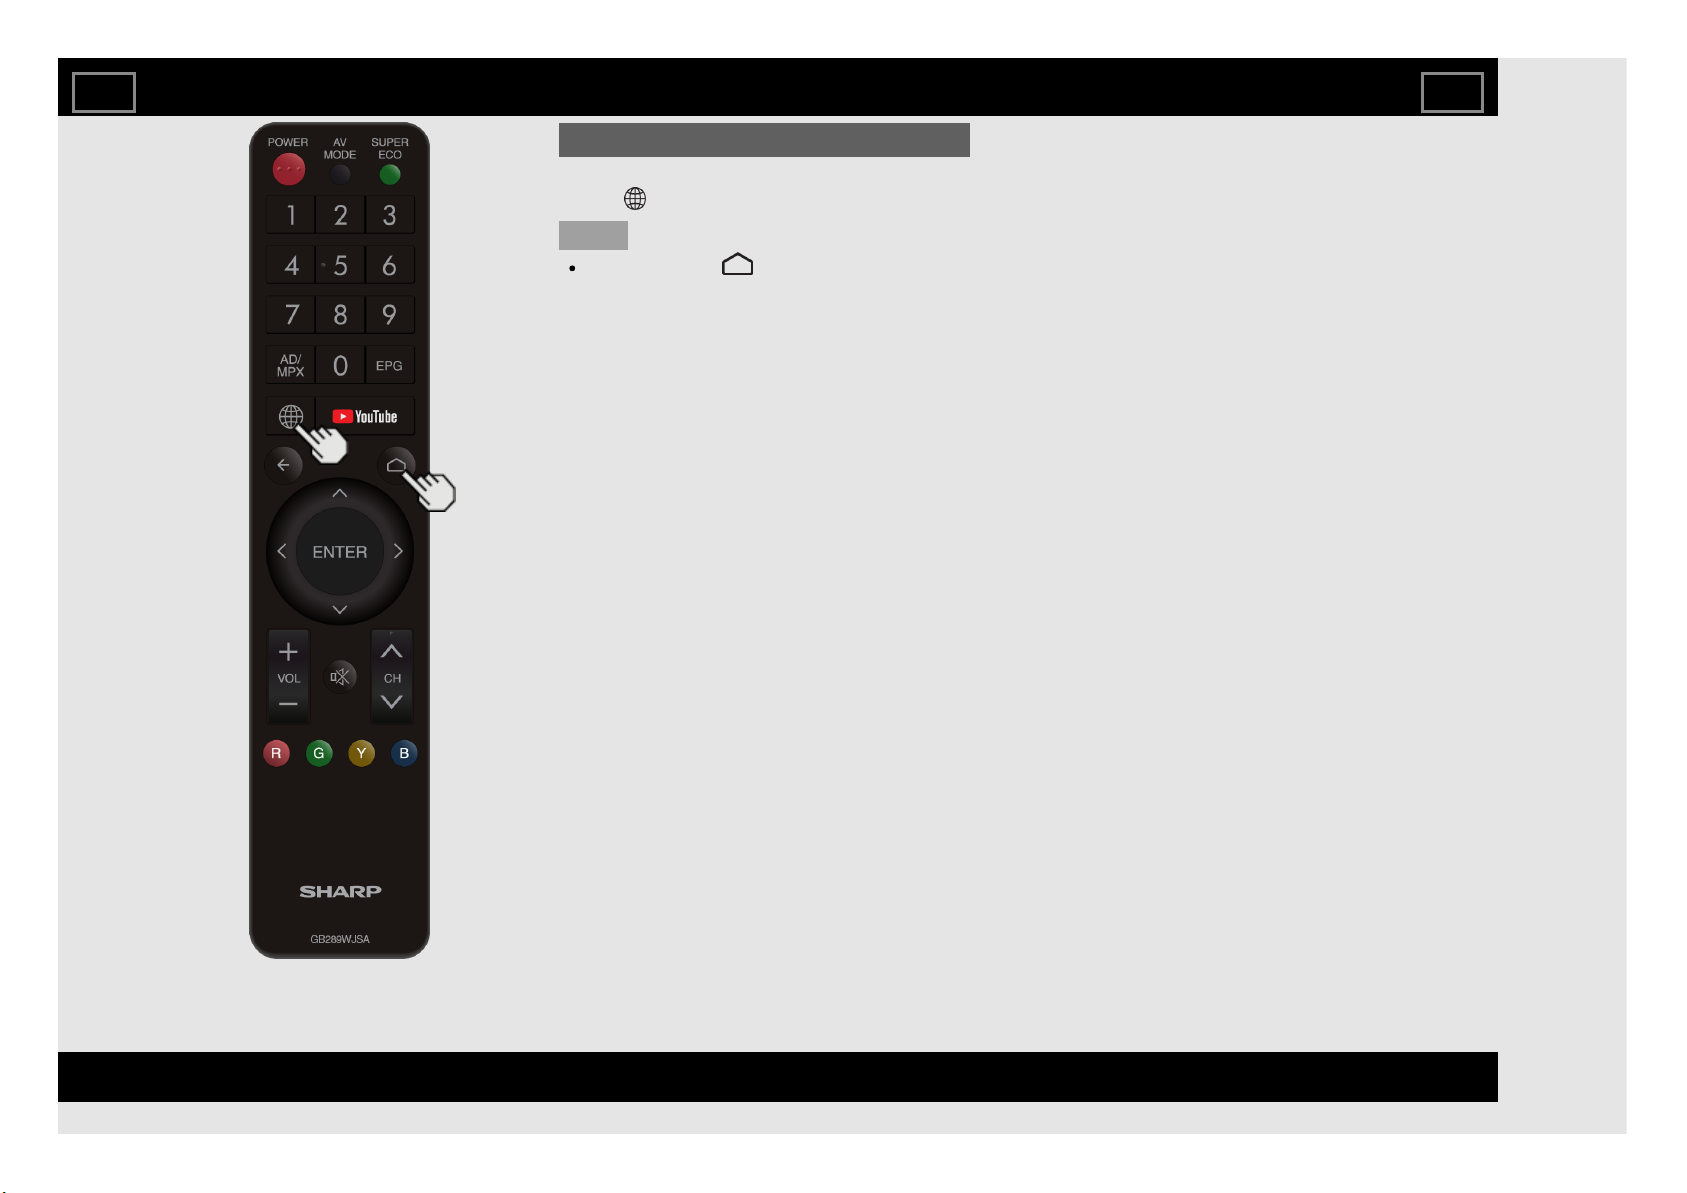
BROWSER
Displays the BROWSER screen.
Press (BROWSER).
NOTE
Please press " (HOME)" key to exit
BROWSER.
Direct Button Operation
EN 3-5
ENGLISH | FRANÇAIS | PORTUGUÊS | РУССКИЙ | 中文 | INDONESIA | ภาษาไทย | TIẾNG VIỆT | ﻲﺑرﻋ | АҒЫЛШЫН | O'ZBEK TILIDA
>><<
Page 20

YouTube
Displays the YouTube screen.
Press YouTube.
NOTE
If you press the YouTube button when the
TV in standby mode, the TV turns on and
the YouTube screen is displayed.
To enjoy YouTube, you need to make:
—a broadband Internet connection
(See page 8-1.)
—settings of Internet Setup
(See pages 8-4 to 8-6.)
Direct Button Operation
EN 3-6
ENGLISH | FRANÇAIS | PORTUGUÊS | РУССКИЙ | 中文 | INDONESIA | ภาษาไทย | TIẾNG VIỆT | ﻲﺑرﻋ | АҒЫЛШЫН | O'ZBEK TILIDA
>><<
Page 21

HOME
Displays the HOME screen.
Press (HOME).
Direct Button Operation
EN 3-7
ENGLISH | FRANÇAIS | PORTUGUÊS | РУССКИЙ | 中文 | INDONESIA | ภาษาไทย | TIẾNG VIỆT | ﻲﺑرﻋ | АҒЫЛШЫН | O'ZBEK TILIDA
>><<
Page 22
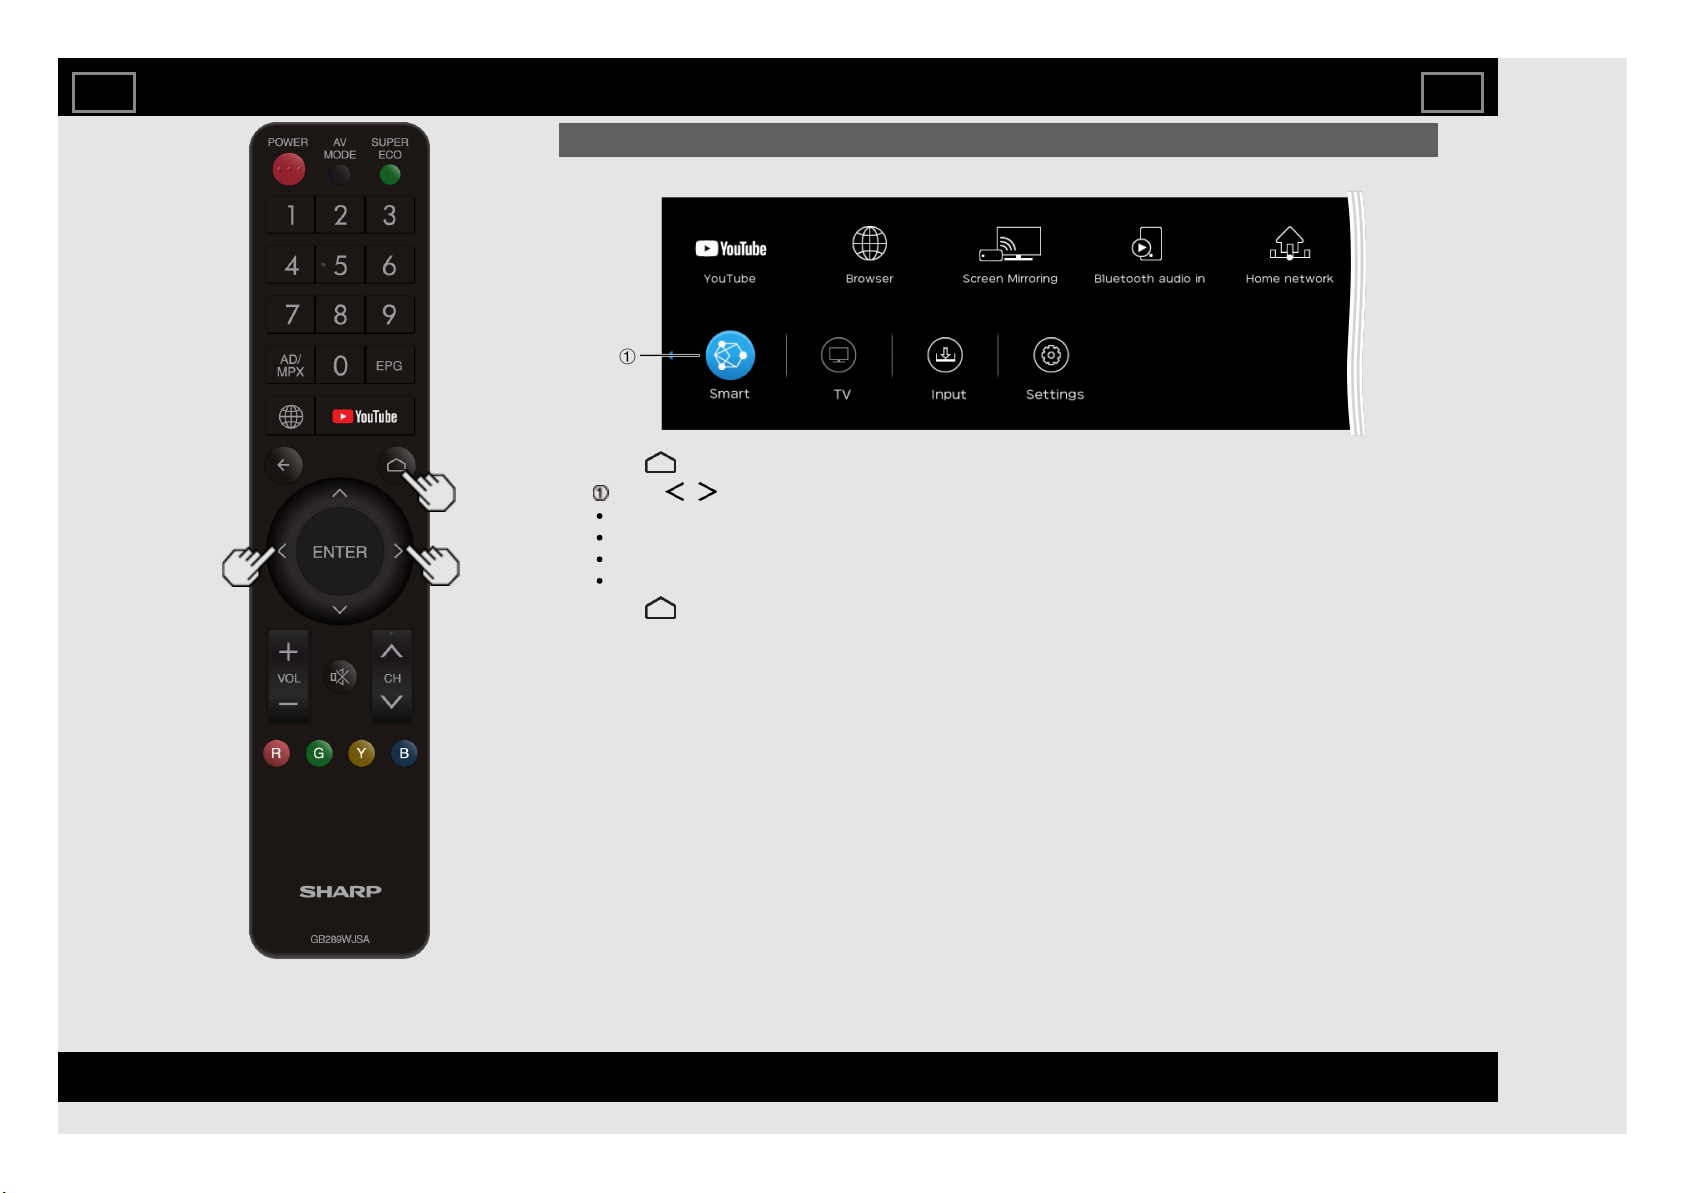
1 Press (HOME) to display the HOME screen.
2 Press / to select the desired menu.
Smart - YouTube, Browser, Screen Mirroring, Bluetooth audio in, Home network
TV - Channel list, Teletext
Input - Switch the input (DTV, ATV, HDMI 1, HDMI 2, INPUT 3, USB)
Settings - Audio settings, Internet setup, Subtitle, Menu, Manual
3 Press (HOME) to exit.
Introduction
Home menu screen
On-Screen Display Menu
EN 4-1
ENGLISH | FRANÇAIS | PORTUGUÊS | РУССКИЙ | 中文 | INDONESIA | ภาษาไทย | TIẾNG VIỆT | ﻲﺑرﻋ | АҒЫЛШЫН | O'ZBEK TILIDA
>><<
Page 23
About Menu Items
Some menu items may not be displayed
depending on the selected input source.
NOTE
The screens in the operation manual are for
explanation purposes (some are enlarged,
others cropped) and may vary slightly from
the actual screens.
The order of explanations for each menu
item in the following pages is not necessarily
in accordance with the alignment of the items
on the screen.
Introduction (Continue)
On-Screen Display Menu
EN 4-2
ENGLISH | FRANÇAIS | PORTUGUÊS | РУССКИЙ | 中文 | INDONESIA | ภาษาไทย | TIẾNG VIỆT | ﻲﺑرﻋ | АҒЫЛШЫН | O'ZBEK TILIDA
>><<
Page 24

1 Press (HOME) to display the HOME
screen.
2 Press / to select "Settings", press ,
press / to select "Menu", and then
press ENTER.
3 Press / to select the desired menu.
Press / to select a specific
adjustment item, and then press ENTER.
Additional related adjustment items may
be displayed. Press / to select the
desired item.
Adjust the item while referring to the guide
display.
Operations vary depending on the
function or item. Refer to the guide display
corresponding to the menu setting screen
for button operations.
4 Press (HOME) to exit.
NOTE
Menu options differ in the selected input
modes, but the operating procedures are the
same.
On-Screen Display Menu Operation
Example
On-Screen Display Menu
EN 4-3
ENGLISH | FRANÇAIS | PORTUGUÊS | РУССКИЙ | 中文 | INDONESIA | ภาษาไทย | TIẾNG VIỆT | ﻲﺑرﻋ | АҒЫЛШЫН | O'ZBEK TILIDA
>><<
Page 25
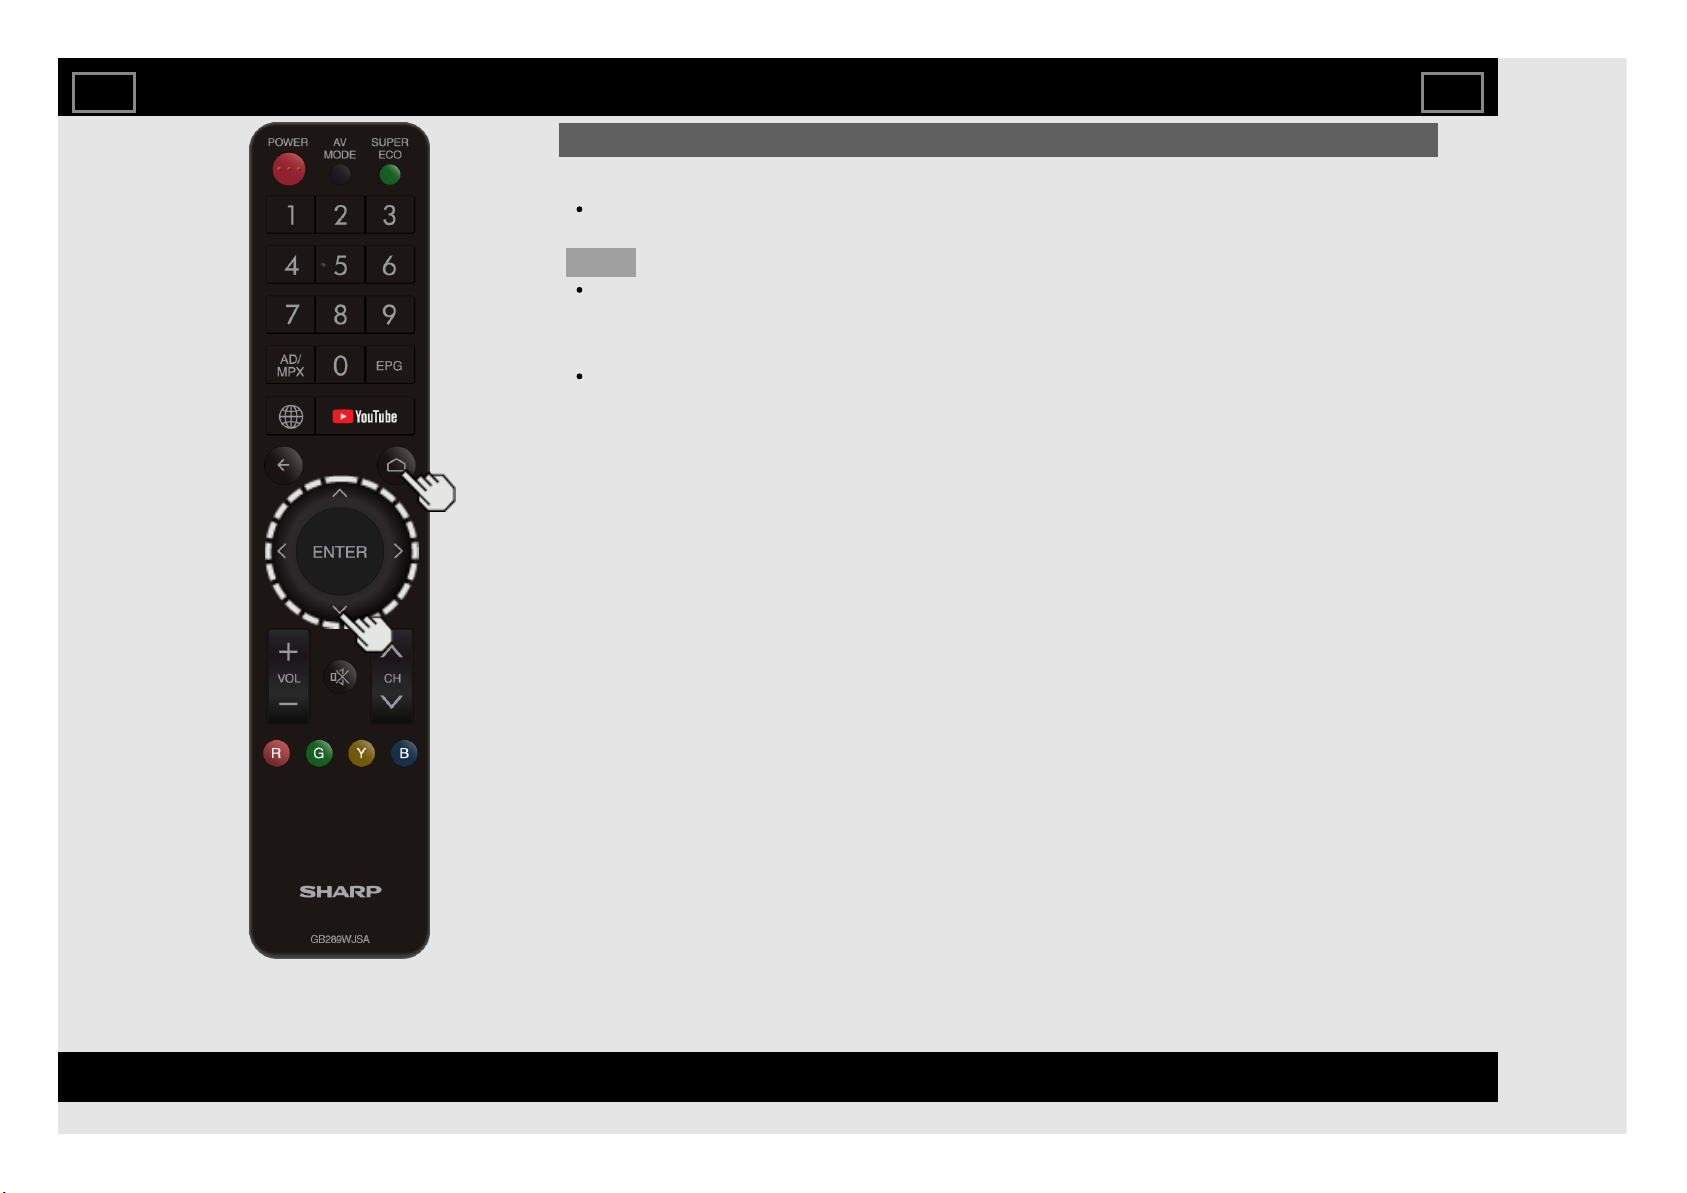
Menu Operation Buttons
Using the remote control
Use the following buttons on the remote control
to operate the menu.
(HOME): Press (HOME) to display the
HOME screen.
/ / / : Press to select a desired item
on the screen or adjust a selected item.
ENTER: Press to go to the next step or
complete the setting.
(BACK): Press to return to the previous
step.
On-Screen Display Menu
EN 4-4
ENGLISH | FRANÇAIS | PORTUGUÊS | РУССКИЙ | 中文 | INDONESIA | ภาษาไทย | TIẾNG VIỆT | ﻲﺑرﻋ | АҒЫЛШЫН | O'ZBEK TILIDA
>><<
Page 26
Example
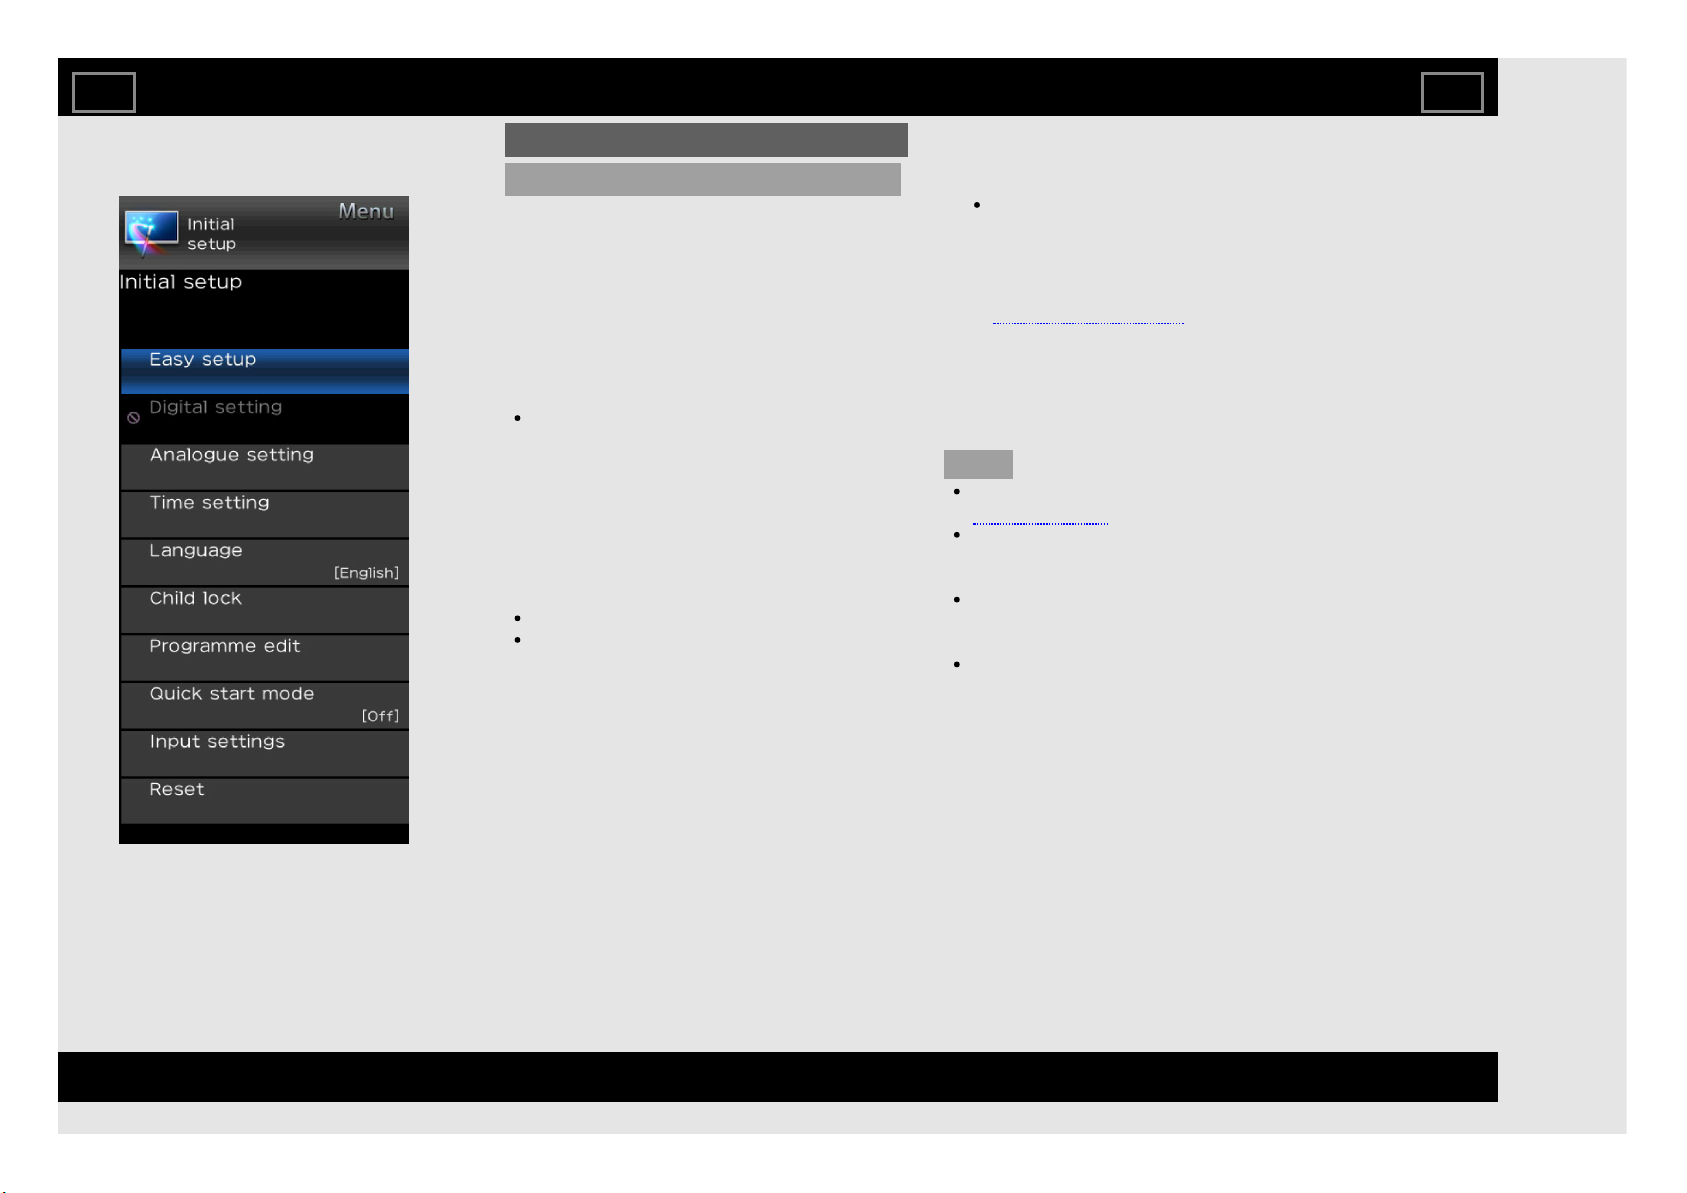
Initial setup
Easy setup
You can run Easy setup again, even after
setting up the preset channels.
Language: Select from among 13 languages.
(English, Simplified Chinese, Arabic,
French, Portuguese, Russian, Persian,
Thai, Vietnamese, Indonesian, Hebrew,
Hindi and Malay).
Location : Make settings for the country
where you use the TV.
Select your country: Select either "Iran",
"Singapore", "Malaysia", "Morocco",
"Vietnam", "Indonesia", "Myanmar",
"Thailand", "Uzbekistan", "Philippines",
"Kenya", "Tanzania", "Nigeria", "Angola",
"United Arab Emirates", "Georgia",
"Mauritius", "Egypt" or "Others".
TV location: Select "Home" or "Store" for the
location where you plan to install the TV.
Home: AV Mode is set to "STANDARD".
Store: AV Mode is set to "DYNAMIC
(Fixed)".
CH search: Channel auto search makes the
TV look for all channels viewable in the set
area.
Smart TV: When you connect to the Internet
on the TV, confirm the connection method
and make adjustments.
Wireless LAN connection is possible
only when the WPS (push button) method
is used. If any other method is used,
make settings by Smart TV > Internet
Setup.
(See pages 8-4 to 8-6.)
SHARP Legal: To view Sharp Terms of Use
and Sharp Privacy Policy.
Completed: The settings confirmation screen
is displayed. Confirm the information
displayed on the screen.
NOTE
See Initial Installation on
pages 2-2 to 2-7 for setting each item.
If no channel is found, confirm the type of
connection made with your TV and try "Easy
setup" again.
"Time zone" enables you to select your
local time zone and then press 0-9 to enter
postal code. (Only for Indonesia).
The "DTV" and "DTV+ATV" selection does
not work when country selected is
Phillippines.
On-Screen Display Menu
EN 4-5
ENGLISH | FRANÇAIS | PORTUGUÊS | РУССКИЙ | 中文 | INDONESIA | ภาษาไทย | TIẾNG VIỆT | ﻲﺑرﻋ | АҒЫЛШЫН | O'ZBEK TILIDA
>><<
Page 27
Example
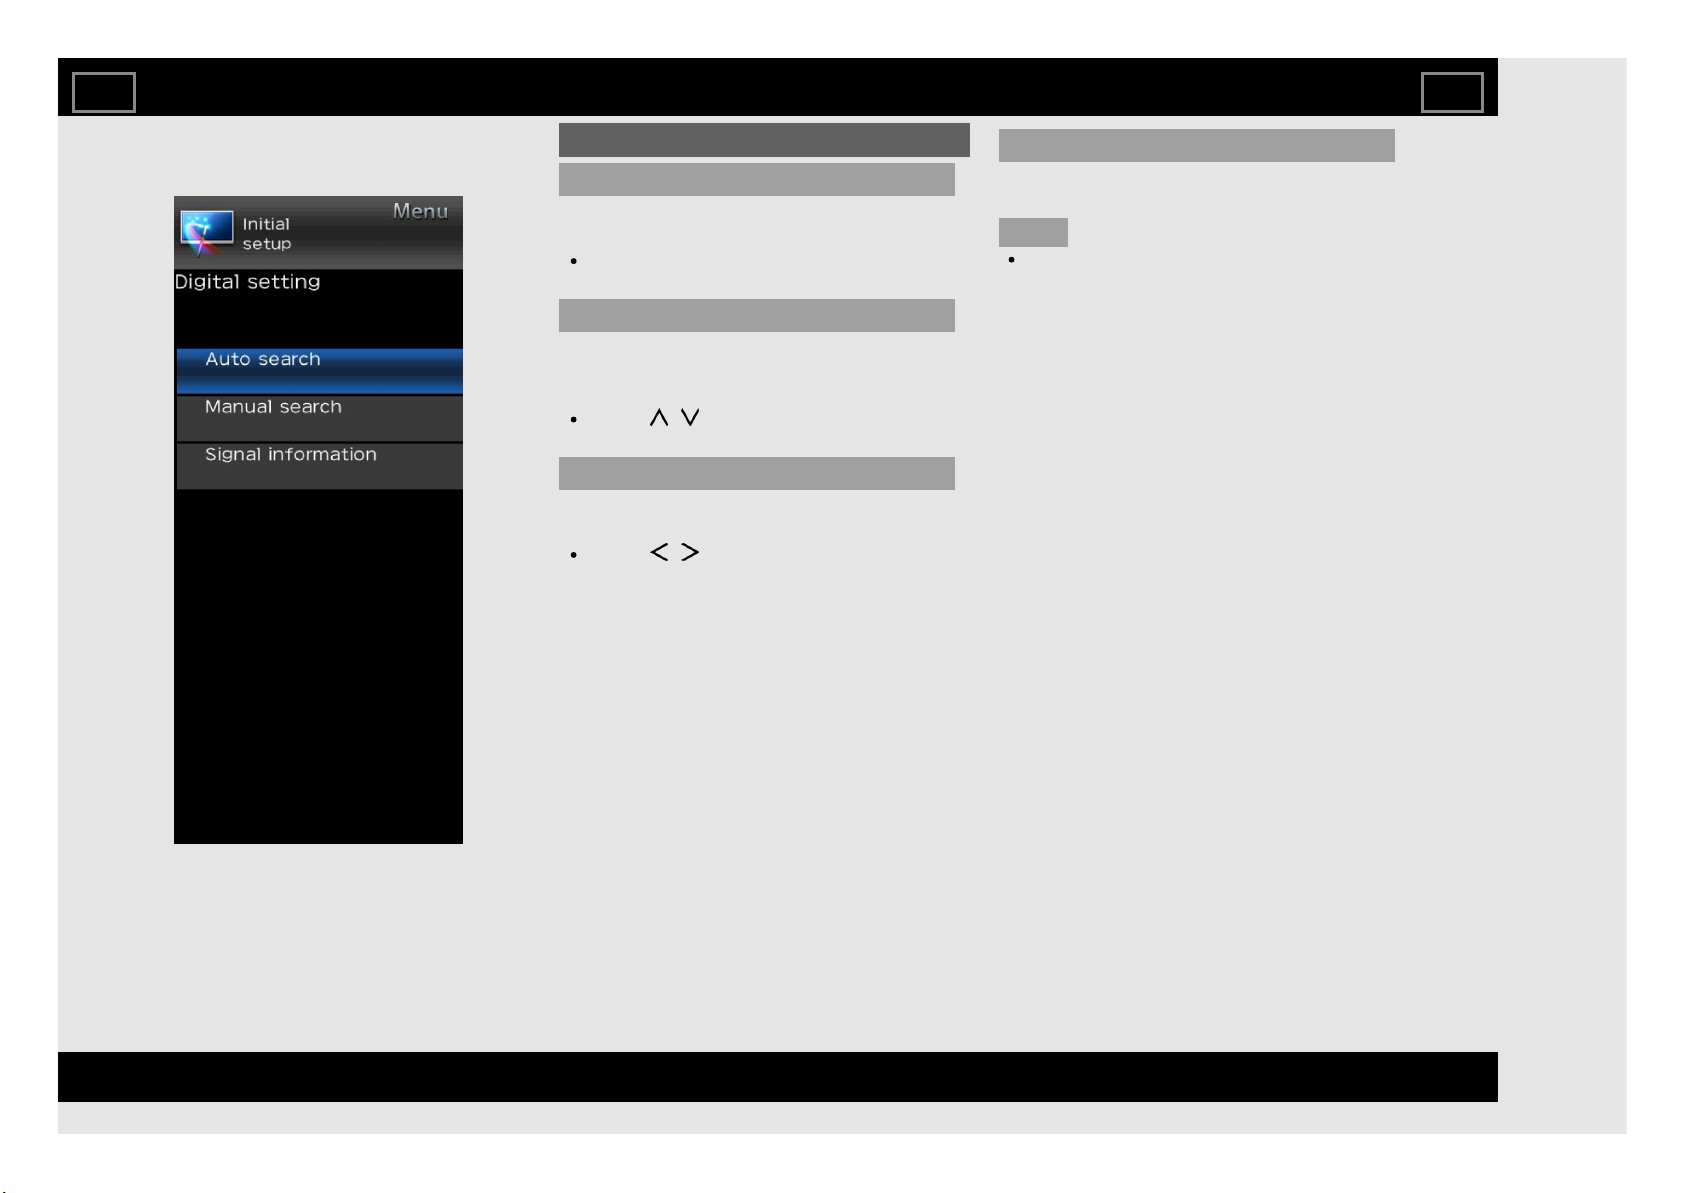
Initial setup (Continue)
Digital setting
You can reconfigure DTV services settings
automatically or manually.
If you have already set the password, enter
it here. See "Child Lock" to set password.
Auto search
Use this menu to add new services
automatically after auto installation has been
completed.
Press / to select "DTV" or
"DTV+ATV".
Manual search
Add new services within a specified frequency
band.
Press / to find the channel and then
press ENTER .
Signal information
Use this menu to check signal information
depends on receiving channel.
NOTE
This selection does not work when country
selected is Phillippines.
On-Screen Display Menu
EN 4-6
ENGLISH | FRANÇAIS | PORTUGUÊS | РУССКИЙ | 中文 | INDONESIA | ภาษาไทย | TIẾNG VIỆT | ﻲﺑرﻋ | АҒЫЛШЫН | O'ZBEK TILIDA
>><<
Page 28
Example
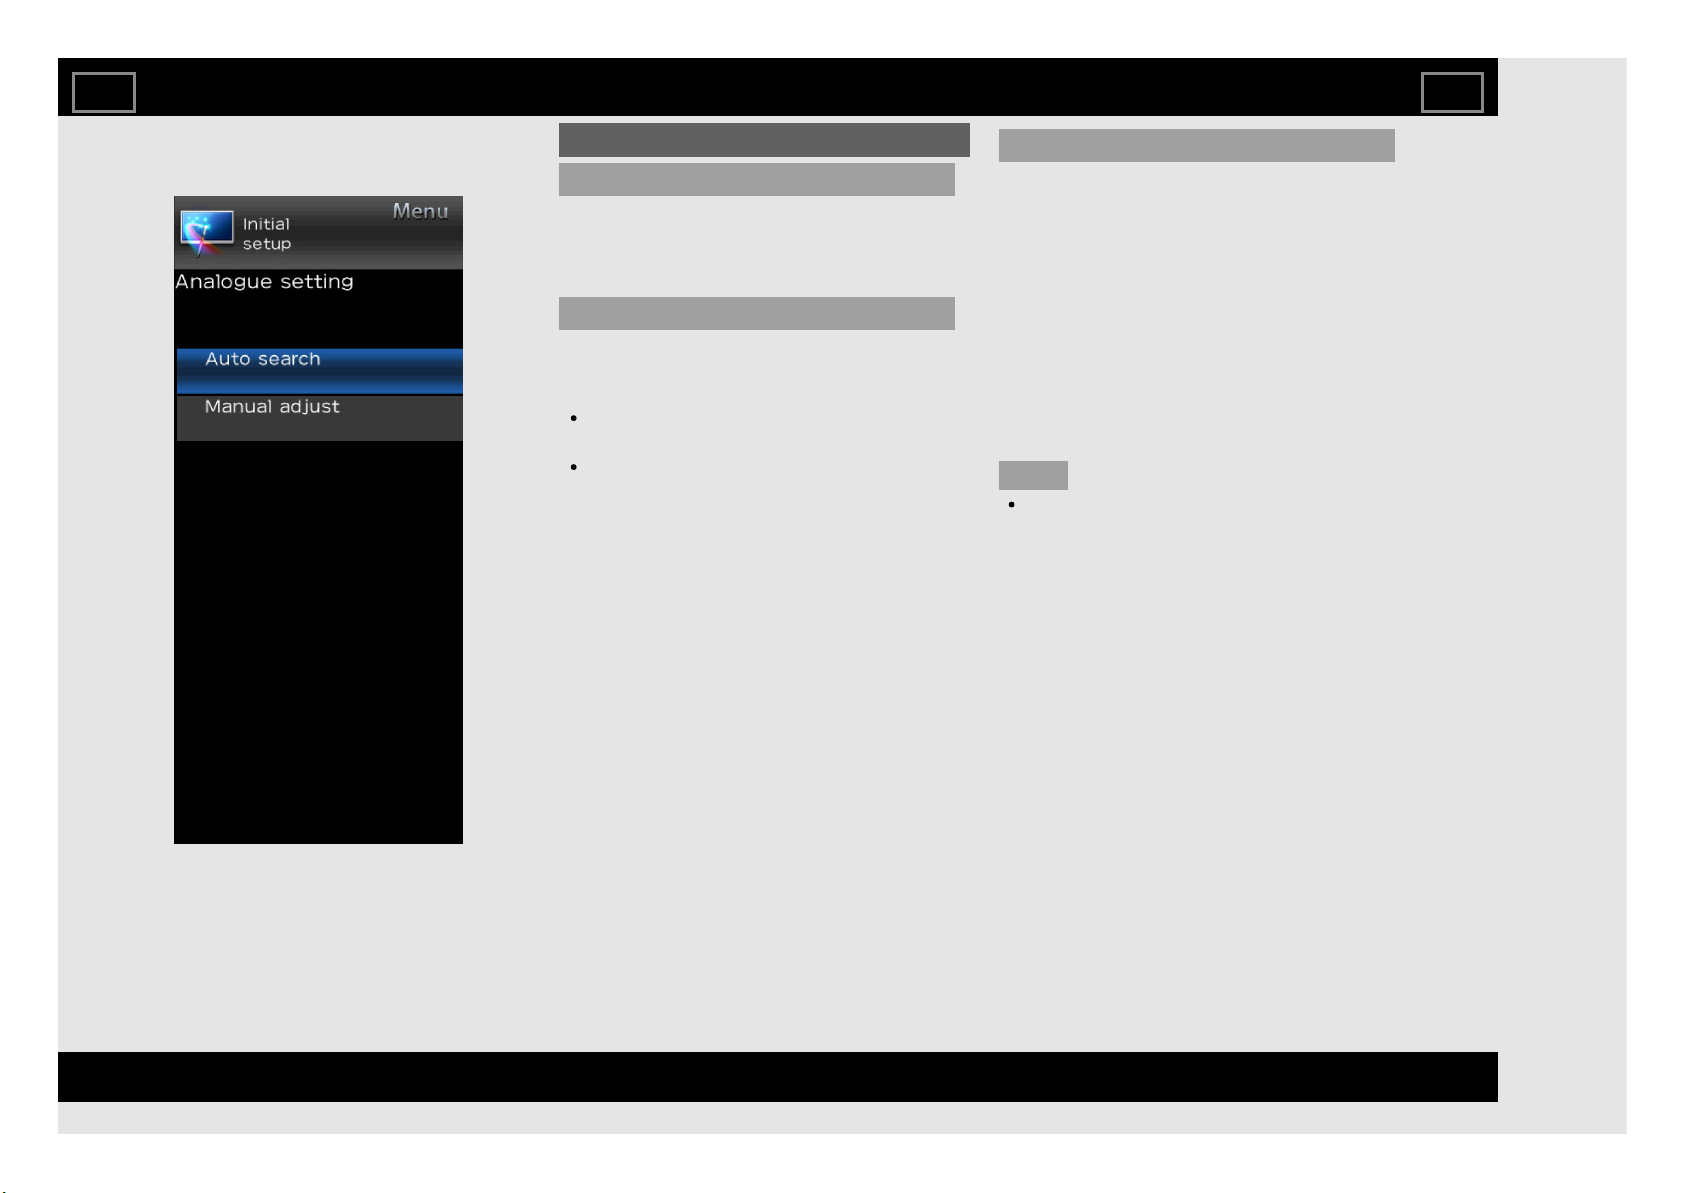
Initial setup (Continue)
Analogue setting
You can reconfigure the TV channel settings
automatically or manually using Auto search
or Manual adjust.
Auto search
Use this menu to add new services
automatically after auto installation has been
completed.
If you have already set the password, enter
it here. See "Child Lock" to set password.
You do not need to do anything during the
auto search.
Manual adjust
You can set some channel items manually.
Current CH: Select the channel you want to
edit.
Sound system: Select the optimum sound
system (Broadcasting system) to receive.
(B/G, D/K, I, M).
Colour system: Select the optimum colour
system to receive. (NTSC 3.58, NTSC 4.43,
PAL, SECAM).
Search: Start searching from current channel.
Fine-tune: Tune the frequency of the stored
channel to your desired position.
NOTE
The frequency shown below the On-Screen
Display shows the real-time frequency of
the displayed channel.
On-Screen Display Menu
EN 4-7
ENGLISH | FRANÇAIS | PORTUGUÊS | РУССКИЙ | 中文 | INDONESIA | ภาษาไทย | TIẾNG VIỆT | ﻲﺑرﻋ | АҒЫЛШЫН | O'ZBEK TILIDA
>><<
Page 29
Example
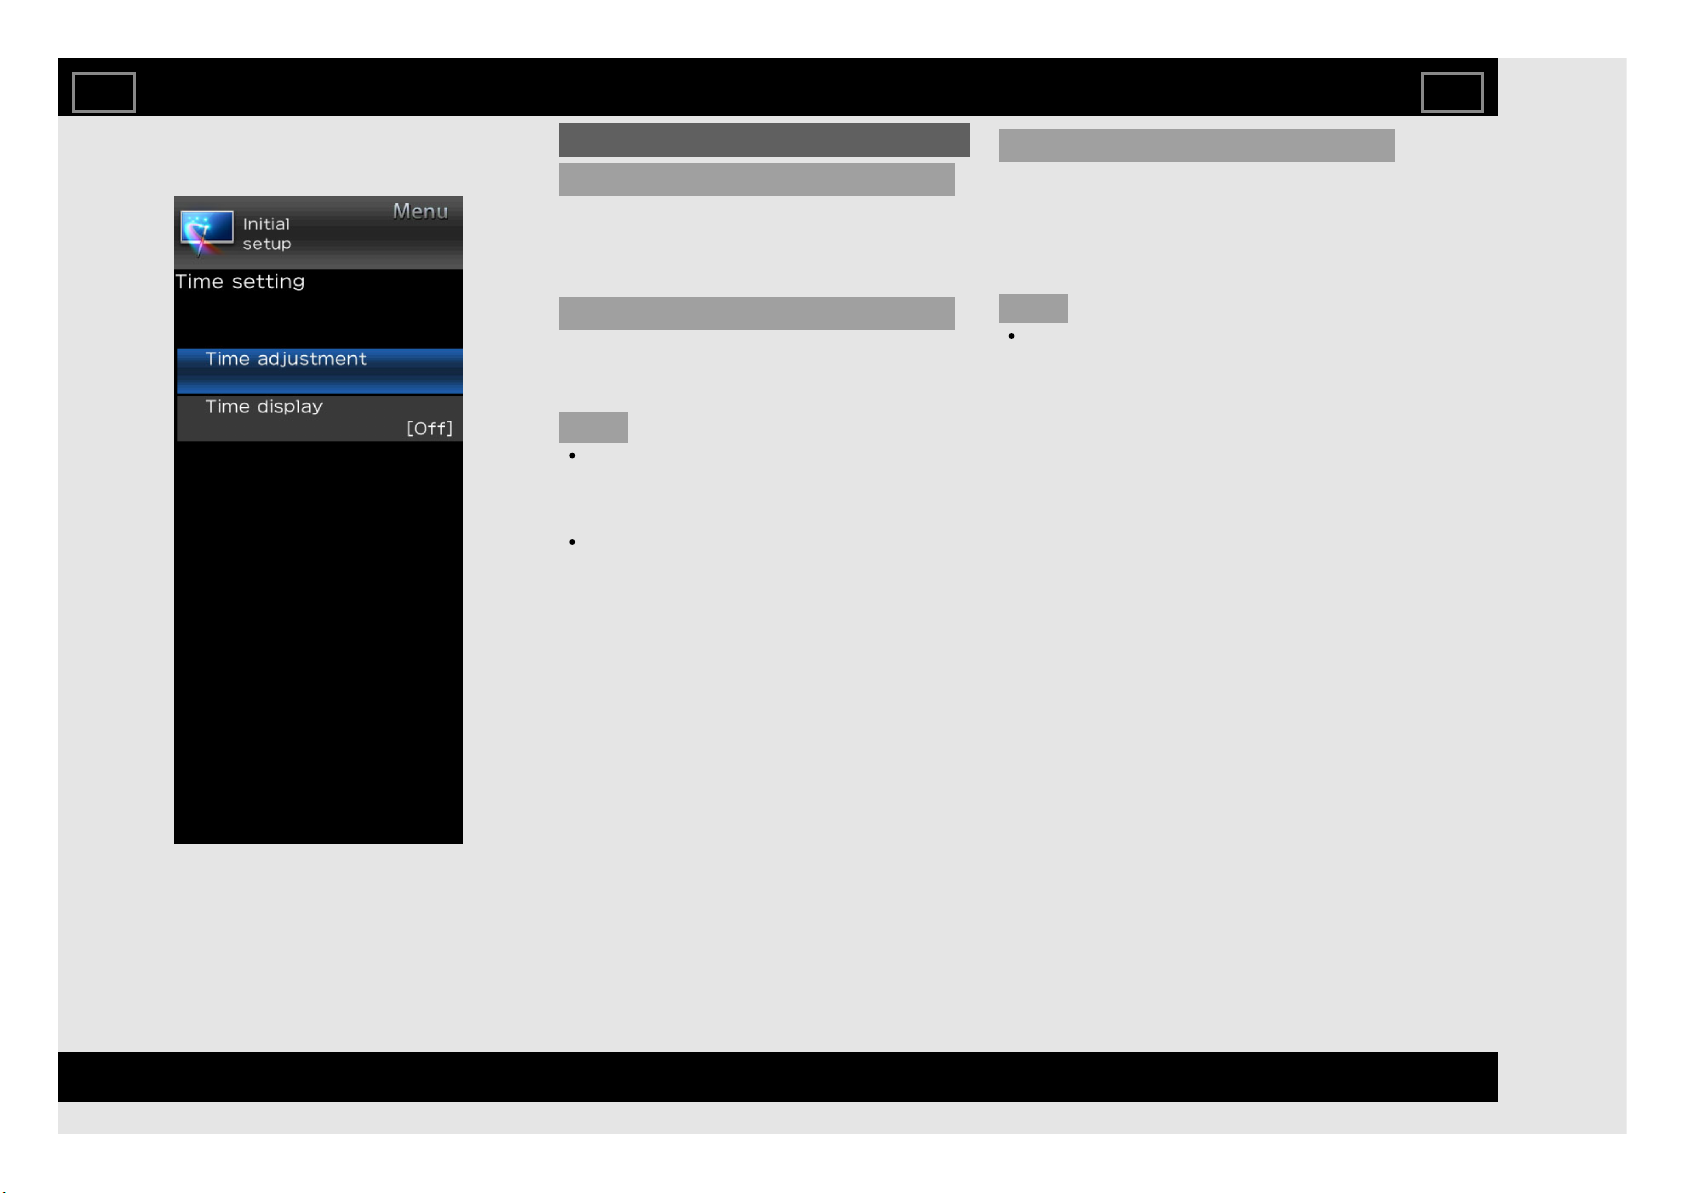
Initial setup (Continue)
Time setting
This function can display the time, data on
screen and channel's timetable with updated
time info.
Time adjustment
This function allows you to set the clock
manually.
NOTE
If you select “On” in “Auto synchronization”
the TV will try to get the time for the
broadcast. It will only be selectable when
“Auto synchronization” is set to “Off”.
“Time zone” enables you to select your
local time zone. It will only be selectable
when “Auto synchronization” is set to “On”.
Time display
This function allows you to display the clock
time in the lower-right corner of the screen.
Off: Hides the clock time.
On: Displays the clock time.
NOTE
Time information is available when channel
time information including the teletext
information is obtained in the "TV" mode.
On-Screen Display Menu
EN 4-8
ENGLISH | FRANÇAIS | PORTUGUÊS | РУССКИЙ | 中文 | INDONESIA | ภาษาไทย | TIẾNG VIỆT | ﻲﺑرﻋ | АҒЫЛШЫН | O'ZBEK TILIDA
>><<
Page 30

Example
Initial setup (Continue)
Language
You can select a language. Select from among
13 languages. (English, Simplified Chinese,
Arabic, French, Portuguese, Russian, Persian,
Thai, Vietnamese, Indonesian, Hebrew, Hindi
and Malay.)
NOTE
To change the language of the manual,
select " (HOME)" > "Settings" > "Menu"
> "Initial setup" > "Language" to change the
language. Then, press ENTER.
On-Screen Display Menu
EN 4-9
ENGLISH | FRANÇAIS | PORTUGUÊS | РУССКИЙ | 中文 | INDONESIA | ภาษาไทย | TIẾNG VIỆT | ﻲﺑرﻋ | АҒЫЛШЫН | O'ZBEK TILIDA
>><<
Page 31

Example
Initial setup (Continue)
Child lock
Allows you to use a password to protect certain
settings from being accidentally changed.
Lock system
If the password is not set, the "Lock system" is
invalid.
Please make sure the "Lock system" is set to
"On" before the Child lock is set. (Off, On).
Set password
You can set and change the Password by using
0-9.
NOTE
To view a locked channel, you must enter a
password. When you select a locked
channel, "Child lock has been activated" is
displayed and then enter the password.
Block programme
The "Block programme" can be select after
"Lock system" is set to "On".
Parental rating
This function allows TV channels to be
restricted. It prevents children from watching
violent or sexual scenes that may be
considered inappropriate.
Off: Cancel the blocking.
Age xx years: Select desired age to block.
(Example) If age 14 is selected,
programmes rated for ages of 15 or more
are blocked.
On-Screen Display Menu
EN 4-10
ENGLISH | FRANÇAIS | PORTUGUÊS | РУССКИЙ | 中文 | INDONESIA | ภาษาไทย | TIẾNG VIỆT | ﻲﺑرﻋ | АҒЫЛШЫН | O'ZBEK TILIDA
>><<
Page 32

Example
Initial setup (Continue)
Programme edit
Use this menu to set up a channel individually.
Erase: Channels can be erased individually.
Press / to select “Yes” or “No”, and then
press ENTER to erase the selected channel.
Label: You can change channel names
individually. Maximum 5 alphanumerics can be
input. Press ENTER to start labelling. Press
/ to select a character, press / to
select next character, and then press ENTER to
save.
Sort: Channel position can be sorted freely.
Skip: Channels can be skip by select “Off” or
“On”.
NOTE
"Label" is available only for ATV channel.
On-Screen Display Menu
EN 4-11
ENGLISH | FRANÇAIS | PORTUGUÊS | РУССКИЙ | 中文 | INDONESIA | ภาษาไทย | TIẾNG VIỆT | ﻲﺑرﻋ | АҒЫЛШЫН | O'ZBEK TILIDA
>><<
Page 33

Example
Initial setup (Continue)
Quick start mode
When this function is activated, you can reduce
the TV's start-up time or even let the TV in
standby mode start displaying images and so
on via the connected equipment on the
network. (Off, On)
NOTE
Setting "Quick start mode" to "On"
consumes more power.
On-Screen Display Menu
EN 4-12
ENGLISH | FRANÇAIS | PORTUGUÊS | РУССКИЙ | 中文 | INDONESIA | ภาษาไทย | TIẾNG VIỆT | ﻲﺑرﻋ | АҒЫЛШЫН | O'ZBEK TILIDA
>><<
Page 34

Example
Initial setup (Continue)
Input settings
HDMI auto view
When you view images sent from external
equipment in an HDMI connection, this function
allows the image size on the TV to
automatically switch to an appropriate one.
(Enable, Disable)
HDMI type selection
Sets the HDMI type for HDMI INPUT 1 and 2
terminals. Set to "Full" when an HDMI 4K60P
4:4:4 device is connected, and set to "Limited"
when an HDMI 4:2:0 device is connected.
Digital audio
This function allows you to select the digital
audio signal type.
Off: No selection.
Bitstream: To multi-Channel Dolby Digital.
PCM: To stereo audio system.
Audio output select
You can select which device is used for
outputting audio.
Headphone: Output audio through
headphones.
Audio out: Output audio through an A/V
receiver or surround audio controller.
NOTE
If you select “Headphone” when a cable is
inserted in the AUDIO output terminal, the
TV speakers are muted and all Audio menu
items cannot be adjusted except for
Balance.
If you select “Audio out”, sound via the
AUDIO output terminal is not adjustable and
constantly outputs.
CAUTION
AUDIO output terminal is also used for
headphones. Reduce the volume before
using headphones. Overwhelming sound
may damage your hearing.
Colour system
Select the video signal system compatible with
your equipment from the list below:
Auto, PAL, SECAM, NTSC 3.58, NTSC 4.43,
PAL-60.
NOTE
"Colour system" can only be set for the
VIDEO IN.
On-Screen Display Menu
EN 4-13
ENGLISH | FRANÇAIS | PORTUGUÊS | РУССКИЙ | 中文 | INDONESIA | ภาษาไทย | TIẾNG VIỆT | ﻲﺑرﻋ | АҒЫЛШЫН | O'ZBEK TILIDA
>><<
Page 35

Example
Initial setup (Continue)
Input settings
LINK setup
Link operation
Using the HDMI CEC (Consumer Electronics
Control) protocol, with Link operation you can
interactively operate compatible system
equipment (e.g. DVD), by connecting the link
operation-compatible devices with HDMIcertified cables to the TV. Link operation allows
you to operate the HDMI-connected equipment
and the TV by using a single remote control
unit. (Off, On)
Auto power on
If this is activated, the one touch play function
is enabled. While the TV is in standby mode, it
automatically turns on and plays back the
image from the HDMI source. (Off, On)
Speaker select
You can select to listen to the TV sound only
from the LINK-compatible audio system.
(Internal speakers, External device)
Audio return channel
If this function is set to “Auto”, the TV can send
audio data for video content shown on the TV
to a connected audio device with just one ARCcompatible cable. Using this function eliminates
the need to use a separate digital or analogue
audio cable. (Off, Auto)
Connection for using “Audio return
channel”
You need to use ARC-compatible
cables/devices and connect to the HDMI 1
terminal to activate this function.
NOTE
The ARC (Audio return channel) function
works only when using the HDMI 1 terminal.
When you use an audio system compatible
with the ARC function of the TV, you do not
need to connect an optical audio cable to
the TV.
On-Screen Display Menu
EN 4-14
ENGLISH | FRANÇAIS | PORTUGUÊS | РУССКИЙ | 中文 | INDONESIA | ภาษาไทย | TIẾNG VIỆT | ﻲﺑرﻋ | АҒЫЛШЫН | O'ZBEK TILIDA
>><<
Page 36

Example
Initial setup (Continue)
Reset
If complex adjustments are made and the
settings cannot be restored to normal, you can
reset the settings to the factory preset values.
If you have already set the password, enter
it here.
NOTE
If you execute “Reset”, all the settings such
as “Picture settings”, “Audio settings” and
“Initial setup” will be reset to the factory
preset values.
On-Screen Display Menu
EN 4-15
ENGLISH | FRANÇAIS | PORTUGUÊS | РУССКИЙ | 中文 | INDONESIA | ภาษาไทย | TIẾNG VIỆT | ﻲﺑرﻋ | АҒЫЛШЫН | O'ZBEK TILIDA
>><<
Page 37

Example
Information
Identification
You can check the current version of the
software on the screen.
Software update
This is used to upgrade the system software to
enhance the TV functions.
Manual update
Select the method for manually updating the
software.
USB update: Updates the software using a
USB memory device containing the update
file. (See pages 4-19 to 4-21 for details on
the "Updating the Software via the USB
Memory device".)
Network update: Downloads the update file
via the network and then updates the
software.
(See page 4-21 for details on the "Updating
the Software via the Network".)
NOTE
A broadband connection and Internet
Setup are required to update the software
using the network.
(See pages 8-4 to 8-6.)
It may take time to access and download
the update depending on the Internet
connection and other factors.
On-Screen Display Menu
EN 4-16
ENGLISH | FRANÇAIS | PORTUGUÊS | РУССКИЙ | 中文 | INDONESIA | ภาษาไทย | TIẾNG VIỆT | ﻲﺑرﻋ | АҒЫЛШЫН | O'ZBEK TILIDA
>><<
Page 38

Example
Information (Continue)
Software update
Auto update setting
OAD update
This function is for automatically download
the data for the version update software
over digital broadcasts when the “OAD
update” is set to “On”.
To download, follow the instructions when
the download message appears during a
digital broadcast.
Once the software upgrade is done, the TV
will automatically go to standby state with
Red LED.
OAD scan
This function is for manually download the
data for the version update software over
digital broadcasts.
CAUTION
Do not disconnect the AC cord when
the software upgrade is in progress, as
this may cause the upgrade to fail. If
problem arises ask a qualified service
personnel before the software upgrade
period expires.
Network update
When the TV is on, or when an Internet
application is being accessed, this function
enables the TV to connect to the network and
check for updates automatically.
When an update is available, a message is
displayed.
Press / to select "Yes", and then press
ENTER to display the download screen.
(See page 4-21.)
NOTE
This function does not work when a
broadband connection or Internet Setup is
not available.
A message may also be displayed when an
application is running.The message varies
depending on the application.
On-Screen Display Menu
EN 4-17
ENGLISH | FRANÇAIS | PORTUGUÊS | РУССКИЙ | 中文 | INDONESIA | ภาษาไทย | TIẾNG VIỆT | ﻲﺑرﻋ | АҒЫЛШЫН | O'ZBEK TILIDA
>><<
Page 39

Example
Information (Continue)
Software license
You can read the software license on the
screen.
SHARP Terms of Use
You can read the SHARP Terms of Use on the
screen.
SHARP Privacy Policy
You can read the SHARP Policy on the screen.
Manual
Displays the built-in operation manual on the
screen. You can read information about how to
use this device.
On-Screen Display Menu
EN 4-18
ENGLISH | FRANÇAIS | PORTUGUÊS | РУССКИЙ | 中文 | INDONESIA | ภาษาไทย | TIẾNG VIỆT | ﻲﺑرﻋ | АҒЫЛШЫН | O'ZBEK TILIDA
>><<
Page 40

Example
Information (Continue)
Software update
Manual update
Updating the Software via the USB Memory device
1. Insert the USB memory device with the update file into the USB terminal on the TV.
On-Screen Display Menu
EN 4-19
ENGLISH | FRANÇAIS | PORTUGUÊS | РУССКИЙ | 中文 | INDONESIA | ภาษาไทย | TIẾNG VIỆT | ﻲﺑرﻋ | АҒЫЛШЫН | O'ZBEK TILIDA
>><<
Page 41

Example
Information (Continue)
Software update (Continue)
Manual update (Continue)
2. Press / on the Manual update screen to select "USB update", and then press ENTER.
3. Press ENTER to start checking the data in the USB memory device.
4. Press ENTER again and the TV will update software.
If the USB memory device is not properly installed or the correct update file cannot be found on the
USB memory device, an error message is displayed.
Check the file on the USB memory device, and then reinsert the USB memory device correctly.
On-Screen Display Menu
EN 4-20
ENGLISH | FRANÇAIS | PORTUGUÊS | РУССКИЙ | 中文 | INDONESIA | ภาษาไทย | TIẾNG VIỆT | ﻲﺑرﻋ | АҒЫЛШЫН | O'ZBEK TILIDA
>><<
Page 42

Example
Information (Continue)
Software update (Continue)
Manual update (Continue)
CAUTION
Do not remove the USB memory device
or unplug the AC cord while the software
is being updated.
Be sure to properly follow the whole
procedure described below, step by step.
Otherwise, for example, the TV cannot
read the data in the USB memory device
and software updating will fail.
5. When the software is successfully updated,
a screen is displayed indicating that the
update process is completed.
After this screen is displayed, the TV
automatically turns off and then turns on
again.
If the update has failed, check the file in
the USB memory device and try Software
update again.
6. Remove the USB memory device.
Updating the Software via the Network
1. Press / on the Manual update screen
to select "Network update", and then press
ENTER.
The TV connects to the network and
checks for updates.
To cancel, press ENTER.
2. The current version of the TV and the latest
version of software are displayed. To
update the TV software, select "Yes", and
then press ENTER.
When a server connection cannot be
established or an update is not available,
a message is displayed.
If a server connection cannot be
established, check the broadband
connection and Internet Setup.
3. After the update file is downloaded, the
software update process begins.
CAUTION
Do not unplug the AC cord while the
software is being updated.
4. When the software is successfully updated,
a screen is displayed indicating that the
update process is completed.
A screen indicating that the update is
completed is displayed. 4 seconds later, the
TV restarts automatically.
If the software was not updated
successfully, check the broadband
connection and Internet setup, and then
try updating the software again.
On-Screen Display Menu
EN 4-21
ENGLISH | FRANÇAIS | PORTUGUÊS | РУССКИЙ | 中文 | INDONESIA | ภาษาไทย | TIẾNG VIỆT | ﻲﺑرﻋ | АҒЫЛШЫН | O'ZBEK TILIDA
>><<
Page 43

Example
Picture settings
Adjusts the picture to your preference with the
following picture settings.
NOTE
For operating the on-screen display menu,
see page 4-3.
Selected
item
button button
Backlight The screen
dims
The screen
brightens
Contrast For less
contrast
For more
contrast
Brightness For less
brightness
For more
brightness
Colour For less
colour
intensity
For more
colour
intensity
Tint Skin tones
become
reddish
Skin tones
become
greenish
Sharpness For less
sharpness
For more
sharpness
HDR
gamma
For less HDR
gamma
For more
HDR gamma
For resetting all Picture settings items to
the factory preset values, press / to
select "Reset", press ENTER, press /
to select "Yes", and then press ENTER.
HDR gamma is available only when
receiving HDR signal.
AV mode (Changing Pic.Quality)
AV Mode gives you several viewing options to
choose from to best match the surrounding
environment of the TV, which can vary due to
factors like room brightness, type of
programme watched or the type of device
connected.
These settings will be automatically saved on
each input for convenience.
STANDARD: For a highly defined image in a
normal lighting.
MOVIE: For a movie.
PC: For PC.
USER: Allows you to customise settings as
desired. You can set the mode for each
input source.
DYNAMIC:For a clear-cut image emphasising
high contrast, useful for sports viewing.
DYNAMIC (Fixed): Changes the image and
sound settings to the factory preset values.
No adjustments are allowed.
SUPER ECO: Reduce backlight brightness to
save power consumption.
NOTE
You can select AV mode by pressing
AV MODE on the remote control unit.
On-Screen Display Menu
EN 4-22
ENGLISH | FRANÇAIS | PORTUGUÊS | РУССКИЙ | 中文 | INDONESIA | ภาษาไทย | TIẾNG VIỆT | ﻲﺑرﻋ | АҒЫЛШЫН | O'ZBEK TILIDA
>><<
Page 44

Example
Picture settings (Continue)
Advanced
Motion enhancement
Use Motion enhancement to view fast-action
video more clearly. (Off, Standard, Advance)
NOTE
"Motion enhancement" may cause image
noise. If this occurs, turn the function "Off".
Digital noise reduction
Produces a clearer video image.
Off: No adjustment.
Low/Medium/High: You can select a desired
level for viewing a clearer video image.
Auto: Automatically adjusts the level of noise
reduction.
Eagle View
"Eagle View" technology produces a sharp
picture from the original moving picture.
(Off, On)
AquoMotion Lite
"AquoMotion Lite" technology provides superior
solutions for display picture quality removing
motion blur. (Off, High, Advance)
NOTE
This effect is greater on fast moving
images.
If images appear blurred or flickering, set to
"Off".
Color Temp.
Adjusts the colour temperature to give the best
white image.
Item
High White with bluish tone.
MidHigh
Intermediate tone between “High”
and “Middle”.
Middle Natural tone.
MidLow
Intermediate tone between “Middle”
and “Low”.
Low White with reddish tone.
Contrast Enhancer
Enhance the image for greater contrast.
(Off, On)
On-Screen Display Menu
EN 4-23
ENGLISH | FRANÇAIS | PORTUGUÊS | РУССКИЙ | 中文 | INDONESIA | ภาษาไทย | TIẾNG VIỆT | ﻲﺑرﻋ | АҒЫЛШЫН | O'ZBEK TILIDA
>><<
Page 45

Example
Audio settings
You can adjust the sound quality to your
preference with the following settings.
NOTE
For operating the on-screen display menu,
see page 4-3.
Selected
item
button button
Treble For weaker
treble
For stronger
treble
Bass For weaker bass For stronger
bass
Balance Decrease audio
from the right
speaker
Decrease audio
from the left
speaker
NOTE
For resetting all Audio settings items to the
factory preset values, press / to select
"Reset", press ENTER, press / to
select "Yes", and then press ENTER.
Surround
The surround function produces Surround
effect from the speakers.
NOTE
For some discs, setup may be required on
your BD/DVD player. In this case, please
refer to the operation manual of your
BD/DVD player.
Bass enhancer
This function allows you to enjoy bassenhanced sound.
Off: Outputs the normal sound.
On: Bass enhancer function is on.
NOTE
If distorted bass sound is heard, set to
“Off”.
Auto volume
Different sound sources sometimes do not
have the same loudness level, such as a
programme and its commercial brakes, The
Automatic Volume Control (Auto Volume)
reduces this problem by equalizing.
Off: No adjustment.
On: Reduces the loudness gaps among
different sound source. The result is
automatically adjusted according to the
sound sources.
On-Screen Display Menu
EN 4-24
ENGLISH | FRANÇAIS | PORTUGUÊS | РУССКИЙ | 中文 | INDONESIA | ภาษาไทย | TIẾNG VIỆT | ﻲﺑرﻋ | АҒЫЛШЫН | O'ZBEK TILIDA
>><<
Page 46

Example
Smart TV
Dashboard
You can display a list of the main Smart TV
settings.
Internet Setup
Configures LAN and Internet settings.
(See pages 8-4 to 8-6.)
AQUOS Remote Control
Set this function when operating the TV from
equipment connected by LAN or wireless LAN.
(See page 7-1.)
WakeOn Wifi/LAN
Enable the TV to be started by a signal over a
Wifi/LAN.
NOTE
The setting will automatically turn ON when
first time using YouTube and it will remain
ON until you change it.
Standby power consumption will be
increase when WakeOn Wifi/LAN is turned
ON.
Standby Clock Display
TV display time and date information when TV
in standby mode.
NOTE
This feature only available in TV with
internet connected and Digital broadcast.
User can choose either pre-install images
or photo from USB act as the background.
Images will rotate every 30 seconds.
User need to set the folder name as "CLK"
in order to read the image in USB.
To improve realistic viewing, user need to
insert the picture which equal or more than
1920 x 1080 pixels.
"Data source" can only be selected when
"Standby Clock Display" set to "On".
Screen Mirroring
Enjoy favourite content and apps in large
screen from smartphone through wireless
connection.
NOTE
User need to key in the pin number
generate by the TV to operate screen
mirroring.
On-Screen Display Menu
EN 4-25
ENGLISH | FRANÇAIS | PORTUGUÊS | РУССКИЙ | 中文 | INDONESIA | ภาษาไทย | TIẾNG VIỆT | ﻲﺑرﻋ | АҒЫЛШЫН | O'ZBEK TILIDA
>><<
Page 47

Example
Smart TV (Continue)
Bluetooth setup
Bluetooth
This feature enable a TV to connect with other
Bluetooth devices via Bluetooth connection.
Off: "Paired devices" and "Add accessory"
does not work when Bluetooth is set to
"Off".
On: Bluetooth function is on.
NOTE
When you use the Bluetooth device with
your TV for the first time, you must make
pairing between the device and the TV (Add
accessory). Once the pairing is correctly
carried out, the Bluetooth device will be
registered on the TV (Paired devices).
Connectivity and reception range may
depend on condition, environment and
distance of Bluetooth devices.
Sound quality and compatibility are depend
on Bluetooth devices.
The Bluetooth format only supports HID,
A2DP and AVRCP.
Paired devices
You can pair, unpair or forget the device for
Bluetooth devices.
Add accessory
The TV will start searching list of Bluetooth
devices.
NOTE
Before pairing operation between devices
and TV is completed, enter the PIN code by
using the software keyboard (If necessary).
When audio output device is connected, you
can set the "Speaker type" between
"External speaker" and "Subwoofer".
Lip sync error may occur depends on
Bluetooth device and signal source.
RECOMMENDATION
We recommended you to use CP-SW60A1
SHARP Subwoofer to get better
performance.
On-Screen Display Menu
- -External speaker: Audio output at
external speaker only. During this setting,
"Audio settings" of TV are no available.
Subwoofer: Audio output at TV speaker
and Subwoofer. User can change
Subwoofer behaviour suit the user
preference (Bass, Audio delay).
EN 4-26
ENGLISH | FRANÇAIS | PORTUGUÊS | РУССКИЙ | 中文 | INDONESIA | ภาษาไทย | TIẾNG VIỆT | ﻲﺑرﻋ | АҒЫЛШЫН | O'ZBEK TILIDA
>><<
Page 48

Example
Smart TV (Continue)
Advanced
TV name setting
Set this function when operating the TV from equipment connected by LAN or wireless LAN.
(See page 7-1.)
Use the software keyboard when you need to input text at TV name setting.
Software Keyboard
ABC
Switches character to uppercase. If "abc" is pressed again, switches character to lowercase.
":&12"
Changes character set into the alphabet, numbers, symbols, etc.
OK
Applies the entered information and closes the software keyboard.
space
Enters a space.
Erases the character string.
On-Screen Display Menu
EN 4-27
ENGLISH | FRANÇAIS | PORTUGUÊS | РУССКИЙ | 中文 | INDONESIA | ภาษาไทย | TIẾNG VIỆT | ﻲﺑرﻋ | АҒЫЛШЫН | O'ZBEK TILIDA
>><<
Page 49

Example
Smart TV (Continue)
Advanced (Continue)
IPv6 Setup
IPv6 (Internet Protocol version 6) is the newest
version of Internet Protocol (IP), the
communications protocol that provides an
identification number and location for each of
the world's internet-connected devices.
Wired: Select "Auto" to set the address
automatically. Otherwise, select "Manual".
On-Screen Display Menu
EN 4-28
ENGLISH | FRANÇAIS | PORTUGUÊS | РУССКИЙ | 中文 | INDONESIA | ภาษาไทย | TIẾNG VIỆT | ﻲﺑرﻋ | АҒЫЛШЫН | O'ZBEK TILIDA
>><<
Page 50

Example
Smart TV (Continue)
Advanced (Continue)
Adhan - Prayer time
This feature could help a Muslim user to stay
on top of Prayers with Adhan by getting the
accurate prayer times via notification.
By configuring location and time zone, all five
times prayer will be calculated according to the
pointed calculation method.
Auto setup: This function allows you to select
the address configuration through pre-set data.
(Country, Province, City)
Manual setup: You can insert manually all
informations in the screen.
Prayer time selection: You can select or
deselect between 5 prayers for Adhan
notification.
Notification: You can select or deselect prayer
time to notify and enable or disable prayer alert.
Info: A quick reference for you to get info on
five times prayer after setup completed.
NOTE
The notification will be displayed on the
screen for 5 minutes. After 5 minutes, the
notification screen will be off automatically.
The notification is based on the setting in
Prayer time selection.
Press (BACK) to off the notification
screen immediately.
This selection only available when country
selected are Malaysia and Indonesia.
The TV and Adhan time information prior to
internet connection.
The TV time information from digital TV
signal will be used if internet connection is
not available.
Deviation of the TV and Adhan display time
may occur due to improper digital broadcast
standard.
On-Screen Display Menu
EN 4-29
ENGLISH | FRANÇAIS | PORTUGUÊS | РУССКИЙ | 中文 | INDONESIA | ภาษาไทย | TIẾNG VIỆT | ﻲﺑرﻋ | АҒЫЛШЫН | O'ZBEK TILIDA
>><<
Page 51

Example
System options
NOTE
For operating the on-screen display menu,
see page 4-3.
Power control
Power control setting allows you to save
energy.
No signal off
When this function is enabled, the TV
automatically shuts down if no signal is
received for more than 15 minutes.
NOTE
When it is 5 minutes before the power
shuts down, the remaining time will start to
keep appearing every minute.
When a TV programme finishes, this
function may not operate.
No operation off
When you enable this function, the TV
automatically shuts down if no operation is
performed for more than 3 hours.
(Disable, 3 hours, 30 min.)
NOTE
When it is 5 minutes before the power
shuts down, the remaining time will start to
keep appearing every minute.
Sleep timer
Allows you to set a time when the TV
automatically switches to standby.
The remaining time displays when the
sleep timer has been set.
Set the Sleep timer.
When set, the time automatically starts
counting down.
When it is 5 minutes before the time
expires, the remaining time will start to keep
appearing every minute.
NOTE
The TV will enter standby when the
remaining time reaches 0.
On-Screen Display Menu
EN 4-30
ENGLISH | FRANÇAIS | PORTUGUÊS | РУССКИЙ | 中文 | INDONESIA | ภาษาไทย | TIẾNG VIỆT | ﻲﺑرﻋ | АҒЫЛШЫН | O'ZBEK TILIDA
>><<
Page 52

Example
System options (Continue)
View option
Wide mode
This function changes the screen size.
Select "View option" on the menu to display the
Wide mode menu screen.
The Wide mode menu varies depending on the
input source.
For HD programmes
Full: Displays with an overscan image. Crops
all sides of screen.
Dot by Dot: Displays an image with the same
number of pixels on the screen when
receiving HD signals only.
NOTE
When using Dot by Dot, it is possible to
see noise or bars around different outer
portions of the screen. Please change wide
mode to correct this.
This feature is available with TV, HDMI IN
1-2, and Video input.
Availability in other input modes varies
according to the individual App
specifications.
Some items do not appear depending on
the type of received signal.
For 4:3 programmes
Normal: Keeps the original aspect ratio in a
full screen display.
Full: For 16:9 squeeze pictures.
Cinema 16:9: For 16:9 letterbox pictures.
Bars may appear on the top and bottom
with some programmes.
Cinema 14:9: For 14:9 letterbox pictures.
Bars may appear on the top and bottom
with some programmes.
Zoom 14:9: For 14:9 letterbox pictures. A thin
side bar appears on each side, and you
may also see bars on the top and bottom
with some programmes.
Panorama: In this mode, the picture is
stretched toward each side of the screen.
The picture may appear similar to "Full"
depending on broadcast signals.
For PC
Normal: Keeps the original aspect ratio in a
full screen display.
Full: An image fully fills the screen.
Dot by Dot: Detects the resolution of the
signal and displays an image with the same
number of pixels on the screen.
NOTE
Connect the PC before making
adjustments. See the Setup Guide.
On-Screen Display Menu
EN 4-31
ENGLISH | FRANÇAIS | PORTUGUÊS | РУССКИЙ | 中文 | INDONESIA | ภาษาไทย | TIẾNG VIỆT | ﻲﺑرﻋ | АҒЫЛШЫН | O'ZBEK TILIDA
>><<
Page 53

Example
System options (Continue)
View option (Continue)
4:3 mode (DTV and HDMI only)
The 4:3 mode allows you to select between
"Normal" and "Full".
Normal: Normal range keeping 4:3 or 16:9
aspect ratio.
Full: Wide image without side bars.
Auto wide (DTV only)
The "Auto wide" allows the TV to switch
automatically among the different picture size.
(Off, On)
NOTE
Use "Wide mode" if an image does not
switch to the appropriate picture size. When
the broadcast signal contains no aspect
ratio information, the function will not work
even if enabled.
Change audio
MPX
Allows you to change the audio when multiple
audio is available for the programme you are
watching. (Auto, Mono)
NOTE
You can change Audio by pressing
AD/MPX on the remote control unit.
See page 3-4 for details of Audio function.
Bilingual
Select from among 3 kinds of mode: DUAL I,
DUAL II and DUAL I + II.
On-Screen Display Menu
EN 4-32
ENGLISH | FRANÇAIS | PORTUGUÊS | РУССКИЙ | 中文 | INDONESIA | ภาษาไทย | TIẾNG VIỆT | ﻲﺑرﻋ | АҒЫЛШЫН | O'ZBEK TILIDA
>><<
Page 54

Example
System options (Continue)
View option (Continue)
Change audio
Audio only
When listening to music from a music
programme, you can turn the screen off and
enjoy audio only.
Off: Both screen images and audio are
output.
On: Audio is output without screen image.
NOTE
The screen image will return to normal
when a button (except those for audio
adjustment, such as VOL, MUTE) is
presses.
Audio description (DTV only)
This function allows you to adjust volume
output of audio description if the TV receives a
signal including audio description.
Switching the multi audio languages
Each time you press AD/MPX on the remote
control, the audio language switches.
NOTE
This function is valid only if broadcaster is
transmitting audio description.
Hearing impaired (DVB subtitle)
Each time you select "Subtitle" in HOME
screen, the subtitle switches when the
broadcast contains subtitle information.
NOTE
This function is valid only if broadcaster is
transmitting multilingual subtitles.
Digital audio language
Set up to two preferred multi audio languages
to display if the audio languages are available.
(1st language, 2nd language)
NOTE
If audio for the selected languages is not
included in a received broadcast, audio will
not be output for that language.
On-Screen Display Menu
EN 4-33
ENGLISH | FRANÇAIS | PORTUGUÊS | РУССКИЙ | 中文 | INDONESIA | ภาษาไทย | TIẾNG VIỆT | ﻲﺑرﻋ | АҒЫЛШЫН | O'ZBEK TILIDA
>><<
Page 55

Example
System options (Continue)
View option (Continue)
Change subtitle
Digital subtitle Language
You can display subtitles for the hearing
impaired in the Teletext broadcast if the subtitle
languages are available.
(1st language, 2nd language)
NOTE
If subtitles for the selected language are
not included in a received broadcast,
subtitles will not be shown for that language.
On-Screen Display Menu
EN 4-34
ENGLISH | FRANÇAIS | PORTUGUÊS | РУССКИЙ | 中文 | INDONESIA | ภาษาไทย | TIẾNG VIỆT | ﻲﺑرﻋ | АҒЫЛШЫН | O'ZBEK TILIDA
>><<
Page 56

Example
System options (Continue)
Text language
If Teletext information does not display
correctly, perform the procedure below.
Select from among five kinds of language
tables: West Europe, East Europe, Cyrillic,
Arabic and Farsi.
Each table is compatible with the Teletext
languages listed below.
West Europe — English, French,
Scandinavian, Turkish, German, Spanish,
Italian
East Europe — Polish, French,
Scandinavian, Czech, German,
Slovenian/Croatian, Italian, Rumanian
Cyrillic — English, Russian, Estonian,
Czech, German, Slovenian/Croatian,
Ukrainian, Lettish
Arabic — English, French, Scandinavian,
Turkish, German, Hebrew, Italian, Arabic
Farsi — English, French, Scandinavian,
Turkish, German, Hebrew, Italian, Farsi
NOTE
Teletext can be displayed only when it is
sent by a network. Not used to convert
between languages.
On-Screen Display Menu
EN 4-35
ENGLISH | FRANÇAIS | PORTUGUÊS | РУССКИЙ | 中文 | INDONESIA | ภาษาไทย | TIẾNG VIỆT | ﻲﺑرﻋ | АҒЫЛШЫН | O'ZBEK TILIDA
>><<
Page 57

Example
System options (Continue)
Demo (store mode only)
When "Store mode" is set to "On", after all the
settings are completed, the Feature demo
screen is displayed if there is no operation for
30 seconds.
On-Screen Display Menu
EN 4-36
ENGLISH | FRANÇAIS | PORTUGUÊS | РУССКИЙ | 中文 | INDONESIA | ภาษาไทย | TIẾNG VIỆT | ﻲﺑرﻋ | АҒЫЛШЫН | O'ZBEK TILIDA
>><<
Page 58

Preparation
You can connect the TV to a USB memory device, USB hard drive or Home Network server to enjoy viewing pictures, listening to music, and watching
videos.
NOTE
Depending on the USB memory device/USB hard drive/Home Network server, the TV may not be able to recognise the recorded data.
It may take time to read the recorded data if the USB memory device/USB hard drive/Home Network server contains many files or folders.
Use only alphanumeric characters for naming files.
File names over 80 characters (may vary depending on character set) may not be displayed.
Connecting a USB Memory Device/USB Hard Drive
Insert the USB memory device with recorded photos, music or videos into the USB terminal on the TV.
Enjoying Photo/Music/Video Playback
EN 5-1
ENGLISH | FRANÇAIS | PORTUGUÊS | РУССКИЙ | 中文 | INDONESIA | ภาษาไทย | TIẾNG VIỆT | ﻲﺑرﻋ | АҒЫЛШЫН | O'ZBEK TILIDA
>><<
Page 59

Preparation (Continue)
When connecting a USB hard drive, be sure to use a hard drive with an AC adapter.
Do not remove a USB memory device or memory card from the TV while transferring files, using the slide show function, or switching screens, or before
you exit "USB" from the INPUT list.
Do not insert and remove a USB memory device/USB hard drive to and from the TV repeatedly.
When using a card reader, be sure to insert a USB memory device first.
CAUTION
Do not use a USB extension cable when connecting a USB memory device to the USB terminal on the TV.
Using a USB extension cable with the USB memory device may prevent the TV from performing correctly.
Connecting a Home Network Server
Connect the TV to the Home Network server using an ETHERNET cable.
You can also connect a Home Network server by using a wireless LAN.
NOTE
Do not disconnect a Home Network server from the TV while transferring files, when a screen is switching to another or before you exit "Home network"
from the HOME screen.
Do not connect and disconnect a Home Network server from the TV repeatedly.
Enjoying Photo/Music/Video Playback
EN 5-2
ENGLISH | FRANÇAIS | PORTUGUÊS | РУССКИЙ | 中文 | INDONESIA | ภาษาไทย | TIẾNG VIỆT | ﻲﺑرﻋ | АҒЫЛШЫН | O'ZBEK TILIDA
>><<
Page 60

USB Media Player
To play back data on a USB memory device, insert the USB memory device on the TV.
1. Select "USB" in "Input" or "Home network" in "Smart" from HOME screen.
2. Press / to select "Video", "Music" or "Photo", and then press ENTER.
3. Press / to select your USB directory, and then press ENTER.
4. Press / / / to select the desired folder, and then press ENTER.
NOTE
"Wide mode" is fixed during "Photo" and "Music".
Depending on the USB device, the TV may not be able to recognise the contained data.
A file name with more than 10 characters may not be displayed all (depending on the character set).
Files in USB 1.1 devices may not be played properly.
Operation using USB hubs is not guaranteed.
The compatibility of USB HDDs may not be guaranteed.
USB only support device up to DC5V 1.5A.
Enjoying Photo/Music/Video Playback
EN 5-3
ENGLISH | FRANÇAIS | PORTUGUÊS | РУССКИЙ | 中文 | INDONESIA | ภาษาไทย | TIẾNG VIỆT | ﻲﺑرﻋ | АҒЫЛШЫН | O'ZBEK TILIDA
>><<
Page 61

Selecting the Folders to Play Back
NOTE
If the TV is turned off and then on again, the number assigned to the USB may change.
USB Device Compatibility
USB device USB Memory
File system FAT32, NTFS*
Photo file format
Format JPEG (.jpg)/PNG/BMP)
Music file format
Format Bitrate [KHz]
MP3 32k, 40k, 48k, 56k, 64k, 80k, 96k, 112k,
128k, 160k, 192k, 224k, 256k, 320kbps
* Not guarantee for all devices.
Enjoying Photo/Music/Video Playback
EN 5-4
ENGLISH | FRANÇAIS | PORTUGUÊS | РУССКИЙ | 中文 | INDONESIA | ภาษาไทย | TIẾNG VIỆT | ﻲﺑرﻋ | АҒЫЛШЫН | O'ZBEK TILIDA
>><<
Page 62

Selecting the Folders to Play Back
(Continue)
Video file format
Container Video Audio
AVI
H.264
MPEG4
Motion Jpeg
Dolby Digital Plus
LPCM
ADPCM
Dolby Digital
MKV
H.264
MPEG4
Dolby Digital Plus
MPEG
Dolby Digital
MP4
H.264
MPEG4
Motion Jpeg
Dolby Digital Plus
MPEG
Dolby Digital
MPEG2 – PS MPEG2
LPCM
Dolby Digital
MPG
MPEG
MPEG2
MPEG1
LPCM
MPEG
Dolby Digital
TS
H.264
MPEG2
Dolby Digital Plus
LPCM
MPEG
Dolby Digital
NOTE
Progressive format jpeg files are not
supported.
USB 1.1 devices may not be played
properly.
Operation using USB hubs is not
guaranteed.
Some video file formats may not be played
depending on the file.
Some images may not be displayed in the
appropriate aspect ratio depending on the
file format.
File extensions are not used to determine
the file format.
Home Network Server Compatibility
Photo file
format
JPEG
Music file
format
LPCM, MP3
Video file
format
AVI, MP4, MPG
NOTE
Progressive format jpeg files are not
supported.
Some video file formats may not be played
depending on the file or the server.
Enjoying Photo/Music/Video Playback
EN 5-5
ENGLISH | FRANÇAIS | PORTUGUÊS | РУССКИЙ | 中文 | INDONESIA | ภาษาไทย | TIẾNG VIỆT | ﻲﺑرﻋ | АҒЫЛШЫН | O'ZBEK TILIDA
>><<
Page 63

Playing Back Files on a USB Memory Device/Home Network Server
Control panel for Photo/Music/Video mode operations
Press B to display the control panel below.
Button/menu Description Photo Music Video
When selecting a folder icon: Enter this directory. When selecting a
thumbnail: Play the selected file.
Play/Pause.
Rewind. Each time you press rewind, the speed will change (2x, 4x, 8x, 16x). -
Fast-forward. Each time you press fast-forward, the speed will change
(2x, 4x, 8x, 16x).
-
Play the previous file.
Play the next file.
Stop playback and return to the list of files.
Loop. Each time you press ENTER, the mode will switch between
Play/cancel the background music. - -
Mute. Press ENTER to toggle between mute and unmute. -
Two loop. Press ENTER to set the current playback time starting point. Press
ENTER to set the loop end of the current playing time and start loop
playback. Press ENTER button to cancel the loop.
- -
Slow-forward.
Each time you press slow-forward, the speed will change.
- -
NOTE
Enjoying Photo/Music/Video Playback
* The button G and Y does not work during control panel display.
Files in folder which are not related to a selected mode cannot be accessed.
“Unsupport file” alert will pops up for a selected file of invalid format.
EN 5-6
ENGLISH | FRANÇAIS | PORTUGUÊS | РУССКИЙ | 中文 | INDONESIA | ภาษาไทย | TIẾNG VIỆT | ﻲﺑرﻋ | АҒЫЛШЫН | O'ZBEK TILIDA
>><<
Page 64

Playing Back Files on a USB Memory Device/Home Network Server (Continue)
Control panel for Photo/Music/Video mode operations (Continue)
Press B to display the control panel below.
Button/menu Description Photo Music Video
Step-forward.
Each time you press ENTER, the picture will change to the next still picture.
- -
Rotate clockwise 90°.
- -
Rotate counterclockwise 90°.
- -
Zoom in an image. Select to display larger image size.
- -
Zoom out an image. Select to display smaller image size.
- -
Select playback length of a slideshow.
- -
Select photo display interval.
- -
Slide effect.
- -
Select subtittle to On or Off subtitle.
- -
NOTE
Enjoying Photo/Music/Video Playback
Files in folder which are not related to a selected mode cannot be accessed.
“Unsupport file” alert will pops up for a selected file of invalid format.
EN 5-7
ENGLISH | FRANÇAIS | PORTUGUÊS | РУССКИЙ | 中文 | INDONESIA | ภาษาไทย | TIẾNG VIỆT | ﻲﺑرﻋ | АҒЫЛШЫН | O'ZBEK TILIDA
>><<
Page 65

Controlling HDMI Equipment Using LINK Operation
What’s LINK Operation?
Using the HDMI CEC (Consumer Electronics Control) protocol, with LINK
Operation you can interactively operate compatible system equipment
(Blu-ray disc equipment, AV amplifier, DVD).
By connecting LINK-compatible devices with HDMI-certified cables to the
TV, you can control a recorder or AV amplifier using the remote control of
the TV.
LINK Operation allows you to operate the HDMI-connected equipment
with one remote control.
NOTE
For connecting the TV to LINK-compatible equipment, use commercially
available cables.
Point the remote control toward the TV, not to connected HDMI
equipment.
Video noise may occur depending on the type of HDMI cable used. Make
sure to use an HDMI-certified cable.
Up to 3 pieces of HDMI recording equipment and one AV amplifier can be
connected using this system.
NOTE
If the equipment does not operate, turn on the equipment and select the
appropriate input source using (HOME).
The LINK feature may not operate properly when an HDMI splitter or AV
selector unit is used. These devices may cause interruptions to the image
and/or sound.
Connected LINK-compatible devices can be operated without changing the
settings of the remote control unit.
One Touch Play
While the TV is in standby mode, it automatically turns on and plays back the
image from the HDMI source.
Single remote control
The LINK Operation automatically recognises the connected HDMI device
and you can control the TV and the devices as if using a universal remote
control.
Control the LINK-compatible audio system
Set the volume of LINK-compatible audio system.
NOTE
The above description is an example of the LINK Operation function.
Refer to this operation manual and the operation manual of the LINKcompatible device to be used with this TV.
Using LINK Operation
EN 6-1
ENGLISH | FRANÇAIS | PORTUGUÊS | РУССКИЙ | 中文 | INDONESIA | ภาษาไทย | TIẾNG VIỆT | ﻲﺑرﻋ | АҒЫЛШЫН | O'ZBEK TILIDA
>><<
Page 66

Control of the TV
The TV can be controlled from a PC, control panels and other devices
using the RS-232C. (at ‘SERVICE ONLY’ terminal)
Use a cross-type RS-232C cable (commercially available) for the
connections and conversion cable to minijack. (can purchase from service
center)
NOTE
This operation system should be used by a person who is accustomed to
using computers.
AQUOS Remote Control
Set this function when operating the TV from equipment connected by LAN or
wireless LAN. To perform the operation, refer to "Smart TV" > "AQUOS
Remote Control".
AQUOS Remote Control
When "AQUOS Remote Control" is selected, "Change" will be highlighted.
Press ENTER.
Detailed Settings
Make the detailed settings (Login ID, password).
Follow the on-screen instructions to configure the settings.
Device Name
Set the name of the TV displayed on other network devices.
Configure the settings from " (HOME)" > "Settings" > "Menu" > "Smart
TV" > "Advanced" > "TV name setting".
Communication Conditions for RS-232C
Set the RS-232C communication settings on the PC to match the TV's
communication conditions.
The TV's communication settings are as follows:
Baud rate: 115,200 bps
Data length: 8 bits
Parity bit: None
Stop bit: 1 bit
Flow control: None
Communication procedure
Send the control commands from the PC via the RS-232C.
The TV operates according to the received command and sends a response
message to the PC.
Do not send multiple commands at the same time.
Wait until the PC receives the OK response before sending the next
command.
Using a PC
EN 7-1
ENGLISH | FRANÇAIS | PORTUGUÊS | РУССКИЙ | 中文 | INDONESIA | ภาษาไทย | TIẾNG VIỆT | ﻲﺑرﻋ | АҒЫЛШЫН | O'ZBEK TILIDA
>><<
Page 67

Control of the TV (Continue)
Command format
Eight ASCII codes +CR
Command 4-digits: Command. The text of four characters.
Parameter 4-digits: Parameter 0-9, x, blank, ?
Parameter
Input the parameter values, aligning left, and fill with blank(s) for the
remainder. (Be sure that 4 values are input for the parameter.)
When the input parameter is not within an adjustable range, "ERR" returns.
(Refer to "Response code format".)
Any numerical value can replace the "x" on the table.
Response code format
Normal response
Problem response
(communication error or incorrect command)
Command table
Commands not indicated here are not guaranteed to operate.
CONTROL ITEM COMMAND PARAMETER CONTROL CONTENTS
POWER SETTING P O W R 0 _ _ _ Power Off It shifts to
standby.
1 _ _ _ Power On Power On
INPUT
SELECTION
TOGGLE I T G D _ _ _ _ (Toggle) It input-
switches by
the toggle.
(It is the
same as an
input change
key)
TV I T V D _ _ _ _ It input-
switches to
TV. (A
channel
remains as it
is. (Last
memory))
0-4 I A V D * _ _ _ 0: TV,
1: HDMI 1,
2: HDMI 2,
3: VIDEO IN,
4: USB
NOTE
If an underbar (_) appears in the parameter column, enter a space.
If an asterisk (*) appears, enter a value in the range indicated in brackets
under CONTROL CONTENTS.
Any numerical value can replace the "x" on the table.
Using a PC
EN 7-2
ENGLISH | FRANÇAIS | PORTUGUÊS | РУССКИЙ | 中文 | INDONESIA | ภาษาไทย | TIẾNG VIỆT | ﻲﺑرﻋ | АҒЫЛШЫН | O'ZBEK TILIDA
>><<
Page 68

Control of the TV (Continue)
CONTROL
ITEM
COMMAND PARAMETER CONTROL CONTENTS
AV MODE
SELECTION
A V M D * _ _ _ 0: (Toggle),
1: STANDARD,
2: MOVIE,
4: USER,
5: DYNAMIC,
6: DYNAMIC
(Fixed),
7: PC,
8: SUPER ECO
Although it can
choose now, it is
toggle operation in
inside.
VOLUME V O L M * * * _ Volume (0-100)
CONTROL
ITEM
COMMAND PARAMETER CONTROL CONTENTS
WIDE MODE W I D E * * _ _ 0: (Toggle),
1: Normal,
2: Zoom 14:9,
3: Panorama,
4: Full,
5: Cinema 16:9,
6: Cinema 14:9,
7: Normal (PC),
9: Full (PC),
10: Dot by Dot,
11: Underscan,
12: Auto (USB),
13: Original (USB)
It is the same as
Wide Mode key.
MUTE M U T E * _ _ _ 0: (Toggle),
1: On,
2: Off
NOTE
If an underbar (_) appears in the parameter column, enter a space.
If an asterisk (*) appears, enter a value in the range indicated in brackets
under CONTROL CONTENTS.
Any numerical value can replace the "x" on the table.
Using a PC
EN 7-3
ENGLISH | FRANÇAIS | PORTUGUÊS | РУССКИЙ | 中文 | INDONESIA | ภาษาไทย | TIẾNG VIỆT | ﻲﺑرﻋ | АҒЫЛШЫН | O'ZBEK TILIDA
>><<
Page 69

Control of the TV (Continue)
CONTROL ITEM COMMAND PARAMETER CONTROL CONTENTS
SURROUND A C S U * _ _ _ 0: (Toggle),
1: On,
2: Off
AUDIO
SELECTION
A C H A _ _ _ _ (Toggle)
SLEEP TIMER O F T M * _ _ _ 0: Off,
1: OFF TIMER - 30 MIN.,
2: OFF TIMER - 60 MIN.,
3: OFF TIMER - 90 MIN.,
4: OFF TIMER - 120 MIN.,
5: OFF TIMER - 150 MIN.
TELETEXT T E X T 0 _ _ _ TEXT OFF
T E X T 1 _ _ _ (Toggle)
CHANNEL D C C H * * _ _ TV DIRECT CHANNEL (1-99)
I D T V _ _ _ _ An input change to DTV
NOTE
If an underbar (_) appears in the parameter column, enter a space.
If an asterisk (*) appears, enter a value in the range indicated in brackets
under CONTROL CONTENTS.
Any numerical value can replace the "x" on the table.
Using a PC
EN 7-4
ENGLISH | FRANÇAIS | PORTUGUÊS | РУССКИЙ | 中文 | INDONESIA | ภาษาไทย | TIẾNG VIỆT | ﻲﺑرﻋ | АҒЫЛШЫН | O'ZBEK TILIDA
>><<
Page 70

Control of the TV (Continue)
CONTROL ITEM COMMAND PARAMETER CONTROL CONTENTS
CHANNEL CH UP C H U P _ _ _ _ The channel
number of TV
+1
If it is not TV
display, it will
input-switch to
TV. (same
function as CH
)
CH DOWN C H D W _ _ _ _ The channel
number of TV
-1
If it is not TV
display, it will
input-switch to
TV. (same
function as CH
)
DEVICE NAME T V N M 1 _ _ _ The device
name set in
"Device Name"
is displayed.
MODEL NAME M N R D 1 _ _ _ The model
name of the TV.
CONTROL ITEM COMMAND PARAMETER CONTROL CONTENTS
SOFTWARE
VERSION
S W V N 1 _ _ _ The current version
of the TV software
is displayed.
IP PROTOCOL
VERSION
I P P V 1 _ _ _ The currently
supported version
of IP protocol is
displayed.
NOTE
If an underbar (_) appears in the parameter column, enter a space.
If an asterisk (*) appears, enter a value in the range indicated in brackets
under CONTROL CONTENTS.
Any numerical value can replace the "x" on the table.
Using a PC
EN 7-5
ENGLISH | FRANÇAIS | PORTUGUÊS | РУССКИЙ | 中文 | INDONESIA | ภาษาไทย | TIẾNG VIỆT | ﻲﺑرﻋ | АҒЫЛШЫН | O'ZBEK TILIDA
>><<
Page 71

Control of the TV (Continue)
CONTROL ITEM COMMAND PARAMETER CONTROL CONTENTS
REMOTE CONTROL
BUTTONS
R C K Y * * _ _ 0-9: 0-9,
12: POWER,
13: DISPLAY,
15: ,
16: ,
17: ,
18: ,
19: ,
20: ,
21: ,
24: SLEEP,
28: AV MODE,
29: WIDE,
30: (FLASHBACK),
31: MUTE,
32: VOL -,
33: VOL +,
34: CH ,
35: CH ,
36: INPUT,
38: MENU,
39: HOME,
40: ENTER,
41: ,
42: ,
43: ,
44: ,
CONTROL ITEM COMMAND PARAMETER CONTROL CONTENTS
REMOTE CONTROL
BUTTONS
R C K Y * * _ _ 45: RETURN,
49: MPX,
50: R (red),
51: G (green),
52: B (blue),
53: Y (yellow),
61: MANUAL,
64: SUBTITLE,
65: TELETEXT,
66: GUIDE,
68: HOLD,
71: INFO,
72: REVEAL/HIDDEN,
82: RADIO,
83: EPG,
84: YouTube,
85: BROWSER
NOTE
If an underbar (_) appears in the parameter column, enter a space.
If an asterisk (*) appears, enter a value in the range indicated in brackets
under CONTROL CONTENTS.
Any numerical value can replace the "x" on the table.
Using a PC
EN 7-6
ENGLISH | FRANÇAIS | PORTUGUÊS | РУССКИЙ | 中文 | INDONESIA | ภาษาไทย | TIẾNG VIỆT | ﻲﺑرﻋ | АҒЫЛШЫН | O'ZBEK TILIDA
>><<
Page 72

PC Compatibility Chart
It is necessary to set the PC correctly to display XGA and WXGA signal.
Resolution
Horizontal
Frequency
Vertical Frequency VESA Standard
VGA
720 x 400 31.5 kHz 70 Hz ―
640 x 480
31.5 kHz 60 Hz
37.9 kHz 72 Hz
37.5 kHz 75 Hz
SVGA 800 x 600
35.1 kHz 56 Hz
37.9 kHz 60 Hz
48.1 kHz 72 Hz
46.9 kHz 75 Hz
XGA 1024 x 768
48.4 kHz 60 Hz
56.5 kHz 70 Hz
60.0 kHz 75 Hz
WXGA 1360 x 768 47.7 kHz 60 Hz
SXGA 1280 x 1024 64.0 kHz 60 Hz
SXGA+ 1400 x 1050 65.3 kHz 60 Hz
1080p 1920 x 1080 67.5 kHz 60 Hz ―
VGA and XGA are registered trademarks of International Business Machines Corp.
Using a PC
EN 7-7
ENGLISH | FRANÇAIS | PORTUGUÊS | РУССКИЙ | 中文 | INDONESIA | ภาษาไทย | TIẾNG VIỆT | ﻲﺑرﻋ | АҒЫЛШЫН | O'ZBEK TILIDA
>><<
Page 73

Connecting to the Internet
By connecting your TV to a broadband system, you can access the Internet from the TV.
You can enjoy a variety of streaming content and Internet applications.
It is necessary to configure the network settings in order to enjoy streaming content and internet applications.
These settings can be configured from " (HOME)" > "Settings" > "Menu" > "Smart TV" > "Internet Setup".
NOTE
To connect your TV to the Internet, you must have a broadband Internet connection.
If you do not have a broadband Internet connection, consult the store where you purchased your TV or ask your Internet service provider or telephone
company.
When an Internet connection is made, an Ethernet and wireless connection cannot be used at the same time. Use only one of the connection types.
Using an ETHERNET cable
Use an ETHERNET cable (commercially available) to connect the ETHERNET terminal on the TV to your broadband router (commercially available).
Using the Internet
EN 8-1
ENGLISH | FRANÇAIS | PORTUGUÊS | РУССКИЙ | 中文 | INDONESIA | ภาษาไทย | TIẾNG VIỆT | ﻲﺑرﻋ | АҒЫЛШЫН | O'ZBEK TILIDA
>><<
Page 74

Connecting to the Internet (Continue)
Using the wireless LAN
This TV is equipped with a wireless LAN function.
For a wireless LAN connection, you must use wireless setup to connect the access point and TV.
NOTE
This TV has a built-in wireless LAN function. Using a separate wireless USB LAN adapter may result in radio communications that do not comply with
regulations on radio communications. Therefore, do not use a separate wireless LAN adapter.
A wireless LAN connection and performance cannot be guaranteed for all residential environments. In the following cases, the wireless LAN signal may
be poor or drop, or the connection speed may become slower.
- When used in buildings made with concrete, reinforced steel, or metal
- When placed near objects that obstruct the signal
- When used with other wireless devices that emit the same frequency
- When used in the vicinity of microwave ovens and other devices that emit a magnetic field, electrostatic charge, or electromagnetic interference
Operations cannot be guaranteed when used with access points that do not have Wi-Fi® certification.
Using the Internet
EN 8-2
ENGLISH | FRANÇAIS | PORTUGUÊS | РУССКИЙ | 中文 | INDONESIA | ภาษาไทย | TIẾNG VIỆT | ﻲﺑرﻋ | АҒЫЛШЫН | O'ZBEK TILIDA
>><<
Page 75

Connecting to the Internet (Continue)
NOTE
A wireless LAN router/access point is required to connect the TV to the Internet using a wireless LAN. See the operation manual of your access point for
setup.
If your access point is set to a stealth mode (that prevents detection by other devices), you may not be able to establish a connection. In this case,
disable the stealth mode on the access point.
A stable connection speed is required to play back streaming content. Use an Ethernet connection if the wireless LAN speed is unstable.
Before transferring to a third party or disposal, be sure to initialize the wireless LAN settings.
Please follow the legislation in your country when using the wireless LAN outdoors.
If you have failed to connect to the Internet in the above operation, then an error message will appear. In this case, press (HOME) to exit from the
connected TV feature to make changes to the network settings.
If you still cannot connect to the Internet, please consult your Internet service provider or telephone company.
You cannot configure the settings from " (HOME)" > "Settings" > "Menu" > "Smart TV" > "Internet Setup" while using an application. If you must
configure your "Network" settings, press the (HOME) key to exit the function.
Using the Internet
EN 8-3
ENGLISH | FRANÇAIS | PORTUGUÊS | РУССКИЙ | 中文 | INDONESIA | ภาษาไทย | TIẾNG VIỆT | ﻲﺑرﻋ | АҒЫЛШЫН | O'ZBEK TILIDA
>><<
Page 76

Smart TV
Internet Setup
Perform the procedure below to make
adjustments or to confirm the settings for
accessing the Internet.
1 Press (HOME) to display the HOME
screen.
2 Press / to select "Settings", press ,
press / to select "Internet Setup", and
then press ENTER.
3 Press / to select "Internet Setup", and
then press ENTER.
4 Press / to select "Connection type",
"Wired setup" or "Wireless setup", and then
press ENTER.
Select ”Wired setup" or "Wireless setup"
when you make general adjustments to
connect to the Internet.
5 Press / to select a specific item, and
then press ENTER.
6 Press / / / to select the desired
setting, and then press ENTER.
7 Press (HOME) to exit.
Connection type
Select the connection type.
Wired: The signal is detected and setup is
performed automatically. Use "Wired setup" to
check and change the settings as necessary.
See page 8-5.
Wireless: Configure the access point settings
on "Wireless setup". See page 8-6.
Using the Internet
EN 8-4
ENGLISH | FRANÇAIS | PORTUGUÊS | РУССКИЙ | 中文 | INDONESIA | ภาษาไทย | TIẾNG VIỆT | ﻲﺑرﻋ | АҒЫЛШЫН | O'ZBEK TILIDA
>><<
Page 77

Smart TV (Continue)
Internet Setup (Continue)
Wired setup
You can make adjustments manually for the IP.
You can switch the "Connect type" to
"Auto" or "Manual".
Check that numbers are displayed for each
setting.
If there are any settings without numbers,
specify the numbers by following the onscreen instructions.
Input the IP address etc by using remote
control buttons 0-9 .
Using the Internet
EN 8-5
ENGLISH | FRANÇAIS | PORTUGUÊS | РУССКИЙ | 中文 | INDONESIA | ภาษาไทย | TIẾNG VIỆT | ﻲﺑرﻋ | АҒЫЛШЫН | O'ZBEK TILIDA
>><<
Page 78

Smart TV (Continue)
Internet Setup (Continue)
Wireless setup
Make adjustments and confirm the settings
necessary for wireless LAN connection (such
as search for the access point and registration
of it).
WPS
WPS push button: Allows the TV to
automatically establish the connection
using a button on the access point.
WPS PIN code: Sets up the connection by
registering a PIN code for the access
point.
Search: Searches for and selects the access
point to be connected.
Manual setup: Allows you to make the
connection by entering an SSID for the
access point.
If your access point supports Wi-Fi Protected
Setup (WPS push button method), it is
recommended that you use this function for the
wireless connection. You can press the WPS
button on the access point to configure the
settings automatically.
The name of the WPS button function may
differ depending on the access point. See
the operation manual of the access point for
details.
1. Confirm the current settings in "Connection
type".
If "Wired" is selected, press / to
select "Wireless".
2. Select the desired connection method and
follow the instructions shown on the display.
3. When a connection is established, the
connection details are displayed. Press
ENTER.
NOTE
Operations cannot be guaranteed when
used with access points that do not have
Wi-Fi® certification.
A wireless LAN router/access point is
required to connect the TV to the Internet
using a wireless LAN. See the operation
manual of your access point for setup.
If your access point is set to a stealth mode
(that prevents detection by other devices),
you may not be able to establish a
connection. In this case, disable the stealth
mode on the access point.
A stable connection speed is required to
play back streaming content. Use an
Ethernet connection if the wireless LAN
speed is unstable.
Before transferring to a third party or
disposal, be sure to initialize the wireless
LAN settings.
Please follow the legislation in your country
when using the wireless LAN outdoors.
Using the Internet
EN 8-6
ENGLISH | FRANÇAIS | PORTUGUÊS | РУССКИЙ | 中文 | INDONESIA | ภาษาไทย | TIẾNG VIỆT | ﻲﺑرﻋ | АҒЫЛШЫН | O'ZBEK TILIDA
>><<
Page 79

If "alphabet" is selected, this switches
characters between uppercase and lowercase.
Each time you press ENTER, the character type
switches.
Press ENTER to select the type of characters
entered: alphabet, or sign.
Erases text one character at a time.
Entering Text (Software Keyboard)
When you are editing an input screen or specifying the Network settings used for accessing the Internet,
enter text from the software keyboard.
NOTE
You can enter up to 128 characters for text.
Some special characters or diacritics may not be available depending on where you enter the text.
Using the Internet
The text you enter is displayed as you type it in.
To move the cursor (the current input position), use " " or " " on the software
keyboard.
While you are entering text, likely input conversion candidates are displayed based on what you typed
in.
EN 8-7
ENGLISH | FRANÇAIS | PORTUGUÊS | РУССКИЙ | 中文 | INDONESIA | ภาษาไทย | TIẾNG VIỆT | ﻲﺑرﻋ | АҒЫЛШЫН | O'ZBEK TILIDA
>><<
Page 80

Entering Text (Software Keyboard)
(Continue)
Enter
Applies the entered information and closes the
software keyboard.
Space
Enters a space.
Close
Closes the software keyboard without applying
the entered information.
Buttons on the
remote control
unit
Description
/ / / Moves the focus. When
moved at the far edge, the
focus moves to the
opposite edge.
ENTER Performs the processing for
the button currently in the
focus.
Closes the software
keyboard without applying
the original input elements
for the entered text.
Using the Internet
EN 8-8
ENGLISH | FRANÇAIS | PORTUGUÊS | РУССКИЙ | 中文 | INDONESIA | ภาษาไทย | TIẾNG VIỆT | ﻲﺑرﻋ | АҒЫЛШЫН | O'ZBEK TILIDA
>><<
Page 81

Using the Browser
Press (HOME), press / to select the
browser icon from the application window, and
then press ENTER.
Press (HOME) again to switch back to
the currently tuned channel.
Buttons for Using the Browser
ENTER, / / /
Press / / / to select a link that
you want to jump, and then press ENTER.
(BACK)
Press the button to return to the previous
page.
NOTE
Restrictions apply to window display.
Some website may not able to see properly
due to compatibility issue.
Using the Internet
EN 8-9
ENGLISH | FRANÇAIS | PORTUGUÊS | РУССКИЙ | 中文 | INDONESIA | ภาษาไทย | TIẾNG VIỆT | ﻲﺑرﻋ | АҒЫЛШЫН | O'ZBEK TILIDA
>><<
Page 82

Tool bar
Using the Browser (Continue)
Selected
item
Description
Allows you to go back to the
previous page.
Allows you to go to the next page.
Displays the home page.
Refreshes the page.
Interrupts a page while it is
loading.
Selected
item
Description
Configures browser settings.
Displays your browsing
history.
Displays the bookmarks list.
Using the Toolbar
You can use the toolbar to control the browser
and to specify settings.
1 Press / to select a function, and then
press ENTER.
Browsing Web Contents
You can display the web content you want to
enjoy.
1 Press / to move to the address area in
the toolbar, and then press ENTER.
The Enter Address menu is displayed.
2 Enter an address, and then press ENTER.
The web content you want to view is
displayed.
Using the Internet
EN 8-10
ENGLISH | FRANÇAIS | PORTUGUÊS | РУССКИЙ | 中文 | INDONESIA | ภาษาไทย | TIẾNG VIỆT | ﻲﺑرﻋ | АҒЫЛШЫН | O'ZBEK TILIDA
>><<
Page 83

Using the Browser (Continue)
CAUTION
If the power is cut due to a power failure or
the TV being unplugged while you are using
the Internet, information such as bookmarks
or cookies may not be saved correctly.
To users who access the Internet from a PC
When you access the Internet from this TV,
the procedures may not be the same as
regular browser-based access on a PC.
On some pages, video and audio, text or
images may not be displayed correctly.
About links
Web pages on the Internet often include
"links" that allow you to jump to other web
pages (or sites).
"Links" can take various forms, including
words or images, but they always work in the
same way letting you jump to the link
destination when you select them.
Selected items (such as links of text input
fields) are enclosed in a frame.
You can jump from a "link" to the
corresponding link destination.
DISCLAIMERS
SHARP corporation bears no responsibility
regarding the content and quality of the
content provided by the content serve
provider.
Using the Internet
EN 8-11
ENGLISH | FRANÇAIS | PORTUGUÊS | РУССКИЙ | 中文 | INDONESIA | ภาษาไทย | TIẾNG VIỆT | ﻲﺑرﻋ | АҒЫЛШЫН | O'ZBEK TILIDA
>><<
Page 84

Using the Browser (Continue)
Browser Settings
You can check or modify your browser settings
from the Browser menu.
1 Press / to select " " in the toolbar,
and then press ENTER.
2 Press / / / to specify the required
setting, and then press ENTER.
Using the Internet
EN 8-12
ENGLISH | FRANÇAIS | PORTUGUÊS | РУССКИЙ | 中文 | INDONESIA | ภาษาไทย | TIẾNG VIỆT | ﻲﺑرﻋ | АҒЫЛШЫН | O'ZBEK TILIDA
>><<
Page 85

Using the Browser (Continue)
Website Favourite Link
User can create direct website link through
each icon shown in Home menu.
NOTE
User need to bookmark the website link at
web browser before they can bookmark at
Home menu.
Once bookmark complete by user in web
browser, user can move the cursor to
icon to create direct link at Home menu.
Using the Internet
EN 8-13
ENGLISH | FRANÇAIS | PORTUGUÊS | РУССКИЙ | 中文 | INDONESIA | ภาษาไทย | TIẾNG VIỆT | ﻲﺑرﻋ | АҒЫЛШЫН | O'ZBEK TILIDA
>><<
Page 86

Using Keyboard and Mouse
You can use a keyboard or mouse for operating
the TV when using applications.
When you use the USB devices, connect
the device to the USB terminal on the TV.
NOTE
The keyboard or mouse may not operate
properly depending on the application being
used.
Using the Internet
EN 8-14
ENGLISH | FRANÇAIS | PORTUGUÊS | РУССКИЙ | 中文 | INDONESIA | ภาษาไทย | TIẾNG VIỆT | ﻲﺑرﻋ | АҒЫЛШЫН | O'ZBEK TILIDA
>><<
Page 87

Using Applications via the Internet
By connecting the TV to the Internet, you can enjoy a variety of broadband content, including videos, music
and photos.
Please check that the most current software is loaded on TV by selecting "Auto Update Setting" on
"Software Update"
(see page 4-17).
Use the application window to access your favourite Internet applications. Press (HOME) to display the
application window.
Follow the on-screen instructions for each application.
When using this TV to access an Internet application for the first time, the Disclaimer appears on the
screen.
Press / to select "Agree", and then press ENTER. (You must select "Agree" to use the application.)
Check the web site of the provider for details on setup and use of the functions.
NOTE
If " " or " " is displayed , check your TV's network settings and connection.
These applications are provided by content providers. The available applications vary depending on your
country or region.
The delivery speed of applications varies depending on the network speed. Check the web site of the
provider for details on application setup and other information.
Using the Internet
EN 8-15
ENGLISH | FRANÇAIS | PORTUGUÊS | РУССКИЙ | 中文 | INDONESIA | ภาษาไทย | TIẾNG VIỆT | ﻲﺑرﻋ | АҒЫЛШЫН | O'ZBEK TILIDA
>><<
Page 88

Troubleshooting
Problem Possible Solution
No power Check if you pressed POWER on the remote control unit.
Is the AC cord disconnected?
Has the power been turned on?
Unit cannot
be operated.
External influences such as lightning, static electricity, may
cause improper operation. In this case, operate the unit after
first turning off the power of the TV or unplugging the AC cord
and replugging it in after 1 or 2 minutes.
Remote
control unit
does not
operate.
Is the equipment to be operated by the remote control unit set
correctly?
Are batteries inserted with polarity (+, -) aligned?
Are batteries worn out? (Replace with new batteries.)
Are you using it under strong or fluorescent lighting?
Is a fluorescent light illuminated near the remote control
sensor?
Picture is
cut off/with
sidebar
screen.
Are screen mode adjustments such as picture size made
correctly?
Page 4-31
Strange
colour, light
colour, or
colour
misalignment
Adjust the picture tone.
Pages 4-22 to 4-23
Is the room too bright? The picture may look dark in a room
that is too bright.
Power is
suddenly
turned off.
Is the sleep timer set?
Page 4-30
Check the power control settings.
Page 4-30
The unit's internal temperature has increased. Remove any
objects blocking vent or clean.
Problem Possible Solution
No picture Is connection to other components correct?
If the PC image is not displayed, check the following:
- When connecting a laptop PC to the TV, check that display
output mode of the PC is set to external monitor.
- Check the resolution setting on the PC. Is a non-compatible
signal being input?
Page 7-7
Picture
quality of HD
programmes
is poor.
To enjoy HD images from external equipment, you are
required to set up HDMI connection or component
connection.
If the programme content is not of HD quality, HD images
cannot be displayed. Check that the programme you are
viewing provides HD images.
The HD cable/satellite set-top box may need to be
configured to output HD images via cable/satellite.
The cable/satellite broadcast may not support a signal
resolution of 1080p.
The TV
sometimes
makes a
cracking
sound.
This is not a malfunction. This happens when the cabinet
slightly expands and contracts according to change in
temperature. This does not affect the TV's performance.
Appendix
EN 9-1
ENGLISH | FRANÇAIS | PORTUGUÊS | РУССКИЙ | 中文 | INDONESIA | ภาษาไทย | TIẾNG VIỆT | ﻲﺑرﻋ | АҒЫЛШЫН | O'ZBEK TILIDA
>><<
Page 89

Troubleshooting (Continue)
Problem Possible Solution
No sound Is connection to other components correct?
Is the volume too low?
Page 3-2
Have you pressed (MUTE) on the remote control
unit?
Page 3-3
Check the audio output of the connected external
equipment. Is the volume too low or muted?
When external equipment is connected via an HDMI
cable, you may need to configure the audio to be
output through the HDMI cable.
When connecting a PC via an HDMI-certified cable,
check the following:
- Is the audio output of the PC configured correctly?
Check the audio output settings and output audio format
in Sound Properties on the PC.
The audio formats compatible with this TV are PCM,
Dolby Digital. With other formats, audio cannot be
output.
Appendix
EN 9-2
ENGLISH | FRANÇAIS | PORTUGUÊS | РУССКИЙ | 中文 | INDONESIA | ภาษาไทย | TIẾNG VIỆT | ﻲﺑرﻋ | АҒЫЛШЫН | O'ZBEK TILIDA
>><<
Page 90

Troubleshooting - Error Message
The example of an
error message
displayed on a
screen
Possible Solution
No broadcast now. Check the antenna cable. Check that the antenna is
correctly setup.
Check the broadcast time in the programme guide.
An incompatible
audio signal has
been received.
Check the output
device settings.
This message is displayed when an audio format
other than PCM, Dolby Digital is input.
- Set the audio output format of connected external
HDMI equipment to PCM, Dolby Digital.
- Refer to the operation manual of the external
equipment for setting details.
Appendix
EN 9-3
ENGLISH | FRANÇAIS | PORTUGUÊS | РУССКИЙ | 中文 | INDONESIA | ภาษาไทย | TIẾNG VIỆT | ﻲﺑرﻋ | АҒЫЛШЫН | O'ZBEK TILIDA
>><<
Page 91

Information on the Software License for This Product
Software license
You can read the software licenses in the on-screen display menu. Refer to
" (HOME)" > "Settings" > "Menu" > "Information" > "Software license" .
Software composition
The software included in this product is comprised of various software
components whose individual copyrights are held by SHARP or by third
parties.
Cautions regarding use in high and low temperature environments
When the unit is used in a low temperature space (e.g. room, office),
the picture may leave trails or appear slightly delayed. This is not a
malfunction, and the unit will recover when the temperature returns to
normal.
Do not leave the unit in a hot or cold location. Also, do not leave the unit
in a location exposed to direct sunlight or near a heater, as this may
cause the cabinet to deform and the front panel to malfunction.
Storage temperature: -20°C to +60°C
Appendix
EN 9-4
ENGLISH | FRANÇAIS | PORTUGUÊS | РУССКИЙ | 中文 | INDONESIA | ภาษาไทย | TIẾNG VIỆT | ﻲﺑرﻋ | АҒЫЛШЫН | O'ZBEK TILIDA
>><<
Page 92

Manufactured under license from Dolby Laboratories. Dolby,
Dolby Audio, and the double-D symbol are trademarks of Dolby
Laboratories.
The terms HDMI and HDMI High-Definition Multimedia Interface,
and the HDMI Logo are trademarks or registered trademarks of
HDMI Licensing Administrator, Inc. in the United States and other
countries.
The Wi-Fi CERTIFIED™ Logo is a certification mark of Wi-Fi
Alliance®.
The Wi-Fi Protected Setup™ Logo is a certification mark of Wi-Fi
Alliance®.
The Bluetooth® word mark and logos are registered trademarks
owned by the Bluetooth SIG, Inc. and any use of such marks by
SHARP Corporation is under license. Other trademarks and trade
names are those of their respective owners.
ANY USE OF THIS PRODUCT IN ANY MANNER OTHER THAN
PERSONAL USE THAT COMPLIES WITH THE MPEG-2
STANDARD FOR ENCODING VIDEO INFORMATION FOR
PACKAGED MEDIA IS EXPRESSLY PROHIBITED WITHOUT A
LICENSE UNDER APPLICABLE PATENTS IN THE MPEG-2
PATENT PORTFOLIO, WHICH LICENSE IS AVAILABLE FROM
MPEG LA, LLC, 6312 S. Fiddlers Green Circle,
Suite 400 E, Greenwood Village, Colorado 80111 U.S.A.
THIS PRODUCT IS LICENSED UNDER THE VC-1 PATENT
PORTFOLIO LICENSE FOR THE PERSONAL AND NONCOMMERCIAL USE OF A CONSUMER TO (i) ENCODE VIDEO
IN COMPLIANCE WITH THE VC-1 STANDARD (“VC-1 VIDEO")
AND/OR (ii) DECODE VC-1 VIDEO THAT WAS ENCODED BY A
CONSUMER ENGAGED IN A PERSONAL AND NONCOMMERCIAL ACTIVITY AND/OR WAS OBTAINED FROM A
VIDEO PROVIDER LICENSED TO PROVIDE VC-1 VIDEO. NO
LICENSE IS GRANTED OR SHALL BE IMPLIED FOR ANY
OTHER USE. ADDITIONAL INFORMATION MAY BE OBTAINED
FROM MPEG LA, L.L.C. SEE HTTP://WWW.MPEGLA.COM
THIS PRODUCT IS LICENSED UNDER THE AVC PATENT
PORTFOLIO LICENSE FOR THE PERSONAL USE OF A
CONSUMER OR OTHER USES IN WHICH IT DOES NOT
RECEIVE REMUNERATION TO (i) ENCODE VIDEO IN
COMPLIANCE WITH THE AVC STANDARD (“AVC VIDEO”)
AND/OR (ii) DECODE AVC VIDEO THAT WAS ENCODED BY A
CONSUMER ENGAGED IN A PERSONAL ACTIVITY AND/OR
WAS OBTAINED FROM A VIDEO PROVIDER LICENSED TO
PROVIDE AVC VIDEO. NO LICENSE IS GRANTED OR SHALL
BE IMPLIED FOR ANY OTHER USE. ADDITIONAL
INFORMATION MAY BE OBTAINED FROM MPEG LA, L.L.C.
SEE HTTP://WWW.MPEGLA.COM
THIS PRODUCT IS LICENSED UNDER THE MPEG-4 VISUAL
PATENT PORTFOLIO LICENSE FOR THE PERSONAL AND
NON-COMMERCIAL USE OF A CONSUMER FOR (i)
ENCODING VIDEO IN COMPLIANCE WITH THE MPEG-4
VISUAL STANDARD (“MPEG-4 VIDEO”) AND/OR (ii)
DECODING MPEG-4 VIDEO THAT WAS ENCODED BY A
CONSUMER ENGAGED IN A PERSONAL AND NONCOMMERCIAL ACTIVITY AND/OR WAS OBTAINED FROM A
VIDEO PROVIDER LICENSED BY MPEG LA TO PROVIDE
MPEG-4 VIDEO. NO LICENSE IS GRANTED OR SHALL BE
IMPLIED FOR ANY OTHER USE. ADDITIONAL INFORMATION
INCLUDING THAT RELATING TO PROMOTIONAL, INTERNAL
AND COMMERCIAL USES AND LICENSING MAY BE
OBTAINED FROM MPEG LA, L.L.C.
SEE HTTP://WWW.MPEGLA.COM
Trademarks
EN 10-1
ENGLISH | FRANÇAIS | PORTUGUÊS | РУССКИЙ | 中文 | INDONESIA | ภาษาไทย | TIẾNG VIỆT | ﻲﺑرﻋ | АҒЫЛШЫН | O'ZBEK TILIDA
>><<
Page 93

TV
Item Model: 4T-C50AH1X
LCD panel 126 cm
Resolution 8,294,400 pixels (3840 x 2160)
Video colour system PAL/SECAM/NTSC 3.58/NTSC 4.43/PAL 60
TV Function
TV-standard
Analogue PAL: B/G, D/K, I SECAM: B/G, D/K, K/K1 NTSC: M
Digital DVB-T / DVB-T2
Receiving Channel
VHF/UHF 44.25—863.25 MHz
CATV S1—S41 ch (including Hyperband)
TV-tuning system Auto Preset 99 ch
STEREO/BILINGUAL NICAM: B/G, I, D/K A2 stereo: B/G MTS: M
Audio amplifier 10 W x 2
Terminals
ANT (Antenna input) UHF/VHF 75 Ω DIN type
SERVICE ONLY Ø3.5 mm jack
INPUT 1 (ARC) HDMI HDMI (HDMI input), ARC
INPUT 2 HDMI HDMI (HDMI input)
INPUT 3 AUDIO in, VIDEO in
AUDIO OUT AUDIO out, Headphone (Ø3.5 mm stereo)
USB USB (DC5V 1.5A output)
ETHERNET (10/100 BASE-T) Network connector
OSD language
English/Simplified Chinese/Arabic/French/Portuguese/Russian/Persian/Thai/Vietnamese/
Indonesia/Hebrew/Hindi/Malay
Power Requirement AC 110 — 240 V, 50/60 Hz
Power Consumption 140 W (0.5 W Standby)
Dimensions
without stand 1122 (W) x 666 (H) x 74 (D) mm
with stand 1122 (W) x 708 (H) x 253 (D) mm
Weight without stand (with stand) 12.0 kg (12.5 kg)
Operating temperature 0°C to +40°C
As a part of policy of continuous improvement, SHARP reserves the right to make design and specification changes for product improvement without prior notice. The
performance specification figures indicated are nominal values of production units. There may be some deviations from these values in individual units.
Specification may differ depending on the selected country.
CAUTION
Installing the Liquid Crystal Television requires special skill that should only be performed by qualified service personnel. Customers should not attempt to do the work
themselves. SHARP bears no responsibility for improper mounting or mounting that results in accident or injury.
Carefully read the instructions that come with the bracket before beginning work.
Specifications
EN 11-1
ENGLISH | FRANÇAIS | PORTUGUÊS | РУССКИЙ | 中文 | INDONESIA | ภาษาไทย | TIẾNG VIỆT | ﻲﺑرﻋ | АҒЫЛШЫН | O'ZBEK TILIDA
>><<
Page 94

Wireless LAN
Specification
Standard IEEE 802.11b/g/n
Security
Static WEP (64/128 bit kry index 1 only)
WPA-PSK (TKIP)
WPA2-PSK (AES)
Modulation
IEEE802.11b: DBPSK, DQPSK, CCK / DSSS HRDSSS
IEEE802.11g: BPSK, QPSK, 16QAM, DBPSK, DQPSK, CCK, PBCC / OFDM
IEEE802.11n: BPSK, QPSK, 16QAM, 64QAM / OFDM
Throughput
IEEE802.11b: 1, 2.5, 5, 11Mbps
IEEE802.11g: 6, 9, 12, 18, 24, 36, 48, 54Mbps
IEEE802.11n: ~300Mbps
Specifications
EN 11-2
ENGLISH | FRANÇAIS | PORTUGUÊS | РУССКИЙ | 中文 | INDONESIA | ภาษาไทย | TIẾNG VIỆT | ﻲﺑرﻋ | АҒЫЛШЫН | O'ZBEK TILIDA
>><<
Page 95

4T-C50AH1X
Unit: mm
Dimensional Drawings
EN 12-1
ENGLISH | FRANÇAIS | PORTUGUÊS | РУССКИЙ | 中文 | INDONESIA | ภาษาไทย | TIẾNG VIỆT | ﻲﺑرﻋ | АҒЫЛШЫН | O'ZBEK TILIDA
>><<
Page 96

ENGLISH | FRANÇAIS | PORTUGUÊS | РУССКИЙ | 中文 | INDONESIA | ภาษาไทย | TIẾNG VIỆT | ﻲﺑرﻋ | АҒЫЛШЫН | O'ZBEK TILIDA
<<
 Loading...