

Page 1

sharp operation manual
>>
Page 2

sharp operation manual
>>
<<
Contents
1. Part Names
1- 1. TV (4T-B60CJ1U/4T-B70CJ1U/4T-B80CJ1U)
1- 2. Remote Control Unit
2. Introduction
2- 1. Displaying an External Equipment Image
2- 2. Initial Installation
3. Direct Button Operation
3- 1. Changing Channels
3- 2. Changing Volume
3- 3. MUTE
3- 4. APPS
3- 5. MPX
3- 6. Sleep Timer
4. On-Screen Display Menu
4- 1. Introduction
4- 3. On-Screen Display Menu Operation
4- 4. Menu Operation Buttons
4- 5. Initial Setup
4- 13. Information
4- 16. Picture Settings
4- 19. Audio Settings
4- 20. Network Settings
4- 22. System Options
5. Enjoying Photo/Music/Video Playback
5- 1. Preparation
5- 2. Selecting the Folders to Play Back
5- 4. Playing Back Files on a USB Memory Device/
Home Network Server
6. Using LINK Operation
6- 1. Controlling HDMI Equipment Using LINK Operation
6- 3. Link Operation Menu
7. Using a PC
7- 1. Control of the TV
7- 7. PC Compatibility Chart/AV Compatibility Chart
8. Using the Internet
8- 1. Connecting to the Internet
8- 2. Entering Text (Software Keyboard)
8- 4. Using the Browser
8- 8. Using Keyboard and Mouse
9. Appendix
9- 1. Setting the TV on the Wall
9- 2. Troubleshooting
10. Specifications
10-1. TV (4T-B60CJ1U/4T-B70CJ1U/4T- B80CJ1U)
10-2. Wireless LAN
11. Trademarks
12. Dimensional Drawings
13. Software License
ENG Contents
Page 3
sharp operation manual
(Front)
*1
(Side)
*
(Rear)
>>
<<
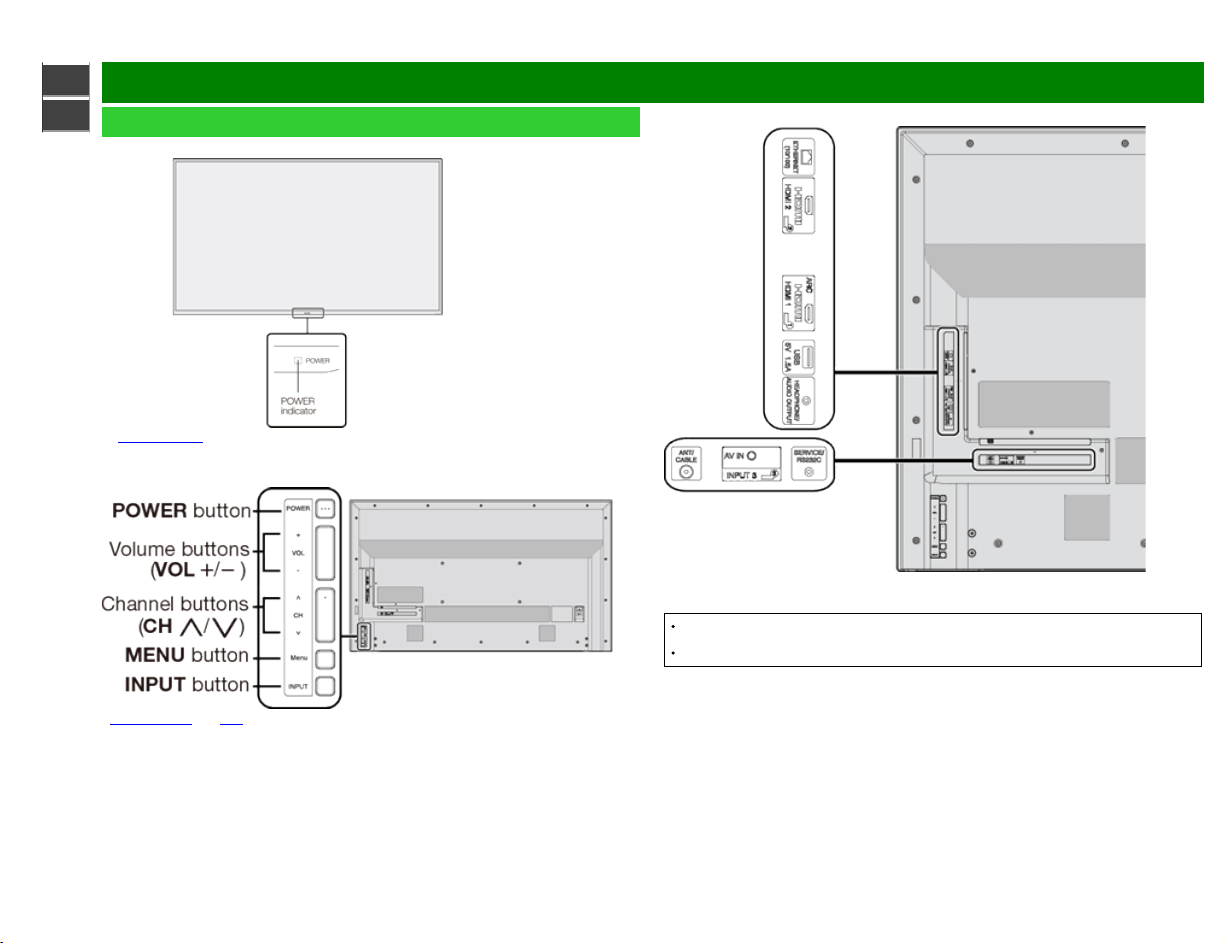
Part Names
TV (4T-B60CJ1U/4T-B70CJ1U/4T-B80CJ1U)
See page 4-26.
The illustrations and on-screen displays in this operation manual are for explanation purposes
and may vary slightly from the actual operations.
The examples used throughout this manual are based on the 4T -B60CJ1U model.
See pages 2-1 and 4-4 for button operations.
ENG 1-1
Page 4

sharp operation manual
1
2
3
(See page 3- 6.)
4 0
(See pages 3- 1.)
5 •
(See pages 3- 1.)
6 OPTION:
Operation is used.
(See page 6- 1 to 6-4.)
7
(See page 3- 2.)
8
(See page 3- 5.)
9
(See page 3- 3.)
10
11
12
(See page 4- 6.)
13
(See page 4- 15.)
14
(See page 3- 4.)
15
(See page 2- 1.)
16
(See page 3- 1.)
17
(See page 4- 1.)
18
>>
<<
Part Names
Remote Control Unit
NOTE
When using the remote control unit,
point it at the TV.
POWER: Switch the TV power on or enter standby.
DISPLAY: Display the channel information.
SLEEP: Set the sleep timer
–9: Set the channel.
(DOT): Set the channel.
Display the Link Operation Menu screen. This button will function only when LINK
VOL+/-: Set the volume.
AUDIO: Select the MTS/SAP or the audio mode during multichannel audio broadcast.
MUTE: Mute the sound.
/ / / , (ENTER): Select a desired item on the screen.
EXIT: Turn off the menu screen.
A/B/C/D: Select 4 preset favorite channels in 4 different categories.
MANUAL: Display the operation manual.
APPS: Display the application window.
INPUT: Select a TV input source.
CH: Select the channel.
MENU: Display the menu screen.
RETURN: Return to previous menu screen.
ENG 1-2
Page 5

sharp operation manual
To view external source images, select the input source by pressing
unit or on the TV.
>>
Introduction
<<
Displaying an External Equipment Image
Example
INPUT on the remote control
1 Press INPUT.
The INPUT list screen displays.
2 Press
/ to select the input source.
An image from the selected source
automatically displays.
You can also select the input source by pressing INPUT.
Each time INPUT is pressed, the input source toggles.
ENG 2-1
Page 6

sharp operation manual
>>
<<
Introduction
Initial Installation
Perform the following steps before you press POWER on the
remote control unit.
1. Insert the batteries into the remote control unit.
2. Connect the antenna cable to the TV.
3. Plug in the AC cord to the AC outlet.
Language (Language setting)
Select from among 3 languages: English, French and
Spanish.
1 Press
/ to select the desired language listed on the
screen, and then press ENTER.
ENG 2-2
Page 7
sharp operation manual
>>
<<
Introduction
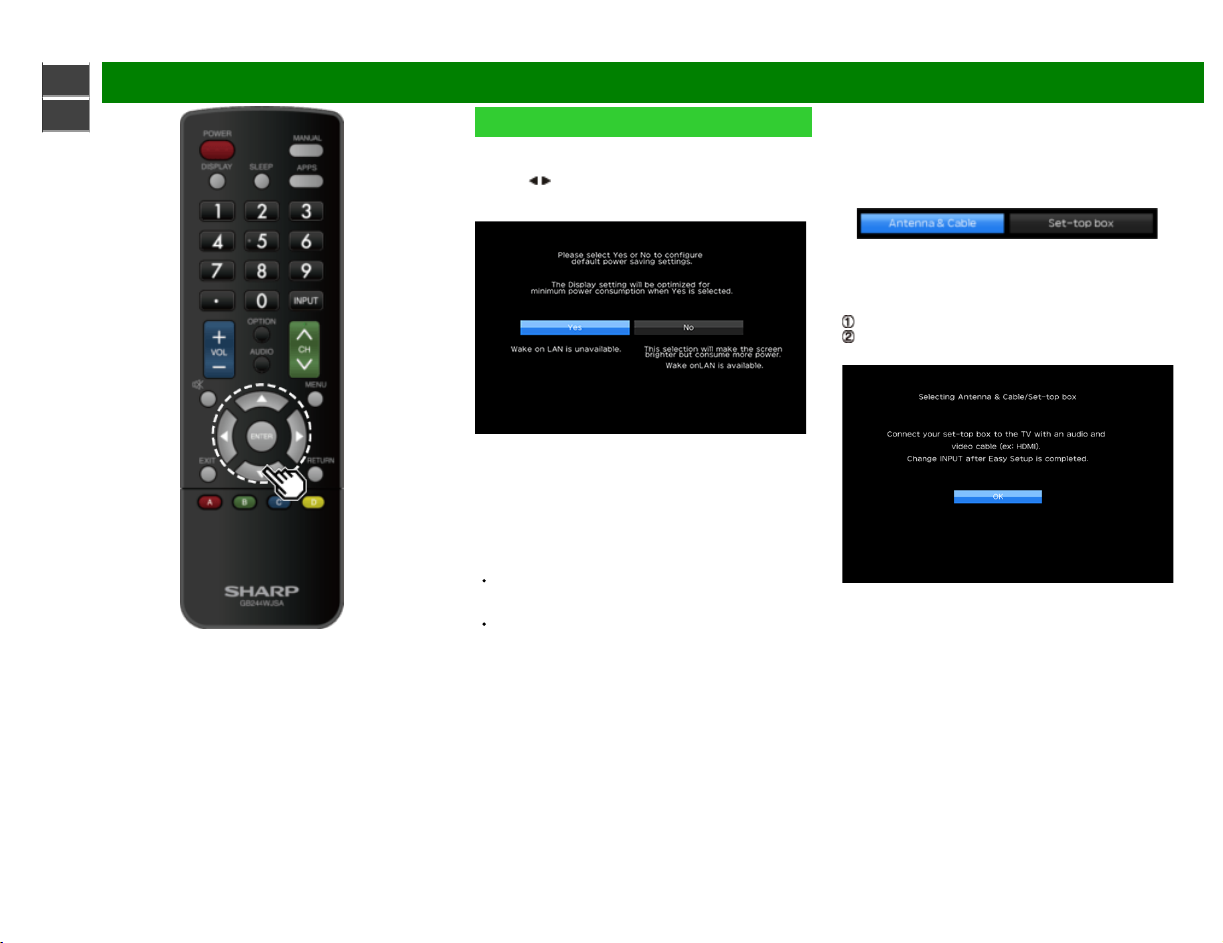
Initial Installation (Continue)
Power Saving
Select "Yes" or "No" to configure default Display settings.
2 Press
/ to select "Yes" or "No".
Press ENTER to enter the setting.
Yes: AV MODE is set to "STANDARD".
No: AV MODE is set to "DYNAMIC (Fixed)". Picture Reset
can be set.
Picture Reset: AV MODE will be set to "DYNAMIC
(Fixed)" regardless of whether Picture Reset is "On" or
"Off".
If you select "On" and there is no operation for 30
minutes:
- AV MODE will be reset to "DYNAMIC (Fixed)".
When "Off" is selected:
- Even after 30 minutes elapses, AV MODE is not reset
to "DYNAMIC (Fixed)".
Antenna & Cable/STB
Select the type of connection you will use to watch TV.
3 Press / to select "Antenna & Cable" or "Set-top box", and
then press ENTER.
To watch TV via an antenna or cable connection
(without using a set-top box):
Select "Antenna & Cable", and then go to step 4. To
watch TV via set-top box:
Select "Set- top box" and then press ENTER.
Check that the set-top box connected to the TV is on.
ENG 2-3
Page 8

sharp operation manual
>>
<<
Introduction
Initial Installation (Continue)
CH Search (Channel search)
Channel auto search makes the TV look for all channels
viewable in the set area.
4 When "Air" is selected in Antenna setting:
Press
/ to select "Start", and then press ENTER.
When "Cable" is selected in Antenna setting:
Press
/ to select "Analog & Digital Search Start" to
search both analog and digital broadcasts, or to select
"Analog Search Start" to search only analog broadcasts, and
then press ENTER.
The Channel search will start automatically.
To exit the Channel search screen, select "Cancel", and
then press ENTER.
ENG 2-4
Page 9

sharp operation manual
>>
<<
Introduction
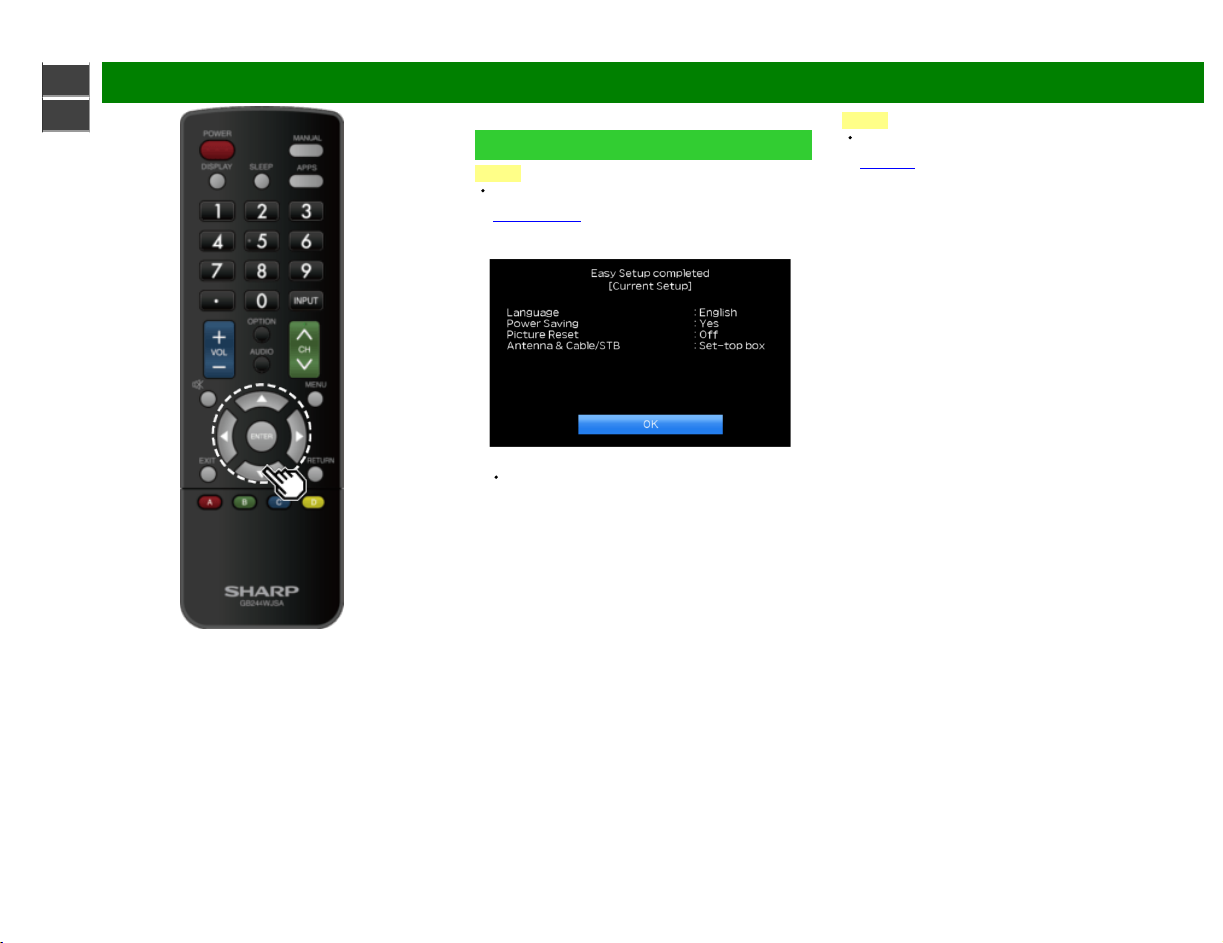
Initial Installation (Continue)
Completed
5 The settings confirmation screen is displayed. Confirm
the information displayed on the screen, and then press
ENTER.
Examples of the settings confirmation screen
When "Antenna & Cable" was selected in step 3.
ENG 2-5
Page 10
sharp operation manual
>>
<<
Introduction
Initial Installation (Continue)
NOTE
If no channel is found, confirm the type of connection
made with your TV and try "Easy Setup" again.
(See page 4- 5.)
When "Set-top box" was selected in step 3.
Click "OK" to display the confirmation screen for input
source switching.
Show the input list: You can check the current connection
status of external equipment. Confirm which input
terminal is connected to the set-top box.
OK: Clicking "OK" will complete the Easy Setup procedure.
NOTE
For changing the settings of the Initial Installation, perform
"Easy Setup" on the Initial Setup menu on
page 4 -5.
ENG 2-6
Page 11

sharp operation manual
>>
<<
Direct Button Operation
Changing Channels
You can change channels in several ways.
Method 1
Using CH
Method 2
Using remote control buttons 0-9, • (DOT).
Examples:
To select a 1 or 2 -digit channel number (e. g., Channel
Press 5
To select a 3-digit channel number (e. g., Channel
Press 1
To select a 4-digit channel number (e. g., Channel
Press 2
/ on the remote control unit or on the TV.
5):
ENTER
115):
1 5 ENTER
22.1):
2 • (DOT) 1 ENTER
NOTE
When selecting a 1-digit channel number, it is not
necessary to press 0 before the number.
When you enter 0-9 only, channel selection will be made
if there is no operation within a few seconds.
if you push "0" by itself, nothing will happen.
Complete the above steps within a few seconds.
When you enter 0-9 and • (DOT), channel selection will
be made if there is no operation within a few seconds.
ENG 3-1
Page 12
sharp operation manual
>>
<<
Direct Button Operation
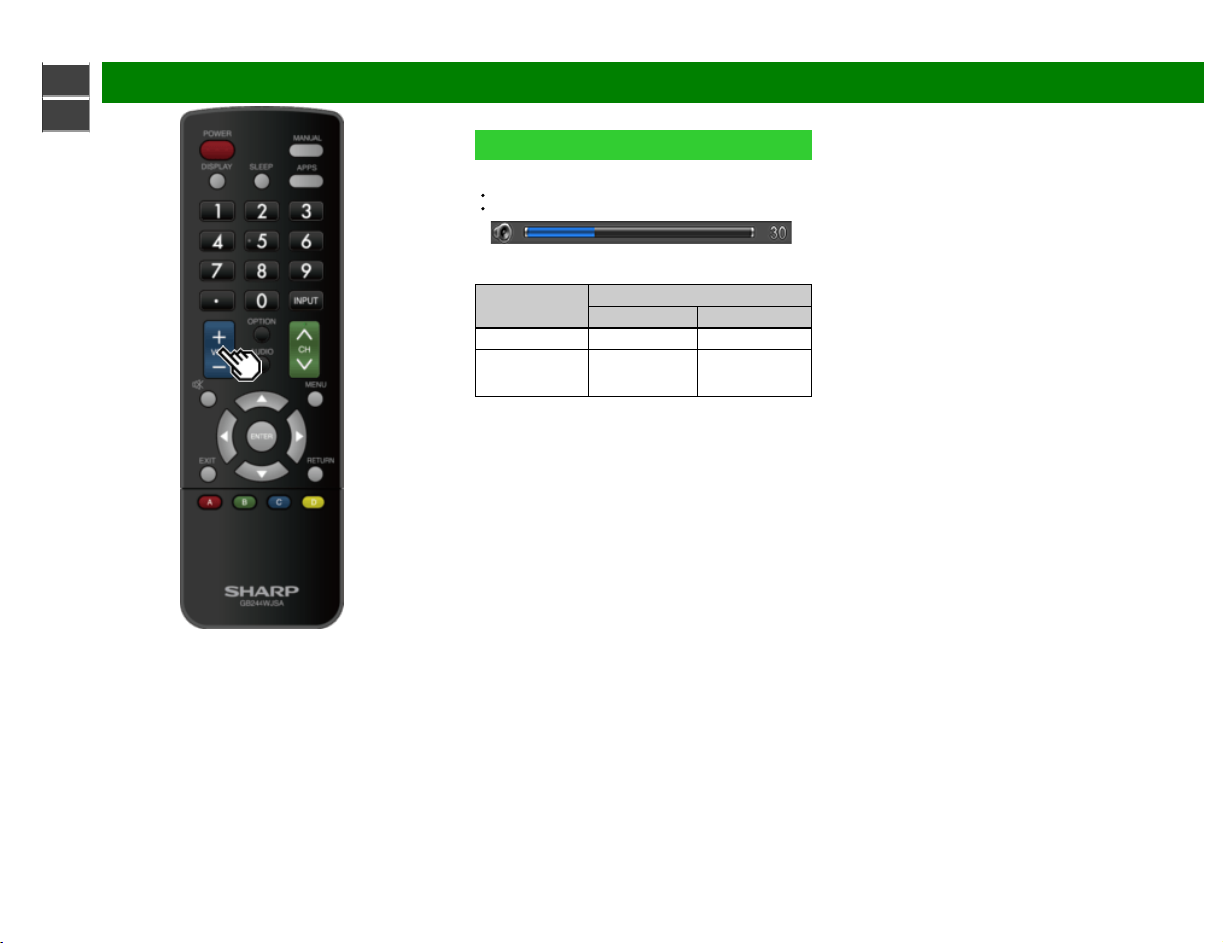
Changing Volume
You can change the volume by pressing VOL+/- on the TV
or on the remote control unit.
To increase the volume, press VOL + .
To decrease the volume, press VOL -.
Audio status
Output device
TV Speaker Variable Sound Mute
AUDIO OUT /
HEADPHONE
Audio Output Select
Audio Out Headphone
Fixed Sound
(Volume MAX)
Variable Sound
ENG 3-2
Page 13
sharp operation manual
>>
<<
Direct Button Operation
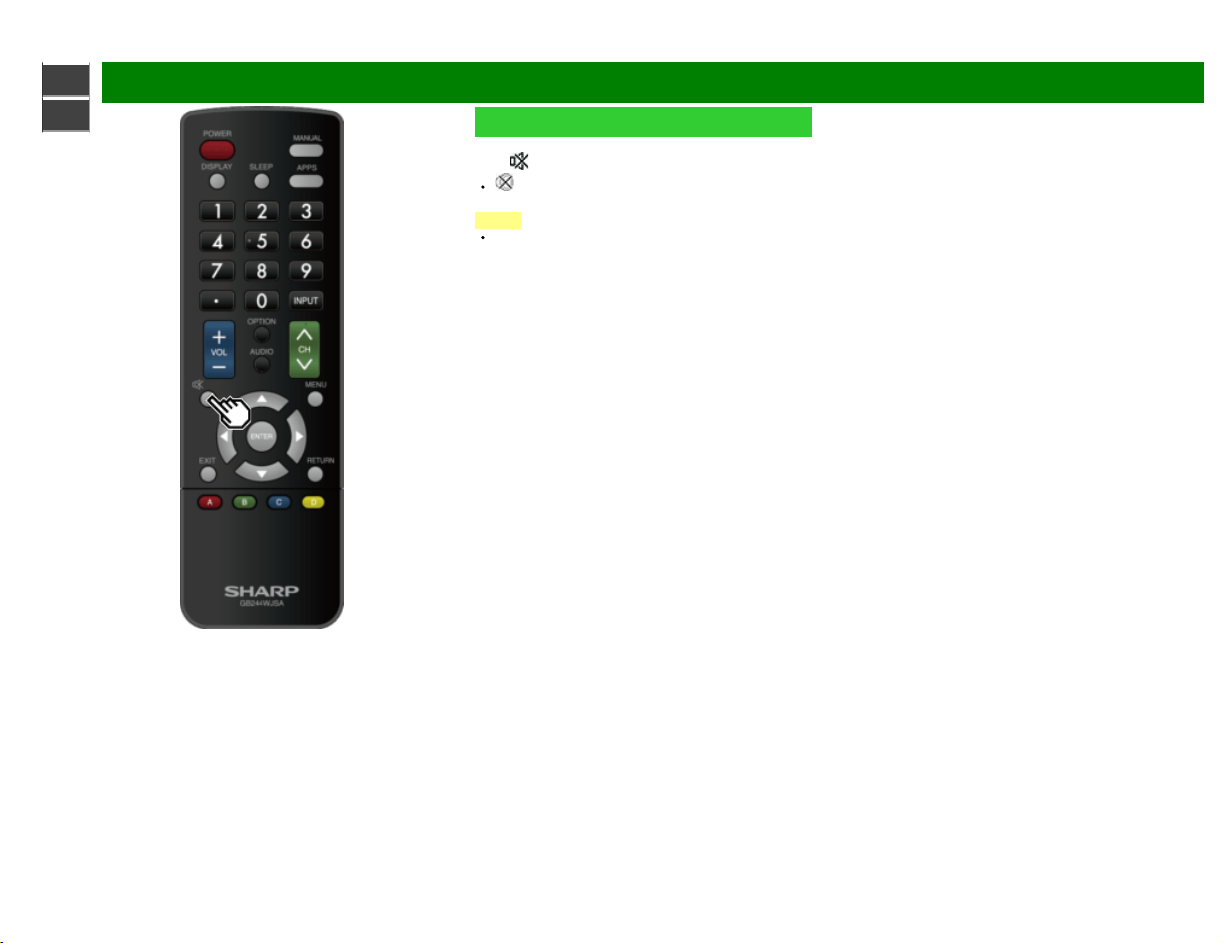
MUTE
Mutes the current sound output.
Press
(MUTE).
" " will be displayed on the screen for 30 minutes, and
the sound is silenced.
NOTE
Mute can be cancelled by pressing VOL+/- or MUTE.
ENG 3-3
Page 14
sharp operation manual
>>
<<
Direct Button Operation
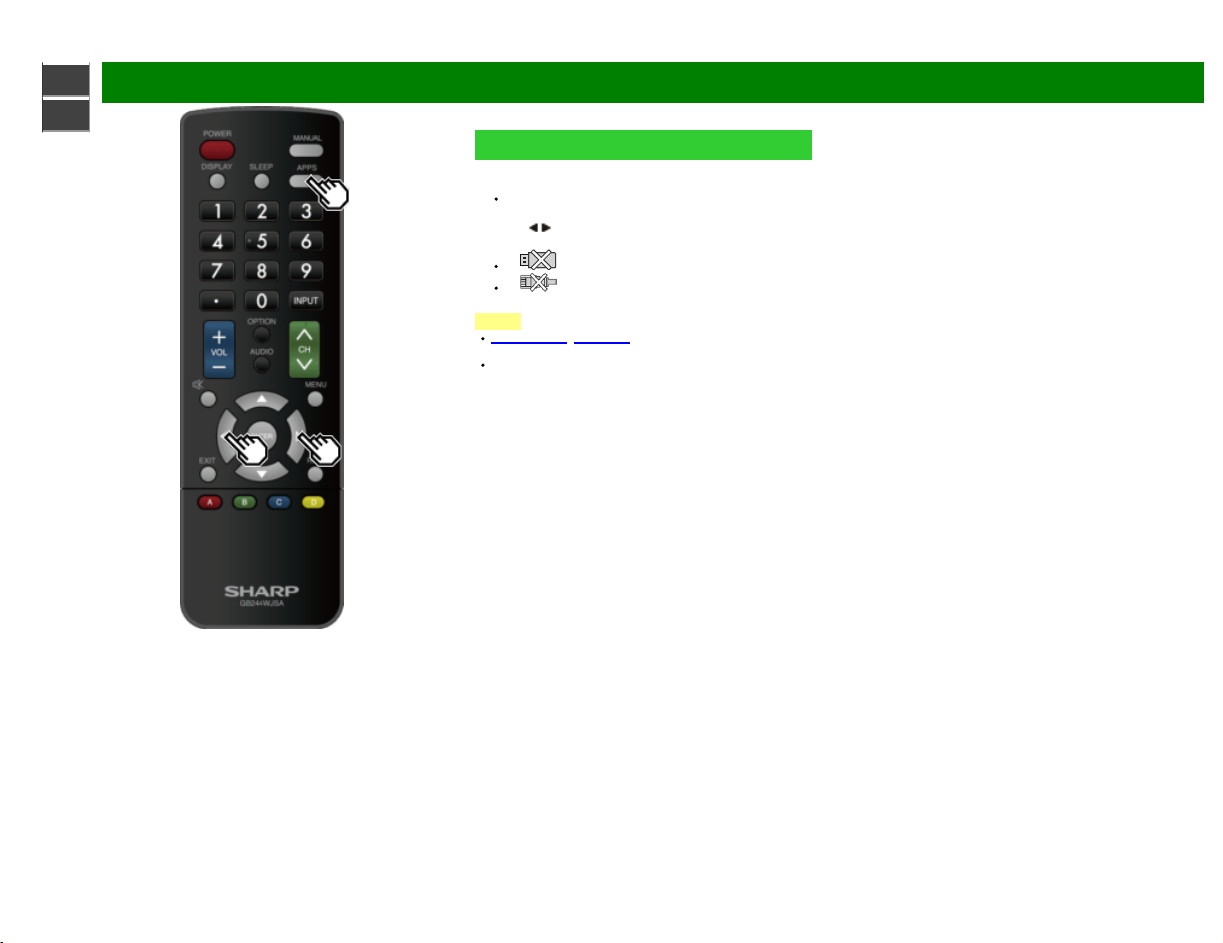
APPS
Allows you to directly activate various types of applications.
1 Press APPS to display the application window.
Press APPS again to switch back to the currently
select input.
2 Press
/ to select the desired application, and then
press ENTER.
If " " is displayed, check the USB connection.
If " " is displayed, check your Monitor’s network
settings and connection.
NOTE
See page 5-2, 8-4 to 8-7 for details of viewable
applications.
When this function is not available, "Can not operate this
function now" will display.
ENG 3-4
Page 15

sharp operation manual
>>
<<
Direct Button Operation
MPX
Switching the digital audio format (DTV only)
If multi sound modes are received, each time you press
AUDIO (MPX) the mode switches.
NOTE
The sound mode screen disappears in three seconds.
Selectable items vary depending on the received
broadcasts.
The audio description sound is selected depending on
the main audio.
Switching the analog audio format
You can switch between multiple audio modes when
watching a multiple audio or stereo broadcast program.
When receiving a stereo signal
Each time you press AUDIO (MPX) , the mode switches
between Stereo and Mono.
When receiving a Stereo + SAP signal
Each time you press AUDIO (MPX), the mode switches
among SAP, Mono and Stereo.
When receiving a monaural signal
When you press AUDIO (MPX), “Mono” displays.
When receiving a monaural signal + SAP signal
Each time you press AUDIO (MPX), the mode switches
between Mono and SAP.
When receiving a bilingual signal
Each time you press AUDIO (MPX) , the mode switches
among Dual I and Dual II.
ENG 3-5
Page 16
sharp operation manual
>>
<<
Direct Button Operation
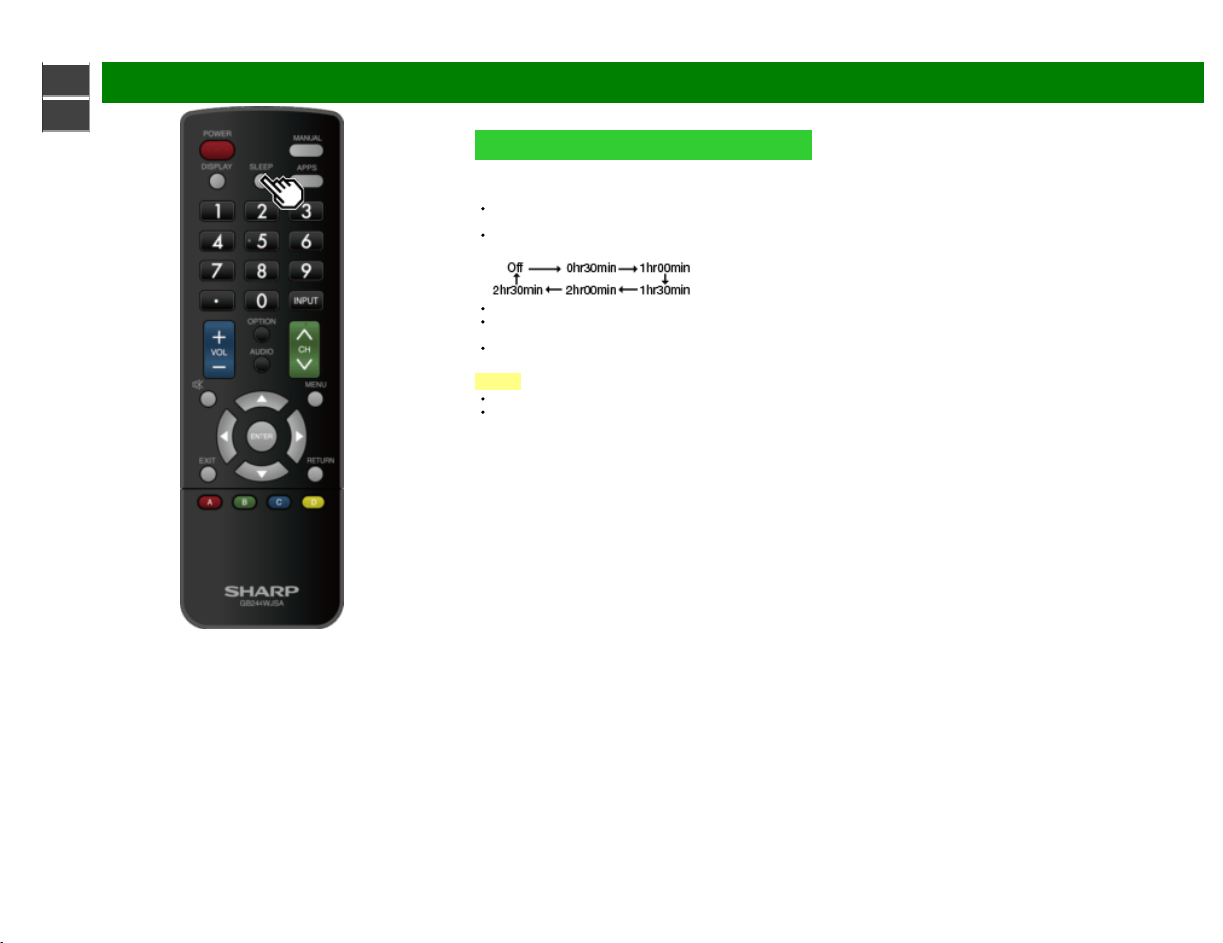
Sleep Timer
Allows you to set a time when the TV automatically switches
to standby.
Press SLEEP.
The remaining time displays when the sleep timer has
been set.
Each time you press SLEEP, the remaining time switches
as shown below.
When set, the time automatically starts counting down.
If you want to adjust the sleep timer, you can press
SLEEP twice then change the time setting.
When it is 5 minutes before the time expires, the
remaining time will start to keep appearing every minute.
NOTE
Select "Off" by pressing SLEEP to cancel the sleep timer.
The TV will enter standby when the remaining time
reaches 0.
ENG 3-6
Page 17
sharp operation manual
>>
<<
On-Screen Display Menu
Introduction
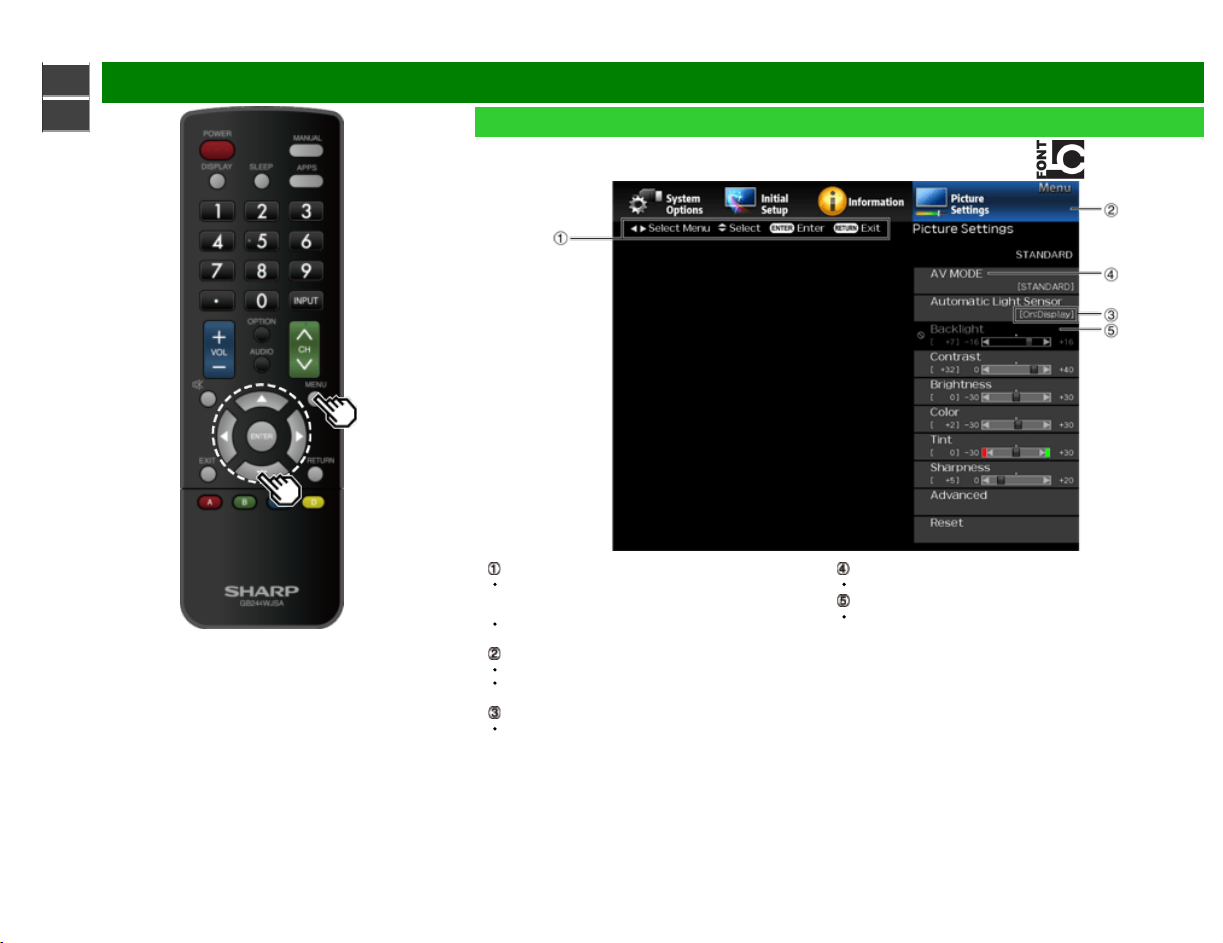
Guide display
This indicates the buttons that can be operated on the
displayed screen. The guide display varies depending on
the menu setting screen.
The operations for some selected items may be displayed
in the operational guide bar at the bottom of the screen.
Item displayed in blue
This indicates the item currently selected.
Press ENTER to go to the adjustment screen for this
item.
Item in brackets
This indicates the current setting for the item.
LCFONT embedded
Item displayed in white
This indicates that the item can be selected.
Item displayed in gray
This indicates that the item cannot be selected.
There are various reasons why the items cannot be
selected, but the main reasons are as follows:
— Nothing is connected to the selected input terminal.
— The function is not compatible with the current input
signal.
— When this conflicts with other functions, you must change
the settings for the other functions.
ENG 4-1
Page 18

sharp operation manual
>>
<<
On-Screen Display Menu
Introduction (Continue)
About Menu Items
Some menu items may not be displayed depending on the
selected input source.
NOTE
The screens in the operation manual are for explanation
purposes (some are enlarged, others cropped) and may
vary slightly from the actual screens.
The order of explanations for each menu item in the
following pages is not necessarily in accordance with the
alignment of the items on the screen.
LCFONT:
This product is embedded with LC Font technology, which
was developed by SHARP Corporation for clearly
displaying easy-to -read characters on LCD screens.
ENG 4-2
Page 19
sharp operation manual
>>
<<
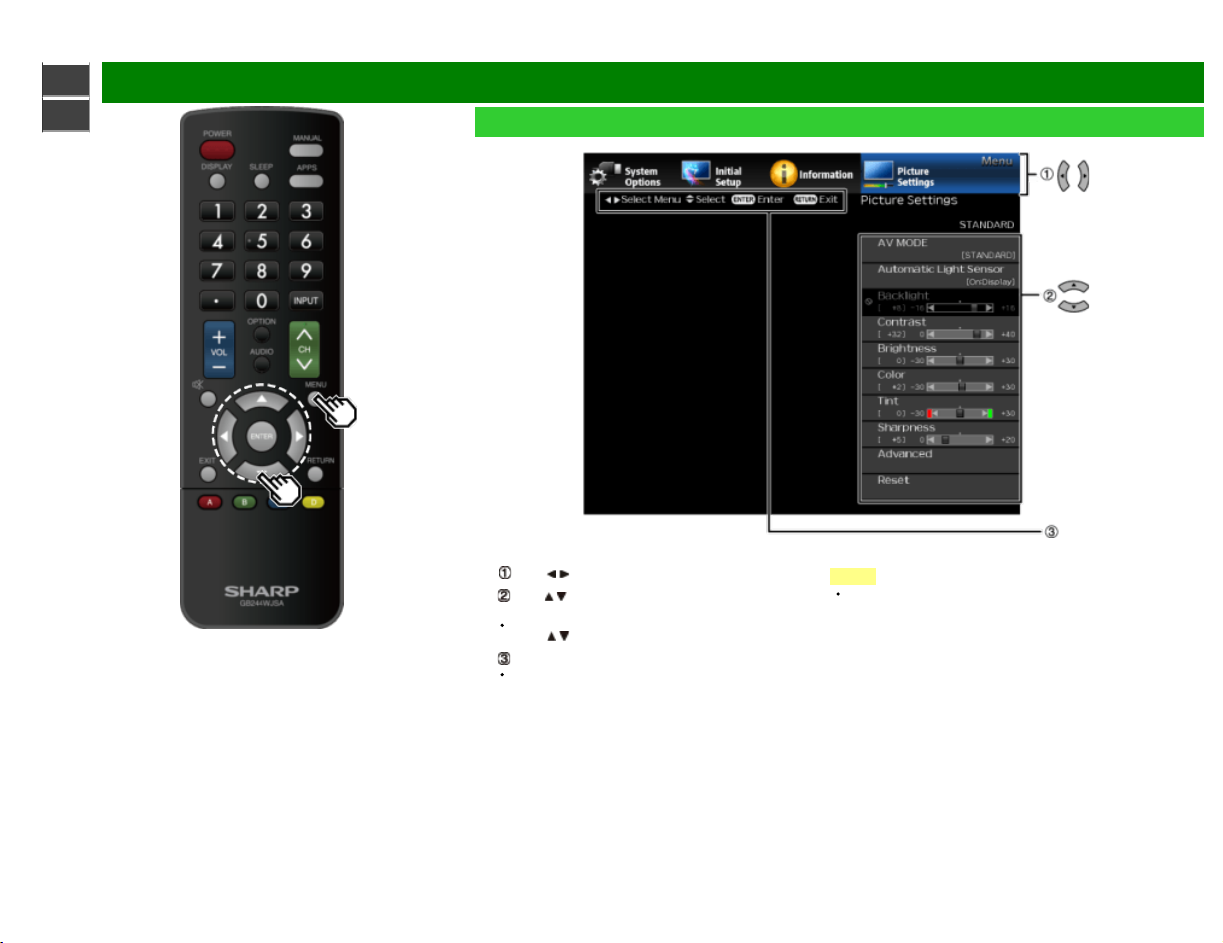
On-Screen Display Menu
On-Screen Display Menu Operation
Example
1 Press MENU to display the MENU screen.
2
Press / to select the desired menu.
Press / to select a specific adjustment item, and then
press ENTER.
Additional related adjustment items may be displayed.
Press
/ to select the desired item.
Adjust the item while referring to the guide display.
Operations vary depending on the function or item.
Refer to the guide display corresponding to the menu
setting screen for button operations.
3 Press MENU to exit.
NOTE
Menu options differ in the selected input modes, but the
operating procedures are the same.
ENG 4-3
Page 20
sharp operation manual
>>
<<
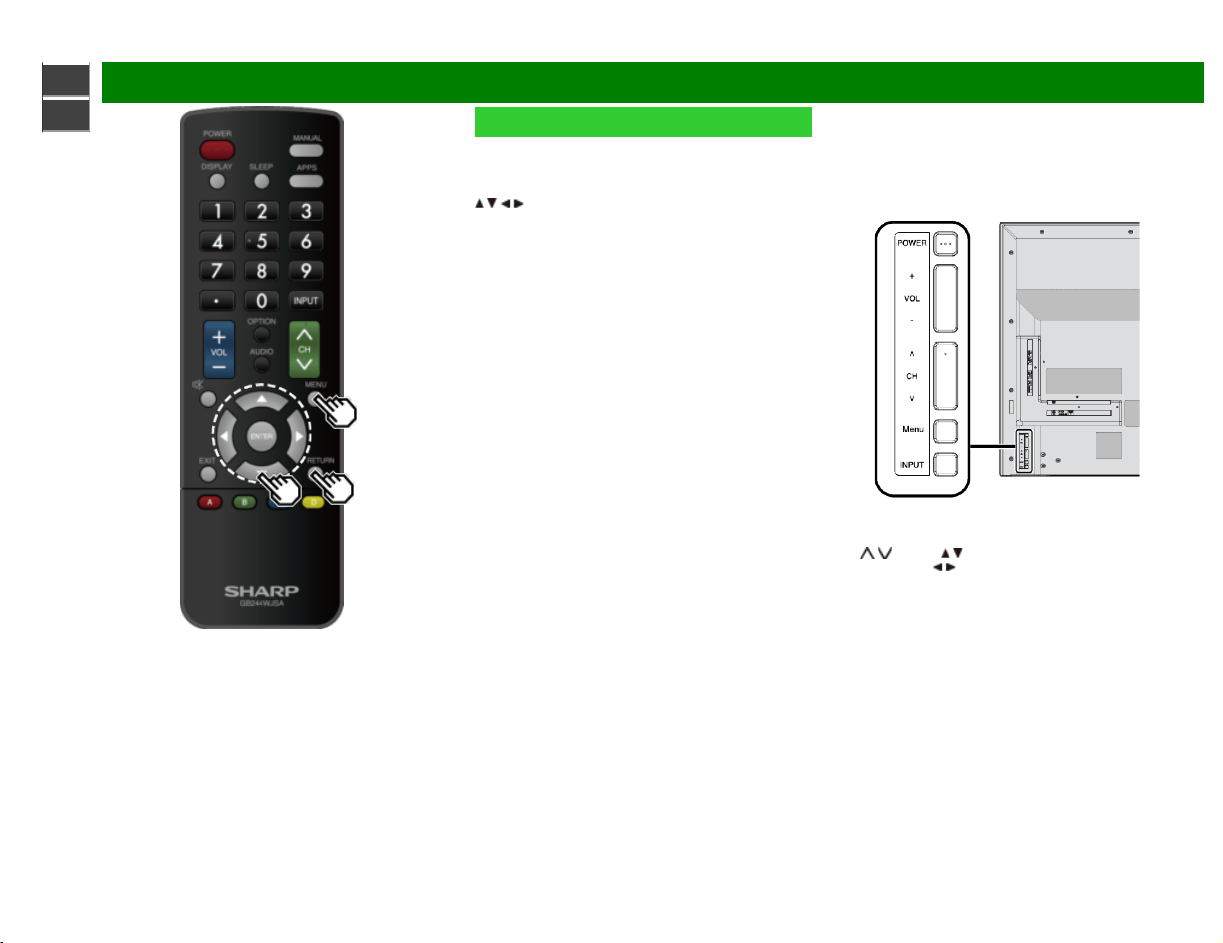
On-Screen Display Menu
Menu Operation Buttons
Using the remote control
Use the following buttons on the remote control to operate
the menu.
MENU: Press to open or close the menu screen.
/ / / : Press to select a desired item on the screen or
adjust a selected item.
ENTER: Press to go to the next step or complete the
setting.
RETURN: Press to return to the previous step.
Using the control panel of the TV
You can also operate the menu with the control panel of the
TV.
Button operations on the control panel correspond to the
ones on the remote control as shown below.
MENU: MENU on the remote control.
INPUT: ENTER on the remote control.
CH
/ : Cursor / on the remote control.
VOL+/-: Cursor
/ on the remote control.
ENG 4-4
Page 21
sharp operation manual
>>
<<
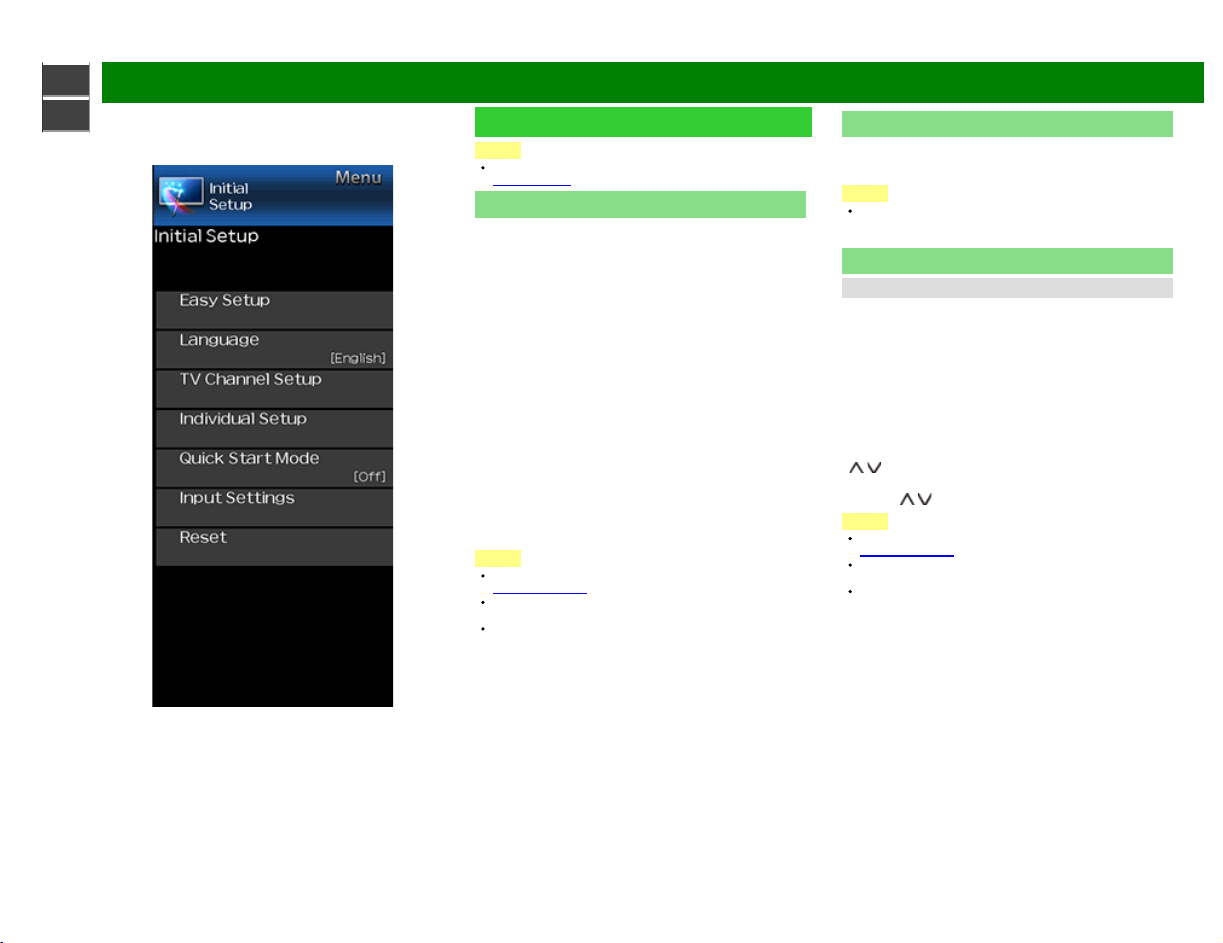
On-Screen Display Menu
Example
Initial Setup
NOTE
For operating the on -screen display menu,
see page 4- 3.
Easy Setup
You can change the settings of the Initial Installation.
Language: Select from among 3 languages (English,
French and Spanish).
Power Saving: Select "Yes" or "No" to configure default
Display settings.
Yes: AV MODE is set to "STANDARD".
No: AV MODE is set to "DYNAMIC (Fixed)". Picture Reset
can be set.
Picture Reset: AV MODE will be set to "DYNAMIC
(Fixed)" regardless of whether Picture Reset is "On" or
"Off". If you select "On", AV MODE will be reset to
"DYNAMIC (Fixed)" if there is no operation for 30 minutes.
When "Off" is selected, even after 30 minutes elapses, AV
MODE is not reset to "DYNAMIC (Fixed)".
Antenna & Cable/STB: Select the type of connection you
will use to watch TV.
Air/Cable: Make sure what kind of connection is made
with your TV when selecting "Air" or "Cable".
CH Search: Channel auto search makes the TV look for
all channels viewable in the set area.
Completed: The settings confirmation screen is displayed.
Confirm the information displayed on the screen.
NOTE
See Initial Installation on
pages 2 -2 to 2-6 for setting each item.
If no channel is found, confirm the type of connection
made with your TV and try "Easy Setup" again.
If you select "Analog Search Start" and initiate the
channel search, the CH Memory for Cable Digital will be
deleted.
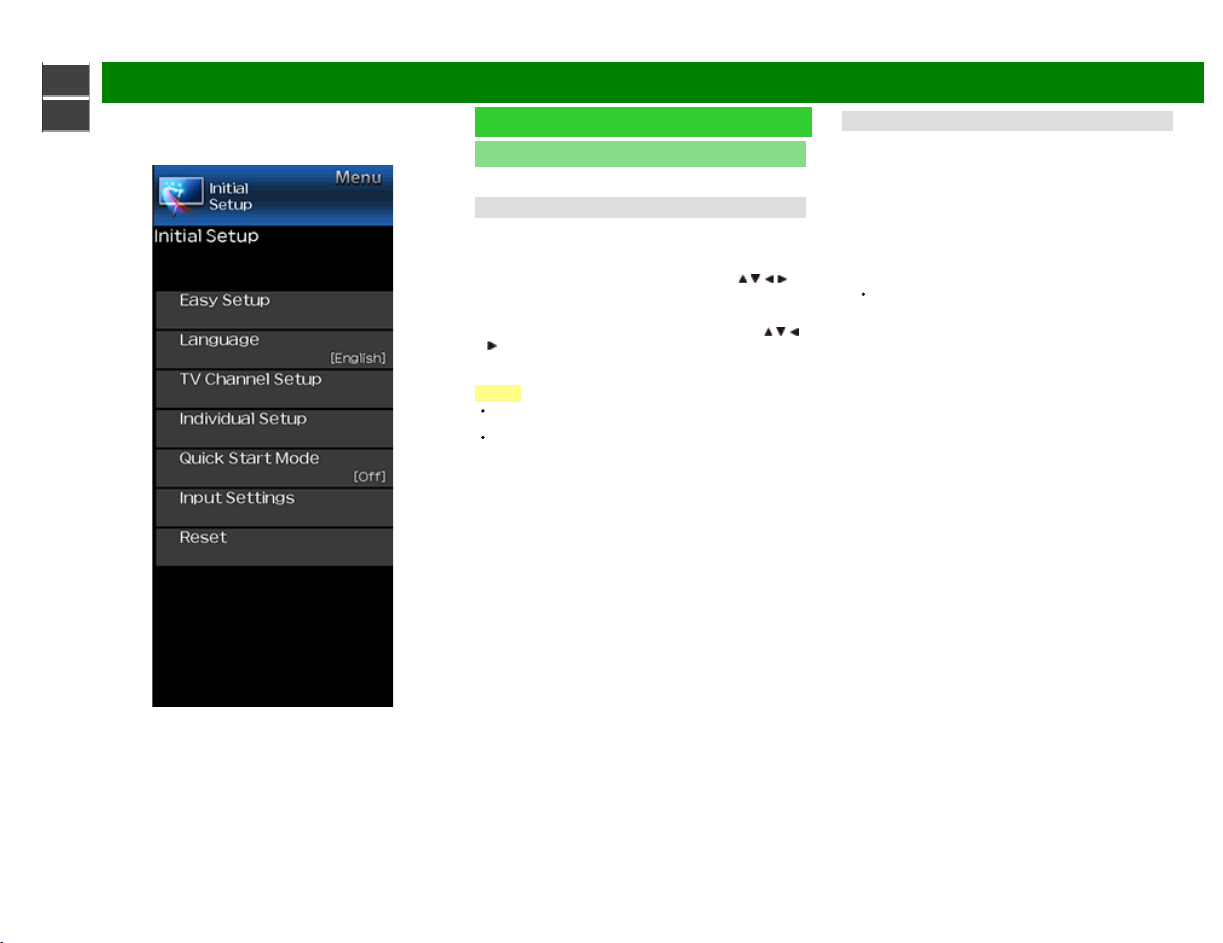
Language
You can also select a language from the Initial Setup menu.
Select from among 3 languages: English, French and
Spanish.
NOTE
To change the language of the manual, select "MENU" >
"Initial Setup" > "Language" to change the language.
Then, press MANUAL again.
TV Channel Setup
Channel Setup
If Initial Installation does not memorize all the channels in
your region, follow the instructions below to manually
memorize the channels.
Air/Cable: Make sure what kind of connection is made
with your TV when selecting "Air" or "Cable".
CH Search: Channel auto search makes the TV look for
all channels viewable in the set area.
CH Memory: You can select the channels to skip in each
ANALOG (Air), ANALOG (Cable), DIGITAL (Air) and
DIGITAL (Cable).
On: Skips channels. (Channel selection disabled using CH
/ .)
Off: Does not skip channels. (Channel selection enabled
using CH
NOTE
/ .)
See Initial Installation on
pages 2 -2 to 2-6 for setting each item.
If no channel is found, confirm the type of connection
made with your TV and try channel search again.
If you select "Analog Search Start" and initiate the
channel search, the CH Memory for Cable Digital will be
deleted.
ENG 4-5
Page 22
sharp operation manual
>>
<<
On-Screen Display Menu
Example
Initial Setup (Continue)
TV Channel Setup
Favorite CH (Favorite Channel Setting)
This function allows you to program 4 favorite channels, in 4
different categories. By setting the favorite channels in
advance, you can select your favorite channels easily.
To register your favorite channel:
Select "Register" and then press ENTER. Press
select the position in the category, and then press ENTER
to register.
To delete your favorite channel:
Select "1 Data Clear" and then press ENTER. Press
to select the channel you want to delete, and then
press ENTER. Select "Yes" and then press ENTER.
To delete all the favorite channels, select "All Data Clear".
NOTE
Before setting the channel, select the channel you want
to register as a favorite channel.
You can display the "Favorite CH" screen by pressing
FAV CH on the remote control.
/ / / to
/ / /
Antenna Setup-DIGITAL
In order to receive digital air broadcasts, you need a digital
broadcast antenna. You can confirm the antenna
configuration through the "Antenna Setup-DIGITAL" screen.
If necessary, adjust the direction of the antenna to obtain the
maximum signal strength.
Signal Strength: The signal strength of DIGITAL channel
is displayed. The signal information is based on the
current channel.
Channel Strength: Input the 2- digit channel number to
check the signal strength of the selected channel. Make
sure the signal is strong enough for each channel.
This function is available for DIGITAL (Air) only.
ENG 4-6
Page 23
sharp operation manual
>>
<<
On-Screen Display Menu
Example
Initial Setup (Continue)
Individual Setup
Secret No.
Allows you to use a secret number to protect certain
settings from being accidentally changed.
IMPORTANT:
Three conditions must be met to enable the V-Chip
1. Secret No. is registered.
2. V-Chip/V-Chip (DTV Only) settings have been made.
The "V-Chip (DTV Only)" will only be selectable when
a new rating system can be downloaded via digital
broadcasting in the U.S.
3. "Status" is set to "Enable".
Setting Secret No.
You can set and change the secret number by using 0-9.
New Secret No.: Changes or sets the Secret No.
Confirm Secret No: Enter Secret No. to confirm.
NOTE
As a precautionary measure, make a note of your secret
number and keep it in a familiar place.
Parental Control
(Parental Control Setting)
V-Chip
V-CHIP is an electronic filtering device built into your TV.
This tool gives parents a great degree of control over
broadcasts accessed by their children. It allows parents to
select programs judged suitable for child viewing while
blocking ones judged not suitable. It does so automatically
once you activate the V-CHIP feature in your TV. "V-Chip"
and "Status" will not be selectable from the menu if you do
not first configure your secret number.
The U.S. has two rating systems for viewing content: TV
Parental Guidelines and movie ratings.
The TV Parental Guidelines work in conjunction with the
V-CHIP to help parents screen out inappropriate
television shows from their children.
Movie ratings are used for original movies rated by the
Motion Picture Association of America (MPAA) as
watched on cable TV and not edited for television. The
V-CHIP can also be set to block MPAA -rated movies.
NOTE
The setting automatically enters "Block" for any ratings
below your selection.
If Status is not set to "Enable", the configuration settings
will not work.
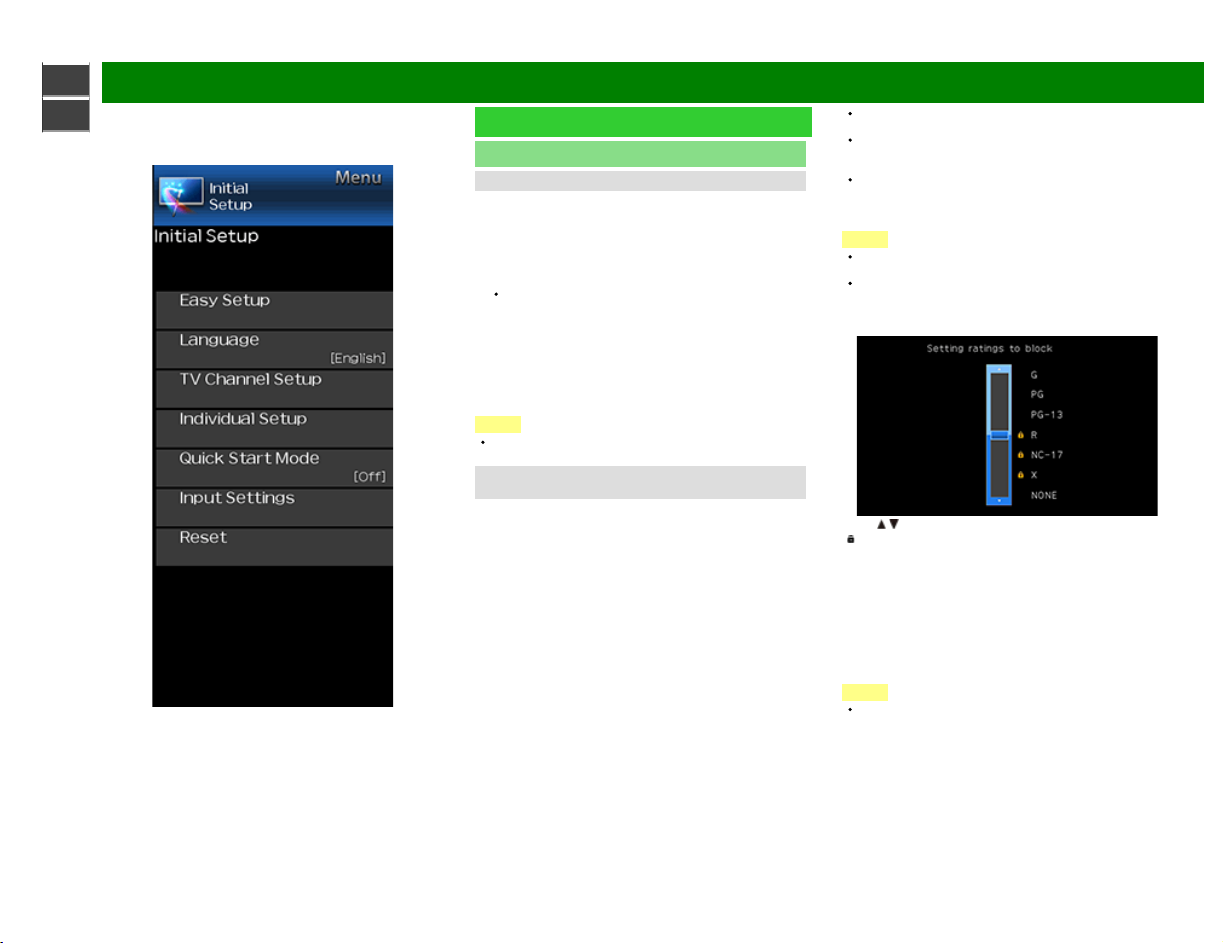
MPAA (Voluntary movie rating system)
Press / to adjust the item to your desired position.
"
" indicates the item is blocked. Press MENU to exit.
G: General audiences. All ages admitted.
PG: Parental guidance suggested. Some material may not
be suitable for children.
PG-13: Parents strongly cautioned. Some material may be
inappropriate for children under 13.
R: Restricted. Under 17 requires accompanying parent or
adult guardian (age varies in some jurisdictions).
NC-17: No one 17 and under admitted.
X: X is an older rating that is unified with NC-17 but may be
encoded in the data of older movies.
NOTE
Voluntary movie rating system only uses an age- based
rating.
Example
ENG 4-7
Page 24
sharp operation manual
>>
<<
On-Screen Display Menu
Example
Initial Setup (Continue)
Individual Setup
Parental Control
(Parental Control Setting)
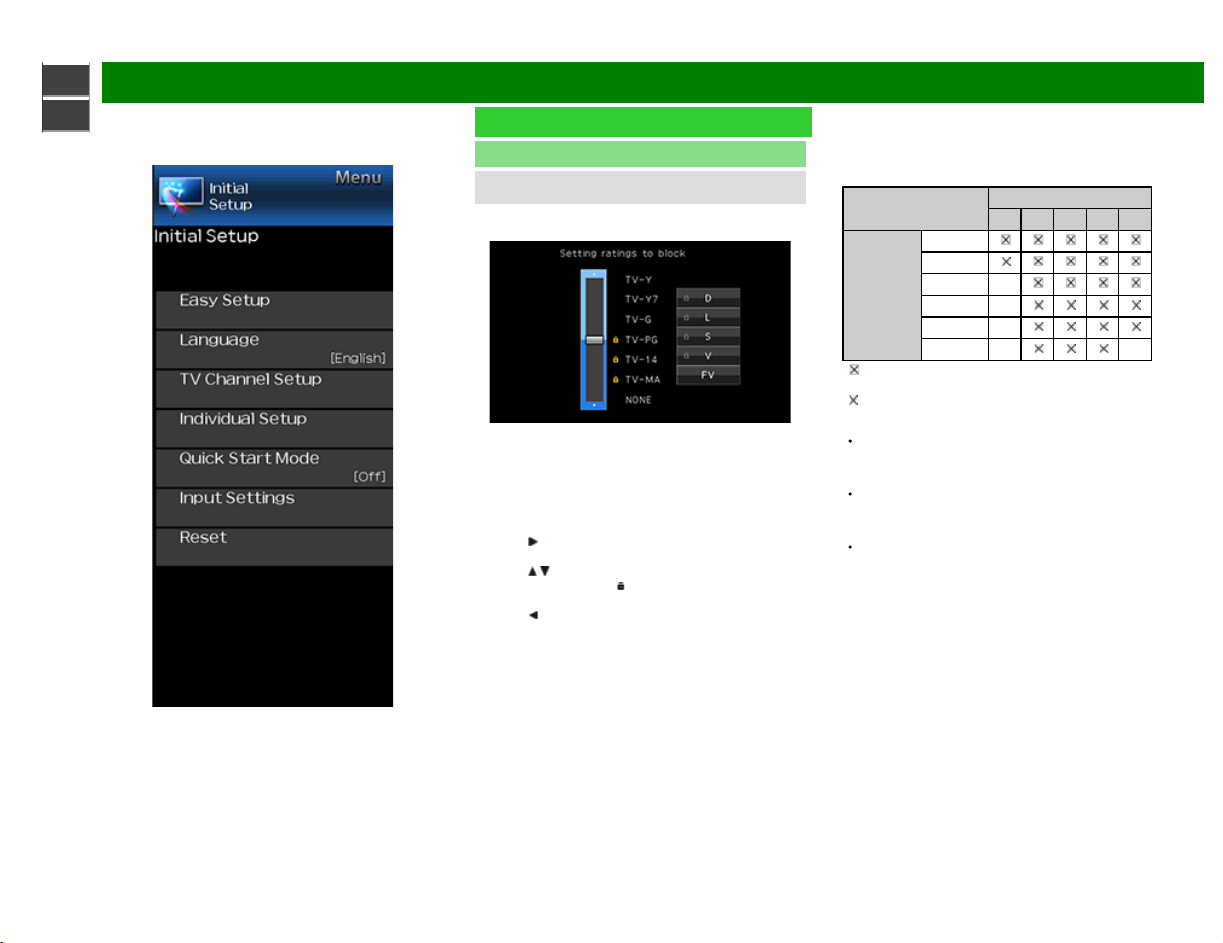
TV Parental Guidelines
Suggested age
TV-Y: All children.
TV-Y7: Directed to older children.
TV-G: General audience.
TV-PG: Parental Guidance suggested.
TV-14: Parents strongly cautioned.
TV-MA: Mature audience only.
When setting an individual content-based rating item:
1 Press
or ENTER to access blocked content items from
the currently selected age-based rating item.
2 Press
/ to select an individual item, and then press
ENTER to unblock it ("
steps for the other items.
3 Press
or RETURN to register after all individual
content rating items are set.
Example
" is removed). Repeat the same
Content
FV: Fantasy violence.
V: Violence.
S: Sexual situation.
L: Adult language.
D: Sexually suggestive dialog.
Rating
TV-Y
TV-Y7
Suggested
age
: The content rating can be set, but this rating is not
normally broadcast by TV stations.
: Content rating can be set.
Canadian Rating Systems (Canadian English ratings
and Canadian French ratings)
The TV rating systems in Canada are based on the
Canadian Radio-Television and Telecommunications
Commission (CRTC) policy on violence in television
programming.
While violence is the most important content element to
be rated, the structure developed takes into consideration
other program content like language, nudity, sexuality
and mature themes.
When setting the V-CHIP on the Canadian system you
can choose either the Canadian English ratings or the
Canadian French ratings.
TV-G
TV-PG
TV-14
TV-MA
Content
FV V S L D
ENG 4-8
Page 25

sharp operation manual
>>
<<
On-Screen Display Menu
Example
Initial Setup (Continue)
Individual Setup
Parental Control
(Parental Control Setting)
Canadian English Ratings
E: Exempt: Includes news, sports, documentaries and
other information programming; talk shows, music
videos, and variety programming.
C: Children: Intended for younger children under the age of
8 years. Pays careful attention to themes that could
threaten their sense of security and well-being.
C8+: Children over 8 years old: Contains no portrayal of
violence as the preferred, acceptable, or only way to
resolve conflict; nor encourage children to imitate
dangerous acts which they may see on the screen.
G: General: Considered acceptable for all age groups.
Appropriate viewing for the entire family, contains very
little violence, physical, verbal or emotional.
PG: Parental Guidance: Intended for a general audience,
but may not be suitable for younger children (under the
age of 8) because it could contain controversial themes
or issues.
14+: Over 14 years: Could contain themes where violence
is one of the dominant elements of the storyline, but it
must be integral to the development of plot or character.
Language usage could be profane and nudity present
within the context of the theme.
18+: Adults: Intended for viewers 18 years and older and
might contain depictions of violence, which while related
to the development of plot, character or themes, are
intended for adult viewing. Could contain graphic
language and portrayals of sex and nudity.
Canadian French Ratings
E: Exempt programming.
G: General: All ages and children, contains minimal direct
violence, but may be integrated into the plot in a
humorous or unrealistic manner.
8ans+: General but inadvisable for young children: May be
viewed by a wide public audience, but could contain
scenes disturbing to children under 8 who cannot
distinguish between imaginary and real situations.
Recommended for viewing with parent.
13ans+: Over 13 years: Could contain scenes of frequent
violent scenes and therefore recommended for viewing
with parent.
16ans+: Over 16 years: Could contain frequent violent
scenes and intense violence.
18ans+: Over 18 years: Only for adult viewing. Could
contain frequent violent scenes and extreme violence.
How to temporarily release the V -CHIP BLOCK
When the V -CHIP BLOCK is working and censors a
broadcast, "V-CHIP HAS BEEN ACTIVATED." displays.
1 Press ENTER while the V-CHIP is working, and then the
secret number setting menu displays.
2 Input the 4-digit secret number by using 0–9 . At this time
V-CHIP BLOCK temporarily releases.
ENG 4-9
Page 26

sharp operation manual
>>
<<
On-Screen Display Menu
Example
Initial Setup (Continue)
Individual setip
Parental Control
(Parental Control Setting)
Reactivating the temporary released V-CHIP BLOCK
You can reactivate the temporarily released V_CHIP BLOCK
as shown below.
Select "Status" setting from the Parental Control menu to
reactivate BLOCK.
Select "V_Chip" setting ("MPAA", "TV Guidelines", "Can.
English Ratings" or "Can. French Ratings") from the
Parental Control to reactivate BLOCK.
(See pages 4- 7 to 4-9)
Switch off the TV power. (When "Quick Start Mode" is
"OFF".)
NOTE
Performing any of the three above will activate the VCHIP BLOCK.
Status
Used to enable or disable the parental control function. This
function will not be selectable from the menu if you do not
first configure your secret number.
Quick Start Mode
When this function is activated, you can reduce the
Monitor's start -up time or even let the TV in standby mode
start displaying images and so on via the connected
equipment on the network.
NOTE
Setting "Quick Start Mode" to "On" consumes more
power.
ENG 4-10
Page 27

sharp operation manual
>>
<<
On-Screen Display Menu
Example
Initial Setup (Continue)
Input Settings
HDMI auto view
When you view images sent from external equipment in an
HDMI connection, this function allows the image size on the
TV to automatically switch to an appropriate one.
NOTE
Refer to your external equipment operation manual for the
signal type.
HDMI type selection
Sets the HDMI type for HDMI INPUT 1 and 2 terminals. Set
to "Full" when a HDMI 4K60P 4:4:4 device is connected,
and data to "Limited" when an HDMI 4:2:0 device is
connected.
Digital Audio Output
You can output digital audio to an AV amplifier or similar
device whose DIGITAL AUDIO INPUT terminal is connected
to the DIGITAL AUDIO OUT terminal on the TV. Please
select an audio output format compatible with the audio
format of the program you are watching and the equipment
connected.
PCM: For connecting to equipment that does not support
Dolby Digital. The same audio (main, sub, or main/sub)
as the audio of the program being viewed is output.
2- channel audio with a sampling rate of 48 kHz or less is
output as linear PCM audio.
Bitstream: For connecting to an audio system that
supports Dolby Digital. Audio is output through both the
main and sub channels.
NOTE
Video input audio are output in PCM mode even when
"Bitstream" is selected.
PCM digital input signals are output in PCM mode even
when "Bitstream" is selected.
Audio Output Select
You can select which device is used for outputting audio.
Headphone: Output audio through headphones.
Audio out: Output audio through an external AMP.
NOTE
If you select "Headphone" when a cable is inserted in the
AUDIO OUT terminal, the TV speakers are muted and all
Audio menu items cannot be adjusted except for
Balance.
If you select "Audio out", sound via the AUDIO OUT
terminal is not adjustable and constantly outputs.
CAUTION
AUDIO OUT terminal is also used for headphones.
Reduce the volume before using headphones.
Overwhelming sound may damage your hearing.
Input Skip
This setting allows you to skip the TV, HDMI1, HDMI2 or
Input3 on the Input Selection operation.
ENG 4-11
Page 28
sharp operation manual
>>
<<
On-Screen Display Menu
Example
Initial Setup (Continue)
Input Settings
Color System
Select the video signal system compatible with your
equipment from the list below:
AUTO/NTSC/PAL-N/PAL-M
NOTE
"Color System" can only be set for the TV or VIDEO IN.
HDMI CEC Link
Make the settings to use LINK Operation.
Set the settings with "Initial Setup" > "Input Settings" >
"HDMI CEC Link".
(See page 6- 2.)
Reset
If complex adjustments are made and the settings cannot be
restored to normal, you can reset the settings to the factory
preset values.
If you have already set the Secret No., input the 4-digit
secret number here.
ENG 4-12
Page 29

sharp operation manual
>>
<<
On-Screen Display Menu
Example
Information
NOTE
For operating the on -screen display menu,
see page 4- 3.
Identification
The current version of the TV software and model name is
displayed.
Digital Caption Info.
(Digital Caption Information)
This function allows viewing of digital closed caption
information for the digital broadcast program being viewed.
NOTE
This list is not displayed for analog broadcasts or external
input audio/video.
This information is not included in CC1, CC2, Text1, or
Text2, and is not displayed in a list.
Software Update
This is used to upgrade the system software to enhance the
TV functions.
1 Press MENU to display the MENU screen, and then
press
/ to select "Information".
2 Press
/ to select "Software Update", and then press
ENTER.
3 Press
/ to select "Manual Update" or "Auto Update
Setting", and then press ENTER.
The operations thereafter vary depending on the
setting.
Manual Update
Select the method for manually updating the software.
USB Update: Updates the software using a USB memory
device containing the update file. (See "Updating the
Software with a USB Memory Device".)
Network Update: Downloads the update file via the
network and then updates the software.
(See page 4- 15.)
NOTE
A broadband connection and Internet Setup are required
to update the software using the network.
(See page 8- 1.)
It may take time to access and download the update
depending on the Internet connection and other factors.
Auto Update Setting
When the TV is on, or when an Internet application is being
accessed, this function enables the TV to connect to the
network and check for updates automatically.
When an update is available, a message is displayed.
Press
/ to select "Yes", and then press ENTER to
display the download screen.
(See page 4- 15.)
NOTE
This function does not work when a broadband
connection or Internet Setup is not available.
A message may also be displayed when an application is
running.The message varies depending on the
application.
ENG 4-13
Page 30

sharp operation manual
>>
<<
On-Screen Display Menu
Example
Information (Continue)
Software Update
Manual Update
CAUTION
Do not remove the USB memory device or unplug the
AC cord while the software is being updated.
Be sure to properly follow the whole procedure
described below, step by step. Otherwise, for
example, the TV cannot read the data in the USB
memory device and software updating will fail.
1 Insert the USB memory device with the update file into
the USB terminal on the TV.
2 Press
/ on the Manual Update screen to select "USB
Update", and then press ENTER.
3 Press ENTER to start checking the data in the USB
memory device.
4 During the data checking, "Checking" blinks.
The current version of the Monitor software and the
version of the update file on the USB memory device
are displayed.
If the USB memory device is not properly installed or
the correct update file cannot be found on the USB
memory device, an error message is displayed.
Check the file on the USB memory device, and then
reinsert the USB memory device correctly.
ENG 4-14
Page 31

sharp operation manual
>>
<<
On-Screen Display Menu
Example
Information (Continue)
Software Update
Manual Update
CAUTION
Do not remove the USB memory device or unplug the
AC cord while the software is being updated.
5 When the software is successfully updated, a screen is
displayed indicating that the update process is
completed.
After this screen is displayed, the TV automatically turns
off and then turns on again.
If the update has failed, check the file in the USB
memory device and try Software Update again.
6 Remove the USB memory device.
Updating the Software via the Network
/ on the Manual Update screen to select
1 Press
"Network Update", and then press ENTER.
The TV connects to the network and checks for
updates.
To cancel, press ENTER.
2 The current version of the TV and the latest version of
software are displayed. To update the TV software,
select "Yes", and then press ENTER.
When a server connection cannot be established or an
update is not available, a message is displayed.
If a server connection cannot be established, check
the broadband connection and Internet Setup.
3 After the update file is downloaded, the software update
process begins.
CAUTION
Do not unplug the AC cord while the software is
being updated.
4 When the software is successfully updated, a screen is
displayed indicating that the update process is
completed.
A screen indicating that the update is completed is
displayed. 4 seconds later, the TV restarts automatically.
If the software was not updated successfully, check the
broadband connection and Internet Setup, and then try
updating the software again.
Manual
Displays the built-in operation manual on the screen. You
can read information about how to use this device.
ENG 4-15
Page 32

sharp operation manual
>>
<<
On-Screen Display Menu
Example
Picture Settings
Adjusts the picture to your preference with the following
picture settings.
NOTE
For operating the on -screen display menu,
see page 4- 3.
Selected item
Backlight The screen dims The screen
Contrast For less contrast For more contrast
Brightness For less brightness For more
Color For less color
Tint Skin tones become
Sharpness For less sharpness For more
For resetting all Picture adjustment items to the factory
preset values, press
ENTER, press
ENTER.
button button
brightens
brightness
intensity
reddish
/ to select "Reset", press
/ to select "Yes", and then press
For more color
intensity
Skin tones
become greenish
sharpness
AV MODE (Changing Pic.Quality)
The audio and picture settings can be changed to suit the
program or input content being watched.
You can use USER Mode to create customized settings for
each TV input. These settings will be automatically saved on
each input for convenience.
STANDARD: For a highly defined image in a normal
lighting.
MOVIE: For a movie.
PC: For PC.
USER: Allows the user to customize settings as desired.
You can set the mode for each input source.
DYNAMIC: For a clear-cut image emphasizing high
contrast, useful for sports viewing.
DYNAMIC (Fixed): Changes the image and sound settings
to the factory preset values. No adjustments are allowed.
NOTE
You can select a different AV MODE item for each input
mode. (For example, select STANDARD for TV input and
DYNAMIC for COMPONENT.)
The selectable items vary depending on the input source
and on the model of your TV.
ENG 4-16
Page 33

sharp operation manual
>>
<<
On-Screen Display Menu
Example
Picture Settings (Continue)
Advanced
Digital Noise Reduction
Produces a clearer video image.
AUTO: Automatically adjusts the level of noise reduction.
High/Medium/Low: You can select a desired level for
viewing a clearer video image.
Off: No adjustment.
Color Temp. (Color Temperature)
For a better white balance, use color temperature correction.
High: White with bluish tone
Middle:
Low: White with reddish tone
ENG 4-17
Page 34

sharp operation manual
>>
<<
On-Screen Display Menu
Example
Picture Settings (Continue)
Advanced
Active Contrast
Automatically adjusts the image contrast according to the
scene.
On: Produces high contrast image.
Off: No adjustment.
Reset
Returns Picture Settings to their factory preset values. To
reset, select "YES" and then press ENTER.
ENG 4-18
Page 35

sharp operation manual
>>
<<
On-Screen Display Menu
Example
Audio Settings
You can adjust the sound quality to your preference with the
following settings.
NOTE
For operating the on -screen display menu,
see page 4- 3.
Selected
item
Treble For weaker treble For stronger treble
Bass For weaker bass For stronger bass
Balance Decrease audio from
NOTE
The Audio menu is grayed out when "Audio Output
Select" is set to "Variable".
(See page 4- 11.)
For resetting Audio adjustment items to the factory preset
values, press
/ to select "Yes", and then press ENTER.
SURROUND
The surround function produces Surround effect from the
speakers.
NOTE
The Audio Settings menu is grayed out when "Audio
Output Select" is set to "Variable".
(See page 4- 11.)
For some discs, setup may be required on your BD/DVD
player. In this case, please refer to the operation manual
of your BD/DVD player.
button button
the right speaker
/ to select "Reset", press ENTER, press
Decrease audio from
the left speaker
Bass enhancer powered by SRS Labs, Inc.
This function allows you to enjoy bass-enhanced sound.
Off: Outputs the normal sound.
On: Bass enhancer function is on.
NOTE
If distorted bass sound is heard, set to “Off”.
Auto Volume
Different sound sources sometimes do not have the same
loudness level, such as a program and its commercial
brakes, The Automatic Volume Control(Auto Volume)
reduces this problem by equalizing.
ON: Reduces the loudness gaps among different sound
source. The result is automatically adjusted according to
the sound sources.
OFF: No adjustment.
Reset
Returns Audio Settings to their factory preset values. To
reset, select "YES" and then press ENTER.
ENG 4-19
Page 36

sharp operation manual
>>
<<
On-Screen Display Menu
Example
Network Settings
Dashboard
You can display a list of the main Network settings.
Connection Type
Select the connection type.
Wired: The signal is tected and setup is performed
automatically. Use " Wired Setup" to check and change
the settings as necessary.
Wireless: Confrigure the access point settings on
"Wireless Setup".
Wired Setup
You can make adjustments manually for the IP.
You can switch the "Connect Type" to "AUTO" or
"Manual".
Check that numbers are display for each setting.
If there are any settings without numbers, specify the
numbers by folowinging the on-screen instructions.
Inputs the IP address etc by using remote control buttons
0-9.
Wireless Setup
Make adjustments and confirm the settings necessary for
wireless LAN connection (push as search for the access
point and registration of it).
WPS
WPS push button: Allows the TV to automatically
establish the connection using a button on the access
point.
WPS PIN code: Sets up the connection by registering a
PIN code for the access point.
Search: Searches for and selects the access point to be
connected.
Manual Setup: Allows you to make the connection by
entering an SSID for the access point.
If your access point supports Wi-Fi Protected Setup (WPS
push button method), it is recommended that you use this
function for the wireless connection. You can press the WPS
button on the access point configure the settings
automatically.
The name of the WPS button function may differ
depending on the access point. See the operation
manual of the access point for details.
1 Confirm the current settings in "Connection Type".
If "Wired" is selected, press / to select "Wireless".
2 Select the desired connection method and follow the
instructions shown on the display.
3 When a connection is established, the connection details
are displayed. Press ENTER.
IP Control
Set this function when operating the TV from equipment
connected by LAN.
ENG 4-20
Page 37

sharp operation manual
>>
<<
On-Screen Display Menu
Example
Network Settings (Continue)
Device Name
Set this function when operating the TV from equipment connected by LAN or wireless LAN.
Use the software keyboard when you need to input text at Device Name Setting.
Software Keyboard
ABC
Switches character to uppercase. If "abc" is pressed again, switches character to lowercase.
":&12"
Changes character set into the alphabet, numbers, symbols, etc.
OK
Applies the entered information and closes the software keyboard.
space
Enters a space.
DEL
Erases the character string.
Wake on Wi-Fi/LAN
Enable the TV to be started by a signal over a Wi-Fi/LAN.
NOTE
If you want to use Wake on Wi- Fi function, it is recommended to keep Quick start mode to be ON. (See page 4-10.)
Standby power consumption will be increase when Wake on Wi-Fi/LAN is turned ON.
ENG 4-21
Page 38

sharp operation manual
>>
<<
On-Screen Display Menu
Example
System Options
NOTE
For operating the on -screen display menu,
see page 4- 3.
Power Control
Power control setting allows you to save energy.
No Signal Off
When this function is enabled, the TV automatically shuts
down if no signal is received for more than 15 minutes.
NOTE
When it is 5 minutes before the power shuts down, the
remaining time will start to keep appearing every minute.
When a TV program finishes, this function may not
operate.
No Operation Off
When you enable this function, the TV automatically shuts
down if no operation is performed for more than 3 hours.
(Disable, 30 min, 3 hours)
NOTE
When it is 5 minutes before the power shuts down, the
remaining time will start to keep appearing every minute.
ENG 4-22
Page 39

sharp operation manual
>>
<<
On-Screen Display Menu
Example
System Options (Continue)
View option
Wide mode
This function changes the screen size. Select "View Option" on the menu to display the Wide mode menu screen. The Wide mode
menu varies depending on the input source.
For HD Video source
Displays with an overscan image. Crops all sides of screen. Displays an image with the same number of pixels on the
Overscan Full
screen when receiving UHD signals only.
ENG 4-23
Page 40

sharp operation manual
>>
<<
On-Screen Display Menu
Example
System Options (Continue)
View option
Wide mode
For SD Video source
Example: Screen size images
Keeps the original aspect ratio in a
For 14:9 letterbox pictures. Bars may
appear on the top and bottom with
Normal Full Cinema 16:9
full screen display.
Cinema 14:9 Zoom 14:9 Panorama
some programs.
For 16:9 squeeze pictures.
For 14:9 letterbox pictures. A thin side bar
appears on each side, and you may also
see bars on the top and bottom with some
programs.
For 16:9 letterbox pictures. Bars may appear
on the top and bottom with some programs.
In this mode, the picture is stretched
toward each side of the screen. The picture
may appear similar to "Full" depending on
broadcast signals.
ENG 4-24
Page 41

sharp operation manual
>>
<<
On-Screen Display Menu
Example
System Options (Continue)
View option
Wide mode
For USB-Video, Home Network, HDMI VGA (PC format)
Example: Screen size images
Input signal Normal Dot by Dot Full
Keeps the original
aspect ratio in a full
screen display.
NOTE
Connect the PC before making adjustments.
Selectable screen size may vary with input signal type.
MPX
Allows you to change the audio when multiple audio is available for the video you are watching.
NOTE
You can change Audio by pressing AUDIO on the remote control unit. See page 3-5 for details of Audio function.
Change CC
Allows you to change the Closed Caption display. Select "Change CC" on the menu to display the Closed Caption information.
The information displayed varies depending on the video you are watching.
NOTE
Closed Caption is available for TV and Video input and is unavailable for Component input.
Displays an image by
an original size.
An image fully fills the
screen.
ENG 4-25
Page 42

sharp operation manual
>>
<<
On-Screen Display Menu
Example
System Options (Continue)
Caption Setup
This function allows you to adjust the closed caption screen
appearance to suit your preference.
Size/Edge Effect/Edge Color/Text Color/Background
Color/Text Opacity/Background Opacity
Startup Screen
With this function activated, the SHARP logo will be
displayed when you turn on the TV.
NOTE
This function is not available when the TV is set to "Quick
Start Mode".
Front Indicator Light
When this function is set to "On", the LED on the front of
the Monitor turns on.
NOTE
"On" is the factory preset value. If you want to turn off
the LED, set the function to "Off".
AutoPlay
You can automatically start USB media player or web
browser.
Off: This function does not work.
USB: After the power is turned on, the video is played
back continuously or slide show of still images
automatically starts.
Web Browser: After the power is turned on, the Web
NOTE
When more than one video is played back continuously,
the screen goes black while the data of the next video is
being loaded. To shorten this blackout time, adjust the
data size of the content.
Create a folder named "AutoPlay" in the root directory of
the USB memory device (the first directory when the
USB memory device is opened), and store into the folder
the video or still images you want to playback.
Browser starts automatically and displays
the Home Page.
When both video and still images are saved in "AutoPlay"
folder, video has priority and still images will not be
played.
You must insert the USB memory device to the Monitor
before turning off the TV.
If there are images on the USB memory device but they
do not appear on the screen, switch to USB mode and
check whether the image files on the USB memory
device are shown correctly.
It will be interrupted by any operation. After a few
minutes, it will automatically start again.
Public Mode
1. How to start Public Mode setup screen.
1. There are two ways to enter the public mode.
Press / / / to select "MENU" > "System Options" >
"Public Mode", and then press ENTER.
Press the "INPUT" and "VOL (+)" keys on the set at
once and turn on the power.
2. Get the password input screen displayed.
3. The 3-digit password is now verified.
The password [0] [2] [7] provides for the public mode
screen.
With any other passwords, the screen changes to the
normal mode.
Procedure
The Input starts with the left most
digit.
Use the numeric keys [1] thru [9]
and [0] keys on the remote
controller. The other keys are not
acceptable.
With a numeric-key input, "-" will
change to "
The input position will move one
digit to the right.
With all the 3 digits entered, the
password will be verified.
".
ENG 4-26
Page 43

sharp operation manual
>>
<<
On-Screen Display Menu
Example
System Options (Continue)
Public Mode
2. How to exit from Public Mode setup screen
There are the following ways to quit the public mode setup
screen.
Turn off the power with the "POWER" key.
Select "EXECUTE".
3. Public Mode Menu
The guidance is not displayed on screen.
Setup procedure
Turn off the power with the "POWER" key.
To move the cursor up and down, use the "cursor
UP/DOWN" key (remote controller) or "CH (
(remote controller and TV set).
To change the settings, use the "cursor RIGHT/LEFT"
key (remote controller) or "VOL (+)/(-)" key (remote
controller and TV set).
To save new settings, select "EXECUTE" and press
"ENTER" key (remote controller and TV set).
4. How to use USB clone
This is the function that copying the one TV's user setting to
other TVs or copying previous user setting to itself. Cloning
is available between the same model.
1. Insert the USB memory to TV.
2. Enter public mode.
3. Select "COPY MODE".
4. Then select the "TV→USB [Start]".
5. "USB Cloning Finished." message is displyed when it is
finished , then select "Reset" . TV will restart.
6. Insert the USB which has the data from TV to another
TV or itself.
7. Enter public mode.
8. Select "COPY MODE".
9. Then select the "USB→TV [Start]".
10. "USB Cloning Finished." message is displayed when it
is finished , then select "Reset" . TV will restart.
11. Comfirm the user setting is copied.
)/( )” key
PUBLIC MODE
POWER ON FIXED [ VARIABLE ]
MAXIMUM VOLUME [ 100 ]
VOLUME FIXED [ VARIABLE ]
VOLUME FIXED LEVEL [ 30 ]
RC BUTTON [ RESPOND ]
PANEL BUTTON [ RESPOND ]
MENU BUTTON [ RESPOND ]
AV POSITION FIXED [ VARIABLE ]
ON SCREEN DISPLAY [ YES ]
INPUT MODE START [ NORMAL ]
INPUT MODE FIXED [ VARIABLE ]
RC_PATH_THROUGH [ OFF ]
PUBLIC MODE [ OFF ]
RESET
EXECUTE
COPY MODE
ENG 4-27
Page 44

sharp operation manual
>>
<<
On-Screen Display Menu
Example
System Options (Continue)
Public Mode
5. On Setting Items
1. POWER ON FIXED
Selection Selection between "Variable" and "Fixed"
Default - (Variable)
Explanation
Limit in Setting None
Exception None
Remarks
2. MAXIMUM VOLUME
Selection Adjustment from 0 to 100
Default 100
Explanation Sound volume can not be adjusted higher than the present value.
Limit in Setting
Exception None
Remarks None
3. VOLUME FIXED
Selection Selection between "Variable","Fixed", "ACON (AC CTRL)" and "AC/RCON (AC/RC CTRL)"
Default (Variable)
Explanation
Limit in Setting
Exception None
In "Fixed setting, the power-off by the power key of the unit is invalidated and the image is kept being
received. The power can be turned off by stopping the power supply from AC.
In "Variable" setting, the power operation is in wait for 1 sec and then turn off when the main power switch
is off.
When the sound volume is set lower than 99, only figures are displayed and the sound volume bar is not
displayed.
FIXED: Fixed at the level adjusted for a fixed volume.
AC CTRL: Start-up at the level specified for a fixed volume at ACON.
AC/RC CTRL: Start-up at the level specified for a fixed volume at start.
The sound volume for the ON-timer (Wake up timer) is fixed also without display of menu. Besides, the
setting is made impossible. (Basically, the menu is not displayed.)
The following keys become invalid when set to "Fixed":
Sound volume Up/Down (VOL +/–) [for both
remote control and the unit]
Mute (MUTE)
Remarks
As for sound volume fixing and sound volume MAX level, the sound volume fixing has priority.
ENG 4-28
Page 45

sharp operation manual
>>
<<
On-Screen Display Menu
Example
System Options (Continue)
Public Mode
4. VOLUME FIXED LEVEL
Selection Adjustment from 0 to 100
Default 30
Explanation The sound volume to be fixed by “Volume fixed” is determined.
Limit in Setting None
Exception None
Remarks
5. RC BUTTON
Selection Selection between "Respond", "No Respond" and "Limited"
Default Respond
Explanation
Limit in Setting
Exception None
Remarks None
6. PANEL BUTTON
Selection Selection between "Respond" and "No respond"
Default Respond
Explanation In case of "No respond" setting, all operations by keys (except the power key) of the unit can be invalidated.
Limit in Setting None
Exception None
Remarks None
Setting is valid when "Volume fixed" is selected for "fixed" , "ACON (AC CTRL)" or "AC/RCON (AC/RC
CTRL)".
Making the remote controller settings.
At the "No Respond" setting, the remote controller keys are disabled. Its power key (reception/standby key)
is disabled too.
At the "Limited" setting, volume / , channel / , POWER button are operative.
In “No respond” setting, all the keys (including the power key) are not accepted.
ENG 4-29
Page 46

sharp operation manual
>>
<<
On-Screen Display Menu
Example
System Options (Continue)
Public Mode
7. MENU BUTTON
Selection Selection between "Respond" and "No respond"
Default Respond
Explanation
Limit in Setting None
Exception None
Remarks None
8. AV POSITION FIXED
Selection Selection between “Variable” and “Fixed”
Default Variable
Explanation In case of “Fixed” setting,
Limit in Setting None
Exception None
Remarks None
9. ON SCREEN DISPLAY
Selection Selection between "Yes", "No"
Default Yes
Explanation
Limit in Setting
Others
Exception
Remarks
In "No respond" setting, the menu operation by the menu key of the remote control and the menu key of the
unit are invalidated.
–Menu “Picture” and “Audio” setting can't be changed like “Dynamic (Fixed)”.
At the "No" setting, all OSD except public mode menu arenot displayed on screen. An input selection is
immediately made because the menu is not displayed.
Keys falling under any of the following items become invalid.
Appearance of screen changes and the sound changes.
Personal functions which are hard to restore.
Screen display, menu, OFF- timer, AV MODE, screen size switching, sound changeover, LANGUAGE,
CLOSED CAPTION
Simple input switching is generated
Such a caution which is displayed independently is displayed as it is. Non- responding signal caution
When CC has already been ON, CLOSED CAPTION is displayed.
ENG 4-30
Page 47

sharp operation manual
>>
<<
On-Screen Display Menu
Example
System Options (Continue)
Public Mode
10. INPUT MODE START
Selection
Default Normal
Explanation In power-ON, the input source to be started or channel can be set.
About options
Limit in Setting
Exception None
Remarks
11. INPUT MODE FIXED
Selection Selection between “Variable”, “Fixed”, “ACON (AC CTRL)” and “AC/RCON (AC/RC CTRL)”
Default - (Variable)
Explanation
Limit in Setting
Exception None
Remarks
Selection between “Normal”, “Air (
(In standard mode, the operation follows the last memory.)
All the input sources in the model are made selectable.
In TV mode, the channel to be set follows the last memory and the content of the last memory is included
in the notation by options. Ex.) Air (2), Cable (98.1) etc.
The display of channel setting menu and the channel setting operation are prohibited.
In setting at “Normal”, the setting of “Input mode fixed” is changed to “Variable” and selection should be
prohibited.
At the “Fixed”setting, the TV set gets started with the settings of “Input mode start”, and then any other
channels and inputs are not accepted.
At the “ACON (AC CTRL)”setting, the TV set gets started with the settings of “Input mode start” under AC
control.
At the “AC/RCON (AC/RC CTRL)” setting, the TV set gets started with the settings of “Input mode start”
under either control.
The following keys are invalidated.
CH
/ , direct tuning button, input.
However, the keys (input switching and CH / keys) of the unit for menu operation remain valid.
In the following case, setting is cancelled and mode is changed to “Variable”.
When the setting of “Input mode start” is set to “Normal”.
)”, "Cable ( )", "Input3", "HDMI 1", "HDMI 2", "USB", "Home Network"
ENG 4-31
Page 48

sharp operation manual
>>
<<
On-Screen Display Menu
Example
System Options (Continue)
Public Mode
12. RC PATH THROUGH
Selection Selection between “OFF”, “ON: Display RCE” and “ON: Display RCD”
Default OFF
Explanation Function to feed the remote controller -received signal to Pin 9 (open) on the RS232C.
Limit in Setting None
Exception None
Remarks When the setting is “ON: Display RCD”, TV doesn't respond to the RC operation.
13. PUBLIC MODE
Selection Selection between "ON" and "OFF"
Default OFF
Explanation In case of "ON", public mode settings are effected.
Limit in Setting None
Exception None
Remarks The public mode settings are operable only when this item is set at ON.
ENG 4-32
Page 49

sharp operation manual
You can connect the Monitor to a USB memory device, USB hard drive or Home Network server
to enjoy viewing pictures, listening to music, and watching videos.
Insert the USB memory device with recorded photos, music or videos into the USB terminal on the
TV.
Connect the TV to the Home Network server using an ETHERNET cable.
>>
<<
Enjoying Photo/Music/Video Playback
Preparation
NOTE
Depending on the USB memory device/USB hard drive/Home Network server, the Monitor may
not be able to recognize the recorded data.
It may take time to read the recorded data if the USB TV device/USB hard drive/Home Network
server contains many files or folders.
Use only alphanumeric characters for naming files.
File names over 80 characters (may vary depending on character set) may not be displayed.
Connecting a USB Memory Device/USB Hard Drive
When connecting a USB hard drive, be sure to use a hard drive with an AC adapter.
Do not remove a USB memory device or memory card from the TV while transferring files, using
the slide show function, or switching screens, or before you exit "USB" from the INPUT list.
Do not insert and remove a USB memory device/USB hard drive to and from the TV repeatedly.
When using a card reader, be sure to insert a USB memory device first.
CAUTION
Do not use a USB extension cable when connecting a USB memory device to the USB
terminal on the TV.
Using a USB extension cable with the USB memory device may prevent the TV from
performing correctly.
Connecting a Home Network Server
You can also connect a Home Network server by using a wireless LAN.
NOTE
Do not disconnect a Home Network server from the TV while transferring files, when a screen is
switching to another or before you exit "Home Network" from the INPUT list.
Do not connect and disconnect a Home Network server from the TV repeatedly.
ENG 5-1
Page 50

sharp operation manual
>>
<<
Enjoying Photo/Music/Video Playback
Selecting the Folders to Play Back
To play back data on a USB memory device, insert the
USB memory device on the TV.
Use the following procedure to switch back to USB mode
after switching from USB mode to another mode.
1 Select "USB" or "Home Network" from INPUT list screen.
2 Press
then press ENTER.
3 Press / to select the desired folder, and then press
ENTER.
"Wide mode" is fixed during the Music mode. During
During "Video mode", videos that are smaller than the
/ to select "Photo", "Music" or "Video", and
Example
"Video mode", you can select "Normal", "Full" or "Dot
by Dot".
number of pixels on the screen are displayed at their
original size.
In these cases, switch "Wide mode" to "Full" to have
the video fill the screen.
NOTE
16 is the maximum number of USB drives and 10 is the
maximum number of Home Network servers that can be
displayed.
USB Device Compatibility
USB device USB Memory
File system FAT32, NTFS
Photo file format
Format JPEG (.jpg)/PNG/BMP
Music file format
Format Bit rate
MP3 32k, 40k, 48k, 56k, 64k, 80k, 96k, 112k,
128k, 160k, 192k, 224k, 256k, 320kbps
ENG 5-2
Page 51

sharp operation manual
>>
<<
Enjoying Photo/Music/Video Playback
Selecting the Folders to Play Back
(Continue)
Container Video Audio
AVI
MKV
MP4
MPEG2-PS MPEG2
MPEG2-TS
Video file format
H.264
MPEG4
Motion JPEG
H.264
MPEG2
H.264
MPEG4
H.264
MPEG2
H.265
MP3
ADPCM
AC3
MP3
AC3
MP3
AC3
LPCM
AC3
MP3
MP3
AC3
NOTE
USB 1.1 devices may not be played properly.
Operation using USB hubs is not guaranteed.
Some video file formats may not be played depending on
the file.
Some images may not be displayed in the appropriate
aspect ratio depending on the file format.
ENG 5-3
Page 52

sharp operation manual
>>
<<
Enjoying Photo/Music/Video Playback
Playing Back Files on a USB
Memory Device/Home Network
Server
NOTE
The screen images in this section are for the USB mode.
It may be slightly different in the Home Network mode.
Photo Mode
Viewing Thumbnails
Example
Buttons for thumbnail operations
Buttons Description
/ / / Select a desired item.
ENTER When selecting a folder icon:
RETURN Return to the previous process.
A (red) Clear the file information display.
B (green)
C (blue)
D (yellow)
NOTE
A few seconds after the cursor is positioned on a
thumbnail, the file information is displayed in the right of
the center of the screen.
Enter this directory.
When selecting a photo thumbnail:
Start the slide show.
ENG 5-4
Page 53

sharp operation manual
>>
<<
Enjoying Photo/Music/Video Playback
Playing Back Files on a USB
Memory Device/Home Network
Server (Continue)
Slide Show
The photos displayed on the thumbnail selection screen are
displayed as a slide show.
Buttons for slide show operation
Buttons Description
RETURN Return to the thumbnail selection screen.
B (green) Previous file
C (blue) Displaying/hiding operation guidance
D (yellow) Next file
NOTE
Rotating photos only applies to the temporarily selected
item and this setting is not saved.
ENG 5-5
Page 54

sharp operation manual
>>
<<
Enjoying Photo/Music/Video Playback
Playing Back Files on a USB
Memory Device/Home Network
Server (Continue)
Music Mode
Buttons for music mode
/ / / Select a desired item.
ENTER When selecting a folder icon:
RETURN Return to the previous process.
A (red) Clear the file information display.
B (green)
C (blue)
D (yellow)
NOTE
The displayed play time may differ slightly from the actual
play time depending on the files.
A few seconds after the cursor is positioned on a
thumbnail, the file information is displayed in the right of
the center of the screen.
Example
Buttons Description
Enter this directory.
When selecting a music file:
Play music.
ENG 5-6
Page 55

sharp operation manual
>>
<<
Enjoying Photo/Music/Video Playback
Playing Back Files on a USB
Memory Device/Home Network
Server (Continue)
Video Mode
Buttons for file selecting operations
/ / / Select a desired item.
ENTER When selecting a folder icon:
RETURN Return to the previous process.
A (red) Clear the file information display.
B (green)
C (blue)
D (yellow)
Example
Buttons Description
Enter this directory.
When selecting a video file: Play the
video.
NOTE
A few seconds after the cursor is positioned on a
thumbnail, the file information is displayed in the right of
the center of the screen.
When more than one video is played back continuously,
the screen goes black while the data of the next video is
being loaded. To shorten this blackout time, adjust the
data size of the content.
ENG 5-7
Page 56

sharp operation manual
>>
<<
Enjoying Photo/Music/Video Playback
Playing Back Files on a USB
Memory Device/Home Network
Server (Continue)
Buttons for playing mode
Buttons Description
Stop playback
Stop playback
Fast forward
Fast rewind
A (red) Subtitle
B (green) Previous file
C (blue) Display/hide operation guide
D (yellow) Next file
RETURN Go back to the file selection screen.
ENG 5-8
Page 57

sharp operation manual
What's LINK Operation?
Connected LINK-compatible devices can be operated without changing the settings of the remote
control unit.
The
Control the LINK -compatible audio system
Set the volume of LINK-compatible audio system.
Buttons for playing mode
>>
Using LINK Operation
<<
Controlling HDMI Equipment Using LINK Operation
Using the HDMI CEC (Consumer Electronics Control) protocol, with LINK Operation you can
interactively operate compatible system equipment (Blu-ray disc equipment, AV amplifier, DVD).
LINK Operation allows you to operate the HDMI-connected equipment with one remote control.
NOTE
For connecting the TV to LINK-compatible equipment, use commercially available cables.
Point the remote control toward the TV, not to connected HDMI equipment.
Video noise may occur depending on the type of HDMI cable used. Make sure to use an HDMI -
certified cable.
Up to 2 pieces of HDMI recording equipment and one AV amplifier can be connected using this
system.
These operations affect the HDMI equipment selected as the current input source. If the
equipment does not operate, turn on the equipment and select the appropriate input source
using INPUT.
The LINK feature may not operate properly when an HDMI splitter or AV selector unit is used.
These devices may cause interruptions to the image and/or sound.
OPTION button will function only when LINK Operation is used.
NOTE
The steps in "HDMI CEC LINK" on
page 6 -2 need to be completed beforehand.
Refer to this operation manual and the operation manual of the LINK device to be used with this
TV.
Buttons Description
/ / / Select a desired item
ENTER Activate the selected function
A (red) Stop
B (green) Previous chapter
C (blue) Play
D (yellow) Next chapter
RETURN Go back to the previous page
EXIT Exit from the page
ENG 6-1
Page 58

sharp operation manual
>>
<<
Using LINK Operation
Controlling HDMI Equipment Using
LINK Operation (Continue)
HDMI CEC LINK
Make the settings to use LINK Operation. Set the settings
with "Initial Setup" > "Input Settings" > "HDMI CEC LINK".
Link Operation
Select LINK Operation Control to disable the LINK function
even when a LINK-compatible HDMI device is connected to
the TV. This function prevents the device from starting to
operate unexpectedly.
Auto Power On
If this is activated, the One Touch Play function is enabled.
While the TV is in standby mode, it automatically turns on
and plays back the image from the HDMI source.
Audio Return Channel
This function allows you to listen to the TV audio via audio
equipment without using an optical fiber cable, which
conventionally is required.
Requirements for using an ARC-compatible AV
amplifier:
ARC-compatible AV amplifier connected to the ARC-
compatible HDMI IN terminal. (HDMI IN 1)
(Refer to the operation manual of the ARC -compatible
equipment for details.)
Use of an ARC-compatible cable.
Auto: You can listen to the TV audio with ARC-compatible
audio equipment.
Off: This function does not work.
NOTE
If the TV audio cannot be output from the AV amplifier
even after making the necessary settings, connect the
TV to the AV amplifier with an optical fiber cable and
select "Off".
ENG 6-2
Page 59

sharp operation manual
>>
<<
Using LINK Operation
Link Operation Menu
The Link Operation Menu allows you to make adjustments
during operation of LINK-compatible equipment.
1 Press OPTION to display the Link Operation Menu.
2 Press
/ to select the desired item, and then press
ENTER.
Specific operations differ depending on the item you
select. Following are the basic operations for each
item.
Device Power On/Off
You can manually turn on/off the power of the connected
LINK-compatible equipment.
Each time you press ENTER, the connected equipment
switches on or off.
ENG 6-3
Page 60

sharp operation manual
>>
<<
Using LINK Operation
Link Operation Menu (Continue)
Show Start Menu
You can call up a setup menu from the connected LINKcompatible equipment.
NOTE
Depending on the status of the equipment (recording or in
standby mode, etc), the setup menu will not be
displayed.
Change Audio Output Device
You can select to listen to the TV sound only from the
LINK-compatible audio system.
Audio Return Channel: The sound from the TV speaker is
muted and only the sound from the LINK -compatible
audio system is audible.
• You can use VOL+/- and MUTE.
Built-in Speaker: The sound is output from the TV
speaker.
HDMI Device Selection
If multiple HDMI devices are connected in a daisy chain, you
can specify which device to control here.
Press
/ to select the desired device from a list of
connected HDMI devices, and then press ENTER.
HDMI CEC LINK
You can also display the HDMI CEC LINK screen from the
Link Operation Menu.
ENG 6-4
Page 61

sharp operation manual
Set this function when operating the TV from equipment connected by LAN. To perform the
operation, refer to "Network Settings".
IP Control
When "IP Control" is selected, "Change" will be highlighted. Press
Detailed Settings
Make the detailed settings (Login ID, password, etc.).
Follow the on-screen instructions to configure the settings.
Set the name of the TV displayed on other network devices.
Connect to the TV with the following settings made for IP on the PC.
When you set your ID and password on the TV menu, you need to enter them as soon as you
connect to the TV.
Set the RS -232C communication settings on the PC to match the Monitors communication
conditions.
The Monitor's communication settings are as follows:
Communication procedure
Send the control commands from the PC via the RS-232C or IP.
The TV operates according to the received command and sends a response message to the PC.
Do not send multiple commands at the same time.
Wait until the PC receives the OK response before sending the next command.
>>
<<
Using a PC
Control of the TV
The TV can be controlled from a PC, control panels and other devices using the RS -232C or IP.
Use a cross-type RS-232C cable, ETHERNET cable (commercially available) or wireless LAN for
the connections. (Needs the conversion cable to minijack (Terminal : "SERVICE ONLY") for
using RS-232C.)
NOTE
This operation system should be used by a person who is accustomed to using computers.
IP Control
ENTER.
Device Name
Use the software keyboard to set the name.
See page 4-21 for details on the software keyboard.
Communication Conditions for IP
IP protocol: TCP/IP
Host IP address: Set the IP address on the TV menu
Service: None (Do not select Telnet or SSH)
TCP port#: Set a port number on the TV menu (Control
NOTE
When you use this function, make settings for "IP Control".
The connection will be cut off when there has been no communication for 3 minutes.
Communication Conditions for RS-232C
Baud rate: 115,200 bps
Data length: 8 bits
Parity bit: None
Stop bit: 1 bit
Flow control: None
port)
ENG 7-1
Page 62

sharp operation manual
Command format
Eight ASCII codes +CR
Command 4 -digits: Command. The text of four characters.
Parameter 4-digits: Parameter 0–9, x, blank, ?
Parameter
Input the parameter values, aligning left, and fill with blank(s) for the remainder. (Be sure that 4
values are input for the parameter.)
When the input parameter is not within an adjustable range, "ERR" returns. (Refer to "Response
code format".)
Any numerical value can replace the "x" on the table.
Response code format
Normal response
Problem response
Command table
*1 Select "Initial Setup" from the menu screen and set "Quick Start Mode" to "On" to enable the
*2 The minijack (Terminal: “SERVICE ONLY”) outputs the system boot message for service other
>>
<<
Using a PC
Control of the TV (Continue)
(communication error or incorrect command)
Commands not indicated here are not guaranteed to operate.
CONTROL ITEM COMMAND PARAMETER CONTROL CONTENTS
POWER SETTING *2 P O W R 0 _ _ _ Power
1 _ _ _ PowerOnPower On *1
INPUT
SELECTION
Power On command for LAN and Wi-Fi.
When "Quick Start Mode" is set to "Off" and "Wake on Wi-Fi/LAN" is set to "Enable", you can
use "Wake on LAN (Magic Packet)" to turn on the power via LAN.
When "Quick mode" is "Off" and the power of the display is off, you can use only "POWR1"
command by setting the baud rate as "9,600" on PC side.
After using "POWR1" command, the baud rate becomes the original setting before turning off
the display.
than command response when the TV turns on / off. Please ignore the system boot message.
NOTE
If an underbar (_) appears in the parameter column, enter a space.
If an asterisk (*) appears, enter a value in the range indicated in brackets under CONTROL
CONTENTS.
Any numerical value can replace the "x" on the table.
TOGGLE I T G D _ _ _ _ (Toggle) It input-switches by the toggle.
TV I T V D 0 _ _ _
It shifts to standby.
Off
(It is the same as an input
change key)
It input-switches to TV. (A
channel remains as it is. (Last
memory))
ENG 7-2
Page 63

sharp operation manual
>>
<<
Using a PC
Control of the TV (Continue)
CONTROL ITEM COMMAND PARAMETER CONTROL CONTENTS
INPUT
SELECTION0-5
AV MODE
SELECTION
VOLUME V O L M * * * _ Volume (0-100)
I A V D * _ _ _ 0: TV
A V M D * _ _ _ 0: (Toggle),
1: HDMI IN 1,
2: HDMI IN 2,
3: VIDEO IN,
4: USB
5: Home Network
1: STANDARD,
2: MOVIE,
4: USER,
5: DYNAMIC,
6: DYNAMIC
(Fixed)
Although it can
choose now, it is
toggle operation in
inside.
CONTROL
ITEM
WIDE MODE W I D E * * _ _ 0: (Toggle),
MUTE M U T E * _ _ _ 0: (Toggle),
NOTE
If an underbar (_) appears in the parameter column, enter a space.
If an asterisk (*) appears, enter a value in the range indicated in brackets under CONTROL
CONTENTS.
Any numerical value can replace the "x" on the table.
COMMAND PARAMETER CONTROL CONTENTS
1: Normal,
2: Zoom 14:9,
3: Panorama,
4: Full,
5: Cinema 16:9,
6: Cinema 14:9,
10: Dot by Dot,
14. Overscan
1: On,
2: Off
It is the same as
Wide Mode key.
ENG 7-3
Page 64

sharp operation manual
>>
<<
Using a PC
Control of the TV (Continue)
CONTROL ITEM COMMAND PARAMETER CONTROL CONTENTS
SURROUND A C S U * _ _ _ 0: (Toggle),
AUDIO
SELECTION
SLEEP TIMER O F T M * _ _ _ 0: Off,
A C H A _ _ _ _ (Toggle)
1: On,
2: Off
1: Sleep timer - 0 hr. 30 min.,
2: Sleep timer - 1 hr. 00 min.,
3: Sleep timer - 1 hr. 30 min.,
4: Sleep timer - 2 hr. 00 min.,
5: Sleep timer - 2 hr. 30 min.
CONTROL ITEM COMMAND PARAMETER CONTROL CONTENTS
CHANNEL DIRECT
NOTE
CHANNEL
(ANALOG)
DIRECT
CHANNEL
(DIGITAL)
If an underbar (_) appears in the parameter column, enter a space.
If an asterisk (*) appears, enter a value in the range indicated in brackets under CONTROL
CONTENTS.
Any numerical value can replace the "x" on the table.
D C C H * * * _ The
D A 2 P * * * * (0100-
D C 2 U * * * _ (1-999) DIGITAL Cable (Two -
D C 2 L * * * _ (0-999) DIGITAL Cable (Two-
An input change is
channel
included if it is not TV
number
display.
of TV
In Air, 2-69ch is
(1-135)
effective.
In Cable, 1 -135ch is
effective.
DIGITAL Air (Two-
9999)
Part numbers, 2-digit
plus 2-digit)
Part numbers, 3-digit
plus 3-digit) Front half
of DIGITAL CABLE
CHANNEL NO.
(Designate major
channel)
Part numbers, 3-digit
plus 3-digit) Rear half
of DIGITAL CABLE
CHANNEL NO.
(Designate minor
channel)
ENG 7-4
Page 65

sharp operation manual
>>
<<
Using a PC
Control of the TV (Continue)
CONTROL ITEM COMMAND PARAMETER CONTROL CONTENTS
CHANNEL DIRECT
CC C L C P x _ _ _ (Toggle) Toggle
DEVICE NAME T V N M 1 _ _ _ The device
MODEL NAME M N R D 1 _ _ _ The model
CHANNEL
(DIGITAL)
CH UP C H U P _ _ _ _ The channel
CH DOWN C H D W _ _ _ _ The channel
D C 1 0 * * * * (0-6383) DIGITAL Cable
D C 1 1 * * * * (0-9999) DIGITAL Cable
number of TV
+1
number of TV
-1
(One-Part
numbers, 5digit, less than
10,000)
(One-Part
numbers, 5digit, more than
10,000)
If it is not TV
display, it will
input-switch to
TV. (same
function as CH
)
If it is not TV
display, it will
input-switch to
TV. (same
function as CH
)
operation of a
closed caption.
name set in
“Device Name
Setting” is
displayed.
name of the
TV.
CONTROL ITEM COMMAND PARAMETER CONTROL CONTENTS
SOFTWARE
VERSION
IP PROTOCOL
VERSION
NOTE
If an underbar (_) appears in the parameter column, enter a space.
If an asterisk (*) appears, enter a value in the range indicated in brackets under CONTROL
CONTENTS.
Any numerical value can replace the "x" on the table.
S W V N 1 _ _ _ The current
I P P V 1 _ _ _ The currently
version of the TV
software is
displayed.
supported version
of IP protocol is
displayed.
ENG 7-5
Page 66

sharp operation manual
>>
<<
Using a PC
Control of the TV (Continue)
CONTROL ITEM COMMAND PARAMETER CONTROL CONTENTS
REMOTE CONTROL
BUTTONS
RS232C BAUD RATE
CHANGE
R C K Y * * _ _ 0-9: 0-9,
B A U D 0 0 9 6 baud rate: 9,600
1 1 5 2 baud rate: 115,200
10: DOT,
12: POWER,
13: DISPLAY,
23: OPTION,
24: SLEEP,
31: MUTE,
32: VOL -,
33: VOL +,
34: CH
,
35: CH
,
36: INPUT,
38: MENU,
39: APPS,
40: ENTER,
41:
,
42:
,
43:
,
44:
,
45: RETURN,
46: EXIT,
49: AUDIO,
50: A (red),
51: B (green),
52: C (blue),
53: D (yellow),
61: MANUAL
NOTE
If an underbar (_) appears in the parameter column, enter a space.
If an asterisk (*) appears, enter a value in the range indicated in brackets under CONTROL
CONTENTS.
Any numerical value can replace the "x" on the table.
ENG 7-6
Page 67

sharp operation manual
It is necessary to set the PC correctly to display XGA and WXGA signal.
>>
Using a PC
<<
PC Compatibility Chart
Resolution
VGA
SVGA 800 x 600
XGA 1024 x 768
WXGA 1360 x 768 47.7 kHz 60 Hz
SXGA 1280 x 1024 64.0 kHz 60 Hz
SXGA+ 1400 x 1050 65.3 kHz 60 Hz
1080p 1920 x 1080 67.5 kHz 60 Hz ―
UHD 3840 x 2160
VGA and XGA are registered trademarks of International Business Machines Corp.
720 x 400 31.5 kHz 70 Hz —
640 x 480
Horizontal
Frequency
31.5 kHz 60 Hz
37.9 kHz 72 Hz
37.5 kHz 75 Hz
35.1 kHz 56 Hz
37.9 kHz 60 Hz
48.1 kHz 72 Hz
46.9 kHz 75 Hz
48.4 kHz 60 Hz
56.5 kHz 70 Hz
60.0 kHz 75 Hz
112.5 kHz 50 Hz ―
135 kHz 60 Hz ―
Vertical
Frequency
VESA Standard
AV Compatibility Chart
Resolution
640 x 480p
720 x 480p
720 x 576p 50 Hz
720(1440) x 480i
720(1440) x 576i 50 Hz
1280 x 720p
1920 x 1080i
1920 x 1080p
3840 x 2160p
Vertical
Frequency
59.94 Hz
60 Hz
59.94 Hz
60 Hz
59.94 Hz
60 Hz
50 Hz
59.94 Hz
60 Hz
50 Hz
59.94 Hz
60 Hz
24 Hz
50 Hz
59.94 Hz
60 Hz
30 Hz
60 Hz
HDMI
ENG 7-7
Page 68

sharp operation manual
By connecting your TV to a broadband system, you can access the Internet from the TV.
Using an ETHERNET cable
Use an ETHERNET cable (commercially available) to connect the ETHERNET terminal on the TV
to your broadband router (commercially available).
Using the wireless LAN
This TV is equipped with a wireless LAN function.
For a wireless LAN connection, you must use "Wireless Setup" to connect the access point and
TV.
Perform the procedure below to make adjustments or to confirm the settings for accessing the
Internet.
>>
Using the Internet
<<
Connecting to the Internet
To connect your TV to the Internet, you must have a broadband Internet connection.
If you do not have a broadband Internet connection, consult the store where you purchased your
TV or ask your Internet service provider or telephone company.
When an Internet connection is made, an Ethernet and wireless connection cannot be used at
the same time. Use only one of the connection types.
NOTE
This TV has a built- in wireless LAN function. Using a separate wireless USB LAN adapter may
result in radio communications that do not comply with regulations on radio communications.
Therefore, do not use a separate wireless LAN
A wireless LAN connection and performance cannot be guaranteed for all residential
environments. In the following cases, the wireless LAN signal may be poor or drop, or the
connection speed may become slower.
- When used in buildings made with concrete, reinforced steel, or metal
- When placed near objects that obstruct the signal
- When used with other wireless devices that emit the same frequency
- When used in the vicinity of microwave ovens and other devices that emit a magnetic field,
electrostatic charge, or electromagnetic interference.
Network Settings
1 Press MENU to display the MENU screen, and then press ENTER.
2 Press
/ to select "Network Setting", and then press ENTER.
/ to select "Connection Type", and then press ENTER.
3 Press
Press / select "Wired" or "Wireless". and press ENTER.
/ to select "Wired Setup", or "Wireless Setup", and then press ENTER.
4 Press
Select ”Wired Setup" when you make general adjustments to connect to the Internet.
See page 4-20.
5 Press MENU to exit.
ENG 8-1
Page 69

sharp operation manual
>>
<<
Using the Internet
Entering Text (Software Keyboard)
When you are editing an input screen or specifying the Network settings used for accessing the Internet, enter text from the software
keyboard.
NOTE
You can enter up to 128 characters for text.
Some special characters or diacritics may not be available depending on where you enter the text.
The text you enter is displayed as you type it in.
To move the cursor (the current input position), use "
While you are entering text, likely input conversion candidates are displayed based on what you typed in.
If "alphabet" is selected, this switches characters between
uppercase and lowercase.
Each time you press ENTER, the character type switches.
" or " " on the software keyboard.
Press ENTER to select the type of characters entered:
alphabet, or sign.
Erases text one character at a time.
ENG 8-2
Page 70

sharp operation manual
>>
<<
Using the Internet
Entering Text (Software Keyboard)
(Continue)
Enter
Applies the entered information and closes the software
keyboard.
Space
Enters a space.
Clear
Erases the character string.
When the cursor is somewhere in a line: the character
string to the right of the cursor will be erased.
When the cursor is at the right end of a line: the entire
line will be erased.
Close
Closes the software keyboard without applying the entered
information.
Buttons on the
remote control unit
/ / / Moves the focus. When moved at
ENTER Performs the processing for the
EXIT Closes the software keyboard
RETURN
0-9 Directly enters the single-byte
• (DOT) Erases text one character at a
Description
the far edge, the focus moves to
the opposite edge.
button currently in the focus.
without applying the original input
elements for the entered text.
number for that button.
time.
ENG 8-3
Page 71

sharp operation manual
>>
<<
Using the Internet
Using the Browser
1 Press APPS, press / to select the browser icon from
the application window, and then press ENTER.
Press APPS again to switch back to the currently
tuned channel.
Buttons for Using the Browser
ENTER,
/ / /
Press / / / to select a link that you want to jump,
and then press ENTER.
EXIT
Press the button to return to the Monitor screen.
RETURN
Press the button to return to the previous page.
NOTE
Restrictions apply to window display.
Using the Application Window
During Dock Display
You can move the application icons.
1 Select an application, and then press .
/ to move the icon to the desired location.
2 Press
Move the Icons
You can move the icons of the more commonly used
applications closer to the left.
Press
/ to move the icon to the desired location.
Example
ENG 8-4
Page 72

sharp operation manual
>>
<<
Using the Internet
Using the Browser (Continue)
Selected
item
Allows you to go back to the previous
page.
Allows you to go to the next page.
Refreshes the page.
Interrupts a page while it is loading.
Displays the home page.
Displays the page in the full -screen size.
Allows you to expand or reduce the page.
Description
Selected item Description
Displays the bookmarks list.
Displays your browsing history.
Configures browser settings.
Using the Toolbar
You can use the toolbar to control the browser and to specify
settings.
1 Press / to select a function, and then press ENTER.
Browsing Web Contents
You can display the web content you want to enjoy.
1 Press
/ to move to the address area in the toolbar, and
then press ENTER.
The Enter Address menu is displayed.
2 Enter an address, and then press ENTER.
The web content you want to view is displayed.
ENG 8-5
Page 73

sharp operation manual
>>
<<
Using the Internet
Using the Browser (Continue)
CAUTION
If the power is cut due to a power failure or the TV being
unplugged while you are using the Internet, information
such as bookmarks or cookies may not be saved
correctly.
To users who access the Internet from a PC
When you access the Internet from this TV, the
procedures may not be the same as regular browser based access on a PC.
On some pages, video and audio, text or images may
not be displayed correctly.
Due to a large number of pictures or information, the
loading time for an internet site can be considerably
extended. Sometimes Internet pages can not be loaded.
About links
Web pages on the Internet often include "links" that allow
you to jump to other web pages (or sites).
"Links" can take various forms, including words or images,
but they always work in the same way letting you jump to
the link destination when you select them.
Selected items (such as links of text input fields) are
enclosed in a frame.
You can jump from a "link" to the corresponding link
destination.
ENG 8-6
Page 74

sharp operation manual
>>
<<
Using the Internet
Using the Browser (Continue)
Browser Settings
You can check or modify your browser settings from the
Browser menu.
1 Press
/ to select " " in the toolbar, and then press
ENTER.
2 Press / / / to specify the required setting, and then
press ENTER.
ENG 8-7
Page 75

sharp operation manual
>>
<<
Using the Internet
Using Keyboard and Mouse
You can use a keyboard or mouse for operating the TV
while using the browser.
When you use the USB devices, connect the device to the
USB terminal on the TV.
NOTE
The keyboard and mouse can only be used on a browser
screen.
The keyboard or mouse may not operate properly
depending on the application being used.
ENG 8-8
Page 76

sharp operation manual
For the screws, refer to the table shown below.
>>
<<
Appendix
Setting the TV on the Wall
Standard screws M6 (Use 1.0 pitch screws.)
Length(Depth of mounting holes) 15/32 (12)
Quantity 4 pcs.
NOTE
To use this TV mounted on a wall, remove the cable tie as needed.
Do not use screws that do not comply with the VESA standard screw specifications.
Do not use screws that are longer than the standard length. Screws that are too long may cause damage to the inside of the TV.
Do not fasten the screws too firmly or loosely. This may damage the product or cause the product to fall, leading to personal injury. SHARP is not liable for these kinds of accidents.
SHARP is not liable for product damage or personal injury when a non-VESA or non-specified wall mount is used or the consumer fails to follow the product installation instructions.
Do not install the wall mount kit while your TV is turned on. It may result in personal injury due to electric shock.
70/60 inch models
Unit: inch
(mm)
ENG 9-1
Page 77

sharp operation manual
>>
<<
Appendix
Troubleshooting
Problem Possible Solution
No power Check if you pressed POWER on the remote control unit.
Unit cannot
be operated.
Remote
control unit
does not
operate.
Picture is cut
off/with
sidebar
screen.
Strange color,
light color, or
color
misalignment
Power is
suddenly
turned off.
Is the AC cord disconnected?
Has the power been turned on?
External influences such as lightning, static electricity, may cause improper
operation. In this case, operate the unit after first turning off the power of the
TV or unplugging the AC cord and replugging it in after 1 or 2 minutes.
Are batteries inserted with polarity (+, -) aligned?
Are batteries worn out? (Replace with new batteries.)
Are you using it under strong or fluorescent lighting?
Is a fluorescent light illuminated near the remote control sensor?
Is the image position correct?
Page 7- 1
Are screen mode adjustments such as picture size made correctly?
Pages 4-23 to 4-25
Adjust the picture tone.
Pages 4-16 to 4-18
Is the room too bright? The picture may look dark in a room that is too bright.
Is the sleep timer set?
Pages 3-6
Check the power control settings.
Page 4- 22
The unit's internal temperature has increased. Remove any objects blocking
vent or clean.
Problem Possible Solution
No picture Is connection to other components correct ?
Picture quality of HD
videos is poor.
The TV sometimes
makes a cracking
sound.
Some Internet functions
used on a PC are not
available from the TV.
Is the correct input selected?
Pages 2-1
If the PC image is not displayed, check the following:
- When connecting a laptop PC to the TV, check that display
output mode of the PC is set to external TV.
- Check the resolution setting on the PC. Is a non-compatible
signal being input?
Page 7- 7
To enjoy HD images from external equipment, you are required to
set up HDMI connection or component connection.
If the Video source is not of HD quality, HD images cannot be
displayed. Check that the Video source you are viewing provides
HD images.
The HD cable/satellite set-top box may need to be configured to
output HD images via cable/satellite.
This is not a malfunction. This happens when the cabinet slightly
expands and contracts according to change in temperature. This
does not affect the Monitor's performance.
The TV has only limited functions compared with regular PC
browsers.
Pages 8-4 to 8-6
ENG 9-2
Page 78

sharp operation manual
>>
<<
Appendix
Troubleshooting (Continue)
Problem Possible Solution
No sound Is connection to other components correct ?
Is the volume too low?
Page 3- 2
Have you pressed MUTE on the remote control unit?
Page 3- 3
Check the audio output of the connected external equipment. Is
the volume too low or muted?
When external equipment is connected via an HDMI cable, you
may need to configure the audio to be output through the HDMI
cable.
Cautions regarding use in high and low temperature environments
When the unit is used in a low temperature space (e.g. room, office), the picture may leave
trails or appear slightly delayed. This is not a malfunction, and the unit will recover when the
temperature returns to normal.
Do not leave the unit in a hot or cold location. Also, do not leave the unit in a location
exposed to direct sunlight or near a heater, as this may cause the cabinet to deform and the
front panel to malfunction.
Storage temperature: -4°F to +140°F (- 20°C to +60°C)
ENG 9-3
Page 79

sharp operation manual
>>
<<
Specifications
TV (4T-B60CJ1U/4T-B70CJ1U/4T-B80CJ1U)
Resolution 8,294,400 pixels (3840 x 2160)
Video color system NTSC-M/PAL-N/PAL-M
TV-standard
TV Function
Audio amplifier 10 W x 2
Terminals
OSD language English/French/Spanish
Power Requirement AC 120 V, 60 Hz
Power Consumption 120 W 138 W 174 W
Dimensions 1360.2 x 853.9 x 305.5 mm 1568.5 x 976.4 x 286.9 mm 1825.9 x 1125.7 x 387.2 mm
Weight 27.0 kg 34.9 kg 47.4 kg
Operating temperature 0°C to +40°C
As a part of policy of continuous improvement, SHARP reserves the right to make design and specification changes for product improvement without prior notice. The performance specification
figures indicated are nominal values of production units. There may be some deviations from these values in individual units.
Continuous operating time and warranty. This product is designed for a maximum daily use of 16hours. Continual use in excess of 16 hours per day is not covered by the warranty.
CAUTION
Installing the Liquid Crystal Television requires special skill that should only be performed by qualified service personnel. Customers should not attempt to do the work themselves. SHARP bears no
responsibility for improper mounting or mounting that results in accident or injury.
Carefully read the instructions that come with the bracket before beginning work.
Receiving Channel
TV-tuning system Auto Preset 135 ch
STEREO/BILINGUAL BTSC system
Antenna terminal ANTENNA/CABLE IN (Antenna
input)
SERVICE ONLY Ø3.5 mm jack Ø3.5 mm jack
INPUT 1 (ARC) HDMI HDMI (HDMI input), ARC
INPUT 2 HDMI HDMI (HDMI input)
AV IN (INPUT 3) AUDIO in, VIDEO in
AUDIO OUT AUDIO out, Headphone (Ø3.5 mm stereo)
USB USB (DC5V 1.5A output)
ETHERNET (10/100 BASE- T) Network connector
Item 4T-B60CJ1U 4T-B70CJ1U 4T-B80CJ1U
Analog NTSC
Digital ATSC
Analog VHF/UHF 55.25—859.25 MHz
Digital UHF 470—806 MHz
CATV 75 Ω F type
ENG 10 -1
Page 80

sharp operation manual
>>
<<
Specifications
Wireless LAN
Standard IEEE 802.11b/g/n
Security
Modulation
Throughput
Specification
Static WEP (64/128 bit kry index 1 only)
WPA-PSK (TKIP)
WPA2-PSK (AES)
IEEE802.11b: DBPSK, DQPSK, CCK / DSSS HRDSSS
IEEE802.11g: BPSK, QPSK, 16QAM, DBPSK, DQPSK, CCK, PBCC / OFDM
IEEE802.11n: BPSK, QPSK, 16QAM, 64QAM / OFDM
IEEE802.11b: 1, 2.5, 5, 11Mbps
IEEE802.11g: 6, 9, 12, 18, 24, 36, 48, 54Mbps
IEEE802.11n: 300Mbps
ENG 10 -2
Page 81

sharp operation manual
>>
<<
Trademarks
Dolby, Dolby Audio, and the doubleD symbol are trademarks of Dolby Laboratories.
The terms HDMI and HDMI High- Definition Multimedia Interface, and the HDMI Logo
are trademarks or registered trademarks of HDMI Licensing Administrator, Inc. in the
United States and other countries.
The Wi -Fi CERTIFIED Logo is a certification mark of the Wi- Fi Alliance.
The Wi -Fi Protected Setup Mark is a mark of the Wi-Fi Alliance.
Wi-Fi CERTIFIED Miracast™ and Miracast™ are trademarks of Wi-Fi Alliance.
registered trademarks of SHARP Corporation.
This product is embedded with LC Font technology, which was developed by
SHARP Corporation for clearly displaying easy-to -read characters on LCD screens.
However, other fonts are used for some screen pages, too.
and LC logo mark are
ENG 11 -1
Page 82

sharp operation manual
>>
<<
Dimensional Drawings
4T-B60CJ1U
Unit: mm
*1 Active area
*2 Thinnest part
*3 Including projecting parts
ENG 12 -1
Page 83

sharp operation manual
>>
<<
Dimensional Drawings
4T-B70CJ1U
Unit: mm
*1 Active area
*2 Thinnest part
*3 Including projecting parts
ENG 12 -2
Page 84

sharp operation manual
>>
<<
Dimensional Drawings
4T-B80CJ1U
Unit: mm
*1 Active area
*2 Thinnest part
*3 Including projecting parts
ENG 12 -3
Page 85

sharp operation manual
Information on the open -source software license.
Software composition
The software included in this product is comprised of various software components whose
individual copyrights are held by third parties.
This product also makes use of freely distributed software and software components whose
copyrights are held by third parties. These include software components covered by a GNU
General Public License (hereafter GPL), a GNU Lesser General Public License (hereafter LGPL)
or other license agreement.
Obtaining source code
Some of the open source software licensors require the distributor to provide the source code with
the executable software components. GPL and LGPL include similar requirements. For information
on obtaining the source code for the open source software and for obtaining the GPL, LGPL, and
other license agreement information.
Acknowledgements
The following open source software components are included in this product:
/bootcode/uboot
/linux-3.7.2
/system/ap/develop/busybox/busybox-1.18.4
/system/lib/develop/e2fsprogs/e2fsprogs-1.42.6
/system/lib/develop/uClibc-0.9.30.3
/system/ap/develop/mtd/util
/system/tools/squashfs
/Platform_Lib/Graphics/FontRenderer/libotf-0.9.9
/Platform_Lib/Graphics/FontRenderer/fribidi-0.10.9
/Platform_Lib/Graphics/FontRenderer/freetype-2.3.5
/Utility/tinyxml
/Application/Win32/RSSClient/tinyxml
/Include/Utility/tinyxml"
/Utility/wpa_supplicant
/system/tools/lzma
/open_source/icu-54.1
/open_source/harfbuzz/harfbuzz-0.9.35
/open_source/graphite2/graphite2-1.2.4
/src/Platform_Lib/Graphics/DirectFB/DirectFB-1.4.2
/open_source/curl/curl-7.32.0
/open_source/libwebp/libwebp-0.4.1
/open_source/FastJpegLib/jpeg-6b
/open_source/libmng/libmng-2.0.2
/open_source/Libpng
/open_source/font/freetype-2.4.11
/open_source/c-ares/c-ares-1.10.0
/open_source/openssl-1.0.1j
/open_source/expat
/open_source/zlib-1.2.3
/open_source/Tremor
/open_source/Alsa/alsa-lib-1.0.23
/open_source/picotts
/Utility/wpa_supplicant
/libmediaplayerservice/wfdisplay/spu/core/bigd*
/open_source/HTTPC
/open_source/upnp
/system/src/Platform_Lib/Graphics/JpegRenderer
/system/open_source/libpng
/system/open_source/gif
/system/open_source/libwebp
http://tv.realtek.com/LGPL/alsa-lib-1.0.23.tgz
http://tv.realtek.com/LGPL/curl-7.28.1.tgz
http://tv.realtek.com/LGPL/c-ares-1.9.1.tgz
http://tv.realtek.com/LGPL/icu-4.8.1.1.tgz
http://tv.realtek.com/LGPL/mpg123-1.21.0.tgz
http://tv.realtek.com/LGPL/fontconfig-2.11.0.tgz
http://tv.realtek.com/LGPL/expat.2.0.1.tar.gz
http://tv.realtek.com/LGPL/qt-everywhere-opensource-src-5.0.0.tgz
http://tv.realtek.com/LGPL/openssl-1.0.1l.tgz
>>
Software License
<<
ENG 13 -1
Page 86

sharp operation manual
Software copyrights
Bootcode:
uboot
GPL V2 http://tv.realtek.com/LGPL/uboot.tgz
Kernel:
vmlinux
GPL V2 http://tv.realtek.com/LGPL/linux-3.7.2.tgz
busybox
GPL V2 http://tv.realtek.com/LGPL/busybox- 1.18.4.tgz
e2fsprogs
GPL V2 http://tv.realtek.com/LGPL/e2fsprogs-1.42.6.tar.gz
http://tv.realtek.com/LGPL/e2fsprogs-libs-1.42.6.tar.gz
uclibc
LGPL 2.1 http://tv.realtek.com/LGPL/uClibc-0.9.30.3.tar.bz2
mkfs.jffs2
GPL V2 http://tv.realtek.com/LGPL/jffs2.tgz
mksquashfs
GPL V2 http://tv.realtek.com/LGPL/squashfs4.2.tar.gz
Library:
libotf
LGPL V2.1 http://tv.realtek.com/LGPL/libotf-0.9.9.tar.gz
fribidi
LGPL V2.1 http://tv.realtek.com/LGPL/fribidi-0.10.9.tar.gz
freetype
FTL ~ BSD http://tv.realtek.com/LGPL/freetype -2.4.11.tar.gz
tinyxml
zlib http://sourceforge.net/projects/tinyxml/files/
openssl
Apache License 1.0 BSD
http://tv.realtek.com/LGPL/openssl-1.0.1l.tgz
http://tv.realtek.com/LGPL/openssl-1.0.1j.tar.gz
Utility:
wpa_supplicant
BSD http://tv.realtek.com/LGPL/wpa_supplicant -2.4.tar.gz
lzma
public domain http://tv.realtek.com/LGPL/lzma-4.65.tgz
Harfbuzz
MIT
http://tv.realtek.com/LGPL/harfbuzz-0.9.35.tar.bz2
Graphite
Apache 2.0 http://tv.realtek.com/LGPL/graphite2 -1.2.4.tgz
gperftools
New BSD License http://tv.realtek.com/LGPL/gperftools -2.2.tar.gz
directFB
LGPL V2 http://tv.realtek.com/LGPL/DirectFB-1.4.2.tar.gz
libjpeg
JPEG
libmng
MNG License
>>
Software License
<<
ENG 13 -2
Page 87

sharp operation manual
libpng
libpng license.
FreeType
freetype
c-ares
MIT
Miracast:
openSSL
OpenSSL/SSLeay
expat
MIT/X
zlib
Zlib
Tremor
Xiph.org
alsa
LGPL 2.1
http://tv.realtek.com/LGPL/alsa-lib-1.0.23.tar.gz
http://tv.realtek.com/LGPL/alsa-lib-1.0.23.tgz
picoTTS
apache 2
LGPL 2 http://tv.realtek.com/LGPL/JavaScriptCore.r118995.tar.gz
MIT
BSD
Miracast:
openssl
Apache License 1.0
BSD
http://tv.realtek.com/LGPL/openssl-1.0.1j.tar.gz
http://tv.realtek.com/LGPL/openssl-1.0.1l.tgz"
BigDigits
http://www.di-mgt.com.au/bigdigitsCopyright.txt
http://tv.realtek.com/LGPL/bigdigits.tar.gz
Http:
neon
GPL http://tv.realtek.com/LGPL/HTTPC.tar.bz2
DLNA:
upnp
No License
http://tv.realtek.com/LGPL/upnp.1.6.16.tar.gz
http://tv.realtek.com/LGPL/upnp.tar.bz2
photo:
jpeg6b
public domain http://tv.realtek.com/LGPL/jpegsrc.v6b.tar.gz
libpng
public domain
http://tv.realtek.com/LGPL/libpng-1.6.7.tar.gz
http://tv.realtek.com/LGPL/libpng-1.6.17.tar.gz
giflib
public domain http://tv.realtek.com/LGPL/giflib -5.1.1.tar.bz2
libwebp
public domain
http://tv.realtek.com/LGPL/libwebp-0.4.1.tar.gz
http://tv.realtek.com/LGPL/libwebp-0.4.3.tar.gz
Others:
alsa
LGPL 2.1
http://tv.realtek.com/LGPL/alsa-lib-1.0.23.tar.gz
http://tv.realtek.com/LGPL/alsa-lib-1.0.23.tgz
curl
MIT/X derivate license
http://tv.realtek.com/LGPL/curl-7.28.1.tgz
http://tv.realtek.com/LGPL/curl-7.32.0.tar.gz
>>
Software License
<<
ENG 13 -3
Page 88

sharp operation manual
c-ares
C89 compatibility, MIT licensed
http://tv.realtek.com/LGPL/c-ares-1.9.1.tgz
http://tv.realtek.com/LGPL/c-ares-1.10.0.tar.gz
icu
ICU license , a simple, permissive non-copyleft free software license, compatible with the GNU
GPL.
http://tv.realtek.com/LGPL/icu-4.8.1.1.tgz
http://tv.realtek.com/LGPL/icu4c-53_1.tgz
http://tv.realtek.com/LGPL/icu4c-54_1-src.tgz
mpg123
LGPL 2.1
http://tv.realtek.com/LGPL/mpg123-1.21.0.tgz
fontconfig
Copyright Ac 2000,2001,2002,2003,2004,2006,2007 Keith Packard
Copyright Ac 2005 Patrick Lam
Copyright Ac 2009 Roozbeh Pournader
Copyright Ac 2008,2009 Red Hat, Inc.
Copyright Ac 2008 Danilo A?egan
Copyright Ac 2012 Google, Inc.
http://tv.realtek.com/LGPL/fontconfig-2.11.0.tgz
expat
same as the MIT/X Consortium license.
http://tv.realtek.com/LGPL/expat.2.0.1.tar.gz
http://tv.realtek.com/LGPL/expat-1.95.tgz
QT(including Webkit)
LGPL 2.1 http://tv.realtek.com/LGPL/qt-everywhere-opensource-src-5.0.0.tgz
openssl
Apache License 1.0 BSD
http://tv.realtek.com/LGPL/openssl-1.0.1j.tar.gz
http://tv.realtek.com/LGPL/openssl-1.0.1l.tgz
Copyright (C) 1989, 1991 Free Software Foundation, Inc.
51 Franklin Street, Fifth Floor, Boston, MA 02110 -1301, USA
Everyone is permitted to copy and distribute verbatim copies of this license document, but
changing it is not allowed.
Preamble
The licenses for most software are designed to take away your freedom to share and change it.
By contrast, the GNU General Public License is intended to guarantee your freedom to share and
change free software --to make sure the software is free for all its users. This General Public
License applies to most of the Free Software Foundation's software and to any other program
whose authors commit to using it. (Some other Free Software Foundation software is covered by
the GNU Lesser General Public License instead.) You can apply it to your programs, too.
When we speak of free software, we are referring to freedom, not price. Our General Public
Licenses are designed to make sure that you have the freedom to distribute copies of free
software (and charge for this service if you wish), that you receive source code or can get it if you
want it, that you can change the software or use pieces of it in new free programs; and that you
know you can do these things.
To protect your rights, we need to make restrictions that forbid anyone to deny you these rights or
to ask you to surrender the rights. These restrictions translate to certain responsibilities for you if
you distribute copies of the software, or if you modify it.
For example, if you distribute copies of such a program, whether gratis or for a fee, you must give
the recipients all the rights that you have. You must make sure that they, too, receive or can get
the source code. And you must show them these terms so they know their rights.
We protect your rights with two steps: (1) copyright the software, and (2) offer you this license
which gives you legal permission to copy, distribute and/or modify the software.
>>
Software License
<<
GNU GENERAL PUBLIC LICENSE
Version 2, June 1991
ENG 13 -4
Page 89

sharp operation manual
Also, for each author's protection and ours, we want to make certain that everyone understands
that there is no warranty for this free software. If the software is modified by someone else and
passed on, we want its recipients to know that what they have is not the original, so that any
problems introduced by others will not reflect on the original authors' reputations.
Finally, any free program is threatened constantly by software patents. We wish to avoid the
danger that redistributors of a free program will individually obtain patent licenses, in effect making
the program proprietary. To prevent this, we have made it clear that any patent must be licensed
for everyone's free use or not licensed at all.
The precise terms and conditions for copying, distribution and modification follow.
TERMS AND CONDITIONS FOR COPYING, DISTRIBUTION AND MODIFICATION
0. This License applies to any program or other work which contains a notice placed by the
copyright holder saying it may be distributed under the terms of this General Public License. The
"Program", below, refers to any such program or work, and a "work based on the Program" means
either the Program or any derivative work under copyright law: that is to say, a work containing the
Program or a portion of it, either verbatim or with modifications and/or translated into another
language. (Hereinafter, translation is included without limitation in the term "modification".) Each
licensee is addressed as "you".
Activities other than copying, distribution and modification are not covered by this License; they are
outside its scope. The act of running the Program is not restricted, and the output from the
Program is covered only if its contents constitute a work based on the Program (independent of
having been made by running the Program). Whether that is true depends on what the Program
does.
1. You may copy and distribute verbatim copies of the Program's source code as you receive it, in
any medium, provided that you conspicuously and appropriately publish on each copy an
appropriate copyright notice and disclaimer of warranty; keep intact all the notices that refer to this
License and to the absence of any warranty; and give any other recipients of the Program a copy
of this License along with the Program.
You may charge a fee for the physical act of transferring a copy, and you may at your option offer
warranty protection in exchange for a fee.
2. You may modify your copy or copies of the Program or any portion of it, thus forming a work
based on the Program, and copy and distribute such modifications or work under the terms of
Section 1 above, provided that you also meet all of these conditions:
a) You must cause the modified files to carry prominent notices stating that you changed the files
and the date of any change.
b) You must cause any work that you distribute or publish, that in whole or in part contains or is
derived from the Program or any part thereof, to be licensed as a whole at no charge to all third
parties under the terms of this License.
c) If the modified program normally reads commands interactively when run, you must cause it,
when started running for such interactive use in the most ordinary way, to print or display an
announcement including an appropriate copyright notice and a notice that there is no warranty (or
else, saying that you provide a warranty) and that users may redistribute the program under these
conditions, and telling the user how to view a copy of this License. (Exception: if the Program itself
is interactive but does not normally print such an announcement, your work based on the Program
is not required to print an announcement.)
These requirements apply to the modified work as a whole. If identifiable sections of that work are
not derived from the Program, and can be reasonably considered independent and separate works
in themselves, then this License, and its terms, do not apply to those sections when you distribute
them as separate works. But when you distribute the same sections as part of a whole which is a
work based on the Program, the distribution of the whole must be on the terms of this License,
whose permissions for other licensees extend to the entire whole, and thus to each and every part
regardless of who wrote it.
Thus, it is not the intent of this section to claim rights or contest your rights to work written entirely
by you; rather, the intent is to exercise the right to control the distribution of derivative or collective
works based on the Program.
In addition, mere aggregation of another work not based on the Program with the Program (or with
a work based on the Program) on a volume of a storage or distribution medium does not bring the
other work under the scope of this License.
>>
Software License
<<
ENG 13 -5
Page 90

sharp operation manual
3. You may copy and distribute the Program (or a work based on it, under Section 2) in object
code or executable form under the terms of Sections 1 and 2 above provided that you also do one
of the following:
a) Accompany it with the complete corresponding machine-readable source code, which must be
distributed under the terms of Sections 1 and 2 above on a medium customarily used for software
interchange; or,
b) Accompany it with a written offer, valid for at least three years, to give any third party, for a
charge no more than your cost of physically performing source distribution, a complete machinereadable copy of the corresponding source code, to be distributed under the terms of Sections 1
and 2 above on a medium customarily used for software interchange; or,
c) Accompany it with the information you received as to the offer to distribute corresponding
source code. (This alternative is allowed only for noncommercial distribution and only if you
received the program in object code or executable form with such an offer, in accord with
Subsection b above.)
The source code for a work means the preferred form of the work for making modifications to it.
For an executable work, complete source code means all the source code for all modules it
contains, plus any associated interface definition files, plus the scripts used to control compilation
and installation of the executable. However, as a special exception, the source code distributed
need not include anything that is normally distributed (in either source or binary form) with the
major components (compiler, kernel, and so on) of the operating system on which the executable
runs, unless that component itself accompanies the executable.
If distribution of executable or object code is made by offering access to copy from a designated
place, then offering equivalent access to copy the source code from the same place counts as
distribution of the source code, even though third parties are not compelled to copy the source
along with the object code.
4. You may not copy, modify, sublicense, or distribute the Program except as expressly provided
under this License. Any attempt otherwise to copy, modify, sublicense or distribute the Program is
void, and will automatically terminate your rights under this License. However, parties who have
received copies, or rights, from you under this License will not have their licenses terminated so
long as such parties remain in full compliance.
5. You are not required to accept this License, since you have not signed it. However, nothing else
grants you permission to modify or distribute the Program or its derivative works. These actions are
prohibited by law if you do not accept this License. Therefore, by modifying or distributing the
Program (or any work based on the Program), you indicate your acceptance of this License to do
so, and all its terms and conditions for copying, distributing or modifying the Program or works
based on it.
6. Each time you redistribute the Program (or any work based on the Program), the recipient
automatically receives a license from the original licensor to copy, distribute or modify the Program
subject to these terms and conditions. You may not impose any further restrictions on the
recipients' exercise of the rights granted herein. You are not responsible for enforcing compliance
by third parties to this License.
7. If, as a consequence of a court judgment or allegation of patent infringement or for any other
reason (not limited to patent issues), conditions are imposed on you (whether by court order,
agreement or otherwise) that contradict the conditions of this License, they do not excuse you from
the conditions of this License. If you cannot distribute so as to satisfy simultaneously your
obligations under this License and any other pertinent obligations, then as a consequence you may
not distribute the Program at all. For example, if a patent license would not permit royalty-free
redistribution of the Program by all those who receive copies directly or indirectly through you, then
the only way you could satisfy both it and this License would be to refrain entirely from distribution
of the Program.
If any portion of this section is held invalid or unenforceable under any particular circumstance, the
balance of the section is intended to apply and the section as a whole is intended to apply in other
circumstances.
It is not the purpose of this section to induce you to infringe any patents or other property right
claims or to contest validity of any such claims; this section has the sole purpose of protecting the
integrity of the free software distribution system, which is implemented by public license practices.
Many people have made generous contributions to the wide range of software distributed through
that system in reliance on consistent application of that system; it is up to the author/donor to
decide if he or she is willing to distribute software through any other system and a licensee cannot
impose that choice.
This section is intended to make thoroughly clear what is believed to be a consequence of the rest
of this License.
>>
Software License
<<
ENG 13 -6
Page 91

sharp operation manual
8. If the distribution and/or use of the Program is restricted in certain countries either by patents or
by copyrighted interfaces, the original copyright holder who places the Program under this License
may add an explicit geographical distribution limitation excluding those countries, so that
distribution is permitted only in or among countries not thus excluded. In such case, this License
incorporates the limitation as if written in the body of this License.
9. The Free Software Foundation may publish revised and/or new versions of the General Public
License from time to time. Such new versions will be similar in spirit to the present version, but
may differ in detail to address new problems or concerns.
Each version is given a distinguishing version number. If the Program specifies a version number
of this License which applies to it and "any later version", you have the option of following the
terms and conditions either of that version or of any later version published by the Free Software
Foundation. If the Program does not specify a version number of this License, you may choose
any version ever published by the Free Software Foundation.
10. If you wish to incorporate parts of the Program into other free programs whose distribution
conditions are different, write to the author to ask for permission. For software which is copyrighted
by the Free Software Foundation, write to the Free Software Foundation; we sometimes make
exceptions for this. Our decision will be guided by the two goals of preserving the free status of all
derivatives of our free software and of promoting the sharing and reuse of software generally.
NO WARRANTY
11. BECAUSE THE PROGRAM IS LICENSED FREE OF CHARGE, THERE IS NO WARRANTY
FOR THE PROGRAM, TO THE EXTENT PERMITTED BY APPLICABLE LAW. EXCEPT WHEN
OTHERWISE STATED IN WRITING THE COPYRIGHT HOLDERS AND/OR OTHER PARTIES
PROVIDE THE PROGRAM "AS IS" WITHOUT WARRANTY OF ANY KIND, EITHER EXPRESSED
OR IMPLIED, INCLUDING, BUT NOT LIMITED TO, THE IMPLIED WARRANTIES OF
MERCHANTABILITY AND FITNESS FOR A PARTICULAR PURPOSE. THE ENTIRE RISK AS TO
THE QUALITY AND PERFORMANCE OF THE PROGRAM IS WITH YOU. SHOULD THE
PROGRAM PROVE DEFECTIVE, YOU ASSUME THE COST OF ALL NECESSARY SERVICING,
REPAIR OR CORRECTION.
12. IN NO EVENT UNLESS REQUIRED BY APPLICABLE LAW OR AGREED TO IN WRITING
WILL ANY COPYRIGHT HOLDER, OR ANY OTHER PARTY WHO MAY MODIFY AND/OR
REDISTRIBUTE THE PROGRAM AS PERMITTED ABOVE, BE LIABLE TO YOU FOR
DAMAGES, INCLUDING ANY GENERAL, SPECIAL, INCIDENTAL OR CONSEQUENTIAL
DAMAGES ARISING OUT OF THE USE OR INABILITY TO USE THE PROGRAM (INCLUDING
BUT NOT LIMITED TO LOSS OF DATA OR DATA BEING RENDERED INACCURATE OR
LOSSES SUSTAINED BY YOU OR THIRD PARTIES OR A FAILURE OF THE PROGRAM TO
OPERATE WITH ANY OTHER PROGRAMS), EVEN IF SUCH HOLDER OR OTHER PARTY HAS
BEEN ADVISED OF THE POSSIBILITY OF SUCH DAMAGES.
END OF TERMS AND CONDITIONS
How to Apply These Terms to Your New Programs
If you develop a new program, and you want it to be of the greatest possible use to the public, the
best way to achieve this is to make it free software which everyone can redistribute and change
under these terms.
To do so, attach the following notices to the program. It is safest to attach them to the start of
each source file to most effectively convey the exclusion of warranty; and each file should have at
least the "copyright" line and a pointer to where the full notice is found.
one line to give the program's name and an idea of what it does.
Copyright (C) yyyy name of author
This program is free software; you can redistribute it and/or modify it under the terms of the GNU
General Public License as published by the Free Software Foundation; either version 2 of the
License, or (at your option) any later version.
This program is distributed in the hope that it will be useful, but WITHOUT ANY WARRANTY;
without even the implied warranty of MERCHANTABILITY or FITNESS FOR A PARTICULAR
PURPOSE. See the GNU General Public License for more details.
>>
Software License
<<
ENG 13 -7
Page 92

sharp operation manual
You should have received a copy of the GNU General Public License along with this program; if
not, write to the Free Software Foundation, Inc., 51 Franklin Street, Fifth Floor, Boston, MA 021101301, USA.
Also add information on how to contact you by electronic and paper mail.
If the program is interactive, make it output a short notice like this when it starts in an interactive
mode:
Gnomovision version 69, Copyright (C) year name of author
Gnomovision comes with ABSOLUTELY NO WARRANTY; for details type `show w'. This is free
software, and you are welcome to redistribute it under certain conditions; type `show c' for details.
The hypothetical commands `show w' and `show c' should show the appropriate parts of the
General Public License. Of course, the commands you use may be called something other than
`show w' and `show c'; they could even be mouse-clicks or menu items--whatever suits your
program.
You should also get your employer (if you work as a programmer) or your school, if any, to sign a
"copyright disclaimer" for the program, if necessary. Here is a sample; alter the names:
Yoyodyne, Inc., hereby disclaims all copyright interest in the program `Gnomovision' (which makes
passes at compilers) written by James Hacker.
signature of Ty Coon, 1 April 1989
Ty Coon, President of Vice
This General Public License does not permit incorporating your program into proprietary programs.
If your program is a subroutine library, you may consider it more useful to permit linking proprietary
applications with the library. If this is what you want to do, use the GNU Lesser General Public
License instead of this License.
>>
Software License
<<
ENG 13 -8
Page 93

sharp operatiom manual
<<
 Loading...