

Page 1
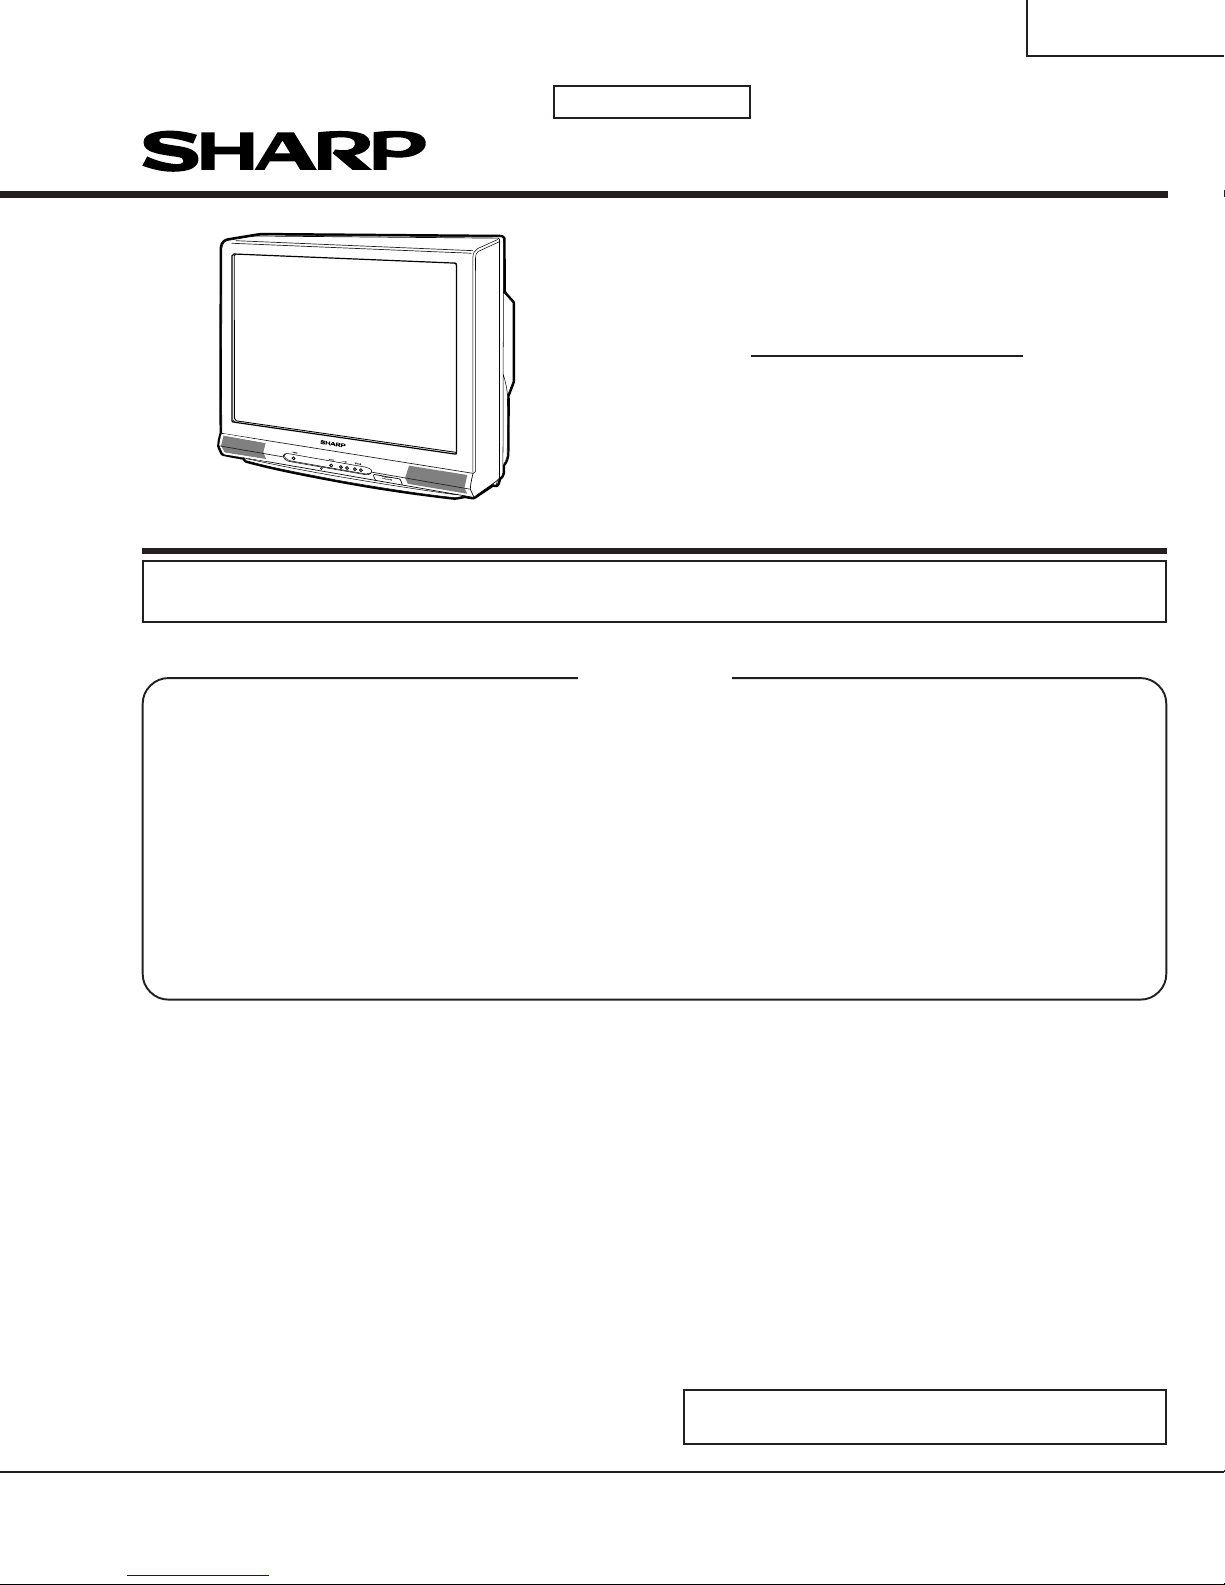
36U-F510
1st Edition
SERVICE MANUAL
COLOR TELEVISION
Chassis No. MS-B
MODELS
In the interests of user-safety (Required by saf ety regulations in some countries ) the set should be restored to its
original condition and only parts identical to those specified should be used.
36U-F510
CONTENTS
Page
» ELECTRICAL SPECIFICATIONS .........................................................................................................1
» IMPORTANT SERVICE SAFETY PRECAUTION .................................................................................2
» LOCATION OF USER'S CONTROL .....................................................................................................4
» INSTALLATION AND SERVICE INSTRUCTIONS ................................................................................6
» SERVICE ADJUSTMENT ...................................................................................................................10
» CHASSIS LAYOUT .............................................................................................................................13
» BLOCK DIAGRAM ..............................................................................................................................15
» SCHEMATIC DIAGRAMS ...................................................................................................................17
» PRINTED WIRING BOARD ASSEMBLIES ........................................................................................37
» REPLACEMENT PARTS LIST ............................................................................................................43
» PACKING OF THE SET ......................................................................................................................57
ELECTRICAL SPECIFICATIONS
POWER INPUT..................................................... 120V AC, 60 Hz
POWER RATING .................................................................. 180W
PICTURE SIZE .......................................... 3,905 cm2 (605sq inch)
CONVERGENCE ............................................................. Magnetic
SWEEP DEFLECTION .................................................... Magnetic
FOCUS ...................................................... Ex-D Gun Electrostatic
INTERMEDIATE FREQUENCIES
Picture IF Carrier Frequency ..................................... 45.75 MHz
Sound IF Carrier Frequency...................................... 41.25 MHz
Color Sub-Carrier Frequency .................................... 42.17 MHz
(Nominal)
AUDIO POWER
OUTPUT RATING ..............5.0W + 5.0W (at 10% distortion and
Dual CH Operate)
SPEAKER
SIZE ........................................................ 12 x 6 cm oval (2 pcs.)
VOICE COIL IMPEDANCE............................... 8 ohm at 400 Hz
ANTENNA INPUT IMPEDANCE
VHF/UHF.....................................................75 ohm Unbalanced
TUNING RANGES
VHF-Channels...............................................................2 thru 13
UHF-Channels ............................................................14 thru 69
CATV Channels...........................................................1 thru 125
(EIA, Channel Plan U.S.A.)
Specifications are subject to change without
prior notice.
SHARP CORPORATION
This document has been published to be used for after
sales service only.
The contents are subject to change without notice.
Page 2
36U-F510
IMPORTANT SERVICE SAFETY PRECAUTION
Ë
Service work should be performed only by qualified service technicians who are
thoroughly familiar with all safety checks and the servicing guidelines which follow:
WARNING
1. For continued safety, no modification of any circuit
should be attempted.
2. Disconnect AC power before servicing.
3. Semiconductor heat sinks are potential shock hazards
when the chassis is operating.
4. The chassis in this receiver has two ground systems
which are separated by insulating material. The nonisolated (hot) ground system is for the B+ voltage
regulator circuit. The isolated ground system is for
the low B+ DC voltages and the secondary circuit of
the high voltage transformer.
To prevent electrical shock use an isolation
transformer between the line cord and power
receptacle, when servicing this chassis.
CAUTION: FOR CONTINUED
PROTECTION AGAINST A
RISK OF FIRE, REPLACE
4A 125V
ONLY WITH SAME TYPE 4A125V FUSE.
SERVICING OF HIGH VOLTAGE SYSTEM
AND PICTURE TUBE
When servicing the high voltage system,
remove the static charge by connecting a
10k ohm resistor in series with an insulated
wire (such as a test probe) between the picture tube ground and the anode lead. (AC
line cord should be disconnected from AC
outlet.)
1. Picture tube in this receiver employs integral implosion
protection.
2. Replace with tube of the same type number for
continued safety.
3. Do not lift picture tube by the neck.
4. Handle the picture tube only when wearing
shatterproof goggles and after discharging the high
voltage anode completely.
X-RADIATION AND HIGH VOLTA GE LIMITS
1. Be sure all service personnel are aware of the
procedures and instructions covering X-radiation. The
only potential source of X-ray in current solid state
TV receivers is the picture tube. However , the picture
tube does not emit measurable X-Ray radiation, if
the high voltage is as specified in the "High Voltage
Check" instructions.
It is only when high voltage is excessive that Xradiation is capable of penetrating the shell of the
picture tube including the lead in the glass material.
The important precaution is to keep the high voltage
below the maximum level specified.
2. It is essential that ser vicemen have available at all
times an accurate high voltage meter.
The calibration of this meter should be checked
periodically.
3. High voltage should always be k ept at the rated v alue
−no higher. Operation at higher voltages may cause
a failure of the picture tube or high voltage circuitry
and;also, under certain conditions, may produce
radiation in exceeding of desirable levels.
4. When the high voltage regulator is operating properly
there is no possibility of an X-radiation problem. Every
time a color chassis is serviced, the brightness should
be tested while monitoring the high voltage with a
meter to be certain that the high voltage does not
exceed the specified value and that it is regulating
correctly.
5. Do not use a picture tube other than that specified or
make unrecommended circuit modifications to the
high voltage circuitry.
6. When trouble shooting and taking test measurements
on a receiver with excessiv e high voltage, a void being
unnecessarily close to the receiver.
Do not operate the receiver longer than is necessary
to locate the cause of excessive voltage.
2
Page 3
2
2
2
IMPORTANT SERVICE SAFETY PRECAUTION
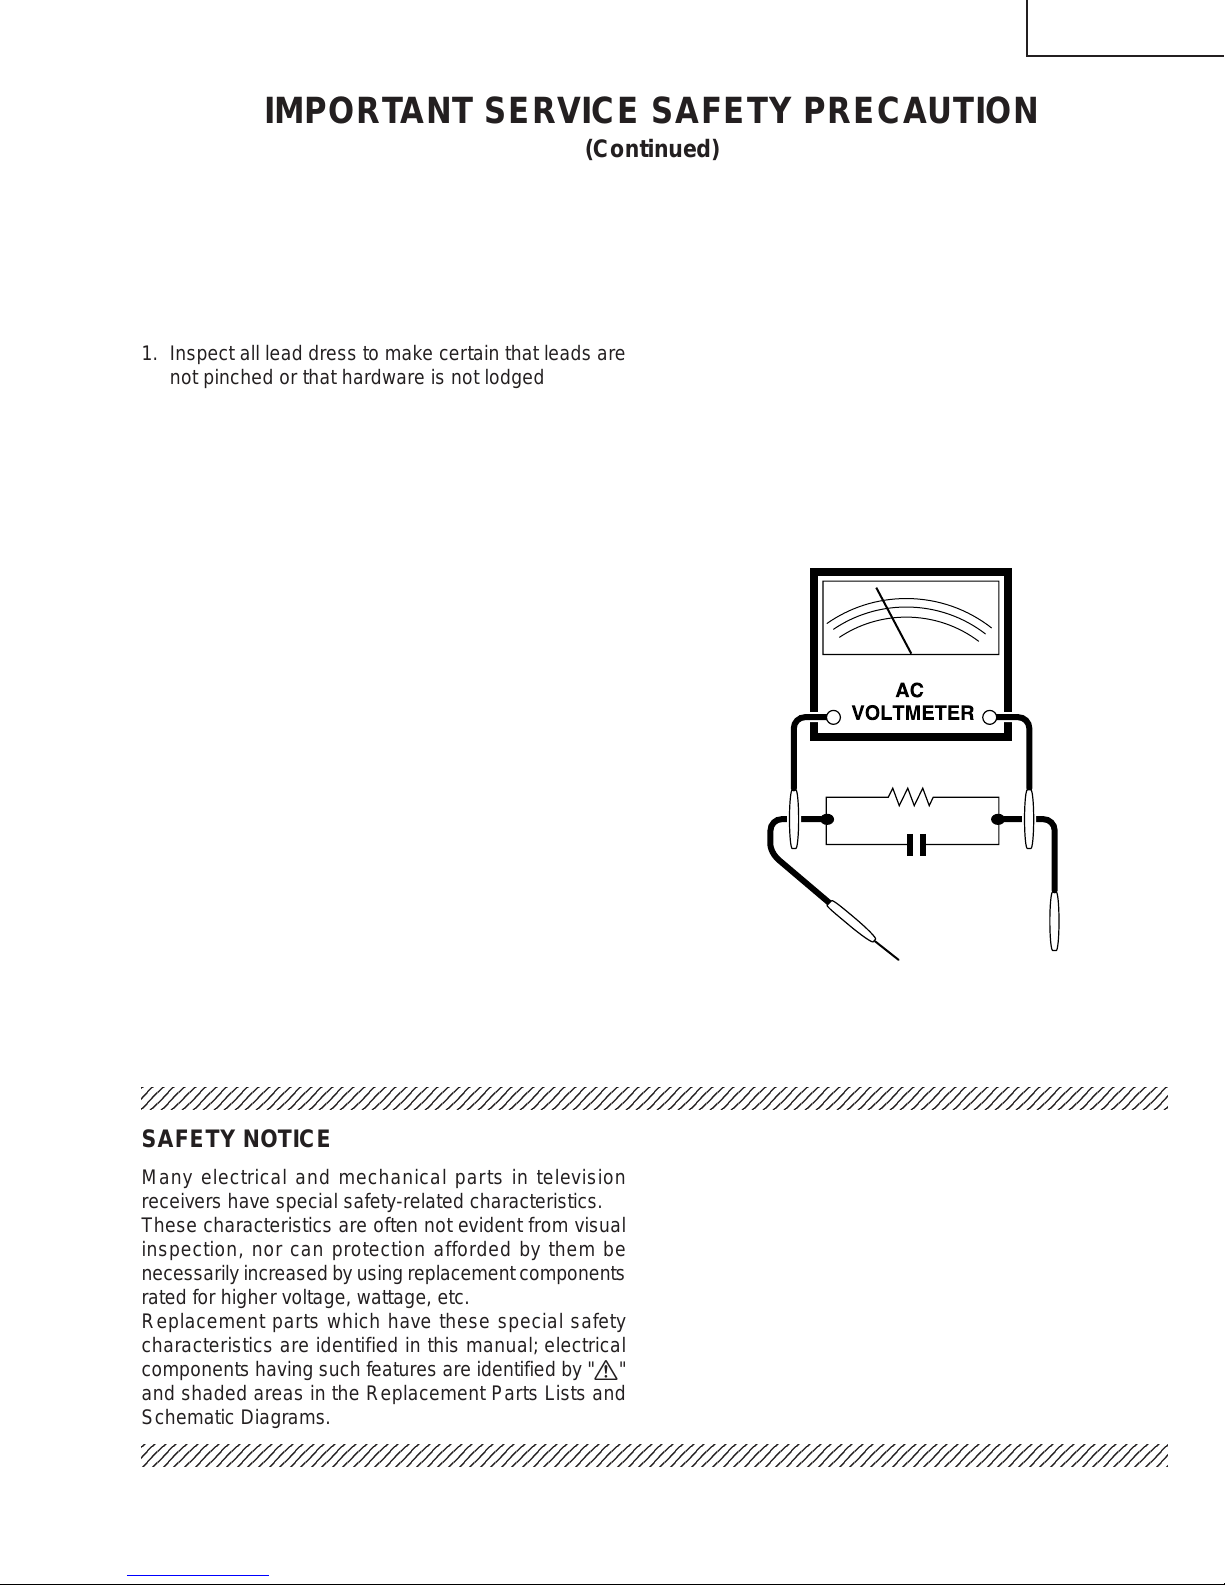
1.5k ohm
10W
0.15µF
TEST PROBE
TO EXPOSED
METAL PARTS
CONNECT TO
KNOWN EARTH
GROUND
(Continued)
36U-F510
BEFORE RETURNING THE RECEIVER
(Fire & Shock Hazard)
Before returning the receiver to the user, perform
the following safety checks.
1. Inspect all lead dress to make certain that leads are
not pinched or that hardware is not lodged between
the chassis and other metal parts in the receiver.
2. Inspect all protective devices such as non-metallic
control knobs, insulating materials, cabinet backs,
adjustment and compartment covers or shields,
isolation resistor-capacity networks, mechanical
insulators, etc.
3. To be sure that no shock hazard exists, check for
leakage current in the following manner.
• Plug the AC cord directly into a 120 volt AC outlet,
(Do not use an isolation transformer for this test).
• Using two clip leads, connect a 1.5k ohm, 10 watt
resistor paralleled by a 0.15µF capacitor in series with
all exposed metal cabinet parts and a known earth
ground, such as electrical conduit or electrical ground
connected to earth ground.
• Use an AC voltmeter having with 5000 ohm per volt,
or higher, sensitivity to measure the A C voltage drop
across the resistor.
• Connect the resistor connection to all exposed metal
parts having a return to the chassis (antenna, metal
cabinet, screw heads, knobs and control shafts,
escutcheon, etc.) and measure the AC voltage drop
across the resistor.
AII checks must be repeated with the AC line cord
plug connection reversed. (If necessar y, a nonpolarized adapter plug must be used only for the
purpose of completing these check.)
Any current measured must not exceed 0.5 milliamp .
Any measurements not within the limits outlined
above indicate of a potential shock hazard and
corrective action must be taken before returning the
instrument to the customer.
234567890123456789012345678901212345678901234567890123456789012123456789012345678901234567890121
234567890123456789012345678901212345678901234567890123456789012123456789012345678901234567890121
SAFETY NOTICE
Many electrical and mechanical parts in television
receivers have special safety-related characteristics.
These characteristics are often not evident from visual
inspection, nor can protection afforded by them be
necessarily increased by using replacement components
rated for higher voltage, wattage, etc.
Replacement parts which have these special safety
characteristics are identified in this manual; electrical
components having such features are identified by "å"
and shaded areas in the Replacement Parts Lists and
Schematic Diagrams.
234567890123456789012345678901212345678901234567890123456789012123456789012345678901234567890121
For continued protection, replacement parts must be
identical to those used in the original circuit. The use of
substitute replacement parts which do not have the same
safety characteristics as the factory recommended
replacement parts shown in this service manual, may
create shock, fire, X-radiation or other hazards.
3
Page 4
36U-F510
LOCATION OF USER'S CONTROL
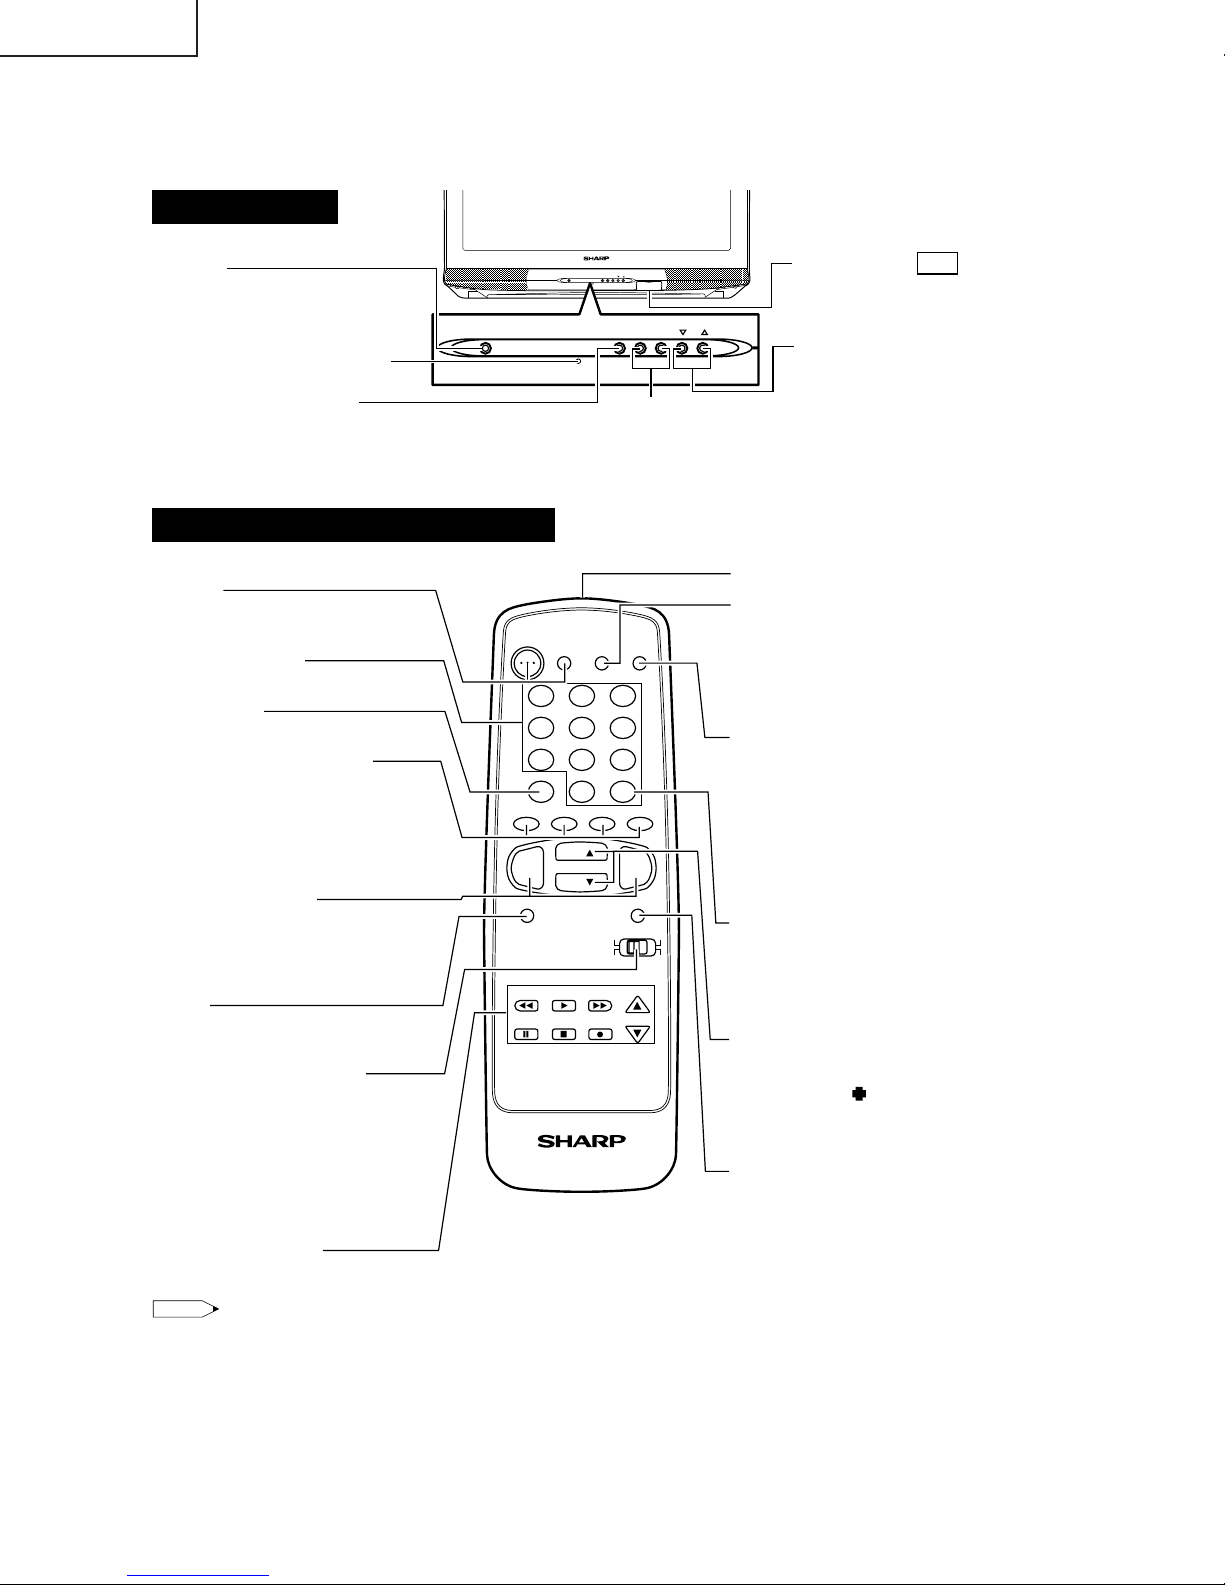
Front Panel
POWER
Press → On.
Press again → Off.
SENSOR AREA FOR
REMOTE CONTROL
MENU
Press → Accesses MAIN MENU.
Press again → Exits MAIN MENU.
Basic Remote Control Functions
POWER
Press → On.
Press again → Off.
REMOTE KEYPAD
Accesses any channel from keypad.
FLASHBACK
Returns to previous channel.
PERSONAL PREFERENCE
With the Personal Pref erence buttons,
you can program your favorite
programs by using the 4 categories A,
B, C and D. The channels can be
accessed quickly by using these
buttons.
VOLUME UP/DOWN
(+) Increases sound.
(–) Decreases sound.
• In menu mode, changes or selects
the TV adjustments.
MENU
Press → Accesses MAIN MENU.
Press again → Exits MAIN MENU.
CATV/DVD-TV/VCR MODE
SELECT SWITCH
In TV/VCR position, sends power and
channel select commands (Channel
up/down and Random Access buttons)
to the TV and VCR control.
In CATV/DVD position, sends power
and channel select commands to a
cable TV con verter and DVD control.
DVD/VCR CONTROL
POWER MENU – VOL + CH
POWER MENU – VOL + CH
PULL-OPEN
VOLUME UP/DOWN
(+) Increases sound.
(–) Decreases sound.
POWER
TV
DVD
VCR
DISPLAY
INPUT
1 2 3
4 5 6
7 8 9
FLASHBACK
PERSONAL PREFERENCE
A B C D
VOL
—
MENU MUTE
REW PLAY FF
PAUSE
TV • CATV • VCR • DVD
0
CH
CH
STOP REC
ENTER
100
VOL
+
CATV TV
DVD VCR
CH/SKIP
TERMINALS
IN 2VIDEO/AUDIO
(INSIDE DOOR)
CHANNEL UP/DOWN
(') Selects next higher
channel.
(") Selects next lower
channel.
• Press both at the same
time to access the MAIN
MENU screen.
Infrared Transmitter Window
DISPLAY
Press→ Displays receiving channel for
four seconds.
Press again → Removes display.
• Temporarily displays receiving
channel when in Closed Caption
mode.
INPUT
Press → Switch to external video
INPUT 1 mode.
Press 2 times → Switch to external video
INPUT 2 mode.
Press 3 times → Switch to external video
INPUT 3 mode or COMPONENT mode.
Press 4 times → Switch back to the
original TV mode.
ENTER
Used in some instances where a Cable
Converter Box requires an “enter”
command after selecting channels,
when using the REMOTE KEYPAD
button.
CHANNEL UP/DOWN
( ) Selects next higher channel.
'
( ) Selects next lower channel.
"
• Moves the “
” mark of the MENU
screens.
MUTE
Press → Mutes sound.
Press again → Restores sound.
• CLOSED CAPTION appears when
sound is muted.
Note:
• The above shaded buttons on the Remote Control glow in the dark. To use the glow-in-the-dark display on the
remote control, place it under a fluorescent light or other lighting.
• The phosphorescent material contains no radioactive or toxic material, so it is safe to use.
• The degree of illumination will vary depending on the strength of lighting used.
• The degree of illumination will decrease with time and depending on the temperature.
• The time needed to charge the phosphorescent display will vary depending on the surrounding lighting.
• Sunlight and fluorescent lighting are the most effective when charging the display.
4
Page 5

36U-F510
INSTALLATION AND SERVICE INSTRUCTIONS
Note: (1)When performing any adjustments to resistor controls and transformers use non-metallic
screwdrivers or TV alignment tools.
(2)Before performing adjustments, the TV set must be on at least 15 minutes.
CIRCUIT PROTECTION
The receiver is protected by a 4.0A fuse (F701),
mounted on PWB-A, wired into one side of the AC
line input.
X-RADIATION PROTECTOR CIRCUIT TEST
After service has been performed on the horizontal
deflection system, high voltage system, B+ system,
test the X-Radiation protection circuit to ascertain
proper operation as follows:
1. Apply 120V AC using a variac transformer for accur ate
input voltage.
2. Allow for warm up and adjust all customer controls
for normal picture and sound.
3. Receive a good local channel.
4. Connect a digital voltmeter to TP651 and make sure
that the voltmeter reads 12.8 ±0.7V.
5. Apply external 16.1V DC at TP651 by using an
external DC supply, TV must be shut off.
6. To reset the protector, unplug the AC cord and plug
the AC cord power on. Now make sure that normal
picture appears on the screen.
7. If the operation of the horizontal oscillator does not
stop in step 5, the circuit must be repaired before the
set is returned to the customer.
HIGH VOLT A GE CHECK
High voltage is not adjustable but must be checked
to verify that the receiver is operating within safe
and efficient design limitations as specified checks
should be as follows:
1. Connect an accurate high voltage meter between
ground and anode of picture tube.
2. Operate receiver for at least 15 minutes at 120V AC
line voltage, with a strong air signal or a properly tuned
in test signal.
3. Enter the service mode and select the service
adjustment "V18" and Bus data "01" (Y-mute on, CRT
Cut Off).
4. The voltage should be approximately 36.0kV (at z ero
beam).
If a correct reading cannot be obtained, check circuitry
for malfunctioning components. After the v oltage test,
make Y-mute off to the normal mode.
5
Page 6
36U-F510
For adjustments of this model, the bus data is conver ted to various analog signals by the D/A converter
circuit.
Note: There are still a few analog adjustments in this series such as focus and master screen voltage.
Follow the steps below whenever the service adjustment is required. See "Table-B" to determine, if service adjustments are required.
1. Service mode
Before putting unit into the service mode, check that
customer adjustments are in the normal mode. Use
the reset function in the video adjustment menu to
ensure customer controls are in their proper (reset)
position.
2. Service number selection
Once in the service mode, press the Ch-up or Chdown button on the remote controller or at the set.
The service adjustment number will vary in
increments of one, from "V01" to "P08". Select the
item you wish to adjust.
3. Data number selection
Press the Vol-up or V ol-down b utton to adjust the data
number.
DATA NUMBER
SERVICE ADJUSTMENT NUMBER
To enter the service mode and exit service mode.
To enter the service mode manually just press and hold
the Vol-down and Ch-up buttons at the same time, plug
the AC cord into a wall socket.
Now the TV set is switched on and enters the ser vice
mode.
To exit the service mode, turn the television off by
pressing the power button.
CHANNEL
V01
Figure A.
55(085)
02
6
Page 7
36U-F510
SERVICE
NUMBER
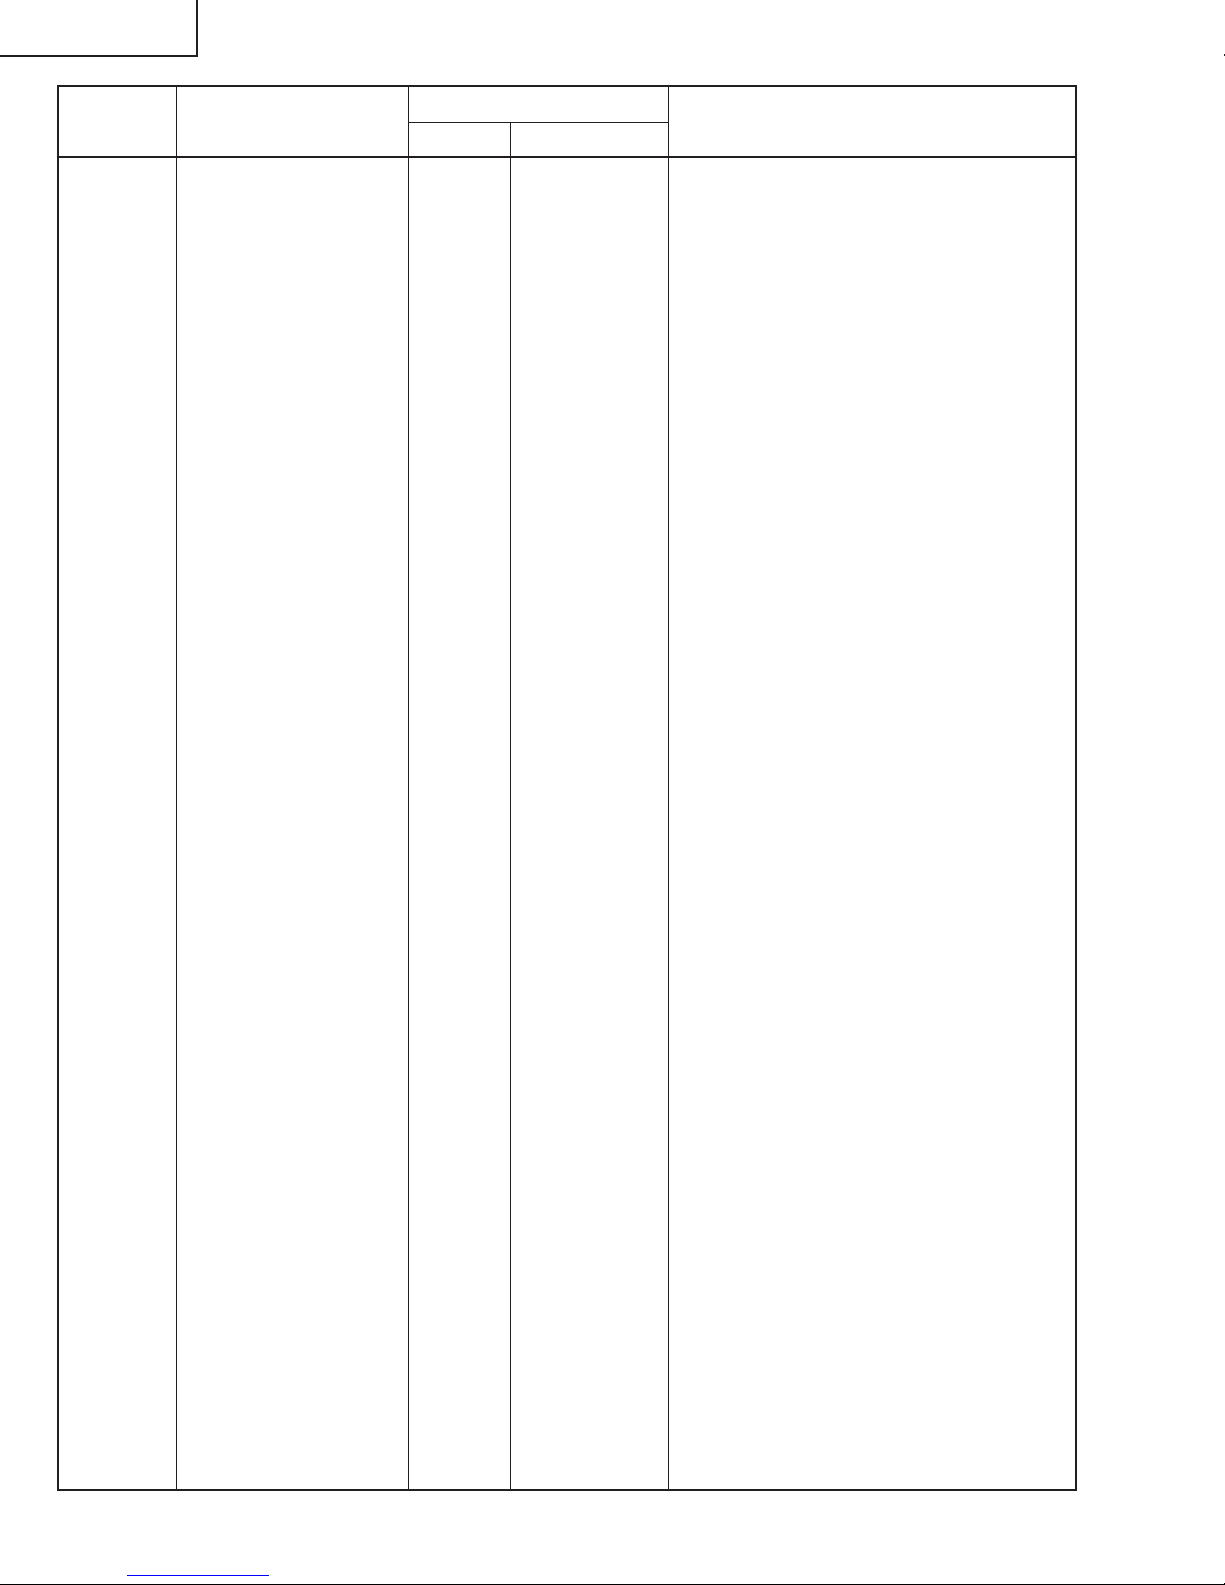
V01 PICTURE 3(03h) 0-15(00h-0Fh)
V02 TINT 62(3Eh) 0-127(00h-7Fh)
V03 COLOR 45(2Dh) 0-127(00h-7Fh)
V04 SUB COLOR 16(10h) 0-127(00h-1Fh) Must be set to “10”
V05 BRIGHT 77(4Dh) 0-127(00h-7Fh)
V06 R CUT-OFF 64(40h) 64-255(40h-FFh)
V07 G CUT-OFF 64(40h) 64-255(40h-FFh)
V08 B CUT-OFF 64(40h) 64-255(40h-FFh)
V09 G DRIVE 64(40h) 0-127(00h-7Fh)
V10 B DRIVE 64(40h) 0-127(00h-7Fh)
V11 SHARP 20(14h) 0-63(00h-3Fh) Must be set to “1E”
V12 N PHASE 1(01h) 0-3 (00h-03h) Must be set to “01”
V13 DC RESTORATION 0(00h) 0-3 (00h-03h) Must be set to “03”
V14 BLACK STRETCH 3(03h) 0-3 (00h-03h) Must be set to “03”
V15 ABL START POINT 3(03h) 0-3 (00h-03h) Must be set to “03”
V16 ABL GAIN 2(02h) 0-3 (00h-03h) Must be set to “02”
V17 γ POINT 0(00h) 0-3 (00h-03h) Must be set to “02”
V18 Y-MUTE/V-STOP 0(00h) 0-2 Must be set to “00”
V19 ENERGY SAVE 40(28h) 0-63(00h-3Fh) Must be set to “28”
V24 LOW-G 247(F7h) 0-255(00h-FFh) Must be set to “F7”
V25 LOW-B 232(E8h) 0-255(00h-FFh) Must be set to “E8”
V26 ML-G 0(00h) 0-255(00h-FFh) Must be set to “00”
V27 ML-B 249(F9h) 0-255(00h-FFh) Must be set to “F9”
V28 HIGH-G 3(03h) 0-255(00h-FFh) Must be set to “03”
V29 HIGH-B 6(06h) 0-255(00h-FFh) Must be set to “06”
V30 WPS 1(01h) 0-1 Must be set to “01”
V31 RGB CONTRAST 32(20h) 0-63(00h-3Fh) Must be set to “30”
V32 Y-DL 2(02h) 0-7(00h-07h) Must be set to “02”
V33 Y-DL-INPUT 1(01h) 0-7(00h-07h) Must be set to “01”
V34 VSM GAIN 7(07h) 0-7(00h-07h) Must be set to “07”
V35 N COMB 1(01h) 0-1 Must be set to “01”
V36 BPF/TOF-INPUT 0(00h) 0-1 Must be set to “01”
V37 CORING 0(00h) 0-1 Must be set to “00”
V38 VSM PHASE 0(00h) 0-1 Must be set to “00”
V39 COLOR γ 0(00h) 0-1 Must be set to “01”
V40 SHARP-INPUT 20(14h) 0-63(00h-3Fh) Must be set to “1E”
V41 TINT-INPUT 62(3Eh) 0-127(00h-7Fh)
V42 PICTURE-COMPONENT 3(03h) 0-15(00h-0Fh)
V43 TINT-COMPONENT 16(10h) 0-31(00h-1Fh) Must be set to “10”
V44 COLOR-COMPONENT 48(30h) 0-31(00h-1Fh) Must be set to “44”
V45 BRIGHT-COMPONENT 74(4Ah) 0-127(00h-7Fh)
V46 R CUT OFF-COMPONENT 64(40h) 0-255(00h-FFh)
V47 G CUT OFF-COMPONENT 64(40h) 0-255(00h-FFh)
V48 B CUT OFF-COMPONENT 64(40h) 0-255(00h-FFh)
V49 G DRIVE-COMPONENT 64(40h) 0-127(00h-7Fh)
V50 B DRIVE-COMPONENT 64(40h) 0-127(00h-7Fh)
V51 SHARP-COMPONENT 20(14h) 0-63(00h-3Fh) Must be set to “1E”
V52 N PHASE-COMPONENT 01(01h) 0-3 (00h-03h) Must be set to “01”
V53 C-TRAP 0(00h) 0-1 Must be set to “00”
V54 ANT-B PICTURE 3(03h) 0-15(00h-0Fh)
V55 ANT-B TINT 62(3Eh) 0-127(00h-7Fh)
V56 ANT-B COLOR 45(2Dh) 0-127(00h-7Fh)
V57 ANT-B SHARP 20(14h) 0-63(00h-3Fh) Must be set to “1E”
V58 ANT-B BRIGHT 77(4Dh) 0-127(00h-7Fh)
ADJUSTMENT ITEM
INITIAL V ALUE
DA T A
ADJUSTMENT CONTENTS
RANGE
R01 RF-AGC 36(24h) 0-63(00h-3Fh)
R02 PIF VCO coil – –
R03 RF-AGC REF 92(5Ch) 0-255(00h-FFh) Must be set to “5C”
D01 V POSITION 0(00h) 0-7 (00h-07h)
D02 H POSITION 16(10h) 0-31(00h-1Fh)
D03 V SIZE 18(12h) 0-63(00h-3Fh)
D04 H SIZE 31(1Fh) 0-63(00h-3Fh) Must be set to “16”
D05 V-LINEARITY 7(07h) 0-15(00h-0Fh)
D06 V-S CORRECTION 8(08h) 0-15(00h-0Fh) Must be set to “0A”
Table - A
7
Page 8
36U-F510
SERVICE
NUMBER
ADJUSTMENT ITEM
INITIAL V ALUE
DA T A
ADJUSTMENT CONTENTS
RANGE
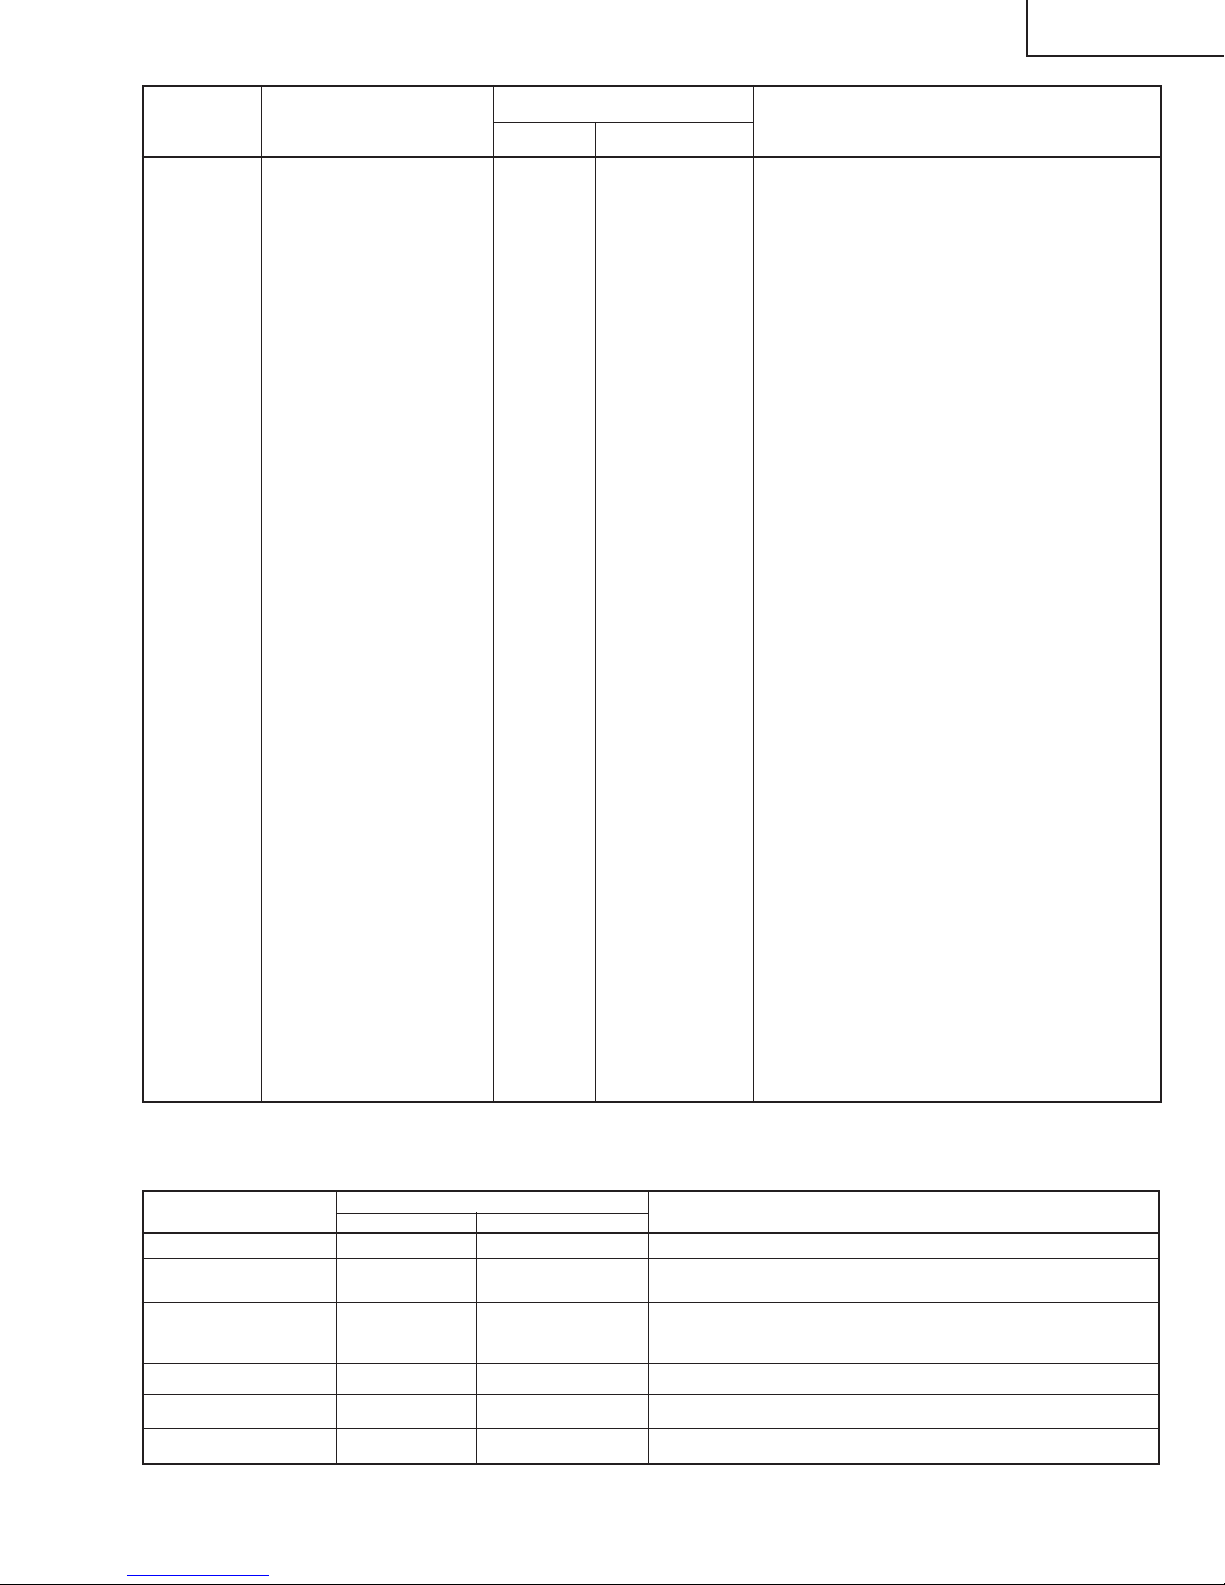
D07 EW PARABOLA 33(21h) 0-63(00h-3Fh) Must be set to “24”
D08 EW TRAPEZIUM 14(0Eh) 0-31(00h-1Fh) Must be set to “0D”
D09 EW CORNER 12(0Ch) 0-15(00h-0Fh) Must be set to “08”
D10 AFC GAIN 2(02h) 0-3 (00h-03h) Must be set to “02”
D11 V EHT 7(07h) 0-7 (00h-07h) Must be set to “04”
D12 H EHT 3(03h) 0-7 (00h-07h) Must be set to “04”
EX1 FAO VOLUME 36(24h) 0-50(00h-32h) Must be set to “24”
EX2 CC-POSITION 33(21h) 0-127(00h-7Fh)
EX3 INT 122(7Ah) 0-255(00h-FFh) Must be set to “7A”
EX4 A-ATT 90(5Ah) 0-127
EX5 TUNER data 0(00h) 0-3(00h-03h) Must be set to “00”
EX6 Think chip-Slice LEVEL 54(36h) 0-255(00h-FFh) Must be set to “36”
OP1 OPTION1 247(F7h) 0-255(00h-FFh) Must be set to “F7” (36U-F810), “F5” (36U-F500)
OP2 OPTION2 249(F9h) 0-255(00h-FFh) Must be set to “F9” (36U-F810), “18” (36U-F500)
OP3 OPTION3 15(0Fh) 0-255(00h-FFh) Must be set to “0F”
M01 INPUT LEVEL 9(09h) 0-15(00h-0Fh) Must be set to “09”
M02 MTS VCO 36(24h) 0-63(00h-3Fh)
M03 FILTER 31(1Fh) 0-63(00h-3Fh)
M04 WIDEBAND 24(18h) 0-63(00h-3Fh)
M05 SPECTRAL 16(10h) 0-63(00h-3Fh)
M06 ANT-B INPUT LEVEL 9(09h) 0-15(00h-0Fh)
M07 ANT-B WIDEBAND 24(18h) 0-63(00h-3Fh)
M08 ANT-B SPECTRAL 16(10h) 0-63(00h-3Fh)
M09 SRS LEVEL 255(FFh) 0-255(00h-FFh) Must be set to “E0”
M10 BBE LEVEL 255(FFh) 0-255(00h-FFh) Must be set to “D9”
M11 SRS&BBE LEVEL 255(FFh) 0-255(00h-FFh) Must be set to “D0”
M12 SRS&BBE OFF LEVEL 255(FFh) 0-255(00h-FFh) Must be set to “E5”
M13 SRS Effect 2(02h) 2-3(02h-03h) Must be set to “02”
M14 BBE-L Effect 8(08h) 0-15(00h-0Fh) Must be set to “0F”
M15 BBE-H Effect 8(08h) 0-15(00h-0Fh) Must be set to “0F”
M16 AGC Level 7(07h) 0-7(00h-07h) Must be set to “01”
M17 BASS Offset 0(00h) 0-31(00h-1Fh) Must be set to “10”
M18 TREBLE Offset 0(00h) 0-31(00h-1Fh) Must be set to “10”
M19 BASS Offset-BBE 0(00h) 0-31(00h-1Fh) Must be set to “11”
M20 TREBLE Offset-BBE 0(00h) 0-31(00h-1Fh) Must be set to “10”
P01 CONTRAST-PIP 50(32h) 0-127(00h-7Fh)
P02 TINT-PIP 41(29h) 0-63(00h-3Fh) Must be set to “29”
P03 COLOR-SAT-PIP 50(32h) 0-127(00h-7Fh)
P04 Y-OFFSET-PIP 9(09h) 0-31(00h-1Fh) Must be set to “09”
P05 HXA-PIP 10(0Ah) 0-255(00h-FFh) Must be set to “0A”
P06 HADJ-PIP 0(00h) 0-15(00h-0Fh) Must be set to “00”
P07 FREE RUN-PIP 11(0Bh) 0-15(00h-0Fh) Must be set to “0B”
P08 TINT-PIP-INPUT 36(24h) 0-63(00h-3Fh) Must be set to “24”
Table - A
Holding down both the VOL-up and CH-up buttons on the TV set at service mode for more than 2 seconds will
automatically write the above initial values into IC2102.
PART REPLACED
IC2001
IC201
IC2102 (or IC2101)
CRT
IC3001
IC1801
NECESSARY UNNECESSARY
ADJUSTMENT
X
X
X
X
X
NOTES
X
Data is stored in IC2102.
The adjustment is needed to compensate for characteristics of parts
including IC201 and MTS level (M01).
Holding down both the VOL-up and CH-up buttons on the TV set in the
service mode for more than 2 seconds will automatically write the above
initial values into IC2102 (or IC2101). Then perf orm a complete adjustment.
Adjust items related to picture tube only.
Adjust items related to MTS only (M01~M20).
Adjust items related to P-IN-P only (P01~P08).
Table - B
8
Page 9

36U-F510
A
B
SERVICE ADJUSTMENT
RF AGC Adjustment
1. Receive a good local channel.
2. Enter the service mode and select the service
adjustment "R01".
3. Set the data value to point where no noise or beat
appears.
4. Select another channel to confir m that no noise or
beat appears.
Note 1 : You will have to come out of the service
mode to select another channel.
Note 2 : Setting the data to "00" will produce a black
raster.
ScreenAdjustment
1. Receive a good local channel.
2. Enter the service mode and select the service
adjustment "V03" and set the data value to "00" to
set the color level to minimum. (Record original data
code under adjustment "V03" before changing) You
may skip this step, if you selected a B/W picture or
monoscope pattern.
3. Select the service adjustment "V18" and adjust the
data value to "01", this turn off the luminance signal
(Y-mute).
4. Adjust the master screen control until the raster
darkens to the point where raster is barely seen.
5. Adjust the service adjustments "V06" red, "V07" green
and "V08" blue to obtain a good grey scale with
normal whites at low brightness level.
6. Select the service adjustment "V18" and reset data
to "00". Select the service adjustment "V03" and reset
data to obtain normal color level.
7. For component input, the data value of "V46" red,
"V47" green and "V48" blue is adjusted to follow the
data value of "V06", "V07" and "V08" respectively.
8. Reset the master screen control to obtain nor mal
brightness range.
Sub-picture and Sub-Bright Adjustments
1. Receive the window pattern signal.
• RF INPUT (TU51)
2. Get into service adjustment data "V01" and "V05"
and set the luminance as shown in figure "A" and "B"
as below respectively.
• RF INPUT (TU52)
3. Get into ser vice adjustment data "V54" and "V58"
and set the luminance as shown in figure "A" and "B"
as below respectively.
• COMPONENT INPUT
4. Get in service adjustment data "V42" and "V45" and
set the luminance as shown in figure "A" and "B" as
below respectively.
VOLTAGE CONFIRMATION
A: 80±10cd/m
B:1.1±0.5cd/m
2
2
Sub-Tint Adjustment
1. Receive the half color bar signal.
• RF INPUT (TU51)
2. Get into Y-Mute by R/C, or by setting the "V18" bus
data to "01".
3. V ary the "V02" bus data until the wa v ef orm becomes
as stated below.
LEVEL
B-AMP Base waveform in step
(TP47B)
White Balance Adjustment
1. Receive a good local channel.
2. Enter the service mode and select the service
adjustment "V03" and set to "00" (minimum
color)(Record original data code under adjustment
"V03" before changing). "V03" does not have to be
adjusted, if you selected a B/W picture or monoscope
pattern.
3. Alternately adjust the ser vice adjustment data of
"V09" and "V10" until a good grey scale with normal
whites is obtained. (RF Input)
4. For component input, the data value of "V49" and
"V50" is adjusted to follow the data value of "V09"
and "V10" respectively.
5. Select the service adjustment "V03" and reset data
to obtain normal color level.
4. Input data of "V55" to minus 1 step from "V02" data.
• AV INPUT
5. Input data of "V41" to minus 5 step from "V02" data.
Sub-Color Adjustment
1. Receive a good local channel.
2. Make sure the customer color control is set to center
position .
• RF INPUT (TU51)
3. Enter the service mode and select service adjustment
"V03".
4. Adjust "V03" data value to obtain a normal color level.
5. Enter the service mode and select service adjustment
"V56".
6. Input the data of "V56" same as "V03" data.
9
Page 10
36U-F510
Focus Adjustment
1. Receive a good local channel.
2. Adjust the VR-1 (upper knob) and VR-2 (middle knob)
of the flyback transformer to make the image as fine
as possible.
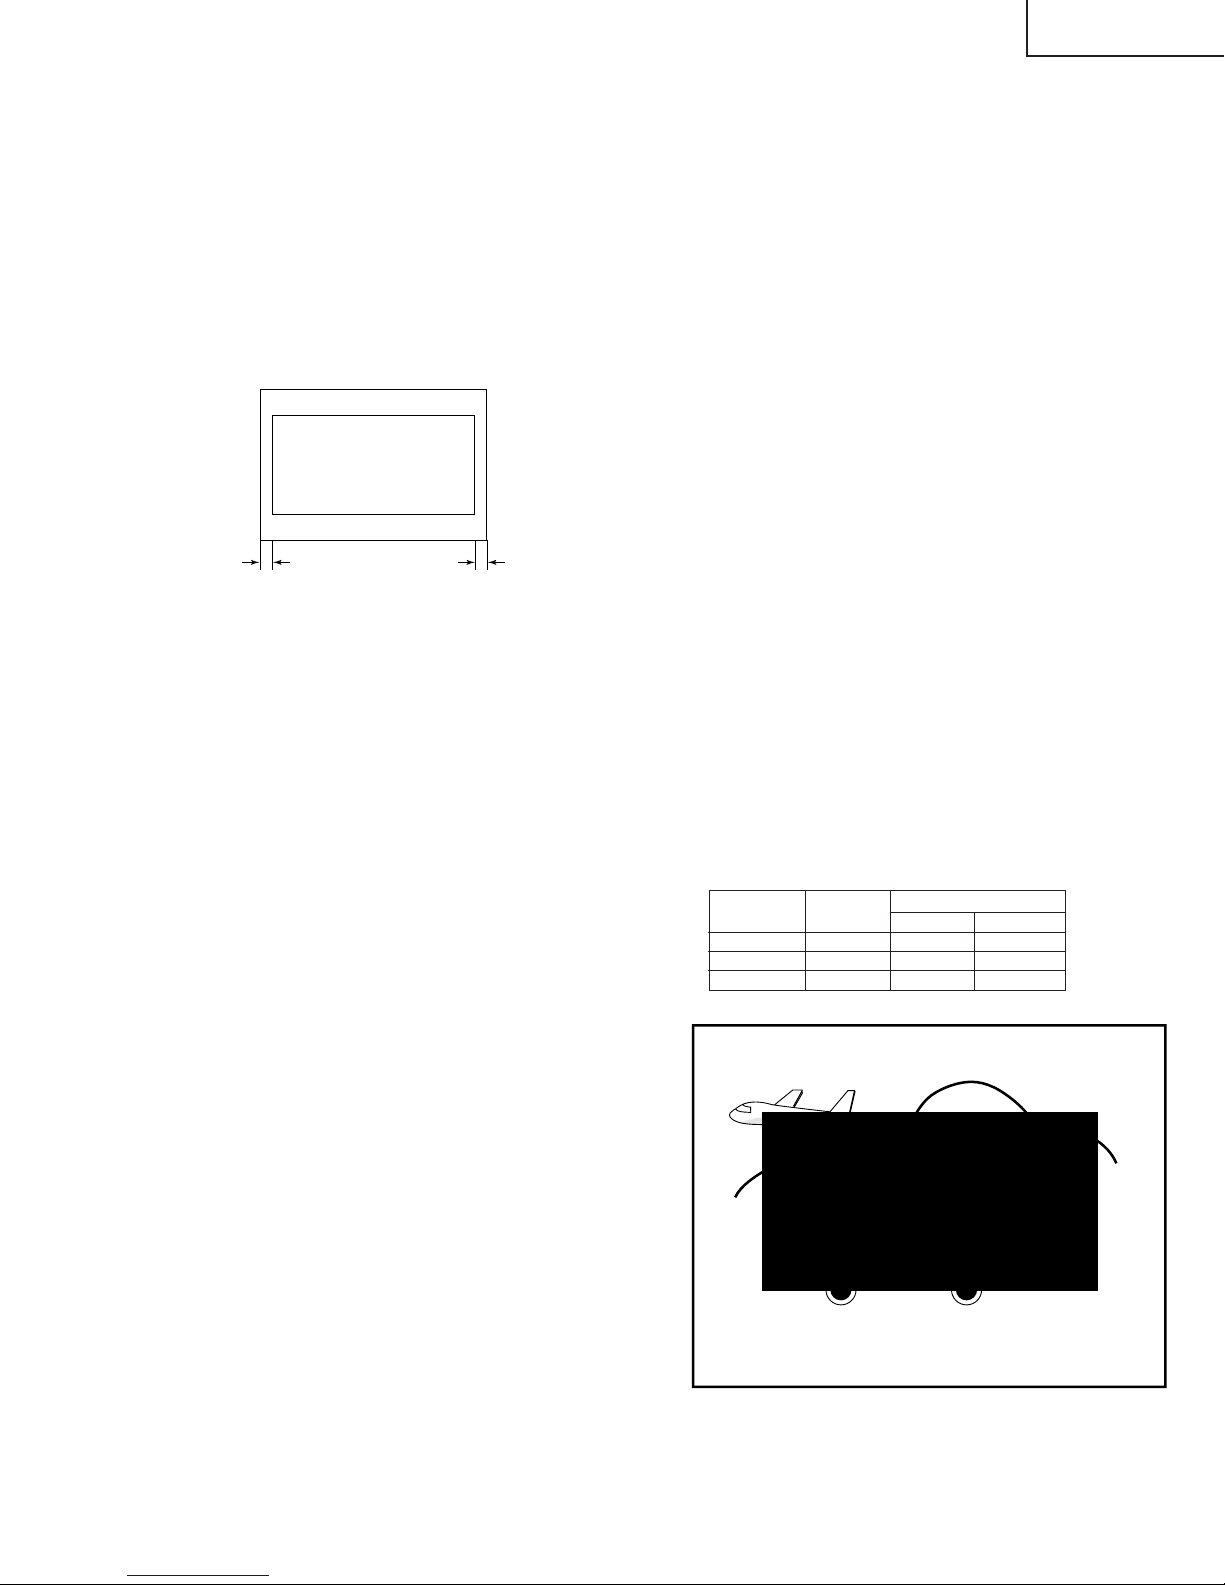
C. C Display Position Adjustment
1. Receive the lion head pattern signal.
2. Select "EX2" to display the text box.
3. Adjust the "EX2" bus data to let the text bo x display ed
in the center.
DISPLAY OF TEXT BOX
TEXT BOX
A
SPEC INSPECTION:| A-B | / 2
B
<
5mm
=
| A-B | / 2
Vertical-Size and Linearity Adjustments
1. Receive a good local channel.
2. Enter the service mode and select the service
adjustment "D03" for V-size.
3. Adjust the "D03" bus data to get the proper V-size.
4. For V-linearity adjustment, select data bus "D05" and
adjust to get the proper vertical linearity.
Note: Aging for 10 min before adjustment. After the
adjustment of V-center and V-size, readjustment for this V-line.
Vertical Phase Adjustment
1. Enter the service mode and select the service
adjustment "D01".
2. Adjust "D01" data value so that picture is centered.
Horizontal-Size Adjustment
1. Receive a good local channel.
2. Enter the service mode and select the service
adjustment "D04" for H-size.
3. Adjust the "D04" bus data to get the proper H-size.
EW-Parabola
1. Receive a good local channel.
2. Enter the service mode and select the service
adjustment "D07" for EW parabola.
3. Adjust the "D07" bus data to get the proper vertical
straight line for both left and right side.
EW-Trapezium
1. Receive a good local channel.
2. Enter the service mode and select the service
adjustment "D08" for EW-Trapezium.
3. Adjust the "D08" bus data to get the best position
display.
EW-Corner
1. Receive a good local channel.
2. Enter the service mode and select the service
adjustment "D09" for EW-Corner.
3. Adjust the "D09" bus data to get the best linearity for
4 corner points.
Other Adjustments
1. Enter the service mode.
2. Adjust the following data values as listed below.
SERVICE ADJUST DATA(Hex)
POSITION ITEM
OP1 OPTION1 F5
OP2 OPTION2 18
OP3 OPTION3 0F
Horizontal Position Adjustment
1. Receive a good local channel.
2. Enter the service mode and select the service
adjustment "D02".
3. Adjust "D02" data value so that picture is centered.
Caption Position Adjustment (Horizontal)
1. Receive a good local channel.
2. Enter the service mode and select the service
adjustment "EX2".
3. A black text box appears on the screen. (see
B.
)
4. Adjust "EX2" data value so that text bo x is positioned
in the center of the screen.
Figure
Figure B.
10
Page 11

36U-F510
Ë
MTS ADJUSTMENT
MTS Level Adjustment
1. Set the sound volume above 1.
Monoral signal: 400Hz, 100% modulation
2. Confirm "M01" data is "09h".
3. Vary the "EX4" bus data until the voltage to pin (39)
of IC3001.
4. Become the value as stated below.
ADJ spec : 490±10mVrms
CHK spec: 490±20mVrms
MTS VCO Adjustment
1. Keep the unit in no-signal state.
2. Connect the frequency counter to pin (39) of IC3001.
3. Connect a capacitor (100µF, 50V) in between
positive(+) side of C3005 and ground.
4. Enter the service mode and select the service
adjustment "M02"
5. Adjust the data so that the frequency counter reads
62.94 ±0.75kHz.
Filter Adjustment
1. Feed the following stereo pilot signal to pin (14) of
IC3001 .
Stereo pilot signal: 9.4kHz, 600mVrms.
2. Enter the service mode and select the service
adjustment "M03".
3. Adjust the data until "OK" appears in position on the
screen. Make sure the "OK" is displayed almost at
the center of the data range.
Separation Adjustment
1. Input "SIGNAL 1" and vary the "M04" bus data to get
the minimun AC voltage to pin (39) of IC3001.
2. Input "SIGNAL 2" and vary the "M05" bus data to get
the minimun AC voltage to pin (39) of IC3001.
SIGNAL 1:
SIGNAL 2: 3kHz, 30% modulation, Lch only, NR-ON
Note: SIGNAL 1 Adj. for wideband
SIGNAL 2 Adj. for spectral
Check the output of the speaker at the maximum
volume as stated below.
Confirmation spec:
ADJ spec: above 25 dB
CHK spec: above 20 dB
300Hz, 30% modulation, Lch only, NR-ON
1. Receive a good local channel.
2. Enter the service mode and select the service
adjustment "P01".
3. Adjust "P01" data value to obtain normal contrast
level.
P-IN-P TINT Adjustment
1. Receive a good local channel.
2. Enter the service mode and select the service
adjustment "P02".
3. Adjust data value to "29".
P-IN-P COLOR Adjustment
1. Receive a good local channel.
2. Make sure the customer color control is set to center
position.
3. Enter the service mode and select the service
adjustment "P03".
4. Adjust "P03" data value to obtain normal color level.
P-IN-P Y-OFF SET Adjustment
1. Receive a good local channel.
2. Enter the service mode and select the service
adjustment "P04".
3. Adjust data value to "09".
P-IN-P H-POSITION Adjustment
1. Receive a good local channel.
2. Enter the service mode and select the service
adjustment "P05".
3. Adjust data value to "0A".
P-IN-P BURST GATE PULSE (for MAIN)
1. Receive a good local channel.
2. Enter the service mode and select the service
adjustment "P06".
3. Adjust data value to "00".
P-IN-P FREERUN
1. Receive a good local channel.
2. Enter the service mode and select the service
adjustment "P07".
3. Adjust data value to "0B".
11
Page 12
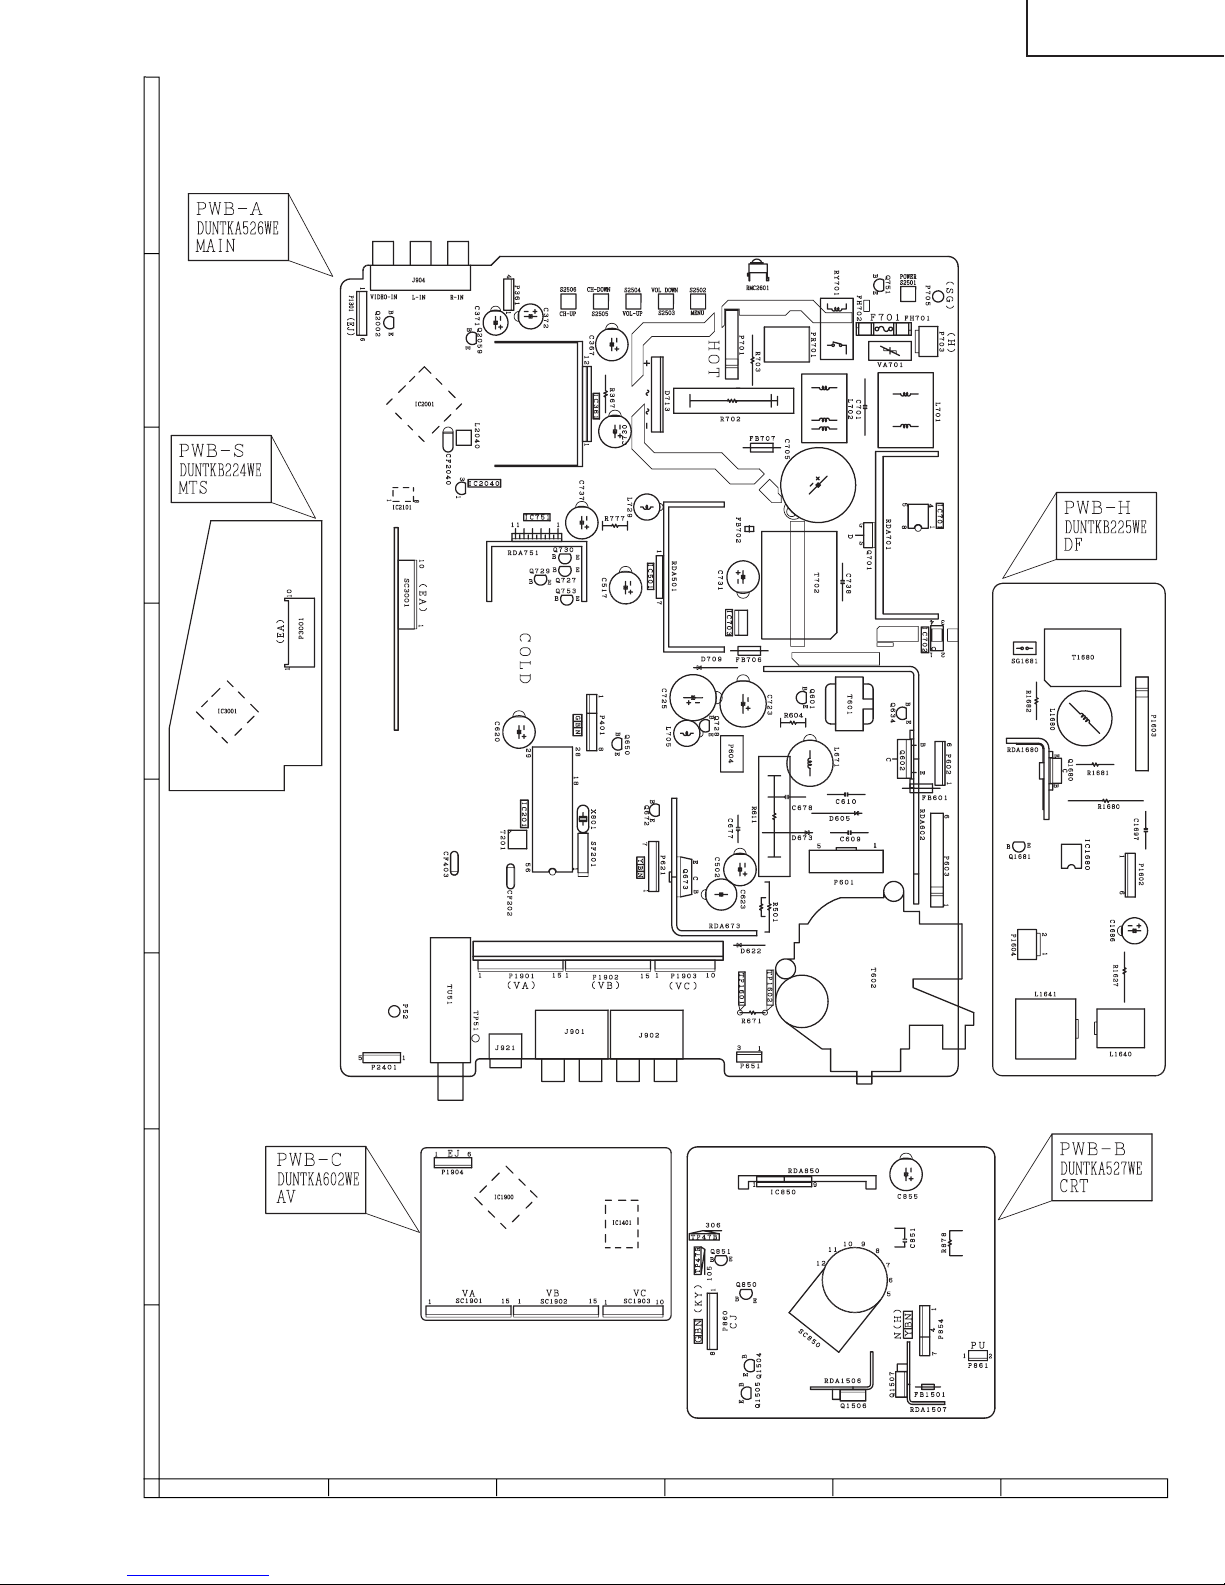
MODEL 36U-F500 CHASSIS LAYOUT
H
G
F
36U-F510
E
D
C
B
A
654321
12
Page 13
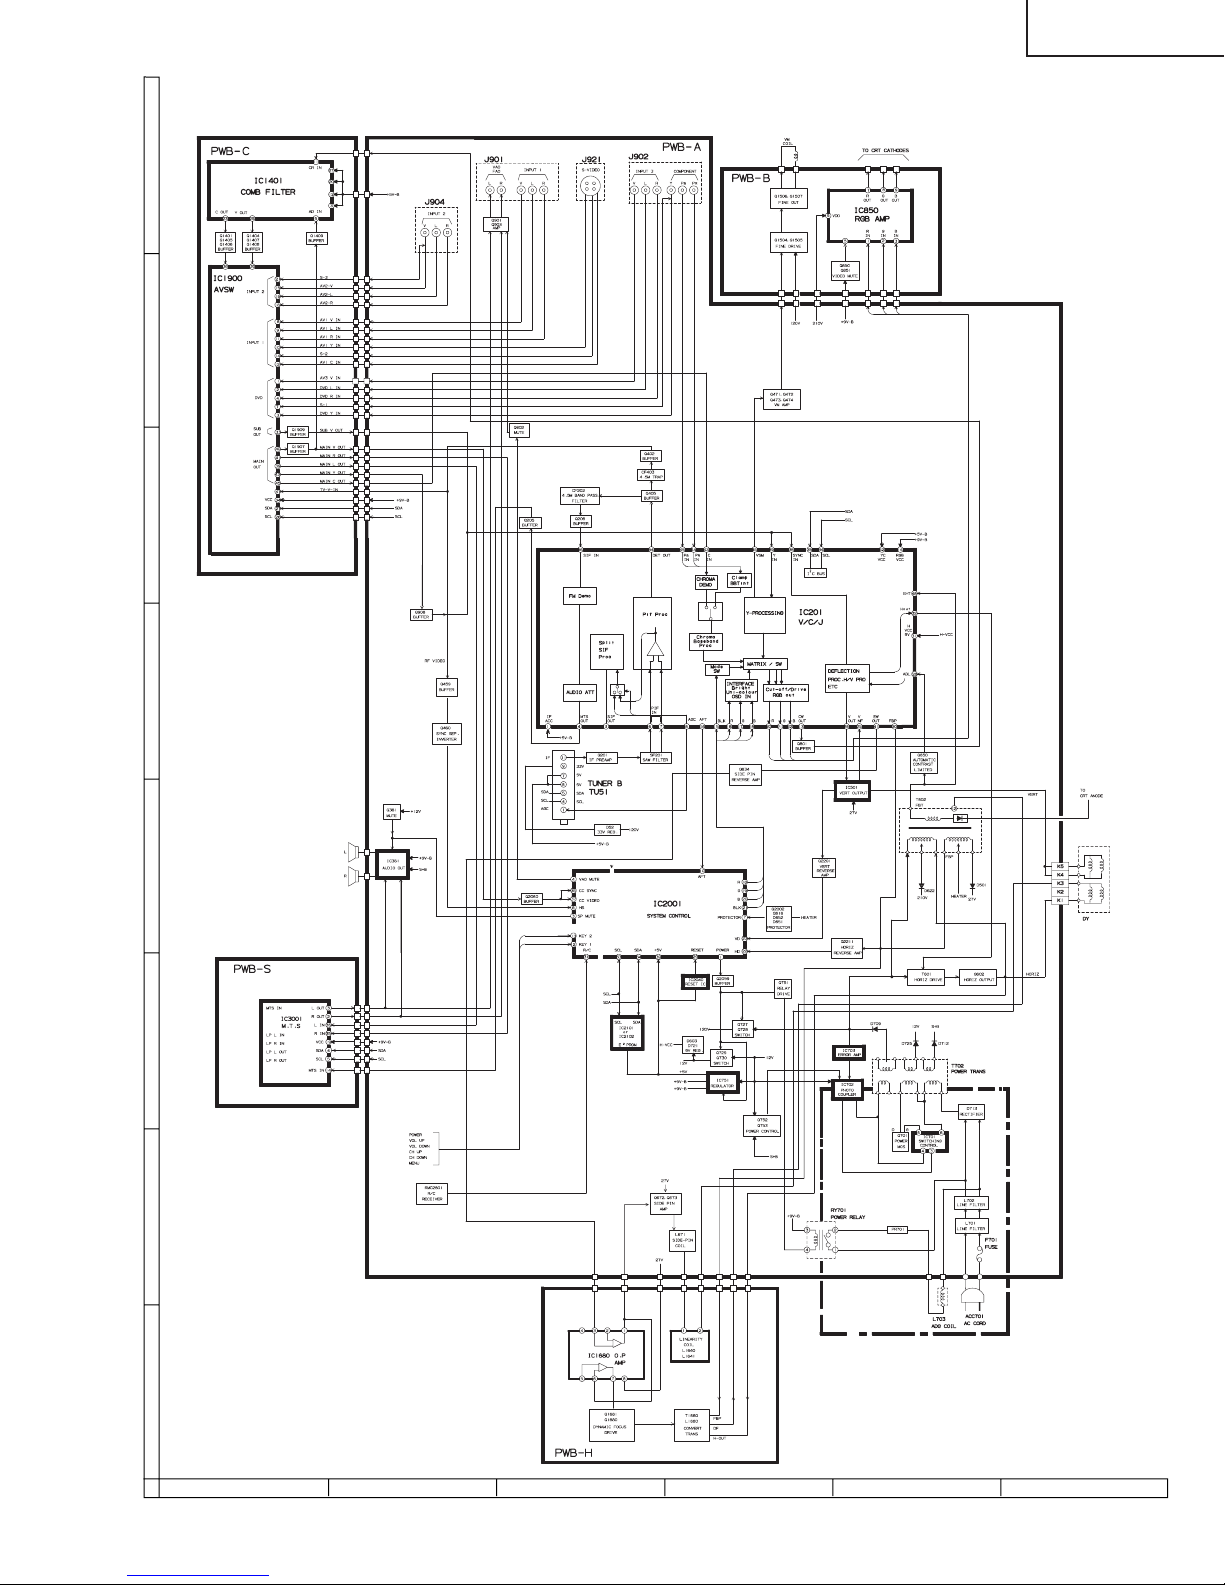
MODEL 36U-F500 BLOCK DIAGRAM
H
G
F
36U-F510
E
D
C
B
A
654321
13
Page 14
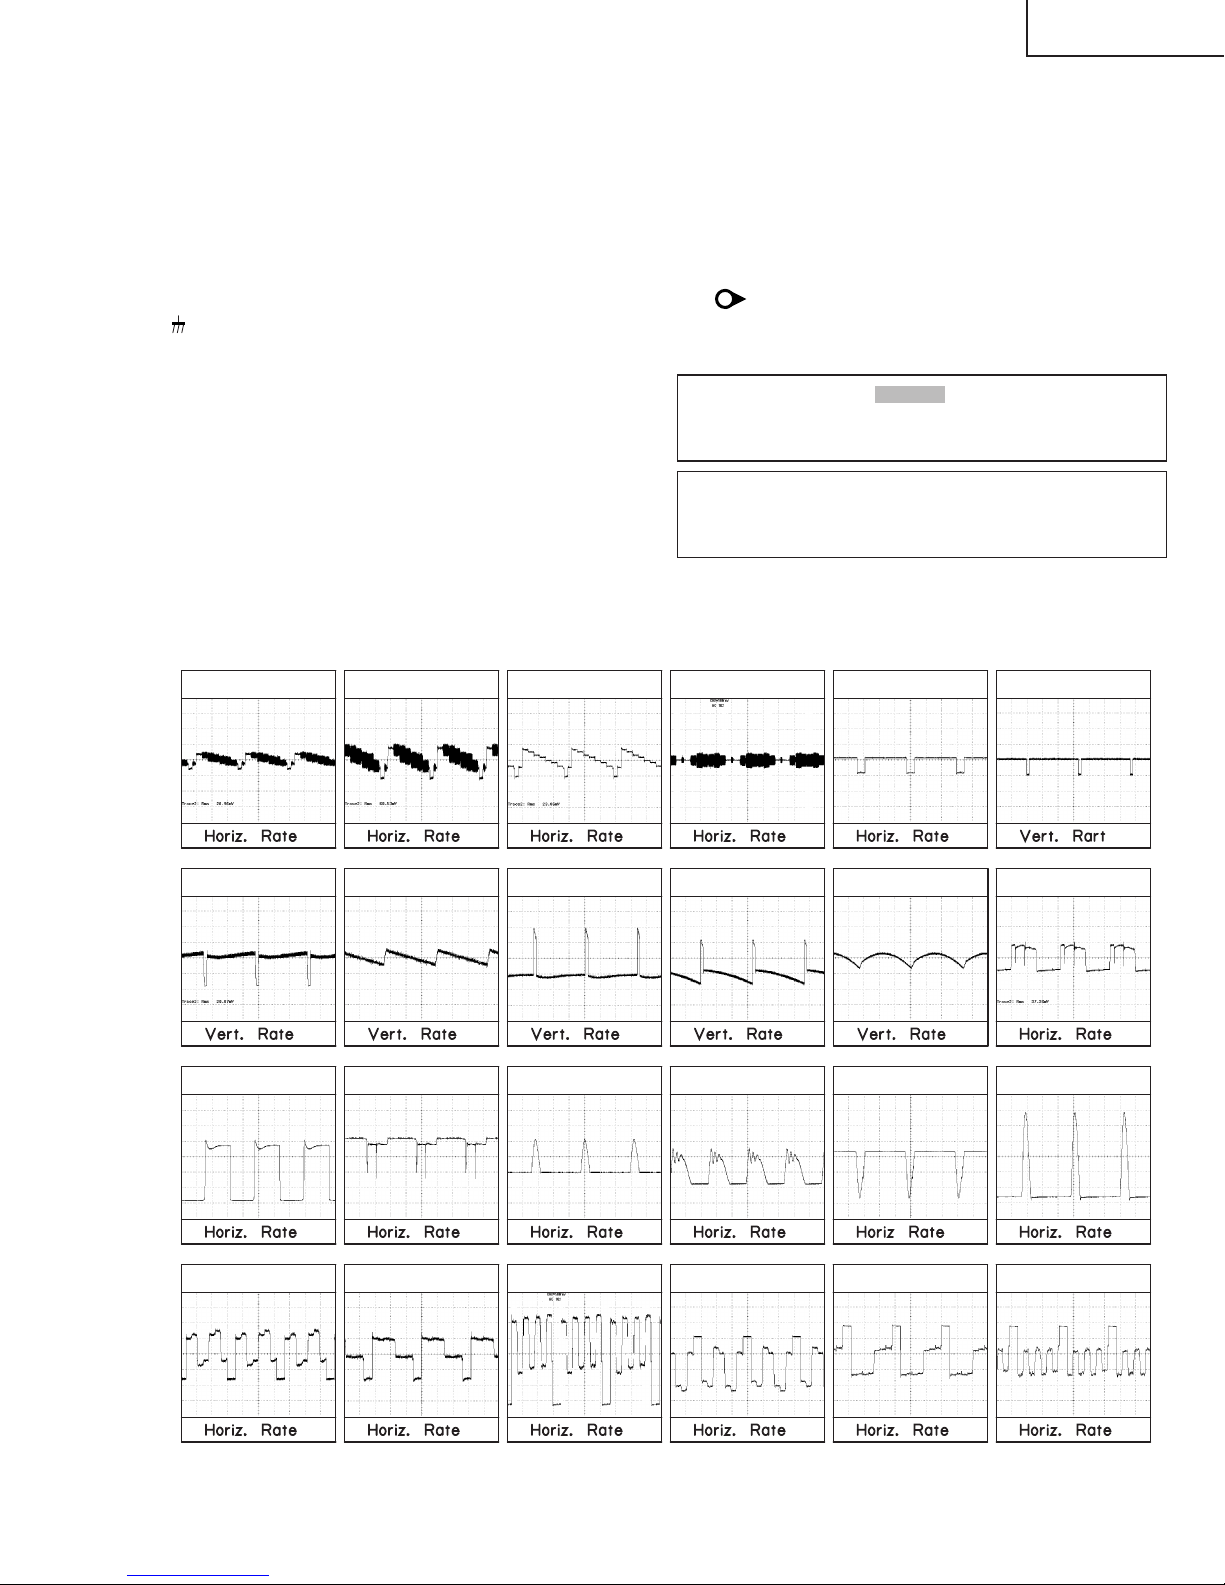
DESCRIPTION OF SCHEMATIC DIAGRAM
1 1.2 Vp-p 2 2.3 Vp-p 3 1.0 Vp-p 4 0.5 Vp-p 5 5 Vp-p 6 5 Vp-p
7 1.1 Vp-p 8 1.5 Vp-p 9 30 Vp-p 0 53 Vp-p q 5.4 Vp-p w 0.8 Vp-p
e 190 Vp-p r 15 Vp-p t 1050 Vp-p y 900 Vp-p u 220 Vp-p i 27 Vp-p
o 3.0 Vp-p p 3.0 Vp-p a 3.0 Vp-p s 140 Vp-p d 130 Vp-p f 130 Vp-p
36U-F510
NOTES:
1. The unit of resistance "ohm" is omitted.
(K=kΩ=1000Ω, M=MΩ)
2. All resistors are 1/16 watt, unless otherwise noted.
3. All capacitors are µ F, unless otherwise noted.
(P=pF=µµF)
4. (G) indicates ±2% tolerance may be used.
5. indicates line isolated ground.
VOLTAGE MEASUREMENT CONDITIONS:
1. All DC voltages are measured with DVM connected
between points indicated and chassis ground, line
voltage set at 120V AC and all controls set f or normal
picture unless otherwise indicated.
2. All voltages measured with 1000µ V B & W or Color
signal.
WAVEFORMS
WAVEFORM MEASUREMENT CONDITIONS:
1. Photographs taken on a standard gated color bar
signal, the tint setting adjusted for proper color. The
wave shapes at the red, green and blue cathodes of
the picture tube depend on the tint, color level and
picture control.
2.
indicates waveform check points (See chart,
waveforms are measured from point indicated to
chassis ground.)
å
AND SHADED ( ) COMPONENTS
= SAFETY RELATED PARTS.
ç
MARK= X-RAY RELATED PARTS.
This circuit diagram is a standard one, printed circuits
may be subject to change for product improvement
without prior notice.
14
Page 15
16
36U-F510
15
121110987654321
A
B
C
D
E
F
G
H
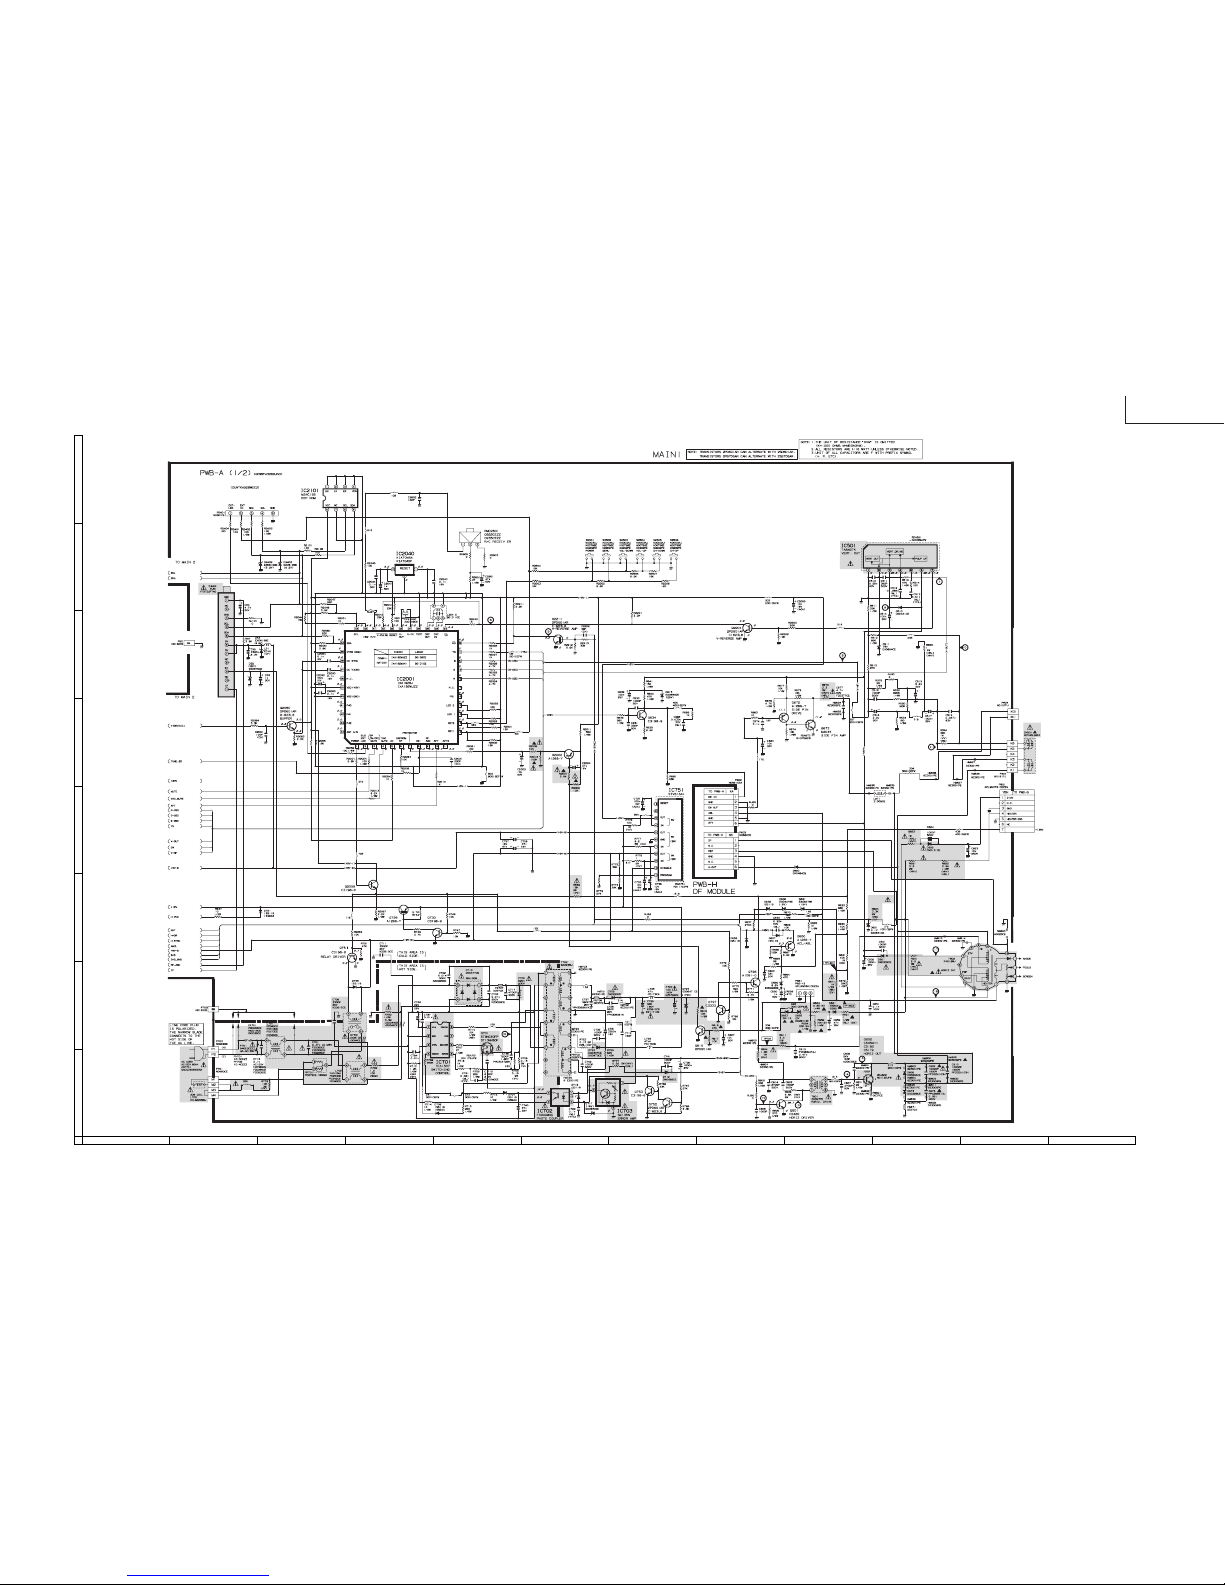
MODEL 36U-F510 SCHEMATIC DIAGRAM: MAIN-1 Unit
Page 16
18
36U-F510
17
121110987654321
A
B
C
D
E
F
G
H
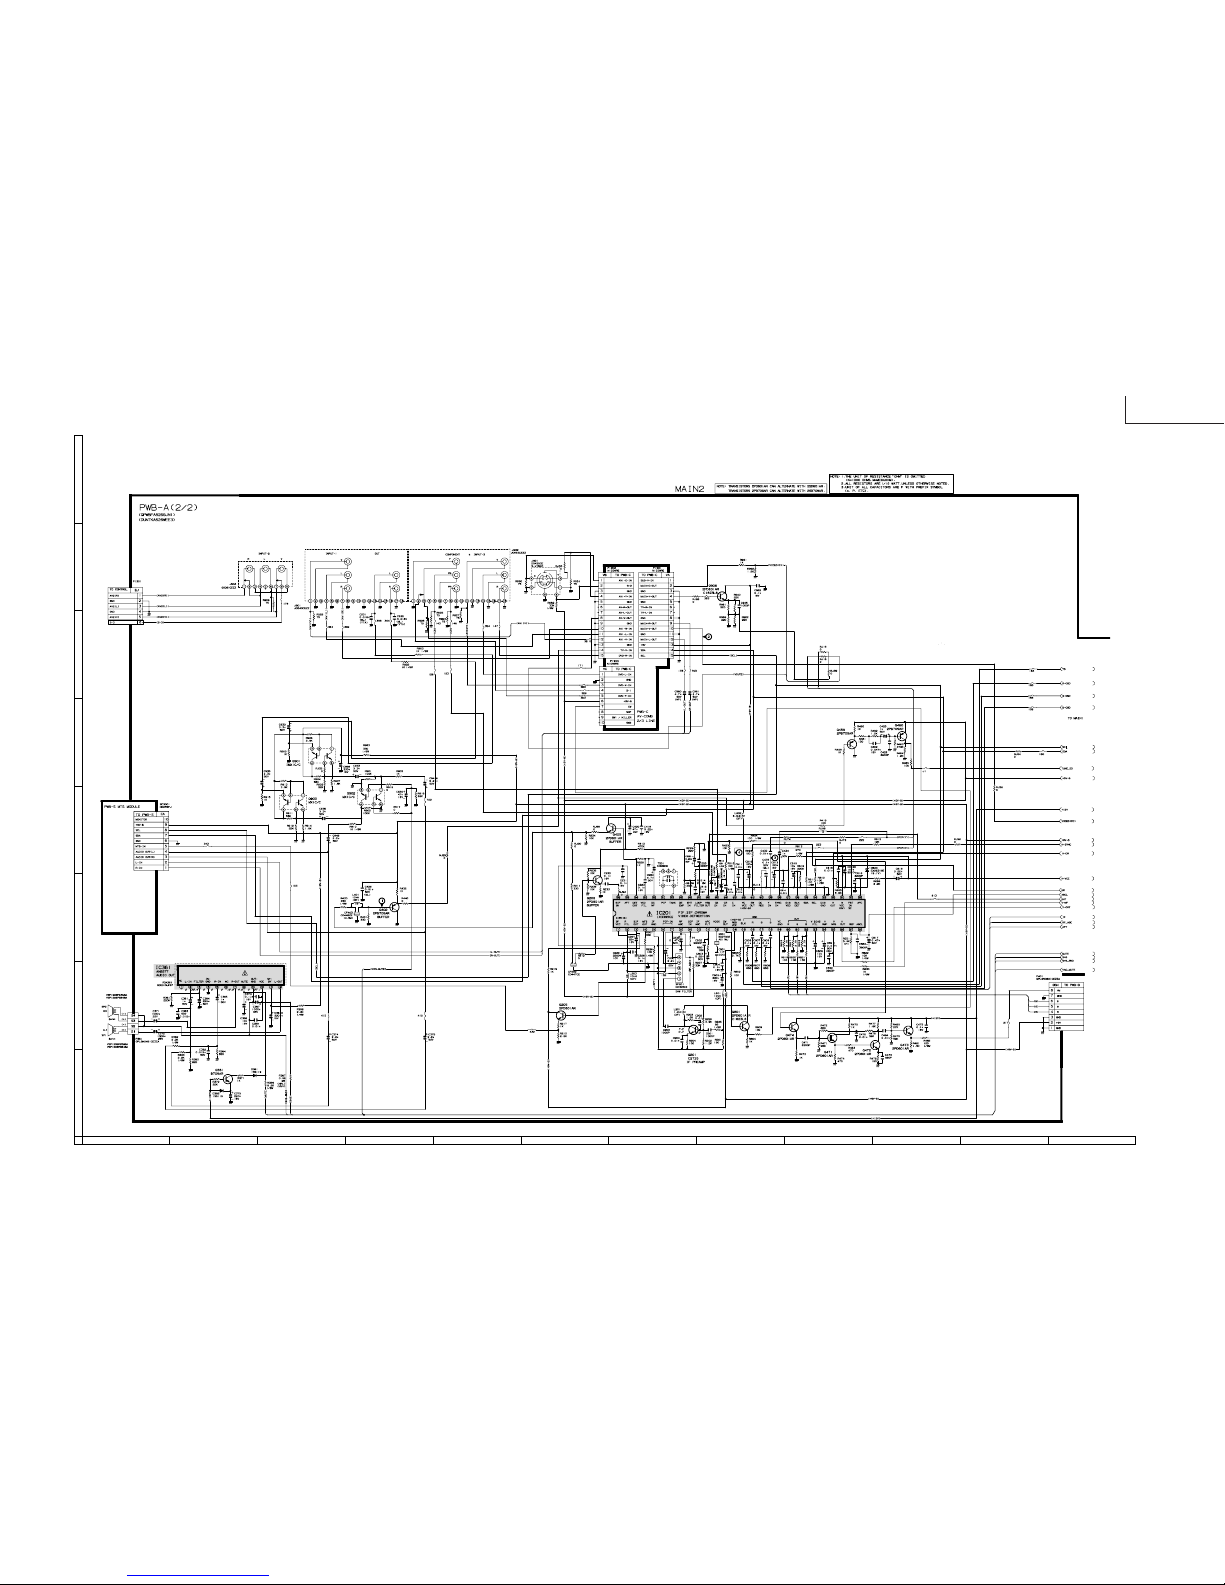
MODEL 36U-F510 SCHEMATIC DIAGRAM: MAIN-2 Unit
Page 17
20
36U-F510
19
121110987654321
A
B
C
D
E
F
G
H
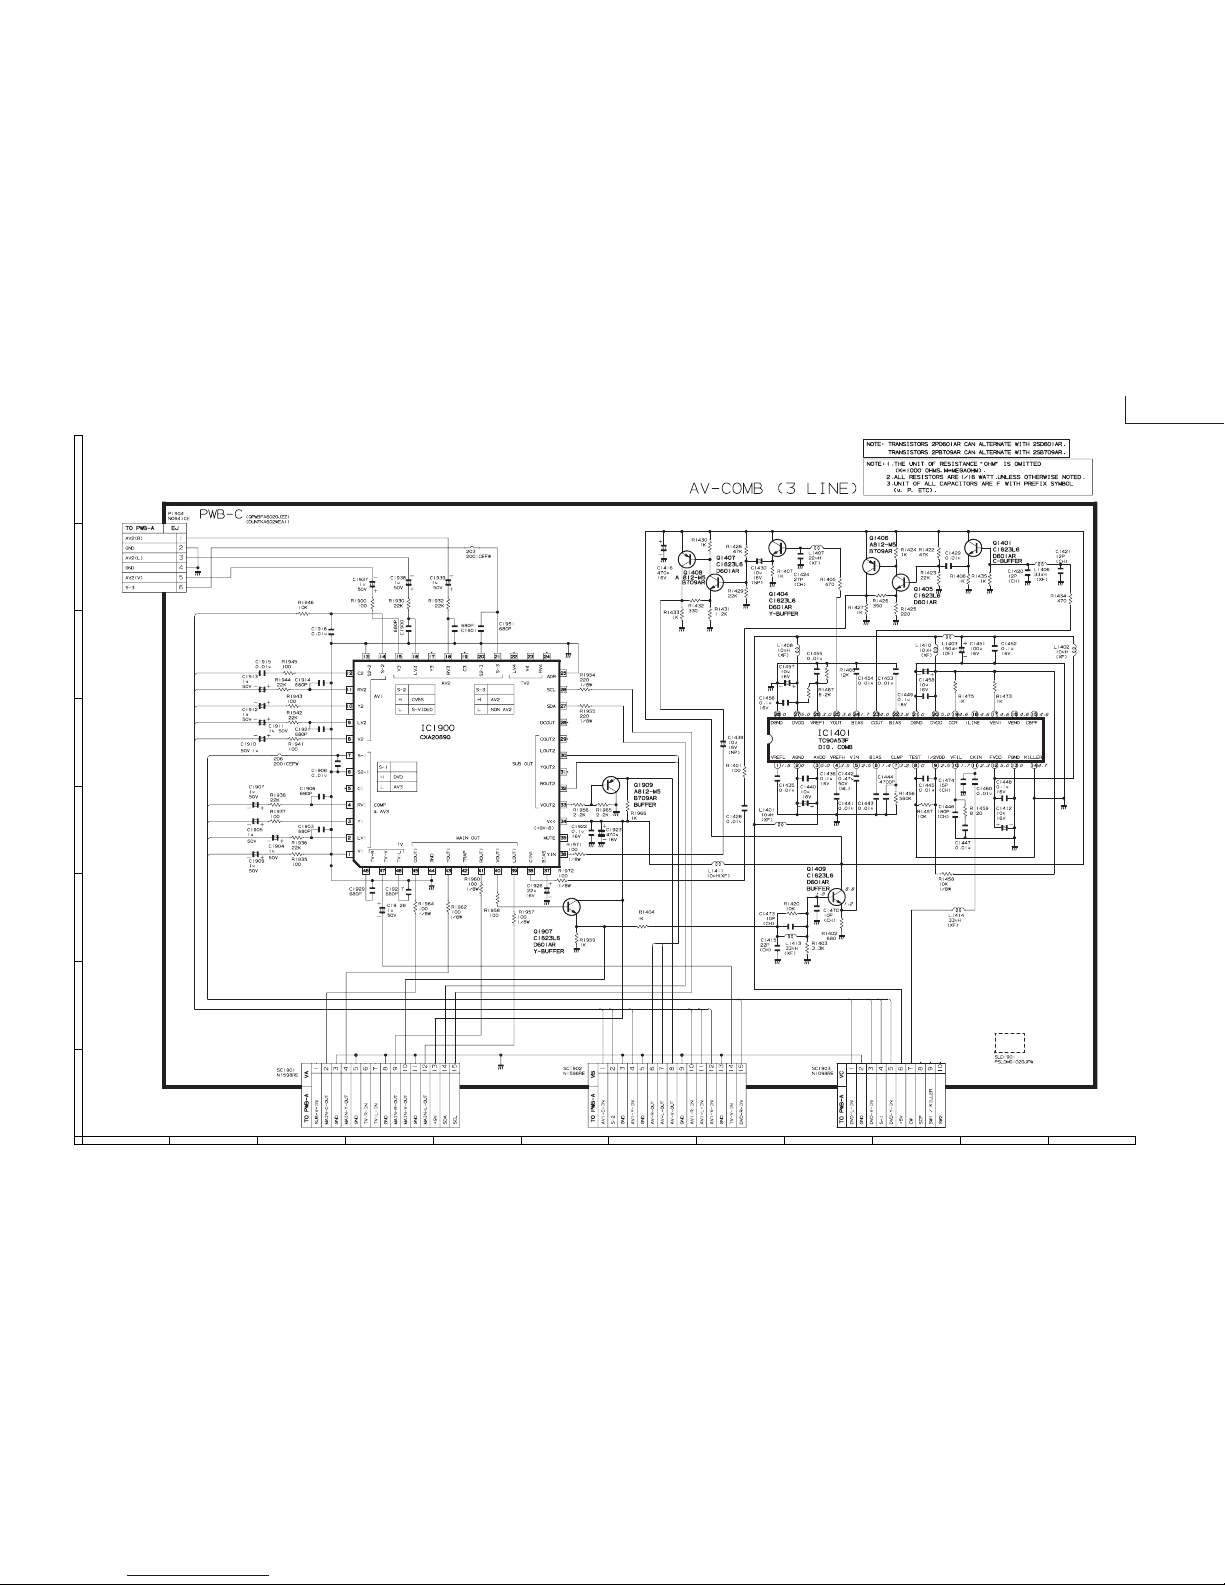
SCHEMATIC DIAGRAM: AV Unit
Page 18
36U-F510
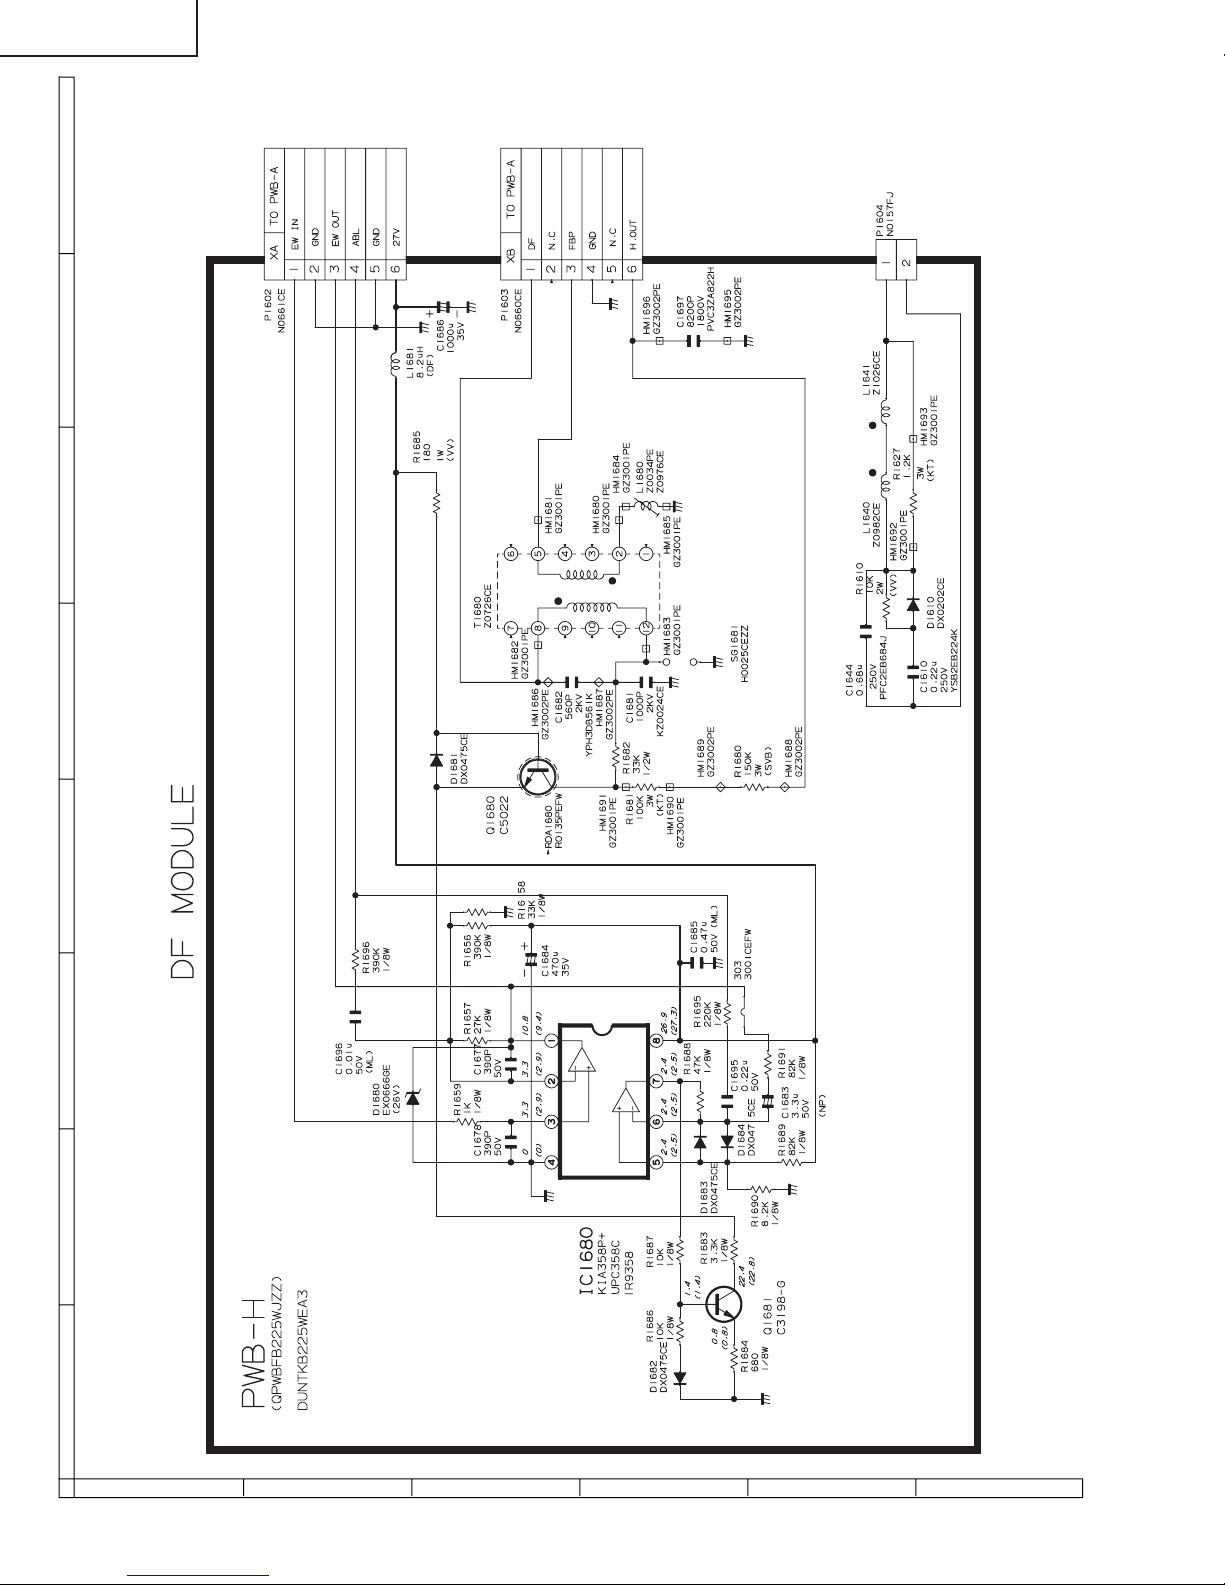
SCHEMATIC DIAGRAM: DF MODULE Unit
H
G
F
E
D
C
B
A
654321
21
Page 19
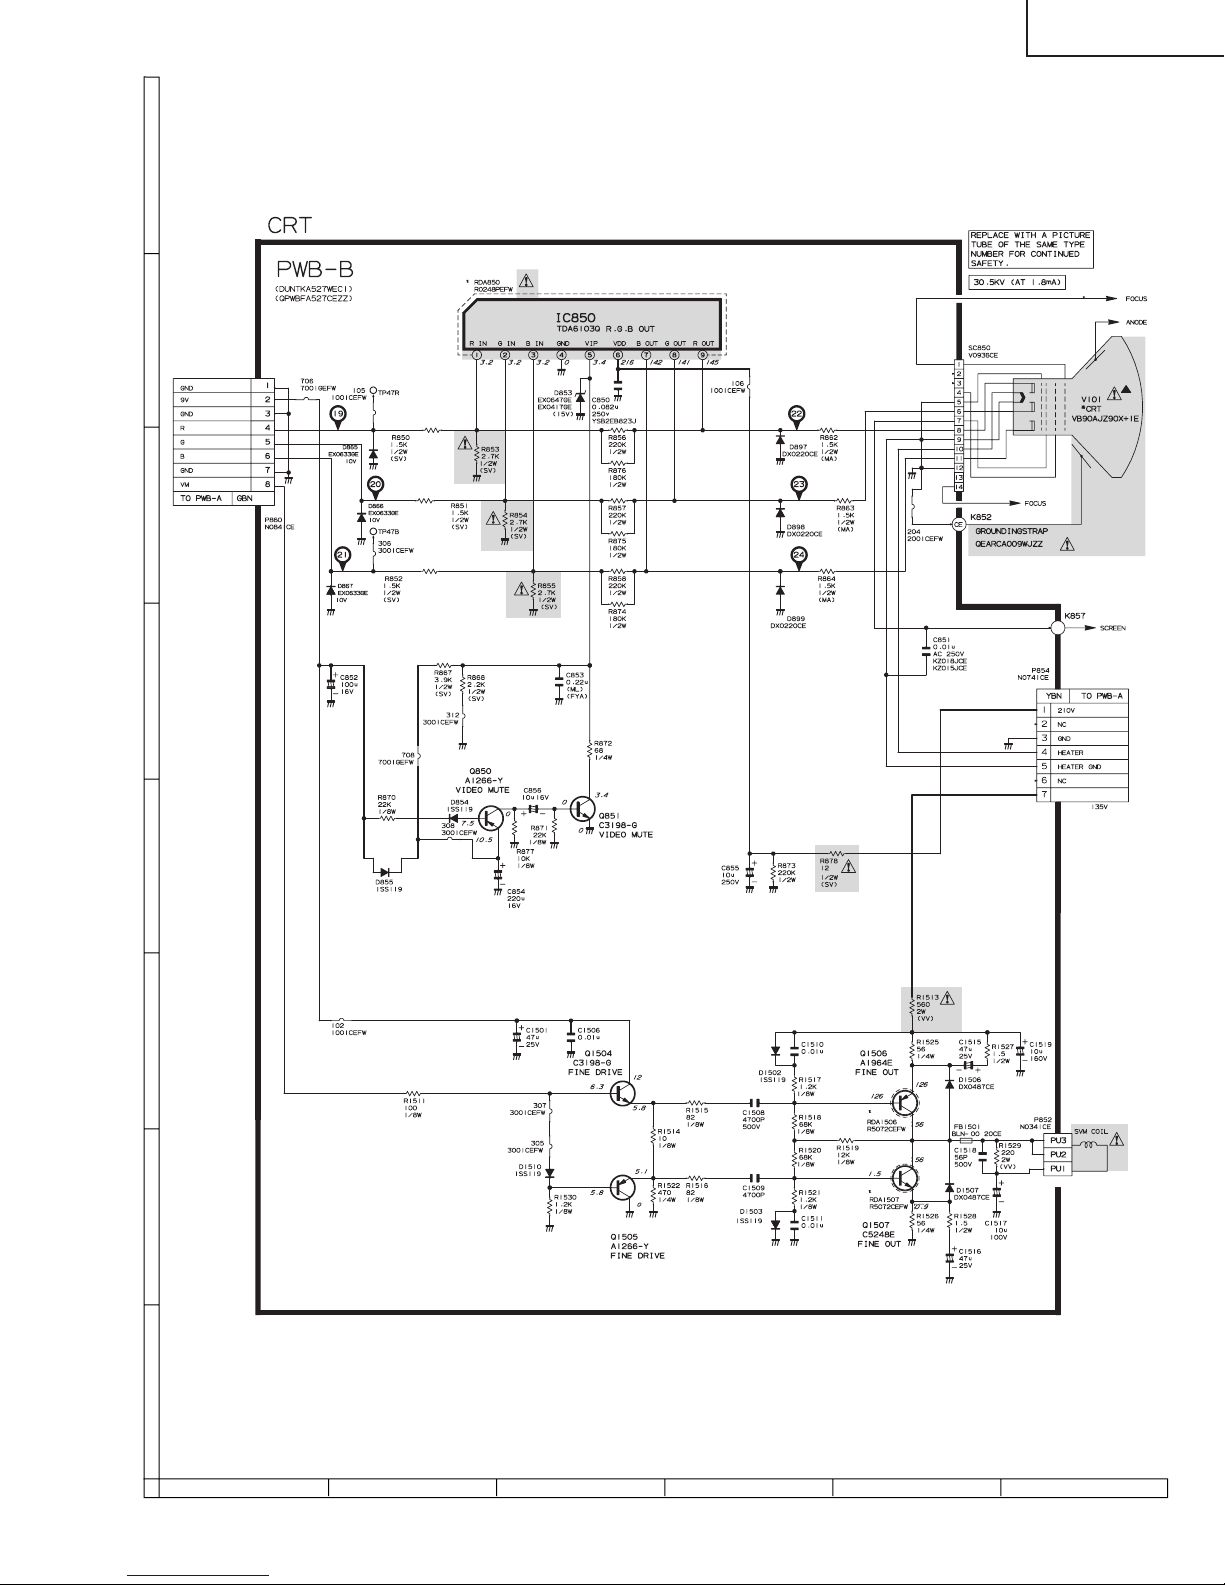
SCHEMATIC DIAGRAM: CRT Unit
H
G
F
36U-F510
E
D
C
B
A
654321
22
Page 20
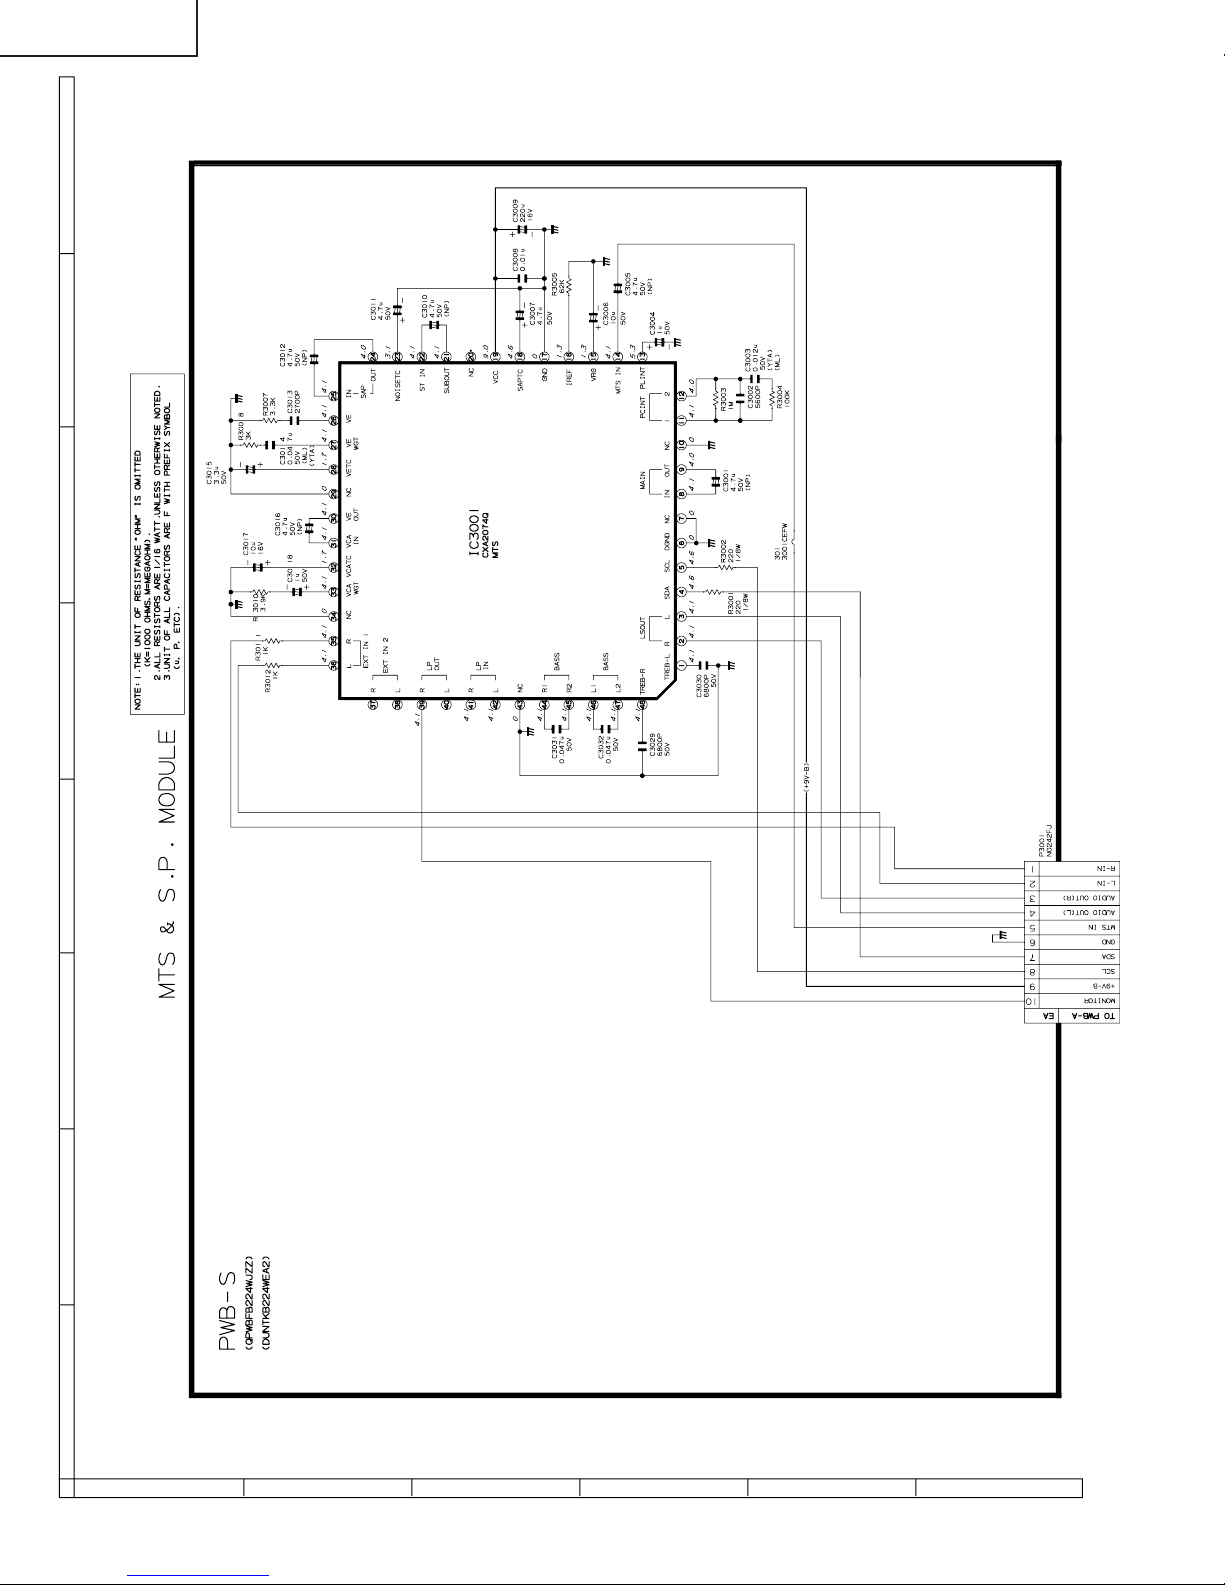
36U-F510
SCHEMATIC DIAGRAM: MTS MODULE Unit
H
G
F
E
D
C
B
A
654321
23
Page 21
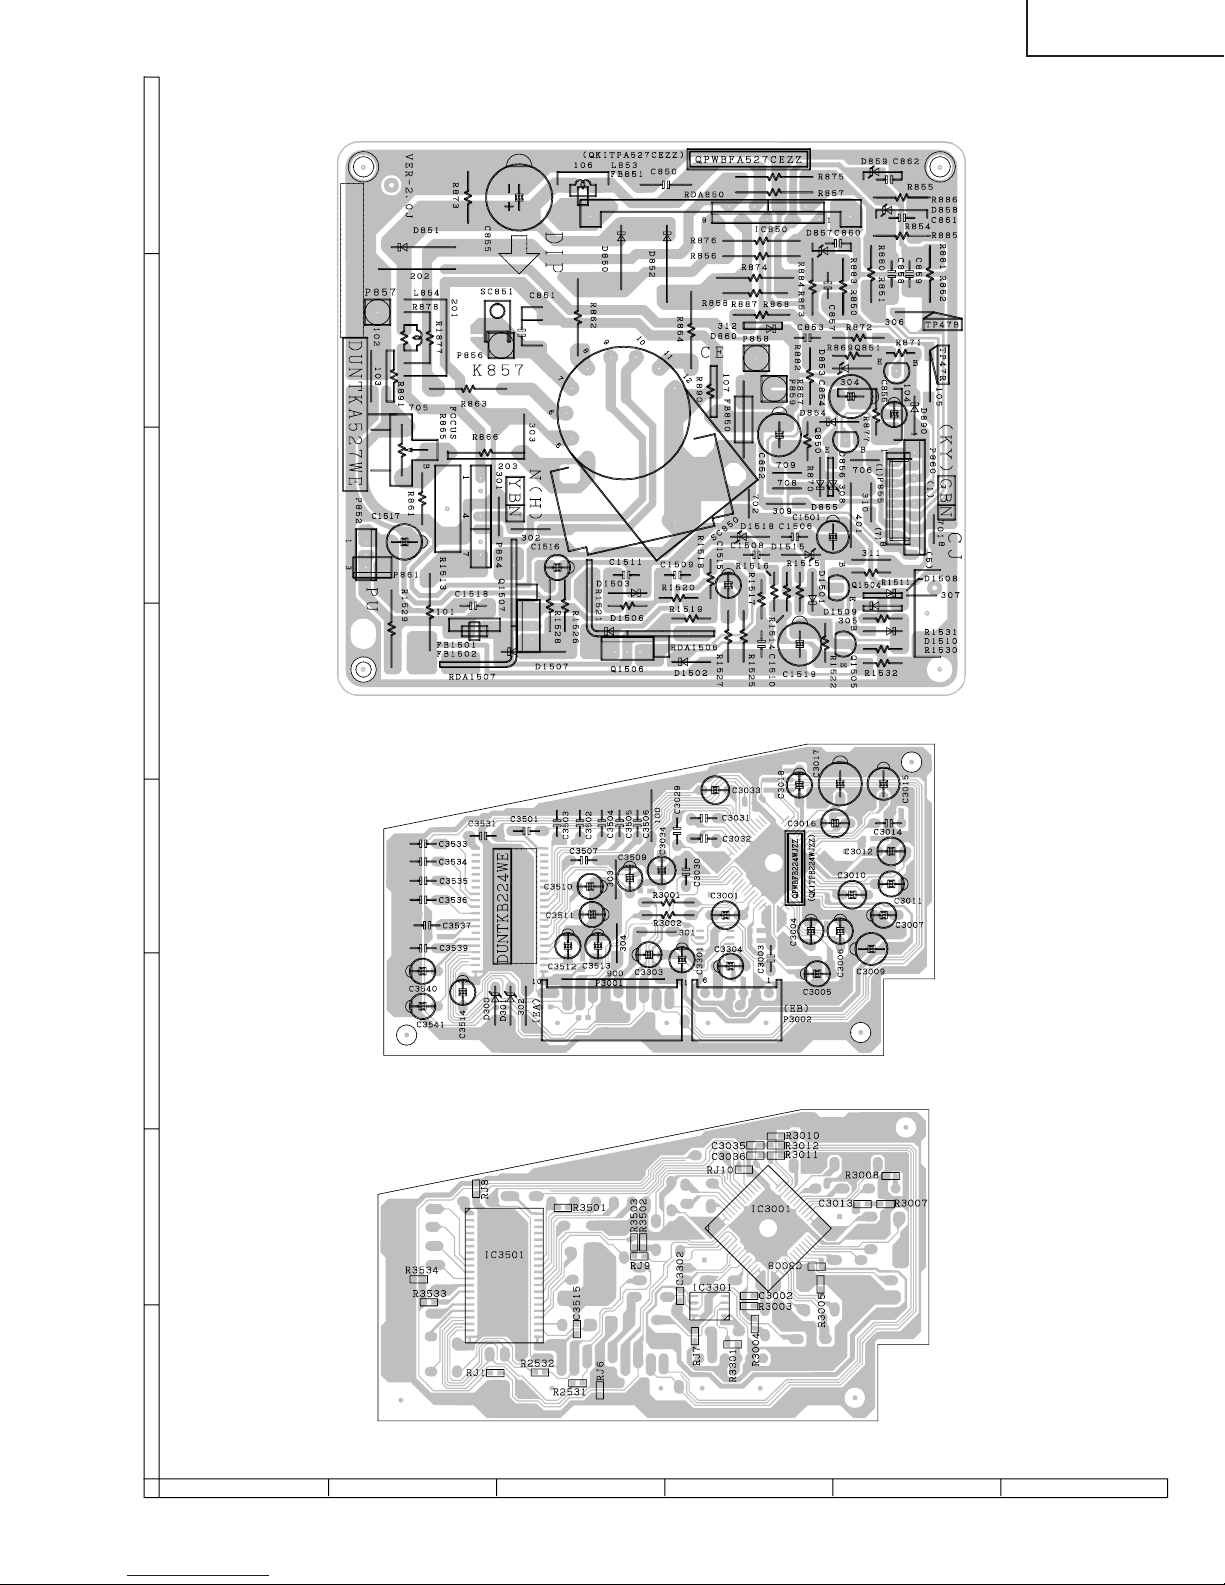
PRINTED WIRING BOARD ASSEMBLIES
H
G
F
36U-F510
E
PWB-B: CRT Unit (Wiring Side)
D
C
PWB-S: MTS MODULE Unit (Wiring Side)
B
A
PWB-S: MTS MODULE Unit (Chip Parts Side)
654321
24
Page 22
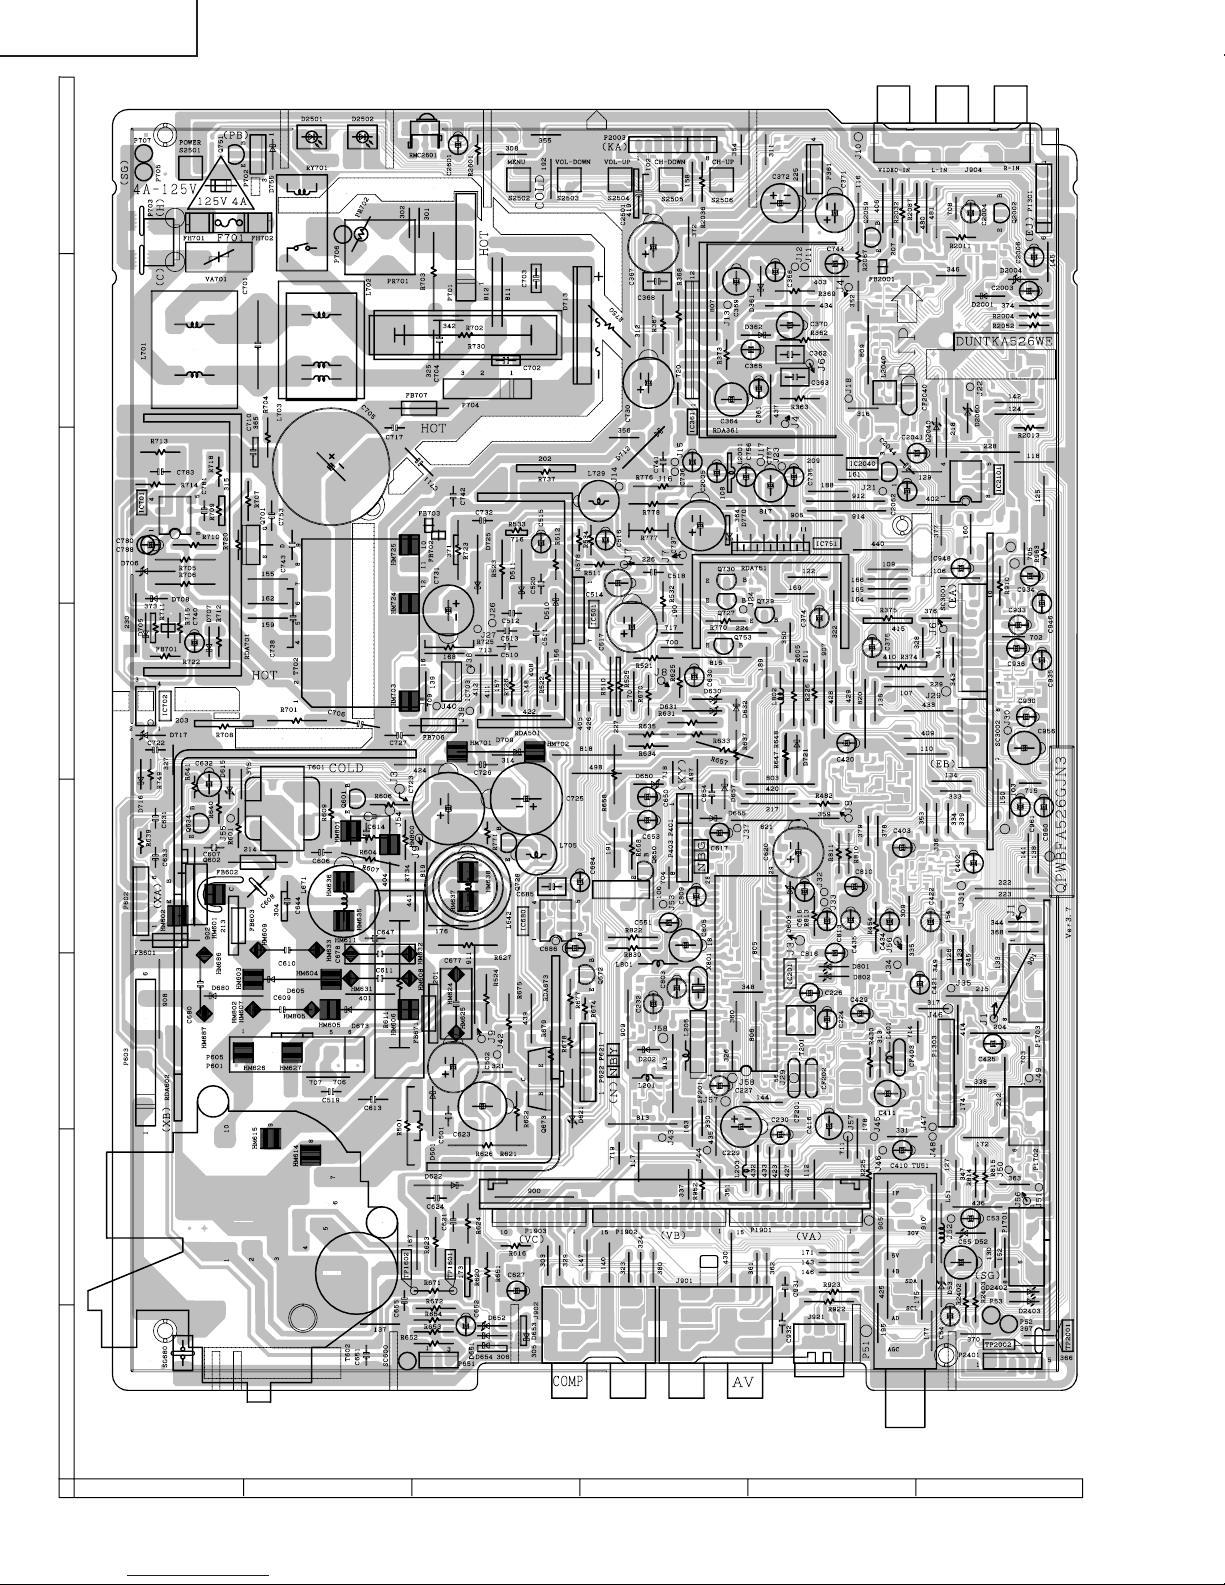
36U-F510
H
G
F
E
D
C
B
A
PWB-A: MAIN Unit (Wiring Side)
654321
25
Page 23
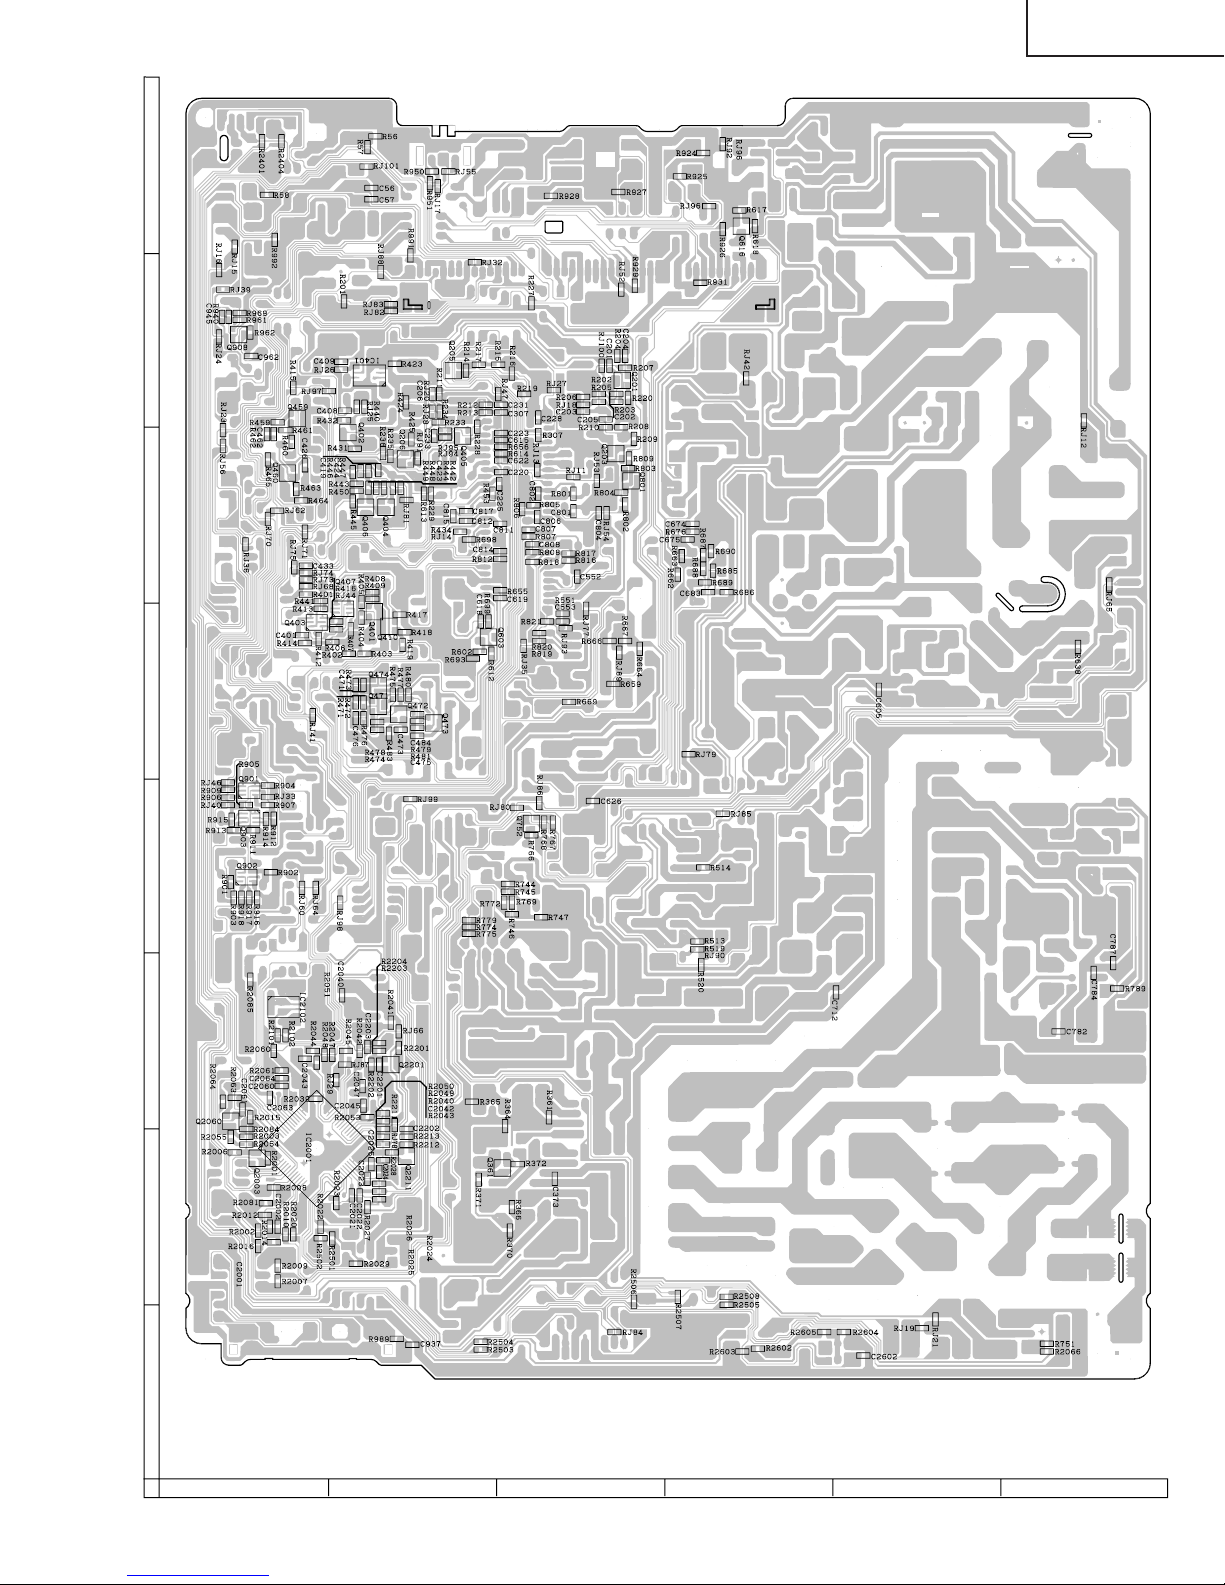
36U-F510
H
G
F
E
D
C
B
A
PWB-A: MAIN Unit (Chip Parts Side)
654321
26
Page 24
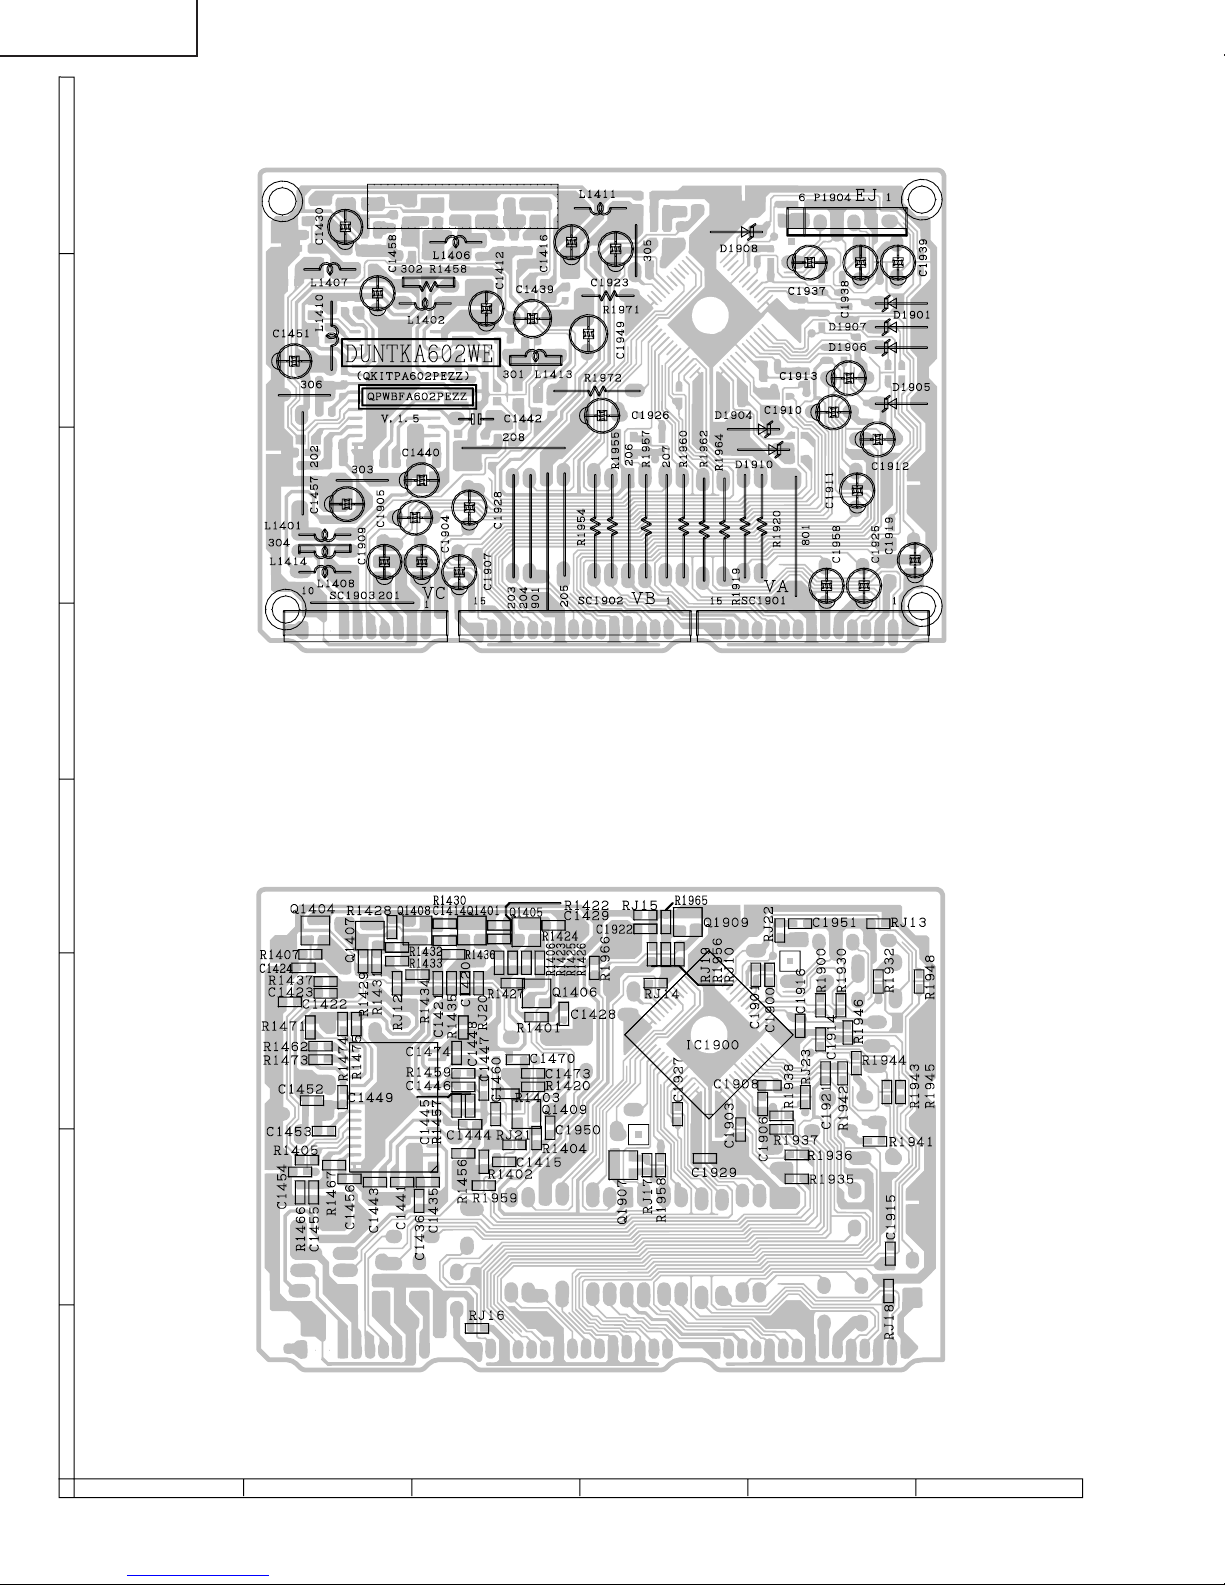
36U-F510
H
G
F
E
PWB-C: AV Unit (Wiring Side)
D
C
B
A
PWB-C: AV Unit (Chip Parts Side)
654321
27
Page 25
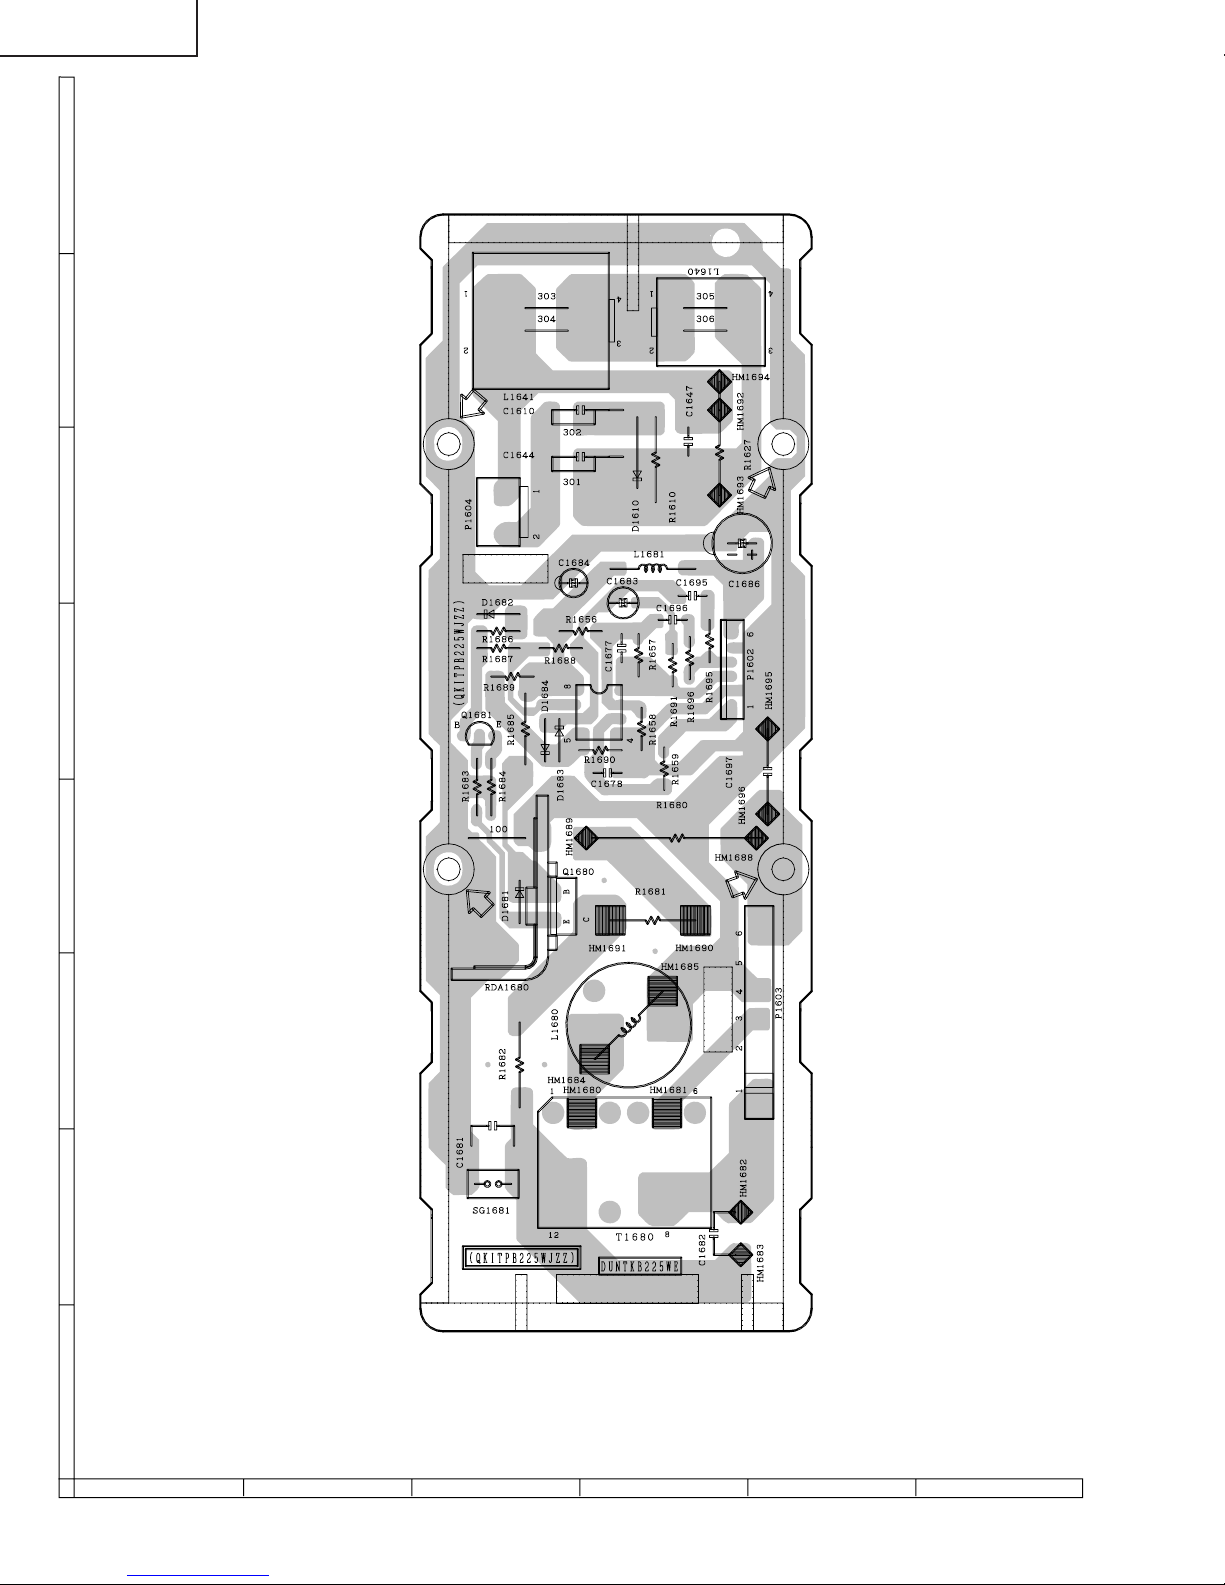
36U-F510
H
G
F
E
D
C
B
A
PWB-H: DF MODULE Unit (Wiring Side)
654321
28
Page 26

36U-F510
Ref. No. Part No. ★ Description Code Ref. No. Part No. ★ Description Code
PARTS LIST
PWB-A: DUNTKA526WEE3
PARTS REPLACEMENT
Replacement parts which have these special safety characteristics identified in this manual ; electrical components having such features are
identified by å and shaded areas in the Replacement Parts Lists and
Schematic Diagrams. The use of a substitute replacement part which
does no have the same safety characteristic as the factory recommended replacement parts shown in this service manual may create
shock, fire or other hazards.
"HOW TO ORDER REPLACEMENT PARTS"
To have your order filled promptly and correctly, please furnish the following informations.
1. MODEL NUMBER 2. REF. NO.
3. PART NO. 4. DESCRIPTION
in USA: Contact your nearest SHARP Parts Distributor to order. For
location of SHARP Parts Distributor, Please call Toll-Free; 1800-BE-SHARP
★ MARK: SPARE PARTS-DELIVERY SECTION
' MARK: X-RAY RELATED PARTS
Ref. No. Part No. ★ Description Code
PICTURE TUBE
'åV101 VB90AJZ90X+1E Picture Tube(with DY) DP
å L703 RCiLGA039WJZZ Degaussing Coil AS
LHLDW0102GJKZ X Wire Holder, x4 AC
å QEARCA009WJZZ Grounding Strap AE
PRINTED WIRING BOARD ASSEMBLIES
(NOT REPLACEMENT ITEM)
PWB-A DUNTKA526WEE3 – MAIN Unit —
PWB-B DUNTKA527WEC1 – CRT Unit —
PWB-C DUNTKA602WEA1 – AV Unit —
PWB-HDUNTKB225WEA3 – DF MODULE Unit —
PWB-S DUNTKB224WEA2 – MTS MODULE Unit —
NOTE: THE PARTS HERES SHOWN ARE SUPPLIED AS AN
ASSEMBLY BUT NOT INDEPENDENTLY.
å TU51 VTUVTST5UF740 Tuner AX
å IC201 RH-iX3395CEN2 J TB1252CN AY
å IC361 VHiAN5277//-1 J AN5277 AN
å IC501 VHiTA8427K/-1 J TA8427K AL
å IC701 VHiTEA1507/-1 J TEA1507P/N1 AL
å IC702 RH-FX0008GEZZ J PC123FY8 AE
å IC703 VHiSE135N//-1 J SE135N AG
IC751 VHiSTV8164+-1 J I.C. AL
IC2001 RH-iXA192WJZZQ TMPA8700CSF
or
RH-iXA192WJN1
IC2040 VHiKiA7045A-1+ J KIA7045AP AD
or
VHiKiA7045P
IC2102 VHiBR2416E2-1~ J BR24C16F AK
Q201 VS2SC2735//1E ~ J 2SC2735 AC
Q205 VS2SD601AR/-1 ~ 2SD601AR AC
Q206 VS2SD601AR/-1 ~ 2SD601AR AC
Q361 VS2SB709AR/-1 ~ 2SB709AR AC
Q402 VS2SB709AR/-1 ~ 2SB709AR AC
Q405 VS2SD601AR/-1 ~ 2SD601AR AC
Q459 VS2SB709AR/-1 ~ 2SB709AR AC
Q460 VS2SB709AR/-1 ~ 2SB709AR AC
Q471 VS2SD601AR/-1 ~ 2SD601AR AC
Q472 VS2SD601AR/-1 ~ 2SD601AR AC
Q473 VS2SD601AR/-1 ~ 2SD601AR AC
Q474 VS2SD601AR/-1 ~ 2SD601AR AC
Q601 VS2SC2482//-1+ J 2SC2482 AD
å Q602 VS2SC5450++1E 2SC5450++ AH
or
VS2SC5150
or
VS2SC5179
Q616 VS2SD601AR/-1~ 2SD601AR
Q634 VS2SC3198-G-1+ J 2SC3198-G AA
Q650 VS2SA1266-Y-1+ J 2SA1266-Y AA
Q672 VS2SA1266-Y-1+ J 2SA1266-Y AA
Q673 VS2SD2045//-1 J 2SD2045 AL
å Q701 VSST9NC60FP1E ST9NC60FP AP
or
VSST10NK60F
Q727 VS2SC3333//-1+ J 2SC3333 AD
Q728 VS2SA1091-O1A+ 2SA1091 AC
Q729 VS2SA1266-Y-1+ J 2SA1266-Y AA
Q730 VS2SC3198-G-1+ J 2SC3198-G AA
Q751 VS2SC3198-G-1+ J 2SC3198-G AA
Q752 VS2SD601AR/-1 ~ 2SD601AR AC
or
VS2SC1623L61E
Q753 VS2SC3198-G-1+ J 2SC3198-G AA
Q801 VS2SD601AR/-1 ~ 2SD601AR AC
or
VS2SC1623L61E
Q901 VSiMX1C/C//-1 ~ IMX1C/C AB
Q902 VSiMX1C/C//-1 ~ IMX1C/C AB
Q903 VSiMX1C/C//-1 ~ IMX1C/C AB
Q908 VS2SD601AR/-1 ~ 2SD601AR AC
or
VS2SC1623L61E
Q2002 VS2SA1266-Y-1+ J 2SA1266-Y AA
Q2059 VS2SC3198-G-1+ J 2SC3198-G AA
Q2060 VS2SD601AR/-1 ~ 2SD601AR AC
or
VS2SX1623L6
MAIN UNIT
TUNER
INTEGRATED CIRCUITS
TRANSISTORS
29
Page 27

36U-F510
Ref. No. Part No. ★ Description Code Ref. No. Part No. ★ Description Code
CF2040
PWB-A: DUNTKA526WEE3
MAIN UNIT (Continued)
Q2201 VS2SD601AR/-1 ~ 2SD601AR AC
or
VS2SC1623L61E
Q2211 VS2SD601AR/-1 ~ 2SD601AR AC
or
VS2SC1623L61E
DIODES
D52 RH-EX0676GEZZ~ J Zener Diode. 32V AA
D53 RH-EX0619GEZZ~ J Zener Diode, 6.2V AA
D361 VHD1SS119//-1~ J Diode AA
D362 VHD1SS119//-1~ J Diode AA
å D501 RH-DX0302CEZZ~ J Diode AC
D510 RH-DX0441CEZZ~ J Diode AC
D511 RH-EX0654CEZZ~ J Zener Diode, 75V AD
D603 RH-EX0630GEZZ~ J Zener Diode, 9.1V AA
D605 RH-DX0255CEZZ J Diode AC
D615 RH-EX0665GEZZ~ J Zener Diode, 25V AA
D621 RH-EX0631GEZZ~ J Zener Diode, 9.1V AA
D622 RH-DX0131CEZZ~ J Diode AC
D630 RH-EX0647GEZZ~ J Zener Diode, 15V AA
D631 RH-EX0647GEZZ~ J Zener Diode, 15V AA
D632 VHD1SS119//-1~ J Diode AA
D650 RH-EX0628GEZZ~ J Zener Diode, 8.2V AC
'åD651 VHD1SS244//-1~ J Diode AB
or
VHD1SS82
'åD652 RH-EX0641GEZZ~ J Zener Diode, 12V AA
'åD653 VHD1SS119//-1~ J Diode AA
D655 VHD1SS119//-1~ J Diode AA
D657 VHD1SS119//-1~ J Diode AA
D673 RH-DX0229CEZZ J Diode AF
D680 RH-DX0484CEZZ J Diode AE
D707 VHD1SS119//-1~ J Diode AA
or
VHD1SS244
D708 VHD1SS119//-1~ J Diode AA
or
VHD1SS244
å D709 RH-DX0229CEZZ J Diode AF
å D712 RH-DX0468CEZZ J Diode AE
å D713 RH-DX0477CEZZ J Diode AF
D716 VHD1SS119//-1~ J Diode AA
D717 RH-EX0650GEZZ~ J Zener Diode, 16V AB
D721 VHD1SS119//-1~ J Diode AA
or
VHD1SS244
å D725 RH-DX0407CEN1 Diode AB
or
RH-DX0473CE
D727 RH-EX0647CEZZ ~ Zener Diode, 175V AE
D755 VHD1SS119//-1~ J Diode AA
D801 RH-EX0631GEZZ ~ J Zener Diode, 9.1V AA
D802 RH-EX0631GEZZ ~ J Zener Diode, 0.0475V AA
D2402 RH-EX0619GEZZ ~ J Zener Diode, 6.2V AA
D2403 RH-EX0619GEZZ ~ J Zener Diode, 6.2V AA
VA701 RH-VX0019CEZZ J Varistor AC
or
RH-VX0035CE
or
RH-VX0048CE
PACKAGED CIRCUITS
å PR701 RMPTP0072CEZZ J Packaged Circuit AH
X801 RCRSAA011WJZZ Crystal AG
or
RCRSB0278CE
FILTERS AND COILS
CF202 RFiLC0447CEZZ J Ceramic Filter AD
CF403 RFiLC0446CEZZ J Ceramic Filter AD
å L701 RCiLF0345CEZZ J Coil AH
å L702 RCiLF0345CEZZ J Coil AH
å T601 RTRNZ0057PEZZ R Transformer AK
'åT602 RTRNFA018WJZZ H-Volt Transformer AX
å T702 RTRNWA029WJZZ Transformer AH
RFiLA0099CEZZ+ Ceramic Filter AB
SF201 RFiLC0405CEZZ J S.A.W Filter AH
L51 VP-CF270K0000~ J Peaking 27µH AB
L201 VP-XF1R2K0000~ J Peaking 1.2µH AB
L203 VP-DF100K0000~ J Peaking 10µH AB
L401 VP-XF100K0000~ Peaking 10µH AB
L671 RCiLZ1005CEZZ J Coil AH
or
RCiLF0313CE
or
RCiLF0273CE
or
RCiLF0273CE
or
RCiLFA010WJ
L705 RCiLP0179CEZZ+ J Coil AD
L729 RCiLP0179CEZZ+ J Coil AD
L801 VP-DF100K0000~ J Peaking 10µH AB
L802 VP-DF6R8K0000 ~ Peaking 6.8µH AB
L2040 RCiLB0159CEZZ J Oscillation Coil AE
TRANSFORMERS
T201 RCiLi0636CEZZ X IF Coil AH
CAPACITORS
[EL.··· Electrolytic, M-Poly.··· Metalized Polypro Film]
C53 VCEA0A1HW105M+ J 1 50V EL. AB
C54 VCEA0A1HW475M+ J 4.7 50V EL. AB
C55 VCEA0A0JW338M+ J 3300 6.3V EL. AD
C201 VCKYCY1HB102K ~ J 1000p 50V Ceramic AA
C202 VCKYCY1HB103K ~ J 0.01 50V Ceramic AA
C203 VCKYCY1HB102K ~ J 1000p 50V Ceramic AA
C204 VCKYCY1HB103K ~ J 0.01 50V Ceramic AA
C223 VCKYCY1CF104Z~ J 0.1 16V Ceramic AA
C224 VCEA0A1HW475M+ J 4.7 50V EL. AB
C225 VCKYCY1HB102K ~ J 1000p 50V Ceramic AA
C226 VCEA0A1HW224M+ J 0.22 50V EL. AB
C227 VCEA0A1CW226M+ J 22 16V EL. AB
C228 VCKYCY1CF104Z~ J 0.1 16V Ceramic AA
C229 VCEA0A1AW228M+ J 2200 10V EL. AD
C230 VCEA0A1HW225M+ J 2.2 50V EL. AB
C231 VCKYCY1CF104Z~ J 0.1 16V Ceramic AA
C232 VCEA0A1HW474M+ J 0.47 50V EL. AB
C233 VCKYCY1CF104Z~ J 0.1 16V Ceramic AA
C361 VCEA0A1HW105M+ J 1 50V EL. AB
C362 VCQYTA1HM123J+ J 0.012 50V Mylar AA
C363 VCQYTA1HM123J+ J 0.012 50V Mylar AA
C364 VCEA0A1HW227M+ 220 50V EL. AB
C365 VCEA0A1HW105M+ J 1 50V EL. AB
C366 VCEA0A1CW106M+ J 10 16V EL. AB
C367 VCEA0A1VW108M+ 1000 35V EL. AB
C368 VCKYPA1HF103Z+ J 0.01 50V Ceramic AA
C369 VCEA0A1CW227M+ J 220 16V EL. AC
C370 VCEA0A1CW227M+ J 220 16V EL. AC
C371 VCEA0A1EW108M+ 1000 25V EL. AB
C372 VCEA0A1EW108M+ 1000 25V EL. AB
C373 VCKYCY1CF104Z~ J 0.1 16V Ceramic AA
C374 VCEA0A1HW225M+ J 2.2 50V EL. AB
C375 VCEA0A1HW225M+ J 2.2 50V EL. AB
C419 VCKYCY1CF224Z~ J 0.22 16V Ceramic AB
C420 VCEA0A1CW476M+ J 47 16V EL. AB
C425 VCEA0A1HW105M+ J 1 50V EL. AB
C426 VCKYCY1HB682K ~ J 6800p 50V Ceramic AA
C429 VCQYTA1HM103J+ J 0.01 50V Mylar AB
C433 VCKYCY1HB103K ~ J 0.01 50V Ceramic AA
C434 VCEA0A1HW105M+ J 1 50V EL. AB
C435 VCQYTA1HM104J+ 0.1 50V Mylar AC
C462 VCKYCY1CB473K ~ J 0.047 16V Ceramic AA
30
Page 28

36U-F510
Ref. No. Part No. ★ Description Code Ref. No. Part No. ★ Description Code
PWB-A: DUNTKA526WEE3
MAIN UNIT
C471 VCKYCY1HB822K~ J 8200p 50V Ceramic AB
C473 VCKYCY1HB561K~ J 560p 50V Ceramic AA
C475 VCKYCY1CF104Z~ J 0.1 16V Ceramic AA
C476 VCKYCY1HB103K~ J 0.01 50V Ceramic AA
C484 VCKYCY1HB103K~ J 0.01 50V Ceramic AA
C501 VCKYPA2HB102K+ J 1000p 500V Ceramic AA
C502 VCEA0A1VW108M+ 1000 35V EL. AB
C510 VCFYSA1JB564J+ 0.56 63V Mylar AB
C511 VCKYPA2HB391K+ J 390p 500V Ceramic AA
C512 VCQYTA1HM683J+ J 0.068 50V Mylar AB
C513 VCQYTA1HM103J+ J 0.01 50V Mylar AB
C514 VCEA0A1VW107M+ J 100 35V EL. AC
C515 VCEACA1HC225J+ 2.2 50V EL. AB
C516 VCEACA1HC225J+ 2.2 50V EL. AB
C517 VCEA0A1VW108M+ 1000 35V EL. AB
C518 VCKYPA2HB102K+ J 1000p 500V Ceramic AA
C519 VCFYSA1JB473J+ J 0.047 63V Mylar AC
C551 VCFYFA1HA474J+ 0.47 50V Mylar AB
C552 VCKYCY1HB392K ~ J 3900p 50V Ceramic AA
C553 VCKYCY1HB392K ~ J 3900p 50V Ceramic AA
C605 VCKYCY1HB102K ~ J 1000p 50V Ceramic AA
C606 VCKYPA2HB152K+ J 1500p 500V Ceramic AA
C607 VCKYPA1HB472K+ 4700p 50V Ceramic AB
C608 RC-KZ0033CEZZ J 150p 2kV Ceramic AB
'åC609 VCFPFD3ZA103H J 0.01 1.8kV M-Poly. AD
C610 VCFPFD3ZA103H J 0.01 1.8kV M-Poly. AD
C613 VCFPVC2DB474J J 0.47 200V M-Poly. AE
C614 VCKYPA2HB272K+ 2700p 500V Ceramic AB
C615 VCKYCY1CF104Z~ J 0.1 16V Ceramic AA
C616 VCEA9M1HW224M+ 0.22 50V EL. AB
C617 VCEA0A1HW474M+ J 0.47 50V EL. AB
C618 VCKYCY1HB822K ~ J 8200p 50V Ceramic AB
C619 VCKYCY1HB103K ~ J 0.01 50V Ceramic AA
C620 VCEA0A1CW227M+ J 220 16V EL. AC
C623 VCEA4A2EN106M+ 10 250V EL. AB
C624 VCKYPA2HB102K+ J 1000p 500V Ceramic AA
C627 VCEA0A1HW106M+ J 10 50V EL. AB
C631 VCKYPA1HB331K+ J 330p 50V Ceramic AA
C632 VCEA0A1VW107M+ J 100 35V EL. AC
C633 VCKYPA1HB102K+ J 1000p 50V Ceramic AA
C650 VCEA0A1HW105M+ J 1 50V EL. AB
C651 VCQYTA2AA104K+ J 0.1 100V Mylar AB
C652 VCEA0A1VW476M+ 47 35V EL. AB
C653 VCEA0A1HW336M+ 33 50V EL. AB
C654 VCFYFA1HA334J+ J 0.33 50V Mylar AB
C674 VCKYCY1CB104K ~ J 0.1 16V Ceramic AB
C677 RC-FZ0377CEZZ J 4.7 50V Mylar AF
'åC678 VCQPPC2JB513J 0.051 630V Mylar AB
C684 VCEA0A1VW106M+ J 10 35V EL. AB
C685 VCQYTA1HM333J+ 0.033 50V Mylar AB
å C701 RC-FZ038SCEZZ J 0.47
or
RC-FZ030SCE
or
RC-FZ022SCE
C702 RC-KZ0029CEZZ+ 0.01 500V Ceramic AB
C703 RC-KZ0029CEZZ+ 0.01 500V Ceramic AB
C705 RC-EZ0722CEZZ J 820 200V EL. AR
C706 RC-KZ021SCEZZ J 3300p 2kV Ceramic AE
C710 RC-KZ0040CEZZ J 820p 2kV Ceramic AD
C711 RC-KZ021SCEZZ J 3300p 2kV Ceramic AE
C712 VCCCCY1HH151J ~ J 150p 50V Ceramic AA
C713 RC-FZ036SCEZZ J 0.1
or
RC-FZ028SCE
or
RC-FZ020SCE
C717 VCKYPA2HB472K+ J 4700p 500V Ceramic AB
C722 VCQYTA1HM104J+ 0.1 50V Mylar AC
å C723 RC-EZ0724CEZZ J 100 160V EL. AG
AC125V
Plastic AE
AC125V
Plastic AC
å C725 RC-EZ0810CEZZ J 330 160V EL. AH
or
RC-EZ1171CE
C726 VCKYPH3DB561K J 560p 2kV Ceramic AC
C727 VCKYPH3DB561K J 560p 2kV Ceramic AC
C730 VCEA4A1VN108M+ 1000 35V EL. AC
C731 VCEAHA1CN338M J 3300 16V EL. AG
C732 VCKYPA2HB102K+ J 1000p 500V Ceramic AA
C735 VCEA0A1CW106M+ J 10 16V EL. AB
C736 VCEA0A1CW106M+ J 10 16V EL. AB
C737 VCEA0A1CW107M+ J 100 16V EL. AC
C738 VCFPVC3CA722H J 7200p 1.6kV M-Poly. AF
C740 VCEA0A1EW476M+ 47 25V EL. AB
C741 VCKYPA2HB102K+ J 1000p 500V Ceramic AA
C742 VCKYPA2HB102K+ J 1000p 500V Ceramic AA
C756 VCEA0A1CW476M+ J 47 16V EL. AB
C757 VCEA0A1CW476M+ J 47 16V EL. AB
C780 VCEA9M1EW226M+ 22 25V EL. AB
C781 VCFYFA1HA334J+ J 0.33 50V Mylar AB
C784 VCKYCY1HF103Z~ J 0.01 50V Ceramic AA
C787 VCKYCY1HF103Z~ J 0.01 50V Ceramic AA
C801 VCCCCY1HH110J ~ 11p 50V Ceramic AB
C802 VCKYCY1HB222K ~ J 2200p 50V Ceramic AA
C803 VCEA0A1HW224M+ J 0.22 50V EL. AB
C804 VCKYCY1CF104Z~ J 0.1 16V Ceramic AA
C805 VCEA0A1CW107M+ J 100 16V EL. AC
C806 VCKYCY1CF104Z~ J 0.1 16V Ceramic AA
C807 VCKYCY1CF104Z~ J 0.1 16V Ceramic AA
C808 VCKYCY1CF104Z~ J 0.1 16V Ceramic AA
C809 VCEA0A1CW106M+ J 10 16V EL. AB
C810 VCEA0A1CW106M+ J 10 16V EL. AB
C811 VCKYCY1HB103K ~ J 0.01 50V Ceramic AA
C812 VCKYCY1HB103K ~ J 0.01 50V Ceramic AA
C813 VCEA0A1CW107M+ J 100 16V EL. AC
C814 VCKYCY1HB103K ~ J 0.01 50V Ceramic AA
C815 VCKYCY1HB103K ~ J 0.01 50V Ceramic AA
C816 VCEA0A1CW107M+ J 100 16V EL. AC
C817 VCKYCY1HB103K ~ J 0.01 50V Ceramic AA
C930 VCEA0A1HW335M+ J 3.3 50V EL. AB
C931 VCQYTA1HM183J+ 0.018 50V Mylar AB
C932 VCQYTA1HM183J+ 0.018 50V Mylar AB
C933 VCEA0A1HW335M+ J 3.3 50V EL. AB
C934 VCEA0A1CW476M+ J 47 16V EL. AB
C935 VCEA0A1HW335M+ J 3.3 50V EL. AB
C936 VCEA0A1HW335M+ J 3.3 50V EL. AB
C945 VCKYCY1HB102K ~ J 1000p 50V Ceramic AA
C946 VCEA0A1HW225M+ J 2.2 50V EL. AB
C948 VCEA0A1HW225M+ J 2.2 50V EL. AB
C956 VCEA0A1CW337M+ J 330 16V EL. AC
C960 VCE9GA1HW475M+ J 4.7 50V EL. (N.P) AB
C961 VCE9GA1HW475M+ J 4.7 50V EL. (N.P) AB
C962 VCKYCY1CF104Z~ J 0.1 16V Ceramic AA
C2001 VCCCCY1HH331J ~ J 330p 50V Ceramic AA
C2003 VCEA0A1HW106M+ J 10 50V EL. AB
C2004 VCEA0A1CW476M+ J 47 16V EL. AB
C2005 VCEA0A1CW106M+ J 10 16V EL. AB
C2040 VCKYCY1CF104Z ~ J 0.1 16V Ceramic AA
C2041 VCEA0A1HW105M+ J 1 50V EL. AB
C2044 VCQYTA1HM104J+ 0.1 50V Mylar AB
C2060 VCKYCY1CF104Z ~ J 0.1 16V Ceramic AA
C2061 VCCCCY1HH101J ~ J 100p 50V Ceramic AA
C2062 VCEA0A1AW107M+ J 100 10V EL. AB
C2063 VCKYCY1CF104Z ~ J 0.1 16V Ceramic AA
C2064 VCKYCY1CF104Z ~ J 0.1 16V Ceramic AA
C2202 VCCCCY1HH390J ~ J 39p 50V Ceramic AA
C2601 VCEA0A1HW476M+ J 47 50V EL. AB
C2602 VCCCCY1HH101J ~ J 100p 50V Ceramic AA
31
Page 29

36U-F510
Ref. No. Part No. ★ Description Code Ref. No. Part No. ★ Description Code
PWB-A: DUNTKA526WEE3
MAIN UNIT
RESISTORS
[M-Ox.··· Metal Oxide, M-Film··· Metal Film]
RJ13 VRS-CY1JF000J~ J 0 1/16W M-Ox. AA
RJ14 VRS-CY1JF000J ~ J 0 1/16W M-Ox. AA
RJ15 VRS-CY1JF000J ~ J 0 1/16W M-Ox. AA
RJ16 VRS-CY1JF000J~ J 0 1/16W M-Ox. AA
RJ17 VRS-CY1JF000J ~ J 0 1/16W M-Ox. AA
RJ20 VRS-CY1JF000J ~ J 0 1/16W M-Ox. AA
RJ25 VRS-CY1JF000J ~ J 0 1/16W M-Ox. AA
RJ27 VRS-CY1JF000J ~ J 0 1/16W M-Ox. AA
RJ28 VRS-CY1JF000J ~ J 0 1/16W M-Ox. AA
RJ31 VRS-CY1JF000J ~ J 0 1/16W M-Ox. AA
RJ32 VRS-CY1JF000J ~ J 0 1/16W M-Ox. AA
RJ33 VRS-CY1JF000J ~ J 0 1/16W M-Ox. AA
RJ34 VRS-CY1JF000J ~ J 0 1/16W M-Ox. AA
RJ35 VRS-CY1JF000J ~ J 0 1/16W M-Ox. AA
RJ39 VRS-CY1JF000J ~ J 0 1/16W M-Ox. AA
RJ40 VRS-CY1JF000J ~ J 0 1/16W M-Ox. AA
RJ41 VRS-CY1JF000J ~ J 0 1/16W M-Ox. AA
RJ46 VRS-CY1JF000J ~ J 0 1/16W M-Ox. AA
RJ47 VRS-CY1JF000J ~ J 0 1/16W M-Ox. AA
RJ52 VRS-CY1JF000J ~ J 0 1/16W M-Ox. AA
RJ53 VRS-CY1JF000J ~ J 0 1/16W M-Ox. AA
RJ54 VRS-CY1JF000J ~ J 0 1/16W M-Ox. AA
RJ55 VRS-CY1JF000J ~ J 0 1/16W M-Ox. AA
RJ56 VRS-CY1JF000J ~ J 0 1/16W M-Ox. AA
RJ60 VRS-CY1JF000J ~ J 0 1/16W M-Ox. AA
RJ65 VRS-CY1JF000J ~ J 0 1/16W M-Ox. AA
RJ66 VRS-CY1JF000J ~ J 0 1/16W M-Ox. AA
RJ68 VRS-CY1JF000J ~ J 0 1/16W M-Ox. AA
RJ73 VRS-CY1JF000J ~ J 0 1/16W M-Ox. AA
RJ74 VRS-CY1JF000J ~ J 0 1/16W M-Ox. AA
RJ78 VRS-CY1JF000J ~ J 0 1/16W M-Ox. AA
RJ79 VRS-CY1JF000J ~ J 0 1/16W M-Ox. AA
RJ80 VRS-CY1JF000J ~ J 0 1/16W M-Ox. AA
RJ81 VRS-CY1JF000J ~ J 0 1/16W M-Ox. AA
RJ84 VRS-CY1JF000J ~ J 0 1/16W M-Ox. AA
RJ85 VRS-CY1JF000J ~ J 0 1/16W M-Ox. AA
RJ86 VRS-CY1JF000J ~ J 0 1/16W M-Ox. AA
RJ87 VRS-CY1JF000J ~ J 0 1/16W M-Ox. AA
RJ88 VRS-CY1JF000J ~ J 0 1/16W M-Ox. AA
RJ90 VRS-CY1JF000J ~ J 0 1/16W M-Ox. AA
RJ94 VRS-CY1JF000J ~ J 0 1/16W M-Ox. AA
RJ95 VRS-CY1JF000J ~ J 0 1/16W M-Ox. AA
RJ97 VRS-CY1JF000J ~ J 0 1/16W M-Ox. AA
RJ98 VRS-CY1JF000J ~ J 0 1/16W M-Ox. AA
RJ101 VRS-CY1JF000J ~ J 0 1/16W M-Ox. AA
R57 VRS-CY1JF392J ~ J 3.9k 1/16W M-Ox. AA
R201 VRS-CY1JF151J ~ J 150 1/16W M-Ox. AA
R202 VRS-CY1JF122J ~ 1.2k 1/16W M-Ox. AB
R203 VRS-CY1JF122J ~ 1.2k 1/16W M-Ox. AB
R204 VRS-CY1JF101J ~ J 100 1/16W M-Ox. AA
R211 VRS-CY1JF331J ~ J 330 1/16W M-Ox. AA
R212 VRS-CY1JF000J ~ J 0 1/16W M-Ox. AA
R215 VRS-CY1JF222J ~ J 2.2k 1/16W M-Ox. AA
R217 VRS-CY1JF102J ~ J 1k 1/16W M-Ox. AA
R219 VRS-CY1JF102J ~ J 1k 1/16W M-Ox. AA
R220 VRS-CY1JF392J ~ J 3.9k 1/16W M-Ox. AA
R225 VRD-RA2BE680J~ J 68 1/8W Carbon AA
R226 VRD-RA2BE101J~ 100 1/8W Carbon AE
R227 VRS-CY1JF333J~ J 33k 1/16W M-Ox. AA
R228 VRS-CY1JF102J~ J 1k 1/16W M-Ox. AA
R229 VRS-CY1JF221J~ J 220 1/16W M-Ox. AA
R233 VRS-CY1JF102J~ J 1k 1/16W M-Ox. AA
R234 VRS-CY1JF103J~ J 10k 1/16W M-Ox. AA
R235 VRS-CY1JF103J~ J 10k 1/16W M-Ox. AA
R236 VRS-CY1JF103J~ J 10k 1/16W M-Ox. AA
R307 VRS-CY1JF333J~ J 33k 1/16W M-Ox. AA
R361 VRS-CY1JF224J~ J 220k 1/16W M-Ox. AD
R362 VRD-RA2BE222J~ J 2.2k 1/8W Carbon AA
R363 VRD-RA2BE222J~ J 2.2k 1/8W Carbon AA
R364 VRS-CY1JF821J~ J 820 1/16W M-Ox. AA
R365 VRS-CY1JF821J~ J 820 1/16W M-Ox. AA
R367 VRN-RL3DBR56J+ 0.56 2W M-Film AE
R368 VRD-RA2BE222J~ J 2.2k 1/8W Carbon AA
R369 VRD-RA2BE822J~ 8.2k 1/8W Carbon AA
R371 VRS-CY1JF102J~ J 1k 1/16W M-Ox. AA
R372 VRS-CY1JF223J~ J 22k 1/16W M-Ox. AA
R415 VRS-CY1JF101J~ J 100 1/16W M-Ox. AA
R430 VRD-RA2BE331J~ 330 1/8W Carbon AA
R431 VRS-CY1JF331J~ J 330 1/16W M-Ox. AA
R432 VRS-CY1JF102J~ J 1k 1/16W M-Ox. AA
R440 VRS-CY1JF000J~ J 0 1/16W M-Ox. AA
R453 VRS-CY1JF103J~ J 10k 1/16W M-Ox. AA
R454 VRD-RA2BE101J~ 100 1/8W Carbon AE
R459 VRS-CY1JF102J~ J 1k 1/16W M-Ox. AA
R460 VRS-CY1JF102J~ J 1k 1/16W M-Ox. AA
R461 VRS-CY1JF151J~ J 150 1/16W M-Ox. AA
R462 VRS-CY1JF122J~ 1.2k 1/16W M-Ox. AB
R463 VRS-CY1JF474J~ J 470k 1/16W M-Ox. AA
R464 VRS-CY1JF122J~ 1.2k 1/16W M-Ox. AB
R465 VRS-CY1JF101J~ J 100 1/16W M-Ox. AA
R471 VRS-CY1JF223J~ J 22k 1/16W M-Ox. AA
R472 VRS-CY1JF821J~ J 820 1/16W M-Ox. AA
R473 VRS-CY1JF102J~ J 1k 1/16W M-Ox. AA
R474 VRS-CY1JF471J~ J 470 1/16W M-Ox. AA
R475 VRS-CY1JF102J~ J 1k 1/16W M-Ox. AA
R476 VRS-CY1JF393J~ J 39k 1/16W M-Ox. AA
R477 VRS-CY1JF182J~ J 1.8k 1/16W M-Ox. AA
R478 VRS-CY1JF151J~ J 150 1/16W M-Ox. AA
R479 VRS-CY1JF393J~ J 39k 1/16W M-Ox. AA
R480 VRS-CY1JF273J~ J 27k 1/16W M-Ox. AA
R481 VRS-CY1JF152J~ J 1.5k 1/16W M-Ox. AA
R482 VRD-RA2BE101J~ 100 1/8W Carbon AE
R483 VRS-CY1JF471J~ J 470 1/16W M-Ox. AA
å R502 VRN-VV3LB2R2J J 2.2 3W M-Film AC
R510 VRD-RA2BE471J~ 470 1/8W Carbon AE
R511 VRD-RA2BE393J~ J 39k 1/8W Carbon AA
R512 VRD-RA2BE683J~ 68k 1/8W Carbon AA
R513 VRS-CY1JF273J~ J 27k 1/16W M-Ox. AA
R514 VRS-CY1JF101J~ J 100 1/16W M-Ox. AA
R520 VRS-CY1JF184J~ J 180k 1/16W M-Ox. AA
R523 VRN-RL3DB1R0J+ 1 2W M-Film AB
R524 VRS-RG3AB391J+ 390 1W M-Ox. AE
R532 VRD-RA2EE824J~ 820k 1/4W Carbon AA
R534 VRD-RA2BE181J~ J 180 1/8W Carbon AA
R551 VRS-CY1JF562F~ J 5.6k 1/16W M-Ox. AA
R578 VRD-RA2BE123J ~ 12k 1/8W Carbon AE
R601 VRD-RM2HD220J ~ J 22 1/2W Carbon AA
å R604 VRS-KA3NG122J J 1.2k 7W M-Ox. AD
R605 VRD-RM2HD331J ~ J 330 1/2W Carbon AA
R606 VRD-RM2HD271J ~ J 270 1/2W Carbon AA
R609 VRS-RG3DB562J+ 5.6k 2W M-Ox. AB
å R611 VRW-KQ41C3R3K J 3.3 15W Cement AG
R612 VRS-CY1JF472J~ J 4.7k 1/16W M-Ox. AA
R613 VRS-CY1JF474J~ J 470k 1/16W M-Ox. AA
R614 VRS-CY1JF225J ~ 2.2M 1/16W M-Ox. AA
'åR616 VRD-RA2BE103J ~ 10k 1/8W Carbon AE
'åR617 VRS-CY1JF103J ~ J 10k 1/16W M-Ox. AA
'åR618 VRS-CY1JF473J ~ J 47k 1/16W M-Ox. AA
å R621 VRN-RL3DB3R3J+ 3.3 2W M-Film AB
å R622 VRN-RL2HCR68J+ 0.68 1/2W M-Film AB
å R623 VRN-RL3AB1R0J+ 1 1W M-Film AE
å R624 VRS-RG3DB332J+ 3.3k 2W M-Ox. AB
R631 VRS-RG3AB103J+ 10k 1W M-Ox. AB
R635 VRD-RA2EE103J ~ 10k 1/4W Carbon AA
32
Page 30

Ref. No. Part No. ★ Description Code Ref. No. Part No. ★ Description Code
36U-F510
PWB-A: DUNTKA526WEE3
MAIN UNIT
R637 VRD-RA2BE274J ~ J 270k 1/8W Carbon AA
R638 VRS-CY1JF822J ~ J 8.2k 1/16W M-Ox. AA
R639 VRD-RA2BE561J ~ 560 1/8W Carbon AA
R640 VRD-RA2BE473J ~ 47k 1/8W Carbon AE
R641 VRD-RA2BE151J ~ J 150 1/8W Carbon AA
R647 VRD-RM2HD100J ~ 10 1/2W Carbon AE
'åR651 VRN-RL2HC1R0J+ 1 1/2W M-Film AB
'åR652 VRD-RA2EE103G ~ 10k 1/4W Carbon AA
'åR653 VRD-RA2EE682G ~ 6.8k 1/4W Carbon AA
'åR654 VRD-RA2EE333G ~ 33k 1/4W Carbon AA
R655 VRS-CY1JF562J ~ J 5.6k 1/16W M-Ox. AA
R656 VRS-CY1JF334J ~ J 330k 1/16W M-Ox. AA
å R658 VRS-RG3DB153J+ 15k 2W M-Ox. AB
R659 VRS-CY1JF471J ~ J 470 1/16W M-Ox. AA
R663 VRS-CY1JF102J ~ J 1k 1/16W M-Ox. AA
R664 VRS-CY1JF471J ~ J 470 1/16W M-Ox. AA
R666 VRS-CY1JF223J ~ J 22k 1/16W M-Ox. AA
R667 VRS-CY1JF562J ~ J 5.6k 1/16W M-Ox. AA
R668 VRD-RA2BE680J ~ J 68 1/8W Carbon AA
R669 VRS-CY1JF103J ~ J 10k 1/16W M-Ox. AA
R670 VRD-RM2HD563J ~ 56k 1/2W Carbon AA
å R671 VRS-RG2HC102J+ 1k 1/2W M-Ox. AA
R672 VRD-RM2HD393J ~ J 39k 1/2W Carbon AA
R674 VRD-RA2BE103J ~ 10k 1/8W Carbon AE
å R675 VRN-RL3LB3R3J+ 3.3 3W M-Film AF
R677 VRD-RA2EE103J ~ 10k 1/4W Carbon AA
R678 VRD-RA2BE472J ~ 4.7k 1/8W Carbon AA
R679 VRD-RM2HD103J ~ J 10k 1/2W Carbon AA
R689 VRS-CY1JF102J ~ J 1k 1/16W M-Ox. AA
R690 VRS-CY1JF683J ~ J 68k 1/16W M-Ox. AA
R698 VRS-CY1JF101J ~ J 100 1/16W M-Ox. AA
R699 VRS-CY1JF822J ~ J 8.2k 1/16W M-Ox. AA
å R702 VRW-KQ4AC1R2K J 1.2 10W Cement AE
å R703 VRS-RG3LB101J+ 100 3W M-Ox. AB
R705 VRN-VV3DBR15J J 0.15 2W M-Film AB
R706 VRN-VV3DBR15J J 0.15 2W M-Film AB
R707 VRD-RM2HD270J ~ J 27 1/2W Carbon AA
R709 VRD-RA2BE223J ~ 22k 1/8W Carbon AE
R710 VRS-RG2HC103J+ 10k 1/2W M-Ox. AE
R712 VRD-RA2BE100J ~ J 10 1/8W Carbon AA
R713 VRS-RG2HC122J+ 1.2k 1/2W M-Ox. AB
R714 VRD-RM2HD100J ~ 10 1/2W Carbon AE
R715 VRD-RA2BE221J ~ J 220 1/8W Carbon AA
R718 VRD-RA2BE102J ~ 1k 1/8W Carbon AE
R723 VRN-VV3DBR15J J 0.15 2W M-Film AB
å R725 VRD-RM2HD821J ~ 820 1/2W Carbon AA
å R737 VRN-RL3DBR22J+ J 0.22 2W M-Film AA
R744 VRS-CY1JF272J ~ J 2.7k 1/16W M-Ox. AA
R745 VRS-CY1JF472J ~ J 4.7k 1/16W M-Ox. AA
R746 VRS-CY1JF103J ~ J 10k 1/16W M-Ox. AA
R747 VRS-CY1JF103J~ J 10k 1/16W M-Ox. AA
å R750 RR-DZ0049CEZZ ~ J 3.9M 1/2W Solid AB
å R789 VRS-CY1JF394J~ J 390k 1/16W M-Ox. AA
or
RR-HZ0048CE
R751 VRS-CY1JF473J ~ J 47k 1/16W M-Ox. AA
R766 VRS-CY1JF333J~ J 33k 1/16W M-Ox. AA
R767 VRS-CY1JF273J~ J 27k 1/16W M-Ox. AA
R768 VRS-CY1JF332J ~ 3.3k 1/16W M-Ox. AE
R769 VRS-CY1JF103J ~ J 10k 1/16W M-Ox. AA
R770 VRD-RM2HD823J ~ 82k 1/2W Carbon AE
R771 VRD-RA2BE272J~ J 2.7k 1/8W Carbon AA
R772 VRS-CY1JF103J ~ J 10k 1/16W M-Ox. AA
R774 VRS-CY1JF393J ~ J 39k 1/16W M-Ox. AA
R775 VRS-CY1JF563J ~ J 56k 1/16W M-Ox. AA
R776 VRN-VV3DB1R0J J 1 2W M-Film AB
R777 VRS-KA3HG8R2K J 8.2 5W M-Ox. AD
R778 VRS-RG3AB101J+ 100 1W M-Ox. AB
R779 VRS-CY1JF273J ~ J 27k 1/16W M-Ox. AA
R801 VRS-CY1JF333J~ J 33k 1/16W M-Ox. AA
R802 VRS-CY1JF101J ~ J 100 1/16W M-Ox. AA
R804 VRS-CY1JF102J ~ J 1k 1/16W M-Ox. AA
R805 VRS-CY1JF272J ~ J 2.7k 1/16W M-Ox. AA
R806 VRS-CY1JF681J ~ J 680 1/16W M-Ox. AA
R807 VRS-CY1JF681J ~ J 680 1/16W M-Ox. AA
R808 VRS-CY1JF681J ~ J 680 1/16W M-Ox. AA
R809 VRS-CY1JF471J ~ J 470 1/16W M-Ox. AA
R810 VRD-RA2BE101J~ 100 1/8W Carbon AE
R811 VRD-RA2BE101J~ 100 1/8W Carbon AE
R812 VRS-CY1JF224J ~ J 220k 1/16W M-Ox. AD
R813 VRD-RA2BE271J~ 270 1/8W Carbon AA
R814 VRD-RA2BE101J~ 100 1/8W Carbon AE
R815 VRD-RA2BE101J~ 100 1/8W Carbon AE
R816 VRS-CY1JF272J ~ J 2.7k 1/16W M-Ox. AA
R817 VRS-CY1JF272J ~ J 2.7k 1/16W M-Ox. AA
R818 VRS-CY1JF272J ~ J 2.7k 1/16W M-Ox. AA
R819 VRS-CY1JF101J ~ J 100 1/16W M-Ox. AA
R820 VRS-CY1JF101J ~ J 100 1/16W M-Ox. AA
R821 VRS-CY1JF101J ~ J 100 1/16W M-Ox. AA
R822 VRD-RA2BE101J~ 100 1/8W Carbon AE
R830 VRD-RA2BE102J~ 1k 1/8W Carbon AE
R901 VRS-CY1JF104J ~ J 100k 1/16W M-Ox. AA
R902 VRS-CY1JF104J ~ J 100k 1/16W M-Ox. AA
R903 VRS-CY1JF102J ~ J 1k 1/16W M-Ox. AA
R904 VRS-CY1JF683J ~ J 68k 1/16W M-Ox. AA
R905 VRS-CY1JF223J ~ J 22k 1/16W M-Ox. AA
R906 VRS-CY1JF392J ~ J 3.9k 1/16W M-Ox. AA
R907 VRS-CY1JF182J ~ J 1.8k 1/16W M-Ox. AA
R909 VRS-CY1JF102J ~ J 1k 1/16W M-Ox. AA
R910 VRD-RA2BE102J~ 1k 1/8W Carbon AE
R911 VRS-CY1JF683J ~ J 68k 1/16W M-Ox. AA
R912 VRS-CY1JF223J ~ J 22k 1/16W M-Ox. AA
R913 VRS-CY1JF392J ~ J 3.9k 1/16W M-Ox. AA
R914 VRS-CY1JF182J ~ J 1.8k 1/16W M-Ox. AA
R915 VRS-CY1JF102J ~ J 1k 1/16W M-Ox. AA
R916 VRS-CY1JF683J ~ J 68k 1/16W M-Ox. AA
R917 VRS-CY1JF000J ~ J 0 1/16W M-Ox. AA
R918 VRS-CY1JF000J ~ J 0 1/16W M-Ox. AA
R922 VRD-RA2BE102J~ 1k 1/8W Carbon AE
R923 VRD-RA2BE102J~ 1k 1/8W Carbon AE
R924 VRS-CY1JF750J ~ J 75 1/16W M-Ox. AA
R925 VRS-CY1JF750J ~ J 75 1/16W M-Ox. AA
R926 VRS-CY1JF750J ~ J 75 1/16W M-Ox. AA
R927 VRS-CY1JF750J~ J 75 1/16W M-Ox. AA
R928 VRS-CY1JF750J~ J 75 1/16W M-Ox. AA
R940 VRS-CY1JF221J~ J 220 1/16W M-Ox. AA
R950 VRS-CY1JF750J~ J 75 1/16W M-Ox. AA
R951 VRS-CY1JF750J~ J 75 1/16W M-Ox. AA
R952 VRD-RA2BE333J~ 33k 1/8W Carbon AE
R961 VRS-CY1JF221J~ J 220 1/16W M-Ox. AA
R962 VRS-CY1JF221J~ J 220 1/16W M-Ox. AA
R963 VRD-RA2BE331J~ 330 1/8W Carbon AA
R969 VRS-CY1JF221J~ J 220 1/16W M-Ox. AA
R989 VRS-CY1JF750J~ J 75 1/16W M-Ox. AA
R991 VRS-CY1JF102J~ J 1k 1/16W M-Ox. AA
R992 VRS-CY1JF122J ~ 1.2k 1/16W M-Ox. AB
R2001 VRS-CY1JF562J ~ J 5.6k 1/16W M-Ox. AA
'åR2002 VRS-CY1JF103J ~ J 10k 1/16W M-Ox. AA
R2004 VRD-RA2BE101J ~ 100 1/8W Carbon AE
'åR2007 VRS-CY1JF562J ~ J 5.6k 1/16W M-Ox. AA
R2008 VRS-CY1JF102J ~ J 1k 1/16W M-Ox. AA
'åR2009 VRS-CY1JF103J ~ J 10k 1/16W M-Ox. AA
R2010 VRS-CY1JF102J ~ J 1k 1/16W M-Ox. AA
R2011 VRD-RA2BE561J ~ 560 1/8W Carbon AA
R2013 VRD-RA2BE822J ~ 8.2k 1/8W Carbon AA
'åR2016 VRS-CY1JF104J ~ J 100k 1/16W M-Ox. AA
R2022 VRS-CY1JF103J ~ J 10k 1/16W M-Ox. AA
R2024 VRS-CY1JF472J ~ J 4.7k 1/16W M-Ox. AA
R2025 VRS-CY1JF472J ~ J 4.7k 1/16W M-Ox. AA
R2026 VRS-CY1JF472J ~ J 4.7k 1/16W M-Ox. AA
R2027 VRS-CY1JF102J ~ J 1k 1/16W M-Ox. AA
R2028 VRS-CY1JF102J ~ J 1k 1/16W M-Ox. AA
R2029 VRS-CY1JF103J ~ J 10k 1/16W M-Ox. AA
R2040 VRS-CY1JF102J ~ J 1k 1/16W M-Ox. AA
R2041 VRS-CY1JF333J ~ J 33k 1/16W M-Ox. AA
or
or
or
or
or
or
or
or
33
or
Page 31

Ref. No. Part No. ★ Description Code Ref. No. Part No. ★ Description Code
MAIN UNIT
R2042 VRS-CY1JF101J ~ J 100 1/16W M-Ox. AA
R2043 VRS-CY1JF333J ~ J 33k 1/16W M-Ox. AA
R2044 VRS-CY1JF153J ~ J 15k 1/16W M-Ox. AA
R2045 VRS-CY1JF101J ~ J 100 1/16W M-Ox. AA
R2047 VRS-CY1JF221J ~ J 220 1/16W M-Ox. AA
R2048 VRS-CY1JF562J ~ J 5.6k 1/16W M-Ox. AA
R2051 VRS-CY1JF102J ~ J 1k 1/16W M-Ox. AA
R2052 VRD-RA2BE101J ~ 100 1/8W Carbon AE
R2054 VRS-CY1JF102J ~ J 1k 1/16W M-Ox. AA
R2055 VRS-CY1JF682J ~ J 6.8k 1/16W M-Ox. AA
R2060 VRS-CY1JF221J ~ J 220 1/16W M-Ox. AA
R2061 VRS-CY1JF562J ~ J 5.6k 1/16W M-Ox. AA
R2063 VRS-CY1JF222J ~ J 2.2k 1/16W M-Ox. AA
R2064 VRS-CY1JF332J ~ 3.3k 1/16W M-Ox. AE
R2066 VRS-CY1JF103J ~ J 10k 1/16W M-Ox. AA
R2067 VRD-RA2BE222J ~ J 2.2k 1/8W Carbon AA
R2081 VRS-CY1JF101J ~ J 100 1/16W M-Ox. AA
R2084 VRS-CY1JF103J ~ J 10k 1/16W M-Ox. AA
R2101 VRS-CY1JF101J ~ J 100 1/16W M-Ox. AA
R2102 VRS-CY1JF101J ~ J 100 1/16W M-Ox. AA
R2201 VRS-CY1JF222J ~ J 2.2k 1/16W M-Ox. AA
R2202 VRS-CY1JF103J ~ J 10k 1/16W M-Ox. AA
R2203 VRS-CY1JF184J ~ J 180k 1/16W M-Ox. AA
R2211 VRS-CY1JF222J ~ J 2.2k 1/16W M-Ox. AA
R2212 VRS-CY1JF682J ~ J 6.8k 1/16W M-Ox. AA
R2213 VRS-CY1JF333J ~ J 33k 1/16W M-Ox. AA
R2401 VRS-CY1JF101J ~ J 100 1/16W M-Ox. AA
R2402 VRD-RA2BE101J ~ 100 1/8W Carbon AE
R2403 VRD-RA2BE101J ~ 100 1/8W Carbon AE
R2404 VRS-CY1JF101J ~ J 100 1/16W M-Ox. AA
R2501 VRS-CY1JF183J ~ J 18k 1/16W M-Ox. AA
R2502 VRS-CY1JF183J ~ J 18k 1/16W M-Ox. AA
R2503 VRS-CY1JF103J~ J 10k 1/16W M-Ox. AA
R2504 VRS-CY1JF103J~ J 10k 1/16W M-Ox. AA
R2505 VRS-CY1JF822J~ J 8.2k 1/16W M-Ox. AA
R2506 VRS-CY1JF822J~ J 8.2k 1/16W M-Ox. AA
R2507 VRS-CY1JF183J~ J 18k 1/16W M-Ox. AA
R2508 VRS-CY1JF183J~ J 18k 1/16W M-Ox. AA
R2601 VRD-RA2BE470J~ J 47 1/8W Carbon AA
R2603 VRS-CY1JF000J~ J 0 1/16W M-Ox. AA
R2605 VRS-CY1JF000J~ J 0 1/16W M-Ox. AA
S2501 QSW-K0003AJZZ+ J Power AB
or
QSW-K0079GE
or
QSW-K0202PE
S2502 QSW-K0003AJZZ+ J Menu AB
or
QSW-K0079GE
or
QSW-K0202PE
S2503 QSW-K0003AJZZ+ J Vol-Down AB
or
QSW-K0079GE
or
QSW-K0202PE
S2504 QSW-K0003AJZZ+ J Vol-Up AB
or
QSW-K0079GE
or
QSW-K0202PE
S2505 QSW-K0003AJZZ+ J CH-Down AB
or
QSW-K0079GE
or
QSW-K0202PE
S2506 QSW-K0003AJZZ+ J CH-Up AB
or
QSW-K0079GE
or
QSW-K0202PE
SWITCHES
å RY701 RRLYJ0081CEZZ J Relay AL
å F701 QFS-B4023CEZZ J Fuse, 4A-AC125V AC
or
RRLYJ0094CEZZ
FH701 QFSHD1013CEZZ+ J Fuse Holder AC
FH702 QFSHD1014CEZZ+ J Fuse Holder AC
FB601 RBLN-0037CEZZ~ J Ferrtie Bead AB
FB671 RBLN-0037CEZZ~ J Ferrtie Bead AB
FB702 RBLN-0020CEZZ+ J Ferrtie Bead AB
FB706 RBLN-0037CEZZ~ J Ferrtie Bead AB
FB707 RBLN-0037CEZZ~ J Ferrtie Bead AB
J901 QTANJ0540CEZZ X Termina, Input-1 AH
J902 QTANJ0655CEZZ J
J904 QJAKG0091CEZZ Jack, Input-2 AH
J921 QSOCD0430CEZZ J Socket, S-Video AE
P52 QPLGN0160CEZZ J Plug, 1-pin (SG) AB
P361 QPLGN0461CEZZA Plug, 4-pin(S) AB
P401 QPLGN0861CEZZA Plug, 8-pin(GBN) AB
P601 QPLGN0161FJZZ J Plug, 6-pin(K) AE
P602 QPLGN0661CEZZA Plug, 6-pin(XA) AB
P603 QPLGN0660CEZZ J Plug, 6-pin(XB) AC
P604 QPLGN0157FJZZ J Plug, 2-pin(XC) AC
P621 QPLGN0761CEZZA Plug, 7-pin(YBN) AB
P651 QPLGN0361CEZZA Plug, 3-pin(P651-3) AB
P701 QPLGN0460CEZZ J Plug, 4-pin(M) AC
P703 QPLGN0269GEZZ J Plug, 2-pin(P) AB
P705 QPLGN0160CEZZ J Plug, 1-pin(SG) AB
P1301 QPLGN0661CEZZA Plug, 6-pin(EJ) AB
P1901 QPLGN1559REZZ J Plug, 15-pin(VA) AC
P1902 QPLGN1559REZZ J Plug, 15-pin(VB) AC
P1903 QPLGN1059REZZ J Plug, 10-pin(VC) AC
P2401 QPLGN0561CEZZA Plug, 5-pin AB
SC3001
QSOCN0259FJ00 J Socket, 10-pin(EA) AE
RMC2601
RRMCU0222CEZZ J Remote Receiver AL
RDA361
PRDAR0001WJFW Heat Sink, for IC361 AE
RDA501
PRDARA006WJFW Heat Sink, for IC501 AE
RDA602
PRDAR0114GJFW J Heat Sink, for Q602 AH
RDA673
PRDAR1007MEFW J Heat Sink, for Q673 AH
RDA701
PRDAR0117GJFW J Heat Sink, for Q701 AL
RDA751
PRDAR0111GJFW J Heat Sink, for IC751 AF
SG680 QSPGH0025CEZZ J Spark Gap AC
LHLDW1002PEZZ R Holder AB
LHLDW1047PEZZ R Holder AB
LX-BZ3049GEFD J Screw AA
LX-BZ3100CEFD J Screw AA
LX-HZ3007MEFD Screw AB
MSPRK0034BMFW J Spring AC
Terminal, Input-3/Component
AK
MISCELLANEOUS PARTS
34
Page 32

36U-F510
Ref. No. Part No. ★ Description Code Ref. No. Part No. ★ Description Code
PWB-B: DUNTKA527WEC1
CRT UNIT
å IC850 VHiTDA6103Q-1 J TDA6103Q/N3 AL
Q850 VS2SA1266-Y-1+ J 2SA1266-Y AA
Q851 VS2SC3198-G-1+ J 2SC3198-G AA
Q1504 VS2SC3198-G-1+ J 2SC3198-G AA
Q1505 VS2SA1266-Y-1+ J 2SA1266-Y AA
Q1506 VS2SA1964E/-1 J 2SA1964E AF
Q1507 VS2SC5248E/-1 J 2SC5248E AE
D853 RH-EX0647GEZZ~ J Zener Diode, 15V AA
D854 VHD1SS119//-1~ J Diode AA
D855 VHD1SS119//-1~ J Diode AA
D865 RH-EX0633GEZZ~ Zener Diode, 10V AE
D866 RH-EX0633GEZZ~ Zener Diode, 10V AE
D867 RH-EX0633GEZZ~ Zener Diode, 10V AE
D897 RH-DX0220CEZZ~ J Diode AB
D898 RH-DX0220CEZZ~ J Diode AB
D899 RH-DX0220CEZZ~ J Diode AB
D1502 VHD1SS119//-1~ J Diode AA
D1503 VHD1SS119//-1~ J Diode AA
D1506 RH-DX0487CEZZ~ J Diode AC
D1507 RH-DX0487CEZZ~ J Diode AC
D1510 VHD1SS119//-1~ J Diode AA
C850 VCFYSB2EB823J J 0.082 250V Mylar AD
C851 RC-KZ018JCEZZ J 0.01
C852 VCEA0A1CW107M+ J 100 16V EL. AC
C853 VCFYFA1HA224J+ J 0.22 50V Mylar AB
C854 VCEA0A1CW227M+ J 220 16V EL. AC
C855 VCEA0A2EW106M+ 10 250V EL. AD
C856 VCEA0A1CW106M+ J 10 16V EL. AB
C1501 VCEA0A1EW476M+ J 47 25V EL. AB
C1506 VCKYPA1HF103Z+ J 0.01 50V Ceramic AA
C1508 VCKYPA2HB472K+ J 4700p 500V Ceramic AB
C1509 VCKYPA1HB472K+ 4700p 50V Ceramic AB
C1510 VCKYPA1HF103Z+ J 0.01 50V Ceramic AA
C1511 VCKYPA1HF103Z+ J 0.01 50V Ceramic AA
C1515 VCEA0A1EW476M+ J 47 25V EL. AB
C1516 VCEA0A1EW476M+ J 47 25V EL. AB
C1517 VCEA0A2AW106M+ J 10 100V EL. AC
C1518 VCCSPA2HL560K+ J 56p 500V Ceramic AA
C1519 VCEA0A2CW106M+ 10 160V EL.
INTEGRATED CIRCUIT
TRANSISTORS
DIODES
or
RH-EX0417GE
CAPACITORS
[EL.··· Electrolytic]
or
RC-KZ015JCE
AC250V
Ceramic AC
R873 VRD-RM2HD224J~ J 220k 1/2W Carbon AA
R874 VRD-RM2HD184J~ J 180k 1/2W Carbon AA
R875 VRD-RM2HD184J~ J 180k 1/2W Carbon AA
R876 VRD-RM2HD184J~ J 180k 1/2W Carbon AA
R877 VRD-RA2BE103J~ 10k 1/8W Carbon AE
R878 VRS-SV2HC120J J 12 1/2W M-Ox. AA
R1511 VRD-RA2BE101J ~ 100 1/8W Carbon AE
R1513 VRS-VV3DB561J J 560 2W M-Ox. AA
R1514 VRD-RA2BE100J~ J 10 1/8W Carbon AA
R1515 VRD-RA2BE820J~ J 82 1/8W Carbon AA
R1516 VRD-RA2BE820J~ J 82 1/8W Carbon AA
R1517 VRD-RA2BE122J~ J 1.2k 1/8W Carbon AA
R1518 VRD-RA2BE683J ~ 68k 1/8W Carbon AA
R1519 VRD-RA2BE123J ~ 12k 1/8W Carbon AE
R1520 VRD-RA2BE683J ~ 68k 1/8W Carbon AA
R1521 VRD-RA2BE122J~ J 1.2k 1/8W Carbon AA
R1525 VRD-RA2EE560J~ J 56 1/4W Carbon AA
R1526 VRD-RA2EE560J~ J 56 1/4W Carbon AA
R1527 VRD-RM2HD1R5J~ J 1.5 1/2W Carbon AA
R1528 VRD-RM2HD1R5J~ J 1.5 1/2W Carbon AA
R1529 VRS-VV3DB221J J 220 2W M-Ox. AA
R1530 VRD-RA2BE122J~ J 1.2k 1/8W Carbon AA
MISCELLANEOUS PARTS
FB1501RBLN-0020CEZZ+ J Ferrite Bead AB
P852 QPLGN0341CEZZ J Plug, 3-pin(PU) AA
P854 QPLGN0741CEZZ J Plug, 7-pin(YBN) AC
P860 QPLGN0841CEZZ J Plug, 8-pin(GBN) AB
SC850 QSOCV0936CEZZ J CRT Socket AM
RDA850
PRDAR0248PEFW R Heat Sink, for IC850 AF
RDA1506
PRDAR5072CEFW J Heat Sink, for Q1506 AC
RDA1507
PRDAR5072CEFW J Heat Sink, for Q1507 AC
LX-BZ3100CEFD J Screw AA
RESISTORS
[M-Ox.··· Metal Oxide]
R850 VRS-SV2HC152J J 1.5k 1/2W M-Ox. AA
R851 VRS-SV2HC152J J 1.5k 1/2W M-Ox. AA
R852 VRS-SV2HC152J J 1.5k 1/2W M-Ox. AA
å R853 VRS-SV2HC272J J 2.7k 1/2W M-Ox. AA
å R854 VRS-SV2HC272J J 2.7k 1/2W M-Ox. AA
å R855 VRS-SV2HC272J J 2.7k 1/2W M-Ox. AA
R856 VRD-RM2HD224J~ J 220k 1/2W Carbon AA
R857 VRD-RM2HD224J~ J 220k 1/2W Carbon AA
R858 VRD-RM2HD224J~ J 220k 1/2W Carbon AA
R862 VRC-MA2HG152K~ J 1.5k 1/2W Solid AA
R863 VRC-MA2HG152K~ J 1.5k 1/2W Solid AA
R864 VRC-MA2HG152K~ J 1.5k 1/2W Solid AA
R867 VRS-SV2HC392J J 3.9k 1/2W M-Ox. AA
R868 VRS-SV2HC222J J 2.2k 1/2W M-Ox. AA
R870 VRD-RA2BE223J~ 22k 1/8W Carbon AE
R871 VRD-RA2BE223J~ 22k 1/8W Carbon AE
R872 VRD-RA2EE680J~ J 68 1/4W Carbon AA
35
Page 33

Ref. No. Part No. ★ Description Code Ref. No. Part No. ★ Description Code
PWB-C:DUNTKA602WEA1
AV UNIT
INTEGRATED CIRCUITS
IC1401 VHiTC90A53F-1~ I.C. AV
IC1900 VHiCXA2089Q-1S J CXA2089Q AN
TRANSISTORS
Q1401 VS2SD601AR/-1~ 2SD601AR AC
or
VS2SC1623L61E
Q1404 VS2SD601AR/-1~ 2SD601AR AC
or
VS2SC1623L61E
Q1405 VS2SD601AR/-1~ 2SD601AR AC
or
VS2SC1623L61E
Q1406 VS2SB709AR/-1 ~ 2SB709AR AC
or
VS2SA812-M51E
Q1407 VS2SD601AR/-1~ 2SD601AR AC
or
VS2SC1623L61E
Q1408 VS2SB709AR/-1 ~ 2SB709AR AC
or
VS2SA812-M51E
Q1409 VS2SD601AR/-1~ 2SD601AR AC
or
VS2SC1623L61E
Q1907 VS2SD601AR/-1~ 2SD601AR AC
or
VS2SC1623L61E
Q1909 VS2SB709AR/-1 ~ 2SB709AR AC
or
VS2SA812-M51E
COILS
L1401 VP-XF100K0000~ Peaking 10µH AB
L1402 VP-XF100K0000~ Peaking 10µH AB
L1403 VP-DF151K0000 ~ Peaking 150µH AB
L1406 VP-XF330K0000~ Peaking 33µH AB
L1407 VP-XF220K0000~ J Peaking 22µH AB
L1408 VP-XF100K0000~ Peaking 10µH AB
L1410 VP-XF100K0000~ Peaking 10µH AB
L1411 VP-XF100K0000~ Peaking 10µH AB
L1413 VP-XF330K0000~ Peaking 33µH AB
L1414 VP-XF330K0000~ Peaking 33µH AB
CAPACITORS
[EL.··· Electrolytic]
C1412 VCEA0A1CW106M+ J 10 16V EL. AB
C1415 VCCCCY1HH220J~ J 22p 50V Ceramic AA
C1416 VCEA0A1CW477M+ J 470 16V EL. AC
C1420 VCCCCY1HH120J~ J 12p 50V Ceramic AA
C1421 VCCCCY1HH120J~ J 12p 50V Ceramic AA
C1424 VCCCCY1HH270J ~ 27p 50V Ceramic AA
C1428 VCKYCY1HF103Z~ J 0.01 50V Ceramic AA
C1429 VCKYCY1HF103Z~ J 0.01 50V Ceramic AA
C1430 VCE9GA1CW106M+ 10 16V EL. (N.P) AB
C1435 VCKYCY1HF103Z~ J 0.01 50V Ceramic AA
C1436 VCKYCY1CF104Z~ J 0.1 16V Ceramic AA
C1439 VCE9GA1CW106M+ 10 16V EL. (N.P) AB
C1440 VCEA0A1CW106M+ J 10 16V EL. AB
C1441 VCKYCY1HF103Z~ J 0.01 50V Ceramic AA
C1442 VCFYFA1HA474J+ 0.47 50V Mylar AB
C1443 VCKYCY1HF103Z~ J 0.01 50V Ceramic AA
C1444 VCKYCY1HB472K~ J 4700p 50V Ceramic AA
C1445 VCKYCY1HF103Z~ J 0.01 50V Ceramic AA
C1446 VCCCCY1HH181J~ J 180p 50V Ceramic AA
C1447 VCKYCY1HF103Z~ J 0.01 50V Ceramic AA
C1448 VCKYCY1CF104Z~ J 0.1 16V Ceramic AA
C1449 VCKYCY1CF104Z~ J 0.1 16V Ceramic AA
C1451 VCEA0A1CW107M+ J 100 16V EL. AC
C1452 VCKYCY1CF104Z~ J 0.1 16V Ceramic AA
C1453 VCKYCY1HF103Z~ J 0.01 50V Ceramic AA
C1454 VCKYCY1HF103Z~ J 0.01 50V Ceramic AA
C1455 VCKYCY1HF103Z~ J 0.01 50V Ceramic AA
C1456 VCKYCY1CF104Z~ J 0.1 16V Ceramic AA
C1457 VCEA0A1CW106M+ J 10 16V EL. AB
C1458 VCEA0A1CW106M+ J 10 16V EL. AB
C1460 VCKYCY1HF103Z~ J 0.01 50V Ceramic AA
C1470 VCCCCY1HH100D~ J 10p 50V Ceramic AA
C1473 VCCCCY1HH100D~ J 10p 50V Ceramic AA
C1474 VCCCCY1HH150J ~ 15p 50V Ceramic AA
C1900 VCKYCY1HB681K ~ 680p 50V Ceramic AB
C1901 VCKYCY1HB681K ~ 680p 50V Ceramic AB
C1903 VCKYCY1HB681K ~ 680p 50V Ceramic AB
C1904 VCEA0A1HW105M+ J 1 50V EL. AB
C1905 VCEA0A1HW105M+ J 1 50V EL. AB
C1906 VCKYCY1HB681K ~ 680p 50V Ceramic AB
C1907 VCEA0A1HW105M+ J 1 50V EL. AB
C1908 VCKYCY1HF103Z ~ J 0.01 50V Ceramic AA
C1909 VCEA0A1HW105M+ J 1 50V EL. AB
C1910 VCEA0A1HW105M+ J 1 50V EL. AB
C1911 VCEA0A1HW105M+ J 1 50V EL. AB
C1912 VCEA0A1HW105M+ J 1 50V EL. AB
C1913 VCEA0A1HW105M+ 1 50V EL. AB
C1914 VCKYCY1HB681K ~ 680p 50V Ceramic AB
C1915 VCKYCY1HF103Z~ J 0.01 50V Ceramic AA
C1916 VCKYCY1HF103Z~ J 0.01 50V Ceramic AA
C1919 VCEA0A1HW105M+ J 1 50V EL. AB
C1921 VCKYCY1HB681K ~ 680p 50V Ceramic AB
C1922 VCKYCY1CF104Z~ J 0.1 16V Ceramic AA
C1923 VCEA0A1CW477M+ J 470 16V EL. AC
C1926 VCEA0A1CW226M+ J 22 16V EL. AB
C1927 VCKYCY1HB681K ~ 680p 50V Ceramic AB
C1928 VCEA0A1HW105M+ J 1 50V EL. AB
C1929 VCKYCY1HB681K ~ 680p 50V Ceramic AB
C1937 VCEA0A1HW105M+ J 1 50V EL. AB
C1938 VCEA0A1HW105M+ J 1 50V EL. AB
C1939 VCEA0A1HW105M+ J 1 50V EL. AB
C1951 VCKYCY1HB681K ~ 680p 50V Ceramic AB
RESISTORS
[M-Ox.··· Metal Oxide]
RJ12 VRS-CY1JF000J~ J 0 1/16W M-Ox. AA
RJ13 VRS-CY1JF000J~ J 0 1/16W M-Ox. AA
RJ14 VRS-CY1JF000J~ J 0 1/16W M-Ox. AA
RJ15 VRS-CY1JF000J~ J 0 1/16W M-Ox. AA
RJ16 VRS-CY1JF000J~ J 0 1/16W M-Ox. AA
RJ18 VRS-CY1JF000J~ J 0 1/16W M-Ox. AA
RJ19 VRS-CY1JF000J~ J 0 1/16W M-Ox. AA
RJ20 VRS-CY1JF000J~ J 0 1/16W M-Ox. AA
RJ21 VRS-CY1JF000J~ J 0 1/16W M-Ox. AA
RJ22 VRS-CY1JF000J~ J 0 1/16W M-Ox. AA
RJ23 VRS-CY1JF000J~ J 0 1/16W M-Ox. AA
R1401 VRS-CY1JF101J~ J 100 1/16W M-Ox. AA
R1402 VRS-CY1JF681J~ J 680 1/16W M-Ox. AA
R1403 VRS-CY1JF332J ~ 3.3k 1/16W M-Ox. AE
R1404 VRS-CY1JF102J~ J 1k 1/16W M-Ox. AA
R1405 VRS-CY1JF471J~ J 470 1/16W M-Ox. AA
R1406 VRS-CY1JF102J~ J 1k 1/16W M-Ox. AA
R1407 VRS-CY1JF102J~ J 1k 1/16W M-Ox. AA
R1420 VRS-CY1JF103J~ J 10k 1/16W M-Ox. AA
R1422 VRS-CY1JF473J~ J 47k 1/16W M-Ox. AA
R1423 VRS-CY1JF223J~ J 22k 1/16W M-Ox. AA
R1424 VRS-CY1JF102J~ J 1k 1/16W M-Ox. AA
R1425 VRS-CY1JF221J~ J 220 1/16W M-Ox. AA
R1426 VRS-CY1JF391J~ J 390 1/16W M-Ox. AA
R1427 VRS-CY1JF102J~ J 1k 1/16W M-Ox. AA
R1428 VRS-CY1JF473J~ J 47k 1/16W M-Ox. AA
R1429 VRS-CY1JF223J~ J 22k 1/16W M-Ox. AA
R1430 VRS-CY1JF102J~ J 1k 1/16W M-Ox. AA
R1431 VRS-CY1JF122J ~ 1.2k 1/16W M-Ox. AB
R1432 VRS-CY1JF331J~ J 330 1/16W M-Ox. AA
R1433 VRS-CY1JF102J ~ J 1k 1/16W M-Ox. AA
36
Page 34

36U-F510
Ref. No. Part No. ★ Description Code Ref. No. Part No. ★ Description Code
PWB-C:DUNTKA602WEA1
AV UNIT (Continued)
R1434 VRS-CY1JF471J ~ J 470 1/16W M-Ox. AA
R1435 VRS-CY1JF102J~ J 1k 1/16W M-Ox. AA
R1456 VRS-CY1JF564J~ J 560k 1/16W M-Ox. AA
R1457 VRS-CY1JF103J~ J 10k 1/16W M-Ox. AA
R1458 VRD-RA2BE103J ~ 10k 1/8W Carbon AE
R1459 VRS-CY1JF821J~ J 820 1/16W M-Ox. AA
R1466 VRS-CY1JF123J~ J 12k 1/16W M-Ox. AA
R1467 VRS-CY1JF822J~ J 8.2k 1/16W M-Ox. AA
R1900 VRS-CY1JF101J~ J 100 1/16W M-Ox. AA
R1930 VRS-CY1JF223J~ J 22k 1/16W M-Ox. AA
R1932 VRS-CY1JF223J~ J 22k 1/16W M-Ox. AA
R1935 VRS-CY1JF101J~ J 100 1/16W M-Ox. AA
R1936 VRS-CY1JF223J~ J 22k 1/16W M-Ox. AA
R1937 VRS-CY1JF101J~ J 100 1/16W M-Ox. AA
R1938 VRS-CY1JF223J~ J 22k 1/16W M-Ox. AA
R1941 VRS-CY1JF101J~ J 100 1/16W M-Ox. AA
R1942 VRS-CY1JF223J~ J 22k 1/16W M-Ox. AA
R1943 VRS-CY1JF101J~ J 100 1/16W M-Ox. AA
R1944 VRS-CY1JF223J~ J 22k 1/16W M-Ox. AA
R1945 VRS-CY1JF101J~ J 100 1/16W M-Ox. AA
R1946 VRS-CY1JF103J~ J 10k 1/16W M-Ox. AA
R1948 VRS-CY1JF101J~ J 100 1/16W M-Ox. AA
R1954 VRD-RA2BE221J~ J 220 1/8W Carbon AA
R1955 VRD-RA2BE221J~ J 220 1/8W Carbon AA
R1956 VRS-CY1JF222J~ J 2.2k 1/16W M-Ox. AA
R1957 VRD-RA2BE101J ~ 100 1/8W Carbon AE
R1958 VRS-CY1JF101J~ J 100 1/16W M-Ox. AA
R1959 VRS-CY1JF102J~ J 1k 1/16W M-Ox. AA
R1960 VRD-RA2BE101J ~ 100 1/8W Carbon AE
R1962 VRD-RA2BE101J ~ 100 1/8W Carbon AE
R1964 VRD-RA2BE101J ~ 100 1/8W Carbon AE
R1965 VRS-CY1JF222J ~ J 2.2k 1/16W M-Ox. AA
R1966 VRS-CY1JF102J ~ J 1k 1/16W M-Ox. AA
R1971 VRD-RA2BE101J ~ 100 1/8W Carbon AE
R1972 VRD-RA2BE101J ~ 100 1/8W Carbon AE
P1904 QPLGN0641CEZZ J Plug, 6-pin(EJ) AB
SC1901
SC1902
SC1903
SLD1901
MISCELLANEOUS PARTS
QSOCN1598REZZ J Socket, 15-pin(VA) AD
QSOCN1598REZZ J Socket, 15-pin(VB) AD
QSOCN1098REZZ J Socket, 10-pin(VC) AC
PSLDM0102GJFW J Shield AD
PWB-S: DUNTKB224WEA2
MTS MODULE UNIT
INTEGRATED CIRCUITS
IC3001 VHiCXA2074Q-1 ~ CXA2074Q
CAPACITORS
[EL.··· Electrolytic]
C3001 VCE9GA1HW475M+ J 4.7 50V EL. (N.P) AB
C3002 VCKYCY1HB562K ~ J 5600p 50V Ceramic AA
C3003 VCQYTA1HM123J+ J 0.012 50V Mylar AA
C3004 VCEA0A1HW105M+ J 1 50V EL. AB
C3005 VCE9GA1HW475M+ J 4.7 50V EL. (N.P) AB
C3006 VCEA0A1HW106M+ J 10 50V EL. AB
C3007 VCEA0A1HW475M+ J 4.7 50V EL. AB
C3008 VCKYCY1HF103Z* J 0.01 50V Ceramic AA
C3009 VCEA0A1CW227M+ J 220 16V EL. AC
C3010 VCE9GA1HW475M+ J 4.7 50V EL. (N.P) AB
C3011 VCEA0A1HW475M+ J 4.7 50V EL. AB
C3012 VCE9GA1HW475M+ J 4.7 50V EL. (N.P) AB
C3013 VCKYCY1HB272K ~ J 2700p 50V Ceramic AA
C3014 VCQYTA1HM473J+ 0.047 50V Mylar AC
C3015 VCEACA1HC335K+ 3.3 50V EL. AF
C3016 VCE9GA1HW475M+ J 4.7 50V EL. (N.P) AB
C3017 VCEACA1CC106K+ 10 16V EL. AF
C3018 VCEA0A1HW105M+ J 1 50V EL. AB
C3029 VCQYTA1HM682J+ J 6800p 50V Mylar AB
C3030 VCQYTA1HM682J+ J 6800p 50V Mylar AB
C3031 VCQYTA1HM473J+ 0.047 50V Mylar AC
C3032 VCQYTA1HM473J+ 0.047 50V Mylar AC
RESISTORS
[M-Ox.··· Metal Oxide]
R3001 VRD-RA2BE221J ~ J 220 1/8W Carbon AA
R3002 VRD-RA2BE221J ~ J 220 1/8W Carbon AA
R3003 VRS-CY1JF105J ~ J 1M 1/16W M-OX. AA
R3004 VRS-CY1JF104J~ J 100k 1/16W M-OX. AA
R3005 VRS-CY1JF623J~ J 62k 1/16W M-OX. AA
R3007 VRS-CY1JF332J ~ 3.3k 1/16W M-OX. AE
R3008 VRS-CY1JF302J~ J 3k 1/16W M-OX. AA
R3010 VRS-CY1JF392J~ J 3.9k 1/16W M-OX. AA
R3011 VRS-CY1JF102J~ J 1k 1/16W M-OX. AA
R3012 VRS-CY1JF102J~ J 1k 1/16W M-OX. AA
MISCELLANEOUS PARTS
P3001 QPLGN0242FJ00 J Plug, 10-pin(EA) AE
37
Page 35

36U-F510
Ref. No. Part No. ★ Description Code Ref. No. Part No. ★ Description Code
PWB-H:DUNTKB225WEA3
DF MODULE UNIT
INTEGRATED CIRCUITS
IC1680 VHiKiA358P+-1 R KIA358P AD
or
VHiUPC358C/-1
or
VHiiR9358//-1
TRANSISTORS
Q1680 VS2SC5022//1E J 2SC5022 AG
Q1681 VS2SC3198-G-1+ J 2SC3198-G AA
DIODES
D1610 RH-DX0202CEZZ ~ J Diode AD
D1680 RH-EX0666GEZZ ~ Zener Diode, 26V AB
D1681 RH-DX0475CEZZ ~ J Diode AA
D1682 RH-DX0475CEZZ ~ J Diode AA
D1683 RH-DX0475CEZZ ~ J Diode AA
D1684 RH-DX0475CEZZ ~ J Diode AA
COILS
L1640 RCiLZ0982CEZZ J Coil AK
L1641 RCiLZ1026CEZZ J Coil AK
L1680 RCiLZ0034PEZZ R Coil
or
RCiLZ0976CE
L1681 VP-DF8R2K0000 ~ Peaking 8.2µH AB
TRANSFORMER
T1680 RTRNZ0726CEZZ J Transformer AM
P1603 QPLGN0660CEZZ J Plug, 6-Pin(XB) AC
P1604 QPLGN0157FJZZ J Plug, 2-pin AC
SG1681
QSPGH0025CEZZ J Spark Gap AC
RDA1680
PRDAR0135PEFW R Heat Sink, for Q1680 AE
LHLDW1002PEZZ R Holder AB
LX-BZ3100CEFD J Screw AA
CAPACITORS
C1610 VCFYSB2EB224K J 0.22 250V Mylar AD
C1644 VCFPFC2EB684J 0.68 250V M-Poly.
C1677 VCKYPA1HB391K+ J 390p 50V Ceramic AA
C1678 VCKYPA1HB391K+ J 390p 50V Ceramic AA
C1681 RC-KZ0024CEZZ J 1000p 2kV Ceramic AC
C1682 VCKYPH3DB561K J 560p 2kV Ceramic AC
C1683 VCE9GA1HW335M+ J 3.3 50V EL. (N.P) AB
C1684 VCEA0A1VW477M+ J 470 35V EL. AB
C1685 VCFYFA1HA474J+ 0.47 50V Mylar AB
C1686 VCEA0A1VW108M+ 1000 35V EL. AB
C1695 VCFYFA1HA224J+ J 0.22 50V Mylar AB
C1696 VCQYTA1HM103J+ J 0.01 50V Mylar AB
C1697 VCFPVC3ZA822H J 8200p 1.8kV M-Poly. AE
[EL.··· Electrolytic]
RESISTORS
R1610 VRS-VV3DB103J J 10k 2W M-Ox. AA
R1627 VRS-KT3LB122J J 1.2k 3W M-Ox. AC
R1656 VRD-RA2BE394J ~ J 390k 1/8W Carbon AA
R1657 VRD-RA2BE273J ~ 27k 1/8W Carbon AE
R1658 VRD-RA2BE333J ~ 33k 1/8W Carbon AE
R1659 VRD-RA2BE102J ~ 1k 1/8W Carbon AE
R1680 VRS-SV3LB154J J 150k 3W M-Ox. AC
R1681 VRS-KT3LB104J J 100k 3W M-Ox. AC
R1682 VRC-MA2HG333K ~ J 33k 1/2W Solid AA
R1683 VRD-RA2BE332J ~ 3.3k 1/8W Carbon AE
R1684 VRD-RA2BE681J ~ 680 1/8W Carbon AE
R1685 VRS-VV3AB181J J 180 1W M-Ox. AA
R1686 VRD-RA2BE103J ~ 10k 1/8W Carbon AE
R1687 VRD-RA2BE103J ~ 10k 1/8W Carbon AE
R1688 VRD-RA2BE473J ~ 47k 1/8W Carbon AE
R1689 VRD-RA2BE823J ~ 82k 1/8W Carbon AA
R1690 VRD-RA2BE822J ~ 8.2k 1/8W Carbon AA
R1691 VRD-RA2BE823J ~ 82k 1/8W Carbon AA
R1695 VRD-RA2BE224J~ J 220k 1/8W Carbon AA
R1696 VRD-RA2BE394J~ J 390k 1/8W Carbon AA
[M-Ox.··· Metal Oxide]
P1602 QPLGN0661CEZZ J Plug, 6-Pin(XA) AD
MISCELLANEOUS PARTS
38
Page 36
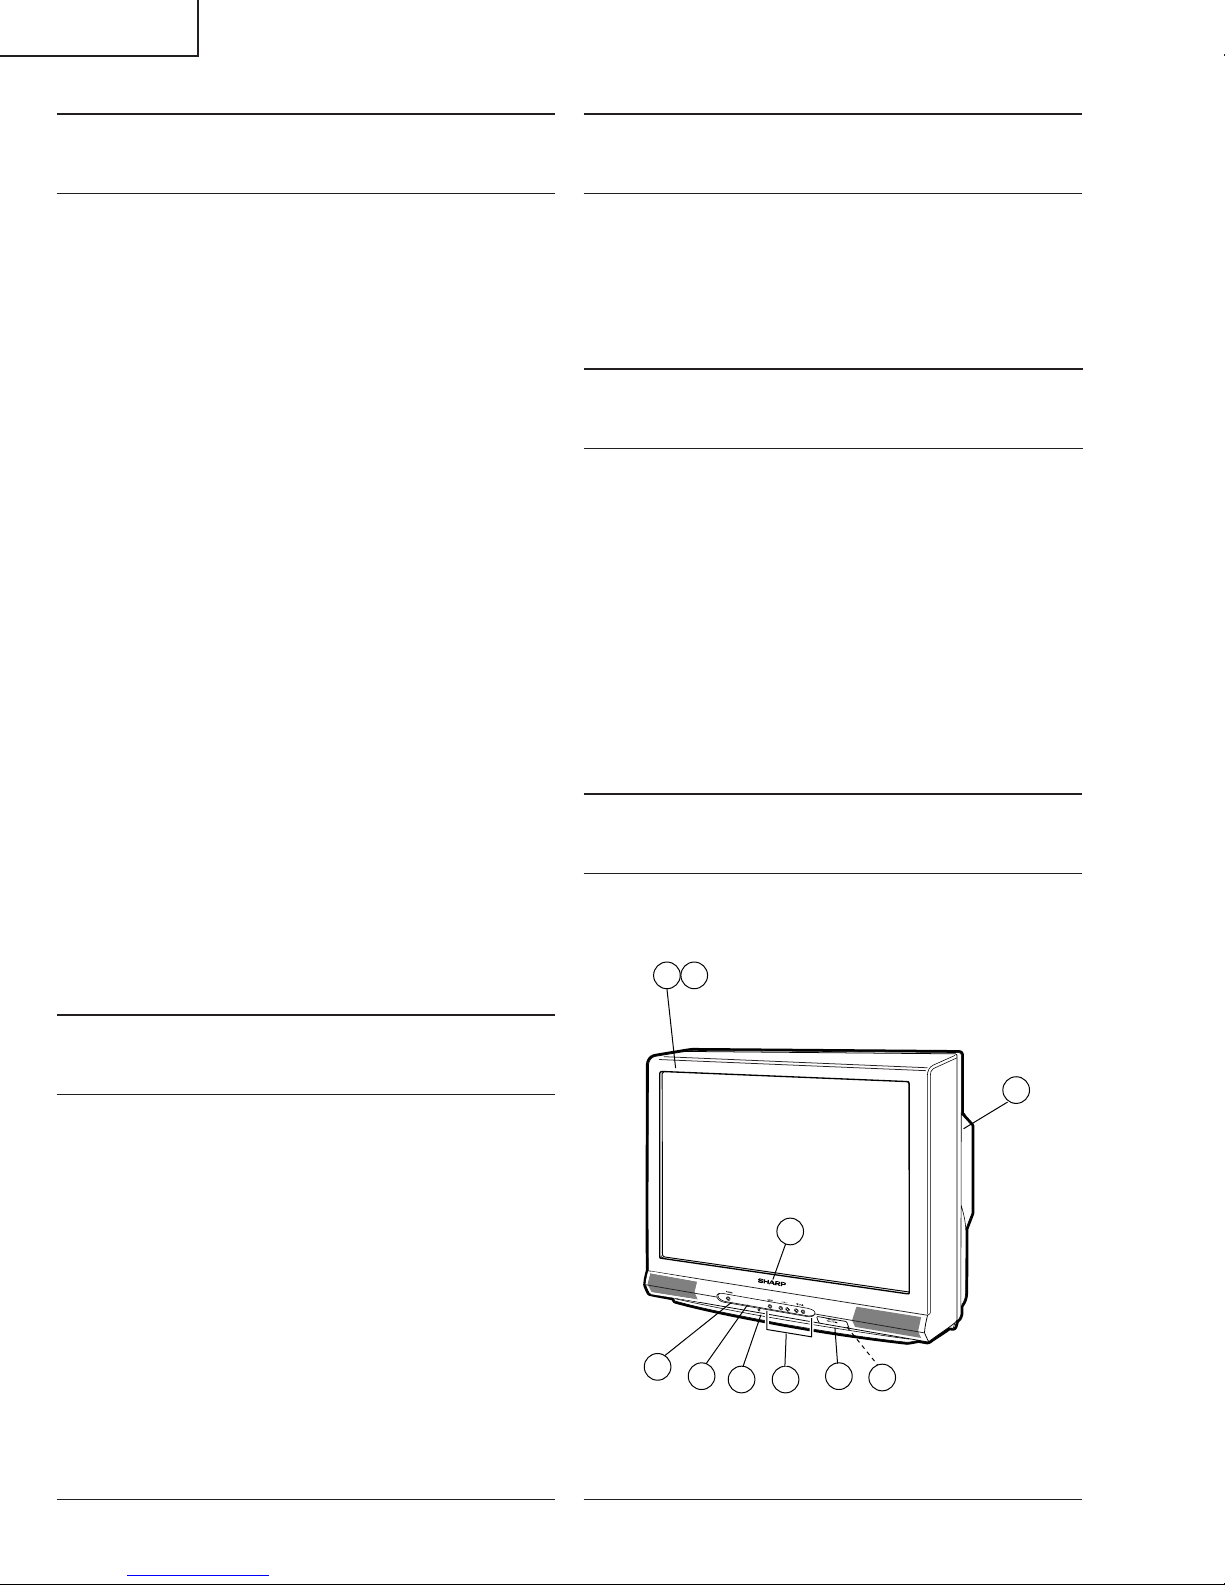
36U-F510
Ref. No. Part No. ★ Description Code Ref. No. Part No. ★ Description Code
MISCELLANEOUS PARTS
å
ACC701
QACCD3065CESA J AC Cord (AC120V 60Hz) AN
SP1 VSP1206PB648A X Speaker (L), 8ohm AN
or
VSP1206PB598A
SP2 VSP1206PB648A X Speaker (R), 8ohm AN
or
VSP1206PB598A
LANGB0102GJFW CRT Bracket, x4 AB
LHLDK0014PEZZ R AC Cord Holder AD
LHLDW1002PEZZ R Wire Holder AB
LHLDW1033PEZZ R Wire Holder AA
LHLDW1037PEZZ R Wire Holder AB
LHLDW1060CEZZ J Wire Holder AB
LHLDW1062PEKZ R Wire Holder AD
LHLDZ0009PEZZ R Bonding Boss, x4 AD
LHLDZ1037MEZZ X Anode Clamp Holder, x2 AD
LX-TZ0012PEFD R Screw, x4 AC
LX-TZ0104GJFD X CRT Screw, x4 AF
LX-WZ3006MEFD Washer, x4 AB
LX-WZ3013MEFD X Washer, x4 AD
PSPAG0006PE00 R Spacer, for Speaker AB
PSPAH0108GJ00 Mask Spacer, x2 AC
PSPAH0110GJ00 Spacer, x4 AB
PSPAHA017WJ00 Spacer, x1 AK
QCNW-0165GJZZ Connecting Cord(EJ) AD
QCNW-A378WJZZ X Connecting Cord(XA) AF
QCNW-A379WJZZ X Connecting Cord(XB) AH
QCNW-A380WJZZ X Connecting Cord(DF) AG
QCNW-A539WJZZ Connecting Cord(YBN) AC
QCNW-A674WJZZ Connecting Cord(GBN) AD
QCNW-A689WJZZ Connecting Cord(SP) AC
QCNW-A718WJZZ Connecting Cord(SG1) AC
TCAUH3048GJZZ Caution Label AB
TLABM0002GJZZ Model Label AB
TLABZ0152GJZZ X Feature Label AD
XTASD30P12000 J Screw, x4 AA
XTASD40P20000 J Screw, x9 AA
PACKING PARTS
(NOT REPLACEMENT ITEM)
SPAKCA008WJZZ – Packing Case —
SPAKP0110GJZZ – Wrapping Paper —
SPAKXA004WJZZ – Buffer Material —
SSAKA0101GJZZ – Polyethylene Bag —
CABINET PARTS
1 CCABAA003WEH1 Front Cabient Ass'y BM
1-1 CCABAA003WWJKB Front Cabient
1-2 HBDGB3141CESA J Badge, "SHARP" AG
1-3 HDECQA010WJSA R/C, LED Cover AC
1-4 JBTN-A005WJKA Button, CH-Up/Down AG
VOL-Up/Down, Menu
1-5 JBTN-A004WJKA Button, Power AG
1-6 HDECQ0104GJKA X Decoration Plate AE
1-7 HiNDP0107GJSA X Indication Plate AB
1-8 GDORFA001WJKA AV Terminal Door AD
2 GCABBA002WJKA Rear Cabinet (36U-F500) BE
CABINET PARTS LOCATION
SUPPLIED ACCESSORIES
TGAN-0001GJZZ X Guarantee Card AB
TiNS-A176WJZZ Operation Manual AH
RRMCGA035WJSB X Infrared R/C Unit AR
39
1-5
1
1-1
2
1-2
1-6
1-3
1-4
1-8
1-7
Page 37
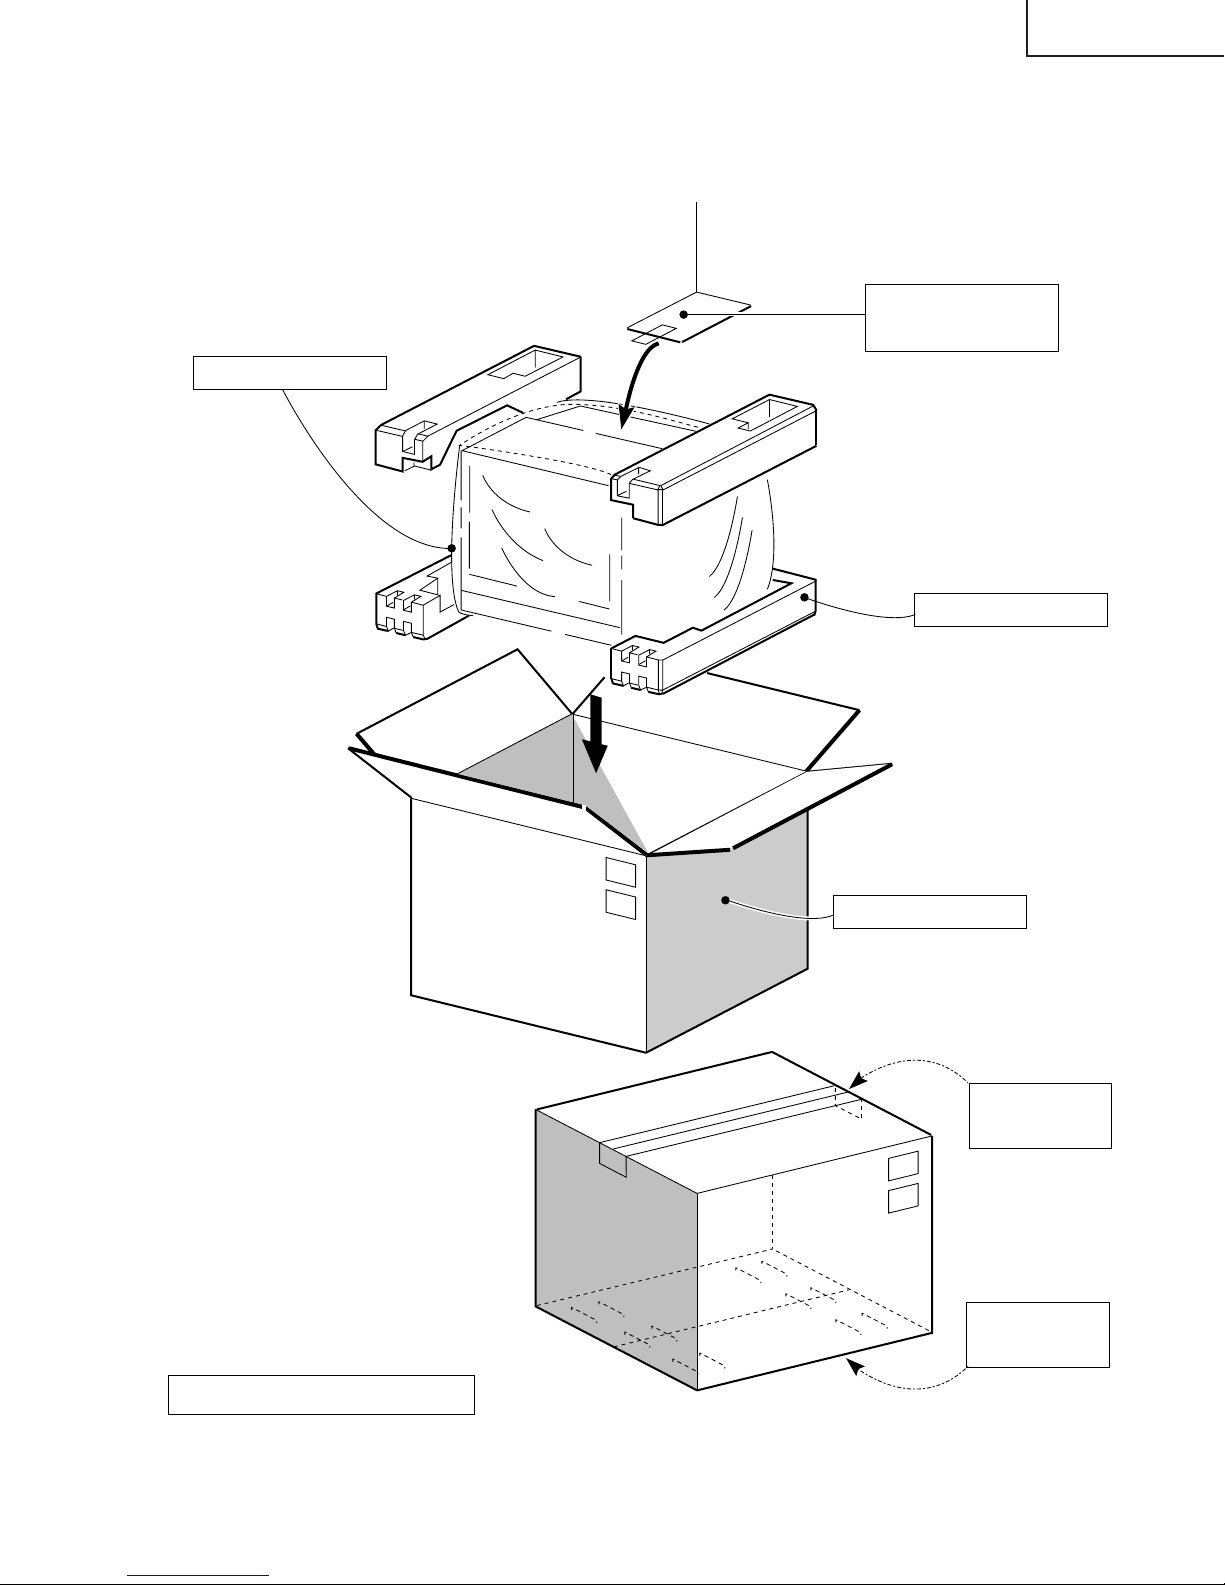
★ Polyethylene Sheet
PACKING OF THE SET
★ Polyethylene Bag
Operation Manual
Infrared R/C Unit
★
Batteries
36U-F510
FRONT
★Buffer Material
★ Packing Case
Use tape to
fix the top side of
packing case.
★ MARK : Not replacement items.
REAR
Use 12 staples to
fix the bottom side
of packing case.
40
Page 38

36U-F510
COPYRIGHT © 2002 BY SHARP CORPORATION
ALL RIGHTS RESERVED.
No part of this publication may be reproduced,
stored in a retrieval system, or transmitted in
any form or by any means, electronic, mechanical,
photocopying, recording, or otherwise, without
prior written permission of the publisher.
D SEM P SEMEX TQ0000-S
Jun. 2002 Printed in Japan
MI. KG
SHARP CORPORATION
AV Systems Group
Quality & Reliability Control Center
Yaita, Tochigi 329-2193, Japan
 Loading...