

Page 1
Products that have earned the ENERGY STAR ® are designed to protect the
environment through superior energy efficiency°
PAGE
• I&ttPORTANT INFORMATION/IMPORTANT
SAFEGUARDS .................................................... 2-4
- Trademarks ................................................ 5
o Supplied Accessories .............................. 5
• Before OperatingYourTelevision ................... 5
° Antenna Connections ................... 6-7
° Quick Reference Control Operation .............. 8-9
o EZ SETUP during First Use ........................ 10-11
- Antenna Setup-DIGITAL ....... t 1-12
o Accessing the MAIN MENU screen without
Remote Control ............................. 12
• Channel Cafl ........................... 12
° Changing Viewing Channel ........................ 13
o Language ................................ 14
• Sleep Timer ........................................... 14
o Video Adjust ....................................... 15
o Audio Select ................ I6-17
MTS (MultichannelTV Sound) ................... t6
SPEAKER (internal Speaker Switch) ..... t6
FAO (Fixed Audio Output) .............. 16
AUDIO ADJUST ........................ 17
o Digital Audio ................................... 18
instructions in Spanish and French
I This operation manual includes basic operating
SPANISH is on page 54-59
FRENCH is on page 60-65
PAGE
• Closed Caption ................................ 19-20
° Parent Control .................. 2'l-31
V-CHIP Operation ................ 2t-28
VIEW TIMER ........................... 29-31
° Energy Save .............. 32
° Set Up ................. 33-40
EZ Setup ........................... 33-34
Channel Setting .................. 34-36
Blue Screen ...................... 37
Personal Preference ............................ 38-39
Universal Plus Function .............. 39-40
• Auto Input ................................ 40
• CHiInput ID .................... 41-42
• Screen Format ...................... 43-44
. Using the Video and Audio input Terminals 45-46
° Using the Audio Output Terminals ......... 47
o Operation of Universal Remote Control ..... 48-51
° Before Calling for Service ........................ 52
, Calling for Service ...................... 52
o Warning message for Digital broadcasting 53
° Specifications ..................... 53
, Limited Warranty ........................ 66
OB!OO[BYI'
DIGITAL
Page 2
Welcome to the SHARP Family We are pleased that you are now the owner of a SHARP Color Television
- built for outstanding quality, reliability and performance
Every SHARP Color Television set is tuned and adjusted for proper color and sound, and has passed
through the most stringent quality control tests at the factory We have prepared this OPERATION MANUAL
so that you may adjust the picture and color to your personal viewing preference
We sincerely hope that you receive the greatest satisfaction and enjoyment from your new SHARP Color
Television set for years to come
Please read these instructions carefully, and keep them handy for your future reference
IMPORTANT
To aid reporting in case of loss or theft, ptease record the TV's
model and serial numbers in the space provided_The numbers
are located at the rear of the TV,
There are two important reasons for prompt warranty registration of your new SHARP television set Use
the REGISTRATION CARD packed in with the set
FIRST -WARRANTY
This is to assure that you will immediately receive the full consumer benefit of the parts, service and labor
warranty applicable to your purchase
SECOND - CONSUMER PRODUCT SAFETY ACT
To assure that you will promptly receive any safety notification on inspection, modification or recall that
SHARP may be required to give under the 1972 Consumer Product Safety Act. PLEASE READ
CAREFULLY THE IMPORTANT "LIMITED WARRANTY" CLAUSE ON THE LAST PAGEr
Model No.:
Serial No.:
WARNING: TO REDUCE THE RISK OF FIRE OR ELECTRIC SHOCK, DO NOT
EXPOSE THIS APPLIANCE TO WET LOCATIONS.
The lightning flash with
CAUTION 1
CAUTION: TO REDUCE THE R!SK OF
ELECTRIC SHOCK,
DO NOT REMOVE COVER (OR BACK).
NO USER-SERVICEABLE PARTS INSIDE.
REFER SERVICING TO QUALIFIED SERVICE
PERSONNEL,
'Note to CATV system installer: This reminder is provided to call the CATV system installer's attention
to Article 820-40 of the National Electrical Code that provides guidelines for proper grounding and, in
particular, specifies that the cable ground shall be connected to the grounding system of the building,
as close to the point of cable entry as practical"
WARNING - FCC Regulations state that any unauthorized changes or modifications to this equipment not
expressly approved by the manufacturer could void the user's authority to operate this
equipment
,_ arrowhead within a triangle is
intended to tel! the user that
parts inside the product are a
risk of electric shock to
persons
The exclamation point within a
triangle is intended to tell the
user that important operating
and servicing instructions are
in the papers with the
appliance
PRODUCT DISPOSAL
This product utilizes a Cathode Ray Tube (CRT) containing lead and tinqead solder
Disposal of these materials may be regulated due to environment considerations For disposal or
recycling information, please contact your local authorities or the Electronics industries Alliance:
www eiae org
Page 3
CAUTION:
o Do not place the AC power cord under the TV set or other heavy items
° To prevent fire, never place any type of candle or naked flames on the top or near the TV set,
• To prevent fire or shock hazard, do not expose this products to dripping or splashing No objects filled
with liquids, such as vases, should be placed on the product
CAUTION: Please read all of these instructions before you operate your television and save
these instructions for later use.
Electrical energy can perform many usefui functions This unit has been engineered and manufactured to assure
your personal safety. BUT IMPROPER USE CAN RESULT IN POTENTIAL ELECTRICAL SHOCK OR FIRE
HAZARDS. In order not to defeat the safeguards incorporated in this equipment, observe the following basic
ru_esfor its installation, use and servicing
1 Unplug this television equipment from the wall outlet before cleaning.
2 Do not use liquid cleaners or aerosol cleaners. Use a damp cloth for cleaning..
3 Do not use attachments not recommended by the television equipment manufacturer as they may cause
hazards.
4 Do not use this television equipment near water-- for example, near a bath tub, washbowl, kitchen sink or
laundrytub, in a wet basement, or near a swimming pool, etc
5 Do not place this equipment on an unstabfe cart, stand, or table The television equipment may fall, causing
serious injury to a child or an adult, and serious damage to the equipment Use only with a cart or stand
recommended by the manufacturer or sofd with the television equipment
6.. Television equipment and cart combination shoutd be moved with care. Quick stops,
excessive force, and uneven surfaces may cause the equipment and cart combination to
overturn
7. Wail or shelf mounting should follow the manufacturer's instructions,and should use a
mounting kit approved by the manufacturer
8 Slots and openings in the cabinet and the back or bottom are provided for ventilation To
insure reliable operation of the television equipment and to protect itfrom overheating, these openings must
net be blocked or covered This television equipment should not be placed in a bui{t-in insulationsuch as a
bookcase unless proper ventilation is provided.
9 The openings should never be covered with a cloth or other material, and the bottom openings should not
be blocked by placing the television equipment on a bed, sofa, rug, or other similar surface This television
equipment should never be placed near or over a radiator or heat register
10 This television equipment should be operated only from the type of power source indicated on the marking
labet If you are not sure of the type of power supplied to your home, consult your television dealer or local
power company.
For television equipment designed to operate from battery power, refer to the operating instructions
11 As a safety feature, television equipment is equipped with a 2-wire polarized plug (one plug blade bigger
than the other). The 2-wire polarized plug will fit only one way intothe power outlet.
Ifthe pIug does not fit, ask your electrician to replace your obsolete outlet Do not modify the plug and defeat
this safety feature
t2 Do not altow anything to rest on tt_epower cord. Do not !ocate this television equipment where the cord will
be abused by persons walking on it
3
Page 4
13. Follow all warnings and instructions marked on the television equipment.
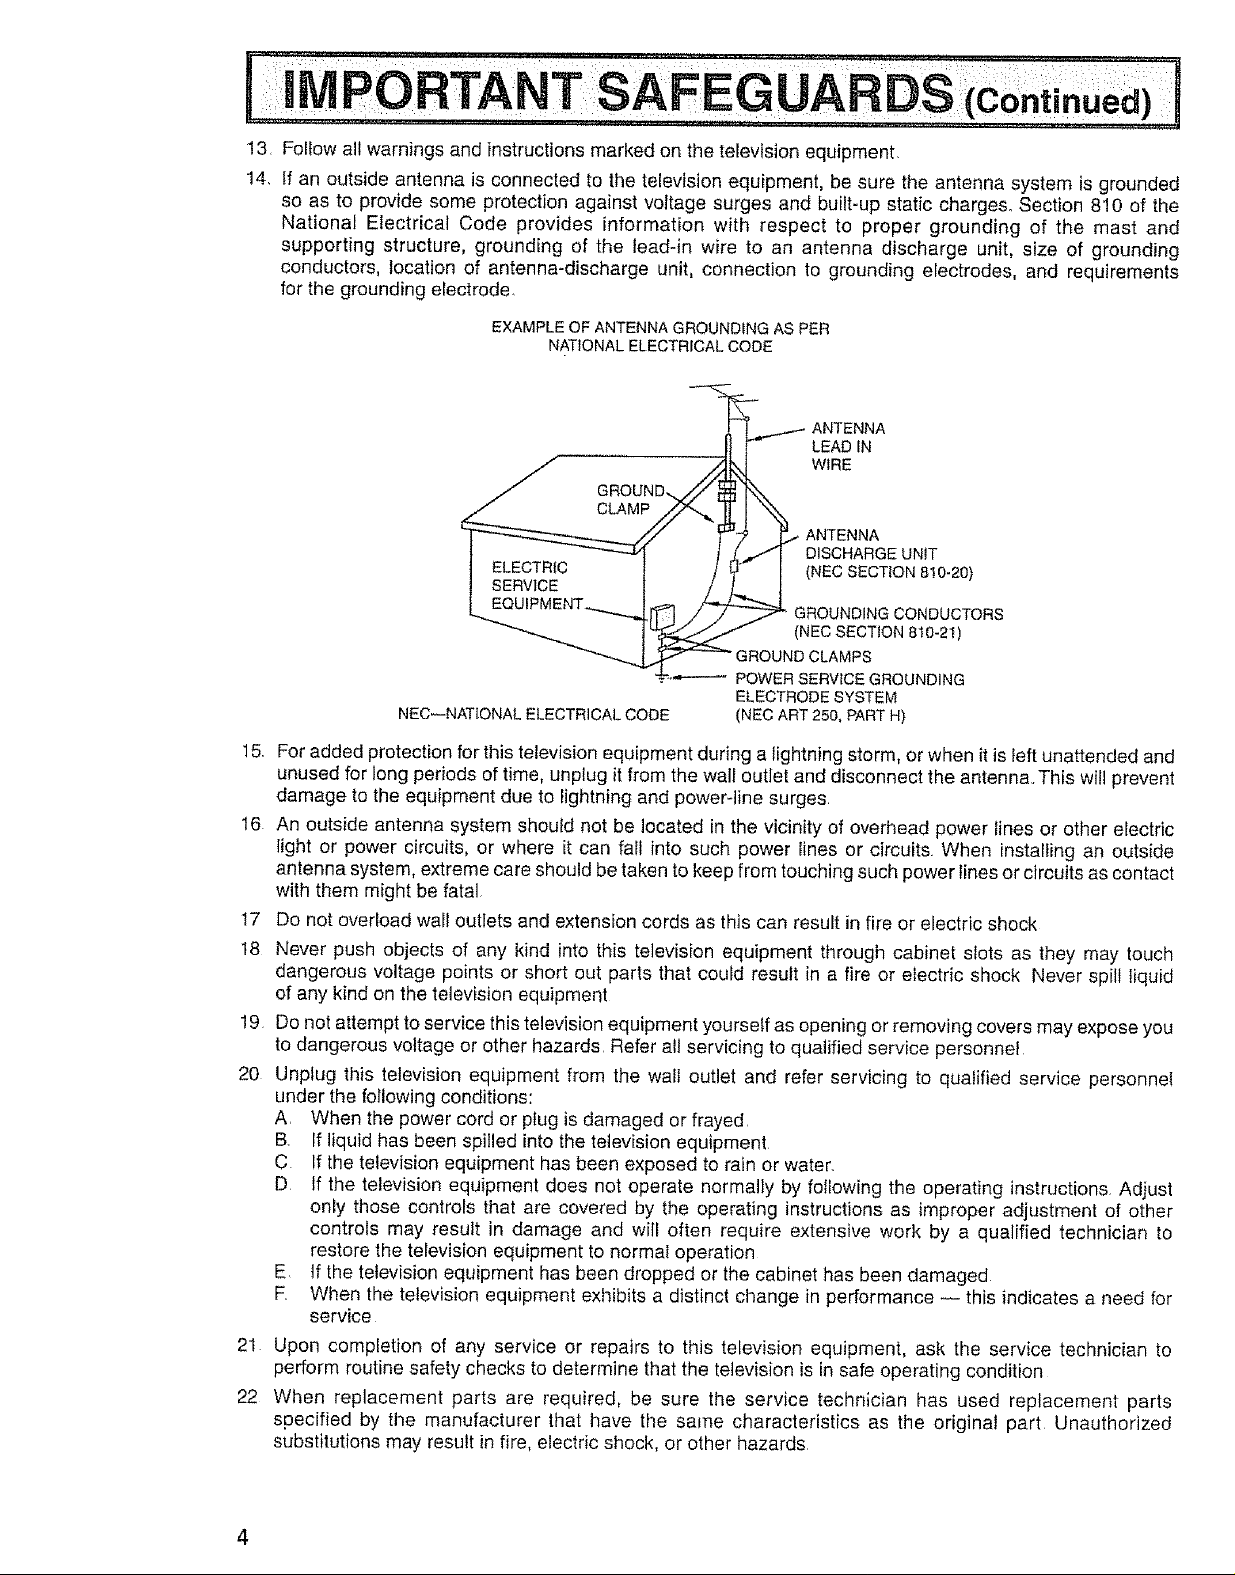
14. If an outside antenna is connected to the television equipment, be sure the antenna system is grounded
so as to provide some protection against voltage surges and built-up static charges° Section 810 of the
National Electrical Code provides information with respect to proper grounding of the mast and
supporting structure, grounding of the lead-in wire to an antenna discharge unit, size of grounding
conductors, location of antenna-discharge unit, connection to grounding electrodes, and requirements
for the grounding electrode
EXAMPLE OF ANTENNA GROUNDING AS PER
NATIONAL ELECTRICAL CODE
_'_"_1"-'_.,/ANTENNA
LEAD IN
w,RE
/ GROUND.._// _ _.
_/ CLAMP //".._ Il I _
I ........ _"_ J _./1 DISCHARGE UNit
1 _i_=_,--r 1 Z _,._ I (NEC SECTION 8!0-20)
L_ ........ __-_4r[ _] ../_' GROUNDING CONDUCTORS
NEOSECTION0,0-2,1
_ _ GROUND CLAMPS
.... POWER SERVICE GROUNDING
NEC--NATIONAL ELECTRICAL CODE (NEC ART 250, PART H)
15. For added protection for this television equipment during a lightning storm, orwhen it is left unattended and
unused for long periods of time, unplug it from the wall outlet and disconnect the antenna.This will prevent
damage to the equipment due to lightning and power-line surges
t6 An outside antenna system should not be located in the vicinity of overhead power lines or other electric
light or power circuits, or where it can fail into such power lines or circuits. When installing an outside
antenna system, extreme care should be taken tokeep from touching such power lines or circuits as contact
with them might be fatal
!7 Do not overload wall outlets and extension cords as this can result in fire or electric shock
18 Never push objects of any kind into this television equipment through cabinet slots as they may touch
dangerous voltage points or short out parts that could result in a fire or electric shock Never spilt liquid
of any kind on the television equipment
!9 Do not attempt to service this television equipment yourself as opening or removing covers may expose you
to dangerous voltage or other hazards Refer all servicing to qualified service personnel
20 Unplug this television equipment from the wall outlet and refer servicing to qualified service personnel
under the following conditions:
A. When the power cord or plug is damaged or frayed.
B. If liquid has been spilled into the television equipment
C Ifthe television equipment has been exposed to rain or water.
D If the television equipment does not operate normally by following the operating instructions. Adjust
only those controls that are covered by the operating instructions as improper adjustment of other
controls may result in damage and will often require extensive work by a qualified technician to
restore the television equipment to normal operation
E, if the television equipment has been dropped or the cabinet has been damaged
F. When the television equipment exhibits a distinct change in performance -- this indicates a need for
service
21 Upon completion of any service or repairs to this television equipment, ask the service technician to
perform routine safety checks to determine that the television is in safe operating condition
22 When replacement parts are required, be sure the service technician has used replacement parts
specified by the manufacturer that have the same characteristics as the original part Unauthorized
substitutions may result in fire, electric shock, or other hazards
ELECTRODE SYSTEM
Page 5
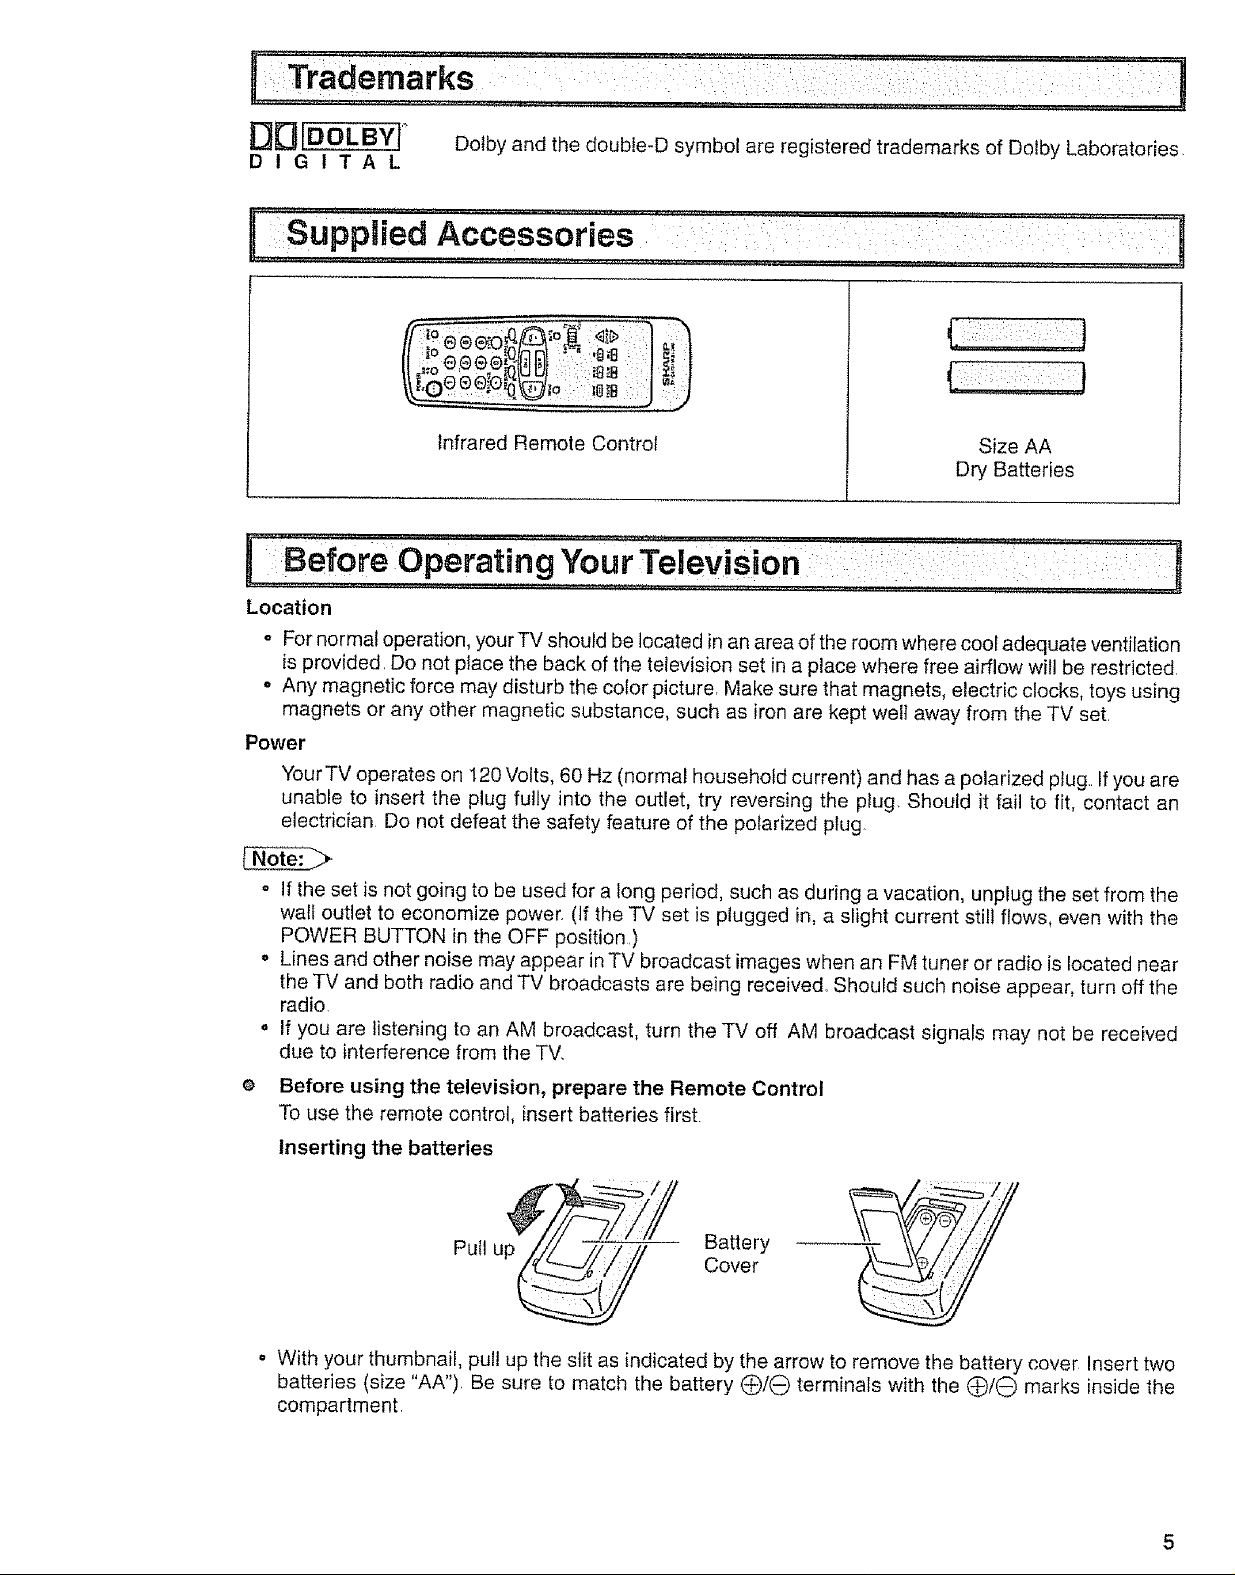
O_IDOLBY( _
DIGITAL
Dolby and the double-D symbol are registered trademarks of Dolby Laboratories.
Supplied Accessories : ""[:: ' "TT:[
),e®e...'e io :,, .... "_:
Infrared Remote Control
Location
o For normal operation, your TV should be located in an area of the room where cool adequate ventilation
is provided. Do not place the back of the television set in a place where free airflow will be restricted.
o Any magnetic force may disturb the color picture. Make sure that magnets, electric clocks, toys using
magnets or any other magnetic substance, such as iron are kept well away from the TV set.
Power
Your TV operates on 120 Volts, 60 Hz (normal household current) and has a polarized plug.. If you are
unable to insert the plug fully into the outlet, try reversing the plug. Should it fail to fit, contact an
electrician Do not defeat the safety feature of the polarized plug
- If the set is not going to be used for a long period, such as during a vacation, unplug the set from the
wall outlet to economize power. (tf the TV set is plugged in, a slight current still flows, even with the
POWER BUTTON in the OFF position.)
o Lines and other noise may appear in TV broadcast images when an FM tuner or radio is located near
the TV and both radio and TV broadcasts are being received, Should such noise appear, turn off the
radio.
o If you are listening to an AM broadcast, turn the TV off AM broadcast signals may not be received
due to interference from the TV.
Size AA
Dry Batteries
e Before using the television, prepare the Remote Control
To use the remote control, insert batteries first
Inserting the batteries
Pull up
o With your thumbnail, pul! up the slit as indicated by the arrow to remove the battery cover Insert two
batteries (size "AA"). Be sure to match the battery Q/O terminals with the O/-O marks inside the
compartment.
Battery
Cover
Page 6
j"i=iAntenn a connect,io,ns , i ,rE
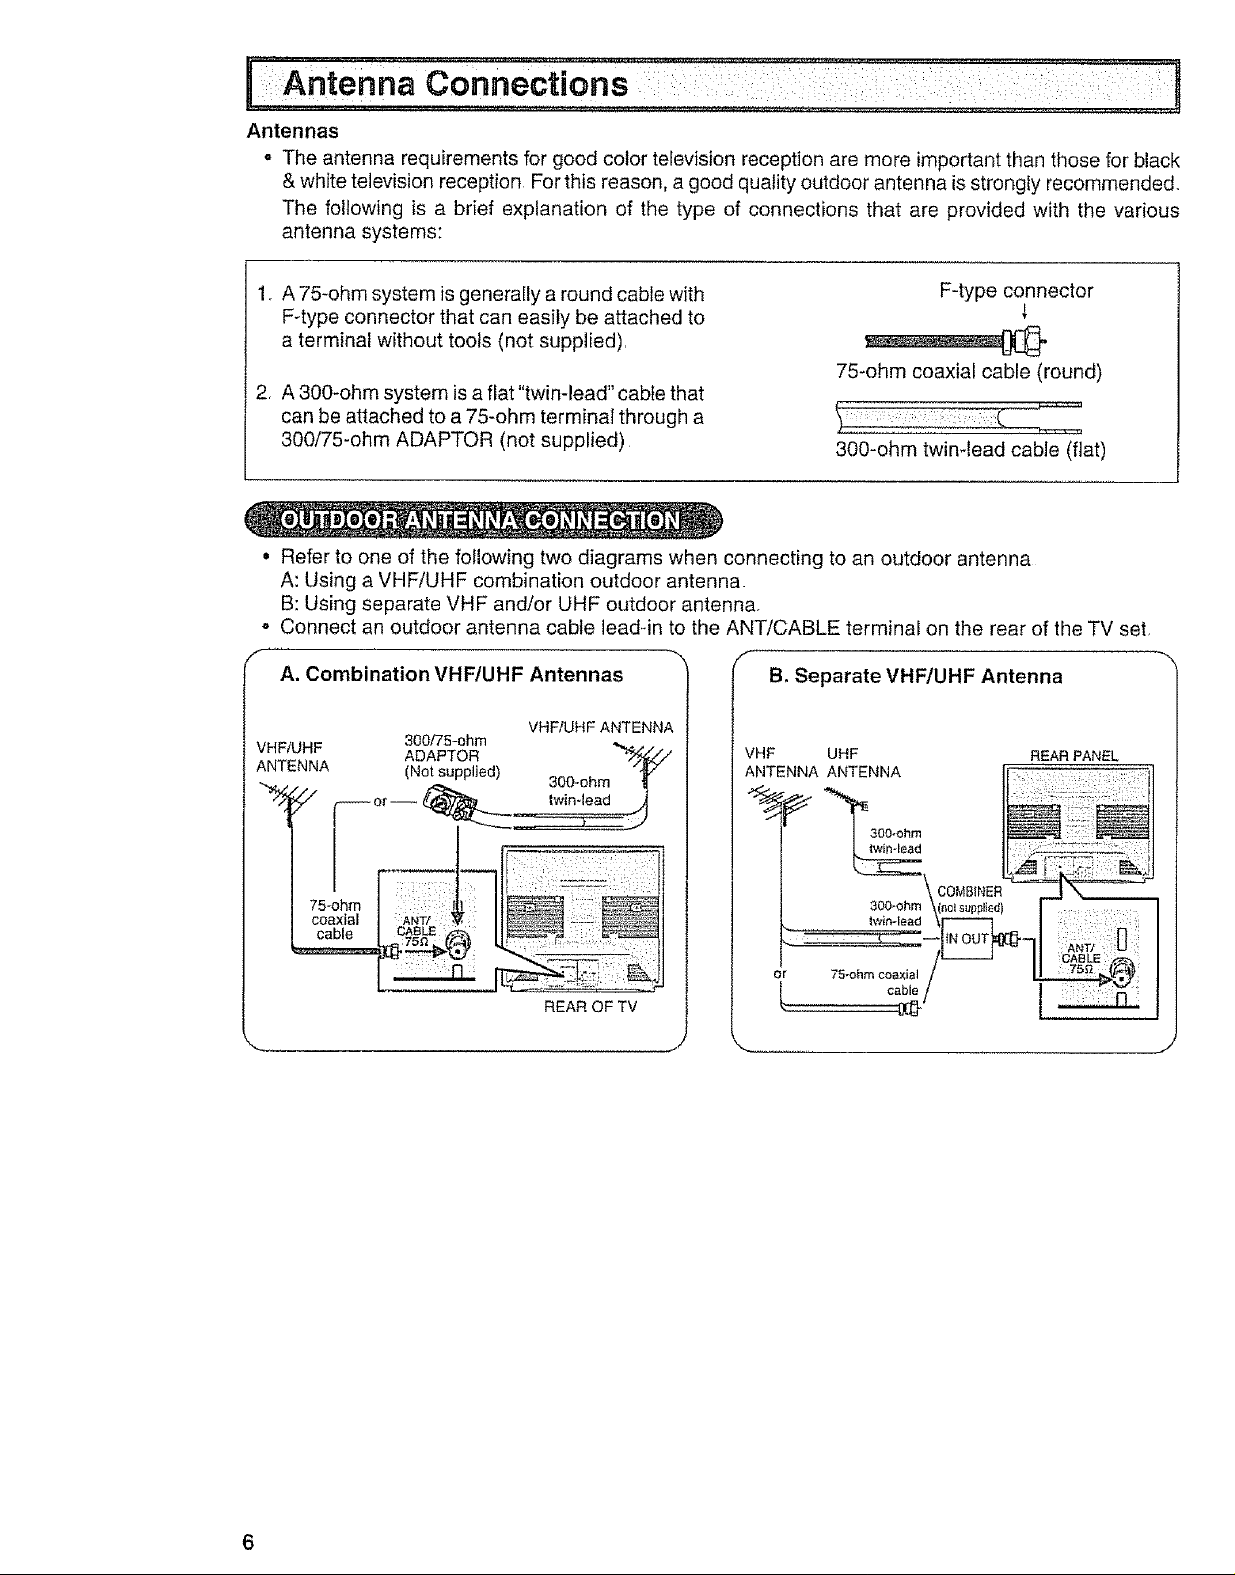
Antennas
- The antenna requirements for good color television reception are more important than those for black
& white television reception For this reason, a good quality outdoor antenna is strongly recommended.
The following is a brief explanation of the type of connections that are provided with the various
antenna systems:
1. A 75-ohm system is generally a round cable with
F-type connector
F4ype connector that can easily be attached to
a terminal without tools (not supplied).
75-ohm coaxial cable (round)
2, A 300-ohm system is afiat"twin-lead" cable that
can be attached to a 75-ohm terminal through a
300/75-ohm ADAPTOR (not supplied)
300-ohm twin-lead cable (flat)
• Refer to one of the following two diagrams when connecting to an outdoor antenna
A: Using a VHF/UHF combination outdoor antenna.
B: Using separate VHF and/or UHF outdoor antenna.
- Connect an outdoor antenna cable leaddn to the ANT/CABLE terminal on the rear of the TV set,
f
A. Combination VHF/UHF Antennas
VHF/UHF ANTENNA
VHF/UHF
ANTENNA
300/75-0hm _...
ADAPTOR
(Not supplied) 300-ohm "_V
f
B, Separate VHF!UHF Antenna
VHF UHF REAR PANEL
ANTENNA ANTENNA
75-ohm
coaxial
cable
:: m. 71
or 75-ohm c,:_:: / _@
REAR OF TV
6
Page 7
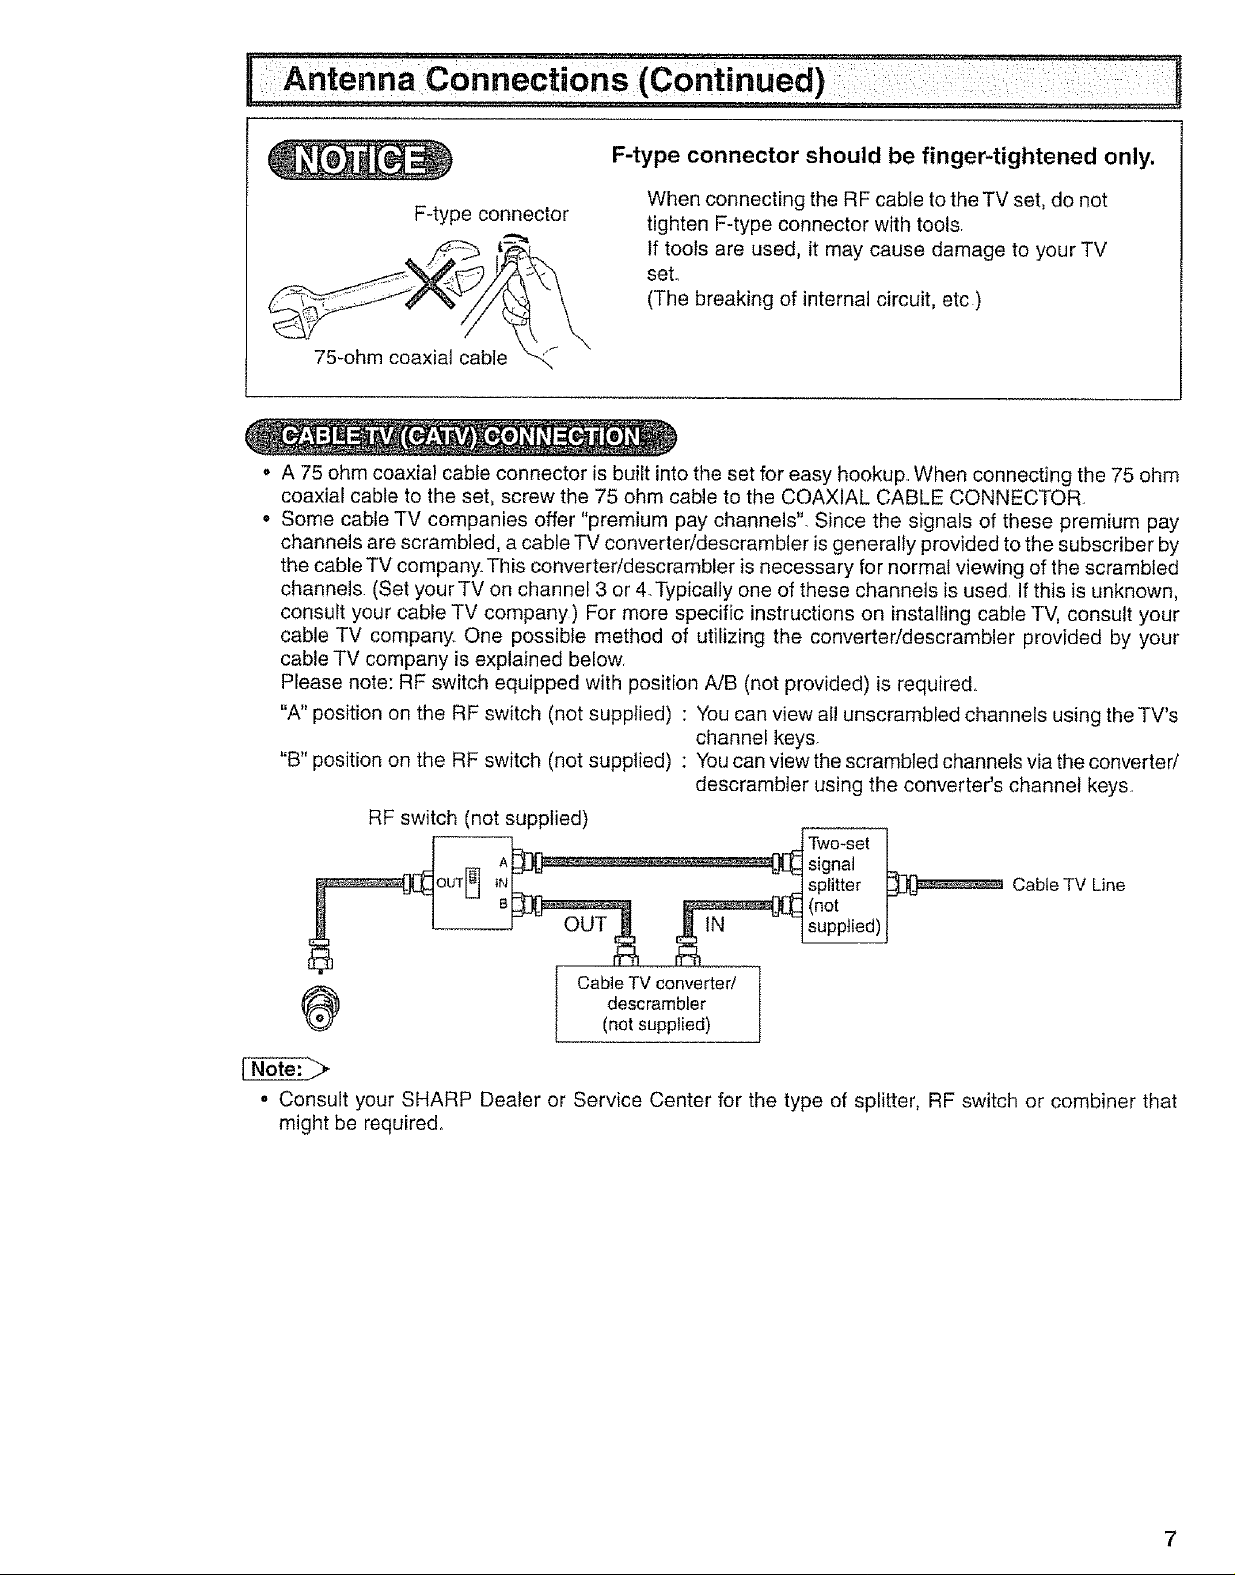
F-type connector should be finger-tightened only.
F-type connector
75_ohm coaxial cable
o A 75 ohm coaxial cable connector is built into the set for easy hookup.. When connecting the 75 ohm
coaxial cable to the set, screw the 75 ohm cable to the COAXIAL CABLE CONNECTOR
• Some cable TV companies offer "premium pay channels". Since the signals of these premium pay
channels are scrambled, a cable TV converter/descrambIer is generally provided to the subscriber by
the cable TV company. This converter/descrambler is necessary for normal viewing of the scrambled
channels (Set yourTV on channel 3 or 4.Typically one of these channels is used. If this is unknown,
consult your cable TV company) For more specific instructions on installing cable TV, consult your
cable TV company One possible method of utilizing the converter/descrambler provided by your
cable TV company is explained below.
Please note: RF switch equipped with position A/B (not provided) is required.
"A" position on the RF switch (not supplied) : You can view all unscrambled channels using the TV's
"B" position on the RF switch (not supplied) : You can view the scrambled channels via the converter/
RF switch (not supplied)
When connecting the RF cable to the TV set, do not
tighten F-type connector with tools.
tf tools are used, it may cause damage to your TV
set..
(The breaking of internal circuit, etc)
channel keys.
descrambter using the converter's channel keys.
signal
splitter CableTV Line
(not
Two-set _
, supplied)
CableTV converter/ I
_1 descrambler
o Consult your SHARP Dealer or Service Center for the type of splitter, RF switch or combiner that
might be required,
(not supplied)
J
7
Page 8
Q
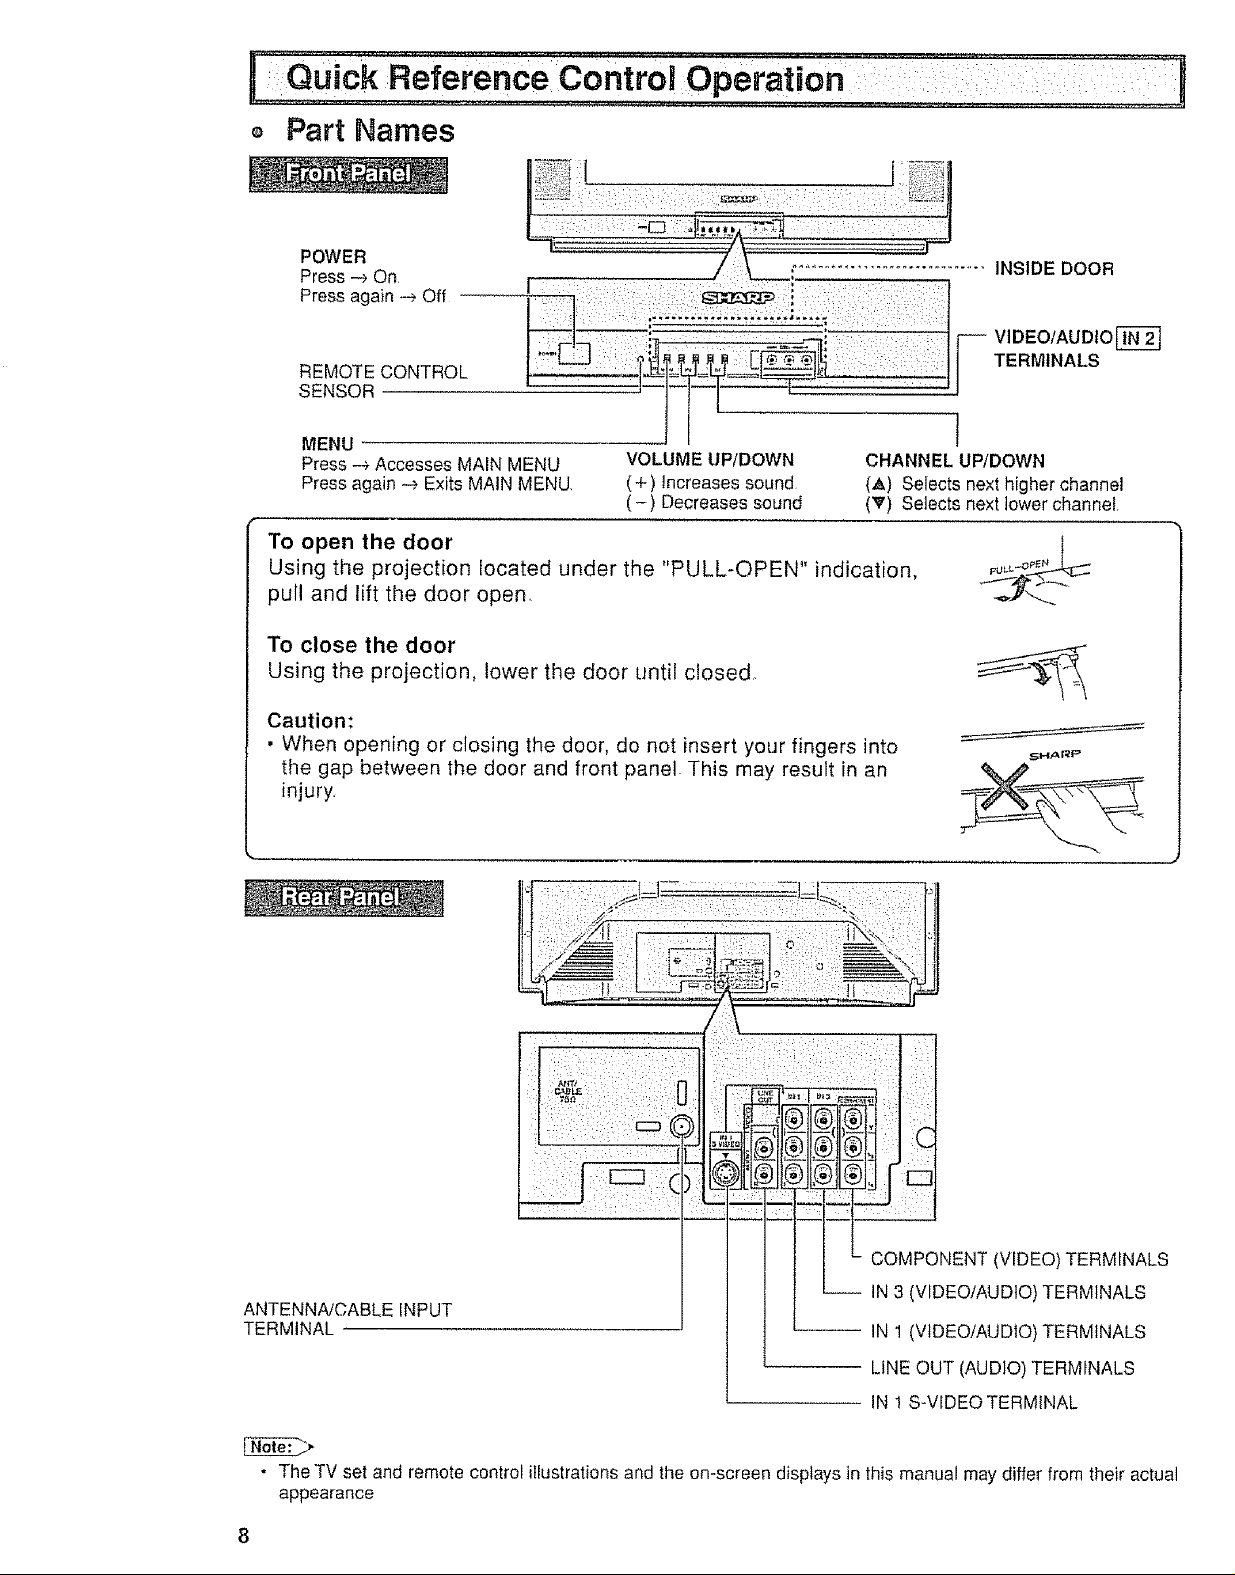
Part Names
[ I,
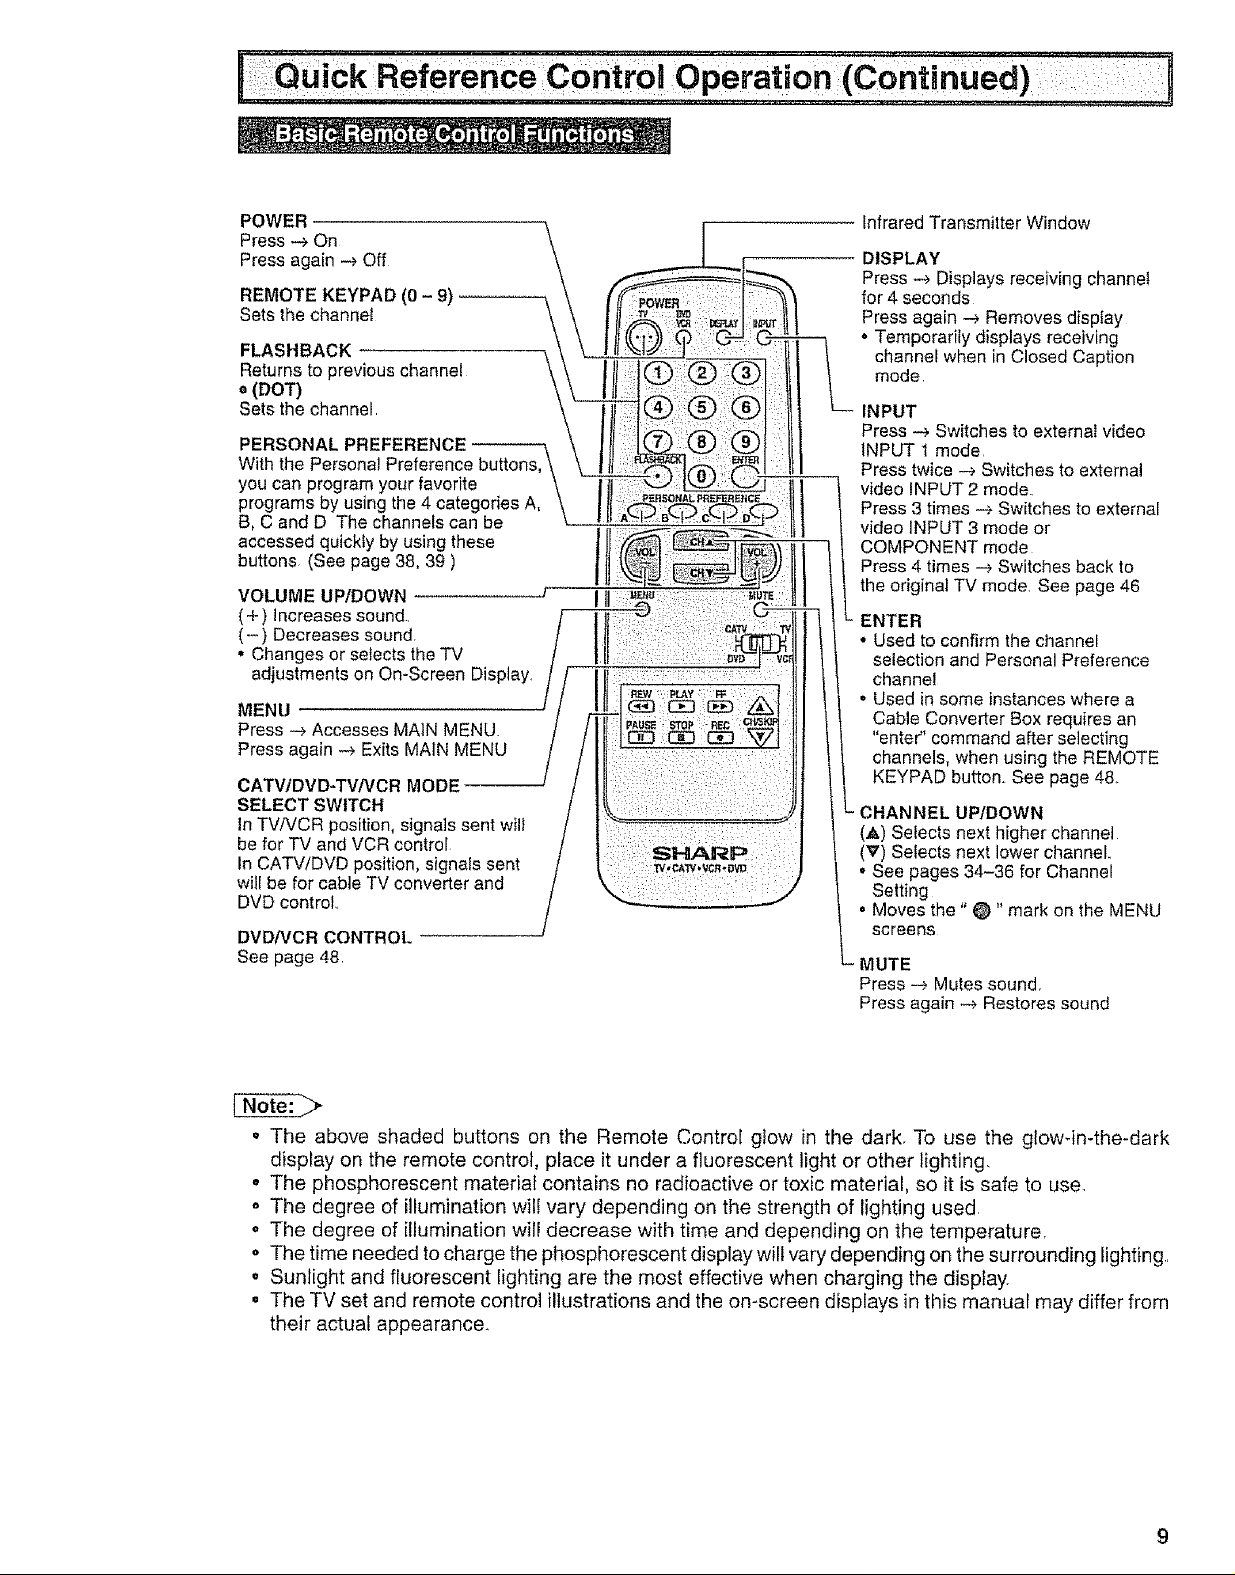
POWER
Press _ On
Press again -e Off
REMOTECONTROL
SENSOR
MENU
Press -_ Accesses MAIN MENU
Press again -e Exits MAIN MENU
VOLUME UP/DOWN
(+) Increasessound
(-) Decreases sound
CHANNEL UP/DOWN
(,_) Selects next higher channe!
(_') Selects next tower channet
To open the door
Using the projection located under the "PULL-OPEN" indication,
pull and lift the door open
To close the door
Using the projection, lower the door until closed°
Caution:
• When opening or closing the door, do not insert your fingers into
the gap between the door and front panel This may result rn an
injury,
...... INSIDE DOOR
Vl DEO/AU DIO
TERMINALS
J
SHARP
COMPONENT (VIDEO) TERMINALS
ANTENNA/CABLE INPUT
TERMINAL
• The TV set and remote control illustrations and the on-screen displays in this manual may differ from their actual
appearance
-- IN 1 (VIDEO!AUDIO) TERMINALS
IN 3 (VIDEO!AUDIO) TERMINALS
LINE OUT (AUDIO) TERMINALS
iN ! S-VIDEOTERM1NAL
Page 9
POWER
Press-_On
Pressagain-_Off
REMOTEKEYPAD(0- 9)
Setsthechanne_
FLASHBACK
Returns to previous channel
o (DOT)
Sets the channel
With the Personal Preference buttons,
you can program your favorite
PERSONAL PREFERENCE
programs by using the 4 categories A,
B, C and D The channels can be
accessed quickly by using these
buttons (See page 38, 39 )
VOLUME UP/DOWN
(+) Increases sound.,
(- ) Decreases sound
, Changes or setects the TV
adjustments on On-Screen
MENU
Press --> Accesses MAIN MENU.
Press again .-_ Exits MAIN MENU
CATV/DVD-TV/VCR MODE
SELECT SWITCH
In TV/VCR position, signals sent will
be for TV and VCR control
In CATV/DVD position, signals sent
will be for cable TV converter and
DVD control..
DVD/VCR CONTROL
See page 48
Infrared Transmitter Window
DISPLAY
Press -_ Displays receiving channel
for 4 seconds
Press again -_ Removes dispIay
• Temporarily displays receiving
channel when in Closed Caption
mode
INPUT
Press -> Switches to external video
INPUT 1 mode
Press twice _ Switches to external
video INPUT 2 mode.
Press 3 times -+ Switches to external
video INPUT 3 mode or
COMPONENT mode
Press 4 times -> Switches back to
the odginal TV mode See page 46
- ENTER
° Used to confirm the channe_
selection and Personal Preference
channel
• Used in some instances where a
Cable Converter Box requires an
"enter" command after selecting
channels, when using the REMOTE
KEYPAD button. See page 48.
- CHANNEL UPIDOWN
(.&) Selects next higher channel
(V) Selects next lower channel.,
• See pages 34-36 for Channel
Setting
° Moves the" @" mark on the MENU
screens
MUTE
Press --> Mutes sound.
Press again -_ Restores sound
• The above shaded buttons on the Remote Control glow in the dark, To use the glowqn-the-dark
display on the remote control, place it under a fluorescent light or other lighting.
o The phosphorescent material contains no radioactive or toxic material, so it is safe to use.
o The degree of illumination will vary depending on the strength of lighting used,
o The degree of illumination will decrease with time and depending on the temperature,
o The time needed to charge the phosphorescent display will vary depending on the surrounding lighting.,
• Sunlight and fluorescent lighting are the most effective when charging the display.
o The TV set and remote control illustrations and the on-screen displays in this manual may differ from
their actual appearance.
Page 10
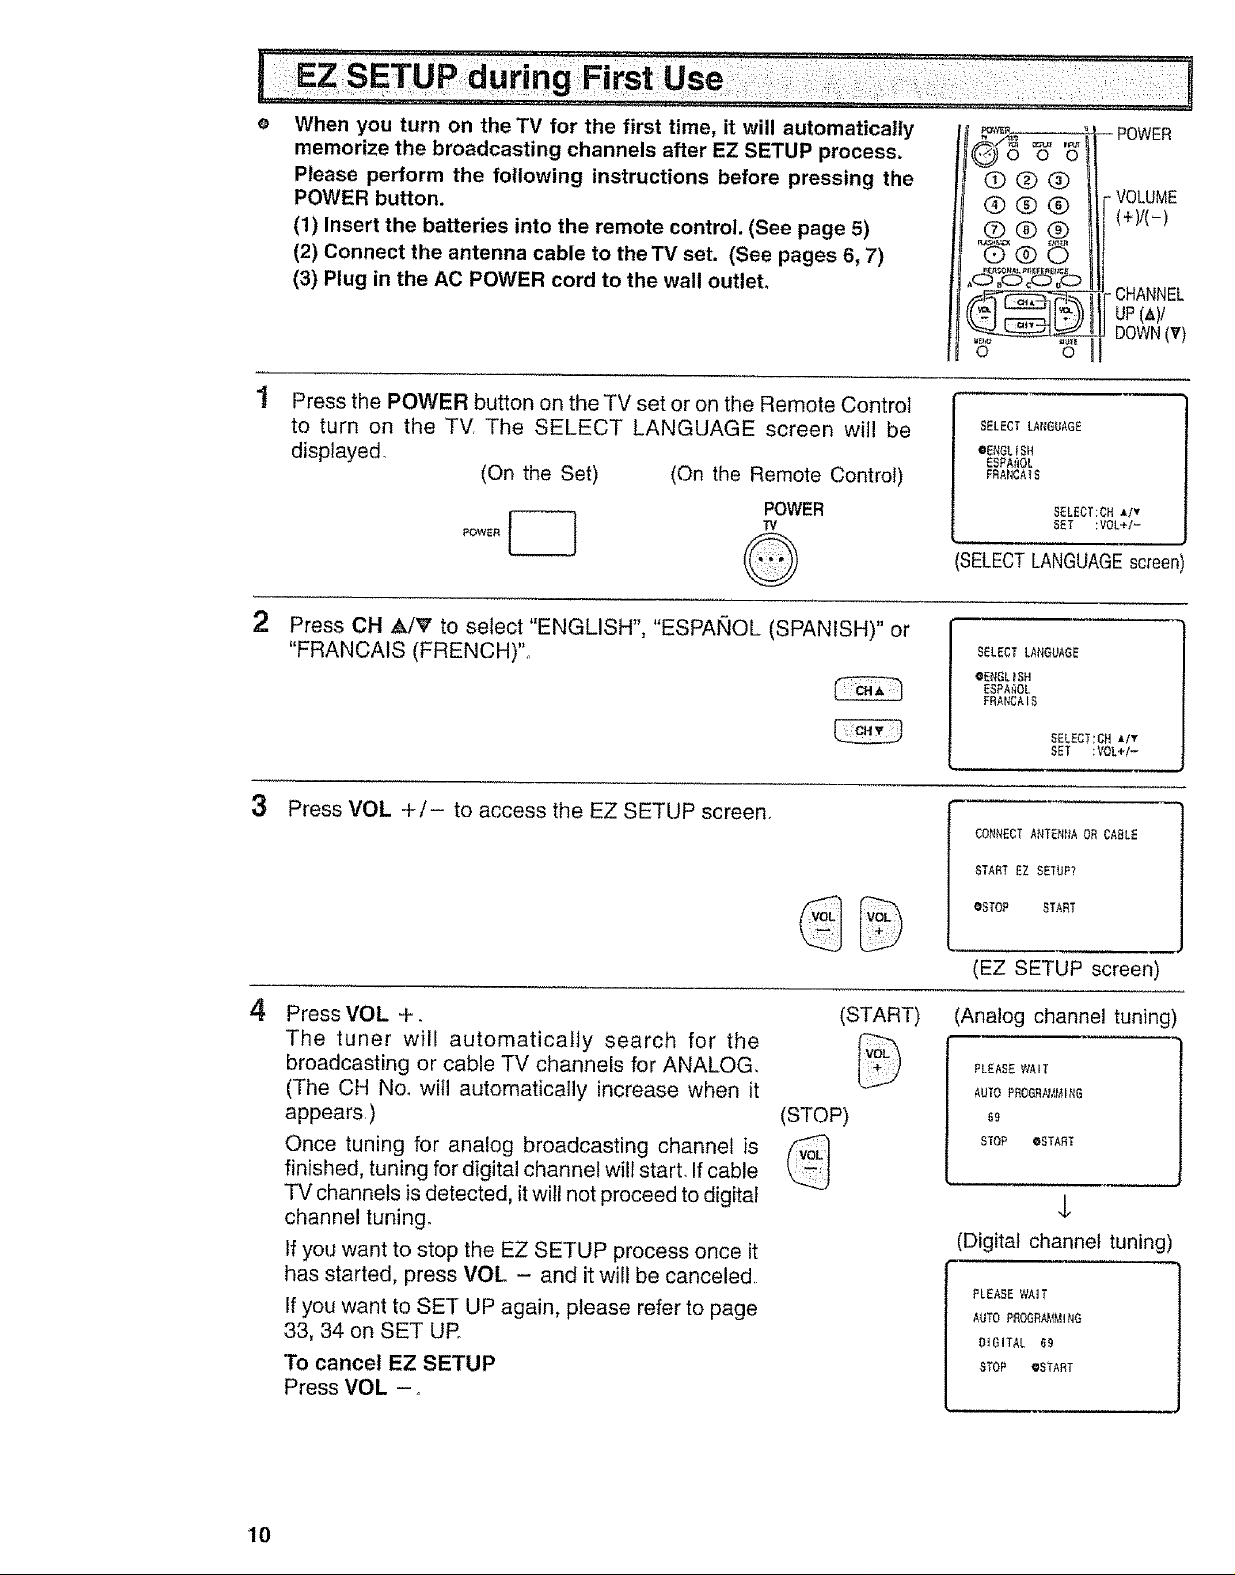
When you turn on the TV for the first time, it will automatically
memorize the broadcasting channels after EZ SETUP process.
Please perform the following instructions before pressing the
POWER button.
(1) Insert the batteries into the remote control. (See page 5)
(2) Connect the antenna cable to the TV set. (See pages 6, 7)
(3) Plug in the AC POWER cord to the wall outlet.
Press the POWER button on the TV set or on the Remote Control
to turn on the TV, The SELECT LANGUAGE screen will be
displayed,
(On the Set) (On the Remote Control)
POWER
2
Press CH _klV to select "ENGLISH", "ESPANOL (SPANISH)" or
"FRANCAIS (FRENCH)".
POWER
@®®
®®®
®@®
o o
SELECT LANGUAGE
•ENGLISH
ESPA_OL
FRANCAIS
SELECT:CHAlV
SET ;VOL+/-
'SELECTLANGUAGEscreen
SELECT LANGUAGE
@E_GL)SH
ESPA_OL
FRANCAIB
VOLUME
(+)/(-)
- CHANNEL
up (A)/
DOWN(V)
3 Press VOL +/- to access the EZ SETUP screen.
4
Press VOL +.
The tuner will automatically search for the
broadcasting or cable TV channels for ANALOG.
(The CH No. will automatically increase when it
appears.)
Once tuning for analog broadcasting channel is
finished, tuning for digital channel will start. If cable
TV channels is detected, it will not proceed to digital
channel tuning.
If you want to stop the EZ SETUP process once it
has started, press VOL - and it will be canceled.
If you want to SET UP again, please refer to page
33, 34 on SET UR
"To cancel EZ SETUP
Press VOL -..
(STOP)
(START)
SELECT:CH AIY
BET :VOL+I-
CONNECT ANTENI_A OR CABLE
START EZ SETUF?
OSTOP START
(EZ SETUP screen)
(Analog channel tuning)
PLEASEWAIT
AUTO PROGRN_MING
59
STOP eSTABT
¢
(Digital channel tuning)
PLEASE WAIT
AUTO PROGRamMiNG
O_GITAL 6g
STOP @START
IO
Page 11
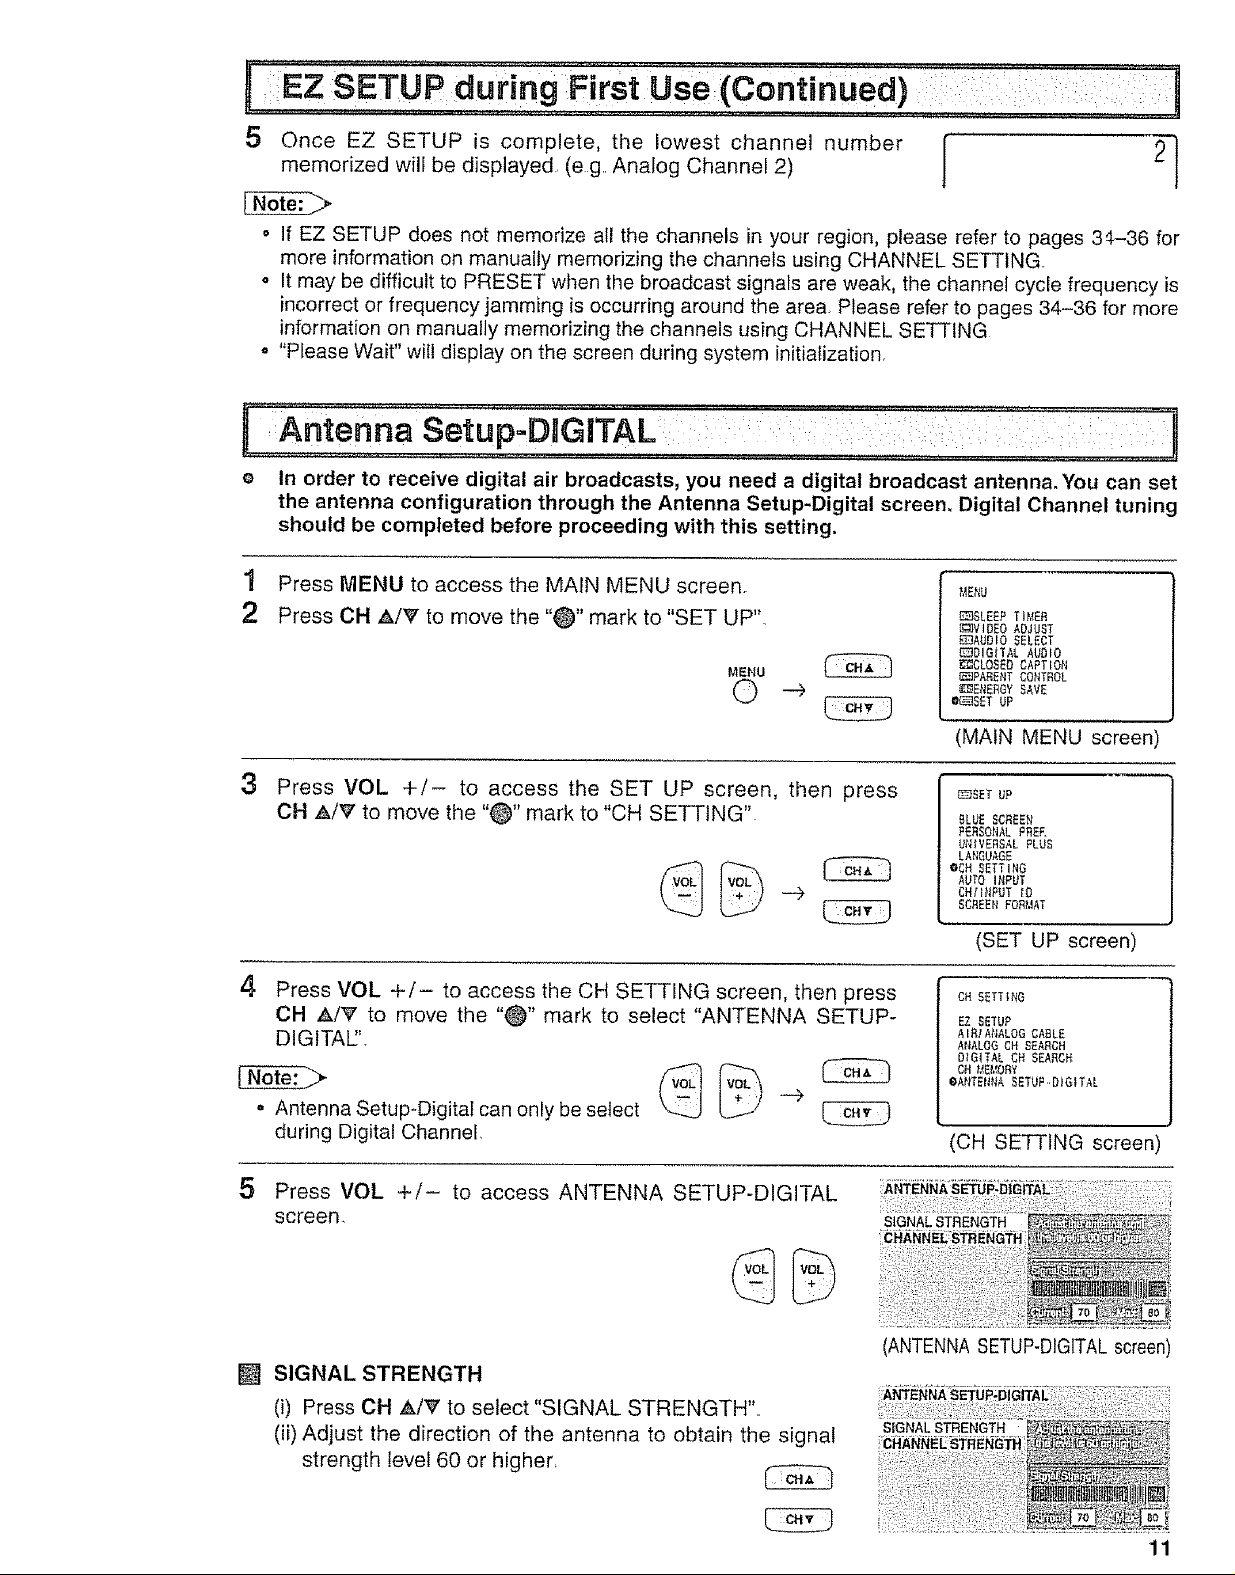
memorized will be displayed (eg. Analog Channel 2)
5 Once EZ SETUP is complete, the lowest channel number [ 2]
o If EZ SETUP does not memorize all the channels in your region, please refer to pages 34-36 for
more information on manually memorizing the channels using CHANNEL SETTING.
o It may be difficult to PRESET when the broadcast signals are weak, the channel cycle frequency is
incorrect or frequency jamming is occurring around the area. Please refer to pages 34-36 for more
information on manually memorizing the channels using CHANNEL SETTING
. "Please Wait" will display on the screen during system initialization.
[:Antenna Setup:DnGiTAL : :i :'"!'
......... : [i ,,_,,,,, ;,L:,,,,,,,,:,.,,,: : :i: i... n
e In order to receive digital air broadcasts, you need a digital broadcast antenna. You can set
the antenna configuration through the Antenna Setup-Digital screen, Digital Channel tuning
should be completed before proceeding with this setting.
1
Press MENU to access the MAIN MENU screen_
Press CH _/V to move the "@" mark to "SET UP",
MENU |
MENU
E_SLEEP TIMER
Z_VIDEO ADJUST
_AUDIO SELECT
_DIG_TAL AUDIO
_-_CLOSED CAPTION
_PARENT CONTROL
_ENE_GY SAVE
O_SST UP
(MAIN MENU screen)
3
Press VOL +/- to access the SET UP screen, then press
CH A/V to move the "@" mark to "CH SETTING"
[_SET UP
BLUE SCREEN
PERSONAL PBEE
UNIVERSAL PLUS
LAngUAGE
OCN SETTING
AUTO iNPUT
CH/INPUT _D
SCBEEff FORMAT
(SET UP screen)
4 Press VOL +/- to access the CH SETTING screen, then press
CH A/V to move the "@" mark to select "ANTENNA SETUP-
DIGITAE'.
CH SETTING
EZ SETUP
AIBJA_IALOG CABLE
A{_ALOG CH SEARCH
DIGITAL CH SEARCH
CN _E_OBY
OANTE_NA SETUP,,DtG_TAL
U
o Antenna Setup-DigitaI can only be select
during Digital Channel.
5
Press VOL +/- to access ANTENNA SETUP-DIGITAL
screen.
[] SIGNAL STRENGTH
(i) Press CH AtV to select "SIGNAL STRENGTH"
(ii) Adjust the direction of the antenna to obtain the signal
strength level 60 or higher,
(CH SETTING screen
SIGNAL STRENGTH
(ANTENNA SETUP-DIGITALscreen)
•S!qN_AFSTF_ENC_TH.......
CHANNEL STRENGTH
11
Page 12
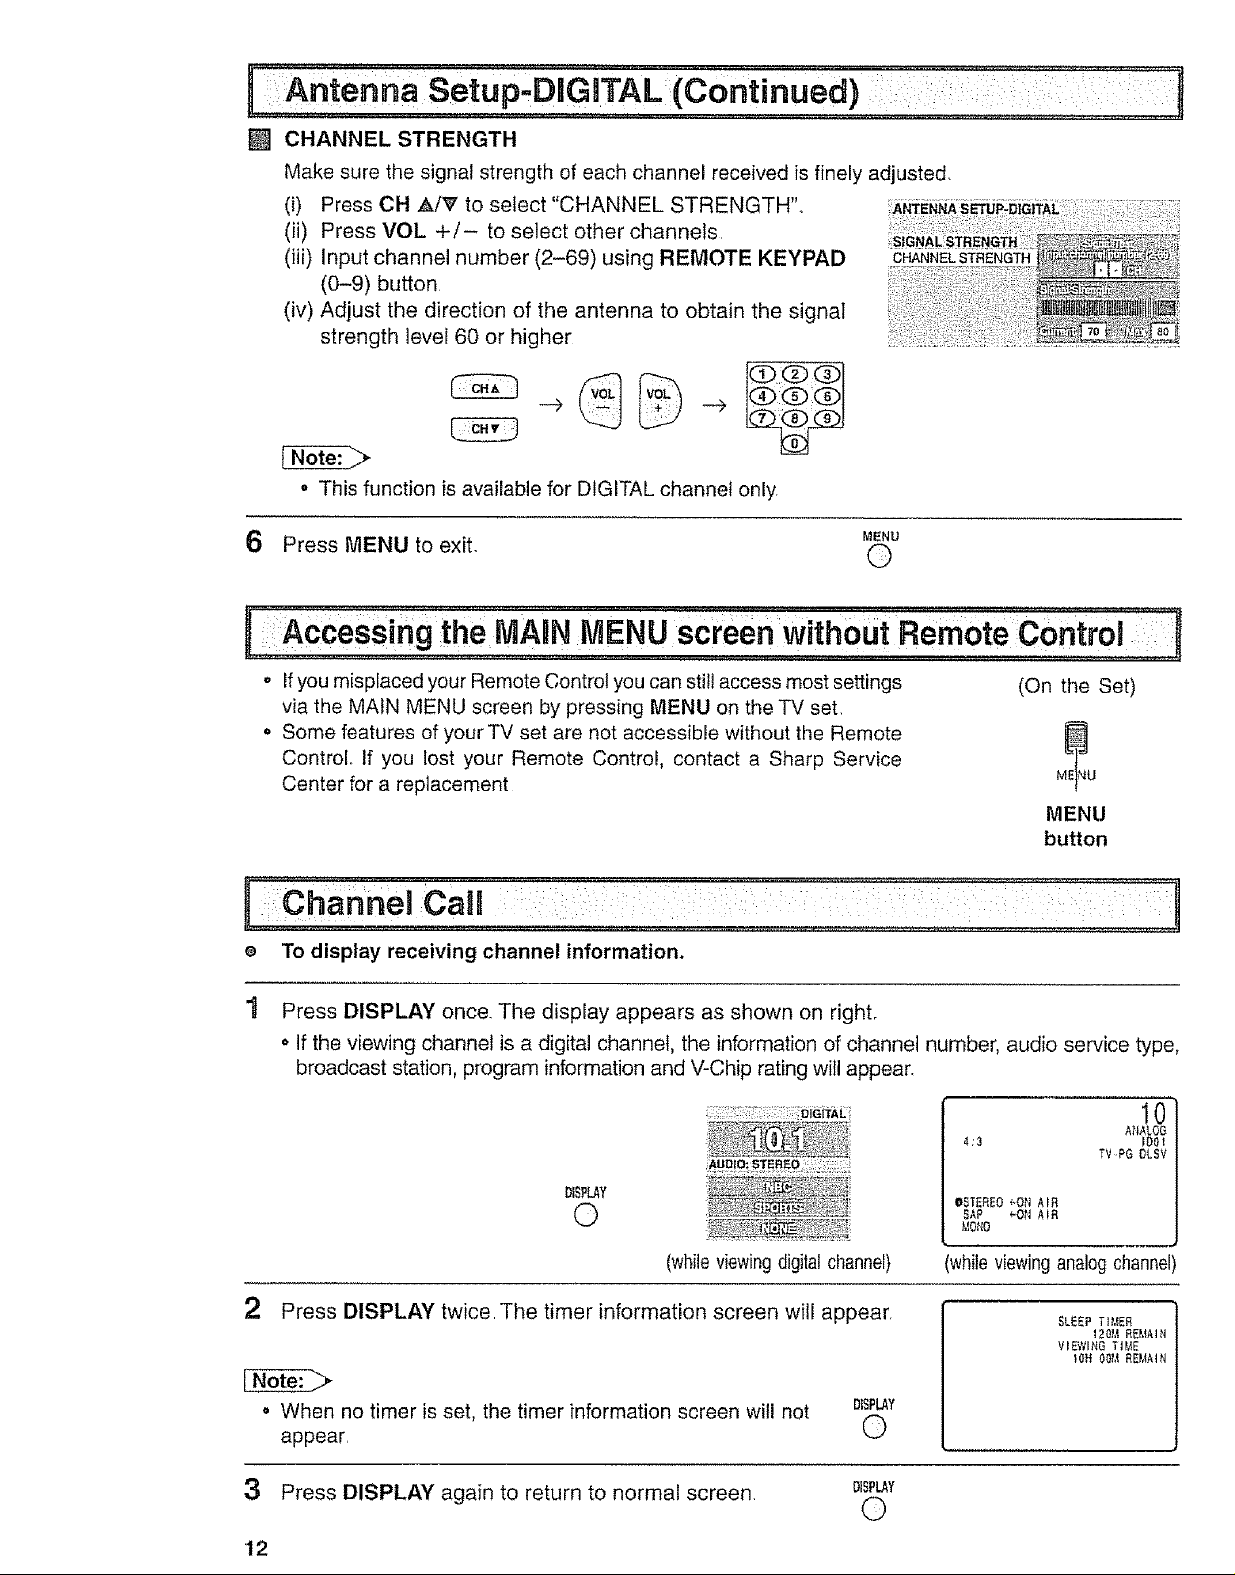
[] CHANNELSTRENGTH
Makesurethesignalstrengthofeachchannelreceivedisfinelyadjusted.
(i) PressCH,_/V to select"CHANNEL STRENGTH".
(ii) Press VOL +/- to select other channels.
(iii) Input channel number (2-69) using REMOTE KEYPAD
CHANNELSTRENGTH
(0-9) button
(iv) Adjust the direction of the antenna to obtain the signal
strength level 60 or higher
o This function is available for DIGITAL channel only,
MENU
6 Press MENU to exit. @
,AcceSSi gtSeMABNMENU r" ..... :: ::
. Ifyou misplaced your Remote Control you can still access most settings
(On the Set)
via the MAIN MENU screen by pressing MENU on the TV set,
o Some features of your TV set are not accessible without the Remote
Control, If you lost your Remote Control, contact a Sharp Service
Center for a replacement
MENU
button
e To display receiving channel information.
Press DISPLAY once. The display appears as shown on right.
o If the viewing channel is a digital channel, the information of channel number, audio service type,
broadcast station, program information and V-Chip rating will appear.
; ;: 0l_,ttA!:
4;3 IDOl
DISP_Y
©
(whileviewingdigitalchannel)
QSTEF{EO _ON AIR
SAP _ON A_R
MOttO
whileviewinganalogchannel)
10
AtlAL06
TVPG OLSV
2 Press DISPLAY twice.The timer information screen will appear,
. When no timer is set, the timer information screen will not DISFLAY
appear. O
3 Press DISPLAY again to return to normal screen.
DISPLAY
©
'12
SLEEP TI_ER
1201_REMAIN
V_EWI_G TI_E
Page 13
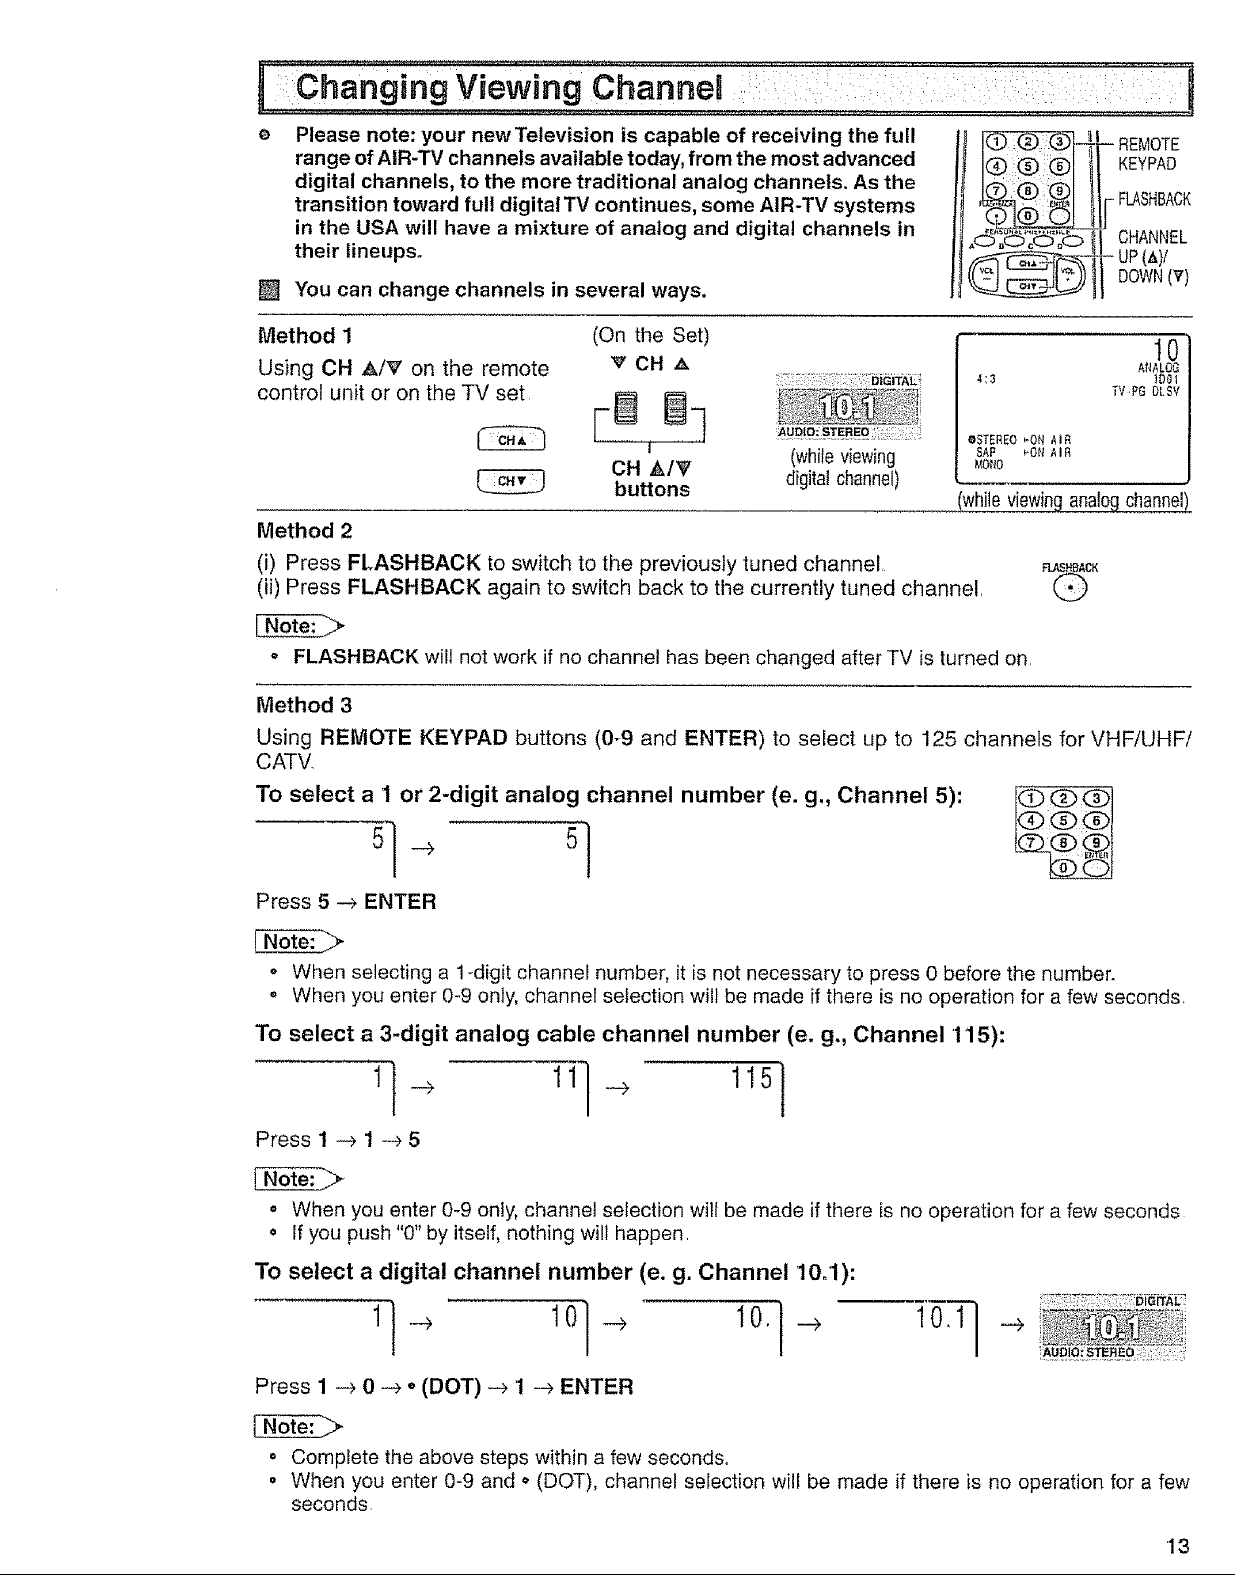
Please note: your newTelevision is capable of receiving the full
range of AtR-TV channels available today, from the most advanced
digital channels, to the more traditional analog channels. As the
transition toward full digital TV continues, some AIR-TV systems
in the USA will have a mixture of analog and digital channels in
their lineups_
[] You can change channels in several ways.
KEYPAD
FLASHBACK
-- EMOTE
CHANNEL
DOWN(V)
- UP (_,)/
Method 1
Using CH APe' on the remote
control unit or on the TV set
(On the Set)
VCH._
FB ]
CH _k/_'
buttons
(whileviewing
digitalchannel)
4;3 IDOl
• STEREO _'ON AIR
SAP _'ON AI£
&{O_lO
AIIALOG
TV,PG OLSV
whileviewing analogchannel)
Method 2
(i) Press FLASHBACK to switch to the previously tuned channel, _._._._Ac_
(ii) Press FLASHBACK again to switch back to the currently tuned channel,
• FLASHBACK will not work if no channel has been changed after TV is turned on.
Method 3
Using REMOTE KEYPAD buttons (0-9 and ENTER) to select up to 125 channels for VHF/UHF/
CATV,
TO select a 1 or 2-digit analog channel number (e. g., Channel 5):
Press 5 --> ENTER
t0
o When selecting a 1-digit channel number, it is not necessary to press 0 before the number.
,, When you enter 0-9 only, channel selection will be made if there is no operation for a few seconds,
To select a 3-digit analog cable channel number (e. g., Channel 115):
Press 1 -_ 1 --> 5
o When you enter 0-9 only, channel selection will be made if there is no operation for a few seconds
o If you push "0" by itself, nothing wilI happen.
To select a digital channel number (e. g. Channel 10ol):
Press 1 -_ 0 -_ o (DOT) -->1 _ ENTER
° Complete the above steps within a few seconds.
o When you enter 0-9 and o (DOT), channel selection will be made if there is no operation for a few
seconds.
'13
Page 14
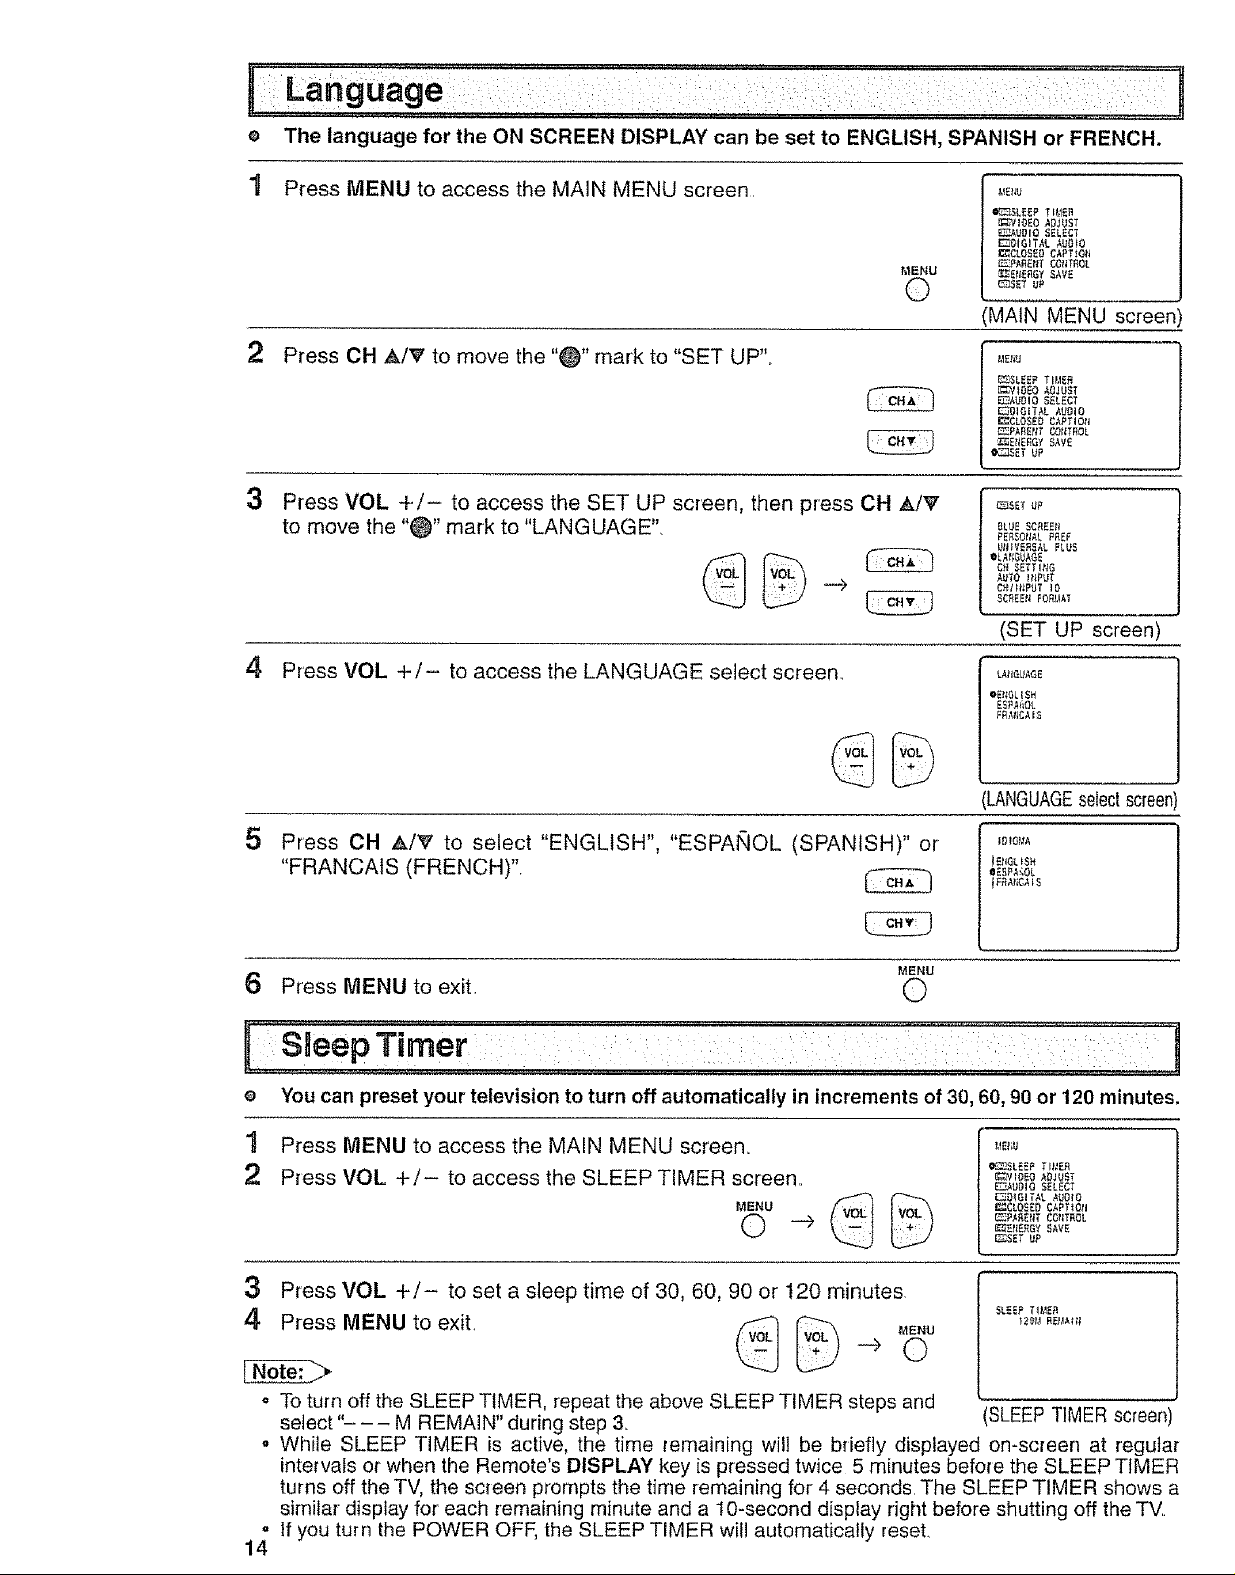
e The language for the ON SCREEN DISPLAY can be set to ENGLISH, SPANISH or FRENCH.
1 Press MENU to access the MAIN MENU screen,
MENU
©
MAIN MENU screen)
2 Press OH ,_/_' to move the "_" mark to "SET UP",,
_LEEF Tb_E_
_IOEO ,_OJUST
F_--_UUI0 _ELECT
_UIGITAL AUUIO
_ULOSEU UAPT{ON
_PARE_ C_tlTEOI
_ErtE_G? _A_E
• _SET UP
_LtJESC_EEt}
PE_SO_IA£PREF
_tI{V_£_ALPLUS
OLAf_GE
C_ SETTlinG
_¢£E_ FO_AT
(SET UP screen)
3
Press VOL +/- to access the SET UP screen, then press CH A/V
to move the "_" mark to "LANGUAGE".
©
4, Press VOL +1- to access the LANGUAGE select screen.,
L_GU_GE
OE_0L{$H
LANGUAGEselectscreer
5
Press OH A/V to select "ENGLISH", "ESPAhlOL (SPANISH)" or
"FRANCAtS (FRENCH)",
MENU
iUIG!4_
}EUGt)SH
OE_PA:;OL
}F_liU_15
6 Press MENU to exit, 0
il Sleep Timer ': :: ::i: ;
;.: ...... ; ..... L :
e You can preset your television to turn off automatically in increments of 30, 60, 90 or 120 minutes.
1 Press MENU to access the MAIN MENU screen,
_--_J_LEEPTI_ER
Press VOL +/- to access the SLEEP TIMER screen,,
MENU
©
_IVt0_0 AOJUET
_-_DIO SELECT
_01UITAL AUU{0
_EtlE_ _AVE
_SET UP
3 Press VOL +/- to set a sleep time of 30, 60, 90 or t20 minutes
4 Press MENU to exit. _ _ MENU ,2_,_,REL'A_t,
SLEE_T_E_
° To turn off the SLEEP TIMER, repeat the above SLEEP TIMER steps and
select "- -- M REMAIN" during step & SLEEP TIMER screen
o While SLEEP TIMER is active, the time remaining will be bdefiy displayed on-screen at regular
inte_vafs or when the Remote's DISPLAY key is pressed twice 5 minutes before the SLEEP TIMER
turns off the TV, the screen prompts the time remaining for 4 seconds. The SLEEP TIMER shows a
similar display for' each remaining minute and a 10-second display right before shutting off the TV.
° If you turn the POWER OFF, the SLEEP TIMER will automatically reset.
14
Page 15
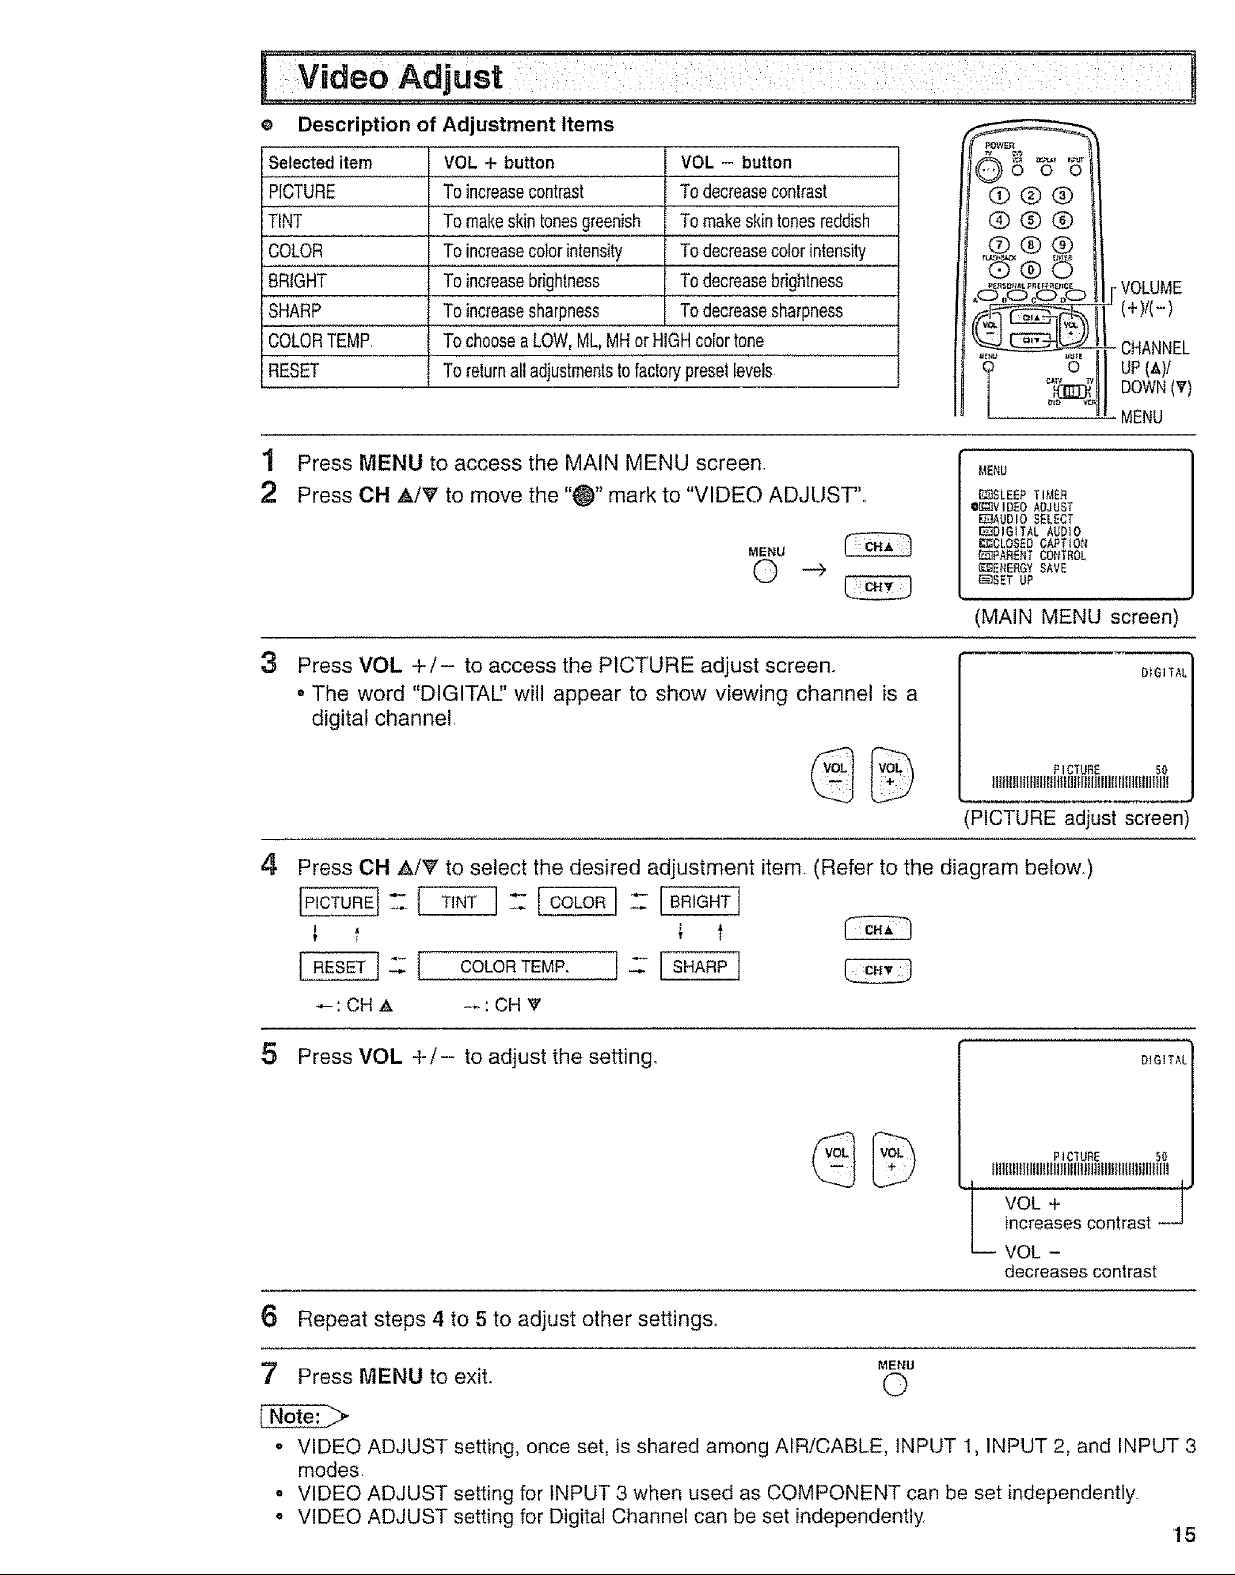
e Description of Adjustment Items
Selecteditem
PICTURE
TiNT
COLOR
BRIGHT
SHARP
COLORTEMP.
RESET
VOL + button
Toincreasecontrast
Tomakeskintonesgreenish
Toincreasecolorintensity
Toincreasebrightness
Toincreasesharpness
TochooseaLOW,ML,MHorHIGHcoiortone
Toreturnalladjustmentstofactorypresetlevels
VOL - button
Todecreasecontrast
Tomakeskintonesreddish
Todecreasecolorintensity
Todecreasebrightness
Todecreasesharpness
@@@
@@@
®@®
T o
•VOLUME
(+)/(-)
.CHANNEL
UP(_)/
DOWN(T)
MENU
1 Press MENU to access the MAIN MENU screen,
2 Press CH A/_' to move the "_" mark to "VIDEO ADJUST",,
MENU
&lEND
iD]SLEEPTIMER
OL{;_IVIDEOADJUST
_UDIO SELECT
E_3DIGITALAUDIO
I_:_CLOSEDCAPTION
_Z_IPARENTCONTROL
_ENERGY SAVE
_SET UP
(MAIN MENU screen)
3
Press VOL +/- to access the PICTURE adjust screen.
o The word "DIGITAl" will appear to show viewing channel is a
digital channel.
IPICTtJRE adjust screen
4
Press CH A/_' to select the desired adjustment item (Refer to the diagram below.)
= [ coLoRmEMP.1:
_:CHA -..: CH V
IllillllllInlnlfltltllttlllllllllt!ll!llfIIIltIIIl
PICTUBE 50
DIGITAL
5 Press VOL +/- to adjust the setting. DIGITAL
tlll!{lltlflltlttlltlll!lllllliitlllllllllllilllllll
i VOL -
PIC'fURE 50
VOL +
increases contrast --
decreases contrast
6 Repeat steps 4 to 5 to adjust other settings.,
MENU
7 Press MENU to exit. (_
o VIDEO ADJUST setting, once set, is shared among AIR/CABLE, INPUT 1, INPUT 2, and INPUT 3
modes
- VIDEO ADJUST setting for INPUT 3 when used as COMPONENT can be set independently.
° VIDEO ADJUST setting for Digital Channel can be set independently
15
Page 16
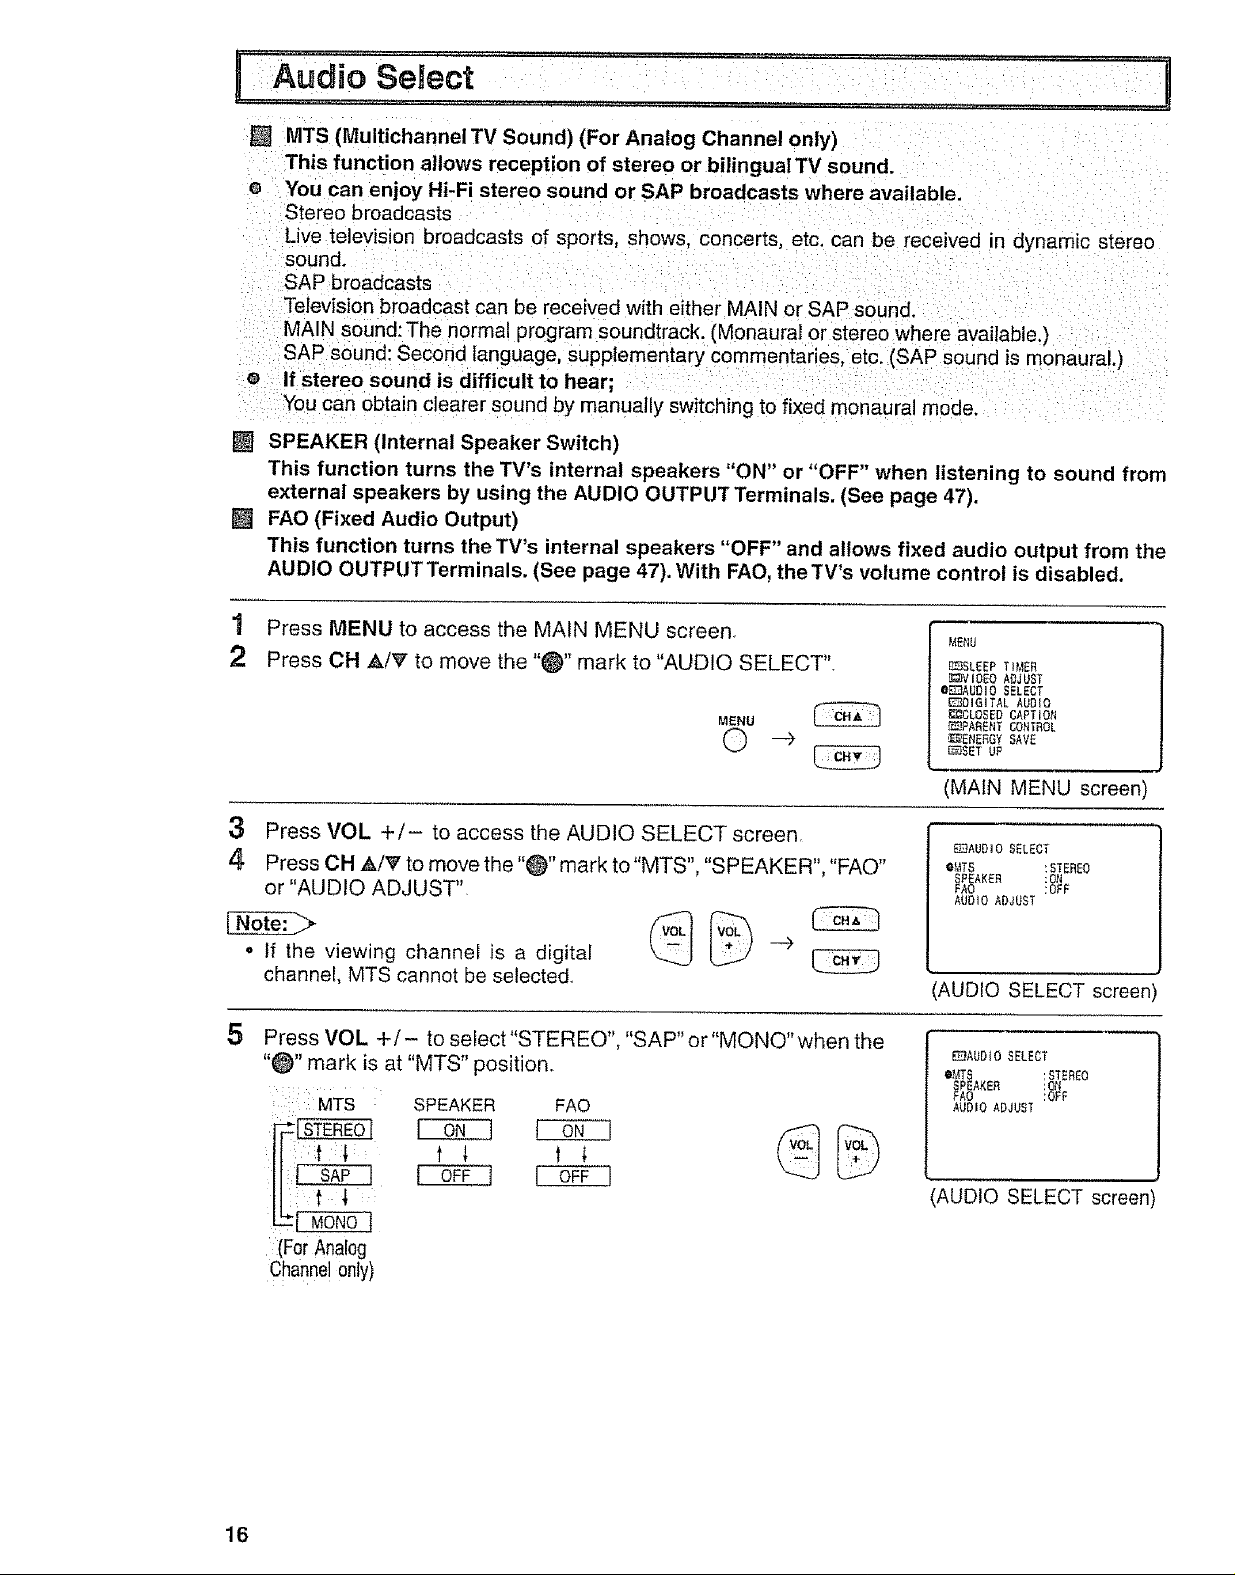
[] MTS(Multichannel TV Sound) (For Analog Channel only)
This function allows reception of stereo or bilinguaITV sound.
e You can enjoy Hi-Fi stereo sound or SAP broadcasts where available ....
Stereo broadcasts
Live television broadcasts of sports, shows, concerts, etc. can be received in dynamic stereo
sound.
SAP broadcasts
Television broadcast can be received with either MAIN or SAP sound.
MAIN sound: The normal program soundtrack. (Monaural or stereo where available.)
SAP sound: Second language, supplementary commentaries, etc. (SAP sound is monaural.)
o If stereo sound is difficult to hear;
You can obtain clearer sound by manually switching to fixed monaural mode.
[] SPEAKER (Internal Speaker Switch)
This function turns the TV's internal speakers "ON" or "OFF" when listening to sound from
external speakers by using the AUDIO OUTPUT Terminals. (See page 47).
[] FAO (Fixed Audio Output)
This function turns the TV's internal speakers "OFF" and allows fixed audio output from the
AUDIO OUTPUTTerminals. (See page 47). With FAO, theTV's volume control is disabled.
1 Press MENU to access the MAIN MENU screen.
2 Press CH _k/'e' to move the "_" mark to "AUDIO SELECT".
MENU
3 Press VOL +/- to access the AUDIO SELECT screen.
4. Press OH _./_ to move the "_" mark to"MTS", "SPEAKER", "FAO"
or "AUDrO ADJUST"
o If the viewing channel is a digital --_
channel, MTS cannot be selected
5
Press VOL +/- to sefect"STEREO", "SAP" or"MONO" when the
"_" mark is at "MTS" position.
MTS
SPEAKER FAO
t _. t i
MENU
_SLEEP TIMER
_VIOEO ADJUST
eEl]AUDIO SELECT
EJDIGITAL AUDIO
_:_OLOSED CAPTION
_PARENT CONTROL
_;rENERGY SAVE
[_SET UP
(MAIN MENU screen)
_AUDIO SELECT
eMTS :STEREO
_AOSP_AKE"18_E
AUDIO ADJUST
AUDIO SELECT screen
E]AUDiO SELECT
eMTS :STEREO
_PEAKE£
AO !_F
AUDIO ADJUST
AUDIO SELECT screen'
:(For Analog
16
Channelonly)
Page 17
I dio se!ect (cOntinUed) " :: : i:: :: : :i
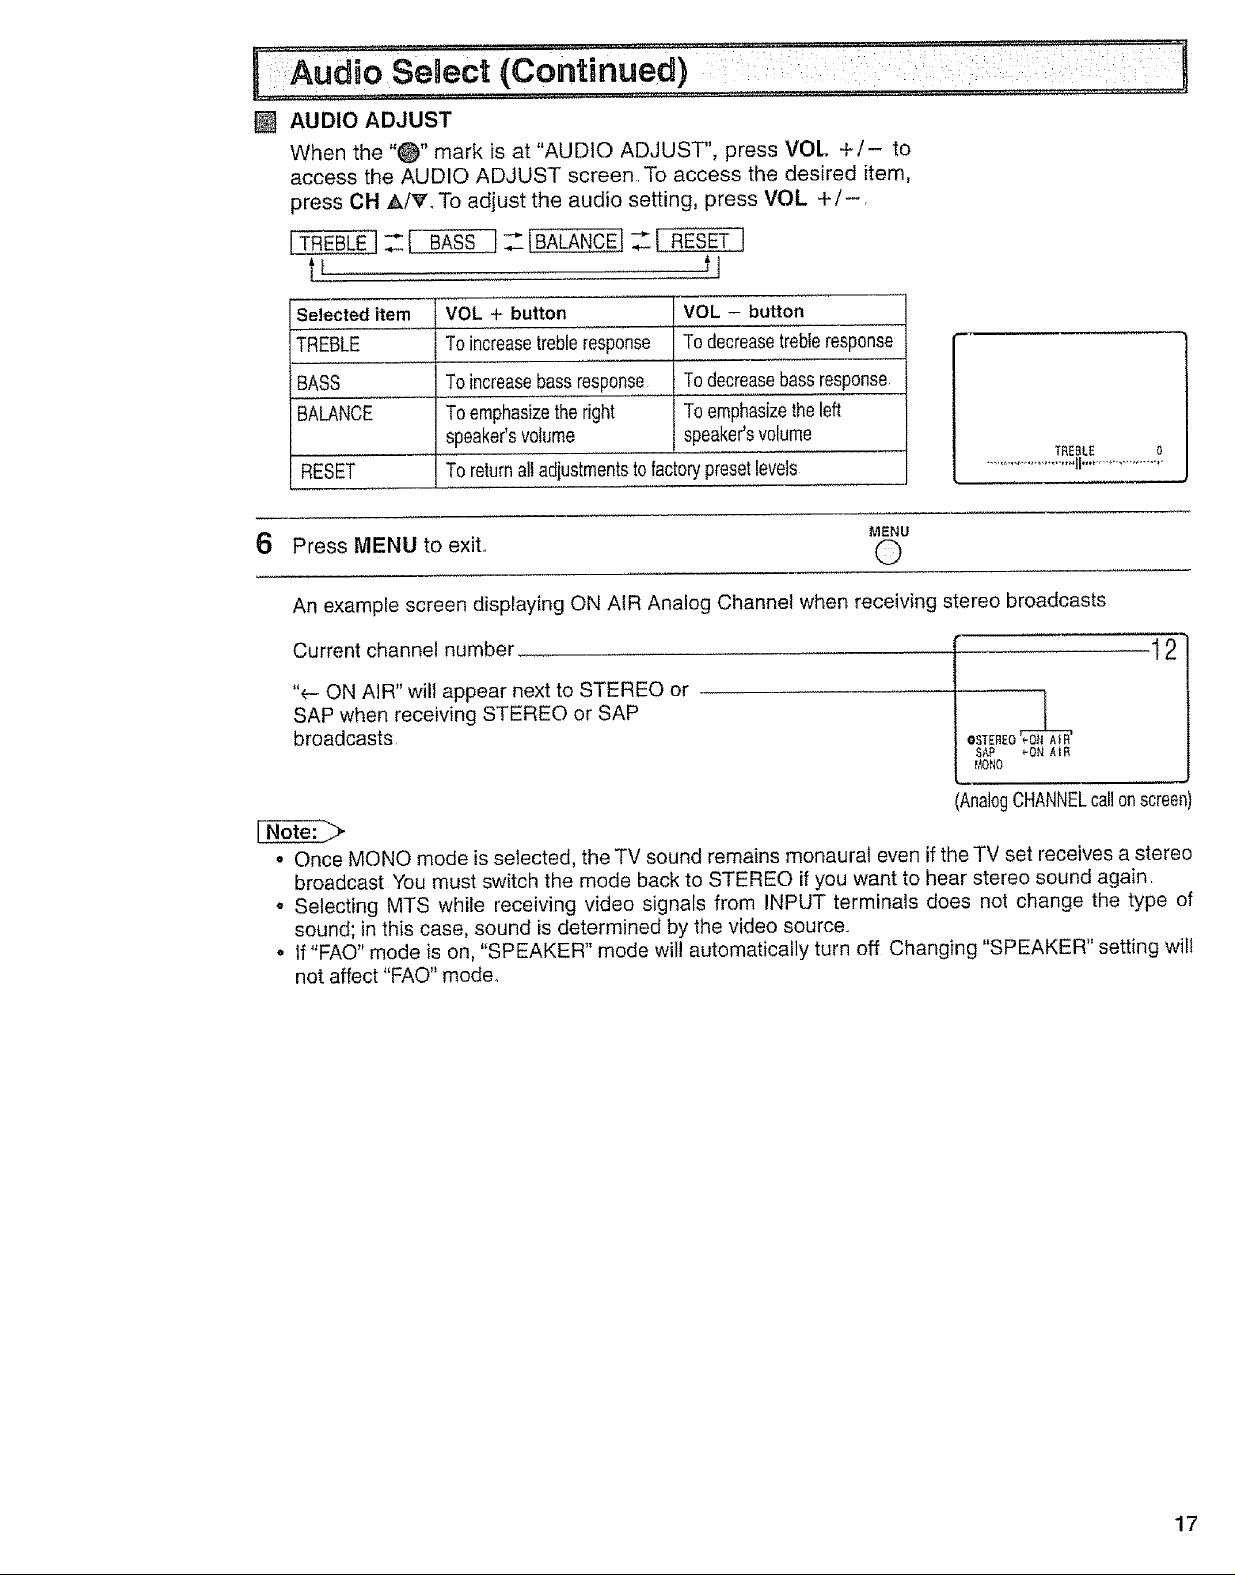
[] AUDIO ADJUST
When the "_" mark is at "AUDIO ADJUST", press VOL +/- to
access the AUDIO ADJUST screen To access the desired item,
press CH AIr. To adjust the audio setting, press VOL +/-.
[TREBLE]_SS ]__IBALANCEf=_ESET !
t_ tj
Selecteditem
TREBLE
BASS
BALANCE
VOL + button
To increasetrebleresponse
To increasebassresponse
To emphasizetheright
speaker'svolume
VOL - bu_on
Todecreasetrebferesponse
Todecreasebassresponse
Toemphasizethe left
speaker'svolume
TREBLE 0
RESET To returnalladjustmentstofactorypresetlevels
MENU
6 Press MENU to exit, 0
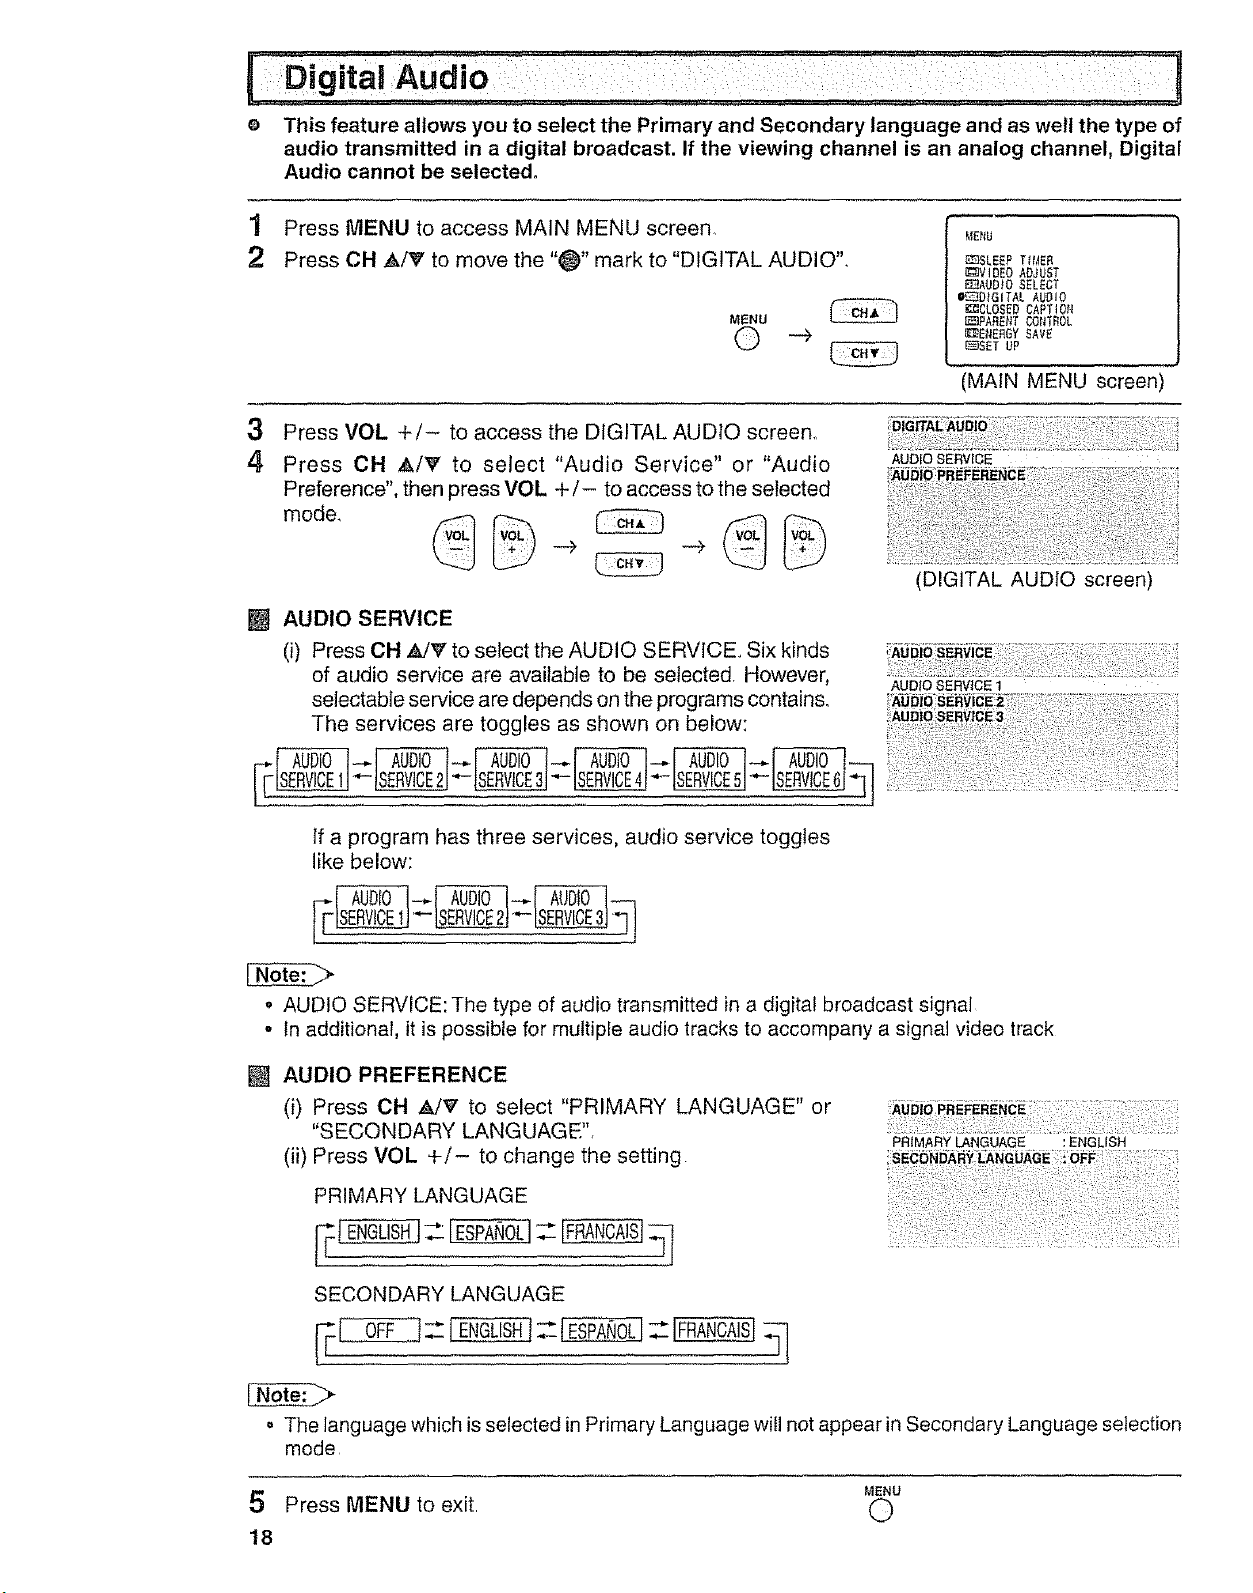
An example screen displaying ON AiR Analog Channel when receiving stereo broadcasts
Current channel number
"e- ON AIR" will appear next to STEREO or
SAP when receiving STEREO or SAP
broadcasts
OSTEREO e_
SAP _ON AIR
_,_ONO
(AnalogCHANNELcallonscreen'
o Once MONO mode is selected, the TV sound remains monaural even if the TV set receives a stereo
broadcast You must switch the mode back to STEREO if you want to hear stereo sound again,
o Selecting MTS while receiving video signals from INPUT terminals does not change the type of
sound; in this case, sound is determined by the video source.,
• If"FAO" mode is on, "SPEAKER" mode wil! automatically turn off Changing "SPEAKER" setting will
not affect "FAO" mode.
12
17
Page 18
e This feature allows you to select the Primary and Secondary language and as well the type of
audio transmitted in a digital broadcast. If the viewing channel is an analog channel, Digital
Audio cannot be selected°
1 Press MENU to access MAIN MENU screen.
2 Press CH A/_' to move the "_" mark to "DIGITAL AUDIO".
MENU
© -+
3
Press VOL +/- to access the DIGITAL AUDIO screen.
4
Press CH AI_' to select "Audio Service" or "Audio
Preference", then press VOL +/- to access to the selected
[] AUDIO SERVICE
(i) Press OH _JV' to select the AUDIO SERVICE.. Six kinds
of audio service are available to be selected. However,
selectabte service are depends on the programs contains.
The services are toggles as shown on below:
MENU
Ii_SLEEPT_tAER
_VIOEO ADJUST
_AUD_O SELECT
O_-_-.DtGITALAUDIO
KI_CLOSEDCAPTION
_IPABENT CON'iROL
_'E_._EFIGYSAVE
_SET UP
(MAIN MENU screen)
AUDIO SERVICE
(DIGITAL AUDIO screen
AUDIO SERVICE 1
If a program has three services, audio service toggles
like below:
. AUDIO SERVICE: The type of audio transmitted in a digital broadcast signal
• In additional, it is possible for multiple audio tracks to accompany a signal video track
[] AUDIO PREFERENCE
(i) Press CH _V to select "PRIMARY LANGUAGE" or
"SECONDARY LANGUAGE",
(ii) Press VOL +/- to change the setting
PRIMARYLANGUAGE :ENGLISH
:SECONDARYI. ;
PRIMARY LANGUAGE
SECONDARYLANGUAGE
0FF j= 1E,GL S. =
o The language which is selected in Primary Language will not appear in Secondary Language selection
mode
MENU
5 Press MENU to exit O
18
Page 19
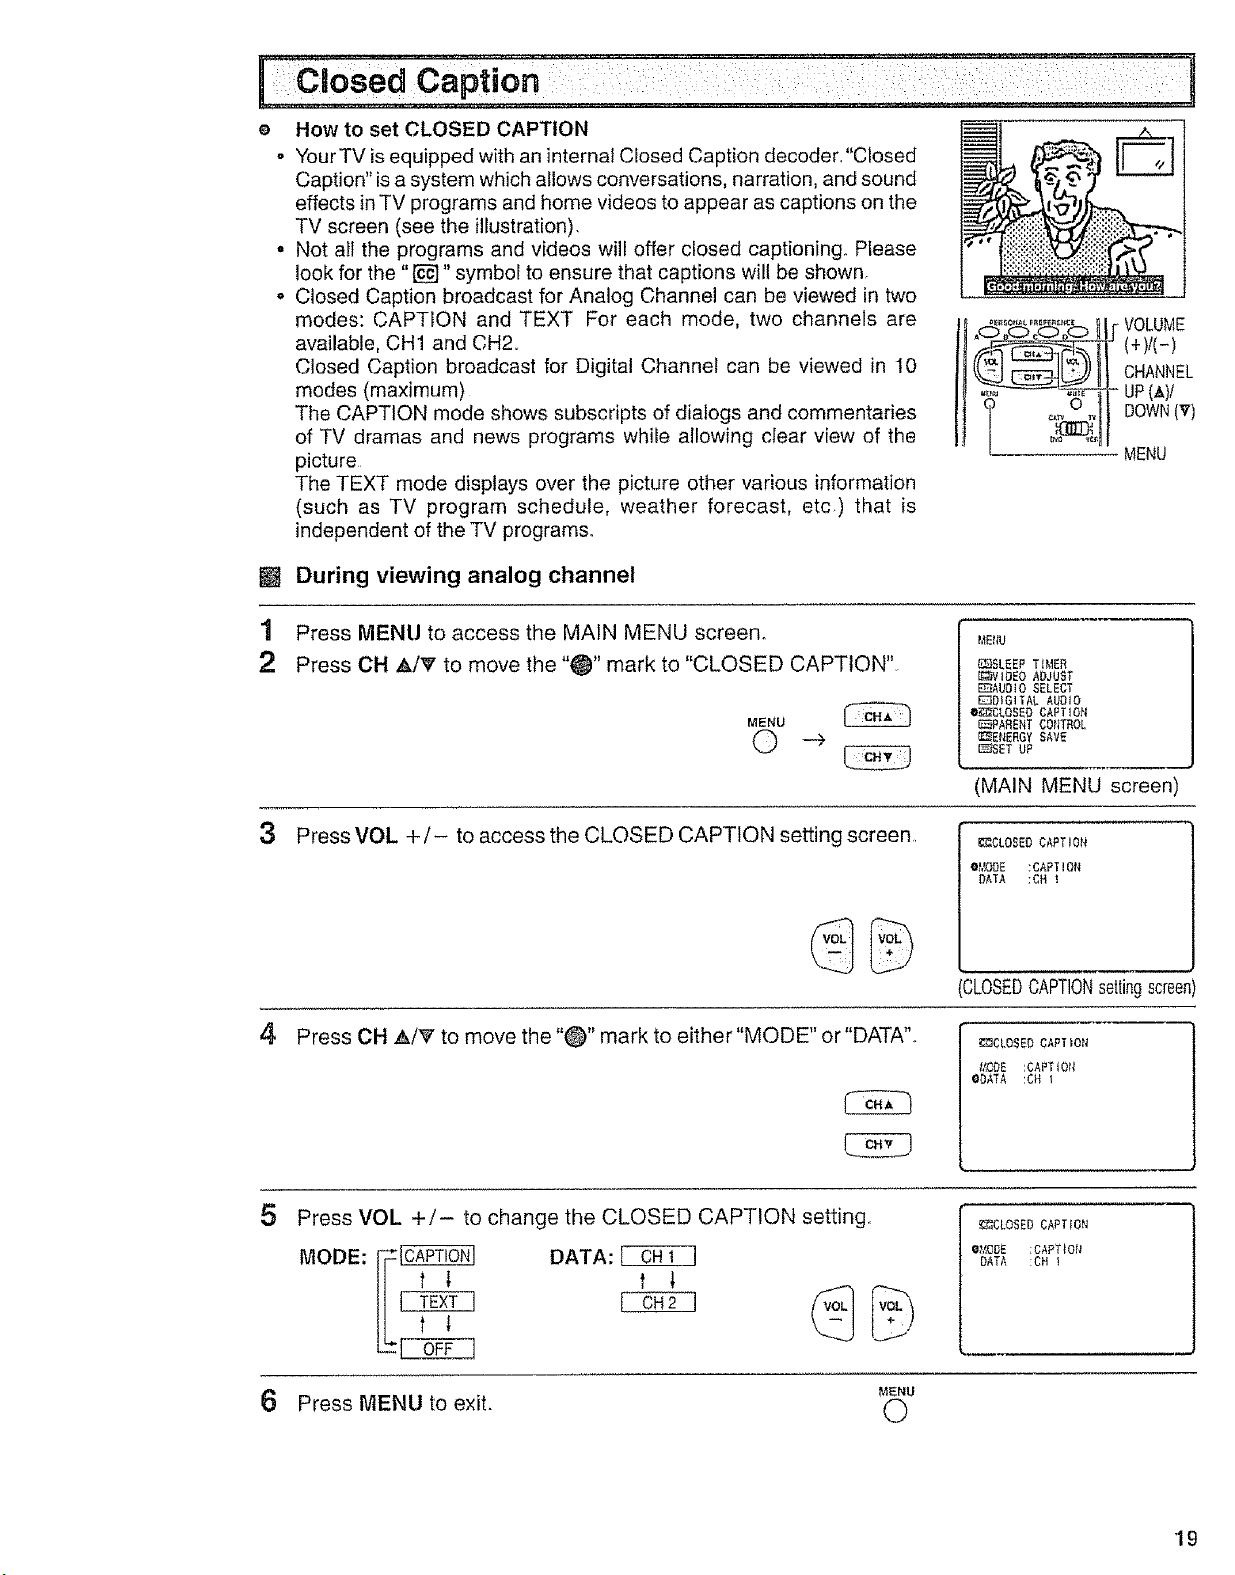
How to set CLOSED CAPTION
o Your TV is equipped with an internal Closed Caption decoder."Closed
Caption" is a system which atlows conversations, narration, and sound
effects in TV programs and home videos to appear as captions on the
TV screen (see the illustration).
° Not all the programs and videos will offer closed captioning.. Please
look for the "[_]" symbol to ensure that captions will be shown
° Closed Caption broadcast for Analog Channel can be viewed in two
modes: CAPTION and TEXT For each mode, two channels are
available, CH1 and CH2,,
Closed Caption broadcast for Digital Channel can be viewed in 10
modes (maximum)
The CAPTION mode shows subscripts of dialogs and commentaries
of TV dramas and news programs while allowing clear view of the
picture
The TEXT mode displays over the picture other various information
(such as TV program schedule, weather forecast, etc.) that is
independent of the TV programs.
[]
During viewing analog channel
1
Press MENU to access the MAIN MENU screen°
2
Press CH A/V to move the "_" mark to "CLOSED CAPTION"
MENU
0 -_
o_,.'0,,._......... VOLUblE
CHANNEL
UP(A}I
I_ L .... _I MENU
P,}Et_U
[C_SLEEP T}MER
_;VIgEO ADJUST
EEIAUO]O SELECT
DD}GITAL AUDIO
e_CLOSED CAFTtO_t
_PAR£NT CONTROL
_ENERGY SAVE
_SET UP
3 Press VOL +/- to access the CLOSED CAPTION setting screen,
4
Press CH A/V" to move the "0" mark to either"MODE" or "DATA".
5 Press VOL +/- to change the CLOSED CAPTION setting,.
MODE:
[_ DATA:
f
(MAIN MENU screen)
_CLOSED CAPTION
O_/DDE :CAPTION
_ATA :OH t
CLOSEDCAPTIONsettingscreen)
_T_CLOSED CAPTIO_
t,_DE :¢APT_O_
ODATA :OH
_¢LOSED CAPTION
e_igOE :CAPTION
DATA :OH I
Press MENU to exit. 0
t_ENU
•19
Page 20
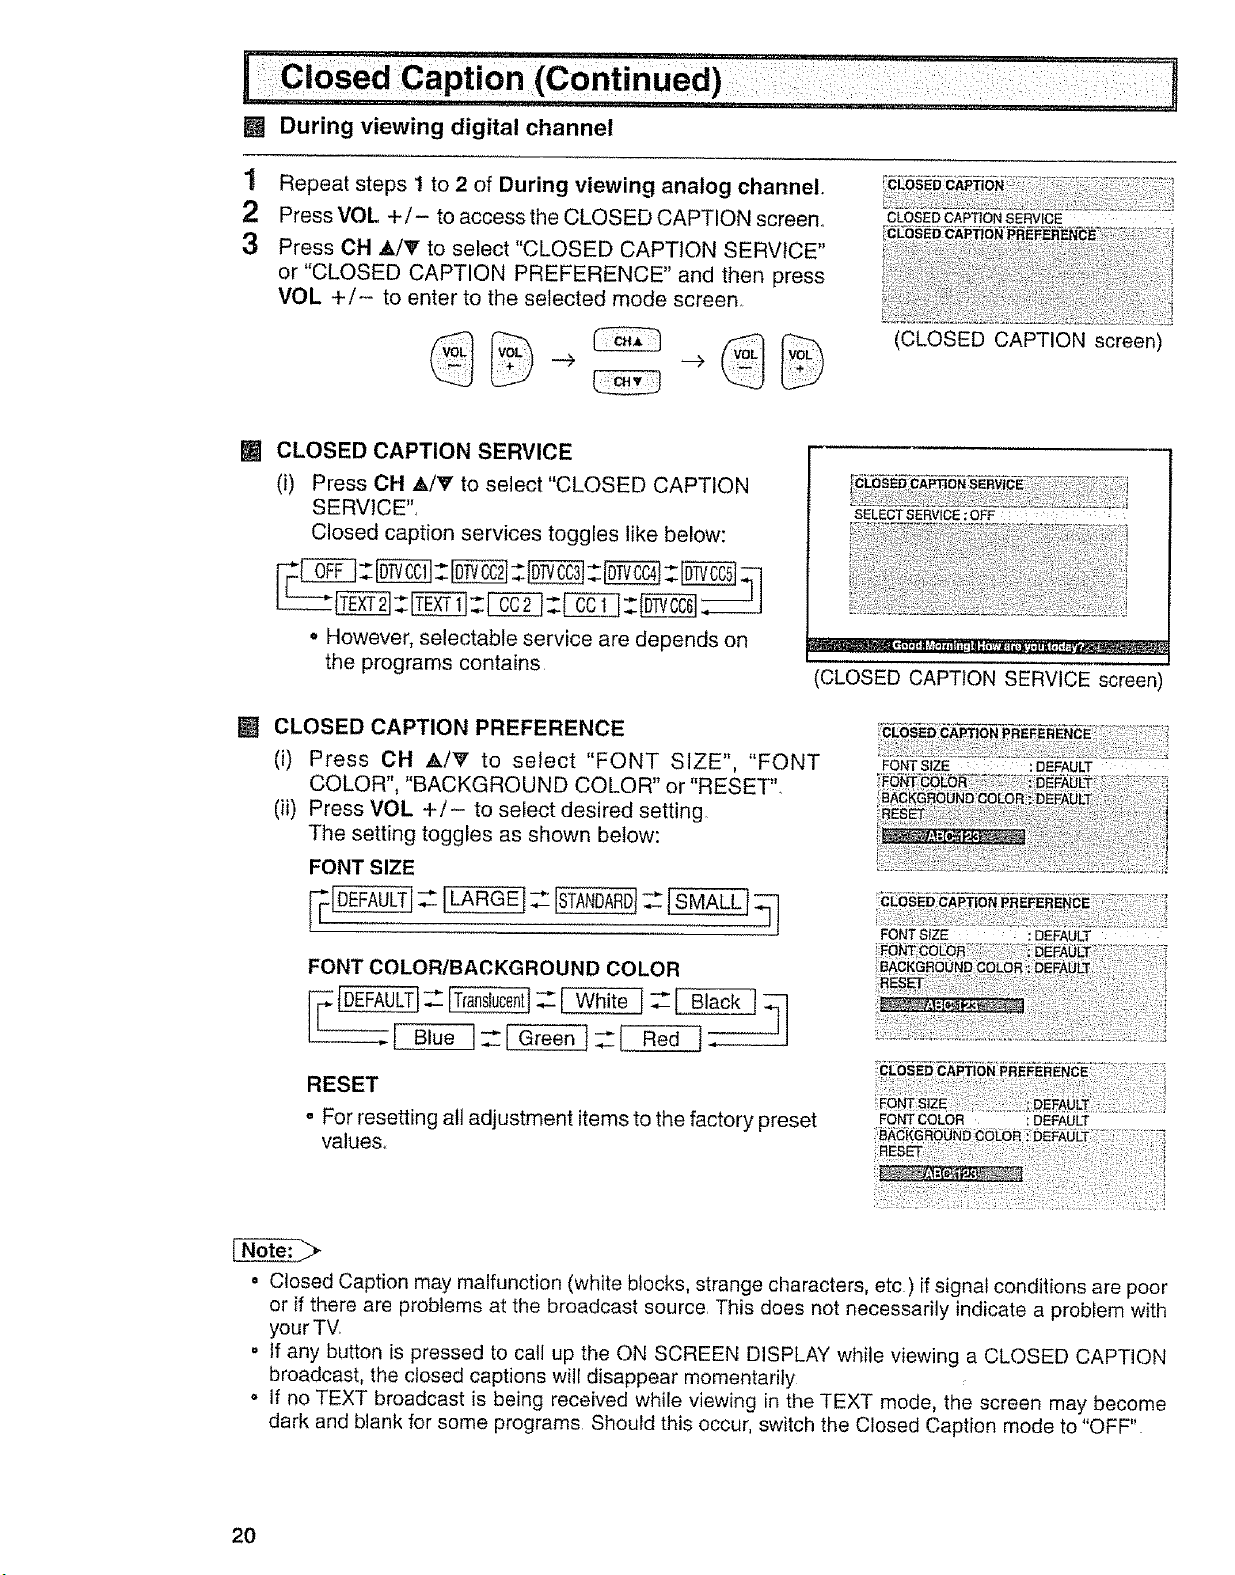
[] During viewing digital channel
1 Repeat steps 1 to 2 of During viewing analog channel.
2 Press VOL +/- to access the CLOSED CAPTION screen.
3 Press CH _k/T to select "CLOSED CAPTION SERVICE"
or "CLOSED CAPTION PREFERENCE" and then press
VOL +/- to enter to the selected mode screen,
CLOSED CAPTION SERVICE
[]
(i) Press CH _/V to select"CLOSED CAPTION
SERVICE",
Closed caption services toggles like below:
• However, selectable service are depends on
the programs contains
CLOSED CAPTION SERVICE .....
(CLOSED CAPTION screen)
SELECTSERVlCE :OFF ; .... :
CLOSED CAPTION SERVICE screen
[] CLOSED CAPTION PREFERENCE
(i) Press CH A/_' to select "FONT SIZE", "FONT
FONTSIZE : : :DEFAULT
COLOR", "BACKGROUND COLOR" or "RESETL
(ii) Press VOL +/- to select desired setting
The setting toggles as shown below:
FONT SIZE
FONT COLOR/BACKGROUND COLOR
White
RESET
o For resetting alt adjustment items to the factory preset
values,,
o Closed Caption may malfunction (white blocks, strange characters, etc) if signal conditions are poor
or if there are problems at the broadcast source, This does not necessarily indicate a problem with
your TW
o If any button is pressed to catl up the ON SCREEN DISPLAY while viewing a CLOSED CAPTION
broadcast, the closed captions will disappear momentarily
• If no TEXT broadcast is being received while viewing in the TEXT mode, the screen may become
dark and blank for some programs Should this occur, switch the Closed Caption mode to "OFF"
FONT COLOR _DEFAULT
2O
Page 21
i
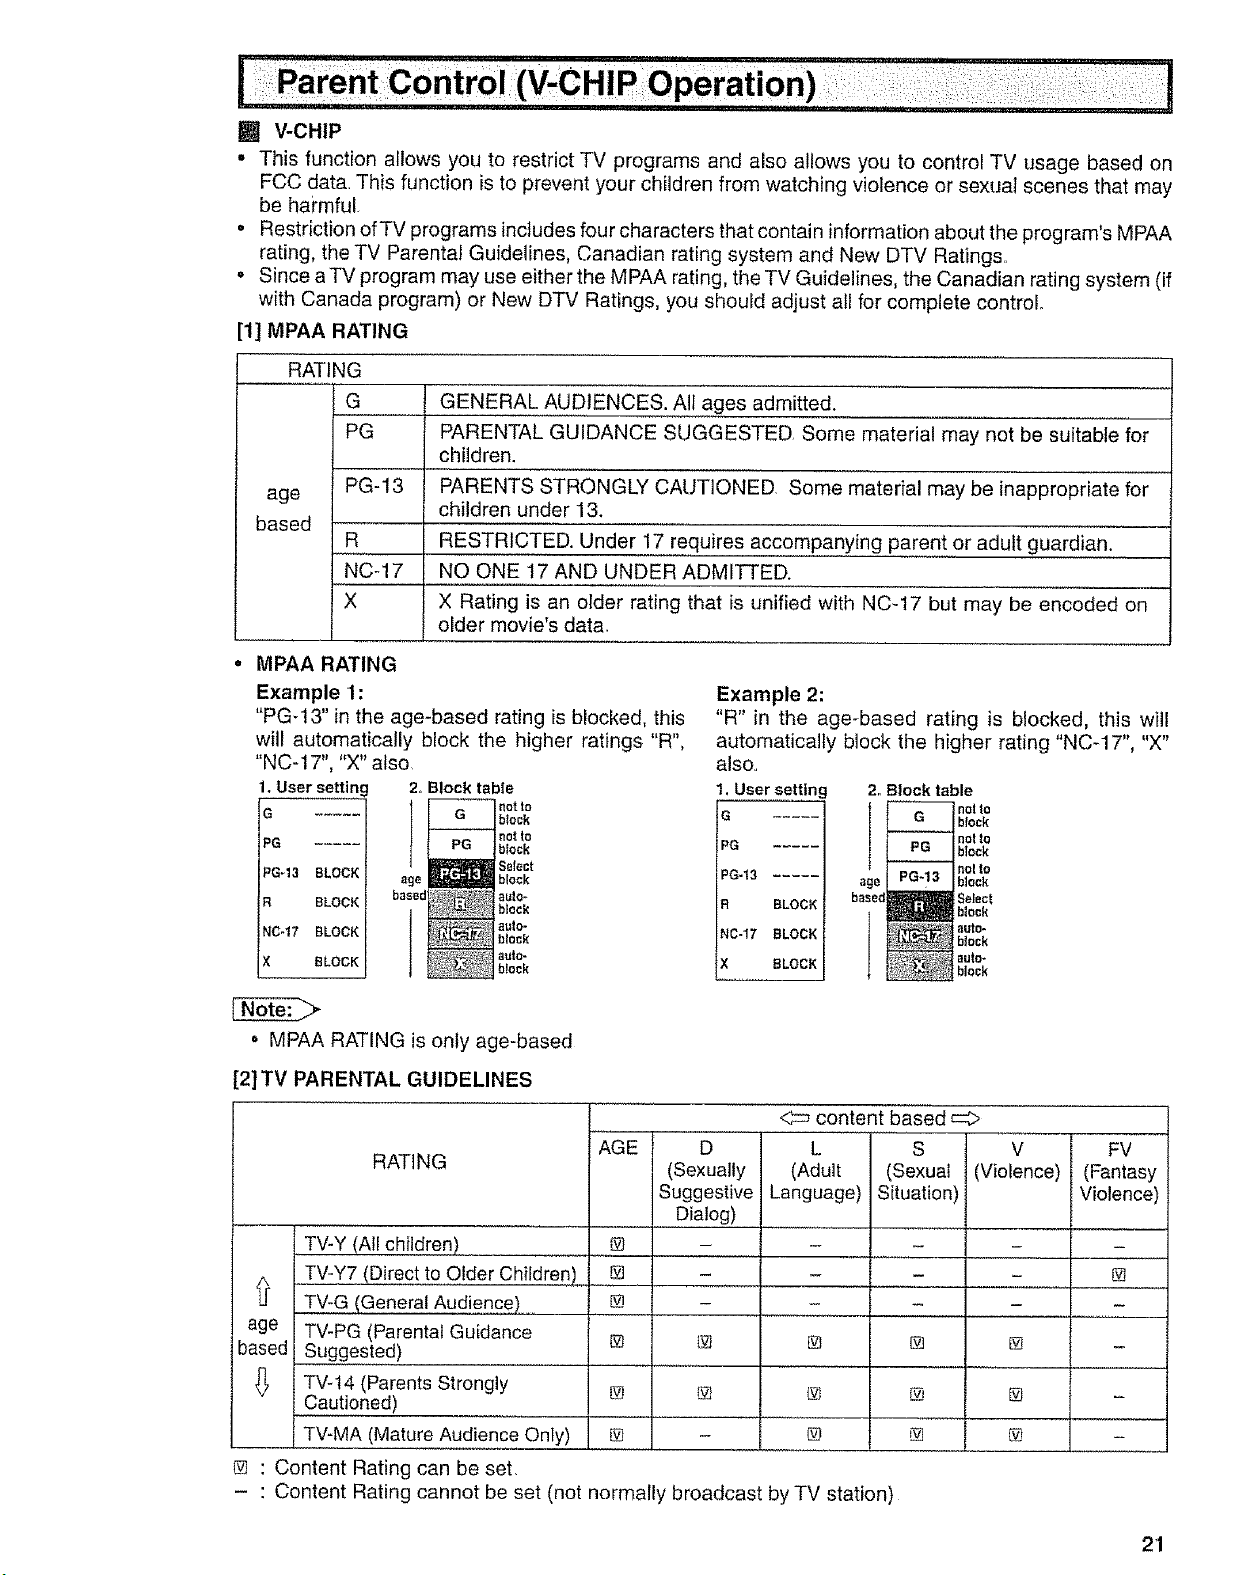
[] V-CHIP
° This function allows you to restrict TV programs and also allows you to control TV usage based on
FCC data. This function is to prevent your children from watching violence or sexual scenes that may
be haimful.
° Restriction ofTV programs inctudes four characters that contain information about the program's MPAA
rating, the TV Parental Guidelines, Canadian rating system and New DTV Ratings.
o Since aTV program may use either the MPAA rating, the TV Guidelines, the Canadian rating system (if
with Canada program) or New DTV Ratings, you should adjust all for complete control
[1] MPAA RATING
RATING
G GENERAL AUDIENCES. All ages admitted.
PG PARENTAL GUIDANCE SUGGESTED. Some material may not be suitable for
children.
age
based
PG-13 PARENTS STRONGLY CAUTIONED Some material may be inappropriate for
children under 13.
R RESTRICTED. Under 17 requires accompanying parent or adult guardian.
NCq7 NO ONE 17 AND UNDER ADMITTED.
X X Rating is an older rating that is unified with NC-17 but may be encoded on
older movie's dat&
o MPAA RATING
Example 1:
"PG-13" in the age-based rating is blocked, this
will automatically block the higher ratings "R",
"NC-17", "X" also.
1, User,settinc 2. Block tabie
E G block
PG
IG-13 .....
BLOCK
047 BLOCK
t! BLOCK
BLOCK
_nat to
I _not to
_ge B_l_;_l block
basec ;_,uto_
block
Select
black
auto-
block
auto-
beck
° MPAA RATING is only age-based
Example 2:
"R" in the age-based rating is blocked, this will
automatically block the higher rating "NC-17", "X"
also..
1. User setting
G .....
PG .....
PG-13 .....
R BLOCK
NC-17 BLOCK
X BLOCK
2., Block table
F block
age PG block
based
€ block
no to
block
nolto
no! to
block
auto-
block
au_o-
[2]TV PARENTAL GUIDELINES
content based
RATING
AGE
D
(Sexually
Suggestive
L S V
(Adult (Sexual (Violence)
Language) Situation)
.... Dialog)
V-Y (All children) @ -
.. . v-y7 (Direct to Older Children) _ -
.... V-G (General Audience) @
age I V-PG (Parental Guidance
based { ugges!ed) ..................
_ _ v-14 (Parents Strongly @
autioned)
V-MA (Mature A,ud,ienceOnly) @.....
[]
[]
@
@ : Content Rating can be set,
- : Content Rating cannot be set (not normally broadcast by TV station)
[]
@
@
FV
(Fantasy
Violence)
@
@
@
2'1
Page 22

o TV PARENTAL GUIDELINES (Example)
Example 1,1 : Age Based setting
Clear []s (block) from each "AGE" box for all ratings
This will automatically unblock everything
AGE D L S V FV
TV-Y7 _; BLOCK
TV-G
|TV-PG
tTV-t4
_,{ERU: RETURN
Example 1.2 : Age Based setting
For "TV-G" put a [] in the "AGE" box. This will automatically block the
higher age ratings "TV-PG", "TV-t4" and "TV-MA" as well as "TV-G".
Please note the content ratings "D", "L_',"S", "V" are automatically blocked
as well,
Example 2.1 : Content Based setting
If you choose to unblock every content-based items ("D", %?,"S", "V"),
clear the [] (block) from each "AGE" box of "TV-PG", "TV-14" and "TV-
MA'L
Example 2.2 : Content Based setting
Put a [] in the box corresponding to "TV-PG" (row) and "V (Violence)"
(column) This will automatically block the "V" boxes for "TV-14" and
"TV-MA" Setting only "TV-PG-V", "TV-14-V" or"TV-MA-V" will not bIock
all programs rated "TV_PG", "TV- 14" or "TV-MA".
Example 3 : Resetting an Age Based setting
For "TV-14", put a [] (block) in the "AGE" box.
This will again automatically block the content ratings "D", "L_',"S '°,"V"
for "TV=MA" as well as "TV-14" ("D" is not available for "TV-MA")
Please note that the lower age rating "TV-PG" does not change from its
previous settings after this
AGE D I,S V FV
TV-YI [']_]:BLOCI'(
eTV_G
TV-PG
TV-14
TV-t,_A
_'_Et_U:RETUR_
AGE O I B V FV
"fV-G
TV-PG
TV-Y i ..... _:VIE_V
TV-bt
OTV-_tA
_,ENU : RETUR_I
AGE D I S V FV
TV-Y7 V_:BLOC_
TV-G
OTV-PG
TV-14
TV-UA
},,IENU:BETUF_N
AGE D L S V FV
TV_Y7 _: BLOCK
TV-G
TV-PG
OTV_I _
TV-IAA
L_EHU :RETURtq
• Content ratings can be modified but only in the combinations indicated by [] in the table on page 21,
- Changing a lower age rating's content setting to "BLOCK" automatically changes the same higher
age rating's content setting to "BLOCK" regardless of their previous settings
° Changing a lower rating's"AGE" setting to"BLOCK" automatically changes alt higher ratings to ,,BLOCK,,
regardless of their previous settings,
o For"TV_Y7", "TV-PG", "TV-14" and "TV-MA", if you clear the [] in the "AGE" box (unblock) you can still
change settings based on content,
Clearing a higher rating's age or content setting will not clear lower settings, Make sure that all
undesired boxes are blocked
22
Page 23

[3] Canadian Rating Systems
o The TV rating systems in Canada are based on the Canadian Radio-Television and Telecommunications
Commission (CRTC) policy on violence in television programming.
o While violence is the most important content element to be rated, the structure developed takes into
consideration other program content like language, nudity, sexuality and mature themes.
= When setting the V-CHIP on the Canadian system you can choose either the Canadian English ratings
or the Canadian French ratings
[i] Canadian English ratings
Rating Description
Children: intended for younger children under the age of 8 years. Pays careful
C attention to themes that could threaten their sense of security and well-being
Children over 8 years old: Contains no portrayal of violence as the preferred,
C8+ acceptable, or only way to resolve conflict; nor encourage children to imitate
dangerous acts which they may see on the screen
G
Age PG younger children (under the age of 8) because it could contain controversial
14 + elements of the storyline, but it must be integral to the development of plot or
General: Considered acceptable for ati age groups. Appropriate viewing for the
entire family, contains very little violence, physical, verbal or emotional.
Parental Guidance: Intended for a general audience, but may not be suitable for
themes or issues.
Over 14 Years: Could contain themes where violence is one of the dominant
character Language usage could be profane and nudity present within the context
of the theme
Adults: Intended for viewers 18 years and older and might contain depictions of
18 + violence, which while related to the development of plot, character or themes,
are intended for adult viewing Could contain graphic language and portrayals
of sex and nudity.
[ii] Canadian French ratings
Rating
G
8+
Age
13+
16+
18+
General: All ages and children, contains minimal direct violence, but may be
integrated into the plot in a humorous or unrealistic manner.
General but inadvisable for young children: May be viewed by a wide public
audience, but could contain scenes disturbing to children under 8 who cannot
distinguish between imaginary and real situations. Recommended for viewing
with parent
Over 13 years: Could contain frequent violent scenes and therefore
recommended for viewing with parent
Over 16 years: Could contain frequent violent scenes and intense violence.
Over 18 years: Only for adult viewing. Could contain frequent violent scenes
and extreme violence
Description
23
Page 24

i :Parent cOntrOl (V-CHIP Operation)(Continued) "........."]
e How to set V-CHIP
[1] MPAA RATING
1 Press MENU to access the MAIN MENU screen.
2
Press OH AIr to move the "_" mark to "PARENT CONTROL".
MENU
©
®@@
(_) @ C) VOLUME
® ® ® _(+)/(-)
J
cb,.°_,.........
, _ j CHANNEL
,_ _ iF UP(A)i
q '6' 11
t_4ENU
_SLEEP TJ_ER
_;_A/IOEOADJUST
_AUOIO SELECT
_OIGITAL AUDIO
_CLOBEO OAPTLON
_PARENT CONTROL
_ENERG¥ SAVE
_]SET UP
(MAIN MENU screen)
_.tENU
{Z_SLEEP TIMER
[(;_VIDEO ADJUST
E_AUDIO SELECT
_DIG_TAL AUDIO
_CLOSED CAPTIOt_
_PARENT CONTROL
_ENERGY SAVE
_SET UP
MENU
3 Press VOL +/- to access the PARENT CONTROL screen.
4 Press VOL +/- to access the V-CHtP select screen,
• If SECRET No, is already set, enter the SECRET No,
(See To change theY-CHIP BLOCK after registering
a secret No. on page 28).
5
Press VOL +/- to select "MPAA". Press CH ,_/_" to move the
"O" mark to "PG", then press VOL +/- to select BLOCK If you
set "PG" to BLOCK, "PG-13", "R", "NC-17" and"X" are automatically
blocked.
_5_PARE_IT CORTROL
BV_OHIP BLOCK
VIEW TIMER
PARENT CONTROL screen'
O},{PAA
TV GUIDELINES
Cd_ English Ralings
Cdn French Ralings
Ne_ DTV Ratings
STATUS :OFF
V-CHIP select screen
G : .....
ePG :BLOCK
PG_13 :BLOCK
R :BLOCK
N0-17 :BLOCK
X :BLOCK
MENU:RETURN
6 Press MENU to return to the V-CHIP select screen O
24
MENU
Page 25

7 Press MENU, then "INPUT SECRET No ." will be displayed
• If SECRET No. is already set, skip to step 9.
8 Enter a 4-digit SECRET No ousing the REMOTE KEYPAD.
I_PUTSECRET No
MENU
©
INPUT SECRET NO
1234
9 When done, press MENUtoexit. Q
MENU
o tf you set "G" to BLOCK, all ratings are automatically b!ocked
. tf you set "X" to BLOCK, "G", "PG", "PG-13", "R" and "NC-17" are not blocked.
[2] TV GUIDELINES
1 Repeat steps 1 to 4 of [1] MPAA RATING
2 Press CH A/_" to move the "@" mark to "TV GUIDELINES"
3 Press VOL +/- to access the TV GUIDELINES screen,
4
To change AGE and CONTENT SETTING, press CH _k/'e"to move
the "_" mark to the desired r ating and then press VOL +/- to
select.
MPAA
OTV GUIDELINES
C_ Englisb Raliags
Cdn French R_ti_gs
Na_ OTV R_I_g_
STATUS :OFF
(V-CHIP select screen
AGE D L S V FV
TV-Y _ ..... B:V IE"W
LfEI_tU:RETURN
TV GUIDELINES screen'
5
Press OH AfV to move the "_" mark to the desired content item
and then press VOL +/- to select either "BLOCK" or ....
(unblock)o
TV-Y7
eAGE BLOCK
D .....
L .....
S .....
V .....
FV BLOCK
_,_E_,IU:RETURt,_
'CONTENT RATING screen'
6 Press MENU to return to the TV GUIDELINES screen
7 Repeat steps 4 to 6 until all ratings and their contents are set,
8 When done, press MENU to return to V-CHIP select screen,
9 Press MENU to exit. MENU
©
A6E D L S V FV
TV_Y _ ..... [q:VIEW
,STV-G
TV_PG
TV-14
TV4,{A
MENU:RETU£N
o If SECRET No, is not set, enter a SECRET Nooas show in steps 7 and 8 of [1] MPAA RATING
25
Page 26

u,...... i J,,,,_J,, ....
e How to set Canadian Rating System
Setting for Canadian English ratings and Canadian French ratings.
1
Repeat steps I to 4 of [1] IVIPAA RATING.
2
Press CH ,_/_F to move the "_" mark to "Cdn.L English Ratings",
then press VOL +/-.
3
You can select "BLOCK" or "- " (unblock) rating items by
pressing CH A!V and VOL +/-.. If you select "PG" to BLOCK,
"14+" and "18+" are automatically blocked.
4
You can select "BLOCK" or .... (unblock) rating items by
pressing CH Air and VOL +/- if you select"Cdn,, French Ratings"
in step 2, If you select "8+" to BLOCK, "13+", "16+" and "18+" are
automatically blocked.
MPAA
TV GUt_ELI_EB
eCdn English Ralings
Cdn French R_ling_
Ne_i OTV B_ti_g_
STATUS :ON
eO : .....
CB÷ : .....
G ; .....
_G :BLOCK
14+ :BLOCK
_B÷ :BLOCK
MENU:RETURN
Canadian English ratings)
OG ; .....
_+ :BLOCK
13+ :BLOCK
_6÷ :BLOCK
I@* :BLOCK
_I_NU:RETURN
Canadian French ratings)
[3] NEW DTV RATINGS
1 Repeat steps 1 to 4 of [1] MPAA RATING,,
2 Press CH AffF to move the "@" mark to "New DTV Ratings", then
press VOL +/-_
_4FAA
TV GUIDELINES
Odn English Raliags
Cdn F_e_h Raling_
ONe_ OTV Ralings
STATUS :011
o The "New DTV Ratings" will only be selectable when a new rating system can be automatically
downloaded via digital broadcasting in the U S
o If the viewing channel is an analog channel, New DTV Ratings cannot be selected
26
Page 27

e Activating the V-CHIP BLOCK
1
Repeat steps I to 4 of [1] MPAA RATING.
2
Press CH A/V to move the "_" mark to "STATUS", Press VOL +/
- to activate the V-CHIP BLOCK° (If STATUS is OFF, V-CHIP
BLOCK will not operate)
3 Press MENU, then "INPUT SECRET No." will be displayed.
o If SECRET No is already set, skip to step 5
4
Enter a 4-digit secret No. using the REMOTE KEYPAD
IQOQ:Q@
MENU
©
@
_PAA
TV GU_OELItlE8
Cd_ Englis_ Ratiag_
Cdn French Ratings
Ne_ DTV Ral_ng_
eSTATUS :Ot_
V-CHIP select screen
_NFUT SECRET H0
MENU
5 Press MENU and the secret No wil! be registered.. 0
e To temporarily cancel the V-CHIP BLOCK
1 "V-CHIP HAS BEEN ACTIVATED" appears if you view a program
with the same program rating data you configured
• "V-CHIP HAS BEEN ACTIVATED" will not be dispJayed if STATUS is
not configured to "ON"
2 Press MENU, then "INPUT SECRET No." will be displayed.
MENU
3
Enter the 4-digit secret No using the REMOTE
KEYPAD, then V-CHIP BLOCK will be canceled
temporarily. If the wrong secret No. is chosen,
"SECRET No, IS INCORRECT" will be displayed
Input the secret No. again in this case.
d>O<:Z)
©
V-CHIP HAS BEEtl ACTIVATED
TV-Y;
FV
t_PUT SECRET Ne
22
o If you turn the power ON from OFF', the V-CHIP BLOCK will be activated again,
27
Page 28

eTo change the V-CHIP BLOCK after registering a secret No.
"I Repeat steps 1 to 4 of [1] MPAA RATING, then "INPUT SECRET
No." wilt be displayed
iNPUT SECBET N_
2
Enter the 4-digit secret No. using the REMOTE KEYPAD and the
V-CHIP select screen will be displayed. Set V-CHIP BLOCK again,
iO@:
io ®®1
e If you forget or need to change your secret No., clear the original secret No. and set
up a new one.
1 Repeat steps 1 to 4 of [1] MPAA RATING, or 1 to 2 of To
temporarily cancel the V-CHIP BLOCK, then "INPUT SECRET
No." will be displayed°
2
Press and hold both VOL + and CH A on the TV set simultaneously
until the message "INPUT SECRET NoZ disappears.
3 Press the MENU button twice to exit°
(On the Set)
T CH
I
VOL + and CH A
buttons
MENU
0
28
Page 29

[] VIEW TIMER
This function allows you to restrictTV viewing time and also allows you to control TV usage
This function is to prevent your children from watching too much TV.
VIEWING TIME (an accumulative timer: counts only the time
duration while theTV power is on.)
o VIEWING TIME can be set from 30M (30 minutes) to IOHOOM (10
hours) in 30 minutes intervals, v_,,_T_,_ER
•eVIEWING T_ME
OFFTIME (RestrictsTV viewing after the VlEWING TIME reaches -OFFTree
zero.) --H--M
STATUS :OFF
= OFF TIME can be set from 30M (30 minutes) to !OHOOM (10 hours)
in 30 minutes intervals.
STATUS (Select ON to activate VIEW TIMER)
O
How to set VIEW TIMER
1
Press MENU to access the MAIN MENU screen..
2
Press CH A/V to move the "_" mark to "PARENT CONTROL:'..
MENU
O
MENU
_ELEEP TIMER
_VIDEO ADJUST
_I!]AUDIO SELECT
_DIGITAL AUDIO
_CLOEED CAPTION
O_PABENT CONTROL
_B;ERERGYSAVE
{_]SETUP
(MAIN MENU screen)
3 Press VOL +/- to access the PARENT CONTROL screen
4 Press CH A/V to move the "@" mark to"VIEW TIMER".
IZS}PARENT CONTROL
V-CHIP SLOCR
OVIEW TIMER
l
5 Press VOL +/- to access "VIEW TtMER",
6
Press CH Ate' to select "VIEWING TIME" and "OFF TIME". For
each selection, press the VOL +/- to set the time duration.
7
Press OH A/V to select "STATUS", Press the VOL +/- to turn
ON the "VIEW TIMER".. (If STATUS is OFF, VIEW TIMER will not
operate)
8 Press MENU "INPUT SECRET No!' will be displayed.
PARENT CONTROL screen)
VIEW TIMER
OV I_tl NG TIME
--H -*M
OFF TIME
--H --M
STATUE :OFF
VIEW TIMER
Vi E'YVH_GTIME
OOFF TIME
--H --M
STATUS :OFF
VIEV_TIMER
V_k3VINGTIME
2H OOM
OFF TIME
SH OOM
OSTATUS:ON
o If SECRET No is already set, skip to step 10.
INPUT SECRET No
MENU
©
29
Page 30

9 Enter a 4-digit secret No. using the REMOTE KEYPAD.
1 0 Press MENU to exit.
loQo
MENU
©
Example:
. To restrict anybody from watching TV for more than 5 hours, after
watching the TV for 2 hours, your settings would look like the one on
the right.
= You can choose to watch the 2 hours of TV as you wish For example,
you could watch 1hour of TV, turn theTV off for 30 minutes, then turn
the TV on and watch the remaining 1 hour of the VIEWING TIME.
e To change the VIEW TIMER setting after registering a secret Noo
1 Repeat steps 1 to 4 of How to set VIEWTIMER Press VOL +/-,
and "INPUT SECRET Not' will be displayed
2
Enter the 4odigit secret No, using the REMOTE
KEYPAD, and the VIEW TIMER access screen will
be displayed,. Repeat steps 5, 6.
I< oQI
VIEW"l t_,tER
VIEWING TIME
2H OOM
OFF TIME
5H 00M
@STATUS ION
INPUT SECRET No
• When you choose the correct secret No., the VIEW TIMER access
screen is displayed. If the wrong secret No. is chosen, "SECRET No.
IS INCORRECT" is displayed. Input the secret No. again in this case
@
To cancel the VIEWTIMER (While theTV set is OFF but the VIEW
TIMER is set.)
I
Turn on the TV; a blue screen message "TIME OVER" will appear,
If you do nothing, theTV will turn off in approximately 30 seconds,
2
Enter the 4-digit secret No. using the REMOTE
KEYPAD. When you choose the correct secret No,
the VIEWTtMER is canceled. If the wrong secret No Q® O
is chosen, "SECRET No. 1S INCORRECT" is I_(_)®_l
displayed. Input the secret No_ again in this case. L___
SEGRET No lS hNCORRECT
TIME OVER
IHPUT SECRET NO
TIME OVER
INPUT SEGRET No
3O
Page 31

Q
To cancel the VIEW TIMER setting or change the secret No. (If
you forget the SECRET No.)
1
Repeat steps 1 to 4 of How to set VIEW TIMER. Press
VOL +/-, and 'HNPUT SECRET No.,"will be displayed,
INPU_ SECRET Ro
2
Press and hold both VOL + and CH A on theTV set simultaneously
until the VIEW TIMER access screen is displayed, Now you can
cancel the VIEW TIMER settings or change the secret No, while
"INPUT SECRET No!' is displayed_
e Notice of Remaining VIEWING TIME
o For every 30 minute interval, the remaining time wilt be displayed for
4 seconds. For the last 5minutes, the remaining time will be displayed
every minute,
• "0 REMAIN" will be displayed for 10 seconds just before the VIEWING
TIME expires,
(On the Set)
J
VOL + andCH A
buttons
VIEWING TIME
OH 30M REMAIN ,
VIEWING TiME
OH 05M REMAIN
VfEWING TIME
0 REMASN
31
Page 32

[] SCREEN
This feature lets you lower the power consumption of your TV
set which in turn saves you money and minimizes the impact on
the environment. When this feature is turned on, it reduces the
brightness of the TV to a level that consumes approximately 20
percent less energy than when the feature is turned off.
The reduction in brightness will be less noticeable under low
room lighting conditions.
[] STANDBY
If set to OFF:
No power save during standby mode.
ON:
With power save during standby mode. When
change your TV channel to a digital channel will
take approximately 10 seconds to display afterTV
is turned on.
_OVR.R
oo'_'
0®®
®®®
®©
¢
-VOLUME
(+)/(-)
"CHANNEL
uP(A)I
DOWN(v')
MENU
1 Press MENU to access the MAIN MENU screen,,
2 Press CH AI_ to move the "_" mark to "ENERGY SAVE".
MENU
0
3 Press VOL +/- to access the ENERGY SAVE select screen,
4
Press CH .&/_' to move the "O" mark to either "SCREEN" or
"STANDBY",
•_ Press VOL +/- to select "ON" or "OFF",
SCREEN: STANDBY:
_,IENU
_JSLEEP TI;_ER
_;;_VIDEO ADJUST
_AUDIO SELECT
_DIGITAL AUDIO
_CLOSED CAPT ION
_PAREtlT CONTROL
O_L_-ENERGY SAVE
E_ISET UP
(MAIN MENU screen)
_ENEROY SAVE
OSCREEN :OFF
STANDBY;ON
ENERGYSAVEselecl screen
_ENERGY SAVE
OSCREEN;OFF
STANDBY:ON
_ENERGY SAVE
OSCREEN :0_
STANDBY:OFF
t i t 1
6 Press MENU to exit., _,_ENU
0
o If STANDBY mode is set to "ON", when you turn on the TV set within approximately 15 seconds you
are not allow to turn the power off "Please Wait" will display on the screen,
32
Page 33

[] EZ Setup
By operating the channel preset functions, you can preset your
TV to the desired channels for viewing.
,_.0._.,_._.,,_L._It r VOLUME
__ CHANNEL
? o,.oJ I bOW.IV)
j _'_]t J MENU
1 Press MENU to access the MAIN MENU screen.
2 Press CH A/_ to move the "0" mark to "SET UP".
MENU
3 Press VOL +/- to access the SET UP screen, then press
CH A/V to move the "O" mark to "CH SETTING".
4 Press VOL +I- to access the CH SETTING screen..
MENU
I_SLEEP TIMER
[I_'ViDEO ADJUST
_AUD _0 SELECT
_DIGITAL AUDIO
_CLOSED CAPTION
_PARENT CONTROL
_EHERGY SAVE
_SET UP
(MAIN MENU screen)
I_]SB T UP
BLUE SCREEN
PERSONAL FREE
UHIVERSAL PLUS
LA_GUAGE
eCH SETTING
AUTO INPUT
CHtlNPUT iD
SCREEN FORMA_
(SET UP screen)
CN SETTING
QEZ SETUP
AIRIANALOG CABLE
ANALOG CR SEARCH
DIGITAL OH SEARCH
OH _EM_RY
ANTENNA SETUP.,DIGITAL
(OH SETTING screen
5 Press VOL +/- to access the EZ SETUP screen,
6
Press VOL +_
The tuner will automatically search for the
broadcasting and cable TV channels for ANALOG.
(The CH No. will automatically increase when it
appears,)
Once tuning for analog AIR channel is finished,
tuning for digital channel will start° If cable TV
channels is detected, it will not proceed to digital
channel tuning
If you want to stop the EZ SETUP process once it
has started, press VOL - and it will be canceled
To cancel EZ SETUP
Press VOL -.
(STOP)
(START)
I
CONNECT ARTE_INA OR CABLE t
START EZ SETUP! ,
8STOP START
,,,,,,,,,,,,,,,,,_
(EZ SETUP screen)
(Analog channel tuning)
PLEASE WAIT
AUTO PROGR_JZMING
69
STOP OSTART
$
(Digital channel tuning)
PLEASE WAIT
AUTO PRDGR#}_ING
DIGITAL 6B
STOP eSTART
3:
Page 34

,__ up(Continued):
7 once EZ SETUP is complete, the lowest channel number f 21
memorized will be displayed, / I
[] Channel Setting
If EZ SETUP does not memorize all the channels in your region, follow the instructions betow
to manually memorize the channel.
1 Press MENU to access the MAIN MENU screen.
2 Press CH _,/V' to move the "_" mark to "SET UP".
MENU
©
3 Press VOL +/- to access the SET UP screen.
4 Press CH _/v to move the "(_" mark to "CH SETTING",
5 Press VOL +/- to access the CH SETTING screen
o If the viewing channel is an analog channel, Antenna
Setup-Digital cannot be selected
,, During Cable mode, Digital Charmer Search and
Antenna Setup-Digital cannot be selected.
t_E_U
{_3BLEEPTIMER
_VID_O AD_UBT
EEIAODIOSELECT
E_DIGITAL AUDIO
Z,_CLOSEOCAPTION
_PARENT CONTROL
_EN£RBY SAVE
e_EE? UP
(MAIN MENU screen
_BET UP
BLUE SCREEN
PERSONAL PREK
U_IVBRBAL PLUS
LANGUAGE
eOH BETT_RG
AUTO INPUT
CHIINPUT ID
BBREE_FORMAT
(SET UP screen)
CH B_TTING
eEZ SETUP
AIRIANALOG CABLE
ANALOG CH SEARCH
DIGITAL CH SEARCH
CH _E&IORY
At_TENHA $ETUP-OIGITAL
(CH SETTING screen)
6
Press OH ,&/V to move the "_)" mark to "AIR/ANALOG CABLE",
then press VOL +/- to access the AIR/CABLE screen,
7
Press OH _,/_' to move the "_" mark to the desired mode,
MENU
8 Press MENU to exit. O
o Receivable channels of yourTV set are:
AIR channels:
VHF: 2 through 13,
UHF: 14 through 69,,
CABLE channels:
1 (HRC and IRC mode only)
2 through 125 (STD, HRC and 1RC)
o Digital channel can only be tuned when receiving AIR channels,.
34
CH SETTING
EZ SETUP
QAIRIANALOG CABLE
ANALOG OH SEARCH
DIG_:AL GH BEARCH
CHMEMORY
ARTENNA SETUP-OIGITAL
AIR/A_tALOG CABLE
A_R
CABLE STD
QCAELEHRC
_CABLEIRC
(AIR/CABLE screen)
Page 35

t Set Up(Continued) i: : ::
..... %LI,_,,,__ , : _ ,,,,:..... .... ...... _,,_, i.............
[] ANALOG CH SEARCH
Saving ANALOG broadcast TV channels into memory
Repeat step I to step 5 of Channel Setting. (See page 34)
Press CH A/V to move the "_" mark to"ANALOG
CH SEARCH'L
CH SETTIf,t6
EZ SETUP
AIR/ANALOG CABLE
OANALOG OH SEARCH
DIGITAL CH SEARCH
CH_BMORY
ANTENNA SETUP_DIGITAL
(CH SETTING screen)
2 Press VOL +/- to access the ANALOG CH
SEARCH screen.
To start:
Press VOL +o The tuner wilt search through all
(START)
CH SEARCH
OSTOP START
available channels in your area and add them
into the TV memory..
To stop:
(STOP)
(CH SEARCH screen)
Press VOL -. CH SEARCH will stop at the current
channel and will not add any higher channels.
3 Press MENU to exit. UENU
©
o If you press VOL + again while in the CH SEARCH mode, auto-program will start again, and the
previously memorized channels will be lost
[] DIGITAL CH SEARCH
Saving DIGITAL broadcast TV channels into memory
I CH SETT _G
Repeat step 1 to step 5 of Channel Setting, (See page 34)
Press CH ,_,JVto move the "_)" mark to "DIGITAL
CH SEARCH".
EZ SE_gP
AIR/ANALOG CABLE
ANALOG CH SEARCH
O01BITAL CH SEARCH
CH_Et_0_Y
ANTE_NA SBTUP-D_GITAL
(CH SETTING screen)
2 PressVOL +/- to access the DIGITAL
CH SEARCH screen.
CR SEARCH
To start: (START)
Press VOL + The tuner will search through all
eSTOP STAJ_T
available channels in your area and add them
into the TV memory, (STOP)
(CH SEARCH screen
To stop:
Press VOL -., CH SEARCH will step at the current (v_°_I
channel and will not add any higher channels,
_.._J
MENU
;3 Press MENU to exit.. (_
o If you could not select DIGITAL CH SEARCH, please select CH SETTING - AIR/ANALOG CABLE -
AIR. (See page 34)
35
Page 36

[] CHMEMORY
Adding weak or additional channels or erasing unwanted channels from TV memory
Repeat step 1 to step 5 of Channel Setting, (See page 34)
Press CH A/V to move the "_" mark to "CH
MEMORY",
2 Press VOL +/- to access the CH MEMORY
screen,
3 Use CH ,A!V to select each desired channel to
add or erase,
4
Press VOL + to add a channel to theTV memory
or press VOL - to erase a channel from the TV
memory,
VOL +
c,_,,_o_Y To add channel 10 to
C_EMO_Y
the TV memory
CH SETTING
EZ SETUP
A_RIARALOGCABLE
ANALOG CH SEARCH
DIGITAL CH SEARCH
eCH _E_XOBY
MITENRA SETUP..DIGITAL
(CH SETTING screen)
CH ME},IORY
AIR ID
eERABE ADD
CH MEMORY screen)
ERASE OAOO
VOL -
To erase channel 10 from
(CH MEMORY
unrnemorizedchannel)
the TV memory
(CH MEMORY
memodzedchannel)
MENU
5 Press MENU to exit, Q
o Atl analog channels and digital channels which were tuned during EZ SETUP or DIGITAL CH SEARCH
can be selected
o When new digital channels is appear, please perform EZ SETUP or DIGITAL CH SEARCH
36
Page 37

BLUE SCREEN
Automatically turns the screen blue if a broadcast signal is not
received. After 15 minutes of non-reception, the TV will turn off
automatically.
@®®
®®®
,cS
9___ V _1
VOLUME
(+)/(-)
CHANNEL
UP(4);
DOWN(V)
- MENU
Press MENU to access the MAIN MENU screen,
Press CH A&/_ to move the "0" mark to "SET UP'L
MENU
0
3 Press VOL +/- to access the SET UP screen.,
4
Press VOL +/- to access the BLUE SCREEN select screen,
_ENU
[Z!I_LEEPT#._ER
_;l]VIUEO ADJUST
E]AUD_O SELECT
Z_IDIGITAL AUDIO
_CLOSED CAPTION
I_5]PARERTCONTROL
_SNERGY SAVE
e_]SE T UP
(MAIN MENU screen)
_SET UP
•BLUE SCREEN
PEBBONAL PREP
UNIVERSAL PLUS
LARGUAGE
CH SETTING
AUTO iNPUT
CHI_NPUT !O
SCREEN FOBMAT
(SET UP screen)
BLUE SCREEN:OFF
BLUESCREENselect screen'
5 Press VOL +/- to select "ON" or "OFF",.
BLUE SC£EEN:OR
6 Press MENU to exit _.ENU
O
When the BLUE SCREEN is set to "ON"
Power turns off
No signal Blue screen
after 15
minutes Standby mode
o Poor reception due to weak signals, or too much noise might activate the BLUE SCREEN function
despite the presence of a broadcast signal, To continue watching TV under these conditions, switch
the BLUE SCREEN "OFF",
o While INPUT 1, 2, or 3 (COMPONENT) is selected, the BLUE SCREEN will not be shown even if
BLUE SCREEN is turned on,
automatically
37
Page 38

[] Personal Preference _(_) __
(_ REMOTE
By setting PERSONAL PREFERENCE channels in advance, you /(_) (_) Pl KEYPAD
can select your favorite channels easily, L(_O _t VOLUME
PERSONAL- ::__'_"_ _Z)] CHANNEL
PREFERENCE __ UP(&)/
.,,_ _ DOWN(V)
O o
MENU
1 Press MENU to access the MAIN MENU screen
2 Press CH A/V to move the "_' mark to 'SET UP'
MENU
© -,
3
Press VOL +/- to access the SET UP screen, then press
CH A/V to move the '_' mark to "PERSONAL PREE"
4
Press VOL +/- to select the
PERSONAL PREFERENCE select
screen in which you can program 4
favorite channels, in 4 different
categories (total of 16 channels)
(dudngviewingAnalog/Digitalchannel)
PERSONAL PREF
<A> B C D
ENTER:CO_PI_M
(PERSONAL PREFERENCE select screen)
_ENU
EE]SLEEP T _t,iER
_V IDEO ADJUST
E_3AUD IO _ELECT
_DIGITAL AUDIO
_:_CLOSEO CAPTION
_PARENT CONTROL
_E_}ERGY SAVE
e[_5_SET UP
(MAIN MENU screen)
_SET UP
BLUE BCREEfl
QPEBSONAL PREE
UNIVE£BAL PLUS
LANGUAGE
CH SETTING
AUTO INPUT
CHIINPUT ID
SCREEN FOR_AT
(SETUP screen)
(duringviewing cablechannel
PERSONAL PREF
<A> B C D
ENTER:CONFI_
o Below is using Analog/Digital channel OSD to explain
5
Press VOL +/- and CH _/_ to move the _' mark to the desired
position°
PERSONAL PREP
_A> B C g
_ _ and
ENTER;CONFIR_
To input CHANNEL Number, press REMOTE
KEYPAD on the Remote Then press ENTER to
register the CHANNEL Number into memory
o Press INPUT to register the INPUT mode into
memory
Example: 25 -- Press"2", '5" and ENTER"°
I@®®
LQ®@
PERS0tIAL PREF
_A> B C D
@ 25 ...............
4 ...............
22 5 ...............
E_ITER:C0tIF ) P¢I
4 -- Press "4" and "ENTER"
225-- Press "2', 2', 'o', '5" and ENTER"
To reset a registered CHANNEL Number, input "o" twice
- "o" can not be enter as channel number but will function as reset registered Channel Number when
input twice,
o Only 3 digit numbers are allow to input for cable channel
38
Page 39

I SetUp(continUed) :: ::':
-:_/ ..:,.:, ..... ;,,:_:.:: : :,i i/ii ¸¸¸ i ' i...... ¸!¸-¸:¸i¸¸i¸.¸.¸¸¸¸¸¸¸! !:! ii: ¸?: , : IL¸: :
7 Repeat steps 5 and 6 to register the next CHANNEL Number or INPUT mode
8 Press MENU to exit. MENU
O
To select the PERSONAL PREFERENCE channel.
If the channels are memorized as shown on the right,
press the Remote's "A" button to select the channels betow.
r-" 25 +-"4 -_ 225
!
q
• If the channel number input does not exist, warning message as shown
on the right will appear
[] Universal Plus Function
VCR or DVD input mode will be selected automatically by
pressing the VCR/DVD PLAY button on the Remote
Control
"1 Press MENU to access the MAIN MENU screen+
2 Press CH ,&/V to move the "@" mark to "SET UP".
MENU
©
VOLUME
(+)t(-)
PERSONALPREP
<A> B C D
0 25 ...............
4 ...............
22 5 ...............
ENTER:CONFIR_
_Ept_
Ii_SLEEP TIMER
Lt_VIDE0 ADJUST
_AUDIO SELECT
_DIG_TAL AUD+O
&_CLOSEO CAPTIO_I
_PARENT CONTROL
_E_+ERGY SAVE
O_SET UP
CHANNEL
- UP (,1,,)/
DOWN(+)
MENU
DVDNCR
PLAY
3 Press VOL +/- to access the SET UP screen.
4
Press CH A/_7 to move the "@" mark to "UNIVERSAL PLUS".
5
Press VOL +/- to access the UNIVERSAL PLUS select screen
to select VCR or DVD mode.
(MAIN MENU screen)
_SET UP
QBLUE SCREEN
PERSOtML PREE
UNIVERSAL PLUS
LANGUAGE
CH SETTING
AUTO INPUT
CHIINPUT _O
SCREE_ FORMAT
(SET UP screen)
_SET UP
BLUE SCREEN
PERSO}_AL PRER
eUN+VERSAL PLUS
LANGUAGE
CH SETTING
AUTO INPUT
CHfINFUT ID
SCREEN FURL+AT
UNIVERSAL PLUS
OVCR :OFF
OVD :OFF
UNIVERSALPLUSselectscreen
39
Page 40

up(Continued):
.... : : :_:
Press CH A/_ to select the VCR or DVD, and press VOL +/- to
....... ' NPUT t , PUT 2 , "INPUT 3select CH3, CH4, "1 .... IN "
(COMPONENT)" or "OFF".
___H3 _ CH4 _ INPUT1 _ INPUT2
OFF INPUT 3 (COMPONENT) , --
-q
Switch to the input mode your VCR or
DVD is connected to. If connected
through RF (antenna terminal), select
either CH3 or CH4 to match the setting
of the VCR or DVD
MENU
7 Press MENU to exit.. 0
@
The unit is preset to switch to the INPUT 2 screen automatically
when VIDEO equipment is connected to the INPUT 2 terminal. Do
the following to switch this feature AUTO or OFF:
1 Press MENU to access the MAIN MENU screen.
2 Press CH A/V to move the "@" mark to "SET UP'L
MENU
0 ->
UNIVERSALPLUS
eVCR :CH3
}GVD ;OFF
l_ " ........"-_"_ _FVOLUME
_,oooo oO tt.(+1/(_)
t_ CHANNEL
_,{ENU
_SLEEP TIMER
_;!]VIDEOADJUST
_AUD_O SELECT
'_OIGITAL AUDIO
_CLOSED CAPTION
I_FARENT CONTROL
(_3_ENERGYSAVE
_SET uP
- uP(A)t
MENU
3
Press VOL +/- to access the SET UP screen, then press CH ,¢JV
to move the "@" mark to "AUTO INPUT".
4
Press VOL +/- to access the AUTO INPUT select screen_
Press VOL +/- to select "AUTO".
5 You may turn off "AUTO INPUT" when it is not in use.
Press VOL +/- to select"OFF"o
(MAIN MENU screen)
_SET UP
BLUE SCREEN
PERSONAL FREE
UNIVERSAL FLUS
LANGUAGE
OH SETTING
eAUTO INPUT
CNiINPUT ID
S_REE_ FO£_AT
(SET UP screen)
AUTO INPUT:AUTO
(_NPUT_)
AUTO INPUTselectscreen
AUTO INPUT:OFF
(INPUT2)
6 Press MENU to exit. 0
40
MENU
Page 41

You can assign an ID label to each Analog channel or input mode,
These ID labels can be 4 characters long maximum and will be
displayed along with the channel number/input mode when the
labeled channel is selected.
(Example: labeling air channel 10 "TV12",)
0 :(_)(:_Dt--_-{--REMOTE
!tl KEYPAD
NI VOWME
_" '7" UP(A)/
_ CHANNEL
DOWN(_)
MENU
1 Press MENU to access the MAIN MENU screen.
MENU
©
2
Press OH A/V to move the "_" mark to "SET UP"o
©
©
3 Press VOL +/- to access the SET UP screen then press
CH A!V to move the "_" mark to "CH/INPUT ID"
MENU
O_SLEEP TIMER
_IDEO ADJUST
_AUOIO SELECT
_DIGITAL AUDIO
_CLOSED CAPTION
_PAREUT CONTROL
_ENERGY SAVE
[_}SET UP
(MAIN MENU screen)
(_3SLEEP TIMER
_VIDEO ADJUST
E3AUDIO SELECT
_DIGITAL AUDIO
K[_CLOSED CAPT}ON
_RARENT CONTROL
_[_E_'_EBGYSAVE
e_SET UP
{_SRT UP
BLUE SCREEN
PERSONAL PREE
UNIVERSAL PLUS
LANGUAGE
CN SETTING
AUTO }NPUT
OEHIINPUT ID
SCREEN FORMAT
(SET UP screen)
o If you are viewing a digital channel, "CH/INPUT ID" cannot be set
4 Press VOL +/- to access the CH/INPUT ID screen
CRI_FUT ID
AIR IO
o IO :....
(CHilNPUT ID screen)
41
Page 42

I C /DnputgD(Continued) • ,
....... ;,,ii ._. . ..... ,,,: :,,,,, ;.,11,. i ,,i:.,,1,_
5 Use CH A/?' to select each desired channel to label.
Press INPUT on the Remote to Iabel the {NPUT mode
ID: Labeling the channel name
Press VOL +/- to select"lD" then press VOL + to select the
first character° Press CH A/V to enter a desired letter, Press
VOL +/- to enter the next desired Fetter,,Press MENU to return
to the CH/INPUT ID screen.
OlD : ....
RESET
ME_U:RETURt_
(ID Input screen)
Selectable characters:
Space: _
Alphabets: A-Z
Numbers: 0-9
ID :TVI2
RESET
_,IE_U:EETU£t_
Symbols:-- , & ( ) 1 +
_ MENU
Example TV 12
RESET: Resetting the ID to" _ _ _"
Press CH A/_' to move the "O" mark to "RESET", then press
VOL +/-. The previously set ID will return to ....
ID :TV12
e£ESE?
),_ENU:RETURN
iD ;....
eRESET
MENU:RETURt_
PO Press MENU to exit O
, The maximum number of ID labels available to register Analog channel names is 20 for AIR channels
and 40 _or CABLE channels
• If you wish to register a new ID when ail the available ID labels are assigned, delete a registered tD
to make room,
42
Page 43

The format of the picture can be adjusted to either of the three
screen formats.
(This function allows you to view 16:9 pictures recorded on DVD
or by camcorders that are once saved using the 4:3 aspect ratio
to be played back in the original high-density 16:9 formaL)
VOLU 'E
o,,,_ _,= CHANNEL
uP(A)i
(+)/(-)
DOWN(V)
MENU
"1 Press MENU to access the MAIN MENU screen,
2 Press CH A/_' to move the "_" mark to "SET UP",
MENU
©
3 Press VOL +/- to access the SET UP screen, then press CH A/V"
to move the "_" mark to "SCREEN FORMAT'',
4 Press VOL +/- to access the SCREEN FORMAT select screen,,
o If the viewing channel is an analog channel, iNPUT t,
INPUT 2 and INPUT 3, STRETCH cannot be selected. /'roLl 1VOL_
qEtlU
_SLEEP TIMSR
_VIOEO ADJUST
_AUOIO SELECT
_DIGITAL AUDIO
_J_CLOSED CAP?ION
_I_PARENT CONTROL
_ENERGY SAVE
_SET UP
(MAIN MENU screen)
_SET UP
BLUE SCREEN
PERSORAL PREE
UNIVERSAL PLUS
LANGUAGE
CH _E_TING
AUTO INPUT
CHIIRPUT ID
OSCREEI_ FORMAT
(SET UP screen)
SCBEE_FO_AT
STRETCH
04:3
3CREENFORMATselectscreen
5 Press OH A/V to select "STRETCH", "4:3" or "16:9",
SCREEN FORe'AT
STRETCH
e4:3
16:9
43
Page 44

6 Press MENU to exit,
Example:
While format of signal received
Full t6:9
0 0
Mode set to
STRETCH
MENU
0
Mode set to 4:3
uuuuuulu,u,
Mode set to 16:9
o@o
Side panel 16:9
Normal 4:3
Letter Box 4:3
0 0
lol
o
0
o@o
o The STRETCH and 16:9 screen format will be cancelled when the AC power cord is unplug.
= if STRETCH mode is selected, the quality of picture might be poor°
,, This function can be selected independently among AIR/CABLE, INPUT 1, INPUT 2, INPUT 3
(COMPONENT) and Digital Channel.
44
Page 45

o Connectingvideo equipment for playback of video material,
o To view video material from external video equipment, make sure to connect the equipment properly
to the input terminals on the TV set.
Connecting video device equipped with video output terminals
VIDEO EQUIPMENT
(Front connection terminals of TV)
Putt open the front door
[CAMCORDER]
"_ To AUDIO OUTPUT (L) ,, _
To AUDIO OUTPUT (L)
[TV GAME]
@
To AUDIO OUTPUT (R)
i mll,ll,i i i, i
(Rear connection terminals of TV)
To VIDEO OUTPUT
To AUDIO OUTPUT (L)
To AUDIO OUTPUT (R)
To AUDIO OUTPUT (R)
To AUDIO OUTPUT (L)
To VIDEO OUTPUT
/
!£! :t
Yellow : To video input terminal
White : To audio input (L) terminal
Red : To audio input (R) terminal
\
J
45
Page 46

Notes:
° COMPONENT terminals are DVD compatible, allows you to enjoy the highest quality playback
image than the image from IN 1 S-VIDEO terminal.
o The IN 1 S-VIDEO terminal is used to obtain a higher quality image by importing image signafs.
o The S-VIDEO terminal is for the video image only. To receive an audio signal, connect the audio
cable to the IN 1 AUDIO terminals (left and right).
(Rear connectionterminals ofTV)
: ::: :OUT : N
e :
:PI f ,:
SNI )EO
TO S-VIDEO OUTPUT ! ,...
(When your video I
equipment has an !
S-VIDEO output terminal) !
i
=;[3:]_m_--, To VIDEO OUTPUT
_To AUDIO OUTPUT (L)
To AUDIO OUTPUT (R)
OUTPUT (UR) _ _ Terminals
Video Equipmentwith Component
VIDEO OUTPUT
video (Component Color)
Output Terminals(Y, PBand PR)
e To _vatch video material playback
• Press the Remote's INPUT button to select the VIDEO INPUT mode for the video equipment you
wish to play.
o The external VIDEO INPUT mode will change as follows each time the INPUT button is pressed
AolrR-,. INPUT1 -_ INPUT2 -_ INPUT3 (COMPONENT) 7
CABLE Rear Front Rear
(IN 1) (IN 2) (iN 3)
/
o When the AV cabtes are connected to the VIDEO INPUT 3 and COMPONENTY, PB and PRterminals
simultaneously, the COMPONENT terminal has priority over the VIDEO terminal
o INPUT mode can be selected by pressing either the CH A on the TV remote control when the TV is
set to the highest channel stored in memory, or by pressing the CH _r when it is set to the lowest
channel.
- When connecting video or audio equipment to the television, be sure that the power is turned off in
order to prevent damage to either the television or the equipment being connected
o The S-Video terminal has priority over the VIDEO terminal (IN 1), When you wish to use video equipment
connected to the VIDEO terminal (IN 1), unplug equipment connected to the S-VIDEO terminal
• For detailed information on the connection and use of auxiliary equipment, refer to the instruction
manuals of the equipment being used.
o The connection cables/cords can be obtained from your local video store
46
Page 47

These terminals are used for connecting an external audio amplifier. The STEREO/MONO/
SAP, VOLUME, MUTE and FAO functions can all be controlled via the television's remote control
or directly on theTV itself.These terminals relay the audio signal of all programs being displayed
on theTV screen.
(AUDIO OUTPUT terminals are located on the rear of the cabinet.)
Rear connection terminals of TV)
To the audio
input terminals
(1) Before connecting the cables, turn on the TV and adjust the TV volume for a moderate listening level
(2) Turn off the TV and connect the audio cables to the AUDIO LINE OUTPUT terminals on the TV
(3) Turn the TV set and stereo amplifier on
(4) If you desire, you can turn off the sound of the TV's internal speakers by accessing the TV's AUDIO
SELECT screen See pages 16, 17
(5) Adjust the volume control on the stereo amplifier to a moderate listening level.
(6) Control of the audio can be adjusted using the audio controls (STEREO/MONO/SAP, VOLUME,
MUTE and FAO), from either the remote control, or directly from the TV set
o For detailed information on the connection and use of auxiliary equipment, refer to the operation
manuals of the equipment being used
o When connecting monaural equipment to the AUDIO INPUT or OUTPUT of this set, use an audio
connection cord and plug adaptor as shown below
o When FAO is set to "OFF", we recommend you to keep the TV's audio output levei high for optimal
sound quality (see page 16 )
To the TV
___,__ Pl_g adapter the
"_== _ _° '=t_T°being connected
Stereo Amplifier ! Speaker System
equipment
Pin plug x 2 Pin Plug Pin jack/Mini plug
47
Page 48

e Universal Remote Control e
With the purchase of your television set you
also have received the latest innovation in
remote control technology. With itseasy-to-use
push button keyboard, your Remote can
control your television set and most infrared
remote controlled VCRs, cable TV converters
and DVDs as welt.
o Depending on the model year produced, brand
and type of VCR, cable TV converter and DVD,
some models may not be compatible with the
remote control..
o Some brands may not enable channel
selection until the ENTER is pressed. In such
case, try the following..
Example:
When you select channel 24,
(1) Press REMOTE KEYPAD "2"
(2) Press REMOTE KEYPAD "4"
(3) Press ENTER.
For detailed information on the use of the
Cable TV converter Box refer to their operating
manuals.
o
Using your Remote with your TV
After installing the batteries, set the CATV/
DVD-TV/VCR on the Remote to the TV
position (If you can change the channel of the
TV by pressing CH ,&/V" on the Remote
Control, it is in the TV position.)
DVD/VCR POWER
Press to turn the VCR or DVD
on and off.
PLAY I_ i
Press to playback a tape or disc.
REWIND 44
Press to rewind a tape or
reverse a disc For some VCRs
or DVDs you may need to press
STOP first, then REWIND
PAUSE !!
Press to temporarily stop the
tape or disc during playback
or recording (VCR only)
Press again to release
PAUSE
STOP []
Press to stop the tape or disc
"ldentifying'VCRs, cableTV converters and
DVDs
Your Remote Control has been set at the
factory to operate your TV and many remote
controlled VCRs, cable TV converters and
DVDs. However, in some cases an easy one-
time set-up step may be necessary before the
Remote will operate accessory VCRs, cable
TV converters and DVDs
In this set-up step, the Remote locates and
memorizes the remote control transmitter code
for the VCR, cable TV converters and DVDs.
Once "identified", the Remote sends proper
signals to operate your accessory
This identifying step will not have to be
repeated until power to the Remote is
interrupted due to a battery failure.
Using your remote control with a VCR
Once you make certain the Remote Control
has "identified" your remote controlled VCR or
DVD, the Remote is ready to operate your unit..
The various VCR or DVD function buttons on
the Remote will not operate your VCR or DVD
if those features are not already found on your
unit.
o
All VCR buttons will operate whether the
Remote is in TV or VCR modes
o
For detailed information on the use of the VCR
or DVD, refer to the operation manual of the
VCR or DVD.
-- REMOTE KEYPAD
Use to enter two-digit code
numbers when identifying your
VCR, DVD and CATV converter
--ENTER
-- FF 1_1_
Press to rapidly advance the
tape or disc For some VCRs or
DVDs, you may need to press
STOP first, then FF
-- VCR CHANNEL
UP (A)/DOWN (V)
Press to scan up or down through
channels on the VCR
DVD SKIP
Press to jump forward to the
beginning of the next chapter/trac
or backward to the beginning of tl"
current chapter/track, and
automatically start to play that
chapter!track
RECORD e
Press to begin recording
(VCR onty)
48
Page 49

DVD/VCR
POWER
DISPLAY
IIi
P_R_Of_At. PREFERENCE
CHANNEL
0
e How to identify a VCR
The remote control may already be set to
operate your VCR Try this initial check before
going on to the following "identifying" section.
(1) Slide CATV/DVD-TVNCR switch to VCR
(2) Point the Remote towards VCR and press
POWER (DVD/VCR).
(3) Does the Remote turn the VCR ON and OFF?
. If yes, the Remote is ready to operate the VCR
and no further steps are needed
° If no, continue to the "identifying" section.
Setting Method
Refer to the following steps and list to quickly
find the remote control code for your accessory
VCR,
• First look up your VCR's remote control code
number before going through the Setting
Method.
(1) Slide CATWDVD-TV/VCR switch to VCR.
(2) Press and hold down DISPLAY and CH _ on
your remote control.
Then release both buttons.
(3) Within 10 seconds after releasing DISPLAY
and OH v, enter your VCR's two-digit remote
control code number using the REMOTE
KEYPAD (refer to the list ).
. The remote control is now ready to send
commands to your VCR.
Some brands have more than one remote code
listed, due to changes in the remote codes
from early to rater model years, or due to format
differences (VHS/BETA)_. In such cases, you
may have to try more than one code to find
the code your VCR accepts
.uT_ _LI UP(A)/
0 lil DOWN (V)
Y "III cAT,,,°,,°-
{)VII _ T\tlllf_D
II1
VCR BRAND
Akai
Audio Dynamics
Broksonic
Canon
Capehart
Craig
Curtis Mathis
Daewoo
DBX
Dynatech
Emerson
Fisher
Funai
GE
Goldstar
Hitachi
Instant Replay
JC Penney
JVC
Kenwood
LIoyds
Magnavox
Magntn
Marantz
Memorex
Minotta
Mitsubishi 17, 18, 39, 40
Montgomery Ward 02, 43
Multitech
NEC
Panasonic
Penlax
Philco
Phitips
Quasar
RCA
Realistic
Samsung
Sanyo
Scott
Sears
Sharp
Shintom
Sony
Sound Design
Sylvania
Symphonic
Tatung
Teac
Teknika
Thomas
TMK
Toshiba
Video Concepts
Yamaha
Zenith
CODE NUMBER
25, 26, 37
15, 22, 30
32
O4
34
10, 31
O4
34
15, 22, 30
29
21, 32, 35
09, 10, 11
28, 29
04
24
06
04
04, 06, 24, 30
t5, 41,42
14, 15
29
04, 05, 08
31
30
04, t0, 24, 29
O6
29
15, 22, 30
04, 44, 45
05, 06
04, 05
04, 05, 08
04
06, 07, 33
01, 02, 10, 24
23, 31
14, 10
2O
06, 11, 24
0t, 02, 03
36
12, 13, 38
29
04, 05, 08
29
!5
I5, 29
27, 29
29
21
19, 20
30
15, 29, 30
16
REMOTE CONTROL
Depending on the model, year produced,
brand, and type of VCR, some models may
not be compatible with the remote control
49
Page 50

_L._ VDNCR
0..,-_i_r POWER
TVPOWER tlt
° IllO UP (A)/
c*_ _v DOWN (V)
D_J_I CA, TV/DVD
._/ p_': _ I TVNCR
CHANNEL
PAUSEC_ CJ_ C_STOP C_P
e How to identify a DVD
The remote control may already be set to
operate your DVD Try this initial check before
going on to the following "identifying" section.
(1) Slide CATV/DVD-TV/VCR switch to DVD
(2) Point Remote towards DVD and press DVD/
VCR POWER
(3) Does the Remote turn the DVD ON and OFF?
• If yes, the Remote is ready to operate the DVD
and no further steps are needed.
o If no, continue to the "identifying" section,
Setting Method.
Refer to the following steps and list to quickly
find the remote control code for your accessory
DVD,
o First took up your DVD's remote control code
number before going through the Setting
Method
(1) Slide CATV/DVD-TV/VCR switch to DVD
(2) Press and hold down INPUT and CH V" on
your remote control..
Then release both buttons
(3) Within 10 seconds after releasing INPUT and
CH _, enter your DVDs two-digit remote
control code number using REMOTE KEYPAD
(refer to the list)
o The remote control is now ready to send
commands to your DVD
I
DVD BRAND REMOTE CONTROL
Denon
JVC
Magnavox
Marantz
Mitsubishi
Panasonic
Ph]lips
Pioneer
Proscan
RCA
Samsung
Sharp
Sony
Toshiba
Yamaha
Zenith
I Note:
Depending on the model, year produced,
brand, and type of DVD, some models may
not be compatible with the remote control,
CODE NUMBER
02
09
O4
04
06
02
04
O8
O3
O3
O7
10
01,
O5
O4
O2
O4
5O
Page 51

! OperationofUnaversa RemoteContro (Continued)
DVDNCR
POWER
TV POWER __ 2J"---" "_ ii
REMOTE Ill _
KEYPAD
CATV T_/
O _v_
RP,+,+ FLAY FF I
PAUSE_ __STOP _l_C C_/_'
DISPLAY
CHANNEL
UP (4)/
DOWN iV)
-- CATV/DVD-
TVNCR
e How to identify a cable converter
Setting Method,
Refer to the following steps and list to quickly
find the remote control code for your cable TV
converter.
• First look up your converter's remote code
number before going through the Setting
Method below°
(1) Slide CA'R//DVD-TV/VCR switch to CATV,,
(2) Press and hold down DISPLAY and OH V on
your remote control,
Then release both buttons
(3) Within 10 seconds after releasing DISPLAY
and CH 'e', enter your converter's two-digit
code number using REMOTE KEYPAD (refer
to the list),
, The remote control is now ready to send
commands to your converter.
o Some brands have more than one remote cede
listed due to changes in the remote codes from
early to later model years, tn such cases, you
may have to try more than one code to find
the code your converter accepts.
CATV CONVERTER REMOTE CONTROL
BRAND CODENUMBER
Anvision
Cable Star
Eagle
General Instrument
Jerrold
Magnavox
Oak Sigma
Panasonic
Phi{ips
Pioneer
Randtek
RCA
Scientific Atlanta
Sony
Viewstar
Zenith
07,06
07,08
08
04,05,15,23,24,25,
30,36
04,05,15,23,24,25
30,36
07,08, t9,25,28,29,
32,33,40,41
18
27,39
07,0S, 19,26,28,29,
32,33,40,41
18,20
07,08
27,43
03,22,42
44
07,08,19,26,28,29
32,33,40,41
14
Depending on the model, year produced,
brand, and type of CATV converter, some
models may not be compatible with the remote
control,
51
Page 52

Check these items and see if you can correct the trouble with a slight adjustment of the controls.
QUICK SERVICE
CHECK LIST
POSSIBLE REMEDY 7O _ m _ & z CLO 7° Q L_ O<
Try a newchannel,ifOK, thenthereis
a possiblestationtrouble
Is TV
plugged"i'n'?'Power.a.t.outlet?_ --_ -_-- _ x x x
Is TV's POWERbutton on? X X
Is antennaconnectedto terminalon
theback of the set?
If outside antennaisbeing used, X X X X X X X X X X X
checkfor broken wire.
Checkfor local interferenceor external
electricalnoise.
X X X X X X X X X X X
X X X X X X
X X X X X X X X
Turnoff the POWERandthenturn it X X
on after aboutaminute, , ...... I
Adjust COLORcontrol X
Adjust PICTUREcontrol., X X
CheckexternalVideo/Audioproducts:
lookfor looseibrokenconnection X X X X X
leads. (Referto pages45-47)
Checkbatteries of RemoteControl X
Slide CATViDVD-TViVCRSelect
Switchto Tv position,..........
Are audio cablesconnectedfirmly?
Checkthe volume level.
IsSPEAKERON?See pages t6, !7.
ChangeClosed Captionmodeto
"OFF'/Energy Savemodeto "OFF",
Unplugthe TVand plug it inagain
after 2 minutesor longer
o If no TEXT broadcast is being received while viewing in the TEXT
mode, the screen may become dark and blank for some programs
Should this occur, switch the Closed Caption mode to "OFF"
X XX X X X X XX X X
X
X
X
(Dark and Blank Picture)
For location of the nearest Sharp Authorized Servicer, or to obtain product literature accessories, supplies,
or customer assistance, please call 1-800-BE-SHARP,
52
Page 53

t Warning messageifor Digiiai ,broad€,ssting i, ii it
The warning message about reception of digital broadcast
The example of an warning
message displayed on a screen Possibte Solution
oFailed to receive broadcast ° Check the antenna cable. Check that the antenna is
correctly antenna setup.
o No broadcast now, - Check the broadcast time in the program guide
MODEL
Receiving System
Stereo Broadcast
Reception Channels
AIR
CATV
Digital Terrestrial
Broadcast (8 VSB)
Channel Tuning
Antenna Input Impedance
Screen Size
Terminals
Sound Output
Power Source
Power Consumption
Dimensions
[(W) x (H) x (D)} mm
Weight (approx,)
32SF56B
American TV standard ATSC/NTSC system
MTS/SAP
VHF 2-13 ch
UHF 14-69 ch
1-125 ch
2-69 ch
181-channel Reception PLL tuning system
VHF/UHF 75 ohm Unbalanced
32 Diagonally Measured
AudioNideo input x 3 (Front x 1, Rear x 2)
S-Video input x 1 (Rear)
COMPONENT x 1 (Rear)
Audio output x 1 (Rear)
Antenna x 1 (Rear)
5 W (RMS) x 2
AC 120 V, 60 Hz
163 W
34 4'/64-(W) x 28-(H) x 22-(D)
[880 mm (W) x 711 mm (H) x 559 mm (D)]
t43.,3 Ibso(65,0 kg)
• Design and specifications are subject to change without notice
53
Page 54

(ESPAI OL)
Lea estas instrucciones cuidadosamente y cons_rvelas a fa mano para consultarlas en el futuro
IMPORTANTE
Sfrvase anotar el modelo del televisor y los numeros de serie
en el espacio provisto, para ayudar a reportar en caso de
p_rdida o robo. Los ntJmeros est&n ubicados en la parte
posterior del televisor.
Existen dos razones importantes para registrar dentro def plazo Ifmite la garanfia de su nuevo televisor
SHARP, mediante la TARJETA DE REGISTRO incluida con el aparato
PRIMERA - GARANTfA
Garantiza al cliente la recepci6n inmediata de todas las prestaciones de consumidor en cuanto a piezas, servicio
t_cnico y mano de obra aplicable a su adquisici6n.
SEGUNDA - ACTA DE SEGURIDAD DE PRODUCTOS DE CONSUIViiDOR
Con el fin de garantizar al ctiente la recepci6n puntual de cualquier notificaci6n de seguridad sobre inspecci6n,
modificaci6n o cancelaci6n que se le pueda solicitar a SHARP bajo el Acta de seguridad de productos de
consumidor de1972 LEA CUIDADOSAMENTE LA CL/_USULA"GARANT[A LIMITADA" DE LA 0LTIMA P,&G1NA
l N° de modelo :N° de serie :
ADVERTENCIA "PARAREDUC,REL.,ESGODE,NCEND,OODESCA.aA
" ELI_CTRICA, NO EXPONGA ESTE APARATO A LA HUMEDADo
El ref#,mpago con cabeza de
flecha dentro de un tri&ngulo trata
de indicar al usuario que las partes
,& ,&
PRECAUCION : PARA REDUCIR EL RIESGO DE
DESCARGAS ELC:CTRICAS, NO RETIRE LA CUBIERTA
(NI EL PANEL POSTERIOR)
NO CONTIENE PtEZAS REPARABLES POR EL USUARIO
SOLICITE ASISTENCIA TE_CNICAA PERSONAL DE
SERVtCIO TECNICO ESPECIALIZADO
"Nota para el instalador deI sistema de TV por cable: Esta nota tiene el prop6sito de Ilamar la atenci6n del
instalador del sistema de cable acerca det Artfculo 820-40 del C6digo Electrico Nacional, que contiene las
directrices para la puesta a tierra y, en particular, especifica que el cable de puesta a tierra debe estar
conectado al sistema de puesta a tierra del edificio Io m#,scerca a la entrada del cable."
ADVERTENClA - Las Normas de la FCC establecen que cualquier cambio omodificaci6n no autorizada que
se realice eneste equipo y que no est_ expresamente aprobado por el fabdcante podda anular la autoridad
del usuario para utilizar este equipo
dentro det producto representan
riesgo de electrochoque para las
personas
El signo de exclamaci6n dentro de
un tri_ngufo trata de indicar a!
usuario que las instrucciones
importantes de operaci6n y
servicio se encuentran en los
documentos con et aparato
DESECHO DEL PRODUCTO
Este producto utitiza un Tubo de rayos cat6dicos (TRC) que contiene sotdadura de esta£_oy ptomo
EI desacho de estos materiales debera_ser considerando regutaciones ambientales, Para obtener
informaci6nsobre el desecho o el reciclado,p6ngase en contacto con las autoridades locateso con
Electronics Industries Alliance: www eiae,,org
54
Page 55

RMAC PORTANTE(con,,n ac,6.";!
PRECAUCI6N:
• No coleque el cable de aJimentaci6n de CA debajo det tefevisor u otro e{emento pesado.
° Para impedir un incendio, no ponga nunca ningLTntipo de vela o llama al descubierto encima o cerca del
televisor..
o Para impedir un incendio o una descarga electrica, no exponga este aparato afgoteo ni alas salpicaduras
Tampoco deber_n ponerse encima de los productos objetos llenos de lfquidos como, por ejemplo, fioreros
PRECAU 016 N :Lea pot favor todas estae instruccionee antes de poner en funcionamiento
su televisor, y gu_rdelas para poder utilizarlas en el futuro.
La energ/a electrica permite realizar muchas funciones L)tiles. Este aparato ha sido diseSado y fabricado para
garantizar su seguridad fisica Sin embargo, UNA UTILIZACION INAPROPIADA PODR{A SER LA CAUSA DE
DESCARGAS ELECTRtCAS O INCENDIOS Para mantener el buen funcionamiento de este equipo y evitar
problemas, siga ]as normas b_sicas indicadas a continuaci6n cuando Io instale, uti]ice o repare
1 Desenchufe eltelevisor del tomacorriente antes de limpiado
2. No utilice I[quidos ni aerosoles de limpieza Para limpiar et televisor utilice un pa5o humedo
3 No utilice accesodos que no los recomiende et fabricante del te{evisor porque podrfan causar peligros
4 No utilice ettelevisor cerca det agua - por ejemplo, cerca de una baSera, tavado, fregadero o tavadora, en
un s6tano humedo, cerca de una piscina, etc
5 No utilice este televisor sobre un carrito, un soporte o una mesa inestabies El televisor podrfa caerse
causando serfas heridas a ni5os o adultos, y, per supuesto, el aparato se estropeari& Ponga el televisor
solamente sobre uncarrito o soporte recomendado pot el fabricante, o vendido junto con
el televisor
6 La combinaci6n de carrito y televisor debe moverse con mucho cuidado. Las paradas
r_pidas, la fuerza excesiva y Ias superficies irregulares pueden set fa causa de que ta
combinaci6n de televisor y carrito se vofteen
7 Cuando instale el televisor en una pared o en una estanteria siga las instrucciones del
fabricante, y utilice et kit de montaje aprobado por el fabdcante
8 Las ranuras y aberturas de tacaja y del panel posterior oinferior sirven para la ventilaci6n delaparato, para
que este funcione bien ypara evffar que se caliente Estas aberturas no deben taparse nunca Este televisor
no debe colocarse en un fugar cerrado (como un estante para libros) si 6ste no dispone de la ventitaci6n
apropiada.
9 Las aberturas no deben laparse nunca con un paso u otto material; y tas aberturas del panel inferior no
deben taparse tampoco colocando el televisor sobre una cama, sofA, alfombra u otra superficie similar
Este televisor no debe ponerse nunca cerca oencima de un radiador u otro aparato que produzca calor
10.. Este televisor s61odebe funcionar con la fuente de corriente indicada en ]a etiqueta del fabricante Si no
est,. seguro acerca del tipo de corriente de su hogar, p6ngase en contacto con el concesionario de quien
adquiri6 el televisor o con ta compa_ia el_ctrica local.
En el case de equipes de televisi6n diseSados para funcionar con bater/as, consulte las instrucciones de
USO
11 Como medida de seguridad, el equipo de televisi6n est& equipado con un enchufe polarizado de dos hilos
EIenchufe polarizado de dos hilos solamente calza de una sola manera en eltomacorriente
Si el enchufe no entra en el temacorriente, pfdale a un electricista que le coloque un tomacorriente nuevo
No modifique el enchufe porque anularD,esta caracteristica de seguridad.
12 No permita que se apoye nada sobre el cable de alimentaci(Sn No ponga este televisor donde el cable
pueda set deformado por personas que caminen sobre 61
55
Page 56

13 Cumpla con todos los avisos y las instrucciones marcados en el televisor
14 Si se conecta una antena exterior at televisor, asegurese de que el sistema de antena est6 conectado a
tierra para obtener cierta protecci6n ante los aumentos de voltaje y la acumulaci6n de cargas est&ticas.
La secci6n 810 del C6digo El_ctrico Nacional ofrece informaci6n retacionada con la conexi6n a tierra
correcta del poste y la estructura de apoyo, la conexi6n a tierra del cable de entrada a una unidad de
descarga, el tamafio de los conductores de conexion a tierra, la ubicaci6n de la unidad de descarga de
antena, la conexi6n a los electrodos de conexi6n a tierra, y los requisitos para el electrodo de conexi6n a
tierra
EJEMPLO DE CONEXION ATiERRA DE LA ANTENA
SEGON EL CODIGO ELECTRICO NACIONAL
._ABRAZADERA DE __
)_"_ .._ UNIDAD DE DESCARGA DE ANTENA
1 EQUIPO DIE
I S.ERVlC_O
_CO_'_ _j/_ CONDUCTORES DE CONEXION ATIERRA
SISTEMA DE CONEXf0N A TiERRA
NEC--CODtGO ELECTRICO NACIONAL (NEC ART 250. APARTADO H)
DEL ELECTRODO DE SERVICIO ELt_CTRICO
15. Para proteger a0n m_s este televisor durante tormentas el_ctricas o cuando se deje sin atender y sin
utilizar durante largos periodos de fiempo, desenchufe el cable de alimentaci6n del tomacorriente y
desconecte la antena. Esto evitar& que el aparato pueda estropearse debido a los rel&mpagos y la
sobretensi6n en la I[nea de alimentaci6n
16. Un sistema de antena exterior no debe ubicarse cerca de lineas de alimentaci6n elevadas, ni cerca de
luces el_ctricas o circuitos de alimentaci6n Tampoco debe ubicarse donde pueda caer sobre tales lineas
o circuitos de alimentaci6n Cuando instale un sistema de antena exterior, tenga muchlsimo cuidado
para no tocar las Ifneas ocircuitos de alimentaci6n porque el contacto podNa causar unaccidente mortal.
17 No sobrecargue los tomacorrientes ni los cables de extensi6n porque esto podfia causar un incendio o
descarga electrica.
18. No meta nunca ningun objeto en el interior del televisor porque podda tocar piezas con alta tensi6n o
causar un cortocircuito con otras piezas causando un incendio o descarga efectrica No derrame nunca
ningun tipo de tiquido sobre el televisor.
19. No trate de reparar el televisor usted m]smo porque a] abrir o quitar las tapas podria exponerse a una
descarga de tensi6n u otros peligros. Lasreparaciones debe realizarlas el personal de servicie CALIFICADO
20 Desenchufe este televisor del tomacorriente y solicite el servicio de un t_cnico calificado cuando se
produzcan las condiciones siguientes:
A Cuando el cable de la alimentaci6n o el enchufe est_n estropeados
B Cuando haya derramado un liquido sobre el televisor
C, Si el televisor ha quedado expuesto a la lluvia o al agua
D Si el televisor no funciona normalmente siguiendo las instrucciones de utilizaci6no Ajuste sotamente
los controles indicados en las instrucciones de utilizaci6n. Un ajuste inadecuado de otros controles
podrfa estropear et aparato y,entonces, ser[a necesario acudir a un t_cnico CALIFtCADO para que
_ste lo repare y lo devuelva a su condici6n normal
E. Si el televisor se ha caido e la caja se ha estropeado
E Cuando ]asprestaciones del televisor cambien considerablemente ser& necesario llamar alservicio
de reparaciones
21. AI finalizar cuatquier servicio o reparaci6n de este televisor, pida al t_cnico de servicio que realice
comprobaciones de seguridad rutinarias para determinar si el televisor puede funcionar sin causar ning0n
problema.
22 Cuando sea necesado cambiar piezas, cerci6rese de que el t_cnico de servicio utiliza fas piezas de
CAMBIO especificadas pot el fabricante, aquellas que tengan las mismas caracteristicas que las piezas
originales Las piezas de recambio no autodzadas pueden causar incendios, descargas electricas u
otros peligros.
56
Page 57

o Nombres de los componentes (ESPANOL)
POR DENTRO DE LA
ALIMENTAClON (POWER)
Pulsando -_ Enciende (On)
Pulsando nuevamente -+ Apaga
(Off)
SENSOR DE
CONTROL REMOTE
MENU (MENU)
Pulsando _ Accede al MENU PRINCIPAL.
Pulsando nuevarnenle --_ Sale de1 MENU
PRINCIPAL
AUMENTO/DISMINUCION DEL
VOLUMEN (VOL)
{+) Aumenta el sonido,
( - ) Disminuye et sonido,
Para abrir ta puerta
Utilizando el saliente situado debaio de ta indicaci6n
"PULL-OPEN", tire de la puerta y lev#,ntela para abrirla,
Para cerrar la puerta
Utilizando el saliente, baje la puerta hasta que se cierre,
CANAL SUPERIOR/INFERIOR
(A) Selecciona el siguiente canal superior
(V) Se]ecciona el siguienle canal inferior
PUERTA
TERMINALES DE
ENTRADA VIDEO/AUDiO
IN 2
1
Precaucion:
. Cuando abra o cierre la puerta, no inserte los dedos en la
ranura entre la puerta y el panel frontal Esto podria
producirie una lesiSn
TERMINAL DE ENTRADA DE
ANTENA/TV POR CABLE
TERM1NALES DE VIDEO
COMPONENTE
-- TERMINALES IN 3 (VIDEO/AUDIO)
TERMINALES IN 1 (ViDEO/AUDIO)
TERMfNALES LINE OUT (AUDIO)
TERMINAL IN 1 (S-VIDEO)
, Las ilustraciones det televisor y del mando a distancia, y tas indicaciones en pantalia, de este manual pueden
diterir de su aspecto real
" Las ifustraciones de esta p&gina y de las siguientes son las del 32F640
57
Page 58

t:: ReferenciardpidadeioScontr0iesderoperaci6rl (C0rltinuacJ n)
ALIMENTAClON (POWER)
Pulsando -_ Enciende (On)
Pulsando nuevamente -+ Apaga (Off)
TECLADO A DISTANClA
(REMOTE KEYPAD) 0 - 9
Ajusta el canal
RETORNO AL CANAL ANTERIOR --_
(FLASHBACK)
Para volver al canal anterior
o (PUNTO)
Ajusta el canaf
PREFERENCIAS PERSONALES --1
Con los botones Personal Preference \
puede programar sus programas \ IlL
favoritos utilizando las cuatro \ | II _s_,,_,_
categofias A, B, C y D ',... _" A'--v--B--v c-_J_D_I---
Puede acceder a los canales Ill ___,
rapidamente utilizando estos ill ((_:._._J_J 1_:)}
botones (Consufte la p_gina 38, 39) | tl k._-t_ _ _
/ Ill _E.u ..TE
AUMENTOtDISM NUC ON DEL -- I _9 : C_
VOLUMEN (VOLUME UP/DOWN) / Ill
(+) Aumenta el son|do / ltl .
(-) Disminuye el sonido / i1
-Ca b aose,ecc ooa osajus,est II
PREPARACION (MENU) ----
Pulsando -+ Accede al MENU ;
PRINCIPAL
Pulsando nuevamente --eSale det _.
MENU PRINCIPAL
Botones CATWDVD-TV/VCR
En la posici6n TV/VCR, Las seRates
enviadas serb,n para el control de!
televisor y de ta videograbadora
En la posici6n CATV/DVD, fas
se5ales enviadas seran para el
control dei Convertidor de TV por
cable y de la Reproductor de DVD
CONTROLES DEL DVDAIIDEO
Consulte la p_gina 48
/ _ _ :_(_deTV en la visualizaoisn en pantalla _ c_ i
SHARP
1V-CAW ,VCR*DVD
Ventanilla del transmisor de infrarrojos
VtSUALIZACION (DISPLAY)
Pulsando --e Aparece e! canal de
recepcion por cuatro segundos
Pulsando nuevamente --+ Elimina
la visualizaci6n
" En el modo de "Closed Caption" se
muestra el canal de recepci6n por
un corto tiempo
ENTRADA (INPUT)
Pulsando -+ Cambia al modo de
entrada I del video extemo
Pulsando 2 veces -e Cambia al modo
de entrada 2 del video externo
Pufsando 3 veces -->Cambia at modo
de entrada 3 del video extemo o al
modo COMPONENT
Pulsando 4 veces _ Vuelve al modo
TV original Consulte la pAgina 46
INTRODUCIR (ENTER)
• Se utiliza para confirmar la
selecciOn de canal y el canal de
preferencia personal
- Se utiliza en afgunos casos en Ios
cuales una Caja de Inversor de
Cable requiere una orden "enter"
despu_s de seleccionar los canales,
al usar el teelado a distancia
(Consuite fa p_.gina 48)
'- CANAL SUPERIOR/INFERIOR
(CHANNEL UP/DOWN)
(A) Selecciona el siguiente canal
superior
('e') Selecciona el siguiente canal
t inferior
° Consutte las paginas 34-36 para
obtener informaci6n sobre el
preajuste de canales
I ° En el modo de MENU, mueve la
marca "O "
l
L. StLENClAMIENTO (MUTE)
Pulsando -->Silencia el sonido
Pufsando nuevamente -+ Restaura el
son|do
o Los botones que arriba pueden verse sombreados en el Control Remoto lucen en la oscuridad Papa
usar el visor del control remoto que luce en la oscuridad, colocario bajo una luz fluorescente u otra
fuente luminosa.
° El material fosforescente no contiene elementos radiactivos ni t6xicos, de modo que su uso no
representa ningLin peligro
o El grado de iluminaci6n variara de acuerdo con la potencia de la luz utilizada..
o Et grado de iluminaci6n ir_ decayendo con el tiempo y dependiendo de la temperatura
, Et tiempo necesario para cargar el visor fosforescente variar_, de acuerdo con la iluminaci6n
circundante
,, La luz del sol y la tuz fluorescente son las m_.s eficaces para la carga def visor.
o Las ilustraciones del televisor y del mando a distancia, y las indicaciones en pantalla, de este manual
pueden diferir de su aspecto real
58
Page 59

Vedfique estos puntos para ver si usted mismo puede solucionar el problema
#43
LISTA DE
COMPROBACiONES
DE SERVIClO
RAPIDO
POSIBLE SOLUCION
Pruebecon otrocanal y si todo eat&
bien,el problernapuedeser de la
ernisora.
Est_conectadoeltelevisor?
Llegaelectdcidadaltornacorrientes?
EstAconeclado el interruptordel
te!eyisor?
Est_conectadolaantenaal terminaldei
panelposteriordel televisor?
Si utiliza unaantenaexterior,cerci6rese
de que e!cableno est_ daifiado
Compruebesi hay interferencialocal
Desconecteel interrupterPOWERy
w_efvaa conectario despu_sde
transcurrirun minuto.
Ajusteel control de COLOR.
Ajuste el control de MATIZ
Verifiquelos productesexternosde
Video/Audio,revise si hay fugas de
conexionessuettasorotas.
Compruebeel estadode las piias det
mandoa distancia.
DesliceCATV/DVD-TViVCRselector
parasituarlo sobretaposici6nTV
Est_nbien conectadoslos cablesde
sonido?Cornpruebeelnivel del volurnen.
Est&conectadoel altavoz?
Desactive(OFF) el modoCLOSED
CAPTION! Desactive(OFF)eirnodo
Ahorrode Energfa(EnergySave)
Desenchufeeltelevisoryvuelvaa
enchufarlodespu_sdedosminutosem_s
LU
..t
m
o
n-
03
X X
=::1
o
"0
t,,-)
X
X
X
X
X
X
X
X X X
e
x
x
x
X
o
1:3
N
t,o
o_
03
¢U
N
m_
X
X
X
o Cuando se ve en modo TEXTO sin recibir emisiones de TEXTO, ta
pantalla puede ponerse en blanco y negro Si ocurriera esto, ponga el
modo CLOSED CAPTION en OFF,
(lmagen oscurayen blanco)
Para la IocalizaciSn del Servicio T_cnico Autorizado de Sharp m_s prSximo o para conseguir material de
informaci6n, repuestos o asistencia t_cnica, llame a 1-800-BE-SHARR
59
Page 60

(FRAN( AIS)
Lisez attentivement ces instructions et gardez-les _ proximit_ pour toute r_f6rence ult_rieure
IMPORTANT
Afin de vous aider en cas de perte ou de vol, inscdvez les
num6ros de s_rie et de mod_le du tel_viseur dans les
espaces fournis & cet effet Ces num_ros sent situ_s
I'arri_re du t61eviseur.
Deux raisons importantes d'enregistrer rapidement la garantie de votre nouveau t61eviseur SHARP &
I'aide de la carte d'enregistrement (REGISTRATION CARD) incluse darts le colis :
LA PREMIERE - LA GARANTIE
Gr&ce _ eile, vous ebtiendrez immediatement les avantages client concernant la garantie des pieces, du
service et des travaux applicable _ votre achat
LA DEUXlEME - LA LOI SUR LA SECURITE DU PRODUIT DE CONSOMMATION (CONSUMER
PRODUCT SAFETY ACT)
Grace ,_elle, vous recevrez rapidement un avis de s_curit_ Iors du contr61e,de la modification ou du rappel de votre
produitque SHARP peut#_treamene,_fournir conform_ment ala loide1972sur la securiteduproduitde consommation
L]SEZ ATTENTtVEMENTLE PARAGRAPHE,<GARANTIELIMITEE,, DE LA DERNIERE PAGE
AVERTISSEIVlENT:
POUR REDUIRE LE RISQUE D'INCENDIE OU D'ELECTROCUTION,
N'EXPOSEZ PAS CET EQUtPEMENT A DES ENDROITS TRES HUIVIIDESo
N° du mod61e :
N° de s_rie :
Le symbole de la foudre sous
forme de fl_che clans un triangle
est suppos_ indiquer &
A A
ATTENTION : POUR REDUIRELE RISQUE
D'ELECTROCUTION,
NE RET]REZ PAS LE CAPET (OU LE PANNEAUARRIERE)
L'APPAREIL NE CONTIENTAUCUNE PIECE A ENTRETENIR
PAR L'UTILISATEUR
CONSULTEZUN PERSONNELQUALIFIE POUR
LA MAINTENANCE.
"Note & l'intention de I'installateur du systeme CATV : Ce rappel est fourni afin d'attirer l'attention de I'installateur
de syst_me CATV sur l'article 820-40 du National Electrical Code qui indique les r_gles de raise & la terre
appropri6e et, en particulier, specifie que la ligne de terre dolt _tre connect6e au r_seau commun de mise
]aterre du b&timent, au point le plus proche possible de la source?
AVERTISSEMENT - Les reglementations FCC etabtissent que des changements ou des modifications non
autoris_s sur cet 6quipement et non approuves express_ment par ]e fabricant peuvent annuter tout pouvoir
de I'utilisateur sur le fonctionnement de cet equipement
l'utilisateur que fes pi_ces
internes au produit constituent
un risque d'_lectrocution
Lesymboledupointd'exclamation
dans un triangle est suppos_
indiquer & I'utilisateur que des
instructions de fonctionnement et
de maintenance importantes se
trouvent darts la documentation
fournieavec requipement
MISE AU REBUT DU PRODUIT
Ce produit utilise un tube b.rayonscathodiques (TRC) contenant du plomb #.braseret du brasagetendre.
La mise au rebutde ces matieres peut _tre r_glement_e pour des raisons environnementales Pourtoute
informationsur la raiseau rebutou le recyciage,contactezlesautorit_slocales ou lesprecautionsimportantes
pr_conis_es par la societ8 Electronics Industries Alliancesur : www.eiae org.
60
Page 61

BmNFORMO.S iMPOA.TESiso.o !
ATTENTION;
• Ne placez pas le cordon d'alimentation sous te t_l_viseur ou sous tout autre objet Iourd
, Ne placez pas de bougies ni de flammes hues sur le tel_viseur ou &sa proximitY, afin d'_viter les incendies
o Veillez & ne pas _clabousser ni faire tomber de l'eau sur ces appareits afin d'_viter les incendies ou les
_Iectrocutions Ne placez jamais d'objets remplis de tiquide, comme des vases, sur ces appareils
i ..PRECAUT O"S i P0 .TES
AT'rE NTION :Veu.,ez lire toutes ces instructions avant d'utiliser votre t_l_v|sion et conservez-
les pour un usage utt_rieuro
Eenergie _tectdque peut executer de nombreuses fonctions utites. Cet appareil a _t_ congu et fabriqu_ de fa£;on
& garantir votre enti_re s_curit_ CEPENDANT, TOUTE UTfLISAT1ON INADEQUATE PEUT ENTRAINER DES
RISQUES D'ELECTROC UTION OU D'tNCENDI E Afin de ne pas d_truire les protections int_grees &cet appareil,
respectez Ies r_gtes de base suivantes pour son installation, son utilisation et sa maintenance.
1, D_branchez ta t_l_vision avant de ta nettoyer
2 N'utilisez pas de nettoyants liquides ou d'a_rosois et utitisez un chiffon humide
3 N'utitisez pas d'accessoires d_conseifl_s par le fabdcant de mat_del video, car ils impliquent des dsque&
4 N'utilisez pas cette t_levision & proximit6 d'eau -- par exempte, pres d'une baignoire, d'un lavabo, d'un
_vier ou d'un bac & laver, dans une cave humide ou pros d'une piscine, etc
5 Ne placez pas cet equipement sur un chariot, un support ou une table instable. La t61_vision peut tomber
et provoquer de graves t6sions &toute personne et causer de s_rieux dommages & I'equipement Utilisez
uniquement un support ou un chariot recommand_ par te fabricant ou vendu avec la
t_levision
6 Lensembte t_tevision-chariot doit 6tre d_plac_ d_licatement Les arr_ts brusques, une
force excessive et des surfaces in,gales peuvent renverser !'ensemble
7. L_instatlationau tour ou sur une tablette dolt _tre r6alis_e conform6ment aux instructions
du fabricant et b.l'aide d'un kit de montage approuv_ par ce dernier
8 Les fentes et les ouvertures du ch&ssis &l'arriere ou dans lapattie inf_rieure sont prevus pour faventilation
Pour garantir un fonctionnement fiable de lat_l_vision et pour la prot_ger de route surchauffe, ces ouvedures
ne doivent _tre ni obtur_es, ni recouvertes Lat_!_vision ne dolt pas 6tre plac_e dans unendroit encastr_
tel qu'une bibliotheque, sauf si une ventilation adequate est prevue
9 Les ouvertures ne doivent jamais _tre recouvertes par un chiffon ou autre et celles de la partie inf_rieure
ne doivent jamais _tre obtur_es si vous placez la t_l_vision sur un lit, un sofa, un tapis ou toute surface
similaire Cette t_l_vision ne dolt _tre plac_e ni b.proximit_ d'un radiateur ou d'un registre de chateur, ni
dessus.
!0 Cette t_,l_vision doit _tre atiment_e uniquement par le type d'alimentation _tectrique indique sur I'_tiquette
Si vous n'etes pas sQr du type d'alimentation de votre domicile, consultez votre revendeur de t_levision
ou la compagnie d'_lectricit_ locale (EDF en France)
Pour la t_levision con£ue pour fonctionner sur battede, reportez-vous au mode d'emploi
11. Du point de vue de ta s_curit_, la t_levision est _quip_e d'une fiche polaris_e & 2 fils (une lame plus
importante que I'autre) La fiche polaris_e a 2 fils ne pen_tre dans la prise _lectrique que dans un seul
sens
Si la fiche ne correspond pas &la prise, demandez &votre _fectricien de remplacer taprise, elle dolt _tre
obsolete Ne modifiez pas la fiche et ne d_sactivez pas cette fonction de s6curit_.
12
Ne posez rien sur le cordon d'afimentation Ne placez pas la t_l_vision darts un emplacement ou le
cordon d'alimentafion est susceptible d'etre endommag_ par le passage r_p_t6 de personnes
61
Page 62

13
Respectez tousles avertissernents et instructions mentionn#s sur la t_f_vision
14
Si une antenne ext_rieure est raccord_e 6 la t_l_vision, veillez &ce que le syst_me d'antenne soit reti_ &
la terre de fagon &fournir une protection vis-&-vis des pouss_es de tension etdes charges _lectrostatiques
accumul_es La section 810 du National Electrical Code fourn[t des informations relatives &une rnise &la
terre correcte de la potence et de la structure portante, & une mise &ta terre du fil d'entr_e & une unit_ de
d_charge d'antenne, aux dimensions des conducteurs de terre, b.t'emplacement de I'unit_ de d_charge
d'antenne, au raccordement des prises de terre ains[ qu'& leurs exigences.
EXEMPLE DE MISE A LA TERRE D'UNE ANTENNE
SELON LE CODE NATIONAL DE Ut'=-LECTRICITE
"7 j OESOENTE
_"JCOLLIER DE MiSE/'z/'__"Xxk.
AJ
/ A ,TERRE/.i<..yI\\
_____ " ff_ _ UNIT_ DE DECHARGE
I ......... ---""'_ I _,,/l D'ANTENNE
L,_L_-b'M't"'l_""-,-_r_q // _ CONDUCTEURS DETERRE
i"
G';'_'_ COLLIERS DE MISE A LA TERRE
=_ ELECTRODE DE TERRE DE
NEC-CODE NATIONAL DE CI_LECTRICITE (NEC ART 250, PARTIE H)
15
Pour tout ajout de protection &votre t_l_vision encas de foudre ou lorsque elie reste en vei!le et inutilis_e
pendant de tongues p_riodes, debranchez-la et deconnectez l'antenne Vous eviterez ainsi desdommages
& votre _quipement suite & la foudre et des pouss_es de tension.
16
Un syst_me d'antenne ext_rieure ne dolt pas etre situ_ & proxirnit6 de tignes a_riennes ou d'autres
groupes electrog_nes ou circuits electriques ou dans des emplacements ou I'antenne pourrait tomber sur
ce type de lignes ou circuits Lors de l'instaltation d'un syst_me d'antenne ext_rieure, faites extr#mement
attention & ne pas entrer en contact avec ces lignes ou circuits, car ceta pourrait vous etre fatal.
!7
Ne surchargez pas les prises et les prolongateurs de ligne afin d'_viter tout risque d'incendie ou
d'electrocution.
18
N'introduisez jamais d'objets &travers tesfentes duch&ssis, car ils pourraient entrer en contact avec des
points de tension dangereux ou des pieces court-circuit_es et provoquer ainsi un incendie ou une
electrocution Ne r_pandez jamais de iiquides sur la t_t_vision
19
N'essayez pas de r_parer vous-rn6me votre t_levision_ Eouverture ou le retrait des capots peut vous
exposer & une tension dangereuse ou & d'autres risques Confiez toutes les operations de maintenance
& un personnel qualifi_
20.
Lorsque vous etes confront_ aux situations suivantes, d_branchez ta t_l_vision et confiez routes tes
op6rations de maintenance & un personnel qualifi_ :
A lorsque le cordon d'atirnentation ou la fiche est endomrnag6 ou effileche ;
B. si du liquide a #t_ r_pandu sur/dans ia t_levision ;
C si la t_l_vision a _te expos_e & la pluie ou & l'eau ;
D si ta t_l_vision ne fonctionne pas norrnalement m#rne en respectant le mode d'emploi. R_gtez
uniquernent les cornmandes abord_es par le mode d'emploi Des r_glages inappropries d'autres
commandes peuvent occasionner des domrnages et n_cessiteront ensuite, dans la plupart des cas,
une intervention plus importante d'un technicien qualifi_ pour que la t_tevision fonctionne
normatement ;
E. si la t_levision a _t_ renvers_e ou que le ch&ssis est endommag_ ;
E lorsque la t_l_vision pr_sente une alteration visible des performances -- cela indique un besoin de
maintenance
21 Pour toute maintenance ou r_paration de la t_levision, demandez au technicien de r_aliser des contrSles
de s_curit6 classiques afin de determiner si la t_l_vision est en bon 6tat de marche.
22 Lorsqu'un remplacement de pi_ces se r_vele n_cessaire, veillez & ce que le technicien utilise des pi_ces
de rechange sp_cifi_es par le fabricant et qu'eltes aient les m_rnes caract_ristiques que la piece d'origine.
Des remplacements non autoris_s peuvent occasionner un incendie, une_lectrocution ou d'autres risques
(NEC SECTION 810-2I)
LA COMPAGNIE DI-"-LECTRIClTE
62
Page 63

Nomenclature
ALIMENTATION (POWER)
Appuyer --> Pour mettre sous tension
Appuyer de nouveau _ Pour mettre
hors tension
CAPTEUR DE TI_LI_COMMANDE
(FRANCAIS)
/ _ ............................ DERRIERE LE VOLET
VIDI_O/AUDIO
j[---PRISES D'ENTREE
REGLAGE (MENU)
Appuyer -e Pour mettre sous tension
Appuyer de nouveau _ Pour mettre hors
tension
AUGMENTATION/REDUCTION
DU VOLUME SONORE (VOL)
(+) Pour augmenter le volume du son
( - ) Pour diminuer le volume du son,
Pour ouvrir le volet
A l'aide de la saillie situ6e sous l'indication "PULL-OPEN", tirez
et soulevez pour ouvrir te voleL
Pour fermer le volet
A I'aide de la saillie, rabaissez te volet jusqu'& ce qu'il se ferme,
Attention:
• Lots de t'ouverture ou de la fermeture du voter, n'introduisez pas
les doigts dans la fente entre la porte et le panneau avant sous
peine de provoquer un accident.
1
Canal HAUT/BAS
(.&)S_lectionne lecanal sup_rieur suivant
(,w)S_lectionne le canal inf_rieur pr_c,_dent
PRISES POUR APPAREIL VIDEO
-- PRISES D'ENTREE IN 3 (VlDI_O-
PRISE D'ENTREE ANTENNE/CABLE-
• Les illustrations du televiseur et de la t_lecommande ainsi que les affichages & t'_cran dans ce mode d'emploi
different de la r6alite,
• Les illustrations du t_t_viseur sur cette page et les suivantes sont celles du 32F640
AUDIO)
PRISES D'ENTREE IN 1 (VIDF:O-
AUDIO)
PRISES AUDIO LINE OUT
PRISES D'ENTREE IN t (S-VIDEO)
63
Page 64

ALIMENTATION(POWER)
Appuyer-_Pourmettresoustension.
Appuyerdenouveau-ePourmettre
horstension
PAVE NUMERIQUE DE COMMANDE -
A DISTANCE (REMOTE KEYPAD)
0-9
R_gle le canal
RETOUR (FLASHBACK)
Rappetle le canal regarde pr,_c_dent
o(POINT)
R_gle le canal
PREFERENCES PERSONNELLES
Gr&ce aux touches de preference \
personnetle, vous pouvez programmer \
vos programmes prefOres & I'aide des
4 categories: A, B, C et D Ces
touches vous permettent d'acc_der
rapidement & ces canaux
(Voir page 38, 39) /
AUGMENTATION/REDUCTION DU
VOLUME SONORE (VOLUME UP/
DOWN)
(+) Pour augmenter le volume du son
(-) Pour diminuer te volume du son.
o Modifie ou selectionne tes re.glages
TV sur raffichage sur ecran
RI_GLAGE (MENU)
Appuyer -> Acces au MENU
PRINCIPAL
Appuyer de nouveau -e Sortie du
MENU PRINCIPAL
SIeLECTEUR DE MODE
CATWDVD-TV/VCR
En position TVNCR, Les signaux
envoyes sont destines a commander
le t_!_viseur et le magn_toscope
En position CATV/DVD, les signaux
envoy_s sont destines & commander
le tel_viseur et te magnetoscope
COMMANDE DU LECTEUR DE
DVD/MAG NC:TOSCOPE
Voir page 48
_/
t
I
Fen_tre d'emission du signal
infrarouge
AFFICHAGE (DISPLAY)
Appuyer -e Pour afficher le canal
re?u pendant quatre secondes
Appuyer de nouveau -_ Pour faire
disparaTtre le canal,
° Pour afficher temporairement le
canal regu en mode Sous-titres
ENTRt_E (INPUT)
Appuyer -_ Pour s_lectionner le mode
ENTREE 1 video externe
Appuyer 2 fois _ Pour selectionner le
mode ENTREE 2 video externe
mode ENTREE 3 video externe ou le
mode COMPOSANT
Appuyer 4 lois -9 Pour revenir au
l ppuyer 3 foi;s --> Pour s_lectionner le
mode TV initia! Voir page 46
- ENTRER (ENTER)
• UtiFis_pour confirmer la s_iection
du canal et le canal Personal
Preference (preference personnelte)
o Patrols utilisee lorsqu'un
convertisseur necessite I'introduction
d'une commande "enter" apr#s la
s_lection de canaux & I'aide du pave
num_rique de commande a distance
(Voir page 48)
TOUCHES DES CANAUX
CROISSA NT/DI_CROISSANT
(CHANNEL UP/DOWN)
(_.) S_lectionne le canal sup6rieur
suivant
(V) S_lectionne le canal inf_,rieur
precedent
* Voir pages 34-36 pour prer_gler les
canaux
D6place le curseur" O" sur I'_cran
du MENU
SOURDINE (MUTE)
Appuyer -4. Mise en sourdine du son
Appuyer de nouveau -_
R_tablissement du son
f Rernarque:
o Les boutons ombr_s de la telecommande iltustr_s ci-dessus brillent dans l'obscurit_ Iorsque la
t_l_commande a _te plac6e sous une ampoule fluorescente ou toute autre source lumineuse,
o Le mat_riau phosphorescent n'est absolument pas toxique ou radioactif It peut donc _tre utilis_ en
toute s_curit_,
- Le degr# d'illumination variera en fonction de t'intensit_ de la source d'eclairage
• Le degr6 d'itlumination diminuera avec le temps, en fonction de la temperature
= Le temps requis pour charger les touches phosphorescentes d@endra de t'_clairage environnant,
o Les rayons directs du soleil et les luminaires fluorescents constituent les meilleures sources de
chargement des touches phosphorescentes,
o Les illustrations du t_l_viseur et de la t_tecommande ainsi que les affichages & l'_cran darts ce mode
d'emploi different de la r_alit_
64
Page 65

V6rifierlespointssuivantsafindeddterminers'ilestpossiblederem6dierau
LISTE DES
VITRIFICATIONS
POUR UN
DEPANNAGE
RAPIDE
e_-_
E
probl_meparunsimpler_glagedescommandes
SOLUTIONPOSSIBLE
EssayerunnouveaucanalS'ilfondionne,ils'agit
probabtementd'unepannedelaehaine
Let_t_viseurest-i}branch6?
Laprisesecteurfonctionne+dte?
L'inte_rupteurPOWERduld_vise_es_-iiseus
tension?
L'antenneest-dleraoeord_eau×berries_.I'arri_re
det'appareil?
SiI'antenneext_rieureestutilis_e,s'assurerqu'it
n'yapasde{ilssectionn_s
V_ri_ers'iln'yapasd'interf6rencelocaleoudebruit
dectriqueext_rieur
Meltrel'interrupteurPOWERherstensionpuisde
nouveauSDUStensionauboutd'uneminute,
R@lerlacommandodeCOULEUR
R_glerlacommandodeCONTRASTE
VdrifierI'appareilvideo/audioexteme:s'assurer
quelosc_blesdeconnexionnesentpasdesserr_s
oucass_s
V_riiierlosgilesdelat_l_commande
Faitesglisseries_iecteurdemodeCATViDVDqV/
VCRsurla{]ositionTV
Losc_blesaudiosont-i!slermementeonnecl_s?
V_rilierleniveauduvolume
Loshaul-parleursfonclionnenHts?
Meflrelemodesous-lit_agehersso,ice"ARRET"
Moded'dconomied'dnergiesur"ARRET".
D_b_ancherlet_}ldviseuretlerebrancherapresdeux
minutes
...... I I t
........... I [ l
X IXI
x I t
I _x_x
I I×IX
× I 1
X x _ i
tXl
-- i 1 ]
-- _ _ ,4,
° ot ot
X
XX
X X X
X
X X X
X
xI
XX
X_
XX
X X X
X X
X
X
X
X
X
X XX X
[ Remarque:
. En mode TEXTE, s'il n'y a pas d'emission TEXTE & recevoir, F_cran
du tel_viseur pourrait _tre sombre et vide. Dans ce cas, placer te
mode Sous-titrage hors service
(Image sombre et vide)
Pour connaitre I'emplacement du centre de service apres-vente agree Sharp le plus proche ou pour
obtenir de la documentation sur les produits, des accessoires, des consommables ou une aide au
consommateur, appelez le 1-800-BE-SHARR
65
Page 66

CONSUMER LIMITED WARRANTY
SHARP ELECTRONICS CORPORATION warrants to the first consumer purchaser that this Sharp
brand product (the "Product"), when shipped in its original container, will be free from defective
workmanship and materials, and agrees that it wilt, at its option, either repair the defect or replace the
defective Product or part thereof with a new or remanufactured equivalent at no charge to the purchaser
for parts or labor for the period(s) set forth below
This warranty does not apply to any appearance items of the Product nor to the additional excluded
item(s) set forth below nor to any Product the exterior of which has been damaged or defaced, which
has been subjected to improper voltage or other misuse, abnormal service or handling, or which has
been altered or modified in design or construction
In order to enforce the rights under this limited warranty, the purchaser should follow the steps set forth
below and provide proof of purchase to the servicer,
The limited warranty described herein is in addition to whatever implied warranties may be granted to
purchasers by law, ALL IMPLIED WARRANTIES INCLUDING THE WARRANTIES OF
MERCHANTABILITY AND FITNESS FOR USE ARE LIMITED TO THE PERIOD(S) FROM THE DATE
OF PURCHASE SET FORTH BELOW Some states do not allow limitations on how long an implied
warranty lasts, so the above limitation may not apply to you
Neither the sales personnel of the seller nor any other person is autholized to make any warranties
other than those described herein, or to extend the duration of any warranties beyond the time period
described herein on behalf of Sharp,,
The warranties described herein shall be the sole and exclusive warranties granted by Sharp and shall
be the sole and exclusive remedy available to the purchaser Correction of defects, in the manner and
for the period of time described herein, shall constitute complete fulfillment of all liabilities and
responsibilities of Sharp to the purchaser with respect to the Product, and shall constitute full satisfaction
of all claims, whether based on contract, negligence, strict liability or otherwise, In no event shall Sharp
be liable or in any way responsible, for any damages or defects in the Product which were caused by
repairs or attempted repairs performed by anyone other than an authorized servicer Nor shall Sharp be
liable or in any way responsible for any incidental or consequential economic or property damage
Some states do not allow the exclusion of incidental or consequential damages, so that above exclusion
may not apply to you
THIS WARRANTY GIVES YOU SPECIFIC LEGAL RtGHTS YOU MAY ALSO HAVE OTHER RIGHTS
WHICH VARY FROM STATETO STATE,
Model Specific Section
Your Product Model Number & Description:
32SF56B, 32 inch Color Television
(Be sure to havethis information available when you
need service for your Product )
Warranty Period for this Product:
One (1) year parts and labor, The warranty period
continues for an additional one (1) year, for a total
of two (2) years, with respect to the picture tube(s)
in the Product for parts only Labor and service are
not provided free of charge for this additional period
Additional Item(s) Excluded from
Non-rechargeabfe batteries,
Warranty Coverag_
Where to Obtain Service:
From a Sharp Authorized Servicer located in the
United States To find the location of the nearest
Sharp Authorized Servicer, call Sharp toll free at 1-
800-BE-SHARR
What to Do to Obtain Service:
Contact your Sharp Authorized Servicer to obtain
in-home service for this Product The Servicer will
come to your home and if it is necessary to remove
the Product, the Servicer will reinstall it Be sure to
have Proof of Purchase available_
TO OBTAIN ACCESSORY OR PRODUCT INFORMATION, CALL 1-800-BE-SHARP OR VISIT www sharpusa com
66
Page 67

SHAR
SHARF ELECTRONmCS @ORF@RATION
Sharp Plaza, Mahwah, New Jersey 07430-2t35
Printed in Mexico
TINS-C432WJZZ
06PO1-MMP
 Loading...