

Page 1
COLOUR TELEVISION
21S-FX10M
E2 ACCESSORIES
The following accessories are included with this television.
OPERATION MANUAL
E1 SAFETY PRECAUTIONS
Damage
– Turn off the power and unplug the power cord from the wall outlet immediately if the TV set begins to
make any unusual noises or gives off smoke or an unusual smell. Then call your dealer for service.
Unstable surface and shocks
– Do not place this TV set on an unstable cart, stand, shelf, or table. The TV set may fall, causing serious
injury to a child or adult, and serious damage to the set. Sharp recommends securing the TV set to a
stable surface or wall to prevent the set from falling due to sudden shocks or impact.
Moisture
– To prevent electrical shock, do not use the TV set in an excessively damp place.
Liquid entry
– Do not place a flower vase or anything else containing liquid on the TV set, as liquid spilt
on the TV set can cause electrical shock or failure.
TV Set position
– Do place the TV set onto an even stand, table or rack which size is bigger than the TV set.
If the TV set is put onto a smaller size or uneven stand, table or rack may cause the TV cabinet distort.
Do not put or insert anything between TV set and the stand, table or rack.
Ventilation
– Do not place this TV set in a confined area, such as on a bookshelf or in a built-in case. Leave
adequate space behind the TV for proper ventilation.
Servicing
– To reduce the risk of electric shock, do not remove the back of the cabinet. This TV set contains
dangerous voltage.
Power-cord protection
– To prevent electrical shock, do not subject the AC power cord to damage by bending or twisting it, or by
placing heavy items on top of it and do not place the AC power cord under the TV set. If the AC power
cord becomes damaged, unplug it from the wall outlet immediately and call your dealer for service.
Water
– To prevent fire or electrical shock, do not place the TV set near a bathroom, swimming pool or other
area where it may become wet.
Object entry
– Never insert or drop any metallic or inflammable objects into the ventilation openings of the TV set,
as this can cause fire, electrical shock, or electrical failure.
Uneven surface and excessive force
– Television equipment and cart combination should be moved with care. Quick stops, excessive
force, and uneven surfaces may cause the equipment and cart combination to overturn.
Fire prevention
– To prevent fire, never place any type of candle or naked flames on the top or near the TV set.
Electrical installation
– All pole mains switch with a separation of at least 3 mm in each pole shall be
incorporated in the electrical installation of the building.
ENGLISH
TINS-D440WJN2
08P01-MSP
Remote Control Size-AA batteries
* This 3.5mm stereo cable can only plug in those mobile players that have 3.5mm jack.
• Unplug the AC cord from the AC outlet before cleaning the product. Use a microfibre cloth to clean the product. Do not
use liquid cleaners or aerosol cleaners.
Operation manual
*
3.5mm stereo cable
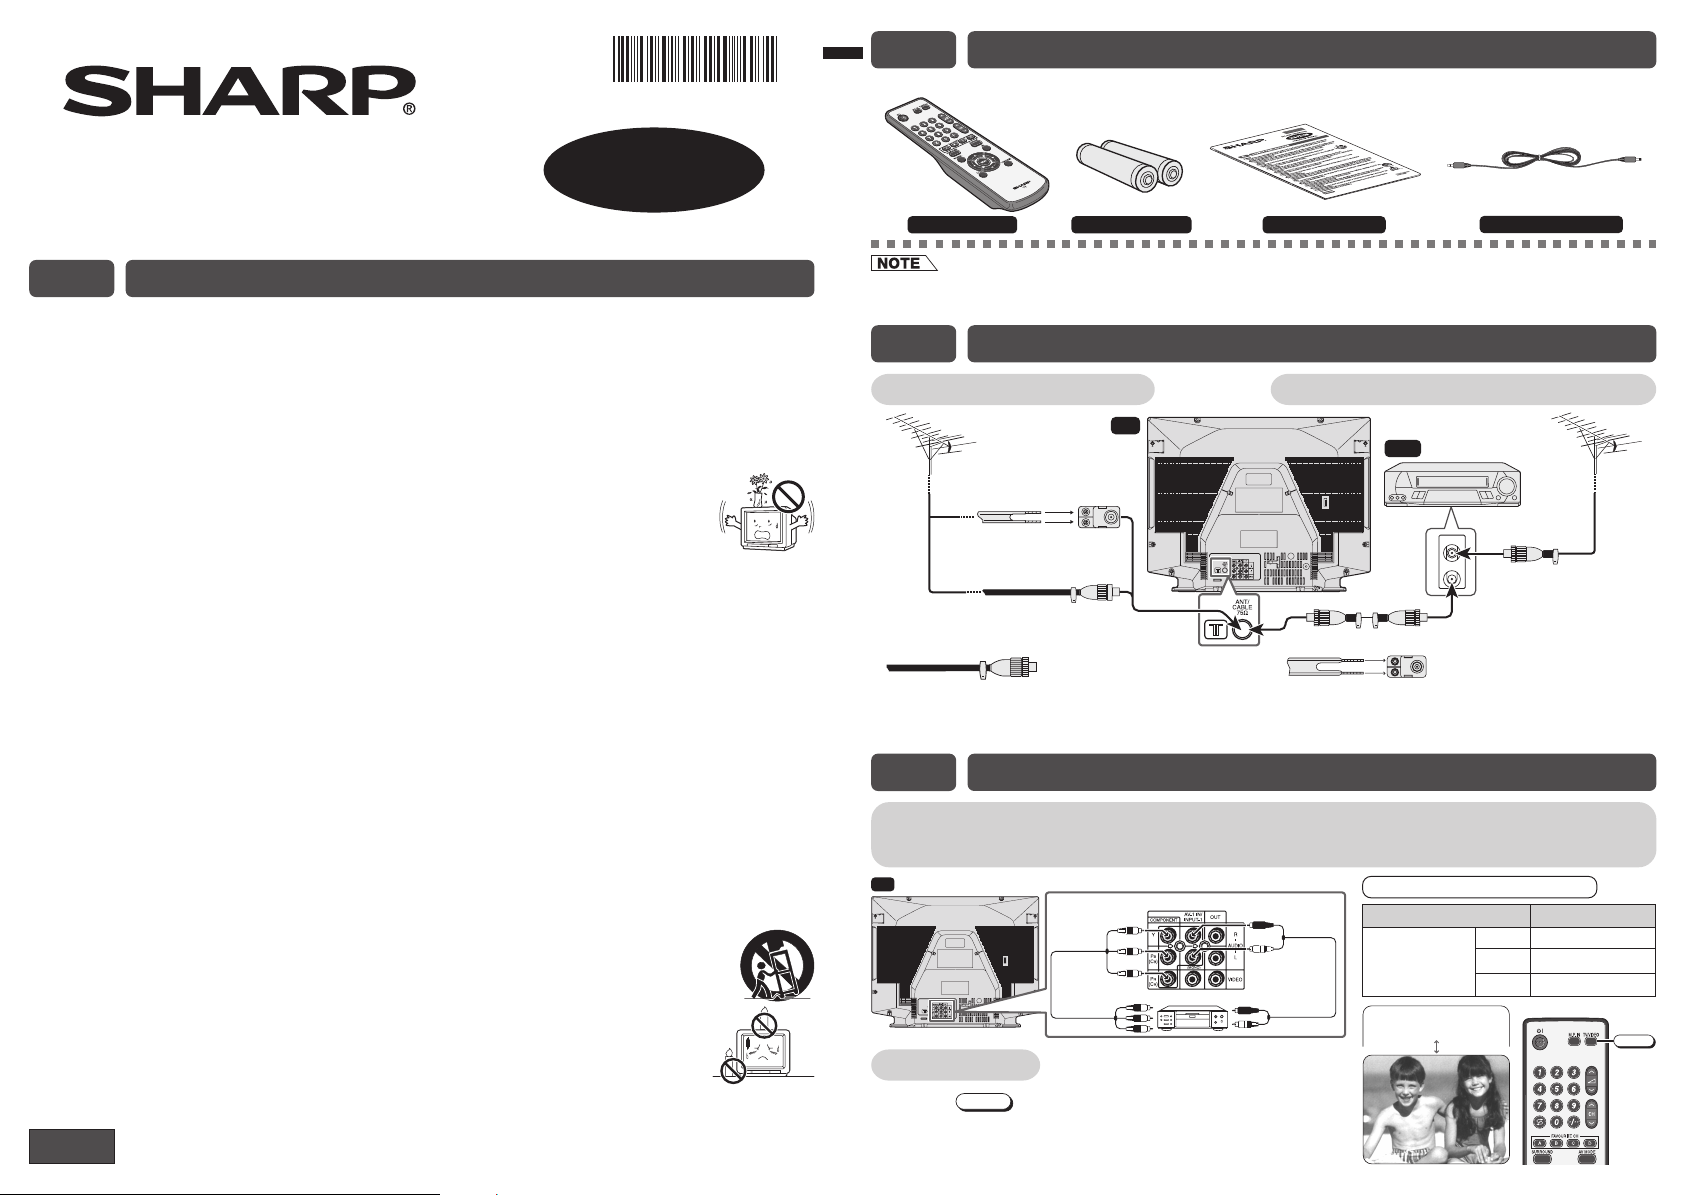
E3 ANTENNA CONNECTION
Connecting to an antenna
TV
75-ohm
300-ohm twin-lead
flat feeder
(not supplied)
75-ohm coaxial cable
(round cable)
(not supplied)
Standard DIN45325
plug (IEC 169-2)
If your outdoor antenna uses a 75-ohm coaxial cable with
a standard DIN45325 plug (IEC 169-2), plug it into the
antenna jack at the rear of the set.
impedance
converter
(not supplied)
Antenna in
Connecting to an antenna via a VCR
VCR
To antenna
in terminal
To RF out terminal
If your outdoor antenna uses a 300-ohm twin-lead flat
feeder, connect a 300-ohm to 75-ohm impedance converter
and plug it into the antenna jack at the rear of the set.
E4 CONNECTING AND WATCHING DVD
Connecting to a DVD player
The DVD input terminals (COMPONENT-IN) on the rear of the TV can be used to input high-quality
images from a DVD player.
TV
Green : To Y
Blue : To P
Red : To PR (CR)
To colourdifference
(component
video) out
terminals
Watching DVD
! Press
TV/VIDEO
input screen.
to select “COMPONENT”, DVD
@ Turn on the DVD player and begin playback.
DVD input terminals
B
(CB)
DVD player
Red : To AUDIO IN (R)
White : To AUDIO IN (L)
To audio out
(L/R) terminals
Connecting the video terminals
DVD input terminals DVD player
COMPONENT-
IN VIDEO
YY
B(CB)PB(CB) or B-Y/Pb
P
P
R(CR)PR(CR) or R-Y/Pr
TNENOP
MOC
TV/VIDEO
Page 2
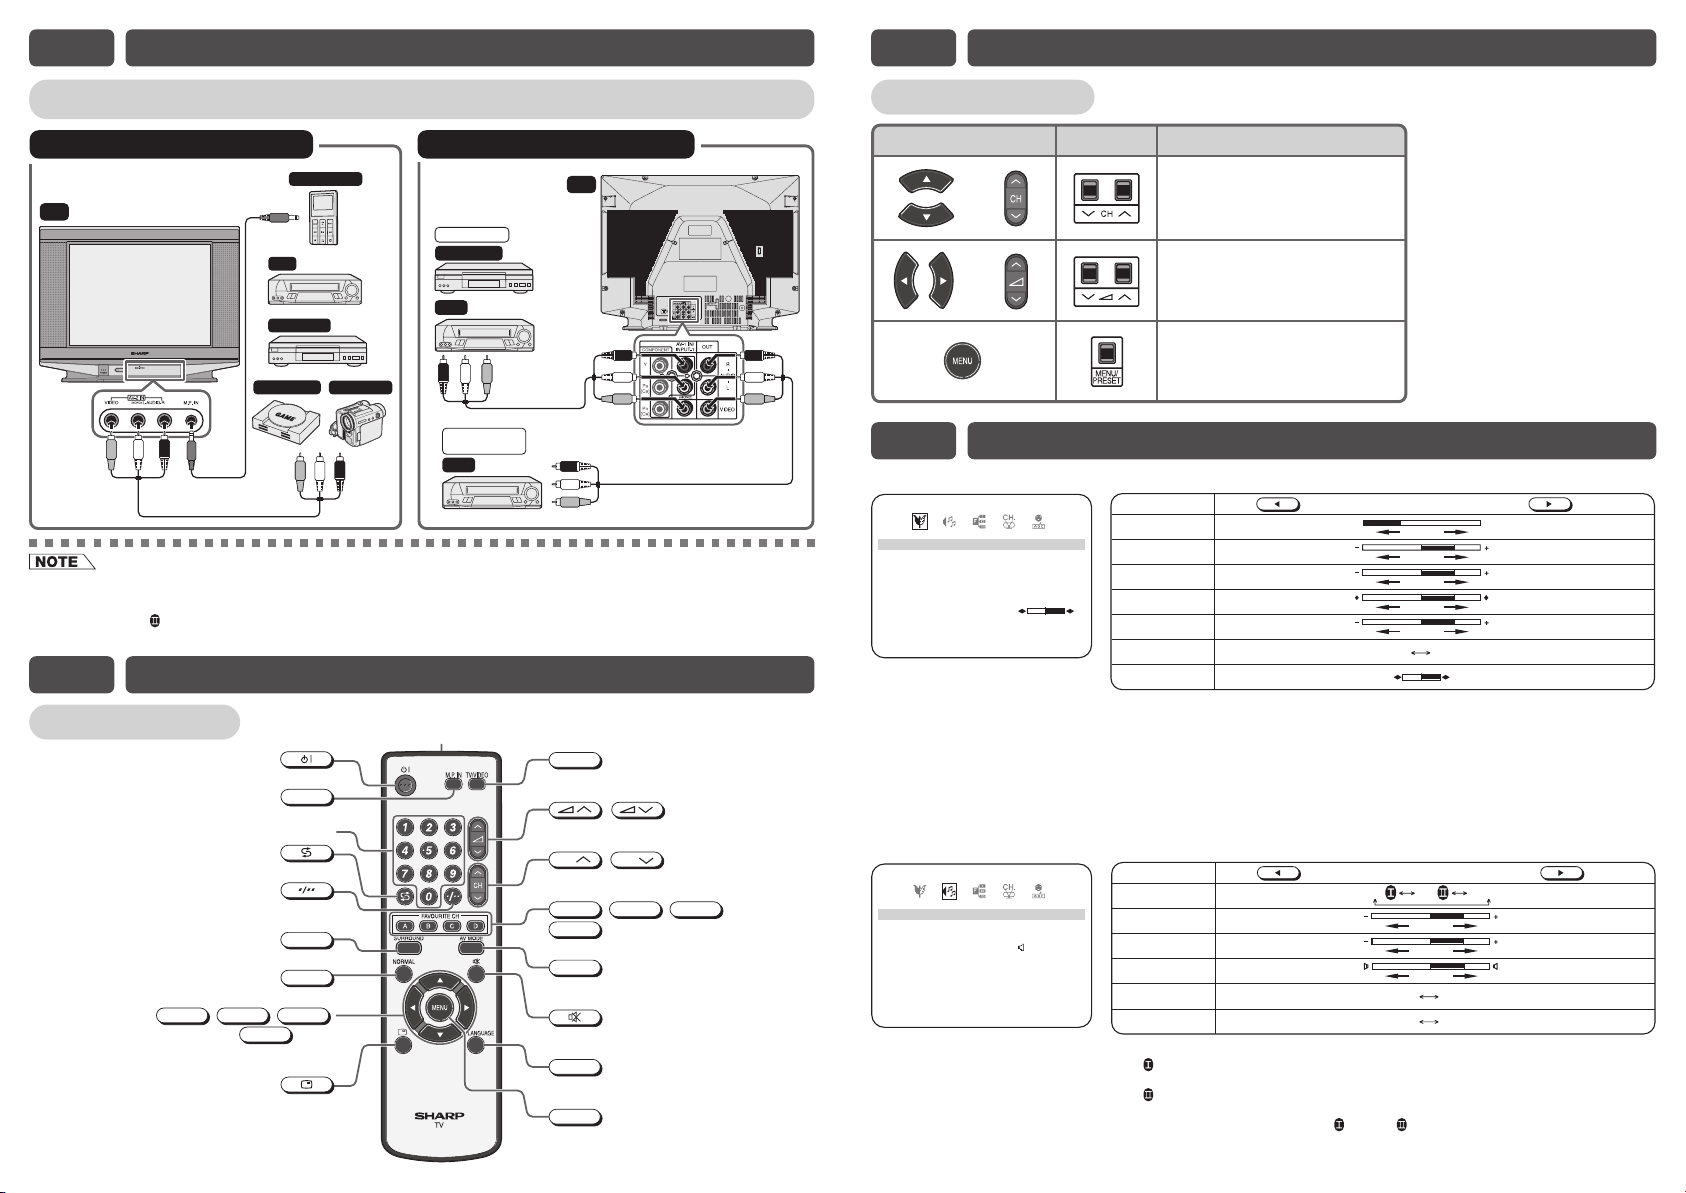
E5 CONNECTING OTHER EQUIPMENTS
E6 PART NAMES (Continued)
Enjoy playback from a video disc player, VCR or other video equipment by connecting them to
this TV set using the Audio/Video in terminals.
Example of front terminals usage
Yellow : To VIDEO
White : To AUDIO (L)
TV
• For playback of monaural audio, connect the external source to the audio input left terminal on the front or rear of the
TV set (MONO) to hear the same sound from both speakers.
If connect the external source to the audio input right terminal only, sound will not come out from both speakers during
SURROUND ON
audio input left terminal if want to enjoy sound from both speakers.
Red : To AUDIO (R)
To Audio/Video
out terminals
condition. Please turn off the SURROUND to hear sound from right speaker only or connect to the
Mobile Player
VCR
DVD Player
Video Game
Camcorder
Example of rear terminals usage
To Audio/
Video out
terminals
TV
To Audio/Video
in terminals
Yellow : To VIDEO
White : To AUDIO (L)
Red : To AUDIO (R)
For Playback
DVD Player
VCR
For Recording
and Editing
VCR
E6 PART NAMES
Infrared transmitter window
Remote control
Turns the TV on or to Standby mode.
Switches M.P. IN mode on or off.
Returns to previously viewed channel.
Switches between one- or two-digit
Produces a more spacious sound.
a
Selects the MENU items, adjusts the volume
Displays the channel and timer settings
M.P. IN
Number buttons
mode channel selection.
SURROUND
NORMAL
Resets all settings.
b
,
and selects the channel.
, ,
d
buttons
on the screen.
Aim this window at the infrared
sensor window on your TV set.
c
TV/VIDEO
Switches between TV broadcasts
and AV input programmes.
/
Adjusts the volume.
Used for MENU setup.
CH
Selects the channel.
Used for MENU setup.
Operate the Favourite Channel.
AV MODE
Switches between MOVIE, MUSIC
and NEWS.
Mutes the sound and restores sound
to previous level.
LANGUAGE
Changes the on-screen display
language.
MENU
Calls the MENU screen.
CH
/
,
buttons
B
A
D
C
,
,
Quick Reference
Remote control
or
or
• Selects the channels.
• Used to select MENU items.
• Adjusts the volume.
• Used to adjust MENU items.
• Calls the MENU screen.
• Used to return to previous
screen or exit MENU screen.
OperationTV set
E7 SELECTING MENU ITEMS
PICTURE menu
Selected item Press Press
CONT RAS T 05
COLOU R 0
BR I G
TINT
SHARPNESS
PICTURE RNFFO
W
HITE
SELE T:CRETUN
MOVIE
HTNESS 01+
PTEM
a
b
ADJ U T:S
cd
0
01
–
RMEUN
CONTRAST
COLOUR
BRIGHTNESS
TINT
*
SHARPNESS
:
PICTURE NR
WHITE TEMP
*:TINT can only be selected and adjusted when receiving NTSC broadcasts.
• Picture Noise Reduction
Noise might be generated on images when playing deteriorated video tapes or
when receiving broadcasts with relatively weak signals. In these cases, set
PICTURE NR to “ON” to reduce the noise. However, when receiving good images
without noise, you can get better image quality by turning OFF this feature.
• WHITE TEMP can only be adjusted on PICTURE menu.
• The CONTRAST, COLOUR, BRIGHTNESS, TINT, SHARPNESS, PICTURE NR
and WHITE TEMP setting can be set differently for individual AV MODE setting.
SOUND menu
Selected item Press Press
SURROUND
TREBLE 0
BASS
BAL NCEA
AVL
LOUDNE SSNO
SELE T:CRETUN
MOVIE
a
b
cd
FFO
1+
01
–
1
0
FFO
:
RMEUNADJ U T:S
SURROUND
TREBLE
BASS
BALANCE
AVL
LOUDNESS
• OFF: Produces normal sound.
ON : Setting to this mode during stereo signal reception produces a spacious
: Setting to this mode during monaural signal reception creates monaural
ON
• When SURROUND is set to “ON
• The SURROUND, TREBLE and BASS setting can be set differently for individual
AV MODE setting.
To decrease contrast
For less colour intensity
For less brightness
To move tint toward red
For less sharpness
To more reddish background
To decrease treble
To decrease bass
To shift balance toward
left
The AVL is ON
The LOUDNESS is ON
sound, making the most of the speaker’s performance.
sound that is similar to stereophonic sound.
To increase contrast
For more colour intensity
For more brightness
To move tint toward green
For more sharpness
ON
ON ON OFF
ON OFF
ON OFF
(see note below)
OFF
To more bluish background
To increase treble
To increase bass
To shift balance toward
right
The AVL is OFF
The LOUDNESS is OFF
” or “ON ”, BALANCE cannot be selected.
Page 3

E7 SELECTING MENU ITEMS (Continued)
FEATURES menu
• AV MODE
MOVIE NEWSMUSIC
cd
A
OFF
cd
H
cd
VOEIM
• OFF (OFF TIMER)
– Automatically turns power off after a set length of time has passed.
FFO
O
N
RMEUNAD JU T:S
• TV (CHILD LOCK)
– Preventing children from watching TV.
– If you forget your PASSWORD, please input “2398” to enter, then
:
change to new PASSWORD.
• BLUE BACK
– Automatically turns the screen blue if a broadcast signal is not received.
• M.P. IN
– When external mobile player is plugged into the M.P. IN jack, you may
listen to the sound source from TV speaker.
– If external mobile player is not plugged into M.P. IN jack,
M.P. IN
not functioning.
• POSITION
– The channel position changes to the higher or lower number.
:
• COLOUR
AUTO SECAM
PAL
• SOUND
B/G D/KI
• SKIP
ON OFF
NTSC4.43
NTSC3.58
72
68 25MHz.1
RMEUNADJ U T:S
• BOOSTER
– Enhance the picture quality during weak signal.
ON
ON OFF
• MANUAL (Fine tuning)
i) Each time / is pressed, the frequency changes to allow
fine tuning and the colour of channel number changes to yellow to
indicate fine tuning.
ii) Press / for more than 2 seconds, the “Manual Channel
Tuning” will start. If a signal is found, the Manual Channel Tuning will
stop searching.
• AU TO
Press / and Auto Channel Tuning is started. Auto tuning
bar will shown during Auto Search only.
The on-screen display language can be set to English, Chinese or Malay.
ENGLISH MELAYU
:
RMEUNENT R:E
DE
AV OM
OFF :––––
TV FFO
PAS
S
W
ORD 0 000
ACK
B
BLUE
M.
P
.IN
a
b
SELE T:CRETUN
CH-SETTING menu
POS I T I ON
COLOU R UT O
SOUN
D/BG
SK I P OFF
BOOS TER
MANU AL
AUTO
a
b
SELE T:CRETUN
LANGUAGE menu
GL I SEN
ME
LAYU
a
b
SELE T:CRETUN
• When the sound is not stable or no sound, switching to an approriate system may improve the sound quality.
• The on-screen displays in this manual may differ from their actual appearance.
will
E8 USEFUL FEATURES
Channel / Timer display
Displays the current channel number, the timer, and other settings on the screen.
!
Press .
•
The time remaining on the Off timer and channel number
appears on the screen.
•
When no timer is set, the channel number appear on the screen.
@
Press once again. The display disappears.
Mute
Silences the sound.
!
Press .
•
Press , “ ” appears on the screen, and the sound is
silenced.
@
Press , the volume returns to its previous level.
•
Mute will be cancelled if the or is pressed at any time.
Channel recall
Switches back to the channel you were watching just before the current channel.
Press .
•
The channel previously viewed returns to the screen.
Example:
After switching from channel 5 to channel 7, is pressed, the
channel will change to channel 5. Press again to return to
channel 7.
TV / Video selection
Switches between TV broadcasts and AV input programmes.
•
Each time you press the
TV/VIDEO
, the input switches between AV1
(or COMPONENT), AV2 and TV programme.
Favourite channels
A
The
favourite channels.
!
Press
(e.g. Channel 12)
@
Press
•
The display will disappear after four seconds, and then the
selected channel is preset.
#
To watch favourite channel, press
•
The preset favourite channel will be displayed. (e.g. Channel 12)
$
To preset another favourite channel, repeat steps 1 and 2 above.
•
To change a preset favourite channel, repeat steps 1 and 2 above.
B
,
CH
/
A
for example, until channel number turns white.
C
,
CH
D
,
buttons can be used to select up to four
to select your favourite channel.
A
.
OFF 2 : 30
Displayed in
green or yellow
Turns to white
or
TNE1VANOPMOC
TV/VIDEO
Number
buttons
5
5
7
5
7
VA
522
21
21
21
CH
CH
A
B
C
D
Page 4

E9 TROUBLESHOOTING
The following problems do not always indicate a hardware failure. Therefore, please use the
troubleshooting guide below before calling for repair service.
If, after following the guide none of the remedies work, unplug the TV set and call for service.
Quick Service Check List
Problems
Remote control does not work.
Bars on screen.
Picture distorted.
Picture rolls vertically.
No colour.
Poor reception on some channels.
Picture weak.
Picture lines or streaks.
Picture ghosting.
Picture blurred.
Sound OK, picture poor.
Possible Causes/Remedies
Try a new channel to check for possible station trouble.
TV not plugged in. Outlet power OFF.
POWER switch of TV not ON.
Antenna not connected to terminal at the back of the TV set.
If outside antenna is used, check for broken wires.
Check for local interference.
Turn OFF using the POWER switch, then turn ON again after 8 minutes.
Adjust COLOUR control.
Check batteries in the remote control.
Try fine tuning to correct.
Contrast setting in picture mode might be all the way to the minus side.
Press the NORMAL button on the remote control to correct.
Increase the volume.
This unit is equipped with a microprocessor. Its performance could be adversely affected by external electrical
noise or interference. If this should happen, unplug the unit and plug it in again after a few minutes.
Picture OK, sound poor.
No picture or sound.
SHARP CORPORATION
E10 SPECIFICATIONS
MODEL 21S-FX10M
Receiving System PAL – B/G, I, D/K SECAM – B/G, D/K, K1 NTSC 4.43 – B/G, I, D/K
Receiving Frequency 44.25 MHz – 863.25 MHz
Channel Tuning 100-Channel Electronic Tuner with Full Auto Tuning System
Terminals Audio/video input × 2 (front × 1, rear × 1), Audio/video output × 1 (rear),
Sound Output 3 W (RMS) × 4, total 12 W (RMS)
Power Source AC 110 – 240V, 50/60 Hz
Power Consumption 98 W
Dimensions 577 (W) × 467 (H) × 340 (D) mm
Weight 20 kg (Approx.)
• Design and specifications are subject to change without notice.
• Receiving system: These receiving systems, encompassing all currently available technology, include those with
planned broadcast, videotape and laserdisc hardware and software.
M.P. IN jack × 1 (front), DVD input (COMPONENT) × 1 (rear)
 Loading...