

Page 1
®
As an ENERGY STA R
the ENERGY STA R
Partner, SHARP has determined that this product meets
®
guidelines for energy efficiency. ENERGY STA R® is a
U.S. registered trademark.
COLOR TELEVISION
MODEL
20F630
L OPERATION MANUAL L
CONTENTS
• IMPORTANT INFORMATION/IMPORTANT
SAFEGUARDS ................................................ 2 ~ 10
• Supplied Accessories ............................................ 11
• Before Operating Your Television ........................... 11
• Antenna Connections .................................... 11 ~ 12
• Quick Reference Control Operation...............13 ~ 15
• EZ SETUP during First Use ................................... 16
• Demo Mode ........................................................... 17
• Accessing the MAIN MENU screen without
Remote Control ...................................................... 17
• Language ............................................................... 18
• Sleep Timer ........................................................... 19
• Video Adjust .......................................................... 20
• Audio Adjust........................................................... 21
• Audio Select...................................................22 ~ 23
MTS (Multichannel TV Sound) ............................ 22
INTERNAL SPEAKER SWITCH .........................22
FAO (Fixed Audio Output) ................................... 22
This operating manual includes basic operating
instructions in Spanish and French.
SPANISH is on page 5 ~ 7, 14, 53.
FRENCH is on page 8 ~ 10, 15, 54.
20F630[01-05].p65 25/3/03, 2:45 PM1
PAG E
• Closed Caption ...................................................... 24
• Parental Control ............................................. 25 ~ 35
V-CHIP ........................................................ 25 ~ 32
View Timer ..................................................33 ~ 35
• Ch Setup ........................................................ 36 ~ 41
EZ Setup .............................................................36
Channel Setting .......................................... 37 ~ 39
Personal Preference ........................................... 40
Universal Plus Function ...................................... 41
• Set Up ............................................................ 42 ~ 43
Energy Save ....................................................... 42
Blue Screen ........................................................ 43
• Using the Video and Audio Input Jacks ......... 44 ~ 45
• Using the Audio Output Jacks ............................... 46
• Operation of Remote Control ......................... 47 ~ 51
• Before Calling for Service ..............................52 ~ 53
• Calling for Service ......................................... 52 ~ 53
• Specifications ........................................................ 54
• Limited Warranty .................................................... 56
PAG E
A725 WJ
Page 2
Welcome to the SHARP Family. We are pleased that you are now the owner of a SHARP Color Television
– built for outstanding quality, reliability and performance.
Every SHARP Color Television set is tuned and adjusted for proper color and sound, and has passed
through the most stringent quality control tests at the factory. We have prepared this OPERATION MANUAL
so that you may adjust the picture and color to your personal viewing preference.
We sincerely hope that you receive the greatest satisfaction and enjoyment from your new SHARP Color
Television set for years to come.
Please read these instructions carefully, and keep them handy for your future reference.
IMPORTANT
To aid reporting in case of loss or theft, please record the TV’s
model and serial numbers in the space provided. The numbers
are located at the rear of the TV.
Model No.:
Serial No.:
IMPORTANT INFORMATION
There are two important reasons for prompt warranty registration of your new SHARP television set. Use
the REGISTRATION CARD packed in with the set.
FIRST – WARRANTY
This is to assure that you will immediately receive the full consumer benefit of the parts, service and labor
warranty applicable to your purchase.
SECOND – CONSUMER PRODUCT SAFETY ACT
To assure that you will promptly receive any safety notification on inspection, modification or recall that
SHARP may be required to give under the 1972 Consumer Product Safety Act. PLEASE READ
CAREFULLY THE IMPORTANT “LIMITED WARRANTY” CLAUSE ON THE LAST PAGE.
WHAT IS ENERGY STAR
TVs and VCRs use energy both when they are on and when they are off. Americans spend more than $1
billion a year on energy consumed by TVs and VCRs when they are not in use. The new ENERGY
STAR® models will reduce that energy “leakage” by up to 75 percent. Ultimately, this will mean more than
$500 million a year in energy savings for consumers.
The energy savings will help reduce the burning of fossil fuels and the related carbon dioxide pollution
that contributes to global warming. If every American family replaced their TVs and VCRs with ENERGY
STAR® models, it would reduce carbon dioxide emissions by five million tons every year — equivalent to
eliminating the pollution from more than one million cars.
By using ENERGY STAR® products, you will save money on your electric bills and use less energy. That
makes good economic sense and it’s good for our environment.
WARNING:
®
TO REDUCE THE RISK OF FIRE OR ELECTRIC SHOCK, DO NOT
EXPOSE THIS APPLIANCE TO WET LOCATIONS.
The lightning flash with
arrowhead within a triangle is
intended to tell the user that
parts inside the product are a
risk of electric shock to
persons.
CAUTION: TO REDUCE THE RISK OF
ELECTRIC SHOCK,
DO NOT REMOVE COVER (OR BACK).
NO USER-SERVICEABLE PARTS INSIDE.
REFER SERVICING TO QUALIFIED SERVICE
PERSONNEL.
“Note to CATV system installer: This reminder is provided to call the CATV system installer’s attention
to Article 820-40 of the National Electrical Code that provides guidelines for proper grounding and, in
particular, specifies that the cable ground shall be connected to the grounding system of the building,
as close to the point of cable entry as practical.”
The exclamation point within a
triangle is intended to tell the
user that important operating
and servicing instructions are
in the papers with the
appliance.
2
20F630[01-05].p65 25/3/03, 2:45 PM2
Dimension: 140mm x 215mm
Page 3

IMPORTANT INFORMATION (Continued)
WARNING – FCC Regulations state that any unauthorized changes or modifications to this equipment not
expressly approved by the manufacturer could void the user’s authority to operate this
equipment.
PRODUCT DISPOSAL
This product utilizes a Cathode Ray Tube (CRT) containing lead and tin lead solder.
Disposal of these materials may be regulated due to environment considerations. For disposal or
recycling information, please contact your local authorities or the Electronics Industries
Alliance:www.eiae.org
CAUTION: Do not place the AC power cord under the TV set or other heavy items.
IMPORTANT SAFEGUARDS
CAUTION: Please read all of these instructions before you operate your television and save
these instructions for later use.
Electrical energy can perform many useful functions. This unit has been engineered and manufactured to assure
your personal safety. BUT IMPROPER USE CAN RESULT IN POTENTIAL ELECTRICAL SHOCK OR FIRE
HAZARDS. In order not to defeat the safeguards incorporated in this equipment, observe the following basic
rules for its installation, use and servicing.
1. Unplug this television equipment from the wall outlet before cleaning.
2. Do not use liquid cleaners or aerosol cleaners. Use a damp cloth for cleaning.
3. Do not use attachments not recommended by the television equipment manufacturer as they may cause hazards.
4. Do not use this television equipment near water — for example, near a bath tub, washbowl, kitchen sink or
laundry tub, in a wet basement, or near a swimming pool, etc.
5. Do not place this equipment on an unstable cart, stand, or table. The television equipment may fall, causing
serious injury to a child or an adult, and serious damage to the equipment.
Use only with a cart or stand recommended by the manufacturer or sold with the television
equipment.
Television equipment and cart combination should be moved with care. Quick stops,
excessive force, and uneven surfaces may cause the equipment and cart combination to
overturn.
6. Wall or shelf mounting should follow the manufacturer’s instructions, and should use a
mounting kit approved by the manufacturer.
7. Slots and openings in the cabinet and the back or bottom are provided for ventilation, and to insure reliable
operation of the television equipment and to protect it from overheating, these openings must not be blocked
or covered. This television equipment should not be placed in a built-in insulation such as a bookcase
unless proper ventilation is provided.
8. The openings should never be covered with a cloth or other material, and the bottom openings should not
be blocked by placing the television equipment on a bed, sofa, rug, or other similar surface. This television
equipment should never be placed near or over a radiator or heat register.
9. This television equipment should be operated only from the type of power source indicated on the marking
label. If you are not sure of the type of power supplied to your home, consult your television dealer or local
power company.
For television equipment designed to operate from battery power, refer to the operating instructions.
If the plug does not fit, ask your electrician to replace your obsolete outlet. Do not modify the plug and defeat
this safety feature.
10. Do not allow anything to rest on the power cord. Do not locate this television equipment where the cord will
be abused by persons walking on it.
11. As a safety feature, television equipment is equipped with a 2-wire polarized plug (one plug blade bigger
than the other). The 2-wire polarized plug will fit only one way into the power outlet.
If the plug does not fit, ask your electrician to replace your obsolete outlet. Do not modify the plug and defeat
this safety feature.
3
20F630[01-05].p65 25/3/03, 2:45 PM3
Dimension: 140mm x 215mm
Page 4
IMPORTANT INFORMATION (Continued)
12. Follow all warnings and instructions marked on the television equipment.
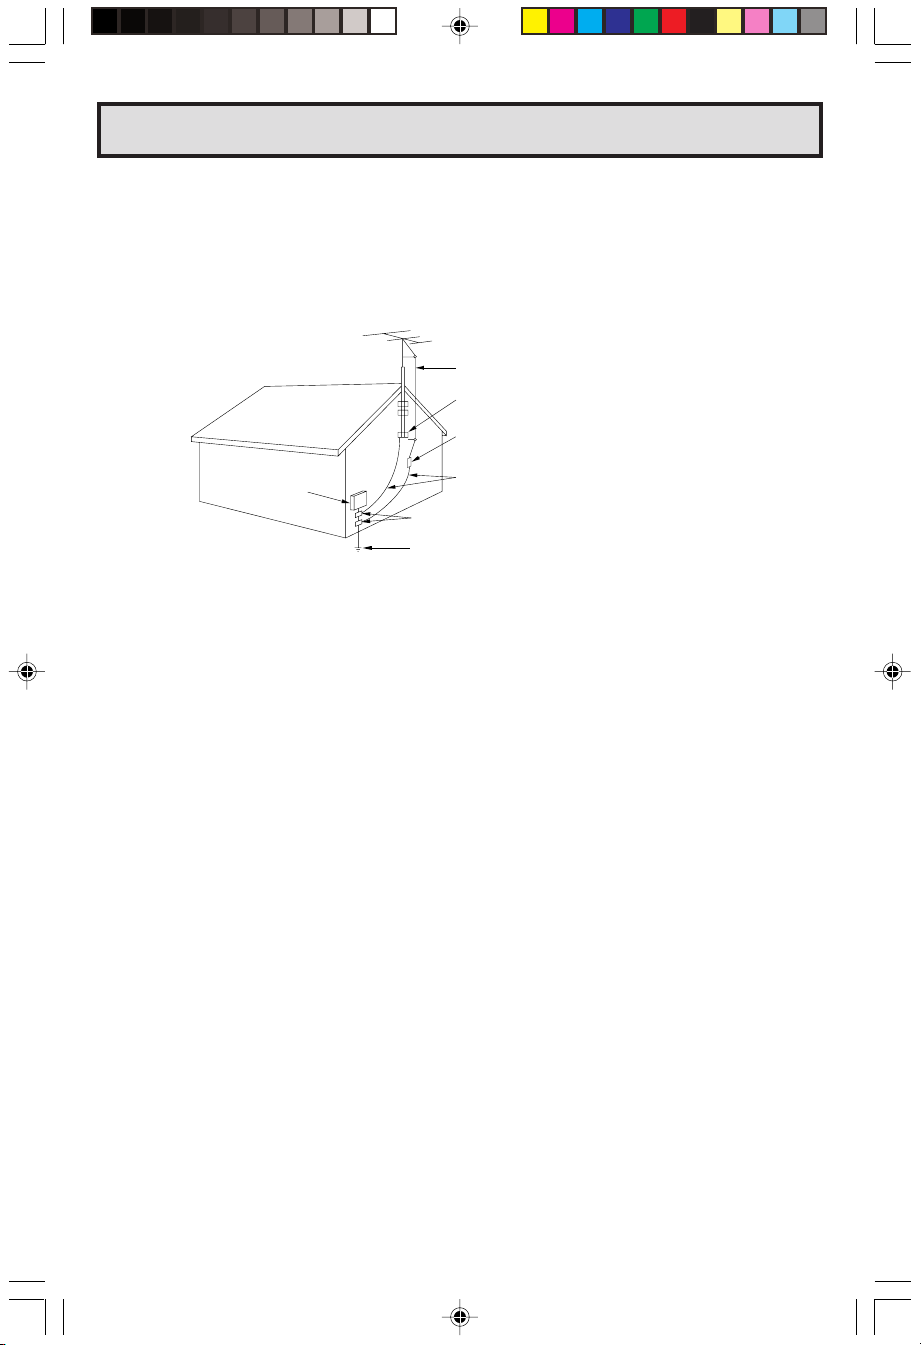
13. If an outside antenna is connected to the television equipment, be sure the antenna system is grounded
so as to provide some protection against voltage surges and built-up static charges. Section 810 of the
National Electrical Code provides information with respect to proper grounding of the mast and supporting
structure, grounding of the lead-in wire to an antenna discharge unit, size of grounding conductors, location
of antenna-discharge unit, connection to grounding electrodes, and requirements for the grounding electrode.
EXAMPLE OF ANTENNA GROUNDING
ACCORDING TO NATIONAL ELECTRICAL CODE.
ANTENNA LEAD-IN WIRE
GROUND CLAMP
ANTENNA DISCHARGE UNIT
ELECTRIC
SERVICE
EQUIPMENT
NEC - NATIONAL ELECTRICAL CODE
14. For added protection for this television equipment during a lightning storm, or when it is left unattended and
unused for long periods of time, unplug it from the wall outlet and disconnect the antenna. This will prevent
damage to the equipment due to lightning and power-line surges.
15. An outside antenna system should not be located in the vicinity of overhead power lines or other electric
light or power circuits, or where it can fall into such power lines or circuits. When installing an outside
antenna system, extreme care should be taken to keep from touching such power lines or circuits as contact
with them might be fatal.
16. Do not overload wall outlets and extension cords as this can result in fire or electric shock.
17. Never push objects of any kind into this television equipment through cabinet slots as they may touch
dangerous voltage points or short out parts that could result in a fire or electric shock. Never spill liquid of
any kind on the television equipment.
18. Do not attempt to service this television equipment yourself as opening or removing covers may expose you
to dangerous voltage or other hazards. Refer all servicing to qualified service personnel.
19. Unplug this television equipment from the wall outlet and refer servicing to qualified service personnel
under the following conditions:
A. When the power cord or plug is damaged or frayed.
B. If liquid has been spilled into the television equipment.
C. If the television equipment has been exposed to rain or water.
D. If the television equipment does not operate normally by following the operating instructions. Adjust only
those controls that are covered by the operating instructions as improper adjustment of other controls
may result in damage and will often require extensive work by a qualified technician to restore the
television equipment to normal operation.
E. If the television equipment has been dropped or the cabinet has been damaged.
F. When the television equipment exhibits a distinct change in performance — this indicates a need for
service.
20. Upon completion of any service or repairs to this television equipment, ask the service technician to
perform routine safety checks to determine that the television is in safe operating condition.
21. When replacement parts are required, be sure the service technician has used replacement parts
specified by the manufacturer that have the same characteristics as the original part. Unauthorized
substitutions may result in fire, electric shock, or other hazards.
(NEC SECTION 810-20)
GROUNDING CONDUCTORS
(NEC SECTION 810-21)
GROUND CLAMPS
POWER SERVICE GROUNDING ELECTRODE SYSTEM
(NEC PART 250, PART H)
4
20F630[01-05].p65 25/3/03, 2:45 PM4
Dimension: 140mm x 215mm
Page 5
(ESPAÑOL)
Lea estas instrucciones cuidadosamente y consérvelas a la mano para consultarlas en el futuro.
IMPORTANTE
Sírvase anotar el modelo del televisor y los números de serie
en el espacio provisto, para ayudar a repor tar en caso de pérdida
o robo. Los números están ubicados en la parte posterior del
televisor.
N° de modelo :
N° de serie :
INFORMACIÓN IMPORTANTE
Existen dos razones importantes para registrar dentro del plazo límite la garantía de su nuevo televisor
SHARP, mediante la TARJETA DE REGISTRO incluida con el aparato.
PRIMERA – GARANTÍA
Garantiza al cliente la recepción inmediata de todas las prestaciones de consumidor en c’uanto a piezas,
servicio técnico y mano de obra aplicable a su adquisición.
SEGUNDA – ACTA DE SEGURIDAD DE PRODUCTOS DE CONSUMIDOR
Con el fin de garantizar al cliente la recepción puntual de cualquier notificación de seguridad sobre
inspección, modificación o cancelación que se le pueda solicitar a SHARP bajo el Acta de seguridad de
productos de consumidor de 1972. LEA CUIDADOSAMENTE LA CLÁUSULA “GARANTÍA LIMITADA”
DE LA ÚLTIMA PÁGINA.
¿QUÉ ES ENERGY STAR®?
Los televisores y las videograbadoras utilizan energía cuando están encendidos ó apagados. Los
norteamericanos gastan más de 1 billón de dólares al año en la energía que consumen televisores y
videograbadoras cuando no se encuentran en uso. Los nuevos modelos ENERGY STAR ® reducen esa
“fuga” de energía hasta en un 75 por ciento. Esto implica más de 500 millones de dólares al año en
ahorro de energía para los consumidores.
El ahorro de energía ayuda a reducir el consumo de combustibles fósiles y por tanto la contaminación
por dióxido de carbono que contribuye al calentamiento global. Si cada familia norteamericana sustituyera
sus televisores y videograbadoras por modelos ENERGY STAR ®, se reducirían las emisiones de dióxido
de carbono en cinco millones de toneladas cada año (equivalente a eliminar la contaminación procedente
de más de un millón de automóviles).
El uso de productos ENERGY STAR® permite reducir el monto de las facturas de energía eléctrica y
consumir menos energía. De este modo ahorrará dinero y ayudará a proteger el medio ambiente.
ADVERTENCIA:
PRECAUCIÓN: PARA REDUCIR EL RIESGO DE
DESCARGAS ELÉCTRICAS, NO RETIRE LA
CUBIERTA (NI EL PANEL POSTERIOR).
NO CONTIENE PIEZAS REPARABLES POR EL
USUARIO.
SOLICITE ASISTENCIA TÉCNICA A PERSONAL DE
SERVICIO TÉCNICO ESPECIALIZADO.
PARA REDUCIR EL RIESGO DE INCENDIO O DESCARGA
ELÉCTRICA, NO EXPONGA ESTE APARATO A LA HUMEDAD.
El relámpago con cabeza de
flecha dentro de un triángulo
trata de indicar al usuario que las
partes dentro del producto
representan riesgo de
electrochoque para las
personas.
El signo de exclamación dentro
de un triángulo trata de indicar
al usuario que las instrucciones
importantes de operación y
servicio se encuentran en los
documentos con el aparato.
“Nota para el instalador del sistema de TV por cable: Esta nota tiene el propósito de llamar la atención
del instalador del sistema de cable acerca del Artículo 820-40 del Código Eléctrico Nacional, que contiene
las directrices para la puesta a tierra y, en particular, especifica que el cable de puesta a tierra debe
estar conectado al sistema de puesta a tierra del edificio lo más cerca a la entrada del cable.”
20F630[01-05].p65 25/3/03, 2:45 PM5
Dimension: 140mm x 215mm
5
Page 6
INFORMACIÓN IMPORTANTE (Continuación)
ADVERTENCIA - Las Normas de la FCC establecen que cualquier cambio o modificación no autorizada
que se realice en este equipo y que no esté expresamente aprobado por el fabricante podría anular la
autoridad del usuario para utilizar este equipo.
DESECHO DEL PRODUCTO
Este producto utiliza un Tubo de rayos catódicos (TRC) que contiene soldadura de estaño y plomo.
El desecho de estos materiales deberá ser considerando regulaciones ambientales. Para obtener
información sobre el desecho o el reciclado, póngase en contacto con las autoridades locales o con
Electronics Industries Alliance: www.eiae.org
PRECAUCIÓN: No coloque el cable de alimentación de CA debajo del televisor u otro elemento pesado.
MEDIDAS DE SEGURIDAD IMPORTANTES
PRECAUCIÓN: Lea por favor todas estas instrucciones antes de poner en funcionamiento
su televisor, y guárdelas para poder utilizarlas en el futuro.
La energía eléctrica permite realizar muchas funciones útiles. Este aparato ha sido diseñado y fabricado para
garantizar su seguridad física. Sin embargo, UNA UTILIZACIÓN INAPROPIADA PODRÍA SER LA CAUSA DE
DESCARGAS ELÉCTRICAS O INCENDIOS. Para mantener el buen funcionamiento de este equipo y evitar
problemas, siga las normas básicas indicadas a continuación cuando lo instale, utilice o repare.
1. Desenchufe el televisor del tomacorriente antes de limpiarlo.
2. No utilice líquidos ni aerosoles de limpieza. Para limpiar el televisor utilice un paño húmedo.
3. No utilice accesorios que no los recomiende el fabricante del televisor porque podrían causar peligros.
4. No utilice el televisor cerca del agua – por ejemplo, cerca de una bañera, lavado, fregadero o lavadora, en
un sótano húmedo, cerca de una piscina, etc.
5. No utilice este televisor sobre un carrito, un soporte o una mesa inestables. El televisor podría caerse
causando serías heridas a niños o adultos, y, por supuesto, el aparato se estropearía.
Ponga el televisor solamente sobre un carrito o soporte recomendado por el fabricante, o
vendido junto con el televisor.
La combinación de carrito y televisor debe moverse con mucho cuidado. Las paradas rápidas,
la fuerza excesiva y las superficies irregulares pueden ser la causa de que la combinación
de televisor y carrito se volteen.
6. Cuando instale el televisor en una pared o en una estantería siga las instrucciones del fabricante, y utilice
el kit de montaje aprobado por el fabricante.
7. Las ranuras y aberturas de la caja y del panel posterior o inferior sirven para la ventilación del aparato, para
que éste funcione bien y para evitar que se caliente. Estas aberturas no deben taparse nunca. Este televisor
no debe colocarse en un lugar cerrado (como un estante para libros) si éste no dispone de la ventilación
apropiada.
8. Las aberturas no deben taparse nunca con un paño u otro material; y las aberturas del panel inferior no
deben taparse tampoco colocando el televisor sobre una cama, sofá, alfombra u otra superficie similar.
Este televisor no debe ponerse nunca cerca o encima de un radiador u otro aparato que produzca calor.
9. Este televisor sólo debe funcionar con la fuente de corriente indicada en la etiqueta del fabricante. Si no
está seguro acerca del tipo de corriente de su hogar, póngase en contacto con el concesionario de quien
adquirió el televisor o con la compañía eléctrica local.
En el caso de equipos de televisión diseñados para funcionar con baterías, consulte las instrucciones de uso.
Si el enchufe no entra en el tomacorriente, pídale a un electrícista que le coloque un tomacorriente nuevo.
No modifique el enchufe porque anulará esta característica de seguridad.
10. No permita que se apoye nada sobre el cable de alimentación. No ponga este televisor donde el cable
pueda ser deformado por personas que caminen sobre él.
11. Como medida de seguridad, el equipo de televisión está equipado con un enchufe polarizado de dos hilos.
El enchufe polarizado de dos hilos solamente calza de una sola manera en el tomacorriente.
Si el enchufe no entra en el tomacorriente, pídale a un electrícista que le coloque un tomacorriente nuevo.
No modifique el enchufe porque anulará esta característica de seguridad.
6
20F630[06-10].p65 25/3/03, 2:48 PM6
Dimension: 140mm x 215mm
Page 7

MEDIDAS DE SEGURIDAD IMPORTANTES
(Continuación)
12. Cumpla con todos los avisos y las instrucciones marcados en el televisor.
13. Si hay una antena exterior conectada al televisor, asegúrese de que el sistema de antena está conectado
a tierra, para obtener así cierta protección contra la sobretensión y contra las cargas de electricidad estática
acumulada.
EJEMPLO DE CONEXIÓN A TIERRA DE UNA
ANTENA SEGÚN CÓDIGO ELÉCTRICO NACIONAL.
BAJADA DE ANTENA
ABRAZADERA PARA PUESTA A TIERRA
UNIDAD DE DESCARGA DE ANTENA
EQUIPO DE
SERVICIO
ELÉTRICO
NEC - NATIONAL ELECTRICAL CODE (CÓDIGO ELÉCTRICO NACIONAL)
(SECCIÓN 810-20 DEL NEC)
CONDUCTORES DE PUESTA A TIERRA
(SECCIÓN 810-20 DEL NEC)
ABRAZADERAS PARA PUESTA A TIERRA
SISTEMA DE ELECTRODOS DE PUESTA A TIERRA DEL SERVICIO
ELÉCTRICO (PARTE 250. PARTE H DEL NEC)
14. Para proteger aún más este televisor durante tormentas eléctricas o cuando se deje sin atender y sin
utilizar durante largos periodos de tiempo, desenchufe el cable de alimentación del tomacorriente y
desconecte la antena. Esto evitará que el aparato pueda estropearse debido a los relámpagos y la
sobretensión en la línea de alimentación.
15. Un sistema de antena exterior no debe ubicarse cerca de líneas de alimentación elevadas, ni cerca de
luces eléctricas o circuitos de alimentación. Tampoco debe ubicarse donde pueda caer sobre tales líneas o
circuitos de alimentación. Cuando instale un sistema de antena exterior, tenga muchísimo cuidado para no
tocar las líneas o circuitos de alimentación porque el contacto podría causar un accidente mortal.
16. No sobrecargue los tomacorrientes ni los cables de extensión porque esto podría causar un incendio o
descarga eléctrica.
17. No meta nunca ningún objeto en el interior del televisor porque podría tocar piezas con alta tensión o
causar un cortocircuito con otras piezas causando un incendio o descarga eléctrica. No derrame nunca
ningún tipo de líquido sobre el televisor.
18. No trate de reparar el televisor usted mismo porque al abrir o quitar las tapas podría exponerse a una
descarga de tensión u otros peligros. Las reparaciones debe realizarlas el personal de servicio CALIFICADO.
19. Desenchufe este televisor del tomacorriente y solicite el servicio de un técnico calificado cuando se produzcan
las condiciones siguientes:
A. Cuando el cable de la alimentación o el enchufe estén estropeados.
B. Cuando haya derramado un líquido sobre el televisor.
C. Si el televisor ha quedado expuesto a la lluvia o al agua.
D. Si el televisor no funciona normalmente siguiendo las instrucciones de utilización. Ajuste solamente los
controles indicados en las instrucciones de utilización. Un ajuste inadecuado de otros controles podría
estropear el aparato y, entonces, sería necesario acudir a un técnico CALIFICADO para que éste lo
repare y lo devuelva a su condición normal.
E. Si el televisor se ha caído o la caja se ha estropeado.
F. Cuando las prestaciones del televisor cambien considerablemente será necesario llamar al servicio de
reparaciones.
20. Al finalizar cualquier servicio o reparación de este televisor, pida al técnico de servicio que realice
comprobaciones de seguridad rutinarias para determinar si el televisor puede funcionar sin causar ningún
problema.
21. Cuando sea necesario cambiar piezas, cerciórese de que el técnico de servicio utiliza las piezas de CAMBIO
especificadas por el fabricante, aquellas que tengan las mismas características que las piezas originales.
Las piezas de recambio no autorizadas pueden causar incendios, descargas eléctricas u otros peligros.
20F630[06-10].p65 25/3/03, 2:48 PM7
7
Dimension: 140mm x 215mm
Page 8

(FRANÇAIS)
Lisez attentivement ces instructions et gardez-les à proximité pour toute référence ultérieure.
IMPORTANT
Afin de vous aider en cas de perte ou de vol, inscrivez les
numéros de série et de modèle du téléviseur dans les espaces
fournis à cet effet. Ces numéros sont situés à l’arrière du
téléviseur.
N° du modèle :
N° de série :
INFORMATIONS IMPORTANTES
Deux raisons importantes d’enregistrer rapidement la garantie de votre nouveau téléviseur SHARP à
l’aide de la carte d’enregistrement (REGISTRATION CARD) incluse dans le colis :
LA PREMIERE – LA GARANTIE
Grâce à elle, vous obtiendrez immédiatement les avantages client concernant la garantie des pièces, du
service et des travaux applicable à votre achat.
LA DEUXIEME – LA LOI SUR LA SECURITE DU PRODUIT DE CONSOMMATION
(CONSUMER PRODUCT SAFETY ACT)
Grâce à elle, vous recevrez rapidement un avis de sécurité lors du contrôle, de la modification ou du
rappel de votre produit que SHARP peut être amené à fournir conformément à la loi de 1972 sur la
sécurité du produit de consommation. LISEZ ATTENTIVEMENT LE PARAGRAPHE «GARANTIE
LIMITEE» DE LA DERNIÈRE PAGE.
ENERGY STAR®: QU’EST-CE QUEC’EST
Les téléviseurs et les magnétoscopes utilisent de l’énergie lorsqu’ils sont allumés et éteints. Les Américains
dépensent plus d’1 milliard de dollars par an en énergie consommée par les téléviseurs et les
magnétoscopes une fois éteints. Les nouveaux modèles ENERGY STAR® réduisent jusqu’à 75 % ce
gaspillage d’énergie. Ce qui représente finalement plus de 500 millions de dollars par an d’économie
d’énergie pour les consommateurs.
Ces économies aident à réduire la combustion des énergies fossiles et la pollution au gaz carbonique
associée, qui contribue au réchauffement de la planète. Si toutes les familles américaines remplaçaient
leurs téléviseurs et leurs magnétoscopes par des modèles ENERGY STAR®, les émissions de gaz
carbonique seraient réduites de cinq millions de tonnes par an — ce qui reviendrait à éliminer la pollution
émise par plus d’un million de voitures.
En utilisant les produits ENERGY STAR®, vous économiserez également de l’argent sur vos factures
d’électricité et vous utiliserez moins d’énergie. Un peu de bon sens économique au profit de notre
environnement !
AVERTISSEMENT:
POUR REDUIRE LE RISQUE D’INCENDIE OU D’ELECTROCUTION,
N’EXPOSEZ PAS CET EQUIPEMENT A DES ENDROITS TRES HUMIDES.
Le symbole de la foudre sous
forme de flèche dans un triangle
est supposé indiquer à
l’utilisateur que les pièces
internes au produit constituent
un risque d’électrocution.
ATTENTION :
NE RETIREZ PAS LE CAPOT (OU LE PANNEAU ARRIERE).
L’APPAREIL NE CONTIENT AUCUNE PIECE A ENTRETENIR
CONSULTEZ UN PERSONNEL QUALIFIE POUR
“Note à l’intention de l’installateur du système CATV : Ce rappel est fourni afin d’attirer l’attention de
l’installateur de système CATV sur l’article 820-40 du National Electrical Code qui indique les règles
de mise à la terre appropriée et, en particulier, spécifie que la ligne de terre doit être connectée au
réseau commun de mise à la terre du bâtiment, au point le plus proche possible de la source.”
POUR REDUIRE LE RISQUE
D’ELECTROCUTION,
PAR L’UTILISATEUR.
LA MAINTENANCE.
Le symbole du point d’exclamation
dans un triangle est supposé
indiquer à l’utilisateur que des
instructions de fonctionnement et
de maintenance importantes se
trouvent dans la documentation
fournie avec l’équipement.
8
20F630[06-10].p65 25/3/03, 2:48 PM8
Dimension: 140mm x 215mm
Page 9

INFORMATIONS IMPORTANTES (Suite)
AVERTISSEMENT - Les réglementations FCC établissent que des changements ou des modifications non
autorisés sur cet équipement et non approuvés expressément par le fabricant peuvent annuler tout pouvoir
de l’utilisateur sur le fonctionnement de cet équipement.
MISE AU REBUT DU PRODUIT
Ce produit utilise un tube à rayons cathodiques (TRC) contenant du plomb à braser et du brasage tendre.
La mise au rebut de ces matières peut être réglementée pour des raisons environnementales. Pour
toute information sur la mise au rebut ou le recyclage, contactez les autorités locales ou les précautions
importantes préconisées par la société Electronics Industries Alliance sur : www.eiae.org.
ATTENTION: Ne placez pas le cordon d’alimentation sous le téléviseur ou sous tout autre objet lourd.
PRÉCAUTIONS IMPORTANTES
ATTENTION: Veuillez lire toutes ces instructions avant d’utiliser votre télévision et conservez-
les pour un usage ultérieur.
L’énergie électrique peut exécuter de nombreuses fonctions utiles. Cet appareil a été conçu et fabriqué de façon
à garantir votre entière sécurité. CEPENDANT, TOUTE UTILISATION INADEQUATE PEUT ENTRAINER DES
RISQUES D’ELECTROCUTION OU D’INCENDIE. Afin de ne pas détruire les protections intégrées à cet appareil,
respectez les règles de base suivantes pour son installation, son utilisation et sa maintenance.
1. Débranchez la télévision avant de la nettoyer.
2. N’utilisez pas de nettoyants liquides ou d’aérosols et utilisez un chiffon humide.
3. N’utilisez pas d’accessoires déconseillés par le fabricant de matériel vidéo, car ils impliquent des risques.
4. N’utilisez pas cette télévision à proximité d’eau — par exemple, près d’une baignoire, d’un lavabo, d’un
évier ou d’un bac à laver, dans une cave humide ou près d’une piscine, etc.
5. Ne placez pas cet équipement sur un chariot, un support ou une table instable. La télévision peut tomber et
provoquer de graves lésions à toute personne et causer de sérieux dommages à
l’équipement.
Utilisez uniquement un support ou un chariot recommandé par le fabricant ou vendu avec
la télévision.
L’ensemble télévision-chariot doit être déplacé délicatement. Les arrêts brusques, une force
excessive et des surfaces inégales peuvent renverser l’ensemble.
6. L’installation au mur ou sur une tablette doit être réalisée conformément aux instructions du fabricant et à
l’aide d’un kit de montage approuvé par ce dernier.
7. Les fentes et les ouvertures du châssis à l’arrière ou dans la partie inférieure sont prévus pour la ventilation.
Pour garantir un fonctionnement fiable de la télévision et pour la protéger de toute surchauffe, ces ouver tures
ne doivent être ni obturées, ni recouvertes. La télévision ne doit pas être placée dans un endroit encastré tel
qu’une bibliothèque, sauf si une ventilation adéquate est prévue.
8. Les ouvertures ne doivent jamais être recouvertes par un chiffon ou autre et celles de la partie inférieure ne
doivent jamais être obturées si vous placez la télévision sur un lit, un sofa, un tapis ou toute surface similaire.
Cette télévision ne doit être placée ni à proximité d’un radiateur ou d’un registre de chaleur, ni dessus.
9. Cette télévision doit être alimentée uniquement par le type d’alimentation électrique indiqué sur l’étiquette.
Si vous n’êtes pas sûr du type d’alimentation de votre domicile, consultez votre revendeur de télévision ou
la compagnie d’électricité locale (EDF en France).
Pour la télévision conçue pour fonctionner sur batterie, reportez-vous au mode d’emploi.
Si la fiche ne correspond pas à la prise, demandez à votre électricien de remplacer la prise, elle doit être
obsolète. Ne modifiez pas la fiche et ne désactivez pas cette fonction de sécurité.
10. Ne posez rien sur le cordon d’alimentation. Ne placez pas la télévision dans un emplacement où le cordon
d’alimentation est susceptible d’être endommagé par le passage répété de personnes.
11. Du point de vue de la sécurité, la télévision est équipée d’une fiche polarisée à 2 fils (une lame plus importante
que l’autre). La fiche polarisée à 2 fils ne pénètre dans la prise électrique que dans un seul sens.
Si la fiche ne correspond pas à la prise, demandez à votre électricien de remplacer la prise, elle doit être
obsolète. Ne modifiez pas la fiche et ne désactivez pas cette fonction de sécurité.
9
20F630[06-10].p65 25/3/03, 2:48 PM9
Dimension: 140mm x 215mm
Page 10

PRÉCAUTIONS IMPORTANTES (Suite)
12. Respectez tous les avertissements et instructions mentionnés sur la télévision.
13. Si une antenne extérieure est raccordée à la télévision, veillez à ce que le système d’antenne soit relié à la
terre de façon à fournir une protection vis-à-vis des poussées de tension et des charges électrostatiques
accumulées. La section 810 du National Electrical Code fournit des informations relatives à une mise à la
terre correcte de la potence et de la structure portante, à une mise à la terre du fil d’entrée à une unité de
décharge d’antenne, aux dimensions des conducteurs de terre, à l’emplacement de l’unité de décharge
d’antenne, au raccordement des prises de terre ainsi qu’à leurs exigences.
EXEMPLE DE MISE A LA TERRE D’ANTENNE
CONFORME AU NATIONAL ELECTRICAL CODE.
FIL D’ENTREE D’ANTENNE
COLLIER DE MISE A LA TERRE
UNITE DE DECHARGE D’ANTENNE
EQUIPEMENT
DE SERVICE
ELECTRIQUE
NEC - NATIONAL ELECTRICAL CODE
14. Pour tout ajout de protection à votre télévision en cas de foudre ou lorsque elle reste en veille et inutilisée
pendant de longues périodes, débranchez-la et déconnectez l’antenne. Vous éviterez ainsi des dommages
à votre équipement suite à la foudre et des poussées de tension.
15. Un système d’antenne extérieure ne doit pas être situé à proximité de lignes aériennes ou d’autres groupes
électrogènes ou circuits électriques ou dans des emplacements où l’antenne pourrait tomber sur ce type de
lignes ou circuits. Lors de l’installation d’un système d’antenne extérieure, faites extrêmement attention à
ne pas entrer en contact avec ces lignes ou circuits, car cela pourrait vous être fatal.
16. Ne surchargez pas les prises et les prolongateurs de ligne afin d’éviter tout risque d’incendie ou
d’électrocution.
17. N’introduisez jamais d’objets à travers les fentes du châssis, car ils pourraient entrer en contact avec des
points de tension dangereux ou des pièces court-circuitées et provoquer ainsi un incendie ou une
électrocution. Ne répandez jamais de liquides sur la télévision.
18. N’essayez pas de réparer vous-même votre télévision. L’ouverture ou le retrait des capots peut vous exposer
à une tension dangereuse ou à d’autres risques. Confiez toutes les opérations de maintenance à un personnel
qualifié.
19. Lorsque vous êtes confronté aux situations suivantes, débranchez la télévision et confiez toutes les opérations
de maintenance à un personnel qualifié :
A. Lorsque le cordon d’alimentation ou la fiche est endommagé ou effiloché ;
B. Si du liquide a été répandu sur/dans la télévision ;
C. Si la télévision a été exposée à la pluie ou à l’eau ;
D. Si la télévision ne fonctionne pas normalement même en respectant le mode d’emploi. Réglez uniquement
les commandes abordées par le mode d’emploi. Des réglages inappropriés d’autres commandes peuvent
occasionner des dommages et nécessiteront ensuite, dans la plupart des cas, une intervention plus
importante d’un technicien qualifié pour que la télévision fonctionne normalement ;
E. Si la télévision a été renversée ou que le châssis est endommagé ;
F. Lorsque la télévision présente une altération visible des performances — cela indique un besoin de
maintenance.
20. Pour toute maintenance ou réparation de la télévision, demandez au technicien de réaliser des contrôles
de sécurité classiques afin de déterminer si la télévision est en bon état de marche.
21. Lorsqu’un remplacement de pièces se révèle nécessaire, veillez à ce que le technicien utilise des pièces de
rechange spécifiées par le fabricant et qu’elles aient les mêmes caractéristiques que la pièce d’origine. Des
remplacements non autorisés peuvent occasionner un incendie, une électrocution ou d’autres risques.
10
(NEC SECTION 810-20)
CONDUCTEURS DE TERRE
(NEC SECTION 810-21)
COLLIERS DE MISE A LA TERRE
ALIMENTATION DU SYSTEME DE PRISE DE TERRE
(NEC PARAGRAPHE 250. PARARAGRAPHE H)
20F630[06-10].p65 25/3/03, 2:48 PM10
Dimension: 140mm x 215mm
Page 11
Supplied Accessories
f
8
ENTER
FLASHBACK
100
0
PERSONAL PREFERENCE
REC
+
VOL
:
)
SKIP
FWD
VCR-CH
g
9
:
J
STOP
9
8
CH
CH
PLAY
L
PAUSE
;
–
VOL
ABCD
MENU MUTE
POWER (DVD/VCR)
TV • CATV • VCR • DVD
(
REW
Dry batteries size “AA”/
1.5 V cc
321
654
987
TV
INPUT
DVD VCR
CATV
DISPLAY
POWER
Infrared Remote Control/Part Number
RRMCGA108WJSA
Before Operating Your Television
Location
• For normal operation, your TV should be located in an area of the room where cool adequate ventilation
is provided. Do not place the back of the television set in a place where free airflow will be restricted.
• Any magnetic force may disturb the color picture. Make sure that magnets, electric clocks, toys
using magnets or any other magnetic substance, such as iron are kept well away from the TV set.
Power
Your TV operates on 120 Volts, 60 Hz (normal household current) and has a polarized plug. If you
are unable to insert the plug fully into the outlet, try reversing the plug. Should it fail to fit, contact an
electrician. Do not defeat the safety feature of the polarized plug.
Note:
• If the set will not be used for a long period, such as during a vacation, unplug the set from the wall
outlet to economize power. (If the TV set is plugged in, a slight current still flows, even with the
POWER BUTTON in the OFF position.)
• Lines and other noise may appear in TV broadcast images when an FM tuner or radio is located
near the TV and both radio and TV broadcasts are being received. Should such noise appear, turn
off either the TV or the radio.
• If you are listening to an AM broadcast, turn the TV off. AM broadcast signals may not be received
due to interference from the TV.
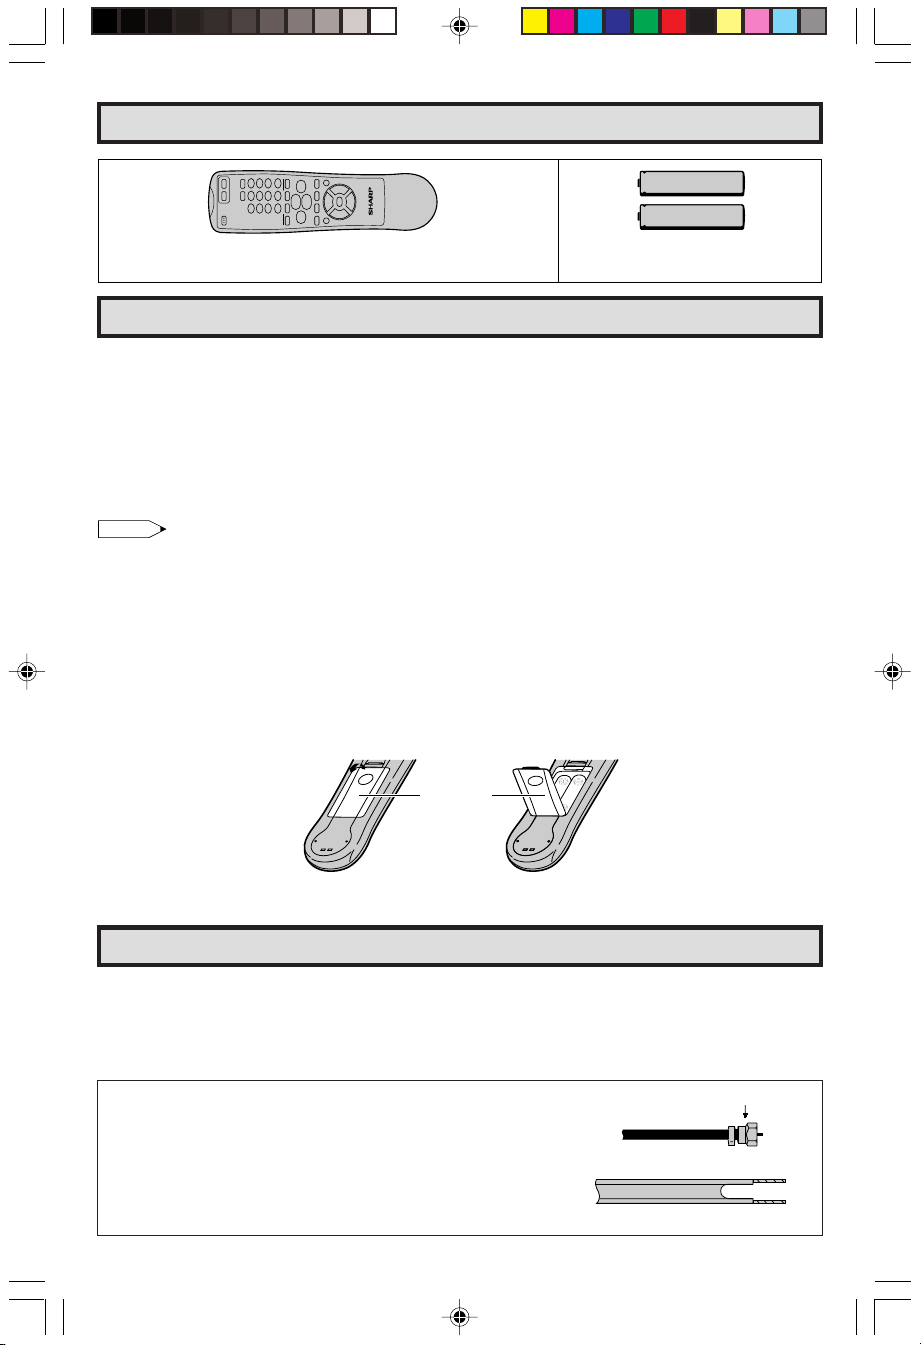
L Before using the television, prepare the Remote Control
To use the remote control, insert batteries first.
Insert the batteries
Pull up
Baterry
Cover
•
With your thumbnail, pull up the slit as indicated by the arrow to remove the back cover. Insert two batteries
(size “AA”/1.5 V cc). Be sure to match the battery e/d terminals with the e/d marks inside the compartment.
Antenna Connections
Antennas
• The antenna requirements for good color television reception are more important than those for black
& white television reception. For this reason, a good quality outdoor antenna is strongly recommended.
The following is a brief explanation of the type of connections that are provided with the various
antenna systems:
1. A 75 ohm system is generally a round cable with F-type
connector that can easily be attached to a terminal without
tools (not supplied).
2. A 300 ohm system is a flat “twin-lead” cable that can be
attached to a 75 ohm terminal through a 300-75 ohm
ADAPTOR (not supplied).
20F630[11-15].p65 25/3/03, 2:50 PM11
75-ohm coaxial cable (round)
300-ohm twin-lead cable (flat)
F-type connector
Dimension: 140mm x 215mm
11
Page 12
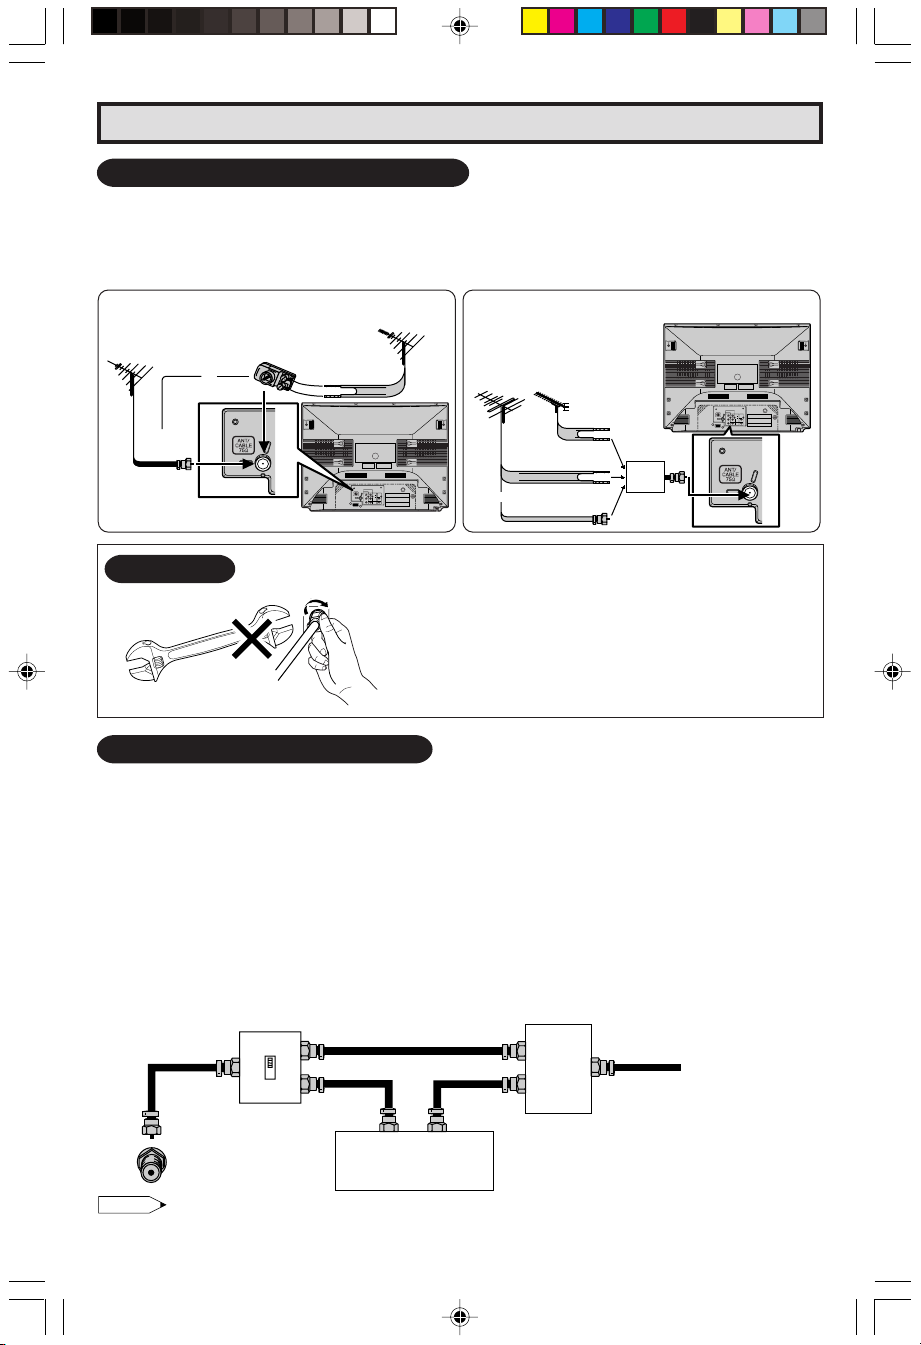
Antenna Connections (Continued)
OUTDOOR ANTENNA CONNECTION
• Use one of the following two diagrams if you connect an outdoor antenna.
A: Using a VHF/UHF combination outdoor antenna.
B: Using separate VHF and/or UHF outdoor antenna.
• Connect an outdoor antenna cable lead-in to the COAXIAL CABLE CONNECTOR on the rear of
the TV set.
A. Combination VHF/UHF Antennas
VHF/UHF ANTENNA
300-ohm
twin-lead
VHF/UHF ANTENNA
75-ohm
coaxial cable
or
300/75-ohm
ADAPTOR
(Not supplied)
IN 1
COMPONENT
LINE
R
Y
OUT
AUDIO
L
PB
R
VIDEO
PR
L
REAR OF TV
B. Separate VHF/UHF Antenna
VHF
ANTENNA
or
UHF
ANTENNA
300-ohm
twin-lead
300-ohm
twin-lead
75-ohm coaxial
cable
COMBINER
(not supplied)
IN OUT
REAR OF TV
IN 1
COMPONENT
LINE
R
Y
OUT
AUDIO
L
P
B
R
P
R
VIDEO
L
NOTICE
F-type connector
75-ohm coaxial cable
CABLE TV (CATV) CONNECTION
• A 75 ohm coaxial cable connector is built into the set for easy hookup. When connecting the 75 ohm
coaxial cable to the set, screw the 75 ohm cable to the COAXIAL CABLE CONNECTOR.
• Some cable TV companies offer “premium pay channels”. Since the signals of these premium pay
channels are scrambled, a cable TV converter/descrambler is generally provided to the subscriber by
the cable TV company. This converter/descrambler is necessary for normal viewing of the scrambled
channels. (Set your TV on channel 3 or 4. Typically one of these channels is used. If this is unknown,
consult your cable TV company.) For more specific instructions on installing cable TV, consult your
cable TV company. One possible method of utilizing the converter/descrambler provided by your
cable TV company is explained below.
Please note: RF switch equipped with position A/B (not provided) is required.
“A” position on the RF switch (not supplied): You can view all unscrambled channels using the TV’s
“B” position on the RF switch (not supplied): You can view the scrambled channels via the converter/
RF switch (not supplied)
A
OUT
IN
B
Note:
•
Consult your SHARP Dealer or Service Center for the type of splitter, RF switch or combiner that might be required.
12
F-type connector should be finger tightened only
When connecting the RF cable to the TV set, do not tighten
F-type connector with tools.
If tools are used, it may cause damage to your TV set.
(The breaking of Internal circuit, etc.)
channel keys.
descrambler using the converter’s channel keys.
Two-set
signal
splitter
(not
OUT
Cable TV converter/
descrambler
(not supplied)
IN
supplied)
Cable TV Line
20F630[11-15].p65 25/3/03, 2:50 PM12
Dimension: 140mm x 215mm
Page 13
Quick Reference Control Operation
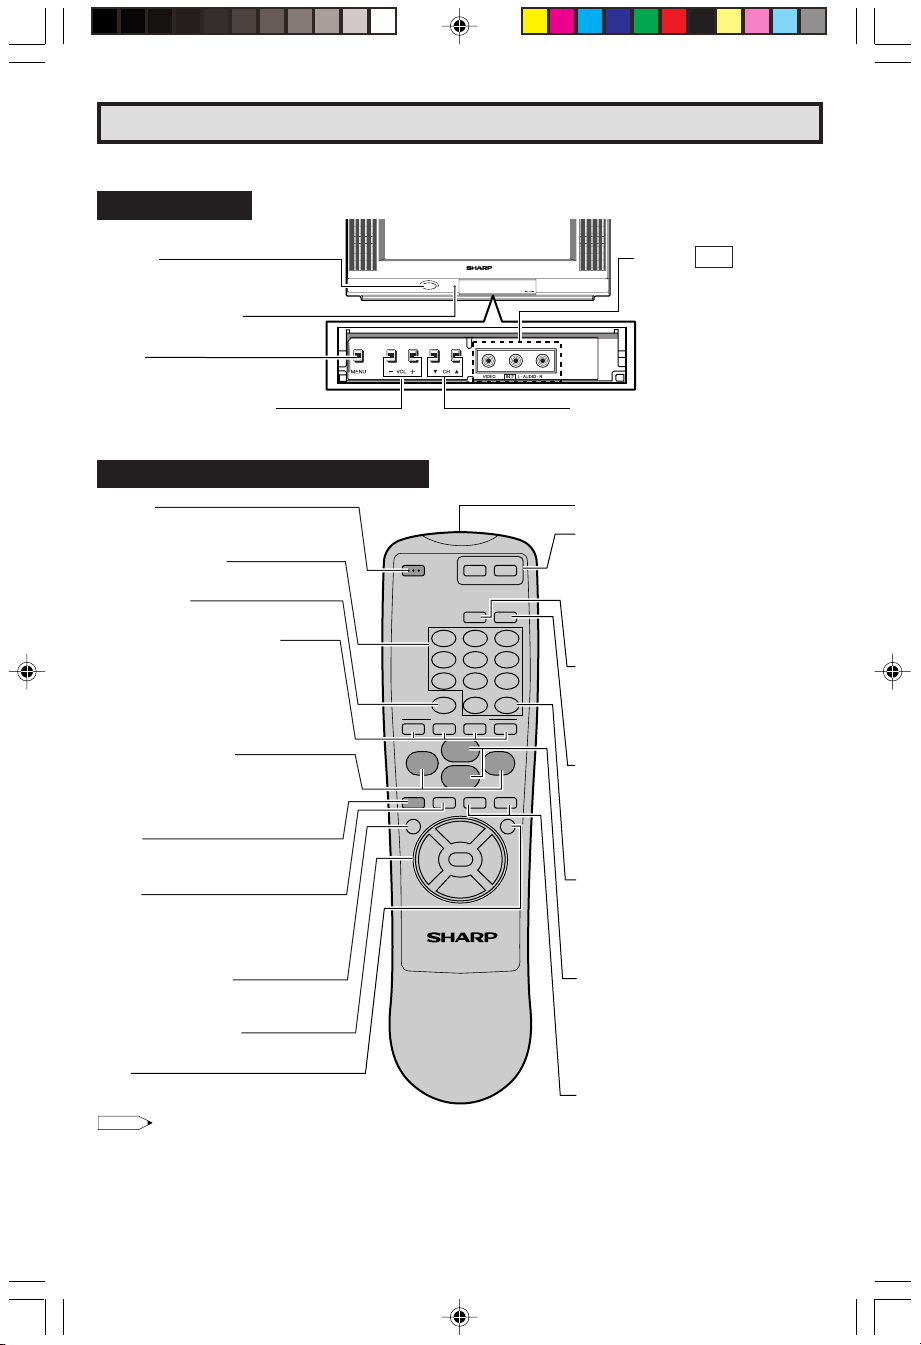
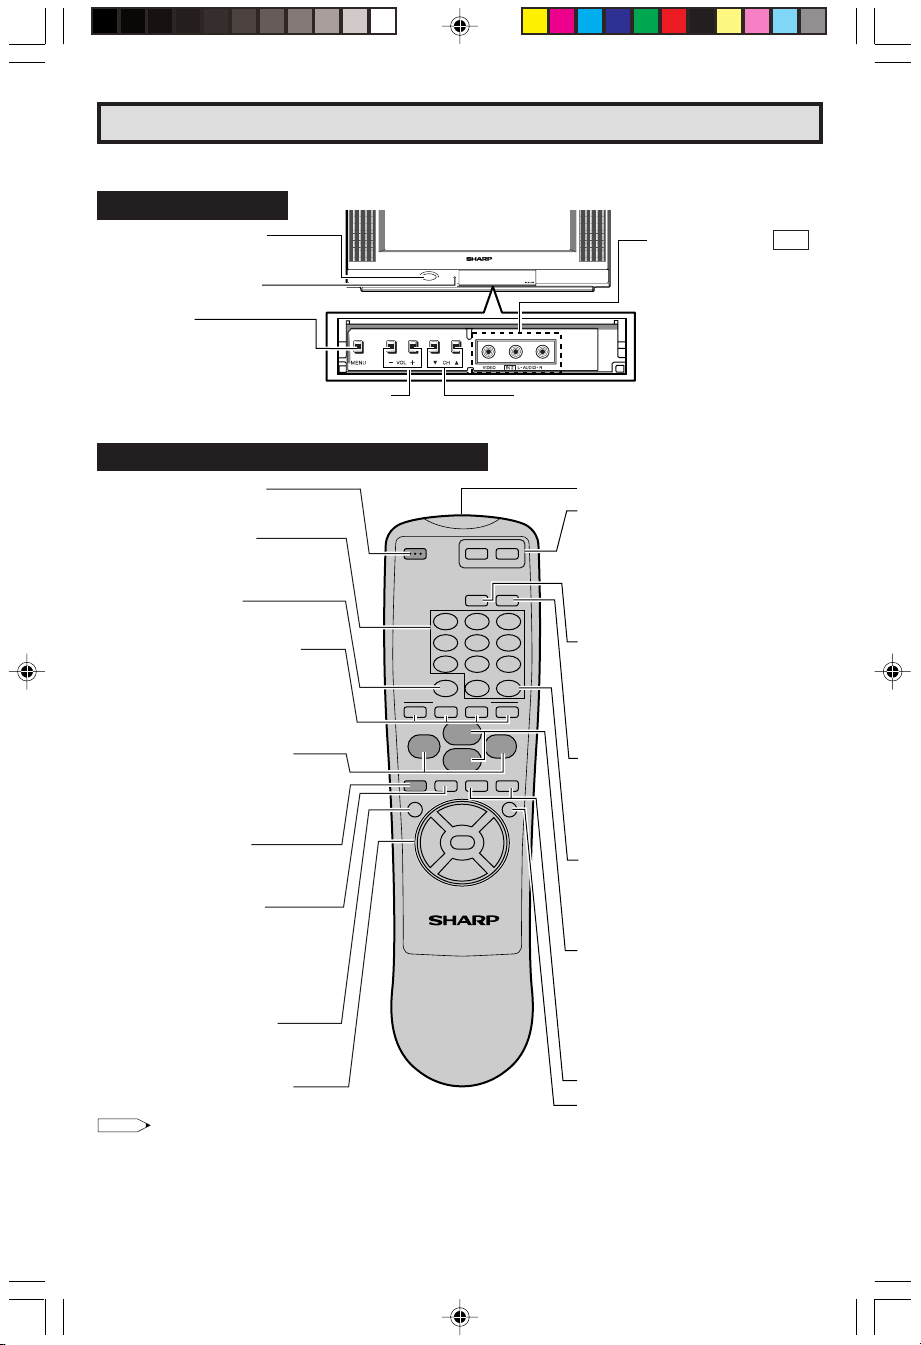
L Location of Controls (ENGLISH)
Front Panel
POWER
Press → On.
Press again → Off.
SENSOR AREA FOR
REMOTE CONTROL
MENU
Press → Accesses MAIN MENU.
Press again → Exits MAIN MENU.
VOLUME UP/DOWN
(+) Increases sound.
(–) Decreases sound.
CHANNEL UP/DOWN
(8) Selects next higher channel.
(9) Selects next lower channel.
VIDEO IN 2 L-AUDIO-R
(INSIDE DOOR)
Basic Remote Control Functions
POWER
Press → On.
Press again → Off.
REMOTE KEYPAD
Accesses any channel from keypad.
FLASHBACK
Returns to previous channel.
PERSONAL PREFERENCE
With the Personal Preference buttons,
you can program your favorite programs
by using the 4 categories A, B, C and
D. The channels can be accessed
quickly by using these buttons. (See
page 40.)
VOLUME UP/DOWN
(+) Increases sound.
(–) Decreases sound.
• In menu mode, changes or selects
the TV adjustments.
MENU
Press → Accesses MAIN MENU.
Press again → Exits MAIN MENU.
MUTE
Press → Mutes sound.
Press again → Restores sound.
• CLOSED CAPTION appears when
sound is muted.
POWER (DVD/VCR)
Press → On.
Press again → Off.
DVD/VCR CONTROL
See page 47.
POWER
MENU MUTEg SKIP
POWER (DVD/VCR)
CATV
TV
DVD VCR
DISPLAY
INPUT
321
654
987
CH
CH
PLAY
L
PAUSE
8
9
:
STOP
J
0
9
:
VCR-CH
FWD
)
ENTER
100
VOL
+
f
8
REC
FLASHBACK
PERSONAL PREFERENCE
ABCD
VOL
;
–
REW
(
TV • CATV • VCR • DVD
REC
Note:
• The above shaded buttons on the Remote Control glow in the dark. To use the glow-in-the-dark display on the
remote control, place it under a fluorescent light or other lighting.
• The phosphorescent material contains no radioactive or toxic material, so it is safe to use.
• The degree of illumination will vary depending on the strength of lighting used.
• The degree of illumination will decrease with time and depending on the temperature.
• The time needed to charge the phosphorescent display will vary depending on the surrounding lighting.
• Sunlight and fluorescent lighting are the most effective when charging the display.
Infrared Transmitter Window
CATV/DVD-TV/VCR MODE buttons
Press TV/VCR, sends power and
channel select commands (Channel up/
down and Random Access buttons) to
the TV and VCR control.
Press CATV/DVD, sends power and
channel select commands to a cable
TV converter and DVD control.
DISPLAY
Press → Displays receiving channel for
four seconds.
Press again → Removes display.
Temporarily displays receiving channel
•
when in Closed Caption mode.
INPUT
Press → Switch to external video INPUT
1 mode or COMPONENT mode.
Press 2 times → Switch to external
video INPUT 2 mode.
Press 3 times → Switch back to the
original TV mode. See page 45.
ENTER
Used in some instances where a Cable
Converter Box requires an “enter”
command after selecting channels,
when using the REMOTE KEYPAD
button. (See page 47)
CHANNEL UP/DOWN
(8) Selects next higher channel.
(9) Selects next lower channel.
• See pages 37 ~ 39 for channel
presetting.
• Moves the “ a ” mark of the MENU
screens.
SKIP/VCR-CH
13
20F630[11-15].p65 25/3/03, 2:50 PM13
Dimension: 140mm x 215mm
Page 14
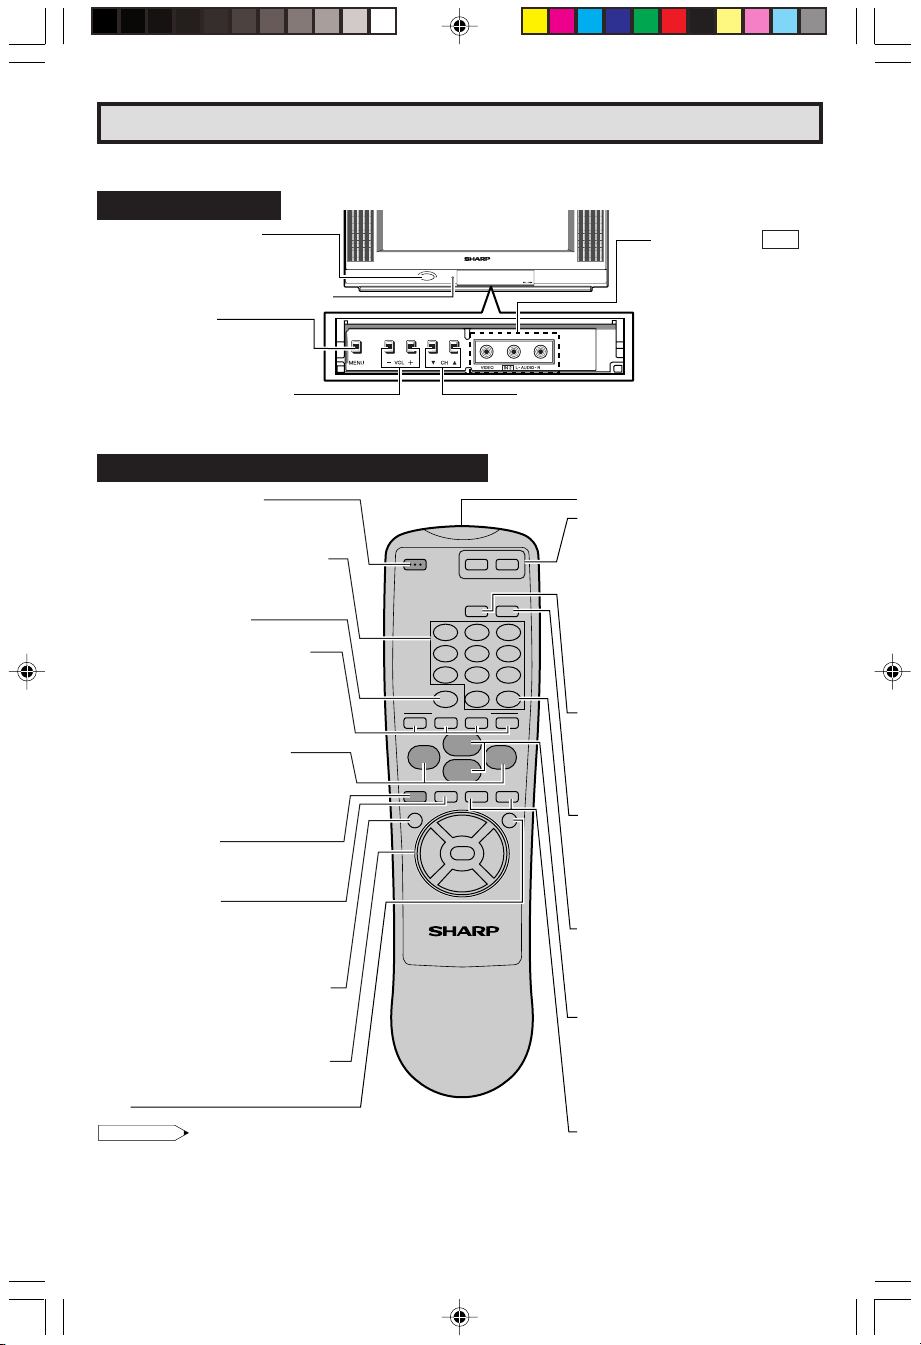
Referencia rápida de los controles de operación
L Ubicación de los controles (ESPAÑOL)
Panel Delantero
ALIMENTACION (POWER)
Pulsando → Enciende (On).
Pulsando nuevamente → Apaga (Off).
ZONA DEL SENSOR DEL
MANDO A DISTANCIA
MENU (MENU)
Pulsando → Accede al MENU
PRINCIPAL.
Pulsando nuevamente →
Sale del MENU PRINCIPAL.
AUMENTO/DISMINUCION DEL VOLUMEN (VOL)
(+) Aumenta el sonido.
(–) Disminuye el sonido.
CANAL SUPERIOR/INFERIOR (CH) – MENU
(8) Selecciona el siguiente canal superior.
(9) Selecciona el siguiente canal inferior.
Funciones Basicas Del Control Remoto
ALIMENTACION (POWER)
Pulsando → Enciende (On).
Pulsando nuevamente → Apaga (Off).
TECLADO A DISTANCIA
(REMOTE KEYPAD)
Para tener acceso a cualquier canal
empleando las teclas.
RETORNO AL CANAL
ANTERIOR (FLASHBACK)
Para volver al canal anterior.
PREFERENCIAS PERSONALES
Con los botones Personal Preference
puede programar sus programas favoritos
utilizando las cuatro categorías A, B, C y
D. Puede acceder a los canales
rápidamente utilizando estos botones.
(Consulte la página 40)
AUMENTO/DISMINUCION DEL
VOLUMEN (VOLUME UP/DOWN)
(+) Aumenta el sonido.
(–) Disminuye el sonido.
• En modo de MENU cambia o selecciona
el ajuste del televisor.
PREPARACION (MENU)
Pulsando → Accede al MENU PRINCIPAL.
Pulsando nuevamente → Sale del MENU
PRINCIPAL.
SILENCIAMIENTO (MUTE)
Pulsando → Silencia el sonido.
Pulsando nuevamente → Restaura el sonido.
• CLOSED CAPTION aparece
automáticamente cuando el sonido es
silenciado.
Siempre y cuando la transmisión tenga
esta señal.
ALIMENTACION (DVD/VCR)
[POWER (DVD/VCR)]
Pulsando → Enciende (On).
Pulsando nuevamente → Apaga (Off).
CONTROLES DEL DVD/VIDEO
Consulte la página 47.
POWER
MENU MUTEg SKIP
POWER (DVD/VCR)
CATV
DVD VCR
DISPLAY
INPUT
FLASHBACK
PERSONAL PREFERENCE
ABCD
VOL
;
–
REW
(
TV • CATV • VCR • DVD
CH
8
9
CH
PLAY
:
L
STOP
PAUSE
J
0
9
:
VCR-CH
FWD
)
ENTER
VOL
TV
321
654
987
100
+
f
8
REC
Nota:
• Los botones que arriba pueden verse sombreados en el Control Remoto lucen en la oscuridad. Para usar el visor del control
remoto que luce en la oscuridad, colocarlo bajo una luz fluorescente u otra fuente luminosa.
• El material fosforescente no contiene elementos radiactivos ni tóxicos, de modo que su uso no representa ningún peligro.
• El grado de iluminación variará de acuerdo con la potencia de la luz utilizada.
• El grado de iluminación irá decayendo con el tiempo y dependiendo de la temperatura.
• El tiempo necesario para cargar el visor fosforescente variará de acuerdo con la iluminación circundante.
• La luz del sol y la luz fluorescente son las más eficaces para la carga del visor.
Ventanilla del transmisor de infrarrojos
Botones DE TELEVISOR/TV POR
CABLE (TV-CATV)
Pulse TV/VCR, el mando envia los comandos
de alimentación y selección de canales
(botones de canal superior/inferior y de
acceso aleatorio) a un televisor.
Pulse CATV/DVD, envia los comandos de
alimentación y selección de canales a un
convertidor de TV por cable.
VISUALIZACION (DISPLAY)
Pulsando → Aparece el canal de
recepción por cuatro segundos.
Pulsando nuevamente → Elimina la
visualización.
• En el modo de “Closed Caption” se
ENTRADA (INPUT)
Pulsando → Cambia al modo de entrada
1 del vídeo externo o al modo.
Pulsando 2 veces → Cambia al modo de
entrada 2 del vídeo externo.
Pulsando 3 veces → Vuelve al modo TV
original. Consulte la página 45.
INTRODUCIR (ENTER)
Se utiliza en algunos casos en los cuales
una Caja de Inversor de Cable requiere una
orden “enter” después de seleccionar los
canales, al usar el teclado a distancia.
(Consulte la página 47)
CANAL SUPERIOR/INFERIOR
(CHANNEL UP/DOWN)
(8)
(9)
• Consulte las páginas 37 ~ 39 para
• En el modo de MENU, mueve la marca
SKIP/VCR-CH
REC
14
ENTRADA VIDEO IN 2
I-AUDIO-D
(POR DENTRO
DE LA PUERTA)
muestra el canal de recepción por un
corto tiempo.
Selecciona el siguiente canal superior.
Selecciona el siguiente canal inferior.
obtener información sobre el preajuste
de canales.
“ a ”.
20F630[11-15].p65 25/3/03, 2:51 PM14
Dimension: 140mm x 215mm
Page 15
Référence rapide sur les commandes
L Emplacement des touches (FRANÇAIS)
Panneau Avant
ALIMENTATION (POWER)
Appuyer → Pour mettre sous tension.
Appuyer de nouveau → Pour mettre hors
tension.
ZONE DE DETECTION DU CAPTEUR
RÈGLAGE (MENU)
Appuyer → Accès au MENU
PRINCIPAL.
Appuyer de nouveau → Sortie du
MENU PRINCIPAL.
AUGMENTATION/RÉDUCTION
DU VOLUME SONORE (VOL)
(+) Pour augmenter le volume du son.
(–) Pour diminuer le volume du son.
TOUCHES DES CANAUX CROISSANT/
DÉCROISSANT (CH) – MENU
(8)Sélectionne le canal supérieur suivant.
(9)Sélectionne le canal inférieur précédent.
Fonctions de base de la télécommande
ALIMENTATION (POWER)
Appuyer → Pour mettre sous tension.
Appuyer de nouveau → Pour mettre hors
tension.
PAVE NUMERIQUE DE COMMANDE
A DISTANCE (REMOTE KEYPAD)
Sélectionne directement le canal voulu sur
le pavé numérique.
RETOUR (FLASHBACK)
Rappelle le canal regardé précédent.
PREFERENCES PERSONNELLES
Grâce aux touches de préférence
personnelle, vous pouvez programmer vos
programmes préférés à l’aide des 4
catégories: A, B, C et D. Ces touches vous
permettent d’accéder rapidement à ces
canaux. (Voir page 40)
AUGMENTATION/RÉDUCTION DU
VOLUME SONORE (VOLUME UP/DOWN)
(+) Pour augmenter le volume du son.
(–) Pour diminuer le volume du son.
•
Pour changer ou sélectionner les
réglages du téléviseur en mode menu.
RÉGLAGE (MENU)
Appuyer → Accès au MENU PRINCIPAL.
Appuyer de nouveau → Sortie du MENU
PRINCIPAL.
SOURDINE (MUTE)
Appuyer → Mise en sourdine du son.
Appuyer de nouveau → Rétablissement
du son.
• CLOSED CAPTION apparaît lorsque
le son est mis en sourdine.
ALIMENTATION (DVD/VCR) [POWER
(DVD/VCR)]
Appuyer → Pour mettre sous tension.
Appuyer de nouveau → Pour mettre hors
tension.
COMMANDE DU LECTEUR DE DVD/
MAGNÉTOSCOPE
Voir page 47.
POWER
MENU MUTEg SKIP
POWER (DVD/VCR)
CATV
DVD VCR
DISPLAY
INPUT
FLASHBACK
PERSONAL PREFERENCE
ABCD
VOL
;
–
REW
(
TV • CATV • VCR • DVD
CH
8
9
CH
PLAY
:
L
STOP
PAUSE
J
0
9
:
VCR-CH
FWD
)
ENTER
VOL
TV
321
654
987
100
+
f
8
REC
REC
Remarque:
•
Les boutons ombrés de la télécommande illustrés ci-dessus brillent dans l’obscurité lorsque la télécommande a été placée sous une
ampoule fluorescente ou toute autre source lumineuse.
•
Le matériau phosphorescent n’est absolument pas toxique ou radioactif. Il peut donc être utilisé en toute sécurité.
•
Le degré d’illumination variera en fonction de l’intensité de la source d’éclairage.
•
Le degré d’illumination diminuera avec le temps, en fonction de la température.
•
Le temps requis pour charger les touches phosphorescentes dépendra de l’éclairage environnant.
•
Les rayons directs du soleil et les luminaires fluorescents constituent les meilleures sources de chargement des touches phosphorescentes.
Fenêtre d’émission du signal infrarouge
Touches DE MODE DE CÂBLOVISION/
DVD-TÉLÉVISION/MAGNÉTOSCOPE
(CATV/DVD-TV/VCR)
Appuyer sur la touche télévision/
magnétoscope (TV/VCR), permet de mettre
le téléviseur et le magnétoscope sous/hors
tension et de sélectionner ses canaux (touche de canaux en ordre croissant/décroissant
et d’accès direct).
Appuyer sur la touche câblovision/DVD
(CATV/DVD), permet de mettre un
convertisseur de téléviseur par câble et un
lecteur de DVD sous/hors tension et de
sélectionner ses canaux.
AFFICHAGE (DISPLAY)
Appuyer → Pour afficher le canal reçu
pendant quatre secondes.
Appuyer de nouveau → Pour faire
disparaître le canal.
• Pour afficher temporairement le canal
ENTRÉE (INPUT)
Appuyer → Pour sélectionner le mode
ENTRÉE 1 vidéo externe ou le mode
COMPOSANT.
Appuyer 2 fois → Pour sélectionner le
mode ENTRÉE 2 vidéo externe.
Appuyer 3 fois → Pour revenir au mode
TV initial. Voir page 45.
ENTRER (ENTER)
Parfois utilisée lorsqu’un convertisseur
nécessite l’introduction d’une commande
“enter” après la sélection de canaux à l’aide
du pavé numérique de commande à distance. (Voir page 47)
TOUCHES DES CANAUX CROISSANT/
DÉCROISSANT (CHANNEL UP/DOWN)
(8)
(9)
• Voir pages 37 ~ 39 pour prérégler les
• Déplace le curseur “ a ” sur l’écran du
SKIP/VCR-CH
ENTREE VIDEO IN 2
G-AUDIO-D
(DERRIÉRE LE VOLET)
reçu en mode Sous-titres.
Sélectionne le canal supérieur suivant.
Sélectionne le canal inférieur précedént.
canaux.
MENU.
15
20F630[11-15].p65 25/3/03, 2:51 PM15
Dimension: 140mm x 215mm
Page 16
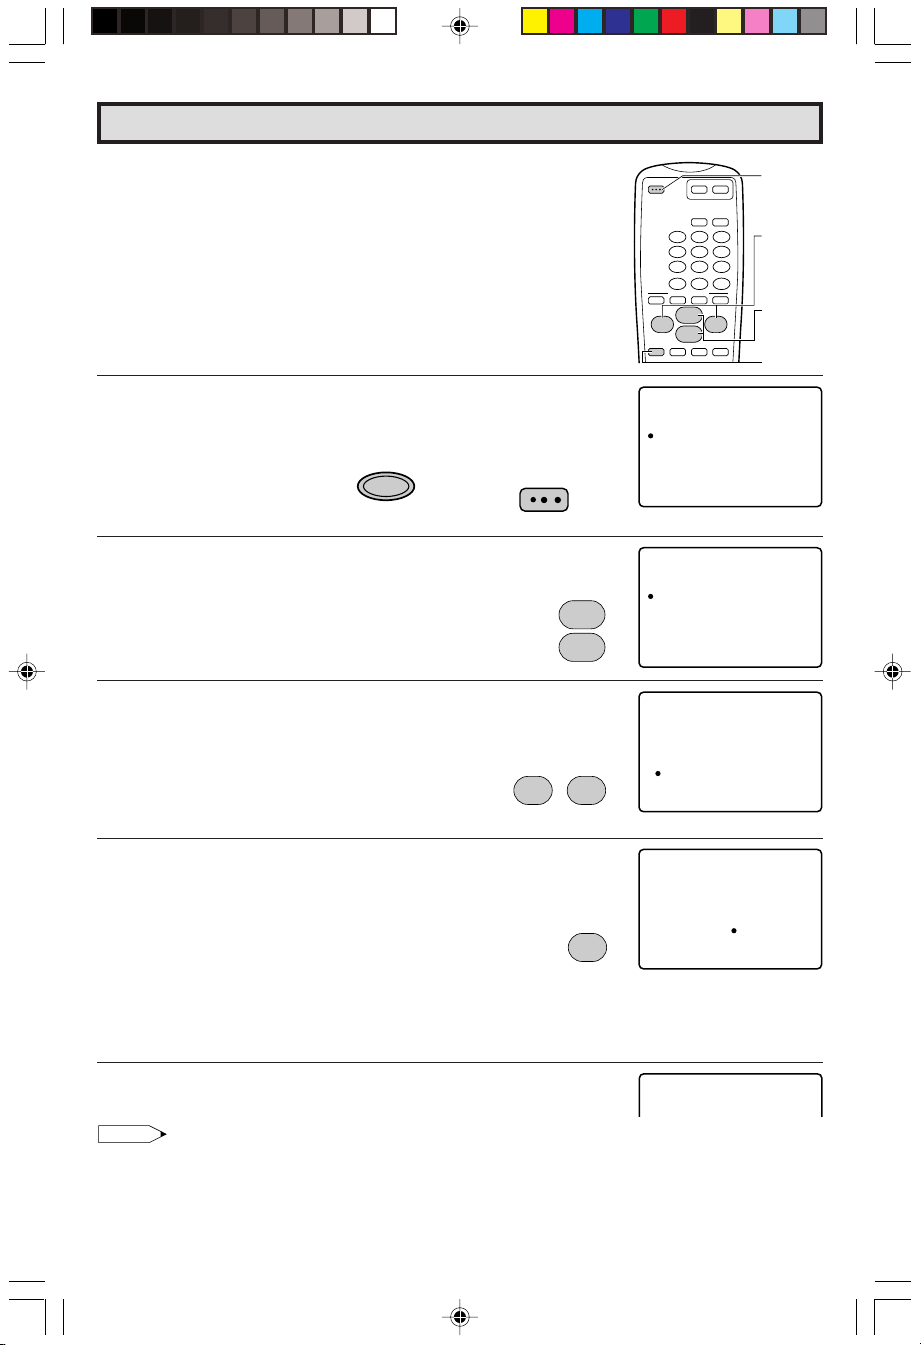
EZ SETUP during First Use
L When you turn on the TV for the first time, it will automatically
memorize the broadcast channels.
Please perform the following instructions before pressing the
POWER button.
(1) Insert the batteries into the remote control. (See page 11)
(2) Connect the antenna cable to the TV set. (See page 11 ~ 12)
(3) Plug in the AC POWER cord to the wall outlet.
1 Press
POWER
on the TV set or on the Remote Control to turn on
the TV. The SELECT LANGUAGE mode will be displayed.
(Remote Control)
POWER
2 Press
CH UP (8)
or
DOWN (9)
(On the Set)
to select “ENGLISH”, “SPANISH
(ESPAÑOL)” or “FRENCH (FRANCAIS)”.
CH
CH
3 Press
VOL (+)
or
(–)
to SET LANGUAGE and access EZ SETUP
mode.
VOL
:
;
–
INPUT
ENTER
VOL
POWER
TV
VOLUME
321
654
(+)/(–)
987
100
CHANNEL
UP (8)/
+
DOWN (9)
f
8
MENU
C
8 / 9
POWER
CATV
DVD VCR
DISPLAY
FLASHBACK
0
PERSONAL PREFERENCE
ABCD
CH
8
VOL
:
;
–
9
CH
MENU MUTEg SKIP
9
VCR-CH
POWER (DVD/VCR)
SE
LLAANG GEUECT
E
NGL SHI
E
SPA OLÑ
F
RAN A SIC
S
ELE T CH:
S
ET VOL+/ –:
(SELECT LANGUAGE mode)
SE
LLAANG GEUECT
E
NGL SHI
E
SPA OLÑ
F
8
9
VOL
+
RAN A SIC
S
ELE T CH:
C
S
ET VOL+/ –:
CO
NTANNT NA ORENE
C
CA
BLE
STE
ZARTSETUP?
S
TOP S ARTT
8 / 9
(EZ SETUP mode)
4 Press
VOL (+)
.
The tuner will automatically search for the broadcast
and cable TV channels. (The CH No. will automatically
increase when it appears.)
If you want to stop the EZ SETUP process once it has
started, press
VOL (–)
and it will be canceled.
PL
EWAITASE
AUR
VOL
:
+
S
R
OG GTO P
AMMI N
5
21
TOP S ARTT
If you want to SETUP again, please refer to page 36
on CH SETUP.
To cancel EZ SETUP
Press
VOL (–)
.
5 Once EZ SETUP is completed, the lowest channel number
memorized will be displayed.
2
Note:
• If EZ SETUP does not memorize all the channels in your region, please refer to page 37 for more
information on manually memorizing the channels using CHANNEL SETTING.
• It may be difficult to PRESET when the broadcast signals are weak, the channel cycle frequency is
incorrect or frequency jamming is occuring around the area. Please refer to pages 37 ~ 39 for more
information on manually memorizing the channels using CHANNEL SETTING.
16
20F630[16-20].p65 25/3/03, 2:53 PM16
Dimension: 140mm x 215mm
Page 17
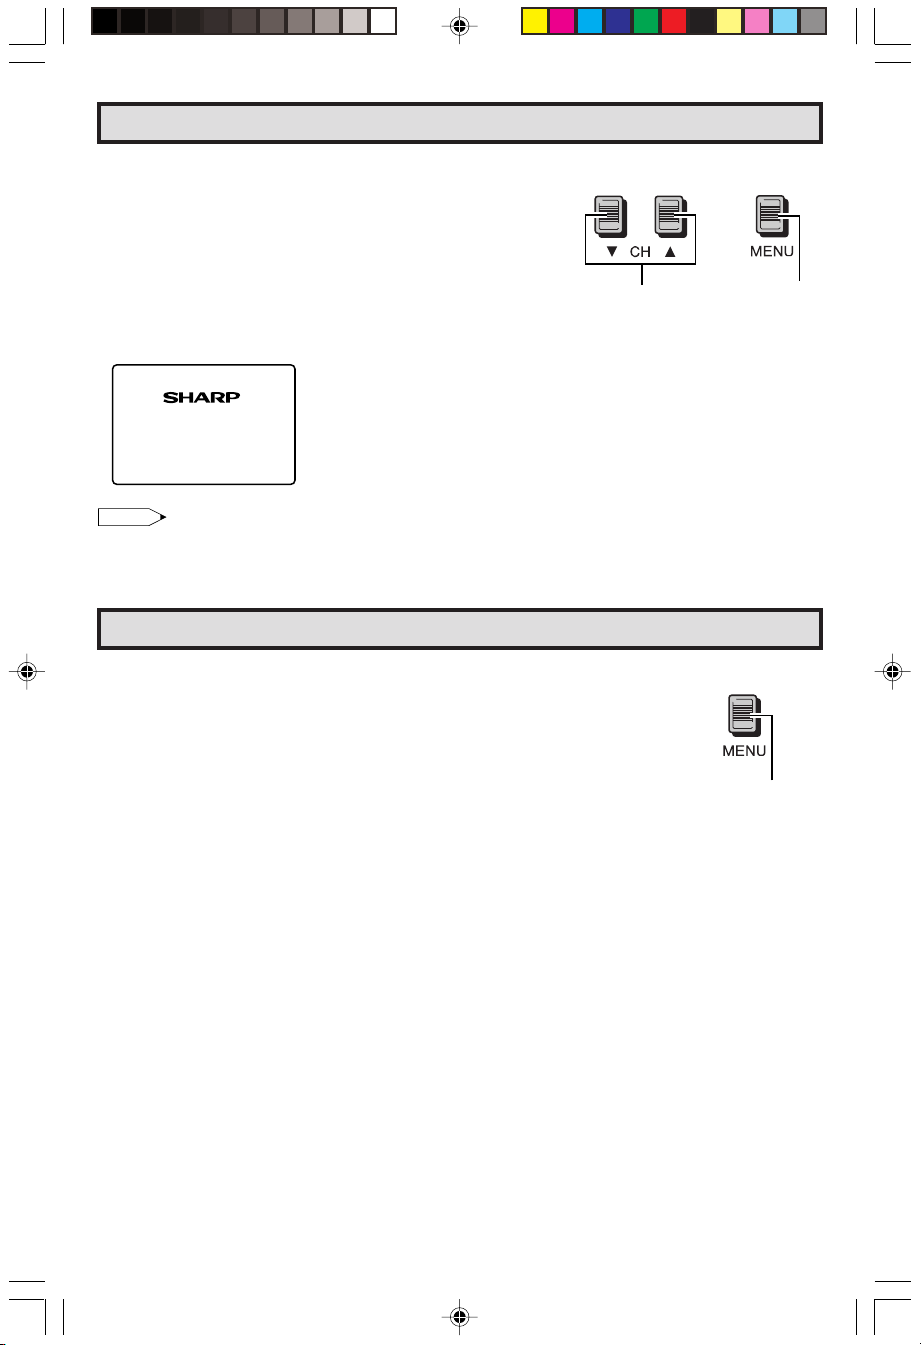
Demo Mode
• To quickly learn more about the TV set, press and hold for
more than three seconds both
MENU
on the TV set. The TV set will go into DEMO mode and
CH UP (8)
and
DOWN (9)
or
(On the Set)
briefly explain the various features.
• To cancel DEMO mode, again press and hold for more than
three seconds both
CH UP (8)
and
DOWN (9)
or
MENU
on
or
the TV set.
MENU
button
Example:
DEMO mode display
oem
ndd
SHARP
uc
PMrio
SHARP
CForm
CHANNEL
UP (8)/
DOWN (9)
buttons
s
t
s
Note:
• Without signal on COMPONENT IN, video input and antenna in, the DEMO mode cannot be activated.
Accessing the MAIN MENU screen without Remote Control
• If you misplaced your Remote Control you can still access most settings via
the MAIN MENU screen when you press
MENU
on the TV set.
• Some features of your TV set will not be accessible without the Remote Control.
If you lost your Remote Control, contact a Sharp Service Center for a
replacement.
(On the Set)
20F630[16-20].p65 25/3/03, 2:53 PM17
MENU
button
17
Dimension: 140mm x 215mm
Page 18

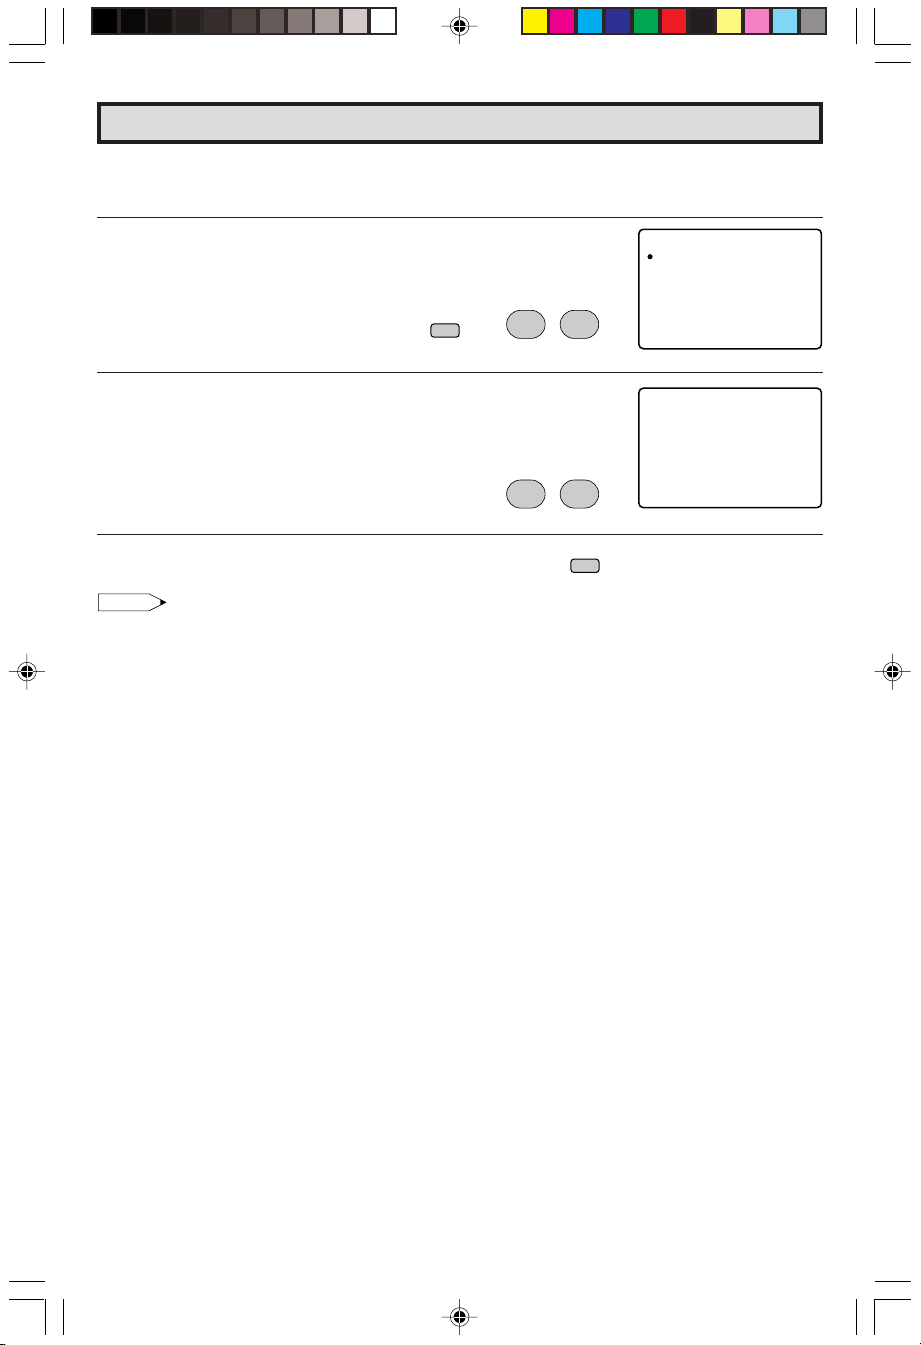
Language
L The language for the ON SCREEN DISPLAY can be set to ENGLISH, SPANISH or FRENCH.
L Setting the ON SCREEN DISPLAY Language.
1 Press
2 Press
3 Press
4 Press
MENU
to access the MAIN MENU screen.
CH UP (8)
VOL (+)
VOL (+)
or
DOWN (9)
or
(–)
to access SETUP mode.
or
(–)
to access LANGUAGE change mode.
to move the “a” mark to “SETUP”.
VOL
VOL
MENU
SLEEP T IMER
VIDEO ADJUST
AUD IO ADJ UST
AUD IO SEL ECT
MENU
CLOSED CAPT
PAREN
CH TSE UP
SETUP
TAL CON ROLT
ION
(MAIN MENU screen)
MENU
SLEEP T IMER
VIDEO ADJUST
AUD IO ADJ UST
CH
8
9
CH
VOL
:
;
–
+
AUD IO SEL ECT
CLOSED CAPT
PAREN
TAL CON ROLT
CH TSE UP
SETUP
SET PU
LANG GUA E
ENERGY SAVE
BLUE SCREEN
ION
(SETUP mode)
ANG GUA E
L
ENGL HIS
ESPAÑOL
FRAN A ICS
VOL
:
;
–
+
(LANGUAGE change mode)
5 Press
CH UP (8)
or
DOWN (9)
(ESPAÑOL)” or “FRENCH (FRANCAIS)”.
6 Press
MENU
to exit.
18
20F630[16-20].p65 25/3/03, 2:53 PM18
to select “ENGLISH”, “SPANISH
CH
8
9
CH
MENU
DIOMA
I
ENGL HIS
ESPAÑOL
FRAN A ICS
Dimension: 140mm x 215mm
Page 19
Sleep Timer
L You can preset your television to turn off automatically in increments of 30, 60, 90 or 120
minutes.
1 Press
2 Press
MENU
to access the MAIN MENU screen.
VOL (+)
or
(–)
to access SLEEP TIMER mode.
MENU
→
VOL
MENU
SLEEP T IMER
VIDEO ADJUST
AUD IO ADJ UST
AUD IO SEL ECT
CLOSED CAPT
VOL
:
;
–
+
PAREN
CH TSE UP
SETUP
TAL CON ROLT
ION
(MAIN MENU screen)
3 Press
VOL (+)
or
(–)
to set a sleep time of 30, 60, 90 or 120 minutes.
VOL
SLEEP T IMER
12 M0AREM NI
VOL
:
;
–
+
(SLEEP TIMER mode)
4 Press
MENU
to exit.
MENU
Note:
• To turn off the SLEEP TIMER, repeat the above SLEEP TIMER steps and select “– – – M REMAIN”
during step 3.
• While SLEEP TIMER is active, the time remaining will be briefly displayed on-screen at regular
intervals or when the remote’s DISPLAY key is pressed.
20F630[16-20].p65 25/3/03, 2:53 PM19
19
Dimension: 140mm x 215mm
Page 20

Video Adjust
MENU
Description of Adjustment Items
Selected VOL UP (+) button VOL DOWN (–) button
item
PICTURE To increase contrast To decrease contrast
TINT To make skin tones greenish To make skin tones purplish
COLOR To increase color intensity To decrease color intensity
BRIGHT To increase brightness To decrease brightness
SHARP To increase sharpness To decrease sharpness
COLOR To choose a MH, HIGH, LOW or ML COLOR TONE.
TEMP.
RESET To return all adjustments to factory preset levels.
PERSONAL PREFERENCE
ABCD
CH
8
VOL
:
;
–
9
CH
MENU MUTEg SKIP
9
VCR-CH
POWER (DVD/VCR)
VOLUME
(+)/(–)
CHANNEL
VOL
UP (8)/
+
DOWN (9)
f
8
MENU
1 Press
2 Press
MENU
to access the MAIN MENU screen.
CH UP (8)
or
ADJUST”.
3 Press
4 Press
VOL (+)
or
CH UP (8)
(–)
or
(Refer to the diagram below.)
VOL (+)
TINT
COLOR TEMP.
: CH DOWN (9)
or
(–)
PICTURE
RESET
: CH UP (8)
5 Press
DOWN (9)
to move the “a” mark to “VIDEO
to access PICTURE adjust mode.
VOL
DOWN (9)
COLOR
to select the desired mode.
BRIGHT
SHARP
to adjust the setting.
VOL
→
–
–
MENU
SLEEP T IMER
VIDEO ADJUST
AUD IO ADJ UST
CH
8
9
CH
AUD IO SEL ECT
CLOSED CAPT
PAREN
TAL CON ROLT
CH TSE UP
SETUP
ION
(MAIN MENU screen)
VOL
:
;
+
PICTURE
_______
27
(PICTURE adjust mode)
CH
8
9
CH
VOL
:
;
+
PICTURE
VOL UP (+)
increase contrast
VOL DOWN (–)
decrease contrast
_______
27
6 Repeat steps 4 to 5 to adjust other settings.
7 Press
MENU
to exit.
Note:
• VIDEO ADJUST setting is available for AIR or CABLE/INPUT 1/INPUT 2 and COMPONENT respectively.
20
20F630[16-20].p65 25/3/03, 2:53 PM20
MENU
Dimension: 140mm x 215mm
Page 21

Audio Adjust
MENU
Selected item VOL UP (+) button VOL DOWN (–) button
TREBLE To increase treble response To decrease treble response
BASS To increase bass response To decrease bass response
BALANCE To emphasize the right speaker’s volume To emphasize the left speaker’s volume
RESET To return all adjustments to factory preset levels.
1 Press
2 Press
MENU
to access the MAIN MENU screen.
CH UP (8)
or
ADJUST”.
3 Press
4 Press
VOL (+)
or
CH UP (8)
(–)
or
(Refer to the diagram below.)
TREBLE
5 Press
VOL (+)
BASS
or
(–)
DOWN (9)
to move the “a” mark to “AUDIO
to access TREBLE adjust mode.
DOWN (9)
BALANCE
to select the desired mode.
RESET
to adjust the setting.
VOL
VOL
→
–
–
MENU
SLEEP T IMER
VIDEO ADJUST
AUD IO ADJ UST
CH
8
9
CH
VOL
:
;
+
CH
8
9
CH
VOL
:
;
+
AUD IO SEL ECT
CLOSED CAPT
PAREN
CH TSE UP
SETUP
(MAIN MENU screen)
(TREBLE adjust mode)
TAL CON ROLT
TRE E 0BL
TRE E 0BL
ION
6 Repeat steps 4 to 5 to adjust other settings.
7 Press
20F630[21-25].p65 25/3/03, 2:55 PM21
MENU
to exit.
MENU
21
Dimension: 140mm x 215mm
Page 22

Audio Select
MENU
L MTS (Multichannel TV Sound)
This circuit allows reception of stereo or bilingual TV sound.
L INTERNAL SPEAKER SWITCH
This function turns the TV’s internal speakers “ON” or “OFF” when listening to sound from
external speakers by using the AUDIO OUTPUT JACKS on page 46.
L FAO (Fixed Audio Output)
This function turns the TV’s internal speakers “OFF” and allows fixed audio output from the
AUDIO OUTPUT JACKS on page 46. With FAO, the TV’s volume control is disabled.
1 Press
2 Press
MENU
to access the MAIN MENU screen.
CH UP (8)
or
DOWN (9)
SELECT”.
3 Press
4 Press
VOL (+)
or
CH UP (8)
(–)
to access AUDIO SELECT mode.
or
DOWN (9)
“SPEAKER” or “FAO”.
5 Press
VOL (+)
or
(–)
to select “STEREO”, “SAP” or “MONO” when
the “a” mark is at “MTS” position.
MTS
STEREO
SAP
SPEAKER
ON
OFF
MONO
6 Press
MENU
to exit.
to move the “a” mark to “AUDIO
CH
8
→
9
CH
to move the “a” mark to “MTS”,
CH
VOL
–
VOL
:
;
+
→
8
9
CH
FAO
ON
VOL
VOL
:
;
–
+
OFF
MENU
MENU
SLEEP T IMER
VIDEO ADJUST
AUD IO ADJ UST
AUD IO SEL ECT
CLOSED CAPT
PAREN
CH TSE UP
SETUP
(MAIN MENU screen)
AUD IO SEL ECT
MTS : SAP
SPEAKER :ON
FAO F:O F
(AUDIO SELECT mode)
AUD IO SEL ECT
MTS : STEREO
SPEAKER :ON
FAO F:O F
(AUDIO SELECT mode)
TAL CON ROLT
ION
Ex: Actual screen indicating ON AIR when receiving STEREO
broadcasts
Actual channel number
“← ON AIR” will appear next to STEREO or
SAP when receiving STEREO or SAP broadcasts.
22
20F630[21-25].p65 25/3/03, 2:55 PM22
12
STE EO ON A I RR
SAP ON A I R
MON O
(CHANNEL call on screen)
Dimension: 140mm x 215mm
Page 23

Audio Select (Continued)
L You can enjoy Hi-Fi stereo sound or SAP broadcasts where available.
• Stereo broadcasts
Live television transmission of sports, shows, concerts, etc. can be received in dynamic stereo
sound.
• SAP broadcasts
Television broadcast can be received with either MAIN or SAP sound.
MAIN sound: The normal program soundtrack. (Monaural or stereo where available.)
SAP sound: Second language, supplementary commentaries, etc. (SAP sound is monaural.)
L If stereo sound is difficult to hear.
• You can obtain clearer sound by manually switching to the fixed monaural mode.
Note:
• Once MONO mode is selected, the TV sound remains monaural even if the TV set receives a stereo
broadcast. You must switch the mode back to STEREO if you want to hear stereo sound again.
• MTS while in the INPUT mode does not change the type of sound; in this case, sound is determined
by the video source.
• If the “FAO” mode is selected “ON”, the “SPEAKER” mode will automatically turn “OFF”.
“SPEAKER” selecting will not affect “FAO ” mode.
20F630[21-25].p65 25/3/03, 2:55 PM23
23
Dimension: 140mm x 215mm
Page 24

Closed Caption
MENU
L HOW TO SET CLOSED CAPTION
• Your TV is equipped with an internal Closed Caption decoder. “Closed
Caption” is a system which allows you to view conversations, narration,
and sound effects in TV programs and home videos as subscript on
your TV screen as shown on the right.
• Not all the programs and videos will offer closed caption. Please look
for the “ ” symbol to ensure that captions will be shown.
• Closed Caption broadcast can be viewed in two modes: CAPTION
and TEXT. For each mode, two channels are available, CH1 and CH2:
The [CAPTION] mode subscripts dialogues and commentaries of TV
dramas and news programs while allowing clear view of the picture.
The [TEXT] mode displays over the picture other various information
(such as TV program schedule, weather forecast, etc.) that is
independent of the TV programs.
PERSONAL PREFERENCE
ABCD
CH
8
VOL
VOL
:
;
–
9
CH
MENU MUTEg SKIP
9
VCR-CH
POWER (DVD/VCR)
VOLUME
(+)/(–)
CHANNEL
+
UP (8)/
DOWN (9)
f
8
MENU
1 Press
2 Press
MENU
to access the MAIN MENU screen.
CH UP (8)
or
DOWN (9)
CAPTION”.
3 Press
4 Press
VOL (+)
or
CH UP (8)
(–)
to access CLOSED CAPTION setting mode.
or
DOWN (9)
“MODE” or “DATA”.
5 Press
VOL (+)
MODE: DATA:
or
CAPTION
TEXT
OFF
(–)
to change the CLOSED CAPTION setting.
to move the “a” mark to “CLOSED
CH
8
→
9
CH
VOL
VOL
:
;
–
+
to move the “a” mark to either
CH
8
9
CH
CH 1
CH 2
VOL
VOL
:
;
–
+
MENU
SLEEP T IMER
VIDEO ADJUST
AUD IO ADJ UST
AUD IO SEL ECT
CLOSED CAPT
PAREN
CH TSE UP
SETUP
TAL CON ROLT
ION
(MAIN MENU screen)
CLOSED CAPT ION
MODE : C AP
DATA :CH1
TION
(CLOSED CAPTION setting mode)
CLOSED CAPT ION
MODE : C AP
DATA :CH1
CLOSED CAPT ION
MODE : C AP
DATA :CH1
TION
TION
6 Press
MENU
to exit.
MENU
Note:
•
If a broadcast has CLOSED CAPTION and the
automatically. Pressing
•
CLOSED CAPTION may malfunction (white blocks, strange characters, etc.) if signal conditions are poor or if
MUTE
again will return the set to its previous condition.
MUTE
button is pressed, the set enters [CAPTION] mode
there are problems at the broadcast source. This does not necessarily indicate a problem with your TV.
•
If any button is pressed to call up the ON SCREEN DISPLAY while viewing a CLOSED CAPTION broadcast, the
CLOSED CAPTION will disappear momentarily.
•
When viewing in TEXT mode, if no TEXT broadcast is being received, for some programs the screen may
become dark and blank. Should this occur, set the CLOSED CAPTION mode to “OFF”.
24
20F630[21-25].p65 25/3/03, 2:55 PM24
Dimension: 140mm x 215mm
Page 25

Parental Control (V-CHIP Operation)
1. User setting 2. Block table
PG
age
base
not to
block
not to
block
not to
block
Select
block
autoblock
autoblock
G
G
PG
PG-13
R
NC-17
X
– – – – –
– – – – –
– – – – –
BLOCK
BLOCK
BLOCK
PG-13
R
NC-17
X
L V-CHIP
• This function allows you to restrict TV programs and also allows you to control TV usage based on
FCC data. This function is to prevent your children from watching violence or sexual scenes that may
be harmful.
• Restriction of TV programs includes two characters that contain information about the program’s
MPAA rating and the TV Parental Guidelines. MPAA is restricted by age. TV Parental Guidelines are
restricted by age and contents.
• Since a TV program may use either the MPAA rating or the TV Guidelines you should adjust both for
complete control.
[1] MPAA RATING
RATING
G GENERAL AUDIENCES. All ages admitted.
PG PARENTAL GUIDANCE SUGGESTED. Some material may not be suitable for
age PG-13 PARENTAL STRONGLY CAUTIONED. Some material may be inappropriate
base for children under 13.
R RESTRICTED. Under 17 requires accompanying parent or adult guardian.
NC-17 NO ONE 17 AND UNDER ADMITTED.
X X Rating is an older rating that is unified with NC-17 but may be encoded on
• MPAA RATING (Example)
Example 1.
“PG-13” in the age based RATING is blocked,
this will automatically block the high ratings
“R”, “NC-17”, “X” also.
1. User setting 2. Block table
G
– – – – –
PG
– – – – –
BLOCK
PG-13
BLOCK
R
BLOCK
NC-17
BLOCK
X
children.
older movie’s data.
not to
G
block
not to
PG
block
Select
PG-13
age
base
R
NC-17
X
block
auto-
block
auto-
block
auto-
block
Example 2.
“R” in the age based RATING is blocked, this
will automatically block the high rating “NC-
17”, “X” also.
Note:
• MPAA RATING is only age based ratings.
[2] TV PARENTAL GUIDELINES
TV-Y (All children) V –––––
TV-Y7 (Direct to Older Children) V ––––V
E
TV-G (General Audience) V –––––
Age TV-PG (Parental Guidance
base Suggested)
TV-14 (Parents Strongly
D
Cautioned)
20F630[21-25].p65 25/3/03, 2:55 PM25
TV-MA (Mature Audience Only) V – VVV –
V : Content Rating can be set.
– : Content Rating cannot be set (not normally broadcast by TV station).
RATING
content base
y
x
AGE D L S V FV
(Sexually (Adult (Sexual (Violence) (Fantasy
Suggestive Language) Situation) Violence)
Dialog)
VV V V V –
VV V V V –
Dimension: 140mm x 215mm
25
Page 26

Parental Control (V-CHIP Operation Continued)
• TV-PARENTAL GUIDELINES (Example)
Example 1.1 : Age Based setting
Go through all select ratings and select unblocked for “AGE”.
This will automatically unblock everything.
Example 1.2 : Age Based setting
For “TV-G” select “BLOCK” for “AGE”. This will automatically block the
higher age ratings “TV-PG”, “TV-14” and “TV-MA” as well as
“TV-G”.
Furthermore, the content ratings “D”, “L”, “S”, “V”, “FV” are automatically
blocked as well for “TV-PG”, “TV-14” and “TV-MA” as well as “TV-G”.
Example 2.1 : Content Based setting
For “TV-PG”, “TV-14” and “TV-MA” select unblocked for each content
ratings (“D”, “L”, “S”, “V”, “FV”) by leaving “AGE” unblocked for
“TV-PG”, “TV-14” and “TV-MA”. If you choose to unblock for each one in
content base.
Example 2.2 : Content Based setting
Then for “TV-PG” and select “BLOCK” for only “V” (Violence). This will
automatically block the higher ratings “TV-14-V” and “TV-MA-V”
(“TV-14” and “TV-MA” for Violence content only).
Please note that with these settings blocking does NOT occur. If a program
is rated only “TV-MA”; it must be rated “TV-MA-V” to be blocked.
Example 3 : Reset an Age Based setting
For “TV-14” and select again “BLOCK” for “AGE”.
This will again automatically block the content ratings “D”, “L”, “S”, “V”,
“FV” for “TV-MA” as well as “TV-14”.
Please note that the lower age rating “TV-PG” did not change from its
previous settings.
TV– Y –– –––
TV– Y7
TV– G
TV GP–
TV– 41
TV– AM
RET RNU
TV– Y –– –––
TV– Y7
TV– G
TV GP–
TV– 41
TV– AM
RET RNU
TV– Y –– –––
TV– Y7
TV– G
TV GP–
TV– 41
TV– AM
RET RNU
TV– Y –– –––
TV– Y7
TV– G
TV GP–
TV– 41
TV– AM
RET RNU
TV– Y –– –––
TV– Y7
TV– G
TV GP–
TV– 41
TV– AM
RET RNU
EDLSVFVGA
––––
–––––
–
V:BLOCK
EDLSVFVGA
––––
–––––
V
V V V V V –
V
V V V V –
–
V V V –
V
V:BLOCK
EDLSVFVGA
––––
–––––
–
V:BLOCK
EDLSVFVGA
––––
–––––
V –
V –
–
V –
V:BLOCK
EDLSVFVGA
––––
–––––
V
V V V V –
V V V –
–
V
V:BLOCK
–
–
–
–
–
–
–
Note:
• Content ratings can be modified but only in the combinations indicated by an V in the table on page
25.
• Changing a lower age rating’s content setting to “BLOCK” automatically changes the same higher
age rating’s content setting to “BLOCK” regardless of their previous settings.
• Changing a lower rating’s “AGE” setting to “BLOCK” automatically changes all higher ratings to “BLOCK”
regardless of their previous settings.
• Any rating’s “AGE” set to unblocked must have its content settings individually set.
[3] ADDITIONAL MODE
Besides the above “MPAA RATINGS” and “TV PARENTAL GUIDELINES” new ratings system’s data
can be downloaded when they become available. (See page 29.)
26
20F630[26-30].p65 25/3/03, 2:57 PM26
Dimension: 140mm x 215mm
Page 27

Parental Control (V-CHIP Operation Continued)
MENU
L HOW TO SET V-CHIP
[1] MPAA RATING
1 Press
2 Press
MENU
to access the MAIN MENU screen.
CH UP (8)
“PARENTAL CONTROL”.
3 Press
4 Press
press
VOL (+)
VOL (+)
VOL (+)
or
or
or
(–)
(–)
(–)
or
DOWN (9)
to move the “a” mark to
CH
8
→
9
CH
to access PARENTAL CONTROL mode.
VOL
VOL
:
;
–
+
to access V-CHIP BLOCK select mode, then
to select “MPAA RATING”.
VOL
VOL
:
;
–
+
→
VOL
VOL
:
;
–
+
REMOTE
321
KEYPAD
654
987
FLASHBACK
ENTER
VOLUME
100
0
PERSONAL PREFERENCE
ABCD
CH
8
VOL
:
;
–
9
CH
MENU MUTEg SKIP
9
VCR-CH
POWER (DVD/VCR)
MENU
SLEEP T IMER
VIDEO ADJUST
AUD IO ADJ UST
AUD IO SEL ECT
CLOSED CAPT
PAREN
TAL CON ROLT
CH TSE UP
SETUP
(+)/(–)
CHANNEL
VOL
+
UP (8)/
DOWN (9)
f
8
MENU
ION
(MAIN MENU screen)
PARENT CONTOLAL
V –CH I P B LOCK
VIEW TIMER
(PARENTAL CONTROL mode)
V –CH IP OCKLB
MPA A
TV UGI
DEL INES
OP OINT
SEC ERT ––No .
STA UTSO:FF
: ––
(V-CHIP BLOCK select mode)
5 Press
CH UP (8)
then press
or
VOL (+)
DOWN (9)
or
(–)
to move the “a” mark to “PG”,
to select BLOCK. If you set “PG” to
BLOCK, “PG-13”, “R”, “NC-17” and “X” are automatically blocked.
CH
6 Press
then press
CH UP (8)
VOL (+)
or
DOWN (9)
or
(–)
8
9
CH
to move the “a” mark to "RETURN",
to exit V-CHIP BLOCK select mode.
CH
8
9
CH
→
→
VOL
VOL
VOL
:
;
–
–
+
VOL
:
;
+
Note:
Ex.
• If you set “G” to BLOCK , all RATING are automatically blocked.
• If you set “X” to BLOCK, “G”, “PG”, “PG-13”, “R” and “NC-17” are not blocked.
20F630[26-30].p65 25/3/03, 2:57 PM27
Dimension: 140mm x 215mm
MPA A
G
PG
PG 31–
R
N
X
RET RNU
MPA A
G
PG
PG 31–
R
N
X
RET RNU
C – 71
C – 71
–
–
–
–
:
–
L
K
C
O
:
B
L
K
C
O
:
B
L
K
C
O
:
B
L
K
C
O
:
B
L
K
C
O
:
B
–
–
–
–
:
–
L
K
C
O
:
B
L
K
C
O
:
B
L
K
C
O
:
B
L
K
C
O
:
B
L
K
C
O
:
B
27
Page 28

Parental Control (V-CHIP Operation Continued)
[2] TV GUIDELINES
1 Repeat steps 1 to 3 of [1] MPAA RATING.
2 Press
3 Press
4 To change CONTENT SETTING, press
5 Press
VOL (+)
or
(–)
press
CH UP (8)
to access V-CHIP BLOCK select mode, then
or
DOWN (9)
to move the “a” mark to “TV
GUIDELINES”.
VOL (+)
VOL
or
(–)
to access TV GUIDELINES mode.
VOL
:
;
–
CH UP (8)
to move the “a” mark to the desired rating and then press
or
(–)
to select.
CH UP (8)
or
DOWN (9)
content and then press
unblock (“– – – – –”).
to move the “a” mark to the desired
VOL (+)
or
CH
8
→
9
CH
(–)
to select either “BLOCK” or
CH
8
→
9
CH
+
VOL
or
VOL
VOL
CH
8
→
9
CH
VOL
:
;
–
DOWN (9)
VOL (+)
VOL
:
;
–
VOL
:
;
–
V –CH IP OCKLB
MPA A
TV UGI
DEL INES
OP OINT
SEC ERT ––No .
STA UTSO:FF
: ––
(V-CHIP BLOCK select mode)
TV– Y –– –––
TV– Y7
TV– G
TV GP–
TV– 41
TV– AM
+
RET RNU
EDLSVFVGA
V
–––––
V
V V V V V –
V
V V V V –
V V V –
–
V
V:BLOCK
V––––
(TV GUIDELINES mode)
+
TV– Y7
L
K
C
O
:
AGE
D
L
S
+
V
FV
RET RNU
B
–
–
–
–
:
–
–
–
–
–
:
–
–
–
–
–
:
–
–
–
–
–
:
–
L
K
C
O
:
B
(CONTENT RATING mode)
6 Press
CH UP (8)
then press
or
VOL (+)
DOWN (9)
or
(–)
to move the “a” mark to "RETURN",
to return to TV GUIDELINES mode.
CH
8
→
9
CH
VOL
;
–
7 Repeat steps 4 to 5 until all ratings and their contents are set.
8 When done, press
28
20F630[26-30].p65 25/3/03, 2:57 PM28
MENU
to exit.
TV– Y –– –––
TV– Y7
TV– G
V
V V V V V –
TV GP–
V
VOL
:
+
MENU
TV– 41
TV– AM
RET RNU
V
Dimension: 140mm x 215mm
EDLSVFVGA
––––
–––––
V V V V –
V V V –
–
V:BLOCK
Page 29

Parental Control (V-CHIP Operation Continued)
[3] ADDITIONAL MODE (DOWNLOAD)
There will be an additional new rating system. In that case, please set up as follows.
Subsequently the new rating system will set up automatically.
1 Repeat steps 1 to 3 of [1] MPAA RATING.
2 Press
3 Press
4 Press
• DOWNLOAD V-CHIP DATA
press
8
)
or
(
press
VOL (+)
or
CH UP (8)
VOL (+)
or
DOWN (9)
VOL (+)
or
MENU
to exit.
(–)
to access V-CHIP BLOCK select mode, then
or
DOWN (9)
(–)
to access OPTION mode, then press
to move the “a” mark to “OPTION”.
VOL
–
to move the “a” mark to “DOWNLOAD”, then
(–)
to “DOWNLOAD : ON”.
VOL
VOL
:
;
–
+
V –CH IP OCKLB
MPA A
TV UGI
DEL INES
OP OINT
SEC ERT ––No .
CH
→
8
9
CH
VOL
:
;
+
CH UP
CH
8
9
CH
VOL
→→
VOL
:
;
–
+
MENU
STA UTSO:FF
(V-CHIP BLOCK select mode)
OPT ION
DOWNLO
RETURN
FLASHBACK
PERSONAL PREFERENCE
ABCD
VOL
;
–
MENU MUTEg SKIP
POWER (DVD/VCR)
: ––
AD: ON
(OPTION mode)
321
654
987
ENTER
100
0
CH
8
VOL
:
+
9
CH
f
9
VCR-CH
8
REMOTE
KEYPAD
VOLUME
(+)/(–)
CHANNEL
UP (8)/
DOWN (9)
MENU
1 If you watch the program containing “New Rating System Data”,
the DOWNLOAD screen will be displayed.
PLEASE WA IT
NOW DOWNLOAD ING
V – CH IP DATA
(DOWNLOAD screen)
2 The DOWNLOAD screen will disappear, once downloading is
finished.
Note:
• DOWNLOAD will not start, if you do not watch a program containing “New Rating System Data”.
20F630[26-30].p65 25/3/03, 2:57 PM29
Dimension: 140mm x 215mm
29
Page 30

Parental Control (V-CHIP Operation Continued)
• How to set Additional mode (Example)
1 Repeat steps 1 to 2 of [3] ADDITIONAL MODE.
2 Press
CH UP (8)
or
DOWN (9)
English Ratings”, then press
to move the “a” mark to “Cdn.
VOL (+)
or
(–)
CH
8
9
CH
.
VOL
→
–
VOL
:
;
+
3 You can select “BLOCK” or “– – – – –” (unblock) from each RATING
mode by pressing
CH UP (8)
or
DOWN (9)
and
VOL (+)
CH
8
→
9
CH
VOL
or
(–)
VOL
:
;
–
+
4 You can select “BLOCK” or “– – – – –” (unblock) from each RATING
mode by pressing
CH UP (8)
you select “Cdn. French Ratings” in step 2.
or
DOWN (9)
and
VOL (+)
CH
8
→
9
CH
VOL
or
(–)
VOL
:
;
–
+
OPT ION
Cdn. Engl ish Ratings
Cdn . F ren ch Rat in gs
DOWNLO
AD: ON
RETURN
(After download the rating data)
ANADI
C
A
NENGLISH
C
.
C8+
G
PG
14+
18+
RETUR
N
THRES
(
HOL D B LOCK )
(ENGLISH THRESHOLD BLOCK
ANADI
C
G
if
8ans+
RETUR
THRES
(
(FRENCH THRESHOLD BLOCK
A
31ans+
61ans+
81ans+
N
HOL D B LOCK )
mode)
N FRENCH
mode)
Note:
• In additional mode
Including two types (English mode, French mode), altogether you are able to download 4 different
modes.
–: ––––
–: ––––
–: ––––
–: ––––
–: ––––
B:LOCK
–: ––––
–: ––––
–: ––––
–: ––––
B:LOCK
30
20F630[26-30].p65 25/3/03, 2:57 PM30
Dimension: 140mm x 215mm
Page 31

Parental Control (V-CHIP Operation Continued)
L Turning On (Activating) the V-Chip Blocks
1 Repeat steps 1 to 3 of [1] MPAA RATING.
2 Press
3 Enter a 4-digit SECRET No. using the
4 Press
5 When done, press
VOL (+)
or
(–)
press
CH UP (8)
to access V-CHIP BLOCK select mode, then
or
DOWN (9)
to move the “a” mark to “SECRET
No.”.
REMOTE KEYPAD
CH UP (8)
then press
VOL (+)
or
DOWN (9)
or
(–)
to move the “a” mark to “STATUS”,
to activate the V-CHIP BLOCK. (If STATUS
is OFF, V-CHIP BLOCK will not operate.)
MENU
to exit.
VOL
–
CH
→
8
9
CH
VOL
:
;
+
.
0
CH
8
9
CH
→
VOL
VOL
:
;
–
+
MENU
V –CH IP OCKLB
MPA A
TV UGI
OP OINT
SEC ERT ––No .
STA UTSO:FF
(V-CHIP BLOCK select mode)
V –CH IP OCKLB
MPA A
TV UGI
321
654
987
OP OINT
SEC ERT 34No .
STA UTSO:FF
V –CH IP OCKLB
MPA A
TV UGI
OP OINT
SEC ERT 34No .
STA UTSO:FF
L To cancel the V-CHIP BLOCK screen while V-CHIP BLOCK has been activated.
1 “V-CHIP HAS BEEN ACTIVATED” will be displayed if you view a
program containing Program Rating data as same as you
configured.
Note:
• “V-CHIP HAS BEEN ACTIVATED” will not be displayed if STATUS is
not configured to “ON”.
V –CIHP
AC VIAETDT
TV– Y7
FV
DEL INES
: ––
DEL INES
:12
DEL INES
:12
HAS BEEN
23
2 Press
3 Enter the 4-digit SECRET No. using the
MENU
, then “INPUT SECRET No.” will be displayed.
MENU
REMOTE KEYPAD
, then
V-CHIP BLOCK temporarily will be canceled. If the wrong SECRET
INP TUS
INP TUSE ECR T oN.
No. is chosen, “SECRET No. IS INCORRECT” will be displayed.
Input the SECRET No. again in this case.
Note:
321
654
987
0
• If you turn the power from OFF, the V-CHIP BLOCK will automatically reset to ON again.
20F630[31-35].p65 25/3/03, 2:59 PM31
Dimension: 140mm x 215mm
EECR T oN.
––––
∗∗∗∗
31
Page 32

Parental Control (V-CHIP Operation Continued)
L To change the V-CHIP BLOCK setting. (Secret No. is registered.)
1 Repeat steps 1 to 3 of [1] MPAA RATING, then “INPUT SECRET
No.” will be displayed.
2 Enter the 4-digit “INPUT SECRET No.” using the
KEYPAD
configuration of the V-CHIP BLOCK.
and the V-CHIP select mode will be displayed. Repeat
REMOTE
321
654
987
0
INP TUS
EECR T oN.
––––
INP TUSE ECR T oN.
∗∗∗∗
L If you forget or need to change your Secret No., clear the original Secret No. and set up a
new one.
1 Repeat steps 1 to 3 of [1] MPAA RATING, or 1 to 2 of [L To cancel
the V-CHIP BLOCK screen while V-CHIP BLOCK has been
activated], then “INPUT SECRET No.” will be displayed.
2 Press and hold both
VOL (+)
and
CH UP (8)
on the TV set
simultaneously until the message “INPUT SECRET No.” disappears.
(On the Set)
VOL (+)/CH UP (,)
buttons
3 Press the
MENU
button to exit.
32
20F630[31-35].p65 25/3/03, 2:59 PM32
MENU
Dimension: 140mm x 215mm
Page 33

Parental Control (VIEW TIMER)
MENU
L VIEW TIMER
This function allows you to restrict TV viewing time and also allows you to control TV usage.
This function is to prevent your children from watching too much TV.
VIEWING TIME (an accumulative timer: counts only the time
duration acquired while the TV is on.)
• VIEWING TIME can be set from 30M (30 minutes) to 10H00M (10
hours) in 30 minutes intervals.
OFF TIME (Restricts TV watching after the VIEWING TIME reaches
zero.)
• OFF TIME can be set from 30M (30 minutes) to 10H00M (10 hours) in
30 minutes intervals.
STATUS (ON/OFF setting of VIEW TIMER)
VIEW ITREM
VIEWING TIME
– H–
––M
OF ITMFE
– H–––M
SEC ERT :–– ––No .
STA UTSO:FF
L How to set VIEW TIMER.
1 Press
2 Press
MENU
to access the MAIN MENU screen.
CH UP (8)
or
DOWN (9)
“PARENTAL CONTROL”.
3 Press
4 Press
VOL (+)
or
CH UP (8)
(–)
to access PARENTAL CONTROL mode.
or
DOWN (9)
TIMER”.
5 Press
6 Press
VOL (+)
or
CH UP (8)
(–)
to access VIEW TIMER mode.
or
DOWN (9)
“OFF TIME”. For each selection, press
time duration.
to move the “a” mark to
CH
8
→
9
CH
to move the “a” mark to “VIEW
CH
VOL
8
→
9
CH
VOL
:
;
–
+
VOL
VOL
:
;
–
+
to select “VIEWING TIME” and
VOL (+)
CH
CH
or
(–)
to set the
8
9
→
VOL
VOL
:
;
–
+
MENU
SLEEP T IMER
VIDEO ADJUST
AUD IO ADJ UST
AUD IO SEL ECT
CLOSED CAPT
PAREN
CH TSE UP
SETUP
TAL CON ROLT
ION
(MAIN MENU screen)
PAREN ATCOLNRTOL
V-CHI P BLOCK
EIVTWIMER
(PARENTAL CONTROL mode)
VIEW ITREM
VIEWING TIME
– H–
––M
OF ITMFE
– H–––M
SEC ERT :–– ––No .
STA UTSO:FF
(VIEW TIMER mode)
VIEW ITREM
VIEWING TIME
H2
00M
OF ITMFE
– H–––M
SEC ERT :–– ––No .
STA UTSO:FF
7 Press
8 Press
CH UP (8)
or
DOWN (9)
4-digit SECRET No. using
VOL (+)
CH UP (8)
or
(–)
or
DOWN (9)
to turn ON the “VIEW TIMER”. (If STATUS is OFF,
REMOTE KEYPAD
VIEW TIMER will not operate.)
20F630[31-35].p65 25/3/03, 2:59 PM33
to select “SECRET No.”. Enter a
.
CH
8
→
9
CH
321
654
987
0
to select “STATUS”. Press
CH
8
9
CH
→
VOL
VOL
:
;
–
+
VIEW ITREM
VIEWING TIME
H2
00M
OF ITMFE
H500M
SEC ERT :–– ––No .
STA UTSO:FF
VIEW ITREM
VIEWING TIME
H2
00M
OF ITMFE
H500M
SEC ERT :12 43No .
STA UTSO:N
33
Dimension: 140mm x 215mm
Page 34

Parental Control (VIEW TIMER Continued)
321
654
987
0
321
654
987
0
9 Press
MENU
to exit.
MENU
Example
• To restrict anybody from watching the TV for 5 hours, after watching
the TV for 2 hours, your settings would look like this:
• They can choose to watch the 2 hours of TV however they wish. For
example, they could watch 1 hour of TV, turn TV off for 30 minutes,
then turn TV on and watch the remaining 1 hour on the VIEWING
TIMER.
L To change the VIEW TIMER settings. (SECRET No. is registered)
1 Repeat “How to set VIEW TIMER” steps and select “PARENTAL
CONTROL VIEW TIMER” during step 3. Press
“INPUT SECRET No.” will be displayed.
2 Enter the 4-digit SECRET No. using the
the VIEW TIMER mode will be displayed. Repeat step
Note:
• When you choose the correct SECRET No., the VIEW TIMER mode is
displayed. If the wrong SECRET No. is chosen, “SECRET No. IS
INCORRECT” is displayed. Input the SECRET No. again in this case.
VOL (+)
VOL
or
(–)
;
–
REMOTE KEYPAD
6 ~ 9
, and
VOL
:
, and
.
+
VIEW ITREM
VIEWING TIME
H2
00M
OF ITMFE
H500M
SEC ERT :12 43No .
STA UTSO:N
INP TUS
––––
VIEW ITREM
VIEWING TIME
H2
00M
OF ITMFE
H500M
SEC ERT :12 43No .
STA UTSO:FF
SECRET
No . SI
INCORRECT
EECR T oN.
L To cancel the VIEW TIMER (While the TV set is OFF but the VIEW
TIMER is set)
1 Turn on TV; a blue screen message “TIME OVER” will appear. If
you do nothing, the TV will turn off in approximately 30 seconds.
2 Enter the 4-digit SECRET No. using the
you choose the correct SECRET No., the VIEW TIMER is canceled.
If the wrong SECRET No. is chosen, “SECRET No. IS INCORRECT”
is displayed. Input the SECRET No. again in this case.
L To cancel the VIEW TIMER setting or change the SECRET No.
(When you forget the SECRET No.)
1 Repeat “How to set VIEW TIMER” steps and select “PARENTAL
CONTROL VIEW TIMER” during step 3. Press
“INPUT SECRET No.” will be displayed.
34
20F630[31-35].p65 25/3/03, 2:59 PM34
REMOTE KEYPAD
VOL (+)
or
. When
(–)
, and
ME O EVR
TI
INPUT TRSE E .NoC
–– ––
TI
ME O EVR
INPUT TRSE E .NoC
∗∗∗∗
INP TUS
EECR T oN.
––––
Dimension: 140mm x 215mm
Page 35

Parental Control (VIEW TIMER Continued)
2 Press and hold both
VOL (+)
and
CH UP (8)
on the TV set
simultaneously until the VIEW TIMER mode is displayed. Now you
can cancel the VIEW TIMER settings or change the SECRET No.
while “INPUT SECRET No.” is displayed.
L Notice of Remaining VIEWING TIME
• For every 30 minute interval, the “remaining time” will be displayed for
4 seconds. For the last 5 minutes, the “remaining time” will be displayed
every minute.
•“0H00M REMAIN” will be displayed for 10 seconds just before the
VIEWING TIME is complete.
(On the Set)
VOL (+)/CH UP (,)
buttons
VEW ITIMRE
030 RMHEIAM
VEW ITIMRE
005 RMHEIAM
VEW ITIMRE
000 RMHEIAM
N
N
N
20F630[31-35].p65 25/3/03, 2:59 PM35
35
Dimension: 140mm x 215mm
Page 36

Ch Setup
MENU
L EZ SETUP
By operating the channel preset functions, you can preset your
TV to the desired channels for viewing.
1 Press
2 Press
MENU
to access the MAIN MENU screen.
CH UP (8)
or
DOWN (9)
to move the “a” mark to “CH
SETUP”.
→
3 Press
4 Press
VOL (+)
CH UP (8)
VOL (+)
or
or
DOWN (9)
or
(–)
to access CH SETUP mode, then press
to move the “a” mark to “EZ SETUP”.
VOL
(–)
to access EZ SETUP mode.
VOL
:
;
–
→
+
VOL
–
;
321
REMOTE
654
KEYPAD
987
FLASHBACK
ENTER
VOLUME
100
0
PERSONAL PREFERENCE
ABCD
CH
8
VOL
:
;
–
9
CH
MENU MUTEg SKIP
9
VCR-CH
POWER (DVD/VCR)
MENU
SLEEP T IMER
VIDEO ADJUST
AUD IO ADJ UST
CH
8
9
CH
AUD IO SEL ECT
CLOSED CAPT
PAREN
TAL CON ROLT
CH TSE UP
SETUP
(+)/(–)
CHANNEL
VOL
+
UP (8)/
DOWN (9)
f
8
MENU
ION
(MAIN MENU screen)
CH ESUPT
AIR AC/BLE
CH MME ORY
CH
8
9
CH
CH ASE RCH
PERSONAL PR
UN IV ERSAL PL SU
EZ TSE UP
EF .
(CH SETUP mode)
CON EN
TACNTENNORA
CAB EL
STA ERT TUP ?ZSE
VOL
:
+
STOP S ATRT
(EZ SETUP mode)
5 Press
VOL (+)
.
The tuner will automatically search for the broadcasting and cable
TV channels. (The CH No. will automatically increase when it
appears.)
If you want to stop the EZ SETUP process once it has started,
VOL (–)
press
To cancel EZ SETUP
Press
. Search will be canceled.
VOL (–)
.
VOL
:
6 Once EZ SETUP is completed, the lowest channel number
memorized will be displayed.
36
20F630[36-40].p65 25/3/03, 3:00 PM36
PLE SA
WAEIT
AUT POR
OG GRAMMI N
215
STOP S ATRT
+
Dimension: 140mm x 215mm
2
Page 37
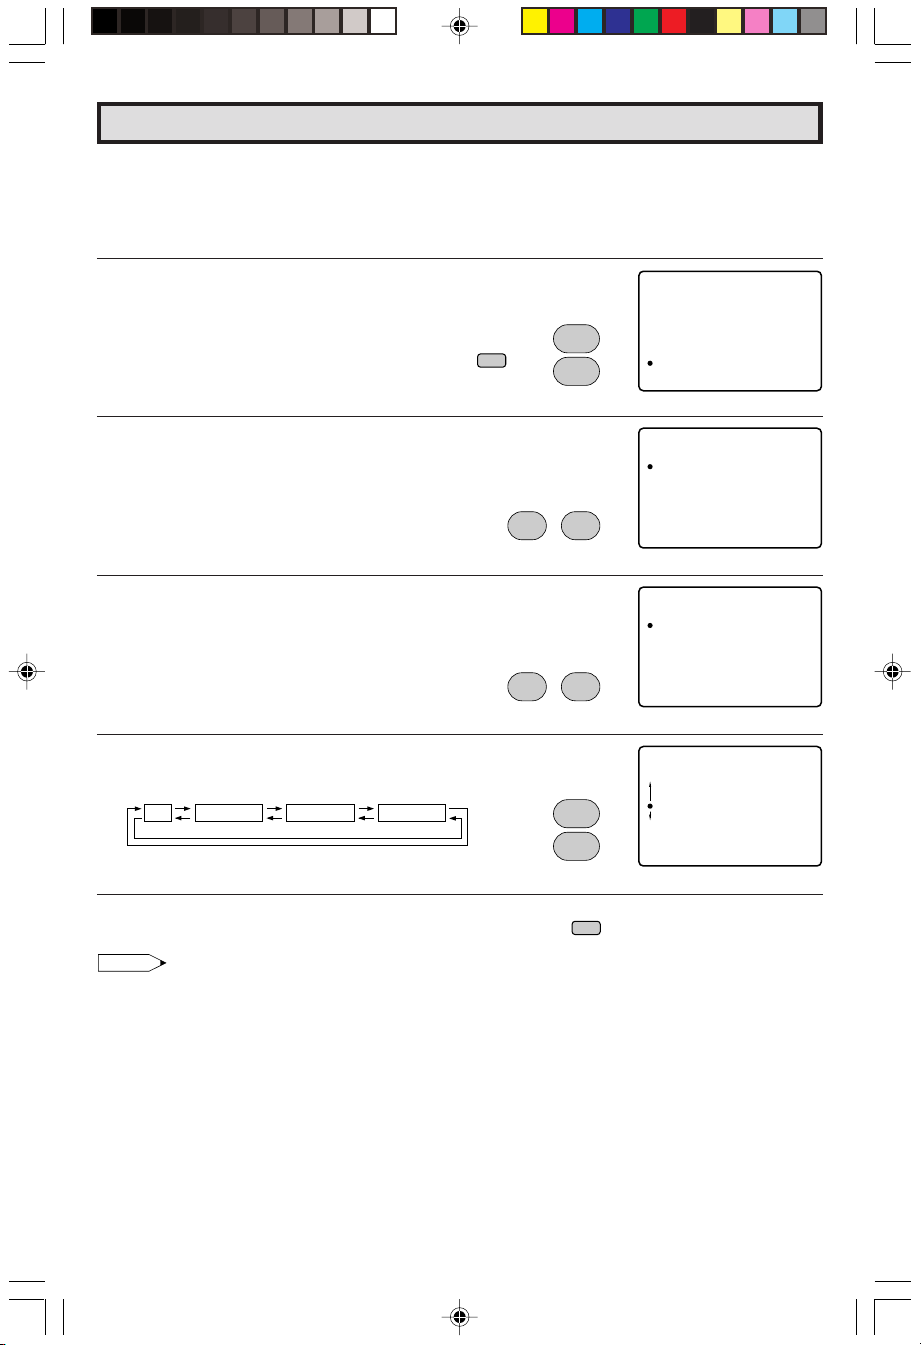
Ch Setup (Continued)
MENU
L CHANNEL SETTING
If EZ SETUP does not memorize all the channels in your region, follow the instructions below
to manually memorize the channel.
1 AIR/CABLE setting
1 Press
2 Press
SETUP”.
3 Press
4 Press
5 Press
mode.
AIR
MENU
to access the MAIN MENU screen.
CH UP (8)
VOL (+)
VOL (+)
CH UP (8)
or
DOWN (9)
or
(–)
to access CH SETUP mode.
or
(–)
to access AIR/CABLE mode.
or
DOWN (9)
to move the “a” mark to “CH
to move the “a” mark to the desired
CABLE STD CABLE HRC CABLE IRC
VOL
VOL
MENU
SLEEP T IMER
VIDEO ADJUST
AUD IO ADJ UST
AUD IO SEL ECT
CLOSED CAPT
PAREN
TAL CON ROLT
CH TSE UP
SETUP
ION
→
CH
8
9
CH
(MAIN MENU screen)
CH ESUPT
AIR AC/BLE
CH MME ORY
CH ASE RCH
PERSONAL PR
UN IV ERSAL PL SU
VOL
:
;
–
+
EZ TSE UP
EF .
(CH SETUP mode)
AI C/RBELA
AIR
CABL E ST D
CA LBEHRC
CABL E CIR
VOL
:
;
–
+
(AIR/CABLE mode)
AI C/RBELA
AIR
CABL E ST D
CH
8
9
CH
CA LBEHRC
CABL E CIR
(AIR/CABLE mode)
6 Press
MENU
to exit.
Note:
• Receivable channels of your TV set are:
AIR channels: CABLE channels:
VHF: 2 through 13. 1 (HRC and IRC mode only)
UHF: 14 through 69. 2 through 125 (STD, HRC and IRC)
20F630[36-40].p65 25/3/03, 3:00 PM37
MENU
37
Dimension: 140mm x 215mm
Page 38
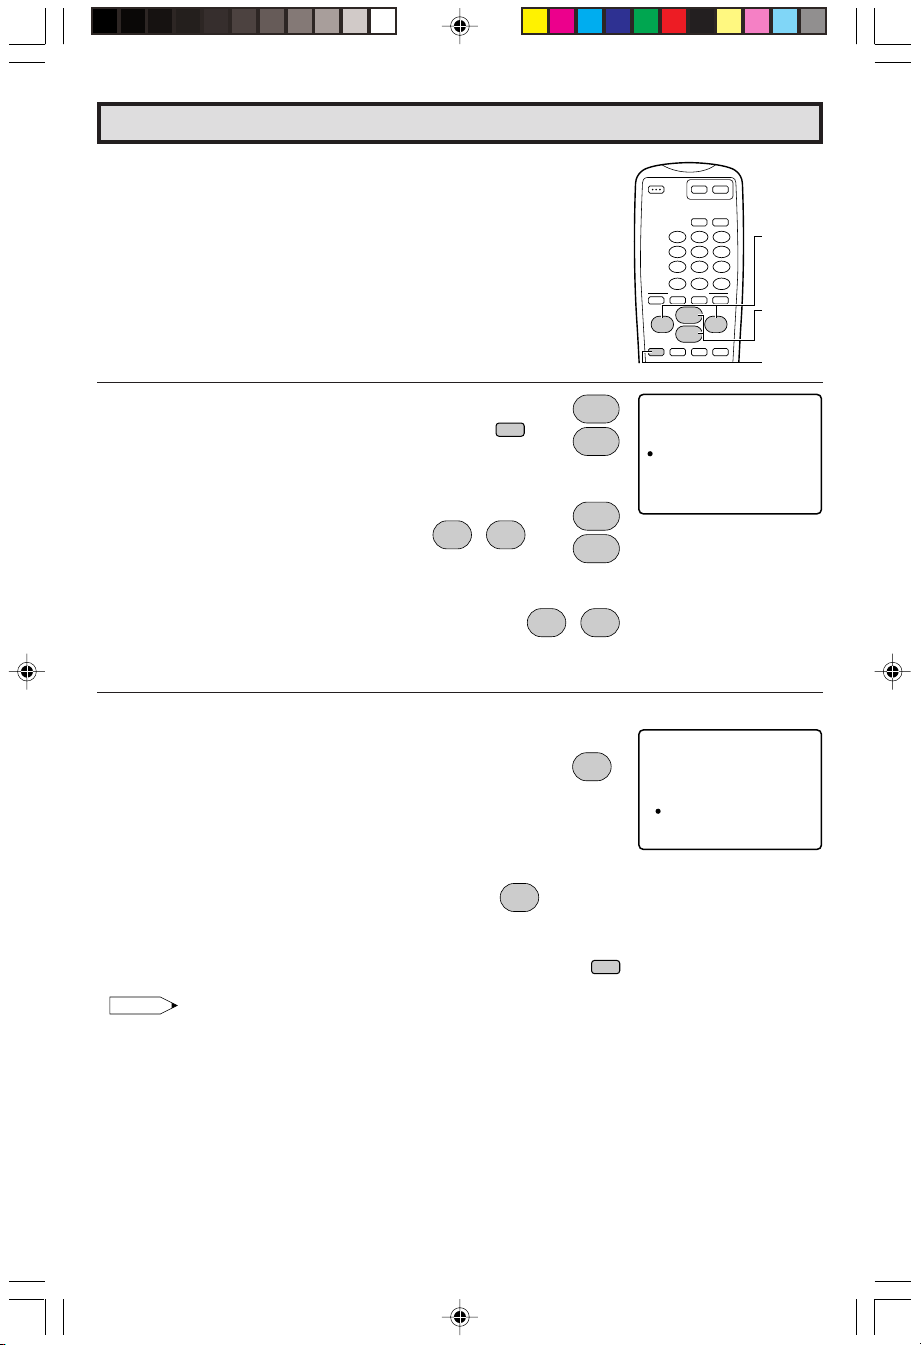
Ch Setup (Continued)
2 How to save broadcast TV channels into memory.
1.1 Press
MENU
to access the MAIN
MENU screen, then press
8
)
or
(
DOWN (9)
to move the “a”
CH UP
mark to “CH SETUP”.
1.2 Press
VOL (+)
or
(–)
to access CH
SETUP mode, then press
or
DOWN (9)
to move the “a” mark
CH UP (8)
VOL
;
–
to “CH SEARCH”.
1.3 Press
VOL (+)
or
(–)
to access CH
SEARCH mode.
START
2.1 Press
VOL (+)
. The tuner will search
through all available channels in your
area and add them into the TV’s
memory.
:
MENU
VOL
POWER
CATV
TV
DVD VCR
DISPLAY
INPUT
321
VOLUME
654
(+)/(–)
987
ENTER
FLASHBACK
100
0
PERSONAL PREFERENCE
ABCD
CH
8
VOL
:
;
–
9
CH
MENU MUTEg SKIP
9
VCR-CH
POWER (DVD/VCR)
CH
CH ESUPT
8
→
9
CH
CH
8
→
+
VOL
9
CH
:
;
–
(START)
VOL
:
VOL
+
+
AIR/ ACBLE
CH MME ORY
CH ASE RCH
PERSONAL PR
UN IV ERSAL PL SU
EZ TSE UP
(CH SETUP mode)
CH ESRCHA
ARI12
STOP S ATRT
CHANNEL
VOL
+
UP (8)/
DOWN (9)
f
8
MENU
EF .
STOP
2.2 Press
VOL (–)
. CH SEARCH will stop
at the current channel and will not
add any higher channels.
2.3 Press
MENU
to exit.
(STOP)
VOL
;
–
Note:
• If you press
VOL (+)
again while in the CH SEARCH mode, autoprogram will start again, and the previously memorized channels will
be lost.
38
20F630[36-40].p65 25/3/03, 3:00 PM38
(CH SEARCH mode)
MENU
Dimension: 140mm x 215mm
Page 39

Ch Setup (Continued)
MENU
321
654
987
100
0
ENTER
3 How to add or erase weak, additional or unwanted channels from TV memory.
1 Press
2 Press
3 Press
4 Use
UP (
UP (
MENU
8
to access the MAIN MENU screen, then press
)
or
DOWN (9)
VOL (+)
8
)
or
DOWN (9)
VOL (+)
CH UP (8)
to move the “a” mark to “CH SETUP”.
or
(–)
to access CH SETUP mode, then press
to move the “a” mark to “CH MEMORY”.
or
(–)
to access CH MEMORY mode.
or
DOWN (9)
each desired channel to add or erase.
VOL
;
–
or
REMOTE KEYPAD
CH
8
9
CH
CH
MENU
SLEEP T IMER
VIDEO ADJUST
AUD IO ADJ UST
AUD IO SEL ECT
CLOSED CAPT
PAREN
TAL CON ROLT
CH TSE UP
SETUP
ION
→
CH
8
9
CH
(MAIN MENU screen)
CH
CH ESUPT
AIR AC/BLE
CH
→
8
9
CH
VOL
:
+
CH MME ORY
CH ASE RCH
PERSONAL PR
UN IV ERSAL PL SU
EZ TSE UP
EF .
(CH SETUP mode)
CH EMORYM
ARI12
VOL
VOL
:
;
–
+
EERAS A DD
(CH memory mode)
to select
or
5 Press
6 Press
20F630[36-40].p65 25/3/03, 3:00 PM39
VOL (+)
to erase a channel from the TV’s memory.
(–)
MENU
to add a channel to the TV’s memory or press
VOL
;
–
to exit.
VOL
VOL
:
+
MENU
Dimension: 140mm x 215mm
39
Page 40

Ch Setup (Continued)
MENU
321
654
987
100
0
ENTER
L PERSONAL PREFERENCE
By setting the PERSONAL PREFERENCE channels in advance,
you can select your favorite channels easily.
1 Press
2 Press
MENU
to access the MAIN MENU screen.
CH UP (8)
or
DOWN (9)
to move the “a” mark to
“CH SETUP”.
→
3 Press
VOL (+)
CH UP (8)
or
or
DOWN (9)
(–)
to access CH SETUP mode, then press
to move the “a” mark to “PERSONAL
PREFERENCE”.
4 Press
VOL (+)
VOL
or
(–)
to select PERSONAL PREFERENCE select
VOL
:
;
–
→
+
mode in which you can program 4 favorite channels, in 4 different
categories. (total of 16 channels)
VOL
;
–
5 Press
CH UP (8)
or
DOWN (9)
to move the “a” mark to the desired
position.
PERSONAL
PREFERENCE
CH
8
9
CH
CH
8
9
CH
VOL
:
+
CH
8
9
CH
REMOTE
321
KEYPAD
654
987
FLASHBACK
ENTER
VOLUME
100
0
PERSONAL PREFERENCE
ABCD
CH
8
VOL
:
;
–
9
CH
MENU MUTEg SKIP
9
VCR-CH
POWER (DVD/VCR)
MENU
SLEEP T IMER
VIDEO ADJUST
AUD IO ADJ UST
AUD IO SEL ECT
CLOSED CAPT
PAREN
TAL CON ROLT
CH TSE UP
SETUP
(+)/(–)
CHANNEL
VOL
+
UP (8)/
DOWN (9)
f
8
MENU
ION
(MAIN MENU screen)
CH ESUPT
AIR AC/BLE
CH MME ORY
CH ASE RCH
PERSONAL PR
UN IV ERSAL PL SU
EZ TSE UP
EF .
(SETUP mode)
PER OSPRE.FALN
><A B C D
––– ––– ––– –––
––– ––– ––– –––
––– ––– ––– –––
––– ––– ––– –––
(PERSONAL PREFERENCE select mode)
PER OSPRE.FALN
><A B C D
––– ––– ––– –––
––– ––– ––– –––
––– ––– ––– –––
––– ––– ––– –––
6 Press
REMOTE KEYPAD
Number into the memory.
Example:
125 — Press “100” followed by “2” and then “5”.
25 — Press “2” and then “5”.
4 — Press “0” and then “4”.
7 Repeat steps 4 to 6 to input the next CHANNEL Number.
8 Press
40
20F630[36-40].p65 25/3/03, 3:00 PM40
MENU
To select the PERSONAL PREFERENCE channel.
If the channels are memorized as shown to the right,
press the Remote’s “A” button to select the Channels below.
125 25 40 4
to exit.
on the Remote to input the CHANNEL
MENU
PER OSPRE.FALN
><A B C D
125 ––– ––– –––
––– ––– ––– –––
––– ––– ––– –––
––– ––– ––– –––
PER OSPRE.FALN
><A B C D
1258538–––
25 123 30 –––
40 55 ––– –––
4 ––– ––– –––
Dimension: 140mm x 215mm
Page 41

Ch Setup (Continued)
MENU
L UNIVERSAL PLUS FUNCTION
VCR or DVD input mode will be selected automatically by pressing
the VCR or DVD PLAY buttons on the UNIVERSAL REMOTE
CONTROL.
1 Press
2 Press
MENU
to access the MAIN MENU screen.
CH UP (8)
or
DOWN (9)
to move the “a” mark to “CH
SETUP”.
→
3 Press
VOL (+)
CH UP (8)
or
or
DOWN (9)
(–)
to access CH SETUP mode, then press
to move the “a” mark to “UNIVERSAL
PLUS”.
4 Press
VOL (+)
VOL
or
(–)
to access UNIVERSAL PLUS to select VCR
VOL
:
;
–
→
+
or DVD mode.
VOL
;
–
VOLUME
PERSONAL PREFERENCE
ABCD
CH
8
VOL
:
;
–
9
CH
MENU MUTEg SKIP
9
VCR-CH
POWER (DVD/VCR)
MENU
SLEEP T IMER
VIDEO ADJUST
AUD IO ADJ UST
CH
8
9
CH
AUD IO SEL ECT
CLOSED CAPT
PAREN
TAL CON ROLT
CH TSE UP
SETUP
(+)/(–)
CHANNEL
VOL
+
UP (8)/
DOWN (9)
f
8
MENU
ION
(MAIN MENU screen)
CH ESUPT
AIR AC/BLE
CH MME ORY
CH
8
9
CH
CH ASE RCH
PERSONAL PR
UN IV ERSAL PL SU
EZ TSE UP
EF .
(CH SETUP mode)
UN I EVSLARPLSU
VCR FF:O
DVD FF:O
VOL
:
+
(EZ SETUP mode)
5 Press
press
CH UP (8)
VOL (+)
or
DOWN (9)
or
(–)
to select “CH3, CH4”, “INPUT 1 (or
COMPONENT)”, “INPUT 2” or “OFF”.
CH3 CH4
INPUT 1 (or COMPONENT)
OFF
INPUT 2
Set model to the input in which your
VCR or DVD is connected to. If done
through RF, select either channel 3 or
4 to match the setting of the VCR or
DVD.
6 Press
20F630[41-45].p65 25/3/03, 3:02 PM41
MENU
to exit.
to select the VCR or DVD, and
CH
8
9
CH
→
VOL
VOL
:
;
–
+
MENU
UN I EVSLARPLSU
VCR H3:C
DVD FF:O
(UNIVERSAL PLUS select mode)
41
Dimension: 140mm x 215mm
Page 42

Set Up
MENU
L ENERGY SAVE
This feature lets you lower the power consumption of your TV set
which in turn saves you money and minimizes the impact on the
environment. When this feature is turned on, it reduce the
brightness of the TV to a level that consumes approximately 20
percent less energy than when the feature is turned off.
The reduction in brightness will be less noticeable under low room
lighting conditions.
1 Press
2 Press
MENU
to access the MAIN MENU screen.
CH UP (8)
or
DOWN (9)
to move the “a” mark to “SETUP”.
→
3 Press
4 Press
VOL (+)
CH UP (8)
VOL (+)
or
or
DOWN (9)
or
(–)
to access SETUP select mode, then press
to move the “a” mark to “ENERGY SAVE”.
VOL
(–)
to access ENERGY SAVE select mode.
VOL
:
;
–
→
+
POWER
CATV
TV
DVD VCR
DISPLAY
INPUT
321
VOLUME
654
(+)/(–)
987
ENTER
FLASHBACK
100
0
PERSONAL PREFERENCE
ABCD
CH
8
VOL
:
;
–
9
CH
MENU MUTEg SKIP
9
VCR-CH
POWER (DVD/VCR)
MENU
SLEEP T IMER
VIDEO ADJUST
AUD IO ADJ UST
CH
8
9
CH
AUD IO SEL ECT
CLOSED CAPT
PAREN
TAL CON ROLT
CH TSE UP
SETUP
CHANNEL
VOL
+
UP (8)/
f
DOWN (9)
8
MENU
ION
(MAIN MENU screen)
SET PU
LANG GUA E
ENERGY SAVE
CH
8
9
CH
BLUE SCREEN
(SETUP mode)
ENERGY SAVE
:OFF
5 Press
6 Press
VOL (+)
MENU
or
(–)
to exit.
to select “ON”.
42
20F630[41-45].p65 25/3/03, 3:02 PM42
VOL
VOL
VOL
:
;
–
+
(ENERGY SAVE select mode)
ENERGY SAVE
:ON
VOL
:
;
–
+
MENU
Dimension: 140mm x 215mm
Page 43
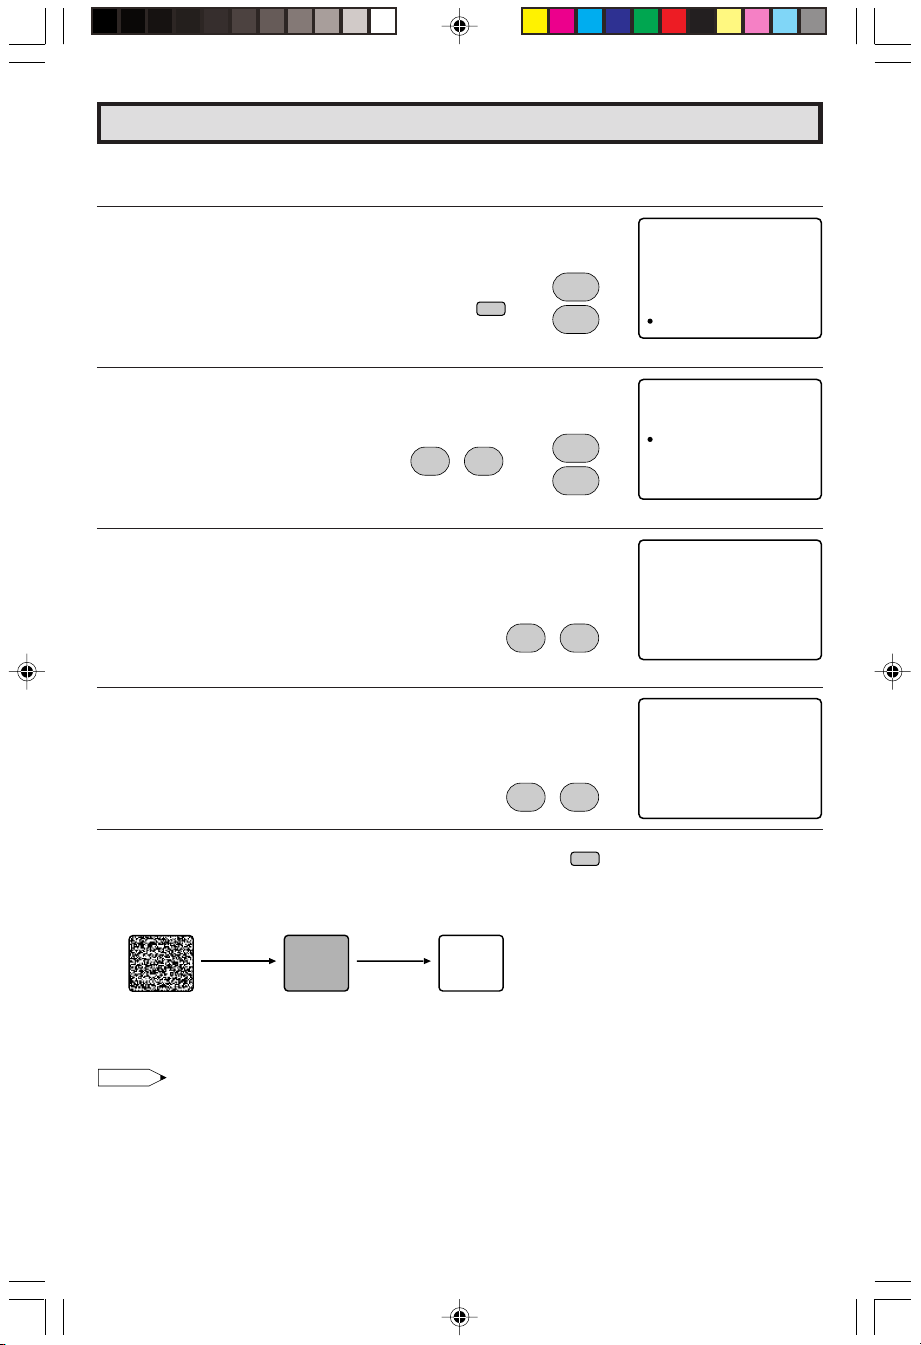
Set Up (Continued)
MENU
L BLUE SCREEN
Automatically turns the screen blue if a broadcast signal is not received.
1 Press
2 Press
3 Press
8
)
or
(
4 Press
5 Press
MENU
to access MAIN MENU screen.
CH UP (8)
VOL (+)
DOWN (9)
VOL (+)
VOL (+)
or
DOWN (9)
or
(–)
to access SETUP mode, then press
to move the “a” mark to “BLUE SCREEN”.
or
(–)
to access BLUE SCREEN select mode.
or
(–)
to select “ON”.
to move the “a” mark to “SETUP”.
CH
8
→
9
CH
CH UP
CH
VOL
VOL
8
→
9
CH
VOL
:
;
–
–
+
VOL
:
;
+
VOL
VOL
:
;
–
+
MENU
SLEEP T IMER
VIDEO ADJUST
AUD IO ADJ UST
AUD IO SEL ECT
CLOSED CAPT
PAREN
CH TSE UP
SETUP
TAL CON ROLT
ION
(MAIN MENU screen)
SET PU
LANG GUA E
ENERGY SAVE
BLUE SCREEN
(SETUP mode)
BLUE CSREEN
:OFF
(BLUE SCREEN select mode)
BLUE CSREEN
:ON
6 Press
MENU
to exit.
MENU
When BLUE SCREEN is set to “ON”.
No signal Blue screen TV off
After five
seconds
After 15
minutes
Standby
mode
Note:
• Poor reception due to weak signals, or too much noise might activate the BLUE SCREEN function
despite the presence of a broadcast signal. To continue watching TV under these conditions, switch
the BLUE SCREEN “OFF”.
20F630[41-45].p65 25/3/03, 3:02 PM43
Dimension: 140mm x 215mm
43
Page 44
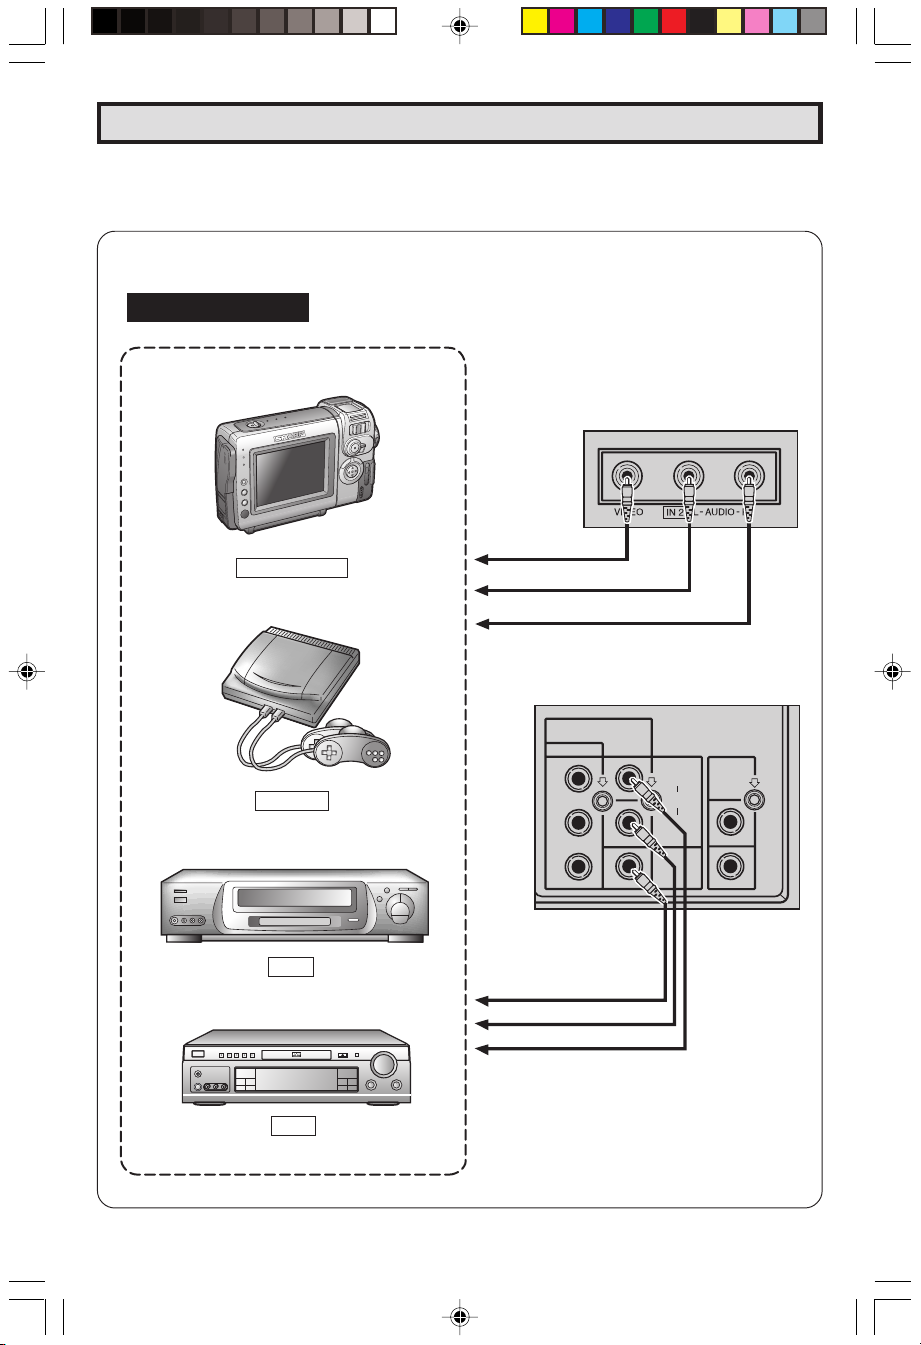
Using the Video and Audio Input Jacks
L Connecting video equipment for playback of video material.
• When the television is connected to video equipment as shown below, the material being played back
on the video equipment can be seen on the television screen.
Connecting video device equipped with video output terminals.
CONNECTIONS
VIDEO EQUIPMENT
CAMCORDER
TV GAME
To VIDEO OUTPUT
To AUDIO OUTPUT (L)
To AUDIO OUTPUT (R)
(Rear connection
terminals of TV)
IN 1
COMPONENT
Y
P
B
P
R
(Front connection
terminals of TV)
(Pull open for inside door)
LINE
R
OUT
AUDIO
L
VIDEO
R
L
VCR
DVD
44
20F630[41-45].p65 25/3/03, 3:02 PM44
To VIDEO OUTPUT
To AUDIO OUTPUT (L)
To AUDIO OUTPUT (R)
Dimension: 140mm x 215mm
Page 45
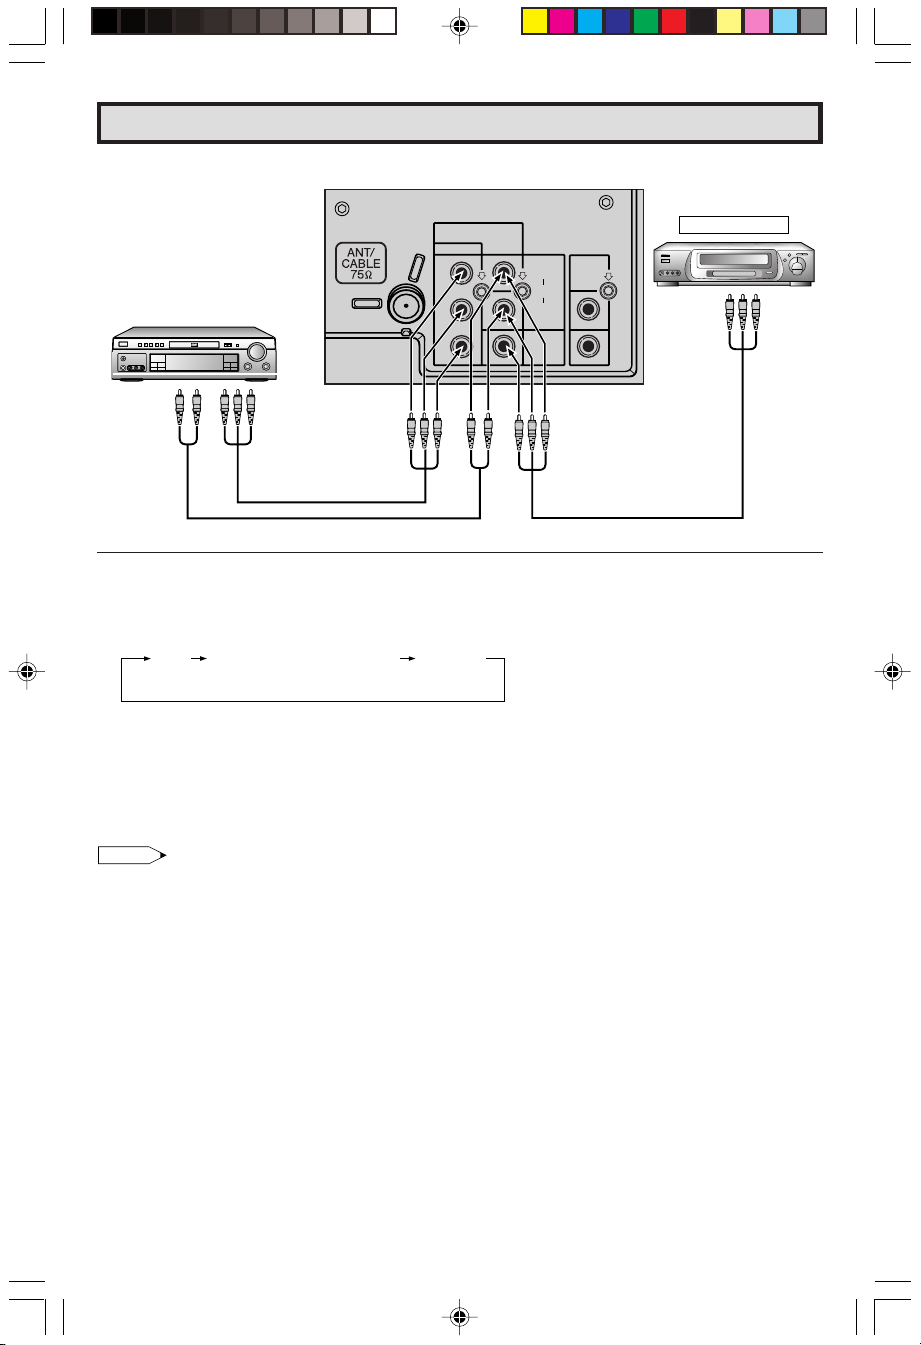
Using the Video and Audio Input Jacks (Continued)
(Rear connection terminals of TV)
Video Equipment
To VIDEO OUTPUT
To AUDIO OUTPUT (L)
To AUDIO OUTPUT (R)
Video Equipment with
Component Video
(Component Color)
Output Jacks (Y, P
To AUDIO
OUTPUT
(L/R)
B
and PR)
To COMPONENT
VIDEO OUTPUT
Jacks
IN 1
COMPONENT
Y
P
B
P
R
R
AUDIO
VIDEO
LINE
OUT
L
R
L
L To watch video material playback.
• Press the Remote’s
INPUT
button to select the VIDEO INPUT mode for the video equipment you wish
to play.
• The external VIDEO INPUT mode will change as follows each time the
AIR
or
CABLE
INPUT 1 (or COMPONENT)
(IN 1)
Rear
INPUT 2
(IN 2)
Front
INPUT
button is pressed.
• When the AV cables are being connected to the VIDEO INPUT 1 and COMPONENT Y terminals
simultaneously, the COMPONENT terminal has priority over the VIDEO terminal.
• INPUT mode can be selected by pressing either the
is set to the highest channel stored in memory, or by pressing the
CH UP (8)
on the TV remote control when the TV
CH DOWN (9)
when it is set to the
lowest channel.
Note:
• When connecting video or audio equipment to the television, be sure that the power is turned off in
order to prevent damage to either the television or the equipment being connected.
• It is the intent of SHARP that this product be used in full compliance with the copyright law of the
United States and that prior permission be obtained from copyright owners whenever necessary.
• For detailed information on the connection and use of auxiliary equipment, refer to the instruction
manuals of the equipment being used.
• The connection cords can be obtained from your local video store.
20F630[41-45].p65 25/3/03, 3:02 PM45
Dimension: 140mm x 215mm
45
Page 46

Using the Audio Output Jacks
L These jacks are used for connecting an external audio amplifier. The STEREO/MONO/SAP,
VOLUME, MUTE and FAO functions can all be controlled via the television’s remote control or
directly on the TV itself. These jacks relay the audio signal of all programs being displayed on
the TV screen.
(AUDIO OUTPUT JACKS are located on the rear of the cabinet.)
CONNECTIONS
(Rear connection
terminals of TV)
IN 1
COMPONENT
Y
PB
PR
AUDIO
VIDEO
LINE
R
OUT
L
R
L
To the audio
input terminals
IN 1
COMPONENT
LINE
R
Y
OUT
AUDIO
L
P
B
R
VIDEO
P
R
L
Stereo Amplifier
Speaker System
(1) Before connecting the cables, turn on the TV and adjust the VOLUME control on the TV to a moderate
listening level.
(2) Turn off the TV and connect the audio cables to the AUDIO LINE OUTPUT JACKS on the TV.
(3) Turn the TV set and stereo amplifier on.
(4) If you desire, you can turn off the sound to the TV’s internal speakers by acessing the TV’s AUDIO
SELECT mode. See page 22 ~ 23.
(5) Adjust the VOLUME control on the stereo amplifier for a moderate listening level.
(6) Control of the audio can be adjusted using the audio controls (STEREO/MONO/SAP, VOLUME,
MUTE and FAO), from either the remote control, or directly from the TV set.
Note:
• For detailed information on the connection and use of auxiliary equipment, refer to the operation
manuals of the equipment being used.
• When connecting monaural equipment to the AUDIO INPUT or OUTPUT of this set, use an audio
connection cord and plug adaptor as shown below.
• For optimal sound quality, we recommend you to keep the TV’s audio output level high.
Plug adapter
To the TV
Pin plug x 2 Pin Plug
Pin jack/Mini plug
To the equipment
being connected
46
20F630[46-50].p65 25/3/03, 3:04 PM46
Dimension: 140mm x 215mm
Page 47

Operation of Remote Control
L Universal Remote Control
With the purchase of your television set you
also have received the latest innovation in
remote control technology. With its easy-to-use
push button keyboard, your Remote can control
your television set and most infrared remote
controlled VCRs, cable TV converters and
DVDs as well.
Note:
• Depending on the model, year produced, brand
and type of VCR, cable TV converter and DVD,
some models may not be compatible with the
remote control.
• Some brands may not enable channel selection
until the ENTER button is pressed.
Example:
When you select channel 24,
(1) Press REMOTE KEYPAD “2”.
(2) Press REMOTE KEYPAD “4”.
(3) Press ENTER.
For detailed information on the use of the Cable
TV converter Box refer to their operating
manuals.
L Using Your Remote With Your TV
After installing the batteries, press the
TV/VCR
on the remote to select the TV mode. (If you
can change the channel of the TV by pressing
CH UP (8) or DOWN (9)
on the Remote
Control, it is the TV mode.)
L “Identifying” Remote VCRs, cable TV
conveters and DVDs
Your Remote Control has been set at the factory
to operate your TV and many remote control
VCRs, cable TV converters and DVDs.
However, in some cases an easy one-time setup step may be necessary before the Remote
will operate accessory VCRs, cable TV
converters and DVDs.
• In this set-up step, the Remote locates and
memorizes the remote control transmitter code
for the VCR, cable TV converters and DVDs.
• Once “identified”, the Remote sends the proper
remote signals to operate your accessory.
• This identify step will not have to be repeated
until power to the Remote is interrupted due to
a battery failure.
L USING YOUR REMOTE CONTROL WITH A
VCR
Once you make certain the Remote Control has
“identified” your remote controlled VCR or DVD,
the Remote Control is ready to operate your
unit. The various VCR or DVD function buttons
on the Remote Control will not operate your
VCR or DVD if those features are not already
found on your unit.
• All VCR buttons will operate whether the
Remote Control is in TV or VCR modes.
• For detailed information on the use of the VCR
or DVD, refer to the operation manual of the
VCR or DVD.
PLAY -
Press to playback a tape or disc.
POWER (DVD/VCR)
Press to turn the VCR or DVD on and
off.
REWIND 3
Press to rewind a tape or reverse a
disc. For some VCRs or DVDs you
may need to press STOP first, then
REWIND.
STOP L
Press to stop the tape or disc.
PAUSE J
Press to temporarily stop the tape or
disc during playback or recording (VCR
only).
Press again to release Pause.
20F630[46-50].p65 25/3/03, 3:04 PM47
POWER
CATV
DVD VCR
DISPLAY
INPUT
FLASHBACK
0
PERSONAL PREFERENCE
ABCD
CH
8
VOL
–
MENU MUTEg SKIP
POWER (DVD/VCR)
REW
(
;
9
CH
9
PLAY
:
L
STOP
PAUSE
J
TV • CATV • VCR • DVD
:
VCR-CH
FWD
)
VOL
TV
ENTER
100
+
REMOTE KEYPAD
Use to enter two-digit code numbers
321
654
987
when identifying your VCR.
ENTER
VCR CHANNEL UP (8)/DOWN (9)
Press to scan up or down through
channels on the VCR.
DVD SKIP
f
8
REC
Press to jump forward to the beginning
of the next chapter/track, or backward
to the beginning of the current chapter/
track, and automatically start to play
that chapter/track.
FF 2
Press to rapidly advance the tape or
disc. For some VCRs or DVDs, you
may need to press STOP first, then
FF.
47
Dimension: 140mm x 215mm
Page 48
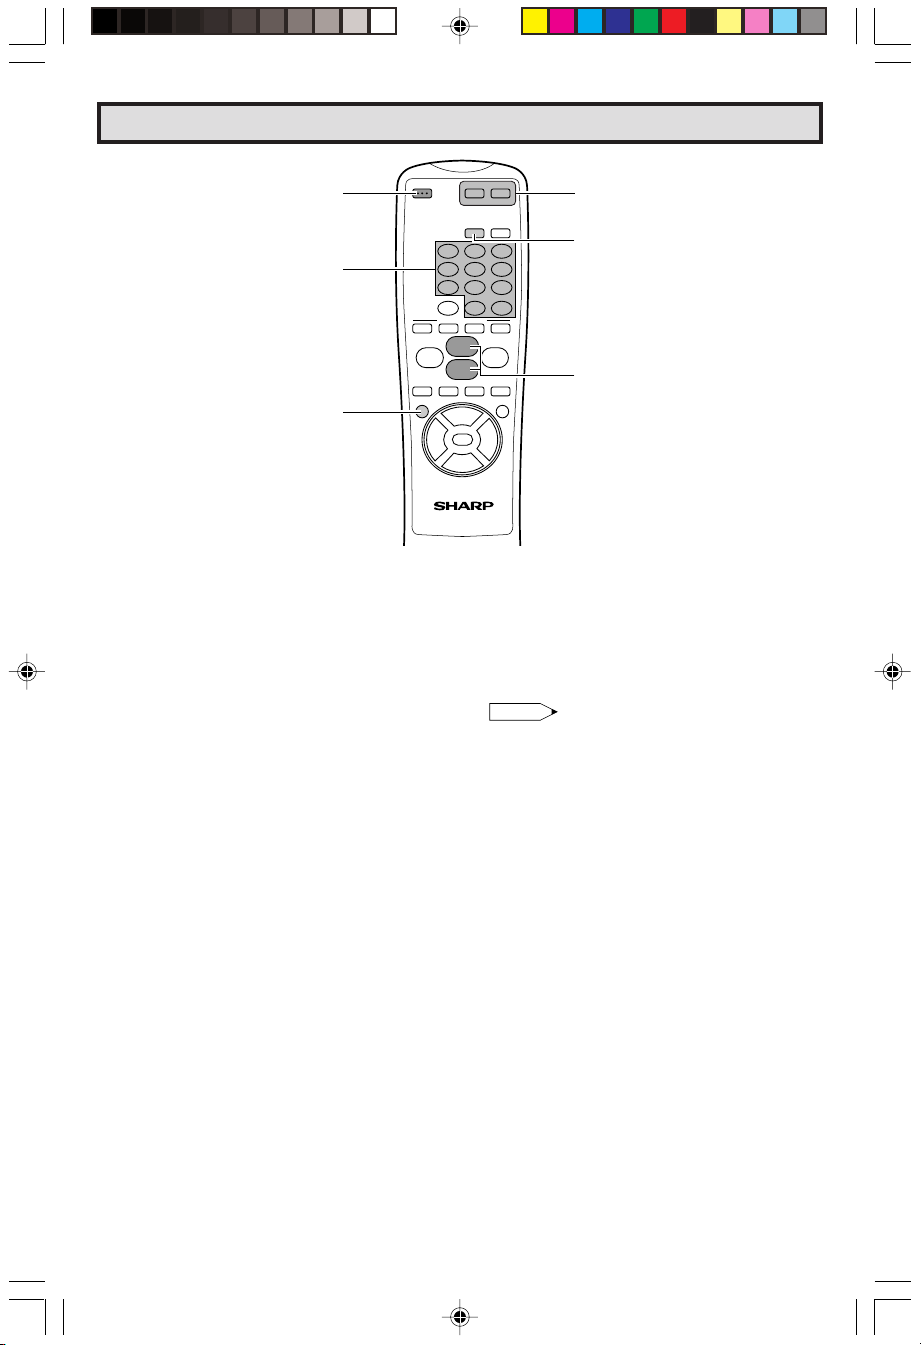
Operation of Remote Control (Continued)
POWER
TV POWER
REMOTE
KEYPAD
POWER
(DVD/VCR)
CATV TV
DVD VCR
DISPLAY INPUT
ENTER
FLASHBACK
0
PERSONAL PREFERENCE
ABCD
CH
8
VOL
–
MENU MUTEg SKIP
POWER (DVD/VCR)
REW
;
9
CH
9
PLAY
:
L
STOP
(
PAUSE
J
TV • CATV • VCR • DVD
:
VCR-CH
FWD
)
VOL
321
654
987
100
+
f
8
REC
CATV/DVD-TV/VCR
DISPLAY
CHANNEL UP (,)/
DOWN(9)
L HOW TO IDENTIFY A VCR
The remote control may already be set to
operate your VCR. Try this initial check before
going on to the following “identify” section.
(1) Press
(2) Point remote towards VCR and press
TV/VCR
(DVD/VCR)
button.
POWER
.
(3) Does the remote turn the VCR ON and OFF?
• If yes, the remote is ready to operate the VCR
and no further steps are needed.
• If no, continue to the “identify” section.
L To Identify Your VCR – Direct Entry Method.
Use the following steps and list to quickly find
the remote control code for your accessory
VCR.
• First look up your VCR’s remote control code
number before going through the direct code
entry steps control.
• If this procedure does not identify your
accessory VCR, use the Search method of
identification (described in the next section).
(1) Press
(2) Press and hold down
TV/VCR
button.
(9)
on your remote control.
DISPLAY
and
CH DOWN
Then release both buttons.
(3) Within ten seconds after releasing
and
CH DOWN (9)
, enter your VCR’s two-digit
DISPLAY
remote control code number using the
REMOTE KEYPAD
(refer to list).
• The remote control is now ready to send
commands to your VCR.
Some brands have more than one remote code
listed, due to changes in the remote codes from
early to later model years, or due to format
differences (VHS/BETA). In such cases, you
may have to try more than one code to find the
code your VCR accepts.
Note:
Depending on the model, year produced, brand,
and type of VCR, some models may not be
compatible with the remote control.
L To Identify Your VCR – Search Method.
(1) Press
TV/VCR
button.
(2) Press POWER on the VCR to ON.
(3) Stand at least six feet away from the front of
the VCR.
Point the remote towards the VCR.
Hold down
DISPLAY
and
CH UP (8)
at the
same time. KEEP HOLDING THE BUTTONS
DOWN.
(4) Watch the Channel Number indicator on the
VCR, Channel numbers will scan up when the
VCR has been identified.
Release
DISPLAY
and
CH UP (8)
as soon as
the channel numbers start to scan up.
The VCR’s remote control code number has
been identified, and the remote is ready to
operate the VCR.
48
20F630[46-50].p65 25/3/03, 3:04 PM48
Dimension: 140mm x 215mm
Page 49

Operation of Remote Control (Continued)
POWER
TV
POWER
REMOTE
KEYPAD
CATV TV
DVD VCR
DISPLAY INPUT
FLASHBACK
ENTER
0
PERSONAL PREFERENCE
ABCD
CH
8
VOL
–
MENU MUTEg SKIP
POWER (DVD/VCR)
REW
(
;
9
CH
9
VCR-CH
PLAY
:
L
STOP
PAUSE
J
TV • CATV • VCR • DVD
VOL
:
FWD
)
100
+
CATV/DVDTV/VCR
321
654
987
f
8
REC
DISPLAY
CHANNEL
UP (,)/
DOWN(9)
TIPS ON IDENTIFYING YOUR VCR:
If your VCR model does not have the CHANNEL
UP function on its remote control, it cannot be
identified using the SEARCH method for
identifying. For such models, please try the
DIRECT ENTRY method of identifying.
Be Patient: a minute or two can seem a lot longer
when you’re waiting for something to happen, but
the code should be identified within 2 minutes.
Remember, it is only a one-time set-up.
Be careful not to let the VCR scan more than five
channels when the indicator starts to move up. If
you continue holding down the
UP (8)
after five channel scans, the proper remote
DISPLAY
and
code can be passed up, and the two minutes
identify cycle will have to be repeated.
If a channel change does not occur on the VCR
within two minutes, read the identifying instructions
again and repeat the steps. Should a channel
change still not occur the remote will not operate
with the desired VCR.
CH
VCR BRAND
Akai 25, 26, 37
Audio Dynamics 15, 22, 30
Broksonic 32
Canon 04
Capehart 34
Craig 10, 31
Curtis Mathis 04
Daewoo 34
DBX 15, 22, 30
Dynatech 29
Emerson 21, 32, 35
Fisher 09, 10, 11
Funai 28, 29
GE 04
Goldstar 24
Hitachi 06
Instant Replay 04
JC Penney 04, 06, 24, 30
JVC 15, 41, 42
Kenwood 14, 15
Lloyds 29
Magnavox 04, 05, 08
Magnin 31
Marantz 30
Memorex 04, 10, 24, 29
Minolta 06
Mitsubishi 17, 18, 39, 40
Montgomery Ward 02, 43
Multitech 29
NEC 15, 22, 30
Panasonic 04, 44
Pentax 05, 06
Philco 04, 05
Philips 04, 05, 08
Quasar 04
RCA 06, 07, 33
Realistic 01, 02, 10, 24
Samsung 23, 31
Sanyo 14, 10
Scott 20
Sears 06, 11, 24
Sharp 01, 02, 03
Shintom 36
Sony 12, 13, 38
Sound Design 29
Sylvania 04, 05, 08
Symphonic 29
Tatung 15
Teac 15, 29
Teknika 27, 29
Thomas 29
TMK 21
Toshiba 19, 20
Video Concepts 30
Yamaha 15, 29, 30
Zenith 16
REMOTE CONTROL
CODE NUMBER
20F630[46-50].p65 25/3/03, 3:04 PM49
49
Dimension: 140mm x 215mm
Page 50

Operation of Remote Control (Continued)
POWER
TV POWER
REMOTE
KEYPAD
POWER
(DVD/VCR)
CATV TV
DVD VCR
DISPLAY INPUT
FLASHBACK
ENTER
100
0
PERSONAL PREFERENCE
ABCD
CH
8
VOL
–
MENU MUTEg SKIP
POWER (DVD/VCR)
REW
(
;
9
CH
9
VCR-CH
PLAY
:
L
STOP
PAUSE
J
TV • CATV • VCR • DVD
VOL
:
FWD
)
321
654
987
+
f
8
REC
CATV/DVD-TV/VCR
INPUT
DISPLAY
CHANNEL UP (,)/
DOWN(9)
L HOW TO IDENTIFY A DVD
The remote control may already be set to
operate your DVD. Try this initial check before
going on to the following “identify” section.
(1) Press
(2) Point remote towards DVD and press
CATV/DVD
(DVD/VCR)
button.
POWER
.
(3) Does the remote turn the DVD ON and OFF?
• If yes, the remote is ready to operate the DVD
and no further steps are needed.
• If no, continue to the “identify” section.
L To identify your DVD – Direct Entry Method.
Use the following steps and list to quickly find
the remote control code for your accessory
DVD.
• First look up your DVD’s remote control code
number before going through the direct code
entry steps control.
(1) Press
(2) Press and hold down
CATV/DVD
(9)
on your remote control.
button.
INPUT
and
CH DOWN
Then release both buttons.
(3) Within ten seconds after releasing
CH DOWN (9)
, enter your DVDs two-digit
remote control code number using
KEYPAD
(refer to list).
INPUT
REMOTE
and
• The remote control is now ready to send
commands to your DVD.
DVD BRAND
Denon 02
JVC 09
Magnavox 04
Marantz 04
Mitsubishi 06
Panasonic 02
Philips 04
Pioneer 08
Proscan 03
RCA 03
Samsung 07
Sharp 01, 10
Sony 05
Toshiba 04
Yamaha 02
Zenith 04
REMOTE CONTROL
CODE NUMBER
Note:
Depending on the model, year produced, brand,
and type of DVD, some models may not be
compatible with the remote control.
50
20F630[46-50].p65 25/3/03, 3:04 PM50
Dimension: 140mm x 215mm
Page 51
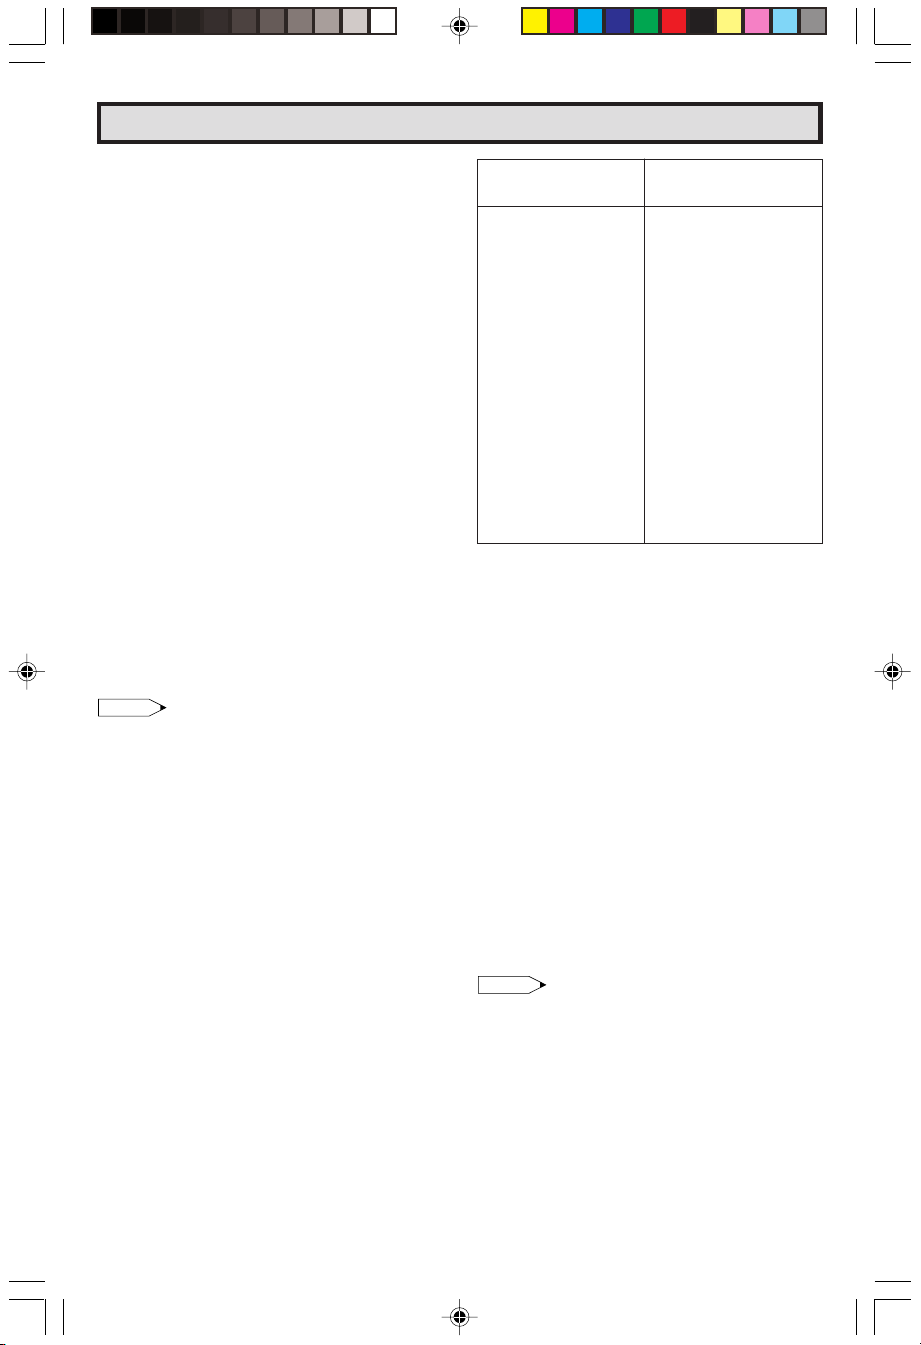
Operation of Remote Control (Continued)
L HOW TO IDENTIFY A CABLE CONVERTER
L To Identify Your Cable Converter –Direct
Entry Method.
Use the following steps and list to quickly find
the remote control code for your cable TV
converter.
• First look up your converter’s remote code
number before going through the direct code
entry steps below.
• If this procedure does not identify your
converter, use the Search method for
identification.
(1) Press
(2) Press and hold down
CATV/DVD
(9)
on your remote control.
button.
DISPLAY
and
CH DOWN
Then release both buttons.
(3) Within ten seconds after releasing
and
CH DOWN (9)
digit code number using
, enter your converter’s two-
REMOTE KEYPAD
DISPLAY
(refer to list).
• The remote control is now ready to send
commands to your converter.
• Some brands have more than one remote code
listed due to changes in the remote codes from
early to later model years. In such cases, you
may have to try more than one code to find the
code your converter accepts.
Note:
Depending on the model, year produced, brand,
and type of CATV converter, some models may
not be compatible with the remote control.
L To Identify Your Cable Converter – Search
Method.
(1) Press
CATV/DVD
button.
(2)Press the POWER button on the cable
converter to ON.
(3) Stand at least six feet away from the converter.
Point the remote towards the converter.
Hold down the
DISPLAY
and
CH UP (8)
at the
same time. KEEP HOLDING THE BUTTONS
DOWN.
(4) Watch the Channel Number indicator on the
converter.
Channel numbers will scan up when the
converter has been identified.
Release the
DISPLAY
and
CH UP (8)
as soon
as the channel numbers start to scan up.
The converter’s remote control code number
has been identified, and the remote is ready to
operate the converter.
CATV CONVERTER REMOTE CONTROL
BRAND CODE NUMBER
Anvision 07, 08
Cable Star 07, 08
Eagle 08
General Instrument 04, 05, 15, 23, 24, 25,
Jerrold 04, 05, 15, 23, 24, 25,
Magnavox 07, 08, 19, 25, 28, 29,
Oak Sigma 18
Panasonic 27, 39
Philips 07, 08, 19, 26, 28, 29,
Pioneer 18, 20
Randtek 07, 08
RCA 27, 43
Scientific Atlanta 03, 22, 42
Sony 44
Viewstar 07, 08, 19, 26, 28, 29,
Zenith 14
30, 36
30, 36
32, 33, 40, 41
32, 33, 40, 41
32, 33, 40, 41
TIPS ON IDENTIFYING YOUR CABLE
CONVERTER:
Be Patient: a minute or two can seem a lot
longer when you’re waiting for something to
happen, but the code should be identified within
2 minutes. Remember, it is only a one-time setup.
Be careful not to let the CATV converter scan
more than five channels when the indicator
starts to move up. If you continue holding down
the
DISPLAY
and
CH UP (8)
after five channel
scans, the proper remote code can be passed
up, and the two minute identify cycle will have
to be repeated.
If a channel change does not occur on the cable
converter within two minutes, read the
identifying instructions again and repeat the
steps. Should a channel change still not occur,
the remote will not operate with the desired
converter.
Note:
Some satellite receivers can be operated by the
REMOTE CONTROL. If you have a Satellite
Receiver, you can use the above method to
search for available channels.
20F630[51-56].p65 25/3/03, 3:07 PM51
51
Dimension: 140mm x 215mm
Page 52

Before Calling for Service
Check these items and see if you can correct the trouble with a slight adjustment of the controls.
QUICK SERVICE
CHECK LIST
PROBLEM
No Playback of VCR and Disc
Player
No Picture or Sound from
External Video/Audio Products
Remote Control Doesn’t Work
Bars on Screen
Picture Distorted
Picture Rolls Vertically
No Color
Poor Reception on Some
Channels
Weak Picture
Lines or Streaks in Picture
Ghosts in Picture
Picture Blurred
Sound OK, Picture Poor
Picture OK, Sound Poor
No Picture or Sound
Dark and Blank Picture
External Electrical Noise
Interfering with TV’s Operation
Color on Part of the Screen
POSSIBLE REMEDY
Try a new channel, if OK, then
there is possible station trouble.
Is TV plugged in? Power at outlet? XX X
Is TV’s POWER button on? XX
Is antenna connected to terminal
on the back of the set?
If outside antenna is being used,
check for broken wire.
Check for local interference or
external electrical noise.
Turn off with POWER button and
then turn it on after about a minute.
Adjust COLOR control. X
Adjust PICTURE control. XX
Check external Video/Audio
products: look for loose/broken
connection leads.
(Refer to page 44 ~ 45)
Check batteries of Remote Control. X
Press TV/VCR button on the
remote to select TV mode.
Are audio cables connected firmly?
Check the volume level.
Is SPEAKER ON? See page 22 ~ 23. X
Change CLOSED CAPTION mode
to “OFF” / ENERGY SAVE mode to X
“OFF”.
Unplug the TV and plug it in again
after two minutes or longer.
XX
X X XXX
XX X X X XX X XX X
XXX X X X
XXXXXXXXXX X
XXXXXXX X
X
X
X XXXX XXXXX X
Appears Distored
Note:
• When viewing in TEXT mode, if no TEXT broadcast is being received,
the screen may become dark and blank. Should this occur, set the
CLOSED CAPTION mode to “OFF”.
(Dark and Blank Picture)
Calling for Service
For location of the nearest Sharp Authorized Servicer, or to obtain product literature accessories, supplies,
or customer assistance, please call 1-800-BE-SHARP.
52
20F630[51-56].p65 25/3/03, 3:07 PM52
Dimension: 140mm x 215mm
Page 53

Antes de llamar al servicio de reparaciones
Verifique estos puntos para ver si usted mismo puede solucionar el problema.
LISTA DE
COMPROBACIONES
DE SERVICIO
RAPIDO
POSIBLE SOLUCIÓN
Pruebe con otro canal y si todo está bien,
el problema puede ser de la emisora.
Está conectado el televisor?
Llega electricidad al tomacorrientes?
Está conectado el interruptor POWER
del televisor?
Está conectado la antena al terminal del
panel posterior del televisor?
Si utiliza una antena exterior, cerciórese
de que el cable no esté dañado.
Compruebe si hay interferencia local.
Desconecte el interruptor POWER y
vuelva a conectarlo después de transcurrir
un minuto.
Ajuste el control de COLOR.
Ajuste el control de MATIZ.
Verifique los productos externos de Video/
Audio, revise si hay conexiones sueltas
o rotas.
(Ver pág. 44 ~ 45)
Compruebe el estado de las pilas del
mando a distancia.
Deslice CATV/DVD-TV/VCR selector
para situarlo sobre la posición TV.
Están bien conectados los cables de
sonido? Compruebe el nivel del volumen.
Está conectado el altavoz?
Ver pág. 22 ~ 23.
Desactive (OFF) el modo CLOSED
CAPTION / Desactive (OFF) el modo
AHORRO DE ENERGÍA (Energy Save).
Desenchufe el televisor y vuelva a
enchufarlo despúes de dos minutos o más.
Nota:
• Cuando se ve en modo TEXTO sin recibir emisiones de TEXTO, la
pantalla puede ponerse en blanco y negro. Si ocurriera ésto, ponga el
modo CLOSED CAPTION en OFF.
PROBLEMA
El vídeo o el reproductor de discos de
video no reproducen imágenes
El equipo de video/audio externo no
produce imágenes ni sonido
El mando a distancia no funciona
Barras en la pantalla
Imagen distorsionada
La imagen se desplaza verticalmente
No hay color
Mala recepción de algunos canales
Imagen débil
XX X X X XX X XX X
XX X
XX
XXX X X X
XXXX X XXXXX X
XXXXXXX X
XX
X
X X XXX
X
X
X XXXX XXXXX X
XX
Franjas en la imagen
Imagen fantasma
Imagen borrosa
Sonido adecuado, imagen mala
Imagen adecuada, sonido malo
(ESPAÑOL)
No hay imagen ni sonido
Imagen oscura y en blanco
Interferencia de ruido eléctrico externo
con el funcionamento del televisor
El color se ve distorsionado en parte
X
X
X
de la pantalla
(Imagen oscura y en blanco)
Solicitud de servicio técnico
Para la localización del Servicio Técnico Autorizado de Sharp más próximo o para conseguir material de
información, repuestos o asistencia técnica, llame a 1-800-BE-SHARP.
20F630[51-56].p65 25/3/03, 3:07 PM53
Dimension: 140mm x 215mm
53
Page 54

(FRANÇAIS)
Avant d’appeler un réparateur
Vérifier les points suivants afin de déterminer s’il est possible de remédier au problème par un simple réglage des commandes.
LISTE DES
VÉRIFICATIONS
POUR UN
DÉPANNAGE
RAPIDE
SOLUTION POSSIBLE
Essayer un nouveau canal. S’il fonctionne,
il s’agit probablement d’une panne de la
chaîne.
Le téléviseur est-il branché?
La prise secteur fonctionne-t-elle?
L’interrupteur POWER du téléviseur est-il
sous tension?
L’antenne est-elle raccordée aux bornes
à l’arrière de l’appareil?
Si l’antenne extérieure est utilisée,
s’assurer qu’il n’y a pas de fils sectionnés.
Vérifier s’il n’y a pas d’interférence locale
ou de bruit électrique extérieur.
Mettre l’interrupteur POWER hors tension
puis de nouveau sous tension au
bout d’une minute.
Régler la commande de COULEUR.
Régler la commande de CONTRASTE.
Vérifier l’appareil vidéo/audio externe:
s’assurer que les câbles de connexion
ne sont pas desserrés ou cassés.
(Se reporter à la page 44 ~ 45)
Vérifier les piles de la télécommande.
Appuyez sur la touche TV/VCR de la
télécommande pour sélectionner le mode TV.
Les câbles audio sont-ils fermement
connectés? Vérifier le niveau du volume.
Les haut-parleurs fonctionnent-ils?
Voir pages 22 ~ 23.
Mettre le mode sous-titrage hors service
“ARRÊT” / Mode d’économie d’énergie
sur “ARRÊT”.
Débrancher le téléviseur et le rebrancher
après deux minutes.
Remarque:
• En mode TEXTE, s’il n’y a pas d’émission TEXTE à recevoir, l’écran
du téléviseur pourrait être sombre et vide. Dans ce cas, placer le mode
Sous-titrage hors service.
PROBLEM
Pas de reproduction d’un magnéto-
scope ou lecteur de disque
Pas d’image ou de son d’un appareil
vidéo/audio externe
La télécommande ne fonctionne pas
Barres sur l’écran
Distorsion de l’image
L’image défile verticalement
Pas de couleur
Faible réception de certains canaux
Image affaiblie
Lignes ou rayures dans l’image
Images fantômes
Image brouillée
Son normal, image médiocre
XX X X X XX X XX X
XX X
XX
XXX X X X
XXXXXXXXXX X
XXXXXXX X
XX
X
X X XXX
X
X
X XXXX XXXXX X
XX
Image normale, son médiocre
Ni son, ni image
Image sombre et vide
Bruit électrique extérieur interférant
X
X
X
avec le fonctionnement du téléviseur
Couleur sur une partie de l’écran
semble altérée
(Image sombre et vide)
Appel au service après-vente
Pour connaître l’emplacement du centre de service après-vente agrée Sharp le plus proche ou pour obtenir de la documentation
sur les produits, des accessoires, des consommables ou une aide au consommateur, appelez le 1-800-BE-SHARP.
54
20F630[51-56].p65 25/3/03, 3:07 PM54
Dimension: 140mm x 215mm
Page 55

Specifications
MODEL 20F630
Receiving System NTSC
Stereo Broadcast MTS/SAP
Reception Channels
AIR VHF 2-13 ch
UHF 14-69 ch
CATV 1-125 ch
Channel Tuning 181-channel Reception PLL tuning system
Antenna Input Impedance VHF/UHF 75 ohm Unbalanced
Screen Size 21˝ Diagonally Measured
(Visible Area) (50.8 cm)
Terminals Audio/Video input × 2 (Front x 1, Rear x 1),
Sound Output 2.5 W (RMS) × 2
Power Source AC 120 V, 60 Hz
Power Consumption 90 W
Dimensions 2325/64˝ × 181/2˝ × 193/32˝
(W) x (H) x (D) [594 mm × 470 mm × 485 mm]
Weight (approx.) 56.22 lbs. (25.5 kg)
• Design and specifications are subject to change without notice.
COMPONENT-IN × 1 (Rear), Audio Output × 1 (Rear)
20F630[51-56].p65 25/3/03, 3:07 PM55
55
Dimension: 140mm x 215mm
Page 56

Limited Warranty
CONSUMER LIMITED WARRANTY
SHARP ELECTRONICS CORPORATION warrants to the first consumer purchaser that this Sharp
brand product (the “Product”), when shipped in its original container, will be free from defective
workmanship and materials, and agrees that it will, at its option, either repair the defect or replace the
defective Product or part thereof with a new or remanufactured equivalent at no charge to the purchaser
for parts or labor for the period(s) set forth below.
This warranty does not apply to any appearance items of the Product nor to the additional excluded
item(s) set forth below nor to any Product the exterior of which has been damaged or defaced, which
has been subjected to improper voltage or other misuse, abnormal service or handling, or which has
been altered or modified in design or construction.
In order to enforce the rights under this limited warranty, the purchaser should follow the steps set forth
below and provide proof of purchase to the servicer.
The limited warranty described herein is in addition to whatever implied warranties may be granted to
purchasers by law. ALL IMPLIED WARRANTIES INCLUDING THE WARRANTIES OF
MERCHANTABILITY AND FITNESS FOR USE ARE LIMITED TO THE PERIOD(S) FROM THE DATE
OF PURCHASE SET FORTH BELOW. Some states do not allow limitations on how long an implied
warranty lasts, so the above limitation may not apply to you.
Neither the sales personnel of the seller nor any other person is authorized to make any warranties
other than those described herein, or to extend the duration of any warranties beyond the time period
described herein on behalf of Sharp.
The warranties described herein shall be the sole and exclusive warranties granted by Sharp and shall be
the sole and exclusive remedy available to the purchaser. Correction of defects, in the manner and for the
period of time described herein, shall constitute complete fulfillment of all liabilities and responsibilities of
Sharp to the purchaser with respect to the Product, and shall constitute full satisfaction of all claims,
whether based on contract, negligence, strict liability or otherwise. In no event shall Sharp be liable or in
any way responsible, for any damages or defects in the Product which were caused by repairs or attempted
repairs performed by anyone other than an authorized servicer. Nor shall Sharp be liable or in any way
responsible for any incidental or consequential economic or property damage. Some states do not allow
the exclusion of incidental or consequential damages, so that above exclusion may not apply to you.
THIS WARRANTY GIVES YOU SPECIFIC LEGAL RIGHTS. YOU MAY ALSO HAVE OTHER RIGHTS
WHICH VARY FROM STATE TO STATE.
Model Specific Section
Your Product Model Number & Description: 20F630, 20 inch Color Television
Warranty Period for this Product: One (1) year parts and 90 days labor. The warranty
Additional Item(s) Excluded from Non-rechargeable batteries.
Warranty Coverage (if any):
Where to Obtain Service: From a Sharp Authorized Servicer located in the
What to Do to Obtain Service: Contact your Sharp Authorized Servicer to obtain
TO OBTAIN ACCESSORY OR PRODUCT INFORMATION, CALL 1-800-BE-SHARP OR VISIT www.sharp-usa.com
(Be sure to have this information available when
you need service for your Product.)
period continues for an additional one (1) year, for
a total of two (2) years, with respect to the picture
tube(s) in the Product for parts only. Labor and
service are not provided free of charge for this
additional period.
United States. To find the location of the nearest
Sharp Authorized Servicer, call Sharp toll free at
1-800-BE-SHARP.
in-home service for this Product. The Servicer will
come to your home and if it is necessary to remove
the Product, the Servicer will reinstall it. Be sure to
have Proof of Purchase available.
SHARP ELECTRONICS CORPORATION
Sharp Plaza, Mahwah, New Jersey 07430-2135
20F630[51-56].p65 25/3/03, 3:07 PM56
Printed in Mexico
TINS-A725WJZZ
03P05-MMP
 Loading...